Users are loving the new Microsoft Office file icons

Microsoft recently released a series of brand-new filetype icons for the Office Suite applications including PowerPoint, Word, and Excel. Furthermore, this time, Microsoft also revamped the current icon design released back in 2013. 

Erin Woo, who is currently working as Microsoft’s Product Designer announced the brand new icons on her Twitter account.

She unveiled some of those icons by sharing a brief video of them. The video shows that the tech giant also released new icons for video, audio, and image file types. T

he tweet says that these icons are gradually rolling out to mobile users of OneDrive and Outlook. However, it remains to be seen if the same icons will be available to Windows 10 users as well.

Microsoft has always been experimenting with the design of its Office Suite varying from a small icon redesign to a complete visual overhaul.

However, the new change appears to be powerful, smart and appealing for users. You will now find a more simple background with a Fluent Design touch.

New Microsoft Office icons coming soon

The Redmond giant has not released new icons for Publisher and Access. According to Microsoft, the company aims to achieve harmony and simplicity with its light, bold and appealing colors.

Microsoft is reportedly currently working to release a new Fluent Design UI revamp for its entire range of products.

It seems like Microsoft is making significant efforts to revamp most of its applications including Office Suite.

Microsoft Office is very popular among both MacOS and Windows users.

Although there are many other third-party office management software, users still prefer to use Microsoft Office.

Most users loved these icons but some of them pointed out some visible inconsistencies.

Why would the music, video, and photo icon not match the document icon? Why would they choose just a rectangle for those three? That doesn’t make any sense to me.

Do you want Microsoft to add some other changes in Microsoft Office? Let us know in the comments section below.

RELATED ARTICLES YOU NEED TO CHECK OUT:

Windows 10 integrates OneDrive files in File Explorer search results

Microsoft recently rolled out a new Windows 10 20H1 build. This build brings some general updates and fixes along with some very interesting File Explorer features.

The new File Explorer features are currently available only to a subset of Insiders who are currently enrolled in the Fast Ring.

Microsoft is trying to offer a unified search experience across all its platforms including Microsoft Office, Windows, and Bing. The company wants the search box to be available everywhere. In this manner, users will be able to easily find related content.

You can now use File Explorer to search for OneDrive files

Microsoft plans to integrate the content of your OneDrive with regular File Explorer results.

So, when you type something in the search box of File Explorer, you will now see a list of suggested OneDrive files. You can either open the location of the file with a right-click or click on the file‘s name from the dropdown menu.

You can further explore your non-indexed locations by pressing the enter key. Furthermore, you can view the dropdown list that contains your search history by pressing CTRL+E keys. 

Improved accessibility options

Microsoft also improved three different accessibility options in this release. The can now efficiently read tables, or provide a summary of your desired web page. When users navigate within the same column or row, they can no longer see repeated header information. 

Although the search box is wide enough to properly show suggestions and search results, you still have the option to resize it with the help of your mouse.  

As a quick reminder, Windows 10 has received six major feature updates so far. Microsoft is all set to release the Windows 10 May 2019 Update later this month.

RELATED ARTICLES YOU NEED TO CHECK OUT:

How to emulate and run Lineage 2 Revolution on your PC

There are many great PC games out there but sometimes you simply want to play a title that is available only on Android.

While this may seem like a daunting task at first, you can quickly and easily run Android games on PC with the help of an Android emulator.

So, if you want to play Lineage 2 Revolution on your Windows 10 PC, you’ve come to the right place.

Follow the instructions listed below and you’ll be able to run Lineage 2 Revolution on your computer in no time.

Unfortunately, there is no Lineage 2 Revolution PC version available yet, so that’s the only way that you can play it on your computer.

But don’t worry, after the install is complete, you will be able to play it with no PC lag at all! Also, once installed, you will be given specific Lineage 2 Revolution PC controls to enjoy the game.

Here’s how to play Lineage 2 Revolution on PC

  1. Go ahead and download BlueStacks through that free game. Click on Download BlueStacks on PC
  2. On the next page, you will have to click on download again, to start downloading BlueStacks emulator for your Windows PC.download bluestacks pc
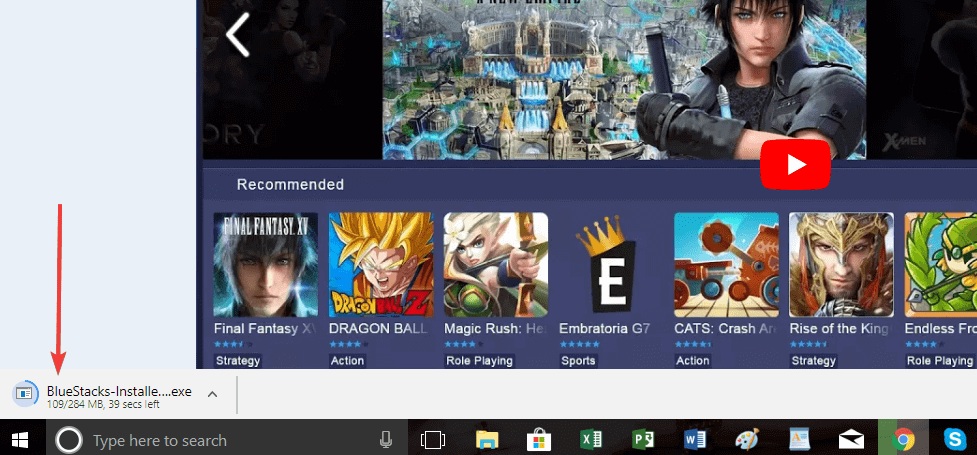
  3. Next, you will see the .exe file for BlueStacks-Installer being downloaded. Once it’s finished, click on it and run it.bluestacks install
  4. If you get the ‘Do you want to run this file?’ pop-up, just ignore it. BlueStacks is completely safe and will not harm your PC. Go ahead and click Run. run bluestacks
  5. Do the same for the next step, if you get the “do you want to allow this app to run on your device?” Click Yes.
  6. Now, you’re almost there. Go ahead and click Install to start installing BlueStacks on your PC.
  7. Wait until the installation process is finished. As suggested by BlueStacks, you might want to disable your antivirus temporarily. Don’t worry, it won’t let any viruses in. Once it’s finished, click on Complete.extract bluestacks pc
  8. Now, you need to wait a couple of minutes in the “Starting the Engine” step of the process. This is needed for the Android Emulator to assess your PC performance and work accordingly.start bluestacks windows 10 pc
  9. Next, you will need to login with your Google account. This might seem annoying, but it is actually a sign that BlueStacks has a professional relationship with Google, thus being able to download any Android game or app on your PC. If you are already logged in with a Google account, make sure to use that one.BlueStacks login google account
  10. Now, the final step is to make sure everything is running smoothly on your PC. Go ahead and install Lineage 2 Revolution. The game will appear in a similar window like the one below:


As you can see, the game comes from the Google Play Store itself, and is also free. Install it, see if it runs on Bluestacks. After that, you can go ahead and download any Android game that you wish.

We’ve tested the game ourself, and we can confirm that the Lineage 2 Revolution PC gameplay is indeed impressive, with nice, smooth PC graphics.

Bonus – by installing the first game that you see, you will also get some special points. You will then be able to redeem them for gaming mice, premium subscriptions and so on.

bluestacks bonus

There you go, you should now be able to run Lineage 2 Revolution PC version on your Windows PC without any problems. In our opinion, BlueStacks is the best PC simulator for Lineage 2 Revolution, so use it without hesitation.

UPDATE: as of 2019, BlueStacks 4 is available.

The PC requirements for the emulator are pretty basic –  3GB of RAM, 5GB of disk space, Windows 7 / Windows 8 / Windows 10 and DirectX 9.0c or higher  installed. Also,  you need a Dual-Core Intel or AMD processor, and for graphic: OpenGL 2.0 support.


RELATED STORIES TO CHECK OUT:

Unable to Join Fortnite Login Queue: How to Get Through

Taking the market by storm, Fortnite quickly became one of the most popular games ever created, but many players reported Unable to join login queue error message in Fortnite.

This is a network issue, and it’s somewhat similar to the previously covered Unable to join a friend’s party in Fortnite problem.

However, there’s a way to fix this error, and in today’s guide, we will show you how to fix it.

Why can’t I queue in Fortnite?

  • Issues with matchmaking servers can cause this error.
  • Not starting the game with necessary privileges.

What to do if I’m unable to join the Fortnite login queue?

1. Check the server status

  1. Visit Epic Games Public Status page.
  2. Check if there are any issues with the servers.
  3. If there are, wait until the developers sort it out.

Start Fortnite as an administrator

  1. Navigate to your Fortnite installation directory: C:\Program Files\Epic Games\Fortnite\FortniteGame\Binaries\Win64
  2. Run the FortniteClient-Win64-Shipping.exe file with administrator privileges.
  3. This might cause some issues with the Fortnite process or the Epic Game Launcher. If this happens, open Task Manager and close these processes a few times while repeating the first and second steps.
    task manager Unable to join login queue fortnite
  4. Users have reported that after closing the unresponsive tasks from Task Manager a few times, they eventually could log into Fortnite and play normally.

In this article, we talked about the recent error found in Fortnite that didn’t allow users to start playing matches.

Some users have reported that they couldn’t see any games, or that the loading process never ended while waiting to log into a game.

Fortunately for PC users, you can try the fix presented in this article to bypass Unable to join login queue error.

It is worth mentioning that this method doesn’t affect your data or game in any way. Speaking of errors, you might want to check our guide on The client is not compatible in Fortnite guide for more in-depth solutions.

Speaking of Fortnite errors, recently we covered Matchmaking error #3 in Fortnite, so don’t miss it for more solutions.

Please let us know how this fix worked by using the comments section below.

Microsoft’s next Xbox exclusive Gears 5 may launch on September 10 according to new leak

Gears 5, the next first-party game from Xbox Game Studios may already have a release date if we believe a new leak from Taiwan. According to a report from Generación Xbox (via Reddit), the Taiwan age rating agency revealed the game’s cover and September 10 launch date, though the latter has since been removed from the web page.

Microsoft took the wraps off Gears 5 at E3 2018 last year, revealing that the third-person shooter would be released sometime in 2019. Gears of War 4, the previous episode was released on October 11, 2016 on Xbox One and Windows 10. Gears 5 is expected to support Xbox Play Anywhere, and it should also be be available on Xbox Game Pass on launch day, just like all of Microsoft’s first-party games since last year.

Gears 5 will likely be a big part of Microsoft’s E3 press conference, as Gears of War remains one of Microsoft’s most important video games franchises along with Halo and Forza. Rod Fergusson, studio head at The Coalition also announced during last month’s Inside Xbox episode that we’ll see the worldwide debut of Gears 5 Versus multiplayer at the ELEAGUE Gears Summer Series live tournament on July 13-14.

Following the disappointing Crackdown 3, we hope that Gears 5 will be a solid new entry in the decade-old Gears of War series. In addition to Gears 5, there are two other Gears games currently in development, a mobile game called Gears Pop! that is now available in closed beta on iOS, as well as a turn-based strategy game for Windows 10 PCs called Gears Tactics.

Install Privacy Possum browser extension to block online tracking

Internet tracking got out of hand these days due to developing technologies that companies use to track users. The tracking process happens in the background, and you may have noticed it by now.

A company may have monitored you if various sites begin displaying all kinds of product ads after you have been checking out the product on a single location. Fortunately, there’s a solution for preventing tracking, and it’s called Privacy Possum.

Privacy Possum open source browser extension for Google Chrome and Mozilla Firefox aims to block data used by companies to track you online.

Privacy Possum’s best features

privacy possum

Here are the main features boasted by the current version of this extension:

  • It blocks referrer headers that may reveal the browsing location.
  • It blocks etag headers to prevent browser catching tracking – the extension strips and stores etag header data and compares it to third-party requests to the URL to determine whether the header is following you or not.
  • It blocks cookies that track users via third-parties.
  • It also blocks browser features that may be used to fingerprint users.
  • Privacy Possum will run automatically, blocking elements without you needing to do anything more.
  • The extension supports whitelist functionality.
  • Privacy Possum lists blocked elements that are loaded in the interface.

In case you want to be secure while surfing the internet, you will need to get a full-dedicated tool to secure your network.  Install now Cyberghost VPN and secure yourself. It protects your PC from attacks while browsing, masks your IP address and blocks all unwanted access.


Increase your online privacy with Privacy Possum

The interface of the extension comes with an on/off switch that you can use to deactivate the extension. The tool also shows blocking activity by displaying a number to the icon.

If you click on the number, you’ll see just how many tracking related elements it managed to block and what’s the exact type of the blocked items. You can disable a blocked site by simply checking on the checkbox that’s placed in front of that particular blocked element.

Privacy Possum will successfully enhance privacy online, so make sure to download it and give it a go.

Get the extension for Mozilla as well.

UR Browser doesn’t need extensions to keep your private data untouched

Although the new kid in town, UR Browser,  fully supports Chrome’s extensions, those are not required when it comes to privacy and safety. UR Browser comes with a built-in VPN, ad-blocker, and antivirus.

Not to mention that it blocks trackers and 3rd-party cookies with a rather ease.

ur browser

You can choose one of the 3 Privacy modes at your disposal, based on the level of privacy you want to achieve.

Check it out today and see for yourself how private browsing can go hand in hand with a great interface and a plethora of customization features.

Editor's recommendation
ur browser
  • Fast page loading
  • VPN-level privacy
  • Enhanced security
  • Built-in virus scanner

RELATED STORIES TO CHECK OUT:

Failed to Request Product Key From Steam: How to Fix

Steam is the best platform for gamers, but many users reported Failed to request product key from Steam. This error can be problematic and prevent you from playing your favorite games, but there’s a way to fix it.

This is just one of many Steam errors that you can encounter, but rest assured that this issue can be easily fixed.

In today’s guide, we’re going to show you the best methods you can use to fix this error on your PC.

Why won’t my Steam key work?

There are several reasons for this issue:

  • Corrupted game files or download cache.
  • Internet settings aren’t properly configured.
  • Issues with ClientRegistry file.
  • The firewall is blocking Steam.

How can I fix Steam product key request failed error?

1. Verify your game files

  1. Open up the Steam window.
  2. Click the Library to open the game collection.
  3. Then right-click on your game and select Properties.
    Properties Key request failed steam
  4. Press the Verify integrity of game files button.Key request failed Steam verify integrity

2. Clear your download cache

  1. Open your Steam client and navigate to Settings.
  2. Select Downloads in the Settings panel.
  3. Click on Clear Download Cache, next click OK to confirm your choice, Steam will ask for your login details afterward.clear download cache Key request failed steam
  4. After logging in again, Steam will start as expected.

3. Change your Internet settings

  1. Open the Internet Settings window.
  2. Select the Advanced tab and scroll down the Security listings.
  3. Uncheck Enable Enhanced Protected Mode.
    enable enhanced protected mode Key request failed steam
  4. Restart your machine and launch Steam.

4. Modify your shortcut

  1. Locate your Steam client.
  2. Create a shortcut of Steam in the same directory.
  3. Click Properties and head over to the General tab.
    properties Key request failed
  4. In the Target dialogue box, add -tcp in the end and click Apply.
  5. Use this shortcut as long as Steam launches.

After doing that, check if Failed to request product key from Steam message is gone.

5. Rename the client registry file

  1. Browse your Steam directory.
  2. Locate ClientRegistry.blob file.
  3. Rename the file to ClientRegistryOld.blob.
  4. Restart Steam and allow the file to be recreated.

6. Open your game through browse local files

  1. Open your Steam client, and next head over to your Library.
  2. Select the game in question, right-click on it, and select Properties.
  3. Now select Browse Local Files, open the game’s executable file and run it from there.

7. Add an exception to your Firewall

  1. From the Start Menu open Control Panel.
  2. In the Manage security settings area, select Windows Firewall.
  3. Click on Allow an app or feature through Windows Defender Firewall.
  4. Click Change settings. Locate Steam on the list and check both Private and Public. If Steam isn’t available, click on Add another app to add it.
    allow app through windows defender firewall steam error key request failed
  5. Click OK, and you’re good to go.

8. Reinstall  Steam

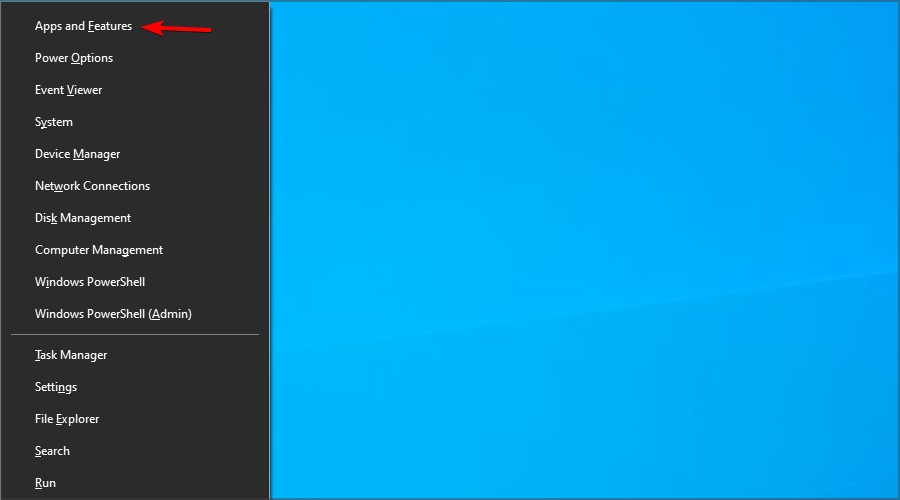
  1. Press Windows key + X and choose Apps and Features.
  2. Locate Steam and click on Uninstall.
  3. Once you remove it, download and install it again.

We hope that these fixes were of help to you and that you managed to fix Key request failed Steam error.

For more information about similar issues, visit our There was a problem adding this product to Steam guide.

If these solutions worked for you, feel free to let us know in the comments below.

Reminder: Edgium or Chredge? Soon it won’t matter

Microsoft’s recent move to switch out browser engines from their own EdgeHTML to the open source Chromium, while a bold move, has if nothing else made life a bit more difficult for tech pundits. Now, there’s Edge, the currently shipping proprietary browser, and Edge, the new open source browser of the future, but they both exist and journalists need a way to talk about them both. Here at OnMSFT.com, we’re using “Edge Insider,” but others have suggested “Edgium” or “Chredge” or even (shudder) “Chredgium“.

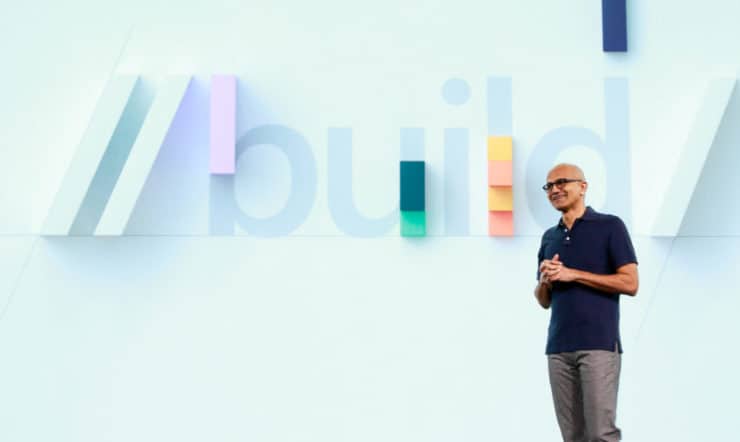
Apart from being a bit of a first world problem, this “Edge vs Edge” dilemma should be short lived, however. After a session at Build last week, a few attendees gathered around CVP for Edge Chuck Friedman, who explained that the problem will soon just go away.

Friedman explained that once Edge Insider ships, it will replace current Edge on all versions of Windows 10 (once users actually update their machines, something they’ve been historically slow to do), including replacing the current various versions of the Web View control built in to Windows with a new single and updateable (via the new Edge app) one, so that (in theory) all versions of Windows 10 will be running the same browser and Web View controls at the same time.

And while the new Edge will indeed be an “app,” updateable via the web apart from Windows Update, it will most definitely not be removable, if only for the nightmare scenario that if you uninstall Edge you wouldn’t be able to access the internet, even to download and install Chrome, for example.

So when will this new Edge be ready? “When it’s great,” Friedman told us. Microsoft isn’t announcing a timeline for the new Edge, and don’t seem to be in any rush to make the change. But once Edge Insider ships, it will become once again just Edge. You’ll no longer be able to run Edge/Chromium and Edge/EdgeHTML side by side, as old Edge will be replaced by new Edge (that is, unless you opt out of updating, furthering the problem that this move is supposed to help fix.)

Xbox One 1905 update reaches Preview Omega ring, with public release coming soon

Xbox Insiders on the Preview Omega ring can now download the next system update for the Xbox One. For those unfamiliar, the Preview Omega ring is the equivalent of the Release Preview ring for Windows 10 updates, so the Xbox One 1905 update hitting the Omega ring yesterday means that the public release is likely imminent.

The next Xbox One system update is a pretty minor one, and we counted five new features overall:

  • With Message Requests, Xbox Live messages sent by your friends will now be separated from other messages sent by strangers.
  • Your Friend List will now display different icons to show when your Xbox Live friends are playing on console, PC or mobile.
  • In recent preview builds, Microsoft also added Voice channels in Xbox Live Messaging.
  • Microsoft has improved sorting options in the My Games & Apps section. Articles such as “a,” “an” and “the” are no longer being used to sort titles when using the “Sort A-Z” and “Group by letter” views, and the Xbox team also added more options to sort games and apps by date.
  • For Xbox Game Pass members, a new a “Play Later” feature will make it easy to add any games in the catalog to a special list that will also be available from the Xbox Game Pass mobile app

It’s not clear yet if we’ll get another minor system update in June, but has already working on the next major Xbox One update to be released in October. For now, Xbox One 1810 builds are only available for Preview Alpha Skip Ahead Insiders, and there are no significant new features so far.

We’re having trouble reaching the server SharePoint error [FULL FIX]

SharePoint is a web-based document management and storage system that integrates with Microsoft Office. However, some users have reported a server related error while using the service. The reported error Sorry we’re having trouble reaching the server occurs when the user tries to use people picker control, enter the username or adding new users.

Are you stuck with an error preventing you to reach the server on SharePoint? Fix it by performing the IIS Reset. By resetting the Internet services, you should be able to restore the connection to Windows servers and resolve the error. In case you’re still unable to do so, install and activate HTTP Activation.

Check the detailed step-by-step explanations below.

How do I fix Sorry we’re having trouble reaching the server on SharePoint

  1. Perform IIS Reset
  2. Install and activate HTTP Activation

1. Perform IIS Reset

IIS (Internet Information Service) for Windows server is a flexible, secure and manageable web server for hosting your contents on the web. Sometimes, the web server may malfunction resulting in Sorry we’re having trouble reaching the server error.

Resetting the IIS service can help you to resolve this error with your Windows servers. Here is how to do it.

  1. Press the Windows Key and type cmd.
  2. Right-click on”Command Prompt” and select “Run as administrator”.
  3. In the command prompt type the following command and press enter:
    iisreset
    Reset IIS Service Windows server
  4. You should see “Internet services successfully restarted” message displayed on the screen.

Now try to use the Windows server and check if the error is resolved after resetting the ISS service.


2. Install and activate HTTP Activation

Now, this may come as a surprise for many, but it is possible that you don’t have HTTP Activation installed for your Windows server. It is an essential component of the .NET framework and if not installed will result in Windows server error.

First, check if you have activated HTTP activation for both .NET 3.5 and .NET 4.5. Here is how to do it.

  1. Launch Windows Server Manager.
  2. From the Dashboard clock on Manage and select “Add or Remove Users“.
  3. In the Add Roles and Features Wizard, click on Next.
  4. Click Next and go to the Server Roles tab.
  5. In the Server Roles tab, make sure “HTTP Activation (installed)” option is checked under “Windows Process Activation Service Support“.Windows server manager HTTP Activation Server role
  6. Click Next to go to the Features tab.
  7. In the Feature tab, under  .NET Framework 3.5 Features (installed), make sure “HTTP Activation” box is checked.
    Windows server manager HTTP Activation
  8. Then under, “WCF Services” make sure “HTTP Activation (installed) “ box is checked.
  9. Click Next and close the wizard.

Before trying to add a user or using people picker, perform an IIS service reset once again. The instructions to perform IIS reset is given in the first solutions.

If you don’t find the HTTP Activation (installed), proceed with installing HTTP Activation on your server and repeat the steps.

RELATED STORIES YOU MAY LIKE:

BEX Error in Steam: 3 Ways to Fix it on Your PC

Steam is without a doubt the best platform for gamers, but many gamers reported Steam Bex error on their PC.

If Steam client is blocked from accessing memory on your system, you might encounter this error, but there’s a way to fix it.

Before we start, you might want to take a look at our Steam not responding guide for more fixes and solutions.

What is Bex in PC?

BEX is short for Buffer Overflow Exception. These types of errors are caused by the following:

  • Compatibility issues
  • Problems with Data Execution Prevention
  • Corrupt software installation

How can I fix Steam BEX error?

Before we start, you might want to try this workaround:

  • Disable peripheral devices, especially if using Synapse technology.

1. Run Steam in Compatibility Mode

  1. Locate your Steam installation directory.
  2. Now, right click on Steam.exe, and choose Properties.
    properties steam error bex
  3. Next, click on the Compatibility tab. Check Run this program in compatibility mode for and select the desired version of Windows.
    compatibility mode steam error bex
  4. Click Apply and OK to save changes.
  5. Double click on Steam.exe to launch Steam.

If this method doesn’t help, try using different settings for Compatibility mode to fix eventtype bex error.

2. Disable Data Execution Prevention

  1. In the Start Menu open Control Panel.
  2. Open System and Security, and select System.
  3. Now select Advanced System Settings.
    advanced system settings steam error bex
  4. Click Settings in the Performance section.
    advanced settings
  5. Go to the Data Execution Prevention tab.
  6. Disable the service, and click OK to exit.

In Command Prompt:

  1. Start Command Prompt with administrator rights.
  2. Now run the following bcdedit.exe /set {current} nx AlwaysOff
  3. Optional: To enable DEP again, run this command: bcdedit.exe /set {current} nx AlwaysOn
  4. Wait till you receive the operation was successful message and close the window.

After doing that, check if the error is gone.

3. Verify game installation

  1. Start Steam and go to the Library.
  2. Right-click the affected game and choose Properties.
     
  3. Now click Local Files and then on Verify integrity of game files.
  4. Wait for it to finish.

We hope that these solutions were able to help you fix Steam Bex error on your PC.

In case you’re having further problems, we have a great guide on how to fix Steam errors on your PC, so be sure to check it out.

In the meantime, let us know in the comment section any potential solutions you found on your own.

Your operating system is not supported by CCleaner error [FIX THIS]

CCleaner is a highly rated system optimization utility that’s compatible with 64 and 32-bit Windows platforms from XP to 10. However, some users have stated on forums that a CCleaner doesn’t work on this version of Windows notification appears when they try to run the software. Consequently, users can’t run CCleaner in Windows 10. How can CCleaner not support Windows 10?

Are you unable to run CCleaner on Windows 10 as the system is seemingly not supported? Firstly, update CCleaner by reinstalling it. Some older versions might give you problems, but the latest one certainly supports Windows 10. Alternatively, you can switch to the portable version and run it from a USB stick when needed.

The step-by-step explanations are below.

The CCleaner Doesn’t Work on This Version of Windows Error

  1. Update CCleaner by Reinstalling the Software
  2. Add the Portable CCleaner to a USB Stick

1. Update CCleaner by Reinstalling the Software

To fix the “CCleaner doesn’t work on this version of Windows” error, users need to reinstall CCleaner. Then users can add the latest CCleaner to Windows 10 to ensure compatibility. This is how users can reinstall CCleaner in Windows 10.

  1. Right-click Windows 10’s Start button and select Run.
  2. Next, enter ‘appwiz.cpl’ in the Open text box and click OK to open the Windows uninstaller.control panel add remove programs
  3. Select the CCleaner software listed on the Programs and Features Control Panel applet.
  4. Click the Uninstall/Change button.
  5. Then select Yes to uninstall CCleaner.
  6. Restart Windows 10 before reinstalling CCleaner.
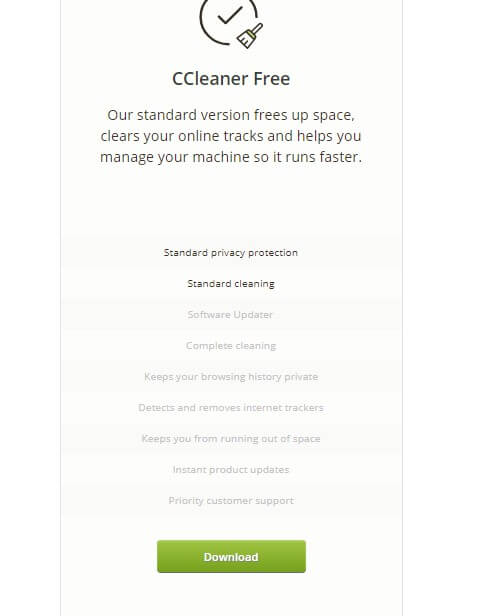
  7. Next, click the green Download button on CCleaner’s website to save the installer for the latest freeware version.
    ccleaner download
  8. Those users who need to reinstall the Pro version will need to download the installer for CCleaner Pro from the software’s website. Users might also need to find their product license key, which they can lookup with the product key tool on CCleaner‘s website.
  9. Thereafter, open the setup wizard for CCleaner to reinstall the software.

2. Add the Portable CCleaner to a USB Stick

  1. Alternatively, users can run the portable CCleaner version from a USB drive. To add CCleaner to a USB drive, click the green Download button for CCleaner – Portable on the software’s website.
  2. Next, insert a USB stick in a USB slot.
  3. Open the folder that includes the CCleaner ZIP.
  4. Double-click the CCleaner (ccsetup556) ZIP.
  5. Press the Extract all button to open the window shown below.extract compressed folders
  6. Press the Browse button, and select to extract the ZIP to a USB drive folder path.
  7. Click the Extract button.

So, those are two resolutions for the “CCleaner doesn’t work on this version of Windows” error. Users can either reinstall the latest CCleaner desktop version or try out the portable alternative.

RELATED ARTICLES TO CHECK OUT: 

We Couldn’t Find Your Folder in OneDrive: How to Fix it

If you use OneDrive to sync your document to the Microsoft account, you may encounter errors like We couldn’t find your OneDrive folder on Windows 10. It’s seemingly one of the many bugs users reported.

Many reported that the error keeps coming back every few days, and a Windows update is the only thing that provides a temporary reprieve. If you, too, are facing the same problem, here are a few quick solutions that helped others fix things.

How do I fix the We couldn’t find your OneDrive folder error?

1. Reset OneDrive Client

  1. Press Windows + R to open Run, paste the following command, and hit Enter:%localappdata%MicrosoftOneDriveonedrive.exe /reset
    Run - Reset - OneDrive App
  2. A command prompt window may appear briefly to complete the reset process.

Your OneDrive desktop clients come with a built-in option to reset the app. Resetting the app will set all the settings to factory default and remove any broken or corrupted configuration. And once done, the We couldn’t find your folder OneDrive error should disappear.

2. Login with an administrative account

  1. Click on Start and select Settings.
  2. Go to Accounts, and select Your Info.
  3. Check if the profile says Administrator.
    WIndows 10 - User Account - Infop
  4. If not, you may have to log out and log in with an administrator account.
  5. Then, launch the OneDrive client and check for any improvements.

If you are using a local user account without administrative privilege, OneDrive may have problems locating the folders and permission issues. So, switch to an administrator account in Windows.

3. Relink your account

  1. Launch the OneDrive client on your system.
  2. Click the Menu button and select Account Settings.
  3. Locate your account, click on Sign out, and then exit OneDrive.
  4. Relaunch OneDrive and sign in again.
  5. The account is now linked to the OneDrive client.

A possible solution when you see the We couldn’t find your OneDrive folder error is to unlink your Microsoft account from OneDrive and then re-link it. Doing so will flush any broken configuration.

4. Change the OneDrive folder location

  1. Open OneDrive, click on Menu, and choose Account settings.OneDrive - Account Settings - Signout
  2. Select your OneDrive account and click on Sign out.
  3. Windows will sign out of your account and ask you to sign in again. Leave the OneDrive account as it is, and don’t sign in yet.
  4. Press Windows + E to open File Explorer, and go to the location where the OneDrive folder is stored.
  5. By default, it is located in the following location, where Username is the active profile name:C:\Users\Username
  6. Select the OneDrive folder, and then from the Home tab, click on the Move to option, and select Choose location at the bottom.
    OneDrive- Folder- Move to - Choose a Location
  7. Finally, select your D: or E: drive, and click Move. If you have a secondary hard disk, that is also a good option.
    OneDrive- Folder Move - Location E
  8. The moving process may take some time, depending on the size of the folder.
  9. When it has finished moving, sign in to your OneDrive account.

If you get the We couldn’t find your folder in OneDrive error due to a permission issue or a corrupt hard disk, try to move the OneDrive folder to a different partition or secondary hard drive on your computer.

Before you leave, find out how to speed up OneDrive uploads.

For any queries or to share what worked for you, drop a comment below.

Google Chrome gets new cookie control options

Google recently announced that it is about to tweak the way its web browser handles cookies. The upcoming version of Google Chrome will come with improved cookie protection and control.

The importance of cookies on the web cannot be denied these days. Cookies are used to save your preferences, sign in details and more.

Google explains that some cookies are used to target users for personalised advertisement campaigns, while others are used to maintain user login sessions.

You can choose not to delete login cookies

As a matter of fact, the browser treats all cookies in the same manner. In case a user accidentally deletes his cookies, he will automatically lose all his login details.

This is a pretty much frustrating experience for the Google Chrome users. The company announced in a blog post that the company would make some significant improvements to the way Google Chrome tackles cookies.

Users will no longer lose their login details because they will have the option to clear specific type of cookies. Furthermore, Google says that developers should eventually adapt to this new technique.

Moreover, the company further explains there are many security benefits attached to this change:

This change also has a significant security benefit for users, protecting cookies from cross-site injection and data disclosure attacks like Spectre and CSRF by default. We also announced our plan to eventually limit cross-site cookies to HTTPS connections, providing additional important privacy protections for our users.

Google restricts fingerprinting practice

Apart from cookies, Google says that the company is restricting fingerprinting for its users. This technique uses the hardware details, user agent, and browser plugins for unique identification of devices and browsers.

Google is currently testing some changes and plans to officially release them later this year. However, there is no confirm from Google in this regard.

What do you think about this recent move by Google? Is it enough to ensure your privacy?

RELATED ARTICLES YOU NEED TO CHECK OUT:

Canon Printer Error 5011: 3 Ways to Clear it

If you’re getting a  Canon printer error 5011, it is mostly because the cartridge of the printer is stuck. This can be a problem and it can lead to issues such as ink cartridge full but printer not printing.

Today we’re going to show you how to fix this printer error, so let’s get started.

What is error message 5011?

  • It’s a hardware issue on your printer.
  • A jammed paper or any other object inside of your printer can cause it.

How can I fix Canon printer error 5011?

1. Perform a power cycle

  1. Unplug your Printers power cord as well as the USB cable that is connected to your PC.
  2. Keep the printer powered off for at least 3 minutes.
  3. After three minutes, plug the power cord and USB cable back and turn it on.

Check for any improvements after the printer restarts. If not, continue the troubleshooting steps.

  1. Power off the printer again.
  2. Open the printer’s lid for the scanner. Turn on the printer again keeping the lid open.
  3. Close the lid after the printer restarts.

Check if Canon printer error 5011 is gone.

2. Check the cartridge

  1. Turn off your printer.
  2. Check if a piece of paper or something else is stuck in the printer jamming the cartridge.
  3. Even a small object can cause this error. So, analyze the printer thoroughly.

After doing that, the error should be gone.

3. Remove and reinsert the cartridge

  1. Turn off your printer and open it.
    canon catrige
  2. If you haven’t tried this already, try to remove and carefully reinsert the cartridge.
  3. You can also try to clean up all the encoder strips found behind the printer.
  4. Reinsert the Cartridge after cleaning the encoder and checking for any objects stuck inside the printer.

Turn the printer on and see if the error is resolved. If the issue persists, you may need to take the printer to an authorized service center to get it fixed.

There are many printer issues that you can encounter, and in the past, we wrote about printer not printing full page, so you might want to check that one.

What methods did you use to fix this issue? Share them with us in the comments section below!

Fix Youtube.com/activate Enter Code problems on Xbox One [Easy Steps]

YouTube is a great service available on many platforms, but many users reported problems with youtube.com/activate enter code screen on Xbox One. This screen is used for authentication, and if you fail to authenticate, you might not be able to watch YouTube on Xbox One. However, there’s a way to fix this issue.

How can I fix Youtube.com/activate Enter Code problems on Xbox One? The first thing that you can do is to re-log into your account and try to authenticate the YouTube app again. If this method fails, try restarting both your Xbox One and network connection to fix the problem.

How to fix problems with youtube.com/activate enter code screen on Xbox One

  1. Re-log into your account
  2. Check your Internet connection
  3. Restart your Xbox

1. Re-log into your account

Sometimes re-logging to your account can help with youtube.com/activate enter code problems. In order to log into your account, simply follow these steps:

  1. Open your Youtube app.
  2. Head over to Sign in & settings.
  3. Now select Sign in and press X.
  4. The app will present to you a code.
  5. Write down the code and don’t close the window.
  6. Go to youtube.com/activate from your PC or phone.
  7. Now enter your Google account information and sign in.
  8. Enter the code that the YouTube app gave you and continue.
  9. Now select Allow access.

2. Check your Internet connection

restart network connection youtube.com/activate enter code xbox one

Sometimes your Internet connection can cause problems with youtube.com/activate enter code screen on Xbox One. As a simple suggestion, you can try restarting your modem/router. But to troubleshoot your network problems, simply follow these steps:

  1. Press the Xbox button to open up the Guide.
  2. Now select Settings, and next select All Settings.
  3. Select Network.
  4. Select Network settings. All connections should show up now.
  5. On the right side of the Network settings screen, select Test network connection.
  6. If there are any issues detected, the Network Connection Troubleshooter will attempt to fix them.
  7. Wait till the troubleshooter is done fixing the issue.

3. Restart your Xbox

restart xbox one youtube.com/activate enter code xbox one

Sometimes the simplest solution can bring give you the best results, and several users claim that they fixed the problem with youtube.com/activate enter code screen by restarting their console. To do that, follow these steps:

  1. Press the Xbox button and open the Guide.
  2. Select Settings.
  3. Select Restart console.
  4. Choose Yes to confirm.

We hope that these fixes were of help to you. In the meantime, let us know in the comment section down below on what other issues have you stumbled upon while using apps on your Xbox One.

RELATED STORIES TO CHECK OUT:

Microsoft’s Purple Cape Crusader steps down from OneNote, Sticky Notes and To Do duties

Just as the future of Microsoft’s note-taking platform comes into view, one of its champion executives and high-profiled Technical Fellow is stepping aside and handing the project over to a new crop of stewards.

Vice president and Microsoft Technical Fellow Laura Butler announced via her Twitter account that she would no longer be shepherding what appears to be the unification of the company’s previously disparate note-taking experiences.

Arguably the face of the modern development of OneNote and her lean-in on using the color of OneNote as identifier online, Butler became associated with the purple color scheme as much as her tendency to tease the internet with her baked goods.

The distinguished engineer has not mentioned what lies beyond her transition away from OneNote, Sticky Notes, and Microsoft To Do daily activities. Many of her fans and Windows developers have voiced their support of her staying within the company, over the past 24 hours.

Butler has since responded to her initial post with “I’ll tweet whatever happens,” and while that doesn’t necessarily mean she’ll be part of Microsoft in the future, it doesn’t hamper her chances of being “president of Mars in 50 years,” either.

From OnMSFT to Laura Butler, thank you, for all your hard work.

Fix BattlEye service startup failed error with these solutions

The BattlEye service startup failed error is an error that comes up when you are using games with the BattlEye anti-cheat setup. This error can create various problems, but today we’ll show you how to fix it.

How to fix BattlEye service startup failed error? This error occurs if the BattlEye files are corrupted, so you need to remove those files manually and then verify the game cache to reinstall BattlEye. In case that doesn’t work, be sure to update your graphics card driver to the latest version and try to run BattlEye again.

How can I fix failed to start BattlEye service error?

  1. Delete the BattlEye file
  2. Make sure all your graphics drivers are up to date

1. Delete the BattlEye file

If you’re getting BattlEye service startup failed error, you can fix it by deleting the BattlEye file. To do that, follow these steps:

  1. If you bought the game on Steam, open your Steam client.
  2. As soon as it opens, open the Library and search for the game that uses BattlEye.
  3. Right-click the game and choose Properties from the menu.
    Battleye service startup failed error properties
  4. Locate the game’s installation directory and go to it.
  5. Search for BattlEye folder, right-click and select the Delete option.

After this, you need to delete the game’s cache.

  1. Press Windows Key + R and enter %appdata%. Press Enter or click OK.
    Battappdata lEye service startup failed error
  2. Now locate the game’s directory and remove all files from it. Be sure to back up your saved games beforehand.

Now, you have to re-download the files you deleted. To do this, carry out the procedure below.

  1. Return to your Steam client.
  2. Open the Library tab and right-click on the affected game and select Properties.
  3. Then, get to the Local Files and click on the Verify integrity of game files.
    verify integrity Battleye service startup failed error

The game files you just deleted will be downloaded and the BattlEye will be installed.

2. Make sure all your graphics drivers are up to date

When the graphics drivers on your computer are not the latest, you might encounter various issues, one of them being BattlEye service startup failed error. To fix the problem, do the following:

  1. Open the Device Manager.
  2. Locate your graphics card on the list, right-click it and choose Uninstall device.
    uninstall device Battleye service startup failed error
  3. Wait for the process to finish.
  4. After removing the driver, visit your graphics card manufacturer’s website and download and install the latest drivers for your model.

Alternatively, you can use third-party software to automatically update all outdated drivers with just a couple of clicks.

There you go, these are some solutions that might help you fix BattlEye service startup failed error on your PC. Be sure to let us know in the comments section if any of these solutions worked for you.

READ ALSO:

HERE releases Location Platform Services for Azure

Despite not occupying the same smartphone lane they used to, Microsoft and HERE maps are still a thing.

Leveraging their location-based data HERE will now provide its Location Platform Services to developers using Microsoft Azure tools.

According to a press release from HERE, “HERE Maps & Location Services allows developers to fast-track the development of location-centric applications, by leveraging HERE’s global map data and curated location content in combination with the readily available location services including rendering, search, routing, transit, and positioning.”

More specifically, Azure-based developers in 193 countries around the world will have the chance to play around with:

  • Geocoding – High-precision mapping of geo-coordinates and addresses
  • Positioning – Device tracking and positioning for indoors and outdoors, online or offline
  • Fleet Telematics – Advanced algorithms for optimal truck routing and planning with a deep set of data including truck attributes (maximum height and weight clearance), toll costs, and environmental zones
  • Routing – Precise instructions to a destination using various transport modes (car, truck, public transit, bicycle) and leveraging matrix and isoline algorithms
  • Places – Extensive set of Points of Interest with rich attribution for 400+ categories providing real-world context and relevance for a variety of use cases
  • Map Tiles – Pre-rendered map tiles with different display types, such as regular map, satellite imagery, and terrain
  • Map Image – Pre-rendered map images already optimized for both desktop & mobile devices

For developers looking to build more precise and engaging data experiences while reducing their server cost overhead, the addition of HERE Map’s Location Platform Services is a great tool to onboard.

In addition to utilizing HERE Maps & Location Platform Services, developers will also get a free start of 250,000 location transactions as they manage WebApp backends, real-time data streams, fleet management, and location search to name a few.

Need to catch up on Build 2019? Check out this 5 minutes recap of Satya’s keynote

Microsoft’s annual Build developer conference was pretty special this year. The company had three big keynotes on day 1, starting with an introducing “Vision keynote” featuring CEO Satya Nadella. This one was followed by an Azure keynote and a Microsoft 365 keynote that ran simultaneously, though this year we didn’t see Joe Belfiore on stage talking about Fluent Design, or some news about the next major Windows 10 update.

Build remains a developer conference more than anything else, so we weren’t really expecting some big Windows 10 consumers news during the introducing keynote. Instead, what we got was updates about Azure, Microsoft Dynamics 365 and Power Platform, as well as Microsoft Edge, but we also saw a pretty cool live HoloLens 2 demo as well as a Cortana video showing the digital assistant being able to engage in a multi-prompt conversation.

In case you missed the keynote, Microsoft published the following five minutes summary which includes all the highlights (the full keynote can be seen here).

Microsoft held more than 500 different sessions at its developer conference this week, and you can now watch video replays for most of them on the dedicated Build website. And yes, even though it’s easy to think that UWP apps are on the way out, there were actually several sessions about this topic and Microsoft’s Kevin Gallo made it clear this week that both UWP apps and the Windows 10 Microsoft Store are here to stay.

Minecraft for Windows 10 is available at a discounted price to celebrate the game’s tenth anniversary

Minecraft, the widely popular sandbox video game, is celebrating its tenth anniversary and Microsoft has discounted its price on the Microsoft Store by $10 for the occasion.

The game allows players to build with a variety of different blocks in a 3D procedurally generated world, requiring creativity from players. Other activities in the game include exploration, resource gathering, crafting, and combat.

As part of its anniversary celebrations, earlier this week, the company released Minecraft Classic available to play for free on the web.

At Build 2019, Microsoft’s annual developer conference, the company teased an upcoming augmented reality version of Minecraft that will be announced later this month.

Minecraft deal

Developed by Mojang, a Swedish game developer in Stockholm, Minecraft became one of the best-selling video games of all time and the company was acquired by Microsoft Studios (now known as Xbox Game Studios) in November 2014. Incidentally, this was the first multi-billion dollar acquisition by Microsoft under the leadership of current CEO Satya Nadella.

You can download Minecraft for Windows 10 from the Microsoft Store. In the US, for example, the game is available at a 37% discount from its original price of $26.99.

Minecraft for Windows
Developer:
Microsoft Studios
Price:
Free

For The King launches on Xbox One and goes straight to Xbox Game Pass

The video game, For The King, is now available to play on Microsoft’s family of Xbox One consoles and the title has also been added to the Xbox Game Pass library for subscribers to play for free.

Here’s the official game description and trailer:

For The King is a strategic RPG that blends tabletop and roguelike elements in a challenging adventure that spans the realms. Set off on a single player experience or play cooperatively both online and locally. None before you have returned from their journey. Will you put an end to the Chaos?

For The King is a challenging blend of strategy, turn-based combat, and roguelike elements. Each playthrough is unique with procedural maps, quests, and events. Explore Fahrul in either single player, local, or online co-op. Just remember adventurer, you do this not for riches or fame but for your village, for your realm, For The King!

For The King follows several other titles that were also added to Xbox Game Pass this month. Tacoma, Surviving Mars, and Black Desert were added to the library of available games yesterday while Descenders was added just two days earlier. Earlier this month, Wolfenstein II and Wargroove were also made fully-available to Xbox Game Pass subscribers to play in full.

Are you an Xbox Game Pass subscriber? Let us know what titles you’re playing right now in the comments below and then follow us on Pinterest for more Xbox gaming content.

The app was not found in the store. ?

Xbox 360’s Hitman HD Pack gains Xbox One backwards compatibility today

The Hitman HD Pack is now playable on Microsoft’s Xbox One consoles after gaining backwards compatibility functionality earlier today.

This Xbox 360 title contains HD remasters of both Hitman 2: Silent Assassin and Hitman: Contracts, each with all of the content from their original releases.

Here’s the original game descriptions for each game:

Hitman 2: Silent Assassin

Enter the realm of a retired assassin, forced back into action by treason. You may be a hired killer but you still have a sense of loyalty and justice. Visit the dark recesses of a world corrupted by crime, greed, degradation and dishonor. And a past that catches up with you. Trust no one – if the price is right, the finger of your most trusted ally will be on the trigger. Your targets may hide in the most remote areas of the planet, but their destruction is never prevented – only postponed.

Learn your trade – master your tools – overcome your obstacles – outsmart your enemies – eliminate your targets. Remember: rash decisions bleed consequences. Know when to strike instantly, know when to take your time. Chance favors the prepared. Failure is not an option.

Hitman: Contracts

Enter the world of a HITMAN – a world of crime, sin and greed. Delve into the mind of Agent 47 and encounter his greatest adversaries, completing the work that made him so brutally efficient and shaped him as an assassin. Eliminate your targets by any means necessary.

There are no rules… only the contract, signed in blood.

Something worth keeping in mind with Hitman HD Pack is that the included Hitman 2: Silent Assassin game isn’t the same game as the Xbox One’s Hitman 2. Hitman 2: Silent Assassin is the second game in the Hitman video game franchise while Hitman 2 is the seventh.

The series had a soft reset with its titles with the current generation of consoles so the sixth game in the series was called simply Hitman. Its follow-up, the seventh game, was thus called Hitman 2. It’s definitely confusing but then the Xbox One is the third Xbox console and not the first.

Are you a Hitman fan and are you looking forward to playing the HD Pack on your Xbox One? Let us know why or why not in the comments below and then follow us on Pinterest for more Xbox gaming content.

The app was not found in the store. ?

First Chromium 76 build (76.0.152.0) comes to Microsoft Edge Insiders on the Dev channel

Build 76.0.152.0 has now rolled out to all Edge Insiders on the Dev channel. This latest build is the first Chromium 76 build launched on the Dev channel and features a large number of new improvements and fixes such as the enabling of spellcheck, new colors and layouts for various sections of the UI, new history filter options, and tooltip improvements.

Here’s the full release notes:

Improvements and new functionality

  • Spellcheck is now enabled by default for everyone.
  • Downloads, Extensions, Favorites, History, and Settings all have refreshed colors and layout.
  • Read Aloud will now select one of the new cloud-powered voices by default.
  • The logic for quick links on the New Tab Page has been updated. Any site you add manually or edit will remain in the list unless you delete it, while other sites will continue to update based on your browsing history.
  • Added support for Dolby AC3/E-AC3 audio decoding for some media playback sources.
  • You can now sort favorites by name from the manage favorites page by right-clicking on the page background and choosing “Sort by name”.
  • Favorites in the favorites bar can now be reordered using ALT+SHIFT+LEFT/ALT+SHIFT+RIGHT.
  • When viewing history, you can now filter by time range and then search within the filtered results.
  • While viewing history, CTRL+A will now select all items in the current list.
  • The “Add a profile” flyout now uses dark colors in dark theme.
  • The default profile icon now has a gray background instead of a white background in dark theme.
  • Tooltip improvements for tabs: new tooltip for tab close button, keyboard shortcuts added to tooltips, and special tooltip notes when a tab is in an error state.
  • The title of an InPrivate window now contains “[InPrivate]”.

Bug fixes

  • The escape key now cancels profile creation.
  • When the window width is small, the “Profiles” and “Appearance” items in the Settings nav bar no longer overlap.
  • Installed sites now show the “Customize and control” menu button in the title bar.
  • Fixed a case where a page would scroll the wrong amount when using the keyboard to scroll in high DPI modes.
  • The first item in a context menu is no longer showing a hover effect when the menu is opened.
  • Fixed a bug which could cause updates to stop if you upgrade to the next Windows 10 release.
  • We fixed some problems with keyboard navigation through the toolbar and favorites.
  • Fixed an issue where Netflix sometimes temporarily stopped playing video after seeking.
  • Fixed an issue where Read Aloud would stop reading if it encountered certain characters.
  • Fixed an issue which could cause the list of pages in “On startup” settings to render incompletely.
  • When creating or editing a profile, the profile icon choices now appear in two tidy rows as expected.
  • Removed an extra vertical separator that was incorrectly appearing between an active tab and its neighbor tabs.
  • Fixed an intermittent crash in the send feedback dialog.
  • Site permissions for USB devices are now shown properly in Settings.
  • When a web page is using your microphone, a microphone icon now shows instead of a camera icon.
  • Fixed some dark text on dark background in the profile flyout in dark mode.
  • In dark theme, disabled toolbar buttons are now much easier to see.

Edge Insiders are a group of users who opt-in to test early versions of the new Microsoft Edge browser. There are three main channels for testing the different software builds. The Canary channel is updated daily with all of the latest changes as they’re made while the Dev channel updates weekly and receives more testing from Microsoft team members for a more stable experience.

The Beta channel will be the most-stable channel out of the three and will get its updates every six weeks once it launches in the near future.

Are you an Edge Insider? Share your thoughts on the experience and this latest update with the community in the comments below and then follow us on Twitter for more Microsoft news.

Microsoft Management Console Can’t Create New Document [Fix]

Many users reported that Microsoft Management Console was unable to create new documents. This can be a big problem, especially if you use this component regularly.

This component is somewhat prone to errors, and in the past, we wrote about MMC.exe application error, so you might want to check that guide as well.

Today we’re going to focus on the issue of creating new documents, so let’s get started.

How do I enable MMC in Windows 10?

  1. Press the Windows key + R to open the run dialog.
  2. Type mmc and press Enter.
  3. MMC will now open in a new window.

How can I fix Microsoft Management Console Unable to create new document error?

1. Run System File Checker

  1. Press Windows key + R, to open Run.
  2. Type cmd in the Run box and click OK to open the Command Prompt.
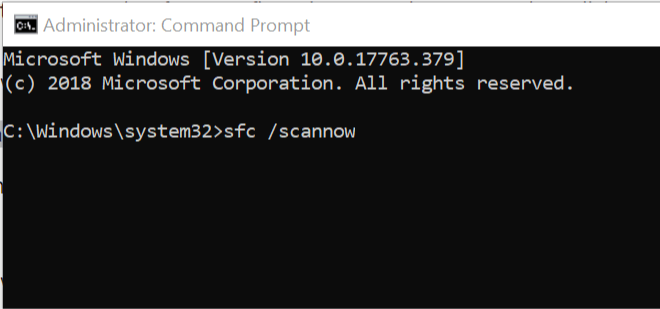
  3. In the Command Prompt, type the following command and hit enter.
    sfc /scannow
  4. System File Checker will scan the system for any corrupted files and fixes them if required.
    run Sfc scannow command - Windows update fix
  5. Restart your computer and check for any improvements.

2. Check the user profile for corrupted files

  1. Type Cmd in the Cortana/Search bar.
  2. Right-click on the Command Prompt and select Run as Administrator.Windows 10 - Create New user- Command prompt
  3. In the Command Prompt, run the following command:
    Net user test /add
  4. You should see The command completed successfully message upon successful completion.

Close the Command Prompt window and login with the newly created user account. Here is how to do it.

  1. Press Windows Key + L to lock the screen.
  2. Click on your alternate user account.
  3. Sign in to the new account.

Try to open the settings or program that was giving the error. If the error does not appear, you may have to create a new user profile with admin access as the error is with your user profile.

After doing that, check if Microsoft Management Console unable to create new document error is gone.

3. Reset Windows Without Deleting Personal Files

  1. Click on Start and select Settings.
  2. Click on Update and Security.
  3. Click on the Recovery tab.
    Reset Windwos 10 PC - Get Started
  4. Under Reset this PC section, click on Get Started button.
    Reset this PC - Choose an Option - Keep My Files
  5. Under Choose an option click on Keep my files.
  6. Follow the on-screen instructions and Windows will reinstall the OS without affecting your personal files.

After the reboot, check if the error is resolved. If not, you may have to completely reset the PC and remove everything including your personal files.

Before factory resetting your PC, make sure you take a backup of your personal data. Once the backup is created, proceed with the following steps to reset the PC again.

Hopefully, this should be able to help with Microsoft Management Console unable to create new document error.

A few users reported that MMC.exe is blocked on their PC, but we already covered the best ways to fix that in a separate guide.

What method did you use to fix this error? Let us know in the comments below.

Windows Explorer stops when copying files? Fix it like a pro

Some users have stated on forums that Windows (or File) Explorer crashes when they try to copy files. When File Explorer crashes, a Windows Explorer has stopped working error message pops up. Consequently, the file manager utility closes and users can’t copy their files.

What do you do if Windows Explorer stopped working when copying files? To fix this problem, you can run the System File Scan utility. This should resolve possible system corruption. If that doesn’t help, try starting Windows in a Clean Boot sequence. Alternatively, you can uninstall a third-party software that causes crashes, like EgisTec.

Learn about these steps in detail below.

Windows Explorer freezes when copying files

  1. Run a System File Scan
  2. Clean Boot Windows
  3. Uninstall EgisTec Software
  4. Restore Windows 10 to an Earlier Date

1. Run a System File Scan

System file corruption can be one factor behind the “Windows Explorer has stopped working” error message. So, it might be worth running a system file scan with the System File Checker utility. Follow the guidelines below to run an SFC scan.

  1. First, press the Windows key + S hotkey to open the search utility.
  2. Enter ‘cmd’ in the search box.
  3. Right-click Command Prompt and select Run as administrator.
  4. Before running the SFC scan, enter ‘DISM.exe /Online /Cleanup-image /Restorehealth’ in the Prompt’s window; and press the Return key.
  5. Next, input ‘sfc /scannow’ in the Command Prompt; and press Return to start the system file scan.sfc scannow
  6. After that, wait for the SFC scan to finish. Restart the desktop or laptop if the scan does repair some files.

2. Clean Boot Windows

File Explorer can stop copying files when there are conflicting third-party software and services. Thus, clean-booting Windows might resolve the “Windows Explorer has stopped working” error when copying files. Clean booting will remove all third-party startup software and services. This is how users can set up a clean boot in Windows.

  1. Open Run with the Windows key + R keyboard shortcut.
  2. Enter ‘msconfig’ in Run and click OK to open the System Configuration utility.system configuration
  3. Select the General tab, if it’s not selected, and click the Selective startup radio button.
  4. Next, users will need to deselect the Use original boot configuration and Load startup items check boxes.
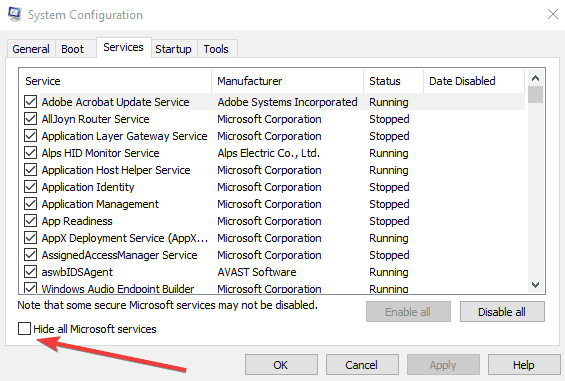
  5. Select the Services tab.
  6. Select the Hide all Microsoft services check box, and then press the Disable all buttonhide all microsoft services
  7. Click the Apply option.
  8. Press OK to exit the System Configuration utility.
  9. A dialog box will then open that will request users restart Windows. Press the Restart button there.

3. Uninstall EgisTec Software

Users have confirmed that Windows Explorer stops working with EgisTec software installed. Those users have fixed the issue by uninstalling EgisTec programs, such as MyWinLocker.

So, check if you have EgisTech software installed, which comes pre-installed with some Acer laptops. Users can uninstall MyWinLocker, and other software, as follows.

  1. Open the Run accessory.
  2. Input ‘appwiz.cpl’ in Run, and select the OK option.
  3. Next, enter ‘MyWinLocker’ in the search box at the top right of the Programs and Features Control Panel applet.
  4. Select MyWinLocker and click Uninstall.
  5. Click Yes to provide further confirmation.
  6. Restart Windows after removing the software. Then try copying the files in Explorer.

4. Restore Windows 10 to an Earlier Date

The System Restore utility might fix File Explorer if it has only stopped copying files for less than a month. Users can utilize System Restore to roll back Windows to a time when it copied files ok.

System Restore will uninstall any recently installed programs, which don’t predate the selected restore point, that might be responsible for the error message. This is how users can roll back Windows.

  1. First, open the Run window shown directly below.system restore
  2. To open System Restore, enter ‘rstrui’ in Run’s text box. Then press the OK button.
  3. Click Next to proceed to a list of restore points.
  4. Select Show more restore points to get a full list of restore points.system restore restore to a restore point
  5. Then choose a restore point that will restore Windows to a date when the “Windows Explorer has stopped working” error message didn’t pop up. If in doubt, just select the restore point that goes the furthest back.
  6. To check what software gets removed, press the Scan for affected programs button.system restore scan for affected programs
  7. Click Next > Finish to confirm the selected restore point. Windows
  8. Select the Yes option on the dialog box that opens.

Those are a few of the resolutions that might fix the “Windows Explorer has stopped working” file copy error. In addition to those fixes, resetting Windows might also resolve the issue.

What is Softthinks and how do I disable it?

If you are noticing high disk usage in your Task Manager and the process behind it is Softthinks, you might be wondering what Softthinks is and whether it is a critical process before trying to end the process.

In this article, we answer what is Softthinks and how you can fix the high disk usage caused by Softhinks Service Agent on your Windows system.

What is Softthinks and why its Service Agent causes high disk usage?

  1. What is Softthinks?
  2. Can you Safely Disable Softhinks Service Agent and how to do it?
  3. Disable Softhinks Agent Service
  4. Uninstall Softhinks Agent Service

What is Softthinks?

To put it simply, Softhinks is a backup utility that runs in the background and does not have an interface hence easy to miss for the users. This process when in use creates a backup of your system and helps you to recover your system in case of fatal error or crash.

Sometimes, the process can cause issues with the system and slows down the system by using all the disk resources. The resource can reach up to 100% for the hard drive as well as 80% of the CPU usage.

This usually happens in case the utility is not compatible with the version of Windows you are running. When a process starts to use 100% of disk resources, the system does not have enough resources to perform other operations hence starts to feel slow and buggy.

Some users have reported that due to Softthinks service agent the computer freezes for more than a few hours with 100% disk usage.


Can you Safely Disable Softhinks Service Agent and how to do it?

Yes, you can disable Softhinks safely without affecting any of the critical functionality of your Windows system. It is not an essential service for Windows and most of the time creates high resource usage issues resulting in freezing and battery draining issues.

This issue mostly affects only Dell made laptops as the service is exclusive to the laptop maker. Dell includes this little backup utility with its devices; however, due to the issues, Dell has released several updates to the fix the issue.

If you don’t need the backup utility and never used it before, we recommend you to disable it.  Here is how you can disable Sofththinks agent service on your Windows 10 system.


Method 1: Disable Softhinks Agent Service

If you don’t want to delete the Dell backup utility just yet, you can choose to disable the service from starting automatically. Stopping the service will fix the high disk usage issue caused Softhinks service agents. Here is how to do it.

  1. Press “Windows Key + R” to open the Run dialog box.
  2. Type services.msc and hit enter.
  3. In the Services window, locate “Softhinks agent service”. You can search for the service by pressing S key on your keyboard.
  4. Right-click on “Softhinks agent services” and select Properties.
    Softthink Service Agent
  5. In the Properties window, click on the drop-down Menu for Startup type and select Disabled. If you want to be able to launch the Dell Backup utility manually, select Manual instead.
    Servicse - Startup Type
  6. Click on the Stop button for “Service status”. This will kill the Softhinks service agent process.
  7. Click on Apply > OK to save the changes.

Reboot your system. After the system restarts, open the task manager and check the disk usage. It should be normal as you have successfully disabled the Softhinks agent service.


Method 2: Uninstall Softhinks Agent Service

The Softhinks Agent Service is a software component of the DellBackuputility. If you don’t need the Dell Backup utility, you can uninstall it from your system.

  1. Press “Windows Key + R” to open Run.
  2. Type Control and hit enter to open the Control Panel.
    Programs and Features
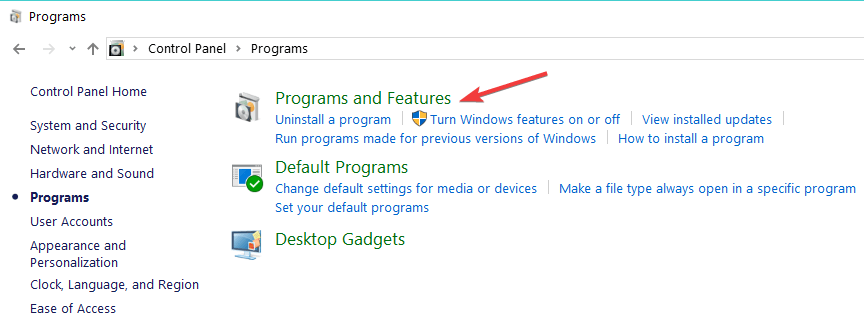
  3. Go to Programs > Programs and Features.
  4. Find “Dell Backup and Recovery” and select it.
  5. Click on Uninstall option to remove the tool completely from your computer.
  6. Restart your computer.

RELATED STORIES YOU MAY LIKE:

The Computer Unable to Establish Two-Way Communication With Device [FIX]

Sometimes the HP printers, be it Wireless or wired printers, may stop printing and show unable to establish error while printing a document. This is a common error attributed to the HP Printers.

How do I fix the Computer is unable to establish two-way communication with the device error? Firstly, try running the HP Print and Scan Doctor. This dedicated tool by HP should fix the error upon scanning. If that doesn’t help, try updating and reinstalling the HP printer driver. Finally, if that fails as well and you’re still stuck with the error, try restoring network settings to default. Find out about these steps in detail below.

Fix the Computer is unable to establish two-way communication with the device error

  1. Run HP Print and Scan Doctor
  2. Uninstall and Reinstall HP Printer Driver
  3. Restore Network Settings to Default

1. Run HP Print and Scan Doctor

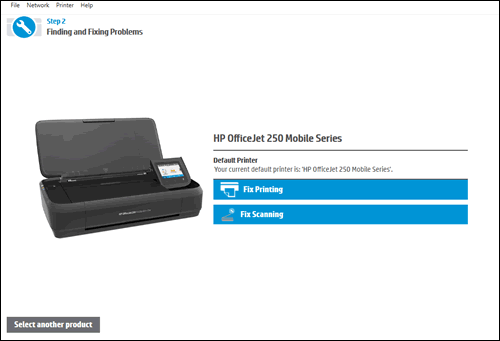
HP Print and Scan Doctor

Before applying any of the fixes listed in this article, it is always recommended that you perform a quick restart of your computer. At times, rebooting your system can fix the temporary error with the computer as well as the printer.

HP offers an HP Print and Scan Doctor troubleshooting software utility to diagnose your HP devices on Windows computer. The tool can automatically find and resolve the issues related to wireless printers and other printing machines.

  1. Go to the HP Support page.
  2. Under “HP Print and Scan Doctor for Windows PC” click on the Download button.
  3. Run the diagnostic tool after the download is complete. Follow the on-screen instructions to diagnose and repair the printer.

2. Uninstall and Reinstall HP Printer Driver

Most of the time this error is caused by a faulty driver installation or corrupted driver software. In any case, you can uninstall the HP Printer driver from your system and then reinstall it to fix the error. Here is how to do it.

  1. Press Windows Key + R to open Run.
  2. Type control and hit enter.
  3. In the Control Panel, go to Programs > Programs and Features.
  4. Select your HP Printer and click on Uninstall.

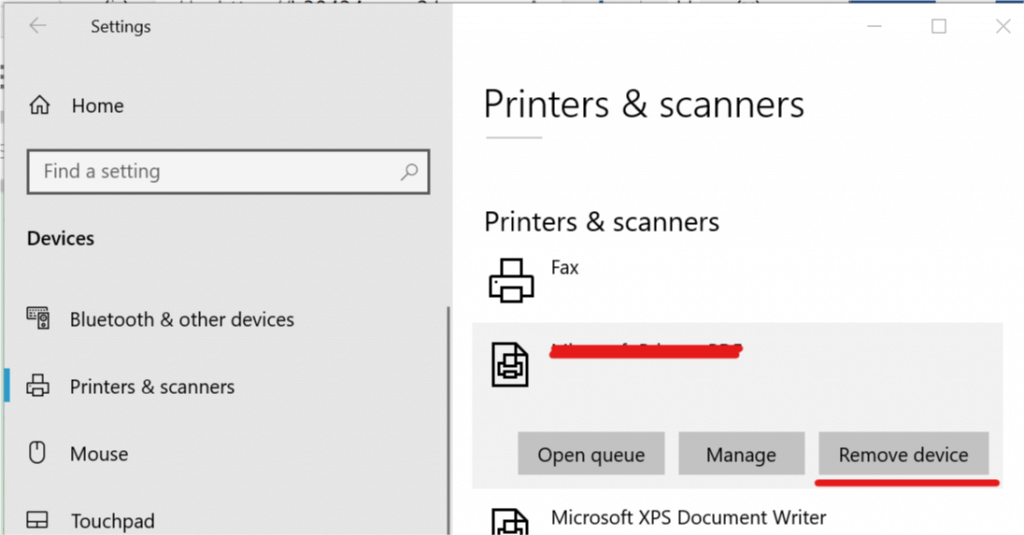
Remove the Printer from the Setting

After uninstalling the HP Printer, you need to remove the device from the Settings. Here is how to do it.

  1. Click on Start and select Settings.
  2. Click on Devices.
  3. From the left pane, click on Printers and Scanners.
    HP Printer - Remvoe Devices - Settings
  4. Under Printer and Scanner, look for your HP printer.
  5. Select your HP printer and click on Remove Device.

Uninstall Printer Drivers

After removing the Printer from the Device tab in settings, you need to uninstall the driver for the printer from the Printer Server Properties. Here is how to do it.

  1. Press Windows Key + R, to open the Run dialogue box.
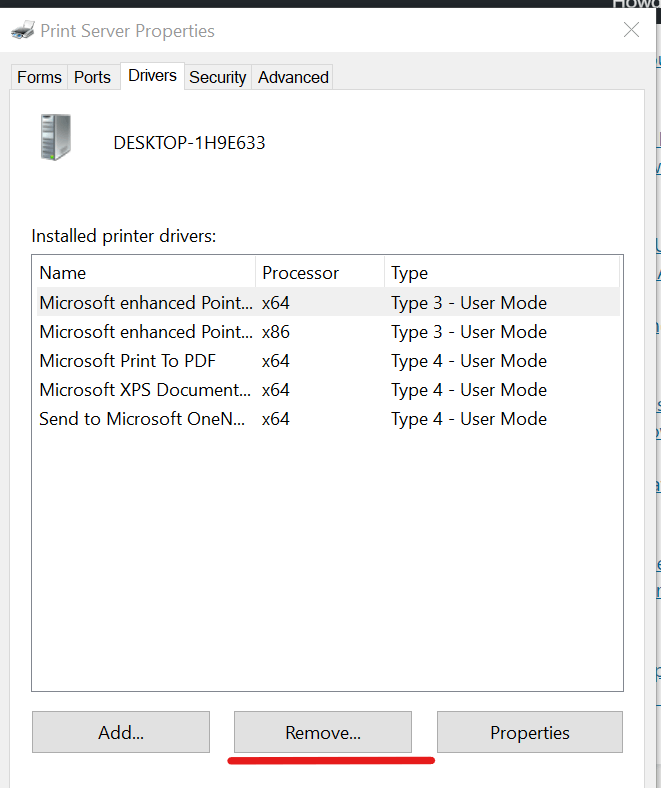
  2. Type printui.exe /s and hit enter. It will open the Print Server Properties.
  3. Go to the Driver tab.
  4. Under “Installed Printer drivers” look for HP Printer.
  5. Select the HP Printer driver and click on Remove button.
    Printer Properties Server - Remvoe
  6. Click OK to confirm the choice.
  7. Click Apply and OK to save the changes.
  8. Close the Print Server Properties window.

Install New Printer Drivers

  1. Restart your system. After the restart, you need to install HP printer drivers from the official website.
  2. Go to HP website drivers section.
  3. Find the drivers compatible with your Printer as well the Windows version.
  4. Download the drivers and install the driver for the first printer.  If successful try to install the driver for the second printer as well.

3. Restore Network Settings to Default

On your Wireless printer, you can try to restore the network setting to default to fix the error. By resetting the settings, you force the printer to use fresh configuration thus removing any old broken configuration.

  1. On your Printer, press the Wireless button and the Cancel button simultaneously.
  2. Keep the buttons pressed for three seconds and then release them.

Once the Settings are restored to factory default, connect the printer to the network.

  1. Press and hold the Wireless button on your printer for 3 seconds. It will start the WPS (Wi-Fi Protected Setup) push mode. The Wireless lights should start blinking once the WPS mode is activated.
  2. Press the WPS button your network router to begin the connection.

Use the Pin Method

You can also connect your printer to the network using the PIN method.

  1. Press the Wireless button and information button at the same time on your printer. This will print the Network configuration page. Locate the WPS PIN in the page (top of the page).
  2. Press and hold the Wireless button on your printer until the Wireless lights start blinking.
  3. Open the Router software on your computer and enter the WPS PIN generated from the printer to connect it to the network.

RELATED STORIES YOU MAY LIKE:

Steam Failed to Update Borrower (Rate Limit Exceeded) [FIX]

Steam allows the users to share their library with their friend allows you to share the games and more. However, at times you may experience Failed to update borrower error.

The full error reads Failed to update borrower (rate limit exceeded). The error can occur either on your front or your friend end while he is sharing the game with you. If you are facing similar error, here is how to troubleshoot this steam related error in your Windows 10 device.

Steam won’t update borrower? Learn how to fix it below

  1. Check if you have Reached the Sharing Limit
  2. Re-Authorize a Shared Library
  3. Check for Steam Updates
  4. Contact Support and Wait

1. Check if you have Reached the Sharing Limit

A Steam account may authorize Family Library Sharing on up to 5 accounts only. So, if you have already authorized 5 accounts to borrow the games, this error is obvious.

To fix this you need to revoke access from one of the friends or family members who is not using the access. Here is how to do it.

  1. Launch the Steam Client on your PC.
  2. Click on Steam and select Settings.
  3. Under Settings, click on the Family.
  4. Under the Family Tab, click on Manage other computers.Steam - Setting - Family - Manager Other computer
  5. You will be asked to enter the 4 digit security code. Enter the code click OK.
  6. In the next window, you will see all the account that you have authorized to gain access.Steam Library Revoke Family Sharing Access
  7. Select the friend or family member account you want to revoke access and click on the Revoke button.

That’s it. The access is now revoked. However, you may have to wait for 90 days to end the cooling period before adding another family member and giving them Steam Library access.


2. Re-Authorize a Shared Library

If you haven’t reached your sharing limit or if you were not trying to add a new user, try to re-authorize a shared library. It is always a good idea to ensure that Family Sharing is working correctly. Here is how to do it.

  1. Launch Steam and sing in with your Steam account.
  2. Click on Steam and select Settings.
  3. Click on Family and click on Manager other computers.
    Steam - Setting - Family - Manager Other computer
  4. You need to enter your security code again.
  5. From “Manage Family Library Sharing” deauthorize the device is giving you issues.
  6. Now, ask your friend (the borrower) to attempt the launch one of the games in the shared library.  This should send a new request to the owner.
    Steam- Family Sharing - Request Game Access from Owner
  7. An Authorization email will be sent to the game owner.
  8. Open your email account associated with the Steam account and click on the link in the email from Steam to authorize that computer and grant access to the library.

3. Check for Steam Updates

If it is a known bug, Valve might have released an update for Steam. If your Steam client did not update automatically, you may have to update your Steam client manually. Here is how to do it.

  1. Launch Steam.
  2. Click on Steam from the top menu and select Check for Steam Client Updates option.
    Steam - Check for updates
  3. Steam will check for any pending update and start downloading it. Wait for the installation to complete.
  4. Once done, try to add your friend using Family Library Sharing menu and check for any improvements.

4. Contact Support and Wait

Steam is not known for its great support when it comes to Family Library Sharing feature. There is no way to know if you have reached you sharing limit and how many days are remaining in the cooling down period to end.

What you can do is contact the Steam support and raise a ticket with your concern. If no response or adequate response is provided you may have to wait for several weeks before you can add another account for Family Library Sharing in Steam.

Rate limit problems affect other services as well, and we have a new guide that show you what to do if Resource is being rate limited in Discord, so don’t miss it.

Posted in Fix

5 woman calendar software to track your fertility

Ladies, if you and bae are trying to conceive, and you’re tired of marking off dates on a physical calendar, your cries have been heard.

Woman calendar software is the right tool to help you calculate fertility. Check and track your regular period and ovulation, on a digital (mobile) platform.

This software simply uses your menstrual cycle information to calculate your fertility.

All you do is enter your menstrual cycle dates from the first to the last, including luteal phase length.

Then create a calendar to start viewing, checking and tracking your fertility.

With woman calendar software, you no longer need a physical calendar to add check off marks.

You can bookmark your calendar for present and future reference, as long as you don’t forget the start date of your last menstrual period.

This software may then assist you to conceive, avoid unwanted pregnancy by indicating the days you need to be abstinent, or if you like, conceive a girl or boy.

Here are the top 5 woman calendar software tools you can use by yourself or with your partner.

  1. LadyTimer
  2. Fertility Friend
  3. Eovulation
  4. JX Lab
  5. Fertility Calendar (EOS Consulting)

Best woman calendar software to get today

Ladytimer

woman calendar software

This is a woman calendar software that tracks and predicts menstrual cycle days, and helps women get pregnant, or avoid unwanted pregnancy.

It is easy to use, is best used for irregular periods, and accessible on any device or computer.

Features include accurate ovulation forecast with its advanced prediction algorithms, ovulation calendar options such as symptoms, moods, weight, and temperature, reminders for period.

Also, they include ovulation and medical exams, fertility calendar with temperature charts, menstrual period history, pregnancy mode, and automatic backup and sync.

You can actually forecast the baby’s sex – girl or boy – plus engage chat and direct messaging with other Ladytimer users, track intimacy, get reminders to take your birth control pills.

You can share your data with your doc or partner, and use the ovulation calculator that has a cervical mucus tracker so you know exactly where you’re at.

All you do is track your start period date monthly, then it calculates the cycle for you. You can also key in your morning body temperature or ovulation tests and mucus for precise fertility tracking.

Get Ladytimer

Get the browser version of the app

Fertility Friend

woman calendar software

This woman calendar software helps moms to be observe and jot down signs of fertility, thus predicting the best days for conceiving or taking a pregnancy test altogether.

You can get it for free, though it comes with a $45 annual premium membership with access to message boards, and quality features such as intercourse timing analyzer.

Also, it offers updated and detailed analyses of your fertility signs that may lead to pregnancy.

Since its inception in 1998, Fertility Friend boasts over 15 years of experience and more than 650000 pregnancies and counting, making it the pioneer in fertility charting.

It is super accurate, empowers you to know your body better, and provides privacy and clarity with web access.

Features include a Fertility Chart (or Basal Body Temperature chart) that observes and records your fertility signs which you can see in your daily status and know your most fertile times.

What makes it work better is your body’s cues that show your status throughout your cycle.

You also get simple educational videos and in-depth resources so you can understand your body signals and fertility better.

It assesses the data you enter for signs of ovulation, pregnancy, and your most fertile days.

It also suggests the best test date to minimize your wait, and help avoid the disappointment of early testing.

The calendar is color coded and has a custom chart based on your own fertility, plus you can see your timing and how all the signs come together in an ultra-precise and reliable platform.

Get Fertility Friend

Eovulation

woman calendar software

This is a woman calendar software that promises to help you get pregnant faster, using natural birth control method to calculate safe days, with an unconditional, no questions asked money-back policy within 60 days of getting the software.

Features include ovulation day prediction, safe days calculation, color-coded ovulation chart that displays most fertile and safe days, password protection for user profiles.

They also include calculation of the most probable conception days for either sex of the baby, basal body temperature charting, and tracking of premenstrual syndrome.

You can also get optional daily notes with alerts and reminders, and make your personal ovulation into a live desktop wallpaper with this woman calendar software.

Get Eovulation

JX Lab

woman calendar software

The JX woman calendar software is designed for any woman who is trying to conceive, avoid unwanted pregnancy or define the future child’s gender.

It calculates ovulation time so as to generate your personal menstrual cycle and fertility calendar.

Features include managing notes and personal profiles, menstrual cycle history, hand and easy adjustable interface, multilingual interface, support for XP themes, automatic startup on Windows, printing and ability to create print templates, and easy, quick installation.

You can use this woman calendar software to control your cycle on your mobile phone using the free JX ovulation calendar version for mobile phones.

Get JX Ovulation Calendar

Fertility Calendar (EOS Consulting)

woman software calendar 2019

This woman calendar software is available for download from Microsoft.

It helps you track and predict your ovulation cycle including your most fertile days of the month.

You can use it if you’re trying to conceive or avoid unwanted pregnancy.

Features include an easy to read calendar that displays your cycle and fertile days, prediction of your next cycle, adjustable period start date, cycle and period length, as well as your luteal phase duration.

It is also small in size so it won’t take up much space for just 1.2MB.

Get Fertility Calendar

Have you settled on which woman calendar you’d like to use to track your cycle and fertility? Share with us which one you’re ready to download and try by leaving a comment in the section below.

RELATED STORIES TO CHECK OUT:

3 Best Windows Restart Scheduler Tools to Use in 2026

Need to restart your PC regularly without the hassle? In this guide, we’ll show you the 3 best Windows restart scheduler tools.

Whether you’re dealing with Windows Update issues or running maintenance tasks overnight, these tools let you control when your system restarts, no surprises.

What are the best tools to schedule Windows 10 restarts?

Wise Auto Shutdown – Silent running mode

This free tool allows you to schedule the PC to shut down, restart, power off, log off, sleep or hibernate on a regular basis or only once, at a specific time.

Thanks to Wise Auto Shutdown, power management becomes easier and less time-consuming.

Also, you can enable reminders so you will be notified 5 minutes before the tool executes the task.

In this manner, if you still need to use your computer, you can delay the task by 10 minutes or up to 4 hours.

The user interface is very simple, as the tool is divided into two panels. On the left panel, you can select which task you want to perform, and on the right panel, you can specify when you want the task to be executed.

Also, Wise Auto Shutdown has a silent running mode. Therefore, when a task starts, the program will minimize in the system tray to run without disturbing the user.

Wise Auto Shutdown requires only 1.6 MB to install, and you can download it for free from WiseCleaner.

Wise Auto Shutdown

Finish various tasks automatically and appoint a concrete execution time with this great tool.
Free Download Get it now

Shutter – User manual

shutter-schedule-windows-10-restart


This tool is a complex scheduling utility that supports many different events and actions.

Apart from restarting your computer, Shutter also allows you to shut down, log off, lock, sleep, hibernate, and turn off your computer.

This utility also comes with a user manual that offers full, step-by-step guides for all the events and actions this tool supports.

To schedule your computer to restart, you first need to add the restart action to the list.

Select the Reboot option from the left-hand panel, then click on Add and schedule the date and time of the restart.

⇒ Get Shutter

Chameleon Shutdown – Simple app

chameleon-shutdown-schedule-windows-10-restart

This tool allows you to switch off, restart, hibernate the computer, and perform other operations.

You can perform these actions immediately or schedule them and add as many actions as possible without limitation.

Chameleon Shutdown’s interface is very easy to use.

To schedule Windows 10 to restart, click the Restart tab and select “With Parameters”. Then, set the specified restart time and click on Start.

You can download Chameleon Shutdown for free from Chameleon-Managers.

⇒ Get Chameleon Shutdown

How to schedule tasks with Windows built-in tools

As a quick reminder, if you prefer to schedule restarts using the Settings menu, follow these steps:

1. Go to Settings > Update & security > Advanced options.

2. From the drop-down menu, select the option Notify to schedule restart.

schedule-windows-10-restart

3. Go back to Windows Update > Select a restart time > schedule the restart.

Aside from scheduling restarts, you can restart your PC with your keyboard.

You can also schedule a shutdown on Windows 10 and on Windows 11.

Have you already tried out one of these three tools to schedule Windows 10 restarts? Tell us more about your experience in the comment section below.

AOL will not accept delivery of this message Office 365 error [Fix]

AOL will not accept delivery of this message error is usually seen when there is a problem with the AOL’S DNS reverse system, or when trying to send an email.

The cause of this error cannot be clearly stated by AOL. In some instances, the error appeared when the email was containing suspicious links. However, there’s a way to deal with this error message once and for all.

What causes AOL message delivery errors?

AOL will not accept delivery of this message error might come to play when the user‘s email account has been hacked by spammers. If that’s the case, your email will be blocked by AOL in order to prevent the spread of spam messages.

To fix this issue, it’s advised that you contact AOL personnel and make sure that your account isn’t hacked.

How can I fix AOL will not accept delivery of this message error? This error usually occurs if your AOL account is hacked. To fix it, make sure that your email account is in good reputation. If case your account is hacked, contact AOL support.

How can I fix AOL will not accept delivery of this message errors?

Anytime you experience the AOL will not accept delivery of this message error, you can take the first step by checking the AOL’s Master Tool in order to check your email‘s reputation. This tool will check your email for any spam reports.

To verify your email, you just need to enter your email IP address. If your IP address says Whitelisted it simply means the error is not on your end and will be rectified by AOL.

If the message says Undisclosed it means your email reputation is still being checked by AOL. However, if your IP address has a Poor status it means that your email account has been blacklisted.

To fix this issue, it’s advised to temporarily disable your account. Once this is done, you can contact AOL and ask them to enable your account. Bear in mind that this process can take over a month, so you’ll have to be extra patient.

If you do not know the IP address of your mail, you can find out by doing the following:
  1. Press Windows key + R.
    ping run window AOL will not accept delivery of this message
  2.  Type ping mail.yourdomainname.com and press Enter.
  3.  You should be able to get your IP address from the new window.ping results

AOL will not accept delivery of this message error can be quite problematic, but hopefully you managed to fix it after using our guide.

READ ALSO:

Microsoft Photos gains internet powered “Similar Search” feature thanks to Bing

Microsoft is adding another nifty new feature to its Photos app for Windows 10 devices. The company is adding a “Search for similar images in Bing” option in the right-click context menu that can be accessed from the selected image screen.

According to MSPoweruser, the update should be live to all users of the Photos app on Windows 10. However, only some of our machines have picked up the update so far, one of which is running the Photos Preview program.

To begin a similar search and share the image with Bing, you’ll have to agree to allow the company to process the file online, as well as potentially use it to improve its search engine image processing services. The company has been big on privacy settings lately, so rest assured you won’t have to worry about prying eyes looking at your private photos without your consent.

From our brief experience, the feature seems to still be broken, as sharing an image brings a blank white browser screen with no results. If this is the case for all users, it’s doubtful that Microsoft has pushed it to anyone except potentially a small handful of people to see what they think before they release it to everyone.

In addition to the new search powered by Bing, Microsoft has also improved the video editor with new animated text styles—Simple, Quiet, Cinema, and Bold— as well as a Duplicate Project option if you’d like to keep an extra copy.

If you’re interested, you can go ahead and download the latest update of the Photos app and let us know in the comments if you’re able to see the new menu option. Please keep in mind that right-clicking an image after you selected from your gallery will bring up the context menu with Similar Search with Bing as the last selection.

In addition, Microsoft is also working to bring automatic People tags and other quick editing tools to the Microsoft photos app to help put it closer to par with Google Photos and iCloud.

Microsoft Photos
Microsoft Photos
Price:
Free

Microsoft to offer two custom Game of Thrones Xbox One consoles to lucky fans

Microsoft’s Xbox One S All Digital edition has only been available for purchase for a couple of days now. However, that hasn’t stopped HBO from partnering with Microsoft to produce the two different special Game of Thrones edition disk-less consoles in celebration of the series’ final season. Of course, as always, these special edition consoles are not available for sale, instead they are available as a prize to those who win it in one of the contests.

As described on the Xbox Wire blog post, the House Targaryen console features the Targaryen crest, which sits on top of the casing which resemble leather dragon scales. Those who would like to take a shot at potentially winning one of these must follow the official Xbox Twitter account, and retreat the reveal post using the #GamerThrones and #Sweepstakes hashtags.

The Night King console features a “weathered tin metal” which is intended to resemble his armor as seen in the series. Similarly to the House Targaryen console, the system can be won by liking the reveal post on Facebook.

The contests will begin starting today, and the last chance to participate will land on May 22nd. Only one of each consoles are available, so if you’re a big Game of Thrones fan, you hate disks, and you love ultra-rare items, then it’s definitely something for you to check out.

Of course, even if you don’t win one of these, Microsoft still has other Game of Thrones giveaways. If you pre-order the season 8 on Xbox through the Microsoft Movies and TV app, you can receive a free exclusive Iron Throne avatar for your Xbox Live account. Additionally, you can also choose to bundle the entire eight-season collection altogether and get two additional free avatars.

Lenovo unveils three new Windows 10 Thinkpads

Despite there being little to no Build news on the Windows 10 operating system front, Windows OEM partners are still pumping out devices that leverage the OS in combination with ever-evolving user request features that make using Windows that much more desired.

One of Microsoft’s premier partners in Lenovo just announced the launch of upgrades to a handful of devices from its ThinkPad line of laptops.

The Lenovo ThinkPad T495, T495s, and X395 represent the company’s medium-range flagship productivity offerings for businesses.

The retooled T and X lineup will include 2nd Gen AMD Ryzen 7 Pro Mobile processors with integrated AMD Vega graphics for better battery management when flying through macro-enabled Excel workbooks and multi-media heavy PowerPoint presentations.

Lenovo has previously offered AMD SKU’s for its more entry-level ThinkPad lines in the A and E series but as of today, its more mid-range devices are getting the switch which could represent an acknowledgment in software evolution or a loosening of the stranglehold Intel has had on its hardware.

Now, these are different SKU’s with different processors which mean different hardware support for the motherboards are in order and owners of the AMD versions of the T495, T495s and X395 will have to forego Thunderbolt 3 support, QHD panel options, and slightly less battery output. In exchange of missing Thunderbolt support, the new laptops will come with support for the newer HDMI v2.0 port protocol and users will be able to use existing T490 and X390 docking stations with the new laptops.

Lenovo expects to ship the ThinkPad T495 for $939.00 in late May, the T495s for $1089 in May as well and the X395 for $1089.00 sometime in June.

Tacoma, Surviving Mars, and Black Desert join the Xbox Game Pass video game library today

Tacoma, Black Desert, and Surviving Mars are the latest Xbox One video games to come to the Xbox Game Pass subscription service. As of today, all three titles are available to play in full for subscribers.

Tacoma launched on the Xbox One in 2017 and is a futuristic story-based video game with a variety of puzzles to solve and plotlines to uncover. Here’s its official description and trailer:

The Venturis Corporation wants their AI back. That’s where you come in. Tacoma is a narrative adventure set aboard a high-tech space station in the year 2088. As you go about your mission, you’ll explore every detail of how the station’s crew lived and worked, finding the clues that add up to a gripping story of trust, fear, and resolve in the face of disaster.

At the heart of Tacoma is the facility’s digital surveillance system, which has captured 3D recordings of pivotal moments in the crew’s life on the station. As you explore, echoes of these captured moments surround you. You’ll use your ability to rewind, fast-forward, and move through the physical space of these complex, interwoven scenes to examine events from every angle, reconstructing the multi-layered narrative as you explore. Tacoma is the next game from the creators of Gone Home, and carries on that tradition of detailed, immersive, and powerful storytelling, while pulling players deeper into the narrative than ever before.

Black Desert is an online roleplaying game that supports worlds with up to 100,000 players. It launched on Xbox One back in March of this year and supports 4K Ultra HD when played on an Xbox One X console.

Black Desert is a living-world MMORPG. Experience fast-paced, action-packed combat, hunt monsters and huge bosses, fight with friends in a guild to siege nodes and region castles, train your life skills such as fishing, trading, crafting, cooking, and much more!
Players will enjoy jaw-dropping graphics, intuitive skill-based combat, and an immersive story encased in our expansive world that’s just waiting to be explored.

Accompanied by a Black Spirit, a companion whose destiny is intertwined with their own, players will discover the secret of the Black Stones and the history of their corrupting effects. In a medieval fantasy setting, the game chronicles a conflict between two rival nations, the Republic of Calpheon and the Kingdom of Valencia. With a battle based on achievements and personal qualifications, Black Desert gives full control to players that can directly aim, escape and make numerous different skill combinations.

Surviving Mars debuted on the Xbox One in 2018 and is a Sci-Fi city building game set on, as its title suggests, the planet Mars. It also features 4K Ultra HD when played on an Xbox One X. Here’s its official game description:

Colonize Mars and discover her secrets, with minimal casualties. Welcome Home! The time has come to stake your claim on the Red Planet and build the first functioning human colonies on Mars! All you need are supplies, oxygen, decades of training, experience with sandstorms, and a can-do attitude to discover the purpose of those weird black cubes that appeared out of nowhere. With a bit of sprucing up, this place is going to be awesome!

Surviving Mars is a sci-fi city builder all about colonizing Mars and surviving the process. Choose a space agency for resources and financial support before determining a location for your colony. Build domes and infrastructure, research new possibilities and utilize drones to unlock more elaborate ways to shape and expand your settlement. Cultivate your own food, mine minerals or just relax by the bar after a hard day’s work. Most important of all, though, is keeping your colonists alive. Not an easy task on a strange new planet. There will be challenges to overcome. Execute your strategy and improve your colony’s chances of survival while unlocking the mysteries of this alien world. Are you ready? Mars is waiting for you.

May has been a pretty good month for new Xbox Game Pass titles. Other titles added to the library this month include Descenders, Wolfenstein II, and Wargroove.

Do you use Xbox Game Pass? Let us know which titles you’ll be playing this month in the comments below and then follow us on Twitter for more Xbox gaming news.

Tacoma
Tacoma
Developer:
Fullbright
Price:
$19.99


Black Desert
Black Desert
Developer:
Pearl Abyss
Price:
Free


Surviving Mars
Surviving Mars
Developer:
Paradox Interactive
Price:
$29.99