6 Simple Ways to Fix Windows 11 WiFi Adapter Code 10 Error

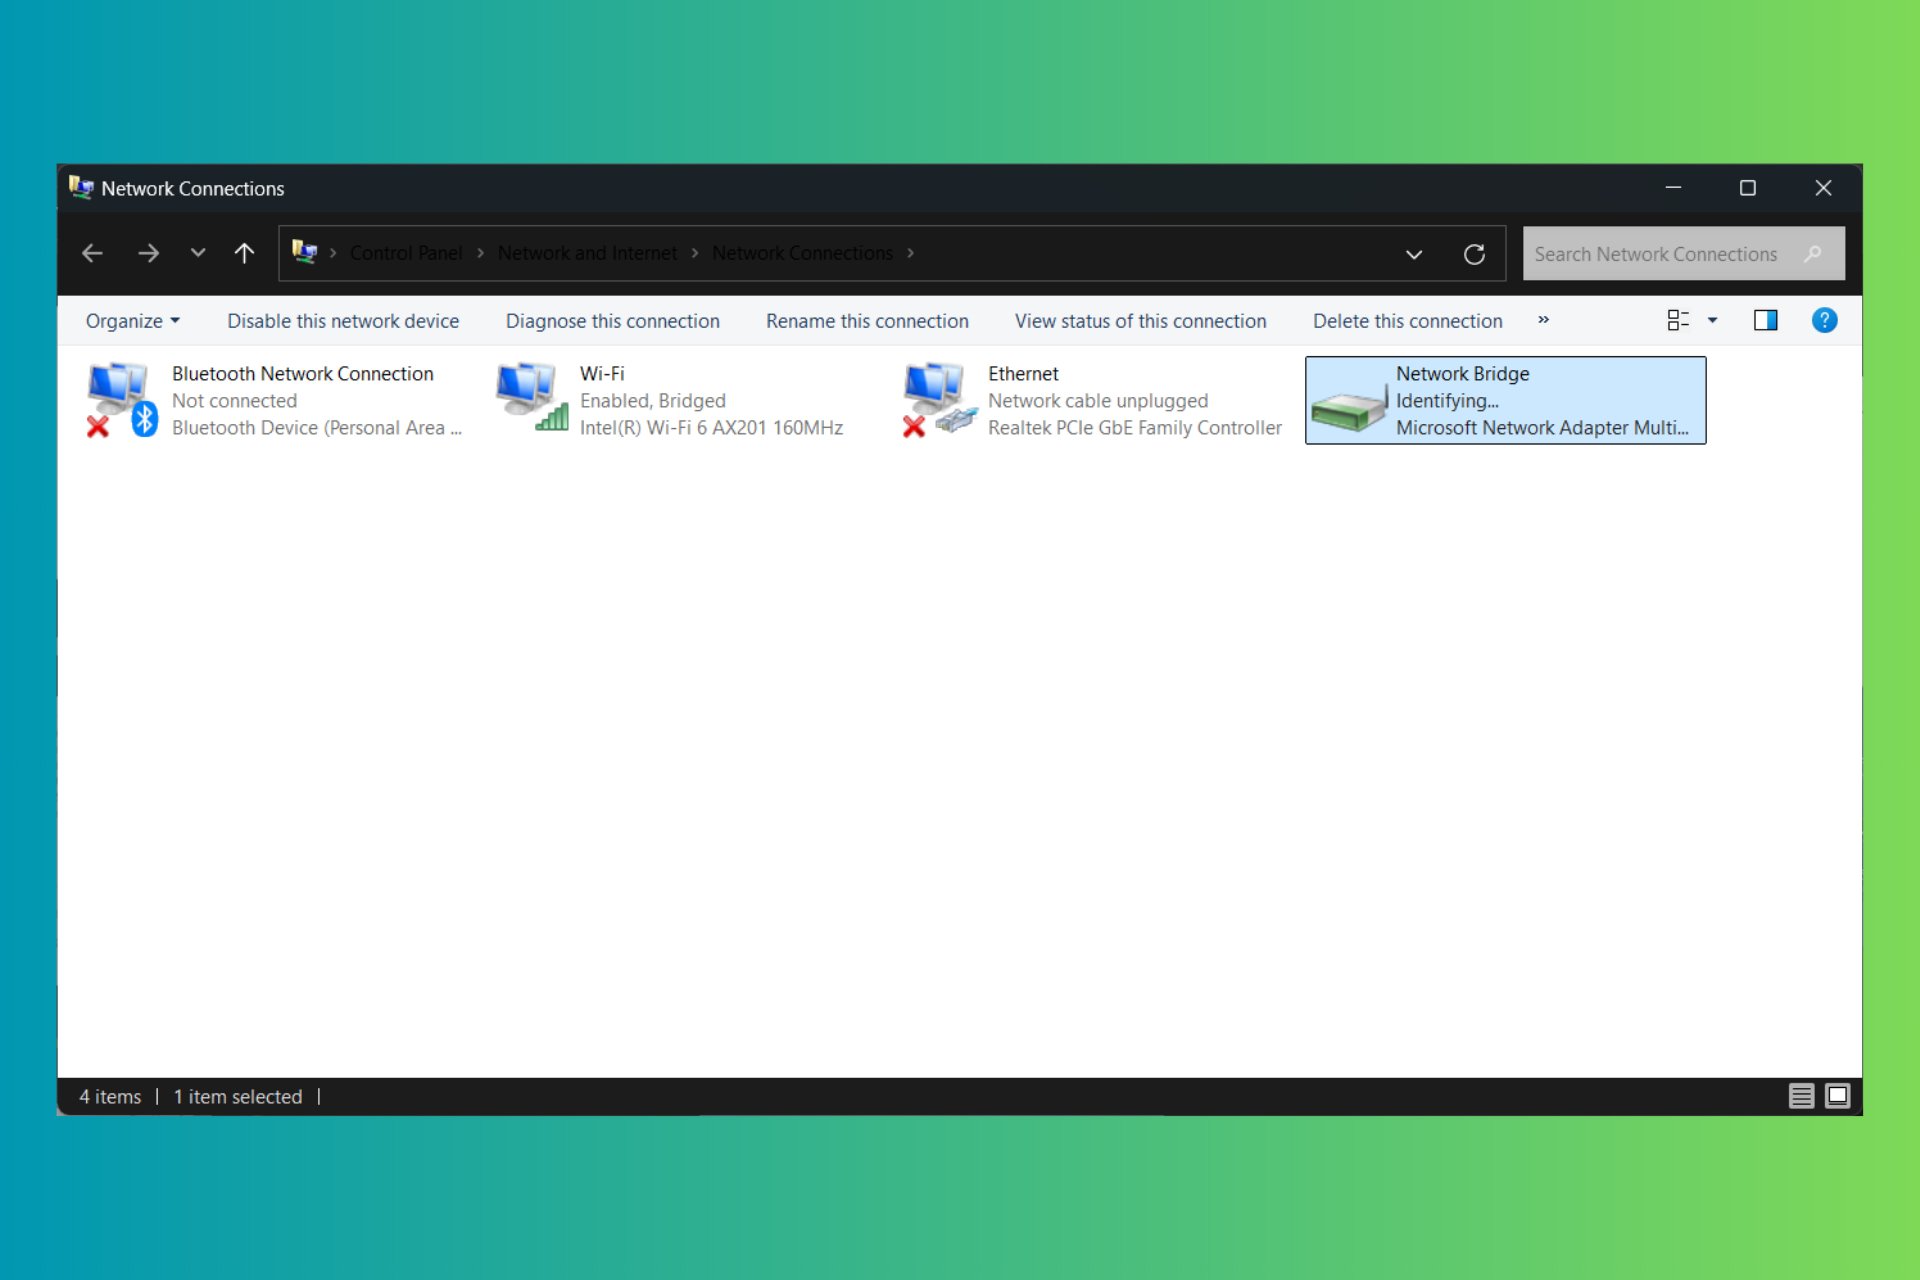
A WiFi adapter code 10 error will typically appear with a yellow warning sign on your device manager. Subsequently, you’ll also notice connection issues with your Internet.

Usually, it’s a driver error. Your network adapter drivers could be missing, outdated or corrupted. It is also possible that your network adapter is undetectable has malfunctioned or due to issues with your connection ports.

How do I fix code 10 error network adapter in Windows 11?

1. Run the necessary troubleshooters

1.1 Run the Network adapter troubleshooter

  1. Hit the Windows key and click on Settings.settings windows 11
  2. Click on System, then select Troubleshoot.Open system troubleshooter
  3. Select Other troubleshooters.other troubleshooters
  4. Locate the Network Adapter troubleshooter and click on the Run button next to it.Network Adapter Run IPv6 No Internet Access

1.2 Run the Internet Connections troubleshooter

  1. Hit the Windows key and click on Settings.settings windows 11
  2. Go to System, and click Troubleshoot.System - Troubleshoot wifi keeps disconnecting windows 11
  3. Now click Other troubleshooters. Other troubleshooters
  4. Locate Internet connections, and click Run. 
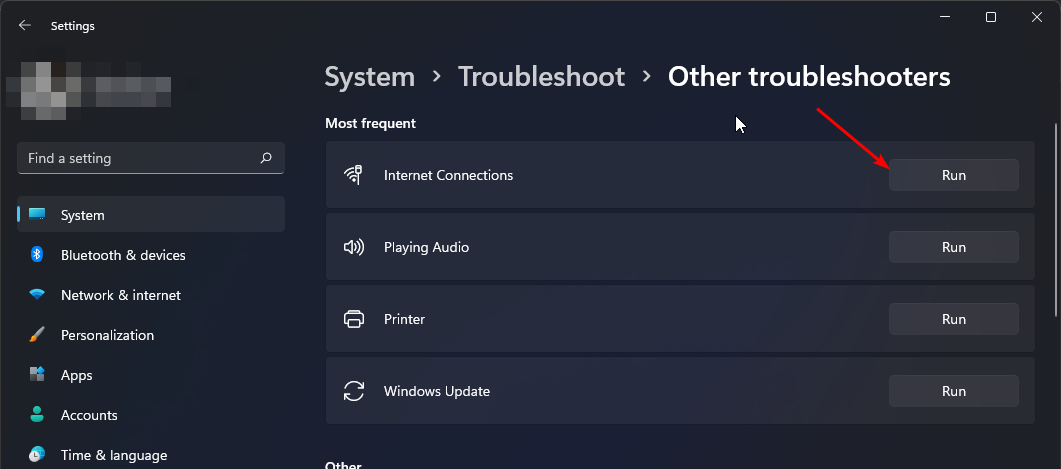
  5. Follow the onscreen prompts to complete the process.  

1.3 Run the Hardware and Devices troubleshooter

  1. Hit the Windows key, type cmd, and select Run as administrator.cmd-run-admin-w11 unexpected kernel mode trap windows 11
  2. Type the following command and hit Enter: msdt.exe -id DeviceDiagnostic
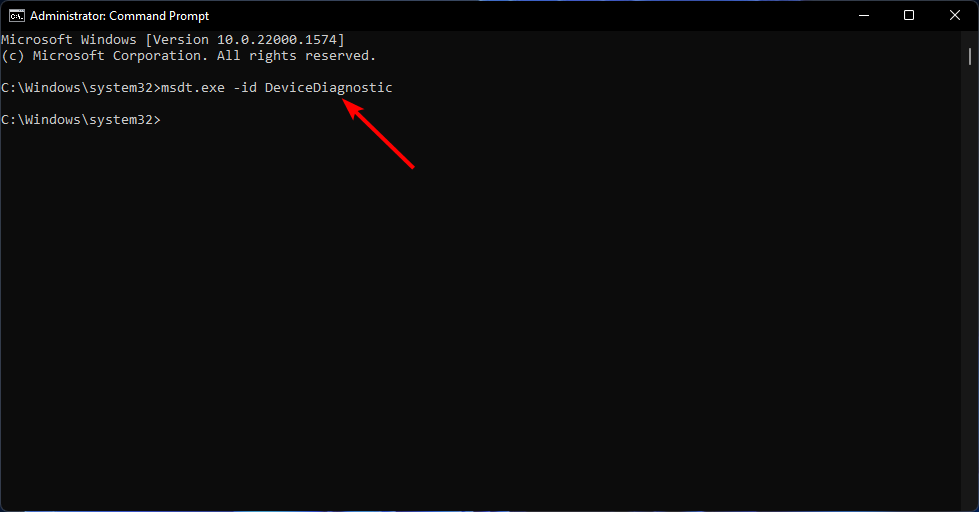
  3. In the Hardware and Devices dialog that appears, click Next.
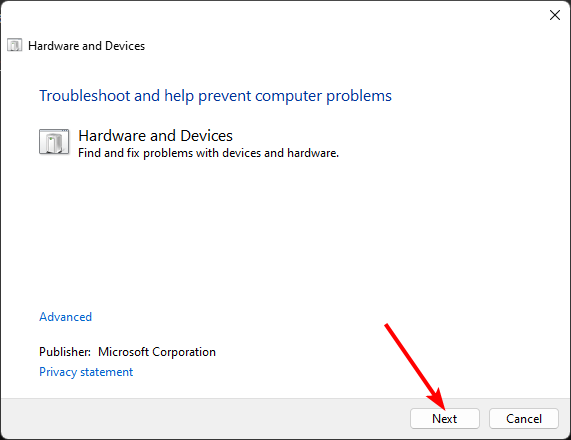
  4. The tool will start scanning for any problems with your hardware and recommend a fix. After it is done, try again and check if the code 10 error persists.
You can also inspect the physical connections of your router and check the network cable for damages. Such issues can make your WiFi adapter stop working.

2. Flush the DNS cache

  1. Press Windows + R to open Run, type cmd, and hit Ctrl + Shift + Enter.
  2. Click Yes in the UAC prompt.
  3. Now, paste the following command and hit Enter:ipconfig /flushdnsflush dns
  4. Once done, restart the computer for the changes to come into effect.

3. Disable your antivirus temporarily 

  1. Hit the Start menu icon, type Windows Security in the search bar and click Open.

  2. Click on Firewall & network protection, then select Public network.league of legends black screen after champion select
  3. Locate Microsoft Defender Firewall and toggle the off button.turning off Microsoft Defender Firewall Windows

An aggressive antivirus has the potential of blocking network traffic or interfering with your network drivers leading to the code 10 error.

4. Resolve driver issues

4.1 Update your network drivers

  1. Hit the Windows key, type Device Manager in the search bar, and click Open.device manager w11
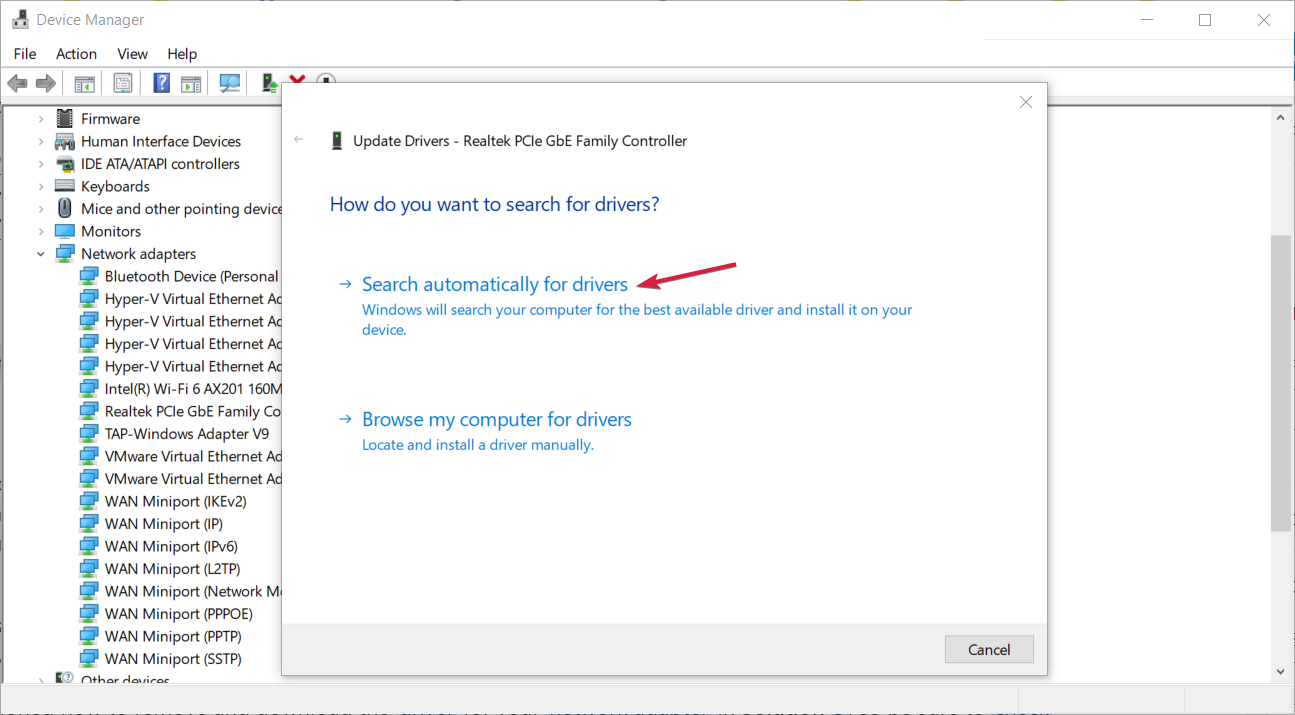
  2. Navigate to your Network adapter, right-click on it, and select Update driver.
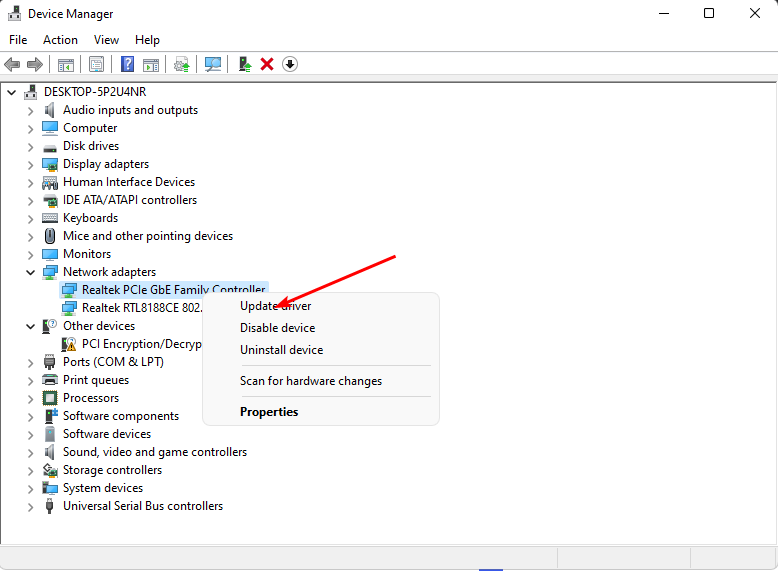
  3. Select Search automatically for updated drivers.
4.2 Reinstall your network drivers

  1. Click on the Start Menu icon, type Device Manager in the search bar, and click Open.device manager w11
  2. Navigate to your Network adapter, right-click on it, and select Uninstall device.
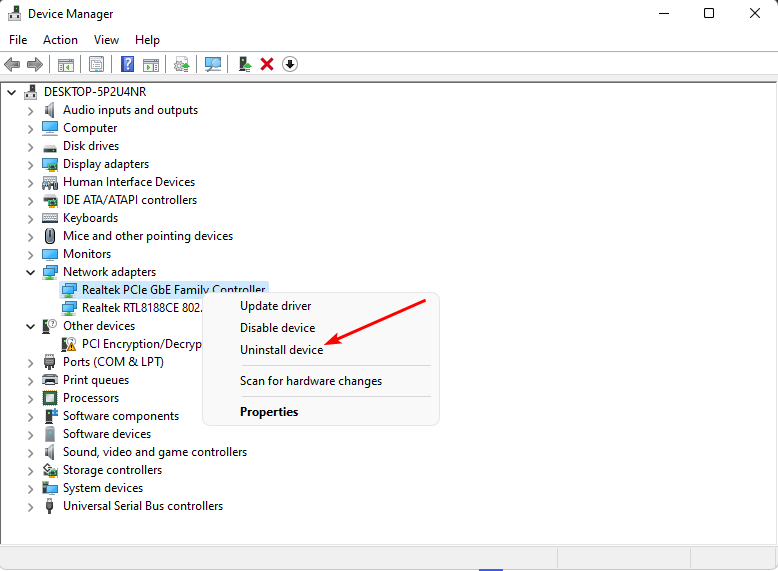
  3. Confirm Uninstall in the next confirmation dialog.
  4. Next, go to your computer manufacturer’s official website from the search results.search for driver
  5. Open the driver page and download the driver setup (.exe file). If it’s a compressed file (.zip), you will first have to extract the contents.
  6. Run the setup and follow the on-screen instructions to complete the installation process.Install Intel Network Drivers
  7. Restart the computer for the changes to come into effect.

4.3 Scan for driver errors

Note icon NOTE
This specific action is for Intel drivers. Check whether your network adapter manufacturer has a dedicated tool.
  1. Launch your browser, and go to the official Intel download site to download the Intel Driver & Support Assistant.
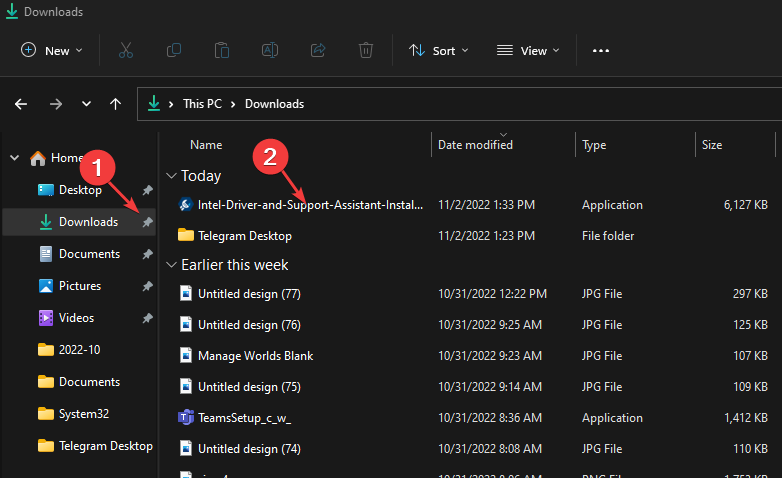
  2. Press the Windows + E keys to open File Explorer. By default, the .exe file should be in the Downloads folder, then launch it.
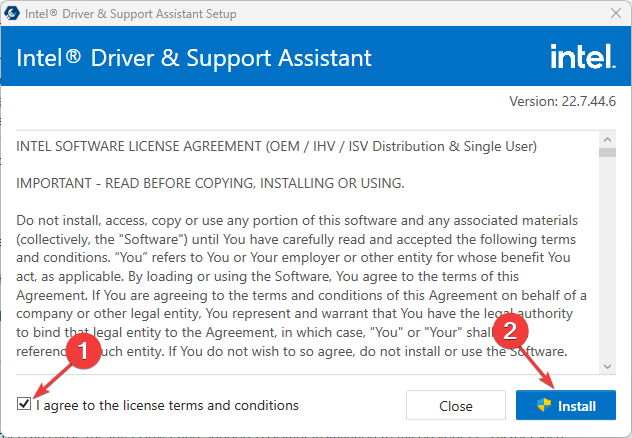
  3. Check the I agree to the license terms and conditions, then click the Install button and confirm the UAC prompt.
  4. Wait for the installation to complete and click Restart to effect the changes.
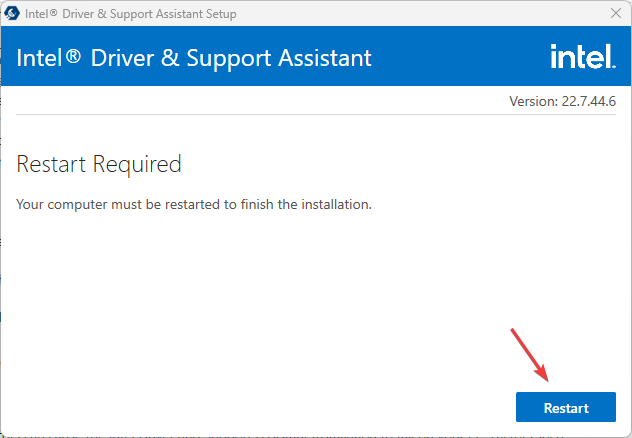
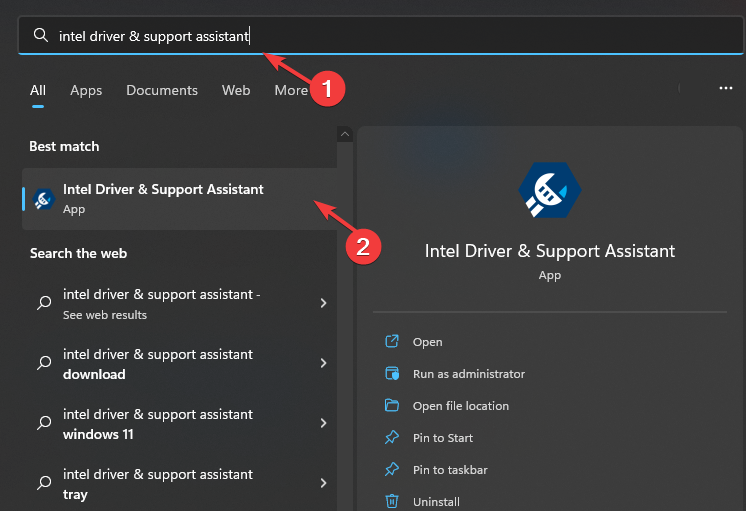
  5. Left-click the Start button, search for intel driver & support assistant and launch it.
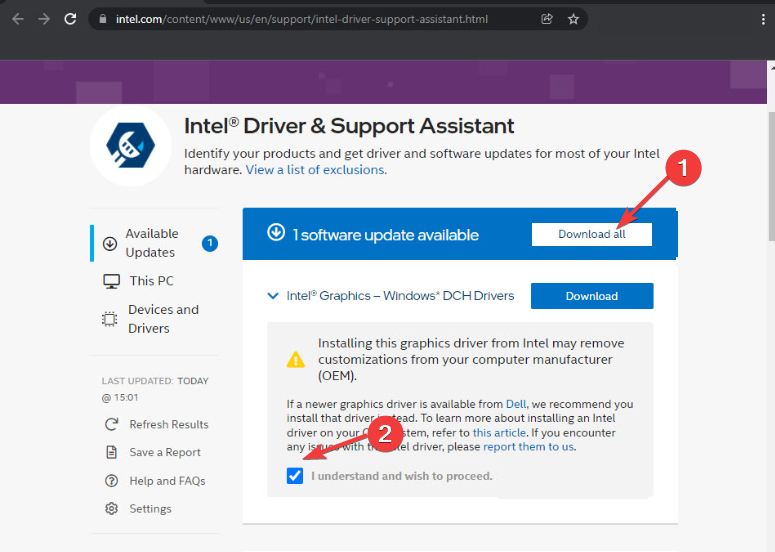
  6. Click Download all and check the box for I understand and wish to proceed.
  7. Then click Install all and wait for the process to complete.
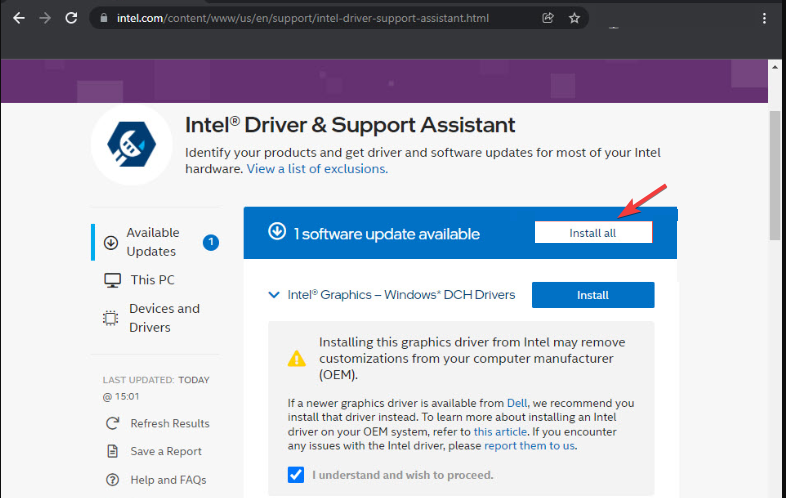
  8. Run the tool and see if it detects any issues with your network adapter.

5. Reset your network

  1. Hit the Windows key and click on Settings.settings windows 11
  2. Navigate to Network & internet.
  3. Select Advanced network settings.going advanced network settings win11
  4. Click on Network reset.Network Reset 1
  5. Next, hit the Reset now button.Network Reset now

6. Perform a repair upgrade

  1. Navigate to the official Windows 11 Downloads page and click on Select download from Download Windows 11 Disk Image (ISO), then pick Windows 11.
  2. Now click on the Download button.
  3. Select the language, then click the Confirm button. You will receive a download link and you will be able to click on the 64-bit Download button to get the Windows 11 ISO.
  4. Now you can create a bootable USB or DVD, or just right-click the ISO and select the Mount option.
  5. You will see a virtual drive in the File Explorer window. Just click on it and then double-click the setup.exe file to start the installation process.
  6. Wait for the installation process to begin. At some point, you’ll be prompted to either keep all your files or install Windows only. Select keep your files, then proceed.

Hopefully, one of these solutions can help you bypass the error code 10 on your network adapter. If it persists, consider setting up a mobile hotspot as you seek help from a professional for further assistance.

If you have any additional comments or suggestions, keep the conversation going in the comment section below.

Discord Crashing When Sharing Screen: How to Get it Working

Dealing with Discord crashing when sharing your screen can be incredibly frustrating, especially when you’re in the middle of an important call or gaming session. Fortunately, there are several solutions you can try to get things back on track.

Why does my Discord keep crashing when I share my screen?

There are multiple reasons, but the most common are outdated drivers or conflicting software. Not running Discord using the dedicated GPU can also cause problems such as these.

What can I do if Discord is crashing when sharing a screen?

Before trying more advanced solutions, ensure that you have the latest version of the GPU driver installed. Also, keep Discord updated to prevent any potential issues, and always run it with your dedicated GPU.

1. Disable hardware acceleration

  1. Open Discord.
  2. Click on the User Settings icon (cogwheel) next to your username in the bottom-left corner.
  3. In the left pane, scroll down and select Appearance.
  4. In the right pane, scroll down to the Advanced section.
  5. Toggle off the switch next to Hardware Acceleration.
    hardware acceleration discord

2. Clear Discord cache data

  1. Press the Windows + R keys simultaneously to open the Run dialog box.
  2. Type %appdata%\Discord and press Enter.
    appdata discord run window
  3. In the Discord folder, locate the Cache folder.
  4. Select all files in the Cache folder by pressing CTRL + A.
  5. Right-click on the selection and choose Delete.
  6. Go back to the Discord folder and repeat the process for the Local Storage folder.

Clearing computer cache and temporary files can be done more proficiently with the help of specialized software. Iolo System Mechanic is great for this task plus it offers a great range of tools that will protect and optimize your computer.

With the Deepclean function of Iolo System Mechanic, you can easily clean temporary files from your computer. Here is how you do it in a few easy steps:

  1. Navigate to the official website and download Iolo System Mechanic.
  2. Install and run the downloaded software.
  3. Access the Performance section and select Deepclean from the dropdown menu.
  4. Click the Start Clean button and wait for the software to clean your computer.

Once it is finished the software will have removed temporary files and any other left over files that might have caused your Discord to crash.

Iolo System Mechanic

Iolo System Mechanic

Cleaning cache files and optimizing your PC can be done in a matter of moments, with tools such as System Mechanic.
Free Trial Visit Website

3. Share screen instead of application

  1. Open Discord and join a voice channel.
  2. Click on the Share Your Screen button (monitor icon) next to your username.
  3. Instead of selecting Share Application, choose Screens.
    screens discord
  4. Select which screen you want to share and click Go Live.

4. Disable advanced screen capture technology

  1. Open Discord.
  2. Click on User Settings (cogwheel) next to your username in the bottom-left corner.
  3. Go to the Voice & Video tab in the left pane.
  4. Scroll down to the Screen Share section.
  5. Disable the toggle for Use our advanced technology to capture your screen.
    ise our latest technology to capture your screen

5. Use compatibility mode

  1. Right-click on the Discord shortcut on your desktop.
  2. Select Properties and go to the Compatibility tab.
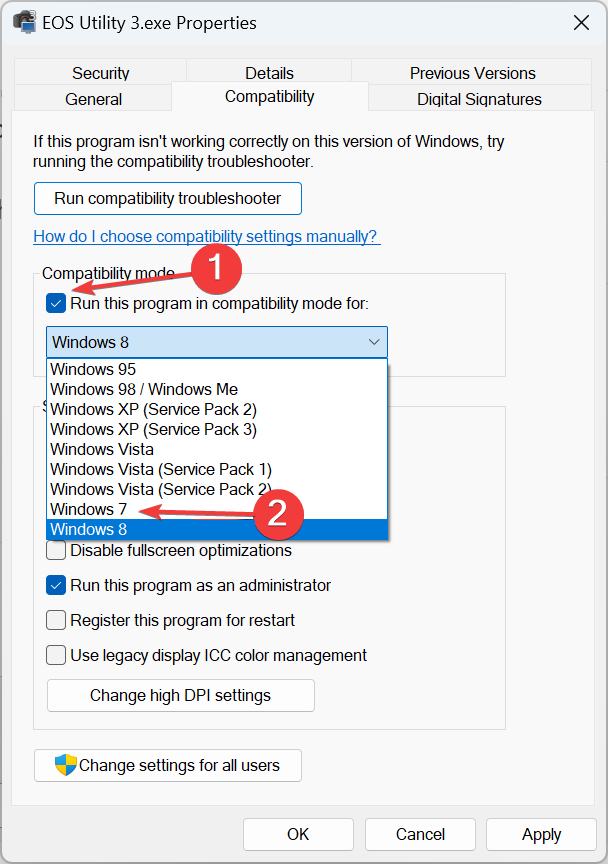
  3. Check the box for Run this program in compatibility mode for and select Windows 7 or Windows 8.
    run this program in compatibility mode for
  4. Click Apply and then OK.
  5. Optional: Run the application as administrator.

6. Uninstall problematic software

  1. Press the Windows key + X and choose Apps and Features.
    apps and features menu
  2. Locate Realtek or Sonic software and click the three dots next to it.
  3. Choose Uninstall.
    uninstall app windows 11
  4. After uninstalling Realtek or Sonic software, check if the problem is gone.

By following these steps, you should be able to fix the issue of Discord crashing when sharing your screen.

Sadly, these aren’t the only issues and many reported that Discord crashes when streaming. For some, the game crashes while streaming on Discord. Moreover, you may encounter a grey screen when opening the app.

How to Improve Your Stream Bitrate on PC

Struggling with blurry or laggy streams? You’re not alone. Many streamers face the challenge of maintaining high-quality streams. First, make sure that you have a quality internet connection with high upload capability. This is the no.1 requirement for broadcasting but also for watching high quality streams.

How do I improve the stream bitrate?

1. Optimize your PC using IOLO System Mechanic

  1. Go to the dedicated IOLO website and get the System Mechanic software.
  2. Open System Mechanic from your Start menu.
  3. Go to the Performance tab from the left.
  4. Click the Performance drop-down menu and select LiveBoost.
  5. Now, from the Configuration menu, turn on OptiCore and RAM Jet.

These settings will set up your computer for maximum performance when using the streaming apps.

2. Invest in high-quality live streaming equipment

  1. Purchase a Full HD or 4K camera to capture higher resolution video.
  2. Invest in a good quality microphone to ensure clear audio.
  3. Consider lighting equipment to ensure your setup is well-lit for the best video quality.

Using high-quality equipment will significantly enhance your stream’s visual and audio clarity, creating a more enjoyable experience for your viewers.

3. Optimize your live encoder settings

  1. Open your streaming software (e.g., OBS).
  2. Go to Settings > Output > Streaming.
  3. Set the video bitrate to a higher value (e.g., 4500-6000 Kbps for 1080p60).
  4. Change the encoder to Hardware (NVENC) if available.
  5. Adjust the audio bitrate to 128 Kbps.
  6. Set the keyframe interval to 2 seconds.
  7. Choose CBR (Constant Bitrate) for more stable streaming.

Optimizing these settings ensures that your stream maintains consistent quality even if network conditions fluctuate.

4. Use a professional online video platform (OVP)

  1. Sign up for a professional OVP like Dacast, Wowza, or Castr.
  2. Upload your video content to the platform.
  3. Use the platform’s settings to enable multi-bitrate streaming and adaptive streaming.

Professional OVPs offer better streaming quality, robust support, and feature enhancements like multi-bitrate streaming to suit various viewer internet speeds.

5. Choose a powerful CDN

  1. Confirm that your OVP uses a reliable Content Delivery Network (CDN) such as Akamai or Cloudflare.
  2. Check for a CDN with a large number of server locations for best global reach.
  3. Ensure the CDN supports high-quality streaming.

A large and powerful CDN reduces buffering and maintains stream quality, even for viewers located far from your streaming server.

6. Enable transcoding and multi-bitrate streaming

  1. Use OVP settings or live-streaming software that supports transcoding.
  2. Set up multi-bitrate streaming to offer different quality streams for various connection speeds.

Adaptive bitrate streaming ensures that viewers with slower internet speeds can still watch your stream at a lower quality without interruption.

7. Choose the optimal resolution

  1. Open your streaming software.
  2. Go to Settings > Video.
  3. Set the base (canvas) resolution to 1920×1080.
  4. Set the output (scaled) resolution to 1280×720 or 1920×1080 depending on your bandwidth.

The majority of people are watching streams on 1080p resolution. Going higher will most likely overburden your connection without any real benefits. Also, before starting to stream, create a private stream test and check the video and audio quality on different devices and internet speeds.

8. Free up your bandwidth

  1. Close unnecessary background applications.
  2. Limit open browser tabs to free up CPU and memory resources.
  3. Limit the number of devices that can access your local network.
  4. Right-click the Start button and select Task Manager. In the Processes tab, order them by clicking on the Network tab. See if there are any other processes that are using your network and close them.

By freeing up system resources, your computer can focus more on delivering a higher quality stream.

9. Adjust video bitrate and resolution for non-partners

  1. Open streaming software settings.
  2. Set video bitrate to 2000-2500 Kbps for non-partnered streams.
  3. Set output resolution to 720p and frame rate to 30 fps.

This setup ensures that non-partnered streams maintain decent quality while being accessible to a broader audience.

By following these steps, you’ll be able to effectively improve the quality of your live stream, providing a better viewer experience and engagement. We also have a dedicated guide with the best OBS settings for low-end PCs that might come in handy.

You might also be interested in how to set the right OBS keyframe interval for your content.

Did our guide help you improve the stream bitrate? Let us know in the comments below.

Sort by Date Modified Not Working in Windows 11: How to Fix

Organizing files isn’t always easy, and many users reported that sort by date modified is not working properly in Windows 11. This can be an issue and make file management more complicated, but luckily, there are ways to fix this issue.

What can I do if the sort by date modified is not working in Windows 11?

1. Set Group by to None

  1. Open the folder that is giving you trouble.
  2. Next, right-click the space.
  3. Expand Group by and then set it to None.
    group by none
  4. After that, try to sort by date modified again.

2. Change folder optimization

  1. Locate the folder that is giving you trouble. Right-click it and choose Properties.
  2. Go to the Customize tab and set Optimize this folder for the desired file type.
    customize folder
  3. Save changes.

This is a pretty vague issue, and if sort by date modified is not working in Windows 11, many users refer to Windows 11 not sorting files and folders together.

If the issue persists, perhaps you should try using a different file manager for Windows 11. Many also reported that File Explorer keeps resetting sort order, but we have a guide that addresses that issue.

ERROR_NO_PROC_SLOTS 89 (0x59): How to Fix it

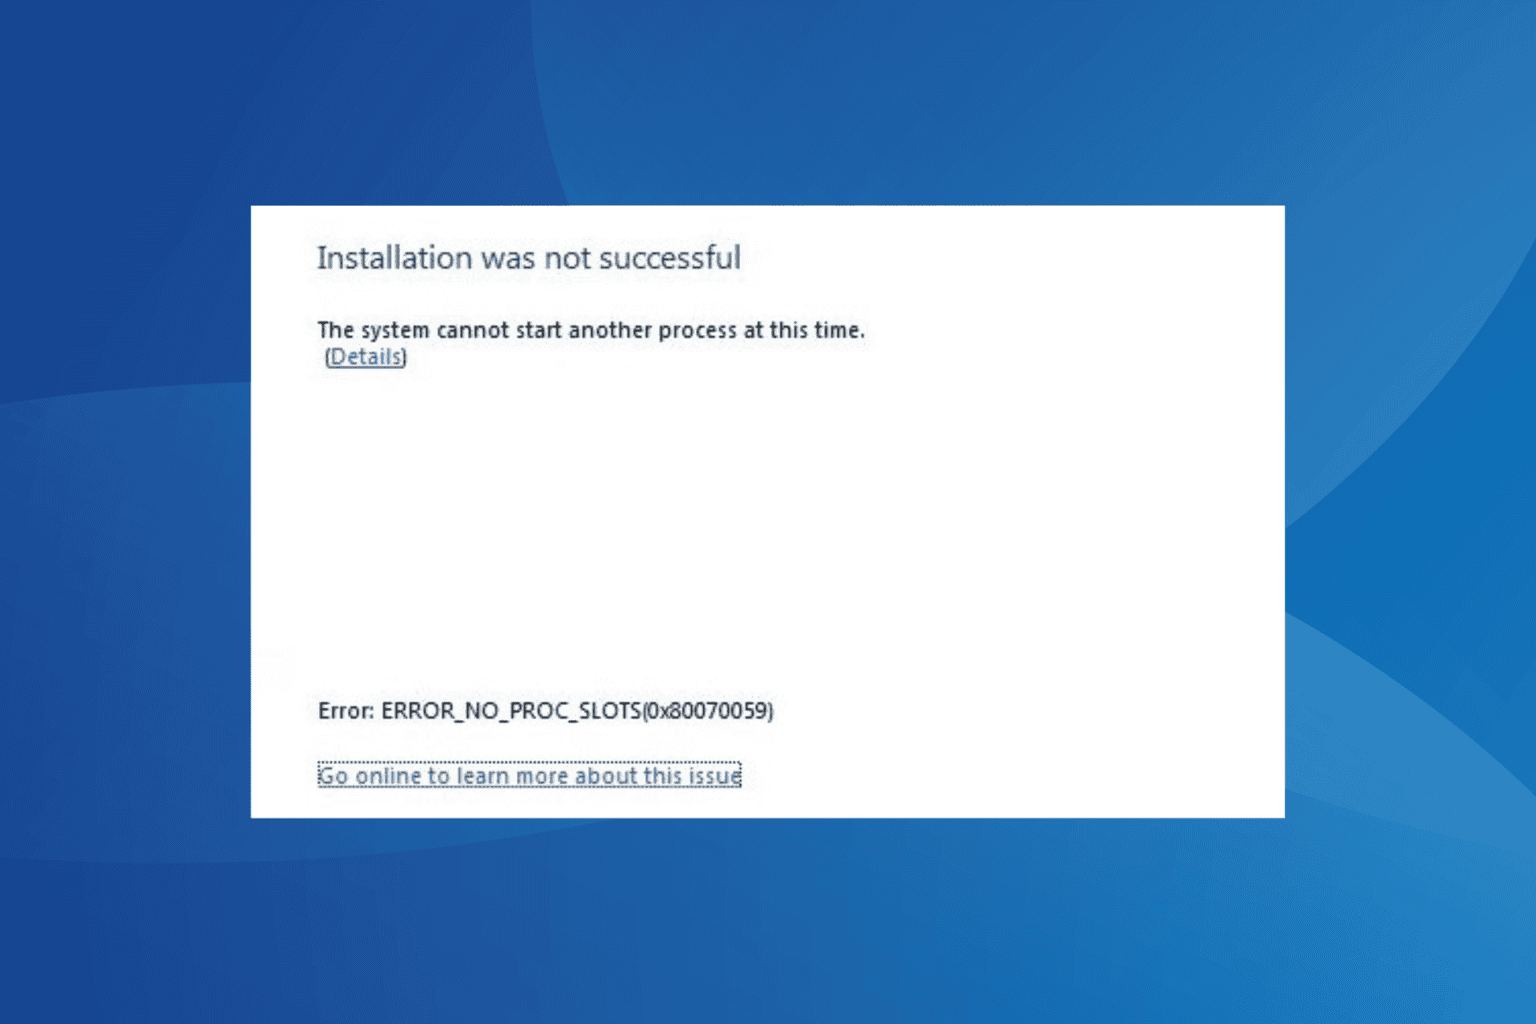
The ERROR_NO_PROC_SLOTS issue, with code 0x80070059, commonly arises while installing a Windows service pack, launching applications, or running resource-intensive programs. The error message reads, The system cannot start another process at this time.

Common causes behind Error No Proc Slots include corrupted system files, malware infection, running low on RAM, and recent changes to the PC.

Before you start troubleshooting, install all pending Windows updates, terminate background processes, and disable non-critical startup apps.

How do I fix the ERROR_NO_PROC_SLOTS system error?

Tip icon Tip
If you are getting the ERROR_NO_PROC_SLOTS while manually installing an update or service pack, rebooting the PC or re-downloading the file(s) should help.

1. Repair the corrupt system files

  1. Press Windows + R to open Run, type cmd, and hit Ctrl + Shift + Enter.command prompt
  2. Click Yes in the UAC prompt.
  3. Paste the following commands individually and hit Enter after each: DISM /Online /Cleanup-Image /CheckHealth DISM /Online /Cleanup-Image /ScanHealth DISM /Online /Cleanup-Image /RestoreHealth
  4. Now, execute this command to run the SFC scan: sfc /scannow sfc scan to fix ERROR_NO_PROC_SLOTS
  5. Reboot the PC and verify whether ERROR_NO_PROC_SLOTS 0x80070059 is fixed.

Corrupted system files are known to trigger issues on a Windows PC, including the System Error 89. To fix this, simply run the DISM (Deployment Image Servicing and Management) and SFC (System File Checker) scans, and all problematic system files will be replaced with their cached copy stored on the PC.

2. Scan the PC for malware

  1. Press Windows + S to open Search, type Windows Security, and click on the relevant result.
  2. Click on Virus & threat protection.windows security
  3. Click on Scan options.
  4. Select the Full scan option and click on Scan now.malware scan to fix ERROR_NO_PROC_SLOTS
  5. Wait for the malware scan to complete. It may take between 15-30 minutes.

3. Increase the virtual memory (page file)

  1. Press Windows + S to open Search, type View advanced system settings, and click on the relevant result.
  2. Click the Settings button under Performance.settings
  3. Go to the Advanced tab, and click on Change under Virtual memory.change virtual memory
  4. Untick the checkbox for Automatically manage paging file size for all drives, select the No paging file option, and click on Set.no page file
  5. Choose Custom size, and enter the following in the fields underneath, based on the available physical memory:
    • Initial size: 1.5 x Available RAM x 1024
    • Maximum size: 3 x Available RAM x 1024
  6. For a PC with 4 GB RAM, this becomes:
    • Initial size: 6144 (1.5 x 4 x 1024)
    • Maximum size: 12288 (3 x 4 x 1024)
  7. Click on Set, and then OK to save the changes.increase virtual memory to fix ERROR_NO_PROC_SLOTS

If your PC is running low on RAM and it’s triggering the ERROR_NO_PROC_SLOTS Win32 error, increasing the virtual memory should fix things in no time!

4. Perform a system restore

  1. Press Windows + R to open Run, type rstrui.exe in the text field, and hit Enter.
  2. Select the Choose a different restore point option, and click Next.restore to fix ERROR_NO_PROC_SLOTS
  3. Pick the oldest restore point from the list or one created before the error first appeared, and click Next.restore point
  4. Verify the details, and click on Finish to start the restore process.
  5. Once done, verify whether the system error, 89 (0x59) The system cannot start another process at this time, is fixed.

5. Reinstall Windows

When nothing else works, you may consider reinstalling Windows. This will fix any software-based inconsistencies or misconfigurations!

To reinstall Windows, plug a formatted USB drive into another PC > download the Media Creation Tool from Microsoft’s official website > use it to create a bootable Windows USB > connect the flash drive to the affected PC > change the boot order to the bootable USB > follow the instructions to install Windows.

installing Windows
Reinstalling Windows from a bootable USB drive

The ERROR_NO_PROC_SLOTS system error is a software-based issue. So, reinstalling Windows (always as a last resort) will do the trick!

Before you leave, discover expert tips to make your Windows PC faster than ever!

If you know of more fixes for the error, share them with our readers in the comments section.

Fix: Facebook Sell Something Button Missing

Facebook’s Marketplace wouldn’t be what it is without the sell something button so if it’s missing for some reason, you need to get it back as soon as possible.

Among the many issues that could make this button disappear include account issues. If you’ve violated the commerce policies, your account may be restricted or even banned from using some features. Also, if you’ve been inactive for some time, your ability to sell may have been temporarily revoked.

What can I do if the sell something button is missing?

1. Log out of everywhere and login again

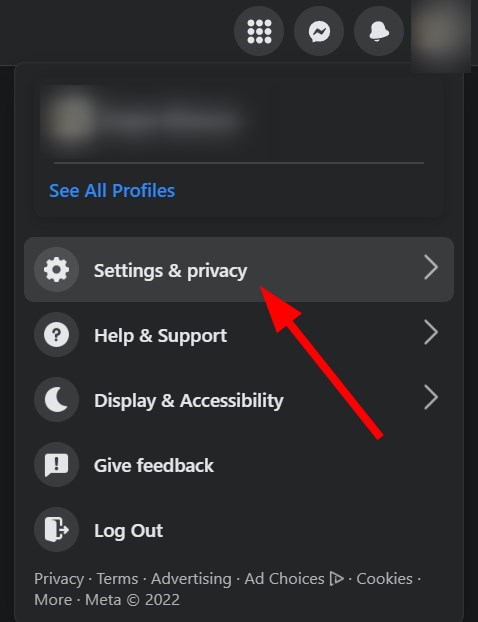
  1. Log into your Facebook account, click on your profile icon and select Settings & privacy.
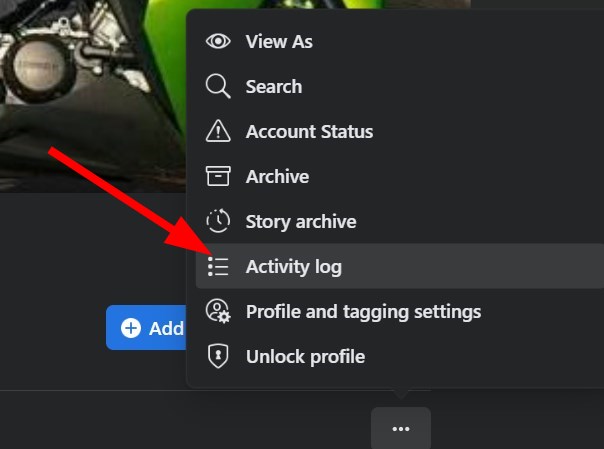
  2. Next, click on Activity log.
  3. Click on Where you’re logged in.
  4. Scroll down and hit Log out on all instances.

2. Clear cache and cookies

2.1 Browser cookies

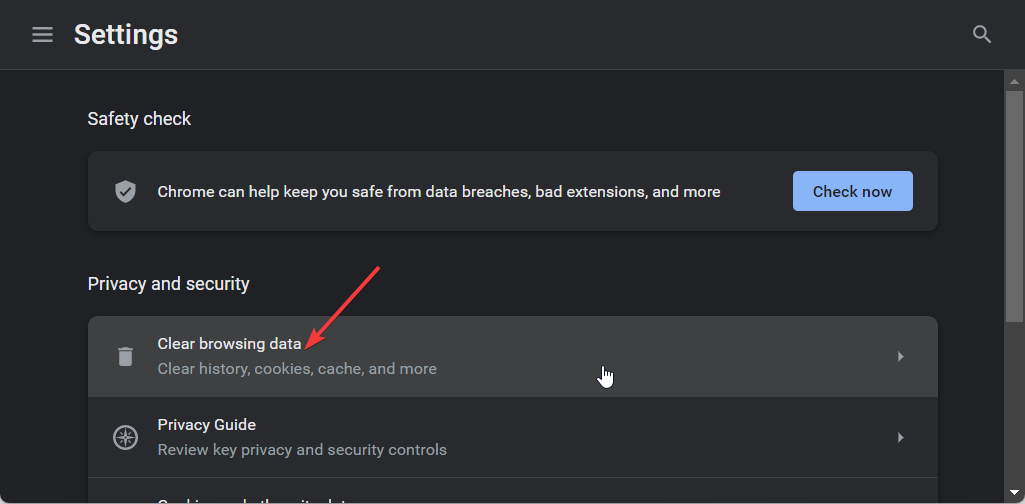
  1. Launch your Chrome browser and click the three vertical ellipses in the top right corner.
  2. Select Settings.Settings Chrome Can't access Microsoft Teams Admin Center
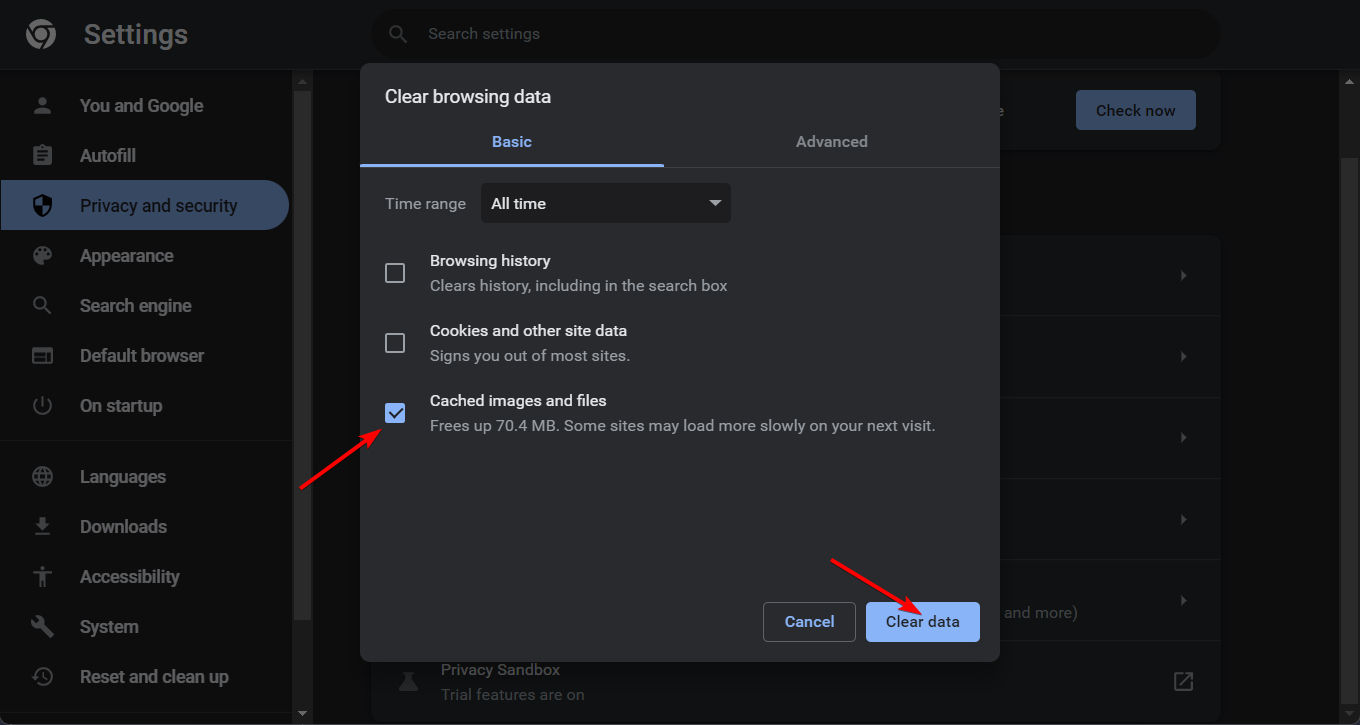
  3. Click on Privacy and security, then select Clear browsing data.
  4. Check Cookies and other site data and Cached images and files, then hit Clear data.clear-data-chrome error-code-224003

2.2 App cookies

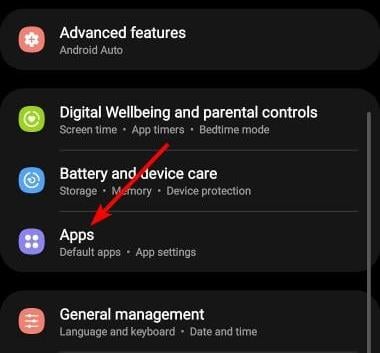
  1. Tap on settings on your phone.
  2. Next, tap on Apps.
  3. Find the Facebook app and tap on it.
  4. Scroll down and select Storage.
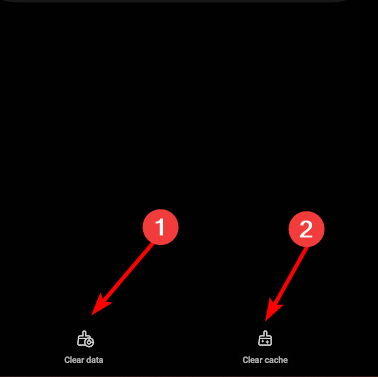
  5. Tap on Clear data and Clear cache, then try again.
  6. Repeat the same steps for the Messenger app if installed on your device.

3. Reset app settings

3.1 Browser

  1. Open your Chrome browser and click on the three vertical ellipses at the top right corner.
  2. Select Settings.Settings Chrome Can't access Microsoft Teams Admin Center
  3. Next, click on Reset and cleanup, then select Restore settings to their original defaults.
  4. Confirm Reset settings in the next dialog box.

3.2 Facebook app

  1. On your browser and go to the basic Facebook page.
  2. From the bottom of that page access your Account.
  3. Now, access Security and Login and change your password.
  4. When done, open a new web browser page and navigate to the Facebook page.
  5. Log in by using the newly created password.
  6. And follow Make my account secure on-screen info.
  7. Now, open a new page once more and go to the Facebook page. You should be able to see the sell something button now.

4. Create a private group and make it public

  1. Launch your Facebook app, navigate to the Groups section on the left side of your.
  2. Click on Create New Group and fill in the necessary details.
  3. Set the group’s privacy is set to Private.
  4. Also ensure it is set to Hidden.
  5. Now, on the left pane, navigate to the Manage section then scroll down and click on the Add button next Buying and Selling under Other features.
  6. Post your sale item and remember to include it in other buy and sell groups too by clicking the List in more places for wider reach.

If you’re out of luck with the above solutions, reach out to Facebook help and click on the Marketplace option. An answer should be available explaining what to do if the sell something button missing but if not, contact Facebook customer support for additional assistance.

Additional tips to avoid the sell something button going missing

  • Regularly update your Facebook app and clear cache often. When using browsers, use Facebook-approved browsers to avoid compatibility issues.
  • Keep your account active and verify it if possible to ensure access to more features.
  • Ensure your sale items meet the commerce policies and comply with any other guidelines that may restrict you from selling.

When it comes to selling online, you need all the tools available at your disposal to ensure you grow your business. Apart from Facebook’s marketplace, you need to integrate online selling software if you want to scale your business to the next level.

Speaking of buttons missing, this is not Facebook’s first rodeo. The switch account button disappearing is also a common issue but see how you can get it back.

That’s it from us but do let us know if you’ve been able to recover the sell something button on your end. For any additional tips or comments, leave a comment down below.

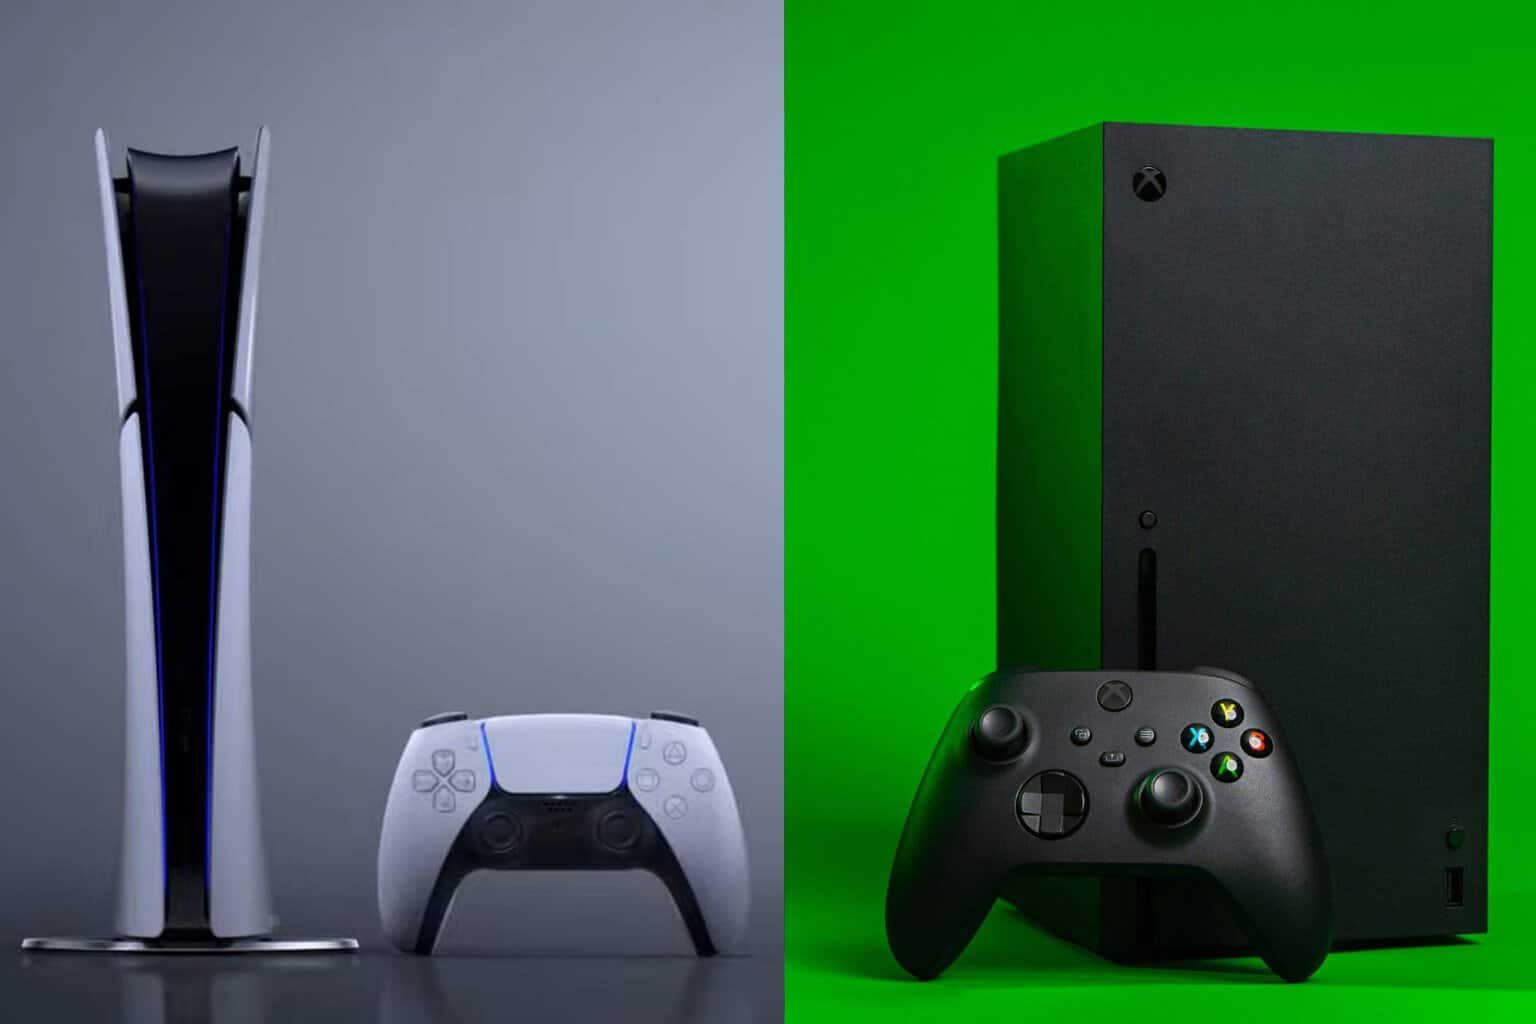
Xbox Series X VS PS5 Pro: Which Console Should You Get?

In the world of gaming consoles, Sony has unveiled its most powerful PlayStation yet, the PS5 Pro, featuring new graphics capabilities, more extensive storage, and a beefier price. Naturally, as the console war is still happening, the brand-new announcement has sparked a lot of buzz about how the PS5 Pro compares to its main rival, the Xbox Series X, so today, we’re doing a lengthy cooperation between the two.

So, let’s not waste any more time and get into it.

Xbox Series X VS PS5 Pro: Which is the better console?

General specs

ConsolePS5 ProXbox Series X
CPU8-Core AMD Zen 2 CPU with Game Boost option8-Core @ 3.8 GHz (3.6 GHz w/SMT) Custom Zen 2 CPU
GPUUnknown, but AMD GPU based on the base PS5 variant with 67% more computing speed and up to 45% faster rendering for gameplay12 TFLOPS, 52 CUs @1.825 GHz Custom RDNA 2 GPU
RAMPossibly 16 GB GDDR6 w/ 320mb bus. But 28% faster speed compared to PS516 GB GDDR6 w/ 320mb bus
Storage2 TB SSD with 12-channel interface and 5.5 GB/s.2 TB NVME SSD @ 2.4 GB/s
Resolution Up to 4K@ 60Hz. Proprietary upscaling technology.4K @ 60 FPS, up to 4K @ 120 FPS, 8K @ 60 FPS
Raytracing YesYes (limited)
Upscaling Yes, through PlayStation Spectral Super Resolution, AI UpscalingUnknown, but AMD GPU based on the base PS5 variant with 67% more computing speed and up to 45% faster rendering for gameplay/
Peripherals and AccessoriesDualSense Wireless controller
Astro Playroom Pre-installed
Disc-less console (Disc drive to be purchased separately)
Xbox Wireless Controller
Disc drive console

CPU

PS5 Pro will not be so different from its base version, the standard PS5: the enhanced version has the same CPU, an 8-Core AMD Zen 2 CPU, and comparatively with its younger sibling, the CPU comes with a Game Boost option, essentially the equivalent of Microsoft’s FPS Boost for the Xbox Series X. According to Sony, Game Boost will be available for thousands of backwards-compatible PS4 games at launch, including Marvel’s Spider-Man 2, Gran Turismo 7, Hogwarts Legacy, Final Fantasy 7 Remake Part 2, and Ratchet & Clank: Rift Apart.

Xbox Series X has a similar 8-Core @ 3.8 GHz (3.6 GHz w/SMT) Custom Zen 2 CPU that will likely maintain its significant advantage regarding loading times. This includes the Quick Resume feature, allowing you to return to the previous game state rapidly. Its performance should be similar to that of the PS5 Pro; however, comparing them might be hard since the PS5 Pro’s new Game Boost will always be running in the background.

GPU

When it comes to GPU, the whole Xbox Series X VS PS5 Pro is debatable: the PS5 Pro has a new and more powerful graphical unit that takes the AMD GPU based on the base PS5 variant and enhances it with more computing space: 67% more computing speed, and up to 45% faster rendering for gameplay. PS5 Pro’s new Advanced Ray Tracing is another capability to be considered, as it will allow for more realistic settings, all thanks to advanced lighting and shadow effects in games. With all the new GPU features, the PS5 Pro is a better console than its younger sibling, the standard PS5.

On the other hand, the Xbox Series X already has a clear advantage over the original PS5 and PS5 Slim. The Microsoft-based console boasts an impressive 12 TFLOPS, 52 CUs @1.825 GHz Custom RDNA 2 GPU, and a max memory bandwidth of 560Gbps, which is higher than the original PS5’s 10.23 teraflops of GPU power with 448GB per second of memory bandwidth. However, while no details have been unveiled, the PS5 Pro will most surely have higher GPU specs than its original variant, so it might surpass the Xbox Series X in terms of graphical power.

Upscaling and Raytracing

Regarding upscaling and raytracing, comparing Xbox Series X VS PS5 Pro is hard. Both consoles have advantages and disadvantages regarding resolution and frame rates. The Xbox Series X supports native 4K at 60fps, 4K at 120fps, and 8K at 60fps, while the PS5 Pro supports up to 4K at 60fps with better performance through proprietary upscaling technology.

However, the PS5 Pro is claimed to deliver 60fps gaming at 4K with ray tracing enabled—something the original PS5 struggled with. The new AI-based PlayStation Spectral Super Resolution should provide super-sharp image clarity and extraordinary detail to video games.

Storage & RAM

With no details about the exact amount of RAM resources, it’s safe to assume that both consoles have 16GB of GDDR6 RAM and a 2TB SSD. However, the PS5 Pro has a 28% faster RAM speed than the PS5. There are no significant changes here unless Sony boosts the new console up to 24GB or even 32GB of RAM.

Both consoles have a 2TB SSD for storage. However, the standard Xbox Series X has a 1TB SSD variant. Either way, considering the size of games nowadays (Starfield has a gigantic 125 GB size), 2TB doesn’t seem much.

Peripherals and Accessories

Regarding what’s in the box, the Xbox Series X VS PS5 Pro topic gets heated. While both consoles come with their own Wireless Controller (DualSense Wireless Controller for PS5 Pro and Xbox Wireless Controller for Xbox Series X), the new PS5 Pro is disc-less, similar to Xbox Series S. That means you won’t be able to plug in physical disks, and its whole way of dealing with games is digital. Sony will give people the chance to purchase a disk drive separately. Additionally, from a design point of view, if you want to keep the PS5 Pro up a stand on its own, you’ll need to buy a vertical stand separately.

On the other hand, the Xbox Series X has a disk input and can stand on its own without needing a separate stand.

Games

Regarding the number of games available on both consoles, PlayStation has a more extensive library than Xbox. With over 560 games available, PlayStation humbles the 448 games on Xbox Series X.

Another advantage of PS5 Pro is the greater number of exclusive games than those on Xbox Series X. And, Xbox exclusives are starting to be available on PlayStation, which makes PlayStation a viable option.

The PS5 Pro Enhanced Games also promises better performances and higher-quality visuals for PlayStation games. While only 13 titles are available for enhancement, Sony says there will be more.xbox series x vs ps5 pro

On the other hand, choosing an Xbox Series X can also be quite versatile: Microsoft has developed various Xbox Game Pass models, including the new Standard Game Pass, to suit each budget and let users access dozens of games.

Xbox Series X VS PS5 Pro: Price

The topic we’re all curious about, and one that caused a bit of controversy on the Internet, is the price, but we’re going to say it: the PS5 Pro is more expensive than the Xbox Series X, and it doesn’t really make sense.

The console with 2TB of storage and no disc drive costs $699.99 (GBP 699.99, EUR 799.99, and JPY 119,980), while the Xbox Series X with 2TB of storage and a disc drive costs $599.99.

Even more ironically, Sony charges more for the PS5 Pro with a standard 1TB SSD than Microsoft charges for the Xbox Series X with a 2TB SSD: $649.99 versus $599.99.

Xbox Series X VS PS5 Pro: Which one should you get?

Getting an Xbox Series X seems like the better idea: you get the same storage, relatively the same RAM, and CPU power for a lower price. However, you’ll not be able to play as many games as you can on PlayStation 5, but you should not miss much. After all, many PS exclusives are coming to PC.

It’s worth saying that the new PS5 Pro doesn’t offer you that much, either. Aside from its unveiled RAM power, which could make the console faster than the Xbox Series X, and its new AI-based innovations in raytracing and upscaling, the PS5 Pro is diskless and only has 2TB. This is a huge deal for those who still prefer to plug in their physical disks to play the games. Plus, it’s absurd that you must buy a separate stand for the console.

However, ultimately, the choice is yours.

How to Fix the RESERVE_QUEUE_OVERFLOW Bug Check 0xFF

The RESERVE_QUEUE_OVERFLOW bug check (0x000000FF) indicates that an attempt was made to insert a new item into a reserve queue, causing the queue to overflow. This error can be due to driver issues, hardware problems, or system resource limitations. So, first, if possible, inspect if the hardware components don’t show any signs of damage and are connected properly and remove any external drives.

How do I fix RESERVE_QUEUE_OVERFLOW?

1. Update the drivers in Safe Mode

  1. Press Win + I to open Settings.
  2. Go to System and click on Recovery.
  3. Under Advanced startup, click Restart now.
  4. After your PC restarts, select Troubleshoot > Advanced options > Startup Settings > Restart.
  5. Press F4 to start your PC in Safe Mode.
  6. After the restart, open Device Manager by pressing Win + X and selecting Device Manager.
  7. Expand each category and look for devices with a yellow exclamation mark.
  8. Right-click on the device and select Update driver.
  9. Choose Search automatically for drivers and follow the prompts.
  10. If you already downloaded a driver from the manufacturer’s website, select the second choice, Browse my computer for drivers and indicate the location where you’ve saved it on your PC.

In case your computer doesn’t start normally, you can use the Windows Recovery feature (shut down and start your PC 3 times using the Power button) to start the PC in Safe Mode. You may also perform the solutions below in Safe Mode or uninstall recently installed software that may have caused this issue.

2. Run SFC and DISM scans

  1. Open Command Prompt as an administrator by typing cmd in the Start menu, right-clicking Command Prompt, and selecting Run as administrator.
  2. Type the following command and press Enter: sfc /scannow
  3. Wait for the scan to complete and follow any prompts to fix detected issues.
  4. Open Command Prompt as an administrator once again and type the following commands one by one and press Enter after each:
    • DISM /Online /Cleanup-Image /CheckHealth
      DISM /Online /Cleanup-Image /ScanHealth
      DISM /Online /Cleanup-Image /RestoreHealth

Scanning your system for errors is one of the best ways to fix BSoD errors that may spawn out of file corruption.

3. Check your disk for errors

  1. Type cmd in the Start menu, right-click Command Prompt, and select Run as administrator.
  2. Type the following command and press Enter: chkdsk /f /r
  3. Follow the prompts to schedule a disk check on the next restart. Restart your computer to perform the check.

4. Perform a clean boot

  1. Press Win + R, type msconfig, and press Enter.
  2. Go to the Services tab, check Hide all Microsoft services, and click Disable all.
  3. Go to the Startup tab and click Open Task Manager.
  4. Disable all startup items.
  5. Close Task Manager and click OK in the System Configuration window.
  6. Restart your computer.

Performing a clean boot will ensure that the Windows OS will only load the necessary services and processes, giving you a chance to troubleshoot the RESERVE_QUEUE_OVERFLOW bug check and identify the culprit.

Also, if you have access to debugging tools, use the !analyze debug extension to display information about the bug check and help determine the root cause. If you want to check a Blue Screen code, click the highlighted link for instructions.

By following these steps, you should be able to resolve the RESERVE_QUEUE_OVERFLOW bug check and restore your system’s stability. We also recommend checking our guide about the causes of BSoD if you need more information about these kind of errors.

This error is similar to Error Arithmetic Overflow and ERROR_MARSHALL_OVERFLOW so don’t miss our dedicated guides for more solutions.

Let us know in the comments below if our guide helped you fix the RESERVE_QUEUE_OVERFLOW bug check.

Sort Files And Folders Together on Windows 11: How to do it

If you want to sort files and folders together on Windows 11, there are a few limitations that you should know about. To learn more, be sure to keep on reading.

How do I sort files and folders together on Windows 11?

1. Use Group by option

  1. Open File Explorer and go to the folder whose content you would like to sort.
  2. Right-click empty space and choose Group by. Now select the desired option.
     group by date modified
  3. Alternatively, you can use the Sort by toolbar and select Group by option from there.
    sort group by toolbar

This isn’t the best option for sorting, but it will group both files and folders, allowing you to easily find the one you’re looking for.

2. Use third-party software

Windows doesn’t allow you to sort files and folders together, but this feature might be available in an alternative file manager, so be sure to try a few different alternatives and see which one works for you.

Unfortunately, when it comes to file sorting Windows is fairly limited, and if you want to sort files and folders together on Windows 11, your best option would be to use a third-party file manager.

This is because Windows groups folders and files separately, and this has been a design choice for years, and this remains in Windows 11.

To learn more about sorting, we have a great guide on how to sort files by size in Windows 11. Keep in mind that issues with sorting can appear, and many reported that File Explorer keeps resetting sort order, but we covered that issue in an earlier guide.

On a related note, users reported that sort by date modified is not working in Windows 11, but our latest article should help you fix that.

FFXIV Script Error Message: 5 Ways to Fix it

Many users encountered an FFXIV script error that occurred when trying to launch the game. This error will prevent you from playing the game, but luckily, there are a few ways to fix it.

Why does a script error keep appearing?

This error appears mostly due to your Internet Explorer security settings. In some instances, your proxy can cause this error.

How do I fix the FFXIV script error message?

1. Change the Internet Options

  1. Copy the URL that appears in the error message.
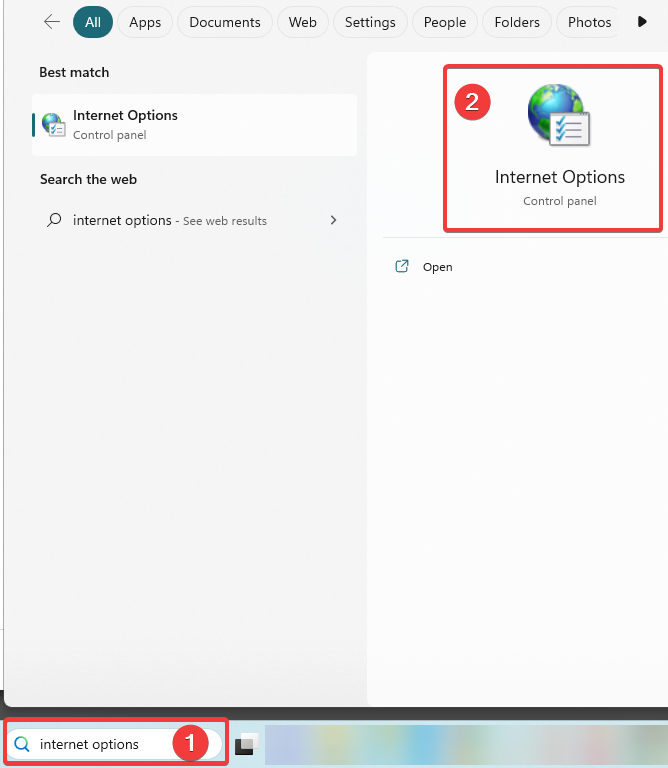
  2. Next, press the Windows key + S and type internet options. Select Internet Options.
    Internet options search
  3. Next, go to the Security tab, select Restricted Sites and click on the Sites button.
    restricted sites internet options
  4. Paste the URL from Step 1, click Add, and save changes.

2. Disable Display Intranet sites in the compatibility view

  1. Open Internet Options again.
  2. Go to Programs and select Manage add-ons.
    manage add-ons internet options
  3. Choose Learn more about toolbars and extensions at the bottom. This will open Internet Explorer.
    learn ore about toolbars and extensions 
  4. In Internet Explorer, click the Gear icon and then choose Compatibility view settings.
    compatibility view settings
  5. Disable Display Intranet sites in compatibility view and save changes.
    display intranet sites in compatibility view

3. Clear the cache in Internet Options

  1. Open Internet Options.
  2. Go to the General tab and click the Delete button in Browsing history.
    delete browsing history internet properties
  3. Confirm that you want to delete the cache.
  4. Start the game again.

4. Disable proxy

  1. Press the Windows key + I to open Settings.
  2. Next, go to Network & internet and select Proxy.
    Choose Proxy in Settings
  3. Now disable Automatically detect settings.
    automatically detect settings proxy

5. Other Internet Options to change

  1. Open Internet Options.
  2. Delete all cache and browsing history as shown in Solution 3.
  3. In the Security tab, set the slider to the lowest value.
    security level medium  
  4. Go to the Privacy tab and then Advanced. Select Accept for First-Party and Third-Party Cookies.
    accept cookies
  5. In the Advanced tab, check Allow software to run or install even if a signature is invalid.
    allow software to install
  6. Check all versions of SSL and TLS. Uncheck SSL 3.0.
    use tsl check
  7. Save changes and run the game as administrator.

FFXIV script error often mentions Google tag manager, but with these solutions, you should be able to fix it in no time. To learn more, we have a whole article dedicated to script errors, so don’t miss it.

We also have guides on FFXIV error code 10105 and FFXIV error 2002, so don’t hesitate to check them out.

How to Set Up Windows 11 Wi-Fi EAP Settings

As its name suggests, the Extensible Authentication Protocol (EAP) is used for managing authentication settings and profiles. Here is how configure Windows 11 Wi-Fi EAP settings, especially if you don’t have access to MDM or Group Policy.

How do I configure Windows 11 Wi-Fi EAP settings?

1. Using the Settings app

  1. Press Win + I to open Settings.
  2. Go to Network & internet and select Wi-Fi.
  3. Now, select Manage known networks and click the Add network button.
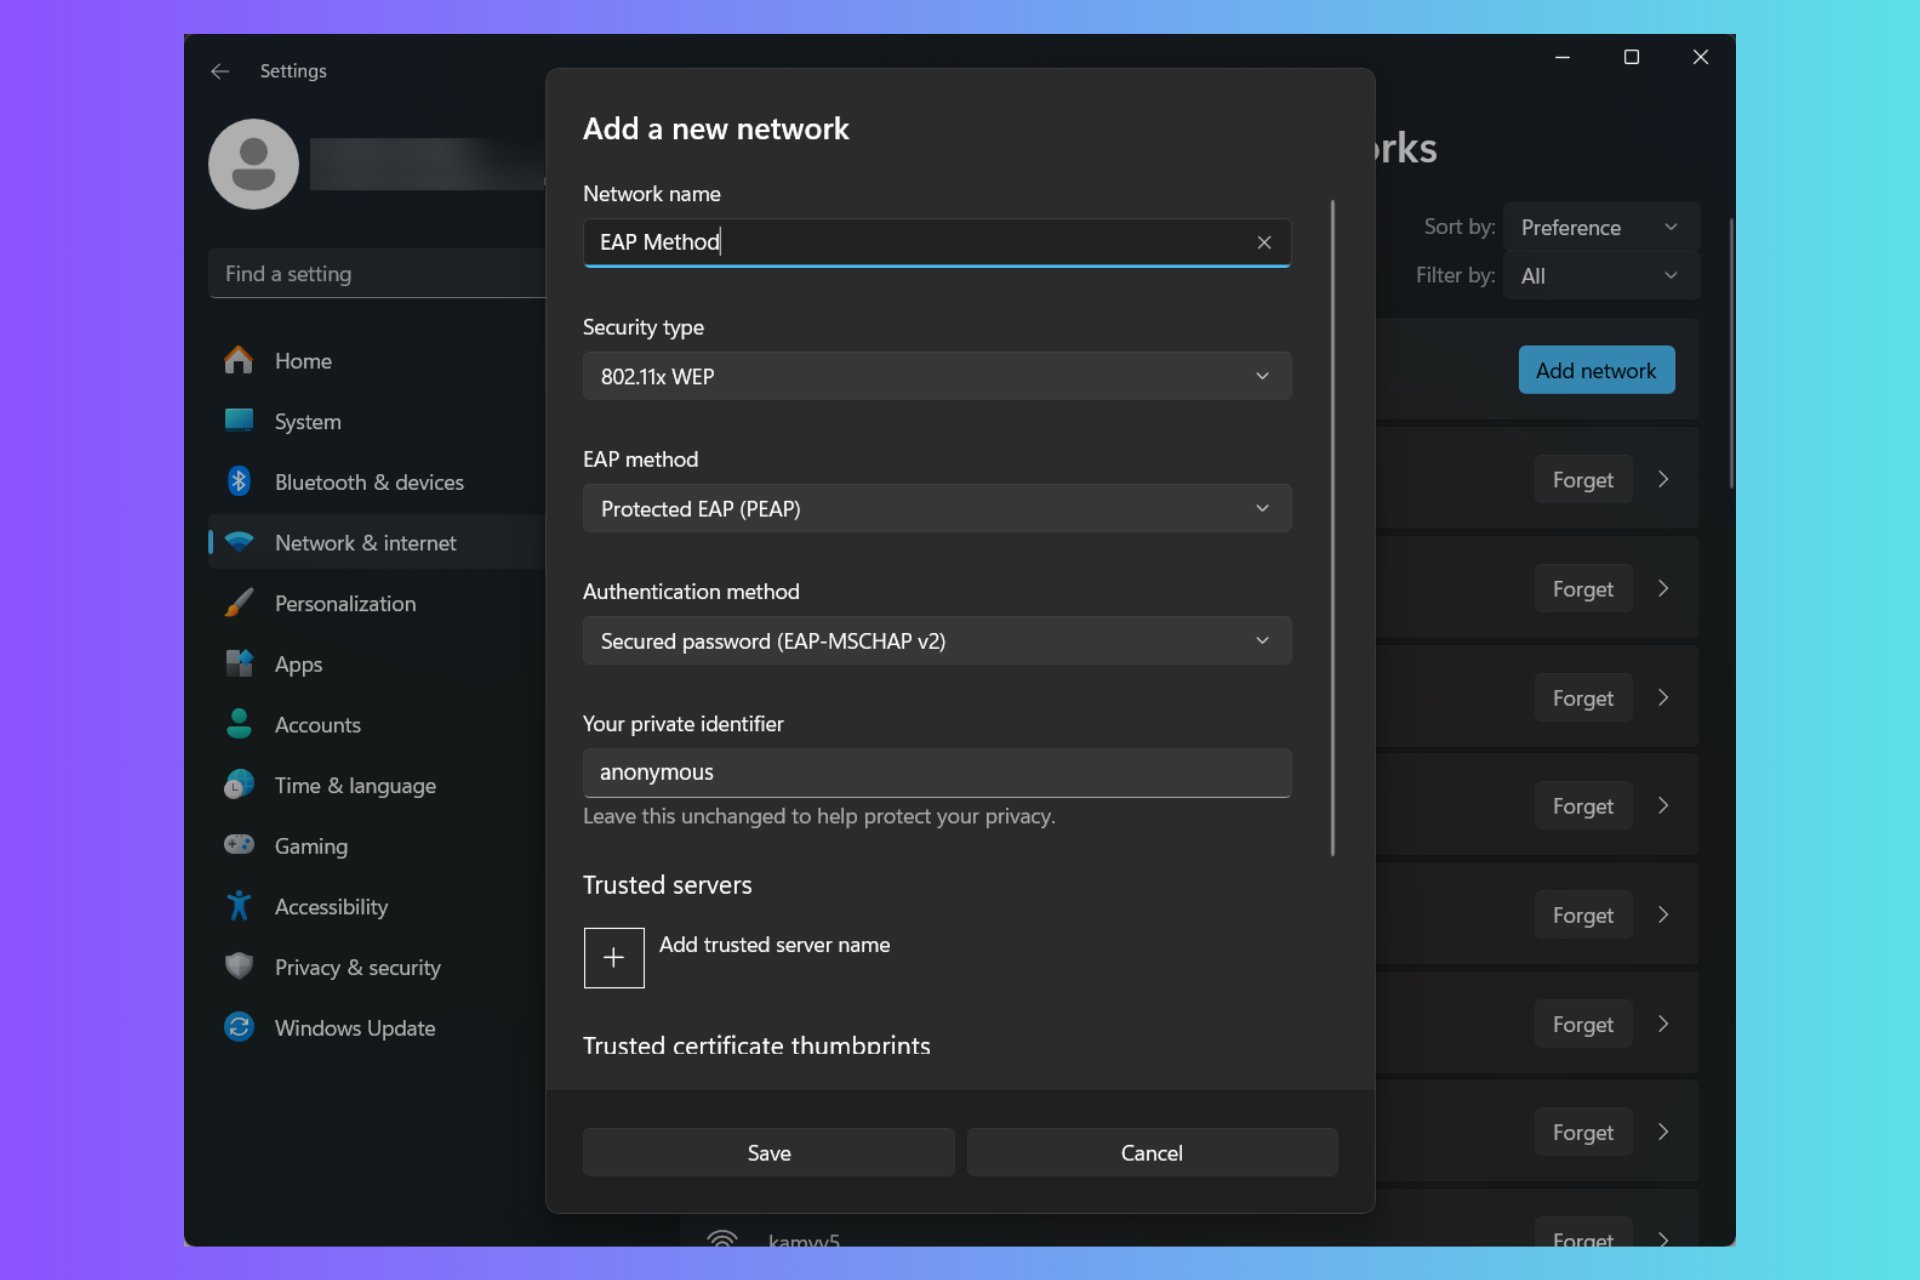
  4. After you type a SSID (name of the connection), you can change the security type and if you select an Enterprise option or 802.11X WEP, you will be able to configure the EAP settings.
  5. Now you can select the EAP type from the drop down menu according to your needs.
  6. For each EAP type, you will be able to select the authentication method, a private identifier and a trusted server.
  7. Review the data and click the Save button once you’re done.

Go through the settings carefully because once you click the Save button below, you won’t be able to edit the profile from Settings. You will have to delete this profile and start over with the needed modifications.

2. Set up Wi-Fi EAP using Command Prompt

To configure a Wi-Fi network in Windows 11, you can use the netsh command in Command Prompt or PowerShell.

The netsh syntax is: netsh [-a AliasFile] [-c Context] [-r RemoteMachine] [-u [DomainName]UserName] [-p Password | *]
[Command | -f ScriptFile]

Here are a few examples on how you can use netsh:

  • To display all Wi-Fi profiles: netsh wlan show profiles
  • To show details of a certain profile: netsh wlan show profiles name="ProfileName"
  • Exporting a Wi-Fi profile to a folder: netsh wlan export profile name="ProfileName" folder="C:\Nameofthefolder"
  • Adding a profile from an XML file: netsh wlan add profile filename="C:\Profiles\ProfileName.xml"
  • Deleting a profile: netsh wlan delete profile name="ProfileName"

As you can see, you may also use an XML file containing the configuration options for that connection and import it using netsh.

3. Using the Group Policy Management Console

  1. Open Group Policy Management Editor and go to: Computer Configuration > Policies > Windows Settings > Security Settings > Wireless Network (IEEE 802.11) Policies
  2. Right-clicking on Wireless Network (IEEE 802.11) Policies and choose Create A New Wireless Network Policy for Windows Vista and Later Releases.
  3. Click on Add and select Infrastructure to create a new Wi-Fi policy.
  4. Here, click on the Security tab and select an Enterprise authentication type to access the EAP authentication method.
  5. Review your settings and click OK, then save the profile.

We will list here the most used enterprise authentication methods:

  • EAP-TLS: Smart Card or other certificate – The users will be able to use a smartcard for login or another type or certificate issued by Microsoft or other entity.
  • Protected EAP (PEAP): This EAP can use two types of authentication – Secure password (EAP-MSCHAP v2), which will simply use the Microsoft account and the Smart card or other certificate (EAP-TLS), which we listed above.
  • EAP-SIM: As the name suggests, this type of authentication uses a SIM card for login. It is less used but ensures a high level of encryption.
  • EAP-TTLS: This type can include EAP-TLS and PEAP, and includes the Enable identity privacy feature. This specifies that clients are configured so that they can’t send their identity before the client has authenticated the RADIUS server, and optionally, provides a place to type an anonymous identity value. 

We conclude our guide here hoping that we offered sufficient information to configure Windows 11 Wi-Fi EAP settings and set up your enterprise authentication profiles. If you can’t deal with command lines, you may also use a network configuration manager tool such as Manage Engine NCM that will help you configure every aspect of your network, including the Wi-Fi EAP using a dedicated console with a comprehensive interface.

We also recommend checking our list of the best open source software for enterprise security.

Let us know in the comments if you have any questions or suggestions.

STORAGE_MINIPORT_ERROR 0x00000F0: How to Fix the BSoD

The STORAGE_MINIPORT_ERROR blue screen, with error code 0x00000F0, appears when the storage Miniport driver fails an SRB request, crashing the OS. For the unversed, a storage miniport driver facilitates communication between the system and storage devices by working at a deeper level.

The Storage Miniport Error Windows BSOD is caused by corrupt/outdated drivers, misconfigured boot settings, corrupted system files, and issues with the system BIOS.

Before you start troubleshooting, install all pending Windows updates, make sure the connections to storage devices are in order, and ensure optimal power supply.

How can I fix the STORAGE_MINIPORT_ERROR blue screen?

1. Reinstall the drivers

  1. Press Windows + X to open the Power User menu, and select Device Manager.
  2. Look for any entries with a warning sign next to their icon. These are the devices with corrupt drivers.
  3. If you find any, right-click on it and then select Uninstall device.uninstall driver to fix STORAGE_MINIPORT_ERROR
  4. Tick the checkbox for Attempt to remove the driver for this device, if available, and click Uninstall.confirm uninstall
  5. Restart the PC, and Windows will automatically install a fresh copy of the driver.

2. Update the drivers

  1. Press Windows + S to open Search, type Device Manager in the text field, and click on the relevant result.
  2. Expand all the storage-related entries here, individually right-click on the devices listed underneath, and select Update driver.update driver to fix STORAGE_MINIPORT_ERROR
  3. Click on Search automatically for drivers and wait for Windows to install the best locally available version.automatic
  4. Similarly, update the other device drivers and then reboot the PC.

Updating the driver often helps fix the 0x00000F0 STORAGE_MINIPORT_ERROR BSOD. If Windows can’t find a better version, visit the manufacturer’s website, search for the new releases, and then manually install the latest driver.

3. Repair the corrupted system files

  1. Press Windows + R to open Run, type cmd, and hit Ctrl + Shift + Enter.command prompt
  2. Click Yes in the UAC prompt.
  3. Paste the following commands individually and hit Enter after each: DISM /Online /Cleanup-Image /CheckHealth DISM /Online /Cleanup-Image /ScanHealth DISM /Online /Cleanup-Image /RestoreHealth
  4. Now, run this command for the SFC scan: sfc /scannowsfc scan to fix STORAGE_MINIPORT_ERROR
  5. Finally, reboot the PC to apply the changes.

Corrupted system files are often the reason behind BSODs. To fix this, run the SFC (System File Checker) and DISM (Deployment Image Servicing and Management) scans, which will replace all such problematic files with their cached copy!

4. Disable fast startup

  1. Press Windows + S to open Search, type Control Panel, and click on the relevant result.
  2. Click on System and Security.system and security
  3. Click on Change what the power buttons do under Power Options.
  4. Now, click Change settings that are currently unavailable.
  5. Untick the checkbox for Turn on fast startup, and click on Save changes.disable fast startup to fix STORAGE_MINIPORT_ERROR
  6. Finally, reboot the PC and verify whether the 0x00000F0 BSoD is fixed.

5. Reset the BIOS

  1. Turn on the computer, and press the F1, F2, F10, F12, Del or Esc key, depending on the system manufacturer, to access the BIOS.
  2. Look for an option that reads Default, Load default, or Reset, and click on it.reset bios to fix STORAGE_MINIPORT_ERROR
  3. Click on Ok to confirm the change.confirm BIOS reset
  4. Boot Windows and check for improvements.

6. Update the BIOS

If a reset doesn’t fix things, the next step is to update the BIOS. Make sure to download a compatible BIOS version from the manufacturer’s website and install it as per the provided instructions!

Remember, any lapses during the process can render your PC unusable. So, be cautious!

7. Reinstall Windows

When nothing else works, you can always reinstall Windows to clear any software-based inconsistencies.

To reinstall Windows > connect a USB drive to another PC > go to Microsoft’s official website > download the Media Creation Tool > use it to create a bootable Windows USB > plug the flash drive into the affected PC > change the boot order to the flash drive > run the setup to install Windows.

installing Windows
Installing Windows from a bootable USB

If a reinstall, too, fails to fix STORAGE_MINIPORT_ERROR, you should contact the manufacturer’s support or visit a local repair shop. Because, in all likelihood, it’s a hardware malfunction to blame for the BSOD at this point!

Before you leave, discover expert tips to fix all BSODs in no time!

If you know of more fixes for the error, share them with our readers in the comments section.

6 Simple Ways to Fix Firefox Not Playing Sound

If you do not hear sound while browsing YouTube or any other video or audio platform on Firefox, it could be due to a change in system audio settings or issues with Firefox audio settings.

To fix the Firefox not playing sound issue, check if the system sound is turned on and the default speaker is used, and then ensure the video’s audio is not muted. You can also try restarting your device and browser and disabling interfering extensions or ad-blocking software.

How can I fix the Firefox not playing sound issue?

1. Check the volume mixer

  1. First, ensure Firefox is running. Then, press Ctrl + D to go to the Desktop, locate the Volume icon from the Taskbar, and click it.
  2. Click the arrow icon next to the Volume slider.Volume - firefox not playing sound
  3. Look for Volume mixer, and scroll down to the list of apps. Locate Firefox and ensure the Volume is not muted for it.Firefox  turn on sound
  4. Also, click the drop-down icon next to the Volume slider and ensure you have selected Default for the Output device.Mozilla Firefox - firefox not playing sound

Alternatively, press Windows+I to open Settings, then go to System>Sound>Volume mixer. You will see a list of apps that can alter the sound settings.

2. Set your default speaker in Windows

  1. Press the Windows key, type control panel in the search box, and click Open. Control Panel start menu - firefox not playing sound  
  2. Click Hardware and Sound.Hardware and sound firefox not playing sound
  3. Click Sound.Sound - Properties
  4. On the Sound properties window, go to the Playback tab.Set as default device
  5. Right-click the connected device and select Set as Default Device.
  6. Click OK.

3. Set Windows Audio service to Automatic

  1. Press Windows + R to open the Run window.Services RUn command - firefox not playing sound
  2. Type services.msc and click OK to open the Services window.
  3. From the list of services, locate Windows Audio. Double-click it to open its Properties window.
  4. Ensure the Startup type is set to Automatic and the Service status is Running. If the Service status is stopped, click Start, then Apply, & OK.Automatic startup type 
  5. Once you are back on the Services window, select Windows Audio, and click Restart the service from the left side.Windows Audio - Restart - firefox not playing sound

4. Ensure the tab is not muted

  1. On the Firefox window, play the video you want to watch.Mute - firefox not playing sound
  2. Hover over the tab with the video playing. You will see the volume icon; ensure that it is not muted.
  3. You can press Ctrl + M to mute or unmute the tab.

5. Verify some Firefox settings

  1. Launch Firefox, click three horizontal lines, and choose Settings.Settings - firefox not playing sound    
  2. Choose the Privacy & Security pane and go to the Cookies and Site Data section.Cookies and other site data - firefox not playing sound
  3. Ensure all the cookies are enabled. Click the Manage Exceptions button.
  4. Now check if the site is not blocked in the Exceptions list. Once you make the changes, click Save Changes.
  5. Next, look for the History section and ensure Firefox is set to Remember History.History
  6. Scroll down to find the Permissions section, locate Block pop-up windows, then click Exceptions.Block pop-up windows - firefox not playing sound
  7. Ensure you have allowed the website to be an exception to the Block pop-up windows setting.Exceptions

6. Update/reinstall your sound driver

  1. Press Windows + R to open the Run dialog box.Device Manager Run command - firefox not playing sound
  2. Type devmgmt.msc and click OK to open the Device Manager app.
  3. In Device Manager, you will see a list of categories representing different hardware components.
  4. Expand each category one by one and look for a device that has a yellow triangle with an exclamation mark inside. Right-click the device and click Update driver.  Update driver - firefox not playing sound  
  5. Select Search automatically for drivers.Search automatically
  6. Follow the on-screen prompts when Windows searches for and installs the driver.

If there is no update available, you need to reinstall the driver. To do that, follow these steps:

  1. Open the Device Manager mentioned above, go to the category with the problematic driver, right-click it, and select Uninstall device.Uninstall device - firefox not playing sound
  2. Click Uninstall again to confirm the action.Action scan for hardware changes
  3. Once done, click Action from the main menu and select Scan for hardware changes.

If there is more than one problematic driver, you can follow the same steps for each one to fix this issue.

If you want to install the driver manually, you can go to the manufacturer’s website. You can also use a third-party driver updater tool to help you safely get the latest version of the driver.

Are you still facing the Firefox not playing sound on your computer? Try reinstalling the browser.

Did we miss any steps that helped you fix the Firefox not playing sound issue? If so, please mention them in the comments section below. We will add them to the list.

How to Fix DRIVER_RETURNED_STATUS_REPARSE_FOR_VOLUME_OPEN BSoD

The DRIVER_RETURNED_STATUS_REPARSE_FOR_VOLUME_OPEN bug check usually returns a value of 0x000000F9. The error indicates an issue with a driver handling volume reparse points used for several file systems and volume operations. Before anything else, try removing all the extra peripherals except the Keyboard and mouse and restarting your computer. You can also check the System Logs using Event Viewer for more information about the issue.

How do I fix the DRIVER_RETURNED_STATUS_REPARSE_FOR_VOLUME_OPEN?

1. Update/Reinstall problematic drivers

1.1 Enter the safe mode

Note icon NOTE
If your Windows can boot up normally, you can skip this step and go directly to the 1.2 section.
  1. First, press and hold the Power button for 10 seconds to turn off your device.
  2. Press the Power button again to turn it back on. When you see the first sign of Windows starting up, hold the Power button for 10 seconds to turn it off.
  3. Repeat this process twice, and at the time of the third attempt, let the device start up fully.
  4. You will see the Automatic Repair mode.
  5. Click Advanced options.Automatic Repair mode - DRIVER_RETURNED_STATUS_REPARSE_FOR_VOLUME_OPEN
  6. On the Choose an option screen, select Troubleshoot.Choose an option - Troubleshoot - DRIVER_RETURNED_STATUS_REPARSE_FOR_VOLUME_OPEN
  7. Choose Advanced options. Advanced options after troubleshoot
  8. Select Startup Settings. Startup Settings - DRIVER_RETURNED_STATUS_REPARSE_FOR_VOLUME_OPEN
  9. You will have a few options: press the key that denotes Safe mode with networking, then Restart.

1.2 Update/Reinstall drivers

  1. Press Windows + R to open the Run window.Device Manager - DRIVER_RETURNED_STATUS_REPARSE_FOR_VOLUME_OPEN
  2. Type devmgmt.msc and click OK to open the Device Manager app.
  3. In Device Manager, you will see a list of categories representing different hardware components.
  4. Expand each category one by one and look for a device that has a yellow triangle with an exclamation mark inside. Right-click the device and click Update driver.  Update device driver DRIVER_RETURNED_STATUS_REPARSE_FOR_VOLUME_OPEN
  5. Select Search automatically for drivers.Search automarically for drivers
  6. Follow the on-screen prompts when Windows searches for and installs the driver.

If there is no update available, you need to reinstall the driver. To do that, follow these steps:

  1. Open the Device Manager mentioned above, go to the category with the problematic driver, right-click it, and select Uninstall device. Uninstall device
  2. Click Uninstall again to confirm the action.
  3. Once done, click Action from the main menu and select Scan for hardware changes.Action scan for hardware changes - DRIVER_RETURNED_STATUS_REPARSE_FOR_VOLUME_OPEN

If there is more than one problematic driver, you can follow the same steps for each one to fix this issue.

If you want to install the driver manually, you can go to the manufacturer’s website. You can also use a third-party driver updater tool to help you safely get the latest version of the driver.

2. Restore your OS to a previous version

  1. Restart your computer in Automatic Repair mode using the steps mentioned in 1.1, then select Advanced options.
  2. On the Choose an option screen, select Troubleshoot 
  3. Choose Advanced options.
  4. Select System Restore.   
  5. Select Choose a different restore point in the System Restore window and click Next.Next Choose a different restore point - DRIVER_RETURNED_STATUS_REPARSE_FOR_VOLUME_OPEN
  6. Choose the restore point with a date before the DRIVER_RETURNED_STATUS_REPARSE_FOR_VOLUME_OPEN event, then click Next.
  7. Click Finish and wait while your Windows restarts and restores to the selected version.

This process usually takes some time, so don’t turn off your computer. If your computer restarts with the previous version, go to Settings, click Windows Update, and then Check for Updates. If an update is available, Click Download & Install to install the latest updates.

However, if you see the System Restore message wasn’t completed successfully after the restart, we recommend you check out this informative guide for solutions.

If none of the above methods work for you, you might have to reset your PC or reinstall the operating system to fix the DRIVER_RETURNED_STATUS_REPARSE_FOR_VOLUME_OPEN.

We covered a similar issue in our ERROR_REPARSE guide, so don’t miss it for more information.

Did we miss any steps that helped you fix the DRIVER_RETURNED_STATUS_REPARSE_FOR_VOLUME_OPEN issue? If so, please mention them in the comments section below. We will add them to the list.

The new Xbox Game Pass Standard is now finally available to users

Xbox users can finally subscribe to the new Game Pass mode, the Xbox Game Pass Standard, which is now generally available.

Xbox Game Pass Standard is currently priced at $14.99/month. In a blog post, Xbox says that users can access all the benefits of Game Pass Core and a library of hundreds of console games, including Halo, Minecraft, Forza Horizon 5 and Tom Clancy’s Rainbow Six Siege.

However, cloud gaming, PC Game Pass, and EA Play perks are exclusive to the Xbox Game Pass Ultimate subscribers.

If you’re wondering what’s in it for you with the Standard plan, then you should know it’s packed with hundreds of games, and Xbox says they’re even adding more as we speak. If you’re part of the Xbox Insiders program and your Game Pass hasn’t stacked beyond two months, you’re in luck; you can join in and share your thoughts on this new tier.

If the $14.99 monthly fee for the Standard plan sounds a bit steep, you might want to check out the Xbox Game Pass Core. At $9.99 a month, it offers a selection of games, online multiplayer, and special member-only discounts. It’s a more budget-friendly option but with fewer games in the library.Game Pass Standard

Microsoft says that the launch of Game Pass Standard is part of its effort to offer a range of price points so players can select the Game Pass plan that best suits their gaming needs and budget.

We continue to be focused on delivering the best gaming experience at a range of price points so players can choose the plan with the features that best fits their gaming needs and budget.

It’s good that Microsoft gives gamers more choices with its subscription plans, but we have to wonder if they will stick around. The gaming industry mocked the plan when it was first announced, with many calling it a degraded product. The Ultimate plan seems more in touch with new releases, but the focused offerings of the Standard or Core plans might find an audience.

What do you think? Will you try the Xbox Game Pass Standard, or are you holding out for something else?

With September’s Patch Tuesday Updates Microsoft fixed 79 flaws, including 4-zero day CVEs

Microsoft has released its September 2024 Patch Tuesday updates, which fix 79 flaws, including four actively exploited and one publicly disclosed zero-day vulnerability, seven of which are critical. The vulnerabilities include Elevation of Privilege, Security Feature Bypass, Remote Code Execution, Information Disclosure, Denial of Service, and Spoofing.

  • 30 Elevation of Privilege vulnerabilities
  • 23 Remote Code Execution vulnerabilities
  • 11 Information Disclosure vulnerabilities
  • 8 Denial of Service vulnerabilities
  • 4 Security Feature Bypass vulnerabilities
  • 3 Spoofing vulnerabilities

The four actively exploited vulnerabilities included:

CVE-2024-38014 – Windows Installer Elevation of Privilege Vulnerability with a CVSS score of 7.8 allowed attackers to gain SYSTEM privileges on Windows systems. Microsoft has not shared any details on how it was exploited in attacks.

CVE-2024-38217 – Windows Mark of the Web Security Feature Bypass Vulnerability with a CVSS score of 7.5, publicly disclosed this flaw last month, and it is believed to have been actively exploited since 2018.

CVE-2024-38226 – Microsoft Publisher Security Feature Bypass Vulnerability with a CVSS score of 7.8, bypassing the security protections against embedded macros in downloaded documents.

CVE-2024-43491 – Microsoft Windows Update Remote Code Execution Vulnerability with a CVSS score of 7.8, which only impacts Windows 10, version 1507, which reached the end of life in 2017.

The last one also impacts Windows 10 Enterprise 2015 LTSB and Windows 10 IoT Enterprise 2015 LTSB editions, which are still under support.

This flaw caused Optional Components, such as Active Directory Lightweight Directory Services, XPS Viewer, Internet Explorer 11, LPD Print Service, IIS, and Windows Media Player to roll back to their original RTM versions. Any previous CVE could be reintroduced into the program, which posed a huge risk of exploration.

Below is a complete list of all the CVEs that Microsoft addressed with September 2024’s Patch Tuesday updates.

TagCVE IDCVE TitleSeverity
Azure CycleCloudCVE-2024-43469Azure CycleCloud Remote Code Execution VulnerabilityImportant
Azure Network WatcherCVE-2024-38188Azure Network Watcher VM Agent Elevation of Privilege VulnerabilityImportant
Azure Network WatcherCVE-2024-43470Azure Network Watcher VM Agent Elevation of Privilege VulnerabilityImportant
Azure StackCVE-2024-38216Azure Stack Hub Elevation of Privilege VulnerabilityCritical
Azure StackCVE-2024-38220Azure Stack Hub Elevation of Privilege VulnerabilityCritical
Azure Web AppsCVE-2024-38194Azure Web Apps Elevation of Privilege VulnerabilityCritical
Dynamics Business CentralCVE-2024-38225Microsoft Dynamics 365 Business Central Elevation of Privilege VulnerabilityImportant
Microsoft AutoUpdate (MAU)CVE-2024-43492Microsoft AutoUpdate (MAU) Elevation of Privilege VulnerabilityImportant
Microsoft Dynamics 365 (on-premises)CVE-2024-43476Microsoft Dynamics 365 (on-premises) Cross-site Scripting VulnerabilityImportant
Microsoft Graphics ComponentCVE-2024-38247Windows Graphics Component Elevation of Privilege VulnerabilityImportant
Microsoft Graphics ComponentCVE-2024-38250Windows Graphics Component Elevation of Privilege VulnerabilityImportant
Microsoft Graphics ComponentCVE-2024-38249Windows Graphics Component Elevation of Privilege VulnerabilityImportant
Microsoft Management ConsoleCVE-2024-38259Microsoft Management Console Remote Code Execution VulnerabilityImportant
Microsoft Office ExcelCVE-2024-43465Microsoft Excel Elevation of Privilege VulnerabilityImportant
Microsoft Office PublisherCVE-2024-38226Microsoft Publisher Security Feature Bypass VulnerabilityImportant
Microsoft Office SharePointCVE-2024-38227Microsoft SharePoint Server Remote Code Execution VulnerabilityImportant
Microsoft Office SharePointCVE-2024-43464Microsoft SharePoint Server Remote Code Execution VulnerabilityCritical
Microsoft Office SharePointCVE-2024-38018Microsoft SharePoint Server Remote Code Execution VulnerabilityCritical
Microsoft Office SharePointCVE-2024-38228Microsoft SharePoint Server Remote Code Execution VulnerabilityImportant
Microsoft Office SharePointCVE-2024-43466Microsoft SharePoint Server Denial of Service VulnerabilityImportant
Microsoft Office VisioCVE-2024-43463Microsoft Office Visio Remote Code Execution VulnerabilityImportant
Microsoft Outlook for iOSCVE-2024-43482Microsoft Outlook for iOS Information Disclosure VulnerabilityImportant
Microsoft Streaming ServiceCVE-2024-38245Kernel Streaming Service Driver Elevation of Privilege VulnerabilityImportant
Microsoft Streaming ServiceCVE-2024-38241Kernel Streaming Service Driver Elevation of Privilege VulnerabilityImportant
Microsoft Streaming ServiceCVE-2024-38242Kernel Streaming Service Driver Elevation of Privilege VulnerabilityImportant
Microsoft Streaming ServiceCVE-2024-38244Kernel Streaming Service Driver Elevation of Privilege VulnerabilityImportant
Microsoft Streaming ServiceCVE-2024-38243Kernel Streaming Service Driver Elevation of Privilege VulnerabilityImportant
Microsoft Streaming ServiceCVE-2024-38237Kernel Streaming WOW Thunk Service Driver Elevation of Privilege VulnerabilityImportant
Microsoft Streaming ServiceCVE-2024-38238Kernel Streaming Service Driver Elevation of Privilege VulnerabilityImportant
Power AutomateCVE-2024-43479Microsoft Power Automate Desktop Remote Code Execution VulnerabilityImportant
Role: Windows Hyper-VCVE-2024-38235Windows Hyper-V Denial of Service VulnerabilityImportant
SQL ServerCVE-2024-37338Microsoft SQL Server Native Scoring Remote Code Execution VulnerabilityImportant
SQL ServerCVE-2024-37980Microsoft SQL Server Elevation of Privilege VulnerabilityImportant
SQL ServerCVE-2024-26191Microsoft SQL Server Native Scoring Remote Code Execution VulnerabilityImportant
SQL ServerCVE-2024-37339Microsoft SQL Server Native Scoring Remote Code Execution VulnerabilityImportant
SQL ServerCVE-2024-37337Microsoft SQL Server Native Scoring Information Disclosure VulnerabilityImportant
SQL ServerCVE-2024-26186Microsoft SQL Server Native Scoring Remote Code Execution VulnerabilityImportant
SQL ServerCVE-2024-37342Microsoft SQL Server Native Scoring Information Disclosure VulnerabilityImportant
SQL ServerCVE-2024-43474Microsoft SQL Server Information Disclosure VulnerabilityImportant
SQL ServerCVE-2024-37335Microsoft SQL Server Native Scoring Remote Code Execution VulnerabilityImportant
SQL ServerCVE-2024-37966Microsoft SQL Server Native Scoring Information Disclosure VulnerabilityImportant
SQL ServerCVE-2024-37340Microsoft SQL Server Native Scoring Remote Code Execution VulnerabilityImportant
SQL ServerCVE-2024-37965Microsoft SQL Server Elevation of Privilege VulnerabilityImportant
SQL ServerCVE-2024-37341Microsoft SQL Server Elevation of Privilege VulnerabilityImportant
Windows Admin CenterCVE-2024-43475Microsoft Windows Admin Center Information Disclosure VulnerabilityImportant
Windows AllJoyn APICVE-2024-38257Microsoft AllJoyn API Information Disclosure VulnerabilityImportant
Windows Authentication MethodsCVE-2024-38254Windows Authentication Information Disclosure VulnerabilityImportant
Windows DHCP ServerCVE-2024-38236DHCP Server Service Denial of Service VulnerabilityImportant
Windows InstallerCVE-2024-38014Windows Installer Elevation of Privilege VulnerabilityImportant
Windows KerberosCVE-2024-38239Windows Kerberos Elevation of Privilege VulnerabilityImportant
Windows Kernel-Mode DriversCVE-2024-38256Windows Kernel-Mode Driver Information Disclosure VulnerabilityImportant
Windows LibarchiveCVE-2024-43495Windows libarchive Remote Code Execution VulnerabilityImportant
Windows Mark of the Web (MOTW)CVE-2024-38217Windows Mark of the Web Security Feature Bypass VulnerabilityImportant
Windows Mark of the Web (MOTW)CVE-2024-43487Windows Mark of the Web Security Feature Bypass VulnerabilityModerate
Windows MSHTML PlatformCVE-2024-43461Windows MSHTML Platform Spoofing VulnerabilityImportant
Windows Network Address Translation (NAT)CVE-2024-38119Windows Network Address Translation (NAT) Remote Code Execution VulnerabilityCritical
Windows Network VirtualizationCVE-2024-38232Windows Networking Denial of Service VulnerabilityImportant
Windows Network VirtualizationCVE-2024-38233Windows Networking Denial of Service VulnerabilityImportant
Windows Network VirtualizationCVE-2024-38234Windows Networking Denial of Service VulnerabilityImportant
Windows Network VirtualizationCVE-2024-43458Windows Networking Information Disclosure VulnerabilityImportant
Windows PowerShellCVE-2024-38046PowerShell Elevation of Privilege VulnerabilityImportant
Windows Remote Access Connection ManagerCVE-2024-38240Windows Remote Access Connection Manager Elevation of Privilege VulnerabilityImportant
Windows Remote Desktop Licensing ServiceCVE-2024-38231Windows Remote Desktop Licensing Service Denial of Service VulnerabilityImportant
Windows Remote Desktop Licensing ServiceCVE-2024-38258Windows Remote Desktop Licensing Service Information Disclosure VulnerabilityImportant
Windows Remote Desktop Licensing ServiceCVE-2024-43467Windows Remote Desktop Licensing Service Remote Code Execution VulnerabilityImportant
Windows Remote Desktop Licensing ServiceCVE-2024-43454Windows Remote Desktop Licensing Service Remote Code Execution VulnerabilityImportant
Windows Remote Desktop Licensing ServiceCVE-2024-38263Windows Remote Desktop Licensing Service Remote Code Execution VulnerabilityImportant
Windows Remote Desktop Licensing ServiceCVE-2024-38260Windows Remote Desktop Licensing Service Remote Code Execution VulnerabilityImportant
Windows Remote Desktop Licensing ServiceCVE-2024-43455Windows Remote Desktop Licensing Service Spoofing VulnerabilityImportant
Windows Security Zone MappingCVE-2024-30073Windows Security Zone Mapping Security Feature Bypass VulnerabilityImportant
Windows Setup and DeploymentCVE-2024-43457Windows Setup and Deployment Elevation of Privilege VulnerabilityImportant
Windows Standards-Based Storage Management ServiceCVE-2024-38230Windows Standards-Based Storage Management Service Denial of Service VulnerabilityImportant
Windows StorageCVE-2024-38248Windows Storage Elevation of Privilege VulnerabilityImportant
Windows TCP/IPCVE-2024-21416Windows TCP/IP Remote Code Execution VulnerabilityImportant
Windows TCP/IPCVE-2024-38045Windows TCP/IP Remote Code Execution VulnerabilityImportant
Windows UpdateCVE-2024-43491Microsoft Windows Update Remote Code Execution VulnerabilityCritical
Windows Win32K – GRFXCVE-2024-38246Win32k Elevation of Privilege VulnerabilityImportant
Windows Win32K – ICOMPCVE-2024-38252Windows Win32 Kernel Subsystem Elevation of Privilege VulnerabilityImportant
Windows Win32K – ICOMPCVE-2024-38253Windows Win32 Kernel Subsystem Elevation of Privilege VulnerabilityImportant

Have you updated your Windows device?

Fortnite Low FPS on High-End PC: 3 Ways to Increase it

Experiencing low FPS in Fortnite on a high-end PC can be incredibly frustrating, especially when you’ve invested in top-tier hardware. Let’s dive into some practical solutions to help you get the most out of your gaming rig and ensure Fortnite runs smoothly.

Why is my FPS so low in Fortnite with a good PC?

In most cases, the issue is caused by your graphics settings. In some instances, your power settings can be responsible for this problem.

How can I fix low FPS in Fortnite on a high-end PC?

Before we start, ensure that your game, Windows, and GPU drivers are up to date.

1. Optimize in-game settings

  1. Open Fortnite from the Epic Games Launcher.
  2. Click on the menu icon and navigate to Settings > Video (monitor icon).
    settings fortnite
  3. Set the Resolution setting to 1600 x 900 or 1280 x 720 for better performance.
    video settings fortnite
  4. Set your monitor’s native resolution but lower the 3D Resolution slider below 100%.
  5. Use the Quality Preset dropdown to set all settings to Low.
  6. Adjust specific settings like Effects, Post Processing, Shadows, and Anti-Aliasing if necessary.
  7. Under the Advanced Graphics section, turn off VSync to prevent performance drops. You can also try enabling it if it’s off.
  8. Set the Rendering Mode to DirectX 12 under the Advanced Graphics section for more efficient CPU use.
    rendering mode directx 12

Many reported that switching to DirectX 12 and setting DLSS to Performance fixed the issue for them, so be sure to try that.

2. Change power plan settings

  1. Press the Windows key + S and type choose a power plan. Select Choose a power plan from the list of results.
    choose a power plan windows 11 search results
  2. Locate your currently selected power plan and click on Change plan settings.
  3. Next, click on Change advanced power settings.
  4. Locate the Minimum processor state and set it to 1%.
    minimum processor state
  5. Save changes.

3. Verify and repair Fortnite files

  1. From your desktop or Start menu, open Epic Games Launcher.
  2. Go to the Library tab.
  3. Select Fortnite, then click on Manage > Verify.
    verify epic games launcher
  4. Allow the launcher to verify and repair any corrupted game files.

Corrupted files can cause issues for your games or even your computer. Specialized software, such as Iolo System Mechanic, can identify and clean up corrupted files in just a few minutes. Plus, it also comes with amazing security and optimization features.

Follow these steps to clean up your files with Iolo System Mechanic:

  1. Download Iolo System Mechanic from the official website.
  2. Install and run the software.
  3. Navigate to the Performance section and select the Deepclean function.
  4. Click the Start Clean button and wait for the process to end.

The software will automatically scan for, identify, and fix any broken files.

Iolo System Mechanic

Iolo System Mechanic

Sometimes temporary files can cause slowdowns on your PC, but you can fix them easily with System Mechanic.
Free Trial Visit Website

By following these steps, you should see a significant improvement in Fortnite’s performance on your high-end PC.

Unfortunately, this isn’t the only problem, many reported that Fortnite causes high CPU usage while others have experienced Fortnite crashes on Windows 11.

We also have a great guide on how to lower ping in Fortnite, so don’t miss it for more useful tips.

Sort Files by Size in Windows 11: Use These 3 Ways to do it

Sometimes you need to find a large file inside of the folder and to do that, you need to know how to sort files by size in Windows 11. This takes just a few seconds, and today we’ll show you how to do it properly.

How do I sort files by size in Windows 11?

1. Use the context menu

  1. Open the desired directory.
  2. Right-click the empty space and choose Sort by and then Size.
    sort by size context menu
  3. You can repeat the steps and choose the ascending or descending order.

2. Use the size column

  1. Navigate to the directory whose files you wish to sort.
  2. Now click the Size column.
    size column file explorer
  3. After a few moments, files will be sorted in a certain order.
  4. Click the Size column again to change the sort order.

3. Use the toolbar

  1. Open the folder that you would like to sort.
  2. Click on Sort.
    sort toolbar
  3. Now choose More and select Size.
    more size toolbar

How do I see what files take up the most space in Windows 11?

To find out what files take the most space, we suggest reading our guide on how to find large files on Windows 11. For this, we would recommend using third-party applications.

As you can see, it’s possible to sort files by size on Windows 11 with ease, without using any third-party tools. However, these methods won’t work since File Explorer is not showing folder size.

Luckily, a few workarounds can help you show folder file size in Windows 11, so don’t miss them.

We also have a guide on how to sort files and folders together, so don’t miss it for more information.

Fix: ERROR_INVALID_PARAMETER 87 (0x57)

The ERROR_INVALID_PARAMETER issue, with code 87 (0x57), can be encountered when mapping a drive, launching an app/game, running a service, or even starting a VPN. The error message reads, Error 87: The parameter is incorrect.

The problem with Error Invalid Parameter is that it doesn’t list what went wrong. But based on previously observed cases, it’s usually outdated/buggy drivers, corrupt system files, conflicts triggered by third-party programs, or improper app installation to blame for the system error.

Before you start troubleshooting, reboot the PC, install pending Windows updates, and disable any third-party antivirus or security software.

How do I fix ERROR_INVALID_PARAMETER in Windows?

Tip icon Tip
These solutions are curated for regular users and not programmers. If you have designed a code or script that throws ERROR_INVALID_PARAMETER, double-check the script, inspect the paths involved, and verify the buffer size.

1. Update the graphics driver

  1. Press Windows + X to open the Power User menu, and select Device Manager from the list of options.
  2. Expand the Display adapters entry, right-click on the graphics adapter, and select Update driver.graphics driver update to fix ERROR_INVALID_PARAMETER
  3. Click on Search automatically for drivers to let Windows install the best locally available version.automatic update
  4. Reboot the PC and check for improvements.

When you get the LoadLibrary failed with error 87: The parameter is incorrect pop-up, updating the graphics driver will fix things. Also, if Windows can’t find a better version, go to the manufacturer’s website, check for new releases, and manually install the driver.

In case there are no newer versions available, you can always roll back the driver update!

2. Repair the corrupt system files

  1. Press Windows + S to open Search, type Command Prompt in the text field, and click on Run as administrator.cmd
  2. Click Yes in the UAC prompt.
  3. Paste the following DISM commands individually and hit Enter after each: DISM /Online /Cleanup-Image /CheckHealth DISM /Online /Cleanup-Image /ScanHealth DISM /Online /Cleanup-Image /RestoreHealth
  4. Now, execute this command to run the SFC scan: sfc /scannowsfc scan to fix ERROR_INVALID_PARAMETER
  5. Once done, restart the computer to apply the changes.

In 2 out of 5 cases, The operating system reported error 87: The parameter is incorrect message appears due to corrupted system files. Here, running the SFC (System File Checker) and DISM (Deployment Image Servicing and Management) scans will get things up and running!

3. Enable service via Registry Editor

  1. Press Windows + R to open Run, type regedit in the text field, and hit Enter.
  2. Click Yes in the UAC prompt.
  3. Paste the following path in the address bar and hit Enter: Computer\HKEY_LOCAL_MACHINE\SYSTEM\CurrentControlSet\Servicespath
  4. Select the service you are having trouble configuring from the list of keys in the navigation pane.
  5. Double-click the Start DWORD.
  6. Enter one of the following values in the Value data field depending on the Startup type you want to set for the service:
    • Automatic (Delayed Start): 1
    • Automatic: 2
    • Manual: 3
    • Disabled: 4modify value data to fix ERROR_INVALID_PARAMETER
  7. Finally, click on OK to save the changes.

If you are getting Error 87: The parameter is incorrect (ERROR_INVALID_PARAMETER) when starting a service or changing the startup type, make the changes via the Registry Editor. For instance, if you want to stop the service, set the Value data to 4, or to run the service, set it to 2, and then reboot the PC.

4. Reinstall the affected program

  1. Press Windows + R to open Run, type appwiz.cpl in the text field, and hit Enter.
  2. Select the affected application from the list, and click on Uninstall.uninstall apps
  3. Follow the on-screen instructions to complete the process.
  4. Reboot the PC, and then reinstall the app.

Often, when you see The parameter is incorrect. 0x80070057 (Win32: 87 ERROR_INVALID_PARAMETER) error while launching an application, say the AMD Radeon Software, Minecraft, or Intune, uninstalling the app and then reinstalling it from the official source will do the trick.

If a quick removal doesn’t work, use a top-rated software uninstaller to get rid of all leftover files and Registry entries, and then proceed with the reinstallation!

5. Perform a system restore

  1. Press Windows + R to open Run, type rstrui.exe, and hit Enter.
  2. Select the Choose a different restore point option, and click Next.restore to fix ERROR_INVALID_PARAMETER
  3. Pick the oldest restore point from the list and click Next.oldest rstore point
  4. Verify the restore details and click on Finish.

When nothing else works, a system restore will fix ERROR_INVALID_PARAMETER 87 (0x57) by reverting recent changes to the PC.

If this, too, fails, get in touch with the support team for the app that is throwing the error. Or, if it’s with a built-in Windows component, contact Microsoft support.

Before you leave, discover expert tips to make your PC faster than ever! Our latest guides covers a similar issue, so don’t miss our Error_Invalid_Cap article.

For any queries or to share which fix worked for you, drop a comment below.

KB5043080 for Windows 11 24H2 on Copilot+ PC makes the ARM-based devices ready for Roblox

Microsoft has released KB5043080 for Windows 11 24H2 users with Copilot+ PCs, bumping them up to Build 26100.1742. The cumulative update is available for manual download from the Microsoft Update Catalog or Windows Update.

This is a security-focused update that addresses several issues. While there are no significant highlights, KB5043080 addresses security issues for your Windows operating system and includes improvements that were a part of update KB5041865, released August 27, 2024.

For example, the Redmond-based tech updated the User Account Control (UAC) to prompt users’ credentials, similar to the Patch Updates to Windows 11 22H2 and 23H2. Microsoft also fixed a frustrating bug with Task Manager: it would not show the correct colours when in dark mode.

Microsoft was also aware of an issue where players on Arm devices could not download and play Roblox via the Microsoft Store on Windows. The tech giant offered a temporary solution: players on Arm devices can play Roblox by downloading the title directly from Roblox. While the issue is minor and is not expected to affect many users, the Microsoft Store might get updated to support downloading from there in the following months.

You can read KB5043080’s full changelog here, and you can download it manually to your Copilot+ PC here.

Use Tablet As Mouse For PC: 3 Ways to do it

If for some reason your mouse isn’t working, you can always use a tablet as a mouse for your PC. This is pretty simple to set up, and today we’re going to show you how to do it.

How do I use the tablet as a mouse for my PC?

1. Use the Bluetooth Keyboard & Mouse app

  1. Go to Play Store and install Bluetooth Keyboard & Mouse on your tablet.
  2. Before starting the app, pair your PC and tablet.
  3. Open the app and head to Setup remote device.
    setup remote device
  4. Select your PC. If it’s not available, select New device and add it.
    select device
  5. Once connected, the touchpad will appear on your screen and you’ll be able to use it instead of your mouse.

2. Use Unified Remote

  1. Go to the Unified Remote download page and click on Latest Server.
    latest server unified remote
  2. Follow the instructions on the screen to install the server.
  3. After you start the server, download Unified Remote from the Play Store.
  4. Open the app on your tablet, expand the sidebar, and choose Servers.
    universal remote servers
  5. Select your PC.
    found server unified remote
  6. Next, select the Basic input on the main menu.
     basic input unified remote
  7. A new screen will appear with instructions on how to use your tablet as a mouse.
    basic input screen

3. Use Remote Mouse

  1. Visit the Remote Mouse website and click on Get now.
    get now remote mouse
  2. Next, choose Windows.
    windows remote mouse
  3. Follow the instructions on the screen.
  4. Once the server is up and running, download Remote Mouse from the Play Store.
  5. Start the app and select your PC.
    remote mouse select PC
  6. The mouse feature will be automatically activated.
    remote mouse touchscreen

You can easily control your PC using the Remote Mouse app, which connects your tablet to your computer through Wi-Fi and lets you use it as a touchpad and keyboard. Learn more by visiting how to use Remote Mouse on Windows.

How to use a tablet as a touchpad for PC?

Various apps for your tablet allow you to use it as a touchpad. All applications shown in this guide will allow you to use your tablet as a touchpad.

How can I control my PC from my tablet?

If you want to control your PC from a tablet, you can use some of these apps, but if you want full control, you want to try using remote control software instead.

As you can see, it’s pretty simple to use a tablet as a mouse for a PC, but did you know that you can use your phone as a mouse on Windows 11?

You’re not limited just to your mouse, you can also use your tablet as a keyboard or if you don’t own a tablet, you can always use phone as a keyboard for PC.

How to Fix ERROR_SHARING_PAUSED

The ERROR_SHARING_PAUSED error (Error 70) typically occurs when a shared resource, like a file or printer, is paused or unavailable. It also appears when you try to change the logon credentials on a server for a user you just created without logging into that account first. In this case, just log into that account one time, then switch to the administrator account and try to make the changes again. If you’re facing the first scenario, apply the solutions below.

How do I fix the ERROR_SHARING_PAUSED?

1. Check the shared resource status

  1. Ensure that the shared resource (e.g., a printer or shared folder) is not paused or offline.
  2. For printers, go to Control Panel > Devices and Printers, right-click on the printer, and ensure it is not paused or offline.

As the error suggests, the server you are accessing to use the resource is in the process of restarting. So, checking the device status you’re trying to use makes a lot of sense. Typically, you will just need to wait for the server to come back online and administrate that resource.

  1. Open the Run dialog by pressing Win + R, type services.msc, and press Enter.
  2. Find Print Spooler in the list, right-click it, and select Restart.

Additionally to resetting the Print Spooler service, you should check if the network printer is actually online and working and not paused or under maintenance.

3. Check the network connections

  1. Ensure that all network cables are properly connected and that your network devices (e.g., routers, switches) are functioning correctly.
  2. If using Wi-Fi, ensure you are connected to the correct network.

You might have an internet connection, but to access a local connection resource, you will also need to be connected to the local network. Check if you logged into the network if you have a dedicated method to do that and it’s not an automatic process.

4. Verify the sharing permissions

  1. Right-click on the shared folder or printer and select Properties.
  2. Go to the Sharing tab and click on Advanced Sharing.
  3. Ensure that Share this folder is checked and that the permissions are set correctly.

You also might be logged into an account that doesn’t have access to the local network resources. Make sure that you use the right account for that.

By following these steps, you should be able to resolve the ERROR_SHARING_PAUSED error and restore access to the shared resource. If none of these work, just contact the IT administrator to get to the bottom of this problem.

You might be interested on ways to fix the folder sharing issues on Windows. We also have a guide on how to view shared files on Windows 11.

Let us know if the solutions from our guide helped you fix the ERROR_SHARING_PAUSED issue by using the comments below.

The latest KB5043076/KB5043067 Patch Tuesday updates for Windows 11 fix the UAC prompting issues, while acknowledging Bluetooth bug

Microsoft has issued the Patch Tuesday updates for Windows 11 23H2, 22H2, and 21H2. The updates are delivered via KB5043076 for 23H2 and 22H2 and KB5043067 for 21H2. Once applied, they will take you to build 22631.4169, 22621.4169, and 22000.3197, respectively.

As part of the Patch Tuesday updates, KB5043076 and KB5043067 include general security updates for each version.

The updates also include several known issues, such as difficulties booting Linux in a dual-boot setup and the inability to change your user profile picture. It seems that these known errors are widespread in all the patches released this month, as Windows 10 is also affected by them.

In addition, KB5043067 for Windows 11 21H2 includes new policies and settings that will update profiles for certain mobile service operators. It’s worth mentioning that using Bluetooth earbuds with this Windows 11 version might be frustrating, as the Redmond-based tech giant highlights that the connection is not stable.

[Bluetooth] Connections to some wireless earbuds are not stable. This occurs on devices that have firmware from April 2023 and later.

On the other hand, KB5043076 fixes some issues for Windows 22H2, such as the User Account Control (UAC) not prompting for credentials.

The complete changelogs for 23H2 and 22H2 updates are found below, while the one for 21H2 can be found here.

You can grab the updates now via Windows Update or manually download them from the Microsoft Update Catalog here.

Installing the latest Security Update KB5043064 in Windows 10, won’t let you boot to Linux

It’s that time of the month, and Patch Tuesday updates are upon us. The latest Windows 10 security update, KB5043064, applies to operating system versions 20H2, 21H2, and 22H2 and bumps the build numbers up to 19044.4894 and 19045.4894, respectively. The update is available via Windows Update and from the Microsoft Update Catalog.

The new release’s primary focus is patching security vulnerabilities. The Windows 10 August 2024 security update includes fixes for the Windows print spooler service, the Microsoft OLE automation system, and the Microsoft Edge web browser.

However, KB5043064 for Windows 10 contain a few known issues. One bug might prevent some users from changing their account profile picture, while another issue could cause problems booting Linux on dual-boot Windows/Linux systems.

After installing this security update, you might face issues with booting Linux if you have enabled the dual-boot setup for Windows and Linux in your device. Resulting from this issue, your device might fail to boot Linux and show the error message “Verifying shim SBAT data failed: Security Policy Violation. Something has gone seriously wrong: SBAT self-check failed: Security Policy Violation.”

The August 2024 Windows security update applies a Secure Boot Advanced Targeting (SBAT) setting to devices that run Windows to block old, vulnerable boot managers. This SBAT update will not be applied to devices where dual booting is detected. On some devices, the dual-boot detection did not detect some customized methods of dual-booting and applied the SBAT value when it should not have been applied.

Microsoft advises all Windows 10 users installing KB5043064 to follow the health page for upcoming workarounds.

If you’re on an older version of Windows 10, note that several other updates are available today via the Microsoft Update Catalog:

  • Windows 10, version 1809: KB5043050, Build 17763.6293
  • Windows 10 Enterprise LTSC 2016: KB5043051, Build 14393.7336
  • Windows 10 Enterprise 2015 LTSB: KB5043083, Build 10240.20766
    With the September 2024 Patch Tuesday updates, Microsoft has also released new SSUs for all of the above versions of Windows 10.

Microsoft’s Windows support site provides more details on the fixes and any known issues in the latest SSUs.

How to Solve ERROR_REQ_NOT_ACCEP in 4 Easy Methods

System error 71, officially known as ERROR_REQ_NOT_ACCEP, occurs when the remote computer refuses to accept more connections because it has reached its limit. It commonly appears on Windows 10, 8, 7, Vista, and XP. According to Microsoft labelling, the hexadecimal code for this error is 0x47.

What is causing the ERROR_REQ_NOT_ACCEP?

When this error occurs, users must find and address the root cause. Various factors, such as misbehaving hardware or software, can cause this error.

Windows system error codes usually result from the OS trying to communicate a problem to the user. They can be triggered by various issues, from software conflicts to hardware problems. Recent Windows or driver updates and corrupted system files could cause the ERROR_REQ_NOT_ACCEP to appear.

How to Fix the ERROR_REQ_NOT_ACCEP in 4 Easy Methods

Method 1: Run an SFC scan and Repair Windows

One way to fix this issue is using the System File Checker tool built into Windows. This command-line utility scans for and repairs corrupted or missing system files, which can lead to fixing the ERROR_REQ_NOT_ACCEP.

  1. Open Command Prompt with Admin Rights.ERROR_TOO_MANY_CMDS
  2. Type in the following command: sfc /scannow
  3. Let Windows run the process, and then restart your PC.

Method 2: Updating/Reinstalling/Rolling back drivers

The root of the problem could also be a device driver. Users can try reinstalling or updating the driver, or rolling back to a previous driver version may also work. First, identify the faulty driver, and then:

  1. In the Search box, type in Device Manager and click on it.
  2. Click on Display Adapters, right-click on your native display adapter and select Update driver.ERROR_TOO_MANY_CMDS
  3. Select your preferred choice, and let Windows run the updating process.

To reinstall the faulty driver, follow the same steps, but instead of selecting Update driver, select Uninstall driver. Then click Uninstall.

Make sure to download and install the proper version of your driver. Reboot your PC, and see if the ERROR_REQ_NOT_ACCEP is fixed.

As we mentioned, rolling back the driver to a previous version could also fix the issue.

  1. In Device Manager, right-click on the affected driver and select Properties.ERROR_REQ_NOT_ACCEP
  2. Go to the Driver section, and select Roll Back Driver.
  3. Follow the steps, and then reboot your PC.

Method 3: Modify the CachedLogonsCount string

Making sure the CachedLogonsCount string from the Registry Editor is set to the correct value could also fix the ERROR_REQ_NOT_ACCEP. To do this, you’ll need to:

  1. Open Registry Editor with Admin rights.ERROR_REQ_NOT_ACCEP
  2. Open the Computer section and select the HKEY_LOCAL_MACHINE.
  3. Scroll down to SOFTWARE and open it.ERROR_REQ_NOT_ACCEP
  4. Then go to Microsoft.
  5. Scroll down to Windows NT.
  6. Locate Winslogon, and click on it until it opens the right panel.ERROR_REQ_NOT_ACCEP
  7. Open ChachedLogonsCount.ERROR_REQ_NOT_ACCEP
  8. Change the Value Data from 10 to the preferred limit, and then click OK.
  9. Close Registry Editor, and then reboot your PC.

Method 4: Perform a System Restore on the Windows device

If none of the solutions above work, a System Restore might be worth trying. This will eliminate all the corrupted files and restore the device to a state before the issue occurs.

To perform a System Restore, hit the Restart Now button from the Advanced Startup pane and follow the instructions. ERROR_TOO_MANY_CMDS

This step is not difficult, but it’s not easy either, and you’ll need some more detailed guidance, which you can find here.

ERROR_REQ_NOT_ACCEP is a frustrating bug, but you can eliminate it using the workarounds above. However, if you have your fix, share it with us in the comments below.

Use Tablet as Keyboard For PC: 3 Ways to do it

If your keyboard isn’t working, you can use the tablet as a keyboard for your PC as a temporary solution. This is simpler than you think, and in today’s guide, we’re going to show you how to do it.

How can I use the tablet as a keyboard for a PC?

1. Use the Bluetooth Keyboard & Mouse app

  1. Download the Bluetooth Keyboard & Mouse from PlayStore on your tablet.
  2. Once installed, enable Bluetooth and your PC and tablet and pair them.
  3. Start the app and go to Setup remote device.
    setup remote device
  4. Select your PC from the list of devices. If it’s not available, click tap on New device and follow the instructions to add it.
    select device
  5. Once connected, tap the keyboard icon.
    keyboard icon Bluetooth Keyboard & Mouse app
  6. Now you should be able to enter text with ease.

Keep in mind that you won’t be able to use any special keys, but you’ll be able to type.

2. Use the Interface app

  1. Visit the Interface PlayStore page and install the app.
  2. Ensure that your tablet and PC are connected via Bluetooth and start the app.
  3. Tap the keyboard icon to bring up the keyboard.
    keyboard icon interface app
  4. Turn your tablet to landscape mode and you’ll have a full-size keyboard with all the keyboard buttons.

3. Use Unified Remote

  1. Visit the Unified Remote download page and click on Latest.
     latest server unified remote
  2. Download and install the server.
  3. Once the server is up and running, download and install Unified Remote from the Play Store.
  4. Start the app, open the sidebar, and choose Servers.
    universal remote servers
  5. In Found servers, select your PC.
    found server unified remote
  6. Next, select the keyboard on the main menu.
    keyboard main menu unified remote
  7. Set your device in the landscape mode and you’ll have a full keyboard.
    keyboard unified remote

Unlike previous solutions, this one works with both Wi-Fi and Bluetooth, so it’s perfect for PCs that don’t have Bluetooth.

How can I use my tablet as an input device for my computer?

It’s possible to use your tablet as an input device, but you’ll need to install the dedicated app to use this functionality. In most cases, you’ll need a Bluetooth or Wi-Fi connection to do this.

How can I control my PC from my tablet?

This can be achieved with the tools from this guide, but if you want even more control with advanced functionality, you should probably look into remote control software.

As you can see, you can use the tablet as a keyboard for a PC in a pinch, but for best results, you might want to look into getting a wireless keyboard.

While a tablet gives you the most comfortable experience, you can also use your phone as a PC keyboard.

Lastly, you can also use your Android phone as a PC mouse, and we have a great guide that shows you how to do that. If you’re a tablet owner, don’t miss our guide on how to use a tablet as a mouse for PC.

Chrome’s Google Lens Update to take WebPage Translations to Next Level

Google is adding the “Translate” feature to Google Lens in Chrome Canary to let you translate foreign webpage content on screen easily. Here is how it works.

The search engine giant has recently made a redesigned version of Google Lens available in the Chrome browser on desktop. The tool, accessible from the address bar, lets you select anything on your screen for a visual search. The results appear in the sidebar.

Chrome adds “Translate screen” button to Google Lens

Google tweaked Google Lens Search in Chrome to match the “Circle to Search” feature in Android. Till now, Lens could only translate selected text. Now, Google is expanding this to the entire screen, including images. This means you can quickly and easily translate whatever on the screen. You can even copy the translated content and paste it into other applications.

Google Lens Overlay with “Translate Screen” option. Image Credit: WindowsReport.

As spotted by us in a commit message, Chrome is adding Translate button to LensOverlay. Because of this, the Google Lens Overlay will soon feature a “Translate Screen” option in the Lens Overlay. This new feature makes it easier than ever to translate content on foreign websites. Simply select the translate button to instantly translate the entire screen.

Google Lens translation feature in Chrome after. Image Credit:WindowsReport.

Apart from adding the Translate feature to Google Lens, Chrome is adding “tab declutter” feature to desktop after Android, Task Manager, PDF Viewer and Picture in Picture are getting a refresh. Additionally, the reading list will support Toast notifications, and Chrome to show save bookmarks to Google Account prompt.

PCI_VERIFIER_DETECTED_VIOLATION BSoD 0xF6 [Solved]

The PCI_VERIFIER_DETECTED_VIOLATION Windows blue screen appears due to issues with the system BIOS or a connected device. PCI in the error message stands for Peripheral Component Interconnect, and it is a critical component that facilitates communication between the PC and connected devices.

Causes for the PCI Verifier Detected Violation BSOD include outdated or corrupt drivers for PCI devices (graphics card, network adapters, sound cards), a misconfigured, outdated, or incompatible BIOS, corrupted system files, and hardware malfunction.

Before you start troubleshooting, install pending Windows updates, make sure all the connections are in order, clear any overclocking, and scan the PC for malware.

How do I fix PCI_VERIFIER_DETECTED_VIOLATION blue screen?

Tip icon Tip
If the PCI_VERIFIER_DETECTED_VIOLATION BSoD appears as soon as you turn on the PC, boot Windows into Safe Mode with Networking and then proceed with the solutions. Also, tech-savvy readers can check the BSOD logs to identify the faulting component.

1. Reinstall the corrupt drivers

  1. Press Windows + X to open the Power User menu, and select Device Manager.
  2. Look for any entry with a warning sign next to the device’s icon. These are devices with corrupt drivers, and the categories they are listed auto-expand when opening the Device Manager.
  3. Right-click on the affected device, and select Uninstall device.uninstall device tot fix PCI_VERIFIER_DETECTED_VIOLATION
  4. Tick the checkbox for Attempt to remove the driver for this device, if available, and then click Uninstall.confirm uninstall
  5. Finally, reboot the PC and check for improvements.

2. Update all the installed drivers

  1. Press Windows + S to open Search, type Device Manager in the text field, and click on the relevant result.
  2. Expand the Display adapters entry, right-click on the active graphics adapter, and select Update driver.update driver to fix PCI_VERIFIER_DETECTED_VIOLATION
  3. Click on Search automatically for drivers and wait for Windows to install the best locally available version.automatic driver search
  4. Similarly, update the drivers for other devices like network adapters, sound cards, storage controllers, and connected peripherals.

If you haven’t checked for newer versions in a while, it’s time to update the drivers. Because, outdated drivers are a common cause of the PCI_VERIFIER_DETECTED_VIOLATION blue screen.

In case Windows tells you that the best drivers are already installed, visit the manufacturer’s website, check for new releases, and then manually install the latest driver!

3. Repair the corrupt system files

  1. Press Windows + R to open Run, type cmd, and hit Ctrl + Shift + Enter.command prompt
  2. Click Yes in the UAC prompt.
  3. Paste the following commands and hit Enter after each: DISM /Online /Cleanup-Image /CheckHealth DISM /Online /Cleanup-Image /ScanHealth DISM /Online /Cleanup-Image /RestoreHealth
  4. Now, run this command: sfc /scannowsfc scan to fix PCI_VERIFIER_DETECTED_VIOLATION
  5. Finally, reboot the PC to apply the changes.

When corrupted system files trigger the 0x000000F6 PCI_VERIFIER_DETECTED_VIOLATION BSOD, run the SFC (System File Checker) and DISM (Deployment Image Servicing and Management) scans.

4. Reset the BIOS to defaults

  1. Turn on your PC, and as soon as the display lights up, repeatedly hit the F1, F2, F10, F12, Del or Esc key, depending on your system manufacturer, to access the BIOS.
  2. In the BIOS, look for an option that says Default, Load default, or Reset, and click on it.reset BIOS to fix PCI_VERIFIER_DETECTED_VIOLATION
  3. Now, click on the appropriate response in the confirmation prompt.confirm
  4. Finally, boot Windows and verify whether the 0x000000F6 BSOD is fixed.

5. Update the BIOS

While it’s not recommended to regularly update the BIOS, given the critical nature of the process, this can fix blue screen errors like PCI_VERIFIER_DETECTED_VIOLATION.

I suggest you check the manufacturer’s website for the exact steps since they are different for each, and be extra cautious.

6. Check the RAM and disk for issues

6.1 Repair the disk

  1. Press Windows + S to open Search, type Command Prompt, and click on Run as administrator.command prompt
  2. Click Yes in the UAC prompt.
  3. Paste the following command and hit Enter: chkdsk /r
  4. If asked to run the scan when the computer next restarts, press Y, hit Enter, and then reboot the PC.check disk to fix PCI_VERIFIER_DETECTED_VIOLATION

The built-in Check Disk utility repairs bad sectors on the disk, which is one of the common reasons for BSODs.

6.2 Inspect the RAM

  1. Press Windows + S to open Search, type Windows Memory Diagnostic, and click on the relevant result.
  2. Click on Restart now and check for problems.windows memory diagnostic to fix PCI_VERIFIER_DETECTED_VIOLATION
  3. After the scan is done running, check the mdsched.exe logs.

If no issues are found, I recommend using Memtest86+, an open-source memory testing tool that runs advanced scans on individual RAM modules and detects almost every problem. In case it finds issues, it’s best to replace the faulty RAM module.

7. Reinstall Windows

When nothing else works, the last option is to reinstall Windows. This will eliminate all software-based conflicts on the PC!

To reinstall Windows > connect a flash drive to another PC > go to Microsoft’s official website > download the Media Creation Tool > use it to create a bootable Windows USB > plug the USB into the affected PC > change the boot order to the bootable flash drive > follow the on-screen instructions to install Windows.

reinstall Windows
Reinstalling Windows from a bootable flash drive

If reinstalling the OS also fails to resolve PCI_VERIFIER_DETECTED_VIOLATION, it’s best to contact a professional or visit a local repair shop. Because, more likely than not, it’s a hardware issue to blame at this point!

Before you leave, discover expert fixes for all BSODs on Windows like the AGP_INVALID_ACCESS and check if any of these do the trick.

Which fix worked for you? Share with our readers in the comments section.

How to Share the Windows 11 Mobile Hotspot Over Ethernet

Sharing the Windows 11 mobile hotspot through an internet cable is extremely useful if you want to share your connection with a PC that doesn’t have a Wi-Fi adapter. There are a few ways to do that and we’ll go through them step by step.

How do I share my Windows 11 hotspot over the ethernet cable?

1. Share the mobile hotspot using Bridge Connections

  1. Connect the host computer to a Wi-Fi hotspot.
  2. Click the Start button, type network connection and select View Network Connections from the results.
  3. Keep the Ctrl key pressed and select the Ethernet and Wi-Fi connections, then right-click the Wi-Fi and select Bridge Connections.
  4. A new connection named Network Bridge will appear. Right click on it and select Properties.
  5. In the new pop-up window, make sure that both Wi-Fi and Ethernet are selected.
  6. Now, connect the host PC with the remote PC through an Ethernet cable. You don’t need to make any further changes or set up anything on the receiving end.

This is the most simple method to share the mobile hotspot from a Windows 11 PC to another computer by using an Ethernet cable. However, note that if the receiving computer has a very old Ethernet adapter, you might need to use a crossover Ethernet cable instead of the usual one you use to connect to a router.

You can get more detailed steps in this guide on how to create a network bridge in Windows, which explains the full process for linking two adapters.

Although it’s very simple to set up, many users reported connection drops. To counter that issue, follow our guide on how to keep the Windows 11 hotspot always on.

2. Using the Internet Connection Sharing

  1. Connect the computers through an Ethernet cable.
  2. On the host PC, type network connection in the Search bar and select View Network Connections from the results.
  3. Here, right click your Wi-Fi connection and select Properties.
  4. Check the box that says Allow other network users to connect… and use the drop-down menu below to select Ethernet.
  5. Now, right click on the Ethernet connection and select Properties.
  6. Select the IPv4 protocol and select Properties again.
  7. Assign a manual IP address (ex.192.168.1.1) and subnet mask 255.255.255.0. Set a DNS such as 8.8.8.8.
  8. Now, on the client computer, open the View Network Connections window, and select Properties on the Ethernet connection.
  9. Click on the IPv4 properties and select the IP address 192.168.1.2, subnet mask 255.255.255.0, default gateway 192.168.1.1 (the same IP as the host PC), and DNS 8.8.8.8.
  10. Double check the values on the host and client PCs.

Now, the client PC should be able to use the Windows 11 hotspot through the Ethernet cable. Although this method seems more complicated, it only requires a bit of extra focus. It’s also a more stable and long-lasting solution.

Another suggestion is to connect the client computer directly to the router through an Ethernet cable, but probably it is too far or no free ports to connect to. There is also the option to buy an external Wi-Fi dongle and connect the client computer to the Wi-Fi hotspot created on Windows 11 or from the router.

In any case, we hope that our solutions helped you share the Windows 11 mobile hotspot over an Ethernet cable and now everything works fine.

If the network sharing is not working on Windows 11, click the highlighted link to troubleshoot and fix the problem. You might also get the LAN network is already configured error but this guide will help you with that problem as well.

Many users are also wondering if it is possible to hide hotspot SSID on Windows 11, and we have a guide that answers this question.

Let us know in the comments below if our solutions helped you share the Windows 11 mobile hotspot through the Ethernet connection.

How to Use Your Tablet As A Drawing Pad For PC

PCs are great devices but when it comes to exploring your creative side especially for graphic designers, you may need to use your tablet as a drawing pad for a stress-free experience.

The main reasoning for making this connection is ergonomics and stylus support for better precision. Essentially, you’ll be screen mirroring your phone or tablet via a USB or wireless internet connection.

For the tablet, you’ll need a drawing tablet that comes with a stylus pen to draw on the tablet. You’ll also need drawing software installed on your tablet.

How can I use a tablet as a drawing pad for my PC?

1. Duet Display

Duet Display is that one app that works with both Android and iOS tablets or iPad. What makes it our top choice is its energy-saving options. If you have a lower-end or older hardware, it may not be powerful enough to handle the task and may experience performance bottlenecks.

Duet Display offers the option to switch between a 30Hz and a 60Hz refresh rate. You therefore get an enhanced drawing experience and improved responsiveness.

1.1 Install Duet Display

  1. Go to Duet Display’s official website and download the tool. Even for the free version, you will be asked to create a Duet account and provide the card details. Though you won’t be charged for the first 7 days.
  2. Once downloaded, run the Duet Display setup.duet display to use ipad as second monitor windows 11
  3. Click Yes in the UAC prompt.
  4. We recommend you go with the default path and follow the on-screen instructions to complete the process.setup
  5. Run the application, and allow it network access through the firewall.
  6. Sign in to your Duet account.

1.2 Get Duet Display running on your tablet

  1. Open the Google Play Store or App Store from your Android or iPad’s home screen.app store
  2. Search for Duet Display.
  3. Now, tap the Get button to download the app. get
  4. Once done, run Duet Display app and allow it to connect to devices on your local network.
  5. Follow the on-screen prompts, and when asked to create an account, go with Tap here if you already have an account.already have an account
  6. Next, tap on Sign In.sign in to use ipad as second monitor windows 11
  7. Sign in with the credentials you created earlier on the Windows 11 PC.
  8. Again, follow the prompts to complete the initial setup, until you reach the Connect to Your Mac or PC page.

1.3 Set up the tablet

  1. Make sure the two devices are on the same network and that Duet Display is running on both.
  2. Go to the application on your iPad and navigate to the Available Desktops tab, denoted by a network icon.network
  3. Identify the available PC, and choose either Mirror or Extend from underneath.extend to use ipad as second monitor windows 11 
  4. It will take a few seconds for things to set up. Windows may lose focus for a while, and you will receive a notification from Duet Display reading, A remote desktop connection has been started.notification
  5. The tablet will now mirror or extend the display. Change the configuration or rearrange the display if required in the Settings app.rearrange display
  6. To turn off the connection, tap the Duet icon on the tablet or iPad screen, and then select Disconnect from the list of options.disconnect

2. SuperDisplay

This happens to be a fan-favorite app for this task and it’s easy to see why. It supports both wired and wireless connections making it a versatile option. It is also available for iOS users which is a win.

For the wired connection, you get to connect your tablet to your PC and at the same time charge it. It’s common for your tablet to drain battery faster than usual when performing resource-intensive tasks so this is another advantage.

3. Weylus

If you’d like to exercise a little bit more control on how you draw and what your chosen app can do, we advise going for an open-source option like Weylus. It is available on all operating systems and supports physical keyboards.

What’s more, you can edit the source code and tailor some of the settings to work for you.

Additional tips for better drawing

  • Adjust sensitivity settings – Using your tablet as a drawing pad is basically your mouse for your PC. Likewise, because you can adjust your mouse sensitivity and speed settings, you also need to fine-tune your stylus sensitivity settings for precision.
  • Use touchpad gestures – Make use of Windows 11 touchpad gestures to zoom in and out and help you navigate your canvas with ease for a clean job.
  • Calibrate your monitor’s color settings – To avid a mismatch in colors between your tablet and PC, calibrate your Windows 11 color settings to match your tablet and minimize discrepancies.
  • Advanced features – Most stylus pens have advanced features that can help you adjust pressure sensitivity or achieve a certain level of thickness when drawing so explore these and adjust where necessary.

Remember to keep your drivers and all software up-to-date to avoid compatibility issues as well as creating backups of your work.

On the downside, you may experience performance issues especially with input lag because of the connection but you can always speed up your Windows 11 and switch to a wired connection with high-speed data cables where possible.

The good thing about using your tablet as a drawing pad for your PC is cross platform compatibility. Not only can you control your PC from an Android phone but also, you can use your iPad as a second monitor and achieve similar results.

That’s all we had for this article. If you’ve tried this connection before, we’d love to get your thoughts on your experience. What software did you use and would you recommend it? Share your thoughts in the comment section below.

How to Get Your Facebook Switch Account Button When It’s Missing

If you use Facebook as your social communication tool, then you know you can easily separate your profiles and switch accounts when necessary. But what happens when the switch account button is missing?

The switch account option on Facebook may be missing if you’ve let cache and cookies build up over a long period. It is also possible if you’ve not logged into the other account in a while and Facebook logged you out for security purposes.

How can I get back the switch account button on Facebook?

1. Log out of everywhere and login again

  1. Log into your Facebook account, click on your profile icon and select Settings & privacy.
  2. Next, click on Activity log.
  3. Click on Where you’re logged in.
  4. Scroll down and hit Log out on all instances.

2. Clear cache and cookies

2.1 Browser cookies

  1. Launch your Chrome browser and click the three vertical ellipses in the top right corner.
  2. Select Settings.Settings Chrome Can't access Microsoft Teams Admin Center
  3. Click on Privacy and security, then select Clear browsing data.
  4. Check Cookies and other site data and Cached images and files, then hit Clear data.clear-data-chrome error-code-224003

2.2 App cookies

  1. Tap on settings on your phone.
  2. Next, tap on Apps.
  3. Find the Facebook app and tap on it.
  4. Scroll down and select Storage.
  5. Tap on Clear data and Clear cache, then try again.
  6. Repeat the same steps for the Messenger app if installed on your device.

3. Reset app settings

3.1 Browser

  1. Open your Chrome browser and click on the three vertical ellipses at the top right corner.
  2. Select Settings.Settings Chrome Can't access Microsoft Teams Admin Center
  3. Next, click on Reset and cleanup, then select Restore settings to their original defaults.
  4. Confirm Reset settings in the next dialog box.

3.2 Facebook app

  1. On your browser and go to the basic Facebook page.
  2. From the bottom of that page access your Account.
  3. Now, access Security and Login and change your password.
  4. When done, open a new web browser page and navigate to the Facebook page.
  5. Log in by using the newly created password.
  6. And follow Make my account secure on-screen info.
  7. Now, open a new page once more and go to the Facebook page. You should be able to switch your accounts now.

If you try all these and none seem to bring up the switch account button, try with another browser. Sometimes, Facebook is just not working on Chrome. There are some browsers that augur well and have a greater compatibility with the app so switch to one of them and see how it works.

You can also try contacting Facebook customer care support and see whether they have any additional solutions.

Still on switching accounts, you may find Facebook keeps asking you to switch accounts but we already have a dedicated article on how to bypass this error.

For more buttons missing like the sell something option being unavailable, feel free to visit our dedicated article for tips to get it back.

If you no longer want to deal with login or account switching issues, you can also follow our step by step guide on how to delete your Facebook account.

If you’ve encountered this issue before and have a solution that worked for you but not mentioned here, feel free to share it with us in the comment section below.

Microsoft’s latest patent describes a cross-device experience that shuts off certain notifications from showing on certain devices at certain times

If you have often dealt with situations where you needed to work from your PC or laptop instead of your work device, you know how frustrating it can be to let work life invade your personal life.

Fortunately, for situations like these, where you’d have to use your devices for work, Microsoft is developing technology that restricts message notifications and conversations based on device type, message category, and period.

In other words, the tech will keep track of your devices and your behaviour to alert you of notifications related to work (but not limited to) based on your behavioural preferences.

This system is designed to manage notifications and conversations across multiple devices that a user owns. Each device is categorized (like a phone, tablet, or computer), and these categories are linked to specific times of the day. For example, your phone might be in one category and your laptop in another.

It then associates different times of the day with these device categories. For instance, during work hours, your laptop might be the primary device for notifications, while your phone might take over in the evening.

The system decides which devices can show notifications based on time and category. Your smartwatch might show notifications during a meeting while your phone stays silent. The technology also categorizes messages. It can determine the type of message (work-related or personal) based on user input or by analyzing the message content using a machine learning model.

The system decides which notifications and conversations to show or hide on each device based on the message category and time. For example, only work-related messages might be displayed on your laptop during work hours, while personal messages are hidden.

The application can include various devices and is not restricted to PCs/laptops. Tablets, netbooks, gaming devices such as Xbox consoles, mobile devices, smart watches, smartphones, and Internet of Things devices are examples of how this technology might be integrated.

The tech exists as a patent, and we’re not sure if it will ever see the light of day, but it gives us a clue about what Microsoft might plan to do with Windows or its Teams platform.

Currently, Windows 11 offers various options for handling notifications, from disabling them to changing their sounds to even hinting at private notifications. Still, the Redmond-based tech giant has never mentioned a cross-device notification experience.

Could the new cross-device notification system from Microsoft be useful? Definitely yes. You can easily use only a set of devices from work to private spaces without relying on additional ones. The tech would end up being entirely sustainable. From a psychological point of view, users can safely check their devices for personal reasons without being overwhelmed or even bothered by professional work-related tasks.

You can read the patent paper here.

Fix: ERROR_FILE_EXISTS Code 80 (0x50)

The ERROR_FILE_EXISTS issue, with error code 0x80070050, indicates a misconfiguration at the user’s end. It is usually encountered when deleting a file or loading applications. The message reads, Error 0x80070050: The file exists or Operating system error code 80.

Common causes for Error File Exists include slow File Explorer, misconfigured settings, cloud storage apps, hitting the Windows character limit for path, and corrupted system files.

Before you start troubleshooting, install pending Windows updates, terminate non-critical apps, disable any third-party antivirus, and scan the PC for malware!

How can I fix ERROR_FILE_EXISTS in Windows?

Note icon NOTE
This article concerns the ERROR_FILE_EXISTS system error. If you have trouble updating Windows, check our detailed guide on the 0x80070050 update error.

1. Restart File Explorer

  1. Press Ctrl + Shift + Esc to open the Task Manager.
  2. Select Windows Explorer, and click on Restart task.restart task to fix ERROR_FILE_EXISTS

If you are getting the ERROR_FILE_EXISTS 0x80070050 issue while deleting files, it’s likely that the said file was already deleted, but the changes were not registered, triggering The file exists message. Restarting the File Explorer task should fix this in no time!

2. Disable Hyper-V (fixes 0x80070050 in Windows Sandbox)

  1. Press Windows + S to open Search, type Command Prompt, and click on Run as administrator.
  2. Click Yes in the UAC prompt.
  3. Paste the following command and hit Enter to disable Hyper-V: DISM.exe /Online /Disable-Feature /FeatureName:Microsoft-Hyper-V-Alldisable hyper-v to fix ERROR_FILE_EXISTS
  4. Reboot the PC and check for improvements.

3. Turn off syncing to OneDrive

  1. Click on OneDrive in the system tray, then click the gear icon, and select Settings.
  2. Go to the Account tab, and click on Unlink this PC. turn off OneDrive to fix ERROR_FILE_EXISTS
  3. Click on Unlink account in the confirmation prompt.confirm

For many users, syncing files to OneDrive triggered the ERROR_FILE_EXISTS Win32 error, and simply disabling OneDrive quickly fixed things. Also, if you have other active cloud storage services like Google Drive, uninstall the app(s) and check for improvements!

4. Disable the Windows character limit for path

  1. Press Windows + R to open Run, type regedit in the text field, and hit Enter.
  2. Click Yes in the UAC prompt.
  3. Paste the following path in the address bar and hit Enter: HKEY_LOCAL_MACHINE\SYSTEM\CurrentControlSet\Control\FileSystempath
  4. Double-click the LongPathsEnabled DWORD on the right.
  5. Enter 1 under the Value data field and click OK to save the changes.disable path limit to fix ERROR_FILE_EXISTS

If you are getting Error 0x80070050: The file exists while performing file-based operations manually or via a script, it could be the character limit imposed by Windows to blame. So, all you have to do is disable the character limit for path via Registry Editor!

5. Repair the corrupt system files

  1. Press Windows + R to open Run, type cmd, and hit Ctrl + Shift + Enter.command prompt
  2. Click Yes in the UAC prompt.
  3. Paste the following commands individually and hit Enter after each: DISM /Online /Cleanup-Image /CheckHealth DISM /Online /Cleanup-Image /ScanHealth DISM /Online /Cleanup-Image /RestoreHealth
  4. Now, execute the following command to run the SFC scan: sfc /scannowsfc scan
  5. Reboot the PC to apply the changes.

Your PC may throw file-related errors when there are corrupted system files. To fix this, run the SFC (System File Checker) and DISM (Deployment Image Servicing and Management) scans, which will replace the affected system files with their cached copy stored in Windows.

6. Run the Check Disk utility

  1. Press Windows + R to open Run, type cmd, and hit Ctrl + Shift + Enter.
  2. Click Yes in the UAC prompt.
  3. Paste the following command and hit Enter: chkdsk /r
  4. If asked to run the scan on the next restart, press Y and hit Enter to confirm, and then reboot the PC.check disk to fix ERROR_FILE_EXISTS

The built-in disk repair utility, Check Disk, can fix issues like bad sectors and other disk-related issues, which are often the reason for (0x50) ERROR_FILE_EXISTS.

7. Perform an in-place upgrade

Note icon NOTE
The steps listed here are for Windows 11. If you are running the previous iteration, learn how to perform a repair upgrade on Windows 10.
  1. Go to Microsoft’s official website, select the OS edition and product language, and then download the Windows 11 ISO.windows 11 ISO
  2. Double-click the ISO file and click Open in the confirmation prompt.
  3. Run the setup.exe file.setup.exe
  4. Click Yes in the UAC prompt.
  5. Click Next to proceed.
  6. Read Microsoft’s license terms and click on Accept to agree.
  7. Verify that the setup reads, Keep personal files and apps, and click on Install.in-place upgrade to fix ERROR_FILE_EXISTS
  8. Wait for the in-place upgrade to complete. It may take 45-90 minutes.

When nothing else works, the last option is to perform an in-place upgrade. It is like reinstalling Windows, but you don’t lose personal files or apps!

One of these solutions should have helped with the ERROR_FILE_EXISTS Windows error. If the error appears while deleting files, restarting File Explorer or the PC should suffice. For other scenarios, in-depth troubleshooting is necessary.

Before you leave, discover expert tips to make File Explorer faster in Windows!

For any queries or to share which fix worked for you, drop a comment below.

What is SBMDL.DLL, Should I Remove It?

The SBMDL.DLL file is often associated with Browser Helper Object (Trojan-Downloader.Win32.Zlob.bfix or Trojan-Downloader.Win32.Zlob.kfs as detected by Kapersky) that usually runs automatically every time you launch your browser.
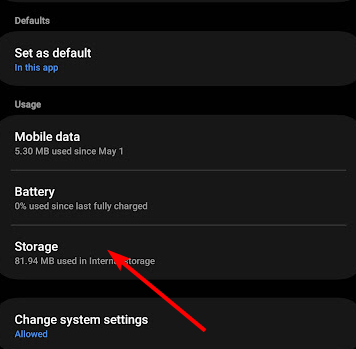
These BHO are used by spyware and adware to display ads, monitor web browsers, slow down your PC and cause issues on it. This file can pose many security risks and as it is no a core Windows file, it is safe to remove it.

Deleting it will not affect your Windows operating system and any other app. Read on to learn the steps to remove SBMDL.DLL file from your computer.

How do I remove sbmdl.dll from my PC?

  1. Press Ctrl + Shift + Esc to open the Task Manager app.End task - sbmdl.dll
  2. Go to the Processes tab, look for any processes related to sbmdl.dll, and click End task.

2. Run a malware scan

  1. Press the Windows key, type security and locate Windows Security, then click Open.Windows Security open Windows key  - sbmdl.dll
  2. Go to Virus & threat protection, and click Scan options.V& T Scan options - sbmdl.dll
  3. Choose Full Scan and click Scan now.Full scan -
  4. The scan will take some time. Once complete, check the scan results and delete the suggested files from your computer.

3. Remove the file manually

  1. Press Windows + I to open the Settings app.
  2. Go to System, then click Recovery. System - Recovery Windows 11
  3. Locate Advanced startup and select Restart now.Recovery Advanced Startup - sbmdl.dll
  4. On the Choose an option screen, click Troubleshoot.Troubleshoot
  5. Select Advanced options.Troubleshoot WITH AO selected
  6. Click Startup Settings.Startup settings
  7. On the next screen, press F5 to enter Safe Mode with Networking.
  8. Your computer will restart; once it starts up, press Windows + E to open Windows File Explorer.
  9. Navigate to this path: C:\WINDOWS\system32\ or C:\Windows\SysWOW64
  10. Look for SBMDL.DLL and click the Delete icon.

4. Reset your browser

  1. Launch your preferred browser; here we use Google Chrome to demonstrate the steps.
  2. Go to the top right corner, click the three-dot icon and select Settings. Settings CHrome - sbmdl.dll 
  3. Click Reset settings.
  4. Click Restore settings to their original defaults.Restore
  5. Click Reset settings to confirm the action.Reset settings

5. Perform a system restore

Note icon NOTE
Before following the steps mentioned , make sure you have saved all your work and note the names of newly installed apps and system settings preferences.
  1. Press the Windows key, type control panel in the search box, and click Open.Control Panel start menu - sbmdl.dll
  2. Choose Large icons for View by, then choose Recovery.Recovery Control Panel
  3. On the following screen, click Open System Restore.Open system restore - sbmdl.dll
  4. Select Choose a different restore point in the System Restore window and click Next.Next Choose a different restore point
  5. You will get the list of available restore points. Click to select the oldest or most recent restore point from when your computer was functioning correctly, click Next.Choose a point - sbmdl.dll
  6. Click Finish to start the restoring process.Finish

    Windows will restart and restore the system settings to the version you selected. This process may take some time, so don’t turn off your PC. Once your computer restarts, go to Settings, click Windows Update, and then Check for Updates. If an update is available, Click Download & Install to install the latest Windows updates.

    If you see the System Restore message wasn’t completed successfully after the restart, we recommend you check out this informative guide for solutions.

    So, a quick way to delete SBMDL.DLL is to run a full scan using Windows Security. If it’s ineffective or you want to use a third-party anti-malware tool instead, we recommend getting one of the best antiviruses from our list of options. You cam also try one of the best PUP removal tools from our list of tested software.

    While you are here and want to deal with unwanted app; check out our detailed guide on how to block potentially unwanted apps from your computer.

    If you have any questions or suggestions about SBMDL.DLL, feel free to mention them in the comments section below.