2024 has been quite intense for Windows Copilot users, everywhere, as Microsoft debuted several new features and versions for the AI tool. Recently, the Redmond-based tech giant introduced the read-aloud feature to the tool, making it more accessible to a wider category of people.
On the other hand, those already happy with Windows Copilot, are now able to get advanced AI capabilities, according to Microsoft, by opting for the brand-new Copilot Pro, at a cost of a $20/month subscription. However, the AI tool is often freezing, due to high demand, although, it’s going to become more stable as the days pass.
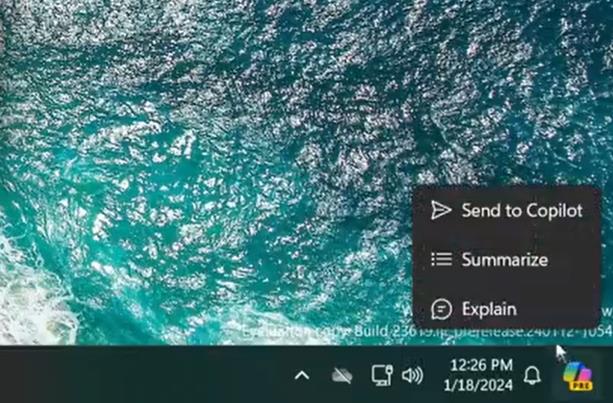
But, even though January is almost over, Microsoft has given users some glimpses of what they should expect from Copilot in the months ahead. Spotted by Windows Insider, @PhantomOfEarth, Windows Copilot is set to debut new settings that will appear when users hover over the Copilot icon on the Windows 11 taskbar.
These new settings include:
Send to Copilot
Summarize
Explain
The Send to Copilot feature is especially useful, as it allows users to quickly highlight a piece of content and send it to Copilot to get insights on it. However, according to the spotter, the new settings only appear in Windows Copilot if the AI tool is linked with Microsoft Edge Canary, and for now, they don’t work.
They can be found inside the latest Dev Build (23619) to the Windows Insider Channel, where @PhantomOfEarth, also discovered a hidden feature, that once enabled, prompts Copilot to open a “ms-copilot” link instead of the regular Edge. The spotter thinks this might be related to Microsoft turning Copilot into a local AI tool.
Could Windows Copilot become a local AI?
A local AI is an AI model capable of running on local hardware (otherwise known as regular hardware), without the need to connect to the cloud for processing.
In other words, every user with a decent PC system, or decent hardware can run a local AI, and build AI apps through it, fine-tune models, or do anything a user would normally do with an AI, but without having to pay for a service, or depend on cloud processes to use the AI.
Depending on the overall performance of the local AI model, one would need different systems to run such tools. For example, for more advanced AIs, stronger hardware would be required, and so on.
The benefit of a local AI is the fact that users will not share it with anyone, so that means they will have access to it anytime, without running into issues, and usually they have greater control over security and privacy settings.
Microsoft turning Windows Copilot into a local AI would be possible in future Windows versions, when those will be built in a way that would require a stronger system overall, as AI in itself, can be quite demanding. With this being said, Copilot might become local, once Windows devices are powerful enough to handle it without impacting the Windows experience.
However, there is little chance of Copilot becoming a local AI and there are reasons for it. Microsoft recently released Copilot Pro, which offers more capabilities for a price. The Redmond-based tech giant might not want to offer to integrate Copilot, as a local AI, for free.
But it could release the local Copilot for Windows, for a fee, for those who would love to have the AI tool for themselves.
Another reason would strictly depend on Microsoft’s willingness to abandon its control over Copilot in favor of letting users have absolute control over the local AI. As we mentioned earlier, a local AI doesn’t depend on cloud processing, and it’s basically built on the whims and needs of the users, who have total control over the privacy, and security settings.
Microsoft, on the other hand, could use Copilot, in the future, for different aspects, including advertising. Allowing users to run it locally will render Copilot incapable of doing so.
But is that a bad thing? Users will probably pay for a chance to run Copilot locally. However, what’s your opinion on this?
Windows Defender Security Center, also collectively known as Windows Security, is the built-in antivirus in Windows. We often compare it with other well-known antivirus solutions, but with the best Windows Defender settings in place, it’s at par with them all!
Is Windows Defender 100% accurate? After conducting extensive tests on its automatic scans, ransomware protection, and firewall, we can say the Windows Defender can detect most threats, but it isn’t 100% accurate. And there’s no need for that as long as you practice healthy cyber hygiene.
Let’s now get to the steps to boost the PC’s security with the best Windows Defender settings!
What are the best Windows Defender settings?
We are listing the best Windows Defender settings after rigorous tests on ten different devices running Windows 10 and Windows 11 (5 each). Our experts tried downloading malicious apps and files to verify the effectiveness of each built-in setting.
Below, you will find what the feature does, the steps to enable it, and tips for optimal results.
1. Real-time Protection
Open Windows Security, and then click on Virus & threat protection.
Click on Manage settings under Virus & threat protection settings.
Enable the toggle for Real-time protection.
The most vital of all, Real-time protection, ensures that no malware runs on the device. It blocks all malicious activity, prevents suspicious apps from installing, and keeps your Windows PC safe.
Remember, it’s not recommended that you disable Real-time protection. Even if you do, it will automatically turn on in a while. Besides, an active status of the feature is critical for enabling other Windows Defender settings.
2. Controlled folder access
2.1 Enabling the feature
In Windows Security, click on Virus & threat protection.
Click on Manage ransomware protection.
Enable the toggle for Controlled folder access.
2.2 Viewing and adding protected folders
In the Controller folder access settings, click on Protected folders.
Click Yes in the UAC prompt.
You will find the following Windows system folders protected by default:
Documents
Pictures
Videos
Music
To include another one, click the Add a protected folder option.
Navigate to the one you want to protect, choose it, and then click on Select folder.
2.3 Allowing an app through Controlled folder access
Click on Allow an app through Controlled folder access.
Click Yes in the UAC prompt.
Now, click Add an allowed app, and then select Recently blocked apps from the menu.
Click the + icon before the affected app. If it’s not listed here, click on Browse all apps, select the app launcher (.exe file), and then manually add it.
Another one of the best Windows Defender settings is Controlled folder access. It prevents unfriendly apps from making changes to critical folders and memory areas. For the feature to work, you must have Real-time protection enabled.
Also, you can add as many to the list of protected folders, but removing protection from a Windows system folder (added by default) is not possible.
Besides, we came across a few cases where Controlled folder access conflicted with safe and verified apps, such as when Warzone settings were not saving. In these cases, you can always add an exclusion for the app!
3. Parental controls
In today’s world, where cyber crimes are on the rise, enforcing security mechanisms for children is of prime importance. And Windows Defender allows you to do that for free!
Just add your child’s account to the family, and you can choose a time limit, prevent inappropriate searches, configure an age filter for apps and games, and set the spending limit.
While it is available in Windows Security under Family options, you will have to access the Microsoft Family Safety portal to configure these settings. If you are new to it, learn how to set up family safety.
4. Core isolation
In Windows Security, click on Device security.
Click on Core isolation details.
Turn on the toggle for Memory integrity, Kernel-mode Hardware-enforced Stack Protection, and Microsoft Vulnerable Driver blocklist.
Core Isolation, one of the best Windows Defender settings, has three sub-settings:
Memory Integrity: Protects the core system processes from malicious code insertion or malware attacks,
Kernel-mode Hardware-enforced Stack Protection: The feature utilizes virtualization technology to isolate the CPU from the active processes, providing enhanced protection. To turn it on, first enable Memory Integrity.
Remember, Core Isolation is one of the trickier settings, and enabling it often results in an error. We, too, came across the Resolve any driver incompatibilities and scan again error message. To fix it, review the incompatible drivers and then uninstall the driver responsible for the issue.
Enabling Core Isolation via Registry
If that doesn’t work, press Windows + R to open Run > type regedit > hit Enter > go to Computer\HKEY_LOCAL_MACHINE\SYSTEM\CurrentControlSet\Control\DeviceGuard\Scenarios\HypervisorEnforcedCodeIntegrity > right-click on the Enabled DWORD > enter 1 under Value data > click OK > restart the PC.
Core Isolation enabled
You should now be able to enable the toggle for Memory Integrity. Do so, and then restart the PC again for the changes to apply.
5. Reputation-based protection
Open Windows Security, and then go to App & browser control.
Click on Reputation-based protection settings.
Now, enable the toggle for the following settings:
Check files and apps SmartScreen of Microsoft Edge Phishing protection Potentially unwanted app blocking SmartScreen for Microsoft Store apps
Reputation-based protection is a built-in feature in Windows Defender that protects the PC against malicious apps (Potentially Unwanted Applications) and files from the web. It also protects critical sign-in information, including email addresses and passwords.
In Windows Security, click on App and browser control.
Click on Exploit protection settings.
You can now configure the various options under System Settings or go to Program settings and add a program to customize.
Exploit protection safeguards against malware attacks that employ exploits to infect the device. The feature has different settings that can be applied system-wide and for individual apps. If you manually configure mitigation for a specific app, it will override the system settings.
Remember, the best exploit protection settings are already in place. So, it’s not recommended you change them. Also, you can export the exploit protection settings to an XML file to set the same configuration on another device.
7. Firewall and network protection
Open Windows Security, and then go to Firewall & network protection.
You can now enable or disable the firewall for the Domain network, Private network, and Public network.
Also, you can allow an app through firewall, run the Network and Internet troubleshooter, configure firewall notification and advanced settings, and restore everything to default.
Windows Defender Firewall, a built-in component of Windows Security, is critical for the security of the device/network. It filters malicious traffic and blocks online cyber-attacks. Again, it’s recommended that you don’t change the default settings unless the firewall is blocking a port or program.
Besides, you can configure the inbound or outbound rules if an app is not running or there are issues with network connectivity, say the firewall is blocking the printer. In our experience, it’s a rare event.
These were the best Windows Defender settings to protect your PC against localized and Internet-based threats.
Lastly, we would like to emphasize that you must not permanently disable Windows Security to run an app or process, no matter what the Internet says. Update the app or contact the developer for a resolution, but never put your PC at risk!
If you are looking to enhance the gameplay or get a competitive edge while playing Rocket League, you must learn the best ways to tweak the camera settings.
To improve the gaming experience and get the best settings for the game, you need to adjust the camera shake, distance, height, angle, camera stiffness, transition speed, and more.
What are the best Rocket League camera settings?
Feature
Value
Field of View
110
Camera Distance
260-280
Height
110
Angle
-3 to -4
Stiffness
0.45
Camera Shake
Off
Swivel Speed
5-6
Transition Speed
1.2
Invert Swivel
Off
1. Field of View
Field of View, or FoV, makes controlling what’s happening in the game easier by providing you with better insight into the field.
So, with a higher FoV, you can see more of the game world and, consequently, can complete difficult tasks without problems. WR experts recommend you keep FoV to 110 and keep an eye on the entire field without even looking all over the place.
2. Camera Distance
Camera Distance determines the distance of the camera from your car, and setting it to a correct value is important as increasing the number provides you with a bigger field of view.
Usually, players keep it in the range of 260-280, depending on what is comfortable for them to maintain accuracy while aiming the shots.
3. Stiffness
Stiffness determines how closely the camera follows your car while you are speeding up. The ideal value is 0.45, however, it ranges from 0.30 to 1.00, depending on your comfort.
However, we suggest you keep a lower value as it will provide a better view of the field, so keep it under 0.50.
4. Angle
The Angle setting lets you adjust the angle at which the camera points at your car. So remember, keeping the angle too high will hinder your view of what’s happening in front of you.
However, a lower value will make it easier to see the situation further on the field. While the default value is -5, WR experts recommend keeping it between -3 and -4, as it will allow you to keep a close eye on opponents coming for the ball.
The Swivel speed allows your camera to move faster around your car and determines how quickly the camera can rotate when you use the camera stick to give you a quicker look at the field.
However, keeping it too high might make you miss out on details on the field, so it is recommended to set the value between 5 and 6 is recommended.
6. Transition Speed
Transition Speed controls the speed of the camera when it switches between your point of view and the ball camera.
Some players like to keep it at a higher value to instantly switch, but the truth is it could throw you off course. So, WR experts recommend setting its value to 1.2 for a smoother transition.
7. Height
It determines how high you want the camera to be placed above the roof of your car. While the default value is 100, you can increase it to 110 -120 or keep it to 90, depending on your choice and comfort.
However, remember that increasing its value to more than 120 might make it impossible to aim aerial shots, as the ball appears smaller on your screen.
8. Camera Shake
Camera Shake adds immersion to the game by letting you feel every impact your car makes. However, when enabled, this feature creates disturbance, as the added visual effects can obstruct your vision and potentially affect your precision, spoiling the entire gameplay.
Therefore, WR experts recommend keeping this setting in Rocket League disabled for a better gaming experience.
9. Invert Swivel
Invert Swivel is for those who have experience playing flight simulator games. It works better if you have a joystick, as it changes the up/down movement of the right stick.
Like Camera Shake, Invert Swivel complicates your gameplay; therefore, it is suggested to keep the setting disabled.
With all the camera settings in place, ensure you have a stable internet connection to avoid lag spikes in Rocket League; read this guide to learn about it in detail.
To conclude, these are the best camera settings for Rocket League, which are known to help the player get a competitive edge and improve their gameplay.
However, don’t stick to the exact values as these are mere indicators, and most of the settings are subject to your gaming hardware, personal preference, and comfort.
In case, while playing Rocket League, you face error 0 on your Xbox, PC, or PS, we tackled this issue in a separate guide. Other than the camera settings, you must know the way to lower ping in Rocket League for improved gameplay; read this guide to learn more.
Did setting the values mentioned in the guide make your gameplay better? Tell us all about it and the settings you prefer in the comments section below.
If you spend longer hours in front of your computer, you might often experience eye fatigue or have trouble sleeping. However, if you use the best night light settings on your Windows 10/11 computer, it can make an important difference in your digital well-being.
Let’s explore the steps to fine-tune the night light settings for late-night work or gaming sessions!
What are the best Night light settings for Windows 11?
1. Turn on the Night light feature
Press Windows + I to open the Settings app.
Go to System, then select Display.
Locate the Night light option and toggle on the switch for it.
The shortest way to turn on or off the Night light is to press Windows + A to open the Quick Settings flyout, then locate Night light and click it to enable the feature.
2. Adjust the Night light settings
Go to the Night Light option in Settings using the same steps mentioned above.
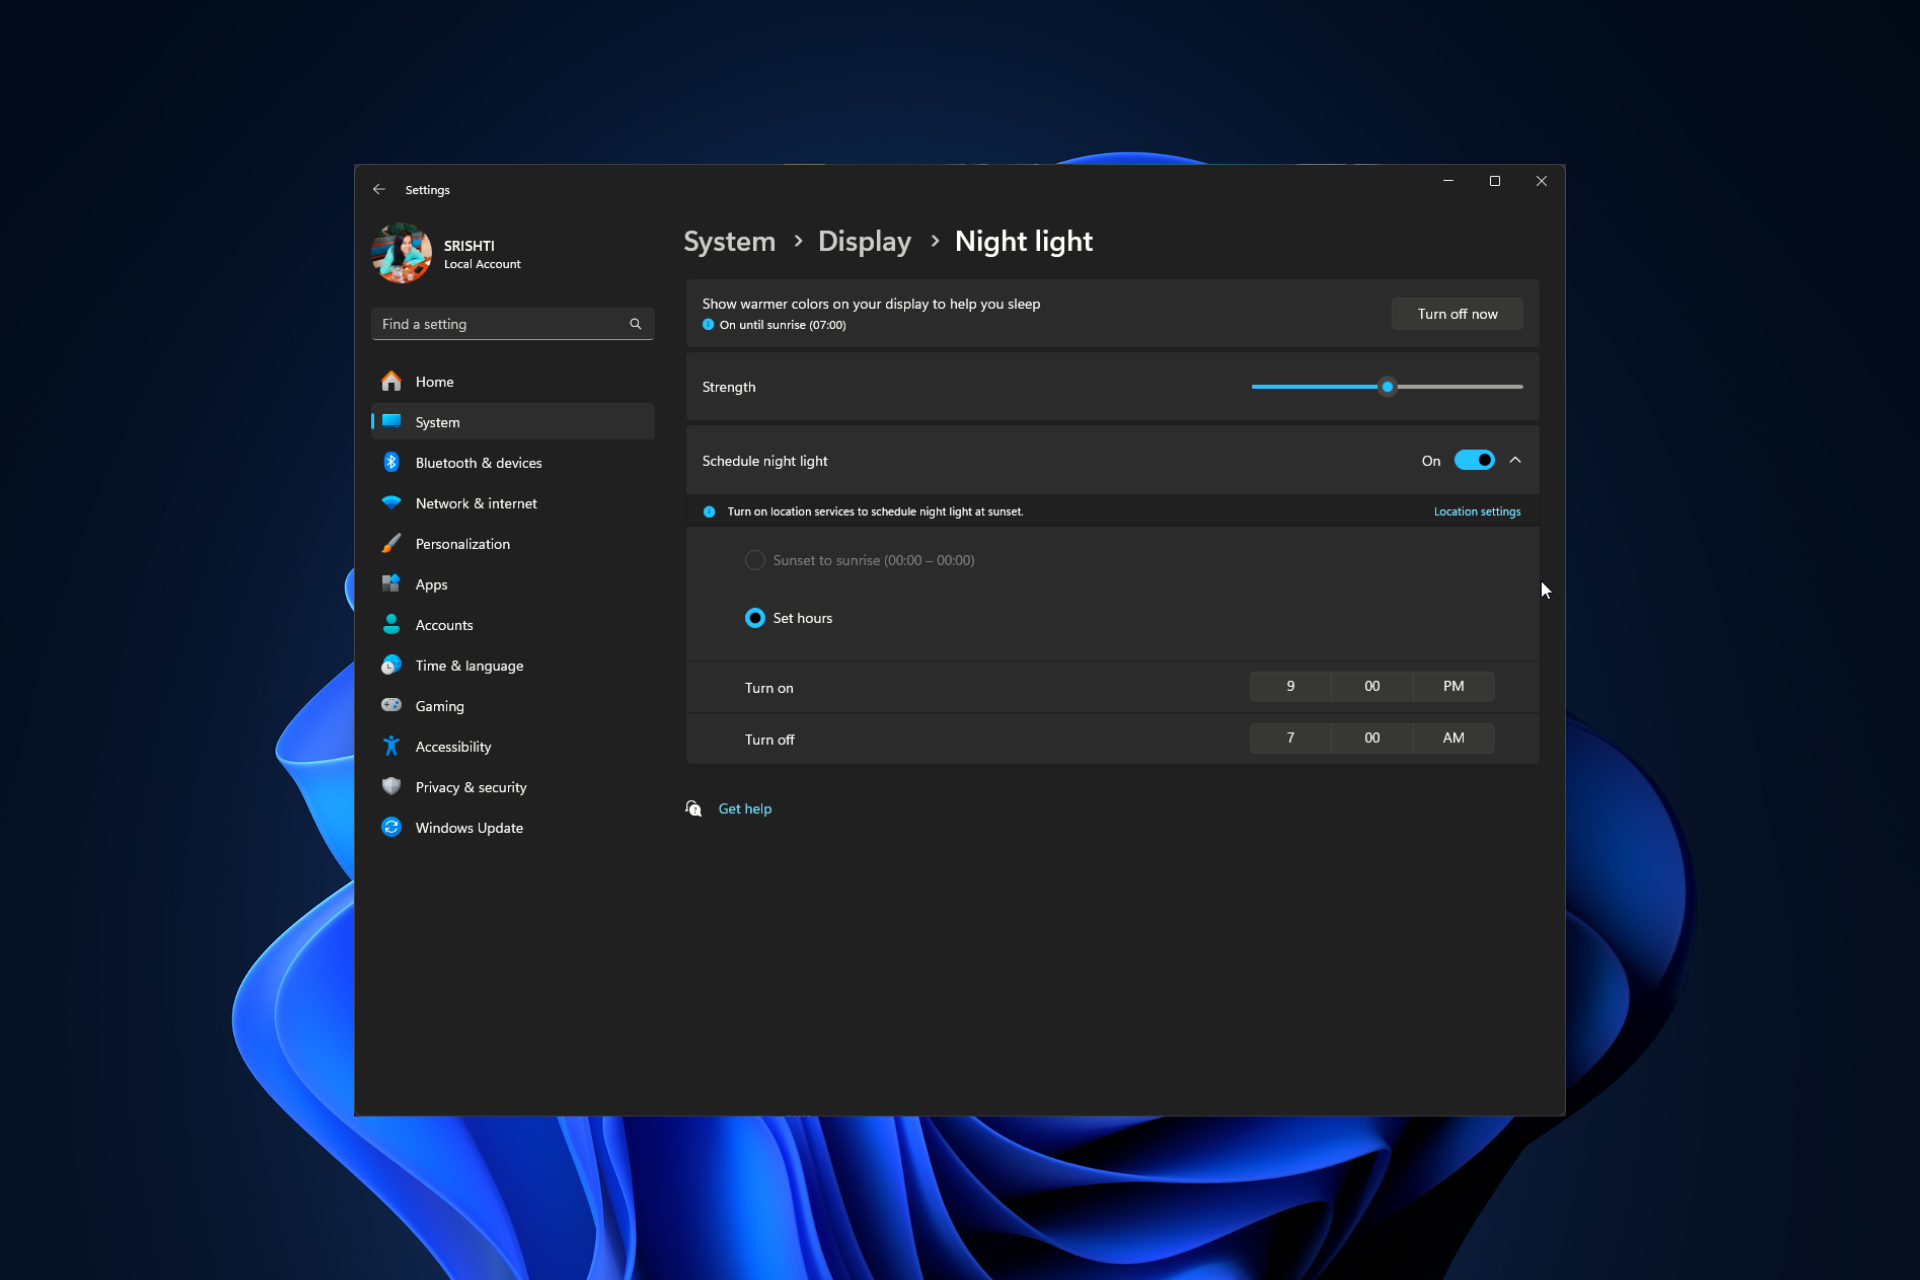
Click the arrow next to the toggle button to access Night Light settings.
Make sure the Show warmer colors on your display to help you sleep option is enabled.
For Strength, you get a slider to adjust how warm you want the screen to be. However, avoid sliding it to extremely warm temperatures as it wouldn’t be any good for the eyes.
Go to the Night Light option in Settings using the same steps mentioned above.
Click the arrow next to the toggle button to access Night Light settings.
Locate the Schedule night light option; it is recommended to keep it turned on, especially if you often work at night.
You can click Set hours, and choose the time for Turn on and Turn off options.
However, if you choose the Sunset and Sunrise option, Windows will set it according to the sunrise and sunset of the current location.
Choosing to set hours according to your routine is the best way to ensure your eyes are not strained.
Tips while using Night Light settings for Windows 11
If the Night light feature is not working for you, restart your PC, try to turn it on/off manually or reinstall the graphics driver.
You can set the color temperature on the screen using Strength according to your comfort between 0 to 100, and the default value is 48. However, WR experts recommend that the strength level should not be more than 50.
Change the position of your monitor to reduce glare and reflections.
In addition to using the Night light feature, exercise the 20-20-20 rule, i.e., every 20 minutes, look at something 20 feet away for 20 seconds.
Adjust the intensity of Night light according to the lighting in your room, meaning lower intensity for darker environments and higher for well-lit rooms.
In conclusion, choosing the best Night light settings on your Windows 11 can help you tailor your computing experience for enhanced eye comfort.
Adjusting the color temperature, and scheduling the time to turn on or off the feature is a significant step towards your visual well-being and improved sleep quality.
You can use the above-mentioned steps to enable Night Light and modify its settings on your Windows 10 computer as well.
You can also invest in blue light filters for monitors that can help you further protect your eyes during long work sessions; read this guide to learn about the best options.
If you have any questions or suggestions about the subject, feel free to mention them in the comments section below.
Giving editing access to your Google Sheets is a great way to let the collaborators provide feedback and make changes to the workbook. Let’s get to the steps to give permissions.
To give editing access to people on Google Sheets, you can either enter their email address in the Share dialog box or adjust the permissions, then copy & share the link for the sheet.
How can I give edit access to Google Sheets?
1. Grant access via email
Login to Google Sheets using your Google account, then open the Google Sheets workbook you want to share.
Go to the upper right corner of the screen and click the Share button.
Next, enter the email addresses of people whom you want to share with. You can add people, groups, or even calendar events in the dialog box.
If you are sharing it with one person, select Editor from the drop-down menu next to it and place a checkmark next to Notify people to send a notification.
In the Message box, you can specify the title or the need of the sheet. However, if you don’t want to, leave it empty, then click the Send button.
In case you want them to access it quicker, you can also click the Link icon present in the bottom left corner to copy the document’s link and share it with people with access.
If not, once you hit Send, the people you added will receive a notification and a link via email. They can click the link and access it.
Before clicking the Send button, ensure you click the Settings icon from the top right corner of the Share dialog box and check if the Editors can change permissions and share option is selected.
2. Give access using a shareable link
Login to Google Sheets using your Google account, then open the Google Spreadsheet you want to share.
Go to the upper right corner and click Share.
On the following pop-up, go to General Access, choose Anyone with the link, and then select Editor from the drop-down.
Now, click the Copy link option and share the link with the group of people or add it to a calendar event.
Sending links is a great way to share your Google Sheets, as it allows you to give access to even non-Google users.
Open the Google Spreadsheet, and go to the specific sheet you want to share.
Go to Data, then select Protect sheets and ranges from the menu.
You will get a Protected sheets and ranges column in the right pane, and select + Add a sheet or range.
Go to the Sheet tab and select the Sheet you want to share from the drop-down.
If you want to specify the range on the sheet, go to the Range tab and select the range, then click OK.
Click the Set permissions button.
On the Range editing permissions pop-up, you will get these options:
Show a wanting when editing this range – This will notify users when they try to edit the sheet
Restrict who can edit this range – Select Custom or Only you, depending on your preference
Choose who can edit – Place a tick mark next to people to whom you want to have editing access
Add editors – Add other email address if you like
Once done, click Done.
If you want to give permission for a selected range to a person, but want to hide some columns, we have a detailed guide for you.
Why won’t Google Sheets let others edit?
The file owner has not given permission to edit the file.
The collaborator is using a different Google account.
Someone with editing access has revoked their permission to edit.
If you are sharing a link, make sure you have chosen Anyone with the link and Editor option from the drop-down menus.
Make sure the person editing the file is connected to the internet.
So, giving permission to edit Google Sheets is an easy task, and you can opt for any of the given methods according to your preferences.
If you are looking to share the sheet via email, you can enter the email address and set permissions. However, WR experts found sharing the editing rights via a link easier.
Furthermore, restricting a person to a specific sheet can ensure the collaborators don’t make changes to other sheets in the Spreadsheet. AT least with Google Sheets, the chances of getting locked out from editing like in Excel are minimized.
The best brightness and contrast settings for your monitor will be dependent on select variables. Nevertheless, they’ll be different for everyone as preference plays a major role.
Other factors that come into play when choosing your brightness and contrast settings include the ambient lighting conditions, your specific monitor model and calibration as well as your level of eye comfort/strain.
What are the best brightness and contrast settings for your monitor?
Brightness
1. Adaptive brightness
Press Windows + R to open Run, type control panel, and hit Enter.
Click on System and Security.
Next, click on Power options.
Click on Change plan settings next to your active power plan.
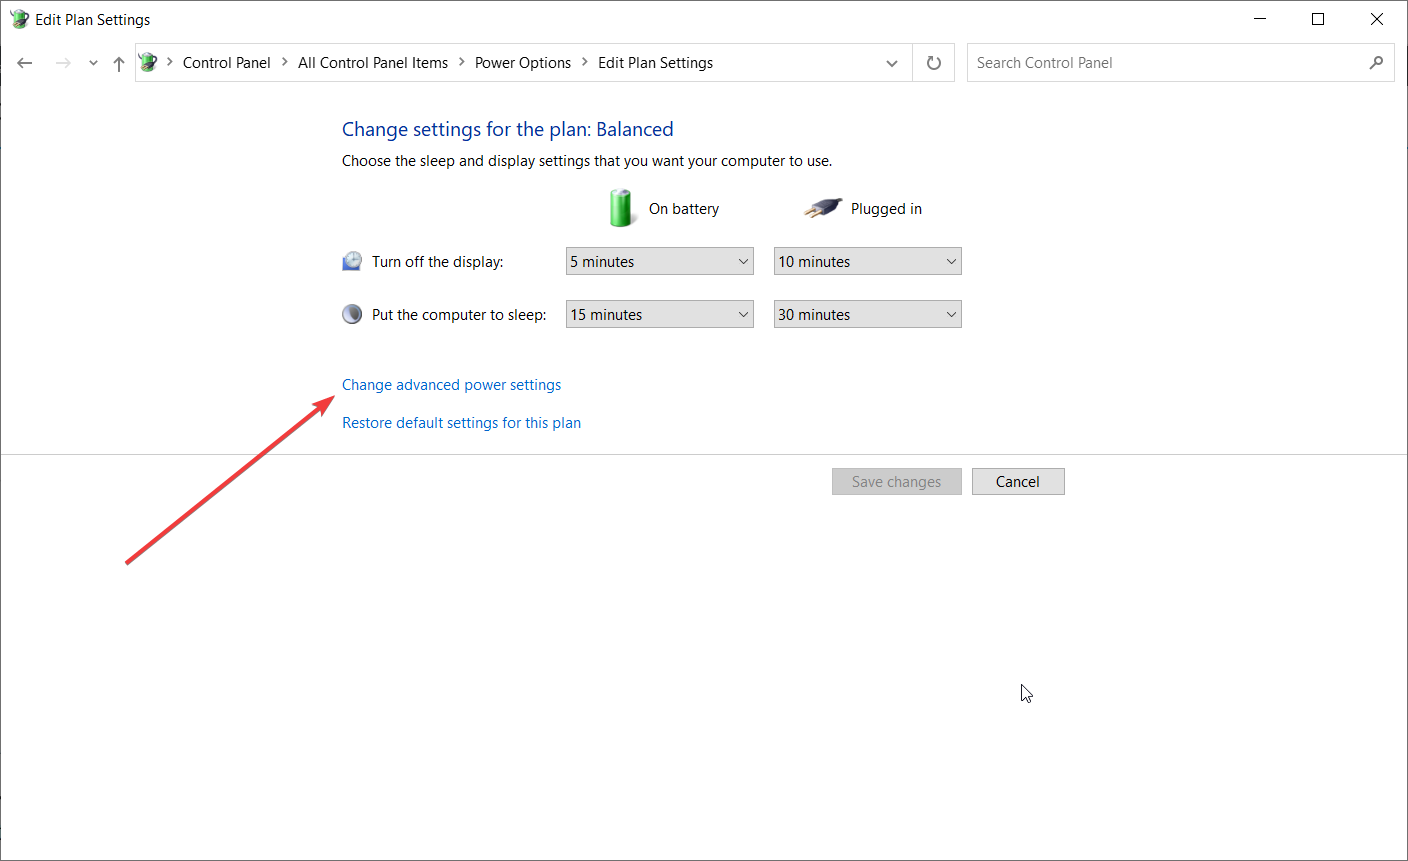
Now click Change advanced power settings.
Once the Power Options window opens, double-click on the Display option to expand it.
Also, expand the Enable adaptive brightness option by double-clicking on it.
Change the Settings option to On from its dropdown.
Once done, click OK.
Adaptive brightness automatically adjusts the brightness level of your monitor based on the content displayed and surrounding light conditions. It’s important to find a balance that provides comfortable visibility and minimizes eye strain for your individual needs.
In well-lit environments, a higher brightness setting may be more suitable, while in dimly lit environments, reducing the brightness can help reduce eye strain. Brightness control software may also be able to help you out where adaptive brightness fails.
2. Night light
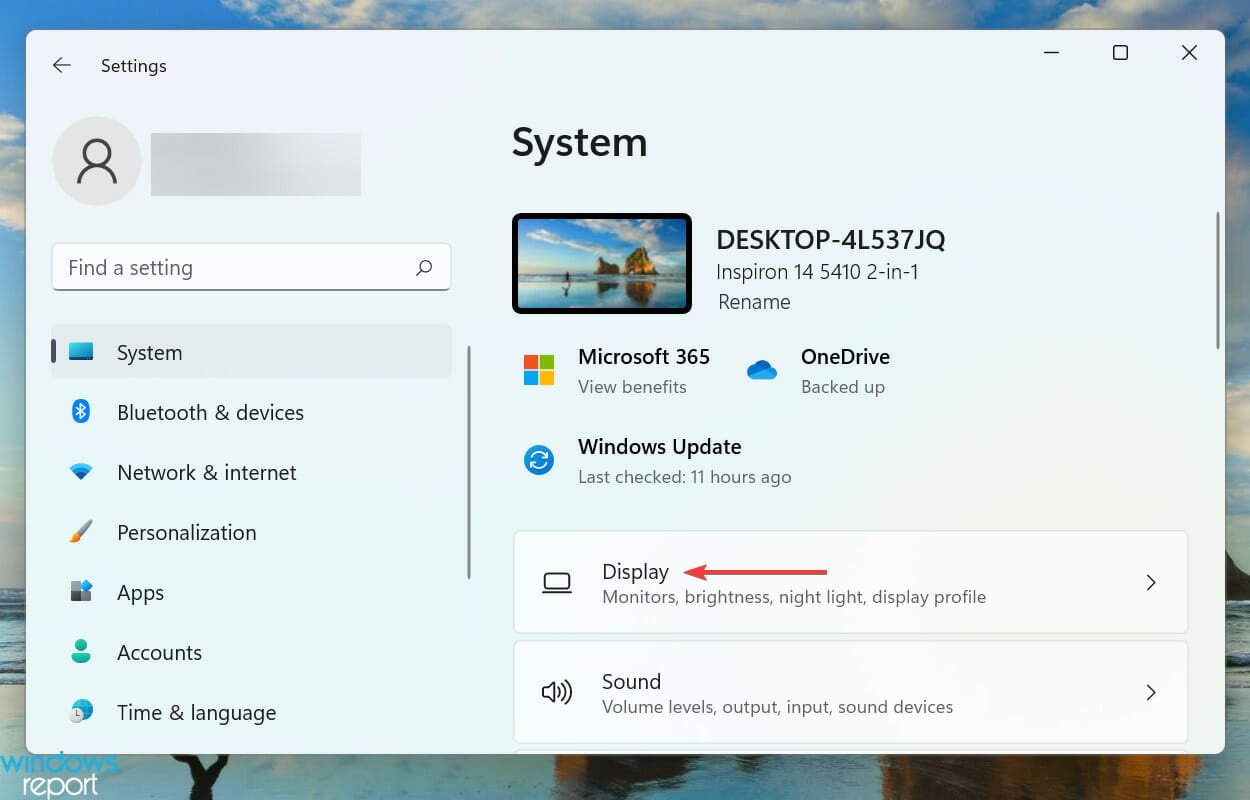
Press Windows + I to launch the Settings app, and click on Display on the right in the System tab.
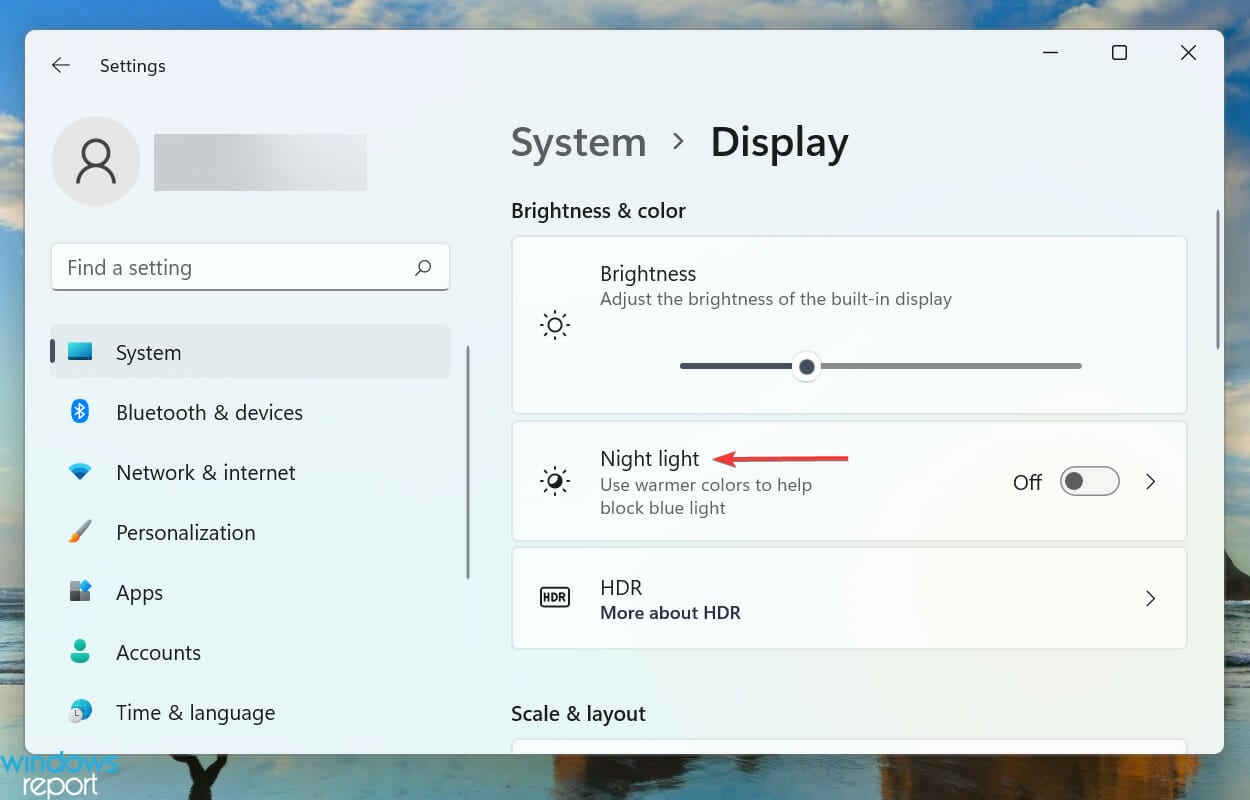
Click on the Night light option and toggle it on.
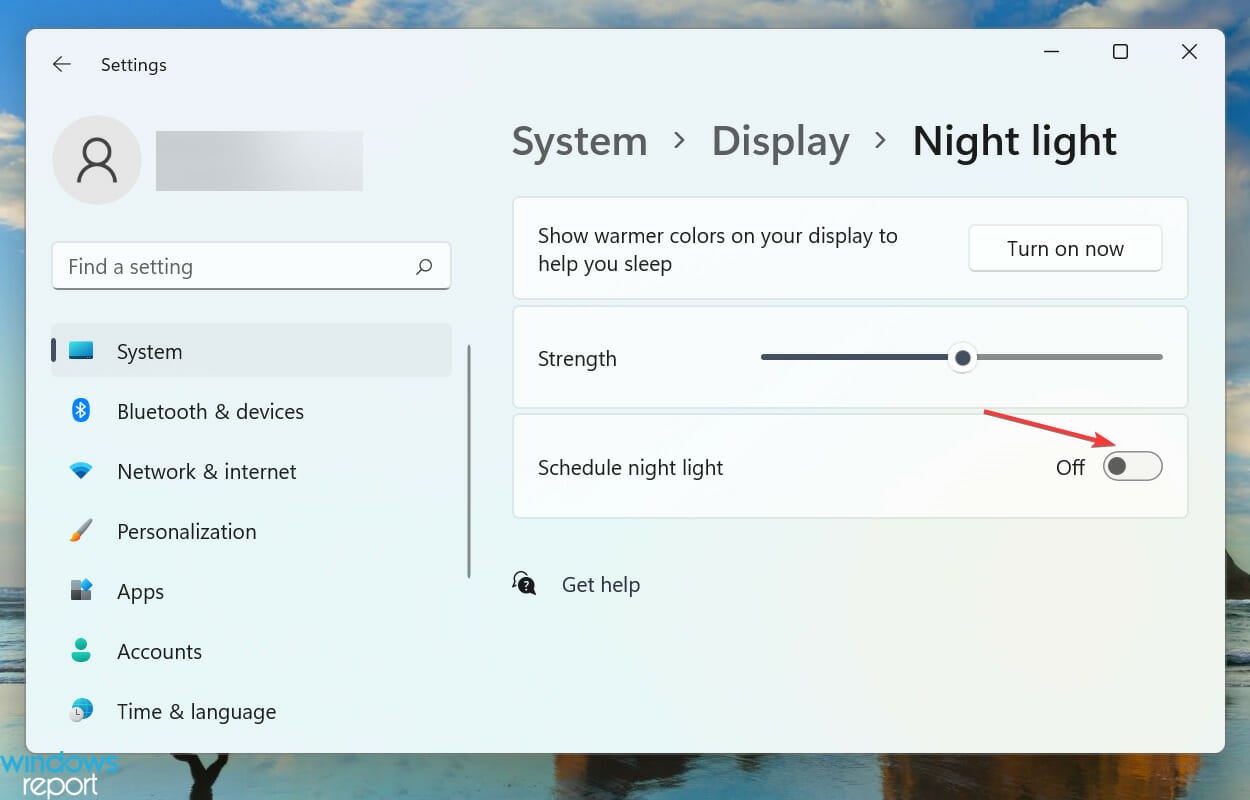
Now, make sure that the toggle for Schedule night light option is enabled.
Night light adjusts the color temperature of your display to reduce blue light and make it easier on the eyes in low-light environments. Also, when adaptive brightness and the night light feature have been enabled, you may notice your screen dims, or the brightness keeps changing.
In this case, you’ll have to manually adjust your brightness settings to a level that works for you, but be careful not to set it too bright. Such configurations can easily lead to a washed-out HDR, making items on your screen difficult to read.
Contrast
1. High contrast theme
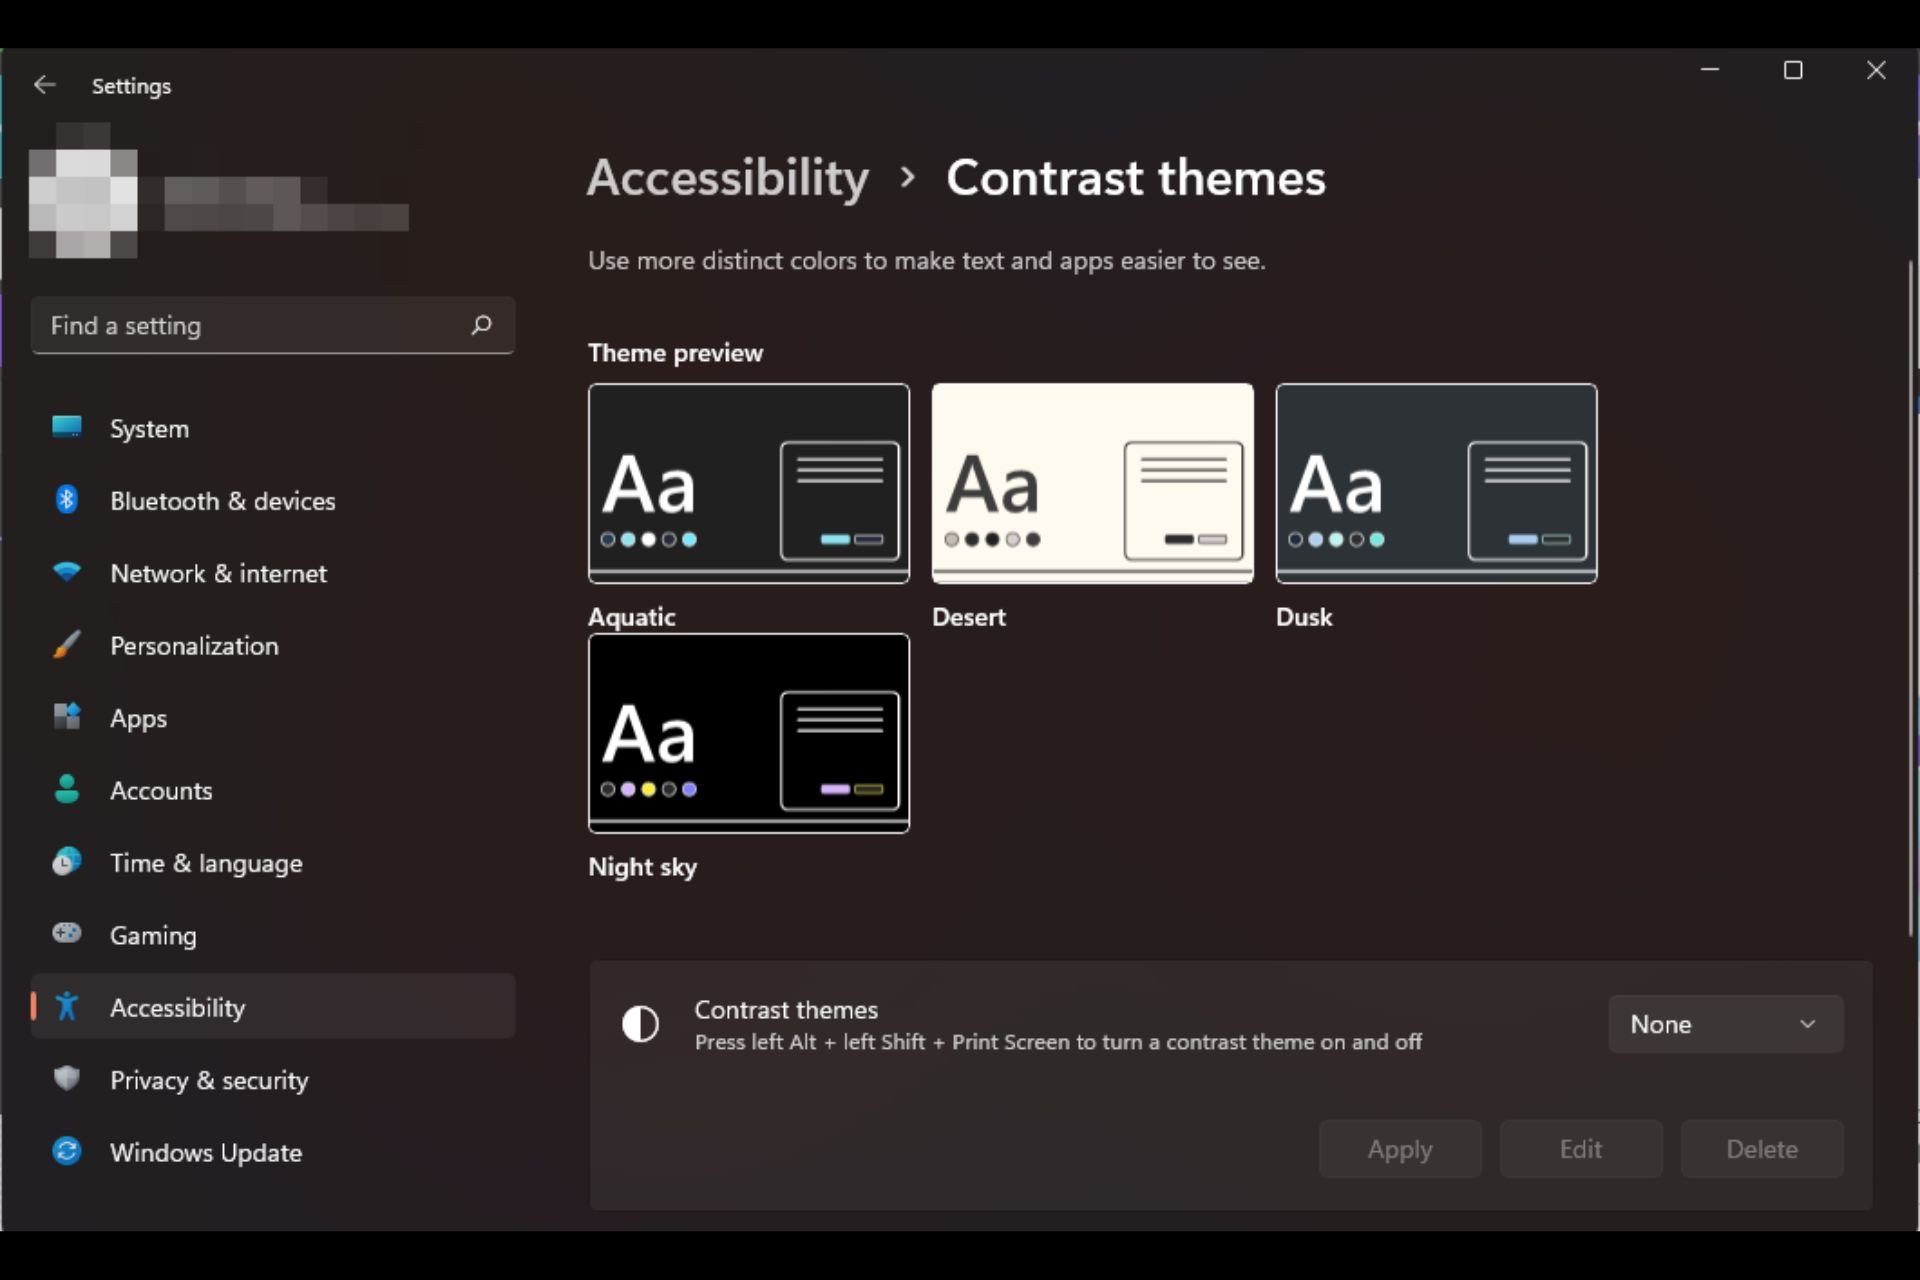
Press Windows + I to open Settings, go to Accessibility from the navigation pane, and select Contrast themes.
Choose one of the high-contrast themes from the dropdown menu. You can also check the appearance under previews.
Click on Apply for the changes to come into effect.
Similarly, you can enable other contrast themes in no time.
If the built-in contrast themes do not satisfy your needs, you can get more from the Microsoft Store.
2. Download contrast themes
Press Windows + S to open the Search menu, type Microsoft Store in the text field, and click the relevant result.
Type Windows Themes in the search field at the top, and hit Enter.
You will now find a range of themes compatible with the PC.
Select any and click the Get button to download it.
After the theme is downloaded, press Windows + I to open Settings, select Personalization from the left pane, and click on Themes.
Finally, choose the one you got from the Microsoft Store, and it should apply immediately.
While the Microsoft Store has a wide variety of dark themes for Windows 11, their biggest limitation is that they’re only applicable for the Desktop. Most apps will remain the same, so the changes will be insignificant.
Should brightness be higher than contrast?
The optimal ratio of brightness to contrast for a monitor is a matter of personal preference and can vary depending on the surrounding lighting and other factors.
However, for purposes of general settings, we recommend setting the contrast slightly higher than the brightness for image quality concerns. A 60% to 70% level should be comfortable enough for reading.
Overall, it’s important to find the right balance that provides comfortable visibility while reducing eye strain. These features can be highly personalized, so we encourage you to experiment with different settings and adjust them based on your individual needs until you find that sweet spot.
While you’re playing with these settings, we cannot forget to mention that your Windows 11 brightness may not work at times. No worries, though, as we’ve already addressed this issue in our extensive guide.
We’re curious about your brightness and contrast settings. What configurations would you say work best for you? Let us know in the comment section below.
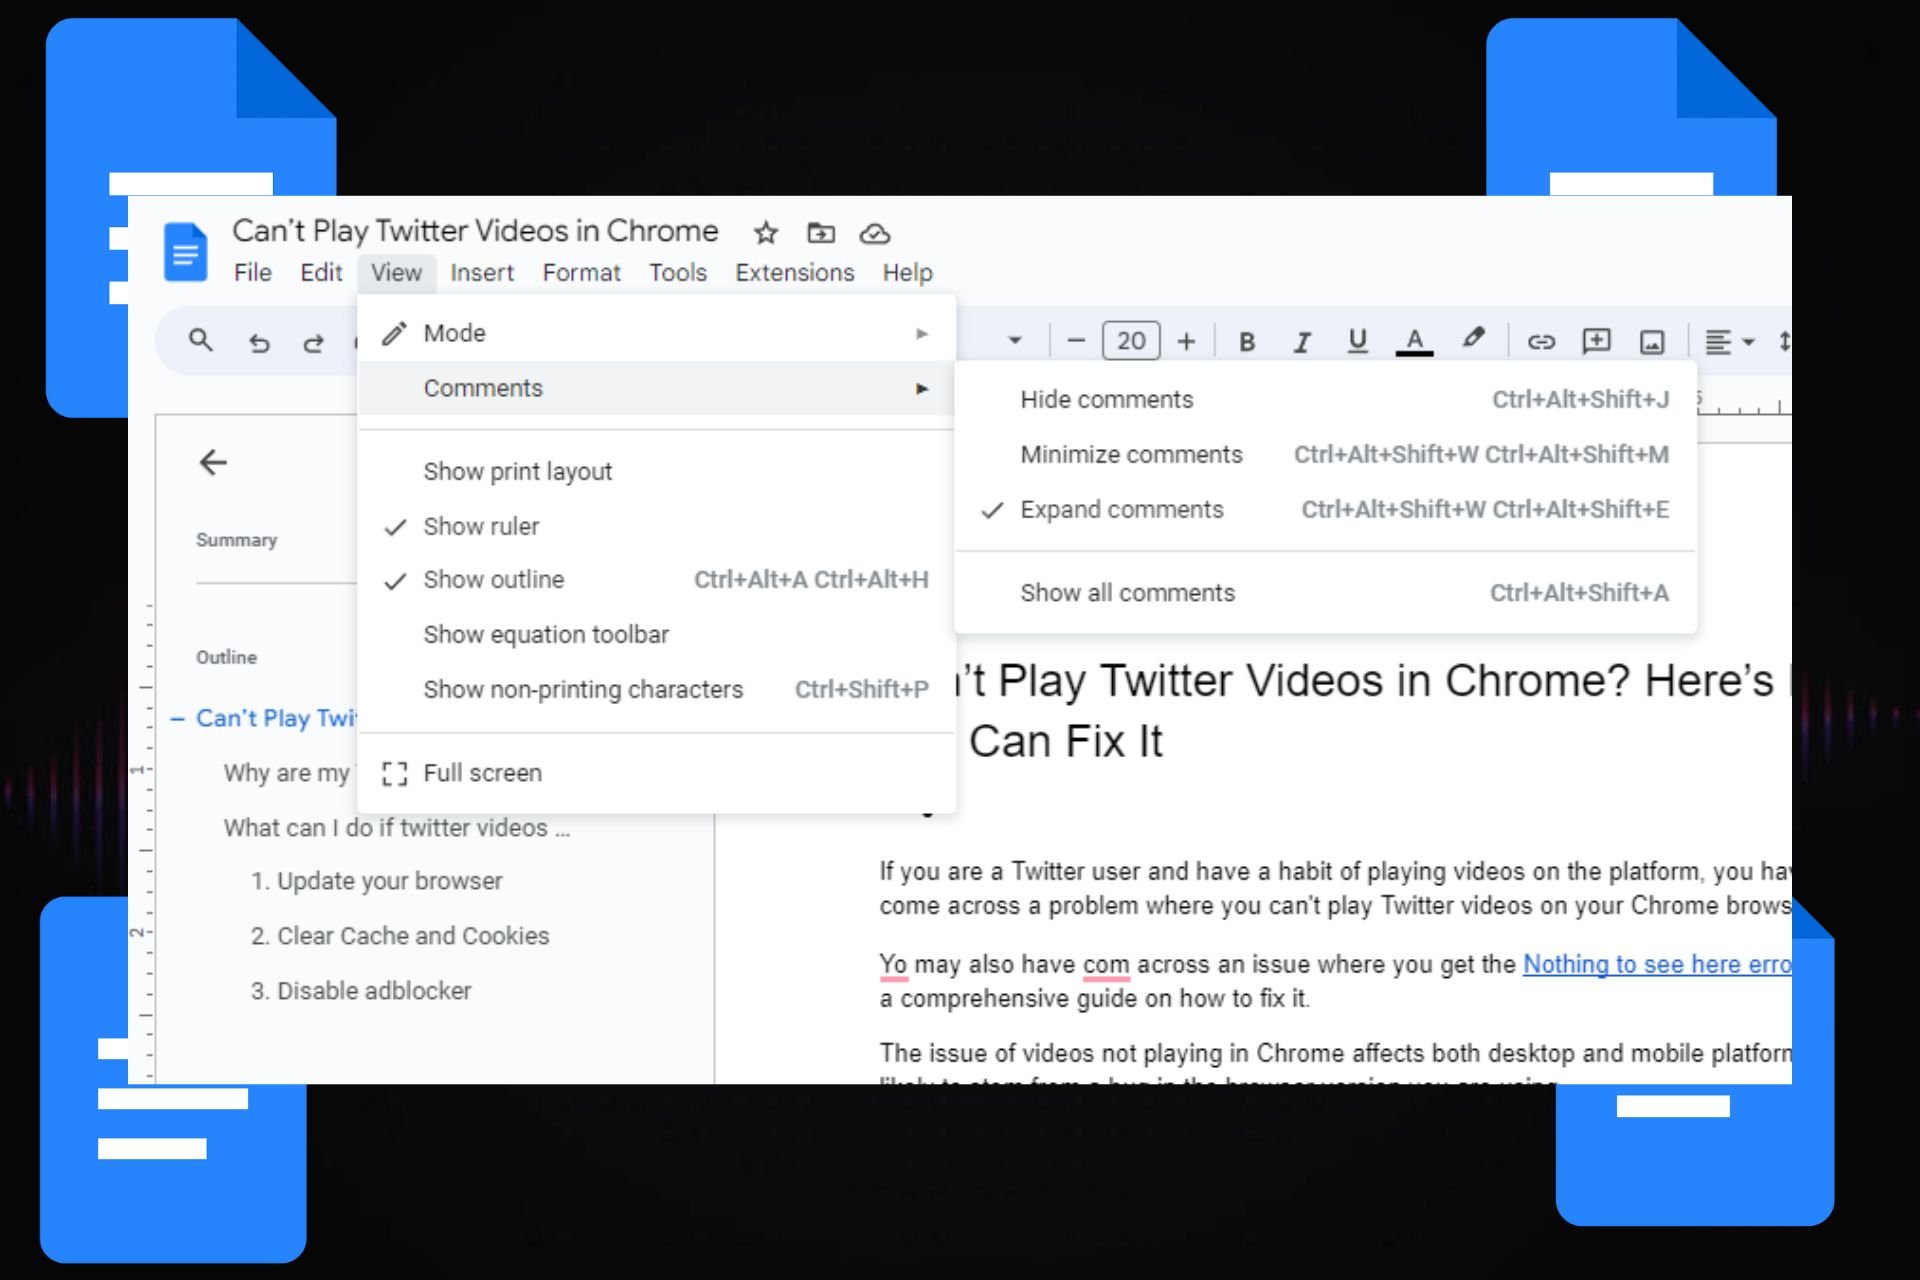
If you’re looking to focus on your content without distractions and get tasks done faster, you can hide comments in your Google Docs document.
Although you can hide comments, other people with whom you’ve shared the Google document with can still see them. However, this depends on their access level. Editors and commenters can see but viewers are restricted.
As the owner, you can manage sharing settings and permissions to control who can view and interact with comments.
Switching to Viewing mode hides comments temporarily but does not delete or remove them from the document. A downside of this mode is that the menu toolbar might also become unavailable. You also cannot edit the document unless you switch to editing mode again.
Select the Comments>Hide comments option to toggle it off.
3. Resolve comments
Open your Google Docs document.
Hover the cursor over the comment you want to hide.
Click on the tick icon to resolve and hide the comment.
Resolving comments is particularly useful when you have addressed or incorporated the feedback provided in the comment and no longer need it to be visible.
Note that resolving comments will permanently hide them from view and move them to the Resolved section in the comments pane. However, the comments will still be accessible in case you need to view or revisit them later.
If you’d like to permanently get rid of the comments, you’ll have to delete them from the document. And if you don’t want people to track who viewed the document, you can view the Google Doc anonymously.
In summary, regardless of the method you use, it is important to remember that hiding comments temporarily will not delete them from the document.
Having gone through the different ways to hide comments on your Google Docs, which method do you prefer and why? Share your thoughts with us in the comment section below.
Microsoft Edge has recently updated the Progressive Web App (PWA) install dialog to make it clearer, easy to understand, and simple for users to indicate what happens when they install a web app in the Edge browser.
PWAs built using web technologies can be installed and run on all devices from one code base. PWAs have application icons that can be added to a device’s home screen or taskbar. They can be launched automatically when an associated file type is opened, and they can run when the user signs in.
Microsoft and Google have collaborated to make PWAs more native Apps when installed on supported devices from the browser. Recently, Microsoft launched Sidebar Apps in the Edge add-on store,Chrome added support for Tab tearing. with advancements happening for PWAs, the install dialog should be precise.
Microsoft Edge’s PWA install dialog
When you install a PWA in Edge browser by clicking its icon in the address bar, till now, Edge showed the following dialog:
This site can be installed as an application. it will open in its own window and safely integrate with Windows features
To tell the truth, the install dialog doesn’t convey what happens when you install PWA in simpler and more understanding terms to the users.
Here, it means that the website you are visiting has been designed to function like a native app, and you can install it on your device like any other app. Once installed, the PWA will open in its window, separate from the browser, and will have its icon on the taskbar or home screen. PWAs can also safely integrate with Windows features, such as notifications, and live tiles, can be uninstalled from Settings App, and more.
Edge’s new PWA install dialog is more informative and improves the installation experience
Microsoft has updated the PWA installation dialog in Edge 122 canary and dev with the following description:
Use this site often? Install the app which: . Opens in a focused window . Has quick access options like pin to taskbar . Syncs across multiple devices
The new install box is more intuitive. The changes in the dialog box provide additional information about the app’s features such as it opens in a focused window and it has quick access options like pin to taskbar, and syncs across multiple devices. The present dialog misses that, where the new install box mentions that.
The key difference between the two dialogs is that the new dialog is more user-friendly and provides more information about the benefits of installing the app. The new dialog makes it more likely that users will install the app.
The post-install dialog wasn’t changed. It remains the same to inform the user that the app has been installed on their device and will safely run in its window. Users can launch it from the start menu, taskbar, or desktop.
In conclusion, Microsoft Edge users may find the new PWA installation dialog more useful. Chrome’s PWA install dialog is not affected by this change.
What’s your take on this? Let us know your thoughts in the comments below.
Microsoft Wallet inside Microsoft Edge, is not working on Surface Pro X, and a handful of other devices, and for now Microsoft doesn’t have any fix for the issue. Several users have noted the Redmond-based tech giant that they can’t access Microsoft Wallet anymore when accessed from Surface Pro X, and other devices such as Pro 9, or Galaxy Book Go.
I can no longer access Microsoft Wallet on my Surface Pro X. Every time I select Wallet, Password or Open Personal Info a new web page opens to this:
When trying to access Microsoft Wallet from these devices, users are welcomed with this page:
The issue has been around for days, as users started noticing Microsoft Wallet wouldn’t work, last week.
Recently, I’ve tried to get into the wallet feature on my Bing account to see my passwords, but every time I do, it comes up with the error message below. I’ve tried everything it’s said to do, refresh the page, go to another tab, and come back later, I’ve even restarted the computer via the windows button, clicking the power, then hitting restart, and it doesn’t work. I’ve also had the problem since last week or the week before last week. If it helps any, the type of computer I’m on is a Galaxy Book Go, Windows 11 Home.
Unfortunately, there is no fix for this issue, but users have been reporting it to Microsoft. The Redmond-based tech giant has yet to respond to the issue.
It’s not clear what exactly is causing this problem. Microsoft Wallet can be set up in Microsoft Edge, and it’s dependent on the browser’s functionalities to work. Many users believe the latest updates to Edge are causing the issue, probably the ARM Edge build.
I have the same issue on a Surface Pro X as well. It’s probably the ARM build of Edge that’s at fault, as someone else is reporting the same issue on a Galaxy Book Go.
Until Microsoft comes up with a solution, though, there are a few options. Users can choose to set up and use Microsoft Wallet on other devices, as Edge on Android devices is not affected by it.
Alternatively, users can wait for Microsoft to fix the issue.
Creating a bootable USB drive is a straightforward process with the right bootable pendrive software. It converts the pen drive into a bootable media, which you use to install the operating system of your choice.
All you need is a valid ISO file of the operating system and a pendrive to start using the bootable pendrive app. The best settings are configured by default unless you want to customize them.
NOTE
Make sure to back up your pen drive data, which can get erased when creating bootable media.
Rufus is a popular open-source and free bootable pendrive software available in over 30 languages. In three easy steps, it creates the bootable USB through the portable or installer version.
You can choose between MBR and GPT partition schemes. On top of that, you can select partition formats from various options – FAT32, NTFS, UDF, and exFAT.
It even lets you select UEFI or legacy BIOS, depending on the computer you want to install the operating system.
And if you are creating a Windows 11 bootable, Rufus can bypass the TPM check, amongst other requirements. This way, you can install Windows 11 on unsupported systems.
Moreover, you can set the persistent partition size through the slider button while creating a Linux bootable.
When installing Windows 10 or 11, the media creation tool is the easiest way to create a bootable USB.
One of the best things about this bootable pendrive software is that you get the latest Windows versions with the latest updates directly from the Microsoft servers.
Plug in your pen drive with at least 8 GB space, then select your language and Windows 10/11 version. After that, it will download the ISO file from the official server and convert the flash drive into a bootable drive.
WinSetupFromUSB keeps it simple with an easy-to-use interface. It can create a bootable USB drive that can boot multiple operating systems, including various versions of Windows.
You can save time formatting your pendrive through its auto-format feature, which you can turn off. Then, you can select the Windows versions and instantly create a bootable USB.
A custom menu feature lets you edit your Windows installation menu. Along with that, you can add Q-Dir, which is useful for exploring files on the hard disk before installation.
And, if you are installing Windows older than 7, you can add general drivers to the setup. You won’t have to find and download drivers on different computers.
When you are on a Linux distro and want to create a Windows bootable, WoeUSB can do it in no time.
You can easily install it on Arch, Debian, and Fedora-based systems through a single command. A more convenient way is through the graphics package manager.
Moreover, you can use WoeUSB to create a bootable USB stick either from an ISO file of a Windows operating system or directly from a physical Windows installation DVD.
6. UNetbootin – Great for downloading Linux distros
UNetbootin is a free bootable pendrive software for Linux that can download the distro over the internet if required. It is available for Windows, Linux, and macOS.
You can choose from over three dozen distros, including Xubuntu and Super OS. Many of them have multiple versions, so you can take advantage of specific features.
But if you have the ISO file, select the option and locate it from a local directory. You can create bootable media on a USB drive or an external hard disk.
Sometimes, you have to install operating systems on multiple computers physically at different locations. In such cases, you can use ImageUSB to create multiple bootable pen drives in one go.
Select the pen drives from the list, then select the first option to write the image to a USB drive. Then, choose the image of your local storage to start the flashing process.
ImageUSB doesn’t let you select between GPT and MBR partition, which would be a good option for older operating systems, as Rufus does.
You can create a bootable of any Linux distro through Universal USB Installer. That is not all; it even lets you create a bootable Windows USB drive.
Select an operating system that will give you the link to download from the official source. It even lets you create persistent space on select Linux distros.
One of the best features here is drag and drop. Add a second Linux distribution by dropping it in the UUI folder in the newly created bootable flash drive. The only thing you will miss through this method is the persistence storage.
So, these were the best bootable pendrive software to use. Once you have prepared the pendrive, use our guide to check if it is bootable or not.
Sometimes, your pen drive might not get detected by the bootable software. In such cases, you can try plugging it again before formatting it to remove minor errors.
You’re trying to make a purchase using Google Pay and you get the [OR-PMSA-05] error which sometimes comse with the message Your payments didn’t go through. Please try a different payment method or try again later.
The OR-PMSA-05 error might be caused by connection errors, maybe the payment method is not accepted by Google Pay, or simply the Google Play or Google Wallet apps are not functioning correctly. Here’s what we did to fix it!
How do I fix the OR-PMSA-05 Google Pay error?
1. Check the Google Play server status
The first thing to do is to check the Google Play Status Dashboard and check for outages. If there are any, wait it out.
Connection problems are the main causes for payment error such as OR-PMSA-05 so make sure that you also have a steady one on you phone.
2. Force restart the Google Play Store app
Go to Settings on your phone, tap the Apps menu and select Google Play Store from the list.
Here, tap on Force stop.
Exit the menu, try to use the Google Pay service again.
You should also do the same for the Google Pay app and Google Wallet. You might as well restart your phone because this way, all the apps will be refrehed.
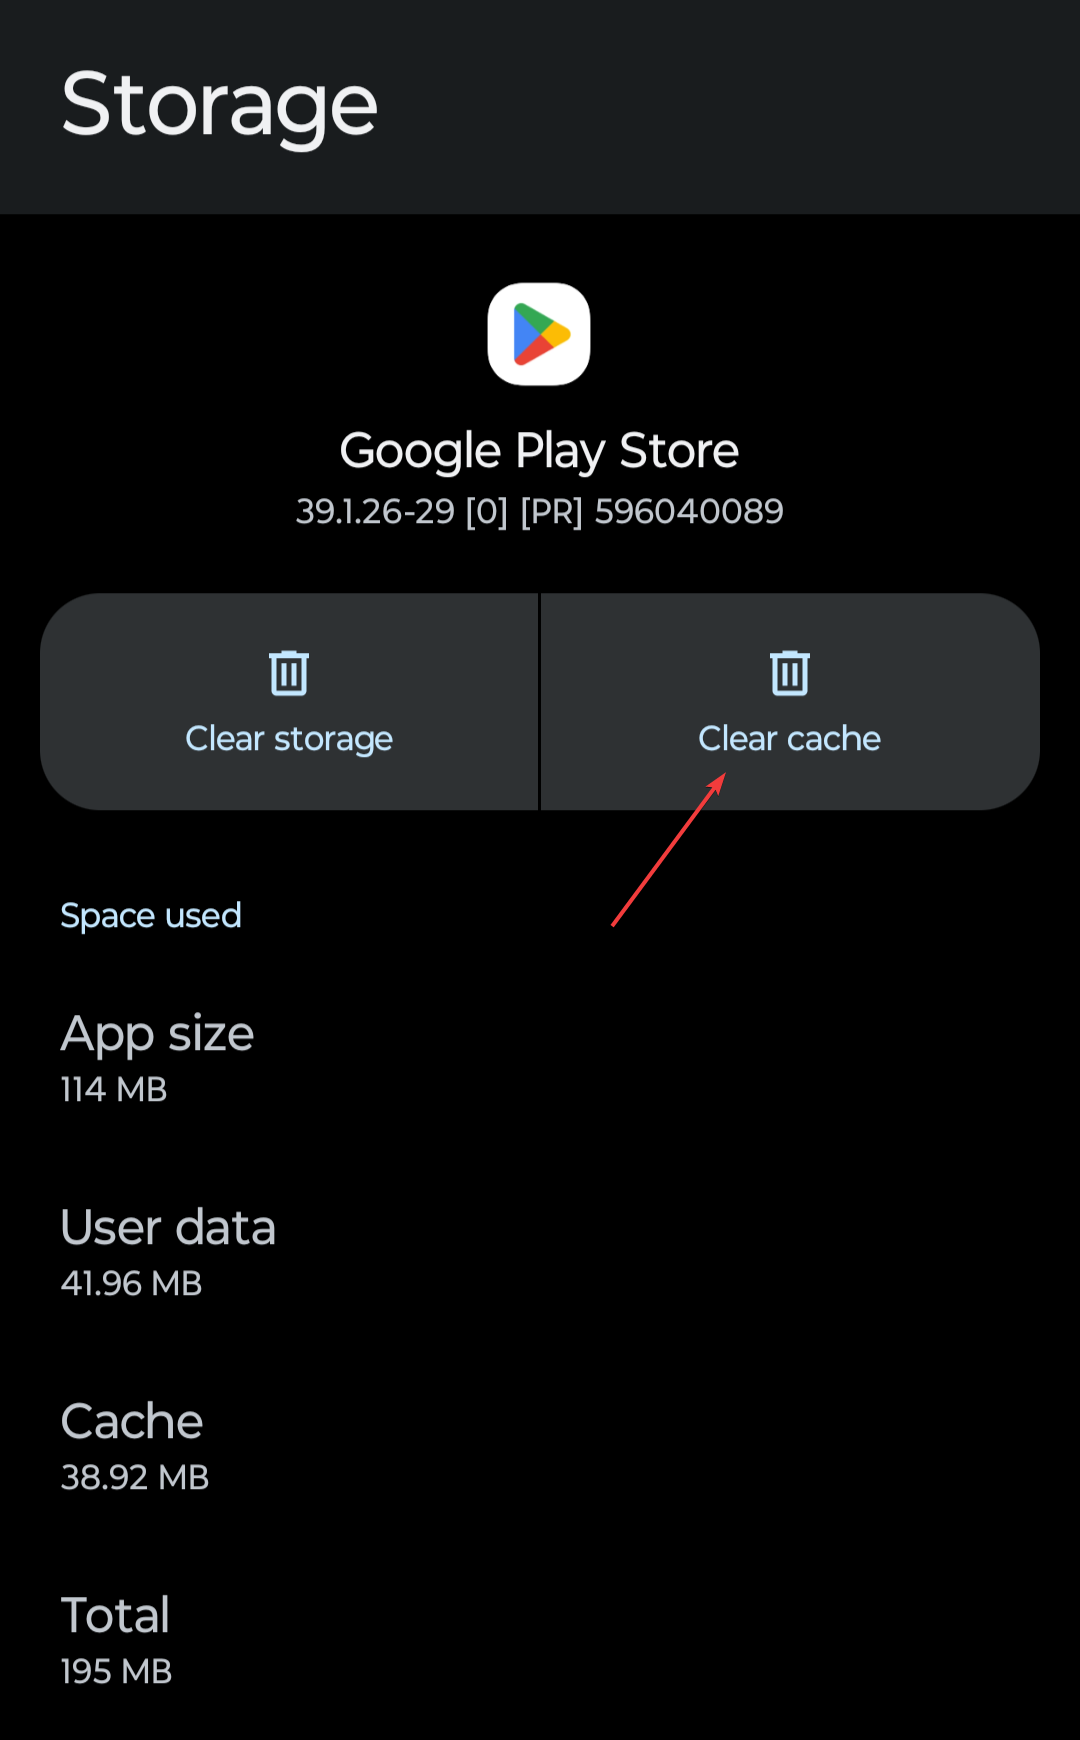
3. Clear the Google Play Store cache and data
Go to Settings on your Android phone, then tap on the Apps menu.
Tap on Google Play Store and next on Storage & cache.
Tap on Clear cache, then try to make the purchase.
If it still doesn’t work, get back to the same menu and tap on Clear data this time.
Once again, you should also clear the cache and data from the Google Pay app and Google Wallet following the same instructions.
Log into your Google Pay account from your phone or on any browser.
Check the allerts from the top right corner of the window.
If you click on the icon, you will see the information on any payment issues and you will be able to fix them.
5. Remove and re-add your card
Go to Google Payments Center just like in the solution above and select Payment methods.
Select the card you wish to remove and click on Remove.
Now, click or tap on Add a payment method.
Fill in the necessary data and hit Save.
6. Try using another payment method
Until you check any problems with your bank account, you should also try using a different payment method in Google Play Store.
You may use Solution 5 to add a new payment method in the Google Payments Center or you can add it straight from Google Play.
After you click on the price of the app or item you want to purchase, click on the down arrow next to the payment method and select another one. If you don’t have multiple choices, just add a new card or payment method.
If all else failed, you can always contact Google Support to figure out exactly what the problem is.
Hopefully, now you have fixed the issue and you no longer get the OR-PMSA-05 error on your phone.
One of Chrome’s features that went missing with the Chrome Refresh 2023 design was Screenshots. The Sharing Hub features without the screenshot button were relocated to the new Save and Share submenu in the main menu.
Google is now adding back the Screenshot tool so you can now take screenshots, copy them to the clipboard, and download them without needing to rely on third-party tools or extensions.
Chrome Refresh 2023 design changes make the Screenshot button disappear
Google Chrome has updated its desktop version with a new look and features as part of its 15th birthday celebration. The new design is based on the Material You design language and includes refreshed icons, new color palettes, and themes that complement your tabs and toolbar. The new design also includes a more comprehensive menu for faster access to Chrome extensions, Google Translate, Google Password Manager, and more.
No more Sharing hub
As part of the major UI redesign, Chrome deprecated the Sharing hub that appears in the URL bar and relocated most of the features to the new Save and Share menu under the main menu. The new Save and Share menu lacks the Screenshot option.
How do I enable the Screenshot feature in Chrome?
Google is now adding the Screenshot button back to Chrome, which has a new design. The option can be found in the Save and Share submenu of the main menu.
Here are the steps to enable and take screenshots in Chrome that has the Refresh 2023 design enabled:
Open Chrome.
Visit chrome://flags.
Search for Screenshot, and find and enable Desktop Screenshots.
Relaunch the Chrome browser.
Visit a webpage that you want to take a screenshot of.
Click on the Menu go to Save and Share and select Screenshot.
Choose a region on the screen and release the mouse. Chrome copies the selected area on the screen to the clipboard and notifies you for download. When you click Download, the screenshot will be saved in PNG format to your device.
We recently came across the McUICnt.exe Entry Point not found, The procedure entry point BCryptHash could not be located in the dynamic link library bcrypt.dll error on several devices, some running Windows 7.
On closer inspection, the problem appeared to be with bycrypt.dll, a system file. BCryptHash is an encryption algorithm used to store critical data securely. As per Microsoft’s official page, BCryptHash works only on Windows 10 or later iterations of the OS.
So, to start with, make sure your PC meets the minimum system requirements for BCryptHash.
How do I fix the BCryptHash could not be located error?
1. Use a DLL repair tool
Your primary approach when any error message lists a DLL should be to use an effective DLL repair tool, as it can identify replacements automatically.
2. Copy the DLL from another PC
If you have another PC running the same Windows iteration and architecture (32-bit or 64-bit), moving a copy of bcrypt.dll would also work. The file is stored in: C:\Windows\System32
System32 folder
On the other PC, locate the bcrypt.dll file and move it to an external drive. Now, rename the existing bcrypt.dll on the affected PC as bcrypt.old.dll, and finally, transfer the DLL from the external drive to the System32 folder.
Remember not to delete the existing DLL (that we renamed) unless the new one works fine, and you don’t receive the BCryptHash could not be located anymore.
3. Run the DISM and SFC scans
Press Windows + S to open Search, type Command Prompt, right-click on the relevant result, and select Run as administrator.
Click Yes in the UAC prompt.
Paste the following DISM commands individually and hit Enter after each: DISM /Online /Cleanup-Image /CheckHealthDISM /Online /Cleanup-Image /ScanHealthDISM /Online /Cleanup-Image /RestoreHealth
Now, run the SFC scan with this command: sfc /scannow
Once done, reboot the PC and check for improvements.
Given that corrupt system files, bcrypt.dll being one, can trigger DLL errors, running the SFC scan and DISM commands got things running for us in 3 out of 5 cases.
Press Windows + R to open Run, type appwiz.cpl in the text field, and hit Enter.
Select any McAfee programs listed here, and click Uninstall.
Follow the on-screen instructions to complete the process.
Reboot the computer and check for improvements.
If it’s the McUICnt.exe process throwing the BCryptHash could not be located error, check for any McAfee programs, utilities, and extensions and remove them. If the standard uninstall doesn’t work, use the McAfee Consumer Product Removal (MCPR) tool.
5. Download the latest Visual C++ Redistributables
Go to Microsoft’s official website and download the latest supported Visual C++ Redistributable packages, depending on the OS architecture (32-bit or 64-bit).
Run the setup and follow the on-screen instructions to complete the installation.
Reboot the device and verify whether your PC has now downloaded BCryptHash.
Go to the official Windows 11 page, select OS edition and product language, then download the Windows 11 ISO.
Double-click the ISO file and click Open in the confirmation prompt.
Run the setup.exe file.
Click Yes in the UAC prompt.
Click Next in the Windows 11 Setup to proceed.
Read Microsoft’s license terms, and click on Accept.
Make sure the setup reads Keep personal files and apps, and click Install. The in-place upgrade will take 1-2 hours.
An in-place upgrade is similar to reinstalling Windows, but you don’t lose the stored files or apps. And when it comes to system DLLs like bcrypt.dll, an in-place upgrade will always fix things! A repair upgrade is also an effective fix against winmmbase.dll errors.
So, you now know that running the SFC scan or uninstalling McAfee will help get rid of the BCryptHash could not be located, if it’s the antivirus to blame. And in case another program throws the error, downloading Visual C++ Redistributables or an in-place upgrade will do the trick!
Microsoft had a quiet 2023 when it came to rolling out first party hardware from its Surface division but 2024 appears to be loaded with events as early as March.
According to the folks over at Windows Central, Microsoft has set a tentative internal date of March 21, 2024, for the first of what could be several Surface hardware events for the year.
Writer Zac Bowden, who has a pretty great track record when it comes to coaxing Surface news from Microsoft sources, believes that the company is primed to deliver commercial versions of the Surface Pro and Laptop dubbed the Surface Pro 9+ and Surface Laptop 5+ that maintain “current in-market designs,” with a narrow array of features “designed for commercial customers.”
While the design language of the Surface Pro 9+ and the Surface Laptop 5+will be roughly unchanged, there are some subtle changes that will accompany the devices in March that include an anti-reflective display, modern NFC reader technology, and support for Microsoft’s new AI-led Windows Studio Effects thanks in part to Intel’s 14th Gen chips supporting dedicated AI NPUs.
Bowden’s claims have been further buttressed by reliable Twitter sluether @WalkingCat with the following tweet.
As it was reported last month, a secondary event will host the consumer coveted Surface Pro 10 and Surface Laptop 6 with their modern designs, support for ARM chips, and the next gen version of Windows known as Windows Germanium the enable a host of new AI features specific to the hardware.
Bowden has updated his previous claims as he continues to speak with people close to the matter and it now looks as though that secondary Microsoft event will be in June and be the one that host the newer designed hardware of the Surface Pro 10 and Surface Laptop 6, and there could be a potential later third release date for an updated Surface Laptop Go 4.
Many users have encountered Failed to Install Port Handler Service Error Code 1073 while installing or updating the driver for their Epson printer. The error could appear due to an outdated printer driver, a loose connection between printer & computer or security software interference.
To begin with, log in to your PC as admin and restart your printer. Next, use a different USB port to connect the printer (for USB connection), ensure your computer & printer are on same the network (for network connection).
How can I fix Failed to install Port Handler service error code 1073?
1. Restart your computer in a clean boot environment
Press Windows + R to open the Run window.
Type msconfig and click OK to open the System Configuration window.
Go to the Services tab, place a checkmark next to Hide all Microsoft services, and then click Disable all.
Switch to Startup tab, and click Open Task Manager.
Next, on the Task Manager window, select Enabled items one by one and click Disable.
Close Task Manager, and on the System Configuration window, click Apply, then OK.
Click Restart to reboot your PC.
Once you are in clean boot, you will have only a limited set of drivers and services enabled, so you can turn on the services and startup items one by one to find the culprit.
When you are done with it, don’t forget to reverse-engineer the steps to restart your computer in normal mode.
2. Run the executable file as an administrator
Press Windows + E to open the File Explorer window.
Locate the installation file, right-click it and select Run as administrator.
Follow the on-screen prompts to complete the process.
3. Update/reinstall the printer drivers
Press Windows + R to open the Run dialog box.
Type devmgmt.msc and click OK to open the Device Manager app.
Locate and click Print queues to expand it.
Right-click the Epson printer and select Update driver from the context menu.
Click Search automatically for drivers.
Follow the on-screen instructions to complete the process.
If the driver is already updated to the latest version, try reinstalling it using the steps below:
Go to the printer listed under Print queues by following Steps 1 to 3, then right-click it and select Uninstall device.
Once uninstalled, click Action, then select Scan for hardware changes to reinstall the device.
Press the Windows key, type control panel and click Open.
Select Category for View by and choose System and Security.
Click Windows Defender Firewall.
From the left side, locate & click Turn Windows Defender Firewall on or off.
Select Turn off Windows Defender Firewall (not recommended) for both Private and Public network settings.
Click OK to confirm the changes.
Check if you are able to install the driver now, and once done, reverse engineer the steps mentioned above to enable the firewall again to ensure your device is secured.
5. Perform a system restore
Press Windows + R to open the Run window.
Type rstrui and click OK to open the System Restore window.
Select Choose a different restore point and click Next.
Now select a restore point before this problem started and click Next.
Click Finish.
Your computer will reboot and try to restore the computer settings to the selected version. If you see the System Restore didn’t successfully complete message, you need to restart your computer in clean boot and try again.
If nothing worked for you so far, we suggest you contact the Epson support team and explain to them the issue, & fixes tried to get help.
To conclude, to fix the Failed to install Port Handler service error code 1073, we used an administrator user account, checked the printer connection, and updated Windows and drivers to the latest version.
However, sometimes, running the installation file as admin, disabling antivirus temporarily, and performing a system restore did the trick for WR experts in the lab.
If you have encountered other printer issues like Epson printer error 1131, we have tackled it in a separate guide; have a look!
Did we miss a step that helped you eliminate the error? Don’t hesitate to mention it in the comments section below.
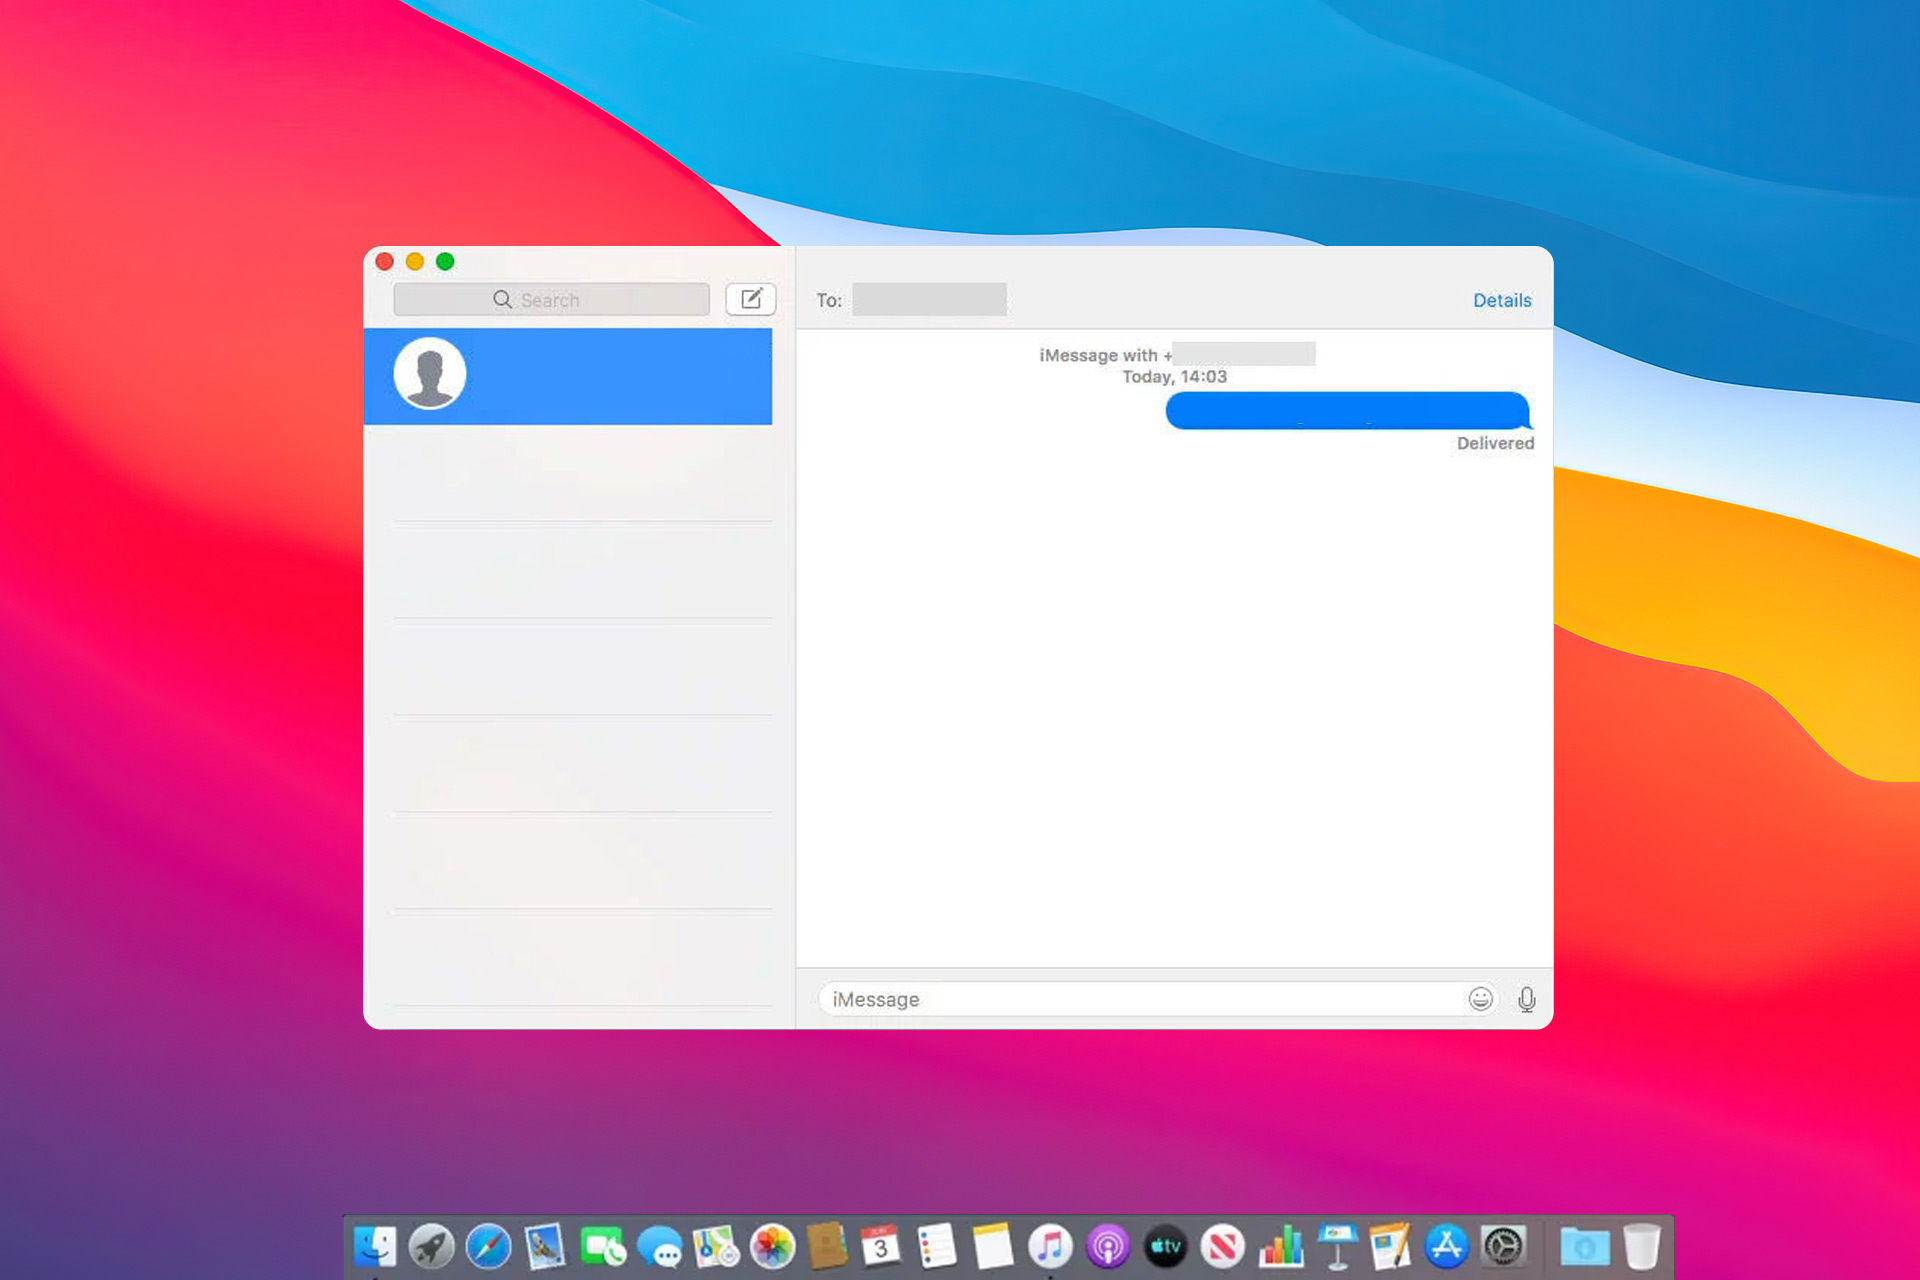
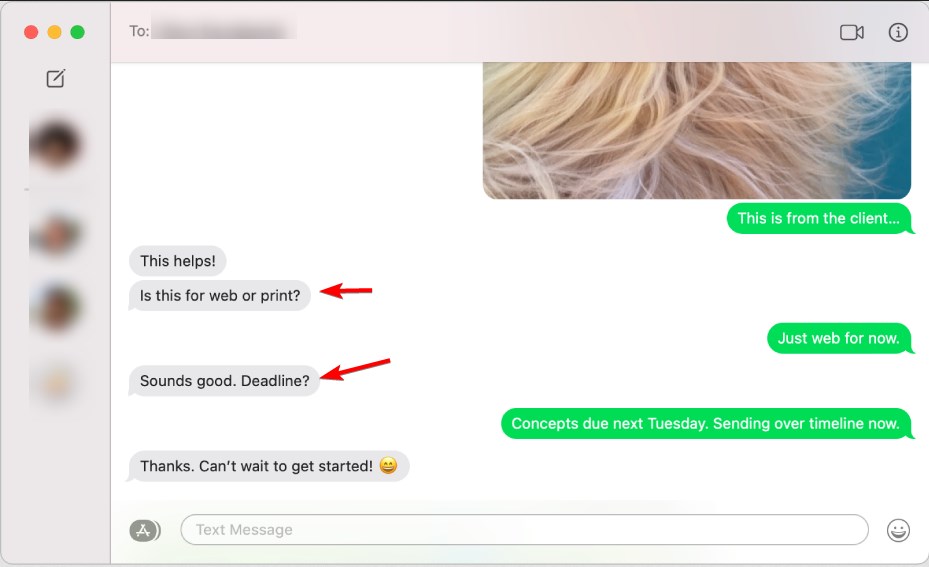
Sometimes you need to organize your texts, and this is why many users are wondering how to select multiple messages on Mac. This is easier than you think, and it takes just a few clicks to select multiple items, so keep on reading to learn how to do it.
How do I select multiple texts on a Macbook?
Use keyboard shortcuts
Open Messages app.
Press and hold the Command key and select the desired messages.
Alternatively, you select the message and then press and hold the Shift key. After that select the desired message to select all items between them.
Can you select multiple conversations in iMessage on Mac?
Yes, you can select multiple conversations in iMessage. You just need to use the same keyboard shortcuts that were mentioned in the previous section.
Keep in mind that this feature is available starting from macOS Ventura, so if you’re using an older version, you might not be able to use this feature.
Select multiple conversations using the methods from the previous section.
Press Delete on the keyboard.
Click on Delete to confirm.
As you can see, it’s rather simple to select multiple messages on Mac, and you just need to use the same shortcuts that are used for selecting files.
The ability to select messages has been present for several versions of macOS, however, it wasn’t possible to select multiple conversations until macOS Ventura.
Outlook for Windows and Web will be getting a brand-new UI experience starting March 2024, all thanks to 3 new features, according to the latest entries in the Microsoft 365 Roadmap.
The features will not only improve the UI experience, as Microsoft states, but it will also give users new ways and new shortcuts to work faster in Outlook. Plus, keeping it tied to the UI, Microsoft will also implement a new way to organize the Outlook menu.
We’re talking about organizing and reordering folders in Outlook for Windows and the Web:
Users can arrange folders in any desired order effortlessly by dragging and dropping the folders in the position that they want.
Microsoft
Then, users will have three new shortcuts to experience:
Ctrl + Drag and Drop: will allow users to duplicate email items.
Ctrl C + Ctrl V: will allow users to easily copy/paste email items.
We’re thrilled to introduce two new ways to copy email items in the new Outlook for web and Windows that will make your email management even more seamless and efficient. Ctrl + Drag and Drop: Simply hold down the Ctrl key while dragging and dropping your email items to effortlessly duplicate them. It’s a quick and intuitive way to manage your emails with precision. Ctrl C + Ctrl V: For those who prefer the classic copy-and-paste method, we’ve got you covered! Just use Ctrl C to copy the email item and Ctrl V to paste it wherever you need.
Microsoft
However, the most important of them, the UI revamp, promises some significant changes to Outlook for Windows and Web.
What are all the changes coming to Outlook for Windows and Web in March 2024?
The removal of creation links.
A new ellipsis icon.
According to Microsoft, creation links will be removed to prove a more streamlined experience in Outlook, greatly impacting the way users interact with the platform. The removal of the creation links will also create a more spacious and organized Outlook, for more efficient work.
A new ellipsis icon will be added to Outlook for Windows and Web, and it will allow users to easily and intuitively create and execute folders, and subfolders. The interesting aspect about this new icon is that it will instantly appear in the left nav bar when hovering existing folders and subfolders.
Microsoft says this will ensure a smoother workflow for Outlook for Windows and Web users.
We’re thrilled to bring you an enhanced folder creation experience! In this update, we’ve introduced a more intuitive way to manage your folders and accounts. Starting soon, the creation links will be removed, streamlining your interface for a cleaner and more efficient workspace. What’s New: A new ellipsis icon will appear in your left nav bar when hovering the folders and accounts for a quick and easy way to create folders, subfolders or execute the existing folder and account actions ensuring a smoother workflow. As part of this update, we’ll be removing creation links to provide a more focused and user-friendly experience. Rest assured, the traditional right-click method will still be available for your convenience.
Microsoft might actually implement more of these changes to suit the new capabilities, including the AI ones, so Outlook users should be excited for what’s to come.
But what do you think about these new features coming to Outlook? Are they useful or not? Let us know your opinions.
A Windoc.exe process in your system can become overzealous and consume your resources, slowing down your PC. If this is the case, remove it and opt for an alternative program.
Windoc.exe is a legitimate system file related to the Norton Utilities software. Removing or tampering with this file may cause issues with the software or its functionality. However, if you have any specific problems or concerns, it’s best to get rid of it.
How do I fix windoc.exe related errors?
1. Install an updated version of your Norton product
Wait for the process to finish and follow any on-screen instructions.
Once updated, end all processes related to windoc.exe and Norton then restart your PC. Observe how it behaves and whether there are any improvements.
2. Run DISM and SFC scans
Hit the Start Menu icon, type cmd in the search bar, and click Run as administrator.
Type the following commands and press Enter after each one:DISM.exe /Online /Cleanup-Image /Restorehealthsfc /scannow
3. Scan for viruses
Press the Windows key, search Windows Security, and click Open.
Select Virus & threat protection.
Next, press Quick scan under Current threats.
If you don’t find any threats, proceed to perform a full scan by clicking on Scan options just below Quick scan.
Click on Full scan, then Scan now to perform a deep scan of your PC.
Wait for the process to finish and restart your system.
4. Uninstall the related program
4.1 Using the Run command
Press Windows + R, type appwiz.cpl, and hit Enter.
Select the Norton Antivirus software from the program list and click Uninstall/Change.
Click the Yes button to confirm.
A Norton uninstaller window will open that might ask if you want to retain some of the Norton antivirus features. Click No thanks to decline.
Click the Next button on the uninstaller window to remove Norton Antivirus.
Finally, restart Windows after uninstalling Norton Antivirus.
The issue with this uninstall method is that some software leftovers may remain behind, and any issues related to the windoc.exe process may continue in the background. You’ll have to go through an extra step of removing the software remnant files or use Norton’s dedicated tool.
And just because you’ve uninstalled Norton, your PC doesn’t have to be left defenseless. There’s a huge pool of great antiviruses that do a great job, so scan through our list and pick one.
Other Norton-related processes include the nsc.exe process, so you may want to check it out too, and see if it is essential in your system.
That’s all we had for this article, but we’re keen to hear any additional thoughts you may have on this process and issues you’ve encountered so far. Drop us a comment down below.
Microsoft Visio is the latest platform to be enhanced with the ability to allow users to add custom shapes to their Visio platform after the Redmond-based tech giant gifted Windows’ Snipping Tool this ability as well, although in a different form.
Either way, the feature is currently rolling out to Visio users, and they can download custom shapes from third-party apps or create them using the Visio desktop app, and then add them to the preferred Vision document.
The Microsoft Visio team is excited to announce that Visio for the web will now support custom shapes, a feature that many of you have been asking for! Users with a Visio Plan 2 license will be able to import custom shapes in the form of a Visio stencil file (.vssx), which can be created using the Visio desktop app or downloaded from a third-party source. You can then use the shapes to create and edit diagrams in Visio for the web—just like you do with the built-in shapes.
Microsoft
Microsoft says the new feature is useful for those organizations that want to personalize and brand their documents, as these custom shapes can be created and tailored to suit every need and scenario. The feature can also be used to create realistic and easy-to-understand plans by allowing the employment of specific shapes.
How to add custom shapes in Microsoft Visio?
It’s worth mentioning that only users with a Visio Plan 2 license will be able to use this feature, so make sure you have one before proceeding.
Open your Microsoft Visio web platform, go to the Shapes pane, and click on the Plus (+) button.
Select Custom Shapes.
Add a custom shape from your preferred location.
As you can see, users can add custom shapes from OneDrive, or their current device. As Microsoft states, once uploaded, these shapes will become available in the Shapes pane, for users to drag, drop, and edit as they like.
Users can also share the custom shapes with other users within their organization, which makes this feature even more useful, as it emphasizes collaboration. Sharing these shapes is the same as sharing the rest of the existing shapes.
However, users will need to provide the stencil (.vssx) files, so that others can access, use, and edit these shapes at will. They will still be able to edit these custom shapes without the stencil files, but the editing will follow the built-in Visio shapes.
Good news for Outlook users everywhere. According to the latest entries in the Microsoft 365 Roadmap, Outlook will support a sort of OneDrive integration that will allow users to access OneDrive directly from Outlook, without leaving the platform.
Up until this integration, Outlook would open a new tab for OneDrive, specifically, and users needed to access to new tab to use OneDrive. However, with this feature, OneDrive will open in Outlook in a more streamlined experience, as Microsoft states:
Quickly access your OneDrive without having to leave Outlook! Previously, the OneDrive button in Outlook opened a new tab for OneDrive; with this change, you will see OneDrive inline for a consistent and fast experience.
Microsoft
It’s worth mentioning that this feature is coming to Outlook for Web, and it involves using OneDrive for Business. Microsoft doesn’t mention anything about the personal OneDrive account, and if there could be an integration between it and Outlook.
However, depending on how this integration is received, and we should know more about it this month, as Microsoft plans to release it by the end of January, most surely the Redmond-based tech giant will expand the feature to include personal OneDrive accounts, as well.
OneDrive-Outlook integration: Why is it important?
Well, both Outlook and OneDrive have been getting a lot of intriguing and useful updates and features in the last months, and they will continue to do so in 2024. Both platforms are getting AI capabilities, with Copilot coming to both of them, so the OneDrive-Outlook integration is a necessary feature to have, for many reasons.
First, it offers a sense of seamless experience, and users will be able to get work done easier and faster without getting lost in dozens of open tabs and emails. With just a few clicks, they will now have everything they need in just one frame.
Second, the OneDrive-Outlook integration will enhance the existing capabilities of both platforms. Imagine you have a file that you need to urgently send through an email. With a drag-and-drop, it can be done in a matter of seconds, effectively. The same could go for Copilot, for example.
The AI tool would be able to inspect and analyze files and documents that can be found in OneDrive, to write a report email in Outlook.
What do you think about this integration? Let us know in the comments section below.
If you get the Channel verification level is too high message on Discord and can’t send any messages on the server or to the mods, it’s likely that you are running an outdated version of the app or don’t have the necessary verification in place required by the server, say the phone number.
When we faced the issue, it mostly affected Android and iPhone devices, while the web app worked fine. So, to start with, switch to Discord web and verify whether you can send messages on the server without getting a Discord verification level error.
Also, verify the Discord server status on the official website or use a real-time monitoring platform like Downdetector. If the servers are down, try again in a few hours.
What can I do if Discord reads Channel verification level is too high?
1. Update the Discord app
When our Windows Report experts tried fixing the error on multiple devices, updating the Discord app worked 9 out of 10 times. So, if you haven’t done so in a few months, install the latest updates.
Once done, launch the app, and if you see a Discord rules pop-up, accept the changes.
2. Verify your Discord account and check the server’s Verification Level
Discord requires you to add some information to verify the account and use certain features. This includes:
Verified email address (you will receive an email to confirm the same)
Mobile number
Age
Also, if yours is a new account, wait for a while. Some servers allow members to interact or take action only when their accounts have been active for a specific duration based on the set Verification Level. Here are the restrictions for the different levels:
None: No restrictions Low: Should have verified the email address. Medium: Should be a registered Discord user for more than 5 minutes High: Should be a registered Discord user for more than 10 minutes. Highest: Should have verified the phone number.
To check the Verification Level settings > right-click on the server > choose Server Settings > go to the Safety Setup tab under Moderation > view the configured settings.
If you are unsure about this, contact the mods. Remember, verification level restrictions do not apply to users who have been assigned a role.
3. Clear the Discord cache
3.1 Android
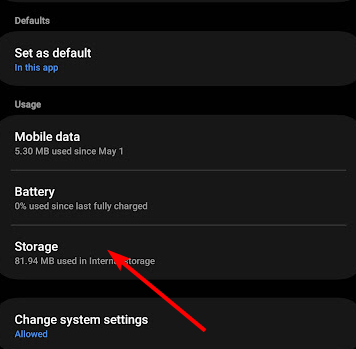
Open the Android Settings, and go to Apps.
Select Discord from the list.
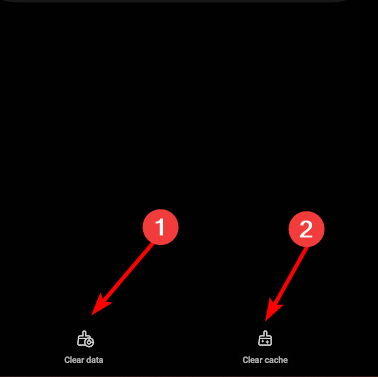
Tap on Storage.
Now, tap on Clear data and Clear cache individually to delete all the non-critical data.
Choose the appropriate response in case a confirmation prompt appears.
3.2 iPhone
Open the Discord app, go to your profile from the bottom right, and tap on the Settings icon.
Scroll down and select Advanced under App Settings.
Enable the toggle for Developer Mode.
Go back to the previous Settings window, scroll down to the bottom, and tap on Clear Caches.
Once done, you will see a Caches Cleared confirmation message.
Since iOS doesn’t natively allow clearing the app cache, as is the case with Android, you will have to rely on the app’s built-in setting. This also helps fix the Bad activity result code 96 error.
The steps listed here are for a PC, though the process for changing the server settings remains the same across operating systems, including Android and iOS.
Launch the Discord app, right-click on the server, and select Server Settings.
Go to the Safety Setup tab under Moderation, and click the Edit button next to DM and Spam Protection.
Disable the toggle for Members must accept rules before they can talk or DM.
Once done, verify whether new members can now send messages without getting the Channel verification level is too high error on Discord. And if the Discord rules screening is not working, make sure you have set up a community.
Now that you have bypassed the issue, it should be apparent that running the latest Discord version is critical because outdated versions lack functionality and may throw errors. And if it’s not a problem at your end, the mods just have to reconfigure the server settings.
Microsoft fixed the CVE-2024-0519 vulnerability in Microsoft Edge, a vulnerability that was reported by the Chromium team as having exploits.
The Microsoft Edge Stable Channel (Version 120.0.2210.144) received an emergency security update on January 17, effectively dealing with the vulnerability by mitigating it.
The Chromium team said the vulnerability proved a challenge to contain, as it existed out in the wild, a term often used by the tech industry to define a vulnerability that exists uncontrolled on users’ devices, meaning personal and sensitive data is at risk.
The Redmond-based tech giant says Edge is effectively protected, and users can safely use the browser to access platforms that requite the input of sensitive information.
It’s worth highlighting that Microsoft Edge’s enhanced security mode feature mitigates this vulnerability. You can opt-in into this security feature and have peace of mind that Microsoft Edge is protecting you against this exploit.
Microsoft
How to keep your Edge safe against CVE-2024-0519
If you haven’t used Microsoft Edge for more than 3 days, make sure you update the browser the second you open it. Microsoft Edge usually updates itself automatically, but it would be better to double-check that your Edge version is the latest version: 120.0.2210.144.
Open up Microsoft Edge, click on Settings at the top-right of the screen.
Then, go down to About Microsoft Edge, and make sure you have the latest version installed.
The browser will display information about the version, and if there are any updates available. If Microsoft Edge is updated to the latest version, it will show the Microsoft Edge is up to date message, as you can see below.
The vulnerability causes out-of-bound memory access in V8, and it affected all Chromium-based platforms, such as Google Chrome, Microsoft Edge, Opera, and so on.
As it can gain access to users’ data such as bank information or social media credentials, it’s highly recommended to protect against it as soon as possible, no matter which type of Chromium-based browsers users prefer.
Snipping Tool now has new shape options that users can select from when editing screenshots in the app. Spotted by Windows insider, @PhantomOfEarth, version 11.2312.33.0 introduces them by adding a new category called Shapes in its toolbar.
It’s worth mentioning that these new features are only coming to Snipping Tool in Windows 11, as the Windows 10 version of the app still lacks many of the features that are already present in the Windows 11 version.
The spotter said the features work, and Microsoft might soon release a statement regarding this addition, so if you’re currently enlisted in the Windows Insider Program, it wouldn’t hurt to update your Snipping Tool.
The tool was greatly updated and improved in the last Insider builds, and it even got HDR display support, so users who wanted to use high-quality screenshots on their displays, would be able to do so.
So the new shape options are coming just in time, as the tool’s expanded features could easily turn into the next go-to screenshot-editing app. That means users won’t have to install third-party apps to use when dealing with screenshots. They can just use the Windows native Snipping Tool’s new shapes. Here’s how you can do it.
How to use Snipping Tool’s new shape features
Open the Snipping tool, by either typing it in the Search bar or pressing Windows key + Shift + S.
Once there, press on the new Shapes button, to open up the new features.
Select the ones you prefer and place them in the screenshot.
You can select from a variety of shapes, including, arrows, circles, lines, and so on, and you can choose to fill them up with color or not.
No doubt Microsoft will upgrade this feature to more shapes and colors in future updates, but for now, it’s enough to get the job done. Maybe Snipping Tool could get an AI treatment, soon? Most probably.
If we think that Microsoft Paint got Cocreator, and Microsoft Notepad got Cowriter, Snipping tool getting a possible Coeditor wouldn’t be a surprise.
A while ago, Microsoft sort of introduced a new Microsoft Rewards system for Xbox, specifically, when a Brazilian Xbox user posted on X (formerly known as Twitter) a screenshot detailing how this new system works.
The new Xbox rewards system was due to be released in December, as the post detailed, but somehow Microsoft didn’t release it back then. The Redmond-based tech giant hasn’t said anything about it either, however, this week, Xbox users noticed a brand-new Weekly Console Bonus within the Microsoft Rewards platform.
The new feature rewards Xbox users daily by playing on Xbox every day of the week. It comes with certain tasks and quests, and it follows a gamification structure that can be very motivating to follow, with apps such as Duolingo, for example, proving why this structure is effective.
There are certain quests, such as Use the Xbox app, or Play a PC game, or Play a game on console, that will reward players with 5 to 50 points just by simply completing them.
How to access the new Weekly Console Bonus
As you can see in the image below, the new Weekly Console Bonus has a pretty structured UI, where you can easily catch up and follow up with the tasks.
The quests reset every Monday, and the app also shows the total points users manage to gather in a single week: this is also good, as it will keep users up to date with their progress.
It seems that Microsoft is gradually rolling out the new app, as not everybody has it. According to the Reddit user who posted the image, they suddenly got it when opening the Xbox app on mobile.
Countless other users can see it as well, and for some, it works, for others, it doesn’t. And many users don’t have access to it yet.
The play a game on console isn’t popping for me. Edit: it just popped for me.
Reddit user
It popped up to me, but I can’t get the reward no matter what. Even tho I played games on the console all day before I saw that quest and after
Reddit user
I got it too. And so far the “play a game on console” for 5 pts ain’t working.
Reddit user
For now, it seems that it’s rolling out gradually to users everywhere in the world, and some players are only getting 250 weekly points, instead of the 500 pictured in the image above, so the new Weekly Console Bonus could be quite unstable, as we speak.
Either way, to access it, make sure your Xbox app has the latest updates installed, as this might be showing up on your app on any day now.
The SynReflash file, developed by Synaptics Incorporated, is used to reflash the Synaptics touchpad driver and is bundled with the program package. Running SynReflash.exe is found to fix trivial trackpad issues. It’s stored in: C:\Program Files\Synaptics\SynTP\SynReflash.exe
If the SynReflash.exe file is not found or the reflash process fails, the touchpad may stop working. The touchpad won’t be listed in the Device Manager anymore since no driver is installed, and it can be viewed only under Hidden Devices.
How do I fix SynReflash.exe errors?
Tip
If the trackpad or touchpad is not working, connect a wired mouse to the PC to perform the steps listed below.
1. Install the latest available driver
Press Windows + X to open the Power User menu, and select Device Manager from the list.
Expand the Mice and other pointing devices entry, right-click on the touchpad/trackpad that’s not working, and select Update driver.
If you can’t find the device, click the View menu, and select Show hidden devices. You will see devices that no longer have a driver installed. Now, perform the previous step.
Select Search automatically for drivers and wait for Windows to install the best locally available version.
If SynReflash.exe is not working, updating the Synaptics touchpad driver will do the trick. When the OS can’t find a better version, check in Windows Update.
To do that, press Windows + I to open Settings > go to Windows Update from the left pane> click on Advanced options > select Optional updates > expand Driver updates > tick the checkbox for the Synaptics driver > click on Download & install.
As a much faster alternative, I recommend using a handy driver updater as it can find the latest driver options from a massive database with just a single click.
Go to your PC manufacturer’s driver download page, and search for the Synaptics driver for the installed iteration of Windows. In our case, it’s a Dell laptop.
Click the Download button to get the installer package.
Run the setup (.exe file) and follow the on-screen instructions.
Once done, restart the computer for the changes to apply and verify whether you still get SynReflash error messages.
It’s not recommended that you download drivers from the Synaptics website, since these are generic and may result in reduced functionality. The official manufacturer, say Lenovo or Dell, provides customized drivers best suited for the device.
3. Update the BIOS
If the device’s trackpad stopped working after performing the SynReflash operation, updating the BIOS will fix things in no time!
Remember, it’s an intricate process, and any errors encountered during it may brick the PC. So, it’s best that you check the manufacturer’s website for the exact steps or contact a professional.
4. Disable Intel Engine Management Interface
Press Windows + R to open Run, type devmgmt.msc in the text field, and hit Enter.
Double-click the System devices entry, right-click on Intel Management Interface Device, and select Disable device.
Press Windows + S to open Search, type Create a restore point, and click the relevant result.
Click the System Restore button.
Select Choose a different restore point option, and click Next.
Pick the older restore point from the list or one created before the issue first appeared, and click Next.
Check the details and click Finish to start the process. The restore will take 20-45 minutes to complete.
If the SynReflash error message keeps appearing after a failed driver update, perform a system restore to revert the PC to a previous stable configuration.
Lenovo is back with an affordable enterprise convertible laptop line in the ThinkPad L15 Gen 4, but does affordable translate into feature-lacking in 2024?
It needs to be said that Lenovo’s ThinkPad lineup is often gifted to employees more than sought after by individuals of their own free will.
Typically, when employers hand out ThinkPad’s, they do so at the behest of IT Admins who deem the devices’ purpose oriented and suitable for the task at hand.
Lenovo updates its most down-the-line laptop with features checklist that should aid it in 2024 for the same low price as it was in 2023 and 2022.
SPECS
Lenovo ThinkPad L13 Yoga Gen 4
Processor
13th Generation Intel® Core™ i3-1315U Processor (E-Core Max 3.30 GHz, P-Core Max 4.50 GHz with Turbo Boost, 6 Cores, 8 Threads, 10 MB Cache) 13th Generation Intel® Core™ i5-1335U Processor (E-Core Max 3.40 GHz, P-Core Max 4.60 GHz with Turbo Boost, 10 Cores, 12 Threads, 12 MB Cache) 13th Generation Intel® Core™ i5-1345U Processor with vPro® (E-Core Max 3.50 GHz, P-Core Max 4.70 GHz with Turbo Boost, 10 Cores, 12 Threads, 12 MB Cache) 13th Generation Intel® Core™ i7-1355U Processor (E-Core Max 3.70 GHz, P-Core Max 5.00 GHz with Turbo Boost, 10 Cores, 12 Threads, 12 MB Cache) 13th Generation Intel® Core™ i7-1365U Processor with vPro® (E-Core Max 3.90 GHz, P-Core Max 5.20 GHz with Turbo Boost, 10 Cores, 12 Threads, 12 MB Cache)
Lenovo updated its L15-series chassis two years ago with the L15 Gen 2 that leaned into its wedge shape, tapered edges, and brushed aluminum exterior lid finish.
Despite its plasticky feel, the L15 is said to be resistant to certain levels of shock, vibration, sand, water, and temperature extremes.
The 15-inch lid to the L15 is smooth to the touch albeit a bit flexy if you’re gripping from the edges or attempting a one-finger open.
Both the lid and the bottom of the laptop feel like they are made of the same plastic material but does help the L15 feel a bit lighter than its previous versions.
Customers also have either a HD (720p) or FHD (1080p) resolution webcam that sits behind a manual shutter and an IR camera enabling Windows Hello facial recognition for one of two ways to bio authenticate on the device. The other bio authentication method on the L15 is through the embedded fingerprint reader in the circular power button on the keyboard deck.
Ports
The L15 is among the most versatile port machines Lenovo offers supporting a full HDMI slot, Ethernet, Smartcard, USB-C, Thunderbolt 4, two Type-A 3.2, microSD, and audio/mic combo jack.
Beyond the side ports, there is a back slot for optional support of a mobile broadband SIM, as well as connectivity with Wi-Fi6E and Bluetooth 5.1.
Keyboard
The backlit keyboard on the L15 is identical to other ThinkPad experiences over the past five years with a similar 1.5mm key travel, U-shaped chiclet keys with nicely separated areas between each button.
There is the addition of Microsoft Teams chat keys that help customers start and end Teams calls as well as jump into chats, which reside next to the function keys at the top of the keyboard deck.
The trackpad on the L15 feels bit squished at the bottom of the bottom of the keyboard deck with roughly a half-inch distance between the mouse and the edge of the laptop.
Lenovo maintains its mechanical trackpad design which means customers will still need to dig into the corners to register clicks unlike other devices that are moving toward haptic trackpads.
Display
The 15.6-inch panel of the L15 uses an aging 16:9 aspect ratio screen that utilizes IPS or OLED technologies depending on the configuration. Customers can get an L15 with a screen that supports 250 of 300 nits of brightness.
Colors on the 1920×1080 resolution screen are middling at best due to a combination of a matte screen and a panel with relatively low light performance.
Performance
The L15 isn’t a barnstormer of a performant laptop and there isn’t much to write home about even though it’s sporting an Inte 13-Gen Core processor. Even with support of up to a Core i7-1365U processor with vPro that has both E and P core maxes of up to 3.90GHz and 5.20Gz respectively pushing through ten cores and twelve threads, the performance of the L15 is par for the course.
Typical workloads that consist of basic to average data processing such as working through Word, Excel, PowerPoint, web-based apps, and web browsing all move smoothly along the device.
More complicated tasks such as jumping back and forth between a multitude of browser tabs, light photo editing, and even some video conferencing apps when paired with filtering effects can get the fans on this device to fire up.
While it sounds like the device is pushing the limits when the fans come on, the L15 remains relatively cool and still decently performant. It is not until attempting light video editing, reviewing macro-enabled Excel docs, hefty PowerPoint decks or web apps with plugins does the system start to stutter.
Lenovo continues to pair many of its laptops with Intel Iris Xe GPUs which don’t offer much in the way of gaming or rendering support so playing video games and exporting video content from the devices are practically a no-go.
Using software such as Davinci Resolve is nice on the L15 but that boils down to the apps optimizations as Adobe Premiere stutters, lags and crashes when scrolling through a timeline filled with cuts, filters, and effects.
As is the case with Intel’s 13th Gen processors, the Raptor Lake lineup runs a bit hotter than previous generations and could be the negating factor for the average battery life of the laptop.
The onboard Lenovo Vantage software which acts as a middle manager of performance for the laptop can only eke out a bit of extra battery life with some extreme settings put into place.
The L15 comes up shorter than its competitor, the Dell XPS 15, by about 30 mins as it logs 6 hours of moderate use and 3:15 mins of heavy use. When used lightly for tasks such as email triage (more specifically via a web browser), HD video playback, or simple web browsing, the L15 can last one and a half days under working hours, roughly 13 hours.
Summary
As this review title states, the L15 is an affordable upgrade but perhaps an overlooked purchase. The L15 checks many of the standard features listed for a modern laptop in 2023-2024 but does with minimum performance benefits.
The L15 maintaining its 16:9 aspect ratio in the face of a growing wave of 16:10 or even 3:2 devices make the laptop feel further antiquated along with its dimly light panel.
Typing on the device is just as comfortable as every other Lenovo ThinkPad and the port selection is second to none when compared to other relatively thin laptops. The added Microsoft Teams control buttons will be a plus for organizations utilizing the enterprise chat platform.
Businesses will be able to slot the L15 into as a replacement for ageing devices in the office, but I doubt many will probably even notice.
Viva Engage, the social network platform inside Microsoft Viva is getting the Copilot treatment, as the Redmond-based tech giant announced the Public Preview of the AI tool. The preview is available to all Viva users with a premium Viva Engage license.
The public preview of Copilot in Viva Engage is now available! If you are an individual team member, corporate communicator, or organizational leader, Copilot can help you engage with others at work in ways that create value for you and your organization.
Microsoft
Microsoft Viva already received a handful of AI capabilities in 2023, but many of them focused on the HR-oriented tasks. However, Copilot in Viva Engage will be capable of many things.
What can you do with Copilot in Viva Engage?
Copilot will personalize your feed with suggestions and ways to engage with your work colleagues, as the blog post states:
Copilot makes personalized suggestions about where to engage based on your activity and what is trending in your organization’s network.
Microsoft
This means Copilot will provide you with everything you need to be up to date with the rest of the Viva Engage community: summarising the community’s purpose and recent trending posts, suggesting and summarising Viva Engage campaigns, and suggesting and creating content ideas.
Speaking of creating content, the tool will also help users create text posts, and it will come with ideas whenever users need them. The tool will then write, edit, and leave feedback on the text, for users to implement.
Whether you’re starting from scratch or working from a draft, Copilot in Viva Engage can help you write, edit, get feedback on your post, and more. For users who are new to AI collaboration, suggested prompts provide examples of how to get the ball rolling with Copilot. These suggestions guide you to collaborate with Copilot in ways that are particularly useful to the task at hand –writing a post that is engaging and expresses what you’ve got to say.
Microsoft
Here are some examples of prompts users can type in:
• Brainstorm ideas for a post about… • Give me a post template about… • Rewrite my draft to be more concise. • Make my draft more engaging. • Read my draft and predict questions readers might have. • Suggest how to increase authenticity. • And more, including your own custom prompts!
It seems Microsoft Viva is getting a lot of love from Microsoft. Earlier this week, the roadmap for it revealed that the platform will also get code snippets, much to the delight of the software developers using the platform.
What do you think about these features coming to Microsoft Viva?
If your Destiny 2 game is stuck on the Initializing screen when updating, you need to end all processes related to Destiny 2 from Task Manager, ensure your internet connection is stable, retrieve storage space, disable antivirus temporarily and run the Blizzard app as admin.
What can I do if Destiny 2 is stuck on Initializing?
1. Run your client app as an administrator
Press Ctrl + Shift + Esc to open Task Manager. Go to the Processes tab, right-click the Blizzard/Battle.net app, then select End task.
Right-click the Blizzard/Battle.net shortcut on your desktop and select Properties.
Go to the Compatibility tab, and under Settings, place a checkmark next to Run this program as an administrator.
Also, verify if your internet connection is stable, then turn off overclocking and try restarting the router & your computer.
In case you are facing other issues like Destiny 2 won’t update, first ensure you have a stable internet connection; read this guide to learn about other solutions.
2. Rename the Destiny 2 folder
Press Windows + E to open the Windows Explorer window.
Go to this path: C:\Program Files (x86)
Locate the Destiny 2 folder, click the Rename icon and rename the folder.
3. Delete the app cache
Press Windows + R to open the Run window.
Type %appdata% and click OK to open the AppData directory.
On the Roaming folder, locate Blizzard, Battle.net and Destiny 2, select them and click Delete.
Go back to the Local folder, locate the same folders and delete them as well.
Type services.msc and click OK to open the Services app.
Locate and double-click Secondary Logon to open its properties.
For Startup type, select Automatic from the drop-down menu.
Click Apply and OK to save the changes, then reboot your PC.
5. Use the Disk Cleanup tool to retrieve space
Press Windows + R to open the Run window.
Type cleanmgr and click OK to open the Disk Cleanup window.
Select the drive and click OK.
Click Clean up system files.
Select the drive and click OK again.
Under Files to delete, select all the items and click OK.
Next, select Delete files.
6. Reinstall the app
Press Windows + I to open the Settings app.
Go to Apps, then select Installed apps.
Locate Destiny 2, click the three dots icon and click Uninstall.
Select Uninstall to confirm the action.
Press the Windows key, type blizzard and click Open.
Go to Library, right-click the game and select Install.
Now, use these steps to reinstall the Blizzard or Battle.net app that you are using to fix the problem once and for all.
In conclusion, running the client app as administrator, renaming the Destiny2 folder, deleting the app cache helped us fix the Destiny 2 is stuck on Initializing screen issue,
However, sometimes setting secondary logon as automatic, retrieving space on the PC and reinstalling the app did the trick.
Xbox is publishing a user-guided self-calibration tool for thumbsticks on Xbox Wireless Controllers, for those individuals who want to repair their Xbox controllers on their own, from the comfort of their own home.
The news was announced as part of the Beta Release Notes for Xbox Insiders for the Beta Build 2402.240111-2200. Among a handful of other useful changes and improvements coming to Xbox, the self-guide stands out as one of the most useful tips for those Xbox gamers who are keen on fixing their broken controllers.
The guide will help all those owning an Xbox Wireless Controller and Xbox Elite Wireless Controller Series 2 that have broken thumbsticks, and it can be accessed through the Xbox Accessories App.
For users in the US who have independently replaced the circuit board on their Xbox Wireless Controller and Xbox Elite Wireless Controller Series 2 or users in all regions experiencing minor thumbstick issues, we now offer a user-guided self-calibration tool for thumbsticks through the Xbox Accessories App.
Xbox
How to repair a broken Xbox Controller on your own
Well, before trying to repair what seems to be a broken Xbox Controller, make sure there aren’t any other issues that might cause your controller functioning problems. We have a comprehensive guide on how to check for underlying issues on Xbox controllers, which you can read here.
You should also make sure your Xbox UI is updated to the latest version, and before you jump into any repairing, make sure your devices don’t have connecting issues.
Depending on the problem you have with the controller, YouTube is a good place to start, as you’ll need visual cues before delving into fixing the broken Xbox controller.
However, now that Xbox is releasing a self-repair guide for a particular issue affecting Xbox controllers, it might release several more in the future, and you’ll be able to use them to fix the Xbox controllers, as closer to an official way to repair, as you can get.
You can read the release notes for the latest Beta Build to the Xbox Insider Program here.
Many users have reported getting there is no Internet connection. There is something wrong with the proxy server, or the address is incorrect with an ERR_PROXY_CONNECTION_FAILED error when trying to use a browser on their computer. To fix this connection error, you can modify the proxy settings, reset TCP/IP, renew the IP address or disable the proxy temporarily.
The err_proxy_connection_failed error means that your browser is not able to connect to the internet because of a proxy connection so the best solution is to disable it.
How can I fix the ERR_PROXY_CONNECTION_FAILED error?
1. Disable the proxy server for your LAN
Press the Windows key, type control panel in the search box and click Open.
Select View by as Category, then click Network and Internet.
Click Internet Options.
On the Internet Properties window, go to the Connections tab and select LAN settings.
Uncheck the Use a proxy server for your LAN option.
Also, remove a checkmark next to the Automatically detect settings option.
Press the Windows key, type cmd and click Run as administrator.
Copy & paste the following commands one by one to reset Winsock and IP, then hit Enter after every command:
netsh winsock reset
netsh int ip reset
Let the commands execute, then close the Command Prompt window and reboot your PC to save the changes.
6. Reset your network connection
Press Windows + I to open the Settings app.
Go to Network & Internet from the left pane and click Advanced network settings.
Select Network reset.
On the following screen, click the Reset now button.
Confirm the action if prompted.
Resetting the network connection and performing a malware scan can help you fix other connectivity issues like Windows 11 proxy error; read this guide to know more about the issue.
7. Reconfigure TCP/IP
Press the Windows key, type cmd and click Run as administrator.
Type the following commands one by one and hit Enter after every command:
netsh int tcp set heuristics disabled
netsh int tcp set global autotuninglevel=disabled
netsh int tcp set global rss=enabled
Close the Command Prompt window.
In conclusion, sometimes renewing the IP address, disabling the proxy server has helped us fix the ERR_PROXY_CONNECTION_FAILED issue.
Alternatively, sometimes deleting a registry key, reconfiguring TCP/IP, and resetting Internet options did a trick for WR experts.
Speaking for internet options, inetcpl.cpl is a built-in Windows component, and if you are getting errors related to it, read this guide to learn more solutions.
If you have any questions or suggestions about the subject, feel free to mention them in the comments section below.
Many users have encountered Your card issuer has declined this request. Contact your bank or use a different payment method. Learn more [OR-CCSEH-26] errors while paying for a service or trying to add a new card to any of the Google products or services. To fix the OR-CCSEH-26 error, clear the app cache, update it, ensure you have entered the correct information, or use a different payment method.
The OR-CCSEH-26 error means your bank is forcing 2-factor authentication to make payments and for other requests so the easiest way is to use another payment method.
How can I fix the OR-CCSEH-26 error?
1. Check your payment information
If you are not able to make a payment using a card, first check if you have mentioned the payment info and billing address correctly, then talk to your bank to fix the issue for you.
Next, ensure you have a stable internet connection, and try switching to Wi-Fi or another mobile data. Also, make sure you install all the updates available for the apps and operating system.
2. Clear the app cache
Tap on the Settings app from the home screen.
Go to Apps.
Tap App Management.
Scroll through the app list and tap to select the app in question, Google Pay or Google Play Store.
Tap Storage usage.
Next, tap Clear cache.
If this doesn’t help, you need to follow Steps 1 to 5, then tap Clear data.
Now tap Delete to confirm.
Clearing data will erase all the details stored on your device, including your login credentials, so launch the app, log in and check if it fixes the issue.
3. Update the app
Tap on the Google Play Store on the home screen.
Click the Profile icon from the top-left corner.
Tap Manage apps & device.
Click Updates available.
Scroll through the list of apps, look for Google Pay and tap Update.
Launch your preferred browser on your phone or computer and visit Google Play Store.
Sign in to your Google account if prompted.
Click Payment methods.
Now, click the Add a payment method option.
Select Add credit or debit card or any other option you see fit.
Enter the details and click Save. Now, try to perform the same action to check if the issue persists.
5. Verify your payment info on Google Pay
Launch your preferred browser on your phone or computer and visit payments.google.com.
Sign in to your Google account.
At the upper-right corner, select Alerts, then click Verify.
In case you can’t see alerts, go to the Payment methods tab.
Navigate to the card that must be verified and click Verify.
Follow the on-screen prompts to complete the process. Once it is done, the payment method must be marked as Verified.
If that doesn’t work for you, you can contact the Google Pay support team and explain to them the issue & steps you took to get further assistance.
In conclusion, switching to another network connection, clearing the app cache, and updating the app is to the latest version has helped WR experts fix the OR-CCSEH-26 error.
Windows updates, especially those on Windows 10, and Windows 11 are released monthly, in the Patch Tuesday updates. They are usually medium to big updates, such as the latest 23H2 version, which took quite the space and time to install.
Depending on their size, these updates are installed faster or slower, but if your device installs them slower than usual, there is a simple trick that can be done to make the installation go faster.
According to Windows enthusiast, @thebookisclosed, there is a command under the name of MoUSO Core Worker Process that uses a lot of CPU power and it especially slows down the installation process of Windows updates.
To somehow stop this command from using so much power, the interface must be closed, and the process will then stop. So, in other words, when installing Windows updates, close the Settings page, and your Windows device should install them faster.
The Windows enthusiast says this trick will do wonders on low-end machines running on Windows 10, and Windows 11.
Did you know that having the Windows Update settings page open slows down installing updates? The MoUSO Core Worker Process responsible for wiring up what’s under the hood to the UI just hammers the CPU, especially on low end machines. Close Settings & enjoy faster installs
Microsoft is set to enhance SharePoint with new Section Background features, coming to the platform in February, and April 2024, according to the latest entries in the Microsoft 365 Roadmap.
The new features will allow users to highly customize and personalize their SharePoint pages. In February, Microsoft will release the Section Background feature to the platform, and it will bring with it a variety of new options and settings that can be used to create featured sections on SharePoint Pages.
Here’s what Microsoft has to say about the feature:
SharePoint now allows you to add an image or gradient color to the sections of the page from a new set of options, including image settings to ensure readability. With this release, we’re providing authors to make beautiful pages with featured sections.
Microsoft
Then, in April 2024, the Redmond-based tech giant will introduce custom images to Section Background, meaning users will be able to customize their SharePoint page with any image they see fit. The feature will also introduce additional settings, such as fill mode, overlay, or opacity, to perfectly set up the SharePoint page background.
Those users who are passionate about graphic design will find these features useful and practical.
SharePoint lets you customize the sections backgrounds with your own image. We’ve enhanced the focal point and introduced more settings like fill mode, overlay, opacity to help you adhere to accessibility best practices and make sure that your contents are clear and readable with customized background. This gives you more power over the image to make your page beautiful.
Microsoft
Section Background transforms SharePoint into a versatile platform for intranet web design
The two features allow for flexibility and customization of SharePoint pages, which is a step ahead in the right direction. This means these pages can now be effectively branded to reflect a company image in the internal network.
Not only that but coupled with the recently released video trim feature, SharePoint could become a versatile platform for intranet web design.
The Section Background features would be used to create the static parts of the page, while the video trim feature would be used to add a bit of animation to the whole page.
But what do you think? Let us know your opinions in the comment section below.
Starting in February 2024, Microsoft Viva users will have access to code snippets in almost every place within the platform, according to the latest entry in the Microsoft 365 Roadmap. These code snippets will be a time saver for a lot of users, especially IT professionals and coders on the platform.
The feature can be accessed on almost every Microsoft Viva functionality, including posts, discussions, polls, and other fields within the platform, as Microsoft states:
Users will be able to add code snippets to their posts, discussions, replies, questions, polls, and praises on Viva Engage. Additionally, if customers are licensed for Answers in Viva Engage, this feature will also be available when asking questions on Answers. To add code snippets, locate the new button on the publisher toolbar.
Microsoft
The feature will be added to the platform in February 2024, and it will be available everywhere.
How useful are the code snippets in Microsoft Viva?
First of all, Microsoft Viva is a platform meant for professional collaboration, teamwork, and work management. To further enhance teamwork and collaboration, Microsoft added features such as the AI-enhanced summarization, back in December 2023.
The code snippets feature will be an easy way to quickly pin short passages of code in meetings, chats, and polls so that other users can see and react to them. This way, the feature will not only save a lot of time, but it will be quite useful in multiple situations.
And since collaboration is a big goal for Microsoft, this feature will also emphasize collaboration between the software developers of a company, and not only them.
Being able to quickly showcase a code snippet with a few lines of code for a specific command, where the other developers can take a look, and validate it with a simple copy/paste would surely be a big plus for collaborative work.
And finally, Microsoft is making this feature easy to use. While we don’t know what it will look like, the Redmond-based tech giant says the feature will have a special button on the publisher toolbar, so it will be easy to find and use.
If you encounter the app not available in your country error when trying to download or access an app, you’ll need to break a few rules to access it.
Certain apps may be unavailable to you if it has licensed content that is only legally available in specific countries or regions, and yours is not one of them.
What do I do if this app is not available in my country?
NOTE
Note that you may apply the same solutions for your iOS device, but when it comes to sideloading, it may be a hard nut to crack.
Connect to a server in a country where the service is available (e.g. USA, Germany, France, etc.).
Try downloading the app again and see if the issue has been resolved.
1.2 On Android devices
Download and Sign up with a VPN service provider.
Install the VPN client on your Android device.
Connect to a VPN server in a country where the service is available.
On your Android device, go to Settings click on Apps, and choose Google Play Store.
Go to Storage.
Next, tap on Clear cache, then choose Clear data.
Tap on Force stop to restart the app.
Open Google Play Store and try launching the app again.
A VPN can mask your device’s location by connecting to a server in a different country. By doing so, you can bypass geographical restrictions and access the app. Make sure you connect to a server in a country where the app is available, then try downloading or accessing the app again.
We also recommend using an undetectable VPN because using it violates the terms of service of certain apps and could potentially lead to account suspension or other issues.
For PC users, you can easily sideload Android apps if you have the Google Play Store app. Android users simply have to navigate to their browsers, search for the app’s APK file, and download it.
If the app is available for download as an APK file from a trusted source, you can try sideloading it. You just have to be cautious, as it may expose you to security risks. Ensure you are obtaining apps from trusted sources.
Alternatively, if the app is not available for your device’s operating system or is restricted by the app developer, there may be no immediate solution to access it from your current location.
Have you experienced any difficulties downloading any apps in your country? What measures did you take, and have you faced any repercussions thus far? Let us know in the comment section below.
The classic IDKFA cheat code used by DOOM players to unlock all the doors, and get all the possible weapons, has now been trademarked by Bethesda, earlier this month. The news of it was spotted by Xbox enthusiast @klobrille, and there is even a trademark document attached to it, which you can check out here.
Bethesda has filed the trademark document for the IDKFA cheat code both in the US region, and the international region, as well, under different categories on January 9, 2024.
In the US, for instance, the classic cheat code is filled under these codes: 021, 038, 026, 023, 036, while having 009 as the primary code. What does this mean? Well, it means the gaming company will have rights over the cheat code in different areas, ranging from computer games to entertaining services, as you can see below:
Recorded computer game software; downloadable computer game software via a global computer network and wireless devices; downloadable computer game software for personal computers and home video game consoles; downloadable computer game software for use on mobile and cellular phones and handheld computers; downloadable electronic publications in the nature of magazines and newsletters in the field of video games; records, discs, tapes, cassettes, cartridges, cards and other carriers bearing or for use in bearing sound recordings, video recordings, data, images, games, graphics, text, programs or information; vinyl records; downloadable audio recordings featuring music. Entertainment services, namely, providing on-line computer games; entertainment services, namely, providing temporary use of non-downloadable computer games; production of music; entertainment services in the nature of recording, production and post-production services in the field of music; entertainment services, namely, providing non-downloadable prerecorded music via a website; provision of information relating to electronic computer games, television programs and movies provided via the internet; non-downloadable electronic publications in the nature of magazines, newsletters, and blogs in the field of video games, television programs and movies; production, provision and distribution of television programs and movies; providing non-downloadable television programs and movies via the internet and video-on-demand transmission services.
IDKFA – Trademark Details
In the international region, the IDKFA cheat code will follow the 009 International class code, which means Bethesda will have rights over it on fields such as:
Scientific, nautical, surveying, electric, photographic, cinematographic, optical, weighing, measuring, signalling, checking (supervision), life-saving and teaching apparatus and instruments; apparatus for recording, transmission or reproduction of sound or images; magnetic data carriers, recording discs; automatic vending machines and mechanisms for coin-operated apparatus; cash registers, calculating machines, data processing equipment and computers; fire-extinguishing apparatus. – Scientific, nautical, surveying, electric, photographic, cinematographic, optical, weighing, measuring, signalling, checking (supervision), life-saving and teaching apparatus and instruments; apparatus for recording, transmission or reproduction of sound or images; magnetic data carriers, recording discs; automatic vending machines and mechanisms for coin-operated apparatus; cash registers, calculating machines, data processing equipment and computers; fire-extinguishing apparatus.
IDKFA – Trademark Details
But the cheat code is also trademarked with the 041 International class code, which gives Bethesda rights over the use of it in fields such as:
Education; providing of training; entertainment; sporting and cultural activities. – Education; providing of training; entertainment; sporting and cultural activities.
IDKFA – Trademark Details
The class codes you see above are the fields Bethesda has the rights over the name of the cheat code. So, if someone decides to use the name of the code within the context of those fields, the game company has all the legal rights to sue those who do that.
On the other hand, the trademark could mean many things: Is Bethesda bringing the good old DOOM cheats back to the game? Is a remake of the original game coming soon? While we don’t want to speculate anything, this is the most likely scenario.