Tired of the same old window border colors on your Windows 11? Let’s shake things up a bit and bring in some fresh hues! Here’s how you can do it:
Open Settings: Press Windows Key + I to open the Settings app.
Navigate to Personalization: In the Settings menu, click on “Personalization.”
Choose Colors: From the Personalization menu, select “Colors.”
Adjust Color Settings: Here, you can choose your preferred color for window borders. You may have to enable the option that says “Show accent color on Start and taskbar” to see the changes applied to window borders.
Apply the Color: After selecting your desired color, the changes should apply automatically to the window borders.
Windows 11 introduced ‘Focus’ as a new feature to help minimize distractions. Integrated with the Clock app, it brought in a focus timer and music integration, aimed at enhancing productivity.
If you’re looking to disable it, I’m assuming you have it running already. So you can either pause or simply click the X button:
However, if you’re looking to completely remove it or for this feature to bother you less, do this:
Open the Settings application by pressing Windows + I, navigate to System > Focus Assist, and then scroll down to disable or configure the automatic rules to prevent Focus Assist from turning on again.
This should be enough to disable the Focus mode in Windows 11. As usual, Windows 11 gets updated quite often, so some of these steps might change in time.
Whether you’re new to Windows 11 or have been using it for some time, accessing the calendar quickly is a straightforward task. It’s really simple and just involves a few easy steps:
1. Go to the bottom right corner of your screen. If you don’t click on the hour, you’ll see the current date hovering.
2. When you do click, the calendar will now appear in your Windows 11 system.
3. From here, you can click on the current month and have an overview of the entire year.
Now, this is the simplified version of the Calendar feature in Windows 11, where you can’t really see anything else other than dates.
If you want to open the full-fledged Calendar, you simply need to search for Calendar in the search box.
Whether you’re new to Windows 11 or have been using it for some time, accessing the calendar quickly is a straightforward task. It’s really simple and just involves a few easy steps:
1. Go to the bottom right corner of your screen. If you don’t click on the hour, you’ll see the current date hovering.
2. When you do click, the calendar will now appear in your Windows 11 system.
3. From here, you can click on the current month and have an overview of the entire year.
This is the basic version of the Windows 11 Calendar, showing only dates. For the full Calendar app, just search for ‘Calendar’ in the search box. Note that Microsoft plans to integrate this app into Outlook, so this may change depending on when you’re reading this.
If you’re looking for a no-brainer way to super quickly find your Windows 11 product key, I have a very short guide for you. Here’s what you need to do:
If you still have older PCs in your fleet, start with our Windows 10 guide that shows multiple ways to reveal the 25-character code, including PowerShell and the registry. Follow the steps here: How to find your Windows 10 product key.
For legacy machines, this walkthrough covers built-in tools and purchase records to locate the key quickly. Read it here: How to find your Windows 7 product key.
If you’re wondering what graphics card you have on your Windows 11 system and you don’t have time to waste, here are the fastest ways to find out.
1. Using Device Manager:
Right-click on the Start button and select “Device Manager”
In the Device Manager window, expand the “Display adapters” section. This will list the graphics card(s) installed in your computer. Normally, this simple step should be enough to know what graphics card you have on Windows 11. But if for whatever reason it’s not working for you, here are a few additional ways that are just as short:
Using DirectX Diagnostic Tool:
Press Windows Key + R to open the Run dialog.
Type dxdiag and press Enter.
In the DirectX Diagnostic Tool, navigate to the “Display” tab. Here, you’ll find detailed information about your graphics card, including the manufacturer, model, and driver version.
Through Settings:
Open Settings by pressing Windows Key + I.
Go to “System” and then “Display”.
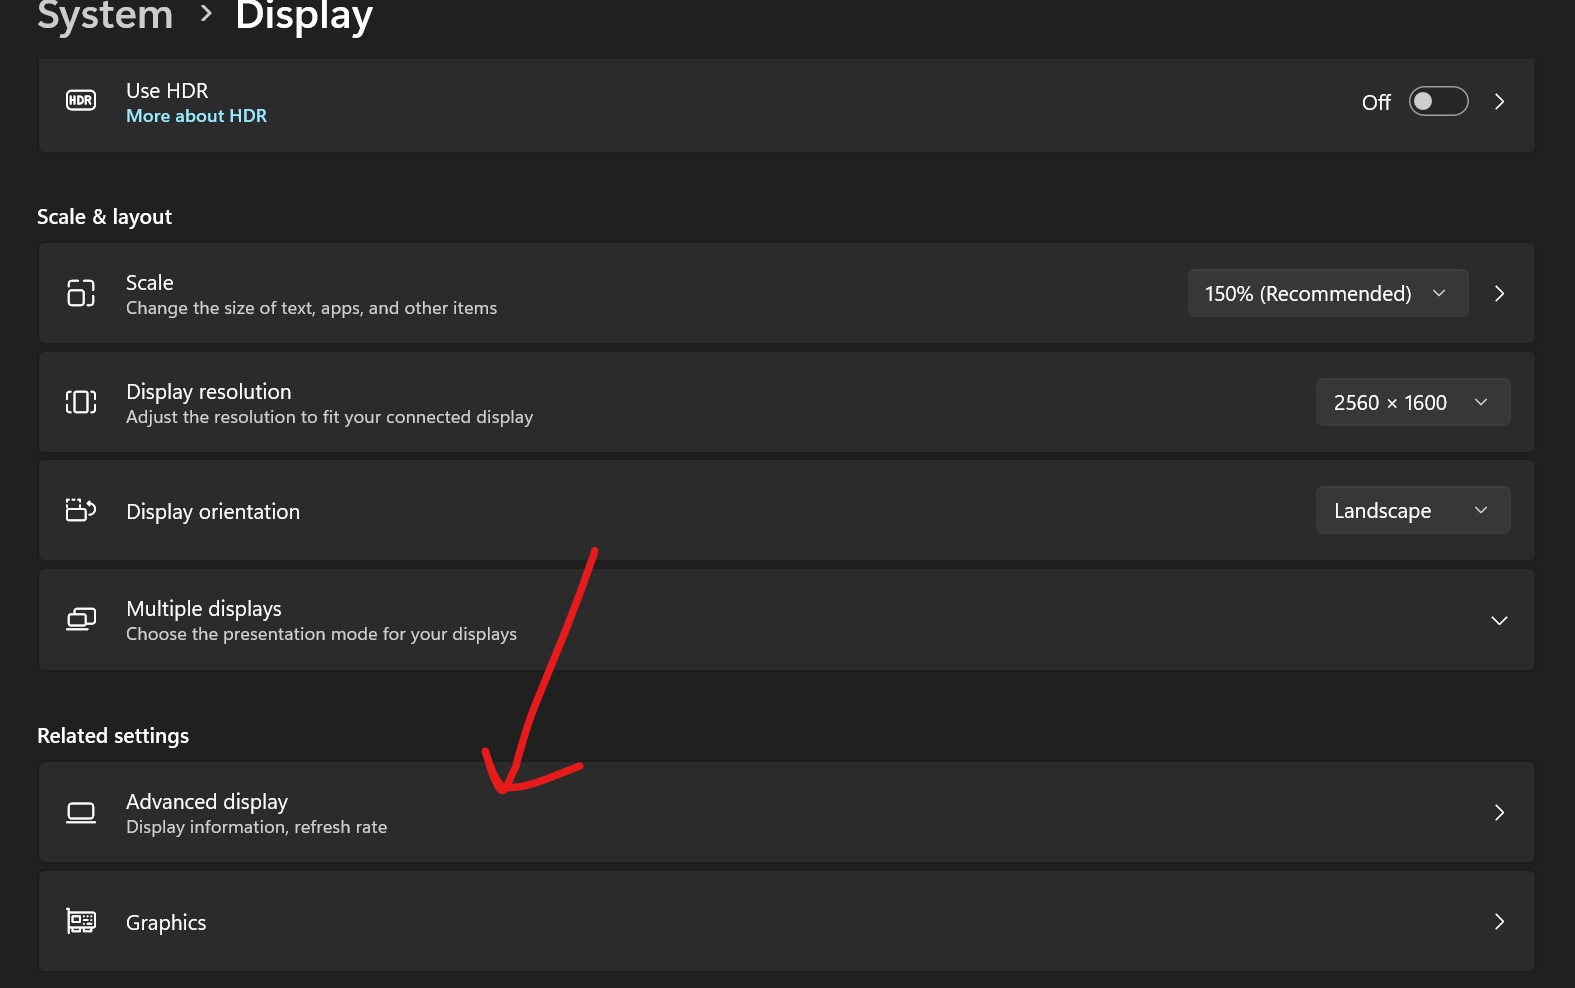
Scroll down and click on “Advanced display settings”. Here you will see the information about your display adapter.
Using System Information:
Press Windows Key + R to open the Run dialog.
Type msinfo32 and press Enter.
In the System Information window, navigate to “Components” and then “Display”. You’ll see detailed information about your graphics card.
Which method mentioned above is the quickest to check the graphics card on Windows 11? Also, note that these steps were performed on the latest Windows 11 Pro version. Keep in mind that as Windows updates, some of these procedures may change.
Lenovo upgraded its ThinkPad T14s G4 series of laptops in 2023 with Intel and AMD’s latest processors as well as an OLED display configuration, unfortunately, it didn’t upgrade its battery tech.
Lenovo has earned its gold star reputation for delivering enterprise-grade devices at reasonable prices and offering head-spinning amounts of configurations, and with the ThinkPad T14s G4, not much has changed.
While the T14s isn’t on the same design level as Lenovo’s flagship commercial ThinkPad X line, it offers a pretty good facsimile of an experience with its identical grease absorbing matte black finish (on most models), wedge design, lightweight footprint, and similar typing experience.
However, in 2023, Lenovo decided to bump up the screen technology for a handful of configurations in the T14s lineup and did so at the cost of battery usage.
SPECS
Processor
13th Generation Intel® Core™ i5-1335U Processor (E-Core Max 3.40 GHz, P-Core Max 4.60 GHz with Turbo Boost, 10 Cores, 12 Threads, 12 MB Cache)
13th Generation Intel® Core™ i5-1345U Processor with vPro® (E-Core Max 3.50 GHz, P-Core Max 4.70 GHz with Turbo Boost, 10 Cores, 12 Threads, 12 MB
Cache)13th Generation Intel® Core™ i7-1355U Processor (E-Core Max 3.70 GHz, P-Core Max 5.00 GHz with Turbo Boost, 10 Cores, 12 Threads, 12 MB Cache)
13th Generation Intel® Core™ i7-1365U Processor with vPro® (E-Core Max 3.90 GHz, P-Core Max 5.20 GHz with Turbo Boost, 10 Cores, 12 Threads, 12 MB Cache)
Operating Systm
Windows 11 Home Windows 11 Pro – Lenovo recommends Windows 11 Pro for business Windows 11 Pro 64 (preinstalled with Windows 10 Pro 64 Downgrade)
Graphics
Integrated Intel®Iris ®Xe Graphics
Memory
Up to 32 GB LPDDR5x (4800MHz) soldered
Storage
Up to 2 TB PCIe SSD Gen 4 Performance
Battery
57Whr Rapid Charge supported with 65W or higher AC adapter Rapid Charge: 60 minutes = 80% runtime
Audio
Dolby Audio™ with Dolby Voice® 2 user-facing mics
Camera
FHD 1080p RGB with webcam privacy shutter 5MP & IR camera with webcam privacy shutter
Connectivity
Ports/Slots
2 x USB-C Thunderbolt™ 4 2 x USB-A 3.2 Gen 1 HDMI 2.1 supporting resolution up to 4K@60Hz Headphone/mic combo Optional: SIM Optional: Smart card reader
* USB port transfer speeds are approximate and depend on many factors, such as the processing capability of host/peripheral devices, file attributes, system configuration, and operating environments; actual speeds will vary and may be less than expected.
Wireless
WLAN: Intel®WiFi 6E* AX211 802.11AX (2 x 2) Optional WWAN: Fibocom L860-GL-16 4G LTE CAT16 Optional WWAN: Fibocom FM350-GL 5G SUB6 Bluetooth® 5.1 * 6GHz WiFi 6E operation is dependent on the support of the operating system, routers/APs/gateways that support WiFi 6E, along with the regional regulatory certifications and spectrum allocation. Note that WiFi 6E requires Windows 11; with Windows 10 it only performs at WiFi 6 speeds.
** Optional WWAN availability varies by region and must be configured at time of purchase; it requires a network service provider. Note that not all carriers support eSIM, so please check with your service provider. Not available in China.
Supported Docking
Thunderbolt™ Dock USB-C Dock
Design
Display
14″ WUXGA (1920 x 1200) IPS touchscreen (on cell), 300 nits, antiglare, 45% NTSC 14″ WUXGA (1920 x 1200) IPS, 300 nits, antiglare, 45% NTSC 14″ 2.2K (2240 x 1400), IPS, Anti-Glare, Non-Touch, 100%sRGB, 300 nits, 60Hz 14″ WUXGA (1920 x 1200), IPS, Anti-Glare, Non-Touch, 100%sRGB, 400 nits, 60Hz, Low Power 14″ 2.8K (2880 x 1800), OLED, Anti-Reflection, Non-Touch, HDR 500, 100%DCI-P3, 400 nits 14″ WUXGA (1920 x 1200), IPS, Anti-Glare, Touch, 100%sRGB, 500 nits, 60Hz, ePrivacy Filter
All displays feature 16:10 aspect ratio; supports up to 3 independent displays.
Dimensions (H x W x D)
16.9mm x 317.5mm x 226.9mm x / 0.66″ x 12.50″ x 8.93″
Weight
Starting at 1.21kg / 2.69lbs
Keyboard
Spill-resistant TrackPoint & TrackPad 115mm / 4.53″ Backlit with white LED lighting
Color
Storm Grey Deep Black
Sustainability
Material
Storm Grey 50% recycled aluminum on A & C covers (top & keyboard) 55% recycled aluminum on D cover (bottom)
Deep Black 22% recycled carbon fiber on A cover (top) 90% recycled magnesium on C cover (keyboard) 55% recycled aluminum on D cover (bottom)
Both 90% post-consumer content (PCC) recycled plastic used in speaker enclosure 90% PCC recycled plastic used in the in 57Whr battery enclosure 90% PCC recycled plastic used in 65W AC adaptor Plastic-free packaging with 90% recycled and/or sustainable content* Low-temperature solder: motherboard, SSD, TrackPad, fingerprint reader module, WUXGA display modules
*Packaging composed of recycled, and/or biobased, and/or sustainably forested content.
Discrete Trusted Platform Module (dTPM) 2.0 Optional: PrivacyGuard display Facial recognition login (requires optional IR camera) Optional: Fingerprint reader integrated with power button (match-on-chip) Ultrasonic human presence detection (requires optional IR camera) Kensington Nano Security Slot™ Microsoft Secured-core PCs (select models) Webcam privacy shutter
Preloaded Software
Intel®Connectivity Performance Suite Intel®Unison™ Lenovo Commercial Vantage, centralized apps Lenovo View, camera enhancements & AI features Office 365 (trial)
What’s in the Box
ThinkPad T14s Gen 4 (14″ Intel) 65W AC adapter Internal Battery Quick Start Guide
In an ironic decision reversal, Lenovo dumped the dark grey colorway option from its previous T14s lineup, which seemed like a move to address the greasy look most black ThinkPads garner over time and reverted to the same matte black days of old with Gen 4’s offering.
Lenovo opted to return the T14s to its IMB roots and stick with the iconic black option for most configurations.
The T14s is practically identical to the previous generation model that includes the 1.3kg/ 2.9lbs weight, 16.9mm height, and 14-inch screen size.
Lenovo also brought back its mixture of Carbon fiber plastic, magnesium alloy and aluminum to construct the very rigid chassis of the T14s as it did with the previous gen model.
The T14s also comes with the trademark ThinkPad MIL-spec certification of STD 810H, passing over 12 military-grade durability tests that include humidity, pressure, sand, dust, vibration, shock, moisture, and more.
The two-point metal hinges that connect the keyboard to the display retain their 180-degree flexibility and are stiff enough to hold the screen locked in place at any degree along that arc as well as buffers against any panel flexing or wobbling.
Lenovo also maintains the same port placement and selections as last year’s model include:
Right Side
Smartcard Reader
USB A 3.2 Gen 1
Kensington Lock
Left Side
2x Thunderbolt
Full HDMI
USB-A 3.2 Gen 1
3.5mm Audio/Mic jack
Display
Perhaps the most notable change to the T14s comes in the form of OLED display options for the fourth generation of the product line. Lenovo opened up the range of display options to include six variants with a 2.8K OLED semi-glossed or 2.2K IPS matte panel.
A more subtle change that came with the T14s is the inclusion of an updated webcam that shifts Lenovo’s previous 1080p efforts to an official 5MP bump which produces clearer and crisper images thanks to enhanced light capture and color saturation.
When compared to similar business-class laptops, the T14s is perhaps the most visually distinct with its matte black color way, red color accents and carbon fiber feel when compared to the sea of silver-to-dark grey aluminum or plasticky competitors such as the Dell Latitude 7440 and HP EliteBook 845 G10.
Keyboard
The full-sized keyboard present on the T14s remains largely unchanged from previous models with dual functioning Function keys paired with a large Enter Key and mid-level sized directional keys located at the bottom.
The key travel for the T14s retains Lenovo’s slightly mushy signature 1.5mm length that helps to deaden the traditional clickity sounds from normal typing.
Trackpad
Unfortunately, Lenovo has dragged its feet in following Microsoft down the haptic trackpad journey, and instead keeping its dual corner mechanical design paired with both left and right button headers.
Adding to the classic clunky feeling of the trackpad is the seemingly truncated size of 11.5 x 6 cm Mylar plastic square that’s encroached upon by the redundant left and right buttons attached to the area.
The touchpoint corners have a deep travel and feel like they could let in a significant amount of dust or Cheeto’s crumbs depending on use, but the T14s trackpad still works relatively well registering the appropriate clicks above 90 percent of the time.
For old-school Lenovo or IMB laptop users, the red-dot (nipple) TrackPoint button remains a secondary cursor option for finer precision movements within Windows and third-party apps.
Performance
For reasons unbeknownst to me, Lenovo hasn’t standardized discrete GPU options for much of its ThinkPad lineup beyond the P-series which means the company is frontloading a lot of its performance gains on whatever Intel puts out for the year.
There are optional configurations Lenovo supports that can include NVIDIA RTX discrete GPU performance.
This year, Lenovo opted to use Intel’s Raptor Lake U15 series of mobile chips which include a core i5-13335U, i7-1355U, and i7365U variants, all of which rely on Intel’s integrated Iris Xe GPUs.
More specifically, Intel’s 13th Gen Raptor Lake chips use two cores of performance and eight cores of efficiency design that can be overclocked in certain situations.
The processing benefit of Intel’s 13th-generation chips over their predecessors is the sustained wattage of 24W during single-core tasks. Unfortunately, multicore tasking with these 13th-generation chips can lack the per-wattage performance of older chips while running a bit hotter under similar or identical loads.
Intel does offer two types of Iris Xe GPUs, the w/80 EUs and w/96 EUs for core i7 variants and above.
The T14s model I evaluated included 16GB of RAM, Intel’s Core i7 with vPro Enterprise support, 512GB SSD TCG Opal storage, and Iris Xe w/96 EUs GPU.
Benchmarks
For the benchmark junkies, I ran tests against synthetic marks from market competing laptops such as the HP EliteBook 845 G10 and Dell Latitude 7440.
To summarize the marks, the Lenovo T14s lands in the middle of the pack behind laptops such as the HP EliteBook 845 G10 that consistently outperformed most other market competitors.
Real World Performance
When I’m not writing, I spend much of my time as a marketing consultant where I use a bevy of software and machines daily. The Lenovo T14s handled most of my daily tasks that include email triage, interacting with various project management software via dedicated apps and web apps, graphics editors such as Affinity Photo, Photoshop and GIMP, as well as video editing tools from Adobe, Filmora, and Davinci Resolve.
For generalized daily management, I also make use of Google’s dedicated Google Ads Editor and Microsoft Ads Editor Windows app alongside macro-heavy Supermetrics Excel docs that can be resource hogs depending on how much data is being measured in real time.
Occasionally, I will venture into more specialized applications for my marketing work including AutoCAD, Microsoft Teams, Zoom, GoTo Meeting, PowerPoint, Slides, Microsoft Publisher, Canva, Slack, and Power BI.
To that end, the T14s were able to run each of the apps listed above by themselves quickly and fluidly, when paired with another app for a two-open Windows experience, most of the apps ran smoothly. It wasn’t until I began to run several (+4) apps at one time paired with several open tabs in both Microsoft Edge and Google Chrome, that a bit of OS stuttering would creep in.
Lenovo and Intel handled the incremental boosting done by the 13th Gen chipset when powering over six open apps in Windows involved the fans kicking up, loudly.
The thermal ceiling on Intel’s Raptor Lake processors is slightly higher than 12th-Gen chips but not nearly as efficient as its 11th-Gen.
I was able to log in for roughly four hours of extensive app and web browsing with default settings enacted. The T14s had its brightness set close to 80%, while I made use of mics and cameras for several pairs of 30-minute video conferences during that timeframe.
When it came to using video editing software for projects, the systems integrated GPU struggled when rendering but not nearly as much as I had expected for the actual editing process. Some of my video editing projects included 45m-inute plus videos with multiple video and audio tracks as well as effects and while the machine whirred loudly during the edits, scrolling, shrinking and expanding were all very smooth.
However, when it came to rendering those video editing projects, the 45-minute-long videos took close to an hour and a half and bogged down the rest of the system while doing so. If we’re looking for a singular culprit for this experience, it’s Intel relying on its paltry Iris Xe GPU and leaning on its CPU to do the heavy video rendering process.
Competitor laptops such as the HP EliteBook 845 G10 can perform the rendering in less time and do so partly due to its AMD Radeon 780M and Ryzen 7 7840U pairing.
But this is mostly an enterprise laptop that can double as a consumer-level experience for most people and to that point, the T14s does a pretty good job.
The battery life of the 57Wh battery onboard the T14s is just “ok” when using Recommended settings in Windows or Lenovo’s software package.
A normal day of data processing and emailing would tap the T14s at around 7 hours with normal screen brightness.
Heavier days of work that included a mix of video conferencing, delving into PowerBI, Supermetrics, and macro-Excel docs would net the T14s about 4 hours of usage, and content creation days that included the use of Adobe apps, Davinci Resolve, Canva, and several social media sites would force me to top off every two to three hours.
Summary
Save the money. While it might be tempting to go for the OLED panel for the brighter and more saturated screen experience, you’ll be doing so at the expense of battery life. A regular IPS panel with FHD resolution might squeeze out an extra hour of battery life for most T14s users.
T14s Intel model users should also be aware of the distinct valley between single-core performance and multicore that result in noticeable experience differences such as rendering video versus moderate data processing tasks.
When compared to the competition in its segment of mid-level enterprise laptops, customers could also consider the Dell Latitude 7440 which offers a similarly crisp viewing experience with better battery life and less pressure on the wallet.
The HP EliteBook 845 G10 outclasses the T14s in most benchmarks thanks to its AMD configuration while also being similarly priced, but for people tied specifically tied to Intel variants thanks to IT admins own personal biases, then the T14s Intel version remains a solid laptop to use.
I would prefer a few more niceties added to the device such as a better webcam, clearer mics, and a haptic trackpad, but I suppose some of those items are reserved for the C-suite level ThinkPad X1 Carbon laptops.
At the end of the day, the T14s brings Intel’s most powerful core processor to a thin and light laptop with a few experience compromises that aren’t all that unheard of from the Lenovo brand anyway. Upgrading or purchasing the T14s for the first time can be a worthwhile effort, but make sure to explore the market beforehand.
A PIB (Platform Independent Binary) file is a simple text file, which consists of a sequence of characters and can be opened natively in Windows. Find out what programs can allow you to view these types of files.
How can I open a PIB file?
1. By extracting the files
1.1 Using File Explorer
Locate the PIB file on your PC and right-click it.
Next, select Extract all.
Choose the extract location and click on the Extract button.
Wait for Windows to extract files and open each with its designated app.
Now click on Unzip to and select the destination folder.
Most PIB files come in a zip format, so unzipping them and then opening them is easy. And if Winzip does not work, you can try with another program like 7zip.
It’s also important to note that some PIB files may come in single file format where you’ll need to open them using other tools, as seen below.
Locate the PIB file or paste its path on the address bar at the top.
Right-click on it and select Open with>Notepad.
2.2 Third-party text editor
While Notepad for Windows can open simple PIB files, some may be way too complex. After all, PIB files use a proprietary format, which means that they are created and edited using special software; hence will require special software to open and view them.
Notepad alternatives will come in handy because they come with advanced features and open a wide range of files.
Although the Platform Independent Binary (PIB) file format can be read by many different programs, a dedicated tool would serve you better.
PIB files can be created in a number of different ways, so with the above methods, you’d have to do a lot of guesswork and could still end up with no way of viewing these files.
With a dedicated PIB tool, you’re guaranteed that you can open these types of files regardless of their format or operating system.
NOTE
WindowsReport is not affiliated with file-extensions.org, so do your due diligence and ensure you have an up-to-date antivirus before installing any programs.
How do I open PIB files on Android?
For Android users, the default file manager that comes with your phone can open the file, but you can get a file viewer from the app store if it doesn’t.
Alternatively, you can opt for a universal file opener. These types of programs do pretty well and can read and open multiple formats. It might just save you the time and frustration, making you skip the trial and error period of downloading multiple apps.
Speaking of developer files, you may also be interested in opening hat files or JSON files so make sure you check out our detailed articles on how to go about it.
And if you deal with such kinds of files often, we have lined up some of the best developer browsers that come with built-in functionalities, a great array of add-ons, and a suite of tools to make your work easier.
We’d love to hear about your experience with PIB files and how you opened them, whether on Windows, Android, or any other OS. Leave your comment down below.
Many users have encountered the ‘_xsrf’ argument missing from POST message while running a script on Jupyter Notebooks, but there are ways to fix this issue.
What causes the _xsrf argument missing from post error?
Missing or expired CSRF tokens are the most common cause. If CSRF protection is disabled, you’ll also get this message. In some instances, browser extensions can cause this issue as well.
How can I fix the ‘_xsrf’ argument missing from POST error?
Before proceeding with any steps ensure that you don’t have LastPass extension installed or active. Also, check for token mismatch and refresh your browser.
To conclude, if you find yourself stuck with Xsrf’ Argument Missing from POST error while saving a script on Jupyter Notebook, you should check for the token expiry, incompatible browser extensions, or disable xsrf checks.
If you think your browser is causing this issue, you can check out the guide listing the best browsers for Jupyter Notebook before making an informed decision.
Did we miss a step that helped you fix the problem? Don’t hesitate to mention it in the comments section below. We will happily add it to the list.
Several antivirus, including Malwarebytes and AVG, label OCSetupHlp.dll as a threat or malware. The DLL file is linked to OpenCandy, a known PUP (Potentially Unwanted Program) that comes bundled with other programs, such as uTorrent and CDBurnerXP.
OpenCandy can change the user’s default browser or homepage, install malicious extensions, or share the browsing history with third parties. Users also reported high CPU usage, sometimes in the range of 70-90%, after OpenCandy was installed. Both OCSetupHlp.dll and OpenCandy pose a threat and should be removed from the PC.
How do I remove OCSetupHlp.dll?
1. Manually delete the DLL
You can always head to the DLL’s storage location and delete it. As per our findings, OCSetupHlp.dll is usually stored in one of the following paths, where Username is your active profile name: C:\Users\Username\AppData\Local\Temp\OpenCandy\OCSetupHlp.dllC:\Users\Username\AppData\Local\Temp\nscCA72.tmp\OCSetupHlp.dllC:\USers\Username\AppData\Local\Temp\Nsl97b.tmp\OCSetupHlp.DLL
Remember to show hidden items for the AppData folder to appear. If you can’t find the file, check the path listed in the threat notification from the antivirus. Once deleted, also empty the Recycle Bin.
2. Run a malware scan using Windows Security
Press Windows + S to open Search, type Windows Security in the text field, and click the relevant result.
Click on Virus & threat protection.
Click on Scan options.
Now, choose Full scan and click on the Scan now button.
Wait for the scan to complete and let Windows Security quarantine or delete the OCSetupHlp.dll virus.
If Windows Security doesn’t flag the DLL, you can always use an effective antivirus solution. The file is identified as a threat, if not malware, by most antivirus programs.
TotalAV is an advanced security software, it comes with an in-depth scanning feature that will help you detect any threat to your computer. This tool also has its own powerful firewall, real-time threat scanning, ransomware shield, and many more.
3. Uninstall OpenCandy and the problematic application
Press Windows + R to open Run, type appwiz.cpl in the text field, and hit Enter.
Select OpenCandy from the list of programs, and click on Uninstall.
Follow the on-screen instructions to complete the process.
Also, uninstall any other applications developed by SweetLabs.
Finally, restart the computer.
If your antivirus still flags the OCSetupHlp.dll malware, it’s likely that the DLL wasn’t removed during the app uninstallation. So, use a reliable software uninstaller tool to delete all leftover files and Registry entries.
4. Reset Windows
When your PC is infected with malware, experts recommend resetting Windows to factory defaults because you never know which other files are affected or compromised. And there’s a possibility that the antivirus might miss a few. So, completely wipe the PC!
This will lead to data loss, both stored files and installed apps, but it’s the best approach. A reset also helps when removing Gcapi.dll.
Once you have dealt with OCSetupHlp.dll, we recommend enabling the best Windows 11 security settings for a safer experience and to prevent such issues from arising in the future!
We also have a new guide on fusion.dll, so if your antivirus ever flags this software as malicious, that guide will tell you everything you need to know. You should also check our guide on OCComSDK.dll, since it’s associated with OpenCandy software as well.
For any queries or to share how you removed the DLL threat, drop a comment below.
Open Python or any compatible console, type the following command according to your conditions, and hit Enter:
# if you have pip already installed
pip install --upgrade pip

# if your pip is aliased as pip3 (Python 3)
pip3 install --upgrade pip

# if you don't have pip in your PATH environment variable
python -m pip install --upgrade pip

# if you don't have pip in your PATH environment variable
python3 -m pip install --upgrade pip

# if you get a permissions error when upgrading pip
pip install --upgrade pip --user

# upgrade pip scoped to the current user (if you get permissions error)
python -m pip install --user --upgrade pip
python3 -m pip install --user --upgrade pip
Keeping the latest versions of PIP and Python installed can help you avoid a lot of issues such as Permission denied; read this guide to learn more.
If the error persists, type the following command to upgrade the version of CMake and hit Enter:
pip install cmake --upgrade
pip3 install cmake --upgrade

# If you don't have pip in your PATH environment variable
python -m pip install cmake --upgrade
python3 -m pip install cmake --upgrade
6. Add setup_requires condition to your file
Locate your setup.py file and right-click it to open in VS Code or any compatible console.
Add this line to your script:
setup(
    # rest,
    setup_requires=['wheel']
)
If this doesn’t help, you need to add these lines to your setup.py file:
import setuptools
from setuptools import setup
To conclude, the Python setup.py bdist_wheel did not run successfully issue occurs mainly due to missing dependencies and compliers or syntax errors in your script.
To fix the error, you need to ensure the Python version you are using is compatible with the package, check the script for errors, upgrade PIP, or install the CMake module.
If you are facing another error with Python, you can use the Try-except-print method; we have a separate guide on how to use it.
Speaking of errors, if you ever get stuck with Python runtime errors, then check the variables for issues and mathematical errors; read this guide to learn more.
Did we miss a step that helped you to fix this build error? Don’t hesitate to mention it in the comments section below. We will happily add it to the list.
We’re used to MP3 being the default audio format in most audio files, but OPUS files are becoming common, hence the need to open them on your Windows devices. We show you just how easy it is.
What is the OPUS file format?
OPUS files are a type of audio file developed by the Internet Engineering Task Force (IETF). It is open-source and royalty-free and is designed to produce meager bit rates while still sounding good. These types of files are common in WhatsApp audio, podcasts, and video-conferencing apps like Skype.
Open the VLC media player app and select Media in the menu bar. A drop-down menu will appear where you can then click on Open file.
Browse through your computer’s files for the OPUS file you want to play, select it, and click Open.
The audio file will start playing.
You can also use the VLC Android version to open OPUS files on your Android device.
2. By using Windows Media Player
Hit the Windows + E keys to open File Explorer.
Locate the OPUS file from your folders or paste the location path on the address bar at the top.
Right-click on the file and select Open with>Windows Media Player.
The OPUS file format does not work on every Windows version, so you may get the Windows Media Player cannot play this file error especially if it comes in an MP4 format. If it doesn’t open with yours, you can proceed with other ways listed below to open the file.
3. By using a third-party app
Although opening OPUS files using the proper application is best, you can try using other third-party programs.
With a handful of programs at your disposal, you can open the OPUS file format and view its media just as you would any other program. To use one of these applications, you will need to download and install it on your computer.
Once converted, we’ve lined up a few Windows 11 media players we think are worth a try. Unfortunately, converting audio files almost always results in a loss of quality. If the sound seems distorted or of lower quality, we have tips to boost your sound quality.
Further, if you’re not up to downloading software to your device because of space constraints or don’t want to tamper with the sound quality, you can turn to browser audio players. All you have to do is copy and paste the OPUS file, and it will start playing.
Is OPUS higher quality than MP3?
OPUS is a good alternative to MP3 for streaming music or other types of media files. It’s very efficient at delivering high-quality audio files at low bitrates.
This means you can store more music files, and it will take less time to download or stream songs encoded with the OPUS codec than other formats. You, therefore, get to save on your storage space without compromising your listening experience.
Another plus is its ability to adapt dynamically to any bandwidth with little to no sound distortion. The only downside is that not all devices support OPUS yet, and it doesn’t work well with other formats.
So there you have it. OPUS files can be handy, especially in cases where you need high-quality audio but don’t have enough space. At the end of the day, nothing is standing between you and being able to open your OPUS files.
Have you interacted with the OPUS file format? How easy or difficult was it to play it on your device? Share with us your experience below.
You can boot multiple operating systems on the PC as long as it has the hardware abilities to do so. And today, we will triple boot Windows 11, Windows 7, and Linux!
Remember, since Microsoft is no longer distributing the Windows 7 ISO, you will have to download it either from third-party sources or use the installation disc.
How can I triple boot Windows 11, Windows 7, and Linux?
We assume you already have Windows 11 running and are trying to install Windows 7 and Linux. If your computer has another OS, use these steps to install Windows 11, and for the other one, the steps below should suffice.
Also, we will be installing the operating systems individually so that a single USB drive is required. The entire process will take a few hours and largely depends on the disk’s read/write speed and the Internet speed.
Installing Windows requires a dedicated partition of the appropriate size. Our first section highlights the steps for it, followed by the process to install Windows 7 and Linux.
1. Creating empty partitions on the drive
Press Windows + X to open the Power User menu, and select Disk Management from the list of options.
Right-click on the C: partition (or any other with 60 GB of free space), and select Shrink volume.
Now, enter 30720 (30 x 1024) in the text field, and click on Shrink.
Once done, verify that a 30 GBUnallocated volume appears in the Disk Management.
Similarly, create another 30 GB unallocated volume for Linux.
Connect the external USB drive to the PC. Make sure it’s formatted and has no stored data.
Launch Rufus, choose the USB drive from the Device dropdown menu, select Disk or ISO image, and then click on Select.
Locate the Windows 7 ISO, select it, and then click Open.
Now, click the Start button to begin creating a bootable USB drive.
Choose the appropriate response in the confirmation prompt.
While creating a bootable drive, we encountered the Error: Access to this device is denied message.
To fix it, open Windows Security > select Virus & threat protection > click on Manage ransomware protection > disable the toggle for Controlled folder access.
2.2 Installing Windows 7 via the bootable drive
With the bootable drive connected, restart the computer, and then repeatedly press the dedicated key to open the boot menu. The key should be listed within the first few seconds after you turn on the PC. It’s Esc for HP computers.
Hit the dedicated key to select Boot Device Options.
Choose the bootable USB from the list.
Once the Windows 7 Setup loads, select the installation language, time and currency format, and the input method, then click on Next.
Click on Install now.
Select the Custom (advanced) option.
Choose one of the 30 GB partitions we initially created, and click Next.
Follow the on-screen instructions to complete the installation, set up Windows, and create a user profile.
You are done with half the steps to triple boot Windows 11, Windows 7, and Linux. At this point, it’s basically a dual boot setup for Windows 7 and Windows 11. Every time you turn on the PC, it will ask you to choose between the two operating systems.
After installing Windows 7, some of the devices may fail to work due to incompatible drivers. So, you will have to search for compatible driver versions on the manufacturer’s website and manually install them.
If a driver for Windows 7 is not available, try one for another iteration, but there’s no guarantee that it will work.
Once done, don’t forget to format the USB drive so that we can use the same for installing Linux!
We will be installing Linux Mint Cinnamon edition. You can similarly install other editions or versions of it.
3.1 Creating a bootable USB
Go to Linux Mint’s official website, and then click the download link corresponding to your location. If the download speed is slow, choose another region or download link. We faced poor download speed when selecting World.
Now, launch Rufus, select the USB drive, choose Disk or ISO image from the Boot selection menu, and click Select.
Locate the Linux ISO file, and then click on Open.
Next, click the Start button.
If you see any warnings or instructions, choose the appropriate response.
3.2 Installing Linux through the bootable USB
With the drive connected, restart the computer and then repeatedly hit the dedicated key to access the boot option. It’s Esc for HP devices.
Then, press F9 to open the Boot Device Options.
Select the bootable USB and proceed.
Choose Start Linux Mint from the available options.
Now, double-click on Install Linux Mint.
Choose the desired language and keyboard layout, then click Continue.
Tick the checkbox for Install mutlimedia codecs and click Continue.
Choose the Something else option, and click the Install Now button.
Double-click the 30 GB partition we earlier created for Linux. Choosing an incorrect partition will result in loss of data as all existing files are deleted in the process.
Choose / from the Boot dropdown menu, and with the Ext4 journaling file system selected, click OK.
Click the Install Now button.
Select your region, and click Continue.
Enter your name and the computer’s name, pick a user name, set a password, configure the login settings, and then click on Continue to start the installation.
Wait for the installation to complete. It took less than 10 minutes in our case.
This completes our triple boot setup of Windows 7, Windows 11, and Linux Mint. Remember, you can, similarly, install as many operating systems. We have seen users with over 20 operating systems installed, and all function seamlessly!
A simpler alternative is to use a reliable Virtual Machine. These help make the installation a lot simpler, and the initial boot setup of the PC remains unaffected.
For any queries or to share your experience triple booting the operating systems, drop a comment below.
Many users have complained about getting fatal: Not possible to fast-forward, aborting error message while trying to make a pull request.
If you have seen this message, that means, you made local commits on your branch that are not on the remote one, the changes are force-pushed to the remote branch, or the commit history of your local branch and the remote branch has diverged due to changes on both ends.
How can I fix the fatal: Not possible to fast forward, aborting issue?
1. Use the Fast-forward merge method
The simplest way to fix the fatal: Not possible to fast-forward, aborting error message is to merge. However, it is possible only if your local branch is contained within the remote branch.
To do the fast-forward merge, type the following command and hit Enter: git pull --ff-only
2. Use the git pull rebase command
To update a local branch with the changes from a remote branch, you can use a git command and hit Enter: git pull origin --rebase
The command integrates changes from the remote branch into the local one by applying each commit from the remote branch on top of the existing commits in the local one.
If your local branch is not contained within the remote branch, you can use the general method to merge. Although, it might cause merge conflicts, which need to be resolved manually. Follow these steps:
Type the following command to do a merge and hit Enter: git pull
In case you get merge conflicts, you need to edit the conflicting files to fix the problem. Once the conflicts are resolved, you can stage the changes and commit them.
Next, to create a branch & check the origin/master head to a local branch, copy & paste the following commands and hit Enter: git checkout -b new_branch origin/master
Once the new branch is created, you can merge the changes from the master branch into it.
To fix these issues, you can also seek help from GitHub Copilot, the AI assistant introduced by GitHub; read this guide to learn more about it.
4. Resolve differences between your local diverged branch and the remote branch
To create a local branch to resolve the differences, type the following command and hit Enter: git checkout -b new_branch
Now, to bring the remote changes into your newly created local branch, you need to pull from the remote branch, copy & paste the following command, and press Enter: git pull origin master
Next, if you see any conflicts, make the changes to resolve them, then save the changes and commit.
Type the following commands one by one and hit Enter after each command:
git add
git commit -m "Conflict resolution"
Once you have resolved the conflicts, copy & paste the following command to push the changes to the remote branch and press Enter: git push origin new_branch
In case you want to merge the changes with the main branch on the remote repository, follow these steps to use a pull request on GitHub to do so:
Go to your GitHub repository, where you created your new_branch.
Click the branch dropdown from the left side of the page and choose the new branch option from the list.
Once you are on the new_branch, click Pull Requests.
Next, click the New Pull Request button.
On the Comparing changes page, ensure the base branch is set to master and the compare branch selected is new_branch. GitHub will show you the changes between the two branches and review them.
Fill in the pull request details, including Title and Description, and click the Create button.
Click the Create pull request again to finish.
Speaking of repositories, if you need help with creating a repository, uploading and hosting files; read this guide to learn more.
So to get rid of the fatal: Not possible to fast-forward, aborting error message; you need to understand the reasons behind it.
You can use fast-forward merges, rebasing, or standard merges to ensure your local and remote branches are aligned properly.
SD cards are one of the cheapest ways to preserve your data, but they come with a finite lifespan. Therefore, understanding the health and knowing the remaining lifespan of the card is important to prevent data loss.
In this comprehensive guide, we will discuss about read/write cycles of an SD card and signs to look for to know the remaining lifespan of the secure digital card.
What is the life expectancy of a memory card?
All the storage devices, including an SD card, can get worn out with time and use. These cards use flash memory technology and have a limited number of read/write cycles before it degrades.
A memory card usually has a lifespan of about 10 to 16 years; however, the duration may vary depending on factors such as usage, card quality, formatting, and environmental conditions.
How can I find the remaining life of an SD card?
Unfortunately, to date, there is no software that can help you check the SD card lifespan accurately. Nevertheless, you can keep an eye on signs indicating the card is approaching the end of its lifespan, such as changes in read/write speeds, file corruption, and instances of unreadable SD cards.
Although, you can run a test named h2testw that checks if your card is failing. Insert your SD card into your computer and follow these steps to test your card:
Download the h2testw.exe zip file and extract the file, then double-click to run it.
Choose English.
Now click Select target, then choose your SD card drive letter.
Select All available space.
Next, click Write + Verify.
During the test, it writes data to your card until there is no space, then reads it back and checks if the data is properly read.
Remember, if you have a larger capacity memory card, which is slow, the test might take up to a few hours to complete.
Additionally, if your SD card is formatted in EXT4, then use the dumpe2fs command to get an approximate estimate of the device’s wear, depending on the amount of data written to the filesystem over time.
How can I repair the filesystem issues of my SD card?
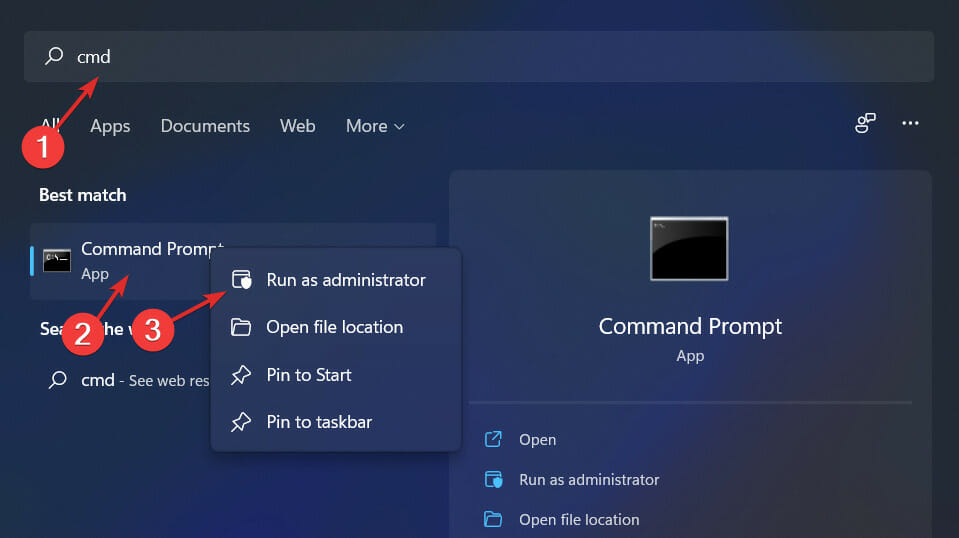
Press the Windows key, type cmd and click Run as administrator.
Type the following command to check the file system metadata of a disk for physical & logical errors and hit Enter after replacing X with the SD card drive letter on your computer: chkdsk /f /r X:
The scan will then identify and fix issues with the file system, bad sectors, and other issues related to the disk.
Once it is completed, restart your computer.
Running chkdsk on your SD card will check and repair faulty storage sections and fix common issues like SD card auto delete files; read this detailed guide.
Difficult accessing or opening files, and frequent error messages when copying or moving files.
Slow performance
Takes time to open or save files.
Bad sectors
Errors related to bad sectors during disk checks.
Crashing & Freezing
SD card crashes or freezes when trying to access data.
Corrupted files
Files getting damaged frequently.
Can’t format
When you try to format the SD card, you get error messages.
Random disconnects
SD card gets disconnected or becomes unrecognized by the PC.
Tips to increase the lifespan of your SD card
Remember never to defrag the card as it won’t help in improving the performance of the card but can add extra write cycles, inducing more wear and tear.
Minimize the frequency of inserting and removing the SD card from your devices, thereby reducing the wear on the card’s connectors.
Always eject the SD card by right-clicking it and choosing Eject to ensure all write processes are complete, decreasing the risk of lifespan.
Ensure you remove dust & debris from the card slots on your device and, handle SD cards with care & avoid physical stress.
Don’t fill the SD card to its maximum capacity, which can help you improve performance and extend lifespan.
To conclude, you can’t predict the exact lifespan of your card; however, you can take care of a memory card to ensure its longevity and reliable performance.
So, to prevent data loss, you can keep an eye on symptoms of a corrupted or dying card, including undetectable SD card, file corruption, and slow performance.
However, if your Windows computer does not recognize your SD card, it could be due to outdated drivers or pending Windows updates, so ensure that’s not the case before moving forward with other steps.
Additionally, while getting a new SD card, ensure you opt for a high-quality SD card that has longer lifespans and can withstand more write cycles.
If you have questions or suggestions about the subject, don’t hesitate to mention them in the comments section below.
The Bank server is down due to maintenance or technical issues.
You entered the wrong UPI PIN or have reached the daily UPI limit,
Here is what you can do to make the error go away:
How can I fix the PhonePe transaction failed due to security reasons issue?
First, make sure your internet is up and running, check your limits and funds, and restart the app. If you’re still getting a payment failed due to security reasons message, follow the steps below:
1. Update the app
Android
Locate the Google Play Store app from the home screen.
Click your profile and tap Manage apps & device.
Tap Update available.
Look for the PhonePe app and tap Update.
iOS
Locate the App Store app from the home screen.
Tap the profile icon.
Under Upcoming Automatic Updates, locate PhonePe, then tap Update.
2. Check your bank server status
Go to the official website of your bank or log in to mobile banking to check for alerts related to server downtime.
Also, check your messaging app or email inbox to ensure that you haven’t received any notifications about scheduled maintenance affecting transactions.
Now, tap Clear cache to clear the app cache, and check if the issue reappears.
If it does, repeat the steps and tap Clear data this time.
Tap Delete to confirm the action.
iOS
Go to Settings from the home screen.
Tap General.
Next, tap iPhone Storage.
Tap PhonePe.
Click Offload App.
Tap the Offload App option again to confirm the action.
Once you have cleared the cache and data, open the app. You need to sign in to the app again and try to do the transaction.
Clearing cache and app data can help you fix other app-related issues, such as error code U13 on Google Pay; read this guide to learn more.
4. Check the permissions for the app
Android
Tap Settings from the home screen.
Next, tap Apps.
Go to App Management.
From the list of apps, tap PhonePe.
Tap Permissions.
Ensure all the necessary permissions of the app are enabled.
iOS
Tap Settings from the home screen.
Scroll to the Apps section, locate and tap PhonePe.
Check all the permissions for the app and ensure each of the essential ones is enabled.
Next, ensure your card is working fine, and there is no such issue as the card can’t be verified, causing this error.
5. Verify account information
Open the PhonePe app and log in to your account.
Tap on the Profile Icon located in the top-left corner.
Select My Account and check the following:
Your mobile number (make sure it’s the same as the one linked to your bank account).
Your name (ensure it matches the name on your bank account).
Your email address (optional but should be updated).
Go to Bank Accounts and verify that your UPI PIN is correctly set. You may want to re-enter or reset your UPI PIN to resolve any issues.
6. Disable VPN or proxy
Android
For VPN:
Open Settings on your phone.
Go to Network & Internet.
Tap on VPN and toggle it off or select Forget VPN.
For proxy:
Open Settings > Wi-Fi.
Long-press on your connected Wi-Fi network and tap Modify Network.
Scroll down and check if a proxy is set. If yes, choose None or Manual.
iOS
For VPN:
Go to Settings > General > VPN & Device Management.
Toggle off any active VPN connections.
For proxy:
Go to Settings > Wi-Fi.
Tap on your connected Wi-Fi network, scroll to the bottom, and make sure HTTP Proxy is set to Off.
Proxies and VPNs can sometimes trigger security issues in apps like PhonePe. Certain VPN/Proxy IPs may be flagged. At the same time, accessing the app with an IP from a different country could also be problematic.
If none of the methods worked for you, we recommend you contact the PhonePe customer service team and explain the issue to them, & provide details of the fixes you tried for further assistance.
Hat files are common in Windows and Mac OS so you’ll need advanced tools to open them. Since they are used to store custom settings and other configuration information for various applications, you’ll need the right one for the information to be readable.
How do I open Hat files on my Windows PC?
1. By using the Notepad app
Hit the Windows + E keys to open File Explorer.
Locate the hat file or click its path on the address bar at the top.
Right-click on it and select Open with>Notepad.
If you have any applications installed that support .hat files, you can also double-click the file and it will open automatically.
2. By using a text editor
Although Windows Notepad does a great job, it has some limitations and may not open all types of hat files. For these reasons, you can use an alternative text editor to Notepad.
And even when dealing with text editors, you have to make sure it supports the hat file as this is not a standard file format.
If the two first methods don’t sound viable, you can always convert the file to another format. You can try with a universal file opener, but it’s highly likely that you will be disappointed with the results.
In its raw format, the hat format requires experts in the field to break down the information. And since it contains a lot of annotations and other complex information, converting it may alter the entire format and information rendering it useless.
How can I open hat files on Android?
Most Android phones come with a File Manager pre-installed. It allows you to view all types of files, but you can download one from the app store if it doesn’t.
File Viewer is a good one to start, so once you download it, go back to the file location, tap on the hat file, and open it with the downloaded app.
Should you have any trouble opening the hat file using any of these methods, it’s possible the file may have been corrupted either by an incomplete download or virus infection. You may want to consider contacting the person who sent it to you to resend it.
Windows AI Studio was announced at the Microsoft Ignite, last month, and the Redmond-based tech giant promised users the platform will be released soon in a preview form.
The company kept its promise and now Windows AI Studio is available to download and install, as a preview version. For those of you who don’t know the platform will allow software developers, or any other Windows user for that matter, to build their own AI models locally, on a Windows-running device.
The platform will also provide a list of state-of-the-art (SOTA) models including Llama 2-7B, Mistral-7B, Falcon-7B, and Stable Diffusion XL, for developers to use when modeling and training their AIs.
However, before diving deep into the Windows AI Studio preview, there are some prerequisites that those interested in testing the platform should know first.
Windows AI Studio preview prerequisites
The preview only runs on NVIDIA GPU-powered devices, for now, so if you don’t have one, you can’t test the platform currently
For those who prefer Linux, Microsoft says the Windows AI Studio preview will only work on WSL Ubuntu distro 18.4 or greater, and it should be set to default before testing the preview
To download the Windows AI Studio, users will need to have VS Code installed on their devices first
When you have all these, the platform will still initiate a checkup to see if your device meets the prerequisites or not. If it meets them, then you’ll be able to experience the preview.
For now, developers will be able to access a lot of features inside the platform and initiate actions such as Model Fine-tuning, RAG project, Phi-2 Model Playground, and Windows Optimized models, as you can see in the image below.
Those interested in the preview should make sure their devices meet all the prerequisites first. Before diving into the platform, it would be useful to check out this GitHub document, which contains technical information about the platform, including a list for fine-tuning processes.
The latest update to the WhatsApp for Windows Beta from Microsoft Store arrived with a very intriguing feature for all WhatsApp users: the platform will start to replace specific text with emojis automatically, and it comes as an option that can be enabled/disabled.
According to wabetainfo.com, which spotted the feature, the feature may or may not appear to users who downloaded and installed the 2.2350.3.0 update, from Microsoft Store. The same goes for the ability to enable/disable the feature. If users are lucky enough to get the feature, only some of them might be able to disable it.
The feature is quite useful, as adding emojis on WhatsApp for Windows can be frustrating. Assuming you’re using this WhatsApp version, adding emojis to your conversations on a Windows device is not the most convenient process. It’s not the same as adding emojis on a smartphone.
So this feature could be very useful for Windows users. As you’re writing text, the feature will replace specific parts of it with emojis as it sees fit. Plus, WhatsApp is intending to make it an optional feature, which is ultimately for the best: those users who prefer clean texts can simply disable the feature.
Speaking of enabling/disabling it, the feature can be easily accessed and managed. Here’s how.
How to disable the text replacement feature in WhatsApp for Windows1
Open the Profile panel and go to the General section.
Here, scroll down, until you see the Replace text with emoji option.
Click on the toggle right next to it to enable/disable the option.
Similar to the view-once feature that debuted in WhatsApp for Windows last month, this option will be released gradually to users, so if you’re currently on Beta, and you don’t see it, give it several days.
Make sure you’re on the version mentioned above in the article, and you can update your WhatsApp for Windows Beta by going to the Microsoft Store and downloading the latest updates.
What do you think about this new feature? Will you use it or not?
The Xbox Cloud Gaming app is accessible in beta form from the Meta Quest Store, for Meta Quest 2,3 and Pro VR headsets. You’ll need a supported Bluetooth controller (Xbox, PS4 and Nintendo Switch Pro controllers are supported, and support for PS5 controllers is in the works). That in addition to a Meta Quest VR headset, obviously, and a high-speed internet connection.
You will also need an Xbox Game Pass Ultimate subscription to access Xbox Cloud Gaming, as with other platforms. At least for the time being: it was reported earlier this week that Microsoft may be preparing to launch an ad-supported free Xbox Cloud Gaming tier.
At home or on the go, this is one of the best ways to experience Xbox Game Pass. Skip the install and jump into your favorite games with friends right away. Play virtually anywhere, from your room or wherever you might travel over the holidays. Choose from four different display sizes and either immerse yourself in an Xbox-themed virtual space or enjoy a view of your physical surroundings with Quest 3 or Pro’s stereoscopic full-color Passthrough.
Xbox Cloud Gaming is available on a wide range of platforms including Xbox, Windows PC, Valve’s Steam Deck, ChromeOS and select Samsung smart TVs and monitors.
There’s no question that the Asus ROG (Republic of Gamers) lineup is one of the most well-known in the gaming world. From incredibly powerful laptops to tablets tailored for gamers, handhelds, desktop PCs, and even smartphones, they all share a similar goal: to offer the most complete gaming experience on the market.
And now, for 2024, Asus is preparing to release its latest upgrade to a long-lasting player in this space, the ROG Phone. While the ROG Phone 7 is an absolute banger, Asus is pushing the ROG Phone 8 and 8 PRO even further. Yes, you read that right; the PRO designation makes its way into the ROG lineup with some out-of-this-world specs. We’ve got our hands on not only the full specs of both phones but also some exclusive images.
Asus ROG Phone 8 & 8 PRO design
Most of Asus’ ROG family stands out through design: lots of RGB, futuristic shapes, and gaming-specific ergonomics. And that’s without even mentioning accessories like the AeroActive Cooler. You can’t get your phone out without being noticed, that’s for sure!
But for 2024, Asus is taking a slightly different approach, making the ROG Phone 8 and 8 PRO more approachable not only for gamers but for anyone else as well. Following current trends, the new phones feature a more square-ish design with slightly rounded corners and flat edges. That’s a significant difference from the ROG Phone 7 lineup, and while design-wise it makes sense, the ergonomics might not be as class-leading as the previous devices.
This time, the new HDR10 2500 nits peak brightness front display gets a hole punch camera in the upper-middle section, while the back display from the Ultimate gets…nothing, as you won’t find it anymore on the new devices. Instead, the ever-present ROG RGB logo remains on the back of Phone 8 and 8 PRO, surrounded by well-placed gaming mottos.
The two-tone back design carries over from the ROG Phone 7 series, featuring different materials for the 8 and the 8 PRO. While we can’t confirm the fit and finish, judging by the images, the new gaming phones seem to follow the industry standard, with the ROG Phone 8 in a matte, grippy finish and a more glossy and premium-feel finish for the 8 PRO.
Lastly, a new addition to the ROG design is the camera bump. Both new phones feature triple cameras, this time housed in a more prominent camera bump. This should mean better camera performance but also a slight disadvantage when it comes to holding the device for prolonged periods. This further hints at the fact that Asus is no longer targeting only hardcore gamers but also light gamers who need flagship-level cameras and a more tamed design.
Asus ROG Phone 8 & 8 PRO full specs
ROG phones, alongside Black Shark or REDMAGIC, are extremely powerful devices but difficult recommendations for normal, day-to-day users. The hard-to-recommend part is mostly because of the in-your-face design and poor camera performance.
For 2024, Asus seems to have fixed both of those problems. And the specs, especially the RAM, look more appropriate for a gaming laptop than a phone.
Here is the table summarizing the specifications for the ROG Phone 8 Pro:
Specification
Asus ROG Phone 8
Asus ROG Phone 8 PRO
Design
Rebel Grey color, IP68 rating
Rebel Grey color, IP68 rating
Dimensions and Weight
N/A
163.8 x 76.8 x 8.9 mm, 225g
Operating System
Android 14 with ROG UI
Android 14 with ROG UI
Processor
Qualcomm Snapdragon 8 Gen 3, SM8650, Octa-core CPUs up to 3.3GHz, Qualcomm Adreno 750 GPU
Qualcomm Snapdragon 8 Gen 3, SM8650, Octa-core CPUs up to 3.3GHz, Qualcomm Adreno 750 GPU
Memory
LPDDR5X 12GB
LPDDR5X 16GB/24GB
Storage
UFS4.0 256GB
UFS4.0 512GB/1TB
Display
6.78″ FHD+ SAMSUNG Flexible AMOLED, Corning Gorilla Glass Victus 2
6.78″ FHD+ SAMSUNG Flexible AMOLED, Corning Gorilla Glass Victus 2, HDR10 support, LTPO 1~120Hz refresh rate up to 165Hz
Cameras
N/A
Triple rear camera setup with Sony IMX890 50 MP main sensor, 13 MP ultrawide, 32MP third camera with 3X optical zoom; 32MP front camera
WiFi 6/6E (802.11 be/ax/ac/a/b/g/n), Bluetooth 5.3, NFC
WiFi 6/6E (802.11 be/ax/ac/a/b/g/n), Bluetooth 5.3, NFC
Battery
Equivalent to 5,500 mAh, Quick Charge 5.0 and PD Charging
Equivalent to 5,500 mAh, Quick Charge 5.0 and PD Charging
Again, looking at the spec sheet, you can easily mix it up with a mid-level gaming laptop, but that can only be good, right? Hopefully, we’ll see more PC-level games and ray tracing not only on iPhones but also on the new ROG Phone 8 and 8 PRO.
Both devices will have an Aero Case and a fast charger in the box. There’s no mention of pricing as of now, but the ROG Phone 8 and 8 PRO will be officially unveiled at CES 2024, followed quickly by official Worldwide and China-only launches.
Asus ROG Phone lineup accessories
As usual, the ROG Phone 8 comes with some gamer-specific accessories. One of them is the DEVILCASE Guardian, a phone case supporting the AeroActive Cooler X. Here’s what it looks like.
When not using the cooler, you can attach the transparent backplate and still see the RGB lighting.
The AeroActive Cooler X hasn’t changed too much from last year, keeping the out-there design and the RGB.
You can still attach it via the side USB-C, and if you’re using the DEVILCASE, you can remove the backplate to use the cooler.
You can also use it as a stand for your phone.
And if that is a bit too much, you can always use the clear case with raised corners for optimal protection.
A classic TPU case and an antibacterial screen protector complete the lineup.
Fatal module v4l2loopback not found in directory message can appear when trying to install certain applications on Linux.
The error message will prevent you from installing software, and you won’t be able to proceed unless you fix it, so today we’re going to show you how to do it.
Why does fatal module v4l2loopback not found in directory error occur?
This issue occurs if your kernel and module aren’t installed from the same source, or if Linux headers or kernel modules aren’t installed. Improperly configured system can also cause this issue.
How can I fix the fatal module v4l2loopback not found in the directory error?
1. Install kernel and v4l2loopback from the same source
Check the source from which the kernel was installed.
Do the same for v4l2loopback.
If their sources aren’t the same, install v4l2loopback from a different source by using the following command: sudo apt -t buster-backports install v4l2loopback-dkms
We used Debian and booster-backports as an example, so be sure to adjust your command accordingly.
2. Install linux-headers
Open Terminal.
Next, run the following command to check if the system is up to date: sudo pacman -Syu
Install linux-headers with this command: sudo pacman -S linux-headers
Lastly, verify Linux headers: pacman -Q linux-headers
These instructions are for Arch, but a similar solution can be applied on Ubuntu. Just run the following command, but be sure to replace the module version accordingly: sudo apt-get install linux-headers-4.14.98-imx
Microsoft has announced several changes in the Windows 11 Insider Preview Build 26016 to improve, modernize, and secure the print experience, and the Windows Protected Print Mode is a part of it. The feature intends to redefine how users print from a Windows device.
What is Windows Protected Print Mode?
Windows Protected Print Mode or WPP disables third-party printer drivers and only supports printers certified by Mopria. WPP will be enabled by default on Windows.
In the WPP mode, the OS would block the loading of malicious modules and legacy configurations and perform XPS rendering as the user instead of System to limit the impact of bugs and vulnerabilities.
How do I enable or disable Windows Protected Print Mode?
1. Using the Local Group Policy Editor (gpedit.msc)
Press Windows + S to open Search, type Local Group Policy Editor in the text field, and click the relevant result.
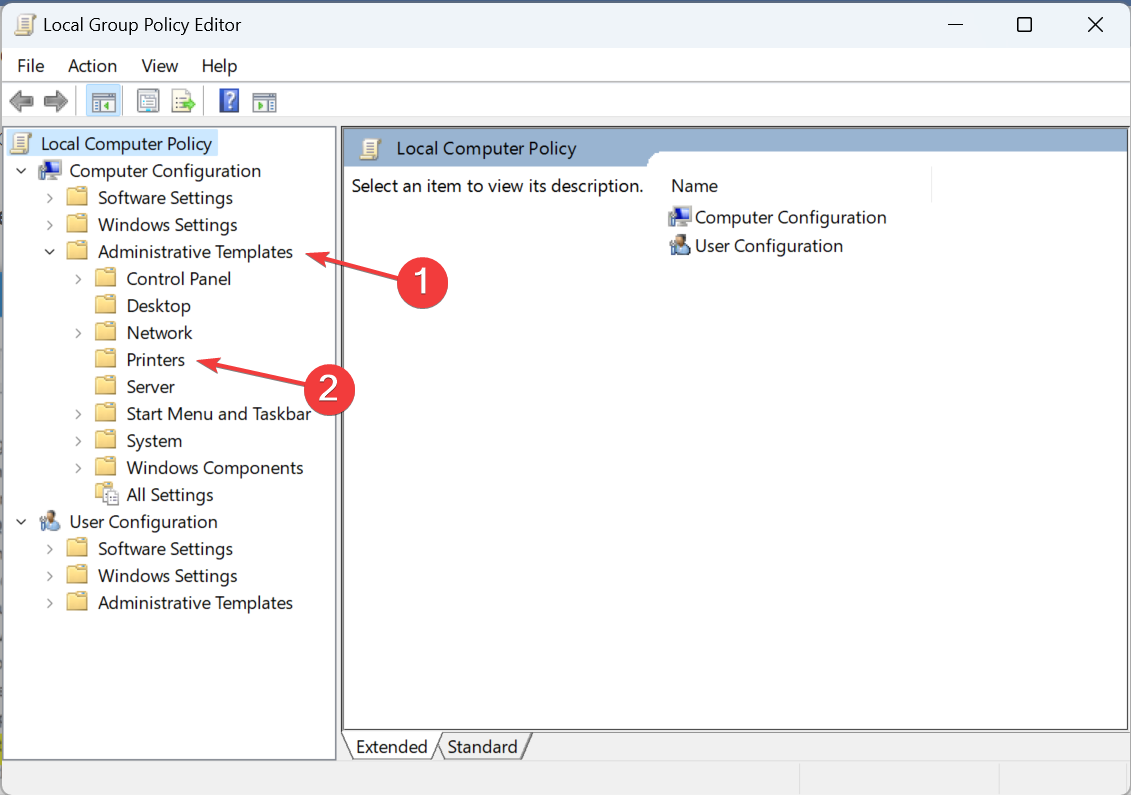
Expand Administrative Templates under Computer Configuration, and then double-click on Printers.
Select the Configure Windows protected print policy from the right.
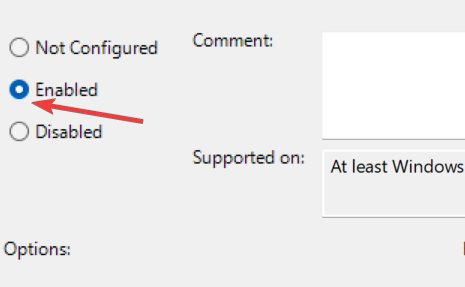
To turn on Windows Protected Print Mode, select Enabled.
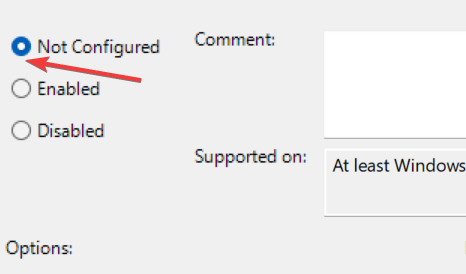
To turn off Windows Protected Print Mode, select Not Configured or Disabled.
Finally, click on Apply and OK to save the changes.
The preliminary steps remain the same whether you want to enable or disable the feature. After that, we have individually listed the steps for both.
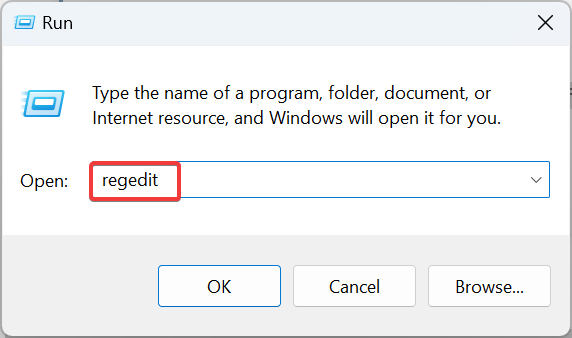
Press Windows + R to open Run, type regedit in the text field, and hit Enter.
Click Yes in the UAC prompt.
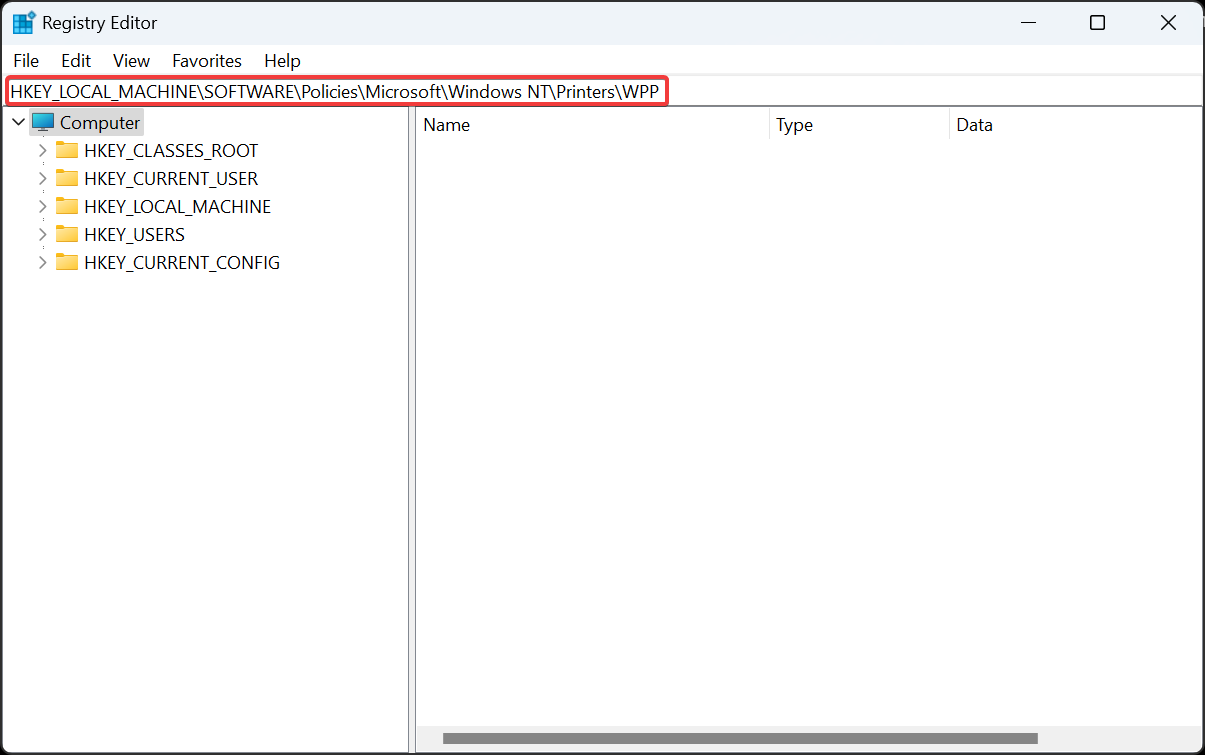
Navigate the following path or paste it in the address bar and then hit Enter: HKEY_LOCAL_MACHINE\SOFTWARE\Policies\Microsoft\Windows NT\Printers\WPP
2.1 Enable
Right-click on the WindowsProtectedPrintMode DWORD on the right, and select Modify.
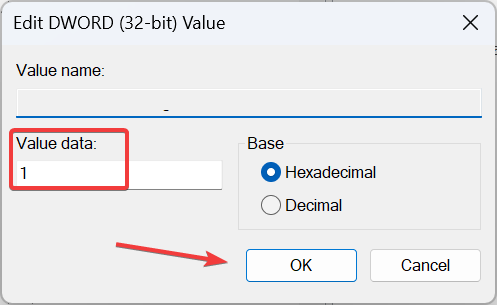
Enter 1 under Value data and then click OK to save the changes.
Similarly, set the following as the Value data for the corresponding DWORDs:
EnabledBy: 2
WindowsProtectedPrintGroupPolicyState: 1
WindowsProtectedPrintOobeConfigComplete: 1
2.2Disable
Right-click on the WindowsProtectedPrintMode DWORD, and then select Modify.
Enter 0 under the Value data field, and click OK.
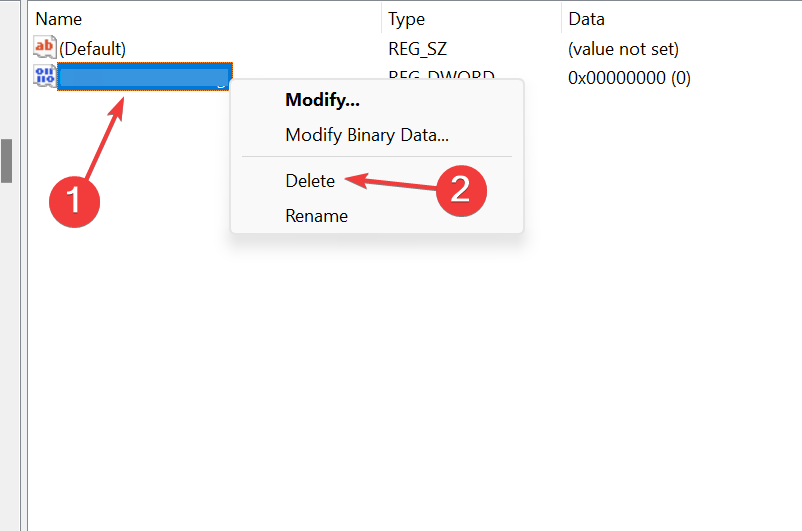
Now, right-click on the EnabledBy DWORD, and then select Delete.
Click Yes in the confirmation prompt.
Similarly, delete the following DWORDs:
WindowsProtectedPrintGroupPolicyState
WindowsProtectedPrintOobeConfigComplete
Restart the computer for the changes to apply.
Remember, Windows Protected Print Mode won’t be available in the regular versions of Windows 11 for quite some time and has only yet been released in the Canary channel. To find out more about the feature and other changes, read Microsoft’s official blog post.
Plenty of people rely on SD cards like SanDisk to store their files so it only makes sense to check its health for optimal performance. If you don’t know how to go about it, we share easy ways to do it.
Ensure your SanDisk SD card is inserted in your PC before proceeding with these steps.
1. By using Windows built-in scanner
Press Windows + E to open File Explorer, right-click on your SanDisk SD card, and select Properties.
Go to the Tools tab, and click on the Check button.
Select the Scan drive option.
2. By using a third-party tool
There are many tools available on the internet that can help you check the health of your SD card. Some of them even offer other features, like formatting and partitioning the memory card.
Third-party software, such as PRTG Network Monitor is always a great choice for this task. This is a professional health check and monitoring software, it can be used to check many types of devices or applications, including HDDs, databases, and of course removable storage devices.
Open the Command Prompt by pressing Windows + S and typing cmd inside. Right-click on the top result and choose Run as administrator.
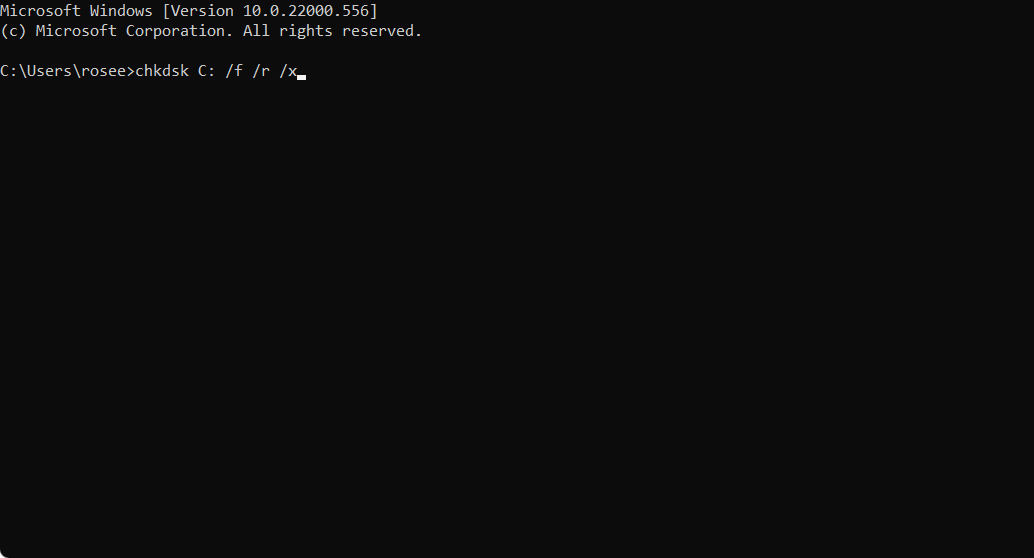
Type or copy-paste in the following command and press Enter to run it. Remember to replace the C with your SanDisk’s drive letter: chkdsk C: /f /r /x
Wait for the process to finish, then restart your computer to apply the changes made.
It may take some time depending on the size of your SD card. It is important to note that this scan will not repair any errors on your SanDisk SD card.
However, it will give you an idea of whether there are any problems that need to be addressed and you can take the next step to repair or format your SD card.
Use only SD cards that are compatible with your device and keep its drivers updated.
Don’t touch the connectors on the SD card or its adapter and store it in a protective case when not in use.
Safely eject it by closing any open files as removing it while your device is accessing can damage it.
Scan all files before copying them to your SD card to avoid data corruption.
While it is possible to check the health of your SanDisk SD card using your PC, third-party tools are more thorough and offer solutions to fix any errors. It’s best to try as many of these options as you can before giving up on a potentially bad card.
Afterall, SD cards’ biggest downfall has always been write errors, or errors when saving files so try addressing these first.
And if you’ve used your SanDisk SD card for a while, remember they do have a lifeline so they can only serve you for so long. You can upgrade to an ultra memory SD card if you have lots of files or a waterproof SD card depending on what suits your needs.
What method do you find effective in checking the health of your SD card? Share with us your favorite in the comment section below.
An STK (.stk) file is used for stick figures (2 dimensional) and is primarily employed by software such as Pivot Animator and Stykz. You will need a similar program to open an STK file in Windows.
The .stk format contains vital information about the stick figure, including the main handle and different segments. So, let’s find out the best STK viewer to download on a PC!
How do I open an STK file?
NOTE
Windows Report is not affiliated with Pivot Animator or any software listed in this article. We recommend you scan them using Windows Security or an effective third-party antivirus.
After changing the file association, you can easily open an STK file in Windows. Besides, there’s also a Mac version of Pivot Animator available. In addition, there are a few online STK file viewers to use, or you could convert the STK file into a format, preferably .piv, supported by your preferred application.
Of late, we have seen an increasing number of Windows users trying to wipe free space on the PC to improve performance. While there’s nothing wrong with the approach, it often doesn’t serve the intended purpose.
Free space is the storage on a disk which doesn’t hold any active files. It could be a space where no files were ever stored or one where files that now stand deleted were stored at some point. Because, when you delete a file, the OS only removes the reference or link and not the actual file from the drive.
Will wiping free space improve performance?
No, wiping free space doesn’t improve the PC’s performance. The operation simply creates an auto-expanding file, which is then deleted, clearing the storage. The amount of available storage doesn’t change after wiping the free space.
How do I wipe free space on the drive in Windows?
1. Using the Cipher command
Tip
While running the Cipher command, you will see the free space on the drive constantly shrinking. It’s normal and a part of the process. The storage will revert to initial levels after the operation.
Press Windows + S to open Search, type Command Prompt in the text field, and then click on Run as administrator.
Click Yes in the UAC prompt.
Now, paste the following command and then hit Enter (for C: drive, to wipe another drive, replace C: with the drive letter): cipher /w:c:
Wait for the process to complete.
Cipher is a multi-step process:
First, it creates a EFSTMPWP folder in the C: drive, then generates another file and fills it up with 0’s. The file expands until it occupies all the free space, and it is then deleted.
Now, the command creates another file filled with the number 255. The second file is again deleted.
Finally, a third file is created, filled with random numbers until the entire free space is occupied. Subsequently, it, too, is deleted.
While running the Cipher command, make sure to close all open programs to wipe up the maximum free space. On our device with a 512 GB SSD and 120 GB free space, Cipher took approximately 40 minutes to complete the wiping process.
Run the program, go to Tools from the navigation pane, and then click on Drive Wiper.
With the default settings in place, select the drive you want to clean, and then click on Wipe.
Wait for the process to complete.
If you want to wipe free space to improve performance, CCleaner is the best option. In CCleaner, you get four Security levels:
Simple Overwrite (1 pass): Simplest and quickest. Only one file is created and deleted.
Advanced Overwrite (3 passes): Same as the Cipher command, three files are created and deleted.
Complex Overwrite (7 passes): Takes longer, 7 files are created and deleted. Preferred if you plan to sell the device.
Very Complex Overwrite (35 passes): The most time-consuming, 35 files are created and deleted. Preferred if you want to wipe traces of highly critical data.
Wiping free space from the storage drive ensures the deleted data can never be recovered. You should do it before selling the computer.
For those wondering whether wiping free space on a hard disk is safe, it poses no harm. But for SSDs (Solid State Drives), the operation may lead to premature wearing out. So, don’t do it frequently!
Remember that the wiping operation won’t create more storage. For that, you can run Disk Cleanup or, for regular cleaning, set up Storage Sense!
Many users have complained about getting Can’t reach this page. The connection to the website was reset. Error Code: INET_E_DOWNLOAD_FAILURE when trying to open a website in Microsoft Edge in IE compatibility mode.
In this guide, we will discuss common reasons for the issue and delve into the WR experts’ recommended solutions so you can visit the site without any problem.
What causes the INET_E_Download_Failure?
Corrupted cache, cookies, and temp files.
Incorrect configuration or network module glitch.
How can I fix the INET_E_Download_Failure?
Before proceeding with any steps to fix this browser issue, go through the following preliminary checks:
Press the Windows key, type credentials manager, and click Open.
Select Web Credentials, click Web Passwords, then look for the site you want to access. If available, click Remove.
Click Yes and reboot your PC.
5. Run the SFC scan
Press the Windows key, type cmd, and click Run as administrator.
Copy & paste the following command to repair the system files and hit Enter: sfc /scannow
Wait for the scan to complete, then restart your computer to save the changes.
Repairing the system files using the SFC scan can help you overcome issues like Microsoft Edge running slow; read this guide to learn more about it.
6. Modify the network isolation settings
Press the Windows key, type cmd, and click Run as administrator.
Copy & paste the following command to enable debugging of the Edge browser for the localhost site and hit Enter: CheckNetIsolation LoopbackExempt -a -n="Microsoft.MicrosoftEdge_8wekyb3d8bbwe"
Restart your computer to save the changes.
The INET_E_Download_Failure error message could appear if the connection was broken or the information of a site could not be downloaded.
To fix it, you can clear the browsing data, enable the IE mode, delete the web credentials related to the site, or run the SFC scan to restore the damaged system files.
To avoid errors like these, ensure you don’t visit any malicious or untrusted websites, as they may be harboring malicious files.
If you want to know how to set up Internet Options settings to avoid network connectivity and choose system-wide settings for MS Edge and other browsers; read this guide to learn in detail.
If you have any questions or suggestions about the subject, feel free to mention them in the comments section below.
Many users have complained about getting the A1B2C3 challenge phrase every time they start up their computer, even if they were entering the correct PIN.
In this guide, we will talk about the ways to disable the challenge phrase feature on Windows 11 so you can log in to your device without any hassle.
How can I turn off the challenge phrase on Windows?
If you have tried to enter the challenge phrase multiple times and correct PIN, still stuck with the login page, then wait for an hour or so before following any steps, then try to enter the PIN.
1. Remove the NGC folder content & set up a new PIN
Press Windows + E to open the Windows File Explorer window.
Navigate to this path: C:\Windows\ServiceProfiles\LocalService\AppData\Local\Microsoft
Locate the Ngc folder, right-click, and select Properties.
Go to the Security tab, then click Advanced.
On the Advanced Security Settings for Ngc window, locate Owner, then click Change.
Under the Enter the object name to select field, type Everyone and click OK.
Next, place a checkmark next to the Replace owner on subcontainers and objects option.
Click Apply, then OK to save the changes.
Once you have permission to make changes to the folder, go to the same path and delete the Ngc folder, then restart your computer. To set a new pin, follow these steps:
Press Windows + I to open the Settings app.
Go to Accounts and select Sign-in options.
Select Pin (Windows Hello) and click Change PIN.
On the Change your PIN window, enter the old PIN and new PIN, then click OK.
If you are not able to remove the PIN from your Windows computer, it could be due to technical glitches or problems with local files that store your PIN information; read this guide to learn more.
Press the Windows key, type cmd, and click Run as administrator.
Type the following command to replace the Ngc folder’s access control lists and hit Enter: icacls C:\Windows\ServiceProfiles\LocalService\AppData\Local\Microsoft\Ngc /T /Q /C /RESET
Next, reboot your computer, then set a new PIN using the steps in Solution 1.
3. Disable the login screen
Press Windows + R to open the Run window.
Type netplwiz and click OK to open the User Accounts window.
Select the Username, then remove the checkmark next Users must enter a user name and password to use this computer.
Click Apply.
You will be prompted to enter the password twice, then click OK.
Remember that the A1B2C3 challenge phrase is not an error but a Windows prevention mechanism to ensure your user account and data are protected.
When you get the prompt to enter the phrase, you just need to enter A1B2C3, as shown on the login screen.
Keeping the feature enabled doesn’t harm you; however, if you are stuck on the login screen with the phrase, it means something is wrong, so you need to disable it using the methods mentioned.
If you have any questions or suggestions about disabling the challenge phrase, feel free to mention them in the comments section below. We will be happy to help!
Many users have reported getting error 0xC007000D while trying to install an update on their computer. In this guide, we will discuss common causes and delve into WR experts’ recommended solutions to ensure your operating system is up to date.
What causes the update error 0xC007000D?
Corrupted system files or Windows update components.
Malware infection.
How can I fix the update error 0xC007000D?
Before proceeding with any steps to fix the update error 0xC007000D, go through the following preliminary checks:
Press the Windows key, type cmd, and click Run as administrator.
Copy and paste the following commands one by one to stop BITS, Windows Update & other related services, then press Enter after every command:
net stop wuauserv
net stop cryptsvc
net stop bits
net stop appidsvc
To remove all files in the Downloader directory and delete SoftwareDistribution & Catroot2 folders, type these commands one by one and hit Enter after every command:
Type the following commands to reset the Winsock catalog one by one, and press Enter after every command: netsh winsock reset netsh winsock reset proxy
Copy & paste the following commands one by one to start the BITS, Windows Update, and other related services, then hit Enter after every command:
net start wuauserv
net start cryptsvc
net start bits
net start appidsvc
Restart your computer to let the changes take effect.
Type rstrui and click OK to open the System Restore window.
Select Choose a different restore point and click Next.
Next, select a point from the list of restore points and click Next.
Click Finish.
Your computer will restart and restore your Windows settings to the chosen point. If the System Restore didn’t complete successfully, it could be due to outdated driver or software conflicts; read this guide to learn more.
Under Download Windows 11 Disk Image (ISO) for x64 devices, and select Windows 11 (multi-edition ISO), then click Download Now.
Once the ISO file is downloaded, right-click it and select Mount from the context menu.
From the next window, double-click the Setup.exe file to open the Windows 11 Setup wizard.
Click Yes on the UAC prompt.
On the Install Windows 11 dialog box, click Next.
Click Accept in the license terms window.
On the Ready to install page, check if the Keep personal files and apps option is selected. If not, click Change what to keep, choose the option, and click Install.
Windows will restart your computer a few times, and once the upgrade is done, you will be greeted with a lock screen.
If nothing has helped you so far, try running the Windows Memory Diagnostic tool to ensure that memory corruption is not the reason behind the error. As, if that is the case, you need to replace one or more RAM modules.
Remember that the Windows Update error can occur if there are corrupted system files or outdated Update components.
Therefore, to fix it, first run the Windows Update troubleshooter, then execute the SFC and DISM commands to repair corrupted files.
Microsoft’s Xbox brand has historically struggled in eastern markets, and with Japanese audiences in particular, most of its gaming success coming from western markets, but a former PlayStation executive has a plan to change that.
According to a profile piece on Mena Kato, the former PlayStation executive turned director of Japan partnerships for Microsoft, is taking a different approach to broaching the two-console dominance of Nintendo and PlayStation in Japan.
Using local experience and a background of success with the PlayStation brand, Kato is looking to reverse the Xbox fortunes in Japan to “better bridge the gap between Japan and the rest of the world,” and doing so by teasing expansion to developers and studios.
Japanese publishers will definitely need us in expanding their business. It would be difficult to do that just with the PlayStation.
Mena Kato – Bloomberg
Dangling the prospect of more revenue and profits via an often overlooked third console option isn’t Kato’s only focus, she is also doing the little things that lost the Xbox brand trust amongst Japanese publishers such as successfully conveying concerns and feedback on documentation translation and broader global promotion campaigns of eastern titles, presumably akin to Xbox exclusives.
When the notion of the chicken and egg situation Microsoft finds its Xbox currently experiencing in Japan came up, where there aren’t enough consoles being sold to re-earn developer attention, UBS Securities analyst Kenki Fukuyama pivots to the billion plus audience of Windows.
Microsoft offers huge scalability to Japanese publishers as there’s virtually no country without Windows PCs. When it comes to access to game fans in emerging countries, Sony and Nintendo just can’t compete with Xbox.
UBS Securities Analyst Kenji Fukyuama
Fortunately, Microsoft has been intertwining its Windows and Xbox platforms into a more consolidate gaming experience with the revamped Xbox app on Windows at the same time Japanese publishers look to grow profits through rereleasing titles to PC in previously unexplored markets at minimal costs.
Who better to help expedite the transition for Japanese publishers into the PC market than the owner of both a gaming division and the leading gaming operating system on a computer, Microsoft.
Obviously, Microsoft will need to reverse course on a decade plus of miscues and missteps in its relationship with Japanese developers, but Kato and head of Xbox Phil Spencer seem committed and focused enough to wade through the tough negotiations ahead.
If you’re a gamer, you’re constantly updating your games so if you spot the galaxypeer.dll file being singled out, you may have wondered whether it’s a necessary or malicious file. We unpack all about it and whether you should keep it or bin it.
What is galaxypeer.dll?
We first spotted the galaxypeer.dll while updating the Battlezone game but it can also appear in other games on Steam. This DLL file is often flagged off as being a risk to your system but this is a false positive brought up by third-party antiviruses.
What can I do if the galaxypeer.dll file appears on my screen?
1. Allow Steam through the firewall
Click on the Windows key, type Control Panel, and open it.
Navigate to System & Security.
Under Windows Defender Firewall, choose to Allow an app through Windows Firewall.
Click Change settings.
Find the Steam app and make sure it has both Public and Private boxes ticked.
Try reloading Steam and see if the update presents the same problem.
2. Disable antivirus temporarily
Hit the Start menu icon, type Windows Security in the search bar, and click Open.
Click on Firewall & network protection, then select Public network.
Locate Microsoft Defender Firewall and toggle the off button.
This state should only last for a while until your game finishes updating. Once done, switch it back on as the risks of running a Windows device without an antivirus are catastrophic.
Whereas the galaxypeer.dll file is not malicious, it is possible for cyberhackers to masquerade a similar file into your game files especially if you download your games from unofficial sites. A quick tell-tale sign that it is a malicious file is its location.
If it is not in the following path or your Steam folder, you can go ahead and remove it: C:\ProgramData\GOG.com\Galaxy
Generally, whenever you’re missing DLL files, you should first verify whether they’re critical before removing them. And if the above methods fail to remove any malicious DLL files, a DLL repair tool should suffice.
Before you leave, you might be interested in our latest guide on and learn what to do if cncs32.dll is missing from your PC.
That’s a wrap from us but we’d love to hear your experience if you’ve come across a similar issue. Share with us in the comment section below.
Setc.exe is an executable file from the MySecurityCenter software owned by Europe Capital, and its purpose is to check the user permissions for the software.
Is Setc.exe dangerous? No, Setc.exe is a harmless file, but like any other executable file, it may be hijacked and infected by wrongdoers. This article will highlight what this file is, how to fix its errors, and if it’s worth keeping.
What is Setc.exe, and what does it do?
Setc.exe is part of the MySecurityCenter app developed by Europe Capital, a UK company that provides internet security programs. Ensure you don’t confuse it with Sethc.exe, an accessibility feature from Windows.
The file is also associated with the installer of the MPC Wizard 3.0 Test & Tune Your Multimedia app.
Can I delete Setc.exe? The file is usually located in the %programfiles%\MySecurityCenter\Programs folder. If you see it in any other location, try to remember if you set that location when you installed it. Otherwise, if the location seems suspicious or you don’t need or use the program, you can delete it.
How do I fix Setc.exe errors?
Before starting the troubleshooting, here are some of the errors that are associated with Setc.exe:
setc.exe has encountered a problem and needs to close.
setc.exe – Application Error. The application failed to initialize properly (0xXXXXXXXX). Click OK to terminate the application.
setc.exe – Application Error. The memory could not be read/written. Click on OK to terminate the program.
setc.exe has stopped working.
End Program – setc.exe. This program is not responding.
setc.exe is not a valid Win32 application.
1. Reinstall the app
Click the Start button and go to Settings.
Now, click on Apps from the left and select Apps & features from the right.
Locate the app associated with setc.exe, click on the dots from its right, and select Uninstall.
Now, use the original installer or get the latest version from the developer and reinstall it.
2. Reregister the setc.exe file
Click the Start button, type cmd, and select Run as administrator from the results.
Type the following command and press Enter to run it: regsvr32 /u SETC.EXE
Now, type the following command to reregister the file: regsvr32 /i SETC.EXE
Close Command Prompt and try to run the program for which you are experiencing the set.exe error.
When you install the app associated with setc.exe, it should automatically register the file, but sometimes, you may get the setc.exe was not registered error. Manually registering the file will fix the problem.
3. Run an SFC scan
Click the Start button, type cmd, and click on Run as administrator from the results.
Now, type the following command and press Enter to run it: sfc /scannow
Wait until the scan finishes, then restart your PC and see if the setc.exe error persists.
How to prevent setc.exe errors?
Install all the new Windows updates and update the app associated with setc.exe.
Clean out the junk from your PC often to prevent the system from clogging.
Keep the drivers updated at all times. Corrupted or missing drivers cause many problems with the system and apps.
To sum up our guide, setc.exe is a harmless file, but if you’re not using the app associated with it, you can delete it without any problems.
If you want to fix the errors associated with setc.exe, you can reinstall the app, reregister the file, or perform an SFC scan to get rid of the problems.
If you’re getting an attachment unavailable message whenever you try to send or receive a file on Messenger, we explore various ways to enable you to view these attachments.
What does it mean when the attachment is unavailable?
This is a message you may receive on Facebook’s Messenger app that prevents you from opening a file shared. The most probable cause is that the sender deleted it, deactivated their account or the app has accumulated cache that has become corrupt.
What can I do if an attachment is unavailable in Messenger?
First, start with these preliminary checks:
Ensure your Messenger app is up-to-date or try from another device or Facebook on a browser.
Check that you have a stable and working connection and turn off any data-saving settings.
Ask the sender to resend the file again or a different one to verify if the issue persists.
1. Turn off background app refresh
1.1 PC
Hit the Windows key and click on Settings.
Click on Apps on the left pane then select Apps & features.
Search for the Messenger app, click on the three ellipses next to the app, and select Advanced options.
Navigate to the Background apps permissions section.
Under Let this app run in the background, choose the Never option.
1.2 Android
Tap on settings on your phone.
Next, tap on Connections.
Go to Data usage>Mobile data usage. (If you’re on a wireless connection, select Wi-Fi data usage)
Tap on the Messenger app and toggle off the Allow background data usage option.
1.3 iOS
Locate Settings on your iPhone and tap on it.
Go to General>Background App Refresh.
Find the Messenger app and toggle the off button.
Repeat the same steps for the Facebook app.
2. Clear app cache
2.1 PC
Hit the Windows key and click on Settings.
Click on Apps and select Apps & features.
Find the Messenger app, click on the three ellipses and select Advanced options.
Scroll down and click on Reset.
2.2 Android
Tap on settings on your phone.
Next, tap on Apps.
Find the Messenger app and tap on it.
Scroll down and select Storage.
Tap on Clear data and Clear cache,then try again.
2.3 iOS
Locate Settings on your iPhone and tap on it.
Go to General>iPhone Storage.
Find the Messenger app, tap on it, and select Offload App.
Proceed to repeat the same steps with the Facebook app as the two are interconnected.
Finally, if you’re still getting the attachment unavailable message, it may be time to try other chat apps. What’s good about these is they don’t take up much space on your device because they’re browser-based.
We appreciate your feedback so if you have any other solution worth checking out, don’t hesitate to drop us a comment below.
If you have encountered the Could not connect to server. Authentication failed error on Conan Exiles, this guide can help!
We will talk about the probable causes and delve into WR experts-tested solutions to ensure you can play the game without interruption.
What causes the Authentication failed error?
The game is blocked by Windows Firewall.
Corrupted BattlEye installation.
How can I fix the Conan Exiles Authentication failed error?
Before proceeding with any steps to fix the authentication error, go through the following preliminary checks:
Press Ctrl + Shift + Esc to open Task Manager, right-click Conan Exiles, Steam, and the processes related one by one, and choose End task.
Verify if you have a stable internet connection and check the server status.
1. Reinstall BattlEye
Press the Windows key, type steam in the search box, and click Open.
Go to Library, look for the Conan Exiles, right-click it, and select Properties from the context menu.
Go to the Installed Files or Local Files tab, then select Browse or Browse Local Files.
Navigate to the BattlEye folder and double-click to open it.
Look for the BattlEye installer, right-click it, and choose Run as administrator option.
Follow the on-screen prompts to complete.
Next, click Steam from the upper left corner and select Exit.
Relaunch the client and game to check if the issue persists.
2. Allow the game through the Windows Firewall
NOTE
Check if Conan Exiles is blocked by Windows Firewall using this guide. If you don’t face the issue after disabling the firewall, follow the steps below to add the game to the Allowed Apps list.
Press the Windows key, type control panel in the search box, and click Open.
Select Category for View by and choose System and Security.
Under Windows Defender Firewall, click Allow an app through Windows Firewall.
On the Allowed apps screen, look for Conan Exiles; if not found, select Change settings, then click Allow another app.
Select Browse, search for the game’s executable file in the system drive, select it, and click Open.
Now click Add.
Once added to the Allowed Apps page, place a checkmark next to Private and Public for the game and click OK.
Press the Windows key, type steam in the search box, and click Open.
Go to Library, then right-click the game, and select Properties from the context menu.
Click the Installed Files tab, and select Verify integrity of game files.
The client app will verify the game files and restore the corrupted missing files. Once done, close Steam, then relaunch it, then open the game. It can also help you fix the launch issues of the game; read this guide to learn more.
4. Reinstall the game
Press Windows + I to open the Settings app.
Go to Apps, then select Installed apps.
Navigate to Conan Exiles, click the three dots icon, and select Uninstall.
Click Uninstall again to confirm the action.
Press the Windows key, type steam in the search box, and click Open.
Navigate to Library, locate the game, and click Install to reinstall the game.
Remember that the Authentication Failed issue could occur due to a faulty network connection or a corrupted game file, so you need to ensure that your internet is stable.
Also, to fix the error, allow the game to firewall, reinstall the BattlEye, verify the integrity of the game files, or reinstall the game.
Speaking of connectivity, check out the guide to the best VPNs for Conan Exiles to overcome lag and lower ping issues.
Did we miss the step that helped you fix the Conan Exiles Authentication Failed issue? Feel free to mention it in the comments section below. We will happily add it to the list.
Dev error 6146 affects Modern Warfare 2 and other CoD games, and it can prevent you from playing the game online with others.
This can be a frustrating issue since you won’t be able to advance further from the game menu, but there are a few solutions that can help you fix this problem.
What causes Dev error?
This issue can appear due to outdated graphics card drivers, corrupted game cache, or RAM overclocking.
How do I fix Dev error 6146?
1. Update your graphics drivers
Go to your GPU’s manufacturer’s website.
Locate your graphics card on the list.
Next, locate the latest driver and download it.
Once the setup file is downloaded, run it and follow the instructions on the screen.
After the setup is finished, restart your PC to complete the process.
2. Turn off XMP
Restart your PC. While it boots keep pressing F2 or Del to enter BIOS.
Once you enter, you should see the X.M.P. setting.
Change its value to Disabled and save changes.
On some motherboards, you might have to go to Advanced settings to disable XMP.
Locate Battle.Net on the list, right-click it and choose End Task.
Next, press Windows key + R and enter %appdata%
Locate the Battle.net folder and delete it.
After that, navigate to C:\ProgramData
Delete the Battle.net folder there as well.
Lastly, start Battle.net again and try to start the game.
You will be asked to download the missing files so be sure to do that.
If the issue is still present, then your only option might be to reinstall the game from scratch.
Dev error 6146 can appear in Warzone 2, MW3, and other games, and in most cases, it’s caused by outdated graphics card drivers, so be sure to update them. This is just one of many errors and we already covered dev error 5476 in Warzone in one of our older guides.
We also have a new guide on Dev error 12502, so feel free to check it out for more information. Dev Error 6144 is pretty similar to this one, so you might want to check it out for more information.
Our latest guide covers the Dev error 5820, so you might want to visit it for more useful information.
Did you find a different solution for this error? If so, share it with us in the comments section.
The Zelle Reason Code 2900 appears while making payments, adding cards to the profile, or even when creating an account on the platform. The error message reads, Zelle will be back up and running soon. Please try again later today. We’re sorry for any inconvenience caused.
This is usually a server-based error, and the problem is on Zelle’s side. However, issues with the app installation or misconfigured network settings on the user’s end can also trigger the message.
How can I fix Zelle Reason Code 2900?
Before we start with the slightly complex solutions, verify whether the Zelle servers are down using a real-time monitoring service like Downdetector, use a different email ID, check whether your bank or card union offers Zelle, and make sure you are running the latest app version.
1. Clear the app cache
1.1 Android
Open the device Settings, and select Apps.
Choose Zelle from the list of applications.
Tap on Storage.
Now, tap on Clear data and Clear storage individually to clear all non-critical files.
Choose the appropriate response in case a confirmation prompt appears.
1.2 iOS
Clearing the cache on an iPhone is slightly different, and you will have to reinstall the app later on. To do that, open Settings > go to General > tap on iPhone Storage > select Zelle > tap on Offload App > again choose Offload App in the confirmation prompt.
Remember, this is also an effective fix against Zelle Error A101.
2. Reset the network settings
2.1 Android
In the Android Settings, scroll down and select General management from the list.
Tap on Reset.
Select Reset network settings.
Finally, tap on the Reset settings button.
Relaunch the app and check for improvements.
2.2 iOS
Open the iPhone Settings, and go to General.
Scroll down and tap on Transfer or Reset iPhone.
Tap on Reset.
Select Reset Network Settings.
Enter the iPhone’s passcode to confirm the reset.
Once done, relaunch Zelle and check whether Reason Code 2900 is fixed.
Tap and hold the Zelle icon on the home screen, and select Remove App.
Select Delete App to confirm.
Now, re-download Zelle from the Apple App Store, and check for improvements.
4. Contact Zelle support
If nothing else works, the last option is to contact Zelle Support. You can submit your query through the website’s form, and they should ideally respond within two working days.
In case you are getting Zelle Reason Code 2900 while making or receiving a payment, reach the support team directly at 1-844-428-8542 between 10 AM and 10 PM ET.
One of these solutions should help get rid of Zelle Reason Code 2900, but in most cases, you will have to wait for the server downtime or maintenance schedule to end.
Also, if you are new to the payment platform, read about the Zelle Facebook scam and discover the tips to identify one! You can also check our guide and see how to quickly fix Zelle error A106.
For any queries or to share what worked for you, drop a comment below.
Many of our readers want to know why RTT randomly turns on Android and iPhone, and in this guide, we’re going to answer this question.
This is caused by software glitches, interference, or accidental activation. Nevertheless, we tested the right solutions in the WR labs, and we’re bringing you the solutions to disable RTT for good.
How do I turn off RTT on Android and iOS?
1. Turn off RTT on Android
On your Android Phone, open the Calling/Call app.
Tap on the three dots icon and select Settings.
Now, tap on Accessibility.
Finally, select RTT and/or TTY and turn them off.
2. Disable RTT calling on iPhone
On your iPhone, go to Settings.
Next, tap on Accessibility.
Look for RTT/TTY or RTT/Textphone, depending on your iOS version, and tap on it
Toggle Software RTT/Textphone and Hardware TTY to off to disable Real-Time Text calling.
What is RTT and why is it on my phone?
The RTT is an acronym for Real-Time Text, and it’s a feature for fast text messaging through an IP network. It was designed especially for people with speech or hearing impediments to use in emergency situations.
As it’s very important, RTT calling is turned on by default on new phones in many countries, including the US.
One of our readers fixed this problem by going into the Calling app and manually deleting all the calls with the specific contact that randomly turned on the RTT.
You can also fix this issue by removing third-party calling apps or by keeping your phone and apps up to date. If nothing else works, you might need to contact your provider.
So, if you were asking why does RTT randomly turn on with certain contacts, now you know that it’s mostly due to software glitches or interference.
Our WR software specialists also provided the methods to disable RTT calling on Android and iPhone and how to prevent this issue.