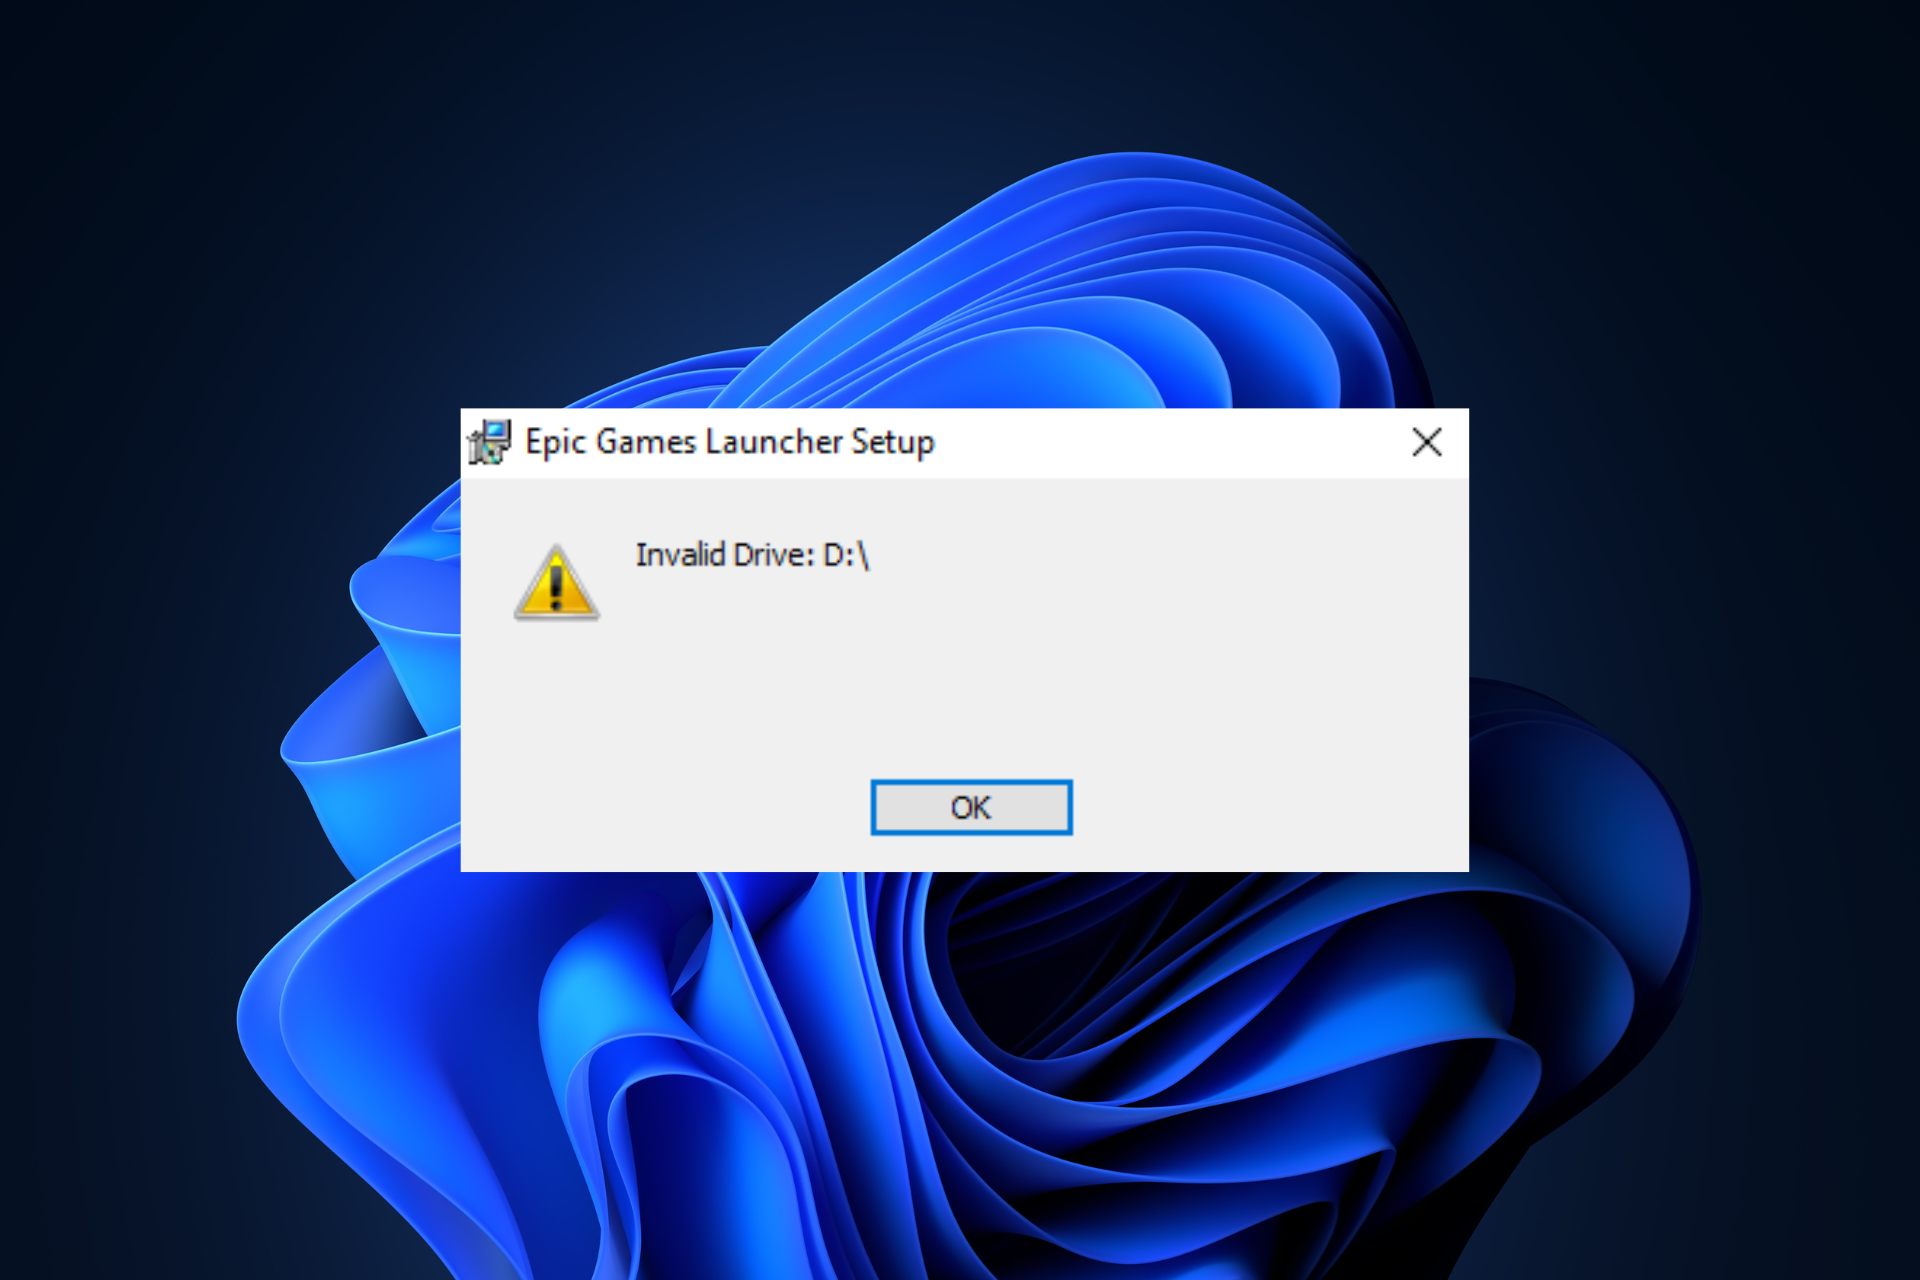
Epic Games Installer Invalid Drive Error: 6 Ways to Fix It

Many users have reported encountering the Invalid Drive error message when using the Epic Games installer to install a game from the store. If you are one of them, this guide can help!

We will discuss expert-recommended solutions to address the issue and get you back to gaming in no time.

Why am I getting the invalid drive error?

  • The installer is trying to access a drive letter that doesn’t exist or is currently unavailable.
  • Issues with Registry, like corrupted drive mappings.
  • Insufficient administrative permissions.
  • Third-party security software interfering with the installation process.

How can I fix the Invalid Drive error when installing the Epic Games Launcher?

Before we go to the advanced fixes, here are a few quick things you could try:

  • Restart your computer and uninstall unwanted apps.
  • Install all Windows updates if available.
  • Right-click the Epic Games Launcher or Installer, select Run as administrator, then try to perform the action.
  • Turn off the third-party security software temporarily if applicable.

1. Recover space on the drive

  1. Press Windows + R to open the Run dialog box.Cleanmgr Run command Epic Games Installer Invalid Drive
  2. Type cleanmgr and click OK to open Disk Cleanup.
  3. On the Disk Cleanup: Drive Selection window, select Windows (C:) or the system drive and click OK.Select Windows C
  4. Click Clean up system files.Clean up system files.
  5. On the Disk Cleanup: Drive Selection window, select the system drive again and click OK.
  6. Select all the items under Files to delete and click OK.Disk cleanup - Files to delete
  7. Select Delete Files from the following window.Delete Files  Epic Games Installer Invalid Drive

Removing temporary files from your computer improves the system performance and can prevent issues like Something went wrong on Epic Games. If your disk is still low on space, try moving large files to an external HDD or cloud storage.

2. Run the troubleshooter

  1. Download the troubleshooter from this website.Download the troubleshooter - - Epic Games Installer Invalid Drive
  2. Double-click the file to run or open.
  3. On the Programs Uninstall and Install troubleshooter window, select Advanced.Click Advanced
  4. Now click Apply repairs automatically and click Next.Apply repairs automatically and click Next.
  5. Choose Installing, as we are facing issues while installing.Choose Installing
  6. Select the program from the list and click Next.Select the program from the list and click Next.- Epic Games Installer Invalid Drive
  7. Follow the onscreen instructions, and the tool will try to fix the problem.

3. Change the drive letter & reinstall the game launcher

First, we will change the driver letter; for that, follow these steps:

  1. Press Windows + R to open the Run dialog box.DISKMGMT RUN COMMAND - Epic Games Installer Invalid Drive
  2. Type diskmgmt.msc and click OK to open the Disk Management window.
  3. Right-click the drive you don’t use much to change the letter and click Change drive letter and paths.Change drive letter and paths.
  4. On the Change Drive Letter and Paths window, select Change.Change
  5. Next, on the following page, from the drop-down list, select the drive letter that appeared on the error. For example, it was Invalid Drive D:\, so I will change the letter to D.drop-down list, select the drive letter
  6. Click OK. You will get a warning prompt; click Yes to proceed.Click Yes
  7. Click OK to confirm the changes.

Now follow these steps to install the game launcher:

  1. Go to the Epic Games Launcher website and click Download Epic Games Launcher.Click Download Epic Games Launcher  Epic Games Installer Invalid Drive
  2. Double-click the installer file, then click Next.
  3. Click Install to initiate the process.Click Install
  4. Follow the onscreen instructions to complete.

Next, uninstall Epic Games Launcher, and for that, follow these steps:

  1. Press Windows + R to open the Run dialog box.APPWIZ RUN COMMAND with signs Epic Games Installer Invalid Drive
  2. Type appwiz.cpl and click OK to open the Programs and Features window.
  3. Locate Epic Games Launcher and click Uninstall.uninstall ERpic Games launcher   Epic Games Installer Invalid Drive
  4. Follow the onscreen instructions to complete the process.
  5. Next, press Windows + E to open File Explorer.Delete the folder
  6. Go to C:\Program Files (x86)\Epic Games and delete the game folder.

Next, use the steps mentioned above to change the drive letter to the previous one so that everything on your computer works fine. Launch the game launcher installer, choose a desired location, and click Install.

Reinstalling the game launcher can also fix other issues related to the app, such as Epic Games Launcher not working.

4. Fix the corrupt registry entries

  1. Press Windows + I to open Settings.
  2. Go to System, and click Recovery.System - Recovery Windows 11 -Epic Games Installer Invalid Drive
  3. Locate Advanced startup, and click Restart now.Recovery Advanced Startup
  4. On the Choose an option page, click Troubleshoot.Choose an option - Troubleshoot
  5. Next, click Advanced options.Advanced options -Epic Games Installer Invalid Drive
  6. On the Advanced Options page, click Startup Repair.Startup Repair

Your computer will restart, and the tool will diagnose & try to repair the issues. Once your computer is up but the Invalid Drive error persists, we suggest you try a specialized repair app.

5. Use the Command Prompt to substitute the drive

  1. Press the Windows key, type cmd, and click Run as administrator.CMD elevated  Epic Games Installer Invalid Drive
  2. In the Command Prompt window, type the following command to trick your Windows into thinking that your C drive is the D drive and press Enter: subst C:D:\cmd_substitute C to D
  3. You need to replace the drive letter as per your computer. For me, here, C is the one I want to use to install Epic Games Launcher, and I am getting Epic Games installer Invalid drive D.

Once the command is executed, try performing the same action you did when you got the error to see if the issue persists.

6. Delete the registry entry

  1. Press Windows +E to open Windows Explorer. Go to a drive where you want to install Epic Games Launcher, click New, select Folder, and name it Epic Games.Click New - Folder - name it Epic Games - Epic Games Installer Invalid Drive
  2. Right-click it, select Copy as path, and paste it at an accessible location after removing the quotes.Copy as path
  3. Press Windows + R to open the Run dialog box.Regedit RUN COMMAND -Epic Games Installer Invalid Drive
  4. Type regedit and click OK to open Registry Editor.
  5. Go to this path: Computer\HKEY_LOCAL_MACHINE\SOFTWARE\WOW6432Node\Microsoft\Windows\CurrentVersion\Uninstall
  6. Double-click Uninstall to expand, and go through the entries to find the folder for Epic Launcher.Install Location of Epic Launcher - Epic Games Installer Invalid Drive
  7. On the right pane, locate InstallLocation, double-click it, change the Value data to the path you copied, and click OK.Mention the path
  8. Restart your computer to save the changes.

If you have changed the hard drive and started getting this error, you might have to reinstall Windows to fix the issue.

In case none of these solutions worked for you, we suggest you contact Epic Games customer support for further help.

Can I install Epic Games on an external hard drive?

Yes, you can install Epic Games on an external hard drive, and it could be a great alternative if you don’t have space on the internal drive or want to access the game library on multiple devices.

To get it on an external drive, uninstall it from your local hard drive. Once uninstalled, run the installer. Once you are on a page to choose the installation location, select the external drive, click Install, and follow the onscreen instructions to complete the process.

Remember that while performing tasks related to installation or uninstallation, you should always log in using an admin account & run the installer file as administrator to avoid related errors.

This isn’t the only problem, and we recently wrote about error code 2738 in Epic Installer, so don’t miss it for more solutions.

Do you know any other solution that worked for you? Feel free to mention it in the comments section below. We will happily add it to the list.


Turn On or Off Autocorrect Misspelled Words on Windows 11

Autocorrect is a really useful feature that can save a lot of time in your daily life. While it is not perfect, most of the time, you can rely on it to fix your typos and mistakes in writing.

However, sometimes it doesn’t work as it should. You’ll find that it doesn’t recognize some words making it difficult to work efficiently. Other times, you just want to disable it and go back to the old ways.

But are there any benefits to using autocorrect?

  • Saves you time by correcting your typos.
  • Helps you learn new words by showing you the correct spelling.
  • It helps you avoid embarrassing mistakes in emails and other documents.
  • You’ll be able to type faster and make fewer mistakes.

How do I turn spell check on or off on Windows 11?

1. By using the Settings app

  1. Hit the Windows key and click on Settings.settings windows 11
  2. Select Time & language, then click on Typing.
  3. Toggle on or off the Autocorrect misspelled words option.

If you’d like to get notified of the misspelled words without changing them, keep the Highlight misspelled words option on.

2. By using the Group Policy Editor

  1. Hit the Windows + R keys to open the Run command.
  2. Type gpedit.msc in the dialog box and hit Enter.GPEDiT.msc -Windows Remediation Service Failed to Start?
  3. Navigate to the following location: User Configuration/Administrative Templates/Control Panel/Regional and Language Options
  4. Double-click on Turn off autocorrect misspelled words.
  5. Check the Enabled box then hit Apply and OK to save the changes.
  6. Go back to step 3, double-click on Turn off highlight misspelled word, and repeat step 5.
  7. To turn it off, follow the above steps and select the Disabled option.

3. By using the Registry Editor

  1. Hit the Windows + R keys to open the Run command.
  2. Type regedit in the dialog box and hit Enter.
  3. Navigate to the following location: HKEY_CURRENT_USER\Software\Microsoft
  4. Right-click on Microsoft, select New Key, and then name it Control Panel.
  5. Next, right-click on the newly created Control Panel, select New Key, and name it International.
  6. Right-click on International, select New DWORD (32-bit) Value, and name it as TurnOffAutocorrectMisspelledWord.
  7. Create another New DWORD (32-bit) Value and name it as TurnOffHighlightMisspelledWords.
  8. Double-click on each and enter the Value data as 0 for each entry then hit OK.
  9. To disable, enter the Value data as 1 for each.

As a precaution, remember that manually editing the registry can render your PC inoperable. To cushion your device from unexpected failure, backup your registry or create a restore point.

How do I remove certain words from autocorrect? 

  1. Hit the Windows key and click on Settings.settings windows 11
  2. Click on Privacy & security, then select Inking & typing personalization.
  3. Select Personal dictionary.
  4. Hit Clear your personal dictionary.

This is a handy feature that can help you delete any words you greenlighted but want to remove.

With these tips, you now have better control of your spelling. After all, autocorrect can be an interesting feature at times, but it can also cause more trouble than it’s worth.

It is important to note that the autocorrect feature is only available for Windows and not other apps. So if you run into an issue where Microsoft Word is not spell-checking after you’ve enabled the autocorrect feature in Windows, the two are unrelated.

Likewise, you’ll have to turn on spell check in Outlook to get spelling suggestions when typing emails.

Do you prefer the autocorrect feature on or off? Let us know in the comment section.

How to Give Read/Write Permissions But Not to Delete

File permissions prevent unauthorized access and modification of your files, and this is why many users want to assign read and write folder permissions but not delete privileges.

Setting up these permissions is simpler than you think, and this guide will show you a couple of methods you can use to prevent your files from being deleted.

Can you delete files with read/write permissions?  

Read/write permissions usually allow you to modify and delete files and folders. However, you can always adjust the advanced settings and revoke delete permission if needed.

How do I set up read/write permissions for files and folders?

1. Use file Properties

  1. Right-click the desired file or folder and choose Properties.
     
  2. Navigate to the Security tab and click on Edit. From here, you’ll be able to modify basic permissions.
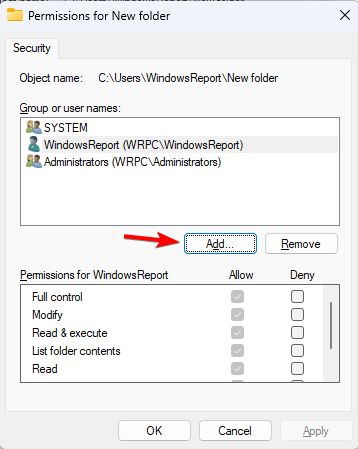
  3. If the desired account isn’t on the click, click on Add.
  4. Next, type the account name, click Check names, and then OK.
  5. Select the desired account. Next, check the directory permissions you want to assign to it in the Allow column and lastly click Apply and OK to save changes.

2. Use advanced security settings

  1. Right-click the desired file and choose Properties.
  2. Navigate to the Security tab and click on Advanced to open the advanced security permissions window.
  3. If your account isn’t on the list, click on Add.
  4. Click on Select a principal.
  5. Enter the desired username, click on Check names, and then click OK.
  6. Select the individual permissions and click on OK.
  7. Click Apply and OK to save changes.

3. Use command line

  1. Press the Windows key + X and select Terminal (Admin).
  2. Run the following command: icacls "C:\Users\WindowsReport\New folder" /grant "Test:(R,W)"
  3. After that, the Test user will have read and write privileges over the New folder.

How do I remove delete permissions for files and folders?

1. Use advanced security settings

  1. Locate the desired file or folder, right-click it, and choose Properties. Next, go to the Security tab and click Advanced.
  2. Double-click the desired account. Click on Show advanced permissions.
  3. Lastly, uncheck Delete and Delete subfolders and files and click on OK.
  4. After that, you’ll only have Windows permissions to create files but not delete.

2. Use the Terminal

  1. Press the Windows key + X and select Terminal (Admin).
  2. Run the following command to remove delete permission: icacls "C:\Users\WindowsReport\New folder" /remove "Test:D"
  3. To remove delete permissions from a folder and subfolders, use: icacls "C:\Users\WindowsReport\New folder" /remove "Test:(DC)"

Tips for maintaining permissions settings

  • Plan carefully which privileges you want to assign to users or groups, and assign only the necessary file permissions to users.
  • Try to utilize built-in groups in Windows since they already have predefined permissions.
  • Use deny permissions rarely since improper configuration can lead to issues.
  • If you’re managing multiple users or computers, document all permissions and access rules.

It’s easy to manage read and write folder permissions, and for less experienced users we suggest using file or folder properties, while more advanced ones can use the command line to quickly change their settings.

Permissions are extremely useful since users need to provide administrator permission to delete certain folders on their PCs. You can also use this feature to limit folder access, and if you do so, restricted users will get access denied to folder messages when trying to open certain directories.

Keep in mind that permissions are quite sensitive, and you can cause issues if you’re not careful, but luckily, you can always reset all permissions to default on your PC.

How do you configure your folder permissions? Share your favorite methods with us in the comments below.

Windows 7 Disk Management: How to Access & Use it

The Windows 7 Disk Management tool is extremely helpful because it allows you to partition the drives, change the drive letter, or format them. In this article, we will show you how to access Disk Management in Windows 7 and use it.

If you’re wondering where is Disk Management in Windows 7, its executable file is diskmgmt.msc and you can find it in the System32 folder on your PC: C:\Windows\System32\diskmgmt.msc.

How do I get to Disk Management in Windows 7?

1. Using the search field

  1. Click the Start button.
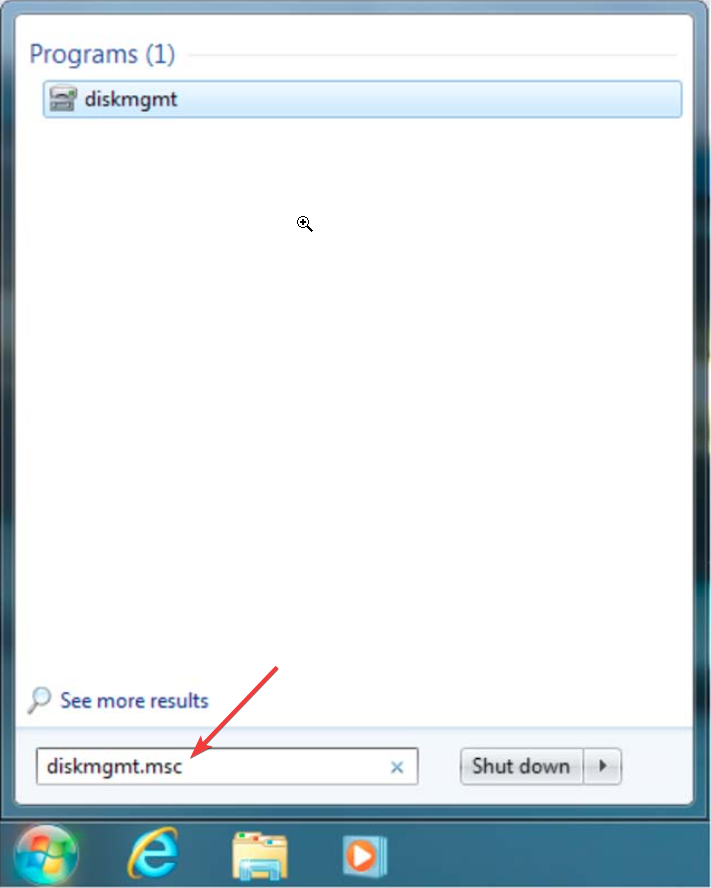
  2. Type diskmgmt.msc in the search box and click the file in the results.

This is probably the easiest and quickest way of starting Disk Management whether you’re running Windows 7, 10 or 11.

2. Using the Run console

  1. Press the Windows key + R to start the Run console.
  2. Type diskmgmt.msc and press Enter or click OK.

3. Using Control Panel

  1. Click the Start button and open Control Panel.
  2. Now, go to Administrative Tools and access Computer Management.
  3. Next, double-click on Disk Management.

4. Using Command Prompt

  1. Click the Start button and type cmd in the search box.
  2. Then, right-click on cmd in the results and select Run as administrator.
  3. Now, type the Windows 7 Disk Management command and press Enter to start the app: diskmgmt.msc

Exploring the User Interface of Windows 7 Disk Management

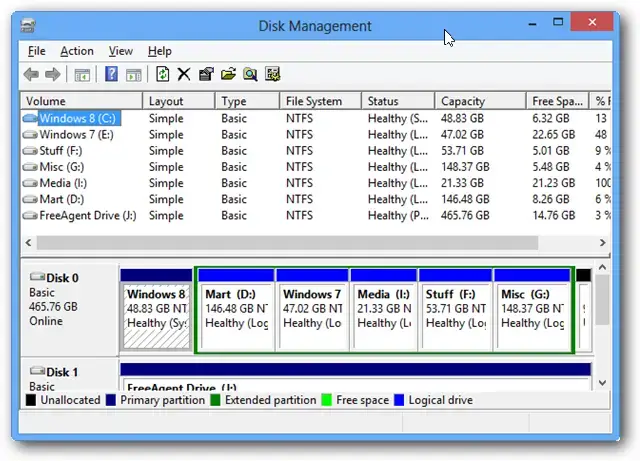
In the upper part, you have the command tabs, and right below, you will see the list of your volumes with their drive letter, type, file system, status, capacity, free space on each one in data volume, and percentage.

You will also notice that your partitions will also feature the operating systems, whether you have one or more on the same PC.

Right below, you will have the color-coded list of drives and the partitions on each one. On the bottom, the Disk Management interface shows you the color map.

The disk partitions can be modified, extended, or merged, as long as they have the same file system. You can’t merge an NTFS partition with a FAT partition unless you delete or convert one of them first.

We also have a helpful guide on how to resize a partition without losing data if that’s what you’re looking for.

How do I use Disk Management in Windows 7?

All the functions of the tool are available at a right click away. Select the drive you want to modify, right-click on it, and you will see all the available options.

For instance, to delete a volume, right-click on that volume, and select Delete from the drop-down menu.

If you have unallocated space on your disk, you may either create a simple volume or extend an adjacent partition to its left with the amount of space of the unallocated one.

Right-click on the volume to its left and select Extend Volume. The app will detect and add the unallocated volume to its right.

With Disk Management, you can only extend the partition to the left of the unallocated disk space, whereas more advanced tools will allow you more options.

What are the differences between Basic and Dynamic Disk?

Some of our readers ranked us if they should go for a Basic Disk or a Dynamic Disk. By default, when setting up a disk, the settings lead you to a basic one and if you have a simple PC for personal use, it’s the simplest way to go.

The main difference between basic and dynamic disks is that basic disks are structured in partitions, and dynamic disks can be split into volumes. Basic drives can have a maximum of four partitions (three primary and one extended).

Dynamic disks can have an infinite number of volumes. You will also benefit from advanced features like disk spanning, software RAID, fault tolerance, and more so they are used by more advanced users in complex hardware environments.

Why is Disk Management not working?

  • Problems with the Storage Service – If the Storage Service is not enabled or poorly configured, Disk Management will fail to start or crush.
  • Hardware issues – Disk Management will likely fail if one or more drives on your PC are malfunctioning or have bad sectors. This is a sign you should check the drives using the chkdsk tool in Command Prompt (change the drive letter according to your needs): chkdsk C: /f
  • Corrupted system files – As Disk Management is part of the Windows 7 system, it’s likely to be affected by corrupted system files or a corrupted Registry. 
  • Unable to start Virtual Disk Services – If the app can’t start the Virtual Disk Services it will fail to launch, prompting an error.

These are the main problems why this app is not working but luckily, our guide on how to fix Disk Management issues will help you straighten things out.

We hope that our guide provided useful information on how to access the Disk Management utility in Windows 7 and how to use it. 

If the built-in tool is not up to your standards, you may also check our list of the best disk management tools for Windows.

Feel free to use the comments section below if you have any questions about any of the information provided.

Device Encryption is Missing on Windows 11? How to Get it Back

Security remains a vital aspect, given the rise in online and offline threats. To combat the problem, Microsoft introduced Device Encryption, but a few users found that the setting was missing in Windows 11.

The Device Encryption feature encrypts your data and renders it unreadable to unauthorized users or hackers if the device is stolen or hacked. To retrieve it, you will use the provided recovery key. Remember, Device Encryption is available on the Windows 11 Home edition.

Why is Device Encryption missing from Windows 11?

  • TPM or Secure Boot is not enabled.
  • The PC doesn’t support UEFI (Unified Extensible Firmware Interface).
  • Your device is missing vital updates.
  • The user account doesn’t have administrative privileges.
  • Your PC doesn’t support Modern Standby.

What can I do if device encryption is missing on Windows 11?

Before we start with the slightly complex solutions, try these quick ones first:

  • Check for any pending Windows updates and install them.
  • If you have a third-party encryption software, disable it and use Device Encryption in Windows 11.
  • Verify whether your PC is encrypted by default, and check if it’s using BitLocker. PCs that run BitLocker use it instead of Device Encryption.
  • Update the BIOS if a newer version is available.
  • Make sure you are signed in with a Microsoft account and not a local user profile.

If none work, head to the fixes listed next.

1. Check if your device is compatible (and the reason for incompatibility)

  1. Press Windows + R to open Run, type msinfo, and hit Ctrl + Shift + Enter.msinfo
  2. Scroll down on the right side and check what it reads next to Device Encryption Support.device encryption support

The various messages here mean:

  • Meets prerequisites: Your PC supports device encryption.
  • Elevation required to view: You are not running System Information with administrative privileges. Make sure to launch the app as an administrator.
  • Any other codes: Critical settings are disabled, or the PC doesn’t meet the system requirements.

2. Enable Secure Boot

  1. Turn off the computer, then power it on, and as soon as the display lights up, repeatedly press the F1, F2, F10, or Del keys, depending on the system manufacturer, to launch the BIOS.
  2. Now, navigate to the Boot tab or the related section.
  3. Select Enabled for Secure Boot.enable secure boot to fix windows 11 device encryption missing

Your primary approach when Device Encryption is missing in Windows 11 should be to enable Secure Boot from within the OS or from the BIOS.

If you get an error code, clear any inconsistencies or reconfigure the BIOS settings. Usually, changing the other suboptions should fix the problem.

3. Enable TPM

  1. Boot the PC into Recovery Mode and launch the BIOS. Or you could do it by pressing the dedicated key after turning on the PC.
  2. Now go to the Advanced tab, locate the TPM entry, and select Enabled from the dropdown menu next to it.enable TPM

A vital requirement for Device Encryption is TPM support. Besides, it’s not just the chip that should be present. You will also need to enable TPM from the BIOS.

4. Switch to an administrator account

  1. Sign in with an administrator account on the PC.
  2. Press Windows + R to open Run, type netplwiz in the text field, and hit Enter.
  3. Select the user account that doesn’t show Device Encryption and click on Properties.  properties
  4. Go to the Group Membership tab, select Administrator, and click OK to save the changes.administrator to fix windows 11 device encryption missing
  5. Sign in with the problematic account and check whether Device Encryption is now available in Windows 11.

5. Reconfigure the local policies

  1. Press Windows + S to open the Search menu, type Local Group Policy Editor, and click the relevant search result.
  2. Expand Administrative Templates under Computer Configuration from the left pane, and then double-click on Windows Components.administrative templates
  3. Select BitLocker Drive Encryption, then choose Operating System Drives under it, and double-click on Configure TPM platform validation profile for native UEFI firmware configurations on the right.configure tpm platform validation
  4. Select Enabled, then untick the checkbox for PCR 2: Extended or pluggable executable code.enabled to fix windows 11 device encryption missing
  5. Finally, click Apply and OK to save the changes, and restart the computer.

Reconfiguring the dedicated local policies may help when the Windows 11 Device Encryption is not showing. But users running the Home edition of the OS will need to manually install the Local Group Policy Editor (gpedit.msc).

Alternatives to device encryption on Windows 11

Device Encryption and BitLocker have long been a source of errors, in addition to incompatibility issues. When faced with either of the two, you may download an effective third-party encryption solution. Here are a few:

  • VeraCrypt
  • EasyLock
  • Dell Data Protection

These are just as good and employ advanced encryption algorithms to protect your data. Besides, you get access to a wide array of security features.

After you have fixed things and Device Encryption is not missing anymore, enable it from Privacy & Security in Windows 11. Also, you can easily adjust the Device Encryption settings or get a copy of the recovery key.

Remember, even after enabling Device Encryption, you may find the Encrypt contents to secure data option greyed out, but it’s easy to fix with a quick Registry edit.

If you know of other fixes or workarounds, drop them in the comments section below.

Online Piracy Statistics & Facts for 2026

It’s no secret that online piracy is a massive issue on the web. From games to TV shows, users are resorting to piracy to save a few coins at the expense of producers.

At face value, this may seem like the only issue, but aside from getting content for free, you’re also putting your device at risk. How dire is this situation? We compiled this report to show you the current status of online piracy.

How common is online piracy? Piracy is a word that gets thrown around a lot these days, but what does it really mean? It is defined as the unauthorized copying or use of another person’s work without permission.

According to a report by Go-Globe, there are at least 357 million visits to piracy websites every day. This loosely translates to a quarter of a million per minute, and streaming sites are the most visited.

What are the global online piracy statistics?

1. Number of downloads Worldwide

The number of illegal downloads worldwide is estimated to be 42% from film alone. Downloads have certainly gone down over the last decade, but that has not reduced piracy. People are opting to stream more as data has become more available with free Wi-Fi areas.

The steady increase in visits to illegal streaming sites can also be attributed to the growth in internet users, especially during the Covid-19 pandemic.

As of April 2023, a report by Statista shows that 65% of the world’s population are internet users, so you can see how this translates to the staggering number of downloads.

2. Countries with the highest rates of piracy

When it comes to piracy rates, a number of factors come into play. These include the digital population in the said country, how stringent the laws are, and GDP.

The world’s most pirated countries are the ones that have the fastest internet connections. The rate of piracy is directly proportional to the speed at which content can be accessed online.

Countries at the bottom of the list tend to have slower internet speeds and have less access to legal alternatives for watching movies and TV shows.

CountryPiracy percentage rate
USA91%
Russia91%
Zimbabwe91%
China90%
Iraq90%
Moldovia90%
Libya90%
Belarus88%
Armenia87%

From the above list, we can deduce that both first-world and third-world countries access illegal sources, and the laws play a major role in accessibility. 

It’s no wonder the antivirus statistics show a rising trend implying that a huge chunk of the digital population has secured their devices because they are treading on dangerous grounds.

3. Global revenues lost to online piracy

The piracy business is a lucrative one. In fact, as of 2022, the industry is said to hit a new high of $52 billion. As much as legitimate sites are growing, pirated sites are working hard to bridge the gap, which could cause the profits to plummet for their legal counterparts.

In addition to these direct revenue losses, indirect effects on employment and tax revenue further impact the economies. Consumers’ unwillingness to purchase after seeing pirated versions online will create decreased public perceptions of intellectual property rights.

4. Most downloaded content types

Movies and TV shows are the most downloaded content types. Users prefer to watch these shows from their favorite illegal sites for a few reasons:

  • Subscription platforms cost a lot of money.
  • You may have to subscribe to more than one platform to access a variety of shows.
  • TV shows take a while to release seasons, so a subscription may be wasted.

According to MUSO, film piracy accounted for 42.5% of all illegal downloads in 2022.

Although TV and film collectively account for the largest portion, we cannot ignore the publishing sector. While the music and movie industry continued unabated for years, the publishing sector remained relatively safe from digital theft.

It was much harder to pirate something that required an additional piece of hardware or software. However, the growing popularity of e-books has made it a lucrative industry. Publishers are losing up to $200 million annually to e-book piracy.

On the other hand, pirated software has decreased as more people realize the risks associated with running pirated Windows and other programs that could lead to data loss.

5. Impact on the Music industry

Before the Internet took over, artists were successful at selling CDs and vinyl records. The Internet then came and changed the music industry. The demand for music has grown exponentially with the rise of digital music and streaming services. 

But it hasn’t been all good news for artists. It’s easier than ever to execute digital video piracy. While many people are willing to pay for legal streaming services like Spotify or Apple Music, others prefer free options like YouTube and SoundCloud.

And even on free sites, any attempt to earn revenue by the inclusion of ads is thwarted by users’ continued usage of adblockers and other tools.

This makes it more difficult than ever for artists to profit from their work. Users are unwilling to pay for streaming subscriptions as these releases tend to be expensive compared with digital downloads.

A report by Music Business Worldwide shows that piracy had slowed down but is picking up the tempo again.

6. Impact on the Film industry

The effects of piracy on the film industry are devastating. Not only does it affect profits, but it also affects future productions as well as jobs for many people involved in making films.

A research by Statista indicates that the film industry is on a downward spiral, with losses registered every passing year.

In addition to the direct costs of piracy, there are also indirect costs associated with increased security measures. Companies will suffer from lost opportunities for consumer sales of legitimate goods and services related to a particular film or TV show.

The worst thing about the film industry is that while their music counterparts can earn extra income from live shows and performances, once a user has viewed a movie, the chances of them watching it again are really slim.

And since actors rarely do live performances of the same film, they are the most affected by this piracy business.

What are some of the streaming platforms used for piracy content?

Platform nameWebsite
Seriesonlinehttps://seriesonline.gg/
DopeBoxhttps://dopebox.to/
HDTodayhttps://hdtoday.tv/
Onionplayhttps://onionplay.se/
Goojarahttps://www.goojara.to/

The illegal streaming services provide access to thousands of titles for free or at a low cost, making them an attractive alternative to paying for subscriptions to Netflix, Hulu, or Amazon Prime Video.

Usually, they’re similar to the real thing but with a few alterations. For instance, an illegal site mimicking Netflix will have the same name, and the icon will deviate from the original by a color hue.

Other noteworthy characteristics to look out for include:

  • They can be difficult to find as they often use multiple URLs to hide their true location, and may change them frequently.
  • The address will also be different and end in something like .cc or .to.
  • No geo-restrictions, and usually contain a warning that you’re entering an unsecured site.
  • They offer movies and TV shows in poor quality.

What has the online piracy evolution been like over the last decade?

Online piracy has been around for a long time, but it’s only in the last decade that it has become an increasingly popular way to consume media.

From Napster to Limewire, Torrents to Popcorn Time, and even Netflix and Hulu, the way we consume media has changed significantly. Consumers want easy access to entertainment at a reasonable price, and pirate sites usually deliver this better than legal services.

The biggest change over the last ten years is that people are using more devices to consume content. Just look at how many computers are in the world, and you’ll get an idea of how many people use laptops and smartphones to access pirated content.

This, in addition to their TVs and gaming consoles, explains why piracy is not going anywhere anytime soon. Torrent sites like The Pirate Bay still host millions of illegal downloads every day, but these downloads are becoming less popular as streaming becomes easier.

Even as ISPs around the world try to block these torrents, there will be fewer people using them in the future, but it’s nothing a good VPN can’t solve.

What does the future hold for online piracy?

The online piracy statistics will continue to grow. As the internet becomes more important in our daily lives, so does online piracy.

The future of online piracy is likely to be influenced by a number of factors, including the growth of mobile devices, the development of new technology, and the continuing evolution of copyright law.

As technology advances, so too will tools that allow users to circumvent copyright protection measures and take advantage of free music and movie downloads from illegal websites.

While some illegal sites may shut down or be forced to relocate their operations because of legal actions taken against them by rights holders or regulatory agencies, this may not stop all piracy activity.

The only way to combat the issue is by educating people about the dangers of online piracy. We need to change people’s mindsets about pirating content. It is not a victimless crime because at least 59% of the population knows they’re accessing illegal content.

What are the malware and virus risks from visiting pirate sites?

  • Your system risks virus and malware attacks from downloading content from these sites if the cyber attack numbers are anything to go by.
  • You could inadvertently be installing a malicious program onto your machine.
  • Your identity may be stolen if you visit a pirate site that asks for personal details.
  • Loss of access to legal content if banned or caught pirating.
  • Piracy is illegal, and if caught, you could face criminal charges for sharing copyrighted content.

To protect yourself against malware/virus attacks, below are some security measures to observe:

What are the copyright infringement penalties in different jurisdictions?

The penalties for copyright infringement vary from country to country.

CountryPenalty
USAImprisonment of up to five years and fines of up to $250,000
Courts may order the defendant to pay the plaintiff’s attorney fees and costs associated with bringing an action against them
RussiaFrom RUB10,000 up to RUB5 million
ChinaFull compensation based on: Monetary losses suffered, profits accrued during the infringement period and statutory compensation
ZimbabweMarket value of the infringed work

While most of these countries have copyright infringement policies in place, and the consequences of piracy seem severe, the reality is that few cases ever lead to actual prosecution.

This is because most people who infringe on copyrights may claim to do so unintentionally. In most cases, the owner has already made significant financial losses and does not have sufficient resources to pursue litigation. The cases can also drag on for years which is just not worth pursuing in the long run.

We hope that by sharing these piracy statistics and facts, we are able to reinforce the message that piracy is a growing and evolving problem. And while it’s a complex matter, we can also appreciate the efforts made to combat it.

Change starts with you, and as a user, the first step is to adjust consumer behaviors. First, stop using unlicensed software and sites and accessing illegal content.

Do you access illegal content, and if so, why are legal sites not an option? Is there anything that can be done to make you switch over to legal sources and software? We’d love to hear your thoughts, so drop us a comment down below.

Satya Nadella to announce Oracle and Microsoft’s partnership update

Microsoft has just posted an announcement on news of their ongoing partnership with Oracle. Details will be unveiled on Thursday, September 14, 2023, at 1 p.m. PT.

Satya Nadella, Chairman and CEO of Microsoft, and Larry Ellison, Chairman of the Board and Chief Technology Officer of Oracle, will make the announcement.

We will be posting all the details as soon as they are out.

Previous partnerships by these tech giants were speculated in May this year, where they are considering a collaboration to tackle the growing demand for high-capacity servers in the field of artificial intelligence.

Forza Motorsport will have three performance mode options on Xbox Series X

The launch of the hotly anticipated Forza Motorsport reboot is less than a month away, and more information is coming out about the game. Earlier this week we got our first look at hand-on previews from various outlets, all of them raving in unison about their experience with the game.

And now we know more about how the next-gen racer will perform on console. To start, Forza Motorsport will include three performance modes on the Xbox Series X version—a first for the series. We break these down in more detail below.

  • Performance: Prioritize 60FPS on-track performance at 4K
  • Performance RT: Enable ray tracing at 60FPS with variable resolution
  • Visuals: on-track full 4K with ray tracing, 30FPS

As for the Series S version, Forza Motorsport will feature two performance modes, and neither will include on-track ray tracing. Rather, that feature will be limited to off-track visuals as in the Car Theater bits of the game. No doubt many will find this disappointing.

The Series S Performance Mode will feature 1080p resolution at 60FPS, while the Quality Mode allows 1440p at 30FPS.

Forza Motorsport will release on October 10 for Windows and Xbox Series X|S as a day one Xbox Game Pass release.

Forza Motorsport
Forza Motorsport
Developer:
Xbox Game Studios
Price:
Free

Via Wccftech. 

OneNote for Windows 10 to lose translation feature

Microsoft plans to deprecate support for the Translation feature in OneNote for Windows 10 in November 2023. This comes after
Microsoft announced 7 updates to the OneNote Android app last month.

5A01B113 Ff81 4D35 A84E 6Abd7A93D256

OneNote for Windows 10 was introduced as a successor to the traditional x86 client but faced challenges among enterprise users who relied on the full-featured version.

Users will no longer be able to translate pages or selections of text within the application after this date. However, there are alternative options available for those who wish to continue translating content in their notebooks.

If users want to download OneNote for free, they can get it from the Microsoft Apps Store. The free version provides the same translation experience as OneNote for Windows 10. It allows the user to use their existing notebooks. However, if the user wishes to use OneNote, they must purchase or subscribe to a Microsoft 365 plan that includes it. The user’s existing notebooks and translation feature won’t be affected.

If you encounter difficulties transferring your notebooks from OneNote for Windows 10 to OneNote for Windows or Microsoft 365 OneNote, it may be because your notebooks are stored in OneDrive or a different location on your device.

via WinBuzzer

Design like a pro with Microsoft Designer, powered by DALL-E 2.5, and describe the stunning design you want to create

Are you aiming to enhance your design skills and craft eye-catching visuals for a variety of purposes, including logos and social media posts? Look no further than Microsoft Designer—an AI-powered tool within the Microsoft 365 suite that harnesses the capabilities of DALL-E 2.5. In this comprehensive guide, we will delve into the essence of Microsoft Designer, explore how to obtain it, and uncover strategies to maximize its features.

What is Microsoft Designer?

microsoft designer dall-e
image created with Microsoft Designer

Microsoft Designer is a versatile graphic design tool offered as part of Microsoft 365. Unlike working on design projects in Word or Publisher, Designer is a dedicated application tailored for graphic design tasks. What truly sets Designer apart from other design tools is its integration with DALL-E 2, an innovative artificial intelligence by OpenAI, which allows users to generate images and artwork by simply describing their vision in text.

It serves as a dedicated application for creating a wide range of graphics, from logos and invitations to blog banners and social media posts.

Harnessing the power of DALL-E 2.5

Microsoft Designer is powered by DALL-E 2.5, an AI system that allows you to create stunning images and artwork simply by providing a text description of your desired design. This revolutionary feature opens up a world of possibilities, enabling you to find unique graphics for your projects. Thanks to advanced programming, the graphics generated are incredibly realistic.

Customize your visuals

Apart from AI-generated images, Microsoft Designer offers a wide range of tools for customization. You can incorporate your own images and leverage built-in design tools such as templates, shapes, photos, icons, text styles, and color themes. With these features, you have the freedom to explore different design possibilities and create visuals that perfectly align with your project’s vision.

How to get started with Microsoft Designer

microsoft designer dall-e

Microsoft Designer is currently accessible as a complimentary application in preview for individuals and families subscribed to Microsoft 365, and it offers the choice of additional premium features. Furthermore, Microsoft has seamlessly integrated Designer with the Edge web browser, aiming to offer Edge users valuable assistance when crafting social media posts and various other items while browsing websites.

Upon logging into Microsoft Designer with your Microsoft account, you may encounter the Designer Copilot, a helpful tool that assists you in creating your first visual. Enter the text you want to use to create your first creation.

Adding AI-generated images (or your own)

microsoft designer dall-eIn the Add image section, you’ll find the option to add an image from your phone, from the device you are currently using, or from “My media” which is where your other Designer creations are located when you opt to save them.

microsoft designer dall-e

Otherwise, you can opt instead to Generate image. Here, DALL-E 2’s capabilities shine. Once you click Generate image, simply enter a description of your desired image, and the AI will generate it. The possibilities are virtually endless, from a house floating on a cloud to a lizard sporting a top hat or even a squirrel waterskiing in a lake. If you don’t know what you want to create, use an example provided by DALL-E 2 located below the text box. Once you’ve found an image you like, click Download or Customize design to incorporate it into your project.

Tips for AI image generation

Generating high-quality images with AI is a skill worth honing. Be sure to familiarize yourself with best practices for using DALL-E 2 effectively. After entering your image description, you’ll see design ideas on the right. Adding a headline to your project will generate updated designs that include your text. Select the design that suits your vision and click Download to download the image as-is or click Customize Design to fine-tune it further.

Uploading your own images

microsoft designer dall-e

If you prefer to use your own images, select from this device to upload a picture from your computer. Provide a headline and, optionally, a subheading for your project. Automatically generated designs will appear on the right. To refine your design, use the Color and Size drop-down menus at the top and then click Customize design.

Adding files from your smartphone

microsoft designer dall-e

For added convenience, you can send files from your smartphone to Microsoft Designer. Select from your phone and use your phone’s camera to scan the QR code displayed. Follow the link to Microsoft Designer on your phone and choose the files you wish to upload. Within minutes, you’ll see the selected files in Designer on the web. Click Upload, provide a headline, and choose your preferred design from the generated options.

Other project starting points

dall-e

In addition to the above options, you can select a “blank design” or “recent designs” at the bottom of Microsoft Designer. Alternatively, you can choose Add image and then My media to use previously uploaded images.

Customizing your design

Once your project is open in the Designer workspace, the creative possibilities are endless. Your design takes center stage, with a range of tools on the left to assist you in the customization process. Here are some customization options that you can use when using Microsoft Designer.

1. Templates

microsoft designer dall-e

Microsoft Designer offers a selection of templates to give your design a distinct style. Browse or search through these templates to find the perfect fit for your project.

2. My media

microsoft designer dall-e

Select a previously uploaded image from My media or import a new one from your device, smartphone, Google Drive, Dropbox, or Google Photos.

3. Visuals

microsoft designer dall-e

Choose from recommended visuals or select a shape, illustration, photo, or icon to enhance your design.

4. Text

microsoft designer dall-e

Add a heading, subheading, or body text to convey your message effectively. You can also choose from various text styles to achieve the desired look.

5. Brand kit

microsoft designer dall-e

Having a brand kit in Microsoft Designer simplifies the design process by providing quick access to these core brand elements. Users can easily apply their brand’s colors and fonts to design materials, ensuring that all their visual content aligns with the brand’s identity and messaging.

Navigating Microsoft Designer

microsoft designer dall-e

To ensure a seamless experience, familiarize yourself with the navigation options on the left side of the screen in Microsoft Designer to help you get the most out of the DALLE-2 AI system.

Get started with templates

microsoft designer dall-e

If you want to take a look at templates, all you need to do is click the first menu item at the top, Templates, to scroll through or search for a specific template you want to use.

Accessing your designs 

microsoft designer dall-e

Select My media on the left to view all your designs, allowing you to switch between different projects effortlessly.

Starting a new project

microsoft designer dall-e
Starting from scratch with a blank design on Microsoft Designer

To create a new design, simply navigate to https://designer.microsoft.com/ to embark on a new project. If you are already using the app, simply click the + New design button at the top of the page to start a new project.

Managing your project

You can edit your project headline, utilize zoom options, and employ the Undo and Redo buttons at the top to fine-tune your design. If you want to start a new design, simply, click + New design. While creating your project, other options may appear depending on the media content you use, but some options that are available include Background, Opacity, Position, and Resize menu options.

Saving and sharing your project

microsoft designer dall-e

Once you’ve perfected your design, it’s time to save and share your creation. Select Download to save your design, and from there, you can choose the file type (PNG, JPEG, or PDF) and then post it on social media, download it, copy it, or send it to your phone.

Use AI for captions & hashtags

microsoft designer dall-e

As an added bonus, you can also use AI for captions and hashtags when posting to LinkedIn, Instagram, or Meta (Facebook). All you need to do is choose the main goal of the post and create a quick description about it and AI will take care of the rest.

Get ideas, provide feedback, and stay updated

On the far right, next to the Download button, you’ll find buttons to send feedback to Microsoft, stay informed about the latest features and improvements, and manage your account.

Microsoft Designer empowers you to create captivating designs with ease. With its integration of AI-generated images (courtesy of DALL-E 2.5), and an array of design tools, it’s a valuable asset for anyone looking to unleash their creativity. Are you ready to take your design projects to the next level with Microsoft Designer? Give it a try and unlock your full creative potential today.

Starfield’s issues on Xbox Cloud Gaming persist

While Microsoft’s Xbox Cloud Gaming has been hailed as one of the finest cloud gaming services out there, it has been plagued by technical issues recently. These have been exacerbated by the release of Starfield simply due to the enormous demand for the game, which recently released as one of the most anticipated titles in recent memory.

As was reported earlier this week, multiple issues had been reported by many gamers looking to play Starfield over Xbox Cloud Gaming—from long wait times of up to an hour to sessions not even starting. These issues seem to be perpetuating as of the time of this writing, leaving many a gamer understandably frustrated by their experience with the cloud gaming service.

These problems come at a time when Microsoft is touting cloud gaming as the future. Xbox seems poised to be a leader in this emerging market, especially if and when its acquisition of Activision Blizzard King finally completes. According to a new report a third of gamers have already tried cloud gaming in one form or another, so there seems to be more than just hype going on here.

While it would be easy to place the blame on a mega-blockbuster like Starfield overwhelming the infrastructure in place, these issues with Xbox Cloud Gaming aren’t new. Similar though less severe hiccups occurred when GTA V came to Game Pass (and Xbox Cloud Gaming) earlier this year. Fortnite players on XCG have also experienced protracted wait times.

If Microsoft wants to sell gamers on its cloud service, then that service is going to need high-profile AAA games like GTA V and Starfield. And if  Xbox Cloud Gaming is really going to compete, it will need the infrastructure to handle the demand created by these games.

Via The Gaming Watcher. 

Microsoft reveals data privacy in Bing Chat Enterprise and announces new admin controls

Microsoft today announced new administrative controls for Bing Chat Enterprise. This generative AI service offers commercial data protection for employees. The new controls allow admins to roll out Bing Chat Enterprise to a subset of users before deploying across the organization.

New Administrative Controls

These controls provide Microsoft 365 admins with the ability to manage the deployment of Bing Chat Enterprise for individual users. Now, admins can roll out Bing Chat Enterprise to a specific group of users before deploying it across the entire organization.

User Experience

If you sign in with your work or school Microsoft Enterprise ID, you can access Bing Chat Enterprise from entry points like bing.com and the Microsoft Edge sidebar. If Bing Chat Enterprise is disabled, you will be redirected to the consumer Bing Chat experience.

Data Processing and Privacy in Bing Chat Enterprise

Microsoft has unveiled that Bing Chat Enterprise cannot access any organizational resources or content within Microsoft 365, including documents, emails, meetings, or Microsoft Teams messages. Microsoft controls Bing Chat Enterprise as the data controller.

When you use the Bing Chat Enterprise service outside your Microsoft 365 tenant, your user prompts may be processed in global data centers. However, this data is encrypted while in transit. Microsoft doesn’t store it beyond a short caching period for runtime purposes.

The Bing Chat Service Plan for A3 and A5 is currently unavailable at the time of the announcement, with plans to add it later.

Microsoft Edge: The uninvited guest continues to intrude on European users

Microsoft’s recent announcement that European-based users must now have their web-links open using their default browsers instead of Microsoft Edge is being met with skepticism.

The policy was set to debut in the Insider build of Windows 11 from version 23531 and carry forward into all versions deployed within the European Economic Area. However, there is no tangible evidence as of now denoting such changes.

The decision, purportedly aligned with Europe’s Digital Services and Digital Markets Act (DMA), is an attempt to avoid the “gatekeeping” tag, a term that criticizes the tech giant’s apparent preference for its in-house browser.

Speaking to The Register about this issue, developer Daniel Aleksandersen, who works for Vivaldi Technologies, states:

In our testing, even the new Windows Insider build continues to default to Edge, irrelevant of the user’s physical location.

I’ve checked, double-, and triple-checked my findings. Nothing has changed. Web links still force-open in Microsoft Edge instead of your default web browser.

Aleksandersen also developed EdgeDeflector, a tool to dodge Edge’s URL scheme behavior.

The Register proposed that the change might not affect Edge directly but could instead impact calling applications such as Outlook, switching from Microsoft Edge-oriented commands to more open-ended instructions. Such a solution might resolve Europe’s gatekeeping concerns.

The doubtful Aleksandersen responded:

I have not observed any reduction in Microsoft Edge links. Nor do we see alternative non-Microsoft-edge iterations.”

He indicates the absence of any significant changes reflective of Microsoft’s claimed amendments.

Aleksandersen maintains that beyond Microsoft’s announcement, no visible changes or functional differences have been noted in its system. Nonetheless, he concedes that the Edge scheme would be adequate if Microsoft had exercised restraint in its use, limiting it to sporadic promotions and account management links.

The story comes as a surprise to users and competitors alike, who now eagerly await the enforcement of Europe’s DMA and Microsoft’s response.

Via The Register.

Enhanced Windows 365 App Experience: Wear Windows 11 in your pocket

A fully-fledged Windows 365 experience is coming to your Android phone, and you will be capable of having a Windows 11 on-the-go, in your pocket, according to Microsoft’s latest announcement.

We are excited to introduce the Enhanced Windows 365 App Experience, a built-in experience for Android devices that empowers you to harness the capabilities of a full-fledged Windows experience powered by the Microsoft Cloud right from your Android smartphone.

Titled the enhanced Windows 365 App experience, the mobile Windows 11 will allow you to work remotely from anywhere, as long as you have your phone with you and an Internet connection.

Plus, Microsoft is bringing a lot of new capabilities to the Windows 365 app for Android. These capabilities will offer you more tools to be able to work on projects from your mobile device.

  • Your phone will become a productivity hub – according to Microsoft, connecting your phone to an external display, along with a keyboard and a mouse, will allow it to become a device hub for work. This could come in handy when dealing with certain situations.
  • You will be able to have instant access to Windows 365 Cloud PC – by simply signing into your enterprise account, and connecting your PC to an external display, you’ll be able to use it to access Windows 11 Cloud.
  • Seamless multitasking will allow you to keep using your phone’s apps while working on Windows 365 Cloud. You can make calls, and answer them, and you can even check your Instagram, without disrupting the Windows 365 experience.

For now, the enhanced Windows 365 App experience is available to all Lenovo ThinkPhone users, as the feature is a collaboration with Lenovo. It’s not yet clear if the experience will come to other Android phones.

What do you think about this new experience coming to Android? Do you see yourself using Windows 11 on a mobile device, for work?

Clipchamp is coming to Windows 10 to replace Video Editor

If you’re been using Video Editor on your Windows 10 to edit your video content, it’s time to say goodbye to it, as Microsoft is replacing it with Clipchamp, too. If you remember, Clipchamp was recently released for free on Windows 11, as well, and it seems the Redmond-based tech giant is not shying away from bringing it to Windows 10.

Clipchamp will be free on Windows 10, and much like its Windows 11 version, you’ll be able to use it for all kinds of video-editing purposes. Microsoft has warned Windows 10 that Video Editor will be replaced, however, it seems that the time has finally come, as spotted by Windows Latest.

The Clipchamp will also be part of Windows 10’s Photos App, replacing the Video Editor within that app. However, you can get it back, temporarily, by downloading the Photos Legacy app in Microsoft Store.

But you should know that most probably, the Legacy version won’t be available for long. However, if you’re not yet up to the change, you can try to get it.

How to replace Clipchamp with the Video Editor app back in Windows 10

For unspecified reasons, when you type in Microsoft Photos Legacy app in the Microsoft Store, the store doesn’t automatically show it.

But there is another way to get it.

  1. Open your Photos app, by clicking typing in Photos app in the Search bar.
  2. Click on the Photos app to open it. clipchamp windows 10
  3. Once the app is open, click on Settings.
  4. In the Settings panel, scroll down, until you find the Photos Legacy.
  5. Click on the Get Photos Legacy button.clipchamp windows 10
  6. This will take you to the Microsoft Store. Once there, click on the Get button.clipchamp windows 10
  7. Now you’ll just have to wait for it to download & install.

When it’s installed, you can open it up, and the Video Editor will be there, as well. As we mentioned earlier, this app will most likely be discontinued over the following months. You should consider using Clipchamp, at least, to get used to it.

But for now, you can still use Video Editor. So make sure to enjoy it while it’s still there.

Cellular Option is Missing on Windows 11? How to Enable it Again

A few users reported that the cellular option is missing in Windows 11. No matter whether they restart the PC or unplug and reinsert the SIM, the cellular option is not showing in Windows 11. And remember, some Windows 10 users, too, faced the same problem.

First, make sure your device supports cellular network capability. Just having a SIM card slot doesn’t confirm compatibility. Also, contact the network operator and check for any issues from their end. You may have to replace the physical SIM card if it’s not being detected in Windows 11.

Verify that you have enabled Cellular in Windows 11 from the Network & Internet settings. Turn on Airplane mode for at least 30 seconds and then disable it if the Internet connection is limited.

We also have a guide on how to enable eSIM on Windows 11. If none of the solutions work, head to the fixes listed next.

How do I enable the missing cellular option again on Windows 11?

1. Reinstall the cellular adapter drivers

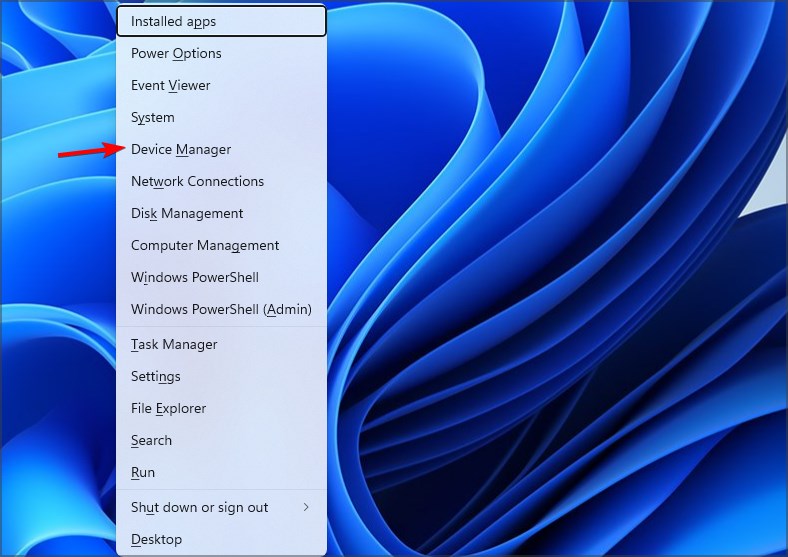
  1. Press Windows + X to open the Power User menu, and select Device Manager from the list.device manager
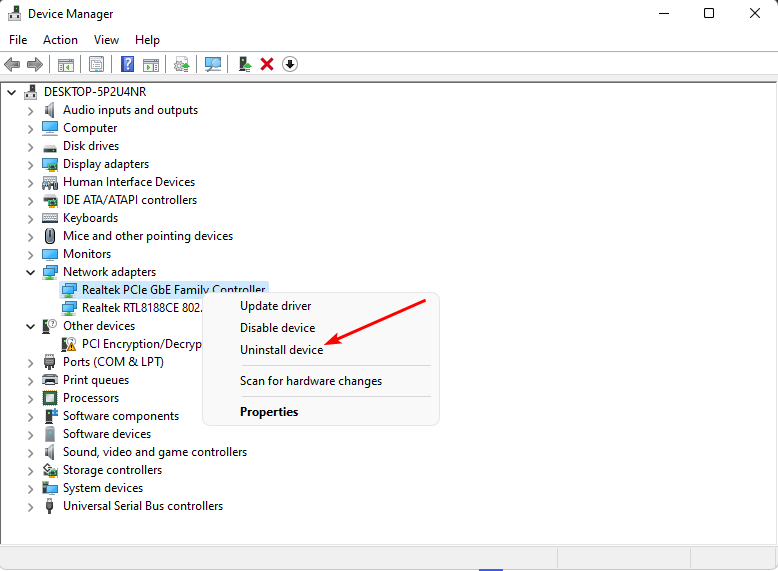
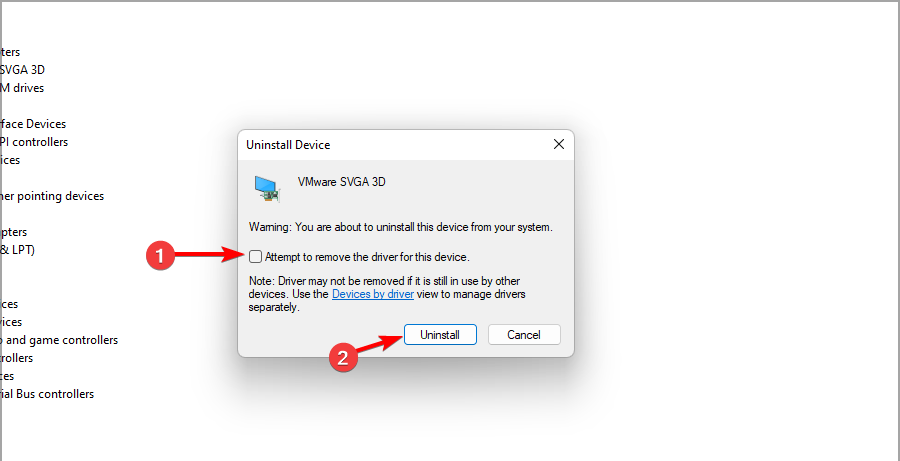
  2. Expand the Network adapters entry, right-click on the Mobile Broadband Device or one with a similar name, and select Uninstall device.uninstall device to fix cellular option missing windows 11
  3. Tick the checkbox for Attempt to remove the drivers for this device, and click Uninstall.
  4. Once done, restart the computer, and Windows will automatically install a fresh copy of the driver.

2. Roll back the drivers

  1. Press Windows + S  to open Search, type Device Manager, and click on the relevant search result.
  2. Double-click on Network adapters, right-click the broadband device, and select Properties.properties
  3. Go to the Driver tab, and click the Roll Back Driver button.roll back driver to fix cellular option missing in windows 11
  4. Select a reason for reverting to the previous driver version, and click Yes to confirm. 

Users often found a bug in the installed driver version to be responsible for the missing cellular option in Windows 11. And in this case, rolling back the driver did the trick.

If the Roll Back Driver option is greyed out, either the driver was not updated, or Windows didn’t store the necessary files. Here, simply head to the manufacturer’s website, locate the previous stable version, and manually install the driver.

3. Update the drivers

  1. Press Windows + R to open Run, type devmgmt.msc in the text field, and hit Enter.devmgmt.msc
  2. Expand Network adapters, right-click on the Mobile Broadband device or the relevant cellular adapter, and select Update drivers.update drivers to fix cellular option missing in windows 11
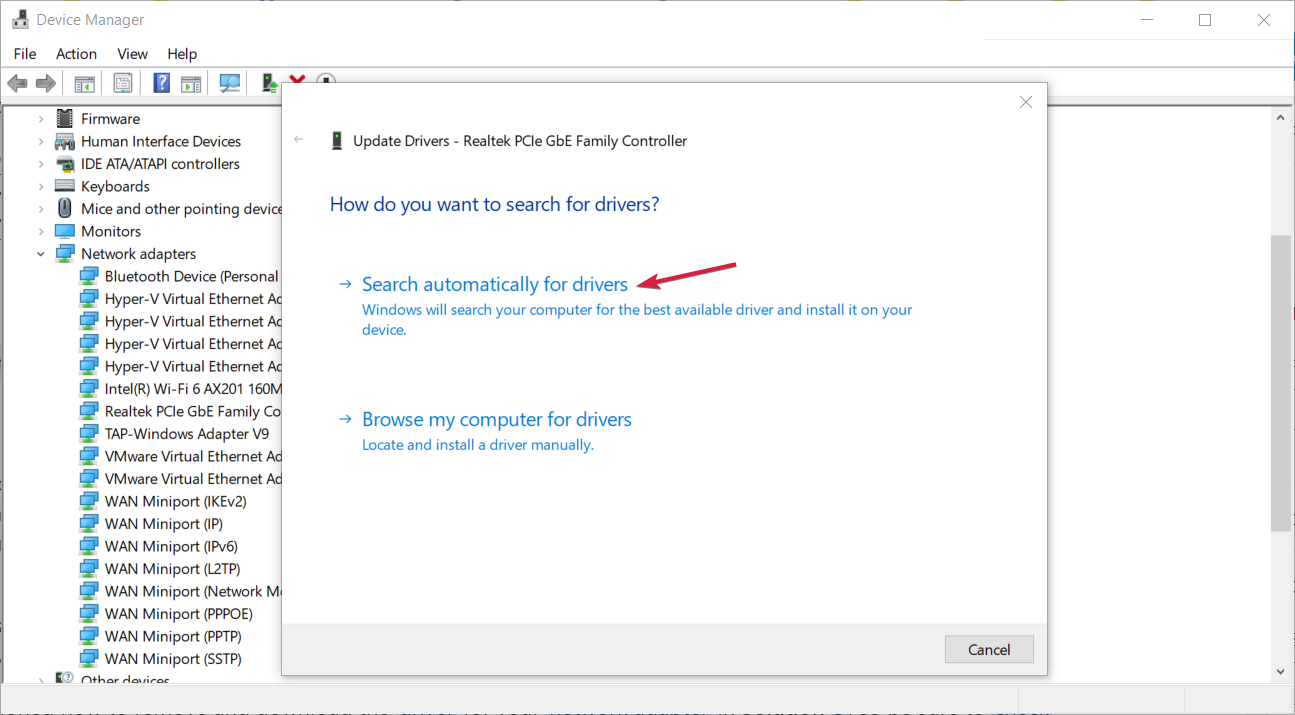
  3. Click on Search automatically for drivers and wait for Windows to scan the PC for the latest version and install it.search automatically
  4. Finally, restart the computer.

A problematic network device can be fixed by updating the drivers.

If Windows can’t find the latest version, head to the driver download page on the manufacturer’s website, choose your PC, select Modem/communication (or a similar entry) as the driver category, and download the update.

Manually downloading drivers

Look for any drivers with words like LTE, WWAN, or Mobile Broadband and install them.

For Lenovo devices:

  • Sierra Wireless EM7345 4G LTE

For HP devices:

  • HP LT4120 Qualcomm® Snapdragon X5 LTE Mobile Broadband Module
  • HP HS3110 HSPA+ Intel® Mobile Broadband Module

If manually looking for driver updates sounds like a hassle, you can try a driver updater that will find the latest updates within seconds.

4. Reconfigure the adapter settings

  1. Press Windows + R to open Run, type ncpa.cpl in the text field, and click OK.
  2. Right-click on the cellular network adapter, and select Properties.properties
  3. Click the Configure button.
  4. Go to the Advanced tab, choose Selective Suspend under Properties, and then select Enabled from the Value dropdown menu.selective suspend
  5. Finally, click OK to save the changes, then restart the computer and check for improvements.

5. Perform a system restore

  1. Press Windows + S to open the Search menu, type Create a restore point, and click the relevant search result.
  2. Click the System Restore button.system restore
  3. Select Choose a different restore point if the option is available, or go with the default settings, and then click Next.
  4. Pick the oldest restore point from the list, and click Next.restore point
  5. Verify the details, and click Finish to start the restore process.
  6. Once done, check whether you can use the cellular plan for Internet access on Windows 11.

6. Roll back Windows 

If the problem problem appeared after you upgraded to Windows 11, it’s likely an incompatibility between the device and the latest iteration to blame. 

And in this case, rolling back to Windows 10 could work as a solution. But do not forget to backup the stored files in order to avoid data loss.

How do I download & install a cellular driver on Windows 11?

For Windows 11 cellular driver download, the easiest option is to use the Device Manager. Or you could download the latest driver version from Optional Updates.

Optional driver updates in Windows 11

Besides, some prefer manually installing the driver from the manufacturer’s website, but it’s often risky. Getting the wrong drivers can lead to device malfunction. That’s why we recommend downloading an effective driver updater utility. 

When the cellular option is missing in Windows 11, it could be both the hardware and software to blame. Check the network connection details, look for any problems, and rectify them for quick troubleshooting.

Besides, once you have things up and running, find out how to set up a hotspot on Windows 11 and connect other devices to it. This will help when there are issues with the ISP.

If you know any other solutions that work, drop a comment below.

Will Windows 11 Automatically Install?

Yes, Windows 11 will automatically download and install updates. Automatic updates install new features, bug fixes, driver updates, and Windows Defender definition updates 4. The easiest way to install updates is via Windows Update. If you’re not sure how to do this, you can find full instructions in “How to handle Windows 10 and 11 updates” 1. It’s important to note that Windows 11 version 22H2 is being released as a phased rollout and may not be available to you in Windows Update yet 1. If you’re still using Windows 10, you can find information about the updates in “Windows 10: A guide to the updates” 1.

How Long Do Windows 11 Updates Take?

Devices running Windows 10 and 11 can take up to eight hours to fully download and apply software updates, according to a report from Computerworld 5. The problem with long updates is most prevalent on devices running Windows 10, which require substantially larger updates than Windows 11. Microsoft reduced the size of updates for Windows 11 by 40% through compression technology, thereby cutting time and bandwidth requirements for updates 5.

How to Stop Windows 11 Updates

If you want to stop Windows 11 updates, you can do so by pausing updates or disabling the Windows Update service. However, it’s important to note that stopping updates can leave your device vulnerable to security threats and may cause compatibility issues with new software 2.

Sources

Why does Windows 11 update so often?

Windows 11 updates frequently to provide new features, bug fixes, driver updates, and Windows Defender definition updates. These updates are necessary for the security and performance of the operating system. Most of the updates are security intelligence updates which add virus detection and removal skills to Defender 1. Windows 11 follows a similar updating schedule to Windows 10, with an annual feature update that Microsoft promises to support for 24 months 2.

The Size of Windows 11 Updates

One of the reasons why Windows 11 updates frequently is that the updates are large and can take a long time to download and install. According to a report from Computerworld, devices running Windows 10 and 11 can take up to eight hours to fully download and apply software updates1.

The problem with long updates is most prevalent on devices running Windows 10, which require substantially larger updates than Windows 11. Microsoft reduced the size of updates for Windows 11 by 40% through compression technology, thereby cutting time and bandwidth requirements for updates1.

Why Some Devices are Not Up to Date

Microsoft has invested in a significant effort to understand why some Windows devices are still not always fully up to date. About half of Windows 10 devices that are no longer running a serviced build don’t spend enough time online for the updates to be downloaded and installed.

That number drops to 25% of Windows 10 devices that are on a serviced build but have security updates more than 60 days out of date, according to Microsoft1.

Sources

How to Stop Windows 11 From Using So Much Data

Like an overzealous vacuum cleaner, your Windows 11 system seems to be gulping a lot of data for no good reason. You realize you can’t put up with it silently. Granted, the OS came with new features, so it can not consume the same amount of data as its predecessors.

Still, you shouldn’t be a slave to data purchases as frequently. To help you out, we’ve come up with a few ways to stretch over your data to serve you a little bit longer.

Why is Windows 11 system using so much data? It’s no secret that the OS is a data hog. From automatic app updates to background programs, you’ll be lucky to have any data left if you’re on a limited plan. 

Another reason is the various Windows 11 customizations you’ve made. Sure, the themes and wallpapers make an aesthetically pleasing UI, but they come at a cost. 

How do I stop Windows 11 from consuming so much data? 

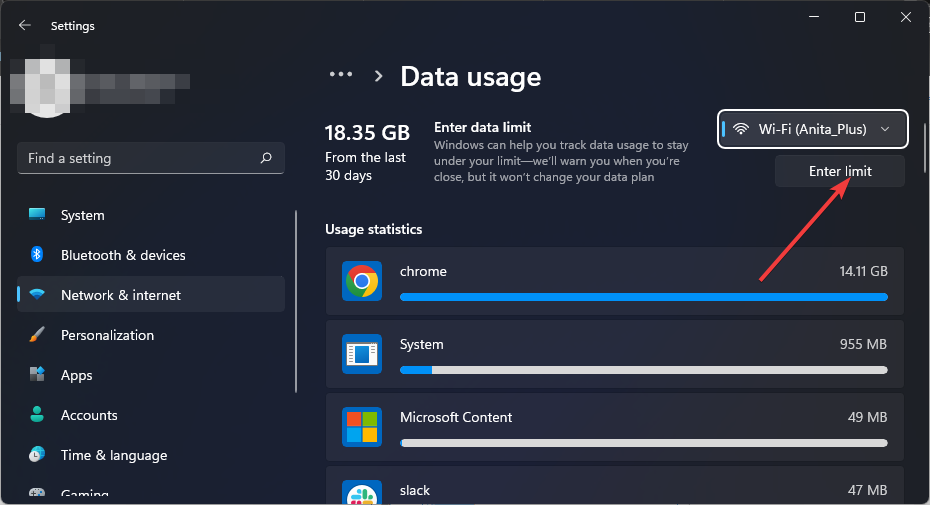
1. Enforce data limits

  1. Hit the Windows key and select Settings.settings windows 11
  2. Click on Network & internet on the left pane.
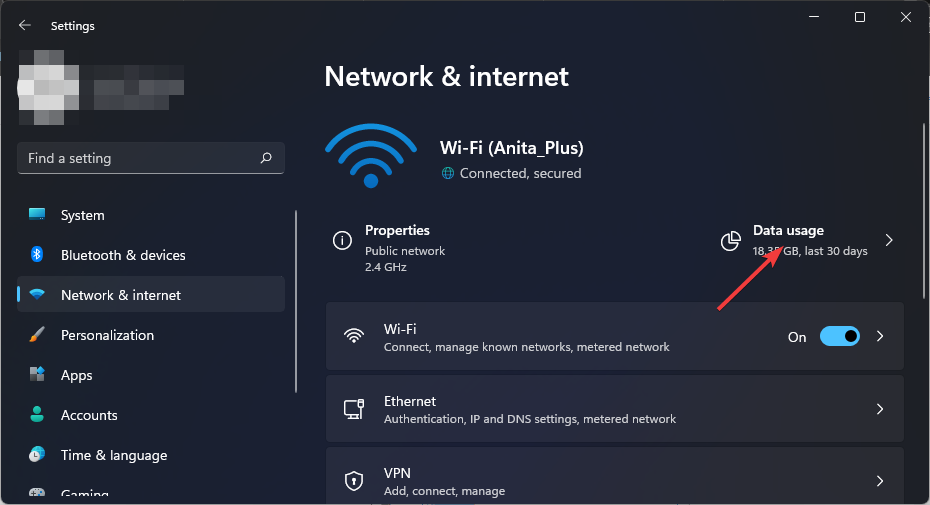
  3. On your current Wi-Fi connection, click on Data usage.
  4. Select Enter limit.
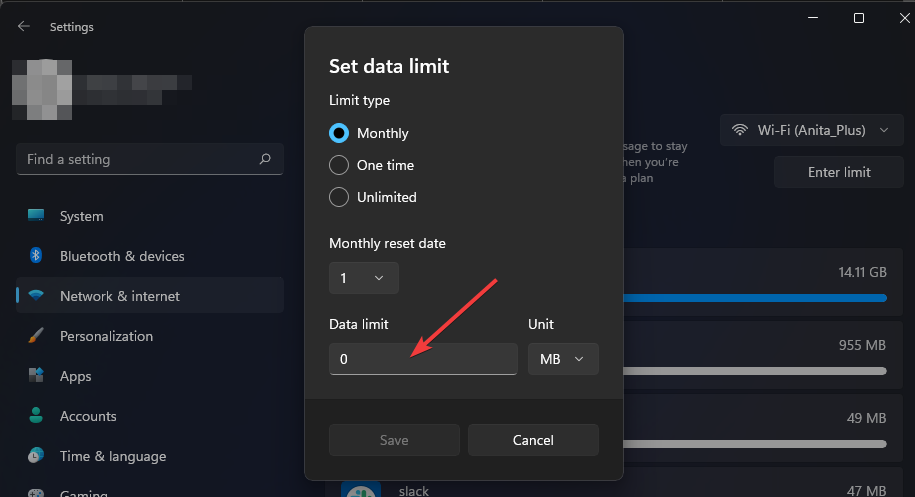
  5. Set the limit type, from the choices ranging from Monthly to unlimited.
  6. Choose the date for the data to be reset every month from the drop-down menu under Monthly reset date.
  7. Now input the data limit and choose whether to limit in MB or GB and finally, click on Save.

Be careful not to set this limit too low, as this may interfere with how certain apps work. For instance, users who set data usage limits on their Teams app disabled incoming videos.

For more ways to limit your bandwidth in Windows 11, check out our comprehensive article.

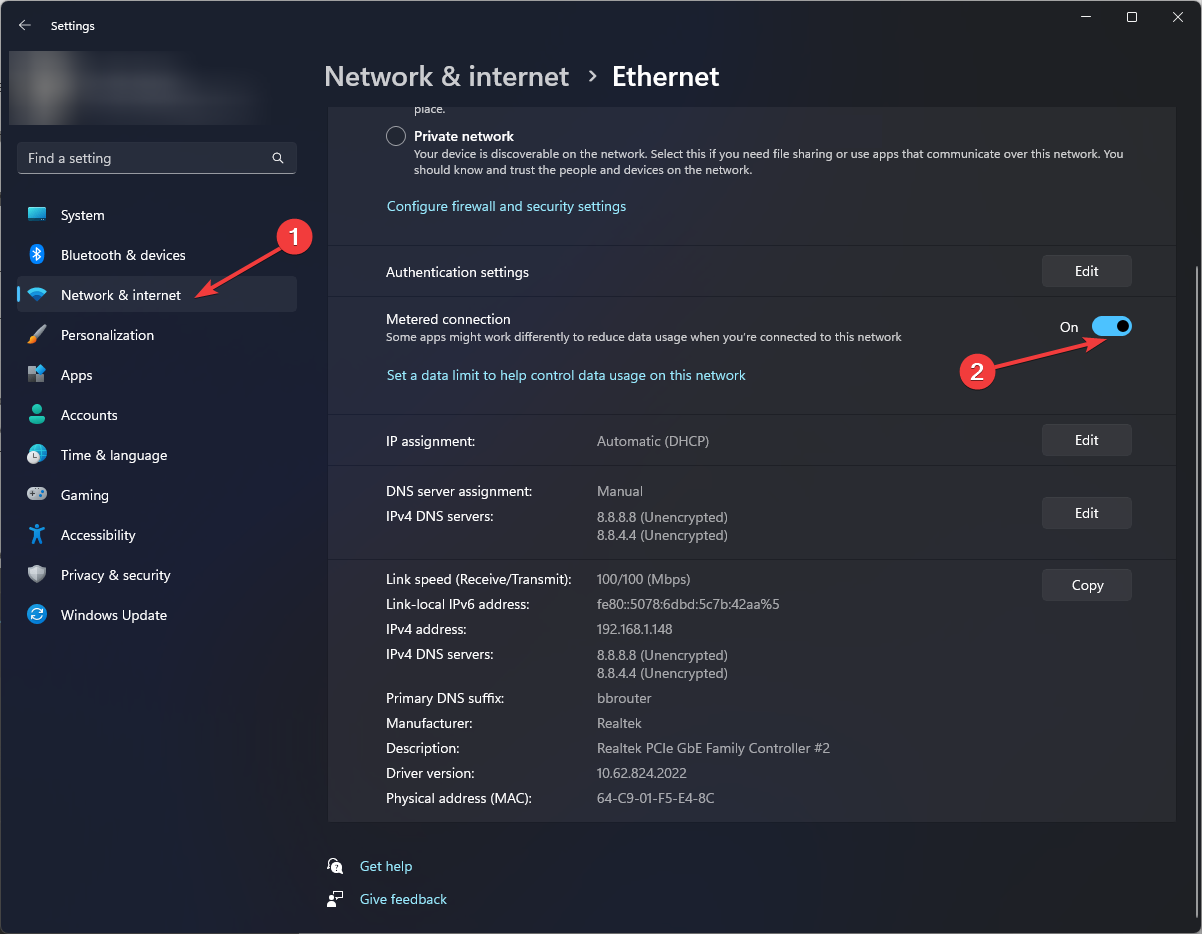
2. Set up a metered connection

  1. Hit the Windows key and select Settings.settings windows 11
  2. Go to Network & Internet.
  3. Select the WiFi or Ethernet, depending on the connection you want to set as metered.
  4. Click the network and toggle on the switch for Metered connection.Set as metered connection Windows 11

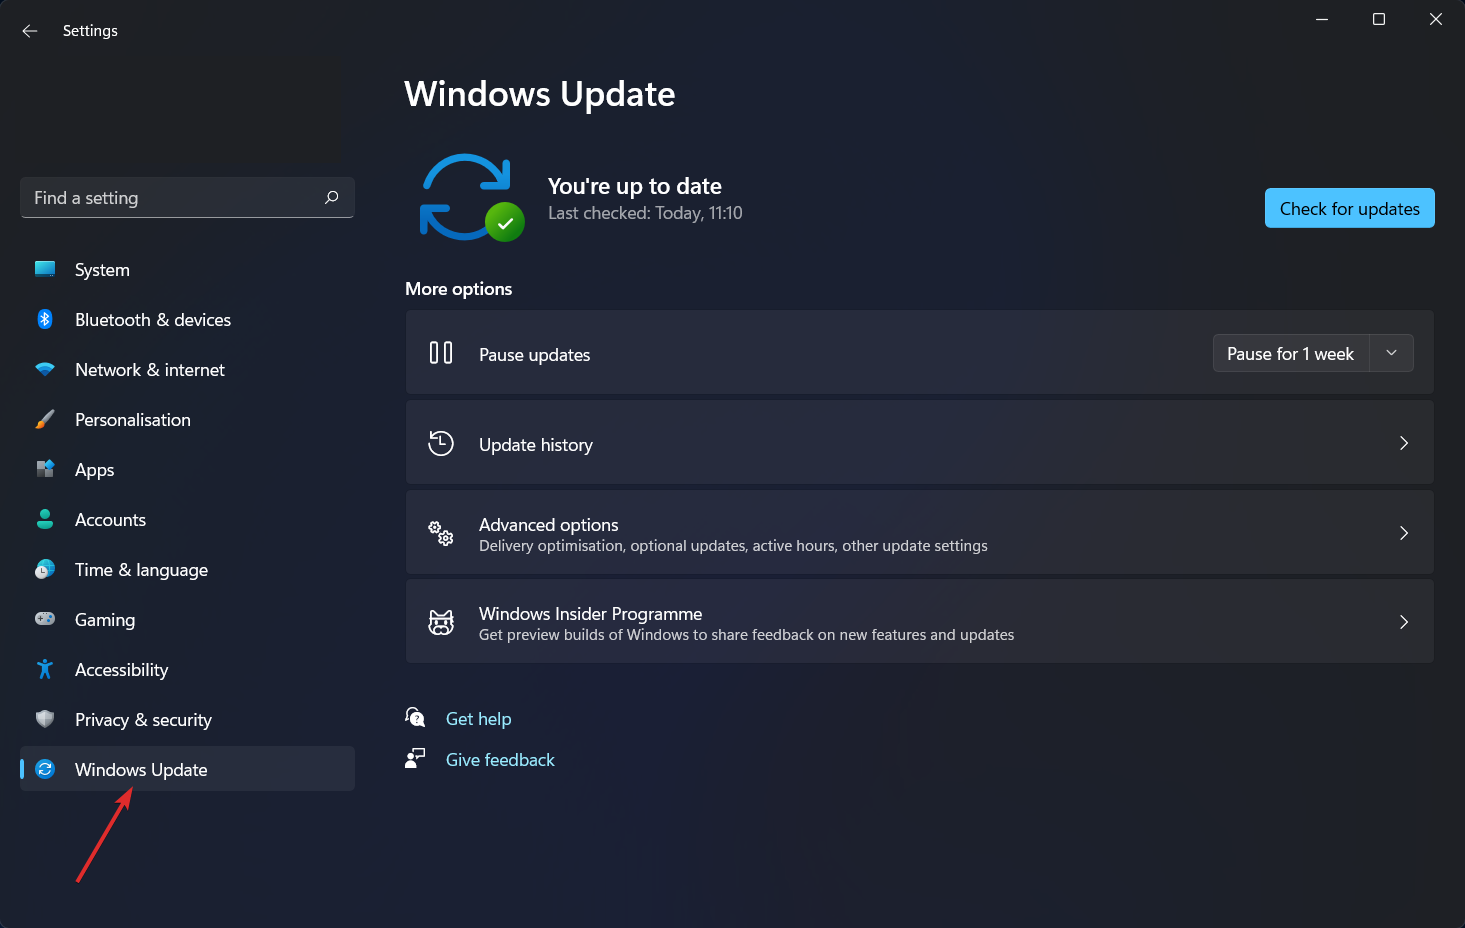
3. Pause Windows updates

  1. Hit the Windows key and select Settings.settings windows 11
  2. Navigate to Windows Update.windows-update windows 11 dynamic refresh rate not working
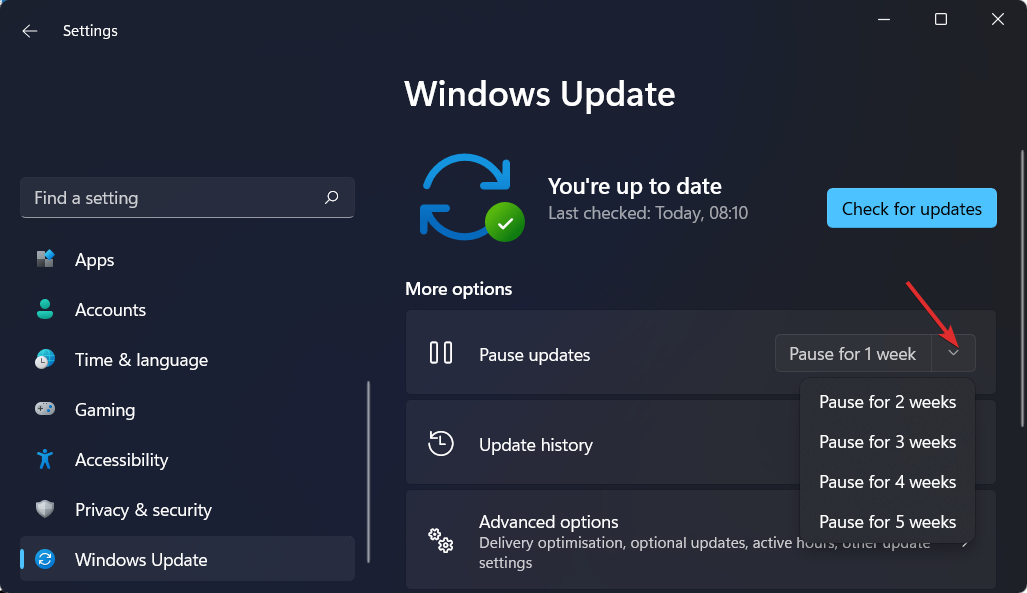
  3. Click on the drop-down arrow next to Pause updates and select a desired period during which your OS won’t update itself.pause-updates windows 11 error after update

Remember that there are risks associated with not updating your OS regularly, so ensure you manually check for updates to keep your system safe.

4. Disable startup apps

  1. Hit the Windows key and click on Settings.settings windows 11
  2. Click on Apps on the left pane then select Apps & features.
  3. Examine the list and find the apps you want to disable on Startup.
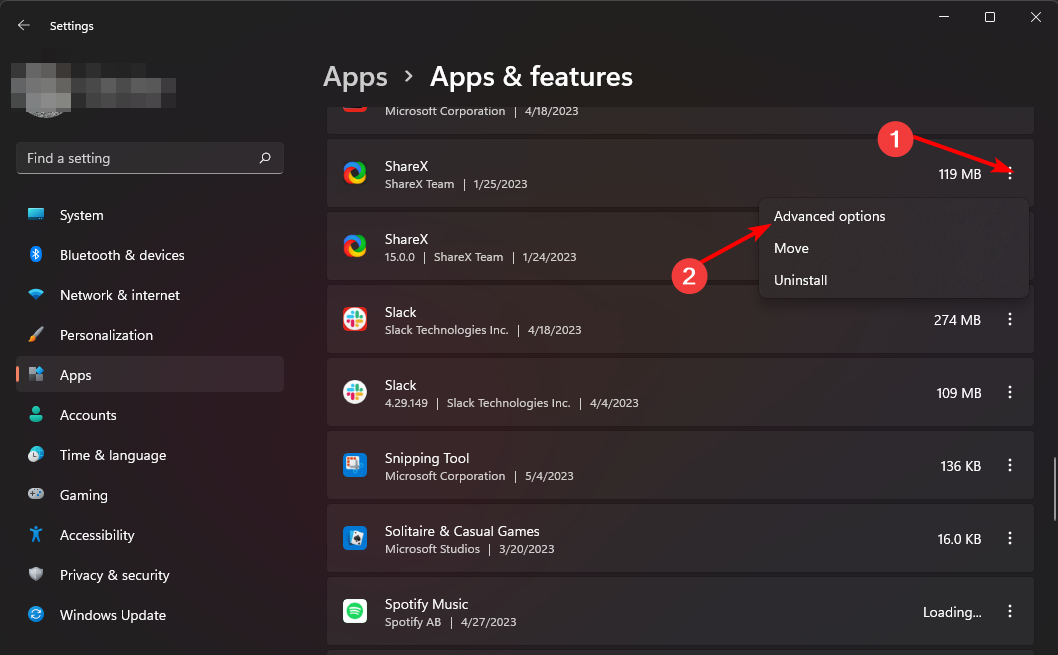
  4. Click on the three ellipses of the select app and click on Advanced options.
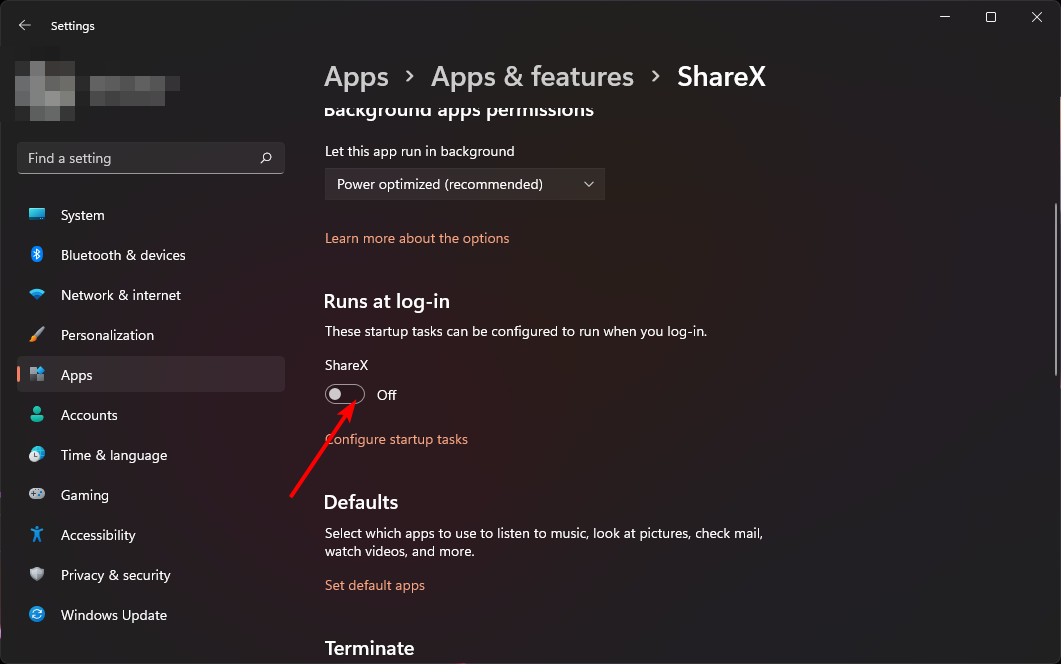
  5. Under Runs at log-in option, toggle the Off button to disable and back on to enable.

5. Turn off background apps

  1. Hit the Windows key and click on Settings.settings windows 11
  2. Click on Apps on the left pane then select Apps & features.
  3. Search for the app you want to disable, click on the three ellipses next to the app, and select Advanced options.
  4. Navigate to the Background apps permissions section.
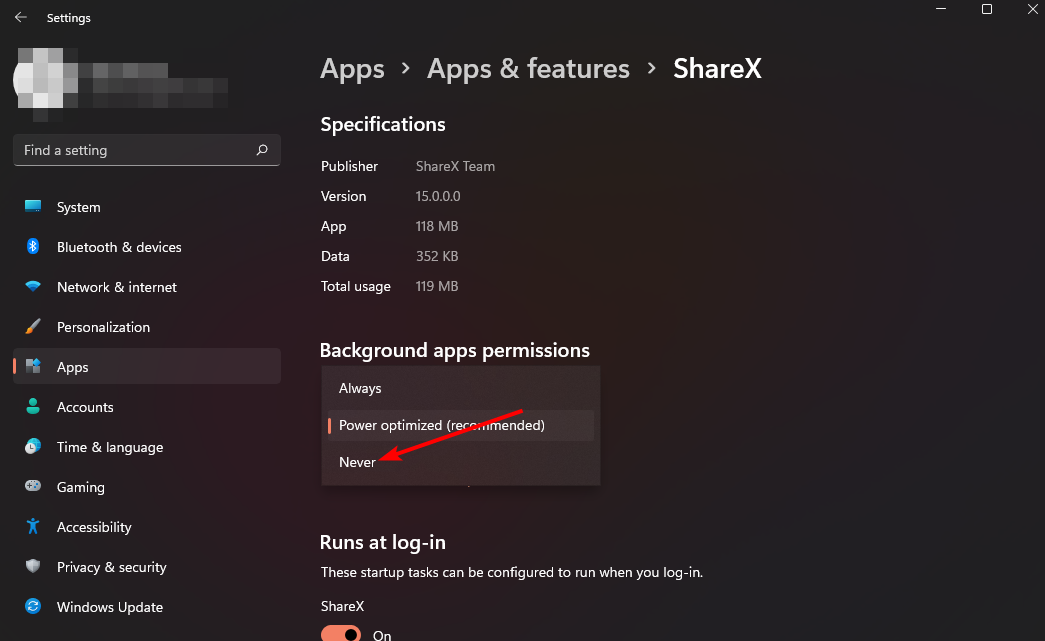
  5. Under Let this app run in the background, choose the Never option.
  6. Repeat the same steps for each background app you need to disable.

6. Archive non-essential programs

  1. Hit the Windows key and click on Settings.settings windows 11
  2. Click on Apps on the left pane, then select Apps & features.
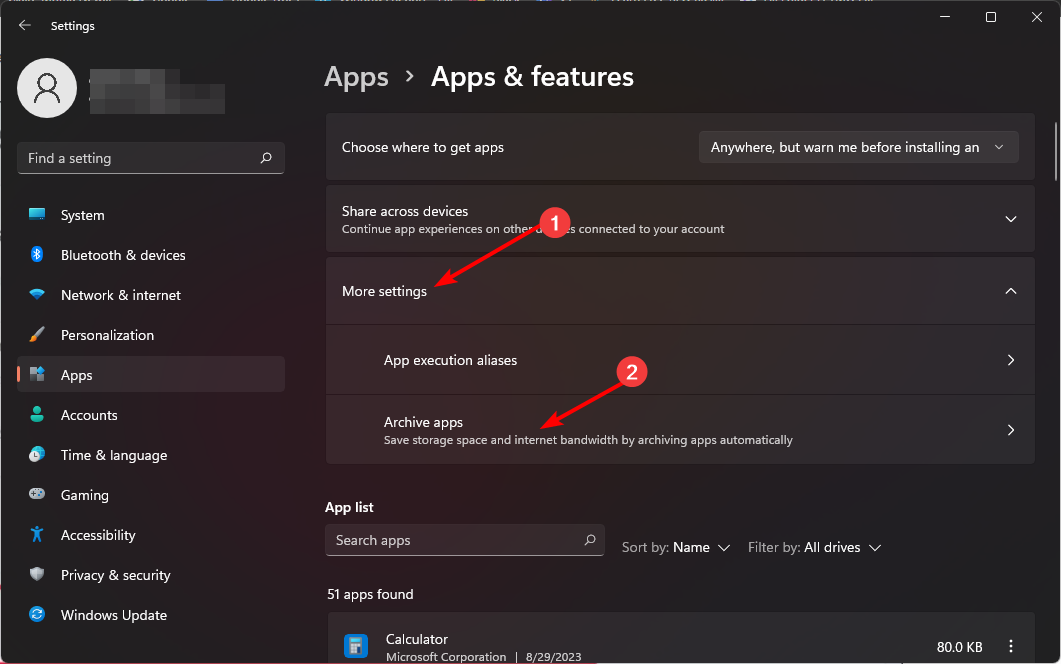
  3. Select More settings then click on Archive apps.
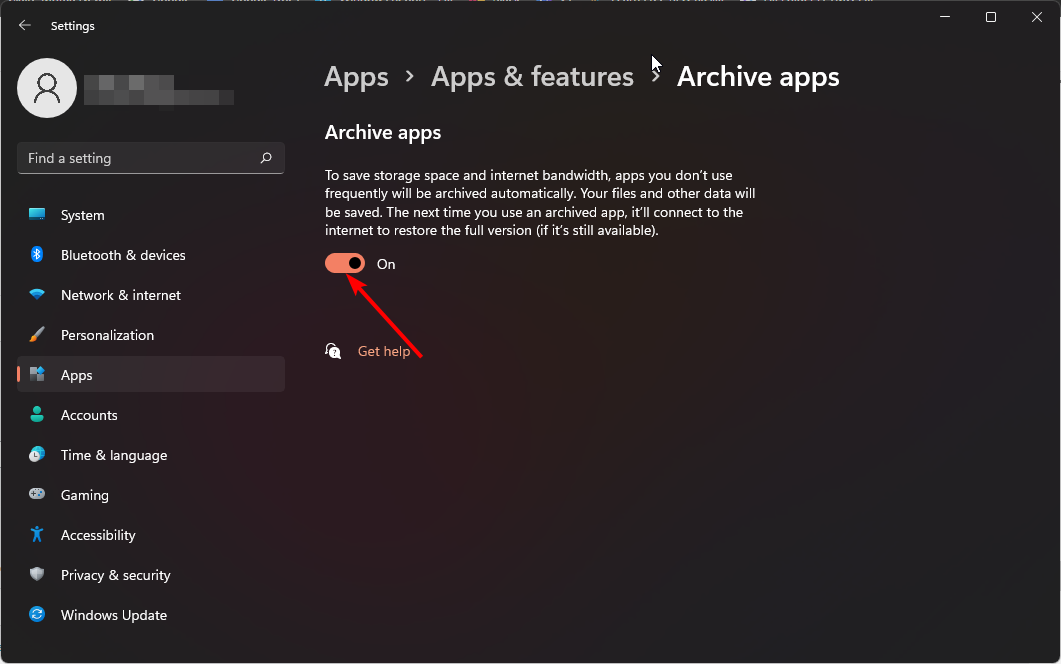
  4. Toggle on the Archive apps button.

7. Turn off automatic app updates

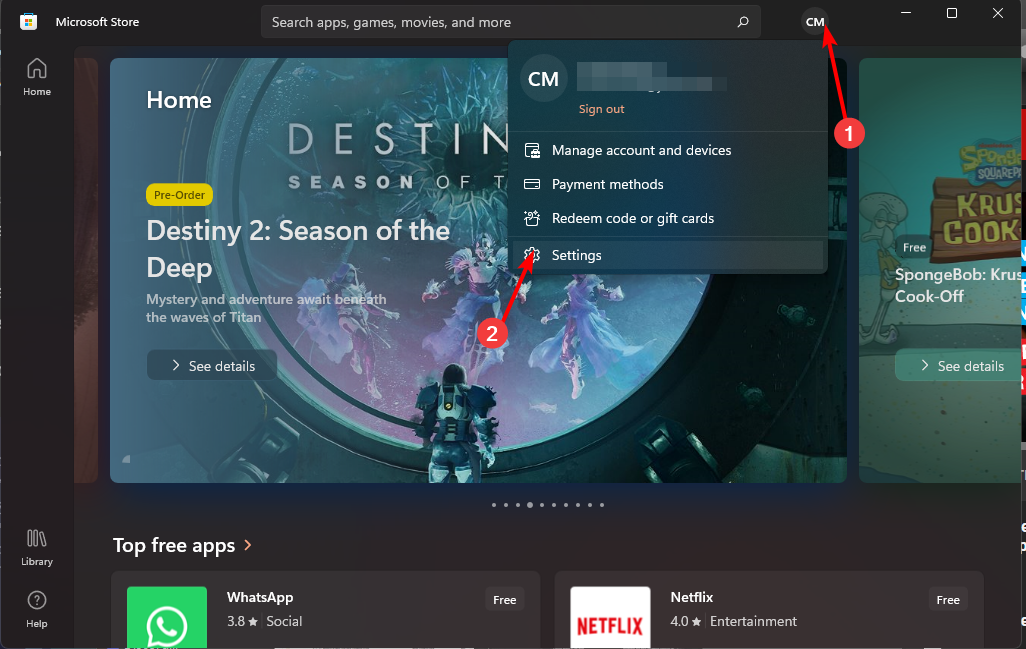
  1. Launch the Microsoft Store from your taskbar or from Search.
  2. Click on your Profile picture and select Settings.
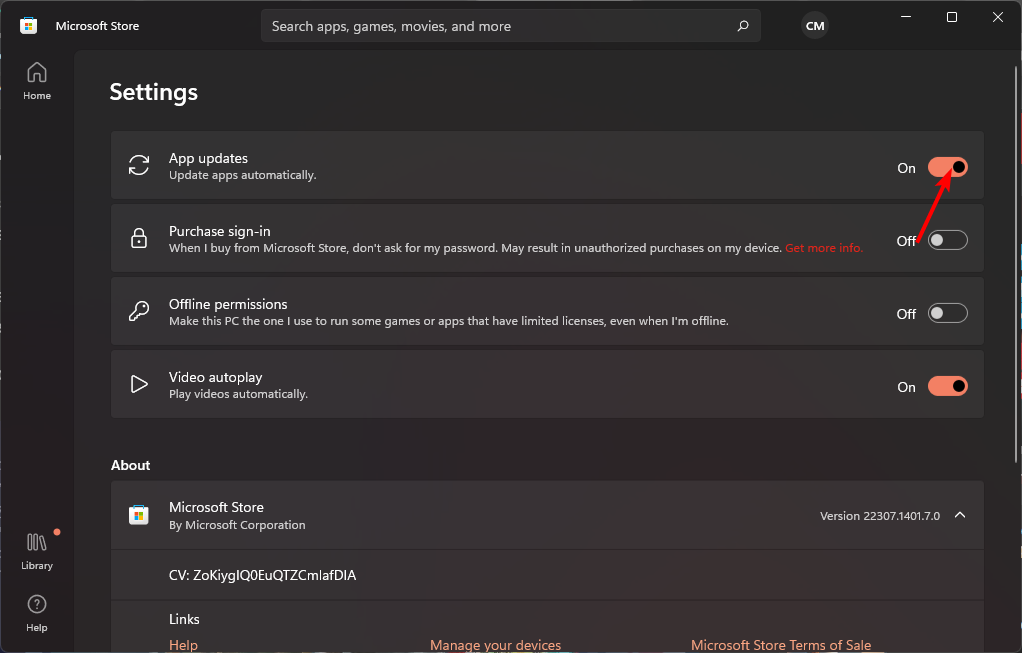
  3. Toggle off Automatic app updates.

8. Disable automatic syncing

  1. Hit the Windows key and click on Settings.settings windows 11
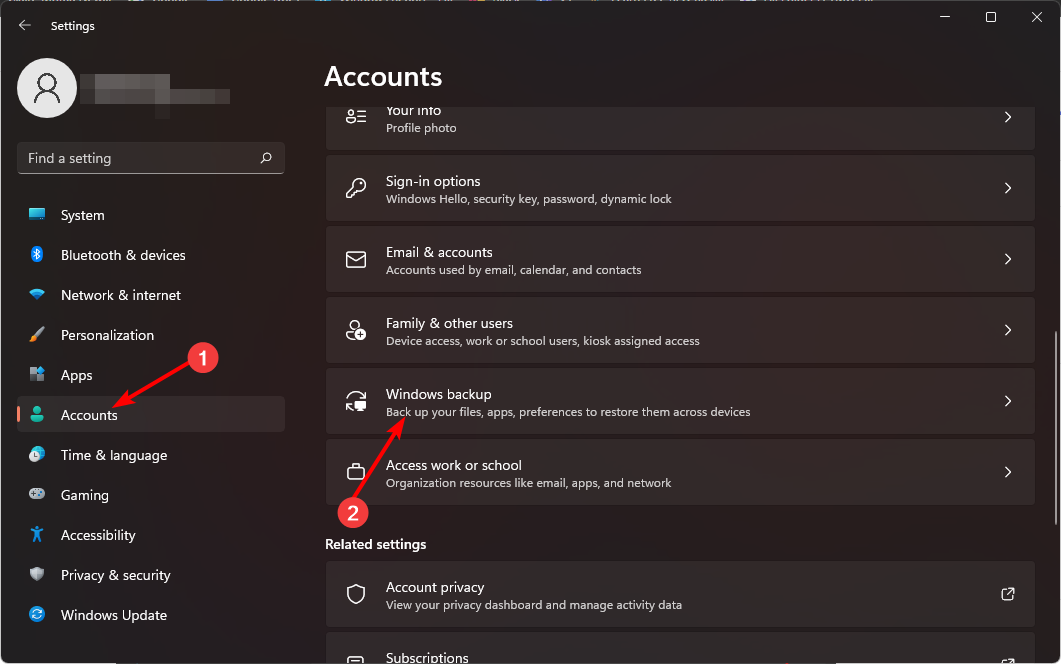
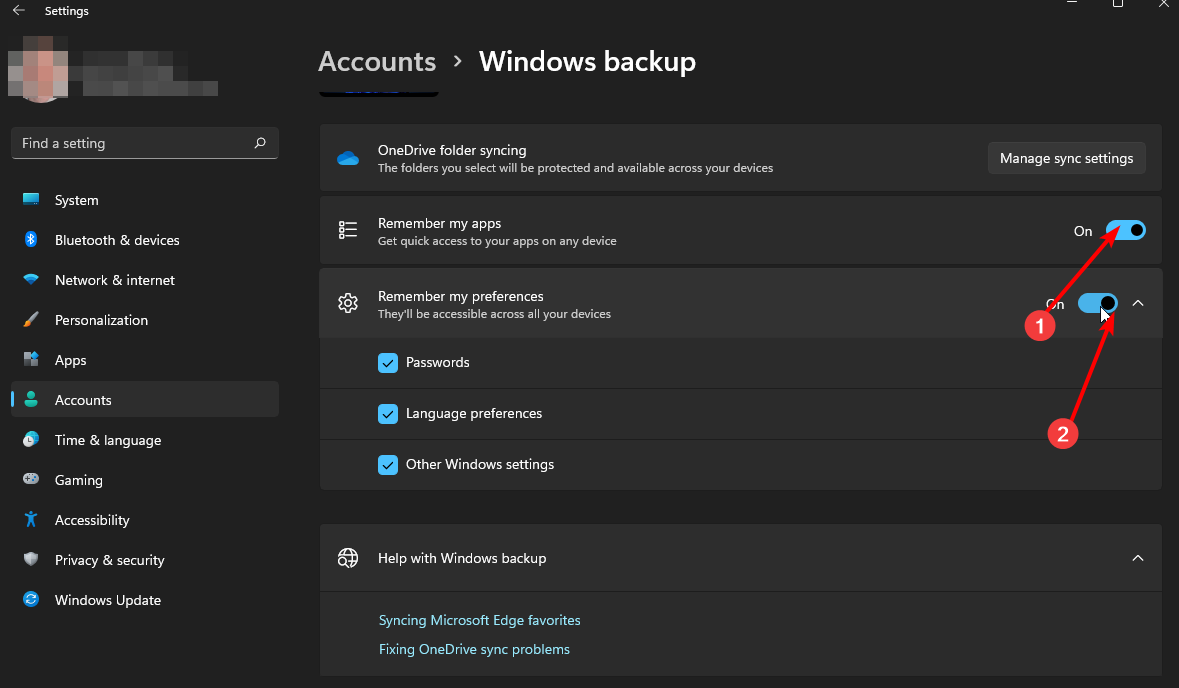
  2. Click on Accounts, then select Windows backup.
  3. Toggle off Remember my apps and Remember my preferences options to disable automatic sync.

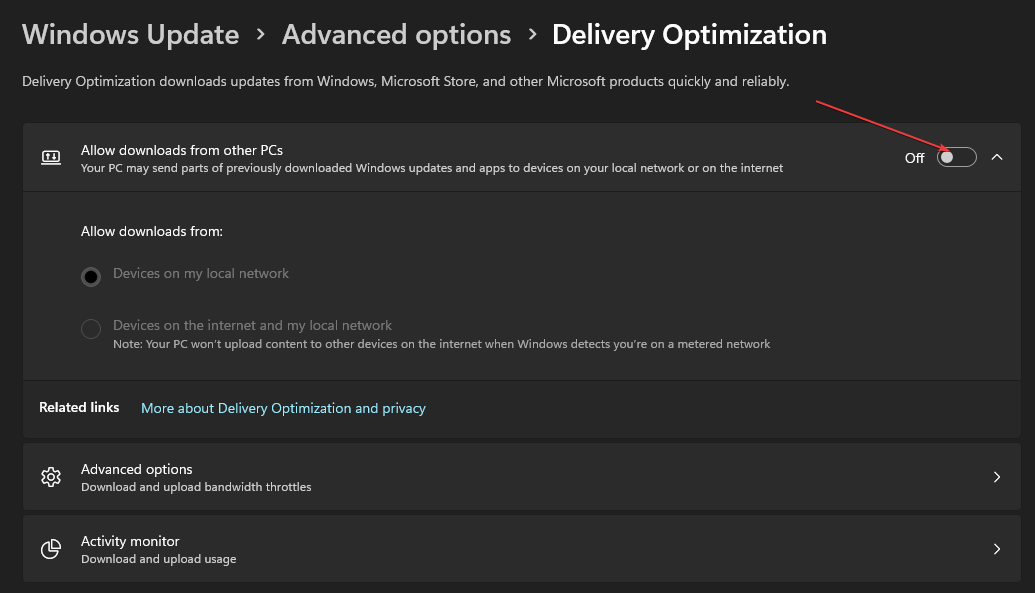
9. Disable the Delivery Optimization service

  1. Press the Windows + I key to open the Settings app.
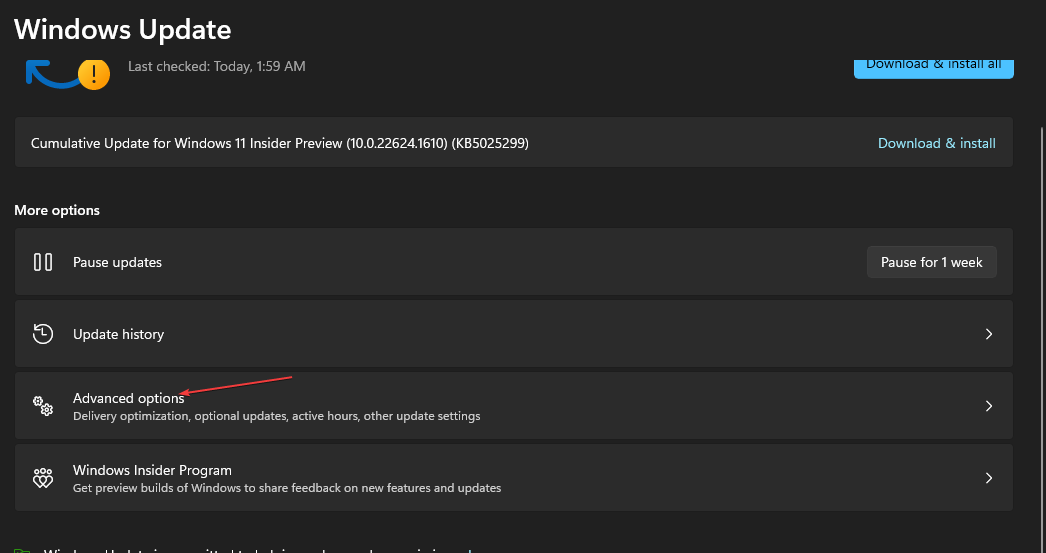
  2. Select the Windows Update option from the left pane of the screen, and click the Advanced Options button.
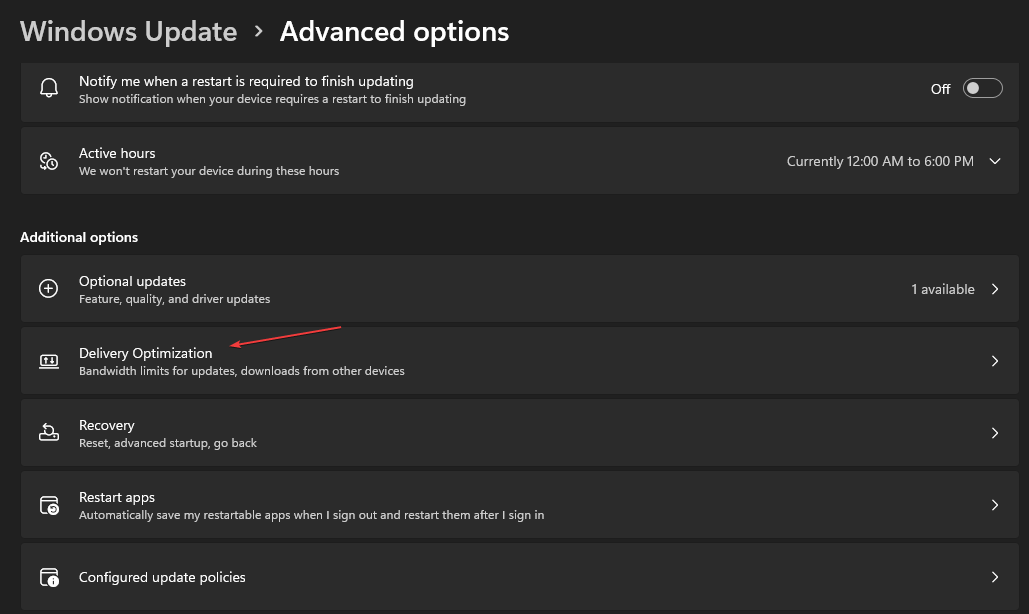
  3. Scroll down to the Addition options section, and click the Delivery Optimization button.
  4. Go to the Allow downloads from other PCs option and toggle off the switch.

What are some tips for optimizing data usage on Windows 11?

The problem of your system using too much data can be detrimental to your overall browsing experience. You may encounter a slow internet connection because too many apps and services are competing for limited bandwidth.

As you can see, with some quick configuration changes on your Windows computer and frequent data usage monitoring, you should be able to handle any potential bandwidth issues that may come up.

If you’ve been worried about data usage being notably higher after upgrading to Windows 11, things should return to normalcy with these adjustments.

How are you managing your system’s data needs? Are there any additional tips you have up your sleeve? We’d love to hear about them, so leave us a comment down below.

File Explorer Windows Keep Opening in Foreground [Windows 11 Fix]

File Explorer remains one of the most effective file managers in Windows, but problems with it are not uncommon. Recently, a large number of users noticed that the Windows 11 File Explorer jumps to the foreground without any manual trigger.

This could happen while you are browsing the web, running other applications, or playing a game. But remember, the Windows Explorer only appears when it’s actively running on the PC. If there are no active sessions, the explorer window won’t open automatically.

What causes File Explorer windows to open in the foreground?

  • A bug in the OS
  • Misconfigured File Explorer settings
  • The Windows installation has corrupted files
  • An unnecessary USB drive is triggering the File Explorer
  • Malware attack or virus

How do I stop File Explorer windows from going to the foreground on Windows 11?

Before we move to the slightly complex solutions, here are a few quick ones to try:

If none work, head to the fixes listed next.

1. Update Windows 11

  1. Press Windows + I to open Settings, go to Windows Update from the navigation pane, and click on Check for updates.check for updates to fix windows 11 explorer foreground
  2. If an update is available, click on Download & install, wait for the installation to complete, and then restart the PC for the changes to come into effect.

2. Uninstall the latest Windows update

  1. Press Windows + I to open Settings, navigate to the Windows Update tab from the left, and click on Update history.update history
  2. Scroll to the bottom and click on Uninstall updates.uninstall updates
  3. Click the Uninstall button next to the KB5021255, KB5022303, or any updates pertaining to the Windows 11 22H2 rollout.uninstall update to fix windows 11 explorer foreground
  4. Again, click Uninstall in the confirmation prompt, wait for the process to complete, and then restart the computer.

When an update with a patch is not available or doesn’t prevent Windows 11 Explorer from opening in the foreground, uninstall the update that triggered the problem in the first place. Remember, you may have to remove a few before finding the culprit. 

3. Disable autoplay

  1. Press Windows + S to open Search, type Control Panel in the text field, and click on the relevant search result.
  2. Click on Hardware and Sound.hardware and sound
  3. Now, click the AutoPlay entry.
  4. Untick the checkbox for Use AutoPlay for media and devices, and then click on Save.disable autoplay
  5. Restart the computer and check whether Windows 11 Explorer still opens in the foreground automatically. 

4. Change the File Explorer options

  1. Press Windows + E to open File Explorer, click the ellipsis near the top right, and select Options from the flyout menu.file explorer options
  2. Now, untick the checkboxes for Show recently used files, Show frequently used folders, and Show file history from Office.com.disable settings
  3. Go to the View tab, uncheck Launch folder windows in a separate process, and click OK to save the changes.disable to fix windows 11 explorer foreground

5. Repair the corrupted system files

  1. Press Windows + R to open Run, type cmd, and hit Ctrl + Shift + Enter.cmd
  2. Click Yes in the UAC prompt.
  3. Paste the following command lines individually in the Command Prompt and hit Enter after each: DISM /Online /Cleanup-Image /CheckHealth DISM /Online /Cleanup-Image /ScanHealth DISM /Online /Cleanup-Image /RestoreHealth
  4. Next, execute this command to run the SFC scan:sfc /scannowsfc scan
  5. Once done, restart the computer and check for any improvements.

6. Change the wallpaper personalization settings

  1. Press Windows + I to open Settings, head to Personalization from the left, and click on Background.background
  2. Choose Picture from the Personalize your background menu.set picture
  3. Now, head back to the Personalization settings, and select Colors.
  4. Choose Manual from the Accent color menu, and pick one that works best.set manual to fix windows 11 explorer foreground

7. Perform a clean boot

  1. Press Windows + R to open Run,  type msconfig in the text field, and hit Enter.msconfig
  2. Go to the Services tab, tick the checkbox for Hide all Microsoft services, and click the Disable all button.disable all
  3. Now, head to the Startup tab, and click on Open Task Manager (skip if you have previously disabled startup apps and go to Step 5).
  4. Select the apps listed here individually, and click Disable.disable
  5. Once done, go back to System Configuration, and click OK to save the changes.
  6. Click Restart in the confirmation box that appears.
  7. After the PC reboots, check whether the problem persists.

When Windows Explorer opens in the foreground on Windows 11, a clean boot will help identify whether the problem lies with a background application or service (when the issue disappears), or if it’s a bug in the OS (when the issue is present). 

In case it’s the former, start by enabling the third-party services and applications one at a time unless the problem reappears. And when it does, the process enabled last is the underlying cause. Keep the service disabled or uninstall the app, as the case may be, until Microsoft releases a fix.

Tip icon Tip
If nothing works, we recommend reporting the problem on Feedback Hub so that Microsoft releases a patch soon. Check the official page for more information.

Additional tips for preventing future issues with File Explorer windows

  • Regularly scan your computer for malware and viruses.
  • Clean up unnecessary files and folders regularly. You could use the built-in Disk Cleanup utility, or for better results, go with a third-party drive cleaner solution.
  • Always install updates as soon as Microsoft releases them.
  • Make sure to regularly update the graphics driver and all other critical device drivers.
  • Do not change any settings on Windows 11 or modify the Registry unless you fully understand how it would reflect.

Based on our research, the problem with Windows 11 Explorer automatically coming to the foreground is linked to a bug in the OS, but we can’t negate the possibility of third-party conflicts. So make sure to verify all aspects, and before you know it, the issue will be gone for good!

As a last resort, you could always ditch the built-in Windows Explorer and switch to a user-friendly File Manager for Windows 11. If you don’t, try customizing the File Explorer and get tasks done quickly!

For any queries or to share what worked for you, drop a comment below.

Check out the MEGA Construx Xbox 360 Collector Set coming October 8

Xbox and MEGA Construx have announced an exciting new product coming in October that will definitely check all the right boxes for those with Xbox 360 nostalgia.

The 3:4 scale Xbox 360 Collector Set will be available exclusively at Target this October, and you can preorder here. As per the announcement post on Twitter: “This hits so many levels of nostalgia and we’re here for it.”

The set will include the following,

  • An accurate, buildable Xbox 360 console replica with working lights and a removeable hard drive
  • A buildable controller
  • A Halo 3-inspired disc that activates the motherboard
  • And Easter eggs to discover while putting the set together!

Microsoft Xbox 360 Collector MEGA Building Set - 1342pcs, 4 of 8

(Note that this is not an actual functioning Xbox 360 Console).

The unit features “a removeable hard drive and side shell panels to reveal an interactive interior” with working lights, and you can place the Halo 3 disc in the disc drive to activate the motherboard.

Microsoft Xbox 360 Collector MEGA Building Set - 1342pcs, 3 of 8

At the time of this writing preorders have sold out, so here’s hoping stock will be replenished soon.

Featured image via MEGA Construx. 

Microsoft ends software support for original Surface Duo

Three years to the day since its inaugural release, Microsoft has concluded the official software support for its first-generation Surface Duo. Launching initially with the Android 10 operating system, the device has navigated through a lifecycle that fell somewhat short of the support span that consumers may have hoped for. The original Surface Duo ends with Android 12L as its last official update.

From the outset, Microsoft had outlined a three-year update plan for the Surface Duo. True to their word, the company has adhered to this timeline, ceasing to roll out new OS updates or security patches as of September 10th 2023. While this means the device misses out on a third major OS update, typically seen in the industry, users can find solace in the fact that their devices will still function, albeit with heightened caution advised due to the lack of forthcoming security patches.

Surface Duo users need not fret too much, as the app ecosystem will continue to offer updates, allowing for the usual functioning of the device for the time being. Despite this, the cessation of security updates does prompt a call for increased vigilance in the evolving cyber landscape. Nonetheless, as further Android releases become available, apps will inevitably drop support for older versions and therefore, over time, apps may cease to be available on the original Surface Duo, particularly sensitive apps such as finance/banking apps.

The official support page for the Surface Duo lifecycle, captured by Windows Central, serves as a testament to the journey that the device has been on since its inception. Moreover, Microsoft hasn’t been channeling efforts towards new features or bug fixes for the Surface Duo for several months now. As we reported on last month, there’s a distinct lack of clarity over Microsoft’s plans for its Surface Duo lineup, especially following reports that people previously involved in the product have been reassigned to other teams.

What are your thoughts on Microsoft’s Surface Duo support lifecycle? Where do you see the lineup heading? Share your thoughts in the comments below.

Xbox Cloud Gaming frustrations mount amid long wait times and game sessions failing to start

In recent weeks, the gaming community has been grappling with mounting frustrations, as Xbox Cloud Gaming users find themselves caught up in seemingly endless wait times in some regions when trying to start a cloud gaming session.

A dilemma that has exacerbated since the hotly anticipated launch of Starfield, users are not only being subjected to protracted queues but are also encountering glitches where the game session fails to initiate altogether, with no queue time message appearing to inform them of the delay, or, in some cases, the queue time coming to an end and then the session failing to start.

Queue time complaints began to increase when Grand Theft Auto V rejoined the Xbox Game Pass lineup, but has become increasingly problematic since Starfield’s launch.

Since the launch of the blockbuster game Starfield, the Xbox Cloud Gaming platform seems to have been overwhelmed, indicating that the current infrastructure might not be equipped to handle the surge in user traffic. Users have been vocally expressing their dissatisfaction on various forums, highlighting the ongoing issue that has been persistent for several weeks now.

Many are left wondering whether the infrastructure behind the cloud gaming service is sufficiently robust to cater for growth, and whether Microsoft is even willing to improve and iterate on the service, following several promised updates to the service having not come to fruition, and lack of communication over the current issues being experienced.

Complaints have come in various different forms, including:

  • Long queue times (though this tends to vary depending on your location. It can be instant, but often several minutes, if not upwards of 45 minutes to an hour)
  • Once the estimated queue time ends, the gaming session never starts
  • No queue time displayed at all, and the service seemingly not connecting or actually loading

Here are some examples of the complaints that have been coming in on the xCloud (former name of Xbox Cloud Gaming) sub-reddit:

Is Xcloud Down?
byu/DONOHUEO7 inxcloud

Cloud Gaming stuck on “Getting your game ready”
byu/Sgt-Shisha inxcloud

I am stuck on the rocket ship loading screen
byu/Any_Fruit_8172 inxcloud

Frustrated with unfair XCloud wait times
byu/play150 inxcloud

One suggestion to workaround the issue of no queue time being displayed is to try Xbox Cloud Gaming on a different browser or app. For example, if you’re trying to stream via the Xbox app, instead switch to Microsoft Edge and connect to Xbox Cloud Gaming from the website instead. Unfortunately, however, if your main issue is the queue times, then there’s no workaround for these, you’ll have to wait it out and hope that the session starts after your wait.

What exacerbates the issues is the lack of communication about the extent of the problem or potential remedies. Gamers find themselves in limbo, unsure whether to continue waiting or abandon the session altogether, as no queue time message or notification pops up to guide them. This has inevitably led to a ripple of discontent amongst the gaming community, with users yearning for a more streamlined and responsive gaming experience.

It should be understood that the service is still in beta, however, at a time when Microsoft should be wanting to persuade gamers that cloud streaming is the future, these issues will only achieve the opposite result.

While cloud gaming promises a future where games can be accessed and played instantly, without the need for hefty downloads or installations, the current scenario paints a somewhat gloomy picture.

As users anticipate quick fixes, Microsoft is expected to respond swiftly to these growing concerns, possibly deploying upgrades to bolster the cloud infrastructure and ensure a smoother gaming experience. Failing to do so risks jeopardising gamers’ trust in the service and lead to abandonment and potentially creating backlash against cloud gaming more generally which may inhibit future growth of the platform, as people have to return back to waiting to download the game, but at least can guarantee a good experience at the end of it.

Have you been grappling with issues using Xbox Cloud Gaming? Share your experiences in the comments below. You never know, someone may have a workaround for your particular issue.

Fix: File System Error (-2147163901) on Windows 11

Many Windows 11 users have reported getting a File system error (-2147163901) dialog box when attempting to open a system app like Skype, Photos, Xbox, Mail, etc. If you are one of them, this guide can help!

We will discuss some expert-recommended methods to resolve this issue and regain access to the app.

What does File system error (-2147163901) mean?

This File system error (-2147163901) on Windows 11 indicates a problem with the file system or a component associated with it.

It might occur due to various reasons, including corrupted system files, driver conflicts, bad disk sectors, or software incompatibilities.

How do I fix File system error (-2147163901) on Windows 11?

Before engaging in advanced troubleshooting steps, you should consider performing the following checks:

If none of these helped, move to the detailed fixes.

1. Run the Windows app troubleshooter

  1. Press Windows + I to open the Settings app.File System Error (-2147163901) on Windows 11
  2. Go to System, then click Troubleshoot.
  3. Click Other troubleshooters.Other Troubleshooters
  4. Locate Windows Store Apps and click Run.Windows store app
  5. Follow the onscreen instructions to complete the process.

2. Run SFC & DISM scans

  1. Press the Windows key, type cmd in the search box, and click Run as administrator.CMD elevated File System Error (-2147163901) on Windows 11
  2. On the Command Prompt window, type the following command to replace corrupt files from the cache copy stored in the Windows components store and hit Enter: sfc /scannowSFCSCANNOW CMD
  3. Wait for the process to complete, then copy & paste the following to restore damaged system files and components in your Windows installation and press Enter: Dism /Online /Cleanup-Image /RestoreHealthRestore health
  4. Reboot your computer to let the changes take effect.

Restoring system file integrity could also help you avoid other File system error messages like 805305975 on your Windows device.

3. Reset the app

  1. Press Windows + I to open Settings.
  2. Go to Apps, then click Installed apps.Apps, installed apps File System Error (-2147163901) on Windows 11
  3. Locate the affected app, click three dots, and select Advanced options.Click Advanced options
  4. Locate Reset and click the Reset button.Reset

This action will delete the app data, so you might have to sign in if the app requires sign-in to work.

4. Restart your computer in a clean boot

  1. Press Windows + R to open the Run dialog box.cleanboot1 File System Error (-2147163901) on Windows 11
  2. Type msconfig and click OK to open System Configuration.
  3. Go to the Services tab, select Hide all Microsoft services, and click Disable all.Clean boot Disable all
  4. Switch to the Startup tab, and click Open Task Manager.Open task Manager Clean boot
  5. On the Task Manager, select each Enabled item one by one, and click Disable.Disable startup
  6. Close Task Manager, and click Apply and OK on System Configuration.CLEAN BOOT 5
  7. Select Restart.Restart clean boot

Your computer will restart with limited functionalities and will help you determine if the issue is system-related or caused due to third-party software conflicts.

Once you identify the root cause, reverse engineer the steps method above to reboot your PC in normal mode.

5. Reset the Microsoft Store and re-register apps

  1. Press the Windows key, type powershell in the search box, and click Run as administrator.Powershell File System Error (-2147163901) on Windows 11
  2. Copy & paste the following command to reset the Microsoft Store app to its default settings and hit Enter: Get-AppxPackage Microsoft.WindowsStore | Reset-AppxPackageReset Microsoft Store File System Error (-2147163901) on Windows 11
  3. Restart your computer.

Once your computer boots up, follow these steps to re-register the Windows app:

  1. Open PowerShell with administrator rights using step 1 from the above method.
  2. Type the following command to set the execution policy to Unrestricted and press Enter: Set-ExecutionPolicy Unrestricted
  3. Now type Y when prompted.Re register Microsoft apps
  4. Copy & paste the following commands to re-register the apps and hit Enter: Get-AppXPackage -AllUsers | Foreach {Add-AppxPackage -DisableDevelopmentMode -Register "$($_.InstallLocation)\AppXManifest.xml"}
  5. Reboot your PC to let the changes take effect.

Re-registering Windows apps can also fix File system error codes like 2147219195 which prevents you from opening pictures in the Photos app.

6. Perform a system restore

  1. Press the Windows key, type control panel in the search box, and click Open.Control Panel start menu File System Error (-2147163901) on Windows 11
  2. Select Large icons for View by and click Recovery.Recovery Control Panel
  3. Now, click Open System Restore.Open system restore
  4. On the System Restore window, select Choose a different restore point and click Next.Next Choose a different restore point
  5. Select a restore point and click Next.Choose a point
  6. Click Finish to initiate the process.Finish

Your computer will restart and restore your computer to the selected version. The process might take some time, so don’t turn your PC off until it is complete.

7. Perform an in-place upgrade (Last resort)

  1. Visit the Windows 11 official website and locate Download Windows 11 Disk Image (ISO) for x64 devices.
  2. Select Windows 11 (multi-edition ISO) and click Download Now.Download now Windows 11  File System Error (-2147163901) on Windows 11
  3. Choose the product language and click Confirm.
  4. Click Download; once the ISO is downloaded, right-click it, choose Mount.Mount
  5. On the following window, select Setup.exe and click Yes on the UAC prompt if prompted.Setup1
  6. On the Install Windows 11 window, click Next.
  7. Click Accept on the license terms page.
  8. On the Ready to install page, ensure Keep personal files and apps are selected. If not, then click Change what to keep and select it. Once done, click Install.Install
  9. Follow the onscreen prompts to complete the process.

Your computer may restart several times, and once the installation is successfully complete, you will be greeted with a lock screen.

Tips for preventing file system errors & corruption on Windows 11

  • Regularly install Windows updates and security patches.
  • Ensure your computer hardware is in good condition.
  • Avoid improper shutdowns.
  • Use reliable antivirus to protect your computer from malware.
  • Ensure your PC has sufficient disk space, and keep an eye on disk errors.
  • Always install apps that are compatible with your Windows OS.

Keeping these things in mind could help you avoid all types of file system error messages on Windows 11.
Do you know other methods that worked for you? Don’t hesitate to mention them in the comments section below, and we will happily add them to the list.

Control Panel vs Settings App: Which One to Use?

Since Windows 8, the Control Panel and Settings App co-exist in the Windows environment; the Control Panel is the Centre Hub, which can be used to make complex changes, whereas the Settings app is a modern customization tool with a sleeker interface.

In our Control Panel vs Settings app discussion, we will talk about the distinctions and merits of using both fundamental tools of Windows 11 to help you choose which suits you the best.

What is the difference between the Control Panel and the Settings app?

Control Panel and Settings are used for similar purposes but differ in functionality and interface. The former has a traditional detailed view of system settings, including advanced configurations.

However, the latter has a modern, intuitive interface focusing on commonly used settings for basic Windows users.

Control Panel vs Settings App: Windows 11 Overview

Control Panel and Settings are two main tools of Windows 11 available to configure system settings. Both come with similar functionalities but differ in their interface, range of settings, and accessibility.

Control Panel is a longstanding feature in the Windows ecosystem with a conventional interface, icons, and system settings & configuration options.

These settings are divided into eight categories, giving you deeper access, wherein you can adjust settings like network, security, hardware, user accounts, personalize your computer, and more.

On the other hand, Settings is a newer and modern app with a streamlined approach and user-friendly layout, which makes it easier to navigate and customize the Windows experience.

The app offers easy access to settings related to hardware, Windows updates, apps, privacy, devices, & user accounts and aligns with the modern design of newer Windows iterations.

Advantages of using Control Panel on Windows 11

  • Provides access to a wide range of advanced system settings to fine-tune the Windows experience.
  • Offers compatibility to configure and manage older hardware & software components.
  • Helps you make system-wide changes and configure multiple aspects at the same time.
  • Allows you to modify every aspect of Windows, including power management, security, and display.
  • Offers access to logs, Device Manager, and other advanced tools to help troubleshoot complex issues.

Advantages of using Settings App on Windows 11

  • User-friendly & visually cohesive, it focuses on accessibility, making it an ideal choice for users of different levels of expertise.
  • Integrates well with the new Windows version and is consistent with the look and feel of the OS.
  • Comes with cleaner sections, making it easier to navigate through.
  • Offers a search option to access the settings you are looking for quickly.
  • Allows to customize Windows experience for all levels of users without overwhelming them with advanced options.

To explore each section of the Windows 11 Settings app in greater detail and understand how it simplifies configuration compared to the classic Control Panel, check out our full guide on System Settings in Windows 11.

Control Panel vs Settings App: Which one should I use?

Choosing between Control Panel and Settings depends upon the changes you need to make and personal preferences.

If you are a power user, administrator, or one who knows his way around the Control Panel, you can use it to access advanced system settings and make a global change to the Windows environment.

However, if you are an average user who prefers a simple interface and easy access to settings related to personalization, Windows updates, devices, and more, the Settings app is the option for you.

Now the question lingers: if Microsoft wants to phase out Control Panel, why does it still exist? The answer lies in the need for a gradual transition, and it is an ongoing effort.

Over the years, Microsoft has swiftly moved Advanced Network settings, Advanced Sharing settings, Personalization features, and other device settings.

It is crucial to give users ample time to adapt to the new interface and become accustomed to essential configuration settings now available in the Settings app.

In our Control Panel vs Windows Settings app debate, we admit there are differences in these tools regarding look, feel, and advanced system settings; however, both strive to provide Windows users with a tailored computing experience.

In our opinion, getting used to the Settings app is the right choice for all Windows users, as Microsoft will make the Control Panel redundant once the transition period is over.

If interested, read our guide on Microsoft Store apps vs Desktop apps to understand which app is for you!

Which one do you prefer to configure your Windows settings? Feel free to mention your choice in the comments section below!

What is Caktus AI & How to Properly Use it

Whether you are a university student seeking academic guidance or a tech enthusiast eager to learn coding at your own pace, Caktus AI is here to lend a hand!

This comprehensive guide will introduce you to Caktus AI, an emerging AI assistant. We will explore how it can help you elevate your content quality while facilitating a holistic learning experience all in one place.

Do you need to pay for Caktus AI?

After you sign up for a free account, Caktus AI gives you 20,000 credits, which is good for 5000 characters. However, you need to subscribe to an annual or monthly plan to enjoy unlimited assistance.

What is Caktus AI?

Caktus AI is an AI-powered learning platform founded by Harrison Leonard and Tao Zhang. It features 56 robust tools & features, such as Essay Writer, Paragraph Generator, Citations, Content Improver, and more, designed to enhance personalized and efficient learning.

How Does Caktus AI Work?

Caktus AI uses Natural Language Processing (NLP) techniques combined with access to the CORE database to produce high-quality educational results as per the query.

NLP allows the platform to understand and interpret human language, and the CORE database acts as a knowledge source.

Benefits of Using Caktus AI

1. Wide range of tools & features

Tools CAKtus AI

Caktus AI comes with 56 tools and features, including Essay Writer, Paragraph Generator, Discussion Questions, Text Summarizer, Content Improver, Personal Statement Writer, Email Writer, and Python Writer.

With the Humanize feature, the writing assistant enables you to generate content in your writing style, and if you are working on a research paper, the Citations feature can help you generate accurate citations and bibliographies in popular formats, including MLA, APA, and Chicago.

2. Seamless interactions & productivity

Chrome extension CAKtus AI

Like ChatGPT, Caktus also has its own chatbot, a versatile virtual assistant ready to answer your queries and engage in general conversations.

The Chrome extension for Caktus AI makes it possible to use artificial intelligence on every website you visit to take notes, write paragraphs, and more by just selecting text.

3. Artificial Intelligence Capabilities

Caktus AI employs its state-of-the-art Natural Language Processing (NLP) and ML algorithms to understand the query, interact, and answer it accordingly.

Due to these AI capabilities, it can analyze, generate, and improve text with a high level of accuracy and efficiency. Moreover, it has an ability to learn and adapt from user interactions, making sure it meet your needs.

Pricing Plans & Subscriptions Options

Pricing Plans & Subscriptions Options CAKtus AI
  • Monthly Premium plan– $14.99/ per month
  • Yearly Premium plan – $99.99 a year ($8.33 per month)

Benefits of using the Annual subscription plan:

  • Unlimited credits & access to all tools all year round
  • 20+ Templates and Flashcards to help you study
  • 100% plagiarism-free content generation
  • Access to the Math Solver tool with approximately 100 monthly step-by-step solutions.
  • Best for students who want to use it for longer periods and comes at a discounted price.

Tools & Features Offered by Caktus AI

  • Essay Writer Tool – Effortlessly organize your thoughts, enhance coherence, and craft well-structured essays on diverse topics, from science to literature, in a few minutes. Simply type in your prompt, and voila, witness the magic!
  • Writing Tool with Citation Sources – Write academic papers with precision while incorporating citation sources and accurate formatting and ensuring compliance with the citation standards.
  • Language Tutor Tool – Learn Spanish, Russian, Japanese, French, Mandarin, Italian, & Arabic. This tool also helps you improve your grammar, practice your pronunciation, vocabulary, and more.
  • Math Solver Tool – Assists you in understanding and solving complex mathematical equations & problems, making math learning easy and accessible.
  • Python Writer Tool – Provides assistance to learners and developers by generating Python code snippets for diverse applications and offering code enhancements.
  • Content Improver Tool – Suggests better words and sentence structure to express your thoughts and maintain the flow, thereby improving the overall quality of content.

How can I use Caktus AI?

  1. Visit Caktus AI official website and click Join Caktus.Join
  2. Enter username, email address, and strong password and click Continue.Join caktus AI
  3. Choose a monthly or yearly plan, and make the payments. You will be taken to the Caktus Dashboard, select any tool listed, enter a detailed prompt, and then click Generate to get Output.

Caktus AI Alternatives

  • ChatGPT – Efficiently responds to your queries and can help you with all text-related requests with its Chat 3.5 (Free) and ChatGPT 4 (Subscription-based) versions.
  • Plaito AI – This advanced AI website helps you with homework, exam preparations, & other writing support for all subjects and even with advanced placements.
  • Socratic AI – Provides visual explanations of important concepts in subjects like Science, Math, Literature, Social Studies, etc.
  • Tutor AI – Personalized tutoring and explaining complex concepts, enhancing hands-on learning and skill development.
  • Writecream – Has a free version with limited credits and helps you generate icebreakers, differentiators, articles, SEO-optimized ads, social media content, audio, image & video.
  • HIX.AI – Comes with free credits and has more than 120+ tools to choose from to help you generate unique content in a few minutes.

Caktus AI, a powerful tool, offers a wide range of critical features that can help students refine their writing skills & learn programming and mathematical problems at their own pace. Upon using it, we found that it works exceptionally well in addressing queries and generating quality content.

Further, to explain technical content, you’ll need SciSpace Copilot to help you easily understand the complexities.

However, if you are looking for a free content generator with advanced features to create content, read this guide.

What do you think about Caktus AI? Feel free to mention your thoughts in the comments section below.

Fix: Wi-Fi Stops Working When Connecting an External Monitor

Connecting a second monitor to your computer can be a great way to boost productivity, but it can also cause problems. Your Wi-Fi was probably working fine, but now it disconnects when using an external monitor.

Usually, it’s because you’re using an older PC that doesn’t support using both Wi-Fi and the monitor simultaneously. If you’re lucky enough, you won’t need to upgrade your hardware. 

So, can an external monitor affect Wi-Fi? Yes, because most wireless adapters are not designed to handle the power requirements of a monitor. When you plug in an external monitor, your Wi-Fi signal is likely going to drop significantly.

You’ll also notice that your Wi-Fi keeps disconnecting if you’re using a newer laptop with a newer operating system that just doesn’t play nicely with their monitor’s settings. Fortunately, modern laptops have built-in Wi-Fi adapters, so this should no longer be an issue.

How do I stop Wi-Fi from dropping whenever I connect an external monitor on Windows 11?

Attempt the following basic workarounds before any technical troubleshooting:

  • Ensure you’re using the latest version of Windows 11 by running Windows Update and installing any available updates.
  • Shut down any other apps that might be interfering with your Wi-Fi connection and disconnect non-essential hardware.
  • Try connecting directly to your router with an Ethernet cable, and if that doesn’t work, switch to a different network connection if available.

1. Run connection troubleshooters

1.0 Run the Network adapter troubleshooter

  1. Hit the Windows key and click on Settings.settings windows 11
  2. Click on System, then select Troubleshoot.Open system troubleshooter
  3. Select Other troubleshooters.other troubleshooters
  4. Locate the Network Adapter troubleshooter and click on the Run button next to it.Network Adapter Run IPv6 No Internet Access

1.1 Run the Internet Connections troubleshooter

  1. Hit the Windows key and click on Settings.settings windows 11
  2. Go to System, and click Troubleshoot.System - Troubleshoot wifi keeps disconnecting windows 11
  3. Now click Other troubleshooters. Other troubleshooters
  4. Locate Internet connections, and click Run. 
  5. Follow the onscreen prompts to complete the process.  

2. Update your Network driver

  1. Hit the Windows key, type Device Manager in the search bar, and click Open.device manager w11
  2. Navigate to your Network adapter, right-click on it, and select Update driver.
  3. Select Search automatically for updated drivers.

Since Windows is a bit finicky sometimes and may not match you with the correct drivers, you’ll need a sure way of getting the correct ones. Outbyte Driver Updater is the tool you need for the job.

It will find new drivers compatible with your computer and download and install them automatically. This way, you will be able to enjoy a better experience while using the internet.

3. Reinstall your Network drivers

  1. Click on the Start Menu icon, type Device Manager in the search bar, and click Open.device manager w11
  2. Navigate to your Network adapter, right-click on it, and select Uninstall device.
  3. Confirm Uninstall in the next confirmation dialog.
  4. Restart your PC, and your drivers will be automatically reinstalled.

4. Adjust your Network adapter power management settings

  1. Hit the Windows key, type Device Manager in the search bar, and click Open.device manager w11
  2. Navigate to your Network adapter, right-click on it, and select Properties.
  3. Switch to the Power Management tab, uncheck the Allow the computer to turn off this device to save power option, and hit OK.

5. Perform a Network reset

  1. Hit the Windows key and click on Settings.settings windows 11
  2. Navigate to Network & internet.
  3. Select Advanced network settings.going advanced network settings win11
  4. Click on Network reset.Network Reset 1
  5. Next, hit the Reset now button.Network Reset now

If a network reset does not yield the desired results, it could be a hardware issue. In such a case, you should consider upgrading to a reliable network adapter.

What are some tips for maintaining a stable Wi-Fi connection on Windows 11?

  • Update your router’s firmware from time to time.
  • Keep connected devices to a minimum by disconnecting non-essential ones.
  • Ensure your OS and drivers are always up-to-date.
  • Change the wireless adapter power mode to high performance.
  • Run your antivirus software regularly and ensure it is up-to-date.

If you’ve observed all these maintenance checks but still, your Wi-Fi is frequently disconnected, it could be your VPN causing the interference. Sometimes, turning on your VPN turns off your Wi-Fi.

Worst case scenario, you’ll have to upgrade to a modern PC with a built-in network adapter, but on the bright side, it will serve you for years.

Hopefully, we’ve shed some light on the problem and given you a few potential fixes. And while this article is specifically for Windows users, the solutions also apply to other OSes.

As always, we’d like to hear any feedback you have on this article. Let us know whether the solutions worked for you or I you have any other not mentioned here.

Fix: Cursor Keeps Moving to the Left When Typing on Windows 11

Irregular or unintentional mouse movement can affect tasks and be infuriating. And in some cases, users found that the cursor keeps moving to the left when typing in Windows 11. It was more prominent when naming or renaming files.

The problem, surprisingly, is widespread, as per reports in forums. But more often than not, it turned out to be a problem at the user’s end, though we can’t rule out an issue with the OS.

Why does my cursor keep moving to the left?

  • Misconfigured mouse settings
  • You keep hitting the touchpad, or your hand grazes past it.
  • Outdated, corrupt, or incompatible mouse drivers.
  • A bug in the installed version of Windows 11.
  • Third-party apps triggering conflicts.

How do I stop my cursor from jumping around while typing on Windows 11?

Before we head to the slightly complex ones, here are a few quick fixes to try:

  • Connect the mouse to another USB port, or forget the device and re-establish the connection for wireless ones. Also, plug it into another PC to verify if the problem lies with the peripheral or the computer.
  • Check whether the file is being synced by OneDrive. In that case, wait until the process is complete, or you can disable syncing altogether.
  • If using a laptop, ensure your hand is not in contact with the touchpad and check for any pressure at the back of the laptop.
  • Update Windows and unpin all apps from the taskbar, including MS Paint.
  • In case the typing cursor keeps moving left while renaming the file, right-click on it > select Properties > enter the file name in the text field > click OK.

If none work, move to the solutions listed next.

1. Disable the touchpad

  1. Press Windows + I to open Settings, go to Bluetooth & devices from the navigation pane, and click on Touchpad.touchpad
  2. Now, disable the toggle for Touchpad.disable touchpad to fix cursor keeps moving to the left when typing windows 11

When the cursor jumps or moves on its own in a Windows 11 laptop, you might have both the touchpad and the external mouse in use. Verify that and disable the touchpad.

2. Change the mouse settings

  1. Press Windows + S to open Search, type Control Panel in the text field, and click the relevant search result.control panel
  2. Click on Hardware and Sound.
  3. Now, click on Mouse under Devices and Printers.mouse
  4. Go to the Pointer Options tab, tick the checkbox for Enhance pointer precision under Motion, and uncheck Automatically move pointer to the default button in a dialog box under Snap to.enhance pointer precision
  5. Once done, click OK to save the changes, then restart the computer and check whether the problem is resolved.

3. Run the Hardware and Devices troubleshooter

  1. Press Windows + R to open Run, paste the following command, and hit Enter: msdt.exe -id DeviceDiagnostictroubleshooter
  2. Click the Advanced option, and tick the checkbox for Apply repairs automatically.troubleshooter to fix cursor keeps moving to the left when typing windows 11 
  3. Click Next to proceed with the troubleshooting and let the tool identify and fix problems.

4. Reinstall the mouse drivers

  1. Press Windows + X to open the Power User menu, and select Device Manager from the list of options.
  2. Expand the Mice and other pointing devices entry, right-click on the affected mouse/touchpad, and select Uninstall device.uninstall device
  3. If available, tick the checkbox for Attempt to remove the driver for this device, and click then click Uninstall.
  4. Once done, restart the computer and verify whether the cursor still moves backward when typing.

5. Update the mouse drivers

  1. Press Windows + R to open Run, type devmgmt.msc in the text field, and click OK.
  2. Double-click Mice and other pointing devices, right-click on the problematic mouse/touchpad, and select Update driver.update driver to fix cursor keeps moving to the left when typing windows 11
  3. Click on Search automatically for drivers and let Windows search the PC and install the best one available.search automatically
  4. Finally, restart the computer for the changes to come into effect.

If the mouse cursor keeps moving to the left when typing in Windows 11, a quick fix is to update the mouse drivers. In case a newer driver is not available locally, head to the manufacturer’s website, locate the latest version and manually install the device driver.

For those using a wireless mice, update the Bluetooth driver as well.

6. Uninstall conflicting applications

  1. Press Windows + R to open Run, type appwiz.cpl in the text field, and hit Enter.
  2. Select any app you believe may conflict with the mouse, and click Uninstall.uninstall to fix cursor keeps moving to the left when typing windows 11
  3. Follow the on-screen instructions to complete the process.

If the text cursor moves left on its own and the mouse selects everything, it could be a third-party application to blame. So, uninstall the app to get things running. 

For complete removal, we recommend using an effective uninstaller tool to clear any leftover files and registry entries. 

7. Perform an in-place upgrade

  1. Go to Microsoft’s official website, select the installed OS edition and product language, and then download the Windows 11 ISO. 
  2. Once downloaded, double-click the ISO file and click Open.open
  3. Run the setup.exe file.setup.exe
  4. Now, click Yes in the UAC prompt.
  5. Click Next to proceed.next
  6. Click Accept to agree to the license terms.
  7. Finally, verify that the setup reads, Keep personal files and apps, and click Install to start the repair upgrade.in-place upgrade to fix cursor keeps moving to the left when typing windows 11
  8. It may take a few hours to complete the repair.

To rule out any software problems, we must perform an in-place upgrade. This will reinstall all Windows files without clearing the installed apps or personal data. 

Tip icon Tip
When none of the fixes work, it’s likely a hardware issue to blame, and we recommend you replace the mouse. If it’s just the touchpad connected, get it looked at by a certified repair professional.

If the mouse cursor keeps moving to the left when typing in Windows 11, check both the hardware and software aspects. Remember, based on our research, most used had to replace the mice. And if you, too, are in a similar situation, go with a wired USB mouse.

Also, if the mouse keeps freezing or disappearing, the two problems could be related. Verify that and eliminate both issues in one go!

If you know any other solutions that worked for users, drop a comment below

6 Ways to Clear Cache And Cookies on Windows 10

Your browser cache can sometimes prevent certain websites from loading, so many people want to know how to clear cache and cookies on Windows 10.

The process is rather simple and can be performed in a matter of moments, so today, we’re going to show you how to do this properly in several different browsers.  

How do I clear cache and cookies on my Windows 10 PC?

1. Use the Settings app

  1. Press the Windows key + I to open the Settings app and navigate to System.
     
  2. Next, select Storage in the left pane, and in the right pane choose Temporary files.
  3. Select the type of files you want to remove and click on Remove files.
  4. Wait for the process to finish.

2. Use Disk Cleanup

  1. Press the Windows key + R and enter cleanmgr.exe. Next, press Enter.
  2. Select your C drive and click OK.
  3. Select the files you want to remove and click OK to remove cache and clear disk space.
  4. Alternatively, you can click on Clean up system files to reveal more cache files that you can remove.

3. Clear the DNS cache

  1. Press the Windows key + X and choose PowerShell (Admin) from the list.
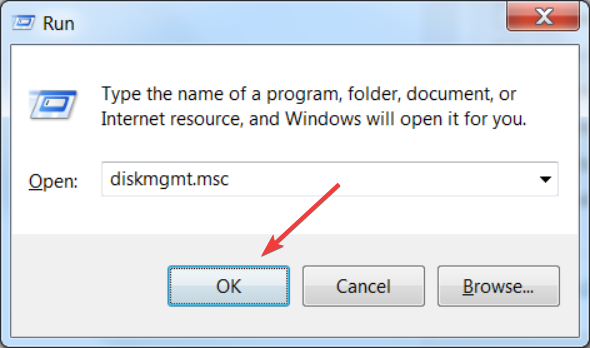
  2. Run the following command: ipconfig /flushdns
  3. Wait for the process to finish. In most cases, it’s instant.

4. Delete the Microsoft Store cache

  1. Use the Windows key + R shortcut to open the Run dialog.
  2. Type wsreset.exe and press Enter.
  3. Wait while Windows clears the store cache.

5. In Microsoft Edge

  1. Click the Menu icon in the top right corner and choose Settings from the drop-down menu.
  2. Navigate to Privacy, search, and services in the left pane. In the right pane, head to Clear browsing data and click Choose what to clear button.
  3. Select the data you want to clear and click on Clear now.
  4. If you want to clear the cache for Internet Explorer, repeat the same steps, but select Choose what to clear button in the Clear browsing data for Internet Explorer section.

6. Clear Internet Explorer 11 cache and cookies

  1. Press the Windows key + S and type internet options. Select Internet Options from the list of results.
  2. Click the Delete button in the Browsing history section.
     
  3. Check all the types of data you want to remove and click on Delete.

Where do I find cookies on Windows 10?

For Internet Explorer, it’s the following path:

C:\Users\WindowsReport\AppData\Local\Microsoft\Windows\INetCookies

You can find Chrome cookies in the following location:
C:\Users\WindowsReport\AppData\Local\Google\Chrome\User Data\Default\Network

For Microsoft Edge, the location is the following:
C:\Users\WindowsReport\AppData\Local\Microsoft\Edge\User Data\Default\Network

Firefox stores cookies in the following location:
C:\Users\WindowsReport\AppData\Roaming\Mozilla\Firefox\Profiles

Does deleting cache delete cookies?

Deleting the cache doesn’t delete cookies, but many browsers are set to clear both cache and cookies simultaneously by default.

The two can be removed separately from your PC without affecting one another; just be sure not to select the cookies option when clearing the cache.

As you can see, clearing cache and cookies on a Windows 10 laptop takes just a few seconds, regardless of the operating system you’re using.

If you’re on the latest version of Windows, be sure to check our guide on how to clear the cache on Windows 11. It’s worth mentioning that you can automate this process using cookie cleaner software, so be sure to consider it as well.

Besides browser cache, there’s app cache as well, and we have a great guide on how to delete app backup files, so be sure not to miss it.

If the cache is causing disruptions on your Xbox Series X, our article on Clearing Cache on Xbox Series X can help you troubleshoot.

Do you know of any other method for clearing cache and cookies on your Windows 10 PC? Don’t hesitate to share it with us in the comments section!

Disable Taskbar Thumbnail Previews on Windows 11 [How to]

Taskbar thumbnails can be useful but many users want to disable Taskbar thumbnail preview on Windows 11 since they find it distracting.

While this feature looks great, thumbnails can take a lot of space, especially if you’re multitasking, so we’re going to show you a few ways to remove them.

How do I get rid of the previews in Taskbar in Windows 11?

1. By using the Settings app

  1. Hit the Windows key and click on Settings.settings windows 11
  2. Click on System then select About.
  3. Hit Advanced system settings.
  4. Navigate to the Advanced tab and select Settings under Performance.
  5. In the Visual Effects tab, check the Enable Peek, Save taskbar thumbnail previews and
    Show thumbnails instead of icons options. Hit Apply and OK to save the changes.
  6. You may have to restart your PC.

Ensure you check all your thumbnails are enabled, including those from File Explorer. Sometimes, thumbnail previews in File Explorer may not show up due to incorrect configurations.

2. By using the Group Policy Editor

  1. Hit the Windows + R keys to open the Run command.
  2. Type gpedit.msc in the dialog box and hit Enter.GPEDiT.msc -Windows Remediation Service Failed to Start?
  3. Navigate to the following location: User Configuration/Administrative Templates/Start Menu and Taskbar
  4. Switch to the Standard tab and double-click on Turn of taskbar thumbnails.
  5. Select Enabled, then hit Apply and OK to effect the changes.

This solution won’t work in the Home Edition of Windows since Group Policy Editor isn’t available. However, there are ways to enable gpedit in Windows 11.

3. By using the Registry Editor

  1. Before you make any changes, back up your registry or create a restore point.
  2. Hit the Windows + R keys to open the Run command.
  3. Type regedit in the dialog box and hit Enter.
  4. Navigate to the following location: HKEY_CURRENT_USER\Software\Microsoft\Windows\CurrentVersion\Explorer\Advanced
  5. Right-click on an empty space on the right pane, select New DWORD (32-bit) Value, and name it as ExtendedUIHoverTime.
  6. Double-click on ExtendedUIHoverTime, and in the Value data entry, type in a value from 10000 and below.
  7. Restart your PC.

You can also try this registry adjustment:

  1. In Registry Editor, go to HKEY_CURRENT_USER\Control Panel\Mouse
  2. Locate MouseHoverTime value and double-click it.
  3. Set the value to 2000 or more and click OK.
  4. After doing that, restart your PC.

If the Taskbar thumbnail preview disappears too quickly, you may have to change the hover time delay.

How do I make the Taskbar show a list instead of thumbnails?

  1. Open Registry Editor.
  2. Navigate to HKEY_CURRENT_USER\Software\Microsoft\Windows\CurrentVersion\Explorer\Taskband
  3. Create a new DWORD and name it NumThumbnails. To do that, right-click the right pane and choose New and then DWORD (32-bit Value).

These are just a few potential methods that you can use to disable the Taskbar thumbnail preview on Windows 11. In most cases, you just need to disable a few settings or modify the registry.

If you’re a huge fan of taskbar previews, but your thumbnail previews are not showing, you can check out our helpful guide for quick fixes.  

Keep in mind that issues with Taskbar can occur, and many reported that Taskbar isn’t centered and in some rare cases Taskbar is not working at all. Luckily, we covered those issues in separate guides.

For any additional thoughts on this topic, let us know in the comment section below.

LiveKernelEvent Code 1a8 & 1b8: How to Fix These Hardware Errors

Hardware error 1a8 appears in log files after a system crash, and as such it can cause stability issues and loss of files on your PC.

Since this error will negatively affect your performance and the stability of your system, it’s important to address it as soon as possible, so keep on reading to learn how to fix it.

 What is live kernel event 1a8 & 1b8?

These error codes will usually appear when viewing Reliability History after a system crash. They are caused by the following:  

  • Issues with hardware components, in most cases with your graphics card and faulty drivers
  • Overclocking settings in BIOS
  • FreeSync settings on your PC

How do I fix LiveKernelEvent code 1a8 & 1b8?

1. Install older graphics driver

  1. Press the Windows key + X and choose Device Manager.
  2. Locate your graphics card driver, right-click it, and click on Uninstall device.
     
  3. Check Attemprt to remove driver software for this device and click on Uninstall to remove the corrupted drivers.
  4. Next, navigate to your graphics card manufacturer’s website, and select your model from the list.
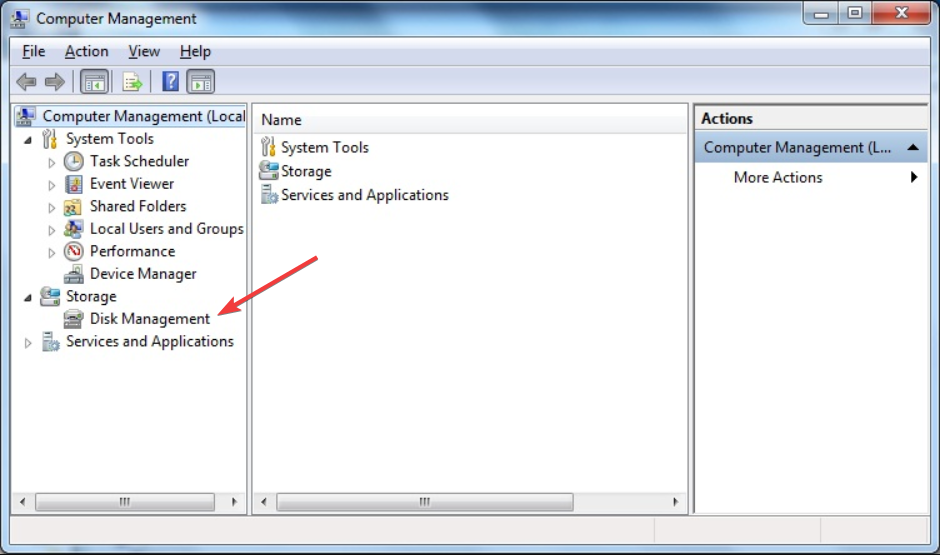
     
  5. After that, select the driver you want to use. Some users suggest using the previous driver update.
  6. Lastly, click on Download and wait for the process to finish.
  7. Once the download is finished, run the setup file to install the correct driver.

To remove graphics card drivers completely, many users are recommending using Display Driver Uninstaller, so you might want to consider it.

Rolling back the driver can resolve many incompatibility issues like LiveKernelEvent 144, giving you a stable environment to play your favorite game.

2. Disable auto overclocking in BIOS

  1. Restart your PC and keep pressing F2 or Del key to enter BIOS.
  2. Next, locate the Ai Overclock Tuner feature and disable it or set it to Manual. Sometimes this feature is called Game Mode or Auto Overclocking depending on your motherboard.
  3. Save changes.

If you are unable to enter BIOS, we have a great guide on how to access BIOS that might be helpful.

3. Disable FreeSync on your monitor

  1. On your monitor, press the Menu button.
  2. Navigate to the display settings.
  3. Locate FreeSync or AdaptiveSync and set it to disabled.
  4. Save changes.

Also, be sure to disable FreeSync on a software level:

  1. Open AMD Software Adrenaline Edition.
  2. Click the Gear icon in the top right corner.
     
  3. Choose Display and then disable AMD FreeSync.

Hardware errors 1a8 or 1b8 will appear due to issues with your graphic drivers, and in most cases, they can be fixed with a quick reinstall. In some instances, a hard disk hardware error or GPU problem can cause LiveKernelEvent 141, LiveKernelEvent error, or Kernel Power error 41.

What method did you use to fix this problem? Feel free to share it with us in the comments section below.

5 Ways to Fix Docked in Taskbar Greyed Out on Windows 11

For many, the Docked in the taskbar option is greyed out in Windows 11. The first thing to try is to switch languages with hotkey Windows + Spacebar. But why is it happening and how to fix it?

Most commonly, the docked won’t sho when you only have one language pack installed. Errors in installation, corrupt system files or profiles or Windows bugs may also be at fault.

Follow the steps below to fix it as soon as possible.

How do I fix Docked in the taskbar option if it’s greyed out on Windows 11?

1. Disable the desktop language bar

  1. Press Windows + I to open Settings, go to Time & language from the navigation pane, and then click on Typing.typing
  2. Click on Advanced keyboard settings.
  3. Untick the checkbox for Use the desktop language bar when it’s available.uncheck to fix docked in the taskbar greyed out windows 11
  4. Restart the computer for the changes to apply.

If you are wondering how to dock the language bar in Windows 11, just disable the setting that shows the input languages on the desktop. Before that, check whether the taskbar is not working and get to the bottom of it.

2. Download another keyboard

  1. Press Windows + I to open Settings, select Time & language from the left, and click on Language & region.language & region
  2. Click the ellipsis next to the affected language and select Langauge options.language options
  3. Click the Add a keyboard button next to Installed keyboards.
  4. Select one from the list and wait for the installation to complete.add keyboard to fix docked in the taskbar greyed out windows 11
  5. Once done, head back to Typing, and click on Advanced keyboard settings.advanced keyboard setitngs
  6. Click on Language bar options.
  7. Select the Docked in the taskbar option, and click OK to save the changes.docked in the taskbar

3. Re-install the affected language

  1. Press Windows + I to open Settings, select Time & language from the left, and click on Language & region.
  2. Click the ellipsis next to the other language, and select Move up.move up
  3. Now, click on the ellipsis next to English (United States) and select Remove.remove to fix docked in the taskbar greyed out windows 11
  4. Click Yes in the confirmation prompt.
  5. Once done, restart the PC for the changes to come into effect.
  6. Go to Language & region settings, and click on Add a language.
  7. Select English (United States) from the list, and click Next.English (United States)
  8. Make sure you have ticked the checkbox for all components, then click Install, and wait for the installation to complete.
  9. Finally, restart the PC, go to Language bar options, and tick the checkbox for Docked in the taskbar.

4. Modify the Registry Editor

  1. Press Windows + R to open Run, type regedit in the text field, and hit Enter.regedit
  2. Click Yes in the UAC prompt. 
  3. Paste the following path in the address bar and hit Enter or navigate from the left pane: HKEY_CURRENT_USER\SOFTWARE\Microsoft\CTF\LangBar
  4. Double-click the ShowStatus DWORD, then under Value data, enter 4, and click OK to save the changes.modify to fix docked in the taskbar greyed out windows 11
  5. Restart the computer for the changes to apply and check whether the option is enabled.docked in the taskbar

You should now find the Docked in the taskbar setting selected in Windows 11 for all the keyboard inputs, even though the option remains greyed out. If you uncheck it, re-enabling it won’t be possible unless you edit the Registry again.

5. Create another user account

  1. Press Windows + R to open Run, type netplwiz in the text field, and click OK.
  2. Click the Add button.add
  3. Click on Sign in without a Microsoft account.
  4. Now, click the Local Account button.local account
  5. Fill out the username, password, and password hints fields. 
  6. Next, select the newly created account, and click on Properties.properties
  7. Go to the Group Membership tab, select Administrator, and click OK to save the changes.administrator to fix docked in the taskbar greyed out windows 11
  8. Finally, sign into the new account, and you should be able to dock the language bar to the Windows 11 taskbar.

The problem often arises when there are corrupt files in the user account. A quick fix is to create a local account. Make sure to set the account as administrator for maximum privileges and permissions.

Remember, it’s usually misconfigured language options or corrupted files and not a problem with the OS to blame when Docked to the taskbar is greyed out in Windows 11.

The issue could also appear when the pinned taskbar items keep disappearing, so your approach should be to fix that first.

If another solution worked for you, share it with us and fellow community members in the comments section.

Microsoft will only change CPUs in the next Surface laptops

On September 21, Microsoft hold a special event that will most likely uncover the next generation of Surface laptops, among other devices and software. But with two weeks ahead of the conference, supposedly, Microsoft won’t bring any radical changes to the current devices, other than a refresh of CPUs, according to WinFuture.

All the changes coming to the next Surface Laptops

Apparently, the CPU upgrade will happen to the Surface Studio, the Surface Go 2 and the Surface Go 3. And there will be slight changes and improvements. For example:

  • The Surface Studio will receive Intel’s new 45W Core i7-13800H Raptor Lake CPU, and you’ll be able to customize it: 16 GB, 32GB with 512GB or 1TB Storage.
  • The Surface Go 2 will get Intel’s Core i5-1235U Alder Lake CPU, and you’ll be able to choose versions with 128GB or 256GB SSD. However, the laptop will only support 8GB of RAM.
  • The Go 3 laptop will suffer the greatest change, as it will supposedly get the Intel N200 quad-core processor from the Alder Lake N series, switching up from its current ARM chipset. It will come in versions of 64GB, 128GB, and 256GB SSD, but it will be limited to 8GB of RAM.next surface laptops

It’s also worth noticing that Microsoft might announce the new Surface Go 4. According to WinFuture, this iteration might actually be the improved Go 3 laptop. There won’t be any design changes at all, either. All the laptops will keep the same design, more or less.

The new interactions of the Surface laptops should be available at the same price, starting in October. However, we’ll have to wait until September 21 to see if there are any price changes.

As for the next generation of the Surface laptops, there are no clues if Microsoft will release them this year. However, the Redmond company might surprise all of us.

Either way, we’ll keep you covered with everything going on at the Microsoft Special event on September 21.

How to Quickly Change the Default Browser in Outlook

By default, when you click on a link in the Outlook app, it opens in your default system browser. If you want to open email links in another browser by default, you must change a few options.

Below, we’ve listed the steps to do just that for Windows 11, Windows 10, and even your mobile devices.

What does changing the default browser do?

  • Customizes your link-handling experience on Outlook.
  • Allows you to use your preferred web browser to open when you click a link or a document.
  • Fixes issues like hyperlinks not working in Outlook.

How do I change my default browser in Outlook?

1. Use the Outlook Options (Outlook 365 and Outlook 2019, & Outlook 2016)

  1. Press the Windows key, type outlook, and click Open. Outlook Start menu open Quickly Change the Default Browser in Outlook?
  2. Go to File.File menu
  3. Click Options to open the Outlook Options window.Outlook Start menu open Quickly Change the Default Browser in Outlook?
  4. Go to Advanced, locate File and browser preferences for Open hyperlinks from Outlook in, and select the browser from the drop-down. For older versions of Outlook, look for the Link Handling option instead.Outlook settings - Quickly Change the Default Browser in Outlook
  5. Click OK to save the changes.

2. Use the Settings app (Older versions of Outlook)

  1. Press Windows + I to open Settings.
  2. Go to Apps, then select Default apps.Apps - Default apps - Change the Default Browser in Outlook?
  3. Locate the web browser from the list of apps.Select Google Chrome
  4. Click the Set default button to change the default browser on Windows 11.Set as default

You can use any of the above methods to change the default web browser in the Outlook app on your Windows 10 PC as well.

If you often use Microsoft Outlook to handle email messages, making it the default email client on Windows 11 can streamline the email management process.

3. On an Android device

  1. Open the Settings app from the home screen.Settings icon Android
  2. Go to Apps.Apps
  3. Click Default apps.Default apps
  4. Tap on the Browser app.Browser apps
  5. Choose the preferred one.Chrome - Change default browser on Outlook

4. On an iPhone

  1. Launch the Settings app from the home screen.iPhone settings - Default browser on Outlook change
  2. Locate and tap the preferred browser from the list.Select Browser
  3. On the next screen, tap the Default Browser app option.Default browser app
  4. Now tap on the browser you want to choose.Choose the browser

Testing your new default browser setting in Outlook

Once you have selected the new default web browser for Outlook, launch Outlook, open an email with a link, click on the link, and check if it opens in the preferred web browser. If not, restart Outlook and try again.

You can follow the same steps on your mobile device. If it doesn’t work, try redoing the steps above or leave us a comment in the section below and we’ll try to guide you.

Microsoft’s new Python learning module empowers coders with GitHub Copilot, Codespaces

In exciting news for Python coders, Microsoft is rolling out a new training module, “Using GitHub Copilot with Python.”

The module is designed to guide users in integrating GitHub’s Copilot and Codespaces functionalities within their Python projects, whether they are adding new features or debugging code, the software giant announced in a blog post.

We are excited to announce the release of the new Using GitHub Copilot with Python – Training Learn Module. The Module guides you on how you can work with GitHub Codespaces and Copilot in your Python projects, through adding new features and debugging your code.

The Advantage of Codespaces

The new module introduces users to GitHub Codespaces, a top-notch developer environment hosted in the cloud. Compatible with Visual Studio Code, Codespaces offers a fully configured and customizable workspace, easily accessible from any device.

In the new module, Microsoft ensures a swift and hassle-free start for users by providing them with a preconfigured Codespace environment. Fledgling developers and seasoned coders alike will appreciate the timesaving convenience of such an integrated, prepared work setup.

The Power of GitHub Copilot

The “Using GitHub Copilot with Python” module introduces Python programmers to their new indispensable ally – GitHub Copilot. Is there a better alternative to time-consuming manual lookups of documentation, spending hours debugging misbehaving code, or creating tests and documentation? Microsoft believes there is now with GitHub Copilot.

Designed as an advanced coding partner, GitHub Copilot offers intelligent coding assistance by suggesting code snippets and completing lines of code. The module will instruct users how to leverage GitHub Copilot most effectively, sharing insights on crafting effective prompts and following best practices for updating and debugging a Python Web API.

An Endorsement of Your Skills

Upon completion, learners will earn a badge to validate and display their newly acquired skills. It seems that by integrating GitHub Copilot and Codespaces into the curriculum, Microsoft’s training module aims to equip Python developers with cutting-edge practices for effective coding.

Touted to save time, reduce errors, and increase coding efficiency, the fresh approach is a significant step forward in catering to the needs of Python developers across the globe.

Fix: Taskbar Thumbnail Preview Disappears too Quickly on Windows 11

While the Taskbar thumbnail preview is a handy feature, some users reported problems with it.
In most cases, application icons can’t be clicked because the thumbnail preview goes away too fast.

In this guide, we will discuss the expert-recommended methods to fix the Taskbar preview issue immediately after explaining the causes.

Why is the Taskbar thumbnail preview disappearing so fast?

  • Corrupted system files or other system file errors
  • Outdated version of Windows
  • Third-party security software conflicts
  • Corrupted user profile

How do I stop the Taskbar thumbnail preview from disappearing quickly on Windows 11?

Before proceeding with any steps to fix the Taskbar thumbnail preview not working on Windows 11, go through the following preliminary checks:

  • Right-click desktop> from the context menu, select Refresh.
  • Close the unwanted apps, uninstall or turn off third-party antivirus, and restart your computer.
  • Press Ctrl + Shift + Esc to open Task Manager, right-click Windows Explorer, and select Restart.
  • If using a laptop, look for an option to put your battery at Full charge.
  • Run Disk Cleanup to remove junk files.

1. Update Windows

  1. Press Windows + I to open Settings.
  2. Go to Windows Update, and click Check for updates.Windows Update Check for updates - Taskbar Thumbnail Preview Disappears too Quickly on Windows 11
  3. If available, click Download and install. Wait for the process to complete.

During the update, your computer may restart, so save your work and close the entire app.

2. Verify the Performance Options

  1. Press Windows + I to open Settings.
  2. Go to System, then About.
  3. Click Advanced System Settings.System About - Advanced system settings
  4. On the System Properties window, under Performance, click the Settings button.SystemPropertiesAdvanced_rnMCTO2RCI
  5. Ensure Animate controls and elements inside windows, Enable Peek, and Show thumbnails instead of icons are selected. If not, place a checkmark next to all of them.Change performance options
  6. Click OK, then OK to confirm the changes.

3. Use the System File Checker

  1. Press the Windows key, type cmd, and click Run as administrator.CMD elevated Taskbar Thumbnail Preview Disappears too Quickly on Windows 11
  2. Copy & paste the following command to repair the system files and hit Enter: sfc /scannowSFCSCANNOW CMD
  3. Wait for the command to be executed, then restart your PC. Once the system is up, hover over any Taskbar icon to check if the issue persists.

As a faster and more practical alternative, we suggest trying repair software to replace corrupt and malfunctioning system files automatically with new Windows components.

4. Register and reinstall the ShellExperienceHost app package

  1. Press the Windows key, type powershell, and click Run as administrator.Powershell Taskbar Thumbnail Preview Disappears too Quickly on Windows 11
  2. Type the following command to register and reinstall the ShellExperienceHost app package and press Enter: Get-AppxPackage Microsoft.Windows.ShellExperienceHost | foreach {Add-AppxPackage -register "$($_.InstallLocation)\appxmanifest.xml" -DisableDevelopmentMode}powershell_REINSTALL Shell
  3. Wait for the command to be executed, then reboot your computer to save the changes.

The ShellExperienceHost is an essential Windows shell component responsible for various user interface elements, including Taskbar, and this command restores its normal functioning.

5. Change hover delay time

  1. Press Windows + R to open the Run dialog box.Regedit Taskbar Thumbnail Preview Disappears too Quickly on Windows 11
  2. Type regedit and click OK to open Registry Editor.
  3. Before making any changes, first create a backup. Go to File, then click Export. Save the .reg file at a desired location.Export
  4. Now, on Registry Editor, navigate to this path: Computer\HKEY_CURRENT_USER\Software\Microsoft\Windows\CurrentVersion\Explorer\Advanced
  5. On the right pane, locate ThumbnailLivePreviewHoverTime. If you can’t find it, right-click on the blank space, click New, then DWORD (32-bit) Value.New, DWORD
  6. Right-click the DWORD, select Rename from the context menu, type ThumbnailLivePreviewHoverTime, and press Enter.Rename
  7. Double-click it to edit, select Base as Decimal, and for Value data, enter Time in milliseconds to increase the delay in thumbnail preview.regedit_Decimal
  8. Click OK, close Registry Editor, and restart your computer to let the changes take effect.

When you hover over the Taskbar icons, it will stay open for the selected time. To reset the default Taskbar thumbnail preview delay time, choose the ThumbnailLivePreviewHoverTime, and press Delete on your keyboard.

You can change the size of the Taskbar on Windows 11 using the same registry key; check this guide to learn the complete process.

6. Create a new user profile

  1. Press Windows + I to open Settings.
  2. Go to Accounts and then Other Users.Apps - Other users Taskbar Thumbnail Preview Disappears too Quickly on Windows 11
  3. Locate Add other user, then click Add account.Add other user
  4. Click I don’t have this person’s sign-in information on the Microsoft account page.Microsoft Sign -in
  5. Now click Add a user without a Microsoft account.Add a user without Microsoft account
  6. Enter a username and password for the new profile and click Next.Create a user
  7. Once the user profile is created, click Change account type.
  8. Select Administrator and click OK.Change account type
  9. Press Ctrl + Alt + Delete and select Switch user. Select the new profile, log in, and check if the issue persists.

7. Perform a system restore

  1. Press Windows + R to open the Run dialog box.rstrui command Restore point Taskbar Thumbnail Preview Disappears too Quickly on Windows 11
  2. Type rstrui and click OK to open System Restore.
  3. Select Choose a different restore point in the System Restore window and click Next.Next Choose a different restore point
  4. Select a restore point and click Next.Choose a point
  5. Click Finish to initiate the process.Finish

Windows will restart and restore your computer to the last known good configuration. If the System Restore isn’t completed successfully, read this guide to understand why.

If these fixes didn’t help, your Taskbar might not be working correctly. Should this be the case, you can disable and enable the thumbnail previews and see if it works.

Remember that the issue could be due to misconfigured system settings or outdated Windows, so apply these fixes first.

Do you know other methods that worked for you? Don’t hesitate to mention them in the comments section below, and we will happily add them to the list.