This PC can’t be upgraded to Windows 10 v1903 [POTENTIAL FIX]

Windows 10 May 2019 Update brings a weird bug that blocks the installation of the new OS. As a matter of fact, Microsoft already acknowledged the issue.

The company stated that Windows 10 users who attempt to install Windows 10 version 1903 may encounter the error This PC can’t be upgraded to Windows 10.

The tech giant says that this error arises if an external SD card or USB device is connected to your PC during the installation of Windows 10 v1903. Microsoft explains that drives are not properly reassigned during the upgrade process.

The Redmond giant suggested that users should unplug all external SD cards and USB devices from their system. Finally, you need to reboot their systems before starting the upgrade process.

However, one Reddit user created a post to report that unplugging USB devices didn’t solve the issue.

I unplugged all my USB devices on my gaming desktop and still failed, then realized my Corsair AIO water cooler is also using USB and the update still fails. For anyone with an AIO water cooler that uses USB, if you’re able to unplug that, you’ll have to do so as well in order to update or just wait for an official patch, or go Insider.

It is pretty annoying that Windows users have to unplug their AIO devices. There are some unofficial reports that suggest installing the latest Insider patches can fix the issue.

Microsoft confirmed that this issue no longer exists in Windows 10 Insider Preview Build 18877 or later. However, the company promised to release a hotfix for the general public in the upcoming release. 

RELATED ARTICLES YOU NEED TO CHECK OUT:

Windows 10 May 2019 Update doesn’t recognize SB X-Fi sound cards

Many Windows 10 users reported experiencing issues with their Sound Blaster X-Fi sound cards.

Creative Technology’s SB sound cards drivers often fail to recognize the speakers.

This issue seems to occur after users installed the Windows 10 May 2019 Update.

Here’s how one user describes this issue:

Hi, like above. I updated my Windows 10 from 1803 to 1903 and my XFI stopped working. I formated my PC and still the same problem. I install the drivers (daniel_k 4.0 ) without any problems, but it doesnt detect my yy… (speaker X-fi), just SPDIF
Is there any working solution ?

Another user confirms he encountered the same problem:

Just moved from W10Pro 1809 to 1903 (18362.116) and unfortunately my X-Fi Platinum Fatal1ty Champion stopped working. Reinstalling SBXF_PCDRV_L11_2_30_0011.exe from 21 January 2016 does not make any difference. Some ports like SPDIF In/Out pop up in Device manager but no Speaker endpoint. Is there going to be any newer driver release for W10-1903 or is this the end of the road?

It seems that Sound Blaster X-Fi sound card users have no reason to worry though. They just need to have a little patience until a hotfix is rolled out to their computers.

Creative is already aware of this issue and are working on developing a new driver that provides support for Sound Blaster X-Fi sound cards on Windows 10v 1903.

 Creative_Ryan
There will be a driver released very soon. Received an update from the team and it looks like within this week. THanks for the patience! There’s a LOT of work to do under the hood for these cards (that are 10 years old).

Have you encountered similar issues after installing the latest Windows 10 OS version on your machine? Let us know in the comments below.

If you’re looking for ways to troubleshoot this problem, here are a few suggestions:

Set associations for a program is blank/greyed out [SOLVED]

Windows, by default, sets some programs as default apps to open files with specific file types. The user can, however, change the default program by changing the file association for a program from the File Explorer. However, sometimes, the set association for a program may not preserve the changes or show the section blank or greyed out.

Is the File Association option blank or greyed out for default programs? For starters, reset default apps in Windows 10 and re-assign them again.

This is the best way to resolve the problem. On the other hand, if the issue persists, restore default Windows File Extensions or use Registry Editor to fix it.

Check the detailed instructions below.

How do I fix Set associations for a program is blank/greyed out?

  1. Reset Default Apps in Windows 10
  2. Restore Default Windows File Extensions
  3. Alternate Registry Editor Fix

1. Reset Default Apps in Windows 10

If the issue persists after performing a deep scan with your security programs, try to reset the default apps in Windows 10. Here is how to do it:

  1. Click on Start and select Settings.
  2. Click on Apps.
  3. From the left pane, click on Default Apps.
    Reset Default Apps Windows 10 Set associations for a program is blank
  4. Under Default Apps, scroll down and click on the Reset button.

Now try to open the file and check if the “Always use this program to open file type” option for Open with is functioning or not.


2. Restore Default Windows File Extensions

If you are using Windows7 or if the resetting the Default Apps settings in Windows 10 did not resolve the error, you can restore the default Windows file extension through the registry editor. Here is how to do it.

  1. Press “Windows Key +  R” to open Run.
  2. Type regedit and hit enter to open the registry editor.
  3. Now, navigate to the following location in the Registry Editor.
    • Computer\HKEY_CURRENT_USER\Software\Microsoft\Windows\CurrentVersion \Explorer\FileExts
  4. Under FileExts, look for the file extension that is giving you the trouble. I have used .bmp for this demonstration.
    Registry Editor Export Userchoice Set associations for a program is grayed out
  5. Expand the .bmp Key/folder and look for UserChoice folder.
  6. Right-click on the UserChoice folder and select Export. Enter a name for the key and save it.  (This step is optional and created for backup purpose).
    Registry Editor Delete UserChoice Set associations for a program is blank
  7. Again right-click on the UserChoice folder and select Delete.
  8. Close the registry editor and reboot the system. After the restart, check if you are able to set file association for the program.

Want to enable Reserved Storage on Windows 10? Here’s how to do it properly!


3. Alternate Registry Editor Fix

If the problem is occurring after you have set a specific file type to open with a specific program(like .ini file type with regedit tool) and now unable to restore the settings to default, follow these steps.

Note: For this article, I will be using the regedit tool for demonstration. Make sure you apply these steps to the problematic program appropriate in your case.

  1. Press Windows Key + R to open Run.
  2. Type regedit and press OK.
  3. In the Registry Editor, navigate to the following location:
    • HKEY_CLASSES_ROOT\Applications
  4. Expand the Applications Key and click on Regedit.exe.
    Regedit NoOpenWith Set associations for a program is blank
  5. In the right-pane, you should see the NoOpenWith value. Right-click on it and Rename it as NoOpenWith2.
    Regedit NoOpenWith 2 Set associations for a program is grayed out
  6. Close the registry editor and check for any improvements.

If you found our solutions helpful, let us know in the comments section below.

RELATED STORIES YOU MAY LIKE:

Outlook Meeting Location Suggestions are Not Working [Fix]

Outlook allows users to add other users to the Calendar. However, recently, users have reported an issue where the Outlook meeting location suggestions are not working.

When you add new users to an existing meeting and try to send updates only to added or deleted attendees, the Outlook Meeting location is missing. There are a few tricks to Outlook and get things running!

What can I do if Outlook meeting location suggestions are not working?

1. Repair Outlook Client

  1. Close the Outlook client and other Office applications if running.
  2. Press Windows + R to open Run, type appwiz.cpl, and hit Enter.
  3. Select your Microsoft Office client and click on the Change button on top.
    repair office 2016
  4. Select the Quick Repair option and click on the Repair button. 
    Microsoft Office Repair Option
  5. If that doesn’t work, select Online Repair the next time.
  6. Follow the on-screen instructions in case asked to apply any fixes.
  7. Once done, reboot the PC and check whether the error is fixed.

Microsoft offers an inbuilt troubleshooter to fix Microsoft Office suite-related issues. Since Outlook also comes as part of Microsoft Office, run the repair tool to fix things when Outlook 2016 meeting location suggestions are not working or missing.

2. Repair Outlook Data File

2.1 Locate the data files

  1. In the Outlook client, click on File, and select Account Settings. 
  2. Select Account Settings from the option.
  3. Go the Data Files tab and note down the Outlook data file location. It should look something like:C:\Users\username\Documents\Outlook Files
    Outlook Data Files Location

2.2 Run the Inbox Repair tool

  1. Exit Outlook and other Office applications if running.
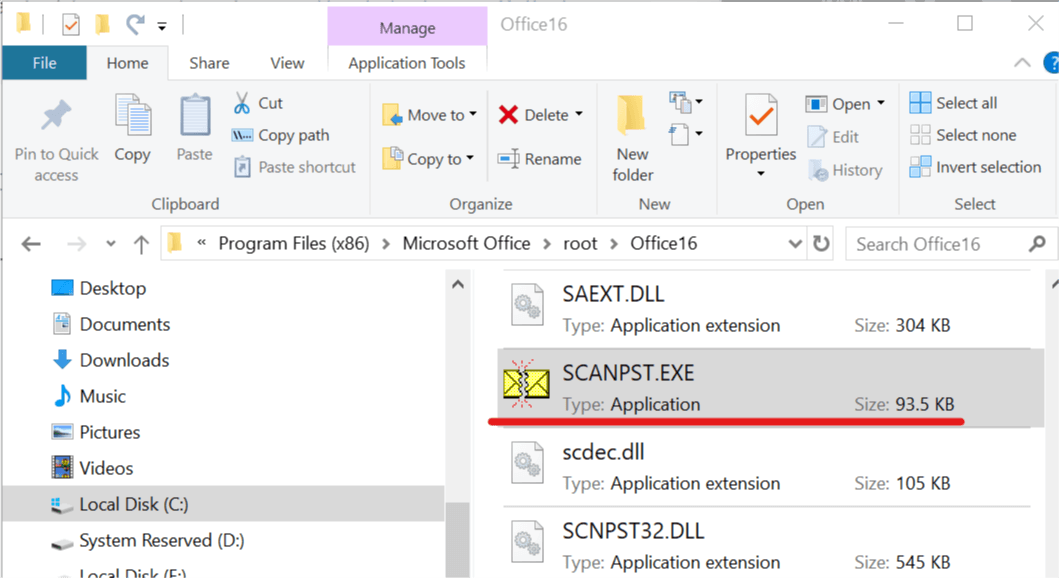
  2. Press Windows + E to open File Explorer and navigate to the following location:C:\Program Files (x86)\Microsoft Office\Root
  3. Now, click on the version of the Microsoft Office folder installed on your system. In this case, it is Office 16.
    SCANPST - exe file
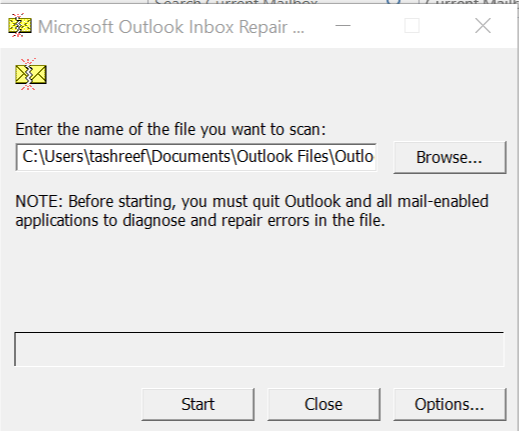
  4. Locate SCANPST.exe file and run it. It will open the Microsoft Office Inbox Repair tool
  5. Click on the Browse button and navigate to the Outlook Data Files location. Select the file and click Open.
    Outlook Inbox Repair Tool
  6. Click the Repair button to begin the process and check for any improvements after it is over.

The Inbox Repair tool can help you with repairing the Outlook data file in case the issue occurs due to missing data or corruption. The tool checks the Outlook data files on your computer to see if they are in good condition. 

By now, you should have fixed things when Outlook 2019 meeting location suggestions are not working.

Before you leave, do check some quick tips to speed up Outlook when it’s running slow.

Tell us which fix worked for you in the comments section below.

Album Art Cannot be Changed When a Song is in Use [Fix]

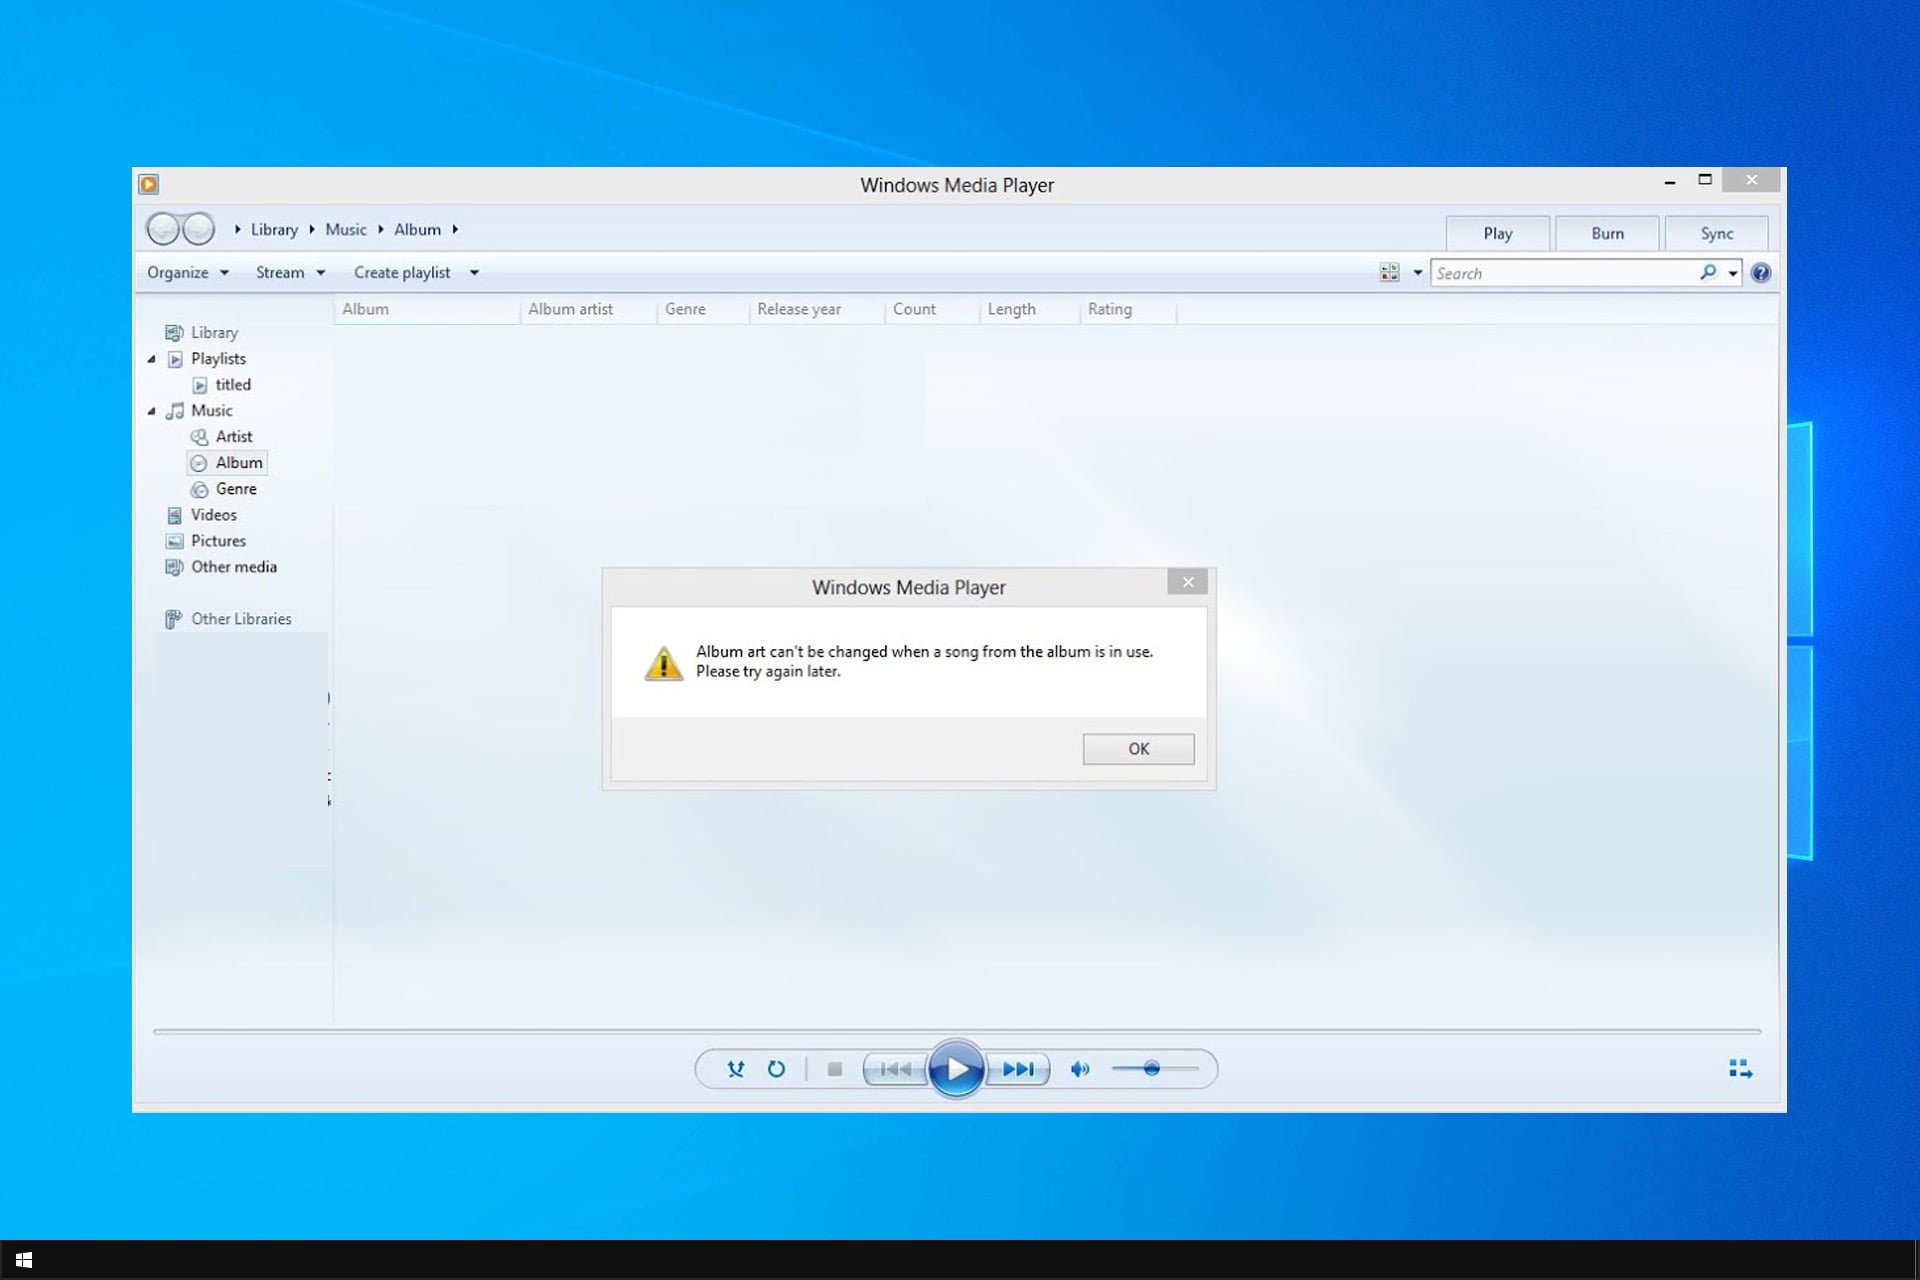
Windows Media Player allows you to add album art to your favorite tracks, but you might get Album art cannot be changed when a song is in use message sometimes.

There are other issues with album art, and we already wrote about Windows Media Player not finding album info. Today, we’re going to focus exclusively on album art issues.

Why won’t my album art change in Windows Media Player?

  • Permission errors can sometimes prevent you from changing the album art.
  • The MP3 tags might not be properly configured, thus resulting in an error message.
  • A corrupted Media Player Database can sometimes cause this issue.

How do I fix Album art cannot be changed when a song is in use error?

1. Change file permissions

  1. Close the Windows Media Player if it is open.
  2. Open File Explorer and navigate to the location where the album folder is stored.
  3. Select all the files in the album and right-click on the tracks.
  4. Select Properties from the option.
    Album art - Read only attribute
  5. The Attribute must be set to Read-only. Uncheck the Read-only box and click Apply and OK to save the changes.
  6. Launch Windows Media Player and check if you can add album art without the error.

2. Use the tag editor software

  1. Download MP3TAG and install it on your computer.
  2. Launch MP3Tag, click on File and select Add Directory.
    MP3Tag File Add directory
  3. Navigate to the directory where your album folder is stored. Select the folder and click on Select Folder.
  4.  Now right-click on all the track that is affected by the said error and select Remove Tag.
    MP3Tag Remove Tag
  5. Click Yes when asked to confirm the removal of the tags.

Once the tags have been removed, reopen the track in the Windows Media Player. Try to add the album art and check for any improvements.

3. Clear Windows Media Player database

  1. Quit Windows Media Player if running.
  2. Press Windows key  + R.
  3. Type the following and press Enter: %LOCALAPPDATA%\Microsoft\Media Player 
  4. Select all the files in the Media Player folder and delete them.
    Windows Media Folder
  5. Relaunch Windows Media Player and check if you are able to add the album art without any error.
  6. If that does not work, navigate to %LOCALAPPDATA%\Microsoft
  7. Delete the Media Player folder.

These are just a couple of solutions you can use to fix Album art cannot be changed when a song is in use message.

If you want to learn more about album art, we have a great guide on adding album art to MP3 files, so don’t hesitate to check it out.

How did you fix this problem? Share your solution with us in the comments section below.

Windows 10 v1903 bugs: Display brightness won’t change

Microsoft finally released the much-awaited Windows 10 May 2019 Update today. The update stayed in the Release Preview ring for about a month so that no major bugs made their way to the final release version.

However, it seems that the strategy didn’t work out as planned and Microsoft started acknowledging the first Windows 10 v1903 bugs.

As a matter of fact, this release is affected by 12 known bugs. In this article, we are quickly going to discuss about a driver compatibility issue that may cause display brightness settings not to respond to adjustments.

Display brightness adjustment issues

Microsoft acknowledged a known issue that is affecting Windows 10 1903 (May 2019 Update). Microsoft says that some Intel display drivers may trigger driver compatibility issues on your PCs.

Your actual display brightness may not change even if you modify brightness settings. The tech giant warns that this issue may arise shortly after the installation of the latest OS version.

Microsoft says that it blocked Windows 10 version 1903 on problematic devices. The company is working to fix this issue as soon as possible.

How to fix display brightness issues in  Windows 10 v1903

Microsoft suggested a quick workaround to resolve the issue. You simply need to reboot your system several times for the brightness changes to take effect.

As mentioned earlier, Microsoft is working on fixing the bug. This indicates that a permanent fix is expected to be available in the upcoming updates. The Redmond giant warned its users that they should not try a manual update.

We recommend that you do not attempt to manually update using the Update now button or the Media Creation Tool until this issue has been resolved.
Comment down below if you have you encountered display brightness issues as well.

RELATED ARTICLES YOU NEED TO CHECK OUT:

Download Windows 10 v1903 ISO files for a smooth upgrade process

Microsoft officially rolled out Windows 10 May 2019 Update (Windows 10 v1903). The update was previously available to Slow and Release Preview ring Insiders.

Microsoft wanted to get rid of all the potential issues that may hit Windows 10 before its public release.

We all know Windows 10 October 2018 Update’s story. This time Microsoft didn’t want to repeat the update bug history and therefore delayed the public release.

The tech giant also took an important step forward and users now have the possibility to delay or defer updates for up to 35 days.

Download Windows 10 v1903 ISO files

Microsoft has already rolled out Windows 10 version 1903. The update should autocratically install on your system starting next week.

As a quick reminder, Microsoft gradually rolls out the update. It usually takes one week for major feature updates to be available to all users.

Alternatively, you can also use the ISO files for Windows 10 May 2019 Update to manually download and install the update.

Microsoft recommends Home and Pro to grab Windows 10 v1903 through any of the following links:

However, the above-mentioned links are expected to expire soon. Alternatively, you can use Windows 10 installation media tool available on the official download site.

It is worth mentioning that Windows 10 May 2019 Update brings a series of known issues. Microsoft is currently working on fixing these problems and new patches should soon be available.

Don’t forget to backup your system before installing the update.

RELATED ARTICLES YOU NEED TO CHECK OUT:

Microsoft starts rolling out Windows 10 May 2019 Update today

Microsoft just announced the Windows 10 May 2019 OS is now available for download.

Windows 10 version 1903 brings a plethora of new features and improvements. For more information about the full changelog, you can check out Microsoft’s official webpage.

Windows 10 v1903 is not available for all users just yet

Microsoft decided to implement the update gradually, in an attempt to detect and hopefully fix all the potential system issues before making it available to all PC users.

Based on positive data and the feedback we’ve seen from this longer preview phase; I’m pleased today to share that we are beginning to make the Windows 10 May Update available. We will be taking a measured and throttled approach, allowing us to study device health data as we increase availability via Windows Update.

In other words, Windows v1903 will not be available for everyone at the same time.

For the time being, automatic download is not an option. If you want to download and

In order to manually download the Windows update, you would need to opt to Check for updates from the Windows Update section, in the Windows Settings.

Microsoft is very cautious with this specific update release. It will only make the Download and Install button available if it detects that your PC’s specs are compatible with the official system requirements.

Microsoft’s website also contains a section dedicated to reported issues and update status information. There you can find information if these specific bugs are under investigation or have been fixed.

If you already installed the Windows 10 May 2019 Update on your device, do tell us more about your experience in the comments section below.

If, on the other hand, you want to block the update, you may want to check out the following guides:

Xbox Insider Hub doesn’t work [FIXED by EXPERTS]

If you’re trying to open up the Xbox Insider Hub on your Windows 10 PC, and get an error message, you are not the only one to experience this issue. The most common error relating to Xbox Insider is Please try again. There was an issue with your network.

Getting this error message every time you want to log into the Xbox Insider Hub can be very stressful. You can’t get access to your beta testing games, so it is impossible for you to give a proper review. In this article, we will explore some of the best methods to deal with this issue.

How to fix Xbox Insider Hub problems on Windows 10? Problems with Xbox Insider Hub can occur if the date and time aren’t correct on your PC, so be sure to check them first. In addition, make sure that your antivirus or firewall isn’t interfering with the Xbox app. If that doesn’t work, try resetting Xbox Insider Hub.

What to do if Xbox Insider Hub doesn’t work on my PC?

  1. Check date and time settings in Windows
  2. Check third-party antivirus software
  3. Check if the Windows firewall is blocking your Xbox Insider Hub connection
  4. Clear and reset Microsoft Store cache
  5. Reset Xbox Insider Hub

1. Check date and time settings in Windows

If the clock and date of your PC are not set to the right timezone, then the capability of your system to connect to Xbox Insider Hub will be affected.  The most efficient way to do that is to set your time and date settings to Set time automatically. Here’s how to do it :

  1. Right-click on your Windows clock found in the right side of your screen.
  2. Choose the Adjust date/time option.adjust date Xbox Insider app doesn't work
  3. In the new window that opens, make sure you have the Set time automatically, and the Set time zone automatically options toggled on.

2. Check third-party antivirus software

Some versions of antivirus software can set custom privileges for other apps and block others from running. In this case, it is possible that the firewall of your antivirus might be blocking the Xbox Insider App from accessing the Internet.

Make sure to check the firewall settings in your respective antivirus software, and allow all connections for the Xbox Insider Hub.

In some instances, you might have to disable or even uninstall your antivirus. If it comes to that, you might want to consider switching to a different antivirus.

There are multiple antivirus programs that don’t block other services unless it’s advised to. You can surely find a more efficient antivirus that suits your needs entirely.

Hence, protect your system accordingly and at the same time, use the most efficient antivirus software for gaming.

3. Check if the Windows firewall is blocking your Xbox Insider Hub connection

  1. Press Windows Key + X keys on your keyboard, and select Windows PowerShell (Admin).windows powershell Xbox Insider app not working
  2. Copy this command to your clipboard: netsh advfirewall firewall show rule 4jxr4b3r3du76ina39a98x8k2
  3. Inside the PowerShell window, right-click on the top bar, then select Edit > Paste.paste powershell Xbox Insider app doesn't work
  4. If the command looks like the image below, you can press Enter.netsh powershell Xbox Insider app doesn't work
  5. This will start the process of verifying if any custom rules are set for your Windows 10 firewall.
  6. If the result of the scan is ‘ No rules match the specified criteria.’ , then it means you have no rules blocking your Xbox Insider Hub connection.no rules match the criteria Xbox Insider app doesn't work

4. Clear and reset Microsoft Store cache

Sometimes Xbox Insider Hub doesn’t work due to the corrupted cache. To fix that, follow these steps:

  1. Press Windows Key + R keys on your keyboard.wsreset.exe Xbox Insider app doesn't work
  2. Type in WSReset.exe, then press Enter.
  3. A Command Prompt window will open until the process is complete.
  4. After the process is finished, try connecting to your Xbox Insider Hub again.

5. Reset Xbox Insider Hub

  1. Click on Start button > choose Settings.
  2. Click on the Apps button in the Settings window.apps settings app
  3. Search for the Xbox Insider in the list, right-click on it, and select Advanced options.
  4. This will open up a new window.
  5. Scroll down to the bottom of the screen > click Reset.
  6. Restart your computer.
  7. Check if the problem persists.
  8. If it does, you can uninstall and reinstall the app, then try connecting to Xbox Insider again.

In this article, we explored some of the best methods to deal with the issue of not being able to connect to your Xbox Insider Hub from Windows 10. Please make sure to follow the steps presented in this article closely for the best results.

Please feel free to tell us if this guide solved your connection issue, by using the comment section below.

Privacy Eraser Pro deletes your browser activity protecting your privacy

Deleting your browsing history can sometimes come in really handy especially if you share a computer with others. You definitely wouldn’t want them to find out your more private searches. This is where software that is able to delete your browsing history comes in hand, and one of the best tools that can do this is Privacy Eraser created by Cybertron Software.

Privacy Eraser’s key features

Privacy Eraser is a handy solution that protects your privacy by deleting your browsing history and more computer activity. This piece of software supports all main web browsers, and with a single click, it offers you the chance to erase all of your digital footprints including browsing history, web browser cache, cookies, saved passwords, search history, temporary files, recycles bin and more.

This tool supports Windows systems, and it’s packed with lots of great features such as the following:

  • Privacy Eraser provides enhanced computer security for Windows.
  • It supports over 250 free pre-configured plugins that will clean the traces left by lots of apps, and you will also get the chance to extend the cleaning features by making your own app plugins.
  • Privacy Eraser is a great tool that permanently erases specific files and folders from your computer without any chance of recovery.
  • It also wipes additional and hidden data from all of your drives, and all the free clusters will be eliminated.
  • The program removes invalid registry entries for apps that no longer exist, and it fixes corrupted registry entries as well.
  • It can optimize your overall PC performance, and it will also speed up Windows startup.
  • You will be able to use this piece of software each and every time that you close your browser after every session spent at the PC.
  • You can also set this tool to monitor Windows in the background and autodetect what to clean.

Privacy Eraser is effortless to use, and it provides enhanced security on any computer running Windows. Using this tool, you will be able to recover hard drive space by deleting unnecessary or redundant data.

You can head over to Privacy Eraser’s official website and get the software for free to boost your PC’s performance and stability and to make your system run leaner, faster and more efficient than ever. You can also check out more great features and benefits that you will be able to enjoy if you do decide to use this great program.

Your system’s overall performance can be boosted with other useful software, CyberGhost that is perfect for those users who desire high speed and reliable privacy for their machine. This is a robust solution mainly thanks to its zero logs policy and a vast set of useful features.

Hotspot Shield is yet another app that you can choose for secure web browsing, and it’s important to note that this software’s target is to provide users anonymous presence online via an excellent VPN service that will mask the IP. Both these apps along with Privacy Eraser reviewed above come with extended sets of features which catapult them into the top high-quality privacy-related software.

Or you might as well try with a browser that doesn’t require third-party software to clear the browsing data or a third-party VPN to keep you anonymous online? UR Browser is everything one would ask for from a web browser and then some.

UR Browser comes with an advanced anti-tracking and anti-profiling mode similar to those Incognito modes falsely advertised in so many browsers. The Ninja Mode makes you a ghost when online and no website would be able to track you. You can configure 3 privacy modes separately for every website and have 12 search engines at just 1 click to choose from.

Check out UR Browser today and see for yourself how effective it is against intrusive websites and prying eyes.

Editor's recommendation
ur browser
  • Fast page loading
  • VPN-level privacy
  • Enhanced security
  • Built-in virus scanner

RELATED STORIES TO CHECK OUT:

Learning to code? With Windows 10 May 2019 Update, Microsoft has made installing Python much easier

When you’re just learning to code, sometimes just getting started is the hardest part. Most tutorials you’ll find online assume you know how to do the basic stuff, and move right in to managing your server farms or whatever. This is true across a lot of technical learning, but especially so for learning Python, an easy to use and easy to read coding language that is still powerful enough to do real coding, but it doesn’t come built-in to Windows. Up until now, getting Python installed on Windows is just the kind of frustrating experience that can slow down or stop aspiring programmers, but that hasn’t gone unnoticed at Microsoft, and the Python team has made some changes to make it much easier to install Python on the Windows 10 May 2019 update, and get to coding without tearing your hair out.

The first thing the Python team did was to help the open source community develop a Microsoft Store installation of Python. With the Store app, rather than hunting around for instructions on how to get the programming language working on Windows, you just install the app and you’re up and running. A Windows Dev blog post explains:

It’s been widely known for many years that Windows is the only mainstream operating system that does not include a Python interpreter out of the box. For many users who are never going to need it, this helps reduce the size and improve the security of the operating system. But for those of us who do need it, Python’s absence has been keenly felt.

Once you discover that you need to get Python, you are quickly faced with many choices. Will you download an installer from python.org? Or perhaps a distribution such as Anaconda? The Visual Studio installer is also an option. And which version? How will you access it after it’s been installed? You quickly find more answers than you need, and depending on your situation, any of them might be correct.

We spent time figuring out why someone would hit the error above and what help they need. If you’re already a Python expert with complex needs, you probably know how to install and use it. It’s much more likely that someone will hit this problem the first time they are trying to use Python. Many of the teachers we spoke to confirmed this hypothesis – students encounter this far more often than experienced developers.

So we made things easier.

But that still wasn’t easy enough, and users expecting Python to just be there may still not know to go to the Store, so Microsoft took it one step further. Now, if you type in “python” or “python3” in the Windows 10 May 2019 Update search box, you’ll be taken directly to the Microsoft Store app if Python isn’t yet installed (once Python is installed, typing “python” opens a command prompt running Python:

Python command line

As someone who’s spent hours trying to get past a seemingly easy hurdle, so easy in fact that no one bothers to write it up as a blog post or a how-to, this kind of shortcut, making it easier to get started is a welcome addition indeed, and hopefully students and others learning to code won’t feel quite so intimidated when doing a simple task like installing Python is actually indeed simple.

Are you trying to learn to code? What are your pain points?

New online Windows Health Dashboard works with Windows 10 May 2019 Update and older versions, too

Microsoft has already flipped the switch and has begun rolling out the Windows 10 May 2019 Update to the general public. While it definitely has its share of useful new features, it also has its fair share of known issues that need to be sorted out, which can be seen in the new Windows Health Dashboard.

Microsoft is currently investigating three of these issues, including one that involves a compatibility issue that prevents the display brightness from responding to user adjustments. Some users are also experiencing audio loss when using Dolby Atmos headphones or home theater. Additionally, another issue causes some known folders—such as Documents, Pictures, or Downloads—to be incorrectly redirected to a newly created folder of the same name. Here’s the issues that are being “investigated”:

  • Display brightness may not respond to adjustments
    Microsoft and Intel have identified a driver compatibility issue on devices configured with certain Intel display drivers.
  • Audio not working with Dolby Atmos headphones and home theater 
    Users may experience audio loss with Dolby Atmos headphones or Dolby Atmos home theater.
  • Duplicate folders and documents showing in user profile directory
    If known folders (e.g. Desktop, Documents, or Pictures folders) are redirected, an empty folder with that same name may be created.

Microsoft has also listed nine other issues marked as “mitigated,” including issues with Bluetooth, Wi-Fi, Intel Audio, the Camera app, among others. Here’s the list.

  • Error attempting to update with external USB device or memory card attached 
    PCs with an external USB device or SD memory card attached may get error: “This PC can’t be upgraded to Windows 10.”
  • Unable to discover or connect to Bluetooth devices
    Microsoft has identified compatibility issues with some versions of Realtek and Qualcomm Bluetooth radio drivers.
  • Night light settings do not apply in some cases
    Microsoft has identified some scenarios where night light settings may stop working.
  • Intel Audio displays an intcdaud.sys notification
    Microsoft and Intel have identified an issue with a range of Intel Display Audio device drivers that may result in battery drain.
  • Cannot launch Camera app 
    Microsoft and Intel have identified an issue affecting Intel RealSense SR300 or Intel RealSense S200 camera apps.
  • Intermittent loss of Wi-Fi connectivity
    Some older devices may experience loss of Wi-Fi connectivity due to an outdated Qualcomm driver.
  • AMD RAID driver incompatibility 
    Installation process may stop when trying to install Windows 10, version 1903 update on computers that run certain versions of AMD RAID drivers.
  • D3D applications and games may fail to enter full-screen mode on rotated displays
    Some Direct3D (D3D) applications and games may fail to enter full-screen mode on rotated displays.
  • Older versions of BattlEye anti-cheat software incompatible
    Microsoft and BattlEye have identified a compatibility issue with some games that use older versions of BattlEye anti-cheat software.

Microsoft has placed safeguards that prevent certain PCs with incompatibility issues from downloading the update until the issue is resolved. The company is currently studying device health and implementing fixes for a small subset of users that have the May 2019 Update, which is being gradually rolled out to the public. This way, it can minimize potentially major issues should they arise.

Microsoft has mentioned on his release blog post that it is committed to increasing transparency by releasing the new Windows Health Dashboard, which allows users to keep track of known issues much more effectively than keeping tabs on KB numbers. It works not just for the May 2019 update, but also the older versions of Windows as well, including all Windows 10 versions from 1507 on, Windows 7 and 8.1, and Windows Server versions beginning with Windows Server 2008 SP2.

Windows Server version 1903 also reaches general availability

The Windows team has been on a relative tear lately with the release of several updates to users systems that include the official May 2019 Update as well as several rounds of supportive cumulative rollouts.

Adding to its docket of Windows-related releases for the month of May is Windows Server version 1903.

According to the Microsoft Server blog, the sneak peek window for select IT managers and developers is over and the updated version 1903 will be given to all. New features for 1903 include Windows Server Containers that support Azure Kubernetes Service (AKS) and GPU Acceleration.

The Windows Admin Center Storage experience is also getting some needed attention that now addresses Windows Server 2008 migrations with updated Azure File Sync integration.

Server Core received two new additions in Task Scheduler and Hyper-V manager tools to help improve application compatibility with the Feature on Demand (FOD) augmented server sessions of Server Core.

To see the full list of features and details coming with Windows Server 1903’s rollout, visit here.

Microsoft plans to simplify Windows 10 Xbox app, starts by removing group messaging

Following the release of the Xbox One 1905 Update last week, Microsoft has started notifying users of the Windows 10 Xbox app that the Xbox Live Messaging experience will soon be revamped. According to the message shared by Windows Central, the Xbox app will get the same Message Request feature that Microsoft is bringing to Xbox One consoles and the new Xbox Game Bar on Windows 10, as well as support for GIFs.

Image credit: Windows Central

However, Microsoft is also warning users that the Windows 10 Xbox app will also lose its group messaging functionality, adding that “a desktop solution for group messaging is coming soon” (Group messaging is already supported in the new Xbox Game Bar). These changes to the Xbox app are apparently coming tomorrow, May 23, and you can read the full message below:

We will be upgrading our messaging services to introduce improved chat features (secondary inbox for non-friends, GIFs, and more). Sadly, your old group messages will be lost during the upgrade, so copy any old chats that you want to keep on Xbox.com.

After the transition, we will be removing group messaging from this app to focus on console settings and simplify our apps. But rest assured a desktop solution for group messaging is coming soon so be sure to update Windows to get the newst Xbox apps and experiences when they become available.

In the meantime, please use the Xbox app on iOS/Android for the upgraded group messages experience. The upgraded group messages will be available on your Xbox console on 23 May.

Thanks for understanding. We continue to look to you and your feedback to help us build the best Xbox apps so please let us know how we’re doing as we transition!

The part where Microsoft says that it will “focus on console settings and simplify our apps” is quite interesting. The new Xbox Game Bar, which has dedicated widgets for Xbox Live Messages and the Looking for Groups social feature, is already much faster than the Xbox UWP app, which has become quite bloated over the years. Perhaps it’s time for Microsoft to trim it a bit and refocus it on some of its killer features, such as Xbox game streaming to Windows 10 PCs.

Microsoft is expected to kick off public trials for its Project xCloud game streaming service later this year, and we’re wondering if the Xbox app could also be used to handle xCloud streaming on Windows 10 PCs. It would make sense if the Xbox app could finally be used to play actual Xbox games, even though those are streamed from the cloud. Otherwise, Microsoft could well launch a separate xCloud UWP app that would do the heavy lifting, similar to what the company did with its Windows Mixed Reality Portal for VR headsets.

This is all speculation for now, but with the Xbox Game Bar becoming really good for everything related to Xbox Live social features, maybe it’s time for the Windows 10 Xbox app to get a bigger gaming role. “I know we’ve talked quite a bit over time about what we want to deliver for the player on PC, but at E3 this year, and throughout 2019, you’ll begin to see where we’ve been investing to deliver across Store, services, in Windows and in great games. It’s just the beginning,” said Xbox head Phil Spencer back in February in an interview with PC Gamer. We’re hoping to hear more during Microsoft’s E3 press briefing on June 9.

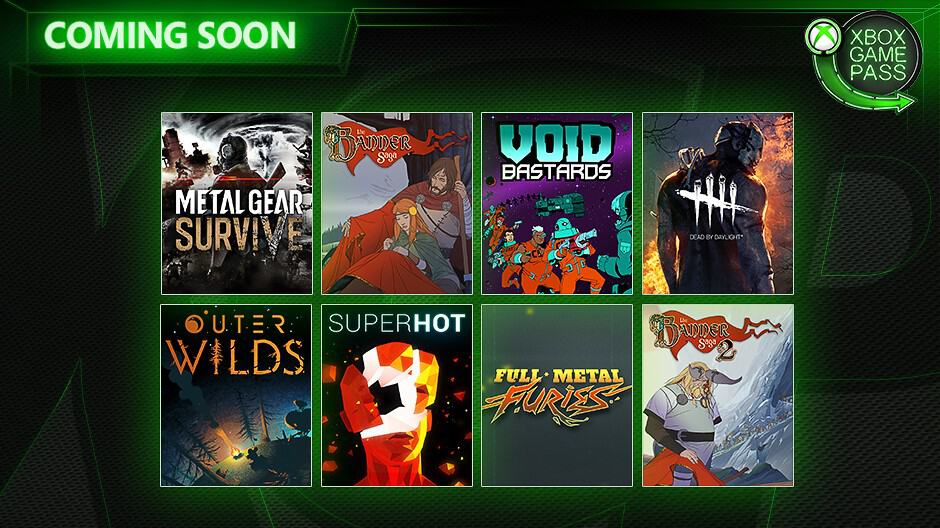
Metal Gear Survive, The Banner Saga and six other games are joining Xbox Game Pass

The Xbox team is doing it once again, there is a second wave of new Xbox Game Pass games this month. Overall, eight new games will join the catalog between May 23 and June 6, starting with Metal Gear Survive and The Banner Saga tomorrow.

Three other games will join Xbox Game Pass next week, with Void Bastard coming on May 29 and Dead by Daylight and Outer Wilds following on May 30. The later will actually be available on Game Pass the same day as its launches worldwide on Xbox One, Windows and PlayStation 4.

Lastly, The Banner Saga 2, Superhot (a previous Games with Gold title) and Full Metal Furies will be added to Game Pass on June 6. It’s worth noting that the latter also supports Xbox Play Anywhere and cross-platform multiplayer between Xbox One and Windows 10.

Microsoft’s Xbox Game Pass service will likely be a big topic at Microsoft’s E3 press conference on June 9, and we’re looking forward to seeing what Xbox head Phil Spencer will announce during the event. If you have yet to try the game subscription service, we remind you that you can currently get three months of Game Pass for just $1 (instead of $29.97) for a limited time.

Sticky Notes keeps resizing on Windows 10/11 [TECHNICIAN FIX]

Even though Sticky notes is a greatly useful application, but some users reported that Sticky Notes keeps resizing. The most common trigger for this issue is using multiple monitors for the same PC. Because of an error found in the code of the Sticky Notes app, it has issues reformatting the image to a monitor that has lower DPI capabilities.

While we wait for an official fix from Microsoft, in this article we will explore the best methods to try and solve this issue. Read on to find out more.

What to do if Sticky Notes keeps resizing? First of, update Windows 10 to the latest version, since it’s highly possible that Microsoft has addressed this issue in of the recent updates. If that doesn’t help, try resetting Sticky Notes app or try using Microsoft Store Apps troubleshooter.

How to fix Sticky Notes resizing issue on Windows 10?

  1. Update your Windows 10
  2. Reset the Sticky Notes application
  3. Troubleshoot the Microsoft Store apps

1. Update your Windows 10

If Sticky Notes keep resizing, be sure to check for latest updates from Microsoft.

  1. Click on Start Button > choose Settings.settings app Sticky Notes keeps resizing
  2. In the Settings app, select Update and Security.update & security Sticky Notes keeps resizing
  3. In the Windows Update tab, click on Check for updates, and install if anything is found.check for updates Sticky Notes keeps resizing

2. Reset the Sticky Notes application

Note: Please make sure to save all the information from your Sticky notes app before trying out this step, as this may result in the loss of the data found on the notes.

If Sticky Notes keep resizing on your PC, perhaps reinstalling the app can solve the problem.

  1. Open the Settings app.
  2. Now click on Apps.apps settings app Sticky Notes resizes
  3. Find Sticky Notes in the list, select it, then choose Advanced options.advanced options Sticky Notes keeps resizing
  4. In the Advanced options window, choose the Reset option.
  5. Try to see if the Sticky Notes issue has been solved.

3. Troubleshoot the Microsoft Store apps

If Sticky Notes keep resizing, perhaps you can solve the problem by running the built-in Microsoft Store Apps troubleshooter.

  1. Click on Start button > select Settings button > Update & Security > Troubleshoot > Windows Store Apps.windows store apps troubleshooter sticky apps Sticky Notes keeps resizing
  2. After you’ve clicked on Run the troubleshooter, a window will open that will scan for any issues with your Windows Store Apps.
  3. When the process of scanning for issues is complete, you can try to see if the Sticky Notes error persists.

In this article we explored some of the best ways to deal with the Sticky Notes apps error that keeps resizing the notes after a monitor disconnect. Please make sure to follow the steps presented in this article in the order that they were written, to avoid any issues.

Please let us know if this article helped you solve your issue, by using the comment section below.

READ ALSO:

Xbox One’s Star Wars Battlefront II update increases Trooper levels from 70 to… 1,000!

The Star Wars Battlefront II video game is receiving a rather significant update on Xbox One consoles right now that has the potential to both please players and cause some controversy.

The biggest change with this update is the increase of level caps. While the player level is still stuck at the same limit it had at launch, all player/character classes can now level up to Level 1,000. This is pretty substantial as previously Troopers would be maxed out at 70, Heroes at 40, ships at 40, Reinforcements at 30, and vehicles at 30.

While players will continue to unlock Star Cards and earn Credits for reaching each level before the previous limits, no rewards will be granted for levelling up to one of the newly available levels. This level increase is very much being done to give players bragging rights and to continue working towards something.

The latter had become almost impossible for many long-time players who had been playing since launch and had already maxed out all of their classes.

In addition to the level increase, today’s update also completely revamps the popular Heroes Versus Villains mode, changing it from the previous targeting system to a new free-for-all model. Once the update is installed, players will no longer be tasked with attacking one specific target on the opponent’s team and will be granted team points for every kill they make.

Other changes include the addition of Kamino to the new Capital Supremacy game mode, the introduction of a dialogue wheel that works like the current emote wheel, appearance bundles being made purchasable with Crystals only, new victory poses for Iden and Rey, an increase to the number of Heroes using voice lines at once, and a variety of character adjustments.

Star Wars Battlefront II has been receiving a lot of updates these past few months and there’s been hints that something major could be announced regarding future updates next month. With the EA earnings call now out of the way and EA Play just two weeks away, it makes perfect sense that any Battlefront II announcements would be coming in June.

Whether that’s the addition of the rumored Padme and Ahsoka Heroes or content to tie into The Mandalorian and The Rise of Skywalker remains to be seen.

Do you play Star Wars Battlefront II on your Xbox One? Let us know what you think of these changes in the comments below and then follow us on Pinterest for more Xbox gaming content.

The app was not found in the store. ?

How to fix FIFA 19 server issues and join Weekend League

FIFA 19 is a football simulation video game developed and published by Electronic Arts.

Millions of gamers play this game on a daily basis, making FIFA the biggest football simulation game. FIFA Ultimate Team is a game mode that has a huge player base.

Usually, FIFA has its weekly audience peak during FUT Champions, from Friday to Sunday.

FUT Champs (Weekend League) gives FIFA Ultimate Team enthusiasts the possibility to play 30 games over the course of three days, offering substantial weekly rewards. This means that many gamers play at the same time, sometimes congesting the servers.

Many FIFA fans reported experiencing connectivity issues during FUT Champs implying server disconnects and heavy lag. And yes, this problem occurs almost every weekend.

Although sometimes the connectivity issues could be caused by EA servers, sometimes they are caused by the users’ setup.

In order to help you improve your connection to the FIFA Ultimate Team servers, we came up with a series of solutions that you can use on your PC.

How to prevent FIFA 19 server disconnections

  1. Use a wired connection
  2. Check your internet connection
  3. Perform a hard reset
  4. Change your DNS

1. Use a wired connection

Making sure that you use a wired connection is the first thing that you should consider.

Many users reported noticing big differences between using a wired connection and a wireless connection.

Wi-Fi connections tend to be slower and less constant. This inconsistency causes you to experience speed-up lag and server disconnects.

2. Check your internet connection

Test your internet speed and ping if you experience connectivity issues.

Try browsing different websites too see if they respond quickly.

You can also test your internet speed from the Xbox settings if you’re playing the game on your console.

In order to perform an internet speed test, follow these steps:

  • Press the Home button on your controller
  • Select the Settings icon > go to All settings
  • Choose Network > Network settings
  • Select Test network connection and wait for the process to commence test network connection xbox one
  • If you experience latency higher than 100ms, the issues could be caused by your internet connection.

— RELATED: How to fix FIFA 19 bugs on your Windows PC

3. Perform a hard reset

Apparently, connectivity issues during the Weekend League could occur due to incorrect server connection settings.

Sometimes EA connects you to servers located too far away from your location. This could cause lag and server disconnects to occur.

After performing a PC/router/console hard reset, you should get connected to a server that is closer to your location. This offers a better gaming experience.

In order to perform a hard reset to your console, follow these steps:

  • Turn your console off
  • Unplug your console from the power socket
  • Plug it back in after at least 2 minutes
  • Open your console and see if it made any difference.

4. Change your DNS

Try to connect to a different DNS than your default one.

High latency could, as well be, a sign of a problematic DNS.

Try connecting to the Google Public DNS to see if you get better connection. Manually input the following addresses:

Change DNS IP addresses (IPv4) to:

  • 8.8.8.8
  • 8.8.4.4change DNS settings

Change DNS IPv6 addresses to:

  • 2001:4860:4860::8888
  • 2001:4860:4860::8844

Test the connection speed afterwards to see if your internet speed and latency improved.

If it didn’t improve or made the connection worse, search online for different free DNS addresses and see which fits your connection best.

Also, make sure to find the DNS addresses closer to your location.

Eventually if nothing works, there could be an issue with the EA servers. Make sure to check if other users have been experiencing issues with the EA servers lately.

We hope that at least one of our solutions helped you fix this issue. If you liked this article, leave a comment in the comment section below.

READ ALSO:

Windows Media Player cannot download media information for CD [FIX]

Windows Media Player allows you to burn the media files to your CD. However, at times the player may display Cannot download media information for this CD error while ripping the CD. The tracks, artist, and the album will be identified as “Unknown” in your library. For best results, connect to the Internet or manually add media information for the CD.

Why Windows Media Player won’t download media information when ripping CD with audio files? Start by reinstalling Windows Media Player through Windows Features. This should reset the settings and, hopefully, resolve the issue at hand. If you’re still stuck with the error, run Windows Media Player Configuration tool or enable Error Correction option.

Read about the aforementioned solutions below.

Fix Windows media player cannot download media information for this CD

  1. Uninstall and Reinstall Windows Media Player
  2. Run Windows Media Player Configuration Tool
  3. Enable Error Correction
  4. Check the Privacy Option

1. Uninstall and Reinstall Windows Media Player

If the troubleshooter did not resolve the error, try to uninstall and reinstall the Windows Media Player. Here is how to uninstall and reinstall the app.

  1. Press “Windows Key + R” to open Run.
  2. Type control and click OK to open Control Panel.
  3. Go to Programs > Programs and Features.
  4. From the left-pane click on “Turn Windows on or off”.
    Turn Windows features on or off
  5. In the Windows Features window, expand Media Features.
  6. Uncheck “Windows Media Player” option.
    Disable Windows Media Player
  7. If a warning pop-up appears, click on Yes.
  8. Click OK to save the changes and reboot the computer.
  9. After the restart, go to  Control Panel > Uninstall Programs > Turn Windows Feature on/off.
  10. Check “Windows Media Player” option and click OK.
  11. Reboot the system, and that should resolve the error.

2. Run Windows MediaPlayer Configuration Tool

Windows media Player Library

Microsoft offers a configuration troubleshooter tool that can find and fix any configuration related issues with the Windows Media Player. Here is how to use them:

  1. Download the three fixes listed below
    Windows Media Player Configuration tool
    Windows Media Player Library 
    and Windows Media Player DVD
  2. Run the troubleshooters one by one and follow the on-screen instructions. Apply the fixes suggested by the troubleshooter and reboot the system. Check for any improvements.

3. Enable Error Correction

If the error is occurring due to a corrupted file or some error in the CD, you can enable the error correction which will allow the Windows Media Player to skip the faulted files. Here is how to do it:

  1. Launch Windows Media Player.
  2. Click on Organize and select Options.
    Windows Media Player - Organize - Options
  3. Go to the Devices tab.
  4. Select your DVD device and click on the Advanced button.
  5. Check “Use error correction” option. Click OK to save the changes.

Now try ripping the CD and check if the Windows Media Player media information error is resolved.


4. Check the Privacy Option

Windows Media Player allows you to disable the access to the internet to retrieve media info for the music files. You may face this error if the option is disabled in the Privacy tab.

  1. In the Windows Media Player, click on Organize and select Options.
  2. Open the Privacy tab.
    Update music files by retrieving media info from the internet
  3. Make sure “Update music files by retrieving media info from the internet” option is checked.
  4. Click Apply and OK to save the changes.

RELATED STORIES YOU MAY LIKE:

World of Warships Unsupported operating system error [EXPERT FIX]

World of Warships is a great game, but many users reported Unsupported operating system error when running their game. Threads dedicated to this issue are around. And some solutions are available. So let’s get started, shall we?

How to fix World of Warships Unsupported operating system error? First of, make sure that you have the latest version of Windows installed. As a temporary solution, you can try running the game in Windowed mode. We also suggest adding the game to the list of exceptions in your firewall in order to avoid any interference.

How can I fix Unsupported operating system error?

  1. Update Windows
  2. Try Windowed Mode
  3. Change Nvidia settings
  4. Check and update your DirectX
  5. Add firewall exception
  6. Reinstall your game

1. Update Windows

Sometimes you might be facing Unsupported operating system error because you don’t have the latest Windows updates installed. However, you can fix that by doing the following:

  1. From your Start Menu, open Settings.
  2. Click on Update & Security.
    update and security world of warships error
  3. Click on Windows Update.
  4. Now click on the Check for updates.
    check for updates unsupported operating system
  5. Lastly, you’re gonna click the Restart Now button after the update has been downloaded on your device.

2. Try Windowed Mode

To fix Unsupported operating system error in World of Warships, you can try going into Windowed Mode if the game is acting up, it works to solve black screen issues as well:

  1. Start your game.
  2. Press ALT + ENTER to make the game go into windowed mode.
  3. Access video settings in the game and adjust its resolution to your screen’s resolution.
  4. Save changes, you can now play the game in fullscreen mode.

3. Change Nvidia settings

nvidia control panel world of warships unsupported operating system

  1. Open your Nvidia Control Panel.
  2. Select Manage 3D Settings and select World of Warships from the Program Settings and set the Power Management to Prefer Maximum Power.
  3. Save your changes and exit.

4. Check and update your DirectX

In the event that you’re facing an outdated DirectX, we suggest you download the latest version of it. And always make sure to check up on what version you’re using to begin with. In order to do this, follow these steps:

  1. In your Start Menu, type dxdiag in the Search section, and press Enter.
  2. Now you can check the DirectX Version on the report tab, in the System Information section.

5. Add firewall exception

You might be facing some connectivity issues here. Add an exception to your antivirus for World of Warships game, and whitelist your game in Windows Firewall. In order to do so, follow these steps:

  1. Open your Start Menu.
  2. Now select Control Panel.
  3. Then click on Windows Firewall.

    windows defender firewall world of warships error

  4. Now, click on Allow an app or feature through Windows Firewall.
  5. Now, the Allowed App windows will open.
  6. Click on the Change Settings.
  7. Check the boxes next to the apps or programs you want to allow through Windows Firewall.
  8. Click OK to save your new settings.

6. Reinstall your game

When all else fails, the best solution is to simply uninstall and reinstall your game.

To uninstall World of Warships:

  1. Open your Start Menu and click on Settings.
  2. Select Apps.
    apps world of warships error unsupported operating system
  3. Select World of Warships and click the Uninstall.uninstall app world of warships error unsupported operating system

To reinstall World of Warships:

  1. Download the installer from the Wargaming official website.
  2. Click the Download Game button and select Save File to any location on your computer.
  3. Run the installer and select the installation folder.
  4. After this, the Launcher will begin downloading and installing the game.

We hope that these fixes were able to help you solve the Unsupported operating system World of Warships error. If they did, let us know in the comments section below.

RELATED STORIES TO CHECK OUT:

Microsoft acknowledges new Windows Update BSOD bugs

Microsoft just acknowledged a brand new issue affecting Windows 10 devices running the latest updates. The tech giant confirmed that your device may experience a fatal crash during system restore.

Microsoft stated that you may see error 0xc000021a in the following specific scenario: clean-install Windows 10, turn on system protection, create a restore point on your system, install your desired Windows 10 updates, and finally try to restore your system.

Microsoft says that in this situation, your system fails to restore your device and displays the above-mentioned stop error.

Moreover, if you attempt to restart your system, all you’ll see is a black screen.

How to fix system restore BSOD after update

The company also suggested a quick workaround to resolve the issue. Microsoft recommends its users to avoid using the Settings app for performing a system restore.

You need to reboot your system and head towards Windows Recovery Environment (WinRE). Microsoft says that you may need to reboot your system twice. This issue exists in all Windows 10 versions.

We expect a hotfix to arrive with the upcoming Windows 10 Update. As you all know, Microsoft is working hard these days to add the finishing touches to the Windows 10 May 2019 Update OS.

The company released new Windows 10 cumulative updates to fix existing issues affecting the OS. Moreover, the bug M also rolled out a series of driver and firmware updates for Surface devices.

Windows 10’s bug history started with its initial release back in 2015. We hope that Windows 10 May 2019 Update will not bring any major bugs. However, it remains to be seen how everything turns out as a result of the official release.

RELATED ARTICLES YOU NEED TO CHECK OUT:

Microsoft introduces new OneDrive features at SharePoint Conference, including differential sync for all file types

In the season of conferences, Microsoft rattles off another with its SharePoint Conference 2019 and during the event, users and fans of OneDrive for enterprise use got a nice helping of feature announcements that bring the two platforms even closer together.

First up is Time to Read which will bring some speedy data visibility to users. The new Intelligent on-hover file cared updates will allow users to see a file card full of data points for individual content that include life cycle signals, malware, DLP and missing metadata for the OCD content managers out there.

Next up is a Save for later feature which will allow a sort of bookmarking of files and folders in shared libraries or from OneDrive business accounts. When in use a new aggregated view of bookmarked files and folders in a special Saved for later section akin to Pocket, in the SharePoint start page.

Users will also be getting a beefed-up UI with a higher fidelity of content via OneDrive UI on the web.

This means you can create new documents, pin important ones to the top, create views, manage metadata, share and more. We are also updating the Create new shared library with a streamlined experience backed by an Office 365 group, allowing you to specify the people you want to share with – and the new shared library appears immediately as a new content collaboration space for your team files.

Other features include Autodesk Auto CAD DWG file previews with one-click functionality and integrated AutoCAD web app support for editing DWG.

In addition, rich, interactive 360-degree image previews are coming for over 320 plus file types that can be uploaded and previewed in OneDrive.

The announcements were not just about how SharePoint and OneDrive will further mesh in the future but how OneDrive and Microsoft Teams are beginning to collaborate.

Soon, Microsoft Teams will be getting an updated integrated file sharing experience that, ” lets you choose what kind of sharing link you want in 1:1 chats and within the conversations tab. When typing your message, simply click the paperclip Attach icon, select OneDrive, choose the file you wish to share, and click the Share a link button; you can also copy/paste a sharing link and Teams will properly format it to look nice within the discussion.”

Outlook got a shout out as well in the new feature line up where traditional file attachment gets a makeover and becomes permissible view/edit links that support content saved and shared via Outlook Web App (OWA) and OneDrive.

Similar to Google Drive, OneDrive will be getting a Shared with me search functionality.

PowerPoint also got a nod with a new Individual Slide link feature that does precisely as advertised. Rather than having to share an entire deck, users will now be able to deep link to a specific slide and save the recipient time and space on their hard drives or cloud storage.

The honorable feature mentions also include, differential sync save time and network utilization, Windows Virtual Desktop and Windows 10 Multi-User (EVD) Operating System, the eventual support of OneNote sync client migration, a new files experience for Outlook app for iOS, mobile PDF viewer for the OneDrive mobile app and updated annotation options.

The list of new features and improved experiences coming to OneDrvie are extensive, unfortunately, most of today’s announcements come with the caveat that they are either in development or are a roadmap to delivery in the near future.

Not much of what was mentioned today will be hitting users desktops and mobile devices anytime soon, but for specifics on when to expect these features, visit Microsoft’s Office 365 and Microsoft 365 Roadmap here.

Surface devices are now ready for Windows 10 May 2019 Update

In a previous post, we reported that Microsoft released new Windows 10 Cumulative Updates to fix various issues with some UK government websites.

Now, the company released another batch of firmware and driver updates for various Surface devices.

Windows Insiders who are currently running Windows 10 v1903 can now install the latest updates. The release of both of these updates is an indication that Microsoft is gearing up for the release of May 2019 Update this week.

Microsoft released these driver updates for almost all the supported Surface models. However, the company skipped Surface Go LTE Advanced and Wi-Fi only editions. It is surprising to see that Microsoft is still supporting its 5 years old Surface Pro 3.

The tech giant released network adapters updates for Surface Studio 2 devices including Bluetooth and Ethernet. Microsoft covered various components of the Surface Pro 6 device in its recent series of updates.

Surface Pro 6 known issues

However, the company acknowledged a known issue that affects Surface Pro 6 devices. The company says that the Intel Graphics Control Panel is not compatible with the device. You can avoid any potential issues by uninstalling the application until the company has fixed the issue.

Furthermore, Microsoft released a long list of updates to Surface Laptop 2 devices. This release also introduced some known issues, including the Intel Graphics Control Panel hitting Surface Pro 6.

Similar updates were also rolled out to Surface Book 2, first-gen Surface Laptop and the fifth-gen Surface Pro devices. 

Thankfully, the list of updates for Surface Studio was relatively small. These updates were related to network devices. Moreover, the Surface Pro 4 and the Surface Book received a series of system updates alongside the updates for Bluetooth, and camera. 

Similarly, Surface 3 and Surface Pro 3 received a small list of updates including changes for Bluetooth and Network adapters. You can check out the Surface Update History page for detailed information. 

New Surface Books 2 and Surface Pro 6 models coming in June

Some recent reports suggest that Microsoft is releasing new variants for the Surface Book 2 and Surface Pro 6 laptops.

Notably, Microsoft is yet to confirm the upcoming models that are expected to arrive on the 18th of June. Some specifications mentioned on the Best Buy Canada website confirm that both models will feature a Core i5 processor, 256 GB storage and 16 GB RAM.

RELATED ARTICLES YOU NEED TO CHECK OUT:

Could Huawei replace Windows 10 with its own operating system?

This week, Google announced it suspended the updates for Huawei smartphones, amid the tensions between China and United States.

Also, Microsoft, who provides the operating system for Huawei laptops and tablets, could follow suit.

Other American tech giants such as Intel, Qualcomm and Broadcom, will no longer supply components to Huawei.

In spite of these bans, the operating systems will not stop working. The Windows 10 license on Huawei laptops and tablets will continue to be available to users.

Still, in these circumstances, Huawei will no longer obtain OEM (original equipment manufacturer) licenses from Microsoft. This means the situation remains complicated for future Huawei devices.

What are the chances of Huawei launching its on PC OS?

The Chinese company prepared itself for this (apparently) bleak scenario.

Richard Yu, the CEO of the consumer division from Huawei, made the following statement before the ban:

We have prepared our own operating system. Should it ever happen that we can no longer use these systems, we would be prepared. That’s our plan B. But of course we prefer to work with the ecosystems of Google and Microsoft.

We don’t know at what stage the development of a new operating system is and how it will affect or influence the hardware of the Chinese company.

An efficient and secure operating system could not be implemented in a day, probably not even in the future generation of devices. So, it is also possible that, as a “crisis solution”, Huawei could adopt an existent alternative to Windows, such as Linux.

No one knows exactly what the new ban will bring, but it is safe to say that Huawei was caught in the middle of the escalating trade tensions between China and the United States.

Also, the new ban caught Huawei somewhat prepared. They’ve been working on the new operating system(s) since 2012.

What are the chances of seeing a brand new operating system on Huawei laptops and tablets?

Let us know in the comment section below.

RELATED POSTS:

No Man’s Sky expected to receive major update in July

Recently, Hello Games announced that the update No Man’s Sky: Beyond, consisting of three components, will be released this summer, probably in July.

The update teases a completely new multiplayer experience. Hello Games says that it will allow “players everywhere in the universe to meet and play together”.

Developers didn’t offer any other details regarding the release date, so the fans need to be really patient.

This made the subject of a discussion thread on Steam, but users didb’t have a clear answer for it.

Luckily, summer is just around the corner, so gamers don’t have to wait much longer. We’re sure that the wait will eventually pay off.

No Man’s Sky multiplayer to support 16 players

The next update could bring multiplayer support for up to 16 players. Still, Hello Games emphasize that the game will not become a MMO.

They also mention that, as a part of their optimization work, the game will have enhanced Vulkan support that will bring immediate performance improvement.

The No Man’s Sky: Beyond expansion, which will be the fifth for this game, will be released for free to the existing gamers.

Do you think No Man’s Sky: Beyond will be released in July? Or you’re rather pessimistic and expect the update to land in August?

Let us know in the comments below.

RELATED:

How to uninstall InstallShield Update Service [SIMPLE GUIDE]

InstallShield Update Service can be useful, but what if you want to remove it from your PC? In today’s article, we’re going to show you how to do that on your Windows 10 PC.

How to easily uninstall InstallShield Update Service? You try disabling all InstallShield processes from the Task Manager and removing the files manually. Alternatively, you can use tools such as Software Manager Uninstall to remove InstallShield Update Service.

How can I remove InstallShield Update Service?

  1. Remove files manually
  2. Remove InstallShield Update Service Scheduler
  3. Use the FlexNet Connect Software Manager Uninstall Tool

1. Remove files manually

You can do a manual removal of the program. This method is one of the ways to remove the InstallShield Update Service. Below is a step to step guide on how to get this done.

  1. Press the CTRL, Shift and the ESC keys altogether to open the Windows Task Manager.
  2. If you are using Windows 8 or any newer windows, click on More details.more details uninstall Installshield Update Service
  3. Then, navigate to the Process tab.processes task manager Installshield Update Service
  4. Search for ISUSPM.exe and agent.exe and right-click on both processes and select Open file location.
  5. As soon as the folder opens, right-click and choose the End task option.
  6. Navigate to the folders you opened before and delete the contents. All these files should be stored in Program Files (x86) > Common Files > InstallShield > Update.

2. Remove InstallShield Update Service Scheduler

You can use this method to remove the InstallShield Update Service. Here’s how to do it.

  1. Download the Software Manager Uninstall tool, find its location and run it.
  2. Follow the on-screen instructions in the tool to finish the removal.
  3. After you have finished following the instructions, restart your computer and see if the file still exists on your computer.

Alternatively, you can use uninstaller software to completely remove the problematic application from your PC along with all of its files.

Using it to uninstall programs will remove the process as well as any associated files and folders, leaving a clean space behind. It will not only uninstall InstallShield Update Service, but also any associated folders, icons, and registry files.

3. Use the FlexNet Connect Software Manager Uninstall Tool

  1. Uninstall any Nuance related software.
  2. Press the CTRL + R buttons together.
  3. Type cpland and click OK.
  4. Double click on the application you wish to uninstall and follow the on-screen instructions.
  5. Download the FlexNet Connect Manager Uninstall tool.
  6. Find its location and run it. Follow the on-screen instructions in the wizard.
  7. Click the Yes option when asked if you want to remove the FlexNet Connect Software Manager.
  8. Reboot your computer and see if the file still exists.

There you go, these are just a few simple solutions that might help you remove Installshield Update Service from your PC, so feel free to try them all. Leave us a comment with your thoughts on this topic in the dedicated area below.

The Elder Scrolls V: Skyrim Special Edition Bugs [Fixed]

The Elder Scrolls V: Skyrim Special Edition is now available for both Xbox One and Windows PC. This game version brings the epic fantasy to life in stunning detail.

The Special Edition brings a series of add-ons with all-new features, such as remastered art and effects, dynamic depth of field, and more. Unfortunately, The Elder Scrolls V: Skyrim Special Edition also brings issues of its own.

In this guide, you will find a list of the common issues you can face in this game and how to resolve them.

How can I fix The Elder Scrolls V: Skyrim Special Edition issues?

1. My Mouse/Keyboard doesn’t work

Some have reported that unplugging or changing the gamepad setting in the settings fixed this.

Another solution is to unplug any USB device, such as a microphone, memory, or even a webcam. Some have reported that the USB microphone was the culprit.

2. Animations are weird

vsync

Many have reported that VSync should be enabled/forced and limited to 60hz. This can be done in the NVIDIA/AMD control panel.

Another solution is to go to the path below on File Explorer: Documents\My Games\Skyrim Special Edition\Skyrim\Prefs.ini

Then set iVsyncpresentinterval to 0 if using a G-Sync compatible system. You may also want to do this in the NVIDIA/AMD control panel specific to the game, and as an added bonus, it should speed up the game’s performance according to multiple accounts.

3. I’m getting terribly low FPS

manage 3d

By default, Skyrim might set your GPU to integrated graphics instead of dedicated. From what we’ve seen, this is mostly an NVIDIA issue. Go to your NVIDIA control panel and then go to Manage 3D settings.

Add Skyrim SE if it’s not in the list and then change its settings from Global/Integrated Graphics to High-performance NVIDIA processor.

Another solution, according to users, is to disable G-Sync. This should vastly improve performance and remove stuttering. If that is not the cause, we believe you should try a dedicated driver solution.

So, using a tailored driver update tool can entirely detect misconfigured Nvidia graphics drivers and fix them automatically as we speak.

⇒ Get Fortect Driver Updater

4. Skyrim SE keeps crashing

If you are using mods, please make sure your mods aren’t using any scripts and have relied on other mods that use scripts.

Various people have also reported that changing the Language helps prevent crashing. You can change the language in Skyrim.ini.

With this, we can conclude this guide. You should now be able to fix these common issues on The Elder Scrolls V: Skyrim Special Edition.

If you are dealing with a more serious issue like Elder Scroll V: Skyrim not saving settings, we have a dedicated guide for that.

If you found other bugs and glitches in The Elder Scrolls V: Skyrim Special Edition, please let us know in the comments section below, along with any other questions you may have, and we’ll surely take a look.

How to get started with Microsoft Search and why it’s something different than Bing or Google

Microsoft Search is a business-oriented intelligent search solution from Redmond’s leading software provider, which allows companies and organizations to search for business documents, people, conversations, tasks, and files from a single search box. While it uses the same artificial intelligence technology that powers the Bing search engine, it differs significantly with its enterprise focus and enhanced capabilities.

Perhaps the easiest way to access Microsoft Search from within your organization is through Bing, as it will give you both business-related info as well as general search results. This creates a central hub for users to access a variety of information, both related to their business as well as that from outside. These queries not only come from Bing, but from everywhere in Microsoft 365, including Teams, OneDrive, and Outlook according to the company’s blog post.

Microsoft Search can also be accessed from the Office portal or from its new progressive web app. Users can use it to quickly search for their business apps, files, contacts, sites from Sharepoint, and list items. Microsoft applies AI to the service to provide its users will relevant suggestions based on the work they are performing though intent-based commands or for performing common tasks to enhance work efficiency.

Businesses that use SharePoint can also benefit from being able to quickly keep up with the news and latest announcements, and search through sites without keeping bookmarks. Microsoft highlights its “zero intent queries” as a significant feature, which brings up relevant information and suggested documents without having to type a word. The search bar can also provide results from people within the organization, previews from more than 270 file types, as well as site previews.

Microsoft is also working to integrate its Search solution straight into Windows 10, as well, which will expand the search to apps, device files, and settings straight from the search bar in the taskbar. These personalized results provide users with relevant information and files both locally as well as from Office 365, including smart results such as for the people that are contacted most frequently.

Microsoft is continuing to provide enhancements and bringing additional capabilities to Search, with new features being added every month. If you’re interested in integrating it into your business, you can find out more on its website.

The Referenced Account is Currently Locked Out: How to Fix

Are you having problems while trying to log in to your Microsoft account? In that case, you will most likely receive the following alert: The referenced account is currently locked out and may not be logged on to.

This can be a problem, and you won’t be able to log in with your Microsoft account, so it’s important to fix this issue as soon as possible.

What does the referenced account is currently locked out and may be logged on to mean?

  • This message appears due to Windows security policy.
  • In case you have several unsuccessful login attempts, your PC will be locked to protect your data.

How long will I be locked out of my computer?

This depends on the administrator and the configuration of this policy. In some cases, you might be locked out for a few minutes.

In others, you might be locked out permanently until an administrator manually addresses the issue.

How to fix account locked-out issues?

1. Wait 30 minutes

  1. After you get this message, step away from your PC.
  2. Don’t try to log in for 30 minutes or more. Try to remember your password.
  3. After 30 minutes have passed, try to log in again.

2. Remove the Account lockout threshold

  1. Press the Windows key + R keys.
  2. In the Run box, enter secpol.msc and press Enter.The referenced account is currently locked out
  3. From Local Security Policy window click on Security Settings – located in the left panel.
  4. Then, from the submenu that will be displayed navigate towards Account Policy and choose Account Lockout Policy.
  5. From the main panel of this window, double-click on Account lockout threshold policy.The referenced account is currently locked out
  6. The Account lockout threshold Properties window will be displayed.
  7. Select the Local Security Setting tab and under Account will not lock out enter 0.The referenced account is currently locked out
  8. Click OK and then Apply.
  9. You can reboot your Windows 10 system in the end.

Now you can verify if everything was fixed by entering the wrong password several times. If you’re not getting The referenced account is currently locked out and may not be logged on to message, you successfully fixed this security issue.

Remember that if you can’t remember your password, you have to reset it manually. You may also try to remove your Windows password.

Speaking of passwords, if you want to manage better the passwords you use on your computer, check out this guide on the best password manager for Windows 10.

How to mount multiple ISO files in Windows 10

An ISO is effectively an uncompressed archive file that you can open either by burning to CD/DVD or mounting them on virtual drives.

You can mount the ISO files in both Windows 8/10 without any extra third-party software.

However, to mount multiple ISO files in other Windows platforms you’ll need some extra software.

Mounting an ISO file is like creating a virtual CD or DVD, only you don’t have to use a physical disc.

An ISO image is very helpful in many situations, such as when you play a video game that requires the disc to be inserted. So, you can do that much easily by creating a virtual image of the disc.

How do I mount multiple ISO files in Windows 10?

Mounting ISO Files in Windows 8/10

  • Open the folder that includes the ISO you need to mount.
  • Then you should right-click the ISO to open its context menu.
  • Select the Mount option on the menu. A window for the ISO should open.
  • However, if a window doesn’t open navigate to This PC in File Explorer and then double-click the new virtual drive there to open ISO.

Mount Multiple ISO Files with Virtual CloneDrive

Virtual CloneDrive is a third-party tool that enables you to mount multiple ISO files.

This is still worth adding to Windows 10/8 as it enables you to set up multiple virtual drives for ISOs and supports numerous image file formats.

You can add it to your hard disk by clicking the Download button on this page.

  • Once you’ve added Virtual CloneDrive to Windows, open the program’s window in the snapshot below.

mount ISO

  • First, click the Number of Drives drop-down menu and choose a number of virtual drives from there.
  • Click OK to close the software’s window, and then open File Explorer.
  • Navigate to This PC, which will now include additional virtual drives as in the shot directly below.

mount ISO2

  • Right-click one of the virtual drives and select Virtual CloneDrive > Mount from context menu.
  • Now select an ISO image to mount.
  • Alternatively, you can mount ISO files by right-clicking the Virtual CloneDrive system tray icon. Then select a drive on the context menu and click Mount.

mount ISO3

  • To unmount an ISO, right-click its virtual drive, select Virtual CloneDrive > Unmount.

So mounting multiple ISO files in Windows 10 is straightforward. It’s better to mount multiple ISOs with the Virtual CloneDrive software.

You could also try out software such as ISODisk, which is also a freeware disk image tool.

RELATED ARTICLES YOU NEED TO CHECK OUT:

Dauntless launches today on Xbox One, PS4, and PC, the first game to launch with true crossplay

With Microsoft and Sony finally playing nice on gaming and streaming efforts, Xbox and PlayStation gamers alike have been waiting for the first game to offer a true cross platform play experience. Launching today, Dauntless is that game, and is available on Xbox One, Windows 10, and PS4. Epic Games announced Dauntless on Twitter, even offering instructions to gamers to properly link their Xbox Live, PC, and PS4 accounts.

Dauntless is a “free-to-play, co-op action RPG,” testing the waters with its launch today in cross-platform play. Unbeknownst to most, Dauntless has been in development for the past four years. For the uninitiated, Xbox Wire offers ten strategies for gamers to keep in mind when playing Dauntless for the first time on Xbox One.

Last week, Eurogamer compared Dauntless to be in the same vein as Monster Hunter and it seems to be a fair assessment. Here is the console announce trailer for Dauntless on Xbox One and PS4.

It will be interesting to see how Dauntless fares in cross-platform play. As Microsoft said in its holiday commercial last year, “when everyone plays, we all win.” Personally, I hope to see Microsoft and Sony work on making more games (past, present, and future) available for cross-platform play.

Email stuck in Outlook 2007 Outbox [COMPREHENSIVE GUIDE]

Outlook is one of the most popular email clients on Windows 10, and while some users use the latest version, others prefer the older one. Users reported that their messages are stuck in Outbox in Outlook 2007, so let’s see how to fix this problem.

What can I do if my message is stuck in Outlook 2007’s outbox? The quickest solution is to delete the messages from the Outbox folder. In many cases, moving or deleting the emails solved the issue.

If that’s not the case, then disable/uninstall Outlook‘s add-ons or use MFCMAPI tool.

For more info on how to do that, check the steps below.

Steps to fix a stuck email in Outlook 2007’s outbox:

  1. Delete the messages from the Outbox folder
  2. Remove large attachments
  3. Disable / uninstall Outlook add-ons
  4. Check if your password is correct
  5. Check if the authentication is working properly
  6. Check if both Outlook and the mail server are online
  7. Set the default account
  8. Close all Outlook processes
  9. Repair Outlook data file
  10. Disable your antivirus software
  11. Delete all Outlook files from AppData folder
  12. Turn off Cached Exchange Mode
  13. Start Outlook in Safe Mode
  14. Create a new pst file
  15. Use MFCMAPI tool
  16. Enter the email address manually
  17. Create a new Contacts folder
  18. Disable your Internet connection
  19. Check your router configuration
  20. Disable IP CEF feature on your router
  21. Delete the .ost file
  22. Create a new email profile and paste the old .pst file to it
  23. Uninstall PGP
  24. Click the Send / Receive button
  25. Change the SMTP port
  26. Create a new profile
  27. Edit your registry
  28. Check the Send immediately option
  29. Specific case – Message stuck in Outbox Outlook 2007 cached mode
  30. Specific case – Message stuck in Outbox Outlook 2007 POP3

Solution 1 – Delete the messages from the Outbox folder

According to users, this error will prevent you from sending emails because they will get stuck in the Outbox folder, but you can fix this problem simply by deleting messages from the Outbox folder. To do that, follow these steps:

  1. Start Outlook and select Work Offline option. Selecting this option will prevent you from sending or receiving any emails.
  2. Go to the Outbox folder and delete the messages. Alternatively, you can move them to any other folder if you want to preserve them.
  3. Go to File menu and uncheck Work Offline option.
  4. If you moved emails from the Outbox folder to some other folder, you can try sending them again.

After performing these steps, the problem with stuck emails should be fixed. Keep in mind that this is just a workaround, but it should fix any problems with stuck emails.

Solution 2 – Remove large attachments

Large attachments are usually one of the main reasons why emails get stuck in Outbox folder, but you can fix this this problem by resizing or removing the attachment. To do that, follow these steps:

  1. Start Outlook and turn on Offline Mode.
  2. Move the problematic message to the Drafts folder so you can edit it. You can also move the message by right clicking it, selecting Move > Other Folder > Drafts. If you get an error saying that Outlook is already transmitting this message, you should wait for a couple of minutes and check if Outlook manages to send the email.
  3. After moving the email to the Drafts folder, you can edit your message, resize the attachment or remove it.

If you have problem with sending attachments, you might want to consider using a cloud storage such as Dropbox or OneDrive to upload your attachment and include the link in your email message.

Solution 3 – Disable / uninstall Outlook add-ons

According to users, this problem can appear if you open a certain email message while it’s located in the Outbox folder. This message will be marked as read and it won’t be send.

One cause for this problem are Outlook add-ons, but you can easily fix this problem by disabling or removing the installed add-ons. If you rely heavily on those add-ons, you can simply move the email message to the Drafts folder and try to send it again.

You can also disable some add-on by changing the registry. Simply navigate to

 HKEY_LOCAL_MACHINESOFTWAREMicrosoftOfficeOutlookAddins

and

 HKEY_CURRENT_USERSoftwareMicrosoftOfficeOutlookAddins

key and change LoadBehavior to 0 to disable a certain add-on.

Solution 4 – Check if your password is correct

Sometimes this problem can appear if you change your email password. For example, if you use webmail with Outlook and you change the email password, you’ll have to enter the new password in Outlook as well.

To change your account settings in Outlook, do the following:

  1. Open Outlook and go to File > Info. Select Account Settings > Account Settings.
  2. Select your account and click the Change button.
  3. Enter the new password in the password field and click Next > Finish to save changes.

-READ ALSO: 6 best password sync software to try

Solution 5 – Check if the authentication is working properly

If the authentication with the email server doesn’t work properly, you might get email messages stuck in the Outbox folder. To fix this problem, you need to check your authentication settings by following these steps:

  1. Go to Tools > Account Settings >Email.
  2. Double click your account to open its properties and click More Settings button.
  3. Go to Outgoing server tab and check if your settings match the one recommended by your email provider. Make sure that Require Secure Password Authentication (SPA) option isn’t checked unless your mail server requires it.
  4. Head over to the Advanced tab and check if Outgoing Server port number is correct. Port 25 or 587 should be assigned to SMTP accounts. For SSL encrypted SMTP connections use TCP port 465. Assign POP accounts to port 110 and IMAP accounts to port 143.

Gmail has special settings, and if you use Gmail POP with Outlook you need to set port 995 for POP3 and port 465 for SMTP. Also you need to check This server requires an encrypted connection (SSL) option.

For Gmail IMAP account use port 993 for POP3 and port 587 for SMTP. Also be sure to turn on SSL option. For more details on how to configure Outlook, we suggest that you check your email provider for detailed instructions.

Solution 6 – Check if both Outlook and the mail server are online

Outlook comes with a useful feature called Offline Mode that allows you to view your emails offline, but you won’t be able to send emails if this feature is turned on, so make sure that you disable it.

You can disable Offline Mode simply by going to the Send / Receive tab and clicking the Work Offline button.

If Offline Mode isn’t turned on but you still have this problem, it’s possible that the mail server has some issues. In that case you can only wait until the administrator fixes the problem.

Solution 7 – Set the default account

This problem can occur if you don’t have a default account assigned. To assign a default email account, do the following:

  1. Start Outlook and go to Account Setting dialog.
  2. You should see all available email accounts. If none of the accounts has a little check mark next to its name, it means that there’s no default email account.
  3. To set a default email account, select the account that you want to use and click the Set as Default option from the menu.

Solution 8 – Close all Outlook processes

This problem can occur if another application is using Outlook data file, and in order to fix this problem, you need to start Task Manager and end all Outlook-related processes.

To do that, simply press Ctrl + Shift + Esc to start Task Manager. When Task Manager opens, locate and close any processes that are related to Outlook. After you do that, check if the problem is resolved.

Solution 9 – Repair Outlook data file

Sometimes emails can get stuck in Outbox folder if Outlook data file is damaged. To fix this problem, you can use Inbox Repair Tool to repair the data file.

Simply go to the Outlook installation directory and run the SCANPST.exe tool. Select your data file, click the Start button and wait for the scan to repair your data file.

Solution 10 – Disable your antivirus software

Many antivirus tools have an option that scans all incoming or outgoing emails, and sometimes this option can interfere with Outlook. To fix this problem, you need to open your antivirus application and turn off email scanning option.

If that doesn’t work, you might want to disable your antivirus software, or remove it and switch to a different antivirus program.

Solution 11 – Delete all Outlook files from AppData folder

Before you start deleting these files, we strongly suggest that you create a backup just in case. If anything goes wrong, simply use your backup to restore the deleted files. To delete Outlook files from AppData folder, follow these steps:

  1. Press Windows Key + R. When Run dialog opens, type %appdata% and press Enter or click OK.
    message-stuck-outlook-2007-outbox-appdata-1
  2. Now you’ll need to locate Outlook directory and delete all files from it. It should be located in Microsoft folder. Sometimes these files can also be located in AppData > Local > Microsoft > Outlook folder, so be sure to check it out as well.
  3. After doing that, simply start Outlook again and it will recreate necessary files and the problem with stuck emails in Outbox should be fixed.

-READ ALSO: Outlook emails have disappeared: 9 solutions to get them back

Solution 12 – Turn off Cached Exchange Mode

Sometimes Cached Exchange Mode can interfere with Outlook 2007 and cause email messages to get stuck in Outbox folder. You can easily fix this problem simply by disabling Cached Exchange Mode by following these steps:

  1. In Windows search box, type Control Panel and hit Enter.
  2. Go to Mail and select Data Files > E-mail Accounts.
  3. Double click the Microsoft Exchange Server option.
  4. Locate Use Cached Exchange Mode option and uncheck it.
  5. Save changes and try to run Outlook again.

Solution 13 – Start Outlook in Safe Mode

Outlook add-ons can interfere with email sending process and cause email messages to get stuck in Outbox. Fortunately, you can fix this problem by starting Outlook in Safe Mode. To do that follow these steps:

  1. Press and hold Ctrl on your keyboard and click the Outlook shortcut.
  2. Keep the Ctrl key pressed until you see dialog box asking you to start Outlook in Safe Mode. Choose Yes.

Running Outlook in Safe Mode will disable all add-ons and reset Outlook to default settings, so you should be able to send your emails without any problems.

Solution 14 – Create a new pst file

By creating a new pst file you’ll force Outlook to create a new Outbox folder, and that can sometimes fix this problem. To create a new pst file, do the following:

  1. Start Outlook and go to File > New > Outlook Data File.
  2. Now go to File > Data File Management and set the new pst data file as the default data file.
  3. After doing that, restart Outlook.
  4. When Outlook restarts, you should see your original pst file as the secondary set of mailbox folders. From there you can delete your old Outbox folder. Be sure to completely remove it by holding the Shift key and chosing the Delete option.
  5. Now set the original pst file as default and restart Outlook.
  6. Outbox folder will be created again and the issue should be resolved.

Solution 15 – Use MFCMAPI tool

This is a third-party tool, but it can be used to fix this type of problem. Keep in mind that this tool can cause damage to your mailbox, so be sure to create a backup and be extra cautious while using it.

To fix this problem with MFCMAPI, follow these steps:

  1. Download MFCMAPI. If you use 64-bit version of Outlook, be sure to download 64-bit version of the tool.
  2. Once you download the tool, extract it and run mfcmapi.exe.
  3. Choose Session > Logon.
  4. Locate your Outlook email profile and click OK.
  5. You should see several entries on the list. Double click the entry that has Default Store set to True.
  6. In the left pane, expand the first entry. This entry should be called Root – Mailbox or Root Container.
  7. Locate Outbox folder. It should be located in one of these folders: IPM_SUBTREE, Top of Outlook data file, Top of Personal Folders or Top of Information Store.
  8. Double click Outbox folder. You should see all messages that are stored in it.
  9. Select the problematic message and choose Actions > Submit > Abort submit.
  10. While the message is still selected choose Actions > Delete message.
  11. Set the Deletion style to Permanent delete passing DELETE_HARD_DELETE (unrecoverable) and click OK.
  12. Repeat these steps for all messages that are stuck in your Outbox.
  13. After you’re done, close MFCMAPI and restart Outlook.

Solution 16 – Enter the email address manually

According to users, this error appears if you select an email address from your contact list or if you select an email address from the list of suggestions. To prevent this problem, they are suggesting to manually enter the email address to the To field while sending email.

Entering the address manually allows you to send emails, so be sure to try that out. Keep in mind that you’ll have to manually enter the email address every time you want to send an email.

Solution 17 – Create a new Contacts folder

Users reported that emails can get stuck in Outbox folder due to corrupted contact list. To fix this problem, you need to create a new Contacts folder and copy all your contacts to it. To do that, follow these steps:

  1. Start Outlook and go to Contacts.
  2. Right click Contacts in the navigation pane and select Create New Folder. Set the name of the folder to Backup.
  3. Select all your contacts and copy them to the Backup folder.
  4. Select all the contacts from the Backup folder and paste them back to the original Contacts Folder.
  5. Choose Update All option.

After all your contacts are updated, the issue with stuck emails will be fixed.

Solution 18 – Disable your Internet connection

Few users reported that you can fix this issue simply by disabling your Internet connection. To do that, follow these simple steps:

  1. Press Windows Key + X and select Network Connections.
    message-stuck-outlook-2007-outbox-network-connections-1
  2. When Network Connections window opens, right click your network connection and choose Disable from the menu.
    message-stuck-outlook-2007-outbox-network-connections-2
  3. After disabling your network connection, delete the messages from Outbox or move them to a different folder.
  4. Go to Network Connections, right click your connection and choose Enable.

If you don’t want to use Network Connections, you can fix this problem simply by unplugging your Ethernet cable, moving or delete emails from Outbox folder and reconnecting the Ethernet cable again.

  • READ ALSO: NetDisabler allows users to fully take control of their internet connection’s ON/OFF switch

Solution 19 – Check your router configuration

Sometimes these problems can appear if you change your router’s firewall settings. To fix this problem, you need to change your firewall settings or reset your router.

To reset your router check its instruction manual for detailed instructions.

Solution 20 – Disable IP CEF feature on your router

Users reported that Cisco routers have issues with Outlook 2007, and if you want to fix the problem with emails stuck in Outbox, open your router configuration and turn off Cisco Express Forwarding feature.

After turning this feature off, the problem should be resolved.

Solution 21 – Delete the .ost file

Sometimes this problem can occur due to a corrupted .ost file, and to fix this problem you need to remove that .ost file. To do that, follow these steps:

  1. Open Outlook and go to Tools > Account Settings.
  2. Navigate to Data Files Tab > Settings.
  3. Select Offline Folder File Settings and check the File location. Remember the file location because you’ll need it for the next step.
  4. Close Outlook and go to the File location that you got in the previous step.
  5. Locate .ost file and delete it.
  6. After deleting the file, start Outlook again and check if the problem is resolved.

-READ ALSO: Fix: change offline Outlook Data File (.ost) location in Microsoft Outlook on Windows 10

Solution 22 – Create a new email profile and paste the old .pst file to it

Few users reported that they fixed this problem by creating a new email profile by going to Control Panel > Mail. After doing that, locate the pst file of the new profile and rename it. Then copy the pst file from the old profile and the problem with stuck emails should be fixed.

Solution 23 – Uninstall PGP

Users reported that this problem was caused by PGP 8.1, and according to them, you can easily fix this problem by removing PGP. After removing the PGP, the problem with emails stuck in Outbox will be resolved.

Solution 24 – Click the Send / Receive button

To fix this problem sometimes you just need to click Send / Receive button. According to users, sometimes there can be a certain bug that prevents messages from sending, but you should be able to fix this problem simply by clicking the Send / Receive button.

Solution 25 – Change the SMTP port

Few users reported that they fixed this problem simply by changing SMTP port from 25 to 26. Sometimes your ISP can block certain ports, but after changing the SMTP port to 26, the problem was fixed. For more information on how to change your ports, check the Solution 5.

Some users are also suggesting to increase the Server Timeout to 7 minutes and 30 seconds, so you should try doing that as well.

Solution 26 – Create a new profile

According to users, you can fix this problem easily by creating a new Outlook profile. If you want to keep all your autocomplete entries, be sure to rename the NK2 file. After creating a new profile, the problem should be fixed.

Solution 27 – Edit your registry

Users reported that you can fix this problem by changing few values in your registry. Before modifying the registry, be sure to create a backup in case anything goes wrong. To edit your registry, do the following:

  1. Press Windows Key + R and enter regedit. Press Enter or click OK.
    message-stuck-outlook-2007-outbox-regedit-1
  2. Go to the
     HKEY_CURRENT_USERSoftwareMicrosoftOffice12.0OutlookCached Mode

    key in the left panel.

  3. In the right panel, right click the empty space and choose New > DWORD (32-bit) Value and set SendOne as the name of that DWORD.
    message-stuck-outlook-2007-outbox-regedit-2
  4. Double click the SendOne DWORD and in the Value data field enter 0.
  5. Click OK to save changes and close Registry Editor.

After making these changes, start Outlook again and check if this problem is resolved.

Solution 28 – Check the Send immediately option

Users reported that their emails are getting stuck in Outbox folder when they send them using other Office tools. To fix this problem, you need to enable one option in Outlook. To do that, follow these steps:

  1. Open Outlook and go to Tools > Options.
  2. Go to Mail Setup tab and check Send immediately when connected option.
  3. Click OK to save changes.

Specific case – Message stuck in Outbox Outlook 2007 cached mode

Solution 1 – Cancel the Send / Receive process

Few users reported that you can fix this problem by starting the Send / Receive process and cancelling it. To do that, simply click the Send / Receive button.

Send / Receive status should appear at the bottom of the screen. Click the arrow next to it and click on Cancel Send / Receive. By doing that, all messages from Outbox folder should be removed.

Solution 2 – Restart Microsoft Exchange Active Directory Topology service

This is just a temporary solution, and you’ll have to repeat it every time this error appears. To restart Microsoft Exchange Active Directory Topology service, do the following:

  1. Press Windows Key + R and enter services.msc. Click OK or press Enter.
    message-stuck-outlook-2007-outbox-services-1
  2. When Services window opens, locate Microsoft Exchange Active Directory Topology service, right click it and choose Restart from the menu.

After this service restarts, open Outlook and check if the problem is fixed.

Specific case – Message stuck in Outbox Outlook 2007 POP3

Solution – Copy all emails from the problematic pst

Few users reported that they fixed this issue simply by copying all emails from the problematic pst file to a new pst. After you do that, remove the old pst file along with the problematic Outbox and the problem should be fixed.

Message stuck in Outlook 2007 Outbox can be a big problem and prevent you from sending emails, but as you can see, this problem can be easily resolved by using one of our solutions.

If you have any more questions about Outlook 2007, feel free to leave them in the comments section below and we’ll take a look.

[wl_navigator]

Posted in Fix

Microsoft Launcher beta v5.5.0 now available with support for adaptative icons and more

Beta testers of the Microsoft Launcher app for Android now have a new set of features to try out. Perhaps the most noteworthy new feature is the implementation of adaptive icons. This means that users can now select the shape they wish to be applied on all of their app icons on the home screen.

Adaptive icons were first introduced in Android Oreo, which allowed for multi-layered (background and foreground) icons which can be easily reshaped by the system. Developers are slowly implementing them into their apps, so many apps still use a single-layered image instead.

Interestingly, Microsoft Launcher chooses to reshape these legacy icons into the same shape as the adaptive icons are set, much like the way that Samsung and LG phones do in their stock launchers. The app doesn’t do a good job at this right now, making each one look like an icon on top of another background.

Many of the legacy app icons are reshaped with the added background.

Additionally, Microsoft has also re-enabled the hidden dock in the Launcher, so users who choose to have it enabled will be able to access the larger dock area by swiping up from the toggle at the bottom of the screen.

Microsoft Launcher hidden dock

For those who aren’t a fan of the Cortana implementation in Microsoft Launcher (or the assistant itself, for that matter), notification badges will now work with calling and messaging apps without the launcher having to be set as the default assistant. Of course, the company says that setting the app as the default assistant will increase the accuracy of the notification badges, should you prefer.

The app also features various other improvements, including faster task card syncing for Microsoft work/school accounts, as well as adjustments for accessing shortcuts while the home screen is locked. Microsoft encourages testers to provide feedback on these changes through the Google Play comments, uservoice, or email, so that issues can be sorted out before it’s released to general users.

If you’re not a tester, you can become one by heading to the Microsoft launcher beta test page. One signed up, you’ll be able to download the beta version of the app from the Google Play Store. Feel free to leave your comments about the app down below.

Microsoft Launcher
Microsoft Launcher
Price:
Free

More than 200 games discounted in this week’s Deals with Gold and Xbox Backward Compatibility Sale

Starting today, Microsoft is offering deep discounts on more than 200 Xbox games in this week’s Deals with Gold and Xbox Backward Compatibility Sale. As noted in a post by Xbox Wire, now through May 27, 2019, Xbox gamers can save up to 75% off “on over 280 Original Xbox and Xbox 360 titles playable on Xbox One via the Backward Compatibility program.”

This week’s Deals with Gold include several game titles from acclaimed franchises, such as Call of Duty, Gears of War, Grand Theft Auto, Far Cry, Bioshock, Assassin’s Creed and many more. Red Dead Redemption and Splinter Cell Blacklist are Xbox One X Enhanced, so you can play them on the most powerful console on the planet, the Xbox One X. Take a look at all the Xbox games available in the Microsoft Store.

Below video game on Xbox One
BELOW on Xbox One

Buy BELOW, No Man’s Sky, or Tacoma as they are the featured games available in this week’s Deals with Gold sale for Xbox One. The Outfit, Red Dead Redemption, and Tom Clancy’s Ghost Recon Advanced Warfighter 2 lead the way for Xbox 360 games. On his blog, Major Nelson posted the full list of Xbox One games available in the Deals with Gold sale. There are plenty of Xbox Game Pass and Xbox Play Anywhere game titles available as well as plenty of discounts on Xbox One games and DLC.

This Deals with Gold and Xbox Backward Compatibility Sale won’t last forever. Pick the Xbox One and Xbox 360 games you want from the Microsoft Store before this sale disappears on May 27, 2019.

Microsoft Kaizala app changes the number of characters allowed for group names

The Microsoft Kaizala app updated on iOS devices today, bringing the app to Version 1.129.106163311.

This latest update improves the app’s energy efficiency and also changed the number of characters allowed when creating a group name. The character limit has now been increased to 50.

In addition to the two above changes, this update also includes a variety of performance improvements and fixes for bugs that had been frustrating users of the previous version.

Here’s the full release notes:

Apart from bug fixes and performance improvements, this update includes:

  • Fixes to reduce battery consumption
  • Now you can make group names up to 50 characters long.

Kaizala is an official Microsoft app designed for team collaboration. The app allows users to create polls and surveys and send media to one another and also lets users share their location and keep track of specific tasks.

The Kaizala app was originally created for the India market and is currently used by over 1,000 different domestic companies. In late-2018, Microsoft expanded the service to 27 additional regions and it’s now available as part of Office 365.

Do you use Kaizala? Let us know in the comments below and then follow us on Pinterest for more tech content.

‎Microsoft Kaizala
‎Microsoft Kaizala

Failed to create a graphics device error [GUARANTEED FIX]
Experiencing the Failed to create a graphics device error on your PC? This tutorial will show you a set of sure fixes to fix the error.

Basically, when this error occurs, it often indicates a problem associated with your PC’s graphics cards/drivers. Most times, this error is encountered on PCs that have two graphics cards.

How to fix Failed to create a graphics device error? Firstly, start with restarting your PC. If that doesn’t help, try updating your graphics card drivers since drivers are the most common cause for this error. If that doesn’t work, reinstall your graphics card drivers from the Device Manager.

How can I fix Failed to create a graphics device error?

  1. Restart the PC
  2. Update graphics drivers
  3. Reinstall graphics drivers

1. Restart the PC

Restarting/rebooting the system is probably the most basic method that you can try in order to fix Failed to create a graphics device error.

  1. Open the Start Menu and click Power.failed to create a graphics device windows 10 power button
  2. Select Restart.failed to create a graphics device windows 10 restart
  3. Wait for your system to reboot.

After restarting your PC, check if the error is fixed. You can do this by launching a game player on your computer.

2. Update graphics drivers

One of the most notorious causes for Failed to create a graphics device error is outdated graphics drivers. To resolve this, all you need to do is to update your PC’s graphics drivers.

To update the graphics driver in Windows 10, follow the steps below:

  1. Click on Windows + R to open the Run dialog box.
  2. In the box, type devmgmt.msc and press Enter.failed to create a graphics device windows 10 devmgmt.msc
  3. Locate and expand Display adapters to display underlying options.
  4. Locate and right-click on the graphics driver.
  5. Click on the Update driverfailed to create a graphics device windows 10 update driver
  6. Select the Search automatically for updated driver software Windows will automatically search for updates.
  7. Wait for the update to complete.
  8. Restart PC.

This action will look for updates and install the latest drivers on your system. And this should fix the error. If the problem persists, you can try reinstalling the graphics drivers.

Alternatively, you can use third-party tools such as third-party driver updater software to update all your outdated drivers automatically, just with a few clicks.

⇒ Get Fortect Driver Updater

3. Reinstall graphics drivers

To reinstall graphics drivers on Windows 10, follow the guidelines below:

  1. Open the Device Manager.
  2. Locate and double-click Display adapters to expand it.
  3. On the underlying options, right-click on your graphics driver/device.
  4. Select Uninstall device.failed to create a graphics device windows 10 uninstall device
  5. In the confirmation window, check the Delete the driver software for this device checkbox and click on Uninstall to confirm the action.
  6. Close program and restart the computer.

There you go, these are just several simple solutions that might help you fix Failed to create a graphics device. Be sure to try all of our solutions and let us know if they managed to fix your problem.