How to fix frequent Outward game issues and resume gameplay

Outward, the newest open-world RPG with a blend of survival elements has been out for a few days. And as we know, no launch is true without hiccups with users reporting various issues with the game.

But we’ve created a list of fixes to common bugs found throughout the game. So let’s get started with our list.

Solutions to fix Outward bugs

  1. Frame drops
  2. Game crashes
  3. Split screen not working
  4. Display bugs
  5. Black screen fix
  6. No audio issues

1. Frame rate drops

Firstly, you’re going to Open your Nvidia Control Panel, and select 3D Settings, then turn off the Dynamic Super Sampling.

When dealing with FPS drops, try lowering the image quality, changing your graphics quality to medium from high. This helps with consistent frames when you might be experiencing drops.

Sometimes, low FPS and lagging gameplay indicate that your graphics driver is not working. A simple driver update can boost gaming speed by fixing performance bottlenecks and applying system tweaks that enable games to run faster and error-free.

We recommend installing a trustworthy third-party driver update manager that will keep your OS up and running with automatic updates and in-depth error fixing.

You can trust that Fortect Driver Updater is capable of making such improvements to assure a proper update with the most recent graphics card drivers compatible with your PC.

2. Game crashes

Don’t we all hate it when this happens? The reasons for a game crashing could stem from not meeting the minimum system requirements, outdated graphic drivers, or even corrupted game files.

To fix Outward from crashing we first suggest that you right-click on your Outward shortcut or exe. file and run the game in Windows Compatibility Mode.

Secondly, if that didn’t work, open your Nvidia Control Panel and select Manage 3D Settings and select Outward from the Program Settings and next you’re going to set the Power Management to Prefer Maximum Power.
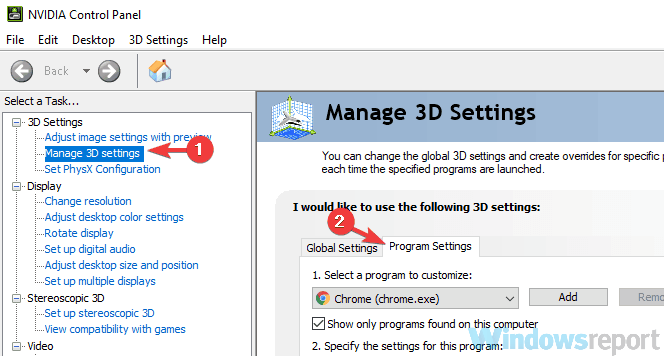
nvidia control panel andy os

3. Split screen not working

In order to solve this issue, we suggest that you and your fellow adventurers run the game on Administrator rights.  If nothing else works, simply use the Steam overlay and head on over to your friend list, click the other player and join game.

This works best if neither player is moving at the time they join a game.

4. Fix display bugs

Right-click on the Desktop and click on Display Settings, now you’re going to select Advanced Settings, next click on Adjust Resolution.

Computer screen shifted sideways

Select which one suits your screen, keeping in mind the refresh rate of your screen. Also, you can disable V-sync in your in-game menu.

5. Black screen issues

In order to ensure that this works, firstly you’ll need to try running the game in Windowed Mode or lowering your resolution to 1080p. If this didn’t work, click on Verify or Repair Outward in your Steam client or Epic Launcher.

steam overlay not working windows 10

Or alternatively, simply uninstall and reinstall the game in case you have corrupted files in your Steam directory.

6. No audio

For this fix, you’re going to right-click on the speaker icon on the bottom right corner of your screen or toolbar for hidden icons and click on Sounds.

Now head on over to the Playback section and disable all the sound devices except the internal speaker or the speaker you wish you want to use.

hidden devices playback settings HDMI not showing

Also, keep in mind that changing your audio from surround sound to stereo can do the trick too.

Tips for smooth gaming sessions on PC

  • Always whitelist your game through the Windows Firewall, or any antivirus software that might be preventing the game from going into split screen mode.
  • Keep your graphic drivers up-to-date, and any esential components on your machine.
  • Whenever you have a freshly launched game, it’s best to run the game on recommended settings until future patches are released.
  • Always remember the minimum requirements when running a game, these are specs for Outward:
    • OS: Windows 7 (64 Bit) / 8 (64 Bit) / 10 (64 Bit);
    • Processor: Intel Core i5-750 or equivalent;
    • Memory: 4 GB RAM;
    • Graphics: Nvidia GTS 450 or equivalent;
    • Storage: 15 GB available space.

So these are the main issues reported with Outward RPG. Hopefully, these solutions are an aid whenever you stumble upon any of them. Feel free to share any thoughts on this topic in the dedicated comment area below.

Fix: Generation Zero Leaving Streaming Install Area

There are many great FPS games, and speaking of which, many reported Generation Zero leaving the streaming install area and other various issues.

These types of errors can make the game almost unplayable, so it’s important to fix them as soon as possible.

Luckily for you, in today’s guide, we’re going to show you a couple of great solutions that can help you fix this and various other issues.

Why is my Generation Zero game not loading?

  • An antivirus or firewall blocks the game, so you must make an exclusion.
  • Overclock settings are causing the game to crash.
  • GPU settings are preventing the game from running properly.

How can I fix Generation Zero leaving streaming install area and other issues?

Before we start fixing these issues, there are a few quick solutions that you should try:

  • Make sure that your antivirus doesn’t block the game.
  • Remove overclock settings if you’re using overclocking software.
  • Use Alt + Tab to minimize the game and get back to it quickly.

1. Change GPU settings

  1. Open your Nvidia Control Panel by right-clicking on the desktop and selecting Manage 3D Settings.
  2. Select the game from the Program Settings and set the Power Management to Prefer Maximum Power.
  3. Optional: Go to 3D Settings tab and turn off the Dynamic Super Sampling or DSR.

After making these changes, check if Generation Zero leaving streaming install area error is still there.

2. Allow the game through firewall

  1. Open Windows Defender Firewall and click on Allow an app or feature through Windows Defender Firewall.
  2. Click on Change settings and choose Allow another app.
  3. Locate Generation Zero exe file and make sure you check both Private and Public checkboxes.

After doing that, check if Generation Zero host no longer present error is still there.

3. Verify game integrity

  1. Open Steam and go to Library.
  2. Locate Generation Zero, right-click it and choose Properties.
  3. Go to the Local Files tab and click on Verify integrity of game files.
  4. Wait for the scan to finish.

As you can see, it’s easy to fix Generation Zero, leaving streaming install area and other issues with these steps.

However, if you have additional problems, we have a great guide on how to fix game crashes, so we encourage you to read it.

So far, how are you enjoying the game? Let us know in the comment section below.

What to do if League of Legends Friends List doesn’t work

As one of the most popular MOBA games in the world, League of Legends is basically useless without friends and other players to play it with. But that’s exactly what might happen as occasional problems with Friends Lists in League of Legends are possible.

There are a few factors that can mess up your League of Legends Friends List. Also, there are a few issues with the Friends list that can be quite annoying, including:

  • You or a friend recently changed your Summoner name, but you (or your friend) see the old summoner name.

  • You’re able to send messages to friends, but they don’t receive them (or vice versa).

  • You add a summoner name to your friends list that includes special characters, which can cause your entire friends list to disappear.

Luckily, League of Legends support has provided a workaround that should resolve these issues. The solution is quite simple, all you need to do is to delete the affected friend from your Friends List and then add him/her once again. Your friend needs to do the same thing.

This will reset the Friends List and resolves any possible flaws. Keep in mind that Friends List issues can also be caused by various servers problems. In that case, there’s really nothing you can do but to wait for the development team to address the problem or release a patch.

You can also try and repair the game with the Battle.net client, although that’s a long stretch solution as the bug is on the server-side, not with the local files. With that said, it won’t take too much time. Just open the client, right-click on League of Legends, and repair the game.

Did this advice help you to resolve the problem with Friends List? Do you know about some other workaround? Let us know in the comments below.

RELATED STORIES YOU NEED TO CHECK OUT:

Unable to install Windows 10 Creators Update with Media Creation Tool [Fix]

As we already mentioned in some previous articles, it’s quite comforting to know that there are multiple ways to update your system. Windows 10 is somewhat infamous for its over-the-air update issues, and if there’s no Media Creation Tool, a lot of users will have a hard time updating to the Creators Update.

The latest insights in this useful feature give us a few reports about the Media Creation tool’s failure. Namely, a moderate number of users was restricted from utilizing this tool, which was followed by various errors. So, what do you do when the solution becomes a problem? Luckily, you’ve come to the right place.

We prepared the most common ways to address this issue. So, if you’re prompted with errors like ‘‘There was a problem running this tool” or ”Something went wrong’‘, check the solutions below and we should get the Media Creation tool running in no time.

How to fix Media Creation Tool issues in Windows 10 Creators Update

  1. Enable update-related processes
  2. Disable antivirus/firewall
  3. Change language
  4. Tweak registry
  5. Use another PC

1. Enable update-related processes

First thing first, you should try and run the Media Creation Tool as Administrator. If that wasn’t helpful, there’s a chance some of the needed system update processes are disabled. That will, of course, stall updates or inflict various errors. Luckily, there’s a way to check their status and enable them.

Follow the instructions below to apply this workaround and hopefully resolve the issue at hand:

  1. In the Search Windows bar, type services.msc and open Services.
  2. Confirm that the following services on the list are set to run Automatic:
    • TCP/IP NetBIOS Helper
    • IKE and AuthIP IPsec Keying Modules
    • Server
    • Workstation
    • Automatic Updates OR Windows Update
    • Background Intelligent Transfer Service
  3. Right-click on each of these services and open Properties.
  4. Make sure that they are set to Automatic.

If the problem is persistent and the Media Creation tool still won’t function, check the alternative workarounds below.

2. Disable antivirus/firewall

More often than not, update issues are closely related to 3rd-party antimalware solutions. For the standard Windows update procedure, they block some services and prevent your PC from updating. And, apparently, the same goes for the Media Creation tool, as well. So, before you take some other, more advanced steps, make sure to disable the antivirus before you run the tool.

In addition, some users reported an interference caused by Windows’ native firewall. It’s risky to disable both antivirus and firewall for an extended period, but it won’t harm if you disable it for a couple of minutes.

If you’re unsure how to disable both firewall and Windows Defender, the instructions are just below:

  1. Press Windows + I to open the Settings app.
  2. Open Update & security.update & security windows 10
  3. Under the left pane, select Windows Defender.
  4. On the right side, you’ll see Real-time protection. Turn it off.
  5. Now, right-click the Start menu and, under administrative shortcuts, select Control Panel.
  6. Open System & security.
  7. Click the Windows Firewall.
  8. Disable both Private and Public networks.
  9. Try running the Media Creation tool again.

3. Change language

Some users managed to resolve this issue by changing the language settings. It seems the tool sometimes won’t function on non-English language systems, so your best bet is to switch to the English locale language. You’ll need to match languages, most of the time, in order for the tool to work properly.

Follow the instructions below to change the system language. Later on, you can switch back to any language of choice.

  1. Right-click Start and open Control panel.
  2. Click Region.
  3. Under the Administrative tab, choose Change system locale.
  4. Set language to English, and click OK to confirm.
  5. Now, under the Administrative tab, go to Copy settings
  6. Make sure both “Welcome screen and system accounts” and “New user accounts” checkboxes are checked
  7. Confirm changes and restart your PC.

However, if the language is not the cause behind the faulty Media Creation tool, you’ll need to take an alternative approach.

4. Tweak registry

The registry is dangerous ground for those who aren’t aware of the negative effects it can have on the system. However, it can be used for various tweaks and workarounds, and most of the time will serve you good. When it comes to matters at hand, you can use one registry tweak to resolve the issue with the Media Creation tool.

For the safety of your system, make sure to follow the instructions closely:

  1. In the Windows Search bar, type regedit. Right-click Registry Editor and run as administrator.
  2. Navigate to the following path:
    • HKEY_LOCAL_MACHINESOFTWAREMicrosoftWindowsCurrent VersionWindowsUpdateOSUpgrade
  3. Right-click on the right field and choose New > DWORD.
  4. Name it AllowOSUpgrade.
  5. Set the value for newly created input to 1 and save it.
  6. Restart your PC and look for changes.

If even this procedure wasn’t enough for you to fix your issue, there is still one way you should take into consideration.

5. Use another PC

In the end, if none of the above-mentioned workarounds managed to get the job done, or you lost your nerves trying, there’s an alternative. If you’re unable to run the Media Creation tool on one PC, you can create a bootable media, like USB or DVD on another. The procedure is simple and won’t take you too much time:

Follow the instructions below to create a bootable media on an alternative PC:

  1. Plug a USB stick in one of the ports.
  2. Run the Media Creation tool.
  3. Accept the License Agreement.
  4. Select Create installation media for another PC and click Next.
  5. Select the language, edition, and architecture that resembles the one you already had installed.
  6. Choose USB as media you’ll use.
  7. After the procedure is finished, plug in the bootable USB in troubled PC and double-click Setup.
  8. That way, you should be able to update the system without trouble.

We hope this article helped you resolve the issues at hand. If you have any additional solutions or questions, make sure to post them in the comments section below.

RELATED STORIES YOU NEED TO CHECK OUT:

You can download language packs for Windows via Microsoft Store

Microsoft seems to be experimenting with some new language options for Windows these days.

Microsoft’s latest plans include offering its users access to a few language packs from Microsoft Store. In other words, you would be able to bypass Windows Update and download and install language packs directly from Microsoft Store the same way you download games and apps. This should ease the usage, as Microsoft is focusing on making the Store more valuable to Windows 10 users by making it the hub of all extra features.

You can already find three language packs that include Catalan, Valencian, and Russian in the Microsoft Store.

Redstone 4 will allow users to download language packs

The fact that during the last few days, the company uploaded a series of language packs might mean that Microsoft is planning to soon provide us with the opportunity to download language packs from Microsoft Store with Redstone 4.

The official description of each one of the three available language packs says that if you want to experience Windows in a brand new language, the local Experience Pack will do the job. This includes the latest language resources for Windows features such as Start Menu, File Explorer, and Settings.

The official description of every language pack from Microsoft Store also states that after you install the app, you have to select the Launch button in order to navigate to Windows Settings app and from there you would be able to control all of your language preferences including the Windows display language. This should be really interesting.

For now, you can try downloading the three available language packs that you can find in the Microsoft Store including Catalan, Russian and Valencian. It’s pretty likely that this is just a test for Microsoft to see how things will be going and the company will probably upload more language packs shortly in the Microsoft Store as well.

RELATED STORIES TO CHECK OUT:

GTA 5 Stopped Working: How to Fix it Quickly

Grand Theft Auto 5 is one of the highest-grossing Windows games that has broken industry records.

However, the game doesn’t always run flawlessly and has one error message that states, Grand Theft Auto 5 has stopped working.

That error message pops up for some GTA fanatics when they start the game. Consequently, GTA 5 doesn’t run for them. There are, however, various ways that you can fix this issue.

How can I fix GTA 5 if it stops working?

1. Check GTA 5’s System Requirements

system requirements gta 5

If GTA 5 has stopped working, double-check that your laptop or desktop meets GTA 5’s minimum system requirements, as shown above.

Note that the game requires NVIDIA and AMD video cards, so it isn’t going to run on desktops or laptops with Intel integrated graphics.

You can also check that GTA 5 will run on your PC at the Can You RUN it website. This website matches games’ system requirements with your system specifications to tell you if they will run.

Enter Grand Theft Auto 5 in the website’s search box, and press the Can You Run It button. Then, a new page will open, showing you how your hardware specifications match the game’s system requirements.

canirunit system requirements gta 5

If your PC doesn’t meet GTA‘s minimum system requirements, you can get a refund from Steam, provided you downloaded the game less than two weeks ago.

Your Steam account will list games you can still get refunded. This Steam page provides further details on how to request a refund.

2. Install the Latest Visual C++ Redistributable Pack

The Visual C++ 2008 redistributable pack is also an essential requirement for Grand Theft Auto 5, which should have been installed with the rest of the game. However, Visual C++ might not have been installed correctly; and there’s also a more updated version.

Press the Download button on the Microsoft download website to update Visual C++ if you don’t have the latest version.

3. Run Grand Theft Auto 5 in Compatibility Mode

  1. Open GTA 5’s folder in File Explorer.
  2. Right-click the GTAVLauncher.exe, and select Properties on the context menu.file properties
  3. Click the Compatibility tab to open the options shown directly below.compatibility mode
  4. Select the Run this program in compatibility mode for option and select your preferred OS.
  5. Click the Run this program as administrator checkbox at the bottom of that tab.
  6. Press the Apply and OK buttons on the Compatibility tab.
  7. You can also open the Program Compatibility Troubleshooter from the Compatibility tab, which might come in handy for fixing the GTA 5 stopped working error. Press the Run compatibility troubleshooter button to open the window shown below.
program compatibility troubleshooter

Grand Theft Auto 5 is not an outdated game, but it still predates Windows 10. As such, running the game in compatibility mode as an administrator might resolve the GTA 5 stopped working error.

4. Disable non-Windows Services

  1. Press the Windows key + R, type msconfig, and click OK.system configuration general tab
  2. Select the Services tab shown in the shot directly below.disable non-microsoft services
  3. Click the Hide all Microsoft services check box to remove the MS services from the list.
  4. Now you can select Disable all to switch the third-party services off quickly.
  5. Deselect the Load startup items check box on the General tab.
  6. Click Apply, select OK, and press the Restart button to reboot Windows.
system configuration restart pc

It might be the case that a third-party software service is crashing the game. To ensure that’s not the case, disable the non-Windows services.

5. Update your Graphics Card Driver

  1. Press the Windows key + X and select Device Manager.
  2. Double-click Display adapters to open a list of graphics devices.device manager
  3. Right-click the graphics card listed there, and select the Update driver option.
  4. Select the Search automatically for updated drivers option to install and update the driver automatically.
    update drivers device manager
  5. If no new device driver is detected, there might still be a better driver available on the manufacturer’s website. Open this website page to update NVIDIA graphics card drivers.
  6. Select your graphics card and Windows platform from the drop-down menus.download nvidia drivers
  7. Press the Search button, and click Download to download the listed driver.
  8. Then open the folder that includes your driver, and click its setup wizard or installer.
  9. Restart Windows after installing the driver.

This GTA stopped working error could be due to an outdated graphics card driver. NVIDIA released GeForce Game Ready 350.12 WHQL drivers more specifically for GTA 5.

So it’s worth checking if there is an up-to-date driver for your video card. This is how you can update an NVIDIA graphics card driver manually or automatically.

Regardless of this way, you can perform it effortlessly. It’s possible to find and detect GPU outdated drivers with a fully automated driver application.

With this efficient tool, you will get the full list of outdated drivers on your device and press one click to update them and fix problematic graphics drivers causing gaming issues.

⇒ Get Fortect Driver Updater

6. Verify the Steam Game Cache

  1. First, open and log in to Steam.
  2. Open the game Library section, and then right-click Grand Theft Auto 5.
  3. Select the Properties option on the menu.steam game properties
  4. Select the Local Files tab, which includes a Verify Integrity of Game Files option.verify integrity of game cache
  5. Press the Verify Integrity of Game Files button to verify the cache. Steam will replace corrupted GTA 5 files.

It’s worth verifying the Steam cache for any game that’s not starting. That might detect and repair corrupted game files.

7. Switch off antivirus software

Third-party antivirus software and their firewalls can stop the game from running. The quick way to find out if that’s the case is to switch off third-party antivirus software temporarily.

Right-click the antivirus software’s notification area icon and select its disable or turn off setting if you can find one on the context menu.

Then you can probably select to temporarily switch the software off before launching GTA 5.

8. Reinstall Social Club

Social Club is the online multiplayer setup for GTA 5. Rockstar, the game’s publisher, suggests that players reinstall Social Club to fix GTA 5 startup issues. You can do that by entering appwiz.cpl in Run and clicking OK.

Then select Rockstar Games Social Club, and press the Uninstall button. After that, right-click the Social Club installer and select Run as Administrator to reinstall Social Club.

9. Uninstall Identity Cloaker

Some Grand Theft Auto 5 players have found that the GTA V has stopped working error is due to the Identity Cloaker software.

If you happen to have Identity Cloaker on your hard drive, uninstalling it will probably fix the game. You can uninstall Identity Cloaker via the Programs and Features tab, much the same as Social Club.

Those resolutions will probably fix GTA 5 so that the game runs without a stopped working error. Aside from that, you can also try reinstalling the game.

Similarly, if GTA 5 keeps crashing your PC, check our guide to fix it.

If you have a further fix for the GTA 5 stopped working error, please share the additional tip below.

How to stop Windows 10 from automatically sending virus samples to Microsoft

When Windows 10 detects a new threat on your device, it will automatically send the problematic file to Microsoft. This enables the company to analyse the threat and develop new antivirus definitions that help identify it in the future.

While this sample sharing helps improve the overall security of the Windows ecosystem, it might make you feel uncomfortable. Although Windows will prompt you if a sample is “likely” to contain personal information, you may prefer to disable sample submission altogether.

Scanning for v iruses using Windows Security Centre

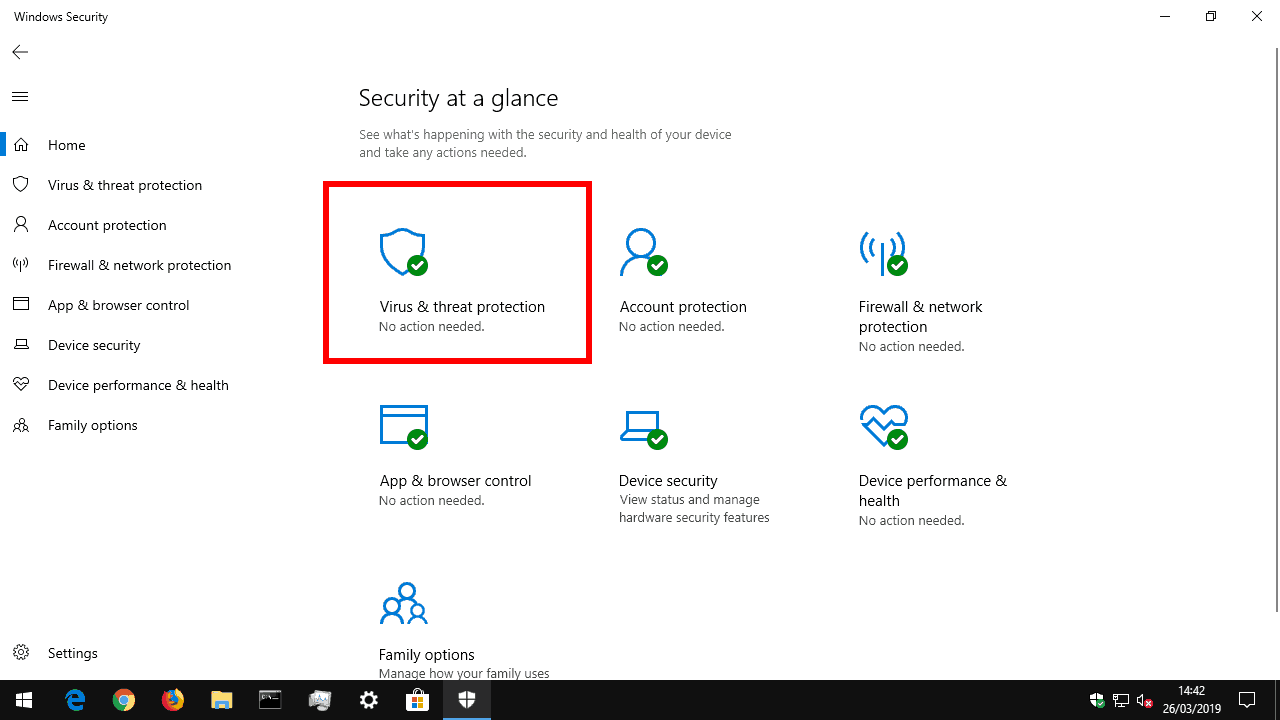
The relevant option can be found in the Windows Security app (previously known as Windows Defender Security Centre prior to the Windows 10 October 2018 update). Launch the app and press the “Virus & threat protection” tile on the homepage.

Disabling automatic sample submission in Windows Security

Next, click the “Manage settings” link under the “Virus & threat protection settings” heading. This screen controls how Windows detects and responds to possible viruses on your PC.

Disabling automatic sample submission in Windows Security

The relevant option for our purposes is under the “Automatic sample submission” button. If it’s enabled, simply click it to turn off the automatic sample submission. Potentially problematic files will no longer be sent to Microsoft when they’re detected or quarantined on your device.

Microsoft warns that disabling sample submission could impact the effectiveness of Windows Defender’s cloud-delivered protection. Consequently, it’s possible you’ll miss out on the very latest antivirus definitions being offered by Microsoft’s cloud servers. You should think twice before turning off this option – it’s a delicate balancing act between protecting your personal privacy and keeping your device secure.

HBO GO won’t play on Xbox One? Try these solutions

It’s been quite a while since we’ve been pampered by HBO’s streaming service HBO GO, 2010 came and went, but the service is still going strong. Proving quite a selection of content, including current and past series, films, specials, through either the HBO website, on mobile devices, or in this case, video game consoles.

Looking for that perfect movie night? You’ve fired up your Xbox One, and you’re ready to cool off, but HBO GO won’t play anything. Where do we go from here? Well, we have a couple of solutions for you. So hang onto your seat.

What to do if HBO GO can’t play video on Xbox One?

  1. Restart HBO Go
  2. Switch to a Wi-Fi connection
  3. Uninstall HBO GO

1. Restart HBO GO

xbox controller

If HBO GO won’t play on Xbox One, sometimes restarting the application might fix the problem.

  1. Restart the HBO GO app.
  2. Restart your smart TV.
  3. Update your smart TV software.
  4. Delete and reinstall HBO GO.
  5. It should be working now.

2. Switch to a Wi-Fi connection

wi-fi connection

If you’re using a cable connection on your console, simply unplug the Ethernet cord and run the Xbox on Wi-Fi instead. Several users reported that this method works for them, so feel free to try it out.


3. Uninstall HBO GO

Sometimes, if all else fails and HBO GO won’t play on Xbox One, the simplest method is just uninstalling your app and reinstalling it.

  1. Go to My games & apps. Highlight HBO GO and then press the Menu button on your controller.
  2. Unplug your Xbox One and unplug the power cord from your Xbox One.
  3. Reinstall HBO GO (go to Apps and download HBO GO).
  4. You’re good to go.

Hint

To activate the app on your Xbox simply follow these steps:

  1. Launch HBO GO in your device.
  2. Sign in to your Xbox account.
  3. Select your Provider.
  4. Select the Activate your device button, and the next screen should display the activation code.
  5. Follow the steps showed onscreen and finish the activation process.

Hint

Do you want this app on your smart TV? Follow these steps to install it:

  1. Go to the smart TV app store and make sure your TV model is supported (choose the Check your device link).
  2. Download HBO GO from the Smart Hub on your TV.
  3. Open HBO GO on your TV.
  4. On your computer, go to the HBO activation website.
  5. You can now use this service.

There you go, these are some solutions that you can try if HBO GO won’t play on Xbox One. How are you enjoying this streaming service so far? Let us know in the comment section down below.

RELATED STORIES TO CHECK OUT:

Windows 10 news recap: new Pinterest app arrives in Microsoft Store, Intel makes it easier to check integrated graphics settings with new app, and more

Welcome back to our Windows 10 news recap, where we go over the top stories of the past week in the world of Microsoft’s flagship operating system.

New Pinterest app shows up on the Windows 10 Microsoft Store

A new app for Pinterest has appeared in the Microsoft Store on Windows 10, but before you get too excited, it looks to be just a web app with no additional features, it simply replicates the Pinterest website into an app shell, unlike Twitter’s app which takes the website and bolts features on top.

The now open source Windows 10 Calculator app will get a new “graphing mode”

Microsoft is adding a “Graphing Mode” to its now open source Windows 10 Calculator app. The new mode will show visualisations of mathematical equations on a graph.

Intel makes it easier to check your integrated graphics settings on Windows 10 with new Graphics Command Center app

Intel has released a new app into the Microsoft Store on Windows 10 that makes it easier for users to adjust settings for their integrated graphics card, surfacing settings to optimise for games, videos, and adjust settings for displays.

Windows 10 Your Phone app now lets you push content from a PC to an Android phone

The Your Phone app on Windows 10 can now push content from a Windows 10 PC to an Android phone, making it easier to move from one device to another seamlessly. Microsoft Edge is the only app supported at first, but it could allow you to move a website you’re looking at from your laptop to your phone, if you’re about to go out but still need the content, for example.

That’s it for this week. We’ll be back next week with more Windows 10 news.

5 steps to set Google as your default search engine in Chromium-Edge

If you already downloaded and installed Chromium-based Microsoft Edge on your computer, you may have noticed that Bing is the default search engine.

Most of the internet users are not fond of Bing as a search engine, and they want to set Google Chrome as their default browser. This is rather simple to do by following these steps.

How do I set Google as a default search engine in Chromium-Edge?

Change the settings

Once you have downloaded and installed the Chromium-based Edge browser, follow the steps listed below:

  1. The first step is opening a new tab in the web browser.
  2. Now head towards the address bar and type google.com.
  3. Now you need to browse something in the search bar and navigate to Menu >> Settings >> Privacy and services. 
  4. Click the following options Address bar >> Manage Search engines, you will now be able to see another search engine.
    manage search engines chromium edge
  5. Next, you need to click the horizontal ellipsis icon and select Make default. 

You should keep in mind that the installer for the upcoming Edge browser has not been officially released by the user yet. As a matter of fact, we can not deny the risk associated with downloading and installing the .exe files from unknown sources.

Now you have successfully updated the Google settings with your custom search engine. You will now be able to see the entry in the drop-down menu, once you have successfully configured the Google search engine option in Microsoft Edge.

Moreover, you can follow the same procedure to add more search engines, including privacy-focused search engines. The feature now allows you to switch as per your requirements.  Did you know you can change Cortana’s search engine? That’s right, and we have a guide that shows you how to do that.

You can also follow this step by step guide on how to change the default search engine in Microsoft Edge to switch between Google, Bing, or any other provider whenever you like.

FAQ

How do I set Google as my default search engine in Microsoft Edge?

Open Edge, go to Settings, select Privacy, search, and services, scroll to Address bar and search, choose Manage search engines, and set Google as Default.

Why is Google not showing in my search engine list?

You need to visit google.com first so Edge can detect it. After loading the site, reopen the Manage search engines page and Google should appear.

Can I remove Bing from the search engine list in Edge?

You cannot delete Bing because Edge requires a fallback engine, but you can set Google as the default so Bing is never used during normal searches.

Why does Edge still show Bing results even after I change the default to Google?

You may be searching from the new tab page, which uses Bing by design. Use the address bar or install a new tab extension to force Google results.

Microsoft is definitely going to add more search engine options as it further develops the browser. However, the tech giant has not shared any details regarding its plans to offer Google as an alternative service in the application. 

RELATED ARTICLES YOU NEED TO CHECK OUT:

This privacy-focused search engine is better than Google

Google is a search engine that can be used to find a variety of information such as websites, pictures, maps or even just answers to questions that have been driving you mad for a long time.

If you thought Google was the best search engine, well, I’ve got some news for you. While it’s hard to believe, there is a search engine that has defeated all the other searching engines out there, including the almighty Google.

Not many of you have heard of Startpage.com. But you may want to use it after reading this article.

German organization Stiftung Warentest recently labeled Startpage.com to be the best search engine option out there — privacy and search result-wise.

What is Startpage.com?

Startpage.com is a search engine that you open in any web browser. It offers the same search engines services that Google, Yahoo, and Bing offer.

The major difference is that this search engine protects your privacy. Moreover, its search results are even better than those offered by the most popular search engines out there.

Startpage privacy protection mechanism only apply to the searches you conduct through their website. This is very important, because the other search engines like Google, Yahoo, and Bing make a record of all of your searches.

The information is then used to create a profile about you and your interests. Startpage does not do this.

That’s why so many people are switching to Startpage, DuckDuckGo and other privacy-focused search engines and browsers.


In case you want to be secure while surfing the internet, you will need to get a full-dedicated tool to secure your network.  Install now Cyberghost VPN and secure yourself. It protects your PC from attacks while browsing, masks your IP address and blocks all unwanted access.


Have you used Startpage.com yet? Or will you give it a chance in your next searches?

It only depends on how much you value your privacy.

RELATED POSTS TO CHECK OUT:

Tropico 6 Bugs and Game-Breaking Problems: How to Fix Them

Unlike previous titles, Tropico 6 is one of the best titles of the Tropico series, but it can also be troubled by bugs in its best form.

In this detailed guide, we have gathered the common errors users encounter with this game and explain how to fix them effectively.

How do I fix Tropico 6 bugs and errors?

Before getting into more complicated solutions, make sure you perform the following preliminary steps:

  • If you have an installation issue, exit Steam and restart your machine. Restart the installation, and verify your file integrity in the Steam client.
  • For graphical tearing problems, disable the vertical sync since it can reduce graphical tearing. If, after this, you are facing tearing or related bugs while playing Tropico 6, we suggest you toggle vertical sync to back on in your game settings.

1. Audio issues

hidden devices playback settings HDMI not showing

Firstly, try changing your audio from surround sound to stereo. On your desktop, just right-click on the speaker icon on the bottom right corner of your screen and select Sounds.

Head on over to Playback and disable all the sound devices except the internal speaker or the speaker which you wish to use. This should get rid of most audio-related Tropico 6 bugs for good.

2. Black screen issues

Steam game failed to start missing executable

For this issue, try running the game in windowed mode to see if it happens again. If this doesn’t help, click on Verify or Repair Tropico 6 in your Steam client.

In the event that the issue is not resolved, uninstall and reinstall your game.

3. Start-up game crashes

  1. Launch Steam and right-click on Tropico 6.
  2. Next, choose Properties and select Local Files.
  3. Now, click Uninstall.
  4. Once the game is uninstalled, click on Browse Local Files and delete the remaining file. The last step is reinstalling Tropico 6.

4. Out-of-memory error
virtual memory system drive speed up windows 10

  1. Press the Windows key, type control, and select the Control Panel option.
  2. Choose System and Security.
  3. Now, click on System.
  4. Next, click on Advanced System Settings.
  5. Choose the Virtual Memory window, and uncheck Automatically manage paging file size for all drives.
  6. Tick the Custom size radio button.
  7. Finally, enter the Initial and Maximum memory sizes that would help you in running the game smoothly.

5. Tropico 6 stutter

For this, you’re going to disable the latest DirectX version and restart your game. Keep in mind that stuttering can sometimes be related to driver issues.

The latest driver is not working well with the game, and in this case, we’d recommend you fall back to an older version of the drivers you’re using.

Tips for a smoother Tropico 6 gameplay

For a smoother experience when launching and running Tropico 6 and prevention of bugs, we recommend closing all programs running in the background.

  • If you experience that your character is warping around the map or getting stuck at the starting point, you might be experiencing connection issues. Check your internet connection and troubleshoot it.
  • When first playing Tropico 6 use the recommended settings to avoid any performance instability.
  • When running Tropico 6, keep the requirements in mind for a better experience.

MINIMUM:

  • Requires a 64-bit processor and operating system
  • OS: Windows 7 64-bit
  • Processor: AMD or Intel, 3 GHz (AMD A10 7850K, Intel i3-2000)
  • Memory: 8 GB RAM
  • Graphics: AMD/NVIDIA dedicated GPU, 2GB dedicated VRAM (Radeon HD 7870, Geforce GTX 750)
  • DirectX: Version 11
  • Storage: 16 GB available space

RECOMMENDED:

  • Requires a 64-bit processor and operating system
  • OS: Windows 10 64-bit
  • Processor: AMD or Intel, 3.3 GHz (AMD FX 8300, Intel i5 3000)
  • Memory: 16 GB RAM
  • Graphics: AMD/NVIDIA dedicated GPU, 4GB dedicated VRAM (Radeon R9 380, Geforce GTX 960)
  • Storage: 16 GB available space

With this, we can conclude this guide on how to fix popular Tropico 6 bugs and errors. In the same vein, if you want to know how to fix the common Anno bugs, check our detailed guide to do it quickly.

How do you like the Tropico 6 game so far? Do you rule with an iron fist, or do you run your nation with peace?

Let us know in the comment section below.

OneDrive and SharePoint now offer built-in AutoCAD file support

Good news for OneDrive and SharePoint users! Autodesk AutoCAD has now been integrated into SharePoint and OneDrive.

Those users who save DWG files in SharePoint and OneDrive accounts can now easily open and edit them with Autodesk solutions including the AutoCAD mobile app, AutoCAD desktop application and the new AutoCAD web app.

The AutoCAD web app basically enables users to utilize AutoCAD on any computer in order to save drafts and design ideas.

You can use the new AutoCAD web app to open DWG files directly from SharePoint or OneDrive. Microsoft has already started rolling out OneDrive integration technology. The company plans to release support for SharePoint in the coming weeks.

What does this mean for your team?

OneDrive SharePoint AutoCAD

You just need to select the item and navigate to the toolbar’s open menu in order to open AutoCAD files in Autodesk applications. 

The OneDrive team explains the fact that computer-aided design (CAD) drawings are an integral part of the workflow for most of the companies working in engineering, architecture, and manufacturing. 

The company says that the new features offer enterprise-grade compliance, industry-leading mobile and desktop applications, and innovative collaboration capabilities to SharePoint and OneDrive. 

Surprisingly, your tasks will get simpler, integrating your data with business processes will be easier, helps you to stay in your flow. It can be achieved by integrating both the files and tools tightly.

Hence, your existing workflow will transform by developing deeper connections between key business tools to files. 

You can open your files without AutoCAD

Some of the users might not have AutoCAD installed on their systems. You don’t need to worry in that case as you can use the AutoCAD web app for opening files in your existing web browser.

It is worth mentioning that Microsoft plans to integrate a bundle of new features very soon. In future, the tech giant plans to enhance collaboration with Autodesk. This means more exciting new features coming your way later this year.

RELATED ARTICLES YOU NEED TO CHECK OUT:

Windows always needs to update? Fix it now

Admittedly, Microsoft updates are super important in securing your PC against myriad security threats. They also ensure that you enjoy the best experience when using various Microsoft software including their Office suite. But sometimes the updates can prove a nuisance because the tech giant has designed the update function such that Windows always needs to update, sometimes several times in one day.

So, how can you stop this behavior and use your Windows 10 PC in peace? Well, let’s look at the cause of this intrusive conduct before discussing how to halt it.

As I mentioned, an updated operating system guarantees maximum security for users. But not all users are committed to updating their Windows 10 so apparently, Microsoft thought it wise to make Windows 10 update itself automatically.

The company is always trying to catch up with makers of malicious software by releasing new updates rather frequently. Consequently, there are so many updates seeking to address specific vulnerabilities. To some, the automatic update feature is time-saving. However, other users find it pretty intrusive and will go all out to terminate the practice.

Why is Windows 10 constantly updating?

  1. Use Group Policy to disable automatic updates
  2. Disable auto-updating using the Windows registry
  3.  Set your Internet connection to be metered
  4. Block the Windows Update Service
  5. How to install updates manually

1. Use Group Policy to disable automatic updates

Users of Windows 10 Professional, Enterprise and Education versions can bar automatic updates using their Group Policy Editor. Once done, the Group Policy will be notifying you of fresh updates instead of automatically installing them.

  1. Press Windows key + R to launch the Run utility.
  2. Type gpedit.msc then click OK.gpedit.msc Windows always needs to update
  3. Click on Computer Configuration, then select Administrative Templates and lastly choose Windows Components.local group policy editor windows turn off automatic updates
  4. Now click Windows Update.group policy windows update Windows always needs to update
  5. Double-click on Configure Automatic Updates.configure automatic updates windows needs to update always
  6. Choose Disabled (as shown) and click Apply then OK.configure automatic updates disabled windows needs to update

This disables the automatic Windows Update feature.


2. Disable auto-updating using the Registry

If your Windows always needs to update, you might fix it by using the Registry Editor. The registry is one of the most powerful computer management tools and can help you rein in on this issue. To make these changes, do the following:

  1. Launch the Run tool by pressing the Windows key + R.
  2. Type regedit and press Enter. Choose Yes if prompted by UAC (User account control).Windows always needs to update regedit
  3. Go to this path:
    • HKEY_LOCAL_MACHINE\SOFTWARE\Policies\Microsoft\Windows
  4. Right-click on the Windows folder/key then select New and click on Key.
    how to stop windows 10 auto update registry editor
  5. Name this key(new) WindowsUpdate then press Enter.
    turn off auto update windows 10 new key
  6. Now right-click on the freshly created key (Windows update) and select New again and then click on Key. You will name this newest key AU then press Enter.
    Windows always needs to update new key
  7. Now Right-click on the right-hand side (of AU) then select New then click on DWORD(32-bit) Value.
    Windows always needs to update new dword
  8. Name this new DWORD key NoAutoUpdate then press Enter.
    NoAutoUpdate key Windows always needs to update
  9. Again Double-click on this newly created DWORD key and modify its value date to 1 (from 0).
    value data how to disable windows 10 update permanently
  10. Click OK and restart your PC.

Alternatively, use these workarounds if you’re on Windows 10 Home Edition to fix this problem.


3. Set your Internet connection to be metered

Limiting your WiFi Internet connection can also help impede the terrible behavior where Windows always needs to update.

  1. Click on the Start button.
  2. Click on the Settings.settings start menu Windows always needs to update
  3. Choose the Network & Internet.network and internet Windows always needs to update
  4. Click WiFi (on the left pane).
  5. Select the name of the Wi-Fi connection you’re using.wi-fi connection Windows always needs to update
  6. Click it, and enable Set as metered connection option.metered connection windows needs to update constantly


4. Block the Update Services

Disabling the service in charge of the automated updates can sometimes help if Windows always needs to update.

  1. Press Windows key + R to start the Run box.
  2. Type services.msc then press Enter.services.msc Windows always needs to update
  3. Scroll down until you find Windows Update then double-click it.windows update service windows 10 keeps updating every day
  4. Choose Disabled in the Startup type then select Apply and OK.startup type disabled Windows always needs to update

5. How to install updates manually

Once you implement any of the above fixes, you still need to download and install essential updates at your own convenience. Here is how to manually check for updates.

  1. Open the Settings app.
  2. Click Update & Security and then Windows Update.Windows always needs to update update and security
  3. Now click Check for updates.
    check for updates windows 10 update every time i shut down
  4. If there are pending updates, install them.

There you go, these are some solutions that you can use if Windows always needs to update, so be sure to try them all, and let us know if they work in the comment section below.

MORE GUIDES SELECTED JUST FOR YOU:

Outlook now supports dynamic emails for AMP format

Google recently added new AMP technologies to emails to enhance the interactivity level. Last year, Google announced in a press release that Gmail would have the Accelerated Mobile Pages framework.

The implementation of the feature made emails more interactive and engaging.

Initially, the feature was available to those who were a part of the Developer Preview program launched by the company.

Google already launched the AMP framework that pushed Microsoft to announce that Outlook.com is also going to support this format.

As a matter of fact, Microsoft already started rolling out the preview program of AMPHTML framework for Outlook.com.

The preview build goes live this summer

Microsoft is expected to release the preview build in summer 2019. Therefore, Outlook.com users will have access to the feature next year.

For most of the users who are desperately waiting for the feature, this will be a bit frustrating.

Users will no longer have to open a web browser as they will be able to:

Companies supporting the feature

Right now, the feature is supported by only a few companies, such as Despegar, Booking.com, Ecwid, Freshworks, OYO Rooms, Nexxt, Pinterest, Despegar, Doodle, and redBus.

Google decided to review the applications to allow users who are interested in sending dynamic emails. The decision has been made to alleviate security concerns.

The feature will also be supported by third party providers including Yahoo Mail, Mail.ru and others.

Google believes that the dynamic emails feature is going to be revolutionary for those enterprises that are regularly interacting with customers.

The idea sounds interesting but those who are really interested in adopting the technology will take the most benefit out of it.

Your email client must support the latest platform so that you can start adopting the new technology as soon as it’s available for the general public.

RELATED STORIES TO CHECK OUT:

First-person RPG Operencia: The Stolen Sun joins Xbox Game Pass today with Xbox Play Anywhere support

Operencia: The Stolen Sun, a new first-person RPG from Hungarian developer Zen Studios is launching today on Xbox One, Windows 10 and the Epic Games Store. The Xbox One and Windows 10 versions support Xbox Play Anywhere, and the game is also available on Xbox Game Pass today.

Zen Studios is mostly known for casual games like the Pinball FX series, but Openrencia: The Stolen Sun has been conceived as an homage to classic dungeon crawlers, with some references to Hungarian culture. “With Zen being based in Hungary, an added degree of regional pride drives every aspect of this game, and we hope that shines through as our own unique spin,” the developer said.

Xbox Game Pass subscribers can play Openrencia: The Stolen Sun for free on Xbox One and Windows 10 starting today, and the game is also priced at $29.99 on the Microsoft Store. Early reviews for the game are positive, so this is a pretty nice surprise for Xbox Game Pass subscribers before the end of the month.

Operencia: The Stolen Sun
Developer:
Zen Studios
Price:
$29.99

What to do if your laptop fails to open any browser

Sometimes your laptop won’t open any browser despite being connected to the Internet. You see, your Internet could be working the whole day only to stop abruptly without any prior indicators or signs of connectivity problems.

Well, we have been digging around and unearthed a couple of solutions for this most stubborn problem. But before we discuss them, let’s look at the causes of this fault and related errors.

Potential causes of the no browser will open (My laptop won’t open any browser) problem

  • Security blockades: Your antivirus and/or firewall could be blocking your browsers from opening because your system is infected with malware.
  • Registry issues: Problematic entries or improper editing of your registry settings could cause issues with browsers.
  • A recent Windows update: Recently installed Windows updates at times might render your browser inaccessible.
  • Adobe Flash Player: To prevent security incidents, web servers that allow Flash content occasionally prevent browsers from loading untrusted websites.
  • Jammed Browsing Data: Cookies, passwords, browsing history, and such locally stored information might also crash your favorite browser.
  • Additional installations: Adding extensions and plugins to your browsing software may also trigger this annoying behavior.

What to do if browsers won’t open on Windows 10

  1. Restart your computer
  2. Scan Your PC for Malware
  3. Disable your antivirus
  4. Remove a recent Windows update
  5. Boot into Safe Mode with networking
  6. Update your Browser

1.  Restart your computer

Unbelievably, rebooting your PC removes this issue sometimes. Do it and see whether you’ll succeed in fixing your browsers.

2. Scan Your PC for Malware

If your laptop won’t open any browser, scan your PC for malicious software and clean all found infections.

We recommend that you use a reliable antivirus for this, which also covers scans for malware.

You may already have an antimalware program, but you also require an antivirus. An antivirus is your first and most basic line of defense, whereas antimalware is an extra layer of defense.

Because modern antivirus solutions frequently incorporate deep scans for the most complex threats, that extra layer included with the antivirus is a fairly good value.

3. Disable your antivirus

Temporarily turning off your real-time antivirus protection could be beneficial. However, try to re-enable it because visiting websites when unprotected makes your device highly vulnerable to threats. If still no browser will open, turn off your installed firewall.

Additionally, consider removing your antivirus completely if you’re still having this issue. The steps vary depending on your installed antivirus, therefore refer to the manufacturers’ website if you encounter problems.

4. Remove a recent Windows update

If you think it’s one of your latest updates that causing browser issues, go ahead and uninstall it.

  1. Click the Start button. Select Settings. settings app no browser will open
  2. Select Update & Security.update and security browsers wont open windows 10
  3. Now select Windows Update and then click on Advanced options.advanced options laptop won't open any browser
  4. Now select View your update history then click on Uninstall updatesuninstall updates laptop can't open any browser
  5. Right-click on the problematic update and select Uninstall.uninstall update chrome and firefox not working windows 10
  6. Restart the PC and check if the issue is gone.

5. Boot into Safe Mode with networking

Safe Mode helps troubleshoot a plethora of PC problems. If your laptop won’t open any browser, access Safe Mode by doing the following:

  1. Click the Start button and select Settings.
  2. Choose Update & Security.update and security laptop won't open any browser
  3. Now choose Recovery and select Restart now under the Advanced startup tab.advanced startup laptop won't open any browser
  4. Your PC will reboot to the troubleshooting-oriented Choose an option screen.
  5. Click Troubleshoot then Advanced options.troubleshoot laptop won't open any browser
  6. Choose Startup Settings and then again click Restart. browsers won t load startup settings
  1. After it restarts once more, you’ll have a list of options to choose from. Select 5 or simple press F5 to enter into Safe Mode with Networking.enable safe mode with networking laptop won't open any browser

Test if any browser is accessible and whether web pages launch normally.

6. Update your Browser

At this point, perhaps the most probable solution is for you to update your browsers. And since they won’t open, just uninstall and then freshly install the latest version of your preferred browsing program. It’s a bit tiring but if successful, you will surely fix this issue permanently.

To completely remove an application from your PC, you can use third-party uninstaller software. By using one of the removal tools, you’ll ensure that your browser is completely removed, including all of its files and registry entries.

If your laptop won’t open any browser, feel free to try all solutions from this article and let us know if any of these solutions worked for you.

Microsoft takes control of 99 websites used by Iranian hacker group

Microsoft has taken control of 99 websites that have been used by a primarily Iranian hacker group, called Prosphoras by the company, which targets government agencies as well as journalists and activists to steal sensitive data. The company’s Digital Crimes Unit and Threat Intelligence Center have been investigating the hacker group since 2013, and the Redmond giant has since been able to obtain a court order that allowed them to take control of the websites used for their malicious purposes.

Prosphoras uses multiple methods to hack into the private accounts of its victims. For starters, a technique known as spear-phishing is used, where they use social media to send fake links such as outlook-verified.net, verification-live.net, or myaccount-services.net which link to malicious software used to hack into the user’s private computer systems. Another method used is sending the victim an email that supposedly warns them of a security risk to their accounts, redirecting them to a link to enter their credentials into a form that captures their passwords and gives the hackers access to the accounts.

Over the years, Microsoft has been able to use data security analytics tracking to stop the individual attacks and inform victims of such malicious actions. Thanks to the company’s efforts in tracking the hacker group over the years, it was able to build a legal case that allowed them to take control of the 99 websites, and will redirect the traffic from infected devices to the its digital Crime Unit sinkhole. This will allow it to collect information which will be added to the Microsoft Threat Intelligence Center to improve detections and further protect its customers.

Microsoft has also worked closely with Yahoo in sharing threat information and cooperatively stopping malicious hacks. The tech giant has also worked with various domain hosting companies in transferring ownership of the domains previously used for hacking to itself after the court order was granted.

Microsoft to remove Windows 10 19H1 anti-cheat software upgrade block as game companies release fixes

The list of known issues in the latest Windows 10 19H1 Preview build has just lost an important item this week. Recent 19H1 builds all had problems with games using anti-cheat software trigging bugchecks, forcing Microsoft to put an upgrade block on Insider PCs were the problematic games were still installed.

Yesterday, Microsoft updated the release notes for the 19H1 build 18362 to mention that this issue is about to be resolved. “Many games that use anti-cheat software have released fixes for the issue causing PCs to bugcheck (GSOD). The upgrade block that prevents Windows Insiders from updating to the latest build will be removed soon,” the Windows Insider team explained.

The 19H1 build 18362, which is the latest flight for Windows Insiders in the Fast and Slow Rings still has two incompatibility issues with some Related SD Card readers and Creative X-Fi sound card. Creative recently released updated drivers for Windows 10 version 19H1, but Microsoft’s Brandon LeBlanc said last week that the Windows Insider team was still doing its own validation before crossing that item from the known issues list.

Microsoft has yet to release a new Windows 19H1 build this week, but it seems that the major update is now almost ready to roll out. The software giant previously said that it would use the Release Preview ring for previews of drivers and quality updates, and this may well happen as soon as next week.

If Playback Doesn’t Begin Shortly Error: 3 Ways to Fix it

Sometimes you might get If playback doesn’t begin shortly, try restarting your device while trying to view online video.

This can be a big issue, and sometimes, YouTube videos won’t play on your PC. However, there’s a way to fix this problem, and we’re going to show you how to do it.

Why does If playback doesn’t begin shortly, try restarting your device appear?

  • Hardware acceleration features can sometimes cause this issue on your PC.
  • Problems with your GPU drivers may cause this problem, so you might have to update the GPU driver.

How do I fix If playback doesn’t start shortly error in YouTube?

1. Disable hardware acceleration in the browser

  1. Open Chrome and navigate to Settings.
  2. Head to the Advanced section. Next, select System.
  3. Locate Use hardware acceleration when available and disable it.

After disabling this feature, If playback doesn’t begin shortly, try restarting your device message should be gone.

2. Update or uninstall the NVIDIA graphics driver

  1. Go to the NVIDIA driver page.
  2. Enter your graphics card information and click on Search.
     
  3. Click on the Download button to download the driver.
  4. Once it’s downloaded, run the setup file to install it again.

If that doesn’t help, try uninstalling the driver by doing the following:

  1. Open Device Manager.
  2. Locate your display driver and right-click it. Choose Uninstall device.
  3. Select Remove driver software for this device and click Uninstall.
  4. Once the process is finished, restart your device and update the drivers.

Some users recommend using Display Driver Uninstaller to remove your GPU driver completely, so feel free to try that as well.

After doing that, check if the playback doesn’t begin shortly message is gone.

3. Switch your audio device

  1. Disconnect your current audio device.
  2. Connect different headphones or speakers.
  3. Check if the problem is resolved.

These are just some simple solutions you can use to fix If playback doesn’t begin shortly, try restarting your device error message.

In case you have additional problems, we have a great guide on how to get past Your browser can’t play this video message, so be sure to check it out.

This isn’t the only issue, and many reported that NewPipe is not working with YouTube videos, but we have a separate guide that addresses this issue.

We also have a guide on No valid sources are available for this video, so don’t miss it for more information.

As always, if you have other solutions for this problem, let us know in the comments below.

Error 126: iTunes was not installed correctly on Windows 10/11

Windows error 126 is an error that can occur when some Windows users try to open or install iTunes. The error message states: iTunes was not installed correctly. Please reinstall iTunes. Error 7 (Windows Error 126).

Thus, Windows users can’t get iTunes up and running. If you’ve encountered error 126, this is how you can fix the issue.

Steps to fix iTunes error 126 on PC

  1. Check the Software’s System Requirements
  2. Run a System File Scan
  3. Open the Program Install and Uninstall Troubleshooter
  4. Remove all Apple Software and Install iTunes

1. Check the Software’s System Requirements

The iTunes software isn’t going to run if your laptop or desktop doesn’t match its minimum system requirements. So the first thing to check is iTunes’ system requirements.

The software requires a 1 GHz Intel or AMD CPU and 512 MB RAM. The latest version is only compatible with Windows 7, 8, 8.1 and 10. Also, note that there are 64 and 32-bit versions of the software. Windows users with 32-bit platforms will need to install the 32-bit iTunes version.


2. Run a System File Scan

Windows error 126 can be due to missing or corrupted DLL files. The System File Checker tool fixes corrupted system files.

As such, an SFC scan could feasibly fix error 126. You can initiate an SFC scan in Windows 10 and 8 as follows.

  1. Open the Command Prompt from the Win + X menu by pressing the Win key + X hotkey.
  2. Select Command Prompt (Admin) to open the Prompt’s window.
  3. First, enter ‘DISM.exe /Online /Cleanup-image /Restorehealth’ in the Command Prompt, and press the Return key.
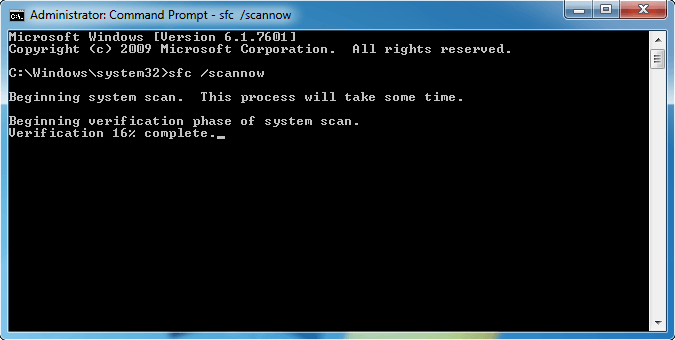
  4. Thereafter, input ‘sfc /scannow’ in the Prompt; and press the Enter key to initiate the scan.scannow
  5. The scan will take up to half an hour. If Windows Resource Protection detects and repairs files, restart the Windows OS.


3. Open the Program Install and Uninstall Troubleshooter

If you can’t install iTunes, add the Program Install and Uninstall Troubleshooter to Windows. That’s a troubleshooter that can resolve software installation, uninstallation or update issues.

The troubleshooter is compatible with the Windows 7, 8 and 10 platforms. Add it to Windows by pressing the Download button on this website page, and click MicrosoftProgram_Install_and_Uninstall.meta (1).diagcab to open the troubleshooter in the snapshot directly below.
program install troubleshooter


4. Remove all Apple Software and Install iTunes

Removing all Apple software from Windows before installing or reinstalling iTunes is one of the best resolutions for error 126. Uninstalling the software via the Programs and Features tab will probably be sufficient.

However, third-party utility software will more thoroughly remove the programs and leftover registry entries. This is how you can uninstall the Apple software with Advanced Uninstaller PRO.

  1. Click Download Now on this web page to save the Advanced Uninstaller PRO setup wizard to your hard drive.
  2. Open the Advanced Uninstaller PRO installer to install the software.advanced uninstaller pro
  3. Next, open the Advanced Uninstaller PRO window in the snapshot below.
  4. Click General Tools > Uninstall Programs to open the window directly below.advanced uninstaller pro
  5. Select an Apple program to uninstall. Remove all Apple software from Windows, such as iTunes (if installed), iCloud, Bonjour, Apple Software Update, Apple Application Support.
  6. Press the Uninstall button to open a Confirm Uninstall dialog box window.advanced uninstaller pro uninstall program
  7. Select the After to uninstall, scan the disk and registry for program leftovers option.
  8. Press the Uninstall button to remove a selected program.
  9. Restart the Windows OS when you’ve removed all the Apple software.
  10. Open the File Explorer to double-check that all Bonjour, Apple, iTunes, iPod, QuickTime, and QuickTime VR subfolders are deleted from the Program Files, Program Files (x86) and System 32 folders. Delete those Apple software subfolders if there are any remaining.
  11. Press the Download now button on this website page to add the latest iTunes version to Windows. If you have a 32-bit Windows platform, open this page instead.
  12. Open the File Explorer, right-click the iTunes installer and select Run as administrator from the context menu. Then go through the setup wizard.


That’s how you can resolve error 126 to install and run the iTunes software. Check out this iTunes guide for some details on how you can utilize the software.

RELATED STORIES TO CHECK OUT:

Sims 4 Alien Disguise Not Working: How to Fix it

The latest update for The Sims 4 brought a series of helpful game improvements, bug fixes, and issues of its own. Perhaps one of the most common and annoying issues is the alien disguise bug that leads to Sims 4 not working.

More specifically, all full aliens born in the game or created through genetics in CAS will lose their alien looks when players edit their characteristics. On the other hand, normal aliens don’t seem to be affected by this issue. Keep reading to find the solution!

What can I do if Sims 4 Alien Disguise is not working?

  1. First, you need to make sure that your alien Sim is in their disguise. Sometimes, the disguise may look alien because of the bug, even if the disguise isn’t selected.fix sims 4 alien disguise not working
  2. Go to a mirror, and select Change Sim. It is worth mentioning that the Alter Disguise and Plan Outfits option won’t work.
  3. Now, select the bottom portrait, the Alien form in CAS, not the disguise.
  4. Change the alien’s characteristics as you wish. If you try to edit the disguise again after it’s been saved, it will be overwritten by the alien form. This means that you’ll have to start all over again.
  5. Save in CAS. The Alien form that you changed should now be the Human Disguise.

The bad news is that you cannot edit this later in CAS, but you’ll have a human disguise until The Sims Studio patches this bug. You can also try repairing the game with the Origin client or reloading the save file.

We can also suggest reinstallation, but that’s the last option, and it’s not something you should do before trying all the other steps. But if it comes down to that, uninstall the app and then download the game all over again.

If you’ve encountered other solutions to fix the alien disguise bug, you can list the troubleshooting steps in the comment section below.

Posted in PC

Deal: Get one year of Office 365 Home plus a $50 Amazon gift card, today only

Amazon is offering a great deal on Office 365 Home subscriptions today. Customers who buy the $99 annual subscription today will get a free $50 Amazon gift card along their purchase, which can be uses to purchase anything on the website (via MSPoweruser).

This deal is only available today, and the Office 365 Home digital code and $50 gift cards will be sent by email after the purchase. It’s worth reminding that Microsoft updated its Office 365 Home subscription back in October, allowing subscribers to share the premium Office apps and 1TB of OneDrive cloud storage with up to five people instead of four. Device limits have also been updated, letting subscribers install the Office apps on an unlimited number of devices (though it’s only possible to be be signed on up to five at the same time).

Amazon last offered a similar deal back in December, and this is another great opportunity to subscribe to Office 365 or renew your current subscription. Office 365 is already great value, but adding a free $50 gift card to the mix makes it a no-brainer.

How to use Windows Photo Viewer as your default image viewer in Windows 10

Windows 10 introduced the shiny new Photos app as the default experience for interacting with image files on your PC. While an altogether more sophisticated offering, it can’t match the old Windows Photo Viewer app for sheer speed and simplicity when viewing single image files. If you miss the simpler experience from the Windows 7 era, read on to reinstate it.

If you upgraded from Windows 7, Windows 8 or Windows 8.1

If you performed an in-place upgrade to Windows 10 on an existing PC (through the Get Windows 10 app), you should find Windows Photo Viewer is still available. You’ll be able to access it from the “Open with” menu on image files.

Setting default apps in Windows 10

All you need to do is change it back to the default image viewer – Windows will have automatically configured Photos as the default during setup. To reverse this, open the Settings app and click the “Apps” category.

Navigate to the “Default apps” page and click the “Photo viewer” tile. In the list that appears, click Windows Photo Viewer. It will now be used as the default app when opening an image file.

Using Photo Viewer to open an image in Windows 10

On newer versions of Windows 10, we’ve found Windows Photo Viewer no longer shows up as an available option in the default apps list – even if it is enabled. A workaround is to set it as the default for each file extension you want to use it with.

Using Photo Viewer to open an image in Windows 10

One quick method of achieving this is to find an image file in File Explorer, right-click it and choose Open with > Choose another app. Select Windows Photo Viewer in the list and then tick the checkbox at the bottom to “Always use this app to open.”

If you did a clean install of Windows 10, or have a brand new device

Unfortunately, reinstating Windows Photo Viewer on a clean copy of Windows 10 is rather more cumbersome. On fresh installs, the app is hidden away and disabled. As Windows Photo Viewer doesn’t have its own executable (.exe), re-enabling it requires modification of the system registry to add a launch target for the Windows Photo Viewer library (PhotoViewer.dll). Here comes a standard warning – registry edits are unsupported by Microsoft and could cause unpredictable consequences for your system.

Saving registry file in Windows 10

Credit goes to nexus over on TenForums for discovering the correct registry keys at Windows 10’s release. To use this technique, you’ll need to copy the code from the forum post into a new registry script. Open Notepad from the Start menu, copy and paste the script into the editor and save the file. In the Save window, select “All Files” for the “Save as type” and save the file with a “.reg” extension – such as “PhotoViewer.reg.”

All that remains is to run the registry script – double-click the file and acknowledge the prompts which are displayed. You should now find Windows Photo Viewer is accessible, so you can use the technique shown above to set it as your default imaging app.

New partnership with Microsoft and LinkedIn to power up Adobe Experience Cloud

When Microsoft acquired the business-oriented social networking site LinkedIn, economists and cynics alike wonder how it planned to monetize the new product.

Thus far, there haven’t been any glaring Microsoft inspired changes to the site aside from some Bing advertisement synergies, but it looks like the company may be leveraging its existing Adobe partnership to add value and financial incentive to LinkedIn users.

Earlier this week, Adobe, Microsoft and LinkedIn announced a new partnership amongst the three businesses that are intended to enhance account-based experiences (ABX) with new integrated marketing solutions.

“The ability to leverage the power of data to find the right opportunities and use insights helps marketing and sales to plan their next move with a member of the buying committee,” said Alysa Taylor, corporate vice president of Business Applications and Global Industry at Microsoft. “Together with Adobe and LinkedIn, Microsoft can help to deliver an end-to-end solution that ultimately accelerates lead conversion and can create opportunities for improved servicing and better cross-sell, resulting in the higher lifetime value of the account.”

The intended effect is that Microsoft and Adobe will work together to source key data points to create profiles in Adobe Experience Cloud, Microsoft Dynamics 365 for Sales and Marketo Engage. The profiles created by this collective data will now be accessible to B2B platforms, to which LinkedIn will amongst the first to use in conjunction with its marketing platform.

According to a report from BusinessWire, the new partnership will offer at least three pillars of opportunity for marketing using LinkedIn’s Marketing Solutions:

  • Gain a deeper, real-time understanding of targeted accounts: Marketing and sales teams will be able to leverage data from Marketo Engage and Microsoft Dynamics 365 for Sales to get a deeper, real-time understanding of targeted accounts, including insights into individual roles, influence, and preferences. By integrating LinkedIn’s Matched Audiences with Marketo Engage, the combined account-based targeting capabilities will help marketers identify the right contacts within an account to reach on LinkedIn.
  • Target audiences more effectively by leveraging richer account profiles: To identify the best-fit accounts to pursue, Marketo Engage’s Account Profiling capability combines the power of intelligence-driven predictive modeling and automation in a single ABX solution, empowering marketers to identify these accounts out of 25 million companies within minutes.
  • Power people-based campaigns with more precision than ever before: Adobe Audience Manager, the company’s Data Management Platform (DMP), on Azure, will enable brands to stitch together audience data to power contact-based campaigns on LinkedIn and other channels while informing media buys with more precision than ever before. Data governance and privacy controls help to ensure that customer data is kept secure and helps brands to comply with their privacy policies and data privacy compliance objectives.

As with most marketing efforts, Microsoft, Adobe and LinkedIn are trying to implement a more personalized ad experience by creating a platform layer of relevant data points used to ultimately deliver more meaningful content.

While this may seem like a hyper-niche audience of both Adobe and Microsoft users who also happen to be LinkedIn members, a cursory view of resumes and skills listed in profiles seem to overwhelmingly include intersections of Office and Adobe CC experts.

New Pinterest app shows up on the Windows 10 Microsoft Store

Pinterest, the popular social media service that lets you save content you find on the Internet and share it with your followers, now has a dedicated app on Windows 10 PCs (via MSPoweruser). The new Pinterest app in the Microsoft Store is actually a web app, and it doesn’t seem to offer much added value compared to the Pinterest website.

Unlike the well-made Twitter Progressive Web App (PWA), this new Pinterest app doesn’t support Live Tiles, Jump Lists, offline mode, and it also doesn’t appear in the Share Menu in Microsoft Edge. As a result, the app can’t replace yet the Pinterest Save button Edge extension that was released a couple of years ago.

Despite Microsoft wanting to make PWAs first-class citizens on Windows 10 thanks to support for service workers and other modern features, we have yet to see many high-quality PWAs appear in the Microsoft Store. A basic web app may be better than nothing, but we hope that more developers will follow Twitter’s lead and make their PWAs offer as much functionality as native apps.

Pinterest
Pinterest
Developer:
Pinterest Inc.
Price:
Free

Windows 10 Huawei MateBook laptops have major security flaws

Hackers have targeted Windows 10 PCs once again compromising the kernel’s security. Microsoft spotted a local privileged execution vulnerability that existed in the Huawei PC Manager driver software.

So, if you own a Huawei MateBook Windows 10 laptop, install the latest updates as soon as possible to patch the security vulnerability.

The patch was released in January

Microsoft uncovered this high-level local privilege escalation threat in the Huawei PC Manager driver program a few months ago. The flaw existed only in the Windows 10 MateBook laptops.

The good news is that a patch to fix this flaw was released in January. However, it’s only now that the company officially acknowledged the problem.

These days, attackers are targeting third-party kernel drivers in order to reach the Windows kernel.

They use an expensive zero-day kernel exploit. The Windows 10 October 2018 Update introduced the new kernel sensors that have identified the flaw in Huawei software.

Windows Defender ATP will detect similar flaws in the future

Microsoft launched an investigation because most of the Windows 10 devices received Defender ATP alerts through the Huawei’s PC Manager.

Later on, the researchers spotted the executable MateBookService.exe as a result of the investigation. The attackers were able to gain elevated privileges by creating a malicious instance of MateBookService.exe.

Keep in mind that this type of vulnerability can compromise your entire machine. Huawei warned MateBook users that the flaw enabled the attackers to trick them into running a malicious app.

The news has been devastating for Huawei as the company has been already under accusations to be working for the Chinese government.

Microsoft is of the opinion that the Defender ATP will be able to detect similar security flaws in the future. Thus, the service has proved to be extremely valuable for Windows users.

RELATED STORIES TO CHECK OUT:

This Publisher has Been Blocked: How to Unblock in Windows 10

Having a hard time unblocking an application publisher on your Windows PC? Is it blocked, and you’re not even sure why that’s the case? We have a plethora of applicable solutions for you to unlock a published in Windows 10.

The need arises when you come across Windows has blocked this software because it cannot verify the publisher or The publisher has been blocked from running software on your machine errors. And simply unblocking the publisher should fix things. Keep reading to find out how!

How do I unblock a publisher in Windows 10?

1. Use Command Prompt

  1. Press Windows + X, and select Command Prompt (Admin).
    cmd
  2. When Command Prompt opens, use the cd command to navigate to the directory that has the application setup file.
  3. After you navigate to the desired directory, enter the name of the setup file, for example, setup.exe, and press Enter.
  4. Your installation should now start normally.

According to users, one way to circumvent the problem is to use the Command Prompt to run the application. This isn’t a permanent solution, but it will allow you to install the desired application even if your publisher is blocked.

2. Reinstall the problematic application

  1. Press Windows + I to open the Settings app.
  2. Navigate to the System section.
  3. Now navigate to the Apps & features section, select the problematic application on the list, and click on Uninstall.

If you’re getting the message that a specific publisher is blocked, you can fix it sometimes simply by reinstalling the problematic application. This will eliminate the need to unblock the publisher in Windows 10.

3. Download the application from a different source

If you can’t install an application because the publisher is blocked, you might want to try downloading it from a different source. Be sure to download the application from the original source. If that doesn’t work, try downloading the application from a third-party source and check if that solves the problem.

4. Try using a different web browser

A few users reported getting the publisher blocked message while trying to install a certain application. According to them, you can fix the problem by downloading the setup file again using a different browser.

Users reported that their publisher was blocked after using Internet Explorer to download files. To fix the problem, open Microsoft Edge or any other web browser and try to download the file again. After that, run the setup file and check if the problem is resolved.

Besides that, you could make use of an alternative browser that has in-built apps and services like sidebar AI bots and messengers. You can also get a redesigned homepage and integrated VPN support.

➡️ Get Opera One

5. Check if the publisher is blocked

  1. Press Windows + S, enter internet options, and click the relevant search result.
  2. Go to the Content tab and click on the Certificates button.
  3. Click the right arrow in the Certificates window and navigate to Untrusted Publishers tab. Select the publisher that you want to unblock from the list and click the Remove button.
  4. Save changes and check if the problem is resolved.

Sometimes these problems can occur if the publisher is blocked on your PC. If you manually blocked a certain publisher, it will appear in Internet Options. And you can then unblock the publisher in no time.

6. Unblock the file manually

  1. Right-click the setup file that you can’t run. Choose Properties from the menu.
  2. Go to the General tab, and in the Attributes section, you should see the Unblock option. Check the Unblock option and click Apply and OK to save changes.
  3. After doing that, try to run the setup file again.

7. Check the certificate and download the file again

  1. Locate the problematic setup file. Right-click it and choose Properties from the menu.
  2. Navigate to the Digital Signatures tab and click on the Details button.
  3. In the General tab, click on View Certificate button.
  4. Look for the Valid from the field and check if your certificate is still valid.

Many developers use digital certificates to protect their software from tampering. However, if the certificate is expired, you might have some issues installing that application. In addition, if the certificate is expired Windows will block that publisher in order to protect you.

If the certificate is expired, you need to download the installation file again and install the application using that file to unblock the publisher in Windows 10.

8. Make sure that you download the latest version

Several users reported that they had this issue while installing a certain driver on their PC. According to them, the driver wasn’t the latest, and it wasn’t fully compatible with Windows 10, thus causing this problem to occur.

To fix the problem, be sure that you’re downloading the latest version of the software that you’re trying to install. By doing so, you’ll ensure that most compatibility issues don’t occur.

9. Use Task Manager

  1. Press Ctrl + Shift + Esc to start Task Manager.
  2. Click on the File menu and choose Run new task.
  3. Check the Create this task with administrative privileges box and click on Browse button.
  4. Find the problematic setup file.
  5. After doing that, click the OK button or press Enter to run it.

Task Manager is a useful tool that can close any application or disable startup items. However, you can also use Task Manager to start any application on your PC. A few users also reported that they fixed the problem with the blocked publisher on their PC simply by running the setup file from Task Manager.

We have to mention that this isn’t a permanent solution, so you’ll have to repeat it every time you encounter this issue.

10. Use the hidden administrator account

  1. Open Command Prompt as administrator.
  2. Paste the following command and hit Enter: net user administrator /active:yes
  3. Log out of your current account and log in to the administrator account.
  4. Try to install the application again using the administrator account.

A few users reported that they managed to fix this issue simply by using a hidden administrator account to install the application. This account is hidden by default, but you can enable it with a quick command.

If the process is successful, return to your main account and check if the application works properly. If so, you can disable the hidden administrator account yet again.

11. Change Group Policy and use File Unsigner

  1. Press Windows + R and enter gpedit.msc. Then, click OK.
  2. When Group Policy Editor opens, in the left pane, navigate to User Configuration, select Administrative Templates, click on Windows Components, select Attachment Manager, and then double-click on Include list for low file types.
  3. Select the Enabled option, and in the Options sections, add .exe. Now click Apply and OK.
  4. Download FileUnsigner.
  5. Open the archive and extract all files. Keep in mind that you’ll need a WinRAR or any other tool that can open .rar files.
  6. Now locate the setup file and drag and drop it to the FileUnsigner icon. If the process was successful, you’d see a Command Prompt message saying that the file was unsigned successfully.
  7. After that, simply double-click the setup file to start it, and it should work without any issues.

12. Turn off SmartScreen Filter

  1. Open Control Panel, and click on Security and Maintenance.
  2. Security and Maintenance window will now appear. Click on Change Windows SmartScreen settings in the left pane.
  3. Select Don’t do anything (turn off Windows SmartScreen) and click OK.

SmartScreen is a useful feature that can protect you from malicious websites and files, but it can also prevent certain applications from running. To unblock publishers in Windows 10, you might have to disable SmartScreen.

After turning off SmartScreen, try to install the application again. Disabling SmartScreen can slightly affect your security, but if you have an antivirus, you shouldn’t have any problems.

13. Temporarily disable your firewall

A firewall is important because it can prevent certain applications from accessing the Internet. However, sometimes Windows Firewall can interfere with certain applications and cause this problem to occur.

If you have problems installing applications because your publisher is blocked, you might want to try disabling your firewall temporarily or whitelisting the affected application with the blocked publisher.

14. Disable the security warning

  1. Open Internet Options, go to the Security tab, and click on the Custom level button.
  2. In the Miscellaneous section, locate the Launching applications and unsafe files option and set it to Prompt or Enable, then click OK to save changes.

15. Run the application in Compatibility Mode

  1. Locate the setup file, right-click it, and choose Properties from the menu.
  2. Go to the Compatibility tab. Check Run this program in compatibility mode for and choose a desired version of Windows. Now click Apply and OK to save changes.
  3. After doing that, check if the problem is resolved. If the issue still persists, try using a different compatibility mode.

16. Disable Always ask before opening this file option

  1. Run the downloaded file.
  2. When the security warning opens, uncheck Always ask before opening this file option. Now click the Run button.

Windows usually give you a security warning when you try to open a downloaded file. To fix the problem with blocked publishers, you have to disable one option when running downloaded files. This should unblock the publisher in Windows 10.

17. Change Group Policy settings

  1. Open Group Policy Editor, go to User Configuration, select Administrative Templates, choose Windows Components, and expand Attachment Manager. In the right pane, double-click on Do not preserve zone information in file attachments.
  2. Select the Enabled option and click on Apply and OK to save changes.

18. Use PowerShell

  1. Press Windows + S and enter PowerShell. Right-click PowerShell from the list of results and choose Run as administrator.
  2. When PowerShell opens, execute the following command:get-childitem "C:Usersyour_usernameDownloads" | unblock-file
  3. Be sure to enter the address that matches your download folder.

This issue can affect multiple files, and if you can’t install new applications, you might be able to fix this problem by using PowerShell. We must mention that PowerShell is an advanced command line tool, and you can cause certain issues with it if you’re not careful.

In this solution, we’ll assume all your setup files are in the Downloads folder. If you store your downloaded files in a different location, use that location instead.

That’s it! With these solutions, you can unblock a published in Windows 10 when applications can’t run. Before you leave, find out how to speed up Windows.

Tell us which fix worked for you in the comments section below.

How to Turn off Narrator in Windows 10

Narrator is a tool in Windows 10 that provides audio feedback about everything that is displayed on your PC’s screen. There is a keyboard shortcut that initiates Narrator and personally, I find that I inadvertently turn it on at the worst possible times. Wherever I might be where silence is expected, like the library, somehow I accidentally type the Windows logo + Ctrl + Enter command to turn on Narrator.  While Narrator is helpful to those that are have visual impairments, I don’t want it on my Windows 10 PC. As helpful as Narrator can be, for those that don’t need it, Narrator can quickly become an annoyance.

Microsoft makes a point that to equip each iteration of Windows with a number of accessibility and ease of access features to make using Windows easy for people with disabilities. Thankfully, if you don’t need it, turning off Narrator in Windows 10 is relatively simple. This is what you need to do:

1. Use the keyboard shortcut to go directly to Windows Settings: Windows logo + I
2. Go to Ease of Access.
Microsoft, Windows, Windows 10, Settings
3. In the left pane, Go to Narrator.
Microsoft, Windows, Windows 10, Settings
4. In the right pane, locate the toggle underneath Narrator and turn it Off.
5. Clear “Allow the shortcut key to start Narrator” box to disable the Narrator keyboard shortcut.

Now, you have successfully turned off Narrator. However, if you are like me and have no use for Narrator, you can take it a step further and disable Narrator completely. In the near future, I hope Microsoft would allow users to be able to uninstall Narrator. Until that time, this is what you need to do to completely disable Narrator in Windows 10.

In order to disable Narrator completely in Windows 10, you need to revoke its Windows 10 app permissions for your user account.
Here are the steps you need to follow:
1. Go to the search bar and type Narrator and Open the file location of Narrator
Microsoft, Windows, Windows 10, Settings2. Once you have the Narrator file location, right-click Narrator and choose Properties.
Microsoft, Windows, Windows 10, Settings
3. Under Narrator Properties, Go to the Security tab and choose Edit to edit user account permissions.
Microsoft, Windows, Windows 10, Settings
4. Select the user account(s) that you want to disable the Narrator app and click Deny full control. By checking deny full control, all check boxes will be checked Deny by default and thus disable all Narrator app permissions.
5. Click Apply for the changes to take effect for the each user account.
Microsoft, Windows, Windows 10, Settings
6. Click OK when you are finished.

If for some reason you want to enable Narrator in Windows 10, you can renew the permissions and toggle Narrator on and off, as well as enable the Narrator keyboard shortcut through the Ease of Access menu in Settings. If you completed the steps above, you’re done! You will never see Narrator in Windows 10 on your PC again.

New AdDuplex surveys sees only 26.4% of Windows 10 PCs running version 1809

The propagation of the latest Windows 10 update is still quite slow according to AdDuplex’s latest data. The ad network once again surveyed more than 100,000 Windows 10 PCs running AdDuplex ads, and found out that only 26.4% of them were running Windows 10 version 1809 in March.

“Windows 10 October 2018 Update has added just a little over 5% to its market share this month, and it looks more and more likely that Microsoft seems to be giving up on it in favor of upgrading users straight to the next version,” noted AdDuplex.

It’s clear that current situation is pretty unique in the history of Windows 10 updates. We don’t have any official data about the Windows 10 ecosystem, except for the 800 million active Windows 10 devices that Microsoft announced earlier this month. However, after the software giant had to delay the public rollout of Windows 10 version 1809 to November, the company made pretty clear that it would check telemetry data very closely before pushing this update to all users. The result could be a situation where the next Windows 10 update (19H1) starts rolling out before the majority of Windows 10 users have already received the version 1809.

Did you also notice in your entourage that many Windows 10 version 1809 is rolling out at a slower pace compared to previous Windows 10 updates? Let us know in the comments below.

Chrome automatically changes between dark and light mode on PC

Good news for Google Chrome users: the new version for Google Chrome 74 will come up with a series of improvements that you’ll definitely love.

Also, for those who use Windows 10, there will be a few special features included.

New Chrome features on Windows 10

  1. Dark Mode support for Windows

The browser will automatically update when the default app mode. This means that you enabled dark mode on Windows 10, the browser will also automatically switch to dark mode.

This also works for the Light theme. It will be quickly applied for tabs, for bookmarks, new tabs and different menus.

  1. New options: Reduce motion or Remove animations

This feature will help a lot the users that get motion sickness when they will look at WebPages with zooming effects, parallax and transition animations.

While many users enjoy such animations, some users dislike them because they feel distracted or slowed down from them. In the worst case, users may even suffer from motion sickness as if it were a real life experience, so for these users reducing animations is a medical necessity.

  1. Better protection against malicious downloads

Google Chrome 74 it will offer also solutions for better protection against malicious downloads. Besides the well known flag that that is available already, Google wants to provide users with additional protection.

Even though additional security checks are done in Chrome and the operating system, we feel blocking downloads in sand-boxed iframes also fits the general thought behind the sandbox. Apart from security concerns, it would be a more pleasant user experience for a click to trigger a download on the same page, compared with downloads starting automatically when a user lands on a new page, or started non-spontaneously after the click.

The final version of Google Chrome 74 is expected to land on April 23. The beta version is already available and you can test these improvements before they hit the general public.

RELATED STORIES TO CHECK OUT:

System and Compressed Memory High Disk Usage [Fix]

If System and compressed memory cause high disk usage on your computer, look no further. In this article, we’ll show more than a couple of ways to solve this problem.

How can I fix System and Compressed Memory issues?

1. Check for memory leaks

We usually start our articles with easier solutions, but not this time. First, you should ensure there are no memory leaks in your system that might cause System and Compressed Memory high disk usage.

Since this can be a complicated and lengthy process, we’ll save some space for this article.

So, make sure to check out our article about memory leaks, where the whole problem is explained in details, including solutions, of course.

2. Set the paging file size for all drives back to automatic

The paging file size for all drives in Windows 10 is usually set to automatic. And that’s how it should be. However, there’s a chance that some external factor, like an update changes these settings. Or even you accidentally did.

If the paging file size is not set to automatic, that can lead to possible memory leaks and, you guessed it, high disk usage.

So, the obvious solution, in this case, is to set the paging file size back to automatic.

If you’re not sure how to do that, follow these instructions:

  1. Go to Search, type performance, and go to Adjust the appearance and performance of Windows
  2. Go to Advanced tab, and click Change… under Virtual memorychange virtual memory settings
  3. Make sure Automatically manage paging file size for all drives is checkedAutomatically manage paging file size all drives

3. Turn off “Show me tips about Windows”

Microsoft implemented a new feature into Windows 10 that gives you tips and mini-tutorials about the system as you use it.

Even though Microsoft imagined it to be a helpful guide for new Windows 10 users, this feature is rather annoying and resource-consuming.

In fact, “Show me tips about Windows” can actually cause high disk or CPU usage, which for example is also the case with Runtime Broker error in Windows 10. And it could also be the main cause of our problem here.

So, in order to resolve the high disk usage issue, we’ll try disabling this feature.

And here’s how to do that:

  1. Go to the Settings app
  2. Go to System > Notifications & actions
  3. Now, disable Get tips, tricks, and suggestions as you use WindowsGet tips, tricks, and suggestions as you use Windows
  4. Restart your computer

After disabling this option, you won’t be getting these annoying messages anymore. And hopefully, your disk will be relieved of the heavy load.

4. Disable Desktop Notifications in Chrome

If you use Google Chrome as your primary browser, there’s a chance you have Chrome Desktop notifications enabled. While this might be useful to you, it’s surely resource-consuming.

So, if you’re dealing with high disk usage, disabling this feature is recommended.

Here’s how to do that:

  1. Open Google Chrome, click the menu (three dots), and go to Settings
  2. Under Privacy and security, click Content settings.
  3. Click Notifications.
  4. Choose to block or allow notifications:
    • Block all: Turn off Ask before sending.
    • Block a site: Next to “Block,” click Add. Enter the site and click Add.
    • Allow a site: Next to “Allow,” click Add. Enter the site and click Add.

5. Update Windows

There’s a chance an update you installed some time ago interferes with some system feature, which causes, you guess, high disk usage. So, it won’t hurt if you check for updates once again.

Maybe it’s a known issue, and Microsoft development team has already prepared the solution.

check for updates

To update your system, simply go to Settings > Update & security, and check for updates.

6. Roll-back updates

If updating Windows doesn’t solve your problem, we’ll do the exact opposite. Maybe the latest update you installed is exactly the one that causes high disk usage.

In that case, your best bet is to delete the update, and wait for Microsoft to release the new one.

Here’s how to delete updates in Windows 10:

  • Go to Settings > Updates & Security > Windows Update
  • Go to Update history > Uninstall updatesSystem and Compressed Memory
  • Now, find the latest update installed on your computer (you can sort updates by date), right-click it, and go to Uninstall
  • Restart your computer

7. Repair Corrupt System Files

If none of the solutions from above solved the problem, we’re going to try running the SFC scan. This built-in tool is made for dealing with various system errors and interferences.

While it doesn’t necessarily mean the SFC scan will solve the problem, it certainly won’t hurt if we try.

In case you don’t know how to run SFC scan, follow these instructions:

  1. Go to Search, type cmd, right-click Command Prompt, and select Open as Administrator
  2. Enter the following command, and press Enter: sfc/scannow
  3. Wait for the process to finish
  4. Restart your computer

8. Run DISM

If the SFC scan found no solutions for the problem, we’ll try with the Deployment Image Servicing and Management Tool (DISM).

This tool basically does the same thing as the SFC but with higher accuracy and deepness.

Here’s how to run DISM:

  • Press Windows key + X and start Command Prompt (Admin).
  • In the command line type following command:
    • DISM.exe/Online /Cleanup-image /RestorehealthSystem and Compressed Memory
  • In case the DISM can’t obtain files online, try using your installation USB or DVD. Insert media and type following command:
    • DISM.exe /Online /Cleanup-Image /RestoreHealth /Source:C:RepairSourceWindows /LimitAccess
  • Be sure to replace ”C:RepairSourceWindows” path of your DVD or USB.
  • The operation should last no more than 5 minutes.

9. Disable the Superfetch service

Superfetch and Prefetch services are there actually to improve your system’s speed and responding time. However, having these services enabled can also lead to high disk usage. So, maybe it would be better for you to disable at least one of them.

Disabling these services helped some users who were facing high disk usage problems before, and maybe it’ll be helpful in this case, as well.

Here’s how to disable the Superfetch service:

  1. Go to Search, type services.msc and open Services
  2. Find Superfetch service, right-click on it and go to Propertiessuperfetch properties System and Compressed Memory
  3. Click on Disable, and then OK

10. Disable the Prefetch service

You can also disable the Prefetch service. Disabling this service is a little more complicated, but it shouldn’t be a problem if you follow these instructions:

  1. Go to Search, type regedit and open Registry Editor
  2. Navigate to the following path:
    • HKEY_LOCAL_MACHINESYSTEM
      CurrentControlSetControlSession Manager
      Memory ManagementPrefetchParameters
  3. Double-click on EnablePrefetch. You can configure EnablePrefetch by entering some of the following values into the Value Data box:
    • 0 – Disables Prefetcher
    • 1 – Enables Prefetch for Applications only
    • 2 – Enables Prefetch for Boot files only
    • 3 – Enables Prefetch for Boot and Application files
  4. As the default value is 3, set it to 0
  5. Restart the computer

11. Kill the Speech Runtime Executable process

Speaking of services, there’s another service called Speech Runtime Executable that can also cause the System and Compressed Memory high disk usage. So, we’re going to kill this process, and see if anything’s different. Here’s how to do that:

  1. Right-click the taskbar, and open Task Manager
  2. Go to the Processes tab
  3. Find the process named Speech Runtime Executable, and select it
  4. Click End Task

12. Limit CPU Usage

And if none of the solutions listed above managed to solve the problem, we’re going to try with limiting CPU usage. This solution helped some users who were facing high CPU usage caused by MsMpEng.exe, and maybe it’ll be also helpful in this case

Here’s what you need to do:

  1. Go to Task Manager > More details > click on the Details tab
  2. Right-click msmpeng.exe > select  Set affinity > select the CPU limit threshold.

That’s about it. We certainly hope at least one of these solutions helped you resolve the System and Compressed Memory high disk usage problem.

If not, maybe it’s time to reinstall your system or check if everything’s okay with your computer’s hardware.

You might also be interested in reading our guide on how to enable or disable Memory Compression on Windows 11.

If you have any comments, questions, or suggestions, don’t hesitate to let us know in the comment section below.

Windows 13: What are the chances of Microsoft releasing the OS?

For some time now, people have looking left and right for any confirmation whether there will be a Windows 13 launch or not.

Call the number unlucky, but all we have is user speculation and no solid evidence to go around this.

Windows 10 will get a new update coming in April. The upcoming update known as Windows 10 version 1903 or 19H1, is part of Microsoft’s plans to release two major updates every year.

Is there a Windows 13 operating system?

After the rumors surrounding Windows 12, users have started speculating about the possibility of getting Windows 13 as well. Call it April Fools, call it soul-searching, but numerous threads have been created on this topic, with more questions than answers.

Is Microsoft going to release a new Windows 13 OS? The short answer is no, as the company already confirmed Windows 10 would never get replaced. Instead, the big M will release two major Windows 10 OS updates every year.

Quora users were also quick to point out that there won’t be any Windows 13, setting the record straight until there’s more solid information.

No…..After releasing the latest updates of windows 10….Microsoft will skip windows 10 and release Windows 12…the next version of windows…

Another user added, that aside from current versions of Windows, nothing was planned for the unluckily numbered OS.

No, Windows 13 OS not launched in anywhere in the world.

So, ladies and gentlemen, until we have further info on this topic, we can call this mystery debunked, for now.

Windows 13 release date

Taken into account the details listed above, we can also answer the question related to Windows 13’s release date.

So, when will Microsoft release Windows 13? Never. Plain and simply.

Does anyone have any news on the Loch Ness Monster?

RELATED STORIES TO CHECK OUT:

Forza Motorsport 7 bugs: FPS drops, input lag, and more

Forza Motorsport 7 is now live. If you’re a car racing fan, you can now show off your skills and push the pedal to the metal leaving your rivals behind.

Just as it happens with every newly launched game, FM7 is also affected by a series of bugs that limit the gaming experience. For example, many gamers are still struggling to download the game, but hopefully, these download problems will get fixed as soon as possible.

In this article, we’re going to list the most frequent Forza Motorsport 7 issues reported by gamers, as well as their corresponding solutions, if available.

Forza Motorsport 7 reported bugs

  1. Strange car sounds
  2. Private lobbies need a fix
  3. Input lag on wheels/pedals
  4. Voice channel issues
  5. FPS drops
  6. Asphalt changes color
  7. Player don’t get CR or XP after finishing the race

1. Strange car sounds

Gamers reported that some of the car sounds are really disappointing. While this is not a game-breaking issue, it’s still very frustrating because it’s limiting the gaming experience. Hearing your car engine purring is one of the greatest joys in the world for car racing gamers and drivers in general.

I am just wondering how they can make it so bad? (confused) Look at Horizon 3 i think there are some problems with the sound there es well but ok generale i would say it’s a lot better still then FM7.
In horizon 3 the cars that should have a characteristic sound do have it but in FM7 all is just the same in cockpit view the sounds are also a lot louder then outside! All the v12’s just sound rubbish.

Hopefully, Turn 10 Studio will fix this bug with a future patch.

2. Private lobbies need a fix

Many gamers criticized Turn 10 Studios for the overall aspect and functionality of private lobbies. More specifically, players say that the lobbies are not fully functional and there are many elements missing from the scheme.

It’s well known by now – the private lobbies are absolutely unfinished and won’t even work properly 50% of the time.

Where is the Drag Racing, at least for private lobbies?
Where is the AI for private sessions with 2 or 3 friends?
Why can’t I create my own Server WITHOUT the need to invite my friends first, so I could set stuff up BEFORE they join?

Who was in charge of this mess? I know the game was just released, but come on… in its current state Multiplayer is absolutely lackluster and utterly useless.

3. Input lag on wheels/pedals

Having a reliable system that transfers your input with lightning-speed is essential in car racing games. Unfortunately, some FM7 players can’t fully enjoy the game due to input lag issues.

Is anyone else having input lag on their wheels/pedals? I have a G27 which works great on all games…except Forza7. I’ve used other USB ports, same results. It’s just a very small lag, but noticeable enough to be a game-stopper. TIA

4. Voice channel issues

Gamers reported that sometimes the voice channel changes automatically, preventing them from communicating with their friends in multiplayer mode.

I can not believe in 2017 not being able to talk to my friends in a party because the game automatically pulls me in and out of the multiplayer from one audio channel to another, it’s unbearable, turn10 has new programmers??? I could not believe they’re still the themselves

READ ALSO: Here are the upcoming DLC cars in Forza Horizon 3

5. FPS drops

Low FPS issues affect both PC and Xbox One players. The problem occurs in single player and multiplayer mode, and randomly affects races.

I’m experiencing a bunch of frame drops / stuttering in multiplayer. Regardless of cars/track/weather used. Playing with my friends private lobby, most of us experiencing this frame drop. It’s really difficult to play well. I’m on Xbox One S, but I know some of the guys are on base XB1 as well. It gets really bad when someone joins or leaves the party and the XB notification pops up on the screen, all of us would freak out experiencing a hefty stutter of what felt like ages but was probably closer to the 1 second time frame.

6. Asphalt changes color

Some players noticed that the asphalt changes color from time to time. This is not a game-breaking bug, but it’s quite annoying because it can ruin your focus.

I was playing in cockpit view on Le Mans during rain conditions and I swear the asphalt flickers blue and grey and so on. Seems like a bug. Anyone else notice?

7. Player don’t get CR or XP after finishing the race

After investing hours into the game, the worst thing that can possibly happen is to realize that you didn’t get any CR or XP to reward your efforts.

Yeah having this problem too. not only in free play but also with career, but only when race length is set to long or extra long, tried restarting game and this still happens.The XP rewards will show up in the tab on the main menu but no credits appearing. hope this gets fixed soon its quite infuriating doing 30+ laps in a race and then having the game skip the XP and CR, pointless playing the game any further if Im not getting anything for the effort.

These are the most common Forza Motorsport 7 bugs reported by gamers. If you came across various solutions to fix them, you can help the gaming community by listing the troubleshooting steps in the comments below.

RELATED STORIES TO CHECK OUT:

How to Make Emulators Run Faster on Windows PC

Ever wondered why emulators run so slow on your PC? Are you looking to optimize the running speed and improve performance? We have compiled a set of solutions – tips and tricks – for you in this tutorial.

With the advancement of emulator engines that are now capable of simulating the system specs and configuration of gaming consoles, you can run console games on your PC, albeit at reduced speed and performance.

The speed reduction arises as a PC attempts to interpret an emulated hardware instruction set (machine commands) and then translate it into a readable language that the PC understands. Although various factors contribute to the slow-running of emulators, the factor described here is the basic one.

To make emulators run faster on Windows PC, there are various tips and tricks you can try, and we have outlined some of these tips in this article.

How can I make emulators run faster?

Note icon NOTE
Different emulators require different system specifications (and configurations). As such, the tricks herein are not universal i.e. they do not apply to all emulators.

1. Check system specifications

make emulators faster hardware

Emulators are powerful engines that require high system specs to operate at optimum capacity. Basically, components like processor, GPU, ROM, RAM, and the like should be top-notch if you want emulators to run at optimal speed on your PC.

Aptly put, high-performance PCs, with Windows 10 (64-bit), advanced AMD or Intel processor (octa-core), 8 GB RAM, and high-end GPU setup (with support for OpenGL 2.0 and above), among others, would typically perform better with emulators than lower spec PCs.

So, if you are running a low-spec PC, the ultimate solution might be to update/upgrade your computer.

2. Reduce resolution

  1. Navigate to the config menu and select Plugin/BIOS Selector.
  2. Under the Plugin tab, click on the Configure icon beside the GS dropdown menu.
  3. Follow the on-screen instructions to reduce resolution.
  4. Restart PC.
  5. After this, your emulators should run at an improved speed.

Normally, the higher a system’s resolution, the more hardware power is required and the slower the emulators run. Hence, reducing resolution speeds up system performance to some extent. Consequently, emulators also run at improved speed. In the same vein, you can reduce the resolution of an emulator in order to get better performance.

This method works best with gaming console emulators like PCSX2, PPSSPP, and ePSXe.

3. Boost up graphics cards

As emphasized earlier, most emulators require a standard GPU setup to function properly. Hence, you can make emulators run faster on Windows PCs by improving the performance of your system’s graphics cards. To do this, simply follow the step-by-step guide below:

NVIDIA:

  1. Right-click on your PC‘s desktop.
  2. Select NVIDIA Control Panel from the context menu.
  3. Click Manage 3D settings.
  4. Go to the Global Settings.
    manage 3d settings make emulators faster
  5. Select High performance NVIDIA processor, under the Preferred graphics processor drop-down menu.

With this, NVIDIA’s performance would be boosted.

AMD:

  1. On your desktop, click the Start button.
  2. Select Programs.
  3. Under Programs, go to Catalyst Control Center and click on it.
  4. Locate and select Power.
  5. Under Power, click on Switchable Graphics Application Settings.
  6. Locate the emulators on your PC.
  7. Set each emulator to High performance.
  8. Restart your PC.

If the above steps are followed as appropriate, your PC‘s graphics cards will be enhanced. Consequently, this would result in improved emulator speed/performance.

4. Disable redundant apps & processes to free up memory

If your system is congested, the running speed and performance of all apps and emulators will automatically reduce. This is especially worse if you run multiple high-powered apps or processes simultaneously.

Hence, to make your emulators run faster in this case, you might have to free up some memory on your system. The only way to do this is by “killing” or disabling some of the running apps/processes.

To do this, simply follow the guidelines below:

  1. On your system’s desktop window, click on the Start.
  2. Locate and select Run or simply press Windows key + R keys, to open the run dialog box.
  3. Input msconfig in the box.make emulators run faster on windows msconfig
  4. Go under Services tab, to bring up all running apps and processes.make emulators run faster windows pc
  5. Kill off or disable redundant processes or apps (this could be antivirus programs or nonessential emulators).
  6. By disabling these programs/processes, more resources are allocated to the remaining processes, thus increasing their performance.

In extreme cases, you may have to uninstall some high-performance programs on your system to create room for essential emulators.

There are other notable tweaks, tricks, and solutions that can be employed to boost emulators‘ running speed on PCs. Some of these entail enabling VT – Virtual Technology – in BIOS and disabling debugging windows, among others.

Now that you know how you can optimize your PC while running an emulator, check out this guide on PS3 emulators for PC and Nintendo 3DS emulators to get started.

In any case, the above-listed tricks, if properly implemented, would boost up the running speed of all (or some) emulators on your PC.