Microsoft has started testing the latest Xbox One system update with members of the Xbox One Preview Alpha Skip Ahead Ring this month, and unfortunately, the preview build released last Thursday caused some issues with apps and games failing to launch. Brad Rossetti, Manager of the Xbox Preview Program explained yesterday that these issues result from the core OS being “corrupted” following this latest update.
As it appeared, the only way to fix these issues is to do an OS refresh, and this is exactly what the latest Xbox One preview build released yesterday will do to your console. This factory refresh build won’t touch your apps, games and cloud saves, but you’ll have re-add your Xbox Live profile and log in to all your media apps all over again.
Xbox One Insiders – Preview Alpha Skip Ahead users we will be releasing a new 1810 build at 2.00pm PDT 7/8/18. This is a Factory Refresh build to fix the OS upgrade issue. Your games and apps are left just profiles and media profiles removed – you can backup profiles to EXT HDD
After identifying and fixing this critical issue, the Xbox team is still hard at to work to fix another issue with various headsets and mics not working properly with the latest 1810 preview builds. The company detailed a workaround in yesterday’s release notes, and Rossetti added that the team needs a little more time to release a fix.
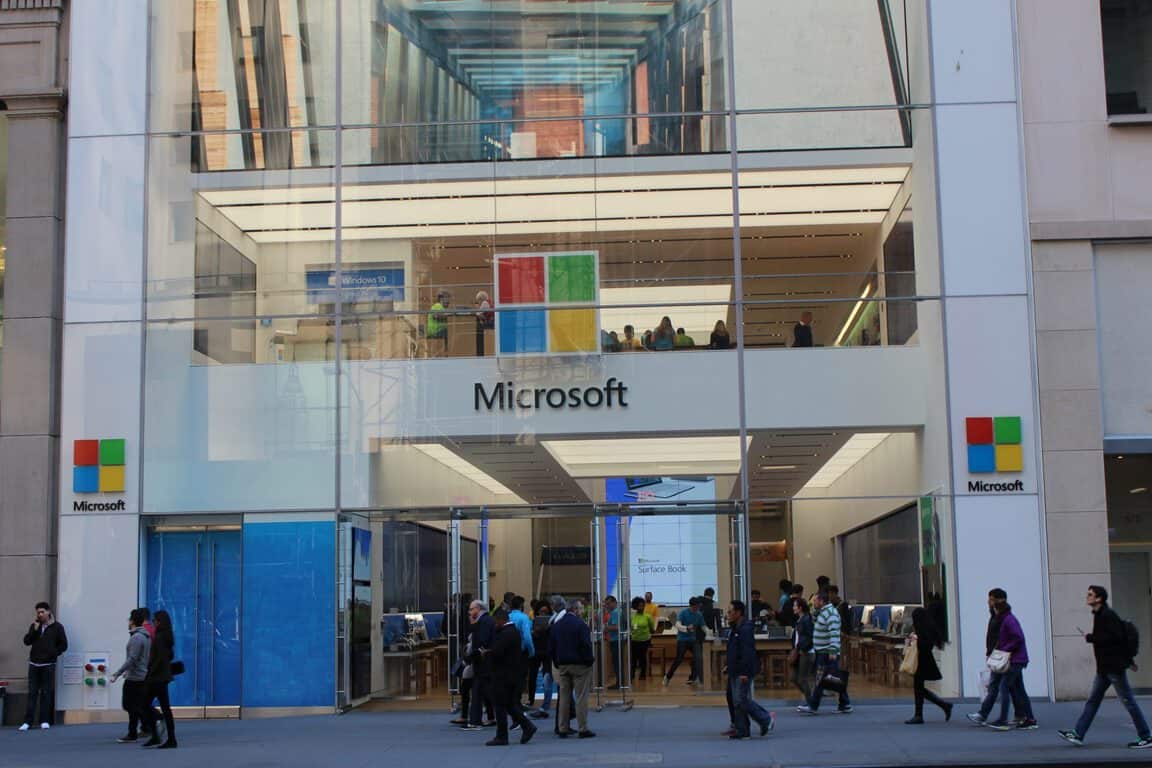
Tech fans in Taiwan now have one more place to go when choosing Surface, Xbox, or anything Microsoft. As noted by Taiwan News, Microsoft recently opened up a new flagship store in Taiwan, the ninth in the Asia region (via MSPoweruser.)
The new store originally opened up on July 6th in the Xinyi District of Taiwan and becomes the 14th flagship Microsoft Store worldwide. According to Chang Chia-hao, a Senior Product Marketing Associate for Microsoft Store, the Xinyi District store also reflects Microsoft’s specific targeting of the Taiwan market.
It is definitely nice to see Microsoft expanding its retail presence worldwide, especially at a time when Surface devices are becoming ever so more popular and common in public places.
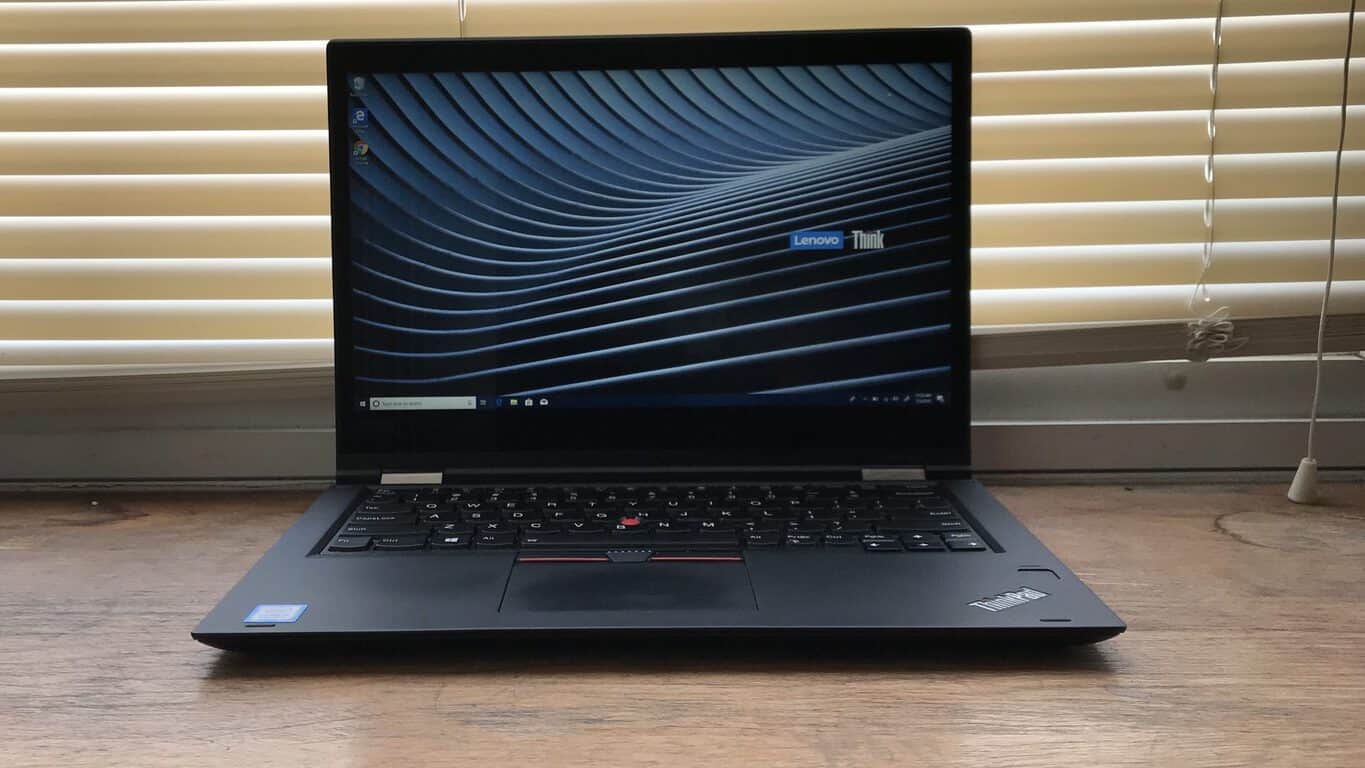
If you’re a professional or a student that is always on the go, you likely won’t want to lug around a heavy laptop to and from work or school. Enter the X380 Yoga, a compact little device that is designed for those who want the flexibility of a 2-in-1, but also the feel of a traditional ThinkPad laptop. I’ve been spending the last 3 weeks with this device, and here’s more on my overall experience.
Specs and Pricing
Our review unit is powered by Windows 10 Pro, and an 8th Gen Intel Core i7-8650U processor clocked at 1.9 GHz. It comes with a total of 8GB DDR4 2400 MHz RAM and a 512GB PCI-E NVMe SSD. The model we have is available from Lenovo for $1,223, but you can customize to your liking. Other specs which will come up throughout this review can be seen in the photo below.
Specs on the X380, from Lenovo
Build and Design
As with all ThinkPads, the Yoga X380 is made of a black colored carbon fiber hybrid material. It’s 12 MIL-STD 810G graded and looks very simplistic— two things that are very important to me when traveling with an expensive device on the go. Of course, you’ll also find Lenovo’s patented 360-degree hinges, which work perfectly and are strong enough to switch the device into its four different modes. And, coming in at about 3 pounds and 12.3 x 8.8 x 0.7 inches, the X380 Yoga manages to keep a compact small footprint.
That classic ThinkPad Logo
Display
At 13.3 inches and 1920 x 1080 FHD resolution, the display on the X380 is bright and vivid enough for any task. You can expect a total of 308 nits of brightness on this unit, which is the standard on most devices in this price range. This meant that when in laptop mode, I didn’t need to keep the brightness high and a medium to low setting was just enough for my needs.
Multi-tasking worked surprisingly well, as I was able to head into the display settings and tune down the scaling for more room for my windows. For my web-based writing work, the brightness also meant text on web pages and images were crisp and clear when rendering. I can see this working well for those who spend time in spreadsheets and word docs, as the screen is pretty easy on the eyes.
Using the X380 for work
I also used the device in tent mode to watch Disney Pixar’s Cars 3 in FHD. The reds in Lightning McQueen’s paint job were especially bright, and the colors from the other cars on the track popped right out. Though I mainly used the X380 for work, I did enjoy the fun when using it for multi-media too.
Ports
Lenovo includes a ton of ports on the X380 for ultimate versatility with your accessories. You’ll find both modern ports and classic ports for your older accessories too. This is something that has always made me love the ThinkPad Lineup, and I am glad to see the trend continue.
On the right side of the device, you’ll find the power button followed by the slot for the Integrated ThinkPad Pen Pro (more on that later.) There is then the headphone jack, the Micro-SD Card Slot with an option for a SIM, USB 3.0 Port, an HDMI port, and the Kensington Lock.
I liked the option for the Micro-SD card, as these make for a nice way to double up on the included storage without breaking the bank. I also appreciated the HDMI port, since I didn’t have to go out and buy dongles just to connect to my monitor. I think these are again two very important things for road warriors who are always on the go.
The right side of the X380
Anyway, on the left side, things are a little less busy. We have Lenovo’s proprietary power port, followed by a USB C Thunderbolt 3 port, and the Mini-Ethernet RJ45 port. Lenovo even throws in another Always-On USB 3.0 port. There’s also extra peace of mind since Lenovo protects the port with Anti-Fry technology for when poorly designed USB-C products draw or give too much power.
At the end of the day, you’re seeing a mix of modern and traditional ports here, so you won’t have to worry about your accessories not working with the X380. You’re also getting Thunderbolt 3, which is the USB C that does it all.
The left side of the X380
Keyboard and Touchpad
Reminiscent of my ThinkPad X200 from way back, the keys on the X380 have a spongey soft touch when mashed down into the chassis. I really liked this feel as it provides some comfort for my fingertips when writing long-form articles.
Another feature that I liked on the X380 keyboard is what Lenovo is calling a Lift n Lock technology. This means that when you rotate the device into each of the non-laptop modes, the keyboard bed will retract into the chassis and lock in place, disabling the keyboard. Again, this versatile feature provided a comfortable feel for when I used the device in the 2-in-1 modes. I didn’t have to worry about my fingers jamming on buttons when in tabet, tent, or stand modes.
As for the buttonless touchpad, it’s otherwise very standard. It is coated in mylar and comes in at about 3.5 x 2.1-inches, which is more than enough room for Windows 10’s touchpad gestures. Lenovo also throws in the TrackPoint nub, which proved a little useful for me when I wanted some more precision clicking. It’s just OK, and there isn’t anything fancy about it.
The Keyboard in Lift n Lock mode
Pen
Included onboard the X380 Yoga is the Thinkpad Pen Pro. This pen slots into the right side of the device and comes with a total of 2,048 levels of pressure sensitivity. That might be half the sensitivity of the Surface Pen, but I really didn’t see the difference on my end.
I honestly never really used the pen very much outside my testing period, but I preferred the convenience of knowing the pen is always there over anything else. When I did use the pen, it was smooth and easy. Access to the two side buttons was tough, but the pen itself easily dragged across the screen with minimal friction. This made drawing easy and nothing held me back between my strokes in Fresh Paint when in tablet mode.
Inking on the X380
Lenovo tells me that a 15-minute charge in the pen slot will allow for up to 100 minutes of use. There’s also a firmware algorithm onboard the X380 Yoga which improves palm rejection. I tested this for myself, and I saw about 4 hours of pen time before it stopped responding on the screen.
Security
The X380 Yoga has options for a Windows Hello Camera, but our unit comes with a fingerprint reader instead. Just as with all other Lenovo laptops, it is speedy and quick. It instantly IDed my finger when I on the Windows 10 lock screen, like an iPhone and many other of my devices. Lenovo also lists that some units come with Intel’s VPro technology, but that wasn’t on board our device.
Fingerprint reader
Performance
I’m not the kind of reviewer that will bore you with full-on tech specs in the terms of performance. I instead put my review units through my own daily real-world testing. That said, the X380 Yoga easily handled all my usual tests, like editing photos and working with 15+ tabs open in Edge. You can take my word for it, or check out the standard Geekbench 4 scoring. The 8th Gen Kaby Lake R processors really make a difference here and give more room for processing power. You can see this in the scoring below in comparison to other Lenovo review units from 2018.
Nothing slows this unit down, but the fans will kick in easily if you stress it out too much. That’ll also heat the device up, particularly in the corners right where my hands usually rest. It’s just one small fault in an otherwise perfect bit of performance.
Using the X380
Battery Life
As with all devices that come equipped with a touchscreen, you can’t expect all-day battery life. In my daily usage of the X380, I got anywhere from 5-6 hours of battery. That’s only with web browsing and some slight multi-media usage, so I’m assuming this is what most people would expect in the real world. But with the device supporting Rapid Charge tech with 80% of charge in 1.2 hours, you’ll get a charge real quick.
The battery life on the X380
Conclusion
Putting everything into perspective, The X380 Yoga is an all-around solid device. Though it is obviously priced a bit high, you’re getting a versatile device that feels just like a traditional laptop. The specs are well up to date, and performance is solid. The display is very bright and vivid, and the Thinkpad Pen Pro is easy to stow away and use. It is like you’re getting four devices in one, and with some solid battery life. You can buy the X380 Yoga from Lenovo here, with prices starting at $1,223, going up all the way to $2015.10.
New Microsoft Surface hardware (tablet) incoming… FCC lists Model 1824, using a QC WiFi/BT module (= Intel based) and the 24W charger from the Pro 4. No clues apart from that, it seems: https://t.co/GWFMIPlBFv
Internet download exploit can’t attack Microsoft Edge users
Users of Microsoft Edge are not vulnerable to the “download bomb” exploit that has come back to haunt Google Chrome. The exploit involves a malicious webpage sending multiple file downloads to the browser in order to freeze it and lock the browser session to a specific page.
Official Uber app updates to PWA on Windows 10 Mobile & PC
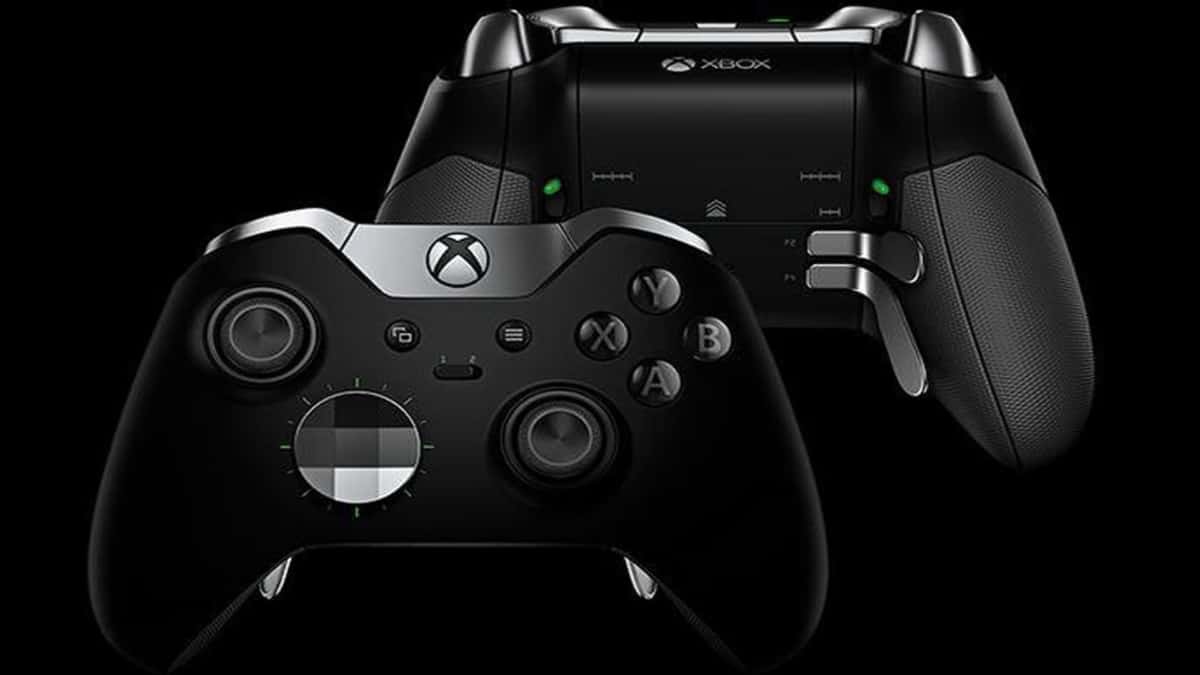
The new Elite Controller popped up for the very first time back in January on the Chinese website Baidu. Sliding back on the memory lane, Microsoft revealed the Xbox Elite Controller during E3 2015, and the tech giant has released a few limited edition Elite controllers since then. Now, Redmond seems to have big plans involving the launch of the Elite controller’s successor soon.
The Elite Controller was designed for all types of gamers
Microsoft designed the Elite Controller to allow gamers to customize their Joysticks and D-Pads according to their needs and they were able to add extra triggers as well.
The controller also supported configurable button mapping. Microsoft relied on user feedback to improve the initial controller.
Spider’s rumored features
Rumors say that Spider which is the codename for the upcoming controller will come with three-stage hair trigger lock which would allow gamers to adjust the amount of trigger depression more compared to the original version on the controller.
Another rumored feature is tension control for joysticks which would allow gamers to control the tension of the joystick’s movement and also adjust the amount of resistance while pushing the sticks. Another configuration profile might be included as well and the new Xbox Elite Controller might also bring USB Type-C connectivity along with PC connectivity via Bluetooth. These were all missing from the original version of the controller.
A MagSafe port could also be added to Spider, and built-in batteries would be included as well. The new device might also pack a proprietary charge dock for fast-charging.
Apart from all these features, there are also lots of patents that Microsoft has already files that might provide a clearer picture of what we can expect. Some of these detail fully customizable and removable triggers.
Pricing and availability
The Spider controller might launch by the end of the year, and the pricing will probably be similar to the original controller, around $150.
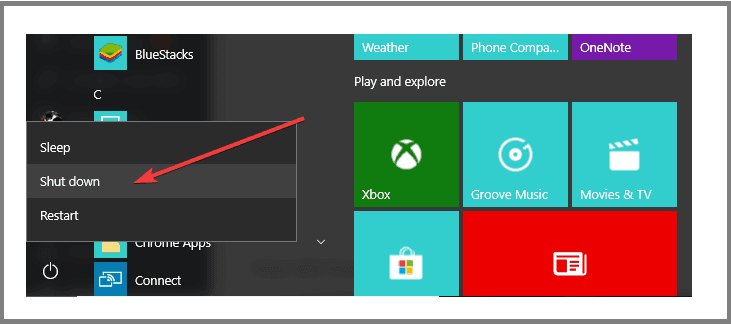
Sometimes, when you first install your Windows 10operating system, or Windows 7, Windows 8.1 for that matter, you might experience some shutdown problems. When you select the reboot feature on your system and your device is shutting down instead. Or perhaps when you select the shutdown feature or the sleep mode, you PC will just reboot instead of shutting down or entering sleep mode.
The shutdown problems in Windows 10, Windows 8.1 usually come along side the Hybrid Shutdown feature introduced first in Windows 8 systems and also in Windows 8.1 and Windows 10 systems. This feature is meant to decrease your device’s start-up time but unfortunately when you have shutdown problems in most of the cases it is caused by this feature. You don’t have to worry because we will show you below how you can disable the “Hybrid Shutdown” feature and fix your Windows 8.1 or Windows 10operating system.
Note: The steps to follow may be a bit different depending on your OS version, but you can quickly locate the ‘Turn on Fast Startup’ option in Control Panel.
Move the mouse cursor over the upper right side of the screen in order to open the Charms bar menu.
Left click or tap on the search feature presented there.
Type in the search box the following text “power” without the quotes.
Left click or tap on the “Settings” feature presented after the power search.
Left click or tap on the “Change what the power buttons do” feature presented in the left side of the window.
Now you should have in front of you the “System Settings” window.
You will have to go all the way to the end of the list presented in the right side of the “System Settings” window.
Find the feature “Turn on fast startup (recommended)” and uncheck the box next to it in order to disable this feature. Note: If this option is not available and you cannot check or uncheck the box next to it then you will have to go in that list all the way to the top and left click on the “Change settings that are currently unavailable” link in order to activate this feature.
Reboot the Windows 8.1 or the Windows 10operating system.
Try shutting down your device and see if it reacts differently. If you still have issues with the shutdown feature after this then do the next method posted below.
2. Disable dynamic tick
Press and hold the button “Windows” and the button “X”.
After you opened up the menu you will have to left click on the “Command Prompt as Administrator” to open it.
In the command prompt window you will need to write the following line “bcdedit /set disabledynamictick yes” without the quotes. Note: Be sure to type the command exactly how it is written above and include a space between the line “bcdedit /set disabledynamictick” and the “yes” word.
Press the “Enter” button on the keyboard.
Reboot the Windows 8.1 or the Windows 10 device and see if you still have this issue.
3. Reset your power plan
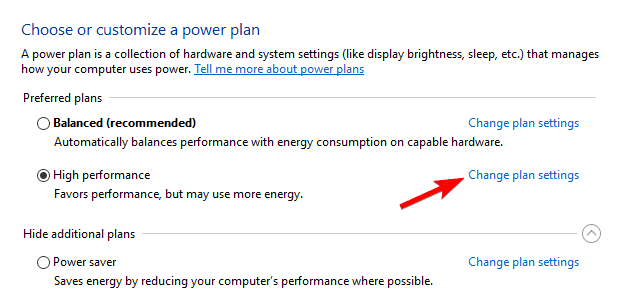
If you’re using a customized power plan, try resetting it to default:
OpenControl Panel and go toPower Options
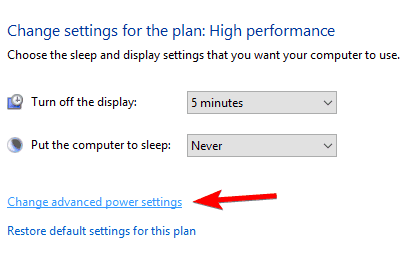
Locate your current power plan > selectChange plan settings
Navigate toChange advanced power settings
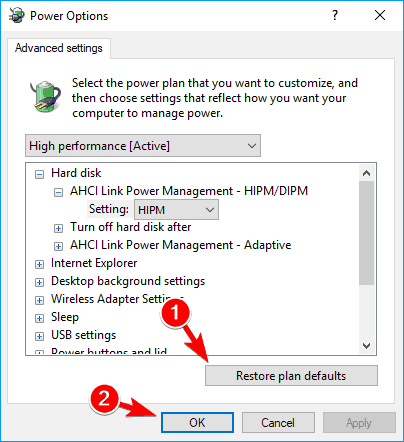
SelectRestore plan defaults > hit ApplyandOK
4. Additional solutions to fix computer shutdown issues
If the issue persists, try installing the latest Windows OS updates, as well as the latest driver versions. In order to prevent PC damage by installing the wrong driver versions, we strongly recommend using specialized software.
The best practice for your system to work properly is to update all your outdated drivers, and that is a tedious process. Thus, with this tool, you can do it automatically.
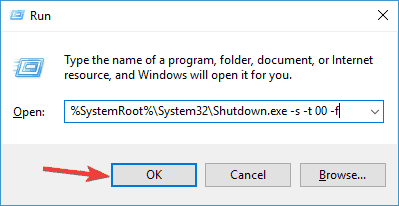
You can also run a shutdown command to turn off your computer. Go ahead and press Windows Key + Rto open the Run dialog and then enter%SystemRoot%System32Shutdown.exe -s -t 00 -fand hit Enter to launch the command. Your computer should shutdown shortly after you hit Enter.
So, the methods listed above should help you fix your computer shutdown issues in Windows 10, 8.1 so that you can carry on your normal activity on your Windows device. If you have any questions on this topic, please let us know in the comment section below.
If you aren’t pleased with the current save location, be sure to keep reading to learn how to change it.
What is the Camera Roll folder in Windows 10?
Camera Roll directory is the default directory for all images created by the Camera app. The location of this folder is the following: C:\Users\your_username\Pictures\Camera Roll
Now that you know the default location, let’s see how we can change it.
You can learn more about saving new photos directly to the Camera Roll folder by following this guide on saving pictures to Camera Roll in Windows, which explains how the Camera app stores images and how to ensure every shot is saved correctly.
How can I change the Windows Camera save location?
1. Change the storage drive of Camera Roll
Click the Start button and select Settings.
Choose System and then go to Storage.
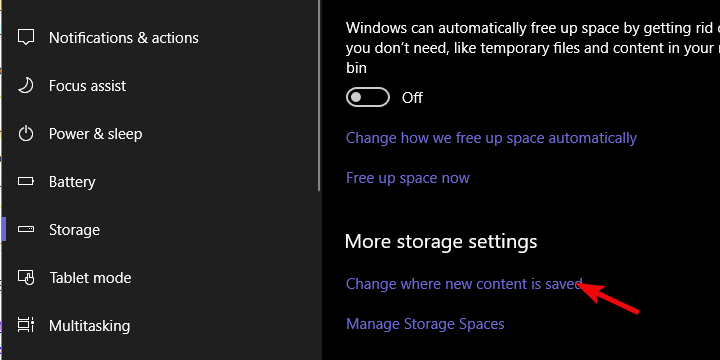
Click on the Change where new content is saved hyperlink.
Expand the New photos and videos will save to section and choose the preferred drive.
In our case, since we have two HDD partitions (system and data partitions), we can choose between one of them. If you make changes, the system will recreate the whole directory path in the alternative partition.
So, the original location will be mirrored to an alternative partition or external drive. Creating redundant folder tree in the process.
However, this only specifies the drive where you save the images, not the actual folder. It will still be the Camera Roll folder but on another drive.
Some users notice the Camera Roll folder missing from the Pictures directory. Learn how to restore it with a simple Camera Roll recovery guide.
You can also explore how to remove Camera Roll and Saved Pictures folders when you want more control over these directories by checking remove Camera Roll and Saved Pictures folders guide.
2. Change the folder location of the camera photos from the Registry
Press the Windows + R keys to start Run console.
Type regedit and press Enter or click OK.
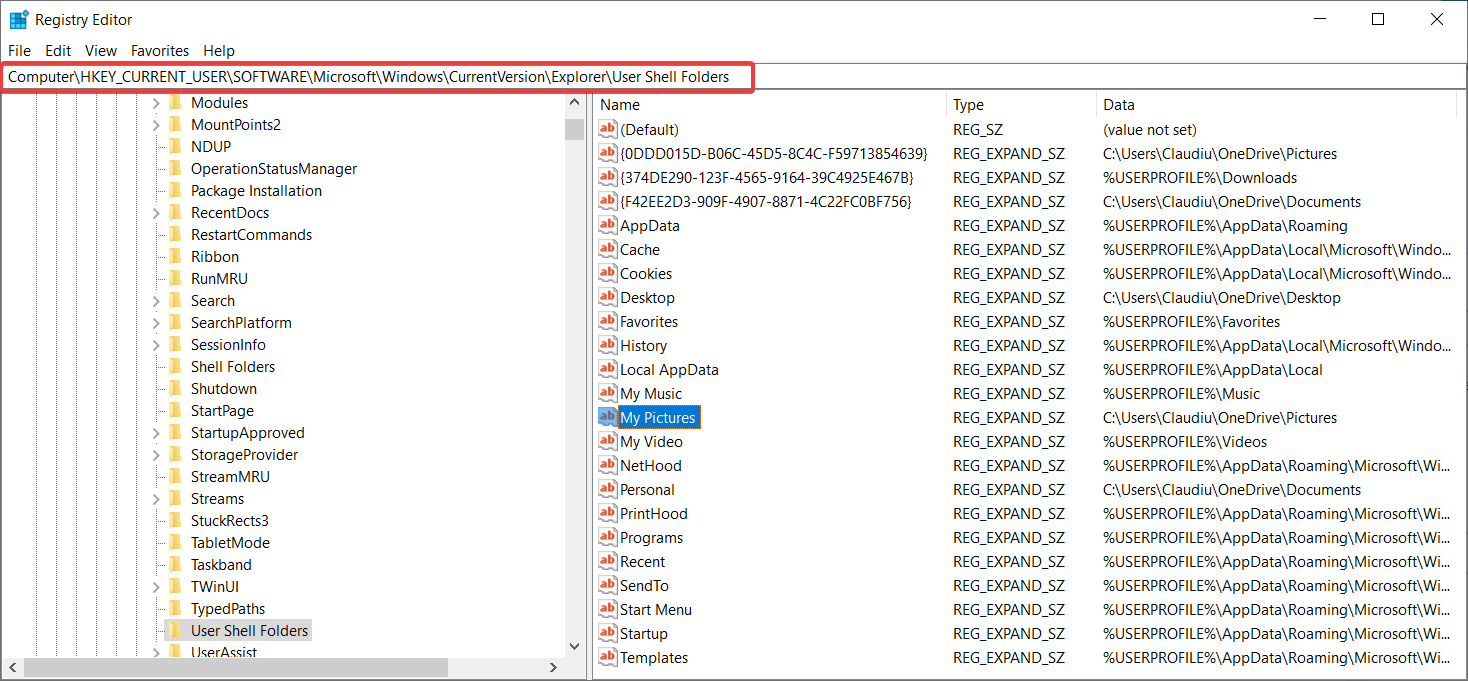
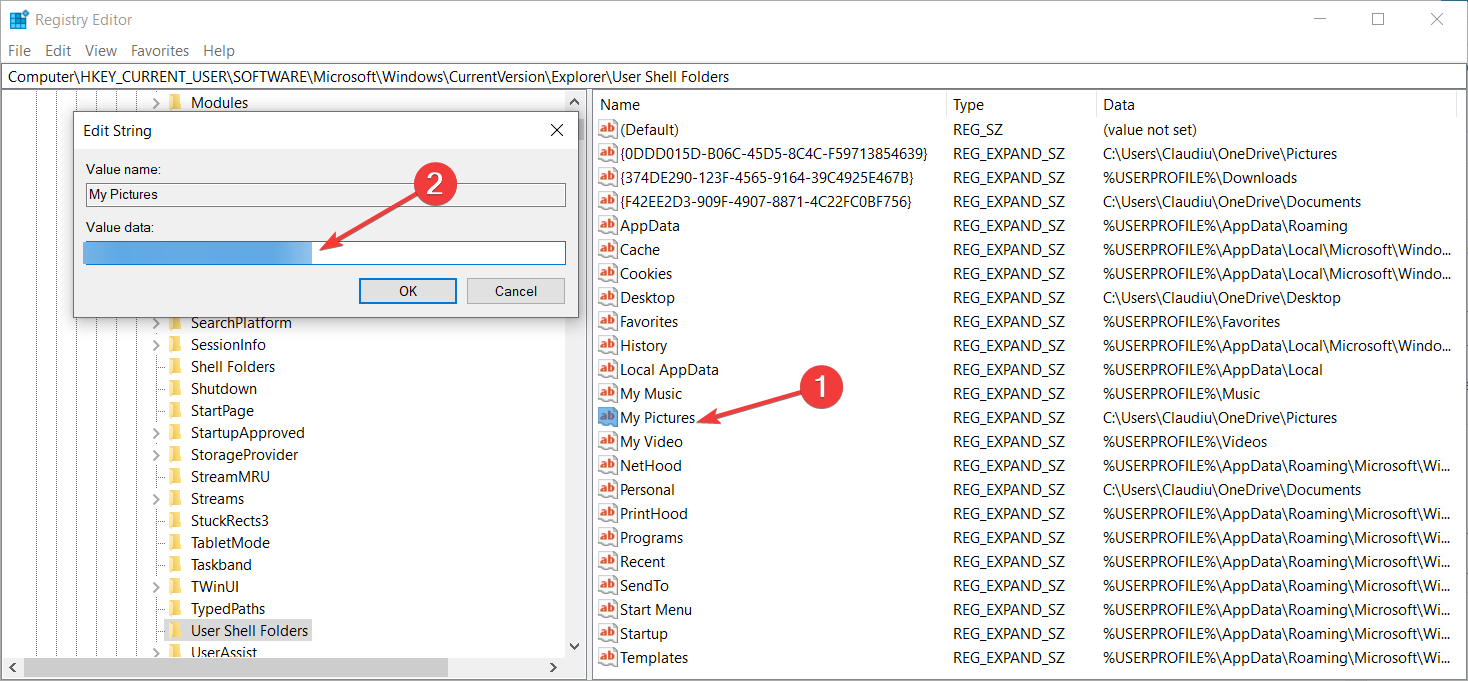
Now, navigate to the following location in Regedit: HKEY_CURRENT_USER\SOFTWARE\Microsoft\Windows\CurrentVersion\Explorer\User Shell Folders
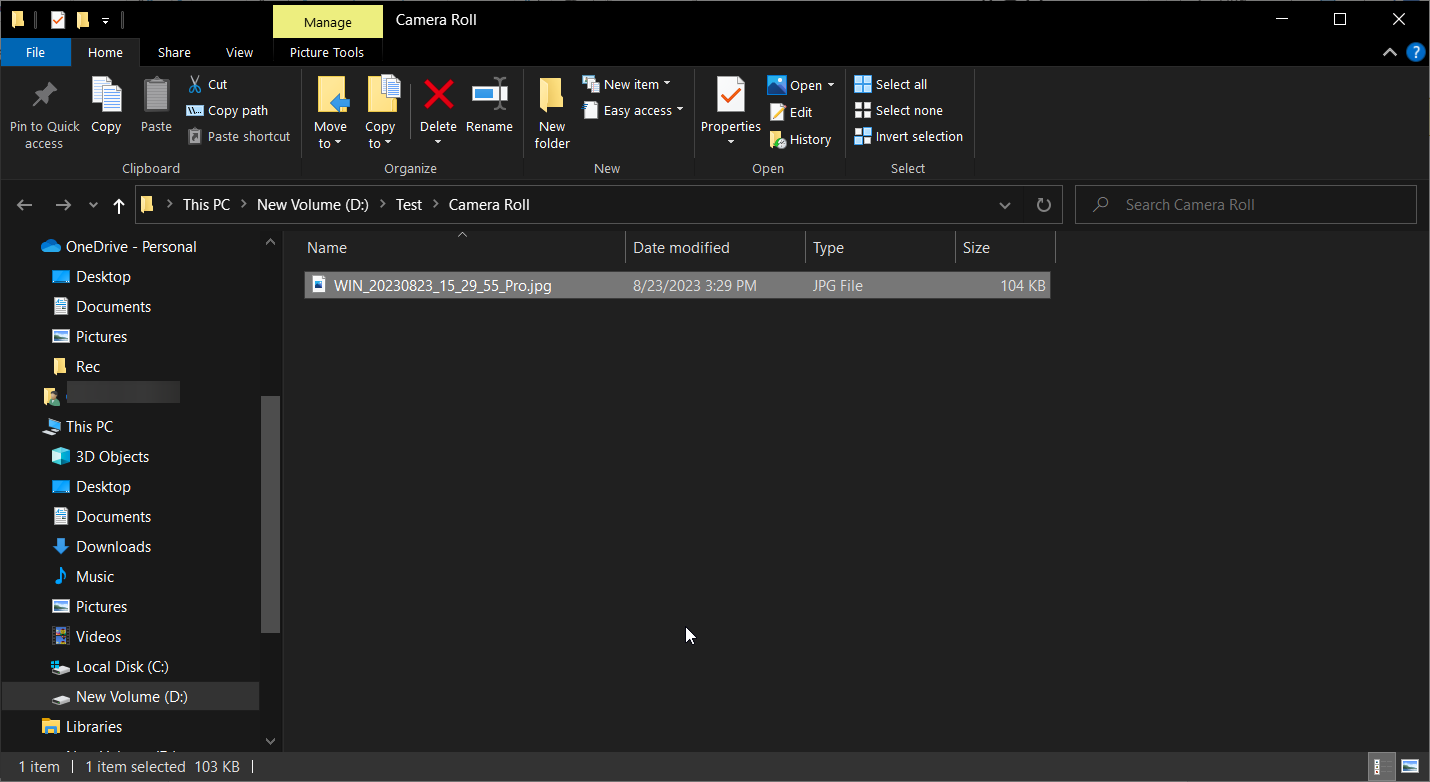
Double-click My Pictures and change the path of the folder you want to store the images to the one you want to use. We have changed it to D:\Test.
Now, when you take a picture with Windows Camera, it will be automatically stored in the new folder D:Test\Camera Roll. Yes, the Camera Roll folder is created automatically.
Windows 10 comes with a built-in Bing search bar. Since most users don’t need or use this feature, here are a few solutions for disabling or removing it for good in Windows 10 operating systems.
When you search for something on your Windows 10 PC, laptop, or other device, this Bing search bar feature will usually automatically start the search on the Internet.
Even if you don’t have it on your Windows device, you might find it on the Internet. So, this is a useful feature, but only for users who really need it.
How can I disable Bing Search in Windows 10?
1. Turn off the option Get search suggestions and web results from Bing
For users who have a touch screen device on Windows 10, you will need to swipe from the right side of the screen to the center to open the charms bar. Note: For users who have a PC or laptop you need to press and hold the button “Windows” and the button “C” on the keyboard.
Left click or tap on the “Settings” icon presented in the “Charms” bar.
Left click or tap on the “Change PC settings” feature presented in the “Settings” window.
Now in the “Change PC settings” menu you will have to search for “Search & apps” and left click or tap on it.
You will have to find in the “Search and apps” menu the “Get search suggestions and web results from Bing” feature and toggle the switch to disable it. Note: Set the switch to “Off” state.
Reboot the Windows 10 device and your Bing search bar should be disabled.
2. Disable Bing Search bar on the Windows 10 Start menu
On Windows 10, you can remove the Bing Search bar by following these steps:
Go to Start > type ‘cortana’ in the search bar > select Cortana & Search settings
Turn off the option where Cortana can give you suggestions, reminders, and alerts
Now, toggle off the Search online option in order to exclude web results.
Well this is it, we hope you have managed to disable the Bing search bar in Windows 10 in just a few minutes. You will see that every time you search for something, the Search feature will access only your Windows device and won’t display Internet search results.
If you want to remove Bing search from your browser, go to Settings and locate the option Manage search engines or something similar. Then, simply replace Bing with another search engine, confirm your choice and that should be it.
You might be content of using older versions of Skype in your Windows 7, Windows 8 or Windows 10 operating systems for several reasons.
The fact of the matter is that Microsoft won’t provide any support for older versions of this application.
But don’t worry and continue reading this guide to learn how to use older Skype versions even on Windows 8, Window 10or Windows 7.
Normally, Windows won’t allow you to install a Skype version older than Skype 6.13.
It will mainly prevent you from signing in as you normally would. But users might not like the new versions of Skype because, for one thing, they will not allow you to block the advertisements in the application.
Also, the newer versions of Skype take up a huge part of your Windows 8, Windows 10 memory thus slowing down your computer.
How to make old Skype version work in Windows 10, 8, 7
1. Create a backup copy of the old Skype .exe file
You will need to create a backup copy of the executable file you have for the older version of Skype. Note: You can copy the backup on your USB stick or portable hard drive.
Go to the Windows store and install the latest version of Skype you have for Windows 8 or Windows 10 operating systems.
Log into Skype as you normally do but be sure to check the box next to the “Automatic sign in” feature.
Now close the Skype app.
Go to your “C:/” partition in Windows and double click (left click) on the “Program Files” folder you have there.
Now in the “Program Files” folder you should have the “Skype” app folder.
In the “Skype” folder you will need to replace the executable file with the one you had from the older version of Skype you want to use.
Double click (left click) on the executable file after you replaced it .
After you run the executable you will be able to run the older version of Skype because you already saved your user account data with the new version.
2. Use Skype’s config.xml file
Install Skype from the Windows store.
After the installation is completed you will need to sign in again with your user account and password. Note: Check again the box next to “Auto sign in when starting Skype”
Close the Skype version after you signed in.
Open the Skype app again.
Press and hold the button “Windows “ and the button “R”.
Write in the “Run” window you opened the following line “%APPDATA%Skype“
Go to your user account folder, open it and locate the “config.xml” folder with your account information.
Now, run the older version of Skype by double clicking (left click) on the executable file.
You will see that it will sign in automatically. Note: it will ask you to update the Skype app but you can skip this pop up message and continue your work.
Speaking of using old Skype versions, you can download and install the classic Skype for Windows Desktop from Microsoft’s website.
There you have two ways on how to continue using your old Skype version. Use the comments section below to let us know if these methods worked for you or not.
Should a forced upgrade or billing change leave you with unwanted charges, learn how to recover your money on Skype with a simple step-by-step guide.
Many users are also complaining about the constant reminders that there’s a new Skype version in town and they fear that the Redmond giant will force them to upgrade at some point:
Every time I log in to the old Skype now I get the screen asking me if I want to upgrade, I also get it when I log out. That didn’t happen for quite some time after I reinstalled the old version. I think MSN is going to force us to upgrade at some point soon. I dread that; they don’t seem able to make the new version work and don’t care.
So, what’s your take on this situation? Are you planning to install the new Skype version in the future?
Some users have stated on forums that they get an error code 643 when they try installing Windows updates. Error code 643 is an update error that occurs more frequently in Windows 7, 8 and 8.1. The error blocks Windows from updating. Here are a few resolutions that might fix error code 643.
The Windows Update troubleshooter fixes numerous update errors. So, that troubleshooter might provide a resolution for error code 643. You can download the Windows Update troubleshooter for Win 10, 8 or 7 from this webpage. Win 7 and 8 users can click Download troubleshooter for Windows 7 and Windows 8 to save the troubleshooter.
Then open the troubleshooter shown directly below from the folder you saved it to. Click Advanced and select Apply repairs automatically. Then select Windows Update, and press the Next button to go through the troubleshooter‘s steps.
2. Turn Off Anti-Virus Software
Third-party anti-virus software can conflict with Windows Update. Some users have confirmed that disabling anti-virus software can fix error code 643. To temporarily disable an anti-virus utility, right-click its system tray icon and select a disable or turn off option on its context menu. If you can’t find a disable option on the anti-virus utility’s context menu, have a look through the settings on the software’s primary window. Alternatively, you can turn off anti-virus software via Task Manager’s Start-up tab as follows.
Press the Windows key + X hotkey to open the menu shown below.
Select Task Manager on that menu.
Click the Start-up tab in the snapshot below.
Select your anti-virus software and click Disable. That will remove the anti-virus utility from the system startup.
Restart Windows and then try installing the required update.
3. Fix NET Framework with the NET Framework Repair Tool
Error code 643 is often due to a corrupted NET Framework installation. You can fix NET Framework with Microsoft’s NET Framework tool, which you can download from this webpage. Then open the utility’s window, and click the I accept the license terms check box. Press the Next button to initiate the repair utility.
4. Repair NET Framework Client Profile via the Control Panel
Windows 7 users can repair the NET Framework Client Profile via the Programs and Features Control Panel applet. That Control applet lists installed NET Framework versions in Windows 7, which you can select to repair from there. This is how you can repair the NET Framework Client Profile in Win 7.
Open Run by pressing the Windows key + R keyboard shortcut.
Input ‘appwiz.cpl’ in Run’s Open text box, and select the OK option.
Then enter ‘NET Framework‘ in the Programs and Features search box.
Double-click the latest NET Framework Client Profile to open a profile maintenance window.
Select the Repair option, and press the Next button.
Press the Finish button when the repair is complete, and select to restart Windows.
As a last resort, reinstall NET Framework. Set up a system restore point that you can go back to before you uninstall NET Framework. Then reinstall NET Framework as follows.
Press the Download button there to save the NET Framework Setup Cleanup Utility ZIP.
Open the cleanup utility’s ZIP in File Explorer, and press the Extract all button.
Click the Browse button to select a path for the extracted ZIP, and press the Extract button.
Open NET Framework Setup Cleanup Utility from the extracted folder.
SelectNET Framework – All Versions from the drop-down menu.
Press the Cleanup Now button.
Thereafter, reinstall NET Framework. This page includes links to Microsoft NET Framework download pages.
Alternatively, you can reinstall NET Framework with All in One Runtimes that provides an installer for NET Framework and other runtime packages. Select All in One Runtimes on this page to add the software to Windows.
Restart your desktop or laptop, and then try updating Windows.
Some of those resolutions might fix error code 463 so Windows updates. In addition, the Deployment Image Servicing command-line utility might also come in handy for fixing error code 463. This Fix Windows Updates page also provides resolutions that could fix error code 463 and other update errors.
Having problems with the printer queue in or Windows 10 can be very annoying, especially if the printer queue is stuck and the documents you printed over time keep printing over and over again.
For one thing, you cannot even stop the printer, except if you shut it down from the power button. However, in some cases, if you reboot your Windows 10 device and start the printer, it will automatically start printing.
Also, when you click to print something and you accidentally clicked a couple of times on the print button, it might print the document several times.
Well, you will be glad to find out that there is a very easy fix to the printer queue issues. All you need to do is follow the methods posted below.
In the Run window you will need to type Control Panel, then click OK.
Under the topic Printers,you will need to right-click on your default printer and click on the See what’s printing feature in the menu presented there.
Left-click on the Printericon on the upper right side of the window.
instead of the Printericon, you might have the File icon in which case you will need to click on that.
Now, in the menu presented, click on the Cancel all documents feature.
This should cancel all the documents you have stuck in the printer queue.
Also if this doesn’t work you will have to reboot the device and try again.
Type in the following command and press Enter: Net Stop Spooler
Then, type in the following command: del %systemroot%System32spoolprinters* /Q
Next, type in the following command Net Start Spooler
Now everything should get back to normal.
3. Check your printer drivers
Verify if your printer manufacturer has the drivers necessary to run in your Windows 10 device. You can look on the manufacturer’s website for the latest update on your printer’s driver and install it from there.
To be safe from any serious malfunction, and to ensure your documents don’t get stuck in the print queue, we suggest you use a third-party tool that will automatically download all the outdated drivers on your PC.
The advantage of using a professional tool is that you save time and avoid all the risks of getting your PC harm.
Some users confirmed that using a different user account helped them fix their print queue not clearing. So, if you already have a second user account on your computer, that’s great.
Just log in and check if your printer works as it should on that account. If not, create a new user account and test your printer again.
Now, that you have your printer queue working once again, you can start using your device without having to worry about the printer malfunctioning.
Did you recently upgrade to Windows 10, Windows 8.1 or Windows 8? In some cases, when users upgrade their operating systems, the drivers for a specific type of hardware might cause some issues. In this post, we will talk a bit about the printer going offline in Windows 8 or Windows 10 and you’ll see exactly how you can fix it by reading the guide below.
Before getting started with the software related issues for printers, you should make sure first that you have the USB cable plugged in from the printer to the Windows 8 or Windows 10 device. Make sure the paper tray is not empty and check if paper is stuck in the printer. After you checked all of the above hardware issues, and you still have this problem, then follow the steps below for a quick fix in the Microsoft operating system.
SOLVED: Printer appears offline on Windows PC
1. Uninstall printer drivers
First of all, make sure to backup the printer’s driver before continuing with this step
Press and hold the buttons “Windows “and “X” to open the “Device Manager” window.
On the left side of the window you will need to locate your Printer name.
Expand the icon of the printer.
Right click on the printer icon in the Device manager window and left click on the “Uninstall” feature presented there.
Another window will pop up with instructions on how to uninstall the driver, you will need to follow the instructions on the screen to remove it.
Now reboot your Windows 7, 8 or Windows 10 PC.
Install the drivers for the printer from the backup or from the CD that came along with the printer when you bought it.
Reboot the Windows 7, 8 or Windows 10 device and try again to see if your printer is still going to offline mode.
2. Check for driver updates on your printer manufacturer’s website
Please try to look on the manufacturer’s website and see if they do have the software necessary to run on Windows 7, 8 or Windows 10. If they don’t have a software available yet for these versions, then it is normal to have these issues regarding the printer.
If they do have the software available, you can easily download it from the manufacturer’s website and install it on your Windows device .
3. Run the Printer Troubleshooter
If the methods above didn’t work for you please left click on the link posted below to download the printer troubleshooter.
After you followed the link above you will have to left click on “Save File” after the window pops up.
Left click on “ok” button to start the download.
After the download is finished go to the folder where you saved the troubleshooter and double click(left click) on it.
Follow the instructions on the screen and let the troubleshooter do its thing.
Reboot your Windows 7, 8 or Windows 10 device and see if you have the same issue.
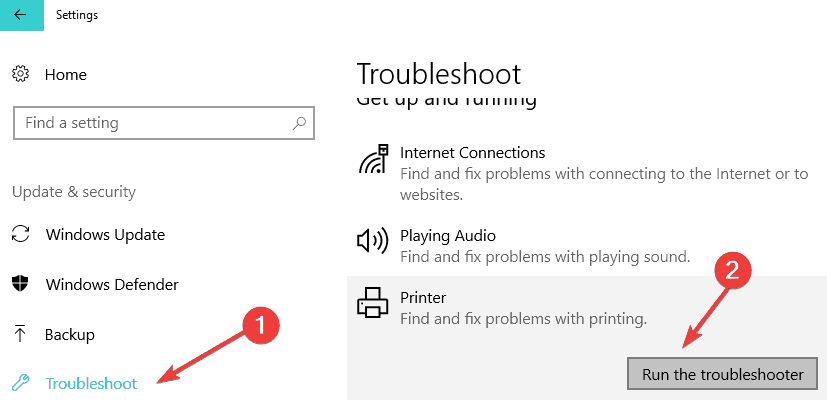
On Windows 10, you can quickly run the Printer Troubleshooter from the Settings page. So, go ahead and open the Settings page, go to Update & Security and select Troubleshoot in the left-hand pane. Under the ‘Get up and running’ section, click on Printer and launch the troubleshooter.
4. Additional troubleshooting solutions
If your printer appears offline even after following all the instructions above, check out this Windows 10 troubleshooting guide for additional fixes.
Change printer settings
Restart the Print Spooler service
Change printer properties
Install the latest Windows updates.
So, now after following the instructions available in this guide, use the comments section below to send your input regarding the printer offline issue in Windows 7, 8 or Windows 10.
Basically alongside with Windows 8 or with Windows 10 operating systems you have the feature to choose a mouse cursor in order to better customize your working environment. Unfortunately, Windows 8 or Windows 10 has a limited supply of mouse cursors to choose from that’s why I have decided to show you below how you can download a lot more cursors that you can choose from.
Downloading the mouse cursors for Windows 8 or Windows 10 system can be very simple and you can pretty much do it in a couple of minutes but reading the lines below you will find out from where you can download the best cursors suitable for Windows 8 and Windows 10 and also how to properly set up the cursor.
Downloading more cursors to use in Windows 8 and Windows 10
Download cursor for Windows 10, 8 and personalize it from your desktop
You will have to download the archive of cursors by left clicking on the link posted below. Download here more cursors to use in Windows 8, 10 Note: You can find other apps to install in order to have access to your favorite cursors. The link above is an example from where you can find a limited pack of cursors.
In order to select a cursor after you downloaded them you need to right click on an open space on your desktop.
Left click on the “Personalize” feature you are presented in the menu.
You will have to left click on the “Change mouse pointers” feature situated on the left side of the “Personalize” window.
You will be presented with a list of cursors already present in Windows 8 or Windows 10 systems.
Left click on the “Browse” button in the lower right side of the screen.
After you left clicked the “Browse” button you will need to locate the directory where you downloaded the cursors.
Left click on the cursor you downloaded to select it and import it to the system. Note: you will have to do this every time you want to change to a new cursor and also be sure to import the extensions “.ico” or “.ani” because if you have any other type it will not work correctly.
After you imported the cursor you want left click on the “OK” button situated in the lower side of the window.
If the cursor hasn’t changed for you try rebooting the Windows 8 or Windows 10 system and see how it works afterward.
So now that you know how to download and properly use the feature in Windows 8 and Windows 10 to change your mouse cursors you can go ahead and customize your system to your liking. Please write us below if you have any questions on how to download the mouse cursors.
All-type mouse cursors possible problems and their fixes
If you have questions about some cursor issues, you are in the right place. Starting from cursor freezing and finishing with cursor disappearing, you can encounter different issues. We have gathered all the available information and compiled it in dedicated fix articles that will help you if you have any issues. Here are some of the most present mouse cursor problems:
Resident Evil 2 is due for release on January 25th next year and will be available in both a regular and Deluxe Edition. Pre-orders of both will unlock two Samurai Edge in-game weapons while those who buy the Deluxe Edition will also get a variety of alternate costumes, another exclusive weapon, and an option to swap the game’s soundtrack.
A deadly virus engulfs the residents of Raccoon City in September of 1998, plunging the city into chaos as flesh eating zombies roam the streets for survivors. An unparalleled adrenaline rush, gripping storyline, and unimaginable horrors await you. Witness the return of Resident Evil 2.
Microsoft’s SwiftKey keyboard for Android devices is getting a special sticker set based on the newly released Marvel’s Ant-Man and The Wasp movie. The stickers are free to use for all users and feature the two main protagonists from the film plus one of the villain and other related images.
The announcement, which came in the form of a tweet from the official SwiftKey account, claims that these stickers are exclusive which is a pretty great win for Microsoft.
Have you tried these Ant-Man and The Wasp stickers yet on your Android device? Let us know what you think of them in the comments below and then follow us on Twitter for more smartphone news.
I know most of you just got used to Windows 8 and Windows 8.1operating systems, but we have a new Windows 10 in town and it is heading up to be quite impressive. You will see more information below if you should upgrade your system to the Windows 10operating system or not.
Microsoft took out Windows 9 from the equation but brought the Windows 10 OS to the spotlight for our desktops and laptops computers. Also, they released the official version of this operating system in October 2015.Regarding the pricing of this operating system, there are two possible scenarios: you can either upgrade to Windows 10 for free (yes, the free upgrade offer is still valid!) or you can shell out $119.00 to get the OS package.
As a plus to the Windows 10operating system, Microsoft introduced a one application platform meaning that it can run on all your Windows devices like Desktop PCs, laptops, tablets, Smartphone’s and of course having the same “Store” feature on all.
RELATED: Microsoft offering free Windows 10 upgrade to cloud service subscribers
Should I install Windows 10 or stick to Windows 8.1, 8?
For all of the fans of the Windows start menu, you will be pleased to find out that Windows 10 has this feature available again. Of course, it is designed so that even if you have a mouse or a touch screen on your device, you are still able to move around quite easily. Another useful feature about the start menu present in Windows 10 is the option to resize everything going from the start menu itself up to the tiles present in the start menu.
Regarding Windows 8, you will still have access to the Charms bar in Windows 10, so this good feature is still available for all the Windows 8 users who got used to it. Also, the search box feature has the capabilities of the Windows 8operating system one of which being the results from our Windows store.
Windows 10 compared to Windows 8
Charms bar feature
Seeing that the charms bar is still present in Windows 10 can be very reassuring for all Windows 8 users. This feature is pretty much the same but with a slight modification to ease your operating time.
Let’s take, for example if you have an app opened up in Windows 10 and you want to bring up the charms bar, you will have to press and hold the buttons “Windows” and “C”. The only difference is that the charms bar will appear a little bit smaller and it will be situated in the upper left corner of the app you have opened.
The command prompt feature from Windows 8 still present in Windows 10
Yes, you will still have the beloved Command Prompt window in Windows 10. Besides the stylish design, you now have the opportunity to copy and paste your text inside and outside of the Command Prompt window.
On the other hand, Windows 10 features a new tool called PowerShell. Windows 10 PowerShell is a task automation framework that allows administrators to perform administrative tasks on both local and remote Windows systems. So, if you want to test this new feature, you need to install the latest Windows 10OS version.
The “Alt Tab” feature
Press and hold the “Alt” button and the “Tab” button in any Windows operating system and you will see how easy it is to shift between apps. This feature has not disappeared in Windows 10 either from what Microsoft shows us in the prototype of this version. From this point of view there is still no downside so far from upgrading your Windows 8 to Windows 10 system.
— RELATED: Microsoft further encourages iOS devs to port their apps to Windows 10
Windows 8 vs Windows 10 Security features
As far as security is concerned, it’s pretty clear why Windows 10 takes the crown. Long story short, if online security is one of your key concerns, then you should definitely hit the upgrade button and install the latest Windows 10 version on your machine.
The Windows Defender version that’s available on Windows 10 is one of the best antivirus software that you can use, according to tests. Microsoft has significantly improved its built-in antivirus tool since the Windows 8.1 edition, adding a plethora of new features and improvements so as to successfully fend off the latest cyber threats.
Windows 8.1 vs Windows 10 gaming
If you’re a gamer, then Windows 10 is definitely the right OS for you. Microsoft has added a series of gaming-related features in Windows 10, including the Game Bar, Game DVR option, and more. Windows 10 definitely offers better gaming performance than Windows 8.1 or Windows 8.
So, seeing that a good bunch of the features in Windows 8 are still be present in Windows 10 and also some of them have been improved a bit as far as the design and user experience part is concerned, it’s easy to tell why this operating system might very well take the first place in Microsoft’s releases so far. It is worth mentioning that Windows 7 is still king, with over 43% of Windows users preferring it over other OS versions.
New Windows 10operating systems will regularly hit the market, but in the meantime you can compare the features present on both operating systems and decide if you want to stick to Windows 8 or upgrade your device to Windows 10. Write us in the comments section below for any questions on this article.
Have you just installed your Windows 10, 8, 7 operating system and your battery icon is missing from your desktop? For this particular issue, we have some steps that we need to take to bring back your battery icon.
Having your battery icon missing from the system tray can get pretty annoying seeing that you might be at work or on a vacation and you don’t have access to the power outlet to charge your laptop.
Not being able to see how much power is left on your laptop‘s battery in Windows 8.1, 8, Windows 7 or Windows 10 might cause you to lose everything you worked on because of an unexpected shutdown. You won’t have to worry about the battery icon anymore because you will list four methods to fix this problem so that you can go on with your everyday Windows 8.1, 8, 7 usage.
In the start screen of Windows 8.1, 8, 7 you will need to left click on the “Desktop” icon to take to the desktop mode.
Left click on the small arrow you have in the lower right side of the screen that is pointing up.
Left click on the “Customize” button you have there.
Now you will have a list with options, look in there for the “Power” option.
Left click on the drop down menu next to “Power” and select the “Show icon and notification” option.
Left click on the “OK” button you have in the lower side of the screen.
Reboot the Windows 8.1, 8, 7device and check if your battery icon shows up now.
2. Uninstall Microsoft AC adapter
Press and hold the buttons “Windows” and “R”.
After the Run window pops up you need to type in there “devmgmt.msc” and press the “Enter” button on the keyboard.
In the window that opens up you will have on the left an option that says “Batteries”. Left click on that option.
In the “Batteries” list you will be presented with a “Microsoft AC adapter” icon.
Left click on the “Microsoft AC Adapter” icon and choose the “Uninstall” feature.
You will get a pop up message where you will need to left click on “ OK”.
Left click on the “Action” tab you have in the upper side of the “Device manager” window.
Left click on the “Scan for hardware changes” option presented in the “Action” menu.
Reboot the Windows 8 device and see if after the startup your battery icon shows up.
3. Use SFC scan
In the menu presented in the start screen you will need to type “cmd”.
After your Windows 8.1, 8, 7 system finds the “cmd” icon you will need to left click on it and select “Run as administrator” feature.
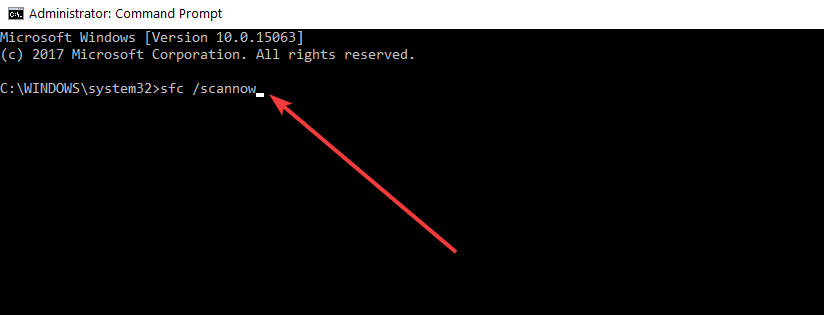
In the “Command Prompt” window you need to type “sfc /scannow” and press the “Enter” button on the keyboard.
After the verification is completed you will need to reboot the Windows 8.1, 8, 7 system and check again for the battery icon.
4. Refresh your PC
NOTE
Do this only if the three methods above did not work for you.
Move the mouse cursor to the lower right side of the screen.
Left click on the”Settings” icon you have in that menu.
In the “Settings” feature left click on “Change PC settings”.
In the “PC settings” feature left click on the “General” tab.
Left click on “Refresh your PC without affecting your files” and left click on the “Get started” button under that topic. Note: this feature will uninstall any apps you installed after the installation of the Windows 8.1, 8, 7 system but you will be able to see a list of the apps that were uninstalled on the desktop and copy them again to your system afterwards.
Left click on the “Next” button to proceed.
After the process is finished you will have to press on the “Refresh” button.
After the process is complete check to see if you have your battery icon back to your system tray.
If it doesn’t show try another reboot of the Windows 8.1, 8, 7 PC.
It is worth mentioning that even the latest Windows OS version, Windows 10, is affected by similar issues. Indeed, Microsoft has yet to permanently fix this missing battery icon problem. So, if you already upgraded to Windows 10, and your battery icon is nowhere to be seen, check out this troubleshooting guide and follow the instructions available there to fix it.
So, there you have it, these quick methods can help you bring back your battery icon in Windows 8.1, 8, 7 and carry on your work. For any questions or misunderstandings regarding this subject, drop us a line in the comments below.
It is always a safe bet to create a backup of your Windows 10, Windows 8.1, Windows 7 operating system just in case something goes wrong, and you would like to have your Windows OS back to the way it was.
For you to create a backup of your Windows 8.1 to your USB stick you will need to have a big enough USB to support everything you have on your Windows 8.1 system. But fortunately for us we only need approximately 6 GB of free space on our USB or less therefore we shouldn’t have any issues with this.
Another good feature in Windows 8.1 is the fact that it offers us the possibility to save directly to an external USB thus making the process a lot easier for us.
So if you used your internal hard drive to save the backup image of your Windows 8.1 operating system you can now transfer it to your USB stick and free up some space for other stuff. For a detailed explanation of how to backup Windows 8.1 to your USB follow the tutorial below.
How do I back up Windows 10 on USB?
1. Use the Create a recovery drive option
Click the Start button and type recovery drive.
Click on the Create a recovery driveicon.
You will need to check the box right next to Copy the recovery partition from the PC to the recovery drive.
Left click on Next button you have in the lower side of the window.
You will be presented on the Windows 10, 8.1 window with the necessary size needed on the USB.
If you have the necessary space needed for the recovery partition on the stick, then insert the USB stick.
Click on the USB drive to select it.
Click on the Next button in the lower side of the screen and select Create.
You will have to wait up to one hour depending on the transfer speed.
Hit the Finish button after the process is completed.
Remove the USB stick from your PC.
2. Use Control Panel
Launch Control Panel and go to System and Security.
Select Backup and Restore (Windows 7)
Create a system image
Now, select On a hard disk.
Select the storage device where you want to save the backup, then launch the backup process.
The wizard will now create a full system backup of your system.
Also, another thing you need to keep in mind is that if you upgraded to Windows 10, 8.1 from a previous Windows 8, 7 version you will need to upgrade again your system after you use the USB stick as a backup.
With this being said, you now have a workable backup copy of your Windows 10, 8.1, 7 system ready to use whenever you have any issues with your operating system. If you have any questions regarding this article, let us know in the comments below and we will reply in the shortest time possible.
Open Notepad and paste the following text: @echo off FOR /F "tokens=1,2*" %%V IN ('bcdedit') DO SET adminTest=%%V IF (%adminTest%)==(Access) goto noAdmin for /F "tokens=*" %%G in ('wevtutil.exe el') DO (call :do_clear "%%G") echo. echo Event Logs have been cleared! goto theEnd :do_clear echo clearing %1 wevtutil.exe cl %1 goto :eof :noAdmin echo You must run this script as an Administrator! echo. :theEnd
Save that text as .bat or .cmd file (Name the file with quotes to automatically save it as .cmd file, like ClearLog.cmd)
Run .cmd file you just saved as the administrator
Just let the command finish
That’s all, all your event logs are now cleared. This is probably the simplest way to clear all event logs in Windows 10, but if you want to try other ways, see how to do that below.
4. Use the PowerShell
Go to Search, type powershell, right-click on PowerShell and choose Run as administrator.
Enter the following line into PowerShell and press Enter: wevtutil el | Foreach-Object {wevtutil cl "$_"}
Now just type Exit to close PowerShell window.
If you decide to use PowerShell to clear event logs, you’ll clear multiple logs in a matter of seconds.
5. Use the sing VBScript/WMI
Open Notepad and enter the following text: strComputer = "." Set objWMIService = GetObject("winmgmts:" _ & "{impersonationLevel=impersonate, (Backup, Security)}!" _ & strComputer & "rootcimv2") Set colLogFiles = objWMIService.ExecQuery _ ("Select * from Win32_NTEventLogFile") For each objLogfile in colLogFiles objLogFile.ClearEventLog() Next
Save it as VBScript (.VBS), take a look at method 1 on how to save file as .vbs directly, name it, for example ClearEvent.vbs
Move ClearEvent.vbs you just created to C:\Windows\System32
Now open Command Prompt as administrator and run the following command: CScript ClearEvent.vbs
As you can see, these are just a couple of methods to remove logs on your PC.
If you’re looking for more powerful software, check our guide on the best event viewer software.
What method do you use to clear the event logs? Share it with us in the comments below.
The File History feature will back up your operating system files if you ever have any trouble. But for many users, File History in Windows 10 is not working.
The problem arises both on Windows 10 and 11 and is often accompanied by the error message, Could not enable File History. The service cannot be started. If you are also facing this problem, keep reading to find solutions.
How do I turn on file history in Windows 10?
Tip
File history will not work immediately when you install Windows 10 because its default setup is set automatically to off state. Besides, you will need an external USB or a network drive to enable to feature.
1. Select where you want the backups to be saved
Plug in the external hard drive or the USB stick in the device.
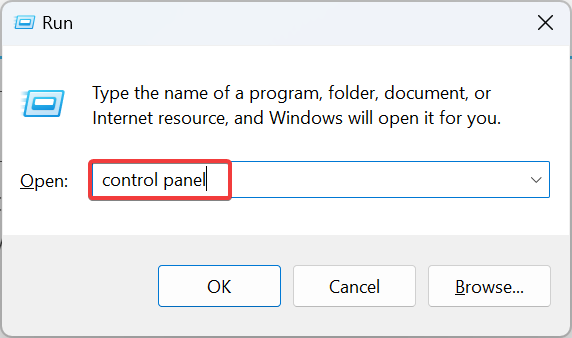
Press Windows + R to open Run, type control panel, and hit Enter.
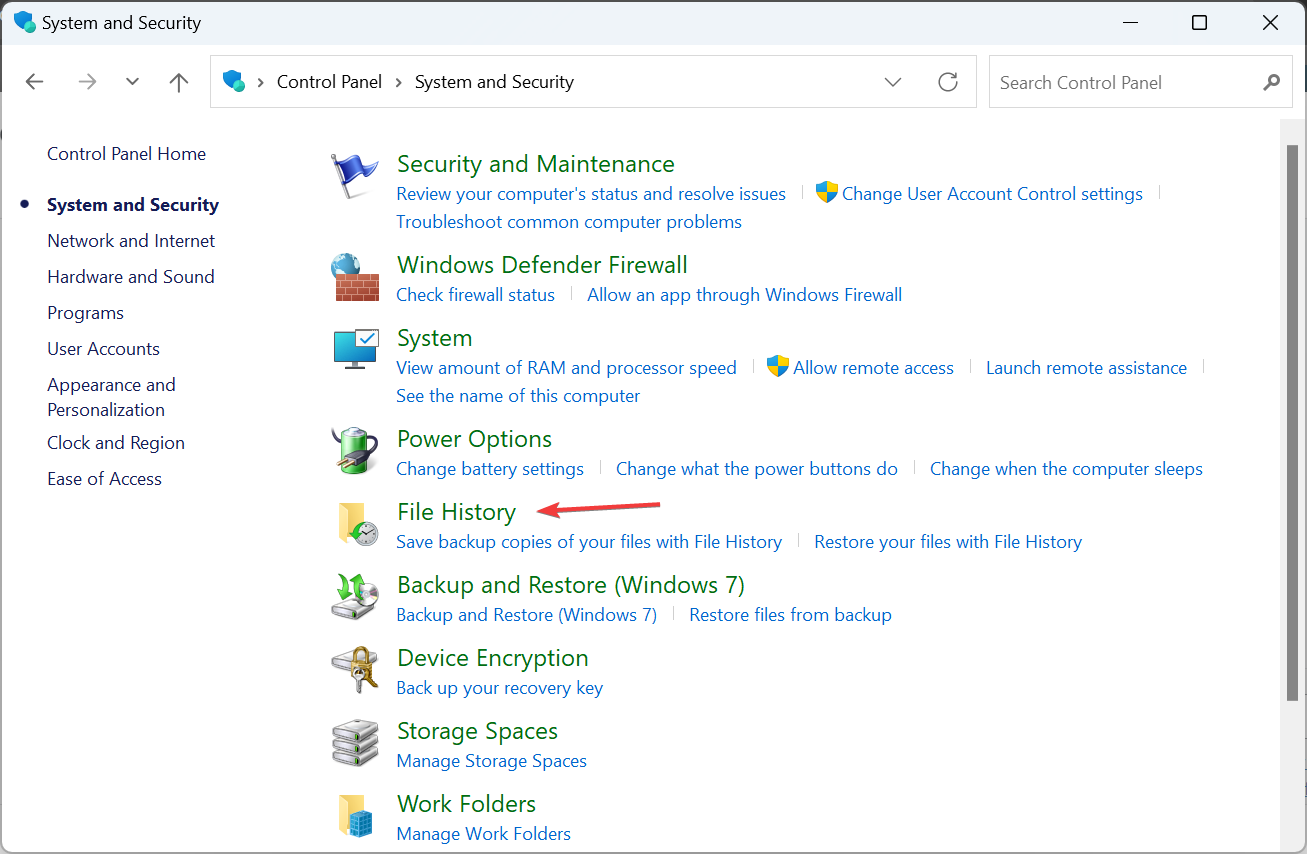
Click on System and Security.
Now, click on File History.
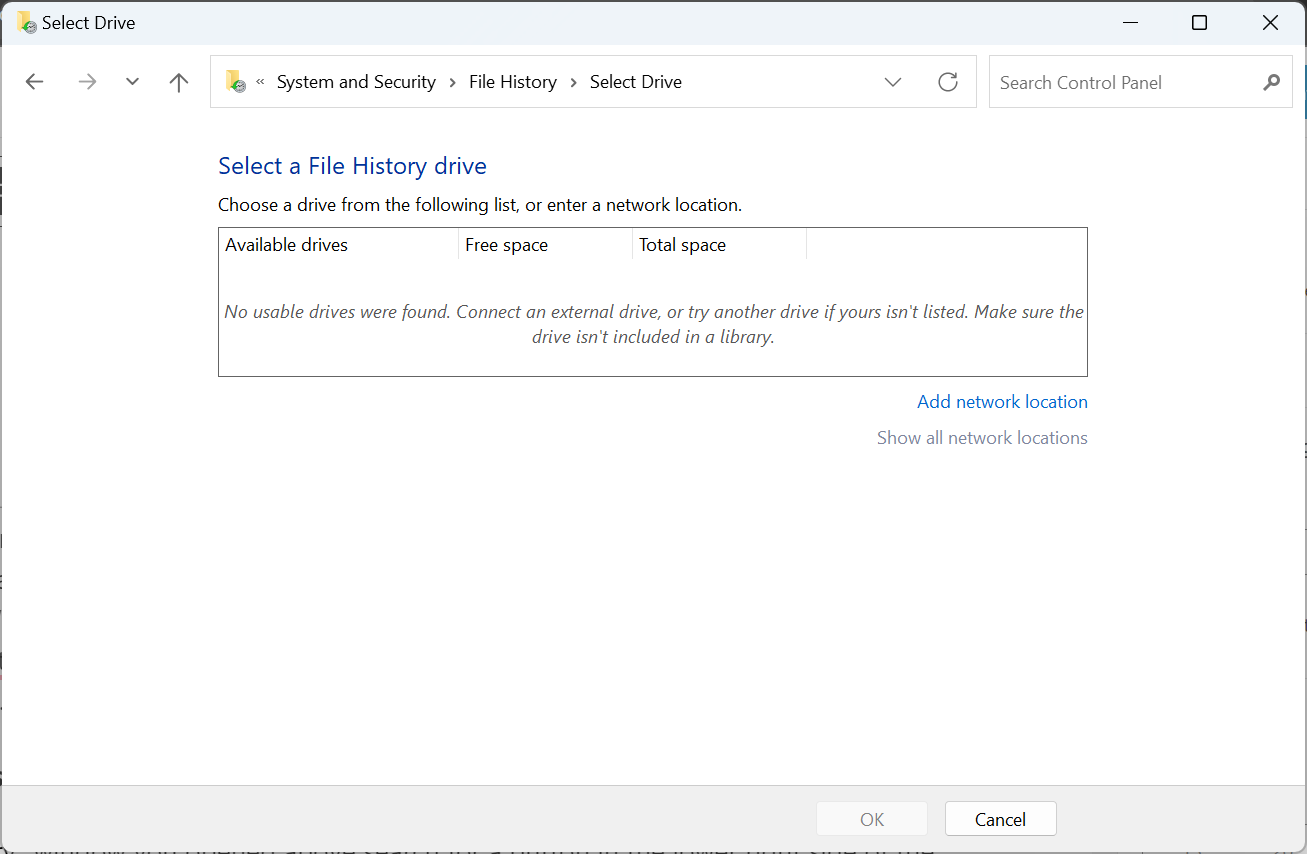
Click on Select Drive in the navigation pane on the left.
Select the external hard disk or the USB stick that is plugged into the Windows 10 PC, and click OK.
Click Yes in case a confirmation prompt appears.
Once you have set up the drive, be it an external one or a network drive, all that’s left is to enable the feature when file history is not working in Windows 10.
2. Turn the file history feature on
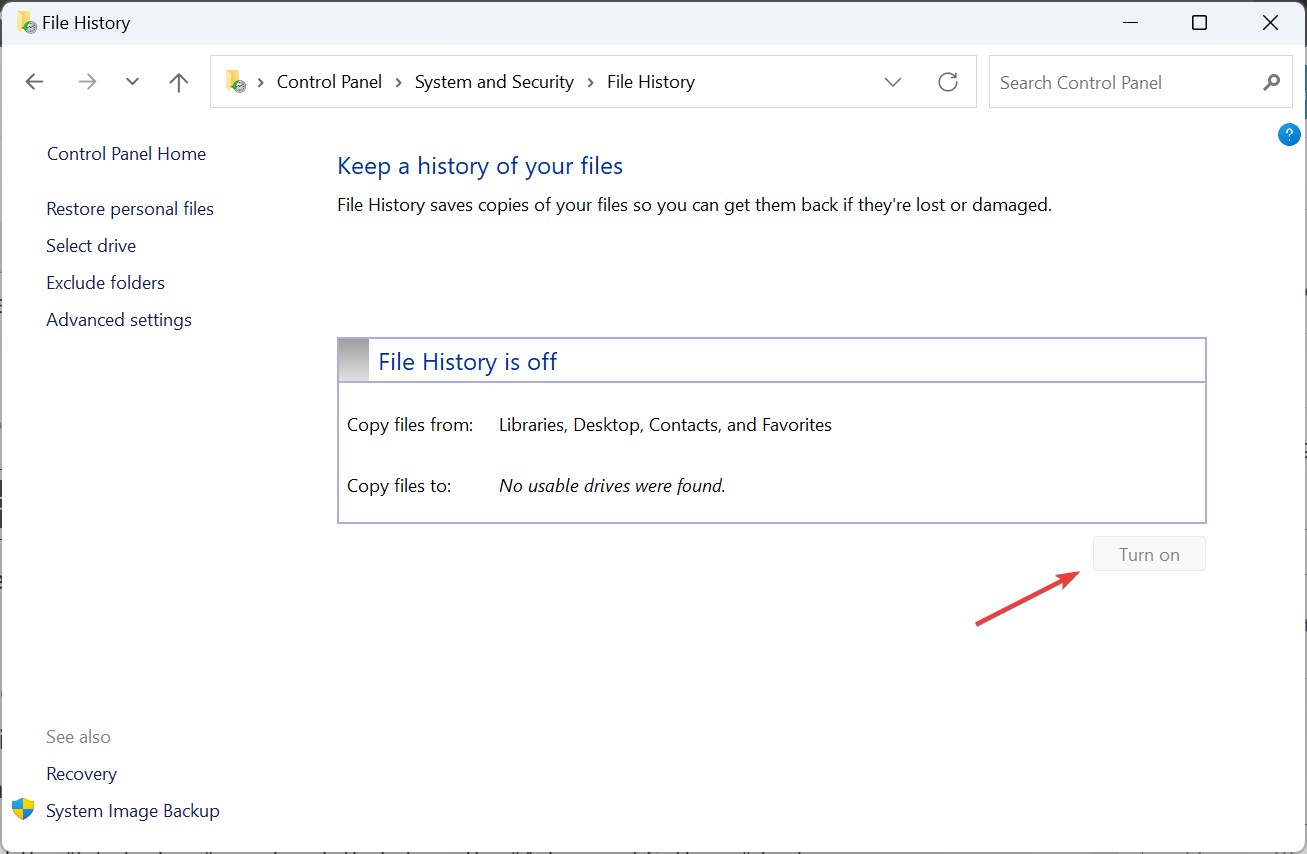
Head back to File History in Control Panel.
Click the Turn on button.
That’s it! If Windows file history backup is not working, adding another USB drive or correctly configuring the first one should get things up and running in Windows 10. In case the error persists, we recommend using a restore point or performing an in-place upgrade.
You can have a stable ISP connection for the Wi-Fi and still occasionally have issues with your Wi-Fi disconnecting. In 80% of the cases, this will be caused by upgrading to Windows 10 or 11. Fortunately for users, a few easy steps will help you fix your WiFi and continue surfing the Internet without any problem from your operating system.
In many cases, you will lose your Internet WiFi connection because you have incompatibilities between the Windows 11, 10, or 7 operating system and the Wi-Fi driver, or your Bluetooth driver is interfering with the Wi-Fi connection, thus making your connection very unstable and unreliable.
Follow the tutorial below for a more detailed explanation of fixing our Wi-Fi connection in just a few minutes.
What can I do if Wi-Fi disconnects frequently on Windows 11, 10, 7?
1. Disable Bluetooth and Network Adapters
Press and hold the buttons “Windows” and “R”.
Type in the box that pops up the word in quotes: “devmgmt.msc”.
Under the topic “Bluetooth” you will need to disable everything you have there.
Under the topic “Network Adapter” you will have to disable all the entries except the one for the Wireless adapter you have.
Reboot the Windows PC or laptop.
See if you have a stable Wi-Fi connection after the restart.
2. Update your Wi-Fi drivers
You will have to look on the manufacturer’s website to see if you have any available WiFi drivers that are compatible with your OS. After Windows 11 was released, most of the manufacturers released new WiFi drivers that are fully compatible with your OS version.
Install the drivers available on the website and reboot your Windows PC. After you restart it, check if WiFi still disconnects frequently. Updating the driver also helps when the Internet keeps disconnecting while gaming.
Alternatively, you can fix the Wi-Fi driver issue more efficiently and faster using dedicated driver update software.
By choosing this alternative, it’s likely to update your drivers accordingly without harming your system even more. The process is automatic, and it finds the appropriate drivers in minutes.
Then, you should have renewed drivers that help your connection to be more stable, so try this method to get it done already.
Suppose the options listed above do not work. In that case, we will uninstall the current driver for the WiFi adapter and let Windows install it automatically after a reboot.
Press and hold the buttons “Windows” and “R”
Type in the box that appeared in the new window “devmgmt.msc” to launch Device Manager
Click(left click) on “Network adapters”
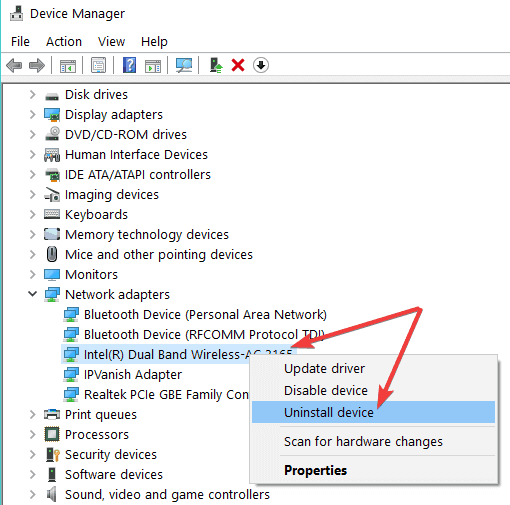
On all the wi fi adapters, you have there you need to click( right click) on them and select the “Uninstall” feature.
Reboot your Windows PC or laptop.
After the reboot, the installation of the Wi-Fi drivers will begin automatically.
Check and see if your Wi-Fi still disconnects after you reboot your machine.
Press and hold the buttons “Windows” and “R” to launch a new Run window
Type ‘control panel’ in the new window and hit Enter to open Control Panel > type ‘power’ in the search menu located in the upper right-hand corner
Click (left click) on “Power options” situated in the Control panel window.
Click (left click) on “Change Plan Settings”.
Click (left click) on “Change Advanced Power Settings”
Click (left click) on “Wireless Adapter Settings”
Click (left click) on “Power Saving Mode”
You have there a feature that says “Plugged in”, you will have to change this to “Maximum Performance” feature.
Reboot the Windows PC and check if the wi fi works now.
5. Disable ‘Allow this computer to turn off this device to save power
Press and hold the buttons “Windows” and “R”.
Type in the box that appeared “ncpa.cpl”
You will have to click(right click) on the wi fi connection you have there and select “Properties”
Click(left click) on “Configure”
In the upper side of the new window you will have to click(left click) on the “Power Management” tab.
From the “Power Management” tab, you will need to uncheck the feature that says “Allow this computer to turn off this device to save power”
Click(left click) on “OK”
Reboot the Windows PC and check your Wi-Fi connection now.
6. Restart Wi-Fi AutoConfig
If the problem persists, you can try to restart and then reset the Wi-Fi AutoConfig service. Here’s how you can do this:
Go to Start > type services.msc > hit Enter to launch Services. You can also launch a Run window, type services.msc and then hit Enter to launch Services.
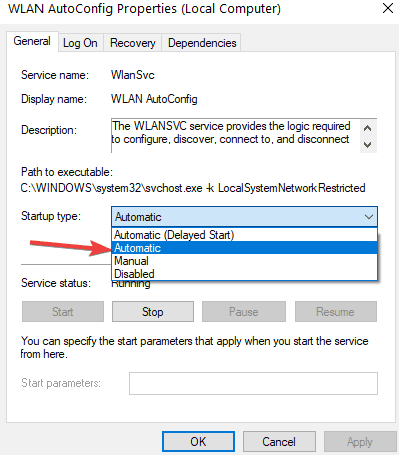
Locate the WLAN AutoConfig service > double-click on it
Select Restart to refresh the service
Now, right-click again on WLAN AutoConfig > select Properties
Go to Startup type > select Automatic >hit Apply and OK
Check to see if your Wi-Fi connection is working as it should.
You can use all the options listed above to fix your Wi-Fi internet connection. In the majority of the cases, applying one of the options above will solve the problem. However, do leave us a comment below to let us know if your Wi-Fi still keeps disconnecting.
Microsoft’s Major Nelson today has announced that the July Xbox Update is now rolling out to users across the world. This update was previously tested with Xbox Insiders last month and comes with FastStart on select games, the Groups feature in Games and Apps, and more. Here’s what you need to know before installing on your Xbox One device.
FastStart
Originally announced at E3, FastStart is a feature which allows you to quickly start playing the games you’ve just downloaded. The feature is only available on select Xbox Game Pass titles on the Xbox Store and is powered by machine learning. FastStart prioritizes the files in games which need to be downloaded first, Microsoft says you can expect for FastStart to expand to more games in more languages over the next few months.
Groups
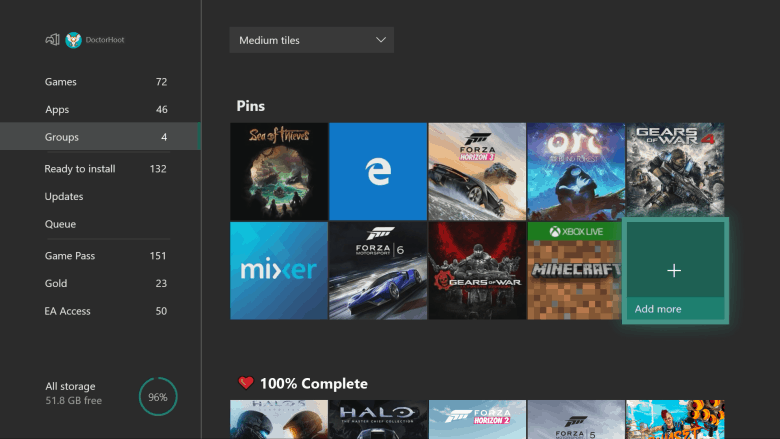
Groups is an enhancement to Xbox’s Pins feature that allows you to create different collections of any of the items under Games and Apps. You can assign names, organize and order the items in Groups, and you can sync them with your Microsoft Account across all your Xbox Consoles. Your groups will appear under My Games and Apps, in Home, and in the Guide.
Search
With the July Update, Microsoft is making it easier to search on your Xbox. You can now press the Y button anywhere on the dashboard to bring up the search box and look for Settings, Games, or products in the store.
Mixer improvements
Microsoft is making multiple improvements for Mixer in the July Update. They’ve updated the Mixer Share controller option on the web, added multi-touch support for Mixer Share on touch devices, and added a channel leaderboard for viewers who’ve contributed to a channel during Share Controller sessions.
Additionally, Mixer streamers can now go full-screen with their webcam when broadcasting. This mode will automatically mute audio in the game, and best works with the webcams seen below:
Microsoft LifeCam Studio
Logitech HD Pro Webcam C922
Logitech Webcam C930e
Microsoft LifeCam HD-3000
This update may not be as major as others from the past, but the arrival of Groups and FastStart is very appreciated. Skip Ahead Xbox Insiders, meanwhile, are now on the Redstone 5 builds, so the development of the next version of the Xbox OS is already underway.
If your Xbox is set to automatically receive updates, it should be downloading now. In the event that you’ve set your Xbox to manually download updates, you can head to Settings > All Settings > System > Updates > Update console to download now.
For many industry observers, the world of virtual and augmented reality has seemingly hit a ceiling in public awareness and relevancy. Despite the fervor of action companies such as Valve, HTC, Facebook, Google, and Microsoft, VR and AR outwardly appear to be for niche audiences.
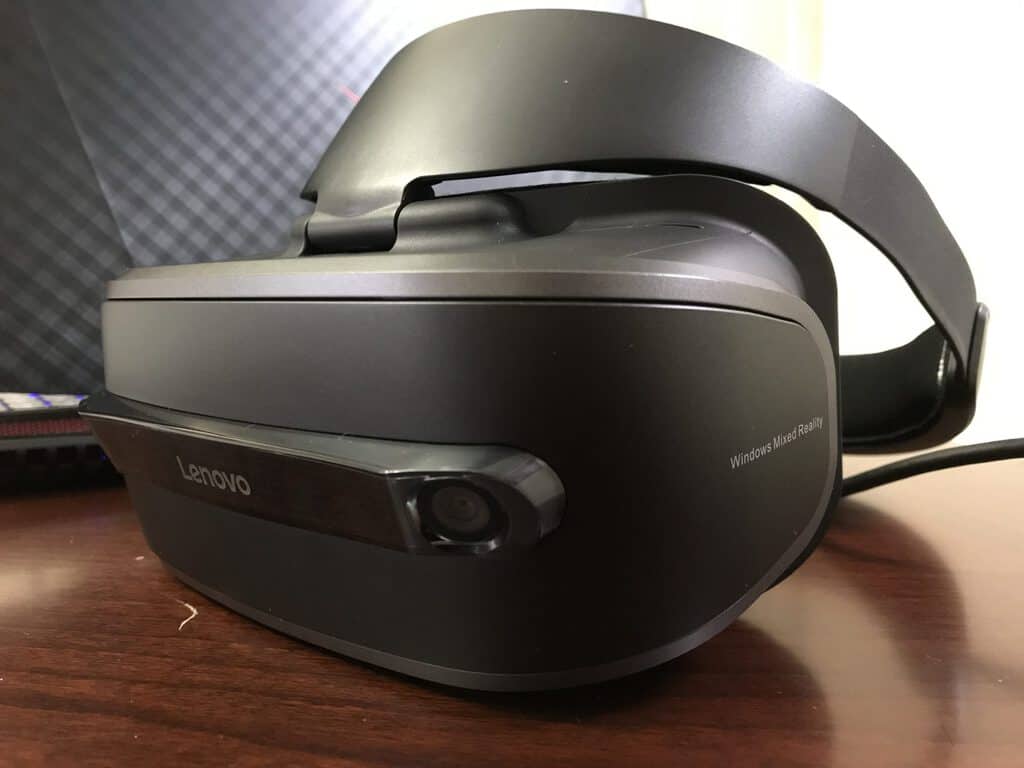
Fortunately, for Microsoft, that niche audience seems to be using its licensed operating systems as the foundation for those “Mixed Reality” experiences according to the latest Steam Hardware Survey.
The numbers as of June 2018 show that SteamsVR experiences, powered by Windows 10 have hit their second highest monthly market share at 6.25 percent which is an increase over its previous month of 5.89 percent.
Recently, partner OEM’s of Microsoft’s Mixed Reality platform went on a price slashing foray which may part of the reason the company saw a bump in market share. This also might also be part of why it’s competitors such as HTC’s Vive platform saw a decrease in the month of June 2018. While Steam’s numbers are somewhat biased in their conclusions, it’s hard not to draw a one-to-one conclusion of lower-priced PC powered VR experiences helped push the needle for Microsoft and partners.
VR and AR still haven’t taken off in any significant mainstream way, but PC partners continue to make the platforms more accessible by packing laptops and headsets to the brim with graphics upgrades. There may be a day in the not too distant future where trying one of these experiences is as easy as downloading an app on your PC and plugging in a set of headphones (metaphorically speaking).
Sets is Microsoft’s feature that brings tabs all across Windows 10, and the tech giant announced that the function wouldn’t get to be launched with the next OS update. The news disappointed lots of users and Microsoft did not say much about the reasons for which it took this decision.
The users’ disappointment is even greater because Sets was already a part of preview builds of Windows 10 Redstone 5, and no one could tell that there’s something wrong with the way it worked.
Sets actually causes compatibility issues
The features worked great only at first glance, because if you took a closer look at it, you would find out that it could trigger some compatibility issues that would eventually ruin some functionalities in third-party apps.
For instance, Reddit apps are just one example, and the removal of the Sets feature from Windows 10 Redstone 5 build returns everything to normal and working correctly after previously being quite unstable.
Third-party app developers agree with Microsoft’s decision
Third-party app developers agreed with this decision that Microsoft took to pull Sets, and their reason was that the apps were sometimes not working as they should due to the tab implementation.
A developer, Jose Fajardo, tweeted “damnit … upgraded to 17661 and “SeparateProcess” WebView in my XAML UWP app is broken 🙁 🙁 Does anyone know if there’s a capability/declaration that needs to be set to get this working again?” and then flaunted his happened on Twitter after finding out the cause of the problem.
wohooo! 17704 reverted “sets” which i suspected was the reason running a “Webview” in a “separateprocess” was broken !!! And now everything works again!! Ahh “sets” you were SO buggy, you were nice, but such a pain for devs !! — Jose Fajardo (@josefajardo) June 28, 2018
It’s worth mentioning that Microsoft did not entirely kill the Sets feature, but it delayed its debut. It will not be packed in Redstone 5, but there’s a pretty strong chance that we’ll get to see it included in the update that’s due in the spring of 2019. We’re expecting to see Redstone 5 launched this fall.
Microsoft Surface owners got some good news as Microsoft decided it’s time to update their devices. Windows Update brings some new goodies, so users are advised to head over there and check them out. Microsoft recently rolled out a few driver and firmware updates for Surface devices running the Windows 10 April Update.
New Intel drivers
Users claim that it seems the updates include new Intel drivers and a new Surface system firmware update for the Surface Book 2. Reports also say that the very same updates rolled out to the Surface Pro and the Surface Laptop as well.
There are also some devices that haven’t been updated just yet, and these include the Surface Laptop, the Surface Book 2, and the Surface Pro. There aren’t any pages that document updates for these systems yet.
The updates might cause trouble with BitLocker
It seems that the latest update might have caused some BitLocker problems, but this could have only been an isolated issue. Many users reported that the latest firmware update for the Surface Book 2 locked them out of their devices with BitLocker. Some users claimed that this is the exact reason for which they haven’t activated BitLocker on their systems.
Some users also find it pretty strange that whenever Microsoft releases a new Windows version, the company also has to update the firmware in their own systems to fix the problems that have been triggered in the latest OS version, but we’re all used to this by now.
More changelogs are probably on their way and also more devices running Windows 10 April 2018 Update will likely receive updates rather sooner than later, and we’ll make sure you’ll find out when this happens.
Some time ago, we have shared with you some tips that you could follow in order to fix errors during the Windows 8.1 Update installation which failed for some with various error codes. Speaking of update errors, all Windows versions are affected by update issues, including Windows 10, the latest OS version. Microsoft already acknowledged one of these errors and has released an official fix for it – hallelujah!
Many have been hit with various errors during the install of the latest Windows 8.1 or Windows 10 Update or after it was already deployed, such as slowing down of the computer or the fact that it erases saved games. So, now, Microsoft has come up with a patch that’s been released via the Windows Update or available for download online in order to fix this error. Here’s how it is officially described:
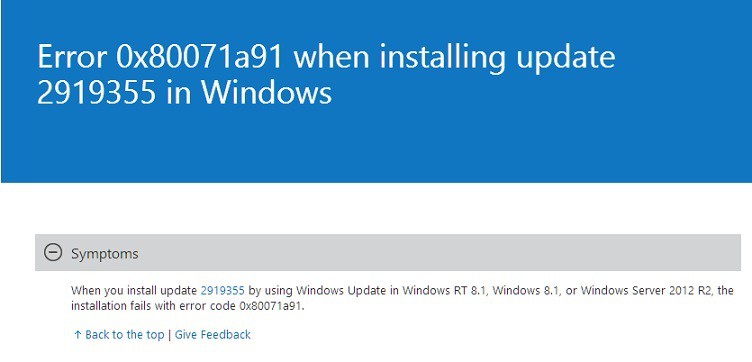
When you install update 2919355 by using Windows Update in Windows RT 8.1, Windows 8.1, or Windows Server 2012 R2, the installation fails with error code 0x80071a91.
Fix error 0x80071a91
1. Uninstall KB2919355
One of the fixes that seemed to work for those affected by various glitches during the install of the Windows 10, 8.1 Update was to uninstall the KB files and then try to perform a Clean Boot install. But the patch released by Microsoft doesn’t uninstall the update in cause – KB2919355, but just patches it so that errors will no longer appear and the system would run smooth. Besides Windows 8.1, Windows RT 8.1, Windows Server 2012 R2 Datacenter, Windows Server 2012 R2 Standard, Windows Server 2012 R2 Foundation, Windows Server 2012 R2 Essentials, Windows 8.1 Enterprise and Windows 10 are also affected by this bug.
2. Run the Windows Update Troubleshooter
Error 0x80071a91 usually occurs during or shortly after you installed the latest updates on your computer. Fortunately, Windows 10, Windows 8.1 features a built-in troubleshooter that can help you fix general update issues — and hopefully it will fix error 0x80071a91 as well.
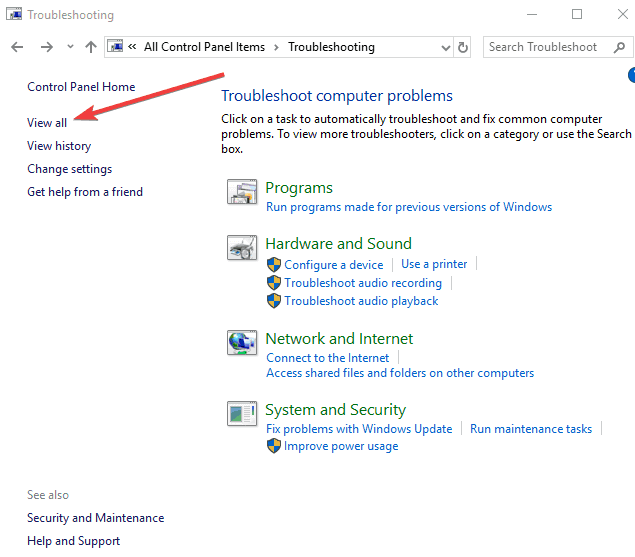
So, launch Control Panel > type ‘troubleshoot’ in the search box located in the upper right-hand corner
Click on View All to list all the troubleshooters
Select the Windows Update troubleshooter and run it
Wait until the process completes, restart your computer and check if the error persists.
After you have installed the patch, you will have to restart in order to see the changes take place. Let us know if this has helped you fix the problems, if not, detail in the comment your issue and we’ll try to solve it together.
The last Far Cry game released by Ubisoft is one of the top games played in 2014 but there are some bugs that need fixing with this game and its compatibility with the Windows 10, 8.1, 8 operating systems, fortunately for us we will be able to play this game in no time at all by following the guidelines posted a couple of rows below in order to fix the frequent issues appearing in Far Cry 3 for Windows 10, 8.1, 8.
There are a few glitches in the compatibility part of Far Cry on Windows 8 due to the fact that the Direct X is not responding correctly, Steam is not responding correctly, Windows 10, 8.1, 8 will encounter incompatibilities with Far Cry or maybe the drivers you are using on your system are outdated and needs updating.
How to fix Far Cry crashing (Windows fixes)
If Far Cry stops responding or crashes randomly:
You need to be sure that Windows 8.1 or 8 has all the specific system requirements needed to play Far Cry.
If the graphics driver you have in your Windows 8, 8.1 needs updating. We recommend you use a driver updater tool that will do all the hard work for you automatically. Using a dedicated tool, you will avoid serious malfunctions.
When opening Far Cry your Antivirus might prevent it from running, to check if this is the case you will need to turn off the antivirus and try opening it again.
When Windows 8 tries to change the visual theme and crashes :
Go to your Far Cry installation folder.
Click (right-click) on the Far Cry .exe .
Click (left click) on “Properties”.
Click(left click) on the “Compatibility” tab on the upper side of the “Properties” window.
Make sure you have the Windows XP SP3 Compatibility mode on.
Mark the “Disable Visual Themes”.
Place a checkmark in the “Disable Desktop Composition”.
Open the game and see if it crashes.
For the “DX11 Crash Error” do the steps below:
Open the folder “C:Users/(open your username)/Documents/My games/Far Cry”.
Click(right click) on “GamerProfile.xml” and select “Open With” and open it with Notepad.
Search for the string that says “D3D11MultithreadedRendering”.
Set this string above to “0”, this will disable the feature.
After you set it to “0” it will look like “D3D11MultithreadedRendering=”0″”.
Click (left click) on “ File” in the upper side of the Notepad and click(left click) on “Save”.
Close Notepad and start Far Cry.
Windows Runtime error will crash your Far Cry game:
In order to fix this issue, you will need to install the following in the order presented below.
Directx9c, Microsoft Visual C++ 2010 x86, Microsoft Visual C++ 2010 x64, Microsoft Visual C++ 2010 SP1 x86/64, (Win7/Vista) Microsoft .NET Framework 3.5 Service Pack 1 / (Win8)Microsoft .NET , Framework 3.5 on Windows 8, Microsoft .NET Framework 4.0, Microsoft .NET Framework 4.5.
If you are asked in the process to repair any files do so as it will fix any runtime files you have in the system.
“Exception Code: c0000005″ Crash Error in Far Cry:
Disable any Direct X hooking software before opening the game.
Usually the Direct X hooking programs are one of the following: Fraps, Evolve Client, Gamer OSD, ASUS Smart Doctor, Gigabyte OC Guru I & II, Steam Overlay.
Far Cry error “Ubisoft Game Launcher was not found. Please try re-installing the game. Error code: 3”:
If you are a UPlay user, reinstall it from the official Uplay download site.
If you are a Steam user, check the integrity of your game cache of the Steam (this will download any corrupted or missing game files).
FarCry 3 crashes in Windows 10: what to do?
For some incompatibility reasons, Far Cry 3 can crash in Windows 10. In this case, there are other solutions to check as the problems start from a different source.
First of all, try to uninstall the game, and reinstall it in compatibility mode by following the steps below:
1. Right-click on the ‘Setup’ file then click on ‘Properties’ 2. Select the ‘Compatibility’ tab 3. Check the ‘Run this program in Compatibility mode’ option 4. Once the game is installed check its functionality
If this doesn’t work, try some basic but important things to do:
Check if you have all the Windows Updates installed
Disable any programs or overlays that could interfere with Far Cry 3
Make sure that DirectX runtimes, Uplay and/or Visual C++ runtimes are installed and working
Last but not least, checking for the latest GPU drivers which are compatible with Windows 10 might fix this issue. Game-ready drivers are game accelerators that provide new features, repair issues and improve gaming performance.
NVIDIA GeForce Game Ready drivers, AMD Radeon Software Adrenaline Edition drivers, and Intel Graphics drivers are examples of common game-ready drivers.
You can manually update or install those drivers if you have a thorough understanding of the drivers your PC requires. Even so, we strongly recommend a driver updater utility that is the best alternative, to avoid any further issues.
You can trust Fortect Driver Updater is capable of making such changes to ensure a proper update with the most recent game-ready drivers. It will find the suitable drivers your computer requires and will update or install them quickly.
There you go, the most common errors you might have playing your Far Cry game on Windows 10, 8.1, and 8. Also for any additional information write us below and we will see how we can help you play this game to the maximum fun you want.
If you upgraded to Windows 10 or Windows 8.1 and your Bluetooth mouse failed to connect after the upgrade then read below this article to find out more on how to connect your Bluetooth mouse on Windows 10, 8.1. Your Bluetooth might fail to connect for several reasons on your Windows 10 and 8.1 but don’t worry because we are going to solve this issue by doing a few easy steps below.
First of all before we start the troubleshooting in Windows 10 and 8.1 we will need to check the batteries of the mouse or any other Bluetooth device because if the batteries don’t have the sufficient power then your Windows 8 PC or laptop will fail to receive the transmission of the mouse , therefore, failing to connect to your Bluetooth feature.
How to solve connection issues with Bluetooth mouse on Windows 10 and Windows 8.1
1. Use Bluetooth Support Service
Press and hold the buttons “Windows” and “R”.
Now that you have the “Run” window opened we need to type in the search box “services.msc” (type the word without the quotes).
After you finished typing hit the “Enter” on the keyboard.
Now a “Services” window will pop up, we need to look in the list presented for “Bluetooth Support Service”.
Double click (left click) on “Bluetooth Support Service” after you find it.
Click (left click) on the “General” tab presented in the upper side of the window you opened (Bluetooth Support Service Properties).
In the “General” tab click on the menu next to “Startup type” and click(left click) on “Automatic”
Now we need to click (left click) on the “Log on” tab in the upper side of the Bluetooth window.
Click (left click) on “This Account” in order to enable this feature.
Type in there your account name or browse to find the account name.
After the above step we need to delete the “Password” field and the “Confirm Password” field.
Click(left click) on “OK” in the lower side of the Bluetooth window.
Reboot the Windows 10, 8.1 PC or laptop.
After the PC or laptop boots up we need to install the latest Bluetoothdrivers available on the manufacturer’s website for Windows 10 or Windows 8.1.
2. Bluetooth drivers not found
If the above steps don’t solve your Bluetooth mouse issue then we will need to do the steps presented below:
There might be a possibility that you wont find the Bluetoothdrivers for Windows 10 or Windows 8.1 .
Press and hold the buttons “Windows” and “R” .
After you have the “Run” window opened we need to type in there “regedit”.
Hit the “Enter” button on the keyboard.
Now that the “Registry Editor” window is opened we need to click (left click) on “HKEY_LOCAL_MACHINE”.
In the “HKEY_LOCAL_MACHINE” folder we need to click (left click) on “SOFTWARE”.
In the “SOFTWARE” folder we need to click (left click) on “Microsoft”.
In the “Microsoft” folder we need to click (left click) on “Windows NT”.
In the “Windows NT” folder we need to click (left click) on “CurrentVersion”.
Note: the path should look like this “HKEY_LOCAL_MACHINE/SOFTWARE/Microsoft/Windows NT/CurrentVersion”
In the “CurrentVersion” folder we will need to look on the right side for the file “CurrentVersion” and double click (left click) on it.
After the “Edit String” window pops up we need to modify the value in there from “6.3” to “6.2”.
Click (left click) on “OK”.
Reboot the Windows 10, 8.1 PC and check your Bluetooth mouse to see if it works.
3. Bluetooth mouse not working in Windows 10, 8.1
If your Bluetooth mouse is simply not working, you can try some of the solutions from this fix article:
Change power and sleep settings
Check if Bluetooth service is running (just in case)
Restart the Bluetooth mouse
Change mouse frequency
Roll back your drivers
Change power management options
You will find how to do id step by step in the article mentioned above, and this will help you fix this annoying issue.
Above you have 2 ways on how to fix your Bluetooth transmission on Windows 10 or Windows 8.1 in order to recognize your mouse. Write us below if you have any questions regarding this article and we will see what we can do to help you further.
After introducing encrypted conversations a couple of months ago, Skype continues to play catch up with the most popular messaging apps out there. Indeed, the latest Skype preview build 8.26.76 brings support for read receipts, letting you see at a glance who read your latest messages.
We just rolled out read receipts for Skype Insiders in preview build 8.26.76 ???? We can’t wait to hear what you think! You can find more info on what's included in this build here: https://t.co/vsfNUFjReLpic.twitter.com/Q5YKOY0OUF
Microsoft says that this feature is available in 1:1 conversations and group chats with 20 or fewer people, and you’ll see your contacts’ avatar below your messages after they’ve been read, as seen below:
For now, read receipts will only work between Skype users running the latest Insider build. You can turn the feature on and off in settings, and Microsoft explained that read receipts will also be disabled when you switch to Invisible mode.
This latest preview build for Skype has started rolling out to Android 6+ and iOS 10+ devices, as well as the desktop client for Windows, Mac and Linux. You can’t officially download this version of Skype on the latest versions of Windows 10, unless you open this page in Internet Explorer and then run the installer in compatibility mode.
The Windows 10 app, Player for DVD’s, has been given a massive $39 discount which brings it down from its usual price of $44.99 to just $5.99.
Player for DVD’s is, as its name suggests, an app for playing DVDs on a Windows 10 PC. This app offers the usual controls one would expect from such an app and also supports playing movie files encoded in several formats. Here’s the app description.
It is easy to watch your favorite DVDs with Player for DVD’s! Player for DVD’s is a powerful DVD player that provides great quality sound and video and supports a wide range of formats! This app offers full playback control and various advanced features that allow you to play with subtitles, manage playlists, view the history of last played files, play in the shuffle mode, use the program in the background etc. You also can select audio tracks from videos, use double volume boost which will give you a splendid visual-audio experience. Player for DVD’s is a complete compatible media player and it supports popular formats including VOB, MKV, MPG, AVI, MOV, FLAC, ALAC, OGG, MP3 and that’s not all. The full list of supported formats you can find in app’s features. Use professional DVD player software and enjoy media playback! Install and try out now!
Do you watch DVDs on your Windows 10 device? Let us know what app you use in the comments below.
Steven Spielberg’s hit Sci-Fi film, Ready Player One, is now up in the Microsoft Store to buy and watch on Microsoft’s Xbox One consoles and other Windows 10 devices.
Ready Player One is available to buy in SD, HD, and UHD and comes with almost two hours of bonus content. As an extra bonus for American customers, anyone who buys it digitally in the Microsoft Store will also receive the Goro playable character for the Mortal Kombat X Xbox One video game.
The Goro bonus gift may seem like an unrelated extra but those who have seen the film will know that the character actually makes a (kind of) cameo in Ready Player One alongside characters from Street Fighter, Minecraft, Overwatch and numerous other video game franchises.
The UHD version of Ready Player One can be bought natively on an Xbox One S or Xbox One X console and via the film’s product page on the web version of the Microsoft Store here. Only the SD and HD versions will show as available on PC and the original Xbox One console.
Some Windows users have stumbled upon VGA issues. Either they get a black screen when booting the PC, or they can’t get into their desired games. So, what do you do when Windows 10 VGA is not working?
The problem often arises after changing the PC or laptop display settings. Keep in mind that some VGA adapters will not support every option we want to use on Windows 10. For example, the two-monitor setting scenario or even high-end games.
Keep reading to find out the solutions!
What can I do when Windows 10 VGA is not working?
Before we head to the slightly complex solutions, try these quick ones:
After you boot the laptop with the alternative display, undo the changes made to the graphics drivers and settings.
Press Windows + X and select Device Manager.
Expand the Display adapters entry, right-click on the problematic graphics adapter, and select Disable device.
Confirm the change, reboot the laptop, and see if you can use the graphics card properly.
If you have a laptop and cannot get into Windows 10 because you have nothing on the screen, the first thing you need to do is connect the laptop to an external display via an HDMI cable.
Then, disable the problematic graphics adapter and let Windows rely on the other one when the Windows 10 VGA is not working.
2. Run the Hardware and Devices troubleshooter
Press Windows + R to open Run, paste the following, and hit Enter:msdt.exe -id DeviceDiagnostic
Follow the on-screen instructions to run the troubleshooter and make the recommended changes.
Once done, restart the PC for the changes to apply.
This is how you can fix all VGA issues when it’s not working on Windows 10 and the latest iteration, i.e. Windows 11.
Microsoft recently confirmed Windows 10 is installed on more than 700 million devices. So, we would expect market data to also show a percentage increase in Windows 10’s user base share. The latest Netmarketshare data shows that Windows 10’s user base has almost increased to the 35% mark with its highest Netmarketshare percentage figure to date.
The Netmarketshare June 2018 figure for Window 10’s user base stands at 34.92%. That is Windows 10’s highest Netmarketshare percentage figure which highlights the platform’s user base continues to increase. Yet, the figure represents only a very slight user share increase for Windows 10 in 2018 as it stood at 34.29% in January. That amounts to a 0.63% increase in the platform’s user base during this year.
Windows 7 keeps its crown
Windows 7 remains ahead of Win 10 in Netmarketshare’s market data. Windows 7‘s user share also increased slightly to 43.03%. Furthermore, that figure also represents an increase in Win 7‘s user base during 2018 as the platform has climbed from 42.39 in January 2018 (an almost identical 0.64% percentage increase). Thus, Windows 10 is seemingly not making great inroads into 7’s user base at the moment.
However, StatCounter market share data for Windows paints a somewhat different picture. Win 10’s user base stands at 46.43% in StatsCounter’s chart data. Thus, StatCounter shows that Windows 10 has now eclipsed 7’s user base, which stands at 39.36% on its chart. There Windows 10 has climbed from 42.4% in January 2018, while 7 has dropped from 41.5%.
Mac OS X 10.13 (High Sierra), Windows 8.1 and XP are the third, fourth and fifth platforms on Netmarketshare’s Operating System Share chart. For an unsupported platform, XP retains a surprisingly high 3.96% market share. Windows 10’s user share has at least risen well above 8.1’s percentage figure, which has slumped to 4.89%. Mac OS X 10.13 is on the rise, and it has now overtaken both 8.1 and XP with a 5.36% market share.
So, Windows 10 still has a bit to do to eclipse Windows 7 in Netmarketshare’s OS share chart. Windows 7 still retains a large user base, and Mac OS X 10.13 might provide some more serious competition for Win 10 from Apple. However, with Microsoft releasing more exclusive software for Win 10 along with two big annual updates, it will probably eventually overtake Windows 7 on all the OS user base charts.
Upgraded your system to Windows 10, 8 recently? If you’re having issues printing after you upgraded to Windows 10, 8, then read this guide on how you can fix your printer and get it to work with the new Windows operating system.
First of all, we need to find out what drivers you have for your printer because usually and in most of the cases the drivers you have on the CD might not be compatible with the Windows 10, 8 operating system resulting in glitches like not letting you print pages. In this case, we need to go on the manufacturer’s website and look for a driver to the printer that is compatible with your new Windows 10, 8 operating system or just let your Windows 10, 8 find the drivers automatically.
Fix printer issues in Windows 10
We need to be aware that printing has changed along with the new Windows 8, Windows 10 upgrade. There are new methods of printing in Windows 8, 10 and they are a bit different from the old versions of Windows where you had to go click on the “File” menu and then select the files to print. Follow the suggestions listed below in order to properly connect your printer to your Windows computer and avoid printing errors.
1. How to print in Windows 10, 8
Open the app you want to print from.
Go to the context in the app you want to print from.
Open the charms bar by pressing and holding the button “Window” and the button “C”.
Click(left click) on the “Devices” icon after you opened the charms bar.
In the “Devices” window you can see a list of printers you can print to. Note: In some cases the app you are trying to print from doesn’t support printing. In this case unfortunately you will have no printers available in the “Devices” window.
All you need to do now is click (left click) on the printer you want to use for printing and a menu should appear (depending on the type of printer the menu will be a bit different).
Click (left click) on the button “Print” to start the printing.
2. How to print PDF files in Windows 10, 8
It seems that printing PDF files in Windows 10, 8 is not always an easy task, but don’t worry we have a solution for this issue as well.
One of the most reliable programs you can try to use to print PDF files in Windows 10, 8 is called CutePDF Writer. Download CutePDF Writer and install it on your PC to avoid printing errors and other issues.
After you finished installing the app, it will appear in your list of printers and you can go from there to print your PDF files.
Also Microsoft has created a better driver architecture for for Windows 10, 8 compared to the previous one, meaning that when you plug in your printer, your Windows 8, 10 PC will automatically detect it without having to install any new special drivers and you can go right to printing.
If you still can’t print PDF files, here are a few troubleshooting guides that you can use:
If you have connected your printer via USB, then make sure your USB cable is not plugged in any hub and is not longer than 1.5 meters. Basically, your USB cable must be directly plugged into your Windows 10, 8 PC or you might encounter some issues while using your printer to normal standards.
In Windows 10, 8 after you plug in the printer from a USB cable, it should automatically detect it and you should be able to start using it immediately.
Ethernet printer connections
Make sure you have the local network or public network setup correctly and connect your Ethernet cable to the router you are using. After you connect the printer to the network via Ethernet cable, Windows 8, 10 will detect it and install the necessary drivers automatically.
Wireless printer connections
Make sure your wireless network is setup properly in your home and your also have your wireless password for the printer. Again, as in the methods above, after you connect the printer to the wireless network, Windows 8, Windows 10 will detect it and will start installing the drivers needed.
So, there quick tips and tricks will help you avoid common print issues on Windows 10. We hope this quick tutorial helped you connect your printer to your Windows 10, 8.1 computer and you can now use the Print button without any issues.
If you recently updated your operating system to Windows 10 or Windows 8.1 for that matter, you might experience some sound issues on your PC. So, if you either want to listen to music or work on your PC, you still need your sound up and running.
Usually the sound on Windows 10, Windows 8.1 appears inactive if you have the sound icon in the lower right corner of the screen marked with an “X”. If you click on the sound icon, it will run the Windows 10, 8.1 troubleshooter but in this particular case it will not work. Another symptom you will find concerns the audio card. If the audio card is not working, when you go to Control Panel and look there for your card, it should show as unplugged.
Unfortunately, after checking your drivers in your Device Manager, the driver will be up to date but sound on Windows 10, 8.1 will not be working. After seeing that people using Windows 10, 8.1 encountered this exact issue, we have decided to compile this guide to help you fix this problem and prevent it from happening in the future.
Now, we will need to save this IDT Audio to our Download folder you have on Windows 10, 8.1
We need to open the “Control panel” in Windows 10, 8.1
In “Control Panel” we need to open “Device Manager”
In “Device Manager” we will need to open “Sound, Video and Game Controllers”.
In “Sound, Video and Game Controllers” you will have to look for “IDT HD Audio” or something that has IDT in the name.
Click (right click) the device with IDT in the name and select “Uninstall”
After doing this you will get a message telling you if you want to delete the current drivers, you will need to check the box that allows the removal of current driver (If you get no IDT entry keep doing the steps posted below).
After you have done the steps above shut down your Laptop.
Unplug the AC power adapter.
Remove the battery of the Windows 10, 8.1 Laptop.
Keep the power button of the Windows 10, 8.1 laptop pressed for approximately 40 seconds.
Put the batter back into the laptop.
Plug in the AC power adapter into your laptop.
Press a few times the “Esc” button when the laptop is starting.
Select F10 to enter BIOS settings.
After this, you need to press “F5” to “load defaults” option(if it is not F5 then read what it says on the lower side of the screen for what you need to press to load defaults).
Select “Yes” using the arrow keys on your keyboard and press “Enter”.
Press “F10” again and select from the arrow keys “Yes”.
Windows 10, 8.1 will load an audio driver but let it finish.
Open the download folder where you downloaded the IDT Audio.
Click (right click) on the IDT Audio installer and select from there “Run as administrator” in order for the installation to start correctly.
After the installation of the IDT Audio is completed, click (right click) on the speaker icon and select from there “Playback Devices”.
Click (left click) the “Speaker and Headphones” to select it and afterwards click (left click) the “Set Default” button on your screen.
Now all you have to do is check the volume you have set in Windows 8.1 from the speaker icon in the lower right side of the screen and raise it a bit so you can check if it works.
Run a music video for example and see if you have your sound back.
2. Run the built-in sound troubleshooters
You can quickly fix sound issues on your computer by running the built-in audio troubleshooters. There are three main Windows 10 sound troubleshooters that you can run: Playing Audio, Recording Audio, and Hardware and Devices (if your speaker can’t play any sounds).
Go to Settings > Update & Security > Troubleshoot > run the three troubleshooters mentioned above.
3. Additional solutions for fixing audio bugs
WindowsReport has already published a series of troubleshooting solutions allowing to fix various audio problems on your Windows 10 computer:
These steps will help you fix your audio issue on Windows 10, 8.1, but keep in mind that this will not solve any issues related directly to your hardware sound card or your sound system. These solutions will solve the specific Windows 10, 8.1 audio problems after updating.
For any thoughts on the audio sound not working in Windows 10, 8.1, use the comment section below and we will help you with additional troubleshooting solutions.
Taking a long time to open apps in Windows 10, Windows 8 can be caused by different reasons. In any case, this is very frustrating if you use your Windows 10, 8 PC for working purposes or even if you want to spend your free time in front of the PC.
There are a lot of reasons why a program takes forever to open on a Windows 10, 8 operating systems. Some of the reasons as why this is happening is that you might have a virus, your antivirus is eating up a lot of memory if you leave it open in the background. Or maybe you have an app that is not fully compatible with your Windows 10, 8 system and it slows down your PC’s response time for everything else you do on the PC.
We will list a few methods below and how you how you can troubleshoot your Windows 10, 8 PC and find out what is causing your apps to load so slowly.
1. Check the system requirements
The first thing we need to check is if we upgraded to Windows 10, 8 without reading the proper hardware specs requirements necessary to smoothly run this version. Check your Windows 10, 8 CD and make sure that you meet the necessary hardware requirements for Windows 10, 8 such as the memory RAM needed, the amount of free space on the hard drive and the processor required to run this version of Windows.
If he necessary system requirements are met yet your computer is slow to open programs, go to the next solution.
2. Scan your system for malware
Run an full system check with your antivirus. One of the reasons for this issue is that your PC might be infected with a virus that slows your Windows 10, 8 PC response time.
You can use Windows Defender to scan your system or you can install a third-party antivirus solution. For more information about the best antivirus tools to install on your computer, check out the guides listed below:
Close your antivirus for the duration of the check and see if your programs respond better. Leaving your antivirus ON might eat up a lot of memory from your PC and prevent your programs from opening as they should.
4. Perform a Clean Boot
We will run a Clean Boot to see if there are any programs that are having conflicts with your Windows 10, 8 operating system.
Here’s how to clean boot your Windows 8.1 computer:
Move the mouse cursor to the right side of the screen and click (left click) on the search box
Type in the search box “msconfig” and hit “Enter”.
Now the “System Configuration” window is opened.Click (left click) on the “General” tab in the upper side of the window.
Click (left click) in the “General” tab on “Selective Startup” and be sure to uncheck “Load startup items”.
Make sure the “Load system services” and “Use original boot configuration” are checked.
Click(left click) on “Services” tab.
Place a checkmark in the “Hide all Microsoft services” situated in the lower side of the screen.
Click(left click) on “Disable All”.
Click (left click) on “Apply” and reboot the Windows 8 PC.
Here’s how to clean boot your Windows 10 computer:
Go to Start > type msconfig > hit Enter
Go to System Configuration > click on the Services tab > check the Hide all Microsoft services check box > click Disable all.
Go to the Startup tab > Open Task Manager.
Select each startup item > click Disable > close Task Manager > restart the computer.
If your programs still take a long time to open, then undo the changes mad and reboot the computer again.
5. Update your apps and programs
Make sure that the programs you are trying to open are up to date and compatible with the Windows 10, 8 operating systems. Some programs only work on Windows 7 ,for example, and if you are trying to use them in Windows 10, 8 they might not work as they should.
If only one app is causing you the problem, try to reinstall it and check if it is still loading slowly. You can use the Control Panel to repair or reinstall the apps that are not running as smoothly as they should.
Go to Start > type ‘control panel‘ > double click on the first result
Click on Programs > select Programs and Features
Select the problematic app in the list of app > right click on it to enable the context menu and select Repair or Uninstall.
Restart your computer and reinstall the respective program.
7. Install a PC optimizer tool
If the issue persists and programs are taking a long time to open in Windows 10, you can also install a PC optimizer software. This category of software solutions quickly scan, repair and optimize your system. For more information about PC optimization software, check out the guides listed below:
So, these are the steps to follow in order to fix your programs and make them run a bit faster. For any thoughts or opinions on this subject, you can drop us a comment in the comment section below.