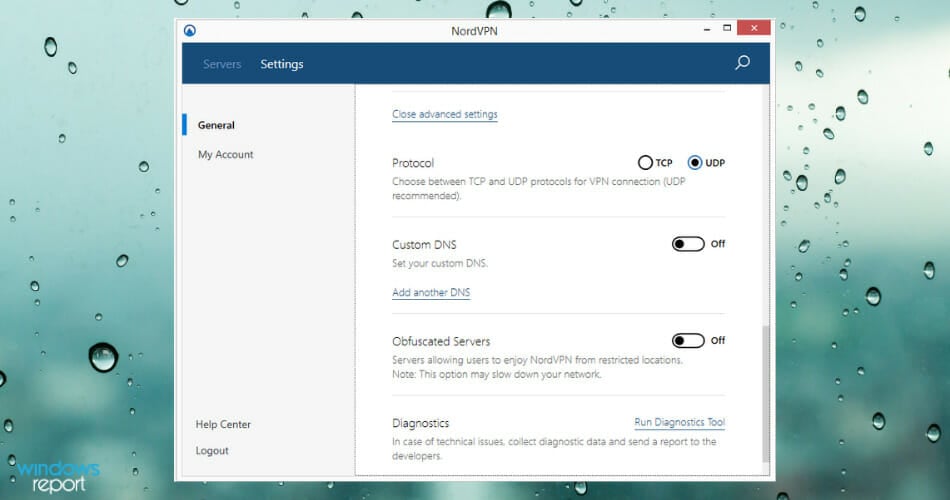
NordVPN is an exceptional VPN service that a lot of users get to unblock websites, watch streaming media on Netflix, and maintain their online anonymity.
But many gamers are wondering if NordVPN can reduce ping. High ping interferes with your overall Internet activities and slows down everything you do online, from visiting websites to downloading torrents.
However, latency issues are particularly troublesome for multiplayer gamers: one wrong move that’s not synced to the servers could mean game over.
Luckily, you can improve your ping with a VPN. It doesn’t mean that all VPN services fit this role, so let’s see how reliable NordVPN is.
Does NordVPN reduce ping?
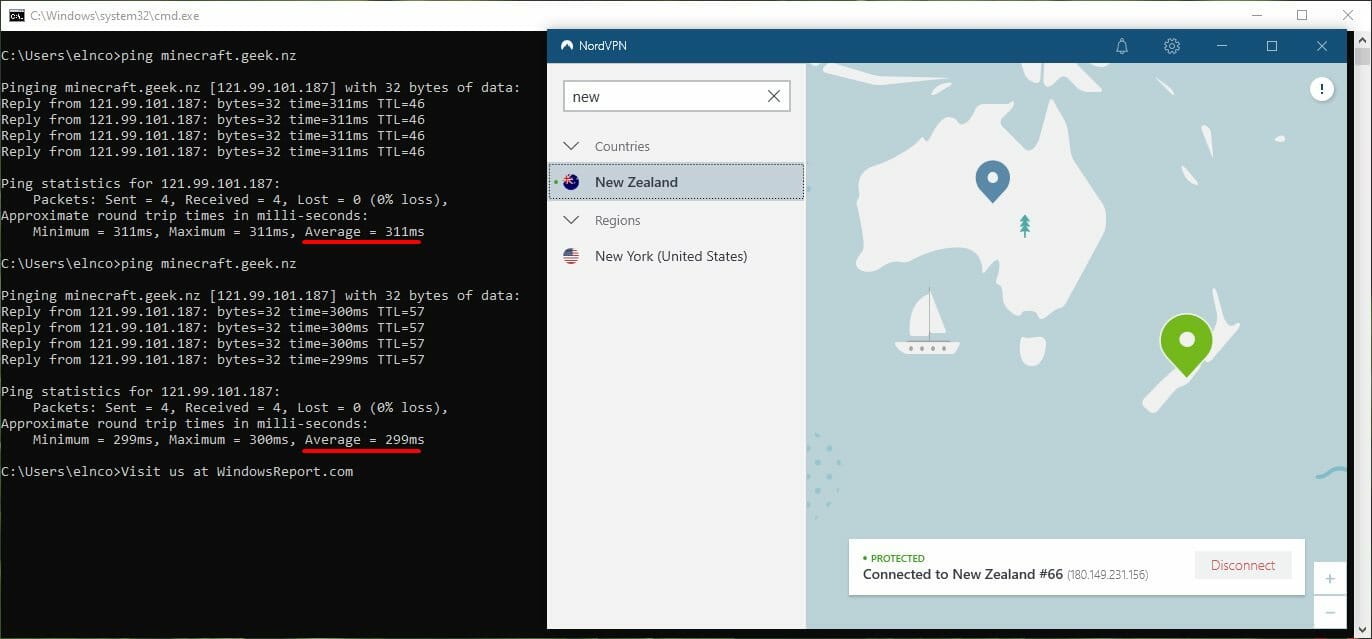
Yes, NordVPN does lower your ping in multiplayer games.
To do this, you must connect to a VPN server that’s physically closer to the game server. Assuming that you live in France and wish to play on a game server from New York, then you should connect to the New York VPN server.
However, it’s not foolproof. You might end up increasing your ping time instead of lowering it. Make sure your VPN isn’t slowing down your Internet.
It depends on several factors, such as the VPN server you connect to, your NordVPN settings, your Internet connection quality, your device settings, and whether or not the game server is crowded.
There’s no recipe for finding the ideal VPN server that lowers ping for your game. It’s a trial-and-error process, no matter which top ping reducer you use.
The most important aspect is to use a VPN server as close to the game server as possible. For example, if you’re trying to join a game session hosted by a friend in another part of the world, make sure to connect to your friend’s location.
On the other hand, you can simply use the Quick Connect button on this VPN to let the software determine which is the best server based on your server’s distance and the best loading speeds.
To recap, NordVPN reduces ping and fixes in-game latency issues. It’s an excellent VPN service not only for gaming but also for streaming, torrenting, online privacy, and computer security. Even more, if you want to lower ping when playing in other regions, rest assured that it’s possible.
You can also check out our NordVPN Guides to learn more about this virtual private network service. Bookmark our VPN Troubleshooting Hub if you frequently have issues with your VPN.
To find out everything worth knowing about this VPN, don’t hesitate to read our NordVPN review.
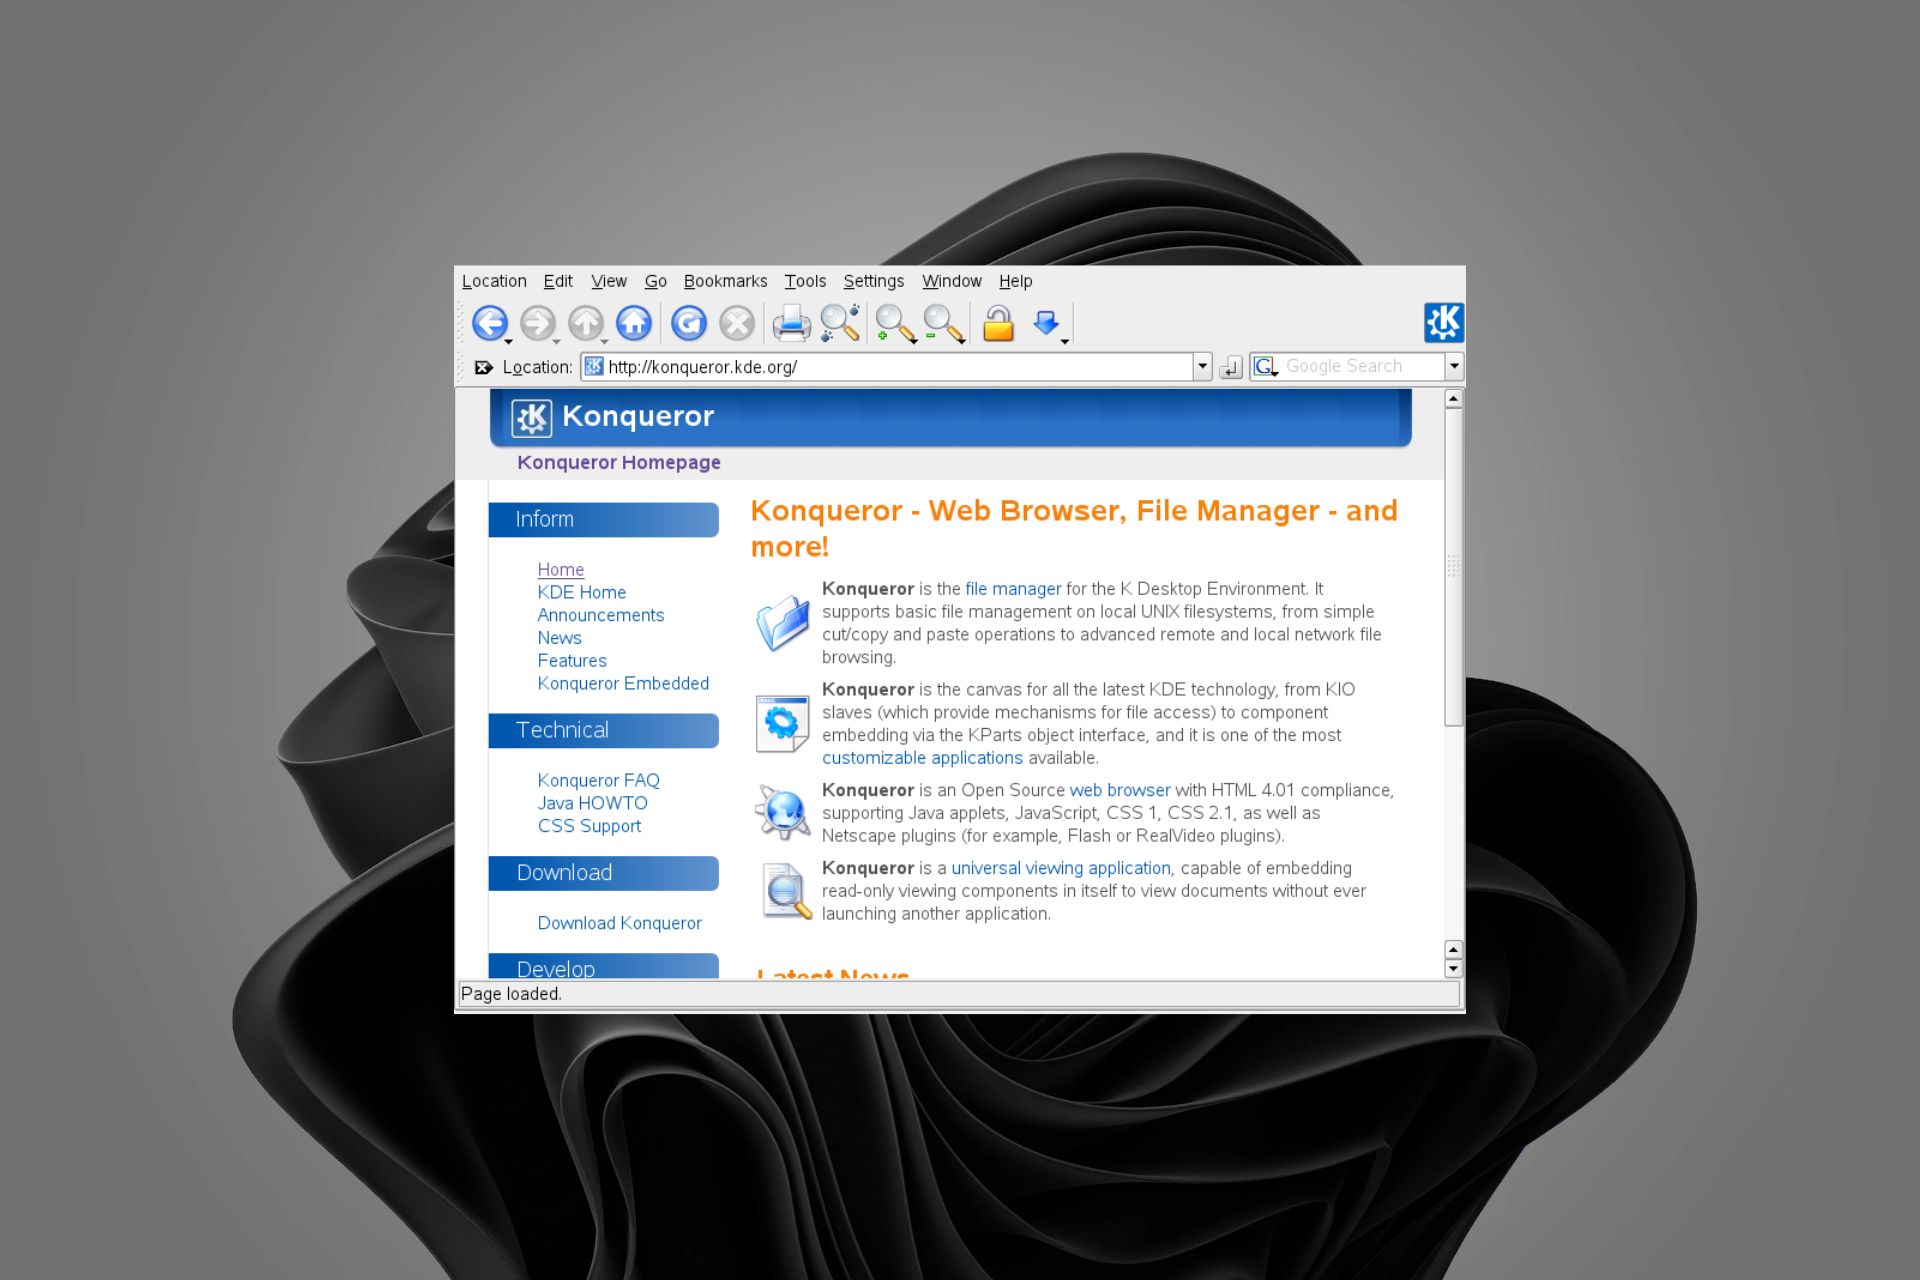
Many Unix-like operating system users install this browser called Konqueror, which is open-source and free to use on Linux or Ubuntu. Users can organize files or folders on their system using the Konqueror browser. This browser is not just limited to web browsing.
Lately, it has been noticed that many Konqueror browser users are facing an issue where the browser suddenly stops working. This problem is directly impacting their productivity.
Don’t worry if you are going through the same situation. This article will find three easy ways to fix this problem.
Why is my browser not working?
Having your browser not work precisely when you want to search for a piece of specific information can be very annoying, and there could be several reasons why the Konqueror browser is not working, and they are listed below.
The system could be outdated. Every operating system releases an update regularly to improve the system performance and user experience.
The Konqueror browser is not updated. Therefore, first of all, users must always ensure that the applications have the latest version to work smoothly.
Browser Plugins There are some plugins that the users install to improve the browser performance, but some plugins are actually the reason for such problems with the application.
The latest version of the Konqueror browser that can be installed on any Linux-like system is 22.04.3.
That being said, several other users are facing a similar situation. Even though the circumstances are not the same, they are worth exploring, as these fixes will allow us to fix the browser from scratch.
Here are some of the most common situations encountered by users:
The Konqueror browser does not get opened on their system, even if the users try several times.
Some users claim that the browser gets hanged while working, creating a problem because the work gets interrupted in the middle.
Browsing speed issues, etc.
Quick Tip:
You can consider switching to Opera One till we figure out why Konqueror isn’t responding. It is fully compatible with Ubuntu and Linux, and it has great results in terms of efficiency and stability.
Additionally, Opera One is always up to date with the newest developer add-ins, so you will never be stuck with an outdated browser. Plus, Opera One comes with VPN, AI, and Ad blocker already built-in.
Opera One
Try a productive and organized web app when you have difficulties with the Konqueror browser.
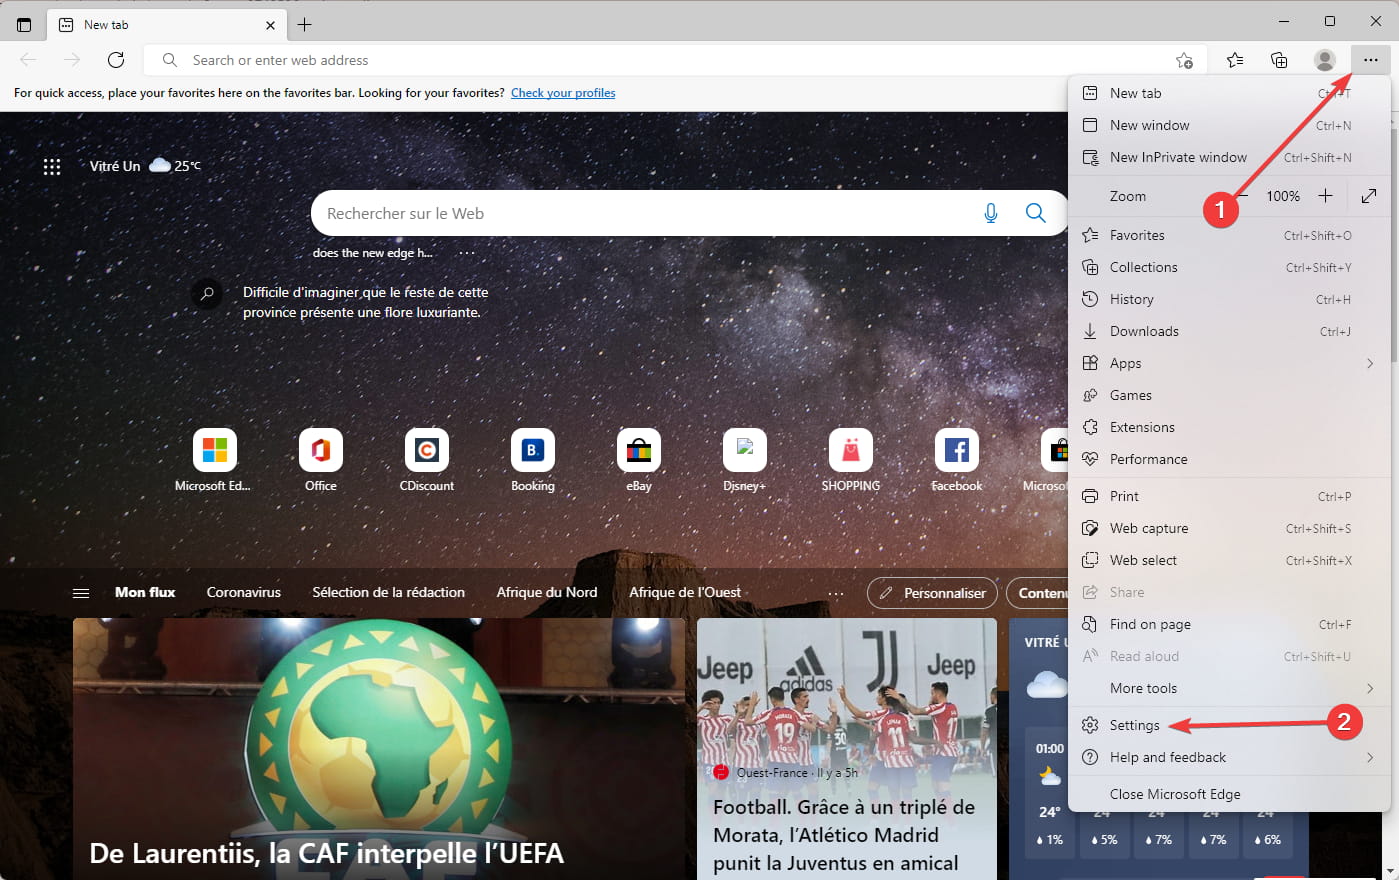
Open the Settings app on your system by right-clicking theStart button on the taskbar.
Now click the Settings option from the menu as shown below.
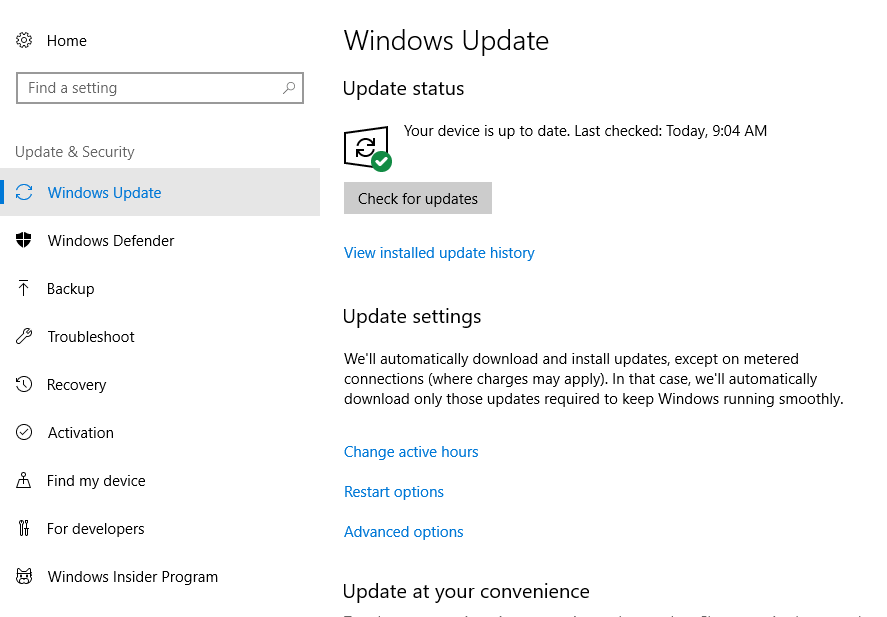
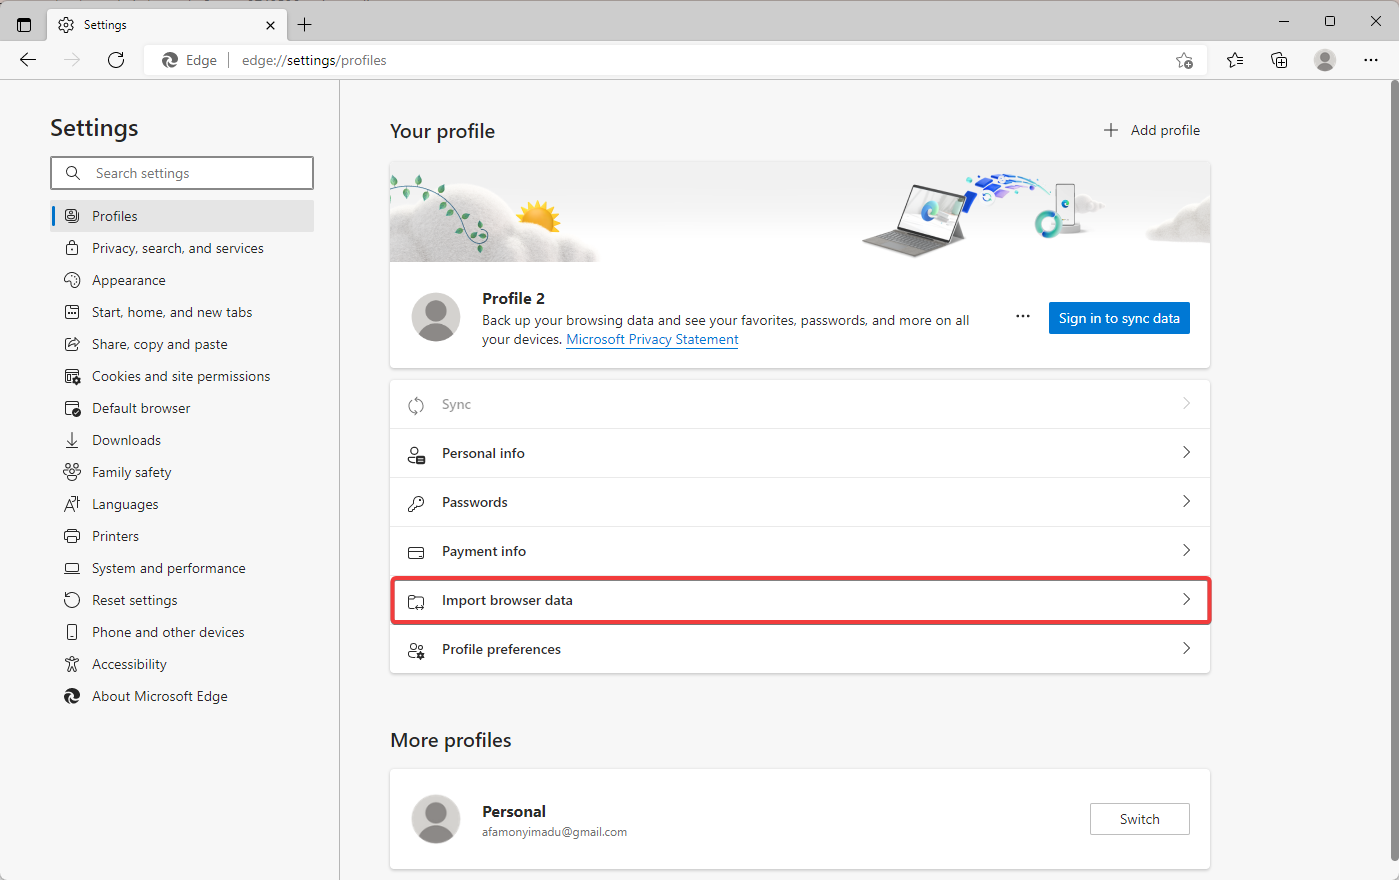
In the Settings app window, click Windows Update on the left side.
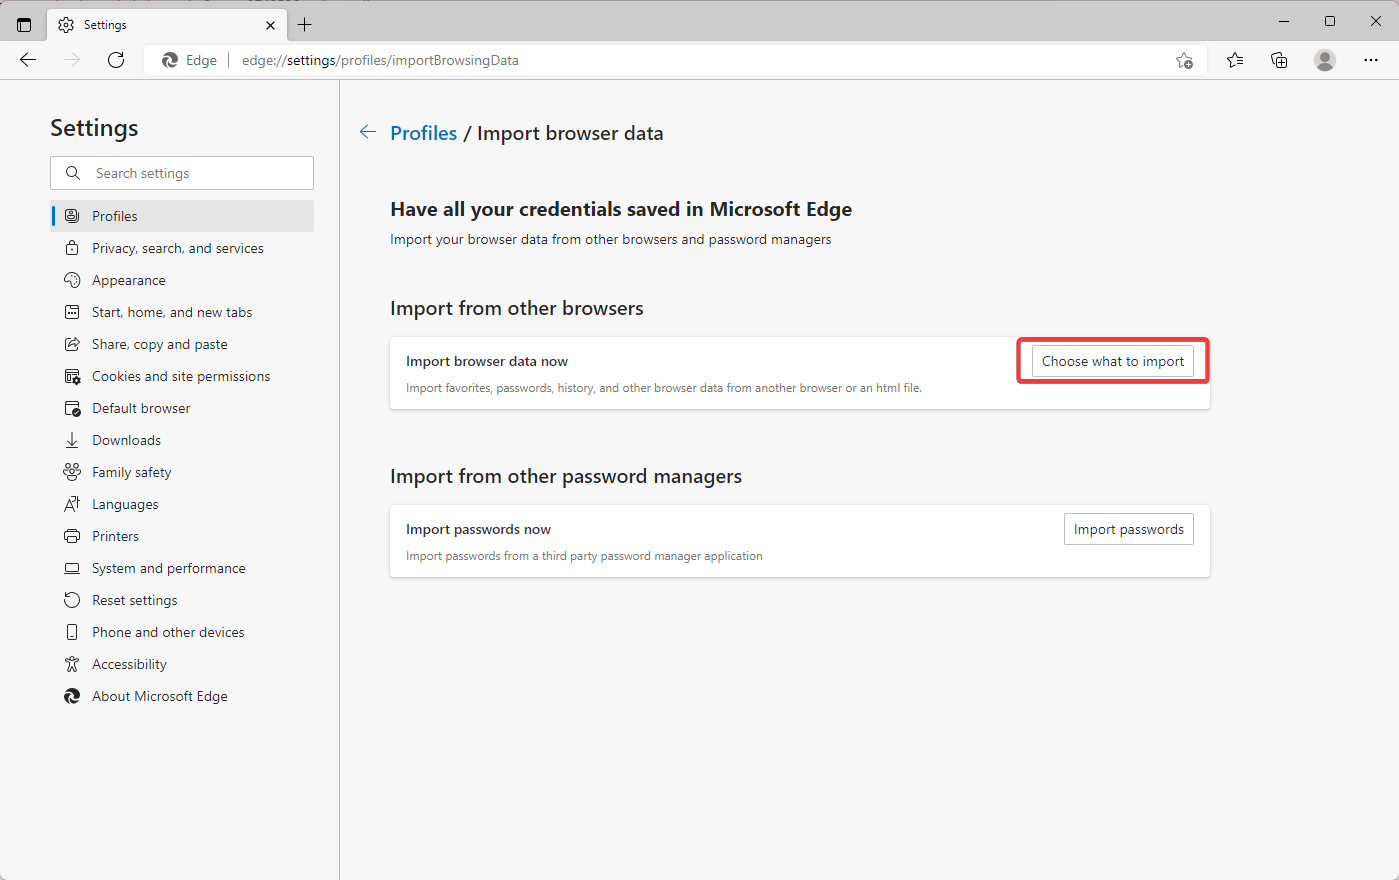
Next, click the Check for updates button on the top right of the Windows Update page.
This will start to check if there are any updates available.
If there are any updates, please click on them to download and install them.
After this is done, you need to restart your system.
2. Uninstall and Install the Konqueror browser app
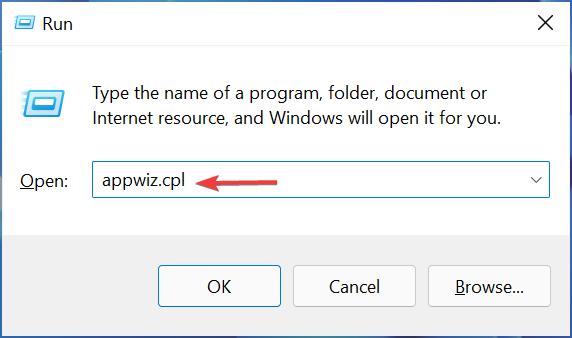
Open the Run command box on your system by pressing the Windows and R keys on your keyboard simultaneously.
Type appwiz.cpl in the run box and press the Enter key.
In the Programs and Features window, select the Konqueror browser from the list and click Uninstall, as shown below.
Once it finishes uninstalling, close the window.
Go to Konqueror’s webpage by clicking here and downloading the browser app.
Install the Konqueror browser using the setup file just downloaded.
3. Disable all the browser plugins
Open the Konqueror browser on your system.
Click Settings on the top menu bar of the Konqueror browser.
Select the Configure Konqueror option from the dropdown and clickPlugins.
In the Plugins Configure window, you can find many plugins installed earlier.
Please disable all the plugins that are actively present by unchecking the plugin’s checkbox.
When done, click OK to close the window.
Restart the browser and see if this worked for you.
Does Konqueror work on Windows 11?
Currently, the Konqueror browser runs on the Unix-like environment and older versions of the Windows OS. Maybe in the future, they might release an understanding of the Konqueror browser that might work on Windows 11.
If none of the methods explained above in this article worked, you could always go for restoring your system using system restore.
In the comments section below, let us know which method worked for you and if you can resolve this issue and get the Konqueror browser working again!
BlueStacks App Player is designed to enable Android applications to run on PCs running Microsoft Windows.
As the largest mobile gaming platform for PC, BlueStacks enables you to run Android apps and games on your PC, with over 140 million users.
In addition, BlueStacks is the most popular software to play Android games directly on your PC. However, some apps particularly streaming apps may give errors when trying to access them from other parts of the world. This is called geo-blocking.
Hence, a VPN is useful since it simulates the correct IP address to the website and enables users to access this content anywhere in the world.
In the following section, we will be showing you the best VPN tools for BlueStacks Android gaming tool.
Is BlueStacks using a VPN?
You are able to install a VPN on the BlueStacks platform and secure your games or unblock different region-blocked games.
Thus, it’s quite straightforward to use a VPN on this Android emulator. You can just download it from Google Play and log in to your account on the BlueStacks interface.
This way, you will hide your IP address and route Internet traffic to other remote server locations.
Mobile gaming is a thriving market, with more developers looking towards it as an alternative to PC or consoles.
Even phone manufacturers have started putting gaming badges on their devices. Screens are getting more responsive, batteries are getting bigger and some phones even have advanced cooling solutions.
However, as a PC gamer rocking a high-end system with a top-of-the-line GPU, you might be less inclined to spend your upgrade money on a gaming phone.
This is where BlueStacks comes in to emulate the Android experience on your PC.
Whilst this is all well and good, you’re still limited to the apps and games available in your region. Private Internet Access removes the shackles of geo-restricted content and lets you loose on the world, free to enjoy content from anywhere with the click of a button.
Once you’ve installed PIA, all you’ll need to do is select the country you wish to connect to and you’re free to explore all that the Play Store has to offer.
Additionally, by using PIA you will protect all your data across all your devices. Just have a look at what you stand to gain:
Use PIA on 10 devices simultaneously, including PC, Mac, and mobile
Secure VPN tunneling to anywhere in the world
Military-grade encryption for banking, online purchases, and browsing
Block ads, trackers, and malware
Multiple VPN gateways
Unlimited bandwidth
Private Internet Access
Get instant access to geo-restricted apps, games, and web content with this VPN on BlueStacks.
This VPN protects your information from being intercepted and also keeps you from being served with phony websites.
With over 2000 servers across the world, with numerous features including ad-blocking, and robust, consistent service.
In terms of speed, NordVPN scores highly on domestic servers, but not as well on international connections, which is good because you’ll be using domestic servers to access the content that’s been restricted.
This is because using a VPN increases physical distance and other factors that limit your normal internet connection, which results in a slower experience, but with more latency.
This, considering that networks can change depending on your location of connection so the mileage will vary.
As one of the fastest VPNs for Windows 10, NordVPN scores well on increasing latency and reducing download and upload speeds.
Here are the additional benefits you stand to gain:
6 simultaneous device connections
Dedicated IP address
Advanced leak and threat protection
Split tunneling support
NordVPN
NordVPN is an excellent VPN that works flawlessly, even with BlueStacks.
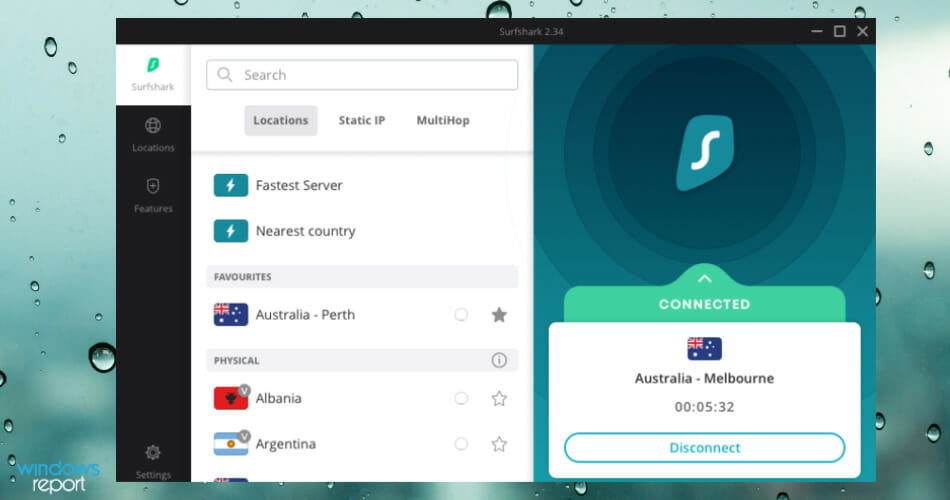
Surfshark is a VPN provider that has a multitude of features. When you connect to their VPN network, you’ll be able to surf in complete privacy.
It’s possible to utilize torrents without any threat and take advantage of streaming sites that would otherwise be blocked due to your geolocation.
It’s a good choice if you want to have Android apps running on your PC and know that you’re connected to the web with a secure connection
This VPN is equipped with secure 256-bit encryption and the best technology when it comes to protocols as they use IKEv2 and OpenVPN.
You’ll also be protected when you’re surfing, playing a game, or watching your favorite show as your connection is always protected by an automatic kill switch.
Surfshark really stands out by allowing unlimited devices, which should suffice any household that has members who are into gaming or just browsing the web.
You’ll also discover that there’s a strict no-logs policy, which ensures that you’re the only one who has knowledge of your activity.
You should receive fast speeds when using this VPN service with Windows 10 as Surfshark has optimized its servers to provide this important feature.
With this service, you’ll have access to over 800 different servers that are scattered around 50 different countries.
Here are its main extras, in a nutshell:
Unlimited device connections
Ad & malware blocker
Private DNS & leak protection
NoBorder mode to use Surfshark wherever you are.
Surfshark
In need of a VPN that works great with BlueStacks? Why not try Surfshark for a change?
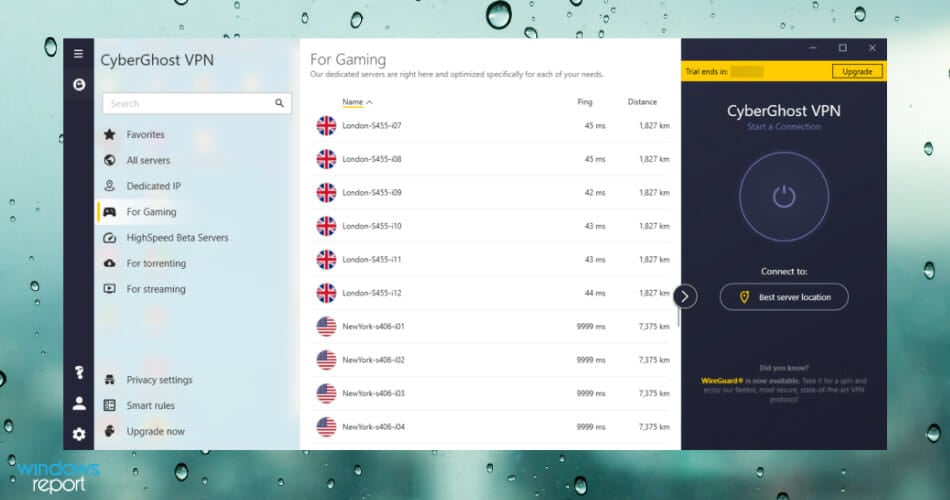
CyberGhost VPN is a freemium VPN that provides a variety of services: which includes surfing or torrenting anonymously, unblocking streaming and websites, and protecting one’s Internet connection from illicit hacks.
With the CyberGhost VPN, you have everything in place to use networks such as airport Wi-Fi, cafes, and hotels more securely, thus if you travel you can rest assured you are fully protected.
It has an automated Wi-Fi security function that protects your data even in public locations. This is made feasible through the use of encryption and the usage of suitable encryption keys. It is secured by AES-256-CBC encryption
There are times when the internet connection is lost after you log in to different accounts, including financial ones. This provides an excellent chance for hackers to steal your data and, as a result, your money.
However, the existence of an automated kill switch prevents such a circumstance from occurring. When the connection fails or is interrupted, CyberGhost VPN automatically terminates all open sessions.
CyberGhost VPN is one of the few all-in-one online privacy software, with a predefined and dedicated profile for any online VPN, need you may have. Users have access to Access over 1800 servers worldwide.
Additionally, you can benefit from the following features:
7 simultaneous device connections
Streaming-optimized servers
Split tunneling support
Great leak prevention
CyberGhost VPN
Looking for the best VPN for BlueStacks? Check out CyberGhost VPN.
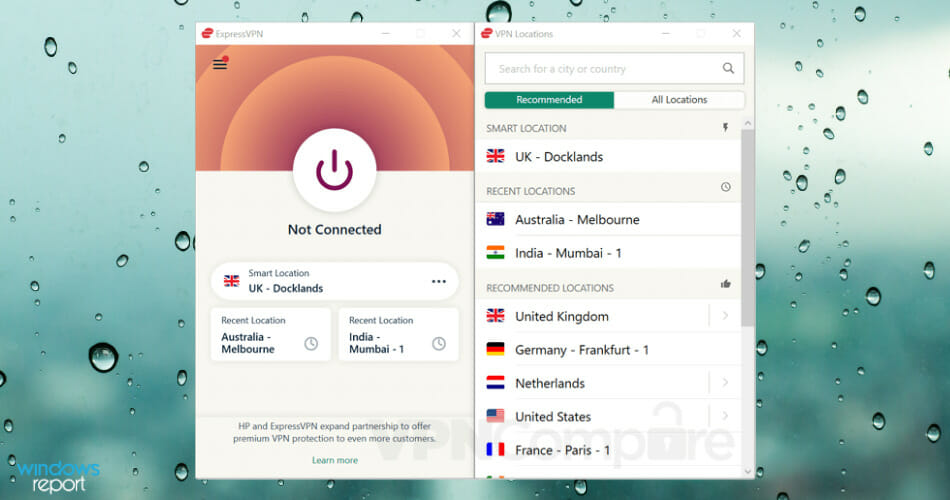
ExpressVPN is speedy, encrypted, and conforms to a rigorous no-logging policy, helping you to stay totally anonymous.
BlueStacks with ExpressVPN provides lightning-fast speeds without affecting security and allows you to install any geo-blocked Android app you can think of for the best gaming experience.
The software works great and is simple to use. Its significant differences can even be seen in the service’s reliability, with 24/7 customer care.
It has over 160 locations in 94 countries, is not part of any internet monitoring organizations, and takes credit cards and even cryptocurrencies as payment.
A single subscription can be used on up to five devices at the same time, whatever platform may be (including virtual machines).
ExpressVPN may be installed on an unlimited number of devices, but only five can be connected at the same time.
Moreover, you can take advantage of:
Advanced leak prevention
High-performing servers for gaming and streaming
Split tunneling support
Private DNS on every server
ExpressVPN
Stay completely anonymous and have access to a plethora of servers to safely stream or play any games!
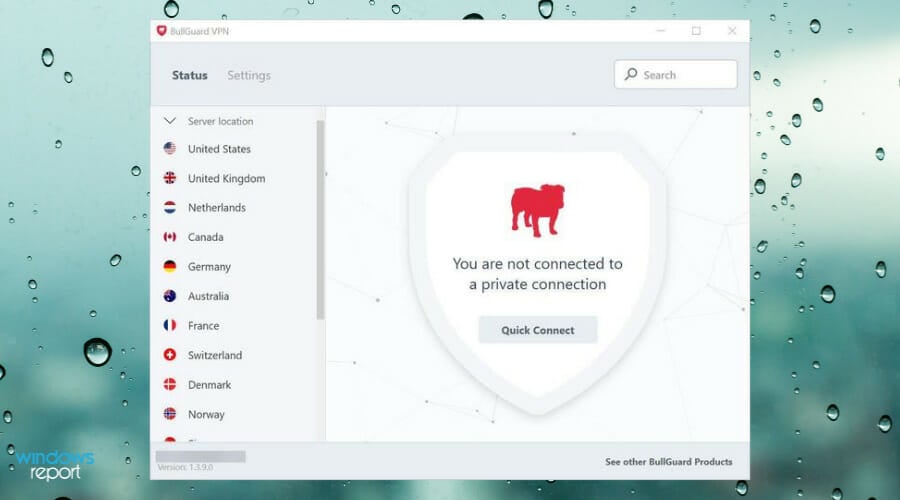
Bullguard VPN is proven to be a very fast VPN provider, regardless of the server location you pick.
Moreover, it is a very good choice as a VPN to use with BlueStacks. It has great encryption and a well-implement privacy policy.
Bullguard VPN hides your IP address which will help you keep your identity private when you connect to gaming platforms.
Along with that, it is important to note that Bullguard lets you secure up to six devices with a single account. It is compatible with all major operating systems, desktop, and mobile.
It has a killswitch that will keep you secure even if the connection drops. All traffic will be blocked and no third parties will be able to access your data.
Additionally, you can expect go get:
6 simulataneous device connections
256-bit AES encryption
Great leak prevention
Bullguard is subscription-based with 4 major plans available.
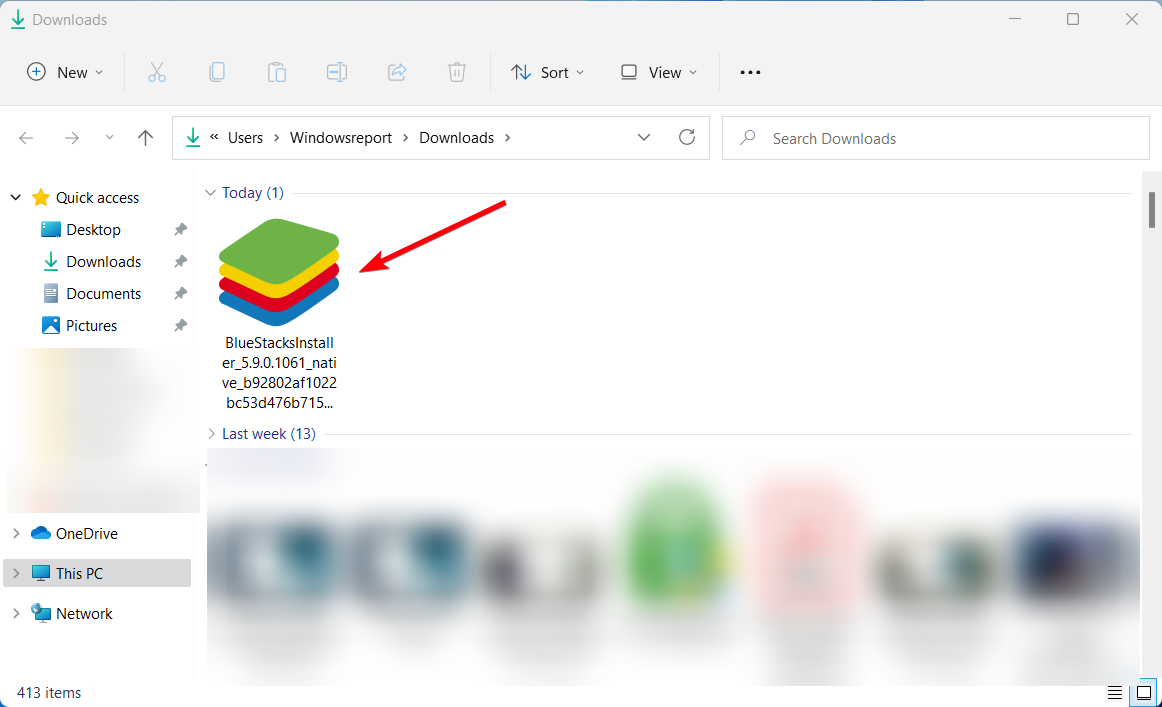
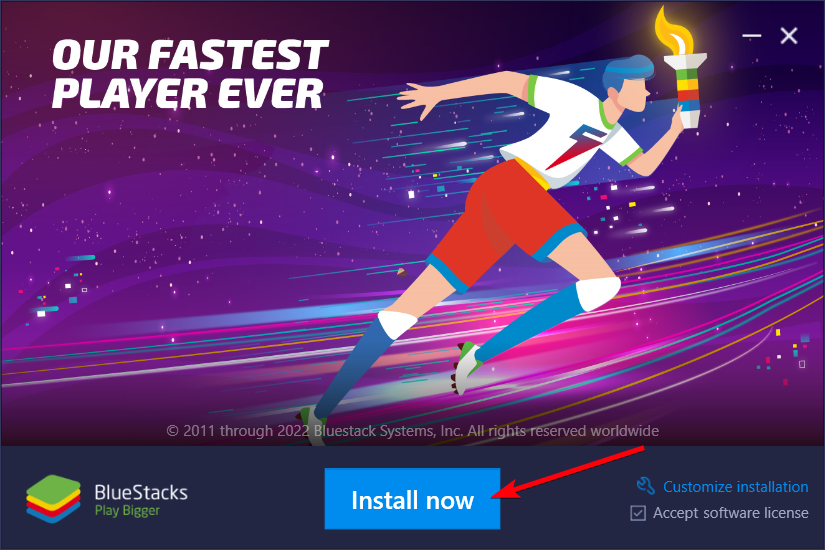
It’s possible to set up your VPN to protect BlueStacks using different methods, most likely on the Android emulator. Hence, this is how you should perform it:
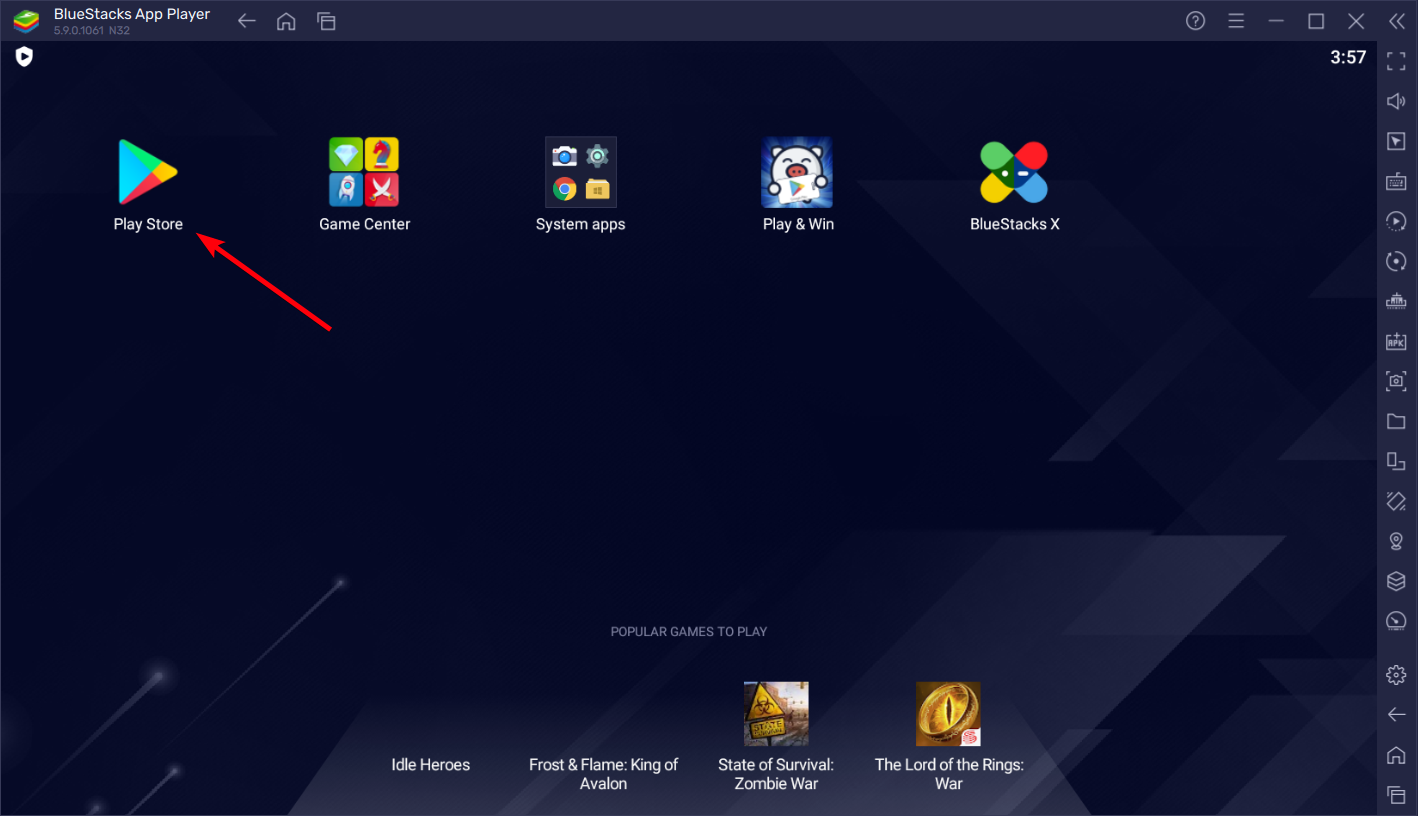
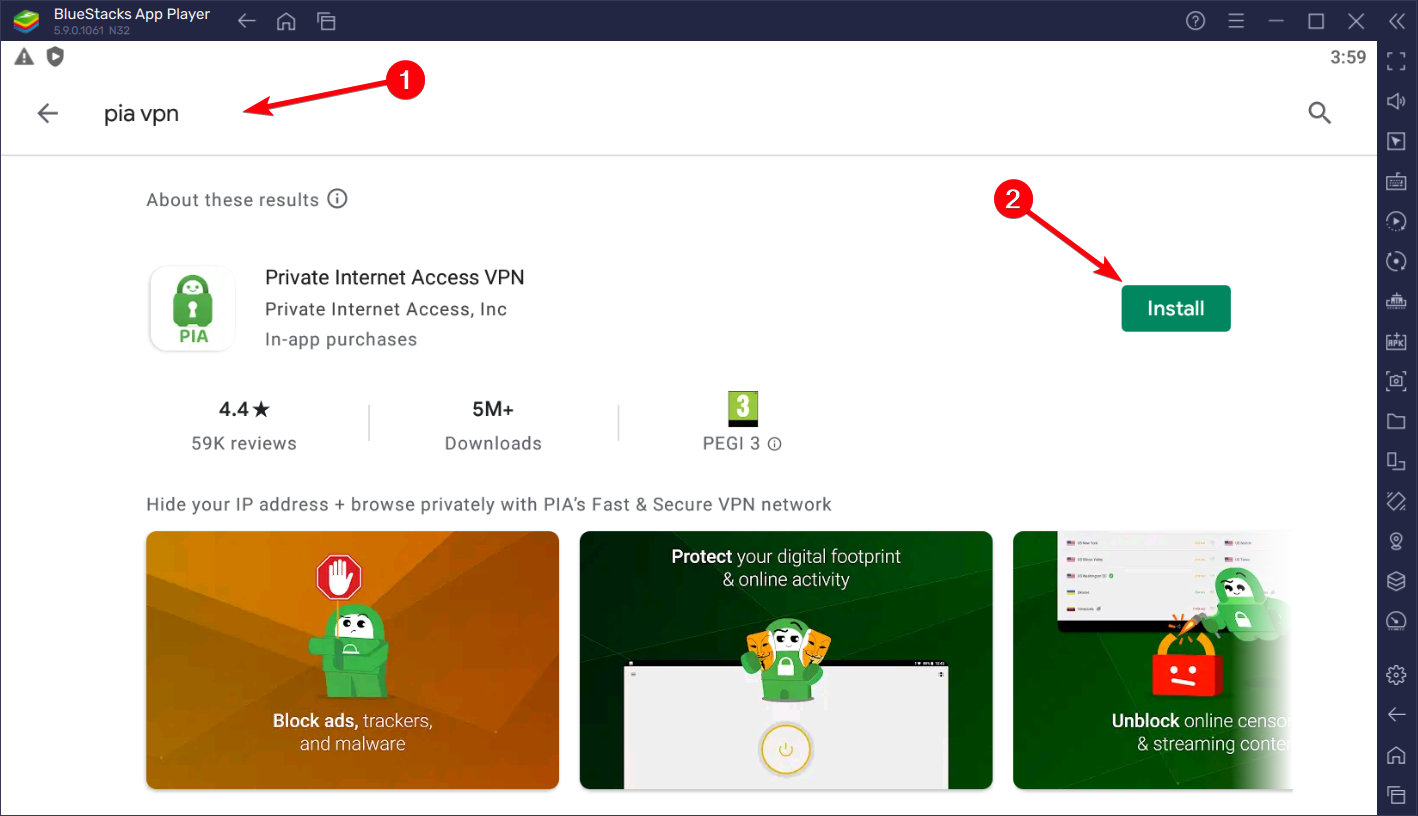
After you installed it on your PC, Go to Play Store.
Write PIA VPN and install the application on your PC.
After the installation is complete, go to the homepage again.
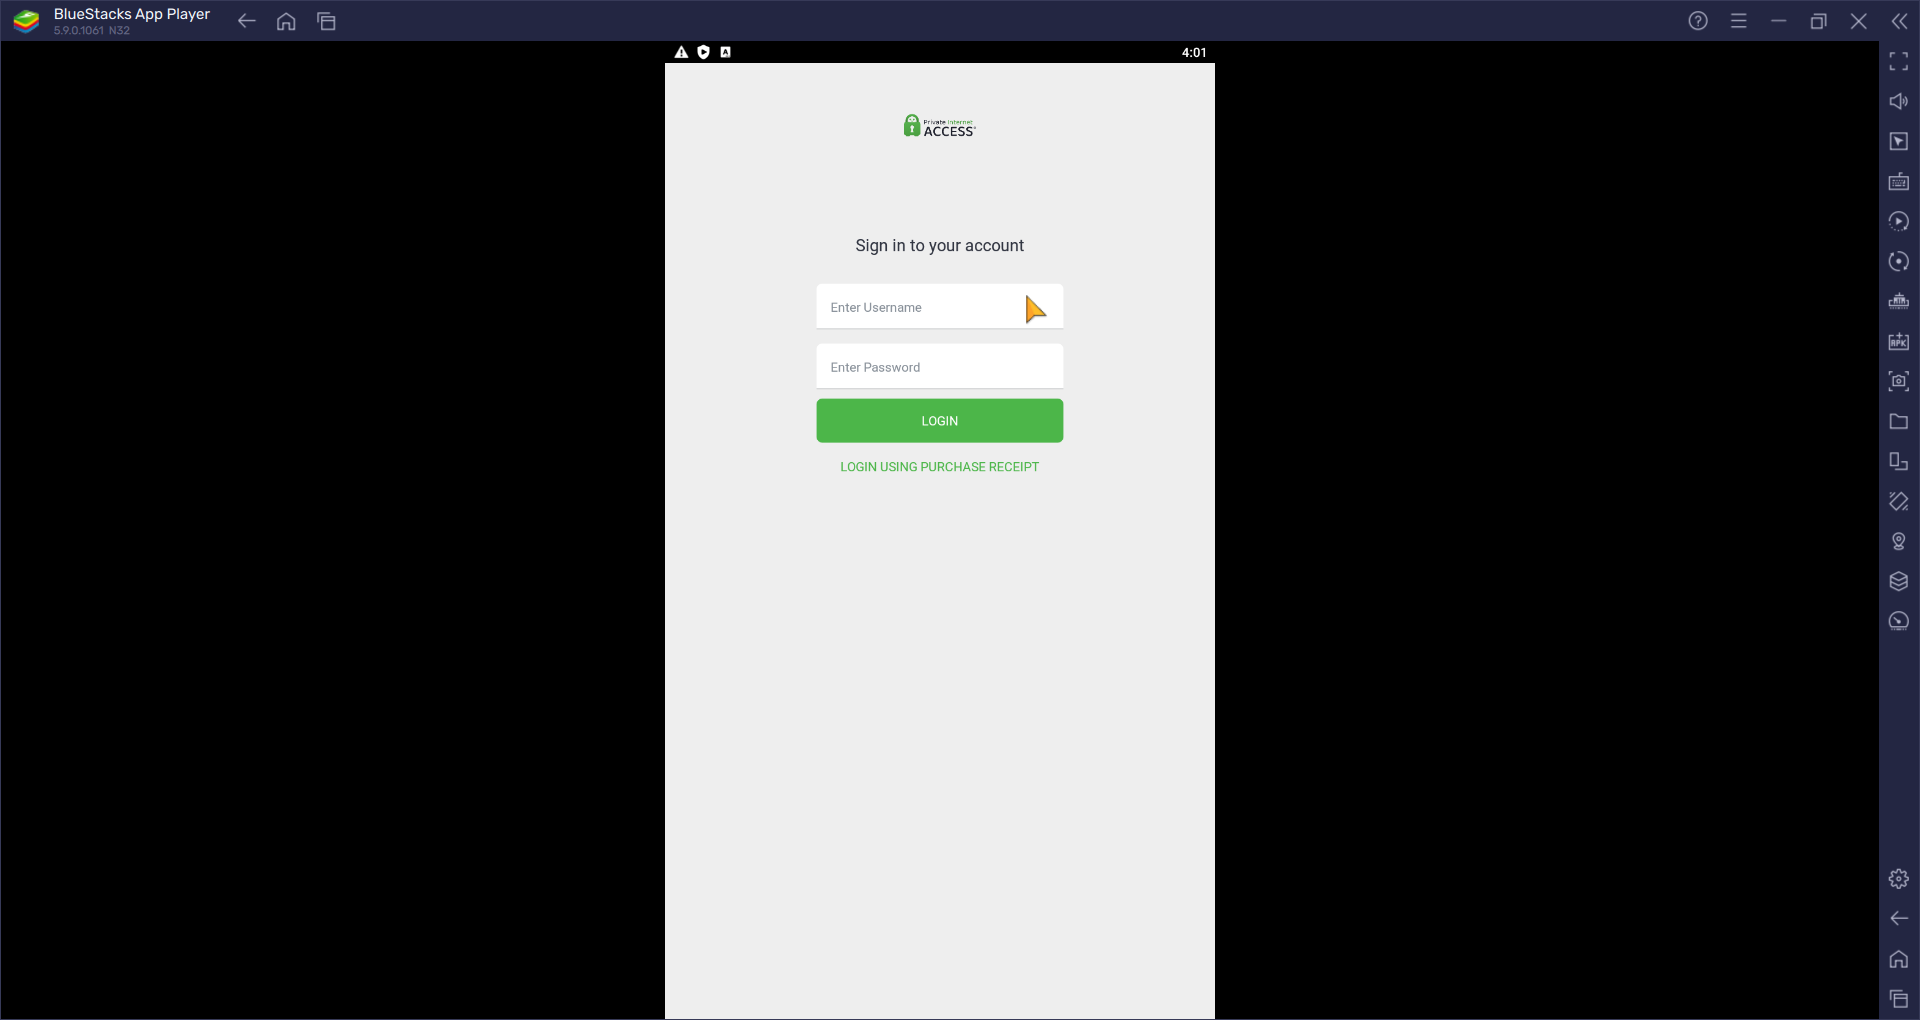
Click on the PIA app and login into your account.
Connect to high-speed servers and enjoy any Android games on your PC.
How can I change my BlueStacks IP?
You can simply change your IP address within the BlueStacks platform with the following steps:
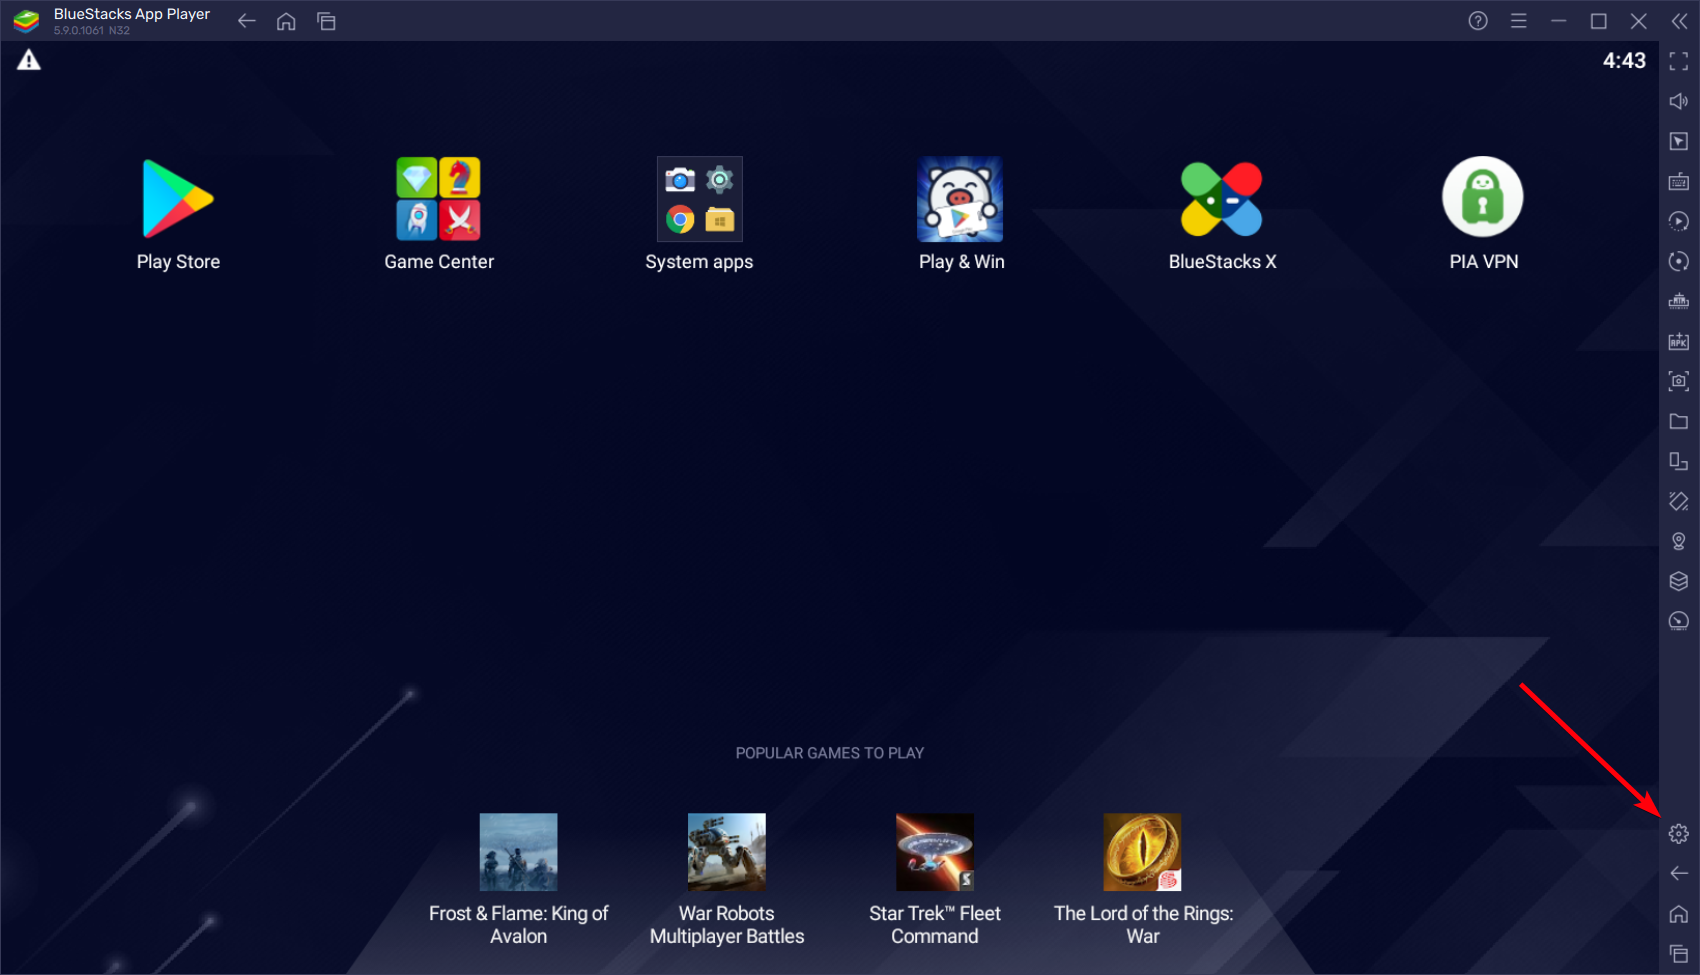
Go to Settings icon in BlueStacks.
Click on Wireless and Network.
Select WiFi, More, and then Advanced.
Go for Use static IP address.
Click on Change my IP address.
Either way, you can use your PC settings to change your IP address or simply utilize the VPN application to change your IP address every time you require it.
We hope this list makes it easier for you to choose the best VPN for BlueStacks to meet your needs.
Feel free to share with us your experience in using any of the VPN service providers we mentioned above by commenting below.
Lacerte Tax is a cloud-based online professional tax software offering from Intuit. Using this tool, you can accurately prepare business and individual returns with any level of complexity. In addition, Lacerte Tax comes with the benefit of preparing returns securely from anywhere on any device.
While the tool is useful, some users reported facing a browser not supported for the Lacerte issue.
Notably, when users click on My Account in the Lacerte software, it does not open the browser as intended.
If you are also experiencing a browser not supported Lacerte issue and are looking for solutions, you have landed in the right place.
This guide will give you some of the best solutions that have helped users resolve the browser not supported in Lacerte error. So let us get right into it.
Why am I having issues when visiting Intuit websites?
If you are trying to visit any of the Intuit websites and come across an error that says Our systems are experiencing some issues. Please try again later, or browser not supported error, then there can be many reasons for this problem.
This could be because of the corrupt cache and data of the browser.
Intuit isn’t added as a trusted website.
There is some issue with the browser settings.
These reasons may be general, but the browser not supported for Lacerte error is a widespread problem caused by common issues.
In the next section, we will discuss the solutions that will help you fix the problem at your end.
Quick Tip:
Lacerte’s cloud-based taxing software is compatible with any Chromium-based browser. Opera One works excellently since it utilizes your default applications option for the web browser to open the hyperlink.
Furthermore, moving to Opera One is simple since you will be prompted to transfer all saved information from your existing browser. This way, nothing is lost, but every other benefit is won.
Opera One
Switch to this flexible browser, and just deal with taxes without errors.
Per the official system requirements, Lacerte can run on Windows 11, Windows 10 (version 1607 or later), and Windows 8.1 (64-bit). So you can quickly run the Lacerte taxing software on your latest Windows 11 PC.
How can I fix Lacerte browser not supported error?
1. Clear browser cache
Launch Chrome.
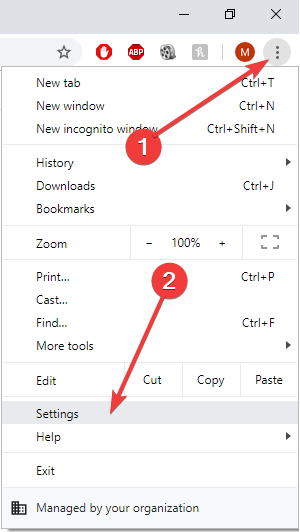
Click on the 3-dot menu icon.
Select Settings.
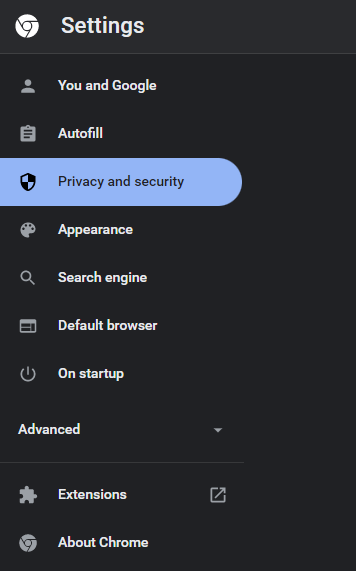
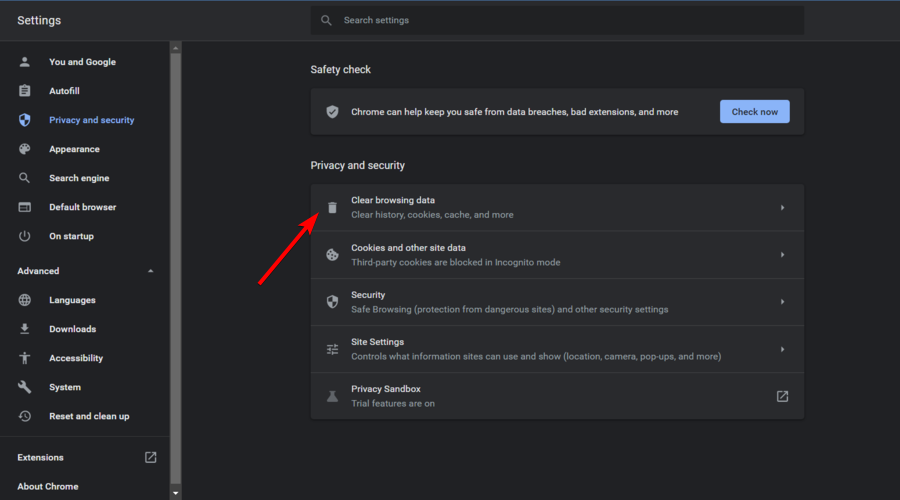
From the left pane, select Privacy and security.
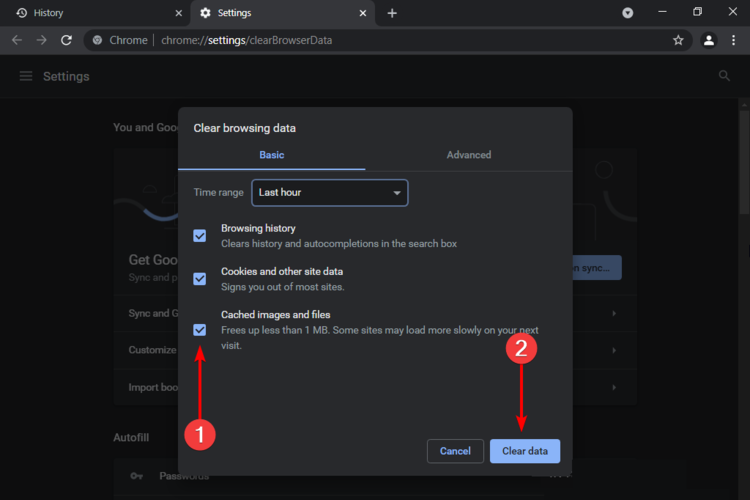
Click on Clear browsing data.
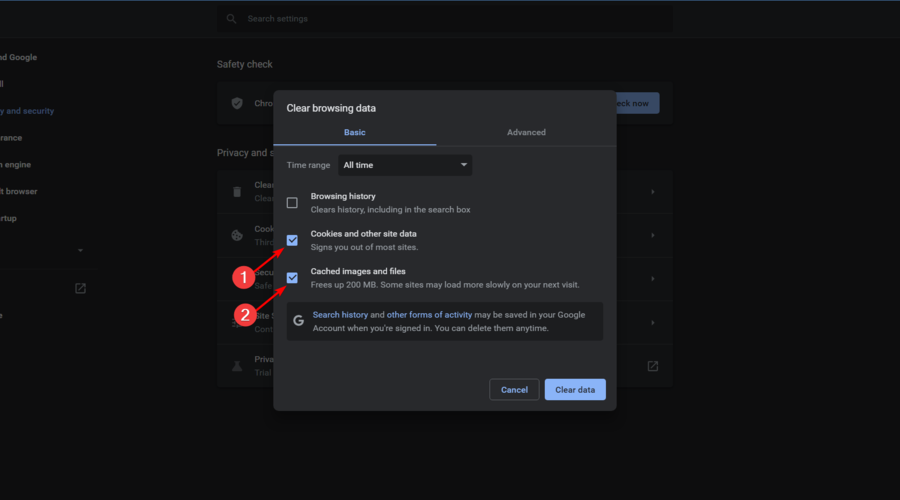
Check the boxes for Cookies and other site data and Cached images and files.
Hit the Clear data button.
We have explained the steps for the Google Chrome browser since it is the most commonly used web browser by millions across the globe.
However, if you use a different browser, you can follow similar steps or check the official forums for help.
Often, corrupted cache and browser files can cause multiple issues within the browser and prevent you from using it optimally. However, you can try clearing the browser cache and data and check if this fixes the browser not supported Lacerte issue or not.
Then select Trusted Sites (the icon with a green check mark).
Click on Sites.
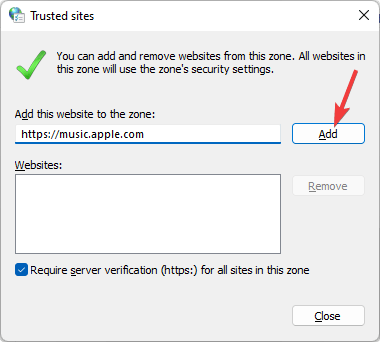
On the new window, enter the URL of the site you want to add to trusted sites in the Add this website to the zone text field.
Click the Add button.
You can add as many websites as you want.
Close the window when you finish.
The above is just one of the ways you can add trusted websites on your PC for the web browsers. You can check out the other ways of adding a website as a trusted site in Chrome on Windows 10/11 & Mac. Adding a website as a Trusted Site will bypass the high security of your PC only after you have permitted it.
If the website isn’t set as a trusted site, you could encounter issues such as the browser not supporting Lacerte or Intuit not supporting this browser error. Add the Intuit website as a trusted site and check if this fixes the problem at hand or not.
3. Reset the browser
Open Chrome.
Click on the 3-dot menu icon.
Select Settings.
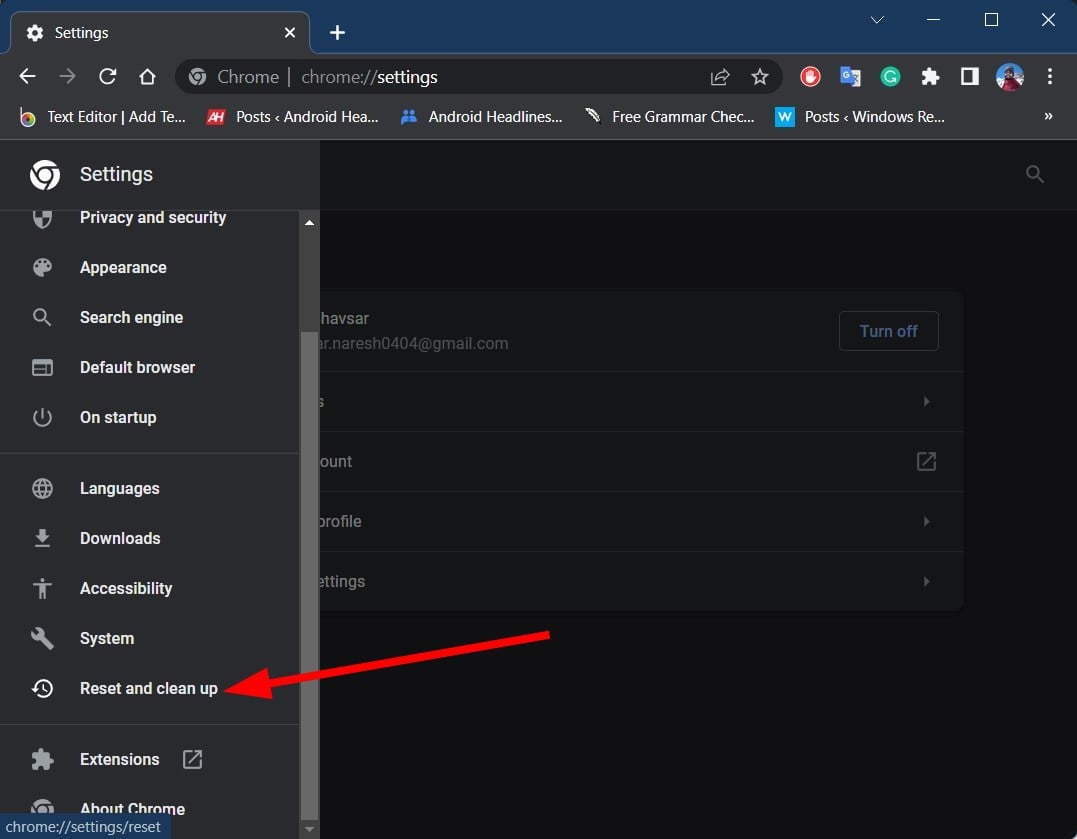
Expand the Advanced section.
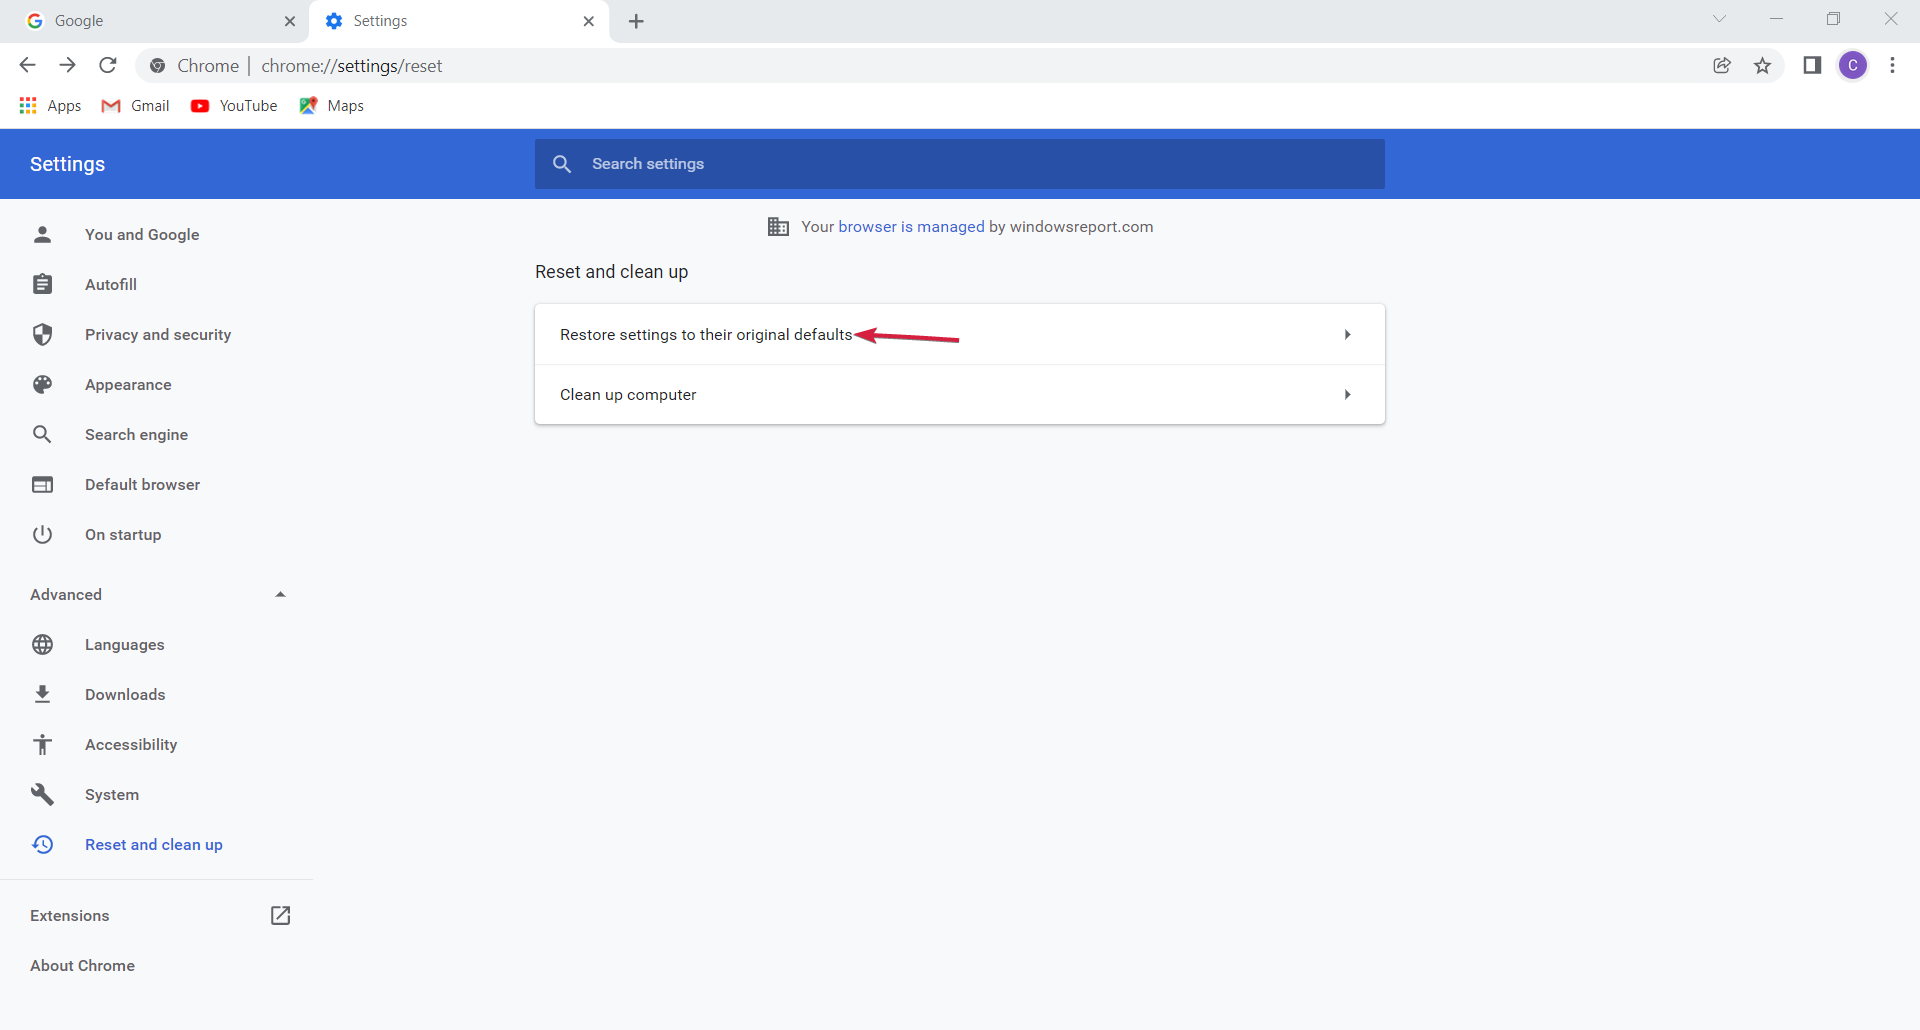
Click Reset and cleanup.
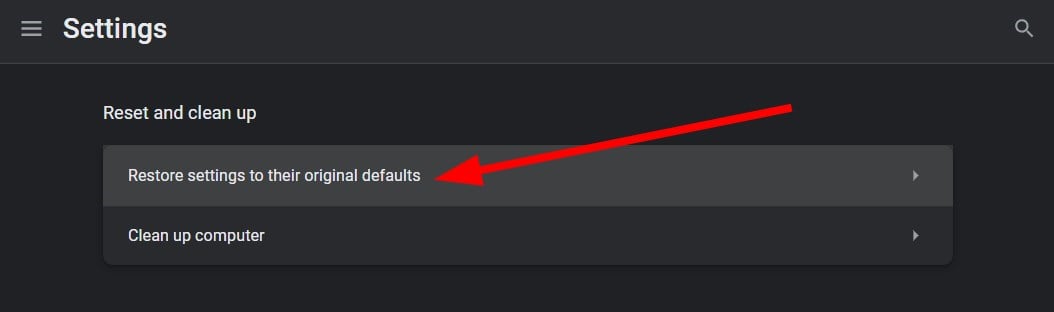
Then click on Reset settings to their original defaults.
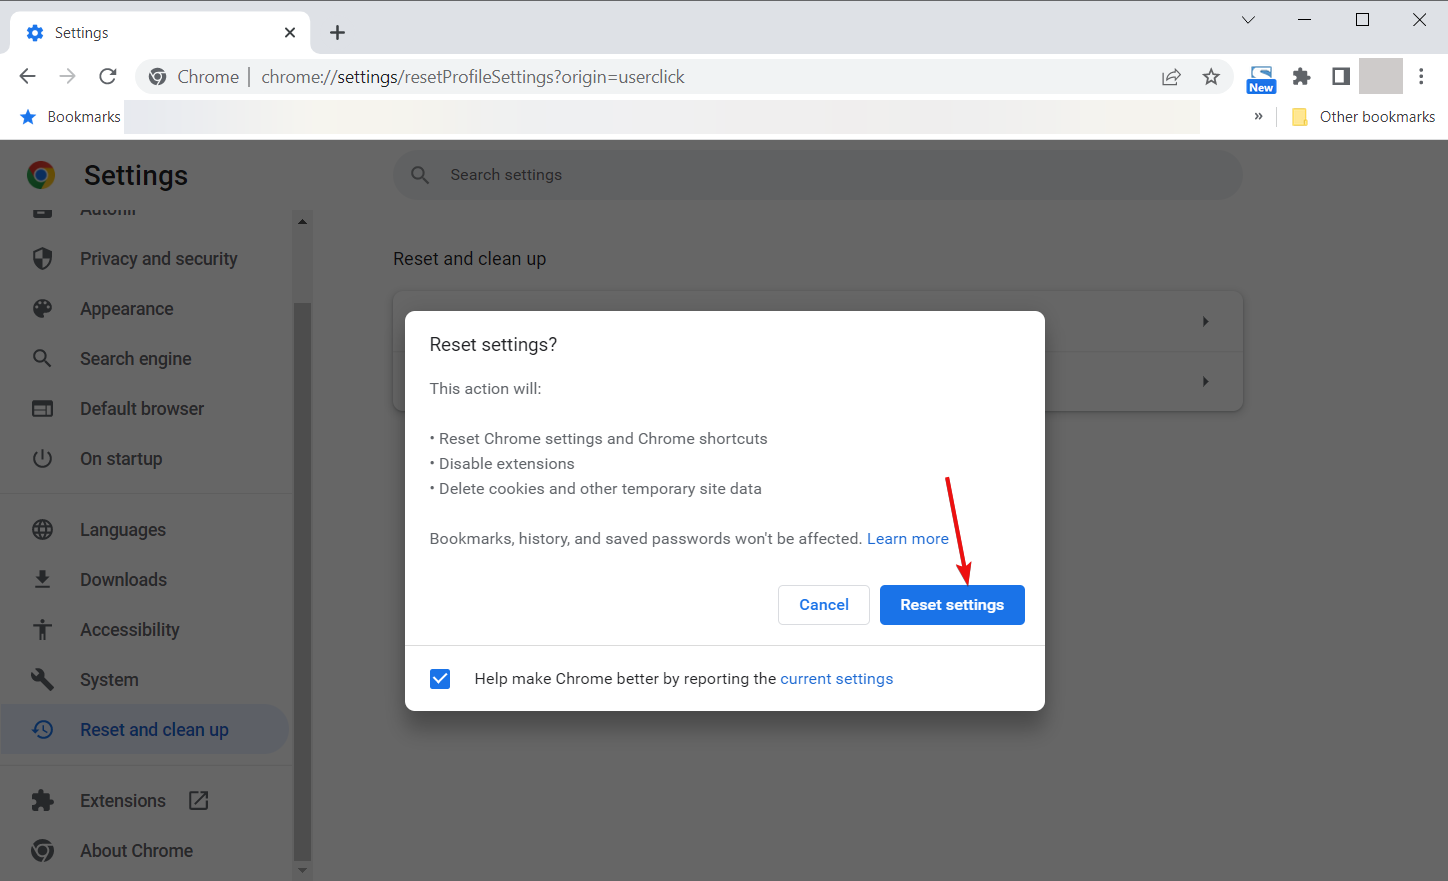
Finally, select Reset settings.
There are chances that some of the extensions that you have installed on your browser might have changed the browser settings, due to which you are coming across the Lacerte not supported in browser error.
Apart from disabling all the extensions, you can try resetting the browser using the above steps.
If the above solutions do not work, your browser could be an issue. You can try updating it from the About section of the browser or switching to a different browser.
Now, since a good variety of web browsers are available, you might get confused about which one to go for. In such a scenario, we suggest you check out our guide on the best browsers you can use in 2022.
Let us know in the comments below if the above solutions helped you fix the browser not supporting the Lacerte issue or not.
Many of our readers reported encountering the error message Error loading media File could not be played in Google Chrome.
The issue also appears with the message Error code 23404 or Error 101104, and it’s due to the fact that your browser cannot connect to the video source.
This issue is common for video files, blocking Chrome users from accessing the respective content.
Why does Chrome says File cannot be played?
The error seems to be caused by a conflict with the media player or errors caused by cookies and extensions.
Error loading media may also occur if you are trying to watch a video on a self-hosted website, or if the built-in media player is wrongfully configured.
Fortunately, we’ve managed to come up with a series of fixes to help you fix this issue.
Quick Tip:
The great thing is that you have another option as backup web app while dealing with these issues. Opera One comes with resource management for media files and also a built-in AI.
As for error loading media, Opera One has a video pop-out functionality that has significantly improved users’ experience. You can browse on other tabs while the opened video is playing without disruptions.
Opera One
The video-pop out is in your control, with separate functions from the normal browsing.
How do I fix Error in loading media File could not be played?
1. Delete cache and cookies
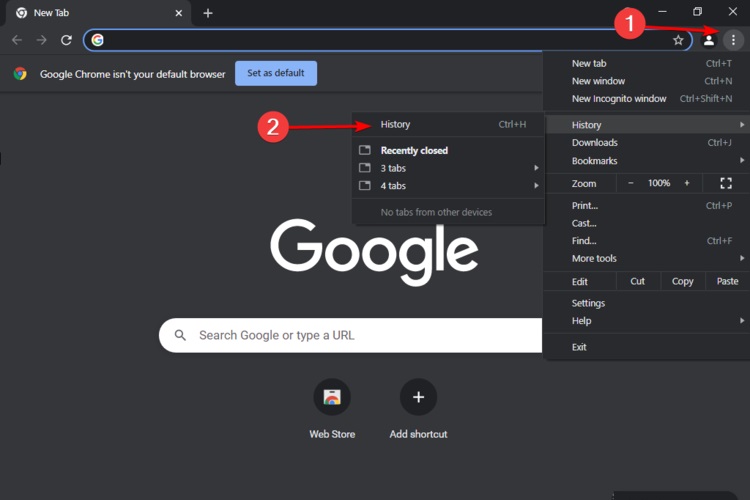
Click on the Settings menu from Chrome (the three vertical dots in the top right corner), hover on History, then select History.
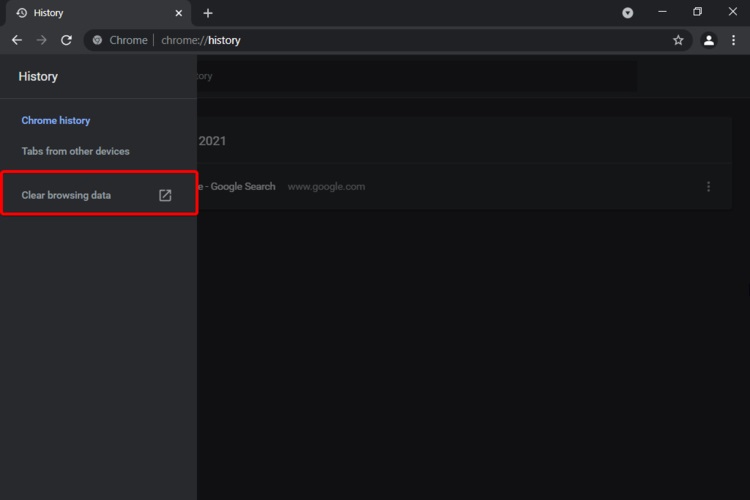
Click on the Clear browsing data option.
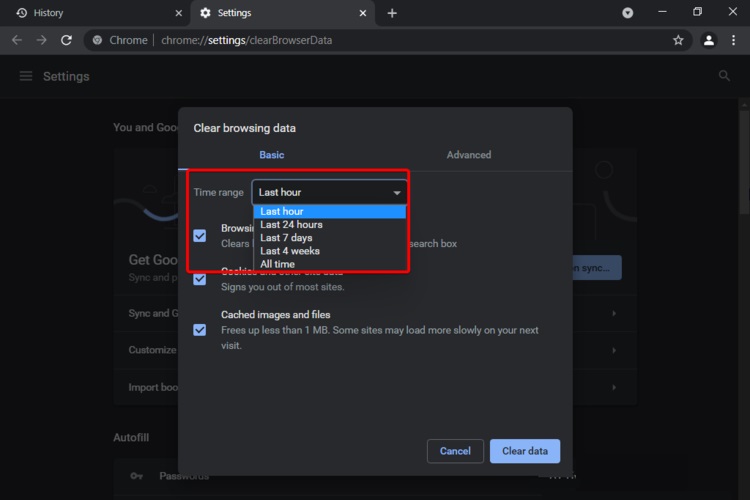
Select a Time range for which you want to clear the cache.
Mark the Cached images and files box, then select Clear data.
Every once in a while, it’s recommended to clear the cache in Google Chrome. Doing so could help fix Chrome errors, including the Loading media:Unknown network error.
Chrome and other modern browsers cache a lot of data. The cache size typically exceeds hundreds of megabytes.
The primary goal of a cache is to locate something quickly on the local server rather than having to load it from the whole internet.
However, because of the large number of indexed data, searching time on the local server increases as well when the cache size is large.
As a result, you may occasionally receive an error message in Chrome stating Sorry, the video player failed to load.(error code: 101102).
Once your system is cleaned, it provides your device with more free space and improved speed, so you may be able to play the desired media file in Chrome.
With a specialized cleaning tool that convinced millions of users, it’s possible to erase browsing data entirely from your system.
CCleaner is the right cleanup software when you require optimizing tools like the disk analyzer for freeing up memory, registry cleaner, or Internet cache and history custom clean.
2. Disable hardware acceleration
Open Settings.
Scroll down and click Advanced.
Find Use hardware acceleration when available in theSystem section.
Press the toggle to turn it off.
Restart Google Chrome.
3. Reset the browser settings
Click the three vertical dots from Chrome and choose Settings.
Go to the Reset and clean up section, then click on Restore settings to their original defaults.
On the next pop-up window, click on Reset settings.
Reload Chrome.
4. Update Google Chrome
Click the three vertical dots icon on the top right corner of the browser.
It’s alive! It’s alive! Winamp has come back from the dead after a four-year hiatus. For those who don’t know, Winamp is an ancient app that’s been around since 1997, when many of us here on Windows Report were children.
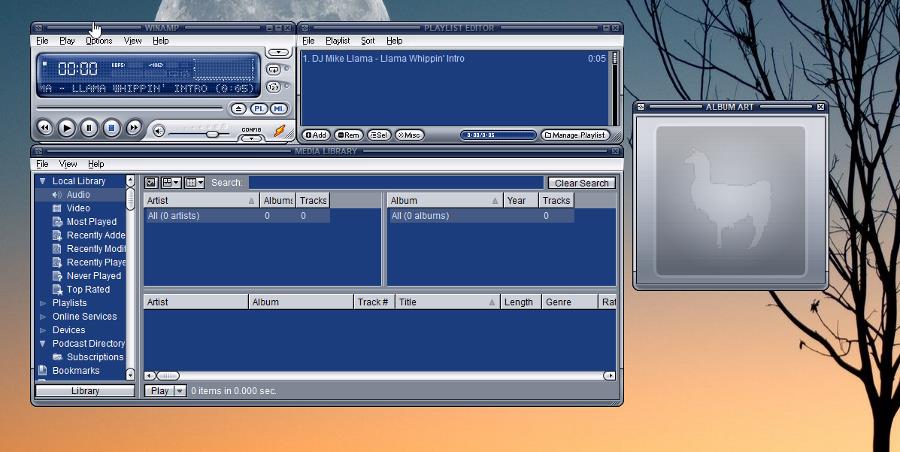
It was one of the first media players during a time when playing music on your computer was a novelty. Winamp was different from Windows Media Player because it had interface skins, visualization, and other ways of customizing the look.
Windows Media Player in the past was rather plain looking. However, in recent years, Winamp has gone through a pretty tumultuous time. In 2013, the Winamp developer announced that it was ending support for the app.
Then the developers announce that Winamp is returning before declaring it’s ending a few years later. This on-off status continues today as there’s a new version of the media player: Winamp 5.9 RC1.
What is in Winamp 5.9 RC1?
The “RC1” in the name means Release Candidate Built 1. This means that the app is still in a preview phase as the developers work on the final version. It’s unknown when the final version will be out, but you can find the developer’s notes on the Winamp forums for a roadmap.
5.9 RC1 introduces features like Windows 11 compatibility, playback of HTTPS streams, a better podcast directory, and support for unique compressed modules.
The developers even worked to eliminate bugs plaguing older versions of Winamp. They even got rid of the specialized tap for the Bento browser.
This guide will show you how to download the new Winamp 5.9 RC1 media player for Windows 10 and Windows 11. However, remember you may encounter bugs since this is an early version of the bugs.
We recommend staying up to date on Webamp’s development cycle and updating it accordingly.
Go to where the Winamp files are located and double-click it to begin the installation.
A window may appear asking you if you want to make changes. Select Yes.
In the Winamp Installer wizard, click Next.
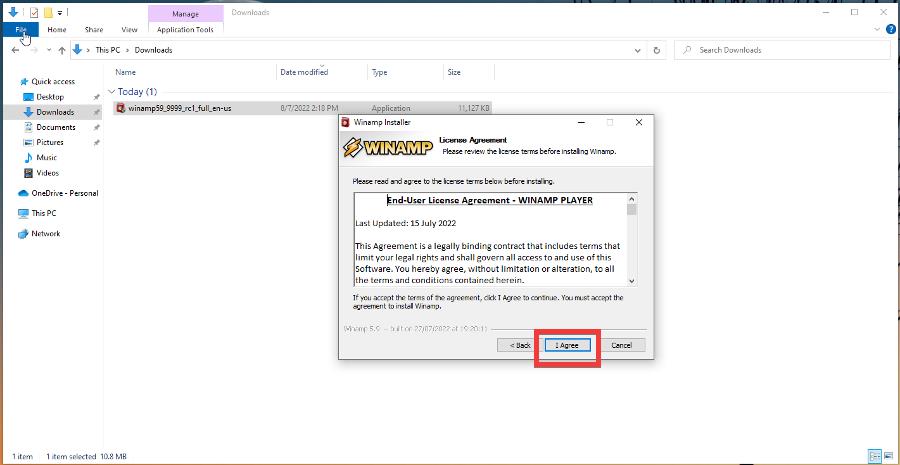
Then click I Agree.
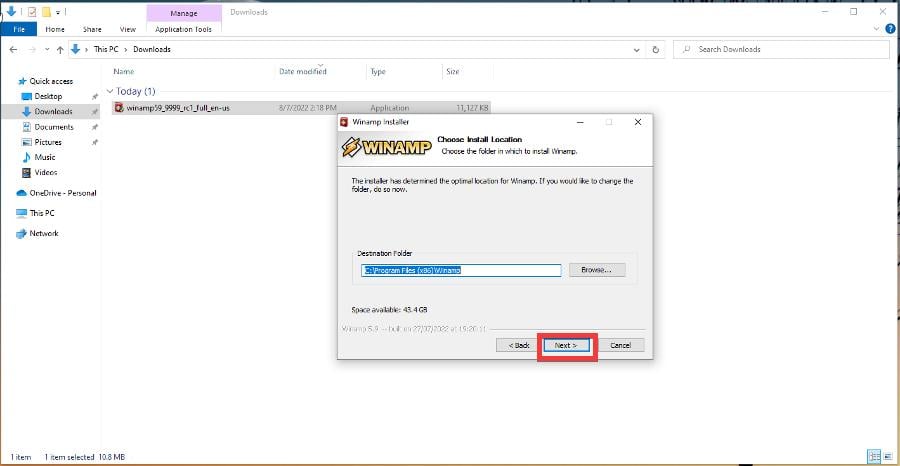
Click Next to set the installation location.
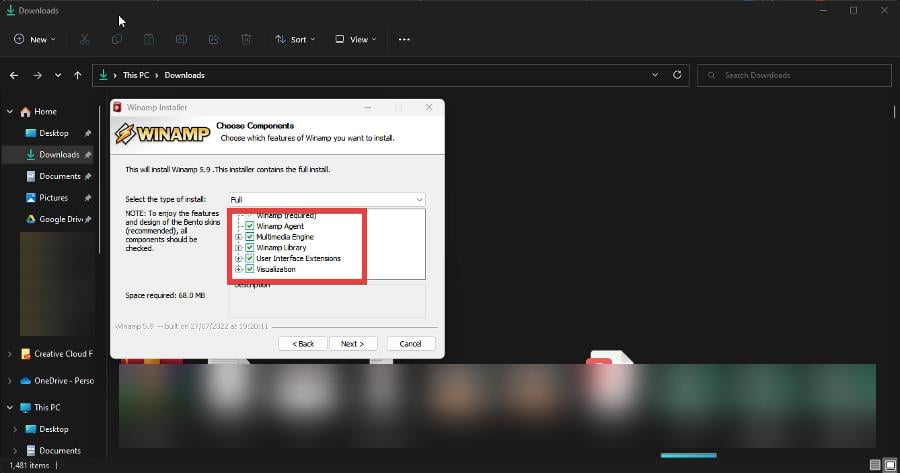
Next, you will have to choose which components you want. For this guide, we’ll select all of them. Click Next.
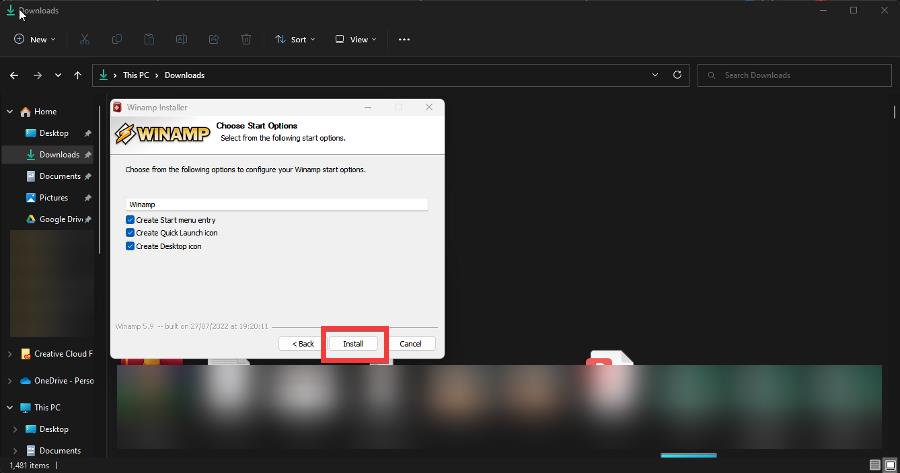
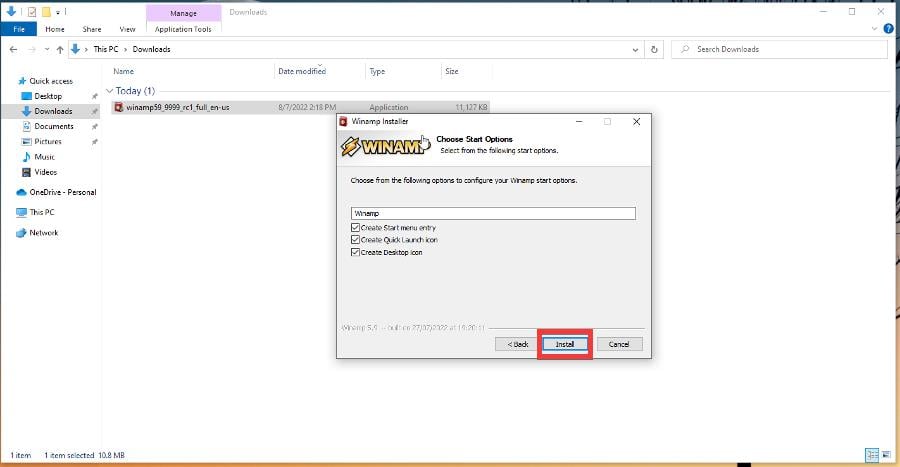
Choose which Start Options you want and click Install.
Give it a few seconds to install and click Finish.
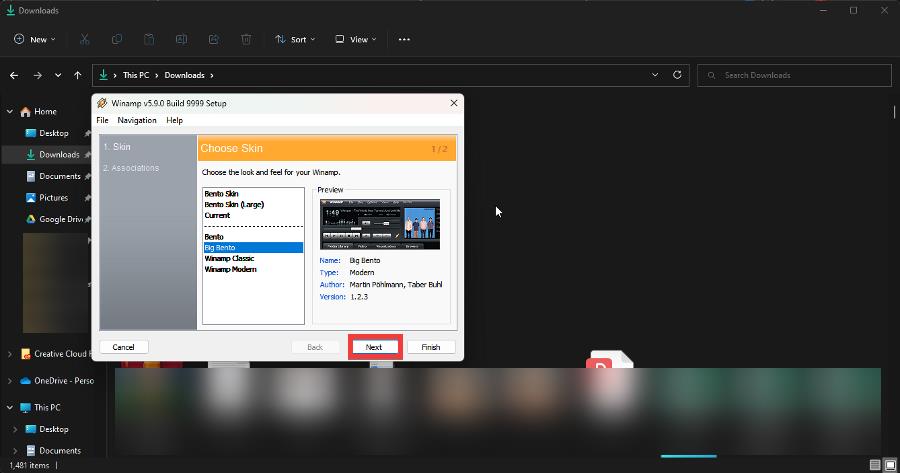
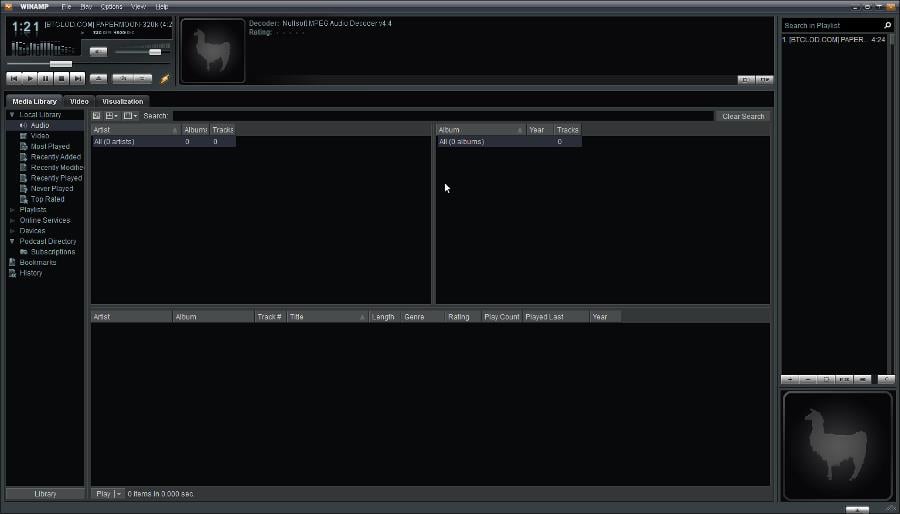
After opening, Winamp gives you some options for its skin. This guide will select Big Bento.
Click Next when done.
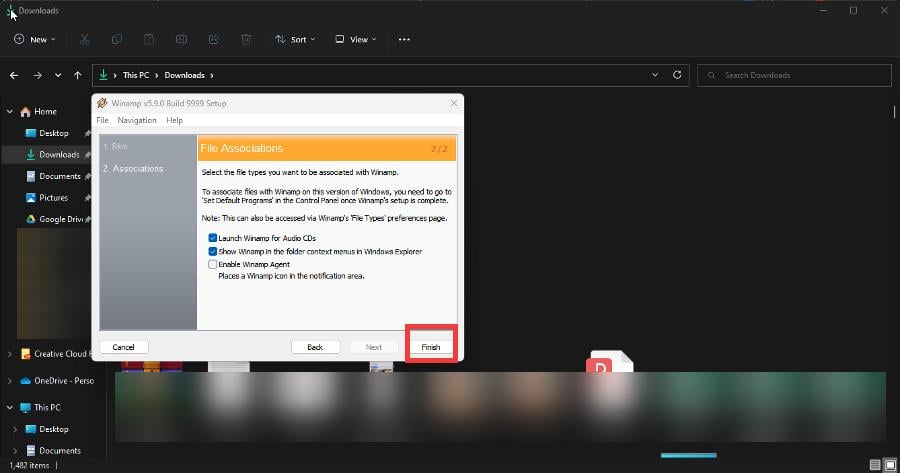
Then you’ll have to choose which file type you want associated with Winamp.
Click Finish when done.
2. Download and Install on Windows 10
Installing the new Winamp app is precisely the same as on Windows 11.
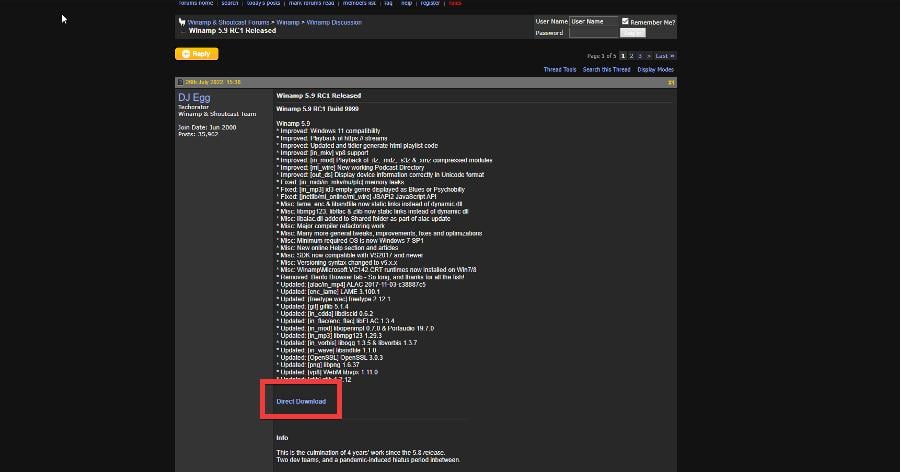
Go to the Winamp website.
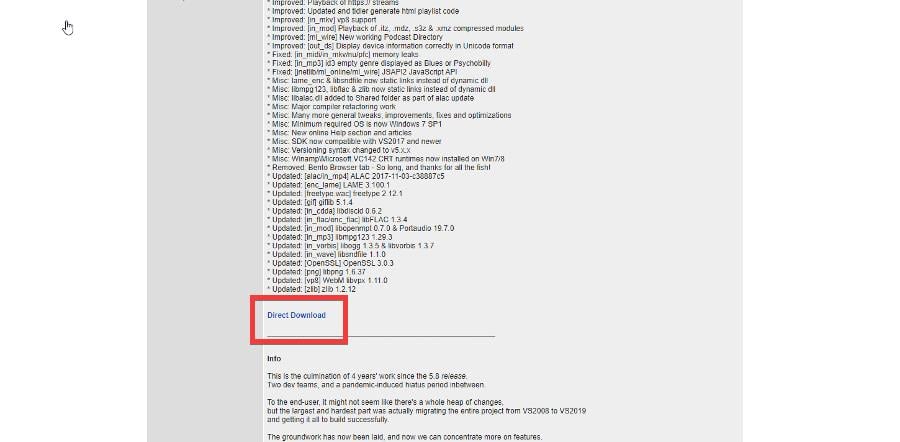
Click Direct Download to download the files.
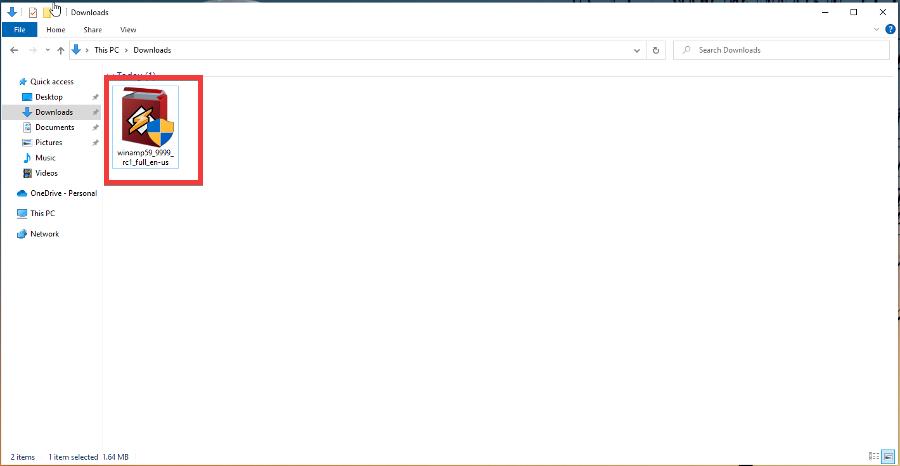
Go to the downloaded file’s location and double-click it to start the installation.
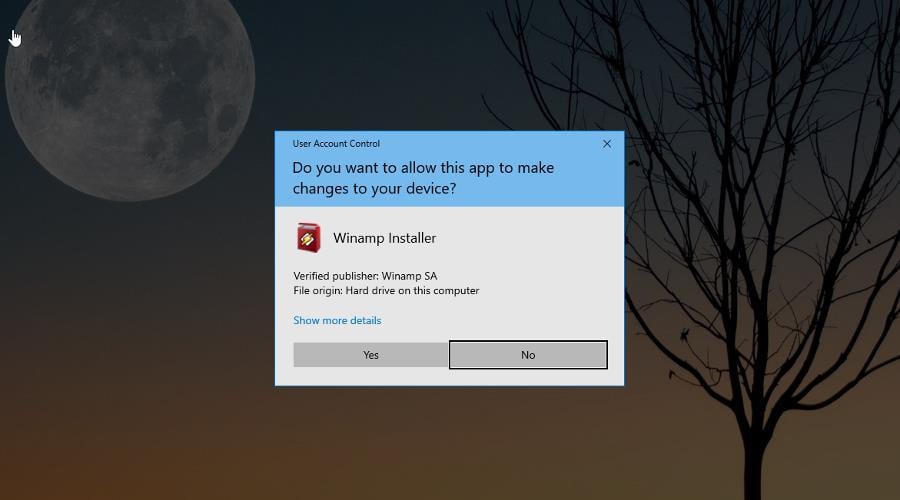
A window may appear asking you if you want to make changes. Click Yes.
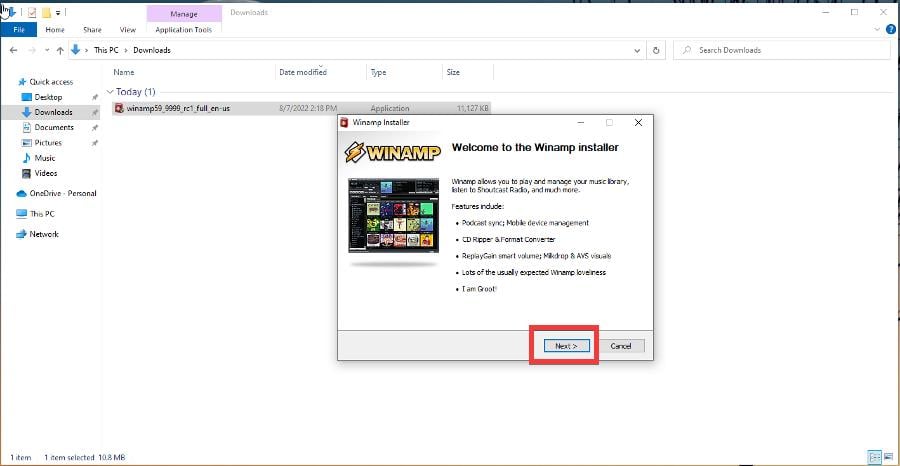
In the Winamp installation wizard, select Next.
Click I Agree in the License Agreement window.
Then you’ll have to choose where the app files will be on your computer. You can click Browse to determine your location or select Next.
Select the components that you want, then hit Next.
Review the Start Options and click Install.
Give the installation wizard a few seconds to install Winamp.
Click Finish to open Winamp.
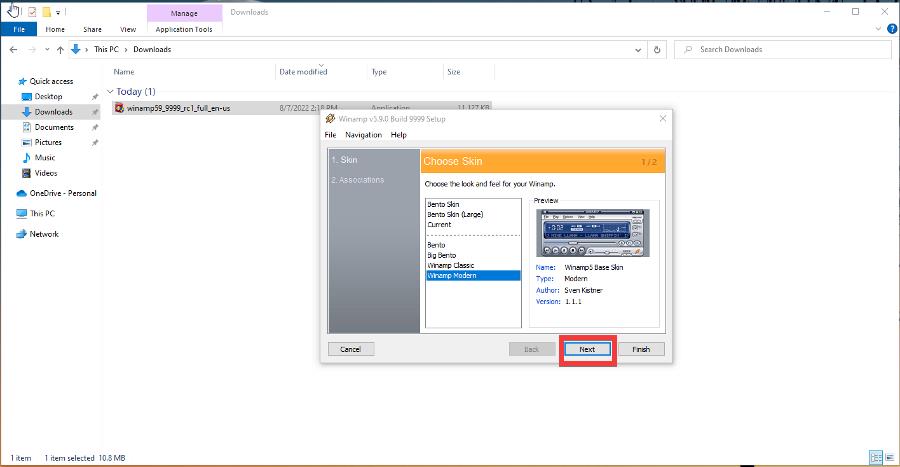
Before using Winamp, select the app skin. For Windows 10, this guide is choosing Winamp Modern.
Then click Next.
Click Finish in the final window.
Give Winamp time to save its settings, and it’ll open automatically.
Features
Now with the installation, it’s time to answer the question of what kind of new features this version of Winamp has. Again, there aren’t any significant changes to this new version.
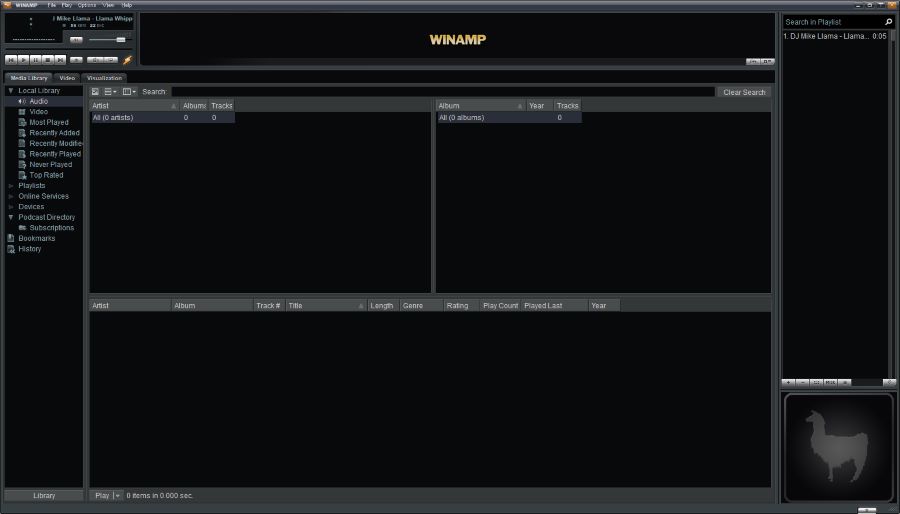
The changes made be considered under-the-hood tweaks to future-proof Winamp. Looking at the music player, it seems like a relic straight from the early 2000s. Depending on who you ask, this may be a good or bad thing.
But this is what the developers intended. If you look at the forum post, it says, “to the end-user, it might not seem like there’s a whole heap of changes, but the largest and hardest part was migrating the entire project from VS2009 to VS2019…”
It’s all about laying the groundwork. Currently, the changes include updating audio codecs to more modern ones, support for Windows 11, and bettering HTTPS streams.
This version of Winamp is very much a relic of the past. Some skins have poor resolution on higher-quality screens.
You do have a lot of the typical features you see on a music player. A library consisting of multiple playlists, comprehensive device support like smartphones and iPods, a podcast directory, an audio equalizer, and more.
What to expect
With all that said, what can users expect? What is in the works? The developers plan to create a cross-platform app that works on Android, iOS, web, and more. But, of course, what that “more” means is anyone’s guest.
There may be a premium subscription service coming to Winamp. A developer states that the base Winamp app will always be free, but additional features will be behind a paywall.
Future releases will see native support for more audio formats (opus, ogv/ogm, TS. H.265, HLS, VP9, and more) and getting rid of old features and replacing them with new ones.
The new features support MusicBrainz and MusicStory, both of which collect music metadata and curate it for artists. That way, the artists know what songs or samples belong to who. It’s a database.
We should also mention Winamp’s NFT initiative. The program sells NFTs based on the original design of the first Winamp release, but it has since ended.
The founder of Winamp hates the NFT initiative, as seen on Twitter. It appears there were plans to incorporate NFTs into a future version of Winamp, but at the time of this writing, it doesn’t look like support will go through.
A forum post from one of the developers said that they “honestly do not know” if NFT support will come to fruition. They later say that NFTs will not be on Winamp for Windows, but it doesn’t include the mobile versions in that comment, so it’s still possible.
Online services of some kind are planned for future Winamp releases, but the developer doesn’t go into future detail.
Problems with Winamp
The app isn’t perfect as people have experienced bugs and glitches. A common problem is some antivirus software will flag Winamp as malicious and may prevent you from using it.
The app is safe to use, so you don’t have to worry about getting a virus. Perhaps it has to do with the fact that the Winamp website is not on HTTPS. Regardless, the Winamp team has contacted antivirus companies to let the music player through.
And that’s it. That’s all the information we have concerning the new Winamp software. We’ll have to wait until the developers finish work on the latest version. Windows Report will cover them as they come out.
Feel free to leave a comment below if you have any questions on other Windows 11 apps or if you have some that you recommend. Also, feel free to leave comments about guides you’d like to see or information on other Windows 11 features.
While browsing the web, you must’ve encountered the term HTML at least once. If you’re unfamiliar with it, HTML is a markup language used to create content on web pages.
HTML underwent several changes over the years, and the latest version is HTML5. This improvement is to improve how websites work on the best modern browsers.
But how do you know if your web browser supports the HTML5 standard? We will show you how to go about it in this guide.
Do all browsers support HTML5?
Virtually all modern browsers are compliant with HTML5. This is because the latest markup language is now the most used by developers to create content on web pages.
So, aside from the old browsers that have not seen any improvement over the years, you should expect any browser you use to support HTML5.
What is HTML5?
HTML5, the fifth version of the HTML standard, was released in 2008.
it brought many new features such as native multimedia support and the ability to handle file manipulation, geolocation, drag, and drop.
Which browser has the highest support for HTML5?
While you would expect most browsers to have HTML5 support, the level of HTML5 compliance differs from one browser to another.
The browser with the highest support for HTML5 is Opera One. This is because it is frequently updated to meet the latest requirement of markup language.
How do I know if my browser supports HTML5?
There is no need to find out if your browser supports HTML5. This is because all modern web browsers support the markup language out of the box. So, there’s no need to install or configure anything.
However, not all browsers offer the same support for HTML5, so if you want the best support, it’s advised to use OperaOne.
The Opera One browser is fully compatible with HTML5 but has many other great features. First, a built-in ad blocker will speed up your webpage loading by blocking tracking cookies and scripts.
In addition, there’s also a built-in VPN that offers unlimited bandwidth free of charge. Additional features such as a pop-out video player and customizable workspaces with a Search in tabs function for easier switching are also there.
Opera One offers great features and full HTML5 support, so this might be a perfect time if you haven’t tried it.
Opera One
New full HTML5 compatibility, plus many unique, smart features to make the most of your browsing time.
There are new features in HTML5 that are absent in the older versions from HTML4 down. If your browser does not support HTML5, below are some of the compatibility issues you might be facing:
Form feature issues: HTML5 has new input and output attributes that cannot be found in the earlier versions. These attributes are email, URL, and datetime-local, among others. So if your browser does not support HTML5, it will have problems with these features.
Semantic Tags: HTML5 has dropped some presentational elements like big, font, and center. So you shouldn’t expect it to work.
Storage Capability: The HTML5 standard has a storage capability that allows browsers to store data on the user side. This data is more long-lasting than the cookies. However, this feature only works in the latest browsers.
Is your Google Drive app’s system tray icon greyed out with no option to sign in? If you can’t sign in with your Google Drive app, there are a few potential fixes.
These are some probable fixes to try out in various Windows platforms if you can’t sign in with the Google Drive client software.
If you’re asking why Google Drive keeps asking me to sign in, that can be caused by several issues, but we’ve got solutions for all of them below.
Many use Google Drive to store their data online. However, sometimes issues with Google Drive can occur and prevent you from signing in.
Speaking of Google Drive errors, here are some of the most common issues that users reported:
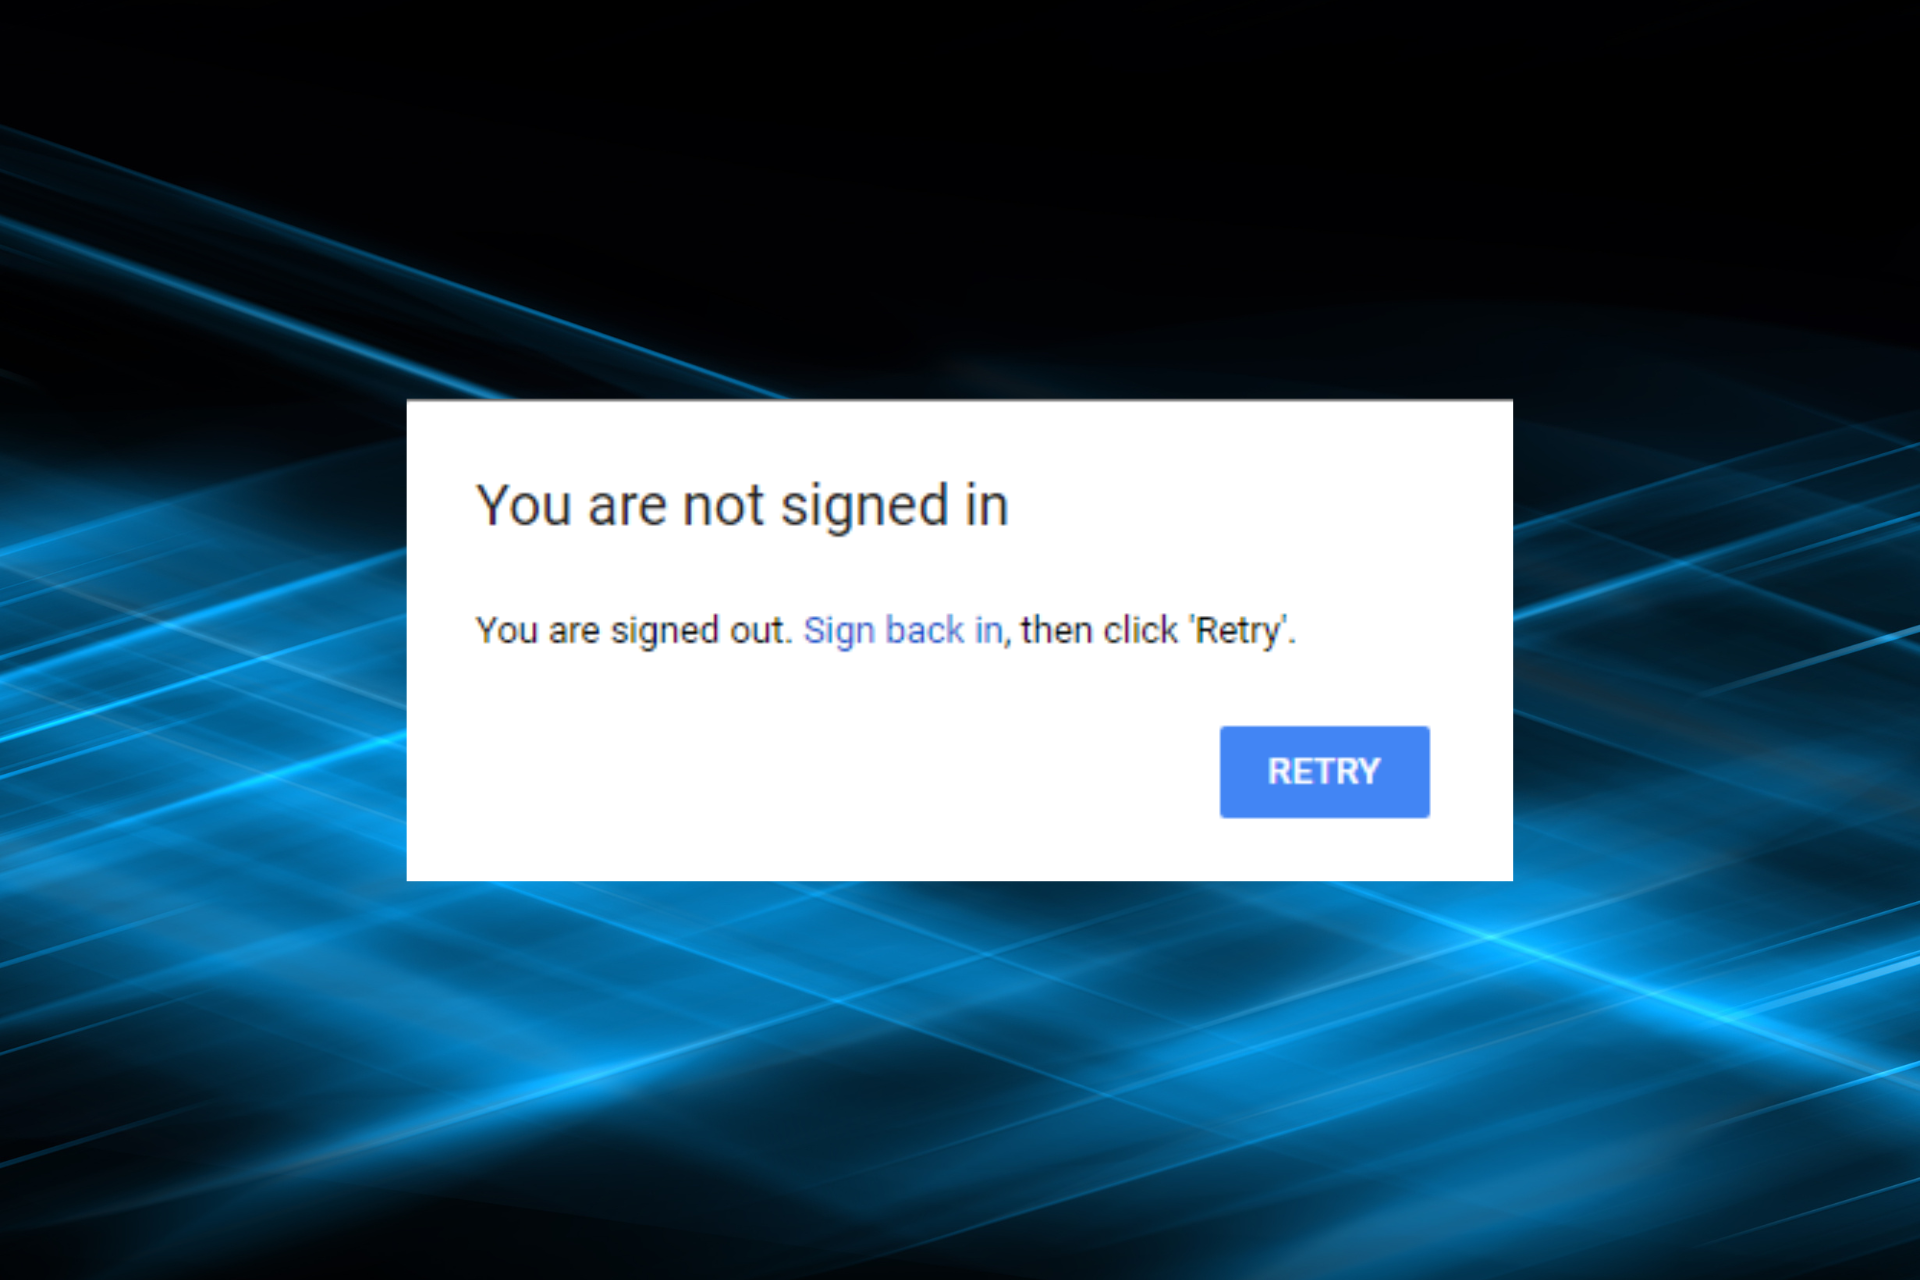
Google Drive you are not signed in Internet Explorer, Chrome – According to users, this issue can appear in almost any browser. If that’s the case, try disabling your proxy and check if that helps. In addition, you can try switching to a different browser and check if that helps.
Google Drive not signed in Windows 7 – This problem can appear in older versions of Windows, and Windows 7 and 8 aren’t exceptions. Even if you don’t use Windows 10, you should be able to apply most of our solutions to your system.
Google Drive you are not signed in during upload – According to users, sometimes you might encounter this issue while trying to upload your files. To fix the problem, be sure to check your Internet options and change them if needed.
Google Drive not syncing Windows 10 – If you have any syncing issues with Google Drive, find out what to do when Google Drive won’t sync.
Google Drive keeps asking me to sign in – Many users reported that Google Drive asks them to sign in even when they are already logged into the platform.
Quick Tip:
Try accessing Google Drive using another browser, like Opera One. It’s built using the new Chromium engine and works just as well, if not faster than other browsers like Chrome or IE.
Besides, you can enjoy private navigation through your Google Drive files thanks to the built-in VPN and the tracking blocker. Also, this browser comes with a native AI.
Opera One
Access your Google Drive web client without any issues with the world’s fastest web browser!
Can I access Google Drive without a Gmail account?
Yes, you can access Google Drive, and most of the other services, using a non-Google account or one ending with @gmail.com.
To do that, head to Google’s account creation page, enter the account details, including the email address, and create an account. Once done, you would get the 15GB storage space as others on Google Drive.
Can you upload to Google Drive without a Google Account?
No, whenever someone shares a link with you to access Google Drive, you would be asked to either provide an address linked to Google or create one. So, you will have to create a Google account.
Also, to add files to their allotted storage space on Google Drive, users are required to create a Google account, though it’s not mandatory to use Gmail for the purpose.
How do I get rid of sign in required Google Drive?
1. Update the Google Drive client software
First, consider reinstalling Google Drive to ensure it’s the most updated version. You can uninstall the Google Drive client much the same as most Windows software via Programs and Features.
Open the Google Drive page and click Download Drive for desktop, and then run the setup to install it. Restart the computer when you’ve re-installed Google Drive.
2. Switch off the Windows Firewall
Press Windows + S to open the Search menu, enter Windows Firewall in the text field, and click on the relevant search result.
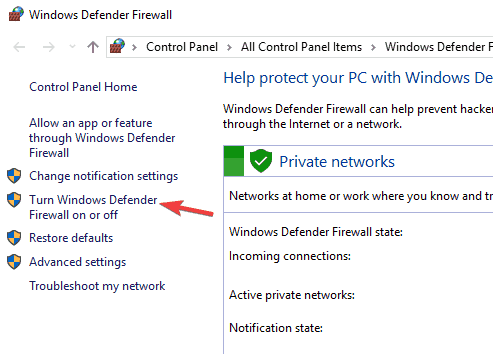
Select the Turn Windows Defender Firewall on or off from the left.
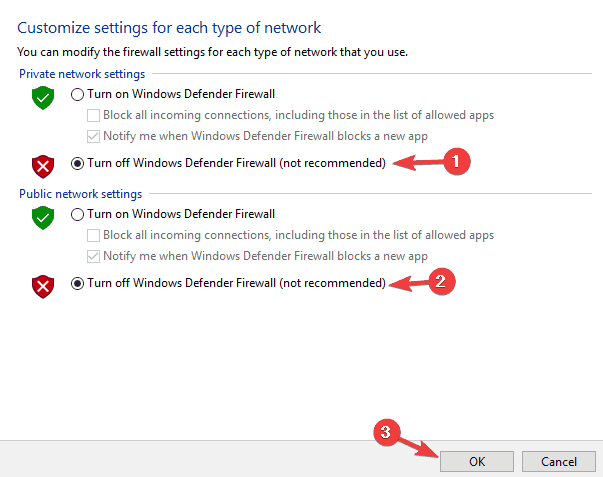
Select the Turn off Windows Firewall option under both the network settings and clickOK.
The Windows Firewall might be blocking the Google Drive app. So switch it off to see if that makes a difference. If the backup and sync not signed in problem persist, head to the next method.
3. Allow an app in Windows Firewall
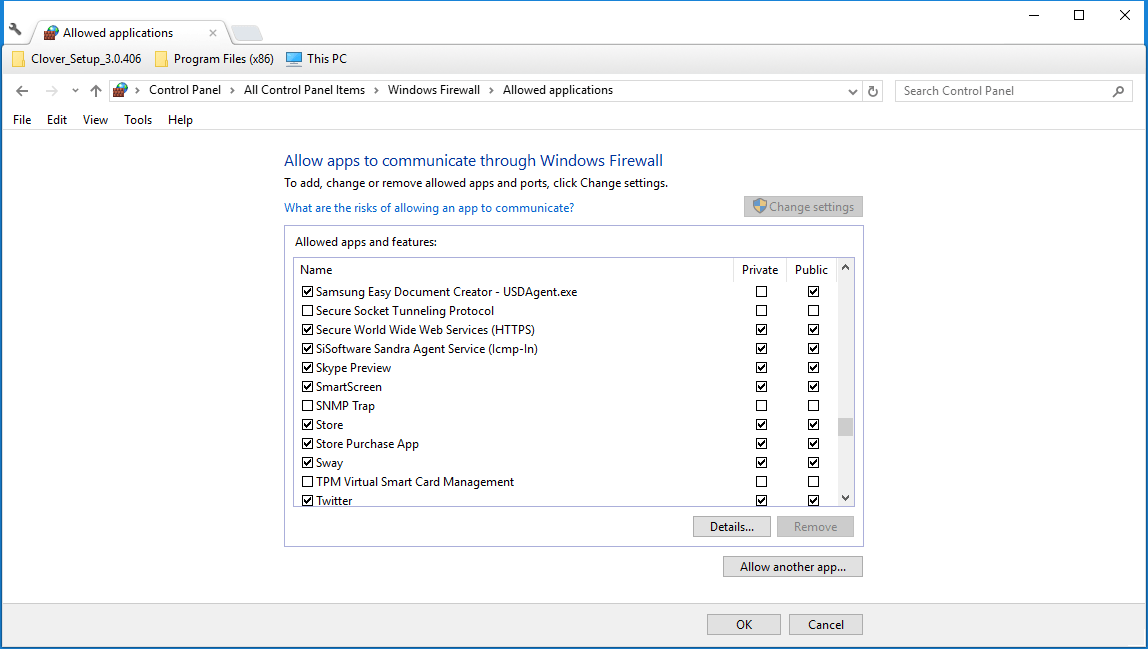
Press Windows + S to open the Search menu, enter Allow an app through Windows Firewall, and click on the relevant search result.
Now scroll down to Google Drive and verify that both the checkboxes are selected here.
In case you don’t find Google Drive listed here, click on the Change settings button.
Now, click on Allow another app.
Click Browse.
Locate the Google Drive launcher, select it, and click Open.
Now, click Add.
Next, verify that both the checkboxes for Private and Public are ticked, and click on OK to save the changes.
That’s it. Whitelisting it in Windows Firewall will help fix the Google Drive can’t sign in error, and you won’t have to disable Firewall anymore.
4. Check your antivirus
According to users, in some cases, you won’t be able to sign in to Google Drive due to your antivirus. Sometimes your antivirus settings can interfere with Google Drive, and to fix this issue, it’s recommended to check your antivirus settings and ensure that Google Drive isn’t blocked.
If Google Drive isn’t blocked by your antivirus, you can try disabling certain antivirus features and check if that helps. In some cases, you might even have to disable your antivirus entirely.
In the worst-case scenario, you’ll need to remove your antivirus and check if that solves the problem. If removing the antivirus solves the issue, you should consider switching to a different antivirus solution.
In order to fix this issue and access your Drive files again, you should find an efficient antivirus. You should therefore consider one of the best antivirus programs for browsing.
5. Re-establish the Google Drive Path
Press Ctrl + Shift + Esc to open the Task Manager, select all Google Drive processes one at a time, and then click the End task button.
Next, press Windows + E to open File Explorer, paste the following path in the address bar, and then hit Enter while replacing Username with the one on your device:C:\Users\Username\AppData\Local\Google
Now, select the Drive folder and hit theDelete key to erase it.
Once done, check if the Google Drive desktop can’t sign in problem is resolved. If not, head to the next method.
6. Check your proxy settings
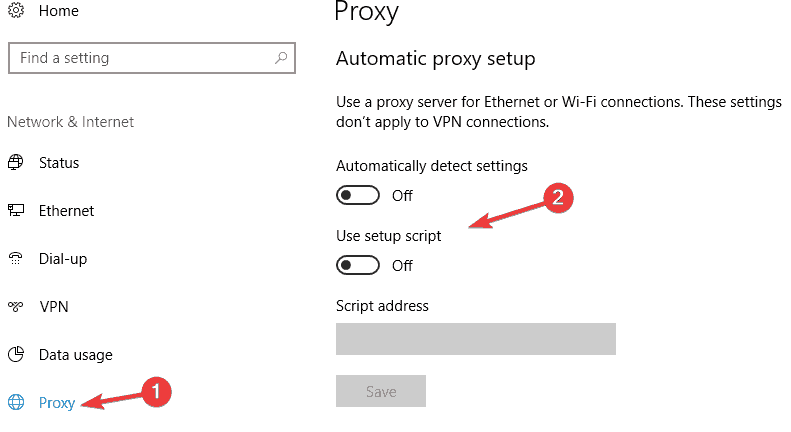
Press Windows + I to open the Settings app and navigate to Network & Internet section.
Select Proxy from the menu on the left. In the right pane, disable all options.
In order to protect their privacy online, many users use proxy to hide their identity. Although proxy can be quite useful, sometimes it can interfere with Google Drive and cause You are not signed in message to appear.
To fix this problem, it’s advised to check your proxy settings and disable them.
After doing that, your proxy should be completely disabled, and the issue should be resolved. As you can see, the proxy is a simple way to protect your privacy online, but it can lead to certain issues.
Nonetheless, if you want to protect your online identity without problems on Google Drive, a VPN solution might be beneficial. So don’t hesitate to choose the best VPNs available for Windows 10 PCs.
7. Adjust the Region Settings in Windows
Press Windows + R to open the Run command, enter control panel in the text field, and then click OK.
Click on Change date, time, or number formats under Clock and Region.
Select English (United States) from the Format drop-down menu.
Press the Apply and OK buttons at the bottom of the window.
8. Check the User Directory Google Drive folder permissions
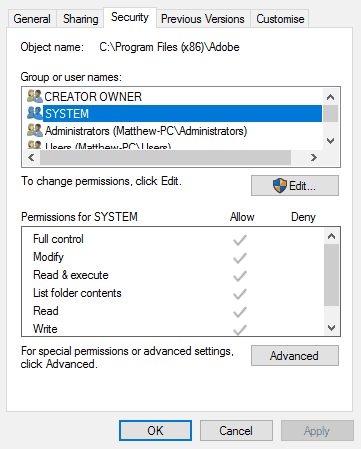
First, right-click your Google Drive folder in File Explorer and select Properties from the context menu.
Navigate to the Security tab.
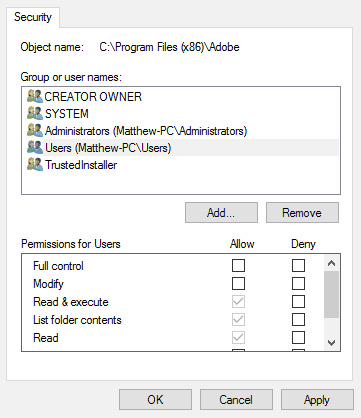
Select your user account and then check the folder permissions. If some of the permissions are denied, click the Edit button.
Now click all the Allow checkboxes to grant the folder all permissions.
Click Apply and OK to confirm the new folder settings.
Also, check your Google Drive folder permissions. The Windows account you use with Google Drive should give you full control of that folder.
9. Remove Google from Trusted sites
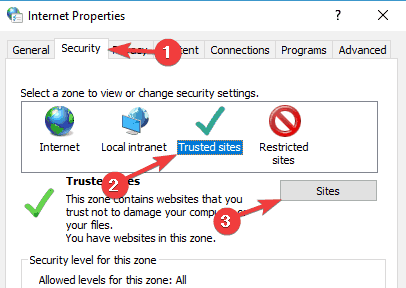
Press Windows + S, enter internet options, and click the relevant search result.
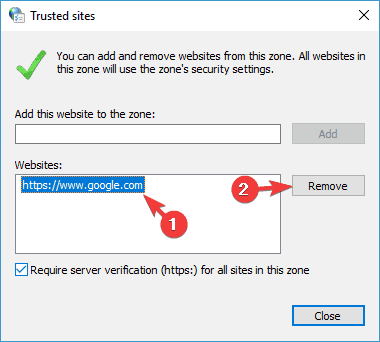
Navigate to the Security tab, select Trusted sites, and then click the Sites button.
Now you should see all websites that are on your list of trusted websites. Select Google and then click the Remove button.
Once you remove Google from the list of trusted websites, save changes, and close the Internet Options window.
According to users, sometimes issues with Google Drive can appear due to your Internet settings.
If you’re getting You are not signed in message while trying to access Google Drive, the problem might be your Trusted sites list, and following the steps here should fix things.
10. Reinstall the Google Drive client
If you’re having issues with You are not signed in message, you might want to consider reinstalling the Google Drive client.
Your installation might be corrupted, or Google Drive might be misconfigured, thus causing this issue to occur. To fix the problem, it’s advised to uninstall Google Drive and install it again.
There are several ways to remove Google Drive, but the best one is to use uninstaller software. Uninstaller software is a special application that allows you to remove any application from your PC completely.
By using uninstaller software, you’ll remove all files and registry entries related to the application you want to remove. This will ensure that there aren’t any leftover files that can interfere with your system.
There are many great uninstaller applications, but the best is IObit Uninstaller 10 Pro. Once you remove Google Drive with this tool, install it once again, and the issue should be permanently resolved.
Can someone else upload files to my Google Drive?
Yes, anyone can upload files to your Google Drive, given they have access to it and the permission to edit. Here, you have to suitably configure the sharing settings before providing access to Google Drive to others.
Google Drive offers three options for sharing files, Viewer, Commentor, and Editor. If you want others to be able to upload files, choose Editor.
So, with these fixes, you should be able to fix things when seeing the Google Drive can’t sign in error.
Are you experiencing the Unable to display RD Web Accesserror message while using Microsoft Edge on your Windows 10 device?
If for some reason, you cannot access your webpage, you cannot refresh a certain page, or you cannot apply the server settings due to this particular issue, don’t panic.
We will try to find the best workarounds that can successfully address this general Edge malfunction.
Is RD Web Access required?
RD Web Access role is a mandatory role in the RDS deployment, and you are needed to install it along with deployment.
However, if you don’t need RD Web Access, you may prevent access to it by disabling the IIS default website. This will cause that page to stop working.
How do I find my RD Web Access URL?
Verify that you are able to access the web client using the web client URL that includes your server name. The URL should be structured as https://server_FQDN/RDWeb/webclient/index.html.
It is essential to ensure that the server name in the URL corresponds to the one found on the public certificate for RD Web Access (typically the server FQDN).
Note that the solutions below can be applied to the following similar errors reported by our users:
Error: Unable to display RD Web Access
Error Unable to display RD Web Access in Microsoft Edge
Unable to display RD Web Access enhanced security configuration
Without further ado, let’s jump into the list of solutions to the Unable to display RD Web Access issue in Windows 10.
Quick Tip:
As this error only appears in Microsoft Edge, before you go along with any potential solutions to fix it, you should think about using a different browser like Opera One.
This alternative is a Chromium-based Internet browser that is free of such issues, although it comes with enhanced security features. Plus, it brings it’s own built-in AI.
Opera One
Forget about errors, lag, crashes, and endless other problems using Opera One.
How can I fix the Unable to display RD Web Access error?
1. Add the site to the Trusted sites zone
Press Windows then type Internet Options and click the top result.
Here, navigate to the Security tab and select Trusted sites.
Click the Sites button then add your website’s URL address in order to whitelist it.
If the Unable to display RD Web Access error is displayed along with the blocked message that asks you to tell Edge whether you trust the implied webpage or not, just add this page to the Trusted sites zone.
Open Edge and click the three-dot menu and select Settings.
Here, navigate to Cookies and site permissions followed by Manage and delete cookies and site data.
Select See all cookies and site data.
Click Remove all followed Clear. That’s it!
3. Apply the latest Windows updates
On your computer, press the Windows + I keyboard hotkeys. From the Windows Settings window, click on the Update & Security option.
Next, from the left panel of the main window, click on the Windows Update entry.
If updates are available you will be prompted with new notifications.
Follow on-screen prompts and apply the Windows packages that are available for your computer.
In the end reboot your PC and try to use Edge again.
4. Reset Edge
Open Edge and access the Menu option followed by Settings.
Here, click the Reset settings option from the left side, followed by Restore settings to their default values.
Click Reset. That’s it!
These guidelines should explain the right troubleshooting solutions to fix the Microsoft Edge Unable to display RD Web Access error.
You can also try to uninstall recently applied Windows 10 updates or remove a certain software program if the Edge malfunction occurred after a system update or after setting up a new program.
If you have further questions or if you want to share another problem, use the comments field available below. We will try to help you as soon as possible.
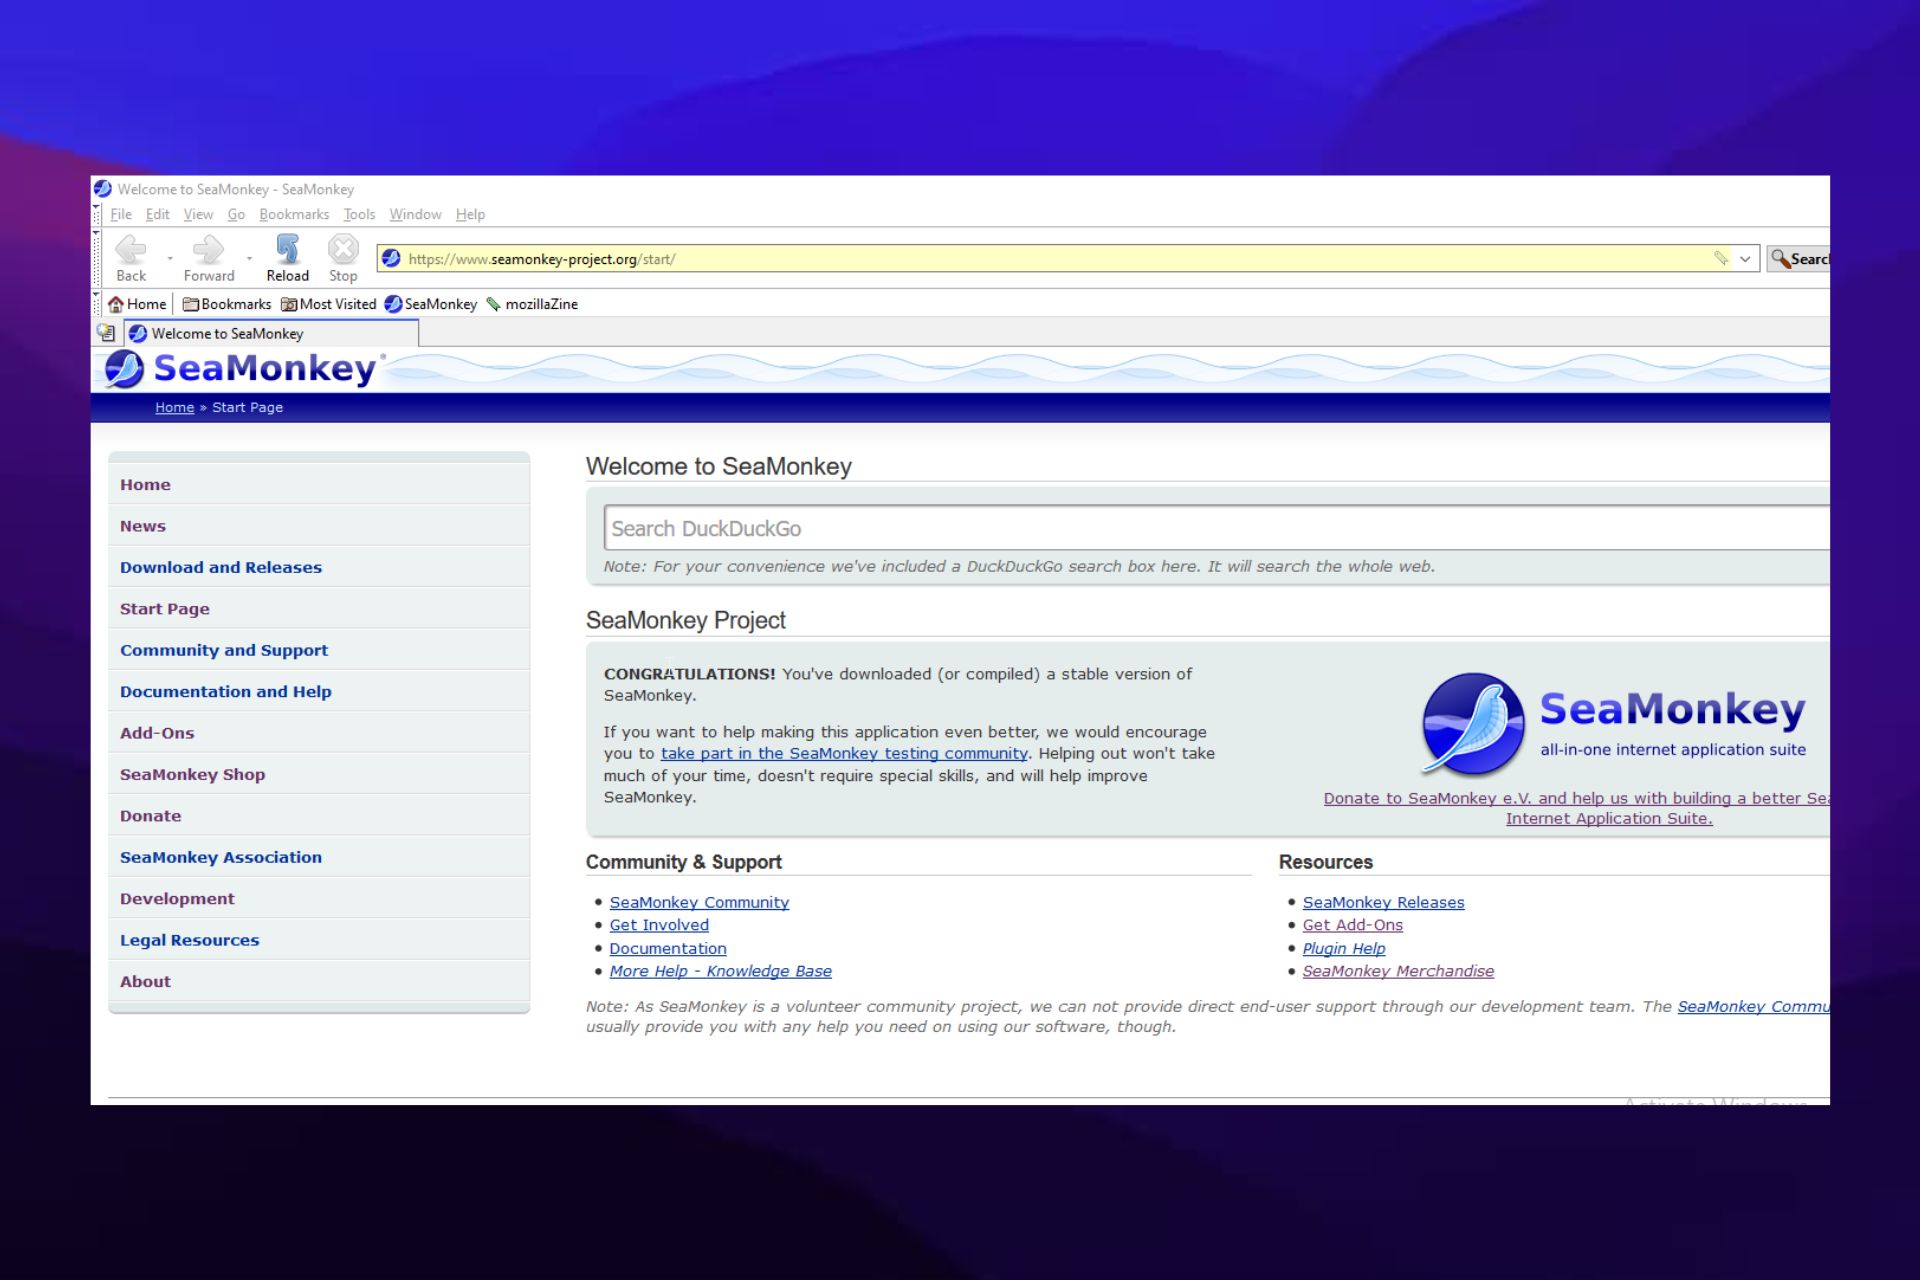
SeaMonkey is one of the newest browsers in the market. It is an open-source browser with numerous features that keep it above most of its pairs. Also, it encourages development communities to contribute and address its maintenance.
It means people can contribute and suggest features that will be helpful for its improvements. However, there are several difficulties you can encounter while using the SeaMonkey browser. The SeaMonkey play Flash not working is a standard error that users complain about.
You can use many plugins and tools with the SeaMonkey browser that helps you enjoy more internet activities. However, you can encounter errors while using these plugins with your browser. So we’ll discuss quick fixes for the Flash not working on SeaMonkey.
Does SeaMonkey support Flash?
The SeaMonkey browser doesn’t support other NPAPI plugins apart from the Adobe Flash Player. However, other plug-ins became unsupported since SeaMonkey 2.53.1. The SeaMonkey browser doesn’t support other plugins, but users can still access them by installing them on their devices.
Quick Tip:
One of the remaining browsers on the market that supports Flash Player both natively and through its extensions is Opera, and that’s why we recommend using it if you still have media files in this format.
The video player that is separate from the normal browsing may help in case you need to use the Flash Player. This video player and the VPN can work together for you to have the greatest experience.
Opera
This flexible web app is suited to play any Flash Player-related media files.
How do I fix SeaMonkey if the Flash is not working?
1. Restart your computer
Click the Windows button on the left corner of your screen.
Select Power from the option.
Click on Restart and select OK.
It will prompt the restart page on your device screen. Most of the difficulties you may encounter with your device browsers can be fixed by simply restarting your computer. A faulty component of your computer may need to be refreshed, so a reboot should fix the SeaMonkey play flash not working.
2. Kill Task for the SeaMonkey browser
Right-click on any space on your screen.
Scroll down and click on Task Manager.
On the left pane of the screen, select Processes, then locate SeaMonkey.
Right-click on SeaMonkey and select End Task.
Ending tasks for SeaMonkey will force-quit the browser and help you relaunch the browsers afresh. However, it assists SeaMonkey in fixing any issues affecting it.
3. Clear SeaMonkey Cache file
Launch the SeaMonkey app and click on the Menu button> Edit.
Select Preferences from the drop-down and click Browsers.
Select Private Data and check the box for the files you want to clear.
Click on the Clear now option and wait till it completes.
Clearing the cache files for your browser will help flush old and corrupt browser data that can cause difficulties with the components and plugins. Although, caches are data that help your browser load sites faster and smoothly. They can become old and corrupt and cause issues with browser parts.
Install an older version of the Flash player: Go to Archive.org and download the installer Adobe Flash player 29. After installation, avoid permitting to check for updates. Once this is done, you should have access to flash without hassles.
Use another browser: However, you need to switch to another browser if your current one isn’t working properly with the flash player. Hence, we recommend that users download an older version of the Firefox either Opera browser. It is because Firefox and Opera are the most capable and adapted browsers to use with flash player.
In conclusion, users can go through our easy guide on how to unblock Flash in major browsers. Let us know how the procedure went for you in the comments below.
Web browsers support all sorts of multimedia features, and one of those features is in our attention today. By using video pop out, you’ll make the YouTube video float on top of all other windows on your PC.
This feature should work with almost any online video, and in today’s guide, we’re going to show you how to use picture in picture YouTube feature in your browser, so let’s get started.
Sometimes browsers have issues with this feature, but we already wrote on how to enable video pop out in Chrome if it’s not working.
Does YouTube have floating window?
Yes, YouTube has a floating window that you can use in almost any desktop web browser. On mobile devices, the situation is slightly different.
While this feature is available in YouTube app, you can only use it with a premium subscription. Now that you know more, let’s see how to use YouTube pop out player.
How can I make YouTube videos pop out in my browser?
On Opera One
Opera One is one of the few browsers that automatically display YouTube videos on your desktop, whether you are using the browser or any other application.
It basically requires little from you because it handles everything on autopilot. This is why, if you haven’t tried it yet, you should definitely give it a shot.
However, if this doesn’t happen, you can follow the steps below to manually change the settings.
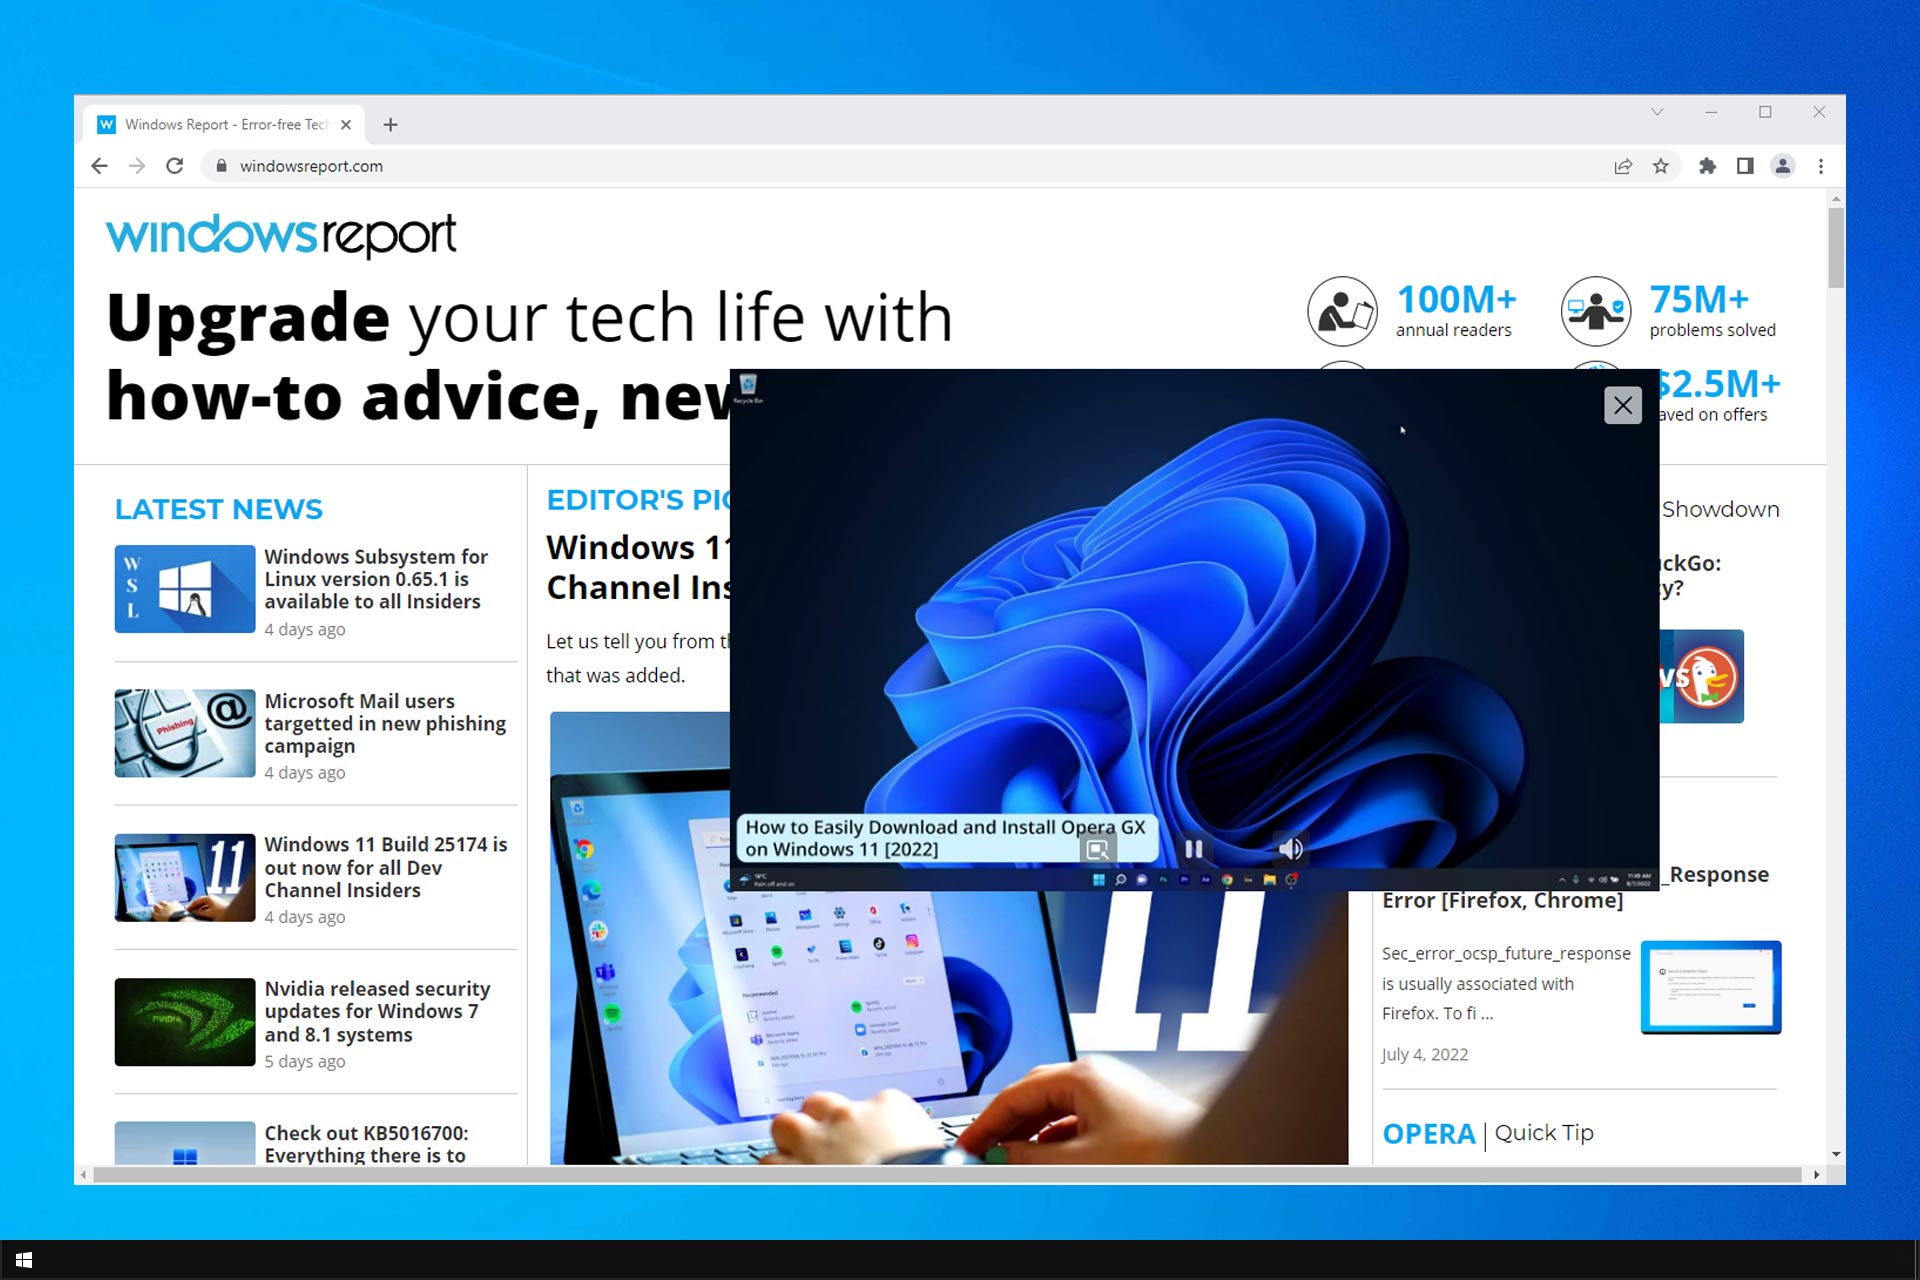
Launch Opera Oneand play any YouTube video that you want.
Move your mouse over the video and click the icon that appears at the top of the video.
After doing that, the video pop-out will appear.
This YouTube pop-out video will always be on top, so you can keep watching the video even if you’re working on something else.
The video has playback controls, you can pause the video or mute it if needed. So, if you ever wondered how to pop out YouTube videos on Opera One or Opera GX, this is how.
This feature is built-in in Opera One, but the browser also has a share of other great features. Opera One has a dedicated workspaces feature that lets you organize all your tabs into groups.
In addition, there’s a built-in ad blocker and a VPN, so you can rest assured that your browsing sessions are completely safe. If you already haven’t, be sure to give it a try.
Opera One
If you want a browser that is secure and optimized for multimedia, you found it.
If you want to watch YouTube in PiP mode, you can do that by purchasing YouTube Premium subscription. Alternatively, you can use third-party apps to achieve the same results.
iPhone
Unlike Android, iPhone is a closed platform, so you can’t use third-party apps to achieve the same results. This means that your only option is to purchase a Premium subscription.
The video pop-out feature is available by default in all major browsers, and we hope that you learned how to pop out a YouTube video properly after reading this guide.
Since you want the very best, check out this list, including great video optimizer software for YouTube. Rest assured that you’ll find a variety of preset device formats to choose from.
In case you have any problems with this feature in Opera, we have a whole guide dedicated on what to do if Opera GX mini player is not working, so don’t miss it.
As for the actual procedures described above, if you have any other suggestions, don’t hesitate to share them via the comments section below.
While most new games will inherently work on modern systems, it isn’t always the case with classic titles. However, getting your hands on old games is easy enough through GOG, and you can also efficiently run GOG games on Windows 10 without much trouble.
GOG.com released an announcement that provided us with all necessary details about compatibility with Windows 10. In addition, the post stated that testers from GOG’s team are constantly working on are they’re very optimistic about running GOG games on Windows 10.
You have been asking on our forums, and now we are here with the official word! We’re getting ready for Windows 10 and putting our QA Team at full capacity to test the games we (and you!) are looking forward to play on the upcoming OS.
Can I run GOG games on Windows 10 & 11?
It depends on the game you are trying to run on your Windows 10 or Windows 11 system. Players have complained that older titles might not work on modern systems.
That being said, this shouldn’t discourage you from trying to play your favorite game on your Windows-powered PC.
Does GOG have a Windows app?
Yes, and you will find all your games and friends in one place. It is called GOG GALAXY 2.0 Open Beta for Windows 10/11, and it is available for Windows and Mac.
All the games you purchase on the GOG website will immediately be available in your Owned games tab. From here, you can install and launch GOG classic and new games on Windows 10 and see DLCs and achievements.
Hover over your username at the top of the screen.
Click on Games.
Select the game you wish to download.
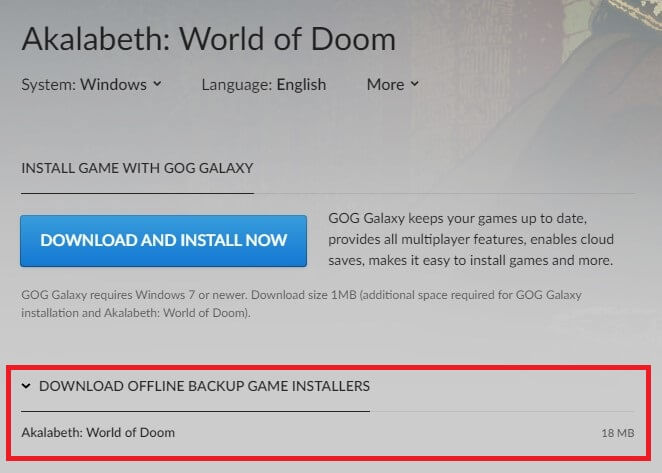
Click on Download Offline Backup Game Installers.
Click on the game title, and your download will begin.
Locate the executable file and follow the wizard to install it.
Downloading GOG games as executable files will allow you to manage your collection without being tied to an online service. As you truly own the game, you can now do whatever you want with the game.
Additionally, this will allow you to install it on offline machines.
GOG games are not working on Windows 10
As we’ve said in the past, GOG has also made it very easy to run classic and new games on Windows 10, and all without any DRM.
However, some titles won’t be compatible with Windows 10 due to their old nature and lack of newer OS compatibility.
You should always contact GOG.
GOG is the subsidiary of CD Projekt, the company that also owns CD Projekt RED, developer of one of the most popular video game series today, The Witcher.
GOG.com is especially popular because it offers video games to users through its DRM-free platform for Windows, OS X, and Linux.
Creating screenshots on Windows is fairly simple, and you can easily create JPG or PNG screenshots without third-party tools.
What about PDF screenshots? In today’s article we’ll show you how to save screenshots as PDF on Windows 10, so let’s get started.
How can I save and convert a screenshot as a PDF on Windows 10?
1. How to save a screenshot as a PDF
You can easily save a screenshot as PDF using the built-in app called Paint. What you need to do is take the screenshot, upload it into Paint, then save the document in PDF format.
1.1 Create a screenshot withPrint ScreenorAlt + Print Screenkeyboard shortcut.
1.2 Press Windows Key + S to open the Search menu.
1.3 Typepaint, and select Paint from the results.
1.4 PressCtrl + Vto paste the screenshot into Paint. You can also right click anywhere in Paint and select Paste from the list of options.
1.5 Go to File > Print.
1.6 SelectMicrosoft Print to PDFand choosePrint.
1.7 Now select the desired save location, enter the desired name, and click onPrint.
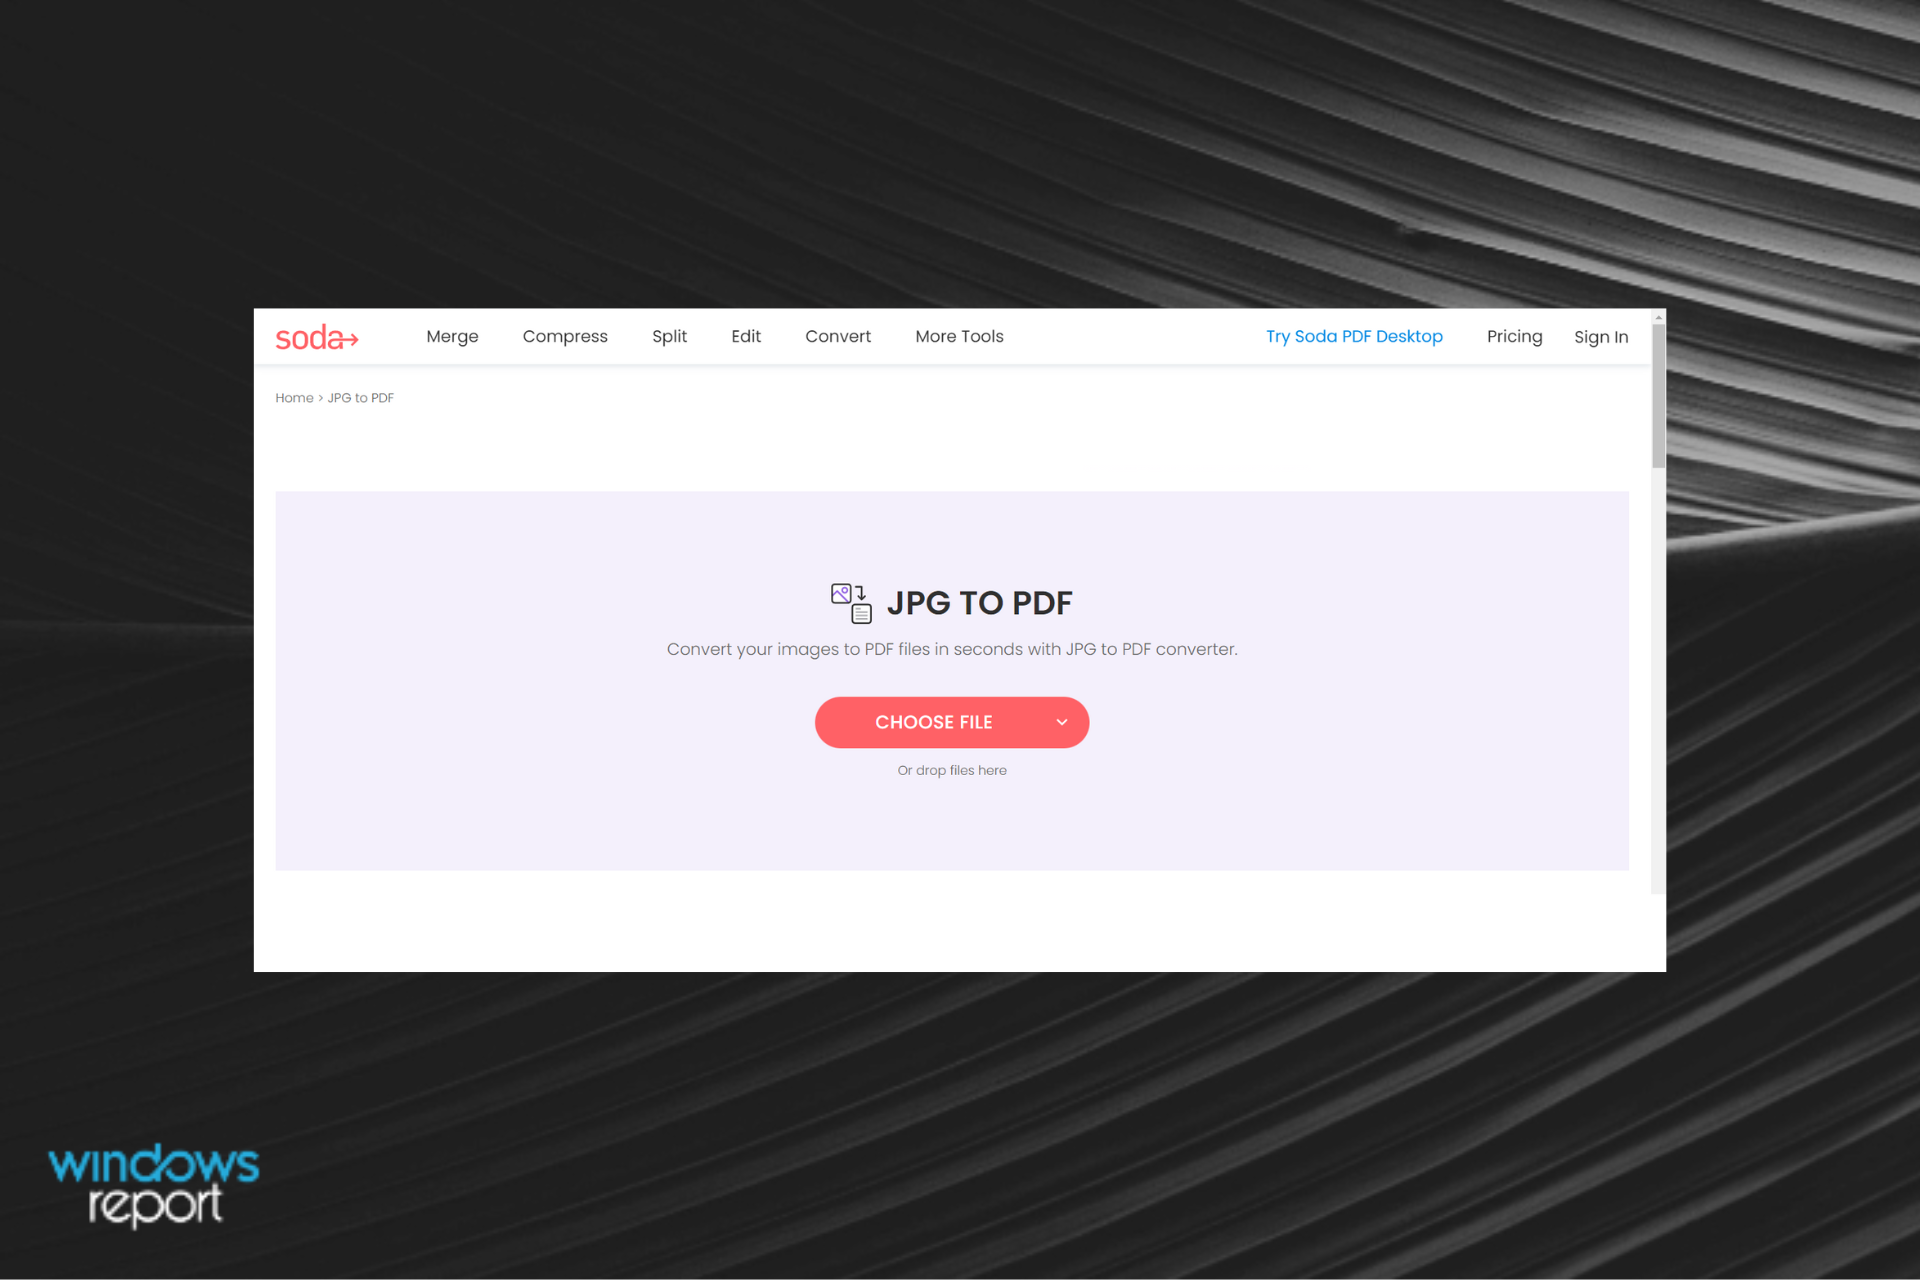
2. How to use Soda PDF to save screenshots as PDFs
Soda PDF is a screen capture and converting software and it can capture your desktop, a region, or a scrolling window. It can even grab text from screenshots, and transform them into a PDF file.
Soda PDF Desktop lets you create PDFs from any common file type and convert PDFs to Word, Excel, PowerPoint, picture, HTML, and other formats. It also allows you to combine many PDF files into a single, manageable document.
Convert a screenshot into a PDF with Soda PDF
Install Soda PDF desktop with the 7 days trial period.
Open the desktop software.
Browse the screenshot from your PC.
Open and convert the screenshot into PDF.
It is simple and quick to convert a screenshot to a PDF. You also have the choice of up to 1GB of backup storage for your important papers. To be more specific, PDFs may be created from blank files, a clipboard, a URL, a scanner, or Office file formats such as Word, PowerPoint, or Excel.
Soda PDF
Convert screenshots into PDFs effortlessly with the Soda PDF app.
3. How to convert a screenshot to a PDF using Adobe Acrobat
If you want to convert screenshots to PDF, Adobe Acrobat will be the best choice for that. The software can convert all sorts of formats to PDF including both JPG and PNG.
In addition to file conversion, you can extensively edit the PDF files with Adobe Acrobat, or add comments, highlights, and annotations.
The software can also recognize the scanned text, and it also allows you to edit it. Adobe Acrobat supports page manipulation, and you can combine pages, delete them, reorder them, split, or crop them.
Lastly, document signing is available, and you can create fillable forms easily, request signatures, and fill forms on your own.
Overall, Adobe Acrobat is one of the best tools to create and convert PDF files, so be sure to try it out.
Saving screenshots as PDF files is simple, and you just need to use a tool that supports that, such as Snagit, or rely on Print to PDF option in Paint or in other image editing software.
As for converting screenshots to PDF, you can do that with the Print to PDF feature, or you can use professional tools such as Adobe Acrobat.
You may have encountered a Konqueror could not connect to host error when attempting to open a website in the browser. This can be caused by multiple things and the solution depends on what is causing it. The first thing you need to do is figure out what is causing this error.
This can be frustrating, as it makes it seem like the website is down when in fact, it might just be temporarily unavailable.
It could be due to technical issues on your end or on the server’s end, but most commonly it’s because of a problem at the server. Other times, it could be a problem with your PC and your apps won’t connect to the internet.
What does it mean could not connect to host?
If you get a could not connect to host error message, it means that your computer can’t connect to the host name or IP address of the website you’re trying to reach. The server or host you are trying to connect to may be unresponsive.
This can happen for a number of reasons:
Your computer isn’t connected to the internet – The first step in troubleshooting is to verify that you are actually connected to the internet or it’s just your internet that is too slow. You can use an internet speed tester to check how fast your connection is.
Browser plugins – One possible cause for this error message is that one or more of your browser plugins may be missing from your system or corrupt due to an outdated version.
Your network settings are incorrect – If you are behind a firewall or using a dynamic IP address Konqueror may not be able to connect.
Virus infection – It is also possible that your computer is infected with malware or adware. Make sure that your antivirus software is up-to-date, and run a scan on both the computer and its browser cache.
The website has been taken offline – There’s a possibility that the website you’re trying to access is down or inaccessible. This could be because of technical issues on the server or because of maintenance. Another possible cause for this error is that the site you’re trying to visit has moved its location.
What’s the latest version of Konqueror? The latest stable version is 21.12.3 (released February, 2022).
Quick Tip:
To get back online fast, use another browser. For an error-free experience, we recommend Opera. It’s lightweight, up-to-date, and includes all the standard features you need in a browser.
On top of that, with Opera, you will be able to create personalized workspaces, connect quicker to social media apps thanks to its built integrations and protect your privacy with the free, unlimited VPN.
Opera
Say goodbye to errors with this performance-optimized browser!
If you are using a wired network connection, check that all cables are securely connected and that no cable is damaged or frayed.
In case it is a wireless network connection, make sure that the router has power and is broadcasting its signal correctly. You should also ensure that your device is within range of the router’s signal.
2. Clear cache and cookies
Cookies are pieces of data stored on your computer or mobile device that can be used to help you log in or navigate through the web pages you visit. They also can be used to store private information, such as preferences and shopping cart contents.
As such, clearing cookies isn’t always necessary but if you’re having trouble logging in or if something doesn’t seem right while browsing online then it’s usually worth checking your cookies first before moving on to other troubleshooting steps.
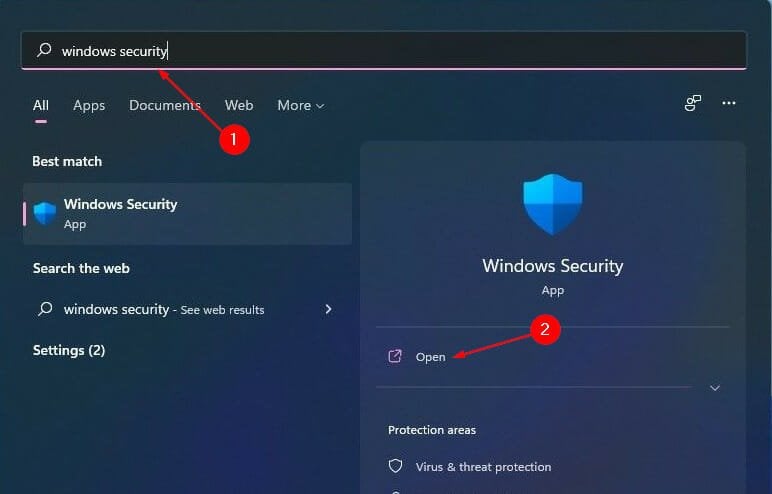
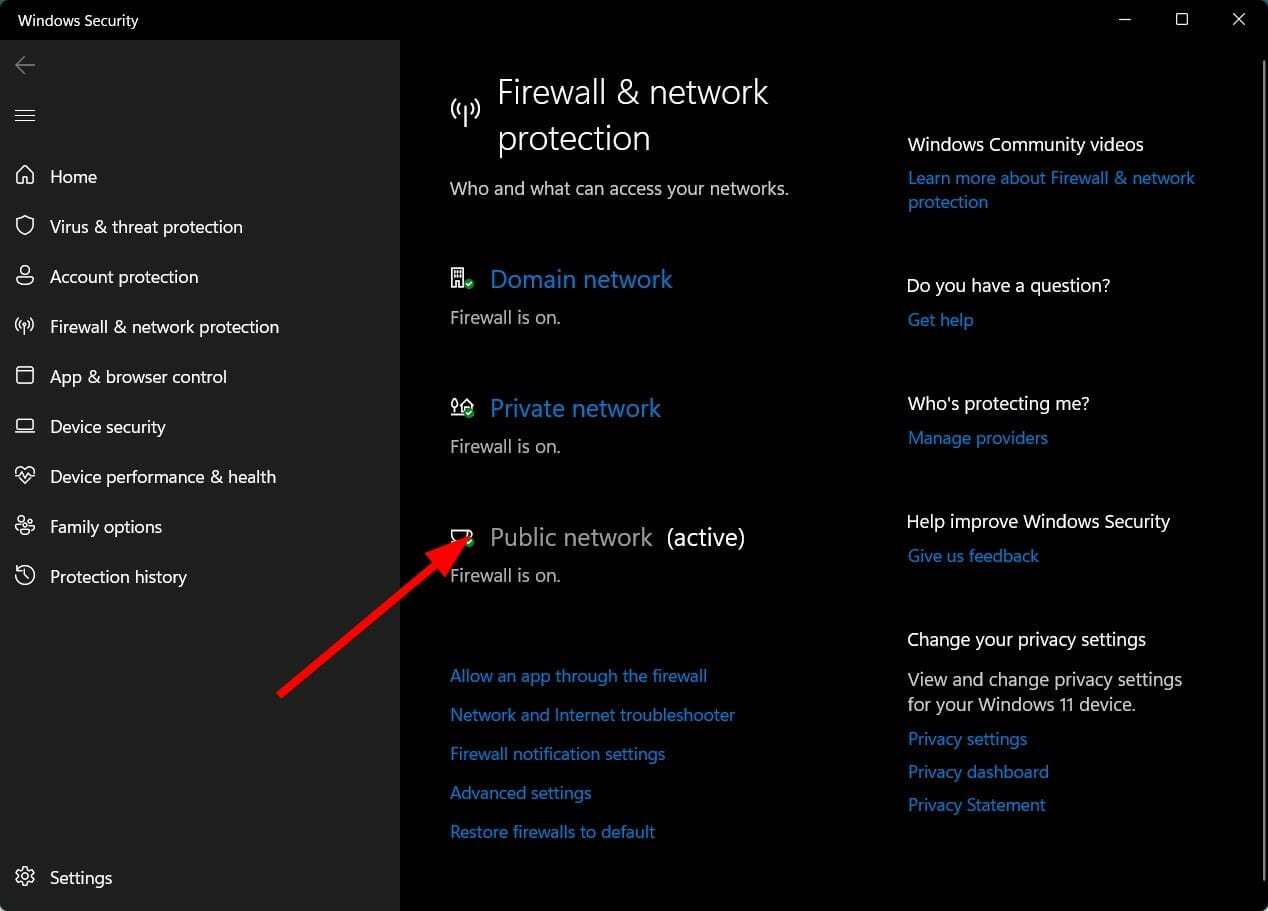
Hit the Windows button, type Windows Security in the search bar, and click Open.
Click on Firewall & network protection then select Public network.
Locate Microsoft Defender Firewall and toggle the off button.
If after attempting the above solutions you are still facing the problem, try an alternative browser. The issue could be browser-related and may take a few moments before it is back to functioning.
Nowadays, the online environment is full of threats lurking at any corner and the school or campus Wi-Fi is not the safest way to connect to the Internet.
Those term papers, notes, media, and other important data all can be gone in a glimpse without the proper protection.
We’re talking, of course, about antiviruses and ESET has a great Back-to-school campaign with great discounts on their antiviruses.
What are the best Back-to-school ESET Antivirus deals?
This year’s Back-to-school campaign brings a huge 30% discount on all ESET Antivirus products.
So, whether you’re a teacher or a student, you should take a closer look at these great deals:
The ESET Smart Security Premium plan is only $41.99/year for one device
ESETInternet Security antivirus is available for $34.99/year for one device
Based on your needs, the ESET products not only can protect your data from all the threats but also provide lots of other important features.
They all work on Windows, macOS, and Android platforms so you will be able to safeguard your entire suite of devices.
You should also know that if you’re a student and you can verify that with an ID.me account, you get an incredible 50% discount on all ESET products.
Also, you will get 30% off ESET HOME Security Essential and ESET HOME Security Premium if you apply the code BTS30-2023 when purchasing them.
ESET is a global brand and security company and we’re sure you have heard of the great reliability of their software.
However, we will outline below some of the best features that these products have to offer.
What are the best features of ESET Antivirus software?
ESET HOME Security Premium
Intel Threat Detection Technology
2 Factor Authentication
LiveGuard protects your devices against the latest threats
Easy and quick cleanup and scanning
Real-time protection against any attacks
Safely store and prefill passwords
Encrypt files and photos
Consumes fewer PC resources
Easy-to-use interface with quick configuration
ESET HOME Security Essential
Intel Threat Detection Technology
2 Factor Authentication
Safe online shopping and banking
Secure all of your devices
Prevent any online and offline attacks
Advanced privacy protection
NOD32 Antivirus
Intel Threat Detection Technology
2 Factor Authentication
Great for home or academic usage
Small footprint on your system
Keeps you safe from fraudulent websites
Autoupdate features
Here are some of the new product updates for the ESET Antivirus software:
All ESET Home products have Intel’s Threat Detection Technology which boosts ransomware protection to detect threats without affecting your system’s performance
2 Factor Authentication within ESET Home
Network Inspector which tests your home router for vulnerabilities
Password Manager
Hurry up because this is a limited offer for customers in the US!
Google Chrome is a popular browser with the option for private browsing in Incognito mode. This mode allows users to browse without Chrome remembering browsing history and data.
However, users have reported that their sound is not working while in Chrome Incognito mode. If your sound isn’t working in regular Chrome, we have solutions for that as well.
Keep reading to find a quick solution to fix no sound in Chrome Incognito.
Why is there no sound on my Internet browser?
First of all, before trying anything else or going through a lengthy troubleshooting process, make sure that the Allow sites to play sound option is enabled in your browser’s sound settings.
Also, just to avoid silly mistakes, make sure the page is not muted by right-clicking on its tab. If it’s indeed muted, you’ll see the Unmute site option
Can incognito affect my browser audio settings?
When you use incognito, all of the cookies are deleted from your browser after you close said incognito window.
Also, browser history isn’t saved, so if another person uses that computer, smartphone, or tablet, it will not list the web pages you just went to
In other words, no, it shouldn’t affect your sound settings at all, as that is all the Incognito mode does to your browser.
Quick Tip:
If you continue having problems with the sound in Incognito mode, you should consider trying a different browser. Opera One offers a similar user experience, but it’s much lighter than Chrome.
The browser gives you the possibility to surf online without keeping track of any data. To start an incognito session on Opera One, just click on the menu and select the New Private Window option.
Opera One
Benefit from fast-paced private browsing and create your own, customized online experience.
Open Chrome and click the three dots in the top right corner and select Settings.
In the sidebar, select Privacy and security.
Open Site Settings and scroll down and expand Additional content settings.
Select Sound.
Make sure Sites can play sound is selected and ensure there are no sites listed under Not allowed to play sound.
If the sound is not enabled in site settings, then that might cause the sound to not work in Incognito mode. Also, make sure there are no sites blocked from playing sound.
2. Unmute the current tab
In Incognito mode, right-click on the tab you want playing sound.
Select Unmute site.
Refresh the page.
The issue could be due to the tab being muted. Unmuting the tab in Incognito mode should solve the problem.
Open Chrome and click the three dots in the top right corner and select Settings.
In the sidebar, expand Advanced.
Click Reset and clean up.
Select Clean up computer.
Click Find.
Remove any malware found.
If there is any potential malware on Chrome, it can prevent it from functioning properly. If your sound is not working in Chrome Incognito, try checking for any harmful malware and removing it to solve the issue.
Open Chrome and click the three dots in the top right corner and select Settings.
Select Extensions from the sidebar.
Click on Details under extensions.
Disable Allow in Incognito.
Check each extension and make sure they are all disabled for Incognito mode.
By default, Incognito mode does not enable extensions. However, if you have some extensions that you have allowed to be enabled in Incognito mode, try disabling them and see if that fixes the problem.
We hope one of the above solutions fixed the issue of no sound in Chrome Incognito. It can be frustrating to have no sound on private browsing, so we hope this article helped. If there is a solution that worked for you that isn’t listed above, let us know in the comments.
Waterfox is a browser based on the Firefox source code, with some additional features added. The browser is optimized for speed, customizability, and security. While it is a fairly great browser, it is not without the usual hiccups that plague every browser.
Sometimes, you may be trying to play a video on Waterfox but it just won’t load or play. Whereas it is a common issue, it does not make it less annoying when it happens especially if you don’t know the cause.
If you are having video streaming problems on your PC, you can easily fix them but when it’s specific to a browser, you will need to troubleshoot and attempt to resolve the issue.
Why is Waterfox not playing videos?
Is your Waterfox not playing videos? Here are some of the reasons that could be the cause of the issue:
Outdated version – The first thing to check is the version of Waterfox that you are using. You will have to make sure that you have updated to the latest version of Waterfox and also make sure that all the plugins are up-to-date as well.
Insufficient storage – The next issue could be your computer does not have enough RAM (memory) to play videos smoothly. If the RAM is less than 1 GB, then you may face issues with Waterfox playing videos smoothly.
Incompatible add-ons – There are several add-ons that could be causing problems with video playback in Waterfox. If you’re using an add-on that’s known to cause this issue, it’s best to disable it until you find something else to replace it with.
Outdated graphics – Your graphics card might not be able to display the video or it may be incompatible with the codecs you are using. You may need to update your graphics card driver or use another browser with hardware acceleration enabled.
What is the best browser for watching videos?
The browser you use to watch videos is one of the most important factors in your online experience. It’s not just about how fast it loads, but also about how well it renders the video and audio.
A good browser should also be able to play all kinds of video formats, even those that aren’t supported by default by your operating system. You can check our recommended list of best browsers for watching videos for various options.
Our top recommendation is Opera One because it offers dedicated support for uninterrupted video streaming. It lets you keep watching youtube while switching between different tasks, thanks to its pop-out feature.
On top of that, it includes a turbo mode to save bandwidth, a built-in ad blocker, and VPN, as well as support for the virtual reality type of videos. Plus, it features it’s own AI.
Opera One
Enjoy YouTube to the fullest with Opera One’s dedicated features for uninterrupted video streaming!
Make sure that you are using the most up-to-date version of your browser. This will ensure that all security patches have been applied, and also any compatibility issues will be solved.
If you are still experiencing problems, you can uninstall and reinstall it again by checking its website for updates.
2. Disable add-ons
If you’ve added any extensions or themes since installing Waterfox, disable them temporarily and see if videos play better without them enabled.
It’s possible that the errors are caused by a bug in Waterfox or one of its add-ons and removing them may solve the issue.
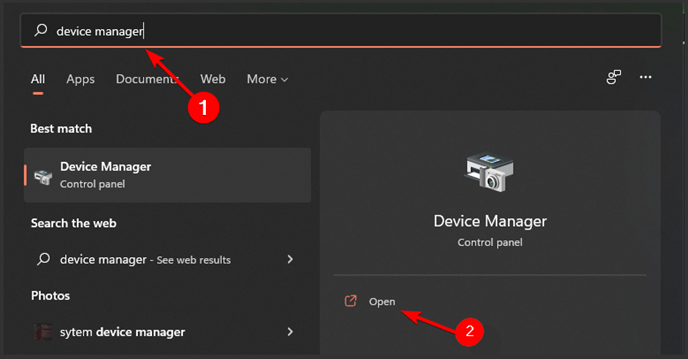
Press the Windows key, search for Device manager and click Open.
Navigate to Display adapters, right-click on your graphics card, and select Update driver.
Click Search automatically for updated driver software.
If you want to save time and prevent having driver issues in the future, use an automatic tool like Outbyte Driver Updater. This utility scans all your drivers and automatically installs the latest versions to your PC.
You can set it up to run in the background and check your drivers on a regular basis. This means that you won’t have to manually check your drivers in the future. Don’t worry, it’s very lightweight.
If you have the auto-update feature enabled Waterfox will automatically check for updates and download them when they are available. However, if it is not enabled, you have to manually update it by following the steps below:
Launch your Waterfox browser.
Click on the gear icon in the top-right corner of your screen and select Help from the dropdown menu.
Select About Waterfox.
If your browser is up-to-date, you will get the following dialog box.
You may also come across a similar issue where Opera is not playing videos but we have adequately covered various fixes to address the problem.
Feel free to drop us a comment below on the solution that worked for you.
Find below how to use WhatsApp in a browser without having to install anything on your PC. With the WhatsApp on the Web option, you can jump into your instant messages fast. Luckily, the process is simple, and we’ll walk you through all the steps.
Here’s how to use WhatsApp on your computer without downloads:
Go to web.whatsapp.com in any major browser such as Chrome, Edge, Firefox, or Safari.
2. Scan the QR Code on Your Computer
Open WhatsApp on your phone.
Tap on Menu or Settings and choose WhatsAppWeb.
Now scan the QR code on your screen.
After scanning the code, WhatsApp will load in your browser.
3. Start Chatting
Your chats will load instantly. You can send messages, voice notes, media files, and even documents from your computer.
Do All Browsers Support WhatsApp?
To ensure WhatsApp works properly, use a supported browser for WhatsApp Web like Opera, Chrome, Firefox, Safari, or Microsoft Edge. WhatsApp does not work in outdated or non-Chromium browsers.
If you’re seeing an error:
Switch to a supported browser.
Clear your browser cache.
Check for firewall or VPN interference.
Try logging out and back in to refresh the session.
Unsupported browsers, outdated settings, or session glitches are common causes of WhatsApp Web not loading properly. For the best experience, consider using Opera. It’s Chromium-based, light on resources, and includes built-in privacy features that keep your WhatsApp Web sessions fast and interruption-free.
FAQ
Can I use WhatsApp without downloading the app?
Yes, you can access WhatsApp Web in any supported browser like Chrome, Edge, or Opera without installing anything on your computer.
How can I use WhatsApp on PC without a phone?
The only way to use WhatsApp completely independently of a phone is by using an Android emulator for Windows 11. Install the emulator, download WhatsApp from the Play Store, and log in using your phone number.
What if WhatsApp Web isn’t working?
If you’re having issues, such as a blank screen or QR not loading, check your browser compatibility and internet connection. You can also follow this step-by-step WhatsApp Web fix guide to troubleshoot common errors.
Can I run WhatsApp Web on older systems like Windows 7?
Yes, you can. If you’re on Windows 7, using the browser version is likely the easiest option. For more details, check this WhatsApp for Windows 7 PC guide.
Wrapping up
Using WhatsApp in a browser is one of the easiest ways to stay connected without installing extra apps. Just scan the QR code, and you’re ready to chat, share files, and multitask from your computer.
Looking for the best GIF compressor tool for Discord that generates the smallest size without losing quality? Then this post will guide you with your requirements.
If you are a Discord fan and love to chat with friends through the platform, using GIFs would make it more fun.
But, the GIF files are usually large and so, the size needs to be reduced. If you are wondering, how do I optimize a GIF, you would need a GIF compressor that helps you compress GIF without losing quality.
So, how does the GIF compression for Discord work? It’s a quick and easy process, provided you have the right tool handy. Read to know more on how to compress a GIF for Discord.
So, if you are looking for a GIF compressor to shrink the image to 256kb for discord, then below are some of the best applications you can try:
What are the best GIF compressor applications for Discord?
Veed.io is a simple-to-use GIF compressor you can use online to reduce GIF files or videos, and post them on any social platform like Discord.
This free compressing tool will help you make catchy GIF images in minutes. You can just upload your GIF file or create one from videos, select the compressing settings, and download it on your PC.
More so, you may combine multiple GIFs to create animated images with anything you want. From various landscapes to human moves, you have it all.
But the best part is that you can also compress anything to share with friends on Discord. It’s even possible to create your GIFs from YouTube videos for memorable times.
In addition, there is a cropping tool on Veed.io that is extremely helpful for files that are not correctly cropped.
Below are some of its other great features:
Audio and video editor
Video to GIF converter
No installation required
YouTube videos compressor
Animated files feature
Veed.io
Use this tool to compress GIFs from your own videos or YouTube and share them with friends on Discord.
FreeConvert – Supports more than 1500 file conversions
FreeConvert is a free image compression tool, that allows you to quickly compress your GIF files (up to 1GB) without losing quality.
It’s a complete online tool with an easy-to-use interface. Simply upload the file via the device, Dropbox, Google Drive, or drag and drop, to get going with the file compression.
Best of all, it adds a security layer to your compressed files by not saving them on their servers. The files get automatically deleted after 4 hours from the time you converted.
You can also use the tool to compress audios, videos, images, and pdf documents. Besides you can also use the converter tool to convert videos, images, audios, documents, ebooks, and units.
Some of its other major features include:
Wide range of advanced tools
Works on Windows, Mac, Linux, and mobile platforms
Media.io is another great online image compressor that helps you to compress image size within a matter of seconds. It helps you compress JPG/JPEG/PNG/GIF image formats in just a few clicks.
It allows you to save the compressed files to your PC or Dropbox directly. Also, if the file compression fails, you can contact their customer service available around the year.
Simply upload files from the PC, Dropbox, or Google Drive, or drag and drop the image, and sit back and relax while it compresses the files maintaining the high-definition image quality.
While it’s available in both free and paid versions, the free version comes without any unsafe ads.
XConvert is a completely free online GIF compressor tool that helps you to compress image files and reduce their size while maintaining the best quality.
It allows you to click and select files saved locally, from Google Drive, or Dropbox, or simply drag and drop to upload files. Additionally, you can select the output file size, framerate, or quality for the best results.
Best of all, it helps you to upload and compress batch images, and generate the best quality output with no watermark. Moreover, you can compress most image formats including JPG, PNG, WebP, or TIFF for free.
It makes things easier by separating all details required to compress GIF and JPEG files. This helps you to convert files with just a press of a button.
Here are a few more interesting features you should know:
The Compress-or-die GIF image compressor is a free tool that helps you to compress image files in a few quick steps.
Select a file from the PC, drag, and drop, paste the image URL, paste a Base64 Data URL from the website clipboard, use the Photoshop JSX-Script, or paste the copied image directly to upload.
The tool allows you to create a 256kb emoji for Discord or replace the HTML5 ad banner with a GIF with reduced size and quality while maintaining the compressed file limits.
You can choose to upload the GIF from the device, through drag and drop, by pasting the image URL/Base64 data URL/image data, or by using the Photoshop JDX-Script.
Some of its other key features are:
Advanced algorithms for GIF compression
Lossy compression for GIFs
Changeable frame rates
Use custom codes
Supports JPEG, PNG, WebP, and SVG formats up to max. 8 MiB
The WorkinTool File Compressor software does not just allow you to compress GIF files, but also other formats like JPG, PNG, and BMP files.
The compressor offers advanced settings for optimized outcomes while maintaining the original quality. The output files are generated either in MP4 or original format, with good quality and in a smaller size.
At the same time, ensures complete privacy of the files you upload and compress. It also allows you to compress video files, PDF files, Word documents, and PowerPoint presentations.
Simply download the software, upload the file, adjust the settings, change the location where you save the output file, and hit Compress to get the reduced file size.
Here are some of its other useful features that are worth a try:
When sharing GIF images on Discord without a Nitro account, you would need to compress the GIF image before you can use it for your purpose. Here’s how:
Go to the Discord app, upload the file on chat, and hit Enter to send.
If you’re in a hurry, you can quickly search for a free GIF compressor tool on Google and use one of the different tools available online.
Here, we have used one of the free tools listed online, which is very easy to use. However, we have listed more tools below that are much better with plenty of additional features.
How do you make a GIF small enough for discord Emojis?
The trick here is to use some cropping software, like Kapwing, resize your GIF in the Output Size section on the right-side menu and decrease your dimensions to 100×100 square.
With your file size reduced, now you can save your progress and choose to Export it as a GIF from the dropdown list.
All that is left to do now is to add it to your Discord and use it however you want. This process will help you compress GIFs for Discord PFP. Pretty easy, right?
Our list includes some of the best GIF compressor tools that will help you to upload optimized GIF images on Discord as well as on other platforms.
There isn’t only one good GIF optimizer for Discord, but we’re pretty sure that you will make the right choice when the time comes to reduce GIF size for Discord.
You can’t just use anything and you have to make the GIF a smaller file size for Discord, so keep that in mind next time.
Be sure to use the best GIF compressor for Discord emojis, and the best GIF compressor for Discord banner, for optimal results.
You can also refer to our guide on the best video compressors to use with Discord if you are looking to compress large video files.
Moreover, if you come across another great GIF optimizer, do let us know in the comments box below.
Because Apple no longer supports Safari on Windows, you won’t be able to update it, which means Safari may stop working on Windows 10 or 11.
This web browser is Apple’s favorite and was first published in 2003. Since then, it has found its way into Apple devices such as the iPhone and has been steadily increasing in popularity.
It works just like other browsers. It has Incognito Mode and supports numerous tabs and other features available on other browsers like Google Chrome, Firefox, Opera One, etc.
Why is my Safari browser not working?
Let’s just put it this way. Since Safari is a native iOS app, updating your system is actually the only way to update the app too.
Keep this in mind the next time you are trying to use the Safari browser but the software refuses to properly function or does not function at all.
Quick Tip:
Using a different browser is the quickest workaround for your problem and a reliable one nonetheless. Opera One for Mac provides a user-friendly design with a lot of adjustable options and a large add-on (extension) marketplace.
It includes a built-in VPN, as well as a quick-access sidebar where you can link your favorite social media and instant messaging accounts. Plus, it comes with a free built-in AI.
Opera One
Use this error-free browser for seamless web surfing on any device!
To fix any problems you’re having with the Safari browser, simply follow the instructions provided.
How do I get Safari to work on Windows 10 & 11?
1. Reload the page
When a glitch disrupts the network connection, Safari does not work on Windows 10. So you can simply refresh or reload the page and check if the problem is solved or not.
2. Check URL
If the problem persists, check your URL to ensure it is correct. You may have entered the URL incorrectly, which is one of the most common causes for a browser to stop working.
3. Clear Safari cache
Open Safari.
Select the gear icon.
Click on Preferences.
Choose Privacy.
After that, select Remove All Website Data.
Click on Remove All to clean website data entirely.
Finally, select Done.
The Cache is the data and information the browsers save when you open a web page and whenever you surf the web.
Cache makes websites’ content load faster. However, sometimes too much Cache may cause Safari stops working and can’t load pages.
4. Install the most up-to-date and compatible version
Unfortunately, Apple has stopped publishing the Windows-compatible version of Safari since 2012. Thus, you can’t download the latest version for Windows 10.
You can also turn Safari extensions to ensure they’re not conflicting and interfering with Safari or the Internet network connection.
6. Use a VPN
When Safari is not working on Windows 10, the reason may be due to geo-restrictions and limitations, or the website you want to open is blocked in your region.
To see if this is the case, use a Virtual Private Network (VPN). We suggest Private Internet Access because it’s fast, stable, and secure and gives access to over 25 thousand fast servers worldwide.
PIA is a cross-platform VPN that is highly compatible with multiple operating systems and works well with many well-established browsers, including Safari. It hides your IP, changes your virtual geolocation, and includes many advanced security and privacy features.
7. Try Incognito Mode
First, choose the File option.
Then, click on New Private Window.
As we said before, Safari stores websites data and information to load them faster. If you want to check whether the cache is the problem or not, another method is to open a website using Incognito Mode.
8. Check Network Settings
Press the Windows key to open the Start menu then click on Settings.
Select Network & Internet.
Following that, click on the Change adapter options.
Right-click on your current connection then select Properties.
Click on Internet Protocol Version 4 (TCP/IPV4) and after that, choose Properties.
Click on Use the following DNS server addresses then type 8.8.8.8 and click OK.
Using a proxy server or custom DNS server may affect Safari’s access to the Internet content. Sometimes installing new software may change network settings, and sometimes you adjust it manually.
If you’re having trouble with Safari on Windows 10, try changing your DNS server to Google’s 8.8.8.8 address. This should fix the problem.
Safari is not just a web browser for Mac users. Users can add articles to their Reading List and access passwords and credit card information stored on iCloud Keychain through this web browser.
However, this browser is not without flaws and errors, and users may experience Safari not working on Windows 10 at times.
Network connection settings, limited access to the internet content in a specific region, incorrect URL, and Safari Cache may cause this issue.
Microsoft Edge version 104 hit the stable channel for everyone to download on Friday. This comes a month after version 104 hit the beta channel with Edge Insiders. The update comes with a notable feature, the new Enhanced Security mode, it now comes with a Basic option which is already toggled by default. Users that make this update will also be able to access all their Chrome data by logging in to their Google account during Microsoft Edge’s First Run Experience, even if they do not have Google Chrome installed.
Be sure to check out Microsoft’s blog to keep track of policy changes that have been added as well as those that have been removed. As usual, Edge should download this update automatically, but if this is not the case, head on over to the Help and Feedback menu in Edge, choose About Microsoft Edge and then restart the web browser when prompted.
Trying to personalize your workspace, but the Chrome theme you picked doesn’t fit the screen? You wouldn’t be the first. This is most likely because the theme wasn’t built correctly to begin with.
Below, we’ll walk you through a few adjustments you can make so your design of choice will look better on your device. Let’s get started.
How do I make my Google Chrome theme fit my screen?
Press the Ctrl+ Tkeys to open a new tab on Chrome.
Click the Customize Chrome button in the bottom right corner.
Click the Background option on the left pane and select Classic Chrome.
Finally, click the Done button to effect the change.
Sometimes, your Google Chrome themes do not fit or appear too small or big due to your background. This is especially common when you upload a background from your device, as it can have a contradicting size to your theme.
In some cases, it can cause the Chrome theme background not to show in a new tab. The easy fix here is to switch to the default background and relaunch your browser.
2. Restore settings to default
Click the menu button and choose the Settings option.
Click the Advanced option on the left pane.
Select Reset and clean up.
Choose the Restore settings to their original defaults option.
Click the Reset settings button.
Google Chrome themes might not be fitting on screen due to some settings on your browser. If you find it hard to pinpoint the cause, this fix should help you restore all settings to their default.
After the restoration, you can now apply the theme you want to use.
Open Chrome and click on the three-dot menu in the top-right corner.
Go to Settings.
Scroll down and click on System in the left sidebar.
Toggle off Use hardware acceleration when available.
Restart Chrome to apply the changes.
4. Try another browser
If you keep having trouble with Chrome, try using Opera instead. It’s a top-notch browser with an intuitive and fully customizable interface. It has a light/dark mode but an addition of a system mode for more options.
Aside from choosing a theme color, you can also add any wallpaper from your PC or the Opera addons store. It gives you so much control of your customization without the errors from other browsers.
Opera
Easily customize your themes and organize your browsing activity using Opera’s wide range of options!
The Chrome theme not fitting issue can make even the most eye-catching background look horrible. And this makes your browser contents appear scattered and broken.
Thankfully, the problem is easy to fix, as shown in this guide. So, if your Chrome theme is not full screen, you know exactly where to tweak it.
The Chrome theme background not showing is another annoying problem that users have been reporting, but we now know how to solve it together.
When Waterfox is not loading pages, you may not be able to view any content on any site you try to access. To fix this, you will want to try and troubleshoot the problem with your browser.
One of the most common reasons is that users are quick to install the browser without ensuring their devices meet the minimum system requirements first. Check that your system meets the minimum requirements to run Waterfox.
If your device satisfies all the requirements, you need to troubleshoot and we have recommended solutions below to help you resolve the issue. You can also check out our in-depth comparison of Opera and Waterfox for more features.
Is Firefox or Waterfox better?
Firefox is one of the most popular browsers in the world. But it’s not perfect — it has its share of quirks. If you are looking for an alternative, Waterfox, a 64-bit browser based on Mozilla Firefox may be what you are looking for.
It is similar to Firefox but with some key improvements. Waterfox has all the features you expect from Firefox: a customizable interface, tabbed browsing, built-in ad blocking, and encryption by default.
But it also comes with a few extras that make it worth considering: Waterfox uses less memory than Firefox, so it’s faster and less likely to crash your computer; it has more options for tweaking performance.
Waterfox is an excellent alternative to Mozilla Firefox, with more features, like better privacy protection, less data collection, and more control over cookies.
All in all, it depends on your needs. Waterfox is among the browsers that keep your data safe so if you are more inclined towards privacy, it is a good option.
Quick Tip:
If you keep having problems, try an alternative browser like Opera. It’s highly responsible and very lightweight, so it should have no problem with quickly loading any webpage.
Opera gets updated about once a month and includes performance-oriented features like hardware acceleration, a battery saver, and more.
Opera
Get an error-free web surfing experience with up-to-standard performance features!
The first thing you should do is make sure your version of Waterfox is updated to the latest version available.
If you’re using an older version of Waterfox, it’s possible that the latest version has fixed some issues that were causing your browser to not load pages properly.
2. Check your internet connection
Check whether or not your connection is working properly, especially if your internet keeps disconnecting. You can do this by simply opening another web browser and trying to visit a website like Google or Facebook.
If the site doesn’t load, it is most likely something wrong with your internet connection and so you need to contact your ISP (Internet Service Provider).
If your firewall is blocking access to Waterfox then it won’t be able to load any pages. You should disable your antivirus temporarily and see if this solves your problem. If it does, you should add an exception for Waterfox in your antivirus program.
Can Waterfox use Chrome extensions?
Waterfox can use Chrome extensions, but you need to make sure that you are running the most recent versions of your OS. For instance, Windows users need to have installed Windows 10 and above to make use of this feature.
Although it is a bit buggy, most extensions work just fine with the browser. This is extremely advantageous given the rich library of extensions available on the Chrome Web Store.
You may also encounter a similar error when Chrome is not loading pages properly but worry not as our expert guide can help you address the issue
Let us know of any additional thoughts you may have on this topic in the comment section below.
Steam is a popular gaming distribution platform, but many users reported encountering the Failed to find Steam error on their PC.
The error shows up when you try to launch a game on Steam and prevents it from opening. The worst part is that the error box doesn’t list the underlying cause or the possible issues leading to the problem.
This aspect makes troubleshooting the error slightly tricky, but we have the best solutions that have worked for most users. Read the following sections to find out.
Why does my game say Failed to find Steam?
This issue occurs if you choose a custom installation location for Steam. As a result, the environmental variables will become incorrect.
Also, compatibility issues when running a game unsupported on your device can lead to the Application error Failed to find Steam issue. So check the minimum requirements for the game before installing it and verify that your computer matches these.
Besides, if Steam doesn’t have the required permissions, the error may appear. In this case, launching the application with administrative privileges did the trick for many.
The error can affect various games, and we have already covered a couple of them:
The Surface Laptop Go 2 is a more than solid follow up to the original Laptop Go and cements its purpose as less a Chromebook rival but all-around “basic” computer.
When Microsoft announced and subsequently released the Laptop Go in mid 2020, I admit I was a bit stumped by the decision. Half a year into a world where parents were learning to homeschool children on inexpensive computers and tablets and digital workers had settled into their work-from-home setups, comes the oddly marketed Surface Laptop Go which many argued was overpriced for its specs and underpowered for its price.
With a year under its belt, Microsoft’s Surface team has addressed one of the biggest drawbacks of the first iteration of the Laptop Go by adding a new 11th Gen Intel Core i5 processor.
While the incremental number change is still a year behind the burgeoning release of 12th gen chips in 2022 and may dissuade critics of the original Laptop Go, the processing and graphical leap from Intel’s 10th Gen chips to the 11th are noteworthy.
Intel’s 11th Gen bumps the processing power of the Laptop Go 2 by almost 2x in the most synthetic benchmarking test and real-world performance displays a much snappier experience for users.
Specs
Surface Laptop Go
Surface Laptop Go 2
Processor
10th Gen Intel® Core™ i5 processor – 1035G1
Quad Core 11th Gen Intel® Core™ i5-1135G7 Processor
Operating System
Windows 10 Home in S mode²
Microsoft 365 Family 30-day trial
Windows 11 Home
Preloaded Microsoft 365 Apps5
Microsoft 365 Family 1- month trial6
Preloaded Xbox App
Xbox Game Pass Ultimate 1-month trial7
Display
Screen: 12.4” PixelSense™ Display
Resolution: 1536 x 1024 (148 PPI)
Aspect ratio: 3:2
Touch: 10 point multi-touch
Screen: 12.4” PixelSense™ Display
Resolution: 1536 x 1024 (148 PPI)
Aspect ratio: 3:2
Touch: 10 point multi-touch
Storage
eMMC drive: 64GB
SSD: 128GB, 256GB
Removable3 drive (SSD) options: 128GB, 256GB
Graphics
Intel® UHD Graphics
Intel® Iris® Xe Graphics
Camera
720p HD f2.0 camera (front-facing)
720p HD f2.0 camera (front-facing)
Memory
4GB or 8GB LPDDR4x RAM
4GB or 8GB LPDDR4x RAM
Dimensions
278.18 mm x 205.67 mm x 15.69 mm(10.95” x 8.10” x 0.62”)
10.95” x 8.12” x 0.62” (278.2mm x 206.2mm x 15.7mm)
Audio
Dual far-field Studio Mics
Omnisonic Speakers with Dolby® Audio™
Dual far-field Studio Mics
Omnisonic® Speakers with Dolby® Audio™ Premium
Weight
2.44 lbs (1,110 g)
2.48 lbs
Color
Ice Blue
Sandstone
Platinum
Sage
Ice Blue
Sandstone
Platinum
Ports/Slots
1 x USB-C®
1 x USB-A
3.5 mm headphone jack
1 x Surface Connect port
2 x USB-C 3.2 Gen 1 (support data transfer, Power delivery 3.0 and DisplayPort 1.4)1 x Pogo pin connector
Battery
Up to 13 hours of typical device usage
Battery Capacity Nominal (WH): 41.0
Battery Capacity Min (WH): 40.0
What’s in the box
Surface Laptop Go
39W Power Supply
Quick Start Guide
Safety and warranty documents
Surface Laptop Go 2
39W Power Supply
Quick Start Guide
Safety and warranty documents
When processing, the Laptop Go 2 is noticeably quieter than the Go with the fans spinning up less than the original, this is not to say they don’t but when comparing the same task between the two devices, a user will have a much quieter time with the new chipset.
Speaking of processing, Microsoft continues to make use of its unique cooling solution that pumps air out through the gap between the keyboard deck and the screen with an updated fan module to keep your lap and hands cool when stressing the system.
However, the 11th Gen chip stuffed into the Laptop Go 2 is only part of the overall improved processing experience as Intel also added its Iris Xe integrated graphics with the its Tiger Lake releases. The addition of Iris Xe was the first significant boost in graphical performance Intel had improved up in year-over-year release and in the Lapotp Go 2, it is notable.
Microsoft built in support for DirectX 12.1 support and Intel does a decent job of translating that with its Iris Xe discrete graphics onboard.
Pitched as a mid-range basic computer, I doubt few will mistake the Laptop Go 2 for a gaming PC, but thanks to xCloud and Game Pass, AAA gaming is possible and for local play, casual turn based or basic adventure RPGs work well on this sort of device.
Iris Xe graphics also help boost the Laptop Go’s ability to up to four displays at 7680×4320 at 60Hz versus last year’s model which topped out at three monitors at 5120×3200 at 60Hz.
The other improvement helping meld the overall upgraded processing experience of the Laptop Go 2 is the bump in storage technology this time around.
Gone are the days of the baffling 64GB eMMC storage solutions, now replaced by 128 and 256GB PCIe 3.) solid state drives (SSD) which now help drive faster read and write speeds that make the overall use of Windows feel snappier than it did on the original Laptop Go.
Most users might still find the Surface Laptop Go 2 limiting in the way of ports, as the overall feature set is still hampered by a single non-Thunderbolt USB-C port, a single USB-A, audio jack and the proprietary quick charge Surface connector.
Understandably, it can be frustrating to rely on dongles and try to figure out the power through and output depending on what needs to be connected, the Laptop Go 2 does not alleviate those concerns this time around. I have found myself relying more on the Surface USB-C Travel Hub as my permeate dongle solution that houses an HDMI, VGA (for really old monitors) USB-C, and GigE ports.
While maintaining the overall design of the Surface Laptop Go, the Surface team snuck in some meaningful upgrades to the Laptop Go 2 that include a full version of Windows versus the S-Mode version that shipped with the 2020 version.
The screen of the Laptop Go 2 maintains its 12.5-inch size and 1536 x 1024 resolution and 10-point multi-touch functionality as well as iconic Surface pen support. The LCD panel sports 2019-ish thin bezels that keep it more modern looking than a Dell Latitude but not as revolutionary as the borderless Dell Insiprions or XPS’s.
As for anyone looking to do some image processing or editing, Microsoft has tuned the display to 98% sRGB, 74% of AdobeRGB, and 78%DCI-P3 while also pushing the lower limits high-end brightness standards at 330 nits.
The Surface Laptop Go 2 doesn’t punch the 400 to 500 plus nits of brightness standards of the higher end laptops but owners can still view 2K and 4K YouTube and Netflix content as well as making use of other Windows specific tweaks to get the most out of the screen in the HDR and Vivid options in the Settings menu.
Perhaps the most standout feature of the Laptop Go 2 is that it maintains the solo-status of being the only 3:2 display laptop on the market. Yes, more OEMs are adopting the 16:10 aspect ratio but not many have jumped aboard the ultra-productive data processing 3:2 screens of the Surface Laptops.
The aluminum and polycarbonate mix for the chassis of the Surface Laptop Go 2 also comes in a few ounces lighter than its predecessor at 1.1kg or 2.45 pounds versus the 1.1kg or 2.48 pounds of the original.
Anyone upgrading this year might also notice a bump in clarity with the upgraded webcam as well as the marginally improved mics embedded into webcam housing. Despite the Laptop Go 2 housing a 720P Full HD webcam for budget-friendly pricing, the f/2.0 lens does a decent job of recording less noise in less-than-ideal lighting conditions.
Microsoft also builds in some software smarts to help edge the marginal camera improvement even further by adding auto-Exposure, auto White Balance, noise reduction, auto brightness, and tweaks to contrast and colors.
The Surface team also stored Bluetooth 5.1 onboard to help keep up with modern connectivity standards as well as take a little strain off the battery as it seeks constant connection to older and newer devices. Unfortunately, the Wi-Fi isn’t quite as modern as Bluetooth as the Laptop Go 2 comes with Wi-Fi 6 AX versus the latest 6E but I doubt many will notice.
Moving onto the keyboard deck, the Surface team made few changes to an already stellar typing experience. The key travel remains the same at 1.3mm and slightly less mushy feeling than the original Laptop Go.
In 2022, Microsoft still cheapens out at keeping backlit keys reserved for its more expensive laptop offerings, yet maintains the singular lit power button. As with the power button on the original Surface Laptop Go, mid-tier and higher models of the Laptop Go 2 house a fingerprint reader in the same spot.
The Surface team did manage, however, to enlarge the glass trackpad which supports Precision Touch drivers and all of the built-in modern Windows gestures, and seamless design that hides the speakers under the keyboard deck is another constant with the Go 2.
The speakers hidden under the speaker deck are just as loud, if not a bit louder than the original Laptop Go. Microsoft doesn’t support Dolby Atmos on the budget Laptop Go 2 but the built-in Windows sound settings should help a tad in producing an adequate loud speaker experience.
The last thing of note is the battery life on the Surface Laptop Go 2, which outperforms the original Go by 45 mins to an hour on average, which equals about 9 to 10 hours of battery depending on the use case.
During my time with the Surface Laptop Go 2 I managed to get about four hours of heavy use out of the device when pushing the machine with an instance of Chrome and Edge with 15 tabs opened a piece as well as a Photoshop project with 50 layers, running YouTube videos in the background and working in a Supermetrics macro-laden Excel document the entire time.
I hit the 5-hour battery limit of the Surface Laptop Go 2 when using Adobe Premiere Pro on a 1080p project with several edits and multiple video layers while also streaming music from YouTube Music in the browser.
On other days, I managed to squeeze out that golden 10-hour battery life when triaging email, basic web browsing, moderate YouTube video watching, streaming podcasts either with the native Windows client Grover Pro or the browser-based Google Podcasts and editing Ads with the Google Ads desktop client.
Summary
The real-world use of the Laptop Go 2 is a solid all-arounder for anyone who values quality build materials and construction as well as tired of their experiences with more mainstream OEMs such as HP, Dell or Asus.
To be more specific, Microsoft can and should target these devices as replacements for in-office fleet devices. As mentioned, anyone who was assigned a mid-range 2017 ThinkPad or Lattitude will get kick out of replacing those devices with a Surface Laptop Go 2.
The Laptop Go 2 is often lighter, quieter, comes in Sage green, and better designed than many in its narrowly defined price category.
Another thing going for the Surface Laptop Go 2 is the built-in secured-core kernel as well as the Signature Microsoft out-of-the-box experience that offers zero bloatware.
The other side of that coin is a consumer pitch for the Surface Laptop Go 2 that offers a great starter or transitional laptop for people with moderate content creative goals but maintain data processing jobs or tasks daily.
Bluechip Technologies, an African tech company that mainly focuses on bringing data warehousing projects together with integrated solutions and services, is expanding its reach to Europe with the help of Microsoft and Oracle as spotted by the folks over at TechCrunch.
The company was launched back in 2008 with a starting capital of $30,000 at the time. The company has since grown and expanded from its main office in Lagos Nigeria. It now has branches all over Africa from Kenya, Nigeria, DRC, Ghana, Zambia, and even Ireland with over 200 consultants aboard. Richard Lewis, CEO of Business Logic Systems, a Bluechip partner based in the U.K., is set to spearhead the company’s operations in the EU market. “Richard has a good feel of the market. He has seen some of the initial requirements from customers that can make him say, “hey, if this is how what you’re paying for a developer in India, we can give you an equally quality developer for 20-30% less this price. And that’s the target that we’re pursuing,” Soyombo indicated.
Essentially, Bluechip Technologies helps businesses decipher trends such as customer lifetime value, churn as well as business analytics with the aim of enhancing effectiveness and efficiency and at the same time turning it into a profitable venture. Other tech companies also make use of its simplex voucher management system to generate airtime vouchers.
According to Olumide Soyombo and Kazeem Tewogbade, Bluechip Technologies founders, “we want to try it out on the EU market and see how it works. The plan is also to expand further elsewhere like French-speaking Africa and possibly North America.” The move will position it as a “new competitive entrant” in the EU market offering its expertise coupled up with well-versed senior data engineers from its head office to pick up the pace in Europe.
Building upon this premise, they recently launched Primo Academy. A dedicated pipeline six-month program of data professionals that serves the entity as well as local and international shareholders. This way the company will be able to equip the professionals with the required skills that will make them land jobs in this current market, and they even help them source these opportunities.
Soyombo attributes these efforts to COVID-19 where most organizations picked up a work-from-home arrangement, which led to many of them suffering because of the shortage of employees that were tech-savvy to manage data. Hence, the company’s expansion to the European market. According to recent research studies conducted, the region’s big data and business analytics market size is set to hit $105 billion+ by 2027. Bluechip’s goal is to help bridge this gap.
We built this core enterprise business application for banks and telcos and the talent pool to address these needs. The whole play here is to be that systems integrator provider to the EU market. The pandemic has accelerated the need for that global flat workspace, and how to place those engineers while working with our partners like Oracle and Microsoft, and to do this cheaper than India or Eastern Europe.
The company’s founders are positive that they will be able to tap into the EU market successfully as Soyombo predicts that the company’s revenues might hit $250 million in five years. Furthermore, they intend to spread and widen its reach to both telcos and banks by leveraging its presence in Ireland.
Car games – and by this, we mean racing games – will never get old. The community for it is huge, and luckily, there are a plethora of online car racing games to play with your friends.
But the real task lies in identifying the best online multiplayer racing games to play with friends. Most found online either lack good graphics, or there’s a lot of lag.
Any good car game available for PC or console needs to be downloaded one way or another. Many of them are paid. Only some of them have multiplayer or online modes.
We’ll go over a few car games that come with online modes since this is one of the most sought-after features, not only for this genre but for almost any game genre.
What is the best browser for gaming?
Most users generally go with Chrome or Firefox, which is usually their primary browser, while playing games. But, both these and other popular browsers are not gaming-oriented and wouldn’t deliver the best performance.
When playing online car racing games, it’s recommended that you choose a browser like Opera GX, which is developed primarily for gaming. It offers several customizations to enhance the experience and boost the browser’s performance while playing games.
It allows users to set a limit on the CPU, RAM, and Data usage. The various apps integrated into the sidebar allow easy access while gaming. Besides, the GX corner lists the various free games, the latest developments, and other gaming news.
What car racing games can you play online with friends?
A classic among online games, TrackMania has a community of over 17 million racers so far, and is one of the best online racing games to play with friends.
The initial game was released in 2008 and is still available because of the solid and fun gameplay.
In the free version, you get access only to the Stadium environment, plus some features. In the paid version, Trackmania United Forever, there are also car customization features, a track editor, 6 other environments, and many more.
You can try a preview of the game by downloading a particular setup only for Windows.
Opinions about Distance vary a lot since the game takes a bit of dexterity to carry on.
So it’s not a game for beginners. However, given its complicated gameplay and visual style, it managed to win some fans that don’t fancy racing games at all. Players have also appreciated the original soundtrack.
It comes with a multiplayer feature that allows online playing (for up to 12 players) and split-screen playing (for 2-4 players) in various game modes. You can also check out this collection of free racing games on Microsoft Store to find more titles you can play at no cost.
Real Racing 3 – One of the best for Android and iOS devices
This is a top-rated online car racing game, available only as an app for both Android and iOS devices.
Its key features include 39 circuits, over 140 cars from top manufacturers, Real-Time Multiplayer, night racing, and Time Shifted Multiplayer™ (TSM) technology, that allows you to race anyone, anytime, anywhere.
As a side note, players have complained about the numerous cheaters in the online multiplayer mode.
As is the case with apps, the free version works up to a certain level; from then on, you have to make in-app purchases.
The Forza series (or their latest games) always tops any racing game rankings due to their ultra-realistic graphics and challenging gameplay.
Forza Horizon 3 uses some of Australia’s top-notch locations for various forms of races, time trials, driftings, and Bucket List Challenges.
The online car racing game also features a four-player live co-operative multiplayer Horizon campaign. It is also part of the Xbox Play Anywhere program, allowing live cross-platform play.
We left this one at the end because a car game list is incomplete without a Super Mario game.
Mario Kart Tour is available only as an app onApple StoreorGoogle Play. The standard version is free to play, but then there are, of course, in-app purchases.
After downloading the app, you have to create a Nintendo account, register your friends on the dedicated list, and you are good to play online.
Unfortunately, themultiplayer option received bad reviews online for its many bugs. The developers are surely working to fix it, as many players have installed the app precisely for this feature.
Waterfox is an open-source web browser designed specifically for ARM64 and PPC64LE systems. Its main intention is to be ethical and offer support for legacy extensions by Firefox.
It was the first 64-bit browser to be available on the web. Not only did it offer better speed, but it gave users freedom and control to run any extensions or addons.
Waterfox is available on Windows, macOS, Linux, and Android. In terms of security, the webpage data is run via Google’s SafeBrowsing service, but you can opt out if you wish so.
Despite all these features, Waterfox still faces some errors sometimes. One of these errors is Flash not working in Waterfox. If you are also among the people facing this error, keep reading this post to learn how to fix it.
Does Waterfox still support Flash?
Flash or Adobe Flash Player is a software that allows the streaming of videos, audio, multimedia, etc., on a supported device. But it was discontinued due to multiple security issues.
Before being discontinued, the Flash Player was available for operating systems including Windows, macOS, Linux, etc. However, a Waterfox Flash plugin is still available to download for free on modern-day web browsers.
Now, to answer the question, yes, Waterfox is one of the browsers that still support Flash. Browsers supporting the Flash Player run fine, but sometimes security issues may arise.
Which browsers still support Flash?
No major browsers support the Adobe Flash Player. This list includes Google Chrome, Firefox, and Microsoft Edge.
However, there are still some lesser-known browsers that support Adobe Flash Player, such as Opera One, Puffin, FlashFox, Waterfox, Dolphin, and Kiwi. The Flash Player is built into the browser package of all these browsers.
If you want to get all the standard features of a browser, as well as privacy-focused features and modern social media integrations, and support for customized workspaces, we recommend trying Opera One.
Opera One
Use Opera One if you need integrated flash support, and up-to-date browsing features under a highly customizable interface.
Open Waterfox and click on the open Application Menu icon at the top right corner.
Click on Help and select About Waterfox.
It will now automatically start to search for updates and install them if any.
Before getting started with different methods to fix Flash not working in Waterfox, check if your browser is running on the latest version or not. This will ensure that all security patches and core files have been updated.
Open Waterfox and click on the hamburger icon at the top right corner.
Click on Settings.
Navigate to Privacy & Security.
In the Cookies and Site Data section, click on Clear Data.
Now click on Clear to confirm the process.
Flash not working in Waterfox can sometimes occur due to the browser’s cache data. Clear the cache data of the browser you are using and check if the issue is fixed.
Several users complain about the fact that they can’t set Firefox as the default browser. Rest assured that our guide shows you what to do in case that happens.
3. Disable extensions
Open Waterfox and click on the hamburger icon at the top right corner.
Select the Add-ons and themes option from the list.
Switch to the Extensions from the left sidebar.
Toggle the Disable option of every extension.
An add-on or extension could be the reason why Flash is not working in Waterfox. Try disabling all extensions and plug-ins and check if Waterfox allows Flash.
You can either disable all the extensions at once or enable them one by one to check which one of them is causing the problem. You can also disable them one by one and check simultaneously; anything per your preference should work.
How do I open a Flash site in 2022?
Open Waterfox and navigate to the page that uses Adobe Flash.
Click on the New Add-on icon on the address bar to open the menu.
Select the checkbox beside Remember this decision to allow Flash to run on this website in the future.
Then click Allow to save the settings.
This was how you can fix Flash not working in Waterfox. We hope that the mentioned steps were able to help you.
If you still have any issues, feel free to drop a comment below or try contacting Waterfox flash support. We’d love to hear from you.
Google Chrome is one of the best browsers on all your devices. It does well in all the major areas that matter to users and satisfies their needs.
However, like any other application, it has its problems. One problem with Chrome that Windows 10 and 11 users reported is err_internet_disconnected. This error prevents you from accessing important and trusted sites and can drag on for long.
Fortunately, it is not the most difficult problem to solve, and we’ll show you how to fix it in this guide.
Quick Tip:
Giving a try for Opera One browser comes as a permanent improvement. It’s a lightweight browser with a battery saver and a proxy VPN to help you with connection errors.
The Opera One it’s more stable overall due to having many of it’s features already built-in. Opera One comes with AI, Ad blocker, workspaces, tab islands, social media and messaging apps integration.
Opera One
Opera One is a top pick for a distraction-free and safe browsing experience.
The err_internet_disconnected, as the name shows, is down to a problem with your internet connection. It simply means your browser is having issues connecting to the host.
However, this problem can go just beyond your internet connection. It might be caused by issues with your browser or some settings on your PC. Below are some of the common causes:
Corrupt browser data
Faulty extensions
Proxy activation on PC
Faulty network driver
How can I fix the err_internet_disconnected error?
1. Check if your Internet connection is working
Before fixing this problem, you need to check if your Internet connection is working. To do that, try accessing the Internet from a different PC on your network.
If you don’t have another PC, you can use any device, such as your smartphone or tablet.
If the problem appears on all devices, there might be a problem with a network cable, so check if everything is connected properly.
However, if the issue appears only on your PC, your router is working properly, and your PC’s network settings cause the problem.
You can also fix this problem by restarting your modem/router. Press the Power button on your router to turn it off and wait for 30 seconds.
Now press the Power button again and wait for the router to boot completely. After your router boots, check if the problem is still there.
2. Clear browsing data and cache
Click the menu icon in the top right corner and choose Settings from the options.
Click Privacy and security in the left pane.
Select Clear browsing data.
Click the dropdown next to Time range and choose All time.
Check the boxes for Browsing history, Cookies and other site data, and Cached images and files.
Finally, click the Clear data button.
Few users reported cleaning the browsing data and cache can fix the err_internet_disconnected on Google Chrome. So you might want to try it out too.
After clearing the cache, restart Chrome and check if the problem is still there.
3. Change Internet Options
Press Windowskey + I to open the Settings app.
When the Settings app opens, navigate to Network & Internet section.
Select Proxy from the menu on the left. In the right pane, disable all options.
Sometimes Err_internet_disconnected error can be caused by your proxy. Although proxy is a great way to protect your privacy online, sometimes it can interfere with your system and cause this and other errors to appear.
To disable proxy in Windows 10, you need to do the following:
After you disable your proxy, check if the problem is still there. If you’re still concerned about your privacy, one good way to protect it is to use a trusted VPN like Private Internet Access (PIA).
PIA ensures complete privacy online thanks to its strong servers worldwide. It also protects your data and identity online without messing with your browser. It is worth considering if you need a reliable VPN.
4. Disable/remove your antivirus
Antivirus and firewall tools can interfere with your Internet connection, and if you’re getting err_internet_disconnected error, you might want to disable your antivirus and firewall temporarily.
If disabling antivirus and firewall doesn’t fix the problem, try uninstalling them.
If the problem is fixed after removing the third-party antivirus or firewall software, you can reinstall it or switch to a different antivirus tool.
When Device Manager opens, locate your network adapter, right-click it and choose Uninstall device.
If available, check Delete the driver software for this device and click Uninstall.
Sometimes the net: err-internet_disconnected 200 problems can occur if your network adapter drivers aren’t fully compatible with your operating system or if they are improperly installed.
To fix this issue, you need to reinstall your drivers. After deleting the driver, restart your PC.
When your PC restarts, the default driver should be installed.
Lastly, if you want to update the missing drivers automatically without going through the steps above, you can choose third-party software in Outbyte Driver Updater.
What you need to do is select the right driver to upgrade from the list, and the software will do all the work on your behalf.
6. Change the name and password of your wireless network
To fix the err_internet_disconnected error, some users suggest changing your wireless network’s name and password.
To do that, connect to your router, go to the Wireless section and change the necessary data. You can also try disabling and enabling the wireless connection right from your router.
7. Flush your DNS configuration
Press Windowskey + X.
Choose either Command Prompt (Admin) or PowerShell (Admin) from the menu.
When Command Prompt opens, run the following commands: ipconfig/release ipconfig/all ipconfig/flushdns ipconfig/renew netsh int ip set dns netsh winsock reset
Sometimes Err_internet_disconnected error can appear due to certain network glitches, but you can easily fix them by running a few commands in Command Prompt.
After running all commands, check if the problem is still there.
8. Delete wireless profiles
Open Command Prompt as administrator.
Now, run the command below to show all available wireless profiles. netsh wlan show profiles
Lastly, run the command below to remove the profile. netsh wlan delete profile name=Name of the profile
If you’re getting the page failed to load error – 106 (internet_disconnected), the internet connection has been lost on your PC, and the problem might be wireless profiles. However, you can fix that problem by manually removing the wireless profiles.
After you remove your wireless profile, try to connect to the same wireless network again and check if the problem is resolved.
9. Temporarily disable Windows Firewall
Press Windowskey + S and type firewall.
Select Windows Defender Firewall from the list of results.
Windows Defender Firewall window will now open. Select Turn Windows Defender Firewall on or off.
Select Turn off Windows Defender Firewall (not recommended) for private and Public networks.
Click OK to save changes.
If you’re getting Err_internet_disconnected error frequently, your firewall may be blocking the browser.
However, you can fix the problem by temporarily disabling Windows Firewall. To do that, you need to follow the above steps.
After you disable Windows Firewall, check if the problem is still there. If disabling the firewall fixes the issue, ensure your firewall is properly configured.
Click the menu icon in the top-right corner and select More tools.
Select the Extensions option.
Toggle the switch before each extension backward to disable it.
Once you disable all extensions, restart Chrome.
In some cases, the Err_internet_disconnected error can appear due to problematic extensions. To fix the problem, you need to find and disable those extensions.
Once your browser restarts, check if the problem is still there. If not, it means that disabled extensions were causing the problem. To pinpoint the cause, you need to enable extensions one by one or in groups until the issue reappears.
Once you find the problematic extension, remove it, and the issue will be permanently resolved.
11. Reset Chrome
Click the menu button on Chrome and select the Settings option.
Click the Reset and clean up option in the left pane.
Select Restore settings to their original defaults.
Click the Reset settings button to confirm.
If you keep getting Err_internet_disconnected error on your PC, the problem might be related to your settings.
Sometimes certain settings in Chrome can cause this issue to appear, but you can easily fix the problem by resetting Chrome to default.
After resetting Chrome to the default, the issue should be completely resolved, and everything should start working again.
Err_internet_disconnected error can cause you a lot of trouble, but you can easily fix this error by changing your network settings or resetting your router.
Speaking of this error, here are some related issues that users reported:
Err_internet_disconnected in Chrome, Firefox: This problem can appear on almost any browser. Even though our solutions are meant for Chrome, similar methods should also work in Firefox.
Net::err_internet_disconnected in Windows 10, 7: This issue can affect other versions of Windows, and even if you don’t use Windows 10, you should be able to apply most of our solutions.
Err_internet_disconnected on Lenovo laptop: Sometimes, this problem can appear on your laptop, and if that happens, be sure to check your drivers and wireless network configuration.
Irrespective of the variety of the error, this guide is an encompassing one with fixes that will surely solve the problem.
Pale Moon is an open-source web browser that runs on engines similar to Firefox. However, its features and functionalities are entirely distinctive.
The browser is very lightweight and offers a very smooth browsing experience. Pale Moon is available for Microsoft Windows and Linux with contributed operating system support.
The browser focuses on efficiency and customizations by offering a range of features. Along with that, it follows the best practices to use a VPN while connecting to the internet.
However, even the most perfect things sometimes have some shortcomings. For example, it’s very common for users to experience YouTube not working in Pale Moon.
Luckily, issues like these are straightforward to fix. So keep reading this post to learn how to do so.
Why isn’t YouTube not working in my browser?
All browsers offer distinctive features that aim toward improving the User experience. However, you can still experience issues while playing videos sometimes.
There are several reasons why YouTube might not function properly on your browser. Some include an unstable internet connection, incorrect settings, and an updated browser version.
What is the best browser to watch YouTube?
Chrome is considered one of the fastest browsers for streaming YouTube videos. Additionally, it offers various features like magic actions and video extensions.
However, Opera One can also be considered the best browser for watching YouTube. This is because it offers some unique video options and features.
Also, Opera One includes a video pop-up allowing users to move videos out of the Opera One page tabs. It also offers an inbuilt ad blocker, a free VPN and also a native AI.
Opera One
Use Opera One to watch ad-free YouTube videos and access geo-blocked content with its built-in VPN!
Open the Pale Moon browser and press Ctrl + Shift + A key combination.
On the left-hand side, select Extensions.
Click on each of the extensions at a time, select, and then click on the Disable button alongside each one.
Restart Pale Moon.
Browser extensions are designed to enhance the web browsing experience. However, these extensions sometimes interfere with the functioning of the browser. To ensure an extension isn’t responsible for YouTube no sound in Pale Moon, disable all extensions.
2. Reset browser to default
Click on Pale Moon at the top and select Preferences.
Navigate to General and click on Restore to default.
Pale Moon Settings could get corrupted, sometimes causing the browser to malfunction. If that’s the case, reset the Pale Moon browser to default settings.
If none of the mentioned above workarounds were able to help you, the browser’s core files might be corrupted. Reinstall Pale Moon and check if YouTube no video in the browser issues get resolved.
This was how you could fix YouTube not working in Pale Moon. We hope that the troubleshooting methods mentioned above were able to help you.
If you still have issues, feel free to drop a common below. We’d love to hear from you.
Mozilla Firefox is a popular browser that is used by millions worldwide. Several Firefox add-ons improve the music listening experience, including the best Firefox equalizer options.
They come in different forms, from enabling you to control your online or desktop media player to helping you fill in music to your album collection.
Some also aid in tweeting current songs to Twitter followers and sharing music on Facebook.
However, audio equalizers, on the other hand, make it easy to change the balance of frequency components of playing audio.
Hence, audio equalizers for Firefox make it easier to adjust the frequency from within the Mozilla Firefox web browser.
Does Firefox have an equalizer?
The browser natively has no sound equalizer, and equalizers are handy features that help users improve the listening experience on streaming videos or music.
However, it is not all doom and gloom since Firefox is a robust, modern browser with a fully developed extension library. As a result, you will be able to get some of the best equalizer features using a few of the browser add-ons.
Quick Tip:
If you are interested in peak audio performance on the web, we recommend taking a look at Opera One as well. Thanks to its lightness and fast response rates, Opera One is a great option for uninterrupted audio streaming.
It includes native support for audio settings so you can easily switch between different output devices, change volume, and more. On top of that, its add-on shop includes tons of audio booster/equalizer apps.
Opera One
Play your favorite tunes with this fully integrated browser with a built-in player.
Audio Equalizer is one of the most downloaded audio equalizers for Firefox. If you want an audio equalizer that enables you to play any embedded video, then this is the ideal equalizer to choose from.
With this lightweight add-on, you can seamlessly alter the audio equalization settings; it provides you with several choices in the toolbar popup.
We love the extension because it functions on every website using HTML5 audio and video components and is accessible on all operating systems in the Firefox, Opera One, and Chrome browsers.
In addition, WildFox works efficiently with media players such as Windows Media Player, Adobe Media Player, and VLC Mozilla Firefox add-ons.
This add-on includes the Mono function, an accessibility option for those who have hearing issues. You won’t ever miss a sound or word while listening to audio via headphones when this function is activated.
However, it is not without some limitations; for example, it cannot dynamically switch resolutions (streams) and does not work with Media Source Extensions (MSE) video tags.
Equalizer for YouTube is an add-on that makes it simple to change the audio settings, including the frequency components and harmony of the audio file for any YouTube video.
Please be aware that YouTube or Google Inc. are not affiliated with the add-on; its creator separately develops and maintains it as an unapproved add-on.
This add-on was created just for the YouTube website and is a condensed version of the Audio Equalizer add-on.
It is very lightweight, lacks a toolbar button, and contains an equalization button on the YouTube page. Also, the YouTube website and all other embedded YouTube videos are compatible with the add-on.
In its preset list, you have 18 audio presets to pick from. For any audio stream, you may choose soft rock dance, club, pop, party, or any other preset format.
To display the add-on’s drop-down list, you must click the equalization button under the video’s title. It’s one of the best Firefox equalizer options available.
This tool alters various media items’ frequencies on web pages.
It comes with the most straightforward equalization; the bass control, which controls low frequencies, and the treble control, which maintains high frequencies. This add-on is a great bass booster for Firefox.
Since it has just these two controls, you can adjust various frequencies. Hence, this extension allows you to alter a broad variety of frequency ranges similar to the popular VLC player.
By adding a toolbar icon to your browser, the extension allows you to manage audio equalization via a popup window easily.
You may choose from roughly 12 presets or establish your settings, and you will like its profiling feature, which lets you organize your choices into many profiles.
Lastly, pre-amplification is also supported for each profile with this modification. In essence, you may modify the volume of each profile separately using the global volume control.
There are many Firefox equalizers to choose from, but in this list, we have only provided the best Firefox equalizer options, including options we have used, tested, and loved.
You should note that this list has not been put together in any particular order, and in the end, we expect that your choices will depend on your personal preferences.
We, however, are curious to know which of these are your favorites, so please tell us in the comments section.
Lastly, if you are looking for a more cross-browser equalizer set, you may try any of the best equalizers for Windows.
Firefox is one of the best cross-platform browsers with wide compatibility with many devices. However, some users often experience your system doesn’t meet the requirements to run error message on Firefox.
This error has been reported to pop up even though the system could easily run Firefox. The root cause of this issue might be that websites or some add-ons incorrectly think you’re running an outdated version of Firefox.
Here’s how one user described the issue on the Mozilla Support forum:
I’m using Windows 7 on my HP laptop. When I try updating, I get a message saying I need to have at least Windows XP. Is there something else blocking my update? I’ve tried both updating an downloading the latest version. My current Firefox is 13.0.1
This guide contains surefire solutions to fix this browser issue.
Can I run Firefox on Windows 10 & 11?
Firefox works on all Windows versions, from Windows 7 to the latest ones. You can download the installer from the official Firefox website for installation on your Windows 10 and 11.
Also, Firefox is available in Microsoft Store for Windows 10 and 11 users. So, you are not short of options and can always run the browser on your PC.
What is the latest version of Firefox?
The latest version of Firefox at the time of writing is version 103.0.1. It is available on Windows and Mac with bug fixes from the 103.0 version.
Thankfully, Firefox updates automatically when you restart your browser on Windows. So, it will be hard to miss out on new releases.
Quick Tip:
If you keep having the same problem, perhaps switching to a different browser can help. Opera One is fast, reliable, and fully compatible with any version of Windows.
It focuses heavily on user privacy and security. It includes an unlimited VPN, crypto mining protection, social media integrations for quicker access, and integrated AI.
Opera One
If your system doesn’t meet the requirements to run Firefox, try installing the lightweight Opera One!
Open Firefox and click the Tools, and selectSettings.
Expand Default User Agent and click on Edit User Agents.
In the newly opened window, click New and select New User-Agent.
Add a description for the new User Agent, for example, Firefox 9.
Change the last number in the User-Agent box to 9.0.1 and click OK.
Open the Tools menu again and select the recently created User-Agent.
Reload the page and see if it works.
3. Make sure that you meet the requirements
Firefox is a pretty light browser that can run with very few resources. However, if you getyour system doesn’t meet the requirementsto run Firefox message, we should cross this problem off the list.
Firefox works with a wide range of Windows PC, from some of the old versions to the latest ones. However, it does not support Windows XP and Vista and has stopped providing security updates.
We will discuss the full system requirements for running Firefox on Windows later in this guide.
So, Mozilla Firefox works on Windows 7, 8, 10, and 11 on both 32-bit and 64-bit versions.
As for the hardware, you can have a Pentium 4 or newer processor with SSE2 support and 512 MB of RAM (2 GB for the 64-bit version). Mozilla also recommends having at least 200MB of hard drive space.
There you have it: a comprehensive guide on fixing Firefox system requirement issues. We hope that our solutions helped you out in solving the problem.
Many Windows users probably decided to switch to Microsoft Edge once it got fully released.
And one of the main problems when switching to another browser is adding your bookmarks or favorites from the previous browser. So, in this quick guide, we will show you how you can easily import your Favorites from your previous browser into Edge, so you don’t have to visit every site and do it manually.
The intuitive design is usually found in browsers with big teams behind them, like Mozilla Firefox, Microsoft Edge, or Google Chrome. However, some hidden gems have a lot to offer.
For example, no web browser can currently match Opera One when it comes to the sheer customization capabilities that it provides you with.
This doesn’t include just visual tweaks; it also includes rearranging UI elements such as your Favorites to suit your needs better.
Importing Favorites from other browsers is extremely easy, and you will be prompted to do so when you first install Opera One.
You can easily remove and add favorites to your home screen and create a new Favorites menu.
Also, you can group favorite websites for different profiles. For example, you can create your own profiles, making it great for PCs with multiple users. And
Opera One
A web browser that highlights customization features in ways other browsers can only dream of!
Click on the dotted menu (…); at the bottom of the main menu, click on Settings to open the settings window.
Choose Import browser data from the profiles menu.
Now under Import from other browsers, click on Choose what to import.
In the Import browser pop-up, select Microsoft Internet explorer from the Import from dropdown, tick the Favorites or bookmarks checkbox and any other data you want to import, then click the Import button.
Microsoft included the option of importing favorites from other browsers into Edge, so you can easily do that in just a few moments.
That’s it, and now you have all your saved favorites from other browsers in Microsoft Edge.
This is an excellent option because going to every site individually and saving the favorites on your own would be very annoying and require a lot of time.
Unfortunately, Microsoft Edge doesn’t support importing HTML bookmarks yet; also, you can’t just drag your bookmarks from another browser to Edge, as with some other web browsers.
We don’t know if Microsoft will change it in the future, so we can’t tell you anything right now.
3. Use the Favorites menu icon
Launch the Edge browser.
Click on the Favorites icon beside the Address bar.
Click on the three dots (…), then select the Import favorites option to open the Import browser window.
Select Microsoft Internet explorer from the Import from dropdown, tick the Favorites or bookmarks checkbox and any other data you want to import, then click the Import button.
Note that a lot of customization can be done from the Favorites icon beside the Address bar. It gives you easy access to add pages to favorites, remove favorites, or even export your favorites.
You can also learn the full process for saving your bookmarks by following this guide on how to export favorites in Microsoft Edge so you always have a backup ready.
Can you transfer favorites from Internet Explorer to Edge?
Internet explorer and Edge are sister browsers even though the former has now been discontinued for the latter.
With that in mind, Microsoft has made the transition easy for many users of IE, and you can transfer your favorites to Edge in just a few clicks.
Transfering your favorites will imply that this change does not totally reinvent your browser habit and use, and with IE now discontinued, it ensures a seamless transitioning experience.
Where are the browser Favorites stored on Windows 10/11?
These are stored in your AppData folder. You can navigate it by pasting the link below on the Address bar of your file explorer.
Be sure to substitute afamo for your user name. And once on this path, you will have access to bookmarks and other essential browser data on Windows 10 and 11.
Moving your favorites across browsers is a straightforward process. You should have completed the migration in under a minute using the steps above.
FAQ
How do I import an HTML bookmarks file?
Open Edge, click the three dot menu, choose Favorites, select Import favorites, pick your browser or HTML file, and complete the import.
Can I import bookmarks from Chrome or Firefox into Edge?
Yes. Edge can import bookmarks, passwords, and history directly from Chrome, Firefox, and other installed browsers.
How do I import bookmarks into Microsoft Edge?
Open Favorites, select Import favorites, choose Import from file, browse for your HTML file, and confirm to load the bookmarks into Edge.
Why are my imported bookmarks not showing?
They may appear in a separate Imported folder. Open Favorites and expand the Imported section, or turn on the Favorites bar to view them.
If you have any performance problems with Microsoft Edge, like connection or crashing issues, you can check out our Edge troubleshooting guide.
Now that you know how to import bookmarks in Microsoft Edge, take a look at our Microsoft Edge bookmarks location guide will show you how to access bookmarks on your PC.
We hope that our guide helped you move your Favorites to Microsoft Edge. If you have other suggestions, don’t hesitate to leave us a comment below.
Unauthorized access to protected data has the potential to result in damages. You can prevent these damages with Keycloak browser support.
Nearly every program needs a solid mechanism to control user identities and access. One of the available solutions is Keycloak.
It is an open-source program now released under the Apache License 2.0 and used for Identity and Access Management.
The critical question is which browsers support Keycloak deployment; hence, below are some solutions if you are looking for Keycloak browser support.
Does Keycloak support SAML?
SAML 2.0 and OpenID Connect, an OAuth 2.0 extension, are both supported by Keycloak. The first thing you must select when gaining clients and services is which of the two you will employ.
Keycloak includes its own set of adapters. The PKCE [RFC 7636] mechanism, which adds additional security during code to token exchanges in the OIDC protocol, is supported by the KeycloakInstalled adapter.
The Opera browser is one of the few browsers that natively support most tools and extensions, which distinguishes it from other browsers.
It also outperforms in terms of speed and performance. For developers, Opera may not be as popular as Chrome or Firefox, but it offers certain advantages.
If you don’t require a lot of advanced development features, Opera may be able to provide you with what you need for a rapid and successful online experience.
Additional features:
Built-in VPN
Social media sidebar
Customizable homepage
Opera
Protect your data with dedicated Keycloak support and browse safely on any webpage!
Although Microsoft Edge supports different Keycloak versions, it still needs some upgrades to function effectively with the tool because the browser lacked native support in earlier versions of Internet Explorer.
You may still use Keycloak in the browser. However, there might be some issues due to the unstable angular support.
Edge is unquestionably light years ahead of rival browsers for general purpose browsing on Windows 10, testing your website pages with Edge, and collaborating and sharing ideas with the WebNote functionality for native page annotation and sharing capabilities.
Because the most recent version of Chrome supports Angular, it may also support Keycloak. Chrome also supports a wide range of extensions, making it easier to add functions that the browser lacks.
Chrome developer tools are the simplest way to see your Lighthouse scores, which help you identify problems that might be preventing you from doing well in Google’s search results and being the gold standard for page rendering.
The most recent Firefox versions all support Keycloak, but you should be aware that since the program prevents cookies and some tools from accessing data, the tool might not function in private mode.
Overall, the developer version of Mozilla’s Firefox is the most effective traditional browser for web development.
Additional features:
Independence from corporations that manipulate user data
Because Safari natively supports angular js, it has Keycloak browser compatibility. This browser supports the majority of file and tool kinds, making it an excellent choice for web developers.
Moreover, Safari contains Web Inspector, a powerful tool for easily modifying, debugging, and optimizing web pages for maximum performance and compatibility on both platforms.
You must enable SSL to activate HTTPS. SSL is a component of the HTTPS protocol that performs data encryption.
Additionally, a browser will almost certainly be able to execute Keycloak if the browser is supported by the Angular script that powers the Keycloak user interface.
Apart from the browsers listed above, most Chromium browsers, such as Brave, will allow you to use Keycloak due to native support for add-ons and development features.
Chrome, the gold standard for any website, is built on chromium. Therefore, you can expect full support and relative ease of use from Keycloak.
Pale Moon is an open-source goanna best web browser focusing entirely on efficiency and customization. This browser is available for Microsoft Windows and Linux.
The browser offers a completely built from its own browsing experience. Pale Moon Browser offers carefully selected features and optimizations to improve the browser stability and user experience.
Apart from all these, below are some other Pale Moon Browser features:
Optimized for modern processors
Based on our own optimized layout and rendering engine, Goanna™
Additional security features and security-aware development
Supported by our user community, and fully non-profit
Familiar, efficient, fully customizable interface
Support for easily-created lightweight themes
Superior gradients and fonts compared to other rendering engines
Extensive and growing support for existing web standards
But recently many users have been complaining about no sound in the Pale Moon browser. If you are among those keep reading this post to learn how you can fix this issue.
Why is there no sound in my browser?
No sound on the Pale Moon browser is a very common issue people face. It could occur on Windows devices due to various reasons. These problems could be as simple as accidentally muting speakers or more serious such as hardware issues.
For starters, check if you have allowed the website to play sound. Also, make sure the page isn’t muted due to accidental mouse clicks.
Where are my sound settings in Pale Moon?
Click on Pale Moon at the top left corner and select Preferences.
Navigate to the Content tab, you will find all sound settings here.
Make the changes as required and click on OK.
Quick Tip:
If you keep having problems, try using Opera instead. It’s one of the best browsers when it comes to response rates and performance, with a very intuitive audio setup.
If you like Pale Moon for it’s small footprint and security, note that Opera has advanced privacy features too. Plus, it updates about once a month to prevent errors and comply with the newest requirements.
Opera
Load audio content with no effort with this light and responsive browser!
Open Pale Moon, and press Ctrl + Shift + A to launch the Add-ons Manager.
Now, click the Remove button next to the problematic extension.
Click on Restart now for the changes to come into effect.
It’s likely that the extension is incompatible with some or all websites if you first noticed the issue after installing it in Pale Moon. Therefore, it is recommended that you delete it and see if Pale Moon no sound is fixed.
2. Restore the browser to default settings
Click on Pale Moon at the top left corner and select Preferences.
Navigate to the General tab and select Restore to default.
Sometimes there is a problem with the browser’s core files that make you can’t hear anything in the browser. Reset it and check if the issue is fixed.
Press Windows + I to open Settings and navigate to Apps on the left pane.
Next, click on Apps & features on the right.
Locate the Pale Moon app, click on the ellipsis next to it, and select Uninstall.
Again, click Uninstall in the confirmation prompt.
After restarting the computer to make the changes effective, install Pale Moon.
If none of the above-mentioned workarounds were able to help you, reinstall the browser. Once you’ve reinstalled the browser check if the Pale Moon no sound issue is fixed.
How do I test my browser sound?
You can test your browser sound by performing a sound test online. By doing so, you can easily find out if the Pale Moon no sound issue is due to browser settings or not.
Before performing the test check if your operating systems volume isn’t all the way down. Turning the volume all the way up is a good idea as your speakers might be working but playing weak sound.
This was how you can fix the Pale Moon browser with no audio. We hope that the troubleshooting methods mentioned above were able to help you.
If you still have any issues, feel free to drop a comment below. We’re eager to hear from you.
Welcome back to our Windows news recap, where we go over the top stories of the past week in the world of Microsoft’s flagship operating system.
Windows 11’s Smart App Control now blocks more types of files used to push malware
Smart App Control is a feature in Windows 11 that Microsoft has been testing, which uses cloud-powered security services from Microsoft to identify malicious software and block its installation. In an update, the feature can now block a wider variety of file types, with ISO and Ink being added to the list.
Windows 11 with smart app control blocks iso and lnk files that have mark of the web just like Macros. https://t.co/mfFCQMv6uf
— David Weston (DWIZZZLE) (@dwizzzleMSFT) August 2, 2022
Amazon Prime Video app updates on Xbox and Windows with new design
An update for Amazon Prime Video on both Windows and Xbox has brought a new design. Predominantly, the new design showcases more menu content on the screen, as well as making content included for free with Amazon Prime Video more clearly labelled.
Internet Explorer still lurks in Windows 11
Support for Internet Explorer ended on June 15, and Microsoft has made all references to Internet Explorer redirect users to Microsoft Edge, except one route which still allows users to access Internet Explorer, and it appears to function as normal. You can read here on how to still access Internet Explorer, if for any reason you needed to.
That’s it for this week. We will be back next week with more Windows news.