3 Best Browsers to Watch Shahid [Worldwide Access]

Watching online content from the comfort of your home has become the new norm, thanks to the COVID-19 pandemic.

While you have streaming giants like Netflix, Amazon Prime Video, Disney+, etc., there is another platform where you can watch original Arabic content. The streaming platform is known as Shahid VIP.

Shahid VIP contains over 25,000 hours of content, including movies, documentaries, and premieres, along with live access to MBC’s TV channels. It is accessible from across the world.

You can watch commercial-free live broadcast services for the top-watched live TV channels in HD quality and enjoy characters from Disney, Pixar, and Marvel on almost all your devices.

While Shahid TV is available for Samsung TV, Android TV, iPhone, Android, iPad, Apple TV, LG TV, and Hisense TV, if you don’t want to install the app and wish to view it on a browser, then this guide lists down some of the best browsers that support Shahid VIP.

What devices support Shahid?

As mentioned above, you can watch Shahid VIP on almost all devices. However, there is an official list of devices that Shahid VIP supports.

Supported smartphones and tablets

Supported Smartphones/Tablets
OS VersionsLatest Shahid App version Supports 4K
All iOS devices, except iPads 1 and 2 and iPhones 4 and 5iOS 11.0 and above7.15.0–
All Android smartphones and tablets installed with Google Play Services.Android 5.0 and above7.12.0–

Supported Smart TVs

Supported Smart TVsOS VersionsLatest Shahid App versionSupports 4K
SonyAndroid 7.0 and above4.10.0Yes
GoogleAndroid 7.0 and above4.10.0Yes
TCLAndroid 7.0 and above4.10.0Yes
SkyworthDigitalAndroid 7.0 and above4.10.0Yes
SWTVAndroid 7.0 and above4.10.0Yes
SagemcomAndroid 7.0 and above4.10.0Yes
SDMCAndroid 7.0 and above4.10.0Yes
PartnerAndroid 7.0 and above4.10.0Yes
VSAndroid 7.0 and above4.10.0Yes
HaierAndroid 7.0 and above4.10.0Yes
NVIDIAAndroid 7.0 and above4.10.0Yes
PanasonicAndroid 7.0 and above4.10.0Yes
SkyworthAndroid 7.0 and above4.10.0Yes
ChanghongAndroid 7.0 and above4.10.0Yes
SHARPAndroid 7.0 and above4.10.0–
HisenseAndroid 7.0 and above4.10.0–
XiaomiAndroid 7.0 and above4.10.0–
PhilipsAndroid 7.0 and above4.10.0–
PHILIPSAndroid 7.0 and above4.10.0–
TPVAndroid 7.0 and above4.10.0–
ExpressluckAndroid 7.0 and above4.10.0–
SCBCAndroid 7.0 and above4.10.0–
SEI RoboticsAndroid 7.0 and above4.10.0–
Samsung TVTizen 2.4 (2016)
Tizen 3.0 and above (2017 and above)
6.9.1 (for Tizen 2.4)
6.9.2 (for Tizen 3.0)
Yes
LG TVWebOS 3.0 and above (2016+)3.5.2–
HisenseAll Hisense 2019 and above(Vidaa 3.0, Vidaa 4.0 & Vidaa U5)3.9.0–
ToshibaFoxxum3.1.0–
TornadoFoxxum3.1.0–

Supported Set-top Boxes

Supported Set-top BoxesOS VersionsLatest Shahid App versionSupports 4K
Apple TVTvOS 12.0 and above4.9.3Yes
Mi BoxAndroid 7.0 and above4.10.0–
Fire TV Cube (2nd Generation) – AFTRAndroid 7.0 and above4.10.0–
Fire TV Stick 4K – AFTMMAndroid 7.0 and above4.10.0–
Fire TV Stick (3rd Generation)- AFTSSSAndroid 7.0 and above4.10.0–
Fire TV (Gen3)- AFTNAndroid 7.0 and above4.10.0–
Fire TV Cube – ATFAAndroid 7.0 and above4.10.0–
Fire TV Stick Lite- AFTSSSAndroid 7.0 and above4.10.0–
Google Chrome Cast–

How can I watch Shahid in my browser?

  1. Open shahid.mbc.net website on your browser.
  2. Click the Subscribe button at the top, if you are using it for the first time.
  3. Select the package that suits your needs.
  4. Complete the purchase and start streaming.

What are the best browsers for Shahid?

Microsoft Edge – Various customization features

microsoft edge

Microsoft Edge is the default web browser on Windows 11 PC. It is a Chromium-based browser, which is far more advanced and offers customization features.

Being one of the officially supported Shahid browser, it loads the pages quickly, gives you access to all Chrome extensions, provides a clean user interface, etc.

⇒ Get Microsoft Edge

Google Chrome – Popular choice

Google Chrome is the most used web browser across the globe. It is the father of Chromium-based browsers and gives you plenty of options to customize and personalize.

You can enhance the feature list using extensions. For streaming video, you can cast your tab to a TV, automatic captions of video or audio when available, tracking prevention, and much more.

⇒ Get Google Chrome

Mozilla Firefox – Fast load times

If apart from watching content on Shahid, you want to enhance your usage as per your liking then Mozilla Firefox is the browser.

With multiple customization options, faster load times, less data consumption, picture-in-picture feature, etc., the Mozilla browser is a decent browser to watch your favorite content with no hassle.

⇒ Get Mozilla Firefox

These are the three officially supported web browser by Shahid VIP. MacOS users can use the Safari browser to stream content from the platform. They come in handy especially when error code 6009 appears on the app.

Let us know in the comments which browser is your go-to for streaming Shahid VIP.
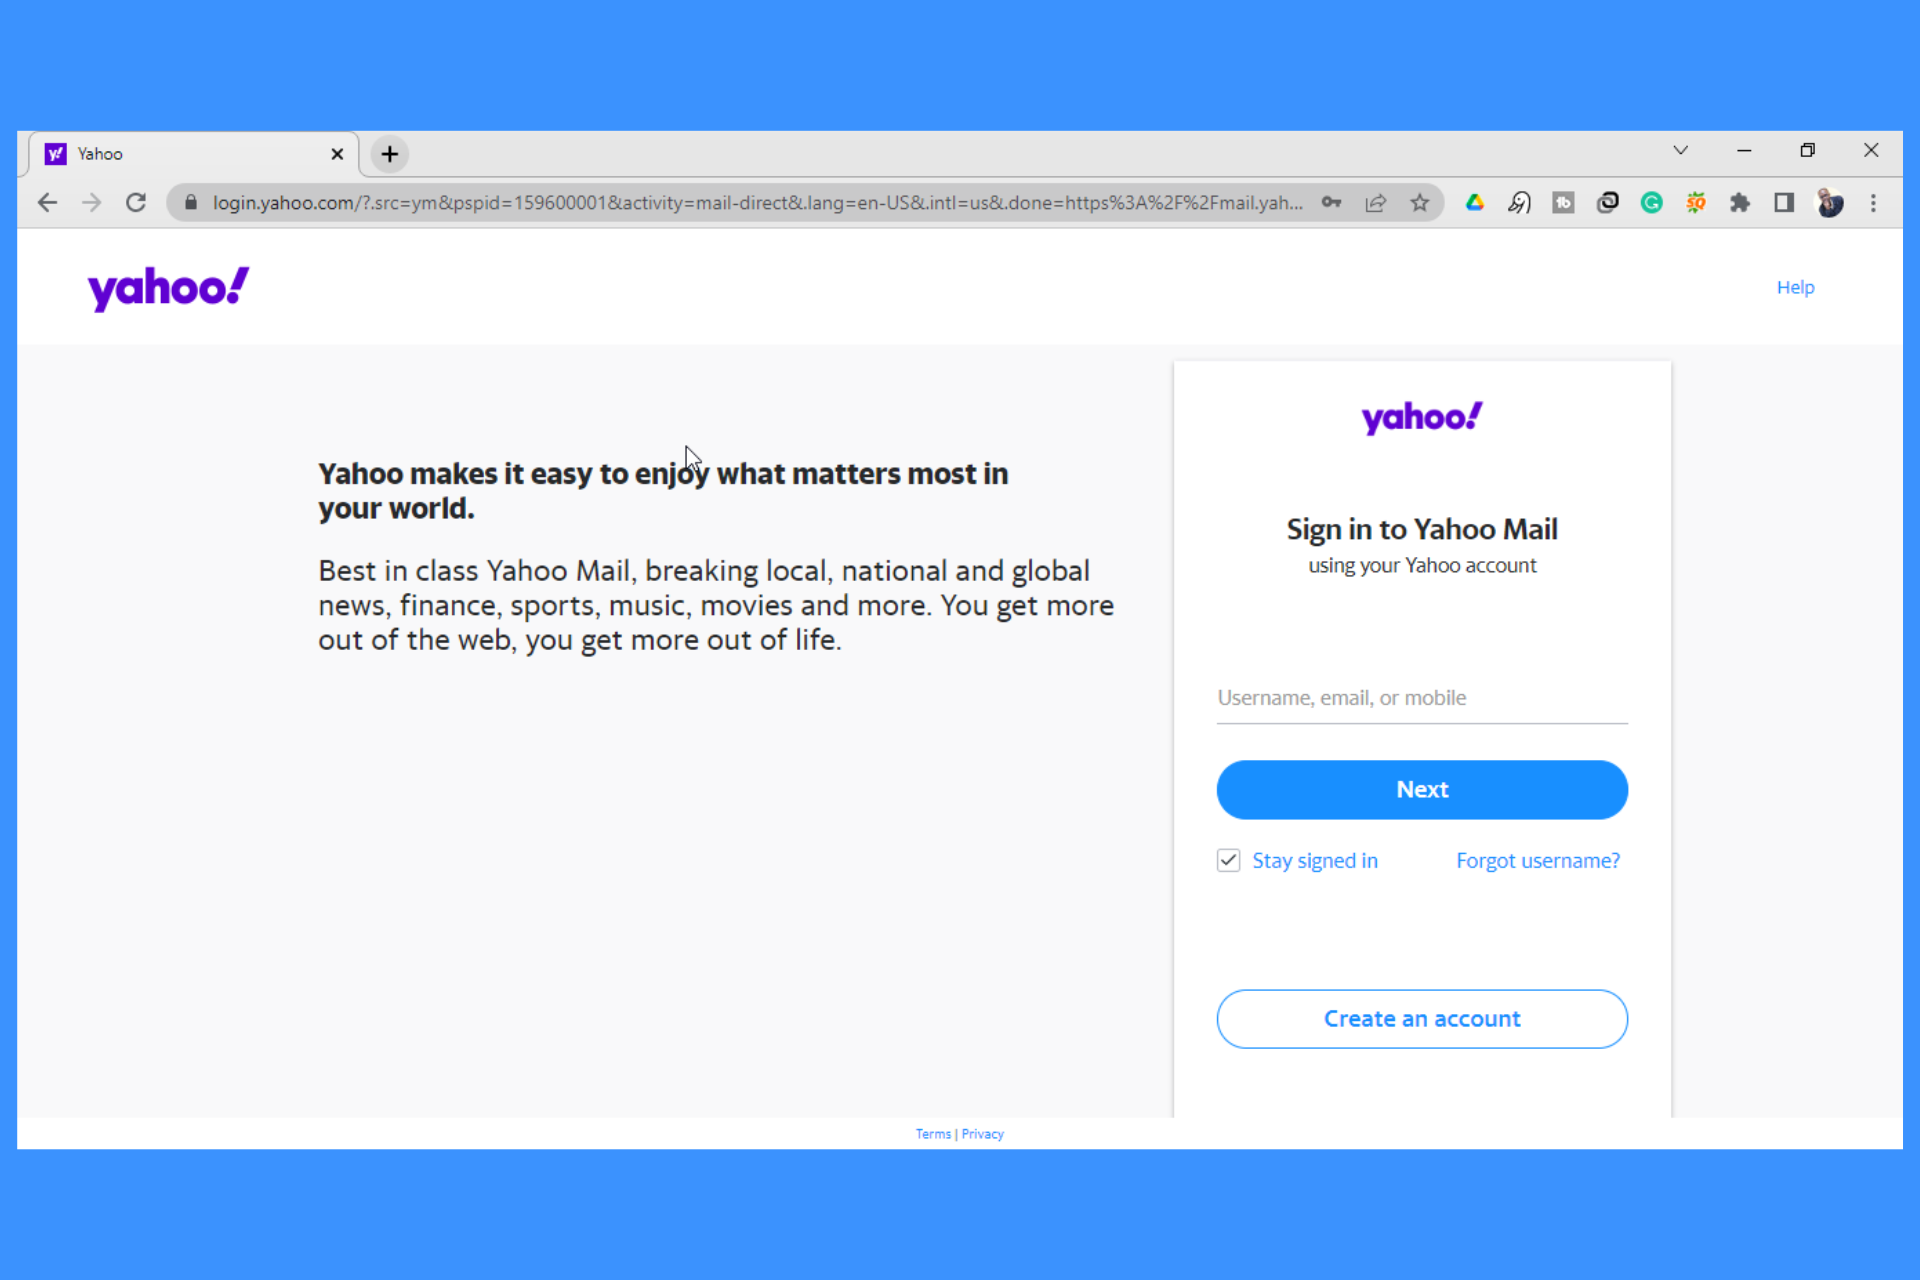
8 Ways to Fix Yahoo Mail When It’s Not Working in Chrome

Yahoo mail not working in Chrome? It’s fixable. Clearing browsing data and disabling conflicting extensions usually does the trick.

However, if the issue is more serious, we’ve go a lot more tricks down our sleeve.

Just follow the step by step instructions below to regain access to your inbox as quickly as possible.

How do I fix Yahoo mail not working in Chrome?

First, check Yahoo mail’s downdetector page to rule out any possible outage on the company’s end. If there are no reports of recent issues, continue with the steps below. If there are, just wait for Yahoo to fix them.

1. Update your Chrome browser

  1. Launch Chrome and click the three buttons on the top right-hand side of the browser.launch menu yahoo mail not working in chrome
  2. Click on Settings from the drop-down menu. settings - Click on Settings from the drop-down menu.
  3. Select About Chrome on the left-hand side panel of the browser. About - yahoo mail not working in chrome
  4. Chrome will start updating automatically. Updating - yahoo mail not working in chrome

2. Clear Google Chrome’s cache

  1. Launch Chrome and click the three buttons on the top right-hand side of the browser.Chrome menu
  2. Click on History from the drop-down menu. chrome history
  3. Select Clear browsing data on the left-hand side panel. browsing data - yahoo mail not working in chrome
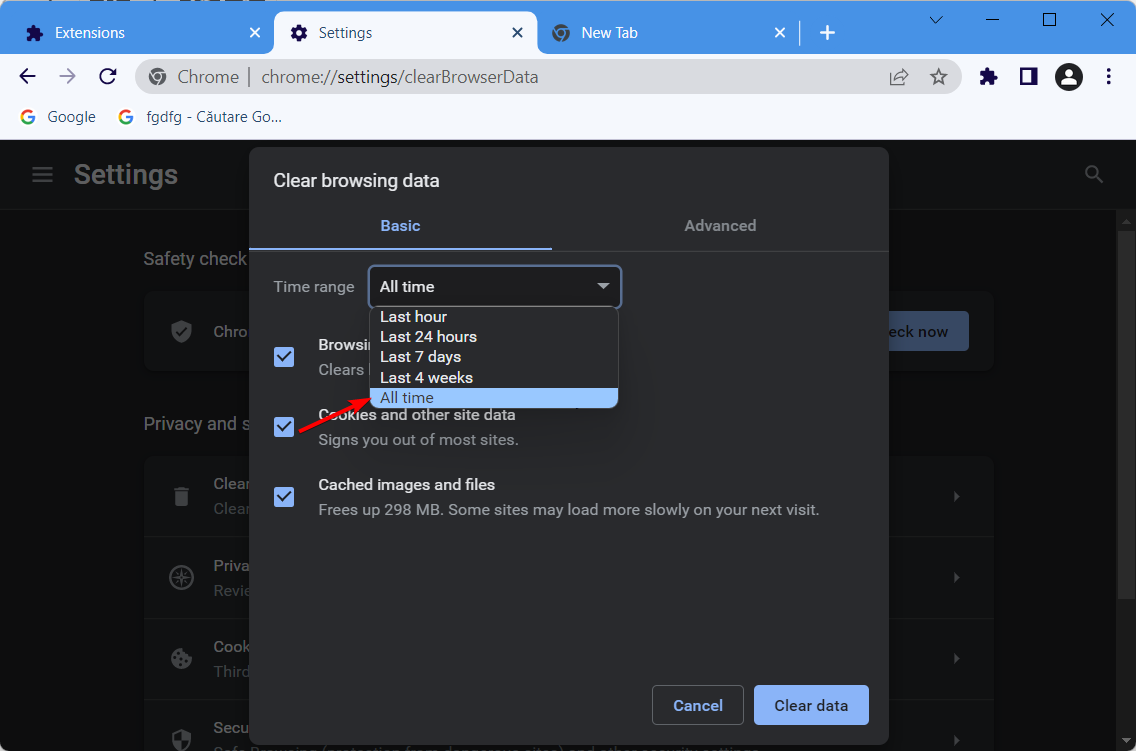
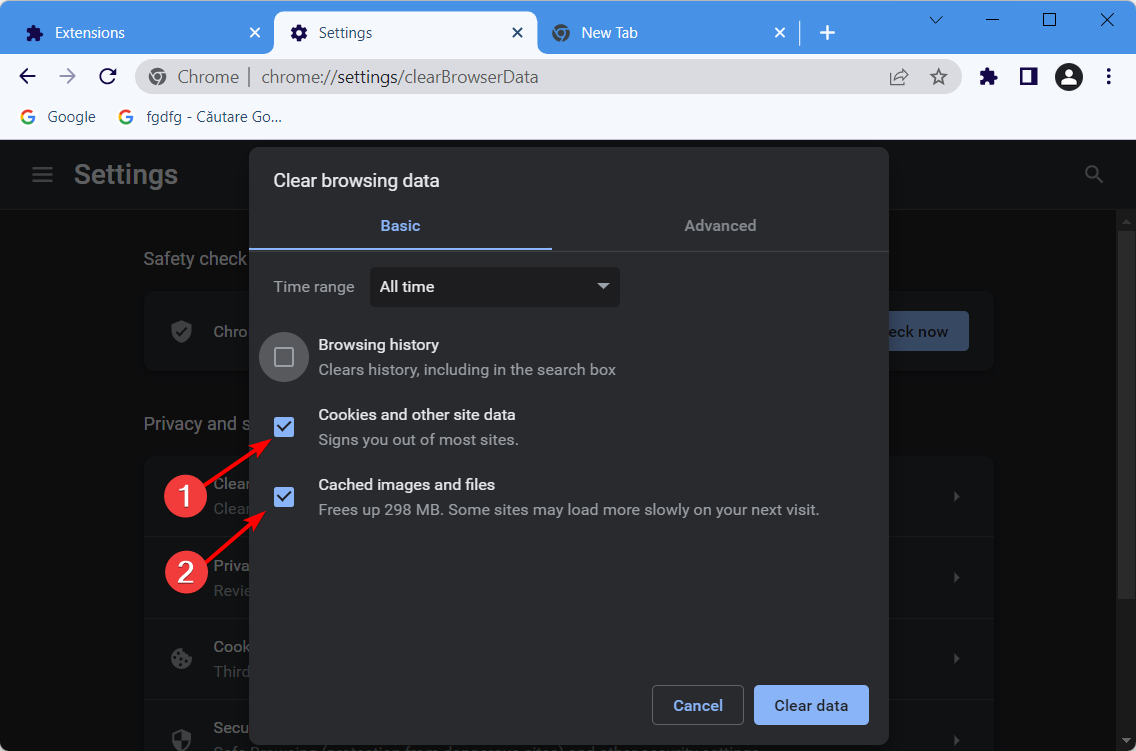
  4. On the window that appears, select the checkboxes next to Cookies and other site data and Cached images and files.
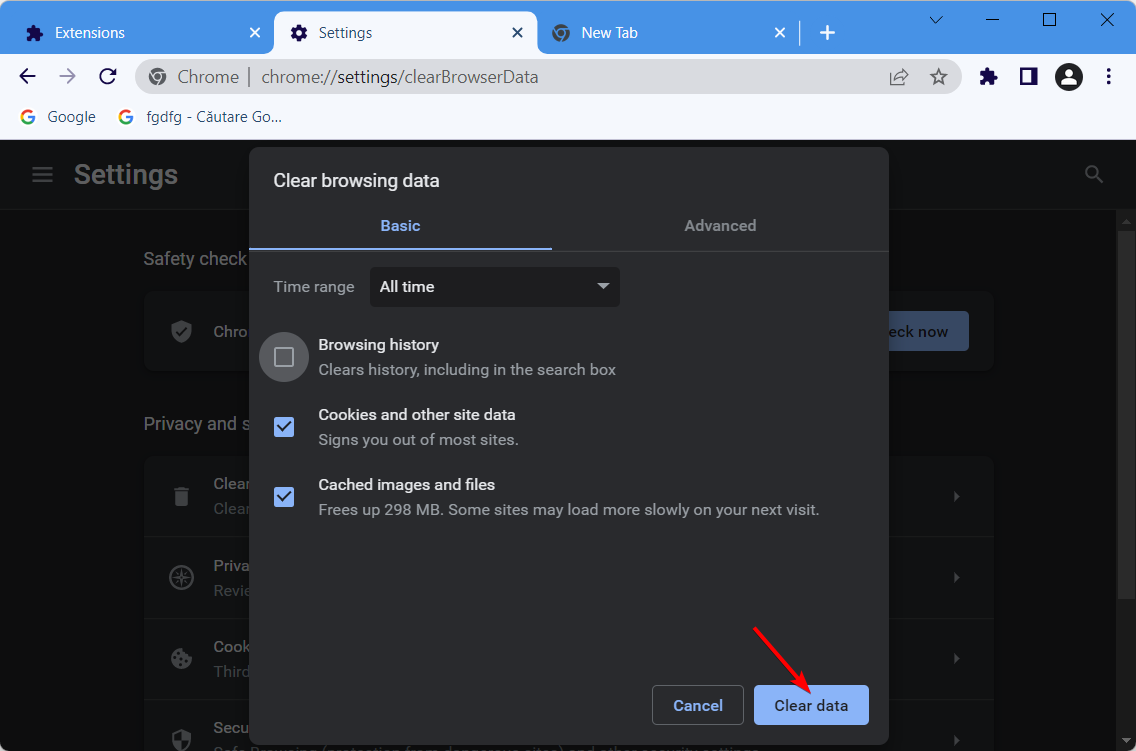
  5. Click on the Clear data button. clear browsing data

3. Restart your computer

  1. Click on the Windows start button.
  2. Select the power button.restart computer
  3. Click on Restart.

4. Remove faulty extensions from Chrome

  1. Launch Chrome and click the three buttons on the top right-hand side of the browser.Chrome menu - yahoo mail not working in chrome
  2. Click on Settings from the drop-down menu. Settings - yahoo mail not working in chrome
  3. Select Extensions on the left-hand-side panel. Extensions - yahoo mail not working in chrome
  4. Remove any extensions that are faulty by clicking the remove button underneath the extension. Remove extensions - yahoo mail not working in chrome

5. Enable JavaScript

  1. Launch Chrome and click the three buttons on the top right-hand side of the browser. chrome menu - yahoo mail not working in chrome
  2. Click on Settings from the drop-down menu. Settings - yahoo mail not working in chrome
  3. Select Privacy and Security on the left-hand side panel on Chrome. Privacy - yahoo mail not working in chrome
  4. Click on Site settings. site settings - yahoo mail not working in chrome
  5. Scroll down the window and select JavaScript. javaScript - yahoo mail not working in chrome
  6. Under the Default behavior, if Don’t allow sites to use JavaScript is enabled, then select Sites can use JavaScript. Use JavaScript - yahoo mail not working in chrome
  1. Restart Chrome.

6. Reset Google Chrome

  1. Launch Chrome and click the three buttons on the top right-hand side of the browser. Chrome Menu - yahoo mail not working in chrome
  2. Click on Settings from the drop-down menu. Chrome settings - yahoo mail not working in chrome
  3. Select Advanced on the left-hand side panel of Chrome.
  4. Click on Reset and clean up under the Advanced drop-down.reseting chrome
  5. Select Restore settings to their original defaults. restore chrome - yahoo mail not working in chrome
  6. Click Reset settings. reset settings - yahoo mail not working in chrome
  1. Restart and sign in to Google Chrome.

7. Deactivate Antivirus

  1. Click the Windows hidden app drawer icon on the taskbar.
  2. Right-click on your antivirus – I am using Avast antivirus. app drawer
  3. Select Avast shields control and then the amount of time you would like the antivirus to stay while disabled. disable avast

8. Try another browser

If all else fails and Chrome seems to not be able to open Yahoo mail, try accessing your inbox from another browser.

A good, up-to-date alternative to Chrome is Opera. We’ve used it extensively and experienced very few errors.

Plus, just like Chrome, it’s built on a Chromium engine – so most addons and extensions you already use will be compatible and there’s practically no learning curve if you make the switch.

This skillful browser is highly customizable and it includes app integrations, improved privacy for Yahoo emails, and more efficient navigation tools.

Opera

Manage your emails on Yahoo Mail without any errors on this flexible browser.

Can I access Yahoo Mail in other browsers?

Yahoo Mail works well in other browsers. Apart from Google Chrome, some other popular browsers you can use without issues include Opera, Mozilla Firefox, Microsoft Edge, and Safari, among others.

As discussed above, all you need to do is to make sure that you are using the latest version of the browser you choose to use.

As you can see, you can solve issues with Yahoo Mail not working in Chrome on your own without any external help. Just follow the solutions discussed above and one of them will surely work for you.

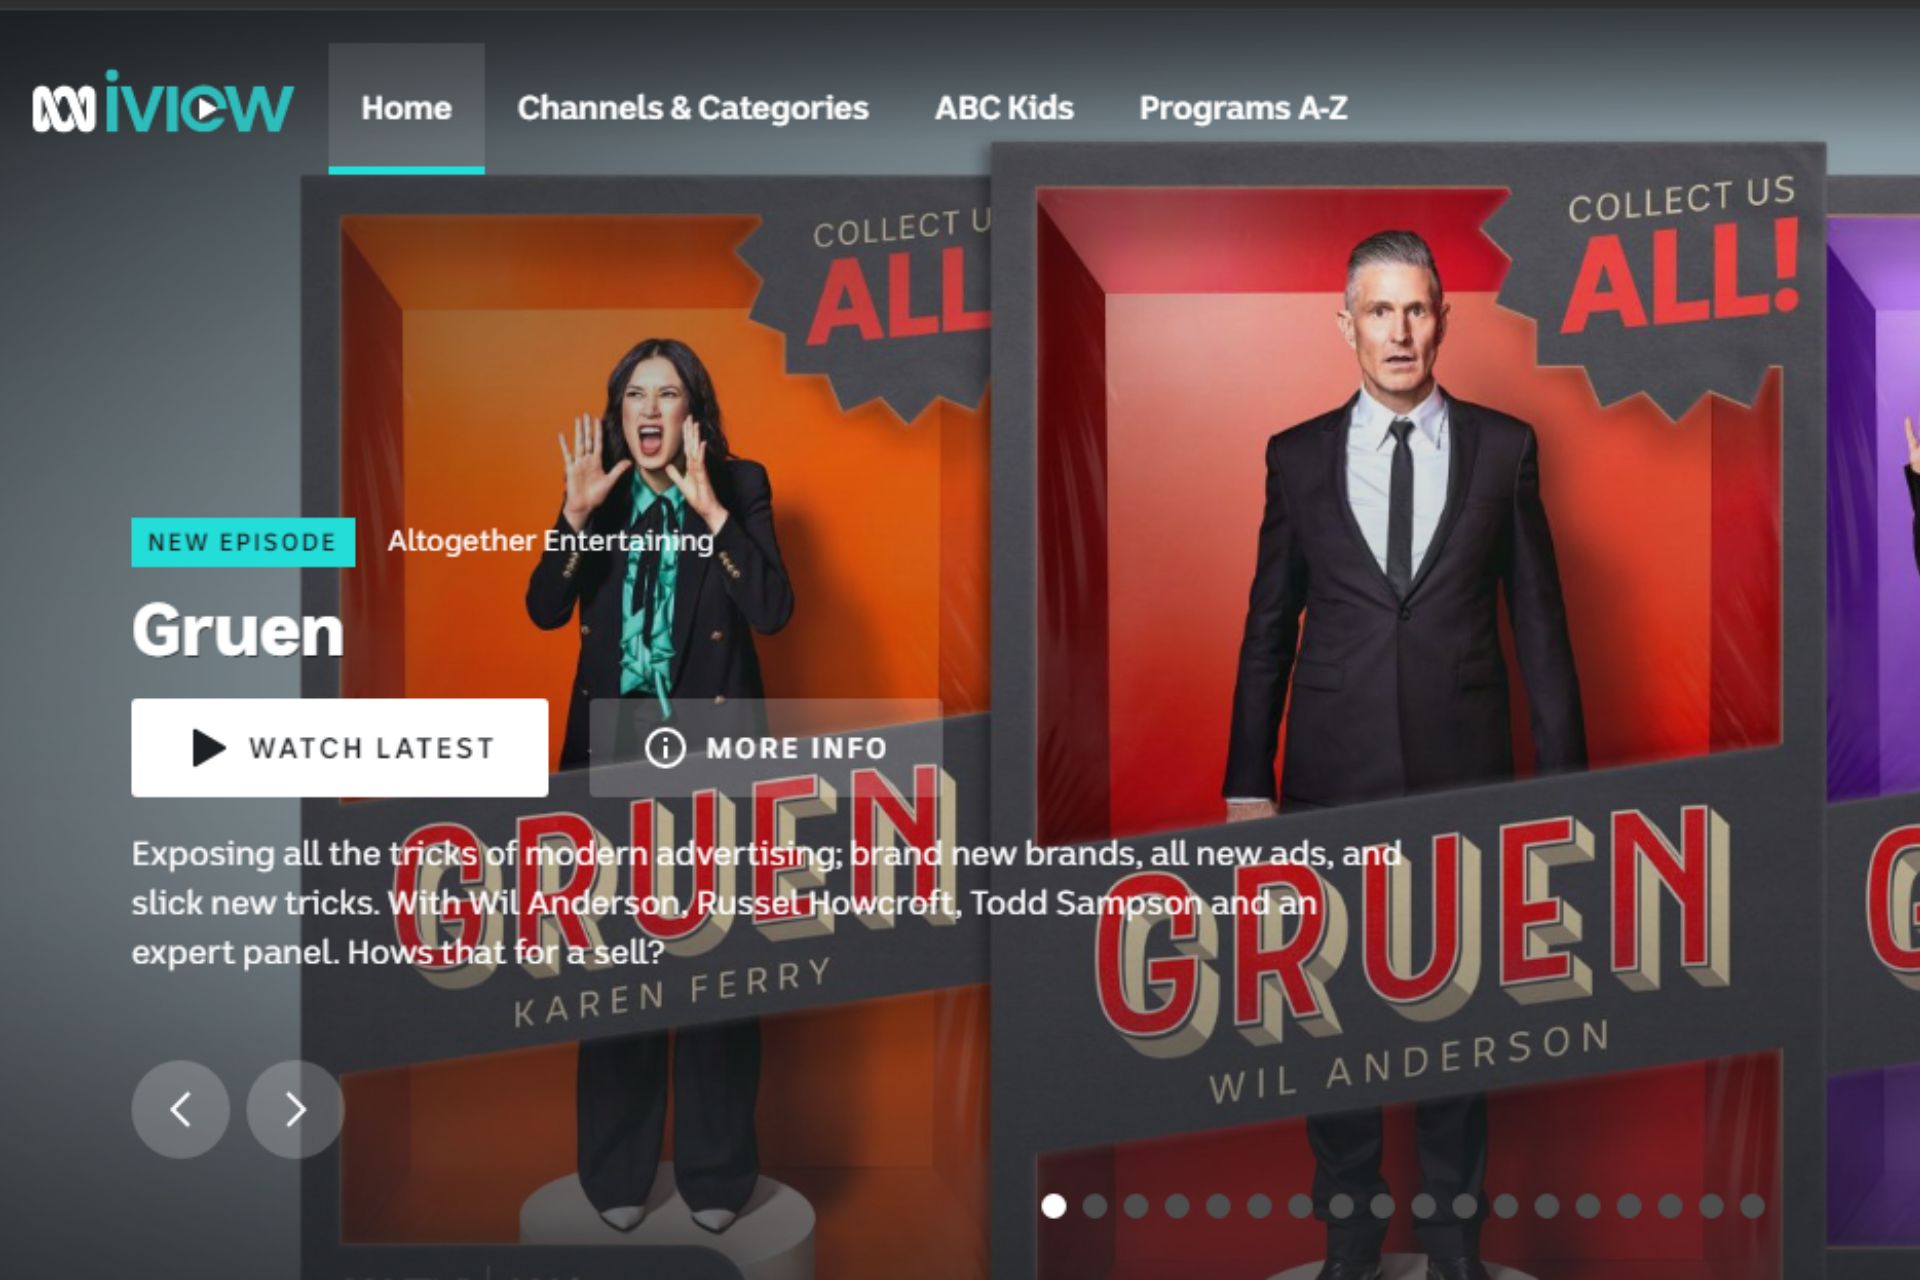
How to Fix ABC iview When It Keeps Buffering or Not Playing

When watching something on ABC iview that keeps buffering, it can be quite the buzz kill, especially when you are in the moment and the suspense is building up.

For many people, ABC iview is the only way to watch some of their favorite TV shows. It’s also an easy way to catch up on missed episodes. So, you need to find a quick solution when it keeps buffering.

Since ABC iview is geo-restricted, your VPN could also be the cause of the issue if you are not in Australia. You can check out our recommended browsers to avoid geo-restrictions to prevent frequent interruptions.

Why does ABC iview keep buffering? 

If the ABC iview becomes unresponsive or stops playing, below are some possible reasons behind the issue:

  • Slow internet connection – If you’re having problems with ABC iview buffering or not playing, you should check your internet connection first. A poor internet connection that isn’t working correctly, may prevent ABC iview from streaming smoothly.
  • Network interference – If you’re using Wi-Fi, ensure your device and router are close together — especially if you’ve recently moved them or changed their position. Also, check that nothing else is using your network simultaneously as ABC iview — this could slow down the stream speed and cause issues during playback.
  • High bandwidth usage – If other apps on your computer or phone are consuming a lot of bandwidth (like streaming music), they will slow down the speed at which ABC iview streams. 
  • Low storage space – If there isn’t enough memory available on your device’s storage space, some apps won’t run properly. The ABC iview app may keep freezing, and you won’t be able to watch anything. Try uninstalling any unnecessary apps and programs and try again.
  • The app is down – Every service experiences crashes from time to time. If you suspect this may be the issue, you can contact ABC iview support to make a report.

How do I stop ABC iview from buffering? 

1. Uninstall unnecessary programs

If you have too many programs running in the background, it can affect your computer’s performance. Try uninstalling any programs that aren’t essential for your everyday use such as games and see if this makes a difference.

In addition, when streaming ABC iview, close all other applications and browser tabs before trying to watch a video. This will ensure that there aren’t any other processes running in the background which could be affecting your experience.

2. Change to a wired connection

If you’re using a wireless connection, it’s possible that you’ll experience buffering and freezing issues when watching ABC iview. This can be annoying when trying to catch up on a show.

Try connecting your computer or smartphone directly to your modem with an Ethernet cable. This will ensure that no wireless connection issues are slowing down your bandwidth or causing buffering issues.

3. Reset your router

If you’ve already tried changing to a wired connection and it’s still not working, it might be worth resetting your router. 

This can often fix problems where there is too much traffic on the network, causing slow internet speeds or even total network collapse for other devices on the same network. 

You can usually find instructions for how to do this on the manufacturer’s website or in the manual for your router.

Why can’t I get ABC iview on my smart TV? 

You can access ABC iview using your PC or Mac, and it is also available on many smart TV sets. However, there are some reasons why you can’t get it on your smart TV. These include:

  • Older TV models – If you’ve got an older model of smart TV, or one that doesn’t have a browser, you may be unable to use this service.
  • Outdated software – To watch ABC iview on your smart TV set, you’ll need to upgrade your software first. If this isn’t possible, you’ll need to get an external device like a Roku or Chromecast dongle.
  • Not enough bandwidth – It is also important to note that not all smart TVs have access to the ABC iview app. You’ll need an internet connection, but it’s not just an internet connection that will do – it needs to be fast enough to stream HD content.
  • Geo-restriction – Geo-restrictions are used by streaming services to prevent users from accessing content from other countries. These restrictions are usually applied for copyright reasons and are imposed by content providers like ABC. Luckily, we have the perfect workaround on how to circumvent geo-blocking.
  • Manufacturer caveat – Some manufacturers block access to third-party apps such as the ABC iview app to promote their own products and services.

Since ABC iview is geo-restricted, we have an excellent VPNs for streaming list that you will find handy if you are outside Australia.

Also, you can check out our expert list of software for uninterrupted streaming so that you can enjoy your shows for longer.

Be sure to let us know which solution worked out for you in the comment section below.

7 Best Cheap Keyboard and Mouse Adapters For Nintendo Switch

The Nintendo Switch is an ever-improving console that has been doing everything to stay up with the competition. It provides users with a stunning interface and different control methods lacking in some consoles.

However, it lacks native support for playing games with a keyboard and mouse. While most people prefer to use modern controllers, you can only get the full experience in some FPS and RTS games using these input devices.

Thankfully, just like the best Xbox One keyboard and mouse adapters, some devices allow you to play games on Nintendo Switch with your two most-used input devices. 

To help add diversity to your gaming control, we have helped gather the best of them available at low cost.

Can you connect a keyboard and mouse to Nintendo Switch?

Nintendo Switch supports many USB keyboards. You only need to plug it into the Switch’s USB port, and you should be ready.

However, this is limited, as you can only use it to enter passwords and text. You will need the best keyboard and mouse adapters for Nintendo Switch to play games.

The factors to consider in a keyboard and mouse adapter for Nintendo Switch varies depending on how you want to use it. The best of them should be portable and easy to set up.

You also need to consider mapping support. Lastly, the adapter should be responsive with no noticeable delay.

What are the best cheap keyboard and mouse adapters for Nintendo Switch?

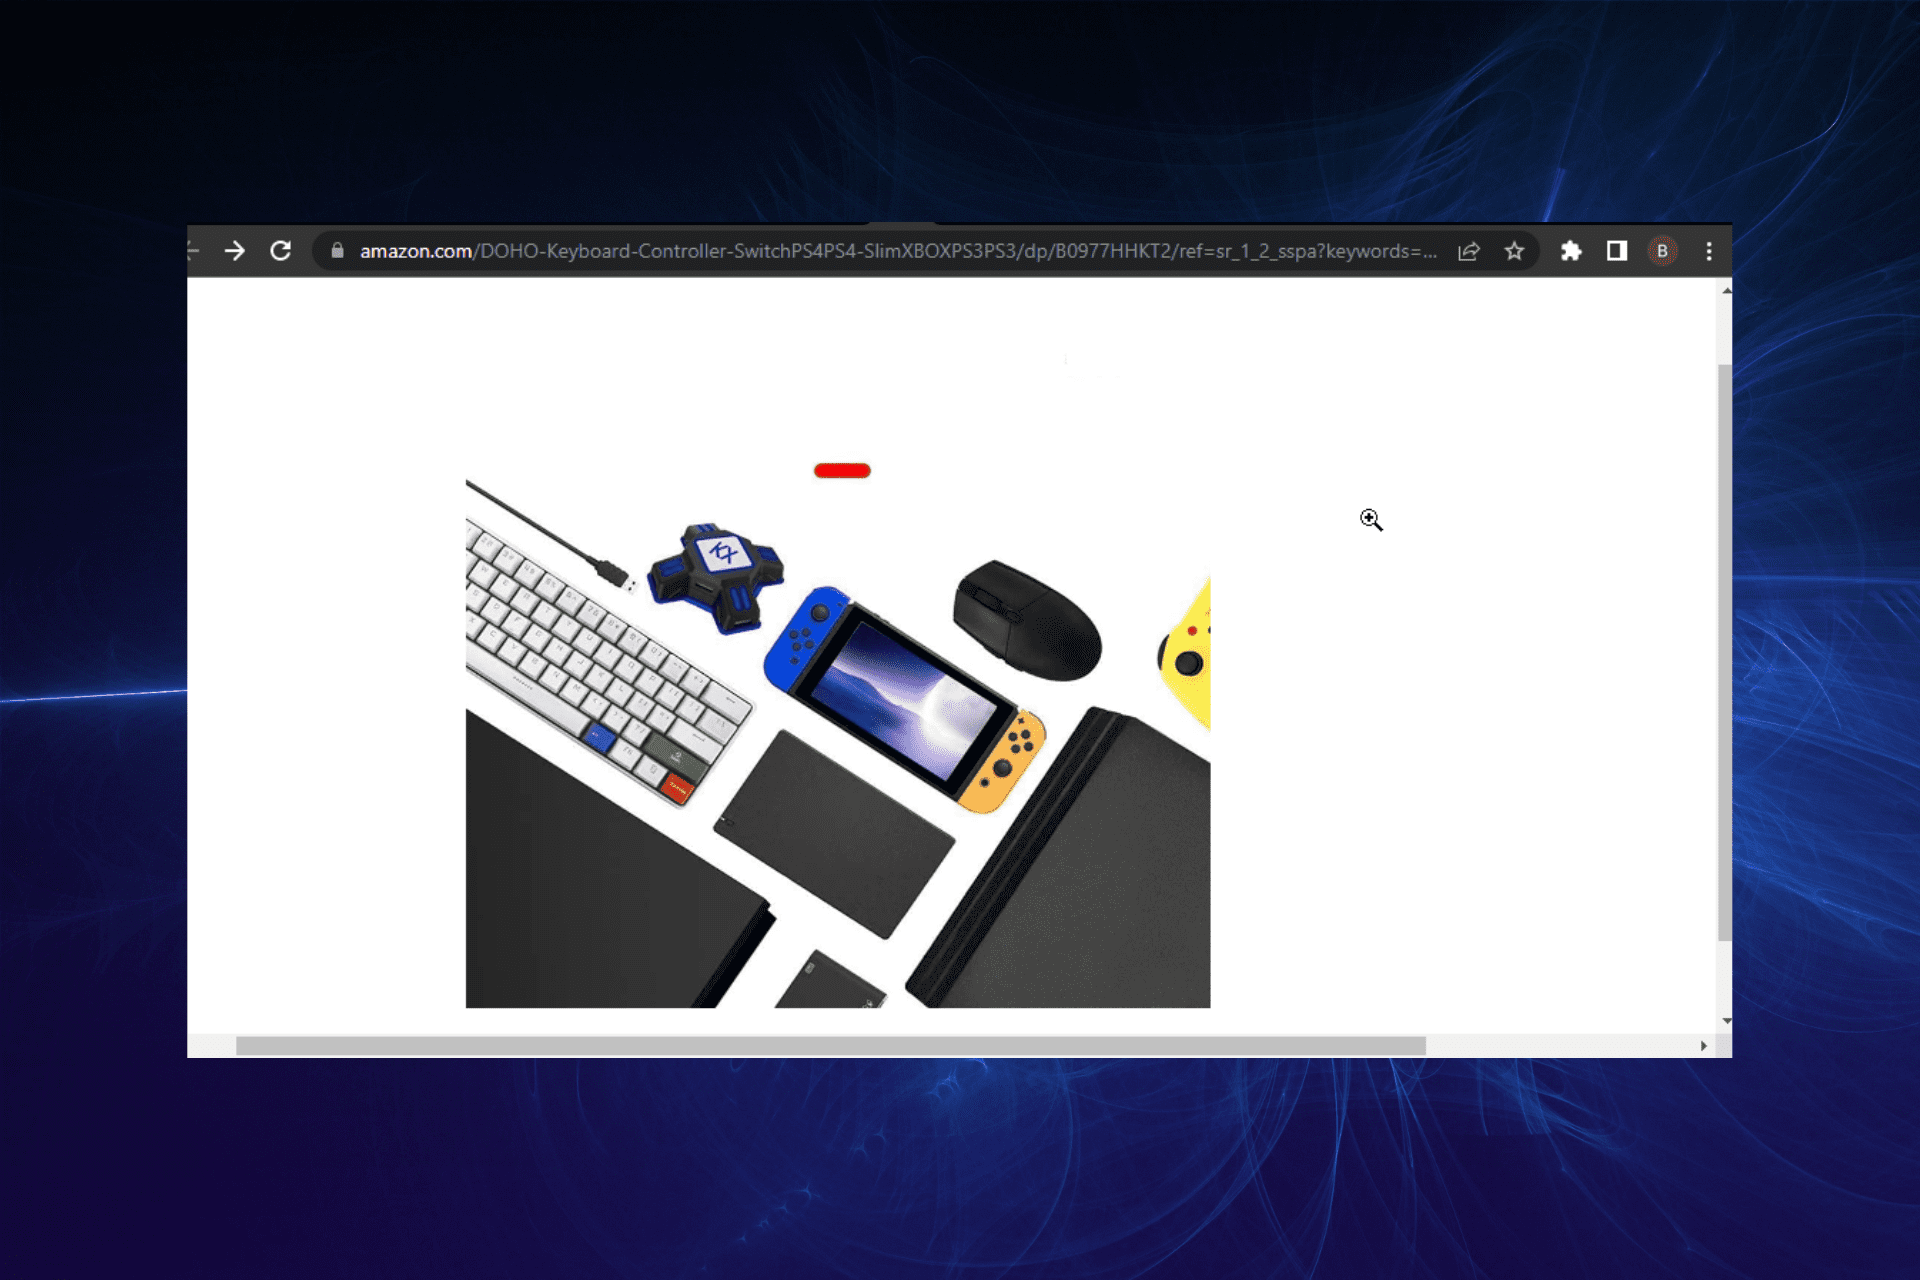
DOHO Game Adapter – Easy to set up

  • Compatible with different consoles
  • Easy to use
  • Fast and effective
  • It is lightweight
  • Does not support a keyboard with a USB HUB interface

If you are looking for an easy-to-set-up Nintendo Switch adapter at a low cost, this product might be the best you will ever see. It requires no driver installation to get going.

You only need to plug it into your console and start having fun. With the DOHO keyboard and mouse adapter, playing FPS games on different consoles becomes easy, and you can use keyboard shortcuts and hotkeys as you wish.

This product is not just limited to the Nintendo Switch. It works with other consoles like PS4 (Pro and Slim), Xbox One (S and X), and PS3.

Lastly, it allows you to adjust the speed of your mouse on the keyboard in case you need to increase or decrease its responsiveness.

Delta essentials FO202 adapter – Dynamic device

  • Responsive and effective
  • Easy to set up
  • It is portable
  • Does not work if connected with the Pro or Joycon controller

Delta essentials FO202 is one of the best keyboard and mouse adapters for Nintendo Switch that works on different consoles. This product allows you to play almost all types of console games with your keyboard and mouse.

It thrives on the top FPS games like Fortnite and Apex Legends, giving you unrestricted control. Also, it allows you to take advantage of some of the shortcuts and hotkeys in your games. 

Lastly, it works with old and some of the most recent consoles like PS3, PS4, Xbox One, and Xbox 360. It just adds more dynamics to your gaming.

Miacoco Keyboard and Mouse Adapter – Wide compatibility

  • Compatible with different consoles
  • Strong and sturdy
  • Has three USB ports
  • Can be difficult to set up

The Miacoco keyboard and mouse Nintendo Switch adapter is the go-to option if you want a device with high compatibility. It is a strong device that requires no driver installation to work.

Also, it allows you to set the keyboard mapping using the Delta keyboard mapping program. This will enable you to set some in-game essentials like shooting and aiming.

What’s more, the Miacoco adapter uses a wired connection instead of Bluetooth connectivity in some devices. With this, you are sure of strong connectivity throughout your gaming sessions.

arVin Wired Adapter – Unlimited control

  • Custom mapping
  • Plug and play
  • Lightweight and portable
  • Key binds can’t be changed

You should consider this product if you want a cheap keyboard and mouse adapter that gives complete control. The arVin wired adapter effortlessly converts signals from your input devices into controller signals.

This makes the control seamless, as your console wouldn’t be able to tell the difference. What’s more, it is not just limited to Nintendo Switch.

It works effectively with popular consoles like PS3, Xbox 360, and Xbox One. Another standout feature of this device is that it allows you to use your keyboard and mouse to play FPS, TPS, RPG, and other high-level games.

Lastly, it has a custom mapping feature that allows you to set the keyboard controls yourself.

arVin N-Switch adapter – Headphone support

  • High responsiveness
  • Wide compatibility
  • Headphone support
  • Does not work with some of the latest consoles

This is another stunning keyboard and mouse adapter for Nintendo Switch by arVin. It effectively allows you to replace your controllers with your wired keyboard and mouse. 

The arVin N-Switch adapter makes it easy to use your external devices to play games like FPS, RPG, and TPS. What’s more, it supports 3.5mm gaming headphones.

With this, you can play games anywhere without disturbing anybody. It should be noted that this product only works for wired keyboards and mice and not the wireless types.  

Lastly, it has a custom mapping feature and allows you to alter the mouse sensitivity settings.

Dobe TNS-19077 adapter – Device for all wired keyboards and mouse

  • Works with most third-party cable games
  • Easy to use
  • Experiences no delay
  • Configuration buttons are a bit difficult to memorize

The Dobe TNS-19077 adapter is designed to provide gamers with improved manipulation and control with the mouse and keyboard. It works with both Nintendo Switch and the Lite version to great effect.

It is plug and play, as it requires no driver installation to get going. Also, it does not select a keyboard or mouse, as it works with most products available.

Another impressive feature is its custom mapping. This ensures you can easily map some of the in-game features like shooting and aiming.

Mcbazel Adapter – Lightweight device

  • Wide compatibility
  • Comes with OTG Type-C adapter
  • Supports most wired keyboards and mice
  • Does not work with Switch Lite

Last but certainly not least on this list of cheap keyboard and mouse adapters for the Nintendo Switch is a simple yet powerful device. Mcbazel adapter boasts wide compatibility.

With it, you can play games on different consoles using your keyboard and mouse. What’s more, it supports standalone and network modes.

Lastly, it is easy to set up and use. Whether on Xbox, Playstation, or Nintendo Switch, you don’t need to install any driver to get going.

The best keyboard and mouse adapter does not need to be expensive to be effective. The products on this are a testament to that fact. You can pick any of them with the assurance of quality performance.

Do you need the best overwatch PS4 mouse and keyboards? Check our guide on the topic for the most effective options to choose.

Feel free to let us know the product that piques your interest from our list in the comments section below.

Everything you Need to Know About Eversend Scam Verification Email

Since everything is now global, you can work from the comfort of your desk for a company that is not located in your home country.

And in order to receive payments, you have the option of using different money transfer options such as Eversend.

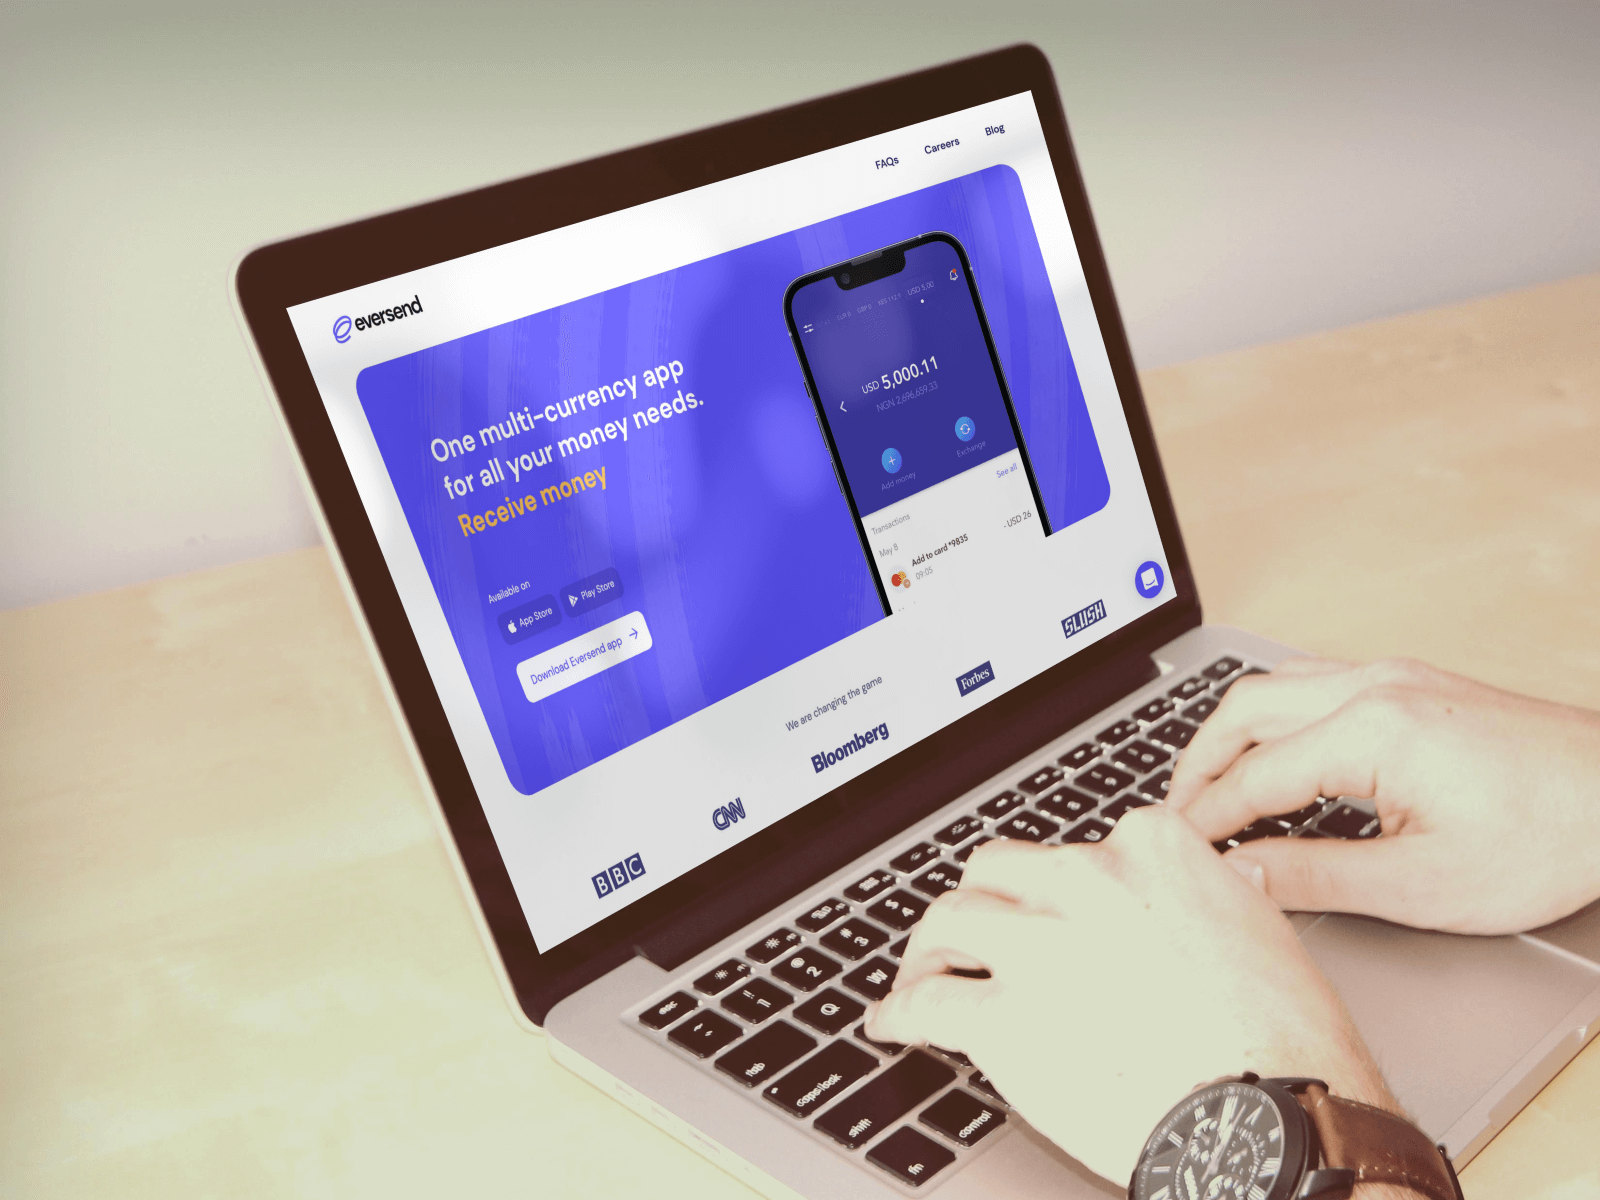
Eversend is one of Africa’s biggest money transfer platforms. It is an all-in-one borderless money app to make money transfers, pay bills, save or exchange currencies, shop online using an Eversend virtual debit card, and much more.

It has a huge userbase, all thanks to claiming to provide the best currency rates compared to other banks and wire transfer methods, Eversend has become hugely popular.

However, in recent times, several people have claimed to have received the Eversend verification email. The strange part is that the people who have received this verification email aren’t even users of the Eversend platform.

After careful research, it was found out that this is all part of the Eversend scam email phishing done by hackers to steal important user information.

But there’s more to it, and that is exactly what we will be discussing in this guide. We will talk about the Eversend scam and how you can take charge and protect yourself from such phishing scams. Let us check out the guide itself.

What is Eversend and how does it work?

Eversend is a money transfer platform. You can use its app and easily transfer money from mobile to mobile, with no fuss.

All you need to do is download the app from either the Play Store or App Store, install it on your phone, get the verification done, and that’s it.

You need to load your Eversend wallet in order to transfer money or pay bills. It supports cards such as Mastercard, Visa, and Maestro.

The best part is that you can send money from Eversend to a person who doesn’t have an Eversend account. You can make use of money accounts such as M-Pesa and Airtel Money to transfer the funds.

However, the main part here is verification. It is very important for a user to verify themselves in order to use Eversend.

Once you have registered with Eversend, below are the details and information you need to provide to verify yourself:

  • You should be 18 years or above.
  • A photo of a valid government-issued ID. This could be your passports, national IDs, or driver’s licenses. You can’t use a hospital card, loan card, or student ID for verification.
  • A video of your face.

What is the Eversend email verification scam?

There are not one or two but several hundreds of user reports regarding Eversend email verification scam. This issue is also not very new and has been reported for quite some time.

Hackers reportedly send a verification email to the target user and ask them for details on opening an Eversend account.

This is a true fact that not everyone is technically sound and knows how to deal with such phishing scams. Affected users also mention that there is a suspicious link in the email that asks them to click so as to input the code.

Upon clicking this link, for some users, it redirects them to a fishy website and steals their account credentials, along with personal and financial information.

While for some users, a malicious website with the same interface as Eversend opens, which bluffs the user into entering their account credentials, and ultimately stealing their money.

The worrying part is that almost all users who have received Eversend scam emails are not users of the platform. This means that someone else, or a hacker, is using the target user’s email ID and scamming them in the hope of getting their financial details.

Some have also reported that the email tricks them into clicking the email to receive a gift, but in reality, it contains viruses, malware, and spyware.

How can I recognize scams or phishing?

Scam or phishing emails or messages most commonly ask you to send in your personal details and financial information.

The email or text may ask for your credit/debit card number, your password, your account number, your Social Security number, etc.

Moreover, phishing or scam texts or emails, like the Eversend scam, may look like they are from a company that you know or trust.

Scam emails offer you a story, which is pretty similar to all scams, and try you into clicking a link or opening an attachment. According to Federal Trade Commission Consumer Advice, the emails may say:

  • They’ve noticed some suspicious activity or log-in attempts
  • Claim there’s a problem with your account or your payment information
  • Say you must confirm some personal information
  • Include a fake invoice
  • Want you to click on a link to make a payment
  • Say you’re eligible to register for a government refund
  • Offer a coupon for free stuff

The above are not all the signs that can help you detect phishing or scam, but are some of the most common practices, hackers do to get hold of your personal details.

Now that you have some idea about how you can recognize scams, like the Eversend scam email verification, let us take a look at how you can safeguard yourself from such scams.

How can I protect myself from Eversend scams?

1. Keep your account passwords different

Often, because of laziness or something else, we always keep the passwords to all of our accounts the same or something very similar.

While this is good practice, you may forget the password if you keep on using a different one for each account. That is where you become more vulnerable to such attacks.

If you can’t remember different passwords for different accounts, then you can make use of password managers that can help you store different passwords for different accounts.

Moreover, they also come with a feature that will generate a different and difficult password for your account, and everything is stored behind a single password. So, all you need to remember is the single password for the password manager, and you can access all of your passwords.

If you are confused about which password manager to go for, we have got you covered. You can check out our guide on the best password managers you can use on your Windows PC.

2. Use a security software

The best way to protect your personal data from being hacked is to use security software. There are tonnes of antivirus software available on the internet.

We have a list of the best security software that you can install and keep yourself protected. Not only the software protects you from security threats but also gives you critical protection updates.

A great alternative would be to install a comprehensive antivirus that will guard you from elaborated phishing attacks or scams.

TotalAV is your key solution for scam protection due to its anti-phishing smart tools, advanced security for banking data, the Exploit Blocker to prevent attacks on your browser, and many more.

Plus, you get a defense against new emerging threats for different devices like Windows, Android, or macOS.

TotalAV

Get this malware and ransomware security and protect sensitive banking data on Eversend platform.
Free Trial Visit Website

3. Keep your system up to date

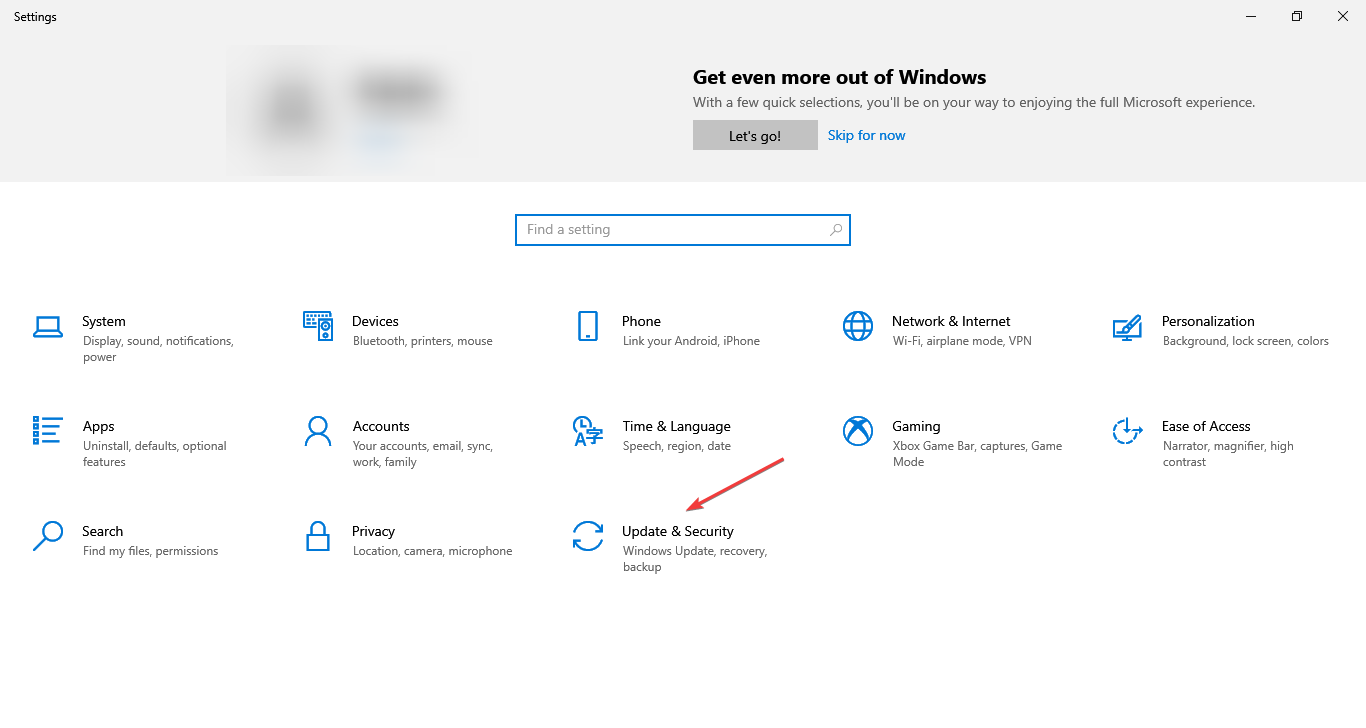
  1. Press Win + I to open Settings.
  2. From the left pane, select Windows update.
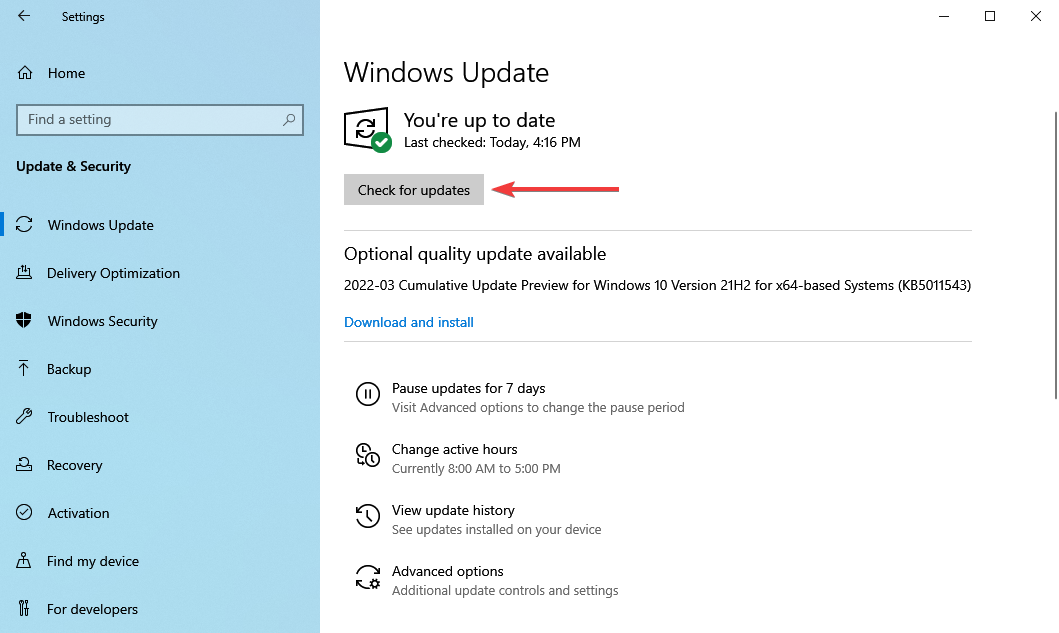
  3. Hit the Check for updates button.
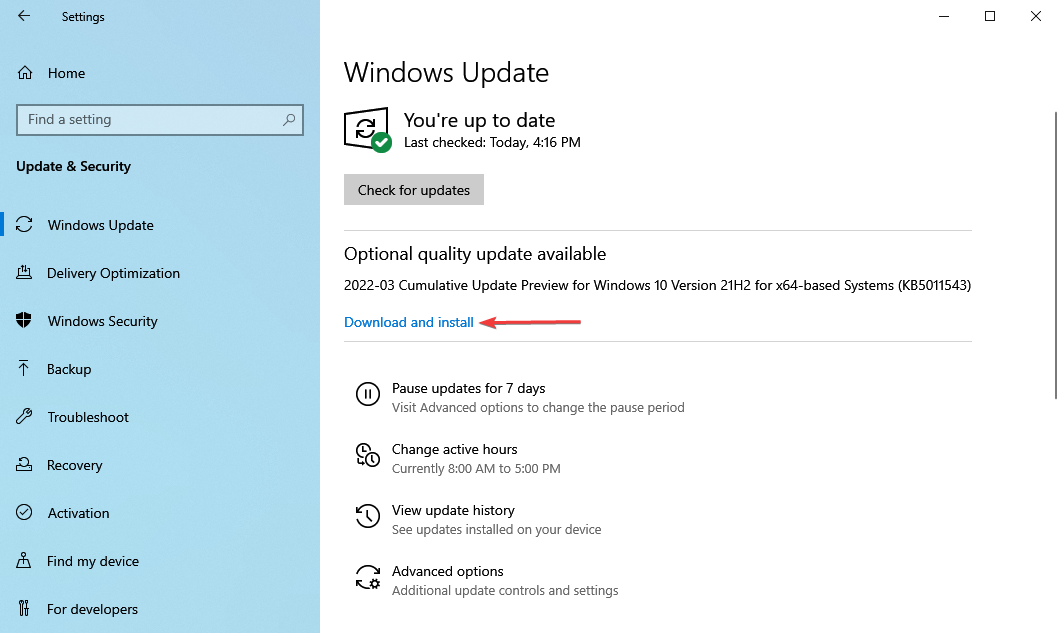
  4. Your system will check its servers for a new update and if found one, will prompt you to install it on your PC.

Whether you use a smartphone or a PC, you should keep your device up to date with the latest available software version installed. The latest updates not only bring new features for the device but also bring critical security features.

3. Use multi-factor authentication

Another way of protecting your accounts and personal data is to make use of 2-factor authentication or multi-factor authentication wherever the feature is available.

There is another layer of protection over your credentials where you are required to enter two or more credentials in order to verify access to your account.

If someone, tries to hack into your account, then it will immediately send you a warning message that someone tried to log in. If that is not you, then you can immediately secure your account.

4. Contact Eversend support

If you have received a Eversend scam email that you are sure is not because of your activity on the platform, then you can immediately contact Eversend customer support.

You can get in touch with Eversend support at [email protected]. In the case of any fake (phishing) emails, purporting to be from Eversend, you can contact Eversend at [email protected].

What can I do if I didn’t get verified the first time?

There is a chance that you have received an Eversend verification email because you weren’t actually verified the first time you performed the process.

After checking the email’s legitimacy, you can do the below mentioned things to get your account verified.

  • Check if the information entered by you matches the uploaded photo ID
  • You can only create an account for yourself and not for a third party
  • One or both photos were blurry; try retaking photos
  • Submit the eligible government ID
  • Follow the KYC instructions carefully

There you have it from us in this guide on Eversend scam. If you have also received a scam email from Eversend, then you can follow the tips mentioned in this guide to safeguard yourself.

How to fix VCI error initializing RCO [Quick Fixes]

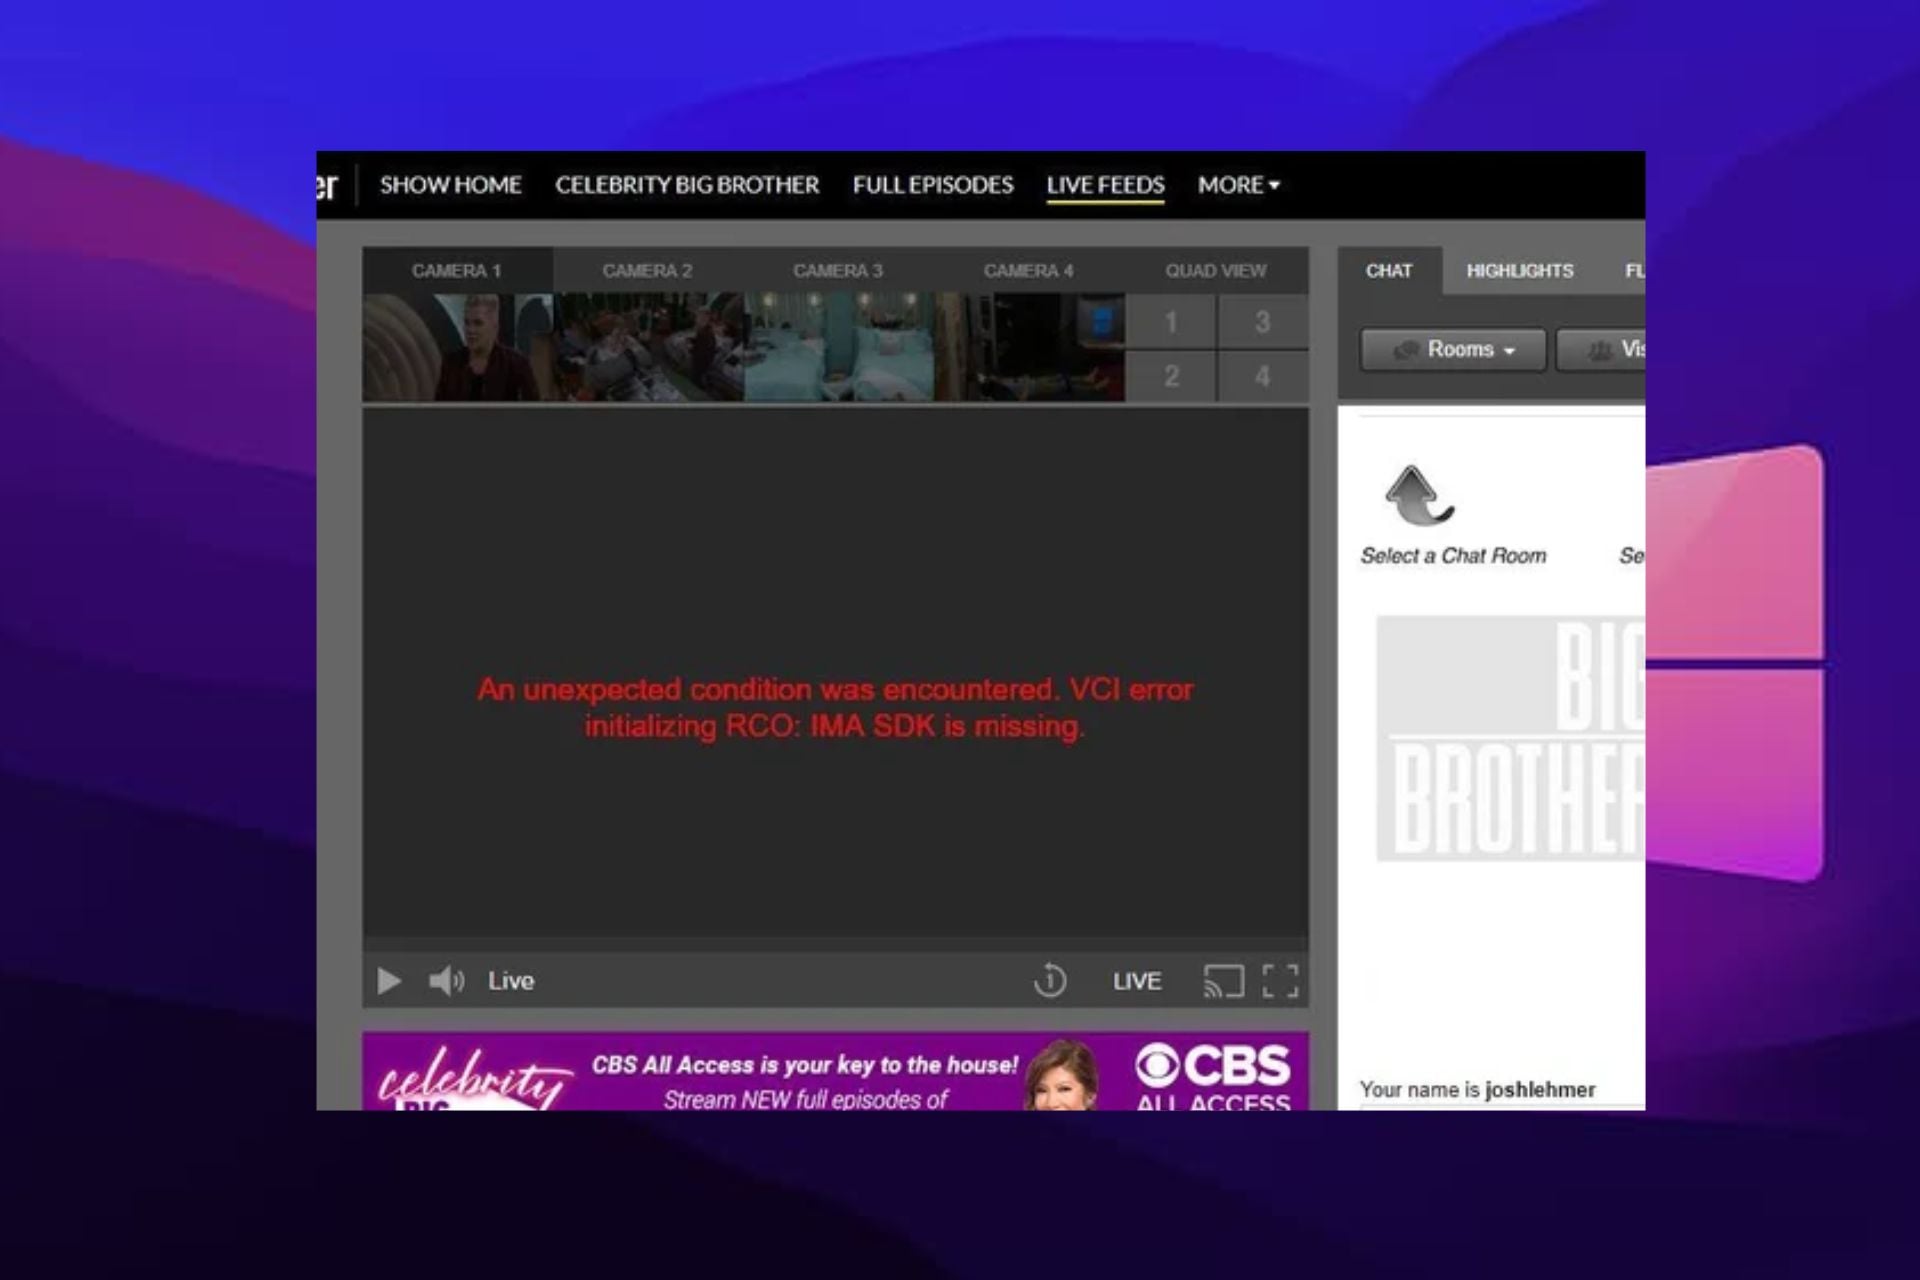
A lot of users encounter different issues when they want to stream their favorite shows. One of the most frequent questions users complain about is how to fix VCI error initializing RCO.

The ‘VCI error initializing RCO’ prevents you from being able to stream. As we go further into this article, we’ll discuss the causes of this error and the solutions you can use to fix it.

What causes VCI error initializing RCO?

1. Ad blockers

An ad blocker is a software that blocks ads or online advertisements in web browsers, native apps, or a network. So, whenever an ad blocker wants to block or filter an ad content, it can affect the initializing process between the VCI and the RCO. Hence, it can be a problem and can cause the VCI connection error.

2. Missing IMA SDK

Another cause of this error is a missing IMA SDK. Every software requires certain features and components to function. However, the VCI error initializing RCO pops up when the IMA SDK is not found on your device to help complete the initializing process.

3. Outdated Windows

Most times, running Windows that is not up-to-date can cause lots of issues with your device. So, an outdated Windows can be responsible for the VCI error initializing RCO.

What can I do if I encounter the VCI error initializing RCO?

1. Disable Ad blockers on your browser

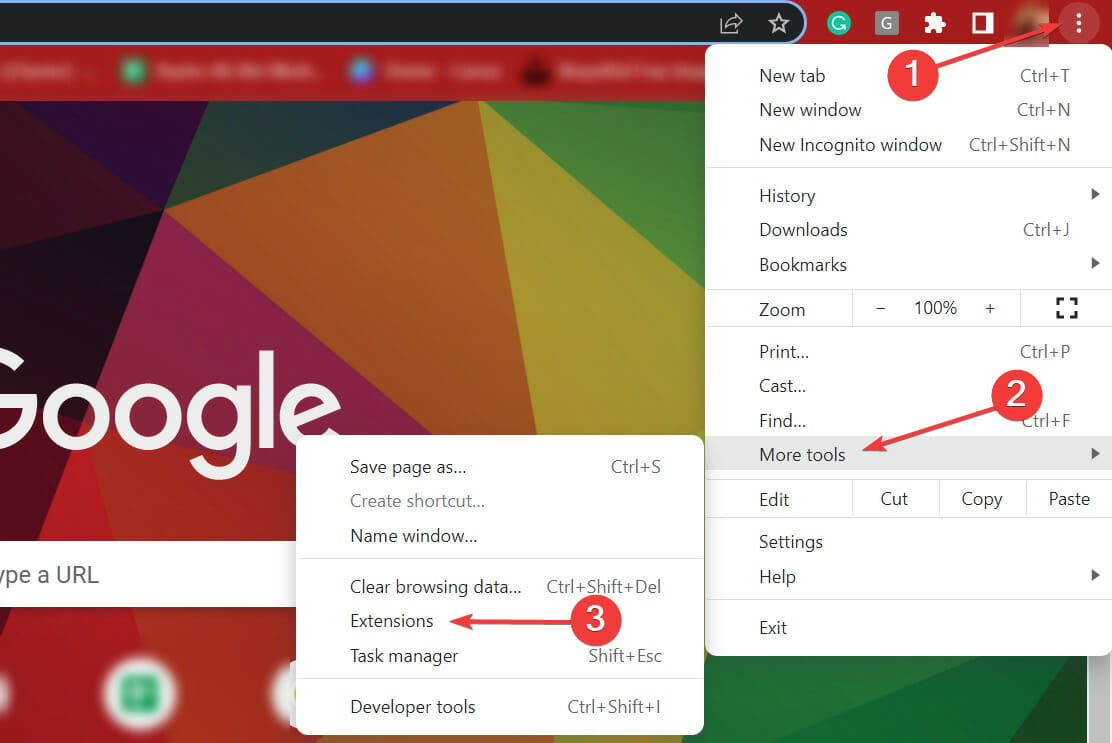
  1. Launch Google Chrome on your desktop.
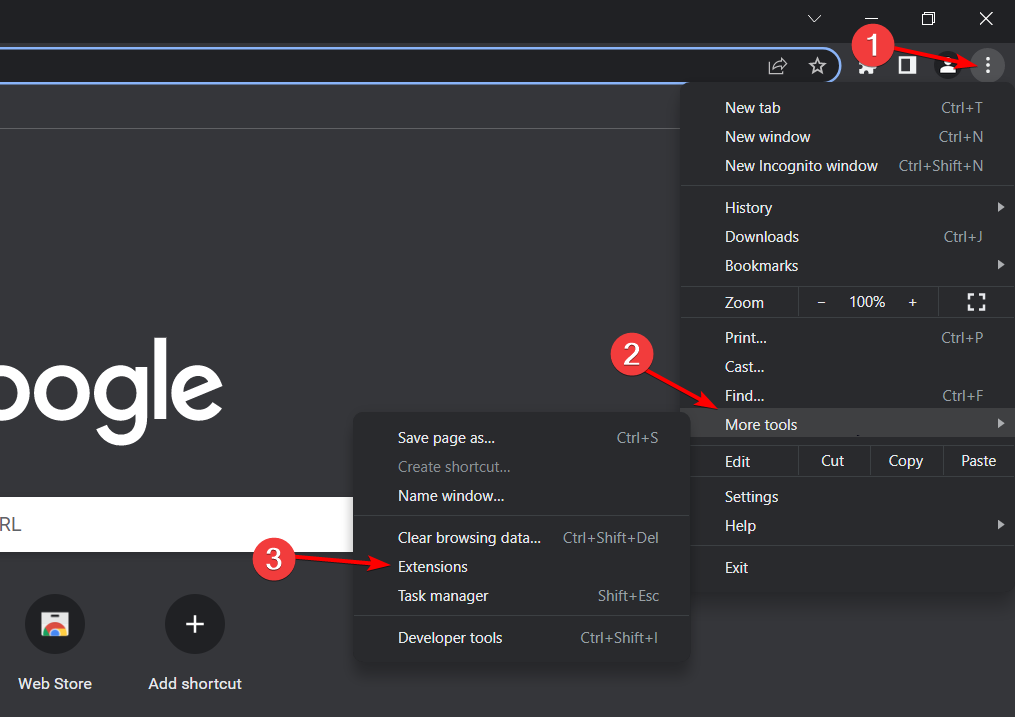
  2. Click the More menu button at the top-right-hand corner of your screen.
  3. Click More Tools from the drop-down.
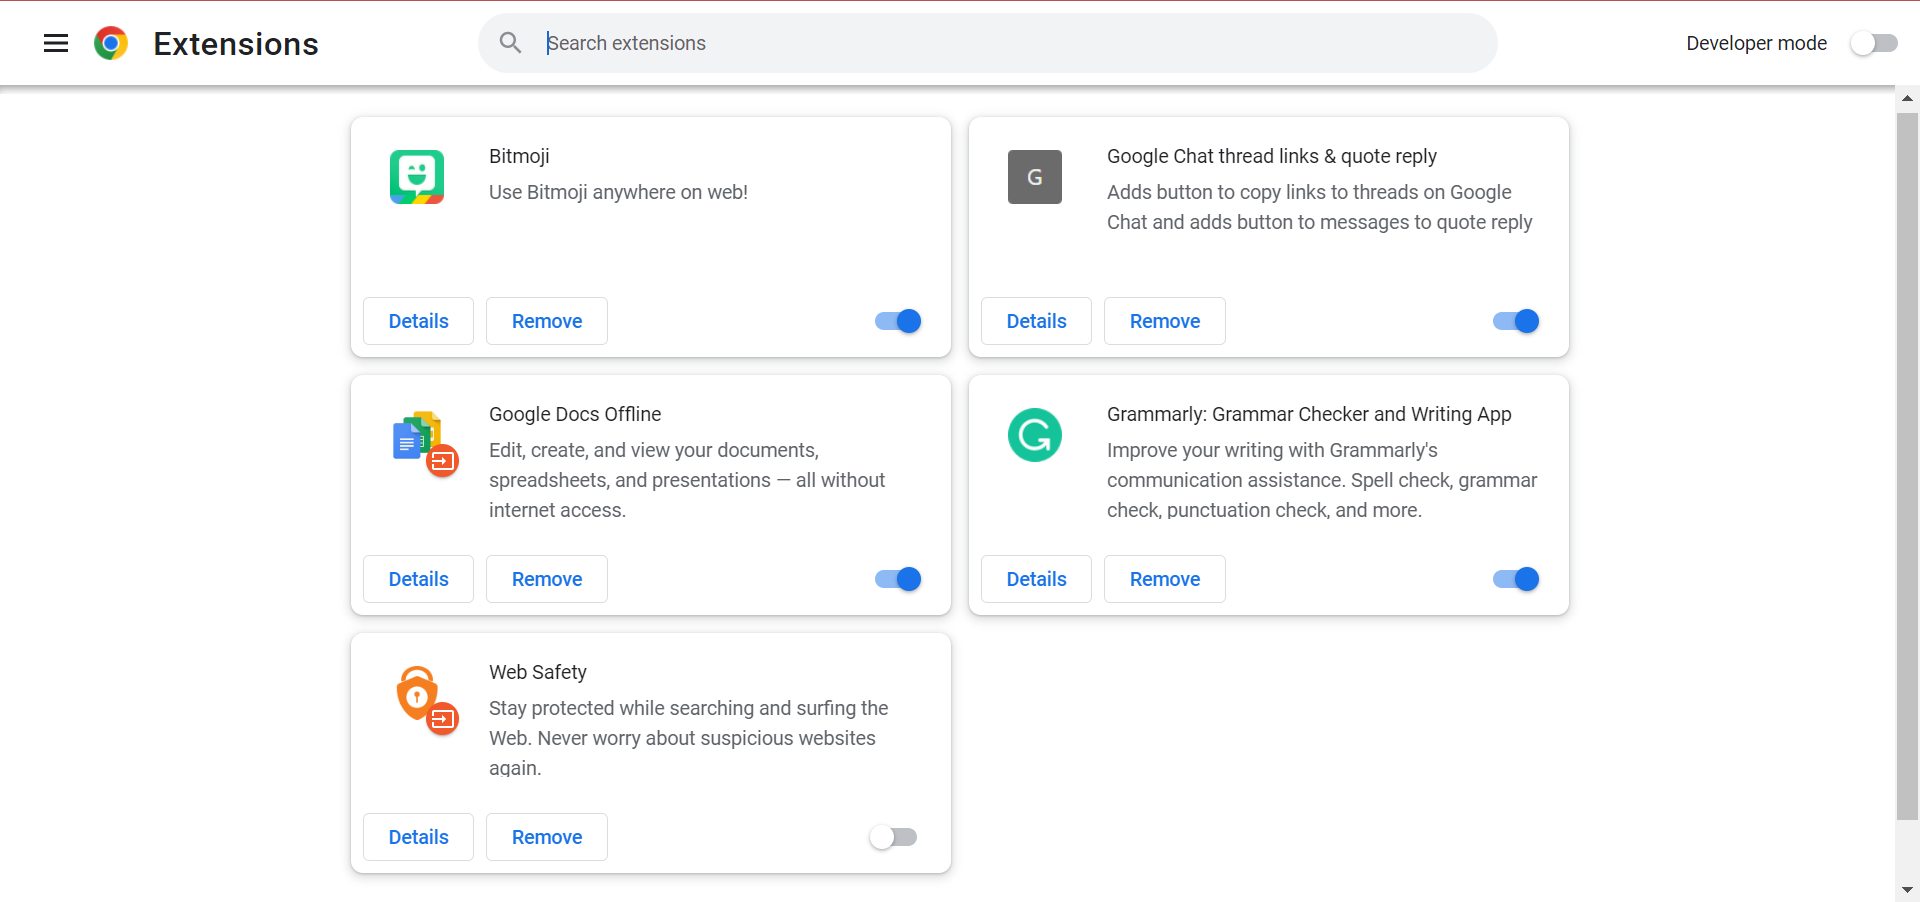
  4. Select Extensions and select your Ad blocker from the plug-ins and mail extension list.
  5. Click the toggle switch at the front to stop it.

Disabling the Ad blocker will be the most likely option to fix this problem. However, if it fails, proceed to the other options.

2. Update Windows

  1. Click the Windows icon on the left corner of your screen, then select Settings.
  2. Select the Windows Update option.
  3. Click check for updates.
  4. If there’s any update available, download and install it.
  5. Restart your PC.

Since compatibility issues could cause the VCI error initializing RCO, updating the device could help fix the problem also.

3. Check your internet connection

Performing a power cycle on your router is an effective way of getting it to work better. Some users have confirmed that this works for them, so it is worth a trial.

Another resourceful topic you should know about is the 7 Best Free web Browsers for Google TV [Adblock Included]. Also, you can learn about the best browsers with VPN and Adblocker already built-in and their functions.

How to Fix Uniqlo System Error [Quick Guide]

Uniqlo is a Japanese shopping platform that deals with casual wear designing, manufacturing, and retail. It is an online shopping store, a brand of Fast Retailing Co.

Shopping at Uniqlo is simple and convenient, but users encounter some errors while using it. These errors are known as Uniqlo System errors.

Users complain about errors like the Uniqlo payment error, which means the buyer isn’t able to make payments for some reason.

Also, the Uniqlo business address error is another error people encounter. It means buyers can’t check out the order. These errors can occur due to several reasons ranging from website issues, card issues, and lots more.

Why is Uniqlo not loading?

1. Network connection issues

It means Uniqlo cannot connect to the server because your network connection isn’t vital. Hence, it can result in Uniqlo not loading.

2. Problem with browser cache and cookies

Browser cookies and cache help it load websites faster and smoothly. They can become corrupted, causing websites to load slowly. Hence, it can lead to Uniqlo not loading.

3. Traffic load

Uniqlo servers can become jam-packed with activities from different users. and can result in the app or website not loading.

4. Uniqlo server is down

Like most online shopping websites, Uniqlo undergoes maintenance. During this period, their servers are down and won’t be accessible until the process is complete.

Is the Uniqlo app safe?

Uniqlo app users give different reviews about it and its services. However, the app operates with a high-security system that protects its and customers’ information.

For instance, information like card details you use for payment, registration details, and more. Furthermore, all data sent to the servers are encrypted and processed with Adyen. It means that it uses a high level of SSL encryption technology. Thus, Uniqlo is a safe app to use.

What does order being processed mean?

Whenever a user gets an email that contains a message that order being processed, it means your purchase is now in process. It indicates that they know of your order and is being processed.

What can I do if I encounter a Uniqlo system error?

1. Clear browser cache and cookies

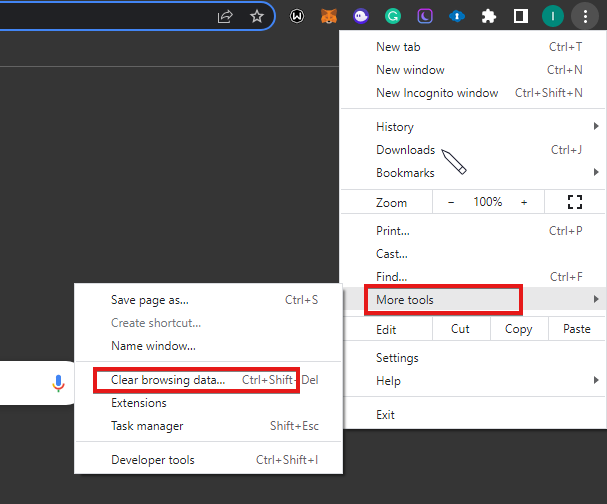
  1. Launch the Chrome browser on your device, then click the More button.
  2. Select More Tools and click Clear browsing data.
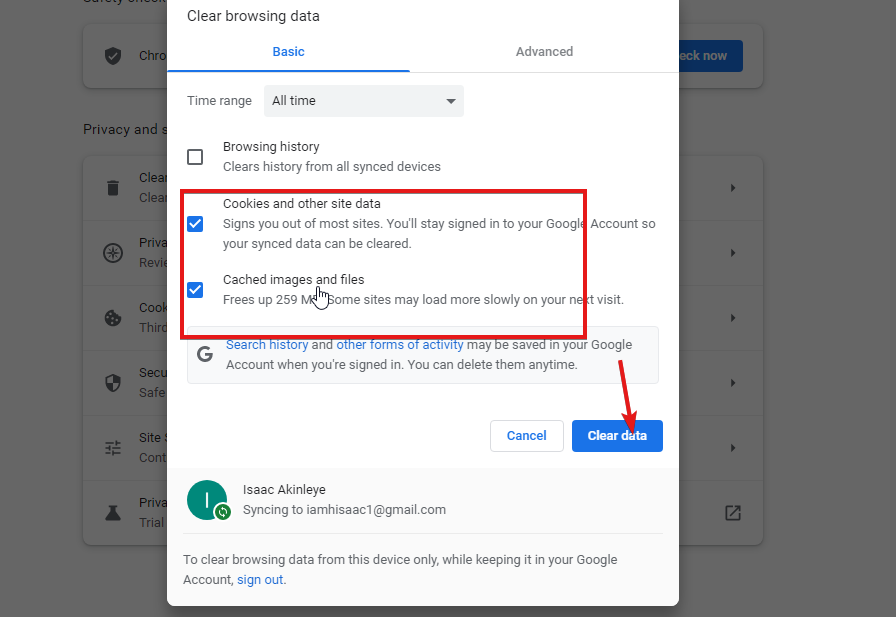
  3. Tick the boxes next to Cookies and other site data and Cached images and files.
  4. Click Clear data, then OK to initiate the process.

2. Check your internet connection

Before troubleshooting anything else, check if your internet connection is stable. A simple way to do this is by unplugging your router from its power source, leaving it for a while, and plugging it back in.

3. Use a different browser

Another thing you can do if you encounter the Uniqlo system is to change the platform you’re using, like the app or web.

It is easier to do this because Uniqlo is available across different platforms. Also, you can change your browser if you’re using the web version. We’d recommend the Opera One browser.

⇒ Get Opera One

4. Check Uniqlo’s social platforms

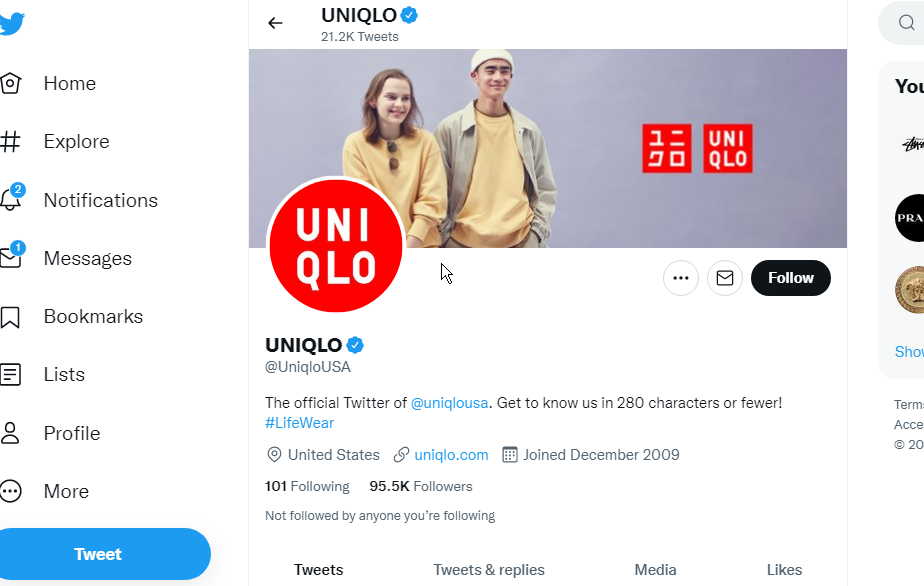
Whenever you encounter the Uniqlo system error, check Uniqlo social platforms for updates on the situation. More so, if it is a server error, Uniqlo will make an announcement. However, if it is a server error, all you can do is wait while they resolve the issue.

The last solution you can try if the above fixes don’t work for you is to uninstall the Uniqlo app on your device and reinstall it. It will help you refresh all the settings, and you can log in to your account.

For easy online shopping payments, you can learn about how to link PayPal to a bank account in just a few steps. Also, you can read about the best-automated purchase order software [2022 Guide].

Posted in Fix

How to run Windows XP games on Windows 10

Windows 10 might easily be the latest and greatest operating system Microsoft has ever come up with. And there are solid reasons for it to be so referred to given the excellent set of features it comes with. Unfortunately, even those do not seem to be enough when it comes to expressing our love for the good old Windows XP.

That also is the reason why we might still be hanging on to that old Windows XP game CD that we spent our teen years playing; and will love to relive those moments all over again in the age of Windows 10. Fortunately, that isn’t overtly impossible either though it can be tricky.

Mentioned here are a few steps you can follow to run your old Windows XP games in Windows 10 though it might not be applicable for all games. It’s worth trying though.

How to play Windows XP games on Windows 10

Run as Administrator

This will be a good first step to try, one that also is the simplest. The logic behind it is simple too, since nearly all users were accorded the status of an administrator on Windows XP, try running the Windows XP game as an administrator and see if this works.

The same isn’t applicable by default in Windows 10 what with all the advanced security features it comes with though here is how you can still do it. Simply right-click on the executable file of the Windows XP game and select Run as Administrator.

Follow on-screen instructions thereafter.

Use the Program Compatibility Troubleshooter

— RELATED: 7 free antimalware tools for Windows XP to protect your old PC

This is how you let Windows 10 decide on the best compatibility setting to adopt when attempting to run the file. Here are the steps:

  • Type Run Programs in the Cortana search box. The rest, that is Run programs for previous versions of Windows will appear automatically. Click on it to launch the Program Compatibility Troubleshooter.
  • Click on Advanced > Run as Administrator. Click on Next.
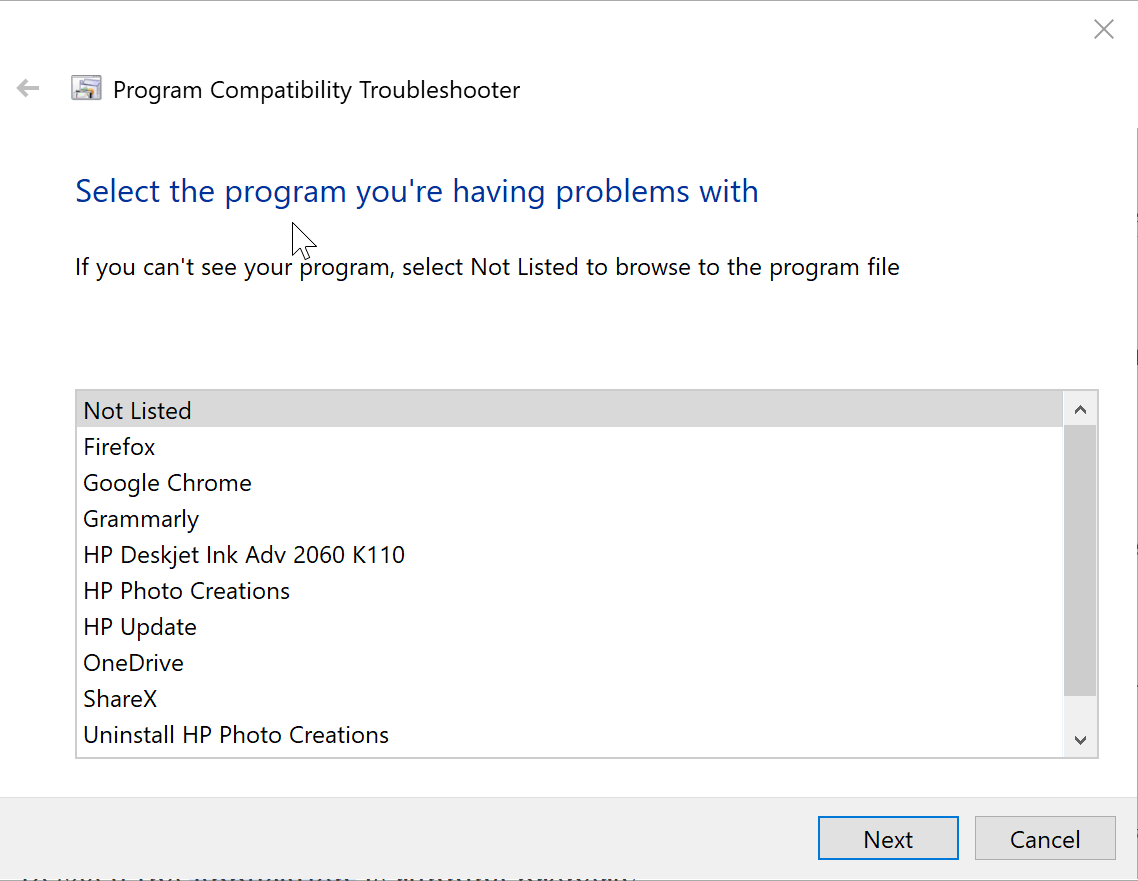
  • You will be led to the Select the program you’re having problems with window. Here, select the program you are having issues with or select Not Listed if you can’t find your applicated already listed. Click on Next.
  • In the next section, you will be required to browse to the .exe file for the particular application. Click on Next.
  • Subsequently, you will reach the Select troubleshooting option window. Here, select the Try recommended settings option.
  • Windows 10 will now try to find the best settings needed for the Windows XP game to run smoothly. Click on test the program.. to see if the application is running properly.

The troubleshooter will ask you if you are able to run the application to your satisfaction.

Selecting Yes, save these settings for this program will mark the end of the troubleshooting process.

However, if the troubleshooting fails and you select No, try again using different settings will land you in a different section where you will be provided with different reasons explaining the cause of the failure. Make your choice and click Next. Follow on-screen instructions thereafter.

— RELATED: 5 PC optimization software for Windows XP to use in 2019

    Run Windows XP games in Compatibility Mode for Windows 10

    Windows 10 comes with yet another option for running outdated programs wherein you can manually change the compatibility settings. Here is how you do it:

  1. 1. Press the Windows key and type your game’s name in the search box.

  2. 2. In the search result shown, right click on the application name and select Open file location.

  3. 3. In the file location, you will see all the files that run the game. Right click on the .exe file and select Properties.

  4. 4. In the Properties window, select Compatibility tab.

  5. 5. Click on the Run this program in compatibility mode check box.

    Run this program in Compatibility mode
  6. 6. Select Windows XP from the drop-down box underneath.

  7. 7. Under the Setting section, there are a few more options to further improve your chances of making the program run effectively. Select those and see if it helps. It is sort of a trial-and-error process and will require several attempts before coming to a stable configuration.

  8. 9. Click on Apply > OK to finish and save changes.

Virtual Machine

This can be considered as a zone within your Windows 10 where you can run programs meant for Windows XP. Or it is like a Windows XP section within Windows 10. However, you will need a valid Windows XP license to successfully create a virtual machine capable of running programs meant for the version of Windows.

For this, you will need to download a virtual machine like VirtualBox or VMware Player and install the same on your PC. Follow on-screen instructions and enter the XP licence when prompted. Try and see if you are able to run the Windows XP game you are so infatuated with.

We hope that you were able to successfully play your beloved games from Windows XP on Windows 10 using our solutions.

Let us know which method worked best for you!

RELATED GUIDES YOU NEED TO CHECK OUT:

5 Best SteamVR Web Browsers to Enjoy Complete Immersion

A Virtual Reality pioneer, SteamVR is a fantastic platform that delivers fully immersive experiences to gamers worldwide. And the best part is that it caters to all major VR equipment manufacturers.

You can easily pair it with headsets such as Valve Index, Oculus, HTC Vive, or Windows Mixed Reality, and the line-up does not stop there.

All nurturing experiences can be traced back to our homes, and SteamVR reflects this principle. Fully interactive, highly customizable, and packed with enticing VR games (out of which many are free to play), SteamVR Home facilitates socialization, trophy collection, in-app purchasing, and more.

You can customize environments, and avatars, set up accurate motion boundaries for your controllers, and browse freely through the SteamVR store and community.

Is there a web browser for VR?

Speaking of browsing, you might be wondering if there is a Steam VR web browser out there. But first, can you browse the Web with a VR headset? You sure can. You can even browse servers on Steam outside a game.

BSO, for that’s a different story. So, let’s focus on this question: How do I view VR in my browser?

That’s easy, and you need a capable browser for Virtual Reality to get in the game (metaphorically, that is). How about a specific SteamVR browser? You wanted to know, and we’re here to serve.

Does SteamVR have a browser?

Yes, SteamVR also includes a browser for you to explore the web without going out of your virtual reality experience. Unfortunately, sometimes that browser stutters and pauses and could cause some nausea.

For a better VR experience, try the browsers mentioned below.

Can you browse the internet on Valve Index?

You can browse the internet on Valve Index, and any software presented below will give you a great experience.

How can I use a Steam VR browser overlay?

Using a Steam VR browser can be quickly done by using OVRdrop, enabling you to attach a specific movement to an action. For example, you could easily have a browser screen appear on your stream when you show your right hand to the camera.

This will allow you to customize how you share information in your live streams, so check it out.

What are the best browsers for SteamVR?

Opera One – Best VR browser with built-in VPN

Once upon a time, Opera One was the first browser to provide an integrated player designed to render 360-degree videos for popular VR headsets.

Embedded VR playback is no longer a novelty. Still, Opera One innovates with nifty features such as video pop-out, the My Flow feature that handles links, videos, and images for you, or the Player feature that plays music in the background.

From content streaming to seamless video viewing with no buffering, Opera One is the go-to instrument that unlocks immersion, allowing users to enjoy VR directly in the browser.

Moreover, Opera One is now rebranded, with a redesigned user interface and an interesting modular design, and tab islands specifically created to ease its users’ browsing experience.

Opera One

Pair Opera One with SteamVR and enjoy seamless VR content just as you want!

Chrome Canary – Developer edition of Chrome that supports VR

The Canary version of Google Chrome is a niche product but no less attractive, an edition reserved mainly for developers.

Boasting web-based VR support, this version will allow you to watch and create 360-degree videos and fully immersive content that can later emulate the display of an Android device, VR headset, and more through an API.

How do I use VR in Chrome?

  1. Download the SteamVR app as well as the Canary Chrome browser.
  2. Next, type the following lines in your browser’s address bar: chrome://flags#enable-webvr, chrome://flags#webxr, and chrome://flags#openvr.
  3. Press Enter after each one and set them to Enabled.
  4. Finally, launch the SteamVR app to check if it is tracking.

⇒ Get Chrome Canary

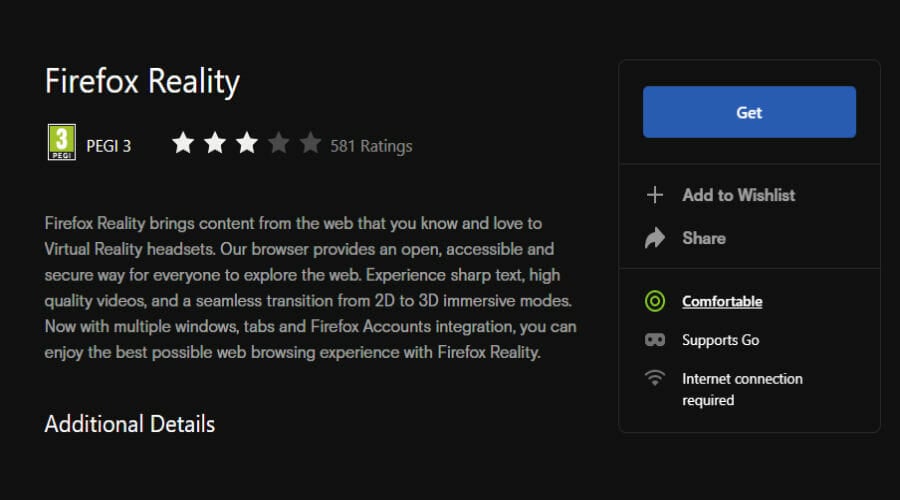
Firefox Reality – Great UI and fast VR response

Is Firefox VR compatible? It is if you know where to look. But, of course, we are talking about Firefox Reality, the browser at the forefront of hosting new technologies such as mixed reality, VR, and emerging realities.

While Igalia is supposed to continue Firefox’s legacy, you can still enjoy the original browser tailored for standalone VR headsets such as Oculus, HTC, or Windows AR.

Alternatively, you can search for it on your device’s store and use it to enjoy fast, private, and immersive browsing like never before.

⇒ Get Firefox Reality

Wolvic – Secure browser for VR and augmented-reality headsets

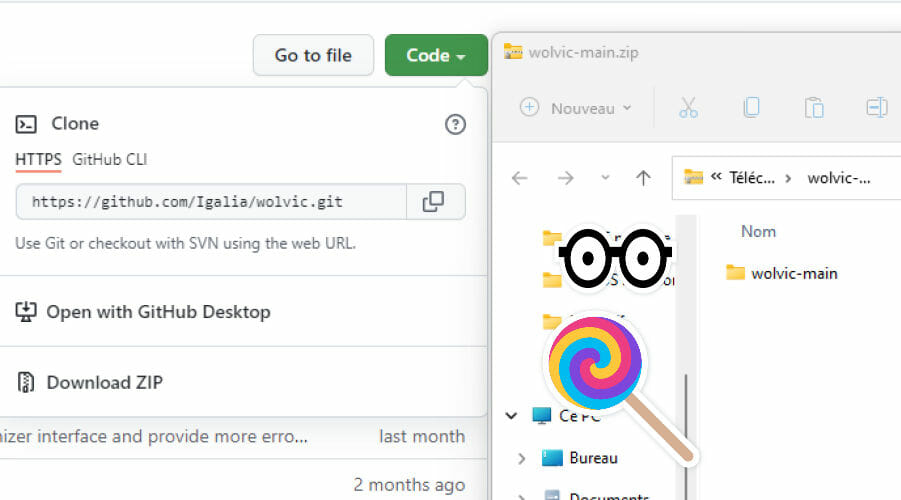
Firefox Reality gave its blessing to Igalia, and soon Wolvic was born. Still in its early stages, this open-source browser aims to redefine our interaction with the World Wide Web. It includes animated features such as immersive content support and environments built for XR.

Wolvic brings a fresh and edgy approach, allowing you to access any web part without leaving the immersive environment. It is now available in the Oculus App store and the Huawei AppGallery.

You can also contribute directly to its refinement by testing it on your device and sharing your input via GitHub.

⇒ Get Wolvic

Grove – Great VR experience with the ability to see the mouse cursor

We listed some attractive solutions so far, but we’re sure you’d like to know if SteamVR has its browser to flaunt. So, does SteamVR have a Web browser? And if so, why did it only reach the 5th position?

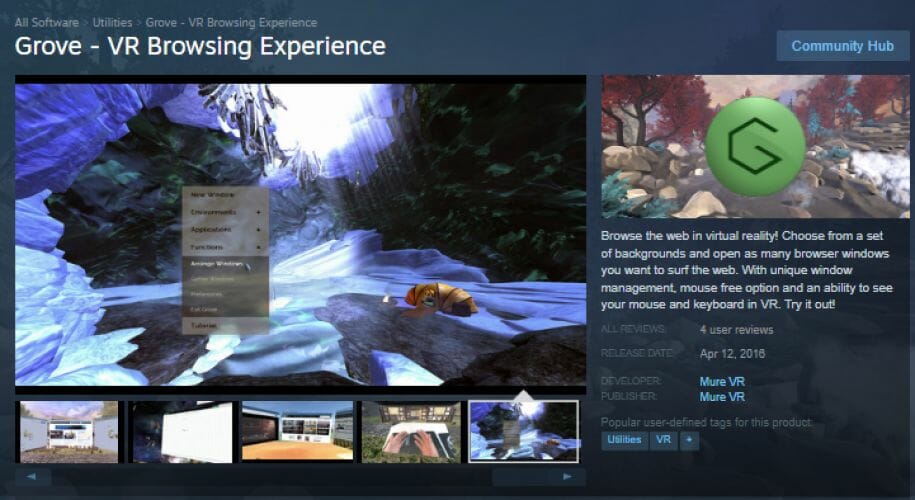
It does. Grove is the tool that delivers the VR browsing experience on Steam.

While it has some interesting features under its bonnet, such as window management, background customization, and the ability to show your mouse and keyboard in VR, it has a long road ahead until it can catch up with other modern browsers.

Meanwhile, you can get in from the Steam store and give it a go. It should have no problem working on Valve Index, Oculus, or HTC Vive devices.

⇒ Get Grove

How do I use Opera One VR?

As the Opera One VR experience has been designed with the most critical user needs in mind, to start using it, you have to plug the VR headset into your Windows, Linux, or macOS PC and click the Watch in VR button that will appear automatically at the top of any video.

There you have it! Feel free to browse around and pick the best Steam VR web browser to deliver the ultimate immersion experience with great ease.

How to use Chromecast in your browser

Chromecast technology allows you to play multimedia content from your browser, phone, or tablet directly to your Chromecast devices.

This is an amazing feature that usually works out of the box on all browsers, and today we’ll show you how to use Chromecast in your favorite browser.

In addition, you should be aware that it’s possible to cast the screen of your devices simply by using any browser. You may assume that Chrome is the best option, yet there are multiple choices for you to try.

What are the best Chromecast browsers?

If you need to analyze your options carefully before choosing one browser, we provide a handy list of the best ones:

  • Opera One– a full-featured browser that comes with enhanced privacy and lots of integrations, including reliable Chromecast support
  • Google Chrome – a browser that has great navigation features and can sync your devices or use its Cast option
  • Mozilla Firefox – has plenty of browser extensions that you can utilize to connect your Chromecast devices
  • Kiwi Browser – quite a fast and private browser that supports most Chrome extensions
  • TV Bro – reliable browser for Chromecast devices developed for Android TV

How do I use Chromecast in my browser?

1. Opera

  1. Click the Opera One icon in the top-left corner and choose Settings.
  2. Scroll down to the User interface section and check the Enable Chromecast support option.
    opera chromecast setting chromecast browser
  3. To cast a page, simply right-click the currently open tab and choose Cast from the menu.
    cast opera chromecast browser
  4. Select the destination device and you’re good to go.

In addition to native Chromecast support, Opera One is also light on your resources which makes it perfect for all multimedia tasks.

Opera One also has a built-in adblocker that will speed up webpage loading. Lastly, there’s tracking and malware protection as well as a free VPN with unlimited bandwidth for extra security.

Opera One

Before setting up Chromecast, make sure you have the latest version of the web app.

2. Google Chrome

  1. Click the Menu icon.
  2. Select the Cast option from the menu.
  3. Now choose the desired destination device.

To stop casting, just click the Cast icon in the address bar and choose Stop casting. Since Google invented Chromecast, it’s no wonder to see that Chromecast works out of the box with Chrome.

3. Firefox

  1. Download fx_cast extension. You might also need to download Windows Bridge software from the same source.
    firefox extension download chromecast browser
  2. Select Continue to Installation button.
    continue to installation firefox chromecast browser
  3. Now click the Add button to add the extension.

To cast content, do the following:

  1. Click the Cast icon from the page or right-click the multimedia player and choose the Cast option from the menu.
  2. Select the destination device and that’s it.

Bear in mind that this extension is in development, so certain features won’t work properly.

4. Microsoft Edge

  1. Click the Menu icon in the top right corner.
  2. Go to More tools > Cast media to device.
    edge cast media to device chromecast browser
  3. Now select the destination device.

After doing that, your multimedia should start playing.

Chromecast is one of the best and simplest ways to stream multimedia, and now you know how to use it.

To learn more, be sure to check our other Chromecast articles. Also, for more news and guides like this one head over to our Browsers Hub.

Are you using Chromecast, and what is your browser of choice? Share your thoughts with us in the comments section.

Zoom Error Code 100000502: Fix it in 5 Simple Ways

Zoom connection issues are among the few letdowns of the otherwise stunning meeting platform. They can disrupt your activities and sometimes make you miss out on essential meetings.

A prominent example is the Zoom error code 100000502. This error code shows up when you try to join or start a meeting. 

Fortunately, it is not the most challenging issue to fix, as we will show in the subsequent sections of this article. All you need to do is follow the instructions, and you will be fine.

Why is Zoom showing the error code 100000502? 

There are various reasons for the error code 100000502 on Zoom, from server problems to issues with the app. Below are some of the well-known causes:

  • Outdated app
  • Antivirus/firewall interference
  • Accumulation of corrupt app data
  • Low internet speed

How do I fix the error code 100000502 on Zoom?

1. Update Zoom

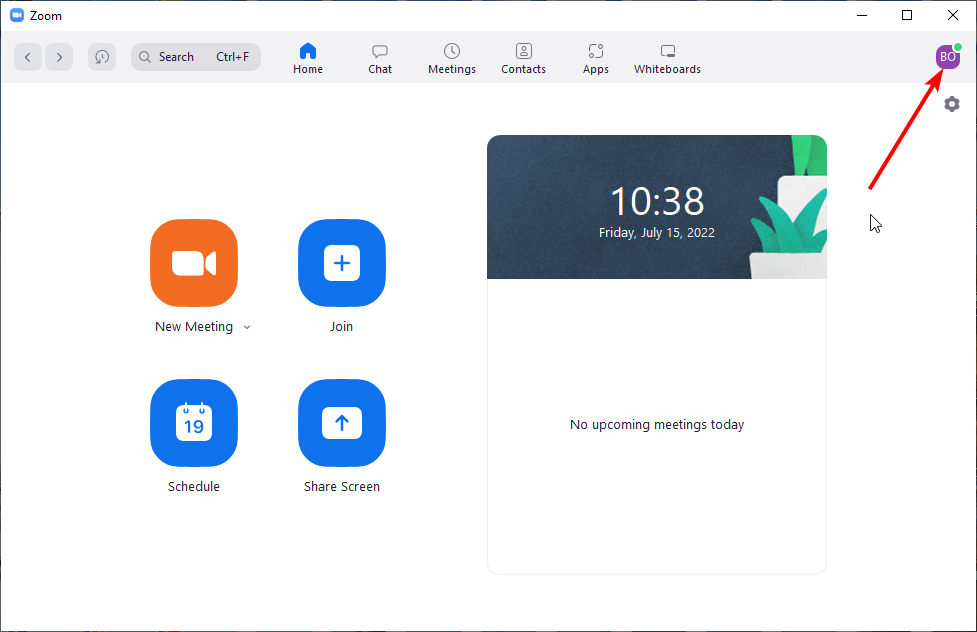
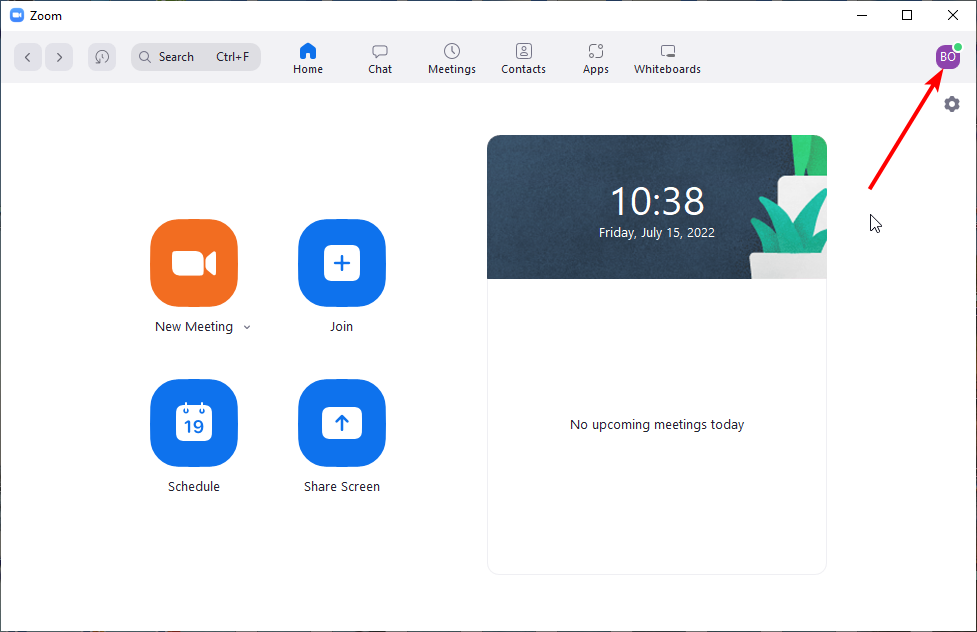
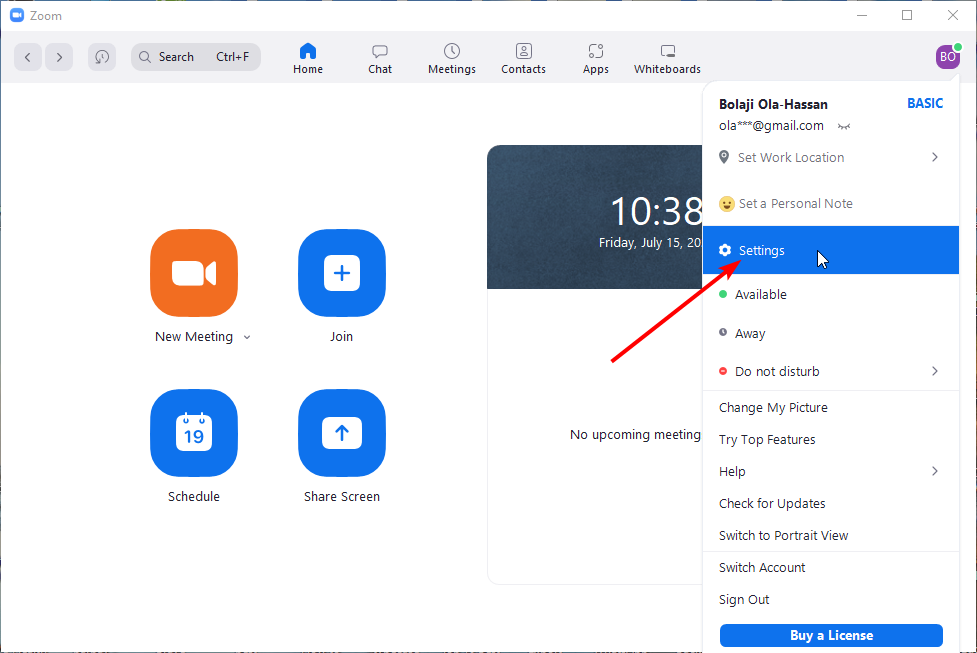
  1. Launch the Zoom app and click on your profile picture in the top right corner.
    profile picture zoom error code 100000502
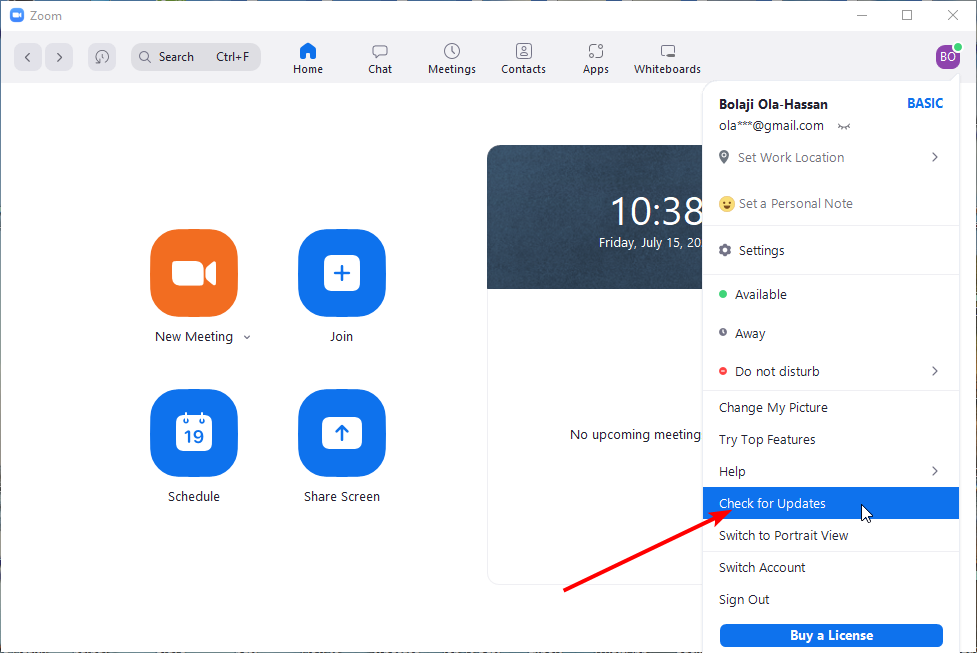
  2. Choose the Check for Updates option.
    check update
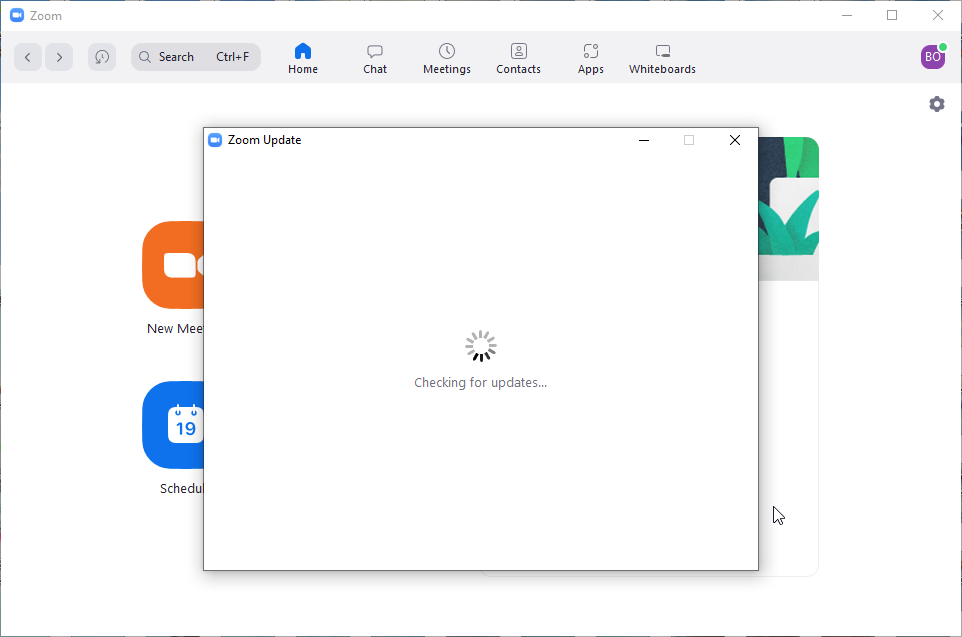
  3. It will show any available updates.
    checking

One of the leading causes of the Zoom error code 100000502 is running an outdated app. This error code is even more likely to show if the meeting host has a different app version than the one you are using.

Zoom updates the app frequently, making it easy to miss out sometimes. Restart the app after the update, try joining the meeting again, and it can also help you fix error code 4502.

2. Check connection speed

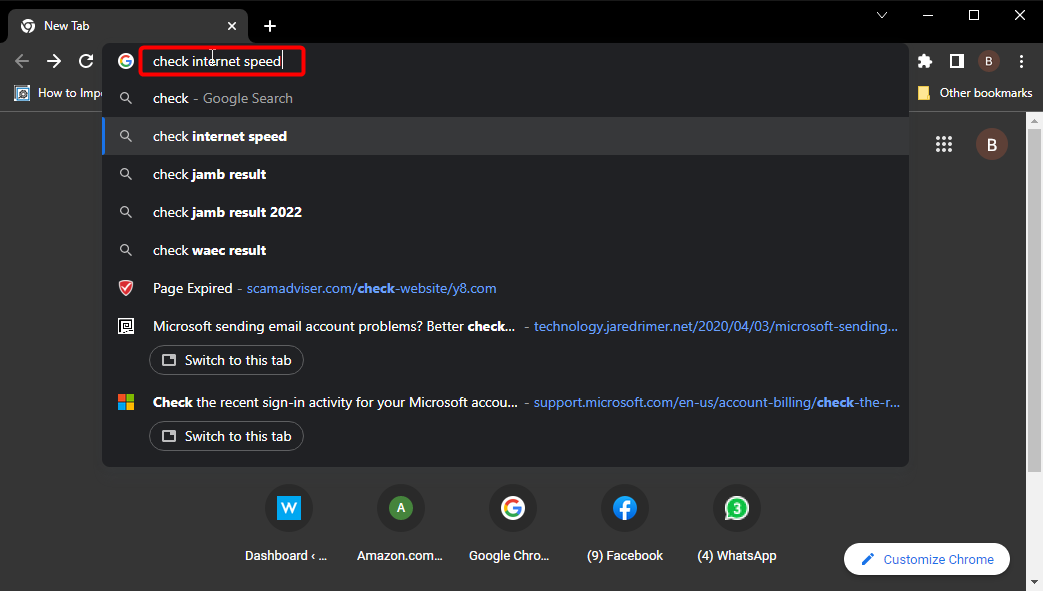
  1. Launch your browser and type internet connection speed in the address bar.
    type bar zoom error code 100000502
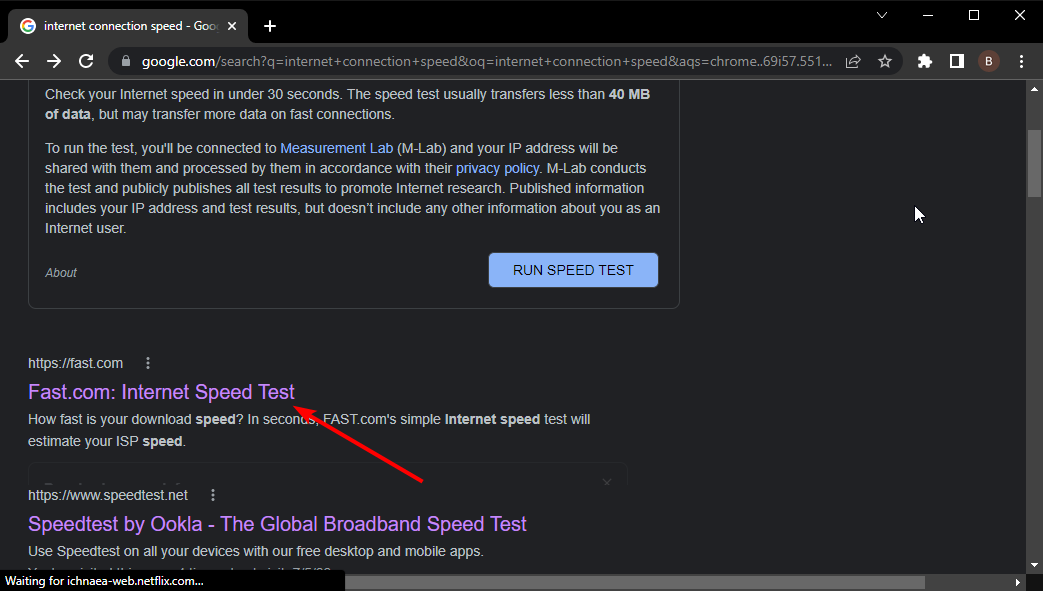
  2. Select one of the first options like Fast.com.
    choose
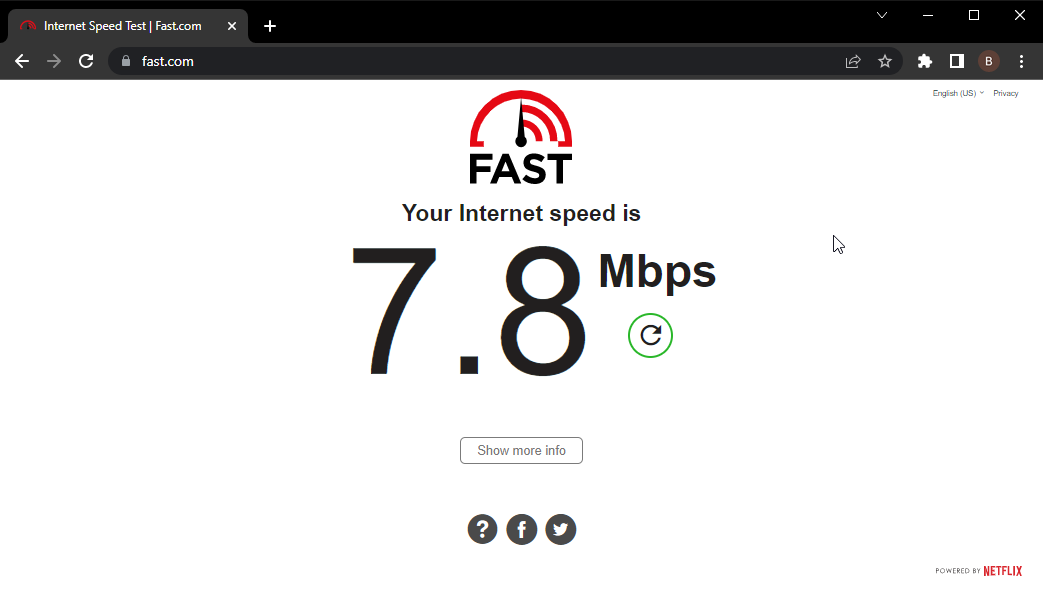
  3. It will display a live evaluation of your internet speed.
    fast result

It is no secret that you need a strong internet connection to use Zoom. If your network is slow, you may get the error code 100000502, among other issues.

In this case, the only solution to get past the error is to change your network to a better one or improve the present one.

3. Disable antivirus/firewall temporarily

If you have an antivirus or firewall activated on your PC, it might be the one causing Zoom error code 100000502. This might raise a false alarm and flag Zoom as dangerous.

To solve the problem, you need to disable the security app temporarily. After connecting to Zoom successfully, you can connect to your antivirus again.

4. Clear Zoom cache

  1. Open the Zoom app and click on your profile picture.
    profile
  2. Select the Settings option.
    settings zoom error code 100000502
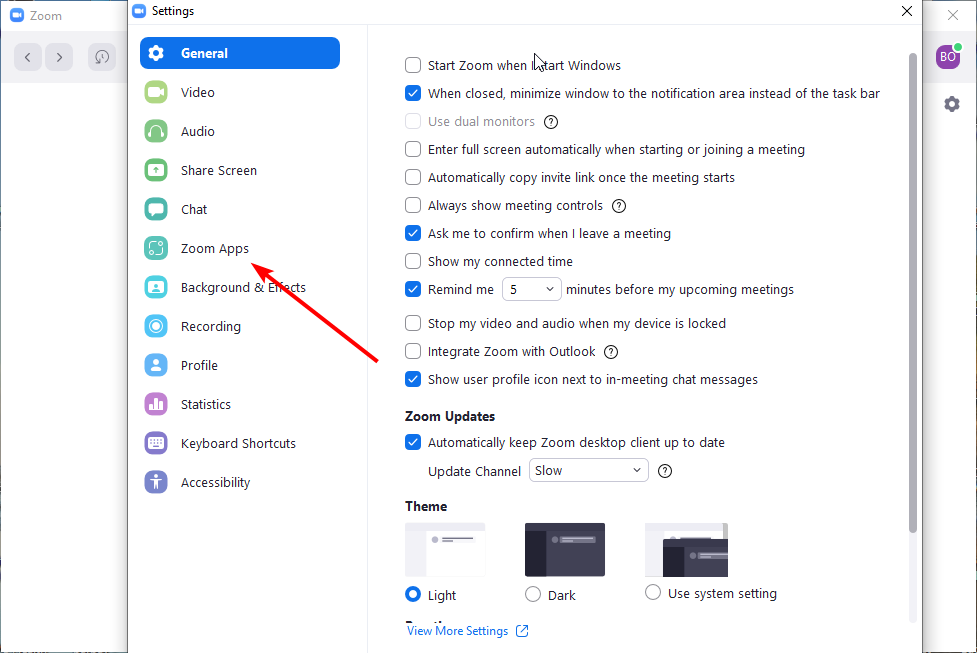
  3. Choose Zoom Apps in the left pane.
    zoom app
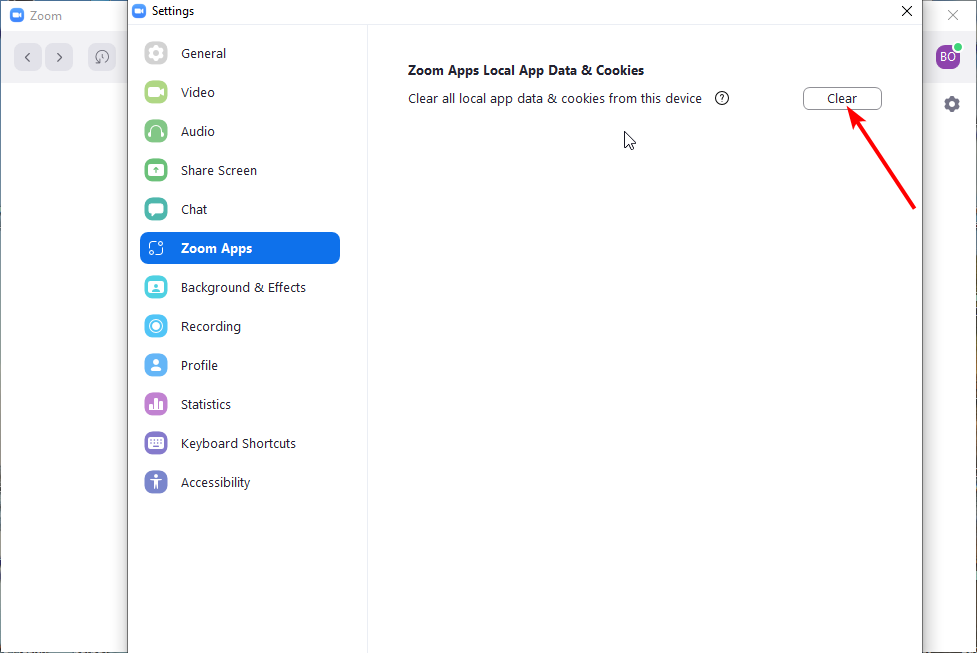
  4. Click the Clear button.
    clear button
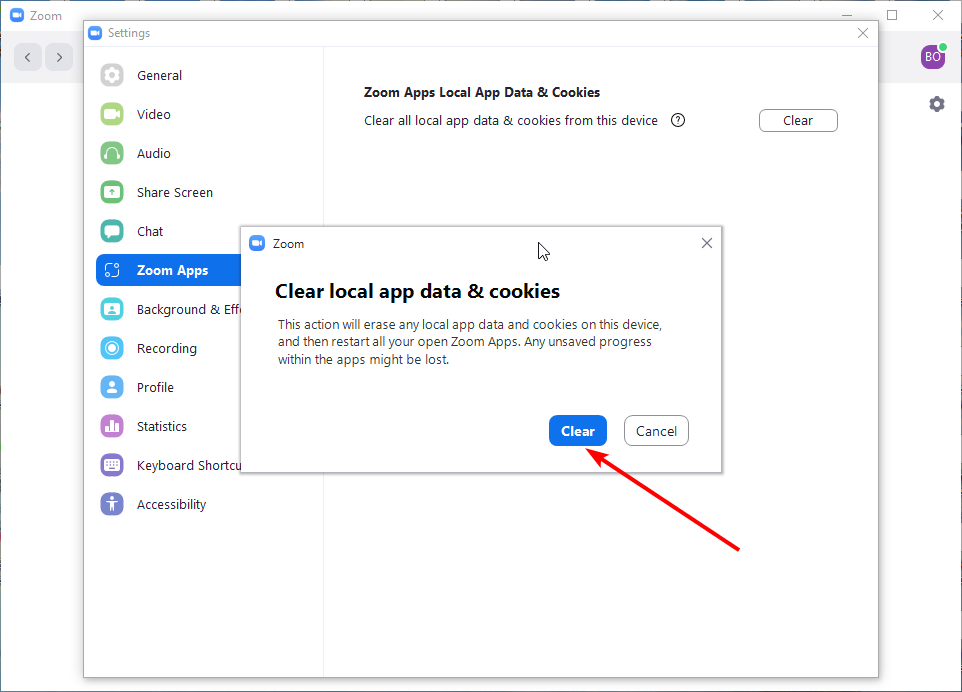
  5. Click the Clear button to confirm the action.confirm clear

While cache and other app data improve user experience, they are only useful when not corrupt. Once a corrupt cache accumulates on Zoom, you can start facing issues like the error code 100000502.

After clearing the data, ensure to relaunch the Zoom app to sync the changes.

5. Uninstall and reinstall Zoom

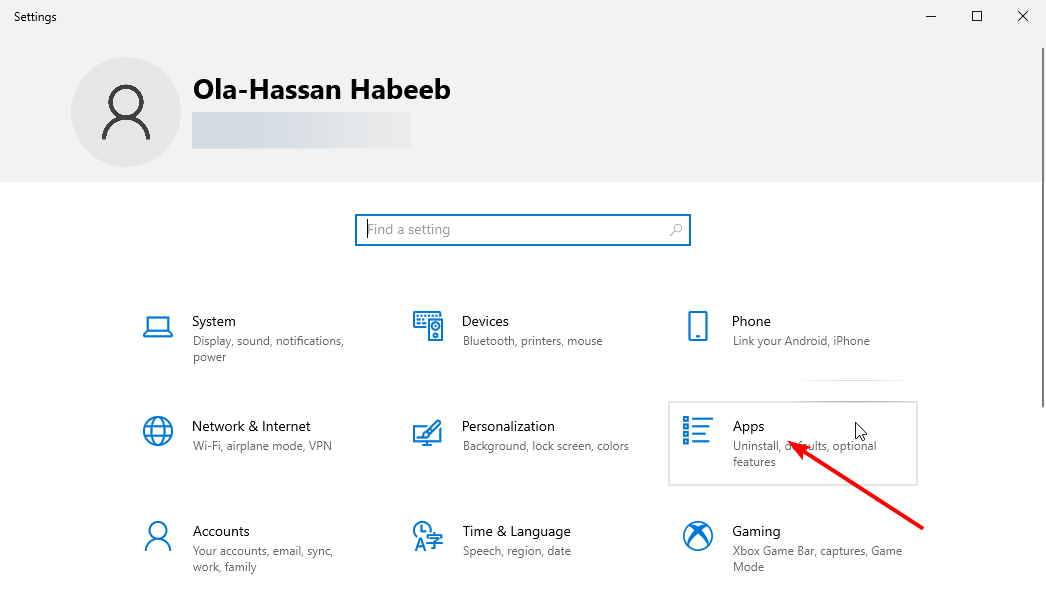
  1. Press the Windows + I keys to open the Settings app.
  2. Choose the Apps option.
    settings apps
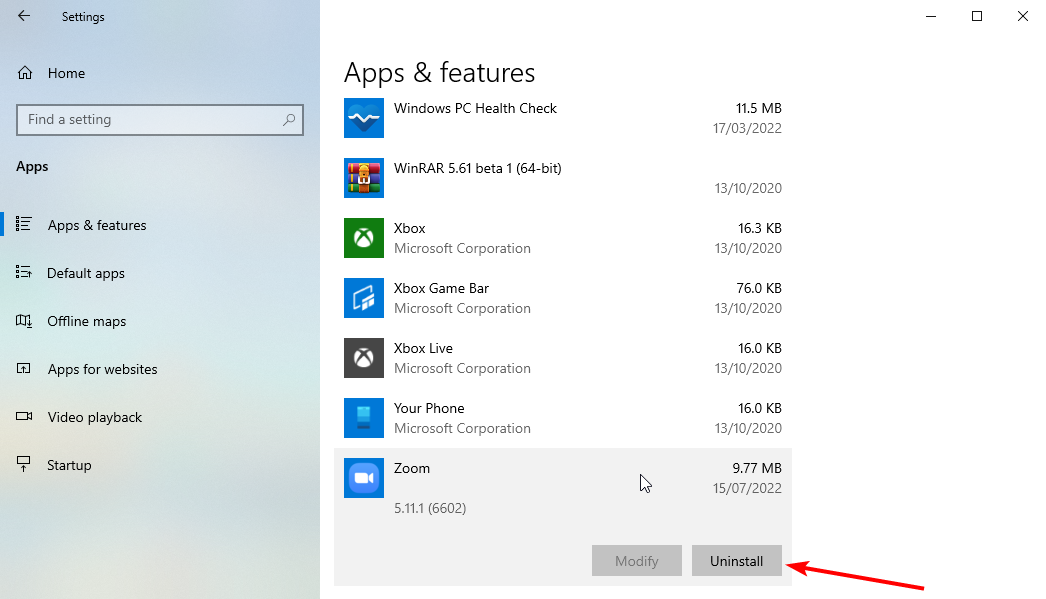
  3. Scroll down till you find the Zoom app and click on it.
  4. Select the Uninstall option.
    uninstall zoom error code 100000502
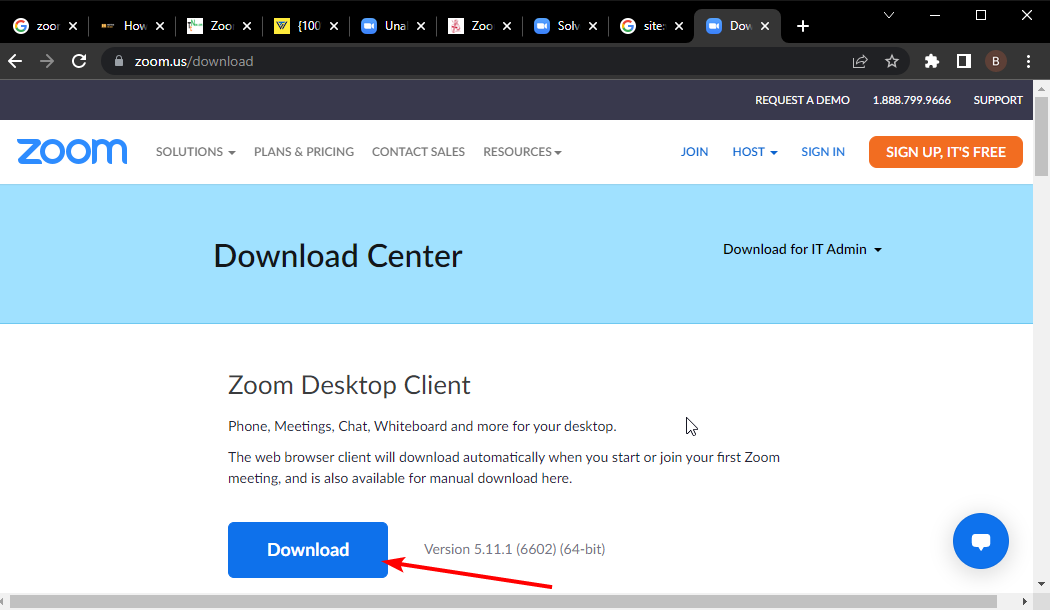
  5. Visit the official Zoom website to download the installer.
  6. Click the Download button.
    download button
  7. Click the downloaded file and follow the simple on-screen instructions to complete the installation.

This step can also help if you are having Zoom install issues. If you are facing a problem after deleting cached files or uninstalling Zoom manually, maybe some corrupted files can’t be removed this way.

In this scenario, we recommend using the professional IOBit Uninstaller tool to completely remove any corrupted and remnant files that refuse to go away. After that, you will have room for a clean reinstallation of Zoom, which will be better for the health of your PC.

If all the fixes above prove futile in solving the Zoom error code 100000502, it means there is a problem with the app on your PC. Uninstalling and installing the latest version from official sources should help solve the problem.

The Zoom error code 100000502 is one of the frustrating issues on the popular virtual meeting platform. Thankfully, the causes are within a close circle, making it an error that is easy to fix.

Check our detailed guide on how to fix the Zoom isn’t configured for this account error message if you are facing this problem.

Were you able to solve the problem with any of the fixes above? Feel free to let us know in the comments below.

3 Best Browsers To Watch ABC Iview On Your PC

ABC iview is a streaming service that allows you to watch some of the best Australian TV shows and programs. You can use the app or a browser if you have limited space.

Unfortunately, ABC iview only works in Australia. If you’re outside of Australia and want to use the service, you’ll need to use a virtual private network (VPN) to spoof your location.

The best way to stream ABC iview is using a browser with a built-in VPN on your computer or laptop. If you’re using a tablet or smartphone, it’s best to use the ABC iview app instead.

What browser is ABC supported on? 

If you want to watch ABC iview on your TV, you will need a good smart TV that supports this app. But if you’re looking for a browser-based solution, you will need a compatible browser. 

Unfortunately, not all browsers are created equal. ABC supports Google Chrome, Firefox, Safari, and Microsoft Edge. The best browser will depend on your operating system and other factors such as memory and how fast your CPU is.

All in all, the supported browsers do a great job, especially with the range of features packed in each; you’ll definitely be spoilt for choice.

Can I watch iview without the app? 

Watching ABC iview without the app is possible but not recommended. The best way to watch ABC iview is by using the official app. This means you’ll get the best quality picture and sound and access to the latest features.

What are the best browsers for ABC iview?

Google Chrome – User-friendly browser

This is by far one of the most popular browsers out there. If Chrome isn’t already installed on your computer, it should be available as a free download from Google’s website. It’s easy to use and fast, making it perfect for watching streaming video content like iview. 

However, not all versions of Chrome, so if you find ABC iview doesn’t work well, consider updating to the latest version or try another one instead.

Additional features:

  • Built-in ad-blocking to prevent buffering
  • Password saving and management
  • Sync across devices

⇒ Get Google Chrome

Safari – Stable browser

Safari is Apple’s default web browser on both Mac and iOS devices, so this may be the best choice if you’re an iPhone or iPad user. It’s fast and stable but doesn’t have as many customization options as other browsers as Chrome or Firefox do.

However, it’s not just a great option for those who use Macs or iPhones – it also has some great features that make it perfect for streaming TV shows on ABC iview.

Additional features:

  • Picture-in-picture support
  • Private browsing
  • Supports multiple streaming video formats

⇒ Get Safari

Firefox – Secure browser

This is also a very popular browser but not quite as popular as Chrome. It has many of the same features as Chrome, such as tabs that allow you to open multiple websites at once without having them cluttering up your desktop space or taking up too much memory.

Firefox has excellent security features, including Private Browsing mode, which allows you to browse without leaving any traces on your computer. You will also need to install the latest version of the browser to prevent any hiccups.

Additional features:

  • Variety of add-ons that make it flexible and powerful
  • Private browsing mode that doesn’t save any history or cookies
  • Speed Dial feature where you can pin all your favorite websites to the home screen

⇒ Get Firefox

How to search on ABC iview? 

Searching on ABC iview is easy. Once you are logged in, click on the magnifying glass icon in the top right-hand corner of the screen, and start typing to search.

One of the biggest advantages of using ABC iview is that you can search for shows by title, genre, episode titles, synopses, and names. 

While you’re still here, you can also find our top recommendations for browsers to watch Acorn TV if you are on the lookout.

Let us know which browser gave you the best streaming experience in the comments section below.

3 Best Browsers To Watch Showmax Worldwide

Showmax is a global entertainment service that offers TV shows and movies for streaming to your TV, smartphone, tablet, or a browser on your computer. The company has grown to become one of Africa’s largest digital content providers.

However, Showmax can only be accessed in select locations due to its geographical restrictions. If you’re based in another part of the world, you need to use a VPN to unblock geo-restricted sites.

Although Showmax has its standalone app, some people prefer to use browsers. Browsers are convenient for streaming content as you don’t have to download the app for each device you are using.

Using a browser is advisable if you have limited storage space since you only have to close the window or clear cache and cookies from time to time to avoid high memory usage.

Can I watch Showmax on my PC? 

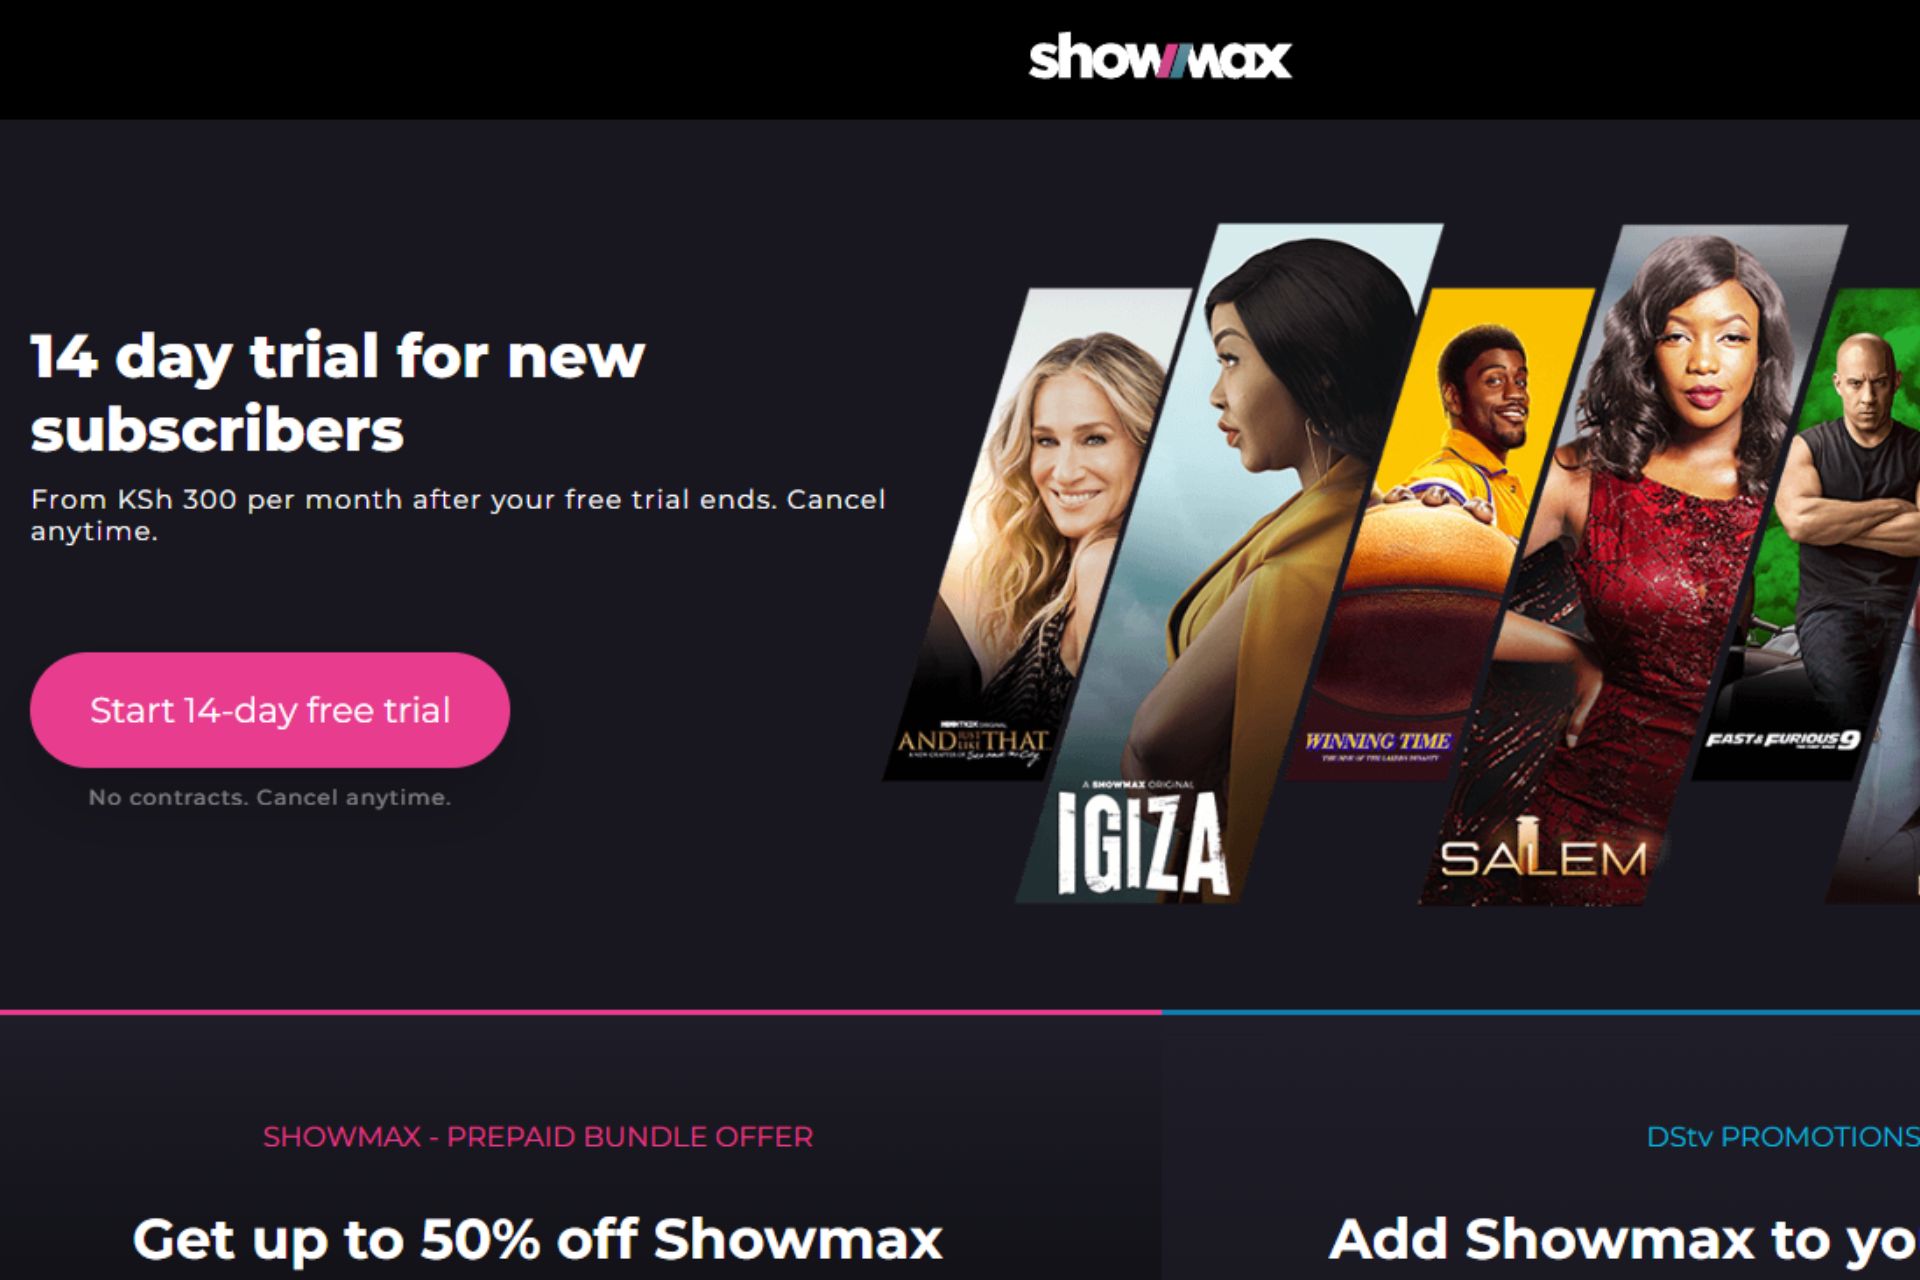
Yes. You can watch Showmax on your PC using the Showmax app or using a browser. However, you will need to have an active account to do so. If you don’t have an active account, there is a 14-day free trial you can use to test out the service and see if it’s worth subscribing to.

You can download the Showmax app from the official website or from Android or iOS app stores. Once installed, open it and sign in using your username and password. Alternatively, you can install streaming software to make your work easier.

How do I stream Showmax to my TV? 

Streaming Showmax to your TV is easy. The Showmax app is available on most smart TVs and streaming devices. One of Showmax’s features includes casting capabilities where you can cast from your phone to your smart TV, provided you have an internet connection.

What are the best browsers for Showmax? 

Opera One – Speed-focused browser

Opera One is a popular browser, and many people use it to watch streaming services like Showmax. One outstanding feature is the built-in Turbo feature which speeds up page loading times and reduces data usage.

The Opera One browser also includes a free VPN service that you can use without paying additional fees or subscription costs.

Additional features:

  • Speed dial, Workspaces and Tab Islands
  • Built-in Ad blocker and VPN
  • Native AI and modular AI-ready design
  • Video pop-out feature

Opera One

With privacy in mind, so you can connect to the integrated VPN and stream your Showmax films from anywhere.
Free Download Visit website

Google Chrome – Popular browser

The browser you use for Showmax is a very important choice. When it comes to streaming subscription-based sites, your browser needs to be fast, secure, and reliable.

Google Chrome delivers just that. Chrome has a built-in ad blocker which means you can enjoy an ad-free experience while watching your favorite shows. It also has a built-in password manager, so you don’t have to remember all those passwords.

Additional features:

  • A vast library of extensions and plugins
  • Incognito mode
  • Bookmarks to save frequently visited sites

⇒ Get Google Chrome

Mozilla Firefox – Flexible browser

Firefox is another great choice for Showmax users because of its speed and security features. The browser uses the Gecko Render Engine, which means pages load faster than ever before. This makes watching on Showmax even more enjoyable.

It also has built-in ad blocking technology so you can browse without any interruptions or distractions from annoying pop-ups or video ads.

Users will appreciate its tracking protection feature more as streaming services track everything you do online so they can serve more targeted ads to you.

Additional features:

  • Tracking protection
  • Ad-blocking feature
  • Import data from other browsers

⇒ Get Mozilla Firefox

How do you delete watched history on Showmax? 

One of the most popular features of Showmax is its ability to track what you have watched. If you have children watching the service, you can easily keep tabs on what they’re watching without worrying about them stumbling upon inappropriate content.

However, there are some instances where you may want or need to remove your Showmax viewing history. Fortunately, it’s quite simple to do so:

  1. Log into your Showmax account.
  2. Scroll down to the Continue watching section and click on the close icon.
  3. Reload the page, and your watch history will be cleared.

We hope that you were able to find a browser that works for you and that you are somewhere comfortable catching up on all the shows that Showmax has to offer.

If you are using other streaming sites, we also have browser recommendations that work best with ZEE5, so be sure to check out that article too.

Let us know of any additional thoughts you may have regarding this topic in the comment section below.

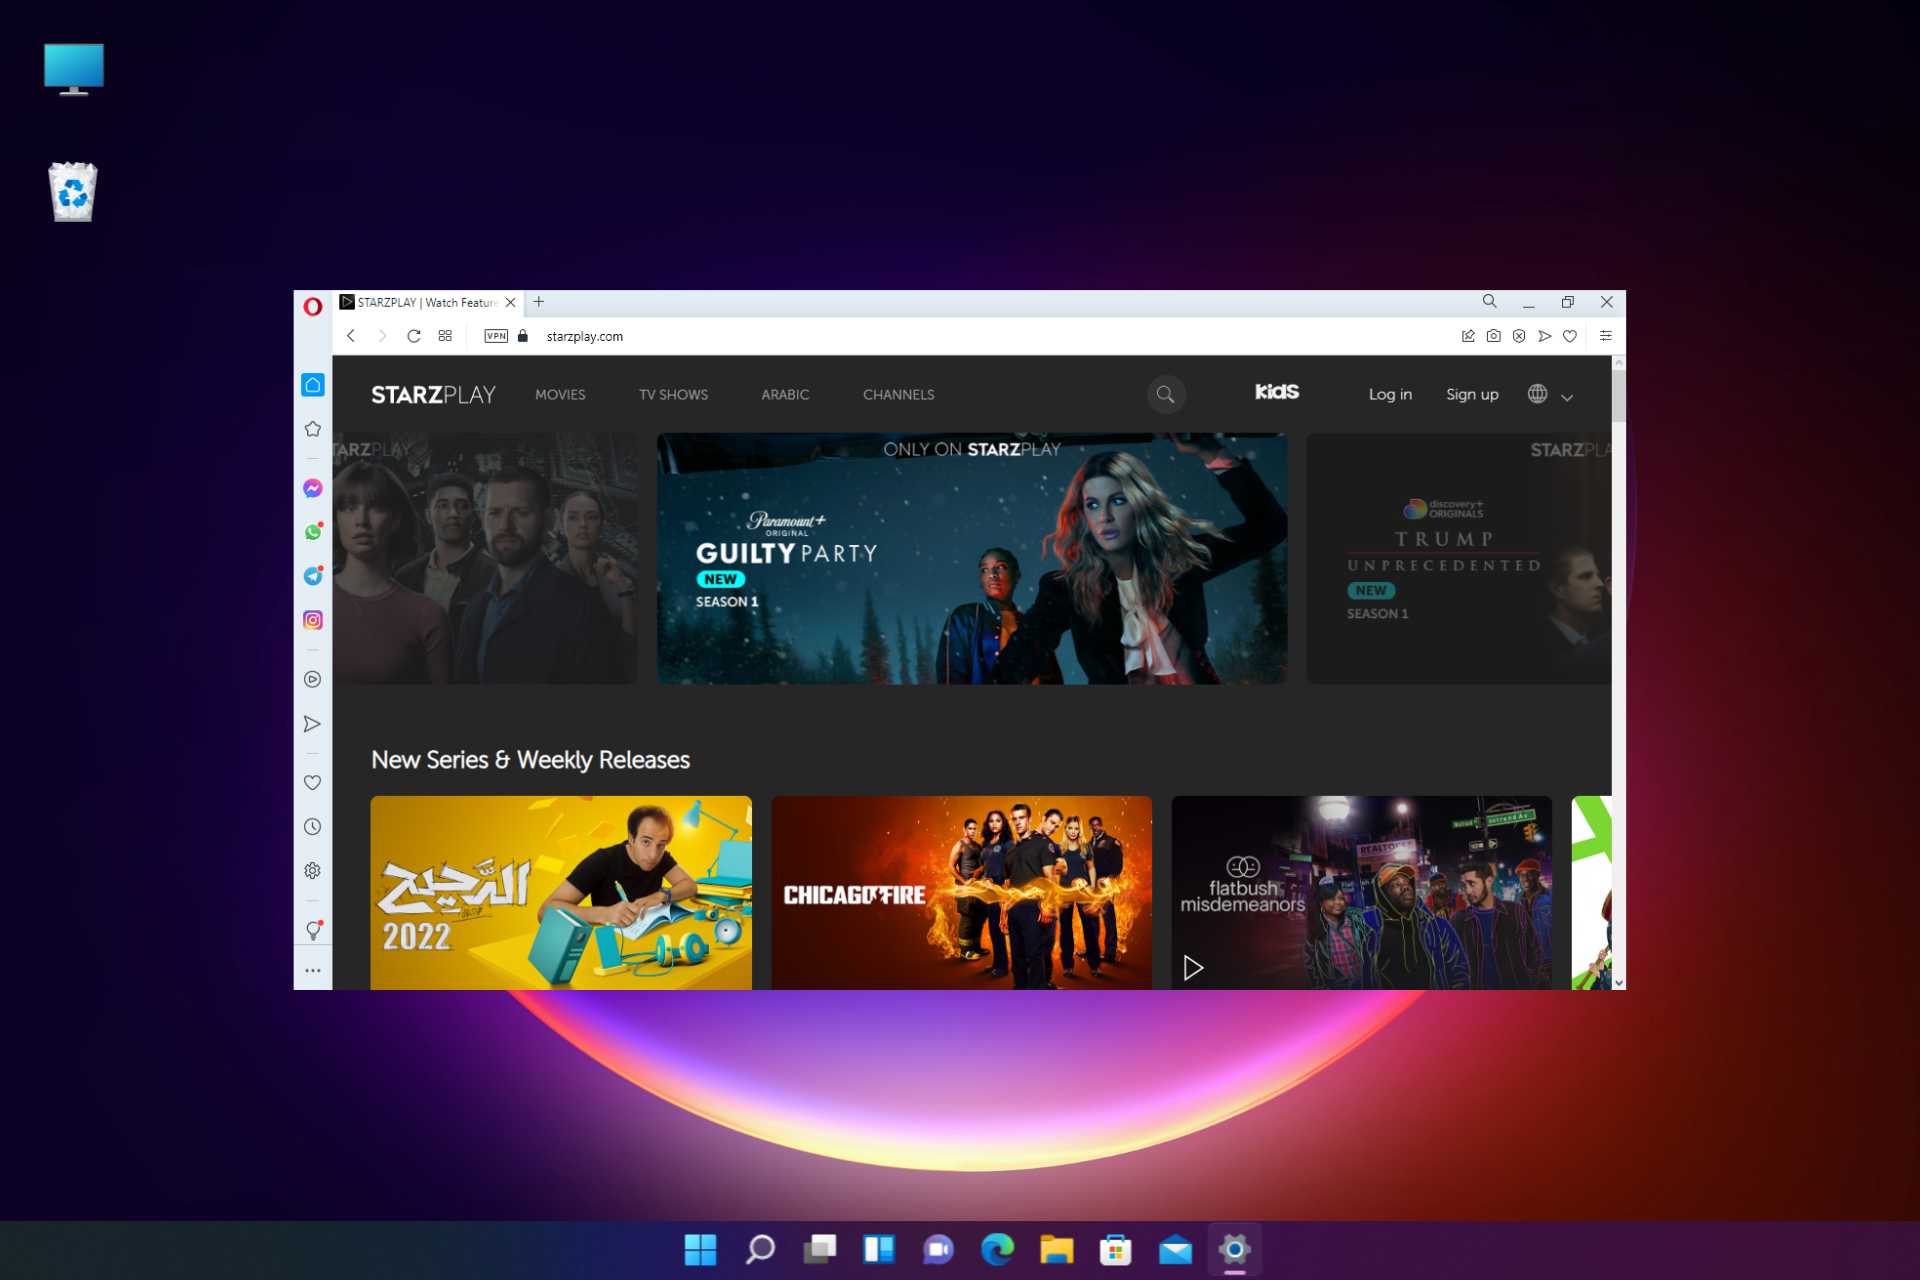
3 Best Browsers to Watch Starzplay on Mobile, PC & Smart TV

Do you love to binge on your favorite content on Starzplay, but wondering how to access it through a browser?

Known as Starz in the US and as Starzplay in other regions, it’s a premium streaming service that airs both movies and original series.

The good thing is, that you can watch your favorite shows on a Smart TV, PC, laptop, and even on a mobile device through an app or a browser.

You can also refer to our detailed post on the best browsers for watching videos without buffering on a PC.

What devices can I watch Starzplay on?

You can watch Starzplay on various devices, for example, iOS devices, Mac, Apple TV, Windows PC, Android devices, Roku, Amazon Fire TV/Fire Stick, and more.

However, make sure that your device should meet the minimum requirements as listed on the Starz official website.

How do I stream Starz on my computer?

You would need to first sign up for Starzplay, irrespective of the region or the device. The only difference will be the payment option.

Follow the below instructions to create a new Starz account:

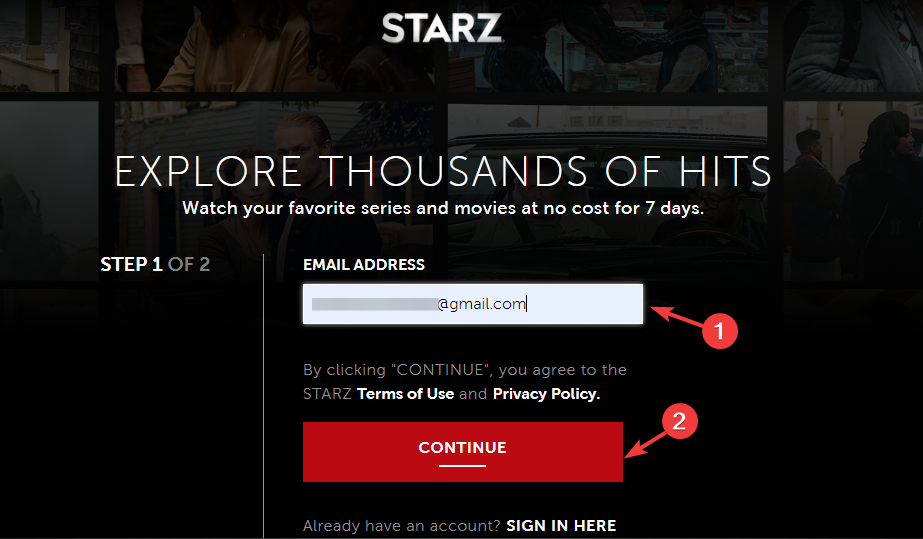
  1. Go to the Starz website and select Start Your Free Trial.starz free trial
  2. Enter your email address and select Continue.enter email address in Starz
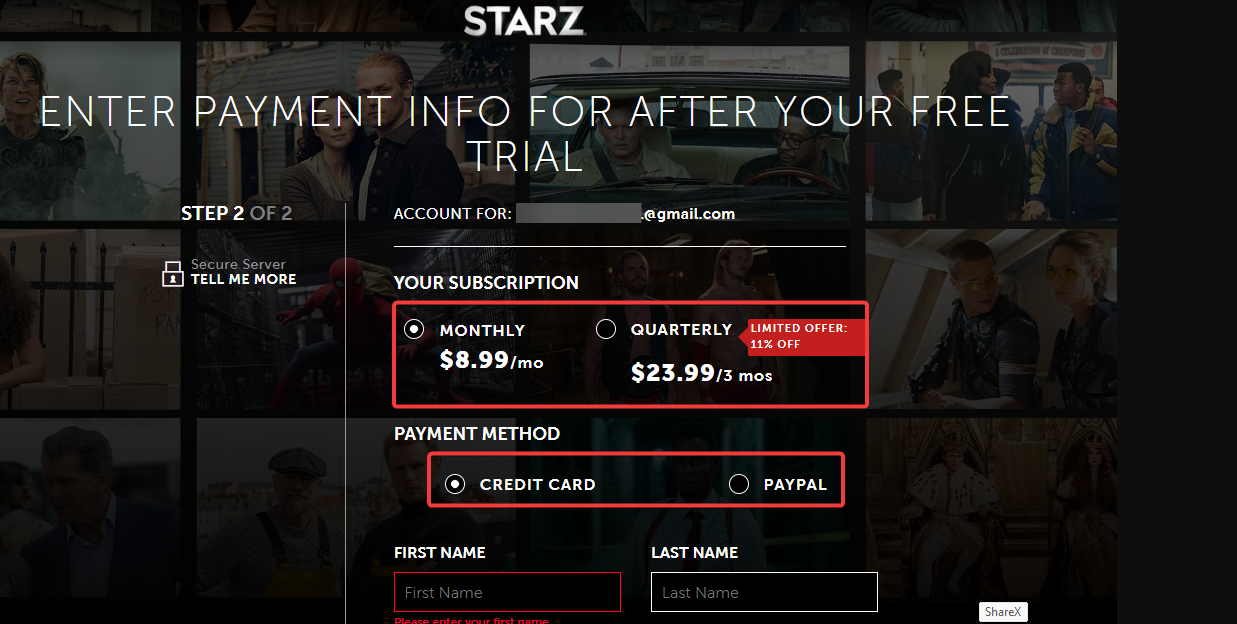
  3. Now select from the monthly and annual plans, and the payment method (credit card/PayPal). select plan and payment method
  4. Enter your personal details and press Continue. enter details - continue
  5. Now, create a password for your account and click on Get Started to continue.
  6. Starz will now log you in, and you can now start watching your favorite shows.

Once the 7 days trial period is over, your account will automatically get renewed and the plan amount will be deducted.

If you are someone who prefers to stream content from a browser, we recommend a list of the best browsers to watch Starzplay shows.

What are the best browsers for Starzplay?

Opera One – Super fast page loading

Although Opera One is not on the list of recommended browsers for Starzplay, it proves to be one of the best browsers to watch Starzplay.

Opera One takes over other browsers in terms of page loading speed, data privacy, and user experience.

A streaming platform needs a stable, yet secured and fast browser and Opera One meets all the requirements successfully.

Besides, if you are located outside the region, you can also take advantage of the built-in VPN for uninterrupted fun.

Below are some of its other major features are:

  • Built-in ad blocker for safe browsing
  • Highly customizable with themes, keyboard shortcuts, etc.
  • Integrated messenger apps for Facebook and Whatsapp
  • Saves battery up to 50%
  • Native AI and modular Ai-ready design

Opera One

See your entertaining movies and series on Starzplay using this browser with a built-in VPN.
Free Download Visit website

Google Chrome – Wide range of device compatibility

best starzplay browser

When talking about the best browser for watching Starzplay, the name Chrome pops up almost immediately.

The most popular browser across the world, Chrome offers a great streaming experience by loading videos in a flash.

Moreover, you can access Google Chrome on PCs (both laptops and desktops), as well as on smartphones and tablets.

So, whether you are at your friend’s place for a night out or traveling, you do not miss your dose of Starzplay entertainment.

Here are some more of its significant features:

  • Helps you cast content to TV through a PC/laptop using Chromecast
  • Option to search Google through the address bar
  • Easy to use
  • Wide range of useful extensions
  • Provides lite mode for less data usage and faster browsing

⇒ Get Google Chrome

Microsoft Edge – Extra online privacy

best starzplay browser

One of the most advanced browsers of recent times, Microsoft Edge is perfect for streaming your favorite movies and shows on Starzplay.

While you enjoy your content, you can also manage multiple tabs using the vertical tabs feature, simultaneously.

At the same time, you can change the Edge settings to block any third-party trackers that may cause interruption with personalized ads.

Best of all, Edge also protects your saved credentials from being leaked on the dark web using the password monitor.

So, you can rest assured that your Starzplay password or payment details are completely safe from any unauthorized access.

Some of its other key features are:

  • Superior online privacy with InPrivate mode
  • Optimizes video quality
  • Power efficient video playback
  • Earn reward points to search in Bing
  • Available on all platforms (Windows, Mac, iOS, and Android)

⇒ Get Microsoft Edge

How do I connect Starzplay to my TV?

There are several different ways through which you can watch Starzplay on your TV, such as:

  • Through an Amazon Prime account
  • Using the Apple TV App Store
  • From Google Play for Android TV users
  • Through a cable or satellite plan
  • Via the Roku app store
  • From the Samsung TV app store
  • As a YouTube add-on

Alternatively, you can also download the PC app from Google Play or install the Starz Windows app from Microsoft Store.

So, if you are looking for an uninterrupted viewing experience, our recommendations help you to pick the right browser to watch your favorite Strazplay shows.

But if you are having video streaming problems in Windows 10/11, you can refer to our detailed guide to troubleshoot the issue.

If you have any other queries related to browsers, you can leave a message in the comments box below.

How to Force Quit Microsoft Edge If It Won’t Close or Respond

Edge might be Microsoft’s flagship browser, but it does have a few glitches. For example, some Edge users have stated on forums that the browser doesn’t always close for them.

Instead, a tab freezes up, and users can’t close the browser with the X button. Some might ditch the browser altogether when that’s a common issue.

However, a few potential resolutions might fix Edge not closing.

Why is Microsoft Edge always running?

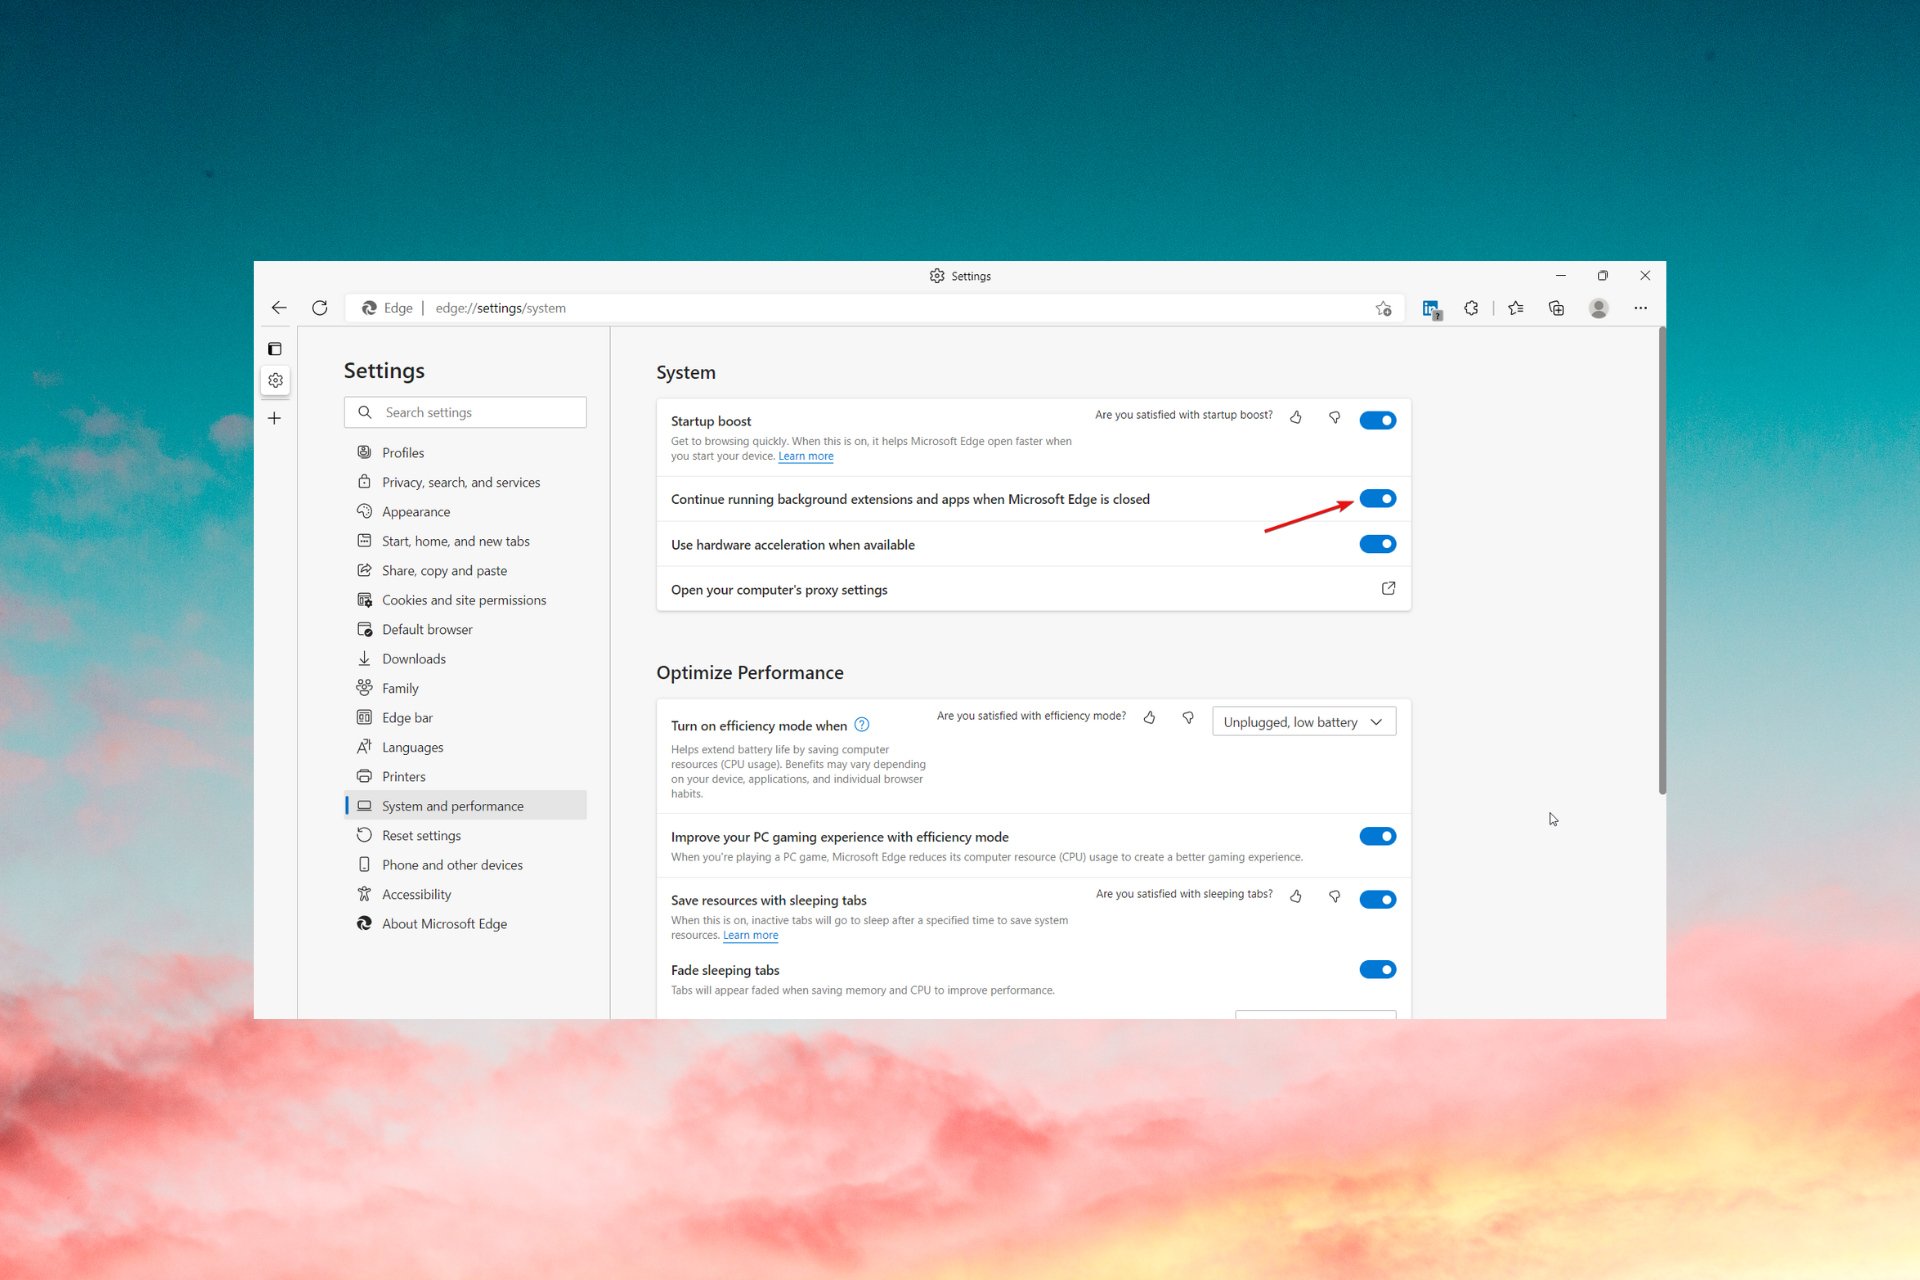
Believe it or not, Microsoft Edge is set up by default to continue running background extensions and apps even when it’s closed.

That makes sense because when you open it again, it will start a lot faster. But if you’re not using another browser, that can become a nuisance, so check out some quick ways to stop Microsoft Edge from running in the background.

Also, note that Edge comes with a Start-up boost feature devised for speeding up the browser’s launch when you boot the computer.

Why does Microsoft Edge keep waking up?

This is another issue related to the default windows-spotlight background from the lock screen. By clicking any of the words from the Windows lock screen, Edge will start searching for that particular word after unlocking.

Our readers reported that changing the background in the locks screen worked for them, so you should also try it.

Quick Tip:

Since the simplest solution is generally the best one, if Microsoft Edge won’t close, switching to a performant browser like Opera One should do the trick nicely.

This cutting-edge browser guarantees to work like a charm with no lagging, interference with web-based apps, and no slowness when it comes to responsiveness times.

Opera One

The modular architecture responds to your needs more efficiently and accurately.

How do I close Microsoft Edge in Windows 10/11?

1. Stop Edge from running in the background

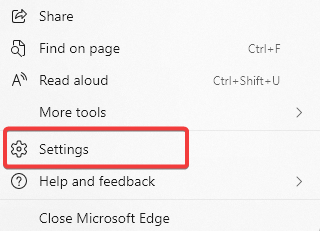
  1. Click the Menu button (the three vertical points) in Edge and select Settings.
  2. Now, click on System and performance from the left pane and switch off the Continue running background extensions and apps…
  3. Restart the browser for the changes to take effect.

And while you’re on the System window, you can also uncheck the Start-up boost to prevent it from starting when you boot up your PC.

2. Closing Edge when the X button doesn’t close the browser

  1. Right-click the taskbar and select Task Manager.
  2. Then select Edge on the Processes tab and press its End task button.

A Windows hotkey also closes active desktop windows. Pressing the Alt + F4 hotkey closes the selected window.

As such, that keyboard shortcut will help Microsoft Edge force close when the X button doesn’t work.

3. Open the Microsoft Store App troubleshooter

  1. Press the Cortana button on Windows 10’s taskbar to open the app’s Search box.
  2. Input the keyword troubleshoot in the app’s search box.
  3. Select Troubleshoot to open the window shown in the snapshot directly below.
  4. Select Microsoft Store Apps and press its Run the troubleshooter button to open the window in the image below.
  5. Then you can go through the troubleshooter’s suggested resolutions.

4. Clear Edge’s browsing data

  1. Open Edge and press its Settings and more button at the top right of the window.
  2. Press the Settings button, and scroll down to Clear browsing data.
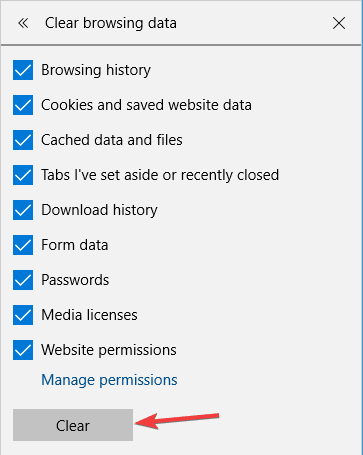
  3. Press the Choose what to clear button to open the sidebar settings in the snapshot directly below.
  4. Select all the data checkboxes there and click Clear to thoroughly erase the browser’s data.
  5. Thereafter, restart the browser.

Some users have found that clearing Edge’s cache helps in case Edge freezes and then won’t close.

5. Reset the browser

  1. Open the Cortana app.
  2. Enter apps in Cortana’s Search box and select to open Apps & features.
  3. Scroll down to Microsoft Edge on the apps list. Alternatively, enter Edge in the search box.
  4. Select Edge and click Advanced options to open further settings.
  5. Press the Reset button and click Reset again to confirm.
  6. Note that there’s a Repair button above the Reset option. You can also press that button to repair an Edge browser that often crashes.

If you still can’t close Microsoft Edge, reset the browser. That will restore Edge to its default configuration and clear data.

6. Switch off Edge’s extensions

  1. Click the Menu button from the top-right corner and select Extensions, then select Manage extensions.
  2. In the next window, disable or remove the extensions.

The Edge not closing error might be due to a third-party extension. You can switch off or uninstall Edge’s extensions by following the steps above.

7. Turn Off Internet Explorer

  1. Open Run by pressing the Windows key + R hotkey.
  2. Next, enter appwiz.cpl in Run’s text box; and press the OK button.
  3. Click the Turn Windows features on or off to open the window in the image below.
  4. Deselect the Internet Explorer 11 checkbox.
  5. Press the Yes button to confirm.
  6. Then click OK to close the window.

Some users have confirmed that turning Internet Explorer off, by deselecting its checkbox in Windows Features On or Off, can help if Microsoft Edge is not closing.

8. Update Windows

  1. Open Cortana by pressing its taskbar button.
  2. Input update in the Cortana search box, and select to open Check for updates.
    Windows 10 keeps reinstalling apps
  3. Then press the Check for updates button.
  4. Windows will list available updates if there are any. Click Download (or Install now) to update Windows 10.

Microsoft fixes numerous Edge glitches with Windows 10 updates, so updating Windows might also help if Microsoft Edge won’t close.

With the Windows Update Service configured for automatic updates, Windows updates automatically. However, it might still be worth manually checking for missed by following the steps from above.

The process is not always smooth as there are times when you may even encounter errors. Even so, you may take a look at our guide on how to fix Windows Update errors in no time.

What can I do if the Microsoft Edge pop-up won’t close?

If a pop-up won’t close, Microsoft Edge is most likely frozen and it needs to be restarted. Solution 2 will work perfectly in this case.

When the Microsoft Edge tabs won’t close, that means the browser is stuck. Just try to close the browser and open it again.

Our readers reported that Microsoft Edge won’t close in Windows 11 either but luckily, all the solutions above are efficient in the latest OS as well.

Those are a few resolutions that might fix an Edge browser that doesn’t always close. Has any of them worked for you?

You might also be interested in our guide on what to do if Microsoft Edge keeps crashing because we have plenty of quick tips. And if the same issue occurs in another browser say Arc won’t close, we have a guide for that as well.

Feel free to share your troubleshooting experience with us by reaching the comments section below.

8 Ways to Fix Confirm Form Resubmission Err_Cache_Miss Error

The confirm form resubmission ERR_CACHE_MISS notification shows up in your browser when you hit Refresh or try to go back.

This is the entire notification message that you will see on your screen:

Confirm form resubmission this webpage requires data that you entered earlier in order to be properly displayed. You can send this data again, but by doing so you will repeat any action this page previously performed. Press the reload button to resubmit the data needed to load the page. ERR_CACHE_MISS.

To protect you from inadvertently doing the same POST actions many times when you are filling out forms, Google Chrome now displays a pop-up that says confirm form resubmission. It might be a hassle to fill in the same information repeatedly or to submit the same thing many times.

If you reload the page, even if the error does not appear, it is possible that your credit card may be charged twice. Whether you refer to it as a pop-up or an error, the fact remains that it appears only for your benefit.

What does it mean when it says confirm form resubmission?

Contrary to what many users might think, the confirm form resubmission message is not an error or a bug.

The browser is actually looking for your permission to load your submitted data while refreshing the page or going back.

You can avoid the ERR_CACHE_MISS problem simply by never refreshing a web page on which you sent some form of information or never clicking Back.

However, it’s almost impossible to never want to see the previous page you were viewing or need to refresh your current page.

Therefore, this post will explore how to avoid the confirmation form resubmission from Google Chrome and other browsers with this issue.

Where is the resubmission button?

To reload the page and submit your form, you can press the F5 key on your keyboard. Alternatively, click on the Reload this page button.

This being said, let’s see how you can fix the confirm form resubmission ERR_CACHE_MISS issue and get back to your tasks. Keep on reading!

How do I remove the confirmed resubmission alert?

1. Change your browser to Opera One

Alternatively, you can easily switch to Opera One, a browser with improved features and a redesigned interface.

Not to mention that this browser also protects you from unwanted ads with a built-in ad blocker. This feature, together with the tracking scripts blocker makes Opera really fast.

And if you’re looking for extra protection, there’s nothing better than the built-in VPN service with no limitations regarding bandwidth.

Overall, Opera One offers better Windows 10 integration by offering lots of out-of-the-box features like a native screenshot tool, a pop-out video player, and much more.

And if you’re looking for Instagram, WhatsApp, or Facebook Messenger, their shortcuts are conveniently placed on the sidebar.

Opera One

Get around errors and other inconveniences by switching to Opera One.

2. Turn off confirm form resubmission

  1. If you wonder how to turn off confirm form resubmission on Chrome, close the browser if it’s open.
  2. Right-click the Chrome icon then right-click on Google Chrome and select Properties from the contextual menu.prop-chrome confirm form resubmission err_cache_miss
  3. Next, go to the Target field and after chrome.exe, append the following: -disable-prompt-on-reposttarget confirm form resubmission err_cache_miss
  4. This makes the complete target transform to: C:Program Files (x86)GoogleChromeApplicationchrome.exe -disable-prompt-on-repost
  5. Click on Apply to save your changes and then hit OK to close the Properties dialog.apply-ok-chrome confirm form resubmission err_cache_miss

Once you make these changes, launch Google Chrome and check if the Confirm form resubmission message still appears.

3. Clear your browser’s data

Firefox

  1. Press on the Windows key, type Firefox, and open the first result.firefox-search twitch extensions not working
  2. Next, click the hamburger menu from the top right corner and navigate to History.history-menu-firefox confirm form resubmission err_cache_miss
  3. Click on Clear Recent History.clear-recent-history confirm form resubmission err_cache_miss
  4. Click on the Time range dropdown menu and select Everything.everything confirm form resubmission err_cache_miss
  5. Checkmark all the data you want to delete from History and Data sections. We recommend selecting all the boxed except Active logins.history-delete confirm form resubmission err_cache_miss
  6. Click OK to delete everything then try to submit the form again.

Chrome

  1. Press the Windows key, type Chrome, then click the first result.chrome-search twitch extensions not working
  2. Use the following shortcut to access the Clear browsing data menu: Shift + Ctrl + Delete and select All time as the time range.all-time-chrome images not loading in chrome
  3. Check the Cookies other site data and Cached images and files options.cookies-and-cache-chrome images not loading in chrome
  4. Click Clear Data. The confirm form resubmission ERR_CACHE_MISS issue will be resolved.clear-data images not loading in chrome

4. Disable corrupt browser extensions

Chrome

  1. If you got the confirm form resubmission ERR_CACHE_MISS issue, open a new Chrome window and click on the three-dot menu followed by More tools and Extensions.extensions-chrome your connection was interrupteda network change was detected. err_network_changed
  2. Turn off your extensions, one by one, by clicking on the toggle button next to them, and then check if you can fill out the form.disable-ext your connection was interrupteda network change was detected. err_network_changed

Firefox

  1. Open Firefox and click on the hamburger menu followed by Add-ons and themes.add-ons-firefox confirm form resubmission err_cache_miss
  2. Next, click on the toggle button next to one of your extensions in order to turn it off then check whether you can fill out the form without any interruptions.toggle-off-ext-firefox confirm form resubmission err_cache_miss

If the confirm form resubmission disappears, you know that the extension was the culprit. Leave it disabled or delete it.

5. Delete no-store

  1. Open the page with the form and find the following code on the header: header('Cache-Control: no-store, no-cache, must-revalidate, max-age=');
  2. From that code, delete the no-store part from the header.
  3. Next, refresh the website page with the confirmation form resubmission error. This is how to disable confirm form resubmission by deleting no-store.
Note icon NOTE
You can only fix the confirm form resubmission on the refresh/back button with this method if you can edit the page.

6. Replace the POST method

The information you entered on the web page is posted using either the POST or GET methods.

While the POST method doesn’t append your entry to the URL, the server wouldn’t have access to your data.

On the other hand, the GET method appends your entry to the URL. Hence, your data isn’t as secure as the POST method.

If you can modify the page data, you can fix the confirm form resubmission issue by changing the POST method to the GET method.

To do this, simply remove the POST from the page URL and replace it with the GET method. For example, if the original code is:

<form action="index.php?load=SUBMIT"method="post">

you can replace the post part to get, so it becomes:

<form action="index.php?load=SUBMIT"method="get">

This solution is intended for web developers, and by making this change you should be able to fix the problem with Confirm form resubmission message.

7. Make use of Ajax submit button

Use the following snippet for the submit button to disable confirm form resubmission:

$.ajax({
type: “POST,”
URL: “bin/validation.php”
data: dataString,
success: function(){
//Insert your submission action
}
});
return false;

8. Reset the Google Chrome browser

  1. Resetting Google Chrome will disable all its extensions, which might fix the confirm form resubmission ERR_CACHE_MISS issue. Start by clicking on the three-dot menu followed by Settings.chrome-settings windows 10 blocking chrome install
  2. Select Reset and clean up from the left menu.
  3. Next, click on the Restore settings to their original defaults option.restore-settings windows 10 blocking chrome install
  4. Finally, click on Reset settings.reset-settings-yes windows 10 blocking chrome install

Whenever you see the confirm form resubmission ERR_CACHE_MISS message on your browser,  you can simply click Continue. However, if you do not wish to resubmit the form data, click on Cancel.

How to prevent confirmation form resubmission?

Making your form utilize the GET method rather than the POST method is one approach to get rid of this error notice. Bear in mind, however, that this is not the best course of action in every situation.

Always utilize the POST method when executing an action that you do not want to be repeated, when transferring sensitive information, or when your form includes either a file upload or the length of all data provided is larger than 2000 characters.

You do not want the page to be refreshed and the data to be resent in any of these scenarios. If you are sending sensitive information, using GET would not only be inappropriate, but it would also be a security issue.

This is because the sensitive item (such as the user’s password) is sent in the URL, and since it is sent in the URL, it will therefore show up in server access logs.

You should use GET for anything else: when you don’t mind if it is repeated, for anything that you could provide a direct link to, when no sensitive information is being transferred, when you are pretty sure your URL lengths are not going to get out of control, and so on.

We recommend that you take a look at the top 5 ways to fix Microsoft Forms when it isn’t opening in case you want to use it instead.

In the case that you had enough of this notification, the steps presented above will ensure you’re not going to encounter it again. Don’t hesitate to leave a comment in the section below and tell us what you think. Thanks for reading!

5 Best Browsers To Watch FuboTV From Anywhere

FuboTV is an American streaming platform accessible to customers in the United States, Canada, and Spain. It is the only TV streaming platform centered primarily on channels that distribute live sports. To access FuboTV, you need a good browser.

This TV streaming service features top leagues and teams, movies, popular TV shows, and news. It is an expensive streaming platform, but it renders one of the best and most comprehensive services for channel delivery. A feature of FuboTV is that it is available on multiple platforms and operating systems.

A downside people complain about is that FuboTV isn’t available in other regions apart from the United States, Canada, and Spain.

Nonetheless, don’t panic if your location isn’t listed above. We shall discuss some of the best browsers you can use to watch FuboTV from anywhere.

Can you watch Fubo on the browser?

FuboTV is available in a web browser version. So you can access it from a variety of browsers. However, not all browsers are fit for watching FuboTV as they may lack some features like speed and pop-out video. Also, watching FuboTV on the browsers doesn’t fix the geo-restriction.

Nonetheless, there are ways by which you can use your browser to watch FuboTV from anywhere. Using browsers with inbuilt VPN services can help you bypass the geo-tactics on the FuboTV website.

Is Fubo trusted?

FuboTV is one of the most reliable sports and entertainment streaming platforms. The company has been around since 2015 and has become one of the most prominent.

According to reviews from users, FuboTV has a responsive customer care service that takes less than a couple of hours to reply to complaints. Thus, its technical support is commendable compared to others. Likewise, it has a reliable cloud DVR feature.

In summary, FuboTV is a streaming platform you can trust.

What are the best browsers for FuboTV?

Opera One – Unlimited and free VPN service

Opera One is the best browser for watching FuboTV from anywhere. Its inbuilt VPN feature allows it to break through the geo-block system.

Hence, it processes your request through a private server, allowing you to browse without being detected. So, you can access public content without location barriers.

Opera One’s other features are: Ad blocker, social media buttons, messaging apps built-in, native AI.

Opera One

Watch your favorite productions from FuboTV on this extremely private browse with free VPN support.
Free Download Visit website

UR Browser – Advanced security

UR browser is well known for its high security and privacy features. It is a Chromium-based browser. The browser has an inbuilt VPN that has no limits.

It offers more than 15 locations to choose from. Likewise, an inbuilt ad blocker comes with the browser for a smooth and better browsing experience.

More so, you should be aware that 3rd party cookies or tracking ads are completely blocked so you can navigate privately without exposing any data.

UR Browser

Use this multilayered privacy browser and stream your favorite shows on the FuboTV platform.

Avast Secure browser – High-grade data encryption

Another browser for watching FuboTV from anywhere is Avast secure browser. With an inbuilt VPN, it helps you bypass the geo-restrictions on sites.

It is notable for its security protection. It also comes with an inbuilt ad blocker.

⇒ Get Avast Secure Browser

Brave – Great speed and security

Brave browser is a new browser compared to Opera. It has features that are helpful to its users regarding security and privacy. It offers a VPN and firewall service from its inbuilt VPN. Also, it can connect to multiple devices simultaneously.

It is one of the most compatible browsers for most devices. It uses voice search and allows you to bookmark your favorite websites. Another feature is that you can use Chromium extensions on it to further increase its streaming functionalities.

⇒ Get Brave

Epic Privacy Browser – Packed with great features

The Epic browser focuses on privacy. It doesn’t collect any user data because of its no-log policy. The browser has an inbuilt VPN, which makes it a good choice for watching FuboTV.

Also, due to its lightweight, the streaming on this browser is extremely fast. Further, you are guaranteed user anonymity protection while using it.

⇒ Get Epic Privacy Browser

Can you trick Fubo with a VPN?

FuboTV uses strict geo-restriction tactics to block viewers in unsupported regions from accessing it. Hence, people are using VPNs to get around it, but the security measures on FuboTV detect some VPNs.

However, there are some reliable VPNs you can use to get around Fubo and watch anywhere. See our recommendations on some of the best VPNs you can use for Fubo right away.

You can also check our page for the best VPN extensions for the Firefox browser. We also have a guide on the best browsers for Skyworth TV.

Do not hesitate to let us know your browser pick in the comments area.

Discover Windows 11 Build 22000.829 and all its changes

We’ve had quite a few software releases from Microsoft these days, and we’re about to elaborate on the latest one yet.

Microsoft has just released Build 22000.829 for all of the Windows 11 Insiders that conduct their testing on the Release Preview Channel.

Don’t forget to also check out Windows 11 Build 25158, Windows Server Build 25158, and KB5015807 for Windows 10.

This new build brings, as might have already expected, several bug fixes as well as some new features like for eligible devices to update to a newer Windows 11 version during the out-of-box experience (OOBE) after the first sign-in.

What’s new after installing Build 22000.829?

Let’s start by saying that you will gain the ability for you to consent to receive urgent notifications when Focus Assist is on, after installing the software.

We should also mention the option for eligible devices to update to a newer Windows 11 version during the out-of-box experience (OOBE) when you first sign in.

This means that, if you choose to update to a newer version, the update process will begin shortly after the update is installed on the device.

Furthermore, the tech giant has restored functionality for Windows Autopilot deployment scenarios that are affected by the security mitigation for hardware reuse.

Keep in mind that this update removed the one-time use restriction for self-deploying mode (SDM) and pre-provisioning (PP).

The above-mentioned build also re-enabled any User Principal Name (UPN) display in user-driven mode (UDM) deployments for approved manufacturers.

Fixes

  • Fixed an issue in UIAutomation() that causes an application to stop working.
  • Fixed an issue that prevents the Startup Task API from working as expected for certain apps.
  • Improved the reliability of a push-button reset after an OS upgrade.
  • Fixed an issue that makes the tenant restrictions event logging channel inaccessible if you remove the EN-US language pack.
  • Fixed an issue that causes certificate-based machine account authentication to fail in some circumstances after you install the May 10, 2022 security updates on domain controllers.
  • Fixed an issue that affects the Arm64EC code you build using the Windows 11 software development kit (SDK).
  • Updated the Remove-Item cmdlet to properly interact with Microsoft OneDrive folders.
  • Fixed an issue that prevents troubleshooters from opening.
  • Fixed an issue that causes port mapping conflicts for containers.
  • Fixed an issue that causes Code Integrity to continue trusting a file after the file has been modified.
  • Fixed an issue that might cause Windows to stop working when you enable Windows Defender Application Control with the Intelligent Security Graph feature turned on.
  • Deployed search highlights to devices. To access the policy for search highlights (on a device that has installed the June 2022 Cumulative Update Preview or July 2022 monthly quality update), go to C:\Windows\PolicyDefinitions and locate admx. For your convenience, we will be publishing an updated version of the Administrative Templates (.admx) for Windows 11, version 21H2 to the Microsoft Download Center soon.
  • Fixed an issue that causes exe to stop working when you use the play and pause keyboard buttons on certain devices.
  • Fixed an issue that causes exe to stop working when you use the Start menu’s context menu (Win + X) and an external monitor is connected to your device.
  • Fixed an issue that displays a blank window that you cannot close when you hover over the search icon on the taskbar.
  • Reduced the overhead of resource contention in high input/output operations per second (IOPS) scenarios that have many threads contending on a single file.
  • Fixed an issue that causes the Windows profile service to fail sporadically. The failure might occur when signing in. The error message is, “gpsvc service failed to sign in. Access denied”.

Known issues

  • On some devices, Widgets may crash in the background upon logging in and show the static default icon instead of populating and updating to show the weather.

Remember to also check the latest changes that Microsoft made for the Media Player app, in case you still use the software.

Have you noticed any other issues after installing build 22000.829 on your Release Preview Channel Windows 11 release? Let us know in the comments section below.

How to Fix Chrome-error://chromewebdata/#: 4 Tested Ways

The chrome-error://chromewebdata/# can appear while developing a web app, and this can seriously impact your development process, so today we’ll show you how to fix it properly.

Before you try anything else, make sure you have the latest version of Chrome installed. In your code, check if it’s trying to navigate to any inexistent URLs.

How do I fix chrome-error://chromewebdata/# error?

1. Check why Chrome wasn’t able to load the application

  1. Open your code editor.
  2. Add the following code at the end:
    if (window.chrome && chrome.app && chrome.app.runtime) {
    // Running inside a Chrome App context
    } else {
    // Either not Chrome, or not as an app window
    }
  3. Save changes.

If your application is a hosted Chrome App, then it is enough to check chrome.app.isInstalled from the website’s code.

2. Check your extensions

  1. Open the Menu choose Extensions and then Manage Extensions.
    manage extensions chrome menu
  2. Disable all extensions by clicking the toggle button next to them.
    extension toggle chrome
  3. After doing that, check if the issue is gone. If it is, enable extensions one by one until you find the culprit.

3. Start your own server to try out the app

  1. Open your Google Chrome browser and navigate to Chrome Web Store.
  2. Click Add Extension button.
    web server for chrome extension
  3. Allow the app to be installed.
  4. If you’re not redirected automatically to the Google Apps page, type the following in a new tab: chrome://apps/
  5. Click on Web Server to start it.
  6. Another window with the server will open.

4. Check your server

  1. Check if your server is running properly.
  2. Make sure you’re using the correct IP address.
  3. Lastly, check if you’re using the right port.

If the error persists after following the steps provided in this guide, it might be an issue generated by your code. Check it closely and see at which line you start having the problem.

Even more, logic errors can happen during the development process, thus resulting in a runtime error. Simply take a closer look at our tips to make Chrome error code 5 a thing of the past as well.

While this is a developer error, Chrome is no stranger to issues, and we covered a Chrome error has occurred while checking for updates in one of our older articles.

Don’t hesitate to use the comments section below for any other suggestions and questions.

Smart Card printing failure mitigation to be removed by Microsoft

It’s no secret that, sometimes, Patch Tuesday updates can lead to other issues, been though they are designed for fixing certain problems.

And, since we’re on the topic, such was the case for the July 2021 Patch Tuesday which broke printing and scanning while using Smart Card authentication.

Back when this was happening, Microsoft provided mitigation solutions for this issue, so it was about time for the situation to be dealt with accordingly.

What is Microsoft planning to do?

However, the Redmond tech giant has announced that it will be removing these mitigations soon, starting with the upcoming July 19 update that will be out in a few days time.

As you already know, on July 13, 2021, Microsoft released hardening changes for Windows Key Distribution Center Information Disclosure Vulnerability, CVE-2021-33764.

After these  changes are applied, smart card (PIV) authentication might cause print and scan failures when you install updates released on July 13, 2021, or later versions on a domain controller (DC).

Thus, the affected devices are smart card authenticating printers, scanners, and multifunction devices that don’t support either Diffie-Hellman (DH) for key exchange during PKINIT Kerberos authentication or don’t advertise support for des-ede3-cbc (“triple DES”) during the Kerberos AS request. 

As a result, a temporary mitigation was released in Windows Updates between July 29, 2021, and July 12, 2022, and was made available for organizations that encountered this issue and couldn’t bring devices into compliance as required for CVE-2021-33764.

So, according to the latest statements coming out of Redmond, starting in July 2022, this temporary mitigation will not be usable in security updates.

Why, you ask? Well, the Windows July 2022 preview update will remove the temporary mitigation and will require compliant printing and scanning devices. 

The conclusion is that, as of July 19, 2022, there will be no further fallback option in later updates, and all non-compliant devices must be identified using the audit events starting in January 2022 and updated or replaced by the mitigation removal. 

5 Best Browsers To Watch The NBA League Pass [1080P, 4K]

Everyone loves to watch their NBA games without encountering issues. The NBA League Pass is a subscription-based NBA platform that allows viewers to watch games. These games are available live and on-demand, so users can always watch what they have missed for a whole season.

However, some viewers are asking for means to access NBA League Pass on their browsers without downloading any other apps. Hence, this article enlists the best browsers for NBA League Pass.

There are several ways you can use your subscription like on a cable, third-party streaming app, NBA League Pass app, and lots more. However, this can be a limitation for fans who can’t download the apps or have access to a cable device.

Furthermore, the web app version allows users to access their accounts through the web browser. Thus, we will go through the 5 best browsers to watch NBA League Pass. Likewise, we’ll consider the browsers that offer 1080p & 4K streaming support for NBA League Pass.

Can I watch NBA League Pass on a browser?

NBA League Pass is an in-app subscription-based product. However, fans can also access their subscriptions on their computers with browsers. It means you can watch NBA games on your browsers across different operating systems like Mac, Windows, etc.

Since League Pass is a subscription service, subscribers can simply log onto the official website of the NBA (National Basketball Association). On the website, there are several links at the top of the screen.

Click the League Pass link and follow the prompts. This way, you’ll be able to access your NBA League Pass on your browsers without encountering any errors.

Does the NBA League Pass include finals?

The NBA League Pass has its limitations in the case of the games it broadcasts. The NBA playoffs are one of the most exciting games to witness, likewise the finals. However, these games are not always available across platforms, including the NBA League Pass.

Hence, the answer to the above question is no. NBA finals are always nationally televised and are also available on streaming services.

These streaming services offer ABC, TNT, and ESPN through their platforms. Also, some other means you can watch NBA finals are through Fubo TV and Sling TV. Likewise, Fubo TV and Sling TV are accessible with subscriptions.

What are the best browsers for watching a league pass?

Opera One – Great for privacy and security

The Opera One browser is a fast, stable, and well-secured browser. It’s been in the market for a long time and has several updates.

Opera One is the best web browser for streaming online videos, making it the perfect choice for NBA League Pass. It has a built-in ad blocker that prevents ads from popping up in the middle of your streaming.

This feature helps it to load multimedia faster than other browsers. Furthermore, it has an inbuilt free VPN service that allows users to surf the internet privately.

Opera One

Watch any NBA games from home or while traveling, thanks to this streaming-friendly browser.

Google Chrome – The best browser for streaming

Google Chrome is a Chromium-based browser. It is one of the most popular in the market. It is because of how fast and smooth it works.

Also, it has a vast array of extensions and features that helps it load sites faster and give you the best internet experience. It is secure and offers highly private browsing sessions.

A notable feature in Chrome is the ability to stream multimedia to Chromecast devices. Also, it has an inbuilt ad blocker that blocks ads from interrupting your streaming experience.

⇒ Get Google Chrome

Mozilla Firefox – Fast browsing speed & high security

mozilla-firefox-browser

Mozilla Firefox is another browser that best works for watching NBA League Pass. It is recognizable for how much security and privacy protection it offers.

It is easy to navigate, and it loads pages faster. Users can download extensions to enhance their browsing experience. Also, it has a customizable user interface that helps you get the best of your browser.

It is a good option because it has a pop-out video player, which is a good feature for online video streaming.

⇒ Get Mozilla Firefox

Vivaldi – Highly customizable

Vivaldi is a recent browser, unlike Opera and Chrome. It is a light browser with lots of features that makes it perfect for NBA League Pass.

This browser comes with advanced features that help you focus on your activities and keeps a good history of your browsing activities.

It allows you to customize your browsing workspace, tabs position, and lots more. Also, it allows you to sync your browsing data across different devices.

⇒ Get Vivaldi Browser

Microsoft Edge – Extremely fast and safe

Microsoft Edge is the default browser for Windows devices. It comes with lots of features like an amazing user interface, ease of navigation, and user data protection.

The browser uses the chromium code. Likewise, it is available in different operating systems. It is a good browser to consider for watching the NBA League Pass.

⇒ Get Microsoft Edge

Why is NBA League Pass not working on Chrome?

There are several reasons to take into consideration:

1. Outdated browser

Google Chrome undergoes updates over time, and they help it function better. However, users can encounter errors like NBA League Pass not working on Chrome if the browser is not up-to-date. So, updating your browser can fix this issue.

2. Browser cache and cookies issues

Caches and cookies are stored to help your browser load websites faster. However, they can cause issues like blocking websites from loading when they become corrupt.

3. Browser/server issues

The NBA League Pass server might be having difficulties connecting with the browser. Hence, an easy fix for this is to switch to another browser.

For more information on the best browsers for streaming, you can read our article on the best browsers for high-quality 4K Netflix streaming.

Also, do not hesitate to check out the best browsers for Disney Plus [4K & 1080p quality streaming]. Let us know your choice in the comments area.

Windows Server Build 25158 is now available to all Insiders

Since we are on the topic of Microsoft releasing new software, you should be aware that the tech giant has released a new build for the Windows Server Insider Preview.

Build 25158, released in July 2022, is now available to download as an ISO from the Windows Server Insider website along with a VHDX.

However, keep in mind that even though this uses the same underlying kernel as the Windows 11 Sun Valley 3 (23H2) development, there’s no changelog to speak of, so it’s unclear what’s new or broken in this build.

What’s new with Build 25158?

Microsoft hasn’t tempered with the product’s branding at all and remains as Windows Server 2022 in the available review.

That being said, Microsoft is asking Insiders to refer to these builds as vNext rather than Windows Server 2022 which is already in the market.

This release came right after the company also dropped Windows 11 build 25158, which is the Sun Valley 3 consumer development.

Users are starting to see an interesting pattern here, which means these rollout editions will continue to sync up from this point forward.

As far as available downloads go, we’re looking at

  • Windows Server VNext Preview in ISO format in 18 languages,
    and in VHDX format in English only.
  • Windows Server VNext Preview VHDX
  • Microsoft Server Languages and Optional Features Preview
  • Windows Admin Center 2110.2 Preview

Know that the keys are valid for preview builds only:

  • Server Standard: MFY9F-XBN2F-TYFMP-CCV49-RMYVH
  • Datacenter: 2KNJJ-33Y9H-2GXGX-KMQWH-G6H67

In order to download the above-mentioned build, registered Insiders can head over to the Windows Server Insider Preview download page.

Also, check out the Getting Started with Server page on the Windows Insider for Business portal to register for the Windows Insider Program in case you aren’t already registered.

Have you noticed any issues after installing this Windows Server build? Share your experience with us in the comments section below.

What to play on Game Pass: Horror Games

New to Game Pass and don’t know where to start? We’ve got you covered with these Game Pass recommendations for those who like a good scare.

And judging from the Game Pass lineup, there must be quite a few of you. Horror games have always been popular. And now with the power of next-gen gaming the thrills have never been more real. So with that out of the way let’s check out the best survival horror games on Game Pass right now.

7 Days to Die

Watch the trailer on YouTube

7 Days to Die is set in a zombie-infested, post-apocalyptic wasteland. This open-world survival horror game from The Fun Pimps puts a big emphasis on the survival aspect. Players have seven days to prepare until the Blood Moon rises. When that happens, the zombie hordes go into a frenzy and hunt the player with renewed fervor. If your fortifications are strong enough, you might just survive…


Alan Wake’s American Nightmare

This standalone Alan Wake game is more combat focused, though it retains everything that make the original game a cult classic. If features solid action and a suspenseful plot. If you love classic horror in the vein of The Twilight Zone and the works of Stephen King, then you’ll love this.

Or if you love mowing down creepy things with machine guns, crossbows, nail guns and shotguns, you will also love this. For those of you in this group, the “Fight till Dawn” Arcade mode will put you up against successive waves of enemies.


Alien: Isolation

Watch the trailer on YouTube

Based on the Alien film series, Alien: Isolation is a first-person survival horror game that puts players in the role of Amanda Ripley, daughter of the protagonist of the first Alien film (that being Ellen Ripley, portrayed by Sigourney Weaver).

The gameplay focuses on survival and stealth elements. It also employs brilliantly-executed atmosphere to deliver a delightfully dreadful experience as Ripley explores a Sevastopol space station teeming with hostile human survivors, androids and aliens. This is probably one of the more underestimated Game Pass titles.


Also check out on Game Pass:

  • Alien: Fireteam Elite


Back 4 Blood

Watch the trailer on YouTube

Back 4 Blood was billed as the spiritual successor to the classic Left 4 Dead series. Considering the game was developed by much of the same talent behind the latter franchise, Back 4 Blood proves worthy of that reputation.

It also incorporates many of the same gameplay elements, with the same emphasis on cooperative teamwork. All told, the game serves as a worthy successor, and over 10 million players agree. If you were a fan of the Left 4 Dead series this is a no brainer. If not, this is still a solid zombie-smashing good time. Try it out.


Dead by Daylight

Watch the trailer on YouTube

2016’s Dead by Daylight has become a survival horror sensation. An online multiplayer horror game with an asymmetric one-versus-four structure, Dead by Daylight allows players to team up in an effort to survive the Killer and escape, or take on the role of the Killer and hunt down the Survivors.

The game has sold more than 50 million copies, and has released crossover content featuring characters from many other horror game and movie franchises. These include Halloween, Left 4 Dead, Silent Hill, Stranger Things, and many more.


Dead Space

This storied survival horror series is well-represented on Game Pass, with four games available on the service at the time of this writing. What began as a rough prototype for the original Xbox, taking inspiration from Resident Evil films like Event Horizon, has become a survival horror classic.

Set aboard the space ship Ishimura, player take the reins of protagonist Isaac Clarke. The ship is ridden with gruesome monsters called Necromorphs. Often described as “Resident Evil in Space,” even by the game’s creators, Dead Space offers a sci-fi take on the genre that gives it its own identity.

A remake of the game is in the works, and is currently set of a January 2023 release.

Also check out on GamePass:

  • Dead Space 2
  • Dead Space 3
  • Dead Space Ignition


State of Decay: Year One—Survival Edition

Watch the trailer on YouTube

Developed by Undead Labs and published by Microsoft Studios, State of Decay mixes up the survival horror formula a bit to deliver a fresh take on the genre. In State of Decay the player is in charge of a small group of survivors in the midst of a zombie apocalypse. Leadership skills are the key here, including resource management. Players will have to use strategy to build and defend their base and keep everyone on the same page.

The game blends disparate gameplay elements – shooting, stealth, strategy, simulation, and role-playing – into a cohesive whole that makes for a frighteningly good time. If you have a Game Pass membership then this is well worth your time.

Also check out on Game Pass:

  • State of Decay 2: Juggernaut Edition


The Evil Within

Watch the trailer on YouTube

Developed by Undead Labs and published by Microsoft Studios, State of Decay mixes up the survival horror formula a bit to deliver a fresh take on the genre. In State of Decay the player is in charge of a small group of survivors in the midst of a zombie apocalypse. Leadership skills are the key here, including resource management. Players will have to use strategy to build and defend their base and keep everyone on the same page.

The game blends disparate gameplay elements – shooting, stealth, strategy, simulation, and role-playing – into a cohesive whole that makes for a frighteningly good time. If you have a Game Pass membership then this is well worth your time.

Last dash to safety…

There you have it: what to play on Game Pass for fans of survival horror. Keep in mind that these are just our best recommendations. Surely there’s enough here to keep you good and terrified for weeks to come. Have you already played any of these scary games? If so, let us know in the comments which is your favorite.

If you don’t already have a Game Pass subscription, you can sign up here. If you would like more info on Game Pass, visit the FAQ page. And don’t forget to check out our other “What to play on Game Pass” recommendations to find other great games.


Quickly Fix ERR_SSL_VERSION_OR_CIPHER_MISMATCH on PC

Err SLL version or cipher mismatch is a web error that has been reported to appear on several browsers and apps.

Windows and the browsers installed on your device use built-in security features to protect your info and keep everything secured. These built-in security tools determine if certain web pages are safe or not.

However, sometimes, your Internet access might be blocked, even if the websites you visit are safe. That explains why you’re getting the err_ssl_version_or_cipher_mismatch error.

This is similar to Chrome says Not secure issue, and for more information, we advise that you check that guide.

While this is a handy security feature, sometimes even trusted sites might be blocked. In today’s guide, we’re going to show you how to bypass the Err SLL version or cipher mismatch message.

What causes Err SSL version or cipher mismatch?

This is a certificate issue, and it appears when the web browser and server don’t support the same encryption protocol version.

This error doesn’t discriminate between your choice of browsers. The Err SLL version or cipher mismatch has appeared as a variant of:

  • Chrome err_ssl_version_or_cipher_mismatch
  • Opera err_ssl_version_or_cipher_mismatch
  • Edge err_ssl_version_or_cipher_mismatch
  • Sonicwall err_ssl_version_or_cipher_mismatch (when trying to connect your browser to this software)

If this happens, you might see one of the following messages:

  • The client and server don’t support a standard SSL protocol version or cipher suite
  • Cipher mismatch/no shared cipher
  • Cipher suite mismatch

Luckily, there are ways to fix this error, and today we’ll show you how.

How can I fix the Err SSL version or cipher mismatch error?

1. Check the website certificate

  1. Try to open the website that is giving you this error.
  2. Click the lock icon in the address bar.
  3. Look for Connection is secure option. You can click it to view more information.
  4. Now when you click on certificate, you’ll see detailed information about it.

If you don’t see this message or the lock icon, it means that the website is using an expired certificate, thus making it unsafe.

You can also check the security by doing the following:

  1. Right-click the page that is giving you this error and choose Inspect.
  2. Now click the arrow icon and choose Security.
  3. You should now see the certificate information.

Alternatively, you can try switching to a different browser to avoid this problem, and the following one might be the best choice because it offers excellent features and security.

It also comes with enhanced browsing technology and improved security that can help you bypass this SSL version.

2. Clear the cache

  1. Open Chrome.
  2. Now press: Ctrl + Shift + Delete.
  3. A new window will appear.
  4. Set the Time range to All time and click on Clear data.

3. Adjust security settings

  1. Open Chrome.
  2. In the search bar, type the following and press Enter: chrome://flags
  3. Look for the Minimum SSL/TLS version supported.
  4. Click on it and choose SSLv3.
  5. Select the Re-launch option.
  6. Restart Chrome and retry to establish your connection again.
Note icon NOTE
This option isn’t available in all versions of Chrome, and if you can’t find it, move to the next solution.

4. Disable quick protocol

  1. Open Chrome.
  2. In the search bar, enter: chrome://flags/
  3. In the search, type quic. Locate Experimental QUIC protocol and set it to Disabled.
  4. Save the changes and restart Chrome.

5. Clear the SSL Certificate cache

  1. Press the Windows key + R keyboard hotkeys to bring the Run box.
  2. Type the line below and press Enter: inetcpl.cpl
  3. Switch to the Content tab. Click on Clear SSL state.
  4. Save your changes and close this window at the end.

Windows will store SSL certificate history by default to make your browsing experience faster.

However, this might be the reason why you get the Err SSL version or cipher mismatch alert. So, clear the SSL Certificate cache by doing as described above.

6. Turn off SSL scanning from antivirus software

6.1 BitDefender:

  1. Open the BitDefender interface and access Settings.
  2. From there, go to Privacy Control and switch to the Antiphishing tab.
  3. Disable Scan SSL.
  4. On other BitDefender versions, you might have to access Protection, and from under Web Protection, you can find the Scan SSL feature.

6.2 AVAST:

  1. Open Avast and navigate towards Settings.
  2. Select Protection, and under Core Shields, select Web Shield.
  3. From there, you can disable the SSL scan.

6.3 Kaspersky:

  1. Access Kaspersky’s Settings page.
  2. From there, go to Network Settings.
  3. SSL settings will be displayed at this point.
  4. Just disable the settings that are related to the SSL scan.

Your antivirus program could cause the Err SSL version or cipher mismatch while accessing the router. So, disable the SSL scanning feature from your security programs before retrying your network connection.

If you’re having problems with your antivirus, visit our guide on the best antivirus software for some great alternatives.

How can I fix the Err SSL version or cipher mismatch error on Windows 11?

This is a browser issue, meaning that solutions are the same on all versions of Windows. So even if you’re using the latest edition, all the methods from this guide should work for you, so be sure to try them.

The error is similar to This website might not be trusted by your browser error. For more information on how to fix it, check out this website not-trusted guide for more details.

What systems are affected by Err SSL version or cipher mismatch?

This is a standard error, and err_ssl_version_or_cipher_mismatch has been reported on Windows, Android, and Mac systems. Servers can also suffer from this issue, and the list of affected servers includes:

  • Localhost
  • Tomcat
  • Cloudflare
  • Sonicwall
  • Nginx

Remember that the Err SSL version error is a security alert telling you one thing: You are trying to access a web page that cannot be trusted.

So, try to disable this alert only if you are sure that you can safely navigate toward the respective website.

The steps above should help you solve the Err SSL version or cipher mismatch error in Chrome. If you’re still having problems, read our Secure connection failed SSL error guide for additional solutions.

We’d like your opinion on this subject, so drop us a comment in the section below.

5 Best Browsers to Watch SBS on Demand

SBS is a streaming platform that offers live streaming of their TV shows and channels. It is possible by what they call SBS On Demand. SBS in full is the Special Broadcasting Service, an Australian national public service broadcaster launched on the 24th of October 1980.

It boasts six TV channels and seven radio networks. A problem with SBS is reaching. It affects how many people the broadcast reaches. So, getting the SBS On Demand browser you can use to access these channels in and outside Australia is essential.

Furthermore, accessing it is almost impossible for people outside Australia. Since people from different regions are looking at ways to access this streaming service without issues with the location barrier. Thus, we have put together this article.

Hence, we’ll highlight some of the best browsers you can download to watch SBS On Demand in and outside Australia.

Can I watch SBS On Demand on my computer?

SBS On Demand is available across different platforms and devices. For more information about this, click the link above.

Nevertheless, you can access SBS On Demand on your computer and watch your favorite TV shows. Even though some mobile apps are not available on the bigger screen versions by default, there are ways to go about it.

Likewise, users can watch SBS on demand on their iPhones, iPads, or Android devices. So, to watch SBS On Demand on your computer or MacBook, you need to use a web browser.

How can I watch SBS On Demand outside Australia?

1. By connecting to a VPN service

Because SBS uses geo-block tactics to prevent viewings from places outside Australia, it is impossible to access SBS On Demand directly. However, the most suitable way around it is by connecting to a VPN. It allows you to surf the Internet without showing your location.

Also, it can place you in the country of your choice. Hence, your internet traffic connects to a server in Australia, which gives you an Australian IP address. Check our recommendations for some of the best VPNs you can use.

2. By using browsers with inbuilt VPN services

Likewise, watching SBS On Demand outside Australia is not allowed. However, with the help of browsers with inbuilt VPN services, you can watch SBS on Demand anywhere. It permits you to browse region-restricted websites and access content unavailable for your present location.

What are the best browsers for SBS on demand?

Opera One – High-level security and speed

Opera One is one of the oldest browsers out there, and it is one of the safest. It is our best pick because it comes with the latest inbuilt VPN and ad blocker.

Another feature of Opera One is that it has a video pop-out player and social media and messaging app integration, so you won’t miss on anything while watching your tv shows.

Also Opera One comes with a built-in AI and modular AI-ready design for the integration of other AI technologies.

Opera One

Thanks to the built-in VPN you can stream SBS on Demand easily in the browser.
Free Download Visit website

Tor Browser – Effective anti-surveillance & inbuilt VPN

Tor is an effective browser with an inbuilt VPN. It is the best for privacy and anti-surveillance internet activities and as such, can be used to access SBS On Demand.

It is a light browser that doesn’t consume a lot of space and power. Likewise, it is a multi-platform browser, meaning it is available across different platforms.

⇒ Get Tor Browser

UR Browser – Customizable, fast, and reliable

UR browser uses a highly developed security and privacy system to protect your internet connection. It comes with a built-in VPN and ad blocker which makes it a good SBS On Demand browser. You can simply select Australia as your location just to access the services easily.

Though it is among the newest browsers, it has features that put it above other browsers. Furthermore, the UR browser is highly customizable and allows users to access more configurations.

⇒ Get UR Browser

Epic Browser – Best for privacy

Epic browser is one of the best when it comes to simplicity. This application has a simple user interface, so anyone can navigate it easily.

Also, it is very efficient in providing a secure passage for your internet connection, allowing you to navigate without being detected.

⇒ Get Epic Browser

Aloha Browser – Best for Mobile users

Aloha browser is a light browser that is available on every mobile platform. It offers reliable privacy security because it has an inbuilt VPN. You can this browser on the go to access SBS On Demand, especially for mobile users.

Aloha is simple to use, and it is credible for its speed. Although it can’t be compared with the likes of Opera One, it is still one of the best browsers with a VPN service.

⇒ Get Aloha Browser

Why is SBS On Demand not working?

1. Network issues

If your internet connection is poor or not stable, it’ll affect the communication of SBS On Demand to its servers. However, this can lead to an SBS on-demand internet browser error when you want to access it on your browser.

2. Geo-blocking tactics

Another thing that can cause SBS On Demand not to work is the location restrictions on non-Australian viewers. In this case, SBS On Demand internet browser will be closed and inaccessible.

In conclusion, you can check our website for the best tips on how to watch IPTV Australia channels from anywhere. Also, it is essential to understand how to fix any VPN error on Windows 10/11 in just a couple of steps.

Let us know your browser choice in the comments area below.

How to Fix Twitch Emotes Not Showing or Working [FrankerFaceZ]

A large number of users have complained about Twitch chat emotes not showing suddenly, or Twitch emotes showing as text.

These happen even if they worked the day before. This issue has made people flood the different online forums asking for help. Here is what one user had to say about this problem:

So, I was gifted emotes about 24 days ago and I have them for a month. They worked fine in chat/discord no problem. I have about a week left and they still work perfectly fine in Discord and even show up as an autocorrect when I go to Twitch chat, but when I hit enter it’s just the text and no picture. Why is this happening? I’m not very informed on how Twitch stuff works.

This isn’t a single case, as many others complained of the same issue. If you also encounter this problem, today you’ll find how to fix it quickly.

Why are Twitch emotes not showing?

Several reasons explain why Twitch emotes are not showing in Discord and not only. We’ve compiled the most common ones and strongly recommend checking them:

  • Server-side error – In this case, you have to consider that, like any other app, Twitch might get into several temporary bugs. Most of the time, they are closely related to server errors.
  • Wrong emotes plugins – You always have to ensure that you’ve configured the correct emotes plugins. The process is easy, and you’ll discover it later in this guide.
  • Cookies and caches blocking Twitch emotes – Because cookies and caches may block your emotes, we’ve prepared some steps to clear them quickly.
  • Browser-related problems – It seems like some browsers are facing serious troubles. That’s why we’re going to recommend you the best-dedicated browser that will guarantee a clean experience.

Now, let’s discover the most efficient solutions to this annoying issue.

Quick Tip:

Twitch is mostly, if not entirely, for gamers, so you may want to view it in a gamer-friendly environment.

One browser to fit this bill is Opera GX, the world’s first and best web browser for gamers! It features a sleek-looking UI and several built-in tools that make it a gamer’s dream come true.

These include a memory optimizer, a bandwidth limiter, a gaming mode, and more, all of which are included in the GX Control panel.

Opera GX

Enjoy the most expressive emotes on Twitch using a fast and reliable gaming browser from Opera.

What can I do if Twitch emotes are not showing?

1. Close and re-open the app

  1. Press Ctrl + Alt+ Del keys simultaneously, then open Task Manager.
  2. Search for your Twitch app inside the list, click on it and related processes, then press on End Task.
  3. Hit the Windows key, type Twitch, then re-open it.
  4. If the issue persists, try the following method.

2. Make sure you have the right emote plugins

FrankerFacez emotes are not showing in Twitch in some cases because your PC doesn’t have the required plugins installed.

To fix this, feel free to download both the FrankerFacez and the BettertTV plugins.

3. Refresh your Twitch app

Some users have reported solving this issue by simply refreshing the Twitch app. You can try this method by pressing the Ctrl + F5 buttons on your keyboard. If this doesn’t work, try the next solution.

4. Use specialized software to delete cookies and caches

  1. Download CCleaner.
  2. Open the downloaded file, then click on Install.
  3. Wait a few seconds, then click on Run CCleaner.
  4. From the left window pane, click on the option Custom clean.
  5. Tick the boxes next to Internet cache and Cookies for each of the browsers on your computer.
  6. Click the Run Cleaner button from the right side of your screen.
  7. Check to see if Twitch emotes are showing normally.

5. Reinstall Twitch

  1. Use the following keyboard shortcut: Windows + X.
  2. Choose Apps and Features.
  3. Search for Twitch inside the list, click on it, then press Uninstall.
  4. Wait for the process to complete.
  5. Then, visit the official Twitch website and download the latest version.
  6. Run the installer and follow the on-screen instructions to complete the setup.

What is the cost for Twitch emotes?

Many users are wondering how much it costs to use Twitch emotes. If you’re in the same boat, keep in mind that you can sometimes get emotes for free if you find someone to volunteer their time and skill (or create them yourself, of course).

However, you’ll sometimes have to pay for the best Twitch emotes. The prices can go from 10$ and up to 90$.

In this guide, we explored the best troubleshooting methods to deal with the Twitch emotes not showing up in chat issues. Also, find more guides on fixing Twitch error codes like the popular Twitch error 2000.

Before you go, don’t miss our guide on how to install FrankerFaceZ for Firefox and get access to more emotes.

Which of these solutions has worked for you? Feel free to let us know and share more tips to handle this issue via the comments section below.

3 Ways to Fix Bios Error in DayZ [Quick Solutions]

DayZ is a realistic zombie survival game developed by Bohemia Interactive where players try to overcome threats and challenges to survive as long as possible. However, North American users have reported receiving Bios errors in DayZ.

The game is available for PC via Steam or cloud gaming, Xbox, and Play Station. DayZ is a sandbox multiplayer game and in its popularity, Bohemia Interactive has released a new DLC map called DayZ Livonia.

Are the DayZ servers down?

Users can check if the DayZ servers are down by checking their social media. When performing updates and bug fixes, DayZ temporarily shuts down the servers and during this time the game is unavailable for play.

DayZ Facebook page announces servers down.

What is the Bios error?

Users have reported being unable to log in to their account and receiving a Bios error that states resources are not accessible.

How do I fix the Bios error in DayZ?

1. Play on Xbox Cloud Gaming

Users that play Day Z on their Xbox consoles have reported that switching to cloud gaming removes the issue. With Xbox Pass Ultimate, users can switch between their console and Xcloud if everything is saved under one account.

Play DayZ on Xcloud to fix bios error.

2. Free up drive space

  1. Press the Xbox button on your controller to open the menu.
  2. Select Profile & system, then go to Settings.
  3. Under System, select Storage. open storage settings to fix bios error dayz.
  4. Under Manage stored devices select Clear local saved games. clear local storage space.

Freeing up drive space can help improve the speed and performance of your Xbox console and may help with the Bios error in DayZ. Keep in mind that this will delete games that are saved on the hard drive, but the games will be saved to the cloud.

When you start up the game to play, your most recent savegame that was stored in the cloud will allow you to pick up where you left off.

3. Reset the MAC address

  1. Press the Xbox button on your controller to open the menu.
  2. Select Profile & system, then go to Settings.
  3. Navigate to Network settings then Advanced settings.
  4. Under Change settings, select Alternate MAC address then Clear. Change settings alternate mac address.
  5. Restart the console. Restart console to fix bios error dayz.

Users have reported that resetting the MAC address on their console helped fix the Bios error in DayZ. Doing this will also help with any network issues.

Hopefully, one the of above solutions helped fix the Bios error in DayZ. If you’re experiencing packet loss in DayZ, we have a guide for that as well.

Let us know in the comments which solution worked for you or if you have a suggestion for a solution that is not listed above.

What to play on Game Pass: Puzzle Games

New to game pass and don’t know where to start? We’ve got you covered with these Game Pass recommendations for all the enigmatologists out there. Who doesn’t love a good, challenging puzzle from time to time? And Xbox Game Pass has a great selection of puzzle games for everyone from the casual player to those who seek the most brain-busting of challenges, and everyone in between. Check out these great puzzle games.

Bridge Constructor Portal

Are you a fan of the first-person shooter/puzzle-platform Portal series? Are you also a fan of the Bridge Constructor franchise? If you answered yes to either of these then you’ll enjoy this engineering simulation/puzzle game. And if you answered yes to both, then you are going to have an absolute field day with Bridge Constructor Portal.

The game blends elements from the two series, and the result is a combination almost as perfect as peanut butter and jelly. Players must construct bridges to get trucks from one point to another within Aperture Laboratories, all under the watchful eye of super AI GLaDOS.

Chinatown Detective Agency

Watch the trailer on YouTube

Visit a cyberpunk Singapore in the year 2037. Take on the role of brand-spanking-new private investigator Amira Darma in this point and click puzzle-adventure sleuthing game.

The game takes a lot of its inspiration from the classic Carmen Sandiego games, and has the player tackling a range of different cases that at first seem to be isolated, until the pieces of a wider conspiracy begin to come together…


Genesis Noir

Watch the trailer on YouTube

Another point and click adventure. A “noir adventure spanning time and space,” Genesis Noir is played through a series of vignettes. Independently developed and Kickstarter-funded, the game features a unique narrative that blends a creation (and destruction) myth with the presentation style of a film-noir detective movie. It is quite an original concept, to say the least. Gameplay is a combination of exploration and interactions that come mostly via on-screen prompts.


Lumines Remastered

Watch the trailer on YouTube

The puzzle classic Lumines now has enhanced visuals and support for higher resolutions. This remastered edition on Game Pass also introduces “Trance Vibration,” which allows players to use multiple controllers in single player games to experience a sense of synesthesia courtesy of the controller’s vibration functions (which are synchronized to the game’s music).

Lumines is an addictive puzzle game in the vein of Tetris and Bejeweled. If you are a fan of such classic puzzle games and have never tried a Lumines title, this is the perfect one to start with.


Paradise Killer

Paradise Killer is a sleuth adventure game with plenty of visual style and interesting characters. As detective Lady Love Dies, the player returns to Paradise Island 24 after a 3-million-day exile to investigate the wholesale murder of the Syndicate – a group of immortal aliens who kidnap humans from Earth to live on Paradise Island as a social experiment.

A delightfully bizarre detective game like no other, Paradise Killer presents a unique take on the puzzle-adventure genre that no fan of it should miss.

Peggle 2

Watch the trailer on YouTube

Peggle 2 is a great choice for casual puzzle gamers. It is the official sequel to 2007’s Peggle. Inspired by Japan’s Pachinko machines, Peggle 2’s gameplay consists of shooting a finite number of balls at a field of differently-colored pegs to clear out specifically marked pegs, while trying to attain a high score through skilled shot planning.

It sounds simple, and it is – at least on paper. It is also highly addictive. Peggle 2 doesn’t stray too far from its predecessor, which has been called one of the best puzzle games of all time. And that’s probably for the best.


Tetris Effect: Connected

Watch the trailer on YouTube

We round out our Game Pass recommendations with an entry from the most legendary of puzzle game franchises. This installment released on Xbox consoles and Windows PC in 2020. It won Game of the Year from several publications that year as proof positive that Tetris is back and better than ever.

Tetris Effect: Connected puts a contemporary spin on time-tested classic with the “Tetris Effect,” a mechanic in which the gameplay is tied to the beat of the music, with themes and music across 30 stages. The game has other surprises in store for Tetris veterans and newcomers alike.


Wrap up

That’s it for our Game Pass puzzle game recommendations. Now that fans of the genre know what to play on Game Pass, tell us what you think of this selection? Are any of these your personal favorites? Let us now in the comments.

If you don’t yet have a subscription to Xbox Game Pass, you can sign up here. You can also learn more about Game Pass over on its FAQ page. And don’t forget to check out our other “What to play on Game Pass” posts for other Game Pass recommendations.

Featured image courtesy of gamesvillage.it.

Slimjet Browser Review: How Safe it is & Why Should You Use it?

There are all sorts of web browsers on the market, but many users prefer using fast and feature-loaded options like the Slimjet browser, and will review it today.

Most users haven’t heard of Slimjet, but it proves to be a viable alternative and offers everything one is looking for.

So, let’s find out all about the Slimjet browser, whether it’s safe, should you use it, and the download process in this review.

What is Slimjet browser?

Developed by FlashPeak Inc. and built on the Chromium engine, Slimjet is a popular alternative to Google Chrome offering several features that are missing in the latter. And, that’s one of the reasons why many go for it.

Also, it’s relatively lightweight when compared to Chrome, so you wouldn’t have to deal with high resource consumption. Slimjet claims to offer a higher download speed and a photo upload speed 20x faster than Chrome, Firefox, or Safari.

Mouse gestures in Slimjet

Another feature integrated into Slimjet that makes browsing easier is support for Mouse Gestures. Simply draw preset shapes to perform a bunch of actions. And, there is a lot more that you can try after downloading the Slimjet browser!

Is the Slimjet browser safe?

Slimjet isn’t associated with Google, and unlike Chrome, it won’t send any of your data to Google. In addition, the browser has anti-tracking technology that will block tracking cookies and scripts.

There’s also phishing and malware protection, as well as a sandboxing feature that should keep all your tabs isolated. So, in all Slimjet is a safe browser and offers security protocols and features that even some of the big names don’t.

Why should I use Slimjet browser?

Slimjet browser comes with a built-in ad blocker so it will block all types of ads out of the box. The browser uses the Blink rendering engine, which makes it fast and responsive.

The browser has its download manager that uses multiple connections, and it can download files up to 12x faster. You can also resume downloads between browsing sessions.

Speaking of downloads, Slimjet supports video downloads, and it can even record online videos. If needed, you can also extract mp3 from downloaded videos.

Customize the toolbar in Slimjet

The browser offers a customizable toolbar, and you can also modify the home page with multiple search engines. Slimjet also supports URL aliases allowing you to type long URLs faster.

What are the lightest browsers for Windows?

Slimjet is a solid browser, but it’s not exactly lightweight and will end up consuming considerable resources after running for a while. Though there are several other lightweight browsers that you could go for, in case your system has a low configuration.

But, none performs as well as Opera One! It’s a privacy and security-oriented lightweight browser, offering all the critical features built-in.

The browser has its own ad blocker as well as tracking protection which will make your web pages load faster. For an additional layer of security, there’s a free VPN with unlimited bandwidth.

Opera One will also block crypto-mining scripts out of the box. As for additional features, there’s the ability to organize tabs into workspaces, integrated messenger, and Instagram.

Opera One is available on all major desktop and mobile platforms and it supports Chrome extensions, so there’s no reason not to try it out.

Opera One

Opera One is the ultimate browser that combines security and privacy with fast page loading and customization.

How do I download the Slimjet browser?

  1. Open your current browser, and go to Slimjet’s download page.
  2. Now, click on any of the links listed here depending on whether you want to download the 64-bit version or 32-bit version of the Slimjet browser, and the type of installer you wish to go for. We went with the 64-bit full installer.Download
  3. Once the download is complete, launch the setup, and follow the on-screen instructions to complete the installation.Review Slimjet browser setup process

That’s it! Wait for a few moments until the installation is done, and you can start using Slimjet, a feature-loaded web browser.

Slimjet is a pretty good Google Chrome alternative regarding privacy, but it can’t compare to other browsers, such as Opera One, in terms of quality.

Are you going to try the Slimjet browser after this review? Let us know in the comments below.

Fix Certificate Errors In Microsoft Edge[2026 Guide]

Getting certificate errors in Edge? You’re certainly not alone. As you may have guessed, this usually signals a problem with the website’s security certificate.

However, other things can prompt it too. Incorrect date and time, security software, and misconfigured settings can all have an impact. Regardless of the root cause, here are the fixes:

How do I fix a navigation blocked certificate error?

1. Remove Trusteer Rapport

  1. Press Windows + R to launch the Run command, enter appwiz.cpl in the text field, and then click OK.appwiz.cpl
  2. Find Trusteer Rapport, right-click on it, and then select Uninstall.Uninstall

Or better yet, use uninstaller software. In addition to removing programs, the uninstaller software will remove all files and registry entries associated with that application.

A few users are also suggested to disable Entrust certificate, so you might want to try that. If Entrust certificate isn’t causing this problem, you might want to disable a different certificate.

2. Make sure that your date and time are correct

  1. Press Windows + S to launch the Search menu, enter Date & time settings, and click on the relevant search result. Date & time settings
  2. If the date or time isn’t correct, turn off the Set time automatically option, and then click on the Change button.Change
  3. Use the dropdown menu to set the correct date and time, and then click the Change button.Change date and time

After setting the correct time and date, the NET::ERR_CERT_AUTHORITY_INVALID error in Edge should be fixed. This also helps with the doh.xfinity.com certificate error.

3. Change the Security level

  1. Press Windows + S, enter Internet Options, and then click on the relevant search result.Internet options
  2. Go to the Security tab and then click Trusted sites. Now, lower the Security level for this zone to Medium-low.
    Certificate error navigation blocked Gmail
  3. Click Apply and OK to save changes.
  4. Restart your browser and check if the issue is resolved.

Users are also suggesting changing ActiveX controls.

  1. To do that, open Internet Options and go to the Security tab.
  2. Click the Custom level button.
    Certificate error navigation blocked no continue option
  3. Locate Download unsigned ActiveX controls and then set it to Enable or to Prompt.
    Certificate error navigation blocked Gmail
  4. Click OK to save changes.

Keep in mind that changing ActiveX settings can cause security issues, therefore use extra caution if you decide to change ActiveX settings.

4. Disable certificate address mismatch warnings

  1. Press Windows + S, search for Internet Options, and then open it.Internet options
  2. Navigate to the Advanced tab. Uncheck the Warn about certificates address mismatch option and then click OK to save the changes.
    Certificate error navigation blocked Firefox

After doing that, your security settings will be changed and the Microsoft Edge certificate not secure error should be resolved.

5. Use Command Prompt

  1. Press Windows + S, enter Terminal, right-click on the relevant search result, and then select Run as administrator.Terminal
  2. Click Yes in the UAC.Yes
  3. Press Ctrl + Shift + 2 to open the Command Prompt.
  4. Now, paste the following command and then hit Enter:certutil -setreg chainEnableWeakSignatureFlags 8Run command

After the command is run, restart your PC and check if your problem is resolved.

6. Check your antivirus software

Sometimes your antivirus can interfere with Microsoft Edge. So you might want to change its configuration and disable specific settings.

If that’s not working, consider switching to a different antivirus solution that won’t interfere with other processes running on your PC.

7. Create a new user profile

  1. Press Windows + I to open the Settings, select the Accounts tab from the left, and then click on Family & other users.Family and other users
  2. Click on the Add account button under Other users.Add account
  3. Choose I don’t have this person’s sign-in information.
    Certificate error navigation blocked no continue option
  4. Select Add a user without a Microsoft account option.
    Certificate error navigation blocked on every website
  5. Enter the desired user name and then click Next to proceed. Passwords are not mandatory for a local account.
    Certificate error navigation blocked IE11

After switching to a new user account, the issue will be fixed. You might have to move all your personal files to a new account and start using it instead of your main account.

Certificate error messages

While the causes and solutions are similar, depending on a few particularities, Edge will display a wide range of error messages, such as:

  • Certificate error navigation blocked (IE11)
  • Certificate error navigation blocked (Chrome, Firefox)
  • Certificate error navigation blocked (Gmail)
  • Certificate error navigation blocked
  • Certificate error navigation blocked
  • Nett:err_cert_authority_invalid Edge

No matter the specific message you’ve gotten, you should be able to fix it with the above-mentioned steps.

Other similar situations have a simpler fix:

How do I fix the There is a problem with this website’s security certificate error when there’s no option to continue?

If you come across the error, there’s usually a Continue to this website option available at the bottom. In case it’s not there, you could modify the settings to stop looking for certificate address mismatch or install the certificates.

Or, you could find the solutions that worked for most users when encountering the There is a problem with this website’s security certificate error.

As you have seen, the certificate errors in Microsoft Edge can be fixed in most cases using the recommended solutions. Still, if that doesn’t work, you can disable the certificate check or disable SSL verification in Edge.

We’d like to hear which one worked for you, so feel free to use the comments section to drop us a line.

8 Tested Ways to Fix AMD Driver Crashes in Windows 10 & 11

AMD has one of the best collections of graphics cards in the market and is perfect for both normal use and gaming. However, several users reported their AMD driver crashes frequently.

This is not a good sign and points to a problem with the driver, the graphics card, or the system settings. But in most cases, it is a simple issue that can be fixed rather easily.

So, let’s now walk you through everything there’s to know about the AMD driver crash and the most effective fixes for it.

Why does my AMD driver keep crashing?

Before you proceed to the actual fixes, it’s imperative to identify why the AMD driver keeps crashing in Windows 10/11. There are a lot of reasons for it, but generally, it was an outdated or problematic driver that causes the issue.

Also, there are certain applications that conflict with the functioning of the driver and cause it to crash. If such apps are configured to launch at startup, the problem would be even more severe.

Besides, it could have to do with hardware issues as well. Overclocking, for instance, is often found to affect the performance of the computer. Dust accumulation is another common reason, along with overheating.

Now that you have a fair idea of the underlying causes, here’s a list of cases when one might encounter the AMD driver crash in Windows.

  • AMD driver crash black screen issues: These occur due to outdated software or OS versions and can be fixed by installing the latest driver or software updates.
  • AMD driver crash blue screen errors: BSOD errors are extremely annoying and often difficult to fix. Unfortunately, AMD drivers may also cause BSOD errors when they crash.
  • AMD driver crash on YouTube: Appears when users try to launch YouTube. In rare cases, the video stops playing, and a black screen appears. The AMD driver may suddenly recover and the video start playing again, only to fail a few minutes later.
  • AMD driver crashes when playing games: Appears when playing your favorite games. Apparently, AMD driver crashes are quite frequent among gamers.
  • AMD driver crash during install: Occur when users try to install the latest AMD drivers on their PC.
  • The AMD driver crash during mining: Encountered when users are mining and is generally a result of overclocking.
  • AMD driver crash after sleep: Appears when the system doesn’t fully recover after being in sleep mode.
  • AMD driver crash Valorant: Users have the ability to build graphics profiles using NVIDIA’s Control Panel and AMD’s Catalyst Control Center, both of which allow users to override program settings and, as a result, can cause VALORANT to not work properly.
  • AMD driver crash Warzone: An incorrect, malfunctioning, or outmoded graphics driver is the root cause of a variety of gaming issues, including crashing and freezing.
  • AMD crash defender has detected an issue with your display driver: It’s possible that your AMD driver crashed because there was too much dust on the fan of your graphics card; in that case, you should clean your graphics card.
  • AMD drivers freezing Windows 10: If AMD drivers are freezing in Windows 10, we recommend that you run an SFC scan in order to clean your files.
  • PC crashes when installing AMD drivers: While the installation is going, be sure to monitor the temperatures of the CPUs in order to avoid a computer crash.

Let’s now head to the most effective fixes for the AMD driver crash in Windows 10 & 11, and get back to normal tasks.

What do I do if the AMD drivers crash in Windows 10?

1. Update the AMD drivers

  1. In order to fix the AMD driver crash in Windows 10, press Windows + X to launch the Power User menu, and select Device Manager from the list.Device manager to fix AMD driver crash
  2. Locate and double-click on the Display adapters option to expand and view the devices under it.Display adapters
  3. Right-click on the installed graphics card, and select Update driver from the context menu.Update driver to fix AMD driver crash
  4. Next, select Search automatically for drivers from the options in the Update Drivers window.Search automatically for drivers
  5. Wait for the system to install the best available version of the driver.

Many times, running an outdated version of the driver could lead to issues with it. And, in this case, updating the driver should eliminate issues causing AMD driver crash in Windows 10. With each update, the manufacturers release patches for previously known bugs.

This also helps with the Display driver amdwddmg stopped responding and has successfully recovered error.

If you do not have the necessary computer skills to update/fix the drivers manually, we strongly suggest a specialized tool.

Dedicated software such as Fortect Driver Updater can scan your computer and identify the right drivers for your components. Within a few minutes, you can have the tool download your fresh drivers and install them.

⇒ Get Fortect Driver Updater

2. Remove Lucid Virtu MVP from your computer

  1. Press Windows + R to launch the Run command, enter appwiz.cpl in the text field, and click OK to launch the Programs and Features window.appwiz.cpl
  2. Locate Lucid Virtu MVP, select it, and then click on Uninstall.Uninstall to fix AMD driver crash
  3. Now, follow the on-screen instructions to complete the process.

Few users reported Lucid Virtu MVP as the main culprit for AMD driver crash on Windows 10, and if you use this application, it’s recommended that you uninstall it in order to fix the problem.

3. Modify the Registry

  1. Press Windows + R to launch the Run command dialog box, enter regedit in the text field, and either press Enter or click OK to launch the Registry Editor.regedit to fix AMD driver crash
  2. Click Yes in the UAC (User Account Control) prompt that pops up.Click Yes
  3. Paste the following path in the address bar at the top and hit Enter. Alternatively, you can use the navigation pane on the left to follow the path:ComputerHKEY_LOCAL_MACHINESYSTEMCurrentControlSetControlGraphicsDriversPaste address
  4. Right-click anywhere in the right pane, hover the cursor over New, select DWORD (32-bit) Value from the list of options, and name it as TdrDelay.Dword (32-bit) Value to fix AMD driver crash
  5. Double-click on the newly created TdrDelay entry.open
  6. Now, enter 8 in the text field under Value data with the Base set to Hexadecimal, and click OK to save changes.Change value data to fix AMD driver crash
  7. Once done, restart the computer for the changes to come into effect.

Modifying the Registry has helped a lot of users eliminate the AMD driver crash issue but you will have to be careful with the process since a minor lapse could considerably damage the computer. In case of an issue, you can always restore the Registry in Windows 10.

4. Undo overclocking on your PC

In order to improve the stability of your graphic card, some users suggest undoing any overclocking of the CPU. Overclocking, though effective in most cases, has often been found to affect the functioning of the computer and lead to crashes with applications and drivers.

Therefore it’s recommended that you undo any change made to the CPU and revert to the original state. Once done, check if the AMD driver crash issue is fixed. In case it persists, head to the next method.

5. Clean your graphic card

AMD driver can crash due to excess dust on your graphic card fan, and if that’s the case, you should clean your graphic card. To do that, you need to open your computer case, remove your graphic card, and wipe the dust.

Remember to be cautious during the process since the components are fragile and excessive force could damage them. If your computer is under warranty, you might want to take it to a certified service center.

6. Remove problematic browser extensions

Note icon NOTE
The steps listed here are for Google Chrome. In case you use another browser, find the exact steps for it on the official website.
  1. Launch the browser, click on the ellipsis near the top-right corner, hover the cursor over More tools, and select Extensions from the list of options that appear.Extensions
  2. Click on the Remove button under the problematic extension to uninstall it.Remove to fix AMD driver crash

Oftentimes, it’s the browser extensions that cause the AMD driver to crash while downloading files. In this case, it’s recommended that you remove the problematic browser extensions to eliminate the problem.

7. Update Windows 10

  1.  Press Windows + I to launch the Settings app, and select Update & Security from the options here.Update & Security
  2. Next, click on Check for updates on the right to scan for the latest available version of the OS.Check for updates to fix AMD driver crash
  3. Let Windows finish searching and click on Download and install, in case a newer version is listed.Download & install

Make sure that you’re running the latest Windows version on your computer. Microsoft constantly rolls out updates in order to improve the system’s stability and fix various issues, including known driver issues.

8. Repair your registry

  1. Press Windows + R to launch the Run command, enter cmd in the text field, and either click on OK or hit Enter to launch an elevated Command Prompt.cmd to fix AMD driver crash
  2. Click Yes in the UAC prompt that appears.Yes
  3. Now, paste the following command and hit Enter to run the SFC scan:sfc /scannowSFC scan to fix AMD driver crash
  4. Wait for the scan to complete and then restart your computer.

The SFC (System File Checker) scan is one of the most effective ways to identify and replace corrupt files on your computer. It’s quick and easy to run, though remember that it might not work every time.

In which case, you can use a reliable third-party Registry cleaner tool and fix issues with the PC, including the AMD driver crash.

What do I do if the AMD drivers crash in Windows 11?

If the AMD driver freezes or crashes, it is probable that the problem lies with your browser. As a consequence of this, it is strongly suggested that you turn off your browser for the time being until the issue has been fixed.

It has been reported that using Chrome or Firefox may result in a crash of the AMD drivers; therefore, uninstalling these two browsers may be required in order to remedy this problem.

After you have removed them, we strongly recommend that you switch to a browser that is more trustworthy and comes with both an up-to-date user interface and a free virtual private network (VPN).

Virtual private networks (VPNs), for those who aren’t familiar with the word, are a technology that allows you to browse the internet in total anonymity by redirecting all of your traffic via secure servers that are situated in different parts of the world.

For more related solutions dedicated to the AMD driver crash issue in Windows 11, check out the article linked.

AMD driver crash black screen

After the installation of a graphics card driver, some customers have claimed that their computers have shut down unexpectedly and displayed a black screen. The problem may be fixed for the user only after they have entered Safe Mode and uninstalled the GPU driver.

Thus, you need to manually uninstall the GPU driver and then reinstall it. You also have the option of using specialized uninstaller software to fully delete all of your driver files, after which you can manually reinstall the drivers by downloading them from the original manufacturer’s website.

We recommend that you take a look at our post on how to fix black screen when/after installing graphics card driver for more in-depth solutions.

Why does AMD driver timeout occur?

Sometimes issues with drivers can occur, and if that happens, you’ll get the Display driver failed to recover from timeout message on your PC.

It’s also possible that this problem occurs because AMD drivers are disabled. Few users reported this issue after updating their operating system, so you should look into that. Also, if the issue started after updating the AMD driver, there are a bunch of easy methods to fix the problem.

These are all the ways you fix issues that cause the AMD driver to crash and get things up and running in no time. Also, once you have gotten things under control, many recommend disabling the AMD driver from updating automatically to prevent the issue from reappearing.

Besides, these methods will help fix issues that lead to AMD drive crash in Windows 11 and 7 as well.

If you have any other queries or know of a method that’s not listed here, drop a comment in the section below.

Browser Won’t Clear Search History: 5 Ways To Fix It In 2026

We have the best solutions in this article if you can’t delete your search history.

Browsers are widely used to access information available on the World Wide Web. Besides that, they store data; they remember everything you do on the internet.

Users, therefore, sometimes need to erase the history of what they have searched so far. However, they fail in this attempt and complain that browsing history is not deleted or will not be clear.

A bug usually creates this problem, preventing the browser’s history, cookies, cache, or other data from deleting.

Consequently, your browsing history is not deleted; follow the methods below to tackle this problem.

You can also read our guide to restore your deleted Chrome browser history or how to delete it automatically.

Why can’t I delete my search history?

Generally, deleting your search history should be straightforward, and the process should always work. Here are the common culprits on the rare chance that you can’t successfully get rid of your search history.

  • You are not signed in to your profile or browser account
  • Your browser is out of date
  • Restriction brought on by permissions
  • Syncing of data across devices
  • Third-party extensions and apps

No matter why your search history is not deleting, our solutions will help resolve it.

How do I permanently delete my search history?

1. Using the History tab

1.1 Using the history tab in Opera One

  1. Open your Opera One browser.
  2. Press Ctrl + H to open the history tab.
  3. On the top-right corner, select Clear browsing data.
    can't delete search history
  4. Select what you wish to delete, then click on Clear data.

If you can’t delete website data on your browser, check if it is up-to-date. If a more recent version of Opera One is available, we suggest you download and install it.

To update your browser, open it, click on the Opera One logo, then select Update & Recovery. Click on the Check for updates button. If any updates are available, they will automatically be installed.

Opera One is a web browser that prioritizes security and privacy above all else. To that extent, it has a built-in VPN, ad-blocker, and tracking-blocker.

These tools work in unison to ensure maximum privacy while surfing the internet without installing extensions or third-party software.

Opera One

Thanks to this extremely privacy-oriented web browser, don’t worry about your browsing history being revealed.

1.2 Using the history tab in Chrome

  1. Launch the Chrome browser.
  2. Press Ctrl + H to open the history tab.
  3. Click on Clear browsing data on the left pane.
  4. Select what you wish to delete, then click on Clear data.

2. Reset the browser

2.1 How to reset Opera One

  1. Launch the Opera One browser.
  2. Click on the Address bar, paste the path below, and then hit Enter.
    opera://settings/resetProfileSettings
  3. Click the Reset button.
  4. Now try deleting the history again using the history tab as we did in the first solution.

2.2 How to reset Chrome

  1. Launch the Chrome browser.
  2. Click on the Address bar, paste the path below, and then hit Enter.
    chrome://settings/reset
    can't delete search history
  3. Click on Restore settings to their original defaults.
  4. Finally, click on the Reset settings button.
  5. Now try deleting the history again using the history tab as we did in the first solution.

3. Update the browser

3.1 How to update Google Chrome

  1. Launch your Chrome browser.
  2. Click on the menu, select Help, and click on the About Google Chrome option.
    can't delete search history
  3. If there is an update, it will be automatically updated, after which you should restart the browser.
    can't delete search history
  4. Now try deleting the history again using the history tab as we did in the first solution.

Usually, Chrome updates in the background when you close and reopen your browser. You can also update it manually if you want to make sure you’re using the latest version.

3.2 How to update Opera One

  1. Launch the Opera One browser.
  2. Click on the icon and select the Update & Recovery option.
    can't delete search history
  3. If there is an update, it will be automatically made; then, you should click on the Relaunch now button.
    can't delete search history
  4. Now try deleting the history again using the history tab as we did in the first solution.

4. Delete the history folder

4.1 How to delete Chrome history folder

  1. Open the File Explorer.
  2. Navigate to the path below, and be sure to replace USERNAME with your actual username.
    C:\Users\USERNAME\AppData\Local\Google\Chrome\User Data\DEFAULT\Cache
  3. Right-click on the Cache_data folder and select delete.
    can't delete search history

4.2 How to delete Opera One history folder

  1. Open the File Explorer.
  2. Navigate to the path below. Be sure to replace USERNAME with your actual username. C:\Users\USERNAME\AppData\Local\Opera Software\Opera Stable\Cache
    can't delete search history
  3. Right-click on the Cache_data folder and select delete.
    can't delete search history

5. Unsync your devices

5.1 Unsync in Opera One

  1. Launch the Opera One browser.
  2. In the Address bar, paste that path below and hit Enter.
    opera://settings
  3. Scroll down to the synchronization menu, and if you are already synced, you will have an option to turn it off.
  4. Now try deleting the history again using the history tab as we did in the first solution.

5.2 Unsync in Chrome

  1. Launch the Chrome browser.
  2. In the Address bar, paste that path below and hit Enter.
    chrome://settings/syncSetup
    can't delete search history
  3. Click the Turn off button.
  4. Now try deleting the history again using the history tab as we did in the first solution.

Who can see my deleted Search history?

First, let us start by saying that nothing is truly deleted. Anyone accessing your account can log into your browsers and see your deleted search history.

That said, it will take some technical know-how, so you should not worry about the everyday person gaining access to deleted search history.

Following the abovementioned steps, you can delete your history from your browsers without encountering any problems.

We hope this article helped you solve your problem. We’ve included many valuable solutions. Please let us know if you have anything to add regarding the subject.

5 Best Browsers for Foundry VTT to Play Tabletop RPGs Online

In this article, we explore the best browser for Foundry VTT.

If you’re a fan of tabletop and roleplaying games, you might be familiar with Foundry Virtual Tabletop. It’s an excellent online service that allows you to play RPGs with friends online.

To ensure the best experience, you need to use a reliable browser, and while the service will work in almost any application, some might be better than others.

In today’s guide, we’ll take a closer look at the web browsers for Foundry VTT, so let’s get into it, shall we?

Also, note that for general gaming, any of these five best browsers for gaming will be a great choice, and you should use the best laptop for Foundry VTT to get the best experience.

Is Foundry VTT browser-based?

Yes, Foundry VTT is a web app that can only be accessed in a web browser; you can experience it in any modern web browser.

Remember that this web app might work better in some browsers, so we’ll help you pick the best one in this guide.

Which browser is best for foundry VTT?

Opera GX – Best for gaming

Opera GX is the world’s first gaming browser optimized for gamers. The software comes with a highly customizable interface, so you can change how your browser looks.

Like the original version of Opera, it offers integration with various messaging services, such as Facebook, WhatsApp, Telegram, VK, and even Instagram and Twitter support.

However, this version has Discord integration so that you can easily organize your gaming sessions with friends, and there’s even Twitch support if you want to keep up with the latest streams.

Opera GX also has a unique GX Control feature that limits the number of resources your browser use, so you can rest assured that it won’t slow down your PC.

Key features of Opera GX:

  • Built-in adblock
  • VPN
  • GX Control for resource management
  • Discord and Twitch integration
  • Support for instant messengers

Opera GX

Run web apps and games smoothly with Opera’s world’s first gaming web browser.

UR Browser – Most lightweight

You might want to consider this software if you need a fast and reliable browser. The browser is lightweight, which makes it perfect for all types of demanding web applications.

It’s important to mention that the browser is highly customizable, so you can change how it looks and personalize it any way you want. You can also arrange your favorite websites in groups to access them quickly on your PC.

This browser is focused on privacy and security, so it can block ads and block cookies from tracking you. Of course, the built-in antivirus scanner will alert you if you try to download suspicious files.

Overall, UR Browser is a great choice if you want to protect your privacy or if you want a lightweight browser that can handle more demanding web apps such as Foundry VTT.

Key features of UR Browser:

  • Lightweight
  • Comes with tracking protection
  • Built-in VPN
  • Highly customizable
  • Built on Chromium

UR Browser

Lightweight and secure, UR Browser is the perfect choice for users who want a fast browser that doesn’t collect personal information.

Google Chrome – Best general-purpose browser

Regarding browsing, Chrome is one of the best browsers on the market, and it comes with a powerful address bar that can perform all sorts of tasks ranging from giving you weather reports to calculating or translating.

The browser is also safe with its password generator, so you’ll always have a strong and unique password to protect your online accounts. Of course, all your data is synced, so you’ll never lose your passwords or bookmarks.

Overall, it’s a reliable and secure browser, so it’s perfect for all types of web applications, and it will be a great choice for Foundry VTT, so be sure to consider it.

Key features of Google Chrome:

  • Powerful address bar
  • Tab grouping
  • Syncing across multiple devices
  • Dark mode
  • A wide array of extensions

⇒  Get Google Chrome

Microsoft Edge – Most compatible on Windows OS

Microsoft Edge went through a significant makeover, and now it runs on the Chromium engine, which makes it just as good as Google Chrome.

Thanks to the advanced tab management, you can easily organize and separate tabs into groups, which will surely come in handy while multitasking.

Microsoft Edge allows you to easily create screenshots and annotate them, which can be helpful if you’re making your custom campaign in Foundry VTT.

Overall, it’s a great browser, and it comes preinstalled with Windows 10 and 11, so be sure to give it a try.

Key features of Microsoft Edge:

  • Built on Chromium
  • Compatible with Chrome extensions
  • Comes preinstalled with Windows
  • Offers excellent protection against malware
  • Multiple productivity features

⇒ Get Microsoft Edge

Mozilla Firefox – Best for privacy

Firefox is a well-known web browser, and it’s known for its privacy features. The software blocks the ad trackers by default, so you can rest assured that websites aren’t tracking your browsing history.

The software has a built-in password manager to generate and store unique passwords securely.

The browser is customizable, comes with multiple themes, a dark mode, and offers a highly customizable user interface.

Firefox isn’t feature-rich as other browsers, but it’s lightweight, so it’s perfect for all types of web applications.

Key features of Mozilla Firefox:

  • Powerful address bar
  • Tracking cookie protection
  • Fingerprint and crypto mining protection
  • DNS over HTTPS
  • Lightweight

⇒ Get Mozilla Firefox

How do I make my Foundry VTT run better?

There are a couple of things that you can do. For example, you can try decreasing the maximum framerate to preserve resources. Shadows can also be a problem, so disabling soft shadows can help you with your performance.

The service also has a special mode called the Haste module that will stop rendering the main board unless objects move. By using this feature, you’ll reduce resource usage and improve performance, especially on low-end devices.

According to the developers, the minimum amount of RAM is 8GB, but users reported running Foundry VTT on less RAM while using fewer modules, so you might be able to run it even if you have 4GB RAM.

Foundry requirements (Source: Foundry)

For optimal experience without any performance issues, it’s recommended to have 16GB RAM.

Foundry VTT is an excellent service for all fans of tabletop roleplaying games, and unlike other services, it offers amazing graphics.

However, it’s also a bit more demanding, so you’ll need a good browser if you want to run it. If you’re looking for more similar services, you can visit our best 5 virtual tabletops article for more information. And make sure to check out the best VTT in 2022.

Which is your browser of choice for tabletop games? Let us know in the comments section below.

5 Best Web Browsers to Watch HBO GO on All Your Devices

In this article, we share our list comparing the best browsers for HBO GO. HBO GO is a fantastic streaming service that lets you watch your favorite HBO shows on almost any device. It is an excellent alternative to streaming platforms like Netflix and Amazon Prime.

Some users prefer using their web browser for multimedia, and if that’s the case with you, today, we’ll show you the best browsers to watch HBO Go.

Which browsers support HBO GO?

Many modern browsers support HBO GO, but for optimal performance, here are our top recommendations:

  • Opera One
  • Edge
  • Chrome
  • UR browser
  • Firefox

We will tell you why we love these browsers later in the article but note that since there are a lot of compatible browsers, this is not an exhaustive list.

There are a few good streaming browsers, including Edge and Safari, but Opera One has an advantage over every other streaming browser. And would be our top recommendation.

We will talk more about this browser later in this article.

What are the best browsers for watching HBO GO?

Opera One – Best for multitasking

The first item on our list is the Opera One browser. This browser has low hardware requirements, so it will leave more than enough power for streaming.

Thanks to the built-in ad blocker, the hardware used is even lower, and your multimedia content will load up to 90% faster.

The browser also has a battery saver feature that can give you up to an extra hour of battery life.

It’s worth mentioning that Opera One supports customization, allowing you to tweak your start page with various news feeds easily.

If you use it for multimedia, you’ll be pleased to hear that Opera One has a video pop-out feature that lets you watch videos in a separate mini window while working on other tasks.

Lastly, with native integration for services like Twitch, Discord, and various messaging and social media apps it is an excellent choice for multitasking.

Notable Opera One features:

  • Built-in VPN with unlimited bandwidth
  • Screenshot tool
  • Available on all major desktop and mobile platforms
  • Ability to easily share files and links between devices with Opera Flow
  • Advanced tab organization with workspaces and tab islands
  • Built-in AI, free and up to date

Opera One

Opera One is the number 1 browser for streaming thanks to its low hardware requirements and built-in ad blocker and VPN!
Free Download Visit website

Microsoft Edge – Best with native 4k support

best browser for hbo go

If you want to watch HBO GO, Microsoft Edge might be the best browser for the service. Edge was recently completely revamped, and it now has various new and exciting features.

Edge has a native 4K support for streaming, but this feature only currently works with Netflix.

Although Edge was previously exclusively available on Windows 10, the revamped version can also work with older builds.

That’s not all; the new version is available on macOS, iOS, and Android. It also has better privacy control and protection, so you can choose what tracking cookies you want to block.

Notable Edge features:

  • New and sleek interface based on Chromium engine
  • Support for Chrome extensions
  • Ability to customize your home page
  • Immersive Reader
  • Built-in malware protection

Microsoft Edge

Edge works on all platforms, and it is continuously updated so it’s great for all purposes.

Google Chrome – Most Chromecast compatible

best browser for hbo go

Chrome needs no introduction since it’s currently one of the most popular browsers in the world. The browser is great for multimedia, especially if you’re using Chromecast devices.

Thanks to native Chromecast support, you can easily stream content from your PC or phone to any Chromecast device.

As for additional features, we have to mention thousands of available extensions that let you customize and enhance your browser.

Speaking of customization, Chrome allows you to customize your start page with various themes easily.

Regarding performance, this browser is optimized for multitasking and can easily handle multiple tabs.

Notable Chrome features:

  • Available on all major desktop and mobile platforms
  • Built-in password manager
  • Adblocker
  • Native translation feature that can cover entire pages
  • Protection against malicious websites

Google Chrome

This is the most popular browser for good reasons and it’s perfect for streaming HBO GO.

UR browser – Good browsing speeds

UR is not the most popular browser out there but it’s still one of the best when it comes to streaming, and watching HBO GO makes no exception.

The browser has a good reputation and high scores for playing HTML5 video, audio, and streaming.

And it’s not much of a surprise because it has the same Chromium engine as Chrome and Edge.

Moreover, you can use Chrome’s video extensions to customize playback on YouTube and other websites.

On top of that, UR also comes with a VPN that will help you enjoy your HBO GO content from any country and unblock content restrictions.

Other useful features:

  • 3 levels of privacy and security
  • Low system resources consumption
  • Modern UI
  • Built-in VPN

UR Browser

Enjoy HBO GO on a browser that offers great streaming speeds and focuses on privacy.

Mozilla Firefox – Best for privacy

If you’re looking for a browser that works with HBO GO and protects your privacy, you should consider Firefox.

This browser is completely open-source, and since a non-profit organization makes it, it won’t sell your browsing data to third parties.

Regarding multimedia, Firefox has a pop-out video player that lets you watch videos while working on different tasks. As for privacy, Enhanced Tracking Protection can block more than 2,000 other trackers.

Firefox also lets you store your passwords, but you can easily access them on any platform with the Firefox Lockwise app.

Notable Firefox features:

  • Hundreds of available extensions
  • Ability to inform you if your account is compromised in a data breach
  • Customizable user interface
  • Available on all desktop and mobile platforms
  • Synchronization feature

Mozilla Firefox

Enjoy your HBO GO content with a browser that blocks trackers and annoying ads.

There you have it, our list contains recommendations for the best browser for HBO GO. Note that these also make our list of the best browsers for HBO MAX.

Remember that this service is not available in every country, so you may also need to use any of the best browsers for streaming to get the best content and viewing experience.

Did you find our list helpful? If so, let us know in the comments below.

Play Tropico 6, For The King, and MLB The Show 22 for free on Xbox this weekend

The Xbox video games, Tropico 6, For The King, and MLB The Show 22 are now free to play on Microsoft’s Xbox One and Xbox Series X console generations until the end of the weekend.

It is worth noting that both Tropico 6 and MLB The Show 22 are currently both available to play as part of Xbox Game Pass so those with an active Xbox Game Pass subscription can already play these for free (as part of their subscription) and will likely be able to play them for a while after this weekend is over.

With that in mind, For The King is the clear choice for Xbox gamers with an active Xbox Game Pass subscription. Of course, those with just an Xbox Live Gold membership only have the next two days to try all three.

Here’s the official game description and trailer for For The King:

For The King is a strategic RPG that blends tabletop and roguelike elements in a challenging adventure that spans the realms. Set off on a single player experience or play cooperatively both online and locally. None before you have returned from their journey. Will you put an end to the Chaos?

For The King is a challenging blend of strategy, turn-based combat, and roguelike elements. Each playthrough is unique with procedural maps, quests, and events. Explore Fahrul in either single player, local, or online co-op. Just remember adventurer, you do this not for riches or fame but for your village, for your realm, For The King!

Here’s the description and trailer for Tropico 6:

In times of political turmoil and social unrest, the people are calling for visionary leaders, who will steer the fate of their country with foresight and ingenuity. Prove yourself once again as a feared dictator or peace-loving statesman on the island state of Tropico and shape the fate of your very own banana republic through four distinctive eras. Face new challenges on the international stage and always keep the needs of your people in mind.

For the first time in the series, manage extensive archipelagos, build bridges to connect your islands and use new means of transportation and infrastructure. Send your Tropicans on raids to steal the wonders of the world, including the Statue of Liberty and the Eiffel Tower. Customize your palace at will and give election speeches from your balcony, to win the favor of your subjects.

And here’s the trailer and description for MLB The Show 22:

Every pitch. Every hit. Every win. Make your mark and Own The Show in MLB® The Show™ 22.

  • Create and use multiple Ballplayers, beyond your Road to the Show personalized Baseball RPG experience, and customize your Ballplayers how you want to aid in your progression.
  • Diamond Dynasty is back and better than ever! Play, collect, and build on your fantasy card collection and bring to life on the diamond.* Try the new Mini Seasons mode, where each season brings new challenges as you face off against a new set of competition!
  • Face your friends with cross-platform play.** With cross progression, continue your progress and earn and use content on other console platforms.***
  • Stepping up to the plate for the first time? Tailor your experience with gameplay styles and two new difficulty settings to help you get the hang of the basics.
  • New Intro Presentations provide the most immersive ballpark experience yet.
  • Play March to October in your style, with updated mode tools to utilize custom uniforms, logos, and created stadiums.
  • Live out your dream Baseball matchups with new Legends joining the diamond.

After more Xbox news? Check out this wild Ninja Turtles Xbox Series S console that’s up for grabs this month.

For The King
For The King
Developer:
Curve Games
Price:
$3.74


MLB® The Show™ 22 Xbox Series X | S


Tropico 6
Tropico 6
Developer:
Kalypso Media
Price:
$39.99

How to Fix Microsoft Edge if There Is No Sound on YouTube

While playing Youtube videos, you must have experienced no sound on the Edge browser. We should help you get it fixed in this article.

With Windows 10 and 11 came a new web browser called Edge. And it brought many changes and improvements compared to its predecessor, Internet Explorer 10.

It is one of the best browsers to use on a Windows OS. However, users reported playback issues with YouTube while using the Edge browser on Windows 10 and 11, so today, we’re giving you a few tips on how to fix this issue.

This is not peculiar to Edge, and some users have also struggled with issues of no sound in Google Chrome.

Why is YouTube playing with no sound?

When YouTube plays without sound, there could be a few factors responsible. Some are peculiar to Youtube or the browser, while others are system-wide problems.

Here are the most common reasons why you can’t get sound on YouTube:

  • The Edge tab is muted
  • YouTube is muted
  • Outdated sound drivers
  • Muted system speakers
  • A Corrupted browser

How do I find audio settings in Edge?

Other than the ability to mute tab volumes, or individual videos playing from a browser, there are no sound settings on Edge, and you will only be able to tweak the sound from the computer Settings.

Speaking of audio issues in Edge, users reported the following problems:

  • No sound YouTube Edge – This is a common problem with Microsoft Edge, and if YouTube audio is missing, it’s advised that you reinstall or update your audio driver.
  • Microsoft Edge sound problem – Various audio problems can appear in Microsoft Edge. If you’re having any audio issues, be sure to try some of our solutions.
  • Microsoft Edge YouTube not working – Several users reported that YouTube isn’t working at all in Edge. This is a big problem; however, you might be able to fix it by disabling Adobe Flash Edge.
  • Microsoft Edge YouTube playback error – YouTube playback errors can sometimes appear in Microsoft Edge, and if that happens, the problem might be your rendering settings. To fix that, be sure to switch to software rendering in Edge.
  • Microsoft Edge browser no sound – Many users reported that they don’t have sound in their browser. Try clearing your history and cache to fix this issue and check if that helps.

Quick Tip:

Try loading YouTube videos with a lighter browser, such as Opera One, for better audio quality. Enable its hardware acceleration feature to boost up speed even more.

Opera One runs on a Chromium engine and uses very few CPU and RAM resources. Make sure to activate the built-in adblocker to remove the need to load unnecessary ads. The battery-saver feature will also help.

Opera One

Get the best out of YouTube with this lightweight, performance-oriented browser.

How do I fix YouTube sound problems on Edge?

1. Clear browsing history and cache

  1. Click the Hub icon on the top right of the browser.
    youtube no sound edge
  2. Next, click on Settings.
    youtube no sound edge
  3. Click on Privacy, search, and service on the left pane, then select Choose what to clear.
    youtube no sound edge
  4. Select the items you wish to clear and click the Clear button.
    Microsoft Edge sound problem
  5. Restart the Edge browser.

2. Reinstall the audio driver

  1. Press Windows Key + X and choose the Device Manager from the list.
  2. When Device Manager opens, locate your audio device.
  3. Right-click it and choose Uninstall device.
    Microsoft Edge YouTube playback error
  4. Click Uninstall to confirm.
    Microsoft Edge browser no sound
  5. Click on Scan for hardware changes icon.
    No sound YouTube Edge

Now verify that the no sound on Edge on Windows 10/11 is fixed; if not, move on to the next solution.

3. Turn off Adobe Flash

  1. Click the Hub icon on the top right of the browser.
    youtube no sound edge
  2. Click on Settings.
    youtube no sound edge
  3. Next, click on View advanced settings.
    Microsoft Edge sound problem
  4. Find the Use Adobe Flash player and disable it.
    Microsoft Edge YouTube not working
  5. Restart the Edge browser.

If the issue of no sound in Edge while playing YouTube videos persists, go to the next solution.

4. Use software rendering

  1. Press Windows Key + S, type Internet options, then select Internet Options.
  2. Click the Advanced tab.
  3. Go to the Accelerated Graphics section.
  4. Check the Use software rendering instead of GPU rendering.
    Microsoft Edge browser no sound
  5. Click Apply, then OK to save changes.

5. Restart Edge

Restarting your browser is an effective way of fixing many minor browser issues. When the browser is relaunched, it allows some processes to close and startup correctly.

If you’re having audio problems with Edge, you might be able to fix them with this simple workaround.

Remember that this is a temporary solution, so the issue may reappear.

6. Change User agent string

  1. Open the Edge browser.
  2. Click the menu button in the top right corner.
    youtube no sound edge
  3. Click on More tools, then Developer Tools.
    youtube no sound edge
  4. Go to the Emulation tab and set the User agent string to Internet Explorer 10.
    Microsoft Edge browser no sound

After doing that, the problem with YouTube audio should be resolved. This is an unusual solution, but some users claim it works for them, so you might want to try using this workaround.

To achieve the best results, open the desired video, and change the User agent string as we showed you above.

Remember that you’ll have to repeat this solution for every YouTube video you want to watch, so this probably isn’t the best long-term solution.

7. Change the audio format

According to users, Microsoft Edge supports surround sound and Dolby Digital Plus Portable audio.

However, sometimes Dolby Digital Plus audio format can be problematic and cause audio problems with YouTube videos in Edge.

You must change your audio settings from the 7.1 to the 2.1 channel to fix this issue. After that, save changes, and the problem with YouTube videos should be resolved.

8. Unmute sound on the tab

  1. Launch the browser.
  2. Open a video on YouTube.
  3. Finally, right-click on the tab playing the video and select the unmute option.

You should also ensure the YouTube player does not mute the video.

9. Turn off Windows Defender SmartScreen

  1. Open the Edge browser.
  2. Click the menu button in the top right corner.
    youtube no sound edge
  3. Click on Settings.
    youtube no sound edge
  4. On the left pane, click on Privacy, search and services, then toggle off the switch for Microsoft Defender SmartScreen.

Note that your internet security can be compromised if SmartScreen is disabled. After you have finished watching YouTube videos, you may turn on SmartScreen protection once again.

10. Try using Playing audio troubleshooter

  1. Open the Settings app.
  2. Go to Update & security section.
    Microsoft Edge YouTube not working
  3. On the left pane, select Troubleshoot, then on the right pane, choose Playing Audio, and finally click the Run the troubleshooter button.
    Microsoft Edge sound problem
  4. Lastly, follow the instructions on the screen to complete it.

Microsoft Edge not showing in volume mixer

Microsoft Edge sound settings are usually found in the volume mixer of your computer. However, if you do not see Edge on the volume mixer, it is most likely because you do not have any sound playing from the browser. In such cases, there is nothing you can do till sound starts playing.

Sometimes, there may be a real problem with the browser sound, and the solutions in this guide should restore sound to the volume mixer. In extreme cases, you may have to reinstall the browser.

That’s all; we hope at least some of these solutions helped you with your YouTube problem in Microsoft Edge.

If you have any comments, suggestions, or maybe another solution for this issue, don’t hesitate to write to us in the comment section below.