The Ultimate Performance power mode is not enabled by default on Windows 11, you have to perform an extra step to turn it on.
On enterprise-level servers and workstations where performance is a priority, this power plan is preferred. Microsoft took out all the power-saving and battery-life extending power options out of this plan to focus specifically on pushing your PC hardware and resources to the max to run 24 hours a day, 7 days a week.
Ultimate Performance power mode features
Starting with Windows 10 version 1803, Ultimate Performance power mode is a preset power policy designed for higher-end PC hardware to get the highest performance possible at all times.
Main features of Microsoft’s Ultimate Performance power mode include:
Hard Disk is never turned off.
Java timer frequency is set to Maximum performance.
Wireless Adapter Settings power-saving mode is set to Maximum Performance.
Hard disk never goes to sleep.
Hibernation is set to Never.
CPU Processor power management is set to 100%
Display is turned off after 15 minutes.
When playing video, the quality of video playing is optimized to enhance it (depends on PC/device hardware).
The Ultimate Performance power plan works to eliminate micro-latency on your PC by prioritizing performance over efficiency.
Enable Ultimate Performance power mode on your PC
Follow these steps to enable the Ultimate Performance power plan on Windows. As a reminder, this power plan will make applications and games run faster but will also consume more power and more battery life.
So, if you are using this power plan on a laptop, you may want to make sure you keep it plugged in because this power plan will deplete the battery faster.
The Ultimate Performance power plan will deplete the battery much faster because it scrapes together every available resource on your PC to get the highest performance possible.
Here’s what you need to do to enable it on your PC:
1. In the Windows 11 Start menu or Search, copy-paste the following command and press “run as Administrator” to run it:
2. Open Control Panel on your PC and in Control Panel, go to System and Security > Power Options.
3. Here, you should see a new “Ultimate Performance” power mode from the list of available options (you may have to open “Show additional plans” under “Preferred plans” by clicking on the down arrow). Click Ultimate Performance to enable and use the power mode on your PC.
Disable and delete Ultimate Performance
If you used the Ultimate Performance power mode and found it doesn’t work well on your PC or is causing you other issues, you can disable it as fast as you enabled it. Here’s what to do.
1. On your PC, open Control Panel and go to System and Security > Power Options and select a different power plan to use. Please note: Windows will not let you delete Ultimate Performance power mode if it is your PC’s current power plan.
2. Once you choose a different power mode, click Change plan settings next to “Ultimate Performance.”
3. Click Delete this plan and then click OK to confirm that you want to delete the Ultimate Performance power mode from your PC.
The last step will permanently remove the Ultimate Performance power mode from your PC. If you want to bring the Ultimate Performance power mode option back, you will need to repeat the steps at the beginning of this guide to re-enable it.
If you cannot print from Edge on Windows 10 or 11, you can follow the solutions featured in this article.
This problem usually signals your settings are incorrect, you have driver problems or registry errors. We’ll help you address all root causes.
All you have to do is closely follow the step-by-step, easy instructions below.
What can I do if I can’t print from Edge?
1. Try using a different browser
If you need to print something urgently from a webpage, you can always use a different browser.
A good option is Opera One because it comes with a built-in printing tool. It can help you tweak and adjust your documents right from within the browser.
Opera One
A feature-packed web browser that offers many useful tools, including the common ability to print out pages.
Microsoft Edge is a universal app and shortcuts are fully supported in Universal apps, which means that you can use print shortcuts inside Edge as well.
Users reported that they couldn’t print in Edge, but by using Ctrl + P shortcut, they were printing without any problems.
3. Run the printer Troubleshooter
Press Win + I to open Windows Settings.
Go to Bluetooth & devices and then Printers & Scanners.
Go to the problematic printer.
Run the troubleshooter and follow on-screen instructions.
Before clicking the Apply fix button, set the printer that you’re troubleshooting as default. After doing that click the Apply fix button.
According to users, you can fix problems with Microsoft Edge and printing by running a Printer troubleshooter.
4. Set a different default printer
Go to the Printers & scanners settings as shown in the previous method.
Toggle off Let Windows manage my default printer.
Now, Go to any of the available printers you want.
Click on Set as default.
Note: After setting a new default printer you need to set your previous printer as a default one again.
In addition, you can also try selecting a different printer in the Edge print dialog before selecting your default one.
5. Select print option from the menu
Open Edge.
Click on the three vertical dots and select Print.
According to some users, you can fix this problem by using the Print option from the menu.
6. Use Print to PDF or any other virtual printer
Press CTRL + P.
Select Microsoft Print to PDF as your printer, and click the Print button.
Choose a save location for your PDF file.
Locate the PDF file and print it using your pre-installed printer software.
7. Try using older drivers
Open Start Menu, type device manager, and hit enter.
Find and double-click on the printer driver.
Go to the Driver tab.
Click on Roll Back Driver and follow on-screen instructions.
8. Use Developer Tools
In Microsoft Edge, Press CTRL + Shift + I to open Developer Tools.
Then, switch to different tabs and close the tool.
Try printing again.
All modern browsers have the Developer Tools feature that allows you to see the source code of a certain website, and so does Microsoft Edge.
This is a rather strange workaround, but users reported that it works for them, so you might want to try it.
9. Edit the registry
Press the Windows Key + R, enter regedit, and press Enter.
Even though you can print anything on Edge using CTRL + P or clicking on the print option from the menu, you may want to add a Print button on this browser for faster interaction. Unfortunately, there is no official way to do it. But, we have the trick.
To add the print button, follow these steps.
Open Edge.
Press CTRL + D on the keyboard.
Click Click on More.
Now, Give the name as Print and URL as the following: javascript:window.print()
Save it.
Cannot print from Microsoft Edge after update
Sometimes, you may find that you cannot print from Edge after updating it. It means the latest version of Microsoft Edge has some issues. So, we recommend you use the older version. To do this, you will need to follow these steps:
Exit Microsoft Edge.
Now, Open File Explorer and go to the following location: C:\Program Files (x86)\Microsoft\Edge\Application\103.0.1264.44\Installer
Right-click on an empty area and choose Open in Terminal.
Run the following command: setup – uninstall – system-level – verbose-logging
Hit the Uninstall button.
Now, Microsoft Edge will be using an older version by uninstalling the latest one. You should not encounter the newly appeared printing error again.
To conclude
Not being able to print from Edge can be a big problem. But, the above solutions will help you to fix the issue of not printing from the Edge browser on both Windows 10 and 11.
If you have any suggestions or got stuck somewhere along the way and need more help, feel free to let us know in the comments and we’ll get back to you!
Having a well-protected PC ensures that all of your data, both online and offline, is safe and people trying to access it will have a hard time getting their hands on your data.
That is why it is very essential to have the best and most updated browsers with advanced security features, and more importantly, an antivirus tool installed on your PC.
With safe browsers, you can explore the web without worrying about your privacy and security issues. Moreover, with an antivirus installed on your PC, you are making sure that your data stored on your PC and when you access the internet is protected all-around.
Avast antivirus is a popular name in the antivirus market and is a good option if you are looking for decent antivirus software for your Windows 11 PC.
However, if you want to try and check other alternatives, then you can take a look at our guide on the best antivirus software for Windows 11 and choose the option that suits you the most.
If you have found a good option over Avast antivirus, then you need to uninstall Avast antivirus in your Windows 11 PC and make way for the new antivirus tool. Did you know that there are various ways you can use to uninstall Avast antivirus software from your PC?
If not, then this guide is here to help you show the different ways to uninstall Avast antivirus in Windows 11. Let us check out the guide.
Does Windows 11 need third-party antivirus software?
Windows 11 was claimed by Microsoft to be the most advanced operating system from them in terms of security and protection, thanks to a trusted platform module (TPM) 2.0 and Secure Boot in order to achieve full compatibility.
However, Windows 11 isn’t going to protect you from all the threats a modern-day computer is exposed to daily.
Do note that TPM 2.0 and Secure Boot will only protect you from threats that they can handle, as for the other threats, you will still need antivirus software installed on your Windows 11 PC.
This antivirus software not only protects you from modern-day threats but also protects you from old threats that still exist. Microsoft Defender in Windows 11 is also capable of protecting you from certain threats, but not all.
How to uninstall Avast antivirus in a Windows 11 PC?
1. Using Control Panel
Open the Start menu.
Search for Control Panel and open it.
Set View by to Large icons.
Click on Programs and Features.
Select Avast antivirus from the list.
Hit the Uninstall button at the top.
Wait for the program to be installed.
Restart your PC to remove all contents of Avast from your Windows 11 PC.
2. Using Windows Settings
Press the Win + I keys on your keyboard to open Settings.
Select Apps from the left pane.
Click on Apps & features on the right side.
In the search bar, enter Avast and locate the app.
Click on the 3-dot icon for Avast, and select Uninstall.
Confirm by hitting the Uninstall button again.
In the Avast Free Antivirus Setup window, click on Uninstall.
Click Yes to confirm.
Wait till the Uninstaller removes the program from your PC.
Launch the program by right-clickingand selecting Run as administrator.
Click Yes to restart the window in Safe Mode.
Again click Yes to immediately restart your Windows 11 PC into Safe Mode.
When the system boots up in Safe Mode, select the location where you have installed Avast antivirus software. If you selected the default installation location during setup, then the tool will pick up the location automatically.
The tool will remove Avast from your PC.
Click on Restart.
4. Using Command Prompt
Open the Start menu.
Search for Command Prompt and run it as administrator.
In CMD, you need to type the below command and press Enter. wmic
Then type the below command and hit Enter. product get name
Input the below command and press Enter. product where name="Avast Free Antivirus" call uninstall
If you have a different Avast product other than the Avast Free Antivirus installed on your Windows 11 PC, then you should enter the title for your Avast Antivirus software within the product name list to uninstall it.
Press Y and Enter keys to confirm the uninstallation.
While the process of uninstalling Avast antivirus from Windows 11 using a command prompt might seem a bit complicated, following the above steps, you can do it easily.
5. Using a third-party tool
Well, another answer to your question of how to uninstall Avast antivirus software in Windows 11 PC is to make use of a third-party tool.
We would recommend you use CCleaner software for this purpose. This tool comes with features that can delete or uninstall any applications from your PC completely without leaving any traces behind.
Using CCleaner, you can easily perform uninstallations without errors for any software on your system, including Avast Antivirus, as many have reported that they aren’t able to uninstall the program from their PC due to multiple errors.
What to do after uninstalling Avast antivirus from my Windows 11 PC?
There is a good chance that you are a person that plans well ahead, and before you uninstalled Avast antivirus from your Windows 11 PC, you already had an alternate option chosen that you would install right away.
However, there are several users that don’t plan much ahead and would like to know what to do after they have uninstalled Avast antivirus from their PC.
While you are still exploring antivirus options, you can turn on Microsoft Defender on your PC and keep it protected from threats in the meantime.
Follow the steps below to learn how you can enable Microsoft Defender on your Windows 11 laptop or PC:
Open the Settings menu by pressing the Win + I buttons on your keyboard.
Select Privacy & security.
Under Security, click on Windows Security.
Click the Open Windows Security button.
Select Virus & threat protection.
Click on Manage settings.
Turn on the Real time protection toggle and other toggles as per your requirements.
This will give your PC good all-around protection, both offline and online, and you can stay safe until you install a third-party antivirus software of your choice.
If you want to learn more about Avast, we have a guide dedicated to Gaming_spy.dll, so you might want to check it out.
That’s it from our side in this guide. Let us know in the comments below which one of the above solutions you picked up to uninstall Avast antivirus software from your Windows 11 PC.
Firefox is one of the best browsers with a series of accessibility features. One of its most-used shortcuts is the Backspace key for navigating to the previous page.
Unfortunately, users have been complaining that this key is not working on some of the newer versions of Firefox. This issue is usually due to the default setting on some version of Firefox and not necessarily problems with the browser.
Thankfully, this guide contains three surefire fixes to get the Backspace shortcut working on your browser again.
Why is Backspace not working?
If you notice that the Backspace shortcut is not working on Firefox 87 and others above, like the 91 version, it is because it has been disabled by default. Mozilla announced that the shortcut would no longer work out of the box to prevent users from losing data when filling out forms.
Thankfully, you can enable the function back from your browser setting, as we will show in subsequent sections of this article.
Is there any alternative key for backspace?
While the Backspace key might not work by default on the latest versions of Firefox, there are combinations of keys you can use.
These keys help you navigate forward and backward like the Backspace and the Backspace+Shift keys.
What can I do if Backspace isn’t working in Firefox?
1. Enable the Backspace key
Launch Firefox and paste the command below into the Address bar. about:config
Click the Accept the Risk and Continue button when prompted.
Type back in the search box and double-click on the browser.backspace_action preference option.
Change its value to 0 and press the Enterkey.
As mentioned earlier, if you are using the latest version of Firefox and the Backspace shortcut is not working, you will need to enable it yourself. After following the steps above, restart your browser to sync the changes.
2. Use alternative keys
The alternative keys combination that performs the same function as Backspace on Firefox is Alt+ Left arrowkeys. When you press these keys together, you get to navigate backward, just like you do with Backspace.
To navigate forward, you can use the Alt+ Right arrowkeys.
If you still can’t get the Backspace key to work on Firefox or prefer not to use alternative keys, you can try an alternative browser in Opera One.
Opera One is an excellent browser with many accessibility features. You can use different combinations of keys or single keys to carry out tasks easily.
Also, the Backspace key works fine on Opera One and has an extension in its Add ons store to ensure you don’t have to enable it manually.
Backspace is one of the accessibility features of Firefox for easy navigation. So, when it’s not working, things become a bit difficult. But with the solutions above, you should get the shortcut working again on your browser.
If you are facing other issues like Firefox not responding, check our detailed guide on how to fix it quickly.
Feel free to let us know how you were able to get the Backspace key working again in the comments below.
If you’re a Twitter user, you might have been greeted with a message that says your browser is no longer supported by the site.
Twitter is a big site. It’s used by many people and it’s got a lot of features. As such, it needs to be able to work with all the different browsers available. But if you’re using an older browser, you may find that some features don’t work as they should.
This can be frustrating, especially if you’re not sure what’s causing the problem or how to fix it. Sometimes, the Twitter app just won’t open and you’ll be forced to use the browser version.
What does this browser is no longer supported mean?
If you’re seeing a message that your browser is no longer supported, it means the site thinks you’re using an outdated browser. You’ll see this error when you try to sign in, tweet, or use other Twitter features.
It’s possible to continue using the site, but some features and functionalities may be limited. In such cases, you should consider upgrading your browser to a newer version or trying another browser.
What browser works best with Twitter? The bad news is that each browser has its own quirks when it comes to displaying and interacting with tweets. The experience can vary widely depending on your location and which device you’re using.
The Twitter sidebar integration in Opera One allows you instant access to your messages and newsfeed. This may be done when searching for anything in the browser, on the same screen, simultaneously.
It also has other social media integrations so you can chat with your friends, post on different apps, and enhance your online activity.
Opera One
Allow the Twitter sidebar integration to ease your access, just by clicking on the icon.
What can I do if Twitter says my browser is no longer supported?
1. Update your browser
If you have an older version of a browser installed on your computer, update it to the latest version before accessing Twitter again.
This seems like a no-brainer solution but it actually works. Not all browsers are set to update automatically so you may have missed the latest update. So, if you haven’t already done so, give it a shot and see if it works for you too.
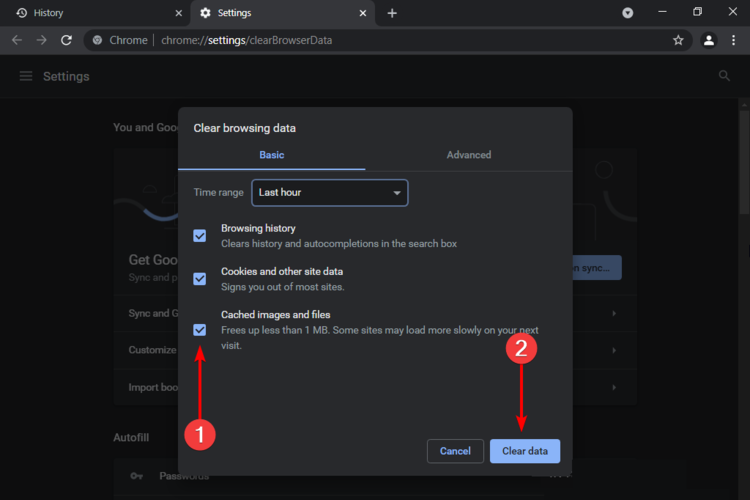
2. Clear your browser history and cookies
This is the most common solution for people who are experiencing issues with Twitter. This will remove all traces of any Twitter activity from your computer.
Once you’ve cleared your history, close out your browser and restart it. Then, you can start fresh and log into Twitter again.
You can bypass this message by switching to another one altogether — like Microsoft Edge or Google Chrome which still supports Twitter.
Sometimes browsers have bugs that prevent you from accessing some sites and all you can do is wait it out. In the meantime, you can try a different browser.
Opera One is the first major browser that has Twitter natively integrated into the sidebar, thus you can access the Twitter app just by allowing it quick access on any page of the browser.
Moreover, Opera One has full support for the Twitter app, so you can rest assured that you can get all the help you need whenever there is an issue.
And that’s how you can easily bypass Twitter’s browser no longer supported messages. You may also come across a Nothing to see here error but we have adequately addressed these concerns in our guide.
We are aware that certain apps don’t function properly or at all on Windows 11, but some of the situations users encounter really have no apparent root cause. Such is the Firefox freezing in Windows 11 issue.
As reported by our readers, Mozilla’s Firefox browser displays some pretty erratic behavior when you run it on Microsoft’s new system.
After reading this post, one might think that this happens because there are too many addons installed on the browser.
However, there are other Firefox users that utilize this browser on Windows 11 and have a similar number of extensions activated within it but experience no such issues.
Why does my Firefox browser keep on freezing?
We encountered the same problems in Windows 10 and there are plenty of potential reasons for Firefox to freeze or become unresponsive.
Using Opera One as an alternative may not fix your issue, but it’s a lightweight and more organized browser. By switching to Opera One you can even import your bookmarks, saved passwords, and other important data from Firefox.
Additionally, it’s well-known for using less RAM, thus you may have this quick workaround until the issue with Firefox is fixed by following the steps below.
Opera One
Freezes and crashes are not uncommon for a browser, but it handles them faster and proactively.
What can I do if Firefox is freezing on Windows 11?
1. Create a new profile
If Firefox keeps freezing in Windows 11, open Firefox and type about:profiles in the search bar. This will open the Profile Manager.
Click Create a New Profile to start the Wizard.
Select a name for your profile and click on Finish.
You should only use the Choose folder option when you wish to choose where to store the profile on your computer.
If Firefox is crashing in Windows 11, it can be due to an Internet security software that interferes with the browser, and prevents it from opening webpages.
NOTE
If you choose your own folder location for the profile, select a new or empty folder. If you select a folder that isn’t empty and you later remove the profile and choose the Delete Files option, everything inside that folder will be deleted.
2. Disable the Hardware Acceleration from Firefox
Click on the Menu icon from the top-right corner in Firefox and select Settings.
Pick the General tab from the left pane and scroll down on the right until you reach the Performance section.
Uncheck the Use recommended performance settings checkbox, then do the same for the Use hardware acceleration when available feature.
Close Firefox, then open it again to see if Firefox is still freezing.
The hardware acceleration feature is usually a great thing because it’s using your graphics card to take some of the load from the system memory.
However, depending on its settings, this can only do more harm than good. Check any changes in the browser behavior and if things are not better, undo the process.
Click on the Firefox Menu icon from the top-right and select the Help option.
Choose More troubleshooting information.
Click on Open Folder from Application Basics.
Close Firefox and go to the Firefox folder that opened, then find and rename the file places.sqlite to places.sqlite.old and places.sqlite-journal to places.sqlite-journal.old.
Start Firefox and see if it works normally now.
4. Remove the Session Restore files
Click on the browser Menu icon and select the Help option.
Pick More troubleshooting information from the list.
Click on Open Folder from the Application Basics section.
Close the browser then and go to the opened folder to delete the sessionstore.js file and any associated files like sessionstore-1.js and so on. If you don’t have the Restore Session option activated in Firefox, you won’t find any such files.
Start the browser again to see if the solution fixed the problem.
5. Reset the browser
From Firefox, click on the Menu icon, then select Help.
Choose More troubleshooting information.
Find and select the Refresh Firefox option.
Continue the reset process and after it ends, open the web browser again.
This concludes our list of solutions on how to fix Firefox issues in Windows 11 and we hope that by applying them, your browser works fine again.
Programs known as extensions and plugins are able to add individualized functionality to your web browser. These add-ons provide for a more customized experience when surfing, but, using too many of them will slow down your browser.
It’s possible that you may increase the performance of your web browser by removing add-ons and plugins that you don’t use.
Your Firefox browser may become unresponsive if you have too many tabs open at once. Simply shutting the browser tabs that you don’t need at the present is one simple way to make your browser run more quickly. You may always save them to your bookmarks for later use.
On the other hand, there’s a possibility that the slow performance of your browser has nothing to do with the browser itself. Instead, it’s possible that your Internet signal is poor, which is causing your browser’s performance to be less than ideal.
By reinstalling, you can be certain that you are using the most recent version of your browser, which is essential for removing bugs and protecting against risks to your computer’s safety. In addition to this, a totally clean cache will be provided for you.
If you’re one of Facebook’s users, then you might find yourself having trouble with Facebook not working on Firefox from time to time. Facebook has been around for a long time, so it’s not surprising that lots of people use it.
Users often experience issues when trying to use their accounts on browsers like Firefox. These issues can range from Facebook not loading at all, to only certain features working correctly.
If you are using Firefox, you might be facing the issue of Facebook not working properly. Here are some reasons behind this problem:
Addons and extensions – Check your extensions and themes for compatibility issues. Sometimes, Facebook is not loading properly on Firefox because of third-party extensions. Your browser might have some outdated plugins installed which are causing this issue and they need to be updated or removed from your computer altogether.
Cookies and cache – Cookies are stored by your browser to keep information about websites you visit. Sometimes they may be corrupted and prevent you from accessing some sites.
Poor internet – If you’re using mobile data instead of WiFi, it’s possible that your connection isn’t fast enough to handle the amount of data Facebook needs to display.
Low memory – The problem could be with your computer’s memory. If you have a lot of programs running at the same time and one of them is using too much memory, it could cause problems with your browser.
Antivirus is blocking Facebook – Your antivirus software might be blocking access to Facebook. If you’re using an antivirus program to protect your computer from malware, make sure that it’s not blocking access to Facebook by whitelisting it.
Which browser works best with Facebook? Each browser is unique in how it works with Facebook. However, Google Chrome has a clean interface and loads pages very fast.
You can also install various extensions such as Notifier for Facebook to stay in the loop whenever any new activity happens on Facebook.
Quick Tip:
We advise you to consider the skilled browser from Opera One before trying further troubleshoot guides on Firefox.
This customizable browser can enhance your navigation with high speeds and lots of tools. As an example, you have social media apps integration (including Facebook in the sidebar).
Opera One
Have the greatest safety and instant access to Facebook from your homepage.
What can I do if Facebook doesn’t work on Firefox?
1. Refresh your browser
Facebook is a very popular website and can be quite slow at times, especially if you have multiple tabs open.
If you are having trouble with Facebook loading on your Firefox browser, the issue could be resolved by simply reloading the page.
2. Check for browser update
Launch your Firefox browser and click on the three horizontal ellipses in the top right corner.
Select Help.
Click on About Firefox.
If your browser is up-to-date, you will get the following dialog box.
3. Clear cache and cookies
Launch your Firefox browser and click on the three horizontal ellipses in the top right corner.
Click on Settings.
Select Privacy & Security and click onClear Data under Cookies and Site Data.
Check Everything from the dropdown and hit OK.
4. Reset Firefox
Launch your Firefox browser and click on the three horizontal ellipses in the top right corner.
Select Help.
Click on More troubleshooting information.
Select Refresh Firefox under Give Firefox a tune up.
Confirm Refresh Firefox in the dialog box that pops up.
5. Disable add-ons
Launch your Firefox browser and click on the three horizontal ellipses in the top right corner.
Click the Add-ons and themes.
Select Extensions and toggle Disable extensions then try reloading the page until you find the culprit.
6. Use incognito mode
If you’re trying to use Facebook in a public place, like a cafe or library, it may be that the site has been blocked by the owner of the computer.
Once you switch to Incognito mode, this won’t matter because it won’t save cookies. This will allow you to use Facebook without any extensions or other software interfering with it.
Hopefully, one of these solutions has been able to come to your rescue and you are back to enjoying all that the popular social site has to offer. If not, try using a different browser as Facebook may not be loading on Firefox due to a downtime.
Should the issue be that Firefox is too slow, we have covered a step-by-step guide on how to speed it up so you don’t have to be stuck waiting for hours on end.
Be sure to let us know of any other solution that we have not mentioned above but worked for you in the comment section below.
Cypress is a purely JavaScript-based front-end testing tool built for the modern web. It aims to address the pain points developers or QA engineers face while testing an application.
Cypress is a more developer-friendly tool that uses a unique DOM manipulation technique and operates directly in the browser. Cypress also provides a unique interactive test runner that executes all commands.
Regardless of its promising features, users have been complaining that cypress failed to connect to Chrome. On other occasions, users claim cypress docker failed to connect to chrome, or that cypress could not verify that this server is running, amongst others.
It is for this that this article poses solutions to the browser-based problems that users face while trying to execute commands using Cypress.
Does Cypress support all browsers?
Cypress has a critical weakness: it cannot natively run tests against all browser types. At the time of writing this article, Cypress supports only a limited set of browsers: Chrome, Edge, Electron, and Firefox.
That means no support for Safari and Internet Explorer (IE). Cypress also doesn’t support mobile browsers.
However, there is a way to run Cypress tests against any browser type, including Safari, IE, and mobile browsers: using Applitools Visual AI with the Ultrafast Test Cloud.
Does Cypress use Chrome Devtools protocol?
When Cypress controls a Chromium browser, it has an open remote interface connection between Cypress and the browser.
DevTools is invaluable for debugging an application, or understanding why an end-to-end test goes astray. Typically, Cypress uses Chrome Devtools protocol to visit the site and perform special operations like setting cookies or setting the file downloads folder.
During Cypress tests, you can click on any command to see additional information for that command, inspect DOM elements, and observe network calls.
How do I get Cypress to work on Chrome?
1. Update the Chrome browser
On your computer and launch Chrome.
At the top right, click on the More icon.
Click Help and then About Google Chrome.
Click Update Google Chrome. (If you can’t find this button, you’re on the latest version)
Also, check chromium.cypress.io for links to download a specific released version of Chrome (dev, Canary, and stable) for every platform.
2. Use Chrome-flavored browsers
Open Cypress by typing this command in the terminal: node_modules/.bin/cypress open
Run the following command in the terminal: cypress run -browser chrome
The Test Runner window will open, which will show the test case cypressTest1.js.
You can select the browser for the test case from the right-hand side of Test Runner.
All Chrome-flavored browsers will be detected and are supported above Chrome 64, such as Chromium, Chrome Beta, Chrome Canary, and others.
3. Debug the Chrome browser
Enable browser to debug logs using this code: npm run cypress:run-hang
When cy.pause()starts, enter chrome://crash in the URL to view behavior.
Doing this will aid Cypress to function effectively on Chrome
Check Browser.setPermission command to set the permission. By granting the test runner the permission, the browser skips showing the “should this site have access to the clipboard?” user prompt.
5. Do a manual check on the command
It is possible that you wrote an endless loop and that you must fix your own code. It could also be that you are running lots of tests on a memory intense application.
We hope that the above fixes will solve any problem you may encounter. You can also check how to fix chromewebdata buttons error.
Twitch won’t let you sign up, displaying a message that reads Sorry, it looks like you’re not eligible for twitch, but thanks for checking us out?
There’s a solution to every problem. So, start with the troubleshooting steps we provided below and we’ll hopefully resolve the problem at hand.
What can I do if Twitch won’t let me sign up?
1. Make sure you’re entering the proper credentials
Double-check the captcha checkbox. If the application informs you that the username is taken (even though it obviously isn’t on some occasions), close the app and try again after some time.
You can also try creating an account for Curse and sign in with it on Twitch. tv platform.
If you’re still unable to sign up for Twitch, even if you’ve met everything we mentioned above and don’t have a Curse account, continue with the further steps.
Before proceeding with the fixes, ensure your account setup is complete by following this quick guide to activate your Twitch account. This helps prevent sign-up and verification errors that commonly occur during registration.
2. Try the Incognito mode
Press on the Windows key, type your browser’s name, then open the first result (In this case, we’ll present the Chrome process).
Click on the 3-dot/hamburger menu in the top right corner of the browser page.
Select New incognito window (New InPrivate window for Microsoft Edge).
Besides the minor bugs which can cause this issue, we’re more concerned with your browser compatibility.
The affected users who dealt with the sign-up problem changed the browser they were using and seemingly addressed the issue.
Why won’t Twitch let me sign up?
Wrong log-inprocess – One of the most common causes that lead to our presented issue is entering the wrong credentials. In addition, there are some other aspects that you should consider when logging in and you’re going to discover them a bit later.
Temporary errors – In this case, you should try accessing Twitch from an incognito mode. We’ll show you how to do that, so make sure you keep on reading.
Browser-related problems – If Twitch won’t let you sign up, it is probably that your browser got into trouble. To never worry again about this problem, we suggest using a dedicated browser, designed for streaming apps.
What other Twitch issues can I encounter?
Because it is always important to be aware of the most common issues that you might face while using Twitch, we decided to present you with a useful list:
Sorry, it looks like you’re not eligible for Twitch, but thanks for checking us out! – Twitch users report dealing with this problem when changing phones, Internet providers, when creating/changing accounts, or because the app’s Cache hasn’t been deleted in a while.
Unable to change username – Many users reported that Twitch won’t change the username and it can be pretty annoying. If it ever happens to you, make sure you check our dedicated solutions to fix it with ease.
The app can not load on certain browsers – It seems like Twitch won’t load on browsers like Chrome or Firefox. Most commonly, this issue occurs when cookies, cache, or malware are blocking the app.
Chat problems – Another reported issue is that Twitch chat is not loading/connecting. In case you face it, we’ve compiled a series of methods to solve it in a few minutes.
Remember that these issues can originate from you you attempting to create accounts too quickly, so keep that in mind when engaging in such actions.
Also, don’t be afraid to contact Twitch support when Twitch won’t let you sign up, or if you are having trouble with the Twitch account recovery tool.
With that said, we can conclude this article. Don’t forget to check the Twitch status and wait it out a bit as this might be a temporary stall.
For any additional questions or curiosities, do not hesitate to leave a comment in the section below.
Well, we weren’t ready for this one! Over on Instagram, Microsoft is teasing “hardwear” for a drop on July 12 at 7 am PT. Yes, we’re sure that’s not a typo or grammatical error.
The company has obsessively marketed and turned its Instagram page to promote that “hardwear” on July 12. We’re not quite sure what “hardwear” can be, but we’re guessing that it is some new clothing-related item from Microsoft. That’s because of the choice of the word “wear” and the fact that the usual “hardware” is not spelled with the usual “ware” at the end.
Still confused? If this is in fact some kind of “wear” from Microsoft, we’re guessing it probably might end up like the annual Windows ugly sweater that Microsoft sent out to journalists, and recently allowed the public to purchase. It looks to be a summer-related item, though. We can see sneakers, hats, flowers, denim jeans, or jackets in a couple of the posts teasing the “hardwear.” There are 12 posts total about “hardwear.” But interestingly enough, there’s also a photo showing old-school Windows PCs, so there’s that to consider, too. That post mentions “giving us all the nostalgic feels.”
There’s no knowing what Microsoft is up to with this, but the posts do seem to mention “creativity” a lot, so who knows if this is a tease for an actual Surface drop? The Surface Instagram and Twitter have been quiet, and so has Panos Panay, so there’s no telling and it might just be a clothing item after all. Also, Microsoft is just fresh off the launch of the Surface Laptop Go 2, so we doubt this is related to a new Surface
Anyway, we’ll let you be the judge. What do you think this “hardwear” might be? Let us know in the comments below.
Encountering Chrome Failed To Load Response Data Request Content Was Evicted From Inspector Cache in DevTools can hinder web development tasks. This error often arises with large JSON files or cross-domain requests.
Here’s how to troubleshoot it in a few steps:
How can I fix the failed to load response data error in Chrome?
1. Add a breakpoint in the Sources tab
In Chrome DevTools, click on the Sources tab.
Expand the Event Listener Breakpoints.
Expand Load and then check the box next to beforeunload.
Reload request.
Users report that performing this function is better than the window.onunload = function() {debugger; } command because there’s no need to write code.
We have to mention that this problem is somewhat similar to GraphQL unauthorized error that we covered recently, so don’t miss it.
3. Use a different browser
If you keep getting this error time and time again, consider switching to another browser with Dev Tools such as Opera GX.
It uses Chromium, the same engine as Chrome so compatibility standards should be no issue. Plus, the GX Control feature gives you precise control over system resources.
Plus, you can use all the same extensions you would use in Chrome and transfer all your history and bookmarks with minimal effort.
Opera One
Never worry about stability and keep your work organized with this feature-rich browser.
This appears to be a long-running bug with Chrome DevTools, but we hope one of the above solutions helped solve the problem or at least allowed you to view the response data. Let us know in the comments if there is a solution that worked for you that isn’t listed above.
Google Chrome, like all the other modern web browsers, keeps a log of the user’s browsing history.
The browsing history helps in revisiting the web pages that the users may have visited but forgotten the name.
However, some of our readers have reported the Chrome browsing history on their computer has disappeared.
And others even said that the Chrome history is not showing everything it would suppose to.
Quick Tip:
Try using a more reliable browser. We recommend Opera One as an alternative to Chrome because it’s faster and more responsive than Chrome.
Opera One has a fully customizable UI with themes, modes a sidebar display, and more. It also has a Turbo mode feature for enhanced speed, an integrated adblocker, and VPN as well as customizable workspaces.
Opera One
Try faster, 100% private, and ad-free browsing with Opera One.
If you have wondered why did my chrome history disappear, check the browser’s settings regarding how long should it keep your history.
Chrome only holds a visited website in history for 90 days so you won’t find any records older than that.
If you want to extend the history retention time, you can use the History Trends Unlimited extension where you can keep all the history locally, without sharing it online.
However, if it disappeared completely, you either deleted the App data folder from Chrome or cleared it from the browser itself.
Another reason might be that you have set your browser to clear all site data when you close the tabs.
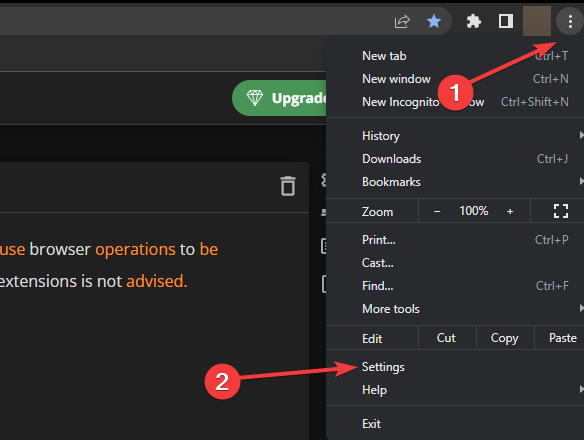
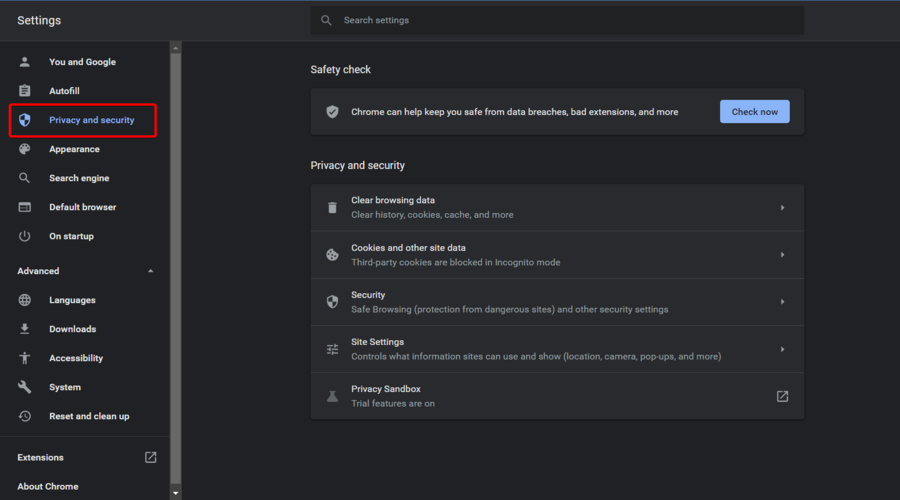
To reverse this option, go to Chrome’s Settings, then access the Privacy and security tab, and uncheck the Clear cookies and site data when you close all windows box.
If your Google Chrome history has disappeared and you need it back, retrieve your browsing history with the solutions we provided below.
Login to your Google account associated with your Google Chrome browser.
After the login, you can view all your past browsing history on My Google Activity page.
You can browse through days and months, check recently visited web pages, etc.
However, you won’t be able to restore the history directly to Google Chrome from here. You can delete any of the browsing histories by clicking on the Options (three dots) and select Delete.
Note: This page only records the browsing history if you are logged into your Google Account at the time of visiting the web page. Any pages accessed without being logged or Incognito mode will not be saved.
2. Restore the previous version of the Chrome folder
Make sure Google Chrome is closed. Open the File Explorer.
Navigate to the following location. C:UsersYour usernameAppDataLocalGoogleChrome
Inside the Chrome folder, right-click on the User data folder and select Restore Previous Version. It will open the User Data Properties window.
Select the User Data folder that you want to restore and click on the Restore button.
Now your Chrome browsing history and other data should be restored and you should be able to access it by pressing Ctrl + H when the Chrome browser is running.
3. Use DNS Cache to see the Chrome History
Type cmd in the Windows Search tab and click on Run as administrator from the results to open Command Prompt with full privileges.
In the command prompt type the following command and hit Enter: ipconfig/displaydns
This command will display all the DNS records.
The disadvantage though is that it can only show the domain and not the specific web pages as you see in history. Also, you can’t restore the browsing history from here but only view it.
4. Reinstall Google Chrome
Press Windows key + R to open Run.
Type control and click OK to open Control Panel.
Click on Programs, then select Programs and Features.
Select Google Chrome and click on Uninstall.
Now, make sure Also delete your browsing data? option is unchecked.
Click on Uninstall to proceed.
Now go to the Google Chrome download page and install the browser.
After the installation, go to the History page and check if your browsing history is visible.
If not, click on the profile icon on the top right corner and select Turn on Sync.
Now enter your Google account credentials and then select Yes, I am In.
That’s it. Now check for the browsing history by pressing Ctrl + H. Chrome should have restored all your browsing history and other data from your Google account.
Can browsing history be recovered once it is deleted?
As you could see above, you can clearly recover the Chrome browsing history if you deleted it from Chrome.
You can even do that if you have sent the folder to the Recycle Bin. However, if you deleted it permanently by using the Shift + Del keys, it’s much more difficult to do so.
It is still possible to recover the data but you will need dedicated data recovery software.
That’s because even when you permanently delete a file from your PC, you’re just marking the spot on your drive so that the system can use it for other data.
If the space on the drive was not overwritten with other information, the data can be recovered.
So, these are the 6 ways that you can use to find and restore Google Chrome browsing data.
Has this article helped you resolve your issue? Do let us know in the comments below.
Funimation is a video-streaming service specifically for Anime cartoons users can utilize with Google Chrome. However, video and log-in issues can arise for Funimation users.
When the Funimation app is not working, users can’t log in to their accounts or selected videos don’t play for them.
Why does Funimation say video not available?
If Funimation displays a video playback error message, such as video not available, it might be a Chrome issue.
Funimation playback issues can arise due to conflicting extensions or corrupted browser data. Certain browser settings might also be blocking playback when videos don’t play.
Why can’t I log into Funimation?
Funimation login issues are often due to users not entering the right login details. So, double-check your log-in details first. Also, note that users who have registered with Funimation via Facebook need to select the Sign in with Facebook option.
Funimation’s unable to connect issues can be due to server outages. Open the Downdetector for status of Funimation to check if there’s a general server issue. If so, you might need to wait a day or two until the server outage is resolved.
Log-in issues can also arise for Funimation users who utilize VPNs. If you utilize VPN software, disable the VPN you’re connected with. Then try logging in to Funimation with the VPN disabled.
Quick Tip:
The videos might play fine in Firefox, Edge, Safari, or Opera One. Utilizing a different browser might not fix the playback issue for Chrome, but at least you’ll be able to watch Funimation’s videos again.
We recommend you try out Opera One, since it comes with an ad blocker so you can watch shows undisturbed, and a VPN so you can access Funimation from anywhere, safely.
Opera One
Watch your favorite Funimation shows undisturbed and ad-free.
Notifications are great, as they can always keep you updated about different events in real life and your system. Your system displays notifications from apps and services, popping up whenever something new is happening – updates, errors, emails, messages, etc.
However, some users would like to know how to disable notifications in Windows 11 for those moments when the OS keeps chiming, and they don’t want to be disturbed.
Fortunately, there are plenty of solutions that will help. Not to mention that they take only a few seconds.
How can I disable notifications in Windows 11?
1. Use the Settings app
Use the following keyboard shortcut to open Windows Settings Menu: Windows + I.
Go to System, then navigate to Notifications.
Scroll-down, then uncheck the Offer suggestions on how I can set up my device option and also the Get tips and suggestions when I use Windows.
Use the following keyboard shortcut to open the Notifications desktop section: Windows + N.
From the Storage settings section, click on the three horizontal dots, to expand the Options menu.
Click on Turn off all notifications for Storage settings.
Turn off all notifications in Windows 11
If notifications from Windows 11 bother you and you want to turn them all off, here’s a guide step-by-step:
1. Open the Settings menu.
2. Go to System, then again to Notifications.
3. Look at the Notifications section, then set the toggle button on Off.
4. If you turn On the Notifications option and click on the arrow listed next to the toggle button, you can customize additional notifications settings. There, you can choose to disable the lock screen notifications, the reminders and the incoming VoIP calls on the lock screen. Moreover, you can turn off notifications sounds.
2. Deactivate notifications for individual apps
Go again to the Notificationspage, from the Settings menu.
Look at the Notifications from apps and other senders section and search for the apps you would like to disable notifications for (you can also sort the list in alphabetical order, so it would be much easier to find the needed ones).
Under the Notifications from apps and other senders section, look for your targeted app, then click on it.
In the Snip & Sketch page, uncheck the Show notification banners box.
Note that in the same page you can choose to uncheck the Show notifications in notification action center box.
4. Mute Windows 11 Notifications
Open the Windows Settings menu.
Go to System, then navigate to Focus assist.
There, if you enable the Focus assist, you’ll find a list of priority apps.
If you checkmark the Priority only option, you’ll get notifications from a list of priority apps.
To specify them, you can choose to Customize priority list.
5. Clear all Windows 11 Notifications
Use the following keyboard shortcut: Windows + N.
At the right-top of the page, you can click on the Clear all button to dismiss all Windows 11 notifications.
Why should I disable Windows 11 notifications?
Notifications are great, but they also can be pretty annoying when you need to concentrate on work or other tasks. They can be noisy and irritating when displayed on your screen.
Also, some notifications are not urgent, so an instant reaction is unnecessary.
Where can I see notifications in Windows 11?
Windows 11 displays notifications in a quick action center at the bottom-right corner of your screen. You can easily access them by clicking on the respective tile.
You can quickly get into the notifications section using the following shortcut: Windows + N. Also, the Windows 11 Settings menu allows you to view the all-app notifications list.
Can I enable back Windows 11 notifications?
If you change your mind, you can always choose to enable back notifications in Windows 11. And the easiest way to do it is through the Settings menu.
You should follow the steps listed in the first and the third solutions, but instead of turning them Off, you need to switch them on.
These are the best ways to disable notifications in Windows 11. We ensured that we delivered a complete guide, so you’ll not have to bother yourself with searching for additional options.
As you can see, the latest OS offers you multiple ways to customize your digital environment. Windows 11 truly provides some other useful tips and features.
If you have other questions or thoughts, do not hesitate to leave a comment in the section below.
New to Xbox Game Pass and don’t know where to start? We’ve got you covered with these Game Pass recommendations for racing enthusiasts. There is a great selection of racing games on Game Pass so strap on your helmet, put the pedal to the metal and let’s get started!
Dirt 5
Dirt 5 is the premiere off-road simcade racer. One of the launch titles for the next generation of consoles, Codemasters’ last game as an independent company does little to disappoint. Tear up roads all over the globe — Brazil, Greece, China, Italy, New York City, Norway, South Africa and more – all with dynamic weather and seasons.
Hone your off-road driving skills in a variety of racing styles, from Rallycross to Ice Racing to Stadium Trucks and Buggies.
Also check out on Game Pass:
Dirt 4
Dirt Rally
Dirt Rally 2.0
F1 2021
The 2021 edition of the official F1 video game franchise introduces a brand-new story mode in addition to new circuits Imola, Portimão, and Jeddah (which were added in post-release updates).
Braking Point is the new story mode, which according to a statement from developer Codemasters, “immerses players into the glamorous world of Formula One, giving a taste of the lifestyle both on and off the track: the rivalries, emotion and dedication needed to compete at the highest level.”
The latest installment of the Forza franchise puts players in an enthralling open-world interpretation of Mexico. See what 20 million players are hyped about in this universally acclaimed, multiple award-winning racer.
And with next-generation technology such as the use of photogrammetry, the racing has never looked better, especially on Xbox Series X|S. You’ll appreciate fine details like the individual needles of a cholla cactus or the weather marks of roadside rocks – if you can slow down enough to see them, that is.
Also check out on Game Pass:
Forza Horizon 4
Grid
Codemasters’ long-running road racing simcade is better than ever in this fourth installment. In Grid players will have to master a medley of racing disciplines including Touring, Stock, Tuner, GT, open-wheel FA racing, and a special Invitational series.
And don’t think you will be able to just shove your way through the ranks of the Grid World Series. With the game’s Nemesis System, each of the 400 unique AI opponents will remember every slight done to them out on the track. So it’ll be in the player’s best interest to mind his/her manners out there.
To be clear, this is a 2015 reboot of the legendary arcade racing series. Need for Speed is an always-online open-world racer set in the fictional city of Ventura Bay (loosely based on Los Angeles). It features 5 different game modes: Speed, Style, Crew, Build, and Outlaw.
The Need for Speed franchise is well-represented on Xbox Game Pass, with 5 NFS games available on the service at the time of this writing. So there is bound to be one suited for any type of speed demon.
A racing game of a different sort. ScreamRide offers 50+ levels and three distinct game modes: Engineer, ScreamRider and Demolition Expert. The game also has a sandbox mode in which players can build their own rollercoasters complete with props, ride pieces and scenery.
The racing – or rather, ScreamRiding – itself serves up something a little different from the typical racing game, as well. As one would expect the roller coaster rides are quite linear, being literally on-rails as they are. Players have (limited) control over leaning, braking, accelerating, boosting and so forth. Needless to say, it provides a different kind of racing(esque) experience.
As you just saw, Xbox Game Pass has quite an awesome lineup of racing games, with both AAA blockbuster titles and lesser-known but equally enjoyable cult-classics, as well as everything in between. Which of these racing games do you prefer for your speed fix? Let us know in the comments. And if you don’t have a subscription to Game Pass yet, you can check it out below.
While there are different ways of reading manga comics, such as downloading the PDF file or reading it online, a few prefer using the Manga Browser on their smartphones or tablets.
For those who don’t know, Manga Browser does precisely what the name implies, it lets you read your favorite manga simply and efficiently.
Multiple features make Manga Browser a good-to-have application on your smartphone if you love reading manga comics.
Features such as the ability to search for your favorite manga with a single keyword, browse through all of your manga in one place, zooming options, viewing images in landscape and portrait mode, and compatibility with multiple formats including PNG, JPEG, BMP, and GIF, etc., make it an efficient manga reader or browser.
However, there are a few users that are reportedly facing an issue where the Manga Browser is not working on their smartphones or tablets.
If you are one of those users and are looking for ways to fix this problem, then you are in the right place. Because this guide will list down some of the best ways in which you will be able to resolve the Manga Browser not working issue for good and get back to reading your favorite manga.
Why is Manga Browser not working?
There can be several reasons for an application to misbehave or not work at all. While there could be a bug present in the current version of the app that is causing the issue, there could be a bunch of other issues that are preventing the app from malfunctioning.
In the case of Manga Browser, users’ reports indicate that this is one of the reasons they were facing the Manga Browser not working issue.
Due to poor internet connection
Because of corrupt cache and data files
Due to a failed session
The app installed is not the latest version
The OS does not support the app version
The app server is down
These are some of the most common reasons you will come across issues such as Manga Browser not working.
Thankfully, we have compiled a list of solutions that will possibly help you resolve the problem at hand.
Quick Tip:
A practical workaround to avoid Manga Browser malfunctions is to utilize a new browser that promises faster navigation and useful reading tools for your manga books. We are talking about Opera One.
The Opera One browser comes with features that help you better organize not just your manga reading, but browsing over all. It comes with the very useful workspaces and tab islands and even a native AI.
Opera One
Have all your reading lists on this customizable browser to read your Manga anytime.
There could be an important file related to the Manga Browser app that failed to load during the previous session.
In such a case, we would advise you to go with the bare-bones solution, i.e., to simply restart your smartphone or tablet. After booting up, launch the app and check if this fixes the issue or not.
2. Check your internet connection
Internet is the most important thing for online apps to run perfectly. Any issues with your internet connection will trigger issues with the app.
We would advise you to make use of websites such as Fast.com or Speedtest to find out the actual speed and ping of your internet.
If you find any issues with your internet, then you can check in with your ISP and get your internet fixed.
Your smartphone stores cache files in order for them to remember your personalized settings and other aspects of the app. However, if for any reason, these cache files get corrupt, the app may find it difficult to function properly.
So, if you are facing Manga Browser not working issue, then we would advise you to clear the cache files of the app and relaunch the app and check if this fixes the issue or not.
4. Check for the update
Open Play Store.
Click on your profile icon.
Tap on Manage apps & device.
Click on See details button.
Check if a new update is available for the Manga Browser app or not. If yes, then tap the Update button and let the Play Store install the latest update.
Due to a bug or glitch present in the previous version of the app, it will throw up multiple problems.
To avoid this issue, it is always recommended that you not only keep the Manga Browser app, but all other apps, up to date to avoid any issues with them.
5. Reinstall the app
Long press the app icon.
Select Uninstall.
Go to Play Store.
Search for Manga Browser and download it on your phone.
6. Check for new OS update
Open Settings on your smartphone.
Scroll down and tap on Software update.
Hit the Download and install button.
Let your smartphone check for a new update. If a new update is available, install it.
Often, when the operating system isn’t updated, certain apps become incompatible as newer versions are released by the developers.
There is a chance that your OS isn’t compatible with the version of the Manga Browser app. So, you should always keep your phone up to date with the latest available update, not only to run apps smoothly but to enjoy the latest features as well.
Why is Manga Browser not updating?
There can be different reasons why the Manga Browser app isn’t updating. Well, the above solutions should suffice and do the job as they cover the most simple to advanced methods to resolve the problem.
However, if nothing works, then we won’t suggest extreme solutions such as resetting your smartphone, because, in reality, Manga Browser isn’t worth that much.
If you are really interested in reading manga comics, then you can find tonnes of online manga websites, where you can easily read, bookmark, or even download manga comics.
There are few online options such as Manga Kakalot, Manga Owl, Manga Reborn, or even Crunchyroll.
There you have it from our side in this guide. Let us know in the comments below, which one of the above-mentioned solutions fixed the Manga Browser not working issue for you.
A lot of focus in the tech world is on what Apple is doing with ARM-based SoC like the M1 and M2. Microsoft, though, has what is known as “Always Connected PCs”, or as we enthusiasts like to say, Windows on ARM (WOA) devices. These are powered by ARM-based SoC from Qualcomm, as part of the Snapdragon Compute Platform.
It has truthfully been a complicated story for Windows on ARM, as flagships products like the Surface Pro X, or the Lenovo Flex 5G have struggled behind Apple’s M1 chip in terms of app emulation. Even when put up against Intel’s chips, many have found that the system performance isn’t there for WOA.
But the ThinkPad X13s is one of the newer Windows on ARM laptops that seeks to change that. I’ve been using it as my daily driver for the past two weeks after purchasing one from Lenovo. Powered by the Qualcomm Snapdragon 8cX Gen 3, I think this ThinkPad is unlike any other. And I certainly do feel like it’s one of the best Windows on ARM laptops in ages.
Specs & Price
My Windows 11 Pro-powered ThinkPad X13s cost me about $1,500 after taxes and shipping. Prices start at $1,100, but adds-ons like 5G connectivity, or a touch screen, will bring the price up a bit. I didn’t opt for 5G connectivity on my model, and I’ve just configured it with 32GB of RAM, and a 512GB SSD. All models are powered by the Snapdragon 8cx Gen 3 SoC.
The 13.3-inch display panel I have on my unit is touch-enabled, tuned at 1920 x 1200 resolution, rated at 300 nits of brightness, and set in the 16:10 aspect ratio. Ports on the laptop include two USB-C Gen 2 ports and a headphone jack. There’s also a 5-megapixel Windows Hello webcam, and a fingerprint reader built into the power button on my unit.
Note that this device also has Microsoft’s Pluton chip inside for extra security. You even can kill the webcam and microphone electronically with a switch on the keyboard.
SSD storage can be swapped out, but there’s no way to change the RAM, as it is soldered down. The battery is rated at 49.5 watts-hour. The weight of the system comes in at 2.35 pounds, and dimensions come in at 11.76 inches x 8.13 inches x 0.53 inches.
Design
The design of the ThinkPad X13s is definitely more business class than anything else. If you’ve ever seen a ThinkPad, then you’ll know what I mean. But if you haven’t, and are more familiar with the aluminum look and feel of MacBooks, then this laptop will feel different for you.
This ThinkPad sports a recycled magnesium design colored in a lone “Thunder Black” option. 90% of that magnesium is actually recycled, too. Lenovo is also using 97% of post-consumer recycled plastic (PCC) in the speaker enclosure, 30% PCC in the battery, and 90% PCC in the power charger. Even the solder is environmentally friendly, with it being low-temperature.
What this means is for an incredibly light and incredibly durable machine. Magnesium is lighter and more durable than aluminum, so this ThinkPad is built strong, with no flexing or bending to deal with. There are even neat speaker holes to the side of the keyboard deck, which are reminiscent of what Apple has done on the MacBook Air.
Some people, though (like myself,) might find that this magnesium on the ThinkPad feels a lot more like plastic than it does metal. You get this feel this on the palm rests, but the lid feels cooler to the touch and metal-like. Overall, though, the ThinkPad is lighter and smaller than a MacBook Air, as I explained in a post for my other publication where I put the two side by side. I definitely like this design for that reason. The ThinkPad is now one of the thinnest and lightest non-tablet devices that I own.
Ports
Ports on the ThinkPad X13s are limited. You’ll only get two USB-C Gen 2 and a headphone jack. While Apple is using Thunderbolt on its M1 Macs, Qualcomm doesn’t use the spec on Snapdragon-powered laptops. In the Windows space, Thunderbolt used to be Intel-only, but AMD is using it on the new AMD 6800U-series laptops. Most AMD laptops, though, don’t have the spec. If you’re worried that means slow speeds, then don’t! USB-C Gen 2 can still hit speeds of 20 GB/S, comparable to Thunderbolt 2.
In my use, I had no issues transferring podcast files from an SSD to the ThinkPad, and it was plenty fast for me. I think these speeds will be fine for business users. However, I still wish Lenovo threw in an SD card reader for extra storage, too. But with the X13s being so thin, space might have not allowed it.
Dongles are definitely a must for this machine for connecting to monitors or using USB-A accessories like USB drives. Which reminds me, I had no driver issues with monitors or docks. Even the Dell Dual Charge Dock (HD22Q) works fine on this machine. I was worried that Windows 11’s ARM flavor would not recognize my accessories, but they all worked fine.
Keyboard & Trackpad
The keyboard and the trackpad on the ThinkPad X13s remind me of a classic ThinkPad keyboard. Overall, the keyboard is very spacious and comfy, with generous key travel and actuation. Key presses on the keyboard deck are quite soft, are not that bouncy, and sound very quiet. This helps me in my speed typing, and get to around 84 words per minute in Bing’s typing tests.
The only thing that annoyed me though, was the positioning of both the FN key and the Control key. The Control key is usually on the right side of the keyboard, but Lenovo has it in the wrong place on the ThinkPad X13s. Instead, they end up putting FN one key over from where Control usually is. TO be fair, though, Lenovo lets you swap the location within the Lenovo Vantage app, or system BIOS to prevent accidental key presses.
The keycaps are also curved which helps your fingers not miss keys as you type. This is something that’s been on all ThinkPad models for a while. Oh, and if you accidentally spill water on the keyboard, you won’t need to worry as it is spill-proof. Keys are backlit up to two levels, and the white LED lighting is even and doesn’t bleed through.
As for the trackpad, it is one of the best on a ThinkPad. While it is not haptic like the one on the new ThinkPad Z series, it is still spacious and accurate. This is since it has both a right-click and left-click area on the bottom as well as the top with dedicated buttons for the Trackpoint. Made of glass, it measures about 4.33 inches.
A common problem with most ThinkPads, the X13s trackpad collects fingerprints like crazy, just like the surface of the laptop does. I often found myself wiping it down. It’s why I sometimes used the ThinkPad nub in the middle of the keyboard instead for finer precision scrolling when the trackpad gestures weren’t needed.
Display & Audio
I was very impressed with the 13.3-inch 16:10 aspect ratio and 1920 x 1200 resolution IPS display onboard the ThinkPad X13s. While it’s not as bright as the 400-500 nit screens, or 4K panels you’ll get on similar devices in his price range, it definitely still has bang for the buck.
Per Lenovo, the panel on my system hits 72% of the NTSC spectrum and gets 300 nits maximum brightness. I could not verify these numbers as my Spyder5 colorimeter software doesn’t work with Windows on ARM.
Still, though, a 16:10 aspect ratio screen means more stuff fits on the screen, and there’s a ton of room for multitasking. The lower resolution also helps with battery life. 300 nits might seem low, but I assure you it is still bright enough to work outdoors or under bright office lights. I tweeted a photo if you’re curious. When plugged in, that screen does seem to hit past 300 nits, even.
Here's me using the display out in my yard. It's a cloudy day but I'd say the display is still readable outside. It's clearly not as good as a MacBook which has a 500 bit panel, obviously. But it's still readable and usable outdoors. pic.twitter.com/uA5HoASfji
As far as multimedia goes, I did feel like the display gets really deep blacks and bright colors. The red-on-black Lenovo logo on the boot screen, for example, really sticks out. When watching a nature movie featuring undersea creatures, the purple colors of coral really looked vibrant. Even the blue in a Blue tang fish looked bright.
Related to that multimedia are the speakers. The ThinkPad X13s has Dolby Audio with 2 user-facing speakers next to the keyboard deck. Lenovo doesn’t provide specs on the speakers, but it says that there’s a bunch of tech under the hood of the laptop.
That includes AI-based noise suppression & echo cancellation & Qualcomm aptX audio technology. When I listen to songs on Spotify, they were pleasing on the ThinkPad, though there’s not as much bass as I expected. I definitely preferred headphones for music but for audio calls, these speakers excel.
Webcam performance & microphone
With a 5-megapixel webcam, the ThinkPad X13s is already in front of most Windows systems. It is high-quality and makes this system great for hybrid work. I called my friend in Los Angeles on Skype using the ThinkPad, and she asked me if I was using my 4K webcam for the call. That’s how good the webcam is.
You can check the video above to see how I looked when using the ThinkPad X13s for a podcast. The microphone is also up to snuff, as there are a ton of AI-feature under the hood that backs it. You can optimize the microphone and have it suppress noise, and use acoustic echo cancellation or optimize it for interviews, your voice, or multiple voices.
Again, this all means this ThinkPad will have your back for video conferencing. There are even optional computer vision human-presence detection alerts onboard this webcam, too. This is so that the system can lock if you walk away.
Performance
Editor’s note: Windows on ARM limits which kind of testing software we can use. We also don’t have paid access to most testing software, but we did our best to benchmark based on our real-world experiences.
The performance of the ThinkPad X13s is what makes this one of the best Windows on ARM systems in a while. The Qualcomm Snapdragon 8cX Gen 3 might not be an Apple M1 killer, but in the Windows on ARM class, it is at the top. In fact, so close to the top that it even approaches a quad-core Intel Core i5 processor in performance.
But as good as that sounds, there is a warning. Do not depend on the ThinkPad X13s for GPU-intensive tasks unless that app is ARM native or ARM optimized. Stick to basic emulated Win32 apps and ARM-native Windows apps instead. Here’s the story as to why.
Specs-wise, the Qualcomm Snapdragon 8cX Gen 3 has 8 cores, and 8 logical processors. The GPU on board is Qualcomm Adreno 690 graphics (on my unit graphics have 16GB of virtual shared memory.) It can hit speeds of up to 3.0 GHz. Lenovo and Qualcomm claim that you can see up to an 85% generational CPU performance increase, and a 60% generational GPU performance increase. System-level performance can also be boosted by up to 57%, according to Lenovo. Oh, and do note this is a 5nm SoC, which even Intel hasn’t accomplished yet.
Okay, so enough marketing jargon. Here are the numbers. In Geekbench 5, the ThinkPad scores great for its class The ThinkPad x13s netted 1,118 single-core and 5,776 multi-core results. Yes, it’s behind the MacBook Air M1, which got 1,727 single-core and 7,585 multi-core results, but there’s a need to dig deeper in the Windows space.
Compared to the Lenovo Flex 5G, which has the Snapdragon 8cx 5G inside, the difference is amazing. The Flex 5G’s 700 scores in the single-core test and 2,802 in the multi-core test. This is even ahead of the HP Elite Folio with Qualcomm Snapdragon 8cx Gen 2, which has an 801 single-core Score, and a 3,139 multi-core score. As for the Surface Pro X with SQ2, that hits a 722 single-core score, and a 2623 multi-core score.
For reference, a quad-core Intel Core i5-11320H CPU on a Dell Inspiron 15 nets a 1,429 single-core score and a 4,275 multi-core score. So, Lenovo and Qualcomm have hit close to Intel’s performance for the first time, and on a lower-wattage chip! And, on paper, this is the highest-scoring ARM-based Windows laptop, ever.
But those are just numbers. In real-world office tasks, the ThinkPad X13s excels. In using 10+ tabs in Edge, the 32-bit version of Chrome, and Teams, I noticed no slowdowns or other issues. That’s mainly because Teams and Edge are optimized for ARM. These apps can run all day without performance hits.
However. Chrome isn’t optimized yet, and is known to be a performance hog. To my surprise, it runs great on this ThinkPad. The Speedometer 2.0 score results of 87.2 can attest to that, as it closes in close to the 100 target range we get with most Windows laptops. It’s also why I noticed no performance hits when running Chrome exclusively under emulation.
The Speedometer 2.0 score is 87.2. Usually, 100 is what most Intel laptops get. My Mac Mini M1 got a 282, for reference. The M1 MacBook Air gets a 220. This doesn't mean much for web browsing, though. It's another subjective benchmark. CC @gustavokov who asked me to do this. pic.twitter.com/BR4LENDWt0
But thanks to the new 64-bit app-emulation in Windows 11, even an app like Wondershare Filmora Wondershare will run on the ThinkPad X13s. That’s where the fault comes though.
While apps like Visual Studio 2022 are optimized for Windows on ARM and can read the Adreno GPU on board the system, most apps that run under the new 64-bit emulation layer in Windows 11 on ARM (or even the 32-bit layer) have issue with it due to the CPU and GPU being passively cooled. Instead, it depends on the CPU, and that really cuts out the potential power of the ThinkPad x13s.
Encoding videos and using GPU-intensive apps, for example, will not be a great experience on this machine. In my test with Cinebench, which runs under emulation, the ThinkPad just sees the CPU and netted some really poor results with 2,029 for multi-core, and 554 single-core. It could just be me, though. Some seem to indicate that they’ve been able to see the GPU used on some 32-bit and 64-bit Windows 11 apps in Windows on ARM (see the comments for more.)
I still think that if you want to buy this, definitely don’t do so for video editing. I tried to edit the OnPodcast on this machine, and it didn’t end well, with the encoding of a 30-minute podcast taking nearly as long as the podcast itself. Photo editing, though, should work quite well. While I didn’t test it as I don’t have the software in my suite, there are native Adobe Photoshop and Adobe Lightroom versions for Windows on ARM.
Hmm, is my favorite video editor, Wondershare Filmora optimized for Windows on ARM? It doesn't show in 32-bit mode like Chrome and other apps do. It acts like it sees the GPU but doesn't use it? A short pod takes 25 mins to encode on the ThinkPad X13s. Not good, I guess. pic.twitter.com/IheEhrhBAI
That also means gaming isn’t ideal on the ThinkPad X13s. This is still a machine meant for office work and not for gaming, other than through the cloud. I tried playing CS: Go full screen, and the ThinkPad kept freezing. I had to put it into a windowed mode to get better frames and lower the settings to very basic graphics levels. Other than that, basic Steam games like Broforce played well, and so did Windows Store games that are optimized for ARM, like Asphalt 8. Many people have asked me this question for some reason, and I will say I won’t trust the ThinkPad X13s for playing titles like Doom. For that, you need a real gaming laptop as a passively cooled machine like this one can’t handle it.
It runs nicely in the windowed mode at a solid 30 frames tho with settings on low. But you shouldn't have to do this. pic.twitter.com/iRnVHdR1Tq
All in all, Microsoft has fixed a lot of the problems with Windows on ARM thanks to 32-bit and 64-bit app emulation support. Along with the physical performance changes with the 8cx Gen 3, this enables the ThinkPad X13s to unlock power and be a well-performing machine for office tasks, and the basics businesses might need — especially when compared to other WOA systems.
Beyond that, though, the ThinkPad X13s will struggle if a GPU-hungry app hasn’t been fully optimized to run on Windows on ARM. Basic Win32 apps, though, will be fine. It’s why there’s the App Assurance Program that businesses can use through Microsoft to ensure their apps run on this device. I still think Microsoft needs to figure out how to unlock the GPU for app emulation on Windows on ARM for this platform to be taken seriously, but for now, the gains with the 8cx Gen 3 are great.
Another problem that’s yet to be addressed? Driver issues. Drivers for hardware like printers, games, and apps only work on this system if they were designed for Windows on ARM specifically. That means my printer didn’t work with my ThinkPad. Third-party antivirus and programs like Oracle Virtualbox also failed to work, too. Microsoft, though, does have Hyper-V on Windows 11 Pro, which I used on the ThinkPad x13s to use a Windows 10 VM.
Security & Pluton Chip
Hey again. The BIOS won’t update for some reason. It’s stuck in an update available loop and says it installed but it didn’t. Anyways I did enable Pluton through the BIOS settings as you showed. Now I have trusted security from Microsoft. pic.twitter.com/mI8zmbzBw0
I do want to mention that the ThinkPad X13s is a device with Microsoft’s Pluton Security Processor. I talked about Pluton before, but it is a new chip-to-cloud approach for security, with two big benefits you need to know about.
The first is the ability for Microsoft to update the firmware of the Pluton processor through Windows Update, to help keep the chip up to date against the latest threats. Second up, is physical attack resilience. Since Pluton is built into the die on the Qualcomm Snapdragon 8cX SoC found on the ThinkPad X13s, attack methods like bus interfaces, which might pass data between the SoC and other components won’t be exposed.
As Microsoft’s David Weston showed me on Twitter, Pluton is actually not enabled by default on the ThinkPad X13s. I had to manually enable it so the device will use Pluton over the in-built TPM. To enable it, I disabled Bitlocker, went into the BIOS, and choose the Microsoft Pluton option.
Battery Life
Battery life is the best part of Windows on ARM laptops, and why you might want to buy this. The ThinkPad X13s netted me about 12 hours of battery for web browsing in my tests, with a loss of 10% an hour. That’s with me using Edge, system apps, and the screen at 34% brightness. You can see how my testing evolved in the below Twitter thread.
Day 2 of battery testing in my real world. 100% charged at around 9:45 AM. down to 75% at 12:53 PM. Off for a quick trip now and will put the laptop on standby let's see what happens when I open it when I get home… pic.twitter.com/VMlecs869S
In my multimedia test, where I looped the 1080p Spiderman: No way Home trailer with the screen at 30% brightness, and Wi-Fi off, I got to 27 hours of battery. Most Windows laptops get around 9-10 hours of battery life for web browsing and similar numbers for multimedia replay, if not, worse.
Lenovo quotes up to 28 hours of battery for continuous battery playback. Battery life is the strength of Windows on ARM, but it’s boosted a bit extra on the ThinkPad X13s. This is thanks to the lower resolution screen.
A champion laptop for Windows on ARM
The Lenovo ThinkPad X13s is one of the best Windows on ARM laptops that you can buy. It sports killer battery life and really great day-to-day performance for a device of its class. That’s mainly thanks to 32-bit and 64-bit app-emulation in Windows 11 and the power of the Snapdragon 8cx Gen 3. Only the fact that emulated apps can’t leverage the GPU holds this back from being the perfect laptop.
There are books written about troubleshooting Windows 10 issues. However, there are rare and peculiar errors that can make usage as a nerve-wracking experience.
One of those error comes in many variations with the same result: something keeps you from copying the file in the Windows system surroundings.
In order to address this, we enlisted a few solutions. So if you’re unable to copy-paste a file or a folder in Windows 10, make sure to gradually progress through the list.
Now, even though File Explorer allows users to access certain archived/zipped files, it’s still a niche where third-party archivers are a better choice.
If an archived file is encrypted, Windows-own File Explorer will have a hard time recognizing it and it won’t be able to copy it from location A to location B.
What you’ll need to do is extract the individual files from the archive and copy them to the desired location afterward.
There are few tools for the job, but the best is by far WinZip. After you download and install this excellent tool, unarchiving the file is just 2 clicks away.
”WinZip”
”WinZip
”Free
&aff_sub2=Native” current_url=”true” button_text=”Get it now” image=”https://windowsreport.com/wp-content/uploads/2017/11/WinZip-button-210×160.png”]
2. Make sure that the file format is supported
Firstly, even though Windows shell supports an abundance of different file formats, it can have a hard time with the cross-system files which come from Linux.
So, one thing to take into consideration is double-checking the file extensions.
If you‘re copying a folder which contains a non-NTFSfile, the system won’t be able to recognize it. Thus, an error in the process will occur.
What you can do is, in case you have a dual–boot option, to transfer the file within the Linux system and then access and copy the file within the Windowsshell.
3. Scan for HDD errors
Right-click Start and open Command Prompt (Admin).
In the command-line, type the following line and press Enter: chkdsk /f C:
After the HDD is scanned for errors, restart your PC.
If this issue is caused by a malware infection, a powerful antivirus should be able to locate the infection and remove it before it causes other errors or damage to your system.
Look for an antivirus with anti-phishing, anti-fraud, advanced threat defense, and web attack prevention features.
Also, make sure to post your questions or alternative solutions in the comments section below. We’ll be glad to hear from you.
In this post, we have listed some of the best browsers that sync seamlessly with Etsy and can eventually help you close a sale.
Why can’t I get Etsy on my computer?
While Etsy works pretty well with some other browsers like Opera as well, it recommends a list of browsers that you can use to access the online shopping portal.
So, if you are not using any major browsers, it may be incompatible with the e-commerce portal.
However, if you are wondering how to update a compatible browser through my browser settings, check for the latest update on the browser’s settings page.
Here’s a quick rundown of the best browser recommendations to access Etsy.
Firefox has been offering features for online shoppers for over a decade now and it’s easily a pro at it.
It offers a good range of add-ons specially dedicated to online shoppers that helps you to stay updated on special offers and coupons.
Moreover, consumers can shop privately using its private browsing mode without any fear that their passwords, browsing history, or cookies would be saved.
Below are some of its other important features:
Auto-populate card details with complete security
Create emails from open tabs to create a product wishlist
Firefox monitor to help you check if you’ve been part of a data breach
Who doesn’t love a great adventure? With Xbox Game Pass, you can go on an unforgettable video game adventure any time you like, all without having to get up off the couch (except to raid the fridge on occasion).
Adventure games invite us to explore new worlds and meet fascinating characters. And often, we get a memorable story in the bargain. But if you’re new to Game Pass you may not know where to start with all this grand adventuring. We’ve got you covered with these Game Pass recommendations for those who seek the thrill of adventure.
Far: Changing Tides
Few games capture an atmosphere quite like this one. Published by Frontier Foundry, this grand adventure is set in a haunted post-deluge world brimming with danger. And players will have to brave those dangers to collect salvage and gather resources to keep their ship afloat.
ReCore
When Joule Adams awakes from her centuries-long cryo-induced sleep, she finds that her home – the utopian colony of Far Eden – lay in ruins. Don’t you just hate when that happens?
ReCore follows Joule’s quest to discover what happened to Far Eden in this intriguing open-world adventure that combines platforming, third-person shooter and exploration elements.
Sable
In this gorgeous open-world exploration adventure, players guide the eponymous young girl Sable on a coming-of-age quest. Sable must brave the perils of a ruined desert planet in search of a suitable mask with which she can return to her nomadic clan. Luckily, she has a customizable hoverbike to help her along the way.
Subnautica: Below Zero
Both the original Subnautica and its 2021 sequel Subnautica: Below Zero are available on Game Pass as of the time of this writing. Both are fine open-world, first-person survival adventures each in their own right. Explore a deep-sea alien world, collecting resources, crafting tools, building bases and constructing submersibles along the way. Survive the perils of the abyss and unveil the many secrets of planet 4546B.
The Forgotten City
A mystery adventure game with roleplaying aspects, The Forgotten City was originally a Skyrim mod released in 2015. A beautiful rendition of an ancient Roman City, The Forgotten City boasts an award-winning story that puts an entirely different spin on the phrase “The Golden Rule.”
Wrap up
So what do you think of our Game Pass recommendations for adventure games? Are there any games on this list that have you chomping at the bit to dive into? Let us know in the comments below. And if you don’t have Xbox Game Pass yet, you can check it out here. You can also visit the FAQ page for additional info.
Google Chrome just got bumped up to 103.0.5060.114. This version is in place to help Windows users bypass a zero-day vulnerability, which hackers use to compromise their system. As spotted by the folks at BleepingComputer, this marks the fourth Chrome zero-day patch update this year.
The zero-day bug fixed today (tracked as CVE-2022-2294) is a high severity heap-based buffer overflow weakness in the WebRTC (Web Real-Time Communications) component, reported by Jan Vojtesek of the Avast Threat Intelligence team on Friday, July 1.
According to a blog post by Google, they confirmed that they were aware of the CVE-2022-2294 exploit. The latest version has already hit general availability worldwide in the Stable Desktop channel. They further indicated that it would only take a couple of days or weeks till it was available across the entire userbase.
Google has indicated that the attacks via this threat “range from program crashes and arbitrary code execution to bypassing security solutions if code execution is achieved during the attack”. However, they are yet to provide a detailed account highlighting any of these attacks.
That said, Google has stated that “Access to bug details and links may be kept restricted until a majority of users are updated with a fix. We will also retain restrictions if the bug exists in a third-party library that other projects similarly depend on, but haven’t yet fixed.”
For Windows users, your browser is supposed to automatically install this update, but if this is not the case then you can go to your browser’s menu, then click on Help and select About Google Chrome to manually update it.
I have been very loyal to my Dell monitors for years, and it would take a lot of persuasion for me to switch to a different brand. But the Innocn 4K 27-inch monitor might have persuaded me to make the switch.
The Innocn 27C1U UHD 3848 x 2160px flat screen monitor has an IPS panel and LED backlighting delivers a nice bright interface and sharp images. The monitor has been designed to have a minimal frame which gives a maximum screen real-estate. The VESA ( Video Electronics Standards Association) stand is adjustable for height up to 120mm and pivots along its vertical axis up to 90 degrees if you prefer your monitor in portrait orientation. The monitor will also rotate 45 degrees in each direction on its stand and will tilt from 5 degrees forward to 20 degrees back from the vertical plane.
What is in the Innocn box?
In the box, there is the display screen, a type-C cable, a DP cable and a USB upstream cable. There is also a power adapter and cable, the stand and the base. In addition to the user manual, there is also a colour calibration report. The monitor is extremely well packed in its box so it is unlikely that it will suffer in transit to you.
On the right-hand side at the bottom of the monitor, there are five buttons underneath the screen. The button on the left invokes the menu, and the next button navigates through the menu options, and will also adjust the brightness of the monitor. The next button exits the menu or will change the input ports if you have the monitor connected to multiple units. The final button on the right is the power button.
Underneath the power button is an LED indicator which glows steady white when the monitor has power. AT the rear of the monitor there is one USB type C port and two HDMI ports. There are other connection ports at the rear of the display screen: Two USB Type-A ports and a USB Type-B port for transferring data. There is also a display port and a 3.5mm audio headphone jack next to the power port. I never managed to fill all of the ports – there were more than enough for my needs.
There are also two 5W speakers in this monitor which deliver a reasonable sound across the ranges – although the bass notes aren’t as rich as I like. I expect that audiophiles would connect headphones to the monitor for a richer sound. For the spoken voice on video calls and music played at average
Testing the Innocn 27C1U monitor
I ran a few tests using web-based software tools to check that the calibration of the monitor was not an exaggeration as can sometimes be found with lesser-known monitors.I used tools such as the Eizo monitor test and a browser-based refresh rate tool. I also checked the colour calibration.
The Eizo test suite allows you to test for defective pixels across a range of colours. You can check for the colour uniformity, colour distances, gradients and sharpness. I also had a look at the viewing angle, its gamma setting and the response time.
I found no defective pixels in the monitor across each colour. The image was uniform across the grayscale pattern and there were no areas of differing colours. The Innocn monitor was able to detect different colour distances of two grade differences clearly. Any closer than this and my eyes could have been the issue – not the monitor.
I also found that there was a good gradient across greyscale – even at 256 steps, the colours were easily discernible. The sharpness was good even at 10-point font size – impressive on a larger monitor.
I did, however, notice a difference when testing the viewing angle as I moved my head from side to side. This was not a significant difference and would not have impacted my viewing of the screen. I had a slight distortion of the shapes – nothing more.
The Gamma value was 1.2 according to the test, and the speed blur was 1510 pixels per second – but again – this might have been due to my eyes tracking across a larger screen.
I tested the refresh rate which was 60.050Hz – pretty standard I reckon. More accuracy could have been obtained in a dedicated test lab – but my home office would have to do for this test – I do not have lab-quality testing and measuring equipment.
The only drawback I could find about this monitor was the lack of an integrated webcam meaning I could not use this for my main screen. I would have to buy an external video camera to do web conferences – or position the monitor so that my image on the screen showed me looking roughly at the monitor itself, not off to one side. However, I am splitting hairs here. This monitor is designed for use in gaming or business and an additional webcam is a minor irritation.
Would I buy the Innocn 27C1U 27-inch monitor?
So all in all, I am impressed with the quality of the Innocn 27C1U 27-inch monitor which has far exceeded my expectations. It is bright and clear and the images have a good depth of colour. There is minimal blurring and the sound is good for office work. For a little over $400, the Innocn 27C1U 27-inch monitor is a bargain worth considering.
The Chromebook is a compact, lightweight, fashionable, and compatible laptop that runs on Google’s ChromeOS. And when it comes to games, there are a few excellent browser for Chromebook to have the best gaming experience.
It is a one-of-a-kind operating system that shares certain characteristics with Windows and Mac. It also includes excellent security and privacy features to keep you safe.
Google Chrome is the built-in internet browser on the Chromebook. Despite its reputation as the greatest online browser for ChromeOS, users may become tired of using the same browser over and over.
Experimentation and variety are appealing to most people, and more importantly, you may be looking for a more specialized gaming browser for your Chromebook. Let us introduce you to the best browsers for gamers that will work on your Chromebook.
Can Chromebook run Opera GX?
Opera GX is one of the most advanced browsers that can run on pretty much any operating system including Chrome OS on the Chromebook. And, it would work just as well as it does on Windows or Mac.
So, if you haven’t yet tried Opera GX, now is the time to install the best gaming browser for Chromebook.
Is Opera GX better than Chrome?
Both browsers have their set of pros and cons, but the pros for Opera GX far outweigh the ones for Chome. It doesn’t consume as much resources, so your PC is not always under undue stress.
Also, Opera GX offers several customizations to enhance your gaming experience. And, it comes with built-in features like an ad-blocker, VPN, and video popout with multimedia controls. So, it can be safely said that Opera GX is indeed better than Chrome.
There is no finer browser than Opera GX if you’re searching for a browser designed specifically for gamers.
Opera GX is a variant of the original Opera browser that adds new tools to assist gamers in managing their resources. For example, you may employ RAM, CPU, and network limiters in this browser to locate the perfect balance for gaming quality and performance.
Opera GX is also a very light browser, which means it won’t tax your Chromebook’s resources, which is essential since web games may use a lot of them.
The Opera GX for Chromebook also has privacy features, personalization options, and even a mobile version of the browser so you can play games on the go.
There are several custom themes available to fit your favorite color. When your gaming sessions go too lengthy, you may switch to a dark mode to make it easier on the eyes, which can also help you concentrate better on your game.
Opera GX has a GX area where you can discover free games and a calendar with popular game news and releases. Also, the developed recently introduced, Operius, an Opera GX offline game, you can try when the Internet connection is down.
Twitch, a broadcasting network, is now incorporated into the browser, allowing you to follow popular gamers with a single click. Discord is also integrated into the browser if you want to keep up with gaming mates or a team.
Other features include a messenger, a unique and fast video player, and pinboards. These tools are easy to access since they’re all grouped in a quick navigational menu.
Depending on whatever website you’re playing on, you’ll also be safeguarded by the browser’s free VPN and adblocker.
Important features:
Advanced theme customization
A video pop-out feature
Free unlimited bandwidth VPN
Opera GX
The world’s Number 1 browser made specifically for all gaming fans.
Gamers prefer having complete control of their software. If you share this sentiment, Vivaldi will be an excellent gaming browser for Chromebook.
Vivaldi is a cutting-edge browser that allows for complete customization. You get to disassemble it down to the tiniest detail and customize its interface to your liking. As a result, Vivaldi can be configured to be anything from the simplest browser you’ve ever seen to a full-stack browser.
Several options may help you get rid of extra tools like Screen Capture, Notes, Image Properties, etc. This implies that you’ll have to use fewer resources to operate other applications and programs, leaving you with enough capacity to play browser games.
A custom search engine, configurable macros, tab grouping, a notes manager, split-screen tab viewing, and mouse gestures are some of the distinctive and popular Vivaldi features.
All its’ features are unique for gaming, but they also make surfing easier whether you’re reading gaming news, looking for new games, or keeping up with popular gamers online.
Vivaldi has privacy features, including a built-in ad blocker and a bespoke, private search engine. Search is not recorded for marketing reasons, and personal data isn’t collected.
If you’re one of those players who is constantly flooded with tabs, the option to operate tabs in two stacks can help keep things organized, even if you’re running ten or more at once.
If you prefer to use Vivaldi, there are a plethora of gaming themes to pick from to round out your gaming experience.
Mozilla Firefox is very different from Chrome-based browsers, and although it isn’t known to be the most secure or fastest browser on the market, it ticks a lot of boxes for gamers.
A key reason is that it has a gaming collection extension that gives you access to various browser games for smooth and relaxed gaming.
You may also utilize Firefox’s extensions and add-ons to increase versatility and better meet your gaming demands and tastes. In addition, this browser has an inbuilt tracker blocking mechanism that can stop practically any questionable code, ensuring that your privacy is protected.
It also has a social tracker, autoplay, and a cookie blocker, so you do not have to worry about your privacy while gaming.
You may personalize this browser as a gamer by using themes, configurable search bar settings, skins, and a tab layout to play and access games.
Brave is one of the fastest lightweight browsers, meaning it wouldn’t consume only a fraction of the resources taken up by Google Chrome.
Also, as per reports, it loads web pages 4-5 times faster than the browsers we usually use. This is majorly achieved by blocking ads and trackers, which are a serious security threat as well.
Another feature that helps Brave stand out from the crowd is that it rewards users to view curated ads. And, with Brave, you can easily import extensions, passwords, and other browsing data in less than a minute.
So, if you were planning to switch to a gaming browser for Chromebook, Brave would be a good choice.
If you are one to experiment with things, Dolphin would a great option since it allows users to customize the browser as per their requirements. It has a built-in ad blocker for enhanced security and a plethora of add-ons available for added functionality.
It’s safe, quick, and offers features that are yet to be introduced on other popular browsers. For instance, the option to customize gestures for various functions comes in handy.
Besides, Dolphin offers the option to sync data across multiple devices for easy access, making it one of the best browsers for Chromebooks.
There you have it, our top recommendations for gaming browsers for your Chromebook!
We like to emphasize that all these recommendations would make the ideal solution for you depending on your personal preferences; however, the Opera GX is famous for being customized as a strict gaming browser.
If you’re a fan of Safari, we have a great guide on Safari on Chromebook, so if you want to learn if it’s possible to install it, don’t miss our guide.
We look forward to reading your comments and knowing what gaming Chromebook browsers are your more preferred options.
Live streaming on YouTube is becoming increasingly popular as it allows gamers and influencers to connect more with their viewers. Having a high-quality stream is essential for growing an audience. Keep reading to find the solution to YouTube not receiving enough video to maintain streaming.
Can I stream 4K on YouTube?
YouTube does support streaming in 4K for users with compatible equipment and software. Viewers can watch 4K streams from YouTube from their PC and smartphones now that YouTube offers 4K support for Android and iOS.
The most common cause of a low-quality stream is a poor internet connection or low bandwidth. Internet connections that are unstable or from a public network are not very reliable and can reduce the quality of the stream.
Another cause could be a build-up of YouTube’s stored data and cache or conflicting apps. Users report receiving the error: YouTube is not receiving enough video to maintain smooth streaming for the following platforms:
vMix
ATEM
OBS
FFmpeg
Wirecast
What can I do if YouTube can’t maintain streaming quality? How can I make my stream resolution better?
1. Check internet connection
Having a stable internet connection is essential for a good-quality stream. If you are getting the error: YouTube is not receiving enough video to maintain smooth streaming, the biggest culprit may be an unreliable connection.
However, users can monitor their network connection using tools. Check out our recommendations for the best ping monitoring software to ensure a low ping value.
Internet connection speed is the key to streaming video uninterrupted and preventing issues like YouTube Locate not working.
2. Adjust the bitrate
Video bitrate is the amount of data transferred during a period of time. For lag-free streaming, the recommended bitrate for a 1080p video is between 4,500 and 9,000 kbps.
YouTube, however, automatically sets a user’s stream to a Variable bitrate which means that YouTube detects the resolution and frame rate while streaming. Users can manually adjust their bitrate by turning on the manual resolution and thus maintain smooth streaming.
3. Clear browser cache
In your browser, open the menu located in the top corner.
Click on Settings.
Under Privacy & security, select Clear browsing data.
Click Clear data.
Restart your browser.
If your browser cache and data haven’t been cleared in a while, it can cause issues and affect your YouTube streams. Clearing browser data can help improve resolution quality.
If you want more options and in-depth browser data analysis, use CCleaner to clean your browser. It organizes your data in more specific categories such as download history, cookies, last saved file, and more.
If after trying the above steps you’re still receiving the error, your best bet may be to reduce the video quality. Users can adjust the resolution in the video’s settings. If there is not enough bandwidth available or if it’s congested, then the only way to stream smoothly is to reduce the quality of the video.
What affects video streaming quality?
There are a number of aspects that can affect video streaming quality. Some of which are bandwidth and internet speed and settings. However, your computer’s processor speed and cache size also have a big impact on streaming quality.
Hopefully, one of the above solutions helped solve the error YouTube is not receiving enough video to maintain smooth streaming. Let us know which step helped you fix YouTube stream lagging or if a different solution not listed above worked.
A laptop by itself is already a highly convenient and handy device. However, you can further increase its usefulness by complementing it with various accessories.
Now, there are a wide variety of laptop accessories, ranging from USB ports to laptop backpack. Wondering what the best laptop accessories are? Check out the list below!
What are the best laptop accessories deals?
Laptop bags
Perhaps the most important accessory of them all is the laptop backpack.
Why is that? Well, the convenience and portability of a notebook computer are somewhat undermined without a proper suitcase or backpack to carry it around.
Basically, a laptop is pretty much incomplete without a proper bag.
Now if you are looking for a more traditional laptop bag, then you will want to check out the AmazonBasics 15.6 inch laptop bag.
This laptop bag is incredibly cheap and it offers enough space and compartments to make it a great buy. It is great for people who are looking for a bag that offers just the basics.
If you are looking for something that is ideal for your business trips and meetings, then we recommend the Kenneth Cole Reaction Colombian Leather suitcase specifically designed for laptops.
Modern, durable, and aesthetically very pleasing, this laptop bag is perfect for professionals who travel a lot. While it is the most expensive bag in this article, it is certainly worth it.
If you’re carrying important documents, it’s only fair to offer them perfect protection, and the Vintez Fireproof Document Bag with Lock does that and a lot more.
The fire and water protection are ensured by a 4-layer non-itchy silicone coated fiberglass that passed the SGS TEST (UL94 VTM-0 certified).
Your possessions are completely safe because this business bag is woven with strong seams of fireproof thread, has metal fastenings, a durable handle, and an adjustable shoulder strap.
The bag offers a lot of space within its 14.2×10.6×4 inches dimensions and comes with three compartments for all your certificates, documents, cards, passports, money, and electronics, including your laptop.
Laptop Wireless Mouse
Arguably the next most important accessory for a laptop is a wireless mouse. Now of course you can always buy a mouse with a cord, but these tend to be far less convenient than wireless mice.
The reason behind this is that you will have to untangle the wires of your cord mouse every time you take it out of your laptop bag.
Furthermore, constantly moving your accessories around can damage the cord that is connected to the mouse.
Typically, cord mice are ideal for stationary desktop computers, while wireless mice are best for portable laptop computers.
On the other hand, if you are looking for a laptop wireless map that is designed for gaming, then we recommend the Razer Lancehead (Tournament Edition).
The gaming mouse has advanced optical sensors, great exterior design and form, light customizations, DPI buttons, and much more. It is the perfect esports-level mouse for gaming.
External Hard Drive
Typically, buying a laptop with a lot of integrated memory is quite costly. Therefore, purchasing an external hard drive usually goes hand in hand with purchasing a new laptop.
Even if you do not need the extra space, a HDD allows you to transfer large files of projects, reports, etc from device to device.
Another good option for an external hard drive (with USB 3.0) is the Toshiba HDTB410XK3AA Canvio Basics. It comes in four capacities: 1TB, 2TB, 3TB, and 4TB.
It is easy to use and doesn’t need software to install. Therefore, it quickly adds more storage capacity to your laptop.
USB 2.0 is compatible with no external AC power cord needed.
At an affordable price, this is a reliable and easy to come accessory for your laptop.
This external HDD from Seagate is a favorite among many. This is not surprising as the HDD is fast, ultra-slim, looks great, and is available on Amazon.
It needs no additional power source, as transfers and power supply are done via the same cable when connected to the PC.
If you are looking for a portable device to transfer your files that is even smaller than a portable HDD, then check out the SanDisk Extreme.
This Flash Drive is capable of reading up to 245 megabytes per second and writing up to 100 megabytes per second.
This basically means you can transfer a large file, like a full-length film, in a matter of seconds.
However, perhaps the most unique thing about this USB drive is that it comes with security software from SanDisk that allows you to encrypt your files with 128-bit AES encryption.
If you’re looking for a gaming grate USB flash drive, PNY 1TB PRO Elite can be one of the best choices you’ve got.
This little gadget comes with 1 TB of storage and it’s on par with USB 3.1 technology. That translates into 400MB/s read speed and 250MB/s write speed if you plug it into a compatible port.
We wouldn’t recommend loading important documents on it but it will hold a lot of movies and music.
Well if you are looking for a port hub that offers just USB 3.0 ports, then you should check out the Sabrent USB Hub.
This device allows you to connect four more 3.0 USB devices and transfer data at lightning-fast speeds. The only downside to this port is that you will need to plug in the adapter to make it run.
However, if you do not mind this small inconvenience then this USB port is ideal because it is both cheap and fast.
Many users are wondering if they can get the Twitch audio-only option for the browser version, similar to the one available for mobile.
Since music streams have gotten a lot more popular lately, having the possibility to use Twitch as the mainstreaming/radio service would definitely be great.
In this article, we will explore what steps you need to make Twitch sound only if you are using the desktop app.
What is the best browser for Twitch audio-only?
Opera GX is one of the most popular browsers for gaming enthusiasts since it comes with integrated dedicated services.
It is dedicated to streaming and chatting apps, so you can always keep in touch with your favorite streamers.
Opera GX comes with a Twitch integration in the sidebar which makes it easier to check your favorite channels.
Thanks to the Twitch integration you can easily see all the channels you follow, and you can receive notifications when someone you follow goes online.
Check out some other Opera GX features:
Free VPN
Ad-blocker
Easy to use
Opera GX
Browse your Twitch content without draining all resources and use the audio-only feature anytime.
The Twitch Radio Mode extension first of is great for saving network bandwidth, RAM, and other resources.
In case you were wondering how to watch Twitch without video, thanks to this extension, you can play only the sound of a stream.
Once you install the extension, anytime you want to play the Twitch audio-only option in the browser, there is a radio button in the control panel that can be pressed.
Of course, there are other extensions you can try, but this one seems to be one of the user’s favorites.
As of right now, there is not a direct option to switch to the Twitch audio-only mode for the browser, other than the already presented extensions.
Taking this into consideration sending your suggestion is a great idea, using the Twitch forum.
Hopefully, the request will be taken into consideration and this feature will be added as soon as possible.
What should I know about Twitch audio-only?
Before discovering how to do sound only on Twitch’s PC version, let’s see what exactly is this and what benefits generates.
With the Twitch audio-only feature, the data usage will decrease considerably as well since running video takes a lot of extra resources.
Users who tried it are extremely pleased with how it works with the Twitch app. So, be ready to uncover more about how to use it in the desktop version.
Also, do not forget that you can also find the Twitch audio-only feature available for smartphones that work with Android.
We hope that the details we offered today helped you choose the best extension to use for the Twitch audio-only option when it comes to the browser.
If you have additional suggestions or recommendations, we would love to hear them in the comments section below.
There are different reasons RuneScape might not load. From problems within your PC to interference from another app, the causes are numerous. Below are some of the common ones:
Outdated drivers
Compatibility issues
Firewall interference
Problems with your version of the game.
Why is RuneScape stuck at loading application resources?
RuneScape will be stuck at loading application resources if you use a second screen connected via an HDMI cable. This is because the client and the loading screen must share the same monitor for the game to load properly.
The only way to fix this issue is to close the client, unplug the HDMI cable, and connect it back once the client finishes loading successfully.
How can I get RuneScape to load again?
1. Temporarily disable antivirus/firewall
If you have an antivirus or any firewall activated on your PC, it might be causing RuneScape not loading on Steam. This might create a false alarm and stop the game from connecting to its server.
In this case, the easiest way to fix the issue of Old School or the normal RuneScape not loading is to disable the antivirus software temporarily. After the game has established a connection, you can enable it again.
2. Update the graphics driver
2.1 Update driver manually
Press the Windows+ Xkeys and select Device Manager.
Click on the Display adapters option to expand it.
Right-click on any driver there and select the Update driver option.
Choose the Search automatically for drivers option.
Wait for the search to complete and update the driver if there are any.
Outdated drivers cause RuneScape not loading issues accompanied by a black screen. This manual driver update should help restore normalcy.
Instead of going through the numerous steps above to search and install a driver update, you can automate the process with a driver updater in Fortect Driver Updater.
This tool is a top-notch software that automatically scans, updates, and fixes drivers. Whether outdated, broken, or missing drivers, this tool keeps them all in top shape.
And with a very large database of original drivers, you can be sure it has everything you need to fix RuneScape stuck on loading, please wait, and other related issues.
Check the box for Run this program in compatibility mode for.
Finally, click the Apply button followed by OK.
This fix is effective if RuneScape is not loading after an update on your PC.
The RuneScape not loading can be exasperating, as the cause can sometimes be difficult to pinpoint. With the fixes recommended in this guide, you should be able to get the game working again.
A while ago, Firefox and Chrome users complained about sec_error_ocsp_future_response on the Mozilla forum. Unfortunately, this is still not in the past.
It seems then the error code: sec_error_ocsp_future_response pops out when users try to open webpages in Firefox and Chrome.
As frustrating as it may be, there are still ways to circumvent this error and we will explore them in the guide below. So, read on and discover how to fix sec_error_ocsp_future_response on Windows 7, 10, and 11.
What does Sec_error_ocsp_future_response mean?
This error occurs if the OCSP response isn’t valid. This can happen if there are problems with date and time on your PC.
The full error message states that the the OCSP response is not yet valid (contains a date in the future).
An error occurred during a connection to. The OCSP response is not yet valid (contains a date in the future). Error code: SEC_ERROR_OCSP_FUTURE_RESPONSE.
In this guide we’ll show you how to fix sec_error_ocsp_future_response in Firefox and Chrome, so let’s get started.
Quick Tip:
If you have trouble opening web pages in Firefox on a permanent basis, you should consider switching to Opera One.
Based on the impressive core features this browser has to offer, it’s safe to say you won’t be bothered by sec_error_ocsp_future_response again. The video pop-up, built-in VPN, integrated messenger, and My Flow are just some of its biggest enhancements.
Opera One
Looking for a fast and reliable browser with a redesigned UI? Suit yourself right away.
How to fix error code Sec_ error_ OCSP_ old_response?
1. Update the browser
OpenFirefox.
Click Firefox’s Open menu button. Click Help to open further menu options.
Select the About Firefox option.
Press the Restart to update Firefox button.
Error code: sec_error_ocsp_future_response can be triggered when users run an outdated version of the browser. Make sure you follow the steps we described above to bring Firefox up to date.
If you’re on Chrome, do the following:
Click the menu button and select Help. Now choose About Google Chrome.
Wait for the updates to download.
Restart your browser.
2. Check the time and date in Windows 10
Press the Windows key + S keyboard shortcut.
Enter the keyword time in the search box. Click Change the date and time.
Turn on the Set the time automatically option.
Restart your desktop or laptop.
Click the Change button to manually adjust the time and date settings.
Press the Change button, and restart Windows.
The ocsp response is not yet valid (contains a date in the future). error code: sec_error_ocsp_future_response message appears if the date or time on your PC is wrong, so update it to fix this issue.
Note: You might also need to replace your PC’s CMOS battery if the date and time keep changing in Windows. You can do that by removing the old CMOS from the motherboard, but some users might prefer to hand their PCs to IT repair services to replace CMOS batteries.
3. Turn off OCSP verification
Launch Firefox.
Click the menu button and select Settings.
Click Privacy and Security on the left of the tab. Scroll down to the Query OCSP responder servers to confirm the current validity of the certificates option and disable it.
Close and restart Firefox.
One way to circumvent the Unable to check ocsp response due to network error is to disable certain security features in the browser, so you might want to try that as well.
By following these steps, you should be able to completely fix the SEC_ERROR_OCSP_FUTURE_RESPONSE error in Mozilla Firefox.
Discord is the best web-communication tool that you can use to communicate with friends and family members.
With multiple mods, you can even enhance your voice chatting features on Discord. One such mod is Voicemod.
Voicemod is a free voice changer that lets you change your voice by applying filters that bring the fun factor while voice chatting with your friends. Do note that there is an extensive list of voice filters from which you can choose within Voicemod.
However, Voicemod is known to misbehave often, and sometimes it won’t work at all with Discord. Several users have experienced Voicemod not recognizing the mic issue.
This prevents users from using the voice filters using the mod and, hence, makes the chatting on Discord a little less fun.
If you are one of such users and are looking for solutions to fix Voicemod not recognizing mic issue, then you are in the right place.
Because in this guide, we will explain to you all the features that will help you fix the problem at hand. Let us check out the guide.
How to add Voicemod to Discord?
Visit the official Voicemod website and download the app.
Install the app on your PC.
Verify your account by login in using your email ID, Twitch ID, or Discord ID.
On the homepage, Voicemod will ask you to select your default Select your microphone, and Select your speaker. Do the necessary selections.
Now open the Discord app.
Click on the Settings icon.
From the left pane, select Voice & Video.
Under the INPUT DEVICE option, select the Microphone (Voicemod Virtual Audio Device (WDM)) and select your headphone as your OUTPUT DEVICE.
Then it will open the Voicemod app.
You will be asked to do some tweaks under Discord User Settings, i.e., disable Input Sensitivity, Noise Suppression, Echo Cancellation, Noise Reduction, and Automatic Gain Control.
After you do all the above-said tweaks, you can use the Voicemod voice changer application with your Discord app and have some fun chatting with your friends by applying voice filters.
How can I fix Voicemod not recognizing mic issue?
1. Restart your PC and app
The first simple solution that we would advise you to try out to fix the problem is to simply restart your PC.
There are chances that the settings that you have chosen with the Voicemod or Discord app did not really apply to these apps, and they require a restart.
In such a case, you can turn off your PC, and wait for about 10 seconds before booting it back up again. Also, you can try to close the Voicemod and Discord apps and open them back again to check if this resolves the Voicemod not recognizing mic issue.
2. Set up your input device properly
Press Win + I keys together to open Settings.
Select Sound.
Scroll down and under the Input section, select the correct microphone device.
Open Control Panel.
Click on Sound.
Switch to the Recording tab.
Make sure to enable the correct microphone device.
Restart the Voicemod application and check if this fixes the Voicemod not recognizing mic issue or not. Similarly, make sure to select the correct output device under the Playback tab.
Under the APP SETTINGS section in the left pane, click on Voice & Video.
Under the INPUT DEVICE option, select the Microphone (Voicemod Virtual Audio Device (WDM)) and select your headphone as your OUTPUT DEVICE.
In order for Voicemod to work correctly with your target app, you need to configure it appropriately. The best part is that whenever you download Voicemod, it prompts you to perform the settings for it to function correctly.
Follow the above steps to select the correct input device in the target application, and check if Voicemod is working as intended or not.
Furthermore, if you are facing any microphone or audio-related issues with Discord, you can check out our dedicated guides Is the Discord mic not working in browser/app, or Can’t hear anyone on Discord? [3 Easy Solutions] for quick fixes.
4. Reinstall Voicemod drivers
Press the Win + R keys to open the Run dialog.
Type the below command and press Enter. devmgmt.msc
Expand the Audio inputs and outputs section.
Right-click on the Microphone (Voicemod Virtual Audio Device (WDM)) and select Uninstall device from the pop-up menu.
Your system will check for any available updates and prompt you to install it if found any.
Your PC may not function smoothly and may display multiple errors, including the Voicemod not recognizing mic issue, due to a system glitch or bug in the current version of the Windows update.
In such a case, we would advise you to check for a fresh update and install it. Microsoft typically upgrades its operating system on a regular basis, including the most recent security features and bug fixes.
6. Reinstall Voicemod
There are chances that the previous instance of Voicemod installed on your PC did not install correctly and missed a few important files during the process.
To rule out this doubt, you can uninstall Voicemod from your PC, head over to the official website, and download the latest version of Voicemod.
Follow the on-screen instructions to install the app on your PC and connect with your target app, such as Discord, and go through the steps mentioned above to set it up and finally check if this fixes the issue or not.
Voicemod can’t hear myself: How to quickly fix it
There are several user reports on various forums and Reddit that indicate that they cannot hear themselves in Voicemod.
Since it has been reported by multiple users, it does seem to be a pretty serious issue. While there is no perfect solution to fix this, as users have fixed it by applying different solutions, we have a few effective tips that may help you fix the problem, if you haven’t already fixed it.
➡ Turn off mic-exclusive mode
Launch Voicemod.
Go to Settings.
Expand Advanced settings.
Turn off the toggle for MIC EXCLUSIVE MODE.
➡ Contact customer support
As a last resort, for any of your Voicemod-related problems, you can get in touch with its customer support and hopefully get your query resolved.
You can visit this official support page, select the topic of the query, enter your issue, along with your name, email address, country, etc., and expect a reply from their end for a solution.
Business laptop bags tend to be boring, black, and boxy. In an ocean of similar-looking bags, they will not win you any points for personality and style.
But let’s be honest, in this day and age, you don’t want to be embarrassed about carrying a nasty laptop bag around.
This is the exact reason for which we have selected a series of well-made, trendy, and smart business laptop bags for traveling. A great laptop bag can make traveling to your next business destination a bit less stressful.
The tech-savvy bags we’ve got prepared below mean business when it comes to organizing and protecting your stuff. These models will amaze you as they’re not only useful but incredibly stylish as well.
What are the best business laptop bags that I can buy?
Topping off our list is a business bag that looks simple and yet has a bit of elegance to it without sacrificing utility at all.
It is made with durable, water-resistant canvas, and together with the inner padding, it is excellent for protecting whatever you are carrying in it, including a laptop.
Speaking of which, if you want it as a dedicated laptop bag, know it can handle any model up to 15.6-inch in diagonal.
If you are looking for a business laptop bag that won’t draw too much attention and focuses on utility, then the Ytonet laptop bag is the model you need.
It has plenty of pockets, the interior is very roomy, and it can be further expanded via a zipper that will allow you to fit even more things inside.
It is also very padded for extra protection from whatever you are carrying, and the water-resistant material makes it great if you’re caught in the rain.
Sometimes brand-name products are not worth the money since the logo is pretty much what skyrockets the price, so Amazon basics are a great alternative.
This is also the case with the 13 best business travel laptop bags, as it is an incredibly affordable option for those who really need a laptop travel bag but have a tight budget.
However, this bag isn’t wrong at all, as it has all the essential features that you would expect from such a product, and they are surprisingly well-built, too.
Business laptop bags don’t all have to be black, serious, and plain, especially if you’re a lady who likes to treat herself just right.
The EaseGave briefcase is the epitome of what it means to be elegant, cute, and functional simultaneously, thanks to the Vintage Purple Saffiano Eco-leather build.
It is great for work and school, and its design allows it to double as a regular bag as well, not just a bag for laptops or documents.
CoolBELL is at the cutting-edge of fashion trends. The company pursues the best quality in laptop bags and is devoted to offering the best products to its customers.
This laptop bag features three carrying styles. You can use it as a backpack, shoulder bag, and messenger bag. The straps can also be hidden when you use them as messenger and shoulder bags.
Here are the complete bag specifications:
Size: 18.8 x 5.1 x 13.7 inches; Fits laptops up to 17.3 inches.
This CoolBELL laptop bag for business traveling features two main compartments designed for keeping your laptop/tablet and other items.
The accessory compartment features pockets inside for keeping items like power cords, mice, keys, phones, passports, etc. The three front pockets have a zipper.
The bag is perfect for keeping your items safe thanks to the two layers of shockproof solid padding.
Users are very satisfied with the bag’s quality. The only setback identified by some users is the bag’s aspect was deemed a little strange. However, we really like the overall design of this laptop bag.
This business travel laptop bag has a classic look that will definitely turn heads. It is made out of Full Grain Napa Calfskin Leather.
The bag features a front zipper pocket for small miscellaneous items, and a front zipper organizer pocket for pens, business cards, and small devices.
The front zipper compartment features two sections for documents. The back zipper compartment features a padded laptop compartment that holds and protects most laptops up to 15.6 in size.
Users confirmed that this bag is an excellent product. Buyers appreciated especially the leather that the bag is made of.
This bag is made out of high-quality thick top oil leather and you should also know that it’s handmade by professional artisans. Every inch is inspected to ensure the highest standard of quality.
Here’s a brief list of the bag’s specs:
It has one laptop compartment inside
Dimensions:38(L)*11.5(W)*30.5(H)cm /15*4.5*12 Inch. Net Weight:1.48KG
It will fit 14″ Laptop,100% Brand New & Top Quality
You can wear it as a daily life bag, business or traveling bag, and so on
The bag’s price is around $150, a medium price for its value
Business traveling can be hard without ensuring the safety of your items, and the Vintez Fireproof Document Bag certainly takes care of that.
It has a size of 14.2×10.6×4 inches, and it comes with a lock, file organizer bag, home office travel safe bag, two fire, and water-resistant zippers, and multi-layered portable filling storage for documents and laptop.
The fireproof, waterproof bag has plenty of space and has three compartments to store all your documents, cards, passports, money, certificates, and electronics.
Vintez’s bag comes with a 4-layer non-itchy silicone-coated fiberglass that passed the SGS TEST (UL94 VTM-0 certified) for fire and water hazards.
The exterior material of the bag is made out of super durable water-resistant nylon fabric, and the inner material is soft fleece.
Here are the product’s specs:
External Dimensions: 15.83 x 1.18 x 11.26 inches, 40.2 x 3x 28.6CM (L x W x H).
Package Dimensions: 17 x 12.5 x 1.5 inches
Item Weight: 1.4 pounds
It is great for the most popular up to 15.6 Inch Laptops / Notebooks / Ultrabooks; it may not fit perfectly all computers due to variations in the sizes of different models.
Check out some of the bag’s key features and advantages:
Its sleek design lets you carry it with ease, and it gives you a light business fashion experience.
Its top handle can hide away and retract into the pocket, and the luggage belt from the back provides the function of fixing on the luggage trolley.
The bag is universal, and it is not designed for a particular model. But you should check your laptop’s dimensions and ensure it will fit into the internal compartment.
Most users are delighted with the product, judging by their reviews. They especially appreciate its water-resistant feature.
This Lifewit bag features some unique crazy horse leather that becomes nicer with age. Its rugged and scarred styling gives off a vintage and timeless appeal.
Check out more features of this bag below:
The messenger bag’s exterior is water-resistant, and it will manage to protect the stored items from rainy weather
The heavy-duty shoulder strap and the top carrying handle offer multiple ways of carrying
The ample storage capacity will safely secure everything from tablets, laptops, tablets, cables, documents, wallets, and so on
Its great functionality, coupled with the timeless unisex design, will make the messenger bag an ideal companion for men and women in business and casual settings
Here are the bag’s specs:
Materials: Waxed canvas & Crazy horse leather
Color: Gray
External Dimensions: 43 x 32 x 10cm/16.93 x 12.6 x 3.94in
Laptop Compartment Dimensions: 40 x 24 x 4cm/15.75 x 9.45x 1.57in
Adjustable Shoulder Strap: 27.5 – 50.5 inches
The laptop pocket on the back of the backpack can hold computers of up to 15″ in size. The integrated anti-collision isolation pad protects devices against impacts from bumps and drops.
This Viosi business laptop bag is the only product from its class that is certified by TUV Germany for RFID shielding for all standard frequencies. It keeps your credit cards safe from identity thieves.
The manufacturer used a new and improved leather treatment to eliminate color transfer. It is made from the finest selection of full buffalo hides, offering maximum strength and minimal stretch.
The bag’s specs are the following:
Exterior: it has 2 Large Front Pockets: 10.5″ x 6″, 3 Pen Holders, 1 Passport Slot with Button Snap: 4.50″, 1 Front Pocket: 3.40″
Interior: it has 2 Pen Holders, 1 Pocket: 6″ x 4.50″, 1 Pocket: 3.50″ x 4.50″, 1 Zipper Pocket: 9.50″ x 7″, 1 Padded Laptop Holder with Velcro Strap: 16″ x 12″
Large Exterior Zipper Compartment: 11″ x 8″
Overall: 16″ x 12″ x 3″
Item Weight: 5 pounds
The bag includes a ten-year, no-fussle warranty by the California-based family business.
This was our list of 13 business laptop bags. We bet that one matches your taste and style these, so find it and get it while it’s still in stock.
Every aspect of your outfit is crucial, and this naturally includes your accessories, starting from your shoes and finishing with your laptop bag.
You can now carry your electronics with style, and you have plenty of options. Get your favorite business laptop bug and go beyond the boring traditional laptop bags.
If you think a backpack would be more suited for you and it also happens to game on your laptop, you can check our best laptop backpack for travel, maybe you’ll find what you are looking for.
Pokemon is a top-rated franchise with games on multiple platforms. And, there are many Pokemon browser games available that you must try, both free and paid options, though we will be focussing on the former here.
With there being so many options available, it often becomes difficult to find the best Pokemon game, and that too, one that doesn’t consume considerable resources and can be played online.
In this article, we’ll show you how to play a Pokemon browser game easily from your computer without downloading.
Is there a free online Pokemon game?
There is not one but several free online Pokemon games. Most of these would work well on any PC especially when you’re experiencing server issues with games like Pokemon Home on your phone.
Many online platforms have a dedicated section for Pokemon games, and you will find many titles displayed there.
Also, we have listed some of the best platforms to play Pokemon games on your browser:
You can try them all out or choose the one that seems best and play Pokemon online.
How can I play Pokemon on my computer browser?
Open your web browser, and go to the Crazy Games website.
Choose a title from the ones listed here.
Click on the Play Now button to start.
The process is more or less the same for all Pokemon browser games. Some might require you to first register on the platform using an email address.
For the best in-game performance, it’s advised to use a proper browser, such as Opera GX for example.
This browser is focused on gaming, and it comes with features that limit the amount of CPU, RAM, and bandwidth your browser uses.
By limiting the bandwidth and resource usage, you can rest assured that other processes are running smoothly in the background.
The browser has a GX corner that allows you to be updated with the latest news from the gaming industry. There’s also an integrated messenger, which can be useful during gaming sessions.
Additional features include a built-in ad blocker, free unlimited VPN, and a pop-out video player. Due to its low hardware requirements, Opera GX will be perfect for all your gaming needs, so try it out.
Opera GX
If you love playing Pokemon browser games, then might s well play them in a browser that will make you feel like a real gamer.
Playing Pokemon games in your browser is incredibly simple, and you can run the game in less than a minute without it occupying any space on your computer. In case you’re having issues with some games, we have a guide on how to fix Pokemon Home error code 400, and error code 10104 so don’t miss it.
If you love watching anime online, then 9Anime is the best streaming website. It gives you access to a bunch of exciting animes to watch for free.
The website, which was launched in 2016 has come a long way since its launch and also offers HD quality anime streaming. Moreover, you can watch animes from various genres such as action, comedy, demons, historical, school, romance, and much more.
9Anime keeps itself up to date with the latest releases so that you have the latest episode available to watch for free.
However, during the process of updating or due to some technical glitch, you may come across multiple issues when streaming 9Anime.
Google Chrome users, especially, have reported that for them 9Anime is not working, preventing them to watch their favorite anime online.
The errors come with different error code numbers, but the fact of the matter is that 9Anime is not working for users on Google Chrome. If you are also one of such users and are looking for solutions, then you are in the right place.
Because, in this guide, we will give you solutions to fix 9Anime not working in Chrome issue. Let us check out the guide.
Why is 9Anime not working on Google Chrome?
It is the burning question that we have on our hands. Understand this in a way that since 9Anime is a free website and does not hold any rights to the content that it publishes on its websites, it has to source content, i.e., anime from various sources.
One of the reasons 9Anime is not working on Chrome could be because the original creator of the anime might have caught 9Anime and blocked the website.
There are some other reasons that might trigger 9Anime not working on the Chrome issue, which we have listed below:
Ad blockers are conflicting with the website and treating the streaming window as a false positive and blocking it.
9Anime servers may be down because either the website is refreshing with new content or there are some technical difficulties that they are trying to fix.
The browser data, i.e., cookies or cache data might be corrupt.
The Google Chrome browser is not up to date.
Your internet connection isn’t stable.
How can I fix 9Anime error 502 / 521 / 522 / 404 issue?
1. Check 9Anime server status
Often issues related to 9Anime are server-related and they can pop up anytime. They might be undergoing maintenance or having some issues.
In any case, you will see a 9Anime page showing you a server issue error or any error code containing the error message.
You can check the official Reddit page of 9Anime or the official Twitter handle, to check if the website is experiencing any issues or undergoing any refresh. Till that time, all you can do is wait for some time before loading the page back again.
For a complete set of quick fixes that cover all common errors, see our full guide on 9anime not working.
2. Turn off or delete Adblockers
Launch Chrome.
On the top-right toolbar, click on the Adblocker extension.
Turn off or Pause the adblocker and check if this fixes the 9Anime not working on Chrome issue or not.
Alternatively, you can right-click on the Adblocker extension icon.
Select Remove from Chrome.
Again press Remove to uninstall the extension from Google Chrome.
Simply restart the browser and check if this fixes the issue or not. Adblockers, no matter how effective they are, often trigger false positives and can cause multiple issues with websites, especially streaming websites.
Since they block video ads as well, sometimes adblockers may block the content that is streaming. In such a case, you can either disable or pause the adblocker or uninstall it from your browser to see if this fixes the 9Anime not working on Chrome problem.
From, the left pane, select Privacy, and Security.
Select Clear browsing data on the right side.
Check the boxes next to Cached images and files and Cookies and other site data.
Hit the Clear data button.
Cookies and cache data are temporary files that browsers store for all websites to load all the personalized settings and options.
However, if this cache and cookies get corrupt, these can pile up and cause the browser to malfunction. In such a case not only with 9Anime but you will come across errors with other websites as well on Chrome.
So, we would advise you to follow the above steps and clear the browser cookies and cache data and check if this fixes the 9Anime not working on Chrome issue or not.
How can I fix 9Anime DNS error?
Apart from multiple 9Anime error messages with error codes 502 / 521 / 522 / 404, you will come across a specific issue known as 9Anime DNS error.
While you can follow the above steps and try to fix the problem, there are a few more solutions that can possibly help you fix the 9Anime DNS error in case the above solutions don’t work.
➡ Restart your router or modem
The issue with the DNS configurations of your router is the main reason you could come across a 9Anime DNS error.
A simple restart of your router or modem will fix this problem, and will also refresh the internet settings.
A temporary glitch might be causing the issue with 9Anime. In such a scenario, we would advise you to simply refresh the web page and wait for it to completely load.
➡ Switch to a different browser
Since several user reports are regarding 9Anime not working on Chrome, you can always switch over to a different browser and see if the error exists in those browsers as well.
If you are confused about which browser to choose for your PC and to stream content from 9Anime, you can check out our best browsers for Windows 11 guide.
➡ Try Other 9Anime Mirrors
9Anime is blocked by some ISPs. This is the reason why you are not able to access the website, while your friend with a different ISP is able to stream 9Anime content.
Do not worry, as there are multiple 9Anime mirrors, that you can opt for and check which one works for you. Check out the list of the best 9Anime mirrors:
9anime.to
9anime.id
9anime.pl
9anime.tv
That’s it from us in this guide. We hope the above solutions helped you fix the 9Anime not working on Chrome issue and you got back to streaming your favorite anime on 9Anime.
Additionally, if you are facing similar problems on other streaming platforms, you can follow this guide to fix HiAnime not working with step-by-step solutions.
Although Java applets have been disappearing from the web, some websites still have them. So, some users might still encounter an error message that states, Your browser does not support Java.
Fixing this error message is simpler than you think, and in this short guide, we’ll show you the best methods to fix it.
Java applets used to be required to correctly open web-based pages. Most browsers already had the Java applet built-in and all computers used to have the Java application installed.
The technologies have however evolved and many browsers started implementing more modern technologies to enable an even better web experience.
For this reason, Java applets are no longer used, but the Java application is still available for personal use and may come in handy in some situations.
Which browsers still support Java?
The most notable browser that still supports Java, is Opera One. By using this browser, you will have built-in Java support.
Why did browsers stop supporting Java in the first place if it’s such a good program? This is a topic that many of you have asked, and we think it’s safe to say that it’s a question that has merit. They did not, in any case.
Java is a web technology that continues to enjoy massive popularity. The plugins, on the other hand, are a very other matter. Because of safety concerns, the plugin architecture of the vast majority of current browsers has been extensively rethought.
Java plugins are susceptible to viruses, and hackers often take advantage of this feature to inject harmful code into your system in a way that is undetectable by the sentinels that protect it.
However, this does not imply that each and all Java plugins or material written in Java is a ticking time bomb ready to go off.
If you aren’t using a browser that supports Java, you will get the Your browser does not support Java error message or one of the variations below:
Your web browser does not support Java, which is required to launch this course
Please login with a Java-compliant browser and try again
If you see this you don’t have a Java-enabled web browser
Here’s a picture of what you are missing
Cannot display applet
Your browser does not have Java enabled or it does not support it
The visualization runtime could not be started
The browser does not support Java
The Java plug-in is not installed or the applet could not be loaded
Your current browser version no longer supports Java
You may choose to either use designfor digital signing or any browser version with Java support for DSC
This browser does not support applets
What can I do if the Java browser is not supported?
1. Your browser does not support Java Edge
Click the three-dot menu in the top right corner and choose Settings.
Click Default browser on the left side of the tab.
Select Always on the Let Internet Explorer open sites in Edge drop-down menu.
Turn on the Allow sites to be reloaded in Internet Explorer mode option. Finally restart Edge to solve the Your browser does not support Java issue.
2. Your browser does not support Java Internet Explorer
Click Internet Explorer’s Tools menu button then select Internet Options to open that window.
Select theSecurity tab on the Internet Properties window and press the Custom level button.
Then scroll down to the Scripting of Java applets setting and Enable it. Select OK to apply the new setting.
Click Trusted sites on the Security tab.
Reduce the Allowed levels for this zone bar to Low then click the Sites button.
Enter the URLs for the webpage the Java not supported error arises to, and click the Add button.
Click Close to exit the Trusted site window and select Apply in order to save the changes made.
Once you make these changes, check if Your browser does not support Java message is still shown.
3. Your browser does not support Java Opera One/Chrome
Open the IE Tab extension page in a Chromium-based browser such as Opera One or Chrome and click on the Add to Opera One (or Chrome) button.
Select the Add extension option to confirm.
Next, click on the IE Tab extension button. An ietabhelper.exe will download when you click that button.
Double-click the ietabhelper.exe and select Run to complete the IE Tab extension installation.
Thereafter, you can click the IE Tab button to open a page with the Internet Explorer rendering engine. Click that extension button for webpages the Java support error arises.
After doing that, check if Your browser does not support Java message is still there. The IE Tab add-on is available for the Google Chrome web browser, as well as other Chromium-based browsers.
Users are granted the ability to view webpages using the MSHTML browser engine when the extension is installed. This may be used to see sites that will only display correctly in Internet Explorer or will not operate at all in any other browser.
NOTE
The latest Java version still needs to be installed and enabled for Java content to work in Chromium browsers with the IE Tab extension.
4. Your browser does not support Java Firefox
Open the Uninstall Java Versions webpage in a browser and click the I Agree to the Terms and Want to Continue button on that page to download the Java Uninstall Tool.
Open the Java Uninstall Tool’s window and select the Agree option.
Next, select a listed Java version and press the Next button to uninstall the selected Java version.
Then double-click on the downloaded Java installer to reinstall the latest Java.
You can also thoroughly uninstall outdated Java versions with dedicated PC cleaner software. There’s a certain tool designed to remove any unwanted software in one click.
Moreover, rest assured that it cleans up the leftovers as it includes a registry cleaner as well.
As we have already mentioned, not all browsers support Java anymore and you will have to either use a third-party extension or tweak your settings to get your browser to support Java. The same goes if you get the Your current browser version no longer supports Java error message.
Don’t worry if you will have to change your browser to another one, as exporting your bookmarks is easier than ever before.
We recommend you check out our article on how to enable Java support inside the browsers that have the option to do so.
So, that’s how Internet Explorer and non-IE users can feasibly fix the Java not supported browser error. With that error fixed, websites will then run Java applets without any issues.
Online security is an invaluable part of the everyday web-browsing experience. Chrome, for example, has a quite strict policy on downloads, especially the EXE files, which are mostly installation packages.
Speaking of which, sometimes your antivirus blocks EXE files, in order to prevent malicious files from affecting your PC.
It’ll make sure to inform you that, well, the program you’re trying to obtain is possibly a virus and can cause inexplicable damage to your system.
But, the ”This type of file can harm your computer” message can get on your nerves after some time, especially when you’re certain that the installation file comes from a trusted source.
If you’re downloading files frequently and the file’s extension triggers an annoying prompt message, this might help you. So make sure to check out the explanation below.
The fixes listed in this article will also prove helpful if you are experiencing any of these issues:
This type of file can harm your computer: This is a common message, and it appears if you download an unverified file.
Chrome this type of file can harm: Chome has its own file scanner, and if a suspicious file is detected, you’ll get this message.
This type of file can harm your computer turn off: It’s possible to turn off this notification. Sometimes you might get false positives, so many users choose not to use this feature.
This type of file can harm your computer Chrome: As previously mentioned, this is a standard message in Chrome, and it’s designed to inform you about malicious files.
This type of file can harm your computer. Do you want to keep: Messages such as these will give you a choice to keep a file or remove it. If you think that the file is safe, you can keep it, and if it’s not, you can block the download.
Was blocked because this type of file can harm your device Chrome: Some files will be automatically blocked since they don’t come from reliable sources.
What is file might be harmful?
This is just a security warning that appears when you try to open certain files. Usually, this happens when you try to open files that you downloaded or transferred from another PC.
This issue occurs due to your security settings, and it can be fixed simply by adjusting them.
Quick Tip:
Use a browser that offers strong online security without annoying, false alerts. Opera One is a great option, with built-in website filtering.
Not only that, but the browser is able to detect potentially harmful files and boosts your privacy using its anti-tracking and VPN features.
Opera One
Use trustworthy security features and browse without worries about online threats.
Bottom line is, you can’t disable this feature. You can merely tweak the download settings in order to avoid it.
But, then again, it might be easier to confirm that the suspected file is indeed non-harmful than to enable Ask where to save each file before downloading. If you’re downloading multiple files in a succession, this isn’t the way out.
With that, we can conclude this article. We hope that you managed to fix This type of file can harm your computer on Windows 10/11.
Pinterest is a great website to share images on, allowing users to set up boards that include an image collection. As such, it’s a visual bookmarking tool for saving pictures directly from the web. However, users are demanding a way to batch download Pinterest images.
Unfortunately, it doesn’t include an option to batch download images in order to save them to a hard drive folder. Something like this would come in handy for users with lots of photos to keep.
Nevertheless, you can still download all images from a Pinterest board with a few browser extensions and desktop software.
Are images from Pinterest copyright free?
Pinterest has a license for the material on its site that is both non-exclusive and transferable on a global scale. This indicates that others will be able to share and store any material that is submitted on that platform.
However, this only applies to Pinterest. It does not imply that you are permitted to copy stuff from there and publish it elsewhere.
Whether you are not absolutely positive that the picture may be shared (for example, if you have permission from the owner or if it is in the public domain), you should refrain from sharing the image anywhere else on the Internet.
The protection afforded by copyright is crucial for the integrity of any original work of writing. Any kind of creative expression may fall under this category. If you have developed anything and represented it in a definite form, you immediately acquire ownership rights under copyright law.
Can you copy images from Pinterest?
You are only permitted to repin photos on Pinterest. This means that you cannot duplicate them to use them on another service/platform.
Due to the fact that you are solely responsible for everything that you publish on Pinterest, you run the risk of infringing on someone else’s intellectual property rights if the picture you’re repinning was uploaded to Pinterest without the author’s consent.
Quick Tip:
You should consider using a lightweight and fast browser like Opera One. You’ll make sure you’ll be done with the task without errors.
Plus, the Download all images extension in the Opera One add-ons shop allows you to download any image from a web page, including full Pinterest boards.
Opera One
Quickly download whole Pinterest boards with handy in-browser add-ons!
In order to batch download Pinterest images in Chrome, open the image downloader web extension and click on Add to Chrome. Image Downloader adds the extension shown directly below to Chrome’s toolbar.
Open one of your boards on Pinterest.
Click the Image Downloader button on the toolbar to open the extension.
Doing that displays all the pictures on the page, including those saved to your Pinterest board. To filter out images that aren’t saved to your board, enter media cache in the Filter by URL text box.
Select the Pinterest board thumbnail images displayed there with the cursor, or click the Select all option instead and press the Download button to save the selected photos to your folder.
You can edit where they download to by entering an alternative subfolder in the extension’s path text box. To further configure the extension, you can right-click its toolbar button and select Options.
The first extension to note is ImageDownloader for Google Chrome. This is an extension that enables you to select multiple images on website pages to download in a single batch.
To download multiple Pinterest images, navigate to the PinDown extension to add the extension to your browser and configure Chrome’s settings before using the PinDown tab that opens. (Note that you’ll also need to restart the browser after installing PinDown.)
Open one of your Pinterest boards in Chrome, then, the PinDown toolbar icon will include a small number highlighting how many pinned images an album includes as shown directly below.
Click the PinDown extension button to save the album to your HDD.
You can enter an alternative title for the Pinterest picture subfolder in the text box shown to you. However, you can’t enter alternative folder paths for the subfolder.
Press the Let’s rock! button to save the Pinterest board to the download folder.
If you wonder how to use PinDown, we’ve got you covered. PinDown is a Google Chrome extension that enables you to download a full image collection within a Pinterest board. You can download up to 250 pictures per album with PinDown Free, with no restrictions in the full version that retails for $0.99.
3. Use Image Picka
In order to batch download Pinterest images in Firefox, navigate to the Image Picka add-on and press the Add to Firefox button to install the add-on, then restart the browser.
Open your Pinterest board in Firefox and click the Pick Images button to open the extension’s window as below.
Press the Show All button to include all the album’s images. Then, you can select the board pictures to download.
Press the Browse button to choose a folder directory to save the files to, then click Save to download the Pinterest album.
PinDown and Image Downloader are Chrome extensions, but Firefox users can batch download Pinterest pictures with ImagePicker.
This extension is pretty similar to Image Downloader as it enables you to select multiple pictures on a page and download them in a batch.
Although PinDown and Pinterest Downloader only support Pinterest.com and Instagram.com, you can batch download pictures from any site with Image Picker and Image Downloader.
How do I convert my Pinterest boards to PDF?
Open up your Pinterest board then right-click anywhere in the window to choose Print.
Next, select Save as PDF under the Destination option and click Save.
This is how you can save your boards as PDF files. Furthermore, you might be interested in learning how to use the Pinterest Windows app and download it as well.
You won’t need a web browser to use the Pinterest app that’s available in the Windows 10/11 Store since it provides access to the popular site. Simply said, it is a wrapper that, once installed, will deliver the service or website in question right to your desktop in a matter of moments.
It goes without saying that you’ll need a Pinterest account in order to make use of it, but you probably already knew that. Without a genuine account, the website won’t even function properly, so you’ll have no choice but to keep plugging away at it.
If you have any other suggestions or questions, don’t hesitate to leave them in the comments section below.
As a casual Windows 7 user thinking of Internet Explorer 11, let us tell you from the start that you can follow the links below to download the RTM version to your 32 or 64-bit version of Windows 7.
The preview version of Internet Explorer 11 has been released in June, last year, but Microsoft’s browser has been officially launched along with the Windows 8.1 introduction.
Actually, for those who don’t know, Internet Explorer 11 is included by default in Windows 8.1 and comes with a lot of optimization for touchscreens.
Even if it’s an older browser, there are ways to continue using Internet Explorer on Windows 11, and we covered that in a separate guide.
Windows 7 is still a popular OS choice, so the RTM version of Internet Explorer 11 is appreciated by its users worldwide.
What is the latest version of Internet Explorer 11 for Windows 7?
Although Internet Explorer has been discontinued, you can still download it for Windows 7 right from Microsoft’s website.
As for the available version, the latest one is 11.0.0.4, so keep on reading to learn how to download IE11.
Can I still use Internet Explorer after 2022?
You can still use Internet Explorer after 2022, but Microsoft is working hard to retire it completely, so you the official support won’t be available in the upcoming years.
As a result, Internet Explorer will become unsafe to use, so it’s recommended that you switch to a different web browser that is regularly maintained.
Quick tip:
You can use a new-age browser that is still receiving updates, then rest assured that Opera One is a great choice for you. An up-to-date browser means better Internet security.
The browser comes with a free VPN and Ad-blocker, not to mention that it has one of the fastest and most liquid UI. Plus, it comes with integrated messengers and web apps for those in need.
Opera One
Launch this modern browser on your Windows 7 PC without functionality issues.
After doing that, the download should start automatically.
Once the file is downloaded, run it and follow the instructions on the screen to complete the process.
If you’re looking for a 32-bit version, here’s the 32-bit version of Internet Explorer to download. Keep in mind that Internet Explorer 11 for Windows 7 32-bit requires a Service Pack 1, so be sure to install it.
You can also use Internet Explorer 11 for Windows 7 32-bit/64-bit offline installer, the official page is available, but it lacks the download links, so we doubt that you can use it.
2. Use the Windows Updater
Open the Windows Start Button.
Type Update in the search box, select Windows Update from the results, then press Enter.
Click Change Settings on the left pane.
On Important Updates, select that you want them.
Then, under Recommended Updates, select that you want them delivered to you the same way as the Important Updates.
Fortunately, for those who already have an old version of Internet Explorer installed on their operating system, there is an easier way.
If you have Windows Update ticked to deliver automatic updates, then you are supposed to get the latest version automatically. Make sure to enable automatic updates by following the aforementioned steps.
Why can’t I install Internet Explorer 11?
If you can’t install Internet Explorer 11, check if your system is compatible. Currently, you can install IE11 on the following systems:
Windows 7, 32-bit/64-bit with Service Pack 1 (SP1), or later
Windows Server 2008 R2 with Service Pack 1 (SP1), or later
In addition, you need to ensure that you have all the prerequisite updates installed. It’s also important to install the correct version, and you won’t be able to install the 64-bit version on the 32-bit operating system.
Lastly, if you have previous versions of Internet Explorer, uninstall them and then try installing the latest version.
Internet Explorer used the be the most used browser as it was the default browser for Windows 8.1. Now, many users upgraded from Windows 8 to Windows 10, and things have drastically changed.
If you need a different browser, then you might want to check out our guide on the best browsers for Windows 7.
If that’s still your browser of choice, you can always find the necessary tips and tricks on our website.



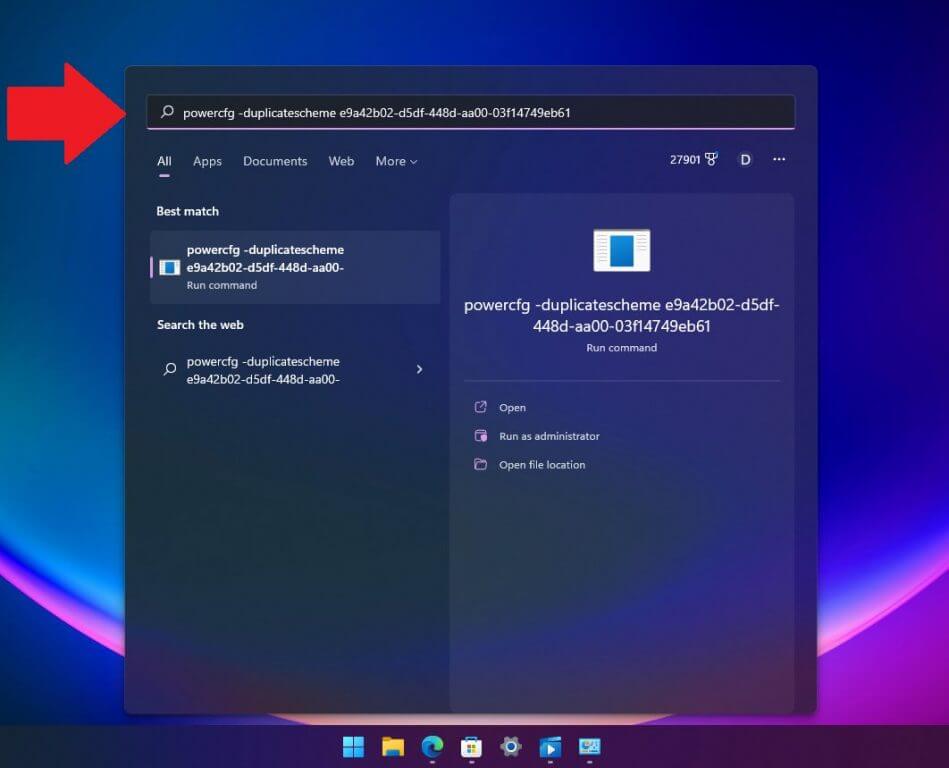
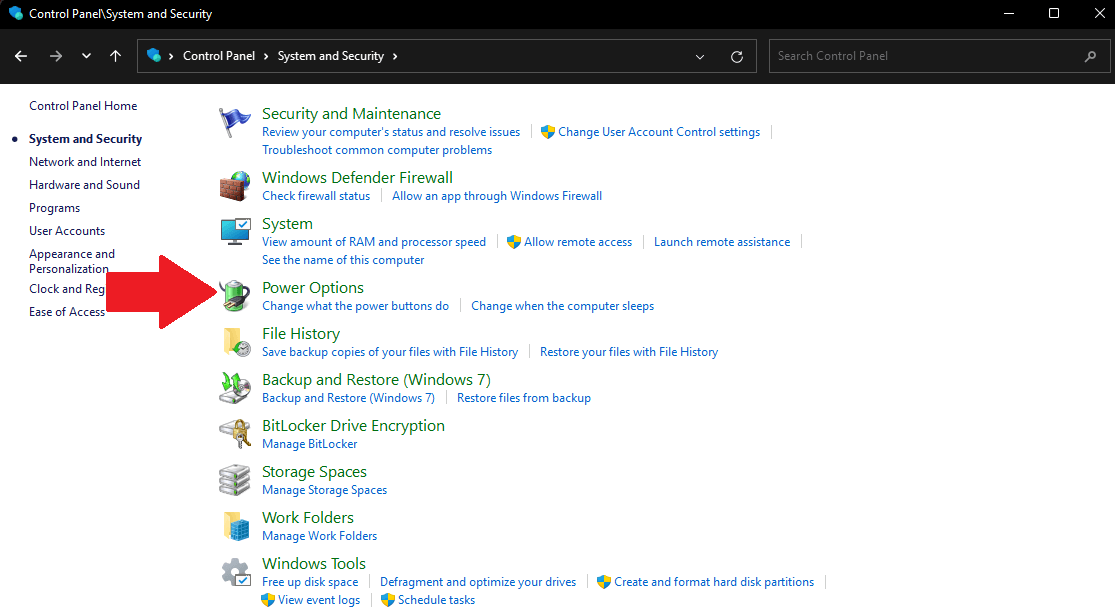
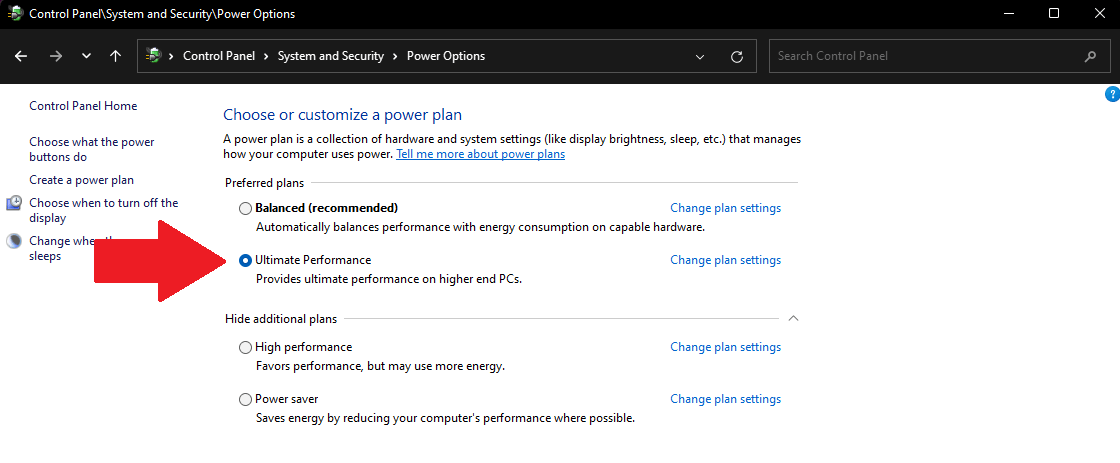
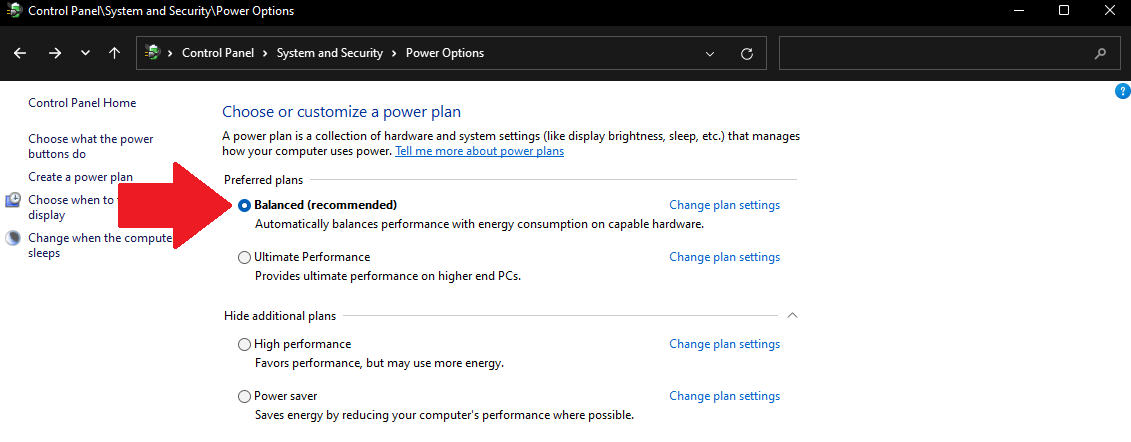
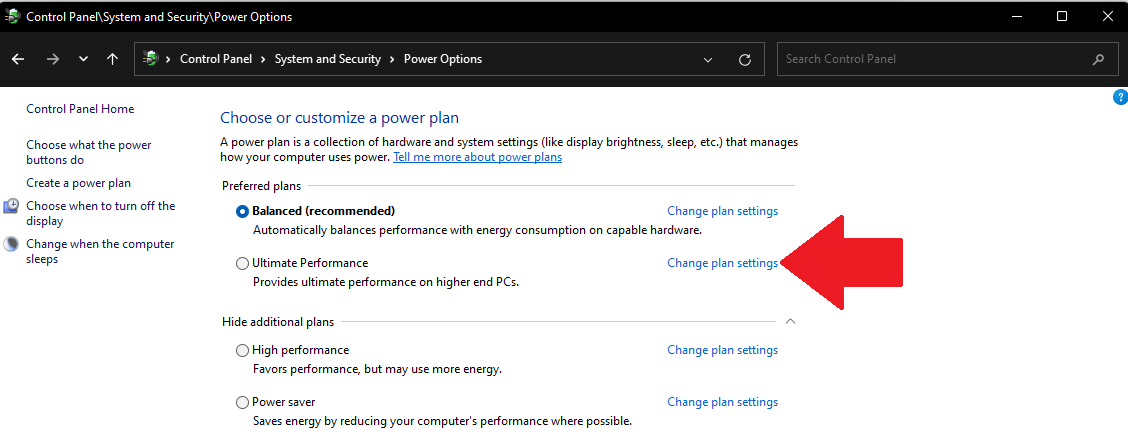
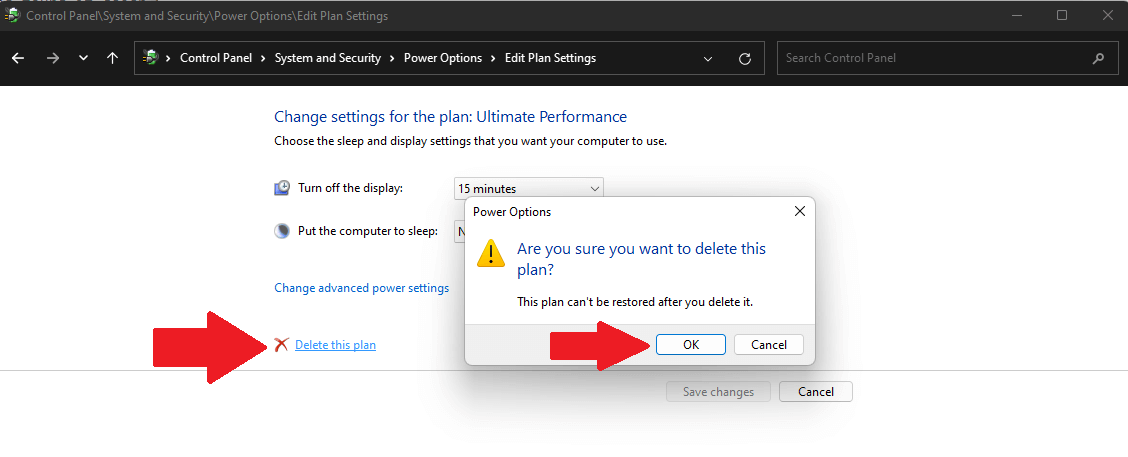




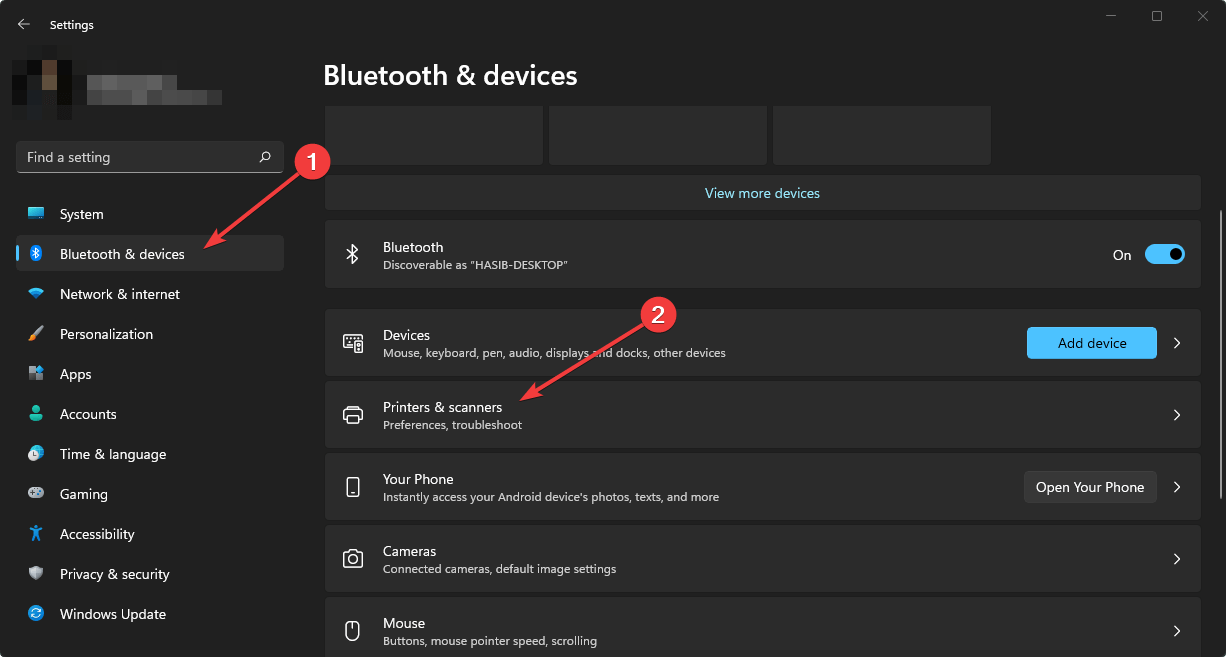


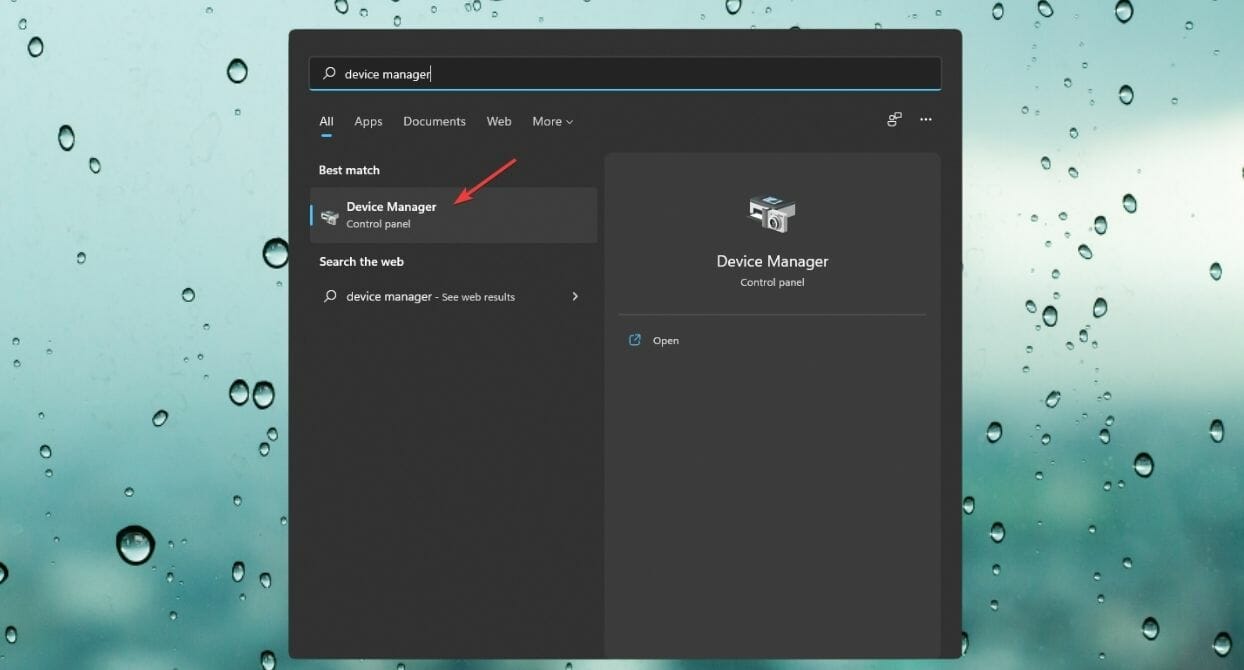


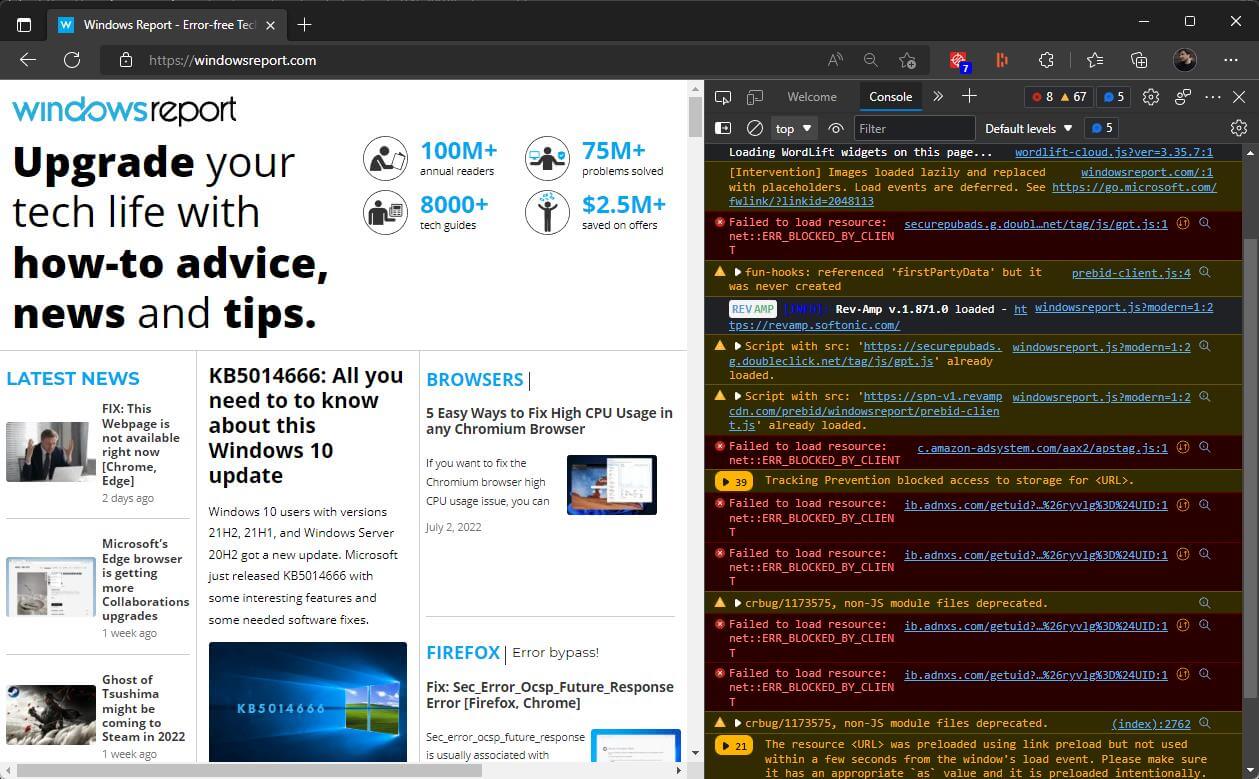
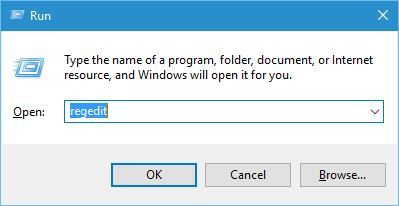


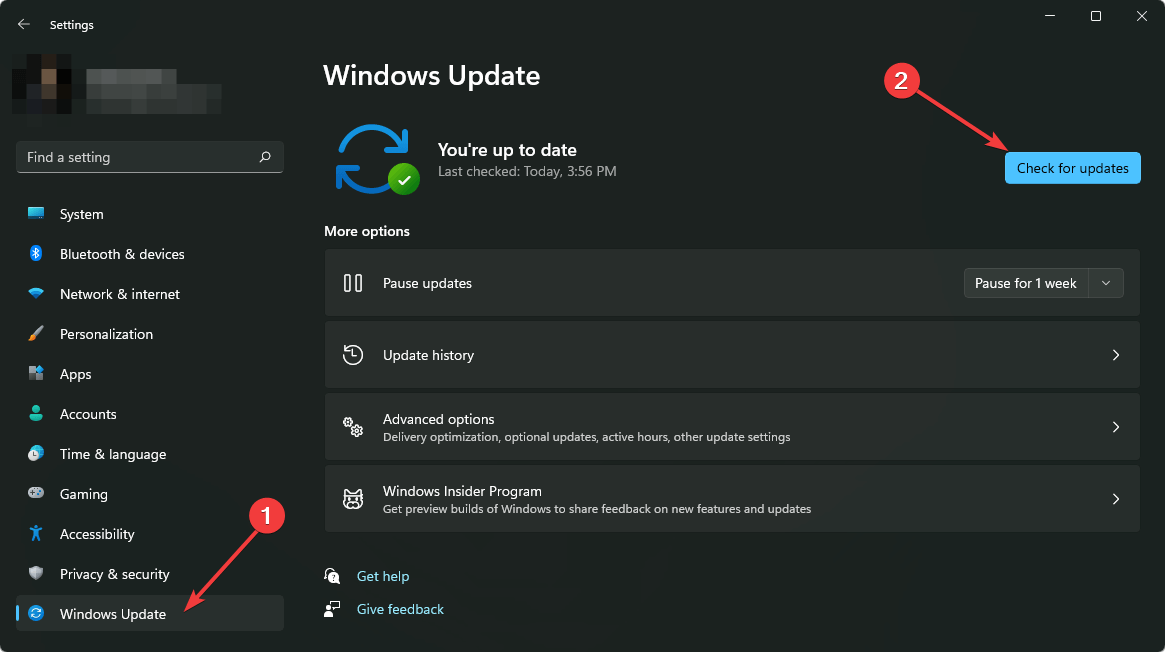


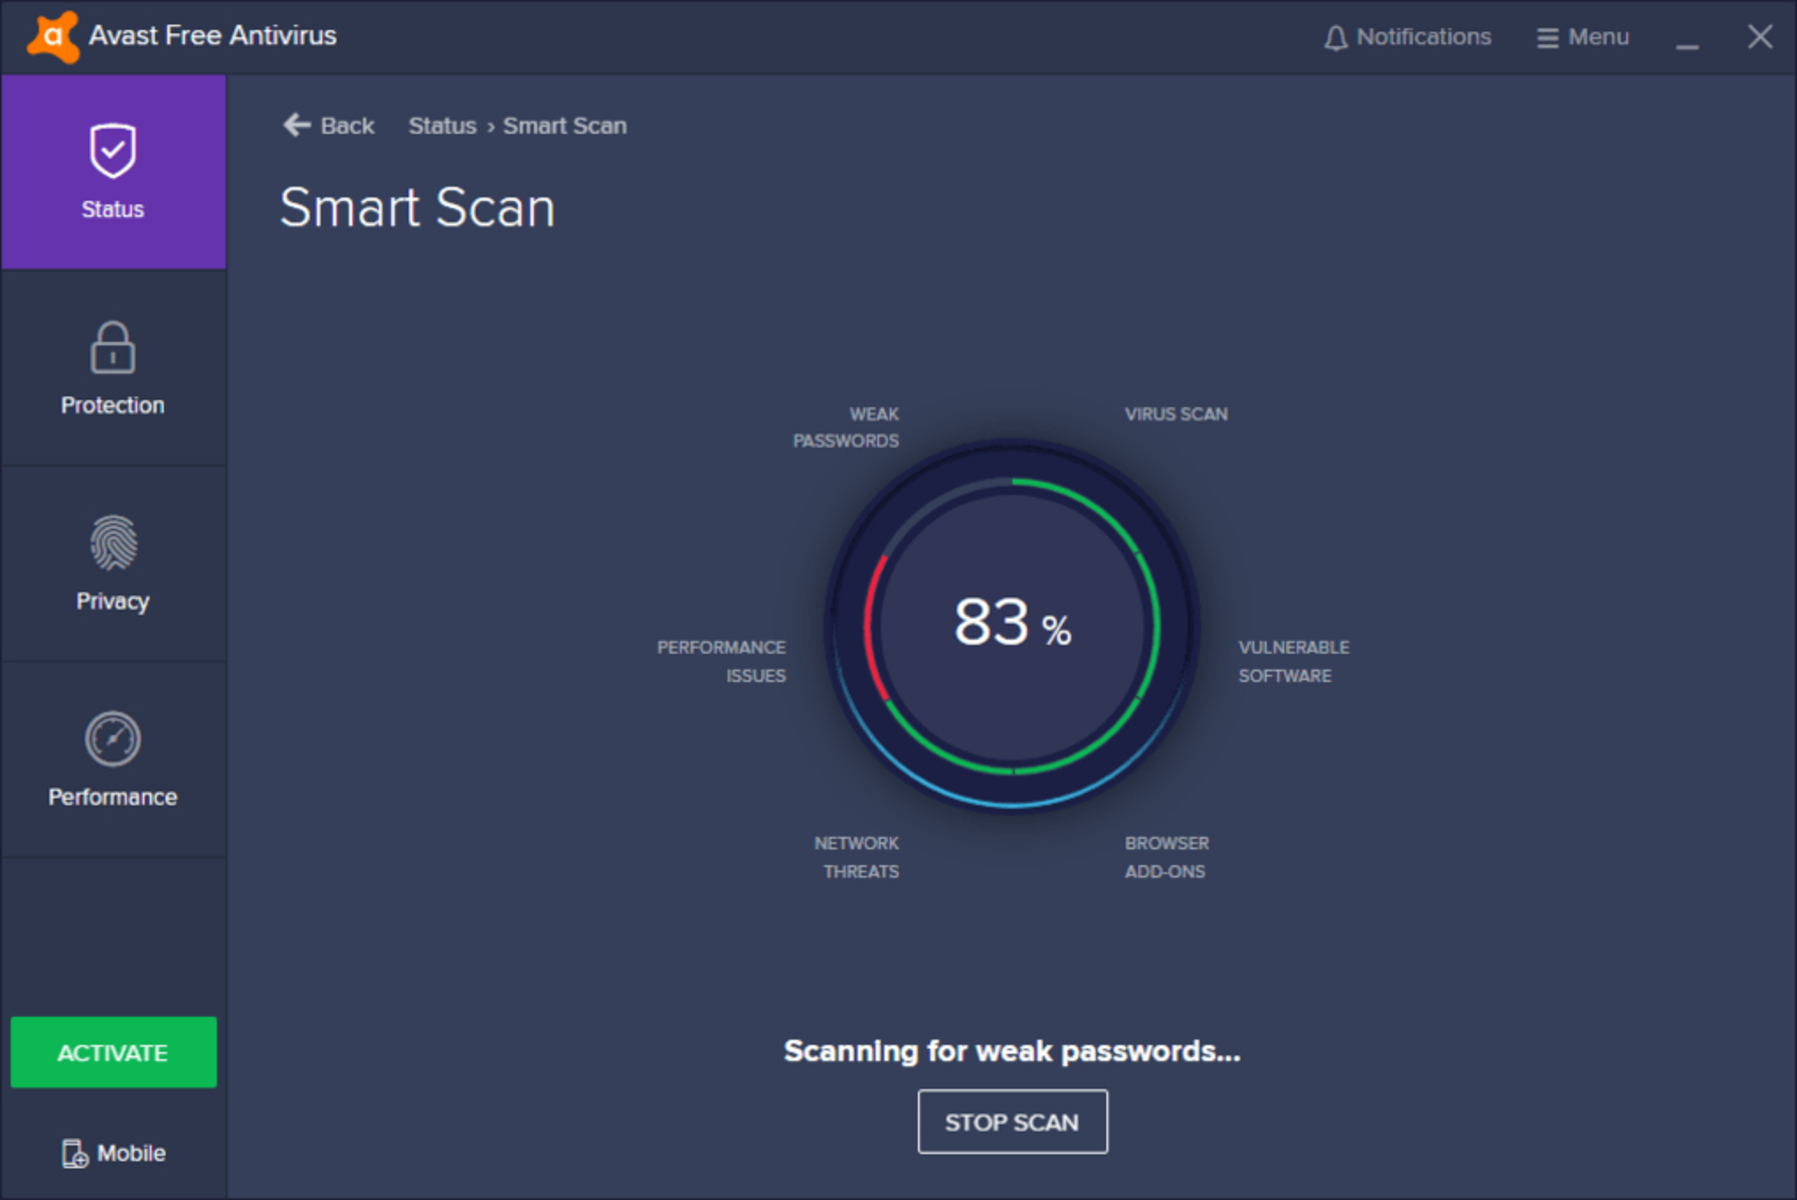


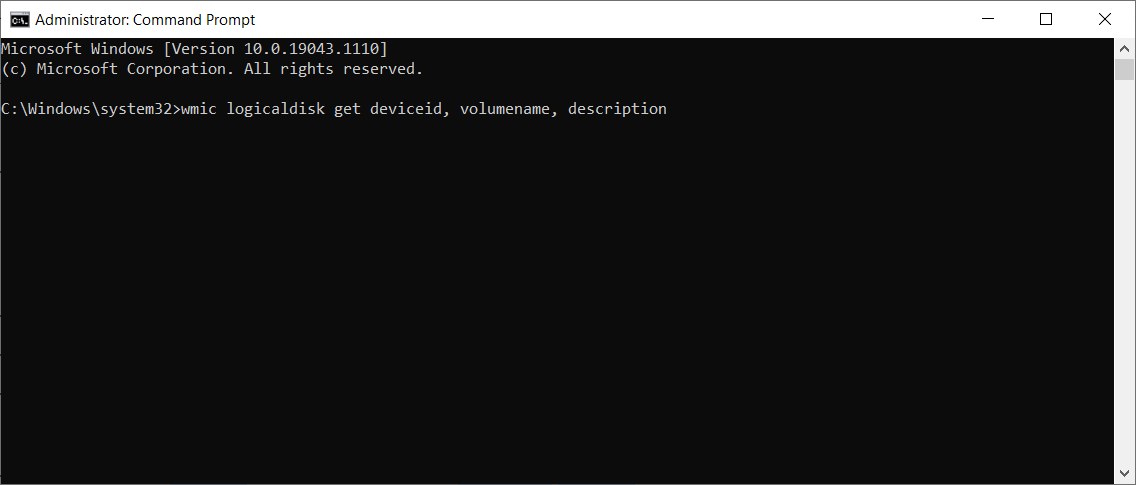


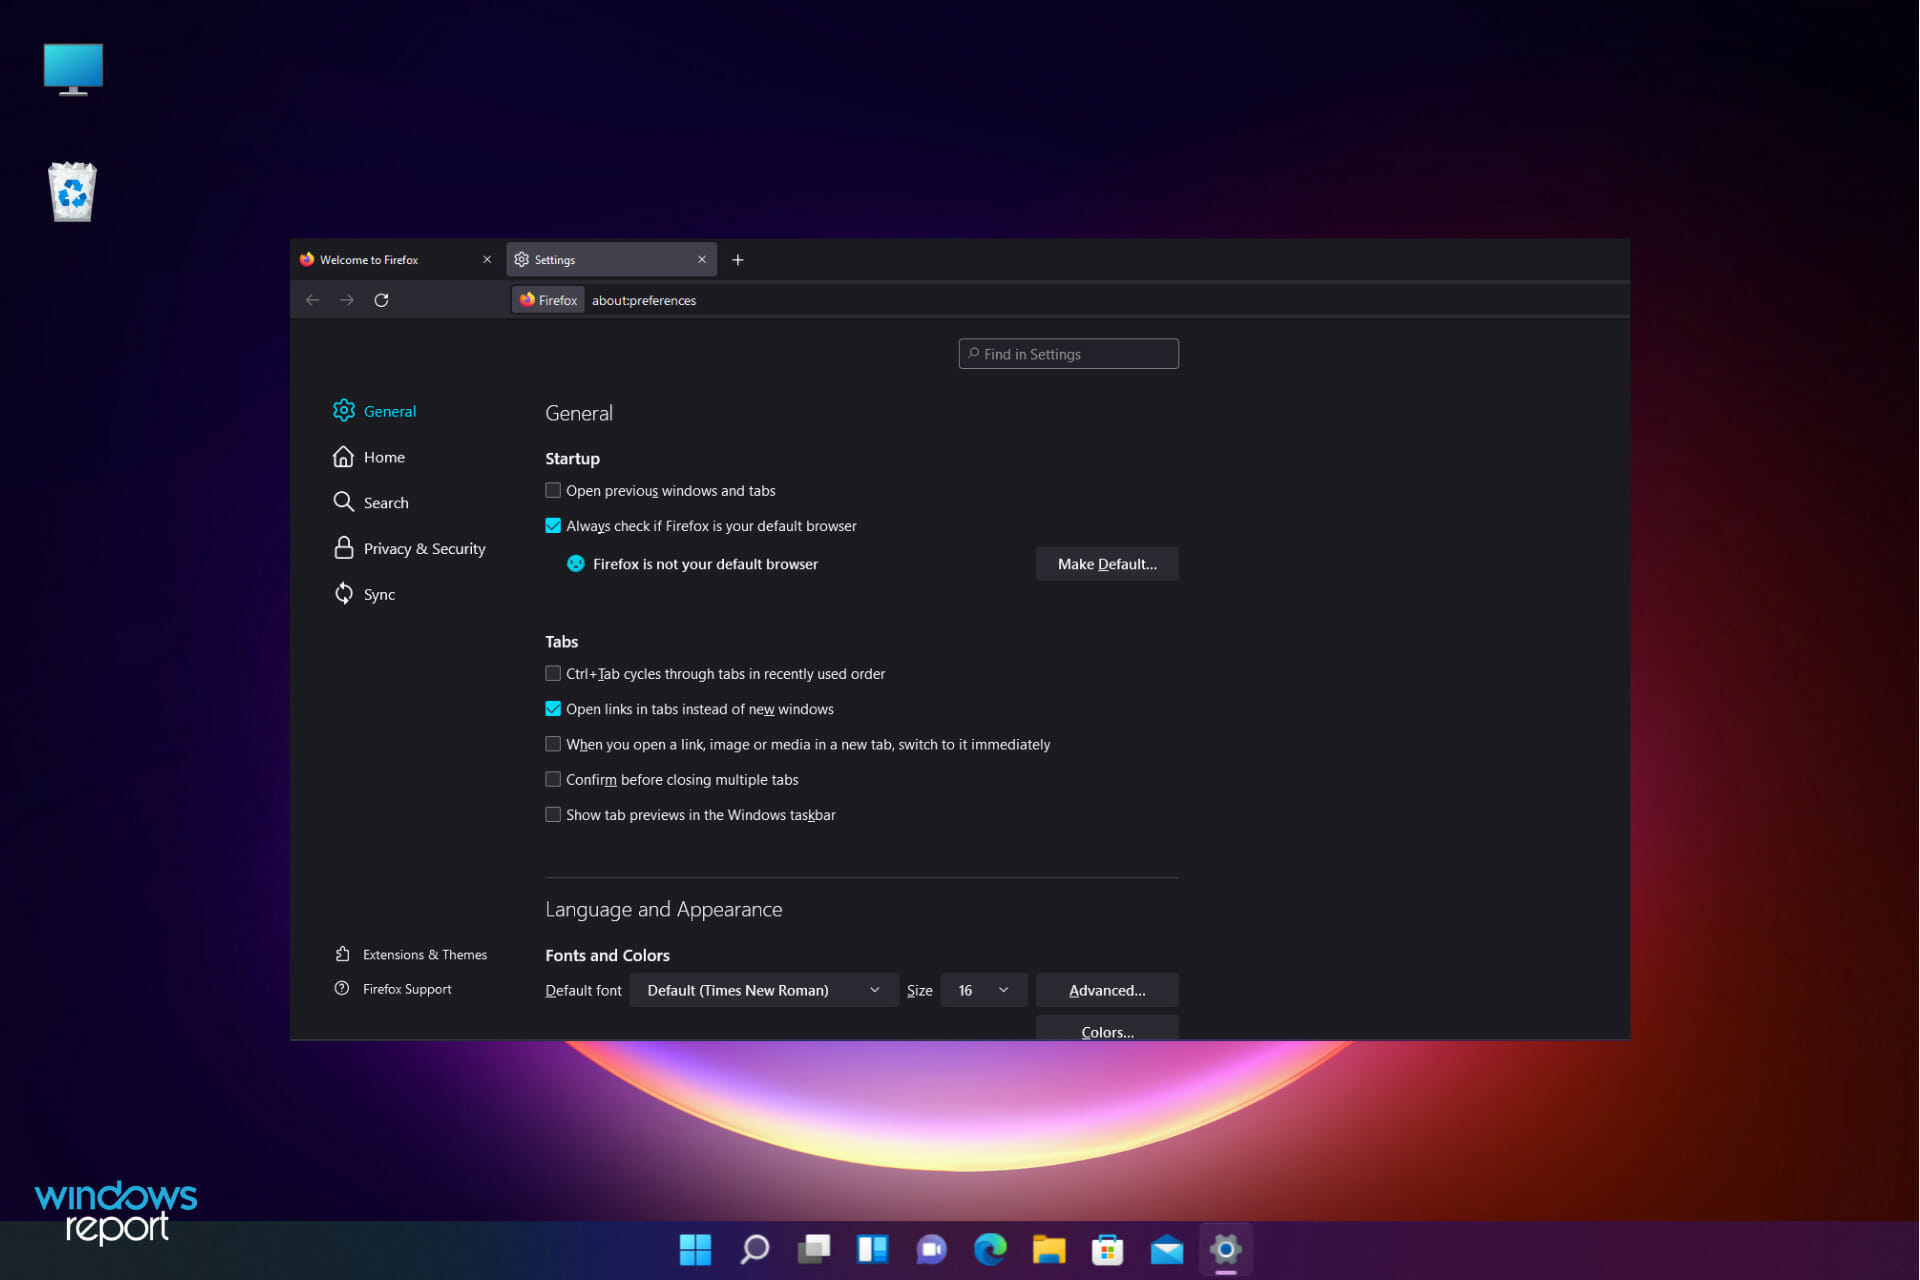
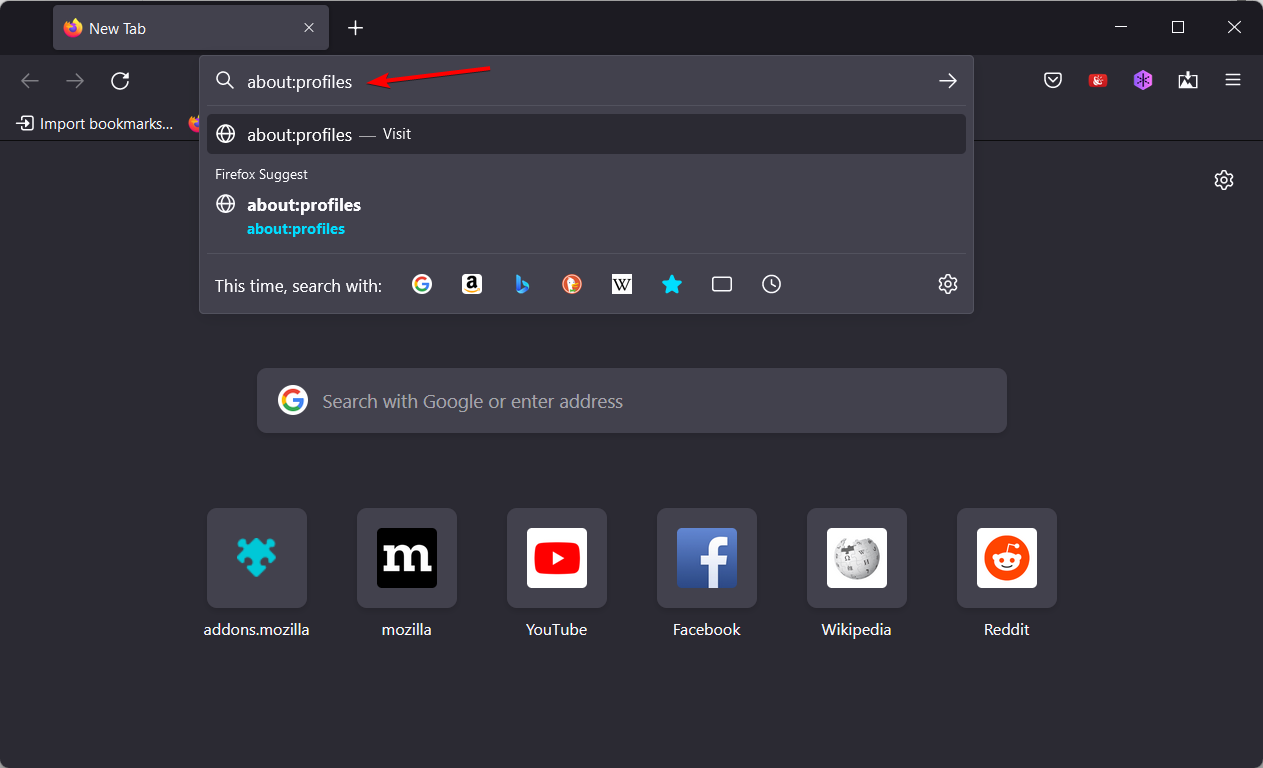
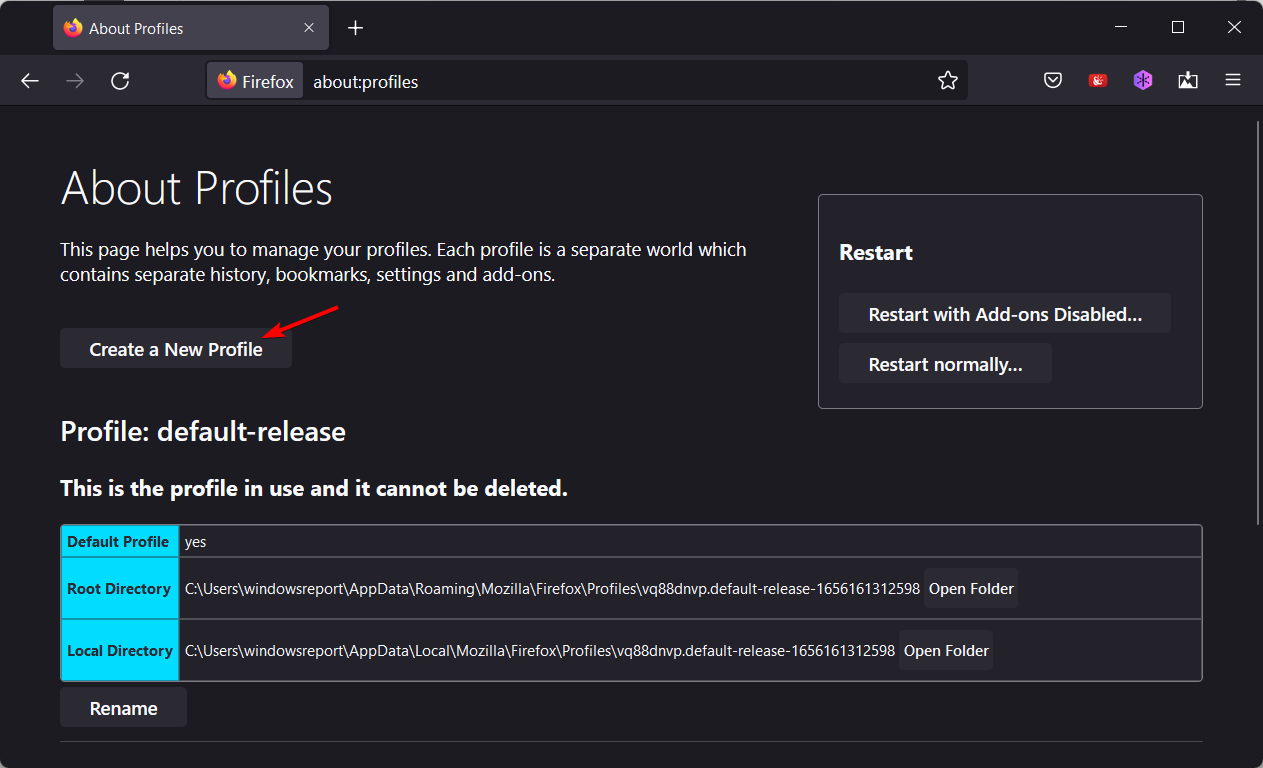
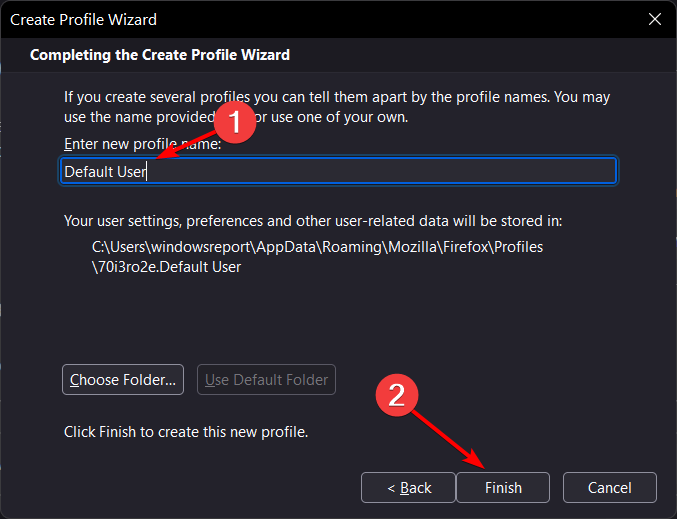

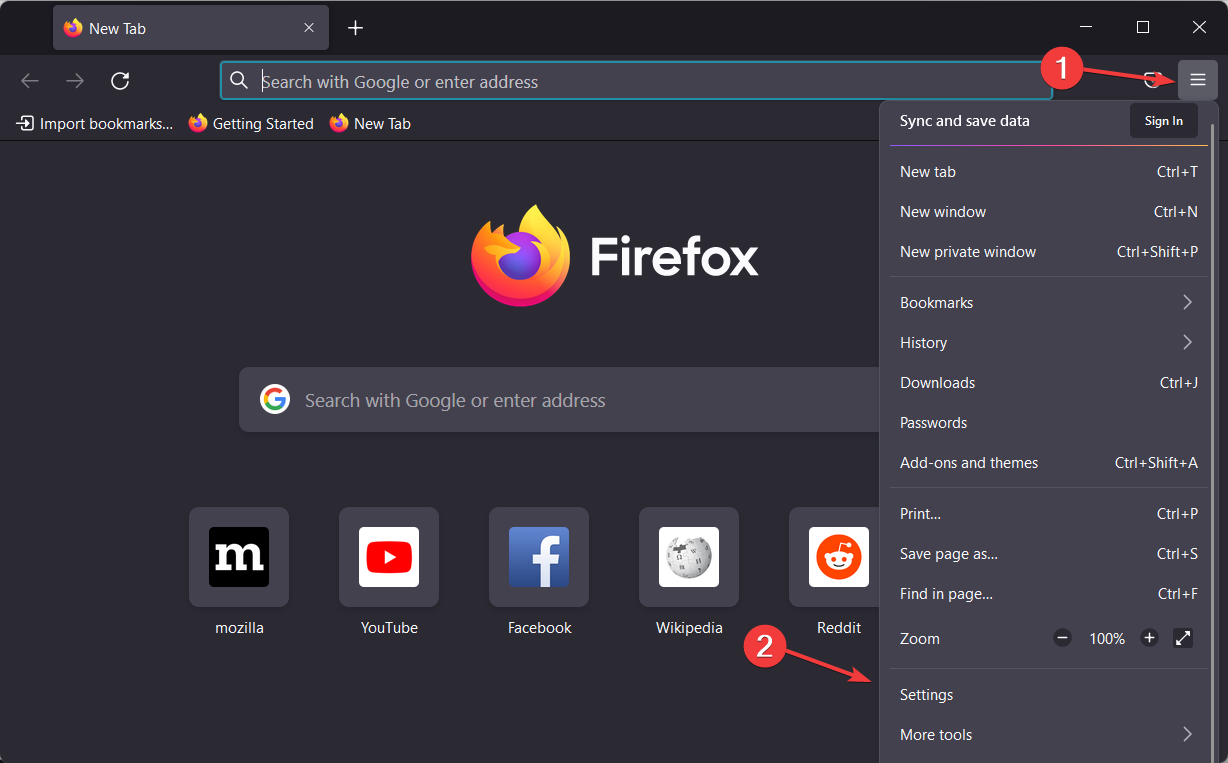
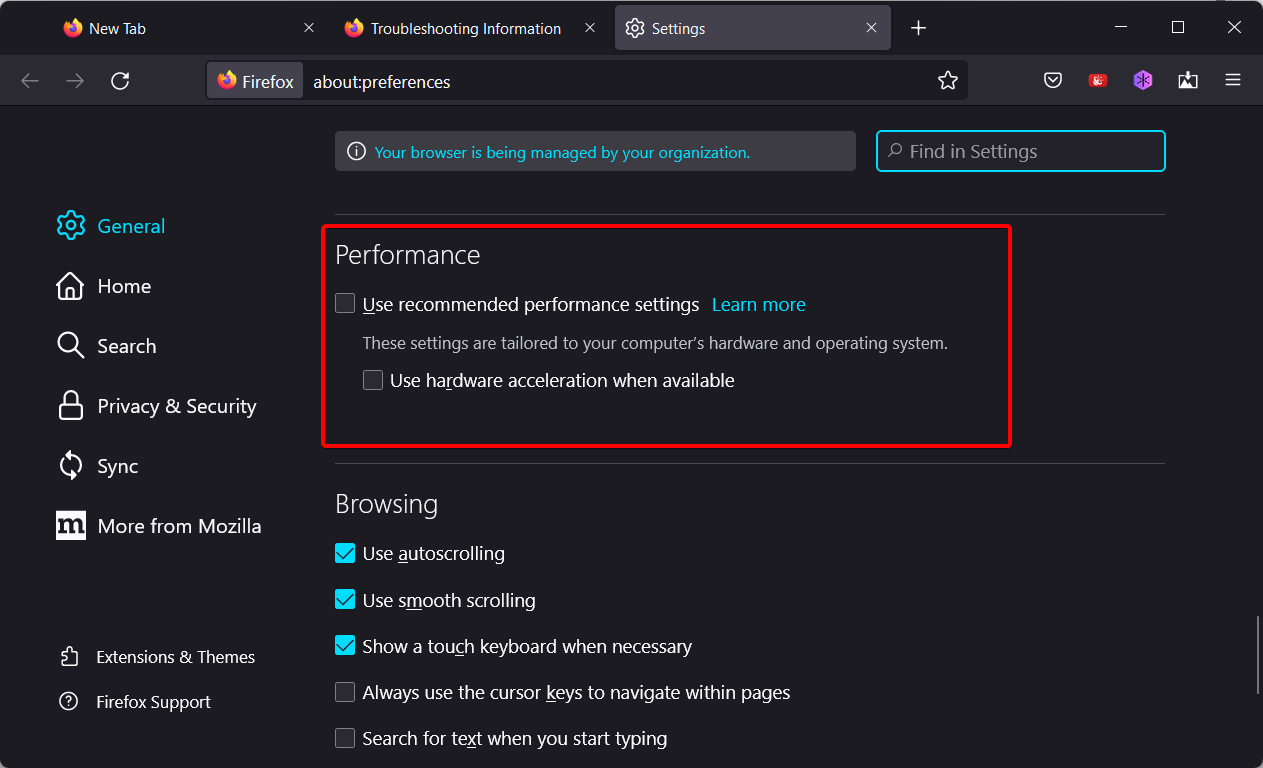
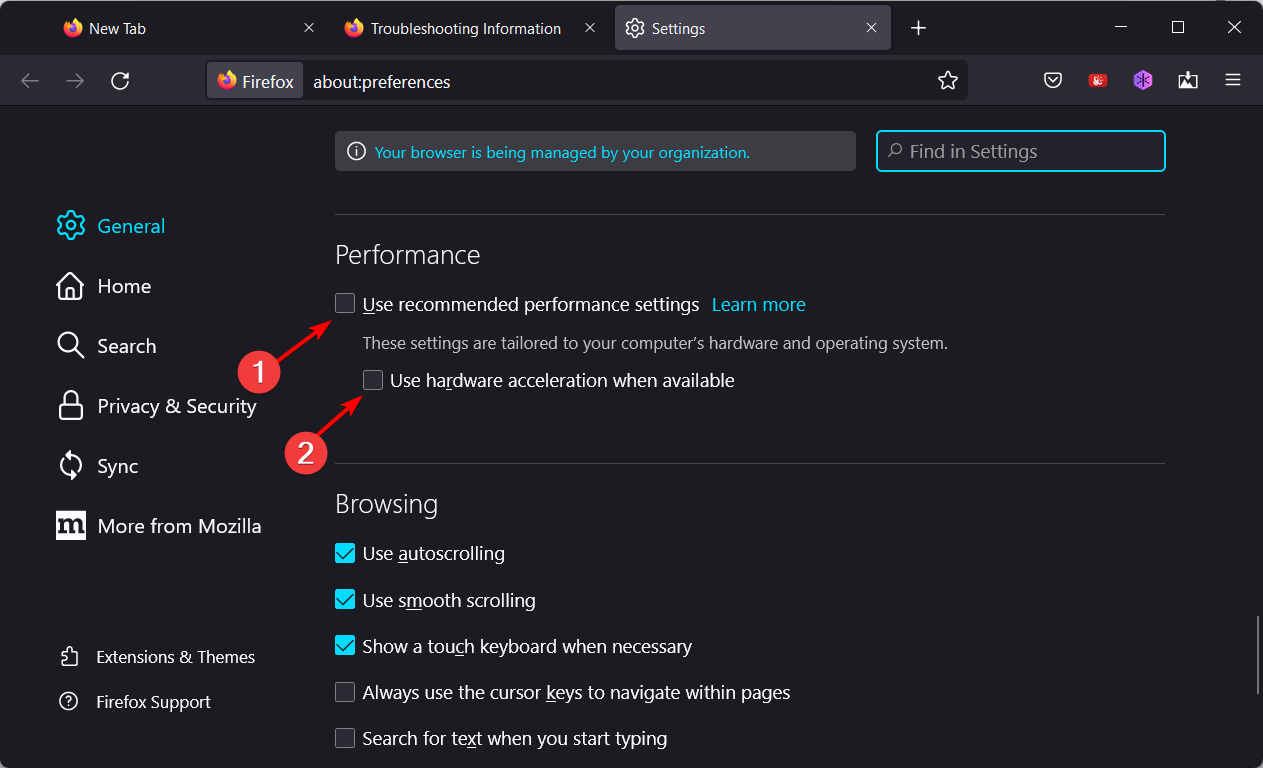
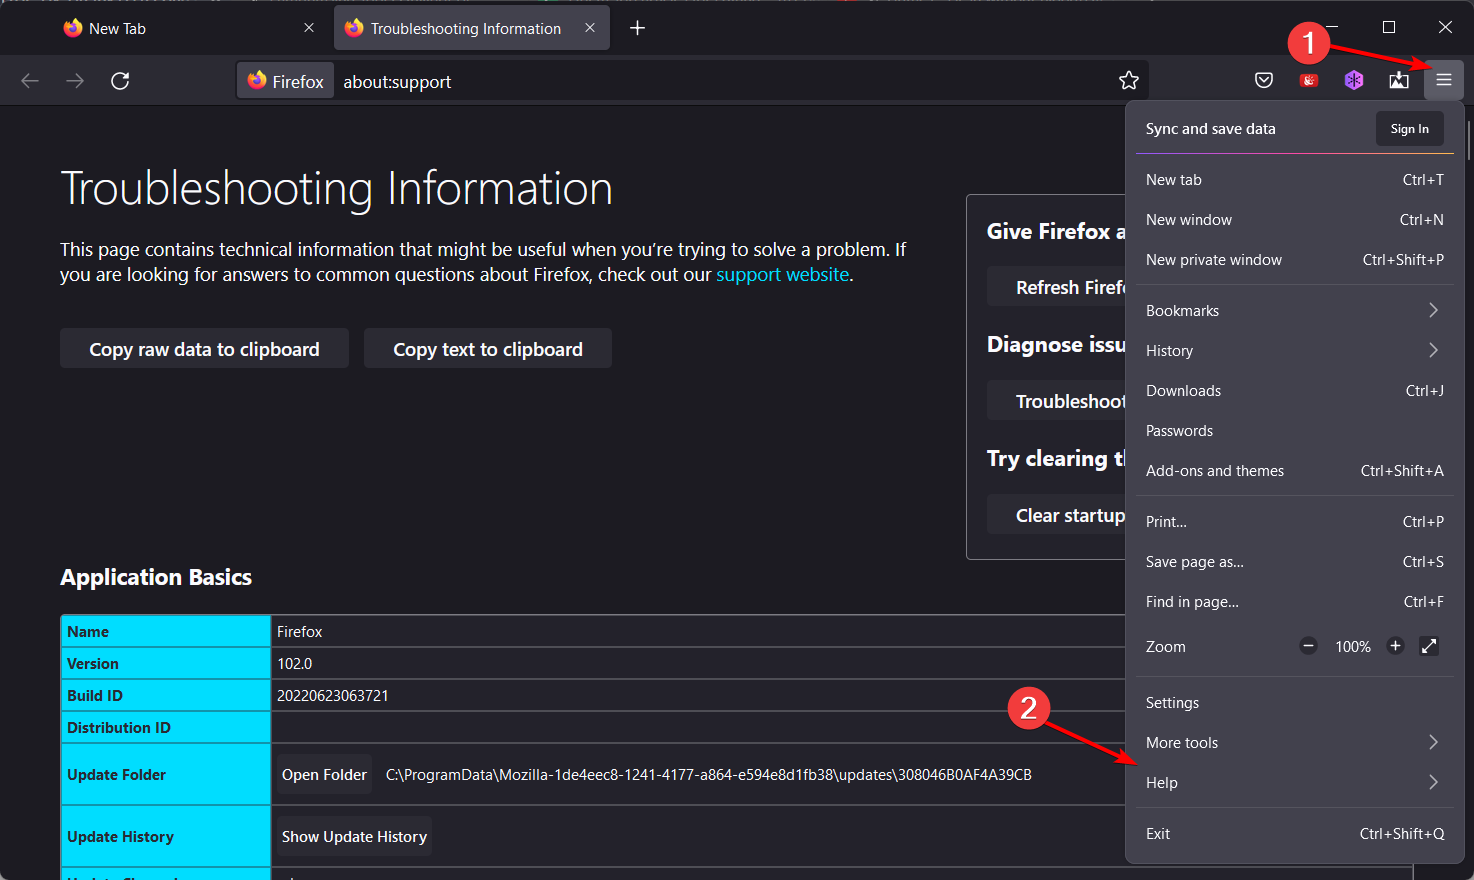
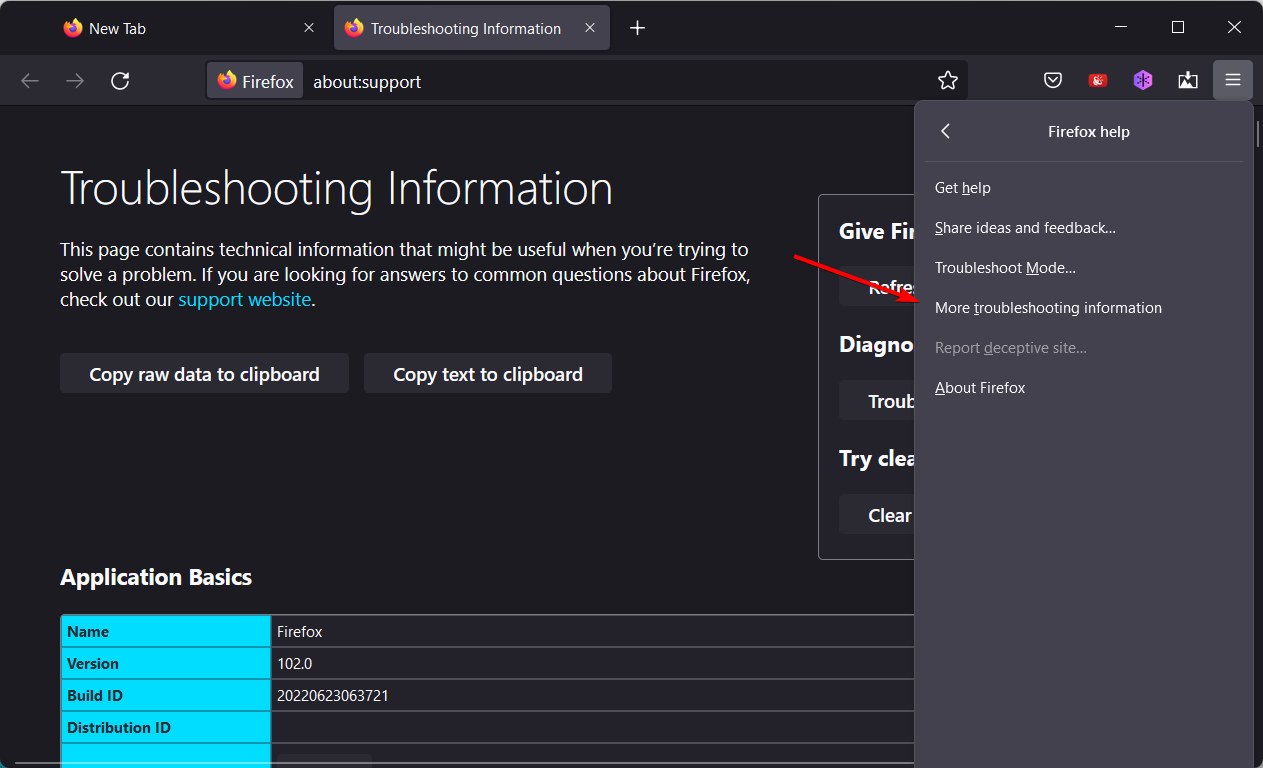
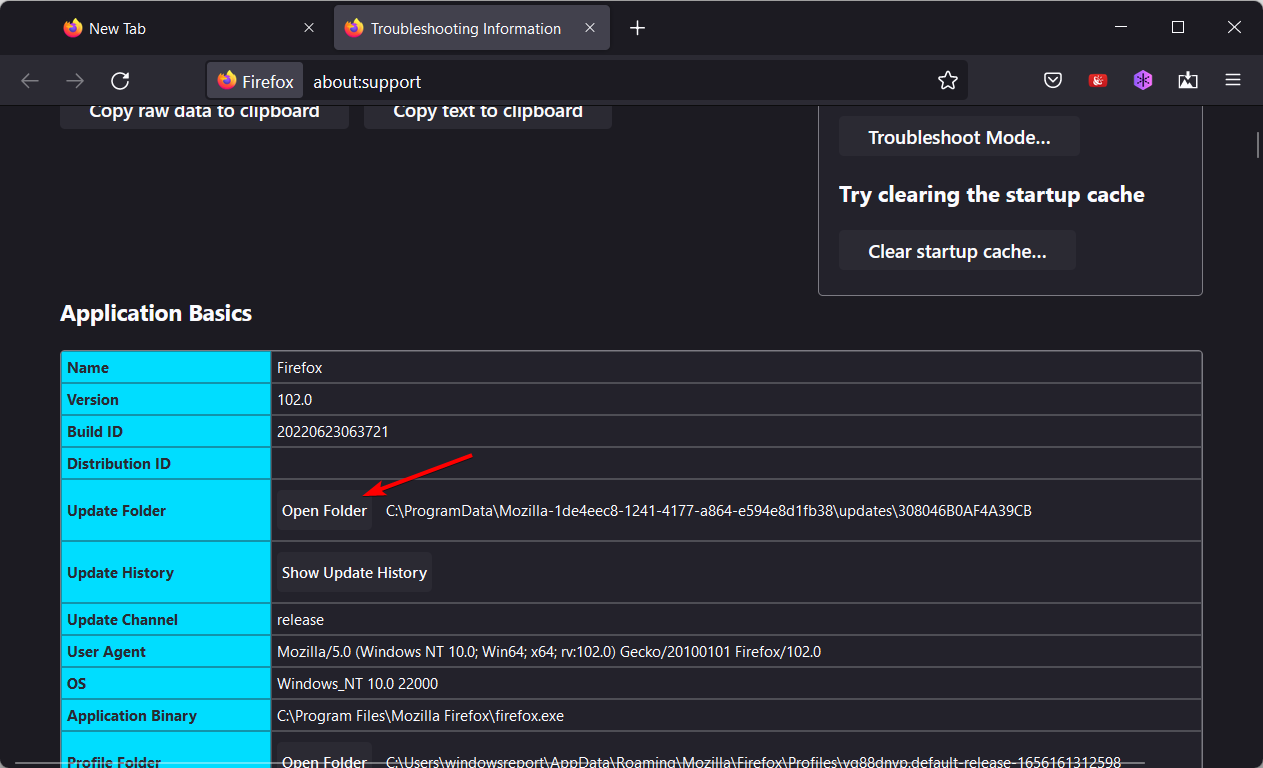
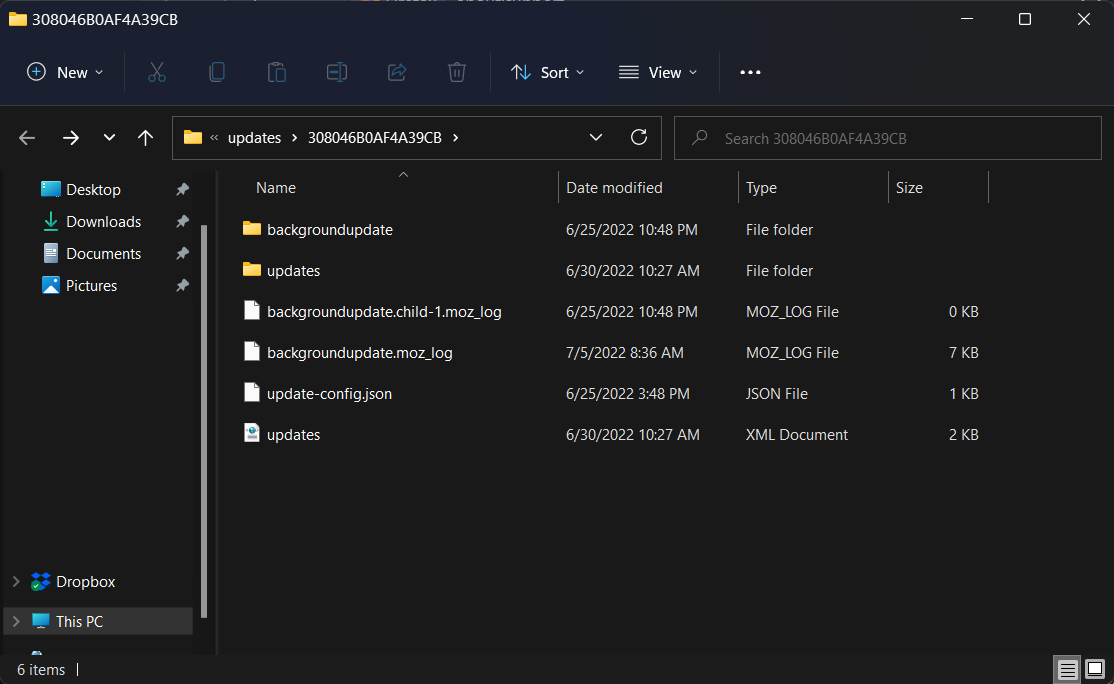
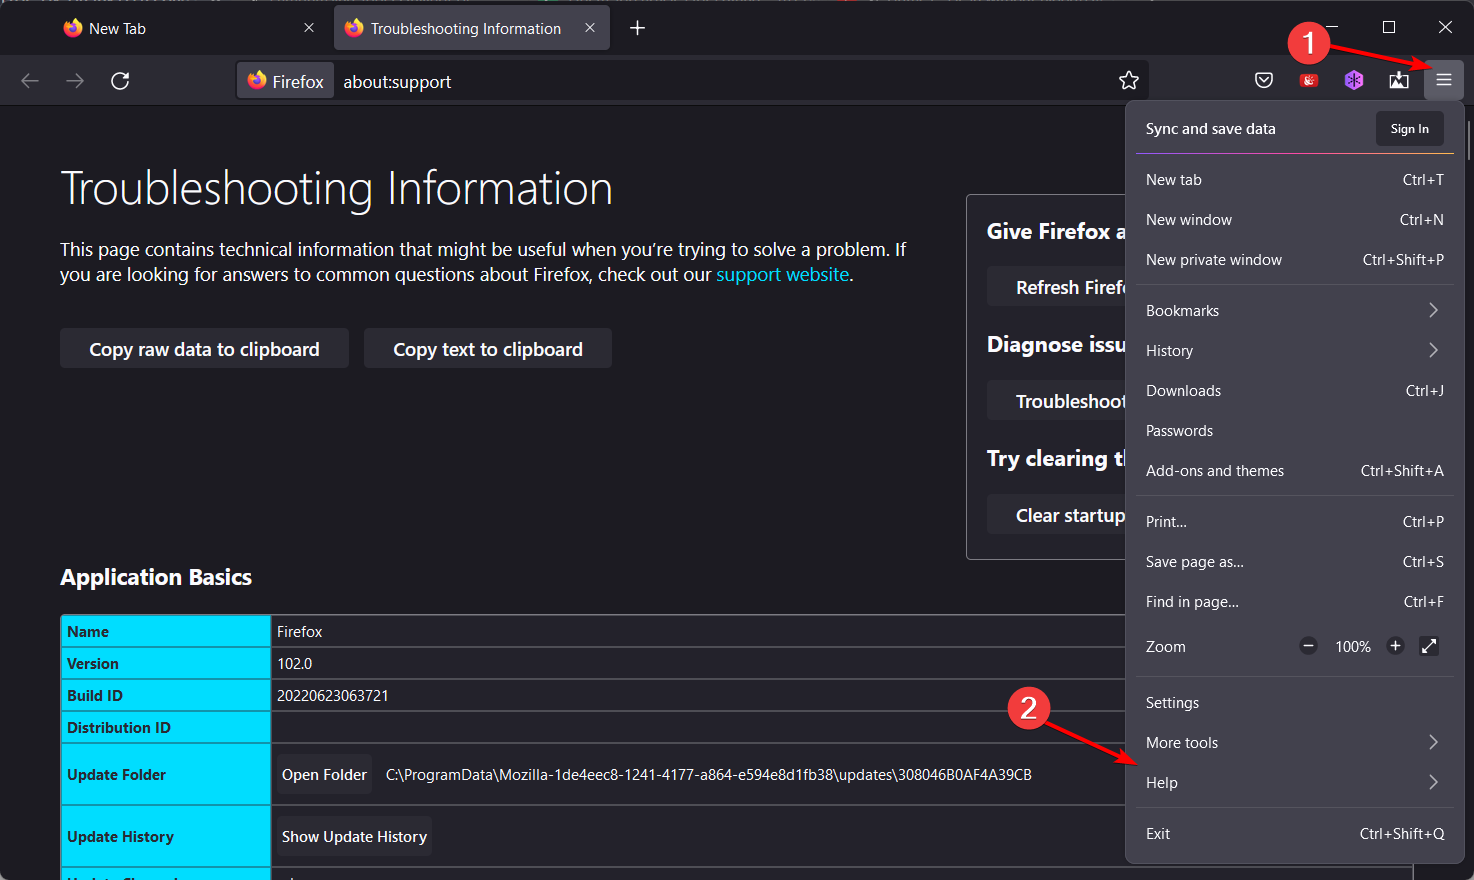
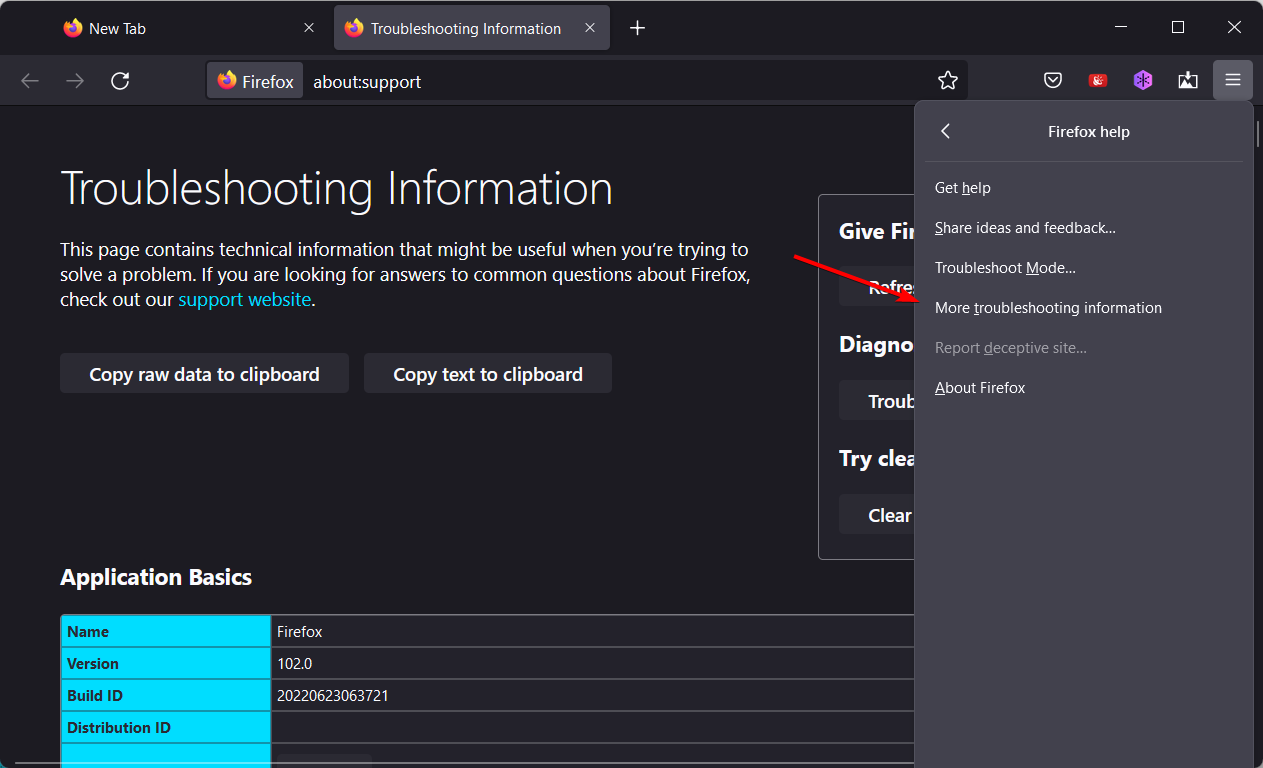
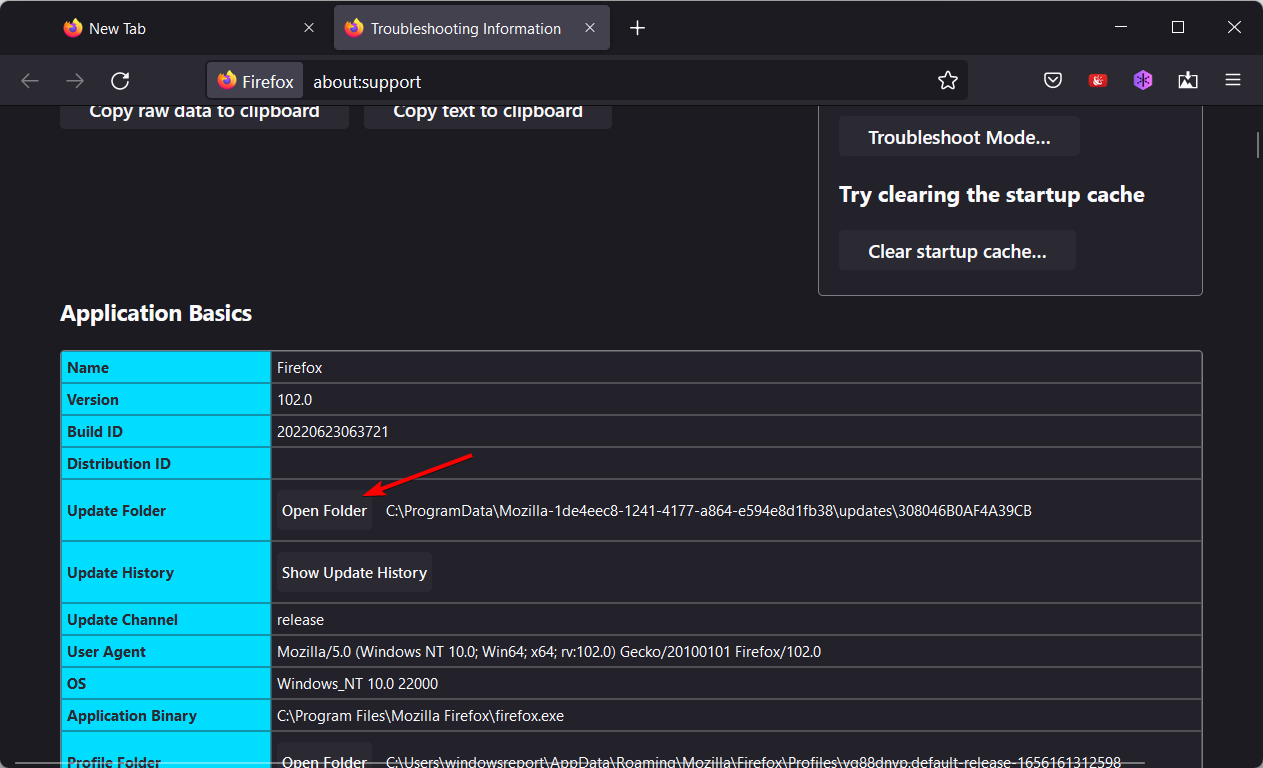
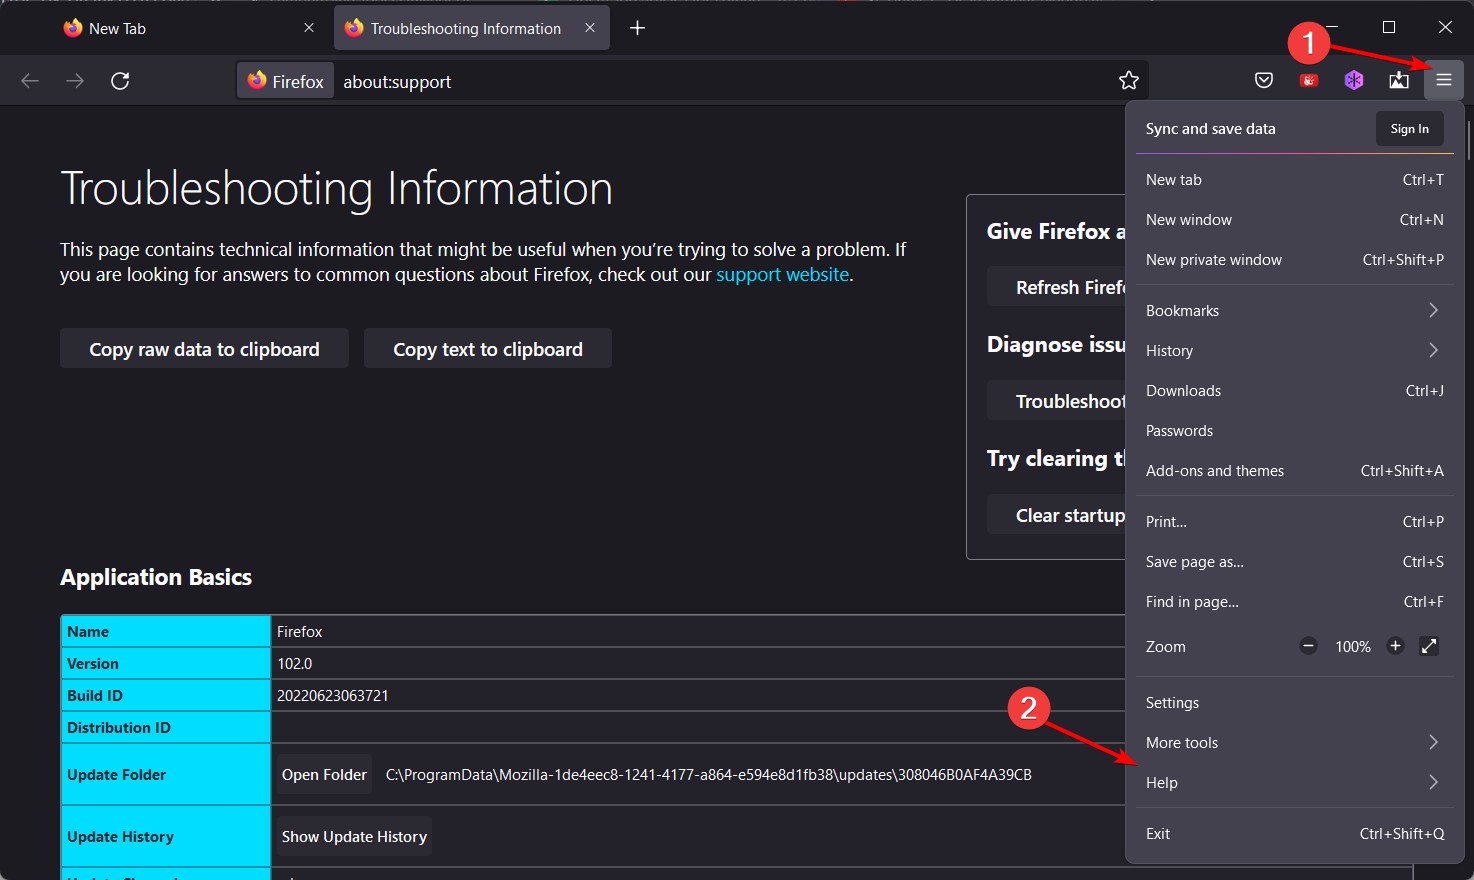
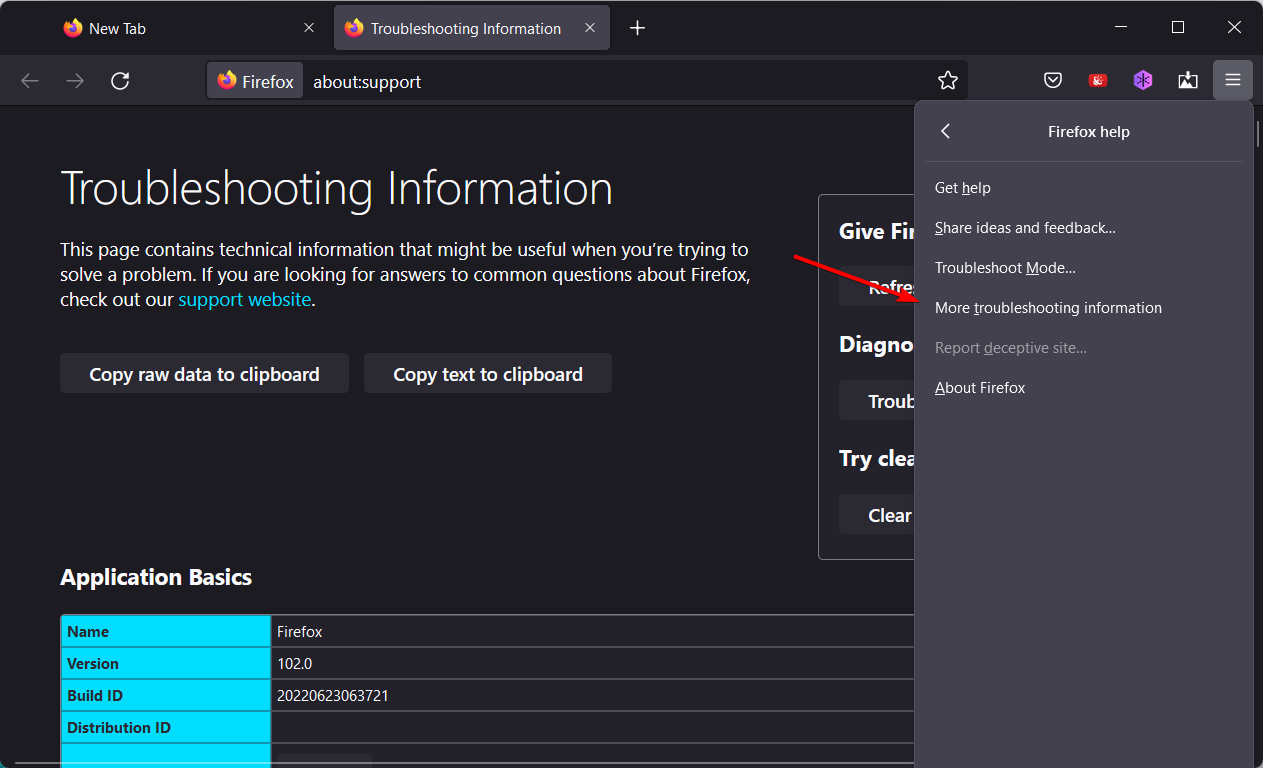
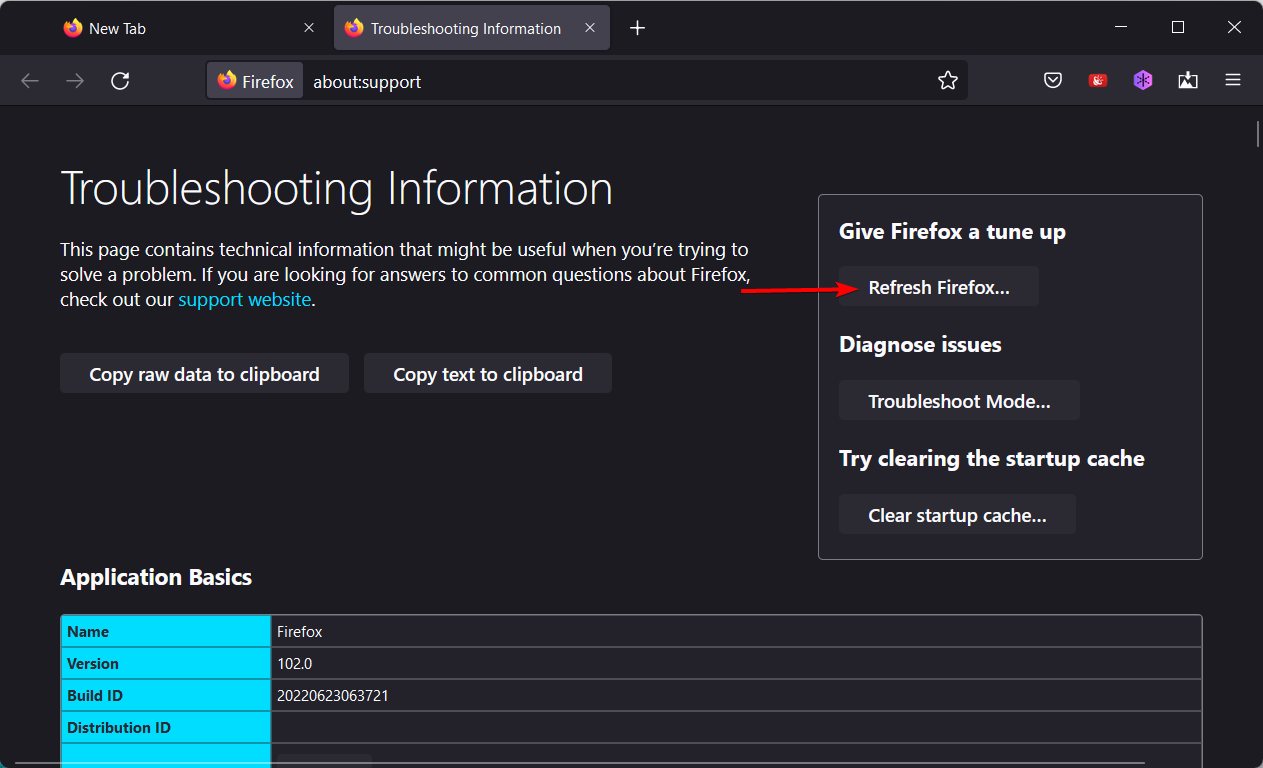
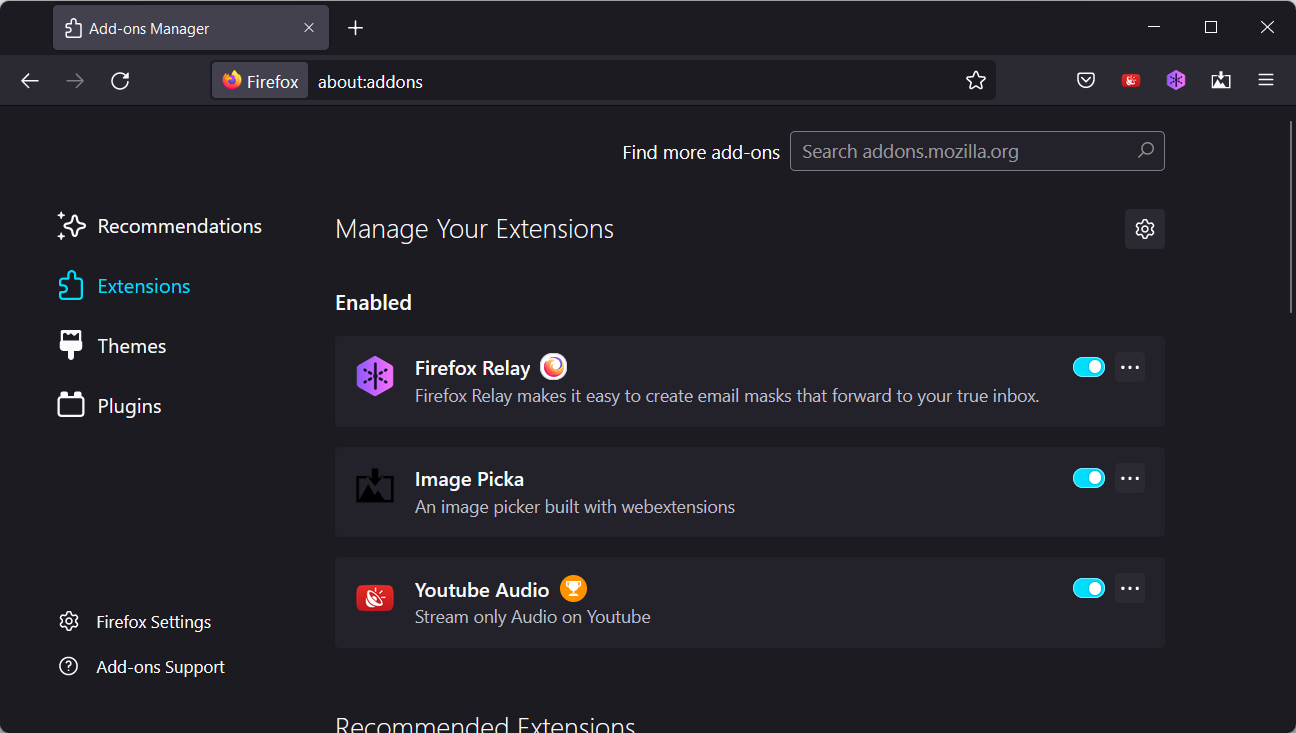
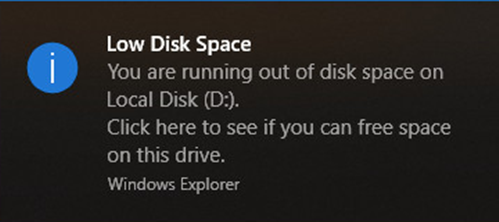
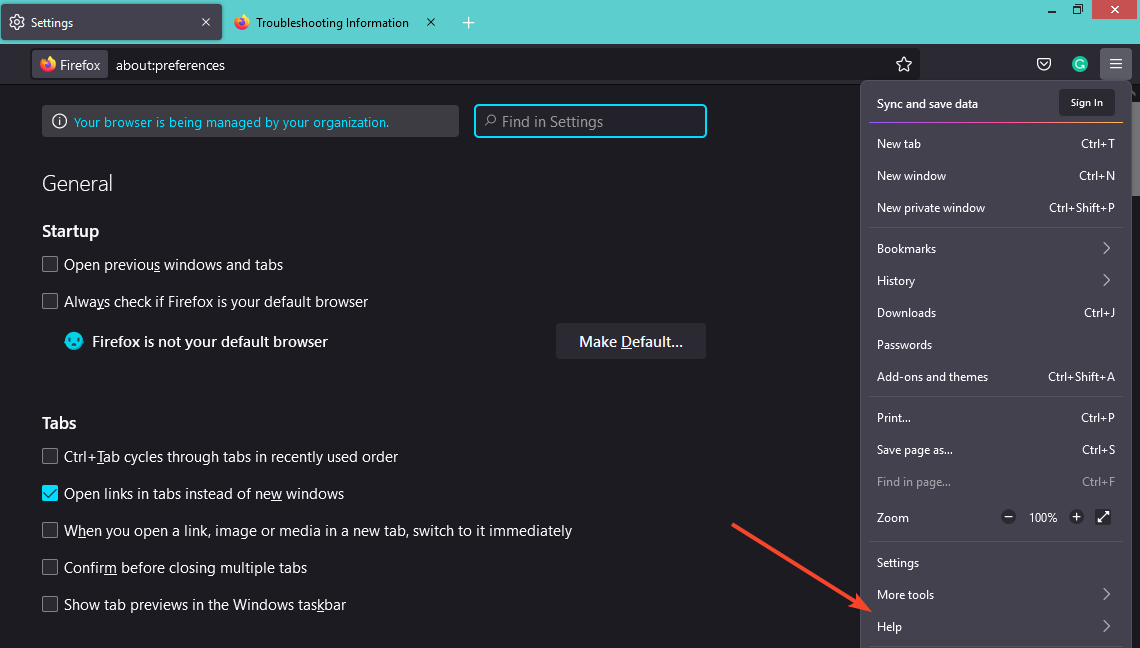
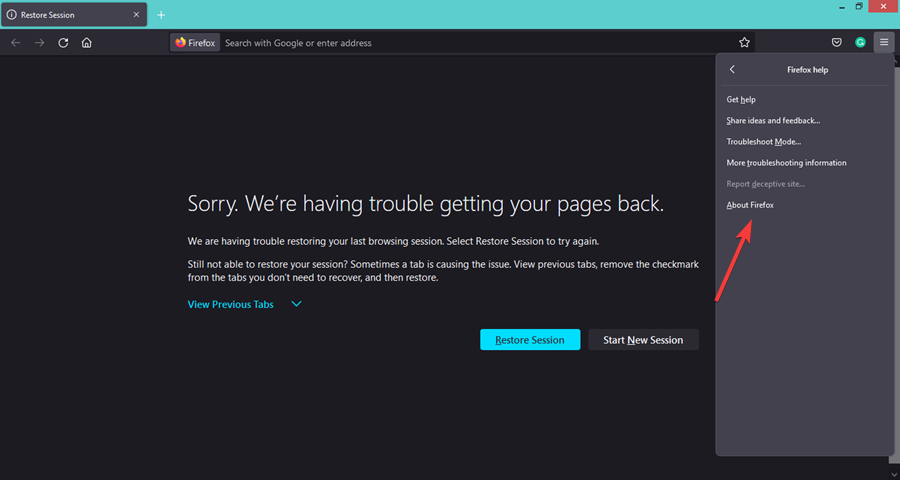
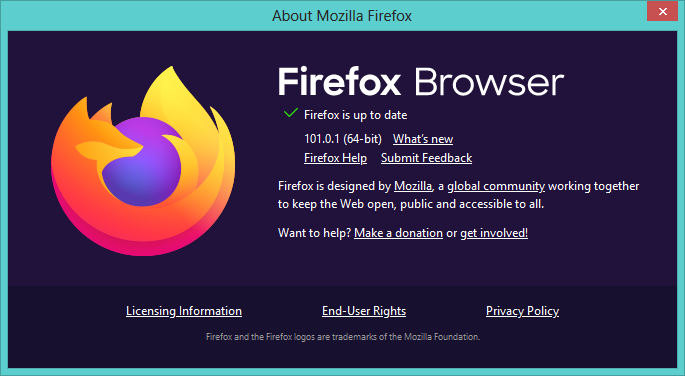
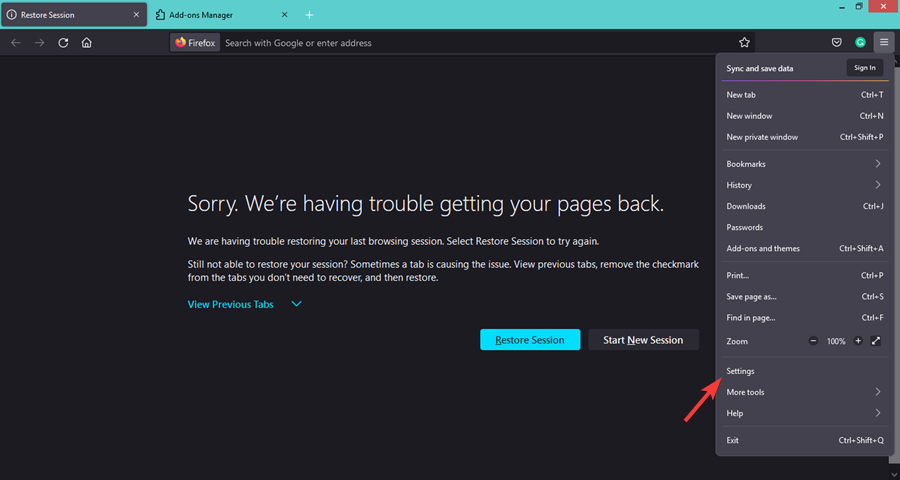
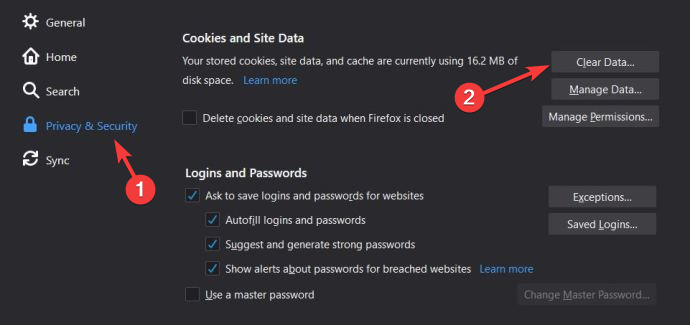
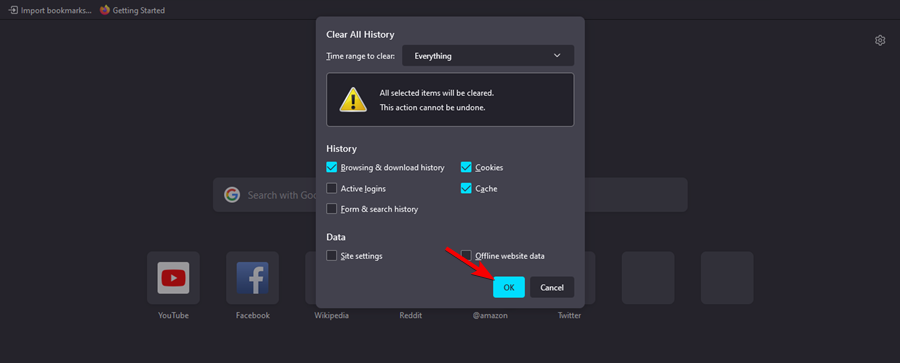
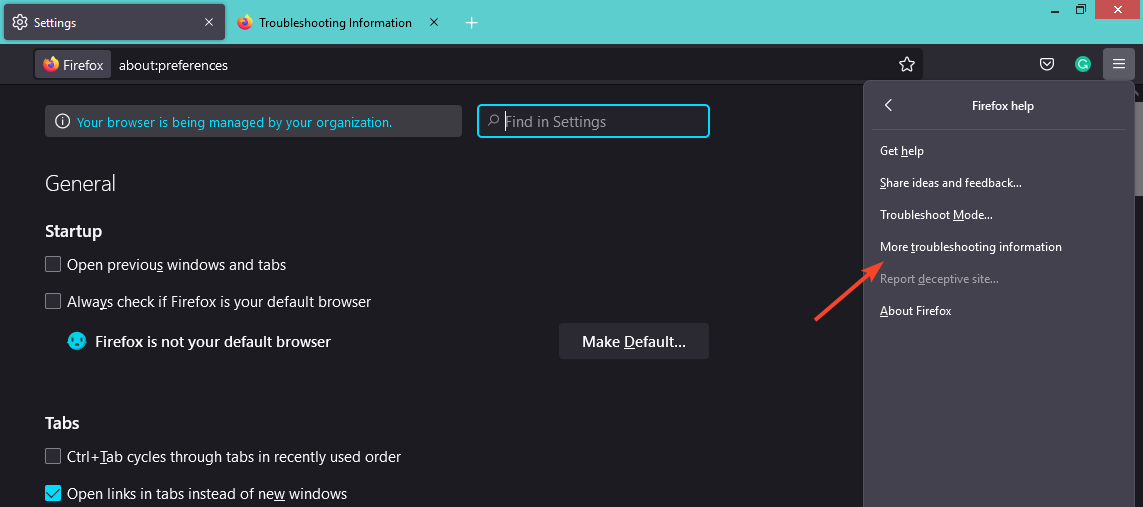
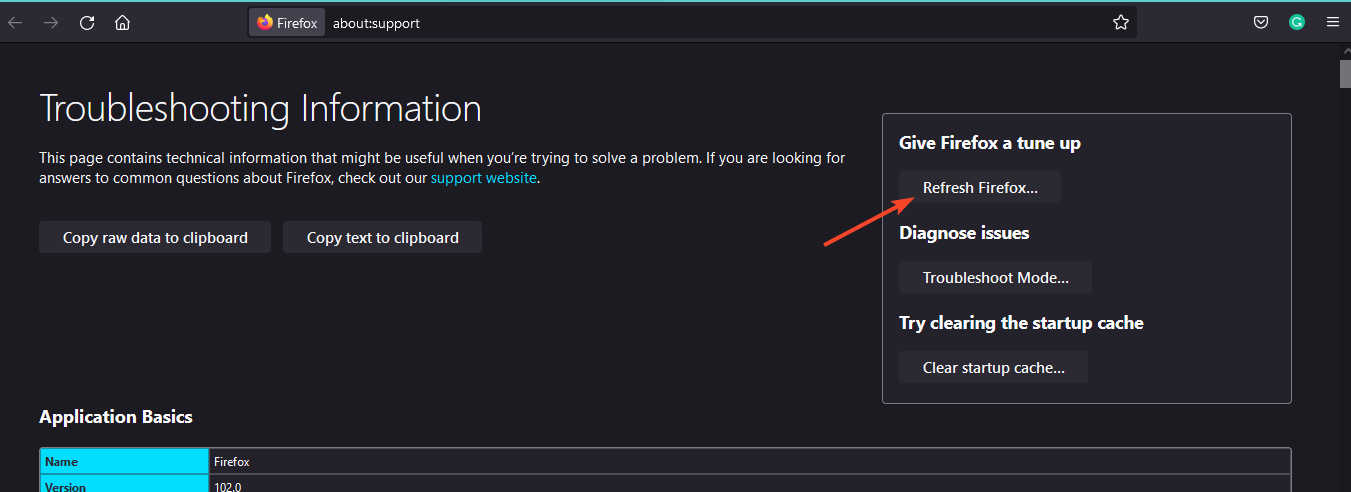
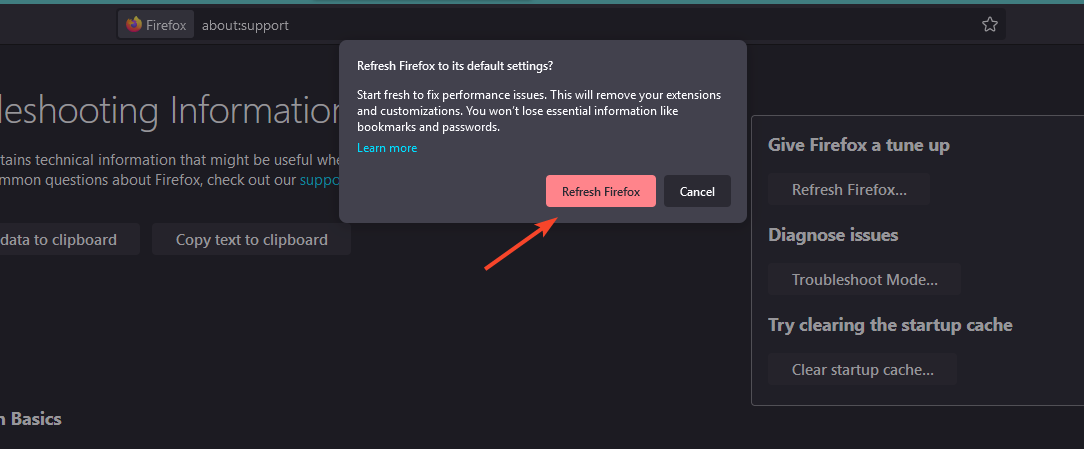
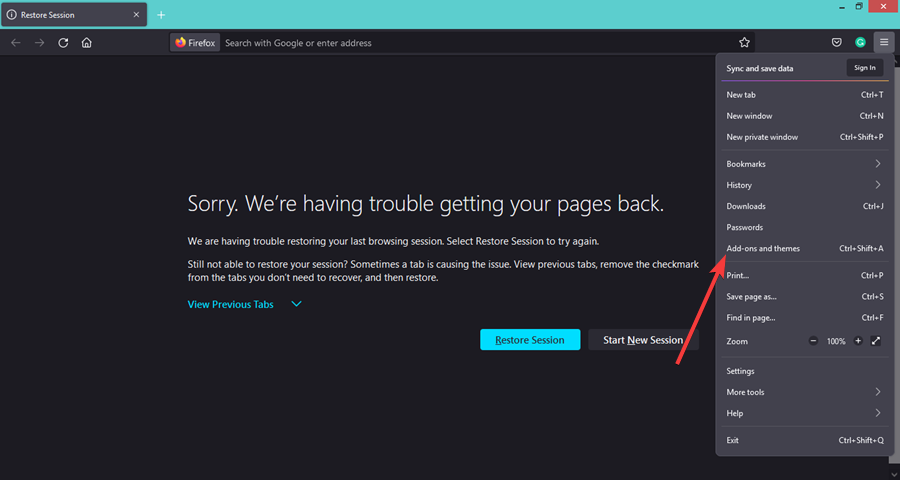
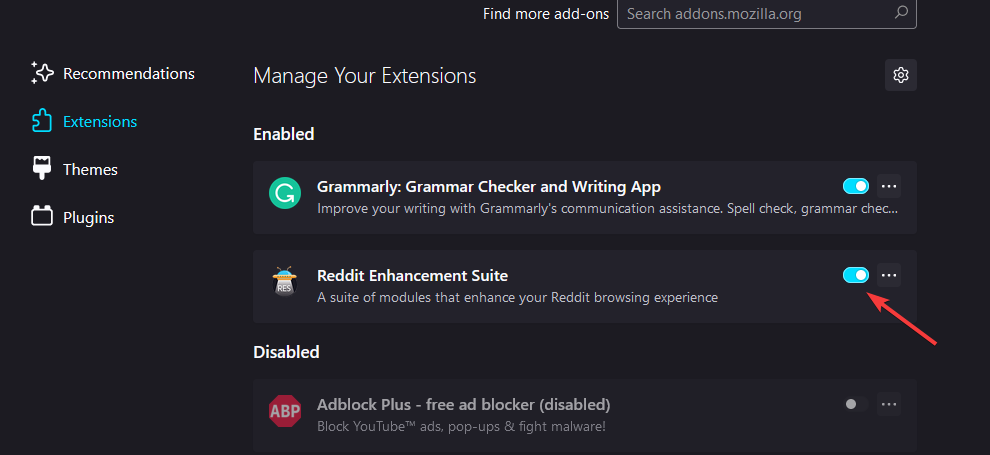
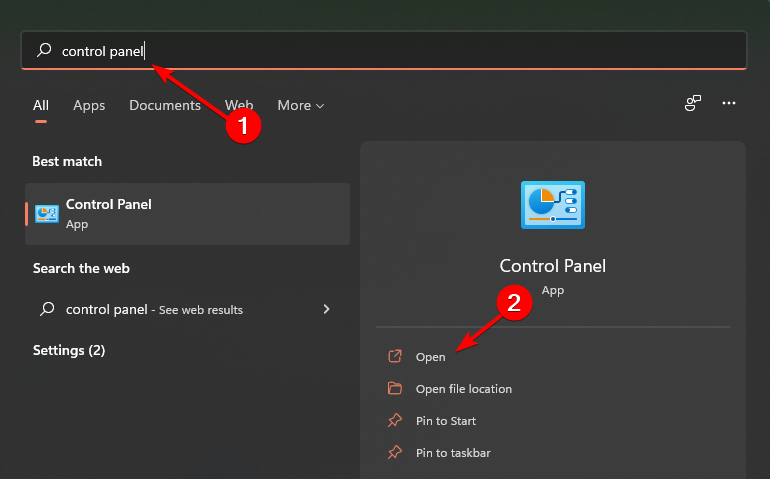
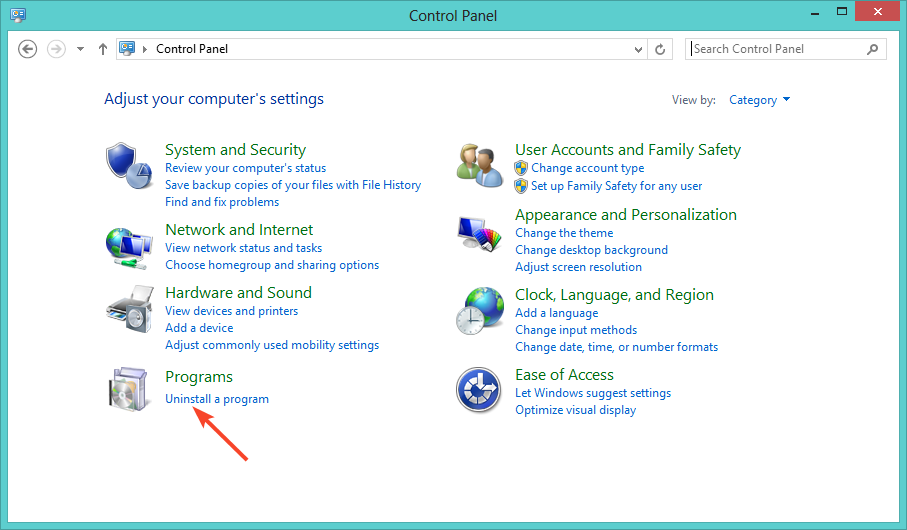
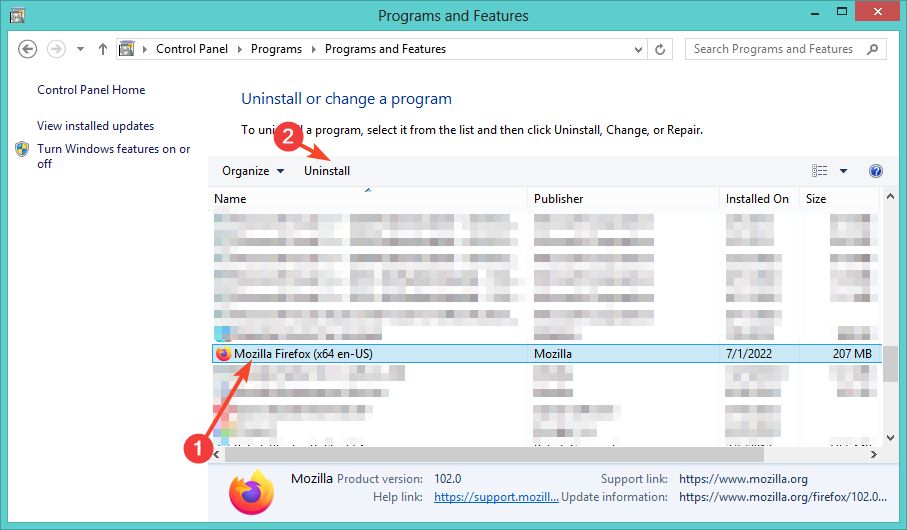
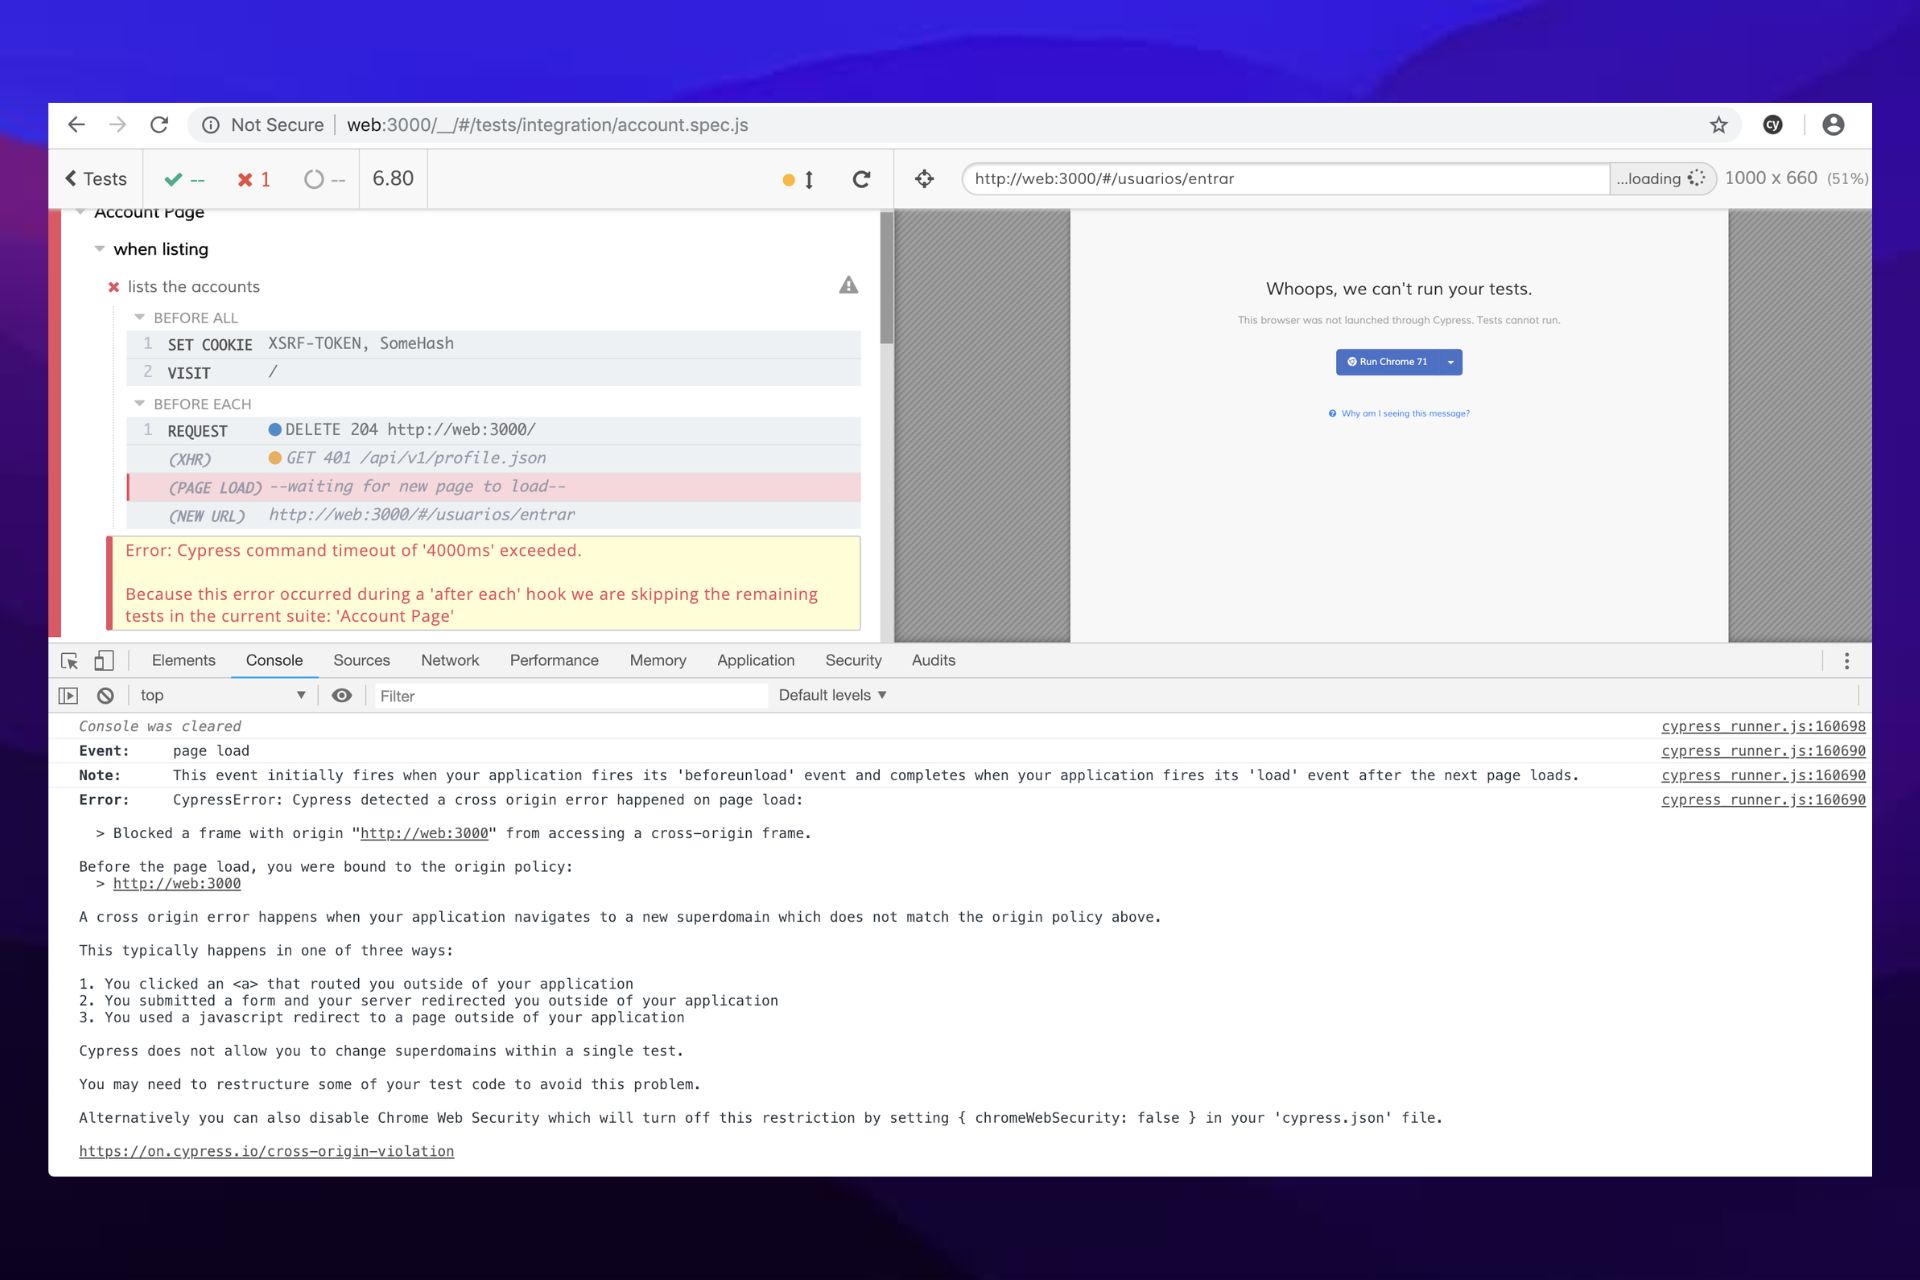


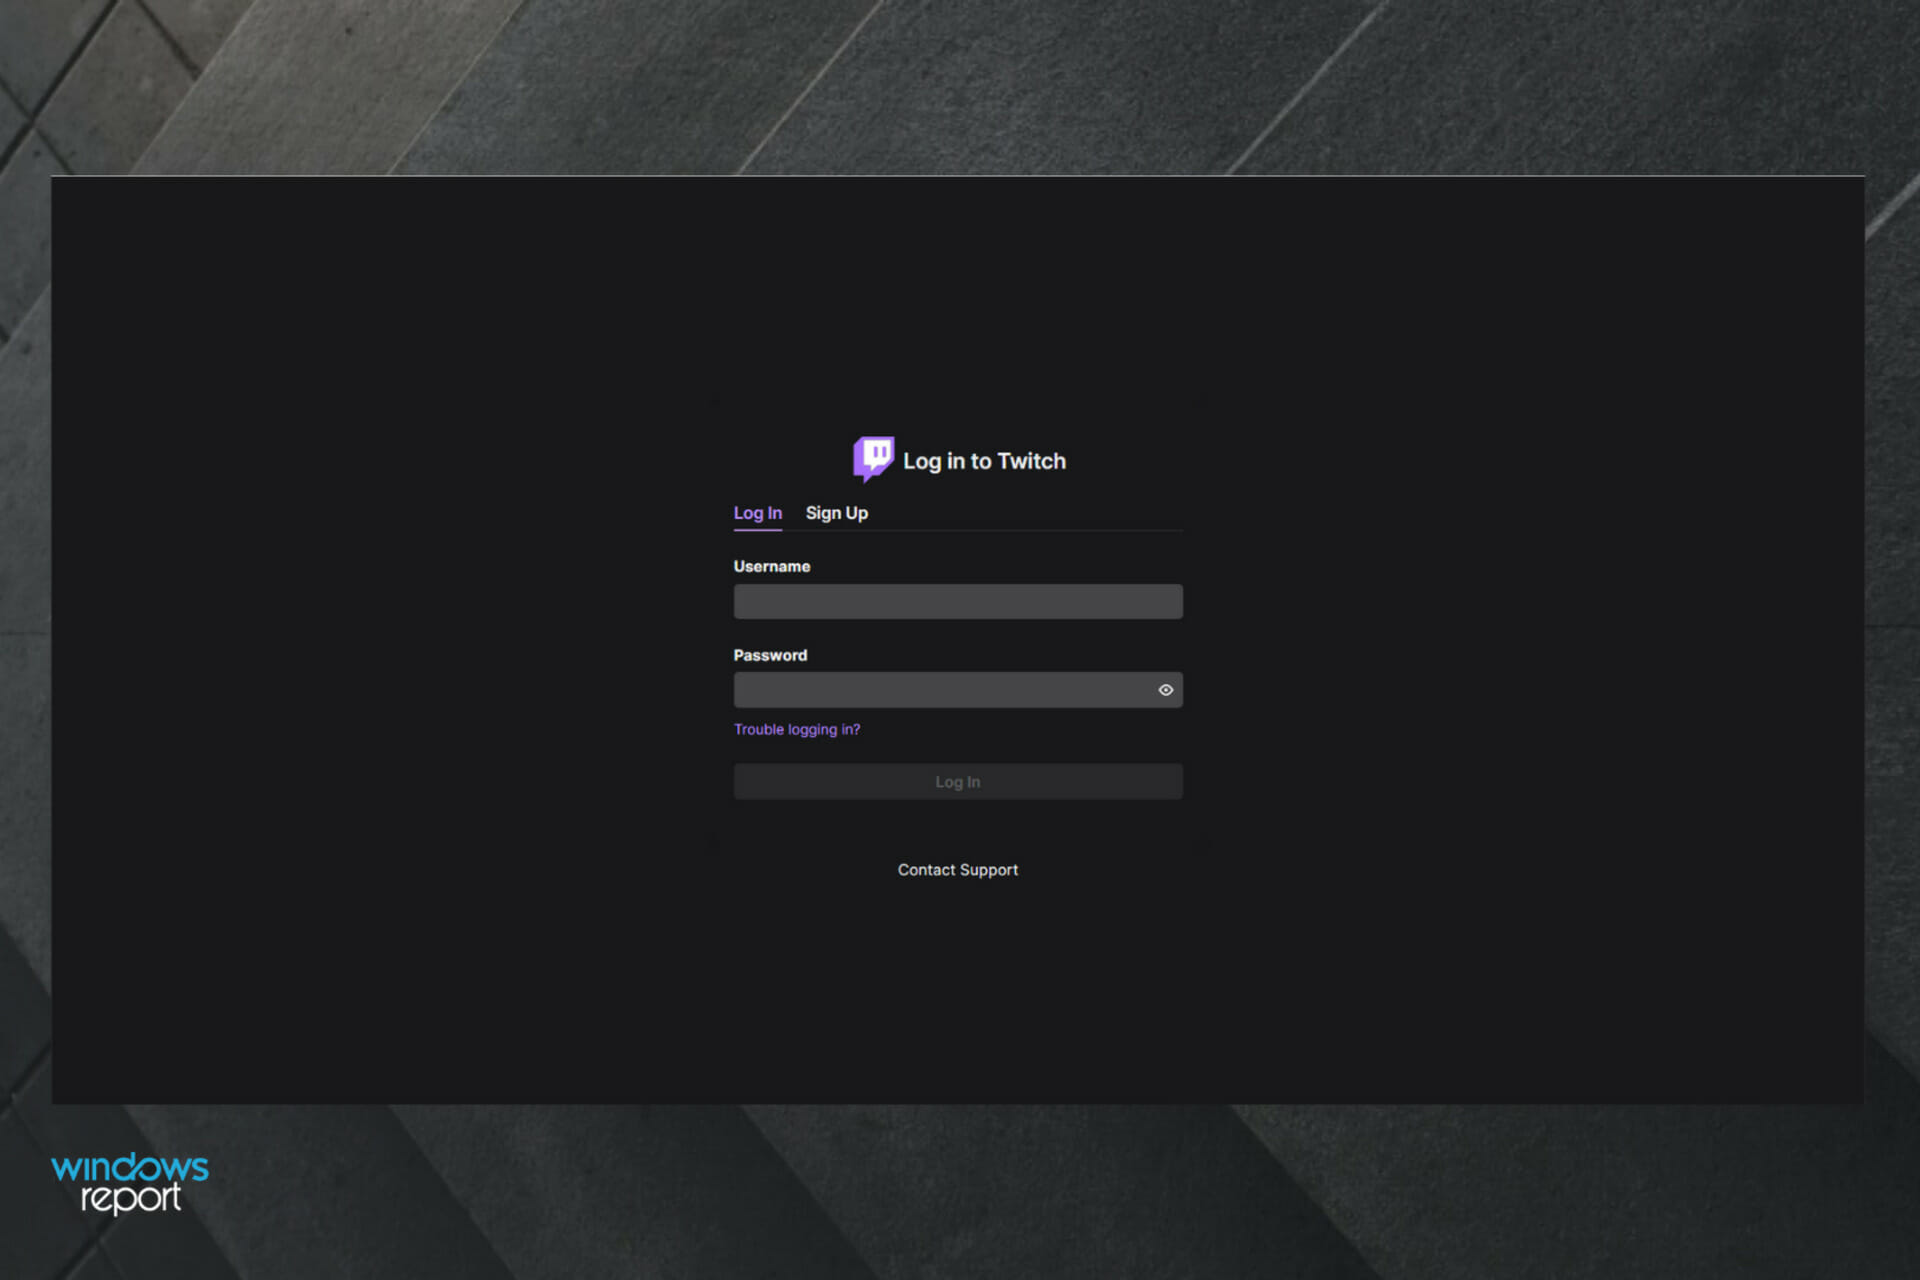



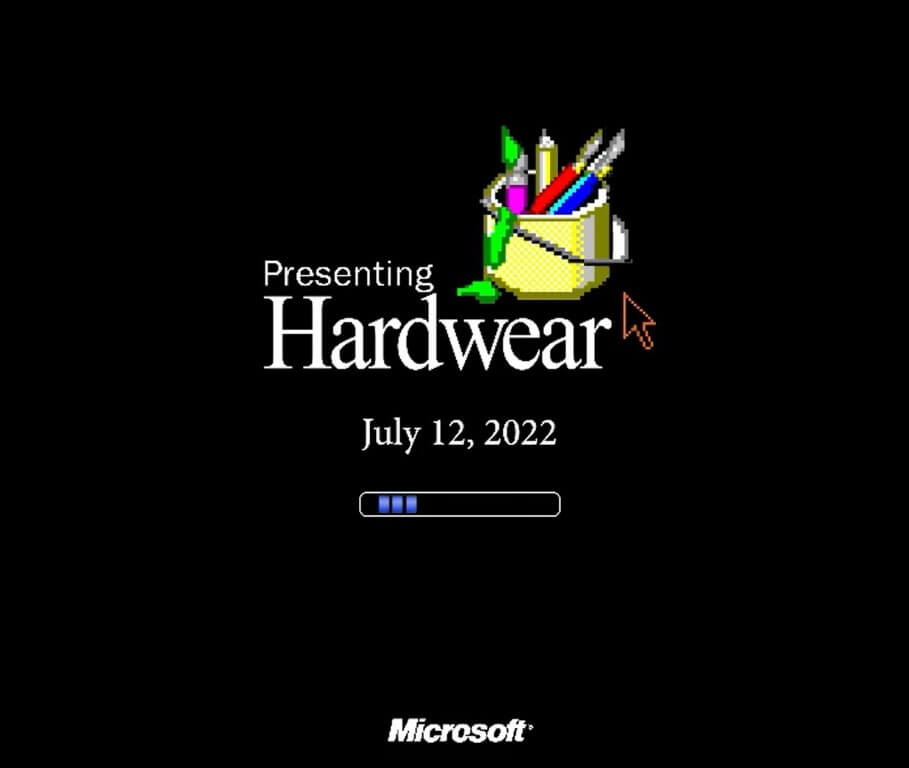

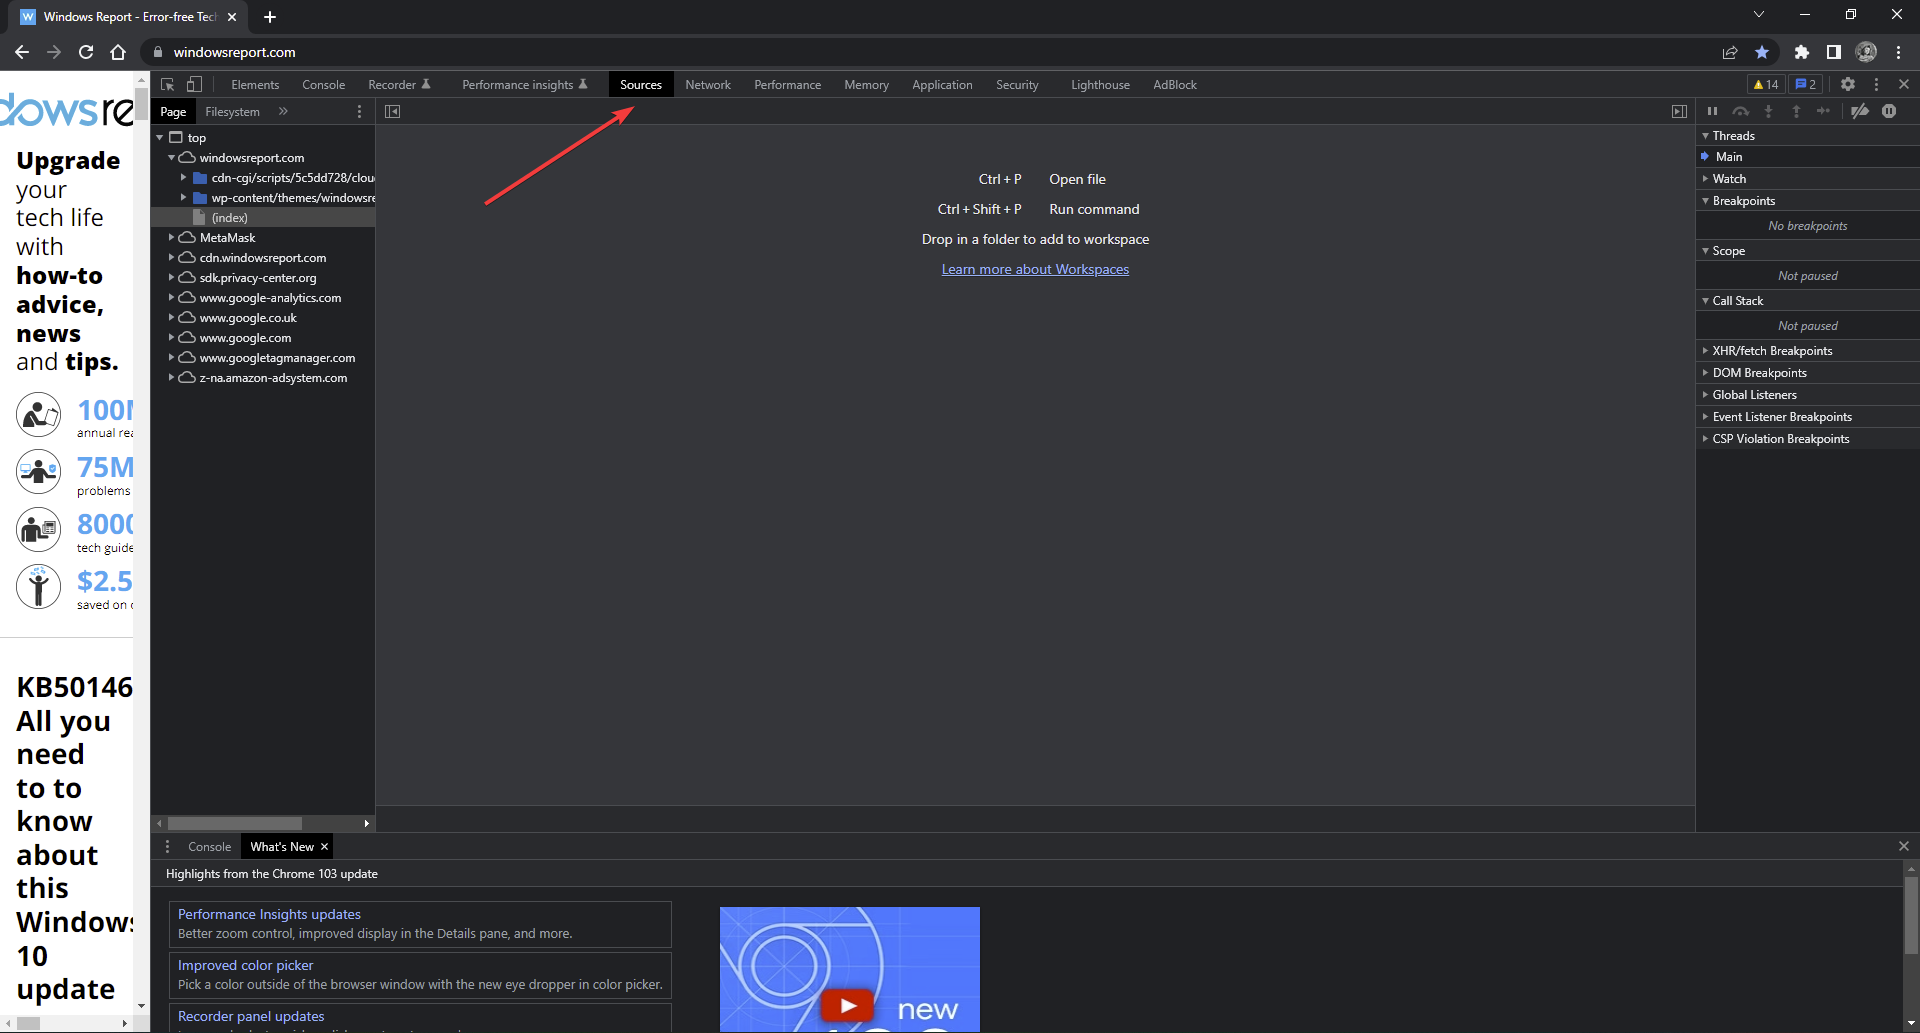
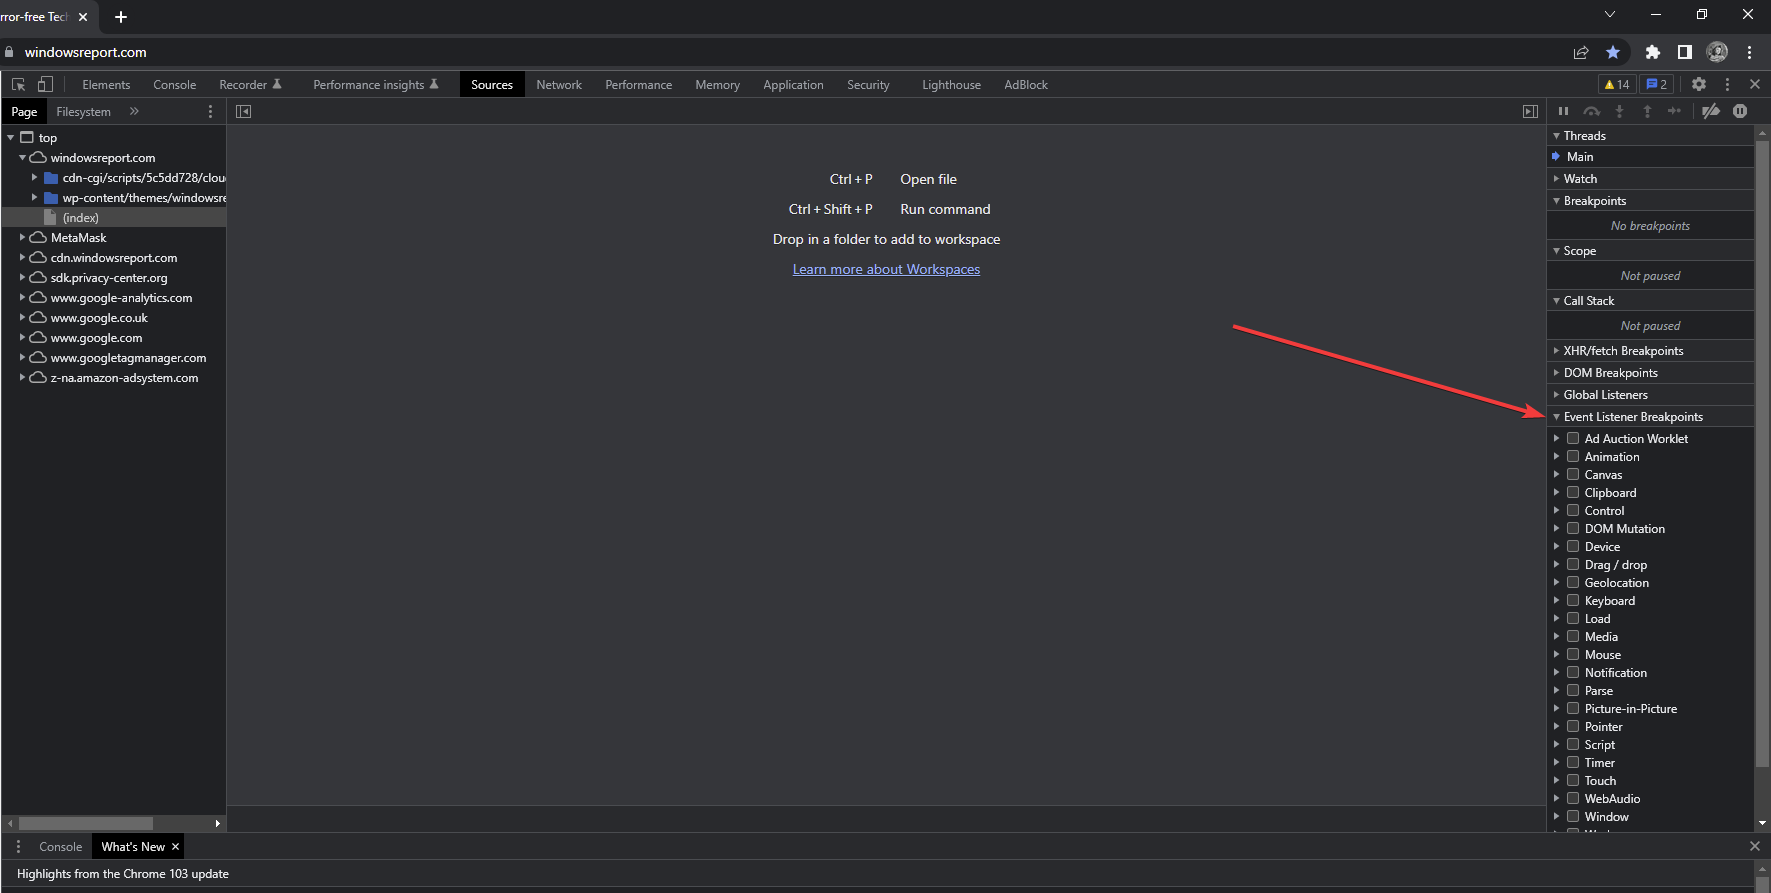
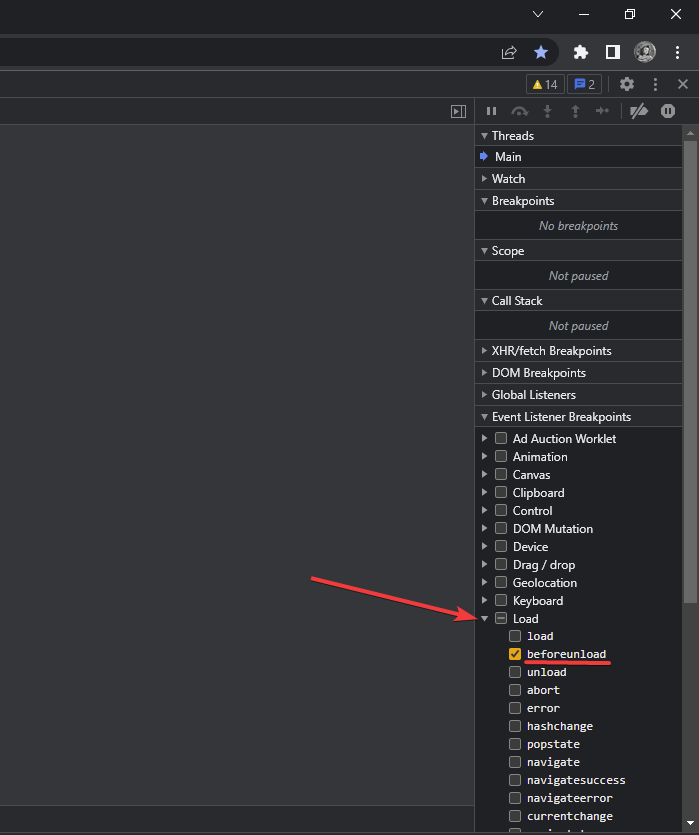
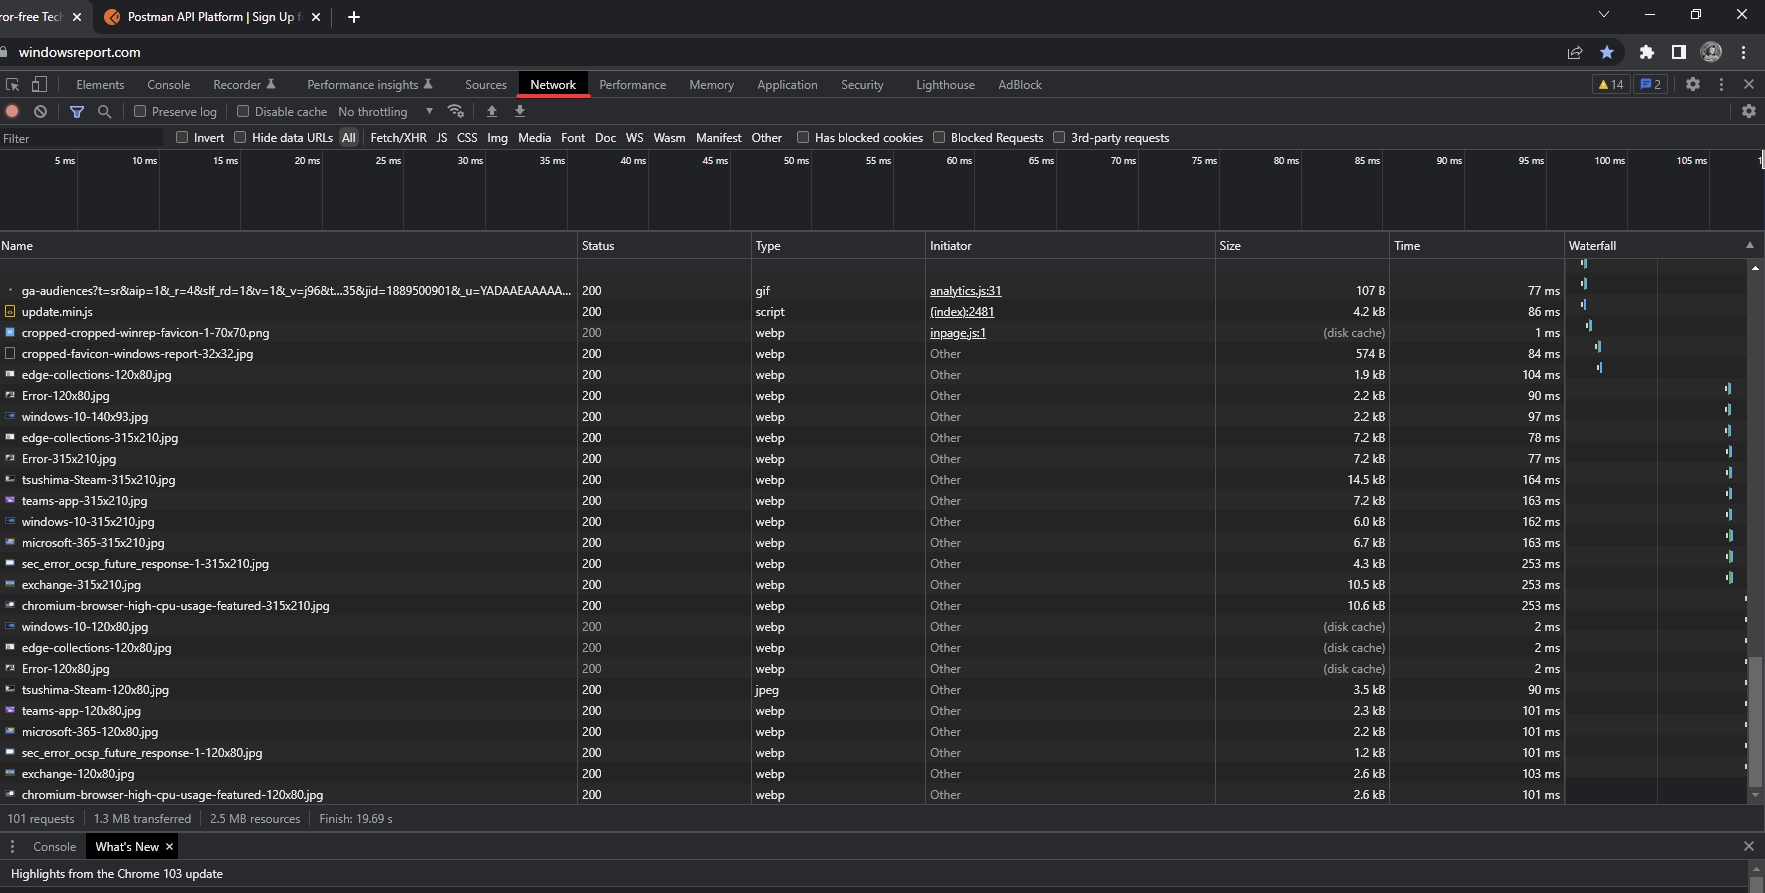
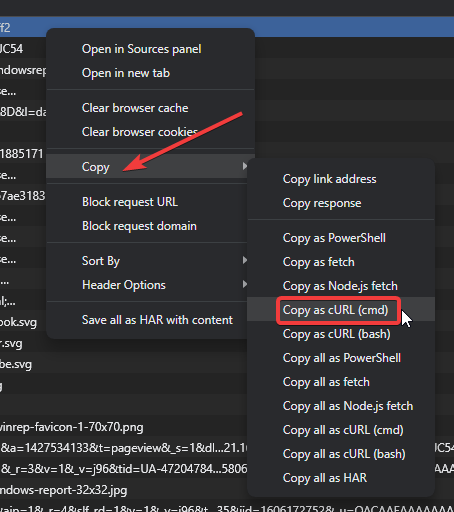
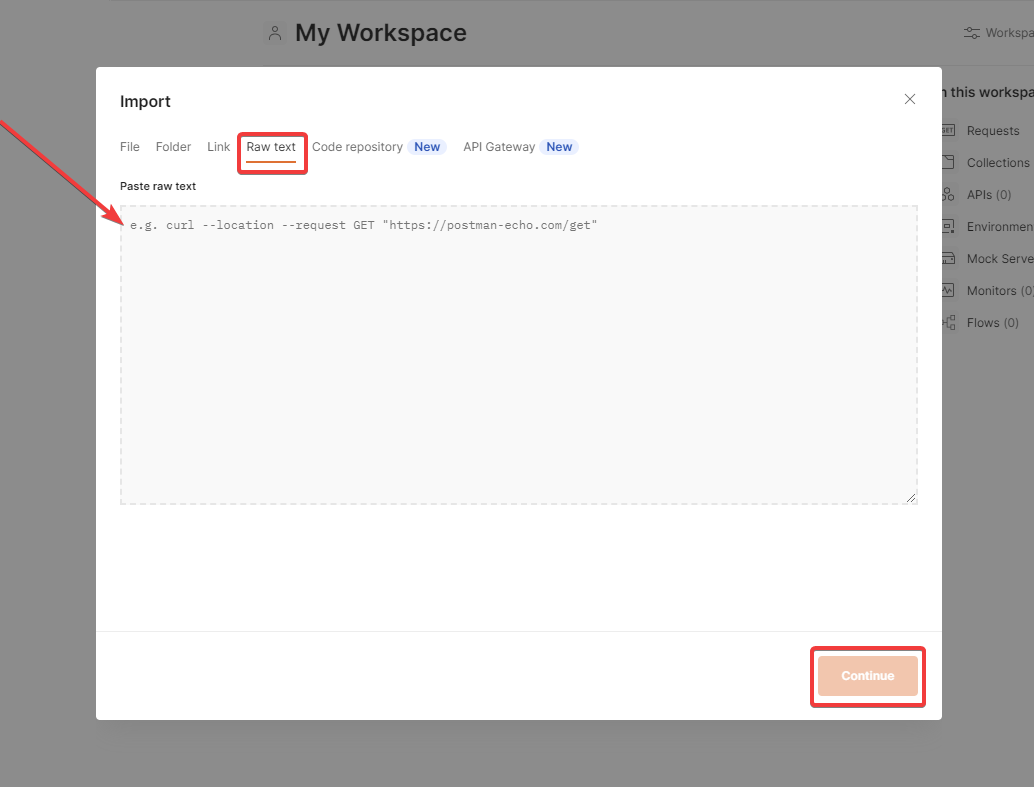
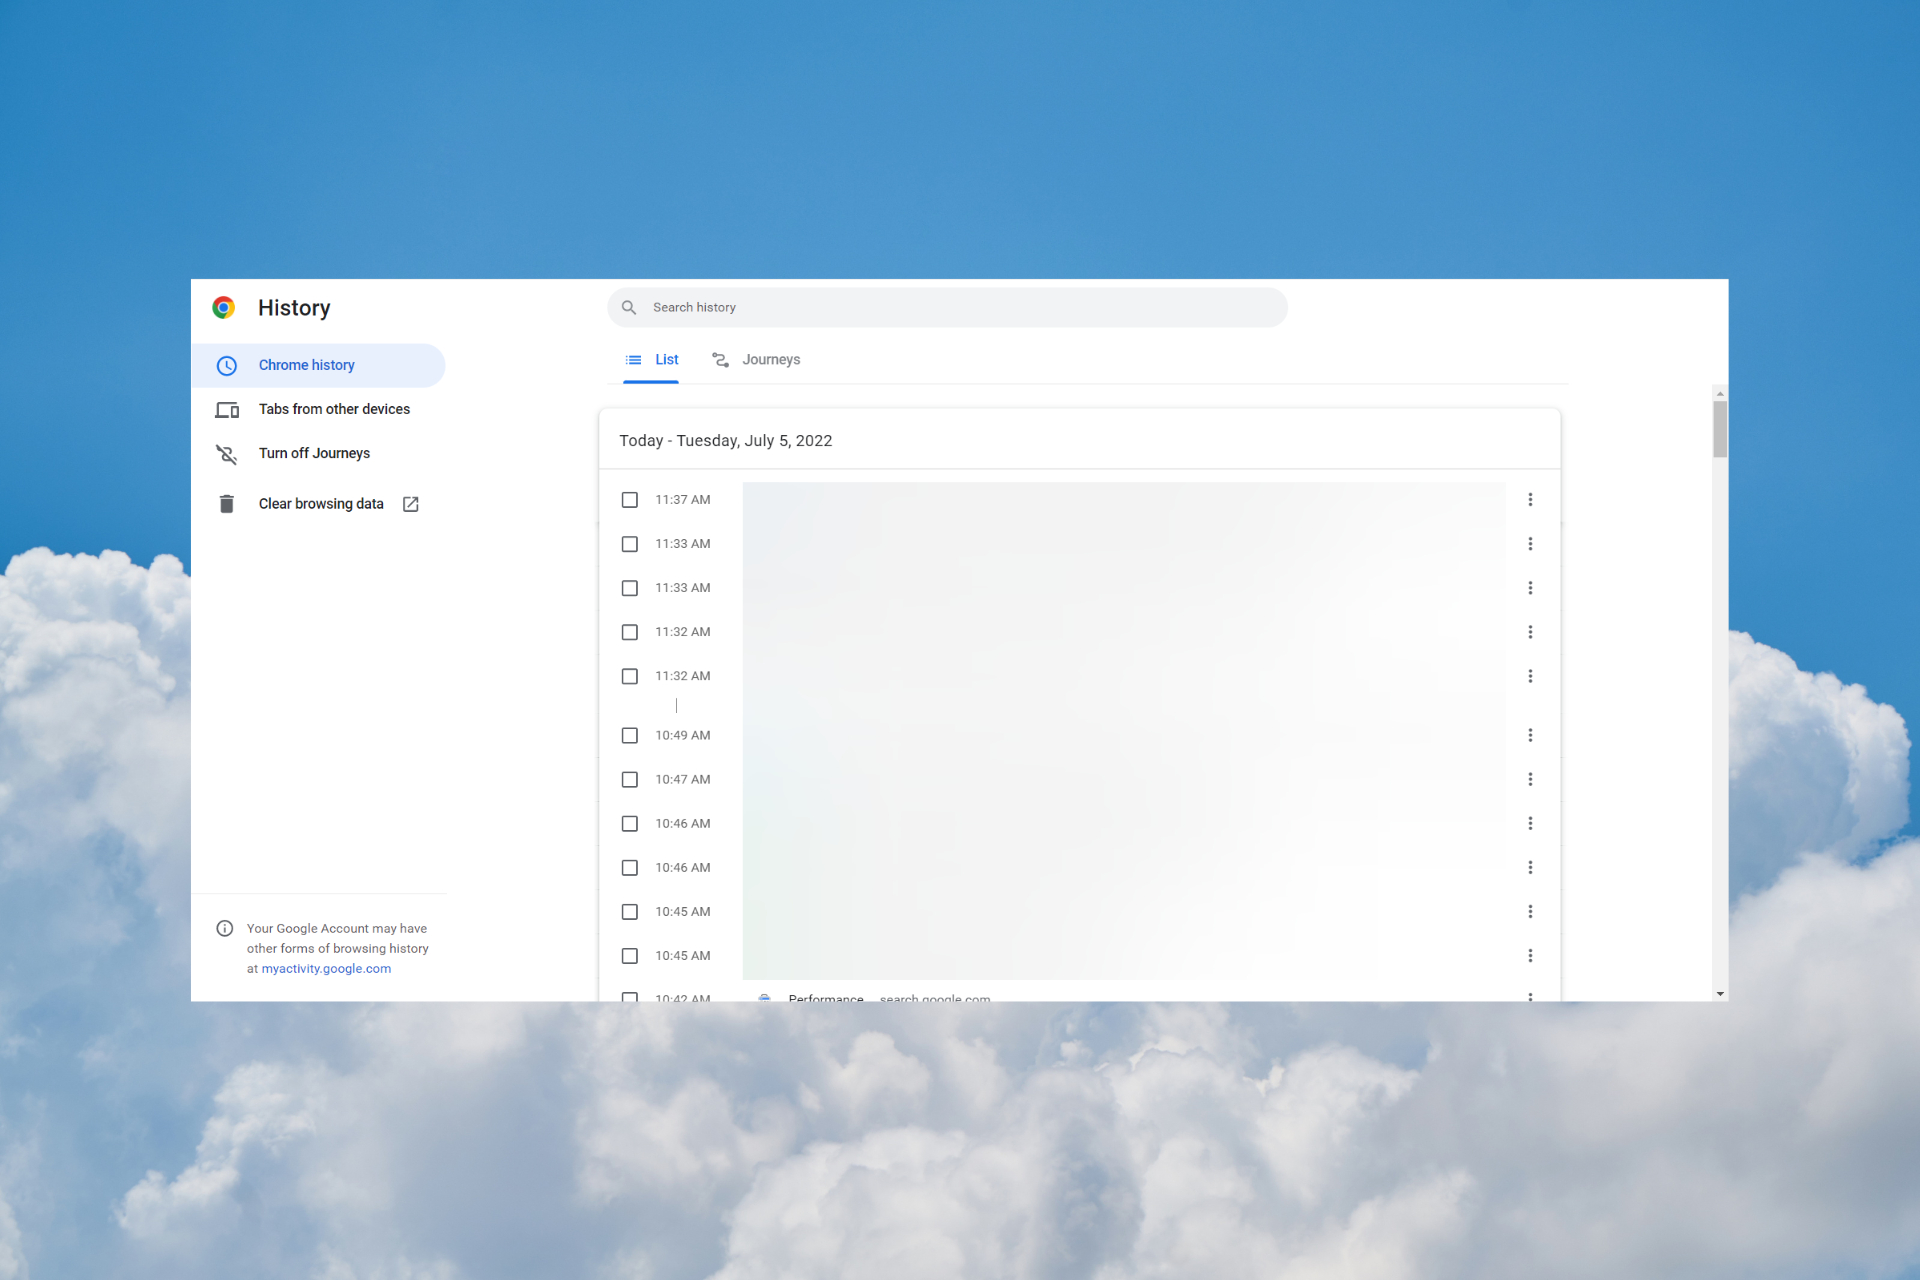


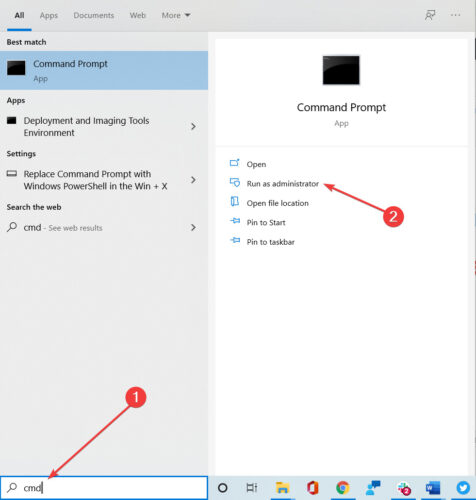


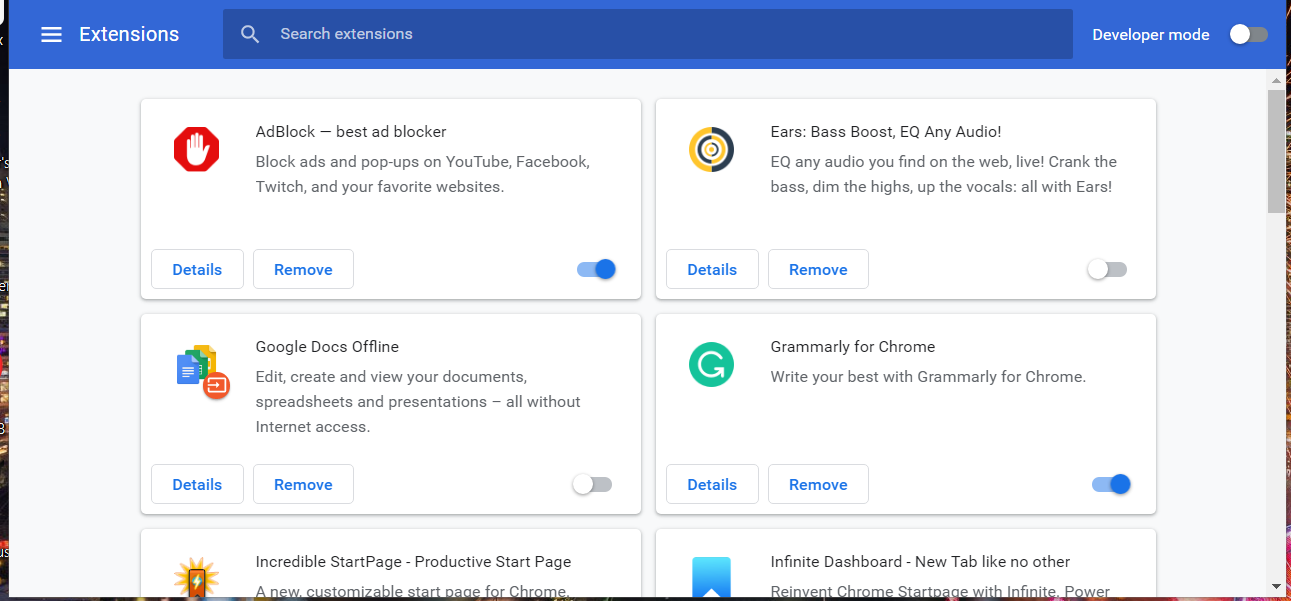
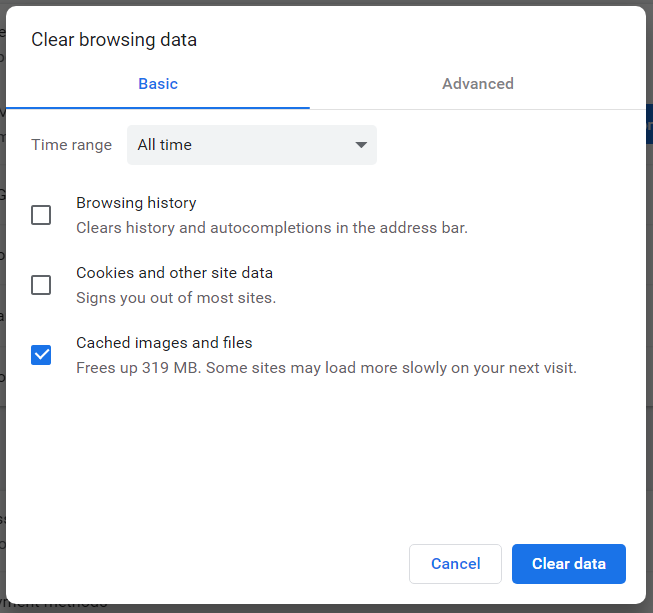
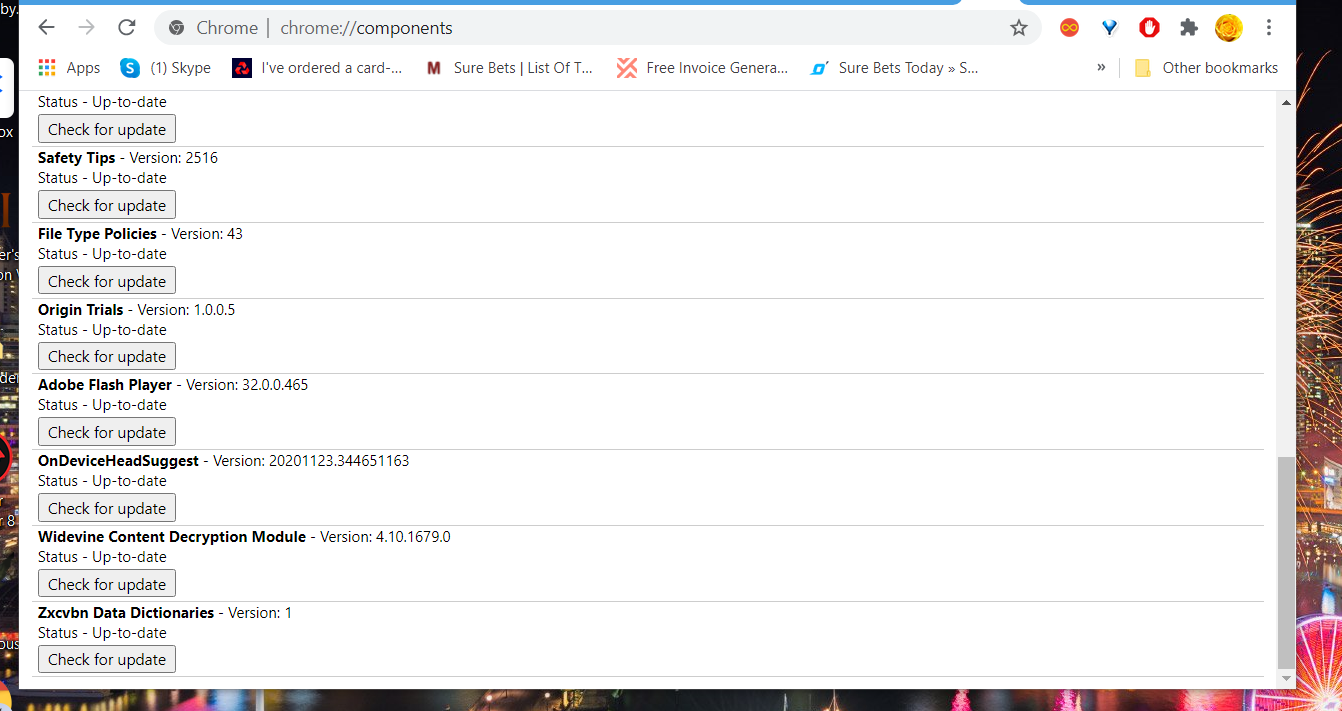
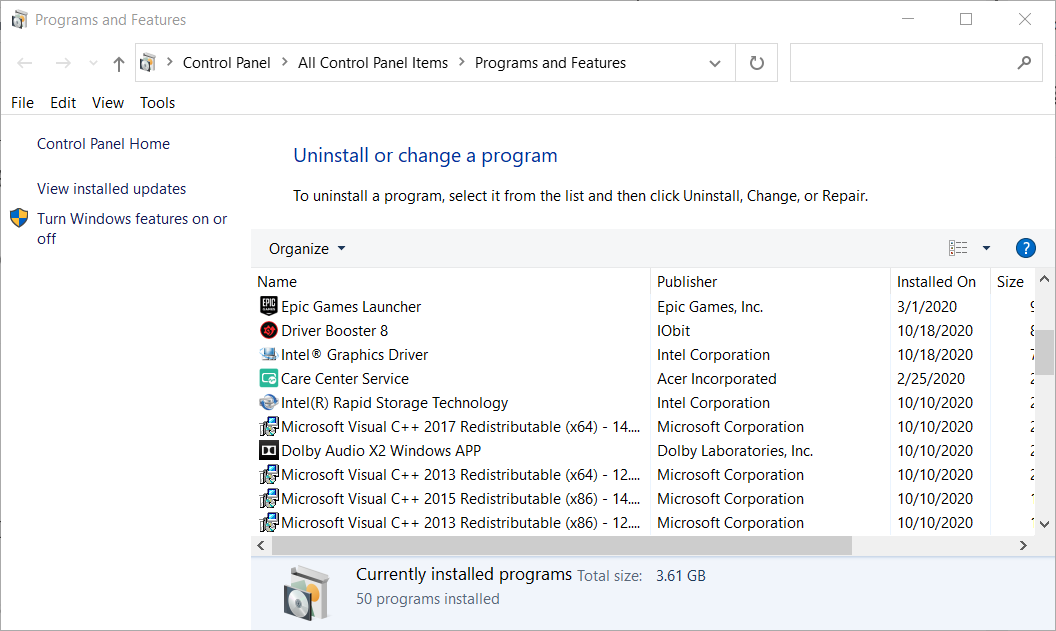
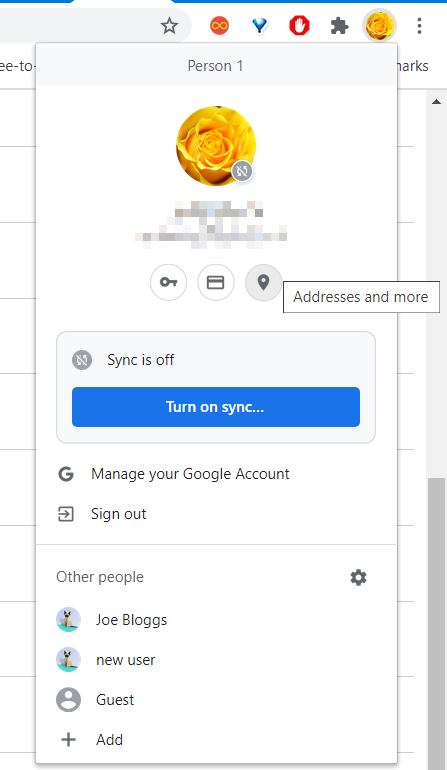

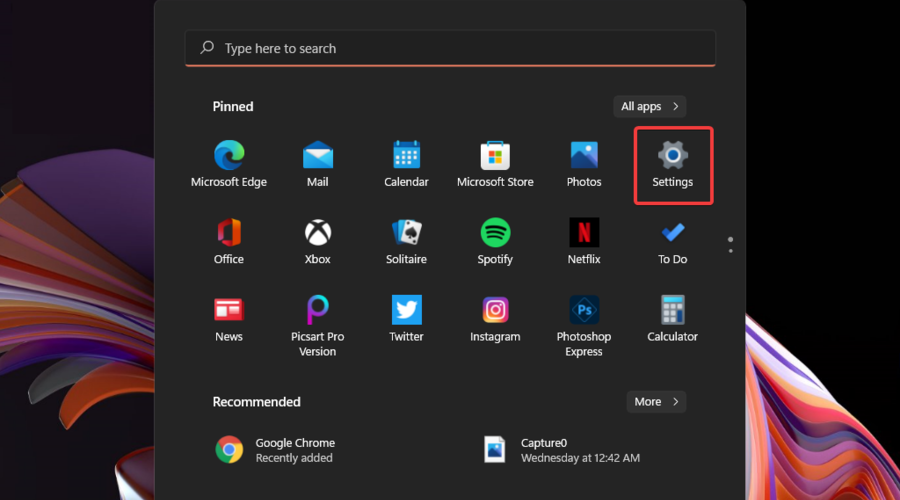


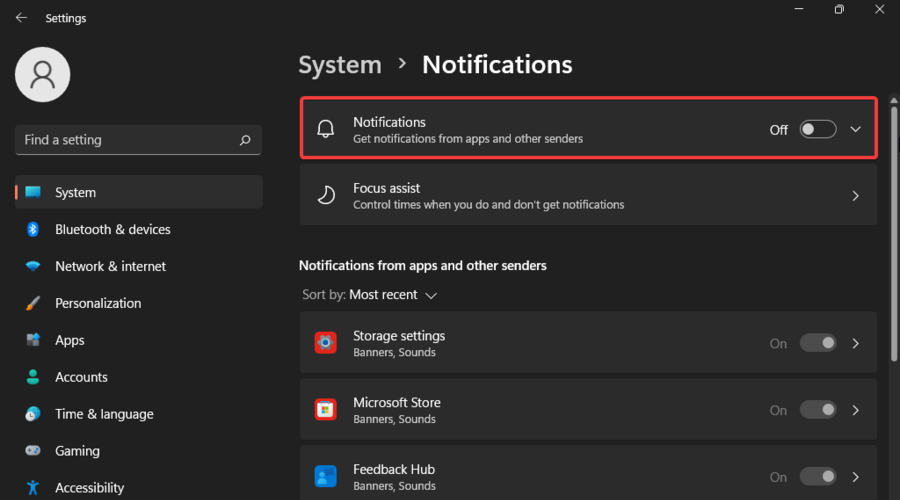


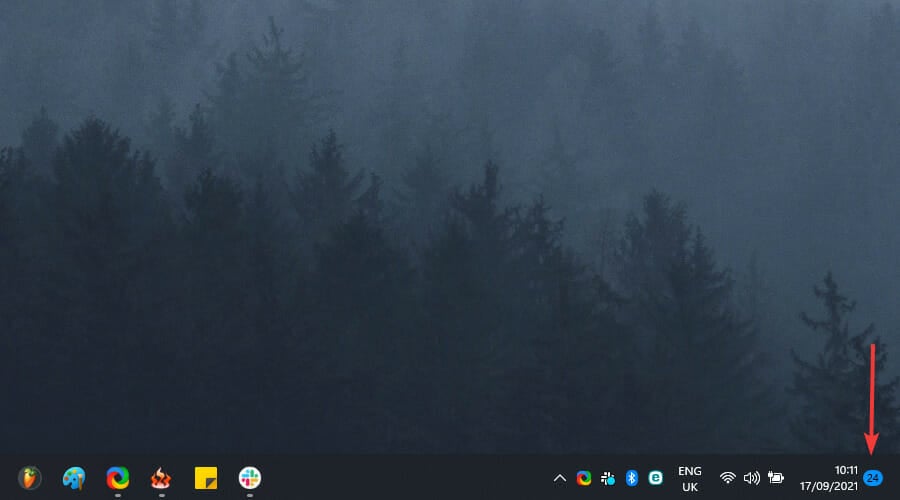











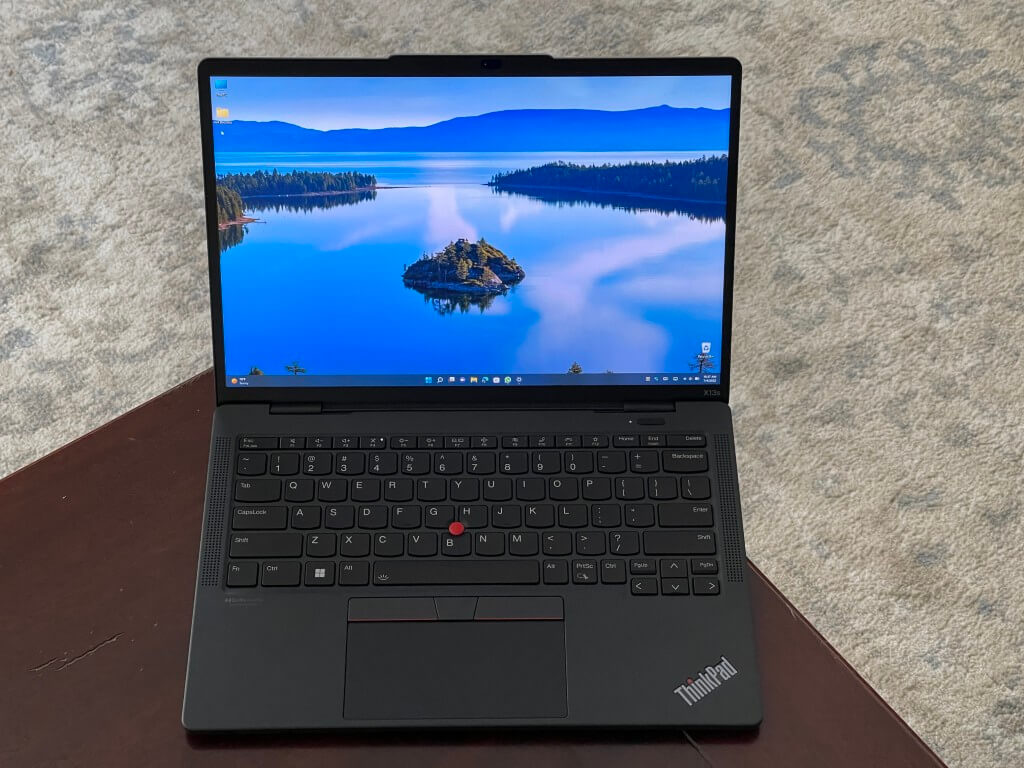
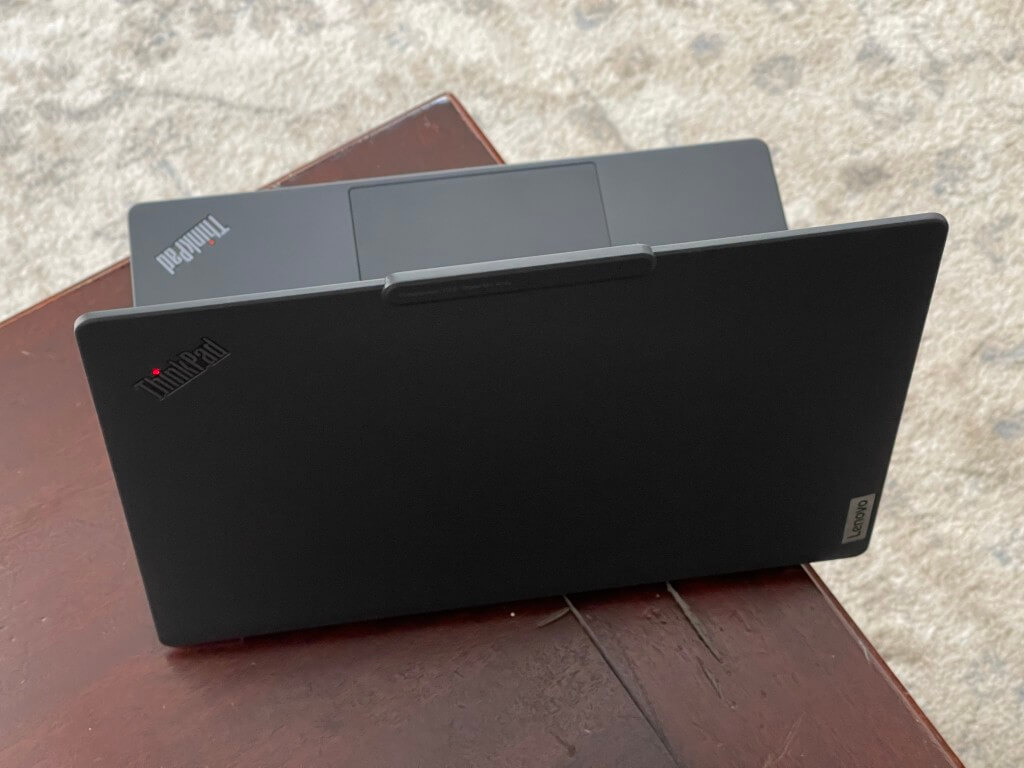
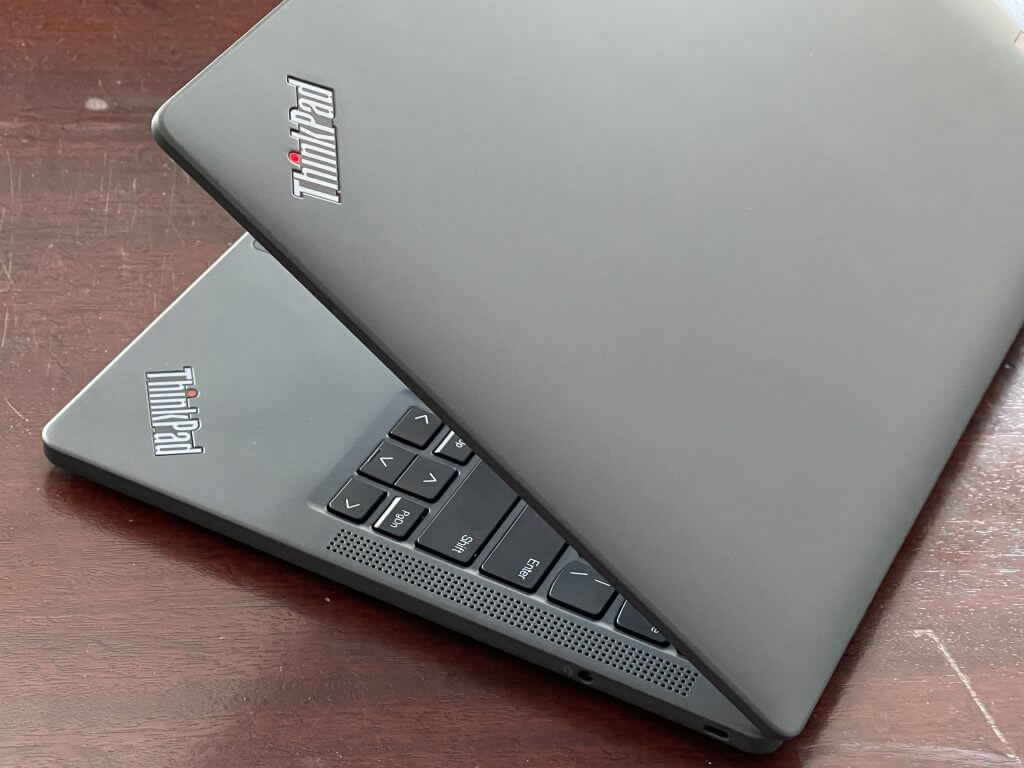
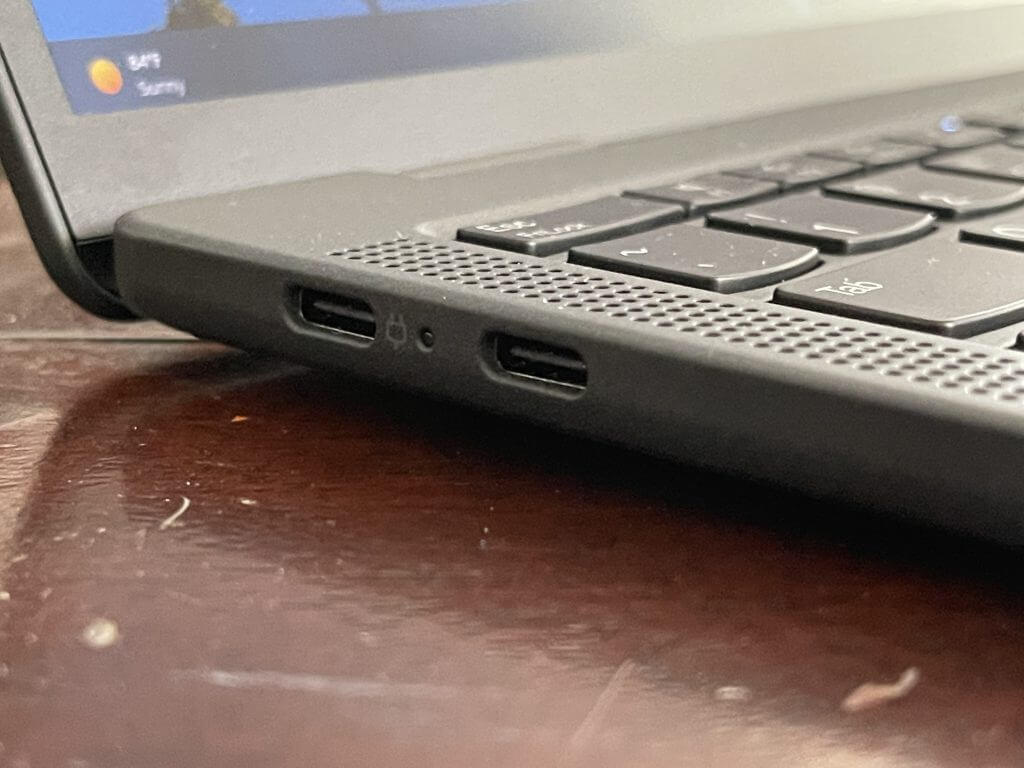
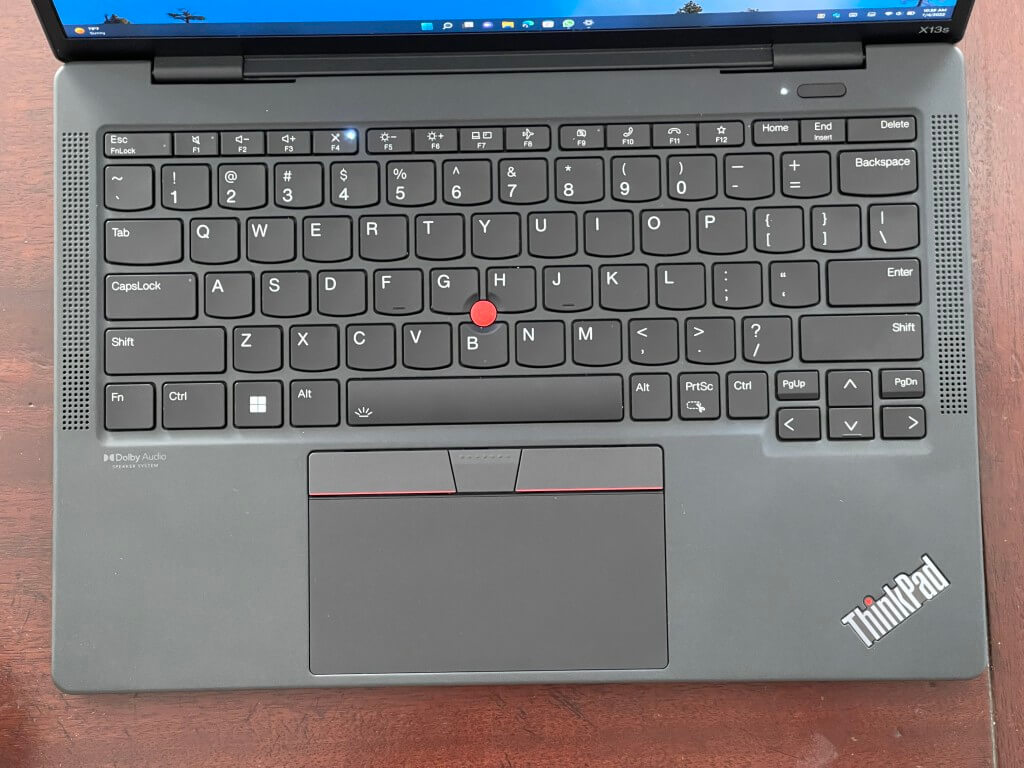
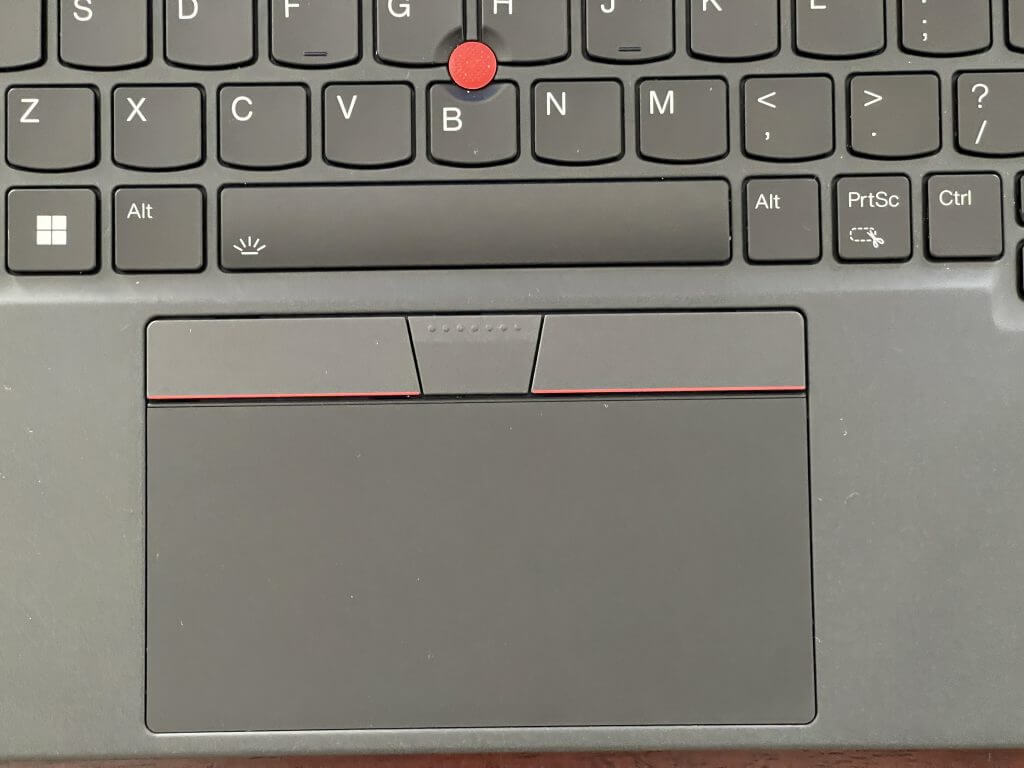
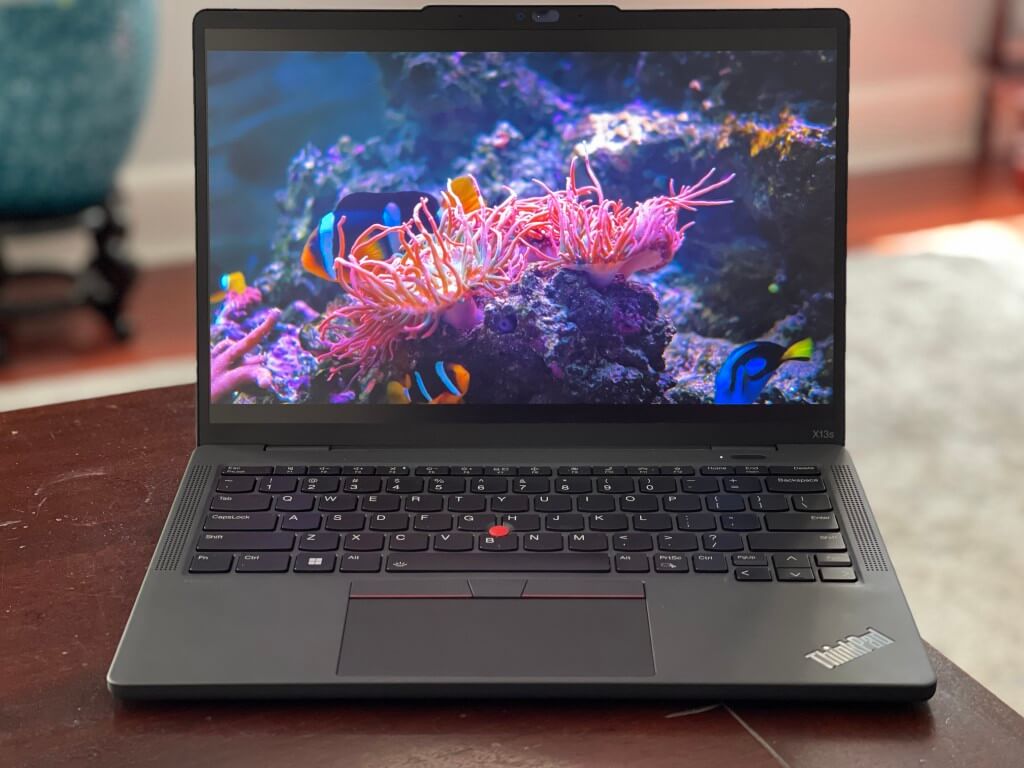
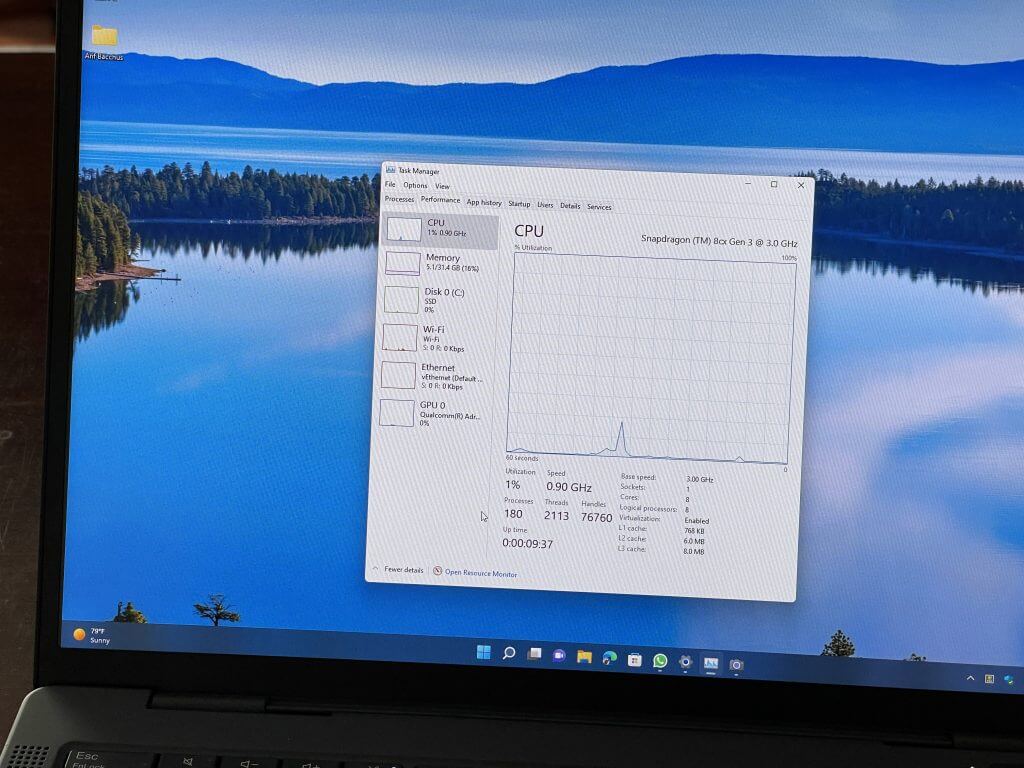
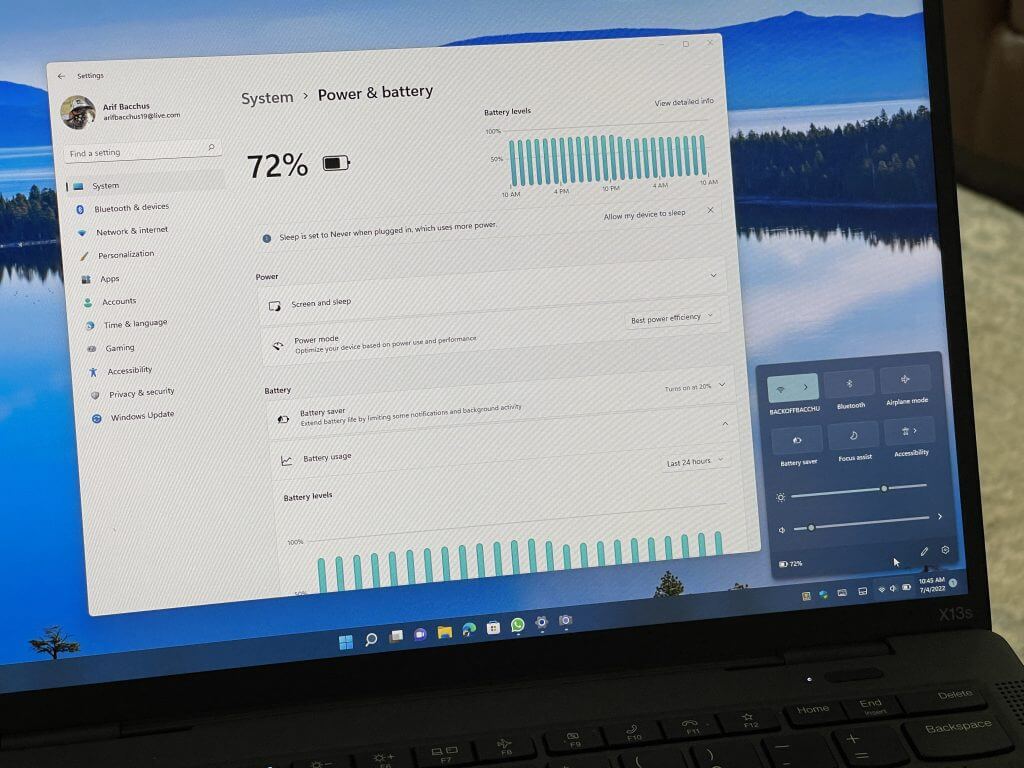





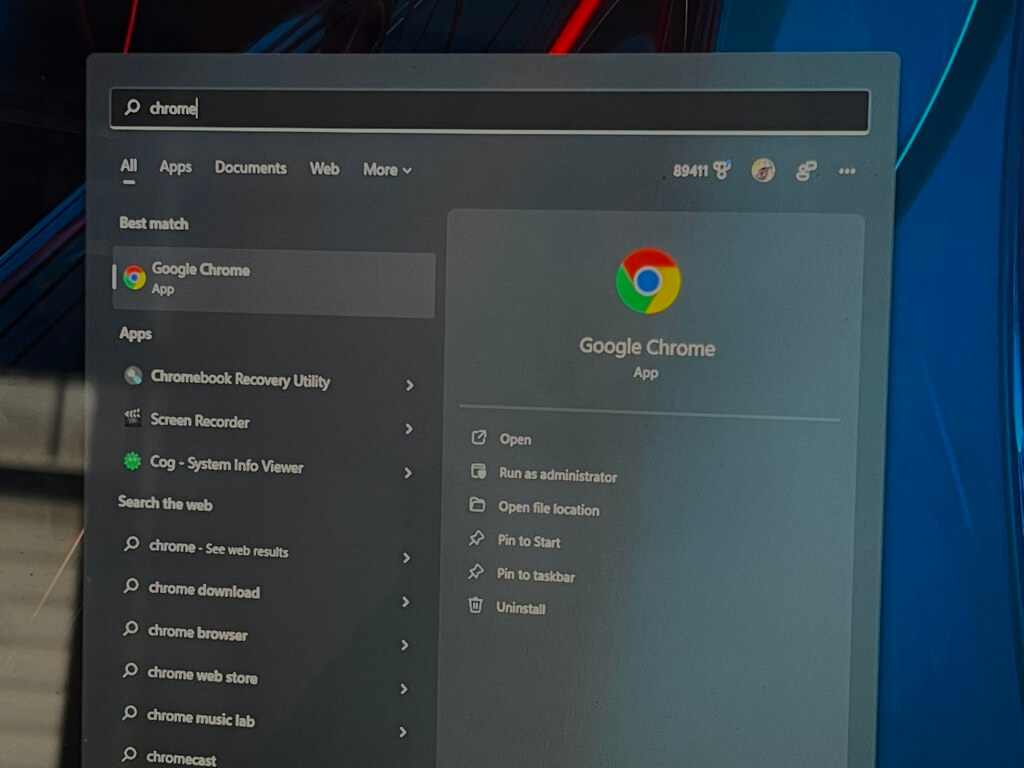
 The
 On the right-hand side at the bottom of the monitor, there are five buttons underneath the screen. The button on the left invokes the menu, and the next button navigates through the menu options, and will also adjust the brightness of the monitor. The next button exits the menu or will change the input ports if you have the monitor connected to multiple units. The final button on the right is the power button.