The Cloud File Provider is Not Running [Fix]

OneDrive is an excellent example of what cloud storage can do when handled appropriately. However, many reported The cloud file provider is not running messages error 0x8007016A while using it, os let’s see how to fix it.

Specialized repair tools can help you quickly identify and repair any issues that might come from the Windows system files and cause this OneDriver error.

How do I prevent error 0x8007016A from happening anymore?

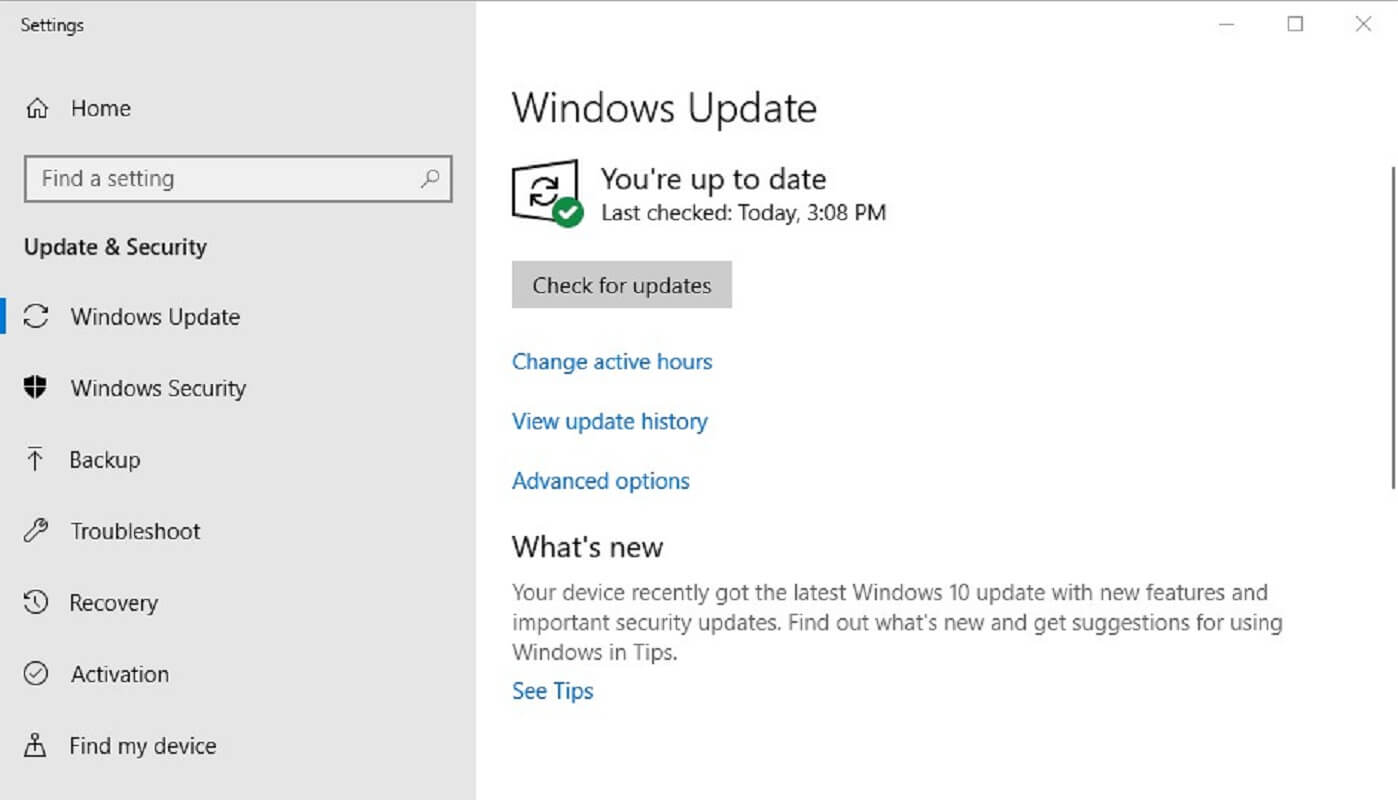
1. Keep your Windows Updated to the latest version

  1. Press Windows.
  2. Click on Settings (the cogwheel-shaped button in the Start Menu).
  3. Select Update & Security.
  4. Click Check for Updates.
    Windows 10 Check for Updates

  5. Let the Updates unfold and restart your PC.

If this doesn’t fix the OneDrive error 0x8007016A, move on to the next solution.

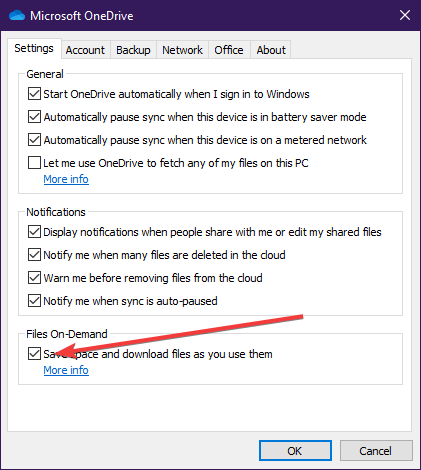
2. Disable Files on Demand

  1. Go to the Taskbar and right-click the OneDrive icon.
  2. Select More.
  3. A new window will open where you have to click on the Settings tab.
  4. Uncheck the Files on Demand service.
    onedrive not showing photo thumbnails files on demand
  5. Restart your PC.

3. Resume file syncing

  1. Access OneDrive from the taskbar by clicking it.
  2. Select More.
  3. Click on Resume Syncing.
    0x8007016A resume syncing

After doing that, check if The cloud file provider is not running message is still there.

4. Modify your PC’s power plan

  1. Press Windows + R.
  2. Type in powercfg.cpl.
  3. Change your power plan to High Performance.
    Change Power Plans

  4. Restart your PC.

5. Reset OneDrive

The solution to end all solutions would be to reset your OneDrive.

  1. Press Windows + R.
  2. Type in %localappdata%\Microsoft\OneDrive\onedrive.exe /reset
    Reset OneDrive

  3. Click OK.

In a matter of seconds, your OneDrive will be reset, and you will lose all user preferences stored, but not the files and folders saved on it and the error 0x8007016A should be gone.

6. Remove the glitched folder by force using PowerShell

  1. Press Windows + R.
  2. Type in powershell, and press Ctrl + Shift + Enter to open a PowerShell window.
  3. Type in Remove-Item "OneDrive folder name" -Recurse -Force
    Remove the glitched folder by force using Powershell
  4. Replace “OneDrive folder name” with the name of the file or folder you wish to delete.
  5. Restart your PC

Why does The cloud provider is not running message appear?

  • Missing Windows updates can cause issues with OneDrive and result in error 0x8007016A.
  • Files on Demand feature in OneDrive can cause issues such as this one to appear.
  • If the file syncing is disabled, you’ll get this error message.
  • Certain power-saving plans can cause this issue on laptops.
  • Glitches with OneDrive can cause this error to appear on your PC.

What is a cloud provider?

  • The cloud service provider is a company that offers a cloud-based platform.
  • The platform offers infrastructure, application, or storage services.
  • Cloud providers offer great scalability and flexibility since they aren’t limited by physical hardware.

We hope this guide helped you fix the problem: The cloud file provider is not running error message on your PC.

Error 0x8007016a FAQs

What is error 0x8007016a in Windows?

Error 0x8007016a commonly appears when accessing or syncing files with OneDrive. It often points to Files On-Demand being disabled or to items removed from the cloud but still referenced locally.

How do I fix OneDrive error 0x8007016a?

Enable Files On-Demand (OneDrive Settings > Sync and backup), then restart OneDrive and check for updates. If needed, unlink and re-link your account or run a OneDrive reset.

Can Windows updates cause error 0x8007016a?

Yes. Certain updates can disrupt OneDrive syncing. Install the latest cumulative updates or roll back a recent problematic update to restore normal operation.

What if enabling Files On-Demand does not fix the error?

Pause and resume sync, ensure the file exists on OneDrive web, and reinstall OneDrive if necessary. You can also restore missing items from the Recycle Bin on the OneDrive website.

This isn’t the only issue, and many reported error 0x80071129 in OneDrive, but we tackled that one in a different guide.

We also wrote about This item might not exist error in OneDrive in one of our earlier guides. If you still encounter problems while using Microsoft’s cloud service, such as unexpected messages when trying to open or sync your files, you can follow this step-by-step guide on how to fix the OneDrive “Sorry, an error has occurred” issue for quick solutions and troubleshooting tips.

Did the solutions listed above help you get rid of OneDrive error 0x8007016A? Please let us know in the comments section below.
Your account can’t make a purchase on Xbox.com? Here’s why

The Xbox Marketplace is an online multiplayer gaming and digital media delivery service created and operated specifically for the Xbox.

Here you can engage in online game matches, download games, avatars, and other such content. However, some users have reported that they are unable to make purchases and are met with an error message:

I am unable to claim any 360 titles or avatar items and this problem is not just temporary. When I try to make a purchase (even a free one) the error message Your account is unable to make this type of purchase on Xbox.com. Please complete this transaction from your Xbox. appears.

While the issue itself seems pretty serious at first, it seems that this is just a normal Xbox feature.

Apparently, the user was registered with a child or teen account. Xbox rules state that:

This error means that the Microsoft account that you’re trying to use to make the purchase doesn’t have the ability to make the purchase.
Child and teen accounts are prevented from making purchases in the Xbox 360 Marketplace. Changing your Microsoft account age or your purchase settings won’t resolve this issue.
To resolve this issue, purchase or download the content on your Xbox 360 console.

How do I buy items in Xbox 360 Marketplace without restrictions?

The first solution that may come to mind is to take your account and modify the restrictions and the age. However, for some reason, this doesn’t seem to work.

Apparently, you must have an adult account from the get-go. For some odd reason, age restrictions only seem to apply to Xbox One users and not Xbox 360 users.

The most probable explanation is that Microsoft considers those that have an Xbox 360 to already be adults by now, as opposed to users of the much more recent Xbox One.

As such, you only have 3 solutions, and all of them are workarounds at best:

  • Have someone else buy the content and gift it to you
  • Get your hands on an Xbox 360 console and make your purchase from there
  • Make a new account, but set it as an adult account with no restrictions from the start

If you are also having trouble purchasing content off of the Xbox Marketplace, try these solutions to bypass them without problems.

Know a solution that doesn’t feel so much like a workaround? Let us know in the comments section below.

RELATED ARTICLES YOU SHOULD CHECK OUT:

Can’t connect to Xbox Live with a Xfinity modem? Here’s why

If you love gaming, regardless of whether it is on PC or console, you know that nothing beats a multiplayer experience.

For PC users, this means plugging in the Internet cable or connecting to the Wi-Fi and logging in. For Xbox users, this means going on Xbox Live and continuing from there.

However, some users have been complaining about having connectivity issues with their Xbox consoles. Additionally, this problem seems to be more closely related to those using Comcast Xfinity modem and routers.

I’ve had Xfinity/Comcast internet for approximately 6 years and Xbox Live for approximately 2 years, without issue. However, as of approximately 4 days ago I’m unable to connect to the Xbox Live service from my Xbox 360. I’m using the Xfinity provided home router/modem (ARRIS TG1682G).

Is my Xbox Live affected by my Comcast Xfinity modem or routers?

It seems that the majority of users having this issue showed some clear common symptoms:

  • The Xbox can connect to the Internet
  • The Xbox can not connect to Xbox Live
    • When you try to run the Test Xbox Live Connection” utility on the Xbox they received the following results:
  • Network: Connected
  • Internet: Connected
  • Xbox Live: Blocked (Sometimes responds “Failed” instead of “Blocked”)

Can I connect to Xbox Live through a Comcast Xfinity modem or router?

The less complicated answer would be that you can’t.

It seems that this issue has something to do with recent upgrades made to Comcast modems and routers. Apparently, an upgrade was made some time ago which is causing problems with NAT on their end.

It would seem that the NAT type is incorrect and causing issues specifically with online gaming. More so, this affected not only Xbox players, but PlayStation players as well.

Some users did argue that they could connect to Xbox Live if they performed some port forwarding. However, this only applies to a handful of models, and the effects can only be seen after a couple of days.

After much debate, it was concluded that the best option is to replace the Comcast Xfinity modems or routers with other models.

More so, those of you that have them should know that they are considered at the end of their life anyway. As such, you’ll soon have to replace them whether you like it or not.

For more information on the matter, please contact official Comcast Support.

Is your Arc Launcher not updating? Troubleshoot it fast

If you find that suddenly your Arc Launcher will not update, you are not the only user experiencing this issue.

It seems the problem is occurring after users have applied the August 2nd’s Feature Patch to Windows 10.

Even though that might be the most common reason for this issue happening, in today’s guide we will also try out other troubleshooting steps.

Please follow along and try to see if the issue is resolved after each method.


Here’s what to do if your Arc Launcher is not updating

1. Check your internet connection

laptop keyboard close-up - Arc launcher not updating

It might seem obvious, but this step is sometimes overlooked by some users. Making sure you have a stable internet connection is very important in order to eliminate this possibility.

If you see an exclamation mark next to the network icon found inside your taskbar, then right-click it -> choose  Troubleshoot problems.

It is recommended that you also check if you can update or download any other files from the web.

If all checks out fine, please follow the next method.


2. Make sure your antivirus software is not blocking the launcher

security on screen - Arc launcher not updating

Depending on the exact brand and version of your antivirus software, the exact steps to follow for this method will vary.

You will need to open the AV software up and check to see if the Arc Launcher is not being blocked by the AV itself, or by the built-in firewall service.

If your Arc Launcher has full access to the internet, then please follow the next method on this list.


Want to permanently delete your Arc Games account? Here’s how


3. Force-close Arc and clear caches

laptop close-up white - Arc launcher not updating

Some users have had success in following this method.

To try it out for yourself, follow these steps:

  1. Press the Ctrl+Alt+Del keys on your keyboard to start the Task Manager.
  2. Find the Arc Launcher inside the Processes tab -> select it -> press End task.
  3. Open Windows Explorer and navigate to the location of your Arc Launcher folder.
  4. Open the Prepatch/Cache folder and delete all the files contained in them.
  5. Start Arc Launcher again and check to see if the issue persists.

4. Uninstall and re-install the Arc Launcher

Arc launcher website - Arc launcher not updating

To uninstall:

  1. Press the Ctrl+X keys on your keyboard -> select Apps and features.
  2. Find the Arc Launcher inside the list -> select it -> click the Uninstall button.
  3. Follow the on-screen instructions to complete the process.

To reinstall:

  1. Download a fresh version of the Arc Launcher.
  2. Run the installer and follow the on-screen instructions to complete the setup.
  3. This method should solve your issue.

Conclusion

In today’s guide, we discussed the best troubleshooting methods to apply in the case that your Arc Launcher is not updating, or if it has stopped working suddenly.

Don’t forget to let us know if you found this guide helpful. You can do so by leaving a comment in the section found below this article.

[wl_navigator]

Download Bitdefender Total Security 2020 For Windows

With the wide array of online threats, it’s crucial to protect your PC online. There are many great security tools, and speaking of which, Bitdefender released the latest version of its security software recently.

The new version of Bitdefender Total Security has many new features, so without further ado, let’s see what this tool offers.

Bitdefender Total Security 2020 is here

Bitdefender Total Security 2020 is the latest entry in the long list of security software from Bitdefender. Before you can start using this tool, you need to create your Bitdefender account.

Click here to get a free or licensed copy of BitDefender

The account creation process allows you to log in using your Microsoft, Google or Facebook account, allowing you to set up your Bitdefender profile in a matter of moments.

download-bitdefender-total-security


After installing Total Security 2020, you’ll be greeted with a modern and friendly user interface. The dashboard allows you to see important information, such as blocked apps or detected threats, but you can also update antivirus definitions right from it.

How to scan your PC using Bitdefender Total Security 2020

You can easily perform a Quick Scan from your dashboard.


You can also perform a vulnerability scan that will check if you have critical Windows and application updates installed. This feature will also check your Windows account passwords and Wi-Fi network ensuring maximum security.


As for additional features, you can also perform a System Scan and scan your entire PC for malware. The application allows you to create custom scans as well, so you can easily choose which directories you want to scan.

In addition, you can schedule your scan and run it periodically or at system startup. It’s worth mentioning that you can choose between three different scanning methods to achieve the best results. Keep in mind that different scanning methods might require more computer resources.

The application allows you to set a list of excluded files and folders, and it will automatically scan all USB devices and optical media for viruses.

We also have to mention that Bitdefender Total Security 2020 offers Rescue Environment that you can use for most serious malware infections.

The application has a powerful antispam filter so you can easily add a domain or an email address to the list of spammers.

There’s also a web protection feature that can warn you about malicious websites. The application scans your network traffic, and it can detect fraudulent or phishing websites.

In addition, there’s also a Search Advisor feature available to protect you from online threats. We also have to mention the whitelist feature that allows you to exclude certain websites from being checked by Bitdefender.

The application has a built-in firewall allowing you to control which apps can access the Internet. You can create custom rules for your apps and customize them.

If you want extra security, you can use Stealth Mode and make your computer invisible in your network.


If you use a wireless connection to access the Internet, you’ll be pleased to hear that Bitdefender has Wi-Fi Security Advisor feature that will help you protect your device from security threats in your network.

To achieve maximum security, the application uses Threat Defense feature to monitor your PC actively. If any suspicious application is detected, this feature will block it instantly to prevent any damage to your PC.

There’s also a Ransomware Protection feature that will protect your PC from all ransomware threats. Bitdefender also has a Safe Files feature that can prevent applications from accessing certain folders.

This is a useful feature to protect sensitive data from unknown applications. Of course, you can set a list of trusted applications allowing access only to the verified apps.

Bitdefender Total Security 2020 can also protect your sensitive information during online purchases. The application has a Safepay feature that starts a secure browser that will protect your sensitive data.

In addition, this feature will also protect you from online fraud. It’s worth mentioning that this tool can automatically enter your billing information, making online transactions simpler and faster.

There’s also a built-in password manager feature so you can easily store your passwords or billing information. All data is stored in a secure vault, so third-party users won’t be able to access it.

There’s also a Parental Advisor feature that works as a parental control software. Using this feature you can monitor your child’s online activity as well as time spent online.

This feature works with Bitdefender Central allowing you to monitor your child from any device or operating system.

Another useful feature is OneClick Optimizer. Thanks to it, you can easily clean junk files and registry and improve your system performance.


There’s also a Startup Optimizer feature that works as a startup manager. Thanks to this feature, you can see startup applications and disable or delay them right from Bitdefender Total Security 2020.


The application also has an anti-theft feature, so you can protect your devices even if they are stolen or lost. This feature uses Bitdefender Central, so it’s accessible from any operating system or device.

Another useful feature is Disk Cleanup which allows you to free up space on your hard drive. To use this feature, select the drive you wish to scan, and the application will analyze it.

Once the scan is complete, you’ll see a pie chart along with the list of directories that take up the most space. You can navigate through directories and delete them permanently right from the application.


The application also allows you to check your activity so you can easily see blocked applications and threats. If needed, you can also see a detailed security report.


Bitdefender Total Security 2020 also has a powerful notifications section allowing you to see all your notifications. You can filter your notifications and see only critical notifications, warnings or other information. Thanks to this feature, you can keep a close eye on all activity on your PC.

As for additional features, the application offers password protection, so you can easily lock it and prevent other users from making changes. In addition, the application can protect your hosts file, so you can see if any application changes it.

Bitdefender Total Security 2020 also comes with several available profiles that you can use to optimize your performance and protection. Each profile is customizable, so you can easily configure its settings.


There are some extra features such as social network protection that will scan social networks for malicious links. There’s also a file shredder feature that allows you to permanently delete your files.

One new feature is a webcam protection, and thanks to it you’ll get a notification as soon as any application tries to access your webcam. Bitdefender Total Security 2020 offers a wide array of features, and some of these features might be confusing to new users.

However, the application has an Autopilot feature that will automatically configure your security without any pop-ups or security dialogs. Thanks to this feature, you won’t even know that Bitdefender is running in the background.

Get an antivirus-VPN bundle

If security and privacy are high on your list of priorities, you should go for the Bitdefender Total Security 2020 Premium VPN bundle. In this manner, you can stay anonymous, get unlimited encrypted traffic, and secure your Internet connection for an additional $39.99.

Conclusion

Bitdefender Total Security 2020 offers a simple and modern user interface, so you won’t have any problems using it. As for protection, this tool offers a wide array of features to provide complete protection from all online threats.

The application offers great performance and protection and is the best antivirus software on the market.

If you’re looking for complete security software, we strongly recommend trying Bitdefender Total Security 2020, it’s definitely one of the best antivirus software to use for securing your Windows PC.

How to remove system Z drive on Windows 10 in three steps

The mysterious system drive Z: has dumbfounded some users who wondered how to remove it from Windows 10. That is a Z: system drive partition that appears in Windows 10’s File Explorer for some users. Z: drive often appears after users have partitioned a hard drive or upgraded to Windows 10. When they try to open the Z: drive, a pop-up window opens stating, “You don’t currently have permission to access to folder.”

However, an HP support representative shed light on what the Z: partition is. On a forum, he stated:

That new drive labeled (Z: ) is the restore partition which is added to give you the option of restoring back to your previous version of windows. It is nothing to worry about, and should not be deleted.

So the Z: drive is usually a hidden partition. Its appearance on some Windows 10 desktops and laptops is due to a system bug. As the HP representative stated, drive Z: isn’t something users really need to fix.

Yet, there are a few ways users can remove the Z: drive. That doesn’t mean deleting the drive, but merely removing the partition so that it doesn’t appear in Explorer. This is how users can remove the Z: drive in Windows 10.

There are three ways to remove the Z: drive

  1. Edit the Registry
  2. Roll Back Windows 10 to a Restore Point
  3. Update Windows 10

Method 1: Edit the Registry

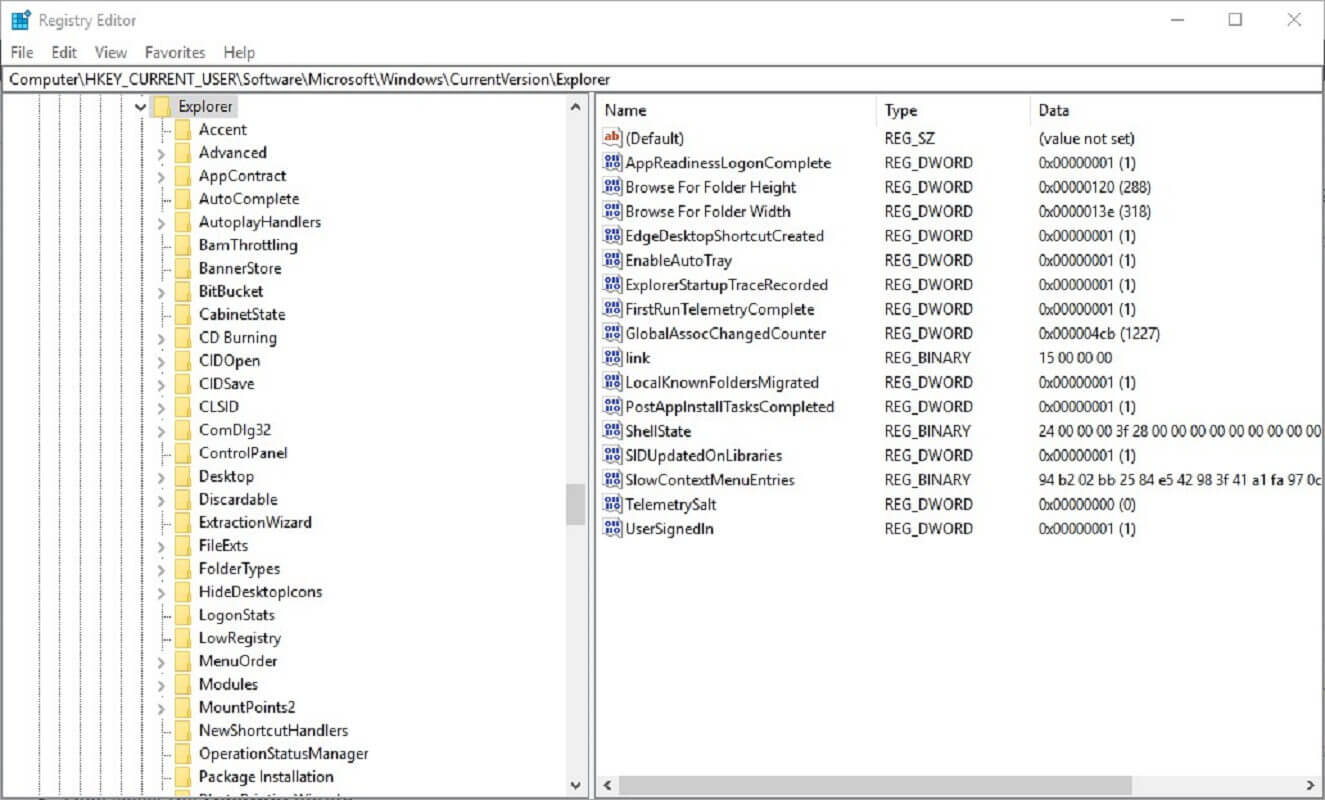
Some users have confirmed that adding new NoDrive DWORDs (or QWORDs) to the registry gets rid of drive Z: in File Explorer. However, some might prefer to set up a System Restore point before editing the registry as an extra precaution. Using the Registry Editor is the safest way to remove system Z drive on Windows 10.

To do that, open Run with the Windows key + R hotkey, enter ‘systempropertiesadvanced’ in the text box, and click the OK button. Click Create on the System Protection tab to set up the restore point. Then follow the guidelines below to edit the registry.

  1. Open the Run accessory.
  2. Enter ‘regedit’ in the Open text box and click OK to open the Registry Editor.
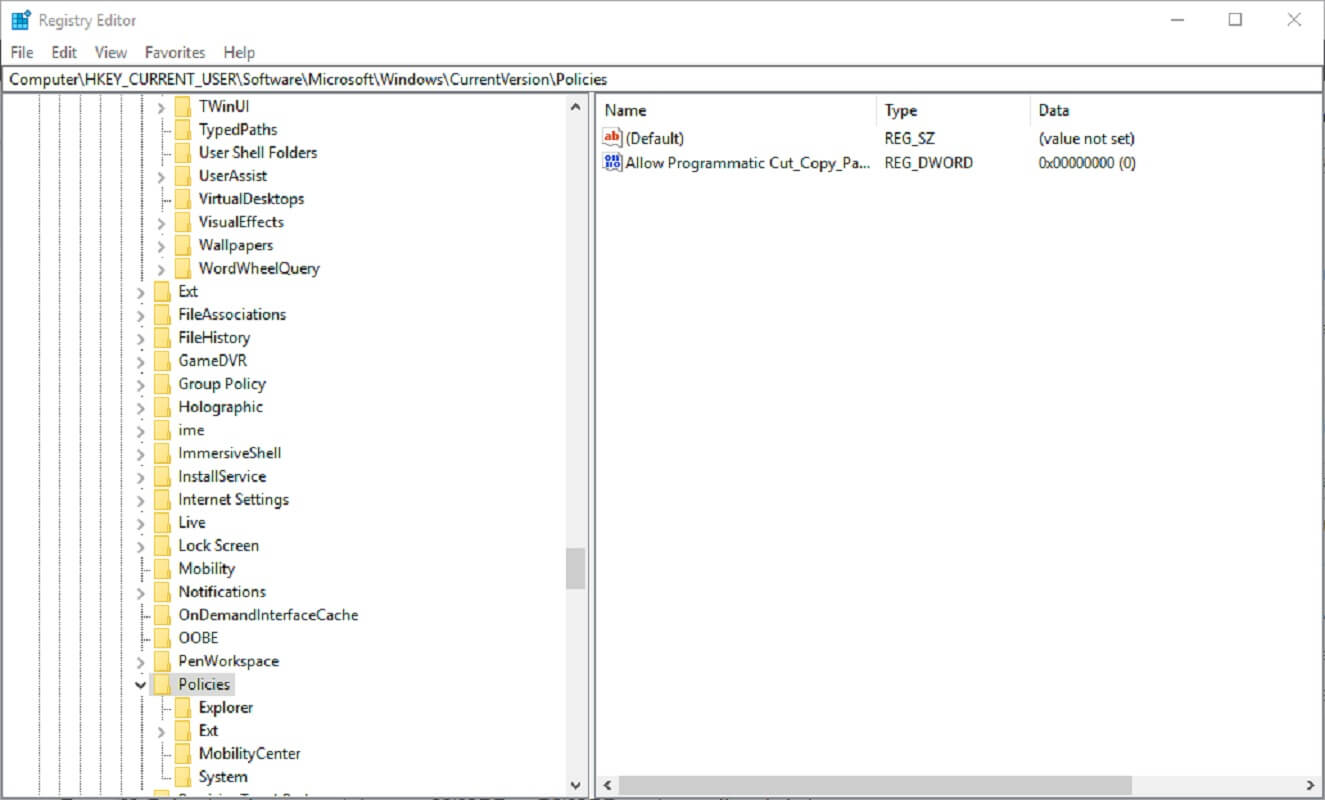
  3. Copy this registry path with the Ctrl + C hotkey: HKEY_CURRENT_USER\SOFTWARE\Microsoft\Windows\CurrentVersion\Policies. Then paste that into the Registry Editor’s address bar by pressing Ctrl + V to select the Policies Key shown directly below.
  4. Right-click an empty space on the right of the Registry Editor window and select New > QWORD (64-bit) Value if you have a 64-bit Windows 10 platform. Users with 32-bit Windows platforms should select New > DWORD (32-bit) Value.
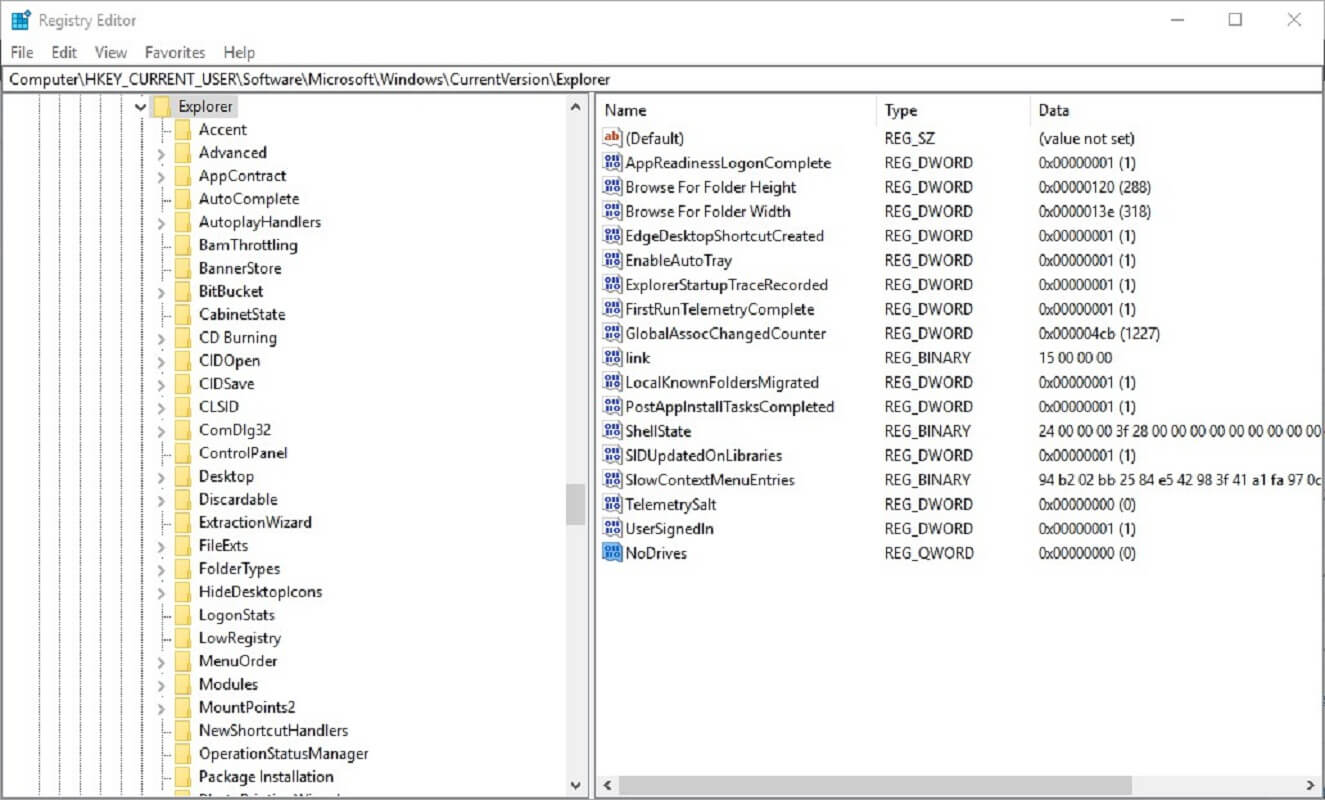
  5. Enter ‘NoDrives’ as the name of the new QWORD or DWORD as shown directly below.
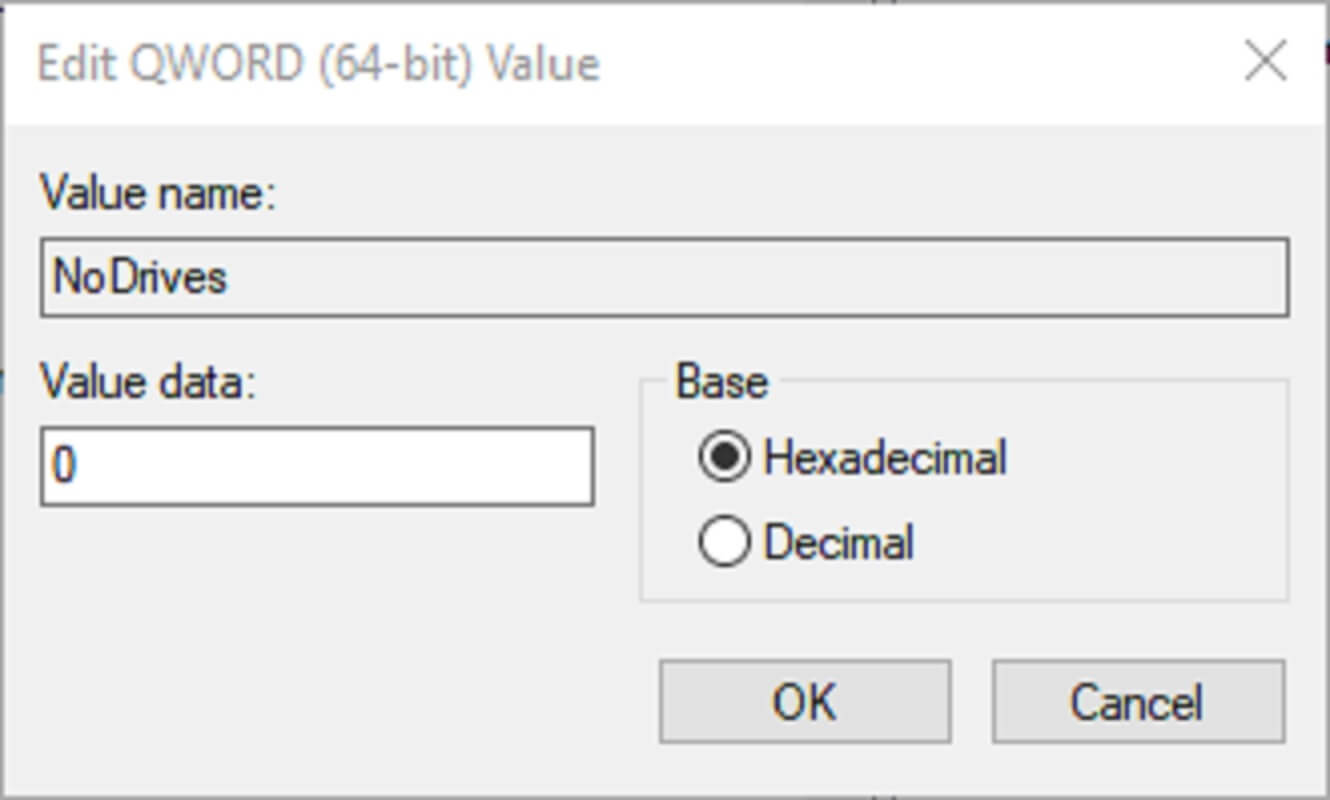
  6. Double-click NoDrives to open the window shown below.
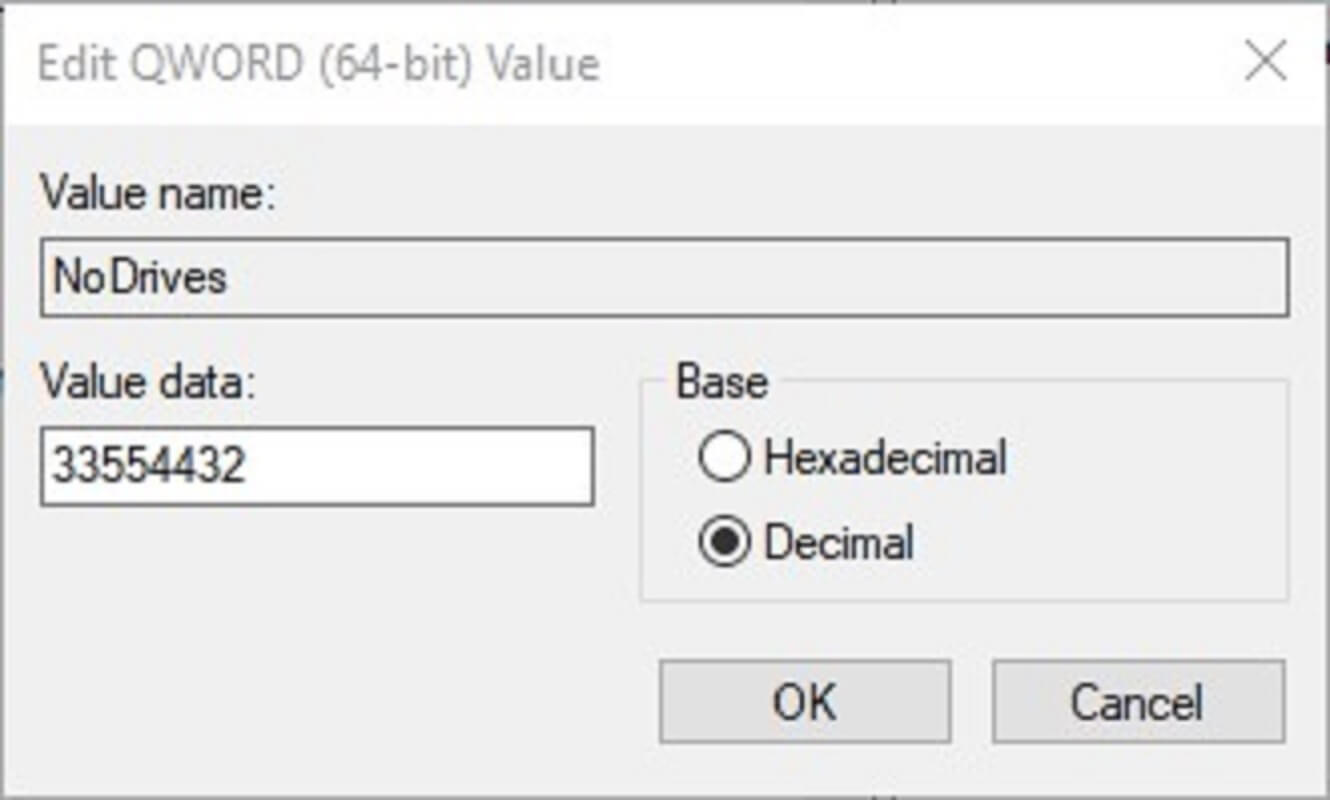
  7. Click the Decimal radio button.
  8. Enter ‘33554432’ in the text box as below, and press the OK button.
  9. Then enter this path in the Registry Editor’s address bar: HKEY_CURRENT_USER\SOFTWARE\Microsoft\Windows\CurrentVersion\Explorer.
  10. Select the Explorer key on the left of the registry.
  11. Then set up a new NoDrives QWORD or DWORD for the Explorer key exactly as you did for the Policies key.
  12. Double-click the NoDrives DWORD or QWORD to open its Edit window.
  13. Then select the Decimal option.
  14. Enter the same ‘33554432’ value in the text box, and click the OK button.
  15. Thereafter, close the Registry Editor window.
  16. Restart Windows after editing the registry and with that, you should remove system Z drive from Windows 10 for good.


— RELATED: 5 best driver removal tools to make sure everything gets deleted

Method 2: Roll Back Windows 10 to a Restore Point

A few users have stated on forums that they’ve removed drive Z: by rolling Windows 10 back to a previous date. System Restore is the utility that rolls Windows 10 back to an earlier date. Note that rolling Windows back to a restore point will also remove software installed after the selected date and undo other system changes.

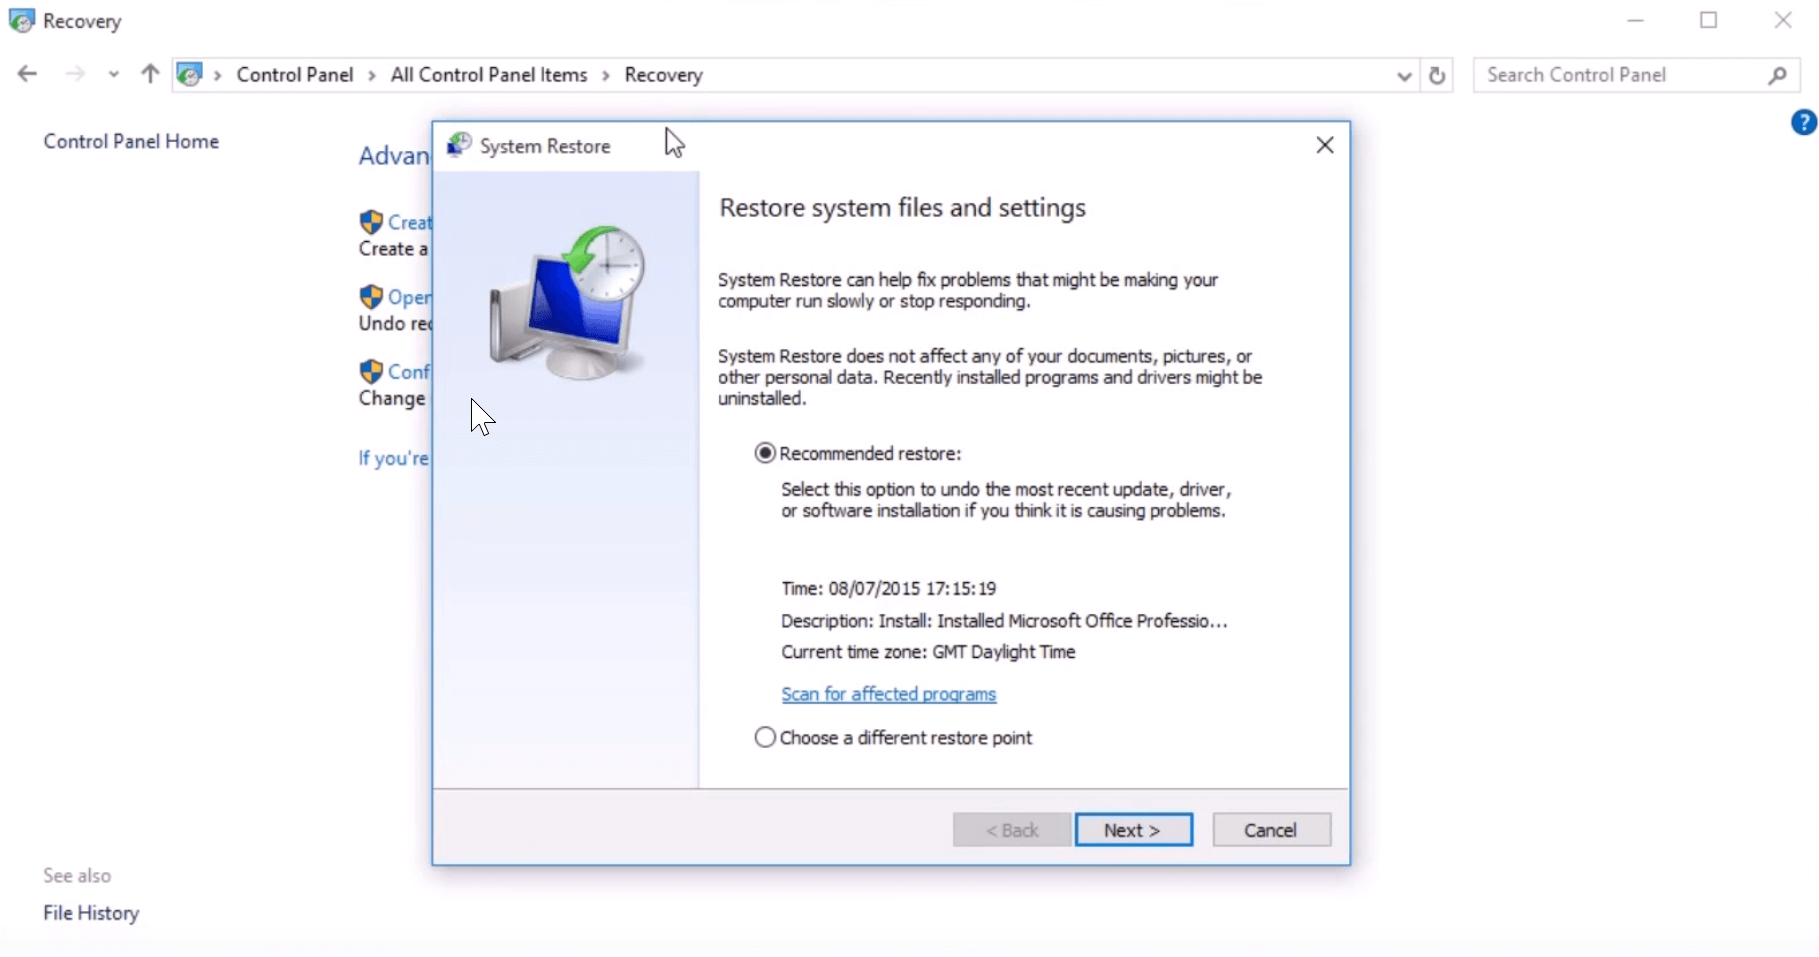
  1. To roll back Windows 10, open the Run accessory. Enter ‘rstrui’ in Run’s text box and click OK to open System Restore.
    how to remove system z drive windows 10
  2. Click the Choose a different restore point option, and press the Next button.
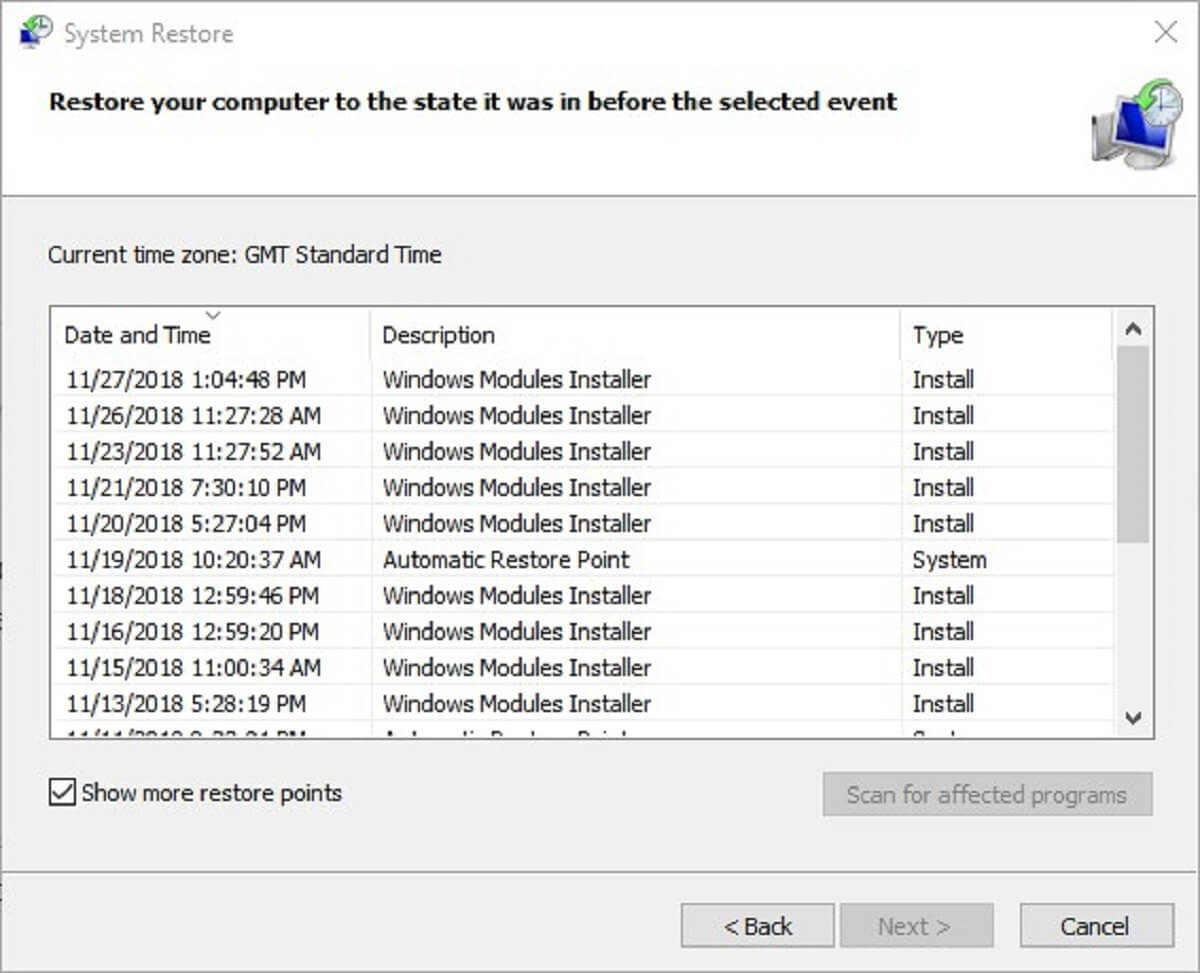
  3. To expand the restore points list, click the Show more restore points option.
    how to remove system z drive windows 10
  4. Select a restore point that will roll the OS back to a time when File Explorer didn’t include a Z: drive partition.
  5. Press the Next button to proceed to the confirmation step.
  6. Click Finish to confirm the selected restore point. With those steps, you should remove system Z drive from Windows 10.


— RELATED: 5 best backup software for external hard drives [2019 LIST]

Method 3: Update Windows 10

Some users have also stated that updating Windows 10 removes the Z: drive. Drive Z: can appear when updates have not completely installed. Thus, checking for Win 10 updates to see if there are any updates waiting to finish might remove the Z: drive.

  1. To check for Windows 10 updates, press the Type here to search button on the taskbar.
  2. Enter ‘updates’ in Cortana’s search box.
    how to remove system z drive windows 10
  3. Then click Check for updates to open the window shown directly below.
    how to remove system z drive windows 10
  4. Press the Check for updates button to scan for updates.
  5. Click the Install now option to add listed updates to Windows 10.


The Settings Windows Update window also lists pending updates. You might need to restart the platform to complete their installation. In some instances, pending updates might be stuck.

If so, check out the Windows Update troubleshooter by entering ‘troubleshoot’ in Cortana’s search box and clicking Troubleshoot. Then select Windows Update and press its Run the troubleshooter button to fix the pending updates.

Those are a few resolutions that might get rid of drive Z: and ensure it never reappears in File Explorer. Then drive Z: will be a hidden restore partition again.

RELATED STORIES YOU NEED TO CHECK OUT:

Apple begins promoting Apple Arcade using an Xbox Wireless (or another) Controller, here’s how to get connected

Apple recently launched its Arcade game subscription service on iOS, macOS, and tvOS devices, with games that can be played with a wireless controller. Because Apple has yet to launch its own gaming controller, the company added support for the Xbox One and PlayStation 4 Wireless controller in iOS 13, tvOS 13, and macOS Catalina, and the Bluetooth-enabled Xbox Wireless controller also appeared on the Apple Store this week.

It’s pretty ironic to see Apple promoting the most popular third-party controllers for Apple Arcade, but Apple published two videos explaining how to pair an Xbox One or PS4 controller to an Apple device this week.

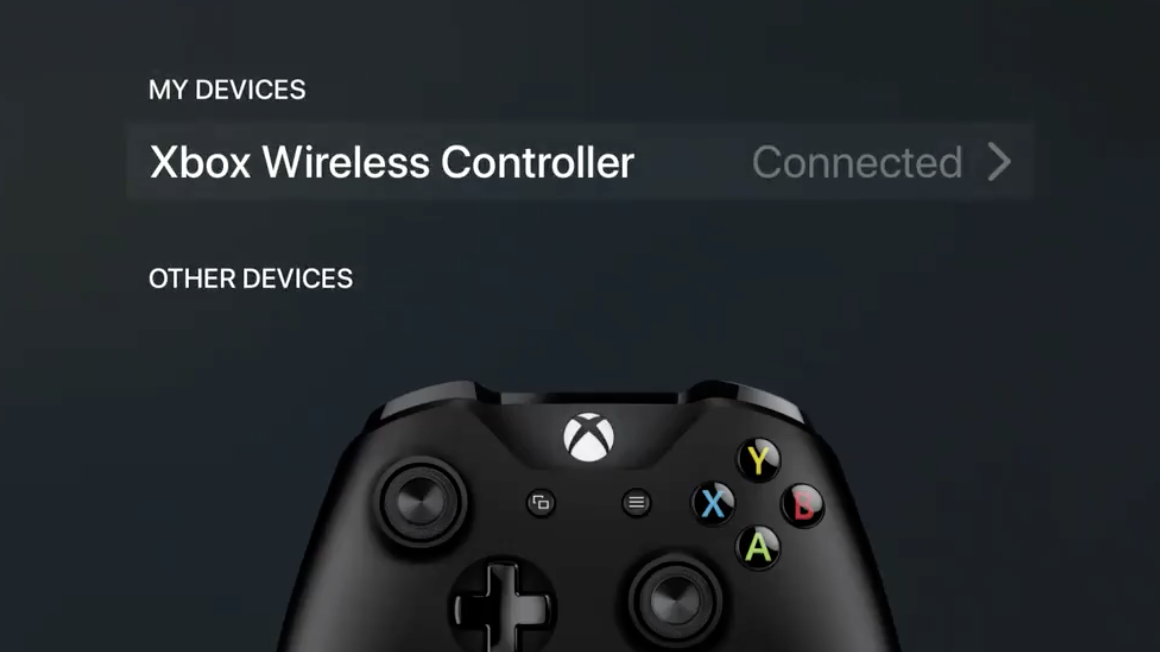
Apple supporting these popular controllers is a really great thing for consumers, and thanks to Bluetooth the pairing process is pretty seamless. Once you have turned on Bluetooth on your iPhone, iPad, Mac, or Apple TV, you just have to put your controller in pairing mode by pressing the connect button. When the Xbox button begins to flash, you should see your controller in the devices list, and you just have to select it to complete the pairing process.

It remains to be seen if Apple will ever launch its own controller for Apple Arcade games, but it would certainly be hard, even for Apple, to beat the market leaders. Microsoft reportedly spent over $100 million in research for the Xbox One controller, which is often considered as the best on the market thanks to its superior battery life (compared to the PS4 controller), and its rumbling triggers. Both the Xbox One and PS4 Wireless controllers are also very affordable, and Apple isn’t really a company interested in low-margin hardware.

As a reminder, Microsoft is getting ready to launch its $179.99 Xbox Elite Series 2 controller next month, and you can already pre-order one on the Microsoft Store. This one will also work with Apple Arcade games, as well as Microsoft’s next-gen “Project Scarlett” Xbox console.

How to fix Operation on the printer is required error

Most of us print documents frequently, but sometimes Operation on the printer is required message can appear and prevent you from printing. This can be an annoying issue, but there’s a way to fix this problem on your PC.

Operation on the printer is required message will prevent you from printing documents, but this isn’t the only printer problem that you can encounter. Speaking of printer issues, here are some common problems that users reported:

  • Operation on the printer is requires intervention – This is a common printer problem, and we already covered a similar issue in our Printer needs user intervention error article, so be sure to check it out.
  • Operation on a printer cannot be completed, not supported – These are some common printing issues that you may encounter, and usually these issues are caused by outdated drivers or your services.

Operation on the printer is required message, how to fix it?

  1. Make sure that Print Spooler service is running
  2. Reinstall the printer driver
  3. Run the printer troubleshooter
  4. Delete the printer keys
  5. Install the latest updates
  6. Perform a System Restore

Solution 1 – Make sure that Print Spooler service is running

If you encounter an Operation on the printer is required message while trying to print a document, the issue might be related to the Print Spooler service. Your printer relies on this service heavily, and if this service isn’t running, you won’t be able to print anything at all.

To fix the problem, it’s advised that you start this service manually and make sure that it’s starting automatically with your PC. You can do that by following these steps:

  1. Press Windows Key + R and enter msc. Now press Enter or click OK.
    printer requires operation services
  2. When the Services window opens, locate Print Spooler service and double-click it to open its properties.
    print spooler printer requires operation
  3. Set the Startup type to Automatic. If the service isn’t running, click the Start button to start it. Now click Apply and OK to save changes.
    print spooler startup type printer operation required

After making these changes, the service will automatically start with Windows every time, and you won’t have any printing issues anymore.

Solution 2 – Reinstall the printer driver

If you keep getting an Operation on the printer is required message while trying to print, the problem might be your drivers. To fix this problem, you need to reinstall your printer driver. This is quite simple to do, and you can do it by following these steps:

  1. Open Win + X menu by right-clicking the Start button. Now choose Device Manager from the menu.
  2. Locate your printer driver in Device Manager and right-click it. Choose Uninstall device from the menu.
  3. When the confirmation dialog appears, click Uninstall. If available, be sure to check Remove driver software for this device.

Once you remove the driver, restart your PC. After your PC restarts, the default driver will be installed and the issue should be resolved. If the default driver doesn’t work, we advise you to update it to the latest version.

To do this, just visit the printer’s manufacturer’s website and download the latest drivers for your model. After installing the latest drivers, check if the problem is still there.

If updating drivers manually seems a bit complicated to you, perhaps you can try using third-party solutions. By using a dedicated tool you can update your drivers automatically with just a couple of clicks, so be sure to try it out. Thus, you will keep your system safe from permanent damage by downloading and installing the wrong driver versions.

Additionally, you have the option to repair corrupted drivers that might harm the PC functionality. Plus, in case anything wrong happens with any driver, you can create a driver backup and return where you began.

Hence, benefit from this effective automated help from this driver solution and optimize your operating system at its best.

⇒ Get Fortect Driver Updater

Solution 3 – Run the printer troubleshooter

According to users, Operation on the printer is required message can appear if there’s an issue with your printer. Sometimes printer glitches can occur, and if this happens, you might be able to fix the problem simply by running the printer troubleshooter.

Windows has many built-in troubleshooters, and you can use them to fix various glitches automatically. To fix the printer problem, you just need to do the following:

  1. Press Windows Key + I to open the Settings app.
  2. Once the Settings app opens, navigate to the Update & Security.
    update and security printer operation required
  3. Now select Troubleshoot from the left pane. In the right pane, select Printer and click Run the troubleshooter.
    printer troubleshooter printer operation required
  4. Follow the instructions on the screen to complete the troubleshooter.

After the troubleshooter is finished, check if the problem is still there. If the issue is still present, perhaps you can fix the problem by running Hardware and Devices troubleshooter.

Solution 4 – Delete the printer keys

According to users, sometimes certain values in your registry can become corrupted, and that can lead to Operation on the printer is required message. To fix that, you might have to remove certain values from your registry. Before you can do that, you need to do the following:

  1. Stop the Print Spooler To see how to open the Services window and how to manage your services, you should check Solution 1.
  2. Once you disable this service, go to the C:\Windows\System32\SpoolPrinters directory and remove all files from it.
  3. Do the same thing for C:\Windows\System32\Spool\Drivers\w32x86

After removing the files from these two directories, you need to modify the registry. To do that, follow these steps:

  1. Press Windows Key + R and enter regedit. Now press Enter or click OK.
    regedit run dialog printer operation required
  2. When Registry Editor opens, navigate to the following path in the left pane:
    • For 64-bit systems go to HKEY_LOCAL_MACHINE\SYSTEM\CurrentControlSet\Control\Print\Environments\Windows x64\Drivers\Version-x (usually it’s Version-3 or Version-4).
    • For 32-bit systems, go to the HKEY_LOCAL_MACHINE\SYSTEM\CurrentControlSet\Control\Print\Environments\Windows NT x86\Drivers\Version-x (usually it’s Version-3 or Version-4).
  3. Before we continue, it’s advised to back up your registry. Right-click the key that you’re going to modify, in this case Version-3 or Version-4 and choose Export from the menu. Choose a save location and enter the desired file name. In case anything goes wrong after modifying the registry, you can always use this file to restore the registry to the original value.
    export registry printer operation
  4. In the right pane, delete all values. You can do that by right-clicking each value and choosing Delete from the menu.
    printer operation required delete
  5. After you delete all values from the right pane, start Print Spooler service again and restart your PC.

Once your PC restarts, check if the problem is still there.

Solution 5 – Install the latest updates

If you keep getting an Operation on the printer is required message, perhaps the problem is related to your system. If your system is out of date, you might experience certain glitches and bugs. Microsoft is working hard to fix common bugs, and the best way to deal with bugs and glitches is by installing the latest updates.

Windows 10 usually installs the missing updates automatically, but you can also check for updates on your own by doing the following:

  1. Open the Settings app and navigate to the Update & Security
  2. Now click Check for updates button in the right pane.
    check for updates printer operation
  3. Windows will now check for available updates. If any updates are available they will be downloaded automatically in the background.

Once you install the latest updates, check if the problem is still there.

Solution 6 – Perform a System Restore

In case that the Operation on the printer is required message is still there, you might be able to fix the problem by performing a System Restore. In case you don’t know, System Restore is a feature that allows you to restore your system to an earlier state and fix various problems along the way. To perform a System Restore, do the following:

  1. Press Windows Key + S and enter system restore. Choose to Create a restore point from the list.
  2. The System Properties window will appear. Click the System Restore
  3. When the System Restore window opens, click Next.
  4. Check Show more restore points option, if it’s available. Choose your restore point and click Next.
  5. Follow the instructions on the screen to complete the restoration process.

After you complete the restoration process, check if the problem is still there.

Operation on the printer is a required message that can be problematic, but we hope that you managed to fix this annoying problem using one of our solutions.

Xbox Achievements are broken for Ori and the Blind Forest on Nintendo Switch

The popular and critically acclaimed Xbox One video game, Ori and the Blind Forest, recently launched on Nintendo’s Nintendo Switch console and joined Minecraft in being one of the few titles on the Switch that could earn players Xbox Achievements.

Unfortunately, while Nintendo Switch owners have been able to unlock some of the Ori and the Blind Forest Xbox Achievements and earn the associated Gamerscore with each unlock, the Achievements themselves have apparently been missing from the Xbox apps and the Xbox One profiles.

A spokesperson for Moon Studios, the developers behind the game, contacted WC and confirmed that they’re aware of the bug and that they’re already working on a fix that will be rolled out in a future update.

For the meantime, players can continue to play Ori and the Blind Forest on the Nintendo Switch and unlock Xbox Achievements as the bug only seems to be affecting their visibility on other platforms. Once the update rolls out, all of the unlocked Achievements should immediately become visible.

Have you played Ori and the Blind Forest on the Nintendo Switch yet or have you already finished it on Xbox One? Share your thoughts with the community in the comments below and then follow us on Pinterest for more Xbox gaming content.

The Username or Password is Invalid on Autologon [Fix]

Many users use auto-login feature on their PC. However, issues such as The username or password is invalid on autologon do appear from time to time.

In case you’re not familiar, we have a great guide on how to enable auto-login on Windows, so be sure to check it out.

However, in today’s guide, we’re going to focus on problems that can occur while using this feature.

Why does it say the username or password is incorrect?

  • In case your credentials aren’t correct, you’ll get this error message.
  • Certain privacy options are enabled and are causing this error.
  • Glitches with auto-login feature can cause this problem to occur.

How can I fix The username or password is invalid autologon error?

1. Disable privacy option

  1. Click on Start and select Settings.
  2. Go to Accounts.
  3. From the left pane, click on Sign-in Options.
  4. From the right pane, scroll down to the Privacy section.
    he username or password is incorrect error
  5. Under the Privacy section, you will see Use my sign-in info to automatically finish setting up my device and reopen my apps after an update or restart option.
  6. It is set to On by default. Toggle the little switch to turn it off.
  7. That’s it. Now you can log in to your Windows 10 computer without “this username and password is incorrect” error.

This issue occurs due to a new feature in Windows 10‘s new builds called Improve Boot Up Experience. This feature allows the Windows to use the user’s login information to apply to set up after restart or update.

However, it can also trigger the error mentioned above. Disabling the feature is the recommended solution.

2. Disable/Enable auto-login in Window 10

  1. Press Windows key + R to open Run.
    auto-login password incorrect error
  2. Type netplwiz and click OK.
  3. This will open the User Accounts control panel.
    he username or password is incorrect error
  4. In the Users tab, uncheck the Users must enter a user name and password to use this computer box.
  5. Click on Apply. You need to enter you user account credentials twice to apply the changes.
  6. Click OK to close the User Accounts window.
  7. Restart your computer and check if auto-login password incorrect error is resolved.

If the auto-login option is already unchecked, try enabling it. In the User Accounts control panel, check the users must enter a user name and password to use this computer box.

Click Apply again and enter the password. Click OK and restart the computer.

By following the steps in this article, you can fix The username or password is invalid during autologon.

In case you’re having more trouble, we have a guide on auto-login not working that you should read.

However, make sure that you don’t enable auto-login on shared computers, as other users will be able to access the data from your computer.

Troubleshoot Glyph launcher error 2017 with these tips

Glyph is a popular game distribution platform that makes it easy to manage all the game titles from a single source. However, after installing a game, some users have reported Glyph launcher error 2017 during login attempts.

This is a common issue as many users have reported a similar issue in the Reddit community as well as Glyph forums. The error reads, “Your client was not authorized to make a login request. Please try again later. (Error #2017)”

I open the Glyph client to login to Rift and it asks me for my email and password, which first off is unusual cos I’m usually left logged in. When I try to login it tells me that my client is not authorized to make a login request, with the error code #2017.

If you are also troubled by this error, here are a couple of troubleshooting tips to help you fix Glyph launcher error 2017 in Windows computers.

What to do if I can’t login into my Glyph client?

1. Log-in via Glyph account management

  1. If you are facing login issues with the Glyph client, try logging into the Glyph account management web service first. This is a confirmed workaround for the login issue.
  2. Launch the Glyph client on your PC.
  3. Click the Account tab at the top.
    Glyph launcher error 2017
  4. It will take you to the Glyph Account Management page.
  5. Enter your username and password. You will be asked to enter the 2FA (two-factor authentication) code.
  6. Make sure you check the “Remeber my login from this location” box.
  7. Click on Login to sign in to your account.
  8. Relaunch the Glyph client.
  9. On the home screen, click the “Play” button for the game that was giving the error.
  10. Glyph should automatically sign you in without any issues. You are required to enter the email and password, but not 2FA code.

Is the Glyph launcher not working? Try these methods


2. Clear browser cookies

  1. The bad cache can create issues when you try to login to Glyph client. Open your web browser and clear the browser cookies and caches. Here is how to do it for Chrome.
  2. Launch Google Chrome and click the Menu icon.
  3. Select Settings.
  4. Scroll down and click on Advanced.
    Glyph launcher error 2017
  5. Under “Privacy and security” click on the “Clear browsing data” option.
  6. Select a time range and then check “Browsing history, cookies and other side data and cached images and files” options.
  7. Click the Clear data button.
  8. Relaunch Glyph client and check if the launcher error 2017 is resolved.

3. Reset the password

  1. The Glyph launcher error 2017 usually occurs due to the two-factor authentication issue.
  2. Try resetting the password for your account using the Recovery option.
  3. Launch Glyph on your computer.
  4. When the login window pops-up, click on Can’t log in link.
    Glyph login issues
  5. It will open the Glyph account recovery page in the browser.
  6. Enter your email address and click on Recover. You may need to verify your email address to reset the password.
  7. Once done, relaunch Glyph and try to sign in using the new password.

Glyph launcher error 2017 is a minor issue but can get annoying real soon. By following the steps in this article, you can try to fix the issue in no time.

RELATED STORIES YOU MAY LIKE:

Skype Bookmarks: Bookmark your messages with ease

Even though Microsoft forcibly pushed Skype for Windows onto the unsatisfied users, there are certainly some good things going for Skype 8. One of those is Skype Bookmarks. As the name itself says, you can set a bookmark on any message in any conversation. This is simple and yet quite useful if you have a lengthy conversation with thousands of exchanged messages.

With it, you can always get to a certain point. Today, we’ll show you how to bookmark messages on Skype with ease.

How to bookmark messages in Skype

Bookmarking messages on Skype is rather simple. What you need to do is right-click on the message you want to bookmark and select Add bookmark. Yes, as simple as that. This can help you a ton if there’s definitely something you need to remember or get back to after some time.

Here’s the procedure:

  1. Open Skype.
  2. Select the conversation with the message you want to bookmark.
  3. Right-click on the message (or on the 3-dot menu) and choose to Add bookmark.

add bookmarks skype

Now, the question is where you can find your bookmarks. It’s quite simple. Just click on your account image at the top left corner and select bookmarks from the drop-down menu.

Once there, you can navigate to the exact spot in the conversation from where the bookmark was taken, obviously. You can also forward the message as well.

how to add bookmarks on skype

It’s no surprise that this feature can come in handy in a variety of scenarios. You can use the Bookmark section as notes to remind yourself about the conversation and get back to the said conversation for some more context. More than welcome addition from Microsoft to Skype, to be perfectly honest.

If you want to learn more about Skype novelties and get over the fact that arguably better Skype (classic version) is no more, check out this article. Hopefully,  this was an informative read and you can add Skype bookmarks without any issues by following our instructions.

RELATED STORIES YOU SHOULD CHECK OUT:

Amazon Fire Stick doesn’t load the home screen [FIX]

Amazon Fire TV Stick is a great device for streaming shows and music. This is a very popular device, so many people are using the Amazon Fire TV Stick in their free time.

However, this device is plagued by many problems. One of the most serious issues is that Amazon Fire Stick is not going to the home screen.

This is an annoying problem that ruins your Amazon experience.

Fortunately, we have some solutions for you and today we will show you what to do if Amazon Fire TV Home is not available.

What can I do if Home is unavailable on my Fire Stick?

1. Restart the device

Sometimes, a simple restart of the device can solve the problem.

Press and hold Select and Play/Pause buttons at the same time.

Alternatively, you can restart the Amazon Fire TV Stick from the menu. Select Settings, then go to Device and select Restart. If this method doesn’t work, try the solution below.

2. Reset Amazon Fire TV Stick

Before you reset the Amazon Fire TV Stick, you need to backup your data. Then, follow the steps below to reset your device.

  1. Press and hold the Back and the right part of the navigation circle together.
  2. Select Continue on the TV screen.

Keep in mind that resetting your device will erase your data.

3. Check your internet connection

Several users reported that the internet connection might be the culprit. So, restarting your router might solve the problem.

To fix any internet issue, check out our comprehensive guide.

Conclusion

These simple solutions can solve your problem in no time. Restart your device by following the instructions above. If the solution is not useful for your case, reset the Amazon TV Stick.

Also, your internet connection might be the culprit. So, ensure everything is ok with your network.

If the issue persists, please contact the Amazon customer support service for a more specific fix.

Did our solutions work for you? Did you find another way to fix this problem? Do let us know in the comments section below!

RELATED ARTICLES YOU NEED TO CHECK OUT:

Sony smart TV HDMI not working? Here’s what to do

The new Sony Bravia lineup comes with HDMI support to connect your set-top box as well as a gaming console and other HDMI devices. Sometimes, the users may encounter Sony smart TV HDMI not working issues while using an external device connected to the HDMI port.

The HDMI issues can occur due to multiple reasons including a defective HDMI port or incorrect configuration.

If you are also troubled by this issue, here are a couple of troubleshooting tips to fix Sony smart TV HDMI not working issue with ease.

What can I do if my Sony smart TV’s HDMI is not working?

1.  Check the video input

  1. To receive the HDMI signal, make sure the TV is set to the correct video input. You can access the input option using the Input button on the remote control.
  2. Press the Input button repeatedly until the correct HDMI input is displayed on the TV screen. Also, make sure that you are connecting to the right TV input.
  3. After that, make sure the input device is turned on and working fine.

2. Disconnect and reconnect HDMI cable

  1. The Sony Smart TV HDMI not working issue can also occur due to bad connection.
  2. Turn off all the devices including your Sony TV, gaming console, Blu-ray player, etc.
  3. Disconnect the HDMI cable from the HDMI input terminal on the TV.
  4. Disconnect the HDMI cable from the HDMI output terminal on the source device that is your gaming console etc.
  5. Leave all the devices idle for a few minutes.
  6. Reconnect the HDMI cable back to your TV and the output devices.
  7. Turn on the TV along with the output devices. Turn off all the devices and turn on again.
  8. Now check if the HDMI connection is working fine.

3. Update TV firmware

Sony smart TV HDMI not working
  1. Outdated firmware can create issues with the new HDMI devices and technologies. Make sure your TV has the latest firmware is installed.
  2. Press the Home button and select Help.
  3. Select “System software update”.
  4. If the automatic update is disabled, then select “Check for a System software update” to check for the update manually.
  5. If the TV has a new update, proceed to install it by clicking the Update button.
  6. The process may take a few minutes to hours depending on your internet connection.
  7. After the update is installed, restart the TV. Make sure you unplug and reconnect all the source devices to the TV.

4. Check for HDMI port issue

  1. If none of the troubleshooting tips in this article helped, the issue can be with the HDMI port.
  2. Contact Sony support and describe the issue.
  3. The support staff will walk you through some troubleshooting tips again.
  4. If that did not work, Sony will repair the HDMI board depending on the warranty availability.

Conclusion

It is important to have a functioning HDMI as it is required to connect your TV box, gaming console, and even projectors. By following the troubleshooting tips in this article, hopefully, you can fix Sony smart TV HDMI not working problems by yourself.

The Custom Form Cannot be Opened in Outlook: 5 Ways to Fix

The custom form cannot be opened error in Outlook can cause many problems, especially if you rely on forms for your business or school projects.

Without custom forms you won’t be able to gather the necessary user information, but luckily, there are a couple of solutions that can help you with that.

Why does The custom form cannot be opened message appear in Outlook?

  • Outlook configuration isn’t correct and you might not be using the correct form.
  • The corrupted cache is a common culprit for this problem.
  • Third-party add-ins can sometimes lead to this and other errors.

What can I do if Outlook can’t open a custom form?

1. Check if Microsoft Outlook item uses a correct Form

  1. Go to the navigation pane
  2. Locate the folder where you want to create a new item.
  3. Right-click it and choose Properties from the context menu.
  4. In the pop-up dialog box, under the General tab, you can see its form in When posting to this folder, use: 
  5. You should know that the form:
    • for emails it is IPM.Post
    • for calendar items it is IPM.Appointment

If this doesn’t work, proceed to the next solution listed below.

2. Try to manually clear form cache

  1. Navigate to: C:\Users\%username%\AppData\Local\Microsoft\FORMS
  2. Back up all items from this folder and then remove them. outlook the custom form cannot be opened clear form cache
  3. Check if the issue persists


If this method doesn’t work either, you should check the integrity of your Microsoft Office install.

3. Install third-party repairing software for Outlook

  1. Download and launch Stellar Repair for Outlook.
  1. Use Choose Location and look for the Outlook data file (OST/PST).
  1. Let the software scan and repair the Outlook data file.
  1. After the Repair Complete message box appears, click OK.

Stellar Repair for Outlook

Make sure you never miss important mails and recover lost email communication with this dedicated repair software.
Check Price Visit Website

4. Open Microsoft Outlook in Safe Mode

4.1. Press and hold the CTRL key to open an Office application

  1. Go to Microsoft Outlook‘s shortcut icon.
  2. Press and hold the Ctrl key and double-click the shortcut.
  3. When a window appears asking if you want to start the application in Safe Mode, click Yes.

4.2. Use the /safe option to open an Office application

  1. Press Windows + R.
  2. Type in the following and click OK: outlook /safe
outlook the custom form cannot be opened safe mode

5. Uninstall any third-party add-ins

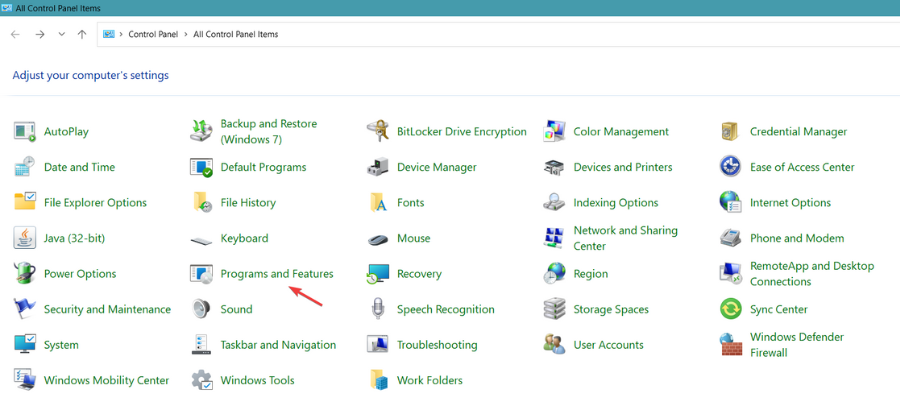
  1. Press Windows + R and type control.
  2. Go to Programs and Features.

  3. Look for the add-in in the list.
  4. Select it and click Remove.

How do I manage forms in Outlook?

  1. Click the File tab and choose Options.
  2. Click Advanced.
  3. In the Developers heading, click Custom Forms.
  4. Lastly, click on Manage Forms.

If none of the methods listed above work, you could also try repairing your Office Installation or uninstall Microsoft Office and install it again.

Did our solutions help with The custom form cannot be opened, Outlook will use an outlook form instead error? If you have found a different solution, feel free to share it with us in the comments section.

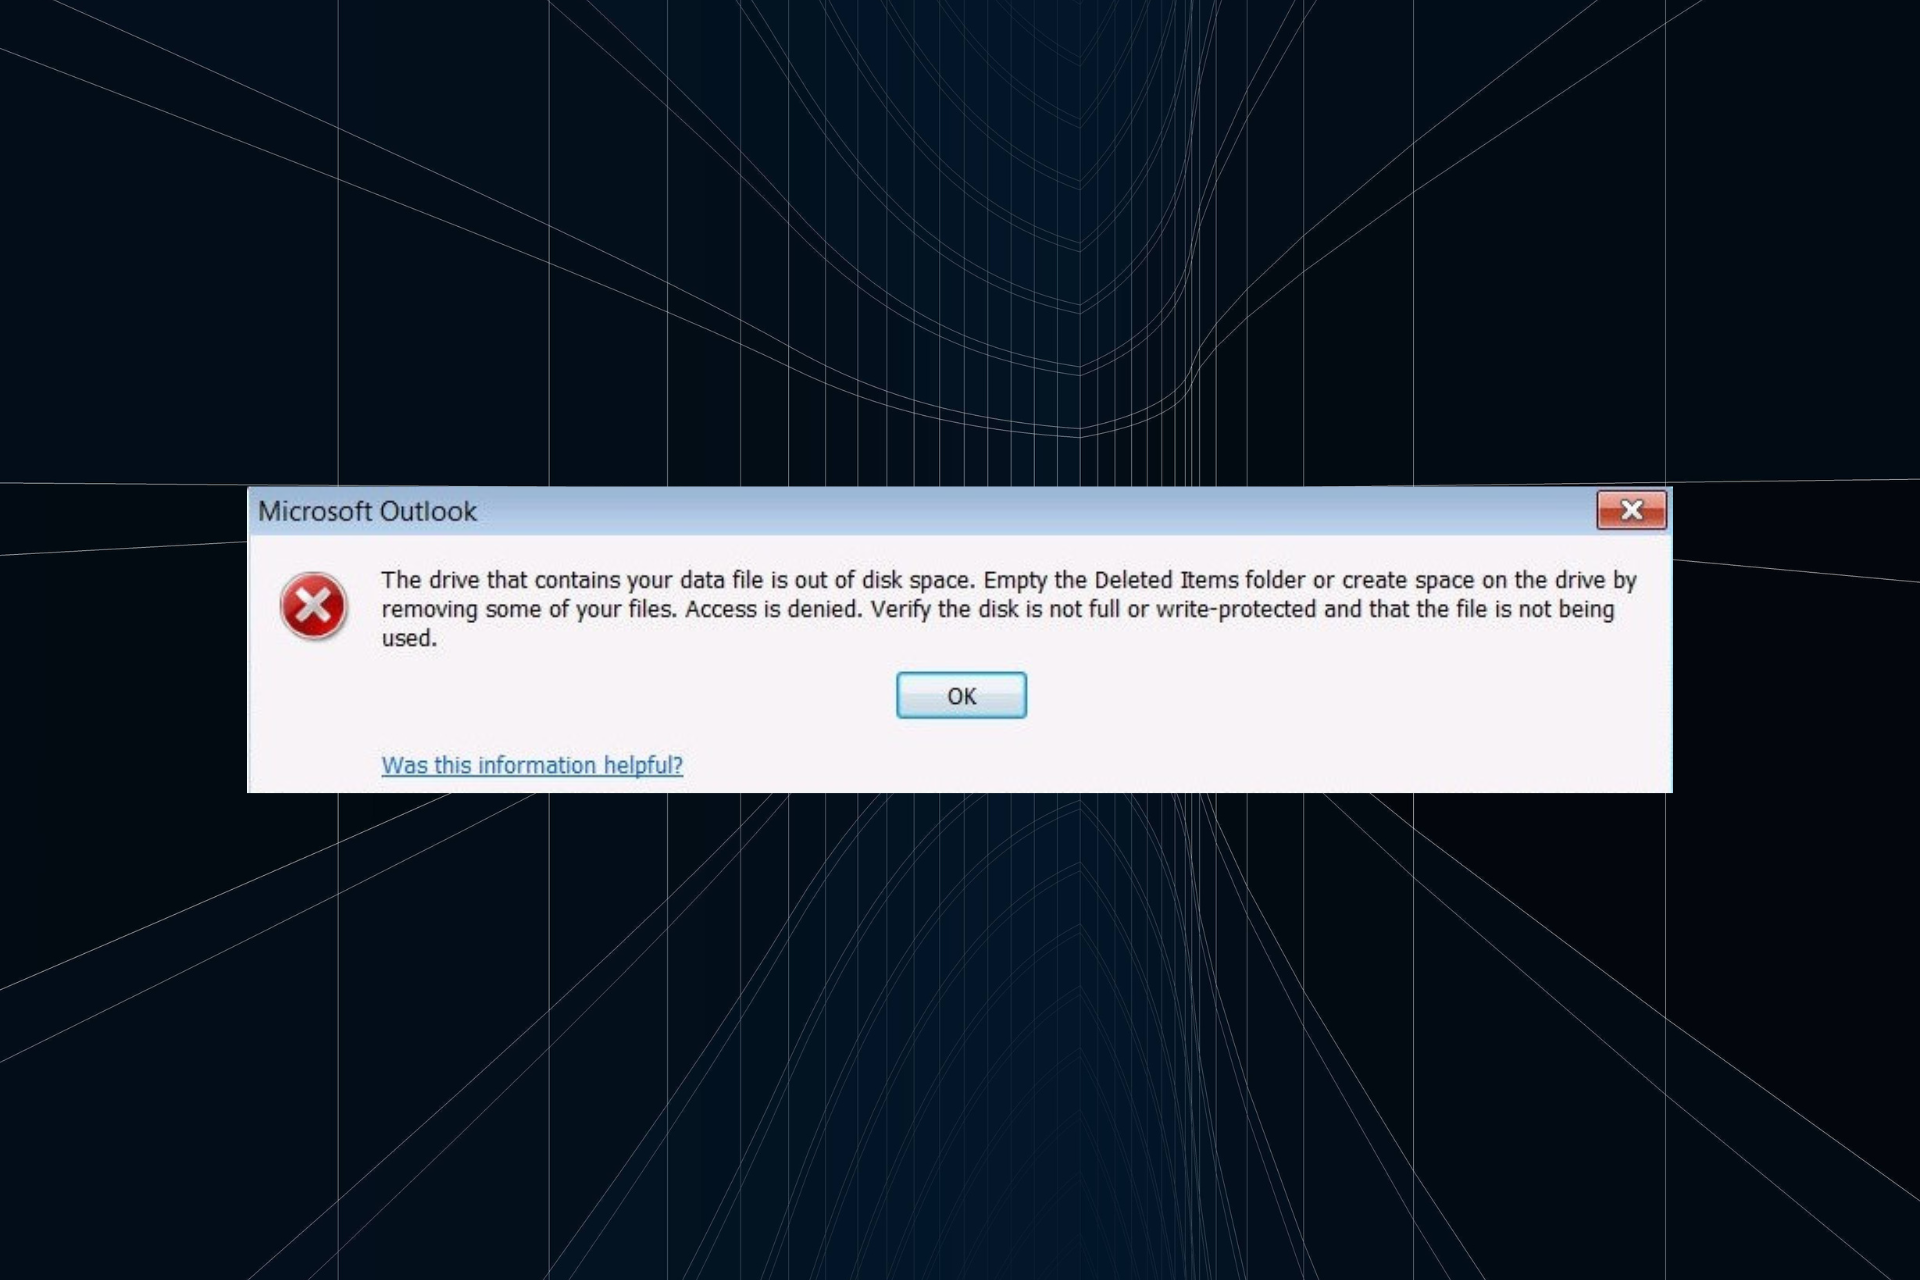
Drive That Contains The Data File is Out of Disk Space [Fix]

Outlook errors are common, given the complex functioning of the email client. One error that bothers many is The drive that contains your data file is out of disk space. Empty the Deleted Items folder or create space on the drive by removing some of your files. Access is denied.

Users can’t receive any emails in Outlook when that error arises. The problem usually arises when users run out of storage space on the drive that contains the PST file. So, let’s find out how you can fix things!

How do I fix the Drive that contains the data file is out of disk space Outlook error?

Before we proceed, here are a few quick solutions to try:

  • Restart the computer.
  • Clear the contents of the Recycle Bin. To do that, right-click on the desktop entry, and select Empty Recycle Bin from the context menu.

If none help fix The drive that contains your data file is out of disk space error, move to the fixes listed next.

1. Set up a New Outlook Profile

  1. Press Windows + R to open Run, type Control Panel in the text field, and hit Enter.
  2. Select Large icons from the View by dropdown menu.large icons
  3. Then click Mail to open Mail Setup.mail
  4. Select the Show Profiles button, and then click on Add in the General tab.Mail Setup window outlook the drive that contains your data file is out of disk space
  5. Enter a profile title in the New Profile window, and click OK.
  6. Then fill out the text boxes on the Add Account window.
  7. Click the Finish button.
  8. On the Mail window, click the Always use this profile option.
  9. Then select the new profile to be the default one for Outlook.
  10. Finally, click Apply and OK to save the changes.

Often, the easiest way to fix things when you get The drive that contains your data file is out of disk space error is to create a new Outlook profile.

2. Set up a new Outlook Data file

  1. Click the New Items button in Outlook, choose More Items, and then select the Outlook Data File option.Outlook Data File option outlook the drive that contains your data file is out of disk space
  2. Then enter a file title for the data file.
  3. You can enter an optional password by selecting the Add optional password option.
  4. Click the OK button.
  5. You can also select the new data file to be the default one for Outlook by opening Mail from the Control Panel.
  6. Click the Data Files button in the Mail Setup window.
  7. Then select the new PST file on the Data Files tab.Data File tab outlook the drive that contains your data file is out of disk space
  8. Click the Set as Default option.
  9. Click the Close button.

Another quick solution to The drive that contains your data file is out of disk space error is to set up a new Outlook data file, preferably in another drive.

3. Convert the C: Drive to NTFS Format

  1. Open File Explorer by pressing Windows + E.
  2. Right-click the C: drive to select Properties.
  3. The General tab directly above lists if their HDDs are FAT32 hard drives.The HDD Properties window outlook the drive that contains your data file is out of disk space
  4. If it’s currently using the FAT32 filing system, press Windows + R to open Run, type cmd, and hit Ctrl + Shift + Enter.
  5. Paste the following command and hit Enter: convert c: /fs:ntfsThe convert command outlook the drive that contains your data file is out of disk space

If the previous solutions didn’t help fix The drive that contains your data file is out of disk space error in Outlook, changing the filing system for C: from FAT32 to NTFS should do the trick.

In case the problem persists and you are looking for Outlook alternatives, check the best email clients for Windows.

We also wrote about Error Handle Disk Full in our latest guide, so you might want to check it out for more information.

For any queries or to share more solutions with us, drop a comment below.

Sony TV Won’t Connect to Internet [Fix]

Everyone nowadays has a Smart TV in the house, but many reported that Sony TV won’t connect to the Internet.

This is a big problem since you won’t be able to connect to Netflix on Sony Smart TV. The same goes for other streaming services. Luckily, there is a way to fix this problem, and today we’re going to show you how to do it.

Why is my Sony TV not connecting to the Internet?

  • Issues with the network cable or network hardware.
  • Problems with the network configuration.
  • The wireless network isn’t properly set up.

What can I do if my Sony Smart TV won’t connect to the Internet?

1. In case you are using a wired connection

  1. Using the original Sony remote, press the Home button.
  2. Go to Settings.
  3. Select Network.

  4. Go to Network Setup.

This is where you should verify the following on the View Network Status screen:

  • Your physical Connection should be OK – This means an Ethernet cable is detected from the TV to the router or modem.
  • Local Access should be OK – This means that the TV sees the router
  • Internet Access should be OK – This indicates that the TV is connecting to the Bravia Internet Video (BIV) server.

If any of the settings are shown as Failed, check for some of the following:

  • Check the Ethernet cable to see if it is secured – If needed, change the LAN ports or the cable altogether.
  • Check whether the cable is actually giving off the signal by testing it on another device (e.g. a PC)
  • Make sure the TV is obtaining an IP address – If the IP Address flashes or starts with 169, then the IP address needs to be changed, and you need to perform a manual IP assignment.

It’s important to check these settings, especially if Sony TV has issues obtaining the IP address.

2. In case you are using a wireless connection

  1. Press the Home button on the remote.
  2. Go to Settings.
  3. Go to Network.
  4. Select Network setup.

  5. Choose Set up network connection or Wireless Setup.
  6. Choose the desired connection method.
  7. Follow the on-screen instructions to complete the setup.

If all else fails, you could also try resetting your network equipment. We also have a detailed guide on connecting Sony Smart TV to Wi-Fi, so feel free to check it out.

This involves resetting the cable modem and router by turning them off and unplugging them for 1 minute. You could also try turning the TV off and unplugging it from the wall for 1 minute.

Unfortunately, this isn’t the only problem, and many reported that their Sony Smart TV is not working, but we covered that issue in one of our older guides.

If you also have a Sony Smart TV experiencing network connectivity issues, please let us know in the comments section below.

The Duration of the Appointment Must be Shorter: How to Fix

A lot of Outlook users utilize that application’s calendar to schedule appointments. However, users are reporting the duration of the appointment must be shorter than how frequently it occurs error while trying to schedule an appointment.

If you are also dealing with this error and need to schedule shorter appointments, the solutions in this guide will help you do it effortlessly.

How do I shorten appointments in Outlook Calendar?

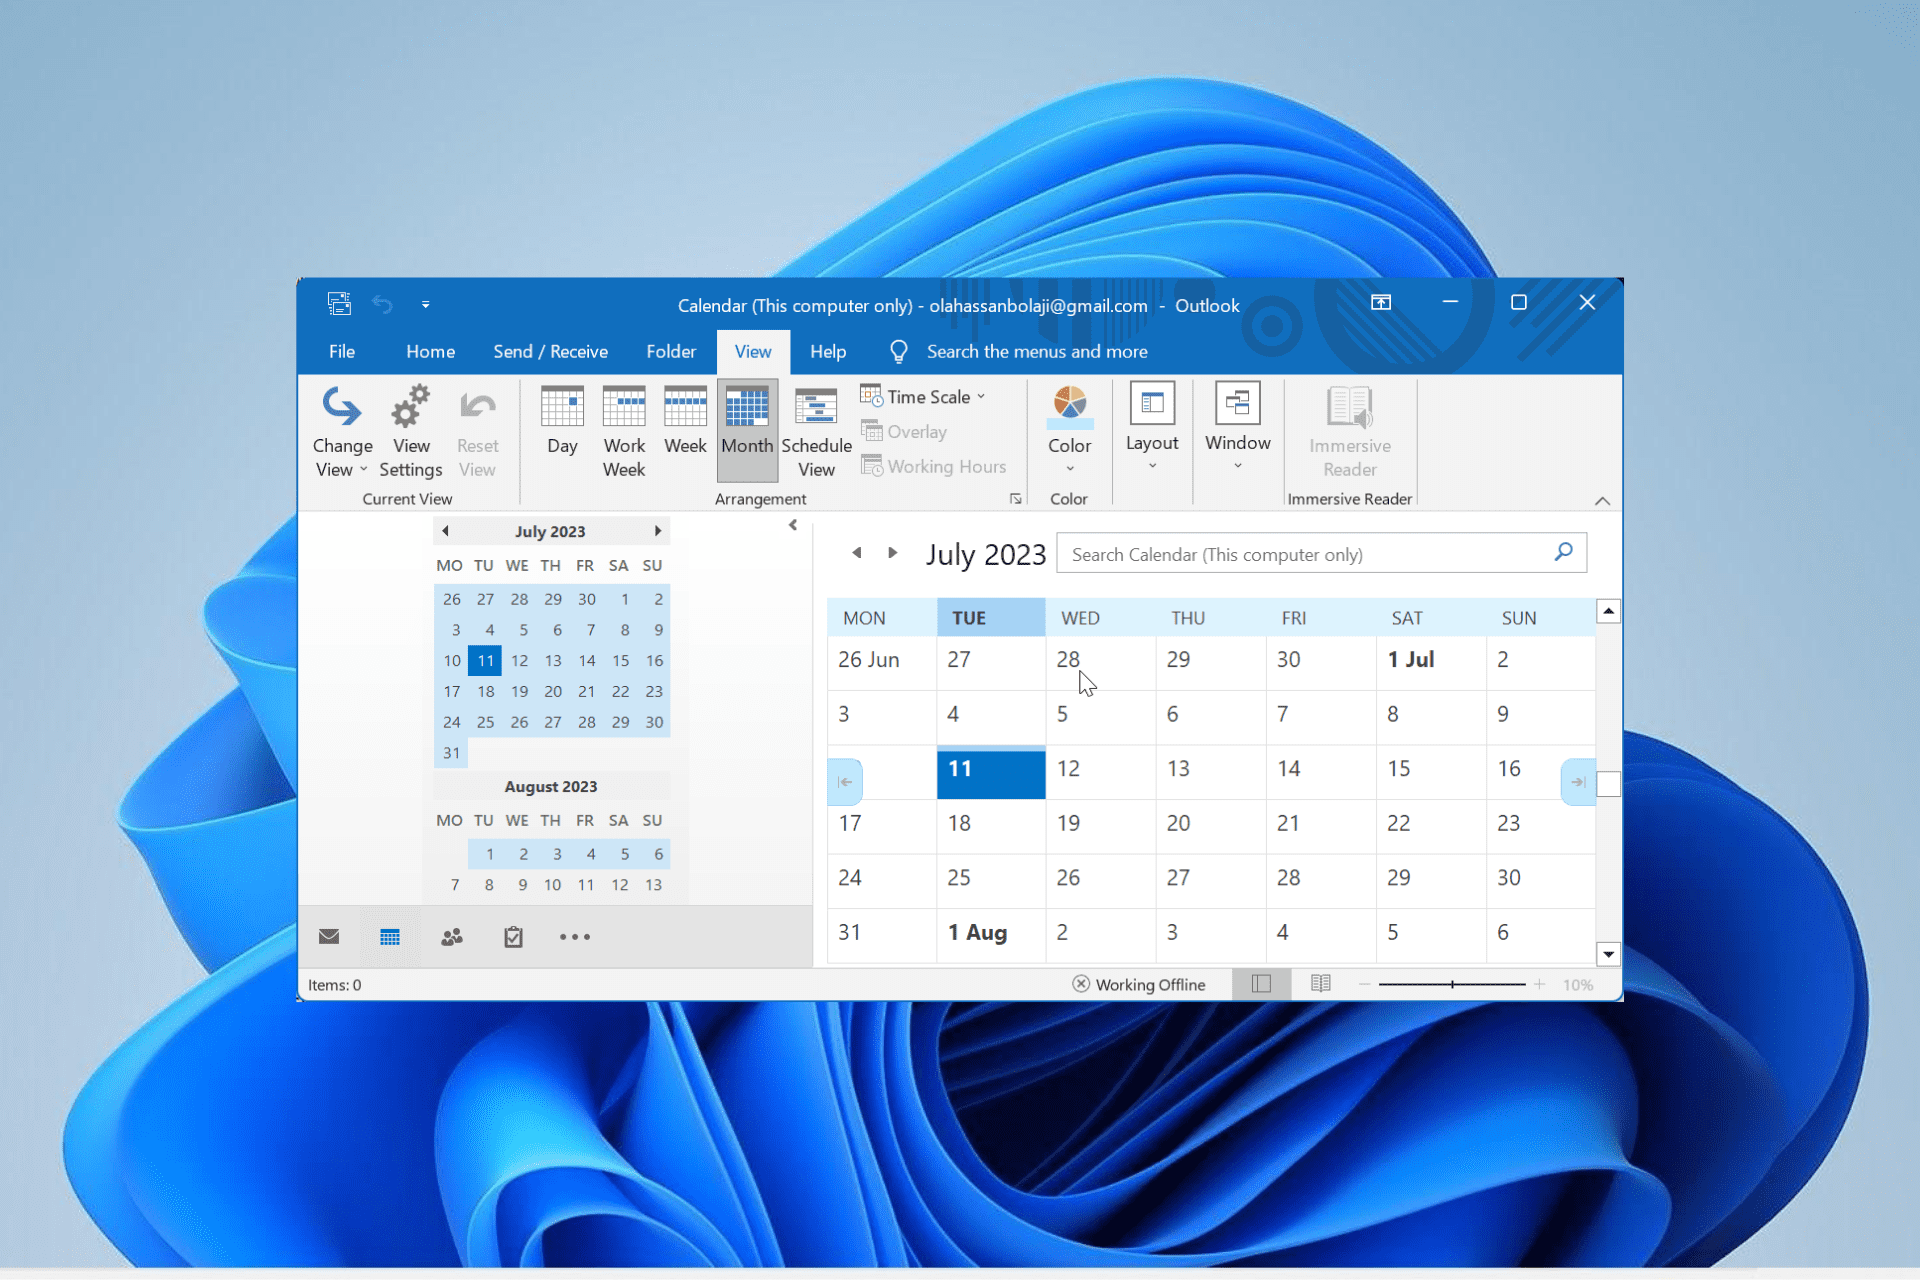
1. Adjust the default time scale settings

  1. First, open the Outlook application.
  2. Click Calendar to switch to the calendar view.
  3. Select the View tab.
    view the duration of the appointment must be shorter
  4. Then press the View Settings button.
    view settings
  5. Users utilizing Outlook 2007 will need to click the View menu. Then select the Current View and Customize Current View options on the menu.
  6. Click the Other Settings button on the Advanced View Settings window.
    other settings
  7. Then click the Time Scale drop-down menu.
  8. Select 15 minutes, or less, as the default duration for scheduled appointments in Outlook.
  9. There are also some additional formatting options there that users can select to adjust the calendar fonts. Click the Font button to change the font for calendar appointments.
  10. Press the OK buttons to exit the windows.
  11. Alternatively, users can change appointment lengths in Outlook by clicking the Time Scale button on the View tab. Then select 15 minutes or less on the drop-down menu.
  12. Users can also select a Change Time Zone to adjust the time zone the calendar displays for an appointment if required.

2. Set Up a Macro

  1. Launch the Outlook app and press the Alt + F11 hotkey.
  2. Click ThisOutlookSession on the left of the macro editor.
  3. Now, copy and paste the VB code below in the macro editor: Private WithEvents objInspectors As Outlook.Inspectors
    Private WithEvents objAppointment As Outlook.AppointmentItem
    Private Sub Application_Startup()
    Set objInspectors = Outlook.Application.Inspectors
    End Sub
    Private Sub objInspectors_NewInspector(ByVal Inspector As Inspector)
    If TypeOf Inspector.CurrentItem Is AppointmentItem Then
    Set objAppointment = Inspector.CurrentItem
    End If
    End Sub
    Private Sub objAppointment_Open(Cancel As Boolean)
    'Set the default duration of new appointment
    If objAppointment.CreationTime = #1/1/4501# Then
    objAppointment.Duration = "15"
    End If
    End Sub
    Private Sub objAppointment_PropertyChange(ByVal Name As String)
    'When you disable the "All Day Event"
    'Change the default duration of the current appointment
    If Name = "AllDayEvent" Then
    If objAppointment.AllDayEvent = False Then
    objAppointment.Duration = "15"
    End If
    End If
    End Sub
  4. Next, click the Disk button to save the changes.
  5. Go back to the Trust Center’s Macro settings tab and select Notifications for all macros option.
  6. Finally, select Enable all macros and click the OK button to launch Outlook with the appointment duration macro enabled.
    enable all

The macro above changes appointment durations to 15 minutes. Users will need to edit the objAppointment.Duration values in the macro to change the duration to a shorter time period.

With this, you should be able to fix the duration of the appointment must be shorter on Outlook. If you want to make your Outlook calendar private, check our detailed guide to do it easily.

Feel free to let us know the solution that helped you fix this issue in the comments below.

FIX: Intune App Failed to Retrieve Information (0x87d30065)

Many users reported that the Intune app failed to install, displaying errors such as Failed to retrieve information (0x87d30065). Similar to 0x87d101f4 Intune compliance error, it won’t let you use the service to full capacity.

Join us while we take a closer look at this Intune error.

How can I fix Intune app failed to install?

1. Check the installation error details

  1. Users can find more specific installation error details via the Troubleshoot tab in Intune. To find installation details, sign in to the MS Azure portal.The Intune portal microsoft intune not installing apps
  2. Then click Intune to open the Intune service.
  3. Next, click the Select user option to select a user for whom the app installation error needs to be fixed.
  4. Click Troubleshoot at the bottom left of the Intune page to open a troubleshooting tab.
  5. Select the device to fix the installation error for.
  6. Then select Managed Apps to open an app list. That list will include the app which didn’t install.Managed Apps tab microsoft intune not installing apps
  7. Select the app with a failed installation status to open an Installation blade (or sidebar) that provides further installation error details in the form of an error code. Then users can note down the error code and other details for further reference.

2. Check Event Viewer’s logs

  1. Users can get further Intune installation error details for Windows apps from the Event Viewer. To do so, launch the Run accessory by pressing the Windows key + R hotkey.
  2. Enter eventvwr.msc in the Open box and click OK to open the window in the snapshot directly below.Event Viewer microsoft intune not installing apps
  3. Click Event Viewer on the left of the window.
  4. Select Applications and Services logs, Microsoft, and Windows in the Console Tree.
  5. Then click AppxPackagingOM and Microsoft-Windows-AppxPackaging/Operational to open the event log in the snapshot directly below. There look for and select recent 404 and 465 app installation error events for further details on them.Event Viewer log microsoft intune not installing apps
  6. In addition, click AppXDeployment-Server and Microsoft-Windows-AppXDeploymentServer/Operational to check events pertaining to deployment errors.

If Intune app failed to install, be sure to try these steps and check if error is resolved.

3. Issue a support request

  1. Intune admin users with Azure AD roles can then issue support requests that includes error code details to Intune’s help and support. First, select a feature area within Intune’s Device Management dashboard.
  2. Then select the Help and support option.
  3. Click the ? Icon at the top right corner from the Device Management portal node.
  4. Select Microsoft Intune on the service drop-down menu to open the Help and support page.
  5. Then fill out the text box there with the error details, and click the Get help button.The help text box microsoft intune not installing apps
  6. To send an email request, click Get support.
  7. Click New service request by email, and then enter an email address for help and support to respond to.
  8. Then press the Send button.

When Intune’s help and support replies, users can provide further error code details noted from the Installation blade and Event Viewer.

Thereafter, Intune’s support service can provide users with some resolutions for the installation errors.

If you are getting an error code 80180006 while trying to login to Intune, read this guide to fix the issue.

We hope that this guide helped you fix the problems with Intune app that failed to install. In case you’re having more issues, check our guide on Intune not syncing.

Did you find a different solution? If so, share it with us in the comments below.

Here’s what the Surface Pro X wallpaper blended with Windows XP’s “Bliss” looks like

If you’ve been following the last week of Microsoft news recently, you might have noticed that the company’s new Surface devices sport some impressive new wallpapers themed towards natural landscapes. We’ve already have shown you where you can download them all, but someone else has taken things a bit further, blending the Surface Pro X wallpaper with Windows XP’s classic “Bliss” wallpaper.

As seen in the first slider image below, Redditor Castetorch worked some graphic design magic and switched out the usual orange-colored landscape from the Surface Pro X wallpaper: He instead added some touches of green, switched around the cloud, and mountain top to replicate the classic Windows XP wallpaper which many have come to love. You can compare the various wallpapers by going through our sliders.

It’s a really visually impressive scene, but Castletorch also has switched things up and created variants for different seasons. Some other variations of the Surface Pro X wallpaper include one with a stormy sky, one with a dark sky, and another one themed for the fall. These can all be found here.

What do you think of this wallpaper? Does it bring back memories? Feel free to let us know in the comments below.

Mike Ybarra, Corporate Vice President for Xbox Live, Game Pass, and Mixer, is leaving the company

Change is in the wind, apparently. After yesterday’s announcement that Windows Insider chief Dona Sarkar was moving to a new role, today we get news that 20 year Microsoft veteran and well known Xbox gamer Mike Ybarra is leaving Xbox:

Ybarra, who started at Microsoft as a Systems Engineer in 2000, according to his LinkedIn profile, and after working on Windows 7, moved to Xbox in October 2009. Ybarra promises to continue to “giving every ounce of energy I have to try and make gaming better for everyone,” but no word yet on where this next adventure of his will occur.

Ybarra had his hands in Xbox Live, in Game Pass, and Mixer, and is leaving Xbox in a very good place indeed. We wish Mike all the best and we’re looking forward to seeing what’s next. Good Luck!

Microsoft’s Xbox Wireless Controller shows up in … the Apple Store

It seems Apple is serious about its gaming efforts. The company has listed the Xbox Wireless Controller on the Apple Store, allowing anyone to order one for their Apple devices or for the Xbox One console.

The Cupertino giant has added support for Xbox wireless gamepads, as well as bluetooth Playstation Dualshock controllers, to its mobile devices with iPadOS/iOS 13, as well as Macs with macOS Catalina and the Apple TV with the tvOS 13 update. Part of Apple’s decision to support these controllers is because of its Apple Arcade subscription service, which brings users a handful of games for just $4.99 per month. Of course, the gamepad should still work for any any game that supports third-party controllers.

Apple’s bringing the Xbox wireless controller to its online store is definitely unexpected, but makes sense. Gaming has never been a big appeal on macOS devices or the Apple TV (Mojang even pulled the plug on Minecraft for Apple TV due to low player usage). So maybe a popular brandname controller is just the push that Apple needs to appeal more for casual gamers.

The Xbox Wireless Controller is available for $59.95, and can be delivered to your door or shipped to your local Apple Store for pickup. If you prefer saving money, Amazon also sells various colors on its website, typically for less than $50.

Would you order an Xbox One controller for your Apple device, or do you prefer playing higher-quality games on consoles? Feel free to share your thoughts below.

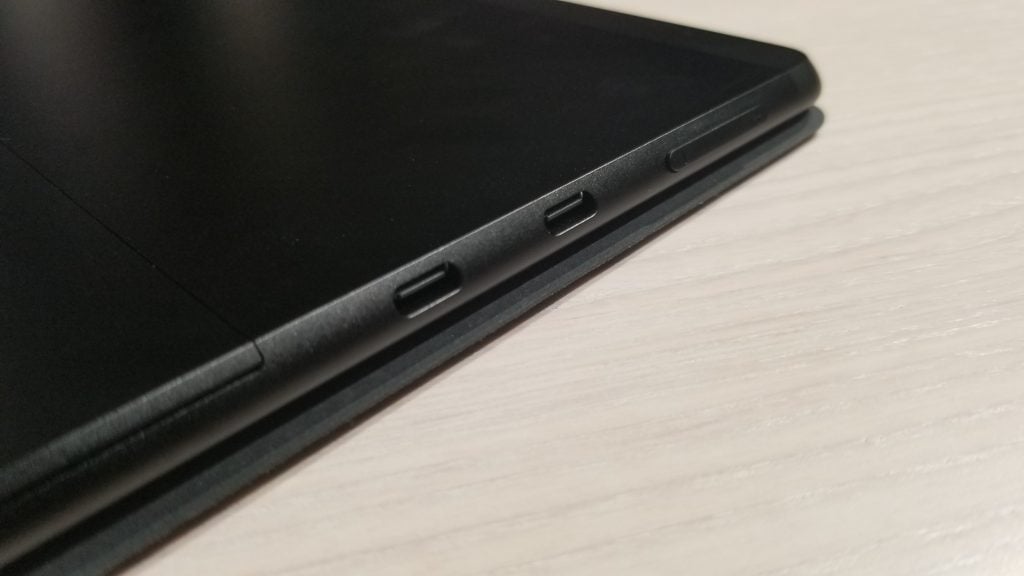
Yes, the new Surface devices have USB-C, but here’s why you need to be careful

If you’ve been thinking of buying any of the new Surface devices, you’ve likely heard good things about its support for USB-C. After years of releasing devices sporting older USB-A ports, Microsoft finally is adopting a newer technology on its hardware. However, there are some pitfalls of USB-C that you should be aware of. Here’s why you need to be careful.

All dongles and USB-C hubs are not created equal

First off, there’s the need to address dongles and USB-C Hubs. Since older USB-A accessories obviously can’t fit inside the USB-C port, you’ll need to purchase one of the two to connect things like USB drives, printers, and more.

You can find these dongles for cheap on Amazon. Our quick search for USB-C hubs turned up this third-party option for around $10, as well as an official option from Anker for $40. We also found the Amazon Basics USB-C to USB-A dongle for $8, as well as this third-party option for $9.

However, when buying these dongles, you need to be careful. While you could cheap out and go for something that fits your budget, you could be putting your new Surface device at risk by doing so.

The reason why? Not all USB-C hubs and dongles support the same protocols. Some don’t support power and will need you to plug in an external USB-C connector for pass-through charging to give it juice. This means you could perhaps plug a display into a USB-C hub, only to have it possibly cause damage or to see it not work with your device.

Additionally, some dongles and hubs draw extra power from your device. If they are not properly equipped with the circuity inside to handle it, you could end up damaging your new Surface and causing electrical shortages and other issues.

That’s why we recommend you pay the price and pick an official option from Microsoft, Belkin, Google, etc when shopping around for dongles and USB-C hubs. You’ll know that what you’re buying will work, and won’t damage your new Surface.

The dangers of USB-C charging and cables

Next up there are the dangers of USB-C charging. While USB-C has been billed as a convenient and easy method of charging Surface devices, it also can be a dangerous endeavor.

You see, just like USB-C hubs and dongles, not all USB-C charging cables are created equal. You should always make sure that a USB-C cable is compliant with the USB-C specification before buying it. This is a particular issue with cables that feature USB-A on one end, and USB-C on the other — for connections to your typical power brick.

But why? Most USB-C devices support fast charging, which means that the device will output a lot of power at a fast rate — up to 100W to be exact. Some cables are not properly equipped to handle this. There needs to be circuitry inside the cable to prevent it from drawing too much power. Badly designed and/or cheap cables don’t have this tech inside and can pull too much power and put your device at risk.

Our best advice when looking for charging and USB-C cables with your Surface is to make sure that what you’re buying is clearly labeled. We’d recommend buying Amazon Basics cables, as they list what you’ll be getting. You can clearly see markings and which speeds the cable support, and more. You also won’t have to worry about the cable being easily damaged, or the connectors breaking off and damaging your Surface.

We also recommend you to check out the USB-C compliant website for where you can buy additional cables that fit compliancy standards.

New USB4 standard is now finalized, with first devices expected for 2020

Just stick to Surface Connect

Worst come to worst, if you’re truly afraid, you can use the Surface Connect port for charging instead. That’s part of the reason why we think Microsoft is still keeping the port onboard its devices, and why the company was reluctant to make the move to USB-C. This is a proven foolproof method, as the power brick handles all the electrical conversions, and not the cable itself. Microsoft even sells an adapter, which lets you convert Surface Connect to USB-C if needed.

Xbox Game Pass for PC to welcome The Outer Worlds, Saints Row IV: Re-Elected, and more in October

Following the additions of Dishonored 2 and Cities Skylines last week, Xbox Game Pass for PC is about to welcome 7 new games in October. The headliner is The Outer Worlds, the upcoming role-playing video game developed by Obsidian Entertainment, a game studio Microsoft purchased last year. The game will be available on Xbox Game Pass for PC and console on launch day, October 25.

Microsoft didn’t announce any release dates for the six other titles joining Xbox Game Pass for PC later this month, but there are two games that are already available on Xbox Game Pass for console, F1 2018 and Stellaris. The four other new games include Saints Row IV: Re-Elected, the futuristic thriller game State of Mind, the indie adventure game Minit, as well as Lonely Mountains Downhill, a Downhill Mountain Biking Game launching on October 23.

Thanks to Xbox Game Pass for PC, Microsoft is finally bringing more PC games to the Windows 10 Microsoft Store, with some of them coming with Xbox Live achievements as well. However, there’s still a long way to go before the Microsoft Store catches up to Steam, Gog, or even the Epic Games Store, especially when the latter offers higher margins to developers and publishers, as well as two PC games for free every week.

Still, Xbox Game Pass remains a very good deal for PC gamers, and there are already many quality games in the catalog including Gears 5, Forza Horizon 4, Metro: Exodus, Wolfenstein 2: The New Colossus, or Prey. It can only get better once big publishers (Capcom, Square Enix) that are already supporting Xbox Game Pass for Console do the same for Xbox Game Pass for PC.

KB4517389 causes Critical Error, Search bugs, and more

Microsoft has just released the October 2019 Patch Tuesday updates and they include a lot of security improvements.

Besides the security updates in Internet Explorer and Microsoft Edge, there are also many fixes and some known issues that are still unresolved.

Strange enough, there’s nothing from Adobe and some users are intrigued by that:

Relative small patch Tuesday, and nothing from Adobe

Amongst the Windows 10 versions that received updates, Windows 10 v1903 seems to be the one that is currently affected by the above mentioned unresolved issues and also by some new ones.

KB4517389 causes Critical Error

Some users are complaining that after installing the KB4517389 on their PC’s, they can’t use the Start Menu and encounter a Critical Error:

KB4524147 originally caused a critical error when using Start Menu AND it prevented my printer from printing. The latter was because of some mess up with the print spooler. I uninstalled KB4524147 and BOTH problems disappeared. This morning, I updated with KB4517389. The printer seems to work, BUT I receive a critical error when using the Start Menu. 

The problem doesn’t seem isolated, as other users reported it on Reddit:

Off to an inauspicious start… KB4517389 broke my W10 1903 test VM. After installing, I get “Critical Error. Your start menu isn’t working.” Rebooting doesn’t change, but uninstalling the patch gets it back.

For now, there isn’t an official resolution. The only thing that seems to work is to uninstall the update.

Also, if you didn’t updated yet and want to avoid similar bugs and issues, you can block the update.

Printer drivers issue

As we already know, Microsoft has released a silent update on October 3rd to solve an issue with printer drivers. Supposedly, the issue was solved then.

Again, with the release of the October 2019 Patch Tuesday updates, the tech giant confirmed that the issue was solved:

Addresses an issue with applications and printer drivers that utilize the Windows JavaScript engine (jscript.dll) for processing print jobs.

Despite that, some users are still encountering the problem:

Tested on one computer, still broken. Edit: Removing KB4524147 / KB452148 before installing the October cumulative update seems to work

For now, the only workaround is to remove KB4524147 / KB452148 before installing the October Patch Tuesday updates.

Search is still not working for some

Windows Search is causing problems for a lot of Windows 10 users. The problem was first reported months ago, and it’s still not working for some, despite Microsoft addressing it several times.

Here’s what one user says:

will test on if Windows Search works and report back EDIT: it doesn’t EDIT: it doesn’t and it might be because I have VMware Pro 15 apparently.

If you encounter the same issue, besides uninstalling the update, there is another unofficial workaround.

You’ll need to copy ActivationStore.dat from another Windows 10 working PC to C:ProgramDataMicrosoftWindowsAppRepositoryPackagesMicrosoft.Windows.Cortana_1.13.0.18362.

If you can’t view/copy in the AppRepository folder, edit the folder permissions to authorize yourself. As we already said, this is an unofficial workaround, but it worked for some.

Give it a try, as it might work for you, too.

Mouse issues after the update

Other users are reporting problems with their peripherals after the update:

After updating to the 1903 i have experienced an issue with my mouse cursor. It started when i tried to load any page on my browser and when gaming (Football Manager 2019). The cursor at some points just jumps or skips. Dont know why..no cpu spikes or any spike of any kind. i kind of fixed it when i updated some drivers on device manager but then another cumulative update came a week ago and the issue started again. i reinstalled windows to the 1903 build and nothing changed.

If you bump into the same issue, don’t worry. We’ve already dealt with this problem. Follow the simple steps from this guide and you’ll get rid of the problem in no time.

Bluetooth problems

Connectivity issues are not that uncommon when it comes to Windows 10 updates. But some users claim that the latest KB4517389 broke their Bluetooth all-together:

I am running windows 10 pro 64 bit, my computer is at this update, and it broke bluetooth completely.[…]One thing that is weird, is after I tried checking the device manager on **** is going on, it shows a broke entry under the USB controllers called “Unknown USB Device (Device Descriptor Request Failed)”.

This can happen if files get corrupted and Bluetooth gets reassigned as a USB controller. There isn’t yet a confirmed solution for this problem, but there are a couple of things that you can try:

  1. Update that certain USB driver in Device Manager.
  2. Update your drivers and your BIOS.
  3. Update the Bluetooth driver from the manufacturer’s website.
  4. Uninstall the Bluetooth driver and let Windows install the default driver.

If you don’t know how to update your BIOS, check out this awesome guide and get the job done without any problems.

Qualcomm Atheros AR9485 not working properly

As we already mentioned, connectivity issues are not that uncommon after an update, but they usually get resolved pretty quickly. That’s not the case with Qualcomm Atheros AR9485, as some users reported:

Devices with Qualcomm Atheros AR9485 experience problems with WiFi dropping and network adaptor needing to be reset. Microsoft are aware there is a problem with their Windows 10 updates since their 1607 upgrade, yet seem incapable of rectifying the problem.Their latest update is showing same problem.

This is a pretty old problem, but we already dealt with it. You can try the steps in this dedicated guide, as it may help you solve the connectivity issues quickly and easily.

Besides these problems, there are also a lot of installation issues and boot errors affecting the latest KB4517389. Check out this article to find out more info about that.

Also, Microsoft Edge seems to stop working on some Windows 10 PCs after updating to KB4517389. If you want to know more, take a look at this dedicated article.

Have you encountered any other issues after updating to KB4517389?

Share your experience in the comments section below and we’ll be sure to take a look.

READ ALSO:

How to permanently delete your Arc Games account

Arc Games has one of the largest collections of free-to-play games. From MMORPGs to shooter and fantasy Games, Arc offers something for everyone. However, what if you want to delete Arc game’s account?

At times you may want to delete your Arc account because it is old and you want to start from scratch again.

In this article, we walk you through the process of deleting the Arc games account as well as uninstalling the Arc client from the Windows system.

Steps to delete your Arc Games account

1. Uninstall the Arc Client

  1. If for some reason you want to uninstall the Arc Client, you can do it from the Control Panel.
  2. Press Windows Key + R to open Run.
  3. Type control and click OK.
    Delete arc account
  4. In the Control Panel, go to Programs > Programs and Features.
  5. Select Arc Client and click on Uninstall.

You can also uninstall the Arc Client from the installation folder.

  1. Open the File Explorer.
  2. Open the Perfect World Entertainment folder.
  3. Click on the Arc folder.
  4. Click on the Uninstall Arc option and follow the on-screen instructions.

To ensure the process has been performed correctly, we recommend using a professional uninstallation tool that removes unwanted software and any files that are left behind in the system or registry.

Residual files are hard to detect when you uninstall an app or program manually. Over time, they can affect your computer’s performance and clog your operating system.

This type of tool is ideal because it performs these actions automatically and in a secure way.

2. Contact Arc support

  1. Unlike other game distribution platform, Arc does not offer an option to delete the account from its client.
  2. Even if you log in to the web app, there is no way to delete the Arc game account by yourself.
  3. The only way to delete your Arc account is to contact the support.
  4. Go to Arc game support.
  5. Open a ticket asking the support to delete your Arc account. You may be asked to confirm the account before it can be deleted.
  6. Once the email is verified, your Arc account will be removed from the database.

Note that once the account is deleted, you can’t recover it in the future. All the data and the transaction associated with the account will be removed.

So if you want to remove one of the Arc games or the Arc client from the PC, follow the next set of steps.

3. Uninstall an Arc game

  1. You can uninstall any game download via the Arc Client from the client itself.
  2. Launch Arc Client on your PC.
  3. Sign in using the username and password for the account.
  4. Under the “Charge” section, click the Title icon. This will show all the games installed on your Arc Client.
    Delete arc account
  5. Right-click on the game you would like to uninstall.
  6. Select the “Uninstall” option.
  7. Arc will delete the game from the system. Click on Yes if asked to confirm the action.

Games deleted from your Arc Client are still available for download. Simply browse the Store to install the games.


By following the steps in this article, you can delete your Arc account. However, if you only want to uninstall some Arc games or Arc Client, follow the second and third methods.

KB4519338 brings plenty of security updates and fixes

The October 2019 Patch Tuesday is finally here with an assortment of new features.

It seems that with KB4519338 Microsoft focused on improving security when using Internet Explorer and Microsoft Edge, as well as some improvements with username and password recognition.

Additionally, the major update also contains changes for Microsoft HoloLens (OS Build 17763.806) released October 8, 2019.

KB4519338 still has a lot of unresolved issues

Check out the full list of quality improvements and changes:

  • Addresses an issue in the Keyboard Lockdown Subsystem that may not filter key input correctly.
  • Addresses an issue in security bulletin CVE-2019-1318 that may cause client or server computers that don’t support Extended Master Secret (EMS) RFC 7627 to have increased connection latency and CPU utilization. This issue occurs while performing full Transport Layer Security (TLS) handshakes from devices that don’t support EMS, especially on servers. EMS support has been available for all the supported versions of Windows since calendar year 2015 and is being incrementally enforced by the installation of the October 8, 2019 and later monthly updates.
  • Addresses an issue with applications and printer drivers that utilize the Windows JavaScript engine (jscript.dll) for processing print jobs.
  • Security updates to Windows Shell, Internet Explorer, Microsoft Scripting Engine, Microsoft Edge, Windows App Platform and Frameworks, Windows Cryptography, Windows Authentication, Windows Kernel, and Windows Server.

Unfortunately, some users should be aware that it also comes with a few issues.

For example, devices with some Asian language packs installed may receive the error, “0x800f0982 -PSFX_E_MATCHING_COMPONENT_NOT_FOUND.”

For the full list of known issues, be sure to check out this link.

If you have your Windows 10 set to perform automatic updates, you will get this update immediately.

However, if you prefer manual downloads, you could simply get the update from the Microsoft Update Catalog.

If you’ve also installed this update and have found some issues, please let everyone else know in the comments section below!

Download Windows 7 KB4520003, KB4519976 Patch Tuesday updates

It’s Patch Tuesday again, and Windows 7 users have not been forgotten.

If you’re still using Windows 7 and want to update your PC, you should see two new updates: KB4520003 and KB4519976. The first one is a security-only update, while the second one is the monthly rollup.

While last month the Patch Tuesday updates for Windows 7 shared a similar changelog, this time they’re a bit different.

KB4520003/KB4519976 changelog

Here’s the full list of improvements and fixes for KB4520003:

  • Addresses an issue in security bulletin CVE-2019-1318 that may cause client or server computers that don’t support Extended Master Secret (EMS) RFC 7627 to have increased connection latency and CPU utilization. This issue occurs while performing full Transport Layer Security (TLS) handshakes from devices that don’t support EMS, especially on servers. EMS support has been available for all the supported versions of Windows since calendar year 2015 and is being incrementally enforced by the installation of the October 8, 2019 and later monthly updates.
  • Security updates to Windows Authentication, Microsoft JET Database Engine, Windows Kernel, Internet Information Services, and Windows Server.

And the full list for KB4519976, which also includes the changes from KB4516048 (released September 24, 2019):

  • Addresses an issue that may fail to disable VBScript in Internet Explorer by default after installing KB4507437 (Preview of Monthly Rollup) or KB4511872 (Internet Explorer Cumulative Update) and later.
  • Addresses an issue with applications and printer drivers that utilize the Windows JavaScript engine (jscript.dll) for processing print jobs.
  • Security updates to Windows Authentication, Microsoft JET Database Engine, Windows Kernel, Internet Information Services, the Microsoft Scripting Engine, and Windows Server.

There are currently no known issues for both of the updates.

It’s worth mentioning that Microsoft recommends that you first install some SSU’s before trying to install the Windows 7 updates:

  1. The March 12, 2019 servicing stack update (SSU) (KB4490628). If you are using Windows Update, this SSU will be offered to you automatically. To get the standalone package for this SSU, search for it in the Microsoft Update Catalog.
  2. The latest SHA-2 update (KB4474419) released October 8, 2019. If you are using Windows Update, the latest SHA-2 update will be offered to you automatically. For more information on SHA-2 updates, see 2019 SHA-2 Code Signing Support requirement for Windows and WSUS.
  3. The latest SSU (KB4516655). If you are using Windows Update, the latest SSU will be offered to you automatically. To get the standalone package for the latest SSU, search for it in the Microsoft Update Catalog.

If you want to manually install the October 2019 Patch Tuesday updates for Windows 7, you can do so by following the links below.

Just keep in mind that you will have to download the servicing stack updates prior to the October 2019 Patch Tuesday updates.

This Modification is Not Allowed in MS Office: 5 Quick Fixes

While editing a Microsoft Office document, you may encounter a warning message stating that the selection is locked. The full error message reads This modification is not allowed because the selection is locked.

This is a common error and occurs if your Office app is not activated when there are multiple instances of Office installed, or if the file is being edited by someone else.

If you are also troubled by this error, here are a couple of troubleshooting tips to fix the This modification is not allowed because the selection is locked in Word 2016.

How do I fix Modification is not allowed because the selection is locked?

Before we move to the slightly complex solutions, try these quick ones first:

  • Restart the computer.
  • Make sure the file is stored on the physical drive and not on an online server.
  • Check whether another user is editing the file you are trying to edit. Try making a copy of the file and make the necessary edits.

If none work, head to the fixes listed next.

1. Check Office activation

  1. To activate the office, launch any Microsoft Office app.
  2. Click on File and select Account.
  3. You will see the activation message if the app is not activated. Enter the product key to activate the Office app.activate office to fix this modification is not allowed because the selection is locked

To fix the error, make sure your Office version if activated. You can encounter the modification locked error when Office 2016 is not activated.

2. Check for multiple instances of Office

  1. Press Windows + R to open Run, type appwiz.cpl, and then click OK.
  2. Select the trial version of Microsoft Office and select Uninstall.this Modification not allowed because selection locked
  3. Try editing the file again and check for any improvements.

If you have multiple versions of Microsoft Office installed, uninstall the older version. Most of the time, you have a trial version of Office Installed, which needs to be uninstalled to fix the This modification is not allowed because the selection is locked error.

3. Change file attributes

  1. Close Microsoft Office, and navigate to the location where the file is stored.
  2. Right-click on the file and then select Properties.
  3. Click the Advanced button.
    Microsoft Office document locked error
  4. Uncheck the File is ready for archiving and Allow this file to have contents indexed in addition to file properties options.
    Microsoft Office document locked error
  5. Click OK to save the changes.
  6. Click Apply and then OK again.

Many users reported that the misconfigured file attributes triggered the modification locked error in Office 2019. Reconfiguring the changes fixed things in no time and they could edit the file.

4. Remove file restriction

  1. Open the Microsoft file with the error.
  2. Click on the Review tab.
    Microsoft Office document locked error
  3. Click on the Restrict Editing option.
    This modification is not allowed
  4. Uncheck the Allow only this type of editing in the document and Limit formatting to a selection of style options.
  5. Save the changes and then open the file again.

Microsoft Office users can apply restrictions on the file to prevent editing. Check if your file also has any restrictions and remove them if any are found.

5. Remove grouping

  1. Open the file with the error.
  2. Click on the Developer tab.
  3. Click on Group and then select Ungroup.

If the group content control has been applied to part of your document, ungrouping the file will resolve the issue. And this should, in all likelihood, fix the This modification is not allowed because the selection is locked error.

Before you leave, find out to speed up Microsoft Office if it’s running slow.

Do let us know which fix worked for you in the comments.

Low Bandwidth on Firestick: 4 Ways to Fix it

The Amazon Fire Stick is a great device to watch your favorite shows. However, many users encountered the error saying that bandwidth is low on the Firestick.

This is a lot different that Firestick not connecting issue that we covered earlier and it will prevent you from browsing and watching online content. Luckily, there are ways to fix that.

Why does my FireStick have low bandwidth?

  • Issues with application cache can sometimes cause this problem to occur.
  • Temporary glitches with your network or Firestick can cause this issue.

How do I fix low bandwidth on Firestick?

1. Clear the cache

  1. Open Settings.
  2. Go to Applications.
  3. Select Managed Installed Applications.
  4. Click on the applications you are using to clear the cache.
  5. Select Clear Cache.

2. Restart the Amazon TV Fire Stick

  1. Open Settings.
  2. After that choose My Fire TV.
     
  3. Select Restart.
  4. Confirm that you want to restart the device.

Once the device restarts, check if Firestick bandwidth is still low.

3. Restart your router

  1. Turn off your modem or router by pressing the Power button on it.
  2. Keep it off for 30 seconds.
  3. Press the Power button again and wait for it to boot.
  4. Once the device fully boots, check if the problem is resolved.

4. Reconnect your network

  1. Open Settings and navigate to Network.
  2. Locate your network and press the Menu button.
  3. Now press Select button twice to forget the network.
  4. Connect to the network again and check if that solves the problem.

So, we have a few solutions available for you to fix this issue in no time. Clear the cache, restart the Amazon TV Fire Stick or restart your router.

Also, reconnect your network to solve this major issue. In case the problem is still there, you might have to factory reset Amazon Firestick.

Did our solutions help you solve the problem? Which method worked for you? Do let us know in the comments section below!

KB4520008 fixes Bluetooth hardening updates and more

Windows 10 fans rejoice as the October 2019 Patch Tuesday hit live and brings an assortment of new features.

KB4520008 boasts several neat highlights, including:

  • Improvements to general keyboard input
  • several necessary Bluetooth updates
  • Several security updates for Internet Explorer, Microsoft Edge and more

Download KB4520008 [DIRECT DOWNLOAD LINK]

KB4520008 Changelog

  • Addresses an issue in the Keyboard Lockdown Subsystem that may not filter key input correctly.
  • Addresses an issue with the Bluetooth hardening updates, released August 13, 2019, that may cause a “0x133 DPC_WATCHDOG_VIOLATION” error.
  • Addresses an issue in security bulletin CVE-2019-1318 that may cause client or server computers that don’t support Extended Master Secret (EMS) RFC 7627 to have increased connection latency and CPU utilization. This issue occurs while performing full Transport Layer Security (TLS) handshakes from devices that don’t support EMS, especially on servers. EMS support has been available for all the supported versions of Windows since calendar year 2015 and is being incrementally enforced by the installation of the October 8, 2019 and later monthly updates.
  • Addresses an issue with applications and printer drivers that utilize the Windows JavaScript engine (jscript.dll) for processing print jobs.
  • Security updates to Windows Shell, Internet Explorer, Microsoft Edge, Windows App Platform and Frameworks, Windows Cryptography, Windows Authentication, Windows Datacenter Networking , Windows Storage and Filesystems, Windows Kernel, Microsoft Scripting Engine, and Windows Server.

Several issues come with KB4520008 as well

There have been some reported issues with this update, such as issues renaming folders from CSVs, and that some devices startup with a black screen.

There have also been reported an issue with Mixed Reality users, probably caused by a bad implementation of the Microsoft HoloLens update.

If you are running an older update, only the newest features will be downloaded and applied to your device.

Have you installed the latest update? Is it causing any issues with your PC?

Let us know in the comments section below!

KB4517389 brings Microsoft HoloLens updates and more

For those of you eagerly waiting for a new update to your Windows 10, know that October 2019 Patch Tuesday is here.

It would seem that KB4517389 (OS Build 18362.418) is mainly focused on bringing updates to the Microsoft HoloLens (OS Build 18362.1034).

Additionally, this patch sees the beginning of the end of the support of e-books that use the .epub file extension over the next several months.

There are also updates to improve security when using Internet Explorer and Microsoft Edge.

Additionally, KB4517389  brings updates for verifying user names and passwords. Lastly, KB4517389  brings updates for storing and managing files.

KB4517389 Changelog

Check out the full list of changes and improvements:

  • Addresses an issue in security bulletin CVE-2019-1318 that may cause client or server computers that don’t support Extended Master Secret (EMS) RFC 7627 to have increased connection latency and CPU utilization. This issue occurs while performing full Transport Layer Security (TLS) handshakes from devices that don’t support EMS, especially on servers. EMS support has been available for all the supported versions of Windows since calendar year 2015 and is being incrementally enforced by the installation of the October 8, 2019 and later monthly updates.
  • Addresses an issue with applications and printer drivers that utilize the Windows JavaScript engine (jscript.dll) for processing print jobs.
  • Security updates to Windows Shell, Internet Explorer, Microsoft Edge, Windows App Platform and Frameworks, Windows Cryptography, Windows Authentication, Windows Storage and Filesystems, Windows Kernel, Microsoft Scripting Engine, and Windows Server.

Fortunately, no issues were discovered with this update. Make sure you read our report before you download the update!

Update: Several important issues with KB4517389 have been reported. Be sure to check them out in the articles below:

Have you set your Windows 10 to automatically update to the latest version? If you did, then the update will automatically install on your PC.

However, if you want to manually install KB4517389, you can follow the direct download link below.

If you encounter any problems or bugs with the new updates, make sure to share your experience in the comments section below.

Amazon Fire Stick cannot obtain an IP Address? Try this

The Amazon Fire Stick is an accessory to the digital media player and its micro-console remote control developed by Amazon.

It provides users with a neat way of streaming content from Amazon, as well as other services in High-Definition.

Since the device is a small network appliance that can deliver digital audio/video content streamed via the internet, it requires a stable connection.

However, some users have been complaining that their Amazon Fire Stick is having issues connecting to an IP address:

[…]It continually drops connection. All day today it will not connect at all. It shows my network and says strong signal but just keeps saying obtaining ip address….it will change to saved momentarily but then changes back to obtaining ip address. […]

How do I make my Amazon Fire Stick connect to an IP Adress?

1. Reboot the Amazon Fire Stick

  1. Remove the Amazon Fire Stick from the TV for around 30 seconds
  2. Plug it back in
  3. Wait for it to boot
  4. Try connecting the Amazon Fire Stick to the network again

Reboot Fire Stick

2. Reboot your router

The problem may be in your router and not your Amazon Fire Stick.

As such, rebooting it is the only solution:

  1. Reboot the router from the GUI on your computer or the switch at the back of the router
  2. Leave it turned off for around 30 seconds
  3. Turn it back on and give it time to boot
  4. Try connecting the Amazon Fire Stick to the network again

reboot router

3. Make your Amazon Fire Stick “forget” the network

  1. Go to the Fire TV Stick menu
  2. Select Settings
  3. Go to Network
  4. Select the network it is connected to, and then select Forget

fire stick forget network

4. Recheck your router’s security

Make sure MAC address filtering is not enabled, and if it is, add your Firestick’s MAC address to the allowed list.

But first, you need to find out the Fire Stick’s MAC address:

  1. Go to the Fire TV Stick menu
  2. Select Settings 
  3. Go to About
  4. Select Network and look for MAC Address (Wi-Fi).
  5. Add the MAC address to the allowed list on the router
  6. Save the change

5. Check your IP Address pool

Most routers have a limited amount of dynamic IP addresses (around 155).

Check to see if your router has any IP Addresses to spare for your Amazon Fire Stick.

By using the methods above, you will surely get rid of any IP address connectivity issues plaguing your Amazon Fire Stick.

If you know any other methods, feel free to make them public in the comments section below.

RELATED ARTICLES YOU SHOULD CHECK OUT:

  1. Your Amazon Fire TV Stick is not booting? We got the fix
  2. Amazon Fire Stick not downloading apps? Try these methods
  3. Is your Amazon Fire Stick not recognized by my TV

Is your Microsoft HoloLens not updating? Try this

Microsoft HoloLens is a pair of mixed reality smartglasses developed and manufactured by Microsoft, similar to Oculus Rift.

HoloLens was Microsoft’s response to the ever-growing mixed reality market running the Windows Mixed Reality platform under the Windows 10 computer operating system.

Seeing that it runs on an OS, it receives updates quite frequently with the sole purpose of improving functionality and removing issues.

However, some users have been reporting on official Microsoft forums that they are having problems updating their HoloLens.

My Company has 3 HoloLens. Today I tried to update the HoloLens OS to latest version. One of them cannot be updated. […]The download progress bar keep 11%, after a while, it will try to update, but the update keep fail[…]

Apparently, when trying to update they are greeted by a message exactly like this one:

Error message (0x80073712)


How do I update the OS of my Microsoft HoloLens?

Normally, your HoloLens will automatically download and install system updates whenever it is plugged-in and connected to Wi-Fi.

However, sometimes you just need to force it to perform a manual update.

1. Manual update

  1. Press Windows
  2. Go the Settings app (the cogwheel-shaped button in the Start Menu)
  3. Go to Update & Security 
  4. Select Windows Update
  5. Select the Check for updates button
  6. Restart the device once the update is complete

Windows 10 Check for Updates

Please remember to turn not turn off your Microsoft HoloLens while your update is in progress.

2. Downgrade to a previous version

Your Microsoft HoloLens doesn’t update even after following the above-mentioned steps?

You should consider downgrading to a previous version and try triggering a manual update again.

  1. Remove all phones or Windows devices from your PC
  2. On your PC, download the Windows Device Recovery Tool (WDRT)
  3. Download the HoloLens Anniversary Update recovery package
  4. Extract the file
  5. Connect your Microsoft HoloLens to your PC using the original USB cables
    • In theory, pretty much any USB cable will work, but the original ones ensure maximum functionality
    • The tool will automatically detect your HoloLens
  6. Select the Microsoft HoloLens tile
  7. Proceed to the next screen and select Manual package selection
  8. Browse to where you extracted the folder contained in the zip from Step 4
  9. Select Install software

Windows Device Recovery Tool (WDRT)

There is a chance the tool may not detect your Microsoft HoloLens, and if that is the case, simply restart the PC.

If that doesn’t work either, select My device was not detected, choose Microsoft HoloLens, and follow the on-screen instructions.

Once the downgrade is complete, attempt manually updating your Microsoft HoloLens again.

Are you having issues updating your Microsoft HoloLens OS, or do you know another solution?

Please let us know in the comments section below.

RELATED ARTICLES YOU SHOULD CHECK OUT:

The Delegates Page is Not Available: 3 Ways to Fix

The Delegates page is not available error is one that arises for some Outlook users. The error can be problematic and prevent you from sending emails.

In case you haven’t tried Outlook, we have a great guide on how to download and install Outlook, so we encourage you to visit it.

Fixing this issue isn’t as hard, and today we’re going to show you the best ways to fix it.

Why the delegates page is not available?

  • The calendar isn’t shared with the delegate properly.
  • Certain rules in Outlook are interfering and causing the issue.
  • Your current Outlook profile might be damaged or corrupted.

How do I fix the delegates page is not available in Outlook?

1. Share the Calendar with the delegate

  1. Microsoft’s official resolution for the delegates page error is to share the Outlook calendar with the delegate, which will set up a new, temporary delegate. To do that, log in to the Outlook web app.
  2. Then click the Calendar button to open Calendar.Calendar button outlook the delegates page is not available
  3. Click the Share button to open the window shown directly below.Sharing and permissions outlook the delegates page is not available
  4. Input a user group in the text box.
  5. Select Delegate on the drop-down menu.
  6. Then click Share and Done.

2. Delete Outlook’s rules

  1. Some users have confirmed they’ve fixed the delegates page error by deleting corrupted Outlook rules. To do that, click the Home tab in the Outlook software.
  2. Then select the Rules button to expand its menu.
  3. Select Manage Rules & Alerts to open an E-mail Rules tab.
  4. Select rules on that tab, and click the Delete button to erase them.
  5. Alternatively, users can start Outlook with rules disabled with a command line switch. Press the Windows key + R keyboard shortcut.
  6. Input the following and click OK: Outlook /CleanRules
    The Run accessory outlook the delegates page is not available

After doing that, check if The delegates page is not available, cannot access Outlook folder message is still there.

3. Set up a new Outlook profile

  1. Setting up a new Outlook profile might also help resolve the delegates page error. Open the Outlook application.
  2. Click the File tab.
  3. Select Account Settings and Manage Profiles.
  4. Press the Show Profiles button.
  5. Then click the Add button.
  6. Enter a new profile title in the open text box, and press the OK button.
  7. Then switch to the new profile by clicking File, Account Settings, and the Change Profile option.
  8. Select the new profile on the Choose Profile window, and click the OK button.The Choose Profile window outlook the delegates page is not available
  9. Click the Options button.
  10. Select the Set as default profile option.

Those are three resolutions that might fix the delegates page not available Outlook error. In addition, users can try fixing the error with the Microsoft Support and Recovery Assistant for Office 365 utility.

For more information about Outlook, we have a great guide if you’re unable to add email account to Outlook 365.

Did you find a different solution? If so, don’t hesitate to share it with us in the comments below.
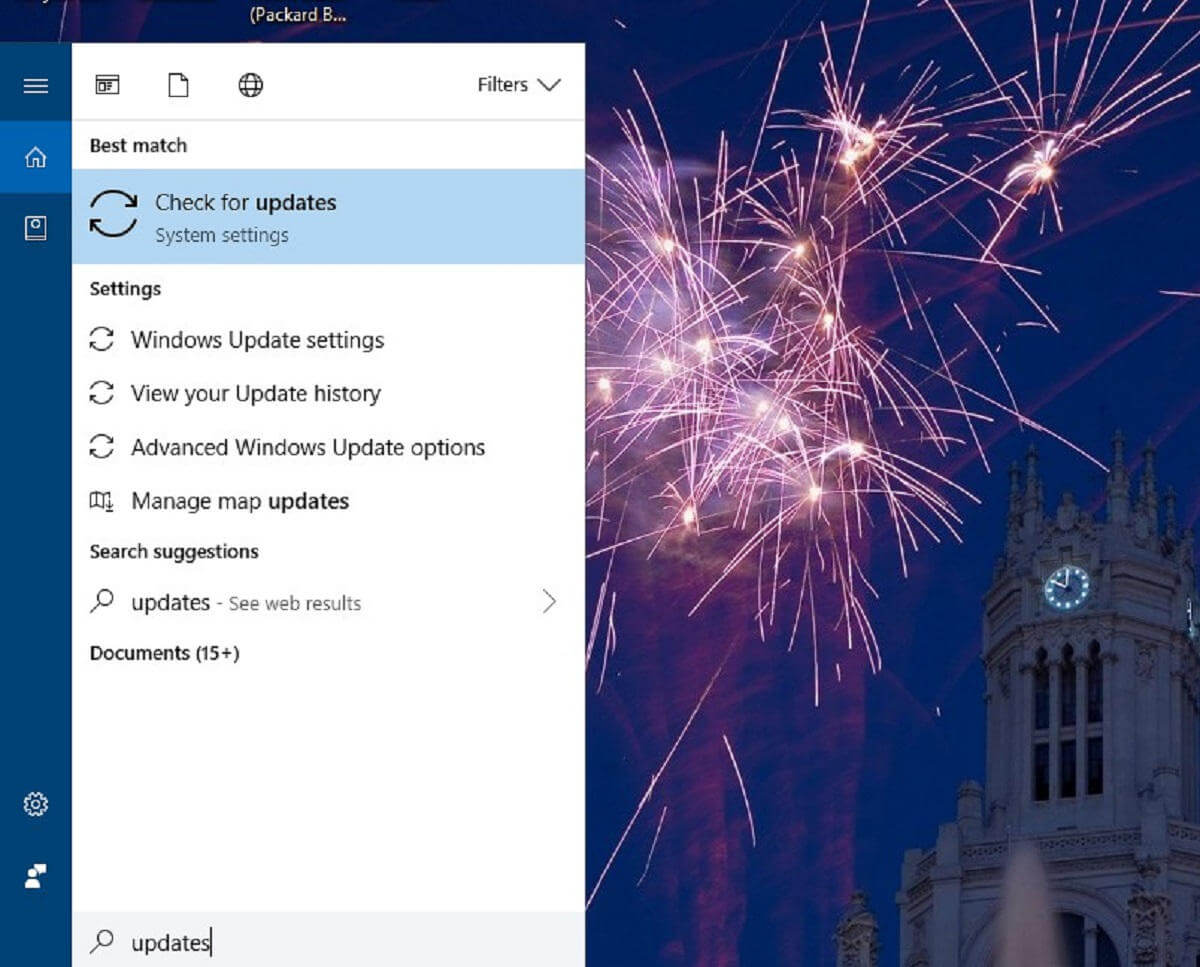
How to Update Uplay Games: Simple and Efficient Solution

Ubisoft has plenty of well-known titles under their belt, and their own desktop client to act as a game launcher and library manager. This client is known as Uplay, and while it may not be the most stable program of its type, it does a pretty good job.
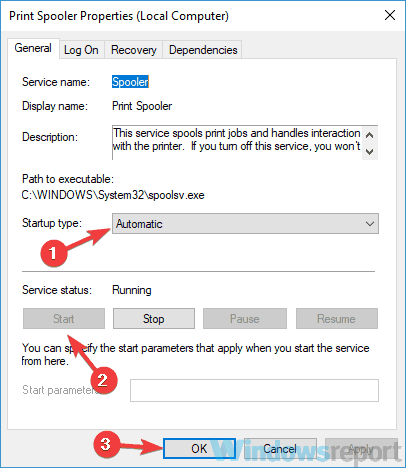
However, many of our readers have been complaining that they are having problems updating their games through Uplay.

Other users stated that whenever they pressed the Update button that’s right under the game‘s icon within Uplay, nothing would happen. However, if they try to verify the game‘s files, it will fail to validate the game.

How do I update my Uplay games?

Keep note that this is more of a workaround rather than an official fix, so make sure you make a backup of your game‘s install files before trying this.

  1. Go to the install location of your Uplay games
    • This location varies depending on where you chose to install Uplay
  2. Rename the folder of the game that you cannot update into something else, but do NOT delete it
  3. Launch Uplay
    • In your list of installed games, the game which you renamed should now be missing from your library
  4. Proceed to look for the game in your game‘s list and click on Download
  5. Before pressing Continue after you chose the install location, go back to your Uplay folder and rename the game back to what it used to be
  6. Now return to the install wizard and click Continue
    • Now instead of downloading the files, Uplay will discover the ones already installed
  7. Uplay will now finish downloading whatever update was NOT installed until that very moment.
  8. Launch the game
Rename Ubisoft game

If you follow these steps, you should be able to successfully update pretty much any Uplay game.

An alternative solution would be to download the game through Steam instead since most Ubisoft games can be found there as well.

However, keep in mind that there are some incompatibilities between Uplay and Steam and that a Ubisoft game downloaded through Steam can only be handled through Steam.

More so, before trying any of these solutions, check to see if you have the disk space to spare.

This is because a lot of Ubisoft titles have patches that are quite big.