Thronebreaker: The Witcher Tales is coming to Xbox One consoles in December

The single-player story mode for Gwent: The Witcher Card Game will finally launch on Microsoft’s Xbox One consoles on December 4th this year. Given that Gwent is an Xbox Play Anywhere title, it’s assumed that the Windows 10 version will also get this mode on the same day.

Named, Thronebreaker: The Witcher Tales, this game mode will use the main Gwent card gameplay mechanics to explore new areas of the fantasy world while telling an original story revolving around Meve, a queen.

“Thronebreaker is a single player role-playing game set in the world of The Witcher that combines narrative-driven exploration with unique puzzles and card battle mechanics. The game spins a truly regal tale of Meve, a war-veteran queen of two Northern Realms — Lyria and Rivia. Facing an imminent Nilfgaardian invasion, Meve is forced to once again enter the warpath, and set out on a dark journey of destruction and revenge,” the official announcement reads. “Throughout the adventure, players will explore new and never-before-seen parts of The Witcher world, embark on thought-provoking quests featuring rich, multidimensional characters. All while gathering resources to expand their army and engaging in epic story battles powered by the skill-based battle system known from Gwent: The Witcher Card Game.”

Gwent: The Witcher Card Game is a free-to-play digital card game based on the popular The Witcher video game franchise. The game features impressive animated artwork on its cards and numerous sound effects recorded by the main series’ voice actors.

Are you a fan of Qwent and are you excited for this new mode to launch? Share your thoughts with the community in the comments below and then follow us on Pinterest for more Xbox One content.

GWENT: The Witcher Card Game

Windows Media Player Plays MKV Files in Windows 10/11

Here’s some great news – you will be able to play MKV files in Windows 10 without the need of third-party players. The good old Windows Media Player will be able to play MKV files with no issues.
mkv files windows media player
MKV stands for Matroska Multimedia Container and it’s an open standard free container format, a file format that can hold an unlimited number of video, audio, picture, or subtitle tracks in one file. Or, in other words, and as many know it – it usually stands for videos that have a high quality.

Windows 10 comes with support for MKV files

And what many of us did in order to play .mkv files was to make use of a third-party media player, one of the most commonly used being VLC Player or BS Player. But now the good news is that Windows 10 will come with MKV support out-of-the-box, which means Window Media Player will be able to play this kind of files with no problems, at all.

So, if you are already on the first preview of Windows 10, you just need to download an MKV file, then select Windows Media Player; ignore the warning which says that the player does not support this file. Just click ‘Yes’, and you will see that the file will then play with no lags whatsoever.

However, we know that this is just the first technical preview of Windows 10, so if it doesn’t work for you, then it means that there are still some glitches and bugs behind the curtain that needs to be fixed. Nonetheless, this is some great news to hear and share with you!

MKV files issues in Windows 10

Windows Media Player is the most used player out there as it is the default Windows 10 player. However, even if it plays MKV videos, it might have some errors that we will list below, as well as the solutions in order to fix them (check the articles for step-by-step solutions). Here they are:

Here it is, all you need to know about Windows Media Player playing MKV files in Windows 10, and how to fix some related errors. Let us know in the comment section how do you play your MKV files on your PC.

READ ALSO: Download Free Microsoft Band App for Desktop Windows 7, 8, 10

Fix: ‘Regsvr32.exe has an Incorrect Version, Please Replace the File With a Genuine Copy’ in Windows 10

Those who have already downloaded the first preview of Windows 10 are already being plagued by countless errors. One that we’re going to discuss about today is regsvr32.exe and the problems that it causes.
Regsvr32.exe has an Incorrect Version, Please Replace the File With a Genuine Copy' in Windows 10
Recently, on the official Windows Insider forums, many have started complaining about an issue related to the regsvr.exe functionality. The thread has quickly started getting more views, which obviously hints to the fact that the problem is affected more and more users. Here’s what one of them has been saying:

Trying to install K-Lite codec pack for media player and keep getting an error popup saying “The file C:WindowsSysWOW64regsvr32.exe has an incorrect version (6.4.9841.0). Please replace the file with a genuine copy. Setup will now abort. Tried installing with compatability mode for XP, 7, and 8 with no success.

And what you need to do in order to get rid of this problem is incredibly easy. You just need to make sure that you have downloaded the new version that is compatible with the Windows 10, as well. Here’s how the official changelog of the latest software version sounds like:

  • Updated MPC-HC to version 1.7.6.279
  • Updated LAV Filters to version 0.62-58-gd8d8713
  • Updated ffdshow to version 1.3.4533
  • Compatible with Windows 10 Technical Preview

If it won’t work for you, then you will have to wait until K-Lite gets an update to support newer Windows 10 builds, just in case the one you have is not yet supported.

2018 update: This issue can be fixed using the newest K-Lite codec pack (14.4.7 update). All that counts, is that you uninstall all your previous codecs and leftovers as they can interfere with this pack and give you some errors. In order to be sure that your PC is clean of every codec you have installed previously, we recommend you to use IObit uninstaller (free download), a great tool that will let you remove independently all that you need on your PC.

READ MORE: Quick Fix: ‘no Boot Device Available” Error in Windows

Special Inside Xbox episode announced for September 25 with lots of Forza Horizon 4 action and a “few big surprises”

Microsoft’s Inside Xbox monthly show will be back on September 25 with a special episode focused on Forza Horizon 4. And because the open world racing game is set in the British countryside, the Xbox team will be live from the beautiful Goodwood House in West Sussex, England.

“We’ll be celebrating the upcoming launch of Forza Horizon 4 with exclusive news and interviews on the game, but of course, we’ll have much more to report,” wrote Will Tuttle on Xbox Wire. The Inside Xbox livestream will kick off at 1:00 p.m. PT/4 p.m. ET on Mixer, Twitch and other platforms, and it will by preceded by a pre-show featuring gameplay streams and “a few big surprises.”

Forza Horizon 4 will be released on October 2 on Xbox One and Windows 10, but owners of the game’s Ultimate Edition will have early access on September 28. A free demo is already available on the Microsoft Store, and those of you who preordered the full game can also pre-load it today ahead of launch.

Forza Horizon 4
Forza Horizon 4
Developer:
Microsoft Studios
Price:
Free

Brütal Legend and Greg Hastings Paintball 2 join the Xbox One Backward Compatibility catalog

In keeping with Tuesday tradition, Microsoft’s Major Nelson today announced that Brütal Legend and Greg Hastings Paintball 2 have joined the Xbox One Backward Compatibility catalog. Though these again are two rather strange titles, there are more than a few people out there who will enjoy.

Greg Hastings Paintball 2 was originally released back in 2011 and puts players on the ground in new terrains from 12 exciting paintball locations across the US and Europe. The game doesn’t seem to be available digitally, but it retails online for around $12.99.  Brütal Legend, meanwhile, was released back in 2014 and is an action game following the story of Eddie Riggs, a roadie chosen by the Rock Gods. You can find that game here for $14.99.

Last week the Xbox One Backward Compatibility catalog received the addition of Zone of the Enders HD Collection and Rumble Roses XX. You can check out the full list of backward compatible games right here on Major Nelson’s blog.

Microsoft releases both Fast (17763) and Slow (17758.1004) Windows 10 Insider RS5 builds

Windows Insiders, it’s time to get your PCs ready for action for new Redstone 5 releases! Microsoft has just pushed build 17763 to the Fast ring, and Cumulative Update build 17758.1004 to the Slow ring. Here’s what you need to know.

First off, there is the Fast build 17763. Again, this build is fairly minor and doesn’t back any new features. It is instead focused on fixing issues with Bluetooth, OneNote, and Powershell. There are also known issues with this time around, covering Task Manager and Background processes. Here’s what you need to know.

General changes, improvements, and fixes for PC:

  • The build watermark at the lower right-hand corner of the desktop is no longer present in this build. This doesn’t mean we’re done…
  • We fixed an issue where touching a Flash element in Microsoft Edge with two or more fingers could result in the tab crashing.
  • We fixed an issue where thumbnails and icons might not be rendered if there were any video files saved to the desktop.
  • We fixed an issue where certain Bluetooth audio devices wouldn’t play sound in apps that also used the microphone.
  • We fixed an issue resulting in an unexpectedly increased use of battery recently when using certain apps like OneNote.
  • We fixed an issue in PowerShell where it wasn’t displaying characters correctly in Japanese.
  • We fixed an issue resulting in display scaling factors not being applied correctly (so the UI was smaller than expected) when viewing a full screen remote desktop window on a monitor set to certain display scalings.

Known Issues:

  • Task Manager is not reporting accurate CPU usage.
  • Arrows to expand “Background processes” in Task Manager are blinking constantly and weirdly.

Next up, there is the Slow ring Cumulative Update Build 17758.1004. There’s nothing much to note here, as this release includes all the releases from build 17760, which was just pushed out last week. That mainly helps address issues with .NET, PDFs, and other issues in Edge. We recapped those issues right here, so feel free to check it out.

Both these builds dropped right as Microsoft’s monthly Windows Insider webcast is underway. Feel free to give that a watch while your new builds download, and drop us a comment below once you’re running the latest releases to let us know how it is working for you.

Kingston Pendrive is Not Working or Cannot be Detected [Fix]

Earlier, pen drives could not hold more than a hundred megabytes, but as the technology gets increasingly complex, a pen drive can easily store up to 120 GB though problems remain! Some users are reporting that the Kingston pendrive is not working.

Kingston is one of the largest suppliers of flash memory because they are affordable, high-capacity, and totally portable. However, your Kingstone flash drive might get corrupted. If you’re dealing with this situation, here’s what might help!

How do I fix a Kingston pendrive that’s not detected?

Before we head to the slightly complex solutions, try these quick ones first:

  • Restart the computer.
  • Connect the pendrive to another USB port.
  • Connect the Kingston pendrive to another PC and verify whether it’s now working. If that’s the case, it’s a problem with the earlier computer to blame.

In case none work, move to the fixes listed next.

1. Change the drive letter

  1. Connect your Kingstone pen drive to the computer.
  2. Right-click on This PC.
  3. Click Manage in the drop-down menu.
  4. Click Disk Management on the left side and wait for a few seconds so that Windows can load the Virtual disk service.
  5. Right-click on your Kingstone pen drive and click Change Drive Letter and Paths.change drive letter
  6. Click the drive letter and click Change.
  7. Select the drive letter from the drop-down list. Click OK.assign letter

Sometimes your computer is unable to assign drive letters (like C, D, E) to your Kingstone pen drive. Due to this reason, the files on it cannot be accessed. To solve this issue, you can assign the drive letter to your device.

2. Use CHKDSK command

  1. Right-click on the Start button and click Command Prompt (Admin).
  2. Now type the following command and hit Enter where K: is the drive letter assigned to the drive: chkdsk /X /f K:

Alternatively, a good solution to repair your corrupted Kingston pen drive is to run the CHKDSK command. Just wait for the process to get complete, and then you should find your Kingston pen drive working as well as new.

3. Use diskpart

  1. Connect your corrupted pen drive to the computer and open Command Prompt as admin.
  2. Type the following command and press Enter:diskpart
  3. Paste this and hit Enter:list disklist disk
  4. Now type the following command where X is the number assigned to the drive and press Enter:select disk X
  5. Paste this command and press Enter:clean
  6. Next, execute these commands individually: create partition primary active select partition 1 format fs=fat32

If the Kingston pen drive is not recognized by the computer, running the Diskpart utility should help.

4. Format the Kingston pendrive

  1. Open This PC.
  2. Right-click on your corrupted Kingstone drive pen.
  3. Click Format in the drop-down menu.format USB
  4. Click Start to begin the format process. You can uncheck the Quick format option for a deep scan of the pen drive, but this will take time. Our suggestion is to uncheck it only if you fail on the first attempt.format usb drive
  5. Click OK in the next dialog box, which will warn you that the data will be lost.

When the Kingston USB drive is not working or recognized in Windows 10, formatting it should do the trick.

5. Repair the corrupted pen drive without formatting

  1. Insert the pen drive into the USB port of your system.
  2. Go to This PC and right-click on the Kingston pen drive, and select Properties.usb properties
  3. Go to the Tools tab and then click the Check button.

Once done, verify whether the Kingston pendrive is now working. Also, running a quick check will help when the Kingston pen drive is not formatting

6. Reinstall the drivers

There are times when the drivers that run your pen drive get corrupted. To fix this, find the particular model of the Kingston pen drive, head to the manufacturer’s website, and manually install the latest drivers.

A driver issue also results in Kingston pen drive not showing data and reinstalling them should get things fixed.

All in all, that is how you can fix a Kingston pendrive when it’s not working. Before you leave, do check some quick tips to increase the data transfer rate for USB 3.0.

Tell us which fix worked for you in the comments section.

Failed to Connect to a Windows Service: How to Fix it

Services are a crucial part of every Windows 10. However, some service-related issues can occur from time to time. Many reported the Failed to connect to a Windows service error message on Windows 10.

It affects a wide range of services and can lead to issues with the automatic startup, thus affecting the related functionality. So, let’s find out how you can get things up and running when a Windows service failed to start.

How do I fix Failed to connect to a Windows service error?

Before we head to the slightly complex solutions, try these quick ones first:

  • Restart the computer. If a quick reboot doesn’t do it, disconnect the headphones or earphones and then try again.
  • Disable UAC in Windows and verify whether the Windows could not connect to the System Event Notification Service error disappears.
  • Turn off fast startup and check for any improvements.
  • If you have Soluto or Bing Bar, uninstall the programs.
  • Boot Windows into Safe Mode. In case the Failed to connect to a Windows service error is fixed, it’s a third-party program, driver, or service triggering the issue. Identify the problematic one and take the necessary action.

If none work, head to the fixes listed next.

1. Use netsh winsock reset command

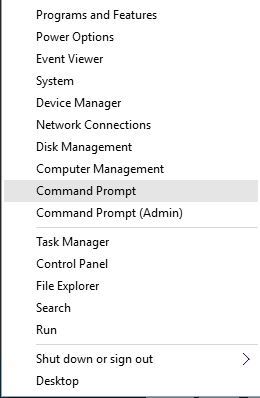
  1. Press Windows + X and choose Command Prompt from the menu.
    command-prompt-start-menu
  2. Type the following command and press Enter:netsh
  3. Now, execute the following command: winsock reset
    cmd-netsh-winsock-reset
  4. Once done, restart your computer and check if the issue is resolved.

To fix the Failed to connect to a Windows service error in Windows 7 or Windows 10, you need to reset the network settings and configuration. This could be done both via Settings and the Command Prompt.

2. Modify the Registry

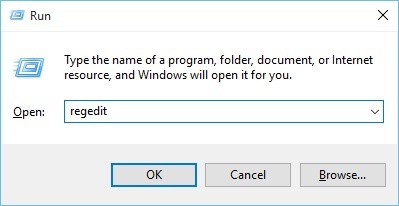
  1. Press Windows + R, type regedit, and then click OK.
    regedit
  2. Now, navigate the following path: HKEY_LOCAL_MACHINE\SYSTEM\CurrentControlSet\Services\gpsvc
    regedit-gpsvc
  3. Locate the ImagePath string, double-click on it, and check the Value data. If it’s set to svchost.exe -k netsvcs, this means that svchost and netsvcs keys are in charge of this service.
  4. On the left pane, navigate to:HKEY_LOCAL_MACHINE\SOFTWARE\Microsoft\Windows NT\CurrentVersion\SvcHost
  5. Locate netsvcs on the right pane and double-click it.
    svchost
  6. Check the Value data field. If gpsvc is missing, make sure to add it. Do not delete anything from the list, just add gpsvc if it’s missing.
    gpsvc
  7. If the netsvcs key is not available under the SvcHost in the left pane, you need to create it manually. Right-click on SvcHost, choose New, select Key, and name it netsvcs.
    new-key
  8. Select the netsvcs key you just created, right-click on empty space, hover the cursor over New, select DWORD (32-bit) Value, and name it CoInitializeSecurityParam.
  9. Double-click the DWORD, set the Value data to 1, and click OK to save the changes.
    reg-value-1
  10. Create another DWORD value, name it CoInitializeSecurityAllowLowBox, and set its Value data to 1.
    reg-value-2
  11. Create a new 32-bit DWORD, name it AuthenticationCapabilities, and set its Value data to 3020.
    reg-value-3
  12. Also, create a CoInitializeSecurityAllowInteractiveUsers DWORD and set its Value data to 1.
  13. Close Registry Editor and restart your computer.

When you get a Windows service start failure error in Windows 10, modifying the registry and adding the missing keys should get things up and running in no time.

3. Stop the Windows Font Cache Service

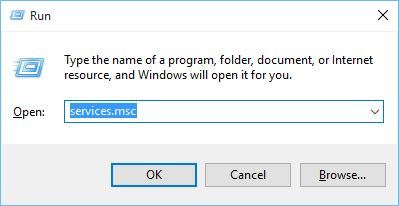
  1. Press Windows + R, type services.msc, and press Enter.
    run-services
  2. Locate Windows Font Cache Service, right-click on it, and choose Stop.
    services-stop
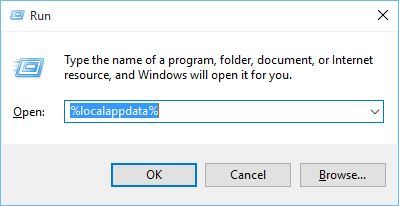
  3. Press Windows + R, type %localappdata%, and click OK.
    localappdata-run
  4. Locate and delete the FontCache.dat files.
  5. Go back to Services, right-click Windows Font Cache Service, and choose Start from the menu.
    services-start

According to users, Windows Font Cache Service can sometimes cause issues with other services. Therefore, you need to re-enable the service and delete the FontCache.dat files to fix the Failed to connect to a Windows service. This problem prevents standard users error.

Before you leave, find out the services you can disable in Windows and get a better performance out of your PC.

Tell us which fix worked for you in the comments section below.

Microsoft could be considering a second NYC flagship store in SoHo

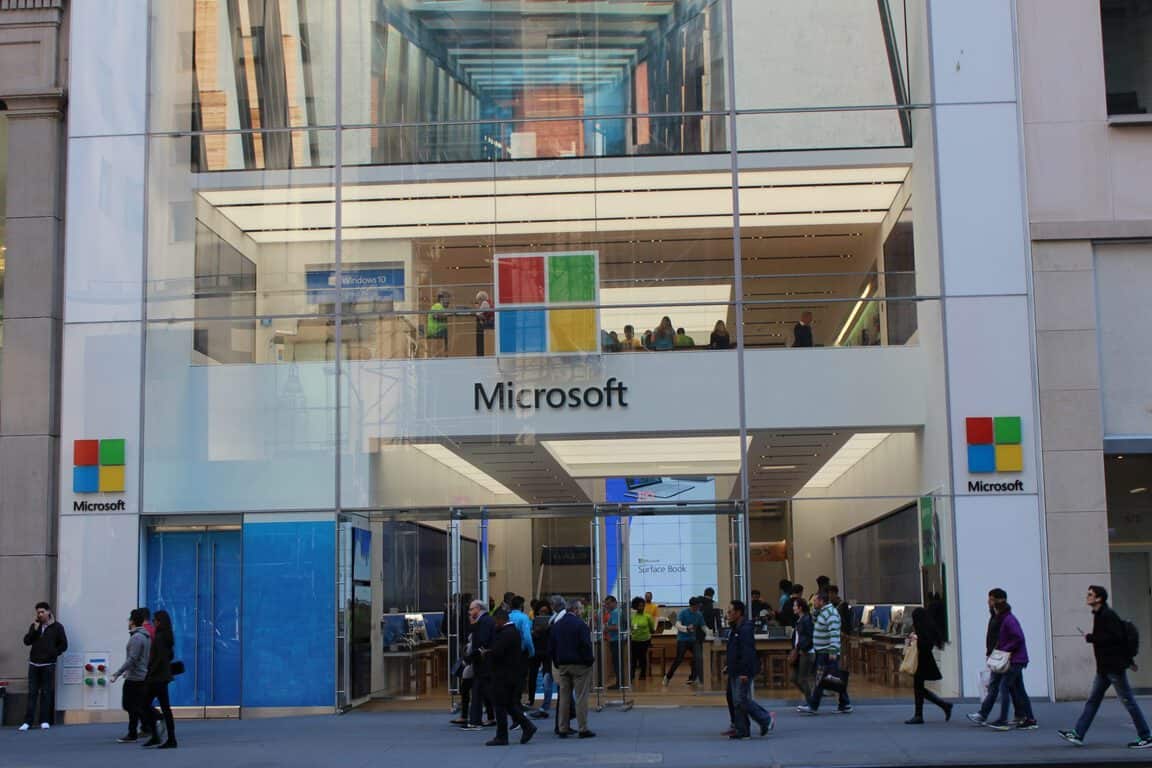
Microsoft made a Manhattan foray into the brick and mortar store world when they opened their flagship store in NYC back in 2015, but the company might not be done expanding its presence in the Big Apple just yet. Noted by The Real Deal, the firm could possibly be considering opening a second store location in SoHo NYC, just a short 6.5 miles from their first retail store on 5th Ave (via MSPoweruser.)

According to the report, Microsoft is looking into leasing a property at 300 Lafayette Street. Currently, this space in SoHo is being developed by Related Companies and LargaVista Companies. Negotiations are apparently in the early stages, but the building is designed includes both 50,000-square-feet of office space and 30,000-square-feet of retail space.

It’s not 100% clear if this property will be a new store or just office space, but Microsoft’s interest does make some sense. Apple already has ten retail locations across three boroughs in NYC and a second store location in SoHo could help Microsoft appeal to more consumers, and the tourists who visit the popular NYC neighborhood.

We answer: What is OneDrive in Windows 10 and how to use it?

Over the last few years, we saw a massive expansion and development of cloud storage services. Cloud services are great if you need to back up your data and collaborate with others, and since OneDrive is integrated with Windows 10, we decided to make make this guide and teach you a thing or two about it.

OneDrive was first introduced as SkyDrive in August 2007, and it went through some massive changes over the years. In 2011 Microsoft did an overhaul of SkyDrive and rebuilt its web version by using the latest HTML5 technologies. The revamped version of SkyDrive offered new features such as caching, HTML5 video and improved visual design. In February 2014, due to a lost lawsuit, Microsoft had to rebrand SkyDrive as OneDrive.

Here’s all you need to know about OneDrive on Windows 10

In addition to its name, OneDrive also changed the amount of free space that it offers to users. According to Microsoft, free users were abusing the OneDrive service by backing up movie collections and therefore OneDrive storage space was reduced to 5GB for free users. Of course, you can still increase OneDrive storage from 5GB to 15GB by referring your friends. In addition, you can also expand your storage by selecting a package and paying a monthly fee.

OneDrive pricing

  • OneDrive Basic 5GB (storage only) – FREE
  • OneDrive 50 Gb (storage only) – $1,99/month
  • Premium OneDrive Features with Office 365 Personal for $6,99/month – storage 1Tb – or with Office 365 Home for $9.99/month – storage 5Tb.

OneDrive access

To access OneDrive on your PC, you need to do the following:

  1. Press Windows Key + S and enter OneDrive. Select OneDrive from the list of results.
    one-drive
  2. Enter your Microsoft account username and password to log in to OneDrive.

After you log in with your Microsoft Account, OneDrive will be enabled on your PC. OneDrive will offer you to sync your Documents folder, and you can choose to Sync all files and folders or to sync only specific folders.

sync-choose

OneDrive account and login

OneDrive collaboration features

OneDrive is designed as a collaboration tool for wide range of platforms, and you can access OneDrive from your Mac computer, Xbox console, Android device, Windows Phone or iPhone, as long as you have the required app.

OneDrive allows you to simultaneously edit documents with other users. This is a great feature if you are working on a specific project with your colleague or classmate since both of you can make changes in real time.

OneDrive allows you to save documents right to it directly from any Office tool, but you can also visit OneDrive website and edit any of your documents or notes by using Microsoft Office Online. Even if you don’t use any of the Office tools, you can create Office documents right from the OneDrive simply by clicking the New button and choosing what type of document you wish to create.

new-onedrive

Regarding file upload, you can upload any file to OneDrive, simply by dragging and dropping in to the OneDrive web application. You can also use the Upload menu to select files and folders manually from your PC.

upload-onedrive

If you prefer, you can also upload and edit files on your PC and they will be automatically synced and added to OneDrive. To do that, simply access OneDrive folder on your PC, and create new files or folders in it to add them to OneDrive. Since your files are in sync, you can simply make changes from OneDrive web app and your files in OneDrive folder on your PC will be automatically changed and vice versa.

OneDrive for business

Sharing is also rather straightforward in OneDrive, and in order to share a file or folder, you just need to do the following:

  1. Right click the file or folder you want to share in OneDrive web app and choose Share from the menu.
    share-onedrive
  2. Now you can select the permissions for that document and allow users to edit it or just view it.
    share-options
  3. Copy the link and share it with others in order to share your document.
  4. Optional: If you prefer, you can also share file or folder via email, and allow users to just view or edit the document.
    share-email
  5. Optional: There’s also an ability to share files or folders using social media, but we advise you to be careful while using this option.

In addition to sharing, there’s also an option available to embed your documents on a web page, but if you choose to use this option bear in mind that everybody will be able to view your embedded documents.

OneDrive photos

OneDrive is one of the best cloud services, and it can be great if you want to collaborate with others, or if you simply want to store your files online for backup. Now that you know how OneDrive works on Windows 10, make sure you give it a try.

If you experience any issues at all, check out the following guides. We’d love to hear about your experience with OneDrive, so feel free to leave us a comment below.

OneDrive sync issues

Related stories:

How to turn off OneDrive

One of the FAQ is: can I remove OneDrive from my computer?

The short answer will be: no, but there’s a workaround. You can’t uninstall it like an app because OneDrive is built into Windows 10. However, you can hide it and stop syncing OneDrive files to your PC.

Follow these guides to Turn off, disable, or unsync OneDrive on your device:

[wl_faceted_search title=”Related articles on OneDrive”]

The Windows Insider webcast is coming back today at 10AM PST, watch it here

We’ve yet to get any new Windows 10 builds this week, but the Windows Insider team would like you to know that they’ve still got a webcast coming up. Be sure to tune into the Windows Insider Webcast today on September 18 at 10 AM PST to hear more from the Flighting and Servicing teams.

As always, this webcast will be streamed on Mixer, and you will have the chance to ask the Insider team any of your burning questions. You can expect to hear more about Slow Ring builds, and how builds are serviced, and other cool Insider facts.

We’re hoping that we might get a new build during this webcast, but there’s no telling if that will happen. Anyway, there was plenty of Windows Insider action last week, with the release of build 17760 to the Fast ring, 17758 to the Slow ring, and 18237 to Skip Ahead. Here’s to more action this week!

October 2018 Update will remove several features from Windows 10

The October 2018 Update (AKA Windows 10 version 1809) will remove several features from Windows 10. As noted in a report from Neowin, Microsoft has published a list showing all the Windows 10 features that will soon be “removed or depreciated.” Let’s start the features that will be removed:

  • Business Scanning, also called Distributed Scan Management (DSM): We’re removing this secure scanning and scanner management capability – there are no devices that support this feature.
  • FontSmoothing setting in unattend.xml: The FontSmoothing setting let you specify the font antialiasing strategy to use across the system. We’ve changed Windows 10 to use ClearType by default, so we’re removing this setting as it is no longer necessary. If you include this setting in the unattend.xml file, it’ll be ignored.
  • Hologram app: We’ve replaced the Hologram app with the Mixed Reality Viewer. If you would like to create 3D word art, you can still do that in Paint 3D and view your art in VR or Hololens with the Mixed Reality Viewer.limpet.exe: We’re releasing the limpet.exe tool, used to access TPM for Azure connectivity, as open source.
  • Phone Companion When you update to Windows 10, version 1809, the Phone Companion app will be removed from your PC. Use the Phone page in the Settings app to sync your mobile phone with your PC. It includes all the Phone Companion features.
  • Trusted Platform Module (TPM) management console: The information previously available in the TPM management console is now available on the Device security page in the Windows Defender Security Center.
  • Future updates through Windows Embedded Developer Update for Windows Embedded Standard 8 and Windows Embedded 8 Standard: We’re no longer publishing new updates to the WEDU server. Instead, you may secure any new updates from the Microsoft Update Catalog.

Next, there are a couple of features that will still be there in the October 2018 update, but Microsoft will no longer be actively developing them. The list includes the Windows 10 Snipping tool, a legacy desktop app that Microsoft intends to replace with its new Snip & Sketch UWP app. You can get more details below:

  • Companion device dynamic lock APIS: The companion device framework (CDF) APIs enable wearables and other devices to unlock a PC. In Windows 10, version 1709, we introduced Dynamic Lock, including an inbox method using Bluetooth to detect whether a user is present and lock or unlock the PC. Because of this, and because third party partners didn’t adopt the CDF method, we’re no longer developing CDF Dynamic Lock APIs.
  • OneSync service: The OneSync service synchronizes data for the Mail, Calendar, and People apps. We’ve added a sync engine to the Outlook app that provides the same synchronization.
  • Snipping Tool: The Snipping Tool is an application included in Windows 10 that is used to capture screenshots, either the full screen or a smaller, custom “snip” of the screen. In Windows 10, version 1809, we’re introducing a new universal app, Snip & Sketch, that provides the same screen snipping abilities, as well as additional features. You can launch Snip & Sketch directly and start a snip from there, or just press WIN + Shift + S. Snip & Sketch can also be launched from the “Screen snip” button in the Action Center. We’re no longer developing the Snipping Tool as a separate app but are instead consolidating its functionality into Snip & Sketch.

Many of the features that are being removed or no longer developed should not come as a big deal for the majority of Windows 10 users. Last year, Microsoft made headlines by announcing that the legacy MS Paint app would be killed off with the Fall Creators Update, but a bad buzz eventually led the company to backtrack. Just like Paint, the legacy Snipping Tool still has its fans and Microsoft is right not to force Windows 10 users to a new UWP solution. Otherwise, the upcoming October 2018 Update will bring some exciting new features such as the new Cloud Clipboard and Your Phone app, and we’ll have more to share when it starts rolling out in the coming weeks.

Microsoft wants to manage your company’s Windows 10 PCs for you with new Managed Desktop service

Managing a fleet of Windows 10 devices isn’t necessarily an easy or cheap task for businesses both big and small, but Microsoft is now here to help. The firm yesterday announced Microsoft Managed Desktop, a new offering which is aiming to help companies maximize their business by having Microsoft manage their Windows 10 devices.

The new service is a combination of Microsoft 365 Enterprise device as a service, hardware, and Microsoft’s other cloud-based device management tools. It is powered by Microsoft 356 and runs a “consistent, lightweight, reference architecture” which should help companies take advantage of all of Microsoft’s security capabilities. The service also leverages AI and can help determine which of a company’s devices are ready for featured Windows 10 updates, or which apps are causing problems with updates.

At the moment, Microsoft has already deployed Managed Desktop in a “measured approach” with a small early set of its customers. The Redmond giant says this allowed them to make changes to the service to enable a better experience for those around the world. Microsoft is also partnering with key companies like Dell, HP DXC, HCL, Computacenter, and Accenture/Avanade for Managed Desktop, and there is room for the service to grow to other regions in the second half of 2019.

Microsoft Managed Desktop is now live in the UK, and US, and will be going online in Canada, Australia, and New Zeland by early 2019. You can expect for this to be mentioned during Microsoft Ignite next week, so best to keep tuned for more.

Xbox One gamers can now pre-load Forza Horizon 4 ahead of launch

The highly anticipated racing game, Forza Horizon 4, is now available to download on Xbox One consoles ahead of its launch on October 2nd.

Anyone who has pre-ordered Forza Horizon 4 should be able to now download the title from the My Games & Apps section of the Xbox One dashboard though, naturally, the game won’t be playable until next month. The one exception to this rule will be those who have early access. These gamers will be able to play next week on September 28th.

Forza Horizon 4 is available to pre-order in three versions. The Standard Edition and the Formula Drift Car Pack while the Deluxe Edition will come with everything in the Standard Edition plus the Car Pass for future car DLC. The Ultimate Edition will feature all of this in addition to two game expansions, the Day One Car Pack, and four-day early access. Those wanting to play early on September 28th will need to buy this version.

Are you excited for Forza Horizon 4? Let us know which version you’ve pre-downloaded on your console in the comments below and then follow us on Pinterest for more Xbox content.


Control Panel in Windows 10/11 to be Changed into PC Settings

Control Panel is one of the features that Windows users are most acquainted with but by the looks of it, it seems that it will be ‘rebranded’ once Windows 10 becomes available. Or, who knows, maybe Microsoft will change its mind until then…
control panel windows 10

What you’re seeing above is an early preview build of Windows 10 (courtesy of WinAero), and we can see in it that the Control Panel has been renamed into PC Settings. Most likely, it will be replaced with the modern PC Settings app that has made its way with the release of Windows 8.

The classic Control Panel was in Windows since Windows 3.0, but now it seems that we’ll have to bid it farewell. The button inside This PC folder has been replaced with PC Settings, but this could be a temporary thing and it’s not excluded that Microsoft will keep Control Panel. After all, it’s another feature that desktop users love.

However, most likely, the good old Control Panel will be consolidated inside the modern PC Settings app, and there will probably be some tweaks, as well. What do you think about this?

Control Panel issues in Windows 10

If you are one of the users who opened the Control Panel from the Win+X menu, then you should know how to restore it by following the instructions from this guide. In case you encounter some problems when you want to access the Control Panel, you can use our fix in order to get rid of ‘Control Panel not opening‘ issue. Other problem encountered in Windows 10 that we fixed and share with our readers is the ‘@(windows.immersivecontrolpanel_6.2.c’ error. Let us know in the comment section if these suggestions helped you.

READ ALSO: Hide Control Panel settings on PC to stop other users from changing your settings

Sysprep Error on Windows 10: How to Troubleshoot it

Sysprep is a System Preparation Tool designed for Windows deployment, but sometimes a Sysprep error on Windows 10 can appear.

If this happens, Sysprep won’t be able to validate installation, or you might get other issues. It’s crucial to fix them, so in today’s guide, we’re going to show you how to do that.

Why is Sysprep failing?

  • Certain packages and provisioning can cause issues with sysprep.
  • Sometimes certain services can prevent this feature from properly running on your PC.
  • In some rare instances, your antivirus might interfere with this feature.
  • Outdated Windows installation can encounter glitches with sysprep.
  • Corruption of system files will cause this and many other errors on your PC.

What do I do if Sysprep fails?

1. Use PowerShell to remove the package and remove provisioning

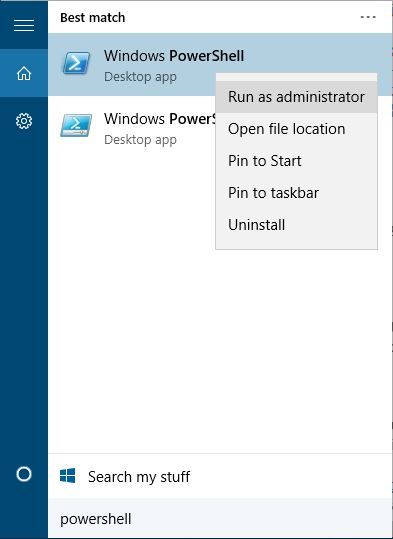
  1. Start PowerShell as administrator. To do that, press Windows key + S, enter PowerShell, right-click PowerShell from the list of results, and choose Run as administrator.
    powershell-run-as-admin
  2. Once PowerShell starts, enter the following lines, and after each line press Enter to run it:
    Import-Module Appx
    Import-Module Dism
    Get-AppxPackage -AllUser | Where PublisherId -eq 8wekyb3d8bbwe | Format-List -Property PackageFullName,PackageUserInformation
  3. Check the output of the last command to see for which users the package is showing as installed. Delete those users’ accounts or simply log in to the computer by using those accounts and perform the next step.
  4. Run the following command but be sure to replace packagefullname  with name of the actual package: Remove-AppxPackage -Package packagefullname
    powershell-1
  5. Now run the Remove-AppxProvisionedPackage -Online -PackageName packagefullname
    powershell-2

After performing these steps, issues with Sysprep should be resolved.

It’s worth mentioning that you might want to disable your Internet connection while performing this step in order to stop Windows Store from updating apps.

2. Stop the tiledatamodelsvc service

  1. Press Windows key + R and enter services.msc. Press Enter or click OK to run it.
    run-services
  2. Locate the tiledatamodelsvc (Tile Data model server) service, right click it and choose Stop.
    tiledatamodelsvc-services

Alternatively, you can disable this service by and fix Windows 10 sysprep errors with PowerShell.

  1. Open PowerShell as administrator.
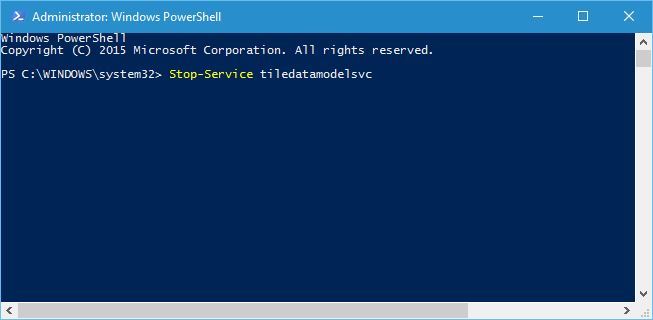
  2. Enter Stop-Service tiledatamodelsvc .
    tiledatamodelsvc-powershell
  3. Press Enter.

If you prefer using Command Prompt, you can use it as well to stop this service by following these steps:

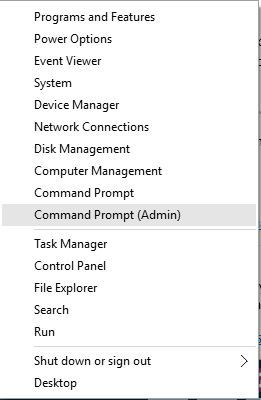
  1. Press Windows key + X and choose Command Prompt (Admin) from the menu.
    command-prompt-admin
  2. When Command Prompt starts, enter net stop tiledatamodelsvc and press Enter to run it.
    tiledatamodelsvc-cmd

Users reported that this service sometimes automatically restarts itself, so you might have to stop it a few times before it’s permanently stopped.

3. Use Registry Editor

  1. Press Windows key + R and enter regedit. Press Enter or click OK to start Registry Editor.
    regedit
  2. Navigate to HKEY_LOCAL_MACHINE\SYSTEM\Setup
  3. Locate Upgrade key in the right pane and delete it.
  4. Close Registry Editor and check if the issue is resolved.

If you cannot find the Upgrade key in Registry Editor, skip this solution and try a different one.

4. Run the SFC scan

  1. Right-click Start and run Command Prompt (Admin).
  2. In the command line, type (or copy-paste) sfc/scannow
  3. Press Enter to start the scanning.
  4. After the process is finished, you’ll be informed of possible errors.

SFC scan can help with Windows 10 sysprep errors, so be sure to try it. In case the sfc scannow is not working, we have a specialized guide that can help you fix it.

In other cases, you could employ a tailored PC repair solution that will fully scan your Windows and detect corrupted files and issues.

5. Uninstall your antivirus software

  1. If you’re getting Sysprep error on Windows 10, ensure your antivirus software is disabled.
  2. Some users even suggest uninstalling your antivirus software completely before trying to run Sysprep.
  3. To avoid any potential problems with sysprep make sure that you’re running Sysprep as an administrator.

In some rare instances, your antivirus software can cause Windows 10 sysprep errors, but that can be fixed easily.

6. Install the latest updates

  1. Open the Settings app and go to Update & Security.
  2. Click on Check for updates.
  3. Wait for the process to finish.

7. Run DISM

  1. Open the Command Prompt as shown above.
  2. Enter the following command and press Enter:
    DISM.exe /Online /Cleanup-image /Restorehealth
  3. Wait for the process to finish.
  4. Restart your computer.
  5. In case the DISM can’t obtain files online, try using your installation USB or DVD. Insert media and type the following command:
    DISM.exe /Online /Cleanup-Image /RestoreHealth /Source:C:\PathToYourInstallationMedia /LimitAccess
  6. Follow further on-screen instructions.

For more information, we have a great guide on how to use DISM, so be sure to check it out.

Sysprep Windows 10 errors can cause problems for advanced Windows 10 users, but we hope our solutions helped you fix the problem.

Sadly, this isn’t the only issue, and many reported Fatal error occurred while trying to sysprep the machine, but we covered that issue in a separate guide.

What solution did you use to fix this problem? Let us know in the comments below.

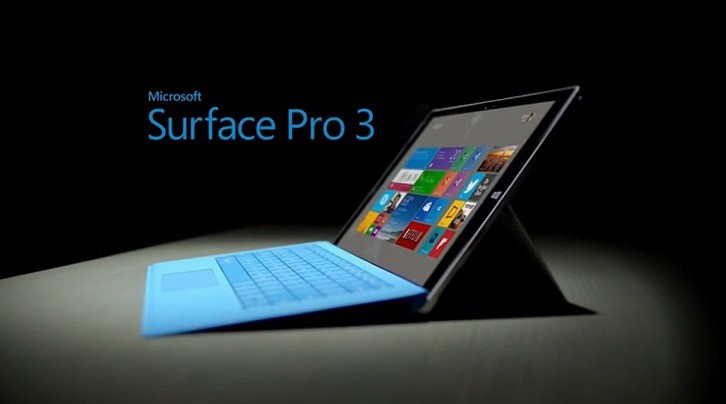
Installing Windows 10/11 on Surface Pro 3: Issues and fixes

Windows 10 is said to have been installed so far mostly on desktop and laptop devices, but we wonder whether the new Surface Pro 3 is considered a laptop or a tablet. In this piece, we take a look at some problems you might have when trying to install Windows 10.
surface pro 3 windows 10 install
Some Surface Pro 3 owners have decided to give Windows 10 a go and try it out on their devices. However, in doing so, they have encountered plenty of annoying problems, so we’ve decided to round them up, so you could know what you could be possible facing prior to making the upgrade.

What problems can you encounter when installing Windows 10 on Surface Pro 3?

One of the first problems seems to be related with the install process not getting until the end, according to one user:

I’m not having any luck. The install runs up to somewhere near 40%. Then the installer closes, no error message or anything. I’m not sure what is wrong.

READ MORE: Wikipedia App for Windows 8.1 Squashes Bugs in Update, Free Download

Also, what you need to take into account is that if you do a fresh install of Windows 10, don’t expect wireless drivers to be available for the Surface Pro 3, which has already been plagued by a lot of WiFi problems that have been recently fixed.

If you do a fresh install, like the old 8.1 retail install, there are NO wireless drivers for the SP3 built into this preview. Either use winreducer and integrate the driver pack 9/9/14 into the install ISO then do a USB drive install, OR download the driver pack, install windows through USB install, and then from within manually install your wireless driver.

Here are some other bugs related to the Windows 10 install on the Surface Pro 3:

The top button on the pen no longer works (can’t double-click to take a screen shot and can’t single-click to open OneNote) and the display no longer rotates.

Some more problems related to the pen functionality, the rotation and even some issues pertaining to the functionality of the Fitbit App:

Buttons on pen not operating properly. Can’t rotate screen. Can’t bring down menu in FreshPaint with finger or pen, can with mouse. Fitbit App similar problem.

Somebody is complaining about the functionality of Internet Explorer, as well:

On my SP3 i can’t have internet explorer in metro mode. always launch in desktop mode.

More issues related to the swiping down for menus

Swiping down for menus isn’t supported with the new layout of apps on the desktop. There is a menu button in top left of window.

Windows 10 install issues and fixes [2018 update]

After this article was written, there was plenty of other issues reported by users. We will list here common issues encountered when trying to install Windows 10 so you could start to troubleshoot your installation process. Here they are:

There are many other similar problems reported so far, but I think you get a picture of what you could get yourself into. That’s why you need to install Windows 10 on a virtual machine or on a device that you’re not actively using. Have you installed Windows 10 on your Surface Pro 3? If so, how does it perform?

READ ALSO: Fix: Windows 10 cannot be installed to this disk

Kindle Not Connecting to PC: How to Fix it

Amazon’s Kindle reader began as a simple e-book reader, but it has slowly evolved. Like any tablet, you may encounter trouble with it. Some users reported that Kindle is not connecting to the PC, and there may be times when it does not appear on your PC.

There are several solutions you can try to make your computer access the Kindle device, and we will walk you through each one!

How do I get my Kindle to connect to the computer?

Before we start with the complex ones, here are a few quick solutions:

  • Press the power button on the Kindle for 30 to 60 seconds until the device restarts to perform a hard reset.
  • Make sure the Kindle is charged. Keep it plugged in for an hour before connecting it to the PC.
  • Use a different USB port to connect the Kindle.
  • Use another cable.
  • Connect the Kindle to another computer to verify whether the problem lies with the previous PC or the Kindle itself.
  • When connecting the Kindle, configure it as a camera during the initial setup. Several users reported that this helped when Kindle was not connecting to the PC.
  • Download Calibre and use it to connect the Kindle.

If none work, move to the ones listed next.

1. Enable ADB

A workaround is to enable Android Debug Bridge (ADB) on your Kindle. You can try both (disabling and enabling) and see which fixes the problem.

You can easily change this setting by going to Settings, choosing Device, and then enabling/disabling ADB.

2. Install Kindle driver

  1. Open Device Manager, expand the Portable Devices. And you will see your Kindle or MTP device.
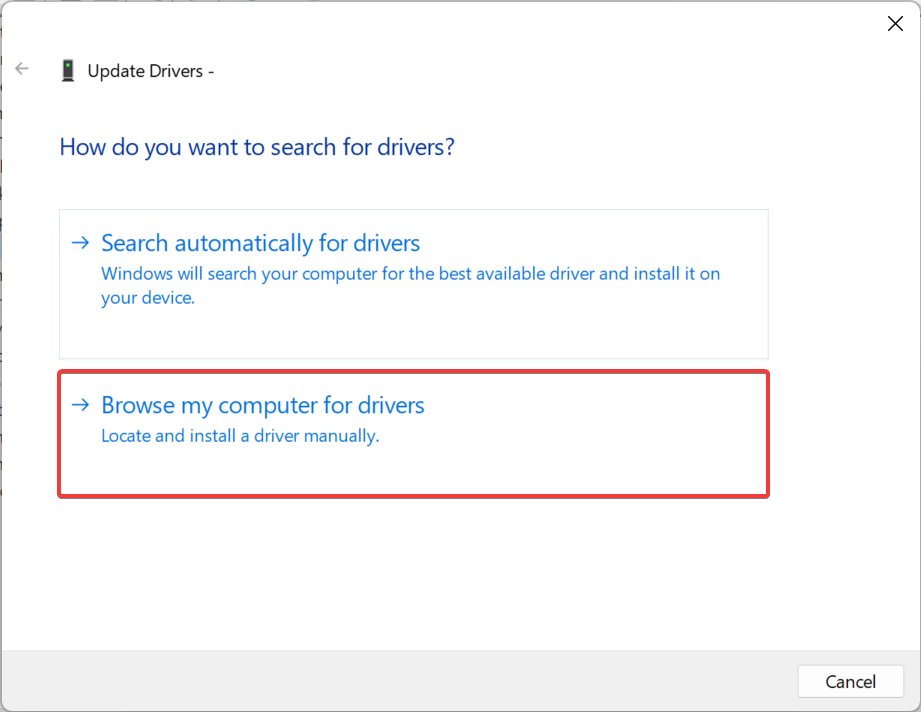
  2. Right-click the Kindle or MTP device and choose Update driver.
  3. Click on Browse my computer for drivers.install driver to fix kindle not connecting to pc
  4. Select Let me pick from a list of device drivers on my computer.
  5. Check Show compatible hardware, and the right model will list. Here choose MTP USB Device and click Next.
  6. Click Yes to confirm.

If your PC cannot detect your Kindle, the cause might be due to the Windows Kindle driver being missing or install failure.

When this happens, you will see a device with a yellow exclamation or an MTP or USB driver with an exclamation under Portable Devices in Device Manager. So, simply install the Kindle driver and have things running in no time.

3. Reinstall the latest Kindle software for Windows 10

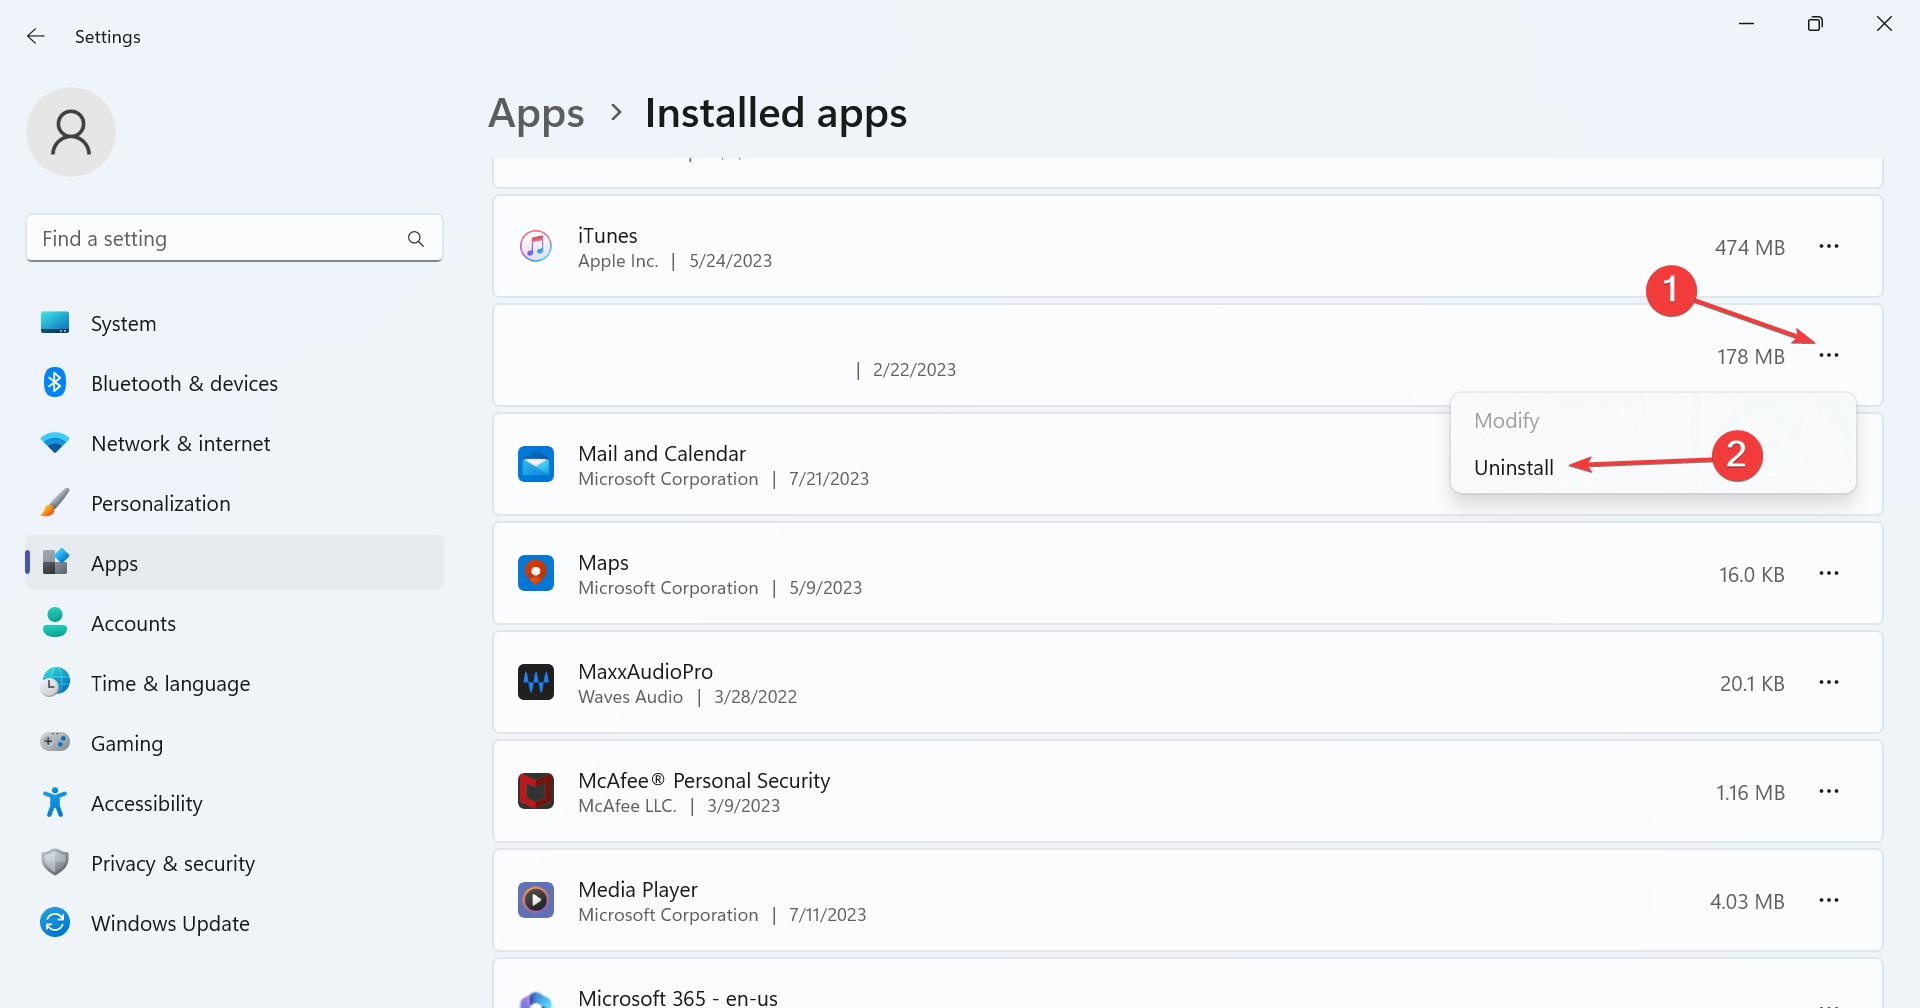
  1. Go to Settings, select Installed apps, and then click on Apps and Features
  2. Look for Kindle software and click Uninstall.uninstall
  3. Restart your PC
  4. Go to the Amazon downloads page to download and install the latest Kindle Software for Windows 10.

When Kindle is charging but not connecting to the PC, reinstalling the dedicated software should do the trick!

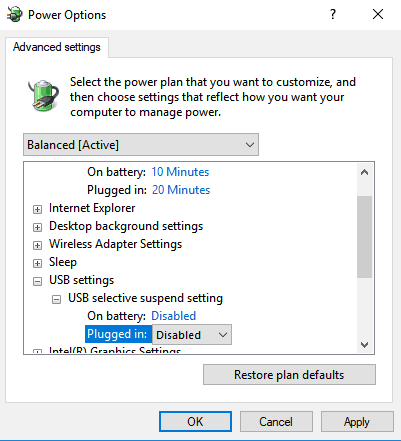
4. Disable the USB selective suspend

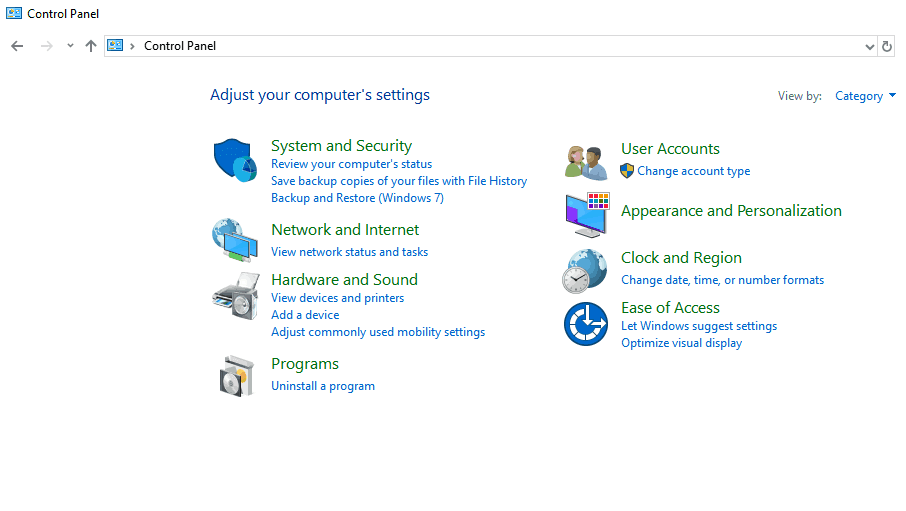
  1. Open the Control Panel, and click on Hardware and Sound.
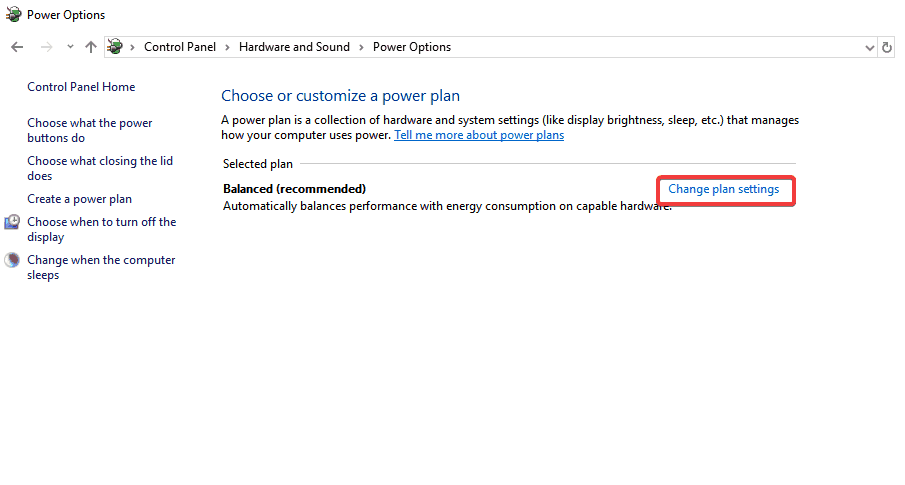
  2. Click on Power Options.
  3. Select the power plan you are using and click on Change plan settings
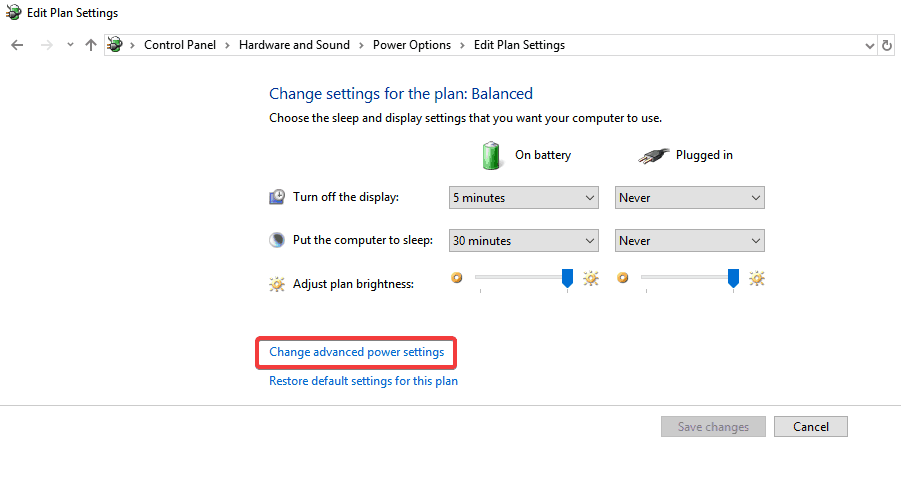
  4. Click Change advanced power settings
  5. Search for USB settings from the list of options and click on it to expand
  6. Click on USB selective suspend settings and select Disabled in both cases (On battery and Plugged in)
  7. Click Apply and OK to save the changes.
  8. Restart your Kindle and your computer and check if this has solved the problem

Many users reported that disabling the USB selective suspend feature also fixed their problem when Kindle is not connecting to the PC. The USB selective suspend feature allows the hub driver to suspend an individual port without affecting other ports on the hub.

It is enabled by default in portable computers to help conserve power and help maintain long battery life.

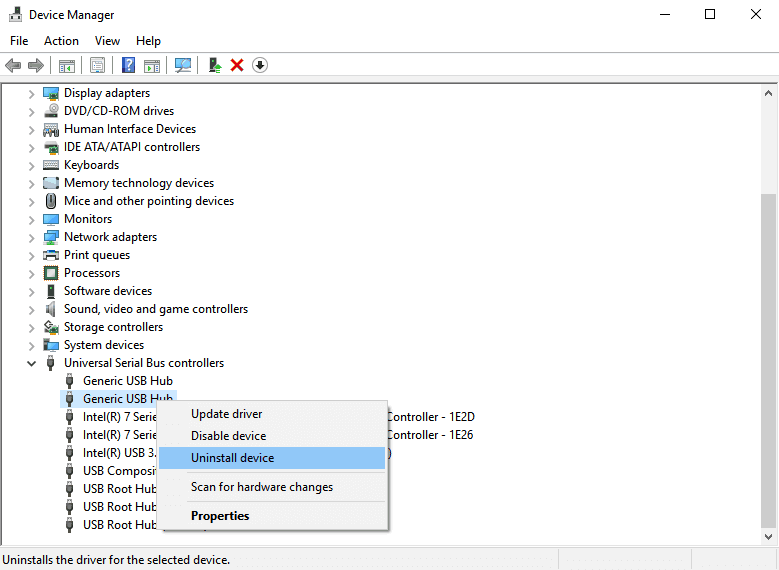
5. Uninstall and reinstall USB controllers

  1. Press Windows + R keys, type devmgmt.msc, and click OK.
  2. Expand Universal Serial Bus Controllers, right-click on the affected device, and select Uninstall device.
  3. Perform the same step for other devices. When completed, restart the computer.

Another suggestion users make is to uninstall and reinstall USB controllers when Kindle is not connecting to the PC via USB.

Kindle is a great device, but as you can see, sometimes your computer cannot find it. If you face this situation, please try any of the solutions from this article.

Also, learn how to use Kindle Text to Speech on the PC. Tell us which fix worked for you in the comments section.

How to fix IAStorDataSvc high CPU usage on Windows 10/11


IAStorDataSvc using too much CPU on Windows 10. How do I fix it?

  1. Run a full system scan
  2. Uninstall Intel Rapid Storage Technology
  3. Disable IAStorDataSvc in Services
  4. Run Windows Update
  5. Change BIOS settings
  6. Uninstall Antivirus

Have you stumbled upon the IAStorDataSvc process on your Windows Task manager which utilizes between 60 – 85% of your CPU? This process results in high CPU usage which affects the performance of Windows 10 PCs.

The IAStorDataSvc process is associated with Intel Rapid Storage Technology on HP computers. Intel Rapid Storage Technology is an Intel driver package which enhances PC performance.

However, Windows 10 users have reported issues of high CPU usage, overheating, and distorted performance because of this process.

IAStorDataSvc causes high CPU usage on Windows 10: how to solve it?

Method 1: Run a full system scan

First and foremost, consider running a full system scan on your Windows 10 PC to remove viruses, malware, and spyware. The IAStorDataSvc problem may be due to a virus infection on your PC.

However, you can run a full system scan by using Windows Defender or any third-party Antivirus that you have on your PC.

Here’s how to carry out full system scan:

  1. Double click on the Antivirus shortcut to launch the application.
  2. Locate the “Scan” menu and Click on “Full Scan” to commence scanning.iastordatasvc
  3. Wait for the scanning to be complete and follow the prompts to clean your PC.

Method 2: Uninstall Intel Rapid Storage Technology

The Intel Rapid Storage Technology may be outdated or corrupted on your PC resulting in the IAStorDataSvc problem. You can uninstall the application so as to fix this problem. However, if you are not satisfied with the application, you can completely uninstall if you like.

Here’s how to uninstall Intel Rapid Storage Technology.

  1. Press “Windows” and “R” key at the same time, then type appwiz.cpl in the search box and hit “Enter”.iastordatasvc
  2. Locate Intel Rapid Storage Technology, click on it, and then select the “Uninstall” button at the top bar.
  3. Hence, wait for the uninstall process to finish, and then restart your PC.

Method 3: Disable IAStorDataSvc in Services

You can also disable IAStorDataSvc from Service in order to solve the overheating problem. Service is a feature in Windows which starts, stops, and configures Windows services.

Here’s how to disable Intel Rapid Storage Technology in Service:

  1. Press “Windows” and “R” key and the same time, type services.msc, and then click on “OK”.iastordatasvc
  2. Locate Intel Rapid Storage Technology option from the list or services, and then double click it.iastordatasvc
  3. Change “Startup type” to “Disabled”. Click on “Apply” and then “OK” to save the change.
  4. Finally, exit Services window.

ALSO READ: Top 3 best laptop cooling software for Windows 10


Method 4: Run Windows Update

Running Windows Update can fix the IAStorDataSvc problem because your drivers may be obsolete which is resulting in high CPU usage, overheating, and distorted Windows performance.

However, running Windows Update will improve your PC performance and update your drivers most especially Intel drivers which supports Intel Rapid Storage Technology application.iastordatasvc
You can run Windows Update on your PC by typing “Windows Update” in Windows Search bar and click on the Windows Update menu. Ensure you are connected to the Internet before proceeding with Windows Update.

In conclusion, these solutions are applicable in fixing the IAStorDataSvc problem on your Windows 10 PC. Some antivirus programs such as AVG and Norton utilizes high CPU usage resulting in affected Windows performance. However, you may consider uninstalling programs which utilize high CPU usage by using “Method 2” above.

Method 5: Change BIOS settings

This is a method that fixed this problem for some users but beware that if you do not have the necessary computer skills, you may harm your computer. If you know what you do, try to change to AHCI your SATA controller in BIOS. After that, save and restart. If it does not work, re-enter BIOS, and change back to SATA.

Method 6: Uninstall Antivirus

Some users have made their own ‘research’ on the problem and reported that the problem is gone after uninstalling AVG or Norton antiviruses. The root of the problem may be an error between the antivirus engine and your Windows system. If you have a paid version of the antivirus, check how you can safely uninstall it without losing the license. After that,

Do you have any question concerning IAStorDataSvc or Intel Rapid Storage Technology problem? Let us know by commenting below.

RELATED STORIES TO CHECK OUT:

Microsoft to increase its presence in Dublin, Ireland, adding 200 jobs

In Dublin, Ireland, Microsoft is adding 200 technical jobs at its One Microsoft Place campus. In a post on Microsoft News Centre Europe, 100 of those jobs are for engineering roles that work on Microsoft’s new and emerging technology, such as Artificial Intelligence (AI). This latest wave of hiring will bring the total number of Microsoft employees in Ireland to 2,200.

In addition, Microsoft is also recruiting 50 people to support the “continued growth of its 700-strong EMEA Digital Sales organisation with vacancies for Technology Solutions Specialists, Solutions Sales Specialists and Account Executives who will join the growing team of talented digital sellers.” Another 50 people  An additional 50 people will be added to the “Data Centre, the Sales subsidiary and positions on the company’s graduate and intern programme.”

Minister for Culture, Heritage and the Gaeltacht, Josepha Madigan TD, said that this is great news for Ireland:

“Ireland has a strong pool of highly skilled workers, a first-class education system, a competitive and transparent taxation regime and a pro-enterprise environment. The Government is working hard to ensure we remain internationally competitive. In this regard, today’s announcement of 200 high skilled jobs is very welcome. It shows the progress we are making in our mission to make this country an innovative, digital economy and a global leader for the tech sector. I would like to congratulate and pay tribute to the existing staff and management at Microsoft Ireland who have allowed the company to go from strength to strength here over the last three decades.”

Microsoft, Ireland, Europe, EU

Cathriona Hallahan, Managing Director, Microsoft Ireland, adds that the jobs in Ireland will help the company further their growth throughout Europe:

“The broad-based expansion of Microsoft in Ireland reflects the dynamism, energy and continued transformation of our team in Dublin. The team here is working with businesses, governments, organisations and people across the globe to help make our vision a reality – helping them to do and achieve more. Our engineering team is at the centre of this work. With the expansion of our engineering team together with the additional roles in other divisions of the business including EMEA Digital Sales and Data Centre, our new operations in Dublin will play an increasingly important role within the company globally.”

Currently, Microsoft is awaiting the outcome of EU antitrust regulators evaluating the Redmond company’s recent acquisition of GitHub. So, the timing of the announcement may appear questionable. However, there is little concern that Microsoft’s takeover of GitHub will fall through. Microsoft expects to continue adding jobs throughout the EU regardless.

Microsoft To-Do Windows 10 app gets Live Tiles support with new Insider update

Microsoft has started testing Live Tile support for its To-Do Windows 10 app today. If you’re a Windows Insider on the Fast or Skip Ahead Ring, you can download the latest version (1.40.1809.14001) from the Microsoft Store and check out the new Live Tile on your Start screen.

Be aware that the Live Tile for Microsoft To-Do will only display tasks that you’ve added to “My Day.” If you opt for the “Large” square Live Tile, you’ll be able to see up to seven tasks, compared to just three for the Medium and Wide Live Tiles. Once you’ve completed all tasks added to My Day, the Live Tile will also display a congratulations message.

Overall, this is a pretty useful update for the task manager app, especially if you’re used to seeing your upcoming appointments on the Outlook Calendar app. If you’re not a Windows Insider, you should get this new version over the next few weeks.

How to Repair Corrupted docx Files [8 Simple Ways]

The docx format has been the default format for saving important Word documents for some time. But like other formats before it, there are times you need to repair your docx file because it got corrupted.

Fortunately, this is easy to do, provided you have the right information. In this guide, we will show you quick and effective ways to achieve this without breaking a sweat. But make sure you create a backup copy of the file before getting started.

How can I repair a corrupted docx file?

1. Use the inbuilt Microsoft Word Repair tool

  1. Open Microsoft Word and click on File.
  2. Click Open and select the .docx file with the problem.
  3. Click the down arrow next to the Open button and choose Open and repair. Open and Repair

Microsoft Word has an inbuilt open and repair tool available since MS Word 2007 that you can use to repair your files. Since it was made by the software manufacturer, it is the safest way to repair a corrupt docx document and file.

2. Use third-party recovery tools

Several third-party applications on the market are designed to recover corrupt documents. Many third-party tools have free demos but we recommend you use Stellar Repair for Word.

This tool can see the text and repair all corrupt, damaged, or simply inaccessible files with original formatting.

The Stellar Repair for Word program is recommended by Microsoft Office experts and IT because it previews the specific repaired Word file in RAW text or machine-readable format.

After that, this file repair application authorizes you to save the repaired document at its original or certain location on your hard disk.

Stellar Repair for Word

Repair your corrupt docx files within minutes with this excellent tool.
Free Trial Visit Website

3. Recover text from any file

  1. Go to the File menu and select Open.
  2. Find the .docx file you want to repair.
  3. From below All word documents, expand it further and find the option of Recover text from any file.
    recover text from any file

If you are unable to recover the corrupted Word file, Microsoft Word also gives you the option to recover text from any file. This will enable you to recover your important data and then reconstruct it in a new Word file.

The feature will try to fetch all the text from your file. If this does not work, please move on to the next solution.

4. Open in Draft Mode

  1. Click on File and go to Options.
  2. Click on Advanced and then scroll down to the Show document content section.
  3. Check the Show picture placeholders box and the Use draft font in Draft and Outline views box.show documents content
  4. Go back to Word, click on View, and then click on Draft under the Document Views section. view draft
  5. Try to open the corrupt file.

Another solution you can try is opening the file in Draft mode. To do this, follow the simple steps described above.

5. Use previous versions

  1. Right-click the file.
  2. Choose Properties and then click on the Previous Versions tab.
  3. Any previously saved versions will show up in the list box below. If you are not able to see the tab, it means System Restore is not turned on.
    previous versions

In Windows 7 and higher, System Restore will automatically make backups of your documents whenever a new restore point is created (usually at least once a day).

System Restore is enabled by default, but if you manually turn it off, you will not be able to recover any data using this feature.

Note that you will lose any data that was added after the last backup was created and before the corruption occurred, but at least you will have at least a part of your .docx file.

6. Open with Notepad

  1. Right-click on your corrupted .docx file and choose Open with.
  2. Click on Choose default program.
  3. On the Other Programs section, click on the arrow pointing downwards to reveal more programs and select Notepad.
  4. Uncheck the box for Always use the selected program to open this kind of file to avoid making Notepad the default program for word files and click OK.open with notepad
  5. Copy and paste the text to a new .docx document and format it all over again.

Opening with Notepad will ignore the document structure and pick only the plain text. You can find this plain text and then copy and paste it to a new Word document, but you will lose all formatting and images.

7. Rebuild the file header

You will have to open several uncorrupted .docx files with a file editor program to identify the header components. By comparing them with the file header of your corrupt file, you may be able to identify corruption in its file header.

You can then replace the corrupt header components with good components from another .docx file in order to fix your problem.

8. Run CHKDSK to check for file system error

  1. Next to the Start menu, in the search box, type cmd.
  2. On the search result, right-click on the Command Prompt and select Run as administrator.Command-prompt-run-as-administrator
  3. Click Yes on the prompt warning
  4. Insert this command and press Enter to run it: CHKDSK [drive[[path]filename]] [/R]

If file-level corruption exists in the Word document, you can run CHKDSK from the command prompt. You may be able to fix the document and gain accessibility. Or else you would be able to understand the cause behind the issue.

With this, we can conclude this guide on how to repair a corrupt docx file. You should now be able to fix the issue for good, following the steps therein.

If you need a list of the best Word file repair tools to aid you, check our detailed guide for the top options available.

Feel free to let us know the solution that helped you fix this issue in the comments below.

Top 4 Kinect Apps for Windows 8.1 to Get you Started, Free Downloads


What are the best free apps to download in order to get started with Kinect?

  1. Kinect Evolution
  2. 3DBuilder
  3. YAKiT
  4. Fusion 4D

As we were telling you in a previous story, Microsoft has made available for download Kinect SDK 2.0, which means that more Kinnect-enabled apps will soon be released on the Windows Store. Here are some to get you started.
kinect apps windows 8
If you’re looking for some Kinect-enabled apps on the Windows Store to get you started with this kind of apps, then we have three proposals that you should definitely check out.


Kinect Evolution

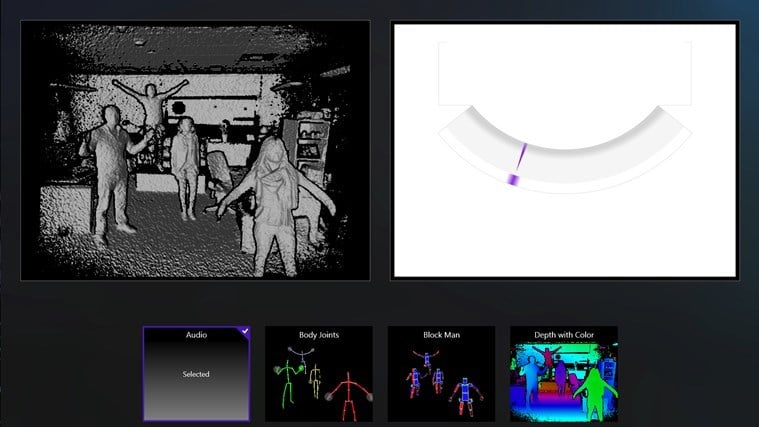
This app demonstrates the core capabilities of the Kinect for Windows v2 technology and helps developers understand the core capabilities of the technology. However, you will need to purchase a Kinect sensor for it to work, obviously.

READ MORE: Kinectimals Unleashed Game Launched for Windows 8, Download Now


3DBuilder

We’ve spoken about this app in the past, as well, and here we’re presenting it as a Kinect-enabled application to try out on Windows 8. Users can scan in 3D color using a Kinect for Windows v2 sensor; load 3MF, STL, OBJ and VRML and save as 3MF or STL; print directly to the 3D printer or order model through 3D Systems. It’s also possible to emboss any model with text or images and you have at your disposal the following features – merge, intersect, or subtract objects from each other, or slice them into pieces.


YAKiT

Perhaps the funniest of them all, this Kinect app allows you to create animated videos by using any photo. You can add expressive animated stickers to customize the photos – including blinking eyes, talking mouths, props, characters, and special effects. It’s even possible to change the pitch of your voice to make it even funnier and create your own mouth from your photo that talks when you talk. By using Kinect, users can fully animate a character.


Fusion 4D

This is my favorite so far because it allows users to manipulate models in 3D using the Kinect for Windows v2 sensor and your body. It’s a really cool educational app for Windows 8 which brings multiple models in biology, engineering, and geography, with even more being added by the developer. You can even get different views including support for 3D glasses and by using the Magic Mirror, you can see yourself holding the model in the virtual world.

You can also check out AhKonCha, but this one is really basic and needs a lot of polishing. We will be constantly updating this list with new apparitions on the Windows Store, so if you know some, do let us know and we’ll include it in the post.


2018 Update: In late 2017, Kinect project was discontinued by Microsoft. Many developers and tech-lovers were disappointed, but after Xbox One has been released, the need in this tool’s sensor started to fade away. Even if it was one of the most sold gadgets ever, Microsoft said STOP! You can find more information about this in our dedicate article about Microsoft discontinuing Kinect.

READ ALSO: Download Avast Free Antivirus 2015 for Windows 8, Windows 10 [Latest Version]

Download now Kinect SDK 2.0 for Free to Develop Windows Apps

If you’re a Windows developer, you can now go ahead and download the newest Kinect SDK 2.0 to start creating apps for Windows 8 that support gesture and voice navigation. Most likely, this will be the same Software Development Kit used for building Windows 10 apps, as well.
download kinect sdk 2.0
The latest 2.0 version of the Kinect Software Development Kit has now been made available for a free download. The fact that the SDK 2.0 is now available for the Kinect v2 sensors means that developers can now commercially deploy Kinect apps in the Windows Store for the first time. Which, in other words, should help extend the number of apps.

Where to download Kinect 2.0 SDK to build Windows apps?

READ MORE: AOC’s New 17-inch USB Portable Monitor Launches for Windows Laptops and Computers

Microsoft also introducing a new adapter kit that enables users to take the Kinect for Xbox One you already own and attach it to Windows PCs and tablets. You should know that there are no fees for runtime licenses of commercial applications developed with the SDK. Here’s what Microsoft said about this:

“With over 200 improvements and updates to the SDK since we released the public preview in June, including enhancements to Visual Gesture Builder, Kinect Studio, and Kinect Fusion, we get you coding faster with a substantially more stable and feature-rich product.”

You can follow this link to download Kinect 2.0 SDK, but you should know that registration is required, of course. Let’s have a look at the most recent features, as well.

New features in Kinect for Windows version 2.0 SDK

  • Windows Store Support
  • Unity Support
  • .NET APIs updates
  • Native APIs changes
  • Audio improvements
  • Face APIs
  • Kinect for Windows v2 Hand Pointer Gestures Support
  • Kinect Fusion
  • Kinect Studio
  • Visual Gesture Builder (Preview)

READ ALSO: Microsoft Makes Xbox One Digital TV Tuner Available in Europe for €30


Xbox One
| Kinect 2 Tech Demo (Part 2 of 2) [EN] by XboxViewTV

2018 Update: Even if Kinect 2.0 was a great discussion topic for all game enthusiasts and tech-consumers. But all the good things come to an end, as well as Kinect. In late 2017, Microsoft announced the ending of Kinect project. Most probably, once Xbox One released, the importance of Kinect’s sensor feature started to fade away. You can find more information in our dedicated article about Kinect’s ending.

You can write down more thoughts about this project in the comment section.

How to Fix Corrupt CMOS in 4 Easy Steps

The corruption of CMOS is a relatively common occurrence. Sadly, it mainly points towards the motherboard failure, but that’s not a rule of thumb. The BIOS/UEFI might be the problem, or the CMOS battery is failing. The estimated longevity is around 3 years, so the latter shouldn’t come as a surprise.

You can try to fix corrupt CMOS with the steps we enlisted below. Make sure to tell us whether they helped you later on.

How to fix corrupt CMOS in a few simple steps?

1. Reset BIOS to factory values

The first step you should take when all and any BIOS-related problems like the BIOS ID check error appear is to try and restore the default configuration. If the hardware is broken, this is a long-stretch solution, but it still might help. Since we need to move gradually toward the battery replacement, let’s give it a shot, and hopefully, the CMOS corruption will be addressed.

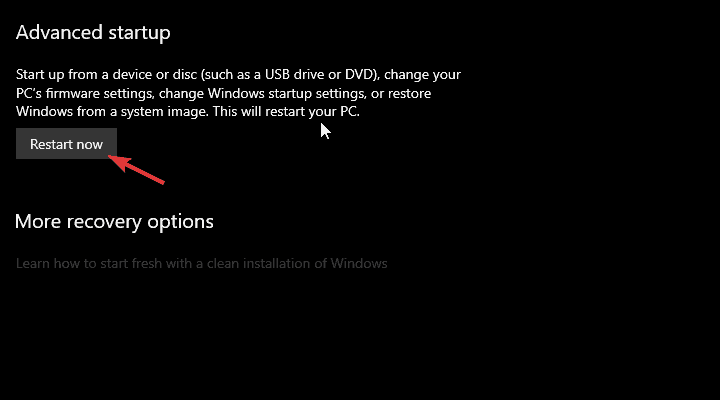
Booting into the BIOS/UEFI settings is a relatively simple task on previous Windows iterations. However, on Windows 10, due to a Fast boot option, the initial screen will be skipped, and you won’t be able to access any of the menus. That’s why we need you to follow the steps we enlisted below and give it a go:

  1. Press the Windows key + I to open Settings.
  2. Choose Update & Security.
  3. Select Recovery from the left pane.
  4. Under the Advanced startup, click Restart now.fix corrupt cmos
  5. Choose Troubleshoot.
  6. Select Advanced options.
  7. Choose UEFI Firmware Settings and click Restart.
  8. Reset all settings to default and reboot your PC.

2. Flash BIOS

Some errors like the “CMOS checksum” can appear due to an outdated BIOS. On the other hand, they can appear if you flashed the wrong version of BIOS. That’s why we suggest re-flashing the BIOS, thus updating it to the latest version. Even though unaccustomed users see meddling with BIOS as a dangerous task, we wouldn’t say so.

There are only two rules you need to follow when flashing BIOS. Keep the power on throughout the procedure. If your PC suddenly shuts down, chances are you bricked your motherboard. The second rule is double-checking the updated version of your motherboard model. Flashing a wrong version leads to worse errors (read: bricking motherboard).

With those in mind, check your motherboard’s model number and look it up online. If there’s a Flashing tool for your model provided by the OEM, use it. Some OEMs even offer direct updating from the BIOS menu, which is even better.

But this is hardly a rule, so check it before moving to flash BIOS. You can find out more about the procedure in this article.

3. Reset the battery

Resetting the CMOS battery is also quite a simple task. It requires some tools (a small screwdriver) to remove the side casing from your case. The same goes for the notebooks. Power off your PC and unplug the power source cable. Watch for the  Remove the screws to gain access to the motherboard.

Once there, you should be able to see a small jumper next to the CMOS battery tagged with the Reset CMOS description. Remove it and keep it off for approximately 20 seconds. Put it back, plug back the power source, place the casing back, and start your PC.

If you cannot locate the jumper, remove the battery and place it back after 10 minutes. Do it gently to avoid breaking the metal clip which holds it still. We need it to fully discharge before placing it back.

4. Replace the battery

Finally, if the battery dies out, you should replace it by following the steps above. As you can see, the battery most likely holds the model number CR2032. It’s a standard hand watch lithium coin battery cell. So you shouldn’t have difficulty finding a replacement as it’s widely available.

If the issues persist, the faulty hardware is to blame. Either the motherboard is malfunctioning, or the Power Supply Unit is faulty, and the replacement is mandatory. For that, you’ll probably need to contact a PC technician, so prepare to spend some money if you’re out of warranty.

With that said, we can conclude this article. Tell us in the comments section below if you have any alternative solutions for the corrupted CMOS. We’ll be thankful for your effort.

Application Not Found Error on Windows 10 [Fix]

Many users use optical media or USB flash drives to share files, but some users complained about the Application not found error on Windows 10.

It seems that this error appears whenever a user inserts CD, DVD or any other removable storage. This isn’t the only DVD issue, and many reported that DVD only reads CDs.

However, today we’re going to focus on the application not found issues, so let’s get started.

Why does it say Application not found?

  • Sometimes issues with the AutoPlay settings can cause this and many other errors.
  • In some rare instances, outdated drivers can cause this problem.
  • Problems with file association and default apps can lead to this issue.
  • Sometimes an autorun file on your removable storage causes this error message.

How can I fix the Application not found error in Windows 10?

1. Use the Populate option

  1. Open This PC.
  2. Locate your DVD drive, right-click it and choose Properties from the menu.
  3. Go to Hardware tab and select your DVD drive. Now click the Properties button.
  4. Go to the Volumes tab and click the Populate button.
  5. After doing that, restart your PC and check if that fixes the problem.

2. Change Autoplay settings

  1. Open This PC.
  2. Locate the problematic drive and right-click it. Choose Open Autoplay option.
  3. Select Take No Action from the menu.

After turning off Autoplay for this drive, the problem will be fixed. We have to mention that this isn’t the best solution, so it might be better to use Ask me every time option instead. You can do that by following these steps:

  1. Press the Windows key + I to open the Settings app.
  2. Go to Devices section and then navigate to AutoPlay tab.
  3. In Choose AutoPlay defaults section set Removable drive and Memory card to Ask me every time.

You can also change AutoPlay settings by using Control Panel. To do that, follow these steps:

  1. Open Control Panel.
  2. When Control Panel opens, select AutoPlay.
  3. When AutoPlay window opens, set Ask me every time for both Removable drive and Memory card.
  4. Optional: If you have this problem with CDs and DVDs, you can also change their autoplay settings from this window.
  5. After you’re done, click the Save button to save changes.

Both methods are similar, but if you need to change Autoplay settings for a DVD drive or you want to set special settings for different types of files, we suggest that you configure Autoplay settings from Control Panel.

After doing that, check if Application not found error on Windows 10 is gone.

3. Update USB drivers

  1. Go to Search, type devicemngr, and open the Device Manager.
  2. Expand Universal Serial Bus controllers, and find your device.
  3. Right-click your router and go to Update driver. 

  4. Follow further on-screen instructions and finish installing drivers.
  5. Restart your computer.

3.1 Update drivers automatically

If you don’t want the hassle of searching for drivers on your own, you can use a tool that will do this for you automatically. Of course, as you’re not able to connect to the internet at the moment, this tool won’t be useful.

However, once you get online, it will help you to keep all your drivers up to date, so you won’t be in this situation anymore. Fortect Driver Updater is very easy to use and also very lightweight, being able to take care of the drivers on any device.

Once you install it and let it run its course, and you’ll have the latest drivers installed in no time.

⇒ Get Fortect Driver Updater

4. Edit your registry

  1. Press Windows key + R and enter regedit. Click OK or press Enter.
  2. When Registry Editor opens, in the left pane navigate to HKEY_CURRENT_USER\Software\Microsoft\Windows\CurrentVersion\Explorer\MountPoints2
  3. Right-click the MountPoints2 key and choose Delete from the menu.
  4. Close Registry Editor and restart your PC.
  5. After your PC restarts, check if the DVD drive is working properly.

5. Change the default zip program

  1. Press the Windows key + I to open the Settings app.
  2. When the Settings app opens, go to System and select Default apps.
  3. Scroll all the way down and select Choose default apps by file type.
  4. A list of file types and default apps will appear. Locate .zip and choose the desired default application for it.
  5. Close the Settings app and check if the issue is fixed.

If you don’t want to use the Settings app, you can also use Default Programs from Control Panel. To do that, follow these steps:

  1. Open Control Panel.
  2. When Control Panel opens, select Default Programs.
  3. Select Associate a file type or protocol with a program option.
  4. When the list of file extensions opens, locate .zip extension and double-click it.
  5. Select the desired default application for .zip files.

We have to mention that this problem can affect other types of files and not just .zip. If you’re having this issue while opening any other file type, be sure to change the default application for that file type.

This is another way to fix Application not found error on Windows 10, so be sure to try it.

6. Turn off Windows Media Player feature

  1. Press Windows key + S and enter windows features. Select Turn Windows features on or off from the menu.
  2. Once the Windows Features window opens, expand the Media Features folder. Locate the Windows Media Player and uncheck it.
  3. A confirmation menu will appear. Click Yes.
  4. Now click OK to save changes.
  5. Restart your computer.
  6. When your PC restarts, repeat the same steps and turn Windows Media Player back on again.

7. Install VLC player

  1. Visit VLC download page.
  2. Click on Download VLC.
  3. Once the software is downloaded, install it.

This should help if this error occurs while playing multimedia files, such as DVDs.

8. Use Open command to access your files

  1. Open This PC.
  2. When This PC window opens, locate the drive that you can’t access and right-click it.
  3. Choose Open from the menu.

After doing that, you should be able to access your files without any problems. Keep in mind that this is just a workaround, but you should be able to avoid the error message by using this solution.

9. Delete autorun.inf file

  1. Insert the removable storage.
  2. Open the removable storage by following the steps from the previous solution. If the Open option doesn’t work, choose to Explore option instead.
  3. Once you access your removable storage, click the View menu and turn on Hidden items option.
  4. Locate the autorun.inf file and delete it.
  5. Disconnect the removable storage and connect it again.

Few users reported that autorun.inf isn’t available on their removable storage, and if that’s the case, you’ll need to use Command Prompt to fix this problem. To do that, follow these steps:

  1. Press Windows key + X and choose Command Prompt (Admin).
  2. When Command Prompt opens, enter the following lines. Keep in mind that you need to replace X with the letter that represents your drive:
    attrib -s -r -h X:\autorun.inf
    del X:\autorun.inf
  3. After running those commands, close Command Prompt and check if your removable storage works.

10. Change the drive letter

  1. Press Windows key + X and choose Disk Management from the menu.
  2. Locate your DVD drive or removable storage and right-click it. Choose Change Drive Letter and Paths.
  3. Click the Change button.
  4. Select the desired letter for the drive and click OK.

After changing the drive letter, your drive should start working again without any problems.

11. Set your current browser as the default browser

  1. Open the Settings app by pressing Windows key + I shortcut.
  2. Go to System section and then navigate to Default apps tab.
  3. Scroll down to the Web browser section and make sure that your current browser is set as default.
  4. Optional: You also need to check if your browser is set to work with certain protocols. To do that click the Choose default apps by protocol.

    Locate FTP, HTTP, and HTTPS protocols and make sure that they are set to work with your default browser.
  5. Optional: If you want, you can also check if your default browser is set to work with necessary file extensions. To see how to assign applications to work with specific file types, be sure to check Solution 4.

You can also change the default browser right from Control Panel. To do that, follow these steps:

  1. Open Control Panel and select Default Programs.
  2. Select Set your default programs option.
  3. A list of all installed applications will appear. Select your current web browser and choose Set this program as default option.
  4. Optional: Click on Choose defaults for this program and check if necessary file types and protocols are assigned to it.

    If not, you can assign them by following similar steps like in Solution 4.

12. Use Reset Settings to Default for AutoCAD

Users reported that this issue occurs when trying to open AutoCAD files. According to them, AutoCAD doesn’t start and instead they are getting Application not found error message.

  1. Re-register AutoCAD with the appropriate actions.
  2. This process is fully automatic, and you just need to run Reset Settings to Default AutoCAD application.
  3. This application should be located somewhere in your AutoCAD directory, so be sure to search for it.

After running the application, AutoCAD will start working again, if the problem still persists, you might have to reinstall AutoCAD in order to fix it.

13. Try your USB flash drive on a different computer

  1. Try connecting your removable storage to a different computer.
  2. If you have an extra PC or laptop, try connecting your USB flash drive to it.
  3. If the error doesn’t appear on a different computer, unplug the flash drive and try using it on your PC.

Few users claim that this workaround fixed the error for them, so be sure to try it out.

14. Use CCleaner

  1. Start CCleaner on your PC.
  2. Let it scan your PC.
  3. After scanning their PC and registry, CCleaner should fix all the issues along with the Application not found error.

15. Replace your DVD drive

  1. Turn off your PC and open the computer case.
  2. Carefully remove the DVD drive.
  3. Now insert a new DVD instead.

Boot your PC and check if the solution works.

16. Reinstall your browser

  1. Open the Settings app.
  2. Navigate to the Apps section.
  3. Locate your browser and click on Uninstall.
  4. Follow the instructions on the screen to complete the process.

After performing the browser reinstallation, the issue was completely resolved.

Application not found error on Windows 10 can cause various problems, so it’s important to fix it as soon as you can.

In case you’re having additional problems, our Windows 10 apps not opening guide should be able to help you.

Did you find a different method to fix this error? Let us know in the comments below!

Download Free CCleaner for Windows 10/11 [Latest Version]

CCleaner is perhaps, if not for sure, the best tool for cleaning junk and useless files on your Windows device. In this continuously updated article, we will be tracking the latest updates that CCleaner gets and will prove you with the safest and easiest ways to download it.

What you’re seeing above is a comparison of CCleaner products that you can get. What most users seem to be opting for is the free version of CCleaner which allows them to have the following features – a faster computer and privacy protection, and they will have to update manually.

The Professional version gets you Complete Cleaning, Real-time Monitoring, and Automatic Update, while Professional Plus brings also Defragmentation, File Recovery, and Hardware Analysis.

Where to download the latest version of CCleaner for Windows?

Since it was released for Windows 8 devices, CCleaner had also been updated to Windows 8.1, and 10 as well. And while at the moment Windows 10 is not yet completely out and this means CCleaner doesn’t have a working version, we will make sure to include the download links to the official version for Windows 10, as well.

download ccleaner windows

⇒ Get CCleaner for Windows

Before proceeding to the download link and description of the latest updates and the date when it was issued, let’s have a quick rundown of the main features of CCleaner for Windows:

  • Most popular freeware cleaner with over 1 billion download
  • CCleaner removes cookies, temporary files and various other unused data that slows down your operating system
  • CCleaner brings a faster computer and solves crashes and system errors
  • CCleaner removes files that advertisers use to track your behavior, thus making you free of online clutter
  • CCleaner Tools and Options tabs allow you to customize cleaning options as you want

CCleaner v5.46.6652 (30 Aug 2018)

  • Separate control to report anonymous usage data added
  • Added a link to a Data Factsheet: explains why the reports have been made and how this data is used
  • Checkboxes reworded: easier for the user to know what he checks
  • When Smart Cleaning disabled, CCleaner’s background process closes and it will not launch on startup
  • Restored previous System Tray and minimize behavior
  • Fixed various stability issues

CCleaner v5.12.5431

  • Improved Firefox 42 Cache cleaning.
  • Improved Google Chrome Download History cleaning.
  • Improved Skip UAC on Windows 10
  • Improved detection and cleaning of portable browsers.
  • Optimized cleaning rules loading routine.
  • Improved localization and language support.
  • Minor GUI Improvements.
  • Minor bug fixes

CCleaner v5.11.5408 

  • Added Windows Store apps to Uninstall tool (Windows 8, 8.1 and 10)
  • Improved Google Chrome Download History cleaning.
  • Improve Firefox 41 cleaning.
  • Optimized Start-up Items detection routine.
  • Improved keyboard navigation and shortcuts.
  • Added Microsoft Office 2016 and Camtasia Studio 8.0 cleaning.
  • Updated various translations.
  • Minor GUI Improvements.
  • Minor bug fixes.

CCleaner v5.10.5373

  • Improved Microsoft Edge Cookie management.
  • Optimized internal architecture for faster start up.
  • Added Chrome extension cache and cookie cleaning.
  • Improved Firefox session cleaning.
  • Added Firefox HSTS (HTTP Strict Transport Security) cookie cleaning.
  • Improved Intelligent Cookie Scan.
  • Improved Window resizing and DPI support.
  • Added Corsican translation. 

Late 2014 update – Windows 10 preview, Opera cache cleaning

  1. Added Windows 10 Preview compatibility
  2. Improved Opera 25 Cache cleaning
  3. Improved exception handling and reporting architecture
  4. Improved Auto-Update checking process
  5. Updated various translations
  6. Minor GUI Improvements
  7. Minor bug fixes

Microsoft Fixes Problems with Power, Sleep Functions in Windows 10

Windows is already available in its early preview form, but, just as expected, there are plenty annoying problems affecting those who have installed it. But now Microsoft has issued a fix for problems related to power and sleep issues.
fix power sleep issues windows 10
Since it was released, the technical preview of Windows 10 has caused various problems, but now we’ve been informed that a recent update fixes some issues related with the functionality of the power and sleep functions.

READ MORE: Autodesk’s AutoCAD 360 App for Windows Gets Markup Tools and More, Download Now

The Windows team has recently tweeted that the latest update for Windows Technical Preview KB3010668 fixes the power/sleep issue in Windows 10 Technical Preview. Here’s what they said:

“#WindowsInsiders The fix for the #Windows10 power/sleep issue released to WU earlier today. Check for new updates to get it.”

So, since there isn’t a hotfix made available for download, you just need to go ahead and perform the latest update as you can see in the above screenshot and you should be good to go.

2018 Update: Sleep malfunctions in Windows 10 have received some fixes from the users, and we have gathered more information and created guides in order to help users. We will list below some great fix articles so you could get rid of these annoying issues. Here they are:

READ ALSO: Windows 10 Creators Update bug: No power options in the Start Menu [FIX]

Windows 10 Redstone 5 build 17758 makes its way to the Slow ring

On Wednesday Microsoft released the latest RS5 build, version 17758, to Windows Insiders in the Fast ring, and today the release has already made its way to the Slow ring. The build, while still marked by the Windows Insider blog post as not yet final, includes a list of changes, improvements and fixes, and a couple of known issues, but no new features, as we’re definitely getting close to a final RS5 build, rumored to be complete by next Friday.

If you’re on the Slow ring, you can download 17758 now, although these slow ring builds are coming pretty fast as we reach the finish line, and you may just want to wait for a final build coming as early as next week.

Fixed: Cannot Print Fax by Using a Fax Modem in Windows 10

Microsoft has recently rolled out some updates that have fixed a bunch of problems – and issues related to fax modems in Windows have also been taken care of.
fax modem windows issues
The issue ‘you cannot print fax by using a fax modem in Windows’ has been recently addressed by Microsoft and fixed with a hotfix that is available for download. Here’s how the error has been described:

When you send a fax job by using a fax modem that is installed in or connected to a computer that is running Windows 8.1, Windows Server 2012 R2, Windows 8, or Windows Server 2012, the fax is not in the Windows Fax and Scan outbox. Therefore, the fax is not printed.

How to fix cannot print fax using a fax modem in Windows?

Microsoft says that this issue occurs because calling of the FaxStartPrintJob function works incorrectly. Follow this link to download the hotfix or make sure that you have the latest update roll out-delivered via Windows Update.

In case the hotfix does not solve this issue, you might try to perform some actions on your own. They might get you rid of this problem. First of all, you can try updating our drivers. After that, we recommend you to troubleshoot your system for errors. Maybe it is a conflict that does not let you use the fax modem normally. If you want to see how to perform these steps, try out the instructions from our fix for fax and scan not working in Windows.

READ ALSO: 8 best fax software to use your PC as a fax machine

[wl_navigator title=”Related topics”]

Windows 10 Freezes When Switching Users: 3 Ways to Fix

It’s not uncommon to have multiple accounts on a PC; however, many reported that Windows 10 freezes when switching users.

This is a lot different than the computer freezes while idle issue that we covered earlier. Luckily, there’s a way to fix this issue, and we’re going to show you how to do it.

Why does Windows 10 freezes when switching users?

  • Glitches with Windows can sometimes cause this problem, so keep your system up to date.
  • Bad updates can sometimes cause problems such as these, so remove any recent updates.

What can I do if Windows 10 freezes when switching users?

1. Install the missing updates

  1. Open Settings app.
  2. Navigate to Update & Security.
  3. Click on Check for updates.

Wait while Windows downloads and installs available updates.

2. Remove problematic update

  1. Press Windows key + S and enter the update history. Select View update history from the list of results.
  2. Now, select Uninstall updates.
  3. Select any recent updates to remove them.

Once you remove the update, check if the problem is gone.

3. Perform a System Restore

  1. Press Windows key + R and enter rstrui. Click OK.
     
  2. Click Next.
  3. Select the restore point you wish to revert back to and click Next.
  4. After that, follow the instructions on the screen to complete the process.

These are some general guidelines, but they are easy to follow and should help you fix any issues with freezes.

Unfortunately, Windows 10 is no stranger to freezes, and we already covered Windows 10 freezing randomly issue in one of our guide. Luckily, this error is more straightforward and easier to fix.

Let us know in the comment section how you managed to fix the problem on your PC. We’re looking forward to hearing about any unique solutions you may have found.

Fix: Rotated Images in PowerPoint 2013 are Printed Incorrectly

From time to time, Microsoft releases certain hotfix files that are made available for download in order to fix various problems for Windows and Microsoft Office users. This article discusses an error where rotated images in PowerPoint 2013 are printed incorrectly when you use XPS in Windows.
Rotated images in PowerPoint 2013
This problem usually occurs when you have a PowerPoint slide that contains rotated images on a computer that is running Windows 8.1, Windows RT 8.1, Windows Server 2012 R2, Windows 8, Windows RT, Windows Server 2012, Windows 7 Service Pack 1 (SP1), or Windows Server 2008 R2 SP1.
READ MORE: Microsoft Office Not Opening in Windows 8, 8.1 [Fix]

Problems with printed rotated images in PowerPoint fixed by hotfix

Thus, when you open the PowerPoint slide in Microsoft PowerPoint 2013, and then you try to print the file by using Microsoft XPS Document Writer or an XPS printer, you may get the PowerPoint slide printed incorrectly. There is a hotfix made available for download, but Microsoft recommends to opt for the update rollup solution, nonetheless:

The update rollup fixes many other issues in addition to the issue that the hotfix fixes. We recommend that you use the update rollup. The update rollup is larger than the hotfix. Therefore, the update rollup takes longer to download.

PowerPoint related issues you need to be aware of

PowerPoint has other problems that our authors have written about. We mention that because you might encounter some of them and maybe do not know how to get over. We will share here a shortlist that will help you solve the most common PowerPoint issues in Windows 8, 8.1 and 10. Here it is:

READ ALSO: How to add Shutterstock images into a PowerPoint presentation

Why is My Computer Saying Everything I do? Here’s The Fix

As a platform, Windows offers many exciting tools to improve the user experience. We can argue about the value of some of these tools and features, but they’re still there for you to try them. And an abundance of features is rarely a bad thing.

However, some less-accustomed users have struggled with their personal computers. Namely, they had trouble with the computer saying everything they do, and for a newbie, this can be a hurdle.

That’s why we prepared this article to help you and show you how to disable this feature. If you’re not sure what it is or why it does what it does, check the explanation below.

How to disable Windows Narrator?

Windows Ease of Access offers various features that tremendously improve the usage for impaired users. Being that visual or some other kind of disability, there are ways to, to some extent, enhance the user interface.

For example, sight-impaired users can improve their usage with the Windows Narrator, which, by using the text-to-speech feature, reads everything they do. Including whatever you type or click.

However, if you do not need this tool, Windows Narrator can annoy you. And that’s the subject of this article today: how to disable Windows Narrator, which keeps narrating everything you do. And disabling it is a quite simple task, if you know where to look, of course.

Here’s how to disable Windows Narrator in a few simple steps:

  1. Open the Windows Search bar and type Narrator.
  2. Open Narrator from the list of results.
  3. When the Windows pop-ups, click Turn off Narrator.why is my computer saying everything i do

You can also disable the keyboard shortcut by going to Settings > Ease of Access. Under the Narrator section, uncheck the Allow the shortcut key to start Narrator. After that, you won’t hear the narrator saying your every move out loud.

Also, find out how to disable Windows 11 Narrator permanently.

In case you’re still trapped, we suggest telling us in the comments section, and we might be able to help. It’s just below, so feel free to tell us.

Windows 8.1/Windows 10 Takes a Long Time to Hibernate/ Shut Down After Plugging in SD Card

Oh, SD Cards – there have been reported so many problems with them since Windows 8.1 and Windows 0 have been announced, that it’s hard to count, really. Now we take a look at yet another one that has been recently fixed by Microsoft.
windows 8.1 doesn't go to hibernate shut down sd card
As you can see in the above screenshot, the problem is described like this – ‘device takes a long time to hibernate or shut down after you plug in an SD card in Windows 8.1‘. But if you are already running Windows 10, then it’s the same for you, as well. Microsoft has issued a recent update that takes care of this, and you can get it via the traditional Windows Update functionality.

READ MORE: Windows 8, 8.1 Doesn’t Recognize my Micro SD Card [Fix]

Hibernate/shut down problems related to SD Cards in Windows 8.1 – solved

Here’s how the symptoms for this problem have been described:

You have an Intel Bay Trail-based or an Intel Bay Trail Cost Reduction (CR)-based device that is running Windows 8.1.
You plug in an SD card to the device.
You try to hibernate or shut down the device.
In this scenario, the device takes more time to hibernate or shut down than usual.

The fix has been delivered as part of update rollup 2995388 and it applies to Windows 8.1 Enterprise, Windows 8.1 Pro and Windows 8.1.

Windows also can simply not shut down without any SD card interference, and at this moment you might think that the Card is the issue. First of all, you might need to detect the problem’s source. You want to try, first of all, some simple fixes in order to see if that solves your shutdown problem. Here are two guides that will help you with that:

Leave your comment below and let us know if it has solved your problems.

READ ALSO: Your Windows 10 computer won’t go to sleep? Here’s how to fix this

Windows Insiders are also getting invited to Microsoft’s October 2 NYC event

Members of the media initially received their invites to Microsoft’s October 2nd NYC event last week, but some lucky members of the general public are in on the action now too. Noted by Neowin, Microsoft is inviting select Windows Insiders to a pre-event meet at Tortilla Flats in NYC, and also the main-press event at Industria Studios.

You can check out the full details on the Windows Insider event by checking here, but be aware that the Insider Event looks to be on an RSVP basis only. According to that website, only an “exclusive group” of Windows Insiders are invited, first meeting at 2:00 pm EDT at Tortilla Flats then eventually transitioning to the main press venue at 4:00 pm EDT.

We’ll be attending the main press event on October 2, where it is widely expected for Microsoft to unveil refreshed Surface devices, and even discuss the Windows 10 October 2018 Update. We put together a post of what we expect from this event, so be sure to check it out.

Microsoft re-publishes Windows 10 19H1 Build 18237 after unintentionally releasing it as encrypted

Microsoft released Windows 10 19H1 Build 18237 to Skip Ahead Insiders yesterday, but many users were quick to report high memory usage and installation issues with this release. The Insider team was speedy in investigating the problems, and they’ve since provided an update, saying the build was re-released after unintentionally being pushed out as encrypted.

If you’re still having high memory usage or other issues with the build, the Windows Insider team said that they are still investigating to see if the re-published build resolves the problem. There are no further details beyond that, but Microsoft MVP Rafael Rivera dived deeper into what was causing the problem, explaining the technicalities in a series of tweets.

https://twitter.com/WithinRafael/status/1039986328576831488

Additionally, as noted by Richard Hay on Twitter, a symptom of getting this encrypted build could be the much-longer than normal install time. If that’s happening to you, it’s probably best to cancel the install or pause the update and restart. Did you also have issues installing this build? Let us know in the comments below.