How to Fix the BSoD 0xc0000420 Error: 5 Quick Ways

The error code 0xc0000420 on Windows is a type of BSoD that indicates an unknown software exception. This error occurs when you try to run an application but instead of opening, your system crashes.

The exact cause of the BSoD error can vary but aside from corrupt or incompatible software, it can also be related to issues such as memory corruption, or driver problems.

How do I fix the 0xc0000420 error?

1. Uninstall the problematic application

  1. Hit the Start Menu icon on the Taskbar and click on Settings.settings windows 11
  2. Click on Apps on the left pane, then select Apps & features on the right pane.

  3. Search for the app in question, click on the three ellipses, and select Uninstall.uninstalling microsoft teams

After uninstallation, do a clean-up of software leftovers to get rid of all software components completely. While you’re still here, ensure that your computer’s hardware components, such as the RAM and hard drive, are functioning properly.

Faulty hardware can also cause system crashes. Use built-in diagnostic tools or third-party software to perform hardware tests like the memory test. If the problem persists, check for OS and driver updates to ensure your system is compatible with the new software.

2. Run DISM and SFC scans

  1. Hit the Start Menu icon, type cmd in the search bar, and click Run as administrator.cmd-run-admin-w11 unexpected kernel mode trap windows 11
  2. Type the following commands and press Enter after each one:DISM.exe /Online /Cleanup-Image /Restorehealth sfc /scannow

3. Scan for viruses

  1. Press the Windows key, search Windows Security, and click Open.

  2. Select Virus & threat protection.
  3. Next, press Quick scan under Current threats.

  4. If you don’t find any threats, proceed to perform a full scan by clicking on Scan options just below Quick scan.Scan options
  5. Click on Full scan, then Scan now to perform a deep scan of your PC.Full Scan Scan Now
  6. Wait for the process to finish and restart your system.

Since the 0xc0000420 error is brought about by a corrupt installation, you can never be too sure whether malware snuck into your PC. Just to be sure, perform a comprehensive scan.

You can also run a reliable antivirus program to catch those that camouflage themselves and bypass Windows’ built-in security tool. For example, TotalAV allows you to perform a deep scan of your system and identify the malware that may have caused your issue, you can easily remove it and then keep your computer safe with its real-time scanning and shielding features.

⇒ Get TotalAV

4. Perform clean boot

  1. Hit the Windows key, type msconfig, and open System Configuration.

  2. Switch to the Services tab and select Hide all Microsoft services.

  3. Click on the Disable all button, then hit the Apply button to save the changes.

  4. Go back and click on the Startup tab, select Open Task Manager then click OK.

  5. In the Startup tab of the Task Manager, Disable all the Enabled startup items.

  6. Close Task Manager and restart your PC.

5. Perform a System Restore

  1. Press the Windows key, type Control Panel, and click Open.control-panel-search fallout new vegas runtime error
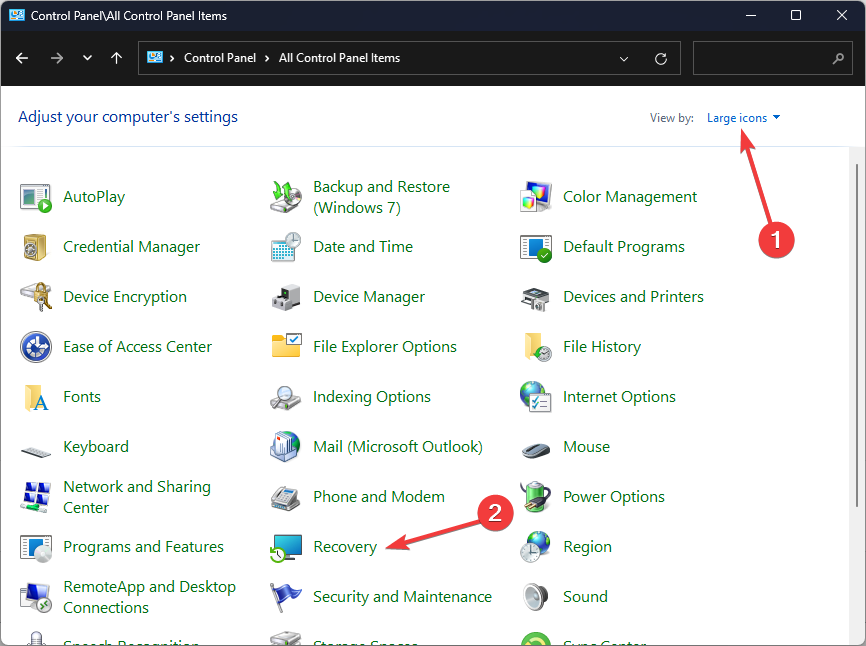
  2. Select Large icons as View by and click Recovery.Recovery Control Panel Advrcntr6.dll
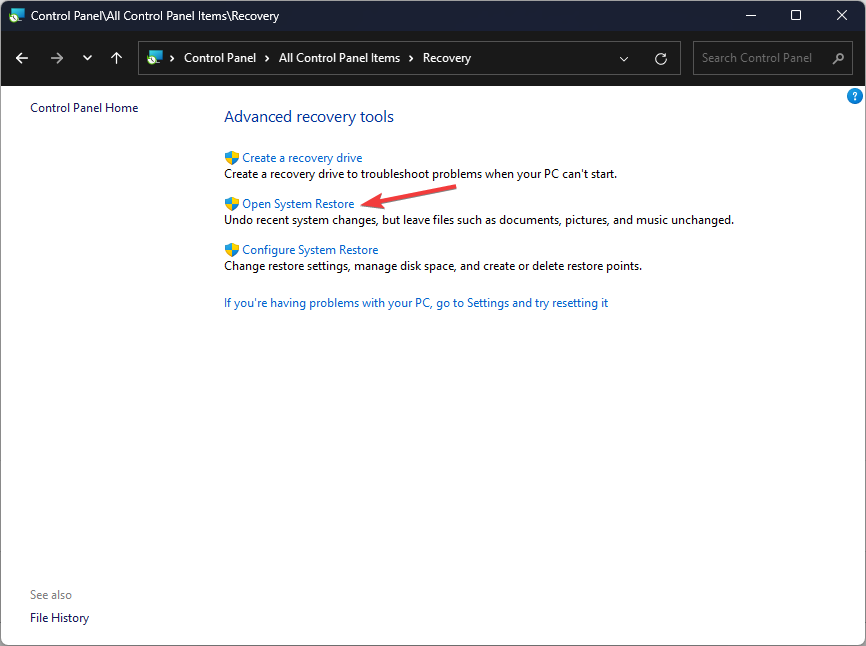
  3. Click Open System Restore.Open system restore
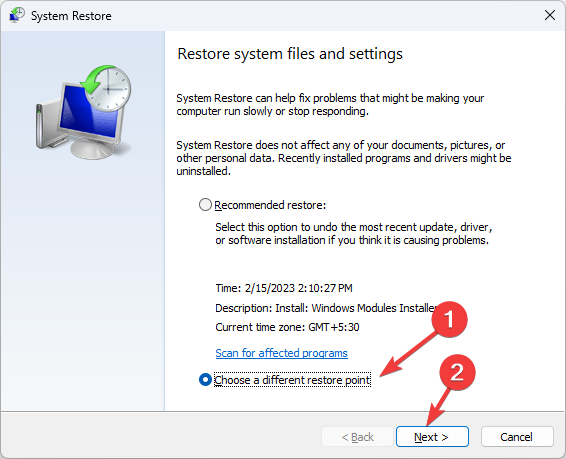
  4. Select Choose a different restore point and click Next.Next Choose a different restore point
  5. Now select the restore point and click Next. Choose a point
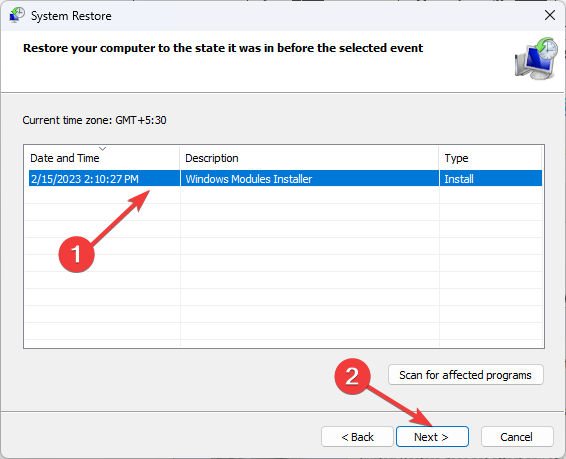
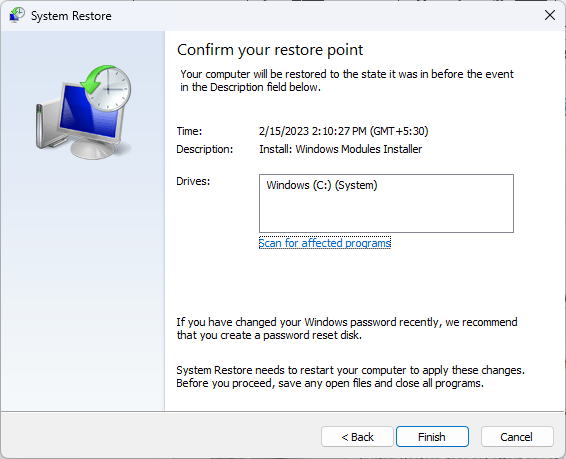
  6. Click Finish to restore the previous settings, and Windows will restart.Finish Restore point

Since most users reported that the issue started after installing new software or drivers, a System Restore can undo recent changes and help restore system stability.

While all the solutions we’ve provided are great starting points to resolve the 0xc0000420 error, they don’t guarantee a sure-bet resolution. An automatic BSoD fixer on the other hand can guarantee you a fix for this and others like 0x00000023 error effortlessly.

Since you can never forecast when a BSoD error will occur, we encourage you to trigger a BSoD error from time to time. Eventhough unorthodox, it’s better to catch problems before they render your system unusable.

That’s a wrap from us but do let us know if you’ve been able to fix this error in the comment section below.

How Often Should You TRIM Your SSD?

If you have an SSD, you obviously want it to serve you for years to come, so it’s only right you ask how often you should perform a TRIM. TRIM allows the operating system to inform the SSD that blocks of data are no longer in use.

This process helps prevent performance degradation over time and ensures efficient use of the SSD’s storage capacity. Your SSD’s health is paramount for continued usage.

How often should you optimize your SSD?

A few factors will determine how often you should TRIM your SSD:

1. Operating System

Different operating systems have their mechanisms for managing SSD TRIM operations. For example, most modern operating systems, such as Windows 11, have built-in mechanisms to automatically send TRIM commands to the SSD regularly.

Depending on the operating system settings, these schedules can vary from daily to weekly. However, if you are using an older version of Windows or have disabled the feature in your system settings, you may need to manually enable TRIM.

It’s important to note that the operating system’s default automatic TRIM settings are generally designed to ensure the SSD stays in optimal condition.

2. Usage patterns

If you frequently perform write-heavy tasks, such as regularly copying, moving, or deleting large files, you may benefit from more frequent trimming to maintain optimal SSD performance.

On the other hand, if your usage primarily involves reading data rather than writing, the need for frequent trimming may be lower. This is also one of the factors to look out for when purchasing a second-hand SSD.

3. SSD model and technology

Different SSD models and technologies may have varying trimming requirements. Some SSDs, due to their specific firmware and architecture, may benefit from more frequent trimming, while others may be designed to handle longer intervals between TRIM operations.

Still, double-check the documentation or support resources from your SSD manufacturer and the operating system you are using. Different SSD manufacturers might have specific recommendations or utilities for optimizing and managing their SSDs. This can help provide more precise recommendations.

While frequently trimming your SSD can improve its performance, it can also lead to slow boot times, especially for older hardware. If your SSD is old, it will obviously require frequent trimming.

It can be difficult for your SSD to perform optimally under such conditions so if this action is proving counter-active, it may be time to upgrade to a faster SSD.

4. Performance degradation

You don’t need to initiate the TRIM process unless specific circumstances require it manually. However, if you notice a significant decrease in SSD performance, it may indicate the need for more frequent trimming.

Additionally, if you’ve made a significant number of changes to the SSD or experienced a performance degradation due to garbage collection inefficiencies, a manual trigger should suffice.

Does trimming reduce SSD lifespan?

The impact of TRIM on an SSD’s lifespan is minimal compared to the overall benefits it provides. However, it’s also important to remember that SSDs have a finite number of write cycles. Therefore, excessive and frequent TRIM operations could potentially contribute to wearing out the SSD over time.

What you can do is take steps to keep your SSD healthy. These include:

  • Reduce write-heavy tasks – SSDs may not handle the same intensity of read/write cycles as traditional hard disks. To prolong the lifespan of your SSD, avoid excessive write operations.
  • Avoid extreme temperatures – Ensure your SSD operates within the recommended temperature range provided by the manufacturer, as extreme temperatures can impact its performance and lifespan.
  • Enable TRIM – TRIM frees up blocks of data no longer in use and optimizes your SSD.
  • Keep some free space on your SSD: Avoid filling it to its maximum capacity. This helps it perform better and extends its lifespan.
  • Update firmware – Your SSD manufacturer occasionally releases updates to improve performance, compatibility, and stability. Check and install them as soon as they’re available.
  • Power backup – Sudden power loss or interruptions during data writing can potentially cause data corruption or damage to your SSD. Consider using a reliable UPS to cushion your SSD from power-related issues.

For regular users, relying on the automatic TRIM feature should be sufficient in most cases. You don’t want to be the person over-optimizing your SSD, as it can potentially lead to unnecessary wear and tear, reducing its lifespan.

Knowing what you know now, have you been trimming your SSD the correct number of times? Let us know in the comment section below.

Xbox Elite Controller Lags on PC: How to Reduce Input Delay

If you find that the Xbox Elite controller lags on the PC, fret not! We, too, had the problem and managed to eliminate the delay. More often than not, it’s either the latest firmware update, the installation of generic drivers, or the misconfigured controller settings to blame.

Switching to a wired connection significantly reduces lag, but that’s not an option everyone would like to go with. And do make sure that the plugged-in batteries are fully charged. Also, press the Xbox controller button for 5-10 seconds, then turn it on to perform a quick reset.

What can I do if the Xbox Elite controller lags on PC?

1. Update the Xbox controller’s firmware

  1. Download the Xbox Accessories app from the Microsoft Store if it’s not already available on the PC.
  2. Now, connect the Xbox Elite controller to the computer using a supported USB cable. Remember, firmware updates on PCs can only be performed over wired connections.
  3. Press Windows + S to open Search, type Xbox Accessories in the text field, and click the relevant result.xbox accessories
  4. Once the controller is listed, click the ellipsis under the Configure option.ellipsis
  5. Click the Update now button.update now to fix xbox elite controller lag on pc
  6. Check all the instructions and click Continue.
  7. Wait for the update to install, then reboot the PC followed by wirelessly connecting the controller, and finally, check for improvements.updating

If you haven’t updated the Xbox Elite’s controller firmware in a while, it’s likely to lag on the PC as well as the console. Also, updating the firmware helps fix things if the Xbox controller keeps blinking when plugged into the PC.

2. Uninstall the controller update

  1. Press Windows + E to open File Explorer, paste the following path in the address bar and hit Enter: xboxaccessories:\\firmwareupdate?legacyDowngrade=truepath
  2. Click the Revert firmware button.revert firmware to fix xbox elite controller lag on pc
  3. Now, click on Yes, revert firmware in the confirmation prompt.revert
  4. Wait for the Xbox Elite controller’s firmware rollback process to be completed. It shouldn’t take more than a minute.

3. Force install the dedicated Xbox Elite controller drivers

  1. Press Windows + X to open the Power User menu, and select Device Manager from the list of options.
  2. Expand the different entries here, right-click on the Xbox Elite Controller, and select Update driver. It could be under Bluetooth, Sound, video and game controllers, or even have a separate category.update driver to fix xbox elite controller lag on pc
  3. Choose Browse my computer for drivers.
  4. Now, select the Let me pick from a list of available drivers on my computer.pcik driver
  5. With the Show compatible hardware checkbox ticked, select the dedicated Xbox Elite Controller driver, and click Next.driver
  6. Follow the on-screen instructions to complete the process, then restart the PC and check for improvements.

Windows often installs generic drivers which leads to a high Xbox Elite controller lag on the PC. So, you will have to verify that and manually install the correct driver.

Or you could use an effective driver update software to install the latest driver for all connected devices automatically.

4. Remove the delay in settings

  1. Connect your Elite controller to the PC, launch the Xbox Accessories app, and click the Configure button.
  2. Select the active controller profile, and click the Edit button on the right.edit
  3. Now, head to the Left stick and Right stick tab individually, and make sure you don’t have Delayed set under the Sensitivity curve. Instead, choose Default, Aggressive, Instant, or Smooth.reconfigure to fix xbox elite controller lag on pc
  4. Finally, launch any Xbox game on the PC and check for improvements.

5. Switch button mapping to default

  1. With the Xbox Elite controller connected, launch the Xbox Accessories app, and click on Configure.
  2. Select the active profile from the left, and click on Edit.
  3. Now, in the Mapping tab, click the Restore to default option.restore defaults

If you see Xbox Elite Wireless Controller Series 2 input lag on the PC or the controller leads to poor game performance, make sure to revert any changes to button mapping. The best option is to restore them to default.

6. Turn on Game Mode

  1. Press Windows + I to open Settings, go to the Gaming tab from the navigation pane, and click Game Mode on the right.game mode
  2. Enable the toggle for Game Mode.enable to fix xbox elite controller lag on pc

Enabling Game Mode also works if you have an external monitor or a TV acting as one. Just enable the equivalent mode on the device, and it will fix any game lag when Xbox Elite is wirelessly connected to the PC.

7. Contact Xbox support

When nothing else works, you can contact Xbox support. They will identify the problem and share a series of fixes with you, or, if required, roll out a firmware update with the patch. This has worked for many in the past!

Lastly, there’s always the option to replace the Xbox controller, as long as it is under warranty.

As you see, when the Xbox Elite (or Series 2) controller causes lag on the PC, your primary approach should be to check the firmware and drivers. And if that doesn’t work, look through the configured settings. Remember, the default settings ensure minimal issues but may not be suitable for some!

Before you leave, discover which batteries your Xbox controller needs and get the right ones for improved performance and increased life!

For any queries or to share how you got rid of the lag, drop a comment below.

Microsoft Edge adds Lunar New Year Themes to the Sidebar

Microsoft Edge has many default themes and other customization options, and you can even add more from the Edge Add-ons Store and Chrome Web Store. But now, Microsoft will make some of them more accessible by adding them to the sidebar.

On the eve of the upcoming Lunar New Year 2024 – celebrated as the Year of the Dragon – on February 10, Microsoft will add new themes to the Edge sidebar. These themes are hidden, but we’ll show you how to enable and install them.

Microsoft Edge Sidebar has built-in Apps such as Copilot, Outlook, Drop, Tools, Games, Microsoft Shopping, E-Tree, and others. The sidebar customize area allows you to pin websites and open Apps. The same sidebar has now received official Microsoft dragon themes before the Lunar New Year. If you don’t know, the Chinese New Year 2024 falls on February 10th (Saturday) and lasts until February 24th. It is being called the Year of the Dragon.

How to enable & install Lunar New Year 2024 Themes in Edge

  1. Close Edge Canary if already open
  2. Right-click on its shortcut on the desktop, select Properties
  3. In the Target field, give a space and add the following
    --enable-features=msEdgeHubAppStoreThemeInstaller
  4. Click Apply and OK
  5. Open Edge using the shortcut to which we have added the command line switch above
  6. Click on the + button in the sidebar
  7. Click on the Celebrate Lunar New Year card and click any one from the 18 themes collection available
  8. Click Add theme and enjoy.

Though these themes are available individually on the Microsoft Edge Add-ons Store, you can’t see and choose them from one place, as you can in the Sidebar. So enjoy your new themes and tell us what’s your favourite one in the comments section below.

2 Windows Folders in C Drive: How to Delete One of Them

2 Windows folders in a C drive is an unusual occurrence, however, some users have encountered it on their PCs.

In today’s guide, we’re going to take a closer look at this problem and show you how to remove the other Windows folder.

What can I do if I have 2 Windows folders in C drive?

Before we take a closer look, we advise you to scan that folder or your entire C drive with your antivirus software and ensure that the folder wasn’t created by malware.

1. Check both folders

  1. Press the Windows key + S and type cmd. Choose Run as administrator.
    CMD elevated -vsmain.exe
  2. Run the following command: dir c:\w* /w
     
  3. You should see the list of matching directories. If both are shown and your results say 2 Dir(s) it means that both are legitimate directories.

If the results differ, the other one might be a file in disguise and potentially malicious.

2. Try to remove the directory

  1. Locate the other Windows directory and try to delete it.
  2. If that doesn’t work, right-click it and choose the Rename option.
    rename
  3. Try to change its name and then try to remove it again.

Create a backup before performing these steps, and make sure you select the correct directory.

If you’re having issues removing the folder, we have a guide on what to do if files won’t delete on Windows 11, so don’t miss it.

3. Reset Windows 11

  1. Back up your important files, since this process will remove all installed applications and files from your C drive.
  2. Press the Windows key + I to open the Settings app.
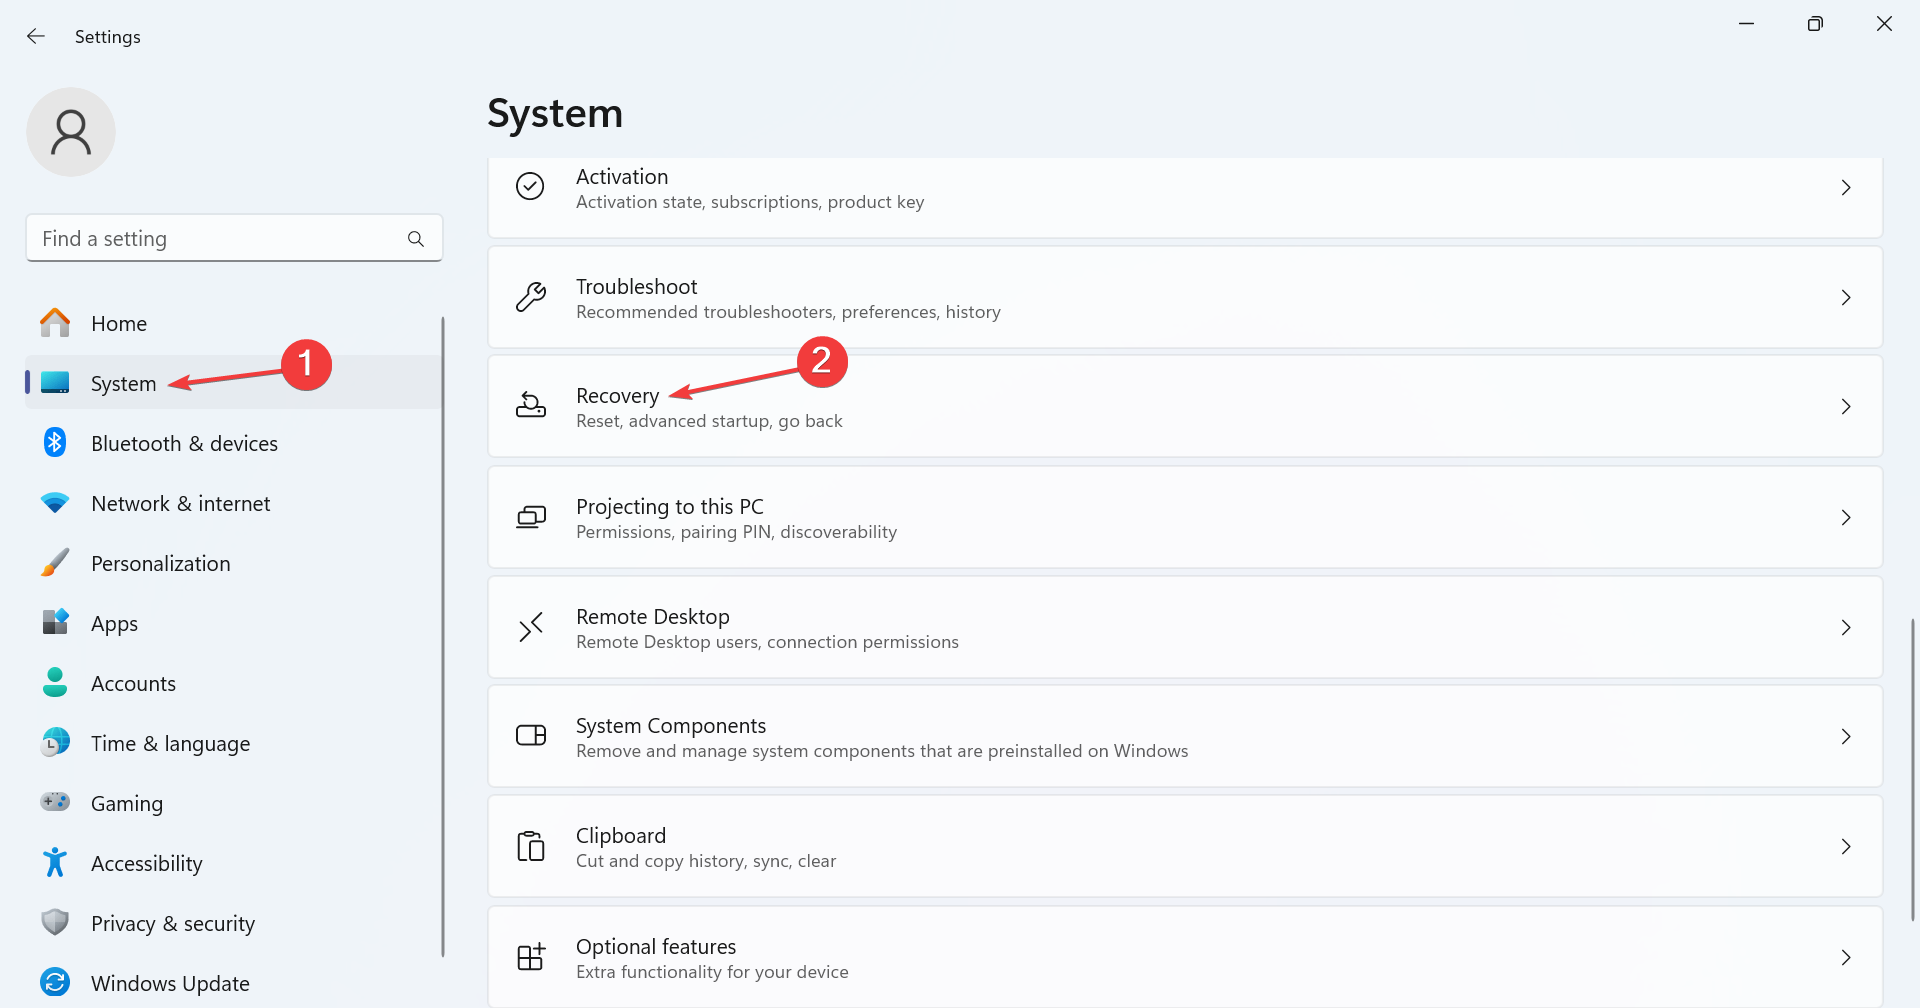
  3. Navigate to System. From there, choose Recovery.
    recovery
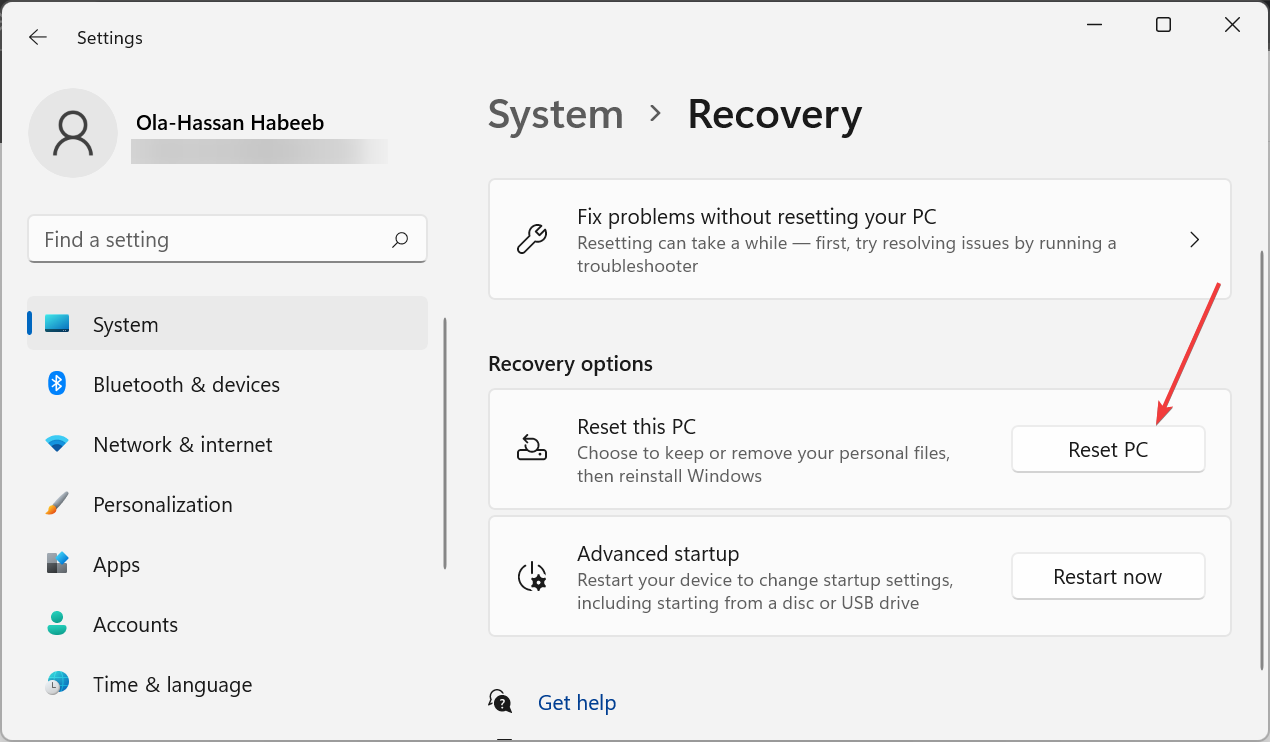
  4. Click on the Reset PC button.
    reset pc
  5. Select the Keep my files option.
    Keep my files
  6. Select Local reinstall.
    click Local download
  7. Follow the instructions on the screen to complete the process.

We don’t recommend resetting unless necessary, but if you weren’t able to remove the other directory and you think it might harm your PC, resetting the PC is a valid option.

Can I delete the Windows folder in the C drive?

You can’t delete a Windows folder using the regular method. You might be able to remove it if you start a Command Prompt from installation media or if you use live Linux USB.

By deleting the Windows folder, your operating system won’t be able to start anymore, so keep that in mind.

Having 2 Windows folders in a C drive is rather uncommon, and unless your PC is having any other problems, or it’s infected by malware, there’s no reason to remove this folder.

There are other Windows folders you can encounter, and we wrote about one in our $Windows.~WS folder guide. We also have a guide on how to delete the Windows.old folder on Windows 11, so don’t miss it.

Have you ever encountered this issue and how did you fix it? Let us know in the comments!

Microsoft explores small language model (SML) alternative to ChatGPT

Despite its multibillion-dollar investment in OpenAI and its coveted ChatGPT pre-generative large language models (LLM), Microsoft is also working internally to create alternatives that now include a cheaper “small language model” (SLM) solution.

How much does ChatGPT cost?

According to a report from the Information, Microsoft’s exploration of supplemental and alternative solutions to OpenAI LLM’s has now surfaced a new team dedicated to creating a SLM that costs less and requires fewer resources to operate.

By most accounts Microsoft is losing money running ChatGPT as its underlying platform for its various Copilot projects, powered by OpenAI’s GPT-3 and 3.5 Turbo language models. The Motley Fool claims that Microsoft lost an average of $20 per user during the first few months of 2023, and some users cost the company an average loss of over $80 per month.

The publication Interesting Engineering estimates that ChatGPT was costing OpenAI some $700,000 per day in computing costs alone, based on the processing needed to run GPT-3.5. A third source, Gizmodo reports that OpenAI’s losses reached $540 million since the development of ChatGPT, and that its future was uncertain as recent as the end of October 2023.

Beyond the sunk costs of embedding the popular LLM in Copilot, Microsoft and OpenAI also have a structured partner deal that comes with a 10-year deadline or repayment timetable that would divest the company’s largest-single-shareholder position and free up space for other entities or consortiums to manage OpenAI in ways outside of Microsoft’s current control.

Microsoft’s GenAI team

Understandably Microsoft wants to be in the driver seat of such a large financial investment in pre-generative artificial intelligence and its new GenAI team is tasked with creating an SML will be charged with providing a similarly functioning conversational and pre-generative platform to ChatGPT but whose carbon footprint is smaller, and ultimately costs less.

Microsoft is bundling the GenAI team under its flagship Azure cloud business to funnel the sector’s healthy profits into research from its top developers who have been drafted from other parts of the company. GenAI consists of Microsoft heavy hitters such as CVP Misha Bilenko as team leader and Microsoft Research vets Jianfeng Gao, Michel Galley, and Chris Brockett who have worked on DiabloGPT and DeepSpeed projects.

While Microsoft was able to get Bing Chat which ultimately became Copilot, out to the door to users and customers first, it is in enviable position of watching Google manage and maintain its own homebrewed Bard services powered by its latest Gemini LLM, and this new GenAI team looks to be the company’s answer to future AI applications from Microsoft.

Can’t Open Windows Defender Scans Folder: How to Access it

Many users reported that they can’t open the Windows Defender Scans folder and this can be a problem, especially if they want to delete scan history.

In today’s guide, we’re going to show you a couple of methods that you can use to access this folder on your PC.

Why can’t I open the Windows Defender Scans folder?

This is a system file and it’s protected from access. The only to access it is to obtain administrative privileges.

How do I open the Windows Defender Scans folder?

1. Manually enter the folder

  1. Press the Windows key + S and type notepad. Right-click Notepad and choose Run as administrator.
  2. Next, go to File and select Open.
  3. In the address bar, paste the following path: C:\ProgramData\Microsoft\Windows Defender\
     
  4. Now locate and enter the Scans folder. Set the menu next to the File name to All files to reveal all files.
  5. After that, you can select and delete the files right from that window.

For a more user-friendly solution, you can use any other file manager for Windows 11, as long as you start it as an administrator.

2. Use Safe Mode

  1. Press the Windows key + I to open the Settings app.
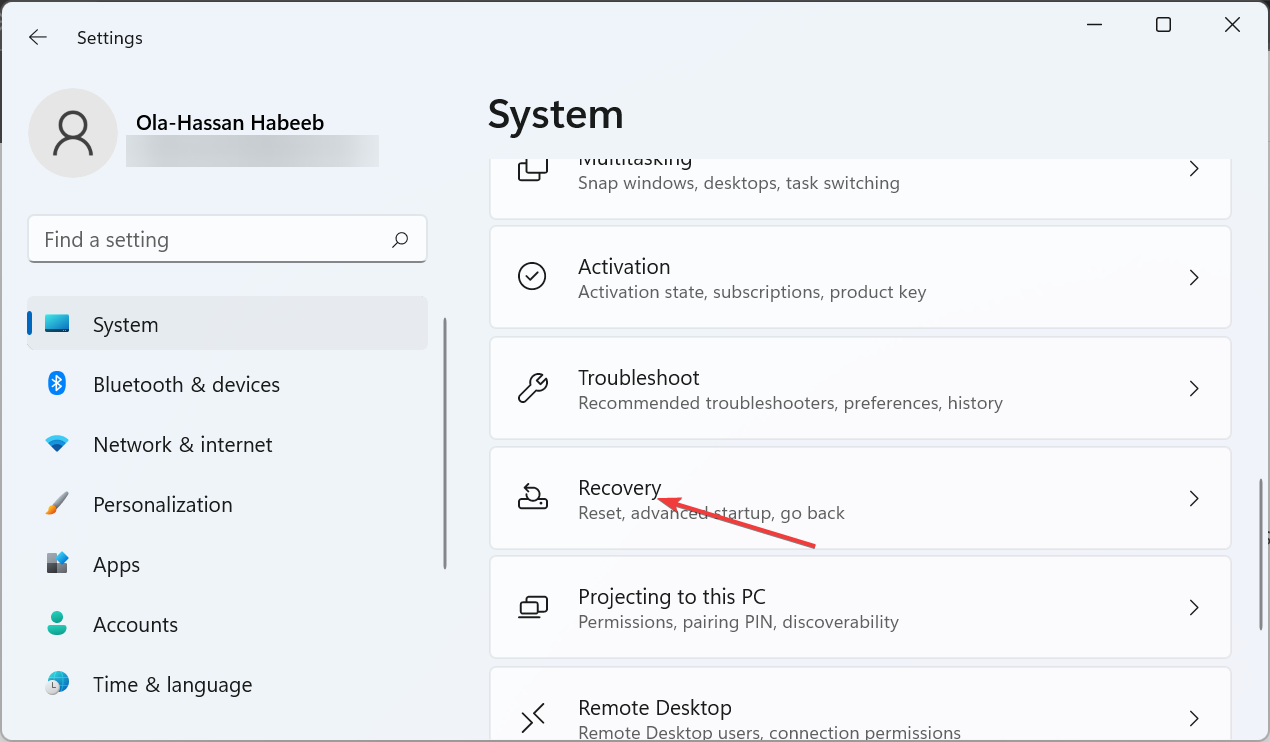
  2. Next, go to System and choose Recovery.
  3. Click on Restart now in the Advanced startup section.
    advanced startup settings w11
  4. Next, select trouble Troubleshoot and then Advanced options.
    Advanced options
  5. Select Startup Settings and click Restart.
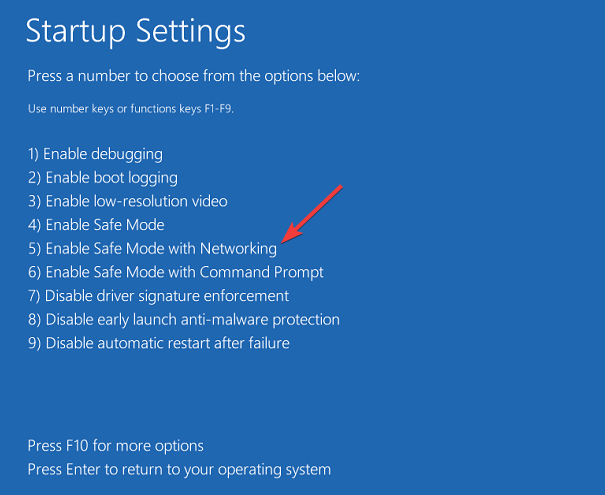
  6. Select the preferred version of Safe Mode by pressing the corresponding keyboard key.
    Enable safe mode with networking
  7. Once you enter Safe Mode, open File Explorer and paste the following into the address bar: C:\ProgramData\Microsoft\Windows Defender\
  8. Locate the Scans folder and double-click it to access it.

If you can’t open the Windows Defender Scans folder, you can easily obtain the necessary permissions through other applications or by using Safe Mode.

Sadly, this isn’t the only permission issue you can encounter, and many users reported that Windows Defender Service can’t be started on their PCs. We also have a guide on what to do if Windows Defender is blocked by Group Policy, so don’t miss it.

Do you know a different method to access this directory? If so, share it with us in the comments section.

HtcVComV64.sys Memory Integrity Error [Solved]

While Core Isolation or Memory Integrity helps protect the PC, enabling it may prove challenging to many. At least that was the case with us, and Windows Security listed HtcVComV64.sys as the incompatible driver.

In such cases, uninstalling the problematic driver is the best course, but not unless you know what the driver does. As for HtcVComV64.sys, it’s a USB Modem driver from HTC Corporation and is not critical to the effective functioning of the PC. So, uninstalling HtcVComV64.sys will cause no harm!

How do I remove the HtcVComV64.sys driver?

1. Use the Device Manager

  1. Press Windows + X to open the Power User menu, and select Device Manager from the list of options.
  2. Look through all the entries here to find the HTC device, right-click on it, and select Uninstall device.uninstall device to fix HtcVComV64.sys
  3. If available, tick the checkbox for Attempt to remove the driver for this device, and click Uninstall.uninstall
  4. Reboot the device for the changes to apply.

If you can’t find the device that employs the HtcVComV64.sys driver, show hidden devices in the Device Manager. Some devices that are no longer connected but still have related entries in the Registry or driver files are hidden to unclutter the interface.

Also, you could use an effective driver uninstaller software to completely remove all traces of the driver.

2. Via Command Prompt

  1. Press Windows + S to open Search, type Command Prompt, right-click on the relevant result, and select Run as administrator.run as administrator
  2. Click Yes in the UAC prompt.
  3. Now, paste the following command and hit Enter to get a list of all available drivers: pnputil /enum-driverslist drivers
  4. Next, execute the following command to delete the HtcVComV64.sys driver: pnputil /delete-driver oem130.infdelete driver to fix HtcVComV64.sys
  5. Once done, reboot the device, and you should now be able to turn on Memory Integrity.

If you get a Failed to delete driver package error, go to the following location:C:\Windows\System32\DriverStore\FileRepository

Now, take full ownership of the folder related to the HTC driver, and then delete it.

3. Enable Memory Integrity using Registry

  1. Press Windows + R to open Run, type regedit in the text field, and hit Enter.regedit
  2. Click Yes in the UAC prompt that appears.
  3. Navigate the following path or paste it in the address bar and hit Enter: Computer\HKEY_LOCAL_MACHINE\SYSTEM\CurrentControlSet\Control\DeviceGuard\Scenarios\HypervisorEnforcedCodeIntegritypath
  4. Right-click on the Enabled DWORD, and select Modify.
  5. Now, enter 1 under Value data to turn on Memory Integrity, and click OK.value data to fix HtcVComV64.sys
  6. Reboot the device for the changes to apply.

If you can’t find the HtcVComV64.sys driver or uninstalling it doesn’t work, you can always force-enable Memory Integrity using the Registry Editor. The same changes can be made through the Local Group Policy Editor, but that involves installing gpedit.msc on Home editions.

You now know all the ways to remove HtcVComV64.sys or any other incompatible driver conflicting with Memory Integrity on the PC. But should you enable Memory Integrity? Check our guide to find out!

Before you leave, discover what worked for our readers when Memory Integrity was greyed out!

For any queries or to share what worked for you, drop a comment below.

RAM Not Running at Full Speed: 7 Fixes For Best Performance

We often see cases where RAM is not running at full speed, or to be precise, the advertised speed. It’s completely normal if the hardware (motherboard or CPU) doesn’t support the RAM speed or the necessary BIOS settings are not in place.

Besides, seating RAM sticks in incorrect slots or having mismatching modules leads to a lower speed. All this is easy to fix. And if nothing works, you can always overclock the PC and get your RAM to run at the desired speed!

What can I do if the RAM is not running at full speed?

1. Check the CPU and motherboard specifications

Your primary approach should be to verify whether the CPU and motherboard support the maximum RAM speed. With most PCs in our lab, this turned out to be the problem.

No matter whether the DDR4 RAM boasts a 4,000 MHz frequency (speed), if the CPU or motherboard is old, the speed will be throttled to the 2,200-2,600 range.

Specifications detailing RAM speed for B760M GAMING AC (Source: GIGABYTE)

To find out which motherboard and CPU are installed, check the PC specifications. Then, open the manufacturer’s page and check the maximum permissible RAM speed the two support.

2. Verify whether the advertised speed is the frequency or transfer rate

Manufacturers often advertise the transfer rate, MT/s (Mega Transfer per Second), and not the actual RAM frequency, which is half of the former. If the RAM module claims to deliver 3200 MT/s, the speed or frequency will be 1600 MHz. So, verify that!

Checking RAM speed in Task Manager

Also, the best place to identify the RAM speed is the Windows Task Manager. To do that, press Ctrl + Shift + Esc to open the Task Manager > go to the Performance tab > click on Memory > check the RAM speed.

3. Enable XMP

Tip icon Tip
The solutions listed here are for an MSI motherboard and BIOS, though the idea remains the same. If you have another motherboard, check the manufacturer’s website or YouTube tutorials for enabling the XMP profile.
  1. Turn off your computer, then power it on, and repeatedly hit the Del key to access the BIOS.
  2. If presently in the EZ Mode, press F7 to enter the Advanced Mode.
  3. If you have the XMP button available, click on it to enable the profile.enable to fix ram not running at full speed
  4. Save the changes, exit the BIOS, and boot the OS. You should now see an increased RAM speed.

XMP (Extreme Memory Profile) is used to get better performance out of your RAM by increasing the frequency. It’s a safe overclocking procedure and won’t put your PC at risk. On Asus devices, you need to enable DCOP.

Also, in some cases, inserting only one RAM module, then enabling XMP, followed by adding the other module, did the trick. And make sure you are using slots 2 and 4.

Enabling the XMP profile also helps when your PC shows the wrong RAM speed.

4. Change the DRAM Frequency

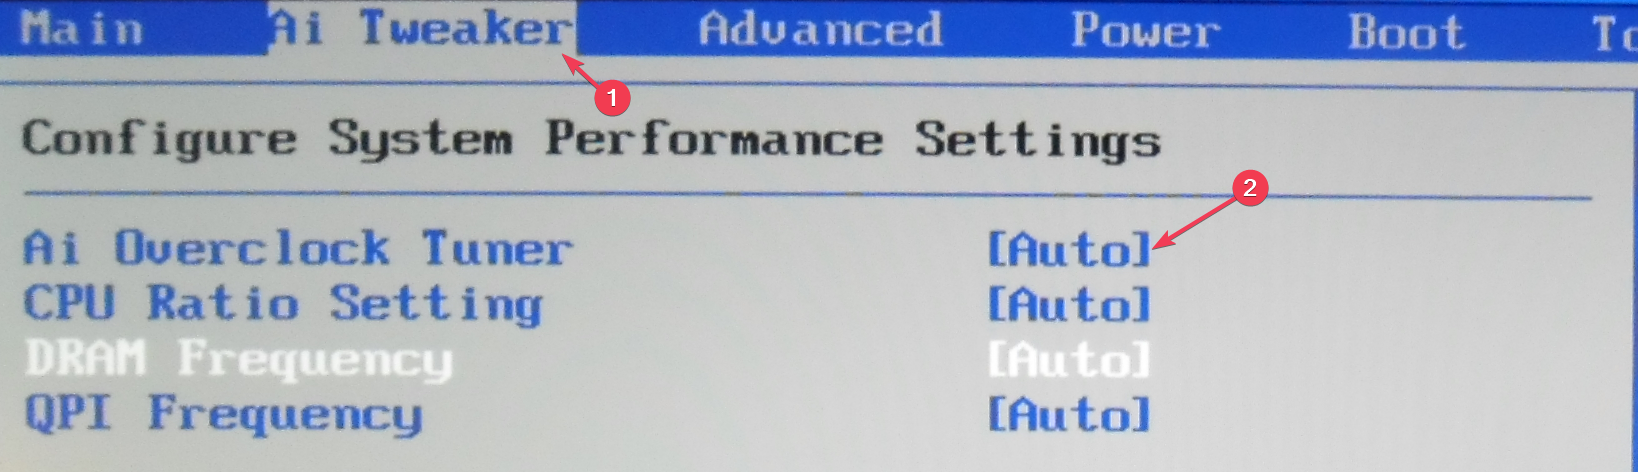
  1. Access the PC’s BIOS, press F7 to switch to Advanced Mode and go to Overlocking settings (OC) from the left.oc settings
  2. Check whether DRAM Frequency is set to Auto. If that’s the case, click on it.manual to fix ram not running at full speed
  3. Now, choose the advertised RAM speed from the list of options.choose
  4. Save the changes, exit the BIOS, and then check for improvements.

5. Update the BIOS

An outdated BIOS is just as likely to result in RAM not running at full speed, no matter the settings you enable. So, update the BIOS to the latest available version. You will find it on the manufacturer’s official website.

BIOS update underway

This will require a USB drive, some technical acumen, and a lot of patience. Do not terminate the update even if it appears stuck, and make sure to have a stable power supply connected throughout the process.

6. Check for mismatch between RAM modules

A common mistake we observed is the use of mismatching RAM modules, which leads to the RAM not running at the advertised full speed. For instance, if you use a module with a 3,000 MHz frequency and another with a 4,000 MHz frequency, the output frequency will be of the lower one.

Also, in a few cases, the motherboard may refuse to recognize the modules and throw a memory error, or Windows will not boot. So, it’s recommended that you always get the same sticks for the different slots.

7. Manually overclock the PC

Lastly, you can manually overclock the PC, say, increasing the voltage or altering the RAM frequency beyond the available limit. There are also several overclocking software that ease the process!

But it may be unsafe unless done properly. Overclocking beyond the safe limit may damage the components, be it the motherboard or GPU. So, it’s best that you get the overclocking done by a professional.

You now know all the reasons the RAM is not running at full speed and ways to fix them. In our experience, simply enabling XMP or manually configuring the DRAM frequency should work for most of you!

Before you leave, find out how much RAM your PC can have and add the modules accordingly. We also have a great guide on what to do if PC is not using all RAM, so don’t miss it.

For any queries or to share how you got the RAM to run at full speed, drop a comment below.

Google avoids Edge browser for ‘Chrome Uninstall Survey’ in EU

To complaint with the EU‘s Digital Markets Act, Google made changes to Chrome browser and search, Microsoft, not an exception. The company now allows users to uninstall the Edge browser on Windows devices in EEA regions. When users uninstall Chrome, the survey opens in Edge via microsoft-edge: protocol, this may not work in the EU, realizing that Google is now making a change to open Chrome Uninstall survey via URL in HTTPS protocol in the default browser rather than in Edge browser by default.

EEA stands for European Economic Area, which is an agreement that allows the free movement of goods, services, people, and capital among the EU member states and three EFTA states (Iceland, Liechtenstein, and Norway).

Back in November last year, Microsoft announced that it would make some changes to Windows 11 and 10 to comply with the EU’s Digital Markets Act (DMA) in the EEA. One of these changes is that will allow users to uninstall Microsoft Edge from their devices, as well as disable Bing in taskbar search. Since the announcement, Microsoft made the necessary changes to Windows 10 and Windows 11 by pushing updates to make that possible.

When you uninstall Google Chrome on Windows, it opens an uninstall survey for feedback. The survey by default uses microsoft edge:protocol to launch in the Edge browser. Edge needs to be installed or set as a default browser for the survey to appear to the user. This could cause problems if that doesn’t happen With the EEA regulations in place, no one can guarantee users will keep Edge. Users can get rid of Edge in non-EU regions by using registry tricks and third-party tools.

Chrome uninstall survey no longer opens in the Edge browser

Upon realizing this, Google swiftly made a change to launch uninstall Survey URL via HTTPS Protocol in whichever default browser users running on their Windows device. We expect this to apply globally, not just in the EU.

Note: Chrome’s uninstall survey is a web page that asks users who are uninstalling Chrome to provide reasons on why they are doing to act and improve upon.

The change does not affect the functionality of the survey, but it may improve the user experience and the response rate.

There is more to this: the uninstall survey page also includes an option to download Chrome again. When users download Chrome, Microsoft Edge uses that to convince users to use its browser again by showing this message at the top of the page:

Microsoft Edge runs on the same technology as Chrome, with the added trust of Microsoft. Browse securely now

With the current change, Google also feels happy as they not only avoid opening Edge and its annoying banners, but the uninstall survey also works as usual as before, possibly in a different browser, but not Edge.

So, going forward, Chrome uninstall survey no longer opens by default in Edge browser, what’s your take on this change? Let us know in the comments below.

Solved: Dark and Darker Server Error Please Try Again

If you have encountered the Server error. please try again issue on Dark and Darker while trying to access your account; then it could be due to network instability, firewall interference, issues with the game server, or an outdated driver.

To begin with, check the Dark and Darker server for outages or maintenance, ensure you have a stable internet connection, close unnecessary background apps, use a reliable VPN, or try changing your password to something with fewer characters.

How can I fix Server error please try again on Dark and Darker?

1. Run the game as an administrator

  1. Locate the shortcut of the game, right-click, and select Properties.Properties  - game  dark and darker server error
  2. On the Properties window, go to the Compatibility tab.
  3. Under Settings, place a checkmark next to Run this program as an administrator.Run as administrator - dark and darker server error
  4. Click Apply, then OK to save the changes.

2. Disable the Windows Firewall temporarily

  1. Press the Windows key, type control panel, and click Open.Control Panel start menu
  2. Select Category for View by and click System and Security.System and security
  3. Click Windows Defender Firewall.Windows Defender -dark and darker server error
  4. From the left pane, select the Turn Windows Defender Firewall on or off link.Turn on or off defender
  5. Select Turn off Windows Defender Firewall(not recommended) for both Private and Public network settings.Turn on or off, click OK - dark and darker server error
  6. Click OK to save the changes.

If you are able to play the game after disabling the Firewall, it means you need to add the game to the Allowed apps list; for that, follow these steps:

  1. Follow the Steps from 1-3 to access Windows Defender Firewall. Now, from the left pane, select Allow an app or feature through Windows Defender Firewall.
  2. Click Change Settings, then select Allow another app.Change app
  3. On the next page, select Browse, and locate the .exe file of the game.Browse1
  4. Once found, click Add.ADD
  5. Now you will see the game in the Allowed apps list; ensure you have checked the Private and Public options.
  6. Click OK to save the changes.

Once done, reverse engineer the steps used to disable Windows Firewall to ensure your Windows stays protected.

3. Update your network driver

  1. Press Windows + R to open the Run dialog box.Device Manager Run command - dark and darker server error
  2. Type devmgmt.msc and click OK to open the Device Manager app.
  3. Go to Network adapters, and click it to expand the category.
  4. Right-click the network driver and select Update driver from the context menu.Update network driver
  5. Click Search automatically for drivers.Search automatically
  6. Follow the on-screen instructions to complete the process.

4. Change the DNS server

  1. Press Windows + R to open the Run dialog box.NCPA run command - dark and darker server error
  2. Type ncpa.cpl and click OK to open the Network Connections window.
  3. Right-click the active connection and select Properties from the context menu.Network Connection properties
  4. Now, under This connection uses the following items box, select Internet Protocol Version 4(TCP/IPv4) and click the Properties button.DNS server - dark and darker server error
  5. Click the radio button next to Use the following DNS server addresses.
  6. Now, for the Preferred DNS server, type 8.8.8.8, and for the Alternate DNS server, type 8.8.4.4.DNS server - dark and darker server error
  7. Click OK, then OK to save the changes.

Changing the DNS server can help you fix other network problems, like the DNS server not responding in Windows error; read this guide to learn more.

5. Reinstall the Microsoft Redistributable C++ 2015-2022

  1. Press Windows + I to open the Settings app.
  2. Go to Apps, and click Installed apps.Apps, installed apps - dark and darker server error
  3. Locate Microsoft Redistributable C++ 2015-2022 for x64, click the three dots icon, and select Uninstall.Uninstall the app
  4. Click Uninstall to confirm the action.Uninstall
  5. Locate Microsoft Redistributable C++ 2015-2022 for x86, and uninstall it as well.
  6. Go to the official Microsoft Redistributable app.
  7. Next, click the click here to download manually link.
  8. Choose vc_redist.x64.exe and vc_redist.x86.exe and click Download.
  9. Double-click the vc_redist.x64.exe file and follow the on-screen instructions to complete the process.
  10. Next, double-click the vc_redist.x86.exe file and follow the on-screen prompts to install the app.

If you are not able to install Microsoft Visual C++ 2015 Redistributable, it could be due to corrupted files; read this guide to learn more.

6. Reinstall the game

  1. Press Windows + I to open the Settings app.
  2. Go to Apps, and click Installed apps.Apps, installed apps - dark and darker server error
  3. Locate Dark and Darker, click the three dots icon, and select Uninstall, then click Uninstall.Uninstall the app
  4. Press Windows + R to open the Run dialog box.Regedit - dark and darker server error
  5. Type regedit and click OK to open Registry Editor.
  6. First, take a backup of registry entries, go to File, and select Export. Save the .reg file in the accessible location.fILE - EXPORT
  7. Navigate to this path: Computer\HKEY_CURRENT_USER\Software\IRONMACE
  8. Locate and right-click the Blacksmith folder and select Delete from the context menu.Delete
  9. Click OK to confirm the action.Permanently deleted click OK
  10. Press the Windows key, type steam, and click Open.Steam Open - dark and darker server error
  11. Go to Library, locate the game, right-click, and select Install.Install the app

In conclusion, to fix the Server error. please try again issue, first ensure your internet is working fine, change the DNS to boost your network, or try using a VPN.

Next, you can disable the firewall temporarily, update the network driver, update the game, or reinstall the Microsoft Redistributable C++ 2015-2022 for both x64 and x86 versions.

Along with the server error, if you are facing other system issues on your computer, WR experts recommend you run the SFC scan to repair the system files.

If that didn’t help you, you can either wait for the developers to fix the issue or reset your computer if you think the issue is with your device.

Did we miss a step that helped you fix the Dark and Darker server error? Don’t hesitate to mention it in the comments section below.

Please Power Down And Connect The PCIe Power Cables [Solved]

While recently turning on one of our PCs, we came across the Please Power Down And Connect The PCIe Power Cable(s) For This Graphics Card error. The PC worked fine the day earlier and didn’t show any signs of hardware malfunction.

On further investigation, it appeared that the error usually appears due to incompatible or loose cables, improper connections, issues with the PSU (Power Supply Unit), problematic BIOS, or a defective GPU. Also, it usually affected RTX 2060, GTX 1650, GTX 1060, and GTX 1080.

To start with, make sure the connections are in order, the PCIe cable is connected both to the GPU and PSU, and all the pins are plugged in. If the connection is loose, you will see a red light on the GPU. When connected properly, the light will turn white.

How do I fix the Please power down and connect the PCIE power cables error?

1. Use the on-board graphics (workaround to boot the PC)

First, you could remove the external graphics and boot the PC with the onboard graphics. This will allow you to access Windows and roll back the driver if that caused the problem in the first place, though it’s highly unlikely.

Graphics card

If that doesn’t work or you didn’t update the graphics driver recently, the problem either lies with the connections, GPU, or PSU.

2. Check the GPU’s requirement

Every GPU is designed to work with a PCIe cable that has a specific number of pins, 6 or 8, and each has to be connected for effective functioning.

A 6-pin cable power cable delivers up to 75 Watts, while an 8-pin cable delivers a maximum of 150 Watts. So, check the GPU’s requirement and use one accordingly.

Remember, it’s best to use the cables provided with the GPU. Besides, if you see some additional pins dangling around, connect them as well. This worked for 3 out of 5 users facing the Please Power Down And Connect The PCIe Power Cable(s) For This Graphics Card error with NVIDIA GeForce GTX 960.

Lastly, do not forget to verify whether your PSU is able to supply the required power to the GPU. For that, check both the PSU’s and cable’s specifications.

3. Re-insert the CMOS battery

  1. Open the back panel of the laptop or the side panel of the CPU, as the case may be.
  2. Now, locate the CMOS battery and remove it. It’s a coin-sized battery used to power the BIOS.cmos battery to fix please power down and connect the pcie power cables
  3. Wait for a minute, then reinsert the battery and try booting the OS.

Removing and re-inserting the CMOS battery resets the BIOS to default. Also, if you are not confident with the procedure, we recommend contacting a professional. Any mistakes during it may damage the other components.

4. Reflash the BIOS

Another fix that worked for many of our readers was to reflash the BIOS. This requires a USB drive and the version of the BIOS that matches the motherboard’s model. You should be able to find one on the computer manufacturer’s website.

The process is complex and may take a few minutes to several hours to complete. Practice extreme caution and have the computer connected to a stable power supply throughout. Also, if you face BIOS corruption, that, too, can be fixed!

5. Contact a hardware professional

If nothing works or you are unsure of some of the solutions listed here, it’s best to contact the manufacturer (if your device is still under warranty) or a hardware professional.

They will ideally test every component individually and replace the malfunctioning one.

In our experience, more often than not, it’s a broken GPU or improper connections to blame. For us, it was the GPU, and we had to ultimately replace it!

If it comes to that, discover the best graphics card compatible with Windows 11 and get one right away!

For any queries or to share what worked for you, drop a comment below.

How to Enable/Disable Dev Drive Protection on Windows 11

Dev Drive Protection is a feature under Windows Security used to protect the Dev Drive on your computer.

In this guide, we will discuss how to enable or disable Dev Drive Protection on Windows 11 using Windows Security and Registry Editor.

How can I enable Dev Drive Protection on Windows 11?

1. Using the Windows Security app

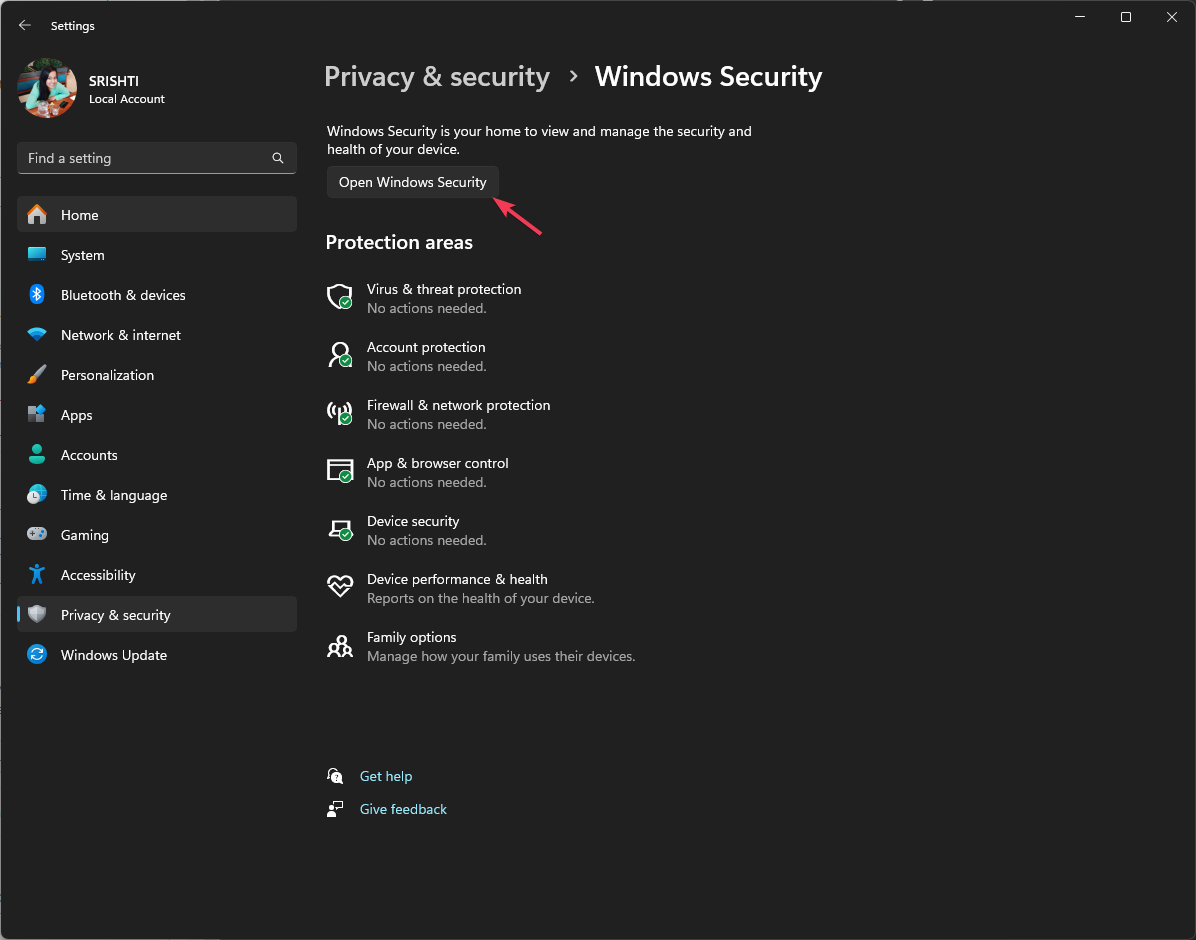
  1. Press Windows + I to open the Windows Settings app.
  2. Go to Privacy & security.
  3. Next, click Windows Security.Privacy & security - dev drive protection windows 11
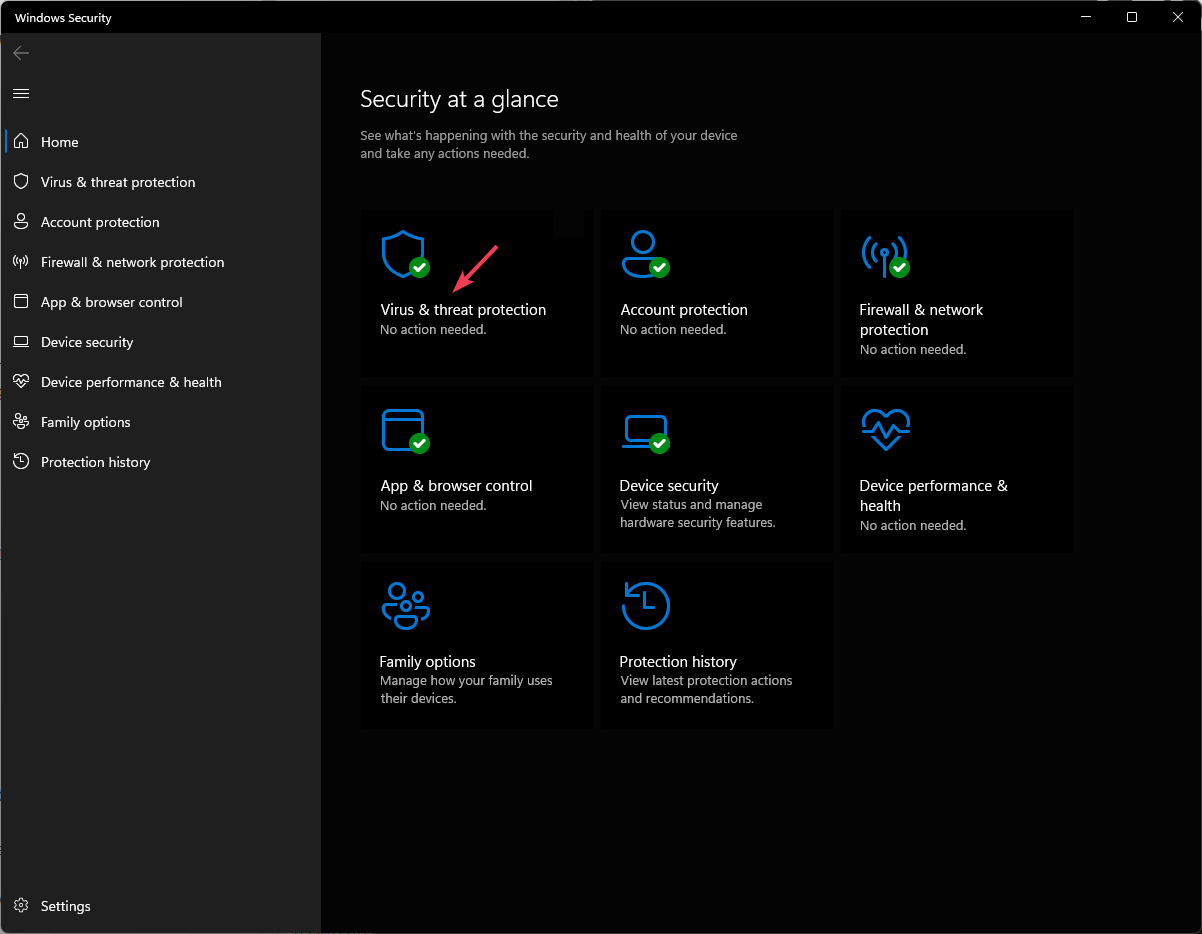
  4. Click the Open Windows Security button.Open Windows Security
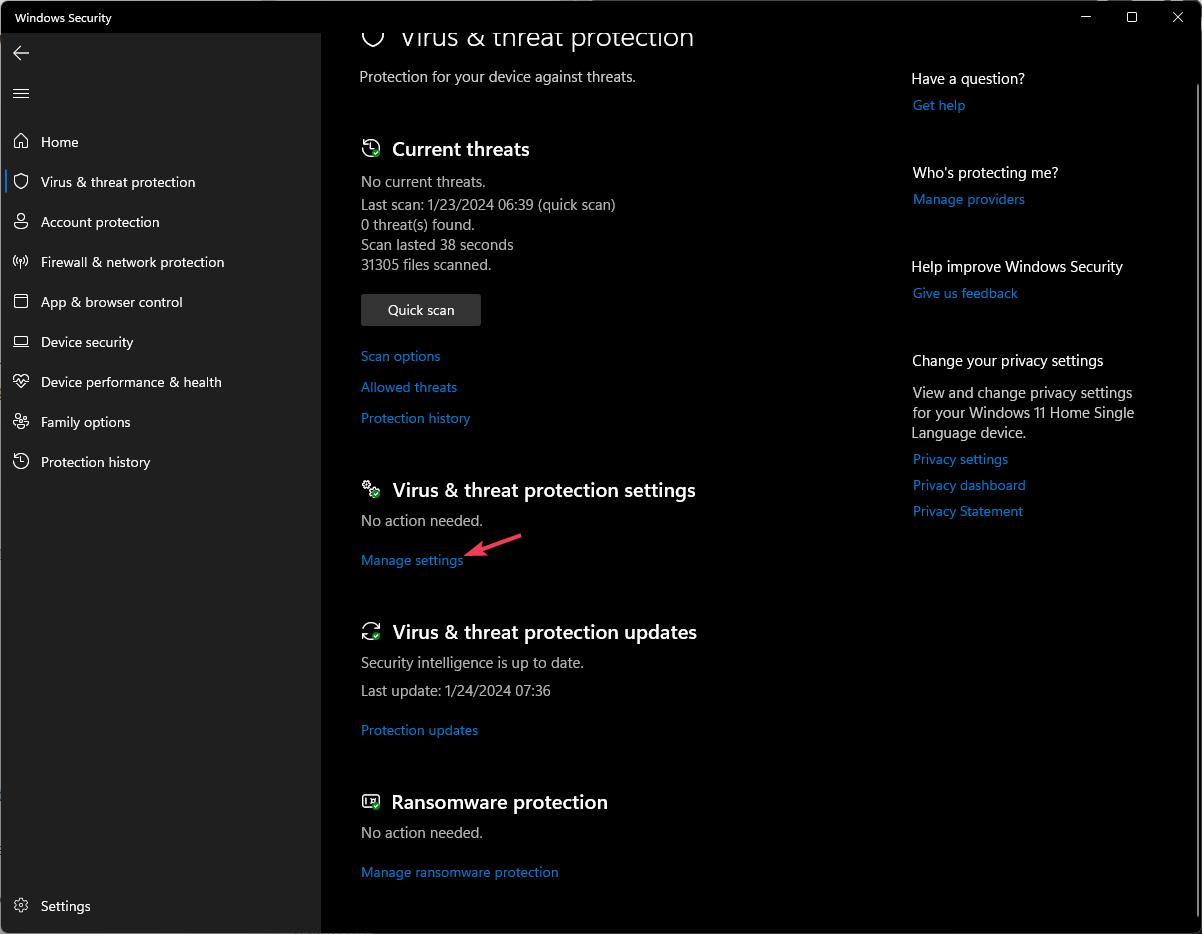
  5. Select Virus & threat protection.Virus & threat protection
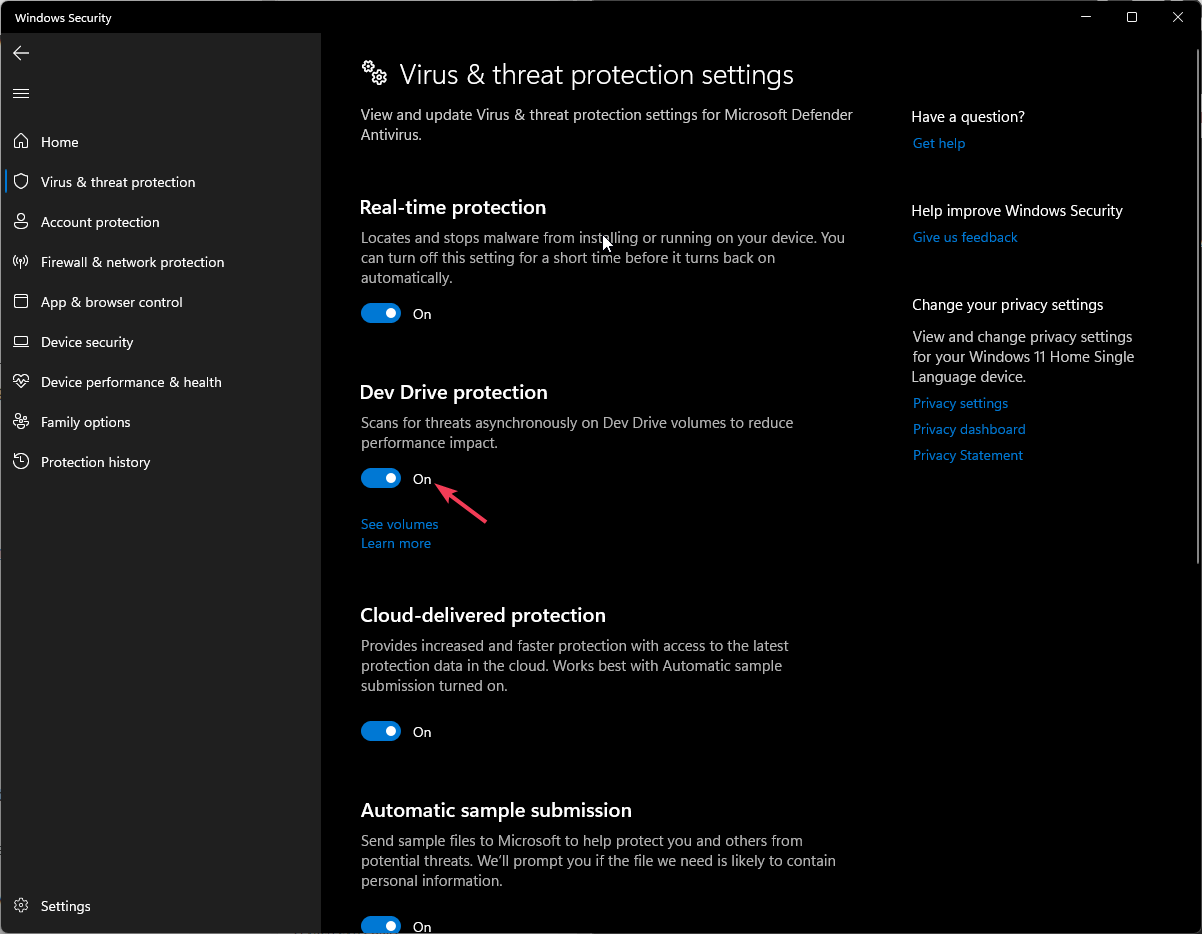
  6. Click Manage settings.Manage Settings
  7. Locate Dev Drive Protection and click the toggle switch to turn it on.Dev device protection windows 11

To turn off the feature from Windows Security, toggle off the switch anytime you like. In case you are wondering how you can set up a dev drive on Windows 11, we have a detailed guide to step-by-step process.

2. Using the Registry Editor

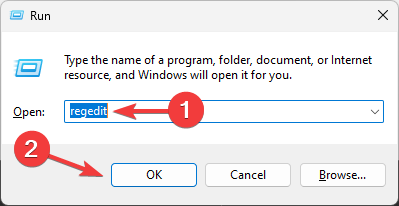
  1. Press Windows + R to open the Run dialog box.Regedit -dev drive protection windows 11
  2. Type regedit and click OK to open the Registry Editor.
  3. Before making any changes, you need to backup the registry entries. Go to File, then click Export. Save the .reg file in an accessible location.
  4. Go to this path: Computer\HKEY_LOCAL_MACHINE\SOFTWARE\Microsoft\Windows Defender\Real-Time Protection
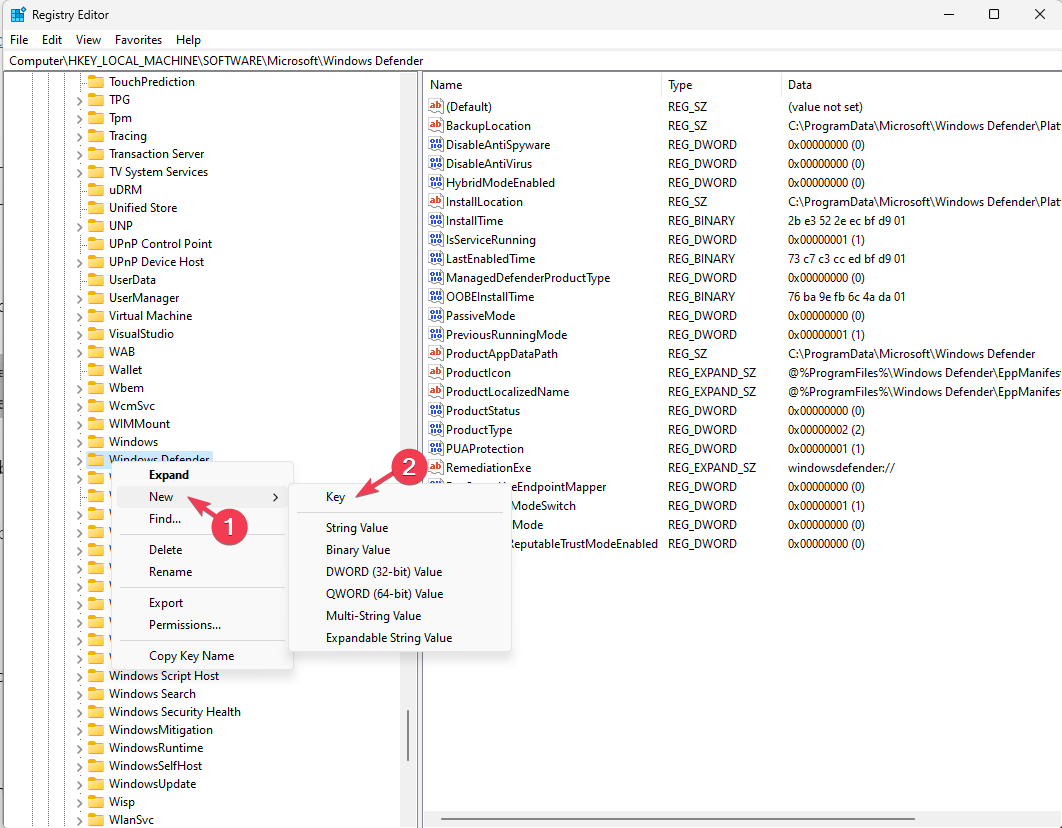
  5. If you don’t find the Real-Time Protection key, right-click Windows Defender and select New, then Key. Name it Real-Time ProtectionNew - key dev drive protection windows 11.
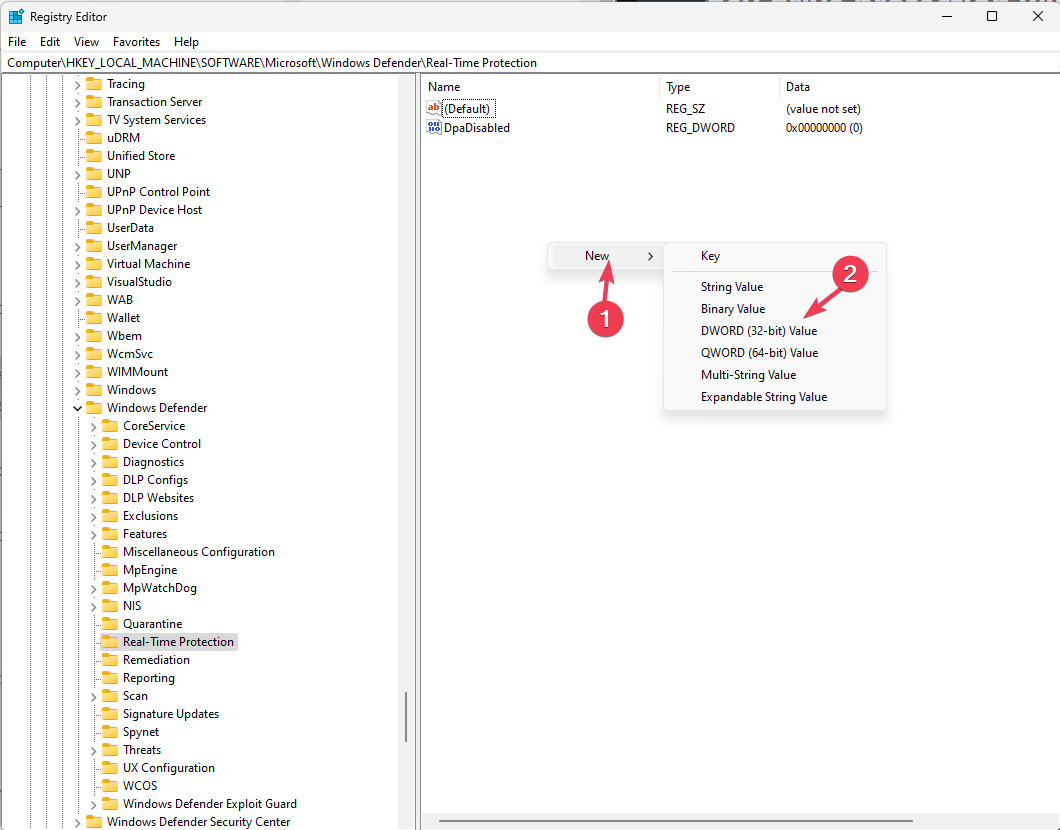
  6. Right-click the Real-Time Protection key, select New, then DWORD(32-bit) Value, and name it DisableAsyncScanOnOpen.New - dword
  7. Double-click the newly created DWORD, set the Value data to 0 to enable Dev Drive Protection, then click OK to save the changes.
  8. Restart your computer to save the changes.

If you ever want to disable the feature, go to the DWORD, double-click it, and this time change the Value data to 1, then click OK and reboot your PC.

In case you can’t create a Key or DWORD in the Real-time protection folder and encounter an error in writing the value’s new contents, it could be a permissions issue; read this guide to fix it.

In conclusion, you can use either Windows Security or Registry Editor to turn on or off the Dev Drive Protection feature. However, WR experts recommend choosing the former one as it is safer than the latter.

Before you leave, find out all about Windows SDK and start developing apps today! If you are not able to launch Windows Security on your Windows 11, you can try repairing the app; read this guide to learn more.

Which method would you prefer to enable the Dev Drive Protection feature on Windows 11? Feel free to mention it in the comments section below.

With KB5034203, Windows 10 22H2 becomes EEA-compliant

Microsoft released the KB5034203 to Windows 10, and with this patch, the Redmond-based tech giant officially started the process of making Windows 10 EEA-compliant.

If you remember, late last year, in November, Microsoft declared the intention to make Windows an EEA (European Economic Area)-compliant operating system, after the company was blacklisted in Europe due to it being considered as trying to monopolize the European market.

However, Microsoft announced its intention to turn Windows into an EEA-compliant operating system for various reasons, but one, in particular, is quite important: Copilot is not yet available in Europe, despite being released to Windows 11 in September 2023, and to Windows 10, in December 2023.

With Microsoft respecting European laws, the Redmond-based tech giant might release the AI tool on this market in 2024, and the company has to find a way to respect European regulation, if it wants to release the AI-based Windows to the region.

The KB5034203 is the first update to Windows 10 that renders the operating system EEA-compliant, and the process will be completed by March 6, 2024, so expect more updates with features that fit the European regulations.

In other details, the patch also brings the new lock screen experience to Windows 10: users will now get a detailed weather forecast on the lock screen, without having to log into the operating system at all. Plus, KB5034203 also comes with a lot of changes and improvements which you can read about below.

KB5034203: All the details

Highlights

  • This update addresses an issue that affects some single-function printers. They might install as a scanner.
  • New! The coming weeks will bring a richer weather experience to your lock screen. This includes dynamic, interactive weather updates. So, as you hover over the weather on your lock screen, you will see more information. When you tap or click on the weather card and sign in, Microsoft Edge opens with the full forecast in MSN weather. If you already use Weather in Settings > Personalization > lock screen > Lock screen status, there is nothing for you to do. Also, this new experience will be on by default if Lock screen status is set to “None.” Like today, lock screen status will be available when you lock your screen no matter which personalization option you select (Windows spotlight, Picture, or Slideshow).

Improvements

Important: Use EKB KB5015684 to update to Windows 10, version 22H2.

This non-security update includes quality improvements. When you install this KB:

  • Microsoft has been working to ensure compliance with the Digital Markets Act (DMA) in the European Economic Area (EEA). To learn more, see Previewing changes in Windows to comply with the Digital Markets Act in the European Economic Area. These changes will gradually roll out to Windows 10, version 22H2 PCs in the EEA to be compliant by March 6, 2024.
  • This update addresses an issue that affects an Internet Explorer shortcut. After you use a policy to remove it, the shortcut reappears.
  • This update addresses an issue that affects Windows Management Instrumentation (WMI). A caching issue occurs. The issue causes CurrentTimeZone to change to the wrong value.
  • This update addresses an issue that affects XPath queries on FileHash and other binary fields. It stops them from matching values in event records.
  • This update addresses a known issue that affects BitLocker data-only encryption. A mobile device management (MDM) service, such as Microsoft Intune, might not get the right data. This occurs when you use the FixedDrivesEncryptionType or SystemDrivesEncryptionType policy settings in the BitLocker configuration service provider (CSP) node.
  • This update addresses an issue that affects the Code Integrity Module (ci.dll). This issue stops your device from responding.
  • This update includes quarterly changes to the Windows Kernel Vulnerable Driver Blocklist file, DriverSiPolicy.p7b. It adds to the list of drivers that are at risk for Bring Your Own Vulnerable Driver (BYOVD) attacks.
  • This update affects Unified Extensible Firmware Interface (UEFI) Secure Boot systems. It adds a renewed signing certificate to the Secure Boot DB variable. You can now opt for this change.
  • This update addresses an issue that stops you from reconnecting to an existing Remote Desktop session. Instead, you get a new one.
  • This update addresses an issue that occurs when you change the keyboard language. The change fails to apply to RemoteApps in some scenarios.
  • This update addresses an issue that affects Windows Local Administrator Password Solution (LAPS) Post Authentication Actions (PAA). The actions occur at restart instead of at the end of the grace period.
  • This update addresses an issue that affects Active Directory. Bind requests to IPv6 addresses fail. This occurs when the requestor is not joined to a domain.
  • This update addresses an issue that affects the LocalUsersAndGroups CSP. It stops processing group memberships if it cannot find a group.
  • This update addresses an issue that affects deleted cloud files. When a cloud provider vetoes a deletion request, the files might still be removed.
  • This update addresses an issue that affects MSIX applications. They do not open, and, in some cases, they make the host unresponsive. This occurs when they use MSIX App Attach with a CimFS image.
  • This update addresses an issue that affects Group Policy Folder Redirection in a multi-forest deployment. The issue stops you from choosing a group account from the target domain. Because of this, you cannot apply advanced folder redirection settings to that domain. This issue occurs when the target domain has a one-way trust with the domain of the admin user. This issue affects all Enhanced Security Admin Environment (ESAE), Hardened Forests (HF) or Privileged Access Management (PAM) deployments.
  • This update changes a setting in Active Directory Users & Computers. By default, the snap-in now uses a strong certificate mapping of X509IssuerSerialNumber. It does not use the weak mapping of x509IssuerSubject.

The game changer AI-powered Auto Super Resolution might finally be coming to Windows

The AI-powered Auto Super Resolution feature might finally be coming to Windows soon, as the Windows Insider @XenoPanther spotted certain strings that were added in the Microsoft DirectX Graphics WDI Handler file (dxgwdi.dll.mui).

According to the spotter, the strings read:

Change some settings for %1 to use Auto Super Resolution. Select this message to learn more. We changed some settings so you can use Auto Super Resolution. Restart %1 for the changes to take effect.

Back in November 2023, @XenoPanther was the first to spot that this exciting feature might be added to Windows 11 in a future update when the Microsoft DirectX Graphics WDI Handler file mentioned the Auto Super Resolution feature in a hidden string.

But now, it all seems more plausible: with Copilot here, and Microsoft announcing that 2024 will be the year of AI for Windows, the AI-powered Auto Super Resolution makes sense, and it won’t be a surprise if the Redmond-based tech giant will add it to Windows 11 in the following months?

What’s the hype about it, you might ask? Well, let us explain.

Why would Auto Super Resolution be a game-changer in Windows?

The existing Super Resolution feature allows for enhancing an image’s quality beyond its original resolution or size.

In other words, if you have an image that looks good on its original resolution but greatly loses its quality once you place it in a higher resolution, you could use this feature to enhance the image in such a way it wouldn’t lose its quality after getting it to your preferred resolution.

The feature makes use of certain technologies to enhance the density of pixels and create new ones through AI, effectively making the image sharper and better, overall.Auto Super Resolution Windows

The Auto Super Resolution feature in Windows would allow users to automatically fix such images, natively, without having to resort to third-party apps to do so.

Not only that, but it can also be a great way to increase Windows 11 popularity, as it offers features that would cater to a lot of creating professionals, and Microsoft has been releasing several updates in this regard, including the layer background and the Cocreator features to Microsoft Paint.

So, without a doubt, Auto Super Resolution will most likely be released to Windows 11 in the following months.

Microsoft Teams Gallery latest update brings new AI features

Microsoft recently updated the Gallery feature set for its enterprise chat app Team with some new artificially intelligent-led tweaks.

Customizable Meeting Views

The January update for Microsoft Teams online brings a new default Gallery experience where it places attendees in equal (16:9) tiles independent of their video feed being on or off. For participants there will still be a circle with their initials or profile pic present, but their presence is in equal framing as every other meeting attendee.

Microsoft also promises that the new default Gallery view will be “more consistent and predictable for all meetings, regardless of size and content shape.”

According to Microsoft, AI will be used to optimize the Gallery view for all default configurations, for instance, enhancing the view and prioritizing virtual participants with raised hands and active speakers.

Another subtle effect that has been added is a room expansion when a Teams Room joins the meeting.

The same manual configuration controls still exist, and users can tweak their view to their preferences by using the More Options menu prompted by a hover-over when in a meeting.

Other manual tweaks include shifting the number of viewable attendees which currently rest at sixteen in the default view. Users can choose between 4, 9, 16, and in rarer cases, forty-nine participants to be viewable on a single screen.

Users can now remove their own distracting virtual meeting tile as it remains in place for all other attendees so that participants can see customers while the reflecting tile is hidden from the stream.

Microsoft Teams customers can also rearrange their profile tile by removing it from the main gallery or shift it to either side of the main gallery for a more moderate computing experience.

Users can also show a bit of favoritism for those who are willing to cast their video feed with a new customization method that includes prioritizing tiles with video on in the updated Gallery view.

In addition to Gallery view adjustments, there are new color scheme options for the Teams interface that include a new Light Theme enabling a brighter viewing experience.

Simplified Meetings

Lastly, there have been some improvements made to the calendar and meeting joining experience that help to streamline the process such as including more meta data for participants presented in a new card invite with clearly marked content that include bolder text to highlight contextual data.

Microsoft has also shortened the invite links, which is cleaner than the previous one. Unfortunately, the shortened link update won’t be available until the second half of 2024.

Microsoft Teams for Work and Personal are getting a bit more interoperable with a tweak to the invite and join process between the two.

We’re also simplifying the experience of joining meetings across your different Microsoft accounts, with the ability to seamlessly join Teams (free) meetings from Teams for work and vice versa. This enables Microsoft Teams (free) users, those using a personal Microsoft Account, to directly join Teams for work meetings from within the client and stay connected even after the meeting has ended. This capability similarly enables Microsoft Teams (work or school) users to join the Microsoft Teams (free) meetings directly from within the client. With this simplified experience, you are no longer prompted to join via a browser and treated as a meeting guest (anonymous). This capability will be available in February.

Microsoft

Better Audio and Video controls

Users will also be greeted with a new audio and video settings experience that involves flyout menus to stream inline adjustments. Going forward when users venture to adjust their camera or mic settings a new flyout will appear during meetings that allows them to change their volume, spatial audio, and level of noise suppression.

Users can also adjust their backgrounds, blur, soft focus, and brightness in real-time during the meetings through the new audio and video flyout menu, as well as accessing Teams avatars for those instances they don’t want to be on screen at all.

Microsoft also made an adjustment to its Together Mode by moving participants to the bottom of the screen when in presentation or content sharing modes.

Most of the new Microsoft Teams features were made generally available yesterday January 22, 2024.

The new Outlook will support the EML, MSG, and OFT formats, and here is why it matters

Good news for Outlook users: the emailing platform will support the .eml, .msg, and .oft file formats, starting March 2024, according to the latest entry in the Microsoft 365 Roadmap.

Next month will be quite the month for the platform, as the Redmond-based tech giant is also revamping it with a new UI experience, that includes a new ellipsis icon capable of quickly letting users edit, and compose folders and subfolders, a new menu experience, plus the removal of the creation links.

These features are meant to offer a new comprehensive experience on Outlook, focusing on accessibility, and efficient workflows, and the latest format additions to the platform are a testament to that.

EML, MSG, and OFT files type support will enable users to open “*,eml”, “*.oft”, and “*.msg” files in the new Outlook by dragging-and-dropping them onto the reading pane, or by double-clicking on them, or by using the Open With menu option in File Explorer.

Microsoft

Why does Outlook supporting the EML, MSG, and OFT formats matter?

The EML, MSG, and OFT formats are legacy formats, so Outlook supporting them means users can access older emails with these formats on Outlook, without resorting to third-party apps to do so.

In other words, users can access legacy formatted emails on Outlook, by dragging and dropping them into the platform, or by simply double-clicking on them, as Microsoft mentions in the Roadmap description.

The 3 formats are quite comprehensive and they encompass a variety of legacy emails specific to Microsoft Outlook. The .EML format, for instance, is widely used to archive emails, while the .MSG format stores emails with attached files to them. The .OFT format is also similar as it stores email templates.Outlook EML MSG OFT

All of these formats are used for archiving emails, and for now, the new Outlook can’t open them, as there is no efficient backward compatibility. But this is about to change in March when Outlook will finally be able to fully and properly support them.

Thus, the platform will offer enhanced accessibility which could make the platform a more popular choice for organizations, and individuals.

Fix: Cloud Path Error Authorization [Roku, TV & PC]

The cloud path error authorization refers to an error message that may occur on Roku devices, TVs, and PCs when attempting to access certain channels or services.

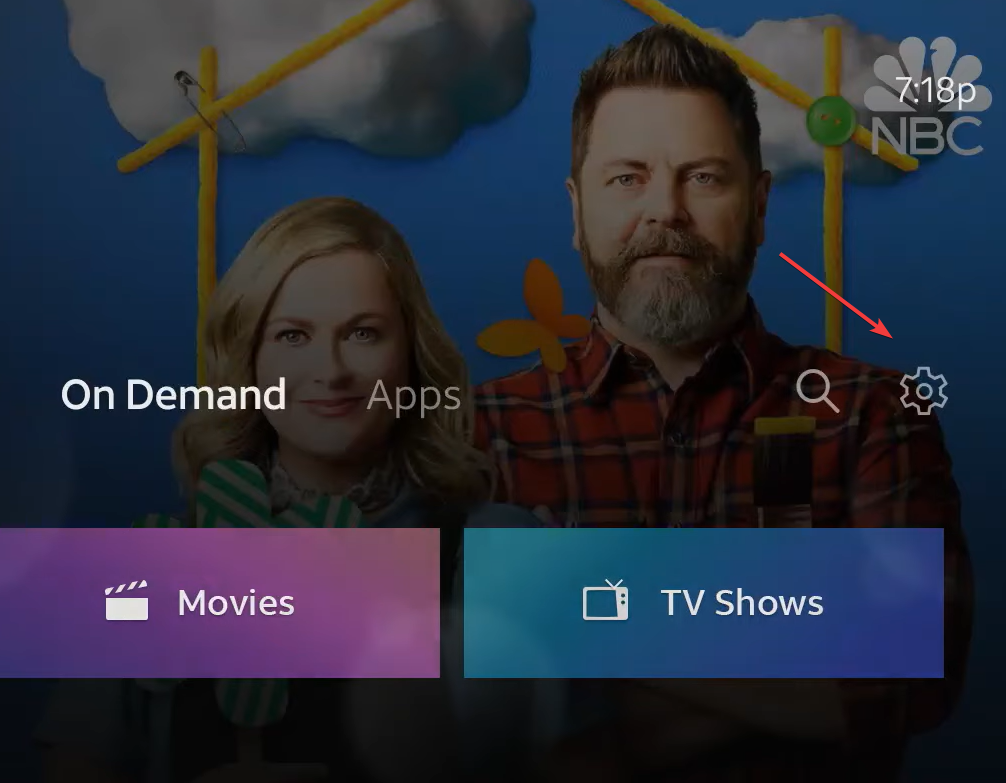
Usually, it’s an issue with logging into the subscription management service used by certain channels, such as the NBC channel.

How can I fix the cloud path error authorization on Roku?

1. Restart Roku

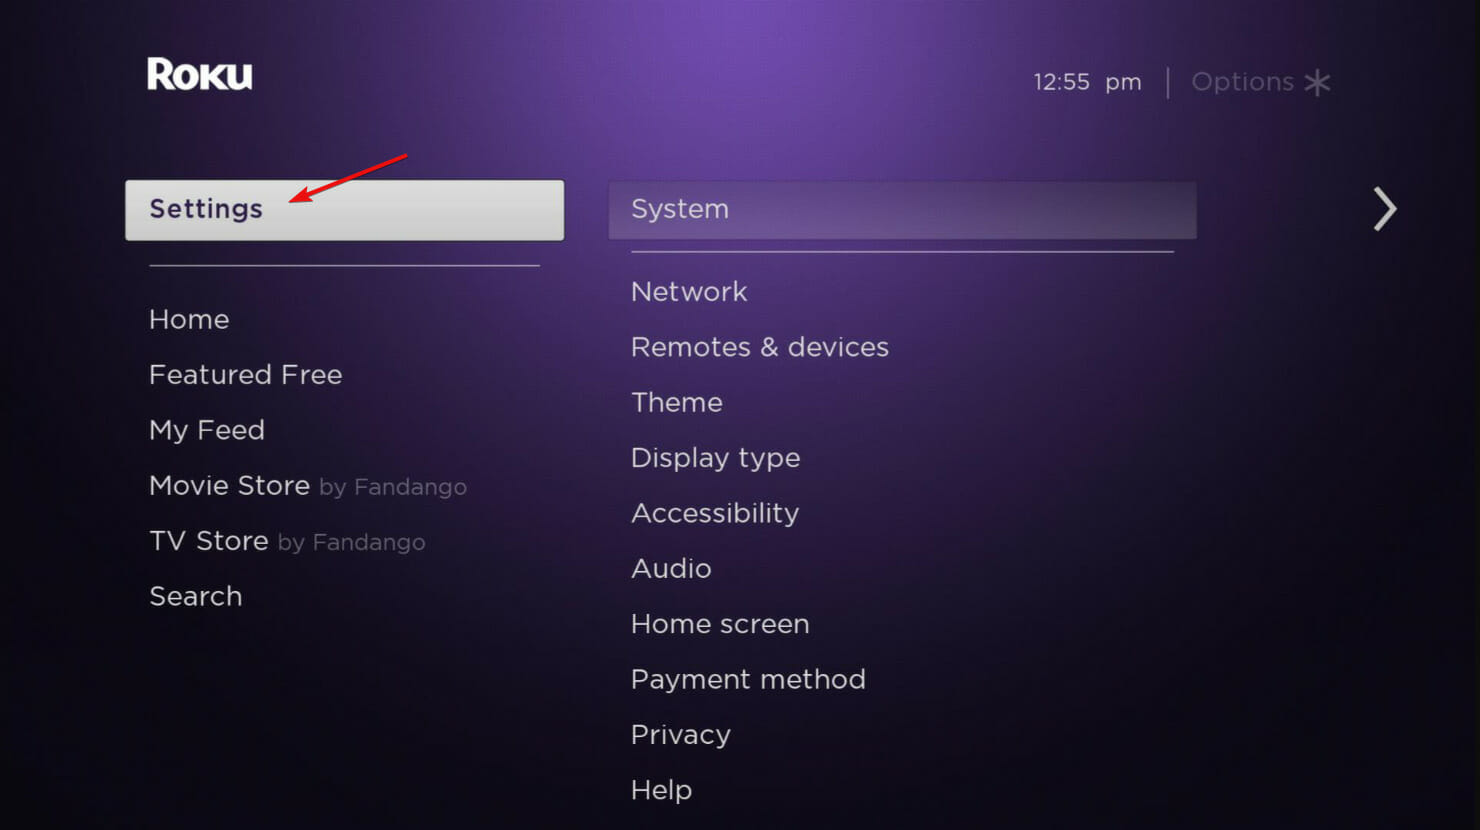
  1. Press the Home button on your Roku remote.
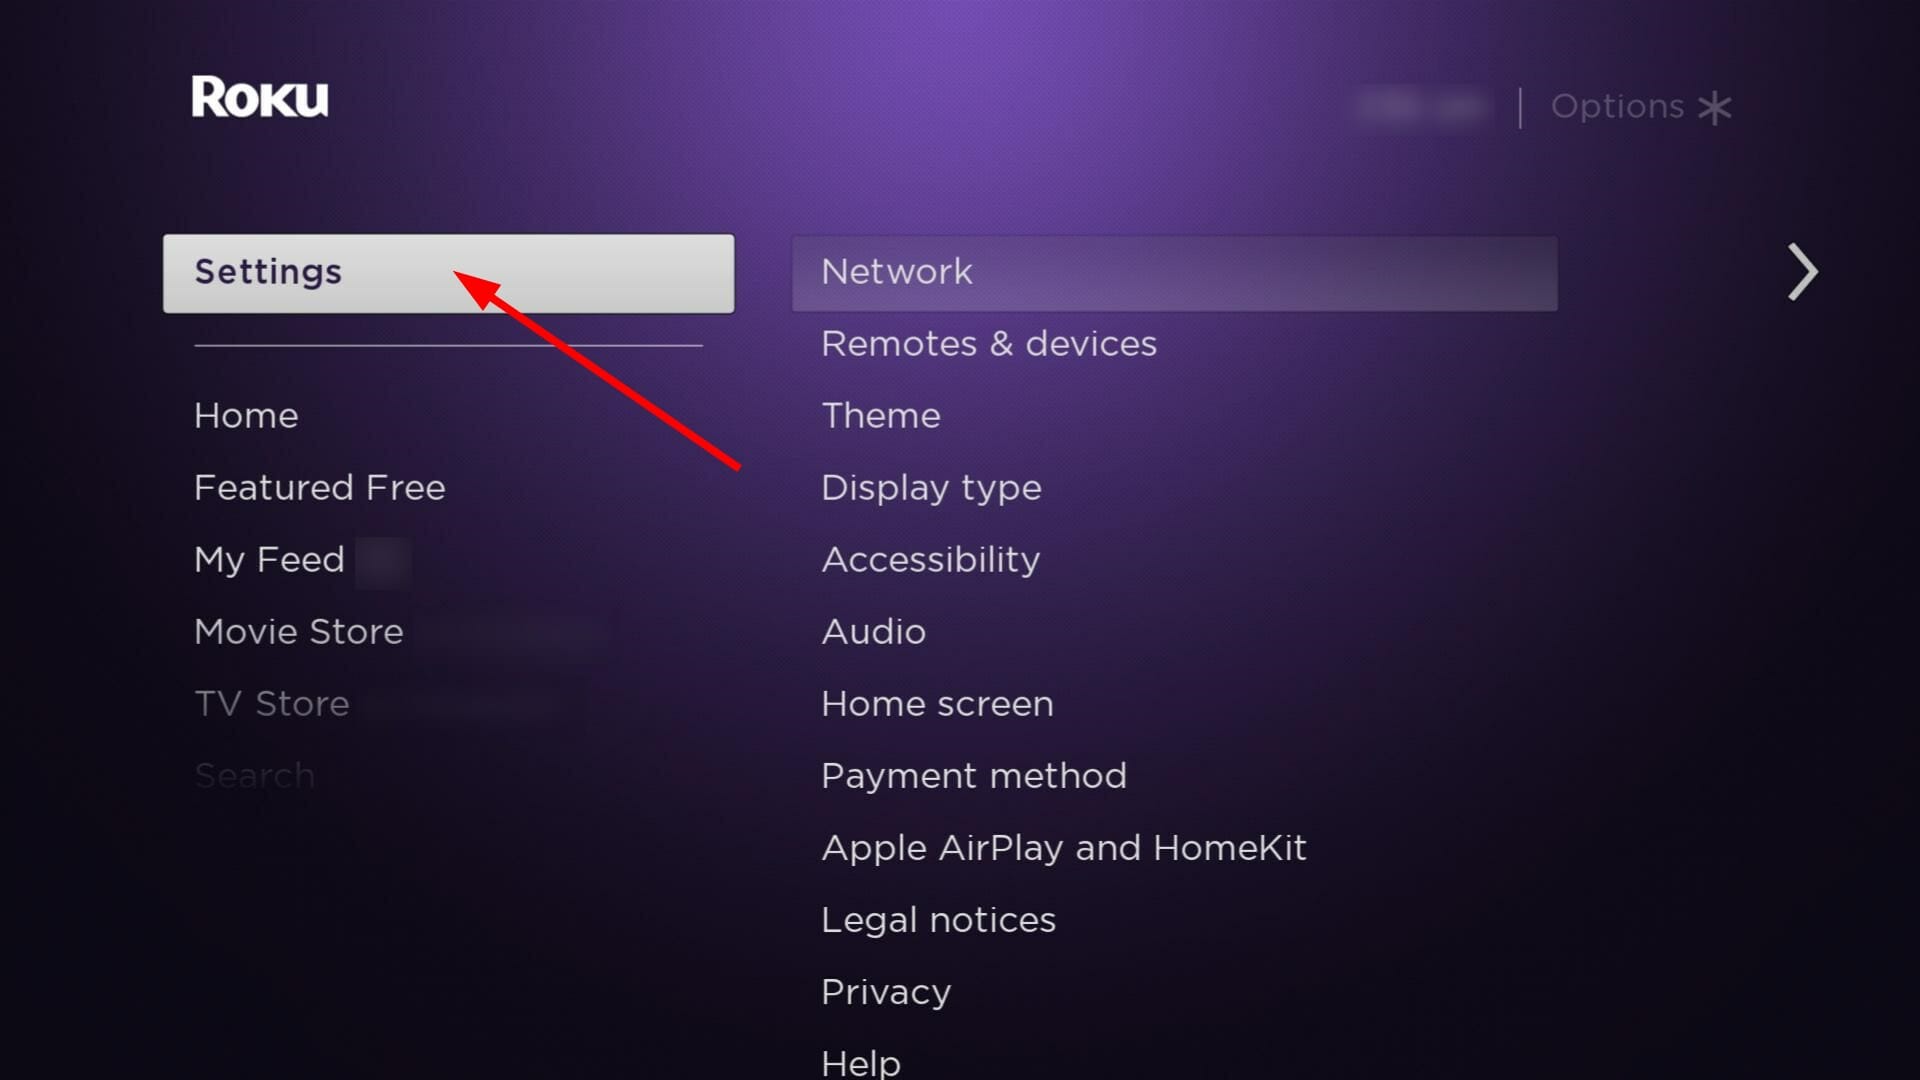
  2. Select Settings.roku connected to Wi-Fi but not working restart
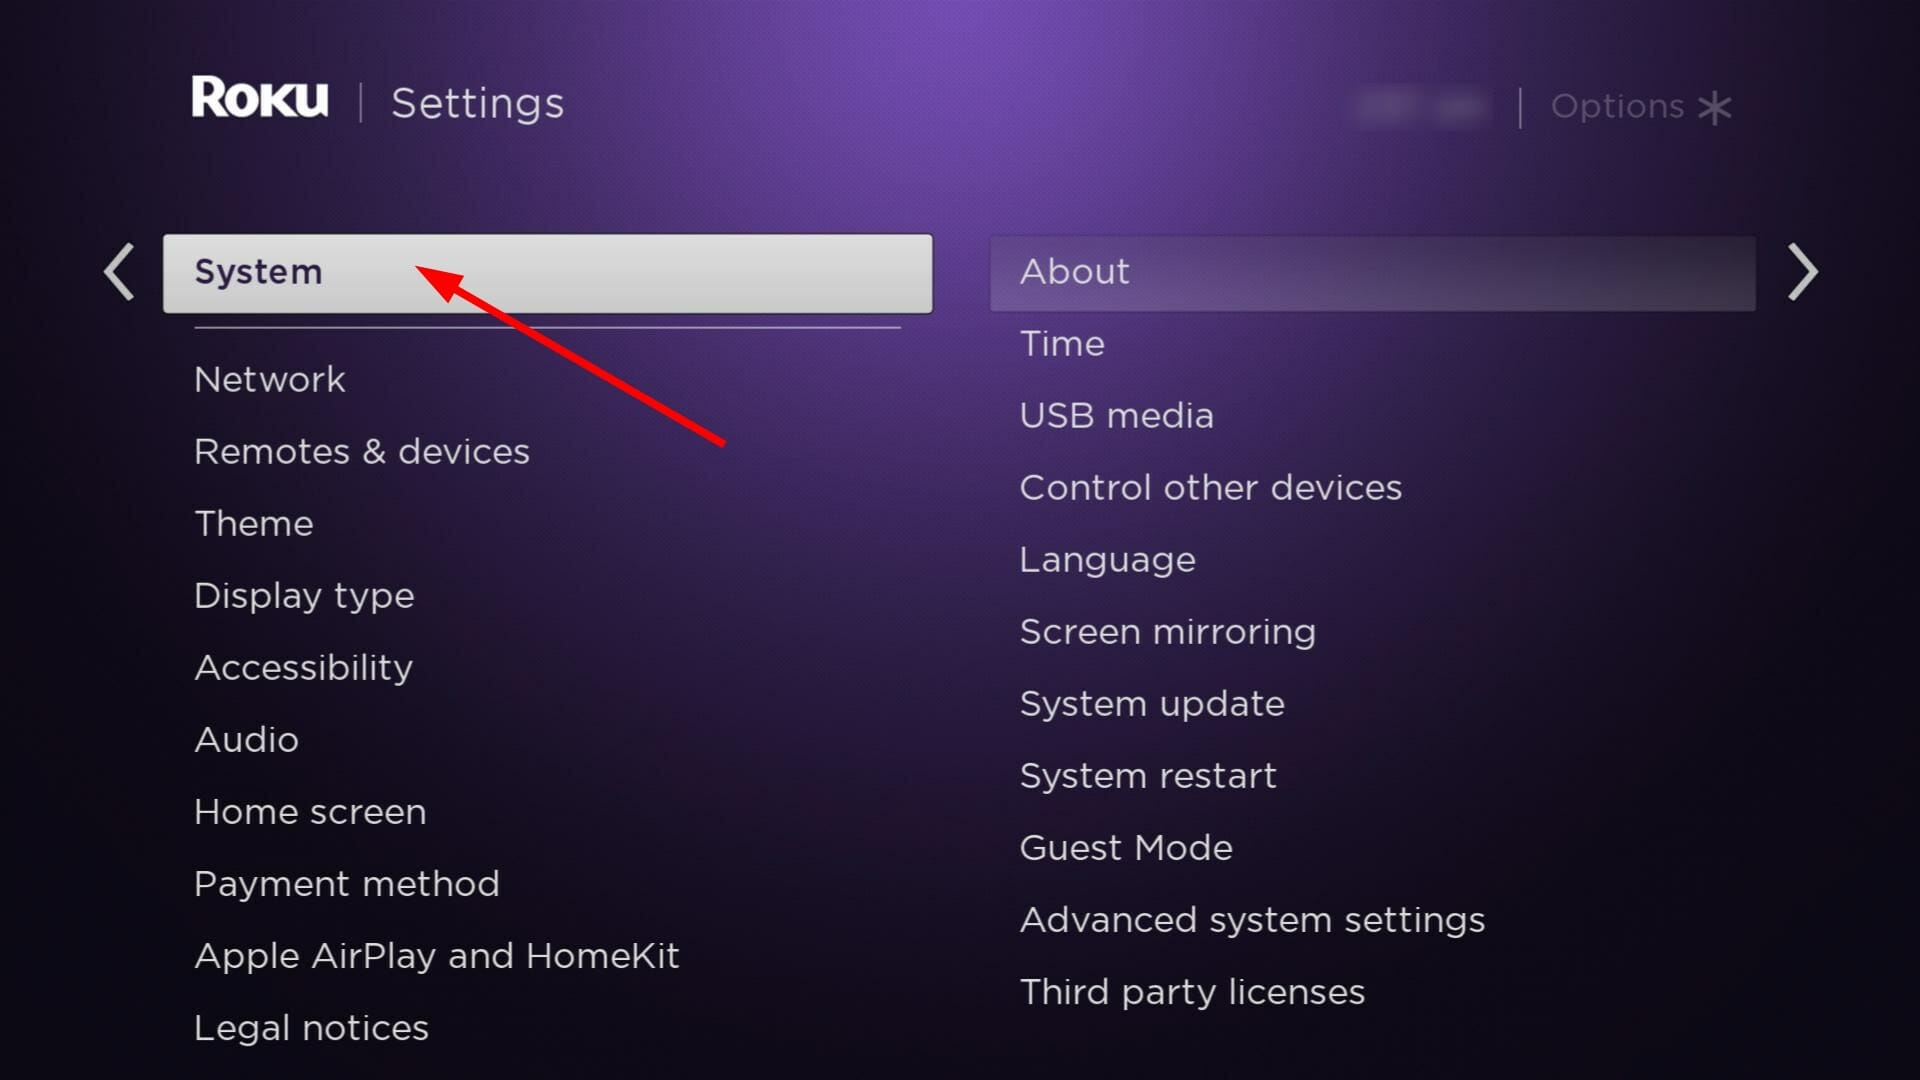
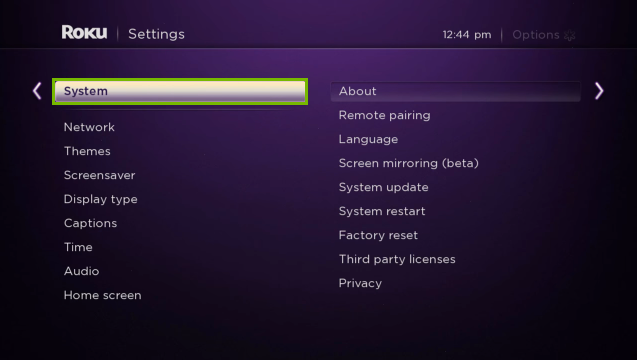
  3. Choose System.roku connected to W-fi but not working system
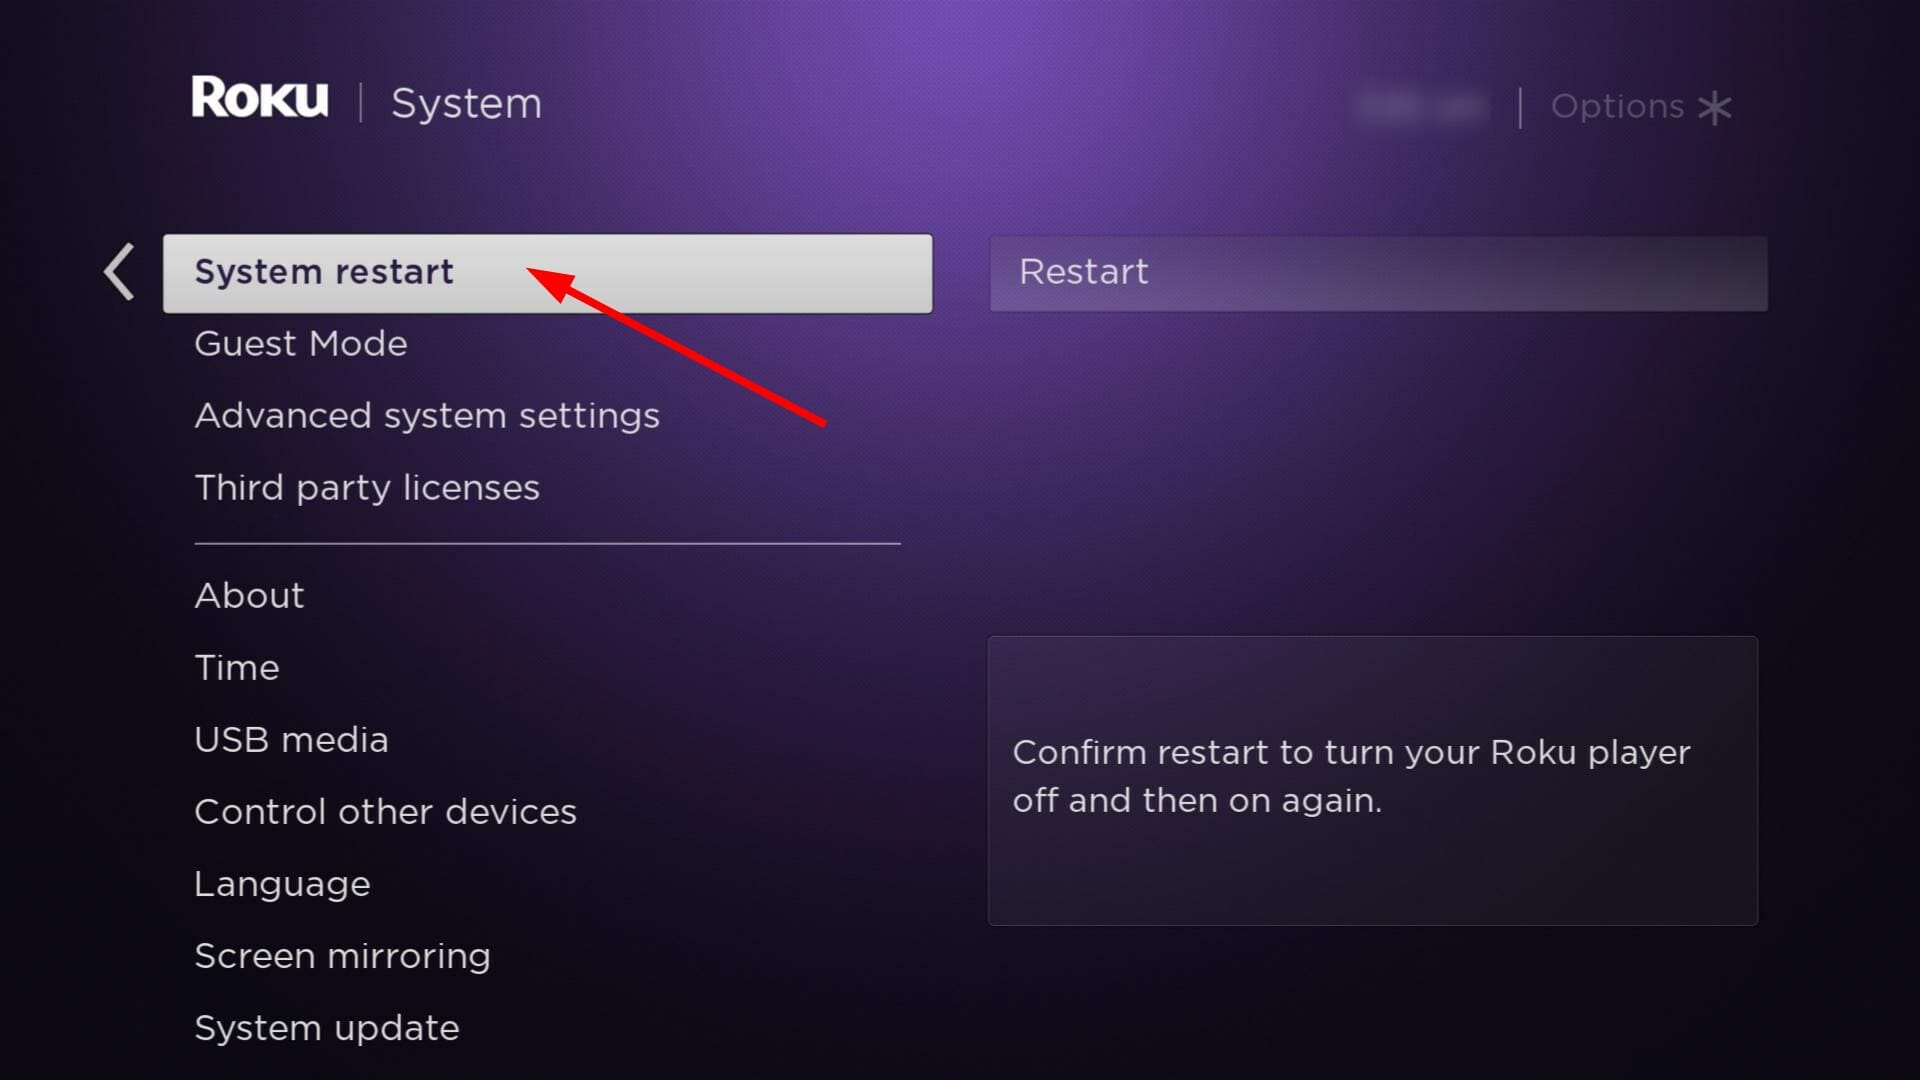
  4. Select System Restart.roku connected to wi-fi but not working system restart
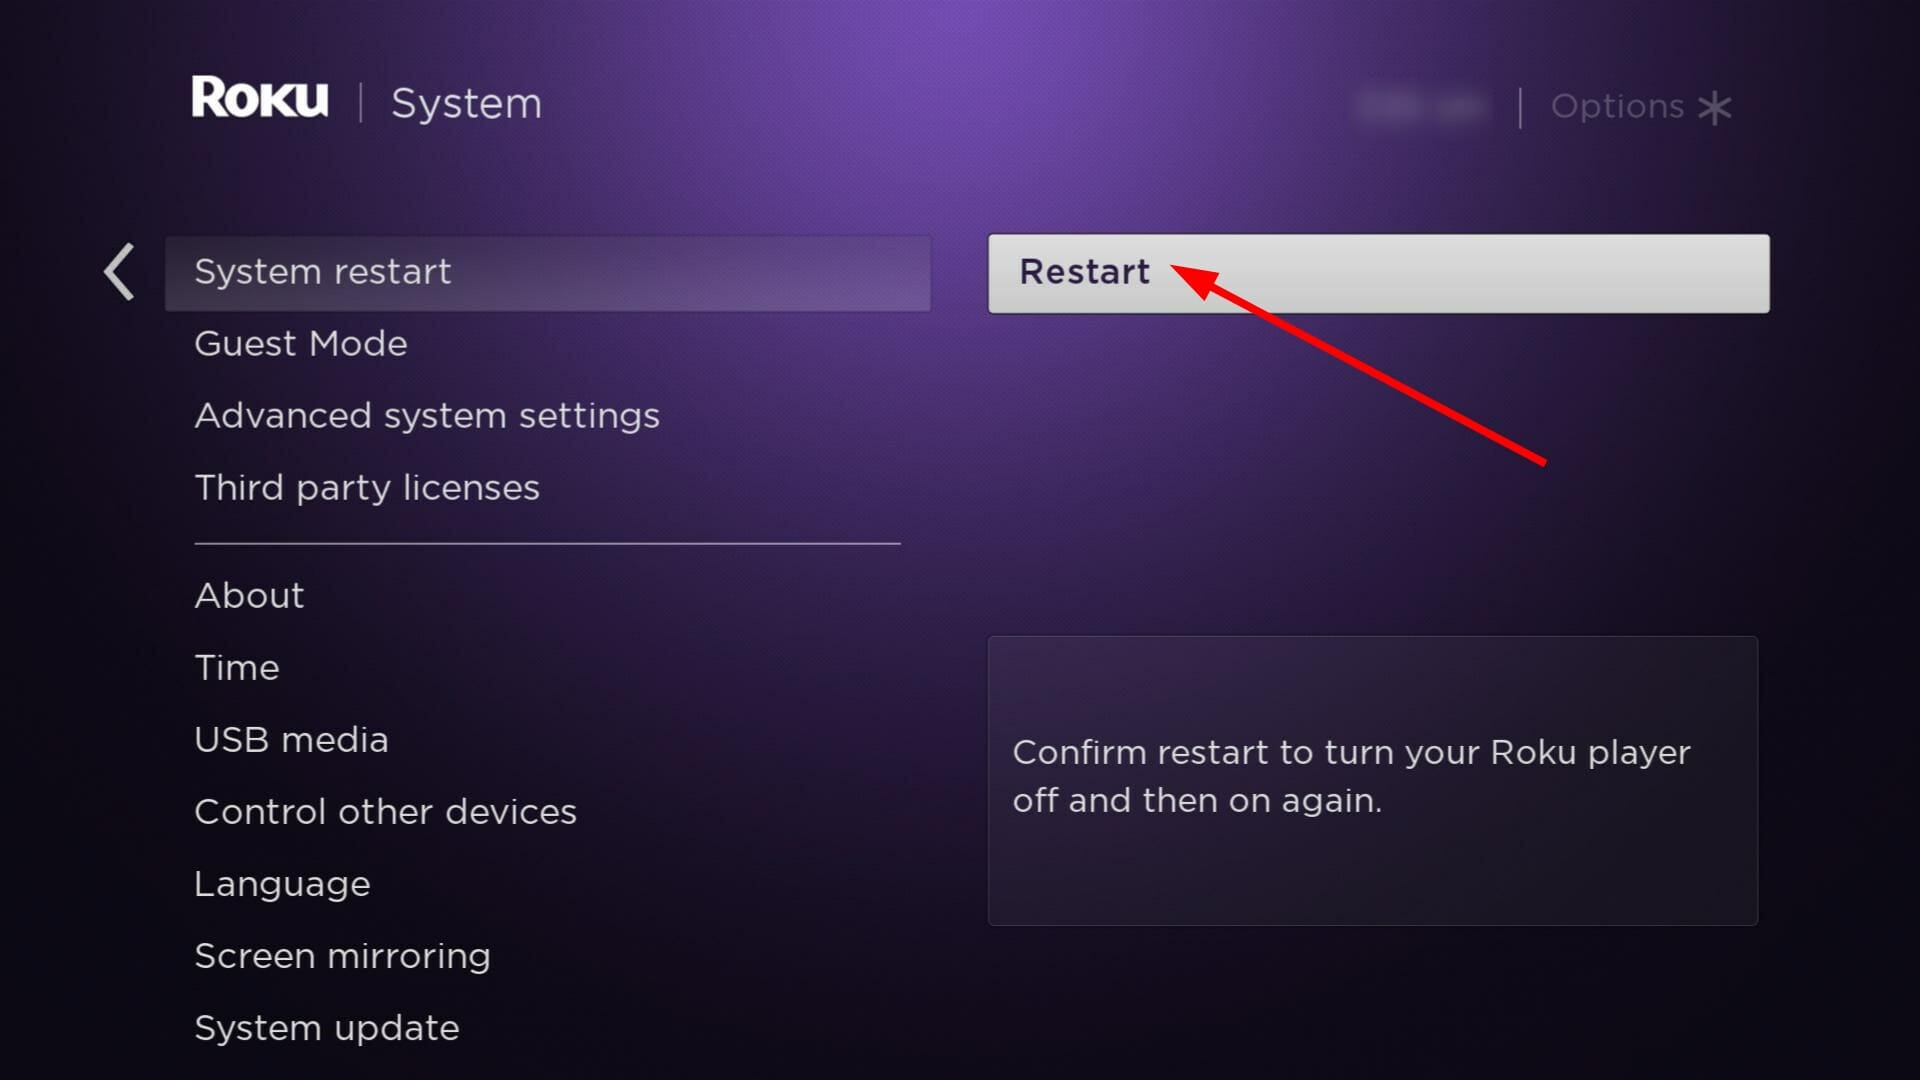
  5. Finally, choose Restart.restart roku

Sign out of your account on the affected device, and then sign back in. This can help refresh the authorization token and resolve the error. Also, make sure your internet connection is working properly and your device is connected to the same network as your computer or mobile device.

2. Remove and re-add the problematic channel

  1. Press the Home button on your Roku remote.
  2. Use the navigation keys to move to the right and highlight the channel in question (NBC in this case).
  3. Press the * Star button on your remote to open the options menu.
  4. Select the Remove channel option and confirm when prompted.
  5. Press the Home button on your Roku remote.
  6. Scroll down and select Streaming Channels.
  7. Enter NBC in the search bar to search for the channel.
  8. Press OK and then select Add Channel to install NBC.
  9. Once installed, launch it and check for any improvements.

3. Clear browser cache and cookies

  1. For this step, we shall be using the Chrome browser.
  2. Launch your Chrome browser and click the three vertical ellipses in the top right corner.
  3. Select Settings.Settings CHrome
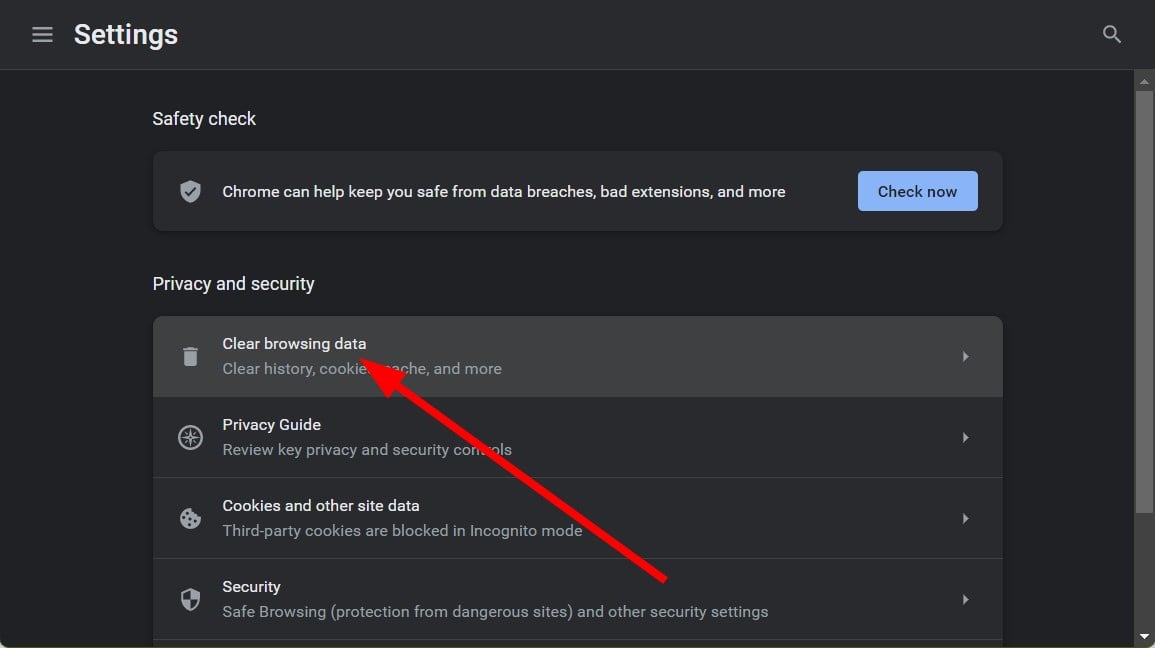
  4. Click on Privacy and security, then select Clear browsing data.
  5. Check Cookies and other site data and Cached images and files, then hit Clear data.Clear data

Alternatively, you can switch to a Roku-recommended browser and see if you’ll be lucky enough to get rid of the cloud path error authorization.

4. Factory reset Roku

  1. Press the Home button on the Roku remote.
  2. Go to Settings.
  3. Select System.
  4. Select Advanced system settings.
  5. Choose Factory reset.
  6. Select Factory reset everything and follow the on-screen instructions.

This can also help resolve any issues with screen-mirroring your Roku.

5. Contact support

If none of these steps resolve the issue, reach out to Roku’s support or the specific app’s support team. But before you reach out, make sure to have relevant information on hand.

This includes the device you are using, the specific error message you are seeing, and any troubleshooting steps you have already taken.

Unfortunately, the NBC channel is notoriously known for authentication errors so hopefully, this one too shall be a smooth sail with one of our recommended solutions.

If you’ve encountered this error before and have another solution we’ve failed to mention, feel free to leave a comment down below.

Variable Refresh Rate: Should You Turn it On or Off?

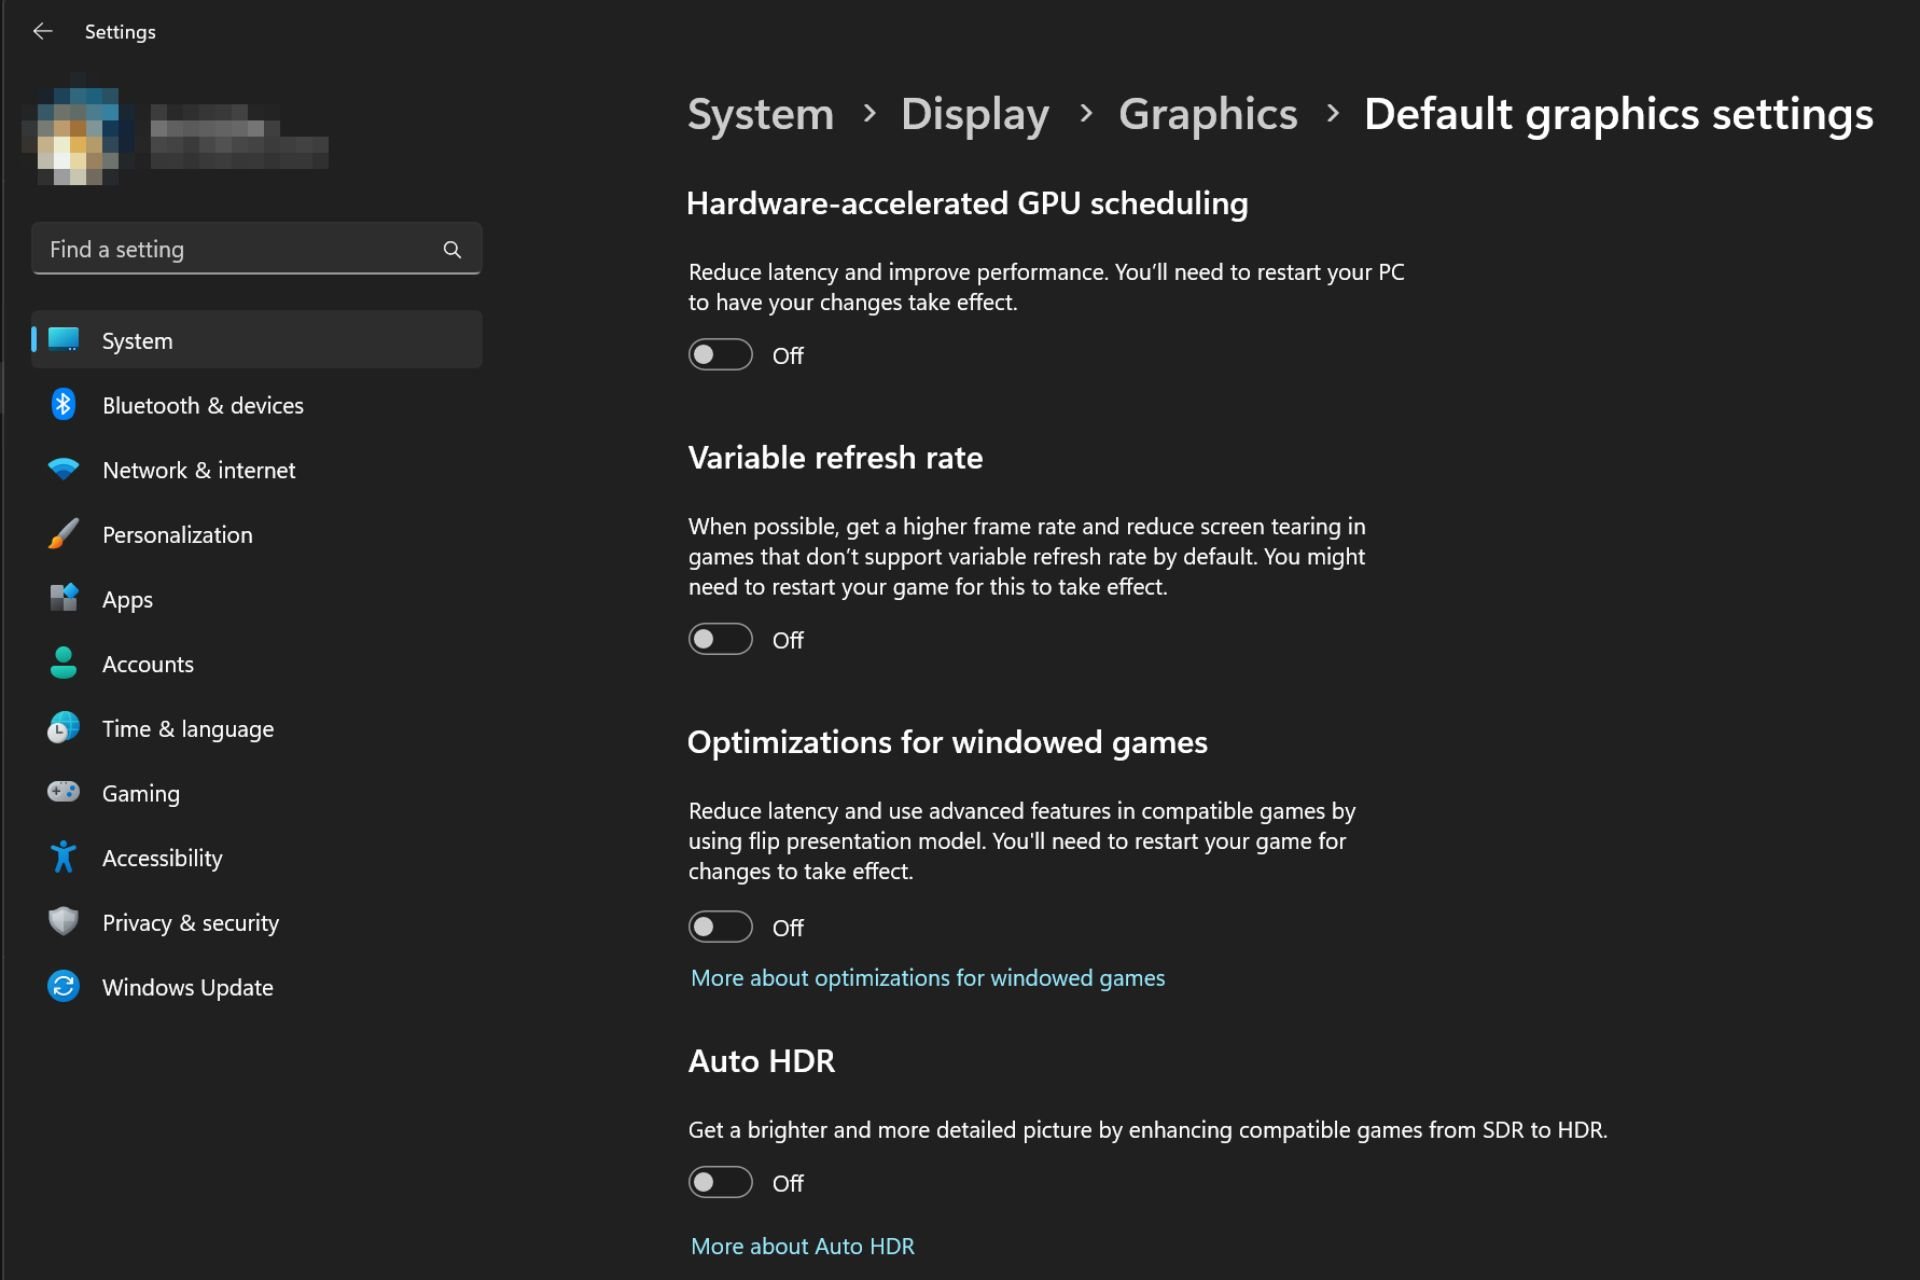
If you game a lot, the variable refresh rate (VRR) is a technology that may be of interest to you. It allows your display to change its refresh rate dynamically to match the refresh rate of the content being displayed.

Is it better to have variable refresh rate on or off?

1. Advantages of turning on variable refresh rate

  1. Smoother gaming experience: No one likes interrupted gameplay so if a feature promises an uninterrupted session, best believe we’re going for it. VRR synchronizes the frame rate of your graphics card with the refresh rate of your monitor. This eliminates screen tearing and stuttering that can occur when the frame rate and refresh rate are out of sync.
  2. Reduced input lag: In competitive games, the delay between your actions and the corresponding on-screen response can play a huge role in you losing or winning. By dynamically adjusting the refresh rate, VRR can provide more responsive gameplay.
  3. Compatibility with different display technologies: If you have a compatible monitor and graphics card, you can take advantage of VRR to enhance your gaming experience. Both NVIDIA G-Sync and AMD FreeSync, which are widely adopted in gaming displays support VRR.
  4. Flexibility to varying frame rates: Whether your frame rate is high or low, VRR adapts to varying frame rates. This flexibility results in smoother visuals and improved image quality.

2. Disadvantages of turning on variable refresh rate

  1. Limited compatibility: In some cases, VRR implementation may not work well with certain games or hardware configurations since not all displays support VRR. Make sure to check if your monitor includes support for either G-Sync or FreeSync technology before considering turning it on.
  2. Capped refresh rates: Older displays often have lower maximum refresh rates compared to newer ones. If you enable VRR on a game with high frame rates, it may not be able to take full advantage of the variable refresh rate capability, because of its limited hardware capabilities.

It is worth noting that individual preferences and hardware configurations may vary. In some unique situations, you may have to disable VRR if you experience compatibility issues with your system or performance limitations in certain games.

Additionally, if you are not a gamer, turning on VRR may not make much sense as most everyday computer usage does not require VRR technology. However, these cases are more exceptional. From where we sit, keeping VRR enabled generally outweighs the disadvantages of disabling it.

Does VRR cause input lag?

While it is true that there can be variations in input lag among different displays and VRR implementations, the overall impact of VRR on input lag is generally minimal and almost insignificant. In some cases, it may even improve input lag compared to fixed refresh rate displays.

It is best to assess the trade-offs and consider the specific needs of your gaming setup before making a decision. Ultimately, turning VRR on or off will depend on your specific needs and use case.

If you primarily use your computer for gaming, turning on VRR may improve your gaming experience. This is especially because V-Sync tends to lower FPS. But, if you are a casual user without demanding graphical requirements, turning on VRR may not be necessary.

Instead of battling with a black screen after changing your refresh rate, or your refresh rate won’t change let VRR do it for you.

Have you tried the variable refresh rate technology while gaming? Would you say there was a considerable gaming improvement? Let us know in the comment section below.

6 Best Code Editors for Low-End PC

Whether you are a beginner looking for a lightweight code editor or a professional looking for optimizing performance, you need to find the right code editor.

In this guide, we will discuss the best code editors for your low-end PC to help you strike a balance between resource efficiency and functionality.

What are the best code editors for low-end PCs?

Code EditorProgramming language supportedPlatform supported
Visual Studio Code JavaScript, Python, Java, Markdown, JSON, Powershell, PHP, YAML, C, C#, CSS, TypeScriptWindows 10 or later, macOS 10.11 or later, and Linux
Notepad++C, C#, C++, XML, Java, HTML, JavaScript, PHP, RC fileWindows
Sublime Text Java, Python, C, CSS, HTML and JavaScriptWindows, macOS, and Linux
Code::BlocksC, C++, and FortranWindows, macOS, and Linux
GNU EmacsC & C++, Java, Python, Ruby, JavaScript, HTML & CSS, Fortran, XML, PHP, TeX & LaTeX, SQL, Haskell & moreWindows, macOS, and Linux
GeanyC, C++, Python, Java, HTML, Ruby, CSS, PHP, Go, JavaScript, Swift, Perl, Haskell, Fortran, Shell Scripting languages (e.g., Bash), & moreWindows, macOS, and Linux

Visual Studio Code – Unmatchable performance and extensive customization

VS code - best code editors for low end pC

Visual Studio Code is free, built on open source, and comes with a wide range of extensions. This best code editor for low-end PCs comes with IntelliSense, which helps you complete a code on the basis of function definitions, variable types, and modules.

It allows you to debug code right from the editor by attaching your running apps using call stacks, breakpoints, and an interactive console.

Visual Studio Code works efficiently with a number of SCM providers, including Git, which means you can push and pull from any compatible service with ease.

With Microsoft Azure support, it allows you to deploy and host your Angular, Node, React, Vue, and Python sites easily.

Other features of Visual Studio Code

  • Offers a rich set of extensions
  • Supports many programming languages, including Python, Java, C and C#
  • Compatible with Windows, macOS, and Linux
  • Easy to use and comes with an intuitive interface

⇒ Get Visual Studio Code

If you have decided to go with Visual Studio Code and downloaded it on your computer, then check out this guide to learn about the extensions you should install to improve productivity.

Also, if you want to get familiar with this software, why not start with our guide on how to open multiple files in Visual Studio Code?

Notepad++ – Allows to compare text files side by side

Notepad++ - best code editors for low end pC

Notepad++ is a free source editor and a great replacement for Notepad. It supports a number of programming languages, including C, C#, C++, XML, Java, HTML, JavaScript, PHP, a makefile, INI file, batch file, SQL, VB/VBS, CSS, Objective-C, Pascal, Python, Perl, Lua, NFO, oxygen Fortran, Unix Shell Script, NSIS, ASP, Flash action scripted and RC files.

This code editor is lightweight and comes with features like syntax highlighting, Unicode support, full drag-and-drop support, user language define system, and more.

It comes with a tabbed interface, which makes it easier to work on multiple documents at the same time, increasing your productivity.

Notepad++ comes with a wide range of collections of plugins, with additional features based on your personal preferences.

Other features of Notepad++

  • Allows you to personalize the interface with themes and customized settings
  • Lets you record and playback macros
  • Supports regular expressions for advanced search
  • Receives regular updates to ensure it is compatible with the latest technologies

⇒ Get Notepad++

If you are looking for alternatives that work like Notepad++, we recommend you check out this guide to learn about more options.

Sublime Text  – Simple & Versatile

Sublime Text is a freemium code editor that works efficiently on a low-end computer. With GPU rendering on the supported platforms, the editor supports resolutions up to 8K to give you a fluid UI with reduced power consumption.

It comes with a Tab Multi-Select function, which easily splits the interface into multiple tabs, and with a Sidebar, Tab bar, or Goto Anything, you can quickly access various parts of your project easily, thereby enhancing productivity and visibility.

Sublime Text comes with a Context-aware auto-complete feature, which provides smart completions on the basis of current code in a project.

The newest version of this code editor comes with an improved syntax highlighting engine and new features like multi-line constructs, handling non-deterministic grammars, syntax inheritance, and lazy embeds, making it a one of a kind editor.

Other features of Sublime Text

  • New themes and custom title bars make the interface intuitive
  • Supports Apple Silicon processors and Linux ARM64 builds for devices like Raspberry Pi
  • A wide array of packages and plugins
  • Allows you to work with multiple cursors and selections at the same time

⇒ Get Sublime Text 

Code::Blocks – Highly extensible & fully configurable

One of the newest code editors, Code::Blocks, is available for free and is an open-source, cross-platform IDE.

Based on a plugin framework, therefore, the feature of Code::Blocks can be extended with the integration of either existing or customized plugins.

This open-source editor comes with no hidden costs and provides multiple compiler support, including MSVC++, Digital Mars, Open Watcom, GCC, clang, Borland C++ 5.5, and more.

Code::Blocks has a tabbed interface and a user-friendly interface with a customizable layout, making it suitable for experienced or new users.

Other features of Code::Blocks

  • Has a Smart code completion
  • Comes with a build-in-build system that facilitates the compilation and linking of projects
  • Allows you to step through code, set breakpoints, and more
  • Comes with a class browser, symbol viewer, and function list, making it easy to navigate

⇒ Get Code::Blocks

GNU Emacs – Real-time display editor

With full Unicode support for almost all human scripts, GNU Emacs is a good code editor available for all major platforms.

It is highly customizable and comes with content-aware editing modes & a packaging system for downloading and installing extensions.

GNU Emacs provides syntax highlighting, easy code navigation, and version control integration to identify and understand the code & its structure easily

Other than the handful of functions as a text editor, you can use GNU Emacs as a project planner, debugger interface, IRC client, calendar, and more.

Other features of GNU Emacs

  • Offers code completion
  • Allows you to set breakpoints, inspect variables, and step through code during debugging
  • Supports building and compiling code straight from the editor
  • Promotes a self-contained coding environment

⇒ Get GNU Emacs

Geany – Powerful IDE

Geany is a lightweight and open-source integrated development environment that aims to provide a fast coding experience.

It supports more than 50 programming languages and is translated into over 40 languages.

Geany is highly customizable, comes with many color themes, and has a quick learning curve.

The tool uses a multiple-document interface, which allows you to work on multiple files at the same time, and tabs are located on the top of the screen, making them more accessible.

Other features of Geany

  • Provides suggestions for functions, variable names, and keywords like developers type
  • Comes with syntax highlighting, which improves code readability
  • Offers extensibility through plugins
  • Has an integrated build system that allows you to compile and execute code directly into IDE

⇒ Get Geany

Things to consider while choosing a code editor for your PC

  • A code editor that is lightweight and uses minimal system resources.
  • Ensure it is compatible with your operating system.
  • Make sure it has the required features and functionalities that you are looking for.
  • Check it is compatible with the extensions or plugins you want to use.
  • Should integrate with version control systems like Git seamlessly.

In conclusion, choosing a text editor for your PC totally depends on the language and platform you are working on.

Visual Studio Code is renowned for its performance & extensive customization options, and Notepad++ is the most lightweight tool; we couldn’t agree more.

However, you can opt for Sublime Text, as it has a wide range of features but is not entirely free, or GNU Emacs, which uses very few resources on your PC but has a steep learning curve.

Additionally, Code::Blocks and Geany come with the latest features without hogging the system resources of your computer.

In case you are a programmer who works on cross-platforms quite often and is looking for the best cross-platform code editors, we have an exclusive guide on that; please have a look.

Which code editor would you like to use? Tell us about it in the comments section below.

Search Special Characters in Windows Explorer: 2 Easy Ways

While we know that Windows doesn’t allow using special characters in file names, most are unaware that it also can’t natively search for them using the standard Search Field method. So, how do you search for special characters in Windows (File) Explorer?

This is slightly tricky, but once you get the hang of the process, searching for files/folders with special characters in all iterations of Windows won’t be a problem anymore.

How do I search for special characters in File Explorer?

1. Use a syntax

  1. Press Windows + E to open File Explorer, and paste the following syntax in the search field while replacing X with the special character you want to search for:filename:*Xsyntax to search special characters in windows explorer
  2. In the example above, we replaced X with &, and File Explorer displayed all the files/folders that used the character.
  3. If this doesn’t work, you can use the following syntax, while replacing X with the special character, say period or parenthesis: ~="X"search special character

With these two syntaxes, you can search for special characters or their combination in Windows Explorer. Each works in specific instances, so try them both and use whichever works.

Also, the ~=”X” will help find duplicate files, especially in instances where a program adds (2), (3) or (4) as a suffix to the file name. If we were to simply search for (2), it would show all files/folders that have 2 in their name.

Searching for (2) without syntax

But as soon as we use ~=”(2)”, Windows Explorer will now only list results with (2) in the file/folder name.

Searching for (2) with syntax

Besides, if you want to search for files/folders with special characters in a specific folder, head to it, and then use the search field in there.

2. Use a third-party search tool

  1. Go to the official website for VoidTools and download the Everything installer, depending on Windows architecture (32-bit or 64-bit).everything
  2. Run the setup and follow the on-screen instructions to complete the installation process.everything
  3. Once done, launch Everything, enter the special character in the text field, and it will list all relevant files on the PC.search special characters in windows explorer with Everything
  4. To look for file names with special characters in specific folders, click the Search menu and select Advanced Search.advanced search
  5. Type the special character in the text field, and click on Browse.advanced search for special characters in windows explorer
  6. Head to the one you where want to perform a dedicated search, select it, and click on OK.folder
  7. Tick or untick the checkbox for Include subfolders, depending on how you want to perform the search, and then click OK.search settings
  8. Everything will now list all available files/folders with the special character in their name.search special characters in windows explorer using tool

In addition to Everything by VoidTools, there are several other advanced search tools for Windows that can be used since searching for special characters can slow down your PC or cause the error_no_more_search_handles.

For users who prefer a more precise and professional-grade solution, try Agent Ransack for Windows 11. It provides detailed search filters, live content previews, and regular expression support, making it ideal for locating files that contain special characters or unique naming patterns.

You now know both options to search for special characters in Windows Explorer. Remember, the syntax method works best for a few searches, but if you regularly work with such files, a third-party tool like Everything is a better way to go!

Before you leave, discover expert-recommended search tips for Windows to find files/folders quicker than ever before!

For any queries or to share which method worked best for you, drop a comment below.

Edge updates move to Browser Essentials; here’s why that’s a good thing

Microsoft constantly improves its Edge browser with performance and security features, and you can monitor the status of these from Browser Essentials. Now, the company is making an important change to make Edge updates more visible to users by adding update alerts to Browser Essentials. The change can be seen in Edge Canary 122.

The purpose of the Browser Essentials feature is to monitor Edge performance and security. For instance, by opening Browser Essentials from the Toolbar in Edge, you can see a report of memory savings contributed by sleeping tabs and how Edge has protected you from security risks and threats by scanning sites you visit and files you download. The feature also recommends enabling efficiency mode, which improves Edge performance.

Browser updates are crucial as they contain security and feature updates. Each browser follows a certain method to make updates visible and discoverable by users when available. For instance, Chrome alerts users about pending updates through an alert in the menu icon. Edge is taking a different approach by now moving the update experience into Browser Essentials for better visibility and experience. Here is what the new experience looks like.

How can I see the latest Edge updates in Browser Essentials?

  1. Launch Microsoft Edge
  2. Click on Menu
  3. Select Settings
  4. Select About Microsoft Edge to check for updates.
  5. If the updates are available, Browser Essentials will trigger user attention with the message “New update available“. The tool asks you to restart and ensures previous tabs will be available when you follow the recommended action.

It may take time for Edge to completely migrate update notices or alerts to Browser Essentials and stop showing them from the settings page at some point in time. As of now, we should expect Edge to start warning users to install pending updates, and this will be truly helpful when talking about security updates.

Fix: Black and White Screen With HDMI [PC to TV]

If you come across a situation where HDMI output from PC to TV shows a black and white screen, it’s not that difficult to fix. We encountered the problem on multiple devices, and usually, the graphics driver or display settings were to blame.

But it’s imperative to rule out issues with the connection. So, make sure that the cable is connected properly and is not damaged, or try connecting to another port. Besides, remove the power cable, keep the two devices powered off overnight and check for improvements in the morning.

In case you still have a black and white display with HDMI, connect another PC to the TV. If things work out this time around, try the solutions listed below. But if the problem persists, reconfigure the TV’s display settings or use a VGA/DisplayPort connection.

What can I do if the TV has a black and white screen with HDMI?

1. Reinstall the graphics driver

  1. Press Windows + X to open the Power User menu, and select Device Manager from the list of options.
  2. Expand the Display adapters entry, right-click on the active graphics adapter, and select Uninstall device.uninstall device to fix hdmi black and white
  3. Tick the checkbox for Attempt to remove the driver for this device, and click Uninstall.remove driver
  4. Reboot the PC and verify whether you now have a colour display when connecting the laptop to a TV via HDMI.

2. Update the graphics driver

  1. Press Windows + R to open Run, type devmgmt.msc in the text field, and hit Enter.
  2. Double-click the Display adapters entry, right-click on the graphics card, and select Update driver.update driver to fix hdmi black and white
  3. Choose Search automatically for drivers and wait for Windows to install the best locally available version.search automatically
  4. Reboot the PC.

When an HDMI connection between a computer and a Samsung or LG TV results in a black and white display, updating the graphics driver might do the trick. This also helps when the PC screen is black and white.

Besides, if Windows can’t find a newer version, you can head to the manufacturer’s website, locate the latest version, and then manually install the driver, or simply use third-party software to find the latest driver versions automatically.

3. Change the display control panel settings

Tip icon Tip
In the following two solutions, we will be using the NVIDIA Control Panel, but the idea remains the same. If you have another graphics card, look for the equivalent settings and configure it accordingly.
  1. Open the NVIDIA Control Panel, and select Adjust desktop color settings from the navigation pane.color settings
  2. Now, select the TV from the listed displays, and if Digital vibrancy is set to 0% (or a similar value), change it to 50%.50% to fix hdmi black and white

4. Reset display panel settings to default

  1. Right-click on the desktop, and select NVIDIA Control Panel.
  2. Click the Restore defaults options near the top right.restore defaults to fix hdmi black and white
  3. Choose the appropriate response in case a confirmation prompt appears.
  4. Now, connect your computer to a TV via HDMI and verify if it still has a black and white screen.

5. Disable color filters

  1. Connect the computer to the PC using an HDMI cable.
  2. Press Windows + I to open Settings on the PC, select Accessibility from the navigation pane, and click Color filters on the right. color filters
  3. If the Color filters setting is enabled, turn off the toggle.disable to fix hdmi black and white
  4. Also, turn off the toggle for Keyboard shortcut for color filters to avoid inadvertently enabling it with the dedicated Windows + Ctrl + C shortcut.

If Windows automatically enables the Color filter settings on connecting your PC to a TV via HDMI and sets it to Grayscale, the display will turn black and white. This also helps when you see black and white squares on the screen.

6. Perform a system restore

  1. Press Windows + S to open Search, type Create a restore point in the text field, and click the relevant result.system restore to fix hdmi black and white
  2. Click the System Restore button.
  3. Select the Choose a different restore point option, and click Next.restore point
  4. Pick a restore point created before the black and white screen issue first appeared, and click Next.
  5. Verify the details and click Finish. A restore typically takes 25-40 minutes.finish

If the HDMI connection between the PC and TV previously worked fine and you didn’t have a black and white display, restoring everything to the previous stable configuration will fix the issue in no time!

You now know what works with HDMI black and white issues. Remember, it’s rarely the cable that’s at fault, but you should check it just to be sure. In our experience, resetting the display settings or increasing Digitial Vibrancy should do it!

Before you leave, discover the best Windows display settings and enable them right away!

For any queries or to share what triggered the issue in your case, drop a comment below.

Best DualSense Edge Settings For FPS [Complete Guide]

Whether you are a seasoned gamer or a newbie, the DualSense Edge controller can help you bring out a new level of immersion in gaming, and with the best settings for FPS, you can elevate the overall gaming experience. Let’s check out how to enhance your skills to the next level!

To gain a competitive edge, tweak the stick sensitivity/Dead zone, remap the button & profiles, and change how to use triggers.

What are the best DualSense Edge settings for FPS?

1. Stick sensitivity

Stick sensitvity

Stick sensitivity comes with six different options, including Default, Quick, Precise, Steady, Digital, and Dynamic.

If you play First-person shooter games, WR experts recommend you choose Precise sensitivity for the Right stick so that the cross-hair moves at the exact same speed no matter how fast you move the stick, making accurate aiming easier.

And, for the left stick, select Quick Curve sensitivity. This setting helps you move faster, which is beneficial if you want to make the 180-degree turns.

These settings give a competitive edge, especially when playing tactical shooting games like Apex Legends, Fortnight, and Rainbox Six Seige.

2. Button remapping

Remapping -  Best DualSense Edge Settings For FPS

You can customize all the buttons on the DualSense Edge controller to enjoy games as per your preferences. Here are some of the combinations of buttons for different games that we recommend:

Name of the gameButtonAction
Rainbow Six SeigeLeft & right back buttonsLeft & right lean commands
Apex LegendsLeft + right back buttonsSlide & heal at the same time when pressed together
FortnightRight back buttonBinding build – Helps building simple walls with one hand.

Also, don’t forget to unbind both the L3 and R3 buttons for all three games to avoid hitting them accidentally.

3. Personalize profiles

If you want multiple configurations for each game, you can get that done using DualSense Edge profiles. The Function button on the controller allows you to easily switch between profiles.

If you want to use the controller on your PC and it is not working for you, it could be due to an outdated graphics driver. To learn more, read this guide.

4. Triggers

Triggers - Best DualSense Edge Settings For FPS

You can customize the DualSense Edge triggers in multiple ways and also adjust the sensitivities & dead zones in your DualSense profile.

The controller comes with sliders on the back, which help you reduce the length of each trigger. There are three settings: Short, Medium, and Long.

The shortest setting is just 2 mm, which is the shortest length that you can set to use the Adaptive trigger function. WR experts recommend that the shooters set the triggers to the shortest length, which in turn will allow them to shoot as fast as possible.

In conclusion, to get the most out of the DualSense Edge controller while playing FPS, you need to change the stick sensitivity to Precise for the right stick and Quick for the left stick.

Furthermore, to quickly switch between profiles, use the Function button on the controller and remap the buttons to optimize your gaming experience.

In case the DualSense Edge controller is not getting detected by your PlayStation, read this guide to learn how to fix it.

Also, check the best game controllers for Windows 11 that are smooth and do not throw any errors.

If you have any questions or suggestions about the best DualSense Edge settings for FPS; feel free to mention them in the comments section below.

Microsoft wants users to interact with elements, such as persons and objects, while watching video content

Microsoft recently filed a patent describing a technology capable of allowing people to accurately detect, identify, and interact with elements, such as persons and objects while watching video content.

The patent, called Detecting Prominence of Objects in Video Information, describes in detail how this technology would be used to facilitate interactive shopping, but also tracking and identification, in a system that would surely send shivers down the spine.

The patented technology, which can be read in its entirety here, works this way:

  • There is a system of processing videos that uses machines to find and follow people who show up in the videos.
  • The system then gives a score to each person based on how important they are in the videos, to make a list of scores.
  • The score of a person shows how much they can be of interest to viewers. For example, the score of a person shows, partly, how much they show up in the videos.
  • The system gives the scores based on information that is specific to each person. The system makes this information by adding up features that belong to a certain person.

The technology could be used in a variety of applications. It could be used to track down a certain product, such as a sweater a character in a movie is wearing, effectively allowing the user to identify it, and save the information for later use, as you can see in the image below.microsoft interactive video content

However, it can also be used to accurately detect and identify persons, either public persons or private persons, by accessing a database and searching for similar faces.

A face detection component determines the identities of the people who appear in the video information by recognizing their faces. For instance, in some implementations, the face detection component determines whether any of the individuals that appear in the video information, have been previously identified as public persons, such as celebrities, or politicians.

One of the most eerie aspects of this tool would be its ability to capture the emotions of each face, by making use of audio and video content to put together a map of the emotions expressed by the subjects of the video.

The emotion detection component dtects emotions of interest by determining whether the audio information contains predetermined sounds indicative of these emotions.

As such, the technology could be used by various parties, from enterprises and companies to regular users, and or even police departments, to place products, and persons in video content, and later detect and identify those products and persons, using the same technology.

Microsoft has been filing many patents, such as the one describing a technology that would make Teams meetings hyperrealist, but not many see the light of day.

However, as video streaming platforms are taking hold, and video content is the predominant form of media, with platforms such as TikTok, Instagram, and other places, a technology like this would surely be a game changer, and it could revolutionize the way we consume video content.

But it is quite eerie.

DirecTV YouTube Not Working: 5 Ways to Fix it

After several users pointed out that YouTube is not working on DirecTV, we tested it and faced the problem on a few TVs while others worked fine. So, it appeared to be more of a device-specific problem.

In our experience, for YouTube issues on DirecTV, it’s generally network issues, corrupt app cache, buggy updates, outdated software, or misconfigured settings to blame. Below, we will share the tips and tricks that helped us fix things when YouTube was missing or not working on DirecTV!

To start with, switch to another network, preferably a mobile hotspot, or go with a wired network connection. Also, press the red Reset button on the DirecTV receiver. It could be on the side or back panel. And do not forget to check the connections, as it helps with DirecTV error code 775

What can I do if YouTube is not working on DirecTV?

1. Clear the YouTube app cache

  1. On the main menu, go to Settings (gear icon).settings
  2. Head to System and then select Apps & Storage.
  3. Now, select YouTube from the list of applications.
  4. Select the Clear cache and Clear data options and choose the appropriate response in case a confirmation prompt appears.
  5. Once done, restart the setup and check for improvements.

2. Install the latest DirecTV software

If you haven’t updated the DirecTV receiver’s software in a long while, chances are that it’s the reason DirecTV YouTube is not working. An outdated software may have issues connecting to the network or trigger conflicts with the installed app version.

So, check for any available updates and install them. Make sure you get them all. Also, enable automatic updates so you never miss out on any in the future.

3. Uninstall app updates

  1. Go to DirecTV Settings, and select Apps & Storage.apps & storage to fix directv youtube not working
  2. Select YouTube from the list of apps.
  3. Now, choose Uninstall updates to revert to the initial version of YouTube installed on the device.
  4. Next, go to the Google Play Store on DirecTV and disable automatic updates for YouTube.
  5. Finally, reboot the device and check for improvements.

4. Reinstall YouTube

If DirecTV YouTube is still not working, it could be an issue with the app installation itself. So, go to App Settings and uninstall YouTube.

Restart the device, and you can then reinstall YouTube from the Google Play Store on the DirecTV streaming box.

5. Reset DirecTV to defaults

In case nothing else works, the last option is to reset DirecTV to the default settings. This will wipe out all data, and you will be forced to re-login and download the apps, but it will, in all likelihood, fix things if the misconfigured settings are to blame.

As a last resort, you can contact DirecTV support.

You now know how to get things running when YouTube is not working on DirecTV. Also, we saw many asking whether YouTube is available on DirecTV. While it was taken off the streaming platform earlier, YouTube is now back on DirecTV and accessible to users.

Before you leave, discover what worked when the DirecTV Player was not working.

For any queries or to share what worked for you, drop a comment below.

You’ll need 32 GB of RAM to run the next Windows on recommended settings

As Microsoft released Copilot to Windows 10, and Windows 11, it’s clear that the Redmond-based tech giant is heading towards an AI-centered Windows. It was reported recently that the next major Windows update will be AI-based, and AI will become an essential part of its functionality.

We don’t know for sure if this next Windows will be Windows 11 24H2, or Windows 12, altogether, but the Windows AI, codenamed Hudson Valley, will be out sometime in 2024, most likely this fall, so we don’t have to wait for long until we find out.

There isn’t much to say about the next Windows, except that it will make use of AI to bring innovative and immersive experiences to Windows users. And it will also eat power. A lot of it.

Since it will be AI-based, the next Windows version will require 16 GB of RAM to run on minimum settings, and a staggering 32 GB of RAM to run on recommended settings.

But worry not because according to a press release issued by TrendForce, the next Windows version will most likely run on AI PCs, and CPU manufacturers anywhere including Intel, AMD, Qualcomm, and NVIDIA are working on CPU+GPU+NPU processors to meet Windows’ new demand, with Qualcomm’s Snapdragon X Elite, AMD’s Strix Point, and Intel’s Lunar Lake being some of the examples.

However, there is a downside to this. While future Windows devices are built to cater to such a huge need for resources, current Windows devices will need serious upgrades to keep up with the new demands.

In 2024, most laptops are either manufactured with 8 GB, or 16 GB of RAM, with the latter becoming more dominating recently, centering its status as the new norm. So, if you were to buy a laptop now, it would most likely come with 16GB of RAM, which would be enough to run the next Windows on minimum settings.

However, the next Windows would require 32 GB of RAM to run properly. And by properly, we mean having a smooth experience with it.

Why would Windows require 32 GB RAM to run properly?

If you are wondering why Windows would require 32 GB of RAM to offer a smooth experience, then prepare to be annoyed (or excited, depending on your enthusiast): it will require at least 16 GB of RAM to run its AI capabilities, including, of course, Copilot.

So, in other words, Copilot would consume a big chunk of those 16 GB of RAM to help you complete tasks, and offer you the experience of using AI at your discretion. Windows 32 gb ram

Even though many people, including a lot of Windows users, are not so excited about Copilot anymore, and according to our survey, only 27% of Windows users use it daily, Microsoft still places all the bets on the AI tool, and it demands both manufacturers, but especially Windows users to get used to something there might not even be an essential demand for, to begin with.

However, if Windows goes beyond the basic AI-human interaction of the Copilot tool, and will use AI to enhance the OS’s performance in fields such as computing, gaming, processing, and so on, then it might actually be useful.

Tech giants, such as NVIDIA, are already using AI to enhance the graphic capabilities of their GPU cards. Intel, AMD, and Qualcomm have also been working on NPU processors capable of providing faster computing operations that would enhance Windows devices.

But if Microsoft wants users to buy devices with 16 or 32 GB of RAM just for these resources to be used by Copilot, which is already not as popular as Microsoft expected it to be, then it might leave many Windows users frustrated.

What do you think?

Copilot Pro is coming to Android/iOS mobile devices

Microsoft released Copilot Pro, just last week, and for a $20/monthly subscription, users can get priority access to Open AI’s GPT-Turbo 4, Copilot GPT builder, access to Copilot inside Microsoft 365 apps, and many more.

The Redmond-based tech giant is encouraging people to subscribe to the new version of this AI tool, due to its advanced AI capabilities, but Copilot Pro is already plagued by issues, as the tool freezes apparently, and some users don’t find it interesting or exciting enough to pay for it.

However, Microsoft will be releasing Copilot Pro to Android, and most likely iOS devices, in the following weeks, so users might want to reconsider the idea.

Spotted by tech enthusiast, @Leopeva64, there is a new flag in Edge Canary for Android that lets users enable Copilot Pro on their Android devices. Once the flag is enabled, Microsoft will introduce a new button, Get Copilot Pro, which would allow users to get the advanced AI tool on their mobile devices.Copilot Pro android ios

Theoretically, Copilot Pro for mobile devices should have the same capabilities as the one currently on the desktop version. Back in December, we spotted that Microsoft released the Copilot app on Android and iOS, so it’s just a matter of time until Copilot Pro will make its way to Android and iOS devices.

Are you excited for it? Or is it $20/month too much for such a tool?

BIOS Settings for Windows 10 [Setup Guide]

Whether it is overclocking your CPU or tweaking power management options, you need to access BIOS settings to unlock unparalleled performance on your Windows 10 computer. Let’s discover the best BIOS settings on Windows 10 to unleash the true power of your machine.

Note icon NOTE
Here, we are using an HP computer to demonstrate the steps to enter BIOS and make the changes.


1. Overclocking CPU

  1. Switch off your computer, press the Power button, and keep pressing the Esc key until you see the Startup Menu. 
  2. Press F10 to enter BIOS Setup Utility.
  3. Go to Advanced/ OC Tweaker/Tuner.Tweaker - best bios settings for windows 10
  4. Locate Overclock and set it to Manual.
  5. Press F10 to save and exit the BIOS utility.

If you have a problem accessing BIOS on your computer using this method, you can check out the other two methods in this guide.

2. Tweak the fan speed

  1. Enter the BIOS menu using the steps mentioned in Solution 1.
  2. Look for settings named Hardware Monitor, Fan Info, Cooling, Smart Fan Mode, or Fan Control.
  3. Now, check the current CPU and overall temperature, then change the temperature/RPM graph to modify the fan speed.
  4. Press F10 to save and exit the BIOS utility.

Make sure increasing the fan speed doesn’t make your system reach high temperatures. If it does, you need to lower the speed to reduce the temperature.

3. Disable Spread Spectrum

  1. Enter the BIOS menu using the steps mentioned in Solution 1.
  2. Go to Advanced.
  3. Locate Spread Spectrum and check its status.
  4. If it is enabled, use the arrow keys to set it to Disabled.
  5. Press F10 to save the changes and exit the BIOS utility.

The setting is disabled by default, but if it is enabled, you might have some issues while overclocking your system, as enabling this feature can help reduce electromagnetic interference of your device.

4. Enable memory profiles

  1. Enter the BIOS menu using the steps mentioned in Solution 1.
  2. Go to Advanced.
  3. Locate EOCP (Extended Overclock Profiles), XMP (eXtreme Memory Profiles) or  DOCP (Direct Overclock Profiles).
  4. Select it and set it to Enabled to ensure your RAM runs at a faster speed.
  5. Press F10 to save and exit the BIOS utility.

Once done, the RAM will run on a higher frequency, resulting in an increase in FPS and load times. However, the downside is you may notice a rise in system temperature as well.

5. Increase the speed of your SSD drive

  1. Enter the BIOS menu using the steps mentioned in Solution 1.
  2. Locate Configuration or a similar option and press Enter.
  3. Go to Serial ATA and press Enter to select it.
  4. Now, choose IDE Compatibility Mode.IDE compatibility mode - best bios settings for windows 10
  5. Press F10 to save and exit the BIOS utility.

6. Enable TPM & Secure Boot

  1. Enter the BIOS menu using the steps mentioned in Solution 1.
  2. Go to the Advanced/Security menu.
  3. Look for TPM settings.TPM - best bios settings for windows 10
  4. Select it and set it to Enabled.
  5. Now go to the Boot menu.
  6. Locate Secure Boot, select it, and press Enter. Now set it to Enabled.Secure boot
  7. Press F10 to save the changes and exit BIOS.

7. Disable C-states

  1. Enter the BIOS menu using the steps mentioned in Solution 1.
  2. Locate CPU Power Management, Advanced CPU, or similar options.
  3. Go to Global C-states, select it, and set it as Disabled.
  4. Press F10 to save the changes and exit BIOS.

8. Disable Compatibility Support Module

  1. Enter the BIOS menu using the steps mentioned in Solution 1.
  2. Go to Boot options or similar options, then locate Boot mode and set it to UEFI.UEFI - best bios settings for windows 1
  3. Next, locate CSM Support and set it to Disabled.
  4. Press F10 to save the changes and exit BIOS.

To sum up, to optimize your computer for better performance and security, ensure you have enabled Overclocking, memory profiles, TPM, Secure Boot, and increased fan speed.

These 5 game-changer features are coming to Microsoft Teams in February 2026

2024 is going to be an exciting year for Microsoft Teams, as the Redmond-based tech giant is going to enhance the recently added Copilot with new capabilities suited for the platform. There is going to be an even greater Microsoft 365 integration with the platform, plus a plethora of new changes, including ones that are not so good.

For instance, in April, Microsoft will retire the ability to open links in the new Teams’ Website tab, something that can greatly disrupt users, especially those who use the platform for work.

However, Microsoft is also adding new features to the platform, with 5 game-changer features coming soon, in February 2024, according to the latest entries in the Microsoft 365 Roadmap.

These features suited for Teams’ meeting organizers, and regular users as well, will have a big impact on the way Teams is used for socializing, working, and branding. Let’s take a look.

5 game-changer features coming to Microsoft Teams in February

Registration Form Updates in Webinars

The webinar registration process can be highly customized, allowing managers and organizers to find out more details about the participants, which could lead to making more informed decisions when planning the next webinars.

Organizers can rearrange the sequence of registration form questions that are presented to attendees during the webinar registration process. The questions available for reordering include address, city, state, zip/post code, country/region, job title organization, industry, and custom questions.

Microsoft

Meeting options updates for Webinars

Microsoft is making it easier for organziers to edit the meeting’s options.microsoft teams february

The meeting options for a webinar are now accessible within the webinar setup in Teams. Organizers can edit meeting options in an inline window within the scheduling form in Teams.

Microsoft

Hide general channel

One of the most exciting features to come to Teams, this one will allow users to hide the general channels, which could improve their focus on the relevant channels to them, instead.

Alike other channels, now you will be able to hide general channels in your teams, helping you focus on the channels that matter most to you.

Microsoft

Automatic Targeting based on roles for Frontline

Frontline teams can notify the right set of colleagues on channel posts (e.g. notify colleagues in specific role or department)

Microsoft

Preset Organizational Backgrounds (Premium)

IT admins, and managers can now preset backgrounds to all participants in Teams meetings. This could be a great tool for marketing purposes, as organizations can brand their meetings with logo backgrounds.

When enabled, a user will have a preset background defined by the IT admin without the ability to change the background

Microsoft

All of these features are scheduled to be rolled out in February 2024.

What Are DPP Files And How to Open Them in Windows 10 & 11

When opening a DPP file in Windows, the OS will ask you to look for an app in the Microsoft Store to. If you try to search for the appropriate software in the store, there’s no tool available by which you can open the file.

So, how do you open a DPP file in Windows? Well, the answer is simple and can be done in two easy steps:

  1. Install DrawPlus software
  2. Open the DPP file through the DrawPlus software

But if you want detailed steps, then in this tutorial, I will walk you through how you can download and install DrawPlus and open DPP files using it.

How can I open a DPP file in Windows 10 & 11?

Whenever you create a new file using the DrawPlus software, it saves the file in the .dpp format, and no other software uses the DPP extension except the DrawPlus software. The main issue is that DrawPlus has been discontinued, and no other product from Serif supports the DPP files, leaving no other way but to use old DrawPlus software to open a DPP file.

Another issue is that you cannot download it from the official site as it is unavailable there, so you must rely on third-party sources to get the DrawPlus. Sure, if you have an outdated version of DrawPlus installed on your system, you can use it.

If you don’t have one, you can visit a third-party website to download the DrawPlus software. Just ensure it is not malicious (by reading the reviews) before installing. Once done, install the software and navigate to the DPP file. To open the DPP file, follow 3 simple steps:

  1. Right-click on the DPP file
  2. Click on the Open with to get a list of available tools
  3. Choose Serif DrawPlus software
Use DrawPlus to open dpp files in Windows

Soon, you’d see the DPP file loaded in the DrawPlus software:

open and edit dpp files in Windows

Now, you can make changes, such as editing the existing images. It may look outdated as it is no longer in active development, but if you want to try modern drawing software, you can refer to our detailed list of top drawing apps for Windows.

What can I do if DrawPlus is not working?

The DPP files are very complex, and I’ve witnessed times when, after creating a drawing using DrawPlus, I couldn’t open it using the same tool. Maybe that is the reason why developers have dropped the extension itself.

In that case, you can choose a more reliable tool from the best vector graphics software available for your PC. If you encounter any other issues with DPP files or want to share your experience, please drop us a line in the comments section below.
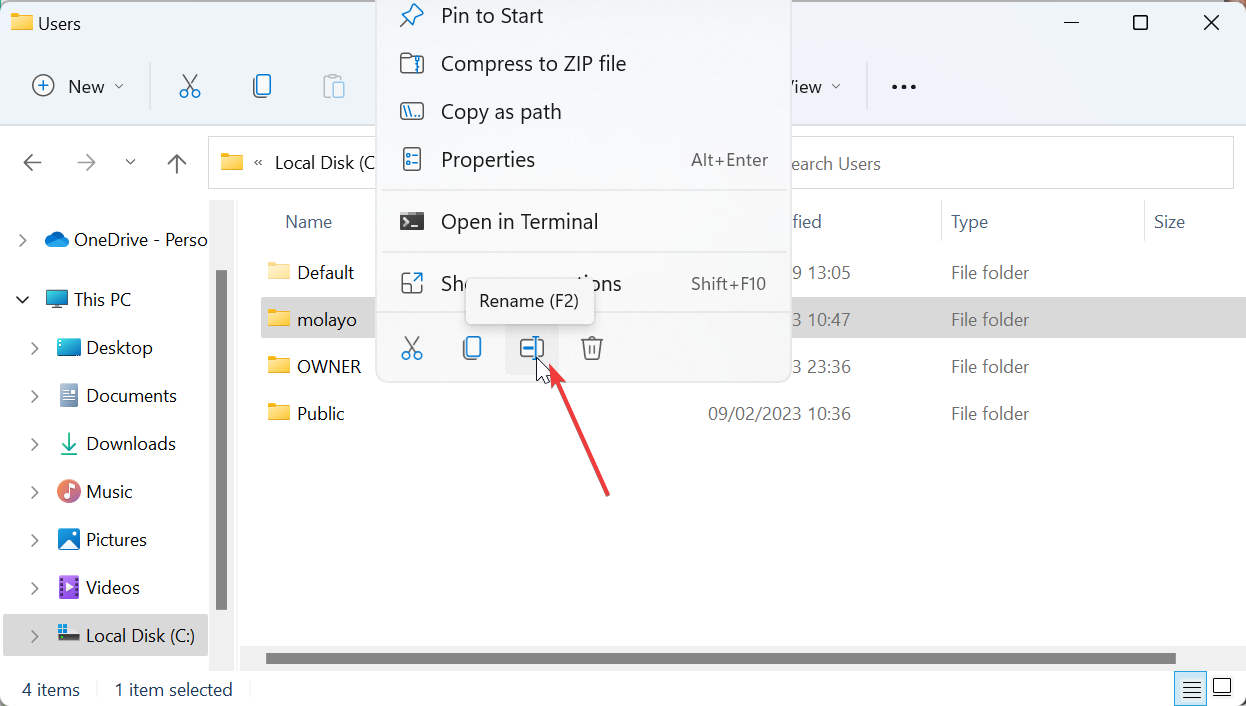
Microsoft’s Mikhail Parakhin wonders if people are tired of AI, and here’s what they say

Microsoft just released Copilot Pro last week, which is a new version of the free Microsoft Copilot tool, but enhanced with advanced AI capabilities.

This version of Copilot comes with additional features, such as Copilot in Microsoft 365 apps, priority access to OpenAI’s GPT Turbo-4, access to Copilot Pro’s Designed, and access to Copilot GPT builder, and it could be the right answer for small businesses. Everything is for a $20/month subscription.

However, a few days after its release, the tool has been encountering issues, such as freezing, and not working.

Amid all the new AI releases, Mikhail Parakhin, leader of the Windows and Web Experiences Team, including Copilot took it to X (formerly known as Twitter) to ask users if they are tired of AI, after sharing an article claiming that most tech enthusiasts are losing interest in the concept.

Interestingly enough, people answered, and the answers were polarized. While there is clearly an interest in AI, and the concept itself could become the next big thing, there are users claiming that it’s also everywhere, and the industry is oversaturated to the point there is nothing exciting about it anymore.

Take a look below.

Are people tired of AI?

Copilot has enormous potential, but in my opinion to make it appreciated you should avoid fragmenting it into multiple applications, try as much as possible to give it an identity, and add some features such as hands-free voice chat, and a code interpreter that generates files like the one in OpenAI. By combining these two features with the features it already has or that are planned, it would no longer have any more rivals

@Davide_Mori_

Doesn’t matter what people think or any hype. If it delivers people will use it and from what it looks like it delivers on its promises. The features are there and they work as expected. This is from larger trustworthy companies. Lots of shady companies will try to scam people though.

@per_arneng

Yes! The consumer excited about AI is vastly overestimated. The business world loves it but consumers really aren’t all that excited. They see some AI tech and they’re like “cool, moving on.”

@TrippyMonster98

Yes they are right. It’s just getting too much for normale people. With AI getting shoved down our throats everywhere now. It’s currently being done in a very intrusive manor. If everything being AI now, the term AI becomes meaningless.

@wenti_man

No as long as it gets integrated in a useful way. Reading and writing will only get you so far, it needs to connect to APIs and backends and save time by executing time-consuming and boring tasks. But this will need foundational re-development and will take some time.

@anko_979

We need a good quality AI agent and less hallucinations to surprise people. Photo editors, image generators, email assistant are good but don’t have much novelty.

@angelusm0rt1s

They are. “AI” won’t live up to the hype if it isn’t AGI. I barely use Bing AI and Image Creator anymore after you guys turned it into another dumb boring bot with censorship. And Google search is still faster for trivial stuffs, while coding question have fairly limited use.

@SturerEmily

As you can see, people are quite divisive on AI, and Copilot. The tech industry’s interest in AI is somehow oversaturated, and it won’t take much until people won’t be interested in AI anymore. In fact, according to our recent survey research on Copilot, we found that only 27% of Windows users use it daily.

We also found that if Copilot would implement a paying subscription (which does, with its Pro version), 46% of current users would stop using it.

Ultimately, while 70% of Windows users know what Copilot is/does and have used it at least once, with 50% using it regularly, Microsoft would need to somehow upgrade Copilot into a seamless experience, many of the people above mentioned, otherwise the AI tool will not last long.

What do you think about Copilot? Is it useful or not?

What is DLADiag.exe and How to Remove it

DLADiag.exe is the executable file for Shared Driver Component and is added to the PC when you install EMCGadgets64, a program by Sonic Solutions, or Roxio MyDVD DE. It’s usually stored within one of the folders in: C:\Program Files\Roxio

To verify whether the file is safe, you must identify the file location. If it’s stored in the parent program’s dedicated directory, it’s likely safe. But it’s also imperative to run a malware scan, just to be sure. So, let’s find out how to check DLADiag.exe for viruses and the steps to delete it!

How do I remove DLADiag.exe?

1. Scan for malware

  1. Press Windows + S to open Search, type Windows Security in the text field, and click on the relevant result.
  2. Click on Virus & threat protection.virus & threat protection
  3. Select Scan options.
  4. Choose Full scan and then click the Scan now button. It will take approximately 10-30 minutes to complete.scan to fix dladiag.exe

If the DLADiag.exe file or process poses any threats, Windows Security will automatically quarantine or delete it. And if it doesn’t find anything, we recommend using an effective third-party antivirus solution.

If you want to run a more in-depth scan of your system, you can always rely on a third-party security solution. It can help you identify potential threats better and also keep your computer safe with real-time protection.

⇒ Get TotalAV

2. Uninstall the app

  1. Press Windows + R to open Run, type appwiz.cpl in the text field, and hit Enter.appwiz.cpl
  2. Select EMCGadgets64 or MyDVD DE from the list of apps, whichever is present, and click Uninstall.uninstall to delete dladiag.exe
  3. Follow the on-screen instructions to complete the process.
  4. Once done, restart the computer and check whether the DLADiag.exe is removed.

If the standard app uninstallation doesn’t work, use a reliable software uninstaller to get rid of all the leftover app files, including DLADiag.exe, and Registry entries.

3. Perform a system restore

  1. Press Windows + S to open Search, type Create a restore point, and click the relevant result.
  2. Click the System Restore button.system restore remove dladiag.exe
  3. Select the Choose a different restore point option, and click Next.choose different
  4. Pick the oldest restore point from the list or one created before you installed the parent program, and click Next.
  5. Verify the restore details, and click Finish. The process will take 30-45 minutes.finish
  6. Once done, verify whether the DLADiag.exe file is removed.

4. Factory reset the device

  1. Press Windows + I to open Settings, go to System from the navigation pane, and click on Recovery on the right.recovery
  2. Click the Reset PC button.
  3. Click on Remove everything.
  4. Now, click on Local reinstall to reinstall Windows from the PC itself.
  5. Verify the current settings, and click Next to proceed. If you want to reconfigure any, click on Change settings.verify settings
  6. Finally, click the Reset button to start the process.reset to delete dladiag.exe

If the previous solutions didn’t delete the file, you can always factory reset the Windows PC to remove DLADiag.exe. This will also delete all other files and apps but is the best option if DLADiag.exe is identified as a threat by the antivirus since the process may have infected other files.

You now know that DLADiag.exe is, most likely, not a threat, but it’s always best to verify that. And to remove the file/process, you just have to uninstall the parent program that added it in the first place.

Before you leave, check if your PC has the rsmui.exe file and delete it, if not needed!

For any queries or to share how you deleted the executable file, drop a comment below.

The new Teams will no longer load sites inside its Website tab, starting this April

The new Microsoft Teams (also dubbed Teams 2.0) will reportedly retire the ability to load new sites in its Website tab, starting April 2024, according to @tomarbuthnot, and Petri.

All new Teams users enjoying this feature will experience a new setting, where Microsoft will open the sites in a new browser tab instead, effectively making users have to switch between tabs back and forth.
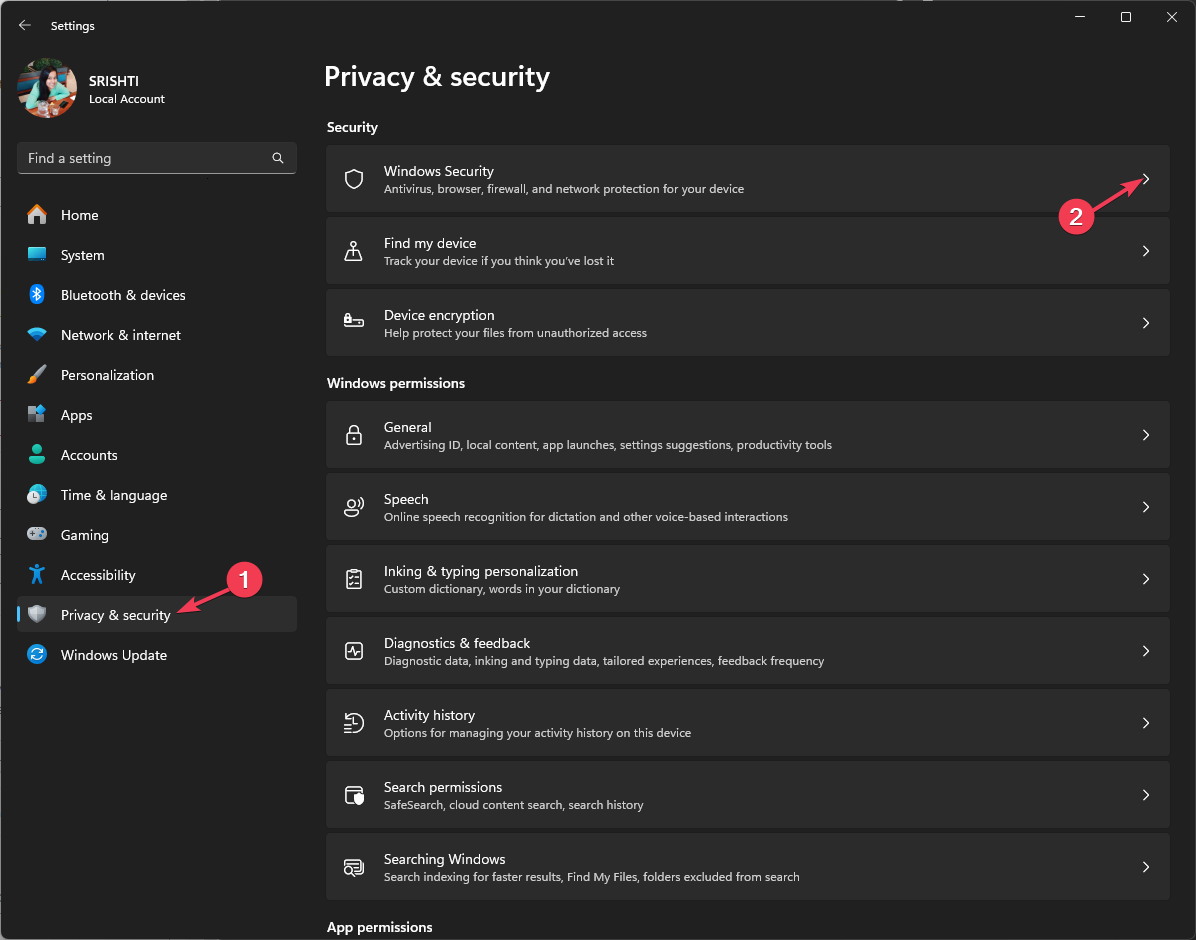
Microsoft says the change is due to improve Teams’ overall web security, stating:

This is to better align with emerging best practices in web security and privacy while improving the reliability of websites opened through this feature.

Microsoft

However, the good news is that Microsoft Teams for Education, which also got a new version back in October 2023, won’t be affected or impacted by this change, and teachers and students can still use this feature, past April 2024. But it won’t last for much, as Microsoft is researching ways to build a similar feature without being too disruptive.

Please Note that EDU tenants will not be impacted as we are still researching options on how to best provide a non-disruptive way to access websites for students and educators at a later date.

Microsoft

How to get ready for Microsoft Teams retiring the website tab

The retirement is scheduled to take place in early April, and the Teams mobile app will not be impacted by it. However, Microsoft recommends that those companies relying on this feature should inform their employees to pin corresponding app tabs instead of pinning their URLs as website tabs.microsoft teams website tab

It’s worth mentioning that this retirement will also impact SharePoint links, for example, and users will need to pin a SharePoint page using the SharePoint app, instead of pinning the URL using the Teams Website Tab.

As users will no longer be able to access websites inside the new Teams desktop, companies are encouraged to let employees know in advance that the retirement is coming in April, so they could have time to accommodate.

Parents are worried, as Bing Videos is playing restricted YouTube videos without any warnings

It seems that Bing Videos is not applying the same age restriction as YouTube does when it comes to parental control security, which leads to the platform showcasing restricted YouTube videos without any warnings, and parents are worried.

On the official Microsoft forums, there are complaints about this issue, and others have noticed that even though Bing Videos showcases YouTube videos when searching, it doesn’t fully take into consideration the age restrictions.

Hi, when searching for Youtube videos, I can find videos that are blocked by Youtube for me (due to age) but are visible by Bing Video. My father uses MS Family Safety to ensure a safe surfing. But actually he now prevents me from using the Laptop as he has no clue how to prevent Bing video from displaying YouTube videos?!

Bing Videos user

The discrepancy between YouTube and Bing Videos’ parental settings can become problematic when it comes to parental control. While we don’t know for sure if Microsoft is aware of the issue, there are simple solutions to stop Bing Videos from showing restricted YouTube videos.

How to stop Bing Videos from showing restricted YouTube videos?

The most straightforward solution to this worrying issue is to access Bing’s SafeSearch option and make sure the Strict option is enabled.

To do that, you’ll have to:

  1. Type in Bing SafeSearch into BingSearch, and click on your Bing account.
  2. In the Search panel, SafeSearch is the first option to pop up.
  3. According to your needs, you can choose from turning SafeSearch off or enabling it to Moderate, or Strict.
  4. For the best results, the Strict option is preferred.
  5. Click Save, and then you’re done.Bing Videos restricted Youtube videos

This one will filter out adult text, images, and videos from the search results, including those search inquiries made on Bing Videos.

For more advanced security settings, especially when it comes to parental control, parents can always opt for the Microsoft Safety app, which is a comprehensive tool for controlling online activity on Microsoft products.

It can be easily installed and set up, as well, by following our guide on how to use this app.