If you get iCloud encountered an error while trying to connect to the server error on Windows 11, you won’t be able to sync your files.
This can be a problem since your cloud backup will stop working, but there are ways to fix this error message, and today we’re going to show you a couple of ways to do it.
Why is my iCloud not connecting to the server?
Issues with your Internet connection, including IPv6 and DNS compatibility issues and incorrect settings.
Third-party services and applications can sometimes interfere with iCloud.
How do I fix the iCloud server error?
1. Disable IPv6 protocol
Press the Windows key + S and enter network. Select View network connections.
Double-click your current connection. The connection status window will appear.
Next, click the Properties button to view your network settings.
Uncheck Internet Protocol Version 6 (TCP/IPv6) and click OK.
Restart your PC, and the connection error should be gone.
2. Use Google DNS
Use the steps 1-3 from the previous solution to open your connection properties.
Double-click the Internet Protocol Version 4 (TCP/IPv4) to open its properties.
Check Use the following DNS addresses. Next, enter 8.8.8.8 as the Preferred and 8.8.4.4 as the Alternate DNS server.
Click OK to save new DNS settings.
3. Disable Killer Network Service
Press Windows key + R and enter services.msc. Click OK.
Locate the Killer Network Service and double-click it.
Set the Startup Type to Disabled and click the Stop button to stop the service.
Lastly, click Apply and OK to save changes.
This service is usually available only on Dell devices.
In most cases, your network connection issues will cause this problem, and if that happens, you can’t sign into iCloud on Windows until you fix them.
Did we miss the solution you used to fix iCloud encountered an error while trying to connect to the server error on Windows 11? If so, share it with us in the comments below.
If you bought your laptop from a mobile operator, it’s likely to have the option of activating the eSIM and connecting your machine to the internet using a cellular network.
With an eSIM on board, you don’t need to insert another physical SIM card into your laptop because it’s already built-in. It’s beneficial when your device can’t connect to a network.
How do I check if my Windows 11 device is eSIM compatible? Click the Start button, then go to Settings > Network & internet > Cellular.
If you don’t see the Cellular option, your device doesn’t have eSIM capability, and you should check other options, such as connecting your laptop to a hotspot using your mobile device.
In order to activate and use the eSIM, you need to meet the following requirements:
A PC Running Windows 11 or Windows 10 version 1703 or later.
Built-in eSIM functionality (follow the instructions above to see if your device comes prepared with cellular data connectivity).
A data plan with your mobile operator.
How do I activate eSIM on Windows 11?
1. Add an eSIM profile
Click the Start button, then go to Settings.
Now, select Network & internet, go to Cellular, and access eSIM profiles.
You will probably already have a profile created by your mobile operator but if you don’t have any, select Add profile.
Now, click on Search for available profiles and hit Next.
When you see the correct profile on the screen, click on Download. Sometimes, you will also need a confirmation code from your mobile operator.
You might also get a QR code to scan to get the activation code, and then the code will appear in the corresponding Activation code box. Click Next after completion.
You can use the cellular data network and mobile connection if you have set up the profile correctly. There is no need for an eSIM software download for Windows 11.
2. Use the profile and turn on the Cellular data function
After you have created and validated the eSIM profile, you can just select it from Network & internet > Cellular > eSIM profiles.
Now, all you need to do is to turn on Cellular data from Network & internet > Cellular.
How do I remove eSIM on Windows 11?
To disable eSIM on Windows 11, you just need to delete the profiles you’re using for the cellular data connection. Here’s how you do that:
Click the Start button and go to Settings.
Select Network & internet, go to Cellular, and access eSIM profiles just like you did when you added the profile.
Finally, select the profile to delete, and choose Delete, then select Yes when you are prompted to confirm your choice.
Without a profile, the cellular data won’t function anymore, so if you need it afterward, you have to create the profile once again, as shown in solution 1 above. However, we suggest turning off the cellular data when you don’t need it without deleting the profile.
What can I do if the eSIM option is missing from Windows 11?
If you have checked that your Windows 11 device has an eSIM or you have used it before and now the option has disappeared, reinstalling the cellular adapter driver is the best option.
That’s it! Now you know how to activate or deactivate eSIM on Windows 11, and hopefully, you can connect to the internet from a remote place where you don’t have Wi-Fi or cable connections.
With just a little under thirty days until Microsoft reaches the end of its extended buyout agreement with Activision Blizzard, the UK’s Competition and Markets Authority seems to have gone radio silent on where it stands with a review of a new restructured acquisition.
Shortly after Microsoft notched a win over the US Federal Trade Commission for its bid to acquire Activision Blizzard by beating a preliminary injunction on the deal, the CMA, which previously denied the deal globally from moving forward, decided to reconsider its position thanks to an appeal to the UK’s Competition Appeal Tribunal.
When it looked like Microsoft may have had life breathed back into its deal regarding UK markets full stop following scrutinization of the CMA’s original handling of the review, the company pitched a restructuring of its original deal that would offload Activision’s cloud streaming licensing business to Ubisoft.
Since proposing that Ubisoft become the arbiter of Activision Blizzard’s streaming rights, the CMA has been uncharacteristically tight lipped on its ongoing re-review of Microsoft’s tweaked acquisition.
Fortunately, someone has been keeping tabs.
Journalist and resident online patents expert Florian Mueller at @FOSSpatents has done a spectacular job of keeping readers abreast of the legal minutia that’s been going on between Microsoft and the CMA during the waning months of a re-review.
In a new thread on Mueller’s Twitter handle (yes, I know some people now refer to it as X), he breaks down what’s transpired in the legal morass of the deal over the past few months as Microsoft approaches its increased breakup fee deadline on this whole Activision bid next month.
In the UK it's September 18, i.e., only one month to go until the Microsoft-ActivisionBlizzard deadlines (the one in the UK proceeding and the one under the extended merger agreement; no coincidence there).
It's been about 4 weeks since the modified deal was announced.
Mueller goes on to explain how the CAT viewed the original CMA analysis of the deal to be off when the regulatory body attempted to argue console market harm theories.
Furthermore, he believes the re-review process is a little more than procedural undertaking since Microsoft seemingly has pitched a solution to the CMA’s principal concern regarding the deal and its effects on the cloud streaming market.
With the CAT forcing the CMA to go back to the drawing board to reassess Microsoft and Activision proposed acquisition, the CMA has now taken close to 57 days to conclude its phase 1 re-review, and many expect a ruling sometime shortly before the October 18, 2023 deadline, which if missed, would force Microsoft to hand over $4.5B in compensation to Activision for failing to wrap of its takeover in a timely manner.
With Microsoft divesting its interest in streaming licenses for Activision Blizzard titles, many thought that would be enough to appease the CMA and force a quicker review and decision this time around but the regulatory body seems content to draw out its review until the last minute or beyond.
With no further publicized communications between the CMA and Microsoft, it simply remains a waiting game for gamers as a $4.5B deadline inches closer.
As reported by VGChartz, Starfield’s European launch was the biggest yet for an Xbox game in that territory for this current console generation.
Starfield beat out Forza Horizon 5 for this honor, and is also the fastest-selling new IP of the year in Europe, in addition to being the fifth fastest-selling game overall there in 2023 thus far behind Hogwarts Legacy, Diablo IV, The Legend of Zelda: Tears of the Kingdom, and Star Wars Jedi: Survivor. It has however beat out Resident Evil 4 and Final Fantasy XVI.
Then you have to consider that these numbers don’t include those playing on Xbox Game Pass, but rather copies sold, which makes it all the more impressive.
Starfield has done well elsewhere as well, hitting over one million concurrent players across all platforms a day after its full release. It was played by over 6 million people just a couple days after. The critical reception has been decidedly positive as well, as seen in our Starfield review roundup post.
Some interesting news regarding The Elder Scrolls VI has come out thanks to some of Microsoft’s documents from the FTC case against its Activision Blizzard merger.
As you can see, a PlayStation release for the game is excluded here. The document also quotes Xbox Gaming CEO Phil Spencer, who said in a GQ interview,
“In order to be on Xbox, I want us to be able to bring the full complete package of what we have. And that would be true when I think about Elder Scrolls 6.”
Spencer has said in the past that exclusivity for Bethesda titles would be considered on a case by case basis.
The Elder Scrolls V: Skyrim.
It has been five long years since the sixth installment in Bethesda’s landmark action TPG series was first announced with a teaser trailer. With development of Starfield having just wrapped up, The Elder Scrolls VI is reportedly in very early development, and it is believed that the company’s upcoming Indiana Jones game will release before TES VI.
In other words, it’s going to be a bit of a wait before we see the game arriving on any platform.
One of the key introduced features of Microsoft 365 Lighthouse is its multi-tenant alert capabilities. MSPs can configure customized alerts for different scenarios and target them to specific tenants or groups. MSPs can also integrate alerts with third-party ticketing systems.
Here are key features and capabilities related to alerts and notifications in Microsoft 365 Lighthouse.
Predefined and Custom Alerts
By default, Lighthouse includes several sample alert types that MSPs can modify to suit their needs.
MSPs can also create custom rules for alerts, targeting tenants by name or using tags to organize tenants into management groups.
Available Alert Types
Lighthouse provides several predefined alert types, including:
Risky Users: Alerts related to risky behaviors detected in user accounts.
Devices without Antivirus Protection: Alerts for devices lacking antivirus protection.
Baseline Variance Detection: Alerts for baseline deviations.
Non-Compliant Devices: Alerts for non-compliant devices.
Security Incidents: Alerts for detected security incidents.
Active Threats on a Device: Alerts for active threats on devices.
Alert Targeting
MSPs can choose to alert all tenants, specific tenants, or tenants grouped by tags.
Alerts can be configured to notify users, groups within the tenant, or third-party email addresses.
Viewing and Managing Alerts
Lighthouse provides an Alert page where MSPs can view and manage alerts.
The page offers a historical view of alert resolution rates and allows further investigation of each alert.
Information on the alert rule that triggered an entry is easily accessible.
Links to impacted users or devices are provided for taking appropriate actions.
Alert Status and Assignment
MSPs can set the alert status and severity.
Alerts can be assigned to specific users.
Additional comments can be added to the alert for notes or resolution steps.
Alert History
Each alert has a complete history viewable by MSPs.
The history includes when the alert was opened, any added comments, and an audit log of updates made to the alert.
Overall, I believe that Microsoft 365 Lighthouse’s multi-tenant alert capabilities are a valuable addition to the platform. They provide MSPs with the tools they need to proactively monitor their customers’ tenants and quickly respond to any potential issues.
AI technology has transformed the way modern businesses operate, helping to streamline processes and improve productivity. One such AI-powered solution that’s now being adopted is the Bing Chat Enterprise by Microsoft.
Jared Andersen, a member of the Bing Chat Enterprise team at Microsoft, provides insights into how the latest GPT-4 language model foundation is seamlessly integrated into Bing Chat Enterprise.
In today’s digital world, the power of generative AI, especially large language models such as GPT-4, cannot be overstated. These platforms can generate content from a single prompt and are becoming an intrinsic part of business operations. However, data protection remains a key concern for organizations adopting such technologies.
Bing Chat Enterprise: Bridging the Gap between AI and Data Protection
Bing Chat Enterprise is an AI-driven communication solution redefining businesses’ approach to managing data. Unlike other public AI services, Bing Chat Enterprise goes above and beyond to protect your data.
It’s built on GPT-4 and is easily accessible through Microsoft 365 Business subscriptions, offering the flexibility of catering to businesses of all sizes. Not only does it make use of up-to-date public web data, but takes stringent measures to safeguard your internal company data.
Data Safety with Bing Chat Enterprise
What sets Bing Chat Enterprise apart is its ability to offer commercial data protection. It ensures that chat histories are not retained and that any data used during a session is not used to train the underlying large language model.
Moreover, the service operates outside your tenant boundary, with no access to internal company data. The chat data is temporary and is purged with each new session.
With Bing Chat Enterprise, you can not only generate compelling content in real time but also control your past and ongoing chats. Thanks to the fact it does not keep conversation histories, there is virtually no risk of your data being inappropriately used.
User and Admin Controls
Microsoft 365 admins have the power to configure Bing Chat Enterprise service for individuals or groups within their tenant. Administrators also have control over whether or not Edge can use browser context.
For users, there are controls available to limit the service’s access to their web pages or PDFs. This, in addition to the other measures in place, reinforces data protection and ensures user comfort and trust.
Bing Chat Enterprise Versus Microsoft 365 Copilot
Comparing Bing Chat Enterprise and Microsoft 365 Copilot throws up several differences. The most notable ones are:
Microsoft 365 Copilot operates entirely inside your tenant boundary, keeping your data secure within.
It can access and orchestrate your work data, including emails, documents, and meetings, via the Microsoft Graph.
While Bing Chat Enterprise relies on the public internet for information, Microsoft 365 Copilot utilizes your internal company data.
Bing Chat Enterprise is a powerful tool offering many advantages. With data protection measures in place, it can help organizations efficiently make the most of generative AI while ensuring their data remains secure. Leveraging this AI solution can propel you toward success in the digital age, driving productivity and unlocking new possibilities for your business.
Money is always a sensitive issue, especially when you have problems sending or receiving it. The rules are a bit stringent with financial apps, so it’s no surprise that Venmo may fail to authenticate your account or even transactions at times.
To get around this issue, you must verify that you’re the true account holder, but if your efforts prove futile, we show you how to get around it.
Why do I keep getting an error on Venmo?
You have not yet verified your email address or linked your bank account to your Venmo account.
You’ve entered the wrong password or forgotten it.
You’re using an outdated version of the app, or there’s an undergoing scheduled maintenance.
How do I bypass the authenticating error on Venmo?
A few basic checks before you begin troubleshooting include:
Ensure your device meets the minimum system requirements to run the app and that your internet connection is stable.
Double-check your password and email credentials, especially if they’re case-sensitive.
Check your date and time settings and ensure they’re in sync.
Ensure you’re using the latest version of the app or try the web version.
Log out of all other devices and log back in.
1. Clear app cache
Tap on settings on your phone.
Next, tap on Apps.
Find the Venmo app and tap on it.
Scroll down and select Storage.
Tap on Clear data and Clear cache,then try again.
If you’re using the Windows app, you can also clear app cache to reset it back to default settings.
2. Reset your password
When you’re on the login page, instead of entering your password, click on the Forgot Password option and enter the email account associated with your Venmo account.
You’ll then receive a reset password which you should change and get access to your account again.
3. Disable your VPN
Press the Windows key and select Settings.
Next, select Network & internet and click on VPN in the right-side menu.
Select the VPN connection you want to disable, click on the drop-down and select Remove.
4. Delete cookies, cache and history from your browser
For this step, we shall be using the Chrome browser.
Launch your Chrome browser and click the three vertical ellipses in the top right corner.
Select Settings.
Click on Privacy and security, then select Clear browsing data.
Check Cookies and other site data andCached images and files, then hit Clear data.
5. Reinstall the Venmo app
Click the Start button and select Settings.
Now choose Apps from the left pane and click on Apps & features from the right.
Look for the Venmo app in the list, click the three dots button from the right, and select Uninstall.
After the process finishes, perform a fresh installation of the app.
Also, remember to get rid of any remnant files that may have corrupted the app in the first place to ensure your fresh install does not inherit such problems.
If you’ve tried all the above but still can’t get into your Venmo account, there’s a high possibility that your account has been hacked. Trust wallets can be hacked, so the customer service team may be able to help. Sometimes it is an isolated issue that needs to be looked into.
You can email, call, or fill out a form explaining the problem in detail, and the support team will get back to you. If proven to be the legitimate owner of the account, you should be able to log in with no difficulties in no time.
What are the safety considerations when troubleshooting Venmo error messages?
Switch to mobile data – Before troubleshooting the Venmo authentication error messages, check your network connection and ensure you’re not using public Wi-Fi.
Verify security protocols are in place – Ensure your 2FA or multi-factor authentication is active.
Turn on account alerts – Ensure you’ve enabled account alerts for any activity registered on your linked bank account and credit card.
Review app permissions – Double-check all apps with permission to view and make changes to the Venmo app and disable them accordingly.
These safety precautions will ensure you limit the risk of your account getting compromised. Alternatively, you should consider storing your funds in hardware wallets, but even these occasionally get hit with similar errors, like your Trezor is not recognized.
Other times, it’s just a regular glitch that happens with like apps, and you find that it’s down or not working, just like when Metamask is not working.
So there you have it. Now you know how to resolve the most common issues that could be blocking you from accessing your Venmo app.
Is there any solution that worked for you that is missing from our list? We’d love to hear about it, so drop us a comment down below.
Microsoft AI researchers accidentally made a lot of private information, like passwords and secret messages, available to anyone who knew where to look on GitHub. This happened because they used a special link that gave people too much access to their data, according to data shared with TechCrunch by cloud security firm Wiz.
During its ongoing research, Wiz discovered that cloud-hosted data was accidentally exposed. In particular, Wiz identified a Microsoft GitHub repository linked to the company’s AI research division. The repository contained open-source code and AI models that could be used for image recognition, with users instructed to download the models from an Azure Storage URL.
The accidentally shared data included 38 terabytes of critical information. It contained personal backups from two Microsoft employees, passwords, secret keys, and messages from Microsoft employees.
The data was exposed due to a misconfigured shared access signature (SAS) token. Azure uses SAS tokens, a mechanism that allows users to create shareable links granting access to an Azure Storage account’s data.
The data has been exposed through a misconfigured URL since 2020. Wiz discovered that the URL allowed “full control” instead of “read-only” permissions. Anyone who knows where to look could delete, replace, or insert malicious content into the data.
Microsoft stated that no customer data was exposed, and no other internal services were at risk due to this issue.
This incident underscores the importance of robust security practices when handling sensitive data, especially in the context of AI research and open-source projects. It also highlights the need for ongoing monitoring and safeguards to prevent accidental data exposure.
Panos Panay, Executive Vice President and Chief Product Officer at Microsoft and a 20 year veteran of the company, is leaving, according to an internal email reported by The Verge.
The email, sent to Microsoft employees from Rajesh Jha, EVP for Experiences + Devices, does not give a reason for the departure:
After nearly 20 years at the company, Panos Panay has decided to leave Microsoft. Panos has had an incredible impact on our products and culture as well as the broader devices ecosystem. Under Panos’ leadership, the team created the iconic Surface brand with loved products. More recently, as the leader of Windows, the team has brought amazing services and experiences to hundreds of millions with Windows 11 on innovative devices including those from our OEM partners. He will be missed, and I am personally very grateful for his many contributions over the years. Please join me in wishing him well.
Panay acknowledged the news on X:
After 19 incredible years at Microsoft, I've decided to turn the page and write the next chapter. I’m forever grateful for my time at Microsoft and the amazing people I had the honor to make products with.
Panay will however help in the transition to a new organization structure as outlined by Jha in the email:
Build silicon, systems and devices that span Windows, client and cloud for an AI world.
This team will be led by Pavan Davuluri, reporting directly to Jha. “Windows planning and release management will continue to be in this team. Our commitment to Surface and MR remains unchanged. ”
Build experiences that blend web, services and Windows for an AI world.
This will be a new “Windows and Web Experiences Team,” led by Bing Chat head Mikhail Parakhin, with teams led by Shilpa Ranganathan, Jeff Johnson and Ali Akgun moving with their teams intact to the new org.
Windows and Surface businesses with our OEM and Retail partners.
Yusuf Mehdi will take over these responibilities.
In addition, Charles Simonyi, Terri Chudzik and Erin Kolb will join the E+D management teams and Ralf Groene and Mike Davidson will work together on the best alignment on design teams.
Panos Panay has become very familiar both to fans of the Microsoft Surface line of devices, and later with Windows itself, leading the release of Windows 11. Are you a fan of Panos Panay? Let us know in the comments below
Despite being one of the most successful e-commerce sites, Amazon is not immune to fraud. And even with all the information on how to spot a phishing scam, people still fall victim. Scammers have clothed their activities so well that it’s hard to tell real from fake.
And while you can ignore these phishing attempts on your account, reporting them is a step closer to helping Amazon improve its security detection. If you don’t know where to start, here’s a guide on how to go about it.
What are some common types of Amazon phishing scams?
Evil twin phishing – It’s when a hacker sets up or names a network that looks like the legitimate Amazon Wi-Fi.
Email phishing – This is when you receive a suspicious email that looks like it’s from Amazon. It usually asks you to follow a link.
Text message phishing – Can come in the form of a fake order confirmation text message asking you to surrender personal information, just like the Amazon security scam text.
Malware phishing – This type of scam uses malware-laced websites to trick users into downloading malicious software onto their computers.
Website spoofing – This involves setting up a fake website that looks like the real thing — often using a URL very similar to the original site.
How do I report phishing to Amazon?
1. Gather evidence of the fraudulent email or phone call
If you receive an unsolicited email or phone call claiming to be from Amazon, you need to keep this evidence. Common messages will be something like your Amazon account has been temporarily locked. You’ll then be asked to click on links or surrender personal information to unlock it.
Instead of clicking on links, gather as much information as possible. This includes the time of the email or call received, the email address or phone number used, and the contents of the email.
2. Contact Amazon Seller Central Customer Service Team
After gathering the information in 1 above, report it to the Amazon Seller Central Customer Service Team. You can forward the contents of the email to Amazon’s phishing email address.
For phone calls, you can either record the call and send it to the same email or forward the number to the Federal Trade Commission.
3. Submit a report to Amazon Seller Central’s Security Team
Customers are not the only ones at risk of getting scammed. Sellers on the platform can also fall victim to phishing scams. Scammers can impersonate their websites and redirect their customers to purchase from them.
Any orders made through the fake page may not be delivered, and customers may lose their hard-earned money. If you’re a seller and a scammer is camouflaging as you or misrepresenting your business, you can report the incident.
Help can be found through your seller account by logging in, going to the help page, and filling in the form. The Security Team will investigate your case and work with law enforcement if necessary.
How can I identify a phishing email?
Grammatical errors – Look for typos and spelling errors. If possible, use grammar checker software to weed out any mistakes you may have missed.
Unsolicited requests for personal information – If you suddenly get requests to submit information without prior communication or on an order you didn’t make, this is a phishing email.
Unusual format of emails – Check for unusual formatting. This includes messages with a lot of text, no links or graphics, or even a weird font.
Suspicious URLs and attachments – Before you click on a link, hover your mouse around it. This will reveal its thumbnail preview, which you can check against the real website and verify its authenticity.
Fake customer service numbers & emails – Any attempts to get you to respond, such as the Geek Squad email scam, can always be verified against the official website before taking action.
Other tell-tale signs include an urgent tone in messages, too-good-to-be-true offers, and persistent emails to take action on clicking links or sending personal information.
If you suspect that your account may have been compromised, change your password as soon as possible. Also, get in touch with your bank if you have shared personal details. This will secure your funds before scammers get to it.
In the future, use strong passwords for your accounts and consider installing multi-factor authentication software to add an extra layer of security to your accounts.
Have you received suspicious messages before, and what action did you take? We’d love to know some of your scam-proof techniques, so let us know in the comment section below.
Microsoft Edge’s upcoming translation feature in its native PDF viewer has been captured by a user on Twitter. As per the user, it is currently in Edge Canary, but all the options are not functional yet. Native translation features for PDFs can be very helpful, especially for users who frequently work with documents in multiple languages.
The translated text will appear in a new “Translate” pane rather than directly within the PDF. This approach can be useful as it allows users to view the translation alongside the original text and doesn’t clutter the main view, making comparing and referencing both versions easier.
Having options like searching for selected text, listening to translations, and suggesting edits can enhance the overall translation experience and make it more versatile for different use cases. This feature will likely be a valuable addition for those who rely on PDFs for their work or personal needs.
The automatic translation feature currently doesn’t extend to the native PDF reader within Microsoft Edge, as it is for websites. Having dedicated features for both web content and PDFs ensures that users have a comprehensive translation solution within the browser.
While Edge has added this feature, they are retiring this another feature and users are not happy about it.
The Windows 11 Start menu might look a bit different in the coming days. Microsoft, in its latest Windows 11 build (22621.2359), has released an update to Insiders on the Release Preview Channel, which now includes website suggestions in the Start menu’s Recommended section.
What’s in the New Build?
According to the Windows Insider Program Team blog post, the new feature leverages users’ browsing history to populate the Recommended section with websites.
This update introduces websites to the Recommended section of the Start menu. These websites will be personalized for you and come from your browsing history.
Typically, users consolidate and bookmark their frequently visited websites within their chosen web browser. Now, Microsoft believes these links deserve a spot right on the Start Menu for ease of access. The update is a part of the Release Preview build, indicating a high likelihood for this feature to find its way into a future stable release for all Windows 11 users.
Don’t like this Feature? Here’s How to Turn it Off
Although providing quick access to your important websites right from the Start Menu could save you a significant amount of time, not everyone may be on board with this feature, especially for privacy reasons.
Thankfully, for those wishing to disable this feature, the process is straightforward. By navigating to Settings > Personalization > Start, users can adjust the recommended content settings and turn off the new feature.
Moreover, if you are someone who prefers your Start Menu neat and uncluttered, Microsoft has also provided an option to disable the Recommended section altogether.
As this feature rolls out, it will be interesting to see how this tweak to one of the most essential parts of the Windows user interface is received by users worldwide.
Microsoft news recap is a weekly feature highlighting the top Microsoft news stories of the past week. Sit back, grab some coffee, and enjoy the read!
EU may file formal complaint against Microsoft Teams’ bundling, despite latest efforts.
Microsoft is currently under scrutiny by the European Union due to concerns surrounding the bundling of its Teams app with other services. Despite Microsoft’s attempts to alleviate these concerns by offering Teams separately at a discounted annual rate, the EU remains unsatisfied, preparing to issue a formal complaint in the coming months. Furthermore, Microsoft is facing investigations regarding the licensing of its cloud infrastructure and the bundling of its OneDrive cloud system with Windows. The EU is also examining whether Microsoft’s Bing, Edge, and advertising services should be regulated under the bloc’s Digital Markets Act.
Starfield will soon get DLSS upscaling, FOV slider, ultrawide monitor support, and more.
A week following its full launch, Bethesda has released the first update for Starfield, hinting at more updates in the near future. The initial update focuses on minor stability and performance fixes, along with addressing some quest-related issues. Upcoming features, as indicated in the Steam patch notes, include brightness and contrast controls, an HDR calibration menu, and Nvidia DLSS support for PC users. Additionally, Bethesda is working on built-in mod support for Starfield, planning to launch this full support early next year, as well as support for ultrawide monitors and an ‘Eat’ button.
A new Xbox Mastercard is soon rolling out for Xbox Insiders members.
Xbox has announced the introduction of a new Xbox Mastercard credit card in collaboration with Barclays. This card will enable members to accumulate points through purchases, which can be redeemed for Xbox-related rewards. The card offers various benefits, including a bonus of 5,000 points after the first purchase and three months of Xbox Game Pass Ultimate for new members. The card, featuring contactless payments and digital wallet compatibility, will be available to Xbox Insider Program members in the US from September 21.
Time magazine names Microsoft world’s best company.
Microsoft has been recognised as the top company in TIME’s inaugural list of the World’s Best Companies. This accolade is based on a comprehensive analysis of various factors including employee satisfaction, revenue growth, and sustainability efforts. Notably, Microsoft secured the first position in employee satisfaction, indicating a positive work environment and engaged workforce. The company, along with others like Accenture, has been working towards improving diversity and inclusion within their workforce.
That’s it for this week. We will be back next week with more Microsoft news.
Many users have reported facing error codes 2502 and 2503 on Windows 11 while installing or uninstalling programs like Epic Games Launcher. If you have encountered the same error, this guide can help!
We will discuss the expert-recommended solutions right after explaining the error message and causes of the same.
What are error codes 2502 & 2503 on Windows 11?
Error codes 2502 & 2503 indicate that the administrator user doesn’t have full write access to the Temp or Windows Installer directory.
However, the error is not limited to permissions; it could occur due to malware infection, corrupted Windows Installer, incorrect registry, damaged setup file, or third-party programs conflict.
How do I fix error codes 2502 & 2503 on Windows 11?
Before proceeding with any steps to fix the issue, go through the following preliminary checks:
If you are facing the same issue, even after following all the steps, download the program installer from a reliable website and try again.
However, if nothing worked for you, try reinstalling Windows to repair all the corrupted files and fix the issue.
Windows Keyboard Layout Creator Error Code 2502 & 2503
To fix the Keyboard layout creator error codes 2502 & 2503, temporarily disable antivirus software, ensure system drivers are updated, and then follow the steps in Method 2 mentioned above.
Remember always to use an administrator account when performing installation or uninstallation processes.
Many are wondering if can you use Microsoft Teams without an account and in this guide, we’re going to answer this and all other questions related to this subject.
Does Microsoft Teams allow external users?
You can allow users in your organization to contact other users outside of the organization as long as they are using a Microsoft account.
How do I join a team meeting as a guest?
1. Joining a Teams Meeting with a Web Browser
Go to the meeting invite and click on the Click here to join the meeting link.
You will get two options on the default web browser: Join on the Teams app or Continue on this browser.
Click Allow to permit Teams to use your microphone and camera if prompted.
When ready, click Join now to attend the meeting without an account on Teams.
You will now be in the meeting lobby and can join as soon as the organizer lets you in.
2. Joining a Teams Meeting with the Mobile phone
Locate the email with the link, and tap on Click here to join the meeting.
Go to the meeting invite and select Click here to join the meeting.
If you have the desktop app, a pop-up will appear; click Open Microsoft Teams app. If not, click Download it now.
Follow the steps to install the app.
Next, click Allow, then Continue to permit the microphone and camera.
Enter your name and click Join now. Now, you will be in the lobby and can join it as the meeting host approves.
Security settings for joining meetings on mobile devices
Use an 8-character long, strong password or PIN.
Check the video settings and permissions before allowing it to access your data
Enable VPN when joining a meeting via public Wi-Fi networks.
Ensure there are no pending updates on your device.
If you are the organizer and don’t want any interruptions while in a meeting, enable the Anonymous users can join a meeting option.
Provide necessary access to the microphone and camera to the Teams app.
Check the screen sharing and recording settings to avoid any mishaps.
Remember that if you join the meeting without a Teams account, notify the meeting host. In case they don’t approve the access within 15 minutes, you will be removed from the lobby.
Also, if you cannot join the call, check with the meeting organizer if they have set up the meeting for the people with accounts only.
Microsoft released new features for the Snipping Tool app on Windows 11 in the Windows Insider Program channels, and one of the most exciting ones is the Text Action feature, which will effectively allow you to get the text from the images you save on your computer.
The best part: you can do so with very few clicks, and it’s an extremely useful feature when you need to handle lots of images and data for different projects.
This feature is literally a game-changer for data analysts, researchers, educators, scholars, and students, but of course, everybody can use it.
With this update to Snipping Tool (version 11.2308.33.0), we are introducing Text Actions, which detects text in your captured screenshots, making it easy to copy text from any image to share with others or paste in another app.
Snipping Tool recently got another useful feature: the ability to record your screen through it, and we have to say. We love the love Snipping Tool is getting from Microsoft.
However, the main star is the ability to copy texts from images with Snipping Tool’s Text Action, and we’re going to show you how to do it.
How to copy texts from images with Snipping Tool’s Text Action
Open your Snipping Tool app in Windows 11, and use it to screenshot an image from your screen.
After you screenshot the image, go back to the Snipping Tool app and click on the Text Action icon.
This action will open 2 options: Copy all text, and Quick redact; click on Copy all text and all the text from the image will be automatically copied to Clickboard.
Open your Notepad or Sticky Notes to copy the text.
And this is it. You can also use the Text Action to quickly redact an image’s text. To do so, you’ll need to repeat the process of taking a screenshot with Snipping Tool and select Quick Redact in the Text Action panel.
This option will allow you to redact any part of the image that you want. The layout of the quick redact option should look like this.
Microsoft says the quick redact option gives you the ability to hide sensitive information from any image that you share, and we couldn’t agree more. It’s a very useful feature.
With Text Actions, you can also redact sensitive information in screenshots before sharing. Select Quick Redact from the toolbar to automatically hide emails and phone numbers or select any text and select Redact Text from the right-click menu to hide the text.
Microsoft should really come up more often with such useful features. What do you think about them?
In the fast-evolving digital landscape, the Internet of Things (IoT) has emerged as a metamorphic force, reshaping industries and reinventing how we live and work.
It is still growing astoundingly, opening doors to challenges and opportunities at a large scale. Therefore, it is vital to stay informed and foresee trends shaping the coming years.
In this comprehensive guide, we discuss the latest IoT statistics and facts, highlighting the present scenario and a glimpse of what’s in store.
What are the most common IoT applications?
Smart home automation – Controls lighting, security cameras, thermostats, and other appliances.
Healthcare industry– Remote patient monitoring via wearable health devices to track activity levels and other vitals.
Security & Surveillance – Video surveillance via access control systems for better security.
Consumer electronics – Connect fitness trackers and smartwatches to gadgets in the home.
Energy management – Monitors & controls energy consumption in buildings via a smart grid system.
Latest IoT statistics & facts for 2023
You would be astonished to know the first IoT device was aCoke machine in Pittsburgh, Pennsylvania, which used to report its contents via a network.
A PWC report shows that 90% of executives believe that the advantages of IoT are far more than the risks involved.
Outdoor surveillance, with USD 7.6 million, is the larget market of IoT.
The Smart Homes Global Market Report 2023 suggests that approximately 69% of US households have at least one smart device, and 15% of the households globally are expected to have a smart home device by the end of 2023.
The Smart Cities market revenue is projected to reach USD 89.49 billion in 2023. It is anticipated to show a compound annual growth rate of 13.13%, resulting in a market volume of USD 165.80 billion by 2028. Compared to the worldwide figures, the United States, with USD 11.12 billion market revenue in 2023, is expected to lead.
The top five industries for IoT are manufacturing, Healthcare, Energy, Manufacturing, & Construction, and the leading countries, as of 2023, are the United States, China, Japan, South Korea, & Germany.
London is the smartest city with 46000 tech companies, 240000 jobs in tech companies, & USD 44 billion revenue generated, and is striving to be a carbon-neutral city by 2050.
IoT market size
A report by Statista states that in 2023, Automotive IoT rules the market with a projected market volume of USD 397.20 billion.
The revenue is anticipated to exhibit a compound annual growth rate (CAGR) of 13.60% between 2023-2028, resulting in USD 2,227.00 billion in the total market volume by 2028.
Compared to worldwide figures, the United States would lead the revenue generation with USD $172.30 billion in 2024.
The Enterprise IoT market is anticipated to exhibit a compound annual growth rate of 28.40% during 2022-2030.
The development of advanced technologies like Bluetooth, Insteon, and Wi-Fi drives the growth of the Enterprise IoT market. Also, the increased use of cloud systems for data management is boosting it further.
The North American region is expected to hold the largest market share in the enterprise market; however, underdeveloped countries like Africa and the Middle East might find it challenging to manage the growth.
Regarding IoT spending share, the Asia Pacific region was leading with 37% in 2018 and still maintains the position even after a decrease of 2%. Here are the details:
Region
2018
2023
Asia Pacific
37%
35%
North America
29%
27%
Europe, Middle East, & Africa
23%
25%
Japan
9%
9%
Latin America
9%
3%
IoT spending share
In the next seven years, by 2030, the annual revenue of consumer internet and media devices is anticipated to be USD 25 billion. Apart from this, we can also expect significant growth in the connected vehicles IoT revenue. Here is the data:
In 2020, the global IoT market was worth approximatelyUSD 182 billion, and by 2030, it is expected to be more than USD 621 billion, which would be triple its revenue in just 10 years.
Also, China is anticipated to lead the Internet of Things market with USD 184 billion by 2030, which would be the1/3rd of the entire market worldwide, followed by North America with USD 138.7 billion and Europe with USD 122.7 billion.
Retail markets are expected to witness a surge in growth, fueled by more than 21.5% CAGR, attributed to the rising IoT adoption rates.
BusinessWire
IoT growth statistics
A report by Frontier Economics forecasted that the United States GDP will get a boost of 10% in 30 years, all thanks to IoT.
This should not be surprising as the IoT statistics show that IoT is already gaining much attention and disrupting the status quo. Some sectors like energy and agriculture have started to see the advantages of its implementation.
An analysis by McKinsey Global Institute forecasted an overall annual economic impact ranging from $3.9 trillion to $11.1 trillion by 2025 across various sectors, including cities, factories, outside settings, the human body, etc.
The highest estimate of economic impact, including consumer benefits, were to be analyzed; it would be worth 11% of the economy worldwide. Here are the details:
Annual economic impact report
Approximately 127 new devices connect to the Internet every second worldwide.
IoT attacks statistics
In the ever-evolving global digital landscape, our devices are getting smarter, and cybercriminals are becoming sharper by the day.
According to a Statista report, in 2018, the number of cyberattacks related to IoT devices was 32 million; however, in just four years, the number has surged to 112 million in 2022, marking a whopping 87% increase.
Cyberattacks related to IoT devices
The SonicWall Cyber Threat Report, a 2023 mid-year update, mentioned an increase of 37% in IoT malware worldwide, resulting in 77.9 million attacks. The highly affected areas were Asia, with 170%, and Latin America, with 164% increase.
As the rise in the attacks has grown, we must take security measures to keep our IoT devices safe and prevent any mishaps.
IoT devices statistics
According to a report on Statista by Lionel Sujay Vailshery, a research expert for the Consumer Electronics industry, published on July 27, 2023, the number of Internet of Things (IoT) devices is anticipated to double from 15.1 billion in 2020 to more than 29 billion in 2030.
With more than 8 billion consumer devices, China is forecasted as the country with the highest number of IoT devices by 2030.
Consumer IoT devices accounted for a lion’s share of about 60% of all IoT-connected devices in 2020, and the proportion is likely to be the same in the next decade.
One of the popular ways of using IoT devices is via consumer internet & media devices such as smartphones, and by 2030, there are expected to be more than 17 billion of these devices in use.
Year
IoT Devices (in billions)
Non-IoT Devices (in billions)
Percentage of IoT devices of total devices in use
2010
0.8
8.0
8.8%
2011
1.1
8.7
9.7%
2012
1.6
9.1
10.7%
2013
2.1
9.5
11.6%
2014
2.8
9.7
12.5%
2015
3.6
9.7
13.3%
2016
4.6
9.8
14.4%
2017
6.1
9.9
16.0%
2018
8.0
9.9
17.9%
2019
10.0
10.0
20.0%
2020
11.7
9.9
21.7%
2021
13.8
10.0
23.9%
2022
16.4
10.1
26.5%
2023
19.8
10.2
29.9%
2024
24.4
10.2
34.6%
2025
30.9
10.3
41.2%
IoT & Non IoT Devices (billions)
A report by Statista suggests that by 2025, there will be a three-times increase in the use of IoT connected devices in use, i.e, 75 billion.
More than874 million smart home devices were shipped globally in the third quarter of 2022, with 296 million units; video entertainment devices top the list, followed by security devices and smart speakers. Given the past figures, here are the forecasted estimates for 2023-2027:
The global market for the Industrial Internet of Things (IIoT) was more than USD 544 billion in 2022, and by 2030, the market is anticipated to grow and reach up to USD 3.3 trillion.
According to PwC survey in 2020, 91% of industrial companies are investing in creating digital factories in the core regions of Europe.
Moreover, in the next five years, i.e., 2028, the global revenue is foreseen to show a compound annual growth rate of 13.73%, making it worth USD 525.20 billion.
According to a Statista report, the number of cellular IoT connections with broadband worldwide and critical IoT in 2022 was 1.5 billion and will rise to 3.3 billion by 2028.
Ericson Mobility Report in June 2023, North East Asia is at the top in the number of cellular IoT connections. It is anticipated to cross 2 billion connections by the end of 2023.
IoT
2022
2028
CAGR
Wide-area IoT
2.9
6.0
13%
Cellular IoT
2.7
5.4
12%
Short-range IoT
10.2
28.7
19%
Total
13.2
34.7
18%
IoT connections (billion)
Here are details of the cellular IoT connections by segment and technology from 2018-2028:
Cellular IoT connections by segment and technology
5G is the next-gen of cellular technology, providing faster and lower latency results than its predecessor. By the end of 2024, the number of 5G cellular subscriptions will reach 1.9 billion.
The Consumer market is forecasted to lead in 2030, driven mainly by smartwatches, headphones, smart speakers, and connected TVs.
Whereas the vertical-specific market is broken into small fragments, smart metering will significantly impact all.
Cross-vertical or Enterprise markets encompass apps across different industries, such as ventilation, connected healing, AC systems, and connected security systems.
Enterprise
Greater China
Europe
North America
Japan
Latin America
South East Asia
MENA
India & South Asia
Russia & Central Asia
South Korea
Australasia
Sub-Saharan Africa
Vertical-specific
2.58
2.23
1.97
0.63
0.49
0.35
0.30
0.28
0.21
0.14
0.14
0.17
Cross-vertical
1.32
0.79
0.83
0.25
0.21
0.13
0.12
0.13
0.08
0.09
0.06
0.05
Consumer
5.95
4.71
4.57
1.29
1.13
0.76
0.60
0.59
0.47
0.46
0.31
0.16
IoT Connections in 2032
The graph below shows the IoT revenues in different enterprise sectors, depicting that Government, Retail & wholesale, and Transportation & storage have significant revenue opportunities even though their growth rates are lower than others.
If you want to look at more details, check this table:
Sectors
Revenue in 2021 (million)
Compound Annual Growth Rate (by 2032)
Arts & Entertainment
4.3
32%
Professional, Scientific & Technical
253.6
18.1%
Construction
581.4
11.2%
Water Supply & Waste Management
2001.5
18.2%
Agriculture, Forestry & Fishing
1876.3
18.9%
Finance & Insurance
3886.3
13.8%
Health & Social Care
5758.2
19.3%
Administrative
4969
16.4%
Electricity, Gas, Steam & A/C
13628.5
11.7%
Mining & Quarrying
627.1
7.4%
Accommodation & Food Service
4329.8
10.5%
Transportation & Storage
22354.8
10.6%
Government
46243
8.5%
Other Services
0.1
65.6%
Recurring IoT Revenue 2021 and CAGR 2021-2032 by Industry Sector
To conclude, the insights from the latest IoT statistics depict how it has created and will continue to create a substantial economic impact worldwide in the next decade.
Although inclusion in various industries has boosted their revenues at folds, the increased number of attacks due to IoT devices can also not be neglected.
Therefore, even though the data collected and reports presented paint a promising picture of IoT technology’s future, it is important to remain vigilant and informed.
What do you think about IoT? Don’t hesitate to mention your thoughts in the comments section below.
When it comes to video calls, the quality of the connection can make or break the experience. Even with a high-speed internet connection, you may still experience some video lag and freeze.
If this is the case, restarting the affected video chat application should do the job, but if it doesn’t, you’ll have to attempt more advanced troubleshooting.
So why would a video call have poor video quality if there are no issues with bandwidth or connectivity? With video calling, both people are sending and receiving data at all times, so you’ll need much more throughput to get good-quality video calls than you do for standard video streaming.
However, a slow internet connection is not the only factor that can degrade your video meetings. Low upload speeds, Wi-Fi interference, and network congestion also play a part. Further, if your computer is running low on memory and can’t allocate enough resources to the call, it will have the same effect.
What can I do if my video calls are choppy even though the internet works fine?
Try the following basic workarounds before attempting the somewhat technical solutions:
Switch from a wireless to a wired connection since Wi-Fi tends to be slower than Ethernet, ensure your Ethernet cable is not damaged, and move closer to your router.
Check whether your ISP is having issues with its servers or network, which could cause problems on your side too.
Ensure your video chat app and OS are both up-to-date.
Try using a lite version of the app or the web version.
1. Switch to a faster GHz band
Hit the Windows key, type Device Manager in the search bar, and click Open.
Navigate to Network adapters and double-click to expand.
Right-click on your network adapter and select Properties.
Click on the Advanced tab and locate the Preferred Band.
In the Value drop-down menu, select Prefer 5GHz band then hit Enter.
On your current Wi-Fi connection, click on Data usage.
Select Enter limit.
Under Set data limit, check the Unlimited box, then click Save.
3. Update your graphics card
Hit the Windows key, type Device Manager in the search bar, and click Open.
Navigate to Display adapters to expand, right-click on your graphics card, and select Update driver.
Select Search automatically for drivers and wait for your PC to find you the best driver.
And because Windows can sometimes fail to find the right driver, you need assistance from a third-party tool. Outbyte Driver Updater is a powerful, easy-to-use software that automatically identifies your system and finds all problematic drivers in just a few minutes.
It will then download & install the latest official drivers to help your computer speed up.
4. Adjust your graphic settings
Press Windows + I to open Settings.
Click on System on the left pane, then select Display.
Under Related settings, click on Graphics.
Find the video app in question and select it.
Now, choose High Performance and click Save.
If you have an older PC that cannot handle the undue pressure on the CPU, it’s best to forego this step and adjust your resolution settings from HD video to something like 480p. It may not be a high-quality video, but it’s decent enough to hold an online meeting.
Click on the Start Menu icon and click on Settings.
Navigate to Network & internet.
Select Advanced network settings.
Click on Network reset.
Next, hit the Reset now button.
6. Enable your VPN
Press the Windows key and select Settings.
Next, select Network & internet and click on VPN in the right-side menu.
Select the VPN connection you want to enable and click Connect.
7. Change Wi-Fi channels
If there’s too much congestion on the channel your device currently uses for its Wi-Fi connection and you have access to more than one Wi-Fi network, go to another channel and see if that gives you a better connection.
You can manually switch channels on most devices, but we recommend using Wi-Fi scanners to see available channels and set you up with the least crowded one.
Why are video conferencing apps dropping my internet down?
Most internet providers offer speeds that can only handle a certain amount of bandwidth usage before they start getting overwhelmed and slowing down everyone’s connection. The only fix here is to limit the number of connected devices or ask your Internet Service Provider to increase your bandwidth.
Video conferencing apps also require a constant stream of data to be sent and received by the app’s servers to function properly.
All this back and forth can overload your carrier’s servers, causing them to become sluggish or even go down completely. The solution is to upgrade to a package with faster speeds.
Still, with older hardware, you’ll find that even with all these steps, you are unable to resolve the issue of your internet being fast, but your video calls are slow. You can test this theory, and if you’re experiencing slow internet on one computer but fast on another, it might be time to upgrade your PC.
We’d love to hear your thoughts on this issue. From our research adding a VPN was the most upvoted but do let us know in the comment section.
Excessive power usage on your GPU can lead to overheating and reduce the lifespan of your graphics card, and one way to prevent that is by setting a power limit in MSI Afterburner.
This is fairly simple to do, but before you can do it, you need to know a few things about how to safely set it up, and this guide is going to help you with that.
What does the power limit mean in MSI Afterburner?
The power limit represents how much Thermal Design Power will your GPU utilize. You can experiment with this value in order to overclock or underclock your graphics card.
How do I set my GPU power limit in MSI Afterburner?
Understanding GPU Power Limits
1. Default power limit values
The default power limit is set to 100% for most graphics cards.
This means that it will utilize 100% of its Thermal Design Power.
You can increase or decrease this value in order to overclock or underclock your GPU.
2. Maximum power consumption and maximum power draw
Maximum Power Consumption represents the GPU power limit.
Maximum Power Draw is the maximum power in W that your GPU has used.
3. Clock speeds, memory clock, and core voltage settings
Your GPU runs on a specific frequency, and by adjusting the clock speed, you can improve its performance.
GPU has its own memory, and by increasing its clock you can make textures load faster, but that will affect your temperature.
By increasing core voltage, you adjust the voltage of your GPU. Higher voltage might make your GPU more stable when overclocking, but it will generate more heat and use more power.
4. Graphics cards and Intel Core processors
Afterburner doesn’t support integrated graphics on Intel Core or Ryzen processors.
To utilize Afterburner, you need to have a discrete NVIDIA or AMD graphics card.
5. Optimal temperatures for safe usage
The optimal temperature for GPUs under load is 80-85C.
Regarding the maximum safe temperature, it depends highly on the GPU model. NVIDIA RTX 30 series has a maximum temperature of 93C while AMD RX 6700 XT has 110C.
Adjusting your GPU’s power limit in MSI Afterburner
1. Use the Power limit slider
Make sure that the software is running.
Change the Power Limit setting in MSI Afterburner software by moving the slider.
Save changes.
2. Adjust fan speed, core clock, memory clock, and core voltage
Open MSI Afterburner.
Locate additional settings and adjust them accordingly.
Keep in mind that each of these settings will improve performance but it will always increase the power consumption, so try to keep it below your current power limit.
3. Setting up custom fan curves for maximum performance & safety
Use any temperature measuring software to determine your current temperature under a load. After doing that, open Afterburner.
Head over to the Fan tab. Next, toggle Enable user defined software automatic fan control.
Locate your temperature value from step 1 on the horizontal axis. On the vertical axis, select the fan speed you want to use for that temperature.
A good rule of thumb is to set the same fan speed for a temperature that is several degrees lower just to be on the safe side.
Save changes and test your temperature again. Depending on the temperature or fan noise, you’ll have to experiment with different values.
Troubleshooting MSI Afterburner power limit issues
Reinstall MSI Afterburner and be sure to have the latest version installed.
Change to the latest skin in Afterburner and after that, you should unlock the power limit in MSI Afterburner.
NOTE
Keep in mind that some graphics cards, especially ones in laptops don’t allow you to adjust the power limit.
2. MSI Afterburner power limit greyed out
Start Afterburner and go to Settings. In the User Interface tab set MSI Touch of Modern Afterburner skin by Drerex Design as your skin. Save changes and restart.
Once you start it, click on the Detach button.
Click the GPU button and select your GPU.
NOTE
This method only works if you have both integrated and dedicated GPU on your PC.
3. MSI Afterburner power limit keeps resetting
Adjust the overclock settings and lower them.
Ensure that the overclock is stable.
If you’re using NiceHash, make sure that it’s not set to manage your power limit.
4. MSI Afterburner power limit not saving
In MSI Afterburner, make sure you click the check icon in order to apply changes.
Start MSI Afterburner automatically with Windows to apply changes on startup.
Turn off the link for temp control.
Your graphics configuration software can also cause issues, so make sure it’s not overclocking your GPU.
We use Microsoft Excel to organize data, manage budgets, and track progress. But, if you’ve ever faced a scenario where the keyboard shortcuts in Excel, you know how challenging it can be.
Fortunately, although disruptive, these issues can often be fixed with a few adjustments or by changing keyboard settings. This guide will explain why this may happen and offer actionable solutions to regain your workflow’s speed.
Why are my keyboard shortcuts not working in Excel?
With these simple solutions, most Excel users should find their favorite keyboard shortcuts back in action. You can now open dialog boxes, drop-down menus, file menus, and other repetitive tasks with your most used key combinations.
To avoid a similar scenario in the future, check your key shortcuts every time you change your keyboard layout, add macro shortcuts, modify language settings, change any control keys, or revert to default settings.
The shortcut issue is pretty standard and many users also reported it for Microsoft Word, but we’ve found some quick resolutions. If you know any other tips and tricks on making keyboard shortcuts work again in Excel, let us know in the comments section below.
When you have a few duplicate emails, it’s not a big deal but when there are tens or hundreds of them, Outlook will become a mess. In this article, you will learn a few quick ways to delete duplicate emails in Outlook.
Why am I getting double emails in Outlook?
The main cause for duplicate emails is synchronization errors if you’re using Outlook on more devices at the same time.
Internet connection problems may also cause the creation of duplicate emails in your inbox.
Seldom times, refreshing the app too often may also lead to email duplication.
If the account settings are not configured correctly, that may result in Outlook duplicates or name conflicts.
When the antivirus software or other apps interrupt the send/receive process in Outlook that will cause the app to start over and get the same emails in duplicate.
How do I manually remove duplicate emails in Outlook?
1. Remove the emails in Preview mode
Click on the View tab, then select Change view from the top left corner of the screen.
Now, select Preview from the options.
Next, click on View Settings and choose Sort.
In the next window, you can sort your emails on various criteria, such as date, size, or subject, so you can identify the duplicates a lot faster.
Finally, click on the emails that are identical to the originals and delete them.
This will help you delete a single or multiple duplicate messages because you will be able to spot the identical ones. However, it can be a bit time-consuming and tedious.
How do I automatically delete duplicate emails in Outlook?
1. Using the Clean Up tool
Select the email folders you want to clean.
Click on the Home tab and select Clean Up.
You will now have three options to choose from: Clean Up Conversation (removes duplicates from the selected conversation), Clean Up Folder (removes the duplicates from the folder), or Clean Up Folder & Subfolders (removes the duplicates from the subfolders as well.
Additionally, in the next dialog, you can click the Settings button to change the folder where the duplicates are moved or other tweak other settings.
By default, they will be moved to the Thrash folder, but you will be able to restore them if you notice that some were deleted by mistake.
You can also go directly to the items folder and access the Clean Up Folder and Clean Up Folder & Subfolders from there.
2. Exporting and importing the PST without duplicates
Click on File, then select Open & Export. and choose Import/Export.
Click on Export to a file and hit Next.
Select Outlook Data File and click Next.
Select the folder you want to save and click Next.
Now, check the Do not export duplicate items option and click Finish
When the process is over, create another folder in Outlook and go to File > Open & Export > Import/Export like you did in the first step.
However, this time, select Import from another program or file and hit Next.
Now, select Outlook Data File (.pst) and click Next.
Hit the Browse button, find the PST file you saved earlier, check the Do not import duplicates option, and hit Next.
Now, set the folder to import from, check the Import to the same folder in option, select the mailbox from which the messages were exported, and click Finish.
This mail filtering procedure is a lot slower and more complicated, but it works so you should try it.
The methods above will work on the desktop versions of Outlook 365, Outlook 2010, Outlook 2013, Outlook 2016 and Outlook 2019. However, when you’re using the Outlook Web version, the solutions are extremely limited.
You don’t even have the option to sort the emails or contents using more than one criterion. So there are no other manual methods apart from simply identifying the duplicate messages or duplicate items visually.
3. Using a third-party Outlook email duplicate remover
As you have seen above, removing duplicate emails in Outlook can be a bit tricky and not always failproof.
Luckily, there are some third-party tools that can help you with deleting duplicate emails in Outlook.
You can try software such as Sysinfo Outlook Duplicate Remover, MailConverterTools PST Duplicate Email Remover, Aryson Outlook Duplicate Remover.
How to protect your Outlook data file from accumulating too many duplicates?
Tips for avoiding unnecessary incoming messages that create unwanted dupes
Don’t hit the Send/Receive button too often. Setting it to refresh automatically in 15-20 minutes is perfectly fine.
Try to use Outlook in a single instance. If you open it on your mobile, don’t open it on your browser or the app on your PC.
Make sure you have a consistent internet connection before opening Outlook.
Change the Junk email settings in Outlook
In the email Home tab, click on Junk and select Junk E-mail Options.
Now you can choose a different level of protection against junk mail.
We recommend choosing the Low option. In the High setting, some of the regular email messages will also be treated as junk mail. However, from Junk Email Options you can also set up a list of safe senders and safe recipients that will be excerpted from the junk policy.
Our readers also asked what is the shortcut for duplicate emails in Outlook. There isn’t such a shortcut, but if you want to create a duplicate of a certain email, you can open it, then click on the subject of the email, press Ctrl + F, and send the email to yourself again.
So, this is how you delete duplicate email messages in Outlook. If you want to delete duplicate contacts, you can do so by accessing the Address book within the Contacts section.
Developing apps is often seen as an intricate task. And in the absence of the right tools, things are all the more complex. That’s where the Windows Software Development kit comes into the picture!
It is the preferred option for designing software solutions for the OS. Though regular Windows users don’t need the SDK, it’s recommended to identify the purpose before you take any steps. The SDK does offer a wide array of advantages and is closely linked to Visual Studio.
Benefits of using Windows SDK:
Makes complex tasks simpler to perform
Reduces the app development time
Provides an optimal support environment for development
Helps eliminate errors that would arise when the app is released
What is the Windows Software Development Kit (SDK)?
Windows SDK or Software Development Kit is a wide set of tools that help create applications for the Windows operating system.
The software development tools are available for free and can be downloaded from the official website. Besides, to further simplify and streamline things, Microsoft has released sample codes for Windows apps on GitHub.
Sample codes on GitHub
But each SDK version can take up a few GBs of space. When running low on disk space, the SDK will be the first thing a regular user would uninstall. So, do you need the Windows Software Development Kit?
Unless you are a developer or run apps that depend on the SDK for core functioning, it’s not a critical requirement. And if you don’t remember manually installing the Windows suite of software development, it was most likely downloaded by Visual Studio.
How do I install Window SDK?
Go to Microsoft’s official website and download the installer or the ISO file for Windows 11 SDK. We chose the former.
Head to the folder where the setup is saved and run it.
Select whether you want to install it on the current PC or get the relevant SDK files for another device, and click Next. We chose the former.
Read the privacy policy, configure whether Micorosft should collect insights, and click Next to proceed.
Click Accept to agree to the license terms.
Tick the checkboxes for the features you want, and click Install. The setup will, by default, download all the components.
Click Yes in the UAC prompt to confirm.
Wait for the installation to complete. It shouldn’t take more than a few minutes.
You can download the Windows Software Development Kit from Microsoft’s website. And while both the dedicated installer and ISO are available, the former makes more sense due to the simpler installation.
And after downloading the SDK, you are just a few steps away from creating a Microsoft Store app. Why not give it a try?
Press Windows + R to open Run, type appwiz.cpl in the text field, and hit Enter.
Select Windows Software Development Kit from the list of programs, and click Uninstall.
Click Yes in the UAC prompt and then the confirmation box.
Wait for the process to complete.
You can uninstall Windows Software Development Kit from the Programs and Features utility or from Settings like you uninstall any app. Besides, many prefer a reliable third-party uninstall tool, given its ability to clear leftover files.
Development tools included in the Windows SDK
Redistributable components
Database table editor
Database schema
Development tools
Installer database validation tool
A sample product and code samples to get a better idea of things
VBScript tools
Also, during the installation, you can get the latest version of the .NET Framework Software Development Kit.
Windows Software Development Kit is a great collection of tools and finds an extensive implementation in programming activities. And if you are a seasoned developer, learn how to set up a Dev Drive and get better performance and security!
Also, to get ready-to-code developer workstations, you can always use Microsoft Dev Box.
For any queries or to share what prompted you to download the Windows SDK, drop a comment below.
Hiding folders is a great way to keep your desktop organized. Maybe you want to keep your personal files or some client details away from prying eyes. Whatever it is, the ability to tuck them away and unhide them when necessary is a big save.
Simply put, these hidden files will not be displayed in the main menu, but they are still accessible. It’s pretty straightforward and shouldn’t take too much of your time.
How do I hide a folder in Windows 11?
1. By using File Explorer
Hit the Windows + E keys to open File Explorer.
Locate the folder you wish to hide, right-click on it, and select Properties.
Navigate to the General tab, check the Hidden box, click Apply, then OK.
In the next dialog box, check the Apply changes to this folder, subfolders and files option box, then hit OK.
Go back to File Explorer, click on View>Show>Hidden, and ensure the tick is not there.
2. By using Command Prompt (CMD)
Hit the Windows key, type cmd in the search bar, and click Run as administrator.
Type the following command and hit Enter. Remember to replace folder name with the actual name of the folder you wish to hide: attrib +h "folder name"
Click on the Start Menu, type PowerShell in the search bar, and click Run as administrator.
Type the following command and hit Enter. Remember to replace C:\Users\Folder with the actual path of folder directory you wish to hide: $FILE=Get-Item ”C:\Users\Folder” -Force
Next, Enter the next command to hide: $FILE.Attributes=”Hidden”
How can I hide a folder in Windows 11 with a password?
While you can use Windows Explorer to hide files in a folder, it’s not a very secure method. Although it makes the folder invisible, if someone has access to your computer, they can easily unhide the folder and access its contents.
Password-protecting your folders is recommended as an extra layer of security. And even with the built-in feature in Windows, it only serves to protect when users log in using other accounts. Anyone who logs in using your user profile can access your hidden items.
Wise Folder Hider – This program allows you to hide any folder on your hard disk drive or removable media, such as USB drives, without sacrificing accessibility.
Folder Lock – This is a feature-rich file security software with online backup and end-to-end data encryption.
IObit Protected Folder – This is a program that comes with multi-layered security for your sensitive files and other advanced features.
Gilisoft File Lock Pro – This program comes with a self-protection mode that keeps your folders locked after a period of inactivity.
Easy Folder Guard – Easy-to-use program with advanced settings like file-disguise to prevent detection.
How do I access a hidden folder on Windows 11?
When you hide folders, they’re no longer visible in Windows Explorer and won’t turn up in search results. Most users do not need to know where these folders are located or how to access them. The folder will be transparent if you’ve enabled the option to see them.
However, if you’ve hidden them from your view in File Explorer, when you want to access the folders you’ve kept away, you will need to show hidden folders.
How do I unhide a folder on Windows 11?
The steps for unhiding folders are similar to hiding, only that you’ll have to reverse-engineer for File Explorer. For the Command Prompt: attrib -h “folder name” is the command to enter, while for PowerShell, it is $FILE.Attributes -match “Hidden”
With these methods, whether you need to get rid of those pesky folders on your desktop or want to secure your files, you can safely keep your folders private without giving away sensitive information while maintaining an intuitive system.
And if you’re looking for more ways to organize your files, we have some folder settings you can try to ensure you get the best user experience possible.
Hopefully, these tips will help you better manage your folder organization on Windows. Are there any other ways you like to hide or unhide folders? Let us know in the comments below.
MSI Afterburner remains the most popular graphics card software due to its compatibility with a wide range of hardware. But it doesn’t always work perfectly. A few got the Failed to start scanning error when running the MSI Afterburner OC scanner.
The problem was more prevalent in the recent versions of the MSI OC scanner, but reconfiguring these settings usually fixed it.
What causes the MSI Afterburner Failed to start scanning error?
The graphic card settings are misconfigured
A third-party program conflicts with the OC scan
You are running an outdated or incompatible graphics driver
A bug in the installed version of MSI Afterburner
How do I fix the Failed to start scanning error in MSI Afterburner?
Before we head to the slightly complex solutions, try these quick ones first:
Turn off the computer, wait for 15-30 minutes, power it on, then run the OC scanner, and verify if you still find the MSI Afterburner scan canceled.
Check for any available updates and install them, both the program and the OS.
Launch the NVIDIA Control Panel, click the Desktop menu, and select Enable developer settings.
Select Manage GPU Performance Counters from the navigation pane, and enable Allow access to the GPU performance counters to all users.
Finally, click Yes in the confirmation prompt, and restart the computer.
2. Terminate all active programs
Press Ctrl + Shift + Escape to launch the Task Manager and identify all active programs on the PC.
Now, select them individually and click the End task button.
After killing the programs, check for any non-critical processes and terminate them as well.
3. Enable CUDA in NVIDIA Control Panel
Open the NVIDIA Control Panel, and go to Manage 3D Settings from the left pane.
Locate the CUDA -GPUs entry, and select All from the dropdown menu.
Save the changes and reboot the computer.
When the MSI Afterburner OC scanner failed to start scanning, enabling CUDA will do the trick! If the option is greyed out or the changes don’t reflect, add your card to the list and turn on CUDA under Program Settings instead of Global Settings.
4. Update the graphics card driver
Press Windows + X to open the Power User menu, and select Device Manager from the list of options.
Expand the Display adapters entry, right-click on the active graphics adapter, and select Update driver.
Click on Search automatically for drivers and wait for Windows to find the best available version and install it.
Often, an incompatible or outdated driver can trigger the Failed to start scanning error in MSI Afterburner. In this case, simply updating the graphics driver should do!
When Windows can’t find a better version, head to the manufacturer’s website, locate the latest version, download it, and then manually install the driver.
Here are the direct links to the driver download page for major manufacturers:
When a simple removal doesn’t work, and you still face the error, use a reliable third-party uninstaller tool. It will clear any leftover files and registry entries created by the program.
Besides, a reinstall is an effective solution against the MSI Afterburner scan failed with code 3 error.
How does MSI Afterburner OC scanner work?
The OC scanner identifies the highest clock speed that delivers a stable performance without damaging any of the hardware. It uses the same algorithm developed for RTX 20 series graphics cards by NVIDIA.
The program does so by gradually increasing the clock speed, stressing the GPU, and verifying the stability. When things turn unstable, the last set configuration will be termed stable overclocking settings.
The MSI Afterburner OC scanner has made overclocking simpler than ever, and though you may encounter errors like Failed to start scanning, these are easy to fix. Remember to verify whether MSI Afterburner is not working, and if that’s the case, fix it first.
For any queries or to share what worked for you, drop a comment below.
Hard drive failure is a serious problem because you can permanently lose your data, and this is why many choose to mirror a hard drive in Windows 10 as a way to back up their data.
Mirroring a hard drive isn’t as complicated as you think, and in today’s guide, we’re going to show you a couple of ways you can do that on your PC.
Benefits of hard drive mirroring
All your data is written to the backup drive in real time, and the mirroring process doesn’t require scheduling, unlike the cloning process.
In case of sudden disk failure, you can continue using the backup drive without any disruption.
Drastically reduces the downtime of any system which can be important if you maintain a local server.
Disk mirroring is scalable, and you can seamlessly add more drives for additional recovery partitions.
How do I clone a hard drive on Windows 10?
1. Use Disk Management
Press the Windows key + X and choose Disk Management.
Select the primary drive that you want to use as the source, right-click it, and choose Add Mirror.
Select the drive letter of the secondary drive that you want to use for mirroring and choose Add Mirror.
You’ll be asked to convert the basic disk to a dynamic disk. Click Yes to proceed.
Wait for a few moments for the process to finish.
2. Use Storage Spaces
Press the Windows key + S and type storage spaces. Select Manage Storage Spaces.
Navigate to Create a new pool and storage space.
Select the drives you want to use.
Next, configure the size of the mirror drive and set the Resiliency type to a Two-way mirror.
Click on Create Storage Space and wait for the process to finish.
3. Use diskpart
Press the Windows key + X and choose PowerShell (Admin).
Once it starts, enter diskpart and press Enter.
Enter the list disk to show all drives on your PC.
Locate the drive that you want to use as the source disk. We used disk 1 in this example: select disk 1
Next, run the following command: convert dynamic
Now repeat the previous two steps for a disk that you want to use as the destination disk.
Run the following command to create a mirror volume: create volume mirror disk=1
Finally, you need to add the other disk with this command: add disk=0
NOTE
Diskpart is an advanced tool, so use it only if you’re already familiar with it.
Troubleshooting common issues with mirroring a hard drive on Windows 10
1. Use chkdsk to fix drive cloning errors and corrupt files
Press the Windows key + X and choose PowerShell (Admin).
Run the following command chkdsk c: /r
If the drive is damaged, the damaged sectors can cause issues with cloning.
2. Use Disk Management to fix unallocated space after cloning
Open Disk Management.
Locate the disk that has unallocated space, right-click it, and choose Extend.
Configure the amount of space that you want to add to the drive and click Next. Follow the instructions on the screen to complete the process.
Additional tips for optimizing your mirrored drives on Windows 10
For mirroring to work, the secondary disk needs to be the same size or larger than your source drive.
In case you need more reliability, consider using three drives instead of two for mirroring and create two copies.
Use high-quality drivers from reliable manufacturers to increase the lifespan of your drive.
Use hardware RAID if possible since it offers better performance and it’s not dependent on your OS, unlike software options.
Mirroring is a great way to protect against sudden hardware failure, and since it’s a built-in Windows feature, it doesn’t require cloning software.
This option is available on all versions of Windows, and if you’re on the latest version, we have a great guide on how to create a mirror volume on Windows 11.
Have you ever used disk mirroring on your PC? If so, share your experience with us in the comments below.
London-based self-driving car maker Wayve, with backing from tech giant Microsoft, has unveiled a groundbreaking technology that aims to address the trust and transparency issues surrounding automatous vehicles (AVs). In a world where self-driving cars were once relegated to the realm of science fiction, Wayve’s innovation could be a game-changer for the industry.
The growing potential of autonomous vehicles is undeniable, but adoption has been hindered by technological delays and concerns about safety and understanding how these vehicles operate. Wayve aims to revolutionize this landscape by developing a system that can effectively communicate with drivers, providing them with insights into how its AI-driven cars make decisions, Fortune reported.
Lingo-1, Wayve’s latest creation, was launched to answer customer questions and explain the rationale behind the vehicle’s driving actions, making the AI-driven system more relatable and understandable to users. Wayve CEO Alex Kendall told Fortune that Lingo-1 is currently about 60% as accurate as human performance and continues to improve as it accumulates more data and experience.
Wayve’s innovative approach comes at a time when large language models like ChatGPT have captured the public imagination, influencing the launch of Lingo-1. With the backing of companies like Microsoft and Virgin, Wayve has been developing this technology for about two years.
The company’s goal is to reduce reliance on 3D maps and enable its AI systems to navigate unmapped roads, identifying and addressing potential hazards along the way. Microsoft co-founder Bill Gates has already experienced Wayve’s technology firsthand and predicts a bright future for autonomous vehicles.
Wayve’s commitment to improving road safety is evident in its efforts to prevent accidents. At the London CogX festival, he highlighted the staggering global toll of 1.3 million lives lost to road accidents annually, with 2% of the UK’s GDP lost due to accident-related costs. AVs promise to enhance road safety, but public resistance, as seen in the recent disabling of self-driving cars in San Francisco, poses challenges.
He also believes AI can create a more sustainable and efficient transport system through autonomous driving, potentially bringing AVs to cities like London. Wayve currently collaborates with British retailer Asda to offer delivery services in self-driven vehicles in select areas of London.
As Wayve’s CEO remains optimistic about the company’s future in the UK and the government’s commitment to fostering AV technology as a growth opportunity, it will be interesting to see how the public will react. Let us know your thoughts on this.
The search functionality has improved significantly in the last couple of iterations. Things are more refined and seamless, allowing users to search for items quicker than ever, but only with the right settings in place. So, how do you search effectively in Windows 11?
Remember, your prime concern shouldn’t be the sought method but the optimal configuration, say Content Indexing. The technique is more of an individual preference, while the search settings are the primary influencing factors.
How do I search on Windows 11?
1. With the Search box
Tip
The Search menu finds extensive application when locating files or apps in Windows 11. Therefore, we have broken the information into sub-sections for better understanding.
1.1. Access Search
Search shortcut in Windows 11: Press Windows + S to directly open the Search menu and find items.
From the Start menu: Press the Windows key or click the Start button, and type in the text field at the top.
From the taskbar: If configured, click the Search icon or type into the search field in the taskbar.
1.2 Add Search to the Taskbar
Press Windows + I to open Settings, go to Personalization from the navigation pane, and click on Taskbar.
Under Taskbar items, select either Search icon only, Search icon and label, or Search box. Try out the three settings and set whichever works best.
1.3 Using the Search Menu
Once you have launched the Search menu, enter the search term in the text field, and it will automatically populate the results, with the best match listed at the top. Remember, the best match could comprise more than one entry.
Say you search for Control Panel. The best match, of course, is the Control Panel utility. But you also find a few related settings under it and the option to explore the web using the exact or related search term.
To the right of Windows Search, you may find recent items or other quick options like Open file location, Run as administrator, or Pin to Start, among others.
When more results are under different categories, the Search menu will list the most relevant ones. Say you search for an application, and the PC also has text files or photos with the same name. It will prioritize the results and list them accordingly.
1.4 Apply filters for refined searches
In the Search menu, you can toggle between the different search filters. Enter the term and select a filter from the top to perform a dedicated search. The following search filters are available:
Apps
Documents
Web
Settings
People
Folders
Photos
Alternatively, you can include the filter in text form while using Windows Search. Type the filter name followed by a colon (:), and then the search query.
For instance, if you want to find an app, type apps: App Name in the search field. You can similarly search for files in Windows 11.
1.5 Change the search permissions
Press Windows + I to open Settings, go to Privacy & security in the left pane, and click on Search permissions.
Configure the SafeSearch settings. By default, Windows sets it to Moderate, but you can select Strict or Off (disables SafeSearch).
Choose whether you want Cloud Content Search enabled and include content from OneDrive, SharePoint, and Outlook, amongst others. Turn off the toggle for Microsoft account and Work or School account to disable it.
Set whether you want Windows to store the search history locally to show curated results. You can also clear the device search history by clicking the dedicated button.
Lastly, there’s the option to configure Search highlights, whether or not you want the content suggestions in the search box.
You can quickly change the Windows 11 search settings for personalized results. This is all the more important for content moderation.
Press Windows + E to open File Explorer, and type the file/folder name in the search box near the top right.
When not searching in a dedicated folder but in This PC, File Explorer will list all the results across folders. The green bar at the top highlights the search progress.
For quicker searches, head to the target folder.
To apply filters in File Explorer, click on Search options, then select Date modified, Kind (file type), or Size, and choose a relevant sub-category from the flyout menu.
From Search options, you can select which entries are to be included in the results, say, System files, Zipped folders, and File contents.
You can change the View of search results or Sort them based on different parameters from the dedicated menu.
You can also use search operators in File Explorer. To search exclusively for a specific phrase, use double quotes (“) or use the minus sign (-) to exclude specific terms. Besides, search operators like AND, OR, and NOT can be employed.
For instance, to search exclusively for PNG files, the phrase becomes “png”. To find both PNG and JPG files, we will use “png” OR “jpg”. If the operators don’t function or the File Explorer search is not working, rebuild the search index or run the Search and Indexing troubleshooter.
Identifying the different file types: Press Windows + I to open Settings > select Apps from the left > click on Default apps > select an app to view the compatible file types or set it as a default.
Viewing the file extensions: Open File Explorer > click the View menu > select Show > and check File name extensions.
Rebuild the search index: Press Windows + I to open Settings > go to Privacy & security > click Searching Windows > select Advanced indexing options > click the Advanced button > click Rebuild > finally click OK to confirm.
Why can’t I find Search in Windows 11?
The Search icon is disabled in the taskbar settings.
Those who still experience search issues or want deeper file scanning capabilities can try using Agent Ransack for Windows 11. It offers advanced search filters, regular expression support, and live content previews, helping you locate files faster and more precisely than the built-in Windows Search.
In case you encounter reduced battery life or high CPU consumption, disable the search service, and it won’t even significantly affect the core search functionality. For advanced search errors like the error_no_more_search_handles check out our expert article.
For any queries or to share more tips for effective searches, comment below.
Hackers are using WebP images to hack into people’s systems. All the major companies have agreed and released security patches for the browsers. NIST acknowledges the threat.
What is WebP? WebP is a contemporary image format offering advanced compression capabilities, both lossless and lossy, for web-based images. Its compatibility extends across all leading web browsers, encompassing Chrome, Firefox, Edge, and Safari.
All the major companies have responded to the situation:
Google responded swiftly by releasing updates for Google Chrome on various platforms.
Mozilla also planned to release updates for Firefox.
Apple indicated that it had pushed an update for this vulnerability.
Other browsers like Brave and Microsoft Edge were mentioned as having released updates.
Electron-based applications, including Signal and 1Password for Mac, were considered vulnerable until they updated their libwebp versions.
Various Linux platforms, such as Ubuntu, Debian, and SUSE, were actively updating their libwebp versions.
It’s not just web browsers. Other programs that use the same technology can also have this problem. Some of these programs are Signal, 1Password, and many more. They are also fixing the issue.
The Apple Security Engineering and Architecture (SEAR) team reported the vulnerability in collaboration with The Citizen Lab at The University of Toronto’s Munk School on September 6, 2023.
Google confirmed the existence of an exploit for CVE-2023-4863 in the wild, underscoring the urgency of addressing the issue.
The affected software versions that contain the necessary fixes are as follows:
Google:
Chrome version 116.0.5846.187 (for Mac and Linux)
Chrome version 116.0.5845.187/.188 (for Windows)
Mozilla:
Firefox 117.0.1
Firefox ESR 102.15.1
Firefox ESR 115.2.1
Thunderbird 102.15.1
Thunderbird 115.2.2
Microsoft:
Edge version 116.0.1938.81
Brave:
Brave Browser version 1.57.64
Users are urged to immediately update their browsers and other affected apps. Suppose users are unable to update their software immediately. In that case, they can mitigate the risk of exploitation by avoiding untrusted websites and not opening attachments from unknown senders.
Microsoft and Oracle have announced Oracle Database@Azure, a solution for running Oracle database services on Microsoft Azure, whose hints they dropped a couple of days ago.
All customers can now access Oracle database services on Oracle Cloud Infrastructure (OCI) via Microsoft Azure data centers, providing benefits for both parties. The aim is to combine Oracle’s database product with Azure’s security, flexibility, and services.
The announcement did not provide many details about Oracle Database@Azure. However, it is anticipated to provide additional choices for Oracle clients to migrate their databases to the cloud. The objective is to deliver a completely integrated solution for deploying, managing, and utilizing Oracle database instances on Azure.
Satya Nadella, Chairman and CEO, Microsoft said:
We have a real opportunity to help organizations bring their mission-critical applications to the cloud so they can transform every part of their business with this next generation of AI. Our expanded partnership with Oracle will make Microsoft Azure the only other cloud provider to run Oracle’s database services and help our customers unlock a new wave of cloud-powered innovation.
Oracle and Microsoft will jointly provide support for mission-critical workloads on Oracle Database@Azure.
Customers can purchase Oracle Database@Azure through Azure Marketplace and use their existing Oracle Database licenses. Oracle will operate and manage its services within Microsoft’s data centers, starting with regions in North America and Europe.
Another significant thing happened at the event as Oracle founder Larry Ellison made his first-ever trip to Microsoft headquarters. Could their rivalry in the database software market for over three decades be the reason for this delay?
With Microsoft 365 Lighthouse, a service manager can service multiple clients/tenants with all their users and devices. It’s great for managing password authentication, security issues, applications, and a lot more.
So, the tool is a standalone web application that helps MSPs (Managed Service Providers) manage multiple Microsoft 365 customer tenants at the same time.
Of course, both MSP and clients need to have Microsoft accounts and subscriptions, but only the MSP needs a Microsoft 365 Lighthouse license to use it.
Before we begin, remember that Azure Lighthouse and Microsoft 365 Lighthouse are separate products.
Azure Lighthouse is built into the Azure portal, and it’s designed for managing Azure clients, Microsoft 365 Lighthouse is for managing Microsoft 365 customer tenants.
How do I access Microsoft 365 Lighthouse?
Before starting anything, make sure that you follow the Microsoft 365 Lighthouse requirements to use it:
All the customer devices must be enrolled with Microsoft Intune to be monitored, and after that, as MSP, you must assign compliance policies to the customer devices.
The customer must have licensed users for Azure Active Directory Premium P1 or later, including Microsoft 365 Business Premium and Microsoft 365 E3. This will enable reports on user management pages.
After you ensure the requirements are met, follow the steps below to access Microsoft 363 Lighthouse.
Next, you will be prompted to get Admin rights to manage your domain. Hit Next.
Now, you will need to log into your domain, extract the necessary data, and paste it into the form to prove that you own it. Microsoft also provides a step-by-step guide on how to do that.
Of course, if you are managing a client domain, you will need the same data for their domain but now you know what data to ask and instruct them how to provide it.
After that, go to Billing > Purchase services > Microsoft 365.
Go to Microsoft 365 Lighthouse, select Details, then click on Buy.
The data from your client will appear in up to 48 hours. And from now on, you can access Microsoft 365 Lighthouse from this portal with your Microsoft account.
You don’t need to pay additional costs for each tenant or client. A single license can cover all your customers.
How do I configure Security Settings with Microsoft 365 Lighthouse?
1. Configure multi-password authentification
Sign into Microsoft 365 with your work or school account.
Because your organization opted for Microsoft 365 Lighthouse integration, you will be prompted to provide more information this time, so click Next.
Now, you will be recommended to install the free Microsoft Authenticator app on your mobile device. The link provided will take you to the mobile store to download it.
Follow the instructions to scan a QR code on the PC screen using the Microsoft Authenticator app which in turn will provide a code you insert into the authentification website on your PC.
Next time you log into your Microsoft 365 account, you will be asked for the code from the mobile app.
The MFA process is the responsibility of the client, not the MSP. However, you, as an administrator, will see in Lighthouse who did not complete the MFA process and notify the risky users to do so.
As for additional portal security measures, you can set up security configuration baselines, monitor the service health, and create self-service password reset policies.
2. Microsoft 365 Lighthouse user management
In the Users menu from the left navigation pane, you have all the user access management options. That includes a situation with users who have failed login attempts, making them Risky users.
You may also find the situation of who activated the multifactor authentication and force a password reset.
3. Microsoft 365 Lighthouse device management
In the left navigation pane, there’s also the Devices tab. From there, you will manage all the client’s devices. You can monitor the security status and device compliance with the policies you have set up.
You can assess and manage any possible threats or notify your client about them.
Here, you will also see the overall device health and take action to mitigate the problem immediately. The threat management options are pretty crucial for securing the customer tenant devices.
You should also note that Lighthouse has AI-driven insights and recommendations to help you get new clients and expand your offers.
About Microsoft 365 Lighthouse pricing, the solution is included with Microsoft 365 Business Premium and Microsoft 365 E3 licenses.
Here, we conclude our guide on accessing Microsoft 365 Lighthouse, in which we also included a few tips on security management and other information.
Windows has many benefits, mostly better software and gaming support, and this is why many want to change from Endless OS to Windows 11.
This process varies if you’re using operating systems in dual boot mode or just Endless OS on its own, but we’ll guide you through both cases in this guide.
Preparations for transitioning from Endless OS to Windows 11
Check system requirements for Windows 11 and make sure that your PC can run the latest version.
Back up all the files from the system drive. You can move them to a different partition, external storage, or cloud.
Download the ISO Image of Windows 11 and create a bootable media.
How do I change from Endless OS to Windows 11?
1. Uninstall Endless OS from Windows 11
Make sure that you boot to Windows 11.
Press the Windows key + I to open the Settings app.
Navigate to Apps and select Installed apps in the right pane.
Select Endless OS, click the three dots next to it, and choose Uninstall.
Follow the instructions on the screen to complete the process.
NOTE
This method only works if you’re using Endless OS dual boot with Windows 11 via Endless OS Installer for Windows.
2. Format your drive and install Windows 11 from scratch
1. Download Windows 11 ISO and create installation media
To complete these steps you need to use a Windows PC since the necessary software is a Windows exclusive.
2. Boot from the installation media and format the drive
Insert the bootable USB drive into your PC and restart the computer.
Keep pressing F4 or F8 to bring up the boot options menu. When the menu appears, select your bootable device.
The installation will now start. Select the desired language and click on Next.
Next, click on Install now.
Select I don’t have a product key.
Select the desired version of Windows.
Next, choose I accept the Microsoft Software License Terms.
Choose Custom: Install Windows only (advanced).
Select the partition that has Endless OS on it and click on Delete to delete all files from the partition. The partitions aren’t labeled, and usually Endless OS is on the Drive 0.
After that, select the drive you just deleted and choose Next.
Follow the instructions on the screen to complete the setup process and install Windows over Endless OS.
Why change to Windows 11 from Endless OS?
Most applications are designed primarily for Windows and they won’t work on Endless OS.
Gaming support is almost non-existent on Endless OS, and Windows 11 is a much better option for gamers.
Hardware manufacturers optimize their driver software for Windows, so it’s less likely you’ll encounter issues with device drivers.
Windows 11 is more user-friendly than most editions of Linux.
Better security thanks to the Secure Boot feature.
Our Linux vs. Windows 11 guide has an in-depth comparison between the two systems, and more useful information if you’re planning to switch, so be sure to check it out.
If you want to change Endless OS to Windows 11, in most cases you’ll have to perform a clean install and format your drive, unless you dual boot Endless OS and Windows. However, it’s also possible to upgrade to Windows 11 without file loss, and we have a guide that shows you how to do that.
Is Endless OS better than Windows 11? Tell us what you think in the comments section below!
Phishing emails are becoming more and more common, but they don’t always stand out from email clutter. Since cybercriminals are getting creative, you also need to up your game and help your domain manager come up with better detection techniques.
The key to a spam-free inbox starts with early detection. You need to know how to spot spam emails, and only then will you be able to report the email so it can be effectively mitigated.
Why report phishing emails?
When you receive a phishing email, it can be tempting to delete it and go on about your day. However, reporting phishing emails is important because it helps other users stay vigilant as they are now aware of the looming attack.
In addition, your organization and email client can also use the reports to improve their anti-phishing detection features and identify new ones that will help block as many fake messages as possible before they reach you.
How do I report phishing in Outlook?
1. Outlook app
Launch your Outlook app.
Locate the suspicious message from your folders and click to open it.
On the top menu, click on Junk, and in the drop-down menu, select Report as Phishing.
Locate the suspected email and click on it to open.
Next, click on Report, and in the drop-down menu, select Report phishing.
Click OK in the next dialog box and the message will be removed from your inbox.
3. Outlook mobile
On your phone, launch the Outlook app.
Go to your inbox or junk folder containing the spam email, tap, and hold on to the message.
Tap the three ellipses on the top right and select Report junk.
Next, select Phishing.
Check the Remember my choice box and tap Report to finish.
How do I report phishing in Outlook without opening it?
If you’re worried that opening an email could lead you to click on malicious links accidentally, you’ll be happy to know that this is not a prerequisite to reporting them. You can simply select the emails from your homepage, follow the steps above, or install the Report Phishing add-in.
Share the message with your IT department or network administrator.
Report the email as phishing or malware to your antivirus software provider so they can update their databases with new threats.
Forward the message to the company or organization it claims to be from or the company hosting the website in question.
Use a secure third-party tool with a secure server that can assess risk and forward it to relevant parties.
Get in touch with the fraud protection center in your country.
With phishing attacks becoming increasingly sophisticated, knowing how to spot and report them can make the internet a safer place for everyone. And while your Outlook email does a decent job detecting some of these phishing attempts, sometimes it may fail to block junk mail.
From one-on-one conversations to group chat, Microsoft Teams stickers can liven up any interaction. In this guide, we will discuss ways to add, create, & send stickers to your chats to add fun and express yourselves freely.
While stickers are a great way to engage in conversations with your friends and colleagues, there are a few things you must consider for your security:
Don’t share personal or sensitive data via stickers.
Exercise caution while adding third-party sticker apps and review their permissions.
Don’t download stickers from unreliable sources to prevent malware and phishing attacks.
Keep your Microsoft Teams and associated apps up to date with security patches.
How do I download more stickers on Microsoft Teams?
Press the Windows key, type teams, and click Open.
On the left pane, select Apps, then type stickers in the search box.
You will get the available stickers for Teams. You can also choose Categories to refine your searches.
Once you see the app that you want, click Add.
Once added, go to the chat where you wish to share stickers and click the three dots.
Select the app and choose a sticker.
The sticker will appear in the message box; you can add content if you like and click Send.
You can also upload the images you like to customize the sticker within the app and reuse them whenever you want.
If you need a break from video fatigue or want to keep the video off while in a meeting, try Teams’ 3D in-app avatars feature.
Types of stickers available for use in Microsoft Teams
Apart from the Popular category, there are 16 other categories of stickers with a wide range of options to choose from, including:
Clippy
Office Drama
Meme
Designers
Devs
Legal
Broccoli
Bee
Teamsquatch
Calamity Bert
Cats In Suits
Word Art
Monkey
Donut Friends
Uncle Blob
Animalopolis
You can also download other digital sticker packs, including Glossy and Bubble-free Stickers, Planner and Meeting Planner Stickers, Searchable Customized Stickers, and more from websites like Etsy.
Sending stickers in a conversation on Microsoft Teams can help express your thoughts or convey messages in a fun way.
But always remember to be cautious when using a third-party app for stickers or creating customized stickers, especially in a professional environment.
If you have a work account on Teams, set up and use Teams Avatars to prevent video fatigue and maintain a level of privacy.
Just like stickers, GIFs are also an excellent way to start light-hearted communication; however, if the GIF option is missing for you in Teams, read this guide to fix it.
Ready to shine through in your conversations with the vibrant touch of stickers? Tell us your sticker tales and share your creations in the comments section below.
RAID, or Redundant Arrays of Independent Disks, is a data storage technology where multiple external drives are combined into one. It was widely employed when large hard disks were expensive, but many still prefer the approach to RAID external drives.
There are several levels of RAID, each meant for a specific purpose. Remember, regular users don’t have to understand the intricacies and a simple setup of RAID 0 or RAID 1 should work fine.
Reasons to consider raiding external drives:
Improved performance of PC
Easy to configure and cheaper than available alternatives
Faster reading and writing of data
An effective backup solution due to mirroring
How do I RAID external drives on Windows 11?
Before you RAID external hard drives, here are a few prerequisites to be aware of:
Two external drives for RAID 0 and RAID 1, three for RAID 5, and 4 hard drives for RAID 10. The drives should be unformatted and of the same make (preferably), size, and speed.
RAID clears all existing data, so make sure you back up the drive beforehand.
Once you have it all ready, choose any method to set up RAID systems.
1. Via Settings
Press Windows + I to open Settings, and click on Storage on the right in the System tab.
Expand Advanced storage settings and click on Storage Spaces.
Click the Add button next to Add a new Storage pool.
Enter a name for the storage pool in the text field, select the desired disks from the list, and click on Create.
Type a name for the storage space, enter the desired size (it can be greater than the size of disks, but we recommend against it), and choose a Resiliency type from the following:
Simple (no resiliency)
One-way mirror
Two-way mirror (preferred due to data loss protection)
Parity (preferred)
Once done, click on Create.
Enter a label name, choose the drive letter and file system, then click on Format. You could check the Advanced options to configure more settings.
Once done, the RAID setup will be accessible from File Explorer.
Also, you can reconfigure or optimize the storage pool from the Storage Spaces settings.
That’s how you can connect multiple external hard drives together with RAID and use them for data storage with advanced protection measures. Remember, it’s best to keep the RAID options simple or go with the default choice for an error-free experience.
2. Use a third-party software
The easiest and fastest way to create a RAID Array with your external drives is of course to use dedicated partition management software. These tools are easy to use and most of the settings for optimization and data loss prevention are only one click away.
For this task, we recommend using AOMEI Partition Assistant as it is a professional tool offering many features that will help you optimize your disk.
Besides allowing you to set up your RAID accurately, this software also allows you to recover, clone, convert, and many other disk operations. It is altogether a powerful and complete software.
AOMEI Partition Assistant
Easily set up your RAID Array on external drives with this professional software.
Press Windows + S to open Search, type Control Panel in the text field, and then click on the relevant search result.
Click on System and Security.
Click on Storage Spaces.
Now, click Create a new pool and storage space.
Click Yes in the UAC prompt.
Tick the checkboxes for the disk you want to add to the storage pool, and then click Create pool.
Now, enter a name, choose the drive letter and file system, select a Resiliency type (preferably Two-way mirror), configure the pool size, and click the Create storage space button.
The created Storage Space will now be listed under the dedicated section in the Control Panel and File Explorer. You can modify the settings, rename the pool, add drives, or delete the storage space here.
That’s how you can set up a RAID array with 2 external hard drives. Remember, it only works for RAID 0 and RAID 1. The other more advanced types require a higher number of drives.
4. Through Command Prompt
NOTE
The process requires converting the disk to Dynamic, creating a RAID setup, and, lastly, formatting it. For simplification, we have broken down the process into sections. But we recommend going with the Settings or Control Panel for easier setup.
4.1 Convert to dynamic
Press Windows + R to open Run, type cmd, and hit Ctrl + Shift + Enter.
Click Yes in the UAC prompt.
Paste the following command and then hit Enter to launch the Diskpart utility: diskpart
Run the following command: list disk
Now, execute these commands to convert the disks you want to add to the RAID system to a dynamic type while replacing X with the number assigned to the disk: select disk Xconvert dynamic
Repeat it for all such disks.
4.2 RAID external hard drives
Run this command to select the first disk while replacing X with the disk number: select disk X
Next, execute this command to create a RAID volume (for more disks, list them, too, in the command): create volume RAID disk 1,2,3
4.3 Format the external drives
Run the following command to identify the number assigned to the RAID volume: list volume
Execute this command while replacing X with the assigned number: select volume X
Next, run this command to format and then assign a label: format fs=NTFS label=Storage Volume
Lastly, run this command to assign a drive letter of your choice (replace X): assign letter= X
You can easily RAID external drives in Windows 11 via the Command Prompt or Windows PowerShell, but with these commands, it will be a RAID 0 level. To set up another level, you will need to run several additional commands.
Remember, Diskpart is an advanced tool and helps eliminate any errors encountered earlier.
There are several RAID Levels, each categorized under Standard, Nested, and Non-standard. The Standard RAID category was the first to be released and find extensive use even today. It comprises:
RAID 0: Best performance but minimum protection.
RAID 1: Data storage is duplicated, increased read performance.
RAID 2: Employs striping but has gone obsolete over the years.
RAID 3: One drive is used to store parity information and also employs striping.
RAID 4: Employs large stripes and eliminates I/O overlapping
RAID 5: Minimum three disks, preferably five. Allows the RAID array to function if one drive fails.
The Nested RAID levels are a combination of standard levels, for instance, RAID 10 (RAID 1 + RAID 0).
Remember, you don’t necessarily need external drives for the process. You can RAID 1 external hard drive by creating virtual drives on it! Now that you know how RAID works be sure to check our guide on RAID 0 vs RAID 1 to learn all the differences between the two.
The ViGEmBus driver and its libraries are the core of the Virtual Gamepad Emulation Framework (ViGEm) that works in the Kernel-Mode Driver Framework and it emulates some of the most popular gaming peripherals as software-based devices at kernel level.
In other words, it helps you mimic the presence of a game controller, or USB gamepads. The games will detect it as you would have it plugged into your computer.
What is a ViGEmBus driver? In other words, it is a software developed by Nefarius Software Solutions e.U. that allows you to emulate well-known gaming peripherals on your Windows computer. The latest version supports x86, x64, and ARM64 Windows systems.
Here are some of the perks of using VIGEmBus:
It helps emulate some of the most popular game controllers including the ones for Xbox, DualShock controllers, and generic HID ones.
The app supports the most popular game platforms like Steam.
You can connect multiple devices on the same driver instance.
It functions directly with Microsoft’s Kernel-Mode Driver Framework.
Double-click the executable file to start the installation and click on Next.
Agree to the terms and hit the Next button again.
Finally, click on Install.
To check if it was installed properly, right-click the Start button and select Device Manager.
Scroll down and expand the System devices section.
Now, scroll down again and you will see the Nefarius Virtual Gamepad Emulation Bus present. And if you double-click on it you should see that it’s working properly under Device status.
If you change your mind and want to remove the tool, click the Search option, type vigem, and click on the installer from the results.
Hit Next, and then select Remove to uninstall it from your PC.
However, you should know that this is not all. You should now look for the emulator of your choice for ViGEm-based devices.
With a simple Google search, we found an Xbox 360 controller emulator perfect for the ViGEmBus driver but you may find the one you need.
Also, some of the game controller emulators, such as DS4 Windows, come with the ViGEmBus driver bundled so it might be easier to proceed that way as well.
So, that’s the most simple ViGEmBus driver download method for Windows 11, but as we mentioned, it also works on Windows 10 and ARM64 versions.
Is the ViGEmBus driver update safe?
ViGEmBus is a safe tool to use signed and verified and as long as you download it from the official Github repository, you will be just fine.
As with any other software, there are several other versions on third-party websites that may indeed contain harmful code, so we always recommend using the official, trusted source.
Known limitations & common issues of the ViGEmBus driver on Windows 11
ViGEmBus driver needs an additional emulator for the game controller of your choice.
Some readers have reported that some third-party software install ViGEmBus silently, without their knowledge. To verify if it was installed, go to Settings > Apps > Installed apps and uninstall it from there.
As with other software, ViGEmBus can become corrupted and it’s prone to crashes. As you have noticed, the installer also has a repair option that you may use in this case.
Accurate emulation of gameplay not being possible on some executable files.
ViGEmBus driver is great for software developers who need to test and benchmark games on several user inputs.
We hope that our article provides all the information needed to install ViGEmBus Driver on your Windows 11 PC.


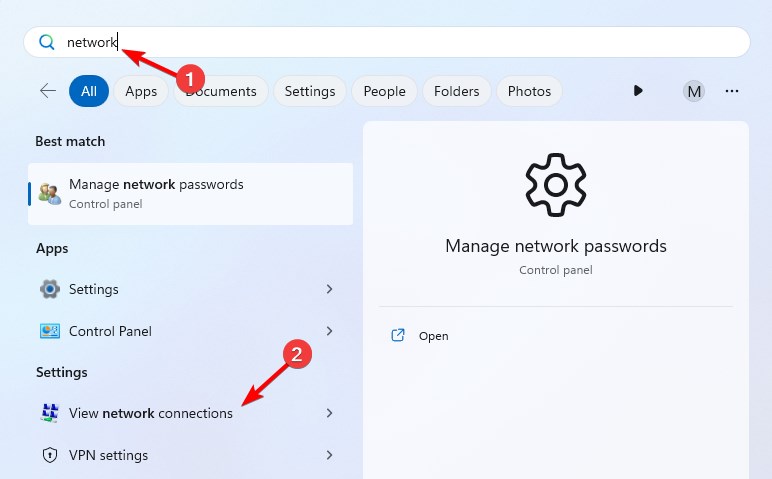
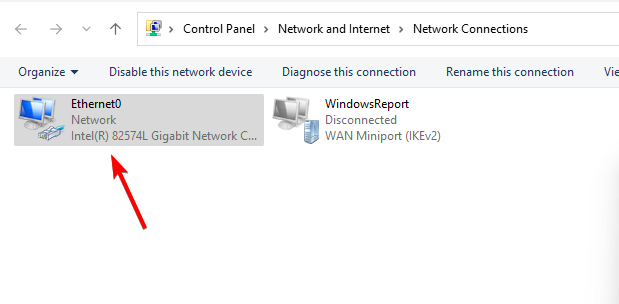
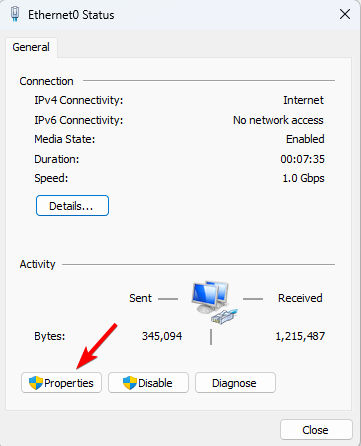
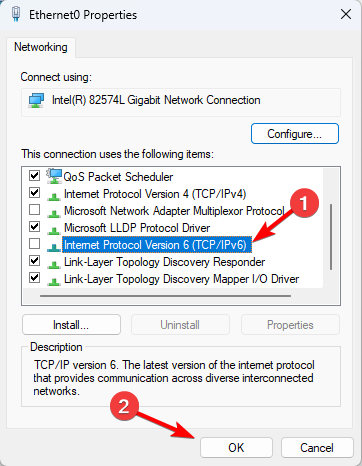
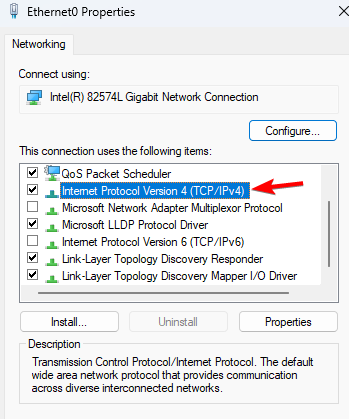
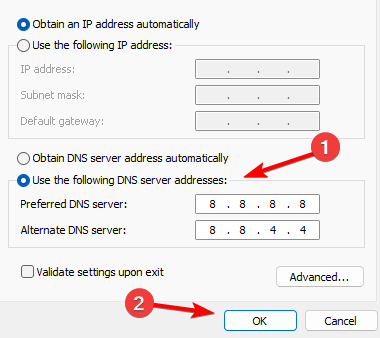
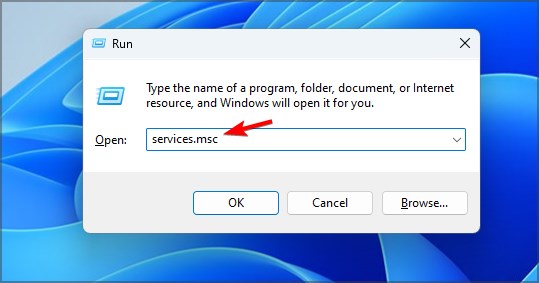
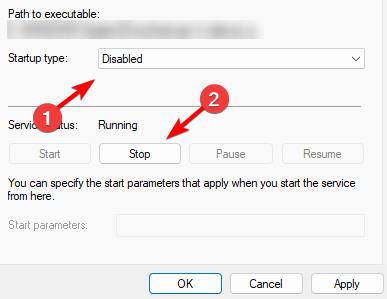





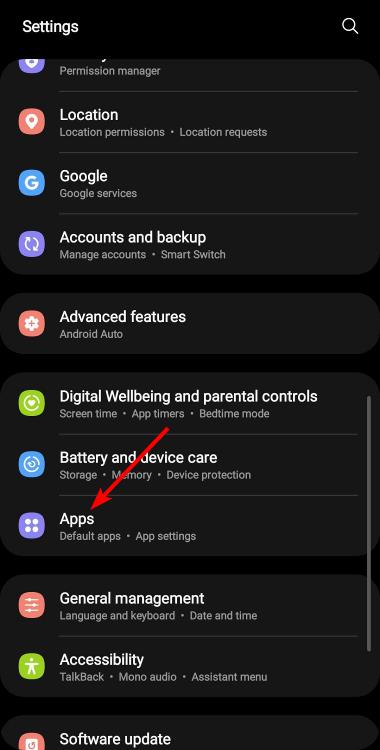
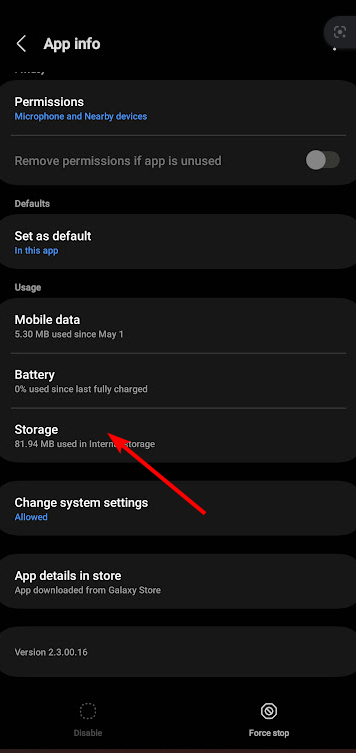
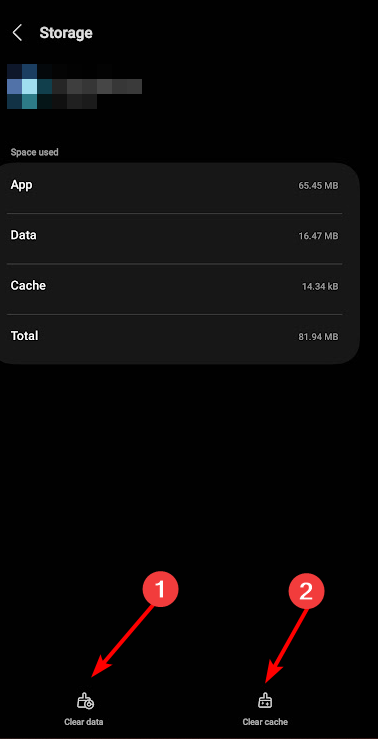




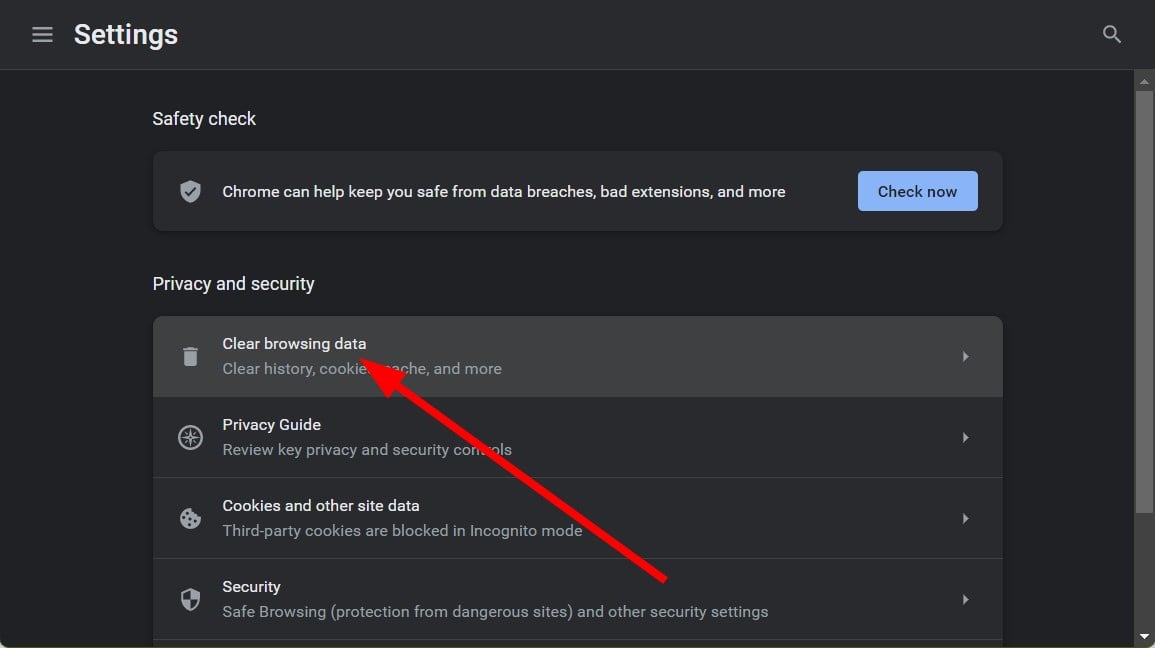





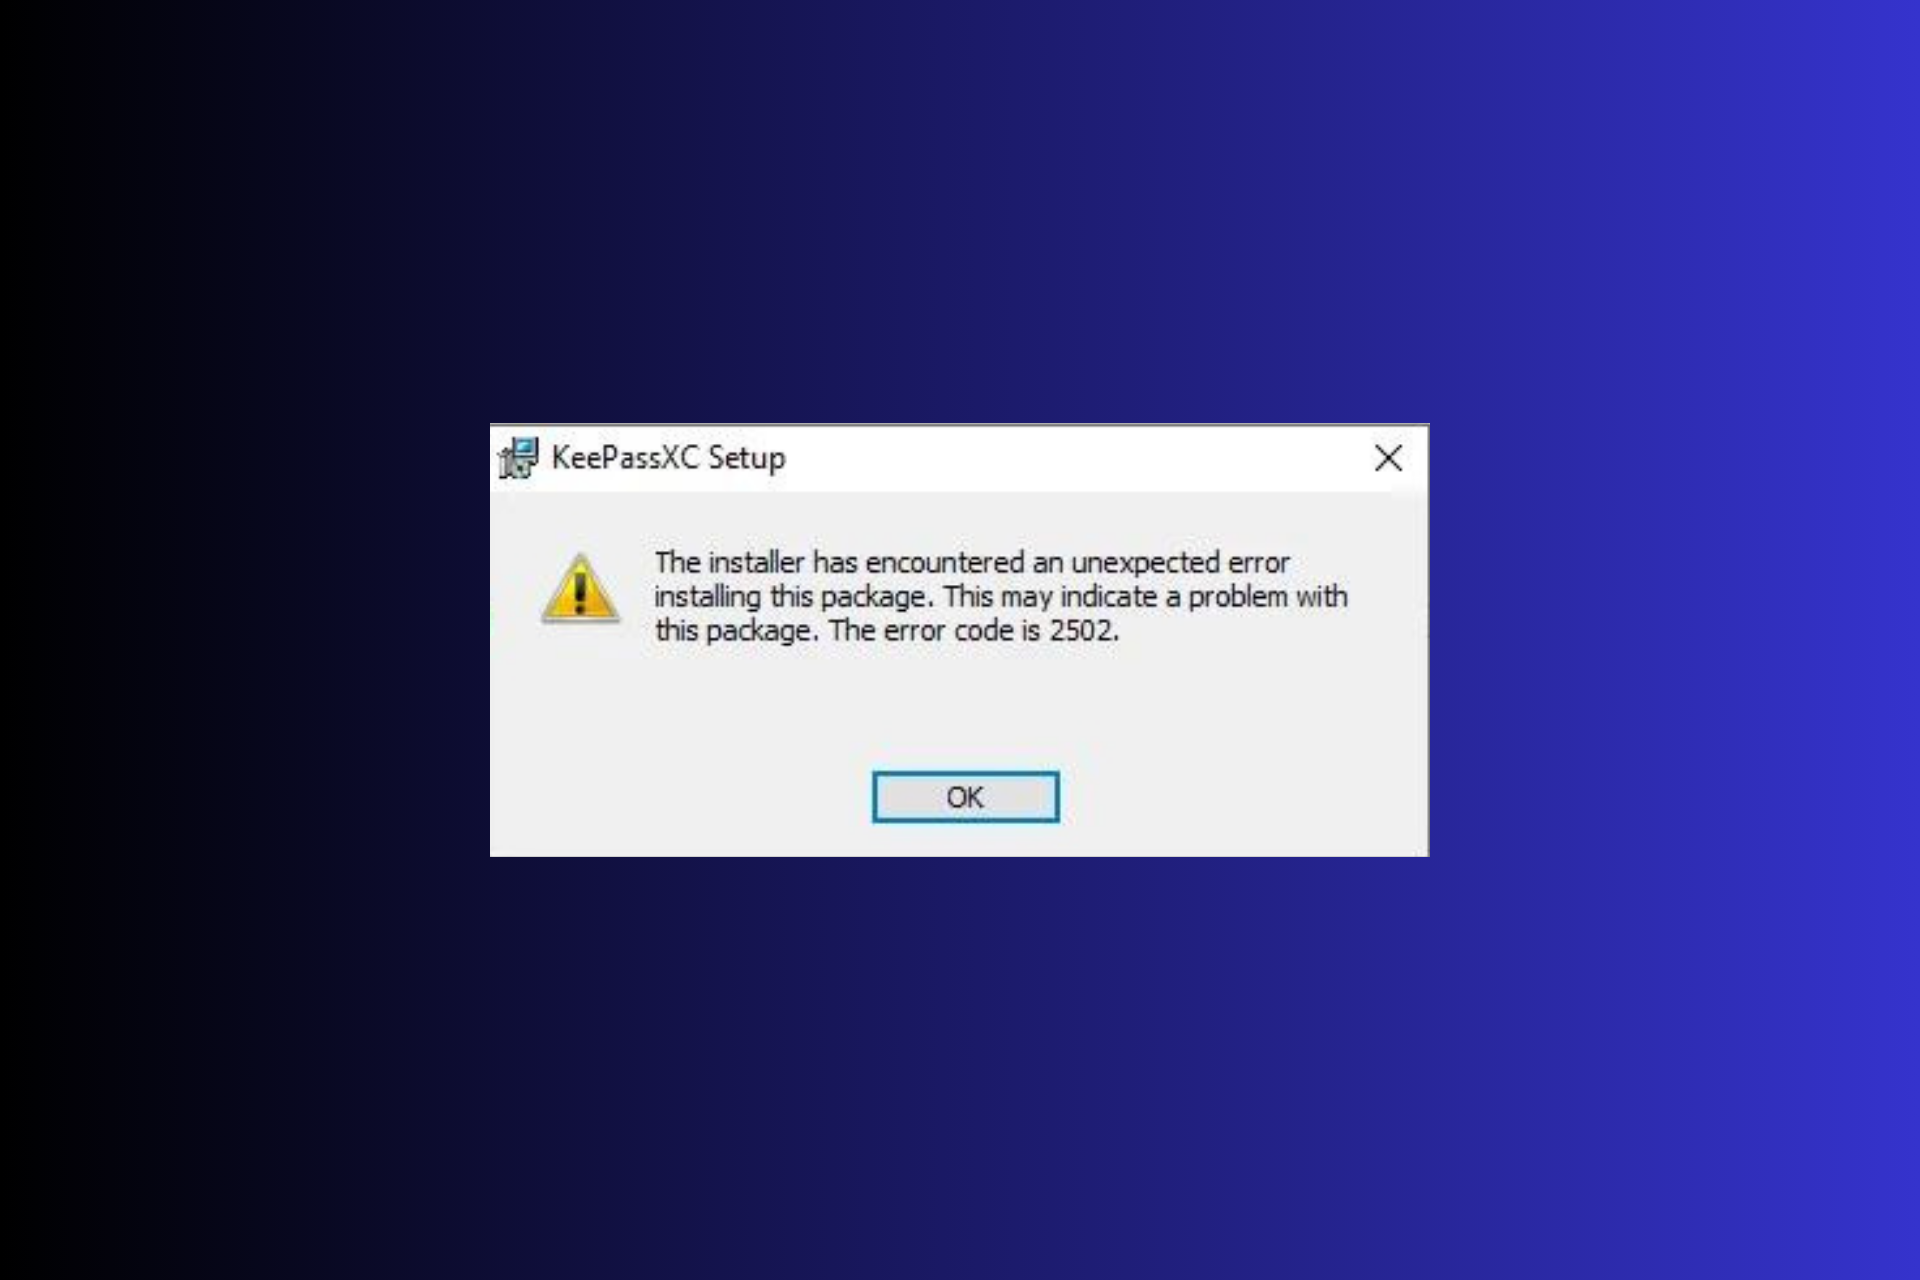


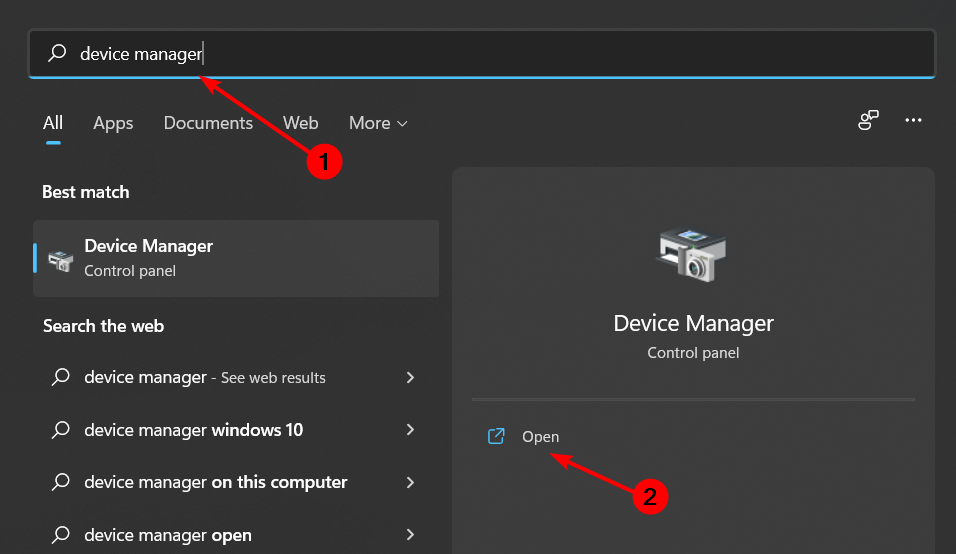
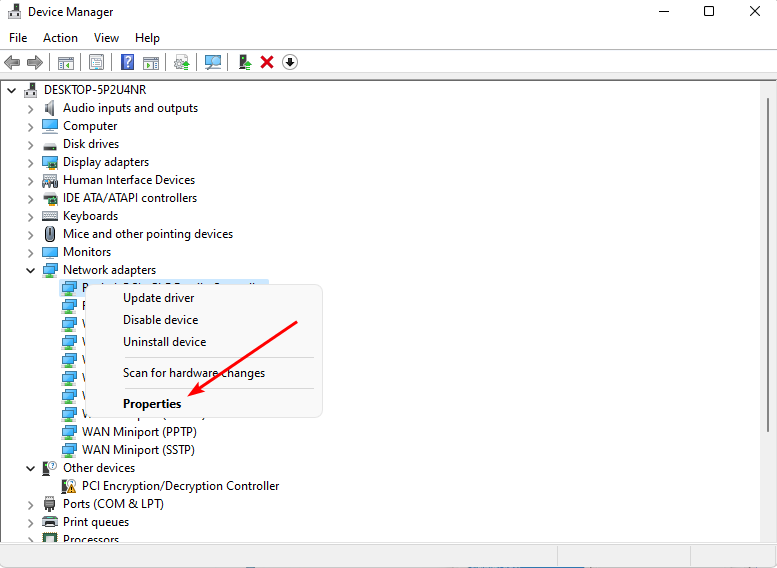
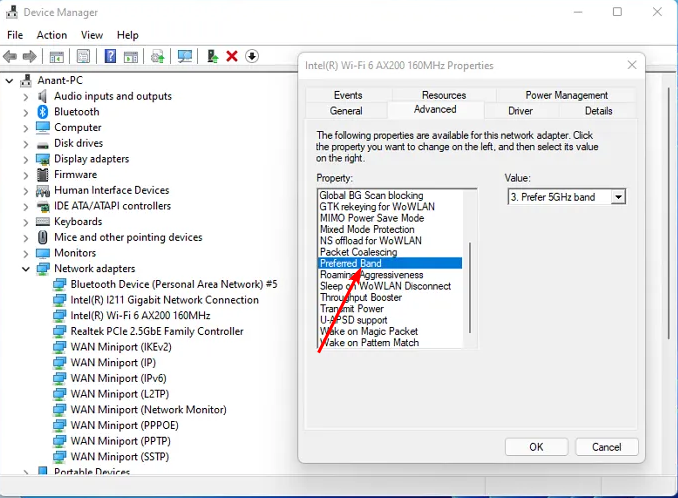
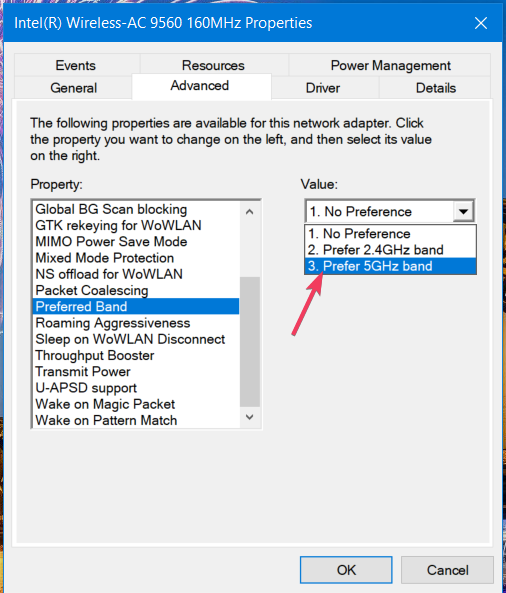

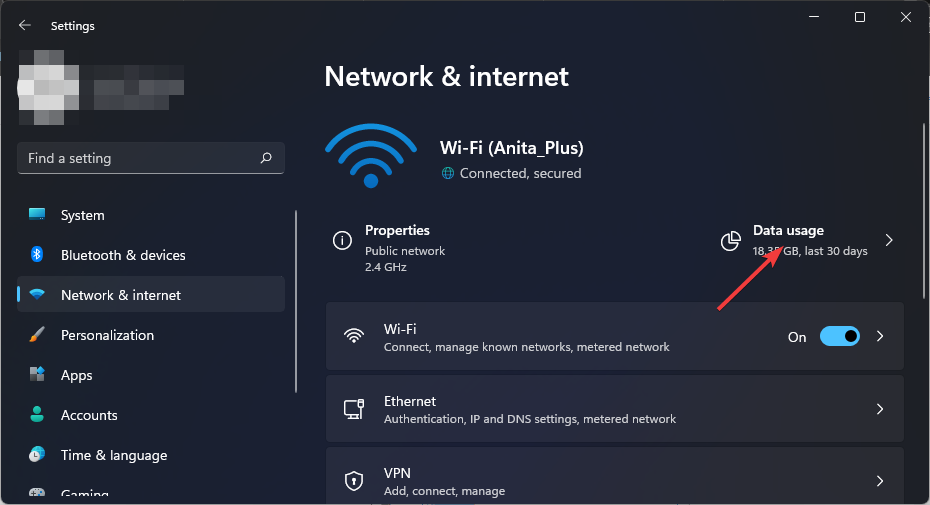
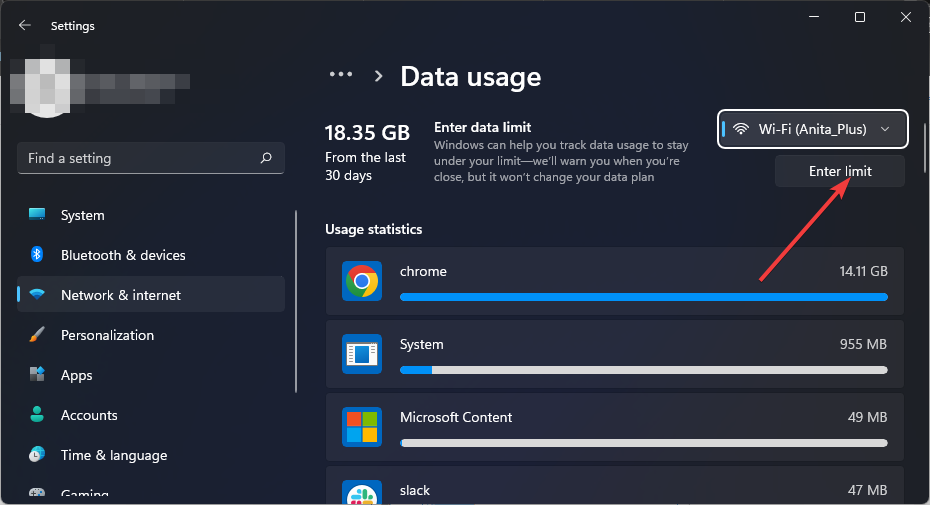




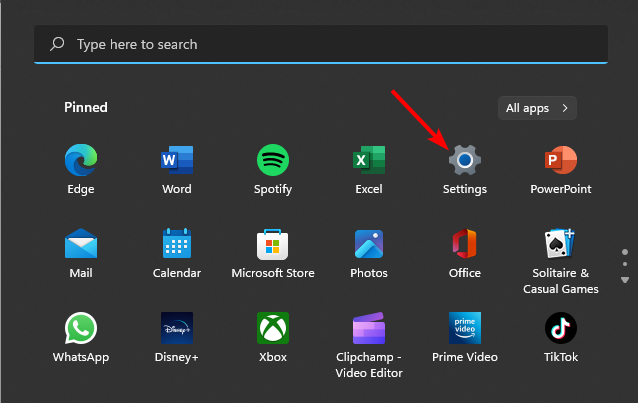


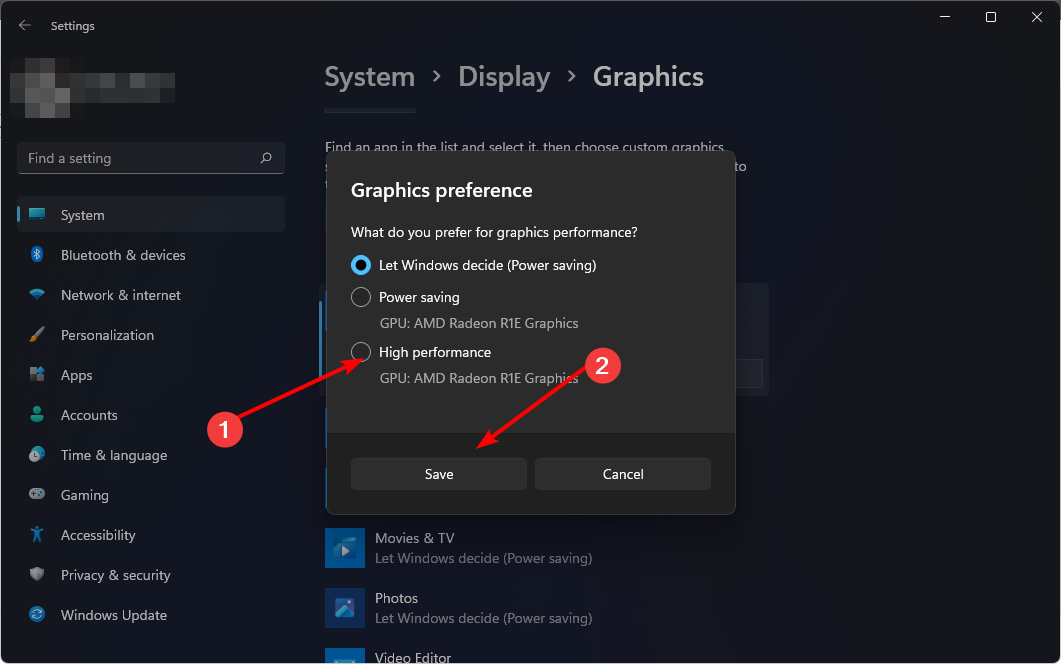





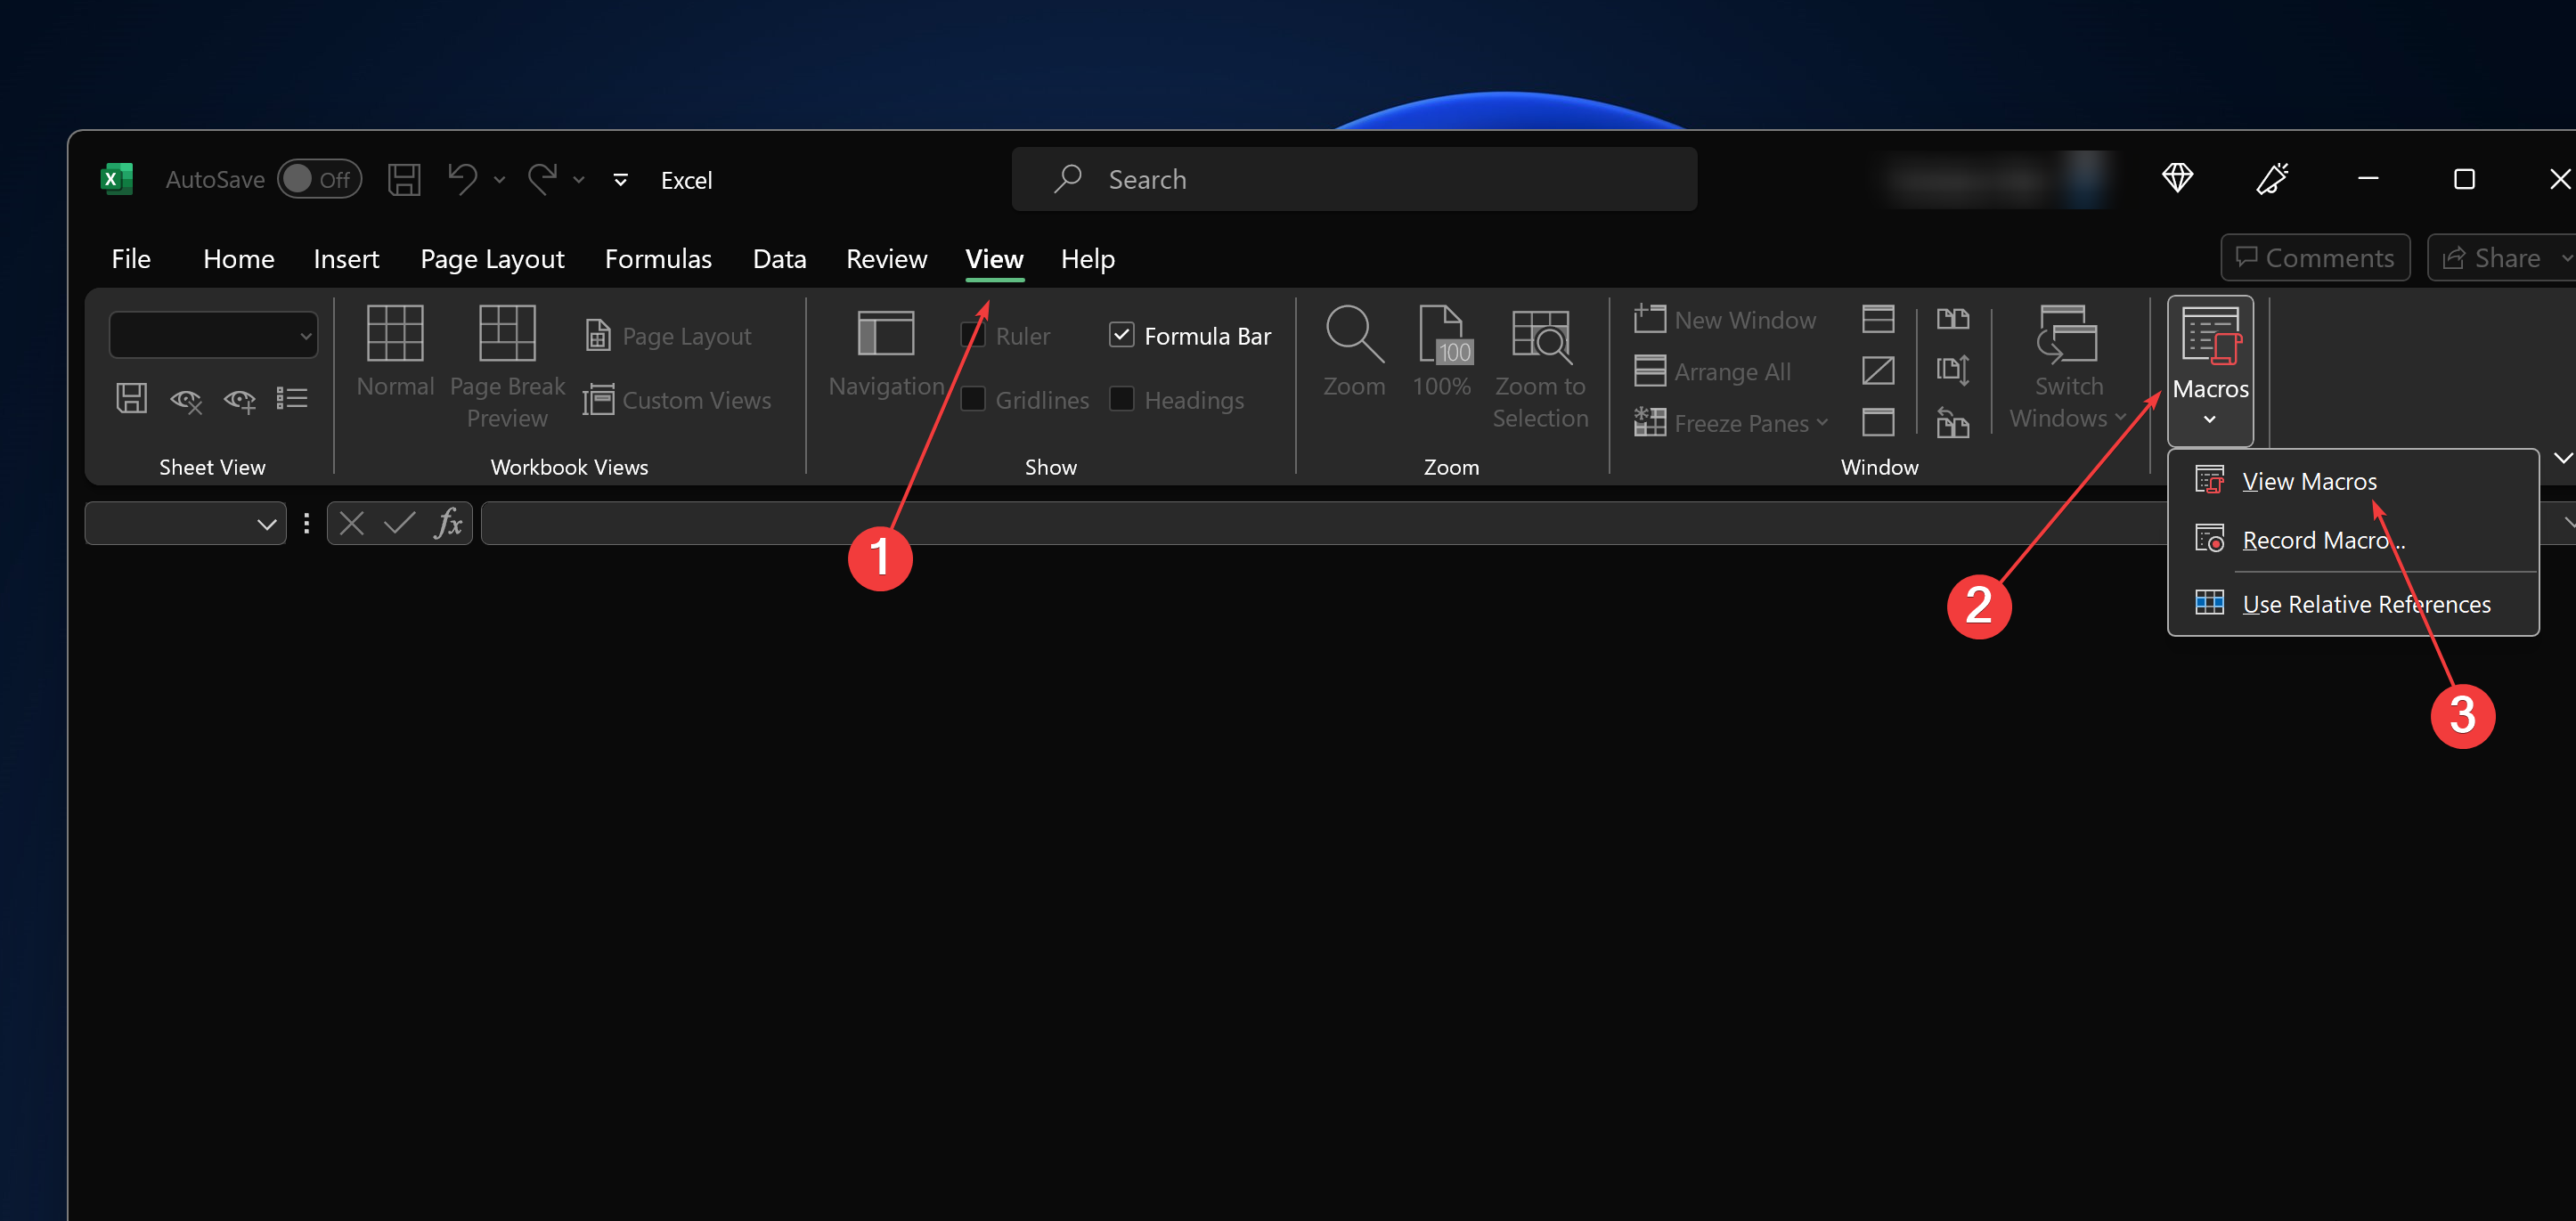
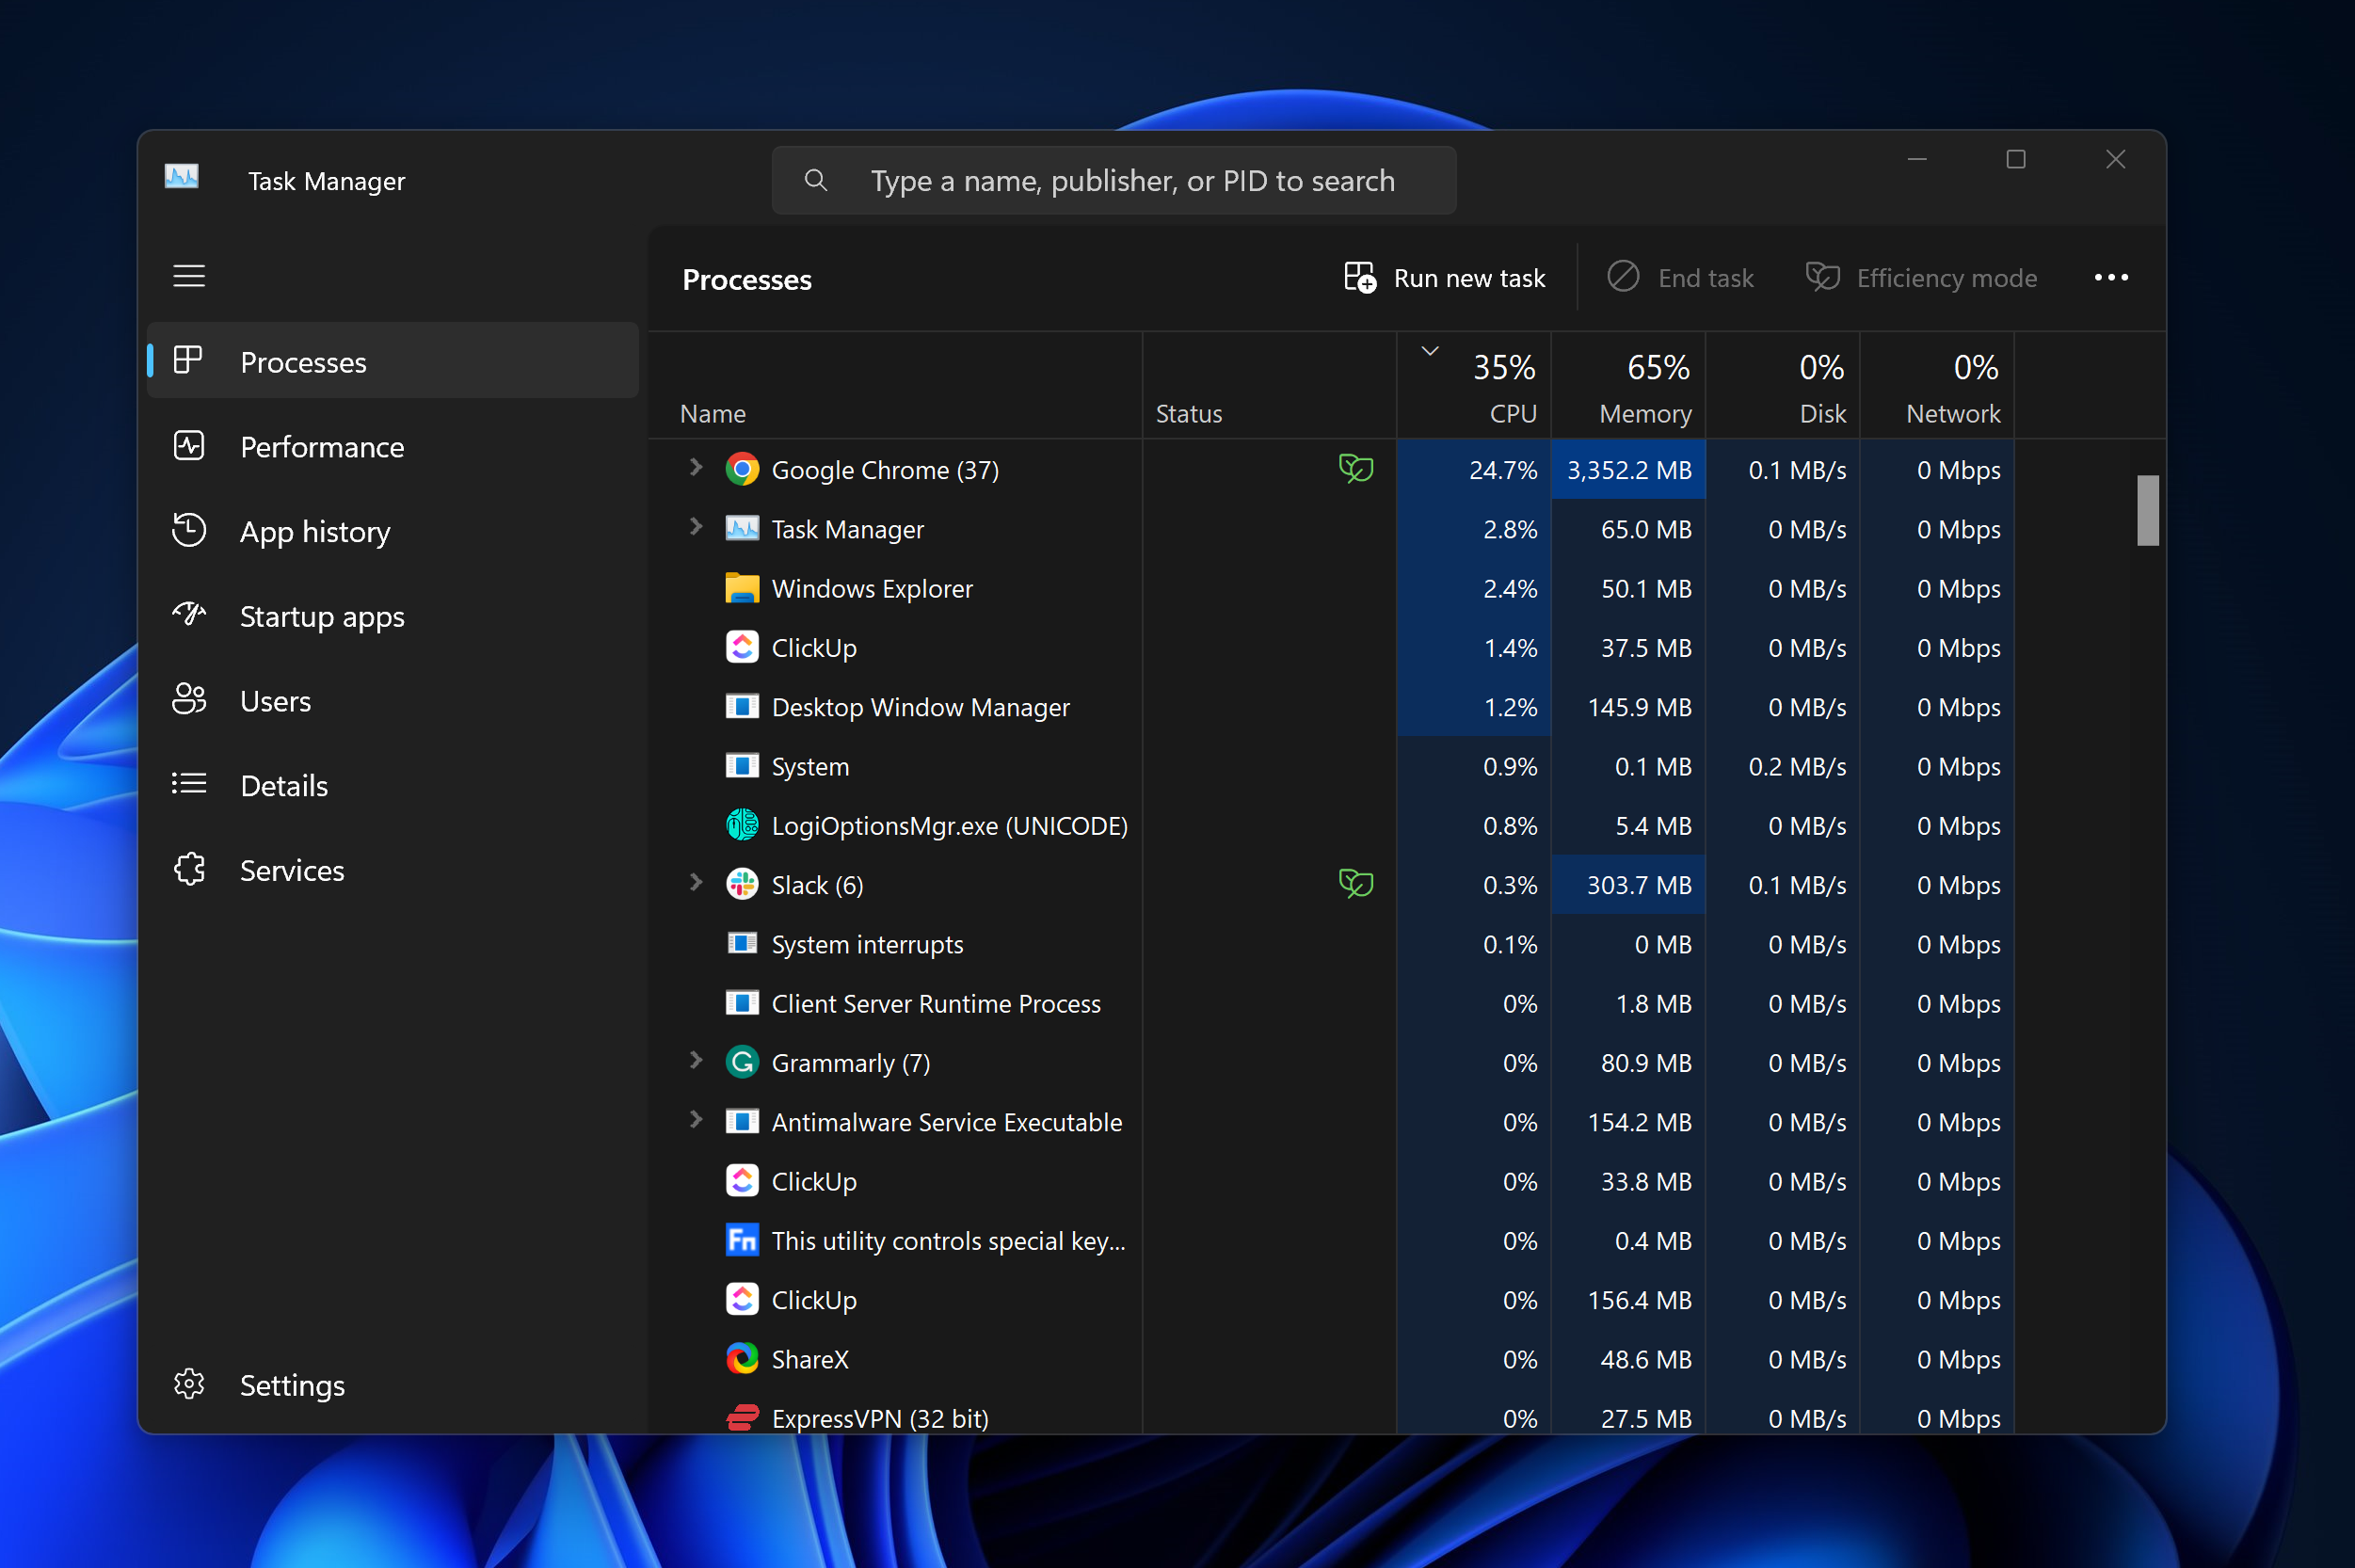
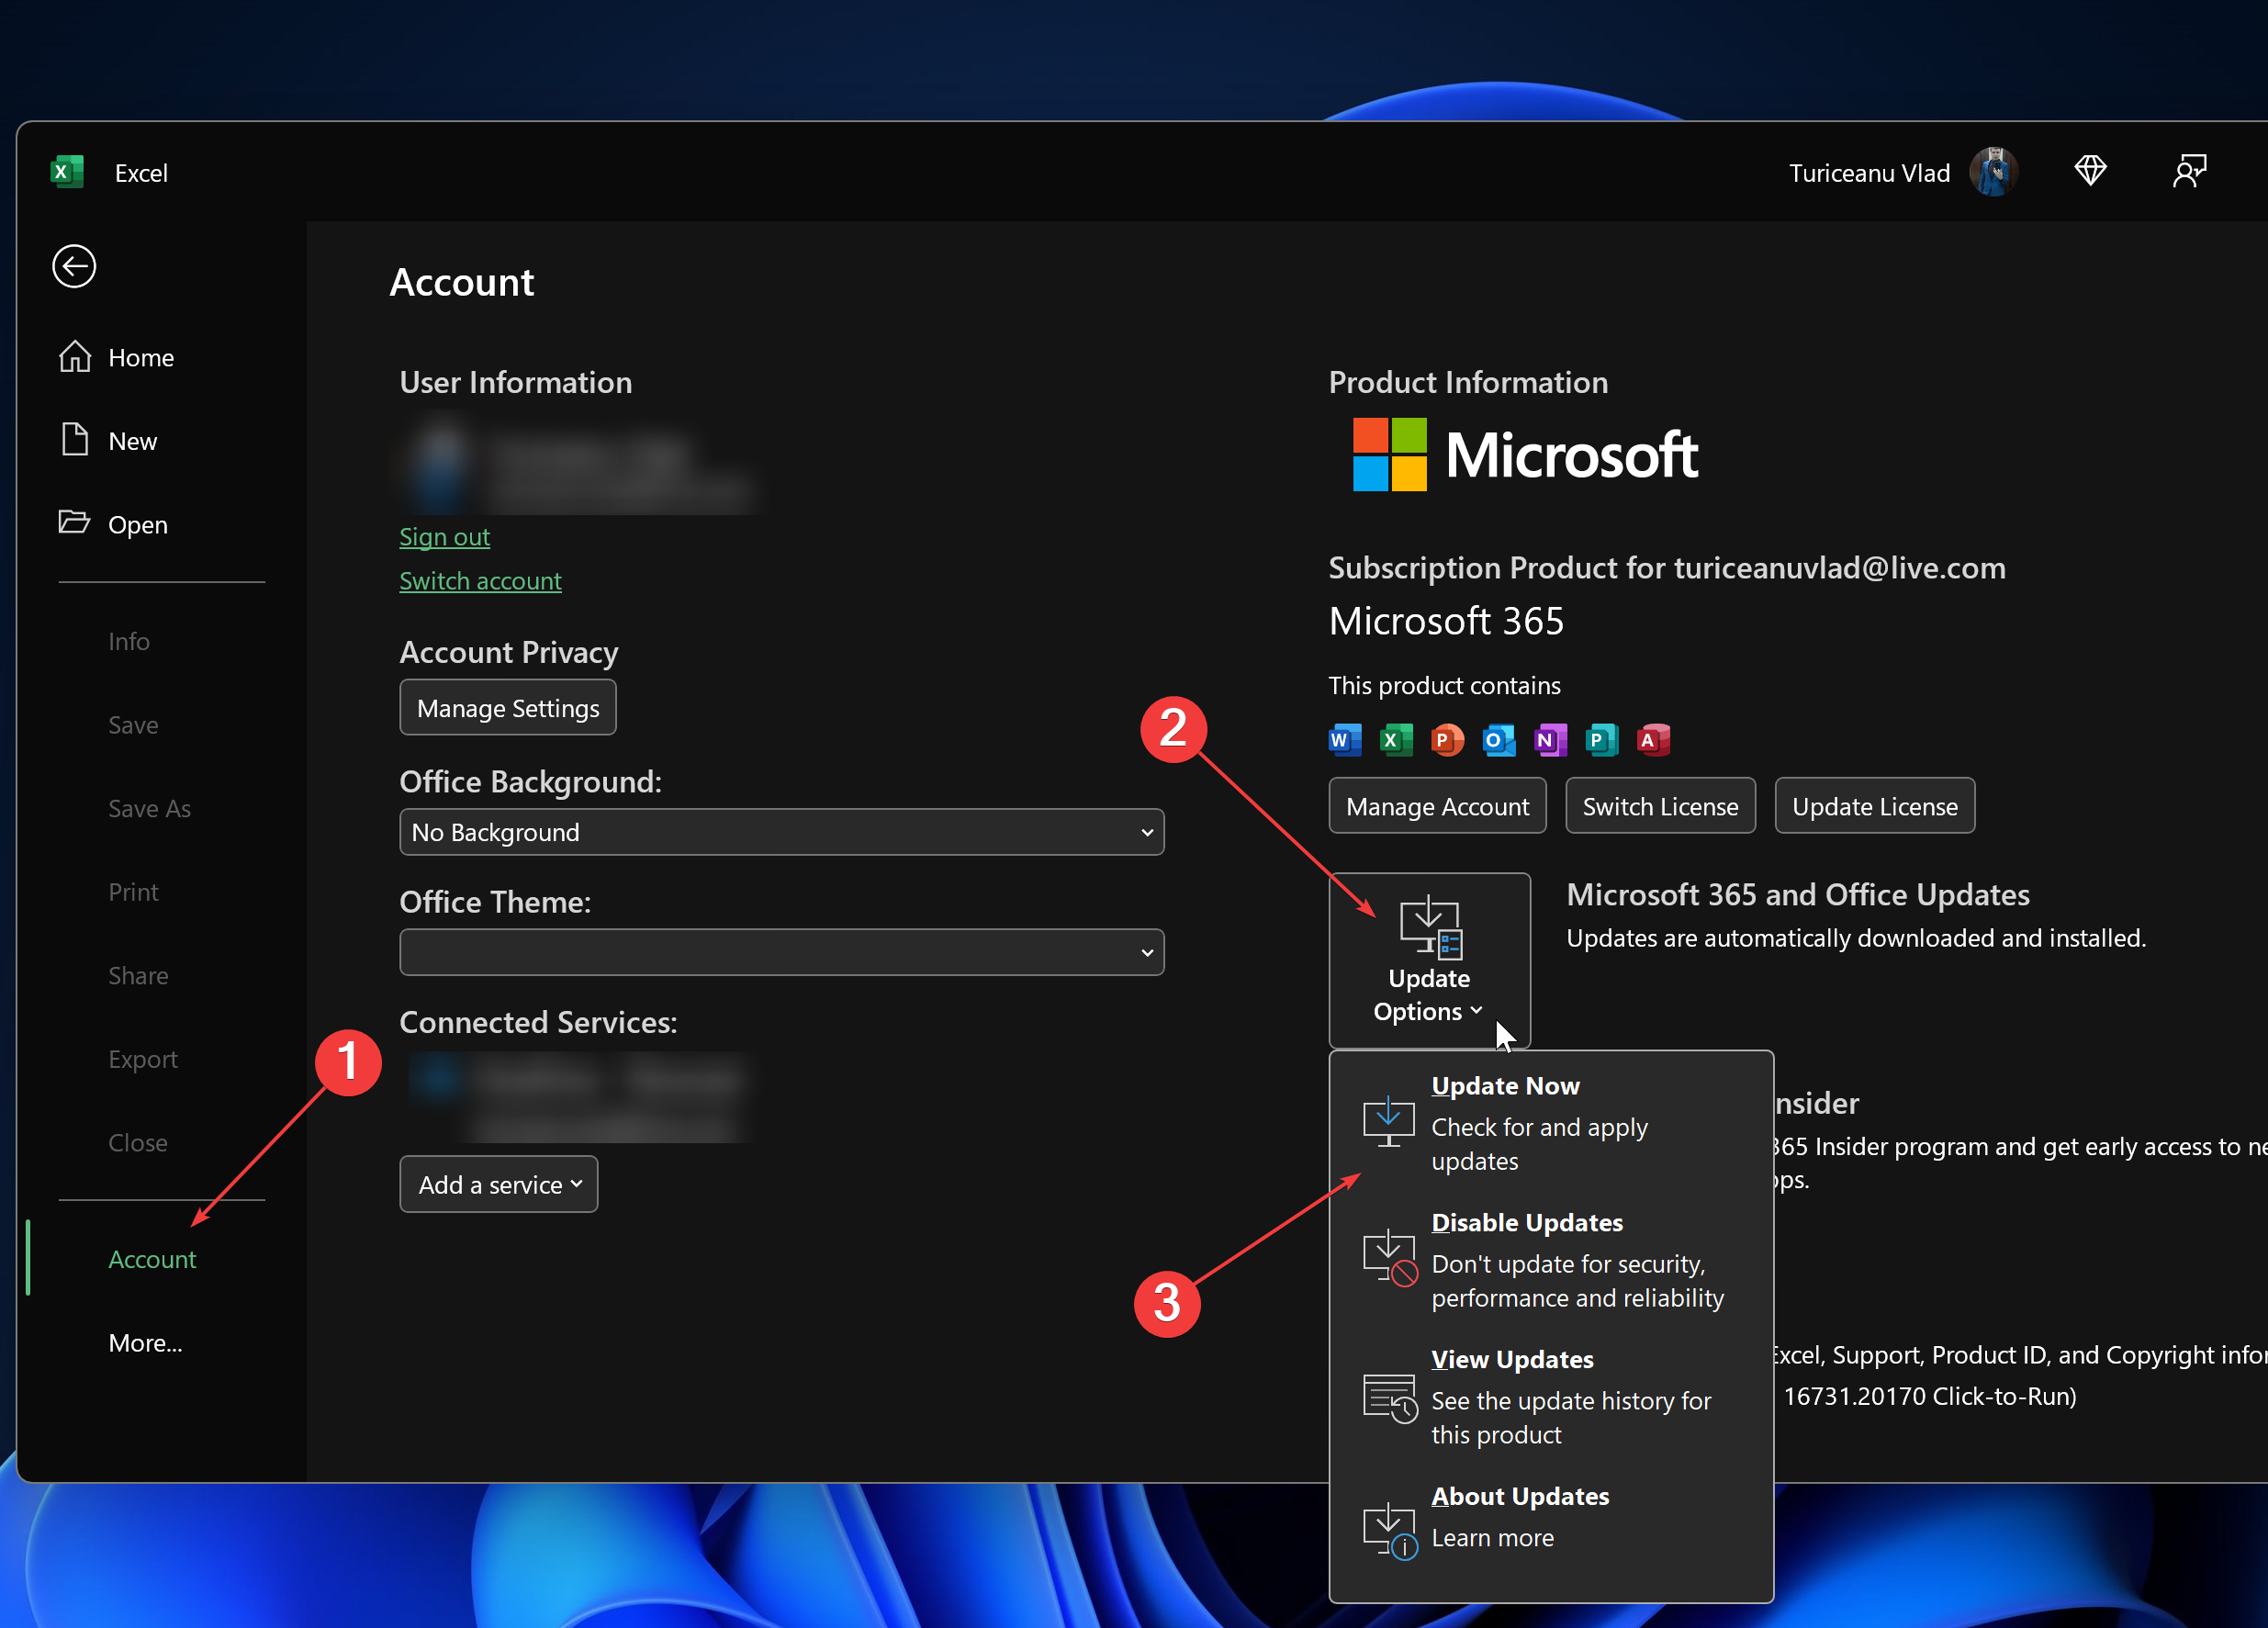






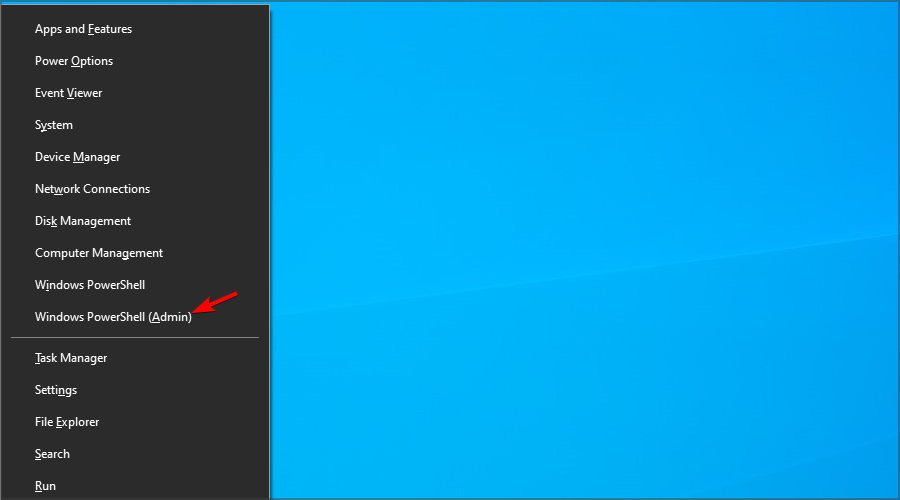










 MEMES> + icon – Microsoft Teams Stickers” width=”634″ height=”500″>