7 Tips to Properly Use Search on Windows 11

The search functionality has improved significantly in the last couple of iterations. Things are more refined and seamless, allowing users to search for items quicker than ever, but only with the right settings in place. So, how do you search effectively in Windows 11?

Remember, your prime concern shouldn’t be the sought method but the optimal configuration, say Content Indexing. The technique is more of an individual preference, while the search settings are the primary influencing factors. 

How do I search on Windows 11?

Tip icon Tip
The Search menu finds extensive application when locating files or apps in Windows 11. Therefore, we have broken the information into sub-sections for better understanding.
  • Search shortcut in Windows 11: Press Windows + S to directly open the Search menu and find items.
  • From the Start menu: Press the Windows key or click the Start button, and type in the text field at the top.
  • From the taskbar: If configured, click the Search icon or type into the search field in the taskbar.search from taskbar in Windows 11

1.2 Add Search to the Taskbar

  1. Press Windows + I to open Settings, go to Personalization from the navigation pane, and click on Taskbar.
  2. Under Taskbar items, select either Search icon only, Search icon and label, or Search box. Try out the three settings and set whichever works best.taskbar settings

1.3 Using the Search Menu

Once you have launched the Search menu, enter the search term in the text field, and it will automatically populate the results, with the best match listed at the top. Remember, the best match could comprise more than one entry.

Say you search for Control Panel. The best match, of course, is the Control Panel utility. But you also find a few related settings under it and the option to explore the web using the exact or related search term.

To the right of Windows Search, you may find recent items or other quick options like Open file location, Run as administrator, or Pin to Start, among others.

When more results are under different categories, the Search menu will list the most relevant ones. Say you search for an application, and the PC also has text files or photos with the same name. It will prioritize the results and list them accordingly.

1.4 Apply filters for refined searches 

In the Search menu, you can toggle between the different search filters. Enter the term and select a filter from the top to perform a dedicated search. The following search filters are available:

  • Apps
  • Documents
  • Web
  • Settings
  • People
  • Folders
  • Photos

Alternatively, you can include the filter in text form while using Windows Search. Type the filter name followed by a colon (:), and then the search query.

For instance, if you want to find an app, type apps: App Name in the search field. You can similarly search for files in Windows 11.

1.5 Change the search permissions

  1. Press Windows + I to open Settings, go to Privacy & security in the left pane, and click on Search permissions.
  2. Configure the SafeSearch settings. By default, Windows sets it to Moderate, but you can select Strict or Off (disables SafeSearch).SafeSearch
  3. Choose whether you want Cloud Content Search enabled and include content from OneDrive, SharePoint, and Outlook, amongst others. Turn off the toggle for Microsoft account and Work or School account to disable it.cloud content search
  4. Set whether you want Windows to store the search history locally to show curated results. You can also clear the device search history by clicking the dedicated button.clear Windows 11 search history
  5. Lastly, there’s the option to configure Search highlights, whether or not you want the content suggestions in the search box.show search highlights in Windows 11

You can quickly change the Windows 11 search settings for personalized results. This is all the more important for content moderation.

Besides, if you aren’t pleased with the recent changes by Microsoft, restore the old Search button.

2. In File Explorer

  1. Press Windows + E to open File Explorer, and type the file/folder name in the search box near the top right.search field
  2. When not searching in a dedicated folder but in This PC, File Explorer will list all the results across folders. The green bar at the top highlights the search progress.search in Windows 11 using File Explorer
  3. For quicker searches, head to the target folder.
  4. To apply filters in File Explorer, click on Search options, then select Date modified, Kind (file type), or Size, and choose a relevant sub-category from the flyout menu.filter search on windows 11
  5. From Search options, you can select which entries are to be included in the results, say, System files, Zipped folders, and File contents.show files
  6. You can change the View of search results or Sort them based on different parameters from the dedicated menu.view and sort

You can also use search operators in File Explorer. To search exclusively for a specific phrase, use double quotes (“) or use the minus sign (-) to exclude specific terms. Besides, search operators like AND, OR, and NOT can be employed.

For instance, to search exclusively for PNG files, the phrase becomes “png”. To find both PNG and JPG files, we will use “png” OR “jpg”. If the operators don’t function or the File Explorer search is not working, rebuild the search index or run the Search and Indexing troubleshooter.

Besides, you can also use Windows Explorer to search for special characters.

File Types and Indexing Options

  1. Identifying the different file types: Press Windows + I to open Settings > select Apps from the left > click on Default apps > select an app to view the compatible file types or set it as a default.
  2. Viewing the file extensions: Open File Explorer > click the View menu > select Show > and check File name extensions.show file extensions
  3. Rebuild the search index: Press Windows + I to open Settings > go to Privacy & security > click Searching Windows > select Advanced indexing options > click the Advanced button > click Rebuild > finally click OK to confirm.rebuild search index

Why can’t I find Search in Windows 11?

  • The Search icon is disabled in the taskbar settings.
  • Relevant services are not running.
  • Corrupted system files caused Windows Search to stop working.
  • Improper Windows installation.

Remember, to quickly search on Windows 11, you must enable search indexing. And if there are no web results when you search, reset Windows Search.

Those who still experience search issues or want deeper file scanning capabilities can try using Agent Ransack for Windows 11. It offers advanced search filters, regular expression support, and live content previews, helping you locate files faster and more precisely than the built-in Windows Search.

In case you encounter reduced battery life or high CPU consumption, disable the search service, and it won’t even significantly affect the core search functionality. For advanced search errors like the error_no_more_search_handles check out our expert article.

For any queries or to share more tips for effective searches, comment below.

Image-related bug: Edge, other browsers, apps, under severe threat

Hackers are using WebP images to hack into people’s systems. All the major companies have agreed and released security patches for the browsers. NIST acknowledges the threat.

What is WebP? WebP is a contemporary image format offering advanced compression capabilities, both lossless and lossy, for web-based images. Its compatibility extends across all leading web browsers, encompassing Chrome, Firefox, Edge, and Safari.

All the major companies have responded to the situation:

  • Google responded swiftly by releasing updates for Google Chrome on various platforms.
  • Mozilla also planned to release updates for Firefox.
  • Apple indicated that it had pushed an update for this vulnerability.
  • Other browsers like Brave and Microsoft Edge were mentioned as having released updates.
  • Electron-based applications, including Signal and 1Password for Mac, were considered vulnerable until they updated their libwebp versions.
  • Various Linux platforms, such as Ubuntu, Debian, and SUSE, were actively updating their libwebp versions.

It’s not just web browsers. Other programs that use the same technology can also have this problem. Some of these programs are Signal, 1Password, and many more. They are also fixing the issue.

The Apple Security Engineering and Architecture (SEAR) team reported the vulnerability in collaboration with The Citizen Lab at The University of Toronto’s Munk School on September 6, 2023.

Google confirmed the existence of an exploit for CVE-2023-4863 in the wild, underscoring the urgency of addressing the issue.

The affected software versions that contain the necessary fixes are as follows:

Google:

  • Chrome version 116.0.5846.187 (for Mac and Linux)
  • Chrome version 116.0.5845.187/.188 (for Windows)

Mozilla:

  • Firefox 117.0.1
  • Firefox ESR 102.15.1
  • Firefox ESR 115.2.1
  • Thunderbird 102.15.1
  • Thunderbird 115.2.2

Microsoft:

  • Edge version 116.0.1938.81

Brave:

  • Brave Browser version 1.57.64

Users are urged to immediately update their browsers and other affected apps. Suppose users are unable to update their software immediately. In that case, they can mitigate the risk of exploitation by avoiding untrusted websites and not opening attachments from unknown senders.

via StackDiary, TheVerge


Microsoft and Oracle’s secret is out as they announce Oracle Database@Azure

Microsoft and Oracle have announced Oracle Database@Azure, a solution for running Oracle database services on Microsoft Azure, whose hints they dropped a couple of days ago.

All customers can now access Oracle database services on Oracle Cloud Infrastructure (OCI) via Microsoft Azure data centers, providing benefits for both parties. The aim is to combine Oracle’s database product with Azure’s security, flexibility, and services.

The announcement did not provide many details about Oracle Database@Azure. However, it is anticipated to provide additional choices for Oracle clients to migrate their databases to the cloud. The objective is to deliver a completely integrated solution for deploying, managing, and utilizing Oracle database instances on Azure.

Satya Nadella, Chairman and CEO, Microsoft said:

We have a real opportunity to help organizations bring their mission-critical applications to the cloud so they can transform every part of their business with this next generation of AI. Our expanded partnership with Oracle will make Microsoft Azure the only other cloud provider to run Oracle’s database services and help our customers unlock a new wave of cloud-powered innovation.

Oracle and Microsoft will jointly provide support for mission-critical workloads on Oracle Database@Azure.

Customers can purchase Oracle Database@Azure through Azure Marketplace and use their existing Oracle Database licenses. Oracle will operate and manage its services within Microsoft’s data centers, starting with regions in North America and Europe.

Another significant thing happened at the event as Oracle founder Larry Ellison made his first-ever trip to Microsoft headquarters. Could their rivalry in the database software market for over three decades be the reason for this delay?

What is Microsoft 365 Lighthouse & How to Access it

With Microsoft 365 Lighthouse, a service manager can service multiple clients/tenants with all their users and devices. It’s great for managing password authentication, security issues, applications, and a lot more.

So, the tool is a standalone web application that helps MSPs (Managed Service Providers) manage multiple Microsoft 365 customer tenants at the same time.

Of course, both MSP and clients need to have Microsoft accounts and subscriptions, but only the MSP needs a Microsoft 365 Lighthouse license to use it.

Before we begin, remember that Azure Lighthouse and Microsoft 365 Lighthouse are separate products.

Azure Lighthouse is built into the Azure portal, and it’s designed for managing Azure clients, Microsoft 365 Lighthouse is for managing Microsoft 365 customer tenants.

How do I access Microsoft 365 Lighthouse?

Before starting anything, make sure that you follow the Microsoft 365 Lighthouse requirements to use it:

  • All the customer devices must be enrolled with Microsoft Intune to be monitored, and after that, as MSP, you must assign compliance policies to the customer devices.
  • The customer must have licensed users for Azure Active Directory Premium P1 or later, including Microsoft 365 Business Premium and Microsoft 365 E3. This will enable reports on user management pages.

After you ensure the requirements are met, follow the steps below to access Microsoft 363 Lighthouse.

  1. Go to the Microsoft 365 admin portal and log in with your Microsoft account.
  2. Next, you will be prompted to get Admin rights to manage your domain. Hit Next.
  3. Now, you will need to log into your domain, extract the necessary data, and paste it into the form to prove that you own it. Microsoft also provides a step-by-step guide on how to do that.  
  4. Of course, if you are managing a client domain, you will need the same data for their domain but now you know what data to ask and instruct them how to provide it.
  5. After that, go to Billing > Purchase services > Microsoft 365.
  6. Go to Microsoft 365 Lighthouse, select Details, then click on Buy.
  7. You will be redirected to the Microsoft 365 Lighthouse portal. You can click on the highlighted link as well.
  8. The data from your client will appear in up to 48 hours. And from now on, you can access Microsoft 365 Lighthouse from this portal with your Microsoft account.

You don’t need to pay additional costs for each tenant or client. A single license can cover all your customers.

How do I configure Security Settings with Microsoft 365 Lighthouse?

1. Configure multi-password authentification

  1. Sign into Microsoft 365 with your work or school account.
  2. Because your organization opted for Microsoft 365 Lighthouse integration, you will be prompted to provide more information this time, so click Next.
  3. Now, you will be recommended to install the free Microsoft Authenticator app on your mobile device. The link provided will take you to the mobile store to download it.
  4. Follow the instructions to scan a QR code on the PC screen using the Microsoft Authenticator app which in turn will provide a code you insert into the authentification website on your PC.
  5. Next time you log into your Microsoft 365 account, you will be asked for the code from the mobile app.

The MFA process is the responsibility of the client, not the MSP. However, you, as an administrator, will see in Lighthouse who did not complete the MFA process and notify the risky users to do so.

As for additional portal security measures, you can set up security configuration baselines, monitor the service health, and create self-service password reset policies.

2. Microsoft 365 Lighthouse user management

In the Users menu from the left navigation pane, you have all the user access management options. That includes a situation with users who have failed login attempts, making them Risky users.

You may also find the situation of who activated the multifactor authentication and force a password reset.

3. Microsoft 365 Lighthouse device management

In the left navigation pane, there’s also the Devices tab. From there, you will manage all the client’s devices. You can monitor the security status and device compliance with the policies you have set up.

You can assess and manage any possible threats or notify your client about them.

Here, you will also see the overall device health and take action to mitigate the problem immediately. The threat management options are pretty crucial for securing the customer tenant devices.

You should also note that Lighthouse has AI-driven insights and recommendations to help you get new clients and expand your offers.

About Microsoft 365 Lighthouse pricing, the solution is included with Microsoft 365 Business Premium and Microsoft 365 E3 licenses. 

Here, we conclude our guide on accessing Microsoft 365 Lighthouse, in which we also included a few tips on security management and other information.

You may also be interested in reading our article on Microsoft 365 vs Office 2021 to see which one is better for you.

In case you are a regular Microsoft Office user, you may also want to learn how to install Office 365 on a Windows computer.

If you have any questions or want to share your experience, please use the comments section below.

How to Change From Endless OS to Windows 11

Windows has many benefits, mostly better software and gaming support, and this is why many want to change from Endless OS to Windows 11.

This process varies if you’re using operating systems in dual boot mode or just Endless OS on its own, but we’ll guide you through both cases in this guide.

Preparations for transitioning from Endless OS to Windows 11

  • Check system requirements for Windows 11 and make sure that your PC can run the latest version.
  • Back up all the files from the system drive. You can move them to a different partition, external storage, or cloud.
  • Download the ISO Image of Windows 11 and create a bootable media.

How do I change from Endless OS to Windows 11?

1. Uninstall Endless OS from Windows 11

  1. Make sure that you boot to Windows 11.
  2. Press the Windows key + I to open the Settings app.
  3. Navigate to Apps and select Installed apps in the right pane.
  4. Select Endless OS, click the three dots next to it, and choose Uninstall.
  5. Follow the instructions on the screen to complete the process.
Note icon NOTE
This method only works if you’re using Endless OS dual boot with Windows 11 via Endless OS Installer for Windows.

2. Format your drive and install Windows 11 from scratch

1. Download Windows 11 ISO and create installation media

  1. Visit the Windows 11 download page.
  2. Select the version that you want and click on Download now.
  3. Select the product language and click on Confirm.
  4. Select 64-bit Download and wait while the ISO file is downloaded.

After the download is finished, you need to create a Windows 11 bootable USB installation media with Rufus or with the Windows 11 Media Creation Tool.

Note icon NOTE
To complete these steps you need to use a Windows PC since the necessary software is a Windows exclusive.

2. Boot from the installation media and format the drive

  1. Insert the bootable USB drive into your PC and restart the computer.
  2. Keep pressing F4 or F8 to bring up the boot options menu. When the menu appears, select your bootable device.
  3. The installation will now start. Select the desired language and click on Next.
  4. Next, click on Install now.
     
  5. Select I don’t have a product key.
  6. Select the desired version of Windows.
  7. Next, choose I accept the Microsoft Software License Terms.
  8. Choose Custom: Install Windows only (advanced).
  9. Select the partition that has Endless OS on it and click on Delete to delete all files from the partition. The partitions aren’t labeled, and usually Endless OS is on the Drive 0.
  10. After that, select the drive you just deleted and choose Next.
  11. Follow the instructions on the screen to complete the setup process and install Windows over Endless OS.

Why change to Windows 11 from Endless OS?

  • Most applications are designed primarily for Windows and they won’t work on Endless OS.
  • Gaming support is almost non-existent on Endless OS, and Windows 11 is a much better option for gamers.
  • Hardware manufacturers optimize their driver software for Windows, so it’s less likely you’ll encounter issues with device drivers.
  • Windows 11 is more user-friendly than most editions of Linux.
  • Better security thanks to the Secure Boot feature.

Our Linux vs. Windows 11 guide has an in-depth comparison between the two systems, and more useful information if you’re planning to switch, so be sure to check it out.

If you want to change Endless OS to Windows 11, in most cases you’ll have to perform a clean install and format your drive, unless you dual boot Endless OS and Windows. However, it’s also possible to upgrade to Windows 11 without file loss, and we have a guide that shows you how to do that.

Is Endless OS better than Windows 11? Tell us what you think in the comments section below!

How to Report Phishing Emails in Outlook

Phishing emails are becoming more and more common, but they don’t always stand out from email clutter. Since cybercriminals are getting creative, you also need to up your game and help your domain manager come up with better detection techniques.

The key to a spam-free inbox starts with early detection. You need to know how to spot spam emails, and only then will you be able to report the email so it can be effectively mitigated.

Why report phishing emails?

When you receive a phishing email, it can be tempting to delete it and go on about your day. However, reporting phishing emails is important because it helps other users stay vigilant as they are now aware of the looming attack.

In addition, your organization and email client can also use the reports to improve their anti-phishing detection features and identify new ones that will help block as many fake messages as possible before they reach you.

How do I report phishing in Outlook?

1. Outlook app

  1. Launch your Outlook app.
  2. Locate the suspicious message from your folders and click to open it.
  3. On the top menu, click on Junk, and in the drop-down menu, select Report as Phishing.

2. Outlook web

  1. Log into your Outlook web email.
  2. Locate the suspected email and click on it to open.
  3. Next, click on Report, and in the drop-down menu, select Report phishing.
  4. Click OK in the next dialog box and the message will be removed from your inbox.

3. Outlook mobile

  1. On your phone, launch the Outlook app.
  2. Go to your inbox or junk folder containing the spam email, tap, and hold on to the message.
  3. Tap the three ellipses on the top right and select Report junk.
  4. Next, select Phishing.
  5. Check the Remember my choice box and tap Report to finish.

How do I report phishing in Outlook without opening it? 

If you’re worried that opening an email could lead you to click on malicious links accidentally, you’ll be happy to know that this is not a prerequisite to reporting them. You can simply select the emails from your homepage, follow the steps above, or install the Report Phishing add-in.

Alternatively, you can forward the emails to the official email address for Microsoft, which deals with phishing messages.

What other ways can I report a phishing email? 

  • Share the message with your IT department or network administrator.
  • Report the email as phishing or malware to your antivirus software provider so they can update their databases with new threats.
  • Forward the message to the company or organization it claims to be from or the company hosting the website in question.
  • Use a secure third-party tool with a secure server that can assess risk and forward it to relevant parties.
  • Get in touch with the fraud protection center in your country.

With phishing attacks becoming increasingly sophisticated, knowing how to spot and report them can make the internet a safer place for everyone. And while your Outlook email does a decent job detecting some of these phishing attempts, sometimes it may fail to block junk mail.

Some emails like the renew your Microsoft 365 phishing scam or unusual account activity detected are almost believable you’ll be tempted to click on links. In such cases, a comprehensive antivirus should suffice. But not just any antivirus will do.

The last thing you need is to question whether your antivirus can detect phishing. You need to look out for its features and ensure it is always up-to-date.

Are there any avenues for reporting phishing scams we may have missed in this article? Share them with us down below in the comment section.

How to Add, Create, and Send Stickers in Microsoft Teams

From one-on-one conversations to group chat, Microsoft Teams stickers can liven up any interaction. In this guide, we will discuss ways to add, create, & send stickers to your chats to add fun and express yourselves freely.

While stickers are a great way to engage in conversations with your friends and colleagues, there are a few things you must consider for your security:

  • Don’t share personal or sensitive data via stickers.
  • Exercise caution while adding third-party sticker apps and review their permissions.
  • Don’t download stickers from unreliable sources to prevent malware and phishing attacks.
  • Keep your Microsoft Teams and associated apps up to date with security patches.

How do I download more stickers on Microsoft Teams?

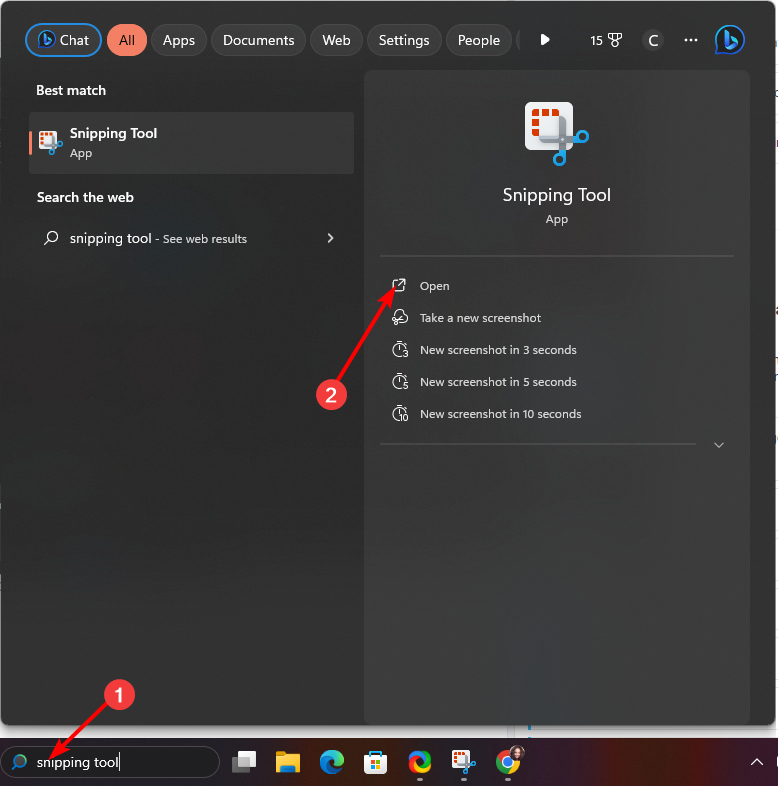
  1. Press the Windows key, type teams, and click Open.Microsoft Teams open - add stickers Windows 11
  2. On the left pane, select Apps, then type stickers in the search box.
  3. You will get the available stickers for Teams. You can also choose Categories to refine your searches.
  4. Once you see the app that you want, click Add.Add sticker app
  5. Once added, go to the chat where you wish to share stickers and click the three dots.Add the stickers to Microsoft Teams
  6. Select the app and choose a sticker.
  7. The sticker will appear in the message box; you can add content if you like and click Send.Sticker app add sticker and click Send

You can also upload the images you like to customize the sticker within the app and reuse them whenever you want.

If you need a break from video fatigue or want to keep the video off while in a meeting, try Teams’ 3D in-app avatars feature.

How do I create & add custom stickers to Microsoft Teams?

  1. On Microsoft Teams, go to the conversation or a group chat and click the Sticker icon.
  2. From the list of stickers, click Popular, type in the search term like grumpy, and select the sticker.Teams_Add sticker from Popular  - Microsoft Teams sticker
  3. Next, you will see the sticker with the text box beneath it, type in the caption you want, and click Done.Add caption to sticker

You can also create your own stickers by uploading the photos you want for Microsoft Teams, to do that, follow these steps:

  1. On Microsoft Teams, go to the conversation or a group chat and click the Sticker icon.
  2. Next, from the left pane of the sticker window, select Meme, then click the Plus icon to upload an image. MEMES> + icon – Microsoft Teams Stickers” width=”634″ height=”500″>
  3. Select an image, and click Open.Select an image and click Open
  4. Next, mention the Top Caption & Bottom caption and click Done.Teams_Enter caption and click DOne

How do I send stickers in Microsoft Teams?

Go to a chat or group conversation on Microsoft Teams, select or customize a sticker from the sticker list, and then click Send.

Microsoft Team stickers send

You can add emojis to your boring Outlook emails and turn them into engaging conversations; check this guide to learn how to do that.

Types of stickers available for use in Microsoft Teams

Apart from the Popular category, there are 16 other categories of stickers with a wide range of options to choose from, including:

  • Clippy
  • Office Drama
  • Meme
  • Designers
  • Devs
  • Legal
  • Broccoli
  • Bee
  • Teamsquatch
  • Calamity Bert
  • Cats In Suits
  • Word Art
  • Monkey
  • Donut Friends
  • Uncle Blob
  • Animalopolis

You can also download other digital sticker packs, including Glossy and Bubble-free Stickers, Planner and Meeting Planner Stickers, Searchable Customized Stickers, and more from websites like Etsy.

Sending stickers in a conversation on Microsoft Teams can help express your thoughts or convey messages in a fun way.

But always remember to be cautious when using a third-party app for stickers or creating customized stickers, especially in a professional environment.

If you have a work account on Teams, set up and use Teams Avatars to prevent video fatigue and maintain a level of privacy.

Just like stickers, GIFs are also an excellent way to start light-hearted communication; however, if the GIF option is missing for you in Teams, read this guide to fix it.

Ready to shine through in your conversations with the vibrant touch of stickers? Tell us your sticker tales and share your creations in the comments section below.

How to RAID External Hard Drives on Windows 11

RAID, or Redundant Arrays of Independent Disks, is a data storage technology where multiple external drives are combined into one. It was widely employed when large hard disks were expensive, but many still prefer the approach to RAID external drives.

There are several levels of RAID, each meant for a specific purpose. Remember, regular users don’t have to understand the intricacies and a simple setup of RAID 0 or RAID 1 should work fine.

Reasons to consider raiding external drives:

  • Improved performance of PC
  • Easy to configure and cheaper than available alternatives
  • Faster reading and writing of data
  • An effective backup solution due to mirroring

How do I RAID external drives on Windows 11?

Before you RAID external hard drives, here are a few prerequisites to be aware of:

  • Two external drives for RAID 0 and RAID 1, three for RAID 5, and 4 hard drives for RAID 10. The drives should be unformatted and of the same make (preferably), size, and speed. 
  • RAID clears all existing data, so make sure you back up the drive beforehand. 

Once you have it all ready, choose any method to set up RAID systems.

1. Via Settings

  1. Press Windows + I to open Settings, and click on Storage on the right in the System tab.storage
  2. Expand Advanced storage settings and click on Storage Spaces.storage spaces to raid external hard drives
  3. Click the Add button next to Add a new Storage pool.add
  4. Enter a name for the storage pool in the text field, select the desired disks from the list, and click on Create.create
  5. Type a name for the storage space, enter the desired size (it can be greater than the size of disks, but we recommend against it), and choose a Resiliency type from the following:
    • Simple (no resiliency)
    • One-way mirror
    • Two-way mirror (preferred due to data loss protection)
    • Parity (preferred)
  6. Once done, click on Create.storage space
  7. Enter a label name, choose the drive letter and file system, then click on Format. You could check the Advanced options to configure more settings.format to raid external hard drives
  8. Once done, the RAID setup will be accessible from File Explorer.raid setup
  9. Also, you can reconfigure or optimize the storage pool from the Storage Spaces settings.

That’s how you can connect multiple external hard drives together with RAID and use them for data storage with advanced protection measures. Remember, it’s best to keep the RAID options simple or go with the default choice for an error-free experience.

2. Use a third-party software

The easiest and fastest way to create a RAID Array with your external drives is of course to use dedicated partition management software. These tools are easy to use and most of the settings for optimization and data loss prevention are only one click away.

For this task, we recommend using AOMEI Partition Assistant as it is a professional tool offering many features that will help you optimize your disk.

Besides allowing you to set up your RAID accurately, this software also allows you to recover, clone, convert, and many other disk operations. It is altogether a powerful and complete software.

AOMEI Partition Assistant

Easily set up your RAID Array on external drives with this professional software.

3. From Control Panel

  1. Press Windows + S to open Search, type Control Panel in the text field, and then click on the relevant search result.
  2. Click on System and Security.system and security
  3. Click on Storage Spaces.storage space
  4. Now, click Create a new pool and storage space.
  5. Click Yes in the UAC prompt.
  6. Tick the checkboxes for the disk you want to add to the storage pool, and then click Create pool.create pool to raid external hard drives
  7. Now, enter a name, choose the drive letter and file system, select a Resiliency type (preferably Two-way mirror), configure the pool size, and click the Create storage space button.create storage space
  8. The created Storage Space will now be listed under the dedicated section in the Control Panel and File Explorer. You can modify the settings, rename the pool, add drives, or delete the storage space here.raid

That’s how you can set up a RAID array with 2 external hard drives. Remember, it only works for RAID 0 and RAID 1. The other more advanced types require a higher number of drives.

4. Through Command Prompt

Note icon NOTE
The process requires converting the disk to Dynamic, creating a RAID setup, and, lastly, formatting it. For simplification, we have broken down the process into sections. But we recommend going with the Settings or Control Panel for easier setup.

4.1 Convert to dynamic

  1. Press Windows + R to open Run, type cmd, and hit Ctrl + Shift + Enter.cmd
  2. Click Yes in the UAC prompt.
  3. Paste the following command and then hit Enter to launch the Diskpart utility: diskpart
  4. Run the following command: list disklist disk
  5. Now, execute these commands to convert the disks you want to add to the RAID system to a dynamic type while replacing X with the number assigned to the disk: select disk X convert dynamic
  6. Repeat it for all such disks.

4.2 RAID external hard drives

  1. Run this command to select the first disk while replacing X with the disk number: select disk Xselect disk
  2. Next, execute this command to create a RAID volume (for more disks, list them, too, in the command): create volume RAID disk 1,2,3

4.3 Format the external drives

  1. Run the following command to identify the number assigned to the RAID volume: list volumelist volume to raid external hard drives
  2. Execute this command while replacing X with the assigned number: select volume X
  3. Next, run this command to format and then assign a label: format fs=NTFS label=Storage Volumeformat volume
  4. Lastly, run this command to assign a drive letter of your choice (replace X): assign letter= X

You can easily RAID external drives in Windows 11 via the Command Prompt or Windows PowerShell, but with these commands, it will be a RAID 0 level. To set up another level, you will need to run several additional commands.

Remember, Diskpart is an advanced tool and helps eliminate any errors encountered earlier. 

RAID levels – understanding your options

There are several RAID Levels, each categorized under Standard, Nested, and Non-standard. The Standard RAID category was the first to be released and find extensive use even today. It comprises:

  • RAID 0: Best performance but minimum protection.
  • RAID 1: Data storage is duplicated, increased read performance.
  • RAID 2: Employs striping but has gone obsolete over the years.
  • RAID 3: One drive is used to store parity information and also employs striping.
  • RAID 4: Employs large stripes and eliminates I/O overlapping
  • RAID 5: Minimum three disks, preferably five. Allows the RAID array to function if one drive fails. 

The Nested RAID levels are a combination of standard levels, for instance, RAID 10 (RAID 1 + RAID 0).

Remember, you don’t necessarily need external drives for the process. You can RAID 1 external hard drive by creating virtual drives on it! Now that you know how RAID works be sure to check our guide on RAID 0 vs RAID 1 to learn all the differences between the two.

Besides, if you encounter any issues, download the RAID controller driver for seamless performance. 

For any queries or to share how RAID benefits your setup, comment below.

ViGEmBus Driver for Windows 11: How to Download & Install

The ViGEmBus driver and its libraries are the core of the Virtual Gamepad Emulation Framework (ViGEm) that works in the Kernel-Mode Driver Framework and it emulates some of the most popular gaming peripherals as software-based devices at kernel level.

In other words, it helps you mimic the presence of a game controller, or USB gamepads. The games will detect it as you would have it plugged into your computer.

What is a ViGEmBus driver? In other words, it is a software developed by Nefarius Software Solutions e.U. that allows you to emulate well-known gaming peripherals on your Windows computer. The latest version supports x86, x64, and ARM64 Windows systems.

Here are some of the perks of using VIGEmBus:

  • It helps emulate some of the most popular game controllers including the ones for Xbox, DualShock controllers, and generic HID ones.
  • The app supports the most popular game platforms like Steam.
  • You can connect multiple devices on the same driver instance.
  • It functions directly with Microsoft’s Kernel-Mode Driver Framework.

How to download & install the ViGEm driver?

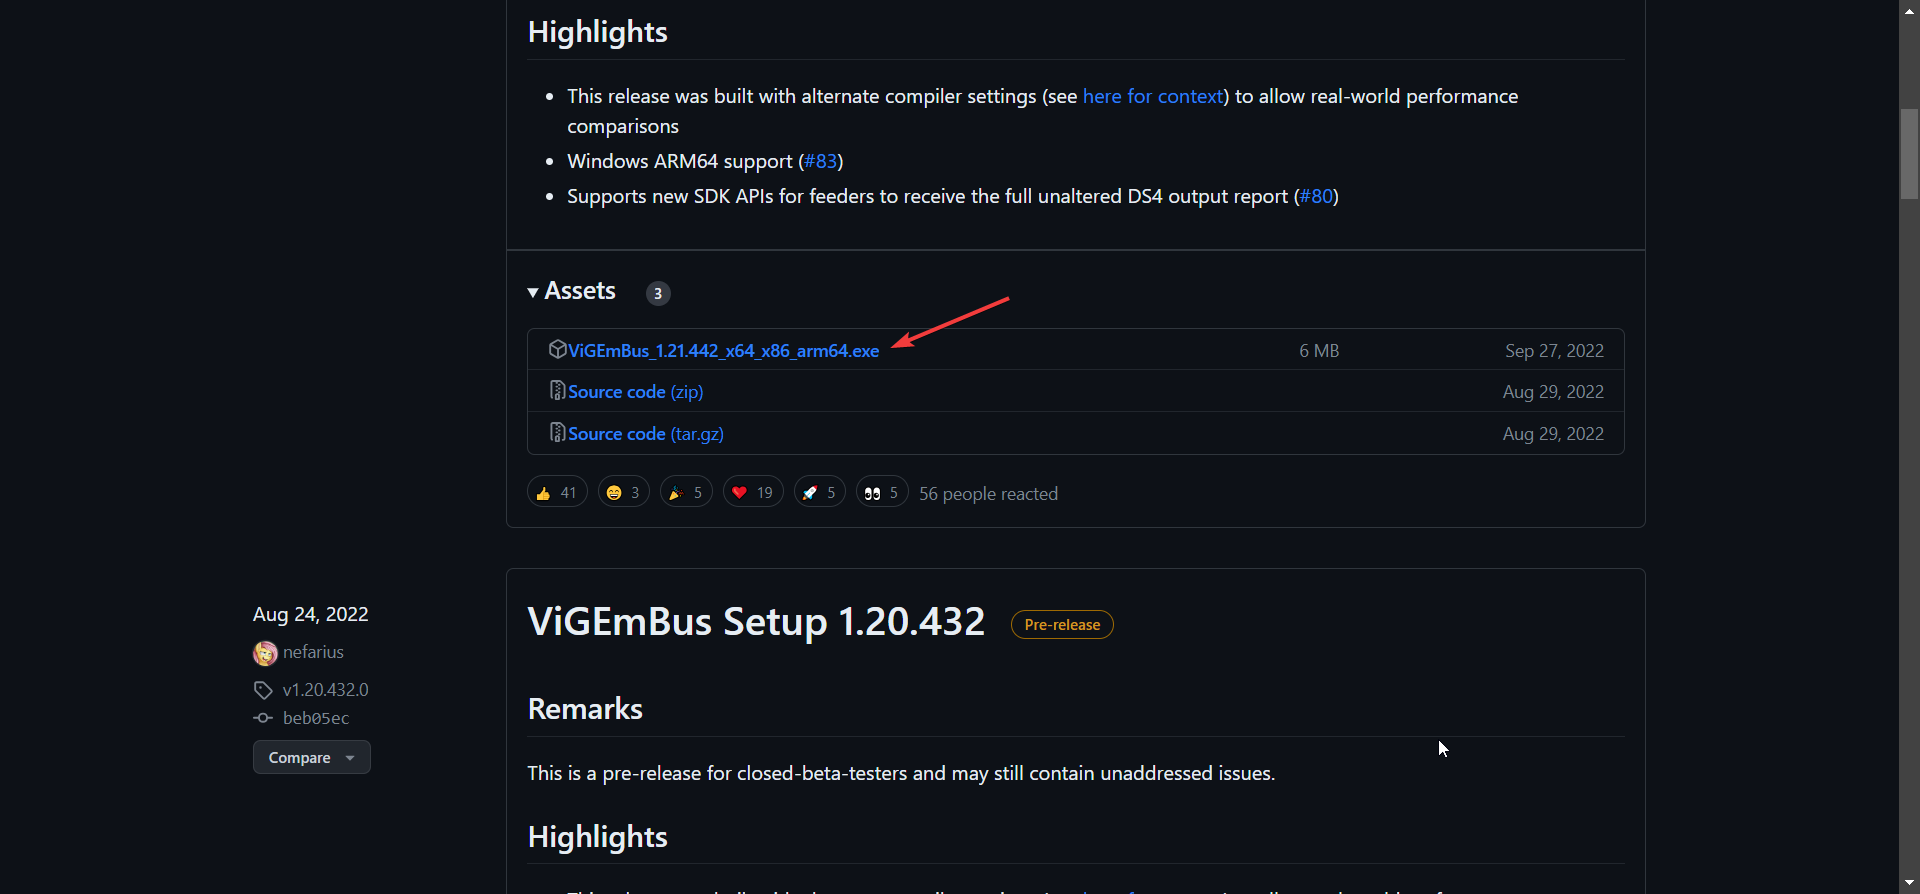
  1. Go to the official GitHub page for ViGEmBus and download the installer.
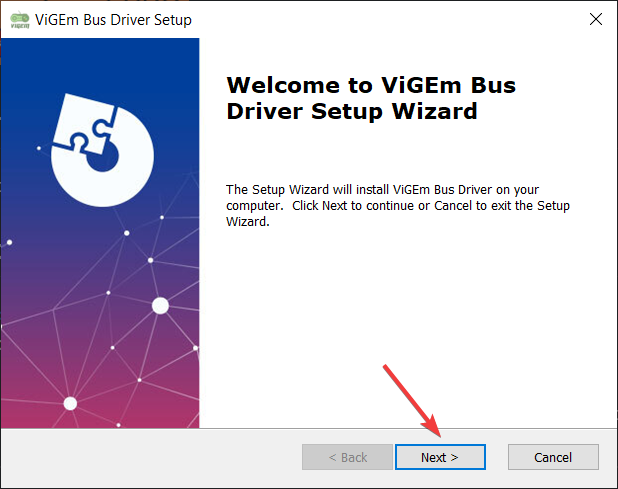
  2. Double-click the executable file to start the installation and click on Next.
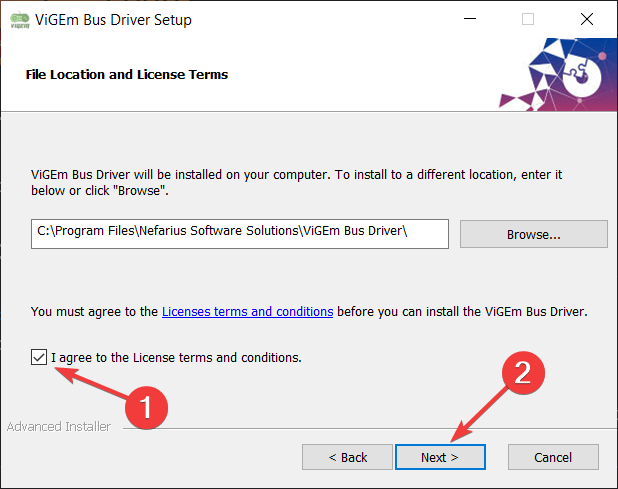
  3. Agree to the terms and hit the Next button again.
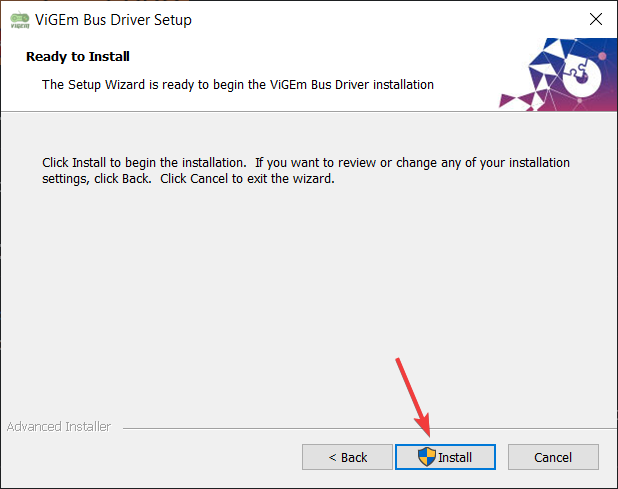
  4. Finally, click on Install.
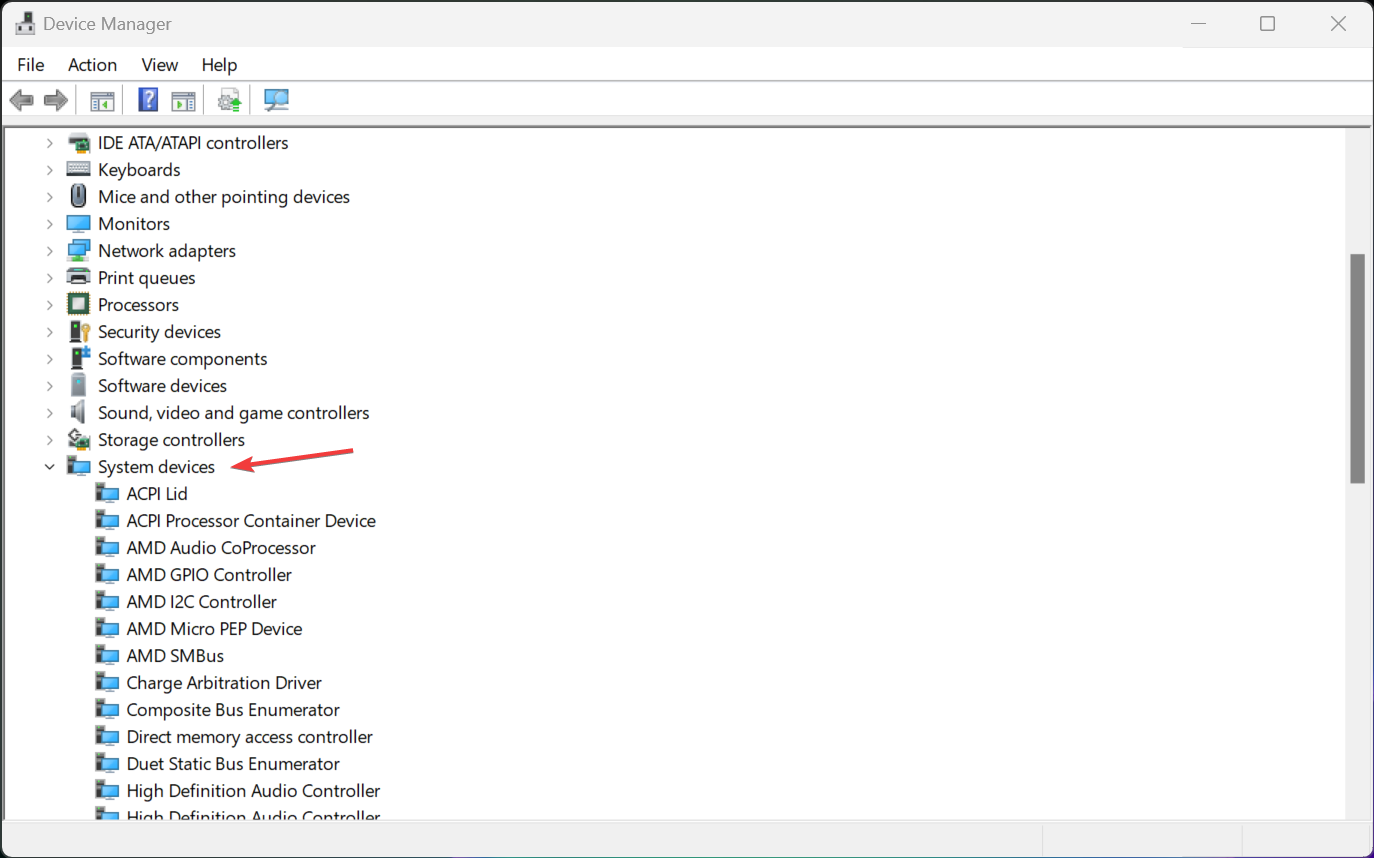
  5. To check if it was installed properly, right-click the Start button and select Device Manager.
  6. Scroll down and expand the System devices section.
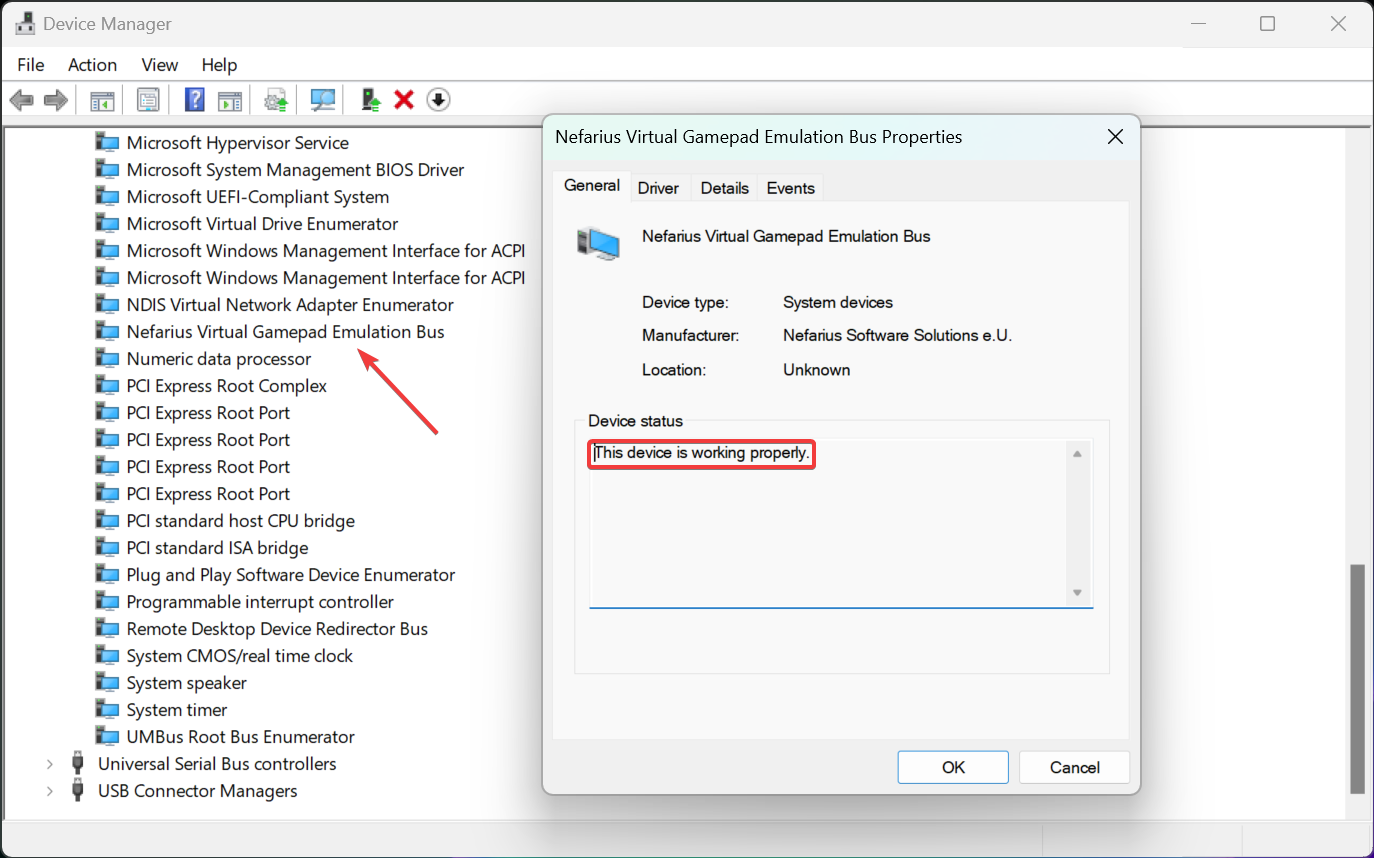
  7. Now, scroll down again and you will see the Nefarius Virtual Gamepad Emulation Bus present. And if you double-click on it you should see that it’s working properly under Device status.
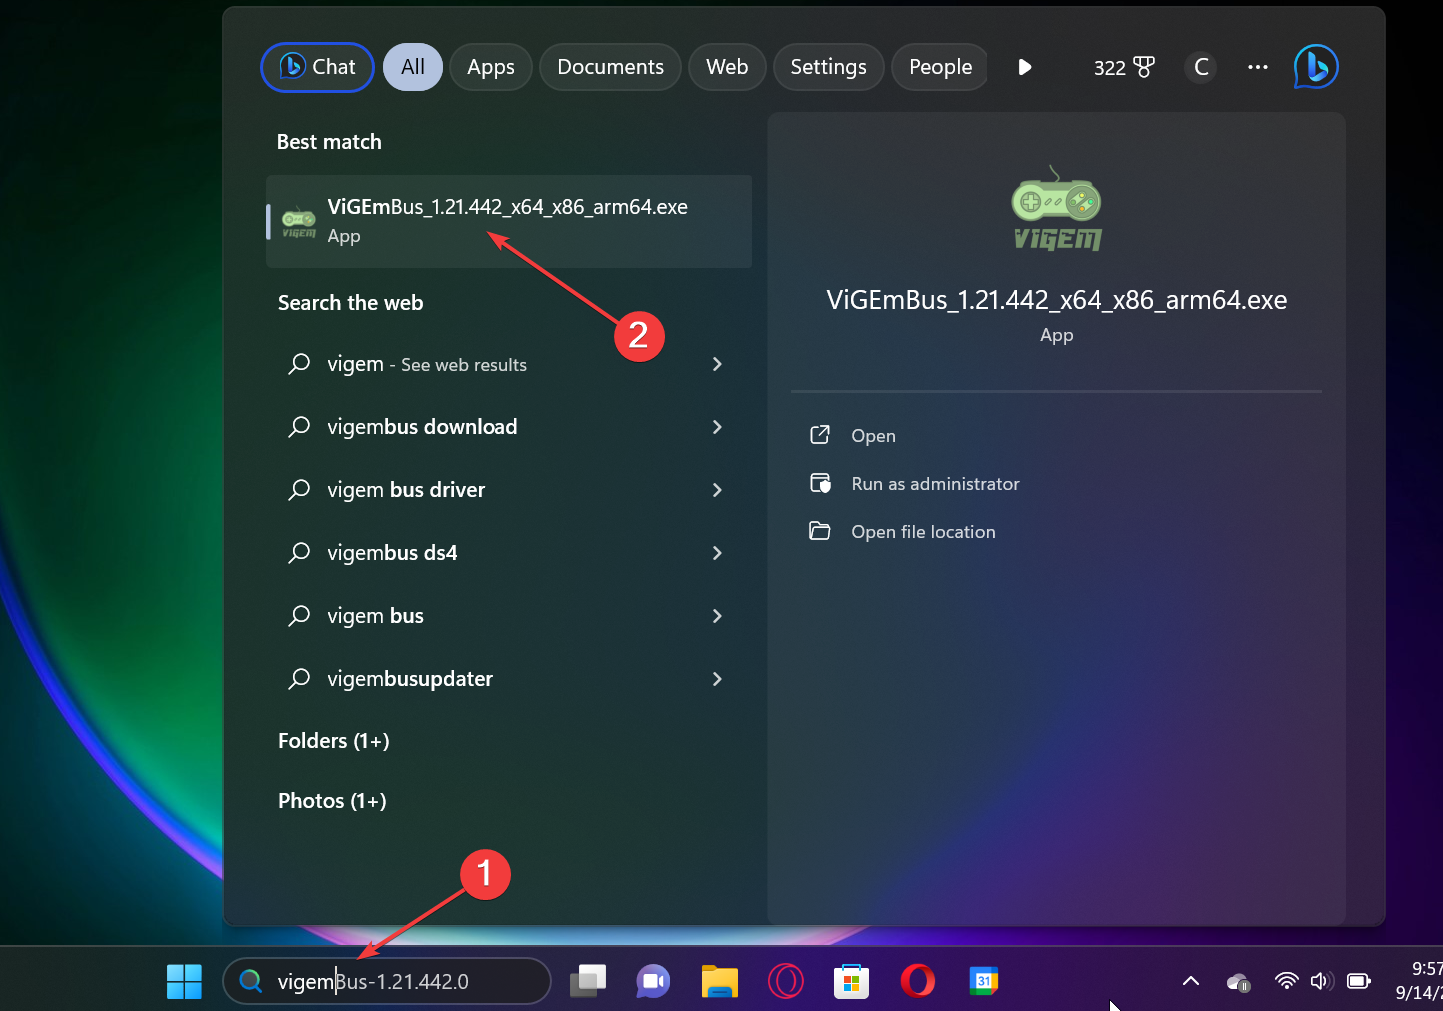
  8. If you change your mind and want to remove the tool, click the Search option, type vigem, and click on the installer from the results.
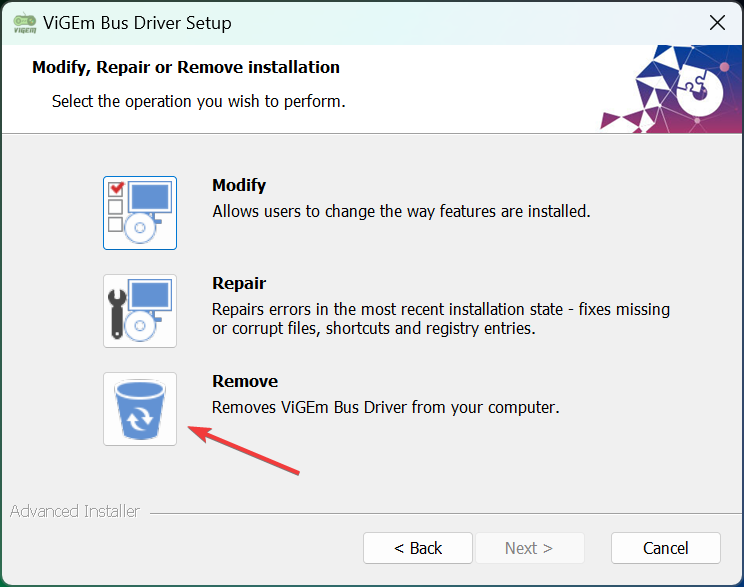
  9. Hit Next, and then select Remove to uninstall it from your PC.

However, you should know that this is not all. You should now look for the emulator of your choice for ViGEm-based devices.

With a simple Google search, we found an Xbox 360 controller emulator perfect for the ViGEmBus driver but you may find the one you need.

Also, some of the game controller emulators, such as DS4 Windows, come with the ViGEmBus driver bundled so it might be easier to proceed that way as well.

So, that’s the most simple ViGEmBus driver download method for Windows 11, but as we mentioned, it also works on Windows 10 and ARM64 versions.

Is the ViGEmBus driver update safe?

ViGEmBus is a safe tool to use signed and verified and as long as you download it from the official Github repository, you will be just fine.

As with any other software, there are several other versions on third-party websites that may indeed contain harmful code, so we always recommend using the official, trusted source.

Known limitations & common issues of the ViGEmBus driver on Windows 11

  • ViGEmBus driver needs an additional emulator for the game controller of your choice.
  • Some readers have reported that some third-party software install ViGEmBus silently, without their knowledge. To verify if it was installed, go to Settings > Apps > Installed apps and uninstall it from there.
  • As with other software, ViGEmBus can become corrupted and it’s prone to crashes. As you have noticed, the installer also has a repair option that you may use in this case.
  • Accurate emulation of gameplay not being possible on some executable files.

ViGEmBus driver is great for software developers who need to test and benchmark games on several user inputs.

We hope that our article provides all the information needed to install ViGEmBus Driver on your Windows 11 PC.

You might also be interested to check out our list of the best console emulators for PC.

If you have any other questions or suggestions, feel free to use the comments section below.

How to Get the Free GitHub Copilot for Students & Teachers

GitHub Copilot is a powerful tool that comes with a subscription. However, you can get GitHub Copilot Education for free.

This is quite simple to do, and today, we will show you how to get this add-on as a teacher or a student free of charge.

Benefits of utilizing GitHub Copilot for Education:

  • Improved learning experience by offering assistance, instant code suggestions, and feedback.
  • Enhanced productivity when writing code thanks to artificial intelligence.
  • It incentivizes students to write clean and readable code, thus improving overall code quality.
  • Copilot supports most of your favorite programming languages.
  • It helps students avoid bad programming practices.

How do I get GitHub Copilot with a student account?

1. Verify your student account

  1. Visit the GitHub Student Developer Pack page. After doing that, click on Get your pack.
     
  2. Select Get student benefits button.
  3. Enter your school email address and information on how you plan to use GitHub.
  4. For the next step, you might be asked to upload a photo of your student ID or any other valid document.
  5. You might have to wait for a few hours for your documentation to be verified.

2. Sign up for GitHub Copilot

  1. Make sure that you have a verified student account.
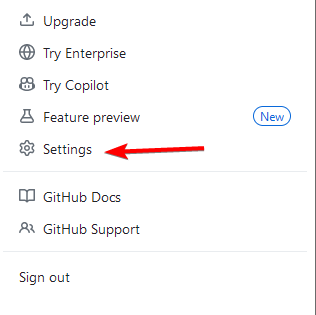
  2. To go Profile Settings page on your GitHub account.
  3. Now select Copilot in the left pane.
  4. Follow the instructions on the screen to sign up with your student account.
  5. After signing up, you just need to install the GitHub extension in Visual Studio Code or your code editor of choice.

How do I get GitHub Copilot free for teachers?

To get GitHub Copilot as a teacher, the process is almost exactly the same as for students. Sign up for the Student Developer Pack as a teacher, verify your teacher account, and that’s it.

How long does the GitHub Copilot Education pack last?

  • The Student Pack lasts for two years.
  • It can be renewed at any time if you’re still studying.

Getting the GitHub Copilot Education version is incredibly simple, and you need a valid student or teacher account in order to obtain it.

GitHub Copilot has another variant for organizations and enterprises, GitHub Copilot for Business; to know more, read this guide.

If you’re studying programming, this is one of the best education software you can use. Of course, the tool is available for other purposes, and we have a great guide on how to enable Copilot in Outlook.

This isn’t the only tool available for teachers, and we wrote about the best Windows 11 editions for teachers in one of our earlier guides.

If you want to know how to add and use GitHub Copilot on Visual Studio 2022, read this guide for detailed instructions.

Have you tried Copilot yet? Share your thoughts on it in our comments section.

Windows 11 Keeps Chiming? Stop it in 8 Steps

Staying productive can be hard, especially when you keep hearing chiming sounds on your Windows 11. You might be working on something important, but you will have to keep stopping to check if the notification refers to something important or not.

The worst-case scenario is when they keep coming at the most inopportune times and you don’t understand where they’re coming from. If this sounds familiar, this post is for you.

Why does Windows 11 keep making constant notification sounds?

  • Faulty drivers – This can happen if you download drivers from unofficial sites.
  • Problematic update – If the problem started right after updating your OS, it’s possible the Windows update was full of bugs.
  • Faulty hardware – If your speakers beep randomly, they’re probably damaged.
  • Virus infection – A virus that found its way to your PC can have such effects because it changes how it functions.
  • Antivirus software – If your antivirus software is continuously running, it may keep making notification sounds when done.

How do I stop Windows 11 from constantly chiming?

First off, start with the following preliminary steps:

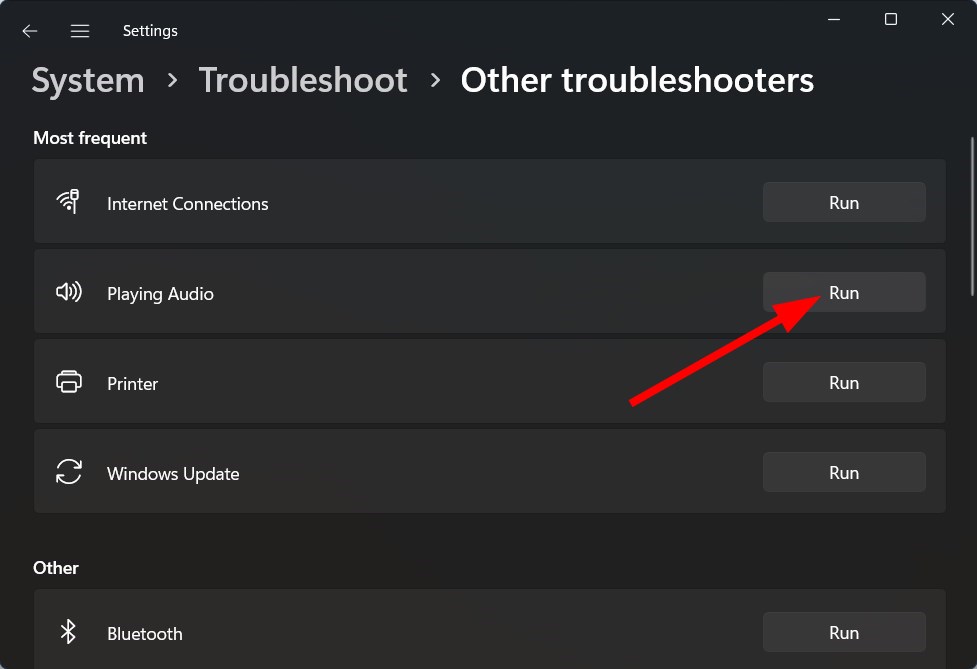
1. Run the audio troubleshooter

  1. Hit the Windows key and click on Settings.settings windows 11
  2. Click on System then select Troubleshoot.Open system troubleshooter
  3. Select Other troubleshooters.other troubleshooters
  4. Hit the Run button next to Playing Audio.

2. Scan for viruses

  1. Click on the Start Menu icon, search Windows Security, and click Open.
  2. Select Virus & threat protection.
  3. Next, press Quick scan under Current threats.
  4. If you don’t find any threats, proceed to perform a full scan by clicking on Scan options just below Quick scan.Scan options
  5. Click on Full scan, then Scan now to perform a deep scan of your PC.Full Scan Scan Now
  6. Wait for the process to finish and restart your system.

3. Run a DISM and SFC scan

  1. Hit the Start Menu icon, type cmd in the search bar, and click Run as administrator.cmd-run-admin-w11 unexpected kernel mode trap windows 11
  2. Type the following commands and press Enter after each one:DISM.exe /Online /Cleanup-Image /Restorehealth sfc /scannow

You can also opt for specialized software if DISM and SFC scans can’t detect all malfunctioning system files that are causing this error.

4. Rollback previous audio driver

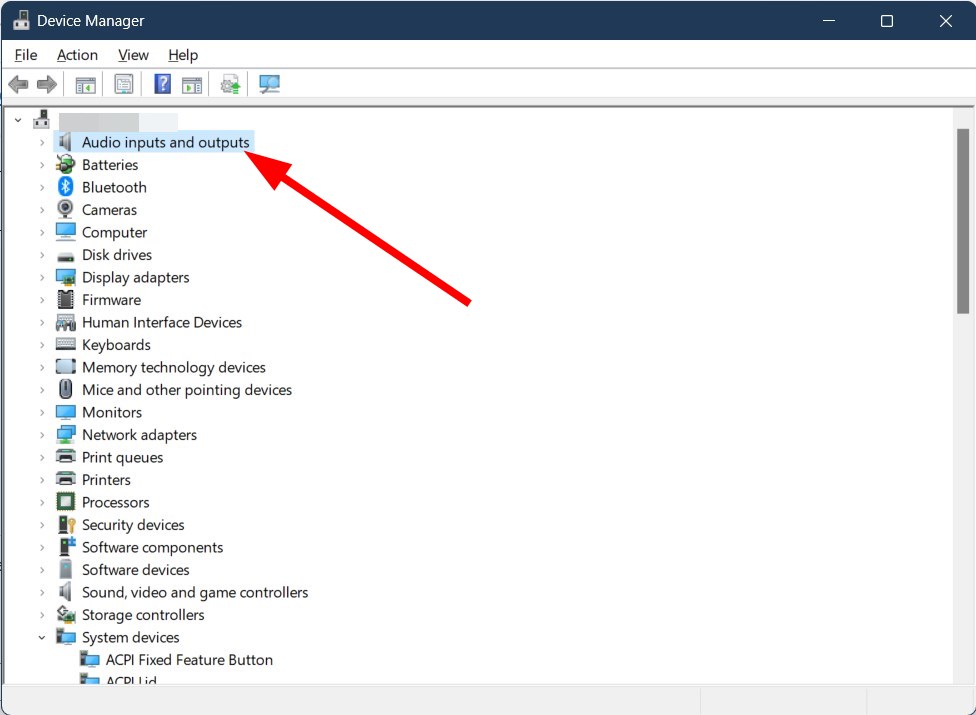
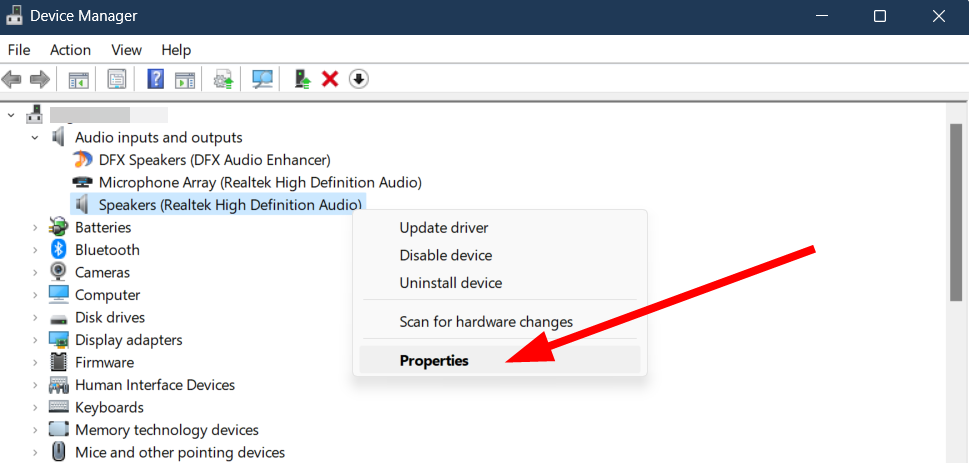
  1. Hit the Windows key, type Device Manager, and click Open.device manager w11
  2. Expand the Audio inputs and outputs section.
  3. Right-click on your audio driver and select Properties.
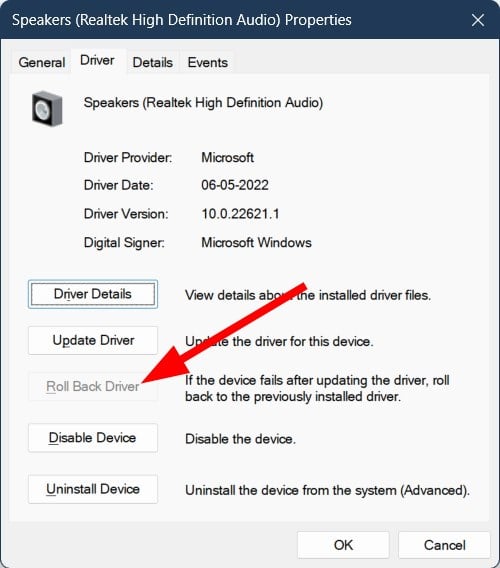
  4. Hit the Roll Back Driver button.

5. Uninstall recent Windows update

  1. Hit the Windows key and select Settings.settings windows 11
  2. Click on Windows Update and select Update history on the right pane.update-history restart to repair drive errors
  3. Scroll down, and under Related settings, click on Uninstall updates.uninstall-updates-w11 computer-recognize-logitech-unifying-receiver
  4. This will take you to the most recent installed updates.
  5. Select the topmost update and click on Uninstall.uninstall-update-latest computer-recognize-logitech-unifying-receiver
  6. Restart your PC and check if the problem persists.

Faulty Windows updates can sometimes cause problems with your audio. For instance, your speakers may produce a high pitched sound because the latest update interfered with your audio drivers.

6. Disable your antivirus temporarily 

  1. Hit the Windows key, type Windows Security in the search bar, and click Open.
  2. Click on Firewall & network protection, then select Public network.league of legends black screen after champion select
  3. Locate Microsoft Defender Firewall and toggle the off button.turning off Microsoft Defender Firewall Windows

7. Perform a clean boot

  1. Hit the Windows key, type msconfig, and open System Configuration.
  2. Switch to the Services tab and select Hide all Microsoft services.
  3. Click on the Disable all button, then hit the Apply button to save the changes.
  4. Go back and click on the Startup tab, select Open Task Manager then click OK.
  5. In the Startup tab of the Task Manager, Disable all the Enabled startup items.
  6. Close Task Manager and restart your PC.

8. Perform a System Restore

  1. Press the Windows + R keys, type rstui, and hit Enter.
  2. The System Restore window will open. Click on Next.
  3. Select the restore point you wish to revert to and click on Next.
  4. Now click on Finish.

How do I permanently turn off all notification sounds on Windows 11?

  1. Hit the Windows key and click on Settings.settings windows 11
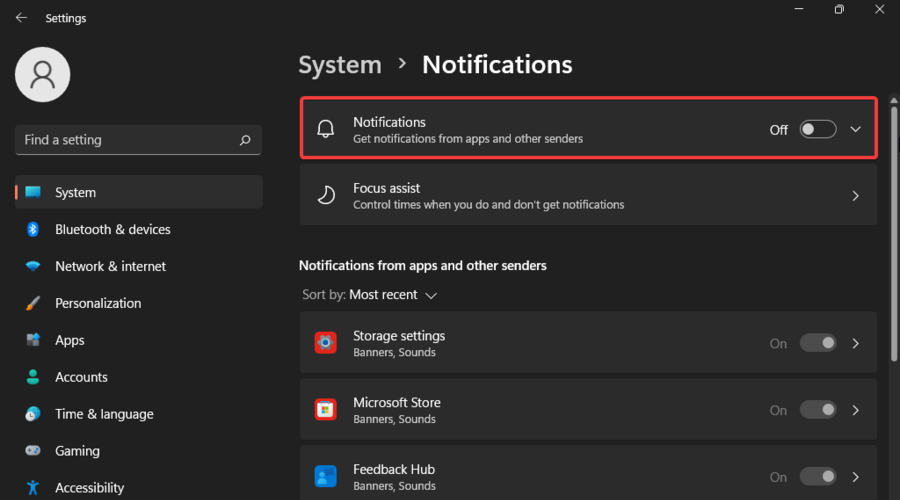
  2. Click on System then select Notifications.
  3. Toggle off the Notifications option.

Whenever you’re ready, you can reverse-engineer these steps to turn them back on.

Disabling all your notifications may give you peace of mind, but you may also miss out on important stuff. It is advisable to turn off notifications for that particular app causing problems and keep the rest.

Better yet, if it’s the notification sound that is annoying, you can easily change your notification sound to one that is more subtle to avoid distractions.

Still, in some rare cases, all these steps may prove futile. As a last resort, you may have to perform a clean install of your Windows OS.

We’d love to hear from you so let us know which one of these methods put an end to the chiming in the comment section below.

Xbox Free Play Days: Tiny Tina’s Wonderlands and The Sims 4 Cats & Dogs bundle

This week’s Xbox Free Play Days event features a pair of exciting games for subscribers of Xbox Game Pass Core and Xbox Game Pass Ultimate to try out free of additional charge. These will be available from Thursday through Sunday, September 17.

Tiny Tina’s Wonderlands

A world of whimsy, wonder, and high-powered weaponry awaits as the unpredictable Tiny Tina takes you along for the ride across her greatest Bunkers & Badasses campaign yet. Forge a highly customizable Fatemaker then embark on a quest to defeat the villainous Dragon Lord. Slay evildoers using a wildly diverse arsenal of guns, spells, and melee weapons, combined with the might of the Multiclass system that lets you harness the power of two unique classes! Get 67% off Tiny Tina’s Wonderlands and Tiny Tina’s Wonderlands: Next Level Edition from September 11, 5:00pm PT to September 26, 3:00am PT.—Xbox Wire.

The Sims™ 4 Cats & Dogs

Create a variety of cats and dogs, add them to your Sims’ homes to forever change their lives, and care for neighborhood pets as a veterinarian with The Sims 4 Plus Cats & Dogs Bundle. The powerful new Create A Pet tool lets you personalize cats and dogs, each with their own unique appearances, distinct behaviors, and – for the first time – expressive outfits! These wonderful, lifelong companions will change your Sims’ lives in new and special ways. Treat animal ailments as a veterinarian and run your own clinic in a beautiful coastal world where there’s so much for your Sims and their pets to discover.—Xbox Wire. 

Learn more about Xbox Free Play Days

Xbox Free Play Days is a perk of Game Pass Core (formerly Xbox Live Gold) and Ultimate tiers. Nearly each week there is a new lineup of game for members to try out. It’s a great way to try something new and maybe even find a new favorite. Learn more about the program over on the Xbox Free Play Days FAQ page.

Featured image via Xbox Wire. 

The big September Nintendo Direct showcase and what it means for Xbox

Nintendo just streamed its big September Nintendo Direct, unloading a slew of new game announcements for the remainder of this year and heading into 2024. Below are just a couple highlight from the event.

Princess Peach Showtime features fun transformations and a release date
Princess Peach: Showtime!

As mentioned, this is only a taste of the many exciting announcements from the September Nintendo Direct. But what does this mean for Xbox?

Well, most immediately it means some pretty strong competition for the fall and winter, and going on into 2024. That said, Xbox is in a pretty strong position right now with the recent release of Bethesda’s space roleplaying juggernaut Starfield.

And don’t forget that many other big-name releases are on the horizon: Payday 3, Lies of P, Mortal Kombat 1 and of course Forza Motorsport. The excitement from July’s Xbox Games Showcase can’t be discounted here. As the most-watched Xbox showcase ever, 2023’s event exceeded expectations and was jam-packed with exciting games.

As for the Nintendo Direct, it’ll be interesting to see how these upcoming Nintendo titles do as more info on the Switch successor takes shape in the months to come.

Featured image via Gameshub. 

New security feature added to Windows 11 Insider Preview to prevent password-cracking attacks

Microsoft has released Windows 11 Insider Preview Build 25951 (Canary), incorporating advanced security measures to counteract password-cracking crimes. A noteworthy upgrade will enable administrators to impede New Technology Lan Manager (NTLM) over Server Message Block (SMB), a traditional file-sharing protocol. The large-scale strategy aims to eliminate NTLM usage throughout Windows completely.

NTLM, a legacy protocol no longer deemed secure, can be a significant security vulnerability. Prevention of this via SMB client prohibiting NTLM facilitates secure remote outbound connections. The goal is to protect users’ hashed passwords from being circulated to an external server, the tech giant announced in a blog post.

With this new option, an administrator can intentionally block Windows from offering NTLM via SMB. An attacker who tricks a user or application into sending NTLM challenge responses to a malicious server will no longer receive any NTLM data and cannot brute force, crack, or pass hashes. This adds a new level of protection for enterprises without a requirement to entirely disable NTLM usage in the OS.

Enabling these safety measures doesn’t mean that NTLM usage needs to be entirely disabled. It gives our enterprise customers access to increased protection,

Plans are underway for further protective enhancements in upcoming Windows Insider releases. The company seeks to empower administrators with the ability to control SMB NTLM blocking for specific servers using an “allow list.” This strategy aims to provide defenses not only against password-cracking attacks but also pass-the-hash attacks and NTLM relay attacks.

Previously, tech experts had raised concerns about NTLM’s susceptibility to pass-the-hash and relay attacks. These types of cyber-attacks can happen when a malicious user gets unauthorized access by successfully guessing the hash value, a unique value derived from hashing a user’s password.

The new security feature is decisive evidence of a larger game plan by Microsoft to end NTLM usage throughout Windows. Keep an eye out for further announcements, as there have been indications of more comprehensive changes in line with this strategy in the coming weeks. In a cybersecurity climate that often seems on edge, this intentional focus on safety delivers much-needed reassurance.

Windows 11: Microsoft Edge tests AI-writing with powerhouse duo, ChatGPT and Bing AI

In an era when technology continues evolving at mind-boggling speeds, Microsoft is testing a new feature slated to transform how we write content online. With a simple click, the all-new AI writing tool embedded in Microsoft Edge could shift our methods of interacting with text.

The feature, powered by next-generation GPT-4 technology and Bing AI, can copy text on a webpage and reproduce the information in a more tailored, personal tone. Windows Latest reports indicate that users will be able to customize the tone to suit their preference – whether professional, casual, enthusiastic, or informational.

The result? A digital experience uniquely tailored to every user’s personal style or business needs. But it doesn’t stop at tonality. The AI tool is also designed to rearrange the text in various format options. Users can opt for a standard structured paragraph, an appealing blog post layout, or even an email format.

Incorporating this feature directly into the browser means the tool will be easily and rapidly accessible to a wider user base. In the current testing phase, the Redmond-based tech giant has engaged a handful of users in the Canary version of Chromium Edge.

We are keenly waiting for further announcements regarding when this feature will officially be incorporated into Microsoft Edge.

Why is this feature important?

With this update, a wider audience will be empowered to delve into blog writing. For those who may feel timid about publishing faultless copy, the AI-powered tool could be a godsend. Furthermore, it becomes an invaluable asset during research or brainstorming sessions, providing a springboard for new ideas. And say goodbye to penning tedious yet essential emails – let the tool do the heavy lifting.

On the flip side, the AI tool, being web-integrated and fed by text available on the internet, could present a challenge with plagiarism detection, underlining the need for careful monitoring and ethical use.

In conclusion, we are at the forefront of an AI writing revolution, and Microsoft Edge is paving the way with its GPT-4 powered tool. Could a new era of personal communication be on the horizon? Only time will tell.

EU may file formal complaint against Microsoft Teams’ bundling, despite latest efforts

Microsoft is facing a series of antitrust investigations and complaints from various entities within the European Union, which suggests increasing scrutiny of its regional business practices. The European Union has been investigating Microsoft’s behavior related to its Teams app and other services.

EU Prepares Complaint Over Microsoft’s Teams App

Microsoft’s video-conferencing app, Teams, has caused problems with the European Union. The EU’s antitrust enforcers are upset with Microsoft’s behavior and ready to complain officially. Microsoft tried to solve the issue by offering Teams separately, but the EU wasn’t impressed. According to the Bloomberg report:

Microsoft’s recent proposal to split its Teams from a broader business software package and sell it to customers separately with an annual discount wasn’t enough to satisfy regulators’ concerns, according to people familiar with the matter, who spoke on condition of anonymity.

The European Commission is preparing a statement of objections to send to the company, which could come in the next few months, the people said.

EU investigates Microsoft for Teams Bundling

Microsoft is also facing other complaints filed with EU regulators, including one from a European cloud group that includes Amazon.com Inc.’s AWS as a member, which says that Microsoft is not fair when licensing its cloud infrastructure. Another complaint filed by German cloud platform NextCloud GmbH in 2021 is about Microsoft bundling its OneDrive cloud system with Windows. Microsoft announced that it will unbundle Teams from its Microsoft 365 and Office 365 suites in the European Economic Area (EEA) and Switzerland. 

Digital Antitrust Investigation

Additionally, Microsoft is under investigation by the EU’s digital antitrust regulators, who are assessing whether its Bing, Edge, and Advertising services should fall under the scope of the bloc’s Digital Markets Act, which outlines regulations for major tech companies.

via Bloomberg (paywalled)

Microsoft 365 faced 9th outage in the past 8 months

Microsoft Teams was down yesterday as it was failing to send and receive messages. Microsoft has acknowledged the issue with Microsoft Teams through their official status handle on Twitter and provided specific information about the problem.

Microsoft 365 has experienced several outages over the past eight months, causing disruptions for its users. These outages have affected various Microsoft 365 services, including Teams, Outlook, OneDrive for Business, and SharePoint.

  1. January: Microsoft experienced an outage, affecting email and Teams access.
  2. February: Another global outage occurred, disrupting email and Teams access.
  3. April (first incident): Users faced issues accessing Microsoft 365 web applications and Teams.
  4. April (second incident): Microsoft investigated a search functionality issue in multiple Microsoft 365 services, including Outlook on the Web, Exchange Online, SharePoint Online, Microsoft Teams, and Outlook desktop clients.
  5. May: The company reported issues with UK users accessing some service offerings under Microsoft 365.
  6. June: Users experienced issues with Outlook Web, Teams, OneDrive for Business, and SharePoint for over eight hours.
  7. July: Exchange Online outage preventing customers from sending emails and triggering 503 errors on affected systems.
  8. Last month, Microsoft faced a data center outage in Australia, attributed to staffing and automation problems.

Multiple incidents within a short period and spikes in reports suggest Microsoft 365 outages have seemingly significantly impacted users and businesses. Microsoft must address these issues promptly and improve infrastructure resilience to prevent future disruptions. Users and organizations should consider implementing backup and contingency plans.

via ComputerWorld

How to Change the Title Bar Color on Windows 11

By default, the title bar color on Windows 11 depends on your selected dark/light theme. However, you can change it to any color you want.

This guide will discuss step-by-step instructions for three methods to change it and personalize your desktop experience, making it visually appealing.

Can I change the title bar color for active and inactive windows? 

Yes, you can change the title bar color for an active window using the Settings app and for an inactive window using the Registry Editor. To know the steps, move to the next section.

How do I change the color of my title bar in Windows 11?

1. Using the Settings app

  1. Press Windows + I to open the Settings window.
  2. Go to Personalization, then click Colors.Personalization, then click Colors - Change the Title Bar Color on Windows 11
  3. On the Colors settings page, locate Show accent color on title bars and windows borders and toggle on the switch next to it to activate it.Show accent color on title bars and windows borders and toggle on
  4. Select any of the colors from the Windows colors option.
  5. If you want more colors, go to Custom colors, and click the View colors button.Custom colors, and click the View colors
  6. Use the slider to select the custom color and click Done.custom color and click Done.

This method will only change or show the color of the title bar and window border of a currently active window.

2. Using the Registry Editor

  1. Press Windows + R to open the Run dialog box.Regedit RUN COMMAND Change the Title Bar Color on Windows 11
  2. Type regedit and click OK to open the Registry Editor.
  3. First, create a backup; for that, go to File, then click Export and save the .reg file to an accessible location.Export registry files
  4. Navigate to this path: Computer\HKEY_CURRENT_USER\Software\Microsoft\Windows\DWM
  5. Locate ColorPrevalence, double-click it, ensure the Value data is 1, and click OK to confirm.regedit_ColorPrevalence, double-click it, ensure the Value data is 1, and click OK to confirm.
  6. Right-click DWN, select New, then click DWORD(32-bit) Value and name it AccentColorInactive.DWN, select New, then click DWORD(32-bit) Value
  7. Now double-click AccentColorInactive, paste the hexadecimal code for a desired color under Value data, and click OK. For example, I want the inactive window’s title bar to be magenta in color, so I will paste FF00FF as the Value data.regedit_inactive window color change title bar windows 11
  8. Restart your computer to save the changes and enable the colored title bar for inactive windows on your computer.

In case you want to customize it further, you can add an option to display the current time in the app title bar. To know how to do it, read this guide.

3. Using a third-party app

In case you are not confident about tweaking the registry entries, try using a third-party app for title bar customization on Windows 11.

  1. Download the Winaero Tweaker software, right-click the winaerotweaker.zip file, and select Extract All from the context menu.
  2. Select Show extracted files when complete and click Extract. Now double-click the WinaeroTweaker-1.55.0.0-setup.exe to initiate the installation. Follow the onscreen instructions to complete the process.Extract the app - Change the Title Bar Color on Windows 11
  3. Launch the Winaero Tweaker app from the desktop, locate Appearance from the left pane, and expand it.WinaeroTweaker_change the color for inactive titlebar Windows 11
  4. Click Inactive Title Bars Color, and on the right pane, select the box next to Current color.
  5. Choose a color and click OK.Choose color
  6. You can also click Define Custom Colors, select the color from the slider, and click Add to Custom Colors.WinaeroTweaker_Select custom color
  7. Next, select the desired color from the Custom colors section, and click OK.

For this method to work, you must always keep the Show accent color on title bars and windows borders settings from the Settings app enabled.

Why is the Windows 11 title bar color not changing?

  • Theme settings – If you have selected a high-contrast theme, it can bypass the accent settings, so to correct that, go to Settings>Personalization> Themes, & choose a theme that supports accent customization.
  • Misconfigured accent color settings– Ensure the Show accent color on title bars and windows borders option is enabled.
  • Third-party software conflict – If you are using some software to personalize your Windows desktop experience, it might interfere with the accent color settings. To fix it, uninstall the app.
  • Corrupted system files – The system files related to the appearance when corrupted could cause this problem. To fix it, press Windows,>type cmd>click Run as administrator>type sfc /scannow and press Enter.

Users who want clearer text visibility on the desktop can also explore this guide on how to change the desktop font color, which helps improve readability alongside title bar and accent color adjustments.

Remember that you won’t see the window title bar color change in File Explorer, Edge, Command Prompt, Settings, Word, Excel, etc., as they have custom ones that don’t change color based on accent color settings.

In case you want to change the taskbar color on Windows 11, read this post to know the detailed steps.

If you have any questions or suggestions related to the subject, please mention them in the comments section below.

Microsoft Viva says goodbye to 365, to be accessed on Viva Home

Microsoft Viva will have a new home, Viva Home, starting December 2023, according to a new entry in the Microsoft 365 Roadmap.

Viva Home is the home for the Viva suite on the web. Accessible via microsoft365.com app launcher and app explorer, it provides a single landing destination on the web for Viva users with the goal to help with education, discovery and navigation to licensed Viva modules.

You’ll be able to access Viva Home via microsoft365.com app launcher and app explorer, still, and it will provide a unified destination for the Viva Suite on the web.

For now, the rollout is scheduled to take place in December 2023, but Microsoft doesn’t say how long it will last. However, the feature will be generally available everywhere.

Viva Home: The Viva suite on the web

It’s important to note that you’ll be able to use Viva Home to access all the Microsoft Viva suite on the web in one single place, without having to cross from one panel to the other.microsoft viva home

While Microsoft doesn’t go into too many details, Viva Home will most probably be designed with simple navigation in mind. The landing page will most probably offer you all you need to know, and then it will guide you to the tools you need to focus on your work.

Since it’s a web-based platform, Viva Home will most probably integrate more web-based features, such as Teams Chats, OneDrive capabilities, and even Copilot, to a degree.

This way, you’ll be able to access it from your device anywhere, and Viva Home will also make it possible for you to be mobile with your work. Since it’s a web-based platform, as long as you have a proper Internet connection, you won’t have to worry about not knowing where you start.

It will all be there, on one single web page.

Are you excited about Viva Home? Do you think it will be better than the current layout or not?

How to Download & Use Offline Maps on Windows 11

If you are an adventurer, hiker, or person often traveling to remote places, you might want to download the offline maps of a specific region on your Windows 11 in advance.

In this guide, we will discuss step-by-step instructions to download and use them via the Windows 11 Maps app when the network fails you.

There are several benefits of using offline maps:

  • Saves data, useful for people with limited data plans.
  • Gives access to maps when you don’t have an active internet connection.
  • Helps you explore places in areas with no cell service.
  • Plan your route before starting the journey.

How do I download offline maps in Windows 11?

  1. Press Windows + I to open Settings.
  2. Go to Apps, then click Offline maps.Apps - Apps - Offline maps - Windows 11
  3. Locate Maps and click the Download maps button.Download Map
  4. Next, select a Continent from the list.Select the continent - offline maps Windows 11
  5. Select a country from the list of countries and click Download.
  6. Also, to get automatic updates for maps, go to Map updates, then select the Update automatically when plugged in and on Wi-Fi option.Update automatically when plugged in and on Wi-Fi’

To download the maps using a metered connection, on the Offline maps page, locate the Metered connection and toggle on the switch, then follow steps 3 to 5.

How do I use offline maps in Windows 11?

  1. Press the Windows key, type maps in the search box, and click Open to open the Windows Maps app.Open Maps to use offline maps Windows 11
  2. In the Windows Maps app, locate the search box in the left corner, and type in the name of the city or place on your downloaded map, then click Get Directions.Get directions
  3. You can also search for individual locations on the map to get step-by-step directions.

In case the Windows Maps app is not working for you, you can download Google Maps on your PC to get the directions.

Where does Windows save offline maps?

The downloaded maps are usually stored in your system drive, however, you can change the location to ensure there is enough space. To do that, open Settings>Apps>Offline maps>Storage location, and select the drive from the list.

With offline maps, you can explore the world without any limits even when your Google Maps is facing problems. You can also use offline maps on Google Maps alternatives.

However, don’t forget to ensure the storage drive selected has enough space and delete the ones you no longer need.

To remove the downloaded maps you don’t need, go to Offline maps, locate the map, and click the Delete icon.

Which offline maps have you downloaded lately? Feel free to mention them in the comments section below. We would love to know!

Xfinity Error 500: How to Quickly Fix it

Long gone are the days of downloading video content as streaming apps come by and have been making it easy for users. Xfinity is one of these programs, and while it works well most of the time, an error 500 may appear on your screen, putting your enjoyment on hold.

If you’re lucky, a simple restart of your TV or device will resolve it, but if not, you can try more solutions that don’t require a lot of technical know-how.

What is error code 500 on the Xfinity Stream app? When the Xfinity Stream app is not working or throwing such errors, it is most likely a server error that can occur for several reasons. The most common is that the server is temporarily unavailable or overloaded with requests.

It can also occur if your internet connection has been interrupted or randomly disconnects and reconnects again. If your internet had issues, it probably interfered with the signal strength, and you’ll encounter the Comcast code 225 error.

How do I fix error 500 on Xfinity?

Before you embark on the multiple-step solutions, try the following basic workarounds:

  • Verify that your device meets the minimum system requirements to run the Xfinity app.
  • Check your internet connection speeds and ensure they are optimal for streaming.
  • Power cycle your modem or router and switch to an Ethernet cable.
  • Update your router firmware or try with another Internet connection if available.
  • Check your firewall settings and ensure it’s not blocking any connections, then restart your device.

1. Update your Xfinity app 

  1. Open the Google Play Store app on your TV or Roku device.
  2. Click on the three ellipses at the top right corner.
  3. Select My Apps.
  4. Scroll to the Xfinity app and click Update if an update is available.

2. Clear Xfinity app cache

  1. Press the Xfinity button on your remote.
  2. Click on the gear icon and press OK to go to Settings.
  3. Scroll to Privacy and press OK.
  4. Locate Locally stored data and press OK.
  5. Press OK to clear locally stored data.

Clearing the cache also helps with the XRE-03059 Xfinity error.

3. Update your OS

  1. Hit the Windows key and click on Settings.settings windows 11
  2. Click on Windows Update then select Check for updates.check-updates-w11 windows 11 blue screen
  3. Select Download & install if available.download and install option in the settings

If you’re using a TV, also ensure to check for any firmware updates.

4. Disable your firewall temporarily

  1. Hit the Start menu icon, type Windows Security in the search bar, and click Open.
  2. Click on Firewall & network protection, then select Public network.league of legends black screen after champion select
  3. Locate Microsoft Defender Firewall and toggle the off button.turning off Microsoft Defender Firewall Windows

5. Reset your Network

  1. Click on the Start Menu icon and click on Settings.settings windows 11
  2. Navigate to Network & internet.
  3. Select Advanced network settings.going advanced network settings win11
  4. Click on Network reset.Network Reset 1
  5. Next, hit the Reset now button.Network Reset now

6. Reinstall the Xfinity app

  1. Open the Google Play Store app on your TV or Roku device.
  2. Click on the three ellipses at the top right corner.
  3. Select My Apps.
  4. Scroll to the Xfinity app and click Uninstall.
  5. Now go back and click Install.

Errors 500 and the TVAPP 00100 error on Xfinity that restrict your streaming are common but can be easily solved following the steps above. Remember, the Xfinity service is parent to other apps, and if it’s having issues, you may also encounter problems like the Adult Swim app not working.

If you’ve been having trouble with your Xfinity account, we hope the above guide has helped you discover and resolve the root of the problem.

For any follow-up questions or if you have something you’d like to add, please don’t hesitate to hit up the comments section below.

How to Safely Perform a Clean Boot on Windows 11

A clean boot on Windows 11 is a method in which your Windows boots up with a minimal set of drivers and essential startup programs to help you identify if a background program is interfering with your app.

In this guide, we will discuss step-by-step instructions to restart your Windows 11 computer in a clean boot environment.

Some of the benefits of performing a clean boot on Windows 11 are:

  • Determine & troubleshoot software conflicts.
  • Fixes performance issues like slow boot, high CPU usage, and frequent crashes.
  • Identifies and fixes startup problems
  • Stops unnecessary programs from running in the background and consuming system resources.
  • Helps improve security & stability.

How can I do a clean boot on Windows 11?

  1. Press Windows + R to open the Run dialog box. Step 1 type msconfig clean boot windows 11
  2. Type msconfig and click OK to open System Configuration.
  3. On the System Configuration window, go to the Services tab, place a checkmark next to Hide all Microsoft services, and click Disable all.  This will ensure only non-Microsoft services are disabled.Clean boot Disable all
  4. Switch to the Startup tab and click the Open Task Manager link.Open task Manager Clean boot
  5. On the Task Manager window, for each Enabled item, select them and click Disable. Remember all the startup items you have disabled; so that you can turn them back on later.Disable startup items
  6. Close Task Manager.
  7. On the System Configuration window, click Apply, then OK.CLEAN BOOT 5 clean boot windows 11
  8. Click Restart to reboot your computer in clean boot on Windows 11.Restart clean boot Windows 11

What is the difference between clean boot and Safe Mode?

When comparing Safe mode vs. Clean boot, they are both diagnostic modes used in Windows to troubleshoot issues. They are similar but used for different purposes.

Safe Mode shuts down everything except the things necessary for Windows to start, including the core services, processes, and essential drivers. It is used for hardware, driver, and software-related issues.

On the other hand, Clean Boot on Windows 11 assumes that Windows is not the problem and doesn’t disable anything related to Windows; it disables third-party services and startup programs to help you identify the root cause of app-related errors.

You can enter safe mode using System Configuration, Boot menu, and Command Prompt; however, you can only access a clean boot environment through System Configuration.

How do I disable clean boot in Windows 11?

To return to normal boot and turn off the clean boot, reverse engineer the above steps and restart your computer.

Remember that you should only boot your PC into this mode when you want to troubleshoot performance issues or software conflicts and for a short period.

Also, don’t forget to boot your system back to normal startup to enjoy the full functionality of your Windows computer.

If you discover the problem is not related to third-party software but a Windows issue, you must enter the Recovery mode to troubleshoot further.

Do you know any other method for entering a clean boot environment? Feel free to mention it in the comments section below. We will add it to the guide.

How to Completely Disable or Uninstall Phone Link on Windows 11

While Phone Link might be a useful feature, many want to disable Phone Link on Windows 11 because they don’t use it or because it tends to send notifications too frequently.

Disabling this feature is simple, and it can be done with just a couple of clicks. In today’s guide, we’re going to show you several different ways to do it.  

1. Use the Settings app

  1. Press the Windows key + I to open the Settings app.
  2. Navigate to Bluetooth & devices and click on Phone Link.
  3. In there, set the Phone Link to Off.

Keep in mind that this feature is available in Windows 11 build 23511 (Dev) and newer.

2. Modify the registry

  1. Press the Windows key + R and enter regedit.
  2. Navigate to the following path in the left pane: HKEY_CURRENT_USER\Software\Microsoft\Windows\CurrentVersion\Mobility
     
  3. In the right pane, double-click PhoneLinkEnabled DWORD.
  4. Set its Value data to 0 and click on OK.

3. Use Group Policy Editor

  1. Press Windows key + R and enter gpedit.msc.
  2. Navigate to the following path: Computer Configuration\Administrative Templates\System\Group Policy​
     
  3. In the right pane, locate the Phone-PC linking on this device and double-click it.
  4. Set it to Disabled and click on Apply and OK to save changes.
  1. Open the Phone Link and click on the Cog icon in the top-right corner.
  2. Next, choose General.
  3. Disable the Start Phone Link when I sign in to Windows.

2. Use the Settings app

  1. Open Settings app.
  2. Go to Apps and select Startup.
  3. Locate the Phone Link and set it to Off.

3. Use Task Manager

  1. Press Ctrl + Shift + Esc keyboard shortcut to open Task Manager.
  2. Go to the Startup tab.
  3. Right-click the Phone Link and choose Disable from the context menu.

 Use PowerShell

  1. Press Windows key + S, type powershell in the search box and select Run as administrator.
  2. Run the following command: Get-AppxPackage Microsoft.YourPhone -AllUsers | Remove-AppxPackage
  3. Wait for the process to uninstall the Phone Link.

If you don’t use Phone Link for iPhone or Android, the best way to disable it is right from the app settings. More advanced users can use Group Policy or Registry Editor. Keep in mind that disabling the app won’t unlink the phone from Windows 11.

Phone Link (formerly known as Your Phone) lets you connect your phone to your Windows PC. It facilitates features like viewing text messages on your PC, getting calls on your PC, using your smartphone camera as a webcam, and accessing & managing your phone files.

Whether you need it or not depends on whether you often transfer files between your phone and PC, like accessing your phone’s texts and other apps through your computer and share screens between these devices.

You can explore an alternative that handles calls, messages, mirroring, and transfers through your PC by checking how to use Dell Mobile Connect for a different way to link your phone with Windows.

Yes, uninstalling Phone Link from your PC is completely safe.

Even though it’s a Microsoft app bundled within the OS or added through an update, it’s non-essential. Removing it won’t affect any process on your PC, nor will it impact performance.

It’s important to mention that this software has its share of issues and many reported that Phone Link app notifications are not working as well as PhoneExperienceHost.exe high CPU usage.

Do you use Phone Link or do you keep it disabled? Let us know in the comments!

How to Crop an Image on Windows 11 [5 Ways]

So you have the perfect picture but want to shave off the edges or bring it more to focus. Well, Windows 11 gives you endless options to crop an image to precision with its built-in tools.

The process is pretty straightforward and shouldn’t take too much of your time, as you shall see below.

How do I crop an image in Windows 11? 

1. By using the Snipping Tool

  1. Click on the Search bar, type Snipping Tool, and click Open.
  2. Next, click on the three ellipses at the top right corner and select Open file.
  3. Select a folder containing the image you wish to crop.
  4. Click on the crop icon, then drag the box to your preferred crop size.
  5. Hit the tick icon when done.
  6. Hit the Save as icon to keep an original of the file.

If these steps seem too lengthy, you’ll be happy to know that the Windows + Shift + S keys shortcut combination will achieve the same results. You just have to open your image first.

2. By using the Photos app

  1. Click on the Search bar, type Photos, and click Open.
  2. Double-click on the image you wish to crop and click on the Edit image icon.
  3. Click on the crop icon, drag the box to desired crop size then hit Save as copy.

3. By using the Paint app

  1. Click on the Search bar, type Paint, and click Open.
  2. Navigate to File>Open, then select the image you wish to crop.
  3. Go to the image tab, click on the rectangular icon, and in the drop-down menu select Rectangle.
  4. Crop your image to your desired size, then hit the crop icon or click CTRL + Shift + X.
  5. Click on File, select Save as, and give your cropped image a name.

4. By using the Paint 3D app

  1. Hit the Windows + E keys to open File Explorer.
  2. Locate the image you wish to crop, right-click on it, and select Open with>Paint 3D.
  3. Click the crop icon and adjust the area to get your desired size.
  4. Hit Done when finished.
  5. Click on Menu, select Save as, and give your cropped image a new name.

Paint 3D is similar to the Paint app only with advanced features.

5. By using the Print Screen feature

  1. Hit the Windows key and click on Settings.
  2. Click on Accessibility, then select Keyboard.
  3. Toggle on the Use the print screen button to open screen snipping option and restart your PC.
  4. Hit the Windows + E keys to open File Explorer, locate the image you wish to crop, then double-click to open.
  5. Next, hit the PrtScSysRq button on your keyboard to crop your image.

What are some alternatives to cropping pictures on Windows 11?

1. Clipchamp

  1. Download the Clipchamp app from the Microsoft Store if you haven’t already.
  2. Hit the Windows + E keys to open File Explorer, locate the image you wish to crop, and drag and drop it to Clipchamp.
  3. Select the fit-to-frame or freehand-crop option.
  4. Once satisfied with your cropped image, click on the tick on the left of your image to effect the changes.
  5. To save your image, click on Export.

Another advantage of using Clipchamp is that you can also crop videos on Windows 11, so you don’t have to download separate apps for these tasks.

2. IrfanView

  1. Go to your Microsoft Store and download IrfanView.
  2. Hit the Windows + E keys to open File Explorer, locate the image you wish to crop, select Open with then choose IrfanView.
  3. Click on Edit, then select Crop selection (Cut out).
  4. Adjust the selection area to your desired crop size then hit File>Save as.

Learn the essentials in this guide to IrfanView as an image editor before you start cropping.

3. ShareX

  1. Download the ShareX app from the Microsoft Store.
  2. Click on the Upload>Upload file and select the image you wish to crop.
  3. Right-click on the image and select Edit image.
  4. Click on the crop icon and adjust the rectangle to your desired crop size, then hit the green tick.
  5. Hit the Save as icon and rename your image.

Aside from the built-in tools availed by Windows 11, you can also get other third-party image editors that are lightweight and have advanced features you may need. For instance, when cropping images with GIMP, you can use various methods to achieve the same results.

If you’re more into advanced editors, you can explore the Fotor editor, which comes with AI features and other tools. Further, where cropping may fail to get rid of unwanted elements, you can use Generative Erase.

And that’s all there is to it. Whether your image needs to be cropped before you upload it, or are you just looking for a way to make changes in-house without needing expensive software, Windows gives you access to easy-to-use image editing programs.

Hopefully, you’ve put to use one of the above methods and can crop your images with ease. Let us know your preferred program to crop your images in the comments below.

Fix: File Explorer Randomly Stealing Focus on Windows 11

The File Explorer is one of the most effective file managers with an easy-to-use interface. But it often becomes a source of problems. A few users found Windows 11 File Explorer taking focus when they were working on another app.

The File Explorer window opened without any trigger, even when the computer had no active applications. Users reported the issue when running video files, playing games, or working on Excel. And for some, File Explorer would open at a fixed time every day. 

What does it mean for a window to take focus?

When the window opens on top of all active programs, and any cursor actions are directed to it, it’s said to have taken focus. You can force trigger a window to take focus, but the configured settings play a significant role here.

How do I stop Explorer from taking focus on Windows 11?

Before trying the complex solutions, give these simpler ones a try:

If none work, move to the fixes listed next.

1. Repair the corrupt system files

  1. Press Windows + S to open Search, type Command Prompt, right-click the relevant search result, and select Run as administrator.cmd
  2. Click Yes in the UAC prompt.
  3. Paste the following commands individually and hit Enter after each: DISM /Online /Cleanup-Image /CheckHealth DISM /Online /Cleanup-Image /ScanHealth DISM /Online /Cleanup-Image /RestoreHealth
  4. Now, execute this command to run the SFC scan: sfc /scannowsfc scan to windows 11 explorer taking focus
  5. Once done, restart the computer and check for improvements.

You should know there are other methods of repairing corrupt system files. For instance, you can try automatic repair tools.

2. Reinstall the problematic drivers

  1. Press Windows + X to open the Power User menu, and select Device Manager from the list of options.
  2. Expand Human Interface Devices , right-click on the touchscreen device, and select Uninstall device.uninstall device
  3. Click Uninstall in the confirmation prompt, and then restart the computer.
  4. If the problem remains unresolved, reinstall the graphics and touchpad drivers.

3. Update all the drivers

  1. Press Windows + R to open Run, type devmgmt.msc in the text field, and hit Enter.device manager
  2. Expand the Display adapters entry, right-click on the active graphics adapter, and select Update driver.update drivers to fix windows 11 explorer taking focus
  3. Click Search automatically for drivers and let Windows search the PC and install the best available version.search automatically
  4. Restart the computer and verify whether the problem is fixed.

Often, outdated drivers are responsible for malfunctions in Windows, and updating the graphics card driver should work when the Windows 11 File Explorer is taking focus.

If a newer version is not available locally, head to the manufacturer’s website, locate the latest version and manually install the driver. And while you are at it, update the touchpad and touchscreen device drivers.

4. Delete any scheduled tasks

Tip icon Tip
This solution only applies to cases where File Explorer takes focus and launches at specific times every day.
  1. Press Windows + S to open Search, type Task Scheduler in the text field, and click the relevant search result.
  2. Select Task Scheduler Library from the navigation pane, and identify any tasks configured for the same time when File Explorer steals focus.
  3. If you find one, right-click on the task and select Delete from the context menu.delete task to fix windows 11 explorer taking focus
  4. Click Yes in the confirmation prompt.

A task could be responsible when File Explorer comes to the foreground and takes focus in Windows 11. A user reported that clearing CCleanerCrashReporting from Task Scheduler did the trick!

5. Uninstall conflicting applications

  1. Press Windows + I to open Settings, go to Apps from the left pane, and click on Installed apps.installed apps
  2. Click the ellipsis next to an app installed around the same time the problem first appeared, and select Uninstall.uninstall
  3. Follow the on-screen instructions to complete the process.
  4. You may have to uninstall a few apps before finding the problematic app.

6. Disable the touchscreen functionality (2-in-1 laptops) 

  1. Press Windows + S to open Search, type Device Manager, and click the relevant search result. 
  2. Double-click the Human Interface Devices entry, right-click on HID-compliant touch screen, and select Disable device.disable touchscreen
  3. Click Yes in the confirmation prompt.
  4. Restart the computer, and if Windows 11 File Explorer is still stealing focus, re-enable the touchscreen.

7. Perform an in-place upgrade

  1. Open Microsoft’s official website, choose the edition and follow the on-screen instructions to download the Windows 11 ISO.windows 11 ISO
  2. Double-click the downloaded ISO file to view its contents.
  3. Run the setup.exe file.setup.exe
  4. Click Yes in the UAC prompt that appears.
  5. Click Next to proceed with the in-place upgrade.in-place upgrade to fix windows 11 explorer taking focus
  6. Check the Microsoft’s license terms, and click Accept.
  7. Make sure the setup reads, Keep personal files and apps, and then click Install.install
  8. Wait for the process to complete.

Issues like Windows 11 File Explorer randomly opening, stealing focus, or the Explorer’s search not working can be fixed with an in-place upgrade. It’s similar to reinstalling the OS, but the stored data remains unaffected.

Other common File Explorer issues & how to fix them

Tip icon Tip
If you are facing any of these issues, click on the hyperlink and view the verified solutions for each in the dedicated guide.

Remember, when Windows 11 Explorer is taking focus from the active window, it’s often a problem at your end or the OS to blame. And now that you have things up and running, check some quick File Explorer customizations to personalize and streamline the experience.

For any queries or to share which fix worked for you, drop a comment below.

Windows 11 is Not Asking to Replace or Skip Files When Copying

If Windows is not asking to replace files when copying new content, that may turn into a big problem that you won’t even notice until too late.

Why isn’t Windows 11 prompting duplicate files? Usually, that happens because the Folder options in File Explorer were modified.

However, according to a Microsoft Support Specialist, you should also know that the duplicate file dialogue only appears when you copy something from one partition to another. For example, from C: to D:.

If you are pasting from an external source or from the same drive to the same folder and the file has an identical name, the system will add a copy of the destination file with an additional identifier like (Copy) to the new file to differentiate it.

What can I do if the Replace or Skip dialogue box no longer appears?

1. Restore the Folder options to default

  1. Press Win + E on your keyboard to start File Explorer.
  2. Click on the three horizontal dots from the top bar and select Options.
  3. Now, click on View and hit the Restore Defaults button.
  4. Click Apply and OK to save the changes.

This is the quickest solution for the Windows 11 no file overwrite prompt issue. If some modifications have been made to File Explorer, this method should restore everything to normal.

If the copy/paste function is not working at all, the highlighted guide will help you fix the problem.

2. Tweak the Folder Options in File Explorer

  1. Press the Windows + E keys to start File Explorer.
  2. Click on the three horizontal dots from the top bar and select Options.
  3. Select the View tab and uncheck the Hide folder merge conflicts.
  4. Click Apply and OK to save the changes and try the copy action again to see if the Replace dialogue appears.

This should reenable the file dialog box when attempting to overwrite a folder with the same name as the destination directory.

3. Reset File Explorer

  1. Press the Windows + E key combination to start File Explorer.
  2. Click on the Menu button and select Options.
  3. Now, hit the Restore Defaults button in the General tab. That will restore all the File Explorer settings.
  4. Click on Apply and OK to preserve the changes, then restart File Explorer and try to copy the files again to see if the Replace and Skip dialogue appears.

The Replace and Skip dialogue should also appear when you extract some files from an archive to the same destination folder from which the files originated.

By default, when you use the Extract all option in Windows 11, the app creates a new folder but if you have changed the settings and set it to paste the file in the same folder, you will have to see the replace or skip options.

How do I restore a file or folder to the earlier version?

In case you have overwritten a file or a folder by mistake or due to this file conflict, here’s how you can undo the action.

  1. Right-click the file or folder that you have overwritten and select Properties.
  2. Go to the Previous Versions tab, click on the version you want to restore, and hit the Restore button.
  3. Click on Apply and OK to confirm the changes.

This concludes our guide, hoping that our solutions helped you get over the file dialog bug and you still have the original files intact.

You might also be interested in our guide about how to move files in Windows 11 and avoid such problems.

If you have any other questions or suggestions, feel free to use the comments section below and leave us a note.

No Details Tab in Properties? How to Enable it on Windows 11

File or folder properties are used to access the vital details or reconfigure the settings, including permissions. But a few users found no Details tab in the properties on File Explorer in Windows 11.

Tabs may go missing occasionally due to a problem with the OS. Some even found the Security tab absent in File Explorer, and it’s just General and Previous Versions available in most cases.

Why is there no Details tab in Windows 11?

  • Corrupted operating system files 
  • Issues with the user account
  • Missing file permissions
  • Recent changes to the PC triggering conflicts

How can I add the Details tab back to Proprieties on Windows 11?

Before we head to the slightly complex solutions, try these simpler ones first:

  • Check whether it’s a file or folder you are viewing. By default, Windows only shows the Details tab for files. 
  • Scan the PC for malware with the built-in Windows Security or a reliable third-party antivirus solution, and make sure the security settings are in order.
  • Make sure you are signed in with an administrator account. If not, make your account an administrator in Windows.
  • Take full ownership of the file or folder. This also helps when file properties can’t be copied. 

If none work, move to the fixes listed next.

1. Modify the Registry Editor

  1. Press Windows + R to open Run, type regedit in the text field, and hit Enter.regedit
  2. Click Yes in the UAC prompt.
  3. Now, paste the following path in the address bar and hit Enter:HKEY_CLASSES_ROOT\*\shellex\PropertySheetHandlerspath
  4. Check whether the {883373C3-BF89-11D1-BE35-080036B11A03} subkey exists in the left pane. If not, right-click on PropertySheetHandlers, hover the cursor over New, select Key, and give it the same name as the string.create key to fix no details tab in properties in windows 11
  5. Alternatively, if you have stored a backup of the reg file before deleting the key, restore it, and the Details tab should reappear in the Windows 11 file properties. 

2. Repair the corrupt system files

  1. Press Windows + S to open Search, type Command Prompt, right-click on the relevant search result, and select Run as administrator.command prompt
  2. Click Yes in the prompt that appears.
  3. Paste the following three DISM commands individually and hit Enter after each: DISM /Online /Cleanup-Image /CheckHealth DISM /Online /Cleanup-Image /ScanHealth DISM /Online /Cleanup-Image /RestoreHealth
  4. Next, run the SFC scan by executing this command: sfc /scannowsfc scan to fix no details tab in properties on windows 11
  5. Wait for the scan to complete, and then restart the computer.

Often, file properties disappear due to corrupted system files, and that’s where the SFC scan and DISM commands come to our rescue. These will replace any corrupt files with their locally stored cached copy. Moreover, you can use dedicated software to perform this task for you.

3. Restore the system

  1. Press Windows + S to open Search, type Create a restore point, and click the relevant search result.
  2. Click the System Restore button.system restore
  3. Select Choose a different restore point and click Next.
  4. Now, pick another restore point (preferably the oldest) from the list, and click Next.restore to fix no details tab in properties in windows 11
  5. Verify the restore details and click Finish.  
  6. Wait for the restore to complete.

4. Perform an in-place upgrade

  1. Go to Microsoft’s official website, select the ISO edition and product language, and then download the Windows 11 ISO.
  2. After it’s downloaded, double-click the file and click Open to confirm.open
  3. Run the setup.exe file.setup.exe
  4. Click Yes in the popup window.
  5. Click Next to proceed.next
  6. Read through the Microsoft’s license terms, and then click Next.
  7. Finally, verify that the setup reads, Keep personal files and apps, and click Finish.install to fix no details tab in properties inwindows 11

When there’s no Details tab or you can’t edit file properties in Windows 11, a quick solution to eliminate any inconsistencies or conflicts is an in-place upgrade. The process may take a few hours, but it is as good as reinstalling the OS, and the stored files and apps remain unaffected.

5. Create a new user account

  1. Press Windows + R to open Run, type netplwiz in the text field, and click OK.
  2. Click the Add button.add
  3. Click on Sign in without a Microsoft account.
  4. Choose Local account from the bottom to proceed.local account to fix no details tab in properties in windows 11
  5. Enter the username, password, and a hint, then complete the account creation.
  6. Select the new account, and click on Properties.properties
  7. Go to the Group Membership tab, select Administrator, and click OK to save the changes.administrator to fix no details tab in properties in windows 11

Sign in with the new user account, and you should find the Details tab in file properties on Windows 11. To transfer data between the accounts, you can use an external drive, a USB stick, or an effective cloud storage service.

Alternatives to viewing file details in Windows 11

  • Use third-party software to find files, and it will list out the basic details.
  • Use the dedicated command for text files.
  • For files downloaded from the web, check details on the hosting server.

While no Details tab in Windows 11 properties is serious, another issue that affects users is the missing Compatibility tab, which prevents them from running older apps.

And some found the Location tab missing, but it’s easily fixable with a quick Registry edit.

If you know of other solutions or workarounds, drop them in the comments section.

How to Create & Set up a USB Security Key on Windows 11

Keeping your PC safe from unauthorized access is crucial if you want to protect your files and personal data, and this is why many want to create a USB security key on Windows 11.  

This is the most secure authentication method, and in today’s guide, we will show you how to set it up on your PC properly.  

The benefits of using a USB security key on Windows 11

  • The physical security key offers the most secure two-factor authentication.
  • They are immune to phishing attacks since they don’t use Internet connection.
  • Security keys can protect both your Windows account and most online accounts.
  • Many security keys are compatible with Windows Hello.

How do I create my USB security key from scratch on Windows 11?

Use the Settings app

  1. Press the Windows key + I to open the Settings app.
  2. Navigate to Accounts in the left pane. In the right pane, choose Sign in options.
     
  3. Expand the Security key section and click on Manage.
  4. Insert your security key and touch it to activate it.
  5. Click the Change button and then enter your old PIN and new PIN twice.
  6. Save changes to complete the Windows security key setup.

Backup options for your USB security keys

Due to the nature of USB security keys and physical authentication, it’s not possible to backup USB security keys.

Instead, it’s always better to have multiple security keys since key recovery isn’t an option.

Additional tips for enhancing your level of security with a USB drive on Windows 11

  • Always have a backup key ready. A good practice is to have two or three keys available.
  • If possible, protect your USB key with a PIN. A strong PIN will add an additional layer of protection.
  • Use security keys from reputable brands to avoid any security and compatibility issues.
  • Store backup keys in a remote but easy-to-access location

The USB security key offers advanced security features since it’s a physical device, and this is why many users prefer using USB software to lock their PCs.

To protect your PC further, we have a guide on the Windows 11 security settings that you should enable. One of these settings includes file encryption, and to learn more, check our guide on how to encrypt a USB flash drive in order to protect it.

If you get tired of receiving the message to insert your security key, you can disable the USB security key and explore other authentication options.

To learn more about Windows security, we have a great guide on what is the Windows Security button, so don’t miss it.

Have you ever used a USB security key on your PC? Let us know in the comments section below!

PowerToys receives new update, unveils new UX design and enhanced features

In a world where software updates come faster than the morning coffee, it’s refreshing when they introduce meaningful changes. One such case is the recent update to PowerToys, presented via a pull request on GitHub (Fluent UX PowerToys Run #28538).

According to the pull request on GitHub, PowerToys is getting an update. The major attractiveness of this update is the transition of Run from the Modern WPF platform to WpfUI.

The developers behind the project had a specific cause for this shift: paving the way for the UX update, aligning seamlessly with the Windows 11 Design Language. So, what does this mean for users? A sleek interface, intuitive design, and a general feeling of smoothness are some of the prominent improvements.

Another hefty change that comes packed in this update is an enhancement that Windows enthusiasts have been eagerly waiting for – the acrylic backdrop. This neat feature becomes apparent when the search box is empty.


Rather than just a void, users now find themselves before an interactive overview of all activated plugins and trigger commands. This gives them a bird’s-eye view of their commands, making navigation more effortless.

Further delving into the cosmetics, the update blesses us with a substitution of all old plugin icons. Replacing them are the fresh symbols from Segoe Fluent Icons. Now users can enjoy a more aesthetically pleasing, coherent appearance in their icon lineup.

Lastly, the default size is now trimmed down, a slight modification that increased the utility of the software. The window of Run isn’t as intrusive as before, with its minimized presence. But don’t be fooled. Sometimes, less is more, and in this case, that ‘more’ is the result. Yes, this reduced size can surprisingly provide a larger stream of results. Efficient and subtle.

In conclusion, this upcoming update may appear less creative at first glance, but it brings with it efficiency, aesthetic appeal, and higher functionality all under one umbrella. PowerToys is thus taking a step in the right direction, adding quality-of-life changes for the users and making their interactions with the software more enjoyable and effective.

Windows 11 Insider build 25921 released to Canary Channel with SMB changes

Microsoft has released a new pair of Windows 11 Insider updates today, for the Canary Channel (25921) and the Dev Channel (23545). For the Canary Channel, there are a couple of new features for Server Message Blocks (SMB), and the new Canary Channel build now supports blocking NTLM for remote outbound connections. This changes legacy behavior, and an administrator can now “intentionally block Windows from offering NTLM via SMB.”

Admins can now also control which SMB2 and SMB3 dialects the SMB server will negotiate.

In addition, the network flyout on the lock screen will now better match the network flyout from quick settings. You can check out all the details over at the Windows Insider blog post.

Microsoft planning to 2x character limit for Bing Chat and BCE, reveals challenges

Microsoft plans to expand Bing Chat’s character limit in both its consumer and Enterprise versions. Doubling the character limit from 4,000 to 8,000 characters could offer users more conversation flexibility.

Mikhail Parakhin, the Vice President of Search at Microsoft, tweeted about the limits, and some of the technical challenges involved in making such a change.

Expanding the character limit could benefit users who require longer and more detailed messages in their chats, especially in enterprise settings where communication is often more extensive and complex.

Earlier this week, Microsoft announced new admin controls in Bing Chat Enterprise.

This update might be well-received by Bing Chat users who have found the previous character limit restrictive for their conversations. It will be interesting to see how this change affects the overall user experience and the adoption of Bing Chat in various contexts.

via MSPowerUser

Microsoft is auto-installing ‘New Outlook’ with beta channel build 22631.2338

With the latest Windows 11 Beta channel build, Windows enthusiasts are witnessing a change. It appears Microsoft has begun pushing the New Outlook onto Windows Insiders.

Windows enthusiast and Twitter user PhantomOcean3 discovered that the Beta channel build 22631.2338 (KB5030305) automatically installed the new Outlook after a system reboot.

PhantomOcean3 conducted an impromptu Twitter poll to gather feedback and confirm updates from other users. As of the last count, it became evident that a fraction of the voters, approximately 28.8%, also received the new Outlook client following system updates.

Brandon LeBlanc, Senior Program Manager of the Windows Insider Program, confirmed PhantomOcean3’s discovery. According to LeBlanc, the auto-installation of the new Outlook was, indeed, an expected move on Microsoft’s end.

However, the implementation is currently expected to occur on some systems only, indicating that Microsoft might be test-driving the feature. The move is possibly in preparation for an automatic installation breakthrough with the Windows 11 23H2 feature update. Still, its distribution might take on the more digestible rate of a gradual rollout.

Tracing the roots of the New Outlook back to May 2022, the project was an initiative by Microsoft to trial a new, redesigned, and revamped version of Outlook. The end goal of the initiative was to unify the Outlook application across all platforms, consequently leading to the project often being referred to as “One Outlook.”

Upon successfully passing the trial stages, Microsoft ventured into debuting the preview to the Current channel users. As of now, the feedback from users who have started using the new Outlook client is highly anticipated.

But for now, Microsoft’s Windows Insiders are poised to continue their explorations and to bring such interesting changes to light.

Teams Chat becomes Microsoft Teams-Free in latest Windows 11 beta build

Microsoft has released two new Windows 11 Beta channel builds. One of these iterations, Build 22631.2338, typically known for bringing in fresh features, has, in fact,  pulled the plug on a significant one – Teams Chat is now officially labeled Microsoft Teams – Free.

Microsoft Teams – Free will now appear as a default icon pinned to the taskbar, operating much like any other app. It can be unpinned at user discretion, akin to other taskbar apps, the tech giant announced in a blog post.

Beginning to roll out with this build, Chat is now Microsoft Teams – Free. Microsoft Teams – Free is pinned by default to the taskbar and can be unpinned like other apps on the taskbar.

Updates on Windows 11 Builds

The Windows 11 Build 22631.2338 promises several new developments. It holds the most buzz due to the virtual exit of Teams. Instead of Teams integration within the system, Microsoft now presents a free version of Teams.

Named “Microsoft Teams – Free”, the app offers features identical to Teams’ consumer and personal versions in previous Windows, including the ability to pin and unpin it from the taskbar. Bug fixes and an overall system enhancement accompanied the rollout.

The second build, Windows 11 Beta Channel 22621.2338, is primarily focusing on bug fixes. We’ve provided an in-depth explanation of both builds in a separate post. Please refer to it for further insights.


Microsoft calls for the need for ‘safety brakes,’ suggests federal regulation of AI

Brad Smith, Vice Chair and President of Microsoft Corporation has addressed the principles that Microsoft believes should guide the development of legislation to advance safe, secure, and trustworthy AI.

Here are some key highlights:

Accountability in AI development and deployment

  • Humans must check AI systems to make sure they are working properly.
  • The people who create and use AI systems must be responsible for their actions.
  • AI systems that make important decisions about people should be checked more carefully.

Building on existing efforts

  • The United States already has some AI safety frameworks that we can use as a starting point.
  • These frameworks cover different parts of AI development and use, so they can be used together to make sure that AI is used safely.

Reflecting the technical architecture of AI itself

  • Any new laws about AI must take into account how AI works.
  • This means that the laws must be flexible enough to change as AI technology changes.

Priority areas for federal regulation and oversight

  • We should require “safety brakes” for powerful AI systems that are used in important places, like power grids and hospitals.
  • We should also require AI developers to know who they are working with, where their data is stored, and what kind of content their systems are using.
  • We should make sure that AI is used to improve government services, like healthcare and education.

Last month Smith released another blog stating blueprints for responsible AI governance in India.

We are particularly interested in requiring “safety brakes” for highly capable AI models in critical infrastructure. This seems sensible to mitigate the risks of these systems being used for malicious purposes. We look forward to following the legislative process’s progress and seeing how the government can work to ensure that AI is used for good.


Tip of the Week #2: The OneNote addin everyone needs

Many Microsoft-watchers – especially fans of OneNote – may reflect on the company’s application strategy over the last few years, as the initial push to Windows 8 “Modern” – not “Metro” – apps evolved into the Universal Windows Platform that could run on phones, PCs and other devices. Clearly, with the cancelling of Windows Mobile, things didn’t work out quite the way they were envisaged and UWP is all but dead. Microsoft itself dabbled with UWP in some areas (for a while offering slimmed down Office apps) but is now leading developers away from that specific model.

OneNote or OneNote for WIndows 10
Which OneNote is the one for me?

At one stage, the venerable OneNote was dropped from the Office suite in favor of the Modern/Store/UWP app (into which all future developments would be put), confusingly also named “OneNote” but known during its life as some combo of “OneNote for Windows Store”, “OneNote Modern app” etc. Calling different things by the same name can cause confusion, but apart from Office, Skype, Teams, Xbox and a few others, Microsoft fortunately doesn’t have too much of this problem.

The mobile app was eventually renamed “OneNote for Windows 10” yet is not the first controversy around the naming scheme for OneNote – during the original app’s development (as “Scribbler“, to be released as part of Office 2003), some of the engineering team so disliked the branding that marketing gave it, they referred to it disparagingly as “Onay-No-Tay“.

In a later change of plan, it was revealed that the original OneNote would in fact be revived and all efforts would be going into that. The UWP app will finally go away in 2025, at the same time as Windows 10 goes out of support.

OneNote and OneNote for Windows 10

The traditional version of OneNote was repackaged and published in the Store (as “OneNote”), and although the UWP one is still there, it doesn’t show up in search results any more.

Back to the OneNote Present

Anyway, now that life is both breathed back into the old Win64 version of OneNote and it is the stated way forward, one positive is that, unlike in the UWP version, there is an addin framework so the base app can be extended. Not that addins are particularly numerous or even easy to find – there’s no “Addins” menu option in the OneNote app, and the AppSource product catalog only lists a handful. App developers can build and install their own addins as EXE files to be distributed and installed like any other program.

Introducing OneTastic

OneTastic and its predecessor OneCalendar have been available for over a decade now, published as a side gig by Omer Atay from the OneNote product group. OneCalendar is especially useful as it shows you a list of which OneNote pages you have edited based on when you did so; if you routinely keep meeting notes in lots of different parts of one or multiple notebooks, it’s a lifesaver. Click on any of the short links on a given day, and it will jump to that particular page, in whichever section or notebook or hover the mouse to get a preview of that page, so it makes jumping back to the notes you took at last week’s meeting so easy.

OneCalendar screenshot
[Image courtesy of OneTastic.com]

OneCalendar started life as a separate app to OneNote, and it can be installed and run separately if you don’t want any of the other stuff OneTastic brings. It is included as a menu option within OneTastic, and the wider suite includes a variety of other tools including a macro language which can automate OneNote. “Macroland” is a rich library of downloadable off-the-shelf macros to carry out functions that don’t exist in OneNote, like inserting a table of contents or doing more advanced table handling, sorting and the likes. There are some limits on downloading and usage of Macros in the free version, with commercial licensing available.

OneTastic Addin for OneNote

Everyone who considers themselves a heavy user of OneNote should check out OneTastic, especially for the OneCalendar function. Some of the macros will save you a lot of time if using OneNote in a collaborative setting, too, and given that it’s written by someone who’s been a long-time part of the OneNote engineering team, it’s the perfect way to fill in some of the gaps in functionality which presumably exist to try to keep OneNote simple and not overburdened with options.

The Office mobile UWP versions of Word, Excel and PowerPoint are no longer discoverable in the Microsoft Store, but they’re still there (at least for now) if you feel like giving them a try. Go on, you know you want to … Similarly, the OneNote UWP version is still available in the Store. 

How to Get & Use High Contrast Themes on Windows 11

While the default theme in Windows works fine for most, some prefer a solid color, especially a black background, for enhanced visibility. And this is where the Windows 11 high contrast themes come into the picture.

Windows offers a set of built-in dark themes, but you can always get more if the available options don’t fulfill the intended purpose. Besides, you can further customize the dark mode, change the background color, and choose other theme options.

Benefits of high contrast themes:

  • Optimal color combination for people who have trouble viewing.
  • Lesser eye strain.
  • A sleek and unique look.
  • Changes the color of links and buttons, enhancing visibility.

How do I get more contrast themes in Windows 11?

1. Choose an already available contrast theme

  1. Press Windows + I to open Settings, go to Accessibility from the navigation pane, and select Contrast themes.contrast themes
  2. Choose one of the high contrast themes from the dropdown menu. You can also check the appearance under previews.choose high contrast theme in Windows 11
  3. Click on Apply for the changes to come into effect.
  4. Similarly, you can enable other contrast themes in no time.

2. Get Windows 11 contrast themes from the Microsoft Store

  1. Press Windows + S to open the Search menu, type Microsoft Store in the text field, and click the relevant result.
  2. Type Windows Themes in the search field at the top, and hit Enter.windows themes
  3. You will now find a range of themes compatible with the PC.
  4. Select any and click the Get button to download it.get high contrast theme in Windows 11
  5. After the theme is downloaded, press Windows + I to open Settings, select Personalization from the left pane, and click on Themes.
  6. Finally, choose the one you got from the Microsoft Store, and it should apply immediately.set theme

Microsoft Store offers a wide range of dark themes for Windows 11. Though, for most of these, the changes are limited to the desktop, and you won’t get the high-contrast colors in the built-in apps.

3. Download from a third-party website

Note icon NOTE
WindowsReport is not affiliated with any of the websites listed here. We recommend scanning files downloaded from these websites with an effective antivirus solution to keep the device safe.

There are several online platforms that allow creators to submit themes and, at the same time, let users download high contrast themes for Windows 11. The options here are limitless, and you should surely find one that meets the requirements.

We found these two to work best:

4. Create your own high-contrast theme

  1. Press Windows + I to open Settings, select the Accessibility tab, and then click on Contrast themes.
  2. Choose a theme from the menu, and click Edit.edit to create custom high contrast theme in Windows 11
  3. You can now change the background color, text color, hyperlink color, and the color assigned to buttons, amongst others. Simply click on the color box next to individual entries and select one that works best.configure preferences
  4. Click Save as to create a new theme.
  5. Enter a theme name in the text field, and click Save and apply.save theme

The new theme will be applied, and its details will be stored on the PC, while the contrast theme you edited initially remains unaltered. Besides, you can create custom themes for Google Chrome.

How do I turn high contrast mode on or off in Windows 11?

  1. Use the keyboard shortcut: Press Left Alt + Left Shift + Print Screen > click Yes in the dialog box. The dedicated shortcut will also turn off high contrast mode when it’s enabled.
  2. From Settings: Press Windows + I to open Settings > go to Accessibility > select Contrast themes > choose one from the dropdown menu > click Apply.
  3. From Control Panel: Press Windows + R to open Run, paste shell:::{ED834ED6-4B5A-4bfe-8F11-A626DCB6A921} > hit Enter > select one of the High Contrast Themes listed here.high contrast theme

Windows allows you to choose from the built-in contrast themes, download one, or edit the available lot. Using the last option, you can find the best high contrast settings for Windows 11. Also, you may consider enabling high contrast on the browser for a better experience.

If all this sounds too complex to deal with, you can invert colors in Windows 11 and get a somewhat similar outcome.

Do share your favorite Windows 11 high contrast theme in the comments section below.