WhatsApp Web is Not Working in Firefox? Open it in 2 Steps

Firefox is one of the fastest browsers you can use with WhatsApp Web. It boasts a searing browsing speed and a simple interface that complements the great instant messaging app.

Unfortunately, users are starting to complain that WhatsApp Web is not working on Firefox for some reason. This has made many miss the flexibility the web version offers.

In this guide, we will show you how to fix the WhatsApp Web on Firefox issue and help you get back to chatting online again.

Why does WhatsApp Web not work on Firefox?

WhatsApp web might not be working on Firefox for numerous reasons. From issues with your PC to problems with the browser, many possibilities exist.

Below are some of the popular causes:

  • Outdated browser
  • Unsupported PC operating system
  • Wrong custom settings and faulty extensions

Which browser is compatible with WhatsApp Web?

WhatsApp Web works on all the major browsers like Opera One, Chrome, Firefox, and Edge. The only condition is that it must be one of the browser’s recent versions.

Also, you must be using a supported operating system. If these conditions are satisfied, there is almost no browser you can’t use with WhatsApp Web.

Quick Tip:

If WhatsApp Web is still not working on Firefox for you, just consider Opera One for a change. 

Opera One is an excellent browser for social and instant messaging apps. It has a WhatsApp Web integration, which makes it super easy to access directly from the sidebar.

Opera One

Keep in touch with your peers and get quick access to WhatsApp, without having to open any new tabs!

How can I make WhatsApp Web work again on Firefox?

1. Update Firefox

  1. Click the menu button on Firefox and select the Settings option.
    settings whatsapp web not working firefox
  2. Scroll down and click the Check for updates button under the Firefox Updates section.
    check update
  3. It will show you the latest versions to install.

Running an outdated browser on your PC is a known cause for the WhatsApp Web not working on Firefox issue. The minimum Firefox version you can use to run WhatsApp Web is Firefox 60+.

Anything below this, and you won’t be able to use the instant messaging app. After updating your browser, ensure you restart it to sync the changes.

2. Restart Firefox in Safe Mode 

  1. Launch Firefox and click the menu button in the top right corner.
  2. Choose the Help option.
    help
  3. Select the Troubleshoot Mode… option.
    troubleshoot whatsapp web not working firefox
  4. Click the Restart button when prompted.
    restart

While extensions help to increase the functionality of Firefox, they can be the reason WhatsApp Web is not working. This is especially true if you start noticing the issue after installing some extensions.

This fix will help you restart Firefox with all extensions, themes, and custom settings disabled temporarily.

What can I do if WhatsApp is not working on a private window?

Some of our readers complained that the WhatsApp web app is now working in a private window.

In this case, here’s what to do to make it work:

  1. Open Firefox, type about:config in the address bar, and press Enter.
  2. Scroll down and find dom.indexedDB.privateBrowsing.enabled and click the button to the right to toggle it to true.
  3. Now, open a private browsing new window and try to open WhatsApp again.

The problem seems to be that WhatsApp requires IndexedDB, and that is not activated in the private browsing mode.

The WhatsApp Web not working on Firefox issue can be exasperating, as it might make you miss out on important messages. Though it is not difficult to fix, you still need a detailed guide such as this to solve the problem.

After solving the issue with WhatsApp, you can check out our carefully-curated tips on how to use Facebook Messenger on browser to make the best of the web app.

Feel free to let us know which solution helped you get back to answering important chats in the comments below.
Microsoft Edge 106 hits the Stable Channel with some tweaks

Microsoft Edge version 106 has shipped to the Stable Channel for everyone to download. The release is fairly minor, but it does unpack two feature updates.

First up, the release provides users with a more reliable web defense courtesy of the rewritten Microsoft Defender SmartScreen library for Microsoft Edge on Windows, which made its debut in Microsoft Edge version 103. Also, note that the NewSmartScreenLibraryEnabled policy is now deprecated in Microsoft Edge version 106 and is set to be obsolete in the subsequent releases that will be made. This means that enterprise customers will no longer be able to continue using the legacy version of the library.

Next up is Work Results that are displayed in the Microsoft Edge address bar have been increased from 2 to 4. It now provides users with enhanced visibility into work content available when conducting searches using the browser. You will however need to enable the AddressBarMicrosoftSearchInBingProviderEnabled policy to access this feature.

Other changes can be seen below as per Microsoft’s changelog:

Policy updates

New policies

Deprecated policies

Obsoleted policies

In other Edge related news, the Edge Insider Canary could now get up to two builds per day and finally, the Outlook for web has now been optimized to fit in the Edge sidebar to enhance visibility. This latest release should automatically install for you. If that is not the case you can trigger the update by visiting Edge’s Settings menu, then click on Help and Feedback, select About Microsoft Edge, and then wait for the browser to download the update.

How to quickly check your PowerShell version on Windows 11

PowerShell is a powerful and useful tool on Windows 10 and Windows 11, but what do you do when you need to update PowerShell? Do you know which PowerShell version on Windows do you have? Follow this guide to find out how to check what PowerShell version on Windows 11 you have

Windows Package Manager, also known as winget, is a command line tool you can use from either Command Prompt or PowerShell to install, manage, configure, and even uninstall apps. You can check your PowerShell version on Windows 11 and Windows 10 1709 (build 16299) or later using a simple command. Here’s what you need to do.

Check your PowerShell version on Windows 11

If you want to quickly check what PowerShell version my computer is running, here’s what you need to do.

  1. Open a new Windows Terminal window with a PowerShell tab.powershell version on windows 11
  2. Type (or copy and paste) the following command: $PSVersionTable.
  3. Press Enter.powershll version on windows 11

Once you press Enter you should see the PowerShell version on Windows 11 that is installed on your PC.

You can also check what version of Windows PowerShell you have by using the same command. Just repeat the steps above and instead of having a PowerShell tab open, open a Windows PowerShell tab instead.

powershell version on windows 11

Microsoft maintains a changelog on GitHub of PowerShell releases that details bug fixes and features added with each new release. If you installed PowerShell on Windows 10, the installation process is a whole lot easier on Windows 11.

How to easily install and update PowerShell on Windows 11

If you check your PowerShell version and realize it’s out of date, you may want to update it or PowerShell itself might remind you it’s time for an update too. But how do you update PowerShell on Windows 11?

Thankfully, Microsoft makes it easier to update PowerShell or any app you want on Windows 11 and Windows 10 1709 (build 16299) or later. Here’s what you need to do.

Update PowerShell on Windows 11 and Windows 10

The easiest way to update PowerShell is by using the command line tool Winget. Winget is the Windows Packager Manager, a command-line tool that allows you to find, install, update, and configure applications on your PC.

Unlike installing PowerShell on Windows 10, the winget command-line tool is bundled with Windows 11 and modern versions of Windows 10 by default as the App Installer in the Microsoft Store. App Installer includes a version of the winget command line tool.

You can install the newest version of PowerShell 7 by following this simple guide that walks you through the complete setup: install PowerShell 7.

Instead of relying on third-party applications like winstall.app to do the grunt work for you, you can just as easily search for and install applications with winget. Here’s how to update PowerShell on Windows 11 using winget.

Update PowerShell or any app with winget

There are a couple of things to point out first:

  • When running winget without administrator privileges, some apps may require elevated privileges to install. When the installer runs, Windows will prompt you for elevated privileges. If you chose not to elevate privileges, the app will not install.
  • When running winget with administrator privileges, you will not see any elevated privileges prompts if the app requires it. With that in mind, always be careful when running a command as an administrator and only install apps you trust.

1. In order to install PowerShell, or any app for that matter, you can use the following command:

winget search <app-name>. In this example, we use winget search PowerShell to find the correct PowerShell app to install. As you can see there are multiple “PowerShell” apps available. I want to install the first entry that appears at the top.

install powershell on windows 11


2. Type (or copy and paste) the following command and press Enter:

winget install 9MZ1SNWT0N5D

3. Once you press Enter, winget will install the app ID you indicate. Keep in mind, you may need to confirm a prompt or two to continue with the app installation.

powershell on windows 11

Once the app is installed, you can close the PowerShell window when you are finished. Otherwise, you can use winget to search for and install more apps.

Chivalry 2 joining, 8 titles leaving Xbox Game Pass this month

The Chivalry 2 video game is now confirmed to join PC and Xbox Game Pass libraries within the next 24 hours. The game is available on both Xbox One and Xbox Series X console families and supports 4K UHD on supported hardware.

Joining Chivalry 2 on Game Pass later this month are Scorn on October 13th, Plague Tale: Requiem on the 17th, Persona 5: Royale on the 20th, and Tian Ding on the 31st.

Titles leaving Game Pass this month include Dirt 4, Dirt Rally, Bloodroots      Console, Echo Generation, Into The Pit, Ring Of Pain, Sable, and The Good Life. Gamers wanting to finish up these games should do so soon.

Game Pass is a Microsoft-owned video game subscription service that gives members full access to digital video games as if they owned them outright. Both the Xbox and PC libraries usually contain around 100 titles each with new ones being added and others cycled out on a monthly basis.

After more Xbox news? Follow us on Twitter and Facebook.

Xbox Game Pass Ultimate

Windows Spotify app gets a new design with latest update

Updated: 3/14/2023

Spotify has begun to roll out a new UI for its official Windows app and on the web. While this new app design does work in much the same way as the previous design with few navigational changes, there are several noteworthy adjustments and additions.

There’s no official release notes for this update but here’s a list of the changes I’ve noticed so far:

  • A new Home button at the top of the app for faster navigation back to the app’s front screen.
  • A new built-in search bar next to the new Home button. Previously users would have to click on a Search option from the left menu.
  • Softer rounded corners on menu blocks and album covers.
  • A new Friend Activity icon on the lower-right of the app to open and close the Friend Activity feed.
  • New, larger, circle user profile icon.

Here’s a screenshot of the new app design:

New Windows Spotify app

And here’s an image of the previous look:

Old Windows Spotify app

In 2023, we’ve seen Microsoft start to allow users to test third-party widgets on Windows 11, Spotify, Meta’s Messenger, and Phone Link are among the few that have been incorporated into Windows 11’s widget board.

Do you like the new changes? Let us know in the comments below and be sure to follow us on Spotify.

Spotify Music
Spotify Music
Developer:
Spotify AB
Price:
Free+

How to Save Pictures from Pinterest on Computer

Pinterest is a popular image-sharing and social media service that offers saving and discovery of information on the internet. It allows you to share your creative work through images, GIFs, or videos with other users on the platform.

That being said, if you discover something worth saving to your smartphone or computer, there is a download option as well.

In this article, we explore a few ways to help you save a Pinterest picture on your computer and smartphone, as well as what to do in case you cannot download the pictures.

How can I save Pinterest pictures to my computer and smartphone?

1. Download pictures directly from Pinterest

1.1 Save a picture from Pinterest on a computer

  1. 1. Log in to your Pinterest account.

  2. 2. Search for the image that you want to download.

  3. 3. Select the picture and click the three-dots icon to bring up the context menu.

    click the three dots icon on pinterest
  4. 4. Choose Download image from the list of options.

    download pinterest image button
  5. 5. Alternatively, you can simply right-click on the image and select Save image as… from the options.

    click on the save image as option
  6. Saving a Pinterest picture on your PC is very easy and can be done within a few clicks from the app’s website version.

    The image will be downloaded to your computer hard drive, and you will be able to use it as you would any other saved picture from the internet.

1.2 Save a picture from Pinterest to a phone

If you want to save the image to your smartphone, here’s how to do it.

save Pinterest pictures
  1. Launch the Pinterest app on your Android phone.
  2. Once logged in, open the image that you want to download.
  3. Tap the three dots and select Download Image.

All the saved images are available in your Gallery app.


2. Download Pinterest pictures using third-party tools

Expertsphp for PC

save Pinterest pictures with expertsphp
  1. Open Pinterest and log in to your account.
  2. Open any image that you want to download.
  3. Copy the image URL from the address bar.
  4. Go to Expertsphp and paste the URL.
  5. Click the Download button.

You can download the image in multiple resolutions from Expertsphp.

Android Phone

save Pinterest pictures to android phone
  1. Open the Pinterest app on your Android phone.
  2. Open any image that you want to download.
  3. Tap the three-dots icon and select Copy Link.
  4. Next, open the Expertsphp link in your phone’s browser.
  5. Paste the link and tap on Download.

3. Download all the images from Pinterest Board

save Pinterest pictures from pinterest board
  1. Open Google Chrome and visit the Image Downloader extension page.
  2. Once installed, open Pinterest.
  3. Next, navigate to the Board from where you want to download the images.
  4. Click the Image Downloader icon on the top-right corner.
  5. If you want to download all, check the Select all.
  6. Click the Download button and click Yes.

If you have configured your Chrome download settings to prompt you to ask every time something is downloaded, then you may see multiple pop Windows openings asking for permission.

Go to your Chrome Settings, click on Advanced and make sure the option Ask where to save each file before downloading is unchecked.

Why can’t I save pictures from Pinterest?

In case the methods previously mentioned do not work and you cannot save Pinterest pictures, it is most likely a glitch. Restarting your PC or smartphone is likely to solve the problem.

If that doesn’t do the trick, here are other possible reasons why you cannot download the images, as well as what to do in case they apply to you:

  • There isn’t enough free storage on your PC or smartphone – check whether you have any disk space available, and, if not, try to delete a few files from your device.
  • There is a problem with your browser – delete your browser’s cache and cookies.
  • The Pinterest website is down – wait until the website gets back online. You can check the Pinterest server’s status to be up to date with it.

Being able to save Pinterest images to your PC and smartphone allows you to save and share high-quality images that are otherwise not possible if you happen to take a screenshot of the image.

Follow the steps and let us know your preferred method to download Pinterest images in the comments below.

Teleparty Is Not Working on HBO Max: 5 Ways to Fix It

To watch Netflix, HBO Max, Hulu, Disney Plus, and other streaming services with family or friends living far away, you can use Teleparty.

Users love functions like automatic syncing and group chat, but this browser extension occasionally performs poorly, and they end up with the HBO Max Teleparty not working issue.

In this article, we’ll outline five solutions for resolving this problem so you can watch movies online with friends or family.

How to use HBO Teleparty correctly?

You should first make sure you are correctly utilizing the Teleparty plugin. You can find a step-by-step tutorial for using Teleparty on HBO Max below.

  1. Go to the HBO Max website.HBO max website
  2. Choose the specific show you want to watch.
  3. Make sure the video is playing on the screen.
  4. Click the Teleparty icon located in the extensions bar now.Teleparty
  5. To create a shared link, select the Start the party button.
  6. Click the Accept & Proceed button after that.
  7. Share the watch party link with your friends by copying it.

Let’s now look more closely at some steps for fixing Teleparty on your device.

How do I fix HBO Max Teleparty not working?

1. Check if the Streaming service is down

  1. Visit downdetector.com.downtime website
  2. Type in HBO, go through the results, then click on the relevant link.
  3. Check if there are any server connectivity or service outages. checking the downtime of HBO

Ensure the streaming service you’re attempting to access is accessible before blaming Teleparty. Streaming services like Netflix and HBO Max could occasionally experience outages.

2. Try a different web browser

Microsoft Edge and Google Chrome both support Teleparty. It’s time to switch web browsers to resolve the problem if none of those mentioned procedures were successful for you.

Download and install Microsoft Edge if you have been using Teleparty on Google Chrome and vice versa.

Since Microsoft Edge is a Chromium-based browser, it too supports the Teleparty extension. Install it by going to the Microsoft Edge web store.

Another great option you can try is Opera Browser. It supports Teleparty and has amazing useful features, including an Ad blocker to help you browse without distractions and load websites faster.

It also has a Video pop-out feature with which you can pop out online videos so they can stream on top of webpages as you browse freely.

Opera

Enjoy your browsing experience without interruption and choose to use Opera.

3. Reinstall Teleparty on your browser

  1. In the extensions bar, right-click the Teleparty extension icon. Select the Remove button.Removing teleparty
  2. A pop-up might prompt you to confirm the action. Simply press the Yes button.
  3. Now that the Teleparty extension has been removed. Let’s reinstall it next.
  4. Visit the Teleparty extension page.
  5. Select Add to Chrome from the menu.Installing Teleparty
  6. On the pop-up that displays, select Add extension.

One of the best ways to resolve any problems with browser extensions is to uninstall and reinstall the plugin.

4. Relaunch the web browser

  1. Close all open browser windows on your PC.
  2. Check that there isn’t a browser icon in the system tray, and ensure there aren’t any running processes visible in the Task Manager.Exiting Browsers from tray
  3. On macOS, right-click the icon in the dock and click the Quit button after closing the browser. After a brief delay, the system will force the browser to close.

By restarting your web browser, you can eliminate a temporary software bug that can cause problems with Teleparty. Therefore, we recommend you close and then reopen the web browser.

5. Clear browser cache

  1. Select the three dots in the top right corner, then click on Settings. privacy settings of chrome
  2. On the left pane, click Privacy and Security from the menu. Then, select Clear browsing data.deleting the cache of browser
  3. Click on All Time as the time frame, then select Cached images and files.
  4. After pressing the Clear data button, wait a while.

Although the cache helps with speed and efficiency, it can occasionally lead to problems and use up a lot of storage on the device. You can easily fix the problem by clearing the browser’s cache.

How to reset the Teleparty extension for HBO Max?

The first thing to do if Teleparty isn’t working is to go to the Extensions page of your browser and select Teleparty from the list.

To turn it off, click on the toggle button. After a slight pause, turn it back on. Also, attempt forcing a stop and reenabling it.

Nothing can compare to the thrill of watching your favorite shows with your friends. The fixes mentioned above would resolve your issue because they are all user-tested solutions.

It’s time to contact the Teleparty support team if, despite following all the troubleshooting steps listed above, you can still not get Teleparty to function.

Simply send an email to [email protected]. Describe your problem and attach screenshots (if any). Hopefully, the support team can assist you in finding a solution.

In the comments section below, let us know if you were able to fix the HBO Max Teleparty not working issue.

How to Integrate Twitter with Slack

Slack and Twitter are two programs and services that can work wonders, especially in work environments.

Slack is a great instant messaging app that allows communities, groups, or teams to join a workspace and stay in touch with each other.

Twitter is a social media platform where everyone can share messages via Tweets.

Given how similar and functional these two services are, it was only a matter of time before someone thought integrating them was a good idea. Read on to find out how to do this.

How can I integrate my Twitter and Slack accounts?

1. Use the Twitter app for SlackSlack Twitter

  1. 1. Go to the Twitter app page in Slack’s App Directory.

  2. 2. Select Add to Slack.

    click to add twitter to slack
  3. 3. Press on Add Twitter Integration.

    click the add twitter integration button
  4. 4. Click on Authorize app to authenticate with Twitter.

  5. 5. Enter the Twitter @username you’d like to track in Slack.

  6. 6. Select what and whose tweets you want to see.

  7. 7. Decide where you’d like the tweets to appear. You can select an existing channel or create a new one just for this.

  8. 8. When you are finished, click on Save Settings.

  9. In order to integrate the two apps, you must first add the Twitter app to Slack, and then connect them and tweak all the settings to your liking.

    The main idea of integrating Slack with Twitter is via the use of add-ins. The Twitter app brings tweets to Slack, and you can automatically update a channel when tweets are sent from your company Twitter account.

    You can also easily track every mention of your Twitter @username, and the best part is that your tweets and mentions are easily searchable in Slack.

2. Online services that connect Slack to TwitterSlack Twitter 2

Of course, plenty of other apps allow the integration of Twitter into Slack, or vice versa. However, most of these work with the browser version of these services and are usually not free either.

A few notable services that let you link your Twitter to Slack are the following:

By using the app or the above-mentioned online services, you should be able to use all of the features Twitter offers within the Slack interface.

This allows for better communication within the workplace, and it can be a lot of fun, too. However, if you’re more reserved and enjoy your privacy, consider making your X account private.

Do you think integrating Twitter and Slack is a good idea? Let us know in the comment section below.

Oculus on Windows 11: How to Fix it if it’s Not Working

You must install the Oculus app on your Windows 11 PC to set up and connect your Oculus VR headset.

This seems simple, but for several Oculus users, even after properly installing the software, the Oculus VR headset isn’t connecting and working on their Windows 11 PC.

There isn’t just one, but numerous user reports claim they cannot connect Oculus to Windows 11. However, the software is not the only reason for this issue. There are could be a bunch of reasons that are triggering this problem.

Few users have raised their queries with the official tech support, and in reply, Oculus does not officially support Windows 11 as of yet.

But several people have managed to successfully run Oculus on Windows 11. The situation seems confusing, but that is why this guide is here to help you out.

Here, we have listed some effective solutions to help you fix Oculus not working on your Windows 11 PC.

What are the potential reasons behind Oculus not connecting to PC?

Oculus lets you enjoy content in Virtual Reality on your PC. However, there is no shortage of issues people currently face with their Oculus devices.

You can find several user reports about Oculus having problems such as black screens, frequent disconnection from the PC, poor performance, etc.

Moreover, these problems are recurring, and it could be frustrating if you have purchased your first Oculus device only to find out it isn’t working on your Windows 11 PC.

Considering all of the user reports, we have deduced some potential reasons for this issue. Having prior knowledge of what could be causing this problem will not only help you fix the problem if it occurs the next time, but you will also be able to quickly resolve it for others.

Here are some of the potential reasons behind Oculus not working on Windows 11 or not connecting to a PC:

  • Mis-matched PC specifications – You may want to upgrade to a PC that suits the minimum requirements of the Oculus device.
  • Damaged USB cable or port – The only solution here may be to get a replacement cable or change the hardware.
  • Outdated Oculus PC software – Reinstalling a current version or an update will resolve the problem.
  • Syncing issues with your account – These issues will mean that your Oculus device and Windows n11 have difficulty communicating.

These are just a few reasons you could be experiencing the problem at hand.

Does Windows 11 have problems with VR?

Virtual reality may not work properly with Windows 11, especially if you use Oculus Air Link or Oculus Link. Framerate decreases, freezes, stuttering, and strange flashes are typical symptoms. When Oculus and SteamVR are used together, these issues get significantly worse.

Now that you have some information about this issue let us check out how to resolve it.

How can I fix Oculus if it’s not working on PC?

1. Check PC specifications

  1. Press the Windows + R buttons to open the Run dialog.
  2. Type dxdiag and click the OK button. DxDiag Oculus not working Windows PC
  3. You can switch between the System, Display, and other tabs to check your PC specifications such as operating system, memory, graphics card, etc.PC Specs oculus not working on windows PC

To check your Oculus device’s minimum PC requirements, you can visit the official Oculus website or search for it over the internet. You should ensure your PC meets the minimum requirements for the Oculus device.

2. Update Oculus software

It is imperative to keep all the drivers installed on your Windows PC up to date. This ensures that you have all the latest available features along with the latest bug fixes.

As mentioned above, outdated software could trigger your Oculus device not working on your Windows PC.

In such a case, you should visit the official Oculus support page and check if a new software version is available. If yes, download it and see if it resolves your problem.

3. Check your USB cable and port for damage

To connect your Oculus headset, you have to use a USB cable. There is no foundation to using a proprietary USB cable to connect Oculus to your PC.

You can use any third-party USB cable as well. However, it should be of high quality to minimize power loss. If Oculus isn’t connecting to your PC, try replacing your USB cable with another one.

Besides, you can try connecting the USB cable to a different port on your PC. Because there might be some issue with your USB port that is triggering the problem.

Furthermore, you can also try disconnecting the USB cable on both ends, i.e., from the Oculus device and your PC. Then connect them back again and see if this helps.

4. Perform a power cycle

A simple restart can do wonders and fix several common problems on a device. The same applies to Oculus devices.

You can perform a power cycle by powering off your PC and your Oculus device. After 10-20 seconds, turn both the devices back on and see if your PC recognizes your Oculus device or not.

5. Update PC drivers

  1. Right-click on the Start menu and select Device Manager.Device manager oculus not working windows 11
  2. Expand Display Driver and right-click on your graphics card. Select Update driver.
    Oculus not working on Windows 11
  3. Select Search automatically for drivers option.search automatically for drivers
  4. Similarly, expand Universal Serial Bus controllers, right-click on the USB device you are having issues with, and select Update driver.

In case that did not work, using a specialized software is a good idea, as it scans your PC for missing or outdated drivers and updates them.

6. Turn off USB power settings

  1. Right-click on the Start menu and select Device Manager.Device manager oculus not working windows 11
  2. Expand the Human Interface Devices section, right-click on the USB input device, and select Properties.
  3. Switch to the Power Management tab and uncheck Allow the computer to turn off this device to save power option.
    Oculus not working on Windows 11
  4. Finally, click OK and exit.

7. Reconnect your Oculus account

This solution may appear to be simple, but Oculus may misbehave and refuse to connect to your PC due to a problematic sign-in.

To fix this, simply open the Oculus software on your PC and log out of your account. Then log back in again and see if this fixes the issue or not.

8. Factory reset your Oculus headset

8.1 Using phone

  1. Open the Oculus app on your smartphone.
  2. Tap Settings in the bottom menu.
  3. Tap the headset connected to your phone, and tap More settings.
    Oculus not working on Windows 11
  4. Then tap on Factory Reset and Reset.
    Oculus not working on Windows 11

8.2 Using the headset

  1. Power off your Oculus headset.
  2. Hold the Power and Volume down buttons together. Wait until the boot screen loads up on your headset.
  3. Navigate using the volume buttons and select Factory Reset using the power button.
  4. Highlight Yes using volume buttons and press Power button to select the option.

9. Contact customer support

If none of the above fixes resolve Oculus not connecting to a PC or not working on Windows 11, then as a last resort, you should contact customer support.

Explain your problem to customer support and apply the solution that they give you.

What are the best settings to get optimum quality and performance from your Oculus headset?

Even if Oculus is connected to a Windows PC that meets the minimum requirements, it does not guarantee optimal performance.

You need to tweak a few Oculus settings to get the best quality and performance out of your Oculus headset.

Here are some tips that you can apply to get the optimum output from your Oculus headset:

  • Ensure you are using a USB 3.0 cable. This is because USB 3.0 unlocks the 80Hz and 90Hz modes. On the other hand, if you use USB 2.0, it operates at 72Hz refresh rate. So, usage of USB 3.0 is a must for best performance.
  • Oculus will give you the best output with the latest NVIDIA 3000 series and AMD 5000 series graphics cards.
  • While 90Hz can look smooth and can reduce latency, it adds more processing load on your PC. So, try reducing the refresh rate for stuttering and lagging games.
  • Set the Encode Bitrate to 250 in the Oculus Debug Tool (ODT). You can find this tool inside the Oculus Support folder, under Oculus-diagnostics. It is found that going beyond 250 bitrate increases latency and stuttering issues.

How do I install Oculus app on Windows 11?

  1. Navigate to the Oculus website.
  2. Click on Download Software for any of the software you need to be installed.
  3. Click on the downloaded app to begin the installation.
    Oculus not working on Windows 11
  4. Now, click on Get started.
  5. Click Agree.
  6. Finally, click on Install now, and give it a moment.

And there you go. If Oculus is not working on your Windows 11 device, you should have been able to fix it with this guide.

Let us know in the comments below if you found this guide helpful in fixing Oculus not working on Windows 11 PC.

How to Integrate Slack and Asana

One of the great things about the Slack instant-messaging platform is that you can integrate a wide variety of web-based apps with it. Slack has an expansive app directory, which includes an Asana app.

That is a Slack app for the web-based Asana project management application. Therefore, that app enables you to integrate Asana project management with the Slack instant-messaging platform.

How can I integrate Slack with Asana?

1. Add the Asana app to Slack via the app directory

  1. First, you’ll need to add the Asana app to Slack. To do so, download the Asana app from the Slack app directory.
  2. Then press the Continue button.
  3. Select the Slack channels for Asana to post to. To include direct messages, click Search for channels.
  4. Thereafter, you and any other team members will need to sign in to Asana from Slack.
  5. Click Asana within the Apps section of Slack’s left sidebar.
  6. Then enter this command in the message box: /asana.
  7. Click Connect Asana to Slack to grant app permissions.
  8. Then click the Allow button to enable the app to access the Asana account.
Allow button how to integrate slack and asana

2. Integrate Slack and Asana from within the Slack app

  1. 1. Launch Slack.

  2. 2. Click on More and then choose Apps from the list of options.

    navigate to apps in slack
  3. 3. Search for the Asana app, and, when you find it, click on Add.

    *Title below* + art's KW
  4. 4. Click on Add to Slack on the web page that opened.

    press the add to slack button
  5. 5. Now you need to give permissions to Asana to connect to Slack. Click on Allow.

  6. 6. Hit Allow once more on the next window.

  7. Asana and Slack can be easily integrated by installing the Asana app to Slack, and then connecting your accounts. You can do this from within the app, by looking up Asana in the apps list, and adding it to Slack.


How can I use Slack with Asana?

1. Set up a new Asana task in Slack

  1. You can set up Asana tasks within Slack. To do so, enter this command into Slack: /asana create.
  2. The dialog box window directly below will open when you press Return.New Asana task window how to integrate slack and asana
  3. Fill in the text boxes on that window.
  4. Press the Create button.

2. Turn a Slack message into a task

  1. Alternatively, you can set up a task from a Slack message. Hover the cursor over the message to set up a task.
  2. Then click the More actions button shown directly below for that message.More actions button how to integrate slack and asana
  3. The More actions menu will include new Asana options. Select the Asana Create a task option.
The Create a task option how to integrate slack and asana

3. Set up Asana notifications

  1. You can set up Asana notifications for Slack channels. First, select the channel on the left to set up a notification.
  2. Next, enter this command in Slack: /asana link.
    /asana link command how to integrate slack and asana
  3. Press the Return key.
  4. Thereafter, you can select a project to link with the channel.

4. Take action on Asana task notifications

When you see a task notification in a channel, you can select actions for it. Click the More actions drop-down menu on the right of a task notification. Then you can select Mark complete, Change due date, Add to project, and other options for it.

More actions menu how to integrate slack and asana

So, the Asana for Slack app effectively combines Slack’s instant-messaging platform with Asana’s project management. The app enables users to act on Slack messages with Asana’s project management options. Thus, it’s a great extension for Asana users.

You can also connect Google Calendar to Slack if you want to keep track of all your events, and we have a special guide that explains how to do that.

If you have any more questions or suggestions, don’t hesitate to leave them in the comment section below.

3 Easy Ways to Fix Fallout New Vegas Runtime Error

When playing or launching the widespread action role-playing game Fallout New Vegas, you may encounter a runtime error that leads to a game freeze and crash. The full error reads:

Runtime Error!
Program: C:GamesFallout – New VegasFalloutNV.exe
This application has requested the Runtime to terminate it unusually. Please contact the application’s support team for more information.

If you are also troubled by this error, here are a couple of troubleshooting tips to help you fix the Fallout New Vegas runtime error in Windows.

Why is Fallout New Vegas not loading?

This problem arises when the most recent save file becomes corrupted for whatever reason. Memory limitations, incorrect installation files, or an incompatible version of Microsoft Visual C++ might contribute to the game not loading correctly.

If rebooting your PC and restarting the game won’t do the trick, you may follow the solutions below to fix this error.

Why do I keep getting a runtime error?

When a program is being executed, or the application is being started for the first time, you may see a runtime error. However, simply reopening the application will often be enough to get rid of the issue on its own.

There are several potential causes of runtime errors, which might vary according to the circumstances. For example, the program has a bug that has to be fixed, or the memory or another resource on the machine is running low.

The problem will typically manifest itself as a little window and will frequently provide an indicator of the impacted application.

How do I fix the Fallout New Vegas runtime error?

1. Use FNV 4GB Patcher

Fallout New Vegas runtime error
  1. Go to the Fallout New Vegas Patcher page.
  2. Create a new account by clicking the Register button. This is required to download any files from the website.register fallout new vegas runtime error
  3. Scroll down, open the File tab, and then click Manual to download the file.manual fallout new vegas runtime error
  4. Once downloaded, extract the file downloaded to the following location: C:\Program Files(x86)\Steam\SteamApp\common\falloutnewvegas
  5. After extracting the folder, right-click the FalloutNVpatch.exe file in the folder—Select Run as administrator to execute the file with administrator privilege.
  6. Launch Steam and try launching Fallout New Vegas.

If the issue persists, you may need to change the *ini file attribute to read-only.

  1. Open File Explorer by pressing Windows + E and navigate to the following location: C:\ProgramsFiles(x86)\Steam\SteamApp\common\falloutnewvegas
  2. Search for *ini files in the folder.ini fallout new vegas runtime error
  3. Right-click on the first ini file and select Properties.prop-file fallout new vegas runtime error
  4. In the General tab, check the Read-only option.general-read-only fallout new vegas runtime error
  5. Click Apply and OK to save the changes. Do this for all the ini files in the folder.

The Fallout New Vegas is a free mod that allows you to overcome any memory limitations preventing the game from functioning correctly.

2. Use New Vegas Anti Crash

Fallout New Vegas runtime error
  1. Download the New Vegas Script Extender to your computer.download-stable fallout new vegas runtime error
  2. Extract the zip folder to the following location: C:\Games\Fallout-New VegasFalloutNV.exe 
  3. The above location may change depending on where you have installed Fallout New Vegas on your computer.
  4. Next, download the New Vegas Anti Crash mode by clicking the Manual button.manual-download fallout new vegas runtime error
  5. Extract the files and put NVSE in the Data folder: C:\Games\Fallout-New VegasData
  6. Once the files are moved, try launching Fallout Las Vegas and check if the Dead money runtime error is resolved.

3. Install Microsoft Visual C++ Redistributable

Fallout New Vegas runtime error
  1. Press Windows, then type control and select the Control Panel result.control-panel-search fallout new vegas runtime error
  2. Click Uninstall a program under Programs.uninstall-program-w11 fallout new vegas runtime error
  3. Check if you have the Microsoft Visual C++ 2008 Redistributable x86 package installed.
  4. If not installed, go to the Microsoft Visual C++ 2008 Redistributable download page.
  5. Download the installer and run it.download-microsoft-cpp fallout new vegas runtime error
  6. Once installed, reboot the computer and check if you can run Fallout New Vegas without any issues or the fallout new vegas runtime error r6025.

How do I fix runtime errors when installing a game?

When installing a game, the easiest and quickest way to repair a runtime issue is to uninstall the game entirely, then redownload and reinstall it.

This is the recommended course of action, as any files that were damaged or contained errors found in the last installation folder will be removed.

Alternatively, you will need to check your Microsoft Visual C++ Redistributable and install the latest versions, as we have shown above in the third solution.

The Fallout New Vegas runtime error can occur due to several reasons. However, most of the time, it can be fixed using the New Vegas Anti Crash mod or the New Vegas 4GB patcher.

This isn’t the only error you can encounter, and we covered what to do if Fallout New Vegas crashes on Windows 11, so don’t miss it.

Follow all the steps in this article and let us know which method helped you resolve the issue in the comments.

3 Quick Ways to Install the Intel Watchdog Timer Driver

The Intel Watchdog Timer driver allows specific devices to leverage the platform’s hardware. It’s a critical driver that enables the system to perform well. And if you want the get it, we will tell you how to install the Intel watchdog timer driver.

It can also automatically restart the failed instances of your programs, logging the activity for troubleshooting. Therefore, it is essential to install its related driver properly.

Today’s article discusses some valuable recommendations to help you install the Intel watchdog timer driver.

What is a watchdog timer, and what is it used for?

A Watchdog Timer is a timer that identifies the programs that are not responding or have stopped working and alerts the necessary components if things are not automatically fixed within a given time frame.

It’s a critical device that prevents damage to the system and ensures an optimal experience by performing the relevant operation.

Do I need Intel Watchdog Timer driver?

Yes, you don’t need it, but installing the Intel Watchdog Timer driver is undoubtedly advisable, given its critical role. And it doesn’t consume high resources or take up a lot of storage on the drive.

You may notice a slightly higher boot time and, in some cases, a deadlock between the Watchdog Timer and Microcontroller Unit.

How do I install the Intel Watchdog Timer driver?

1. Access the manufacturer’s website

  1. Visit the Intel download center.
  2. In the search box, type watchdog timer, and click on the shown result.
  3. Select your choice, then click on the Download blue button.
Note icon NOTE
To easily install the driver, do not hesitate to check out this dedicated Intel Watchdog Timer guide by Intel.

2. Use Device Manager

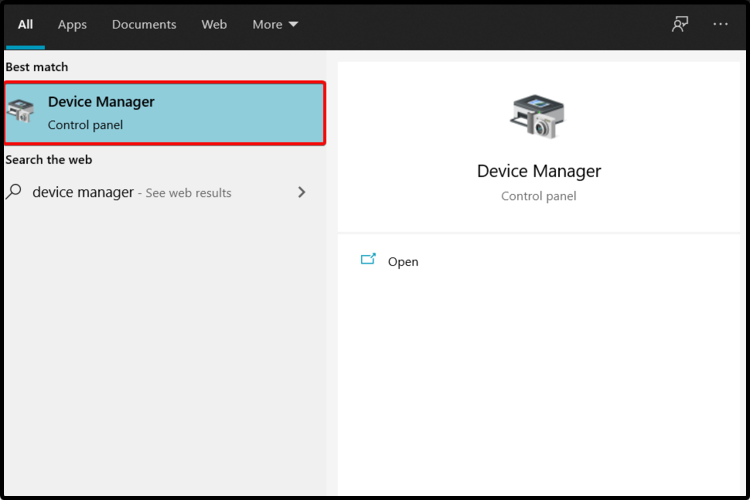
  1. Press Windows + S to open Search, type Device Manager in the text field, and click on the relevant search result.
  2. Expand System devices.
  3. Go to the System timer, right-click, and select Properties.
  4. Select the Driver tab, then click on Update Driver.
  5. Click on Browse my computer for drivers.
  6. Select Let me pick from a list of available drivers on my computer.
  7. Click on Have Disk…, then locate your driver file.
  8. Select Next and wait until the installation is completed.

You now know how to manually install the Intel watchdog timer driver and can easily do so from either the manufacturer’s website or the Device Manager.

But, both these methods are slightly time-consuming, so it’s often wise to choose a dedicated third-party driver updater software.

3. Use third-party software

You can easily install the Intel watchdog timer driver with the help of dedicated third-party software. Compared to the manual methods, this automatic software can save much more of your time.

Also, driver installers allow you to perform actions on a friendly and intuitive interface.

How do I turn on my watchdog timer?

After you have installed the Intel Watchdog Timer Utility, launch it, head to Advanced settings, and then tick the Hardware watchdog checkbox.

Once done, restart the computer for the changes to come into effect. Also, the watchdog timer may be disabled from the BIOS, so you will have to check there as well, the steps for which would be different for all manufacturers and should be available on their official website.

If you were wondering how to install the Intel watchdog timer driver, you would find that we’ve selected the best options by scouring various forums and online blogs.

Ensure you also check some valuable recommendations about updating drivers in Windows 10.

Comment in the section below and let us know which of our suggestions worked best for your Intel watchdog timer driver installation.

How to Connect Slack with Outlook Calendar

Those of you that work in a corporate environment are probably familiar with Slack. For those of you that aren’t Slack is a cloud-based proprietary instant messaging platform that allows specialized communication in work environments.

Another neat tool that is common in work environments is Microsoft Outlook. This is a personal information manager from Microsoft, although most of you use it for the email component.

Given how the two programs can be very useful in work environments, it is only natural to ask yourself whether you can connect the two services together.

There are several methods through which you can connect the functionalities of the two apps. We’ve compiled a list of the best ways to do so.

How can I integrate my Slack and Outlook accounts?

1. Use the Microsoft Outlook email add-in for SlackSlack Outlook

You can use the Outlook add-in for Slack to send emails to Slack channels and direct messages straight from your inbox.

  1. Go to the Slack for Outlook page in Microsoft AppSource
  2. Select Get it now
  3. Follow the instructions
  4. Open the Outlook desktop app.
  5. Click on the Slack icon. It should be in your toolbar.
  6. Select Connect to Slack.
  7. Click Authorize when it appears.

2. Use the Microsoft Outlook Calendar for Slack

    You can use the Microsoft Outlook Calendar app for Slack to integrate Outlook and Slack and benefit from several Office 365 features from within Slack.

    Before you can connect your Outlook Calendar to Slack, you must first install the Outlook Calendar app to the app.

    Here are some things you can do using this app:

    • Automatically update your Slack status based on your calendar
    • Respond to event notifications
    • Get updates when event details change.
    • Join a Skype, Zoom, or Webex video call using an event reminder

  1. 1. Go to the Outlook Calendar App page.

  2. 2. Click on Add to Slack.

  3. 3. You will receive a prompt asking you for permission to connect Outlook Calendar to Slack. Select Allow, and then follow the prompts.

  4. 4. Select Open Slack and return to your workspace.

  5. 5. Open Outlook Calendar.

  6. 6. Go to the Home tab.

  7. 7. Click on Connect Calendar.

  8. 8. Click on Apps, in the upper-left side.

  9. 9. Go to Outlook Calendar.

  10. 10. Go to the Home tab.

  11. 11. Click on Connect an account.

  12. 12. Go back to the Outlook Calendar app in Slack.

  13. 13. Go to the Messages tab.

  14. 14. Click on Use This Calendar.

3. Use Slack for Outlook

Conversely, you can use an add-in for Outlook that will connect it to Slack, which is available in the Microsoft AppSource.

The add-in can be installed like any other Microsoft Outlook add-in, and the Slack functionalities become available whenever you write a new email.

All you need to do is open an email and click on the slack icon on the right-hand side of your inbox.

You then have to choose the channel or person you’d like to forward the email to inside Slack.

Given what these add-ins and apps are capable of, you can now combine the instant messaging capabilities of Slack with the personal information management tools of Microsoft Outlook.

These are the main ways you can connect Slack and Outlook together, and it couldn’t seem to get any better than this.

If you don’t use Outlook Calendar, we have a guide on how to connect Google Calendar to Slack, so don’t miss it.

Do you think performing a Slack and Outlook integration is worth it? Let us know in the comment section below.

10 Most Common Windows Hello Errors & How to Fix Them

While the Windows Hello feature offers you a fun safer way to log in to your Windows PC using fingerprint scan or facial recognition, unfortunately, it’s prone to errors.

Windows Hello errors can be related to PIN creation, TPM not working, the recent update, and more.

However, owing to the fact that passwords are more susceptible to security breaches, biometric authentication like the Hello feature makes it a better alternative.

But, if it’s your Windows fingerprint that isn’t working, we have a few workarounds to help you.

What causes Windows Hello to stop working?

There could be a host of reasons why your Windows Hello stops working and one of the major reasons include a Windows update.

Some of the most common Windows Hello errors include:

  1. Windows Hello is not configured – This error shows up when there is some kind of misconfiguration.
  2. Something went wrong. Try again later – You may encounter this error when there’s something goes wrong with your PIN, face, or fingerprint.
  3. Windows Hello stops working after an update – This is when you installed a Windows update and the Hello feature stops working.
  4. Stuck on Windows Hello Set Up Account Screen – In this situation, Windows Hello is stuck on the blue screen during face setup.
  5. Windows 11 Hello Face not working – In this case, you’ll get an error message when you try to sign in through Windows Hello
  6. This option is currently unavailable – This is when the Windows Hello Biometrics and facial recognition stops working due to a Windows update or Group Policy settings.
  7. Windows Hello not working on Windows 11 – In this case, the fingerprint sensor stops working due to disabled PIN login, an outdated biometrics driver, or missing/malfunctioning biometrics device.
  8. Unable to create Windows Hello PIN – This is when Windows doesn’t recognize the PIN due to insufficient permissions for the NGC folder or due to corrupted system files.
  9. Couldn’t turn on the camera – It’s a problem related to the Windows Hello Face and the culprit is outdated webcam drivers.
  10. Windows Hello isn’t available on this device – You may see this error on a device that does not have a fingerprint scanner or after a recent update.

However, these errors are common and can be easily fixed with some quick workarounds as listed below.

How do I fix Windows Hello problems?

1. Use the Device Manager

1.1 Disable/Enable webcam

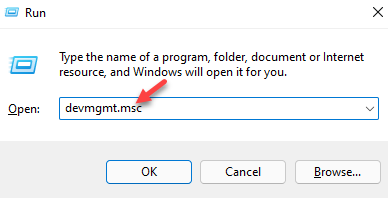
  1. Press the Win + R keys simultaneously to launch the Run console.
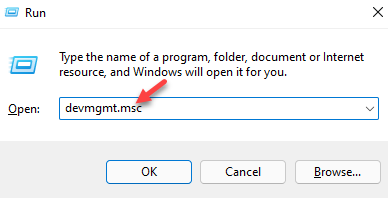
  2. Type devmgmt.msc in the search bar and hit Enter to open the Device Manager window. Windows 11 touch screen won't calibrate
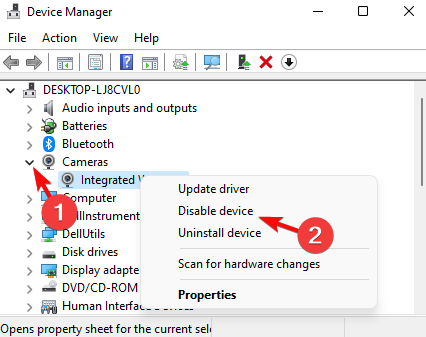
  3. Expand the Cameras section, right-click on the webcam and click on Disable device. disable webcam
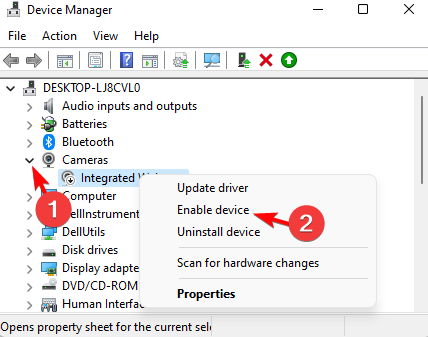
  4. Now, right-click on the webcam again and select Enable device.enable webcam

Now, close Device Manager, restart your PC, and check if you encounter any errors while signing into Windows Hello.

1.2 Reinstall the webcam

  1. Open the Run console by pressing the Win + R shortcut keys.
  2. In the search field, type devmgmt.msc and hit Enter. write devmgmt.msc in the run command and press enter
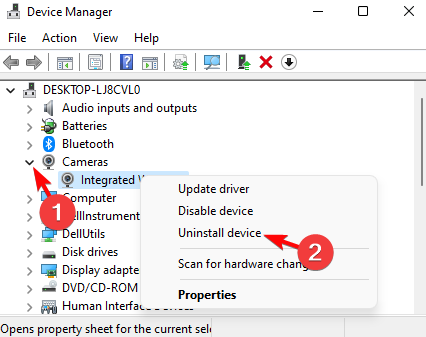
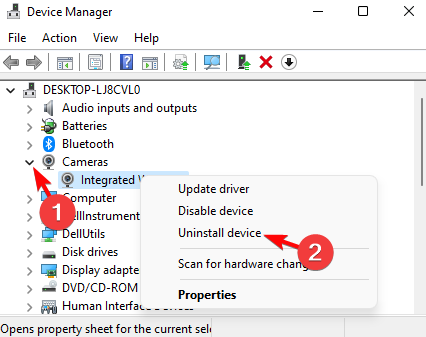
  3. Click to expand the Cameras section, right-click on the device and select Uninstall device. uninstall webcam
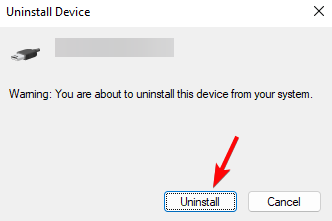
  4. Click Uninstall again in the prompt to confirm. confirm to uninstall
  5. Now, click on the Action tab and select Scan for hardware changes to reinstall the webcam. Scan for hardware changes

Once done, restart your PC and you should not see any error messages while signing into Windows Hello.

1.3 Rollback the webcam driver

  1. Press the Win + I shortcut key combination and the Run console will open.
  2. Next, type devmgmt.msc in the search box and hit Enter. write devmgmt.msc in the run command and press enter
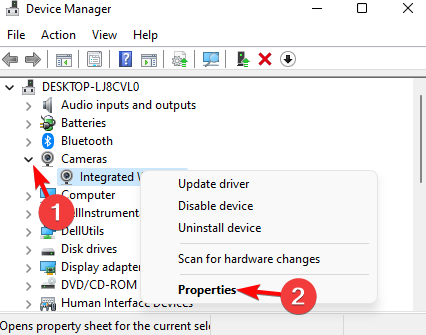
  3. In the Device Manager window, expand the Cameras section, right-click on the device, and select Properties. webcam properties
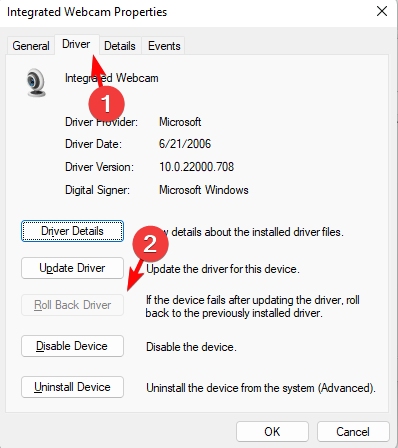
  4. Now, go to the Driver tab and click on Roll Back Driver. rollback webcam driver

Once done, exit Device Manager, reboot your machine, and check for any error as you sign in to Windows Hello.

1.4 Uninstall the Biometric driver

  1. Open the Run console by pressing the Win + R shortcut keys together.
  2. In the search box, type devmgmt.msc and hit Enter. write devmgmt.msc in the run command and press enter
  3. In the Device Manager window, expand the Biometric devices section, right-click on the device, and select Uninstall device.Uninstall biometrics device
  4. Confirm the uninstallation in the next prompt. confirm to uninstall

Once done, restart your PC to check if Windows Hello isn’t available on this device error is resolved.

An easier and faster solution is using a specialized program, like Outbyte Driver Updater, that can execute these steps automatically. It scans your device for old drivers and then locates the latest version from its systematically reviewed database.

⇒ Get Outbyte Driver Updater

2. Set up TPM on your device

  1. Pressing the Win + R hotkey will open the Run console.
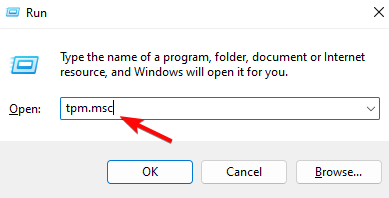
  2. Here, type tpm.msc and hit Enter. run tpm.msc command
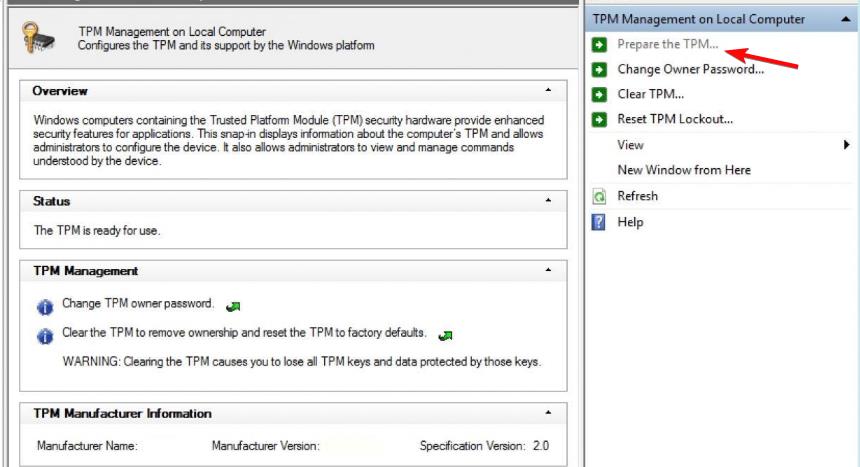
  3. Click on the Action tab at the top and select Prepare the TPM.prepare the TPM

Now restart your PC and you should not face any Windows Hello errors as you sign in.

3. Authorize the PIN Login using the Registry Editor

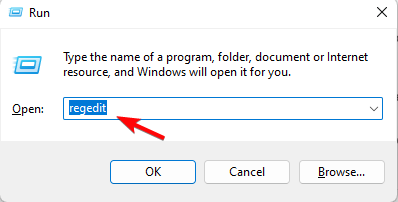
  1. Press the Win + R keys together on your keyboard.
  2. In the Run console search bar that opens, type Regedit and hit Enter. run regedit command
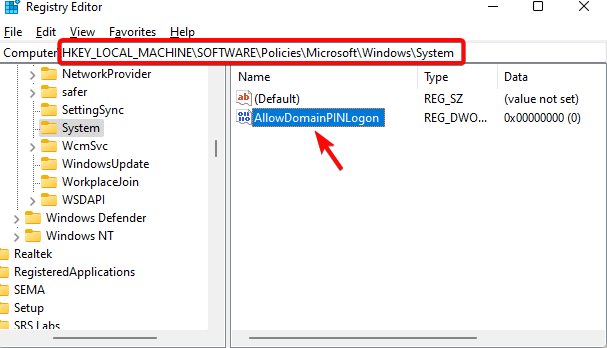
  3. Navigate to the following path in the Registry Editor: HKEY_LOCAL_MACHINE\SOFTWARE\Policies\Microsoft\Windows\System
  4. Now, look for the AllowDomainPINLogon entry on the right and double-click on it. double click on AllowDomainPINLogon
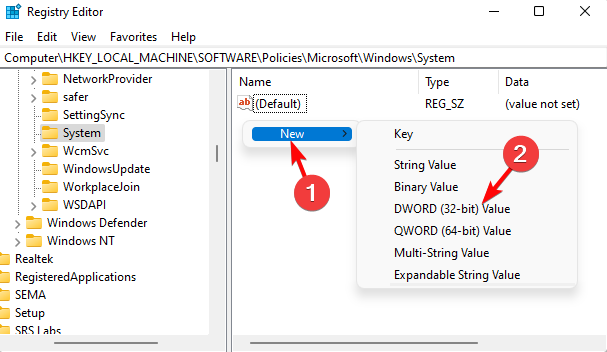
  5. If you don’t find the key, right-click at an empty space on the right, select New, and then click on DWORD (32-bit value).create new dword value
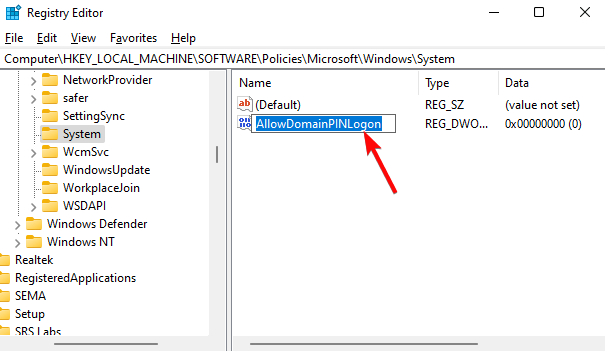
  6. Rename the key as AllowDomainPINLogon and double-click on it to open the Edit DWORD (32-bit value) dialog. rename new dword value
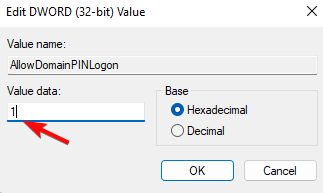
  7. Here, go to Value data and change the value to 1. Press OK. set value data

Close the Registry Editor, restart your PC, and you should be able to create a PIN again in Windows Hello without any errors.

4. Verify your Microsoft account

  1. Open Windows Settings by pressing the Win + I keys together.
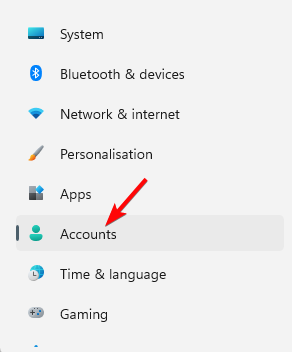
  2. Click on Accounts on the left. accounts settings
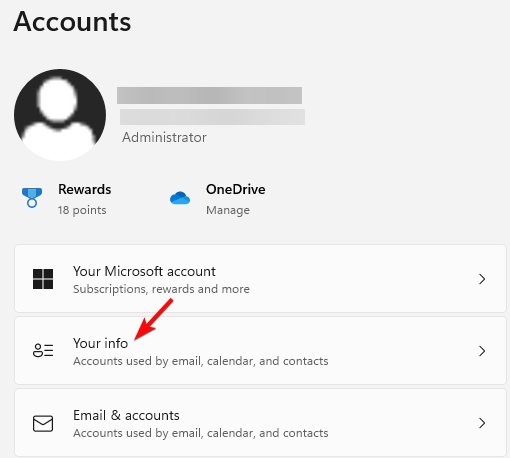
  3. Now, on the right, click on Your info. your info
  4. Next, under the Account settings section on the right, check if it asks you to verify the account. Click on Verify.

Once done, reboot your PC and check if Windows Hello is working normally now.

5. Review the Group Policy Editor settings

  1. Press the Win + R shortcut keys to launch the Run console.
  2. In the search bar, type gpedit.msc and hit Enter.
  3. Now, make sure that the below GPO settings are in place:
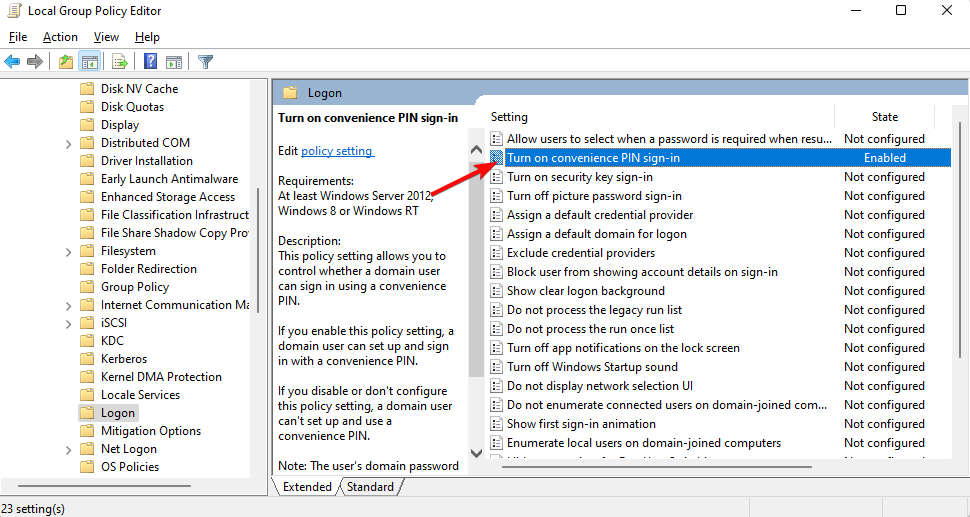
    1. Navigate to Computer>Administrative Templates>System>Logon>Turn on convenience PIN sign-in = Enabledenable Turn on convenience PIN sign-in
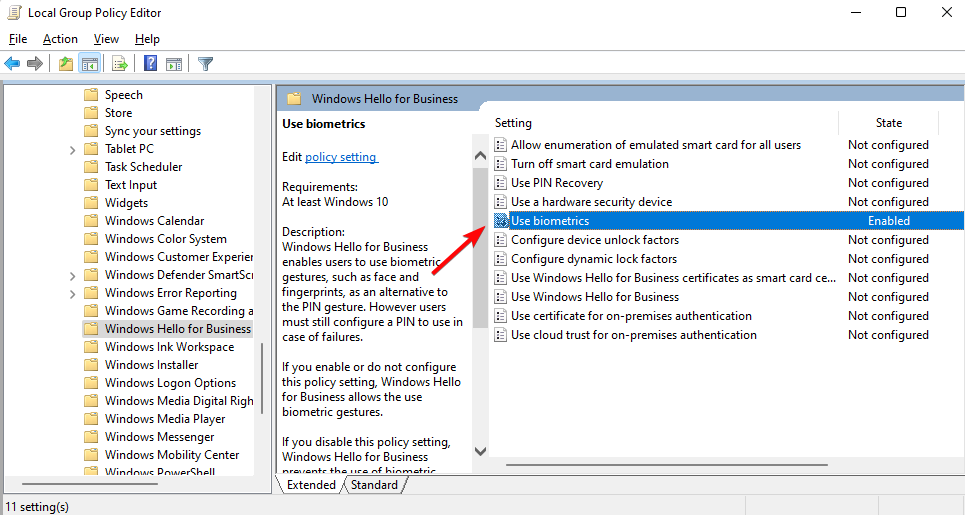
    2. Go to Computer>Administrative Templates>Windows Components>Windows Hello for Business>Use Biometrics = Enabledturn on biometrics
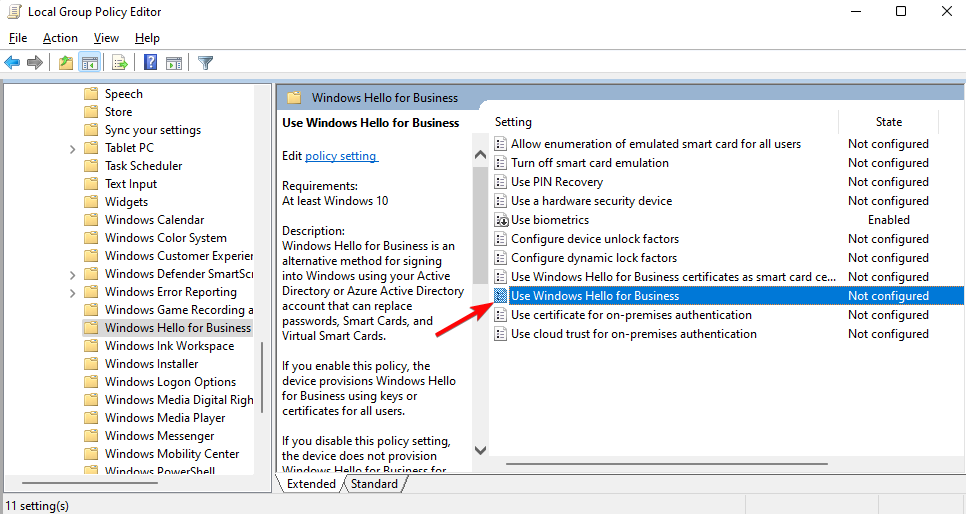
    3. Select Computer>Administrative Templates>Windows Components>Windows Hello for Business>Use Windows Hello for Business = Not configuredenable use windows hello for business
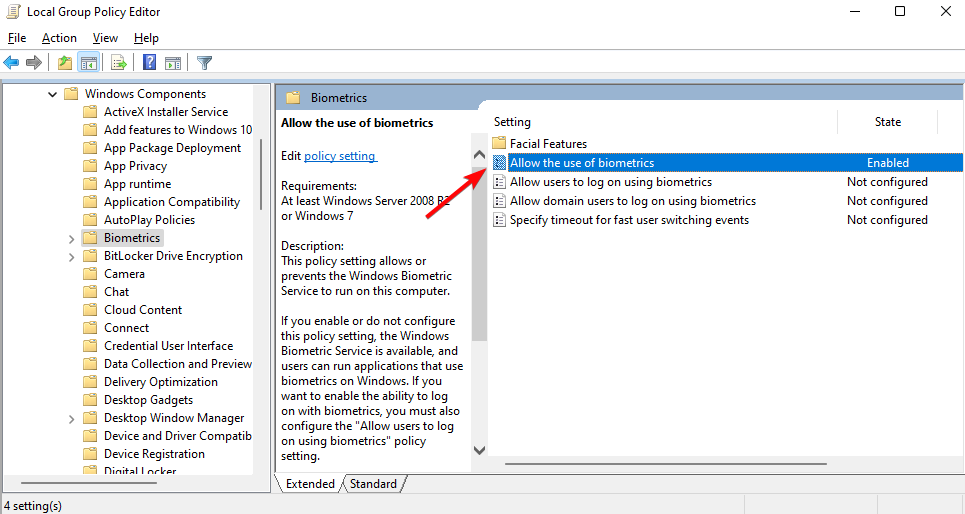
    4. Click on Computer>Administrative Templates>Windows Components>Biometrics>Allow the use of biometrics = Enabledenable Allow the use of biometrics
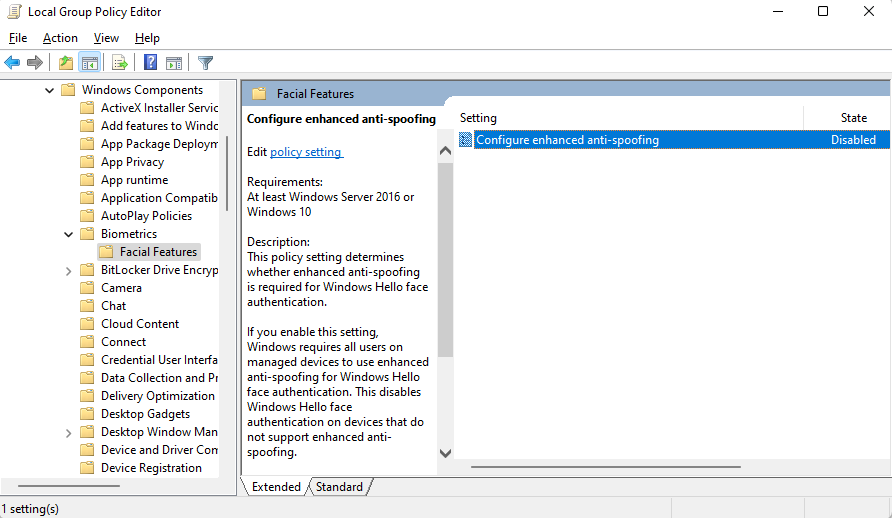
    5. Go to Computer>Administrative Templates>Windows Components>Biometrics>Facial Features>Configure enhanced anti-spoofing option = Disableddisable Configure enhanced anti-spoofing option

This method can help you to fix all kinds of Windows Hello errors like when it’s not working on Windows 11, this option is currently available, or even if you are facing a PIN error.

6. Remove the NGC folder

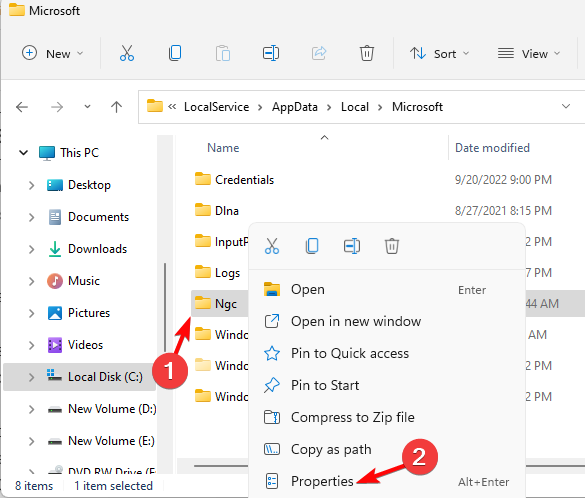
  1. Press the Win + E keys simultaneously to open File Explorer and navigate to the below path: C:\Windows\ServiceProfiles\LocalService\AppData\Local\Microsoft
  2. Now, right-click on the NGC folder and select Properties.ngc folder properties
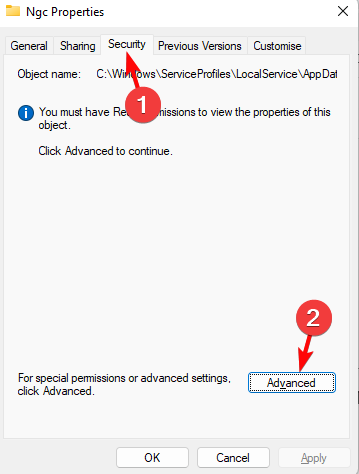
  3. Next, select the Security tab and click on Advanced. ngc folder advanced
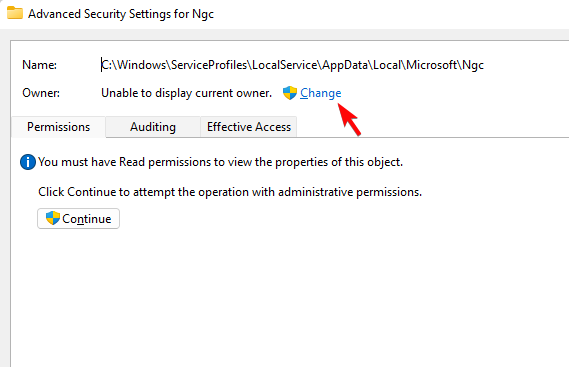
  4. On the Advanced Security Settings page, go to Owner and click on Change. Advanced Security Settings
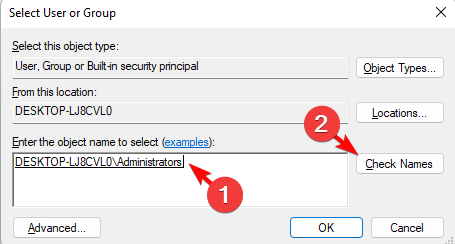
  5. Next, under Enter the object name to select, type Administrator, click on Check Names, and press OK.Enter the object name to select
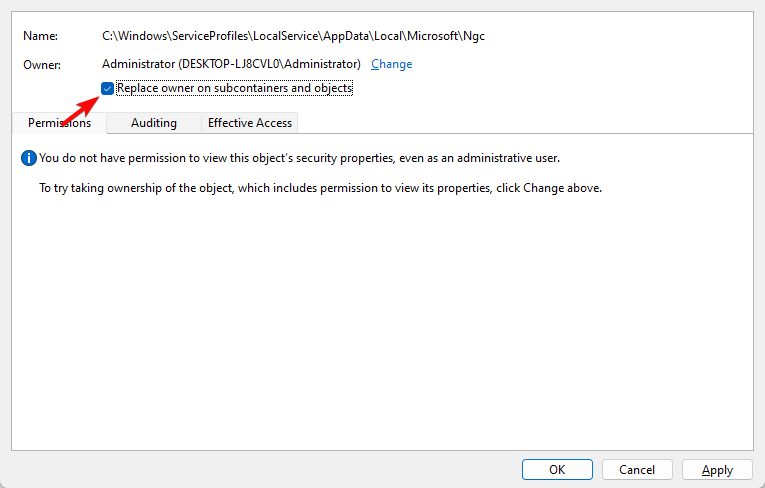
  6. Back on the Advanced Security Settings page, select Replace owner on sub containers and objects. Press Apply and OK. enable Replace owner on sub containers and objects
  7. Now you can double-click on the NGC folder and it should open.
  8. Select all files and folders inside the NGC folder and hit Delete.

Once the files and folders are deleted from the NGC folder, go back to step 1 to add a new PIN.

7. Use the Hardware and Devices Troubleshooter

  1. Press the Win + R keys at the same time to open the Run console.
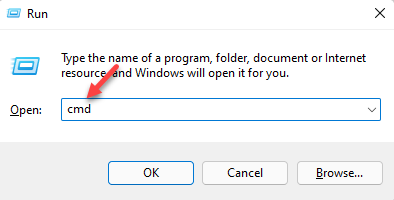
  2. Type cmd in the search field and press the Ctrl + Shift + Enter keys together to launch Command Prompt with admin rights. open elevated command prompt by pressing Ctrl + Shift + Enter together
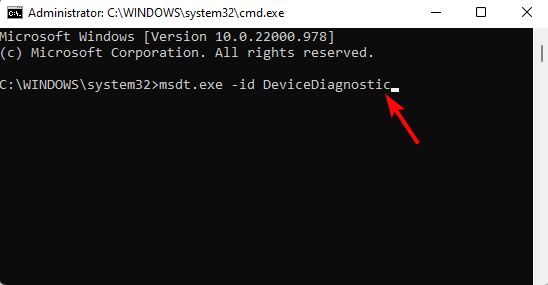
  3. Now, in the elevated Command Prompt, run the below command: msdt.exe -id DeviceDiagnosticHardware and Devices troubleshooter
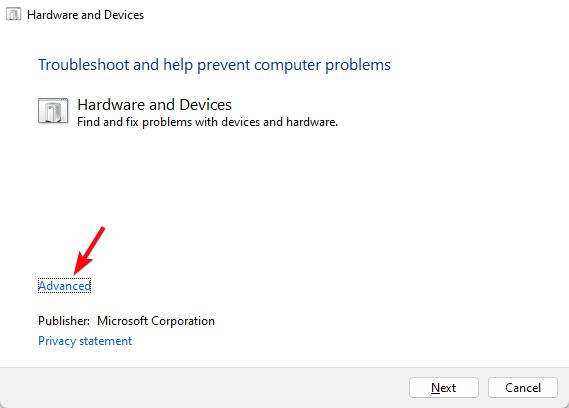
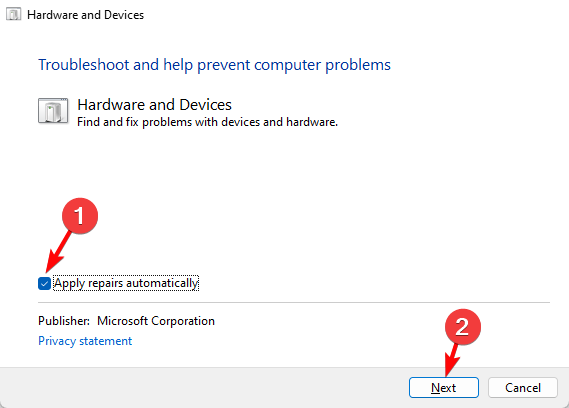
  4. As the Hardware and Devices troubleshooter opens, click on Advanced. hardware and devices troubleshooter advanced
  5. Select Apply repairs automatically and press Next. Apply repairs automatically
  6. Now, wait till Windows detects any errors, and applies the fix accordingly.

Once done, restart your PC and check if the Camera is not compatible with the Windows Hello Face error is fixed.

8. Run DISM/SFC scan

  1. Launch the Run console by pressing the Win + R shortcut keys at the same time.
  2. Now, type cmd in the search bar and press the Ctrl + Shift + Enter hotkey to launch the elevated Command Prompt. open elevated command prompt by pressing Ctrl + Shift + Enter together
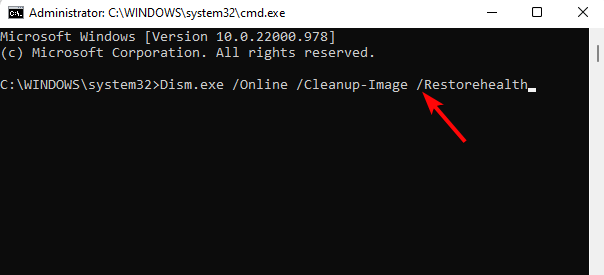
  3. In the Command Prompt (Admin) window, run the below command and hit Enter: Dism.exe /Online /Cleanup-Image /Restorehealthrun dism command
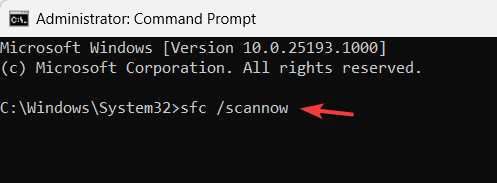
  4. The scan takes a while so wait patiently till it’s over. Once it’s over and you see the success message, run the below command and hit Enter: sfc /scannowrun sfc /scannow command
  5. Wait till the process is over, and once completed, you should see the success message.

Now, restart your PC and check if you can sign in to Windows Hello without any errors.

Another option you can always choose is a specialized tool to ease this process. This way, your PC will be scanned, or even repaired if it is the case, in a more secure way.

9. Turn off Fast Startup

  1. Press the Win + R keys together to open the Run console.
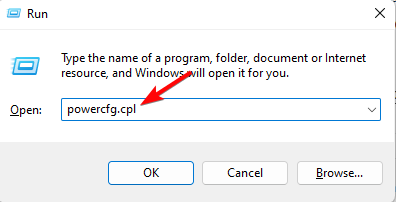
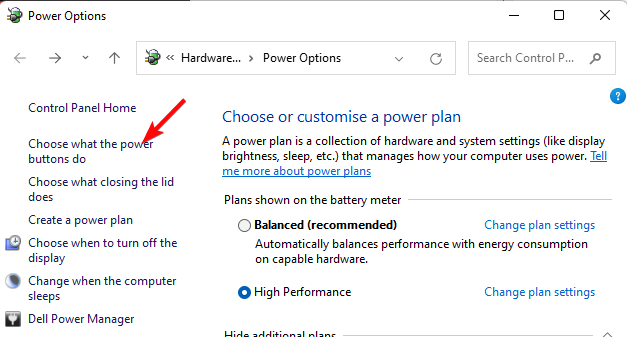
  2. Here, type powercfg.cpl and hit Enter to open the Power Options window. run powercfg.cpl command
  3. Now, on the left, click on Choose what the power buttons do. choose what the power buttons do
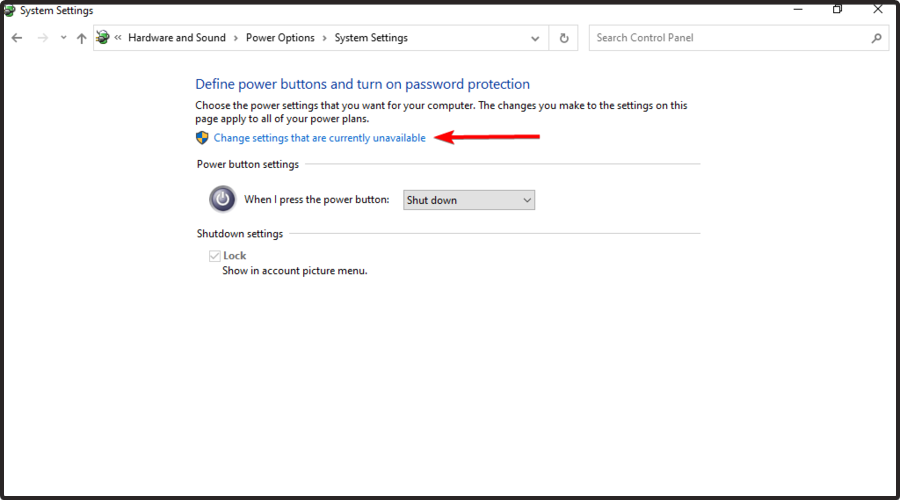
  4. On the next screen, click on Change settings that are currently available. Change settings that are currently available
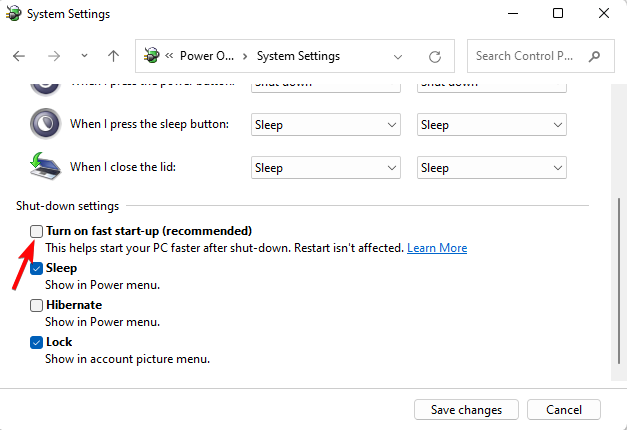
  5. Now, scroll down and under Shut-down settings, deselect Turn on fast-startup. Click on Save changes. disable Turn on fast-startup

Once done, reboot your machine and try signing in to Windows Hello and see if you come across any errors.

How can I set up Windows Hello on my new Windows 11 device?

Windows 11 supports Windows Hello as an alternative to password login and hence, a more personal and secure way to access your device.

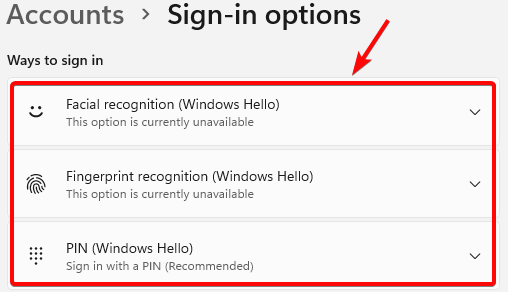
You can sign in using your facial recognition, fingerprint, or PIN. While to activate fingerprint or facial recognition sign-in, you need to set up a PIN, you can also sign in just using your PIN.

Here’s how to set up Windows Hello if you also have a new Windows 11 device and create a PIN:

  1. Press the Win + I shortcut key combination to Windows Settings.
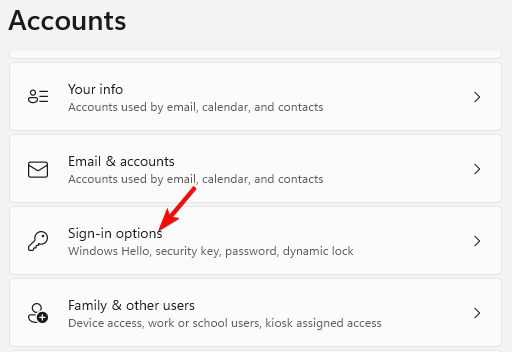
  2. On the left side of the Settings app, click on Accounts. accounts settings
  3. Next, on the right, select Sign-in options. Sign-in options
  4. Now, on the next screen, select the Windows Hello sign-in you want to set up:
    • Select Facial recognition (Windows Hello) to set up facial recognition sign-in.
    • Or, select Fingerprint recognition (Windows Hello) to set up sign-in with a fingerprint reader.
    • Alternatively, you can select PIN (Windows Hello) to set up sign-in with a PIN.select windows hello sign in

At the same time, make sure that you are using the correct PIN. If not, then next time make a note of it to avoid any issues in the future.

You may also uninstall the recent update, install any pending Windows update, remove your Work/School account, or update the BIOS to see if this helps fix the Windows Hello errors.

For any other queries on Windows Hello on your device, you can leave a message in the comments box below.

How to Make a GIF in GIMP: 2 Easy Methods

GIMP is a great open-source photo editor, with an abundance of features. Speaking of which, did you know you can use GIMP to create GIFs?

That’s right, and in this short guide, we’re going to show you how to make a GIF in GIMP with a few simple steps.

If you don’t already have GIMP installed on your PC, you can simply download and install it by following the on-screen instructions.

How can I make a GIF using GIMP?

1. Use the Open as Layers option

  1. 1. Launch the GIMP app on your device.

    open gimp
  2. 2. When GIMP opens, click on File and then choose the Open as Layers option.

    open as layers option in gimp
  3. 3. Now you need to locate the images that you want to use in your GIF, select them all, and then click on Open.

    You can select multiple images by holding Shift and clicking on individual images.

    select the files to open in gimp
  4. 4. From the Layers tab, select the desired order for the images you just selected. The GIF will start with the image on the bottom layer, and continue with those above it. Basically, it goes from the bottom to the top.

  5. 5. Click on Filters > Animation > Optimize (for GIF).

  6. 6. Now click on Filers > Animation > Playback.

  7. 7. A new window will now appear. Click the Play button to preview your GIF.

    preview the animated gif you created in gimp
  8. 8. If the order of frames isn’t good, you’ll need to rearrange them in the Layers section, as described in step 4.

    reorder images in the gif
  9. 9. To save your GIF file go to File > Export as.

    export gimp gif
  10. 10. Select the save location, give the GIF a name, and set the File Type to GIF.

    export animated gif using gimp
  11. 11. Now click Export.

  12. 12. Select As animation and Loop forever. You can adjust other settings if you want as well, from this window.

    make a gif in gimp export the final result
  13. 13. Click on Export.

  14. The first and best way to make GIFs using GIMP is by using the app’s built-in Open as layers option. This method is incredibly simple because it automates the entire process.

    However, in order to use this method effectively, you need to create images that will be used in the GIF beforehand.


2. Create an animated GIF using GIMP from scratch

  1. Open GIMP and go to File > New.
    new file make gif gimp
  2. Set the desired size for the image and click on OK.
    image size make gif gimp
  3. Add the desired graphics to the GIF.
  4. After you’re satisfied with the current frame, create a new layer, and add the desired graphics to it.
    add a new layer make gif gimp
    In some cases, you might have to right-click the current layer and choose the Duplicate layer option to get the desired results.
  5. Repeat these steps until you get the desired results. If needs be, rearrange your layers accordingly.
  6. Double-click the layer name and add (300ms) in its name. This is used to set the delay between the next layer. Of course, you can change the value as you want.
    layers make gif gimp
  7. Repeat the previous step for all available layers.
  8. After you’re done, you can preview your animation by going to Filters > Animation > Playback.
  9. If everything is in order, you just need to export your animation like in the previous solutions.

This method might be more complicated because you need to create your frames on the fly and set the delay time for each frame.

If you don’t have your frames created, this method will be perfect for you, and you’ll master it with a bit of trial and error.

Creating GIF animations in GIMP is simple, and as long as you have your frames created, you can just import them as layers and you’re good to go.

On the other hand, if you want to create layers from scratch, you’ll have to manually create or duplicate each frame.

In case you find GIMP too complicated to use, you might want to consider using a specialized GIF maker and viewer software.

We hope you managed to make a GIF in GIMP using our guides. Let us know in the comments section if you encountered any difficulties.

How to Disable the Ribbon in Windows 10

Like the previous iterations of the OS, we have the same ribbon feature available for Windows 10. But, many don’t really need it, so it’s imperative that you know how to disable ribbon in Windows 10.

The tutorial below will show you exactly what application you need to download and install in order to disable the ribbon in Windows 10.

Also, there are some methods that you can try from within Windows 10 in order to disable this feature, but downloading the application below will save you a lot more time.

How can I disable the ribbon in Windows 10?

    You can easily disable the ribbon on your Windows 10 device using the dedicated third-party tool called Ribbon Disabler. All you need to do is download and install it, and it will allow you to toggle the ribbon on and off in just a click.

  1. 1. Download the Ribbon Disabler tool.

  2. 2. Wait for the download to complete and then go to the directory where the zip file was downloaded.

  3. 3. Now, extract it to the desktop, preferably in a new folder.

  4. 4. After the extraction is completed, open the folder where you unzipped the file.

    disable ribbon on windows 11 installer folder
  5. 5. Now you need to double-click the executable file named Ribbon Disabler.exe.

    windows 10 ribbon disabler folder
  6. 6. The installation wizard will begin.

  7. 7. Select the Disable Ribbon Explorer feature.

    disable windows 10 ribbon feature
  8. 8. Click Yes in the UAC prompt.

  9. 9. You will now receive a message that reads, You have to log off to see the changes. Log off now? Click Yes to proceed.

    ribbon disabler windows 10 log off
  10. 10. Now log in to your Windows 10 account again.

  11. 11. Check your Windows Explorer to see if the ribbon feature has been disabled.

  12. 12. If the ribbon wasn’t disabled, reboot your Windows 10 operating system and verify if the method worked. 

Is it dangerous to disable the ribbon?

For those of you who disabled the Ribbon in order to restart it, there might be some issues. One of the most common problems is that the ribbon does not show the title names.

Another annoying issue is the ribbon blinking all the time. These issues have not yet officially received a fix. Even the dedicated forums do not list any reliable fixes.

We will be back as soon as possible with possible fixes and add them here, so bookmark this page and keep checking.

That was all! You now have a method to disable ribbon in Windows 10 operating system in just a few minutes.

Also, find out the best apps to customize your Windows PC.

You can write us below in the comments section for any other questions you might have regarding this subject, and we will help you as soon as possible.

5 Ways to Fix Nvidia GPU Boost when It’s Not Working Correctly

Graphics cards allow your PC to render images on your display. However, some users have reported that their Nvidia GPU boost is not working correctly or crashes their PC. Try these five solutions to fix this problem quickly.

There have been reports of some Nvidia RTX models not working while gaming or not responding to a GPU boost.

Nvidia’s GPU boost makes it possible to use every bit of PC power from the graphics card for maximum frame rates while gaming. If you’re interested in our suggestions on the best Nvidia drivers for Windows 11, we have a guide.

Why is the Nvidia GPU boost not working?

If the Nvidia GPU is not working on your PC or your game crashes when it’s enabled, it could mean that the drivers are corrupted or damaged. Also, if the driver is outdated, then it could introduce issues when enabling high-performance mode.

If using a laptop and it’s not plugged into a charger, then your PC may be preventing the Nvidia GPU boost from operating properly.

How do I fix the Nvidia GPU boost if it’s not working?

1. Update drivers

  1. Click on Start and search Control Panel, then hit Enter.
  2. Select Hardware and Sound, then click on Device Manager. Open device manager.
  3. Click on Display adapters to reveal your graphics card drivers.
  4. Right-click on the Nvidia GPU driver and select Update driver. Update Nvidia GPU driver if boost not working.
  5. Click Search automatically for drivers. Search automatically for drivers.

If your Nvidia GPU driver is out of date, then the GPU boost may not work properly. Try updating your drivers to see if that solves the problem. If not, try the next solution below.

You can update drivers manually, only if you have complete knowledge of the drivers your PC requires. The best alternative to that is the driver updater tool.

2. Uninstall and reinstall drivers

  1. Click on Start and search Control Panel then hit Enter.
  2. Select Hardware and Sound then click on Device Manager. Open device manager.
  3. Click on Display adapters to reveal your graphics card drivers.
  4. Right-click on the Nvidia GPU driver and select Uninstall device. Uninstall nvidia gpu driver if boost not working.
  5. Select Uninstall again then restart your PC.
  6. Go to Nvidia’s driver download page and enter your PC information then click Search. search for nvidia driver.
  7. Select Download to download and install the driver. Download nvidia driver.

If your Nvidia GPU driver is corrupted or damaged, then doing a complete reinstall of the driver may solve the problem if the GPU boost is not working. You can find the driver for your PC from the Nvidia driver download homepage.

3. Turn on Low Latency mode

  1. Click on Start and search Nvidia Control Panel then hit Enter.
  2. Under 3D Settings, select Manage 3D settings. manage 3d settings in nvidia.
  3. Scroll through the settings and locate Low Latency Mode and click on the dropdown menu.
  4. Select Ultra. ultra low latency nvidia.

If your Nvidia GPU boost is not working, reducing latency may help kick it into gear and improve performance.

4. Check for updates

  1. Click on Start and open Settings (or press Windows + I).
  2. Select Windows Update then Check for updates. check for updates if nvidia gpu boost not working.
  3. Perform any available updates.

If your Windows 10 or 11 is out of date, then a number of issues may arise including the Nvidia GPU boost not working properly. Make sure your PC is up to date to avoid any issues and get the best performance while gaming.

5. Connect to a charger

If using a laptop and the Nvidia GPU boost is not working, your PC may be blocking high-performance mode, so it doesn’t drain the battery quickly. Using a laptop connected to the charger will provide an optimized gaming experience and maintain the health of your battery.

plug pc into charger.

Ensure your PC is connected to a power cable and is charging. If you’re having issues with your laptop not charging on Windows 10 or 11, we offer a guide for that as well.

How do I enable Nvidia GPU boost?

  1. Click on Start and search Nvidia Control Panel, then hit Enter.
  2. Under 3D Settings, select Manage 3D settings. manage 3d settings in nvidia.
  3. In the Global Settings tab, open the dropdown menu under Preferred graphics processor.
  4. Change to High-performance NVIDIA processor. change to high performance nvidia processor.

If there’s extra power available on your PC, then the Nvidia GPU will boost for optimized frame rates and improve gaming performance. Configuring your graphics card to high performance helps your PC prioritize integrated graphics to maximize frame rates.

Remember that errors such as You are not currently using a display attached to an Nvidia GPU will prevent you from using this feature, but we have a guide that shows you how to fix it.

We hope one of the above solutions helped you fix your Nvidia GPU boost if it’s not working. Let us know in the comments below which step worked for you.

5 Ways to Get Back OneDrive’s Green Check Mark if It’s Missing

OneDrive is a cloud service with many features that make it easier to use and navigate. A significant trait of the platform is its simplicity and use of icons to symbolize elements.

However, users may encounter issues if some icons aren’t displayed correctly. For instance, one of many issues affecting users is that OneDrive has no green check mark.

Moreover, many icons represent numerous features and functions on the OneDrive app. Some are:

  • Green tick icons that represent online-only files you opened. They are downloaded to your device and become locally available files.
  • The blue cloud icon next to OneDrive files or folders indicates that the file is only available online.
  • A red circle with a white cross indicates that a file or folder on OneDrive cannot be synced.
  • A solid green circle with the white check mark indicates those files marked as Always keep on this device. They are always accessible even when you’re offline.

Furthermore, many factors may affect OneDrive’s performance, prompting issues with icons and features.

It can result in problems like OneDrive status icons not updating and the OneDrive status icon’s blue arrows not showing. Fortunately, there are solutions to the OneDrive green check mark missing.

Read about the OneDrive status icon missing on your device and how you can get them back.

What does a green circle with a check mark mean in OneDrive?

The green circle with a white check mark in OneDrive represents the files you have marked as Always keep on this device.

The Always keep on this device option downloads the marked files on your device, making them available and accessible even when you are offline.

So, OneDrive automatically keeps a copy of the file locally on your device. Likewise, the green circle with a white check mark indicates that the file with the icon is currently on your local storage and taking up storage space.

However, the OneDrive green check mark may not appear for many reasons, such as outdated apps on your device, outdated operating systems, issues with the temporary file, etc. We shall discuss what to do to get your missing icon back.

How can I get OneDrive’s green check mark back?

1. Update the Microsoft OneDrive app

  1. Click the Start button on the Taskbar and type Remove in the text space.
  2. Click on Add or remove programs from the search results.
  3. Navigate the list of installed programs on your computer and select Microsoft OneDrive.
  4. Click on the Uninstall button and allow Windows to remove OneDrive.
  5. After the OneDrive app is uninstalled, go to the OneDrive download page and click Download to install the latest version on your device.

2. Restart the OneDrive app

  1. Click the OneDrive icon in the Windows taskbar.
  2. Select the Help & settings option.
  3. Click on Quit OneDrive to stop the app from running.
  4. Relaunch the OneDrive app on your device.

Restarting the app will fix startup errors causing the OneDrive green check mark not to show.

3. Update your operating system

  1. Click on the Start button.
  2. Then, select the Settings option.
  3. Click on Windows Update and select Check for updates.

Windows will automatically search and download updates if there are any available.

Updating your OS can fix the OneDrive green check mark missing in both Windows and Mac.

4. End tasks for apps you’re not using

  1. Click on the taskbar at the bottom of the screen, then select Task Manager.
  2. Select CPU and Memory usage in the Task Manager.
  3. Click on the applications using lots of CPU and memory space on your PC.
  4. Click on the End Task from the drop-down that pops up.
  5. Restart your PC.

Ending tasks for apps not necessary will stop interference from third-party apps that may be interfering with OneDrive’s functionality.

5. Edit your registry

  1. Press the Windows + R keys simultaneously to prompt the Run box.
  2. Type Regedit in the search box and press Enter.
  3. Go to: HKEY_LOCAL_MACHINESOFTWAREMicrosoftWindowsCurrentVersionExplorerShellIcon‌OverlayIdentifiers
  4. Delete the folders with no name and remove the spaces at the beginning of the folders name that is related to OneDrive.

Restart your computer and check if the issue persists.

Why is OneDrive not syncing?

An outdated OneDrive app can cause many issues. So, you can encounter syncing issues if the app is not up-to-date. Likewise, uploading too much data can affect the syncing process.

However, you can read our article about how to fix OneDrive sync issues on Windows 11. Also, you can check our guide on ways to rectify the OneDrive upload issues you can encounter when uploading files.

Kindly leave a response if the guide has been helpful to you. We’d like feedback from you.

How to a Create a Photo Album in OneDrive

Storing your favorite photos in a folder on your hard disk is so yesterday. The best and safest way to store all your photos is definitely by using the cloud.

But cloud services offer a lot more than just storing your photos as you can also organize them exactly as you want.

In this article, we will show you how to create albums in our favorite cloud storage service, OneDrive.

How can I create an album in OneDrive?

Creating albums in Microsoft’s OneDrive is easy, allowing you to keep your photos organized and have instant access to your memories.

There are a couple of ways to create an album in OneDrive, and they’re both straightforward. We’re going to mention both methods, so you can choose what’s easier for you.

1. Create a OneDrive photo album in the browser

  1. Open OneDrive in your browser.
  2. Go to the Photos section, from the left pane.
  3. Navigate to the Albums tab, and click on New album.
  4. Now just give your album a name, and pick your favorite photos.
  5. When you name your album and pick all desired photos, just click Add album.

Perhaps the easiest way to create an album in OneDrive is to do so in the browser. To create an album in OneDrive this way, just follow the above steps.

It’s as simple as that. Your newly created album will now appear under the Albums section of OneDrive, and you can access it at any time.

Also, if you want to have unlimited free storage space for saving your data check out our list of the best cloud storage apps for Windows 10, and find what you need.

2. Create an album from a folder in OneDrive via the Photos App

  1. 1. Open the Photos app.

  2. 2. Go to the Albums section, from the left pane.

  3. 3. Click on the plus button in the upper-right part of the screen.

  4. 4. Select the photos you want to include on the album.

  5. 5. Click on the check mark icon to create your album.

  6. 6. Give your album a name.

    onedrive photo album from folder give a name
  7. 7. Once your album is created, click on the upload button in the upper-right part of the screen to upload it to OneDrive.

  8. Another way to create an album in OneDrive is to do so using Windows 10’s default Photos app. Basically, you create an album from a folder that contains photos.

You now know how to easily create albums in OneDrive. Once you create an album, you can always remove photos and add new ones in order to keep your album updated.

Another option to manage and sort photo files locally without downloading any new software is sorting your images by favorites on the Windows Photos app.

If you want to challenge your management skills and creativity, take a closer look at our list of the best digital photo album software for Windows 10, and find the proper one for your needs.

We hope that these instructions were helpful to you and that you’ll store many great memories in your OneDrive albums.

7 Best Antiviruses for Opera Browser

Opera is a popular web browser with an abundance of features. Although this browser isn’t as popular as Chrome or Firefox, it still has a dedicated user base.

If you’re using Opera and you’re looking for antivirus software, today we’re going to show you the best antivirus tools that work with it.

All antiviruses are fully compatible with all web browsers, and the only difference is that some apps come with a dedicated browser extension to scan the websites you visit.

Even though some applications on our list don’t have a dedicated extension for Opera, they offer great security and reliability, so you should try them out regardless.

Does Opera GX have virus protection?

No, Opera GX doesn’t have its own antivirus. Instead, Opera GX provides some amazing features to protect your privacy. It comes with a free VPN that you can use indefinitely.

Also, it comes with a built-in ad blocker so no spam ads or fake notifications can harm your PC. Moreover, it has a tracker blocker to keep all trackers away from you.

It’s important to remember that using your browser’s antivirus alone is not enough to protect against phishing, ransomware, and more. We highly recommend using a third-party antivirus for all tasks you do online to virtually eliminate the chance of infection.

What is the best antivirus software for the Opera browser?

TotalAV – Solid protection for Opera users

TotalAV antivirus scan

TotalAV works with Opera through its WebShield browser extension, which blocks phishing and malicious sites before the page loads. Real-time protection covers downloads and attachments, and ransomware is stopped before it can lock your files.

The browser cleanup tool clears Opera’s cached data and tracking cookies, and the higher plans add an ad blocker and a Safe Browsing VPN. It is available for Windows, Mac, Android and iOS.

  • WebShield extension blocks phishing and malicious sites
  • Real-time protection against ransomware and malware
  • Browser cleanup for cache and tracking cookies
  • Ad blocker and VPN in the higher plans
  • Password vault
TotalAV

TotalAV

If you are concerned about your online privacy, use one of the best antiviruses for Opera browser.
Free Trial Visit Website

Panda Security Essential – Simple and intuitive interface

router antivirus

Panda Security Essential is another antivirus for Opera. It offers real-time protection for your PC, but it also offers a bidirectional firewall to protect your Wi-Fi network.

In addition, this tool can protect your identity online and stop online fraud, identity theft, and phishing attempts. And it also works as an Android antivirus.

The tool also has an anti-theft feature for Android so you can easily locate, lock or wipe your device remotely.

The Parental Control feature can easily block harmful websites. The Data Shield feature allows you to protect your data from unauthorized access. This feature can be useful since it will protect your PC from ransomware.

The premium version includes an additional password manager, and file shredder features. Plus, the file encryption feature easily encrypts and protects your files.

Overview of the most important features:

  • Blocks harmful websites
  • Scans your Wi-Fi connection for vulnerabilities
  • Compatible with both Mac and Windows
  • Anti-theft feature
Panda Security Essential

Panda Security Essential

For secure, private, and unlimited Internet browsing, don’t hesitate to use Panda Dome.
Free trial Visit Website

Bitdefender Total Security – Complete security

A great antivirus for Opera is Bitdefender Total Security. This tool offers protection against all sorts of malware which makes it a complete data protection solution.

The application uses behavioral detection to monitor your apps, and if any suspicious action is detected, you’ll be alerted immediately.

In addition to standard malware, Bitdefender Total Security offers protection against ransomware, and it also provides anti-phishing and anti-fraud detection.

In order to protect your online credentials, Bitdefender Total Security also has a Secure Browsing feature that will scan all your links and search results ensuring their validity.

The application also has a Rescue Mode that is useful in removing rootkits and other malware that can appear before your Windows starts.

Bitdefender Total Security is optimized to be light on your resources, and it also comes with Game, Movie, and Work modes so you can focus on your work without any interference.

It’s also worth mentioning that Bitdefender Total Security has a Global Protective Network feature and it performs heavy scanning in the cloud without affecting your performance.

As for additional features, Bitdefender Total Security has its own secure browser, social network protection, password manager, and file shredder.

Other great features include:

  • Removes rootkits and other malware that can appear before Windows starts
  • Behavioral detection to monitor your apps
  • Scans your search results and blocks infected websites
  • Provides anti-phishing and anti-fraud detection
Bitdefender Total Security

Bitdefender Total Security

Protect all your online activities, using Opera together with a revolutionary antivirus.
Check price Get it now

Guard.io – Best for blocking browser adware

If you want a lightweight antivirus with some of the best browser protection, Guard.io is the right choice.

A full-featured antivirus browser extension, Guard.io keeps every browsing session safe and protects your computer from viruses. It can do full scans of your system, and detect and eliminate anything that might pose a threat.

Automatically blocks malicious web pages before you can access them, checks every downloaded file and executable, keeping guard at every door that a virus might get by.

Data Breach Monitor notifies you when your email account is compromised, so you can quickly respond and fix the problem before it happens.

The main key features of using Guard.io:

  • Advanced anti-phishing and anti-malware protection
  • Eliminates all pesky ads, pop-ups, and scam notifications
  • Most processes are done away from the endpoint, so almost no resources are used
  • Using machine learning and Big Data to keep all systems safe

This antivirus allows you to remove and be notified of malicious extensions that control your browser settings, invade your privacy, or install malware, spyware, and adware.

Guard.io

Guard.io

Your online guardian when browsing the web keeps your system safe from viruses.
Free Trial Visit Website

Avira – Best free antivirus

antivirus old pc best antivirus without ads for PC

If you’re looking for an antivirus for Opera, we have to mention Avira. This antivirus offers real-time protection against malware, but it can also protect you from ransomware.

The application comes with a browser extension that can protect your privacy and prevent phishing attacks. In addition, this extension can also block malicious websites.

The extension can also highlight infected websites in your search results, so you’ll never visit a malicious website.

Another feature of Avira is its built-in password manager so all your online passwords will be stored and protected by a master password.

There’s also a software updater tool that checks if your installed applications are up to date. This feature can be useful in finding security vulnerabilities on your PC.

Other important features include:

  • Built-in VPN
  • Password manager included
  • Block ads and malicious websites
  • Protection against malware
Avira

Avira

Avira is a great choice when you need protection from scams, identity theft, and financial loss.
Free Download Visit Website

Emsisoft Anti-Malware – Best anti-malware antivirus software

Another great anti-malware to use with Opera Browser is Emsisoft’s Anti-Malware tool. This tool offers protection against over 300 000 daily threats.

This tool is designed to work on low-specs PCs and laptops so even if you have an older PC, it will work without any problems.

The most notorious feature is Behaviour Blocker. This tool monitors all downloaded and modified files and blocks or isolates them as soon as it detects something strange.

Emsisoft also uses a dual-engine scan system that enforces your security. Hourly updates keep all-new threats away and it also gives you past logs so you can analyze all threats that have been detected.

This is a great tool to use with opera, especially when the last test shows that Opera isn’t so well-protected. You will find Emsisoft in the link below at a great price.

Other great features that are included:

  • Anti-Ransomware and anti-phishing protection
  • Web Protection
  • Remove unwanted programs
  • Email & live chat customer support

Avast Free Antivirus – Great protection with basic features

If you need an antivirus for Opera, you might want to consider Avast Antivirus. Just like other tools on our list, Avast will protect you from malware and spyware.

In addition, this tool also has phishing protection that will prevent malicious users from stealing your personal data.

To ensure your safety, Avast will send suspicious files for analysis to the cloud for scanning. The application has a Wi-Fi Inspector feature that will scan your Wi-Fi network for any weaknesses.

In addition to Wi-Fi, thanks to Smart Scan feature you can easily find other vulnerabilities on your PC. Lastly, the application has its own password manager.

The Ransomware shield, as well as the Sandbox feature, will run suspicious files in a safe environment without affecting your PC.

Additional features include a passive mode that allows you to use another antivirus alongside, and a Browser Cleanup tool that will remove unwanted extensions, toolbars, and add-ons.

Other great features include:

  • Ransomware protection
  • Scans your Wi-Fi for vulnerabilities
  • Remove unwanted extensions, toolbars, and add-ons
  • Malware and spyware protection

If you’re looking for an antivirus to use together with for Opera browser, feel free to try any application from our list.

Moreover, you can check our guide including the best antiviruses for Windows 10 if you want to discover even more solutions to keep your computer safe.

All these tools can help you keep your PC save, and they’ll also help prevent Download failed, virus detected message in Opera from appearing.

What tool do you prefer? Don’t hesitate to tell us your opinion about our top picks in the comment section below.

3 Ways to Quickly Fix the HTTP 401 Unauthorized Error

HTTP 401 Unauthorized Error is a common connection error. It occurs when a user tries to access a website or resource without the proper authentication.

Like any Windows error, this HTTP 401 error can happen for various reasons. Luckily, there are a few ways to fix the HTTP 401 error and get back on track.

So, if you’ve run into this problem recently, the following sections will help identify the underlying cause and get things up and running.

Why am I getting a 401 error?

There are many possible reasons you could be getting the HTTP ERROR 401 to appear, and here are some of the most common:

  • Authentication with the site was not completed – This means that you either need to log in or provide some other form of identification to prove your identity.
  • The site has blocked your IP address to prevent malicious activity from occurring and causing any further damage.
  • The site itself is down or experiencing some other technical issue – These could be due to server outages.

What is HTTP 401 error?

This response status code indicates that the client couldn’t be authenticated for a given request. A common cause of this error is a failed or incorrect authentication token.

Furthermore, the dreaded 401 Unauthorized Error can also be caused by an invalid or expired access token.

Platforms that are affected by the HTTP 401 unauthorized error:

  • HTTP 401 error on Zoom – The website you’re trying to access is restricted. The site could be password-protected, and you don’t have the correct credentials.
  • HTTP 401 error in Etsy – Servers are unable to authenticate you. This occurs when there’s a problem with the cookies or browser settings.
  • HTTP 401 error while using Doordash – If you’re ever in the middle of ordering a delicious meal from Doordash and you get this message, it means the request you made couldn’t be authenticated.
  • HTTP 401 error on DStv Now – Caused by a problem with the account credentials. It means there’s something wrong with the authentication of your login credentials.
  • HTTP 401 error on Postman – When you try to request with Postman, it may sometimes throw the error. This error means that your request isn’t authorized.

How do I fix HTTP error 401?

1. Check your credentials

This error means that your credentials to access the resource aren’t valid. Therefore, you need to check the credentials and make sure they’re correct to fix this error.

You can try accessing the resource with a different set of credentials. If that doesn’t work, try resetting your credentials.

2. Flush your DNS

  1. Type Command Prompt in the Search bar, and click on Run as administrator on the right.Command Prompt
  2. Type the following command, and press Enter: ipconfig /flushdnshttp 401 error Fix
  3. Wait for the Flush DNS confirmation.Flushing DNS can solve http 401 error
  4. Then, close the Command Prompt and try re-accessing the website.

3. Clear your browser’s cache and cookies

Note icon NOTE
Using a specialized tool like CCleaner is an easy and quick way to clean all of your browser cache and cookies.

➡ Google Chrome

  1. Tap on the three dots near the top right corner and choose Settings.
  2. Next, choose Privacy and security from the left panel, then click on Cookies and other site data.
  3. Tap on See all cookies and site data.
  4. Click on the Remove All button near the top right corner.
  5. Tap on Clear all in the pop-up window that follows to start the process.

➡ Mozilla Firefox

  1. Tap on the three strips near the top right corner and choose Settings.
  2. Next, select Privacy & Security, choose Cookies and Site Data, and then click on Clear Data.
  3. A window will pop up. Check the boxes next to Cookies and Site Data and Cached Web Content, and then click on Clear.

➡ Safari

  1. Tap on the Safari menu and choose Preferences.
  2. Click on Privacy and choose Manage Website Data under Cookies and website data.
  3. Select the website data and tap on Done.
  4. This will open a pop-up window for final confirmation. Select Remove Now.

HTTP 401 vs 403

The HTTP Error 401 is returned by the web server when a request is made for access to a resource that isn’t authorized.

The HTTP Error 403 is similar to HTTP Error 401, with one key difference. It indicates that the user has been denied access precisely because of their authentication status (or lack thereof).

As you can see, dealing with this error isn’t that complicated. You don’t need to be an IT expert to get things working again.

All you need to do is follow the simple solutions outlined above. Also, bookmark our website to find solutions to similar errors.

In case you know of other methods to fix the HTTP Error 401, drop them in the comments section below.

5 Best Antivirus For VMware Virtual Machines [2026 Guide]

VMware is a virtualization and cloud computing software provider located in Palo Alto, California. It was founded in 1998 by Dell Technologies.

Virtualization technologies of VMware are based on its bare-metal hypervisor ESX/ ESXi in x86 architecture.

A hypervisor is usually installed on the physical server to enable multiple virtual machines (VMs) to run simultaneously.

Multiple Operating Systems can run on one physical server because each VM runs its own individual OS. VMs on the same physical server always share resources, such as networking and RAM.

VMware machines areas prone to cyber-attacks as the main devices, so protecting them is also essential.

So today we’ll be looking at the best antivirus software for VMware machines.

Why do you need an antivirus for VMware?

This virtualized computer is as vulnerable to viruses and other threats as a usual PC running Windows. We highly recommend you have antivirus software because of this matter.

Antivirus and malware detection is needed on General Purpose computing environments to attenuate risks from unpredictable sources, such as other users that upload files or link to other web pages.

It can help you strengthen the security of virtual machines by performing anti-malware scanning. It can also remove complications and risks of managing security across multiple environments.

What’s the best antivirus for VMware?

TotalAV – Simple protection inside a VM

TotalAV antivirus scan

TotalAV installs inside a Windows virtual machine like any other PC and gives it real-time protection, WebShield for malicious and phishing sites, and on-demand scans of anything you bring into the VM.

It is a simple way to protect a virtual machine used for browsing, testing or a second work environment without adding much configuration, and the same subscription covers the host machine and your phone.

  • Real-time protection inside the virtual machine
  • WebShield blocks malicious and phishing sites
  • On-demand scans of files brought into the VM
  • Same subscription covers the host PC
TotalAV

TotalAV

Get top protection for VMware machines from viruses, malware, hacking, and theft.
Free Trial Visit Website

Bitdefender GravityZone – Native device encryption

GravityZone is a native virtualization cloud solution designed to provide complete security services for virtual machines (among others).

You need to know from the very start that it is compatible with VMware, Microsoft Hyper-V, Citrix XenServer, Red Hat Enterprise Virtualization (with KVM), etc.

No less important, GravityZone centralizes all security features into a single console. You don’t need to worry about updating or monitoring security activities whatsoever.

Best of all, this security solution can even be hosted by Bitdefender in the cloud, a rather approach appreciated by users worldwide.

Here are its main features:

  • Full protection against malware on all virtual machines
  • Layered security for maximum precision
  • Uses vShield Endpoint for deployment
  • Latency and vulnerability during Windows boot are removed
  • Native device encryption
  • Skilled Bitdefender engineers for professional guidance

Bitdefender GravityZone

Always #1 in independent security tests, Bitdefender GravityZone is the best antivirus for all enterprises.
Check price Visit Website

Avira Antivirus – Advanced detection system

Get access to the best malware protection for your Windows and Mac devices with Avira Antivirus! Take advantage of this software’s advanced detection system and prevent ransomware or exploits from infecting your computer.

Avira Antivirus is designed to offer you complete web protection providing you safety when you have online shopping and baking activities.

Keep your system fast and optimized with Avira’s features that will enhance the performance of your computer in no time.

Blocking and deleting viruses, ransomware, and malicious websites every month, Avira Antivirus is the ideal software for any user.

Check out other impressive features:

  • Virus scanner and cleaner
  • Removes malware, spyware, and viruses
  • Identity protection
  • System optimizer
  • Web, camera, and microphone protection

Avira Antivirus

Avira Antivirus is a smart choice for your VMware because of its powerful malware protection.
Check price Visit Website

Vipre – Cloud-enabled security

antivirus router

Vipre has improved considerably over the past years, making it the topmost affordable and reliable antivirus program on the market.

As a result, Vipre is now a lightweight, next-gen antivirus solution for your VMware machines running on Windows 7, 8.1, and 10.

What you’ll get is excellent malware detection rates thanks to the advanced active protection as well as the ultimate ransomware protection.

Key features that you’re about to enjoy:

  • Real-time protection that scans apps and programs on-the-go
  • Cloud-enabled security that instantly protects all those who connect to your network
  • Application patching to ensure all your apps are up to date and reduce vulnerabilities
  • Free support (US-based clients only)

Vipre Antivirus Plus

Vipre Antivirus Plus scans your VMware machines on the go, providing it real-time protection.
Check price Visit Website

Avast Free Antivirus – Pop-ups blocker

antivirus old pc

Avast Free Antivirus does an excellent job protecting VMware machines and computers against malware and viruses. It also does an excellent job of keeping your home network safe from intruders.

Packed with awesome features such as a user-friendly interface, and advanced protection for applications, Avast will also allow ruling multiple security products with its new passive mode.

Ransomware is a new malware type that affects a lot of users, but if you install Avast, its advanced protection technology will prevent you from becoming a victim of online extortion.

Activate the improved Game Mode so that you will play games, watch movies, or work at your computer without being interrupted by annoying popups.

You might also want to know about other useful features:

  • Software updater
  • Ransomware shield
  • Core firewall functionality
  • Data shredder
  • Anti-spam

Avast Free Antivirus

Keep your VMware safe and protected against, viruses, malware and other online threats with Avast Free Antivirus!
Free download Visit Website

These are the best antivirus solutions for VMware virtual machines for your devices. Make sure you check thoroughly every feature that these programs have to offer before picking one of them.

Which of the previously mentioned antivirus solution is your final choice? Let us know in the comments section below.

5 Quick Ways to Fix OneDrive if Groups Are Not Showing

Many people use cloud storage like OneDrive because it is secure and has enough space for storage. It is easy to synchronize and share your files. OneDrive is one of the best cloud storage services in the market.

However, some issues users complain about with the platform, such as OneDrive groups not showing. It means users can’t find groups on the app for some reason.

Groups in OneDrive is a central location where you can share files and data with a team of selected people in the group.

Furthermore, many factors may be responsible for OneDrive groups not showing on your device. Likewise, the case may not be the same if you’re accessing your OneDrive account via a browser or the app.

However, OneDrive shared libraries not showing in Explorer can be due to network issues, outdated apps, etc.

Nonetheless, fixing the groups not showing in OneDrive is not difficult and can be done in a few steps.

Hence, this article will guide you through what you need to do to make OneDrive show your groups and fix other problems.

Why are OneDrive groups not showing?

  • Outdated OneDrive app: Many issues may occur with the OneDrive app on your device if it is not updated. It is because the app doesn’t have the needed updates and patches for fixing bugs affecting it and improving its performance. Also, it can cause numerous problems when using the app, for instance, OneDrive icons not showing and OneDrive status icons not showing.
  • Network connection issues: You need to be connected to a strong network connection to use OneDrive smoothly. However, you can encounter difficulties with the platform if your network connection isn’t working correctly.
  • No access to the group: If the group not visible in OneDrive is a shared group, you must be allowed in the host’s permission settings. So, the group may not show without access and can prompt issues like OneDrive shared libraries not showing in explorer.

You may be interested in how to use multiple OneDrive accounts on one computer.

How do I fix OneDrive if groups fail to show?

1. Update the Microsoft OneDrive app

  1. Click Start on the Taskbar and type Remove in the search box.
  2. Click on Add or remove programs from the search results.
  3. Scroll through the list of installed programs on your computer and select Microsoft OneDrive.
  4. Click on the Uninstall button and allow Windows to remove OneDrive.
  5. After uninstalling the app, go to the OneDrive download page and click Download.

2. Sign in to OneDrive on another device

  1. Click Start on the taskbar and type OneDrive in the search box.
  2. Click on OneDrive from the search results.
  3. Go to the Sign in space, enter the email address associated with your OneDrive account, and click Sign in.
  4. Go to the password space and enter the password for your OneDrive.

After your account is successfully logged in on the new device, try to access your groups and check if it’s showing.

3. Check your network connection

OneDrive is a cloud service. So, it needs an internet connection to connect to your account. However, restarting your router can fix issues that prevent it from working correctly.

Also, users can switch to a wireless connection if they have LAN connection issues.

4. Restart the OneDrive app

  1. Click the OneDrive icon in the Windows taskbar.
  2. Select the Help & settings option.
  3. Click on Close OneDrive to completely exit the app from running.
  4. Relaunch the OneDrive app.

Restarting the app will fix startup issues that can make it not show your groups.

5. Update your operating system

  1. Click on the Start button.
  2. Select the Settings option.
  3. Click on Windows Update and select Check for updates.

Windows will automatically search and download updates if there are any available.

Updating Windows will help fix any software or driver causing groups not to show in OneDrive. It can also repair OneDrive if it’s not showing in hidden icons.

Where are groups stored?

Groups are stored in the Shared libraries window in OneDrive. Follow the steps below to access your groups:

  1. Click the Starts button and launch the OneDrive app.
  2. Click on the Shared libraries tab to display the groups you’re a part of.
  3. Then select a site or Team to open.

Furthermore, users can read how to fix OneDrive sync issues on Windows 11. Also, you can check our article about how to fix OneDrive if it’s missing from the File Explorer on your PC.

If the solutions have worked for you, kindly leave a comment in the area below. Thank you!

7 Best Antivirus Software for Alienware

Alienware machines are gaming computers owned by Dell, and they’re the favorite systems of gaming enthusiasts.

These computers are amazing gaming machines, and they serve their purpose to the maximum. Alienware hardware is gamer computers and laptops with the primary target being the best gameplay.

Such powerful systems, also need powerful security software to keep them safe. This is why we chose the best security tools that are appropriate for your Alienware machine.

To make your choice much more relaxed, take a look at their complete sets of features and advantages before you choose the one you like.

What are the best antiviruses for Alienware machines?

TotalAV – Best system maintenance and browsing security

For an award-winning antivirus, TotalAV has some of the best features that enhance anonymity, increase privacy and protect you against online threats.

Alienware needs to be always up to date for gaming and other tasks, so the antivirus also offers some tuning tools to keep your PC sharp and prepared for your next session.

While we spend most of our time online, we are vulnerable to attacks at all times. If you want to safely browse and enter any site, TotalAV comes with an amazing feature called WebShield, that blocks malicious websites before you access them.

TotalAV is game-ready with a VPN that allows you to anonymously connect to various servers to access geo-restricted content and streaming platforms.

Some of TotalAV’s best key features are:

  • Real-time antivirus protection against viruses
  • PUA protection and zero-day cloud scanning
  • Cross-device protection
  • Browser manager and cleaner

Ads, pop-ups, and unwanted browser notifications can be very annoying, so TotalAV comes with an integrated ad blocker to get rid of all of them.

Also, you gain a password vault manager for you that you can use to enhance the safety of your accounts.

TotalAV

TotalAV

Keep your system in great shape and protected from threats with this amazing antivirus.
Check Price Visit Website

Bitdefender Internet Security – Best virus protection and prevention

Bitdefender provides one of the most reliable security tools on the market, and this makes it the ideal choice for Alienware computers and laptops as well.

In other words, Bitdefender provides the best protection on all fronts, and this is essential because it can make a huge difference between staying safe and losing all your vital data.

The Bitdefender Photon’s innovative technology helps the software adapt to the hardware and software configuration of your Alienware system just to save as many computing resources as possible.

Some of the best protection features include data protection, advanced threat defense, anti-phishing abilities, rescue mode, secure browsing, anti-fraud features, safe files, and more.

The newest addition to the set of features included is the Bitdefender VPN that is able to protect your online presence, and this will turn out great for online gaming, as you can imagine.

The Bitdefender Autopilot will run your entire cyber-security by itself, while you’re having fun gaming. You won’t have to set anything up and configure annoying settings.

Take a look at the best features that are packed in Bitdefender Internet Security and that will turn out to be really useful for your Alienware machine:

  • The antivirus is user-friendly, and its maintenance costs are kept at a minimum, so this is not something that you should be worrying about
  • Bitdefender Internet Security provides the most reliable protection against Internet threats
  • The multi-layer ransomware protection will keep your files as safe as possible
  • Bitdefender Internet Security can prevent unauthorized modifications made to your most crucial files
  • Another great thing about the software is that it allows you to run your security routine from your mobile device remotely
  • Bitdefender Internet Security offers string Windows Protection and high speeds that will never affect your Alienware’s performance
Bitdefender Internet Security

Bitdefender Internet Security

Protect your Alienware system with one of the best antiviruses with innovative technologies.
Check price Visit Website

ESET HOME Security Essential – Most advanced security features

You must have heard of ESET HOME Security Essential before because this is a legendary software that provides essential defense against malware.

It’s built to protect your online life, and you’ll find it to be extremely useful for your Alienware machine.

It can protect against all types of malware, ransomware, worms, viruses, and spyware, keeping your precious Alienware computer or laptop as safe as possible.

Using ESET HOME Security Essential, you will have no security-related worries, and all you’ll have left to do will be to enjoy the full power of your Alienware machine.

Take a look at some of the best features and functionalities that are included in this software below:

  • Protection against malware, ransomware, worms, viruses, and spyware
  • Your privacy will be protected against phishing, and the program will offer you enhanced security during your time spent online
  • You will get the chance to work, play, and browse the Internet without any slowdowns.
  • The research network makes sure that the software is always at the top of the cybersecurity industry
  • Provides high speed, balance, and excellent usability for the best online experience
ESET HOME Security Essential

ESET HOME Security Essential

Enjoy uninterrupted games on your Alienware with one of the best antivirus solutions.
Free Trial Visit Website

Avira Free Security – Best protection for a free antivirus

antivirus old pc best antivirus without ads for PC

Avira is another great freeware antivirus that can be used successfully on any computer or laptop, including the gaming one from Alienware.

This antivirus will protect you from scams, identity theft, and financial loss. No matter if you play or just surf the web, you are well protected.

The Speed Booster included in Avira improves your PC’s performance, speeds up, and accelerates your system starts.

More best features included in Avira:

  • Free VPN for anonymous web surfing
  • Blocks all online threats, including malicious websites
  • Password manager feature
  • Anti-scam protection
  • Firewall
Avira

Avira

Use a freeware antivirus, with a built-in VPN, to keep your Alienware machine safe from online threats.
Free Download Visit Website

CyberGhost – Best security and VPN while gaming

CyberGhost is another gem for your Alienware system that will make sure to keep everything safe and secure.

This software is also packed with lots of handy features that you will find great such as hiding your IP address allowing access to restricted websites and more.

The software is straightforward to install, and if you need any help, there’s an installation guide available on the service’s website.

The user dashboard is one of the most straightforward that you will find in an antivirus. When you’re online, your whole activity will be encrypted with the 256-AES bit technology.

We’ll detail a few things about CyberGhost’s most important functionalities below, just to offer you a glimpse of what you’ll be able to enjoy if you do decide to use this antivirus tool:

  • CyberGhost can hide your IP address, and it will do this by replacing it with another one from the CyberGhost network, this way, making it impossible for third parties to track your online activity
  • If censorship was an issue, you can now rest assured that those days are long gone, because CyberGhost’s secure servers let you gain access to content from all over the globe
  • When you’re trying to access a website, the software will make sure that it’s safe enough for your Alienware computer or laptop by running a thorough check on the specific URL in a database
  • When using CyberGhost, no one will be able to snoop around your conversations, online transactions, or browsing history even when you’re on public Wi-Fi
CyberGhost

CyberGhost

Keep your gaming data safe with one of the most reliable VPN tools, that secures your online activity.
Check price Visit Website

Webroot – Great malware and spyware protection

antivirus old pc windows vista antivirus 2022

The software is produced by a US-based company, and the tech support is based in Colorado. Webroot is a full-scale antivirus that is able to secure up to three Alienware machines.

The good old times when you had to stare at your computer’s screen while the system runs a scan are long gone, and with Webroot, it only takes about 20 seconds to scan your Alienware machine.

Webroot does not take up too much space, and this means that you will have enough room on your Alienware computer or laptop for your docs, movies, photos, and music.

It also manages to protect users from identity theft. Another great thing about this software is that you will not have to deal with slow scans or time-consuming updates.

Check out the most exciting features that are included in this tool below:

  • This software is able to successfully protect all of your usernames, account numbers, and more vital data
  • Webroot can also provide users with secure browsing and real-time anti-phishing
  • It blocks fake sites that can trick you into entering personal data
  • Webroot is excellent for its lightning-fast scans, and you and your expensive Alienware machine will never be slowed down while using this antivirus
  • Another great feature is that it’s able to detect and block webcam spying threats as well
Webroot

Webroot

Secure your Alienware machine with one great antivirus that protects all your important data.
Check price Visit Website

Avast Free Antivirus – Great scanning features

Avast is a freeware antivirus that offers essential and powerful protection while using your great Alienware computer for gaming, and more.

After you scan your computer for security and performance issues with Avast, the tool will automatically tell you how to fix the problems.

It protects you in real-time by analyzing unknown files before they get to you. So relax and play your favorite game on your amazing Alienware machine.

Do Not Disturb Mode blocks distracting popups whether you’re gaming, watching movies, or presenting on fullscreen.

Other great features packed in Avast:

  • Avast keeps an eye on the app’s behavior to make sure they don’t suddenly go rogue
  • Protects your Wi-fi network
  • Beautifully intuitive interface
  • Detect and block viruses, malware, spyware, ransomware, and phishing
Avast Free Antivirus

Avast Free Antivirus

Play and relax on Alienware while using a trusted antivirus to protect from viruses, malware, and spyware.
Free download Visit Website

These are the best antivirus tools that you can use for your Alienware computer or laptop. Check out the complete sets of features packed in every software before making your final decision.

If you want to discover even more great tools to use when playing, take a look at our guide including the best antiviruses with Gaming Mode & Booster.

Which one is your preferred one? Please write us your opinion and suggestions in the comment section below.

3 Quick Ways to Fix Hearthstone Cannot Connect & Login Issues

Several players have voiced their dissatisfaction with the fact that Hearthstone can’t connect when using mobile data or that it can’t connect/log in on Android.

This can be due to a wide range of underlying problems, and we’ll explore all of them in this article along with suitable fixes for each and every one of them.

If you have this problem, keep reading to learn how to successfully log in to your Hearthstone account or connect to a game and find an opponent.

Why is my Hearthstone connection not working?

There are a few possible explanations for why Hearthstone is unable to connect to the server/find an opponent or the loading menu (Blizzard gates) being stuck. These reasons include the following:

➡️ Outdated/ corrupt game

Sometimes, when your game is outdated, you might encounter issues while trying to log in on Hearthstone mobile and PC.

Open your app and check your version. If any new releases are available, make sure to install them.

➡️ Your device does not meet the requirements.

Hearthstone works only on Android and IOS, along with Windows and Mac. If you don’t use any of these devices, you will not be able to play Hearthstone.

Make sure you have a generous amount of memory, otherwise the game will often freeze or not load properly.

➡️ Unstable internet connection

Suppose your internet connection is unstable for an extended family period of time.

In that case, you may run into some difficulties when attempting to log in to Hearthstone, or you may find that the game cannot establish a connection to the internet.

✅ Preliminary checks:

➜ Check your Internet connection. Try to open your web browser and see if you can actually access anything on the web. If you can, try to use another device and see if you get a connection.

If you cannot connect, contact your ISP because the issue is most likely caused by problems on their end.

➜ Restart your device and try again. This step clears all background processes on your device so that Hearthstone can connect without any interference from a conflicting app.

Restarting the device is frequently overlooked because it’s such a simple fix. But it can actually help because it forces your device to reconfigure and end any unnecessary background processes.

How do I fix Hearthstone not connecting issues?

There are several fixes to Hearthstone unable to connect to the game or Hearthstone can’t log in iPad, and they are as follows:

1. Remove the Battle.net Tools directory

  1. Open Task Manager and End Hearthstone and all Batle.Net-related processes.
  2. Open the directory on your PC where Battle.Net is located. (Usuallly C:\Program Files).
  3. Delete the Battle.Net tools directory.

It will remove all Battle. Net-related temporary files and allow the program to repair any damaged or out-of-date files. The Battle.net cache will be cleared as a result.

Try opening Hearthstone again and see if you can log in. Make sure to use the correct credentials and check your keyboard (make sure caps lock/num lock are disabled).

2. Use a gaming-optimized VPN

  1. Get a reputable VPN client. For gaming, it’s important to use a fast VPN with good server coverage. We use ExpressVPN and can confirm it works great with Hearthstone.
  2. Install the VPN to your PC and log in.
  3. Click on the Power button to connect to VPN.
  4. Launch Hearthstone and try to log in again. If the problem was caused by a bad connection, the VPN should fix it.hearthstone can't connect

? Hearthstone servers are located in the Americas, Asia- Pacific, and China.

Players are automatically assigned to the closest server to their region, so you can let ExpressVPN automatically pick your location. It’s enabled by default. Just pick the Smart location in case you changed it.

A VPN can also help with IP bans because it assigns you a virtual IP address and the games you access will link that to your account instead of your actual IP (provided by your Internet service provider)

Due to the number of people using the normal connection, your gaming experience might be affected negatively, resulting in slow network speeds.

This is why it is in your best interest to use a VPN for Hearthstone to connect to faster servers and avoid speed throttling.

It will also make it difficult for anyone, including your internet service provider, hackers, and government officials, to track your online activity.

ExpressVPN

Use ExpressVPN to access fast & unlimited servers and overcome connectivity issues that prevent you from logging in to Hearthstone.
Free trial Visit Website

3. Try to uninstall and reinstall the game

➡️ Uninstall Hearthstone on PC

  1. Launch Control Panel.
  2. Under Programs and features, select Uninstall a program.hearthstone can't connect
  3. Find Hearthstone in the list, select it and click on the Uninstall program.
  4. Confirm the action and wait for it to complete.hearthstone can't connect

➡️ Uninstall Hearthstone Android

  1. Open Settings on your Android Device.
  2. Select Apps.
  3. Go to Hearthstone and select it.
  4. Select Uninstall.
  5. Wait for the process to complete.

Head to the Hearthstone official website or listing in the Google/ Appstore and re-download the app.

If you have tried many things to fix the game and they all proved abortive, reinstalling the game can fix Hearthstone not starting on PC or mobile.

The process of uninstalling and reinstalling the game reboots the game and gets rid of problems related to an overloaded cache or corrupt game files.

Why can’t I log in to Hearthstone Mobile?

Apart from all the various reasons already mentioned above, using incorrect login details can stop you from logging in to Hearthstone Mobile. Therefore, it is important to use your correct login details.

In case of a forgotten password, you can simply request a password reset from the app’s login interface.

It’s also possible that the game won’t start or function properly due to high ping/lag, in which case we recommend checking your connection or using a VPN.

? How to login on to Hearthstone mobile

To log in to Hearthstone mobile on Android, go through the following steps:

  1. Go to your app store or Google Play and download Hearthstone.
  2. Create an account if you don’t already. Next, build a link with the game you wish to play by clicking the Link Account button. (Skip this step if you have an account).
  3. Select log-in.
  4. Enter your credential (user name/email and password).

Hearthstone is a huge and popular game that has a great development team, but like any game, it does have its problem sometimes.

It would be best if you kept in mind that the majority of the time. The cause of this particular problem is not the game developer but rather the player, in most instances.

Some players utilize hardware that is inadequate for the game’s needs. Others have internet connections that are too slow to support the game.

Let us know which solution worked for you, and leave any questions/ recommendations in the comments.

How to Convert Multiple Files to PDF on Windows 10

PDF is one of the most popular file formats, and many are wondering how to convert multiple files to PDF on Windows 10.

This is pretty simple if you have the right PDF editor software installed on your PC. However, there are other solutions that don’t rely on third-party software.

Join us while we explore the best methods that you can use to convert multiple JPG files to PDF, create PDFs from images, print multiple images to PDF, and save multiple images as PDFs on Windows 10.

How can I convert multiple files to PDF on my Windows 10 PC?

1. Use third-party software

  1. Download Soda PDF and install it on your PC.
  2. Start the application and click the Home button in the top menu. Choose Batch from the list of options.
     
  3. Select the Convert option.
  4. Next, choose File to PDF option.
  5. Add the desired files.
  6. Adjust the settings if needed and click the Batch button.
  7. Wait for the process to finish.

2. Use the built-in feature from Windows 10 to create PDFs from images

  1. 1. Make sure all your images are placed in a folder and opened in File Explorer. That way you’ll be able to use the printing option, as it’s not available on Desktop.

  2. 2. Now, select all the images you want to turn into a PDF file, right-click the first one, and choose Print from the list of options.

    select the print option
  3. 3. When the window pops up, under Printer, select Microsoft Print to PDF.

  4. 4. Once you’re done with all settings, just hit Print.

    select the microsoft print to pdf option
  5. 5. Select a folder where you want to save your PDF file.

    save the converted pdf file
  6. 6. Wait for the wizard to finish the process.

  7. 7. There you go, now you just need to open the PDF file, and all your images will be stored there.

  8. You can use the Windows 10 built-in Microsoft Print to PDF printing option to combine as many images into PDF as you want. This is an easy and safe method that doesn’t require using any third-party apps.

You can also try CutePDF to convert documents to PDF by using its simple print to PDF workflow on Windows.

3. Set up the Microsoft Print to PDF printer

  1. Repeat the first two steps from above, in order to open the printing wizard.
  2. Under Printers, select Install Printer.print to pdf
  3. Now, instead of waiting for the wizard to find a printer, click on Printer I want isn’t listed.
  4. On the Add Printer dialog box, click the Add a local printer or network printer with manual settings option and click Next.print to pdf 5
  5. Make sure Use an existing port is selected, and choose FILE: (Print to File) from the dropdown menu.print to pdf
  6. Now, under Manufacturer choose Microsoft, and under Printers, select Microsoft Print to PDF.
  7. If the printer is already installed on your computer, just choose the Use the driver that is currently installed (recommended) option.
  8. Leave the name as Microsoft Print to PDF, which is set by default.
  9. On the next window, select Set as the default printer.
  10. Click Next, and wait for the installer to finish.
Note icon NOTE
Using the Microsoft Print to PDF printer is very effective. However, it might not appear by default. So, if you can’t find the Microsoft Print to PDF printer, you’ll have to enable it yourself.

The above solutions show you how to convert multiple files to JPG on Windows 10, with easy step-by-step indications. Follow them to get the job done fast.

For more information about PDF conversion, read our guide on how to convert Adobe PDF to regular PDF. You can also download Bytescout PDF Suite on Windows 10, as it might help you when editing PDFs.

If you have any comments, questions, or suggestions, just let us know in the comments below.

3 Ways to Clear Clipboard in Windows 10

If you are worried about the security issues regarding your data and you want to erase as much as possible of your work after you are done, then you have a feature in Windows 10 that can help you out. Today’s article is all about how to clear the clipboard in Windows 10.

Clearing the clipboard in Windows 10 can be done very easily and represents a step forward taken towards securing the work you do.

There are some apps available for Windows 10 that are also meant for clearing the clipboard and you only need to open a simple executable.

In this article, you will see firsthand how to use your operating system without having to install any other particular app to clear your Windows 10 clipboard.

How can I delete clipboard history on Windows 10?

1. Use Command Prompt

    The clipboard history can be easily cleaned via Command Prompt. It is a command line tool that allows you to make modifications to your system. To delete the clipboard history on your device, all you need to do is run a specific command.

  1. 1. Press the Windows key on your keyboard or click on the Start button in the taskbar to open the Search menu.

  2. 2. Type cmd or command prompt in the search box.

  3. 3. Right click on the result for the Command Prompt app and select Run as Administrator from the list of options.

    run command prompt as administrator.
  4. 4. The app will now be opened on your screen and you can start inputting commands in it.

  5. 5. Type cmd /c echo.|clip in the command box.

  6. 6. Press Enter on your keyboard to run the command.

  7. 7. Your clipboard history has been deleted.

2. Create a shortcut for cmd /c echo off clip

  1. Right-click anywhere on your Desktop to choose New followed by Shortcut.new-shortcut clear clipboard history w10
  2. In the white field under Type the location of the item, you will need to enter the following text:
    cmd /c “echo off | clip”cmd c echo off clip
  3. Click Next, then under Type a name of this shortcut you will have to name the shortcut you are making. We recommend naming it Clear clipboard in Windows. Click Finish afterward.finish-clipboard clear clipboard w10
  4. Double click the newly created icon on the desktop and your clipboard will be cleared in Windows 10.

If the icon with clearing the clipboard in Windows 10 did not work right away don’t be alarmed. You will need to reboot your PC; then go again on your desktop as you did in the steps above, and double-click the shortcut you have made.

3. Additional tips to clear clipboard history

If you’re still worried about sensitive data being stored in your Windows clipboard, here are some additional tips and tricks on how to remove clipboard history:

  1. Take a new screenshot that will replace the sensitive information with random images.
  2. Restart your computer. Simply rebooting your computer will delete clipboard history.
  3. Use ClipTTL, a tool that will delete your clipboard history.

Another thing we recommend you do is to download and install a dedicated clipboard software manager. These tools are very useful and easy to use by every user.

Then, if you need to manage all the data you copied on your clipboard for different tasks, and delete them when you want, you have available the best clipboard managers on the market.

Yes, it is as simple as that. You now have your very own feature to clear the clipboard in Windows 10 without having to install a new app, and perhaps even pay for it to get it.

If you have any other Clipboard issues in Windows 10, take a look at our complete guide to solve them with ease.

For any questions you may have on this article, use the comments section below; and we’ll try to provide you with an answer as soon as possible.

Antivirus for Multiple Devices: Top 10 of 2023

You know the importance of using antivirus software on your PC. But, our smartphones can also be under massive attack, and they also need protection from hackers or malware.

Usually, we have to purchase separate licenses for each one of our devices, but thankfully, some antivirus software can offer string security that can protect all of our devices.

What’s even cooler is the fact that they are compatible with Windows. We picked six of the best options for securing multiple devices that you can currently find on the market.

Make sure to check out their sets of features just to be able to eventually make the most informed decision for your needs.

What is the best multi-device security software?

TotalAV – Cloud scanning characteristic

TotalAV is a great antivirus solution with multi-device compatibility, which means it can protect up to three devices with easy-to-use apps across all platforms, including Windows, Mac, iOS, and Android devices.

It offers impressive detection rates and an intuitive interface suitable for all users, experienced or not. It is safe to use and provides your devices with high-quality security.

TotalAV can protect your device from all types of threats, such as ransomware and phishing scams and it constantly monitors your PC for potential threats.

Moreover, this software uses cloud scanning which means that any programs that seem suspicious during scans are compared with the ones included in the cloud database of familiar malware.

See if TotalAV is for you based on these other additional good features:

  • Optimization tools that can help your devices run more competently
  • Easy to reach a customer service advisor if you find any impediments
  • Real-time protection to keep your devices safe all the time
  • Data breach monitoring
  • Multiple scanning options to choose from

TotalAV

A great solution with a powerful anti-malware engine that can protect at least three of your devices.
Check Price Visit Website

Bitdefender Total Security – Multiple layers of protection

Bitdefender-Total-Security-Protection-features-screen

Using this great Bitdefender solution, you can finally stop worrying about losing your data or your money and start enjoying life more and get the best out of your devices.

Bitdefender does not quite need an introduction anymore, as it’s one of the best antivirus solutions in the world, and probably everyone knows this already.

Using this software, you will be able to protect yourself and your whole family from various e-threats with some pretty advanced parental controls.

The Parental Advisor will keep you posted on your kids’ online activities, and you will also get the chance to shield your children from various inappropriate content

More so, Bitdefender VPN will protect all of your online activities, and the multi-layer ransomware protection will keep your files safe.

The complete protection for Windows includes the following features: advanced threat defense, anti-phishing, anti-fraud, secure browsing, anti-theft, rescue mode, safe files, and more

This antivirus is the ideal solution for protecting multiple devices, and you can check its main features below:

  • It can offer protection for all the devices that you have in your household
  • The software can protect the entire family, and this includes the kids as well
  • It offers multiple layers of protection against various threats and ransomware
  • The software uses behavioral threat detection to prevent infections, and it protects your essential data from encryption

Bitdefender Total Security

Use award-winning cybersecurity for all your digital needs, that can be installed on multiple devices.
Check price Visit website

Guard.io – Lightweight extension

Guard.io is an extension created to help you browse more safely and quickly. It is clear, simple, and straightforward to use.

You can log into your Guard.io account on 5 different devices, such as your laptop, your desktop PC, and even your work computer.

With this browser extension, you can remove and get notifications on malicious extensions that control browser settings, invade privacy, or install malware, spyware, and adware.

It utilizes AI and machine learning to scan every site you visit. It warns you about suspicious sites, blocks harmful sites, and offers malware and adware removal.

Guard.io also offers other various helpful features for your device, including:

  • Eliminates all invasive notifications that could be harmful
  • Advanced anti-phishing protection from emails and websites that can steal your personal data
  • Keep track of all email accounts and get alerts on data breaches
  • Automatic detection of suspicious webpages

Guard.io

Enjoy the most lightweight solution with easy setup and strong security characteristics.

ESET HOME Security Essential – Impressive security engine

If you get an ESET HOME Security Essential license, you will be able to install amazing security software for various devices that will keep them as safe as possible.

Your complete online world will finally be in safe hands due to the years of security expertise and modern technologies that are packed into this powerful software.

Check out more interesting features and also more advantages that come together with this great pack for protecting your devices by heading over to ESET’s official website.

Take a look at the main features that you will get to enjoy if you do choose to use this software:

  • You will be able to transfer protection to a new device whenever you want to
  • Whether you run a PC or an Android device, you will be able to protect each one of them with ESET
  • You will get the chance to select the number of devices, choose the products that suit you best, and put together some impressive Internet protection
  • Safe banking & browsing 
  • Protected smartphones and smart homes 

ESET HOME Security Essential

With ESET HOME Security Essential you can easily protect all your devices.
Check Price Visit Website

Avira Free Security – Automatic updates

Avira is not just a common antivirus, it is the ultimate security suite for all your devices that also includes VPN.

It offers complete online protection against malware and other threats, and all this in real-time. Furthermore, it will block infected websites and intrusive ads.

Another awesome feature that you won’t find in many antivirus solutions, is that it keeps your software and drivers up to date.

Some of the other best features of Avira Prime include:

  • Anonymizes and encrypts your web browsing
  • Speeds up your computers and mobile phones
  • Generates and remembers passwords for you
  • Detects malware and online threats in real-time
  • Finds secure, money-saving deals and coupons when you’re shopping
  • Blocks phishing websites and unwanted callers

Avira Free Security

Use the best antivirus solution that allows you to secure up to 25 devices with a single subscription.
Check price Visit website

CyberGhost VPN – Data protector

With CyberGhost VPN you will get the chance to secure your overall digital lifestyle. A VPN comes in handy mainly because hackers can access your data and even the government if it chooses to.

More than that, public Wi-Fi is exposing your personal information, which is another reason you need extra protection.

You can find out even more features, functionalities, and information about CyberGhost’s advantages by heading to its official website and looking around.

CyberGhost also allows users to get rid of censorship because by connecting to the secure servers provided by it, you will get access to worldwide content

Also, you’ll notice the fact that you can download the free trial of the software as well, just to see if you like it and if it can provide enough features for your security needs for your devices.

Take a look at the most exciting features that are included in CyberGhost:

  • Using CyberGhost, you will be able to get simultaneous top-class protection on up to five devices
  • This fantastic VPN service will make sure to hide your IP address and replace it with another one from its own network, and as a result, cybercriminals and other thirst parties will never get the chance to track your online activity
  • Using CyberGhost on all of your devices, you will be able to perform your online transactions as safe as possible no matter where you are
  • While you are using this software, no one will be able to snoop around on your conversations and your private data
  • When you try and access a website, CyberGhost will check out if it’s safe for you to enter and it does this by running a precise check on that website’s URL

CyberGhost VPN

Enjoy the best all-around digital safety that offers privacy on many devices simultaneously.
Free trial Visit website

Norton 360 – Online backup

If you’re like us, one of those people who long for an excellent all-in-one solution for security, then this is the software you should consider as well.

Norton is one of the oldest names in computer security, and it’s one of the best solutions out there after all this time.

Symantec offers various versions of its software and among the best is Norton 360 which makes sure to offer protection to multiple devices.

All its features make it an all-in-one security suite that can be used for multiple devices. You can check out more information about its features and functionalities by heading over to Norton’s official website.

There are other useful options included such as a file cleanup utility, disk defragmenter, a tool that restricts startup programs, and more

Check out the best features that are included in this software below:

  • After you install the program which is an effortless task this software will not try to add lots of elements to your systems, outside the program itself
  • The interface is clean and easy to use and you will get used to the settings really fast
  • Norton 360 can protect a family of up to 10 devices and it can also backup your private data on your PC to a secure cloud
  • Norton can monitor your documents, contacts, pictures, and more items by default after you activate it
  • This software will not interfere with your daily activities at all
  • Norton comes with some convenient extras such as a password manager and online backup

Norton Security by Symantec

Choose to use a solution that comes with multiple layers of protection for multiple devices.
Check price Visit website

AVG Internet Security – AI-based threat protection

This is another all-in-one great antivirus and tuneup combo that you can choose for your devices.

This software managed to win various awards for its enhanced security and performance, and it will turn out to be great for you and your entire family.

AVG Internet Security is designed for personal and family use, and we guarantee that you will not regret trying it out.

Take a look at more exciting features that come with this security suite to be heading over to AVG’s official website.

Just take a look at some of its key features below:

  • AVG Internet Security is packed with security features that will take good care of your devices
  • The software is effortless to use, and it was designed with simplicity in mind, but without compromising the security, obviously
  • It includes brand new Ransomware Protection, Webcam Protection, enhanced firewall, and AI-based threat detection and removal in real-time
  • This program can offer users all they need to remain protected on their devices
  • The tuning suite automatically speeds up your computer by cleaning junk, and offering you enhanced battery life and more

AVG Ultimate

Use a powerful security tool for all your devices to protect your data from ransomware and other threats
Check price Visit website

Kaspersky Standard – Built-in password manager

If you’re looking for a reliable antivirus that can protect multiple devices, perhaps you should consider using Kaspersky Antivirus.

This antivirus offers great performance and solid protection, and thanks to the friendly and simple user interface, you won’t have any problems adjusting to it.

In terms of protection, this antivirus will protect you from viruses, ransomware, and other online threats.

Kaspersky offers the same features as the Kaspersky Antivirus, but it also has multi-device protection, so you can also use it on your Mac or mobile devices.

Privacy and online banking protection are also available in this version, so you’ll remain protected from data theft and phishing attacks.

For maximum protection, there’s Kaspersky security. This version offers parental control and a built-in password manager that will safely store your online credentials.

In addition, there’s also a file protection feature available, so you can rest assured that all your files are completely safe.

Overall, Kaspersky Antivirus offers solid protection, but if you want to use it on different platforms such as Mac, iOS, or Android, you’ll need to purchase the Kaspersky valuable service.

Main features:

  • Malware and ransomware protection
  • Simplicity of use
  • Great performance
  • Available on Mac and mobile devices (Internet Security version)
  • Privacy and online banking protection
  • Parental control, password manager, and file protection

Kaspersky Standard

Get the unmatched feeling of security with award-winning protection against hackers, viruses, and malware.
Check price Visit website

Avast Premium Security – User-friendly interface

Avast Premium Security is a well know antivirus that can also be used to protect all your devices. It is a complete online protection for all of your computers, phones, and tablets.

You can secure up to 10 devices with one license, and then, enjoy safe online shopping and banking whether you are on your computer or smartphone.

Furthermore, this great software will stop hackers from remotely controlling your PC and infecting it with malware or locking your files with ransomware.

Here is a list of other impressive features of Avast Premium Security that you might want to know:

  • Scans websites for security risks on your computers and mobile phones
  • Protects your devices against ransomware attacks
  • Easy to download and navigate
  • Plenty of scanning options, including Custom, Boot-time, and Network Inspector scans
  • Complete malware detection that stops you from sharing infected files

Avast Premium Security

Get one of the best antivirus to stay safe from viruses, and scams on all your computers and phones.
Check price Visit website

No matter which software you choose from the list of six that we presented above, your devices will be protected.

To secure your computers and devices, even more, you can also use any of these best firewall devices to protect your home network.

We advise you to check out their complete sets of features to be able to make an informed decision that’s best for your devices.

How to Enable Back Balloon Notifications in Windows 10

Microsoft introduced an interesting feature in Windows 10 which will show all the applications or perhaps the system notifications as toasts instead of the balloon notification we were used to. However, some users want to enable balloon notifications back in Windows 10.

But if you want to bring back your balloon notifications in your new Windows 10 operating system you can learn below what are the proper steps that you need to take.

Applying some modifications to the Windows 10 system will bring back your balloon notification, but you will have to follow the instructions below to the letter to prevent any potential damage to your Windows 10 system.

Also, it would be recommended to create a backup copy of your current Windows 10 operating system so that you won’t have to worry if you accidentally change something wrong in the Windows 10 system.

Without further ado, let’s see how you can enable balloon notifications in Windows 10. Follow along!

How can I enable balloon notifications on my device?

    You can bring back the balloon notifications on your Windows 10 PC via the Group Policy Editor. It is a built-in tool on your device that allows you to modify settings in regards to the PC. From there, you can disable or enable balloon notifications in a few clicks.

  1. 1. Press and hold the Windows button and the R button at the same time.

  2. 2. The Run dialog window will open on your screen.

  3. 3. Write in the Run window the following command: gpedit.msc

    gpedit windows
  4. 4. Press the Enter button on your keyboard to run the command.

  5. 5. Now you will have on the screen the Local Group Policy Editor window.

  6. 6. On the left pane you will have to double click or tap on the User Configuration icon.

  7. 7. In the User Configuration icon you need to double click or tap on the Administrative Templates folder.

  8. 8. In the Administrative Templates, folder double click or tap on Start Menu and Taskbar.

  9. 9. Now on the left side pane you need to find the Disable showing balloon notifications as toasts option.

  10. 10. Double-click on it.

  11. 11. In the window that pops up, you need to left click or tap on the Enable button you have in the upper left side.

  12. 12. Now you will need to left click or tap on the OK button in the window presented above.

  13. 13. Close the Local Group Policy Editor window.

  14. 14. Reboot your Windows 10 operating system.

  15. 15. After the Windows 10 device powers up again, you can go ahead and test if your balloons notifications are working well.

How can I fix balloon notification issues in Windows 10?

Some of you may have issues with the balloon notifications. User cabidop reported the following problem on Github:

Using the current master version (1.3.1.dev0) I’ve not been able to display a balloon notification on Windows 10. The code I’m using is pretty simple:

from plyer import notification

notification.notify(
    title='Notification',
    message='This is a notification',
    app_name='Application',
    app_icon='icon.ico',
    ticker='Icon'
)

After running it, a system tray icon appears but no desktop notification is displayed. This same code on Ubuntu makes the notification appear as expected, so I guess I’m missing some dependency. 

  1. Press Windows + I then go to Privacy.privacy-w10 balloon notifications w10
  2. Select Background apps from the left panel then make sure the option Let apps run in the background is toggled on.background-apps bubble notifications w10

There is an option available inside the Windows privacy settings that permits applications to operate in the background. You may activate this option to display notifications of any sort in Windows 10.

Users also found our guide on some easy ways to create email notifications for Event viewer useful. Make sure to check it out as well if you are looking for such notifications.

That is all you have to do in order to bring back your balloon notifications in the Windows 10 operating system. Please write us below in the comments section if you have any issues applying the steps above.

Best Antivirus With Parental Control [Out of 15 Tested]

It is impossible for parents to watch their children or teens’ every keystroke, click, and move. That is where parental control antivirus software and programs come into play.

Installing the best antivirus with parental control enables us to closely monitor online or social media activities and block inappropriate materials.

In addition, it also protects the PC against viruses and malware while still permitting our children to enjoy the positive benefits of online resources and knowledge.

Antivirus software provides parents with specific controls to determine which websites, games, and keywords their children can access. Thus, parents can easily restrict or block activities that develop into dangerous situations.

Some of this software has the ability to log keystrokes so that guardians or parents can easily receive emails if their kids try to access dangerous or inappropriate content with their PC or phones.

In this post, Windows Report has compiled the best antivirus software with parental control features for you.

Should you use an antivirus with parental control?

If your child uses a computer, parental controls can help when your child finds unsafe websites on the Internet. It is inevitable that they will become more and more curious.

With parental control options, you can block unsafe websites, downloads from unknown sources, and even adult content that may have accidentally leaked onto the web.

With parental control options, you can also protect your children from all the online threats and risks they face today.

What is the best antivirus with parental control?

TotalAV – Strong protection, no parental controls

TotalAV antivirus scan

TotalAV covers the security side well: real-time protection against malware, adware and spyware, WebShield for phishing and malicious sites, and a Safe Browsing VPN and password vault in the higher plans. It is cross-platform, so a family’s laptops, tablets and phones are covered by one subscription.

It does not include parental controls, though. If content filtering, app monitoring or screen-time limits are the priority, pair it with a dedicated parental-control tool.

  • Real-time protection against malware, adware and spyware
  • WebShield for phishing and malicious sites
  • VPN and password vault in the higher plans
  • Windows, Mac, Android and iOS
  • No parental controls – pair with a dedicated tool
TotalAV

TotalAV

TotalAV allows you and your family to use your PC and browse the Internet safely.
Free Trial Visit Website

Bitdefender Total Security – Activity alerts

Bitdefender-Total-Security-Protection-features-screen

This is one of the best Windows PC antiviruses with parental control. This security software protects against malware very well on all these devices.

Bitdefender comes with a great parental control feature. All you need to do is to install the software on the devices of your children.

A profile will be created for each child, their devices will be added to the created profiles, and then all the activity on these devices will be easily monitored.

Furthermore, it has an IM Monitoring & Blocking feature, which will block or restrict online bullies, blacklist specific contacts, and also block incoming messages with particular keywords.

Let’s quickly look at its key features:

  • Activity Alerts
  • Social Network Tracking
  • Mobile Phone and location tracking are available
  • IM Monitoring & Blocking
  • Monitoring of SMS & Calls
  • Blocking of website & Apps
Bitdefender Total Security

Bitdefender Total Security

Want the best security against all Internet threats? Bitdefender is your best bet.
Check price Visit Website

Norton 360 – Time supervision

This antivirus is one of the best internet security suites. It comes with great parental control features and ranks very high for protection and usability independent tests.

Norton enables kids to explore the Internet in a safe and secure environment. Online predators are almost everywhere and it is essential for kids to be safeguarded from their sophisticated tricks and tactics.

In addition, Norton can detect malware easily no matter what type of device you use. Some of its most noteworthy features are its password manager and online backup storage.

Let’s quickly look at its key features:

  • Time Supervision (to schedule particular times of the day or week allotted to online and device usage)
  • Web Supervision (built-in tools to restrict or block unsuitable websites, and alert you about which websites your kids are visiting)
  • Search Supervision (view the terms, keywords, and phrases that children use in order to supervise and protect them from inappropriate content)
  • Social Network Supervision (check how often kids log onto various social media platforms)
  • Location Supervision
  • It can support up to 10 devices

Kaspersky Safe Kids – Internet activity management

Kaspersky Safe Kids has everything you need for a suite and its components are very effective.

This security software has a strong firewall that can give your system maximum protection against unknown connections.

In addition, it has anti-malware security suitable to detect viruses. Kaspersky Safe Kids also comes with real-time protection for PC and mobile devices.

Let’s quickly look at its key features:

  • Real-time Notifications & Alerts (automatic, on-the-go notifications about children’s activities)
  • Manage Internet Activities (block certain websites and applications based on dubious content)
  • Manage Applications (decide which applications or websites are safe with filters and settings)
  • Manage Devices (scheduling options for allotted time usage of devices and the Internet)
  • Monitor Social Media (effectively monitor all public posts on platforms that children access)
  • Monitor calls, SMS, and location with GPS-safe zones

Webroot Internet Security – Safe web browsing

antivirus old pc windows vista antivirus 2022

This web-based antivirus software offers Internet security protection against various threats such as malware, identity theft, phishing ransomware, and other malicious attacks.

Webroot Internet Security Complete is also one of the best parental control software, plus its constant scanning does not slow down the computer.

Let’s quickly look at its key features:

  • Easy and fast installation
  • It enables web blocking
  • The online web console enables easy management of your devices and licenses
  • It has anti-phishing protection
  • Fast processing to provide constant computer scanning for viruses
  • Identity protection (it protects personal credentials and private information such as account numbers, usernames, and passwords)

McAfee – Great overall security

This antivirus software comes with great parental control features and strictly monitors PC usage with a web filter that blocks or restricts certain applications and websites.

Keep your children from accessing dangerous websites and keep any kind of virus or malware from entering your child’s computer at the same time.

Let’s quickly look at its key features:

  • Complete protection with just one subscription
  • It protects PCs and other devices against online threats, viruses, and malware
  • Free technical support daily
  • It effectively monitors PC usage and blocks unwanted content

Trend Micro Maximum Security – Good ransomware protection

This security software is the best choice for families who need to protect different types of devices because it’s fully compatible with Windows PCs. It also comes with a great parental control feature.

Let’s quickly look at its key features:

  • Compatible with Windows OS
  • Great ransomware protection
  • Social media privacy scanner and parental control
  • Anti-theft tools for mobile devices that can be used to keep track of your children
  • Requires a minimum of computer resources, so it won’t affect the speed of your system

⇒ Get Trend Micro

Cybersecurity is very important, especially when it comes to your children, thus using an antivirus with parental control is thus essential.

Benefit from activity reports, alerts, histories, websites, and social media monitoring, monitoring of calls and SMS, restricting or blocking specific applications or websites, detecting locations, etc.

What is your favorite tool from this list? Let us know in the comments section below.

PST? EML? The 5 most common email files

What started as a simple mode of communication between the computers in MIT’s lab in the 1970s, email has gone on to become one of the most popular communication mediums on the 21st-century internet.

Through email, you can send and receive a combination of texts, images, links, etc., to and from single or multiple recipients. Even though through the efforts of public education and cultural influence, this has become common knowledge for a huge number of modern workers, most people aren’t familiar with all of its intricacies.

One such important aspect of emails that most email users are unaware of is that there’s no single type of email file. In this article, we’ll look at the most common types of email files in use today.

The most common types of email files

We want to come out and say this upfront: there’s a massive amount of email file types out there. An estimate from file-extensions.org puts the number at 75.

While it’s not possible to cover all types of email files, in this guide, we’ve made an attempt to explain the most common ones out there. So let’s get started.

1. EML Files

The most common type of email file, EML is a file extension synonymous with the email itself. It’s a file format used with all the popular email applications such as Outlook, Mail, etc. EML files basically contain plain texts that you’ve sent through your email client.

 Apart from this, the file also consists of Sender, and Recipient, along with the subject, time, and the message itself.

How to open EML files

Your EML files can be opened through a host of email clients; Apple Mail, Mozilla Thunderbird, and Microsoft Outlook are the top ones that spring to mind. 

Apart from unique email clients, you can also use different browsers, like Chrome, Firefox, Edge, and so on, to open and see the files.

2. PST Files

Outlook has a feature that lets you keep a copy of your emails in the local account; these emails are stored locally in PST format. PST files have a size limit of 2GB and they can store everything from messages to email attachments, email addresses, and so on. 

PST files are pretty standard and helpful, especially if you want to keep your Outlook files locally after clearing your cloud storage.

So when you’re backing up any data on Outlook, you’re storing a file locally on your PC.

How to open PST files

You can open your PST file through Microsoft Office. Here’s how:

  1. Launch the Office app and click on File.
  2. Select Open & Export > Open Outlook Data File.
  3. Then, select the PST file you want to open and click on OK.

The PST file will be opened.

3. MBOX Files

The MBOX format, sometimes also called Berkeley format, is a type of email that acts as a central database for electronic emails. In an MBOX file, all the data is concatenated and stored as plain text in a single file; any new messages are stored at the end of the file.

It was first introduced with the fifth edition of Unix and has been in use since then.


You can open the MBOX files with a slew of email clients like Mozilla Thunderbird, Apple Mail, etc.

How to open MBOX files

To launch your MBOX files, follow the steps below:

 If you’re on a Mac, then all you’ve to do is right-click on the MBOX file, and select Open With > TextEdit.app.

That’s it; the file will be opened, and you can view all of its content. Alternatively, you can use the Apple Mail app to open the file as well.

4. OST Files

The OST, also known as Outlook Data Files, as the name suggests, is an email format used on Outlook. When you use an Exchange account for working offline, an OST file is created. As a rule, OST files are simply copies of email files that are already stored on the server and don’t need to back up locally.

How to open OST file

If you have an OST file with you, then one of the simplest ways to view it is through an OST viewer software. There are plenty of such tools all over the internet, so we’re not going to recommend any specific one.

5. EDB Files

The EDB file format is used for the database that stores all your Outlook email information together in the back end with the help of Microsoft Exchange Server. It keeps everything from emails, contacts, calendars, etc., in a ‘B-structure,’ where your data is sorted into parent and child nodes.

How to open EDB files

To open EDB files out of Exchange Server, you’ll have to use a third-party app. There are a variety of apps to choose from out there. We’ll recommend you use the Stellar EDB to PST converter app. As the app’s name suggests, apart from helping you convert your EDB files to PST, you can also use the app to view your EDB files. Here’s how:

  • Download and install the app from the official website.
  • Launch the app and choose the EDB file(s) you’d like to view.
  • As soon as you do this, the app will be give a thorough preview of the EDB files.
stellar edb converter

The most common type of email files

And these, folks, are the most popular type of email files in use today. Now that you know some of the most popular formats, why not take a look at our guide on how to import mbox files to Outlook?

Hopefully, this brief overview helped you get a quick grasp of email and the various types of files it has to offer.

Fix: Windows Defender Not Working in Windows 10

Often we hear people complaining that they cannot turn on Windows Defender in Windows 10, so today we’ve decided to share with you a few tips on how to fix this issue.

It’s the main anti-malware component of Windows. It provides a great defense against threats and you are pretty much safe from most online risks.

Windows Defender must work 24/7 especially when you don’t use any other antivirus. Leaving your PC vulnerable even for a few moments might pose a big risk.

If you’re happy with basic antivirus protection, Windows Security is perfect for protecting your PC. Other antivirus software comes with additional security features.

Windows Defender won’t start

Here are some examples of how this issue may manifest itself:

  • Can’t turn on Windows Defender Windows 10 Group Policy
  • Can’t turn off Windows Defender Windows 10
    • If you want to switch to another antivirus program, this problem might prevent you from turning off Windows Defender.
  • Windows Defender real-time protection handled by another av program
    • Windows Defender and another antivirus program don’t go along (see below).

There are a few possible scenarios for this problem, and we’ll cover most of them in this article.

What to do if Windows Defender is not working in Windows 10

  1. Enable real-time protection
  2. Change date and time
  3. Use professional software for protection
  4. Update Windows
  5. Change Proxy Server
  6. Disable third-party antivirus
  7. Run the SFC scan
  8. Run DISM
  9. Reset the Security Center service

1. Enable real-time protection

  1. Press the Windows key + Q key on the keyboard to bring up the charms search.
  2. Type Windows Defender in the search box and then press Enter.
  3. Head over to the Settings and check Turn on real-time protection.

Windows Defender is designed to turn itself off if it detects any other third-party antivirus software. Windows is designed to detect any installed antivirus software, and certain issues can occur if you have two or more antivirus software installed.

These issues include conflicts between antivirus software that can manifest as frequent freezing, crashing of applications, etc.

Since this is a common problem, in order to avoid any conflicts, Windows Defender will turn itself off if Windows detects any other security program.

In addition, if this security software has a Firewall, Windows Firewall will also turn itself off.

This means that if you want Windows Defender to work, you’ll have to choose between it and the third-party antivirus software.

Often users are not aware of whether security software is installed or not because when you buy a new laptop in most cases it comes with a trial version of antivirus software such as Norton, McAfee, etc.

When you install applications like Flash or Java it might prompt you to uninstall the free security scanner, and that can cause some problems.

Therefore it’s best to search your PC if you’re not sure whether security software is installed or not. Once you remove it, you might need to manually turn it back on using these steps:

2. Change date and time

Another cause for Windows Defender not working properly is the incorrect time and date on Windows 10.

In order to fix this, you need to check your time and date and set it to the correct value before trying to turn Windows Defender back on.

We know that this might sound strange, but most of the Windows system functions are dependent on time and date, therefore an incorrect date or time could trigger abnormal behavior in your Windows OS.

3. Use professional software for protection

Windows Defender is a useful feature for your operating system, but if it doesn’t function properly, you can try professional software. ESET HOME Security Premium is constantly improved through updates by its developer so that it will detect and repair the latest malware that will appear.

Try out the ultimate cybersecurity package that will provide you with online safety. This software was created for users who want full protection against online threats.

This means you will also benefit from extra theft protection and a user-friendly password management feature. Feel free to install and use it on any Windows, Android, Mac, or Linux device, as it is compatible with all four operating systems.

Keep your digital identity under protection from unauthorized third parties with ESET HOME Security Premium’s advanced antivirus technology. This application will also offer efficient protection of your confidential data from phishing and ransomware.

If you desire more privacy for your files, then you can choose to encrypt them and removable media too. This is professional software that keeps you organized with good password management, by storing and organizing them.

ESET HOME Security Premium

ESET HOME Security Premium keeps your computer safe from all digital threats and protects your private data.
Free Trial Visit Website

4. Update Windows

  1. Go to Start, select Settings, and choose Update & Security.
  2. Navigate to Windows Update, and then select Check for updates.Windows updates

Make sure that you keep your Windows up to date using Windows Update since this can cause some problems with Windows Defender. When it comes to any security software, make sure that you update it frequently.

We suggest that you perform a full Windows Update, then open Windows Defender and run an update from there as well.

If you can’t open the Setting app, we have a special article on how to solve the issue.

5. Change Proxy Server

  1. Press Windows key + X and select Command Prompt (Admin).cmd prompt
  2. Type in one of the following:  NETSH WINHTTP SET PROXY 1.1.1.1:8080 or NETSH WINHTTP SET PROXY MYPROXY.NET:8080
  3. Reboot the system and see if it works.

These three are the most common scenarios that can cause problems with Windows Defender, but there are some other not-so-common scenarios that can cause problems as well.

For example, incorrect Zone settings in Internet Explorer can cause problems, but you can easily fix this by resetting Internet Explorer to factory settings.

Bear in mind that if you are using a Proxy server, Windows Defender will not be able to update. If that’s the case, you’ll need to make some minor tweaks to your Proxy server.

If you’re having trouble accessing Command Prompt as an admin, then you can read one of our guides.

6. Disable third-party antivirus

Windows Defender doesn’t get along with third-party antivirus programs. Just like any two antivirus programs don’t work well with each other.

So, if you want Windows Defender to be your primary security option, make sure to disable any third-party antivirus programs you have installed on your computer.

7. Run the SFC scan

  1. Go to Search, type cmd, and open Command Prompt as Administrator.Command Prompt
  2. Enter the following line and press Enter:sfc/scannow
  3. Wait for the process to finish.
  4. Restart your computer.

This simple solution shows how to run the SFC scan in Windows 10.

8. Run DISM

  1. Go to Search, type cmd, and open Command Prompt as Administrator.Windows Defender not working
  2. Enter the following command on the command line:
    • DISM.exe /Online /Cleanup-image /Restorehealth
  3. In case the DISM can’t obtain files online, try using your installation USB or DVD. Insert media and type following command:
    • DISM.exe /Online /Cleanup-Image /RestoreHealth /Source:C:RepairSourceWindows /LimitAccess
  4. Make sure to replace the following path of your DVD or USB: C:/Repair/Source/Windows

9. Reset the Security Center service

  1. Go to Search, type services.msc, and open Services.
  2. Find the Security Center service.services.msc
  3. Right-click the Security Center service, and go to Reset.
  4. Restart your computer.

And finally, if none of the solutions from above worked, we’ll try resetting the Security Center service. Hopefully, Windows Defender will start working after that.

That’s about it, we hope at least one of these solutions helped you resolve your problems with Windows Defender. If you have any comments, questions or suggestions, just let us know in the comments down below.

11 Best Web Filtering Solutions to Block Threats & Websites

Most antivirus has added web filtering and blocking capabilities which were formerly restricted to Internet filter software.

Internet filtering works by giving users access to create a specific user identity or username for every member of their family that uses a computer device.

However, this gives you the power to set restrictions on some websites for certain members based on age or maturity level. This can block access to websites flagged for specific content, such as pornography, drugs, or violence.

The web blocker scans through the site content before it is displayed on your computer screen and blocks inappropriate websites.

What does online privacy mean?

Online privacy is the process of protecting yourself while connected to the Internet. Learn how to stop online tracking.

Do you care for an antivirus program with web filtering? Read on; this post is meant for you.

What is the best Antivirus with web filtering to use?

TotalAV – Best system maintenance and browsing security

TotalAV is an amazing antivirus that provides great security and PC maintenance options. Take care of your system from multiple sides.

You will feel protected knowing it has real-time protection and prevention against viruses, malware, and other online threats. Security is the main focus of this antivirus software.

As for web surfing, it has more features than you can think of. With active WebShield, everything you access, download, and click is verified and scanned for risks.

Web filtering is at its peak since it automatically blocks any malicious web pages, only shows you verified web results, and stops intrusive trackers before they can take control of your privacy.

Let’s see some of the perks of using TotalAV:

  • Blocks ads and disables notifications for faster page loading
  • Included VPN to access geo-restricted websites and content
  • Password vault manager and random password generator
  • Zero-day cloud scanning and PUA protection

TotalAV also comes with tune-up tools for your workstation. Clean junk files and temporary folders from the disk as well as manage and clear your browser to enhance the experience of browsing.

TotalAV

TotalAV

Stay totally safe while engaging with your favorite online content with TotalAV.
Check Price Visit Website

Bitdefender Total Security – Best for multiple devices

antivirus web filtering

Bitdefender is one of the topmost antivirus companies in the world and proves so yearly with its annual release of security software that always rates at the top.

Users that need total Security for their multiple devices have the BitDefender Total Security to take care of their needs. BitDefender Total Security is one of the most feature-rich suites available in the industry.

BitDefender gives excellent marks in malware detection tests and does not use many system resources while scanning.

It also has a good false positives rating, meaning it doesn’t block safe websites and identifies malicious websites well.

The antivirus software blocks ransomware and protects against phishing websites that try to steal login credentials. It also scans removable drives and eliminates threats.

In addition, this program also comes with a file shredder that permanently removes deleted files from your hard drive. It also has 2GB online backup to keep important files as a preventive measure against system crashes.

Other key features of Bitdefender Total Security include:

  • Built-in VPN for online privacy
  • Dedicated safe browser
  • Online shopping and banking protection
  • Automatic don’t disturb modes for gaming and streaming

The firewall gives extra layers of protection against hacks and exploits attacks by performing repairs on programs and windows as patches are released.

Bitdefender Total Security

Bitdefender Total Security

Want the best security against all Internet threats? Bitdefender is your best bet.
Check price Visit Website

ESET HOME Security Essential – Best multi-layered protection

ESET HOME Security Essential offers an advanced level of protection against various online threats. This is necessary software for anyone who values his online privacy.

It will ensure all the necessary protection for any active person who uses the Internet to buy, work, communicate, and do online banking. It is versatile software compatible with any Windows, Mac, Linux, or Android device.

This antivirus has a web control option and a parental control feature. The PC admin can use it to block access to harmful or inappropriate websites.

ESET HOME Security Essential also has a strong firewall to protect your online connection. Paired with the network inspector feature, it will block any suspicious network activity and alert you right away.

Protecting you and your family from phishing attempts is a good option. The built-in anti-phishing feature blocks all known malicious websites.

It also uses advanced machine learning to detect potentially harmful activity from web pages that have not yet been stored in the database.

Other key features of ESET HOME Security Essential include:

  • Cloud-powered scanning
  • Script-based attack protection
  • UEFI Scanner
  • WMI Scanner
  • Ransomware protection
  • Anti-spyware

Make sure your computer is protected from unauthorized access and keep your data safe and secured with ESET HOME Security Essential. Use safe e-wallets and make online payments without having to worry about compromised data.

Guardio – Best shield for browser-based attacks

Guardio provides real-time security and prevention when you browse, make online payments, stream, download attachments from emails, and visit particularly harmful websites.

This is not an antivirus program with web filtering capabilities but rather an antivirus extension for Edge, Chrome, and Firefox with advanced safeguarding abilities.

Guardio is a source of browser protection and data breach monitoring for a safe digital environment for anybody who spends significant time doing online research.

Phishing is the most prevalent online danger today, with over 200,000 online assaults occurring each year, and Guardio, combined with a trustworthy antivirus, is a must-have on your browser.

These are the main features of Guardio:

  • Blocks unwanted popups
  • Alerts on harmful sites
  • Prevents information leaks
  • Restricts harmful apps
  • Checks on system health

Guardio prevents abusive alerts and explicit content from appearing on your computer by deleting malware. Guardio also monitors push provider connections to provide a broader blocking range, and it may work wonders if you have it installed on all browsers you use.

Guardio

Guardio

Real-time web filtering that detects phishing attempts, harmful advertisements, and data breaches.

Avira Antivirus Pro – Advanced detection and filtering

antivirus old pc best antivirus without ads for PC

Avira Antivirus blocks every month more than 25 million infected websites, 8 million phishing attacks, and over 1.4 million ransomware attacks. Avira is a performant antivirus that offers strong protection against malware for Windows and Mac devices.

Avira will contain an advanced detection system to prevent ransomware and zero-day exploits from reaching your computer. Fully benefit from its web protection while doing online banking or shopping.

Allow this professional program to detect malware, clean your computer, and bring it to an optimized state.

The tool combines machine learning algorithms with AI intelligence to see how web attackers operate and block day-one threats.

It protects you from email-based attacks that include malware-infected links or phishing attempts.

Other key features of Avira Antivirus Pro include:

  • Potential unwanted apps shield
  • Anti-tracking feature for your browser
  • Adblocker
  • Protection against viruses, ransomware, trojans, and more

Use its Next ID theft protection so that you can make banking operations anywhere without worrying about the most performant phishing attacks.

VIPRE Antivirus Plus – Straightforward UI

router antivirus

VIPRE is tested every year by independent antivirus authorities, and each time, they earn top ratings for their security systems.

That’s the reason why we recommend VIPRE Antivirus Plus, which also has an excellent web filtering feature. It’s light on your system, but it offers one of the best real-time protection on the market.

This solution is always on the lookout for all types of viruses, malware, Trojans, worms, and other threats. It can even protect you from polymorphic malware that changes its signature to escape detection.

It has a cloud-based website blocker with an up-to-date database of all malicious websites.

With Vipre, you also protect yourself against email attacks. It scans all incoming messages for infected attachments or malicious links.

Other key features of Vipre Antivirus Plus include:

  • Customizable firewall
  • Spam filter for emails
  • Integrated file eraser
  • Browser cleaner

VIPRE Antivirus Plus has a trial version but even if you decide to purchase it, you will still have a 30-day money-back guaranteed policy if you decide it’s not for you.

VIPRE Antivirus Plus

VIPRE Antivirus Plus

An excellent web filtering solution that uses machine learning to identify threats before they even attack.
Free trial Visit Website

Emsisoft Anti-Malware – Well-rounded affordable antivirus

Emsisoft Anti-Malware is an extremely powerful security software with a redesigned interface, significant improvements, and official awards from AV-comparatives and Virus Bulletin.

The surf protection was recently improved to recognize suspicious hosts and provide maximum security against the latest malicious websites.

The program will automatically block three categories of suspicious hosts: malware hosts, phishing hosts, and PUP hosts.

The other types of hosts that fall under the “privacy risks” category are not automatically blocked, as this includes some websites used for advertising or tracking.

In the Protection menu, if you go to Surf Protection and select an option from the Privacy risks drop-down menu, you will be prompted with an Alert for this type of website.

Using the default setting Block and notify is recommended so that you will know instantly when a connection has been blocked. This gives you a clear notification when a particular website has not loaded.

Other key features of Emsisoft Anti-Malware include:

  • Machine learning-based behavior blocker
  • Automatic updates
  • Remote management
  • Scheduled scan
  • Advanced infection cleaning
  • Browser security

This reliable antivirus comes at a more affordable price and offers high-performance security. Check out more on the official website and give it a try.

Sophos Home – Best anti-phishing technology

Dashboard Sophos Central

Sophos Antivirus is more known for providing protection for big businesses and organizations. This antivirus gives excellent web protection, monitors incoming traffic, and blocks access to infected and suspicious websites.

It also scores highly in identifying and blocking phishing websites that try to steal your private data, like credit card info, address, or full name.

In addition, it has high phishing detection rates and is among the highest in the field in this category and offers quality protection to Firefox, Chrome, and Internet Explorer.

This program also excels in URL filtering by filtering websites that host malware and ransomware and prevent their traffic from reaching your browser.

Meanwhile, the dashboard gives access to monitor and control the antivirus remotely. It lists all your activities and shows details of alerts, a website blocked, and the threat removed.

Other key features of Sophos home include:

  • PC cleaning and optimization features
  • Online shopping protection
  • Parental controls for web filtering
  • AI threat detection
  • Dedicated customer support

This program gives you the option to ignore or remove suspicious programs and files. So if you are 100% that a page that is identified as suspicious is actually safe, you can access it in a few clicks.

Symantec Norton Family Premier – Customizable parental controls

Symantec, the company behind the popular Norton antivirus also offers Internet filtering software that delivers up to the standard expected from any Norton product.

Norton family premier is not an antivirus per se but more of monitoring and parental control software.

Norton’s family user interface is quite easy on the eye as the menu is separated using large tabs and icons. The main window has three menus: Device, Children, and Parents.

You can configure any of the categories according to your preferences and add or reduce restrictions in certain sections.

However, the central aspect of this software is web filtering, which stops children from entering inappropriate websites. You can choose to select the level of supervision from High, which blocks access completely, to Moderate, which gives a warning but allows access, to Low which only monitors but blocks nothing.

In addition, the Norton family also uses advanced web tracking features on Windows for social network videos and filters for inappropriate HTTPS sites.

When used in conjunction with the standalone Norton antivirus it gives totally protection against malicious web malware, phishing websites, and ransomware.

Other key features of Norton Symantec Family Premier include:

  • Time spent on PC monitoring
  • Email alerting feature
  • Mobile app monitoring
  • By-request email reports on user activity

There is also a safe search option that blocks any website that is inappropriate and malicious when using search engines like Google, Bing, and Ask.com.

Avast Free Antivirus – Great free antivirus with a small footprint

Keep your computer free from viruses and malware with Avast Free Antivirus, and allow this software to keep your home network safe against intruders.

This is one of the best free antivirus utilities you can find on the web. It uses advanced web filtering to make sure you don’t access suspicious websites.

Not only that, but it also has a very nice and silent app that can run in the background and keep you safe with minimal system impact.

Plus, it has a Do Not Disturb Mode that you can use to pause intrusive notifications whenever you play a game, make a presentation or watch a movie.

You can get a Premium or Ultimate plan subscription if you want increased protection.

These include additional benefits like a cleanup utility, an anti-tracking feature, and a VPN. They have more advanced technology to block unsafe websites and secure against phishing attempts.

Other key features of Avira Antivirus Free include:

  • Cloud-based filtering
  • Network inspector for public Wi-Fi
  • Smart scan feature for software and add-ons

Take advantage of its easy-to-use interface to run advanced application protection and avoid any web-based threats, viruses, or ransomware attacks.

Comodo Internet Security Premium – Strong firewall and traffic filtering

Unlike most of the web blocker and filtering antivirus on this list, Comodo Internet Security is free to use. Internet security is quite easy to set up.

The American-based antivirus company produces a unique Security suite that uses a firewall system.

This antivirus has a URL filtering feature that filters traffic and blocks infected website traffic from entering your browser. It also detects phishing websites and gives adequate protection against these websites.

When about to enter a recognized shopping site, for example, Amazon, Comodo offers you options such as a secure shopping environment, or you can continue with your unsecured browser.

Comodo Internet Security Premium’s secure shopping environment helps to protect your online transactions from external snoops. Programs running in this mode are isolated from programs on your desktop.

In this secure mode, keyloggers can’t capture your keystrokes or take screenshots.  It also warns of hidden leaks in your Wi-Fi network and stops exploit attacks.

Furthermore, this antivirus software has lots of good features, combining antivirus protection with website filtering.

Other key features of Comodo Internet Security include:

  • Anti-rootkit scanner
  • Sandbox technology to check unknown files for infections
  • Dedicated shield for important system files
  • Cutting-edge malware removal technology

With this powerful security utility, you can surf the web without worrying about being tracked down. It secures your payments and protects you against trackers.

⇒ Get Comodo Internet Security Premium

If you’re not a fan of third-party solutions, we have a guide on how to block a website in Chrome without any additional tools.

Do share with us your experience in using any of the antiviruses with the web filtering features we mentioned above.

If you have any suggestions or want to tell us about your experience with any of these antiviruses, please feel free to use the comment section below.

8 Best Antivirus Software for Windows 10/11 in India

No matter what, having antivirus software on your Windows 10 in India is simply a prerequisite these days. Given that India already features among the highest Internet users list in the world, it’s simply a must-have.
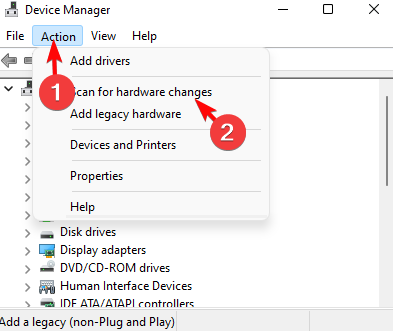
Browsing the Internet even at the slightest of frequency can attract security threats to your computer.

Cyber threats are an increasing concern worldwide and the most common threats in India are malware infections, ransomware, and spam. Network attacks, phishing, crypto miners, or bots are among the other known global threats.

Windows PCs are the default breeding ground for bugs (viruses and malware) and are vulnerable to hackers.

This calls for the need for a powerful antivirus to keep your Windows 10 PC and personal information safe from such threats. The job of a good antivirus is to identify and eliminate these threats from you’re your machine.

But, with countless antivirus available these days, it can be pretty confusing to choose the right one.

For your convenience, we have created this list of some of the best antivirus software to keep your Windows 10 safe.

What is the best antivirus for Windows 10 in India?

TotalAV – Best browsing security and system maintenance

TotalAV is all-inclusive antivirus software. Not only will your system be protected, but it will be optimized for smooth operation.

As an award-winning antivirus, it protects every aspect of your PC. You don’t have to worry about attempts to steal your data while browsing the internet.

One of TotalAV’s main features that many antivirus programs don’t have is a VPN and a built-in ad blocker. You will never see ads or popups again and your data will be anonymous every time you visit the internet.

WebShield is another great feature that makes internet surfing safer for you and everyone who uses your computer. Search results are checked in real-time so you know which sites you can trust. It also blocks malicious websites before you visit them.

The main key features of TotalAV are:

  • Remote firewall to allow or block any connection you want
  • VPN for access to restricted sites or streaming content as well as privacy protection
  • PUA protection, zero-day cloud scanning
  • 24/7 monitoring of all aspects related to your identity, credit cards, and other sensitive data

Enjoy a secure password vault with additional layers of protection and a random password generator for you and your whole family to maintain security across all platforms.

TotalAV didn’t miss any feature, with system tune-up tools and disk cleaner included, you increase your PC’s performance and keep it in check.

TotalAV

TotalAV

TotalAV is a complete first line of defense against all threats trying to access your personal data.
Check Price Visit Website

Bitdefender Total Security – Best virus prevention and safety

Developed and launched by Florin Talpes back in 2001, Bitdefender offers some of the best features for free. The company is located in Romania specializes in internet security tools and offers products targeted at home and business users.

Whether it’s a small device, smart home, small-scale business, or a Business data center, it provides comprehensive security to all. The software is known for its ease of use and delivers superior protection from external threats with exceptional performance.

Offers multi-layer protection and correction against ransomware identifying any behavioral disparity to help block away viruses. Keeps your encrypted files secure from malicious attacks.

Features parental control that provides digital assistance to parents and added online protection for children.

Among the key features of this award-winning antivirus software are:

  • Innovative technology that predicts prevents, detects, and eliminates most cyberthreats
  • Advanced parental control options to keep children safe from online risks
  • Minimal impact on system performance
  • Unlimited and secure VPN

Bitdefender also comes equipped with an anti-rootkit feature that helps the PC or Laptop to start safely each time. What’s more? It also protects online transactions using the web filter feature.

Even though the free version can perform its part well enough, the paid version comes with much more included. Users that purchase a license can enjoy advanced features such as VPN encryption, banking-payments assistant, ransomware protection, firewall, and much more.

Bitdefender Total Security

Bitdefender Total Security

A smart antivirus that offers superior protection to your computer, and real-time detection and prevention.
Check price Visit Website

ESET HOME Security Essential – Best security features and protection

ESET HOME Security Essential is a smart choice for modern people that use the Internet for online banking, shopping, working, and communicating.

Use it to protect your privacy and keep your device virus-free regardless if you use Windows, Mac, Linux, or Android. Keep your computer protected with ESET’s powerful antivirus technology.

Use ESET HOME Security Essential’s advanced features that keep your personal information safe from scammers and ransomware programs. Choose to keep your computer protected from hackers too.

Do not worry about safety when it comes to online shopping and banking. Internet Security protects your data so that all transactions you perform are safe.

The benefits of using ESET are:

  • Firewall and network inspector to protect your webcam and data
  • Banking and payment protection for safe shopping
  • Multilayered protection so you are safe from any type of malware
  • Encryption of sensitive data

All these security features and many more without any slowdowns on your computer. Keep your system safe and enjoy the full power of your computer.

More than a performant antivirus, ESET HOME Security Essentials will also scan your home network and keep it safe from various online threats across all connected devices.

ESET HOME Security Essential

ESET HOME Security Essential

ESET HOME Security Essential keeps your computer, and personal data, safe from online threats and theft.
Check Price Visit Website

Guard.io – Best for blocking browser adware and phishing attempts

Guard.io is a lightweight antivirus that protects your entire PC from browser toolbars. This is a browser extension that has proven to be a full-fledged antivirus.

By blocking malicious software as soon as it tries to access your data, you can prevent it from infecting your system. Block intrusive browser notifications from the websites you visit and questionable third-party extensions.

The most common place where cyber attacks happen is on the web. Guard.io was created to protect and prevent exactly this from happening to you.

Guard.io excels in anti-phishing technologies, being able to detect and alert fraudulent attempts to get your private data.

Here are some of Guard.io’s key features:

  • Takes seconds to add and see its features
  • Remove threats and protects just like a normal antivirus
  • Blocks harmful sites and pages that are meant to scam you
  • Most processes are done away from the endpoint, so there is almost no resource usage

It monitors any information that might leak and gives you a notification the next moment to take action immediately so no sensitive data is vulnerable.

By using machine learning, Big Data, and Cloud Infrastructure, Guard.io can achieve the full capabilities of antivirus with even better benchmarks.

Guard.io

Guard.io

Guardio is available for Edge, Google Chrome, and Mozilla Firefox browsers.
Free Trial Visit Website

Avira Antivirus – Great free VPN included

Protect yourself and your computer against viruses, malware, identity theft, and financial loss with Avira Antivirus. Install it and keep your computer free from viruses, spyware, ransomware, and malicious websites.

Use its free built-in VPN tool to secure and anonymize your online activities regardless if you are browsing, chatting, or verifying your e-mail address.

Avira Free Security offers real-time protection with very low memory usage. With a small system footprint and built-in performance optimization features, your device will run smoothly and quickly.

Avira Free Security includes tools to keep you safe online. Shop safely, block phishing websites and find the best deals with the Safe Shopping extension.

Some of the main perks of using Avira are:

  • Storage optimizer with duplicate file finder
  • Safe shopping and a free VPN
  • Included firewall
  • Software and driver updater

Speed Booster is another interesting Avira feature that will enhance your computer’s performance, and speed up your operating system and start.

Choose Avira Password Manager to create strong and unique passwords that are stored and managed to protect your online accounts.

Avira Antivirus

Avira Antivirus

Avira Antivirus Pro is a smart way to keep any computer protected from viruses, malware, and online threats.
Free trial Visit Website

Kaspersky Standard– Great anti-malware security

Kaspersky is a cybersecurity software that offers support for all devices (PC, Mac, Android Tablet, and Android smartphones).

With excellent scores from four different testing labs, this software is better known for its excellent protection against phishing.

Some of the other features of this antivirus are blocking malware and harmful URLs, and scanning to identify malware in files on the web, or in the mail.

System Watcher is another great feature offered by this software that can identify even zero-day malicious software (malware).

Some of its main key features include:

  • Increased focus on performance same protection with less resource usage
  • Password storage vault and cross-platform synchronization
  • Protection for kids against web threats
  • Security and performance at the highest standards

The Network Attack Blocker that comes with Kaspersky works to block any threatening network activities. Moreover, the software performs optimizes the initial scan to accelerate the following scans.

The best part is, Kaspersky is perfect for protecting your system from security threats.

Kaspersky Standard

Kaspersky Standard

Kaspersky is a powerful antivirus that offered proven excellent protection when used against phishing too.
Check price Visit Website

Symantec Norton Security – Most advanced parental control features

Norton Internet Security by Symantec has been popular since its launch in 1991. 25 years on and there are still many faults to find in this software.

Scans millions of websites and issues caution against likely unsafe pages with the use of features, like, Identity Safe password manager, Norton toolbar, and the Norton safe web.

With an impressive set of tools to offer that are designed to optimize the security of your devices, it’s still one of the best in the business.

Allows users to create a bootable rescue CD when the device becomes fatal. The rescue media allows the users to securely access the infected device, perform an antivirus scan, and bring it back to a functional state.

Some of its major features include:

  • An anti-phishing filter that flags emails aimed to defraud internet users of their personal information by posing as a respectable company.
  • Excellent core antivirus engine that counters a wide range of security issues including threats like malware, viruses, and keyloggers.
  • Using its VPN you get a completely secure and private internet access
  • Parental control options for the safety of the little ones

Norton offers security by passing on the dubious items from the past, to the SONAR (Symantec Online Network for Advanced Response) where they are examined.

For any harmful items detected, special signatures are created while pushing notifications the users across the world via LiveUpdate.

Symantec Norton Security

Symantec Norton Security

Norton Internet Security protects computers against viruses, malware, and phishing attempts.
Check price Visit Website

Avast Free Antivirus – Best free antivirus with basic protection

Avast Antivirus is one of the most popular antivirus software for Windows 10 in India.

It scans all the installed applications while running the usual malware scanning simultaneously. Best of all, it runs on several devices.

Real-time security, intelligent tracking of threats, and an extra layer of protection for your files, browser, network, and passwords.

The program allows users to hide their online activities from being tracked by employers, and internet providers. Be it a restaurant or the airport, this antivirus tool covers users in any location while allowing them to access any content, at any given time, under full protection. Among its other features are:

  • Webcam Shield to keep your built-in camera safe from spyware attacks.
  • Complete security for a business irrespective of its size, network, or devices.
  • Offers mobile phone apps keeping your transactions, or email private and secured. It also helps free up space on your phone.
  • User-friendly and easy to install.

Users can also take advantage of its advanced features, like the smart gaming mode, home network security, or the software updater free of cost.

Ransomware Shield protects any files in the system to prevent encryption without your acknowledgment. This protects users from getting held to ransom.

Avast Free Antivirus

Avast Free Antivirus

Avast protects your computer and home network against viruses, malware, and intruders.
Free trial Visit Website

If you want to save your Windows 10 PC from malicious software and intentions, there could be no better way than using a reputable antivirus (you could also try open source).

While there are many antivirus programs available in India, the above-mentioned five are some of the best in the business, that effectively help you fight against cyber threats.

Fix: OneDrive is Not Connecting After Password Change

OneDrive is a file hosting service that allows registered users to share and synchronize their files. It is a cloud service that protects and stores your files. It is easy to use, and it is well secured. However, users commonly encounter issues when using OneDrive, which can be frustrating to deal with.

OneDrive not connecting after password change is an issue users complain about constantly. Moreover, changing the password on your account allows you to set a more secure and rigid password.

However, logging back into OneDrive after a password change can be difficult because of some app issues. It can prompt errors like can’t sign into OneDrive error code 0x8004def7.

Factors such as an outdated OneDrive app, outdated operating system, network connection problems, OneDrive credentials manager issues, etc., can be responsible for the problem. However, the cause of the problem may differ in different situations.

Nonetheless, we have compiled some fixes for OneDrive not connecting after a password change. Likewise, we’ll take you through the causes of the issue and how to avoid it in the future.

Users may be interested in how to use multiple OneDrive on their PC.

Why is OneDrive not connecting?

  • Network connection issues: A slow network connection can affect your login process on OneDrive. It may prompt difficulty with OneDrive connecting after a password change. Since OneDrive is a cloud service, you need a stable and fast connection to use it smoothly.
  • Outdated OneDrive app: Many issues can occur if you don’t keep your apps up-to-date. It prevents the app from accessing the latest updates and patches to help it fix bugs and improve its functionality. However, such is the case with the OneDrive app resulting in OneDrive not signing in.
  • Outdated operating system: An outdated system will affect many system components and applications. It can cause problems with the activities of your apps. So, an outdated OS may be responsible for Windows 11 OneDrive not signing in.
  • Issues with OneDrive Credentials Manager: Changing your password on OneDrive should update the credentials manager. However, if there’s any problem and the credential is not updated, you can run into issues after resetting the OneDrive password.

What can I do if OneDrive fails to connect after the password change?

1. Check your network connection

Restarting your network router is an easy way to improve your network connection. It will improve its performance and help you connect to the internet faster.

Also, users complain about being able to connect to OneDrive after switching to a wireless connection.

2. Update OneDrive

  1. Click Start on the Taskbar and type Remove in the search box.
  2. Click on Add or remove programs from the search results.
  3. Scroll through the list of installed programs on your computer and select Microsoft OneDrive.
  4. Click on the Uninstall button and allow Windows to remove OneDrive.
  5. After uninstalling the app, go to the OneDrive download page and click Download.
  6. Log into your account and check if OneDrive connects.

3. Sign in to OneDrive on another device

  1. Click Start on the taskbar and type OneDrive in the search box.
  2. Click on OneDrive from the search results.
  3. Go to the Sign in space, enter the email address associated with your OneDrive account, and click Sign in.
  4. Go to the password space and enter the password for your OneDrive.

If you can log into the new PC, then you need to update your OS. Try the next solution.

4. Update your operating system

  1. Click on the Start button.
  2. Select the Settings option.
  3. Click on Windows Update and select Check for updates.

Windows will automatically search and download updates if there are any available. Windows updates can fix bugs causing difficulties with the OneDrive app.

5. Clear the client credential from Credential Manager

  1. Click Start and select the Control Panel.
  2. Click on User Accounts, then select the Credential Manager option.
  3. Select Windows Credential, then go to the Generic Credentials tab and click on the Delete the Office 365 login account option.

After deleting the Office 365 login account, try to log into your account and check if the issue persists.

Check what to do if OneDrive is not showing thumbnails in a few steps.

Is the OneDrive password the same as the Microsoft password?

The password for your Microsoft account is a universal password for all your Microsoft products, such as OneDrive, Outlook, or Office Online. So, the OneDrive password is the same as the Microsoft password.

Conclusively, you may find it beneficial to check our article on fixing OneDrive sync issues on your device. Likewise, you can read about ways to fix the OneDrive status icons missing on your computer.

If this guide has been helpful, kindly leave a comment to let us know which of the solution worked for you.