7 Best VPNs That Work Perfectly With Microsoft Teams in 2022

Microsoft Teams is a cloud-based collaboration platform that helps businesses achieve more by enabling team members to connect and collaborate more effectively.

The platform includes chat, video conferencing, file sharing, and more features. But do you need a VPN to get the best out of Microsoft Teams?

This is what I’ll be exploring in this blog alongside a quick look at the seven best VPNs for Microsoft Teams.

Can you use Microsoft Teams with a VPN?

Yes, you can use Microsoft Teams with a VPN. This can be useful if you need to connect to your team from a different location or if you want to keep your team’s communication private.

However, a few things to remember when using Microsoft Teams with a VPN exist.

  • Make sure that the VPN connection is stable and fast. Otherwise, you may experience lag or other issues while using Microsoft Teams.
  • Remember that your team’s communication will be encrypted when using a VPN. This means that if someone intercepts your team’s traffic, they would not be able to read it.

Does Microsoft Teams need a VPN?

While Microsoft Teams does not require a VPN to function, there are some benefits to using a VPN with the platform.

VPNs help teams avoid surveillance and allow them to bypass censorship in countries that may have banned Microsoft Teams.

Does VPN affect Microsoft Teams?

Yes, VPN can affect Microsoft Teams. Connecting to a VPN can change your IP address and cause problems accessing certain websites or online services.

Additionally, VPNs can encrypt your traffic, making it difficult for your ISP or network administrator to see what you’re doing online. However, most VPNs will not impact the performance of Microsoft Teams.

Which are the best VPNs for Microsoft Teams?

NordVPN – Reliable security
NordVPN is a highly secure and reliable VPN service with robust encryption. This makes it perfect for use with Microsoft Teams, as security is always a top priority when using this collaboration tool. In addition, NordVPN offers fast speeds and stable connections.

Again, this is important for Microsoft Teams users, as the tool requires a solid and stable internet connection to function correctly.

Pros

  • NordVPN is very easy to use
  • It has a user-friendly interface that makes it simple to connect with Microsoft Teams.
  • NordVPN has reliable security and privacy.
  • It packs enough speeds for bandwidth-intensive activities

Cons

  • NordVPN is a paid VPN service. You have to pay to access premium features
  • It doesn’t have a dedicated app for Microsoft Teams

NordVPN

To avoid regional blackouts imposed by the NHL, UFC, and MLB networks, connect to a specific city provided by NordVPN.
Check price Visit website

ExpressVPN – Best speeds

ExpressVPN is one of the best-performing VPNs on the market, and it is perfect for use with Microsoft Teams.

ExpressVPN, ideal for Microsoft Teams, includes servers in 94 countries for fast and reliable connections no matter where you are located.

The VPN also uses the OpenVPN protocol for its high security and performance. ExpressVPN also comes with great mobile apps for convenience.

Pros

  • Fast and reliable speeds for video conferencing and file sharing
  • Allows up to 5 simultaneous device connections
  • Great security and privacy

Cons

  • It’s expensive
  • It lacks a dedicated app for Microsoft Teams

ExpressVPN

With 145+ connection locations in 94 countries, their strict no-logging policy keeps you completely anonymous.
Check price Visit website

Surfshark – Unlimited simultaneous device connections
Surfshark is another excellent option and one of the best VPNs that will work perfectly with Microsoft Teams in 2022. The features that make Surfshark perfect for Microsoft Teams include its strong security and privacy protection.

It also offers fast speeds that make conferencing via Microsoft Teams smooth. There’s also the ability to unblock geo-restricted content in heavily-censored regions.

Surfshark offers a 30-day money-back guarantee, so you can try it out risk-free.

Pros

  • Surfshark encrypts your traffic with AES-256-GCM encryption for extra protection.
  • It offers fast speeds for HD video calls and file sharing
  • It provides unlimited simultaneous device connections, ideal for large teams

Cons

  • It may be cheap, but it still isn’t free
  • It doesn’t have a dedicated app for Microsoft Teams.

Surfshark

Bypass websites and apps as a clean web service free of trackers, ads, malware, and phishing attempts.
Check price Visit website

CyberGhost – Large server network

CyberGhost offers several features ideal for use with Microsoft Teams, including military-grade encryption, 24/7 customer support, and a user-friendly interface.

In addition, CyberGhost offers a 45-day money-back guarantee, so you can try it out risk-free. These combine well to give any business the smoothest and most secure experience on Microsoft Teams.

Pros

  • Reliable encryption and privacy
  • Round-the-clock customer support
  • A 45-day risk-free trial

Cons

  • The trial is limited. You have to pay the total amount to enjoy the complete services.
  • It lacks an app dedicated to Microsoft Teams.

CyberGhost

Numerous servers that are optimized for torrents and streaming, feature-rich, and user-friendly.
Check price Visit website

IPVanish – User-friendly interface

IPVanish offers several features that make it ideal for use with Microsoft Teams. First, IPVanish has excellent speeds, essential for good video quality in online meetings.

Second, IPVanish is very reliable and has a robust network infrastructure. Finally, IPVanish offers excellent security features that protect sensitive data, especially company files.

Pros

  • Incredible connection speeds for stable video calls and meetings
  • A vast server network
  • Reliable military-grade encryption and privacy

Cons

  • It lacks a native app dedicated to Microsoft Teams
  • You have to pay for a subscription plan to get the full benefits

IPVanish

It protects your privacy and security while providing the best services for browsing safely.
Check price Visit website

PrivateVPN – Best privacy

PrivateVPN is another excellent alternative for people looking to secure their Microsoft Teams channels. Some features that make PrivateVPN perfect for Microsoft Teams users include its strong encryption, which will protect your data from being intercepted by third parties.

It also features a strict no-logs policy, which means your privacy will always be protected. Furthermore, it is one of the fastest VPNs around, which will ensure that you can always stay connected to your team.

Pros

  • Reliably fast speeds for smooth performance
  • Industry-standard encryption and privacy
  • Superb usability with a fantastic interface

Cons

  • It lacks a native app dedicated to Microsoft Teams
  • You have to pay a subscription fee to unlock the full features

PrivateVPN

It’s not the fastest VPN, but it’s speedy enough to stream, download files, and encrypt insecure WIFI networks.
Check price Visit website

VyprVPN – Most business-oriented

Last on the list is VyperVPN. It’s one of the most business-oriented VPNs, making it the perfect fit for Microsoft Teams. So, for businesses that rely heavily on Microsoft Teams for communication and collaboration, VyprVPN is an excellent option.

VyprVPN is a reliable and secure VPN service with over 700 servers in 70+ locations worldwide. It offers fast speeds and excellent security, with 256-bit encryption and a no-logs policy.

VyprVPN also has a unique feature called Chameleon, which scrambles OpenVPN metadata to prevent deep packet inspection.

Pros

  • Incredible connection speeds for online meetings and presentations
  • Robust security and privacy for sensitive exchange of data
  • It features a protocol called Chameleone that adds an extra layer of protection

Cons

  • VyprVPN is a paid service, so there may be an additional cost for businesses using it.
  • It doesn’t have a dedicated app for Microsoft Teams.

VyprVPN

Advanced protocols such as WireGuard offer 256-bit encryption and don’t leak IP, DNS, WebRTC, or IPv6 data.
Check price Visit website

How do I improve Microsoft Teams’ connection?

There are a few things you can do to improve your Microsoft Teams connection:

  • First, check your internet connection and make sure it is stable.
  • If you are using a laptop, check to see if the battery is low or needs to be plugged in.
  • Close any applications that you are not using.
  • Restart your computer.
  • Try using a different browser.
  • Finally, make sure you have the latest version of Microsoft Teams installed.
  • If you are still having trouble, contact your IT department or Microsoft support.

So, have you decided on the VPN for your Microsoft Teams needs? Each VPN mentioned above was tested, so the choice comes down to your personal preferences.

Hopefully, these tips will help you improve your Microsoft Teams experience. Also, check our website for more in-depth reviews or troubleshooting Ms. Teams VPN issues.
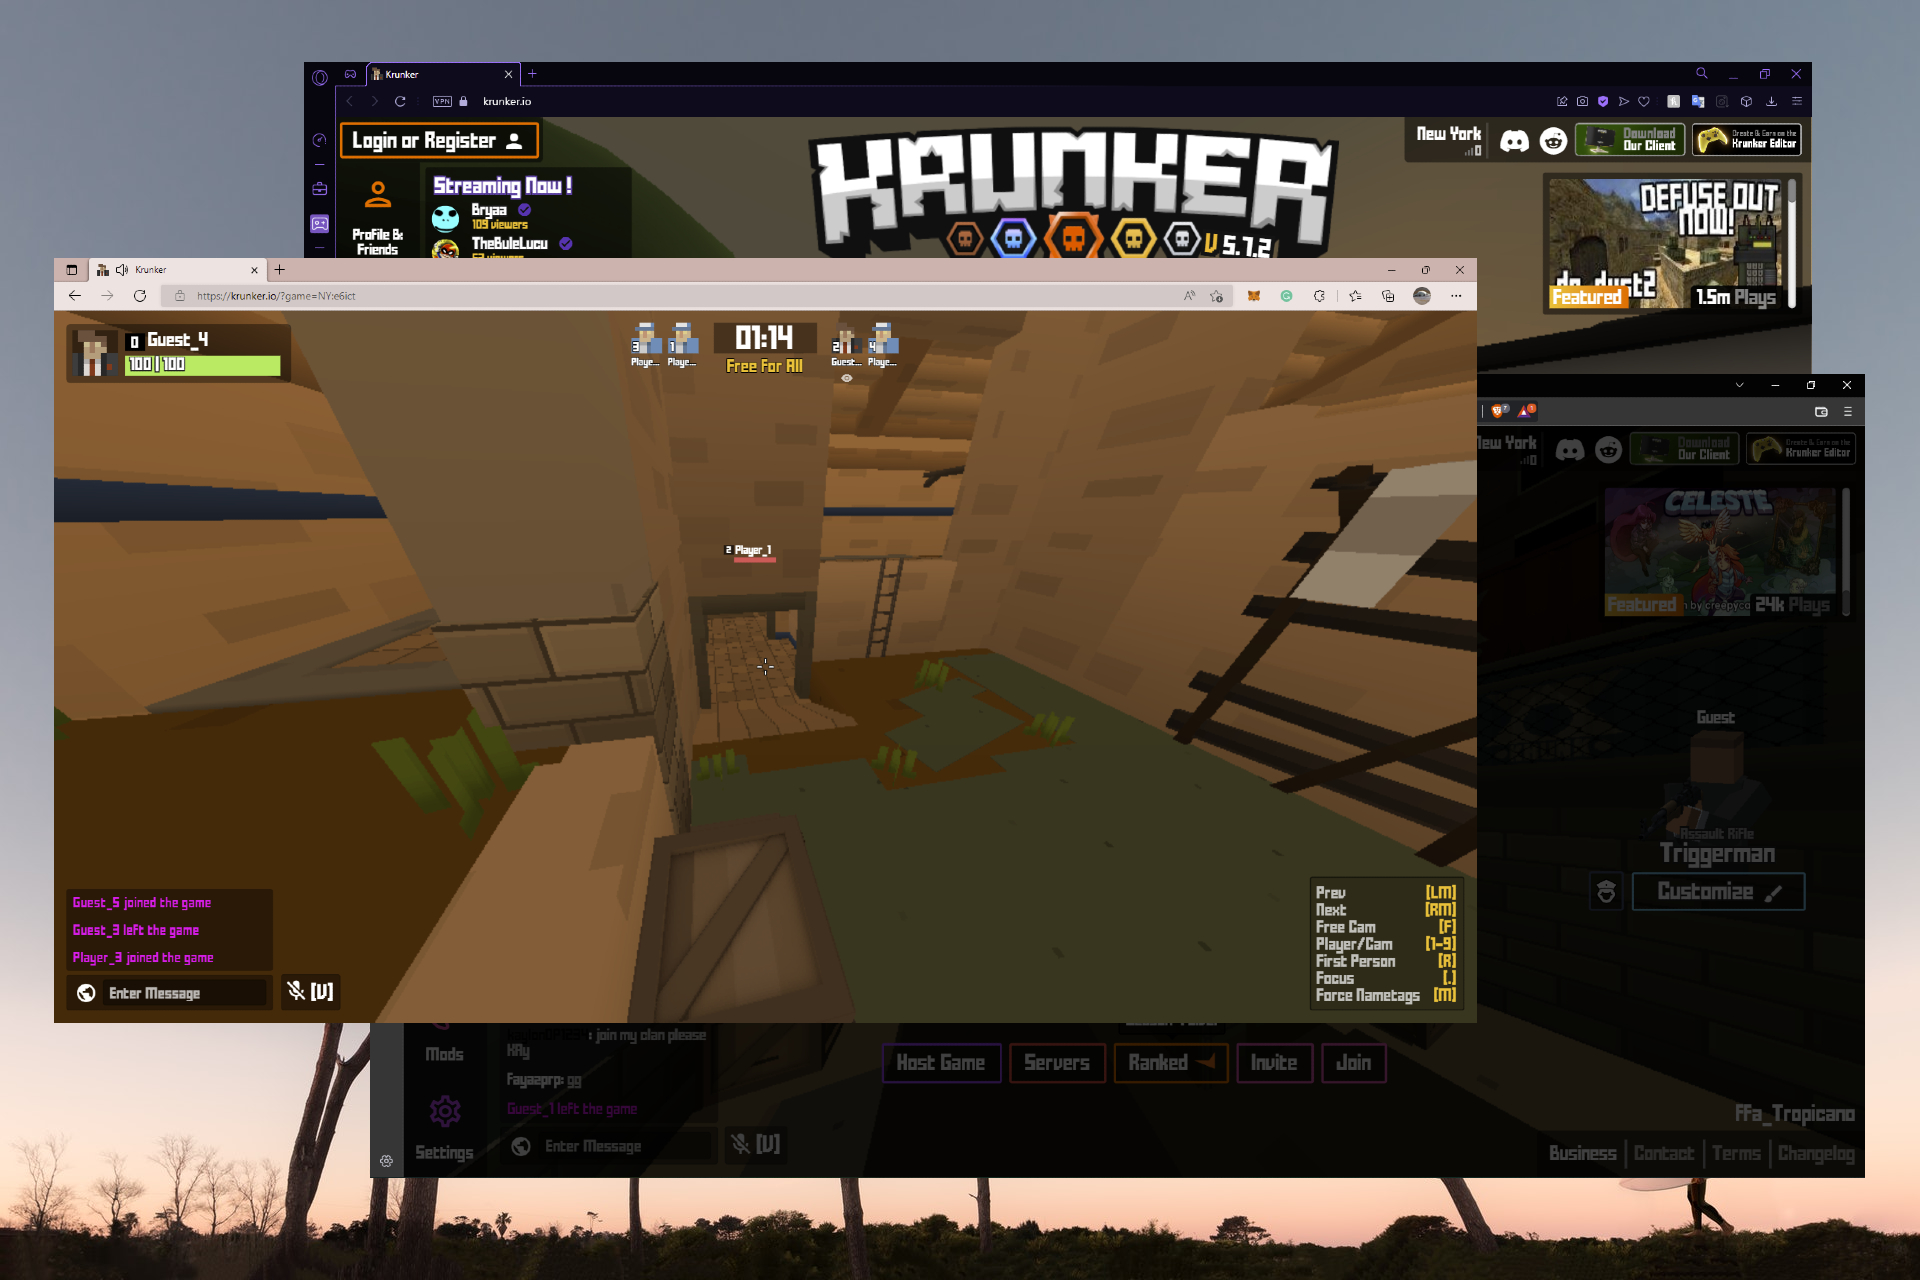
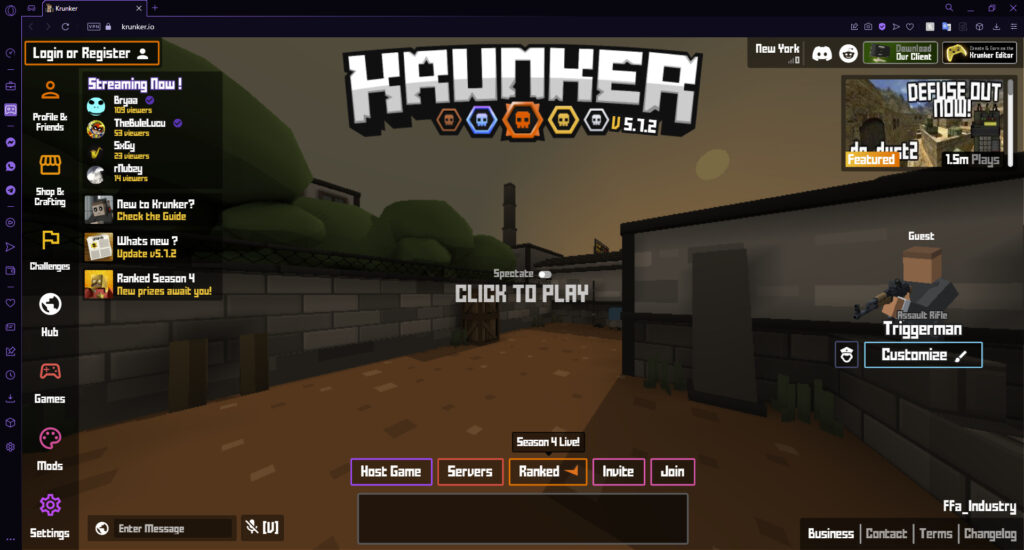
5 Best Browsers to Play Krunker with Optimal FPS & Fullscreen

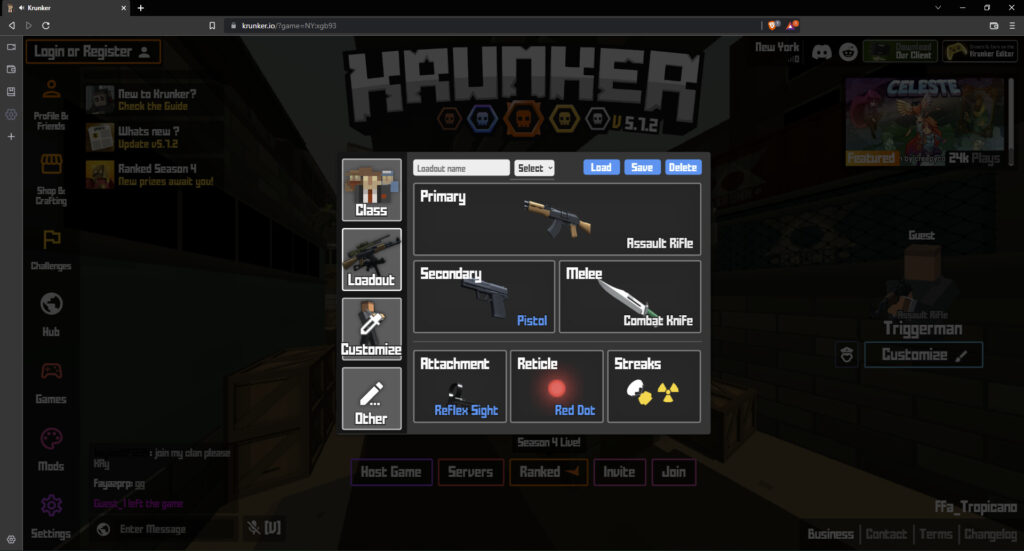
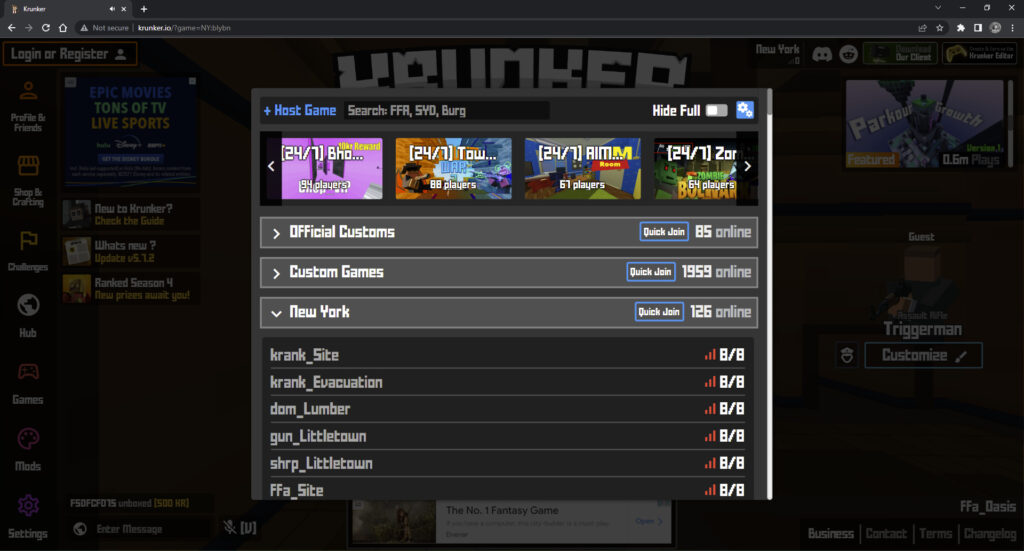
Krunker is one of the world’s most popular First Person Shooter (FPS) .io games. It’s free and straightforward to play. However, for the best Krunker experience, use a browser that allows Fullscreen and provides optimal FPS. Here’s a look at the five best browsers to play Krunker.io.

Users can play free or create an account and unlock different weapons and mods for customizable gameplay.

Can you still play .io games?

Yes, .io games are alive and well. Most .io games are built on HTML5 and can be played using any browser. In addition, many variations of .io games typically offer multiplayer and are free-to-play.

What is Krunker.io? Krunker.io is a popular First-Person Shooter (FPS) .io game that is free to play in any browser. Users do not need to register to play, and no download is required, although there is a downloadable client if players want.

Krunker popular FFS browser game.

Can I play Krunker.io on Fullscreen? You can play Krunker.io in Fullscreen by pressing F11 on the official website. If you are playing on a third-party website, like Crazy Games, then there is usually a Fullscreen button offered in the bottom right corner.

What are the best browsers to play Krunker on?

1. Opera GX

Opera GX best browser to play Krunker.

Opera GX is THE gaming browser, so it’s no surprise that it makes the top of our list. The free and unlimited VPN allows users to game online with peace of mind. It also allows players to change location in Krunker.io if they want to play on a different server.

The cyberpunk interface of the browser is highly customizable and gives users an immersive gamey feel while surfing the web.

Key features of Opera GX:

  • Free and unlimited VPN
  • Cyberpunk interface and customization
  • GX Corner provides the latest gaming news
 Opera GX

Opera GX

Play Krunker securely using Opera GX’s built-in VPN.

2. Brave Browser

Brave best browser for Krunker.

Brave is another highly secure browser that is also perfect for gaming online. This browser values user privacy and doesn’t sell user data. It also includes features typically installed as addons in other browsers, including an ad, script blocker, and cryptocurrency wallet.

However, if users want to add extensions to enhance their Krunker gaming experience, Brave has access to the Chrome Web Store because it is a Chromium-based browser.

Key features of Brave:

  • Doesn’t sell user data
  • Ad and script blocker
  • Cryptocurrency wallet

⇒ Get Brave

3. Microsoft Edge

Microsoft Edge best browser to play Krunker.

Edge has come a long way since its initial release. After some criticism, Microsoft completely redesigned the browser with the Chromium framework, significantly improving its speed and performance, making it perfect for Krunker.io.

Users can sync their browser data, like passwords and bookmarks, across their other devices. With sync enabled, all devices with Edge will have the same settings and browser data for seamless browsing.

Key features of Microsoft Edge:

  • Chromium-based
  • Sync browser data across devices
  • Regular updates

⇒ Get Microsoft Edge

4. Mozilla Firefox

Firefox best browser for Krunker.

Firefox is one of the most tried and true browsers on the market. With default tracker blocking and fingerprint prevention, users can play Krunker.io securely.

The snapshot feature allows users to take screenshots quickly and easily from their browser. In addition, users can install themes from Mozilla’s add-on library for a more personalized interface.

Key features of Mozilla Firefox:

  • Built-in tracker blocker
  • Snapshot feature
  • Personalized themes from the add-on library

⇒ Get Mozilla Firefox

5. Google Chrome

Chrome is an excellent browser for both personal and professional use. In addition, its remarkable speed and performance make it a popular browser among gamers as it doesn’t tend to lag or stutter as much as other browsers.

However, there are some privacy concerns with Chrome and reports of Google profiting off user data that they collect and sell for personalized ads. Although, users can adjust their privacy settings to opt out of data collection.

Key features of Google Chrome:

  • Fast to prevent gaming lags
  • Adjustable privacy settings
  • Cross-platform compatibility

⇒ Get Google Chrome

How do I make Krunker less laggy?

Krunker.io allows users to adjust settings like graphics if players are experiencing lags. For example, lowering the resolution in the display settings may help the game run smoother.

Another issue may be your network connection. Again, try using a VPN to switch to a server with the best performance to prevent lags. Check out our recommendations for the best VPNs for Krunker that fixes lagging if you’re having this issue.

Let us know what you think of our list of the best browsers to play Krunker and which browser you use to play .io games.

2 Ways to Fix Error Communicating With The Remote Browser

There are many browsers that you can download and install on your device. However, most of these browsers have a lot of issues that affect their productivity. Users complain of the error communicating with the remote browser; it may have died

​Many cases can occur with remote browsers, including firewall and network problems. There are several causes for this issue, and we will observe them in this article.

If you experience some browser errors, don’t panic. We will go through the most common issues and some easy fixes for them.

What are some of the most common browser errors?

1. Can’t connect securely to this page errors

Also, similar to the error communicating with the remote browser, this error pops up when users try to open some web pages. It indicates that the site uses outdated or unsafe TLS security settings.

2. Certificate warning

This error occurs when the browser can’t verify who is using the SSL certificate for the site. Sites like this are always malicious and dangerous, so you should avoid visiting them.

3. Unauthorized error

It is known as error 401. It indicates that you need authorization for the site you’re trying to reach. Most times, websites like this require valid login information.

4. Err internet disconnected

This error indicates that there is no internet connection available. However, it is possible that your Wi-Fi is not in range, or you have a bad reception.

These are some common browser errors you can encounter. You can check our page for more information on other issues and how to fix them.

How can I prevent browser errors?

Quick Tip:

It is true that all browsers can run into trouble sometimes, but you can pick one that offers more stability and safety on the web.

Opera One is the experienced browser that it’s utilized by +350 million users due to high-speed results, integrated apps on the homepage, or VPN and Adblocker security. Plus, it comes with it’s own AI.

Opera One

Avoid any “Oops” moments on your browser and have more secure and faster navigation using this modern option.
Free Download Visit website

How can I fix the error communicating with the remote browser issue?

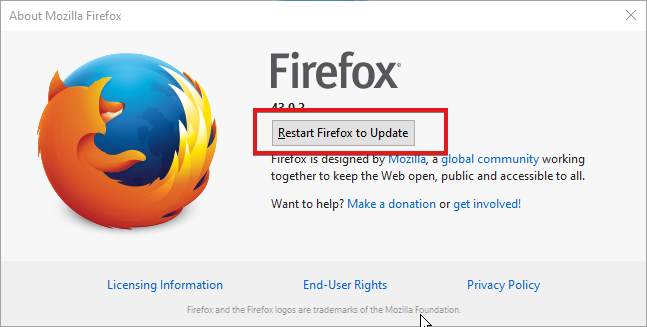
1. Update your browser

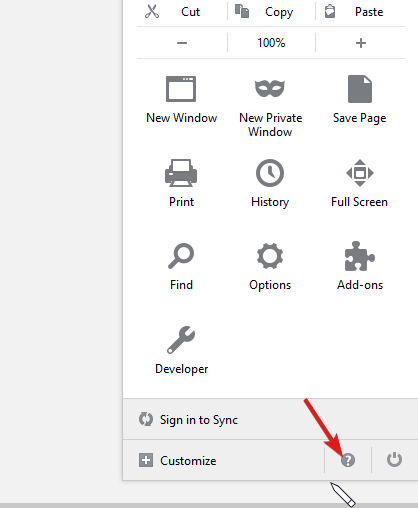
  1. Open your browser and click the menu button on the top right-hand corner.
  2. Below the screen, click on the help sign.
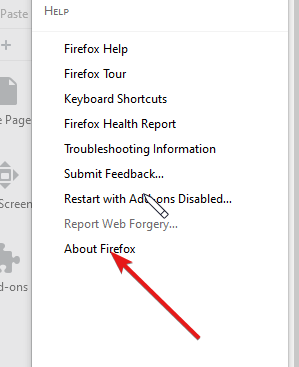
  3. On the help page, select About Firefox and then check for updates.
  4. After checking for updates, click on the Update button to install the update on your device.
  5. Click the Restart Firefox button to complete the update.

Updating your browser is one of the most efficient ways to fix errors communicating with the remote browser; it may have died on Firefox. If this fails, check out the other fixes below for different browsers.

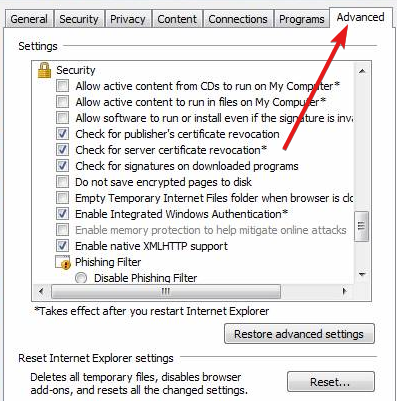
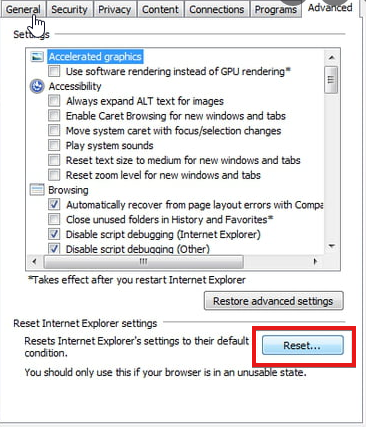
2. Reset your browser settings

  1. Launch your browser, and press the tools option.
  2. Click internet options, then select Advanced settings.
  3. Click the reset button and wait till it resets to default.
  4. Restart Internet Explorer.

These will fix the error communicating with the remote browser; it may have died in Internet Explorer. Likewise, an error communicating with the remote browser it may have killed Firefox.

However, if by trying these fixes, and you’re still unable to solve the errors, uninstall your browser. It will clear all the issues. Visit our page for more information on this topic.
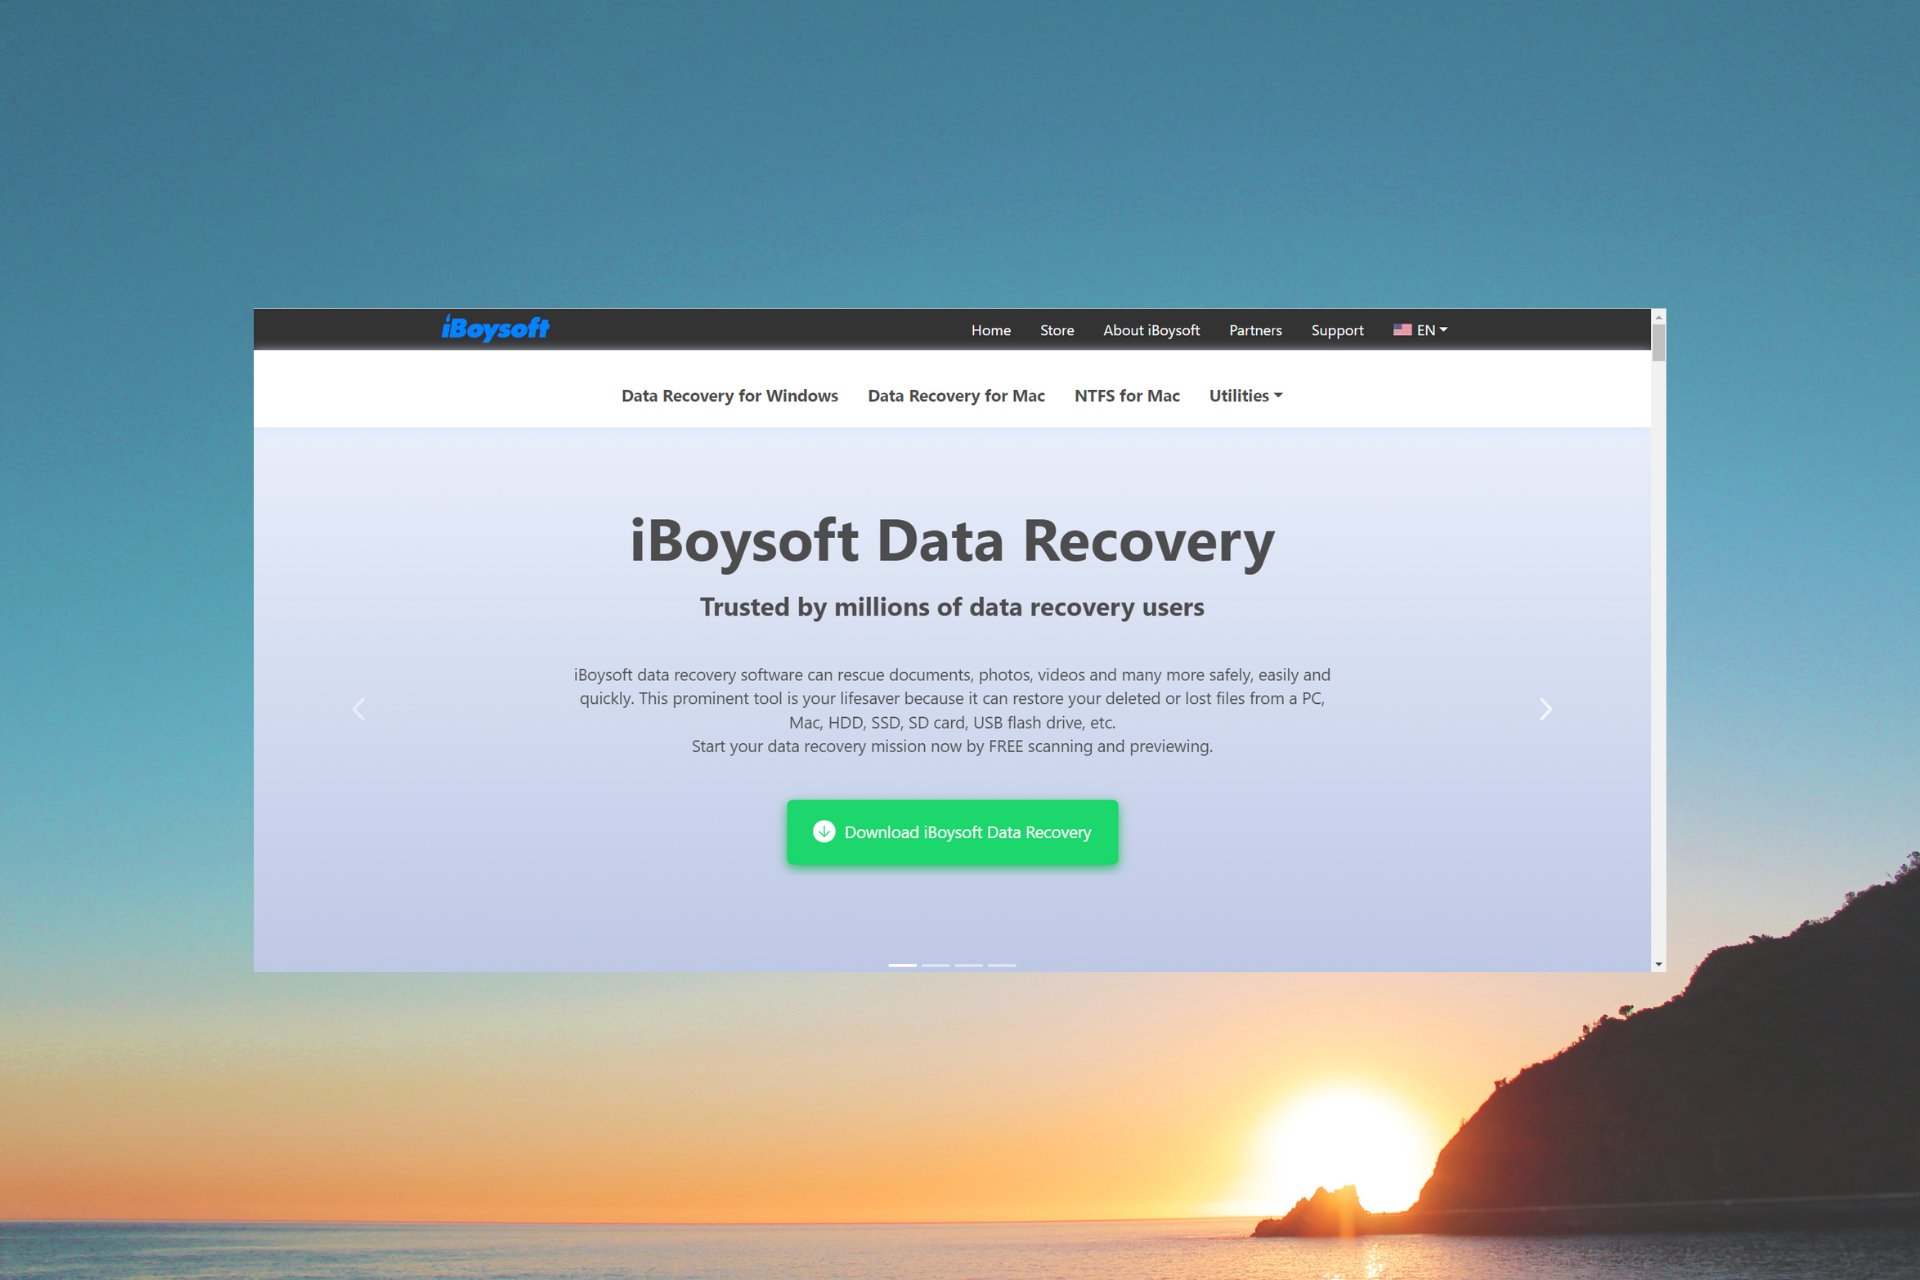
Recover all your Files Using iBoysoft Data Recovery Software

We’ve all had those unfortunate system or hardware failures that crippled our data but iBoysoft Data Recovery is there to help.

It doesn’t even need to be such a dreadful event. If you delete some important files by mistake and empty the Recycle Bin afterward and the data is gone.

So, unless the space allocated for those files was used for writing other data, your files can be recovered.

Nevertheless, if you’ve lost your data, you can still recover them by using the iBoysoft Data Recovery app for Windows.

How can iBoysoft Data Recovery help me recover my data?

As you guessed, iBoysoft Data Recovery is a smart tool that helps you retrieve data that was not overwritten.

It can rescue documents, photos, videos, and many other files safely, easily, and most importantly, quickly.

So whether you want to recover data from a PC, a troublesome HDD or SSD, an SD card, or a USB flash drive, this software will help you.

And the most important quality of iBoysoft Data Recovery is its friendly interface that accommodates both pros and inexperienced users alike.

What are iBoysoft Data Recovery’s best features?

1. 99% recovery success rate

This solution identifies, categorizes, and retrieves any data unless they have been overwritten.

As we’ve mentioned above, when you delete a file from a storage media, the data itself is only logically deleted.

But in fact, it is still there unless the system has used that particular space to write other information, or in case of bad sectors or malicious attacks damaging it.

iBoysoft Data Recovery can recover 99% of the lost data and it does it faster than other traditional tools.

2. Easy partition recovery

Losing a partition can be devastating and if you’ve wrongly used some partitioning tools, don’t panic yet.

This partition recovery software will scan the whole disk with pinpoint accuracy. Then, it will rebuild the correct and complete partition table and recover all data from missing, wiped, or damaged partitions.

iBoysoft Data Recovery supports GPT, MBR, primary, logical, extended, and PC partitions. That means you’re covered in any situation.

3. RAW Drive Recovery

The RAW Data Recovery feature is great if your partition has a RAW file system because the built-in CHKDSK tool in Windows can’t handle it.

iBoysoft Data Recovery will change any RAW drive into an NTFS, FAT32, or exFAT without any losses and recover the data from it.

4. BitLocker recovery

This professional Windows data recovery app does also a wonderful job in recovering files protected with BitLocker.

So, whether you’ve lost, deleted, or formatted the BitLocker partition iBoysoft Data Recovery will retrieve the files quickly.

Even if you’ve deleted a BitLocker partition or lost an encrypted one, this solution will restore all the data.

iBoysoft Data Recovery is free to download for Windows but if you want to recover some data, you will need a license key.

However, with the trial version, you will still get to scan your drive and see if the software can recover the lost data before buying the license.

⇒ Get iBoysoft Data Recovery

On a closing note, we point out the fact that this tool is extremely easy to install and use.

With just three clicks we started scanning our 240 GB drive and in only about five minutes it was over.

However, a deep scan requires a bit more time and patience to complete than our quick one. Even so, we found a lot of files we deleted by mistake a while ago without even realizing it.

To prevent further damage to your system and data, we recommend getting some useful maintenance software to keep your PC in shape.

If you’ve worked with iBoysoft Data Recovery software, share your experience in the comments section below.

3 Tips on What to do When Global VPN Slows Down your Internet

Many users complain that the SonicWall global VPN client slows down internet issues. As a result, it threatens the strength of your internet connection and makes you less productive.

A VPN has to encrypt your internet connection and put you through a secure server. However, because the VPN employs some measures to protect your internet connection, it slows down your internet speed.

Using a different VPN provider or a split tunnel can be of help. Here are tips on what to do when Global VPN slows down your internet speed.

Can SonicWall Global VPN slow down the internet?

Yes, that is the simple answer to your question. The global VPN slows the internet. It can make your connection speed go from 70-80mbs to less than 1mbs.

Moreover, this occurs because VPN uses extra steps to secure your connection, which is outrageous with SonicWall.

Why does VPN slow down my computer?

  • Distance to a server – The distance between the user and the VPN server sometimes affects the speed. For instance, a person in Australia connects to a UK server. This is a long-distance for a data packet to travel smoothly.
  • Server load – The connection speed will slow if many people connect. This issue is relevant to users of free VPN servers because many people have access to it. Unlike paid VPNs, few people will have access to the VPN server. Consequently, this will make the server speed faster.
  • Internet speed offered by your ISP – However, VPNs alone aren’t the cause of slow internet; the internet provider tampers with their bandwidth.

What can I do when Global VPN slows down my internet?

1. Choose a different VPN server

Because the interaction between the VPN server and the client-server matters how far the server is; hence, you can improve your connection speed by opting for a VPN server closer to your location. 

Also, server load is a very dominant problem that affects VPN users. So, using a paid VPN will be of great help.

2. Use a different VPN service

Many VPN providers are not competent enough when it comes to speed. Hence, get another VPN provider. Likewise, opting for a paid VPN goes a long way in increasing your internet speed.

VPN browser extensions can increase your browser’s RAM usage, thus slowing it down. Running a dedicated VPN app typically requires fewer resources, so it’s the recommended way to go.

A standalone VPN app can also secure all your online activity, not just your browser. A reliable VPN that works well both on PC and mobile and supports demanding online tasks like streaming or gaming is Private Internet Access.

⇒ Get Private Internet Access

3. Disable Receive Segment Coalescing

  1. Download the .diagcab file.
  2. Run the file to automatically detect the errors and fix them.
  3. Restart your router and VPN.

By disabling this RSc, your internet connection should not be hindered. Also, the download speed will significantly be higher than the upload speed.

Also, restarting your router/modem helps if none of the options works in fixing the SonicWall global VPN client slows down the internet.
Another issue users complain about is that SonicWall global VPN client frequently disconnects. Check our page for more tips on how to improve your VPN productivity.

Windows 11 Build 22000.776 up for download in Release Preview Channel with Search Highlights, other tweaks

Microsoft has just released Windows 11 Build 22000.776 (KB5014668) to Insiders in the Release Preview Channel on Windows 11 (the original release). This build brings four new features, with the notable one being search highlights, and here’s the scoop.

First up, new features. Microsoft has now introduced Search Highlights to Windows 11, which is a feature that presents notable and interesting moments in the search box for what’s special about each day. These include holidays, anniversaries, and other educational moments in time both globally and in your region. To see search highlights, click or tap on the search icon on your taskbar. This feature will also hit regular Windows 11 customers over the next several weeks. Other new features can be seen below.

  • New! We added IP address auditing for incoming Windows Remote Management (WinRM) connections in security event 4262 and WinRM event 91. This We fixed an issue that fails to log the source IP address and machine name for a remote PowerShell connection.
  • New! We added Server Message Block (SMB) redirector (RDR) specific public File System Control (FSCTL) code FSCTL_LMR_QUERY_INFO.
  • New! We made the SMB client and SMB server cipher suite order configurable using PowerShell.

As usual, the build brings a ton of fixes. The biggest one is a fix for where Windows 11 upgrades won’t work. Other fixes involve Cloud Clipboard, group policies, video playback, and more.

  • We fixed an issue that displays Japanese characters incorrectly in PowerShell.
  • We fixed an issue that affects the Cloud Clipboard service and prevents syncing between machines after a period of inactivity.
  • We fixed an issue that fails to hide the Windows Sandbox startup screen after Sandbox starts to run.
  • We fixed an issue that causes a device that has a Japanese system locale to stop working when you disable end-user-defined characters (EUDCs).
  • We enabled the InternetExplorerModeEnableSavePageAs Group Policy. For more information, see Microsoft Edge Browser Policy Documentation.
  • We provided the ability to use a network proxy during Universal Print operations.
  • We fixed an issue that might cause playback of consecutive video clips to fail in games that use DirectX 12 (DX12).
  • We fixed an issue that causes certain games to stop working if they use the XAudio API to play sound effects.
  • We fixed an issue that affects some certificates chains to Root Certification Authorities that are members of the Microsoft Root Certification Program. For these certificates, the certificate chain status can be, “This certificate was revoked by its certification authority”.
  • We fixed an issue that prevents the use of Encrypted File System (EFS) files over a Web-based Distributed Authoring and Versioning (WebDAV) connection.
  • We fixed an issue that causes a domain controller to incorrectly write Key Distribution Center (KDC) event 21 in the System event log. This occurs when the KDC successfully processes a Kerberos Public Key Cryptography for Initial Authentication (PKINIT) authentication request with a self-signed certificate for key trust scenarios (Windows Hello for Business and Device Authentication).
  • We fixed an issue that prevents Bluetooth from reconnecting to some audio devices after you restart the devices.
  • We fixed an issue that occurs when the Active Directory Lightweight Directory Service (LDS) resets the password for userProxy objects. The password reset fails with an error such as, “00000005: SvcErr: DSID-03380C23, problem 5003 (WILL_NOT_PERFORM), data 0”.
  • We fixed an issue that causes Microsoft NTLM authentication using an external trust to fail. This issue occurs when a domain controller that contains the January 11, 2022 or later Windows update services the authentication request, is not in a root domain, and does not hold the Global Catalog role.
  • We fixed an issue that causes the LocalUsersAndGroups configuration service provider (CSP) policy to fail when you modify the built-in Administrators group. This issue occurs if the local Administrator account isn’t specified in the membership list when you perform a replace operation.
  • We fixed an issue in which malformed XML inputs might cause an error in DeviceEnroller.exe. This prevents CSPs from being delivered to the device until you restart the device or correct the XML.
  • We fixed an issue that might cause Windows 11 (original release) to stop working when you install an application and there is no network connectivity.
  • We updated the Start menu to display Windows PowerShell when you right-click (Win + X) the Start button after you have uninstalled Windows Terminal.
    We changed the name of the Your Phone app to Phone Link on the Settings page.
  • We fixed an issue that caused the Microsoft Surface Dial customization settings page to stop working.

Happy downloading, and as always, remember to submit your feedback to Microsoft on this build! Feedback helps make Windows 11 great for everyone!

3 Ways To Fix Error Code Blzbntbgs00004666 On Warzone

Just because Call of Duty is one of the most popular and successful games in the world, doesn’t mean that you will always have a smooth ride while playing it.

And we’re not talking about skill levels here, we’re actually referring to glitches and all sorts of Warzone error codes that can ruin one’s experience.

And there’s such a wide variety of problems affecting these popular shooters, that you’re almost bound to run into one of them at some point during gameplay.

However, you don’t need to worry too much, as there’s always a workaround or a fix for every software-related issue you might encounter.

For example, many Call of Duty users have been reporting having to deal with Warzone error code blzbntbgs, which are related to the BatleNet app.

Why does Warzone keep giving me an error?

This immense cluster of letters is a glitch that’s been an issue in the community recently, where Warzone gets stuck in a recurring loop of scan and repair.

Needless to say, you will be unable to open and play Warzone while you get this error, so it can get pretty darn frustrating.

Note that this usually happens if you delete Battle.net or files that make it up off your PC, but it can still happen regardless.

The quickest way to fix the problem is to uninstall the Battle.net app and re-install it. That being said, be sure to delete any %LOCALAPPDATA% folders related to it before you re-install.

How do I fix Warzone error code blzbntbgs00004666?

1. Disable Additional command line arguments

  1. Open the Battle.Net app.
  2. Select Warzone.warzone
  3. Click on the Options button and select Game Settings.warzone battlenet game settings
  4. Untick the box next to Additional command line arguments.warzone settings
  5. Launch Warzone.

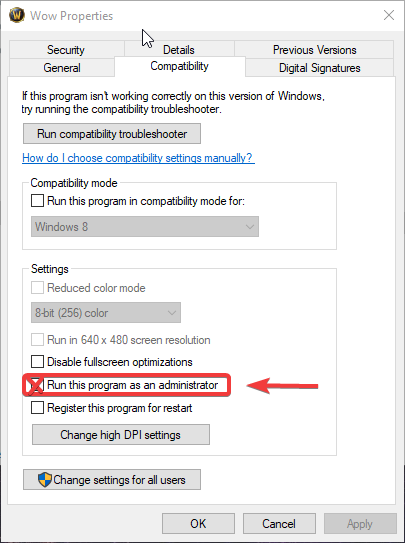
2. Run Warzone as an Administrator

  1. Locate the folder where Warzone is installed.warzone install folder
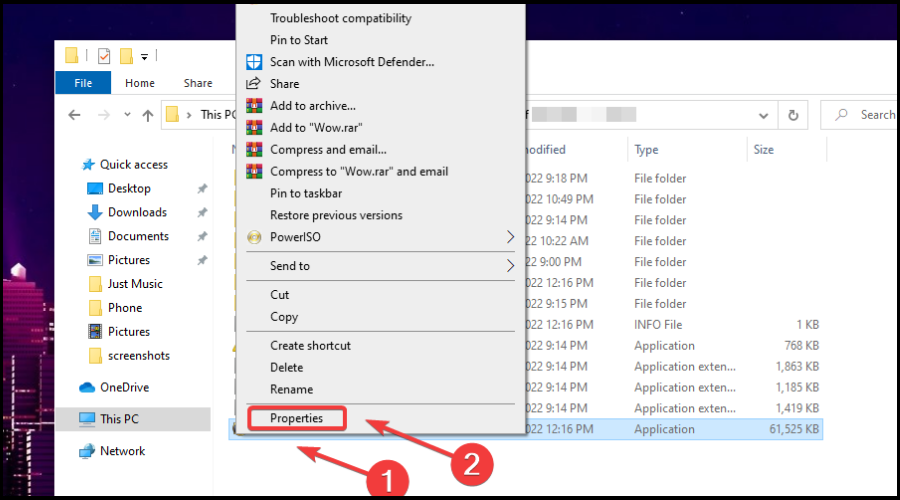
  2. Right-click on the Warzone executable and click on Properties.propreties
  3. Select the Compatibility tab and check the Run this program as administrator box.run werid west as admin
  4. Run Warzone.

3. Uninstall/Re-install Call of Duty Warzone

  1. Open the Battle.Net app.
  2. Click on the Options button and select Uninstall.uninstall warzone
  3. After the process is complete, click the Install button.install warzone
  4. Run Warzone.

These are the solutions you are looking at if you are unfortunate enough to run into error code blzbntbgs00004666.

The process is really simple and shouldn’t take you more than a few minutes, provided you don’t have to reinstall the game, in which case it depends on your internet speed.

Since you are here, we can also show you what to do if Warzone Pacific gets stuck on loading screen, if Call of Duty Warzone update requires restart, or if there’s not enough space for a Warzone update.

Has this guide proven useful in solving this annoying situation? Share your experience with us in the comments section below.

9 Fixes To Common YouTube Glitches on Firefox

We all love things when they work correctly 24/7. But there’s nothing more annoying when they suddenly stop. It has gotten to the point where people are so spoiled by working tech that a bug can feel like the end of the world.

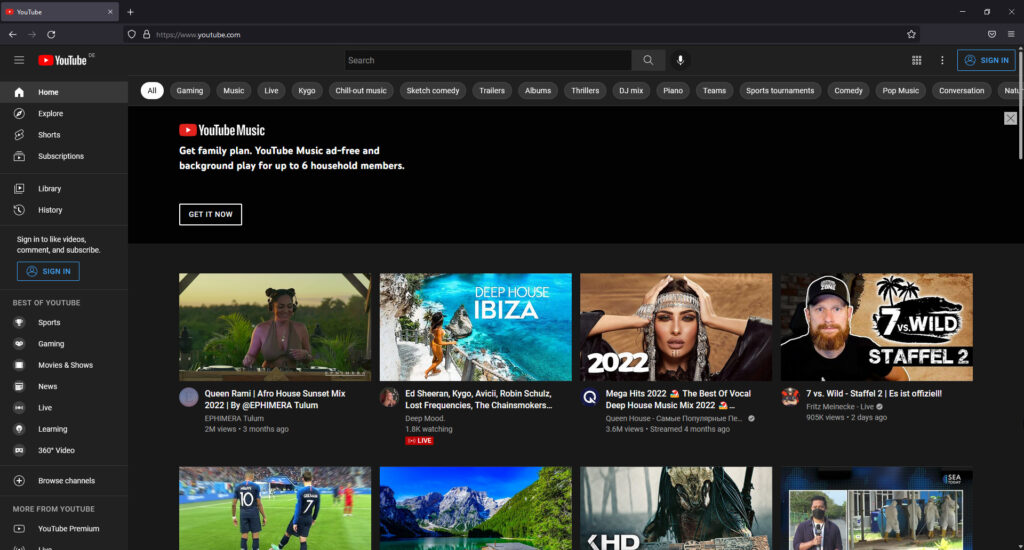
This is especially true when it comes to YouTube. A massively popular video platform, YouTube has every single type of video under the sun, from music to video games to the random comedy skit.

It has provided an infinite amount of entertainment that the world hasn’t seen before. However, the platform isn’t perfect, and you may run a random bug or glitch.

These glitches may cause the video never to load correctly, refuse to connect to YouTube servers or force the user interface to mess up. Whatever the case, they’re always very annoying to deal with.

This guide will show you how to fix the most common YouTube bugs on Mozilla Firefox. Please don’t misunderstand and think that Firefox has poor compatibility with the platform; it’s the opposite.

Firefox is compatible with YouTube and has unique extensions that enhance the experience. It’s just that sometimes YouTube developers overlook bugs in the features that they roll out.

Why is YouTube not working properly on Firefox?

There could be multiple reasons YouTube is not working right on Firefox, but the main three are extensions, corrupted data, and a bad internet connection.

Extensions are a great way to enhance YouTube viewing, but you have to ensure that you get them from a legitimate place. So don’t go around downloading whatever extensions you find on the internet.

Mozilla has an Add-Ons store on their website where everything is vetted and stamped with the company’s seal of approval. You won’t find any malicious extensions here. Get extensions from their store.

Corrupted data can occur from old data caches and cookies collected in the browser. After some time, all that excess data will cause performance problems translating to weird YouTube glitches.

And for lousy internet connections, double-check your internet. There may be a problem with your connection. Other times, YouTube may be suffering its connection problems. This is highly unlikely, however.

Lesser problems involve you not having downloaded the latest version of Firefox. You must stay up to date, so everything works as smoothly as possible.

Quick Tip:

In case you need a shorter road to resolve YouTube glitches on your browser, maybe a change will suit you better.

Opera is a skilled browser that provides integrated apps for everyday use like YouTube or social media messengers right on your homepage. This way, you simply avoid Firefox issues and watch your videos without any errors.

⇒ Get Opera

How to fix the most common YouTube bugs in Firefox

The most common fixes are to restart your computer or refresh the page. Those are the easiest things you can do to fix YouTube compatibility issues with Firefox. Refreshing the majority of computer problems.

It would be best if you also tried closing the YouTube tab on your browser and opening a new one. Or you can go straight to closing the window and opening a new one.

If none of these solutions work, try out any of the following.

1. Check for outages

The first thing you can do is to check your internet connection. See if any issues or outages in your area are causing network interruption. It’s also possible, if unlikely that YouTube might be down.

There’s a website called Down Detector that checks if there are any websites down in real-time. It will also check if there are any internet outages affecting internet service providers.

2. Check your internet speed

You should check if you have a slow connection. Google has a browser app for this which you can access by typing “internet speed test” into the search bar. Once you search for the test, you can start it by clicking the “RUN SPEED TEST” button.

There’s also Speed Test from Ookla, which gives you a detailed report on your internet speed. Just make sure you’re in a private place because the test shows your IP address.

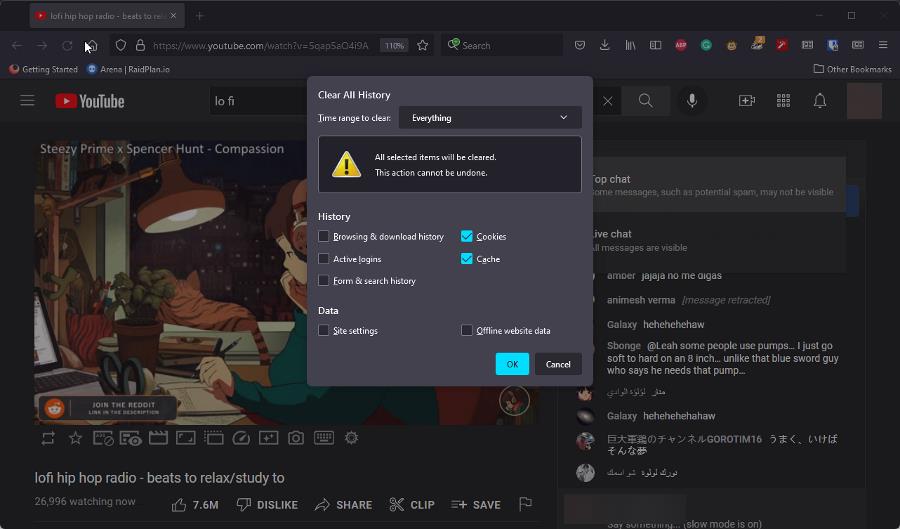
3. Clear Cache and Cookies

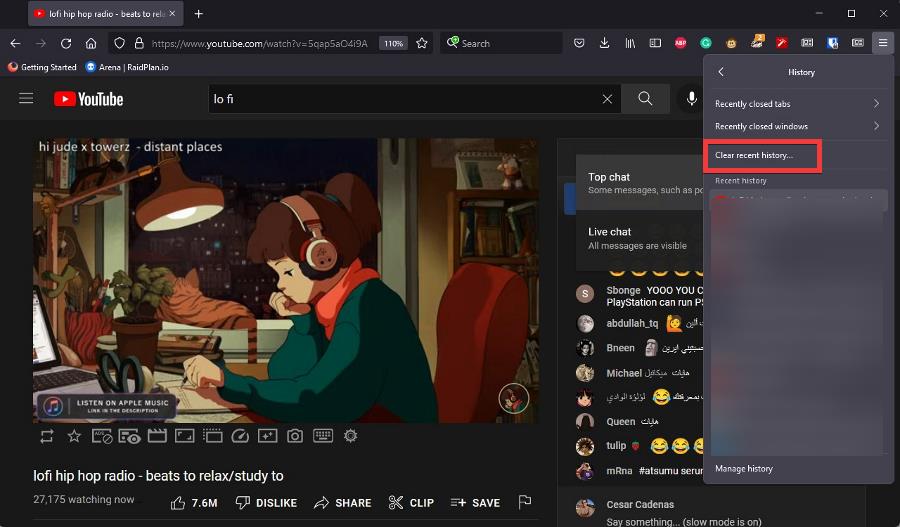
  1. Click on the three lines in the upper right-hand corner of Firefox to open the menu.
  2. In the menu, click History.
  3. Under History, select Clear recent history.
  4. A small window will appear in the middle of Firefox. Ensure that Cookies and Cache are selected.
  5. Click the drop-down window next to Time range to clean and select Everything.
  6. Click OK to erase everything in the cache and all the cookies.

4. Uninstall Firefox Extensions

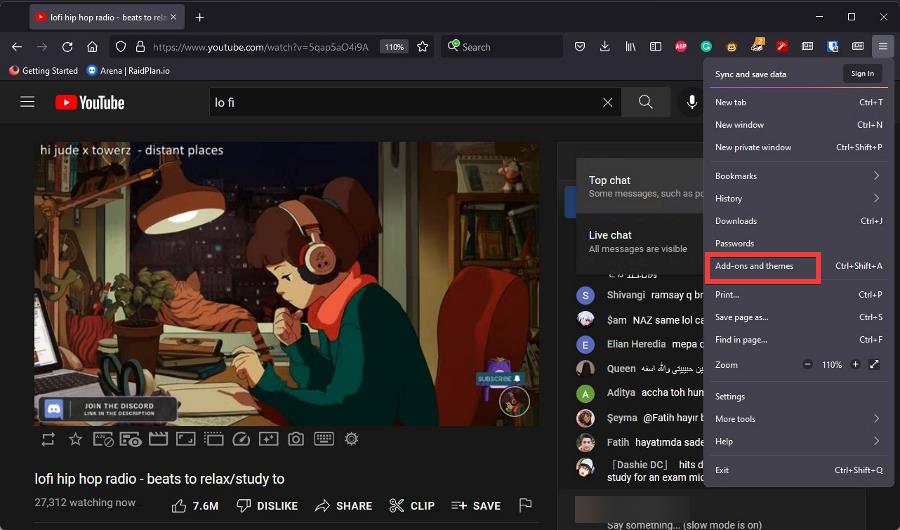
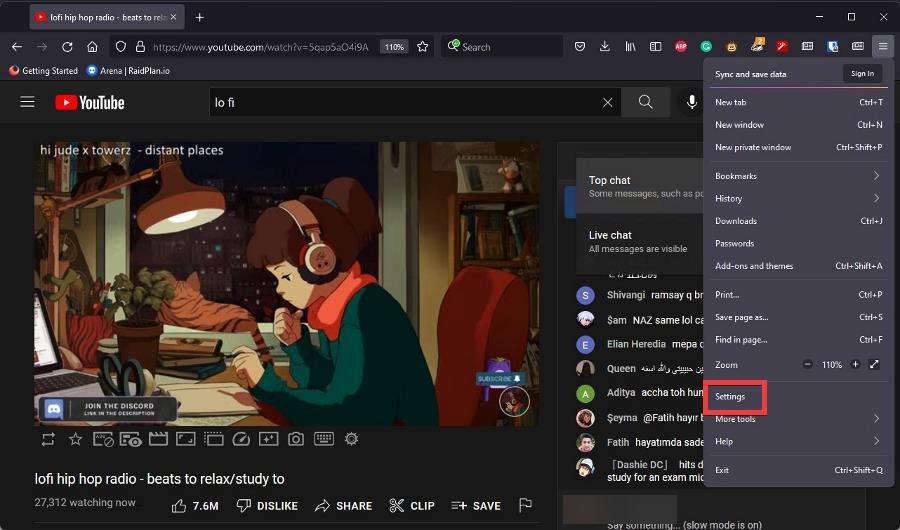
  1. Click on the menu icon in the upper right-hand corner and select Add-ons and Themes.
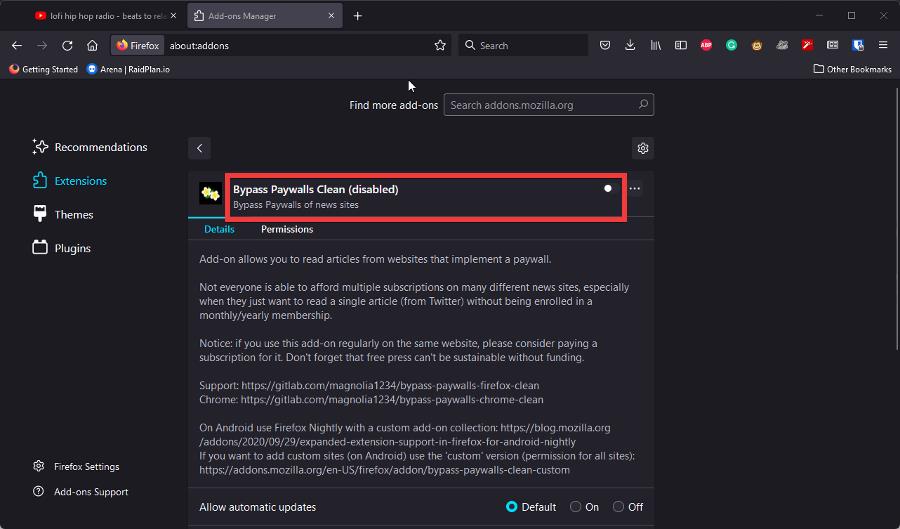
  2. Under Manage Your Extensions, select an extension to uninstall. For this guide, Bypass Paywalls Clean will be chosen.
  3. First, you can disable an extension by toggling it off by clicking the blue switch on the right.
  4. To remove the extension, click the three dots to the right.
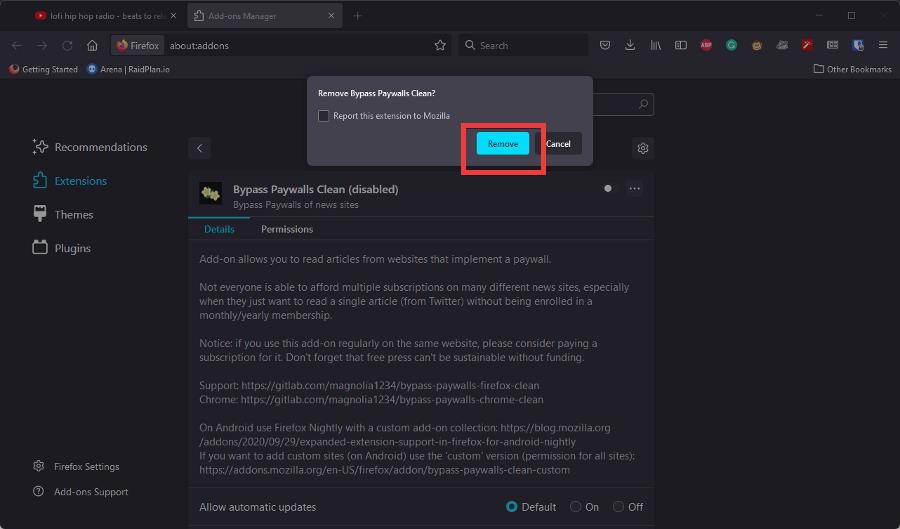
  5. In the small window that appears, select Remove.
  6. A window will appear afterward. Select Remove.
  7. If the extension was obtained from a less than reputable source, it’s recommended you check Report this extension to Mozilla.

5. Turning off hardware acceleration

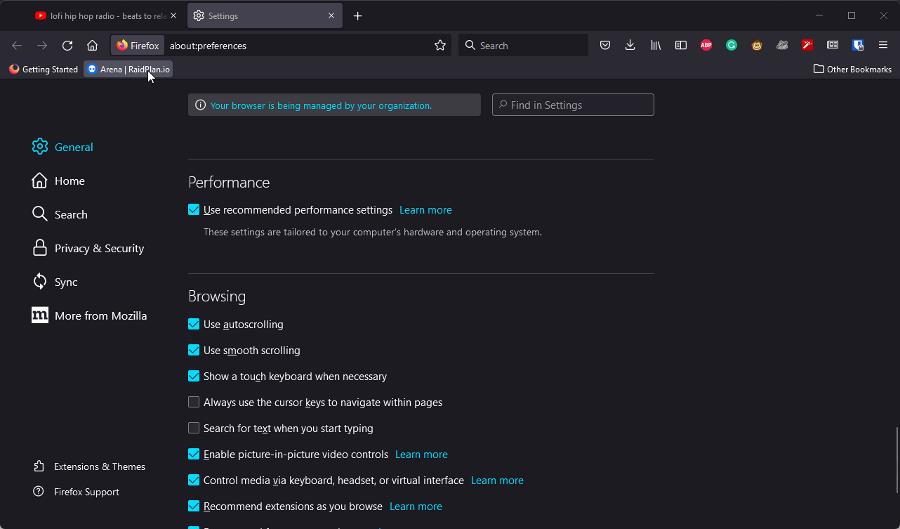
  1. Open the Firefox menu again, and this time select Settings.
  2. Under the General tab, scroll down to the Performance tab.
  3. Uncheck Use recommended performance settings to disable it.
  4. Another option will appear. Disable Use hardware acceleration when available by deselecting it.

6. Update Firefox

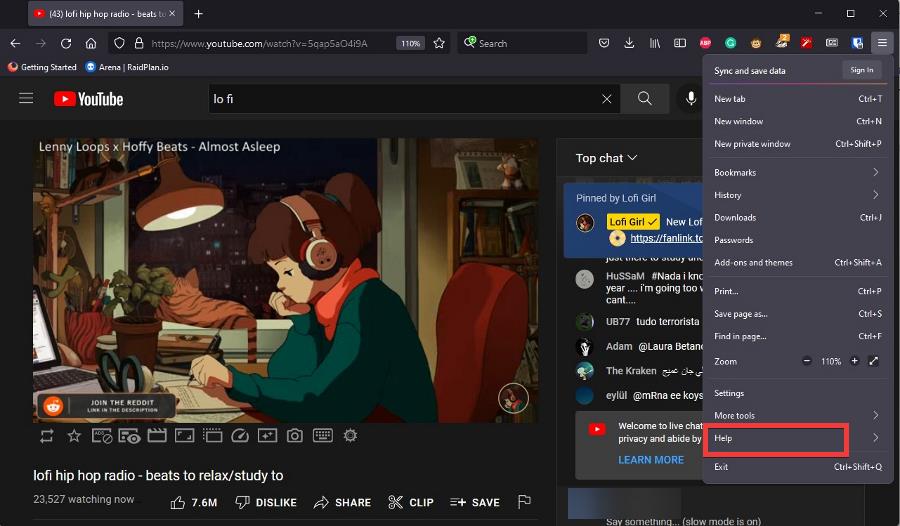
  1. Click on the menu button in the upper right-hand corner to bring down the menu.
  2. Select Help.
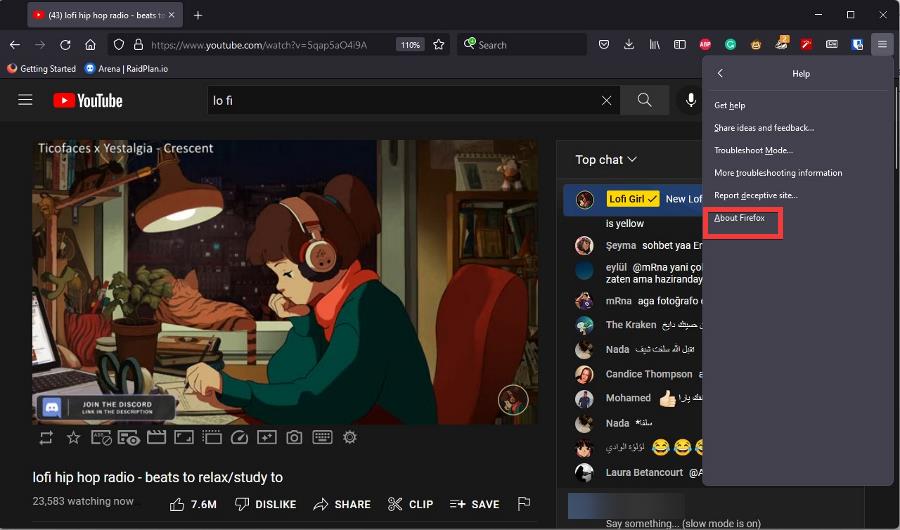
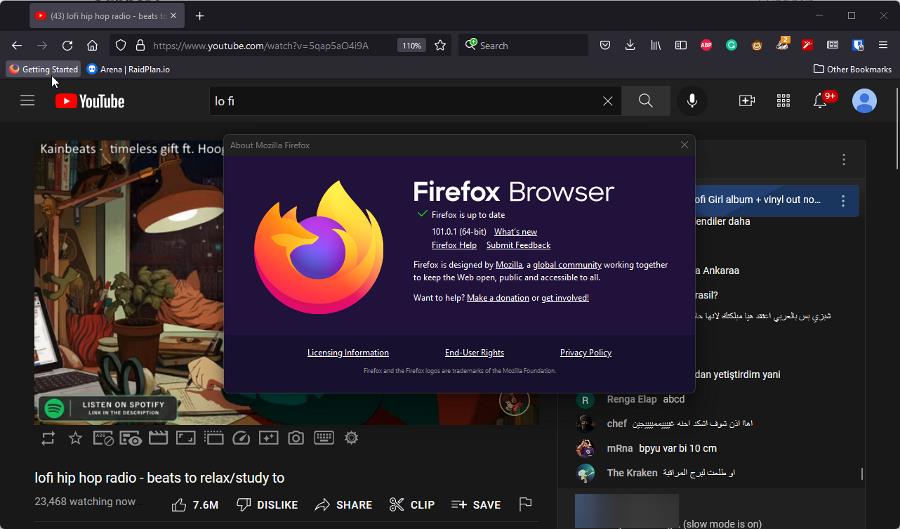
  3. Then select About Firefox in the following menu.
  4. Immediately, Firefox will scan for any new versions of the browser.
  5. The Firefox browser will let you know if you’re up to date.
  6. If you’re not up to date, Firefox will automatically download any new changes.
  7. Afterward, you must click the Restart to Update Firefox button to finish the installation.

7. Reinstall Firefox

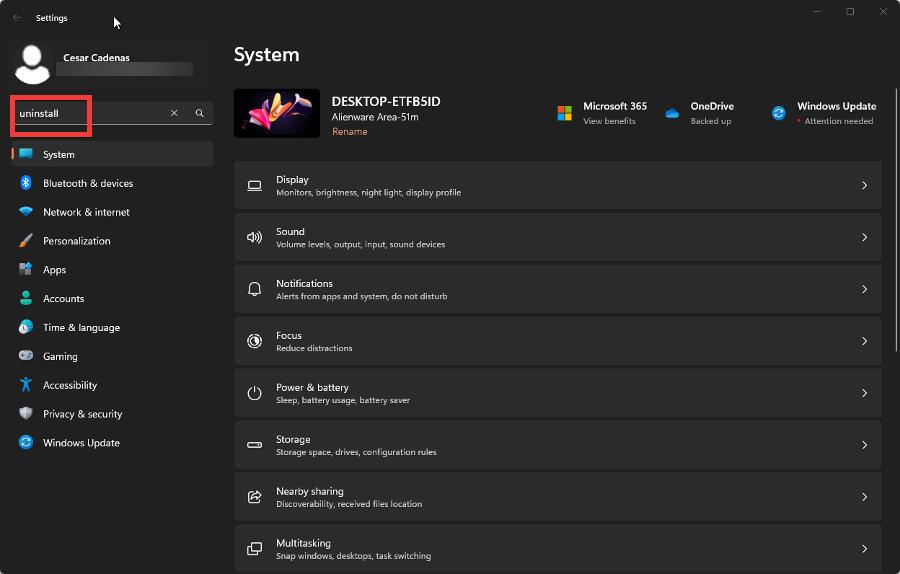
  1. First, you will need to uninstall Firefox, so click on the Start menu and select the Settings icon.
  2. In the left-hand search bar, type in ‘uninstall’ and then select Add or remove programs when it appears.
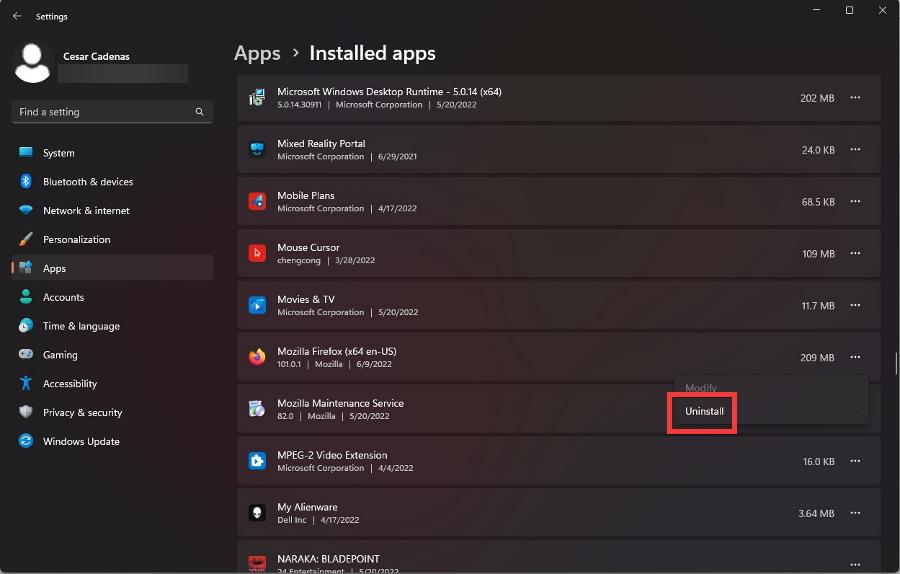
  3. Scroll down the Installed apps list and locate Mozilla Firefox.
  4. Click the three dots to the right of Mozilla Firefox and select Uninstall.
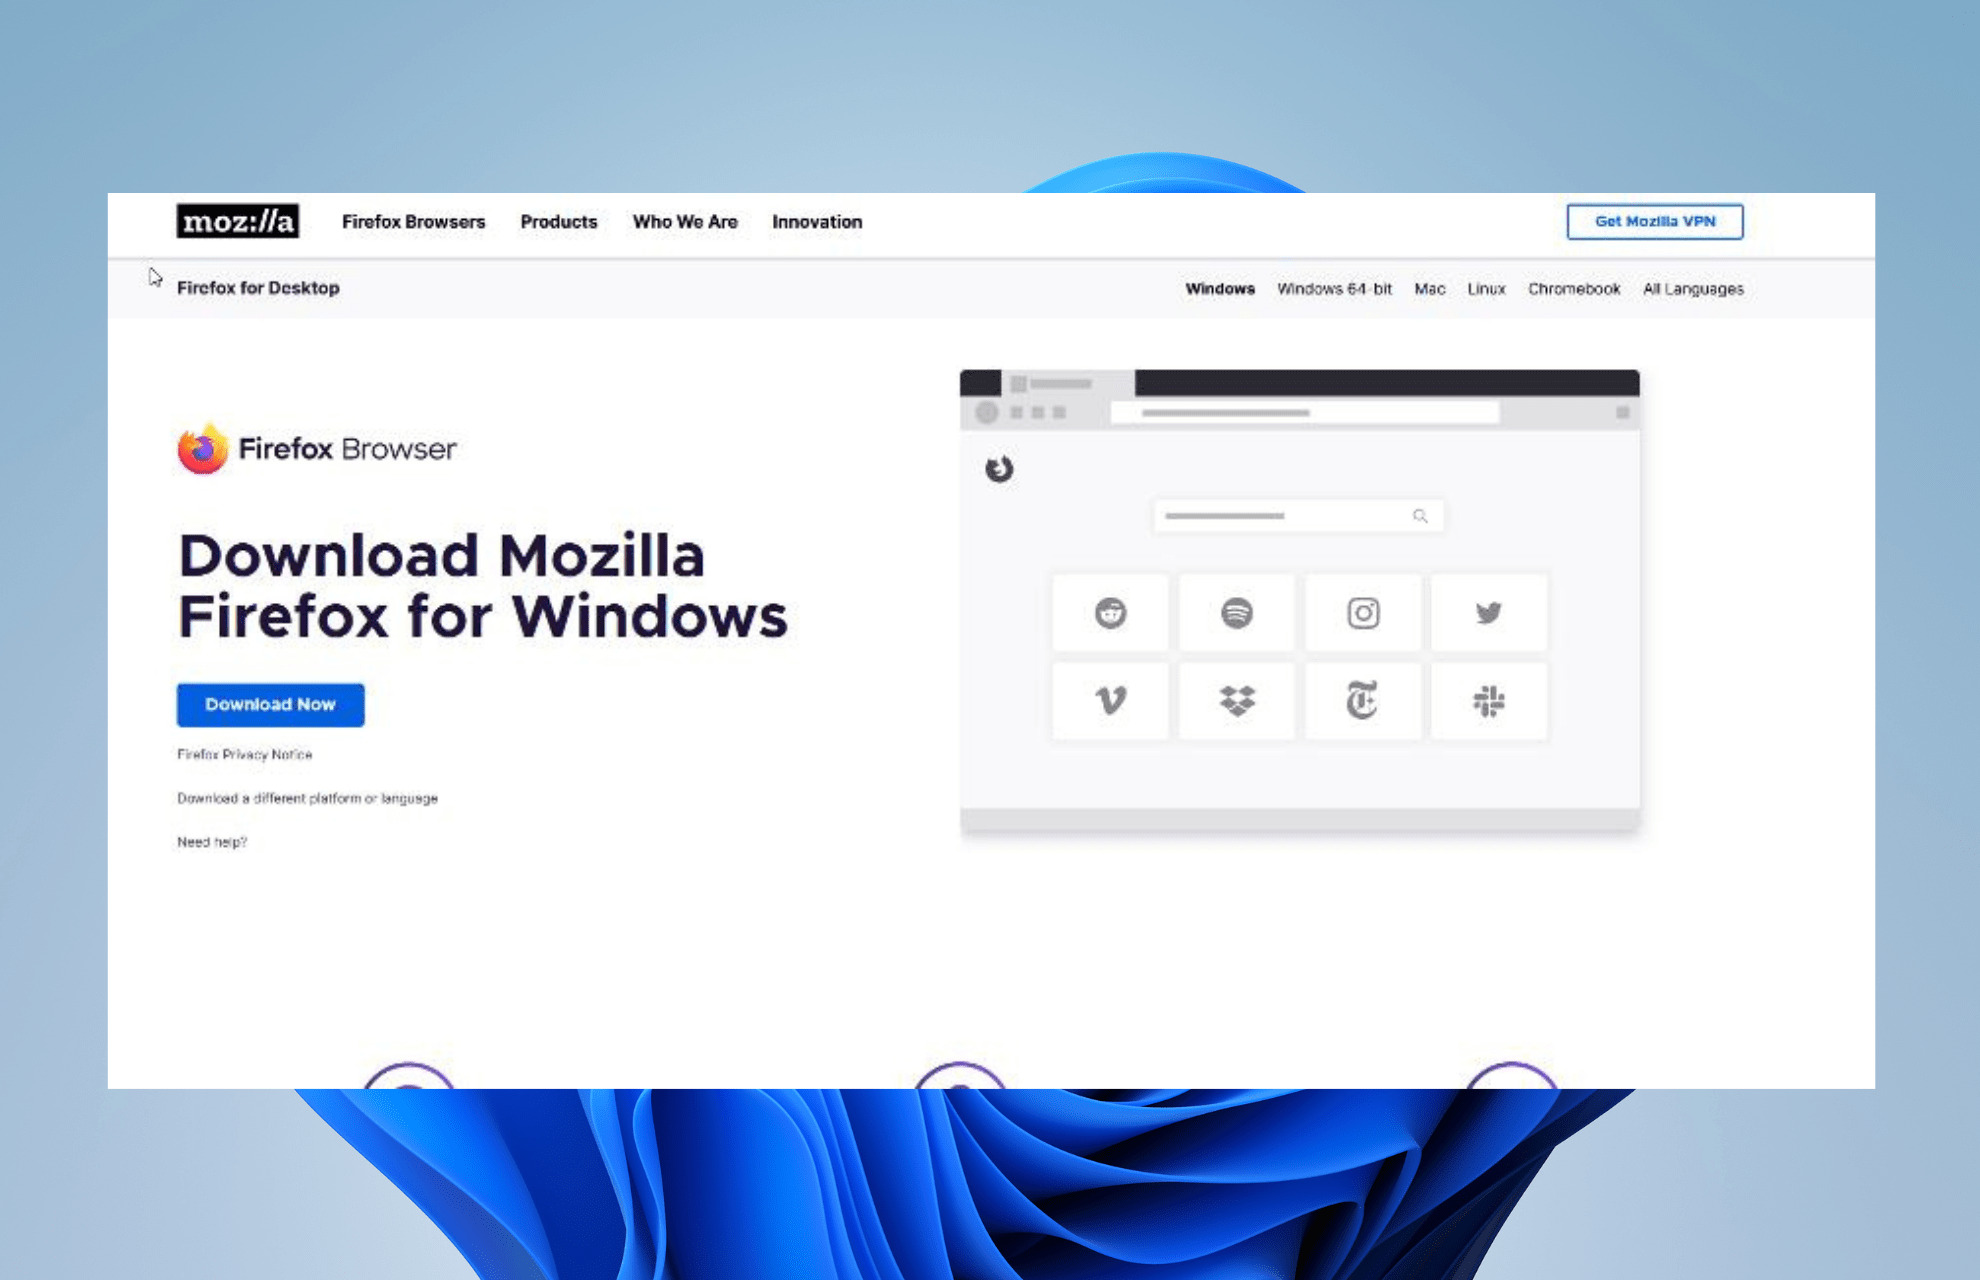
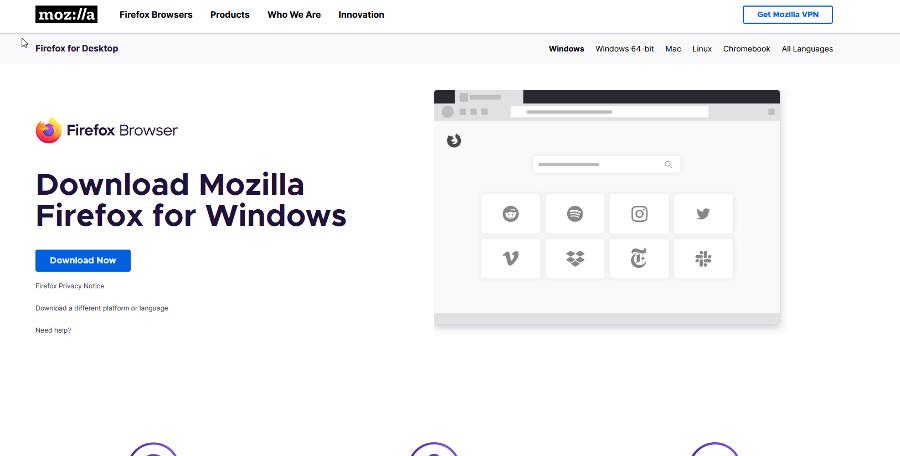
  5. Next, go to Mozilla’s download page for Firefox.
  6. Select the Download Now button.
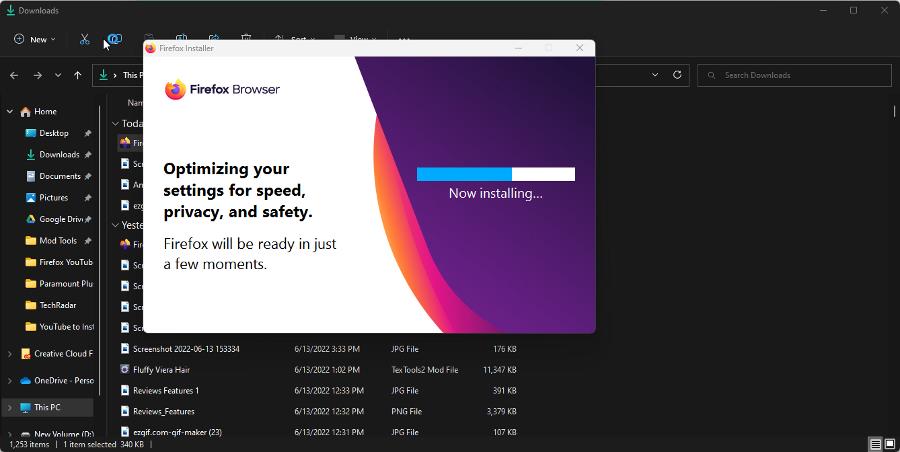
  7. The Firefox setup file will be automatically downloaded.
  8. Go to where the setup file was downloaded and double-click it to begin the installation.
  9. A window may appear asking if you want to make any changes. Select Yes.
  10. The installation will begin immediately. Give it a few moments.
  11. Firefox will open automatically after installation is finished.

8. Update Drivers

  1. You’ll need to update your video drivers if the past solutions don’t work.
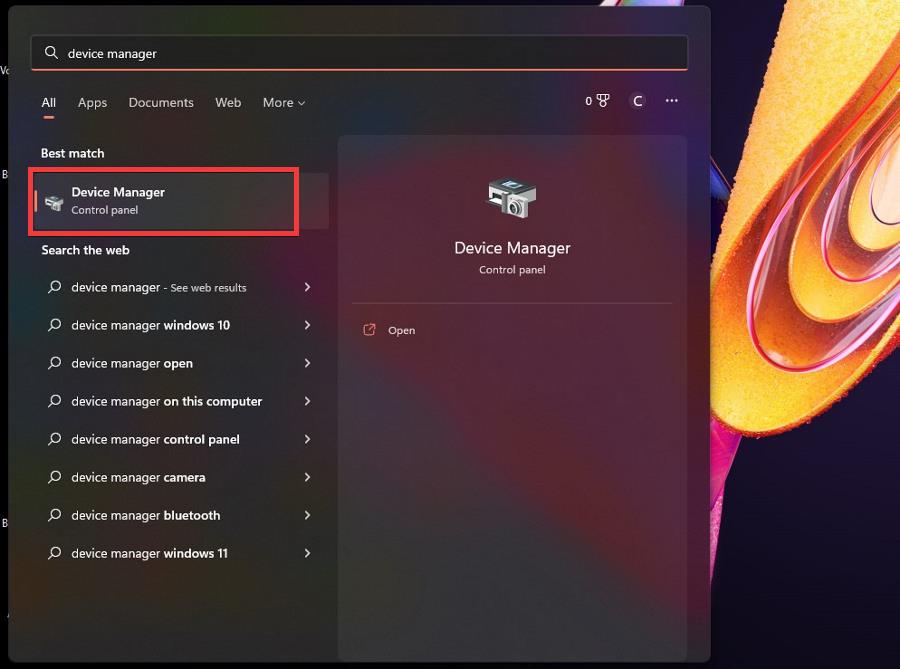
  2. Click on the magnifying glass icon to bring up the search bar.
  3. Search for the Device Manager.
  4. Click the first entry that appears.
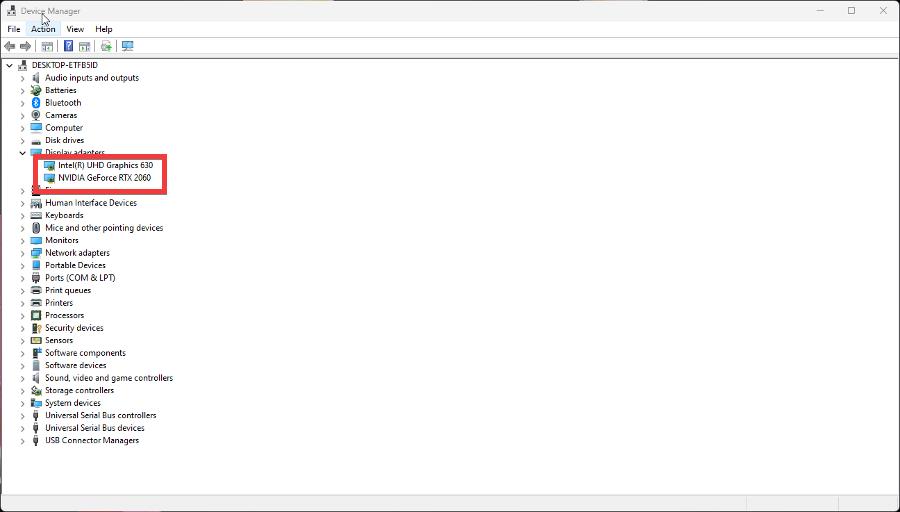
  5. In the Device Manager, click the arrow next to Display adapters. These are the graphics cards you’ll need to update.
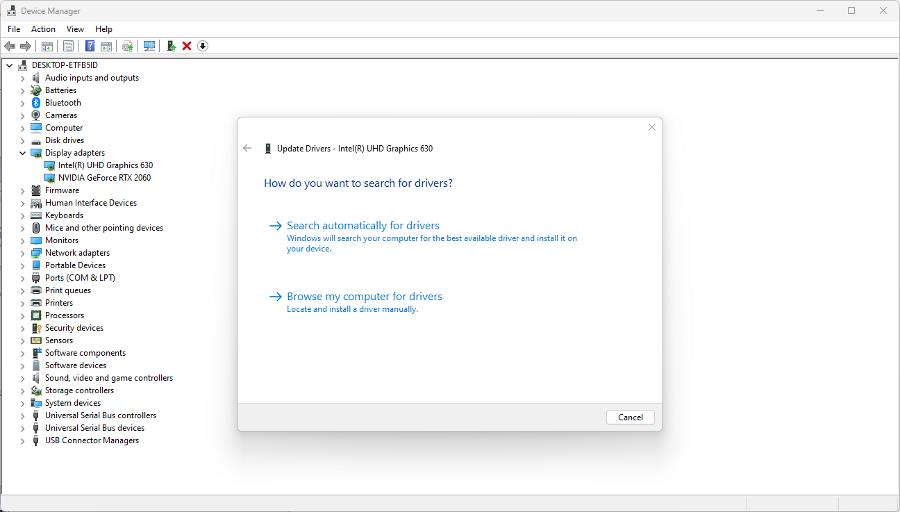
  6. Right-click the graphics cards (or one of them if you have multiple) and select Update Drivers.
  7. In the new window, select Search automatically for drivers.
  8. The newest drivers available will automatically be installed onto your computer.

9. Close with the Task Manager

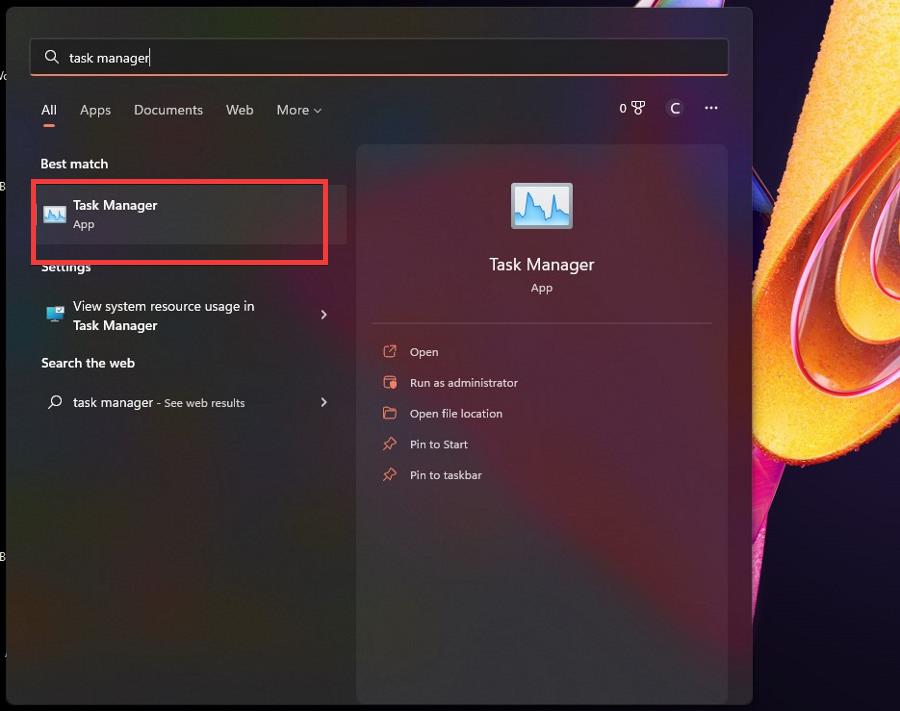
  1. Click on the magnifying glass icon in the bottom left-hand corner.
  2. Search for the Task Manager and click the first entry that appears.
  3. Find Firefox on the Task Manager and right-click it.
  4. Select End Task to force close the browser.
  5. Then restart Firefox by opening it up again.

How do I make YouTube better in Firefox?

You can make YouTube on Firefox better with extensions, and there are three highly recommended ones. Each of them is available on Mozilla’s Add-On store.

The first one is Enhancer for YouTube. It adds new mouse and keyboard shortcuts to YouTube, customizable dark themes, and a mini pop-up player. That way, you can turn a video into a small window and watch it while doing something else.

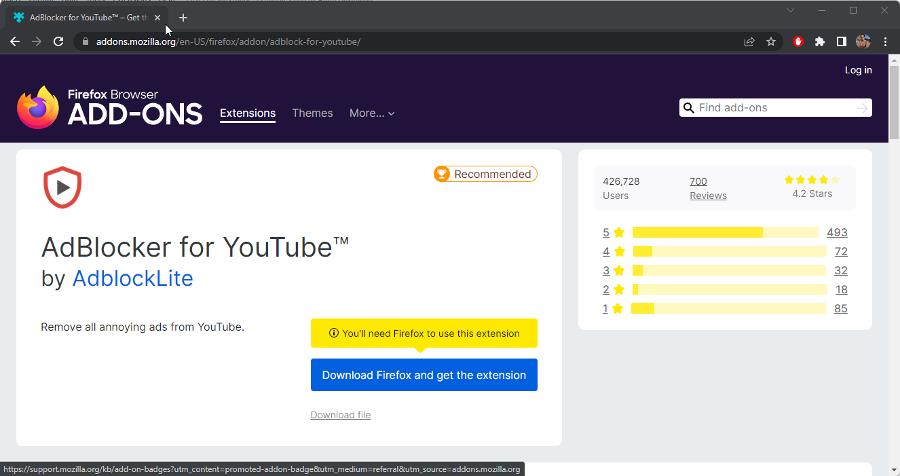
Next is AdBlocker for YouTube. Pretty straightforward extension; it removes those annoying ads from YouTube videos. It also has the added benefit of loading YouTube and the videos faster.

Plus, there’s a version for Android devices as well. AdBlocker for YouTube has over 700 reviews with a 4.2 average rating. It has on hundreds of thousands of computers. It’s beloved by many.

And the final highly recommended extension is Video DownloadHelper. As the name suggests, it lets you download YouTube videos. To be transparent, this extension is not exclusive to YouTube videos.

It also works on other platforms, like Facebook, Twitch, DailyMotion, and many other obscure video sites. Regardless of its support, it’s still one of the best extensions for the website.

There’s even a tutorial video to teach you how to download YouTube videos.

You can always try opening a private window on Firefox as a final effort. If that happens, it’s recommended that you contact Mozilla via its support page, and hopefully, they will roll out a fix soon.

Speaking of issues, many reported that YouTube is not working on Firefox, and we have a fresh guide that addresses this issue.

Feel free to comment below if you have questions about web browsers. Also, feel free to leave comments about guides you’d like to see or information on browsers and their features.

How To Quickly Fix Permission Denied. Error Code: 3 In 2026

In this article, we discuss how to fix Permission denied. Error code:3 Error message from server: permission denied when trying to transfer files.

The message is either a SFTP error 3 or a WinSCP network error that signals you don’t have the necessary rights to access or transfer a directory or file.

Here’s how to fix it:

How do I fix the denied permissions error?

1. Check account

Make sure you’re logged into a Windows account with admin rights. This error often means you cannot move files because you don’t have permission to.

2. Change file permission to read/write

2.1. Using a SSH Client

  1. Type in this code to give read permission:
    sudo chmod -R 755 /remote-dir/
    permission denied. error code: 3 error message from server: permission denied
  2. Type in this code to give write permission:
    sudo chmod -R 777 /remote-dir/
    permission denied. error code: 3 error message from server: permission denied
  3. Try the file copy or transfer again and see if you have the permission denied error message.

Changing the file permission to RXW for everyone could pose a security risk. Hence, if this is your adopted method, you should undo it once the transfer is completed.

2.2. Using Powershell/CMD

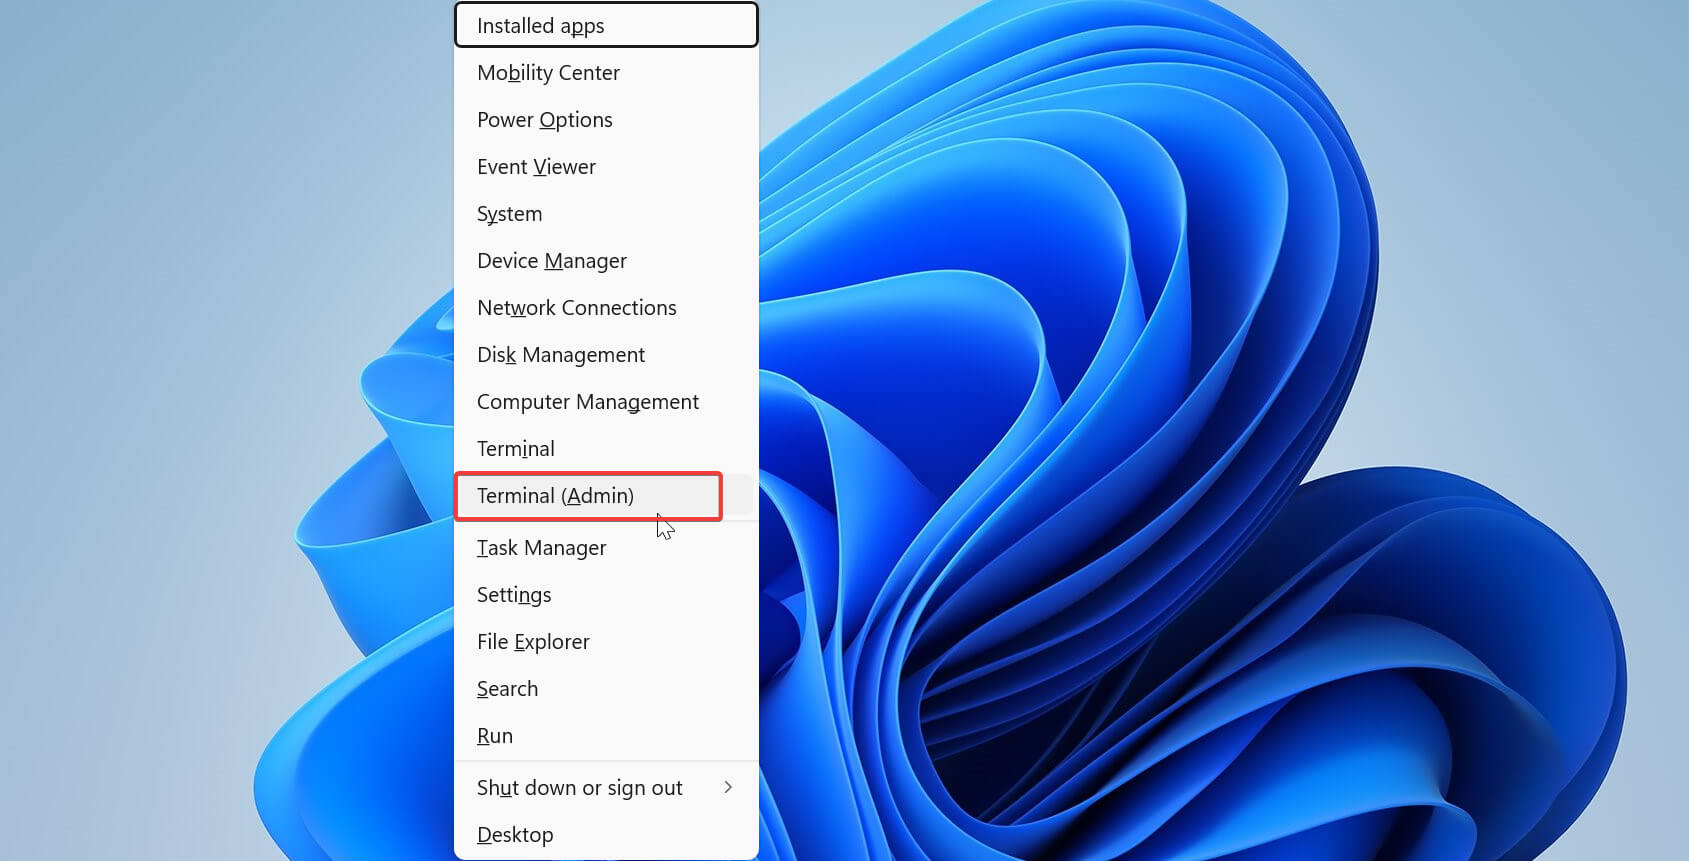
  1. Press Win + X and select “Command Prompt (Admin)” /”Windows PowerShell (Admin)”/”Terminal (Admin)”.terminal admin option windows 11
  2. Type the following command:
    icacls "C:\path\to\directory" /grant Everyone:(OI)(CI)F /T
  3. Press Enter.
Note icon NOTE
C:\path\to\directory represents the full path to a specific directory on your Windows system. Replace it with the actual path of the target directory when changing permissions. For example, C:\Users\Username\Documents\Project specifies the Project folder in the Documents directory

Changing the file permission to RXW for everyone could pose a security risk. Hence, if this is your adopted method, you should undo it once the transfer is completed.

3. Confirm the remote file path

This is a rookie mistake, but not one to be ignored. You may have just typed in the wrong resource path. In this case, your access will be denied.

All you need to do is confirm the correct path and re-input it. If you still do not have access, skip to the next solution.

With any of these three fixes, you should have been able to resolve the permission denied. error code: 3 error message from server: permission denied on your server.

You mainly have to pay attention to user rights, and you will be able to avoid this issue in the future.

New reactions added to the Windows 10/11 WhatsApp UWP

We know there are a lot of WhatsApp users out there, and this one goes out to all of you, since you were kind of expecting this.

We don’t always have time to reply in text to the messages we receive, so having an easier way to let others know how we feel is a great addition.

Message reactions for WhatsApp have actually been in the developing phase for months, now, leaving many to wonder how long was it going to take.

Now, we can finally say that the feature was launched to the general public last month for Android, iOS, and web users.

Spice up your WhatsApp chat with cool reactions

Even though another month has passed, the company responsible for the software has decided to bring support for reactions to its UWP-based beta app on Windows 10 and Windows 11.

Thus, WhatsApp Beta UWP is finally getting support for reactions with the latest update, so your wait has finally come to an end.

We hope you aren’t expecting some 2077-style upgrades, as this is no different than what you’ve already seen on Android and iOS.

Basically, you’ll see an emoticon beside every message received, and you can react to it using classic emojis such as hearts, thumbs up, laughter, crying faces, and the classic praying hands.

Obviously, WhatsApp also allows users to see who reacted to their messages, which is extremely helpful when you’re messaging on various groups.

And, you can see the number of people who reacted to your messages just by clicking on the emojis in the chat.

Keep in mind that this is not a phased rollout, which means anyone running WhatsApp Beta version 2.2223.11.0 can react using the above-mentioned emojis.

The Meta company will also introduce more emojis and skin tones sometime in the future, and it’s quite likely that they will be available to Android and iOS users first.

And, as you’ve already guessed, you can download the WhatsApp Beta UWP app from the Microsoft Store for free.

Have you already tried the new WhatsApp reactions? Share your experience with us in the comments section below.

3 Tips on What to do When Comodo Antivirus Isn’t Updating

If Comodo antivirus is not updating issue occurs on your computer; this article will help you eliminate this problem.

Comodo is a freemium Antivirus software that has recently gained popularity among many users. However, even though it is considered one of the best Antivirus software for Windows XP today, significant users have complained about not updating problems with this Antivirus program.

If you are interested, look at the solutions for the Comodo Firewall problem.

Comodo Antivirus Update Error

Though there are several reasons behind this problem, in this article, we will focus only on the solutions and the critical information.

How often should I update my virus definitions?

You should update the virus definitions at least once a day. In this way, you will get the latest protection benefits. This rule applies not only to the Comodo Antivirus but also to other security programs.

Is Comodo Antivirus worth it?

Comodo is indeed a good antivirus program. It has a free version that you can use at no cost. However, other AV programs may be better for you unless you use an outdated version of Windows.

For example, TotalAV and Bitdefender Antivirus are better in terms of features and performance. If we compare Comodo with these AV tools, particularly the premium ones, Comodo Antivirus is not worth a shot.

How do I manually update my Comodo Antivirus?

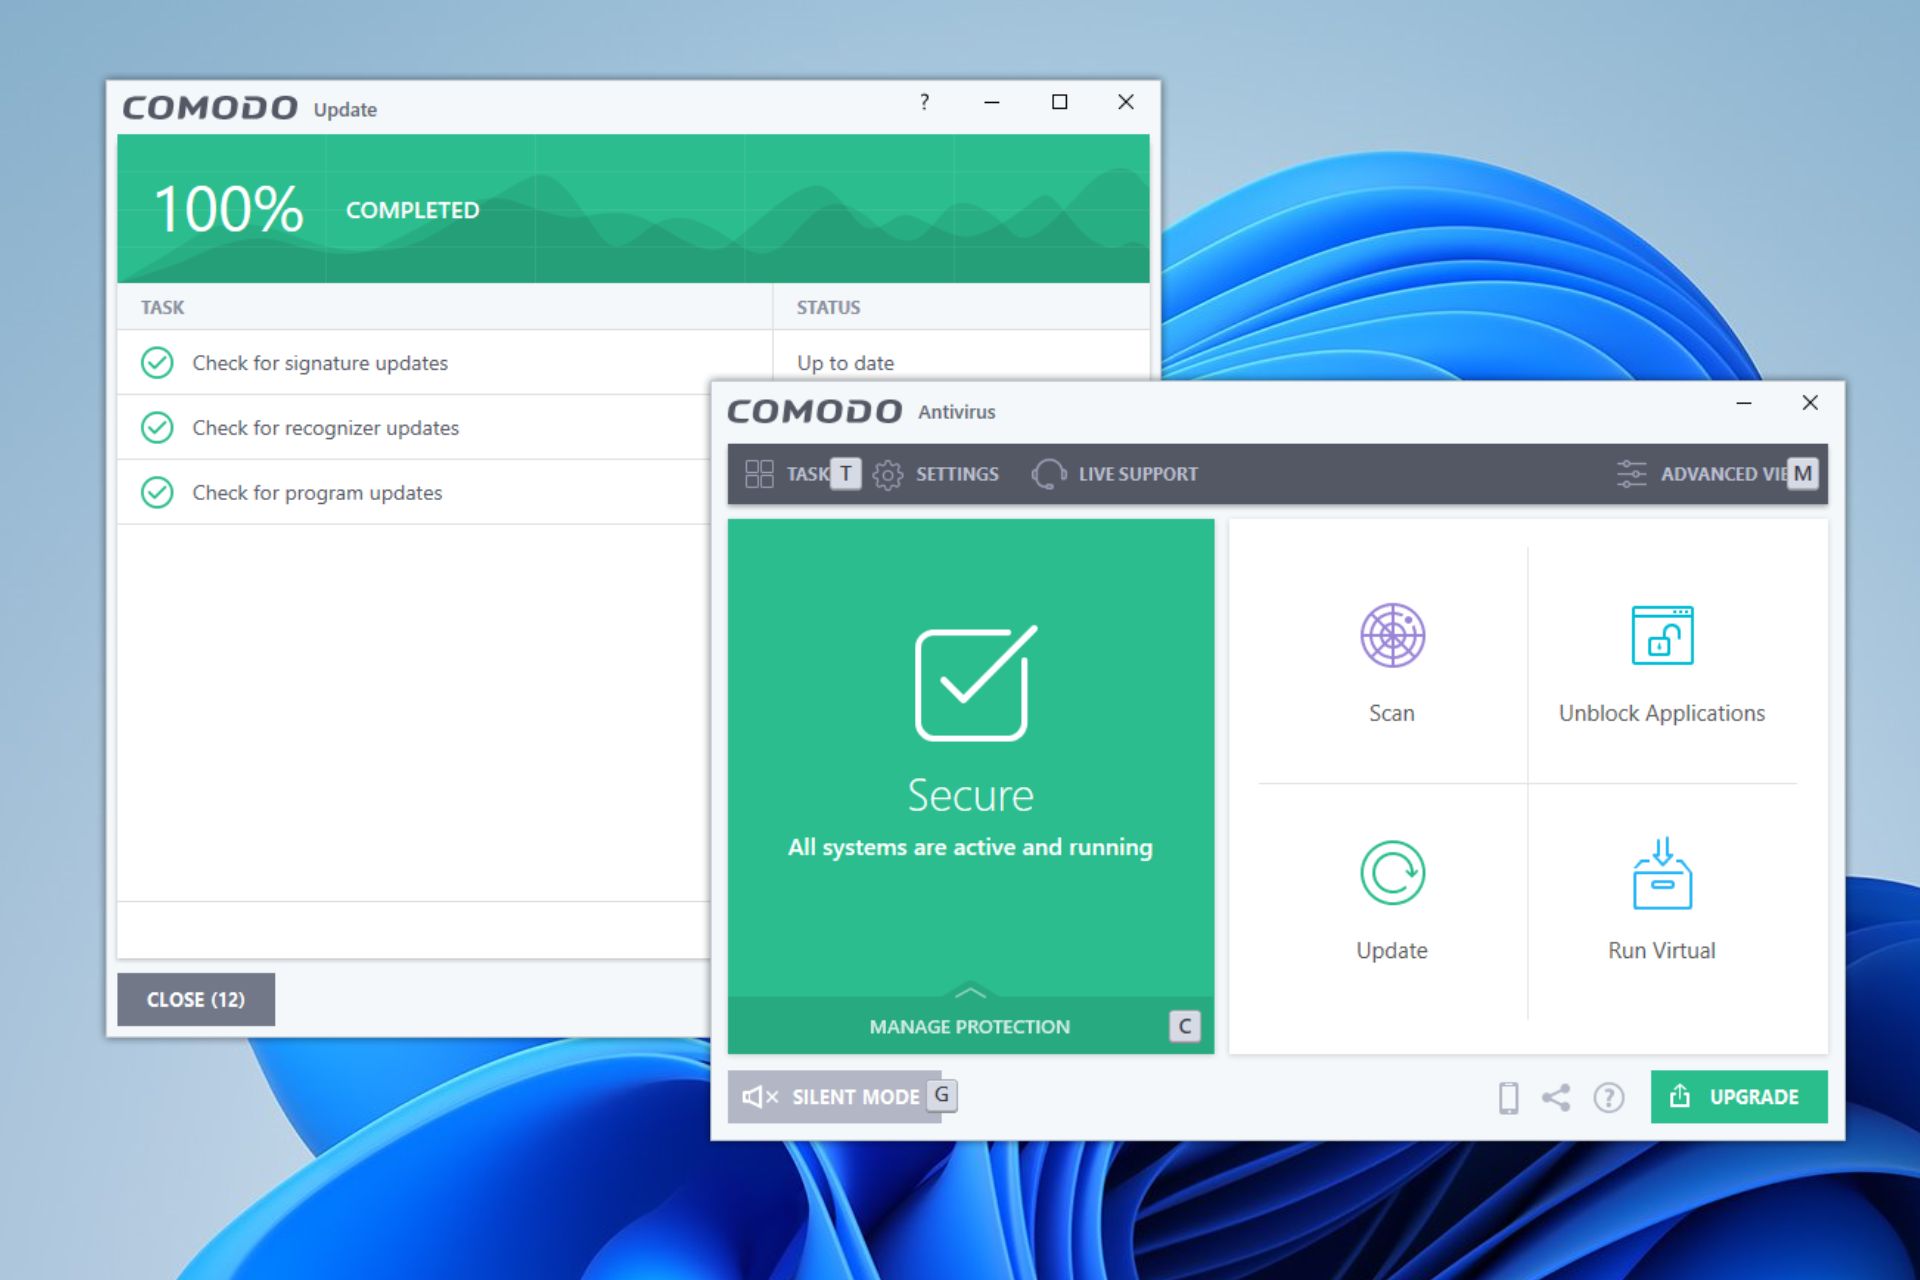
1. Manually tap on the update

  1. Open the Comodo Antivirus.
  2. Click on the Update.clicking update comodo av

2. Configure Proxy and Host settings

  1. Go to Comodo Antivirus Settings.going comodo av settings
  2. Under General Settings, click on Update.going update settings comodo av
  3. Next, click on Proxy and Host Settings.clicking proxy and host settings comodo av
  4. Click on Add and add the following entries one by one. host and proxy settings comodo av
    https://cdn.download.comodo.com/
    https://downloads.comodo.com/
    https://download-cn.comodo.com/
  5. Next, click on OK.
  6. Try to update again as shown in method 1.

3. Manually import the virus database

  1. Go to this virus database download page.
  2. Download the latest AV database. downloading comodo av virus database
  3. Open the Comodo Antivirus on your PC.
  4. Click on the question sign icon and go to its Settings.going comodo antivirus about
  5. Click on import virus database.clicking import virus database comodo
  6. Select the downloaded file and click on open.selecting downloaded virus database comodo
  7. Finish the process.

These are the ways to fix Comodo Antivirus not updating errors. If you know better solutions, you can let us know in the comment box.

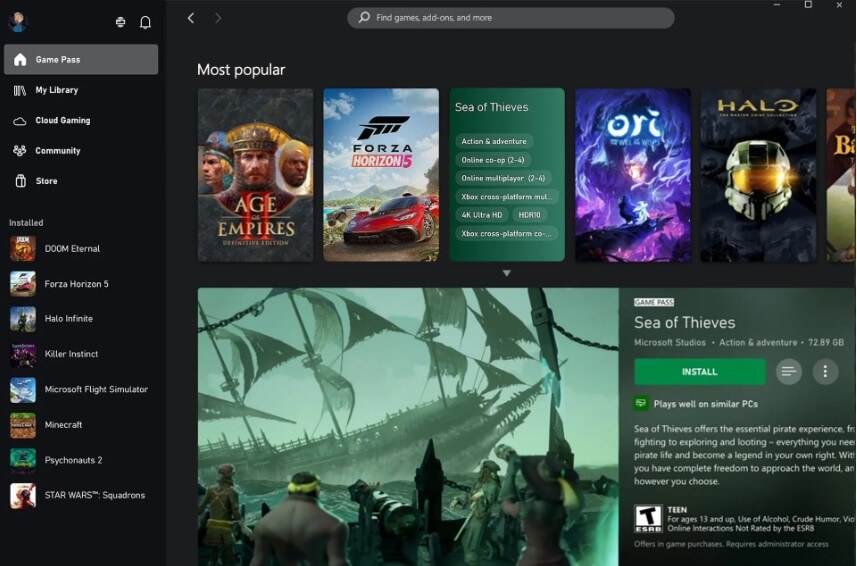
June updates for the Xbox App on PC include Game Performance Indicator, Game Queue, and more

Microsoft continues to make improvements to the Xbox App on PC, rolling out a number of new features for the month of June in addition to general performance and reliability enhancements on the backend.

Search and navigation improvements

This latest June update brings navigation improvements such as a more accurate search function, which now includes search results from EA Play and Ubisoft Connect. Navigation is now on the sidebar, and a new games queue has been implemented on the bottom left corner of the app. New collections have also been added to the Home screen, including a “Games to play together” collection for when you feel like teaming up with friends, as well as a “Side-scroller” collection and a “Point and click” collection.

Game Performance Fit Indicator

This new feature is aimed at helping users determine how well a game might run on their PC before downloading it. When you click on a game’s details you’ll be able to see a prognosis of how the game might perform on your machine by comparing it to that game’s performance on computers with similar specs. If your PC can’t handle the job, you will see the game’s system requirements along with details of what you’ll need to run the game.

Bear in mind that this new feature is being rolled out, and performance checks won’t be available for all games.

This latest update to the PC Xbox App makes for a more user-friendly experience. You can check out the release notes here for more info.

Play Assassin’s Creed Origins, Dead Island Definitive Edition, and I Am Fish this weekend with Xbox Free Play Days

The Xbox Free Play Days lineup is live right now with three more games for Xbox Live Gold members (and by extension those subscribed to Game Pass Ultimate, which includes all the benefits of Xbox Live Gold) to install and play for free. Lets take a look at the three games available to play this weekend from June 16—19.

Assassin’s Creed Origins

The landmark franchise takes players all the way back to Ancient Egypt in Assassin’s Creed Origins, to discover the beginnings of the Assassin’s Brotherhood.

Dead Island Definitive Edition

This is the fully remastered, definitive edition of the game the redefined the Zombie genre. It includes all the previously released DLC.

I Am Fish

Play as four fish friends in this charming physics-based adventure game. Brave, cheerful Goldfish; Pufferfish who can puff into a ball and roll across land; loud, wild Piranha who pack a mean bite; and finally Flying Fish, who can glide through the air.

These games are discounted right now, with the exception of I Am Fish, although that game and Assassin’s Creed Origins are both available on Xbox Game Pass right now.

Xbox Free Play Days is another perk of Xbox Live Gold and Game Pass Ultimate. You can learn more about the program by visiting the FAQ page.

How To Clear Cookies on Netflix [Laptop/PC, Browser, Mobile, Smart TV]

Clearing cookies on Netflix is a maintenance practice that will improve performance and get rid of all sorts of errors, such as Browser not supported or Error Code S7706, and in this guide we’re going to show you how to do that.

How do I clear cookies in Netflix?

1. On a laptop/PC

Netflix app

  1. Click on the Start menu and open the Settings app.
    settings app
  2. Click on Apps on the left pane, then Apps & Features on the right.
    how do you clear cookies on netflix
  3. Scroll down the app list to Netflix, click on the ellipses and select Advanced Options.
  4. Scroll down and click the Reset button.

After clearing the Netflix cache on your laptop, you can go back into the app and pick up where you left off. If you want more details on how to clear Netflix cache, keep on reading to learn how to do that in the browser.

Browser

  1. Launch your browser.
  2. Open Settings and go to Privacy and security.chrome privacy and security
  3. Scroll to Site Settings, go all the way down, and click on View permissions and data stored across sites.chrome view permissions and data shared across sites
  4. Find netflix.com in the list and click on the recycle bin to delete stored cookies and data.delete cookies netflix

2. On mobile (iOS & Android)

iOS

  1. Tap on your Settings app.
    how do you clear cookies on netflix
  2. Scroll down and tap on Netflix.
  3. Toggle on the Reset switch.
    how do you clear cookies on netflix
  4. Restart the application.

Android

  1. Open Settings.
  2. Scroll down to Apps.android apps settings
  3. Find Netflix in the list and tap on it.
  4. Scroll down and select Clear Data.netflix clear data
  5. Confirm and wait for the process to complete.

3. On Smart TV & Streaming devices (Android, Apple TV, Roku, Amazon Fire Stick)

  1. Click on Settings and navigate to the Apps option.
  2. Scroll down till you get to Netflix, then click on it.
  3. Scroll and select the Clear cache option.
  4. Click OK if prompted.

Whether you are on mobile, desktop, or a TV device, the steps above cover how to clear Netflix cache alongside cookies, giving you a clean start for error-free viewing.

Experiencing issues on Amazon Fire TV Stick after clearing cache and cookies? Check our dedicated guide on Netflix not working on Firestick for troubleshooting steps that fix streaming errors fast.

Wrapping up

The cache can cause various Netflix issues, such as Netflix unexpected error and many more. So keeping it clear is essential if you want hitch-free streaming.

We also tackled There was a problem connecting to Netflix error, in a different guide, so don’t miss it. Account-related errors may also require updating your login details. In such cases, you can change your Netflix email address to ensure smooth access.

The process varies based on what device you’re using and whether you watch through the Netflix app or via a web browser, so use one that matches your platform.

We hope this article has successfully shown you how to clear cookies on Netflix.

Still having persistent errors and want to stop billing? Learn how to end your plan safely with this quick guide: Cancel Netflix Subscription.

Before streaming again, learn how to download Netflix shows and movies to keep watching offline on trips or during temporary connection problems.

Frequently Asked Questions

How do I clear my Netflix history in my browser?

To clear Netflix watch history in a browser, head to the Netflix website and select Account. Then, pick your Profile> View Activity. From here, you can hide individual shows/movies or select Hide All to clear everything.

How do I delete “Continue watching” on Netflix on my laptop?

You can’t remove the section itself, but you can remove individual items from it. In a web browser, go to Netflix, pick your user, and hover your mouse over the show you want to delete. An “x” will appear in the corner. Just click on it and the respective title will be removed from your “Continue watching” list.

How do I edit cookies on the Netflix app?

Netflix cookies can not be edited on the app; they can only be edited on the Netflix website, and you usually will need a 3rd party plugin to accomplish this.

Does clearing Netflix cache delete my account or watch history?

No, clearing the cache only removes temporary data. Your account details, profiles, and watch history remain intact.

6 Best Browsers For Arch Linux [Lightweight & Safe]

In this article, we discuss the best browser for Arch Linux.

Arch Linux uses a rolling-release methodology to give most software the most recent secure editions. Its default installation is a stripped-down basic system that the user can customize only to include what’s needed.

On the Arch Linux installation, just like every other OS, you will need a gateway to the internet or the World Wide Web (WWW), and this is why you need to get the most compatible browser to use on this OS.

Can I install Chromium browsers on Arch Linux?

Google Chrome and Chromium browsers can be installed on the Arch Linux OS. To install Chromium-based browsers, you will have to use the code:
sudo pacman -S chromium

Note that some browsers may not be found on Arch Linux repositories by default. This is usually the case for commercial closed source browsers like Google Chrome.

These can still be installed, but you must use an AUR helper.

Which browser is best for Arch Linux?

Opera One – Secured and organized

Opera One is a lightweight and safe-free web browser that is also noted for being the first to provide efficient browsing capabilities.

Tabbed browsing and built-in search become standard features in all web browsers over time. Although Opera One is cross-platform, it can be easily integrated into a variety of Linux desktop environments.

Tab cascading and tiling modes are native to Opera One. By activating the Main toolbar or dragging and dropping the buttons wherever wanted, appropriate buttons may be discovered.

Arch Linux users get access to all of the primary features present in Opera One for Windows and Mac. The built-in sidebar integrations and proxy VPN are the biggest advantages of using Opera One on Arch Linux.

Additional features:

  • Speed Dial
  • Battery saver for laptops
  • Bookmarks and bookmark sharing
  • Themes
  • Extensions

Opera One

The lightweight, secured, organized browser that can be managed easily on Arch Linux.

If you want to install opera-developer for Arch Linux simply download and install it using the secured link and use the command provided in your Linux OS.

Links – The most lightweight

Links is a text-only navigator that integrates a pull-down menu system; also, it is open source. The browser can handle monochrome and color terminals, render complicated pages, and scroll horizontally.

It’s also geared for visual users who want to keep numerous GUI elements like pop-ups and menu windows in a text-only space.

It’s ideal as an internet navigator for internet cafes, low-end terminals in libraries, and other places because of its focus on intuitive usage. As a result, it’s ideal for Arch Linux.

Additional features:

  • Background file downloads
  • Keepalive connections
  • Asynchronous DNS lookup

⇒ Get Links

Lynx browser Best text-based browser

Lynx is another text-based browser and was first launched in 1992. The web navigator is still under development, with the most recent version issued a few years ago.

The lack of images is very obvious to new users of this web browser. But although the browser cannot show videos or pictures, it can start external programs for increased support. 

However, you must note that there is no compatibility for JavaScript, which means that certain pages will not load. Lynx has few privacy concerns because it doesn’t support many new technologies or graphics.

This browser is compatible with macOS, Unix, VMS, Windows 95/98/NT, and DOS386+.

Additional features:

  • Highly configurable
  • Compatible with old hardware
  • Support for SSL

⇒ Get Lynx

Firefox – Most robust

best browser for arch linux

On Arch Linux, you can install the Firefox browser using the Firefox package. Also, you can use alternatives such as Firefox Developer Edition, Firefox Extended Support, Firefox Beta, Firefox Nightly, and Firefox KDE.

There are a lot of configuration options for Firefox on Arch Linux, and you will be able to explore all of them using this script:
about:config

Also, it is the best Linux browser for use with an old PC since it is backward compatible. So, even if you do not use the fastest of computers, there would be a Linux package that is lightweight enough for you.

Additional features:

  • Page actions menu
  • Private browsing
  • Enhanced tracking protection

⇒ Get Firefox

Vivaldi – Most customizable

best browser for arch linux

Here is an excellent option for Arch Linux and also about the best browser for Manjaro.

It’s a fork of Opera One that inherits and amplifies its best features. It has a lot of capabilities that you’d generally find in an extension; for privacy’s sake, it doesn’t collect much information on you.

Tabs can also be adjusted, with four different places to pick from and the option to show a tab preview.

Page tilling is also supported, allowing you to display open tabs side by side, which is ideal for productivity and high-resolution monitors.

Additional features:

  • Tracking protection
  • Ad blocker
  • Extensions support

⇒ Get Vivaldi

Chromium – Best for development

best browser for arch linux

Chromium is an open-source, free web navigator created and mainly maintained by Google.

This source contains most of the coding for Google Chrome, a proprietary piece of software with a few extra capabilities.

It is easily compatible with Arch Linux OS because it is free and open source. However, you must note that it does not have a stable version maintained by Google since it is predominantly intended for developers.

Additional features:

  • Features a torrent engine
  • Support for video grabber
  • No browsing data tracking

⇒ Get Chromium

With any of these browsers, you should be able to get the best of navigating the web with the Arch Linux operating system.

Note that this is not an exhaustive list of all compatible browsers, but these are some of our best recommendations.

You may try any of these best browsers for Linux on other distributions.

Halo Infinite video game gets first Drop Pod update on Xbox and Windows

Halo Infinite’s first Drop Pod update is now live on Xbox One and Xbox Series X console families and Windows PC.

Drop Pod updates are a new type of update that are designed to roll out in between major seasonal content updates with a focus on important bug fixes, accessibility improvements, and UI improvements. Having said that, some new content will also occasionally be added with these updates.

This first Drop Pod update improves loading times, improves the Battle Pass and event rewards menus, enables a more consistent background music experience when transitioning between menus and games, and increases stability when playing on an Xbox One console.

Here’s the full release notes:

RESOLVED ISSUES

  • The following changes were made in the June 14, 2022 Drop Pod.

GLOBAL

  • Season 2 artwork has been added to loading screens across the game.
  • All changes to Target Frame Rate in the Settings tab are now reflected in-game for Xbox Series X and Series S users.
  • Load times for the Battle Pass, Challenges, Customize and Shop menus have been improved.
  • The volume of the Disruptor’s supercombine has been reduced when heard from a distance.
  • When both Battle Pass and Event rewards are unlocked in the same match, all unlocked rewards will now appear in the same post-match notification menu. Additionally, these menus will now consistently show all unlocked items.

CAMPAIGN

  • Weapon racks and ammo crates in the Warship Gbraakon mission are now available consistently.
  • Music now plays consistently in the mission Conservatory and in the main menu.

MULTIPLAYER

  • The Ranked Arena matchmaking playlist is now unlocked by completing 25 matches in other non-Ranked playlists. This change will not apply to players who have already completed 25 non-Ranked matches prior to this update.
  • Due to this change, some players on older versions of Halo Infinite will receive an “Unknown error” when searching in the Ranked Arena playlist. Download this Drop Pod update to continue playing Ranked Arena in matchmaking.
  • A new Fireteam Competitive Skill Ranking (CSR) limit has been implemented for Ranked matchmaking. For more information, please see the Fireteam CSR Limit article.
  • Xbox One stability has been improved to reduce instances of players not entering matchmaking sessions normally.
  • Alterations have been made to increase the durability of light vehicles (Wasp, Banshee, Mongoose) and medium vehicles (Warthog, Chopper, Ghost, Shade). Please see Halo Infinite Weapon, Vehicle, and Equipment Inventory for more information.
  • Unique icons have been added to the Custom Game menu to represent Land Grab and Last Spartan Standing modes.
  • Grenades exploding, respawning, and other effects will no longer repeatedly occur during gameplay.
  • Enemies can no longer be pinged when a wall or another obstacle is blocking them. A direct line of sight is now needed to ping an enemy’s location.

ACCESSIBILITY

  • Various issues tied to the User Interface (UI) Narration option in the Accessibility tab of the Settings menu have been resolved. For example:
  • All sent messages in the chat window will now be read aloud as the user scrolls up or down through chat history.
  • Players will now be informed when the chat window has been opened and closed.
  • Narration now indicates where to invite players in the social menu.
  • Instances of blank messages when text-to-speech is enabled have been resolved.
  • The text chat window will now consistently show the latest messages received.
  • This issue may still occur if Speech-to-Text is enabled in the Accessibility tab of the Settings menu.

KNOWN ISSUES

  • With this update, the team has added one new issue to our Known Issues list. Visit the Known Issues & Workarounds section for more information.
  • Launching Halo Infinite while disconnected from the internet or while Halo services are offline will result in multiplayer modes such as Academy and Custom Games being inaccessible. This issue will not occur in sessions where Halo Infinite is able to connect to the required services and then is later disconnected from the internet.
  • Campaign is still accessible when this issue occurs.

After more Halo and Xbox news? Follow us on Facebook and Twitter.

Redesigned Xbox 360 avatars are now rolling out to current-gen Xbox consoles and PCs

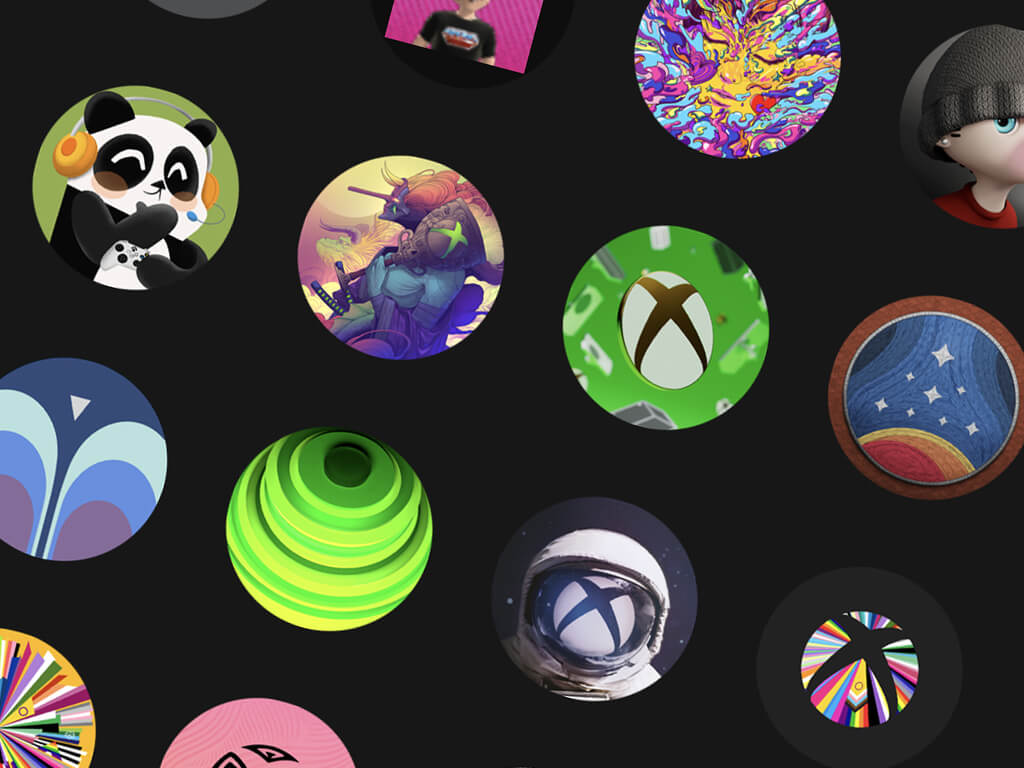
In a bit of a surprise move, Microsoft has redesigned several Gamerpic avatar images from the Xbox 360 console era and made them available on modern platforms.

The redesigned Gamerpics, which include the popular panda and bubble-gum boy images, now seem to be available when editing an Xbox profile’s Gamerpic on Xbox Series X and Xbox One console families and on the iOS and Android Xbox apps.

These new images don’t yet seem to be live within the Windows Xbox app, at least for me here in Australia. Regardless, they should be available on Windows soon.

Need more Xbox in your life? Give us a follow on Pinterest, Twitter, and Facebook.

Microsoft announces Viva Sales, connecting Microsoft 365 with sales CRMs

Microsoft is announcing VIva Sales. This new seller experience application is designed to bring customer relationship management technology into and from Microsoft 365 and Microsoft Teams. Powered by artificial intelligence, the end goal of it is also to help provide personalized recommendations to sellers, and better help then connect to customers.

In total, there are three core themes to Viva Sales, many of which target Microsoft’s rival, Sales Force. The first of those is to help sellers do their jobs, while also providing insights that sales leadership needs. With the second theme, VIva Sales can recommend the next steps to progress a customer through a sales funnel, and help them take the next steps. Third up, Viva Sales can provide AI-driven recommendations to enable sellers to enhance their customer engagement. Microsoft provides the following examples of how this works and how Viva Sales can integrate with other Microsoft products.

  • As sellers are working, they can tag customers in Outlook, Teams or Office applications like Excel, and Viva Sales will automatically capture it as a customer record, layered with all relevant data about the customer.
  • Real-time customer insights provide a deeper understanding of where each customer is in their purchase journey, and how to guide the relationship.
  • Viva Sales is using Context IQ, announced last fall, to ensure relevant content is connected across Microsoft apps and services — like Dynamics 365 and Microsoft
    365 — so sellers save time and stay in the flow of work.

As you can tell, Viva Sales builds heavily on Microsoft Viva, which already provided an integrated employee experience platform. Viva now includes common cores like communications, knowledge, learning, goals, insights, as well as sales. “Viva Sales is a new modern way of selling. As a smart CRM companion, Viva Sales makes sellers’ lives easier while enriching their CRM,” explained Microsoft in a blog post.

Google Photos Isn’t Processing Video: 5 Tips on Fixing it

Google Photos is a pretty easy way to back up your photos or videos, access them across devices, and share them with others. But, several users reported that Google Photos is not processing the video they are trying to upload or already had.

Google Photos allows users to upload and store up to 15 GB of photos and videos, and this also includes emails on Gmail or data stored on Google’s other services.

Let’s find out why Google Photos is not processing videos, and how you can fix the problem.

Why does it take so long to process a video on Google Drive?

When you upload a video to Google Drive, it makes the necessary modifications while processing the video to make it accessible across devices.

Now, this depends on a few factors, the size of the video, the number of changes to be made, Internet speed, and the device used for uploading. So, if Google Drive has to make several changes over a slow connection on a large enough video, the processing time would be long.

Why is my video not processing on Google Photos?

When Google Drive is not processing your video, it could be a problem with your Internet connection or Google’s server. There are times when the servers are down and Google Photos wouldn’t be processing videos.

Also, it could have to do with a corrupt browser cache, so make sure to fix that as well. If you are unsure how to get things up and running again, try the methods listed in the next section.

?️Quick Tip:

Opera One is a Chromium-based browser that shares a lot of code with Google Chrome. The main difference is that  Opera One includes a feature called Video Pop-Out. Also, it comes with a native AI.

When you use it, you can watch an online video in a floating window that you can position above the web page you’re viewing. This can aid in faster video processing and avoid sluggish or interrupted video load distribution.

⇒ Get Opera One

What can I do if Google Photos says video is still processing?

1. Re-login to Google Photos

  1. Go to Google Photos, click on the Profile icon near the top-right, and then click on the Sign out button.Sign out to fix google photos not processing video
  2. Once you have been logged out, re-enter the login credentials to sign back into Google Photos.Login

If you see that the video is being processed on Google Photos for a long time, try re-logging into your Google Account.

2. Increase the Internet Speed

In many cases, it’s a slow Internet speed that leads to Google Photos not processing videos on your device. Whenever you try to add a video to Google Photos, certain changes are made to it, and the better the upload speed, the quicker it will be.

So, check the Internet speed, and make the necessary modifications to get things running again.

3. Clear the browser cache

Note icon NOTE
The steps listed here to clear the browser cache are for Google Chrome, though the concept pretty much remains the same for all browsers. To find out the exact steps for another browser, check their official website.
  1. Press Ctrl + H to launch the Browser History, and click on Clear browsing data on the left.Clear browsing data to fix google photos not processing video
  2. Now, click on the Time range dropdown menu, and select All time.Time range
  3. Tick the checkboxes for Cookies and other site data, Cached images and files, and then click on Clear data.Clear data
  4. Once done, relaunch the browser for the changes to come into effect and check if the problem is fixed.

4. Update the browser

Note icon NOTE
The steps listed are again for Google Chrome. You can check the FAQ section on the official website to find out the steps for other browsers.
  1. Click on the ellipsis near the top-right, select Help from the menu, and then click on About Google Chrome.About Google Chrome
  2. Now, if an update is available, it will automatically be downloaded and installed.Update browser to fix google photos not processing video

After updating the browser, make sure to relaunch it and then check if the video not processing issue in Google Photos is fixed. If not, head to the next method.

5. Watch the video on VLC

  1. Open the problematic video in Google Photos, and click on the ellipsis near the top-right.ellipsis
  2. Select Download from the menu or press Shift + D.Download to fix google photos not processing video
  3. Once the download starts, cancel it since we don’t need to file but the link to it.
  4. Now, press Ctrl + J to head over to the downloads page in Google Chrome, right-click on the video, and select the Copy link address option.Copy link address
  5. Open VLC Media Player, click on the Media menu at the top-left corner, and select Open Network Stream.Open network stream
  6. Next, press Ctrl + V to paste the link you earlier copied, and click on the Play button.Paste link

That’s it! If there’s the Your video will be processed soon message in Google Photos, you can always play the video in the VLC Media Player.

How can I speed up Google Drive uploads?

There are several ways you can speed up Google Drive uploads, and we have listed the most practical ones here:

  • Upgrade your Internet plan and choose one that offers a higher speed
  • Upload smaller videos on Google Drive. You can use an effective video compression tool
  • Enable hardware acceleration on the browser
  • Clear browser cache and cookies

How long does it take Google photos to process a video?

Google Photos is one of the reliable cloud storage platforms that allows videos to be quickly uploaded and processed. If you are wondering why the videos are not playing Google Photos, it’s likely that they are being processed.

Though there’s no fixed time for processing videos since there are several critical factors at play here. So, it can take anywhere from a few seconds for smaller videos, to a few hours for large videos if several changes are to be made.

That’s about it! You now know what to do if Google Photos is not processing your video, and how long it takes to process videos on both Google Drive and Photos.

Also, find out what to do if you see the We are processing this video error in Google Drive or YouTube.

Do not hesitate to tell us which fix worked for you in the comments section below.

How To Get Rid of Privacy Reports on Safari [Tested Solutions]

The Safari browser has sold itself as being a privacy-conscious browsing alternative. Many dedicated users will agree with this, but you may want to tune down in privacy for some reason. So here we discuss how to get rid of the Privacy Report on Safari.

Note that your privacy report will include cross-website tracking that the browser has blocked, and turning off the feature means you no longer have access to this blocked statistic.

If this is what you hope to achieve, then let’s get into it.

Why am I getting a privacy report on Safari?

This report was created to offer you a better understanding of how applications use your information. You can alter your privacy settings or remove authorization if an application looks to be viewing your information in an unexpected way or at an unexpected time.

Additionally, you can review the application’s Privacy Nutrition Label, read its privacy policy, or email the app dev for further details should you need more info about why the application seeks access to specific data and how it uses the key.

How do I view privacy reports in Safari?

  1. Launch Safari.
  2. Navigate to the website whose privacy report you seek.
  3. Hit the aA icon at the bottom left of the browser.
    how to get rid of privacy report on safari
  4. Tap the Privacy Report option.

Now let’s show you how to disable the privacy report on Safari.

?️Quick Tip:

We recommend trying Opera One, one of the browsers with built-in VPNs and an ad blocker for additional privacy and security. Also it comes with built-in AI and modular AI-ready design.

When you enable the tracking blocker, a shield icon appears in the address bar, displaying the number of trackers blocked as well as a list of those trackers. Individual sites can have the feature turned on and off, so you may avoid this privacy report on trusted websites.

⇒ Get Opera One

How do I get rid of privacy reports on Safari?

Turn off privacy report safari iPhone

  1. Open the Settings app.
  2. Scroll down and select Privacy.
  3. Scroll to the bottom and select App Privacy Report.
  4. Tap the option to Turn off App Privacy Report.

How to get rid of privacy reports on Safari iPad

  1. Open the Settings app.
  2. Scroll down the menu and tap Privacy.
    how to get rid of privacy report on safari
  3. Scroll down the privacy menu and tap App Privacy Report; then, if it is on, tap Turn off Privacy Report.

How to turn off privacy report on Mac

1. Clear the Privacy Report from the Start page

  1. Start Safari.
  2. Click the toggle switch at the bottom right of your Safari browser.
  3. Untick the Privacy Report option.
  4. Close the menu.

2. Remove the Safari toolbar Privacy Shield icon

  1. Launch your browser.
  2. Click on the View menu at the top.
  3. From the options, select Customize Toolbar.
    how to get rid of privacy report on safari
  4. Drag the Shield icon into the new window and click the Done button.
    how to get rid of privacy report on safari

3. Disable cross-site tracking

  1. Launch the Safari browser.
  2. Click on Safari, then select the Preferences option.
    how to get rid of privacy report on safari
  3. Select the Privacy tab and uncheck the Prevent cross-site tracking option.
    how to get rid of privacy report on safari

By following these steps, you would have successfully gotten rid of privacy reports on your Safari browser.

Safari or any of the best browsers without tracking are great browser options with excellent Security and Privacy.

5 Best Browsers to Play Forge of Empires [Fastest Ones]

Forge of Empires is an award-winning browser game where users build a city and progress through history. For an optimal gaming experience, use a fast and secure browser. Here are our picks for the five best browsers to play Forge of Empires.

It’s 100% free to create a Forge of Empires account and play; however, there are some perks that users can purchase with real money, but it’s not required to progress.

Can you play Forge of Empires online?

Yes, Forge of Empires can be played online. The browser version was the default way to play when the game was first released. In addition to PCs, Forge of Empires is available on iOS and Android devices.

Play Forge of Empires online via a browser.

Can you play Forge of Empires single-player? There is a Solo Campaign where players can build their city and advance through the ages. Instead of battling other players, users attack provinces run by NPCs.

What are the best browsers to play Forge of Empires?

1. Opera GX

Opera GX best browser to play Forge of Empires.

This Opera browser was designed with gamers in mind. In addition to its customizable gamey interface, it also has GX Corner for users to stay updated on the latest gaming news and features.

Opera GX is secure, with a built-in ad and tracker blocker and a free, unlimited VPN that protects your location and connection.

The GX Control panel allows users to control resources. It also has a Hot Tabs Killer, which will let users know which tabs are consuming a lot and can close them to make your game run smoothly.

Key features of Opera GX:

  • GX Corner provides gaming news
  • Built-in ad and tracker blocker
  • GX Control Panel
 Opera GX

Opera GX

Stay up to date on all of the latest gaming news with the GX Corner.

2. Vivaldi

Vivaldi browser for Forge of Empires.

Vivaldi is not as well known; however, this browser is perfect for gamers because it’s fast while being lightweight.

Features like Notes, Screen Capture, and more give users access to tools they may need without having to open another app or install an extension, thus using fewer resources. Users can also choose which features they use and disable the ones not needed for a seamless Forge of Empires gaming experience.

Key features of Vivaldi:

  • Highly customizable
  • Pick and choose features to use
  • Lightweight

⇒ Get Vivaldi

3. Google Chrome

Google Chrome best browser to play Forge of Empires.

Chrome is excellent for gamers who value speed and want fast-loading games. As one of the most popular browsers in the world and with a minimalistic interface, it’s simple and functional for all. Furthermore, with an extensive addon library, users can customize which features they want to enhance their in-browser gaming.

While Chrome is a powerful browser that provides lag-free gaming, it consumes many PC resources, like memory, to optimize its performance.

Key features of Google Chrome:

  • User-friendly interface
  • Extensive add-on library
  • Fast page loads

⇒ Get Google Chrome

4. Mozilla Firefox

Firefox best browser to play Forge of Empires.

Although not a Chromium-based browser, Firefox is still open-source and has one of the most impressive extension catalogs, including a gaming library addon that gives users access to countless browser games.

The protection features block trackers from collecting user information. Firefox also has built-in blockers to protect user privacy and prevent pages from getting weighed down, so they load faster.

Key features of Firefox:

  • Open-source
  • Addon library
  • Enhanced tracking protection

⇒ Get Mozilla Firefox

5. Brave Browser

Brave Browser for Forge of Empires.

If security is a top priority, Brave is the perfect browser. Brave is one of the most secure browsers on the market while also being lightweight.

Brave provides a built-in ad and tracker blocker with malware and phishing protection. Additionally, with Tor integration, users can game with an anonymous network connection making it perfect for playing Forge of Empires for hours.

Key features of Brave:

  • Built-in ad and tracker blocker
  • Malware and phishing protection
  • Tor integration

⇒ Get Brave

How do you play PvP in Forge of Empires?

Several different PvP modes exist in Forge of Empires, including PvP Fight, which is unlocked once players research Military Tactics in the Iron Age.

PvP Tournaments take place weekly in a neighborhood using a PvP tower acquired by conquering a province with a corresponding building.

The PvP Arena gives players access to a server where they compete with others. This is unlocked after researching Mercenaries in the Early Middle Ages.

Forge of Empires ages progress to unlock PvP.

Check out our list of browser games like Clash of Clans and Forge of Empires if you want some recommendations. We hope you enjoyed our list of the fastest browsers for playing Forge of Empires. Let us know down below what browser you use to play browser games.

3 Tips on What to do When You Can’t Download MSI Afterburner

MSI Afterburner is one of the best overclocking software for graphics cards, but unfortunately, many users reported that the MSI Afterburner download is not working for them.

This can be a problem, especially if you were planning to get the maximum performance out of your graphics card by overclocking.

Luckily, there are ways to fix this problem, and in today’s article, we’re going to show you how to do it.

Where can I download MSI Afterburner from?

You can download Afterburner from the official website by doing the following:

  1. Visit the Afterburner download page.
  2. Click on Download Afterburner.
  3. After the file is downloaded, run the setup file and follow the instructions on the screen.

If for some reason the download afterburner button is not working, you should be able to fix that with steps from this guide.

Can I use MSI Afterburner without graphics card?

If your PC uses an on-board graphics chipset instead of a discrete graphics card, MSI Afterburner won’t be of much use.

Users of the software use it to control the settings of dedicated graphic cards, even if the card is not from MSI.

Without a graphics card, you can only adjust your core speed and memory clock.

?️Quick Tip:

When you download a file from a website, a download message appears below the right side of the combined address and search bar in the Opera One browser.

This message displays a download progress bar and disappears when the download is complete. Opera One has built-in security measures to scan your downloads before installing them. Plus, it comes with a built-in AI.

⇒ Get Opera One

What can I do if MSI Afterburner won’t download?

1. Use a different website

  1. Navigate to the Afterburner download page.
  2. Select the download location.
  3. After 5 seconds, the download will start.

This is the best workaround if the MSI Afterburner download link is not working. Sometimes there’s an issue with the website, and using a third-party website might be the only option.

Note icon NOTE
Third-party websites usually aren’t safe to use when downloading files, however, Guru3D is a reputable and trusted source, so you don’t have to worry about your files.

2. Change your PC’s time zone

  1. Right-click the clock and select Adjust date/time.
  2. Locate the Time zone setting and change it to something else.
  3. Now check if the download is working.
  4. Test several different timezones until you manage to fix the problem.

If MSI downloads are not working, the issue can be related to your date and time, so adjusting them can sometimes help.

3. Check anti-virus program settings

Anti-virus programs might prevent you from downloading files. Although the MSI Afterburner setup file is in the form of a ZIP file, it has the actual EXE file included in it. This might trigger warnings from some anti-virus programs.

If your anti-virus program makes use of white-listing, add the MSI website to the white-list. This will make the program consider the download to be safe.

As a last resort, you may also try temporarily turning off the real-time scanning feature of the anti-virus program.

In case the MSI Afterburner download link is not working, be sure to check your antivirus settings and make sure nothing is interfering with it.

Is MSI Afterburner safe to download?

Due to some recent changes in the official MSI website, many third-party websites host their own copies of the MSI Afterburner setup file. However, only the ZIP file obtained from the official website should be considered safe.

The program itself is safe to run. But you should be careful to overclock the graphics card within safe limits. Not doing so can drastically affect the lifespan of the card and might also end up damaging it.

If you are unable to download MSI Afterburner from the official website, avoid going for third-party links. These copies might contain malware which can put your system’s security at risk.

For securing downloaded files, some programs go beyond the basics and provide enhanced features. Such programs are often included under the Internet security category.

We hope that this guide helped you fix the problem. For more fixes, read our MSI Afterburner not working in Windows 11 guide.

We Compared The Best Cloud Storage Services. Here’s The Result

Wondering which is better, iCloud vs Google Drive vs OneDrive vs Dropbox? Then this post will clear up your confusion about the best cloud storage service providers to choose from.

When talking of cloud service providers, the first few names that come to your mind are Dropbox, Google Drive, OneDrive, and iCloud.

But, with a plethora of cloud service providers in the market, from big names to small players, it can be tough to pick the right fit.

Here’s a detailed list of the best cloud storage for personal use that you can get or try out for free.

In the meanwhile, how do you select the best cloud storage services in 2022?

What is the most important requirement when selecting a cloud service provider?

The best cloud storage providers earned your trust on the basis of reliability, security, amount of storage offered, and pricing.

But, what’s the most important requirement when selecting a cloud service provider?

Considering that storing your data is the primary concern, the security and the privacy of the data are what should be on your priority list.

Usually, a platform using AES 128-bit encryption and above is considered to be the most secured.

Who is the biggest cloud provider?

While the AmazonWeb Services (AWS) stands out as the biggest cloud provider in 2022, the best choices for personal use remain as:

  • IDrive
  • Google Drive
  • Microsoft OneDrive
  • iCloud
  • pCloud
  • Dropbox

But, if you want to choose between iCloud, Google Drive, OneDrive, and Dropbox, here’s a comparison to help you pick the one that suits you the best.

iCloud vs Google Drive vs OneDrive vs Dropbox

Google Drive, iCloud, OneDrive, and Dropbox are among the top cloud storage platforms with their own pros and cons.

So, if you are looking for a cloud storage service, but are not sure which is the best, here’s a quick comparison to help you make a choice.

iCloud – Best-paid cloud storage service at the lowest price

icloud vs google drive vs onedrive vs dropbox

Designed specifically for Apple users, iCloud boasts an outstanding interface, and connects and creates a backup of all your device applications, seamlessly.

Storage

iCloud offers a cloud storage service which is called Files on iOS and iCloud Drive on macOS and Windows.

It offers free storage space for up to 5GB only for Apple users. Paid storage option starts from 50GB and goes up to 2TB.

Privacy & Security

iCloud is known for its balanced approach when it’s to convenience and security. It employs SSL encryptions, AES 128-bit encryption, and two-factor authentication for enhanced security.

Also uses the iCloud keychain with 256-bit encryption for passwords and other private data.

Compatibility

The access is limited to web, macOS, iOS, and few options with Windows. The app is not available for Android users.

Usability

Available across all your Apple devices, iCloud allows you to access and store all your data, including media, calendar, iWorks documents, etc.

You can also access iCloud files from the web if you are using Windows 10 or Android.

Pricing

After the 5GB free storage allowance, you can buy extra cloud space for $0.99/month for 50GB and that goes up to $9.99/month for 2TB.

⇒ Get iCloud

Google Drive – More free cloud storage space

icloud vs google drive vs onedrive vs dropbox

Whether you want to create documents, store them online, or backup your files on your PC, Google Drive is much more than just a cloud storage service.

Storage

Talking of its free cloud storage plan, it leads the pack with three times more space compared to OneDrive and iCloud, and about 7.5 times more than Dropbox.

Having said that, you can also add extra storage space with a paid plan. The paid storage option also comes with additional perks and proves to be a great value for money.

Privacy & Security

When talking about security, Google Drive offers HTTPS for all its services. Moreover, it also provides enhanced security for your data with SSL encryption and dual-factor authentication.

However, it could have done better with a 128-bit AES encryption for the unused data.

Compatibility

One of the best parts about Google Drive is that it integrates with all platforms including Web, Mac, iOS, Android, and Windows.

Moreover, it works seamlessly with other Google apps like Gmail, Google Docs, Google Sheets, etc., and smoothly integrates with third-party services.

Usability

Apart from helping you to save space for all your Google files, it also doubles up as a file syncing and storage solution.

If you set up the Google Drive desktop client, it can save and sync files easily, across all platforms, whenever you want.

You can then access these files or download them from the Google Drive website on any device.

Pricing

After the 15GB of free storage space, you can add extra cloud storage for $1.99/month for 100GB and go up to 30TB of additional space.

When comparing the iCloud vs Google Drive pricing, Google CDrive definitely wins the race.

⇒ Get Google Drive

OneDrive – Ease of use and mobile app support

icloud vs google drive vs onedrive vs dropbox

Being a Microsoft product, OneDrive works best with other Microsoft apps and is known for its ease of use.

Storage

OneDrive offers free storage of up to 5GB with a file size limit of 15GB. However, you can add up to 6TB of storage with paid plans.

When comparing OneDrive vs Google Drive, the latter offers much more free storage allowance in comparison.

Privacy & Security

OneDrive uses TLS encryption and directs you to HTTPS. Besides, it uses a unique AES256 key to protect your network, applications, and content from unauthorized access.

Moreover, it boasts the Personal Vault feature with two-factor authentication as an added security measure for your sensitive data.

Compatibility

While it comes built-in with Windows, OneDrive is also available as an app on other platforms, and access its web version as well.

Due to its integration with Microsoft 365 and Windows 10, it allows you to use the complete range of Microsoft apps.

Moreover, it also integrates with Google products and 3rd party apps.

Usability

Known for its slick functionality and design, OneDrive is extremely easy to use and reliable. Along with its wide range of features, it also boasts an equally easy-to-use web and mobile interface.

OneDrive is available on different clients like PC, web, or mobile where you can sync, view, play, and store data (documents, photos, video, music, or settings).

Pricing

Once you have used up the 5GB free storage space, you can pay to add more storage. Plans start from $1.99/month for 100GB and go up to 6GB for $9.99/month.

⇒ Get OneDrive

Dropbox – Best cloud storage service with a digital signing feature

icloud vs google drive vs onedrive vs dropbox

An excellent choice for online storage, it flaunts the digital signature service (HelloSign) that allows you to digitally sign documents and request e-signatures from others.

Storage

While you can download all the Dropbox apps for free, it offers only up to 2GB of free storage. Hence, to download and save more apps or files, you would need to pay and add up to 16GB more.

You can earn another 500MB of storage space through referrals.

Privacy & Security

Dropbox uses the usual SSL/TLS for file transfer and 256-bit Advanced Encryption Standard (AES) for data at rest.

You can also opt for multi-factor authentication using an authenticator app on your smartphone, or through text messages.

Compatibility

You can download its app on almost all platforms including Windows, Mac, Linux, iPhone, iPad, Android, Kindle Fire, Windows tablets, and the web.

Moreover, it also integrates easily with all Google and Microsoft apps, except Gmail, which has to match your Dropbox email.

Usability

You can easily download Dropbox as a desktop application and it’s equally easy to install the same. It detects your OS and recommends the appropriate client, automatically.

Once installed, you can access it from the system tray and simply drag and add files in the Dropbox folder. Rest, everything else like the file syncing, storage, etc. is all automatic.

Pricing

Once you have used up the free 2GB storage, you can add up to 2TB for $9.99/month.

⇒ Get Dropbox

Our conclusion

While iCloud is a great choice for Apple users, OneDrive is easy to use and offers fast syncing.

Dropbox, on the other hand, is perfect to sync and share files, and Google Drive is great in terms of free storage and pricing.

Therefore, if you ask which is better iCloud or OneDrive or Google Drive, it would completely depend upon your needs and the device you are using.

But, if you are looking for the best cloud storage apps for Windows PC, you can refer to our post for top recommendations.

Our iCloud vs Dropbox vs Google Drive vs OneDrive comparison should help you make the right pick, but if you still have doubts, do leave a comment in the comments box below.

An Unknown Network Error has Occurred on Instagram [4 Fixes]

The annoying An unknown network error on Instagram can appear when you attempt to log in to your account on a smartphone.

This error appears mainly due to network reasons, but it could also signal other more deep-seated issues, and in some cases, users can’t log in to Instagram at all.

Since this error has no specific cause, we resolve it by following the quick steps in this guide.

Why does unknown network error appear on Instagram?

In most cases, the cause is with your device, but that’s nothing a quick restart won’t fix. Your network connection can also lead to all sorts of problems, so be sure to check it.

For the service to work properly, your date and time must be correct, so it’s recommended to ensure they are properly set.

Instead of using the app, you can access Instagram directly from a web browser. Opera One is recommended because it has a built-in instant messaging and social media quick-access feature.

You don’t have to download or install any add-ons. Sign in, and you can check your feed and messages from the browser’s sidebar without switching between tabs.

Opera One

Keep track of your feed & respond to messages while browsing the web with this new fluid browser.

How do I fix the unknown network error on Instagram?

1. Restart the device

  1. Press and hold the Power button on your phone.
  2. Now select Restart from the list of options.
  3. Wait for your phone to reboot.

Generally, restarting can help you fix Unknown network Instagram error during login on Android. However, if it does not, continue to the next solution below.

2. Troubleshoot your network connectivity

  1. Open the quick settings menu and tap on the Airplane mode.
  2. Go to your router and press the Power button to turn it off.
  3. Wait for a few moments and press the Power button again to start the device.
  4. Connect to a different Internet network.

Restarting your network is a simple way to fix Unexpected error occurred message on Instagram, so we encourage you to try it.

3. Update the phone’s date and time

How to set date and time in iOS

  1. Open the Settings app.
  2. Next, tap General.
  3. In the General settings menu, select Date & Time.
  4. Finally, you could update the time manually, but it’s better to Set Automatically by tapping this option.

How to set date and time in Android

  1. Open the Settings app.
  2. Open General management next.
  3. In Settings, tap Date & Time.
  4. Next, tap Automatic date & time to update it automatically according to your detected timezone.

After adjusting the date and time, check if Unknown network error appears when logging into Instagram.

4. Update Instagram

How to update Instagram on Android

  1. Open Google Play Store.
  2. Tap on the menu and select My apps & games.
  3. From the list, find the Instagram app and tap Update.

How to update Instagram on iOS

  1. Open the App Store.
  2. Tap on the icon of your profile.
  3. Finally, scroll down the screen to the pending updates and release notes area and tap Update next to the Instagram app.

For this solution, we update the Instagram app. If you can’t log in to Instagram due to an unknown network error, it may be because the app is outdated.

The Sorry an unknown error occurred; please try again can affect both Facebook and Instagram, and this is why it’s important to keep your apps updated.

To recap, this message usually comes up when you try to log in to Instagram on mobile.

There’s no way to know the cause of this error, and if you still are having issues, we suggest reading our something went wrong Instagram error guide for more information.

Fortunately, when you can’t log in to Instagram because of an unknown network error, these methods above are straightforward and effective. You can complete them within minutes.

We also have a guide on Instagram story is stuck uploading, so be sure not to miss it.

While using these social apps, adhere to the terms of use; otherwise, you may run into issues where your account is restricted due to violating community guidelines.

How to Fix WhatsApp Web’s Qr Code if It’s Not Loading in Firefox

WhatsApp Web is a web version of WhatsApp and it allows you to chat with your friends using your browser. In order to use WhatsApp for Web, all you need to do is scan the QR code on your screen and you will have access.

The only downside is that sometimes, it may happen that when you’re trying to load the QR code in Firefox, it does not load.

You can use WhatsApp for Web on any device where you can access the Internet, including your computer. It works in any browser, including Google Chrome, Mozilla Firefox, and Safari on macOS or iOS devices such as an iPhone or iPad.

Quick Tip:

WhatsApp is already integrated into the Opera One browser for convenience, allowing you to do more in one place without having to download Whatsapp Web.

To pair your phone’s WhatsApp account with your computer, simply scan a QR code. You can always mute WhatsApp message notifications, or simply log out if you want to take a break.

Opera One

Chat easily on WhatsApp on this future-ready browser with AI capabilities.

Why is the WhatsApp QR code not loading?

If your WhatsApp Web QR code is not loading on Firefox, it could be because of one or more of the following reasons:

  • Poor Internet connection – A poor Internet connection could be the reason behind the issue. You can use one of the best Internet speed testers from our list. If it’s slow, then that may be why the QR code isn’t loading.
  • Faulty camera – Check that your camera is working properly by taking a photo of something else. If the camera doesn’t work then it could be an issue with your device or the operating system itself.
  • You have WhatsApp running on another browser – If you are using WhatsApp on multiple devices, then there are chances that you will face problems with the QR code. This is because the QR code is locked to a particular browser or device.
  • Using a third-party QR code scanner – If you are using a third-party application to scan your WhatsApp QR code you may also face this issue. The problem is that WhatsApp may not be compatible with the QR code reader.
  • You’re using an outdated app/browser – If you’re using an outdated app or browser, you might experience errors when using WhatsApp’s QR code feature. To fix this problem, update your app or browser to the latest version.

Should you encounter any of these problems, proceed to try the below solutions to resolve the issue.

What can I do if the WhatsApp Web QR code is not loading in Firefox? 

1. Log out from all devices

The first thing you should do is log out from all devices on WhatsApp. If you are using multiple devices at the same time, then it’s possible that you might be logged in with more than one device at a time. 

Check from your phone all active sessions and log out of all of them then try and reload the QR code again and see if it works.

2. Update your browser

  1. Launch your Firefox browser and click on the three horizontal ellipses in the top right corner.
  2. Select Help.
  3. Click on About Firefox.

3. Clear cache and cookies

  1. Launch your Firefox browser and click on the three horizontal ellipses in the top right corner.
  2. Select Settings.
  3. Click on Privacy & Security then under Cookies and Site Data, hit Clear Data.

Can I log in to WhatsApp web without scanning the QR code? 

Yes, you can log into WhatsApp Web without scanning the QR code by using an Android emulator. If you don’t fancy emulators, you’re in luck as the latest WhatsApp version does not need you to scan a QR code.

All you need to do is update to the latest version and each time you log in to WhatsApp Web, your account will load automatically.

You may also face issues on WhatsApp Windows 10 but our step-by-step guide clearly outlines how to bypass this problem.

Let us know of any other workarounds that you may have tried that worked out for you in the comments section below.

ARK: Survival Evolved’s Patch 2.79 fixes save issues

Who hasn’t heard about Studio Wildcard’s Ark Survival Evolved game by now? Pretty much everyone has tried this awesome title at least once since hearing about it.

These types of games are highly enticing to all sorts of players for a multitude of reasons, about which we’re sure you want to hear more.

What’s not to like about players having to survive while being stranded on one of several maps filled with roaming dinosaurs, fictional fantasy monsters and other prehistoric animals, natural hazards, and potentially hostile human players?

Now, we’re about to take a closer look at the latest game update, version 2.79, and see what tweaks the developers have decided to make.

What’s new with Update 2.79?

Note that Ark Survival Evolved update 2.79 was released today for PS4, PC, and Xbox One and we’re about to review the changelog together.

The previous patch brought a new free DLC to the game, but it also led to some problems including issues with the save data on the PS4.

Now, developers made some changes that users will surely welcome with open arms since the tweaks were a must.

PS4 v704.7 (704.6 client) – 06/14/2022 – Minor version for clients

  •  Fixed save issues on Playstation

PS4 v704.7 – 06/13/2022 – Minor version for servers

  •  Fixed a cooldown on defecation
  • Server administrators can enable and disable the biome teleport in Fjordur with the server config option:
    UseFjordurTraversalBuff=true/false

PC v346.12 – 06/13/2022 – Minor version for servers

  •  Fixed a cooldown on defecation
  • Server administrators can enable and disable the biome teleport in Fjordur with the server config option:
    UseFjordurTraversalBuff=true/false

Xbox v948.7 – 06/13/2022 – Minor version for servers

  •  Fixed a cooldown on defecation
  • Server administrators can enable and disable the biome teleport in Fjordur with the server config option:
    UseFjordurTraversalBuff=true/false

These are the changes implemented with the release of Update 2.79 for the Ark: Survival Evolved game, as developers informed us.

We’ll keep an eye open and keep you posted on any incoming changes that will directly impact your favorite game.

Have you discovered any other bugs after installing the latest patch? Share them with us in the comments section below.

3 Ways To Fix Destiny 2’s Error Code Chicken

Destiny 2 is a thrilling multiplayer first-person blaster when you can play it. But unfortunately, some players can’t play Destiny 2 because of the chicken connection error. The chicken error message says:

Your connection to Destiny 2 character servers has been lost… For information on resolving this issue visit help.bungie.net and search for error code: chicken.

That error can occur on Windows PCs and consoles. Below are some potential error code chicken fixes for Windows Destiny 2 players.

What is the Bungie error code chicken?

The Bungie error code chicken is a server connectivity issue that stops players from signing in. Players can’t access characters to play Destiny 2 when that error occurs.

Error code chicken can sometimes be a server-side issue. So, there might not always be much you can do to resolve the issue. However, the chicken error can still occur when there isn’t a server outage.

How do I fix the error code chicken?

1. Reboot Your Router/Modem

  1. Firstly, unplug the power cable from the back of your internet router.
    Unplugged router bungie error code chicken
  2. Leave the router unplugged for about one to two minutes.
  3. Plug your internet router back in, and press its power button if it doesn’t come back on automatically.
    Router plug bungie error code chicken
  4. Wait approximately five minutes until all the internet connectivity lights turn on.
  5. Try playing Destiny 2 again.
Note icon NOTE
The instructions above are for rebooting routers that incorporate modems. If you’ve got a separate modem, you’ll also need to unplug that. Then, plug the modem back in before the router.

2. Run the Internet Connections troubleshooter

  1. Open Settings in Windows 11 or 10 by right-clicking the taskbar’s Start button and selecting the shortcut for that app.
    Settings option bungie error code chicken
  2. Then click the Troubleshoot navigation option from the System tab in the Settings app.
    Troubleshoot option bungie error code chicken
  3. Select Other troubleshooters to bring up a list of available troubleshooting wizards.
    Other trouble-shooters option bungie error code chicken
  4. Click Run for the Internet Connections troubleshooter.
    Run option bungie error code chicken
  5. Select the Troubleshoot my connection to the internet option, and apply any suggested resolutions.
Note icon NOTE
In Windows 10, select Update & Security > Troubleshoot within Settings. Then you’ll need to click the Additional troubleshooter’s navigation option to access them.

3. Clear the download cache (Steam fix)

  1. Open the Steam client software.
  2. Click the Steam menu to select the Settings option.
    The Settings option bungie error code chicken
  3. Select Downloads on Steam’s Settings window.
  4. Press the Clear Download Cache button.
    Clear Download Cache button bungie error code chicken
  5. Select OK on the Clear Download Cache confirmation window that pops up.
    The OK button bungie error code chicken

Download and install a program like CCleaner if you want to clear your cache with a few clicks. Add a shortcut to your desktop and run CCleaner at any time to thoroughly clean your PC.

When you want to delete a downloaded cache, having a professional tool to assist you can be useful. The intelligent scan allows you to precisely specify what you want to delete from Steam’s cookies and cache.

⇒ Get CCleaner

How can I check the server status for Destiny 2?

Bungee has a maintenance schedule for the Destiny 2 server. Sometimes the chicken error can occur during a maintenance period. Players can view the maintenance schedule on this Destiny Server page.

To check for unscheduled server outage issues affecting Destiny 2, open the Bungie Help page. That Twitter page usually reports most general server-related outage issues for the game.

Aside from that, Downdetector is a good site to check for outages. The Destiny page there will tell you if there’s a more general server outage issue for the game.

If there’s a server-side issue, you might need to wait a day or two for Bungie to get it sorted. First, try applying the above potential fixes for Destiny 2’s chicken error when there isn’t a server issue.

Note that Bungie also recommends playing Destiny 2 with a wired connection. If a wired internet connection is available to you, try playing the game with that alternative connection option.

You can discuss Destiny 2’s chicken error by adding comments below this post. Also, let us know if you have further questions about fixing that issue.

7 Best Roblox Browser Extensions That You Can Use In 2026

Roblox is an excellent online gaming platform with a lot of features. The games are free and can be played in multiplayer.

Although the website is exceptional, you can install extensions to add more features. The creative capabilities are endless when these extensions are paired with the best browsers to play Roblox. 

But with the number of insecure add-ons, selecting the ideal ones might be a real headache.

As always, we have curated a list of seven of the best Roblox browser extensions available in trusted stores for you. So, you have nothing to worry about.

What is the Roblox extension?

Roblox extensions are browser-based tools that help to improve the functionality of the online gaming platform. They add more features, like an extra search button, a colorful friends list, and a display of hidden stats.

These extensions are generally safe and free. Lastly, they only affect the website and not the Roblox games. 

Are Roblox extensions allowed?

Roblox extensions are permitted since they are strictly browser-based. In addition, they don’t affect the gameplay and only focus on website customization.

However, it would be best if you were careful, as there are a few dangerous ones. Only download the extensions from trusted locations like the Chrome Web Store to keep your PC safe.

Which browser is best for Roblox?

While there are a series of supported browsers for Roblox, the pick of the bunch is Opera GX.

Opera GX is the first browser designed specifically for gamers. It boasts a clean and stunning interface built to take your gaming experience to a new level. 

What’s more, it has a feature called the GX Control. This feature allows you to limit your browser’s RAM, Network, and CPU usage so that it will not consume resources meant for gaming.

Lastly, you can install and use Chrome extensions on Opera. The steps are the same for the GX version too. Hence, you are not missing out on the functionality of all the Roblox extensions listed below.

⇒ Get Opera GX

What are the best extensions for Roblox?

BTRoblox – Best Firefox browser Roblox extension

btroblox browser roblox extension

BTRoblox is a safe and secure top-notch extension that allows you to customize the looks of the Roblox website. It is available on the Chrome Web Store but has since established itself as probably the best Roblox browser extension for Firefox. 

One of its endearing features is allowing users to hide ads. It also displays the real-life price of an item after the in-game cost.

Other features:

  • Allows users to change the profile page layout.
  • Comes with different themes.
  • Available on Chrome Web Store and Mozilla add-ons store.

⇒ Get BTRoblox

Roblox+ – Best Chrome Roblox extension

roblox plus

Roblox Plus is another stunning browser extension that modifies the looks of the gaming website. It is designed by a former Roblox staff member and is known to be one of the best Chrome Roblox extensions. 

It comes with a lovely dark theme that is gentle to the eyes. Also, it allows you to modify your profile page to your liking. Be it your Avatar or the trade notifier, you can design anything with its numerous features.

Other features: 

  • Has a trade notifier.
  • Safe and free.
  • Has different themes.

⇒ Get Roblox+

RoPro – Best for in-game traders

ropro roblox browser extension

If you are looking for a Roblox extension that eases your trading, RoPro is everything you need and more. It has an avatar sandbox feature that allows you to try out items before buying them. 

The deals/trade notifier also notifies you of the best deals. Add its feature for customizing your profile, and you will see why it is considered one of the best Roblox browser extensions.

Other features: 

  • Has a trade calculator.
  • Packs in animated wallpapers for customization.
  • Quick item search function.

⇒ Get RoPro

Roblox Server Finder – Best for searching game servers

server finder

The Roblox Server Finder is a top-notch browser extension that helps you search for gaming servers. It eliminates the stress of going through many servers to find the right one.

It allows you to use simple information like the number of players to get a fitting one. Despite the Roblox API changes to limit server finder addons, this extension still does well.

Other features:

  • Fast algorithm. 
  • Takes different parameters as input.
  • Easy to use.

⇒ Get Roblox Server Finder

RoSearcher – Quick game joiner

rosearcher roblox browser extension

RoSearcher is a valid Roblox browser extension for avid gamers who like to explore. It allows you to play a game with a friend who has deactivated the join feature. 

This is especially important if you want to play games with a famous person who rarely allows users to join. Then, you only need to request their current game, and you are good to go.

Other features:

  • Works with the latest Roblox API.
  • Can search for players in the game servers.
  • The process is fast.

⇒ Get RoSearcher

Better Roblox Friendslist – Efficient friends list organizer

better roblox friendlist

This function-specific Roblox browser extension allows you to view and manage your in-game friends. It gives you a clean and efficient menu that shows online and offline friends.

This menu is added to the bottom right corner to prevent it from disturbing your gaming activity. It replaces the built-in Roblox default friends list with a simple yet effective one.

Other features: 

  • Frequently updated. 
  • Easy to use.
  • It has a feature for joining friends on the menu.

⇒ Get Better Roblox Friendslist

Roblox Friend Removal Button – One-click friend remover

roblox friend remover

The last on this list is an extension that allows you to remove friends with a single click. It displays a red button on each friend’s card. 

This button is all you have to click to remove just about anybody. Notice that it only works on your friends list and nowhere else.

Other features:

  • Light on system resources. 
  • Easy to use.
  • Helps to organize friends list.

⇒ Get Roblox Friend Removal Button

There you have it: a list of practical and secure Roblox browser extensions. These add-ons cover different functions and can be used on the same browser.

If the BTRoblox extension is not working after installing it for some reason, you should check our detailed article on how to fix it.

In the comments section below, feel free to let us know the extension you enjoy using most.

Microsoft rolls out new Windows 11 Validation OS

You might have missed this one because Microsoft hasn’t quite made a big deal out of it. In fact, you might even think it was trying to keep it a secret.

The Redmond tech colossus recently released a new lightweight version of Windows 11. Don’t get excited just yet, as we’re not talking about any gaming version or anything like that.

In fact, this new lightweight OS is not meant for the general end-user, so keep that in mind as we move on with describing it.

New Windows 11 Validation OS is now available

This new Microsoft software is actually based on the Command-Line and is called Microsoft Validation OS, in case you were wondering what we’re talking about.

Note that it has been designed for hardware or software vendors, developers, and technicians to help diagnose and mitigate issues.

The new OS version will basically help to build hardware and software around Windows 11 without installing the full thing.

As the company itself stated, the Validation OS is a lightweight, fast, and customizable Windows 11-based operating system that you can use on the factory floor to diagnose, mitigate and repair hardware defects during Windows device manufacturing.

Furthermore, the Validation OS boots into a Command-Line environment to increase reliability on the factory floor and supports running Win32 apps.

This will help in smoothing the transition from early hardware bring-up to the retail OS and app development.

Before you ask, we will tell you that that’s because the Win32 API provides direct access to the system hardware and has various tools for diagnostics.

Have you already tried the new Windows 11 Validation OS? Share your experience with us in the comments section below.

Please Wait if Message is Not Replaced Adobe Reader Error: 3 Fixes

Some utilize their web browsers to open PDF documents. However, users can’t open PDF XFA form documents with browsers that don’t support that type of dynamic form.

Adobe Acrobat is one of the most commonly used applications to open Portable Document Format files, but some users have encountered issues with it.

Some browsers display this error message when users try to open dynamic PDF form documents with them:

Please wait… If this message is not eventually replaced by the proper contents of the document, your PDF viewer may not be able to display this type of document.

In today’s guide, we will explore this issue in-depth, and discuss the best methods to apply in order to fix this pesky issue once and for all. Read on for more details.

How can I open a PDF document if the Please wait error occurs?

1. Configure Firefox to utilize Adobe Acrobat Reader

  1. Download and install Acrobat Reader.
  2. Next, open Mozilla Firefox.
  3. Click the Menu button from the top right and select Settings.
  4. Scroll down to the General tab’s Applications section and find Portable Document Format (PDF).
  5. Click the Action drop-down menu and click the Open in Firefox option.
  6. Then restart Firefox.

In the same way, you can also proceed with any other browsers. For instance, in Chrome, you will find the same feature within the Site settings option.

2. Open the PDF with Adobe Acrobat Reader

  1. Right-click the download link for the PDF you can’t open with your browser.
    Save link as option Please wait if message is not replaced by proper contents
  2. Select the Save link as option.
  3. Enter a title for the PDF in the File name box.
    Save As window Please wait if message is not replaced by proper contents
  4. Choose a folder to save the PDF.
  5. Click the Save option.
  6. Download and install Acrobat Reader.
  7. Open the software.
  8. Click File and Open.
  9. Choose the PDF document you downloaded.

3. Open the document with Internet Explorer’s Adobe PDF Reader plug-in

  1. Press the Windows key + S keyboard shortcut, type edge, and click on Microsoft Edge from the results.
  2. Click on the three vertical dots from the top-right corner and select Extensions.
  3. Select Manage Extensions.
  4. Find the Adobe Acrobat extension and toggle the switch to on to enable it.

Here we have shown you how to enable the Adobe Acrobat extension in Edge but you can do the same in any browser from its add-ons or extensions menus.

Those are three methods for opening PDF form documents that you can’t open with browsers’ default PDF viewers.

You might also be interested in our selection of the best PDF reader apps for Windows & Mac that might also help you open the PDF documents.

All users can download the PDF documents with their browsers’ Save as options for links.

3 Best Browsers With SNI Support To Use

TLS is the standard security protocol for protecting websites and some other web services. It is available on most web servers and, as such, is supported by the vast majority of browsers.
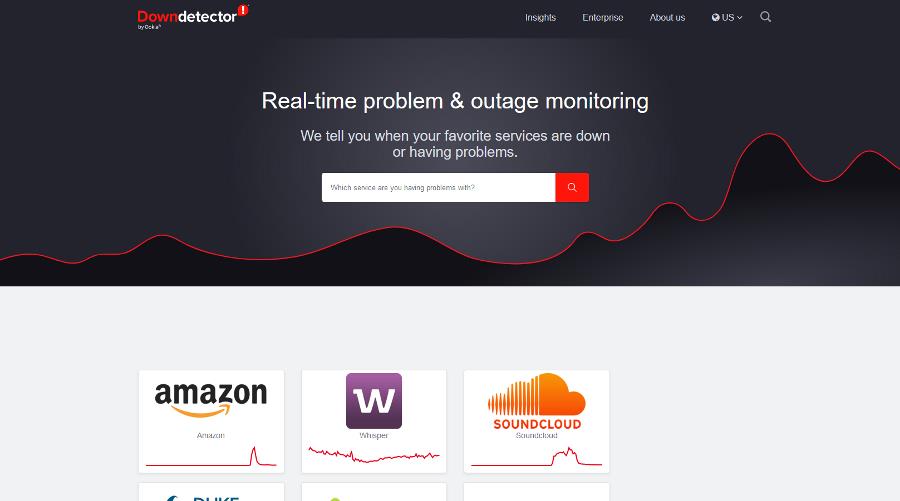
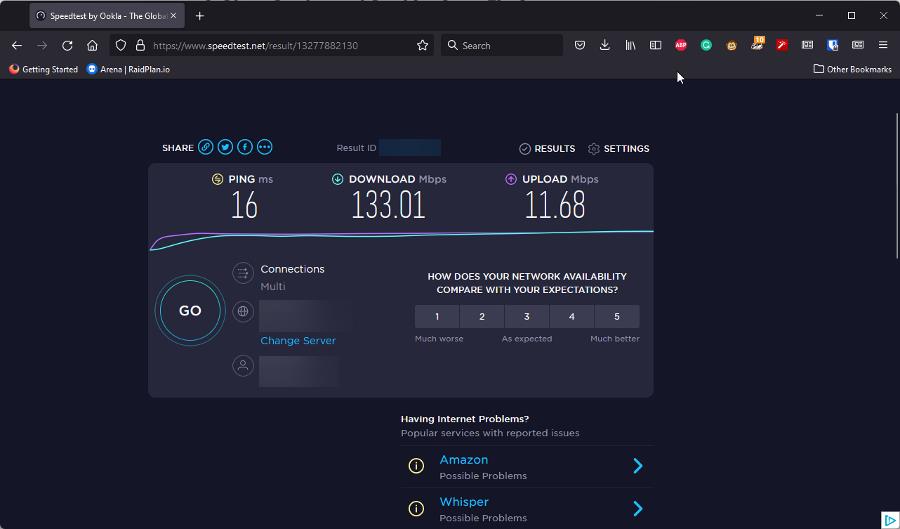
The TLS handshake occurs between a browser and the web server where a website is hosted to keep users’ data secure on the internet. His process requires the hostname of the page to match that on the certificate provided by the server. 
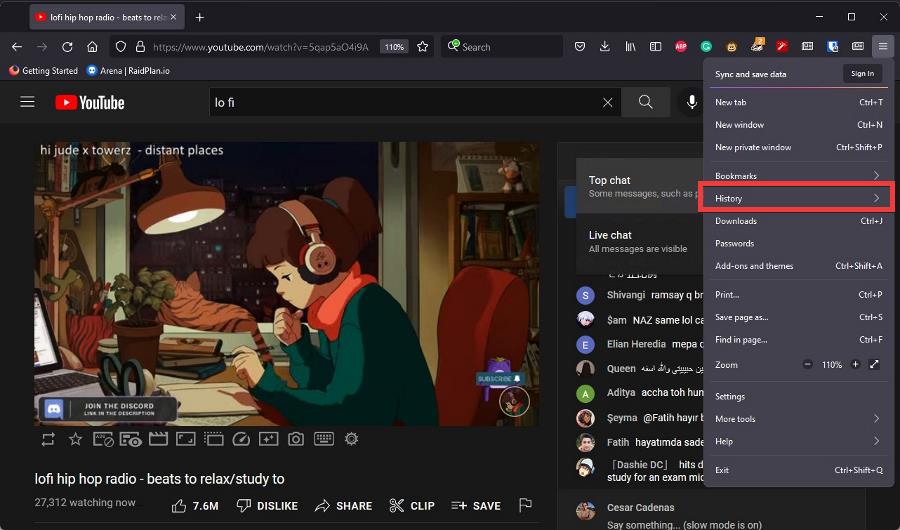
But this became increasingly difficult as users now host more than one certificate on a single IP address on a server. As a result, the server might provide a wrong certificate, leading to problems like handshake failed returned SSL error code on browsers.

SNI was introduced to indicate the certificate’s name needed in the handshake process. He solved the problem, as the server now knows the certification to provide for verification. 

However, not all browsers have this feature. Thankfully, we have gathered the best browsers with SNI support that you can use on all your devices. 

What is SNI & when do you need to use it?

Server Name Indication (SNI) is a TLS security protocol extension. It allows you to use a single IP address to host multiple SSL certificates.

SNI is needed when hosting multiple websites with SSL certificates on a single IP address on a web server. It specifies the certificate’s hostname that the server should supply for the TLS handshake process.
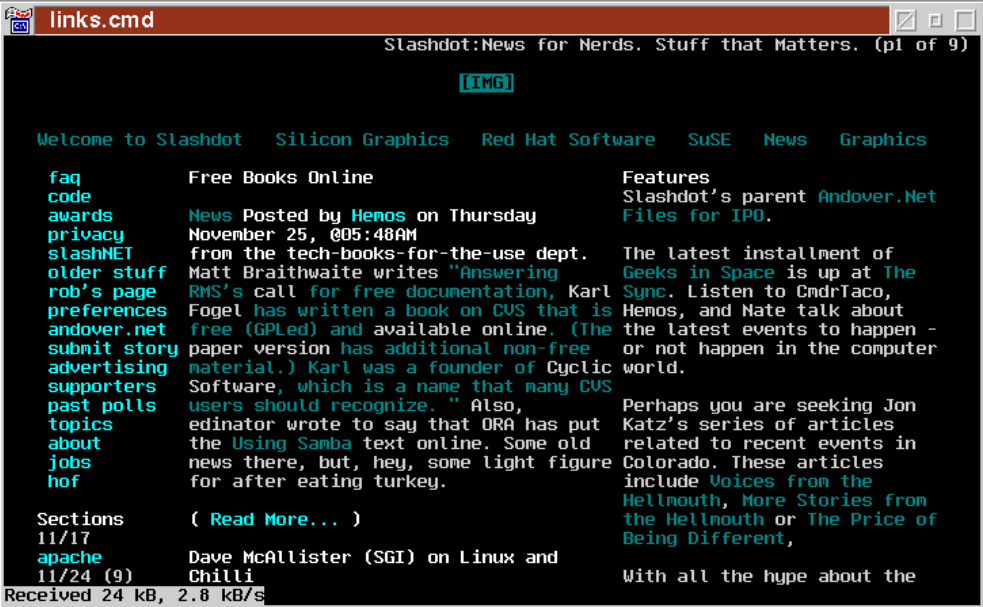
Hosting multiple websites on a single Internet Protocol (IP) address is a common feature due to the limited number of addresses available and the cost involved. Hence, it would be best if you mostly used it.

Is web SNI required?

SNI is required if each website won’t have an IP address to itself. As explained above, only SNI allows the browser to indicate the hostname being contacted on the server.

However, if a website has its unique address, SNI is not needed.

What is the difference between SAN and SNI?

Subject Alternative Name (SAN) is a part of the X509 certificate spec, allowing multiple host names to use a single certificate. This certificate provides a field where you can fill alternative titles of the primary hostname.

This alternative names field is where you fill in the hostnames of your other websites. It saves you the cost of having different security certificates for all your websites.

On the other hand, SNI is a TLS extension that sends the name of the security certificate needed to verify a web page to the server.

While SAN allows you to use a single certificate for many websites, SNI helps simplify having many security certificates on a single IP address.

What are the best browsers with SNI support?

Opera One

browsers with sni support opera

Being one of the most secure modern-day browsers, Opera One has long since provided SNI support. However, not all its versions have this feature.

It is available on Opera 8.0 (2005) and above on desktops. Note that you need to enable the TLS 1.1 protocol to use it. 

The SNI feature is available on mobile starting from the Opera 10.1 beta version on Android. 

⇒ Get Opera One

Google Chrome

google chrome browsers with sni support

Google Chrome is also one of the leading browsers in terms of security. It provides the SNI support on Chrome version 6 and newer on Windows XP and above.

Also, the feature is available on Chrome version 5.0.342.1 and above on macOS X 10.5.7 and later.

⇒ Get Chrome

Mozilla Firefox

mozilla firefox

Firefox has been providing SNI support since its 2.0 browser versions. As a result, his feature is automatically enabled out of the box.

It works on all devices, including Windows, macOS, or mobile versions. The only condition is that it has to be Firefox 2.0 and above.

⇒ Get Firefox

Which TLS version supports SNI?

TLS 1.2 is the widely accepted version that offers SNI support. Though all TLS versions mostly have the SNI extension unless stated otherwise, you can sometimes encounter errors on TLS 1. 

Hence, you should upgrade to TLS 1.2 to fully enjoy the features.

Browsers with SNI support allow you to visit all secure websites irrespective of their IP address. e has curated four of the best to ensure you never get unnecessary error messages on valid websites.

Are you facing issues like Windows Server could not create an SSL/TSL secure channel? Then check our guide on how to solve it.

Feel free to let us know any worthy browser that misses our list in the comments below.

9 Best VPNs from the Microsoft Store [Free and Paid]

Looking for the best free VPN in the Microsoft Store? We’ve compiled a list of reliable options to help you secure your data, maintain privacy, and access restricted content effortlessly on your Windows device. 

Let’s check them out.

Which are the best VPNs on the Microsoft Store? 

1. ExpressVPN – Best for beginner-friendly setup

expressvpn download page

ExpressVPN is a polished, premium VPN service with an official Windows App available in the Microsoft Store. Ideal for users who want fast, easy installation and intuitive controls.

It supports the exclusive Lightway protocol for ultra-fast connections and secure browsing. Compatible with Windows 10 and 11, including ARM64 devices

Other features:

  • One-click connect button with global server selection
  • Strong 256‑bit encryption and built‑in leak protection
  • 30‑day money‑back guarantee; though rated higher cost than alternatives

⇒ Get ExpressVPN

2. Private Internet Access (PIA) – Best for customization & advanced users

Private Internet Access (PIA) delivers a Windows app with deep customization for power users. Installable via the Microsoft Store or directly from PIA’s site, compatible with Windows 10/11. 

Features include multi-hop routing, split‑tunneling, and choice of AES‑128 or AES‑256 encryption. The app is fully open‑source, with advanced settings and support for up to 10 simultaneous connections.

Other features:

  • RAM-only servers enforce strict no-logs
  • Integrated malware/ad blocker (PIA MACE)
  • P2P allowed across servers; live chat support

⇒ Get Private Internet Access

3. CyberGhost VPN – Best for streaming & server coverage

CyberGhost VPN now offers its full Windows app directly from the Microsoft Store, making installation and updates seamless with Microsoft-verified security standards.

It boasts over 11,500 servers in 100+ countries, optimized for streaming (Netflix, Disney+, HBO Max) and high-speed usage up to 950 Mbps via WireGuard protocol support.

Other features:

  • Strict no‑logs policy audited by Deloitte
  • Automatic kill switch and DNS/IP leak protection
  • 24/7 live chat and a 45‑day money‑back guarantee

⇒ Get CyberGhost VPN

4. Hide.me VPN – Best for data management

hide me

HideMe is a reliable free VPN for Windows that you can download straight from the Microsoft Store.

It boasts the renowned 256-bit encryption for protecting your data online. Speaking of data, Hide.me VPN gives you a whopping 10GB per month.

Other features:

  • Has no strict no-logs policy.
  • Offers 24/7 live support chat.
  • It does not require registration to use.

⇒ Get Hide.me VPN

5. Avira Phantom VPN – Best free VPN for Windows 11

avira phantom microsoft best store vpn

Avira Phantom VPN is one of the most effective free security apps on the Microsoft Store. It is easy to set up, and even newbies can activate it in a few minutes. Also, It allows you to connect an unlimited number of devices simultaneously.

The only caveat is that you only have 500MB to use monthly without registration and 1GB with registration. However, this is still more than some other free VPNs offer.

Other features:

  • Incorporates military-grade AES 256-bit encryption. 
  • No IP, WebRTC, and DNS leak.
  • Has no kill switch.

⇒ Get Avira Phantom

6. Hotspot Shield Free VPN – Easy to set up

hotspot shield vpn microsoft best vpn store

Hotspot Shield VPN is one of the best free privacy software on the Microsoft Store for Windows. It has an intuitive and eye-catching interface that is easy to use.

Unlike most free VPNs, Hotspot Shield allows you to connect to over 70 locations. This protects you at all times against cybercriminals. 

Other features:

  • Smart VPN feature for auto server picks based on location.
  • Well-functioning kill switch.
  • Military-tier encrypted traffic. 

⇒ Get Hotspot Shield Free VPN

7. Touch VPN – Free Unlimited VPN for Windows 10

touch vpn

Touch VPN is the actual definition of a free app by all rights. All its features require no registration or credit card details at any point of usage.

It offers completely unlimited resources to give users the best experience. There is no limit to the number of sessions you can use as a free user, nor is there any caveat on the speed and bandwidth.

Other features:

  • Completely free, with no trial period.
  • Offers strong SSL encryption. 
  • Has a kill switch.

⇒ Get Touch VPN

8. Any VPN – Unlimited free monthly bandwidth

any vpn

If you need a VPN app on Microsoft Store that guarantees your anonymity online without paying a dime, Any VPN might be all you need.

It offers an entirely encrypted connection that keeps your data and identity hidden. However, this free version is a bit slow as the transfer speed is limited.

Other features:

  • Hides IP address effectively.
  • It prevents ISP from recording traffic.
  • Easy to use
  • Unlimited data

⇒ Get Any VPN

9. VPN Unlimited – Strongest encryption protocol

unlimited vpn

VPN Unlimited is one of the top-rated security apps on the Microsoft Store. It allows you to visit any website from any location without getting caught.

It offers a military-grade AES-256 encryption protocol to ensure your privacy is assured. This app also allows you to choose between different protocols like OpenVPN, IKEv2, and WireGuard. 

Other features:

  • Over 500 high-speed servers in 80+ locations.
  • Maximum of 5 devices per account.
  • Fast connection speed.

⇒  Get VPN Unlimited

This means that only a client requires you to add a VPN service from a third-party company. This is unlike the best VPN apps in the Microsoft Store that have their client and server.

We have reached the end of this guide on the best VPNs to download and install from the Microsoft Store. This list contains juicy options you can use without paying a dime or registering.

Note that the apps in this guide are not arranged in any particular order.

You can check our guide for trusted and interesting picks if you need a more streamlined list like the best free Windows 11 VPNs.

Feel free to let us know if there is any VPN app from Microsoft Store that should have made this list in the comments section below.

5 Best Browsers For Axie Infinity & Other NFT Games

Axie Infinity and other NFT games are quickly taking over the gaming industry. That is understandable, as nobody will say no to the possibility of earning while having fun.

While the apps for these games are well-built, there are times when you might need to play on your browser for a change. To prevent issues like Axie Infinity is not working, you need the browsers suitable for this purpose. 

We have selected five of the best browsers for NFT games to ensure you match your opponents blow-by-blow.

What are the best play-to-earn NFT games?

A series of play-to-earn NFT games can lay claim to being one of the best. Games like Axie Infinity and The Sandbox will always make the list.

Other games like the Gods Unchained, Splinterlands, and Pegaxy are among the most played play-to-earn NFT games. Hence, you are not short of options to choose.

How do I choose the best Infinity Axie?

Choosing the best Infinity Axie depends on many factors. Foremost, you must consider characteristics like health, speed, skill, and morale.

Also, you need to consider the classes, body parts, and battle cards. Only when you have the right combination and balance between these factors can your Axie thrive on the battlefield. 

What are the best browsers for Axie Infinity?

Opera GX – Overall best browser for gaming

opera gx best browser for axie infinity

Opera GX is undoubtedly the best browser for Axie Infinity and other forms of gaming. It has a feature called GX Control that allows you to limit your browser resource usage. 

Also, you can install and use the best Chrome extensions on Opera with the same process for the GX version. This allows you to take advantage of the Axie extensions from the Chrome Web Store. 

What’s more, it has blockchain-gaming-related integrations like Discord and Twitch. 

Other features:

  • CPU, RAM, and network limiter.
  • Built-in adblocker and VPN.
  • Themes and interface perfect for gaming

⇒ Get Opera GX

Brave – Browser with NFT games support

brave browser

The Brave browser has come leaps and bounds and represents most things that are good in modern browsers. Thanks to its lightness on system resources, it has a claim for being the best browser for Axie Infinity. 

It has a built-in ad blocker that ensures you enjoy your game without distractions. Add its few to no lag and incredible speed, and you are sure of the best gaming session.

Other features:

  • Offers NFT games support.
  • Built-in cross-site tracking blocker.
  • Tor feature for anonymous browsing.

⇒ Get Brave

Chrome – Browser with most Axie extensions

chrome browser best for axie infinity

Chrome needs no introduction as it has firmly established itself as one of the best browsers in the industry. It has a simplistic design that aids gaming.

Also, it is one of the fastest browsers and, as such, offers the perfect platform for multiplayer games like Axie Infinity. More importantly, it has Axie extensions like AxieDeX in its Web Store to improve your gaming.

Other features:

  • Series of extensions for gaming functionality.
  • Little to no lag time.
  • Familiarity in the gaming world.

⇒ Get Chrome

Firefox – Highest gaming library

firefox mozilla

While this might be a different browser from the speedy Chromium-based browsers mentioned above, it is no slouch for NFT gaming. It is a browser suitable to play Axie Infinity, thanks to its load time and lightness.

It is a browser that’s been familiar with gaming in the past, as shown by its robust library extensions for games. This has laid the required groundwork for speed, flexibility, and other resources to play the new NFT games.

Other features:

  • Integrated anti-tracking feature. 
  • Impressive gaming speed.
  • Cookies blocker that prevents access to your info.

⇒ Get Firefox

Microsoft Edge – Quality gaming projection

edge best browser for axie infinity

Microsoft’s default browser is well-versed in gaming. Edge supports a 4K projection, giving you the best gaming view possible. 

Also, it has a spatial sound feature for a fully immersive gaming experience on your browser. This, plus its incredible speed, makes it one of the best browsers for Axie Infinity. 

Other features:

  • Themes and visual upgrades for gaming. 
  • Built-in anti-tracking feature.
  • Extensive extension library.

⇒ Get Microsoft Edge

The best browsers for Axie Infinity and other NFT games ensure you have a competitive advantage over your opponents. We have gathered five that you can download and start earning while playing.

Are you looking for the best software to create NFT Art? Take time to check our detailed guide for the quality options available.

Let us know the browser that allows you to operate at your best on Axie Infinity in the comments section below.

5 Ways to Stop Safari’s Search Engine From Changing to Yahoo

The Apple Safari browser is a great way to browse the web on your iPhone or iPad. However, there are many things that can go wrong with this app, including a bug that causes Safari’s search engine to change to Yahoo instead of your preferred search engine.

Safari’s built-in search engine is Google by default. If you are not getting redirected to your preferred search engine, it can be annoying. The problem not only happens to Safari but other browsers switch to Yahoo too.

This is because you have to go into the settings menu and change it back every time you open up Safari. Whereas Yahoo is also a great search engine, everyone has preferences on what works for them.

Quick Tip:

Avoiding this problem and remaining on the default search engine is possible if you use a different browser.

The unique keyword system in Opera allows you to use a custom search engine for a query without changing the default search engine. Furthermore, it is very lightweight, and with the free VPN, you can be confident that you will not be attacked by any spyware that could hijack your browsing.

⇒ Get Opera

Why does my browser keep switching to Yahoo? 

Some of the common causes why your browser is redirecting you to Yahoo include:

  • Adware programs – An adware program may have found its way onto your computer. Usually, they are pre-installed and can be downloaded in other cases. They’re often very sneaky and hard to get rid of.
  • Malicious extension – If your browser is automatically switching to Yahoo search, it’s possible you have installed a toolbar or extension that overrides your default search engine.
  • Fake/unknown profiles – Fake profiles are designed in such a way that they can be used to steal your personal information, thus making it easy for them to hack into your account and modify your settings.

At some point, you may be wondering: Is Yahoo Redirect a virus?  Yahoo Redirect is a browser hijacker that acts as an adware program.

It is an unwanted program that can take control of your computer without your consent. While it may not be harmful, you need to be cautious especially if you are not sure of its source.

How do I stop Safari from switching to Yahoo? 

1. Uninstall unknown programs 

  1. Click on the Finder and go to Applications.
  2. Check for any unknown or suspicious app that you have not installed.
  3. Right-click on it and select Move to trash.
  4. Next, right-click on the Trash icon and select Empty Trash.

2. Remove unknown/fake profiles

  1. Navigate to Safari on the menu bar and select Preferences.
  2. Select Users & Groups.
  3. Navigate to the profile you wish to remove and click on the minus button.

3. Disable extensions

  1. Navigate to Safari on the menu bar and select Safari Extensions.
  2. Select the extensions you wish to remove and click on Uninstall.Extensions Safari

4. Reset browser settings

  1. Navigate to Safari on the menu bar and select Preferences.
  2. Select the Privacy tab and click on Manage Website Data.
  3. Hit Remove All then click on Done.
  4. Confirm Remove Now in the next dialog box.

5. Manually change the default homepage

  1. Navigate to Safari on the menu bar and select Preferences.
  2. Select the General tab and under Homepage, delete Yahoo and set your preferred site then click on Set to Current Page.

Hopefully, if you were facing this issue, one or more of our recommended solutions was able to help you get back to your preferred search engine.

In case you encounter any other issues such as Safari not downloading files, refer to our expert guide and follow the steps.

Be sure to let us know which solution worked out for you in the comments section below.

3 Tips on What to do When Brave Ads are not Showing

Despite being one of the best browsers with a built-in ad blocker, Brave still has an option that allows users to view ads. In addition, the Brave Rewards feature will enable you to earn tokens when you click on some personal ads.

However, you might stop seeing ads without disabling the Rewards on your browser. This might be due to problems with your browser or some settings on your PC.

In this guide, we have shared some tips to use if Brave is not showing ads for you.

Why are my Brave ads not Showing up?

There are many reasons why your Brave Rewards is not showing ads on Windows 10/11 PC and other devices. Below are some of the common ones

  • VPN usage on PC.
  • Using the browser in full-screen mode.
  • System notifications are turned off.
  • Brave Rewards user wallet marked as fraudulent. 
  • Activation of Focus Assist on Windows

How do I see ads on Brave?

  1. Launch Brave Browser and click the menu button (three horizontal lines) in the top left corner.
  2. Click the Settings option.
    home settings brave ads not showing
  3. Select Brave Rewards on the left pane.
    brave rewards
  4. Click the Brave Rewards are disabled option.
    rewards disabled brave ads not showing
  5. Now, click the Start using Brave Rewards button. This will enable ads for you automatically.
    start using brave ads

That is how to enable ads on Brave with the Rewards option. To turn it off, enter brave://rewards in the address bar to open the Rewards page and toggle the switch back.

How do I disable ad-block in Brave Browser?

  1. Launch Brave Browser and click the menu button.
  2. Select the Settings option.
    home settings brave ads not showing
  3. Choose Shields on the left pane.
    brave shield
  4. Click the dropdown before Trackers & ads blocking and select Disabled.
    disable

That’s how to turn off the built-in ads blocker on Brave. With this, you will start seeing ads on any page you visit.

How do I get more ads on the Brave app?

  1. Click the menu button and select Settings.
    home settings
  2. Select Brave Rewards on the left pane.
    brave rewards ads not showing
  3. Click the dropdown before the Maximum number of ads to display at the top.
  4. Now, select any option of your choice.
    more ads brave not showing

Note that different locations have a maximum allowed number of ads per hour. If you choose a higher number than allowed for your zone, you might face issues like Brave Rewards is not working. 

Brave ads not showing can be frustrating, as it prevents you from earning through the Rewards feature. But with the tips above, you can get things working back usually.

Are you facing issues like Brave Browser not opening or crashing? Then, check our guide on how to fix it.

Feel free to let us know if you got ads showing again on your browser in the comments section below.

Here’s what Microsoft wants you to know about IE 11 retirement on Windows 10

Internet Explorer 11 (better known as IE 11) is hitting the end of support today, June 15 on Windows 10. The moment has been coming for some time, and Microsoft is providing somewhat of an update on how this might impact you, and what moves are being made to port people over to Microsoft Edge.

First up, you’ll notice in the next few months that if you open Internet Explorer 11, you’ll be redirected to use Microsoft Edge in IE mode. You’ll still see the IE icon in your taskbar or Start Menu, but clicking to open IE will open Edge in IE mode instead. Heading down the future, Microsoft will permanently disable IE 11 with a patch in Windows Update, but for now, it’ll still be around.

Naturally, though, data like your favorites, passwords, and settings from IE 11 will be imported as part of the redirection process. Other tweaks Microsoft will be making to ease the transition to Edge are below.

  • To help users get started with IE mode, the redirection process will add a “Reload in IE mode” button to their toolbar in Microsoft Edge. That way, if they encounter a website that may not work correctly— or if they visit a website that asks them to open the site using Internet Explorer—they can easily click the button to open the page in IE mode.
  • Microsoft Edge will also check in with the user every 30 days to make sure they still need IE mode for the site. As more and more sites get updated to modern standards, users will need to use IE mode less and the modern rendering engine more
  • If you’re an IT professional and your organization uses older, legacy sites as part of your normal business processes, you can easily automate IE mode so that those pages launch in IE mode automatically for your users.
  • You can set up IE mode to use a site list, where you can catalog those sites that require Internet Explorer and have them load automatically in IE mode. You can store this site list locally, or in the cloud through the Microsoft 365 admin center.

Note that IE mode in Microsoft Edge will be supported through 2029. Internet Explorer 11 is also only being retired on all currently supported versions of Windows 10 Home, Pro, Enterprise, Edu, and IoT. Retirement doesn’t impact certain versions of Windows currently in support and used in critical environments. That includes Windows 10 LTSC releases (including IoT) and all Windows Server versions, as well as Windows 10 China Government Edition, Windows 8.1, and Windows 7 with Extended Security Updates (ESUs). Future versions of these editions, though, will not include Internet Explorer.