Many users have reported problems concerning their PC RGB controller not working. It makes adjusting the lighting and other features that depend on the controller’s functionality impossible. However, this article will discuss why the controller doesn’t work and how to resolve the issue.
The RGB controller may not receive power, or the power supply might be faulty due to a faulty cable connection.
Connection issues between the RGB controller and the RGB components can cause it not to work.
The RGB controller might have specific features incompatible with the components you are using.
Your PC’s RGB controller not working can be due to outdated or incompatible software and firmware.
Incorrect settings and configuration issues relating to RGB effects, colors, or patterns.
Physical damage to the RGB controller, such as broken connectors or circuitry, can prevent proper functioning.
Can RGB fans work without a controller?
The fans will works, but without customization features. Here’s what you should know:
RGB fans have two main components: the fan and an RGB lighting system.
The fan component works independently of the RGB lighting system.
The RGB lighting on the fan will not be customizable without a controller, so you can’t change colors or effects.
It usually defaults to a standard color or effect, which might not suit your preferences.
What can I do if the PC RGB controller is not working?
Reset the controller
NOTE
The process for resetting an RGB fan controller can vary depending on the specific model and brand of the controller.
Power off your computer or disconnect the RGB fan controller from the power source.
Locate the Reset button on the RGB fan controller. The reset button is usually a small, recessed button that may require a pin or a small object to press.
Press and hold the Resetbutton for several seconds (typically around 5 to 10 seconds). This action should reset the controller to its default settings.
Release the Reset button.
Reconnect the RGB fan controller to power or power on your computer.
Check if the RGB fan controller has been reset and functioning correctly.
If the above steps don’t work, consult the user manual or documentation that came with your specific RGB fan controller. The manual should provide detailed instructions on resetting the controller or any specific steps required for your model.
As you might know, there is a new social media platform in town. It’s called Threads, it’s a direct Twitter competitor, and it has come to dominate the market.
And so far, it seems that it’s on the right way. Instagram Threads has picked up over 100 million users in only 5 days, while traffic for Twitter drastically slowed down. Of course, there are talks about how Threads will take over Twitter, and the market as a whole. But the app it’s still in its infancy, so it’s very early to say it.
And to make matters worse, it seems that scammers are already crawling on the platform as well. So you need to be able to recognize them, ban or report them, and generally just stay away from them.
Instagram Threads scammers – are they dangerous?
Well, as we mentioned earlier Threads is still in its early days, so it will take a while for the platform to be full of scammers to the same level as Instagram, for example.
But with more than 100 million Threads accounts, be sure that there are a lot of scammers around too. And reportedly, they’re good, because they take advantage of Threads’ infancy to impersonate personalities and organizations.
For example, the financial services company Wombex Finance tweeted that there is already a Threads account pretending to be the company.
Please be aware that Wombex Finance DOES NOT have an account on the Threads platform. Any account claiming to be Wombex Finance on that platform is fraudulent and is operated by a scammer!
The NFT trader Jeffrey Huang, who goes by the name of Machi Big Brother, was also the victim of impersonation on Threads. He found out from one of his followers that apparently he’s already on Threads, despite him not making a Threads profile for Machi Big Brother.
So it seems that Threads is the perfect ground for those scammers who want to impersonate public personalities and organizations who haven’t managed to set up their own Threads accounts.
If you plan on creating a Threads account, check to see if you’re not already there, especially if you have a large following already on Instagram or other platforms.
What do you think about this? Let us know in the comments section below.
Good news for Xbox users out there. It’s summer and there is a lot of free time so you might want to check ID@Xbox Demo Fest out. It’s an event that takes place virtually on Xbox, from July 11 to July 17, and you can play over 50 game demos for free. This is another excellent way to see what games are coming to the Xbox. Remember that recently, Microsoft announced that over 5000 new games are in development for the platform.
And guess what? You can do it from the comfort of your own home, anytime between these two days. Demos are playable on the Xbox, and you can find them by going to the special ID@Xbox Demo Fest collection on the Xbox Store online and on the console.
You should be aware that the demos are an early look at the gameplay of these games. They might not fully represent the game, once it’s released. Some of them might even be available in your region, once they’re out. So this might be a good chance to get your hands and your mind on them.
Plus, it’s a good chance to see that other talented studios are out there. You might even find your next favorite video game here.
Here are all the 50 game demos that you can play at Id@xbox game fest demo
Recently, many users have complained about Payday 2 crashing when starting a heist. It can occur due to many factors affecting the game, which we’ll discuss. Also, this article will take you through some detailed steps for fixing Payday 2 crashing issues.
Lowering the game’s graphics settings can reduce the strain on your system and prevent crashes.
1. Run Payday 2 as an administrator
Press the Windows + E keys to open File Explorer.
Go to (If you have installed the game in a different location, navigate to that folder): C:\Program Files (x86)\Steam\steamapps\common\PAYDAY 2
Locate the Payday 2 executable file, right-click, and select Run as administrator from the drop-down menu.
Click Yes on the User Access Control (UAC) prompt for administrator permission to run the game.
Launch the game and check if it crashes again when starting a heist.
Running Payday 2 as an administrator ensures the game has elevated privileges and can access system resources effectively. It is confirmed to fix crashes when launching heists in Payday 2.
Launch the Payday 2 client on your PC and click the Options button at the bottom right corner of the main menu.
Select the Video Settings tab.
Locate the Texture Quality option under the Advanced Video Settings section, click the drop-down menu, and select Medium.
Locate the Shadow Quality option and modify the slider or dropdown menu to the Medium option.
Click Apply, then the OK button to save the changes.
Close the Options menu and restart the game with the updated settings to fix the problem.
The above steps will optimize the graphical quality and performance of Payday 2 based on your system’s capabilities and preferences. Hence, it resolves the graphics issues causing Payday 2 to crash when starting the heist.
The world is ever-changing, so you shouldn’t be surprised when developers migrate from the NET Core 3.1 framework to Net 6. All good things come to an end.
Yes, .NET 6 is compatible with .NET Core. The new version of the .NET Framework brings a lot of great new features and improvements if you’re wondering why anyone would migrate.
It is important to note that although .NET 6 is not the latest version, it is considered the most stable yet.
Another reason developers are migrating to this version is that it is a long-term support version that Microsoft will support for three years. For more information on its new features and how to download and install it, check out our article on the same.
When choosing a .NET version, you have to pick between two types. The Standard Term Support (STS) and the Long Term Support (LTS) versions. STS last for six months while LTS for three years.
To create a cross-platform application using .NET, you need to use .NET Core. This framework from Microsoft allows you to build applications using the same code base regardless of whether it’s running on Windows or Linux.
So far, .NET has had no history of compatibility issues from the versions released.
Another question on your mind might be: Can I run .NET Core 3.1 in a .NET 6? Yes, you can. .NET framework is known to be backward compatible, so this should not be an issue.
The problem is that there may be no official support for running a later version of the framework within an earlier version because the runtime may not be available. Some default apps only run on the common runtime language they were initially developed for.
As such, you may have to create a configuration file for your app to run on the .NET Framework. Consequently, you can also use a NuGet package manager plugin for Visual Studio, which allows you to target multiple versions of NuGet packages at once.
How do I upgrade my .NET Core to .NET 6?
.NET Core 6.0 is a new version of the .NET Framework for cross-platform applications. It provides a modular, cloud-optimized, highly-scalable, secure, and performance-optimized development platform for your server-side applications.
Before you upgrade, you need the following:
Visual Studio 2022 or later is required for the migration
An up-to-date Windows version
You must also have a version of .NET Core SDK
1. Manual upgrade
Launch Visual Studio 2022 to open any current project you have running.
Find the project, right-click on it, and select Properties.
Under the Target framework drop-down menu, select .NET 6.0 and save it.
2. Use the .Net upgrade assistant
Launch Visual Studio 2022, click on Extensions to open the Manage Extensions menu.
In the new window, type upgrade in the search box and click on the .NET Upgrade Assistant option.
Hit the Download button.
Close Visual Studio.
Open Visual Studio again, right-click on a Solution Explorer project, and select Upgrade.
The .NET upgrade assistant is a tool that can help you migrate your existing application from a previous version of the .NET Framework to the latest version. The migration tool analyzes your project and guides how to update it for compatibility with the target framework.
If you have followed all the steps above and executed them correctly, you have successfully migrated your applications to .NET Framework, version 6.0.
Have you upgraded to the .NET 6.0 version? What features or improvements are you loving so far? Let us know in the comment section below.
The file format is the data structure of a file, determining information stored, access, and interpretation by software. However, opening CAL files requires understanding the specific file. Therefore, we will provide a guide on how to open a CAL file, which is a concern for people using Windows OS.
A CAL file is a standard file format for storing calendar data.
Follows the iCalendar format, a standard format for exchanging calendar information between applications and platforms.
Contains events, appointments, and other scheduling details, including start and end times, recurrence patterns, reminders, and descriptions.
You can import or export calendar data between various software programs, such as email clients, scheduling applications, or online calendar services.
How do I open a CAL file?
1. Open with Microsoft Word
Launch the Microsoft Word app on your pc and click the Office icon.
Select Open from the options in the Microsoft Word Menu.
Navigate to the CAL file directory you want to open, click on it to highlight it, and select the Open button.
Microsoft Word is a word-processing app used to open the CAL file format. Check our detailed guide about downloading Microsoft Word software for free on Windows 11.
2. Open the CAL file using AutoCAD
Download AutoCAD from the Microsoft Store, install it, and open it on your computer.
Navigate to the Menu bar and click on the Insert tab.
Click on the raster image, locate the .cal file you wish to access, and proceed to open it.
Set the scale to 1 and clear the specified on-screen box.
Select the location you want the image.
AutoCAD is a computer-aided design app used alternatively to access the .cal file extensions. We have a guide about All you need to know AutoCAD Software for Windows 10/11
Navigate to the .cal file you want to open in File Explorer and right-click on it.
Select Open With and click on Cals Raster from the sub-context menu.
Installing the Cal Raster app on your device will list it under the Open With option on your computer, and you can set it up to open .cal files by default.
Want to experience some classic games? You can play old games on Windows 11, and The Legend of Zelda: Ocarina of Time is the perfect match. Numerous challenges have been precariously linked to this game. Arguably the most challenging one is how to play it on your PC.
It’s one of the most beloved games in Nintendo’s history, so it’s no surprise even the newer generation wants in on the fun. If you’ve ever wanted to play this game on your PC, you’ve come to the right place. In this article, we show you how to get and play it on your PC.
Where can I play The Legend of Zelda: Ocarina of Time on PC?
You’re probably wondering why this is even a question. In this day and age, almost every game can be played on a PC, especially with technological advancements and gaming consoles at your disposal.
Well, you’re not wrong to think that. But some are not as straightforward as clicking the launcher file and getting to playing.
Some games require extra effort to get them to play on your PC. And if you should go through all that is required to play, it should be worth it. The Legend of Zelda: Ocarina of Time is one of those games users will go to extreme lengths to play.
The game was originally released in 1998, so it’s not a new one. However, it’s still enjoyable and well worth playing today. If you’re looking for classic gaming nostalgia or want to check out one of the best games ever made, this is it.
So where can you play it? The answer is simple. On your computer, obviously! But there are some things you need to know before starting your adventure.
Since its release, Zelda has been predominantly locked to Nintendo, which forced other users to look for alternatives. Below, we show you how to bypass these restrictions.
Is there a way to play Zelda Ocarina of Time?
Yes, but before you can start playing, you will need the following:
ROM
You need a copy of the game, and you’ll need to get it legally. The game is no longer in production, and Nintendo has taken steps to prevent people from playing it on their computers. A ROM is a copy of a game cartridge.
It’s an exact bit-for-bit duplicate of the original game. The only difference is that instead of being stored on a physical cartridge, it’s stored in digital form on your computer. It may cost you a few bucks, but if you’re dedicated, you can’t put a price on a classic game.
You can also find ROMs on torrent sites but be careful. A lot of these ROMs are fake or hacked versions of the game that make it easy to cheat or otherwise ruin your experience.
Emulators
Emulators are programs that allow users to run software designed for another platform on a computer or mobile device. In this case, the emulator will allow users to run the original version of The Legend of Zelda: Ocarina of Time on their computers.
These are much easier to come by, and you can check out our recommended list of the best all-in-one emulators. The downside to using emulators, especially for older games, is that they can be quite unreliable and buggy.
For this article, we will use a port: The Ship of Harkinian. This is an unofficial fan-made remake of Ocarina of Time that runs natively on Windows. It includes many improvements over the original game, including high-resolution textures and better controls.
How can I play Zelda Ocarina of Time?
Now that you’re all set proceed with the following steps:
Once the download is complete, unzip the file, then open OTRGui.
Next, click on Open OoT Rom, then select Single Thread, where you will be able to select your Ocarina of Time ROM.
Your system will create an archive file for the ROM.
Once done, click soh.exe and start playing.
While more advanced emulator options exist, ready to play these games with all the visual bells and whistles, it’s hard to beat a classic in its purest form. Ship of Harkinian has proved so far to deliver some visual improvements compared to other emulators.
The resolution is top-notch, and the widescreen support is a much-welcomed improvement. Now, all fans are waiting on is a higher FPS, and from the look of things, it doesn’t seem far off.
After all is said and done, the most important thing to take away from this article is that playing Zelda: Ocarina of Time on your PC is a lot of fun.
It’s easily one of the best games ever made, so it’s well worth playing regardless. If you haven’t played it before, you owe it to yourself to set aside an evening and try out this classic gem.
The CPU and GPU work together to process and render graphics in a computer system for smooth performance. However, if the CPU cannot keep up with the demands placed on it by the GPU, it can cause bottlenecking. This guide will take you through steps for fixing CPU bottlenecking GPU.
Alternatively, check our article on underclocking your GPU and lowering its performance safely.
Can a CPU bottleneck GPU?
CPU bottlenecking GPU occurs when the graphics processing unit (GPU) is constrained by the processing power of the central processing unit (CPU).
In other words, the CPU cannot handle the demands placed on it by the GPU. Hence, the GPU is underutilized or not reaching its full potential.
When CPU bottlenecks GPU, the following can happen:
Results in lower GPU utilization, meaning the GPU won’t operate at its maximum capacity.
CPU bottlenecks in gaming or graphics-intensive applications can lead to lower frame rates.
When the CPU cannot keep up with the demands of the GPU, it may result in stuttering and slower loading times.
It may also impact the system’s ability to handle other tasks simultaneously.
CPU bottlenecking GPU can result in inefficient use of system resources and limit the computer’s overall performance.
Check out our review of the best bottleneck calculators for your PC. These tools will help in identifying the degree of bottlenecking.
What causes the CPU to bottleneck the GPU?
If the CPU is older or less powerful than the GPU, it may strive to keep up with processing demands.
A small or inefficient CPU cache may slow the processing speed and create a bottleneck.
If the CPU has a limited number of cores or low single-threaded performance, it can bottleneck the GPU’s performance.
A CPU running other resource-intensive tasks simultaneously can cause a bottleneck.
CPU bottlenecks can occur due to memory-related issues or insufficient RAM.
How do I fix CPU bottlenecking GPU?
Go through these preliminary checks before trying any advanced troubleshooting steps:
Ensure you have the latest drivers installed for your CPU, GPU, and other hardware components.
Cool your CPU with high-quality coolers or improve the airflow within your system.
Increase your game resolution to balance the load away from the CPU to the GPU.
Optimize the CPU usage via the app or game settings menu.
Lastly, resort to upgrading your CPU if everything fails.
Overclock your CPU
Press the Windows + I key to open the Windows Settings app.
Select System and click on Recovery.
Then, click the Restart Now option under Advanced Startup.
After your computer restarts, select Troubleshoot from the menu.
Click Advanced options and then click on the UEFI Firmware Settings option.
Look for options related to CPU settings or overclocking under sections like Advanced, Frequency, or Overclocking. (The name may vary depending on your motherboard model)
Locate the CPU clock speed or multiplier settings, and increase the value by a small increment, such as 0.1 GHz.
Then, save the settings and exit the BIOS or UEFI.
Reboot your computer to see if that helps with your CPU bottleneck.
NOTE
If the issue persists, return to the BIOS settings and increase the CPU multiplier. Repeat this process, gradually increasing the clock speed or multiplier until the desired result is reached.
Overclocking your CPU will push it beyond its stock speed to achieve higher performance and faster processing.
The last option to consider is to upgrade your CPU. If your current CPU is outdated or underpowered, upgrading to a more powerful CPU can help alleviate the bottleneck.
Should you have further questions or suggestions regarding this guide, kindly drop them in the comments section.
Patch Tuesday it’s here, because it’s that time of the month again, when Microsoft releases the best features for you. But for now, regarding the KB5028182 update coming to Windows 11, you might want to wait a little, especially if you’re using StartAllBack.
But back to the KB5028182 update. Microsoft recommends you should not install it, if you use StartAllBack, because it creates a conflict. Some apps might not start at all, and some might crash after you open them.
However, this is a known issue, so most likely Microsoft will solve it in the following days or weeks. If you still want to get your Windows 11 version up to date, you can find the package here. That’s if Windows 11 hasn’t already downloaded the updates for you.
Here’s what Microsoft has to say about the KB5028182 bug
The issue is labeled as a Known Issue, and here is what Microsoft says about it.
Applies to
Symptom
Workaround
All users
After installing this or later updates, Windows devices with some third-party UI customization apps might not start up. These third-party apps might cause errors with explorer.exe that might repeat multiple times in a loop. The known affected third-party UI customization apps are ExplorerPatcher and StartAllBack. These types of apps often use unsupported methods to achieve their customization and as a result, can have unintended results on your Windows device.
We recommend uninstalling any third-party UI customization app before installing this or later updates to prevent this issue. If your Windows device is already experiencing this issue, you might need to contact customer support for the developer of the app you are using. If you are using StartAllBack, you might be able to prevent this issue by updating to the latest version (v3.5.6 or later). We are presently investigating and will provide more information when it is available.
Elsewhere, the package addresses security issues for your Windows operating system. And there is also a stack update for your Windows 11 servicing settings.
Windows 11 servicing stack update – 22000.2173
This update makes quality improvements to the servicing stack, which is the component that installs Windows updates. Servicing stack updates (SSU) ensure that you have a robust and reliable servicing stack so that your devices can receive and install Microsoft updates.
Will you install the KB5028182 or not? Let us know in the comments section below.
Since it is a Nintendo Switch exclusive, you cannot natively play Zelda Tears of the Kingdom on your PC. However, there are a couple of other methods to play it on your PC. You may consider checking out some of the best emulators for PC gaming.
How can I play Zelda Tears of the Kingdom on my PC?
Click on the Windows icon for the latest build to start the download.
Extract the file, run the Yozu setup, and download the Zelda Tears of the Kingdom game on your PC.
Launch Yuzu and click the Add New Game Directory option at the bottom.
Navigate to the game and add it.
Select the Emulation menu, then click on Configure.
Under the General tab, tick the Limit Speed Percent, and Multicore CPU Emulation options.
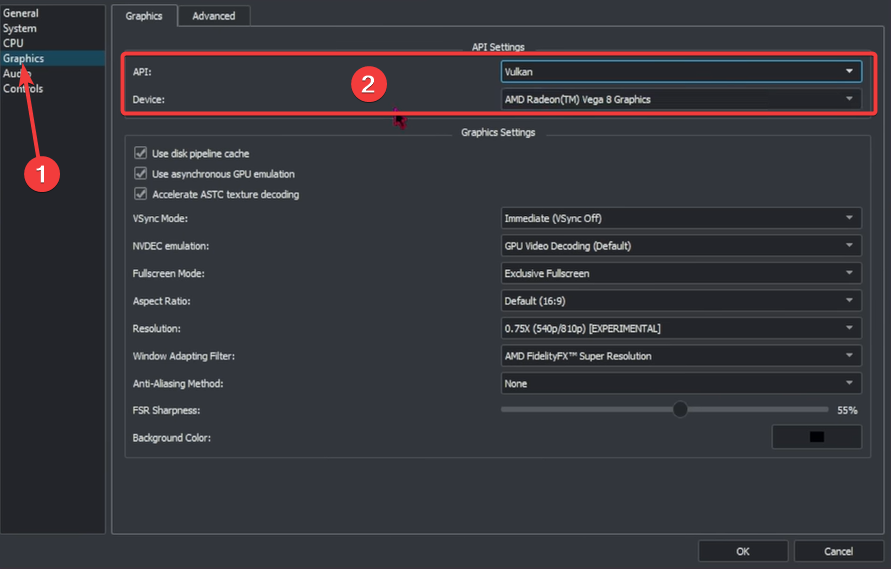
Click the Graphics tab; if you use an AMD processor, ensure the Vulkan API is selected. If not you may select OpenGL.
Click OK, then finally, go back to your initial emulator game page and double-click on the Zelda Tears of the Kingdom game to start it.
2. Use a cloud gaming service
There are a few options, but generally, you must pay for a subscription with any cloud gaming services you prefer. You may be required to download and install the service app before you can start playing games. We recommend using the NVIDIA GeForce NOW service.
It is essential to remember that there may be certain negatives to both emulators and cloud gaming services. For instance, not all games may function flawlessly on emulators, and latency difficulties with cloud gaming services are possible.
Also coming to live servers with KB5028185 are the voice command features, which you can use now, after you update your Windows 11, of course. Officially, the VPN status icon on your Wi-Fi network icon is also live with updates, so you’ll feel far more protected knowing that your network is secure.
However, one of the most useful new features coming up in KB5028185 is the Live Kernel Memory dump. You can easily fix your PC with it, while still working at your PC. The package introduces the LKD collection from the Task Manager. And you can easily work around it to fix your PC on your own.
To install the latest Patch Tuesday updates, just let your Windows 11 download them, and then restart your PC. You can also manually install them by downloading the KB5028185 package.
How to use the Live Kernel Memory to fox your PC
To capture an LKD, you’ll need to go to Task Manager > Details.
Right-click the System process.
Select Create live kernel memory dump file.
This captures a Full live kernel or Kernel stack memory dump. The dump will be written to a fixed location: %LocalAppData%\Microsoft\Windows\TaskManager\LiveKernelDumps. You can also go to the Task Manager Settings page to view or edit the settings for live kernel memory dumps.
You can use LKD to gather data to troubleshoot an issue while the OS continues to work. This reduces downtime when you must investigate an unresponsive program or high-impact failures.
Here’s the complete list of features, changes, and improvements coming in KB5028185
Highlights
This update addresses security issues for your Windows operating system.
New!This update expands the roll out of notification badging for Microsoft accounts on the Start menu. A Microsoft account is what connects Windows to your Microsoft apps. The account backs up all your data and helps you to manage your subscriptions. You can also add extra security steps to keep you from being locked out of your account. This feature gives you quick access to important account-related notifications.
New!This update improves the sharing of a local file in File Explorer with Microsoft Outlook contacts. You now have the option to quickly email the file to yourself. In addition, loading your contacts from Outlook is better. This feature is not available for files stored in Microsoft OneDrive folders. OneDrive has its own sharing functionality.
New!This update adds live captions for the following languages:
Chinese (Simplified and Traditional)
French (France, Canada)
German
Italian
Japanese
Portuguese (Brazil, Portugal)
Spanish
Danish
English (Ireland, other English dialects)
KoreanTo turn on live captions, use the WIN + Ctrl + Lkeyboard shortcut. You can also use the Quick Settings accessibility flyout menu. When you turn it on for the first time, Windows will ask you to download the required speech recognition support. Speech recognition support might not be available in your preferred language, or you might want support in other languages. You can download speech recognition support from Settings > Time & Language > Language & region. To learn more, see Use live captions to better understand audio.
New!This update redesigns the in-app voice access command help page.Every command now has a description and examples of its variations. The search bar allows you to quickly find commands. The new categories provide further guidance. You can access the command help page on the voice access bar from Help > View all commands or use the voice access command “what can I say?” Note that the help page might not include all commands. Also, the supplementary information might be inaccurate. We plan to update this in the future. For a list of all Voice Access commands, see Use voice access to control your PC & author text with your voice.
New!This update adds voice access command support for the following English dialects:
English (United Kingdom)
English (India)
English (New Zealand)
English (Canada)
English (Australia)When you turn on voice access for the first time, Windows will ask you to download a speech model. You might not find a speech model that matches your display language. You can still use voice access in English (US). You can always choose a different language from Settings > Language on the voice access bar.
New!This update adds new text selection and editing voice access commands. Some examples are in the table.To do this this select a range of text in the text box“Select from [text 1] to [text 2]”, e.g., “Select from have to voice access”Delete all the text in a text box“Delete all”Apply bold, underline, or italic formatting for the selected text or the last dictated text“Bold that,” “Underline that,” “Italicize that”
New!This update adds a VPN status icon, a small shield, to the system tray. It displays when you are connected to a recognized VPN profile. The VPN icon will be overlayed in your system’s accent color over the active network connection.
New!You can now choose to display seconds in the clock on the system tray. To turn this on, go to the Taskbar behaviors section in Settings > Personalization > Taskbar. You can also right-click the taskbar to quickly get to taskbar settings.
New!This update provides a copy button for you to quickly copy two-factor authentication (2FA) codes. These are in notification toasts you get from apps installed on your PC or from phones linked to your PC. Note that this feature only works for English.
New!This update adds access key shortcuts to File Explorer’s context menu. An access key is a one keystroke shortcut. You can use it to quickly run a command in a context menu using your keyboard. Each access key corresponds to a letter in the display name of the menu item. To try this out, you can click on a file in File Explorer and press the menu key on your keyboard.
New!This update adds multi-app kiosk mode, which is a lockdown feature. If you are an administrator, you can specify the apps that can run on a device. Other apps will not run. You can also block certain functionalities. You can configure distinct types of access and apps to run for different users on one device. Multi-app kiosk mode is ideal for scenarios in which multiple people use the same device. Some examples are frontline workers, retail, education, and test taking. Some lockdown customizations include:
Limit access to Settings, except certain pages, such as Wi-Fi and screen brightness
Show only the apps that are allowed on the Start menu
Block certain toasts and pop-up windowsCurrently, you can enable multi-app kiosk mode using PowerShell and WMI Bridge. To learn more, see Set up a multi-app kiosk on Windows 11 and AssignedAccess CSP. Support for Microsoft Intune, mobile device management (MDM), and provisioning package configuration is coming soon.
New!This update replaces the settings for Show the touch keyboard when there’s no keyboard attached. These are located at Settings > Time & language > Typing > Touch keyboard. A new dropdown menu gives you three options to control whether tapping an edit control should open the touch keyboard. The options are:
Never. This suppresses the touch keyboard even when no hardware keyboard is attached.
When no keyboard attached. This shows the touch keyboard only when you use the device as a tablet without the hardware keyboard.
Always. This shows the touch keyboard even when the hardware keyboard is attached.
New!This update enables Content Adaptive Brightness Control (CABC) to run on laptops and 2-in-1 devices. This feature dims or brightens areas of a display based on the content. It tries to strike a balance between saving battery life and providing a good visual experience. You can adjust the feature setting from Settings > System > Display > Brightness & color. Thedrop-down menu gives you three options: Off, Always, and On Battery Only. For battery powered devices, the default is On Battery Only. Because the device manufacturer must enable CABC, the feature might not be on all laptops or 2-in-1 devices.
New!This update adds a USB4 hubs and devices Settings page. You can find it at Settings> Bluetooth & devices > USB > USB4 Hubs and Devices. This new page provides information about the system’s USB4 capabilities and the attached peripherals on a system that supports USB4. This information helps with troubleshooting when you need manufacturer or system administrator support. Some features include:
You can view the tree of the connected USB4 hubs and devices.
You can copy details to the clipboard to share them.If your system does not support USB4 with the Microsoft USB4 Connection Manager, this page will not appear. On systems that support USB4, you will see USB4 Host Router in Device Manager.
New!This update adds a presence sensor privacy setting in Settings > Privacy & security > Presence sensing. If you have a device that has compatible presence sensors, you can now choose the apps that can access those sensors. You can also choose the apps that do not have access. Microsoft does not collect images or metadata. The device hardware processes your information locally to maximize privacy.
New!This update improves the performance of search within Settings.
New!This update changes the default print screen (prt scr) key behavior. Pressing the print screen key opens the Snipping Tool by default. You can turn off this setting from Settings > Accessibility > Keyboard. If you have previously changed this setting, Windows will preserve your preference.
New!This update introduces a limit of 20 most recent tabs in Settings > Multitasking. This affects the number of tabs that appear when you use ALT + TAB and Snap Assist.
New!This update improves the cloud suggestion and the integrated search suggestion. This helps you to easily type popular words in Simplified Chinese using the Input Method Editor (IME). The cloud suggestion adds the most relevant word from Microsoft Bing to the IME candidate window. The integrated search suggestion gives you additional suggestions that are like what you see on a Bing search page. You can insert a suggestion as text or search for it directly in Bing. To turn on these features, select a chevron button in the upper right of the IME candidate window. Then select the Turn on button.
This update addresses an issue that affects the on-screen keyboard. The issue stops it from opening after you lock the machine.
This update addresses an issue that might affect your computer when you are playing a game. Timeout Detection and Recovery (TDR) errors might occur.
This update addresses an issue that affects certain apps. In some instances, video flickering occurs.
This update addresses an issue that affects File Explorer (explorer.exe). It stops working.
This update addresses an issue that affects some earbuds. They stop streaming music.
This update addresses an issue that affects the Recommended section of the Start menu. When you right-click a local file, it does not behave as expected.
What do you think about these Patch Tuesday features? Let us know in the comments section below.
In the spirit of staying productive, sometimes, we may have to find unconventional ways to make our work easier. One such way is to use your phone as a keyboard for Raspberry Pi.
Raspberry Pi has no integrated peripherals, so you must get creative. Your phone is an excellent tool for interacting with the Raspberry Pi, and we show you how to set it up in this article.
In other instances, you’ll need to install a program that acts as a middleman between your devices, and then you can use your device’s keyboard to type on your computer.
This is a specially designed type of computer that developers mostly use. Given all the things developers must go through, from finding compatible devices to writing coding language, the last thing they need is problems with a keyboard.
You may wonder why you use a phone as a keyboard when most PCs usually come with a keyboard. Well, the Raspberry Pi is not your ordinary PC.
It’s a wonderful little computer, but if you want to take your Raspberry Pi, you must plug in a monitor, keyboard, and mouse. That’s fine if you’re at home or in a fixed location, but what if you want to take your Pi out on the go?
When you think about it, our smartphones have almost everything we need to control a Raspberry Pi. There’s a CPU, memory, storage, and the main communication bus – Wi-Fi.
Also, if you want to use the Pi as a media center or a gaming console, it’s much better to use your phone or tablet as a remote control.
How do I connect my Raspberry Pi without a keyboard?
Depending on your Raspberry Pi version, this process can be relatively easy to hard. First of all, both your mobile device and Raspberry Pi need to be on the same network.
The OS running on the PI is not so much an issue, but should you experience problems, we recommend you install the Raspbian OS.
Next, you’ll need an app to control your Rasberry Pi remotely. We did a scan on community groups to see which apps users loved and came up with the following three:
For a section of users, the Pi was not discoverable at first. To circumvent this little issue, you must turn on Bluetooth using a mouse if available, then proceed with the steps above. Otherwise, it should be an easy sail through.
And that’s all we had for turning your phone into a keyboard for your Raspberry Pi. If you have an iOS device, some of the above apps also work, so it’s worth a try.
The community around the Raspberry Pi platform is also very active and creative. They regularly develop several hardware options to control your Raspberry Pi without using a computer, so you can keep tabs on them if you like to explore.
We have what you need if you’re a Raspberry newbie and all this seems too much. Raspberry emulators will give you that first-hand feel of what it is all about before you commit to the real thing.
On the other hand, did you know you can use your iPhone as webcam on Windows 11? Or as a keyboard for PC! There’s a ton you can do in just a few simple steps.
We’re keen to hear about your experience with your Raspberry PI and whether you’ve tried to use your phone as a keyboard. Share them with us down below.
It’s that time of the month, again. Yes, you’ve guessed it. The July 2023 Patch Tuesday is here and amongst the features that it brings, the rollout also addresses 132 flaws. Of these flaws, 9 of them are critical, and 121 are important. There are also 2 advisories.
This is a good step for Windows 11, considering last month, Microsoft addressed and fixed 69 flaws in security and privacy with the rollout then.
For these updates to take effect, please update your Windows 11 as soon as possible. Your device should automatically download updates, and it will only ask you to restart your PC. But if not, go to Settings > Windows update > Check for updates. And then let Windows 11 do the work.
However, if you want to install them on your own here are the direct links. KB5028185 and KB5028182.
Microsoft provides fixes for 132 flaws in July 2023
Below there are all the CVEs addressed in this Patch Tuesday rollout. As you can see in the Tag section, each CVE is related to one of Microsoft’s products and Windows features.
Microsoft Office is especially among the apps affected. If you remember, Microsoft Teams is particularly vulnerable to a lot of attacks. A team of researchers found out that Teams is prone to modern malware attacks that could massively disrupt organizations that use it.
So while Microsoft has said that the vulnerabilities addressed by the team were not critical, it’s still good to see that the Redmond-based tech giant is releasing updates to improve security on Teams.
Have you found any other issues after installing this month’s security updates? Share your opinion in the comments section below.
Game crashes are nothing new, but if they happen frequently enough, it’s a problem that needs to be looked into. This is a situation that Payday 2 users are currently facing with the error code 998.
According to reports, the game starts just fine, but if you pause it for a bit and then continue, the freezes and crashes start happening. So why does this happen, and how can it be fixed? Find out below.
What causes the Payday 2 error code 998?
If your Payday 2 is continuously crashing, it may be because of one of the following reasons:
Too many mods – We all love gaming mods for the role they play in enhancing the gameplay, but you also need to go slow on the number you install. Too many mods can alter the game experience and cause it to crash.
Conflicting mods – If you have installed more than one mod doing the exact same thing, you may also experience the error code 998.
Outdated drivers – Your graphics card drivers might be outdated, which can cause problems for your PC when trying to play this game.
Corrupt game files – If you’ve installed Payday 2 from anywhere else but the official site, your game files may have been damaged or corrupted by a virus or some other type of malware.
Server issues – The server may be facing an overwhelming amount of traffic at the time, making it impossible to handle all requests simultaneously.
Hardware failure – It may not seem like an issue, but your hardware setup should be able to accommodate Payday 2. If you’re running on an older graphics card, it may have given out and can no longer handle the game’s requirements.
How can I fix the Payday 2 error code 998?
Try the following basics before any complex troubleshooting:
Hit the Windows key, type Device Manager in the search bar, and click Open.
Navigate to Display adapters to expand, right-click on your graphics card and select Update driver.
Click on Search automatically for drivers.
Still, this method doesn’t guarantee you the latest and updated drivers for your GPU. To ensure you’re getting the right drivers, we recommend choosing a third-party driver updater utility.
Outbyte driver updater does a good job of scanning for outdated, missing, or corrupt drivers and then replaces them with the right ones from its vast database.
Launch Steam and click the Library option at the top.
Right-click the faulty game and select Properties.
Now, choose Local files in the left pane.
Finally, click Verify integrity of game files and wait for the process to complete.
5. Run Payday 2 in Compatibility Mode
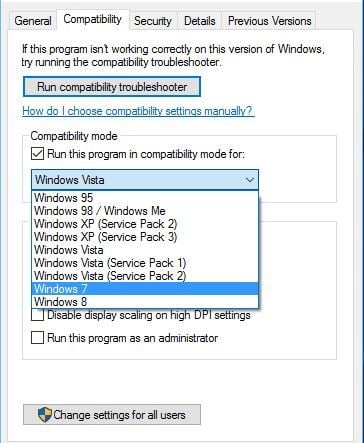
Find the Payday 2 shortcut or go to the game installation directory and locate the Payday 2 .exe file. Right-click the file and choose Properties.
Next, go to the Compatibility tab.
Check Run this program in compatibility mode for and choose one of the earlier versions of Windows.
Click Apply and OK to save changes.
6. Reinstall Payday 2
Open the Steam Client.
Navigate to Library.
Right-click on Payday 2 and choose Uninstall.
Navigate to the installation folder and the AppData folder and remove everything.
Ultimately, the best way to prevent this error from occurring is to invest in a decent computer. When it comes to gaming, you have to go for the best specs if you want to avoid frequent crashes. We have an awesome recommendation of graphic cards for gaming to start you off.
Further, your settings also play a role in minimizing lag and freezing, so here are the best graphic settings for seamless gameplay.
Let us know if you’ve been able to fix the Payday 2 error code 998 in the comment section below.
Facebook may have been in the game for a while now, but that doesn’t exempt it from the usual errors that make it hard to access the app. You may get an error validating access token message, making it impossible to log in.
Access tokens are typically used for authentication in the Facebook API. The user must authenticate the request, so something must be wrong if the token cannot be validated. Let’s dig deeper and find out what this means and possible solutions.
What is Facebook you must provide an access token?
A Facebook access token is a short-lived token that allows an application to access your Facebook account.
It’s a random string of characters that identifies your user account and allows Facebook to tell whether it’s the real account, or a fake one.
When you authorize an application to access your data, the application can get a list of permissions you’ve granted it. For example, you may have given an application permission to post on your behalf.
If you’ve ever been asked to log into Facebook again after taking a break from using it, it is because cookies usually expire after a short period. This is one of the reasons you may encounter the error validating access token message.
Other reasons include:
Change of passwords – If you’re logged into different devices and change your password, Facebook may require you to verify your credentials again to validate the access token. The message may be error validating access token: the session has been invalidated because the user changed their password.
Invalid token – Just as we mentioned, the access token is short-lived so if you don’t use it within the specified time frame, it may have expired hence no longer valid. In such cases, you may get the error validating access token: session has expired facebook message.
Revoked access – The user may have revoked the application’s authorization to access their Facebook account.
App violation – It is possible that the application requiring the access token has been flagged and disabled for violating Facebook’s Terms.
How to fix error validating access token?
A few workarounds that could resolve the error include:
Ensure you have a working Internet connection.
Log out of your Facebook account and log in again.
Regenerate the access token to check if the previous one had expired.
In this article, we will take you through potential reasons behind the Lenovo laptop not charging issue and provide simplified steps on how to troubleshoot the issue.
Why is my Lenovo laptop not charging?
There can be several reasons why you see a Lenovo laptop not charging even when connected to a power supply. Below are some of them:
Poorly connected or damaged charger – One of the major reasons behind this issue is that the cable or the charger adapter may be damaged. Hence, stops transferring power properly.
Faulty battery – It is also possible that the laptop battery may not be detected if it has reached the end of its lifespan or experienced a failure.
Damaged charging port – The charging port on your laptop may be physically damaged or have accumulated dirt, preventing a proper connection with the power adapter.
Power management settings – Another possible reason behind this error is that the power management settings on your laptop may be misconfigured.
Software or driver issues – Sometimes, outdated drivers can cause problems on your Lenovo laptop, which includes its battery.
Now that you know some of the potential reasons why your Lenovo laptop is not charging, let’s proceed to how to fix the issue.
What can I do if Lenovo laptop is not charging?
Before trying any of the advanced solutions provided in this guide, be sure to confirm the following preliminary checks:
Restart the laptop, because a simple restart can sometimes resolve charging-related issues.
Check if the charging LED of your Lenovo laptop turns on when you plug in the charger.
Ensure that there is no loose connection in the AC power adapter.
Make sure that the AC adapter and the charging port are not faulty or damaged.
Having confirmed the above checks, if your Lenovo laptop still does not charge, you can work through any of the advanced solutions provided below.
1. Power cycle your Lenovo laptop
Shut down your Lenovo laptop and remove the battery if it has a removable one.
Next, hold the Power button for 30 seconds to drain power.
Replace the battery and turn on your laptop.
Now, connect it to a compatible charger and see if its battery charges.
After replacing the battery, try powering up the laptop. If it doesn’t power up using its battery, try to use the laptop’s charger. If it turns on, you’ll need to replace the current battery since it might be damaged.
2. Run the Windows battery troubleshooter
Press the Windows, type control panel, and press Enter.
Then, open the Power Options in Control panel.
Click on the Change plan settings link next to your current power plan.
On the next screen, click on the Change advanced power settings link.
In the Power Options dialog box, scroll down until you find the Battery category. Click on the + icon next to Battery to expand it.
Under the Battery category, you will find various settings. Locate and click on the Troubleshoot link.
The Windows battery troubleshooter will now run and attempt to detect and resolve any issues with your laptop’s battery.
Follow the on-screen instructions provided by the troubleshooter to address the identified battery issues.
The Windows battery troubleshooter will help diagnose common battery-related problems on your Lenovo laptop and suggest potential solutions.
Press Windows + R keys to open the Run dialog box. Type devmgmt.msc in the dialog box and press Enter.
Then, expand the Batteries section on the list, right-click on Microsoft ACPI-Compliant Control Method Battery, and click on Uninstall device from the menu.
Press the Uninstall button.
Now, restart your computer to automatically reinstall the software, then repeat steps but choose Update driver instead of Uninstall.
On the new window, click on Search automatically for updated driver software. Then reboot your system.
Alternatively, you can visit the Lenovo support website to download drivers specifically designed for your laptop model and the correct operating system version to ensure compatibility and stability.
In conclusion, Lenovo laptops are known for their impressive battery life and user-friendly nature. However, you may encounter issues such as your Lenovo laptop not charging, which can arise due to several factors as discussed in this article.
Relatively, Dell users also reported a similar laptop not charging issue and we were able to provide steps to fix their laptops.
Dell Technologies Inc. has launched a range of services catered specifically to customers using Microsoft Corp. technology.
These services include multi-cloud solutions, modern workforce enablement, applications, data optimization, resiliency, and security enhancements. The primary objective is to assist customers in extracting maximum value from their Microsoft technology investments while fostering innovation.
In a blog post, Dell explained that these new offerings address several challenges that impede innovation within enterprises. Dell referenced a recent study conducted by Forrester Consulting, which revealed that 75% of information technology decision-makers require external expertise to achieve specific outcomes. Moreover, the study highlighted that 69% of IT decision-makers need more resources and expertise to leverage their tech investments’ value fully.
To tackle these obstacles, Dell is introducing new multi-cloud services that empower businesses to capitalize on the Microsoft Azure cloud fully. These services encompass running container workloads natively in Azure, utilizing Azure Stack hyper-converged infrastructure for hybrid, multi-cloud, and edge use cases, and expanding VMware on Azure.
Dell’s new modern workforce advisory services also aim to help businesses establish personalized and secure environments for hybrid and remote workers. These services encompass Microsoft 365 and Dynamics 365, providing versatile and cost-effective access to Dell’s experts.
Dell offers new implementation services in applications and data that enable customers to modernize critical apps for Azure. Furthermore, Dell facilitates the effective utilization of artificial intelligence-powered data analytics and cloud databases while ensuring the delivery of reliable and secure applications. For example, Dell’s new DevSecOps implementation service on Azure incorporates enterprise-grade security features from Azure and GitHub into customers’ DevOps pipelines.
Lastly, Dell will provide Azure with new backup and recovery services to bolster customer resiliency and safeguard their ability to restore data in the face of cyberattacks, corruption, or accidental deletion. Dell’s incident response team, with a 97% success rate in helping customers recover from cyberattacks, is highlighted as a testament to the company’s unique capabilities in this area.
Holger Mueller of Constellation Research Inc. stated, “Dell is continuing its long tradition of providing additional value to customers through its partnership with Microsoft. It’s helping customers to get more out of their multi-cloud, resilience, and future-of-work investments. Customer adoption will soon tell us how well Dell has hit the nerve regarding the value proposition of these services.”
Dell emphasizes that these new services build upon its successful partnership with Microsoft, which spans over 35 years and encompasses infrastructure, software, security, advisory, and digital experience.
In a recent disclosure, Microsoft revealed that Chinese hackers have successfully gained access to the email accounts of approximately 25 organizations, including U.S. government agencies. Microsoft referred to the threat actor behind the incident as Storm-0558, an adversary based in China with a primary focus on espionage and gaining intelligence through unauthorized access to email systems. The company shared these details in a blog post addressing the breach.
The hacker has also compromised the consumer accounts of individuals likely associated with the affected organizations. Prior to disclosing these details publicly, Microsoft has been actively working alongside the affected customers, ensuring they receive timely notifications and support.
Just last month, cybersecurity firm Mandiant, owned by Google, reported that hackers supported by the Chinese government exploited a vulnerability in an email security service to infiltrate the networks of hundreds of public and private sector entities worldwide. Approximately one-third of the compromised entities were government agencies. Chinese officials swiftly dismissed the report, denouncing it as “far-fetched and unprofessional.” The country’s foreign ministry spokesperson went as far as accusing U.S. cybersecurity firms of collaborating with the government in a smear campaign against other nations.
The breach of email accounts by Chinese hackers underscores the ongoing concerns regarding cybersecurity and the persistent threats faced by governments and organizations worldwide. The need for robust defense measures and international cooperation to counter such attacks is becoming increasingly critical as cyber warfare continues to evolve.
Yesterday, Microsoft published a security advisory, ADV230001, addressing a concerning issue related to numerous drivers certified by the Windows Hardware Developer Program. These drivers were found to be exploited maliciously in post-exploitation activities. The discovery of this problem was credited to the diligent researchers at Sophos, who promptly notified Microsoft in early February 2023. To further emphasize the severity of the situation, Microsoft disclosed that both Trend Micro and Cisco also submitted their reports, collectively identifying 133 unsafe drivers, including non-certified ones.
Upon conducting a subsequent investigation, Microsoft uncovered that several developer accounts associated with the Microsoft Partner Center (MPC) were involved in submitting these malicious drivers to obtain a Microsoft signature. Consequently, all of these accounts were swiftly suspended. In addition, Microsoft implemented additional measures, such as blocking detections (commencing with Microsoft Defender 1.391.3822.0), which protect against legitimately signed drivers exploited in post-exploit activities.
In their findings, Sophos revealed the existence of two types of malicious drivers employed in recent attacks. The first type is similar to the maliciously signed drivers discovered last year and falls under the “Endpoint protection killer.” The second type resembles a rootkit, designed to operate discreetly as an inconspicuous background task.
Fortunately, home users need only ensure their operating systems are kept up to date, as no other devices or services have been impacted by these issues except for Windows PCs. Consequently, Azure, Xbox, or Microsoft 365 users can rest assured that they have no cause for concern.
Let’s not mince words here—the first half of 2023 has been one to remember in terms of groundbreaking AAA video game releases. This is true across all platforms, including Xbox. Just look at what the first six months of 2023 has given us: Dead Space Remake, Hi-Fi Rush, Hogwarts Legacy, Resident Evil 4 Remake, Minecraft Legends, Street Fighter 6, Diablo IV.
While 2022 was admittedly a lackluster year for Xbox, 2023 is without question going to make up for it and then some, and will go down as one of the best years in video games in recent memory. With that said, let’s have a glimpse into what the second half of 2023 will bring.
Notable upcoming games
Armored Core VI: Fires of Rubicon (Aug. 25)
Sea of Stars (Aug. 29)
Lies of P (Sept. 19)
Mortal Kombat 1 (Sept. 19)
Payday 3 (Sept. 21)
Lords of the Fallen (Oct. 13)
Alan Wake (Oct. 17)
Like a Dragon Gaiden: The Man Who Erased His Name (Nov. 9)
Skull and Bones (TBA)
S.T.A.L.K.E.R. 2: Heart of Chernobyl (TBA)
The Talos Principle (TBA)
The heavy hitters
While that was an exciting sneak peek at some of the more notable Xbox releases coming down the pipeline, below are the titles that will most likely define Xbox in the second half of what has been an exceptional year in video games so far across all platforms.
Stray (August 10)
One of the biggest PlayStation exclusives of 2022 comes to Xbox soon.
Starfield will finally land on Xbox on September 6.
What else can really be said about one of the most anticipated video games ever that hasn’t already been said? Bethesda’s epic open world sci-fi action-RPG will have a lot of hype to live up to when it releases on September 6, and the Xbox platform itself has a lot riding on Starfield’s success. It’s fair to say Starfield could in large part make or break the second half of 2023 (and really this entire console generation going forward) for Xbox.
Cyberpunk 2077: Phantom Liberty (September 26)
This long-awaited first (and only) expansion for Cyberpunk 2077 will finally land in players hands as part of what is shaping up to be an absolutely stacked September with the likes of The Crew Motorfest, Lies of P, Mortal Kombat 1, Payday 3 and of course Starfield all launching that month.
Forza Motorsport will be one of the biggest Xbox exclusives of the year.
The (almost) undisputed king of racing sims makes what will hopefully be a triumphant return in October with the release of the long-in-the-making Forza Motorsport reboot. Most Xbox fans will more-or-less know what to expect from the series…or will they? Following the Xbox Games Showcase in June we were treated to a demo of the game which showed off the newly-revamped career mode among other things.
A new Assassin’s Creed release is always big news, and it will be interesting to see how this return to stealth-action form for Mirage will go down with players.
How this will all shake out is anyone’s guess, but as it stands Microsoft is closer to sealing the deal than it has ever been. If and when it does finally happen it can only mean good things for the Xbox platform and its users. How does Call of Duty and other Activision Blizzard games coming to Game Pass day one sound?
Looking beyond into 2024
Upcoming Xbox RPG Avowed.
It looks like 2024 will be no slouch either, going by what’s been announced so far during and since the Xbox Games Showcase.
Microsoft Flight Simulator 2024
Senua’s Saga: Hellblade 2
Like A Dragon: Infinite Wealth
Towerborne
Flintlock: Siege of Dawn
Avowed
Fable?
South of Midnight?
As we all know, it’s possible—if not likely, even—that some of these might not make it to release in 2024. Nonetheless, it’s good to know there are some exciting titles in the pipeline. Regardless, there is no question that the second half of 2023 will be an interesting time for Xbox gamers.
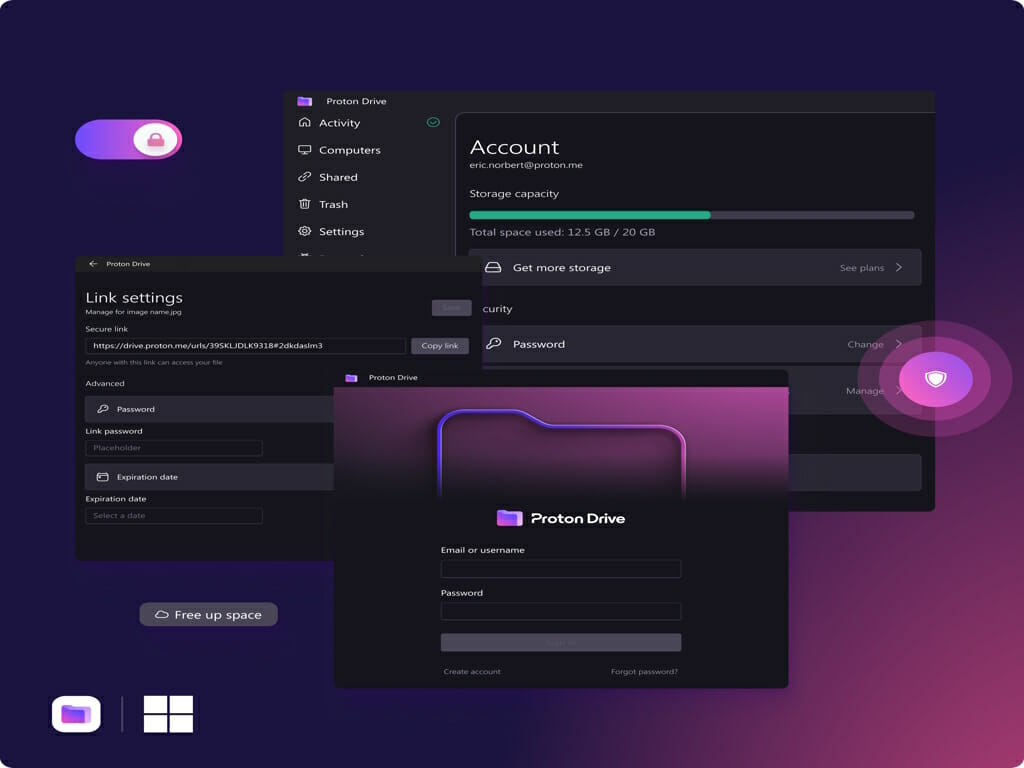
Today, Proton, the Swiss-based company renowned for its commitment to privacy and security, unveiled a significant addition to its lineup of privacy-focused services. The company announced the launch of Proton Drive for Windows, a native application that offers Windows users a secure and end-to-end encrypted cloud storage solution.
With this latest release, Proton Drive’s renowned secure and private cloud storage experience is now available natively on Windows devices, providing users with an optimal solution for backing up, synchronizing, and sharing their encrypted files.
The application’s standout feature is its robust end-to-end encryption, guaranteeing that files stored on Proton Drive remain secure and private. Notably, this encryption ensures that not even Proton can access the files. With privacy and security at the forefront, Proton Drive presents a compelling alternative to established cloud storage providers like Google Drive.
Anant Vijay Singh, Product Lead for Proton Drive, emphasized the significance of this development, stating, “This is a significant step towards making secure and private cloud storage more accessible to everyone, regardless of the platform they are using. With over 1.4 billion Windows users in the world, we knew we had to choose this platform first for our desktop app. We are committed to making privacy the default for everyone, and this new application is a big step on the path to that commitment.”
During the recent beta testing phase, users of the Proton Drive Windows app demonstrated a strong preference for the desktop application, uploading over five times more data compared to users utilizing only the web and mobile applications. This underscores the vital role desktop computers play in data synchronization and backup processes. By introducing the Windows application, Proton aims to make secure storage more convenient, swift, and reliable for its customers, ultimately reducing their risk of data loss.
Key features of the Proton Drive Windows app include:
Seamless synchronization across devices, allowing files and folders to stay up-to-date across all connected devices. Any changes made to files on a Windows PC are automatically reflected on other devices with Proton Drive installed.
The app provides offline access to files, enabling users to access, edit, and save their work even when not connected to the internet. When online, Proton Drive seamlessly syncs the changes, ensuring files are always up-to-date.
The version history feature in Proton Drive for Windows offers users a comprehensive record of changes made to each file. This functionality empowers users to track modifications and revert back to previous versions when necessary, providing an additional layer of protection for their work.
Proton’s commitment to accessibility is evident in the availability of free, encrypted File storage, ensuring that everyone can access secure and private cloud storage at no cost. All files stored in the free tier receive full encryption, safeguarding user data and maintaining privacy.
Maintaining its unwavering dedication to security and privacy, Proton Drive for Windows upholds stringent encryption standards. All files, including metadata, are fully end-to-end encrypted. This commitment to privacy extends to the Windows app, ensuring data remains secure throughout the upload, download, and storage processes.
Proton’s commitment to privacy and security continues to drive innovation, empowering users to take control of their data and communications while providing a reliable alternative to conventional cloud storage providers.
Picking the right one isn’t always easy, and in this guide, we’re going to take a closer look at both systems, check their features, and show you which is the better choice for you.
Xbox Series S vs PS 5: Price
The price difference comes from different hardware. PS5 offers better hardware and performance, and it has an optical drive, which will result in less use of storage space.
Thanks to the optical drive, you can even play DVDs and BluRay discs on the console. The hardware and performance differences are why PS5 is more expensive, and in our option, the PS5 justifies its cost.
Xbox Series S vs PS 5: Physical Comparison
Xbox Series S
PlayStation 5
Dimensions
6.5cm x 15.1cm x 27.5cm
39cm x 26cm x 10.4cm
Weight
4.25lbs
9.3lbs
PlayStation 5 is larger in size, and it weighs twice more than Xbox Series S, so it might not be the best choice if you’re running low on space.
Light indicators
It’s important to mention light indicators on both consoles. Xbox Series S is more minimalistic in this regard, and it has a single light indicator showing your console’s state.
If the indicator is blinking, it means there’s an issue with the device.
On the other hand, PS5 uses ambient lights that change color depending on the state. While this looks great in the dark, it can be a bit confusing to some users.
This is especially true if the console is waking up in rest mode or powering up. In case of an error, the white light will blink, but in some cases, you might get a blinking blue or solid blue light when an error occurs.
While PlayStation 5 light indicators are more vivid, they can be a bit confusing sometimes, so we prefer the minimalistic and straightforward approach that Series S uses.
Customization options
As for customization, both consoles support skins that you can add to your console, but PS5 also has official faceplates, so you can change the color of your console. However, there are many third-party faceplates available as well.
If you’re into customization, then PS5 might be a better option for you.
Xbox Series S vs PS 5: Performance & Graphics
First, let’s take a quick look at the hardware specs of both consoles:
Xbox Series S
PS5
CPU
8x Cores @ 3.8 GHz (3.66 GHz w/ SMT) Custom Zen 2 CPU
8x Cores @ 3.8 GHz (3.66 GHz w/ SMT) Custom Zen 2 CPU
GPU
4 TFLOPS, 20 CUs @ 1.55 GHz Custom RDNA 2
10.28 TFLOPs, 36CUs @ 2.23GHz
Memory
10 GB GDDR6
16 GB GDDR6/ 256-bit
Memory bandwidth
224GB/s
448GB/s
Storage space
512GB NVME SSD
825 GB SSD
Optical drive
Not available
4K UHD Blu-ray Drive
Max resolution
Up to 1440p at 120 FPS
4K at 60 FPS, up to 120 FPS
Both consoles share an identical CPU and but there’s a difference in the GPU department. Series S 4 teraflops while PS5 has 10.28.
Regarding the CUs, there are 20 on Series S and 36 on PS5. Regarding the frequency, GPU on Xbox runs at 1.55GHz while PS5 GPU runs at 2.23GHz.
Differences between the hardware affect the resolution and frame rates directly, and Series S supports up to 1440p resolution at 120FPS. On the other hand, PS5 can handle 4K resolution at 60FPS, and it can even go up to 120FPS.
Loading speed differences and Quick Resume
Regarding loading speed, PS5 can be up to 2 times faster depending on the game. This is because SSD bandwidth and Series S can achieve 2.4GB/sec while PS5 can reach up to 5GB/sec.
Bottom line, PS5 offers twice more bandwidth than Series S, and it loads twice faster.
Xbox Series S uses a feature called Quick Resume to combat this limitation. This allows you to switch between games seamlessly. The feature supports up to 3 save states, allowing you to switch between 3 games.
This is perfect if you play multiple games since you don’t have to wait for the game to load again when switching between games.
The PS5 doesn’t have this feature, so it’s impossible to switch between games seamlessly, but on the other hand, PS5 games load twice as fast, which makes switching relatively fast.
However, we can’t stress enough how convenient this feature is, and we wish PlayStation had something similar to offer.
Ray tracing and Performance Mode
Ray tracing is available on both consoles, but the hardware power is the deciding factor. Series S has a weaker GPU with fewer teraflops and CUs, meaning that Ray tracing is more taxing on your performance.
Simply put, Series S hardware is too weak to handle this feature, and if you choose to use it, you can expect a framerate of around 30fps.
On the other hand, PlayStation 5 has much more powerful hardware that can handle Ray tracing better. Regarding performance, PS5 can handle Ray tracing at 60fps for most games, but some will drop to 30fps while using this feature.
Both consoles have a performance mode feature that adjusts, lowers your graphics settings, and lets you run games at a higher framerate.
Visual changes are noticeable since the resolution will be lowered, and features such as Ray tracing will be turned off.
This means you’ll run games at 1080p at 120fps on Series S and 1440p at 60-120fps on PS5. Without performance mode, you can achieve maximum resolution and quality at the cost of framerate.
For Series S, you’ll get about 30fps, while for PS5, that’s 60fps which is a noticeable difference.
Xbox Series S vs PS 5: Hardware Comparison
Both consoles have 3D audio, and PS5 comes with Tempest 3D, which lets you experience immersive audio with any pair of headphones.
An additional AMD GPU powers this feature compute unit located in the console, which improves the audio quality and performance.
On the other hand, Microsoft has its own Spatial Sound that does the same, but if you want to boost the audio quality and use Dolby Atmos or DTS X, you’ll need to purchase a license.
Storage space and expansion
As for the storage, Series S comes with 512GB SSD, while PS5 has 825GB. It’s important to mention the speed difference, and PS5 is twice faster with a 5GB/sec read speed.
Not only that PS5 has more space, but also has twice faster load times. Since Series S doesn’t have an optical drive, you might soon run out of internal storage on it, so you’ll need to look at expansion options.
The storage space can be expanded on both consoles, and Series S allows you to add additional storage simply by connecting the expansion card to the slot on the console. It’s simple and it only takes a few seconds to do so.
Regarding the PS5, the expansion process is more complex, and you need to open the PS5 case, remove the NVMe cover, insert the expansion drive, fasten it, and close the PS5 case.
This process can take a couple of minutes and requires some practical knowledge. Of course, both consoles support external storage in the form of external hard drives or SSDs, and you can connect them easily via USB, but the loading speeds will differ if using this option.
Regarding expansion, Series S is a clear winner with its straightforward approach.
VR support
One of the biggest differences between the two is the VR support. Series S is a traditional console that allows you to enjoy your games on the screen.
However, PS5 has VR support, and it works surprisingly well, with many users praising how immersive it is. Although we’re not a fan of VR, the technology is here to stay, so if you want to try the latest gaming technologies, PS5 is the way to go.
Controller differences
In terms of controllers, the PS5 controller is slightly more expensive, and it comes only in the wireless version, while Series S offers both wired and wireless versions alike.
As for design, both controllers are ergonomic, and if you’re familiar with the design of the previous versions, you won’t have any issues adjusting to the new one.
In terms of features, PS5 offers a built-in microphone that can come in handy during online matches. In addition, the PS5 controller has haptic feedback which feels more immersive.
Speaking of immersion, adaptive triggers on PS5 can also make your gaming sessions more immersive. Lastly, the built-in trackpad can be used for quick navigation if you choose to use it.
In terms of features, the PS5 controller is superior in every way, but the Xbox controller is more affordable and offers better compatibility with PC out of the box.
Noise level and heating
Regarding the noise, we have to mention that both consoles are pretty quiet, but PS5 might be a bit louder, especially when using a disc drive.
Since Series S comes without a disc drive, it will be almost completely silent during the gaming sessions.
As for heating, both devices can get quite hot, but Series S is unlikely to overheat. The same can’t be said for PS5. This is somewhat expected since it has more hardware power, and thus it’s generating more heat.
Overheating issues aren’t common, but they can happen; however, they are usually caused by dust buildup that can be easily fixed.
Physical media support
The biggest difference between Series S and PS5 is the lack of an optical drive. This means that on Series S, you can only play digital edition games.
While this is handy, it comes with a few drawbacks. Most notably, storage space, and if you planning to have dozens of games installed, you’ll soon run out of storage space on your console.
In addition, if you’re on a slower connection, downloading a game might take a while.
On the other side, PS5 lets you install the game from the disc and that makes the whole process a lot faster.
It’s worth mentioning that PS5 can also work as a multimedia player, so it will play DVDs and Blu-Ray discs without issues.
Keep in mind that if you install the game using the optical drive, you still have to insert it into the console, which is less convenient than running it from the storage drive.
Benefits of disc drives
Region locking isn’t an issue on PS5, and the games should work even if the console and the game aren’t from the same region. However, there might be some issues while doing that.
One benefit of disc games is that you own the game, and you can share it with others or resell it if you want to. Unfortunately, that’s not the case with digital edition games; if the game is removed from the server, you’ll lose access to it.
Another benefit of discs is that you can buy used games and still play them on your console without any limitations. It’s also worth mentioning that disc games can be cheaper, so that is another benefit of physical copies.
Console updates frequency and quality
Both consoles are getting frequent system updates, and usually, Series S updates come without any issues.
Regarding PS5, one update from a few months ago caused freezing on the console, but Sony quickly addressed it.
Both consoles will automatically download system updates, but there’s always an option of downloading updates manually.
Second screen experiences:
Both consoles have companion apps and support streaming to both PC and mobile.
Using the companion apps, you can stay in touch with your friends, chat, share clips, or watch their gaming sessions.
You can also use these apps to control your console remotely. This feature can be useful since it allows you to start a download remotely or to set up your console for a gaming session while away.
Of course, remote play is another major benefit that lets you play away from your TV.
Xbox Series S vs PS 5: Gaming Experience
Both devices support remote play, and while it works pretty well, there are still some issues to look out for.
Latency is an issue, but it can be reduced with a wired connection and a high-quality Wi-Fi router. Do keep in mind that even with a proper network setup, you still might experience some latency.
This isn’t an issue for single-player games or less action-oriented titles, but it can be a major issue in multiplayer games.
In case you plan to use this feature outside of your home network, be prepared to deal with higher latency. The feature works great on both systems, but it works better on a wired connection, so keep that in mind.
Regarding the game library, PlayStation 5 has about 560 games available. On the other hand, Series S has 397 titles.
In terms of games, in our humble opinion PlayStation platform always had better exclusive games. Currently, there are 12 exclusives for PS, and some of them include:
Deamon’s Souls
Final Fantasy VII Remake Intergrade
Gran Turismo 7
Gran Turismo 7
Horizon Forbidden West
Ratchet & Clank: Rift Apart
Spider-Man: Miles Morales
This isn’t all, and we expect new and exciting exclusives to come on PS5 this year as well.
As for Series S, it only has the following exclusives:
Forza Horizon 5
Halo Infinite
Microsoft Flight Simulator
As you can see, PS5 has more exclusives, but if you’re a fan of the Forza, Halo, or Gears series, then Series S might be a better choice for you.
Xbox Game Pass and PlayStation Now
Both consoles offer digital libraries and subscriptions. Xbox Game Pass offers about 465 digital edition games in total and it gives its users up to 20% discount on selected games.
The subscription comes with an Xbox Live Gold membership as well as an EA Play subscription. However, the best option is the day-one pass for titles from Xbox Game Studios and Bethesda Softworks.
On the other hand, PlayStation Plus offers similar features, while allowing you access to the extensive game catalog as well.
The service offers special discounts and special access to Ubisoft+ Classics. One major difference is that Sony usually doesn’t allow day-one access to its games while Xbox Game Pass does.
So even though Sony might have a larger library of games, the lack of day-one access to certain games might drive away some gamers.
Backward compatibility
Backward compatibility is a huge part of both consoles, and we’re pleased to inform you that PS5 is compatible with PS4 games. This means that you can access more than 4000+ PS4 titles on your console, according to Sony.
While this sounds impressive, Series S does a step beyond. Not only is Series S compatible with Xbox One games, but it also works with Xbox 360 games. It can even run some original Xbox games as well.
Both consoles support disc games and digital games, but while PS5 supports only the last generation of games, Series S supports games from the last three generations.
So if you own older games or you want to play some older games on a single console, Series S is a clear winner here.
Game updates and installation
Both systems offer automatic updates for games, so all your games will be seamlessly updated in the background.
The installation process differs, and since Series S comes without an optical drive, all games must be downloaded from the Internet. This is pretty straightforward, but it also means that users with slower connections will have to wait while their games are downloaded.
PS5, on the other hand, supports disc installation, so no Internet connection is required for this process. This is perfect if you’re not using a fast or reliable network connection and don’t want to wait hours to download a game.
Upcoming exclusives
As for upcoming games, systems share a similar library of games, but there are some exclusives to look for. For PS5, the upcoming games are the following:
Final Fantasy 16
Marvel’s Spider-Man 2
Fairgames
Little Devil Inside
Rise of the Ronin
As for Xbox exclusives, the offer is rather limited, but thanks to the Xbox Game Pass, you can get day-one access to upcoming titles such as Starfield.
Lastly, we have to mention Microsoft’s xCloud gaming service. This service is available to the Xbox Game Pass Ultimate subscriptions, allowing you to stream Xbox Series X/S, Xbox One, Xbox 360, and original Xbox games via the cloud.
This means you can enjoy these games on your phone, PC, Chromebook, or any other device with Internet access. This is an exciting feature, but unfortunately, Sony doesn’t have anything similar to offer to its users.
It’s worth mentioning that some games support crossplay, and speaking of which, we have a great guide on how to crossplay Overwatch, so be sure to check it out.
PS5 Vs Xbox Series S: Convenience Features
When it comes to startup, we have to say that Series S is a clear winner here. The console started fully in just 18 seconds, while the PS5 took 23 seconds.
As for the rest mode, it takes just 3 seconds for Series S to start, compared to 13 seconds for PS5.
While this isn’t a huge difference, Xbox Series S is faster when it comes to powering on or waking up, and if you want to quickly power on your console and get right in the action, Xbox is a better choice.
Interface and accessories
The interface on both consoles is simple and easy to use, and Series S UI is similar to the previous generation’s.
Sony, on the other hand, revamped its UI, and the new version comes with a control center that will pause the game and bring you access to the various features.
While the Xbox interface looks more uniform, Sony’s is more exciting, but in the end, both are easy to use and navigate.
As for the sounds, both consoles have unique system sounds, and it all comes down to personal preference.
In terms of accessories, PS5 comes with the following:
PlayStation 5 console
Wireless controller
HDMI cable
AC power cable
USB-A to USB-C cable
Console stand
On the other hand, Series S comes with the following:
Xbox Series S console
Xbox wireless controller
Two AA batteries
HDMI cable
Power cord
Both consoles come with all the necessary equipment but the PS5 comes with USB-A to USB-C cable that can be used for accessories.
Portability and smart home integration
Regarding portability, Series S is smaller in size and twice as light, so it can be easily transported. Plus, you don’t have to carry any discs with it to play.
On the other hand, PS5 is a bulkier device, it comes with a stand, it’s heavier, and you need to carry discs if you want to play certain games. In this regard, Series S is a clear winner.
If you’re a fan of smart homes, we must mention that Series S offers great built-in support for both Alexa and Google Assistant, so you can use them to control smart devices in your home via voice.
Unfortunately, PS5 doesn’t support this feature natively, but it can be enabled with some tinkering. So if you’re not technically inclined, Series S is a better choice for home automation.
Parental control and accessibility features
Both consoles offer parental controls, and you can use them to restrict the following:
Limit the playtime
Limit spending
Filter the content that the child can see
Prevent the child from accessing certain features
The key difference is that you can make all these restrictions from the console or from the dedicated app in the case of Series S. As for PS5, you can put restrictions by using your web browser.
Both consoles have accessibility features, and when it comes to PS5, you can find the following:
Text size adjustment
Zooming
High contrast
Invert colors
Color correction
Auto-scroll speed
Motion reduction
Mono audio for headphones
Screen reader in 14 different languages
Closed captions
Custom button assignment
Vibration intensity settings
Trigger effect intensity
Voice chat conversion to text
Text to speech
On Series S, you can find the following:
Copilot feature
Custom button mapping
Mouse and keyboard support
Magnifier
High contrast
Color filters
Speech to text
Voice commands
Narrator
Closed captions
Mono output
Ability to mute navigation or notification sounds
Overall, both consoles offer great accessibility features, but we wish that PS5 had the Copilot feature like Series S.
Both consoles have standby modes, and they allow you to do the following:
Play games remotely
Keep games suspended
Install games or updates remotely
Charge the controller
PS5 Vs Xbox Series S: Beyond Gaming
Sony takes carbon emissions seriously, and according to research, PS5 produces 0.022kg of CO2 per hour of use.
As for energy usage, Series S used only 0.05kWh, while PS5 used 0.077kWh. This is expected since Series S doesn’t have as powerful hardware.
On the other hand, Microsoft is determined to lower energy consumption, and the console is set to run updates only when the grid is running on renewable energy.
In addition, the Shutdown mode is now the default option on Xbox since it saves the most energy.
Recyclability and resale value
Regarding recyclability, the Series S is made from post-consumer recycled resin, a substance made from recycled plastic. As controllers, they are also using 30% PRC resins for external housing and 50% for their internal components.
On the other hand, PS5 might not be as environment-friendly, but its packaging is fully recyclable, according to Sony.
Lastly, let’s talk about resale value. PS5 comes with physical games, so you can always sell the console and the games separately.
That’s not the case with Series S since all your games are tied to your personal account, so even if you sell the console, the buyer will have to purchase the games and add them to their account manually.
Conclusion
Overall, PS5 and Series S both have their advantages. PS5 offers better hardware, better resolution, better performance, and exclusives, and that’s all thanks to the superior hardware.
On the other hand, Series S is much more affordable, it offers superior backward compatibility, but it doesn’t have a disc drive, so your only option is to download the games to play them.
I’ve been getting some questions about deleting your account. To clarify, you can deactivate your Threads account, which hides your Threads profile and content, you can set your profile to private, and you can delete individual threads posts – all without deleting your Instagram account. Threads is powered by Instagram, so right now it’s just one account, but we’re looking into a way to delete your Threads account separately.
Adam Mosseri
Threads is currently riding a high wave of popularity. The app has grabbed more than 100 million users in less than a week. It also seems to be on par with Twitter, and might even dominate the market share in the following weeks. But it’s not without controversy, though. The app is not available in Europe, due to the fact that it might be too intrusive when it comes to personal data.
That’s why it’s natural if you created a Threads profile and now you want to delete it. Your privacy comes first. However, as we mentioned earlier, you cannot really delete your Threads without deleting your Instagram. However, Meta is working to solve this.
You can, however, do other things, such hiding your Threads account. And we’re going to show you how to do that.
How to sort of delete Threads without deleting your Instagram
Please remember that your Threads account is linked to your Instagram account, so that means you can unlink it. But you can hide your Threads.
Open the Instagram app on your mobile device.
Once you are there, tap on your profile picture in the bottom right corner.
Tap on the number with the Threads symbol under your name.
Tap on Hide badge.
Hiding the badge will make your Threads account invisible to others, so that’s the only solution for now. However, if you want a radical solution and you want to delete your Threads for good, then you should delete your Instagram account.
Open the Instagram app on your
Go to your Account.
Tap on Deactivate account.
Tap on Deactivate Threads profile and confirm.
Now your Threads account is gone, but so is your Instagram. However, remember that Meta is currently working on a feature to let you deactivate your Threads account separately. We will keep this article updated, once the feature is out, so bookmark this article.
What do you think about it? Let us know in the comments section below.
And you won’t be able to use it for a while if you’re from Europe. Why? Because Instagram Threads currently doesn’t meet the EU’s Digital Markets Act requirements. In fact, it is Meta who is refraining to launch Thread in Europe, because the company believes the European rules are a bit unclear.
But it might be even more than that. The European Union has been protecting users’ data with new rules, and companies that want to launch apps in the region must comply with those rules. However, Threads currently imports a lot of data from Instagram, and it asks users for permission to sensitive information.
And this information is protected under EU laws. Although Threads is currently experiencing a high wave of popularity, the app is not seen without controversy. A lot of users believe the app asks for too much data.
Just how much data is Instagram Threads asking for?
According to users, Instagram Threads is a privacy nightmare, so far. The app is currently asking for data that is linked to your identity, including:
Health and Fitness
Financial info
Contact info
User content
Browsing history
Usage Data
Diagnostics
Purchases
Location
Contacts
Search History
Identifiers
Sensitive info
Other data
So, as you can see there is a lot of data for you to give away, in order to use Twitter’s newest rival, Threads. As per usual, this data is collected so you can have the best experience on Instagram Threads, but it does seem a bit too much. Sensitive info and Other Data can mean anything, and the fact that Threads is keen on accessing them might be a hard pass for some users.
When it comes to Europe, Instagram Threads will be released at some point, but not soon, though. If you live in Europe, you might need to wait a bit more before you can create an account on Instagram Threads.
What do you think about this? Let us know your opinions in the comments section below.
A Kindle book is an electronic or digital book specifically formatted and designed to be read on Amazon Kindle devices or through the Kindle reading app.
It is pretty frustrating that some of our readers have recently reported encountering Kindle books not compatible with device error. This article will discuss what causes this and possible ways to resolve the issue.
Why is the Kindle book not compatible with the device?
There are several reasons why a Kindle book may not be compatible with a particular device. Thus, here are some common reasons:
Unsupported format – If the book you are trying to access is in a format that is not supported by your device, it will result in an incompatibility issue.
Outdated software/firmware – If your device’s software or firmware is outdated and doesn’t support the specific Kindle book format, you may encounter compatibility issues.
Device limitations – Older or entry-level Kindle devices may have limitations on the file formats they support, rendering certain Kindle books incompatible.
Regional restrictions – Some books are only available for specific countries or regions, and attempting to access them from an unsupported location will show as incompatible.
DRM restrictions – Some Kindle books have Digital Rights Management (DRM) protection, which limits their compatibility with specific devices or apps registered under your Amazon account.
The above are common reasons behind the Kindle book not compatible with device errors that users may encounter. Let’s proceed to what to do if you encounter this issue.
What can I do if Kindle book isn’t compatible with the device?
Before engaging in any advanced troubleshooting or settings tweaks, you should consider performing the following preliminary checks:
Check if the Kindle book is not under DRM protection.
Check if there are any regional restrictions for the Kindle book.
Ensure that your device is compatible with the Kindle book.
Having confirmed the above checks, if you require further assistance, you can work through any of the solutions provided below.
Save the downloaded file and navigate to its location on your computer.
Further, a small window on your screen will tell you the app is set up.
The app will now be updated with new features.
The Kindle app for PC will, most of the time, update itself automatically. But if you encounter a Kindle book incompatible with a device error like this, you can visit the official Kindle website.
2. Convert the book format using a third-party tool
If the format is unsuitable for your Kindle e-book reader, you may use a conversion tool to get the book to the desired one.
Epubor Ultimate is one of the best software you can use to convert the format of your e-book. This app is very powerful and easy to use and supports almost any e-book format. You can also use this tool to remove the protection from your book or transform an audible to MP3.
Epubor Ultimate
Enjoy your e-books in any format you like with this powerful software.
Tap anywhere on the screen and select the downward-facing arrow on the topmost section of the screen.
Then, click on all Settings.
Then, tap on Device Options and select Update Your Kindle.
Updating the Kindle app to the latest software version should ensure compatibility with Kindle books and access to the latest features and improvements.
And that’s it on what to do if you’re getting a Kindle book incompatible with a device error. Hopefully, one of the methods in this guide will help you fix the issue.
As a Windows user, you’re likely to see at least one occasional Blue Screen of Death error during your time with Windows. One such error commonly reported is the rzudd.sys BSoD error which is associated with Razer device drivers.
Hence, we will provide quick fixes for the error here. Further, you can check out our extensive recommended list of BSoD fixers.
What causes the rzudd.sys BSoD error?
Here are some of the most common causes of the rzudd.sys blue screen error:
Outdated/Incompatible drivers – Running outdated or incompatible Drivers for your Razer Synapse software can lead to system conflicts and instability, causing a BSoD error.
Hardware conflicts – The Razer software can sometimes clash with the existing PC hardware, triggering the rzudd.sys BSoD error.
Overclocking – Overclocking your PC pushes its functionality beyond its natural capacity and limits. This can make your PC unstable and lead to a blue screen error.
Corrupt system files – If your PC’s critical files get corrupted by malware or third-party reasons, it can cause blue screen errors and crashes.
Virus or Malware – If your PC is infected with malware, it can interfere with the normal operations of the Razer Synapse software, potentially leading to a BSoD error.
No matter the causes of the error, try the following steps below to troubleshoot it.
How do I fix the rzudd.sys BSoD error?
Before trying any of the advanced steps, kindly apply the following preliminary checks:
Left-click the Start menu, type restore and click Create a restore point.
Select System Properties and choose System Restore button.
In the Restore Files and Settings box, click Next.
Select the Restore point and click Next.
Then, click Finish to complete the system restore.
If you noticed the BSoD recently and created a restore point before the error started, you can easily restore your PC to that version to quickly fix the rzudd.sys BSoD error.
However, you’ll lose files during a system restore, so it’s essential to back up your PC thoroughly.
Blue screen of death errors are pretty standard among Windows machines; knowing how to fix them will save you much time and effort. Luckily, with the steps outlined in this article, you should be able to fix the rzudd.sys BSoD error.
Google’s partnership with DeepMind, suggestively called Google DeepMind, is about to come out with the strongest AI model on the market, as per their accounts.
The AI model is called Gemini and in an interview for Wired, Demis Hassabis, DeepMind’s CEO, says that the new AI innovations coming from Google are very interesting, to say the least.
At a high level, you can think of Gemini as combining some of the strengths of AlphaGo-type systems with the amazing language capabilities of the large models [e.g., GPT-4 and ChatGPT]. We also have some new innovations that are going to be pretty interesting.
Demis Hassabis
Gemini will be released later this year, in an effort to combat Microsoft’s lead in AI research. As you might know, Microsoft has been at the forefront of AI innovations. Models such as Orca 13B, phi-1, Kosmos-2, LongMeM, or the more recent CoDi, promise a new era for AI. And they’re all happening now.
Even more, it seems that Gemini is being touted as a breakthrough in AI technology. The model will greatly disrupt Microsoft’s OpenAI models on the market, specialists say.
Could Google DeepMind AI, Gemini, be a breakthrough?
Gemini is part of DeepMind’s Alpha family of AI models. Other models from this family are AlphaGo, AlphaGo Zero, AlphaZero, and MuZero. And they are trained in limited or constrained environments, so they are often pushed to the limits. This way, these models surpass human abilities and even human knowledge.
The training on Alpha models happens under human supervision, and the results improve when these models are left to their own devices to find solutions.
On the other hand, GPT models, such as Bing AI or ChatGPT, Orca 13B, and others ones, are trained on huge quantities of data. The training on GPT models does not require human supervision, as these models learn to train themselves.
If you remember, phi-1, and Kosmos-2 were models that learn to code and visualize space on their own.
We’ll have to wait until fall, or winter 2023 to see if Gemini holds up to the hype. But the time of AI is here. And it seems Google does not want to lose ground to Microsoft when it comes to AI. Innovation breeds competition.
What do you think about it? Let us know in the comments section below.
Many of our readers have reported struggling with IPTV not working on AT&T. Because of this issue, users aren’t able to stream content on IPTV and enjoy their time.
This issue can be caused because of corrupt cache or cookie files, etc. In this guide, we will share with you some solutions that will help you resolve the problem at your end. Let us get right into it.
Why is IPTV not working on AT&T?
We did some research and found out some of the common reasons why IPTV is not working on AT&T. Some of them are listed below:
Underlying browser issue – If you are trying to stream using a browser and facing issues, then it could be because of some bug or glitch in the browser.
IPv6 issue – The services do not require or don’t support IPv6 protocol, and because of that, it is causing the IPTV to not work on the AT&T network.
IPTV network-related issue – Chances are the server of IPTV is down or under maintenance because of which IPTV is not working.
AT&T Smart Home Manager issue – Some advanced security options enabled in AT&T are also responsible for IPTV not working problem.
How can I fix IPTV if it is not working on the AT&T network?
1. Disable Smart Home Manager software from AT&T
Open A&T Smart Home Manager.
Select Home Network.
Click on the Wi-Fi tab and choose Advanced Settings below.
Click on the Firewall tab and select Security options.
Select Disable for Home Network Security option.
Close the AT&T Smart Home Manager.
Restart the NetIPTV or IPTV Smarters Pro.
Some users have resolved the IPTV not working on the AT&T network by simply disabling the Smart Home Manager software for AT&T.
2. Flush the DNS cache
Press the Win key to open the Start menu.
Open the command prompt as an admin.
Type the below command and press Enter to flush the DNS cache.ipconfig /flushdns
You will get a confirmation message that the DNS cache has been flushed.
If you are experiencing any network-related issues, then you should try clearing the DNS cache as it has the details of the website that you visit and if they go corrupt, it could cause multiple issues.
For other different ways to completely flush the DNS cache and reset it, you can read the other methods in our dedicated guide.
Check the boxes for Cookies and other site data and Cached images and files options.
Click on the Clear data button.
For explanation purposes, we have made use of the Google Chrome browser. But you can apply the same steps to clear out the cookies and cache data for your browser.
Clearing the cookies and cache data helps you remove any information related to your prior IP address, the information which is usually stored in the cookies and cache files. You can also try switching to a new browser and check if this helps fix the problem.
4. Disable the IPv6 protocol
Press the Win key to open the Start menu.
Launch Control Panel.
Click on Network and Sharing Center.
Select Change adapter settings.
Double-click on your network to open its Properties.
Select Properties.
Uncheck the box for IPv6 and click OK.
The IPv6 protocol is meant to cause some accessibility issues, which may be why you are coming across the IPTV not working on the AT&T network problem. Simply disable it by following the above steps and check whether this resolves the problem.
You should also:
Check if the IPTV servers aren’t down or under maintenance. If they are, your network is fine.
Your internet connection might be slow. Check whether you are getting optimal speed based on your internet connection plan.
Payday 2 is an immersive cooperative first-person shooter game that places players in the shoes of professional criminals executing high-stakes heists.
However, one frustrating issue that players may encounter is the Payday 2 access violation crash, causing it to close abruptly and potentially disrupting your gameplay experience.
In this guide, we will delve into the causes behind the Payday 2 Access Violation Crash, explore its implications on gameplay, and provide practical solutions to fix and prevent this issue from occurring.
What causes the Payday 2 access violation crash issue?
Various factors can cause the Payday 2 access violation crash; some of the common ones are:
Outdated or incompatible drivers – Incompatible graphics card drivers, sound card drivers, or other hardware drivers can lead to conflicts with the game and trigger this error.
Corrupted game files – If the files become corrupted, it could cause an issue when you attempt to load or run certain game elements.
Conflicting software or background processes – Certain software applications, particularly those with overlays or screen capture features, can conflict with PayDay 2 and trigger the error.
Check if your computer meets the system requirements.
Press Ctrl + Shift + Esc to open Task Manager to identify and end non-essential processes.
Once you have checked, move to the detailed methods to fix the issue.
1. Verify the game files
Press the Windows key, type steam, and click Open.
Click Library, then click Home.
Go to Payday 2, right-click, and choose Properties.
Next, select the Local Files or Installed Files tab, and click Verify Integrity of Game Files.
Steam will check for any corrupted or missing game files. Verifying the game files can help you repair & recover the missing files of the game and is a common solution for issues like Nebula Data error on PayDay 3: Failed To Fetch Config Data.
2. Disable the Steam overlay
Press the Windows key, type steam, and click Open.
Click Steam, then Settings.
Go to the In-Game tab from the right side and click the toggle button Off to Enable the Steam Overlay while in-game option.
Turning off the Steam overlay can help resolve conflicts that may trigger access violation crashes.
Locate the Payday 2 app, right-click it, and select Properties.
Switch to the Compatibility tab, under Compatibility mode, then select Run this program in compatibility mode for.
Select Windows 7.
Click Apply, then OK.
4. Add the game to the Exploit protection
Press the Windows key, type exploit protection and click Open.
Click Program settings, then click Add program to customize.
Now click Choose exact file path and go to the game’s file location and select it.
Select Arbitrary code guard (ACG) and click Override system settings.
Do the same for all the other entities on the Program settings window.
Click Apply.
5. Update the drivers
Press the Windows + R to open the Run dialog box.
Type devmgmt.msc and click OK to open Device Manager.
Go to Display adapters and click to expand it.
Locate the drive, right-click, and select Update driver.
Click Search automatically for drivers.
Once done, go to Sound, video and game controllers, click to expand it, and follow steps 4 and 5 to update it.
Now restart your PC to save the changes.
Lowering graphics settings within the game can alleviate strain on your system, potentially resolving crashes. Reduce options like texture quality, shadow quality, anti-aliasing, and other demanding settings.
So, these are methods to fix the Payday 2 access violation crash issue. If nothing worked for you, you may need to contact the game’s official support channelsfor further assistance.
Whatsapp is one of the most popular apps on the market, right now, with billions of people using it every day. The app has a desktop version too for Windows 11, and it works though linking your phone to Windows devices, up to 5 devices for now.
However, it seems that Meta wants to make Whatsapp an app on its own for Windows 11, and the Facebook owner released some updates for the app. It now comes with the ability to share your screen on Windows 11.
Whatsapp for Windows 11 didn’t have this feature before, but now it has it, and you can use it far more freely now than ever before.
You’ll be able to activate screen sharing from your desktop, allowing you to make video calls from Whatsapp on the Windows 11 operating system.
How to use the screen share feature on Whatsapp on Windows 11
To be able to share your screen, you’ll just have to click the Share button in a video call. Then, you’ll be able to choose from your open windows, taskbar, apps, desktop, and so on. Once you know which window you want to share, you just click on it, and it will be shown to all participants in the call.
The feature is not yet available on the general Windows 11 WhatsApp app. However, if you are eager to try the new feature, you can download and install Whatsapp Beta from Microsoft Store. If you remember, Meta released this for everyone who wants to test the new feature before they’re open to the general public.
The app was released in 2022, and it has all the new features, long before they’re out in the wild. Just think about Windows Insider Program but for Whatsapp on Windows 11.
This is not all, though. Several more features are coming to Whatsapp Beta in the following weeks, including:
The ability to upload high-quality videos.
You’ll be able to add stickers to your conversations, and you will have sticker suggestions.
Chat filters are also coming to Whatsapp. You’ll be able to filter your chats.
What do you think about it? Are you excited about Whatsapp for Windows 11? Let us know in the comments section below.
Many users complained about the error message This action could not be performed in Microsoft Office. It indicates a problem when performing a particular task in Microsoft Office. Fortunately, this article will discuss ways to resolve the error on your PC.
Update Windows to fix the system’s performance bugs and add new features to resolve compatibility problems.
1. Repair Office suite
Press the Windows + R key, type appwiz.cpl, and press Enter to open the Programs and Features.
Scroll to Microsoft Office, right-click on it, and select Change.
Select Online Repair and click not the Repair button.
Select Repair from the Ready to Start an Online Repair dialog box.
Wait for the complete process and restart your PC.
Repairing the Office app will resolve issues with corrupt installation files in the Microsoft Office app. Feel free to explore our guide about repairing Office app on Windows 11.
After doing that, check if This action couldn’t be performed error from Microsoft Office is gone.
2. Delete the nonexistent Debugger value in the Image File Execution subkey
Press the Windows + R button to open the Run dialog box, type in regedit, and press Enter to open the Registry Editor.
Navigate to the following path: HKEY_LOCAL_MACHINE\Software\Microsoft\Windows NT\CurrentVersion\Image File Execution Options
Delete the registry keys for Word, Excel, Outlook, and other Office apps prompting the error.
Restart your PC and check if the error appears on Microsoft Office.
Several users have confirmed that removing the Debugger keys for Office apps can fix the issue. Check our article discussing what to do if you have a corrupt registry on Windows.
Microsoft is holding Microsoft Build 2023 Conference these days, in Seattle, and the announcements are exciting: AI features are coming to Microsoft Store and you will be able to use them on Windows 11.
AI is clearly the main focus at Microsoft, and now Microsoft Store opens its doors to artificial intelligence features. In an exciting presentation, one of these features, called AI Hub, will be implemented soon on the platform.
According to Microsoft, the new AI Hub will offer you the best AI-enhanced apps built by developers all over the world. So, in many ways, if you’re looking for apps that have AI features, you will be able to choose them in the AI Hub section.
You will find many AI apps there, including Lensa, Descript, Krisp, and Copy.ai to mention a few.
However, more AI features are coming to Microsoft Store.
How to use AI features in Microsoft Store
Choose the best product with AI reviews summaries
By far, the most useful AI feature coming to Microsoft Store is the one where you can use the AI to go through all the reviews of a product.
AI will then generate a summary of those reviews, with all the details that you need. You will no longer have to go through tens or even hundreds of reviews. AI will go through them instead and it will summarize everything you need to know.
You will soon be able to do it in Microsoft Store by simply selecting the Generate review summary option, in the Reviews section.
Easily generate AI keywords for your app
If you’re a developer looking to release your app on Microsoft Store, the platform will make it easier for you to improve the discoverability of your projects.
By using AI to consume metadata, it will generate Search Tags for your apps, thus making them easier for customers to find them.
The feature will be live soon, but here’s how you can do it:
Go to the Microsoft Partner Center > Home > Apps & Games > Your App > Store listing
Make sure you provide a description of your app
Scroll down to Additional information and wait for the AI to generate your keywords
AI definitely makes Microsoft Store a good place to get all your favorite games and apps. If you weren’t into it, you should give it a try, and see if you like it. After all, Microsoft is keen on improving it even further with newer AI capabilities.
Microsoft Store Ai Hub is out in the app on the Insider Canary Channel
According to the Windows enthusiast, @PhantomOfEarth, the new Microsoft Store AI Hub announced at Build 2023 is starting to roll out in the Canary Channel. Here’s how it looks.
If you’re part of the Insider Program, you should check if you can experience the new AI Hub in Microsoft Store now. Not all users have access to it yet, but you should check to see if it appears on your Windows 11.
What do you think about these new AI features in Microsoft Store? Do you find them exciting? Let us know in the comments section below.
And now back to the question that is on everybody’s mind. Of course, with all the talk about it, we have to wonder. Will Instagram Threads surpass Twitter?
Will Instagram Threads surpass Twitter?
Well, it is still very early to say if Instagram Threads will surpass Twitter. The newly-released app got to an astonishing number of 100 million users in a matter of days. 5 days to be exact.
Threads reached 100 million sign ups over the weekend. That’s mostly organic demand and we haven’t even turned on many promotions yet. Can’t believe it’s only been 5 days!
Mark Zuckerberg on Threads
According to the latest reports, Instagram Threads managed to beat ChatGPT to this milestone, while Twitter traffic slowed down considerably.
It seems that the users are not just coming to the platform, but they’re actively engaging in conversations on Threads as well. There are more than 95 million posts on the app already, and over 200 million likes shared all over Threads.
With over 100 million users on the platform, and still counting, it seems that Threads is getting closer to Twitter. Let’s not forget that in November 2022, Elon Musk said that Twitter had approximately 260 million monetizable daily active users in a tweet then.
So it’s most likely that Instagram Threads’ market share will grow in the following weeks. However, Threads in just at the beginning. And we’re going to have to wait a little longer to see if Threads will really become a product of the time. Meta’s marketing strategy will have to position the platform as an outlet to capture the cultural prints of the moment.
Otherwise, it will have no chance against Twitter. While the platform is not going to push politics and hard news on the feed, Threads wants its users to have social media-based conversations. Whatever that is, that’s up to you.
And while Threads is riding a high wave of popularity right now, Adam Mosseri, head of Instagram, is not sure if Threads is retentive yet. Exactly that outlet for capturing the cultural present we talked about earlier.
What do you think about Instagram Threads? Do you think its market share will grow over the next period? Let us know in the comments section below.
This article will discuss what you can do if you can’t click on YouTube videos. We’ve explained everything in easy-to-follow steps, so all you have to do is follow along.
What can I do if I can’t click on YouTube videos?
First, try restarting your PC, make sure your internet is up and consider using the YouTube app instead of the website. If you’re still having issues, consider the following:
1. Run a video Troubleshooter
Left-click the Windows icon, type Settings, and press Enter to open it.
Click the System category, select Troubleshoot from the left pane, and click on Other troubleshooters.
Then, select Video Playback and click the Run button beside it.
Follow the on-screen command, wait for the process to complete, restart your PC and check if the error is solved.
Running the video playback troubleshooter will fix issues with video playback errors.
2. Update the display driver
Right-click the Windows icon and select Device Manager from the list.
Expand the Display Adpaters category, right-click on the display driver name, and select Update driver from the context menu.
Select the Search automatically for the driver from the new Windows and close the window.
3. Clear browser cache and cookies
Launch the browser from your device.
Click on the three dots on the top right side, select More tools, and click on Clear browsing data.
Select All time from the time range, then check the boxes for Cookies and other site data, and the Cached images and files option. Then click on Clear now.
Clearing the browser cache and cookies will remove all pre-store data, refresh the website, and help you fix issues like YouTube locate not working. If interested, also check our guide about how to clear the computer cache in Windows 11.
Click on the three dots on the top right side, select More Tools, and click on Extensions.
Toggle off the new extensions to disable and check if the error persists.
Repeat this process for all Extensions to find the Extensions causing the error.
Select Remove to remove the Extensions causing the error.
5. Enable Javascript
Open your browser (we used Chrome in this example).
Type the following address in the address bar and press enter:chrome://settings/content/javascript
Check Sites can use Javascript.
Javascript can also cause interference with YouTube videos, so make sure to enable it. We showed you how to do it in Chrome, but similar steps apply regardless of browser.
Many users have reported issues with the Discord app auto start when computers load to the desktop. It affects the system’s performance, and some users don’t want it. Thus, we will discuss ways to stop Discord from opening on startup.
Alternatively, we have a detailed guide about how to fix Discord not opening on the Windows operating system.
Why does Discord open automatically when I start my computer?
This is the default behavior for Discord.
Its settings are configured so it starts along with your PC.
It’s set to start automatically in the Task Manager or Settings app.
How do I stop Discord from opening on startup?
1. Via Discord settings
Launch the Discord app and click the gear icon at the bottom.
Click on App settings and navigate to Windows Settings.
Toggle off the Open Discord switch, close the app, and restart your PC to check if the error is solved.
The Open Discord option is an in-built feature that gives you control over Discord launch at startup. After making this changes, you’ll be able to stop Discord from opening on startup.
2. Via the Task Manager
Left-click the Windows icon, type Task Manager, and press Enter to open it.
Click the Startup tab. Navigate to Discord or Update.exe, right-click on it, and select Disable from the pop-up menu.
Then, close the Task Manager Windows and restart your computer.
The Windows Task Manager manages the activities of all apps on your PC and app startups. Check our guide about fixing Task Manager not responding on Windows PCs.
Right-click the Windows icon and select Settings from the list of options.
Click on the Apps category and select Startup from the left side pane.
Navigate to Discord from the list and toggle off the switch to auto startup.
Windows Settings can be the last resort to stop Discord from opening on startup. We have a guide about ways to fix Windows Settings that won’t open on your computer.
Twitter is a social media platform for sharing and interacting with short messages called tweets. However, people have encountered difficulty accessing tweets due to the rate limit.
Therefore, we will discuss the Twitter rate limit exceeded and how to fix it. Similarly, we have a similar guide on what to do if Twitter is over capacity.
What does it mean when the Twitter rate limit is exceeded?
This message appears when the account has surpassed the allowed number of API requests within a specified time frame.
Twitter imposes rate limits to prevent abuse, ensure fair data usage, and maintain the stability of its platform.
Exceeding the rate limit leads to temporary restrictions, such as being unable to perform specific actions like posting tweets and following or unfollowing accounts.
What is the daily limit on Twitter?
Verified accounts are limited to reading 6,000 posts daily.
For unverified accounts, its 600 posts a day
New unverified users can only access 300 posts a day.
However, in his third tweet, Elon Musk revealed the following:
10,000 requests for verified accounts
1,000 for unverified accounts
500 for new unverified accounts.
How many Twitter limits per hour?
The standard Twitter limit per hour is 100 API calls.
These limits can change and are influenced by factors like the type of API endpoint, the authentication method employed, and the access level granted to the application or user.
How do I get out of rate limit on Twitter?
1. Subscribe to blue tick
Launch your Twitter app and log in with your credentials.
Click on your profile picture and select Verified.
Select your preferred subscription.
Follow the on-screen command to make a payment to subscribe to Twitter Blue.
Subscribing to Twitter Blue monthly or annually, an account gains privileged access to additional tweets unavailable to regular users.
2. Wait for the limit to expire
Elon Musk initiated the rate limit to address extreme levels of data scraping & system manipulation and to preserve the server resources.
If you exceeded the limit, waiting 24 hours for the limit to reset may be the last resort.


 NOTE