Uninstall Apps on Windows 11: 4 Different Ways to do it

Microsoft’s Windows 11 has brought its users some really cool new features and major performance improvements, although it does demands a lot of space to install and run properly.

And even if you’ve met the upgrade conditions, additional storage space might be required to download updates and enable specific features.

So, if you need to free up some space or if you want to improve your overall computer’s performance, you might consider uninstalling apps you no longer use.

What apps and programs can I uninstall?

Chances are you need to free up some space but you don’t know where to begin and what to uninstall.

You can start with removing cleanup apps such as CCleaner or MyCleanPC that can be found on anyone’s computer.

Most of these programs don’t go all the way to the Registry to clean residual files and neither one of them improves your PC’s performance whatsoever.

If you absolutely need all your existing apps and programs, try uninstalling the games you’re no longer playing.

They usually take up a lot more space on your device, so uninstalling only one of them might make a big difference.

You can also take a look at the junk you’ve accumulated in your browser and toolbars and clear them out. Some of the add-ons and extensions might not even be available anymore.

And to identify which programs you can’t uninstall, you can quickly see that the uninstall button is missing for a number of Windows apps.

Now, the new OS does offer some build-in uninstaller tools that you can use and today we’ll go through them all.

How can I uninstall apps in Windows 11?

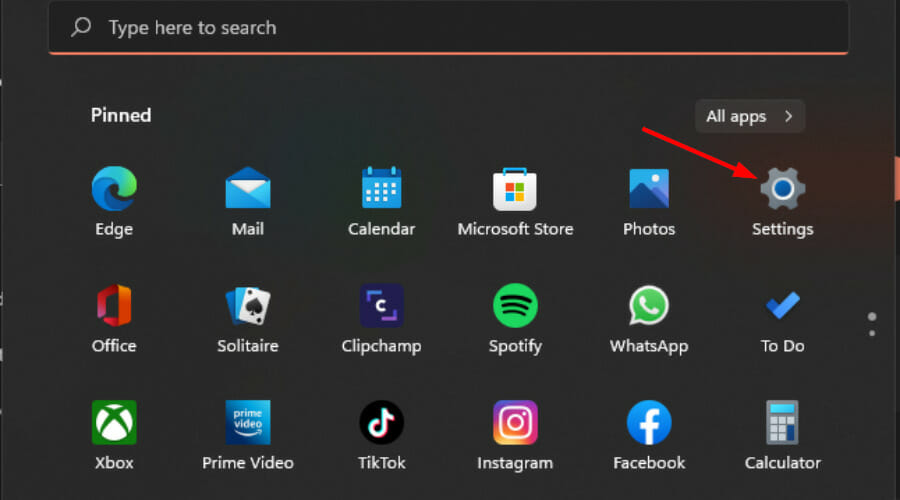
1. Use the Start Menu

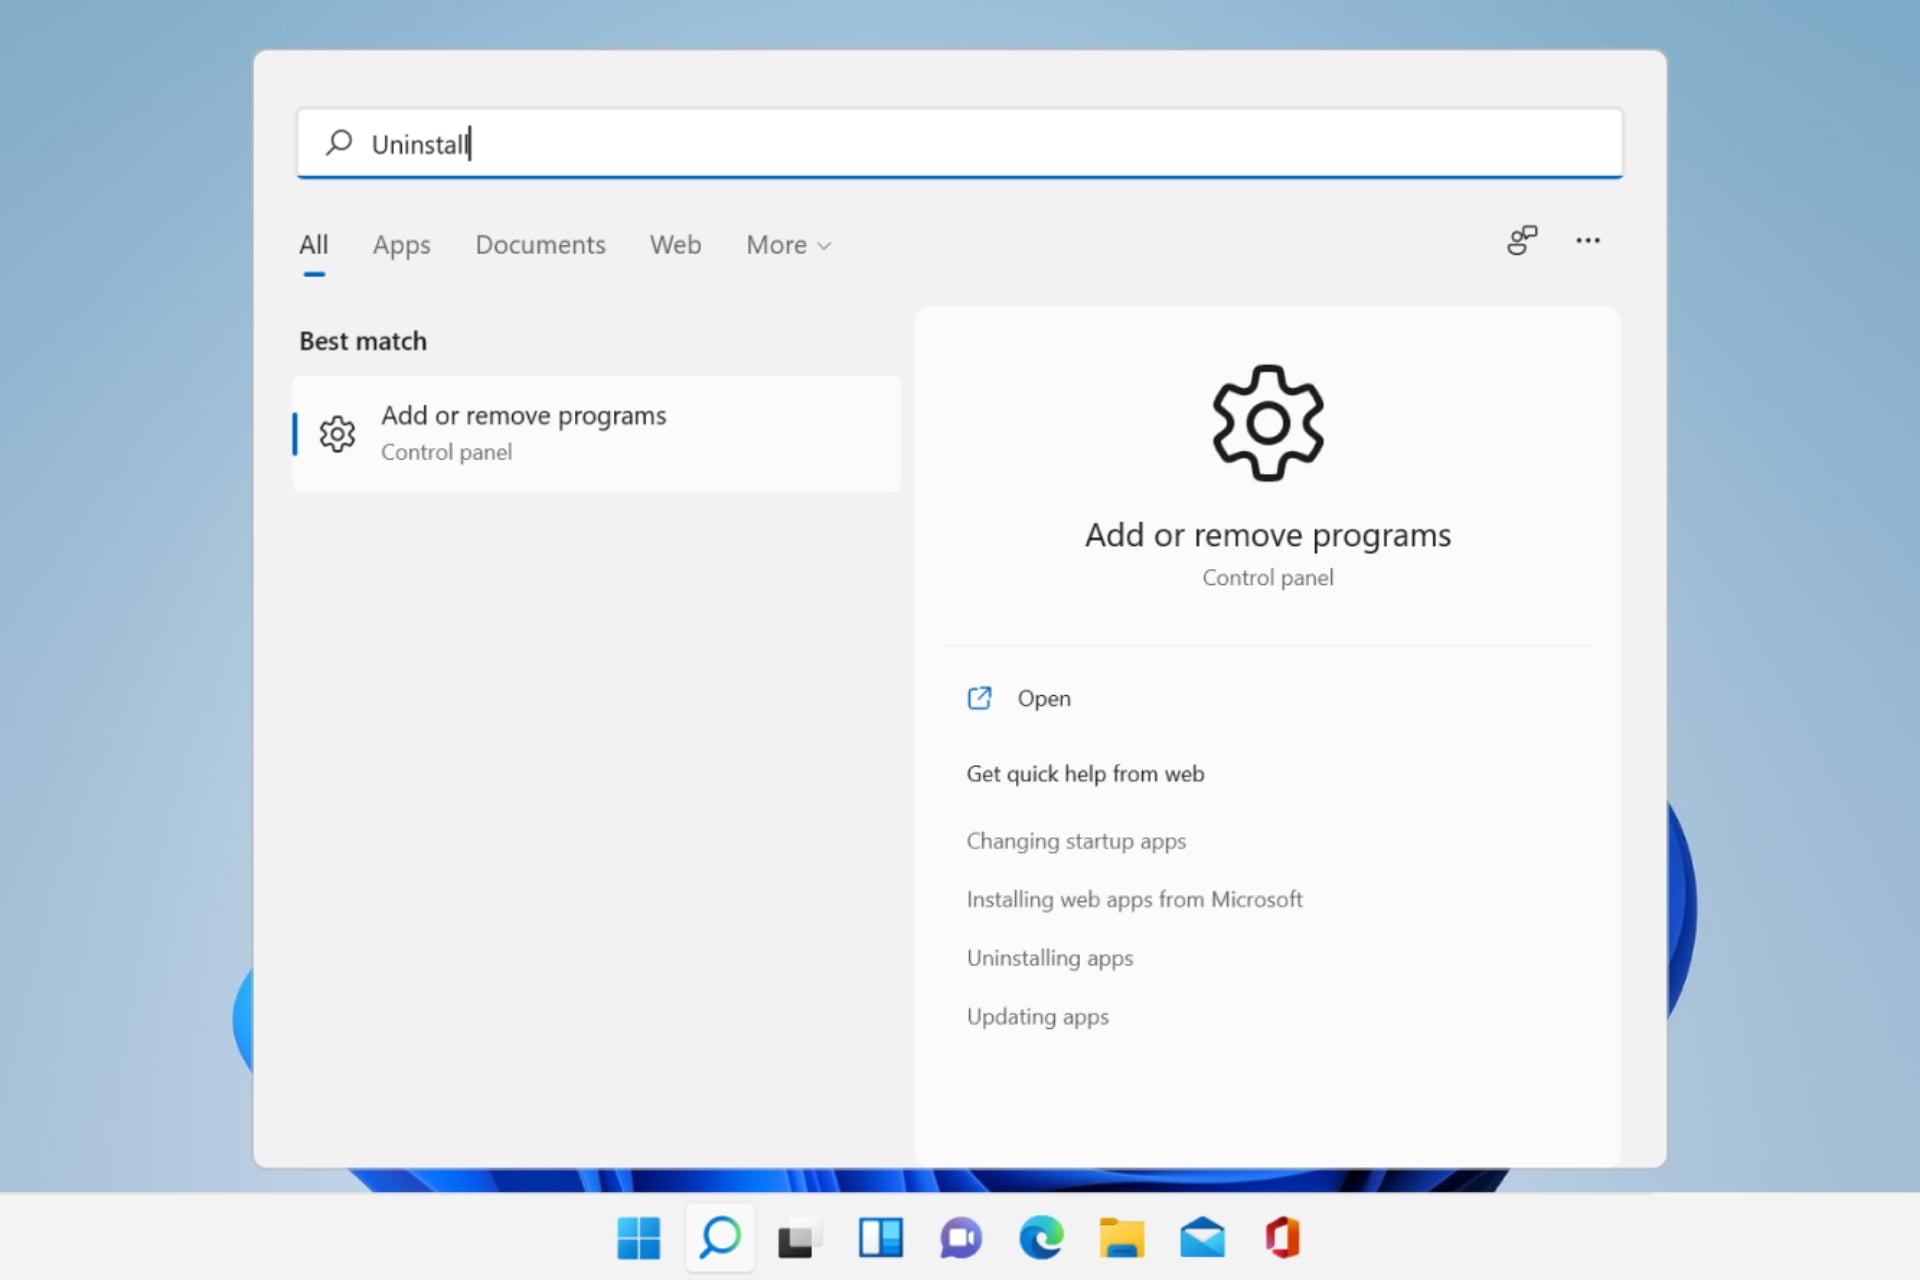
  1. Click on the Search icon and look for the app you want to remove.Look for app
  2. Right-click on it and select Uninstall.Right click Uninstall

2. Use Settings

  1. 1. Press the Windows key to open the search box on your taskbar.

  2. 2. Type Settings in the box.

  3. 3. Click on the first result to open the Settings menu.

  4. 4. Navigate to the Apps section on the left pane.
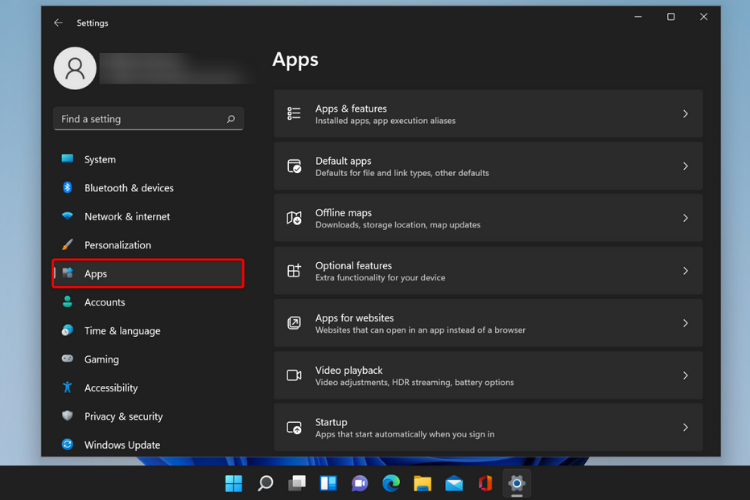
    Apps Win 11
  5. 5. Now you will  be able to see a list of all the apps and programs that are installed on your PC.

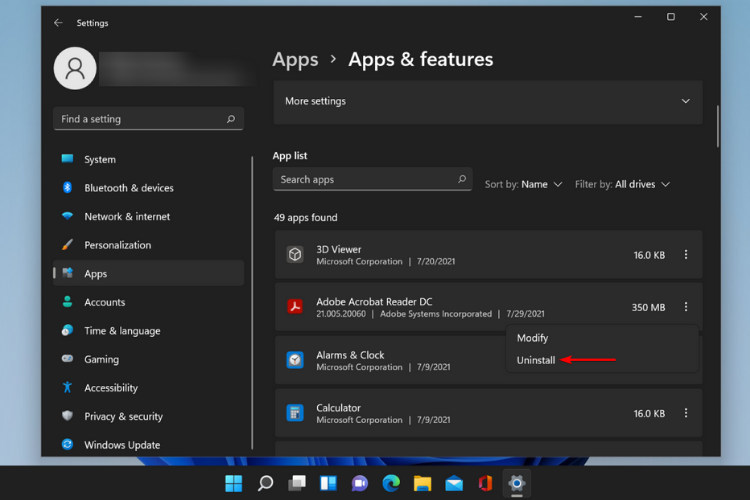
  6. 6. Choose the app you want to remove and click on the three dots next to it.

  7. 7. A menu with options will open. You will be able to choose between Modify and Uninstall.

  8. 8. Select Uninstall.

    Click on three dots and Uninstall
  9. 9. Wait for the removal process to complete. This can take a few moments.

  10. Uninstalling apps and programs via Settings is one of the easiest possible methods. What you need to do is navigate to the Apps & Features center, and manually choose which apps you want to remove from your device.

3. Via Control Panel

3.1. Open Control Panel from Start

  1. Click on Start, type in control panel and launch it.Control panel search
  2. Go to Programs.Programs
  3. Under Programs and Features, click on Uninstall a program.Uninstall a program
  4. Right-click the program you want to remove, and select Uninstall.Select and Uninstall

3.2. Open Control Panel using the Run box

  1. Press Windows + R keys to open the Run box.
  2. Type appwiz.cpl and click on OK.run box control panel command
  3. As in the previous solution, go to the program you want to remove, right-click on it and select Uninstall.

4. Use Power Shell

  1. Click on the Search icon, type power shell and click on Run as administrator to launch it.Power shell run as admin
  2. Enter the following command line to remove all apps at once: Get-AppxPackage -AllUsers | Remove-AppxPackageremove all apps with power shell command
  3. Wait for the process to finish and restart you PC.

Using this command will remove all of Windows default apps at once. Do this only if you are certain you don’t need any of the OS’s default apps.

Find out how to remove apps from a single user account, yet keep in mind that you can also remove a certain app from all users, or reinstall Windows built-in apps if you need them.

How can I make my PC faster?

Uninstalling programs is one of the best ways to make your PC faster, but keeping it updated is also important. Verify regularly if your OS has any updates available and install all of them.

You should also upgrade or limit your RAM usage. It is important to know that the more RAM you have, the more processes your computer can perform at the same time.

Try closing the tabs you do not use on your browser and delete the big files you don’t need from your computer, such as videos or photos.

Even more, removing apps using any of the above options doesn’t actually ensure a clean uninstall as programs can leave old registry entries and residual files behind, which can make your PC work harder. Worse still, some apps may fail to uninstall using any of these methods.

To avoid this from happening and to surely clean up your computer of unwanted apps, we recommend you use IOBit.

Expert in computer health and removal solutions, this third-party program can delete all junk files leaving you with a cleaner and faster PC.

Use these tricks and learn how to make Windows 11 faster and more responsive in just a few steps.

We hope that this guide helped you clean up your device and improve its performance. If you have any questions or suggestions, just head over to the comment section below.

How to Fix Dell Laptop Not Detecting Monitor [3 Ways]

Those who develop dynamic or standalone projects on their system tend to use more than one screen for a better user experience while coding and testing the product.

Recently, we have noticed that many Dell laptop users are experiencing an issue where they cannot connect any external monitor to their laptops. It could be due to outdated drivers, overheating, or even HDMI issues.

This article below discusses three easy ways to fix this issue with the external monitor not working on your Dell laptops.

How do I get my Dell to recognize my second monitor?

1. Check for any physical damages

Whenever problems arise related to the connectivity of any external device to the Windows system, the system may not be responsible for this issue.

The external device might be damaged, so please check for physical damage. Also, don’t forget to check the cable wire used to connect the monitor to the system externally.

If the external monitor or cable wire is faulty, we suggest you replace it with a new one.

2. Force detect the external monitor

  1. Press the Windows + I keys together to open the Settings app.
  2. Click the System option on the left menu, then select the Display option on the right-hand side.
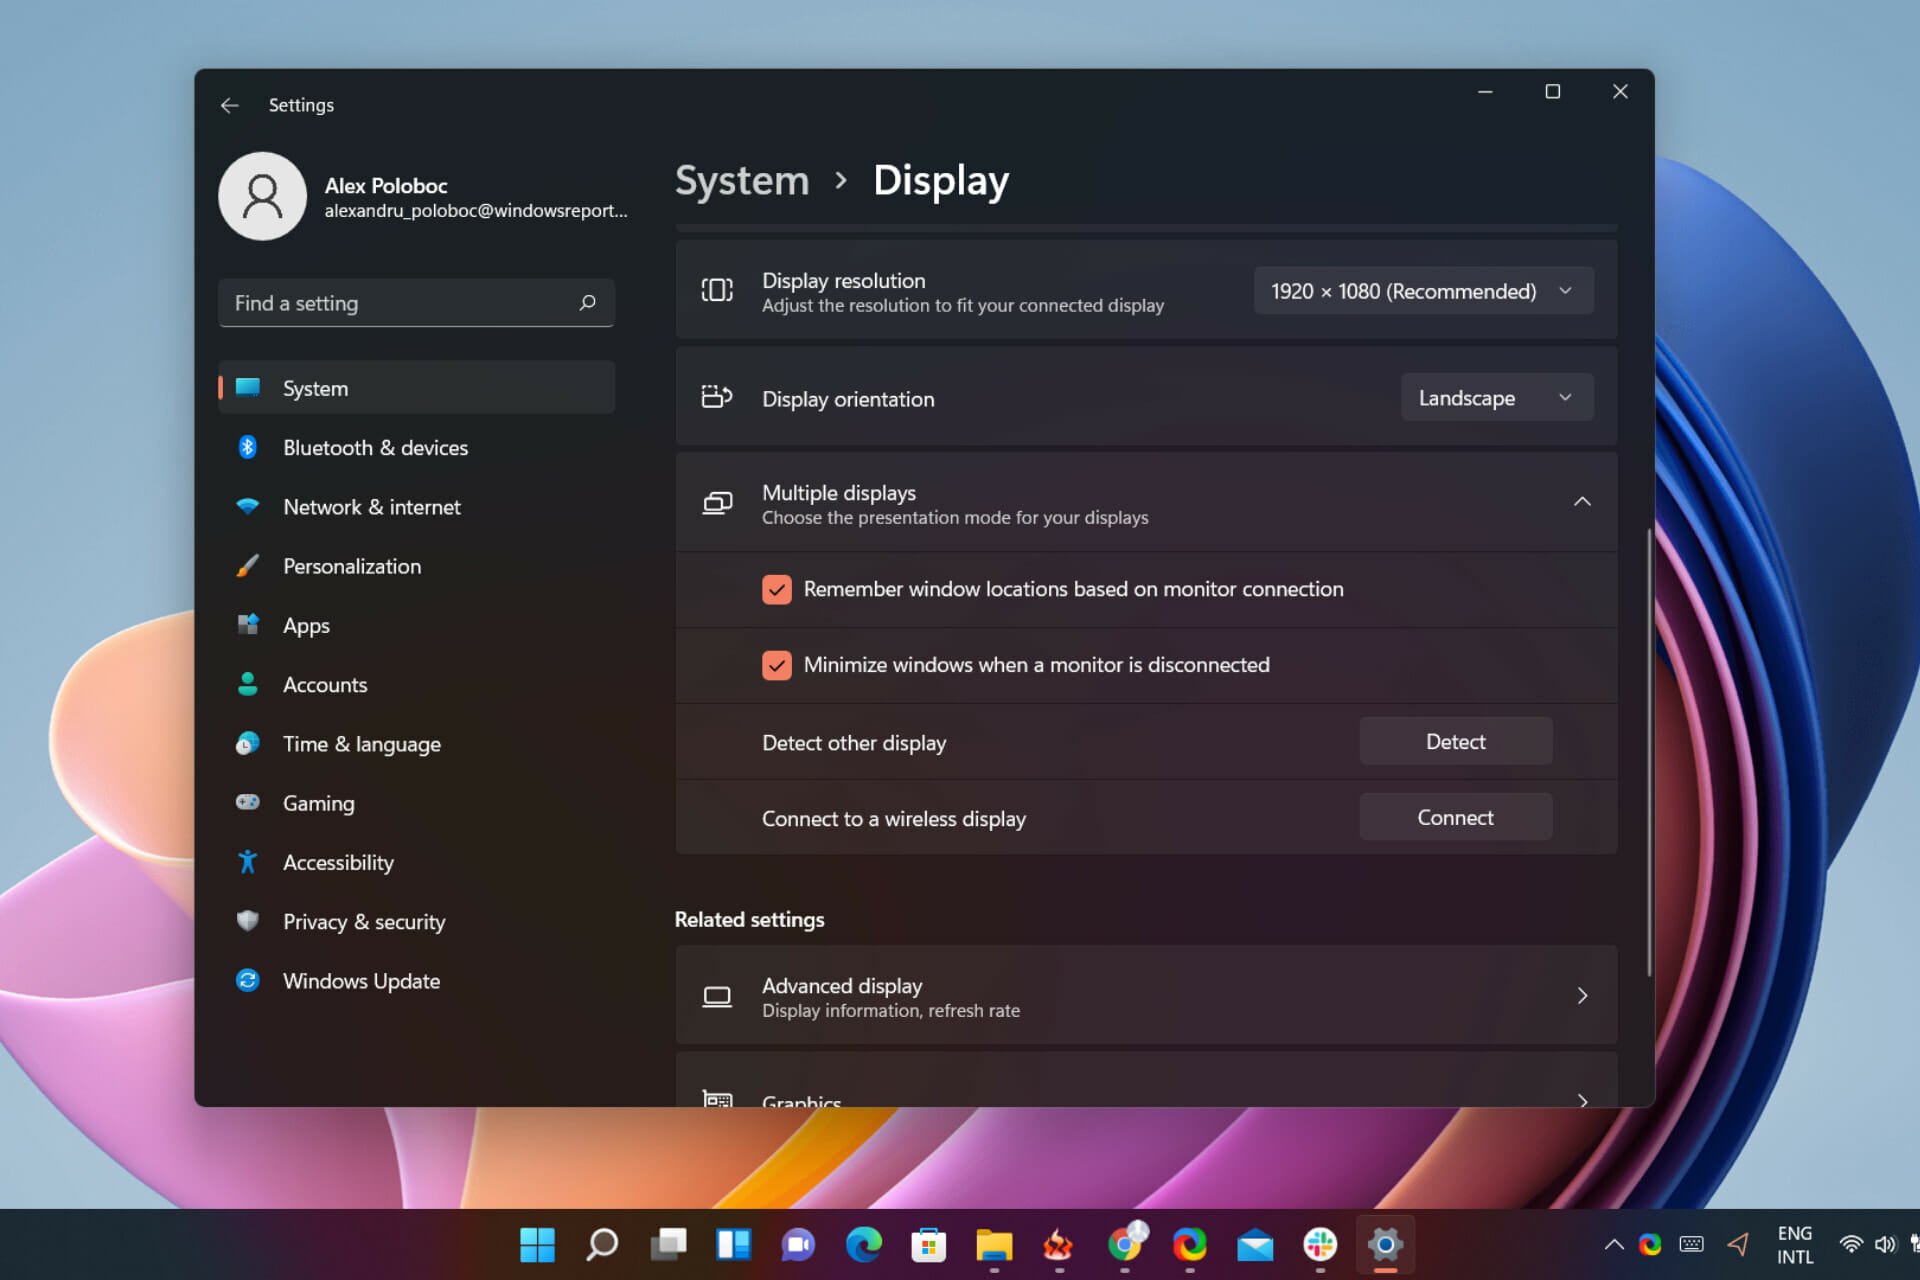
  3. Scroll down the Display page to the Scale & layout section and click the Multiple displays option to expand it.
  4. Now, look for the option called Detect other display and hit the Detect button.
  5. After it detects any external monitor, you can select it from the list, and it will get connected to your system.

3. Update the graphics card driver

  1. Open the Device Manager app on your system by pressing the Windows key and typing device manager.
  2. Click Device Manager from the search results.
  3. In the Device Manager window, locate the Display adapters from the list of devices end expand it.
  4. Right-click on the graphics card adapter and select Properties from the context menu.


  5. Go to the Driver tab and click the Update driver option.
  6. Select Search automatically for drivers to start updating the graphics card driver.

  7. If the problem persists, you need to uninstall the graphics card by right-clicking on the graphics driver and clicking Uninstall device from the context menu.


  8. After uninstalling, restart the system, and it will install the default graphics driver on the system.

Keeping your drivers up to date can also help you fix other issues like no DisplayPort (DP) from your device when connecting using a Dell monitor; read this guide to learn other solutions.

If you’re looking for something quicker and easier, you can use a third-party tool like Fortect Driver Updater to update all the necessary drivers automatically.

How do I know if my HDMI port is working?

For connecting the system to a high-definition external device such as a monitor, it needs a perfectly working HDMI port on the system.

Here is a guide to fixing the HDMI ports that are not working on Windows systems. Follow the steps below to know the status of your HDMI port on the system:

  1. Right-click the Start icon and select Device Manager from the list.
  2. Go to the Display adapters from the list and expand it.
  3. Locate the HDMI port on the list and open its properties window by double-clicking it.
  4. Go to the General tab, it will display the device status.
  5. If the Device status says This device is working correctly, the HDMI port is working on your system.

Why is my Dell laptop not connecting to an external monitor?

  • Outdated graphics driver – Users usually forget to update the graphics card driver, which causes problems with the system, as discussed above in this article
  • Faulty external monitor – Sometimes, the problem is directly linked to external hardware, like a monitor, USB keyboard, external mouse, etc., and it might have been damaged.
  • Damaged cable – If the external accessories, such as a keyboard, mouse, monitor, etc., are connected to the system using the wired cable. If it is broken, it does not connect the external device to the system.

How do I mirror my Dell laptop to my TV without HDMI?

You will probably need a media streaming device, such as Google Chromecast, Microsoft Miracast, or Apple Airplay, to mirror the Dell laptop to the TV without HDMI.

Some also had trouble with the Dell laptops due to overheating and the brightness not working.

All you have to do is configure the media streaming device, your laptop, and your TV to mirror the display from laptop to TV wirelessly via the media streaming device.

If your external display keeps acting up, you’re not alone. Some users report that their external monitor turns off randomly, while others struggle when it’s not detected after sleep.

Device-specific issues are also common—like external monitor problems on a Surface Pro or a Chromebook. And if you’re using a dock, the monitor may not be detected through the docking station, requiring a few extra steps to resolve.

We also have a guide on how to solve no DisplayPort signal on Dell laptops, so don’t miss it.

Here are some of the best screen mirroring software tools for the Windows system. Let us know your choice in the comments area below.

Windows 11 Clock on All Monitors: How to Easily Add it

Indeed, one of the main talking points about Windows 11 is the redesigned taskbar, an element that has been written from scratch in the modern design language.

Thus, some features are missing in the Windows 11 taskbar compared to Windows 10, like drag and drop items between applications, no clock on the second display, smaller design, etc.

Users have complained about these features not being there since the new OS was born, so Microsoft decided to make some of these requests a reality.

How do I display the taskbar clock on all monitors?

Via an Insider build released in the Dev Channel, some simple yet important changes were made by Redmond officials.

For example, the tech giant will add the ability to further customize the Start menu by controlling how much it will display pins or recommendations.

Until now, if you used multiple monitors on your Windows 11 setup, the date and time would only be displayed on the main one.

And seeing how this feature was removed, we had to use third-party software such as ElevenClock to make this possible again.

However, for a small number of Insiders, this has become possible again with build 22509.

Although not exactly clear at this moment, the process of enabling the clock to be displayed on the taskbar of a second or even a third monitor will not be a hard one, rest assured.

Display the clock on all monitors using ElevenClock

  1. 1. Visit the ElevenClock page on the GitHub website.

    elevenclock
  2. 2. Download ElevenClock from the Assets section on the page. You need to click on the EleventClocl.Installer.exe file to start the download.

    download elevenclock
  3. 3. After the download finishes, right-click on the installer to start the installation wizard.

    install elevenclock
  4. 4. Complete the installation process.

  5. 5. After you finish the installation, launch ElevenClock.

  6. 6. Customize the Clock Settings to your liking.

    update Eleven Clock settings
  7. For the time being, ElevenClock is the best chance to show time on all monitors on Windows 11, as the functionality still hasn’t found its way to the Stable channel. The app is very easy to use, and you can configure your Clock Settings in just a few clicks using it.

Looking for even more clock options? Check out these useful clock widgets for Windows 10 to enhance your desktop.

Although the feature hasn’t been introduced to the general public, see the video above to understand where it will most likely end up when it does roll out.

As we mentioned, for the time being, only a limited number of Dev Channel insiders can fiddle with this new option.

If you want to add the clock back on the Windows 11 taskbar for secondary monitors, download and install the ElevenClock utility.

⇒ Get ElevenClock

Install the latest build version if you’re enrolled in the Windows Insider program. The next major Windows 11 stable release will probably return the clock icon to the Taskbar.

But don’t worry, as it is most likely going to become available to us all at the beginning of mid-2022. In addition to the clock, you can also show system tray icons on all monitors on Windows 11 with a few tweaks.

is this a feature you’ve wanted ever since Windows 11 came out? Let us know in the comments section below.

How to Access Internet Explorer in Windows 10 [File Location]

You can find Internet Explorer in every Microsoft Windows version, starting with Windows 95. It is the first web browser developed by Microsoft and included in the OS.

Microsoft intrigued a lot of users when it decided to replace Internet Explorer with Edge. But a change was needed because even the company knew about users’ dissatisfaction with the old browser.

As things stand, reviews of Microsoft Edge are quite positive, with users rating it among the best browsers for all devices. This is not surprising as Edge is probably Microsoft’s last chance to create a fitting default browser for its operating systems.

Since Edge has replaced it, the Internet Explorer browser is almost nonexistent on Windows 10. It is nowhere to be found on the taskbar or the start menu.

However, IE is still present on Windows PC. And if you want to open it for some reason, this guide contains the steps to follow.

Where is Internet Explorer in Windows 10?

Internet Explorer is located among the programs on your PC. You can find the browser from the start menu in another folder.

Also, to get to the location of the Internet Explorer file, you need to go through your hard disk partition and check the program files. We will show you how to do this later in this guide.

Can I still download Internet Explorer for Windows 10?

Internet Explorer comes with your Windows 10 browser by default. So, you don’t need to download the browser.

You only need to know how to find and use it on your PC.

Can you still install Internet Explorer?

You can still install Internet Explorer on Windows 10, but not with a standalone installer or any downloaded tool.

Instead, if you can’t find the browser by default on your device, you will need to enable it as a feature. With this, you will be able to use it.

Quick tip:

We recommended Opera One because is an open source and free to use for all devices. The browser is very fast, and it has a minimalistic and intuitive interface. It has a lot of useful features that make the browsing experience better.

Also, It’s a browser that focuses on content rather than the underlying technology. Opera One is loaded with many useful features by default, such as VPN, Ad Blocker and even AI.

Opera One

Use this friendly browser which can be customized as per user requirements.
Free Download Visit website

How do I access Internet Explorer in Windows 10?

1. Use Cortana

  1. Press the Windows key + S and type internet explorer.
  2. Click on Internet Explorer to open it.
    search box internet explorer file location
  3. Also, you can right-click on it and select Pin to taskbar or Pin to Start to access it later.

You can find Internet Explorer just like you do everything else in Windows 10, with Cortana. However, it is advisable to pin the browser to make it easier to access later.

2. Go to IE file location

  1. Open File Explorer and click the Local disk (C:).
    local disk
  2. Select Program Files (x86).
    program files
  3. Select the Internet Explorer folder.
    option internet explorer file location
  4. Double-click iexplore to open the browser.
    iexplore

All programs installed on your computer are in the Programs files folder on the Windows partition. Therefore, you can locate the Internet Explorer folder on that partition, following the file path above on Windows 10.

3. Go to Windows Accessories

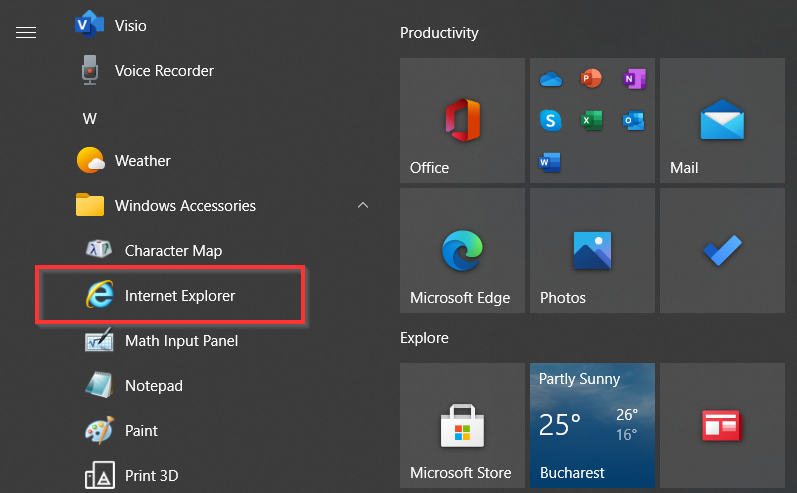
You can also access internet Explorer from Start Menu. It is not located at the letter I as you may think but under the Windows Accessories folder.

On the Start Menu, it is placed alongside other Windows accessories, like Paint or Notepad. So, to open it, navigate to the letter W, click on the Windows Accessories folder, and then select Internet Explorer.

Why can’t I see Internet Explorer in Program and Features?

If you can’t find Internet Explorer in the program and features on your PC, it is most likely because you have uninstalled or disabled it.

The only way to find it is to enable it from optional features in the settings on your PC. With this, you will be able to use the browser.

So, as you can see, Internet Explorer didn’t disappear from Windows 10 completely. But, all the attention is centered on Edge, so you probably won’t even notice that Internet Explorer is there.

Even if you are the greatest Internet Explorer fan in the world, it’s better to use a better modern browser instead: Opera One, Edge, Chrome, Firefox, or privacy-oriented browsers.

Modern browsers feature the latest security improvements so that you can safely use the internet. On the other hand, Internet Explorer is vulnerable to many threats, so choose wisely.

What are your thoughts about Microsoft Edge? Is it a worthy successor of Internet Explorer, or has Microsoft missed the thing again? Let us know your impressions and thoughts in the comments below.

How to Create a Mac OS Bootable USB Media on Windows 10

If you ever need to do a clean Mac OS X install, you’ll need a bootable USB drive.

Sure, you can always set up a bootable USB of Mac OS X on your Apple system; but you can also do the same thing in Windows 10.

So, if something goes wrong with an Apple computer, a Mac OS bootable USB with the installation program is needed.

Therefore, you should consider making a Mac OS bootable USB, even though your computer is working properly.

This is how Mac users without access to bootable Mac system can set up a Mac OS bootable USB media in Windows 10.

There are a few things you’ll need to set up a Mac OS bootable USB media in Windows. The first is a large USB flash drive with up to 16 GB storage space.

That flash USB drive should be empty and compatible with the Mac OS X filesystem. So you might need to format the drive for full Mac OS compatibility.

Secondly, you’ll need a Mac OS X DMG file. You can save a Mac OS X Yosemite DMG to Windows 10 from the Apple Store.

To get the DMG from Apple Store, you’ll also need an Apple ID.

Finally, the TransMac software for Windows 10 is also required.

Make macOS bootable USB on Windows 10 with TransMac

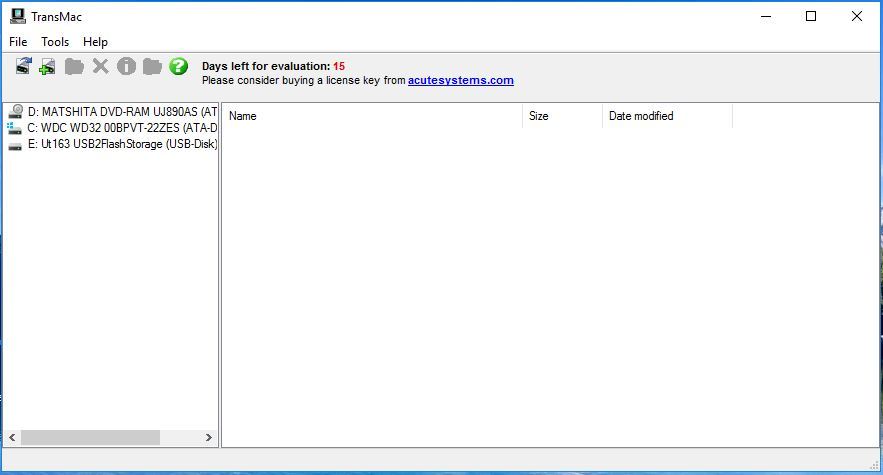
    An easy way to create a bootable USB for mac on Windows 10 is to use the third-party app called TransMac. There’s a shareware version of this app that expires after 15 days. It will aid you in setting up your bootable USB drive.

  1. 1. Click on tmsetup.zip on the Acute System website to download TransMac.

  2. 2. After the download completes, open the TransMac setup wizard to add it to Windows 10.

  3. 3. Insert your flash drive into USB port.

  4. 4. Run the TransMac software as an administrator. To do this, you’ll need to right-click the program icon and select Run as administrator.

    open transmac
  5. 5. After, right-click the USB flash drive and select Restore with Disk Image.

  6. 6. Click Yes on the window that pops up to confirm.

    transmac app
  7. 7. Press the browse button on the Restore Disk Image to Drive window and select your Mac OS X DMG.

  8. 8. Press the OK button to set up the bootable USB. Then it might take a couple of hours for the bootable USB to be ready.

  9. 9. Thereafter, you can close the software and remove the USB.

  10. 10. Connect the USB to your Mac, hold the Options key as it boots up, and then select the USB drive.

Note: Don’t forget that this is paid software, but you have 15 days of trial before you buy it.

So that’s how you can set up a Mac OS X bootable USB drive in Windows 10. With that USB drive you can now reinstall the OS X.

READ ALSO: 

How to Get JPG Images to Show up on the Website

In the online world, pictures speak more than any other form of content, and the ability to customize makes things even better. But, several users reported that websites wouldn’t show JPG.

So when a website won’t show JPG and your pictures are in this format, there’ll be consequences as your website traffic, engagement, and viewer sessions will be affected, with the short attention span of audiences today.

Also, for users, if the images are not showing on the website HTML, this could affect the website’s readability and experience. When ideas fail to load, the website’s design looks broken and messes with the user experience altogether.

Other similar issues related to images not loading or showing on the website include:

  • BBC website not showing images
  • Chrome not loading images on Android
  • Website won’t show jpg WordPress

So, let’s find out all there’s to about the problem and the solutions that worked for most users.

Why are images not displaying in Chrome?

Some causes when a website won’t show JPG include incorrect file paths to the location in your directory structure where the image files reside, misspelled file names for the images, and wrong image file extensions like .jpg or. JPG (case sensitivity matters) or missing files.

Also, the website may be down, or there could be a problem transferring the image when requested by the browser first.

Besides, issues at the website administrator’s end are standard or high traffic could affect the host system’s ability.

How do I fix websites not loading pictures?

1. Try a different browser

If you notice that your browser continues having this issue no matter what solutions you try, you should consider trying Opera One. With specific extensions can make it easier for you to turn Opera One into a dedicated photo viewer.

As a bonus, you get free ad-blocker, tracker-blocker, crypto wallet, VPN and AI.

Opera One

A web browser can also efficiently act as a photo viewer, streaming platform, and more, all thanks to Opera’s technology.
Free Download Visit website

2. Check the basics

One of the first things to check is how your directory structure set up on the host site is, how you upload files, and check to ensure the image folder isn’t the root directory of your website.

The index.html file resides in the root directory and points to the images folder for the pictures.

Try moving the image folder or copying it to the HTTP documents folder (the equivalent of my public_html folder). You can also create a new folder on your desktop and save everything to make it more organized and easier to navigate.

Put all pictures you want to use into the same folder with the index.html file so it can be relevant, and shorten the file path to just the picture name and file type, e.g., logo.jpg.

Note icon NOTE
Where the filename has uppercase characters for the file type, reference it using .JPG and not .jpg. You can fix your links or try to rename all images with uppercase or lowercase kinds depending on the characters on your file type.

Make sure not to use inline CSS. Instead, always separate the website structure, presentation, and behavior by linking to the documents: HTML, CSS, and JavaScript/JQuery, respectively.

These are just some general guidelines, but they can be helpful if images won’t appear on the HTML page website.

3. Disable any user script manager

Some users have discovered that disabling a user script manager like Greasemonkey can fix the issue when the website doesn’t show JPG.

Sometimes the anti-Adblock killer script for Greasemonkey may interfere, and when re-enabled one by one, you can tell which one is causing the problem.

Once done, verify if the website still won’t show JPG. In that case, head to the following method.

4. Clear cookies and cache

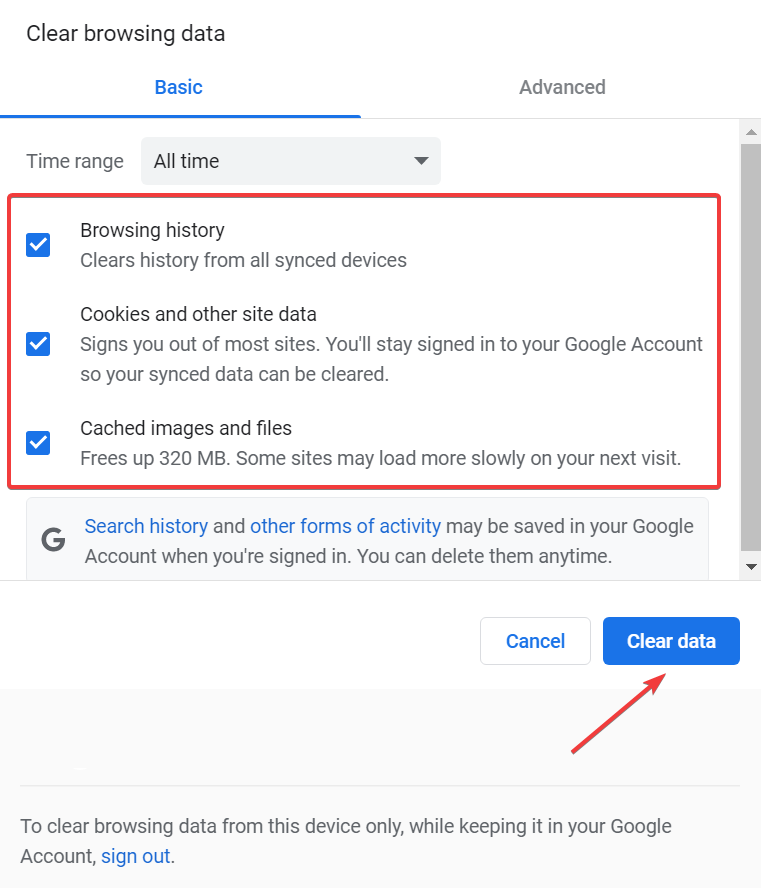
  1. Launch your browser, and press Ctrl + Shift + Del to open the Clear Browsing Data window.
  2. Now, click on the Time range dropdown menu, and select All time.all time
  3. Select all the options listed here, and click the Clear data button.clear data to fix website won't show jpg

Clearing the browser’s corrupt cookies and caches helps fix many issues, including when websites won’t show JPG.

5. Update the browser

Running an outdated browser version may also lead to problems with it, and updating the browser should fix things.

Also, there may be bugs in the installed version of the browser. In this case, the developers release a patch for it in the subsequent versions. So make sure you check for it and install the latest version.

6. Check image permissions

  1. Click on the View site information icon in the address bar, and select Site settings.site settings
  2. Now, locate the Images option, click on the dropdown menu next to it, and select either Allow or Allow (default) from the list of options.Allow (Default) to fix website won't show jpg

Also, several browsers have a built-in option to disable loading images on the website. So, check for it and enable loading if the website won’t show JPG.

7. Refresh your browser

  1. Click on the hamburger icon near the top-right corner, and select Help from the menu.Help
  2. Now, click on Troubleshoot Mode.troubleshoot mode
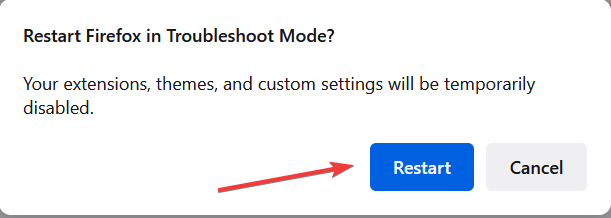
  3. Click Restart in the confirmation prompt.restart
  4. Next, click on the Refresh Firefox button.refresh firefox
  5. Finally, select the Refresh Firefox button once again to confirm the change.Refresh Firefox to fix website won't show jpg

This applies to the Firefox browser, so you can try and refresh to see whether the website still won’t show JPG images.

This feature fixes many issues by restoring Firefox to the default state while saving important information like passwords, bookmarks, and open tabs. However, it removes extensions and extension data.

The refresh feature creates a new profile folder while saving essential information.

Add-ons stored in the profile folder are removed, including themes, and other add-ons stored elsewhere like plugins won’t be removed, but modified preferences will be reset like disabled plugins.

Firefox will save bookmarks, cookies, web form auto-fill info, personal dictionary, browsing, and download history.

Note icon NOTE
Your old profile will be placed in a folder called Old Firefox Data, so if refreshing didn’t fix the problem, you could restore some information by copying files to the newly created profile, then delete the old folder.

How do I get images to show on my website?

If images don’t show on your website, verify that they are added correctly and that the hosting servers work fine. In many cases, the server is either down facing too much traffic.

Also, verify the format is compatible with the website settings. When uploading an incorrect format, the website should ideally throw an error, but even if it doesn’t, check the same.

By leaving a comment in the section below, let us know if any of these solutions helped fix the issue when your website won’t show JPG.

Does Windows 11 Consume More Battery? How to check & improve it

Microsoft’s Windows 11 is great for a lot of things from the advanced features and improved interface that could easily make it a battery hog.

The truth however is that battery life isn’t determined by your operating system. It’s determined by the hardware you have.

There are some circumstances in which it uses more power like when you are playing games or running multiple apps but you can easily tweak your settings to reduce the power usage.

Does Windows 11 use more battery?

If you have an older version of Windows installed on your device, upgrading to the latest Windows 11 may be draining your battery faster than usual. 

This is because of the system requirements of Windows 11, which uses more resources and power than previous versions of Windows.

Because of these changes, it’s recommended that you update any outdated software that may be affecting your battery life. 

Aside from adjusting your settings to help control how much power your computer uses when it’s idle, you can also use some tips and tricks to make your Windows 11 faster and more responsive.

How can I improve Windows 11 battery life?

1. Enable the battery saver feature

  1. Hit the Windows + I keys to open Settings.
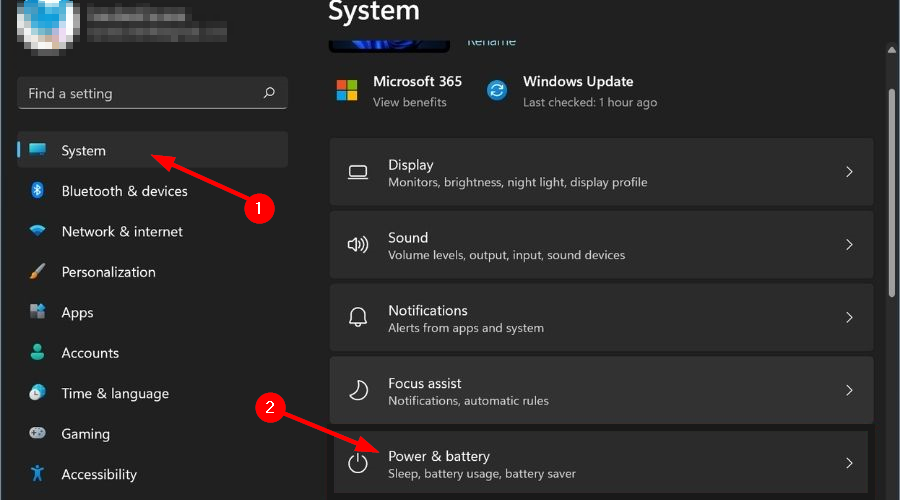
  2. Navigate to System and select Power & battery.
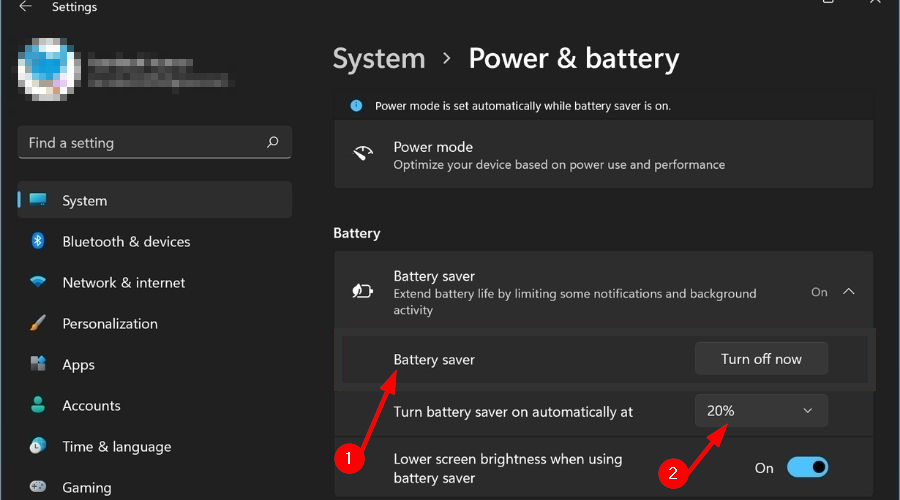
  3. Under Battery saver, select Turn battery saver on automatically at and choose a percentage level when it should automatically turn on.

2. Change Power settings

  1. 1. Hit the Windows + I keys at the same time.

  2. 2. Choose Settings from the menu that opened.

    settings windows
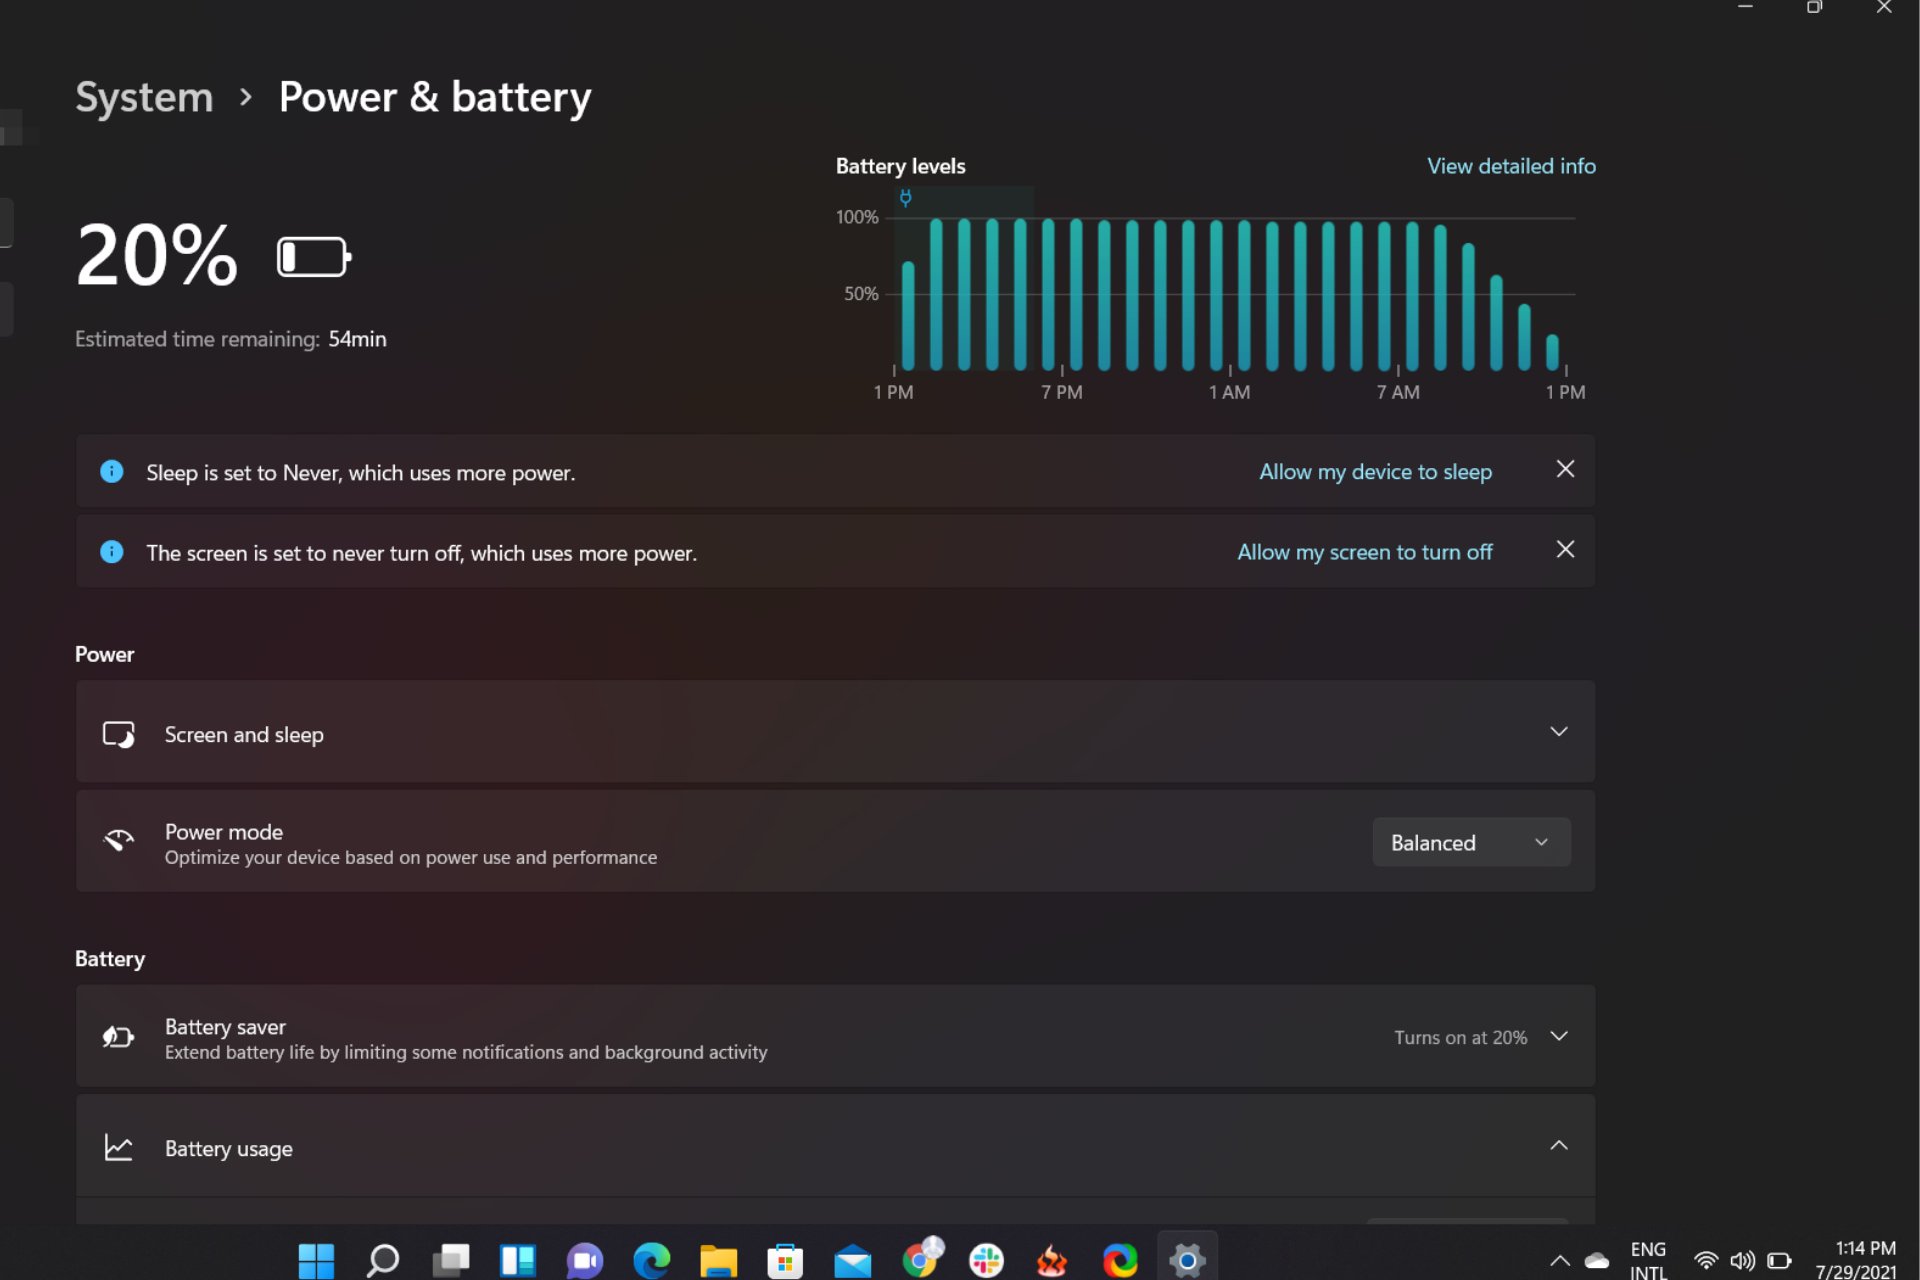
  3. 3. Navigate to System on the left pane and select Power & battery from the right pane that opened.

    Power and battery
  4. 4. Scroll down to the Power mode section and click on it.

  5. 5. A drop down menu will open.

  6. 6. Select Best power efficiency from the menu.

    improve battery life windows
  7. 7. Close the window to apply the changes.

  8. Another great method to improve your battery life on your Windows 10 laptop is to set the Best Power Efficiency Mode on. This can be easily done from the built-in Power & Battery settings menu.

3. Run the Power troubleshooter

  1. Hit the Windows + I keys to open Settings.
  2. Navigate to System and select Troubleshoot.
  3. Select Other troubleshooters.
  4. Click the Run button next to Power.

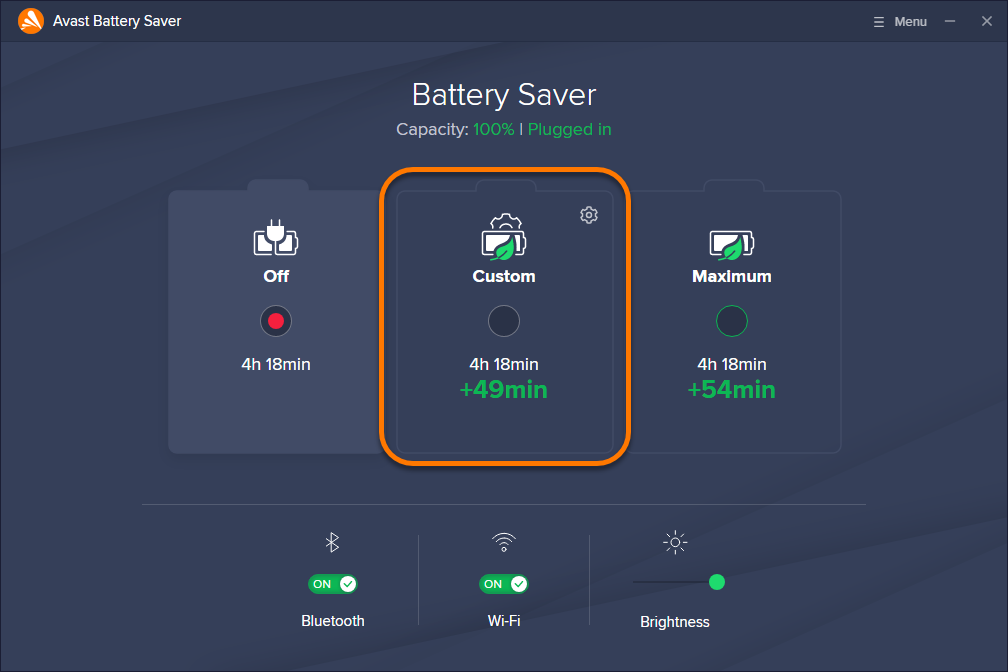
4. Use a specialized software

avast battery life saver mode

Alternatively, if you would like to incorporate an automatic battery saver tool, Avast Battery Saver is a great option that keeps your PC running for longer by intelligently managing your battery life.

The app can extend the life of your PC by up to an hour, depending on its power and how you use it. It also improves your PC’s power efficiency by automatically turning off unnecessary processes when the battery is low and turning them back on when it’s fully charged.

⇒ Get Avast Battery Saver

Does Windows 11 have battery issues?

Battery life is a concern for most laptop users. Although Windows 11 is a powerful OS, it also depends on your laptop. Some models will see a battery life increase thanks to improvements in power management technologies.

Other laptops may get worse battery life in Windows 11 due to more aggressive power-saving features that can cause longer wake from sleep times.

If you are in the market for a powerful PC to run Windows 11, you can select one from our recommended list. We also have a guide that tackles battery drain after shutdown, so don’t miss it if you’re having problems.

Feel free to share some of the tips and tricks you have up your sleeve that you use to save your battery life in the comment section below.

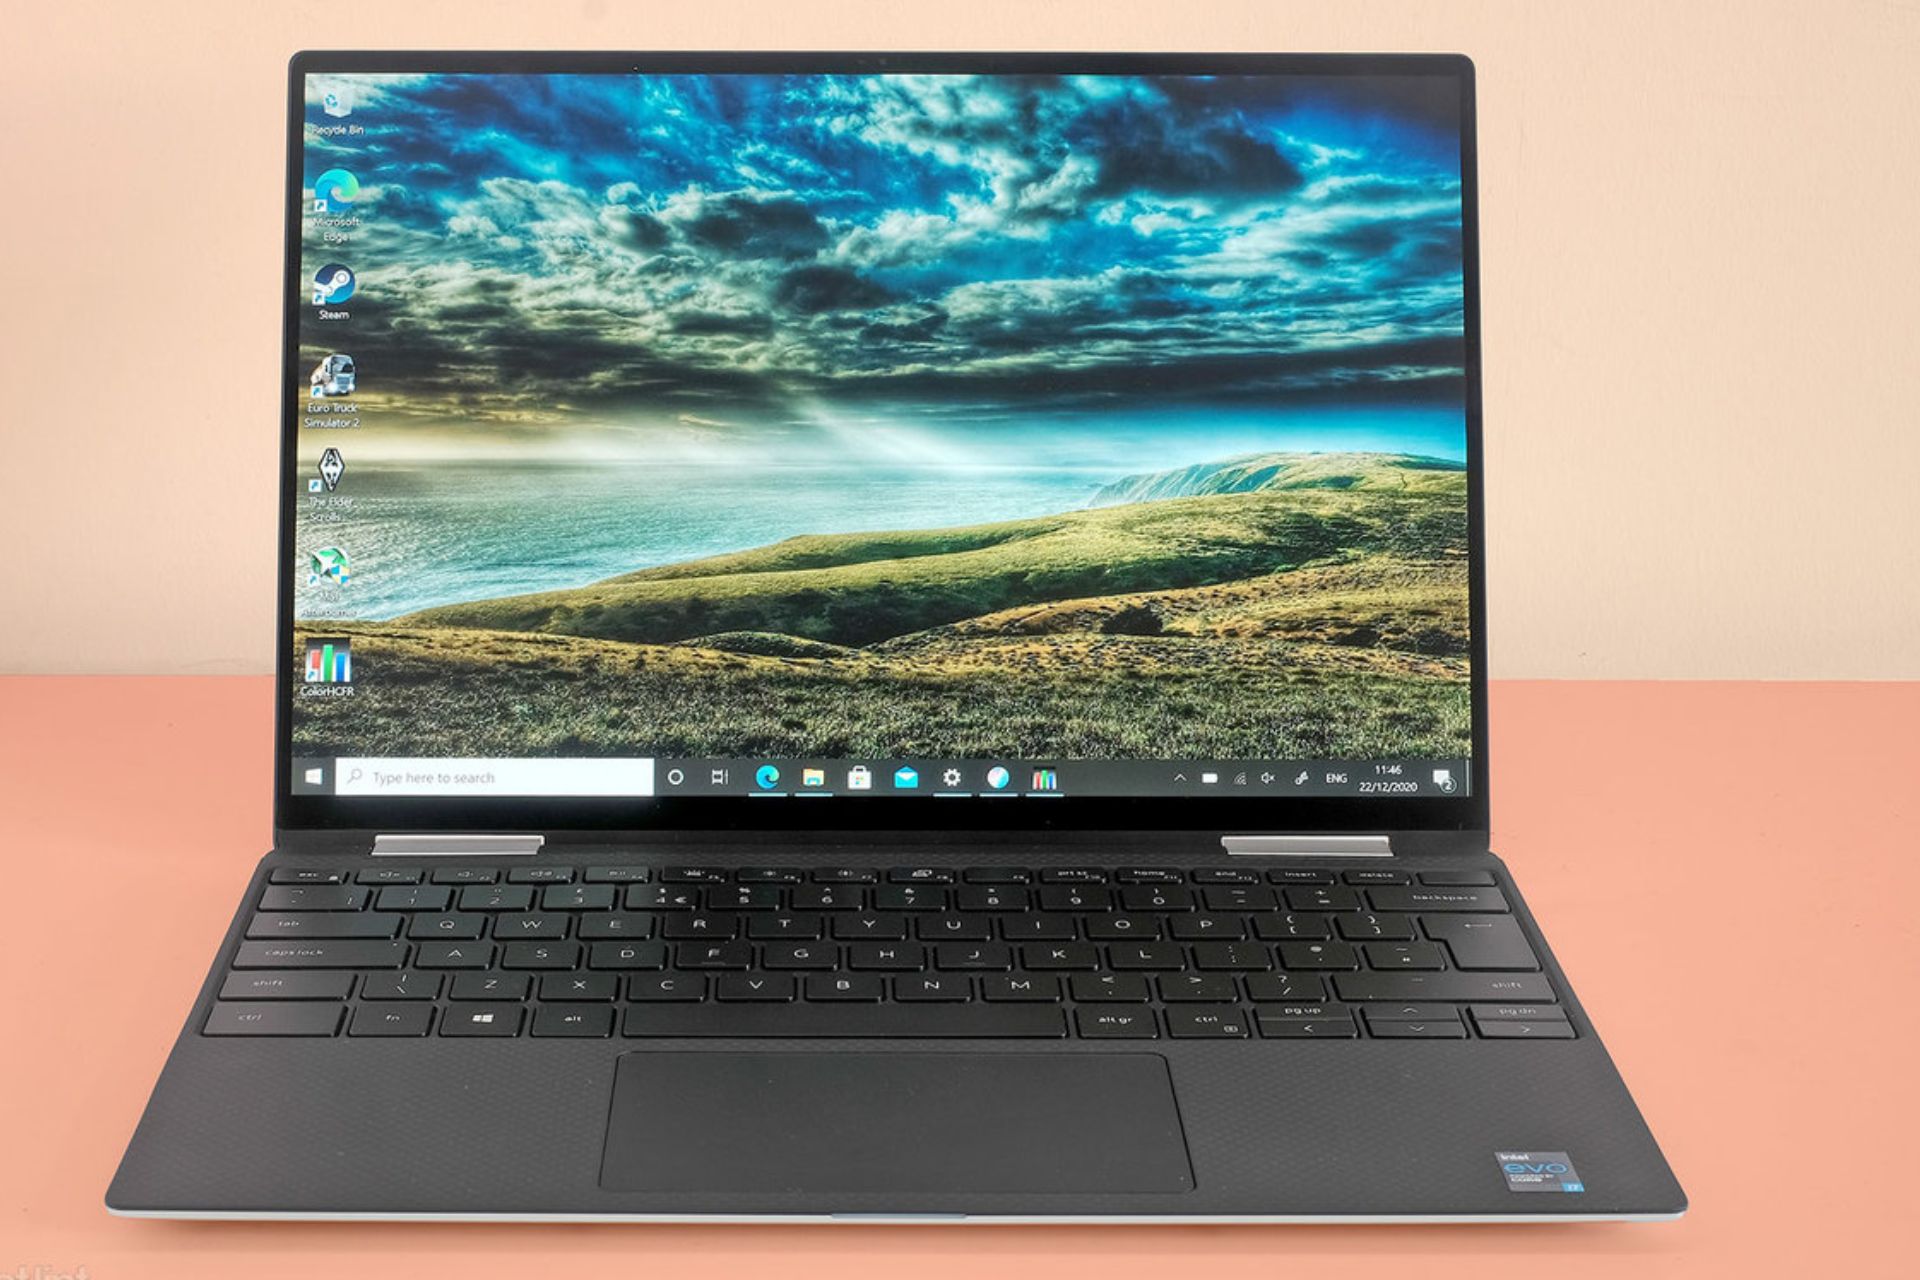
7 Ways to Fix Your Dell XPS 13 when It’s Not Booting Up

Dell is one of the world’s oldest computer products and has been around for a long time. Over time, Dell has become one of the best computers for work and business. However, some issues users complain about with the Dell computer. One of the issues is Dell XPS 13 not booting and Dell XPS 13 not charging.

Dell XPS is a new generation computer that features the best qualities of a computer. The Dell Extreme Performance System (XPS) 13 is one of the fastest computers on the market. It operates at high speed, which helps it respond quickly to inputs and requests.

Also, it features a Core i5 6th gen processor that prevents it from lagging or slowing down regardless of how many tasks are running simultaneously. Likewise, it has advanced graphics quality and high memory features like 8 GB RAM.

Nonetheless, the Dell XPS 13 not booting issue plagues many users and can prevent them from being able to access their computers.

However, there are various reasons why the Dell XPS 13 won’t boot, or Dell XPS 13 is stuck on Dell logo errors, like power and hard drive issues. Hence, this article will discuss ways to fix this error.

Why is my Dell XPS 13 not booting?

  1. Power supply or battery issues: There is a possibility that the battery of your laptop is not working properly. Hence, it will affect the power supply to the PC and prevent it from booting up or starting. This issue can result in the Dell XPS 13 won’t turn on unless plugged in problem. However, if the power supply to the system is cut off or not stable, it can cause the Dell XPS 13 not booting error.
  2. Interference with the USB or memory card plugged in: When you have your USB drive, or memory card plugged into your PC, it can prevent it from booting or turning on. Many users have complained that the external drive is the cause of the issue. However, if the system finds it difficult to read or identify the external drive, it may not be able to process boot.
  3. Hardware issues: The hardware issue occurs when you have a new memory or hardware installed on your computer. However, the newly added component can affect the system if it is incompatible with it, preventing it from booting. Likewise, it can cause the Dell XPS 13 stuck on the Dell logo issue.
  4. Graphics drivers issues: A problem with your graphics drivers can cause the Dell XPS 13 to black screen on startup issue. Several other things can cause the Dell XPS 13 not booting issue. Nonetheless, the problem is not threatening, and you should be able to fix it after one or two troubleshooting.

How do I fix my Dell XPS 13 that won’t boot up?

1. Check the power supply

The first thing to do when your computer isn’t booting or turning on is to check the power supply. However, you can connect your PC to the charger plugged into the wall socket.

Likewise, check if you are using the required adapter for your PC. The Dell XPS and other devices have different power features and voltage requirements. Consequently, your computer may not turn on or work with the wrong adapter. So, use the required adapter.

2. Unplug external drives/memory cards

Peradventure, you have external drives plugged in, unplug them from the USB ports, and try to boot your system.

3. Perform a power cycle on your system

Another solution is to power cycle your laptop. After you’ve unplugged the external devices like USB drives and memory cards, unplug the power source.

Then, hold down the power button for 15-20 seconds. It should fix the issue.

4. Run the Dell diagnostic tool

  1. Press the Power button on your Dell XPS 13 laptop.
  2. Press the F12 key repeatedly to prompt the One Time Boot Menu.
  3. Select Diagnostics and press Enter. If there are any issues, the diagnosis will display error codes.

Although running a diagnostic won’t fix the issue immediately, it can effectively fix Dell XPS 13 without booting past the Dell logo specifically.

5. Restart your graphics drivers

  1. Press the Power button to turn on the laptop.
  2. Press Windows + Ctrl + Shift + B keys simultaneously.

If the Dell laptop is not turning on, but the keyboard light is up, this fix might be more suited. The hotkey combination should restart your device’s graphics drivers and fix the Dell XPS 13 black screen on startup issues.

6. Boot from a rescue disk or USB

  1. Make sure your computer is off.
  2. Plug in the USB drive containing the operating system.
  3. Press the power button to switch on the PC and press F12 repeatedly to open the One Time Boot Menu.
  4. Select the USB drive to boot.

If you have a rescue disk, you can insert it into the computer and follow the steps above. This fix is an alternative solution to consider if the Dell XPS 13 not booting from USB.

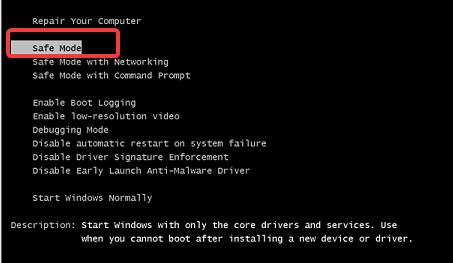
7. Boot in Safe Mode

  1. Press the Power button to turn on the PC.
  2. Press the F8 key to prompt the Advanced Boot Options menu.
  3. Select Safe Mode and press Enter.

Your PC will reboot, and it should fix the issue.

How do you do a hard reset on a Dell XPS 13 laptop?

  1. Disconnect external devices from the laptop (PC charger included).
  2. Press and hold the Power button for 15-20 seconds.
  3. Plug into the power source and turn on your laptop.
  4. Doing this will help your laptop boot smoothly.

We recommend you check our article for more information about how to fix the Dell XPS 13 if it’s not charging. Also, check this article if your Dell XPS 13 fingerprint reader is not working.

Please leave your questions, contributions, and suggestions in the comments below. We’d like to hear from you.

Your Browser Can’t Access the Clipboard [Multiple Devices & Apps]

Many users have reported that the copy-paste function doesn’t work inside their browser, and an error message appears saying Your browser doesn’t allow clipboard access.

It can affect the speed at which you can copy-paste texts in your browser.

This issue is a security feature implemented inside browser software that protects you from third parties getting access to your computer’s clipboard data. This action is performed by JavaScript not being given access to your clipboard.

Your browser can’t access the clipboard issue may appear on any websites or services like Excel Online, PowerPoint Online, Google Docs, or Microsoft Teams on devices like Mac, Windows PC, iPad, iPhone, Linux, etc.

When you face this type of issue, you may see a message like the followings:

Unable to read from the browser’s clipboard. Please make sure you have granted access to this website to read from the clipboard.
You need to grant access to your clipboard to use the copy/paste functionality.

Because of your browser security settings, the editor is not able to access your clipboard data directly. You are required to paste it again in this window.

What it means is that in some cases, you will not be able to use the copy-paste function from the right-click menu. At the same time, it protects you from releasing important information online like credit card details, log-in passwords, IDs, etc.

Why can my browser not access the clipboard?

There are multiple reasons your web browser is not able to access the clipboard or copy-paste feature of the OS. After doing some research, we have found the followings:

  • The browser has a permission issue on your device
  • Internal components of the browser have been corrupted
  • It’s a known bug of a specific browser or a specific version of the browser
  • Any of the third-party extensions or services is preventing your browser from accessing the clipboard

If this problem occurs, you may not get any clue what is actually causing this error. However, you can easily fix it.

We will explore in this article a few methods that can help you copy-paste your content no matter what browser you’re using. Read on to find out how.

How do I make my browser access my clipboard?

1. Use a different browser

In some cases, this issue can be related to your browser. For example, in the past, we saw people faced your browser can’t access the clipboard issue on Safari, Chrome, Edge, or Firefox, but not in some other browsers.

So, in order to fix it, switching to a different browser might be the best solution. In this case, We suggest you consider using Opera One.

This browser is built on the Chromium engine. Therefore, it supports all the same features and extensions. In addition to that, Opera One also has some fantastic free add-ons for the clipboard that you can use.

The clipboard add-on allows you to choose from several filters when you are trying to paste a text. For example, you may want to filter only words that are longer than five characters in search engines.

To install the clipboard add-on, do the following:

  1. Visit the Opera One add-ons page.
  2. On the Skim the clipboard section, select Add to Opera.installing skip the clipboard opera

You have much more flexibility when using Opera One, as you can customize your keyboard shortcuts. With these shortcuts, you can replace most of the clicking and pointing that you are doing when navigating the internet.

It’s definitely worth giving it a try for a much faster and enhanced web experience.

Opera One

Enhance your web experience with Opera One’s amazing features.

2. Use keyboard shortcuts

  1. Press the Ctrl + C keys on your keyboard to copy the text.
  2. Next, press the Ctrl + V keys on your keyboard to paste the text.

This is a neat little trick, but it can help if your browser can’t access the clipboard.

3. Install add-ons to your preferred browser

3.1 Google Chrome

  1. Open Google Chrome.
  2. Download and install Clipboard Permission Manager from the Chrome Store.adding clipboard permission manager to chrome

This extension will allow you to give JavaScript access to your local clipboard for each of the pages that you visit.

3.2 Mozilla Firefox

  1. Open Mozilla Firefox.
  2. Download and install Clipboard Manager from the Firefox Store.adding clipboard manager addon firefox

This add-on will allow you to activate the local clipboard from your PC, but it only works for pasting text, and not copying.

3.3 Microsoft Edge

  1. Open Microsoft Edge.
  2. Download and install the Clipboard Helper browser extension.adding clipboard helper edge

Please use caution when activating the JavaScript access to your computer’s local clipboard, as this can pose a security threat. Make sure to use these items only on sites that you are sure don’t pose any third-party phishing possibility. The details regarding why this is a risk were mentioned above.

Using these extensions has some cool advantages. Even if something prevents your browser from accessing the clipboard, these extensions still work great.

In many cases, you may have seen a message like: Pasting from the clipboard is currently turned off by your browser. Local data will be used. When you have a proper extension, you can easily overcome this type of issue.

This is a workaround, but it can come in handy if your browser can’t access the clipboard.

In this article, we discussed why your browser doesn’t normally allow clipboard access and what you can do to change that.

Please feel free to let us know if this article helped you solve your issue by using the comment section found below this article.

Get ready for the new sidebar in your Edge browser

It was about time we had another look at Microsoft’s flagship browser, which is of course Edge. The last time we spoke of this software was to take a closer look at Dev Channel Build 105.0.1336.2

If you weren’t completely caught up, Microsoft brought some pretty neat improved reliability features, such as:

  • Performance improvements to IMap properties  
  • Improved iOS tooltips  
  • Improved Android shared device support  
  • Optimized read-aloud voice options page for Android   
  • Improved Android shared device support  

Let’s not forget that the Bing search engine now also has an annotation feature that shows price history & coupons.

That was only to get you up to speed with the latest developments concerning your favorite Microsoft-designed internet browser.

However, recently, Microsoft released a new version of the Edge web browser, Edge 104, which is a new stable update that introduces the sidebar to the stable population.

The latest version of Edge Stable introduces a sidebar

Yes, you’ve heard correctly, Microsoft Edge 104.0.1293.63 is already available and is surely installed on most user systems already.

As you can tell from the title, the main new feature of Microsoft Edge 104 is the addition of the highly-requested sidebar.

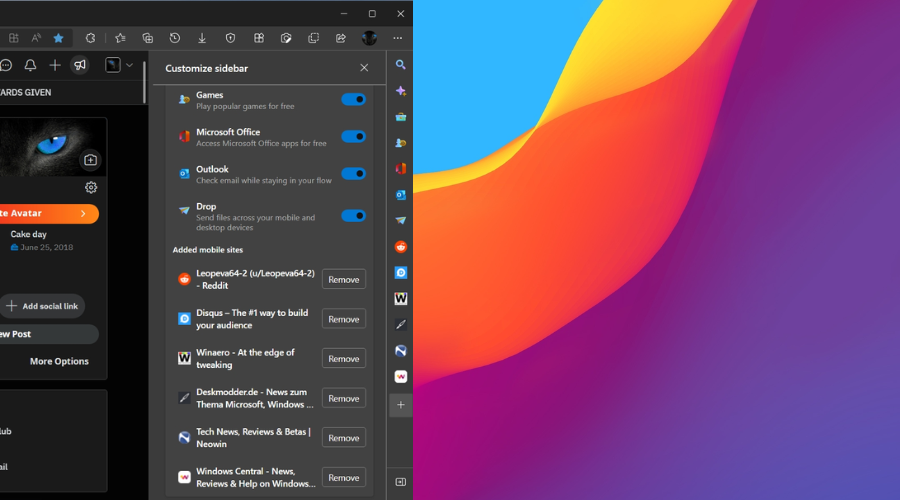
This new sidebar is actually displayed on the right side of the Edge window and includes a mix of features that all open in an expanded sidebar in Edge.

The above-mentioned tools that you can find on the sidebar include Bing Search, Discover, Office, Outlook, Games, and Tools.

If you, let’s say, select the Bing icon, you can therefore run searches on Bing from the sidebar, while another website is displayed in the same window.

The Discover feature will display information about the active website or related content, while Games is powered by MSN, but individual games open in the main area and not in the sidebar.

You should also know, just in case you need this information, that Games can also be turned off by administrators by using the Allow Games Menu policy.

Moving on to the Tools button, know that it is specific to Edge and it includes a calculator, unit converter, Internet speed test, translator, and other services that all open and run in the sidebar of the browser.

As you would have already imagined, Outlook displays Outlook emails and calendars directly in the sidebar.

We also mentioned Office, so know that it links to the various Office applications and recently used documents, provided that the Edge user is signed in with a Microsoft account.

You will surely want these features as well, so know that the sidebar integration will actually roll out gradually to the entire Edge user community.

That being said, don’t be discouraged if you don’t find it in your browser right away. it will become available in a short time.

Another aspect to take into consideration is that Microsoft Edge’s sidebar is not a unique or exclusive feature, as other browsers such as Vivaldi and Opera One already have one.

But, if you chose to go with Edge for your browsing needs, then you surely have reasons to celebrate this latest integration.

What other features do you feel Edge users would benefit from? Share your thoughts with us in the comments section below.
3 Ways to Fix Dell XPS 13 Touchpad if Gestures Aren’t Working

Dell is famous for being one of the world’s fastest and most reliable computer products. It has undergone several improvements and upgrades, but it doesn’t mean it is flawless. One of the issues that users complain about is the Dell XPS 13 touchpad gestures not working.

The Dell XPS 13 is an 11th-generation Intel processor laptop with many features. Some features of the Dell XPS 13 are a 4K display, portability and slimness, high memory components like RAM, and others.

Furthermore, touchpad gestures allow users to set shortcuts like the Dell touchpad enabling two-finger scrolling.

Like other laptop components, the touchpad has drivers that help it work. However, many things can cause the Dell touchpad gestures not to work, ranging from faulty drivers, Windows issues, and many more.

Nonetheless, this article will take you through the causes of the issue and how you can quickly fix it. Also, you can read about how to set touchpad gestures in Windows 11.

Why are my Dell XPS 13 touchpad gestures not working?

  1. Outdated touchpad drivers: Outdated drivers can be responsible for the Dell XPS 13 touchpad gestures not working. However, the touchpad features can’t function properly if the Dell touchpad gestures drivers are outdated. Likewise, when drivers become corrupt, they tend to impede the functionality of the components that rely on them.
  2. Disabled touchpad: Sometimes, users mistakenly disable the touchpad feature on their laptops. Hence, touchpad gestures will stop working. Also, troubleshooting some settings can disable the Touchpad, causing the Dell XPS 13 touchpad gestures not to work.
  3. Disabled touchpad gestures: When the gesture options in the touchpad are now allowed, it can cause the Dell XPS 13 touchpad gestures not to work. Though the touchpad gestures don’t work without enabling the touchpad, gestures may not work if it is disabled in settings.
  4. Booting error: A faulty boot can affect several computer components, including the touchpad gestures. However, when the laptop cannot boot smoothly or entirely, it impedes its functions.
  5. Third-party app interference: Sometimes, applications like antivirus can affect the way components of the system works. Hence, it can prevent the touchpad gestures from working.

What can I do if my Dell XPS 13 touchpad gestures are not working?

1. Restart the PC

  1. Click on Windows to prompt the startup menu.
  2. Click on Power.
  3. Select Restart from the options and press Enter.

Restarting your computer will help it boot properly and fix this and other minor issues with your device.

2. Enable touchpad/touchpad gestures

  1. Click the Start button on the screen and select Settings.
  2. Select Devices, then click on Touchpad.
  3. Toggle on the Touchpad switch.
  4. Return to the Start button on the screen and select Control Panel.
  5. Click on Hardware and Sound, then go to Mouse.
  6. Choose on the Pointers tab in the mouse properties.
  7. Select Scheme and choose a different scheme from the current one or select None.
  8. Click on Apply.

We recommend you restart the PC for the changes to sync correctly. Dell XPS 13 touchpad gestures not working should be fixed if this is the problem.

3. Update Windows

  1. Click Start in the bottom left corner of the screen and choose Settings.
  2. Select Update and Security, then Windows Update.
  3. Click on Check for updates.

Windows will automatically search for updates and download them if there are any available. Once the system is updated, the problem should be solved.

How do I update my Dell touchpad driver?

  1. Right-click on the Start button and select Device Manager.
  2. In the Device Manager tab, select your touchpad driver.
  3. Right-click on the driver and choose Update driver.
  4. Then, click on Search automatically for drivers.
  5. After the update process, restart your PC for the changes to sync fully.

If none of these solutions worked out, an alternative is to try updating all your drivers. To do this, a simple and safe tool that we use is Outbyte Driver Updater which specializes in driver updates.

Outbyte Driver Updater will scan your system and go through all drivers to find the ones outdated, then update all of them if possible. Some drivers don’t get regular updates so this software will renew them to the latest versions.

Outbyte Driver Updater

Simple and safe to use, this tool will optimize your system.

These are the most effective fixes we could come up with to fix the Dell XPS 13 touchpad gestures not working. Nevertheless, you can also learn how to set touchpad gestures on Windows here.

Also, we have a guide you can go through to help you understand how to turn off the laptop touchpad in Windows 10/11.

Further, if your touchpad click is not working on Windows 10/11, you can also check out our guide with details on how to fix it.

Should you have any suggestions or questions, you can leave them below in the comments section. We’d like to hear from you.

Video Not Available? 3 Ways to Get Around This Error

Sometimes while watching YouTube videos, you might encounter a Video not available message, so today we’re going to show you how to fix it properly.

What does it mean when a video is not available?

This message occurs because the video is restricted or due to issues with the uploaded video.

How do I fix Video not available error?

If you have this problem, using a VPN can be a great workaround until you solve the issue.

1. Disable Restricted mode on YouTube

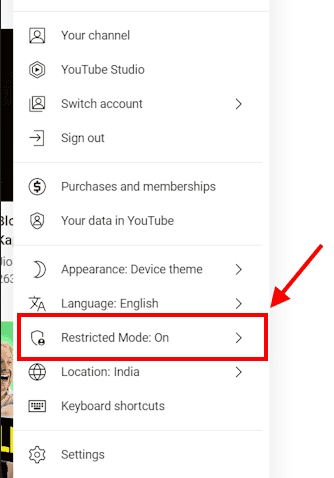
  1. Open YouTube, and click on your profile icon in the top right.
  2. Locate Restricted Mode in the list and disable it.
    restricted mode disable youtube
  3. Check if the problem is gone.
  4. Optional: If you’re an admin go to Admin Console and choose Settings for YouTube. Set Permissions to something less restrictive.

2. Set the video to private

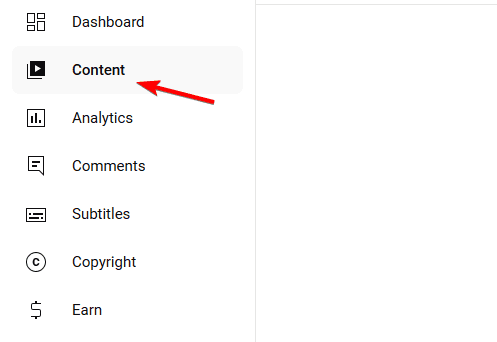
  1. Sign in to YouTube Studio and select Content.
    content youtube
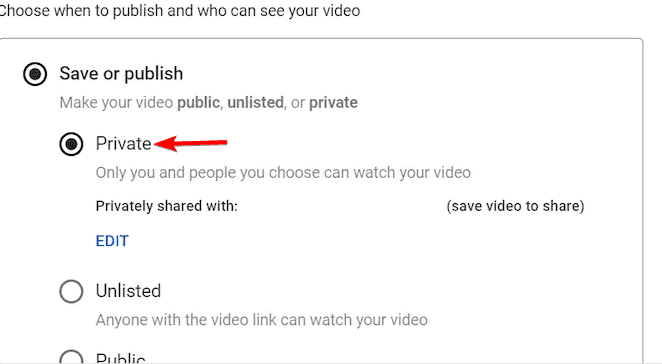
  2. Select your video and set its visibility to Private.
    private youtube video
  3. Save changes.

Keep in mind that this solution only works if you or others can’t see your uploaded videos.

3. Revert video changes

  1. Go to YouTube Studio again, and open your video in Editor.
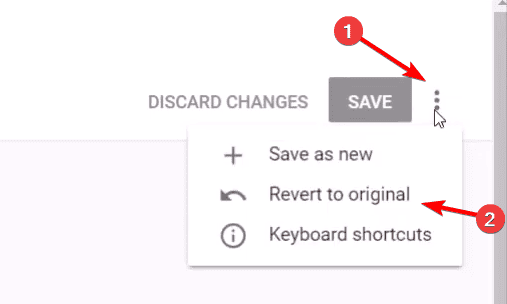
  2. Click the three dots and choose Revert to original.
     revert to original
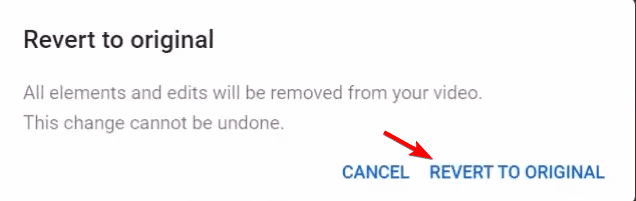
  3. Confirm that you want to revert changes.
    revert to original confirm

Users speculate that this issue occurs due to using royalty-free music, so perhaps avoid using it until the issue is resolved.

How do you watch this video is currently unavailable?

This is usually an issue with the video uploader and its settings, so until those issues are resolved you can’t want unavailable videos.

How to fix YouTube video not available in your country?

Video not available in your country or region error appears if the video is geo-restricted, so you need to use a VPN or proxy to view it.

The Video is not available at the moment message can be pretty annoying and prevent you from watching YouTube videos. However, you should be able to fix it using one of our solutions.

Also, find out what to do if you see the error message, An error occurred. Please try again later on YouTube.

This error is similar to the Browser can’t play this video message that we covered in our earlier guides, so don’t miss it.

We also have a guide on what to do if YouTube videos aren’t playing, so don’t hesitate to visit it.

If you have any other queries or know of a method that’s not listed in this guide, do drop a comment below.

Change Program Files Location in Windows 10

Normally if you have Windows 10 or any other version of Windows operating systems, you will definitely have your Program Files folder located on your C:/ drive where the operating system itself is usually installed.

This is mainly because the system needs to ensure a good correlation between the programs that you are installing and the operating system.

Of course, you can change this location anytime and we will see how to do so by reading the tutorial posted a few rows below.

But first of all, we will need to know the consequences that may happen if we change the Program Files folder location.

Mainly the program files folder is put there for a good reason, if you move it and all your programs will be moved to another location you may experience some system errors after a while.

How to change the location of program files in Windows 10?

    The program files location can be changed using the built-in Registry Editor. You need to access the tool and then manually modify the path of the program files folder.

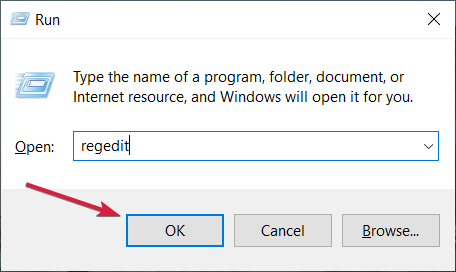
  1. 1. While on your Desktop, you will need to press the Windows and R keys. This will open the Run dialog.

  2. 2. Type regedit and then press Enter or click OK.

  3. 3. Now you should have the Registry Editor window in front of you.

  4. 4. Navigate to the following key:HKEY_LOCAL_MACHINE\SOFTWARE\Microsoft\Windows\CurrentVersion\ProgramFilesDir

    • Note: if you have a 64 bit system it will be a ProgramFilesDir (x86) item.
    program files directory w10
  5. 5. Double click (left click) on it.

  6. 6. From there, you will be able to change the path of the Program Files folder by entering a new path in the Value data section of the window.

  7. 7. After you are done selecting a path you will need to click on OK and then close the Registry Editor window.

  8. 8. If the changes did not work after you closed the window, try a reboot of the system and try it afterward.

Now, you know how to change the path of the program files folder and you can see that it didn’t take up much of your time.

Always keep in mind that if you change the path of the program files folder, this may cause malfunctions in the system.

Microsoft made it clear that it does not support changing the location of the program files:

Microsoft does not support changing the location of the Program Files folder by modifying the ProgramFilesDir registry value. If you change the location of the Program Files folder, you may experience problems with some Microsoft programs or with some software updates.

We hope that our solution helped you change the location of your Program Files folder. However, you should revert the action if problems occur.

Don’t forget to provide your feedback in a comment below if you have any other suggestions.

How to Install and Use Malwarebytes Browser Extension

Malwarebytes is one of the best tools to protect your PC against malware and unwanted threats. Meanwhile, the company has recently introduced the Malwarebytes Browser Extension (BETA).

In other words, Malwarebytes browser extensions, because we have one for Google Chrome and one for Firefox.

What is Malwarebytes browser extension?

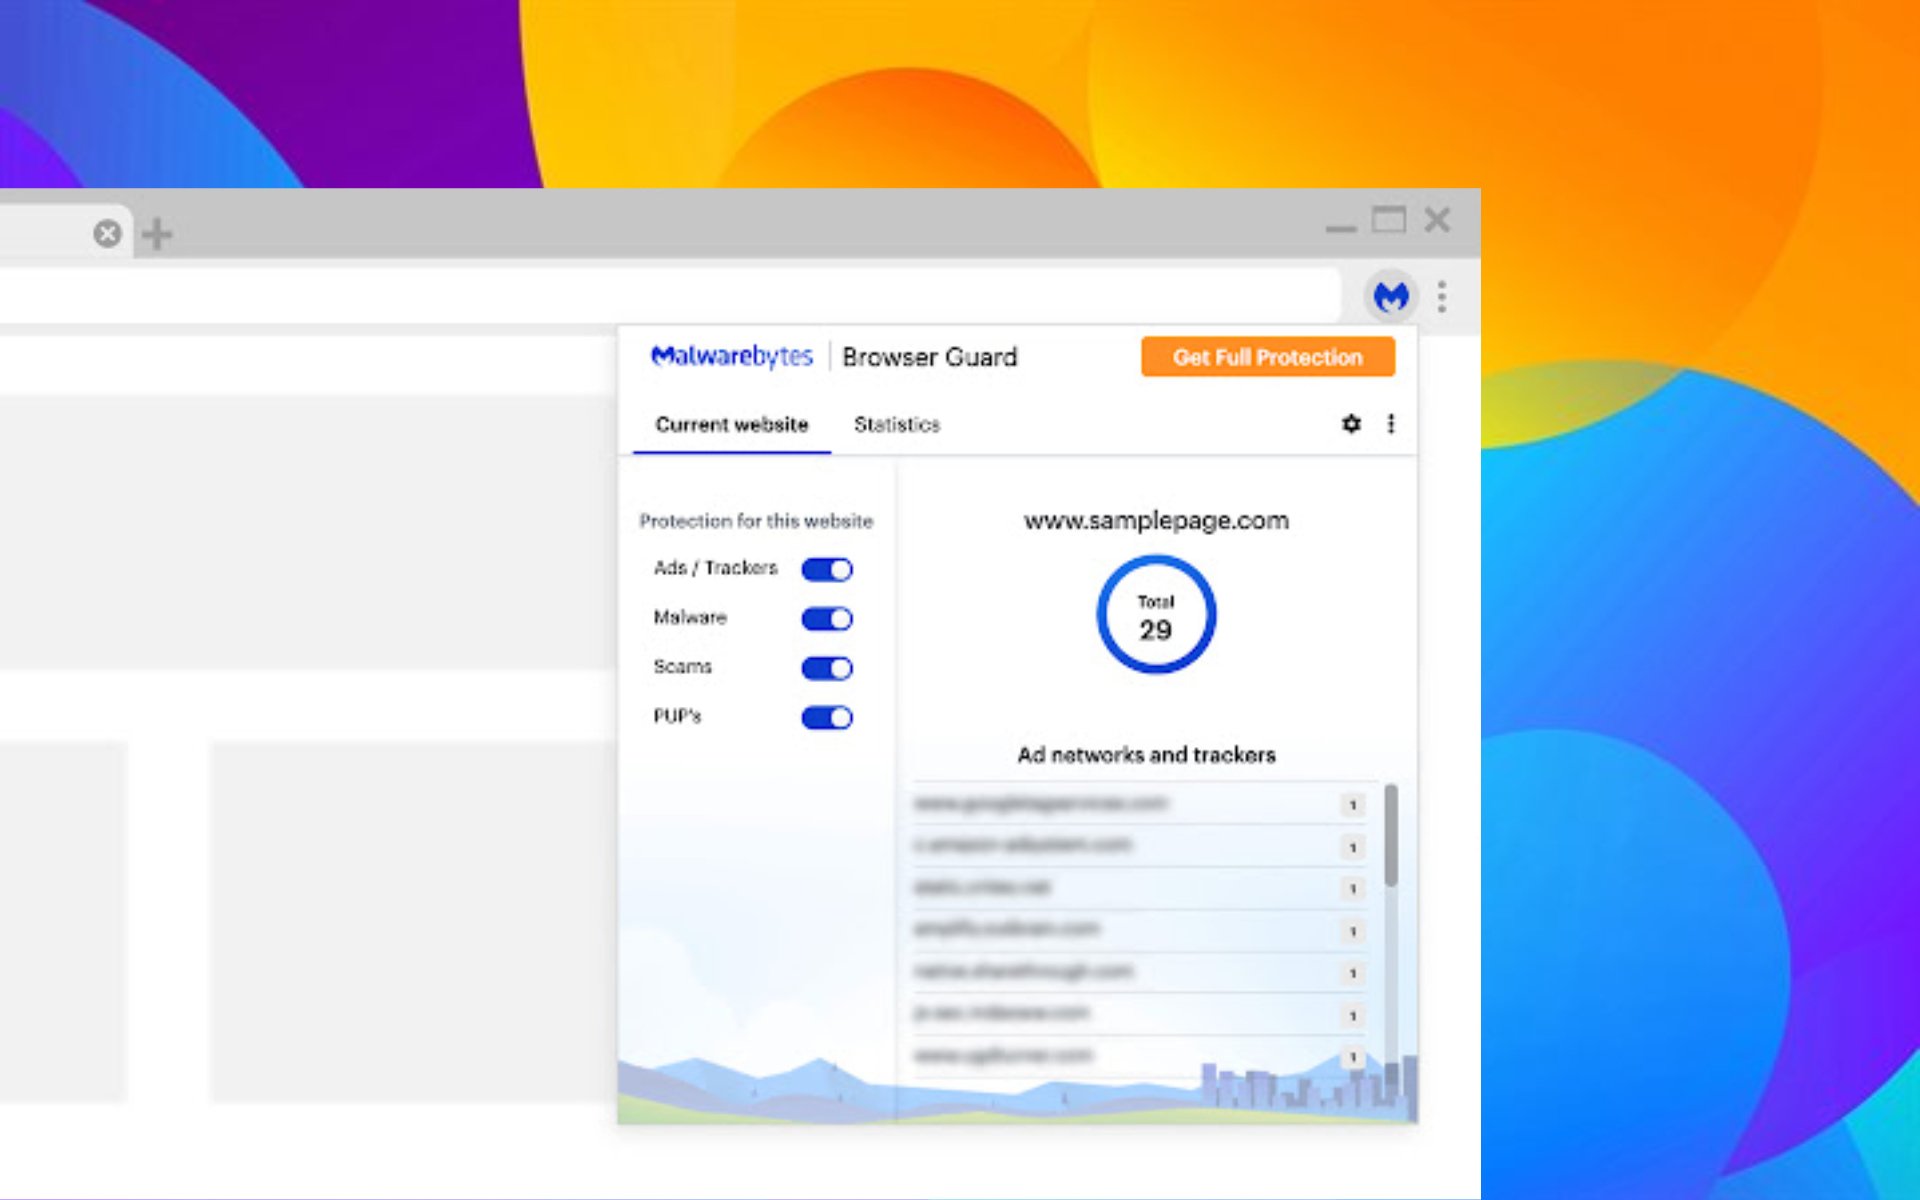
Malwarebytes Browser Extension systemically blocks malicious websites and filters out unwanted content. In addition, the extensions can block browser hijackers, pop-ups, fake news content, cryptocurrency miners, clickbait links, and other malevolent web content; just what you need to protect yourself while surfing the web.

According to Malwarebytes company, the Malwarebytes Browser Extension (BETA) relies on threat behavior patterns to track down and identify the latest threats.

Also, the browser extension(s) heuristically identifies and blocks tech support scams ‘browser-locker pages, which scare users into calling fake tech support scammers. Therefore, you get protection against unwanted social engineering tactics as well as a safe and secure browsing experience.

Malwarebytes lists the following features:

  • Malware protection: Blocks malicious programs or code that can damage your system.
  • Scam protection: Blocks online scams, including technical support scams, browser lockers, and phishing.
  • Advertising/tracker protection: Blocks third-party ads and third-party ad trackers that monitor your online activity. The number of blocked ads/trackers for a website will show beside the Malwarebytes logo in your browser.
  • Clickbait protection: Blocks content and websites that often display behavior of questionable value.
  • Potentially unwanted program (PUP) protection: Blocks the downloading of potentially unwanted programs, including toolbars and pop-ups.

Download Malwarebytes Browser Extension for Firefox and Google Chrome

Is the Malwarebytes browser extension safe?

You will be surprised to know that this is one of the safest browser extensions you can actually use on your Windows PC.

So yes, Malwarebytes offers antivirus/anti-malware protection for Windows, Mac, Android, iOS, and Chromebook.

Furthermore, Malwarebytes Browser Guard is also free to download, and you can try Malwarebytes security products free before buying.

In this article you will learn everything there is to know about it, just in case you wanted to add the Malwarebytes browser extension to Chrome.

You can also find the Malwarebytes Browser Guard Firefox, or Malwarebytes Browser Guard Edge, if that is what you are looking for.

Stay safe online with Guard.io

When you connect to something online, your browser is your primary filter. Even whether you download, play a movie, or view a short reel on Instagram, your browser takes all the possible attacks.

So, while installing the Malwarebytes extension is simple and effective, there is another option for adding an extra layer of security. The Guard.io Opera One and Google Chrome extension can check every site, page, and social media platform you visit and prevents any harmful files to install freely on your device.

Here are the perks of installing the Guard.io extension:

  • Zero-day protection against suspicious websites
  • Push up notification with a non-intrusive message
  • Warns you about harmful extensions
  • Information leak monitoring
  • Blocks hijackers

Guard.io free includes certain real-time functions, such as suspicious sites and harmful extension notifications. As the name implies, it’s your day-by-day browser guardian.

If you choose to use the premium plan with 7 days trial, Guardio will prevent harmful scams and phishing sites, eliminate invasive popups, browser and search hijackers, and clean up and speed up your browser.

Guard.io

Prevention and blocking directly in your browser, and a perfect match for Malwarebytes software.

How do I get Malwarebytes extensions for Chrome?

  1. Access the Chrome Web Store.
  2. Search for Malwarebytes and click on the extension.chrome web store
  3. Press the Add to Chrome button.malwarebytes
  4. Click on the extension icon in order to use it.malwarebytes extension

Should I install the Malwarebytes browser extension?

It’s really up to you, but just keep this in mind. Given the fact that this is actually a browser extension, Malwarebytes Browser Guard could represent a very useful part of your arsenal.

And by that, we were really referring to your defense strategy against all the malware and scams that await us all out there.

That being said, if you aren’t already using some kind of browser add-on to bolster your security when surfing the web, it’ll cost you nothing to try out Browser Guard.

It doesn’t just work on a specific browser, so you can definitely get the Malwarebytes browser extension For Edge.

If, however, you decided to go with Mozilla’s product, know that there is also a Malwarebytes browser extension for Firefox as well.

You know we always recommend Opera One if you are looking to change your browser and yes, you can totally find the Malwarebytes browser extension for Opera One.

4 Tested Fixes for There Was a Problem Displaying This Page

A few Chrome users have stated on forums that they can’t open Google Play e-books in Google’s browser. When they try to open GP e-books in Chrome, an Oops! There was a problem displaying this page tab opens.

Consequently, users can’t load non-free e-books within Chrome. These are a few resolutions that might fix the Google Play e-book error in Chrome.

After following our solutions in detail, you will be able to enjoy reading your favorite stories and novels on your browsers, in the e-book format, once more.

Why some websites are not opening in Chrome?

That’s a really good question you asked. You should know that the reason why the Chrome browser is not loading pages may be down to something as simple as unstable or lost internet connection.

In order to prevent this from happening, make sure that you have an active data plan, and restart your internet connection.

But don’t go just yet, as the solutions to your problems are just below, as you are soon about to discover.

Quick Tip:

One simple solution could be opening them in a new browser. For that, we recommend installing Opera One. It is known for being faster and it comes with some cool data compression features.

Additionally, Opera One offers a built-in VPN and ad blocker, as well as a native AI. With Twitter and WhatsApp integrated into the sidebar, along with workspaces and tab islands you can efficiently organize your tabs with ease.

Opera One

Surf the web faster and safer with the built-in VPN and ad blocker features from the Opera One browser.
Free Download Visit website

How do I fix Google Chrome page Cannot be displayed?

1. Clear Chrome’s browser data

  1. Press the Customize Google Chrome button at the top right of the browser’s window.
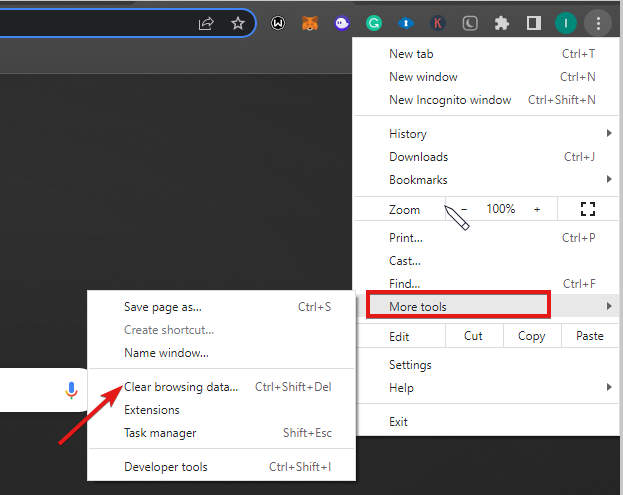
  2. Click More tools > Clear browsing data to open the window shown directly below.
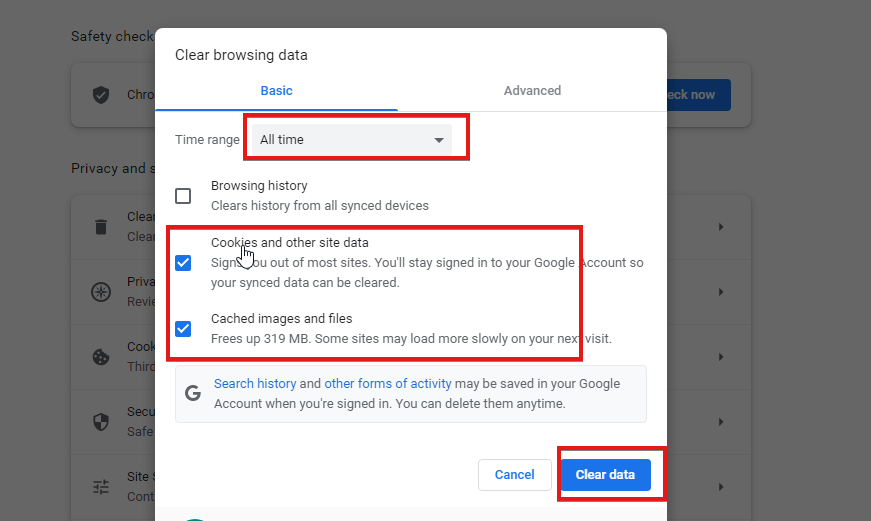
  3. Select the Cookies and other site data and Cached images options.
  4. Then press the Clear Data button.
Note icon NOTE
Clearing the browser’s data is one of the best ways to fix website pages that aren’t loading, and the resolution might also fix GP e-books. You can clear Chrome’s browser data following the steps above.

2. Add cookie exceptions for Google Play Books

  1. Press the Customize Google Chrome button and select Settings.
  2. Click Advanced at the bottom of the Settings tab to expand the options.
  3. Press the Content Settings button to open the content categories shown below.
  4. Click Cookies to open cookie settings.
  5. Press the ADD button for Allow, enter books.googleusercontent.com in the text box, and click ADD.
  6. Press the Allow ADD button again to enter books.google.com in the Add a site text box. Then press the ADD button.
  7. Click See all cookies and site data to open a list of cookies.
  8. Enter books in the Search cookies text box.
  9. Press the Remove All Shown button.
  10. Then press the Clear All button to confirm.
Note icon NOTE
Some Chrome users have fixed the Google Play e-books error by adding cookie exceptions for Google books. 

3. Reset the browser

  1. Click Customize Google Chrome to open the browser’s main menu.
  2. Select Settings to open the Settings tab.
  3. Scroll down and click Advanced to expand the Settings tab.
  4. Then scroll to the Restore settings to their original defaults option shown below.
  5. Press the Restore settings to their original defaults button to open a Reset settings window as below.
  6. Press the Reset Settings button to restore the browser.
Note icon NOTE
Some Chrome users have confirmed that resetting the browser can fix the GP e-book error. Resetting the browser will disable its extensions, clear browser data, and restore Chrome to its default settings.

4. Turn off Ad-Blocker extensions

  1. Press the Customize Google Chrome button.
  2. Select More tools > Extensions to open the tab shown directly below.
  3. Then you can toggle ad-blocker extensions off by clicking their disable buttons.
  4. Alternatively, you can click Remove to remove an ad-blocker extension.
Note icon NOTE
The Google Play e-book error can also be due to ad-blockers that block site analytics. So, switching ad-blockers off can also fix the issue. Resetting Chrome will disable ad-blockers, but you can switch extensions off via the Extensions tab, following the above steps.

Why is my Internet saying can’t reach this page?

You should know that this happens for only a few reasons, which we are about to explain to you in the following sentences. 

Basically, it means that a website is either having technical difficulties, its server may be down, or the website owner has blocked your IP address or region.

Just so we can rule out the second reason, we recommend using a VPN or contacting the website owner to get your IP address unblocked.

Yes, you can also get this annoying There was a problem displaying this page while trying to use WordPress, just so you are not caught unprepared.

This There was a problem displaying this page error code can also be found when using Android, so that’s another thing to look out for.

Those resolutions will probably fix Chrome so that you can load Google Play e-books in the browser again. If you have further fixes for the GP e-book error, feel free to share them below.

3 Quick Ways to Fix Vudu Playback Error on All Devices

With no shortage of on-demand video streaming services, people are a bit confused about which app subscription they should opt for.

Vudu is another on-demand video streaming platform that is owned by Fandango Media, a joint venture between NBCUniversal, Discovery, and Warner Bros.

It is the first on-demand platform that started offering digital movies in HD. Vudu was launched back in 2007. You can use Vudu using a small console, just like you would do for Roku or Western Digital devices.

All you need to do is purchase a monthly subscription and jump into watching free (with ads, of course) and paid content. Customers can also purchase or rent any content for 24 hours.

While the Vudu service is amazing, there are several users who told us about Vudu playback errors on all devices.

It is a bit frustrating fact that this error prevents you from viewing your favorite content. Thankfully, in this guide, we have some solutions that will help users facing the Vudu playback errors on all devices. Let us dive right into it.

Why am I getting Vudu playback error?

Just like any other internet-related service, Vudu is also not immune to errors and issues. Vudu encountered problems during the playback. Please restart Vudu and try again is one of the most common and old errors that people have been reporting.

Vudu playback error is experienced across devices. So, any of the below errors are the one and same:

  • Vudu playback error in Microsoft Edge
  • Vudu playback error on PC
  • Vudu playback error when using Samsung TV
  • Vudu playback error in Xbox
  • Vudu playback error in Chrome
  • Vudu playback error on PS5
  • Vudu playback error on LG smart TV
  • Vudu playback error in Chromebook

We did our research and found some common reasons that trigger this Vudu playback error:

  • There are some issues with your DNS settings
  • You are using a VPN
  • The browser cache is corrupted
  • There might be some issues with the Vudu server
  • Your internet connection might be at fault

How do I fix the Vudu playback error?

1. Tweak your DNS settings

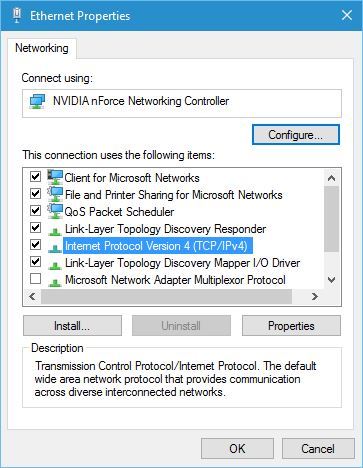
  1. Open Network Connections.
  2. Right-click on your connection and choose Properties.
  3. Select Internet Protocol Version 4 (TCP/IPv4).
  4. Click on Properties.
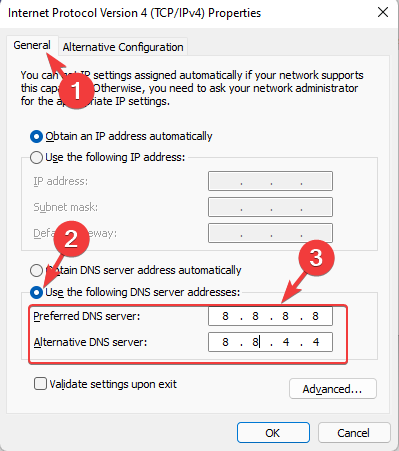
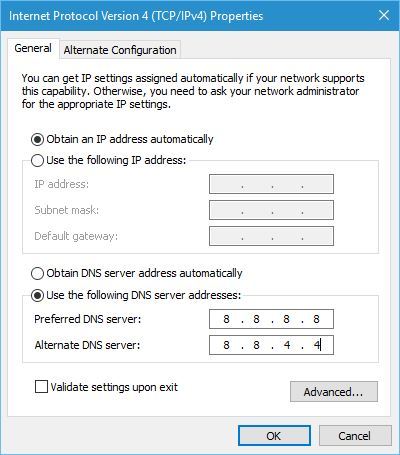
  5. Select Use the following DNS server addresses and set 8.8.8.8 as the Preferred DNS server and 8.8.4.4 as the Alternate DNS server.Enter DNS server addresses in Properties
  6. Click OK.

Some users are suggesting using 208.67.222.222 as the Preferred DNS server and 208.67.222.220 as an Alternate DNS server.

Changing the DNS server won’t affect your internet performance or have any implications on your internet usage.

If you think you have messed up something with the DNS setting, you can always press the Reset button on your router to reset it to default settings.

2. Check a few things on your PC

Here are a few of the common things that you can check and perform in order to resolve the Vudu playback error on your Chromebook or PC:

  • Make sure that your internet connection is stable.
  • If you are using a VPN app, then you should try disabling it and see if this fixes the Vudu playback error.
  • If you use a browser such as Google Chrome or Microsoft Edge to view Vudu, then you should clear the browser cache, which when corrupted could cause multiple issues, one of which is the Vudu playback error.
  • Also, ensure that you have installed the latest network drivers on your PC, as it can resolve many bugs and issues related to it.

3. Delete the Vudu channel

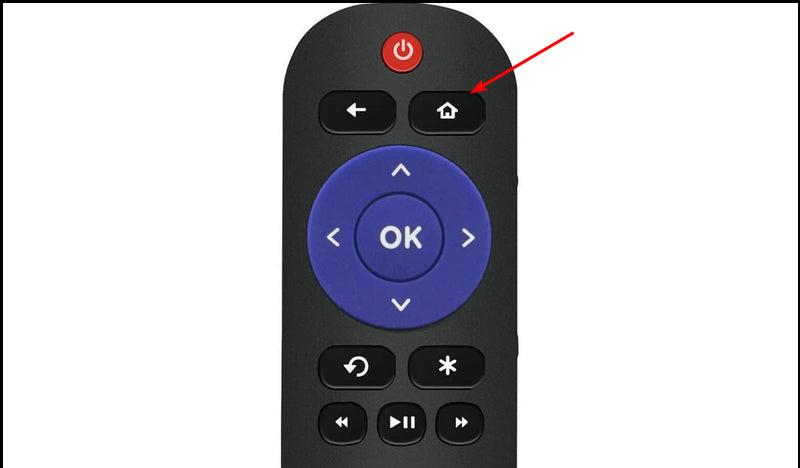
  1. Press the Home button on your Roku remote.
  2. Select Streaming Channels to open the Channel Store.
  3. Highlight Vudu and press the OK on your remote.
  4. Select Remove Channel and confirm the selection when prompted.
  5. Open the Channel Store.
  6. Hit the Add channel button.

Since Vudu is offered as an on-demand channel for various streaming devices, and smart TVs, you can try deleting the Vudu channel and then adding it back up again to check if this fixes the Vudu playback error or not.

There are chances that the previous installation wasn’t appropriate, and it missed out on key important files. In such a case, a simple delete and addition of the Vudu channel on your streaming device can help you fix it.

Also, the above steps are for Roku devices, but you can delete and add the Vudu app on your respective streaming devices, in more or less the same way.

Are Fandango and Vudu the same?

Fandango is the parent company that owns Vudu’s on-demand streaming service. Fandango, used to have its own streaming service called FandangoNOW, which it has now merged with Vudu, and the combination is called simply Vudu.

The company on this merger said that they are sticking with the name Vudu because it has a more big user base and more content as compared to the FandangoNOW service.

If you are facing an issue where the Vudu player is not working on your Windows 10 PC, then you can check out our dedicated guide that lists some effective solutions that will help you resolve the problem.

Also, you can check out our guide, which lists some of the best ad-supported streaming services that you can check out to feed your content consumption appetite.

Let us know in the comments below which one of the above solutions helped you fix the problem.

Remove Adware From Edge Like A Security Expert In 2026

Adware can be a menace on computers and lower the browsing experience. In some cases, it is a source of revenue for the manufacturers; other times, it is malicious and would inject dangerous code into your OS or browser.

Whatever the case, you should eliminate them, and we will show you how. This is not specific to Edge; some Chrome users have had to contend with the MindSpark adware.

How to remove adware pop-up ads and malware from Microsoft Edge

1. Scan your computer

  1. Click the Start button, type Windows Security, and select the Windows Security app.
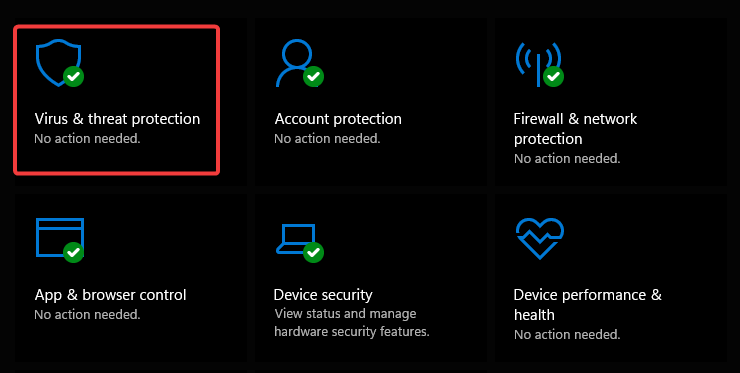
  2. Click on Virus & threat protection.
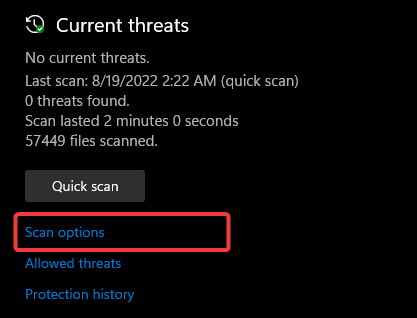
  3. Select Scan options.
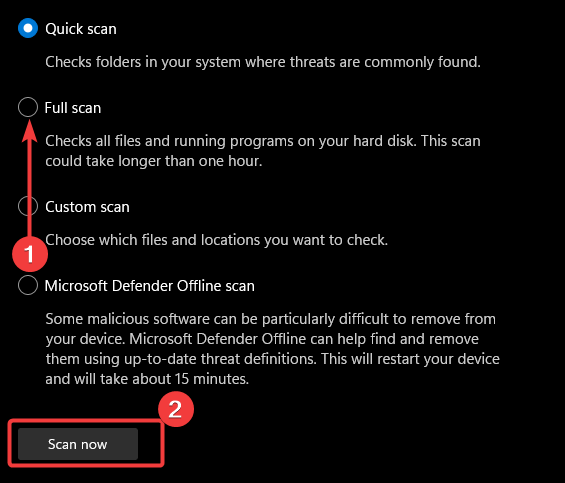
  4. Select the Full scan option, then select Scan now.
    remove adware from edge
  5. This may take several minutes, but restart the computer after the scan.

For better results, we recommend you use some of the best third-party antiviruses for Windows; these are great Microsoft Edge adware removal tools. The process may differ, but they will get the job done.

A great choice for this task is TotalAV. This comprehensive security software allows you to perform a more in-depth scan of your system. It also provides long-term protection due to its built-in powerful firewall and anti-malware shields.

⇒ Get TotalAV

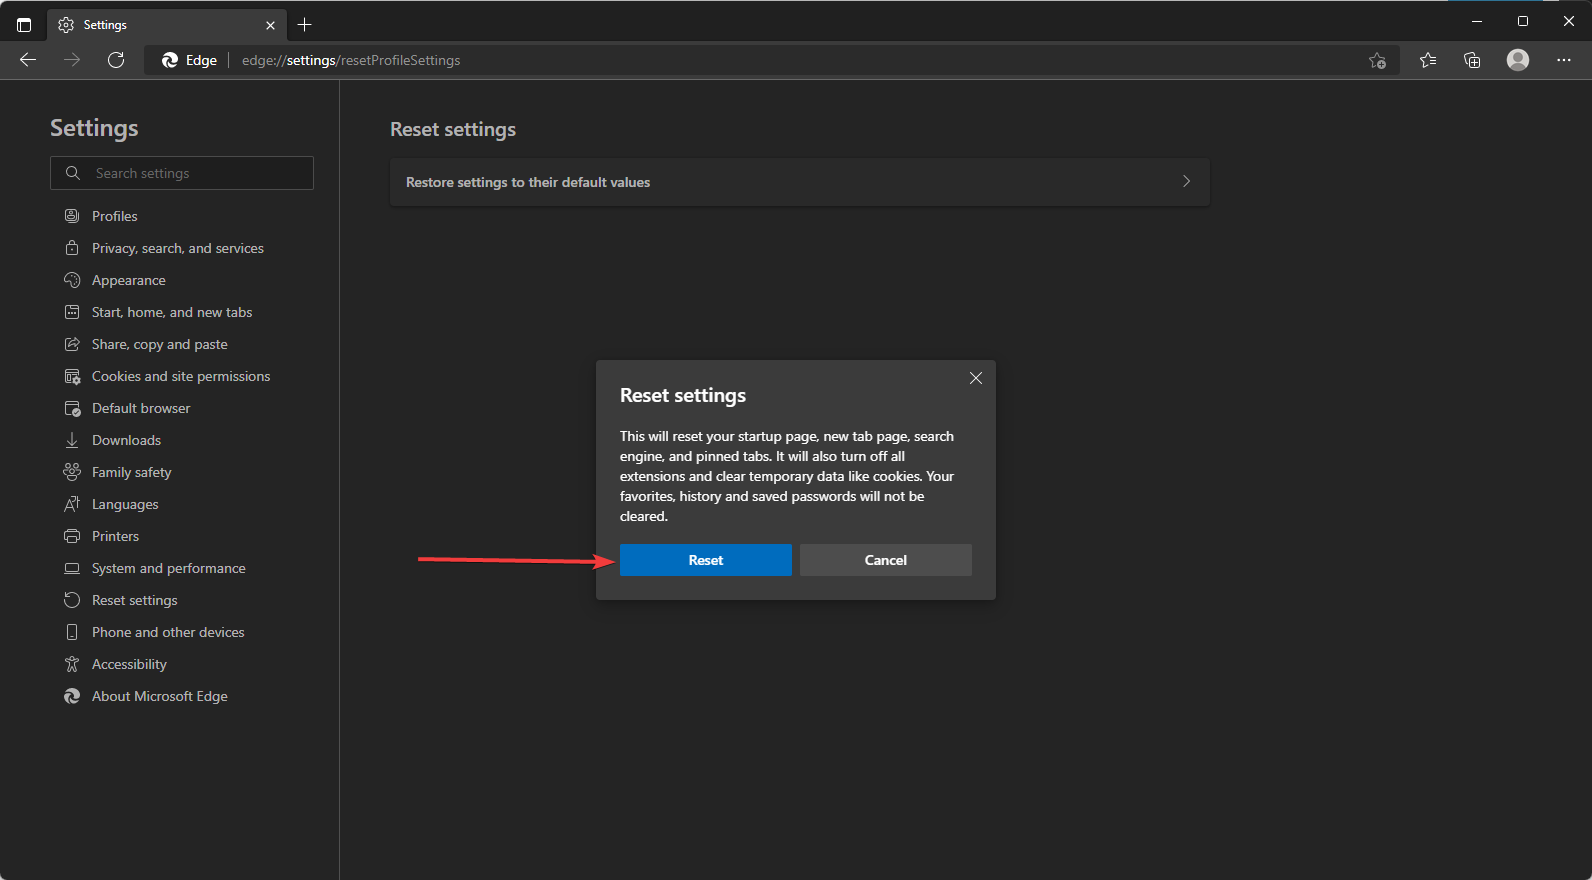
2. Reset the browser

  1. Launch the Edge browser.
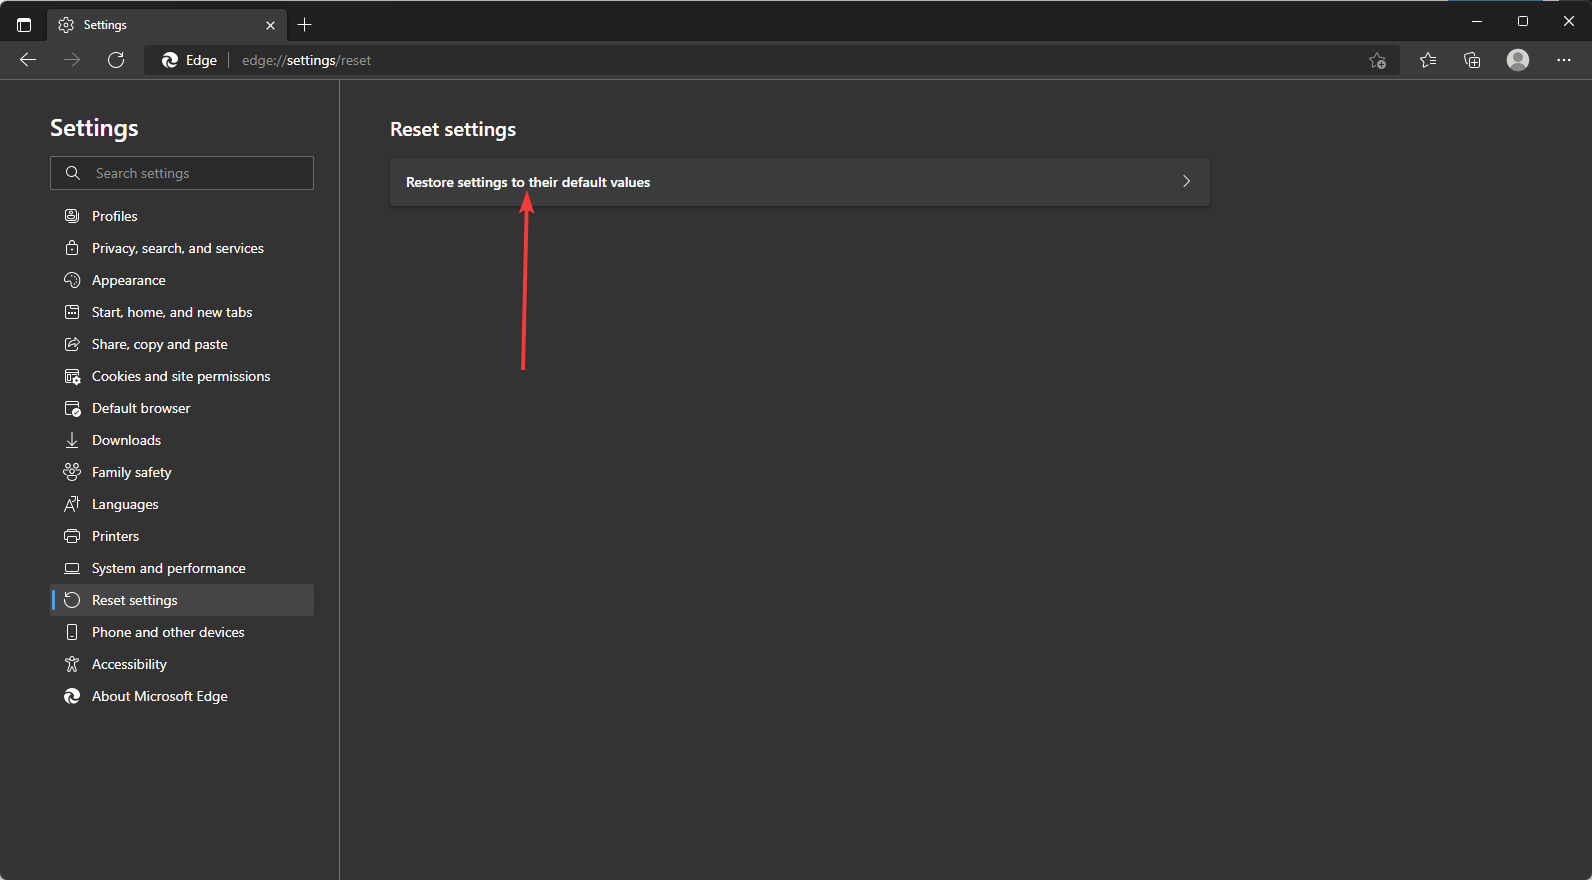
  2. On the Address Bar, type the link below, then click Enter.
    edge://settings/reset
  3. Click on Restore settings to their default values.
  4. Finally, click on the Reset button.

Quick Tip:

Adware is not harmful to your computer, but will surely disrupt your browser experience. To avoid catching any, we recommend using a browser with built-in features that protect against these kinds of threats.

Opera is a browser that comes with an ad and tracker blocker that stops adware activity and other malicious scripts. It also comes with a free VPN that you can use to make yourself anonymous online.

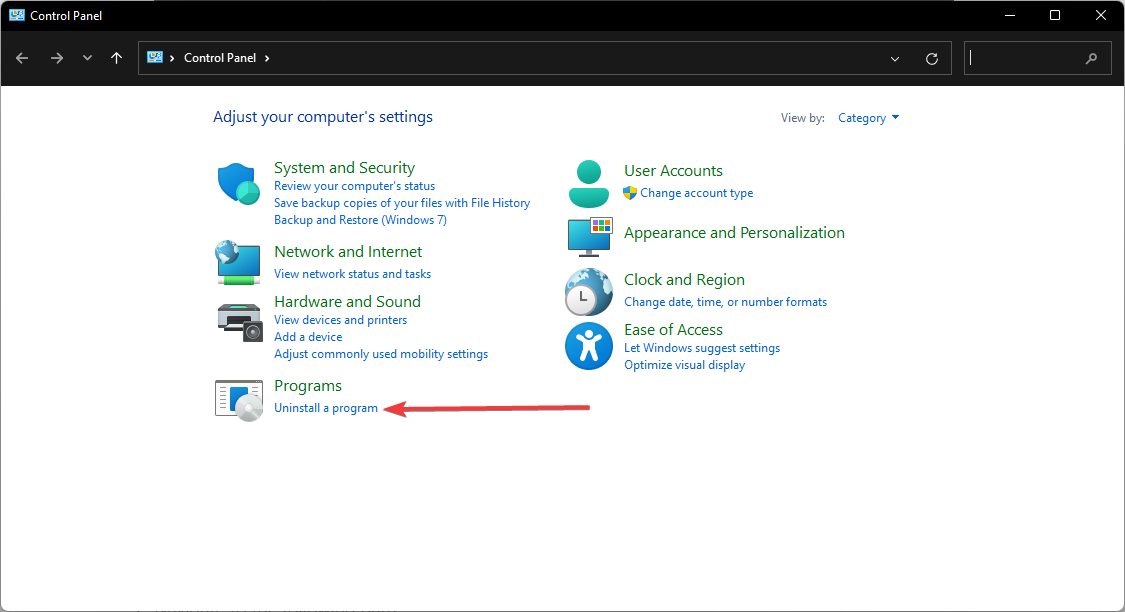
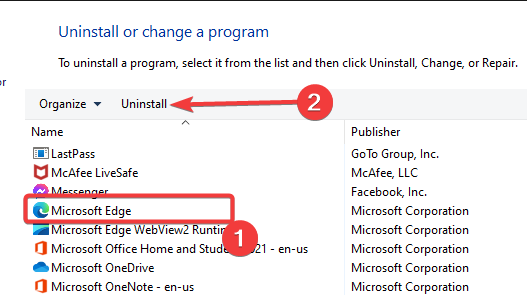
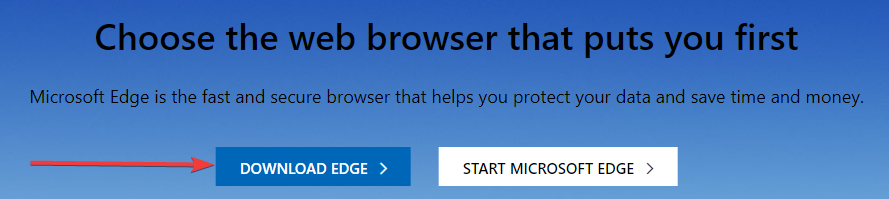
3. Reinstall Edge

  1. Open the Control Panel app.
  2. Click on Uninstall a program.
  3. Click on Microsoft Edge from the list of programs, then click the Uninstall button.
  4. Navigate to the Edge website and click on Download Edge.
    remove adware from edge
  5. Double click on the downloaded file and follow the wizard to complete the installation.

4. Modify the Host file

  1. Download this HOSTS.ZIP file, provided by winhelp2002.mvps.org.
  2. Extract all files from the zip folder anywhere.
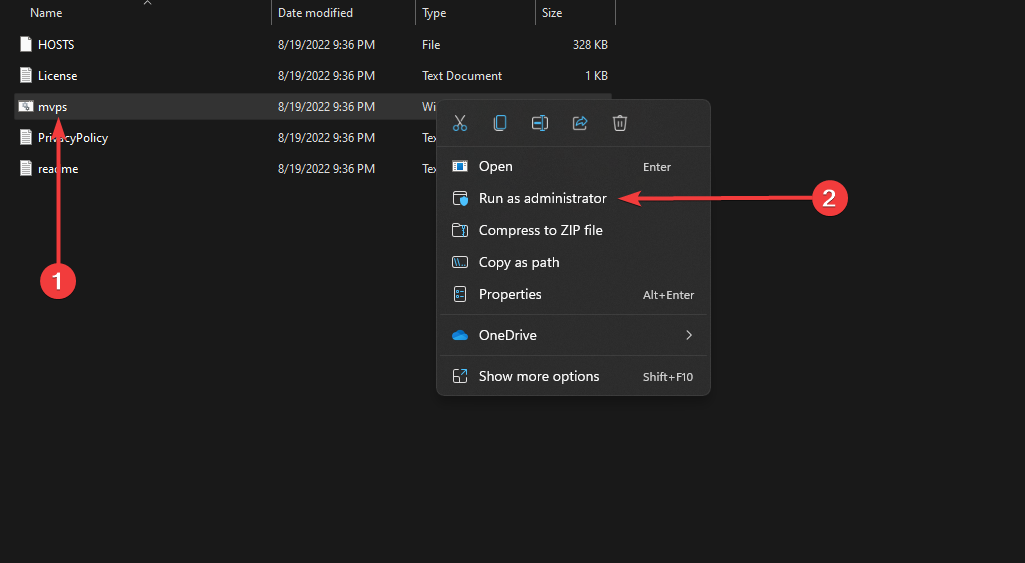
  3. Right-click on Mvps, select Run as administrator, and let the process finish. This will automatically edit all your host files, so you don’t have to do anything manually.
    remove adware from edge
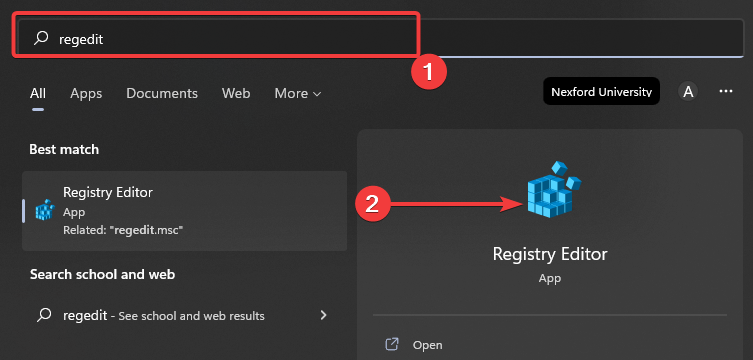
  4. Go to Search, type regedit, and open Registry Editor.
    remove adware from edge
  5. Navigate to the following path:
    • HKEY_LOCAL_MACHINE\SYSTEM\CurrentControlSet\Services\Dns\CacheParameters
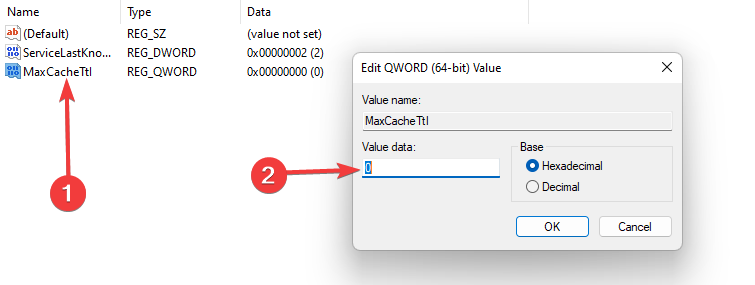
  6. Create a new DWORD value MaxCacheTtl and set the value to 1.
  7. Create another new DWORD MaxNegativeCacheTtl, and set the value to 0.
  8. Close Registry Editor, and restart your PC.

After performing these registry tweaks, all ads should be blocked in your Microsoft Edge browser, and sites should also load normally.

5. Block Pop-up in Microsoft Edge

  1. Open Microsoft Edge.
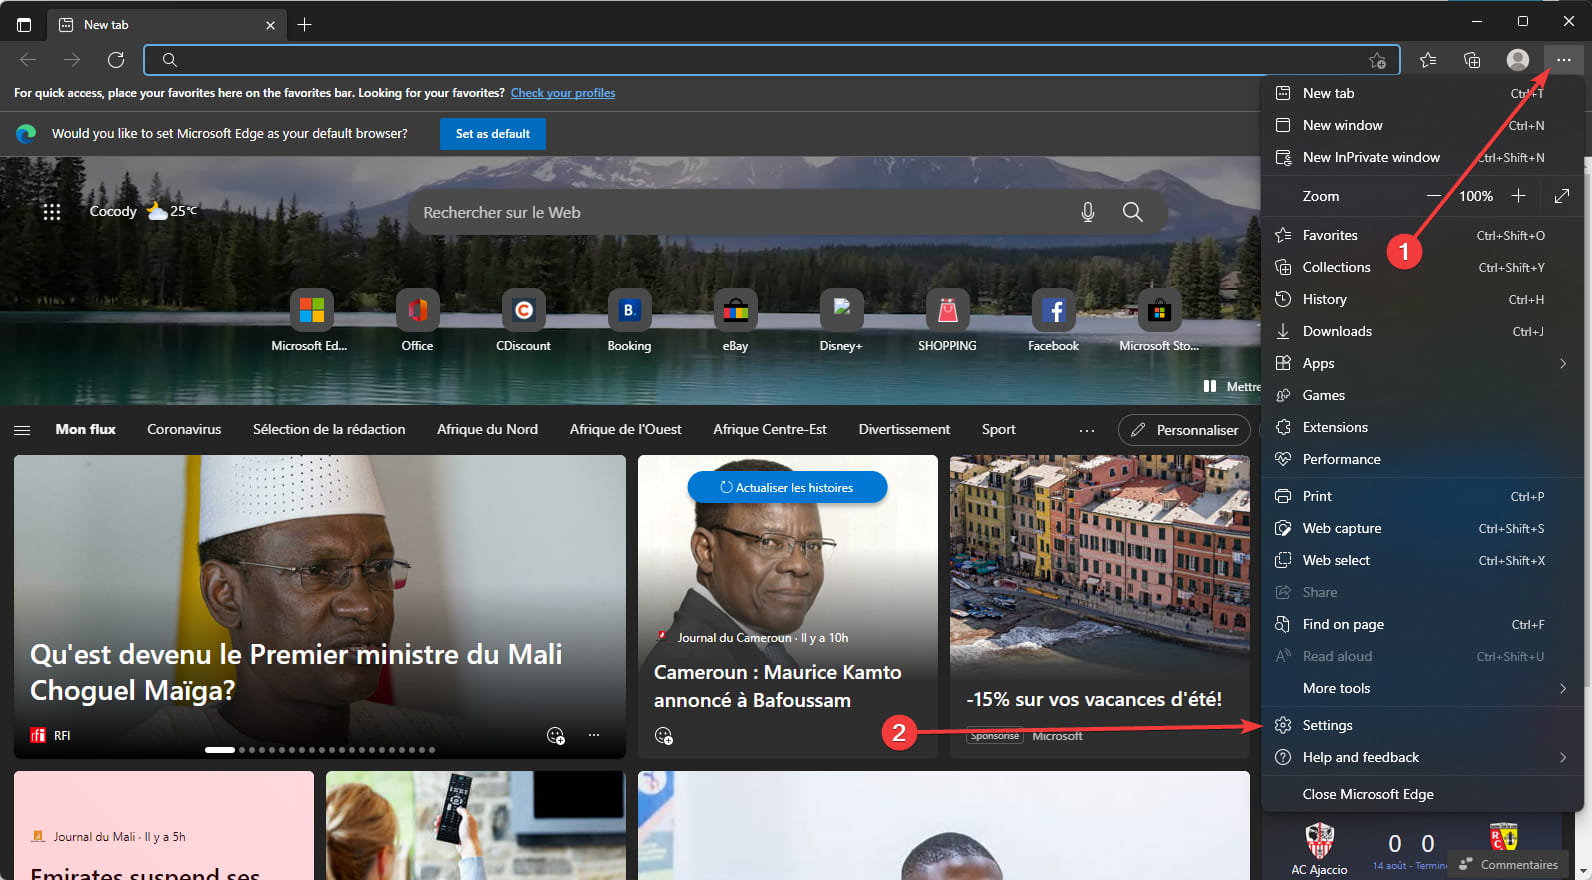
  2. Click on the dotted menu icon, then select the Settings option.
    remove adware from edge
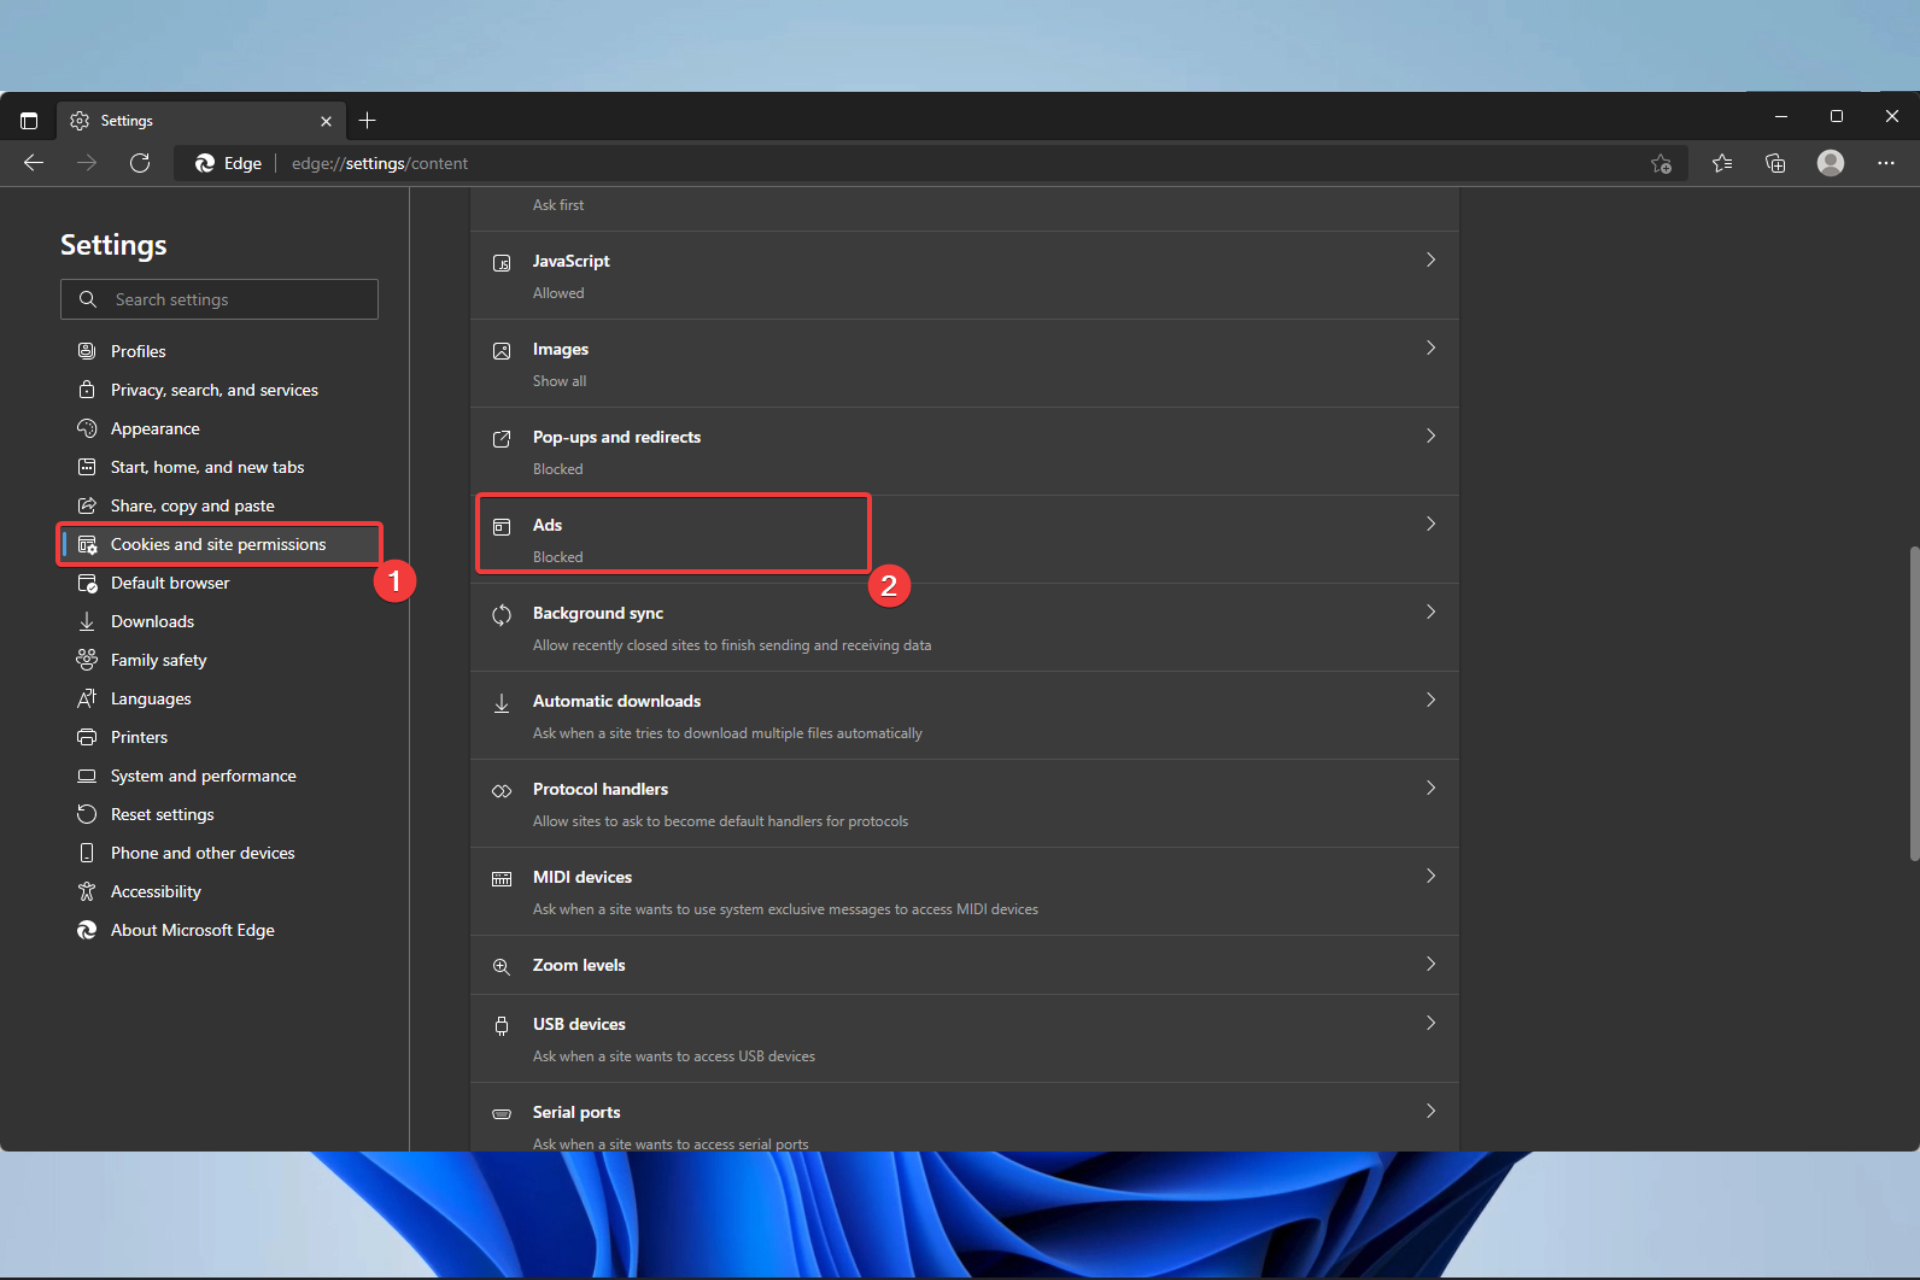
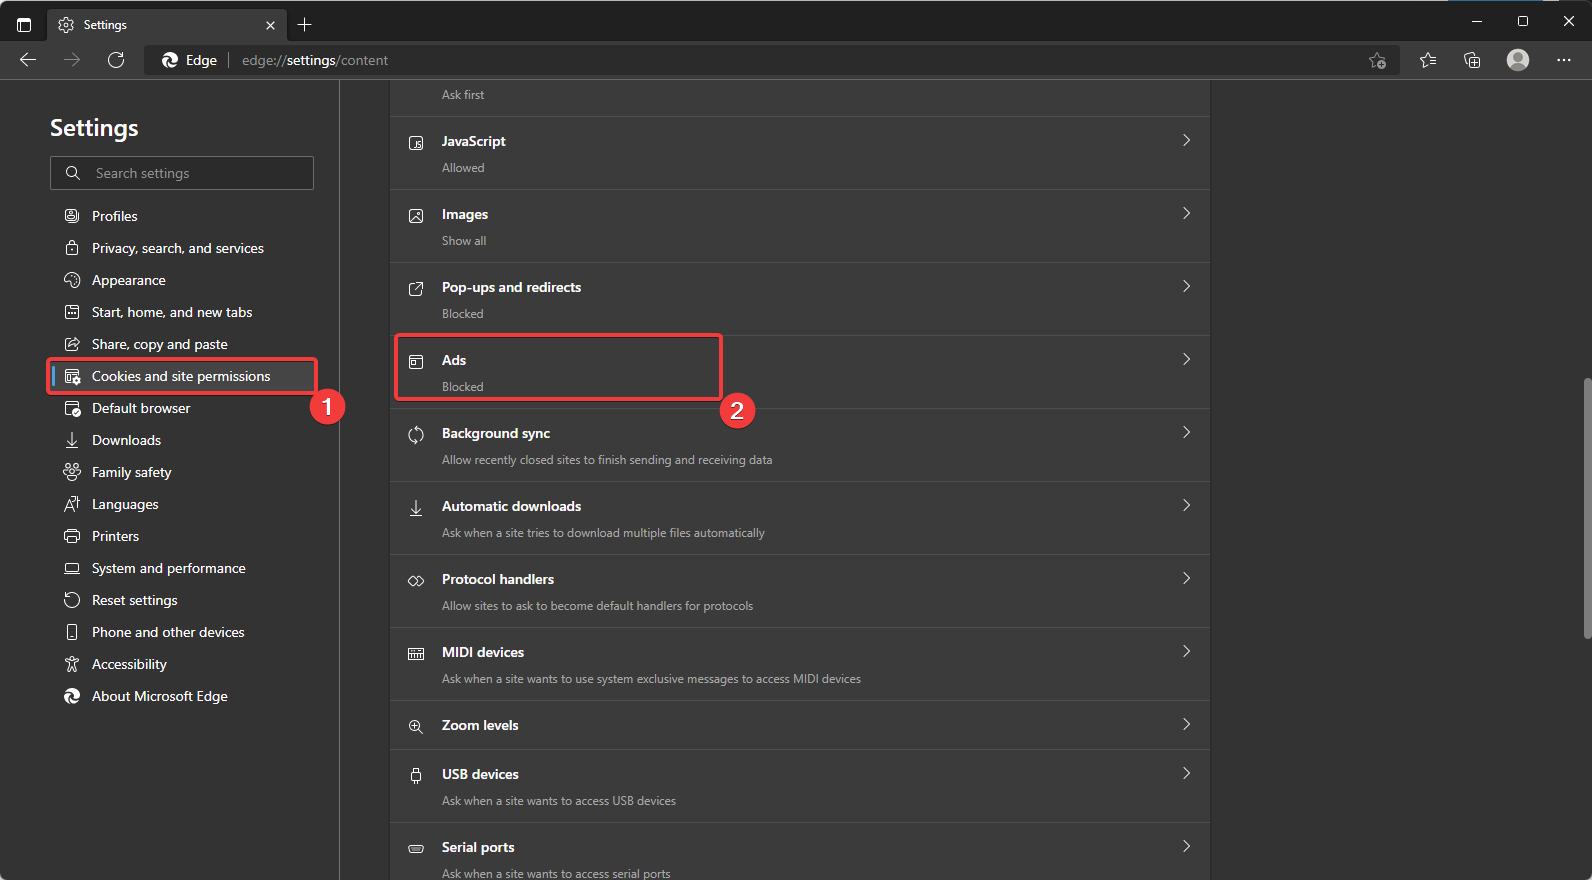
  3. On the right pane, select Cookies and site permission, then click the Ads option on the left.
    remove adware from edge
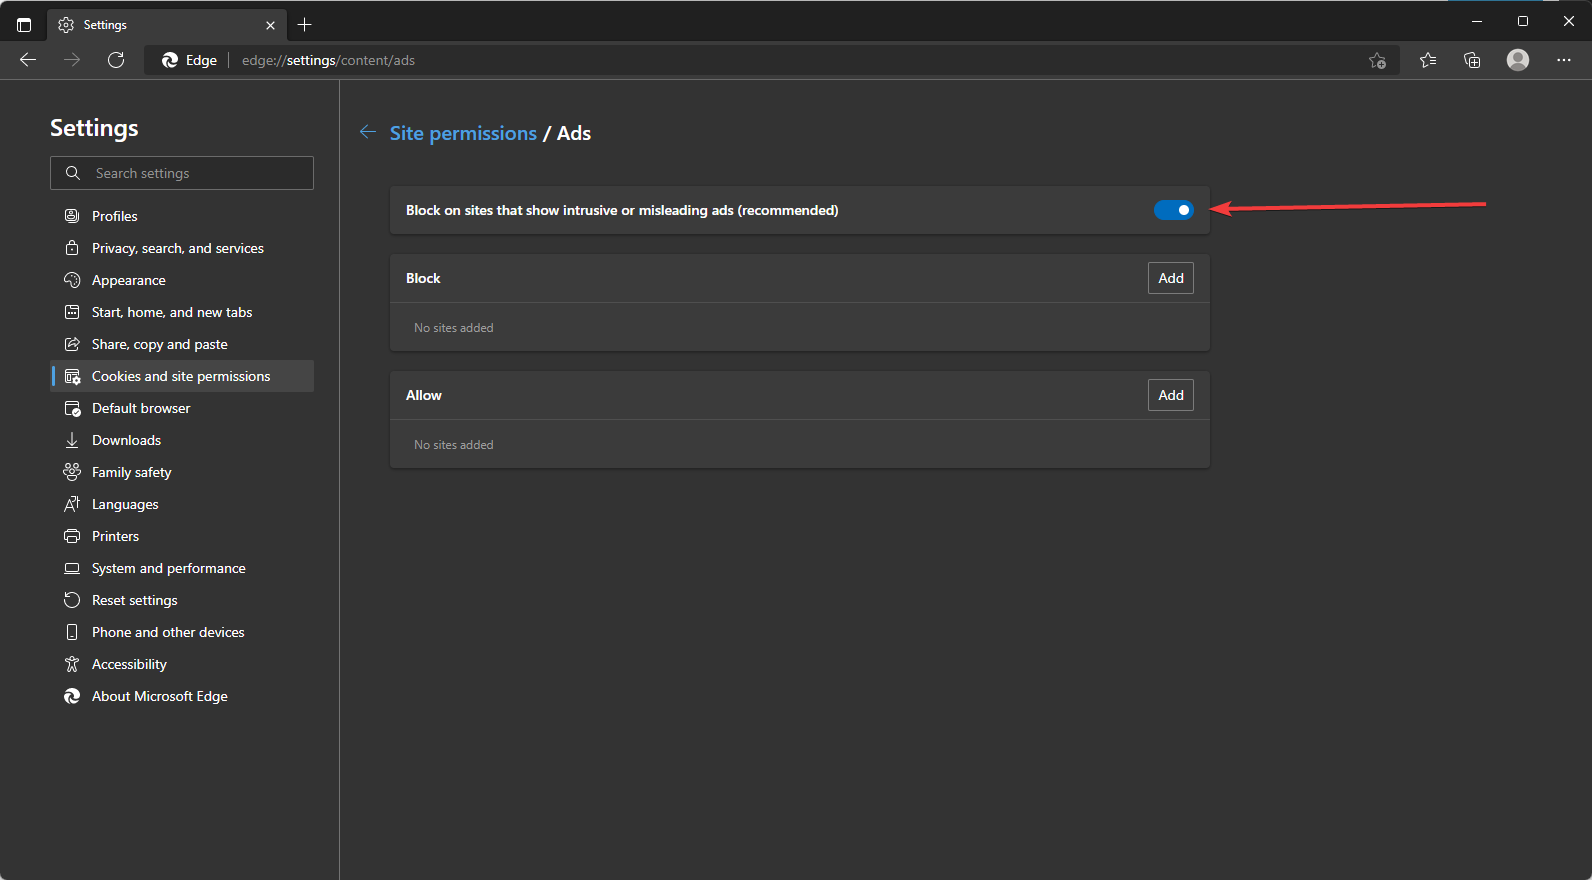
  4. Toggle on the option for Block on sites that show intrusive or misleading ads (recommended).
    remove adware from edge

Please note that if you already have adware infecting your browser, this step may not get rid of it, but it will prevent new adware from affecting you. You should perform the steps if Microsoft Edge keeps popping up.

Keep in mind that adware, sometimes called advertisement-supported applications, makes money for its creators by randomly displaying advertisements on your screen, often when using a web browser.

Although adware may be detected on mobile devices, it is mainly designed for desktops. Adware may be quite deceptive and allow dangerous software to access the system.

A free computer application or app may have extra software, including adware, which you may install unconsciously.

Additionally, your software or OS may include a flaw that hackers may use to infiltrate your machine with malware, including certain varieties of adware.

How can I avoid getting adware?

You can perform a few quick things consistently to protect your device against the spread of adware, such as:

  • Utilize a trustworthy ad blocker –  Ads won’t appear on your browser if you use an ad blocker. Doing this will make you less likely to click on them and infect your computer unintentionally.
  • Read before agreeing –  When downloading an app or software, it is customary to agree to all of the terms and conditions without ever reading them. Unaware of the rights granted to the app, a user later accuses it of spying on them.
  • Use anti-malware and antivirus software –  You may further secure your device by installing reputable antivirus programs and keeping them updated.
  • Steer clear of shareware and freeware –  A source of adware is often free or shareware, as well as pop-up adverts and alerts. Therefore, one should avoid downloading them or even just clicking on them.
  • Only download from trustworthy sources –  Only download programs, applications, and other items from reputable websites and sources. These include official app shops like Google Play, the Apple App Store, and developer and manufacturer websites.

How do I get rid of virus pop-ups on Edge?

  1. Open Microsoft Edge.
  2. Click on the dotted menu icon, then select the Settings option.
    remove adware from edge
  3. On the right pane, select Cookies and site permission, then click the Pop-ups and redirects option on the left.
  4. Click on the Block (recommended) option.

After blocking pop-ups, we recommend a full computer scan with a trusted anti-malware tool. If you are wondering how to stop ads from popping up on Microsoft Edge, follow the above steps.

We have discussed stopping Microsoft Edge from popping up ads on your computer. We recommend starting with tweaks on the Edge settings, followed by a full scan of your system, and reinstalling the browser as a last resort.

Before you go, be sure to check our guide on how to remove Waisheph from your computer.

Let us know if these solutions have been helpful, and if we have missed anything, please let us know in the comments section.

The Importance of Software Reliability in Locksmith Security Systems: From Smart Locks to Cloud-Based Solutions

Locksmith services are no longer limited to just cutting keys and unlocking doors. With the rise of smart technology, locksmith businesses are evolving into providers of cutting-edge security systems that rely heavily on software. From smart locks to cloud-based access control and digital surveillance, these modern solutions offer convenience and enhanced security. However, as these systems become more integrated into our daily lives, ensuring the reliability of the software behind them becomes crucial. In this article, we’ll explore why software reliability is vital for these new-age locksmith services and how businesses can stay ahead by focusing on software development and testing.

Smart Locks and Software-Driven Security: A New Standard

Smart locks have quickly become a popular choice for both residential and commercial security, and for a good reason. These locks allow users to unlock their doors using smartphones, key cards, or even biometrics, offering a level of convenience that traditional locks simply can’t match. However, the reliability of the software powering these locks is what makes them truly effective.

For locksmith companies, ensuring that the software behind smart locks works seamlessly is essential. Whether it’s making sure that the lock consistently recognizes authorized users or preventing it from malfunctioning in the middle of the night, software reliability is key to maintaining trust with customers. Imagine a scenario where a customer is locked out because the smart lock software crashed—this would not only cause frustration but could also damage the locksmith’s reputation. That’s why locksmith businesses need to invest in reliable software solutions and rigorous testing to ensure their systems work flawlessly.

Cloud-Based Access Control: Expanding the Locksmith’s Role

Locksmith services are no longer just about locks and keys. Cloud-based access control systems are becoming a core offering, allowing users to remotely manage who has access to their property. With these systems, a building manager can grant or revoke access with a few taps on their phone, no matter where they are. But for this to work smoothly, the software must be highly reliable.

Cloud-based systems require constant, secure communication between devices. If the software isn’t reliable, users might experience issues such as access delays or, worse, system outages that prevent authorized people from entering a building. This is particularly risky in businesses where timely access is crucial, such as hospitals or banks. Locksmiths must ensure that the software they provide is not only secure but also continuously operational. The last thing anyone wants is to deal with a failed access system due to a software glitch.

Digital Surveillance and the Integration of Software Solutions

Beyond locks and access control, locksmiths are also stepping into the realm of digital surveillance. Modern security systems often include cameras and sensors that monitor activity and alert property owners to potential threats. These systems heavily rely on software to function, from streaming high-quality video to storing data securely in the cloud.

For locksmiths offering digital surveillance systems, the reliability of the software is just as critical as the hardware. Customers expect clear video feeds, timely alerts, and easy access to recordings—all of which depend on solid software performance. Any lag or failure in these systems can compromise security. Therefore, locksmiths need to focus on regular software updates and rigorous testing to ensure their systems remain reliable and up to date.

The Critical Role of Software Reliability Testing

At the heart of all these innovations is one essential element: testing. Software reliability testing ensures that the systems locksmiths provide will work consistently under real-world conditions. This process involves putting the software through various tests to identify any vulnerabilities or performance issues before they become problems for customers.

For locksmith businesses, software testing should include performance testing (to ensure the software can handle heavy usage), security testing (to safeguard against hacking or data breaches), and usability testing (to ensure the system is user-friendly). Without these tests, locksmith companies risk releasing unreliable software that could fail at critical moments, leading to dissatisfied customers and potential security risks.

Leveraging Software Development Processes to Meet Customer Expectations

In today’s competitive landscape, locksmiths who offer software-driven security solutions need to go beyond just offering reliable products—they need to continuously improve them. This is where adopting modern software development processes like Agile, continuous integration (CI), and automated testing can make a significant difference.

Agile development allows locksmith businesses to make quick, incremental improvements to their software, ensuring that any bugs or security vulnerabilities are addressed promptly. Continuous integration and automated testing help ensure that every new update is thoroughly tested before being released, reducing the risk of introducing new problems. By adopting these best practices, locksmith companies can meet the growing expectations of their customers while maintaining the security and reliability of their systems.

Conclusion: The Future of Locksmith Security Systems Depends on Reliable Software

As locksmith services continue to evolve, software reliability is becoming increasingly important in ensuring customer satisfaction and trust. From smart locks and cloud-based access control to digital surveillance, modern locksmiths are offering a range of technology-driven solutions. However, the success of these systems depends on how well the underlying software performs.

By investing in software reliability testing and adopting modern development processes, locksmith businesses can ensure that their systems are secure, functional, and user-friendly. In a world where security is paramount, reliable software is the foundation upon which modern locksmith services are built.

Check Out The Latest Features Coming To Microsoft’s Whiteboard

The beauty of the Windows operating system is its flexibility and versatility, allowing everyone to tailor it and use it for their own specific needs.

Whether you run your company from your Windows-powered device, you manage other people, or you focus on gaming, everything can be done from the same OS.

That being said, if you are a Windows operating system user, make sure you keep up with the latest developments in security updates.

And, since we mentioned gaming, not all gaming is done on PC. So, if you are a console fan, check out the latest studies that have proven once again that Nintendo Switch is the most popular one.

Circling back to why we are here, yet another piece of Microsoft-designed software is about to get a whole bunch of new improvements.

What’s in store for the Microsoft Whiteboard?

As you surely know, Microsoft’s Whiteboard is a digital canvas that is actually available for free across multiple platforms including Windows, Android, iOS, Mac, and Teams.

This software enables users to work in collaborative online environments by allowing them to create and visualize their ideas on a single digital whiteboard. 

The Redmond tech giant regularly adds features to Whiteboard and it has recently revealed a range of new features coming to the app soon.

From what we can tell from the information available on the Microsoft 365 Roadmap portal, Microsoft has outlined several enhancements coming to Whiteboard in the coming weeks and months.

We are about to look at some of these features along with their descriptions, platforms, and expected general availability (GA) dates.

FeatureDescriptionPlatformsTentative GA Date
Embedded Online VideoUsers can insert a video URL and have the video appear directly on the canvas.Teams and Surface DevicesSeptember 2022
URL supportURLs inserted into Whiteboard will become clickable links.Desktop, Teams and Surface Devices, Web, EducationSeptember 2022
AttributionParticipants in Teams and on Web can see who added content to the board.Web, DesktopSeptember 2022
CommentingThe ability to add comments on a whiteboard to aid in discussion with board participants. This will include a comments pane to see all comments on a given whiteboard.Desktop, Teams and Surface Devices, WebNovember 2022
FollowUsers will have the ability to invite users on a whiteboard during a Teams meeting to follow their viewpoint as they navigate and interact with the canvas.Desktop, Teams and Surface Devices, WebNovember 2022
TimerAdding a timer to Whiteboard to help enable users to run timed activities, such as a timed brainstorm.Desktop, Teams and Surface Devices, WebDecember 2022

These are the features that we are all expecting to come to this popular Microsoft-designed software pretty soon.

Before you jump up and down with you though, please note that the general availability dates are only tentative so far, so there’s a possibility that they might slip or that some of the features may not arrive at all.

Which of the above-mentioned features is your absolute favorite? Share your preferences with us in the comments section below.
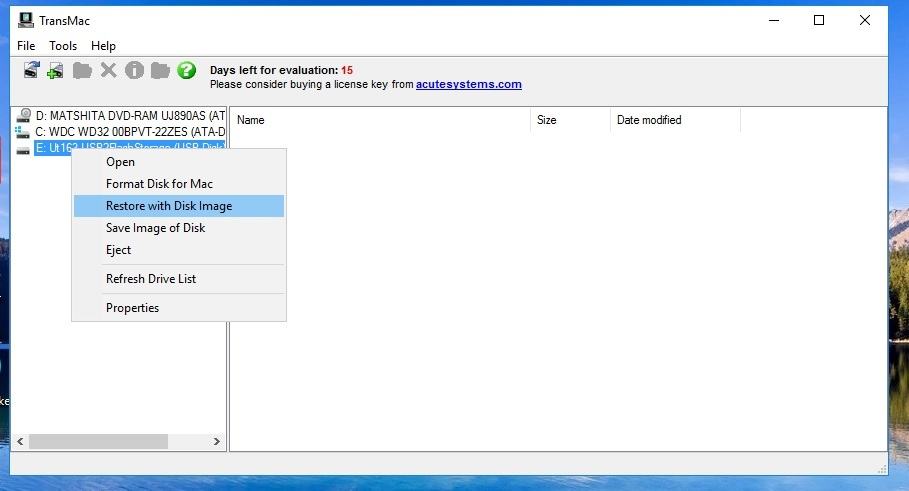
Windows Insider build 25182 in the Dev Channel gets a servicing pipeline update, to 25182.1010

The Windows Insider program is at it again, testing the servicing pipeline for Windows 11 with a small update to the Dev Channel, bumping the version number from 25182 to 25182.1010. This update does not contain any feature updates or fixes, but is still apparently important for Microsoft as they test servicing pipelines all the time.

In case you missed it, Windows 11 Dev Channel build 25182 introduced updates to the Camera and Microsoft Store apps, and included a number of fixes. You can download the latest build and help Microsoft check to make sure everything is working if you’re in the Dev Channel.

How to fix Windows 10 broken audio after installing KB5015878

As we all know by now, updates that are meant to fix certain issues that we might have with our systems, actually end up breaking it even more sometimes.

Yes, we are talking about Microsoft and some of the fix patches that they release, which break other stuff while fixing what they were meant to.

And, since we were on the topic, judging from the latest update from the Redmond tech giant, posted on the Windows Health Dashboard website, there are some problems after installing KB5015878. 

KB5015878 comes with nasty audio bug for Windows 10

Microsoft has therefore officially acknowledged this issue, shared workarounds for the affected users, and applied the Known Issue Rollback System (KIR) to prevent the bug from spreading.

Redmond developers said that the newest known bug in Windows 10 affects machines differently, so you might be experiencing different symptoms.

Some Windows 10 users stated that they have a complete audio blackout, while others only have working audio on certain ports, devices, or applications.

The tech giant reveals that the affected audio drivers actually have the audio enhancements setting disabled before installing KB5015878.

Another variant shared by the company is that the sound device driver has issues with the audio enhancements feature.

Thus, in order to prevent the problem from spreading, Microsoft applied the Known Issue Rollback system that can undo problematic changes without any action required from the end user.

You should also know that this time, KIR only ensures the bug will not affect other systems, just in case you were wondering.

Users that already have audio issues on Windows 10 after installing the above-mentioned update should definitely apply one of the three workarounds that Microsoft shared.

How can I fix my Windows 10 audio not working?

If you have not yet installed the update, you can do the following to prevent the issue:

  • Updating your audio device driver (also called “sound drivers” or “sound card drivers”) might prevent this issue. If there are updated drivers available on Windows Update or from your Windows device manufacturer’s (OEM) webpage, installing them might prevent this issue.
  • If you are using any advanced audio applications such as Open Broadcaster Software (OBS), it is recommended that you backup all your settings before installing the update.

If only certain apps are impacted, you can try the following to mitigate the issue:

  • ​Verify that the audio devices set within those apps are the expected devices. Audio endpoints might be reinitialized after KB5015878 is installed and some apps might set the audio devices for microphone and speakers to default.
  • ​If the device settings within the app are as expected, the apps might be caching the Windows Multimedia Device (MMDevice) ID. Caching the MMDevice ID is not recommended and might require reinstallation of the affected app or contacting support for the developer of the app for how to resolve the issue when audio endpoints are reinitialized and have new MMDevice IDs.

If you have already installed the update and are experiencing issues with audio on all apps, you can try the following to mitigate the issue:

  • The Windows audio or sound troubleshooter might be able to resolve the issue for you. You can launch the troubleshooter from Fix sound or audio problems in Windows by selecting the Open Get Help button in the article. The Get Help dialog window should open, and you will need to select yes to open the troubleshooter.
  • If your device’s audio is still not working as expected, follow the instructions in Disable Audio Enhancements. Note: The article uses the microphone as an example, but you will need to do the steps for any affected audio device.

Please keep in mind that the above-mentioned audio bug that came with KB5015878 affects only Windows 10 versions 20H2, 21H1, and 21H2 users.

That being said, it should not cause any sort of problems for Windows 11 users, just like the recently confirmed BitLocker recovery bug does not affect Windows 10 customers.

Xbox exclusive High on Life delayed 6 weeks, will launch in December

‘High on Life,’ Xbox’s upcoming FPP game was set for launch in November, but Squanch games,the creator of the game Rick and Morty, have delayed the launch of the game from its original date. The reason behind the delaying game launch was reported by Squench Game’s official Twitter account:

The Squanch Games developer team said the extra time spent on the game will be focused on resolving a few bugs and developing the best gaming experience (Via Digtitaltrends.com). High on Life will be featured at gamescom tomorrow.

The good news is High on Life game is still coming in 2022, set for launch on December 13, 2022, and will be available on Xbox One, Xbox Series X|S, PC game Pass, and Xbox Game pass.

For more latest and exclusive tech news updates follow us on Google News.

5 Tested Ways to Fix Roku Error 020 [HDCP Error Bypass]

Roku error 020 is a standard message that appears on the screen of your Roku device. This error means that you cannot connect to the internet and stream videos on your TV.

The device has almost all the features you might need to access thousands of channels and apps. However, sometimes, you may encounter some issues with your Roku device.

Roku is one of the most popular streaming devices used by millions of people around the world. It has become so popular that it can be considered a standard in modern home entertainment systems.

How do I fix HDCP error 020 on Roku? 

1. Change your HDMI cable

The first thing you should check is whether your cables are fully functional. If there’s any damage to the cable or if it’s too long, it could cause problems with the signal being transmitted from your TV to your Roku device. 

Unplug all devices connected to the same HDMI port. If you have more than one HDMI port, try unplugging all devices connected to those ports and then plug them back into another HDMI port. 

This will also solve your problem since it may be due to an overload of HDCP errors generated by different devices connected through one HDMI port. In addition, make sure that both ends of the cable are firmly attached so there’s no loose connection between them.

2. Restart Roku

Unplug the power cable from the back of the device and wait for at least 30 seconds. Then, plug it back in and wait until the device boots up properly.

Sometimes, restarting your streaming player does not fix this issue. In such cases, you must reset your Roku device to factory settings. Ensure you have backed up all your important data before performing a reset as it will wipe out all data stored on your device.

3. Reset your router

Sometimes this problem is caused by corrupted data or other issues in the router itself. If you notice any unusual activity from your router, then it’s time to reset it.

If you have a Wi-Fi connection, try resetting your router by unplugging it for at least 30 seconds. Then, plug it back in and wait for it to boot up before reconnecting with your Roku device. This can also resolve other related issues like the Roku error 014.30.

4. Change the Display type

  1. Press the Home button on your Roku remote to access Settings.
  2. Navigate to Display type.
  3. Select the Auto detect display type option.

5. Disable Display Refresh Rate for Roku

  1. Press the Home button on your Roku remote to access Settings.
  2. Now select System.
  3. Click on Advanced system settings and select Advanced display settings.
  4. Toggle the Auto-adjust display refresh rate to Disabled.

Note that HDCP stands for High-bandwidth Digital Content Protection, and it’s a copy-protection scheme that many streaming services use to prevent unauthorized copying of their content. It is almost similar to DRM protection, but there is a way to remove DRM from files.

The device is compatible with HDCP technology, which allows it to play content from different channels. If you are facing an HDCP error 020 on your Roku device, then it means that there is some problem with the connection between your device and the TV.

Either end of the connection may have become loose or damaged, so unplug and firmly plug the cables back. It is also possible that there is an issue with the HDMI port on your TV or monitor.

What does HDCP unauthorized content disabled mean?

HDCP unauthorized content disabled is a message that may appear on your TV screen when viewing protected content. It’s a security feature that prevents people from copying digital video content, including movies and TV shows.

This message can appear when you try to use an unauthorized device or when you try to connect two devices that don’t support HDCP encryption.

How do I watch HDCP on my TV? 

HDCP is a copy protection technology many devices use to prevent unauthorized digital video and audio content copying.

To watch HDCP-protected content on your TV, you’ll need an HDCP-compatible HDMI cable, which is required to read the encryption key from the source device and send it to your TV.

If the problem persists, you can contact Roku support and check if they have an alternative solution.

Should you encounter an HDCP error on Netflix, refer to our guide on how to fix the issue quickly. Also, if you are having a problem with getting an HDMI signal on your device, we have an expert article to help you resolve it.

We also have a guide dedicated to Roku Cloud Path error authorization, so don’t hesitate to check it out.

Let us know any other tips that may have worked for you in the comments section below.

Attachments not showing up on Outlook? Here’s how you can fix this error for good…

Adding email attachments to your emails lets you transfer critical information along with your message. Images, audio, videos, you know, the usual stuff.

However, the process can sometimes fail. Even though the sender might have sent you the file, the attachment is nowhere to be found at your end. Or, you might be unable to verify the attachment you’ve yourself added. In what follows, we look at the quickest ways to work your way out of this problem. So let’s get started.

Are attachments not showing up on Outlook? Here’s how you can fix this issue…

While no one can pinpoint the exact culprit of this error, we certainly have the strategies you can take to get out of it. So let’s look at them all one by one.

1. Check your internet connection

The most obvious fix to give a shot is to check your internet connection first. If you’re offline, you won’t be able to upload your files. 

So, if you’re using a cabled device, give your router a thorough check first.

And if it’s the Wi-Fi instead, don’t forget to check out the driver. You can also give the Windows Troubleshooter a go for checking your internet connection.


2. Turn off your antivirus

Antivirus is infamous for causing glitches in the normal functioning of different processes of your PC. This is where disabling your antivirus can help—at least while you send away the email.

However, you can turn it back on when you’re sending the attachment. 

Try reinstalling your antivirus and fixing the Outlook attachment problems for a long-term solution.

3. Update Outlook

When was the last time you updated your app? Using an outdated app can run you into all sorts of problems along the line—massive security loopholes being one of them.

In the case of Outlook, it can also get you stuck with random email-sending errors like this. 

So, updating your app is definitely worth the shot to get out of this problem. To do that, head to the Microsoft Store, and update your app from there. Here’s how:

  • Go to the Start menu search bar, type in ‘store,’ and select the best match.
  • In the Store app, click on Library from the bottom left corner.
  • Then click on Get updates and install your updates from there.

store library

That’s it. Do this and your app will get updated; this should have fixed the attachment issues with your app. Alternatively, you can also reset the app. Go to Settings > Apps > Apps & features.

From there, scroll down to find your Outlook app, click on the options (three dots) menu of the app when you find it, and select Advanced options. Scroll down and select Reset. You’ll get a dialog box warning you about the permanent deletion of your data. Click on Reset to finalize the deletion.

reset app

Fixing the attachment issues on your Outlook app

Attachments have become a critical element for any email service and have become a part of the business transfer of information. With the above steps, you can fix all attachment issues you might have on your Outlook app.

Protected Content License Error on Disney Plus & Roku

If you’ve been watching Disney+ content on your Roku, you may have encountered the dreaded Protected Content License Error message. This message appears while trying to play a particular movie or TV show. Roku, like all streaming devices, has its problems. And in many cases, these issues are fixable.

Usually, if you have an active subscription, you should have no problem accessing the content. If you get this error, the file or folder you are trying to open is locked, and only licensed users can access it.

As streaming TV services become widespread, you may encounter licensing issues occasionally. With a few tweaks, you can bypass DRM restrictions. However, some sites have stringent rules that make it almost impossible to view such content.

In such cases, you can try troubleshooting the error provided you are not using pirated software and have a legally obtained and valid subscription to view the content.

What is the protected content license error? 

The protected content license error is a common error that occurs when you attempt to play protected content. This can be caused by an issue with your system or by an issue with the content itself.

Such files often have DRM (Digital Rights Management) protection, which means they can only be viewed on certain devices or applications.

Different websites have different requirements for accessing this type of content. Some will require you to register and authorize your account before you can watch their videos. Others will ask you to agree to their terms of use before they let you watch their content.

Why am I getting the protected content license error? 

There are many reasons why this can occur, but here are a few:

  • You are using a trial or free license – If you are getting this error, it means that you have not purchased a license for the content; hence, it is not available anymore.
  • Outdated firmware – If your device runs on an outdated or unsupported version, you will get the protected content license error.
  • Bad network connection – Ensure you’re connected to the Internet and try again. If it continues to happen, check for any changes in your network configuration. Sometimes, your Roku device may be connected to Wi-Fi but still not working.
  • Damaged HDMI – If you get the protected content license error, it could be because of a damaged HDMI port on your TV. 
  • Outdated application – There is a chance that the developer has disabled support for the app in your current version. Check for any updates available and update accordingly.

Other times, it could just be an internal server issue or downtime with the server. You can wait it out and try again after some time.

How do I fix the protected content license error? 

1. Unplug and re-plug the power/HDMI cables

Unplug all cables from the back of your computer Roku device, including power and HDMI cords, wait 30 seconds, then plug them all back in again. 

This will reset the device, giving it a fresh start with any new content you’re trying to play. A simple restart can sometimes clear up any problems preventing you from playing content on your PC or TV.

2. Check your network connection

If you’re using Wi-Fi or Ethernet for internet connectivity on your PC or TV, ensure these work properly. Ensure your device has a strong Wi-Fi or cellular connection and you’re not in an area with poor coverage.

A weak or poor internet connection can often cause issues like the no valid bitrates error, so it’s worth checking that you have a strong enough signal. If your signal is poor, try connecting to another Wi-Fi source or switch from wireless to Ethernet.

3. Reset your Roku player/TV/Router

Roku players, TVs, and routers are set up to connect to your local network but can occasionally get disconnected.

Resetting your router will clear out any temporary problems, so this is usually a good place to start with any other problems. To reset your router, unplug it from power for 30 seconds, then plug it back in and wait for it to fully power up before powering on anything else.

4. Update your Roku device software

  1. Press the Home button on your Roku remote.
  2. Scroll down and select Settings.
  3. Click on System.
  4. Select System Update.
  5. Click on Check now for available updates.

5. Update your router firmware 

You may need to update the firmware if you have a wireless router. Some routers come with outdated firmware, which can cause problems with protected content streaming. If this is the case, update your router’s firmware.

You can usually check if this is the case by logging into its web interface and checking for any available updates.

6. Uninstall and reinstall the associated app

First, try closing and reopening the app. This will clear any files that may have been causing the issue in the background. 

If that doesn’t work, try uninstalling and reinstalling it from the Google Play Store or Apple App Store. This will clear any traces of corrupt files associated with the app. Now, go back and reinstall it again and see whether the protected content license error persists.

7. Disable hardware acceleration

Hardware acceleration refers to hardware-accelerated video decoding. With hardware acceleration, the video card (GPU) decodes the video, saving system resources and improving overall performance. 

Disable the Hardware Acceleration

However, disabling hardware acceleration may be necessary to view protected content properly if you have an older computer or a poor graphics card. You can disable hardware acceleration using a desktop browser and see if that helps.

If you are still experiencing the error after trying these solutions, you may have to try another PC browser. We have recommended the best browsers that work with Roku, so be sure to check that out.

In some rare cases, the content may be restricted from your country, and you get an error like A19 on Stan. You will need to remove the geo-restrictions and try again.

Alternatively, you can contact Roku customer support and report the issue for additional help. Ensure to include as much detail as possible for prompt help.

Hopefully, you have solved the protected content license error and can enjoy videos uninterrupted.

We love your feedback, so let us know your additional thoughts on this issue below.

Play the Viking Online Game: Browser Recommendation & Tips

Vikings: War of Clans is an MMO strategy game developed and published by Plarium.

The gameplay focuses on the fight for supremacy between various clans of Vikings who live in a particular kingdom. The aim is to conquer a certain place of power, which stands at the center of each kingdom.

At the end of 2019, there were more than 800 kingdoms created by players from all over the world.

Is Vikings: War of Clans free?

If you have any past experience with browser games at all, or you played some of the free games out there, you pretty much know what we are about to say.

Yes, Vikings: War of Clans is completely free to play. However, it has optional in-app purchases for real currency, so keep that in mind.

Quick Tip:

We always enjoyed browser gaming. So, for this game in particular, we have a recommendation. Opera GX is a gaming browser that was created to enhance the gaming experience.

Namely, it comes with a built-in panel to limit RAM and CPU usage for better performance. It also includes a free ad blocker and VPN, to secure your activity while online. Additionally, it provides plenty of gaming-oriented settings that will smoothen out your experience.

Opera GX

A gaming browser with built-in features for a true gaming experience.

How can I play Vikings: War of Clans on PC?

  1. Access the game’s website and hit the Play For Free button.vikings 1
  2. Select your character’s gender.vikings 2
  3. Select the type of Viking warrior you want to be.vikings 3
  4. Confirm you meet the age criteria in order to play.vikings 4
  5. Choose a name for your character and press Continue.vikings 5
  6. Select a password, then press the Continue button.vikings 6
  7. Enter your email address and confirm by pressing Continue.vikings 7

After going through these steps, you will be good to go and you can start your new adventure in the Viking world.

Upon entering the game, you will join, by default, the most recent kingdom. For the following 30 days, you have a chance to participate in the organization of the kingdom and learn the rules.

As kingdoms get into competition with one another, players have to cooperate with each other and join clans or create their own clans. A player can become Chief of his clan irrespective of their experience in the game.

From then on, it’s all about clan management. Each member of the clan has a certain amount of authority, corresponding to their ranking.

Clan members have to protect and reinforce the town where they live, train troops, organize raids, upgrade heroes, conquer other towns, recruit allies, and, at the same time, acquire precious military, strategic and economic knowledge that will help them advance in the game.

By the end of the game,  a clan has to travel to the kingdom of Jotunheim to take part in a legendary competition.

There is no limit to the number of players that can join the game simultaneously. A clan gathers 100-125 players, while a kingdom can include up to 45,000 players.

What are the supported platforms for Vikings: War of Clans?

The game was initially launched in 2015 as a free app for Android and iOS; several features need to be purchased, though.

In time, the developers also launched a desktop version. No downloading is necessary. However, the developer also created a special desktop app, Platinum Play, that should grant more stability, faster loading, and better performance for all their games.

What is the best troop in Vikings: War of Clans?

If you really want to gain the upper hand and crush your enemies in this entertaining game, you should definitely go for the cavalry.

As you might have expected, cavalry is the fastest troop type in the game, which means that it can be used by players who prefer to strike quickly and, sometimes, unexpectedly.

Furthermore, these units are strongest against Ranged (50% bonus), as well as Siege Engines (50% bonus) but perform poorly against Melee (50% penalty) and Killers (25% penalty).

So what are you waiting for? Hit that Vikings: War of Clans login button and wreak some havoc among other tribes that would contest your rule.

This is definitely one of the best free Viking games on PC, so be proud of the choice you made when it comes to browser titles.

If you want Vikings: War of Clans download links for PC you are in the right place, and all you need to do is have fun.

Have you played the Vikings: War of Clans yet? Leave us your feedback in the comments section below.

Use This Method to Play Old Games with Widescreen Resolution

If you’re an avid gamer but mostly a fan of the golden age of gaming, your biggest heartbreak is not being able to play the same games as you used to.

Either they are hard to find, or they are hard to port to the modern Operating Systems or even the old low-spec PCs that are now available.

However, once in a while, you do manage to find your favorite title and maybe even make it playable, so now you are wondering how you can make use of your modern widescreen monitor.

This guide will show you how to do it with a freeware tool. Read on to find out more!

What was the first widescreen game?

According to popular opinions, the first widescreen game is the World Cup ’94 USA. This game was available on the popular Sega CD and had a copyright dated 1994.

However, some gamers believe Virtua Fighter is the earliest widescreen game.

Do all games support widescreen?

The vast majority of modern games support widescreen and ultrawide monitors. However, not all games can work on these monitors or use the feature.

Also, it is important to note that some games support widescreen with mods.

How to play old games on widescreen monitors?

  1. Download and install the Game Widescreener tool from the official website.
  2. Load the tool and click on Select game.
  3. Once you select a game, Game Widescreener will try to detect it on your PC. If you can’t find it, you will manually have to specify the game directory.Game-Widescreener-settings
  4. Manually input your screen’s resolution.
  5. Click the Install button.

In theory, you wouldn’t need Game Widescreener to do the job. You could just manually edit some .INI files or maybe add x-res and y-res values in the target field of shortcuts.

However, in all honesty, no one knows how to do this by heart, especially after a long time. Thus, using the Widescreener tool mainly reduces some of the hassles.

By heading to the official Game Widescreener website, you can look at the list of supported games and the program interface.

Lastly, the program works with all Windows versions Vista and above and is also available in a portable version.

Does RDR 2 support ultrawide?

The Red Dead Redemption game is one of the games that supports a wide range of resolutions and screens. It supports ultrawide, and some gamers suggest that it makes it better.

With a 21:9 ultrawide monitor, you get a cinematic and completely immersive experience. This takes your gaming to a whole new level.

Playing games on widescreen is a different experience from just playing on any screen. It can be a deal-breaker in some games and make your old games feel much better.

With the instructions in this guide, you should be able to enjoy your old games on widescreen. While still on the gaming topic, if you want to know how to play old games on Windows 10/11, check our guide to do it effortlessly.

Feel free to share your experience using the Widescreener tool in the comments below.

7-Zip or WinRAR? Which file archiver provides the best value on Windows 11?

Updated: 3/16/2023

Which file archiver do you use, 7-Zip or WinRAR? Which one has the features you want on Windows 10 or Windows 11? Whether you use one or the other, in this guide we will look at the upsides and downsides of both.

When you need to deal with a lot of files that need to be moved or transferred to a different computer, it is common practice to compress the files before you send them.

There’s a 7-Zip versus WinRAR comparison battle on Reddit to discuss which file archiver is more efficient and “better choice.” We’ll be looking at both, detailing their offerings, cost, and limitations. Here’s everything you need to know:

7-Zip

7-Zip

7-Zip is free and open-source software (FOSS) and allows users to extract and create compressed files in multiple formats. FOSS means that the software can be developed and tweaked by anyone. Most of the 7-Zip code is available under the GNU LGPL.

It uses the .7z file extension and works on most operating systems, including Windows, Linux, and macOS. According to a compression ratio with WinRAR, 7-Zip compresses to 7z format 30-70% better than to zip format and compresses to zip format 2-10% better than WinRAR version 5.20.

It has been widely popular since it was released in 1999, in large part because 7-Zip is free for both personal and commercial use.

WinRAR

 7-Zip

Released way back in 1993, WinRAR is a popular tool that uses the .rar file extension to compress and decompress files. One of the main downsides is that you might need to cough up $29 (USD) to buy a license to use WinRAR after its 40-day “free” trial period.

For the amount that you pay, WinRAR gets the fastest compression speed, but the compression rate is smaller, so the file size doesn’t shrink as much.

Personal choice

Neither one is better nor worse to use. Personally, I opted to use a fork of the 7-Zip repository called NanaZip.

NanaZip provides a more modern Windows 11 graphical user interface. It is available on GitHub and in the Microsoft Store.

It all comes down to personal choice. If you enjoy using 7-Zip, keep using it. If you are more comfortable using WinRAR because it’s an app that works best for you, no need to switch.

Which file archiver do you use on your PC? Let us know in the comments!

How to Manage All Browser Notifications Like a Professional

The best browsers allow you to receive notifications from websites. This can sometimes be useful, as you can receive the latest updates from your favorite websites or web apps.

However, if not properly managed, it might lead to disturbance or even spamming. Configuring your notifications is easier than you think with the right information.

This guide will show you how to adjust these settings in all popular browsers.

Why am I getting all these Chrome notifications?

The default on Chrome is that the browser will notify you if a page or website wants to send notifications. You can either allow or deny the request.

But if you have allowed it and need to change it later, you can turn it off from Chrome notifications settings on Windows 10, as we will show later in this guide.

Quick Tip:

For increased productivity, good notification management is essential in a browser. Opera One gives the user easy access to notification settings and features to work in unison.

Opera One is a Chromium-based browser that brings additional features compared to other browsers. It comes with integrated social and messaging apps for easy notification control, also with an ad blocker, a VPN and a native AI.

Opera One

Simplify your working environment with a productivity-oriented browser.
Free Download Visit website

How do I manage Chrome and other browser notifications?

1. Chrome

  1. Click the Menu button and choose Settings.
    chrome menu manage browser notifications
  2. Select the Privacy and security option in the left pane.
    chrome privacy
  3. Now, select Site settings.
    chrome site
  4. Finally, click on Notifications under the Permissions section.
    option chrome

From there, you should be able to manage all your browser notifications or select the ones to allow.

2. Opera One

  1. Open the Opera menu and select Settings.
  2. When the Settings tab opens, select Privacy & security.
  3. Navigate to Site Settings in the right pane.
    site settings opera browser notifications
  4. Now select Notifications.
    notifications opera browser notifications

Now you can adjust notifications settings as you wish.

If you’re not familiar with Opera One, you should know that this browser is rather light on your resources, so it should be able to handle any website with ease.

The browser comes with a built-in ad blocker for faster loading times and with a VPN tool that offers unlimited bandwidth for free.

Opera One uses the same browsing engine as Chrome, which fully supports Chrome extensions.

If you’re a social network user, you’ll be pleased to learn about the available integrated messengers for the most popular social media platforms, such as Instagram, WhatsApp, and Twitter.

Opera One is available on all major desktop and mobile platforms; if you haven’t tried it, this might be the perfect moment.

3. Firefox

  1. Click the Menu button and select Settings.
    firefox menu
  2. Choose Privacy & Security in the right pane.
    privacy firefox
  3. Locate Notifications under the Permissions section.
  4. Click the Settings… button before it to it.
    settings button manage browser notifications

From there, you should be able to manage all your notifications.

4. Microsoft Edge

4.1. For older versions of Edge:

  1. Click the Menu button and choose Settings.
  2. Go to Advanced and click on the Manage permissions button.
    manage permissions edge browser notifications
  3. From there, you should be able to manage all your notifications.

4.2. For the newer version of Edge:

  1. Launch Edge and click the Settings icon in the bottom right corner.edge settings
  2. Select Cookies and site permissions from the left pane.
    site
  3. Scroll down in the Site permissions section and select Notifications.
    option manage browser notifications
  4. Now configure your notifications as you wish.

How to block notifications from a website on Android?

  1. Launch Chrome on your device and tap the menu button (three vertical dots) in the top right corner.
  2. Select the Settings option.
    mobile menu manage browser notifications
  3. Choose Notifications.
    notifications mobile
  4. Toggle the switch for Show notifications backward to disable all notifications.
    show
  5. Scroll down to the Sites section and toggle the switch for any website to block the notifications.
    each manage browser notifications

With the steps above, you should be able to manage and block notifications on the Chrome browser on your Android device.

Configuring your notifications is rather easy. We believe you should be able to do it easily with the instructions from this guide.

Do you want to know how to search and delete Chrome history? Then, check our detailed guide to get it done quickly and effectively.

Were you able to manage your notifications on your favorite browser? Feel free to drop a message for us in the comments below.

How to Use Skype for Web on Unsupported Browsers

Recently we reported that Microsoft had released a new version for Skype for Web that dropped support for Edge, Safari, and Firefox on macOS and Windows 10 and 11. 

Skype has long been an effective software to communicate and is used by both individuals and corporations alike.

Subsequently, the news sparked criticism from most Skype users all over the world. But here is a twist in the story! Users have finally found a way to use Skype for Web on an unsupported browser.

Quick tip:

We recommended Opera One Browser because it’s very fast, and it has a minimalistic and intuitive interface. Opera One lets you sort the extension gallery by popularity and includes a privacy and security category.

Moreover, this productivity-orientated browser lets you use Skype and other apps having a wide range of extensions from which you can choose, such as VPN, Ad Blocker and AI.

Opera One

Use this fast-paced, productivity-oriented and friendly-user browser to fulfill all your task.
Free Download Visit website

Why Skype in browser is not working?

In most cases, the browser you are running is not compatible with Skype, and the troubleshooting remains pretty straightforward because the error message is displayed right away.

First, Skype recommends using Google Chrome or Microsoft Edge. So if you are using any other browser, try switching to these for the best experience.

Also, in many cases, even if the latest version of a browser supports Skype Web, you might be running a version that doesn’t. In which case, updating the browser should do the trick for most users.

Besides, conflicting extensions or other third-party apps may be behind the Skype for Web unsupported on your browser error.

What browser do I need for Skype?

Other than the two recommended earlier, Edge and Chrome, Skype also works on Opera One and Safari. So, in total, Skype should work fine on these four browsers without any trouble or throwing errors. Firefox too falls in the list of supported browsers, but it’s not fully compatible.

We can’t outright deny the possibility of it running on the other browsers, and recommend giving it a try. We tried running Skype for Web on Vivaldi and Brave, and it opened without throwing any errors.

How to use Skype for Web on unsupported browsers?

The workaround is pretty simple, as the web app works again by just switching the User-Agent, which tricks Skype into believing that you are using a supported browser.

It’s available as an extension on the Chrome Web Store or the as an Add-On for Firefox. If your browser supports extensions developed for Chrome, you can add it and use Skype for Web on the unsupported browser.

The dedicated Skype desktop application supports each and every platform. But there are times when you don’t have access to the desktop app. So this is when the Web version comes to the rescue. 

Run Skype for Web on Opera with ease

If you’re having a hard time running Skype for Web on your browser, consider switching to Opera One. We at WindowsReport did, and it works like a charm.

Based on the Chromium project, the Opera One browser is, fundamentally, a Chrome on steroids. Due to that, everything Chrome can do it can be done on this modern browser. And more.

The resource usage on Opera One is significantly lower than on Chrome. Plus, you can save everything in the pinboards or switch workspaces anytime you need.

It comes with a built-in VPN, prevents tracking and profiling on third-party websites, and keeps you updated with social media and messaging apps integrated with the sidebar.

What does it mean when it says you are using an unsupported browser?

Not all websites or applications are developed to run on every browser. For instance, some may run on Chromium-based browsers, while others are unsupported.

Also, when it comes to some websites, they work only on Internet Explorer, and haven’t made the necessary changes to ensure compatibility with other browsers. This is why the IE Mode on Edge was introduced.

Similarly, several other platforms don’t work on some browsers, and as a result, you see the unsupported browser message throw up.

You now know how to fix things when encountering the Skype for Web unsupported browser error, and should have the platform up and running on your favorite browser.

Also, find out how to fix We didn’t recognize your sign in details Skype error.

If you have any other queries, drop them in the comments section below and we will try to resolve them.

3 Tested Fixes for IE Security Settings Grayed Out

You have found this article because your IE security settings are greyed out, and we will tell you all you need to know.
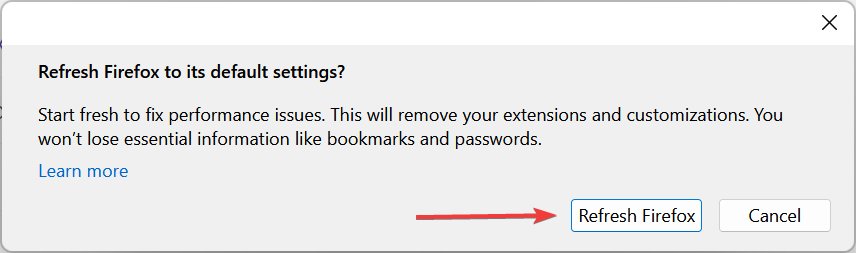
Internet Explorer’s privacy settings can affect how websites monitor your online activity.
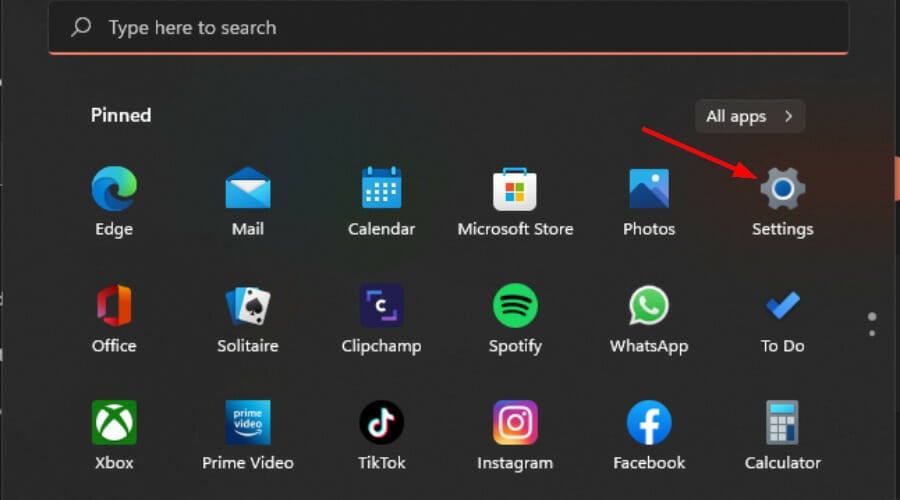
So, not being able to change your Internet Explorer security settings can cause severe issues on your device.
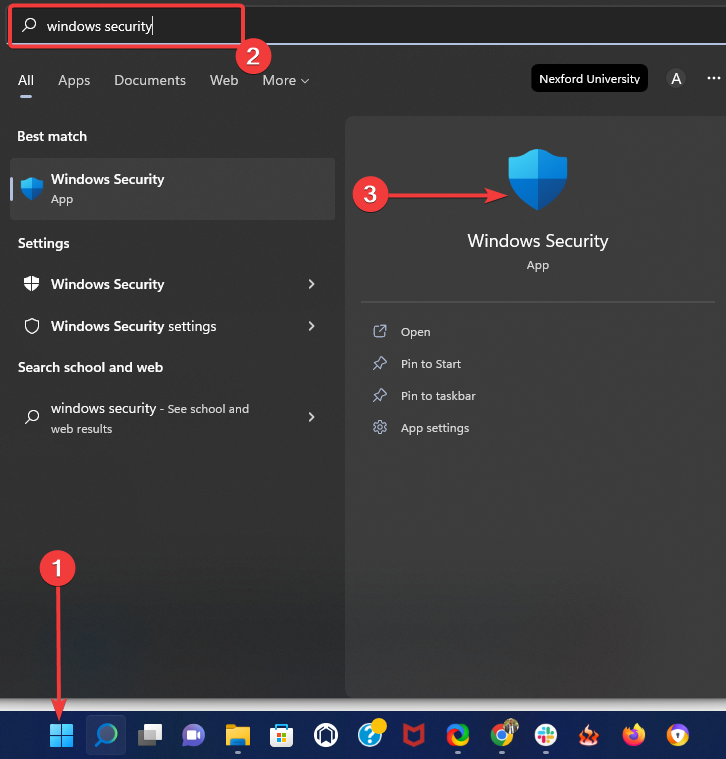
It would help to decide when sites can use your location info, which cookies are stored, or block unwanted pop-ups.

If you’re trying to change your Internet Explorer’s security settings, and you’re running into difficulties because it is greyed out, check out the list below for the most common fixes.

Can’t change Internet Explorer Security settings?

Before diving into fixes, let us explain why you may not be able to change your Security settings in internet explorer.

In some cases, you can fix the problem, while on rare occasions, this error will be beyond a regular user. One example is if you use a domain-based computer and your admin configures restrictive group policies.

However, in other cases, settings on the client’s computer stop you from accessing security settings.

We will now discuss all you can do to rectify the issue.

Quick Tip:

Perhaps before fixing any issues your current browser has, it can be less time-consuming to switch to a new browser simply.

We are referring to Opera One as the primary focus of this browser is on data protection, user interface, and privacy. In addition, the browser comes built-in VPN, Ad blocker and AI.

Opera One

Close to zero connection errors, free built-in VPN, and enhanced encryption are some great features you can use immediately!
Free Download Visit website

How do I unlock IE Security settings?

1. Check the Windows registry

  1. Click the Start button, type regedit in the Windows search box, and press Enter.
    ie security settings greyed out
  2. If prompted by User Account Control, click Yes to open the Registry Editor.
  3. Find your way to: HKEY_LOCAL_MACHINE\SOFTWARE\Policies\Microsoft\Windows\CurrentVersion\InternetSettings
    Windows Registry Editor
  4. Check the items Security_options_edit and Security_zones_map_edit.
  5. Set the value to 0.
    ie security settings greyed out

2. Reset Internet Explorer

  1. Open the IE browser, click Tools, and Internet Options.
    ie security settings greyed out
  2. Next, select Advanced.
    ie security settings greyed out
  3. In the Reset Internet Explorer Settings dialog box, select Reset.
  4. When asked Are you sure you want to reset all Internet Explorer settings? Select Reset.
    how to reset Internet Explorer
  5. Next, click Close, then select OK.
  6. Restart your PC to apply these new changes.

Now you should be able to change the IE security settings, and they will no longer be greyed out. Keep in mind that this process isn’t reversible. All previous Internet Explorer settings are lost after reset.

3. Perform a clean boot

  1. In the search box on the taskbar, type msconfig, and select the System Configuration app.
    ie security settings greyed out
  2. On the Services tab, tick the Hide all Microsoft services checkbox, then click the Disable all button.
  3. In the Startup tab, select Open Task Manager.
    ie security settings greyed out
  4. Under Startup, for each startup item, select the item, then select Disable.
  5. Close Task Manager.
  6. On the Startup tab, select OK.

This is a good solution if the trusted sites in the security tab of internet options are greyed out/not editable or if you are unable to add trusted sites in Internet Explorer 11 on Windows 10.

How do I allow insecure content in Internet Explorer?

  1. Open the IE browser, click Tools, and Internet Options.
    ie security settings greyed out
  2. Click on the Security tab, then select the Custom Level button.
  3. Click Enable on the Display mixed content option, then click the OK button.

Are you using a domain-based computer? If so, your administrator may have configured new policies that restrict you from changing the Internet Explorer security settings.

We hope that one of the above solutions helped you change the IE security settings even if they are greyed out.

As a last resort, you may want to tweak the Internet Options registry settings, but we only suggest this if you have experience editing Registry settings. A similar occurrence where Trusted sites may be greyed out can also occur but we’ve already covered ways to bypass it.

If you have any other questions or suggestions, leave them in the comments section below, and we’ll be sure to check them out.

2 Quick Methods to Stop Cox Browser Alerts

Your online security is important and, speaking of which, many users reported Cox browser alert while browsing the web.

This message can be a bit alarming, and in today’s article, we’re going to show you how to get rid of it, so keep reading.

Many users may assume that Cox alerts are browser hijacking threats or malware that infected their PC.

This is the reason you might need practical methods to block these alerts from Cox regarding unimportant promotions or news.

What are Cox alerts?

First of all, let us say that, when you receive a Cox browser alert during a web browsing session, you are definitely not dealing with a phishing attempt.

We said that because a lot of users have actually reached this conclusion after getting the above-mentioned alert, but it is not the case.

In fact, Cox browser alerts are used to inform Cox Internet customers on a range of topics, such as details about the account.

How do I get rid of Cox notifications?

We just told you what these notifications are, and now you surely want to know how to get rid of these pesky notifications.

In order to close the alert, all you have to do is click the X in the upper right corner of the above-mentioned alert.

However, before you do, make sure that you have read and understood the alert, while also reviewing the support links, and taking the requested action to avoid future alerts or issues.

Quick Tip:

An alternative that will fix Cox browser notification alerts is to switch to a different browser such as Opera One. It has a built-in ad blocker, so it can deal with advertisements such as these out of the box.

Opera One, in addition, comes with a free unlimited VPN that should help you with this problem as well. This great browser is also light on your resources, and you can use it or organize your tabs into workspaces and tab islands.

Opera One

To bypass errors and ads, there is no doubt that these features will take care of them.
Free Download Visit website

Can Cox See my search history?

The developers have stated in the past they don’t want that to be a part of their software, so the answer is going to be no.

Cox does not collect the individual web browsing history of our customers and has absolutely no plans to do so whatsoever.

How can I fix the Cox browser alert?

1. Use a VPN

Several users suggested that using a VPN can help you get rid of Cox browser alerts and eliminate any distractions while you navigate online.

What bothers the most clients of Cox is the recurring pop-up messages regarding promotions or news that appear instantly.

These alerts can disturb the users from personal tasks on the web or give the impression of a virus threat.

Hence, having an efficient VPN can hide your IP address and block tracking ads or pop-up alerts on the Cox browser.

2. Use an ad blocker for your browser

In most cases, these alerts are cleverly disguised advertisements. To get rid of Cox browser alerts, we suggest that you install an ad blocker extension for your browser.

Also, in order to fix this browser alerts issue for good, you can use a browser that already has a built-in ad blocker.

That is all you need to know about Cox alerts and what to do whenever you get them on your device. Remember that Cox alerts can appear immediately after login.

Another approach to this message is to just ignore it. It’s usually an advertisement for Cox services, so you can safely close it and forget about it.

3 Quick Ways to Fix Error 503 Certificate has Expired

Browsing the internet is something we all do at least once a day, and we enjoy doing it without bumping into any difficulties or interruptions. However, there are many errors you can encounter while surfing the internet on your browser.

Common error users complain about is the Error 503 certificate has expired. It means the browser is having difficulties validating the server you’re connecting with. However, this error can occur for various reasons like old/corrupt cookies and caches, invalid certificates, and many more.

What does the Error 503 certificate has expired mean?

For the browser to be able to load websites, it needs to authenticate its SSL certificate and run the SSL handshake.

However, if there are any issues with the website’s certificate, it can prompt the Error 503 certificate has expired. Hence, the browser won’t be able to authenticate the certificate and cause an Error 503 certificate has expired in Chrome.

What causes a 503 error?

  1. Browser cookies and caches: Caches and cookies are data the browser collects from your browsing activities to help you load the websites faster subsequently. However, this data can become old or corrupt and, as a result, cause difficulties with the browser accessing some websites.
  2. Incorrect date and time: When your device’s date and time are not correct, it can cause some issues with the browser authenticating SSL certificates. It means that incorrect dates and times can impede the expiry details of the certificate on your device.
  3. Expired SSL certificate: SSL certificate expiry date helps keep your website in check. Depending on your certificate, how long it lasts can vary. However, users can encounter a 503 Certificate has expired Ticketmaster error if the website’s expired SSL certificate.

Quick Tip:

Install the Opera One browser if you want to learn more about a site’s security certificate. The issuer of the certificate, the type of certificate, and whether the issuer is legitimate will be seen in Opera One.

Opera One has already created procedures and processes for Extended Validation certification and is on the cutting edge of standard compliance. Also, this browser brings you free VPN and AI integration.

Opera One

Verify the integrity of SSL certificates and manage them securely in this privacy-oriented browser.

How do I fix error 503?

1. Renew your SSL certificate

Renewing the SSL certificate keeps your website recognizable, and the browser can authenticate your certificate.

However, you can contact your certificate authority for renewal or visit sites like Let’s Encrypt to generate a free valid certificate.

2. Clear your browser’s cache and cookies

  1. Launch the Chrome browser.
  2. Click the Menu button.
  3. Select More Tools, then click Clear browsing data.
  4. Choose a time range for the data to be cleared (to delete everything, select All time).
  5. Check the boxes for Cookies and other site data and Cached images and files.
  6. Click Clear data.

After completing the process, restart your browser and check if the error persists. Clearing browsing data could also fix similar issues like the 503 Backend Fetch Failed Varnish cache server; read this guide to learn the solutions.

3. Reset your device’s time and date

  1. Right-click the date and time in the Taskbar, then select Adjust date/time.
  2. Toggle off the set time zone automatically and click on Change.
  3. Set the time & date and click Change to effect the new time.

Resetting your device time and date to your correct geo zone can help fix the 503 error. However, it will help the browser recognize the correct date in correlation to the certificates.

Nonetheless, users encounter many other SSL certificate-related issues while trying to use the internet. Hence, we recommend that you check our article on the 12 ways to fix your connection to this site is not secure.

Furthermore, if you are interested in learning about how to fix a problem with the security certificate, check our guide here.

If you have encountered the 503 Backend Fetch Failed Varnish cache server error message; read this guide to learn the solutions.

Leave your suggestions and questions in the comments section below, we’d like to hear from you.

Microsoft news recap: Xbox Cloud Gaming keyboard & mouse support coming soon, Teams Rooms pricing lowered, and more

Microsoft news recap is a weekly feature highlighting the top Microsoft news stories of the past week. Sit back, grab some coffee, and enjoy the read!

Xbox Cloud Gaming to add mouse and keyboard controls soon

A new filter has been added to the Xbox app on Windows that allows filtering of games by keyboard and mouse support, a sign that Microsoft could be getting closer to launching keyboard and mouse support on Xbox Cloud Gaming.

Microsoft added Qatar to its list of live Datacenter regions this week

Qatar has become the latest region to be added to Microsoft’s datacenter list, after the company launched its new datacenter in Doha, Qatar.

Microsoft added Qatar to its list of live Datacenter regions this week - OnMSFT.com - August 18, 2022

Microsoft lowers Teams Rooms pricing, offers free (with device) Basic Tier

Microsoft is shaking up its Teams Rooms pricing structure, with the addition of a Basic tier which is included for free with purchase of a device, as well as replacing Teams Rooms Standard and Premium with Teams Rooms Pro, which will be priced at $40 per month.

Microsoft lowers Teams Rooms pricing, offers free (with device) Basic Tier

Sensitive Microsoft login credentials leak on GitHub

Some sensitive login credentials of Microsoft employees may have been leaked on GitHub, after a security researcher identified the credentials in source code published on the service. Microsoft has investigated the leak and concluded no malicious activity was detected and no sensitive data compromised.

Sensitive Microsoft login credentials leak on GitHub - OnMSFT.com - August 17, 2022

That’s it for this week. We will be back next week with more Microsoft news.

3 Ways to Fix PCI Simple Communications Controller Driver Error

Peripheral Component Interconnect (PCI) is a computer bus used to connect hardware devices to your PC in a standardized format. However, users have reported errors with PCI Simple Communications Controller, keep reading to find a solution.

The PCI slots on a computer are for devices like graphics cards and internet modems. In order for these devices to operate properly, they need a driver installed to control them.

What is PCI Simple Communications Controller?

The PCI Simple Communications Controller is used with PCI devices like modems, USB devices, graphics cards, etc to ensure they run properly. This PCI Simple Communications Controller is commonly used with devices that are not compatible with standardized ports and drivers.

However, there are reports that the PCI device is not recognized on the PC and is usually indicated by a yellow flag next to it in the Device Manager. Try the solutions below to fix this issue.

How do I fix PCI Communications Controller driver error in Windows?

1. Update the driver

  1. Click on Start and search Control Panel and hit Enter.
  2. Select Hardware and Sound. Click on Hardware and Sound.
  3. Under Devices and Printers, click on Device Manager. Open the Device Manager.
  4. Locate the device under Other devices then right-click on the device and select Properties. PCI simple communications controller properties.
  5. Under General, select Update Driver.
  6. In the pop-up, click Search automatically for updated driver software. Update driver software to fix pci simple communications controller error.

If the driver for your PCI Simple Communications Controller has not been updated, then issues may arise. Follow the above steps to check for any driver updates.

2. Via third-party driver updater

When updating drivers it is always a good idea to employ the help of professional driver updating software in order to minimize the risk to your computer.

With a driver updater, you can use the scanning functionality in order to check up on your PC’s drivers and make sure they’re always under control. For example, you can set it to run automatic scans every time your computer restarts. This way, you’ll ensure that your drivers are up-to-date at all times.

3. Locate and install the corresponding driver

  1. Click on Start and search Control Panel and hit Enter.
  2. Select Hardware and Sound.
  3. Under Devices and Printers, click on Device Manager. Open the Device Manager.
  4. Locate the device under Other devices then right-click on the device and select Properties.
  5. Click on the Details tab and under Property, change it to Hardware Ids. Select hardware ids.
  6. Select the longest hardware id from the list of values and right-click it then click Copy. Copy the hardware id to fix pci simple communications controller error.
  7. Open your browser and paste the hardware id into the search bar.
  8. Follow the instructions to download the driver.

If one of your PCI devices does not have a driver installed for it, then an error will likely occur. Usually, this error appears in Device Manager and will tell users to install a corresponding driver. Users can search and install the correct driver to their Windows 10 or 11 online.

Websites like PCI Lookup will make the process of locating a drive a lot easier.

How do I find drivers for PCI Simple Communications Controller?

  1. Click on Start and search Control Panel and hit Enter.
  2. Select Hardware and Sound. Click on Hardware and Sound.
  3. Under Devices and Printers, click on Device Manager.
  4. Locate PCI Simple Communications Controller under Other devices then right-click on the device and select Properties. PCI simple communications controller properties.
  5. Click on the Details tab and under Property, change it to Hardware Ids. Select hardware ids.

These are the driver IDs for your PCI Simple Communications Controller. The longest value is usually the one you want to use if searching for the driver online.

Users can also find the driver of their PC has a motherboard driver disc. Inserting the CD will allow users to install any chipset drivers. The chipset allows Windows OS to locate devices built into the motherboard. The motherboard driver disc will also update any drivers that need it.

We hope one of the above solutions helped you fix any PCI Simple Communications Controller errors. If you’re having issues with unknown devices in your Device Manager, we have a guide for that as well.

Let us know in the comments below which solution worked for you or if you have a suggestion for a different solution.

How to Download and Play Solar Smash on PC [Unblocked]

Solar Smash is a popular simulation game developed by Paradyme Games. Users must strategize to destroy planets in this realistic simulator. Here are our solutions on how to download Solar Smash on Windows 10 or 11.

One of the most impressive features of Solar Smash is the graphics, which include visuals from NASA making it one of the most realistic space simulators.

Is there a PC version of Solar Smash?

Solar Smash is available for Android and iOS mobile devices. While there is no designated PC version, users can play using a mobile emulator on their PC. With third-party emulators like BlueStacks or MEmu, users can download and play Solar Smash on Windows 10 or 11.

Use mobile emulators to download Solar Smash on Windows 11.

Quick Tip:

You may play Solar Smash in the Opera GX browser after installing the Android emulator on your PC. Using a dedicated browser for games you have advantages like the RAM and CPU limiters.

Connect your Google account to the emulator and install the Opera GX browser from the URL below and open the browser using the emulator. Using Opera GX will immensely impact your gaming sessions.

Opera GX

Play Solar Smash on your PC in the browser designed for gamers’ needs.

How do I install Solar Smash on my PC?

1. Via mobile emulator

  1. Go to BlueStacks or a mobile emulator site of your choosing.
  2. Search for Solar Smash then click on Download. Download BlueStacks to play Solar Smash.
  3. Save the installer to a location on your PC. Save to Windows 10 or 11.
  4. Open the installer and click Install now then wait for Solar Smash to download to the emulator.
  5. Click on Launch to begin playing Solar Smash from your Windows 10 or 11. Launch Solar Smash.

Mobile emulators like BlueStacks allow users to play games that are normally only available for Android and iOS devices on their PC. Playing using a mobile emulator provides users with the best gaming experience as they have access to PC power and controls.

For more recommendations on the best Android emulators for Windows 11, we have suggestions for that.

2. From a trusted third-party source

Some websites offer a downloadable Solar Smash that is compatible with Windows 10 or 11. Users can download the package right to their PC and begin playing.

Download Solar Smash for Windows 11 from a trusted third-party source.

However, always double-check a site can be trusted before downloading anything from it. Do some research before installing anything from an unfamiliar site. There are many websites out there that will inform you if a site is safe or not.

How do you download the Solar Smash update?

On Android and iOS, Solar Smash will automatically update if you use the app often. However, on PC, you will need a mobile emulator to update Solar Smash. Most emulators offer access to the Google Play Store, where you can check and update any apps installed on the emulator.

Update Solar Smash on Windows 10 & 11.

However, if you have the Google Play Store on the emulator set to back up to Google Drive, then all app data and device data will be synced. So if you play Solar Smash on your mobile device, your progress will be synced with the Solar Smash in the emulator on your PC.

Hopefully, one of the above solutions helped you download Solar Smash on your Windows 10 or 11. Let us know in the comments what you think of Solar Smash and what your favorite space simulator game is.