McAfee WebAdvisor not Working in Firefox: 3 Easy Fixes

McAfee is a well-known name in the antivirus and security-related software category. People rely on the service of McAfee and make use of the different tools it offers to safeguard their devices from malicious attacks.

For web browsers, McAfee has a tool called McAfee WebAdvisor that is a trusty companion you should have on your PC that keeps it safe from unwarranted threats.

It protects you from malpractices online, viruses and malware when you browse the internet. It is essential, especially if you have young ones using your PC, who are more prone to online scams and phishing attacks.

Some features of McAfee WebAdvisor include misclick protection where it blocks malware and phishing websites to load, alerts you if you type a web address wrongly, scans your downloads, and alerts you if detect a risk, etc.

Several user reports have brought to light the McAfee WebAdvisor not working in the Firefox issue. Firefox is a widely used web browser and this issue has been affecting millions of its users.

In this guide, we will explain, how you can fix the McAfee WebAdvisor not working in Firefox problem and get back to protected web browsing.

Why is McAfee WebAdvisor not working in Firefox?

Several users have reported different causes for McAfee WebAdvisor not working in Firefox. This means that there is no one specific reason why this problem could be triggered.

After research, we have deduced a list of common reasons that are responsible for McAfee WebAdvisor not working in Firefox:

  • Your browser isn’t up to date
  • The McAfee WebAdvisor extension isn’t updated
  • The WebAdvisor is not properly installed
  • Some settings of the McAfee WebAdvisor have been miss-tweaked

Now that you are aware of the common mistakes that could give rise to McAfee WebAdvisor not working in the Firefox issue, let us check out the solutions.

Quick Tip:

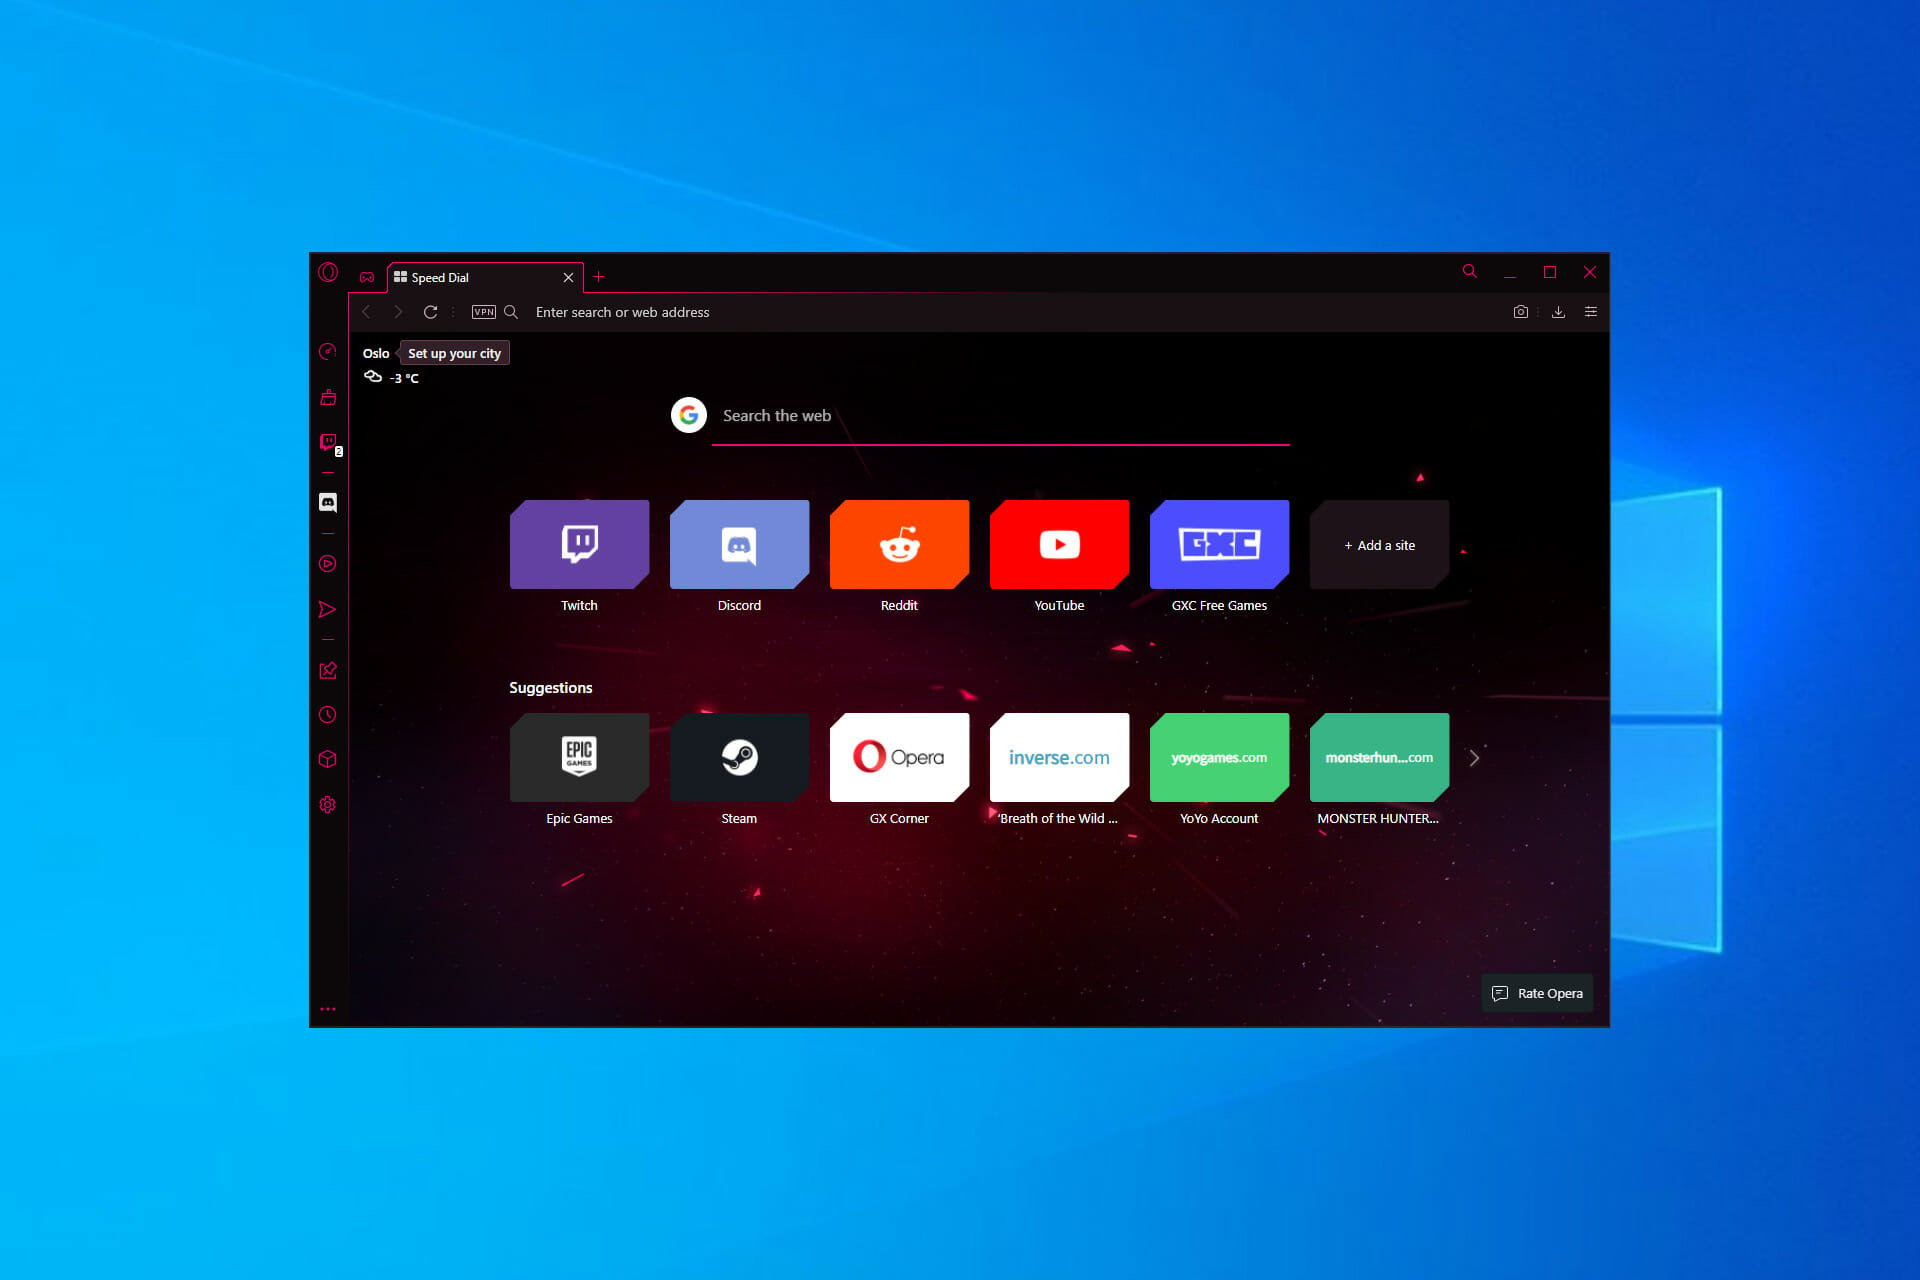
If the problem with the antivirus persists in Firefox, a practical tip we suggest is to consider the Opera One browser.

This modern browser has improved security due to its Ad blocker tool or effective VPN, even it’s own built-in AI.

Opera One

Bypass this security problem from WebAdvisor using the enhanced security of Opera One.
Free Download Visit website

How can I fix McAfee WebAdvisor not working in Firefox?

1. Reinstall McAfee WebAdvisor

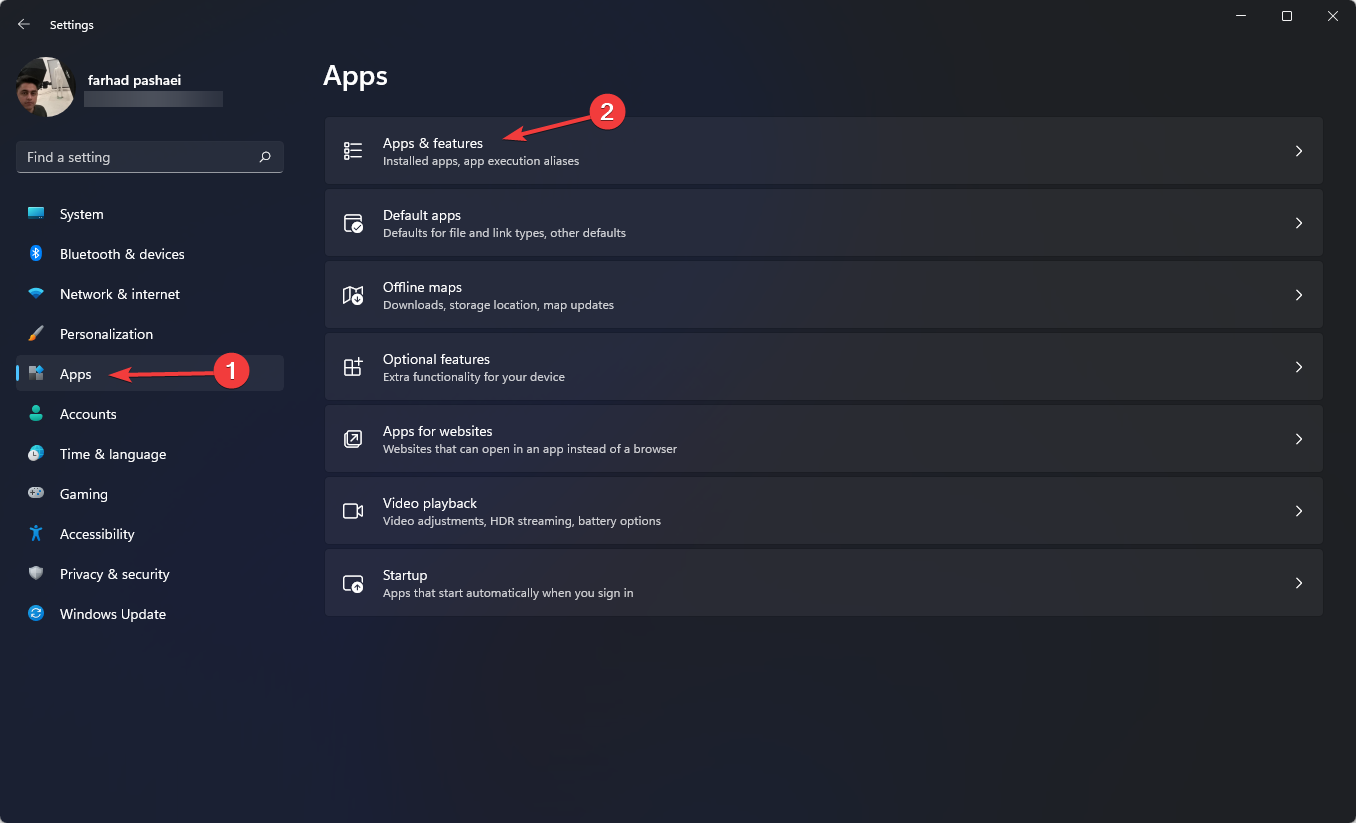
  1. Press the Win + I buttons to open Settings.
  2. From the left pane, select Apps.
  3. Click on Apps & features.
    Apps and features
  4. In the search box, type WebAdvisor and hit Enter.
  5. Click on the 3-dot icon and select Uninstall.
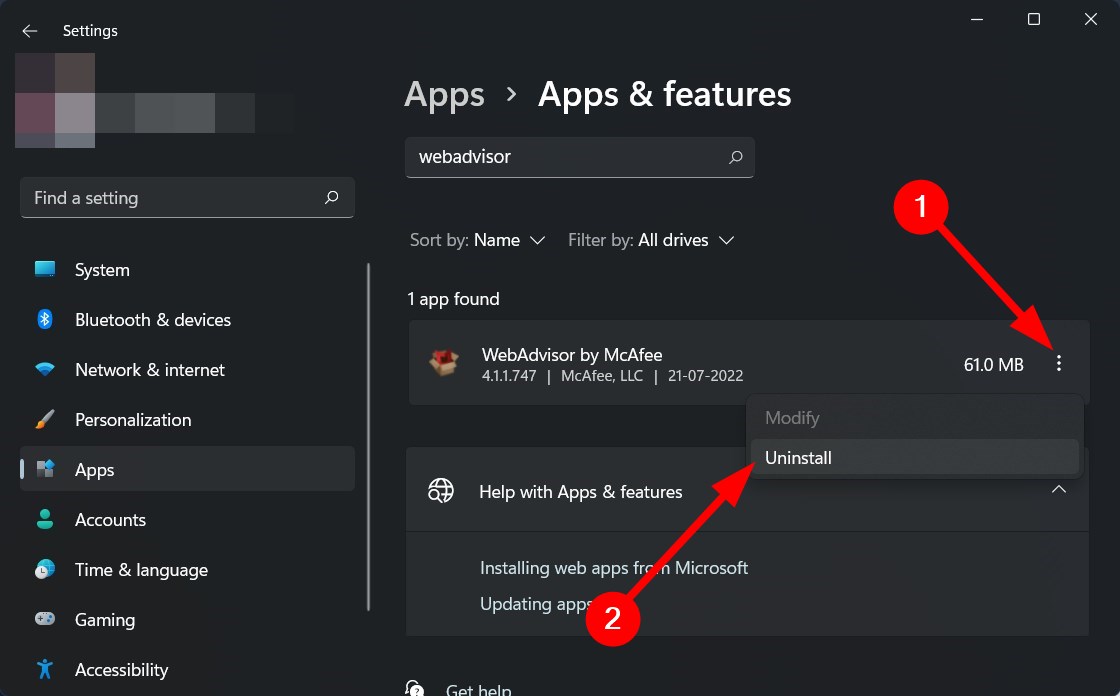
Chances are the previous instance of the WebAdvisor installation failed to install some important files, which is why you are experiencing the McAfee WebAdvisor not working in Firefox issue.

In such a case, reinstall the WebAdvisor client and check if this fixes the issue or not.

2. Reset to default settings

  1. Open Firefox.
  2. Double-click on the McAfee WebAdvisor extension icon on top.
  3. Click on the Home icon on top of the McAfee toolbar.
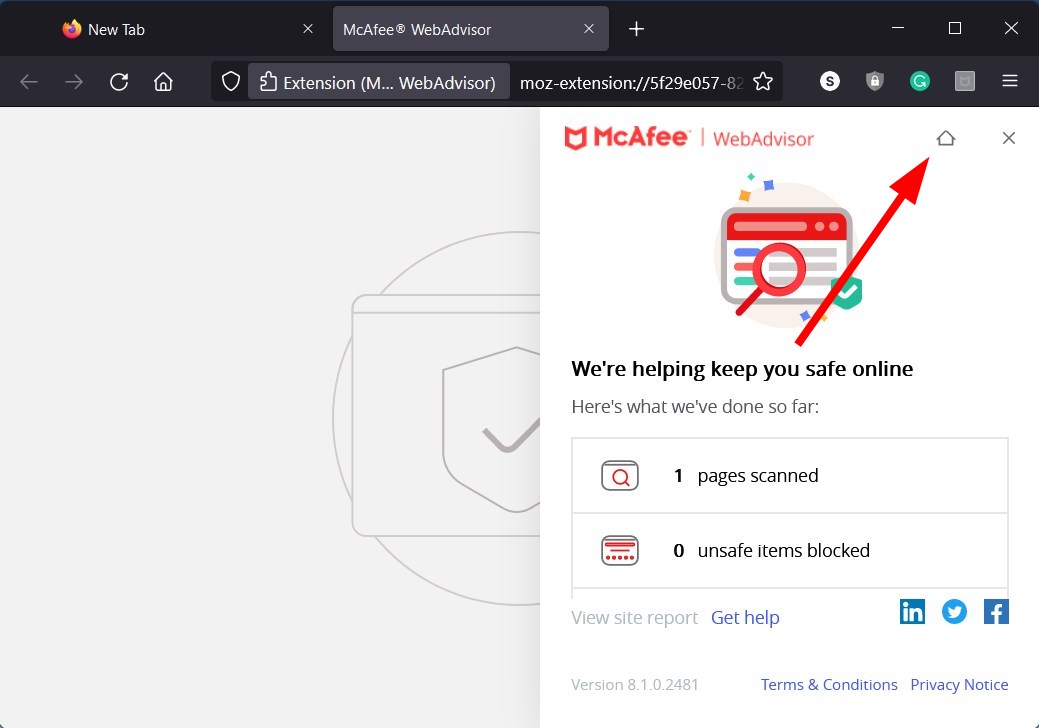
  4. Scroll down and click on Reset Settings.
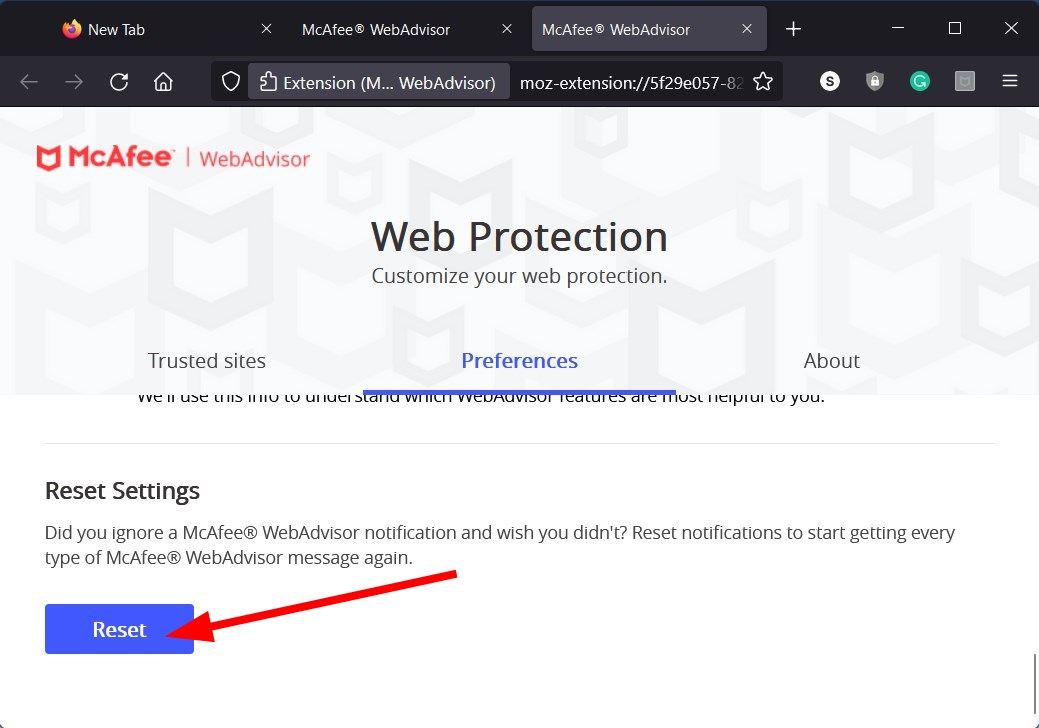
Resetting to default settings will change all the mis-tweaks you might have made to WebAdvisor and restore the factory settings.

Need a clean uninstall path for the extension? Check our Remove McAfee WebAdvisor guide to delete every leftover and restore Firefox protection.

3. Install the latest update

  1. Open Firefox.
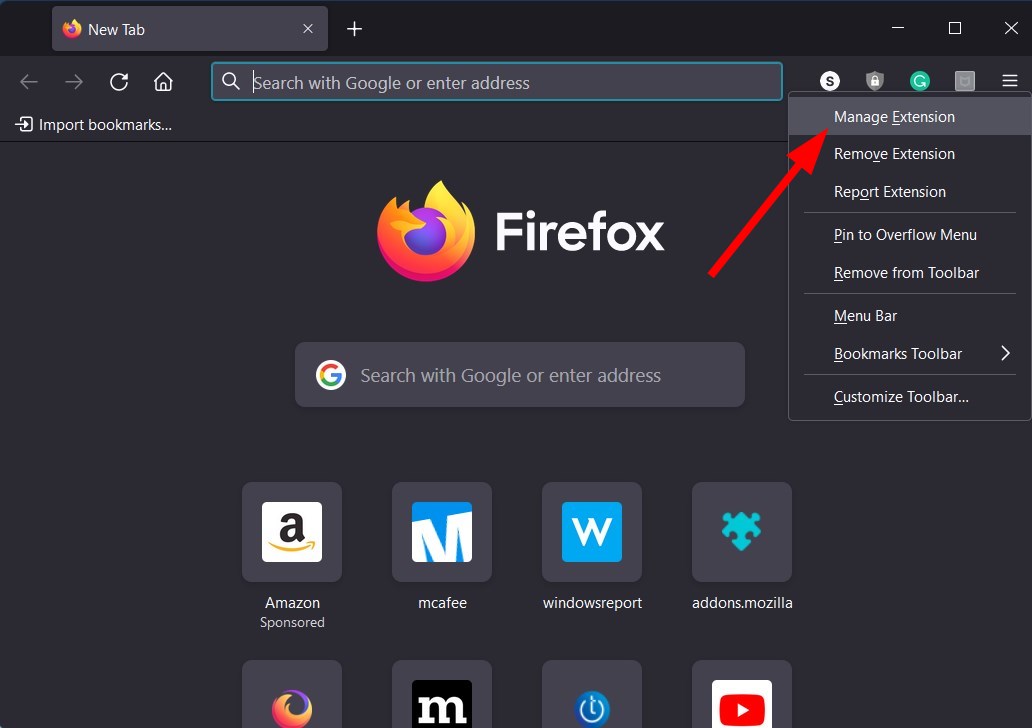
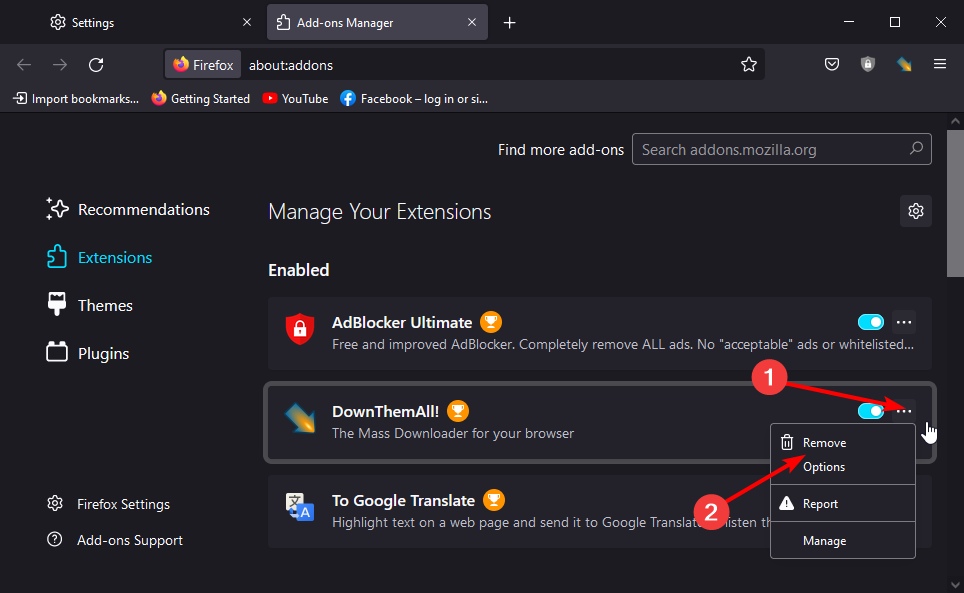
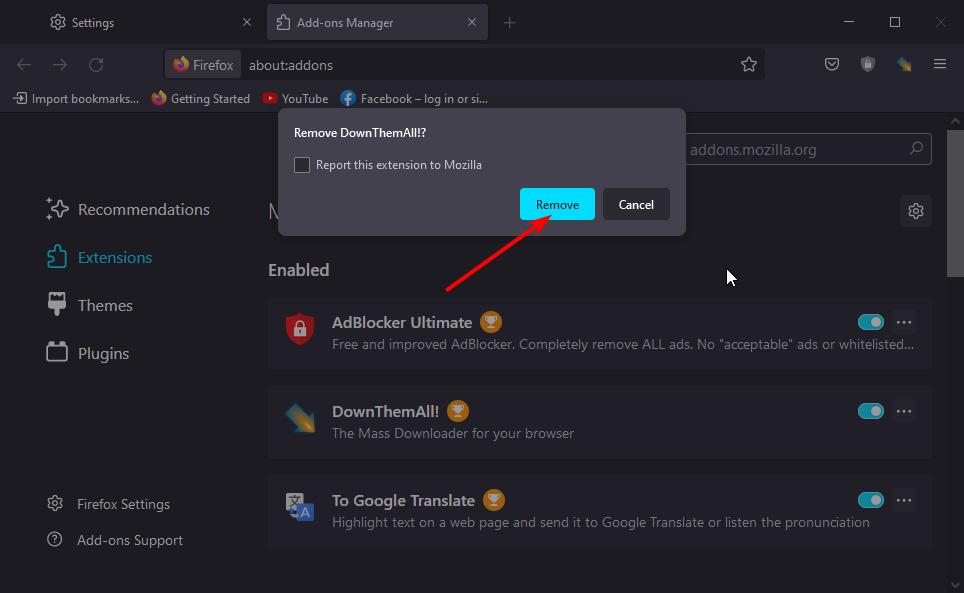
  2. Right-click on McAfee WebAdvisor extension icon.
  3. Select Manage Extension.
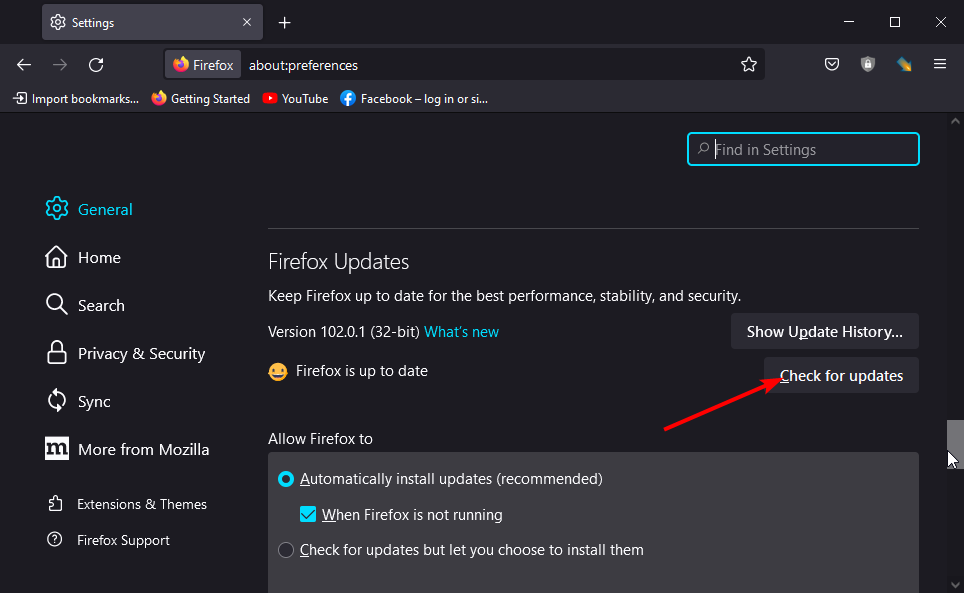
  4. Click the cog-wheel icon on top and select Check for updates.
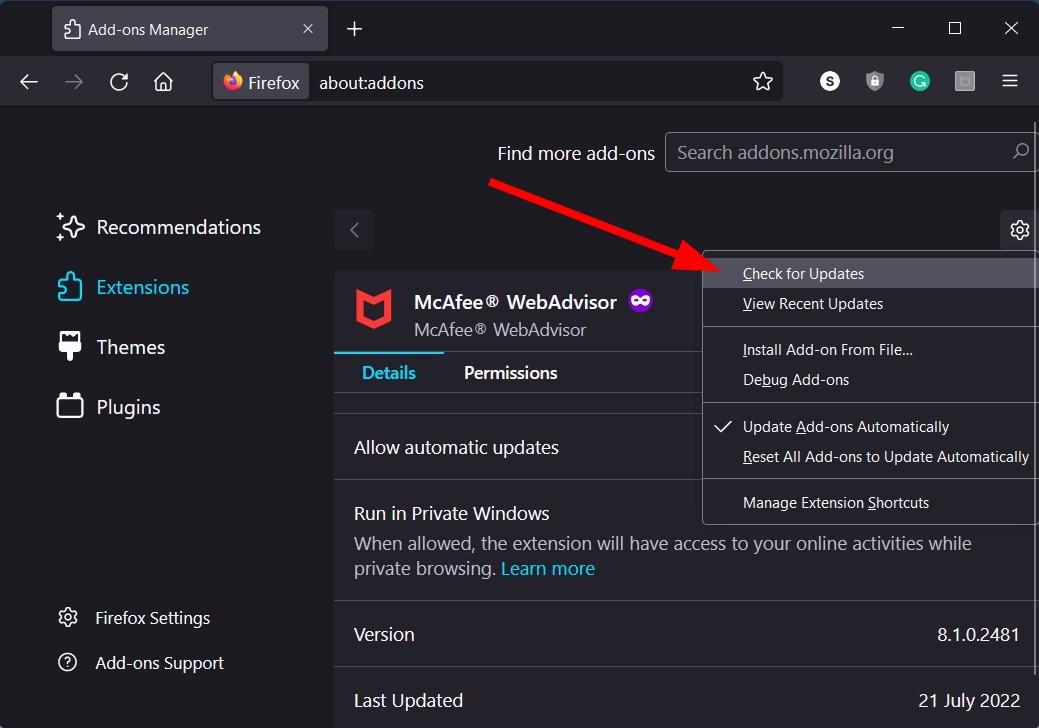
There might be a bug in the previous version of the McAfee WebAdvisor extension that is causing the McAfee WebAdvisor not working in Firefox problem.

It is not only recommended that you keep the WebAdvisor extension up to date, but also update every other extension and software installed on your PC.

What else can get rid of McAfee WebAdvisor not working in Firefox problem?

  • Enable Run in private window
    1. Open Firefox.
    2. Right-click on McAfee WebAdvisor extension icon.
    3. Select Manage Extension.
    4. Select Allow for Run in Private Windows option.
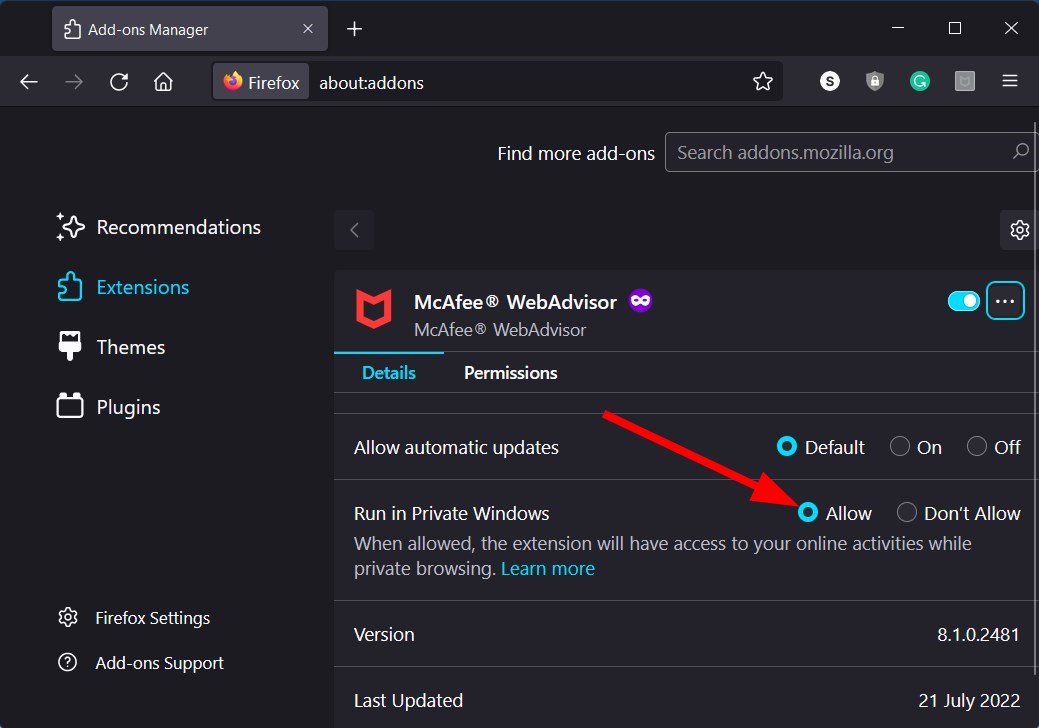
While this feature makes the McAfee WebAdvisor work during private browsing, some users have reported that enabling this feature has fixed the issue for them. So, you can also give it a try.

  • Remove other security tools
    1. Press the Win + I buttons to open Settings.
    2. From the left pane, select Apps.
    3. Select Apps & features.
      Apps and features
    4. Locate any other security tools.
    5. Click on the 3-dot icon next to it and select Uninstall.

There are chances that if you have multiple security tools installed on your PC, they will conflict with each other’s smooth functioning.

Try uninstalling all the other security software and keeping the McAfee WebAdvisor on your PC. And check if this fixes the problem at hand or not.

That is it from us in this guide. We hope that this guide helped you get rid of the McAfee WebAdvisor not working in the Firefox problem. Let us know in the comments below which one of the above solutions helped you resolve the issue.
5 Tested Ways to Fix Origin Error When Buying Something

Amongst the most frequent errors on Origin, encountering an issue when buying something is one of the most common.

This can create a lot of stress for avid gamers who have been waiting for a specific release for some time, and even affects the casual user.

The error seems to be linked to the location from which you are trying to make the purchase, but in some cases, users have reported that the process froze out the blue.

Here is what one user had to say about this issue on the EA Answers forums:

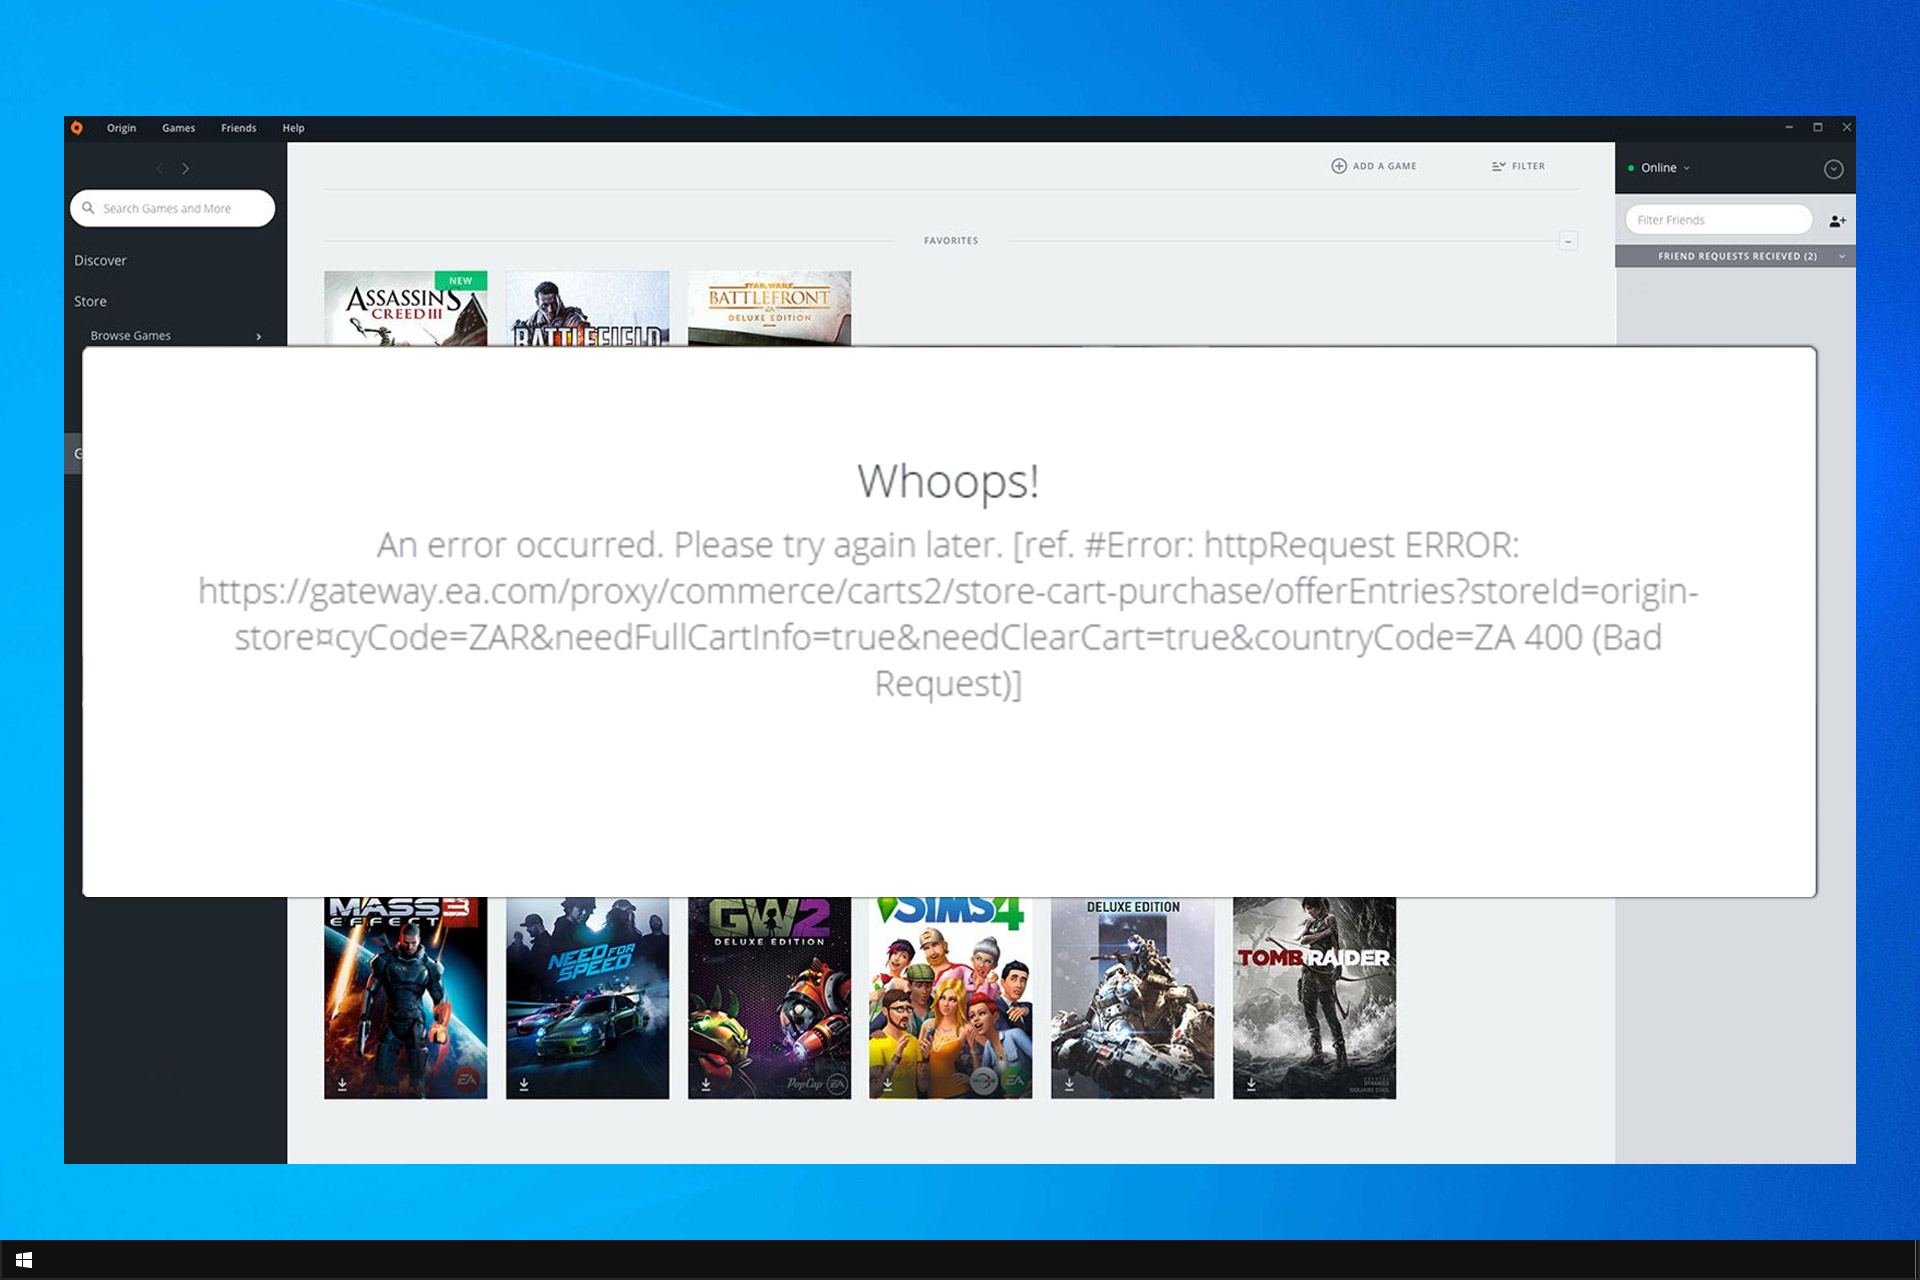
Whoops! An error occurred. Please try again later. [ref. #Error:httpRequest ERROR]. I get this every time I try to purchase anything, or click Join Origin Access. Really want to purchase BF1, any help?

Unfortunately, this isn’t the only issue that users encountered, and many reported Origin client loading issues on their PCs.

Because we understand how important it is for you to be able to download games from Origin freely, in today’s article we will explore some of the best fixes. Read on to find out more.

Why can’t I buy anything on Origin?

If you’re having issues with buying items from Origin, you might have issues with your client. In case that happens, you can try making a purchase from your browser instead.

This doesn’t always work, and if you’re having problems with the client, it’s advised that you clear its cache and try again.

Sometimes when you make a purchase you’ll encounter Origin error em ext 10027 or code 54005, but there are ways to fix that.

Why is Origin not processing my payment?

It’s possible that your region is blocked or that your ISP is preventing you from accessing Origin properly. Using a reliable VPN can help you with that.

Another cause can be account issues, and if that happens, it’s best to contact Origin support so they can perform a detailed inspection.

In this guide, we’re going to show you a couple of solutions that you can use if you are unable to purchase on Origin, so let’s get started.

How can I fix Origin purchase or payment error?

1. Try using the Origin Online Store and not the client

origin online store in opera

If you’re getting Your action cannot be processed Origin, you can try using the Origin website to buy what you want instead.

In order to do this, it is recommended that you log into your Origin account, and add the payment details inside your account settings.

This fix points to an error inside the Origin application, but it doesn’t apply to all cases. Still, it’s worth a try.

You can use any browser for this task, but we recommend trying out the Opera One browser.

Some exclusive helpful features such as the built-in free VPN will guarantee your online activity and IP address stay private. This way, the purchase process should be hassle-free and prompt.

Opera One

Get rid of any errors when purchasing Origin games! With Opera you get to the Online Store in just a few clicks.
Free Download Visit website

2. Use a VPN service to complete your payment

In case you’re getting There was an error displaying the price in Origin, you might want to try using a VPN. This applies if your purchase is blocked due to the location of your Internet provider.

The only way to find out if this fix works, is to install a VPN, and try to purchase something from Origin. If the location is causing the problem on your side, this will resolve it.

use a vpn to purchase from origin

As mentioned before, Opera comes with a pre-installed VPN tool that you only need to activate from the settings menu.

This tool is useful not only to hide your location, but it allows you to access websites that are otherwise blocked in your region. It also serves to add an extra layer of security to your connection, preventing online attacks.

3. Delete Origin cache files

  1. Right-click your Taskbar and open Task Manager.

  2. End tasks: Origin.exe and OriginWebHelperService.exe.
  3. Press Windows + R, type, enter the following, and click OK: %ProgramData%/Origindelete origin cache
  4. Delete everything but the folder: LocalContent.
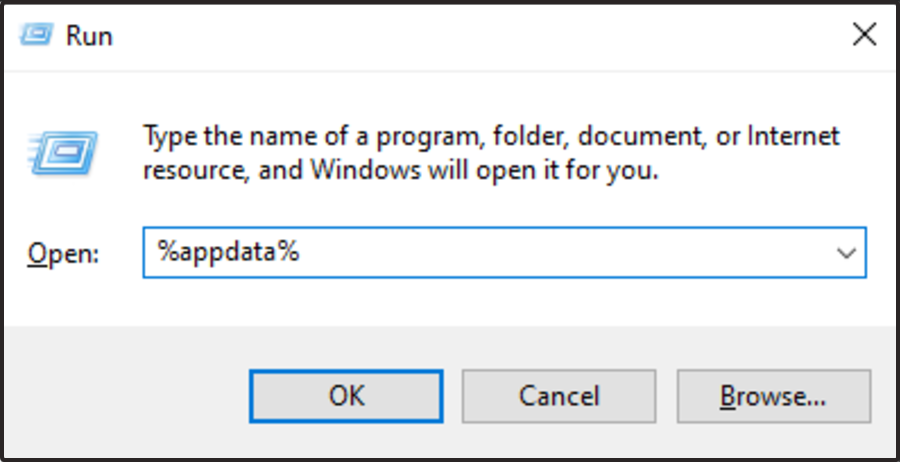
  5. Press Windows + R, and type %AppData% then Enter.

  6. Delete the Origin folder.
  7. Click AppData, open the Local folder and delete Origin.
  8. Reboot your PC.

This is a simple solution, but it can help you with There was an error retrieving item information message in Origin.

4. Remove and reinstall the software

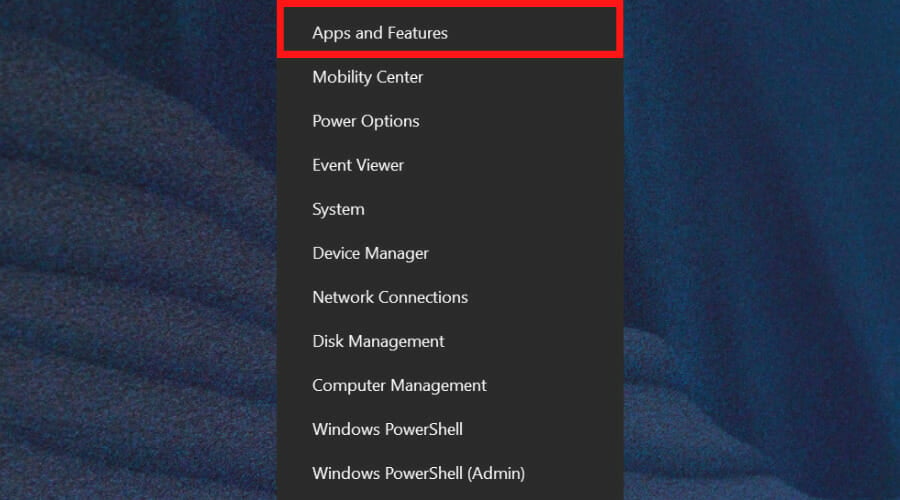
  1. Press Windows + X, go to Apps and Features.
    vpn no internet
  2. Right-click on Origin, then Uninstall.

  3. Download Origin. Right-click on the installer and Run as admin.

5. Check your account status

If all of the above methods failed, and the Origin buying error is still present, then there is a pretty good chance that your account got banned for some reason.

To rectify this, see these instructions to get into contact with the Origin account department.

Does Origin accept debit cards?

When it comes to purchases, Origin works with debit cards in addition to other payment methods.

If you have any issues with your debit card and Origin, contact your bank or Origin support to get it sorted.

In this article, we explored the best methods to try if you can’t buy anything inside Origin. We hope this guide helped you troubleshoot your issue.

This isn’t the only issue that you can encounter and many reported Unexpected error in Origin, but we already covered that issue in a separate guide.

Please feel free to let us know if it did by using the comments section found below.

9 Ways to Speed Up Chrome When It’s Running Slow or Freezing

Is Chrome running slow on your computer? Do you want to speed up this browser? Go through this article to find the most helpful information.

Google Chrome is the browser of choice for many because of its features and compatibility. It is one of the fastest and safest browsers out there for various purposes like casual browsing, news reading, or anything.

However, Chrome is also fairly system resource heavy, which can slow browsing down considerably on more outmoded desktops and laptops.

If you notice that Chrome browser is running slow on Windows 10/11 PC, it can be a very frustrating matter for you. It is because you may be using this browser for professional reasons.

Why is Google Chrome so slow all of a sudden?

While surfing the web or doing anything on Chrome, you may suddenly find that it has become very slow and useless. It happens due to the following reasons:

  • A Chrome tab has crashed
  • You are visiting a very unoptimized JavaScript-heavy website
  • There is been any change in the extensions
  • Your computer has suddenly launched a service in the background
  • Chrome is not up to date

You may find some other reasons too. But, these are the most commonly seen things that hurt Chrome user experience more.

Does my Chrome need an update?

Chrome or any web browser should always be up to date. Even though the modern applications update themselves automatically, sometimes, you may need to give manual effort as well. You may find it very slow when there is a pending update and Chrome needs to restart.

If you continue using an outdated version of Chrome, it may run slow and freeze frequently. You will often see that the browser is lagging while surfing usually.

However, if Chrome is off the pace, trying out the methods mentioned below will surely help.

Quick Tip:

If you’re tired of Chrome’s lackluster performance, consider switching to Opera One, and enjoy a speedy, lightweight, and secure browsing experience that will make it worth your time.Whether you notice Chrome is running slow on PC, Mac, Linux, Android, iPhone, or even iPad, you can consider using the Opera One browser.

Opera One makes your browsing experience more secure with it’s built-in VPN, Ad blocker and AI. The browser brings features that help you stay organized like workspaces, tab islands and more.

Opera One

Team up with Opera, the fastest browsing solution that moves at your pace!
Free Download Visit website

How do I make Google Chrome faster again?

  1. Cut back Chrome extensions
  2. Clear your browser’s data
  3. Turn on Chrome’s Prefetch option
  4. Switch to another browser
  5. Remove images from websites
  6. Remove ads from websites
  7. Increase the number of raster threads
  8. Enable the fast tab/window close flag setting
  9. Don’t open too many tabs

1. Cut back Chrome extensions

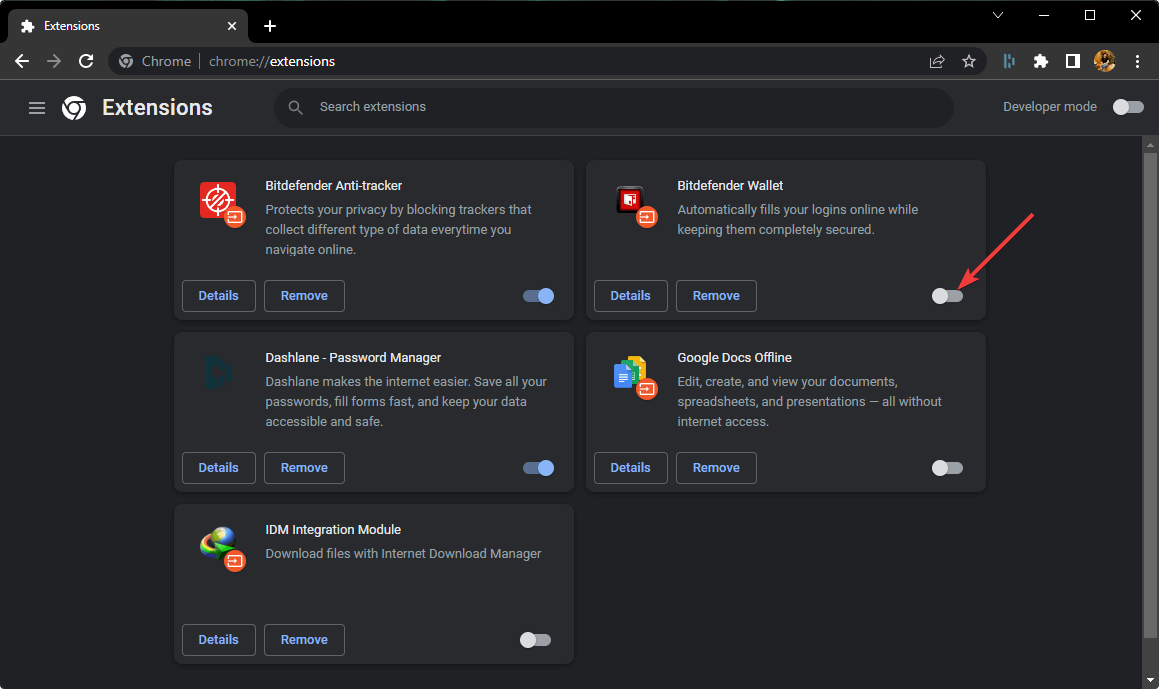
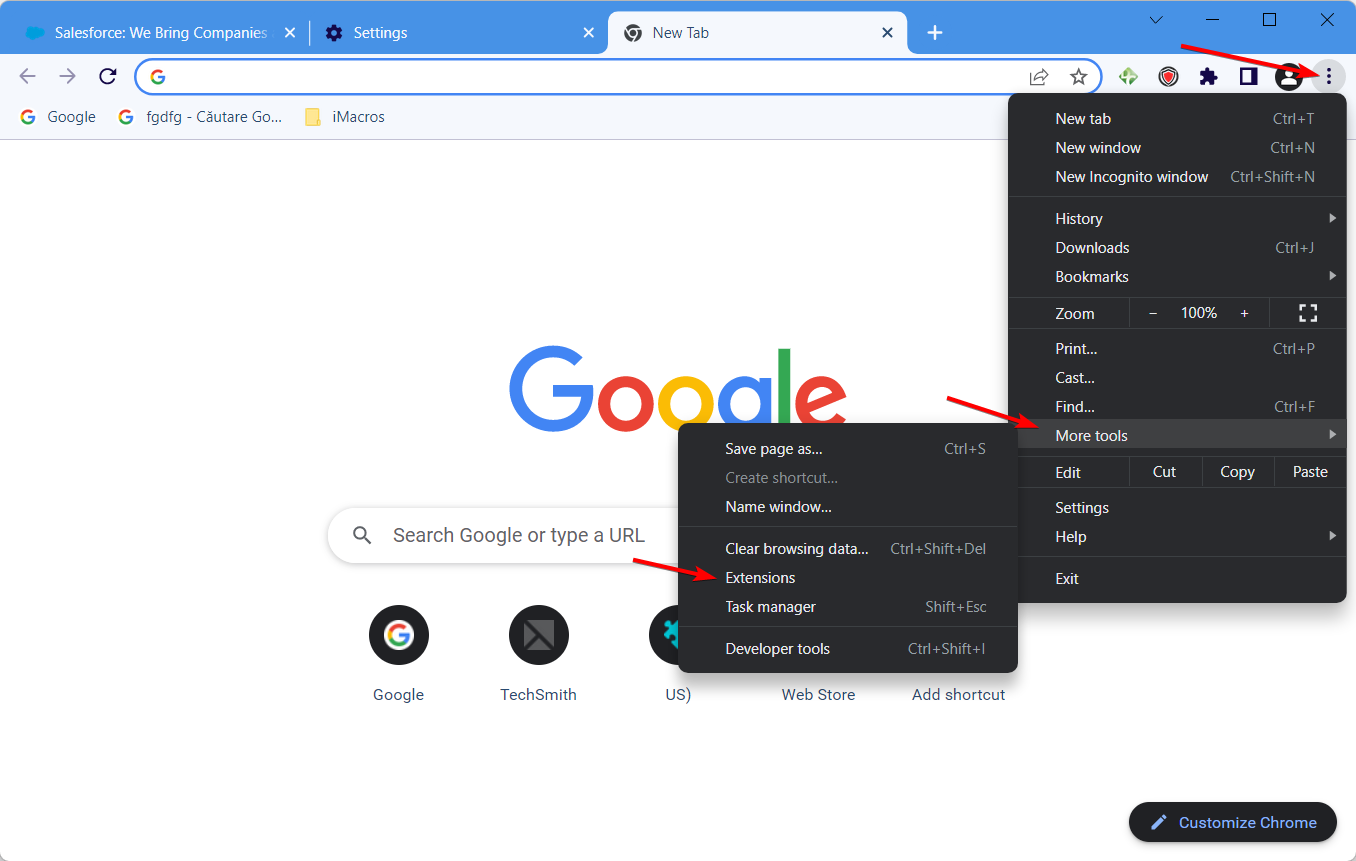
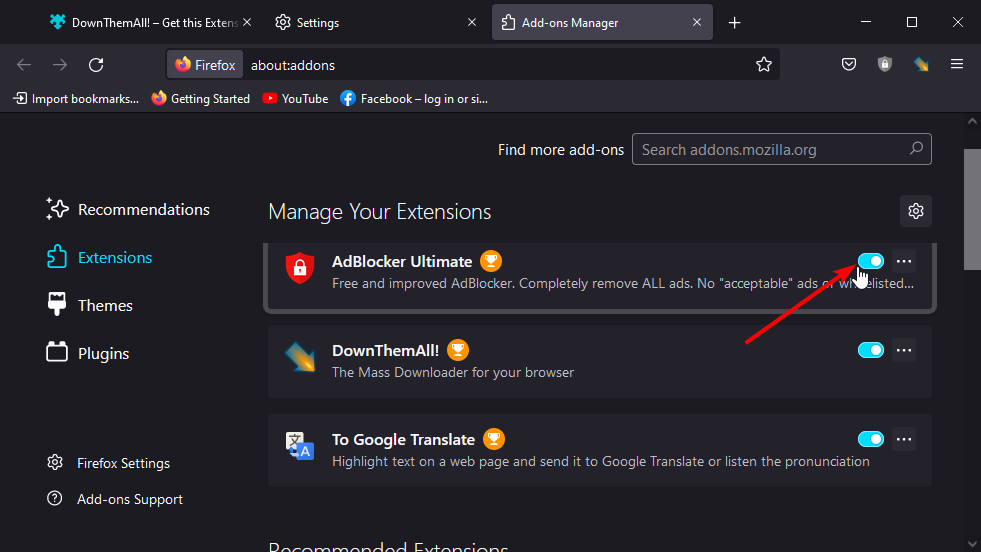
  1. Type the following address in the address bar and hit Enter. chrome://extensions/
  2. Toggle the switch off next to the extensions you want to disable.disabling extension chrome
  3. Click on Remove to remove the extension.

Disabling unnecessary extensions will fix Chrome running slow issue not only on Windows but also on Mac and Linux.

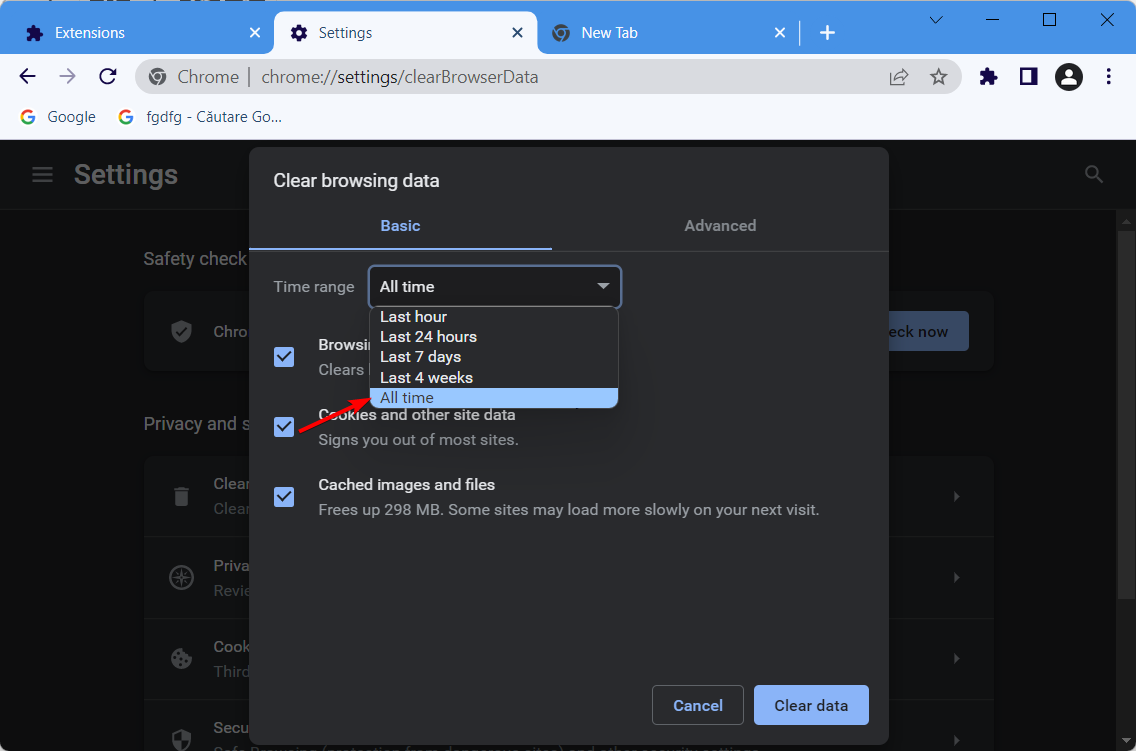
2. Clear your browser’s data

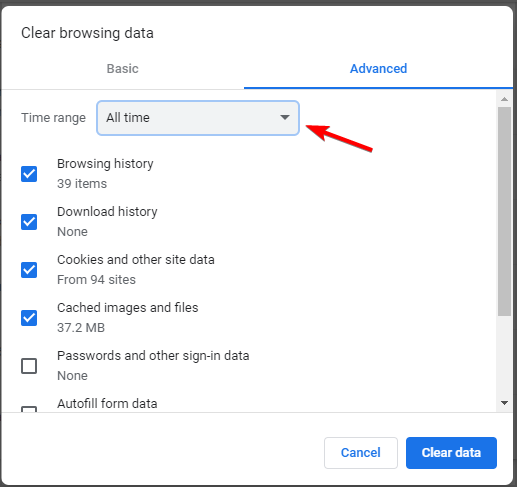
  1. Open the Google Chrome browser.
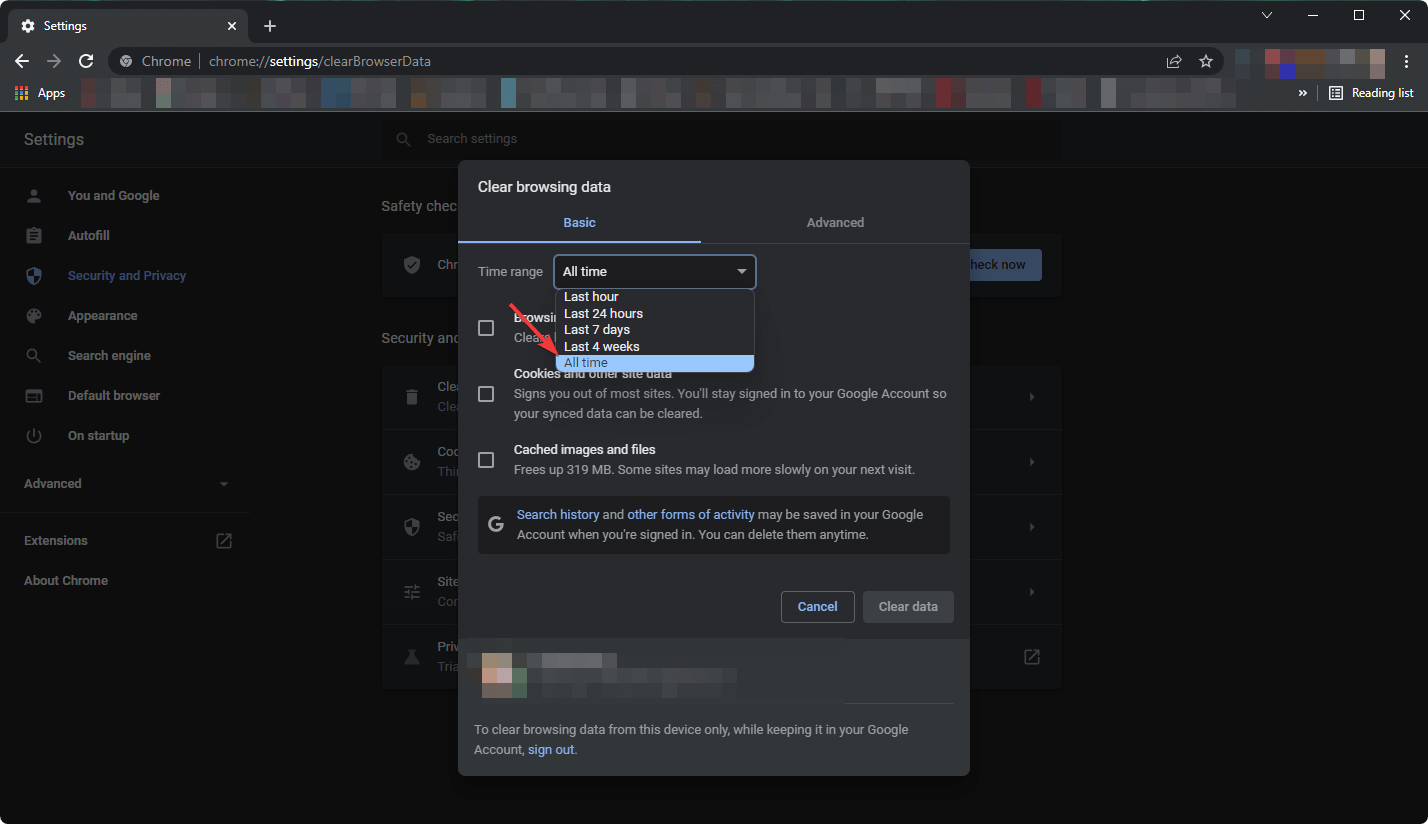
  2. Press CTRL + Shift + Del on your keyboard to open the appropriate settings.
  3. Set All time as the time range. choose clear browsing data time range
  4. Tick Cache images and files, Cookies and other site data, and then click on Clear data.clearing temp data chrome

You can also perform this task automatically by using specialized optimization and clean-up software.

The PC optimization tools free up space, clear your online tracks, including your browsing history and cache, and speed up your system.

Thus, in case you need to clear up your browser data instantly and even increase your internet speed at its peak, invest your time in the best memory cleaner software on the market.

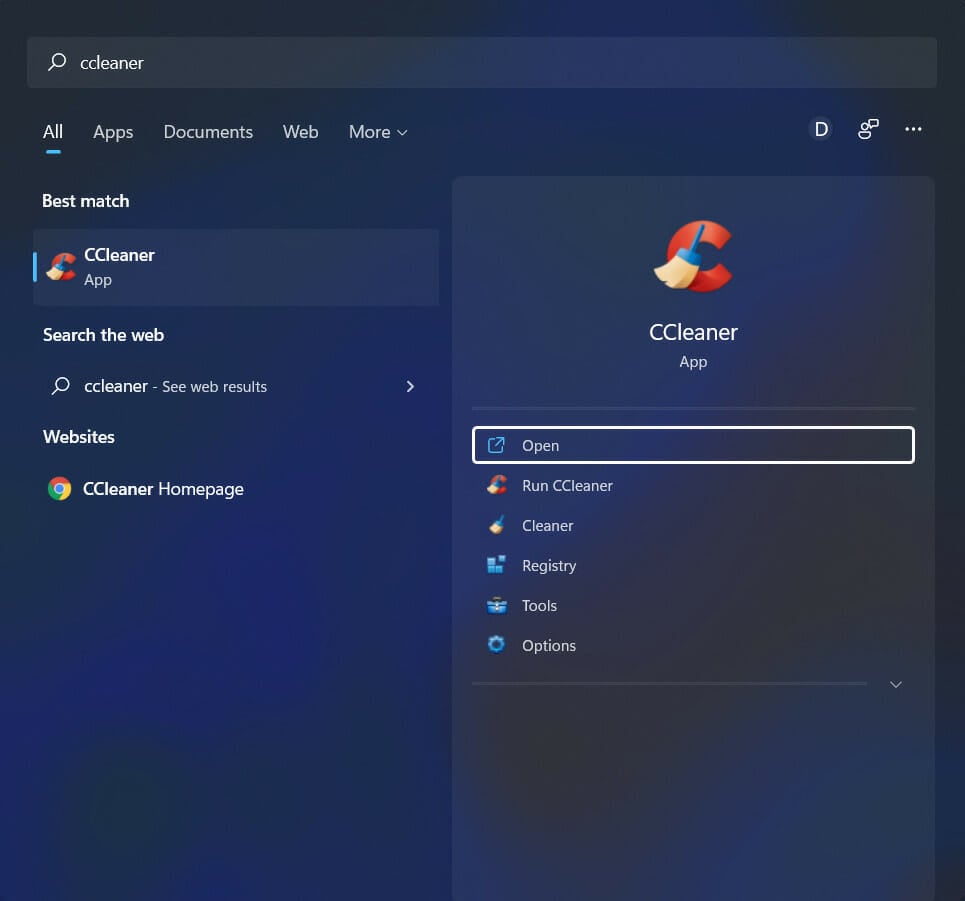
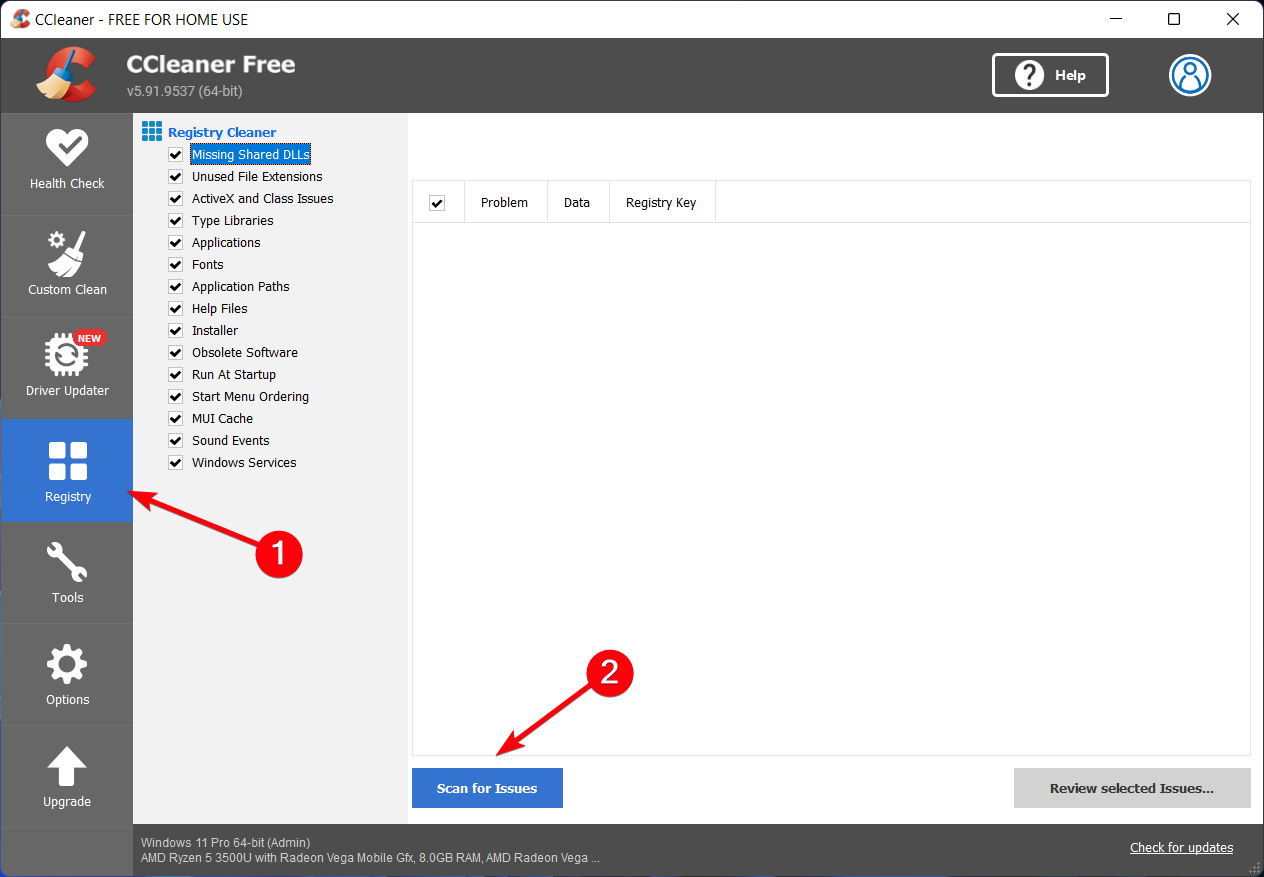
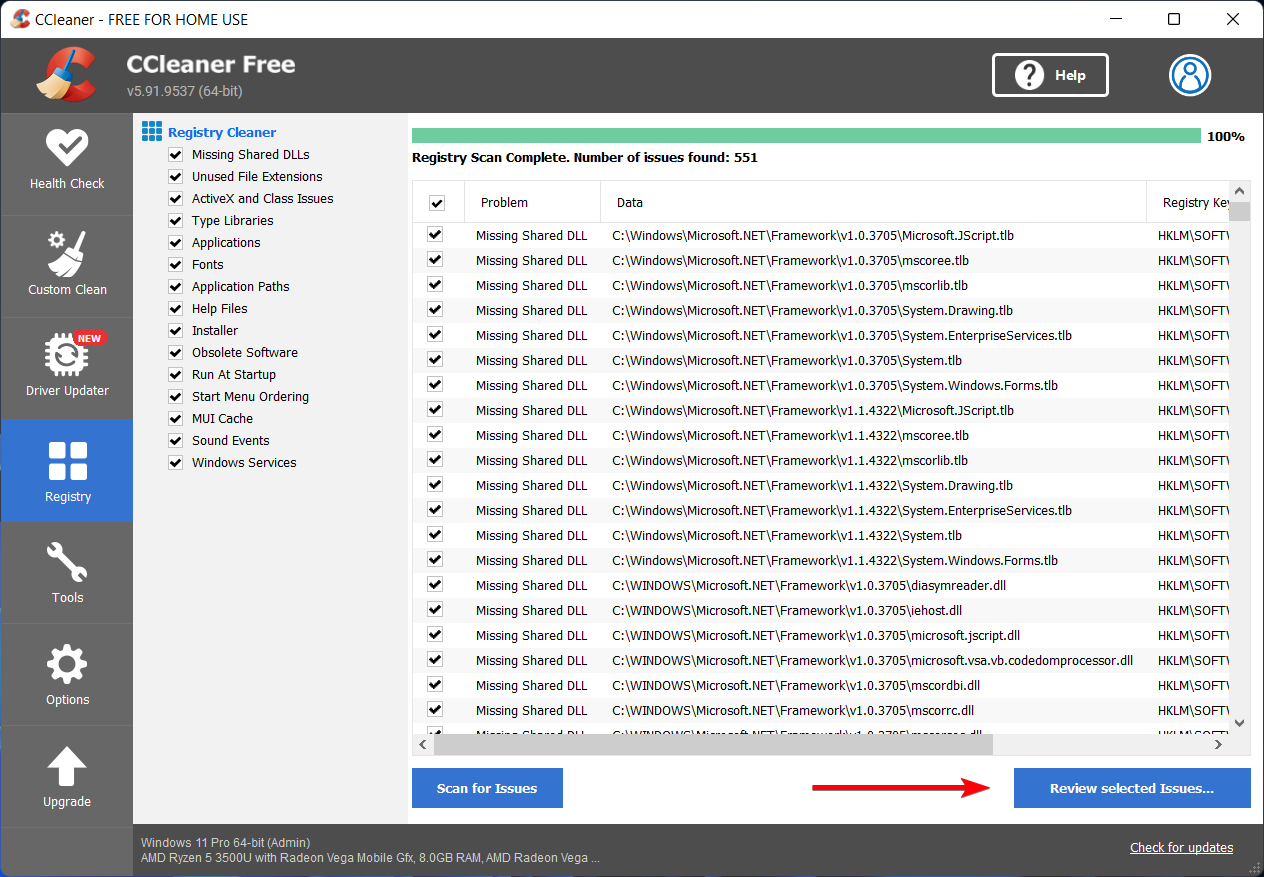
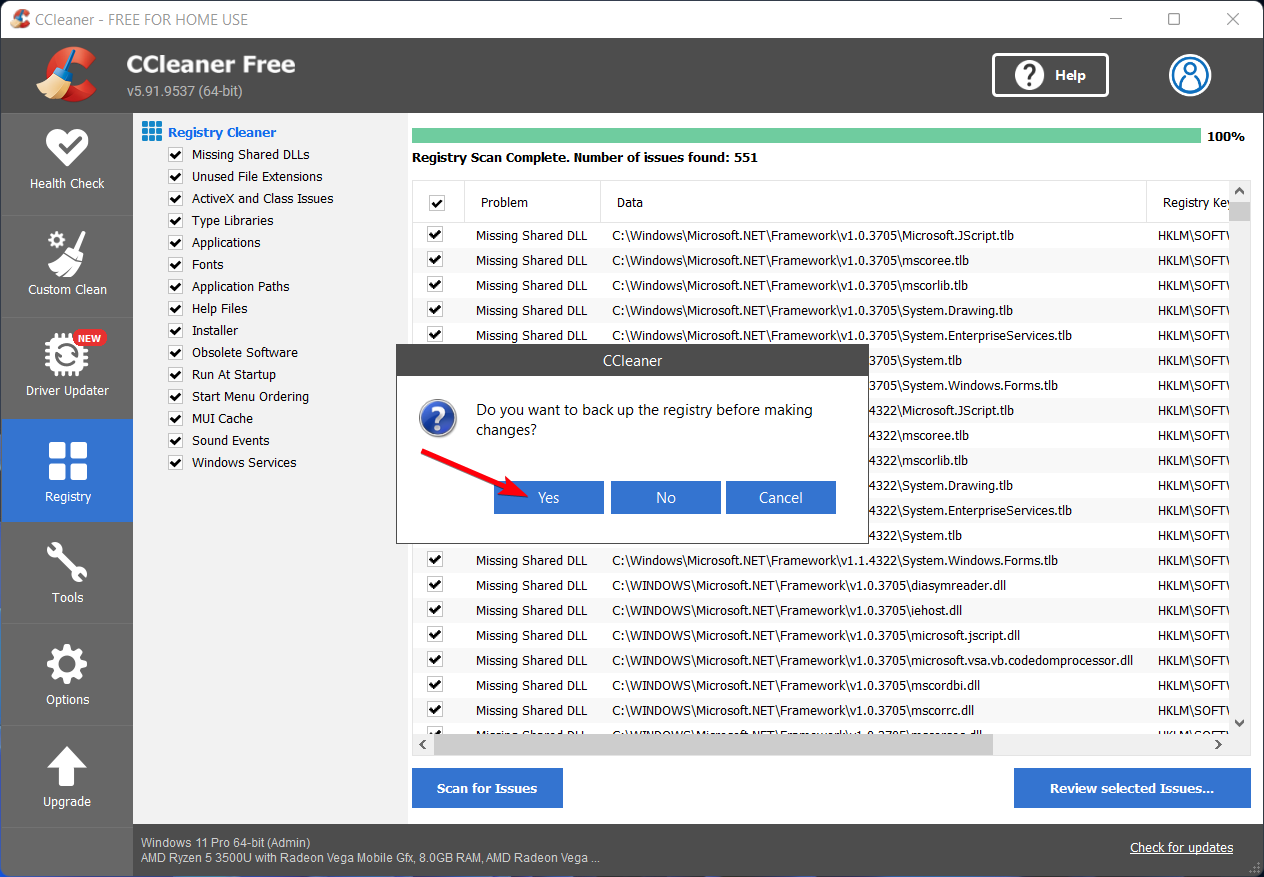
As one of the best programs for this purpose, we gladly suggest CCleaner, which does complete routine maintenance.

CCleaner can remove any unwanted files left by applications, as well as surfing history, cookies, recycle bin, memory dumps, file fragments, log files, system caches, and application data.

With the ultimate cleaning program for Chrome, you can become the master of your browser and make it perform smoothly and swiftly.

If Chrome is running slow on your Windows 10 or 11 PC like a surface laptop or a desktop computer, this cleaner tool can save your day by doing a lot of things automatically.

⇒ Get CCleaner

3. Turn on Chrome’s Prefetch option

  1. Using the Chrome address bar, go to the following location: chrome://settings/cookies
  2. Toggle on the option Preload pages for faster browsing and searching.enabling chrome prefetch
  3. Relaunch Chrome.

4. Switch to another browser

The majority of us use Chrome. It’s the leading browser in the market provided by the largest tech company in the world.

But, considering the alternatives, you have more than a few reasons to cop out and go for something lighter and more privacy-oriented than Google’s flagship browser.

Our recommendation is Opera which, all things considered, ticks all the boxes.

The in-built adblocking solution is one of the main pillars supporting Opera’s dazzling loading speeds.

By keeping ads and invisible trackers at bay, you make sure your confidential data stays private and enjoy an up to 90% faster-browsing experience.

And that’s merely the tip of the iceberg when it comes to accelerating your browsing.

Download and install Opera for Windows 11

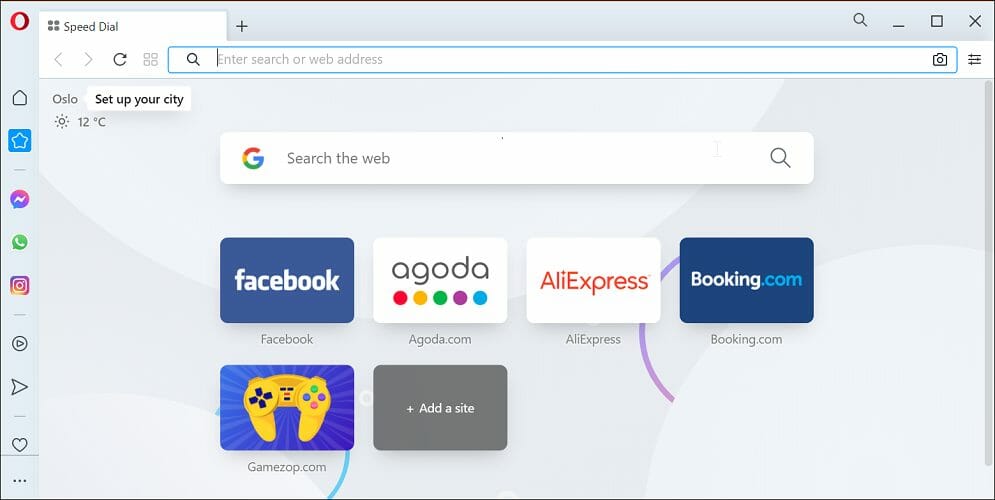
Opera’s fully customizable UI allows you to work with shortcuts, joggle with multiple tabs, and easily find your way through them thanks to the tab previews or tab menu, and of course, access your favorite sites quicker than ever through the Speed Dial feature.

Opera also has a free in-built VPN that keeps your identity private and allows you to access geo-restricted websites and services. Along with that, it supports the picture-in-picture/video pop-out feature that helps you to watch videos from a website on a different tab or application.

Other features of this browser include an integrated snapshot tool, a speed dial separate tab, and support for quick access to instant messaging apps and social media.

⇒ Get Opera

5. Remove images from websites

  1. Go to the following location on Google Chrome: chrome://settings/content/images
  2. Check Don’t allow sites to show images.disabling images chrome
  3. Relaunch Google Chrome.

6. Remove ads from websites

Ads are another thing that can considerably slow down browsing. Ads are similar to images as they add lots of extra content to pages.

So removing ads from website pages is another good way to speed up Chrome. The browser doesn’t include any built-in options to remove ads, but there are various ad-blocker extensions that will do the trick.

The uBlock Origin adblocker is one that you can add to Google Chrome. The good thing about the uBlock extension is that it’s more system resource-efficient than other alternatives.

The extension also blocks pop-ups and other media elements on website pages.

It’s easy to use by clicking the uBlock Origin button on the toolbar to activate/deactivate ad-blocking for specific pages.

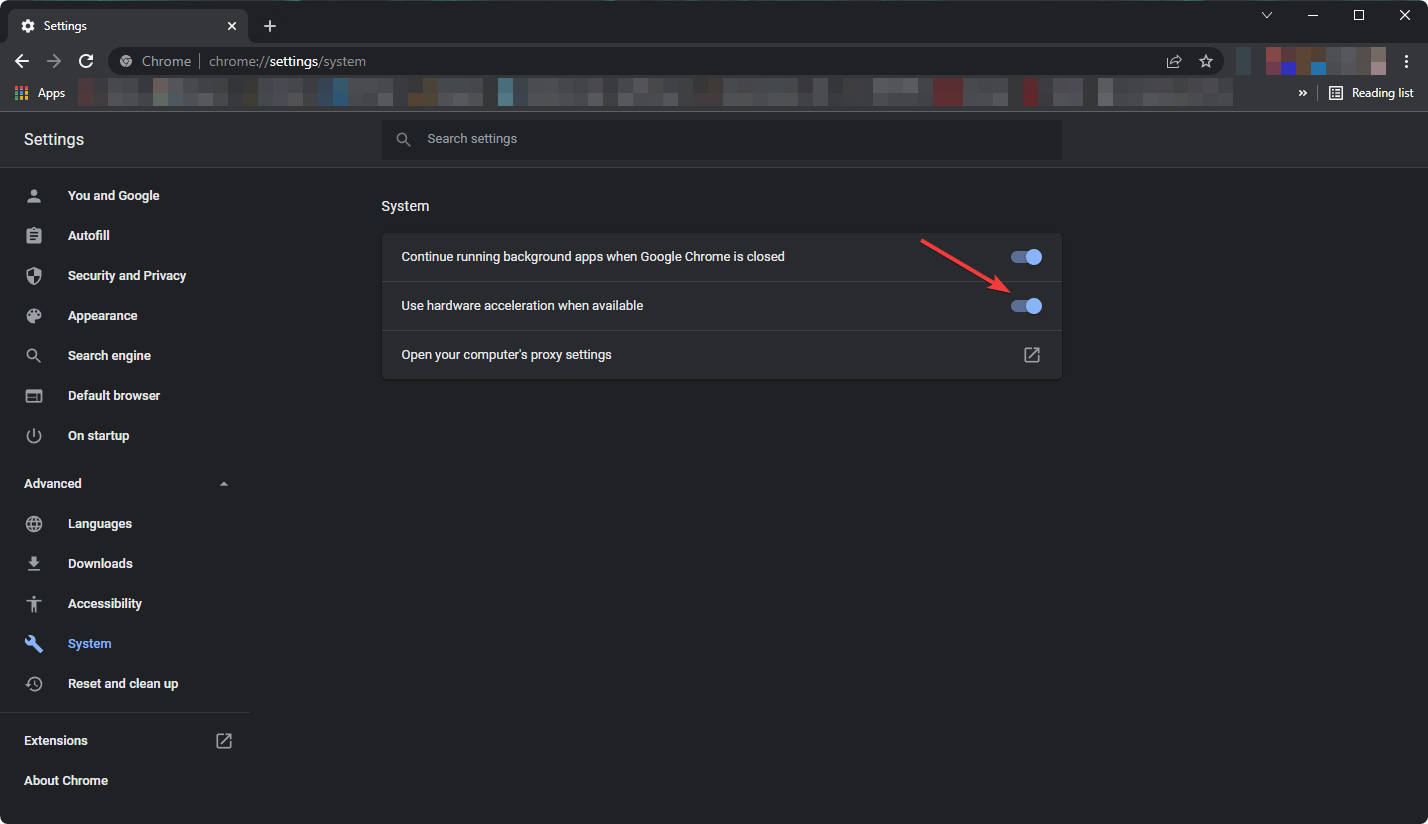
7. Enable hardware acceleration

  1. Go to the following location: chrome://settings/system
  2. Toggle on Use hardware acceleration when available.enabling hardware acceleration in chrome
  3. Restart Chrome

8. Enable Closed tab cache

  1. Using the address bar, go to the following location: chrome://flags/#closed-tab-cache
  2. Now, enable the Closed Tab Cache.enabling closed tab cache chrome
  3. Relaunch the browser.

Enabling this feature will help, particularly if Chrome becomes very slow after opening a closed tab.

9. Don’t open too many tabs

Tab overload can also slow down the Chrome browser. This will usually happen if you open more than 10 pages at a time.

Each of those tabs needs some resources, and Chrome‘s Task Manager highlights that open page tabs can hog more RAM than extensions. Thus, Chrome runs faster with fewer tabs open.

There are numerous tab management extensions that minimize the number of tabs open in Google Chrome.

OneTab is an extension that enables you to preserve RAM by moving pages to an inactive tab list from which you can reopen them when required.

You can easily add it to Chrome. Then you can move a page to the tab list by selecting it, right-clicking the OneTab button, and selecting OneTab > Send only this tab to OneTab.

Each of those tips should speed up your Chrome browser a little more. Now you can browse through website pages somewhat more quickly than before.

What is the Chrome Cleanup Tool?

The Chrome Cleanup Tool is an excellent program from Google that helps to identify the harmful programs that cause various problems to Google Chrome. This program also can remove these programs automatically.

In general, this tool finds potentially unwanted programs (PUP), adware, malware, and many other harmful programs on your PC.

How to use Chrome Cleanup Tool?

  1. Go to the following address on your Chrome: chrome://settings/cleanupchrome scanning for harmful programs on pc
  2. It will automatically start scanning for harmful software and clean them.

Google recommends you to use this tool when you face unwanted problems on Chrome.

This article has featured the best methods to fix the Chrome running slow problem. To further boost Chrome, check out some of these extensions.

If you have any opinion about the topic or any methods mentioned above, let us know in the comment box.

5 Best Star Wars Online Games That Are Free-To-Play In 2026

The Star Wars franchise has always taken care of its gamers community with new releases every few years, such as LEGO games, shooters, and RPGs; the franchise has it all.

With the release of the new Star Wars Jedi: Fallen Order,  Disney has given the gaming community something new to rejoice in until the new Star Wars movie hits the shore.

While there are multiple Star Wars games for PC and console platforms, many online browser-based Star Wars games offer you to play as the Star War characters.

These games are free as well. If you are looking forward to playing free online Star Wars video games, this article is filled with them. You can play as Jedi, Sith, Stormtroopers, and more.

This list has official Disney and fan-made Star Wars games. While all the games in this article are playable on any modern web browser, they will surely work better on the versatile Opera GX browser.

You would want to play Star Wars with any of the 7 best browsers for online gaming.

What is the best Star Wars game right now?

Like the prestigious film series, the greatest Star Wars game is divisive. Knowing your EA from your Bioware slants and Lego iterations can help you understand how diverse this may be. As a result, selecting the finest of the best is no simple task.

While this is not a definitive answer, we lean slightly towards Star Wars Jedi: Fallen Order, you should play it and tell us how you rank it.

Is Star Wars Online free-to-play?

There are many Star Wars online games. And many are paid; luckily, if you are looking for something free, you will have a few free options. Unless you are playing unblocked Star War games, we usually recommend you pay for a subscription to get the most out of these online games.

Quick Tip:

Opera GX is a special version of the Opera browser explicitly built to complement gaming. It also has unique features to help you make the most of your gaming session.

Some notable features of the browser include a CPU resource limiter where you can control RAM, processor, GPU, and bandwidth resource usage per your requirement.

Opera GX

This gaming-enabled browser has many useful features and offers lightning-speed internet browsing!

What are the best free Star Wars games online?

Star Wars Rebels: Strike Missions – Best fan-made game

Star Wars games online

Star Wars Rebels: Strike Missions is a third-party fan-made Star Wars survival game. Choose your team, leader, and support, and launch yourself into battle.

You will encounter the legendary and famous Star Wars characters you’ve experienced in the movies and comics, and they will fight alongside you.

Choose the survival mode and survive as long as possible against the stormtroopers or complete missions; instead, you progress through the game.

You can collect credits by breaking crates that can be used to defeat enemies or unlock new characters and upgrade their skills. Credits can also be used to obtain powerups to boost your weapon.

Additional features:

  • Cool Star War soundtracks
  • Impressive graphics
  • Multiplayer

⇒ Try Star Wars Rebels: Strike Missions

Star Wars Rebels: Special Ops – Best side-scrolling game

Star Wars games online

If you liked the Star Wars Rebels: Strike Missions, you would also love Star Wars Rebels: Special Ops. The game features the popular Star Wars characters like Hera, Ezra, Sabine, Kannan, Zeb, and Chopper.

Start the game by selecting one of the six characters in the game. Star Wars Rebels: Special Ops is a side-scrolling game and uses the arrow keys to move the character forward/backward and jump.

After the training tutorial, you can select one of the four missions in Forest Planet. Each mission comes with an objective that you need to complete while defeating the stormtroopers on the way.

Like Star Wars Rebels: Strike Missions, opening the crates offers credits you can use to defeat Storm Trooper or even unlock new levels.

Additional features:

  • Plenty character choices
  • Multiple missions
  • Great graphics

⇒ Try Star Wars Rebels: Special Ops

Yoda’s Jedi Training – Best Luke Skywalker character game

Star Wars games online

Yoda’s Jedi Training is another popular third-party fan-made Star Wars online game. In this game, you play Luke Skywalker as Yoda trains him to become a great Jedi Knight.

The game starts in the swaps as you leap over holes and smash thorny nests with your lightsaber to collect coins and tokens. The collected items can be used for upgrades in the shop.

The games offer random objectives to complete and unlock more elite versions of Luke once you have leveled up.

There are two versions of Luke – the default Dagobah Luke and the locked Jedi Knight Luke that unlocks at Level 11. Yoda’s Jedi Training uses the standard arrow keys to jump and the space bar to destroy obstacles.

Additional features:

  • Multiple levels
  • Great game soundtracks
  • Multiple missions

⇒ Try Yoda’s Jedi Training

X-Wing Fighter – Best Air fighter Star Wars game

Star Wars games online

If you are into space shooter games, take to the skies with X-Wing Fighter in your trusty X-win and shoot down the enemy ships and TIE fighters while avoiding the enemy attack.

Multiple missions exist, including Battle on Takodana, Starkiller Base Assault, and Simulation Mode. Starkiller Base Assault’s mission can only be unlocked after completing the first mission.

You can use the mouse to move around the X-wing fighter while it shoots lasers continuously. Also, you can hold the right-click or space bar to shoot a laser beam to do more damage.

Collect coins and powerups from the enemy ship wreckage to improve and repair your aircraft and take down the dark side with full speed.

Additional features:

  • Nice game graphics
  • Multiple powerups
  • Different assault modes

⇒ Try X-Wing Fighter

Lego Star Wars: Battle Run – Best Lego version Star Wars game

Star Wars games online

Like Lego and Star Wars? Then Lego Star Wars: Battle Run is for you. Play through an epic battle with your trusty gun to control the outcome and decide between light and dark.

Solve puzzles, fight your way to the Christmas tree at the end of the map and collect all the Lego creation pieces. Use codes to unlock new characters and take them on a dangerous journey.

The game offers over 25 Levels, each consisting of 4 stages. You need to complete the early stages to unlock new levels.

Use WASD to move the character, press space to shoot, and the G button to drop explosives. Be careful with the explosives as wrong moves can kill you instead.

Additional features:

  • Realistic Lego characters
  • Several playing levels
  • Easy keyboard controls

⇒ Try Lego Star Wars: Battle Run

What is the best browser for online games?

In this niche, there are many options, but there is a straight winner – the Opera GX browser.

We love it for many different reasons, but let us start by saying it is the most popular gaming browser we have.

You only need to launch the browser, and you will be instantly put in the gaming mode thanks to its cool themes and sounds for start-up and keystrokes. It also carries all the great attributes of its mother browser Opera.

StarWarsgameonline.com has some of the best Star Wars online games you can play on your browser. Some of these games are better looking than most of the Star Wars games on old-gen consoles.

Apart from the five games listed above, StarWarsgameonline features many other Star Wars games that you can play, and you will find great online, free Star Wars battle simulators.

Give these games a shot, and let us know your favorite Star Wars game in the comments.

6 Fixes for Fallout 4 Mods Not Working – Get Back to Gaming!

Having problems with Fallout 4 not working? You’re not alone. Many players report bugs. Whether it’s Fallout 4 mods not working on PC, Xbox, PS4, or PS5, or issues with Vortex, they usually have common causes.

In this article, we focus on how to fix Fallout 4 mods not working on Windows, including problems that arise after updates.

How do I get mods to work in Fallout 4?

1. Run Nexus Mod Manager (or Vortex) as administrator

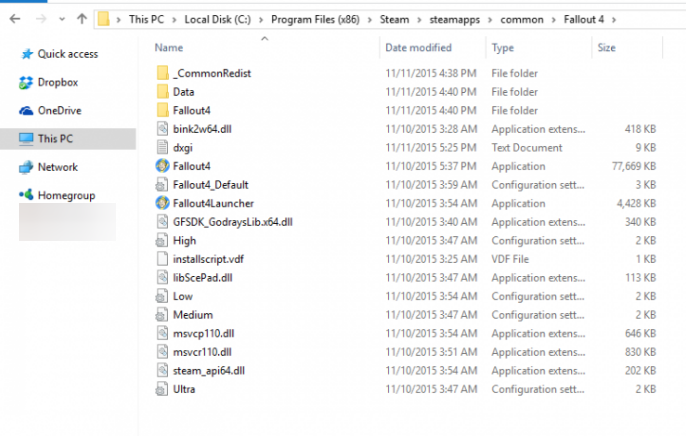
  1. First, open the folder that includes your Nexus Mod Manager (or Vortex modding software) for Fallout 4.
    fallout 4 mods not working
  2. Right-click the EXE file for your Fallout 4 mod software and select Properties.
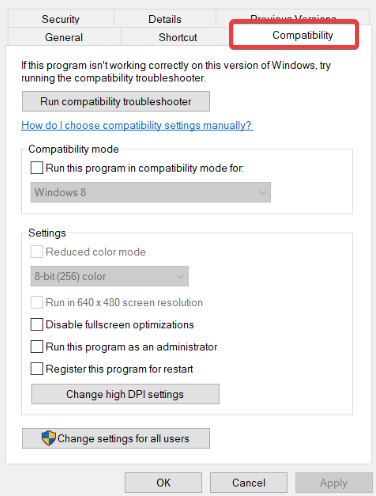
  3. Then select the Compatibility tab shown in the screenshot directly below.
    fallout 4 mods not working
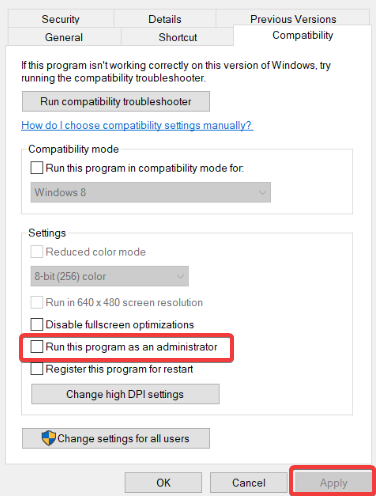
  4. Select the Run this program as administrator setting, and click the Apply option.
    fallout 4 mods not working
  5. Click OK to exit the properties window.

2. Configure INI files for Fallout 4 modding

  1. First, press the Windows + E hotkey to open File Explorer.
  2. Then open the Fallout 4 folder at this path:
    DocumentsMyGamesFallout4
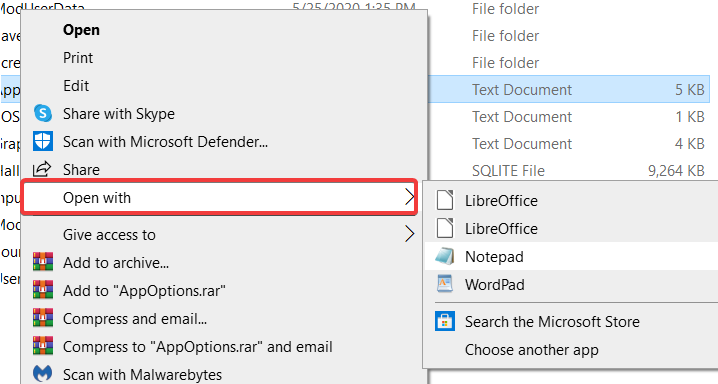
  3. Right-click the Fallout4Custom.ini file and select Open with.
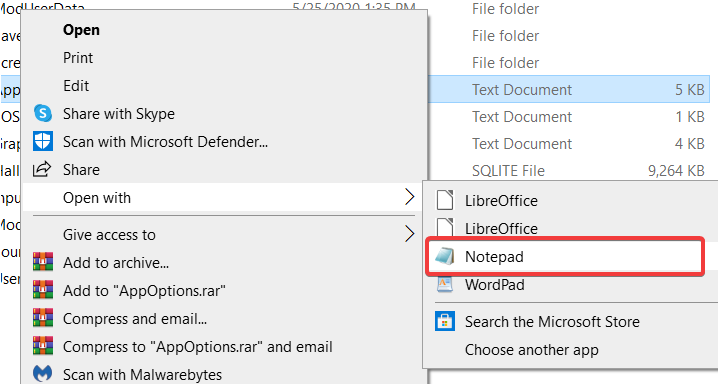
  4. Click Notepad to open Fallout4Custom.ini with that text editor.
  5. Copy the following code with the Ctrl + C hotkey:
    [Archive]
    bInvalidateOlderFiles=1
    sResourceDataDirsFinal=
  6. Paste that code into your Fallout4Custom.ini file with the Ctrl + V hotkey, then save it.
    The additional Fallout4Custom.ini lines fallout 4 mods not working pc
  7. Right-click the Fallout4Custom.ini file and select Properties.
  8. Click on the General tab, and uncheck the Read-only attribute checkbox.
    fallout 4 mods not working
  9. Again, right-click Fallout4Prefs.ini within the same Fallout 4 folder and select Open with to open the file within Notepad.
  10. Enter the code below within the Fallout4Prefs.ini file beneath bEnableFileSelection=1
    [Launcher]

  11. Then select the Save option on Notepad’s File menu.

If your Fallout 4 folder doesn’t include a Fallout4Custom.ini file, set up a new file for that folder by clicking File > Save as in Notepad.

Select All Files on the Save as type drop-down menu. Then enter Fallout4Custom.ini in the file title box, and press the Save button.

3. Enable Fallout 4 through Windows Defender Firewall

  1. Click the Start button, type firewall, then select the Windows Defender Firewall applet.
  2. Click the Allow an app or feature through Windows Defender Firewall.
  3. Press the Change settings button.
    fallout 4 mods not working
  4. Then select both the Public and Private checkboxes for Fallout 4 and Nexus Mod Manager (or Vortex if you use that).
  5. Select the OK button.

If you can’t find Fallout 4 and your mod manager listed within Allowed apps, click the Allow another app option.

Then you can press the Browse button to select and add the Fallout 4 and mod manager apps to the list.

4. Add a Fallout 4 exclusion to Windows Security

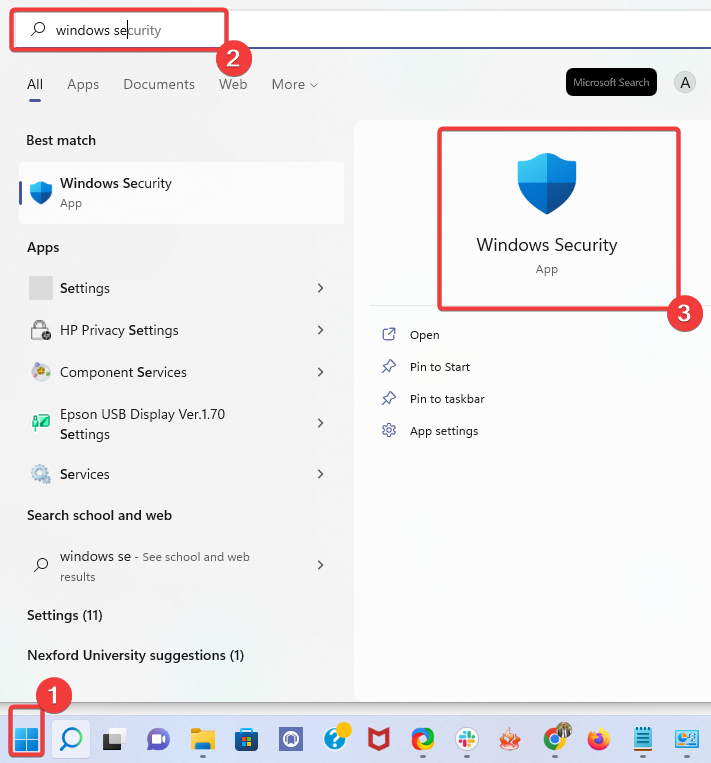
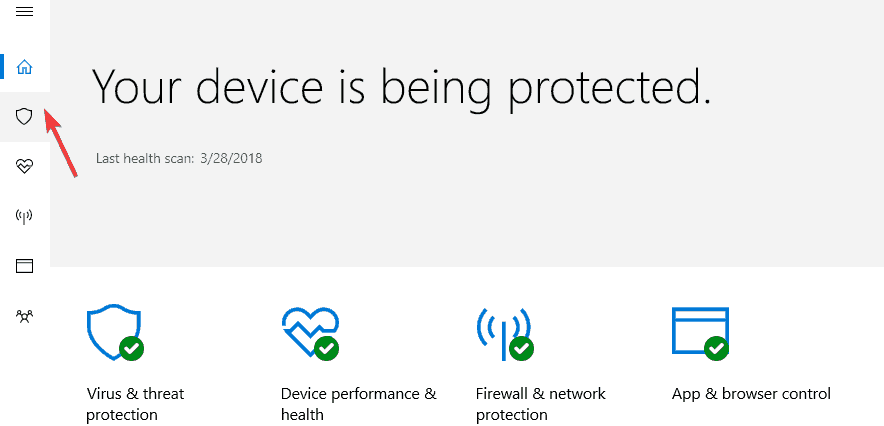
  1. Click on the Start menu, type Windows security, and then select the Windows Security applet. 
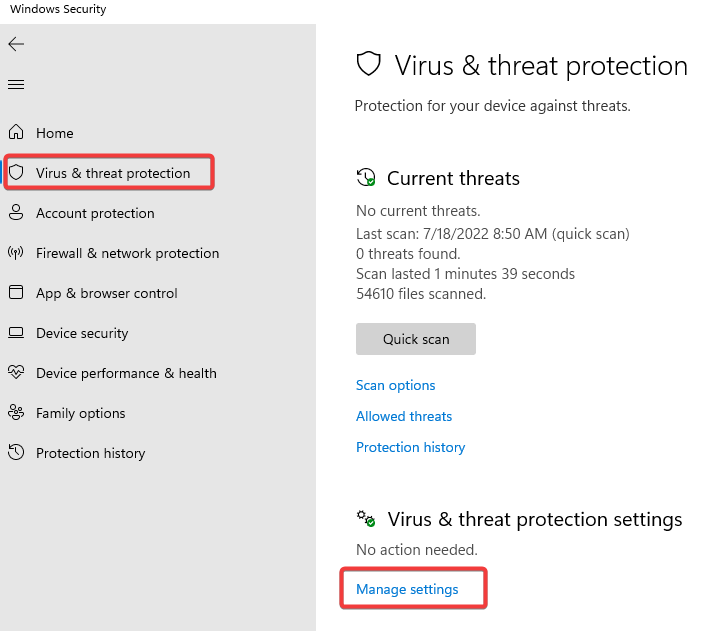
  2. Click the Virus and threat shield button on the left side of Windows Security, then select Manage settings on the right pane.
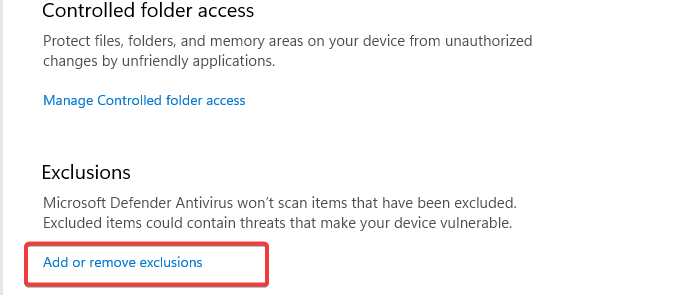
  3. Scroll down and click Add or remove exclusions.
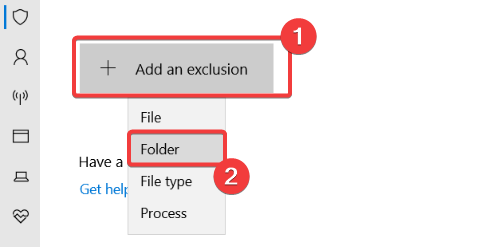
  4. Press the + Add an exclusion button, then click the Folder option, and select the Fallout 4 directory.
    fallout 4 mods not working
  5. Then click the Folder option, and select the Fallout 4 directory.

5. Disable and re-enable mods one at a time

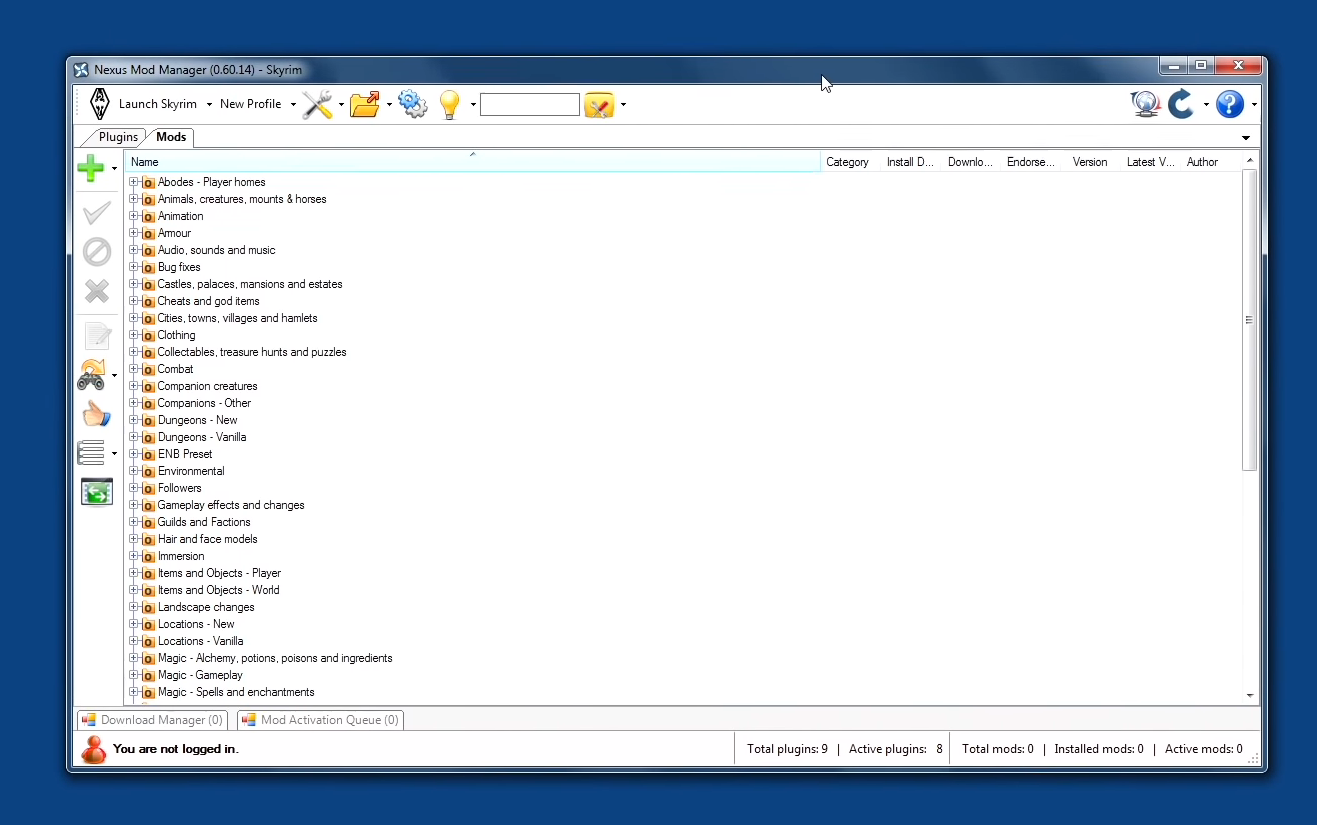
  1. Open the Nexus Mod Manager window.
    Nexus Mod Manager fallout 4 mods not working pc
  2. Then select Fallout 4 in Nexus Mod Manager to open a list of its installed mods.
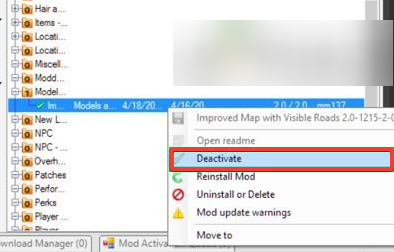
  3. Disable all your mods by right-clicking them and selecting their Deactivate options.
    fallout 4 mods not working
  4. Play Fallout 4 after deactivating all the mods. If deactivating the mods fixed previous issues for the game, at least one of the mods is faulty.
  5. Thereafter, active a mod; and play Fallout 4 after activating it to check for issues. Keep on testing the game after reactivating one mod at a time until you can identify a faulty one.
  6. Deactivate the corrupted mod you discover.

When Fallout 4 mods are not working on Xbox, PC, PS4, and PS5, you should try disabling and re-enabling the modes.

6. Reinstall Nexus Mod Manager to update it

  1. To open the Run accessory, press the Windows + R keys.
  2. Click the OK button after entering this command in Run’s text box:
    appwiz.cpl
  3. Select your Fallout 4 mod software, and click the Uninstall button.
  4. Restart Windows after removing the mod software.
  5. Click the Manual Download button for the latest Nexus Mod Manager version on the NMM download page.
  6. Alternatively, you can click the Download button on the Vortex page to save the setup wizard for that Fallout4 mod software.
  7. Install the mod manager software you downloaded.

When Fallout 4 mods don’t work on PCs, it could be due to misconfigured INI files, corrupted mods, or Windows firewall/antivirus blocking the game. Adjusting property settings may resolve these issues.

Using Mods in Fallout can add more fun to the game and also fix certain bugs such as face glitches.

Lastly, you will find our guide helpful if your Nexus mod manager is not set up to work with Skyrim. Also, check out how to mod Cyberpunk 2077.

Let us know which solution worked for you in the comments area below.

Microsoft will begin blocking Office macros by default

Windows, and more exactly, Office users are getting more and more confused after Microsoft keeps changing its mind about how to handle Office macros.

A bit earlier this month, the tech giant surprised all users when it suddenly changed its mind and started to block VBA macros in popular Office apps.

Just as everyone was getting used to the new normality, the Redmond company said that it wants to reinstate the new policy after making some additional changes to enhance usability.

That being said, now Microsoft is once again announcing that is ready to start blocking Office internet macros by default.

Office macros will be blocked by Microsoft

Microsoft clarified that it resumed the rollout of VBA macro auto-blocking in downloaded Office documents after it temporarily rolled it back as a result of user feedback.

The tech company has updated the available information with clear step-by-step instructions explaining what the end user can do with a blocked macro.

Now, with this latest set of rules in place, we will see a security warning notification when trying to open an Office file with a macro coming from the Internet.

This above-mentioned message will depict a Learn More button linked to a support page describing risks related to opening files with VBA macros.

Furthermore, the support article provides information about enabling macros in case the user trusts the file, and you can access it right here.

In case you were wondering why this pattern of indecision, Microsoft confirms that the huge wave of negative user feedback caused the company to temporarily undo the changes and consider providing better information about such a drastic change in Office applications.

Even though no additional info was shared, users have reported they didn’t know how to re-enable macros after they were automatically blocked because they couldn’t find the Unblock button. 

At the same time, other people found it burdensome to unblock each downloaded Office document multiple times daily.

With the updated information we received, we have all the information that an average user or IT admins need to understand how Office determines whether to block or run macros in files from the internet.

We also learn more about which Office versions are affected by the new rules, how to allow VBA macros in trusted files, and how to prepare for the change.

That being said, in conclusion, the Redmond company plans to start blocking VBA macros in Office Access, Excel, PowerPoint, Visio, and Word in the Current Channel from July 27, 2022.

We’re actually talking about Office version 2206 and newer, and the general idea behind the decision is to eliminate an attack surface that bad actors exploit to infect systems with malware and ransomware.

What is your opinion on this entire situation? Share your thoughts with us in the comments section below.

Best Browsers That Still Support Activex Controls in 2026

With ActiveX browsers, you can interact with countless data formats. If you tried accessing something that your browser doesn’t support, this feature requires a browser that supports ActiveX controls in Chrome might be familiar.

This article will run you through a list of the best browsers with support for ActiveX control.

By using these apps, you’ll be able to circumvent This browser does not support ActiveX components error message.

What browsers support ActiveX controls?

Opera One – Best social integration

opera one browser

Opera One runs on Google’s open-source engine, which means you can install all Chrome-compatible extensions.

So, even though it doesn’t support ActiveX controls out of the box, you can work around that.

The technique for integrating this is outlined towards the conclusion of this guide. Read on to find out how to use the browser’s ActiveX feature.

We like the browser since it’s one of the few with an integrated VPN, which allows you to hide your IP address when needed.

Additional features:

  • Workspaces
  • Snapshot tools
  • Ad blocker

Opera One

Browse securely and customize your workspace with handy add-ons and integrations.

Google Chrome – Most extensive extension database

Chrome does not natively have ActiveX controls support and instead relies on NPAPA (Netscape Plugin Application Programming Interface) to interact with and view sites that do.

You can download ActiveX for Chrome extensions because there are a handful of these. Additionally, a few Chrome configuration tweaks will come in handy.

We like Chrome because it is fast, has robust security measures, has a simple interface, and supports leading standards.

Additional features:

  • Visual Browser History
  • Website tabs manager
  • Browser memory use

⇒ Get Google Chrome

Firefox – Optimized for privacy

browser that supports activex controls

Firefox developers often build new plug-ins for users to install to enable functionality requested by documents and websites that would typically need ActiveX controls.

So, the Open in IE and Esker ActiveX Plug-in, which try to mimic ActiveX controls or the Mozilla ActiveX Control plug-in, will ensure you can use ActiveX content on the browser.

Additionally, when you encounter a broken document or site on Firefox because it employs ActiveX, you may send a report to the dev team.

Additional features:

  • Page actions menu
  • New tab page
  • Enhanced tracking protection

⇒ Get Firefox

What is ActiveX control in the browser?

ActiveX is Microsoft’s patented program that enables you to view and interact with specific documents and websites via an Internet browser.

It is sometimes necessary before you have access to viewing any portion of a document or website, and at times it’s required only for specific functions and services of the website. This requires a browser that supports ActiveX controls.

However, only browsers developed by Microsoft have full ActiveX support. So, other browsers will need to create unique approaches for displaying ActiveX-required websites and documents.

What websites use ActiveX?

ActiveX controls are utilized by a wide variety of Microsoft Windows applications, including a number of Microsoft’s own, such as Internet Explorer, Microsoft Office, Microsoft Visual Studio, and Windows Media Player.

These applications not only use ActiveX controls to construct their feature sets, but they also encapsulate their own functionality within ActiveX controls, which can then be embedded within other applications.

Is ActiveX still supported?

ActiveX was a bridging tech used to connect desktop and web technologies.

Modern browsers like Google Chrome and Microsoft Edge have redefined the distinction between data controls and content.

Therefore, this kind of segmentation is crucial in the Zero Trust age. ActiveX would be retired since the web has progressed to more secure and distributed technology stacks.

However, with that said, many top browsers still give allowance for this feature to be turned on if required.

How do I enable ActiveX in Opera One?

  1. Navigate to the Open in IE extension.
  2. Click on Add to Opera One.
    browser that supports activex controls
  3. When you encounter a program that requires ActiveX, right-click on the Open in IE extension and select Open all Tabs in Internet Explorer.
    browser that supports activex controls

You will also be able to activate ActiveX on Chrome using a similar method.

Here you have it – our list for you if are looking for browsers with ActiveX controls.

You must have in mind that ActiveX content may not always be safe, however, by checking if they are signed, you could avoid malware.

The browsers listed are also our favorites for many reasons other than their support for this tech. Many of them offer great flexibility for browsing security and offer features needed across many domains.

Finally, you should note that your OS may block the installation of extensions, but with a few steps, you can stop Windows from blocking ActiveX install for IE.

Here is what’s coming to Xbox next week, July 25—29

A total of 10 new games (that we know of so far) are set to release on Xbox consoles next week. These games will be releasing between July 25 and July 29. Let’s have a look at the lineup.

Maybe not the most exciting lineup of the summer season so far, but still solid. And there is a good mix of different game types, from racing games to roguelikes to visual novels. Note that release dates are subject to change. Which of these upcoming releases are you excited about? Let us know in the comments.

3 Ways to Fix the URL Autocomplete if It’s Not Working on Firefox

Firefox is one of the easiest-to-use browsers available on all devices. One of its ease-of-use features is the URL autocomplete. 

This feature provides suggestions from your browsing history, bookmarks, and search engine to anticipate and complete the URL you are typing. Unfortunately, the URL autocomplete feature is now starting to fail on Firefox.

The causes for the failure vary from wrong browser settings to broken profile files. Irrespective of the reason, this guide will show you how to fix the issue and help you get back suggestions in your address bar.

Quick Tip:

Use a more stable browser if you keep having problems with Firefox. We recommend Opera One as an alternative because it’s fast and less prone to errors and bugs.

This browser has the autocomplete feature pre-enabled when you install it, and you can easily disable it or customize its settings to your own liking. This browsers also features it’s own built-in AI.

Opera One

Easily enable/disable autocomplete and enjoy fast and secure browsing!
Free Download Visit website

How do I set up the autocomplete URL feature in Firefox?

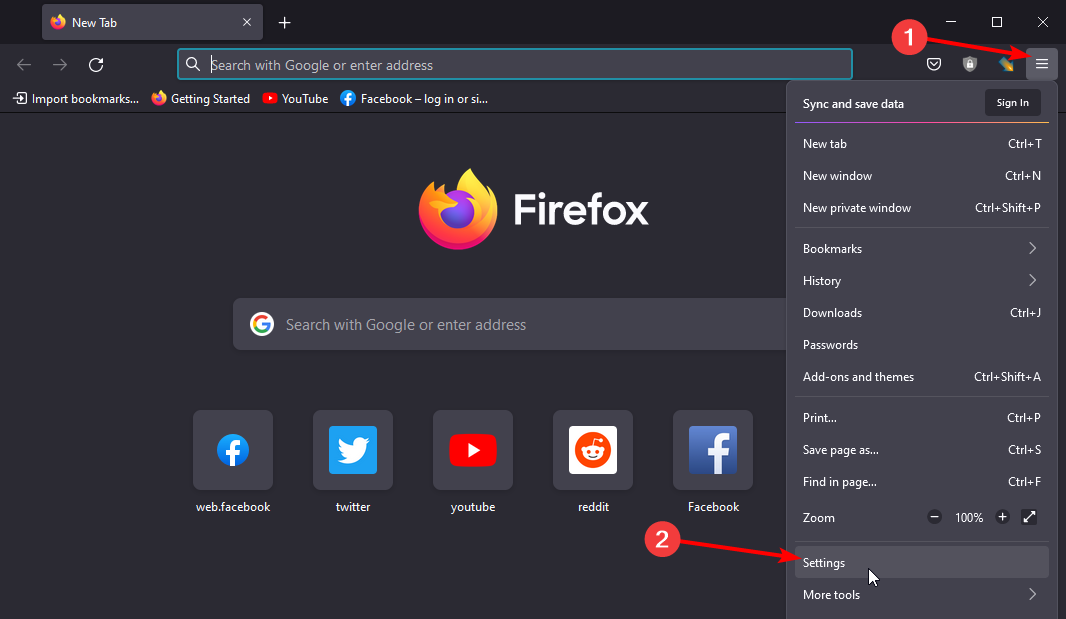
  1. Click on the menu button on Firefox and select the Settings option.
    settings url autocomplete not working firefox
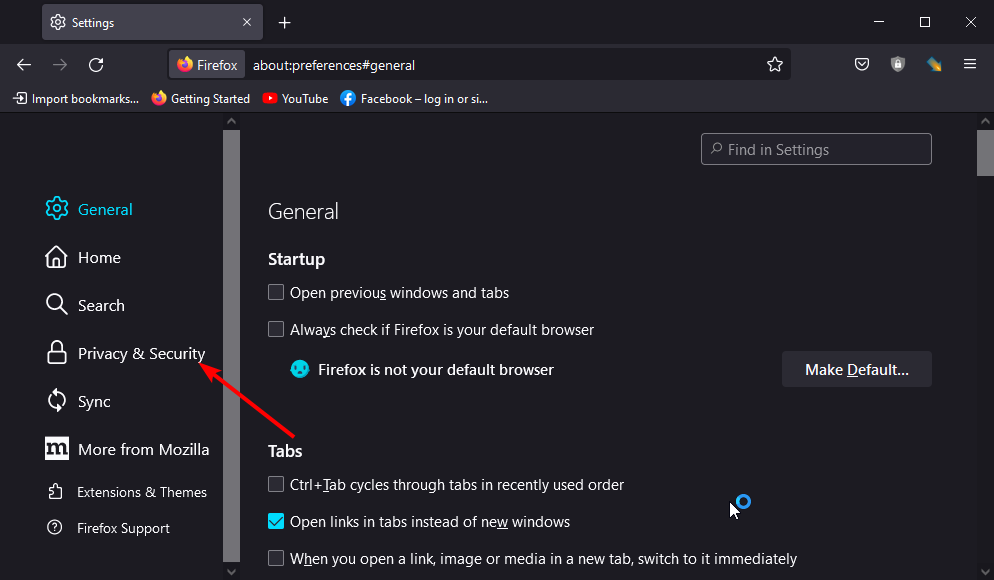
  2. Choose the Privacy & Security option in the left pane.
    privacy 
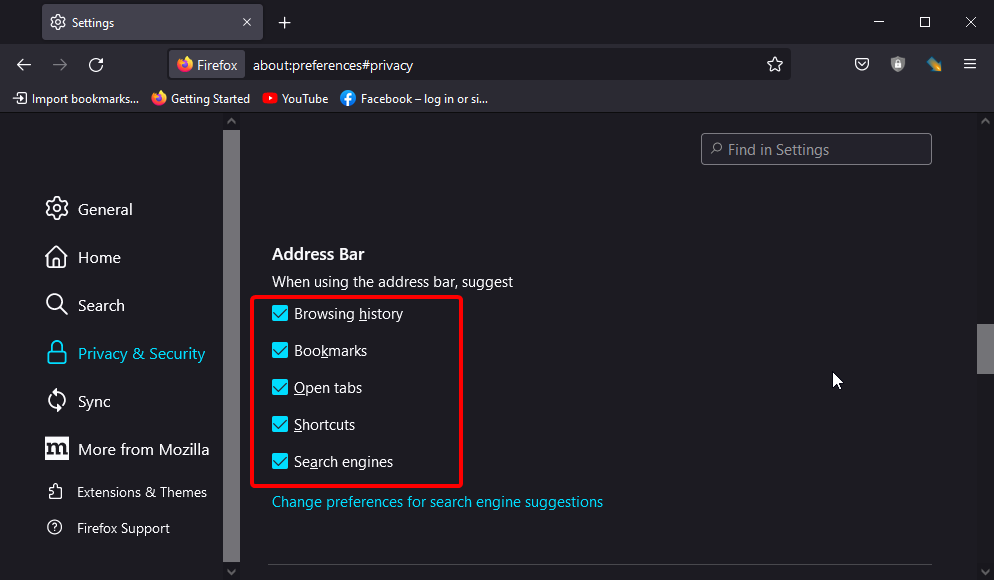
  3. Check the boxes for Browsing history, Bookmarks, Open tabs, Shortcuts, and Search engines under the Address Bar section.
    checkboxes

With the steps above, Firefox will provide suggestions for any URL you type in the address bar from your browsing history, bookmarks, and search engines.

How do I fix the URL autocomplete on Firefox if it’s not working?

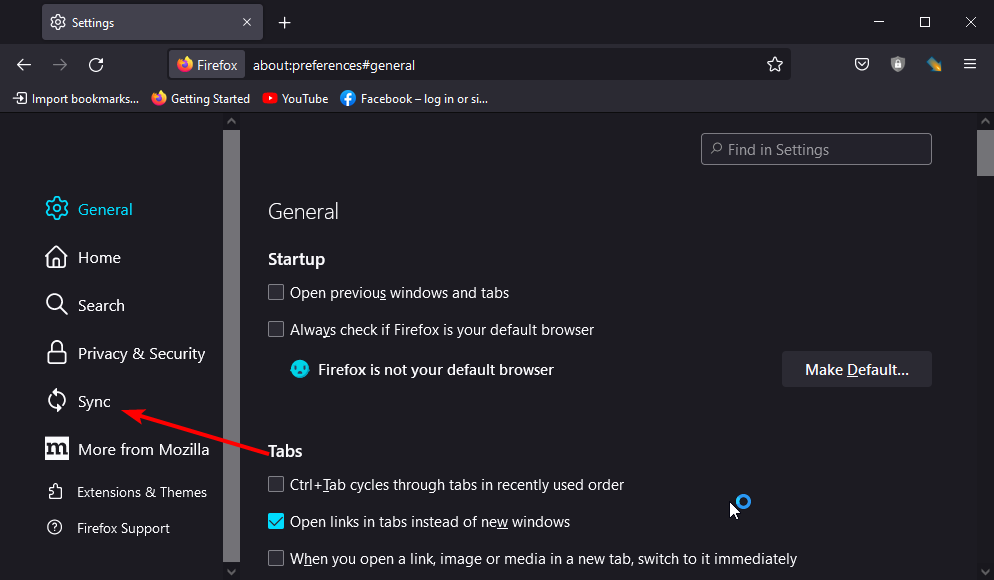
1. Disable sync 

  1. Launch Firefox and click on the menu button (three horizontal lines).
  2. Select the Settings option.
    settings url autocomplete not working firefox
  3. Choose the Sync option in the left pane.
    sync
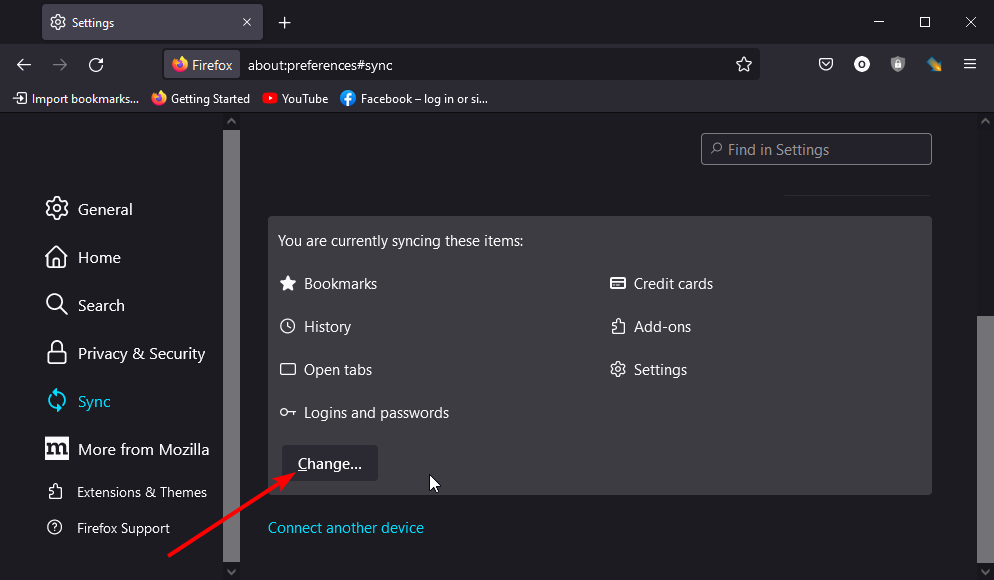
  4. Click the Change… button under the Syncing: ON section.
    change
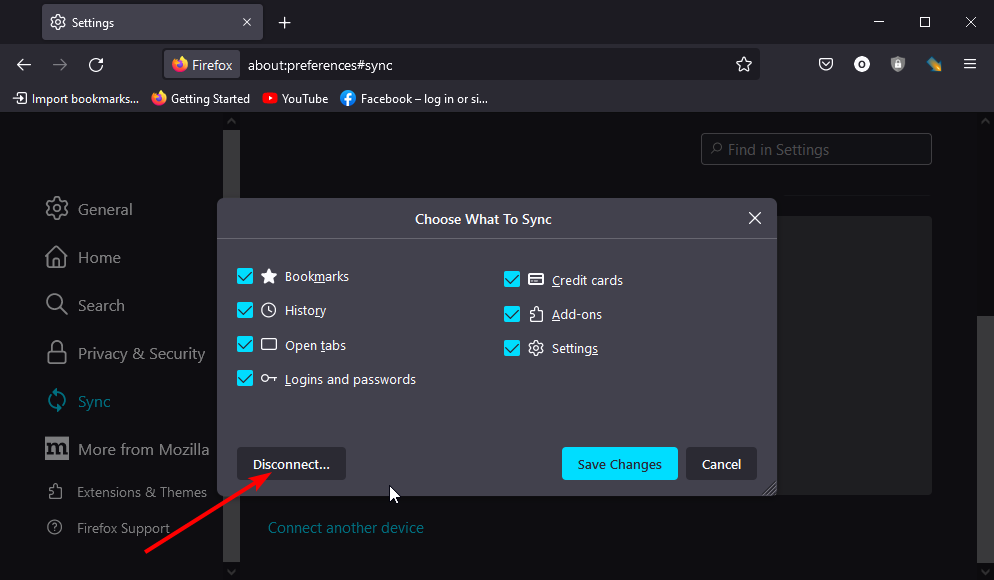
  5. Click the Disconnect… button in the Choose What To Sync window.
    disconnect button
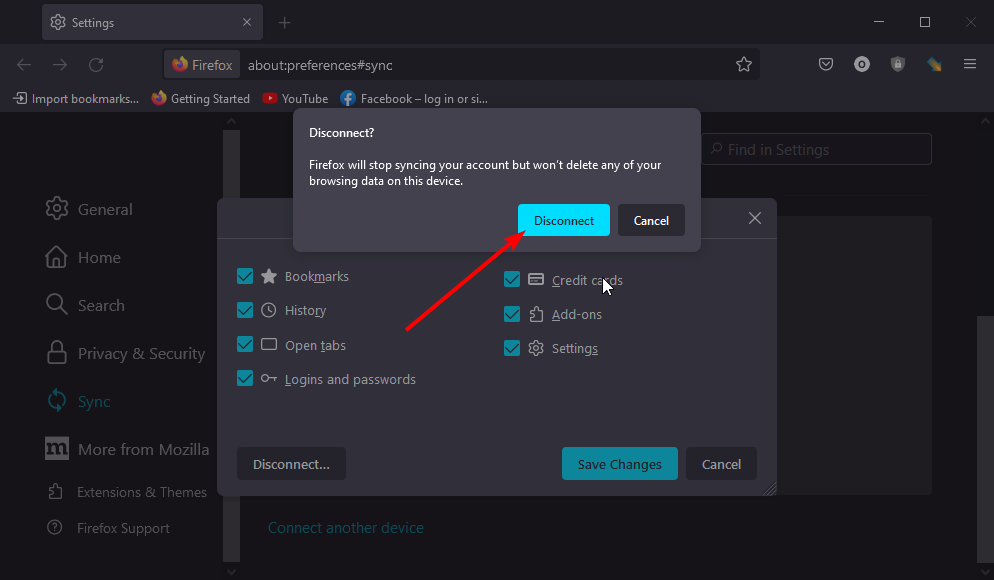
  6. Finally, click the Disconnect button to confirm the action.
    disconnect confirm

If the URL autocomplete is not working properly on Firefox, you might have triggered something on one of your synced devices. Also, if you get the wrong suggestions from sites you have never visited, it might be from another device.

Disabling the Sync will ensure your browser only uses the data available on your current device. And you have nothing to lose as this will not delete any of your data.

2. Remove some files from the Firefox profile 

  1. Open Firefox and click the menu button.
  2. Select the Help option. 
    help option url autocomplete not working firefox
  3. Choose More troubleshooting information.
    more troubleshoot
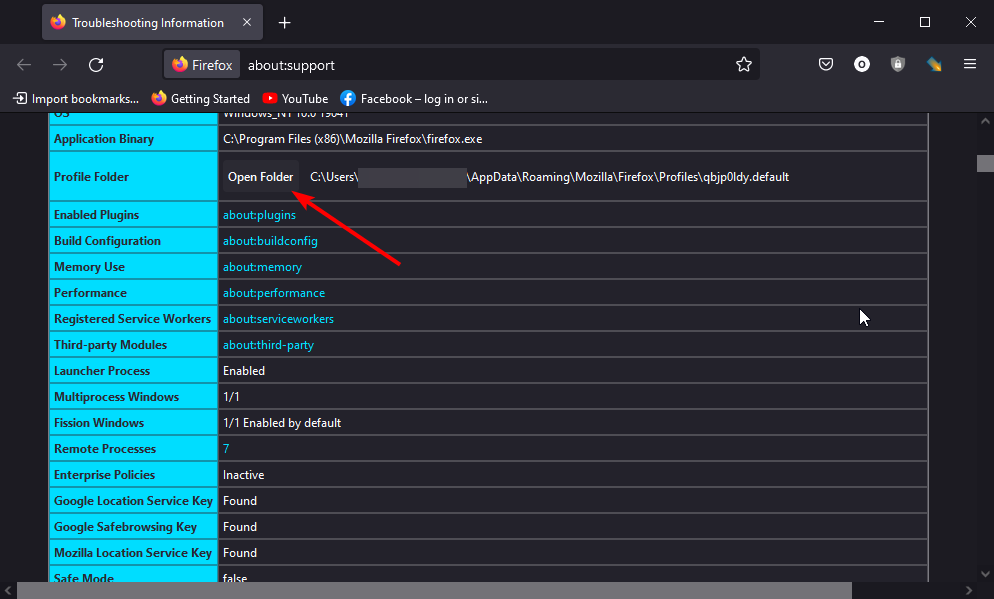
  4. Now, go to the Application Basics section and click Open Folder before the Profile Folder option.
    open folder
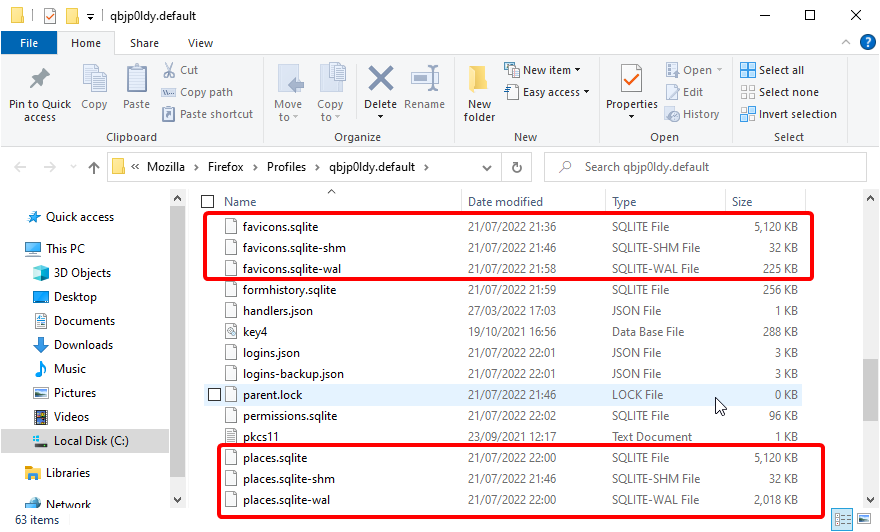
  5. In the folder, delete all places.sqlite and favicons.sqlite files.
    fav places
  6. Finally, restart your browser.

Another reason the URL autocomplete might not be working on Firefox is broken profile files. The quickest solution is to remove the files and let Firefox build a new one from scratch. 

You can create a backup of the places.sqlite file in case it needs to be used to build a new database later.

3. Set URL bar preference to true

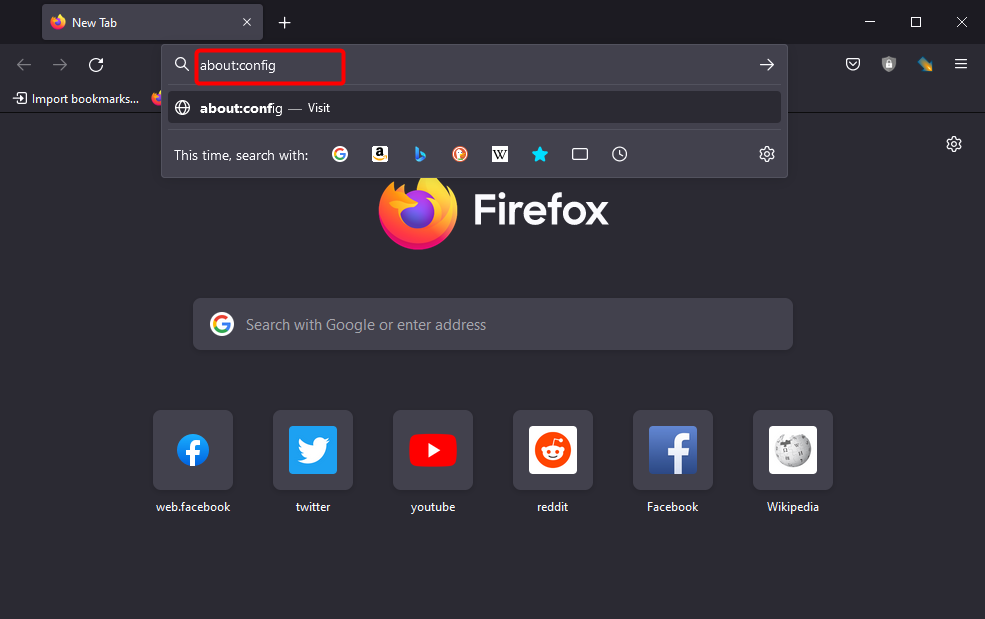
  1. Launch Firefox and copy the command below in the Address bar. about:config
  2. Press the Enter key.
    type about url autocomplete not working firefox
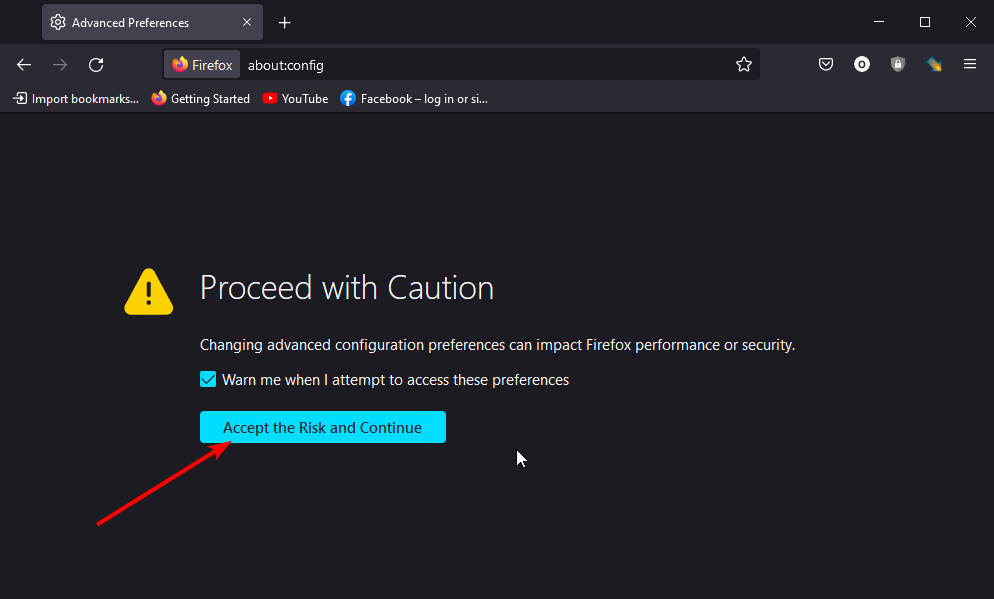
  3. Click the Accept Risk and Continue button.
    accept
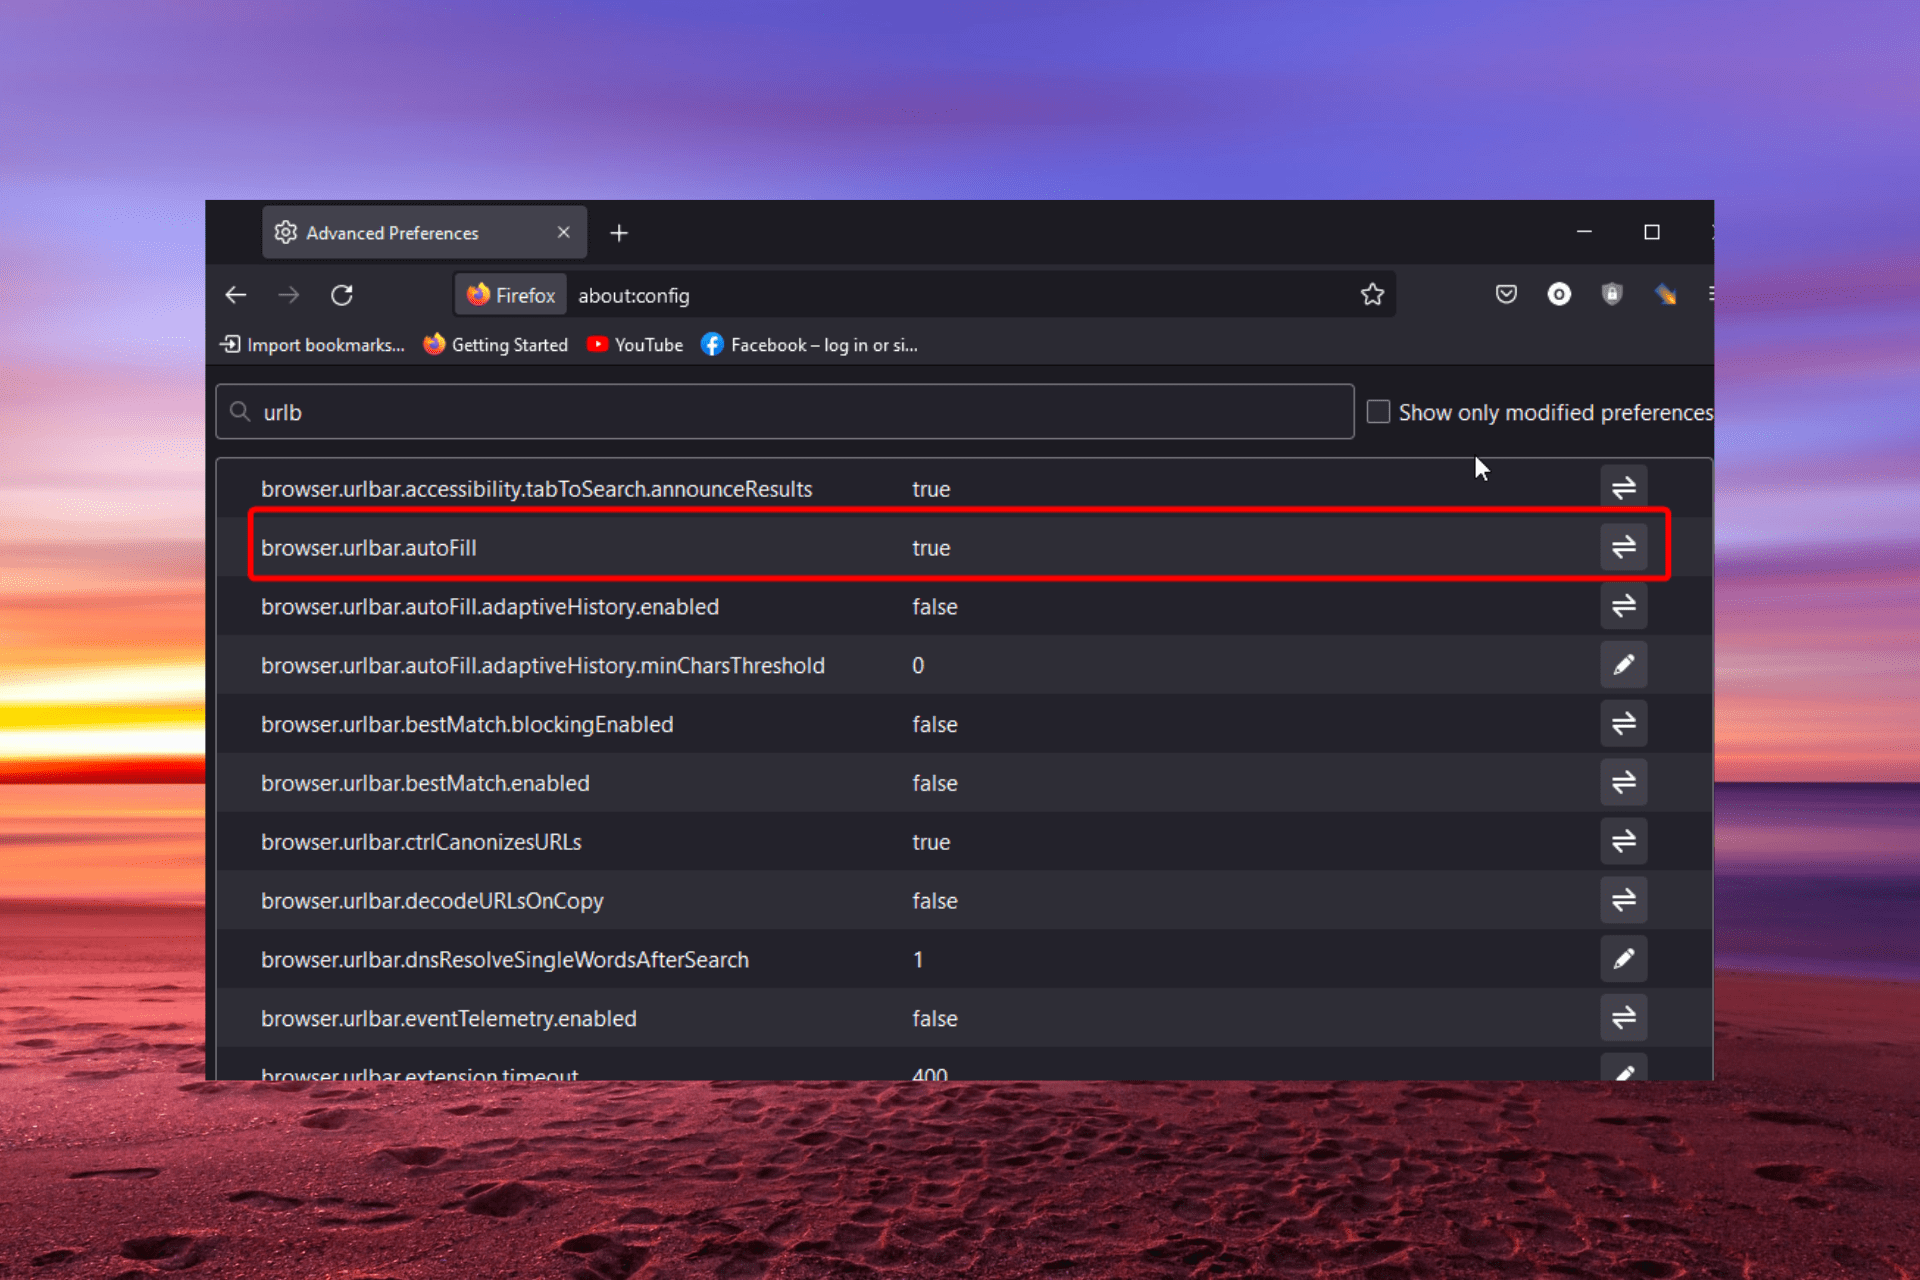
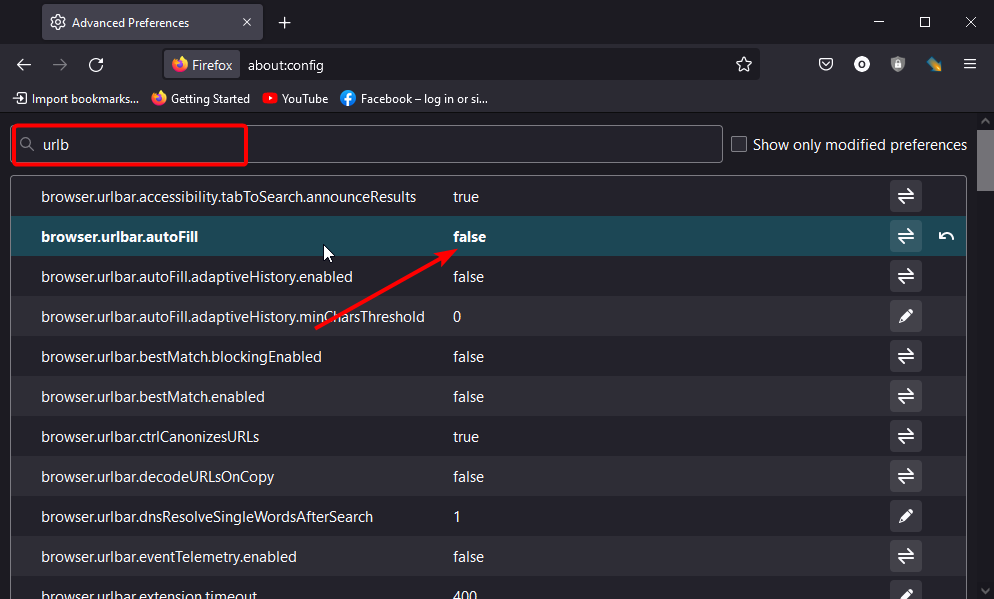
  4. Search for URLB in the search box.
  5. Look for the browser.urlbar.autofill preference from the list.
    search
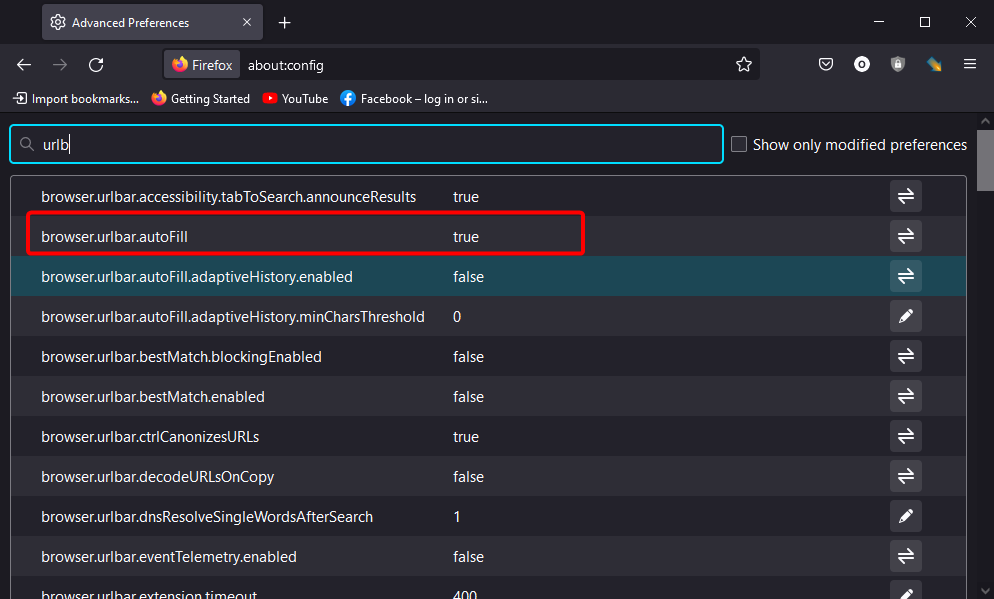
  6. Double-click on it to set the value to true.
    set value true url autocomplete not working firefox

If you tampered with your Firefox settings before noticing that the URL autocomplete is not working, you might have tweaked the wrong preference.

Setting the URL bar to autofill will help return the suggestions. Ensure to restart your browser after making this change.

The URL autocomplete feature is one of the integral ease-of-use features on Firefox. So, it is too good to be missed. With the detailed solutions provided in this guide, you should be able to get it back working without breaking a sweat. 

Are you facing other issues like the Enter key not working on Firefox? Then give our article a read to know how to fix it effortlessly. 

Feel free to let us know the solution that enables you to get back the URL suggestion in your browser in the comments section below.

Windows 11 22H2 startup sound quality is getting lowered by Microsoft

Microsoft Executive Vice President and Chief Product Officer, Panos Panay, has been on an unrelenting campaign to educate users about just how quality-focused Windows 11 really is.

The Redmond-based tech company’s main concern is to deliver a superior product, unparalleled in quality and client friendliness.

However, it seems that Microsoft decided to reduce the quality of certain aspects of the new operating system, an action that sort of contradicts all previous statements.

We’re referring to the user-friendly and warm startup sound for Windows 11, which apparently took a quality hit when least expected.

Microsoft lowers Windows 11 startup sound quality

It seems that Microsoft has further plans for its latest OS that contradict statements made not that long ago, about everything that has to do with Windows 11 being superior.

We said that because, allegedly, the tech giant has lowered the bit rate of the Windows 11 Startup sound in the upcoming version 22H2, Sun Valley 2.

The audio file for the Windows 11 startup sound has a reduced bit rate of 1,536 Kbps, compared to the 2,304 Kbps it had in last year’s build 22463.

This change was noticed in Beta Channel build 22621, which has been confirmed to be the RTM release candidate for Windows 11 22H2.

We’re actually looking at a 33% reduction in the bit rate, which let’s be honest, will not ultimately lead to a perceptible difference in the fidelity of the Windows 11 startup sound.

Some netizens say that Microsoft has also made changes to the music itself, mentioning that the silence at the very start of the sound has been slightly prolonged in Build 22621.

We’re not saying that this might be the end of Windows 11 as we know it. However, some users, using high-fidelity sound equipment, may be ticked off by this reduction.

As for the rest of us, happy with a regular pair of headphones or a plain pair of PC speakers won’t really realize that something happened in the first place.

And, since we’re on the topic of Windows 11, remember that Microsoft released Build 25163 to the Dev Channel, with some pretty important changes coming to the Store.

Two days ago it also released builds 22621.436 and 22622.436 (KB5015888) to the Beta Channel, along with a new tutorial video series for Windows 11 beginners.

KB5015882 also brought some important fixes, in case you didn’t catch up yet. Also, if you are a Windows OS enthusiast, keep in mind that Microsoft will release new operating systems once every 3 years.

With that in mind, don’t forget to check all the updates surrounding Windows 12 and a potential 2023-2024 release.

Considering what you just read, what is your take on Microsoft lowering the Windows 11 startup sound quality?

Share your opinions and thoughts with us in the comments section below.

KB5015882: All you need to know about this recent update

Windows 11 users kept reporting that there was a bug that caused FIle Explorer to randomly freeze, without any apparent trigger or solution.

Now, Microsoft has released KB5015882 for Windows 11 with 20 fixes or improvements, including new Focus Assist and OS upgrade features.

Ready for a more in-depth dive? Also, don’t forget to check out the most recent updates released to the Dev (25163) and Beta (KB5015888) Channels.

What fixes does KB5015882 bring to Windows 11?

Before we begin, keep in mind that this 11 cumulative update is part of Microsoft’s July 2022 monthly C release, which allows users to test the upcoming updates and fixes in the August 2022 Patch Tuesday.

And, as you already know, unlike updates released during Patch Tuesday, these preview updates do not contain security features and only include bug fixes and performance improvements.

That being, said, installing the KB501588 will bring Windows 11’s version number to build 22000.829, in case you were wondering.

Furthermore, Windows 10 users can also download and manually install the KB5015882 update from the Microsoft Update Catalog.

We can start describing KB501588 by saying that it provides the ability for you to consent to receive urgent notifications when focus assist is on.

Also, it gives the option for eligible devices to update to a newer Windows 11 version during the out-of-box experience (OOBE) when you first sign in.

Keep in mind that, if you choose to update to a newer version, the update process will begin shortly after the update is installed on the device.

KB501588 also restores functionality for Windows Autopilot deployment scenarios that are affected by the security mitigation for hardware reuse.

It removes the one-time use restriction for self-deploying mode (SDM) and pre-provisioning (PP), and also re-enables any User Principal Name (UPN) display in user-driven mode (UDM) deployments for approved manufacturers.

  • Addresses an issue in UIAutomation() that causes an application to stop working.
  • Addresses an issue that prevents the Startup Task API from working as expected for certain apps.
  • Improves the reliability of a push-button reset after an OS upgrade.
  • Addresses an issue that makes the tenant restrictions event logging channel inaccessible if you remove the EN-US language pack.
  • Addresses an issue that causes certificate-based machine account authentication to fail in some circumstances after you install the May 10, 2022 security updates on domain controllers.
  • Addresses an issue that affects the Arm64EC code you build using the Windows 11 software development kit (SDK).
  • Updates the Remove-Item cmdlet to properly interact with Microsoft OneDrive folders.
  • Addresses an issue that prevents certain troubleshooting tools from opening.
  • Addresses an issue that causes port mapping conflicts for containers.
  • Addresses an issue that causes Code Integrity to continue trusting a file after the file has been modified.
  • Addresses an issue that might cause Windows to stop working when you enable Windows Defender Application Control with the Intelligent Security Graph feature turned on.
  • Deploys search highlights to devices. To access the policy for search highlights (on a device that has installed the June 2022 Cumulative Update Preview or July 2022 monthly quality update), go to C:\Windows\PolicyDefinitions and locate Search.admx. For your convenience, we will be publishing an updated version of the Administrative Templates (.admx) for Windows 11, version 21H2 to the Microsoft Download Center soon.
  • Addresses an issue that causes explorer.exe to stop working when you use the play and pause keyboard buttons on certain devices.
  • Addresses an issue that causes explorer.exe to stop working when you use the Start menu’s context menu (Win+X) and an external monitor is connected to your device.
  • Addresses an issue that displays a blank window that you cannot close when you hover over the search icon on the taskbar.
  • Reduces the overhead of resource contention in high input/output operations per second (IOPS) scenarios that have many threads contending on a single file.
  • Addresses an issue that causes the Windows profile service to fail sporadically. The failure might occur when signing in. The error message is, gpsvc service failed to sign in. Access denied.

Known issues

Even though these problems shouldn’t exist, what would be a Windows update release without some good old issues that come packaged with it?

  • After installing this update, IE mode tabs in Microsoft Edge might stop responding when a site displays a modal dialog box. A modal dialog box is a form or dialog box that requires the user to respond before continuing or interacting with other portions of the webpage or app.

This above-mentioned issue is resolved using Known Issue Rollback (KIR), but it might take up to 24 hours for the resolution to propagate automatically to consumer devices and non-managed business devices. 

What can I do if KB501588 fails to install?

  1. Press Win + I to access Settings.
  2. Select the System category and click on Troubleshoot. w11 troubleshoot
  3. Press the Other troubleshooters button.other troubleshooters windows 11
  4. Press the Run button next to Windows Update.windows update troubleshooter

There you have it, folks! That’s pretty much all we’re getting with KB501588, and hopefully, the fixes brought by it will last a while.

Have you noticed any other problems after installing KB501588 on Windows 10 or Windows 11? Share your experience with us in the comments section below.

7 Ways to Get Your SWF Files Opening Again in Chrome

Finding a solution to the SWF files not working in Chrome is crucial. Most people still try to use Adobe flash player in the present day, but it won’t work.

This is because the software has been stopped and is no longer available. Chrome has been adopted to open the SWF file format in place of Adobe.

This is done through the help of a Chrome extension, Flash Player, which allows users to open SWF files.

SWF files are identified by the acronym SWF, which stands for Small Web Format or Shockwave Format. It can contain video, animations, and audio files while compressing them into smaller file formats to occupy little or no space.

This article will teach you how you can fix SWF files not working in Chrome and how to open SWF files in 2022.

Do SWF files still work?

There are several ways to open SWF files that do not require Flash to be installed. You can make use of utilities such as SWF players, or you can utilize the Adobe Flash Player that is hidden. You also have the option to convert these files so they may be opened.

Quick Tip:

Try opening SWFs in another browser. Opera One is a very responsive alternative to Chrome. The browser supports Flash Player, and you can easily enable it for specific web pages and play SWF files.

Opera One is also lighter on resources than Chrome and has performance-boosting features like an adblocker, a battery mode, and hardware acceleration.

Opera One

Open SWFs with ease and enjoy fast and seamless browsing.

How do I play SWF files in Chrome?

  1. Go to the Flash player extension to your Google Chrome by clicking the Add to Chrome button. add-to-chrome-button-ext chrome swf files not working
  2. Click the Extensions Manager icon in the upper right corner followed by Manage extensions.extneions-manager chrome swf files not working
  3. Toggle the icon beside the Flash player extension to enable it.flash-on chrome swf files not working
  4. Choose any SWF file, right-click on it, and open it with Chrome. This is how to play SWF files in 2022.

How do I enable SWF files in Chrome?

  1. If SFW files are not working, launch Google Chrome on your device.
  2. Go to the Flashplayer extension profile in the Chrome extension store and click on Add to Chrome.add-to-chrome-button-ext chrome swf files not working
  3. Select the SWF file on your device and right-click.
  4. Choose the Open with option from the list.
  5. Click Chrome for the file to auto-load.

What can I do if SWF files aren’t working in Chrome?

1. Convert SWF to other formats

  1. Download and install Adobe After Effects on your device.
  2. Launch the app, go to the File menu followed by Import, and you’ll be directed to the file manager.files-import chrome swf files not working
  3. Select the SWF to convert and adjust the settings to select the new format to be converted to. Finally click Convert.

Tools like After Effects are suitable for converting SWF files. By changing the file format, it should be accessible on Chrome. Alternatively, you can convert with the next fix.

2. Download an outdated Chrome version

  1. Launch Google Chrome and search for Slimjet Chrome Old version.slimjet chrome swf files not working
  2. Select any old version before 2021 and install it on your device.
  3. Then launch the SWF file using Slimjet outdated Chrome.

Adobe stopped supporting the Flashplayer plugin at the end of 2020. Hence, the older Chrome browsers still have it. So, you can access SWF files without hassles.

3. Use Internet Explorer/ Edge

  1. Launch Internet Explorer and click on the Settings icon at the top right corner.
  2. Select the Manage add-ons option from the list.manada-addons chrome swf files not working
  3. On the add-one page, click Toolbars and Extensions.toolbars chrome swf files not working
  4. Scroll to the MWTPA option and select shockwave flash objects. Click the Enable button, then save.

If Chrome has failed to open the SWF files, consider switching the browser to Internet Explorer. It has in-built plug-ins that will enable access to SWF files.

4. Download SWF Player on Android

  1. Install the SWF player on your Android device via Google Playstore.
  2. Launch the app, then click local files.local-files chrome swf files not working
  3. Select the file to open, then click play.

You can access the SWF files directly without using Chrome for Android users. Just download the app and access the information in the files.

5. Use the VLC Player

  1. Download VLC Media Player by clicking on the Download VLC button.download-vlc chrome swf files not working
  2. Launch VLC on your device and click Media followed by File.
  3. Select the SWF file to open, then drag and drop it into the VLC.

This option is an alternative to fixing SWF files not working in Chrome. It is more suited as a solution for video files in SWF format.

6. Install KMPlayer for Windows

  1. Download KMPlayer by clicking the KMPlayer 64X for Windows 64-bit button.kmplayer chrome swf files not working
  2. Click the drop-down menu on the top left-hand corner, and select Open followed by Open Files.
  3. In the device storage, select the SWF file you want to open.

This is a good media player software that plays flash files like SWF.

7. Use Elmedia Player

  1. Go to the Elmedia Player page to download this application by clicking the Download button.best-video chrome swf files not working
  2. Launch it, click on File and open it.
  3. Select the SWF file that you want to open and select Elmedia Player.elmedia chrome swf files not working

This is a solution to fix SWF files not working in Chrome for Mac OS users. It is similar to VLC as it can view flash files like SWF.

What browsers will support Flash after 2022?

Adobe Flash Player is not currently supported by any major web browsers at this time. This covers Chrome, Firefox, and Edge browsers from Google and Microsoft respectively. Nevertheless, you may make use of Flash add-ons.

These are the best solutions to fix SWF files not working in Chrome. Also, these are the list of browsers that support Flash to have alternatives to turn to for their file formats.

However, if your situation differs, you can check out our article on fixing Shockwave Payer freezes in Windows 10/11.

You can leave your suggestions and questions below. We’d like to hear from you in the comments section.

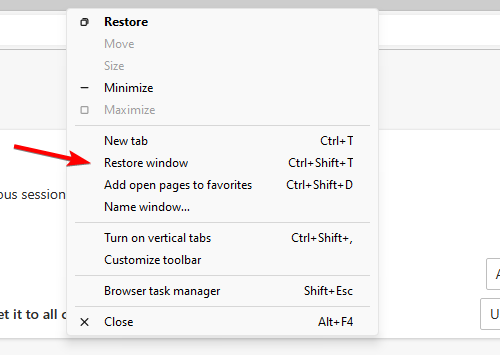
Restore Previous Session Not Working in Firefox? 4 Ways to Fix it

Firefox is one of the strongest browsers for all devices, with ease of use to boot. The restore previous session feature is one of its endearing features that aid productivity.

This feature allows users to regain access to their opened windows after closing the browser. With this comes a much welcome continuity and ease of access. 

However, users are starting to complain that the restore previous session feature is not working on Firefox. Fortunately, it is not the most difficult issue to solve, as we will show in this article.

Quick Tip:

If you want to fix this issue fast, try using a different browser instead. For good performance and low error rates, we recommend Opera.

This browser is light and often updated, so you shouldn’t have the same problem with restoring previous sessions. It uses very few resources and includes an adblocker, a VPN, and more.

Opera

Say Goodbye to errors with this up-to-date and lightweight browser!

How do I turn on the previous restore session in Firefox?

  1. Launch Firefox and click the menu button in the top right corner. 
  2. Choose Settings from the options. 
    settings restore previous session not working firefox
  3. Select the General option in the left pane.
  4. Check the box for Open previous windows and tabs under the Startup section.
    general open
  5. Close the settings page, and your changes will be saved automatically.

Where are previous Firefox sessions stored?

previous

Firefox stores the previous session files in the profile folder on your PC. To locate the files, just open File Explorer and follow the path: C:\Users/Username/AppData/Roaming/Mozilla/Firefox/Profiles/profile folder/sessionstore-backups

Note that the file tagged previous.jsonlz24 is the last saved session on Firefox. So, it is the file you might want to restore.

How do I restore a previous Firefox session when the feature is not working?

1. Quit Firefox with all windows open

  1. Click the menu button in the top right corner. 
  2. Select the Exit option.
    exit
  3. Now, relaunch Firefox.

The restore previous session only works on Firefox if the browser does not close properly. This might be due to a crash, update, or accidentally closing a window.

If you exit Firefox by clicking the close icon at the top right corner of every window, that will not qualify as an accidental closure. So, the previous restore session will not work for you.

But if you use the Exit option, it will close all windows at once, which allows you to use the feature the next time you open your browser.

2. Update Firefox

  1. Launch Firefox and click the menu button.
  2. Select Settings from the options.
    settings restore previous session not working firefox
  3. Click on the General tab on the left plane.
  4. Now, click the Check for updates button under the Firefox Updates section.
    check update
  5. It will show if there are any updates available to install.

An outdated browser might be why the restore previous session feature is not working on Firefox. This might be due to a bug or other issues fixed in a newer version.

3. Restore session with history

  1. Click the menu button on your Firefox browser. 
  2. Select the History option.
    menu history
  3. Choose the Restore previous session option.
    option
  4. Wait for it to the recently closed windows.

Provided that you have enabled the restore previous session in your settings, this fix will help you get your previous windows back on Firefox. 

You can also explore more ways to bring back lost tabs by using this guide on how to restore browser tabs after restart for additional recovery steps.

4. Uninstall and reinstall Firefox 

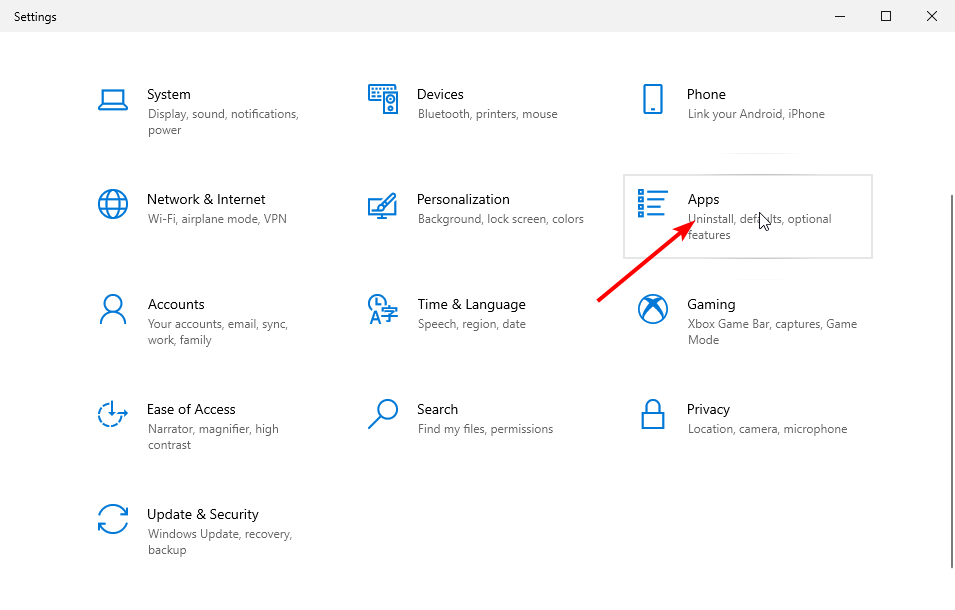
  1. Press the Windows + I keys to open the Settings app.
  2. Select the Apps option.
    apps option  restore previous session not working firefox
  3. Locate the Mozilla Firefox app and click on it.
  4. Click the Uninstall button.
    uninstall
  5. Visit the official Firefox website to download the installer. 
  6. Click the Download Firefox button.
    download
  7. Finally, click the downloaded file and follow the simple onscreen instructions to complete the installation.

Sometimes, the reason the restore previous session is not working on Firefox might be due to a problem with the browser on your PC. The best thing to do is to remove Firefox and all its components and reinstall it.

When the restore previous session is not working on Firefox, you might have to start reloading all your windows manually from the browser history. This not only makes you miss out on some pages but also takes away an important ease of use feature of your browser. 

But with the fixes in this guide, you should be able to solve the problem for good. Are you facing other issues like Firefox not responding? Then, check our detailed article on the topic to fix it quickly. 

Feel free to let us know the fix that helped solve the problem in the comments below.

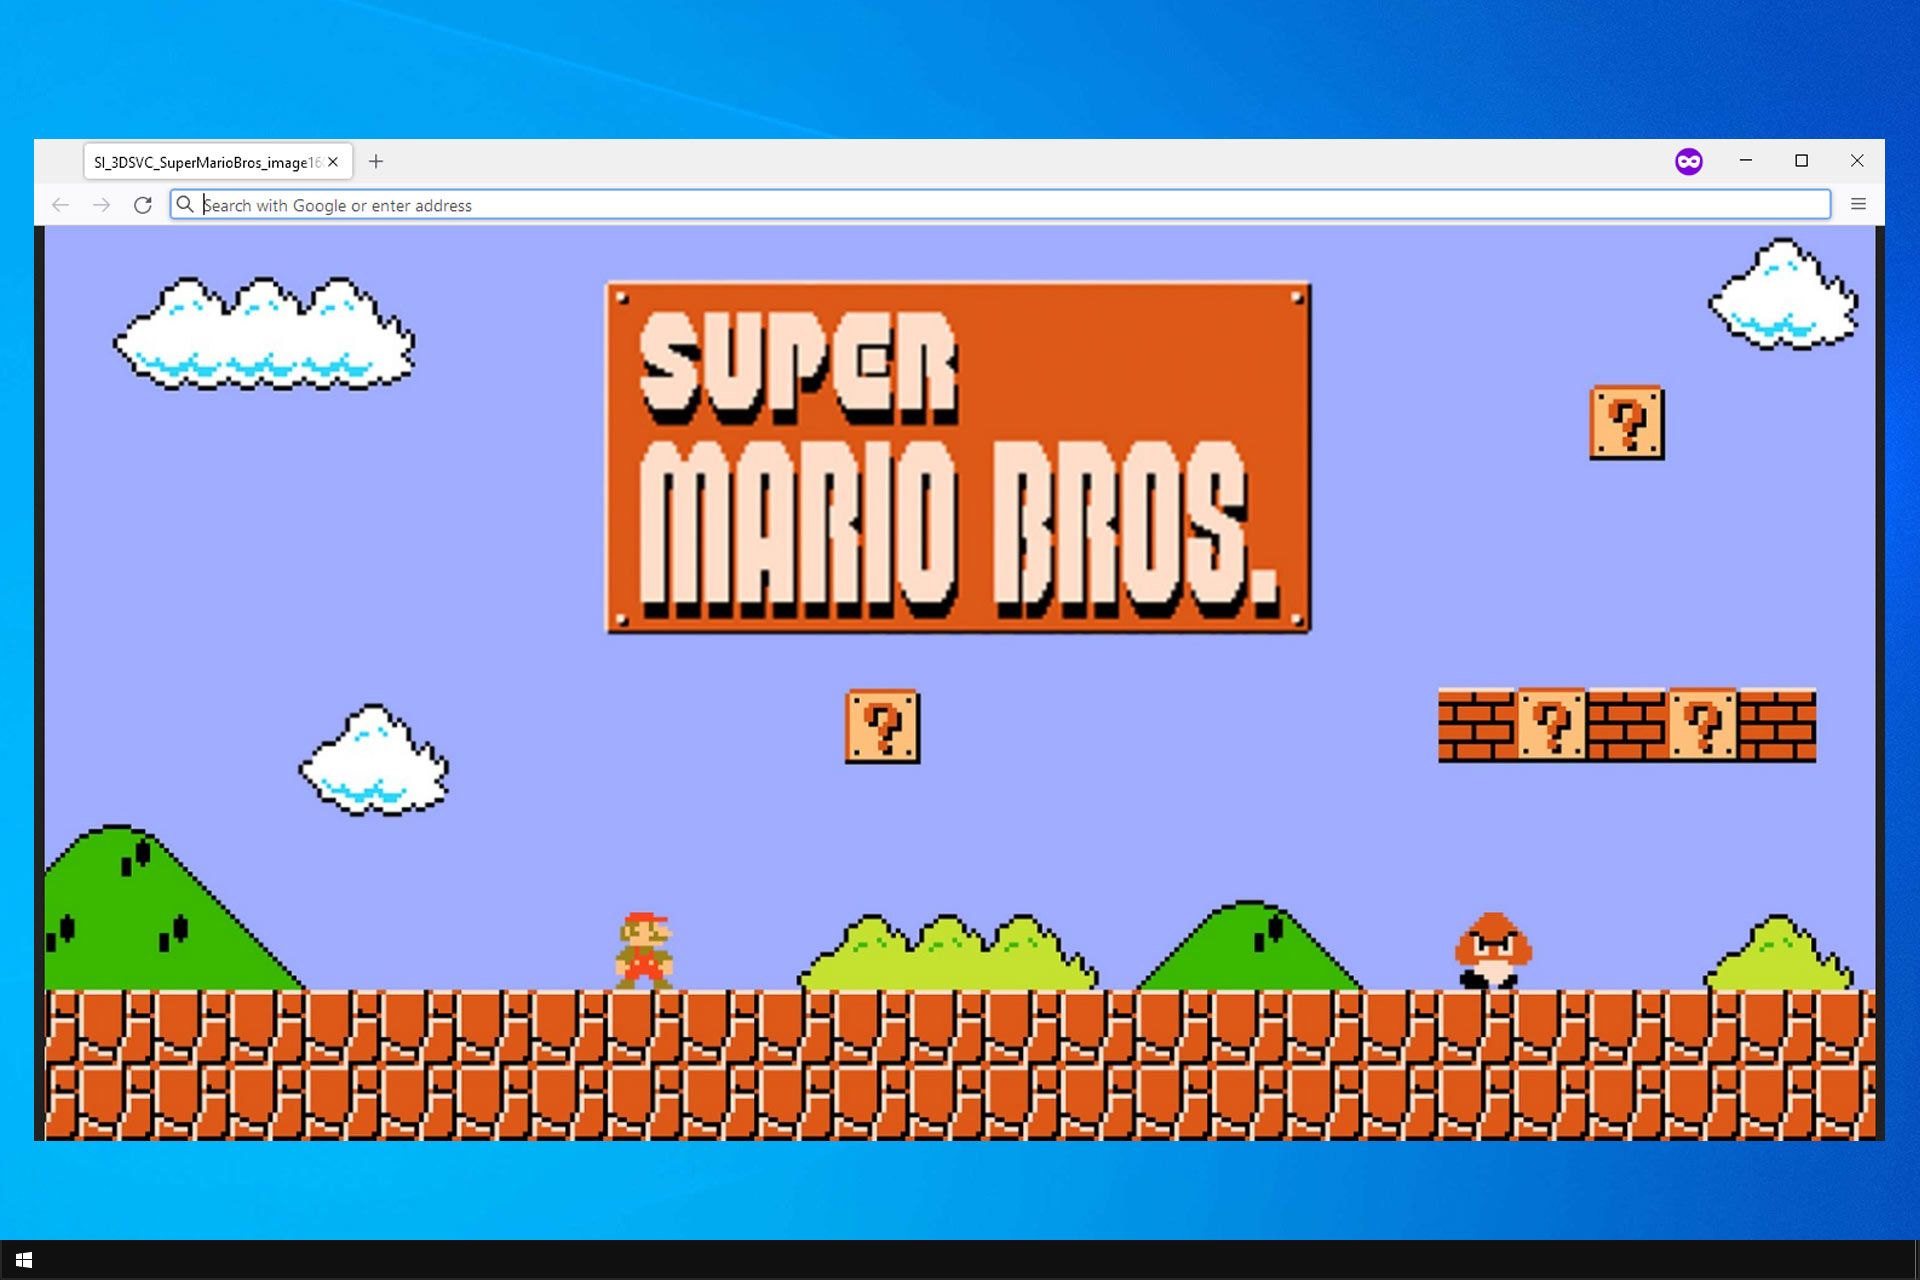
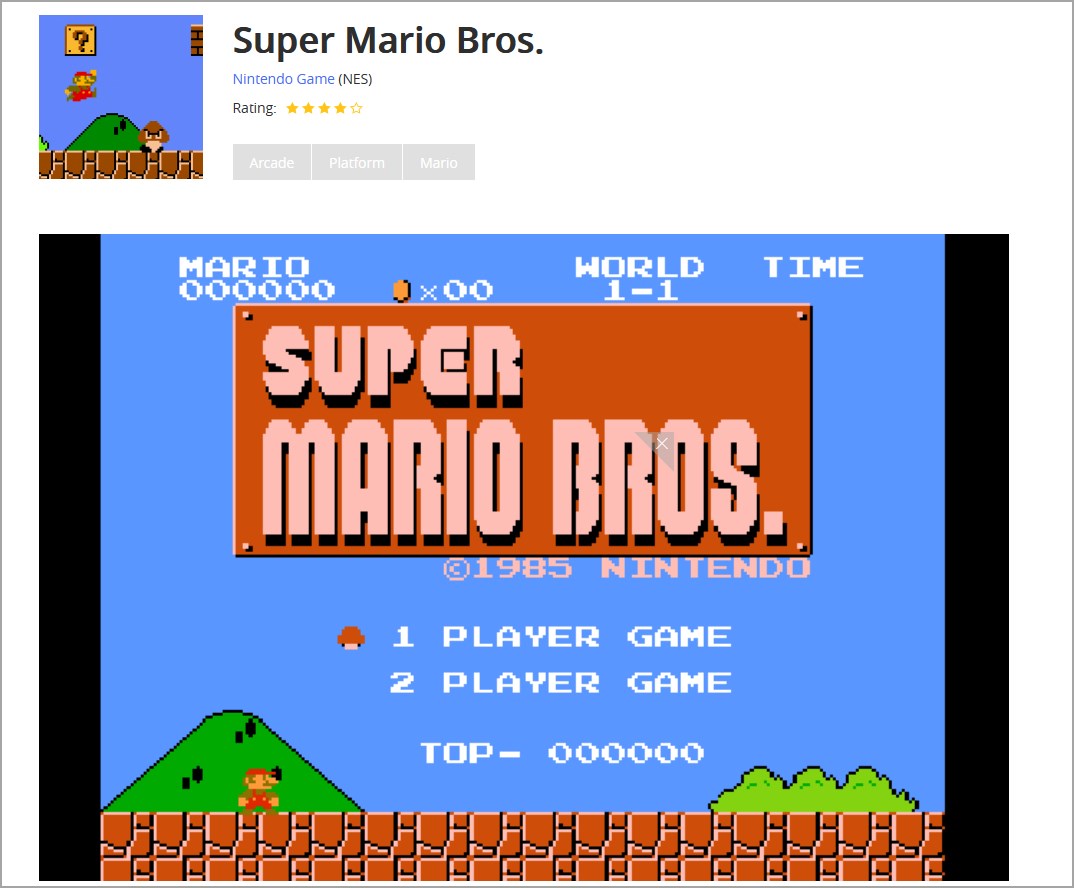
How to Play Fullscreen Mario Games in Your Browser

Super Mario series is probably one of the most popular gaming franchises in the world. There are dozens of Super Mario games on various platforms, but what about Mario browser games?

There are many great Super Mario games available, and today we’re going to show you how to play those games in your web browser. If you’re not a Mario fan, there are many great browser games to choose from.

Fans of the video game franchise have a wide range of options. You can find free-to-play retro-style Mario games based on the original release from 1985.

It does not stop there. You can find more up-to-date versions of the game that you can play in your browser, with improved graphics and new storylines. There are also all sorts of puzzles and fan-made Mario games with alternative storylines.

Playing games in your browser is simple, as long as you have a proper web browser for the job. You should be looking for a tool that is fast and supports lag-free gaming.

Quick tip:

We recommend the gaming browser Opera GX. There’s a video pop-out feature, so you can listen to Mario tutorials whilst playing the game.

Thanks to the Control GX feature, you can allocate resources and ensure that your browser doesn’t use all of them, and tweak settings for high-quality graphics in fullscreen mode.

Opera GX

Toggle settings, adjust visual graphics, and enjoy enhanced fullscreen for Mario Games.

Are there any Mario games available in browser?

Yes, there many ways to play Super Mario online in your web browser. However, none of those games are licensed or created by Nintendo.

However, there are several third-party Mario games available that you can play in your browser without any restrictions.

How can I play Mario directly in my browser?

1. Supermariobros.io

  1. Visit the Supermariobros.io website.
  2. Wait for the game to load.
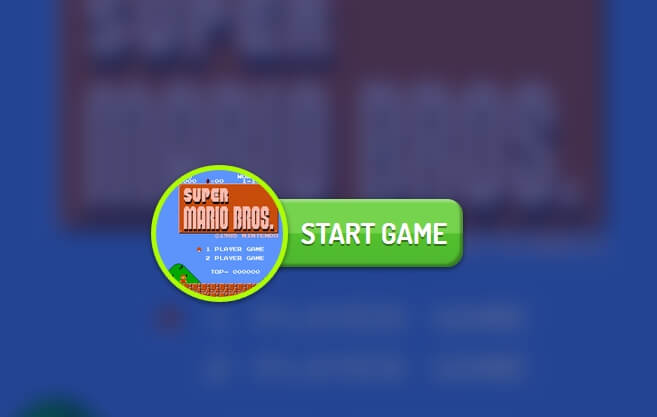
  3. Now click on the Start game button.
    supermariobros.io mario browser
  4. After doing that, the game should load and be ready to play.

This is a simple method, and it will allow you to play Mario in browser.

2. Jcw87.github.io

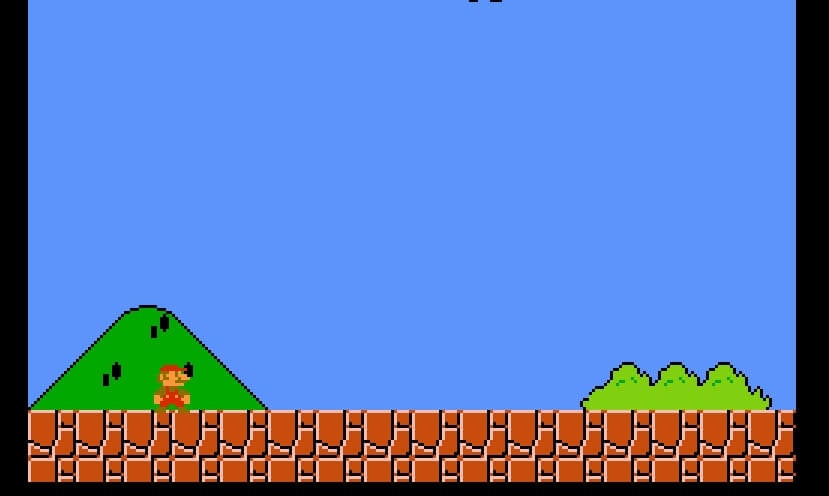
  1. Visit jcw87’s GitHub page.
  2. The game should start automatically as soon as the page loads.
    jcw87github mario browser

This website is simple and straightforward, so it’s perfect if you want to play Super Mario Bros in browser.

3. Emulator websites

  1. Visit one of the many available emulator websites.
  2. Search for Super Mario Bros.
  3. Select the game and wait for it to load.

This method is great, because it allows you to play different Mario games. So for example if you want to play Super Mario 64 in browser, that’s possible with this method.

Super Mario games are great, and now you can play them right from your browser, by using one of the methods from this guide.

If you’re looking for games to play, visit our best Mario games to play online article for some great suggestions.

Are you a Super Mario fan and what is your favorite Mario game? Let us know in the comments below.

What to play on Game Pass: Space Exploration Games

Don’t know what to play on Game Pass? With well over 100 titles to choose from across just about every genre there is, it can be hard to know where to start. Thankfully we have you covered with these Game Pass recommendations for those who have always wondered what’s out there. No longer do you need to ponder the cosmos, because these space exploration games will allow you to explore the farthest reaches of the universe – and all from the comfort of your living room sofa.

Astroneer

Watch the trailer on YouTube

Astroneer is a sandbox adventure game with low poly graphics and a gameplay loop that involves colonizing planets, collecting resources and building structures. Its open-world, procedurally generated terraforming planets are a joy to explore, and the game has a robust crafting system. You aren’t bound to a pre-scripted storyline, because Astroneer doesn’t really have one.

Astroneer has won several awards, including several Webby awards. Game Pass members looking for a great space adventure could do much worse than Astroneer.


No Man’s Sky

Hello Games’ epically open-ended sandbox space exploration adventure just keeps getting better and better with each new update. The game consists of exploration, survival, combat, and trading. And with 18 quintillion procedurally generated planets (we’re serious) with their own flora and fauna and unique ecosystems.

The game embodies the optimism of the classic sci-fi of the 70s and 80s. Despite a messy launch, No Man’s Sky has since seen 20 major updates with the most recent – titled ‘Endurance’ — releasing on July 20, 2022. If you love the open-ended experiences of games like Skyrim, Fallout, and so on, then you owe it to yourself to check out No Man’s Sky. The universe has never seemed so vast as it does in this incredible game.

The Outer Wilds

Watch the trailer on YouTube

In The Outer Wilds you play as a character exploring a solar system stuck in a 22-minute time loop that ends when the sun goes supernova. Your goal is to discover the cause of the time loop and somehow set things right.

The Outer Wilds started life as creator Alex Beachum’s master thesis while studying at USC’s Interactive Media & Games Division. He drew inspiration from Apollo 13 and 2001: A Sapce Odyssey, among other influences. He also took cues from the likes of The Legend of Zelda: The Wind Waker in how the game uses NPC dialogue to build an overarching mythology. The time-loop element is also reminiscent of another Zelda title: Majora’s Mask.

It all comes together to make a space adventure that manages to set itself apart from the others. And with several Game of the Year awards to its credit, The Outer Wilds is without a doubt among the best of them.

The Outer Worlds

If you are anything like us, you may have a hard time keeping the last two entries on this list straight.

The Outer Worlds is a creation of Obsidian, the team behind Fallout: New Vegas (not to mention Grounded and the upcoming Avowed). The game takes a cue from Fallout as well, as a first-person action-RPG in a similar vein. And while the similarities between The Outer Worlds and Obsidian’s Fallout offering may be apparent, The Outer Worlds is so much more than just ‘Fallout in space.’

Create a unique character and navigate your way through the six-planet Halcyon star system, which is being threatened by a corporate conspiracy and a multitude of factions vying for power. With a gorgeous art style and open worlds that are a delight to explore, the Outer Wilds is most definitely not one to miss for those who have ever dreamed of space.

Wrap up

So what do you think of our picks? Have you played any of these amazing games already? If so you can share your experiences in the comments section below.

And if you aren’t already a member of Game Pass, you can sign up here. You may also learn more over on the Game Pass FAQ page. And while you are at it, don’t forget to check out our other “What to play on Game Pass” posts for other Game Pass recommendations.

Featured image courtesy of criticalhit.net. 


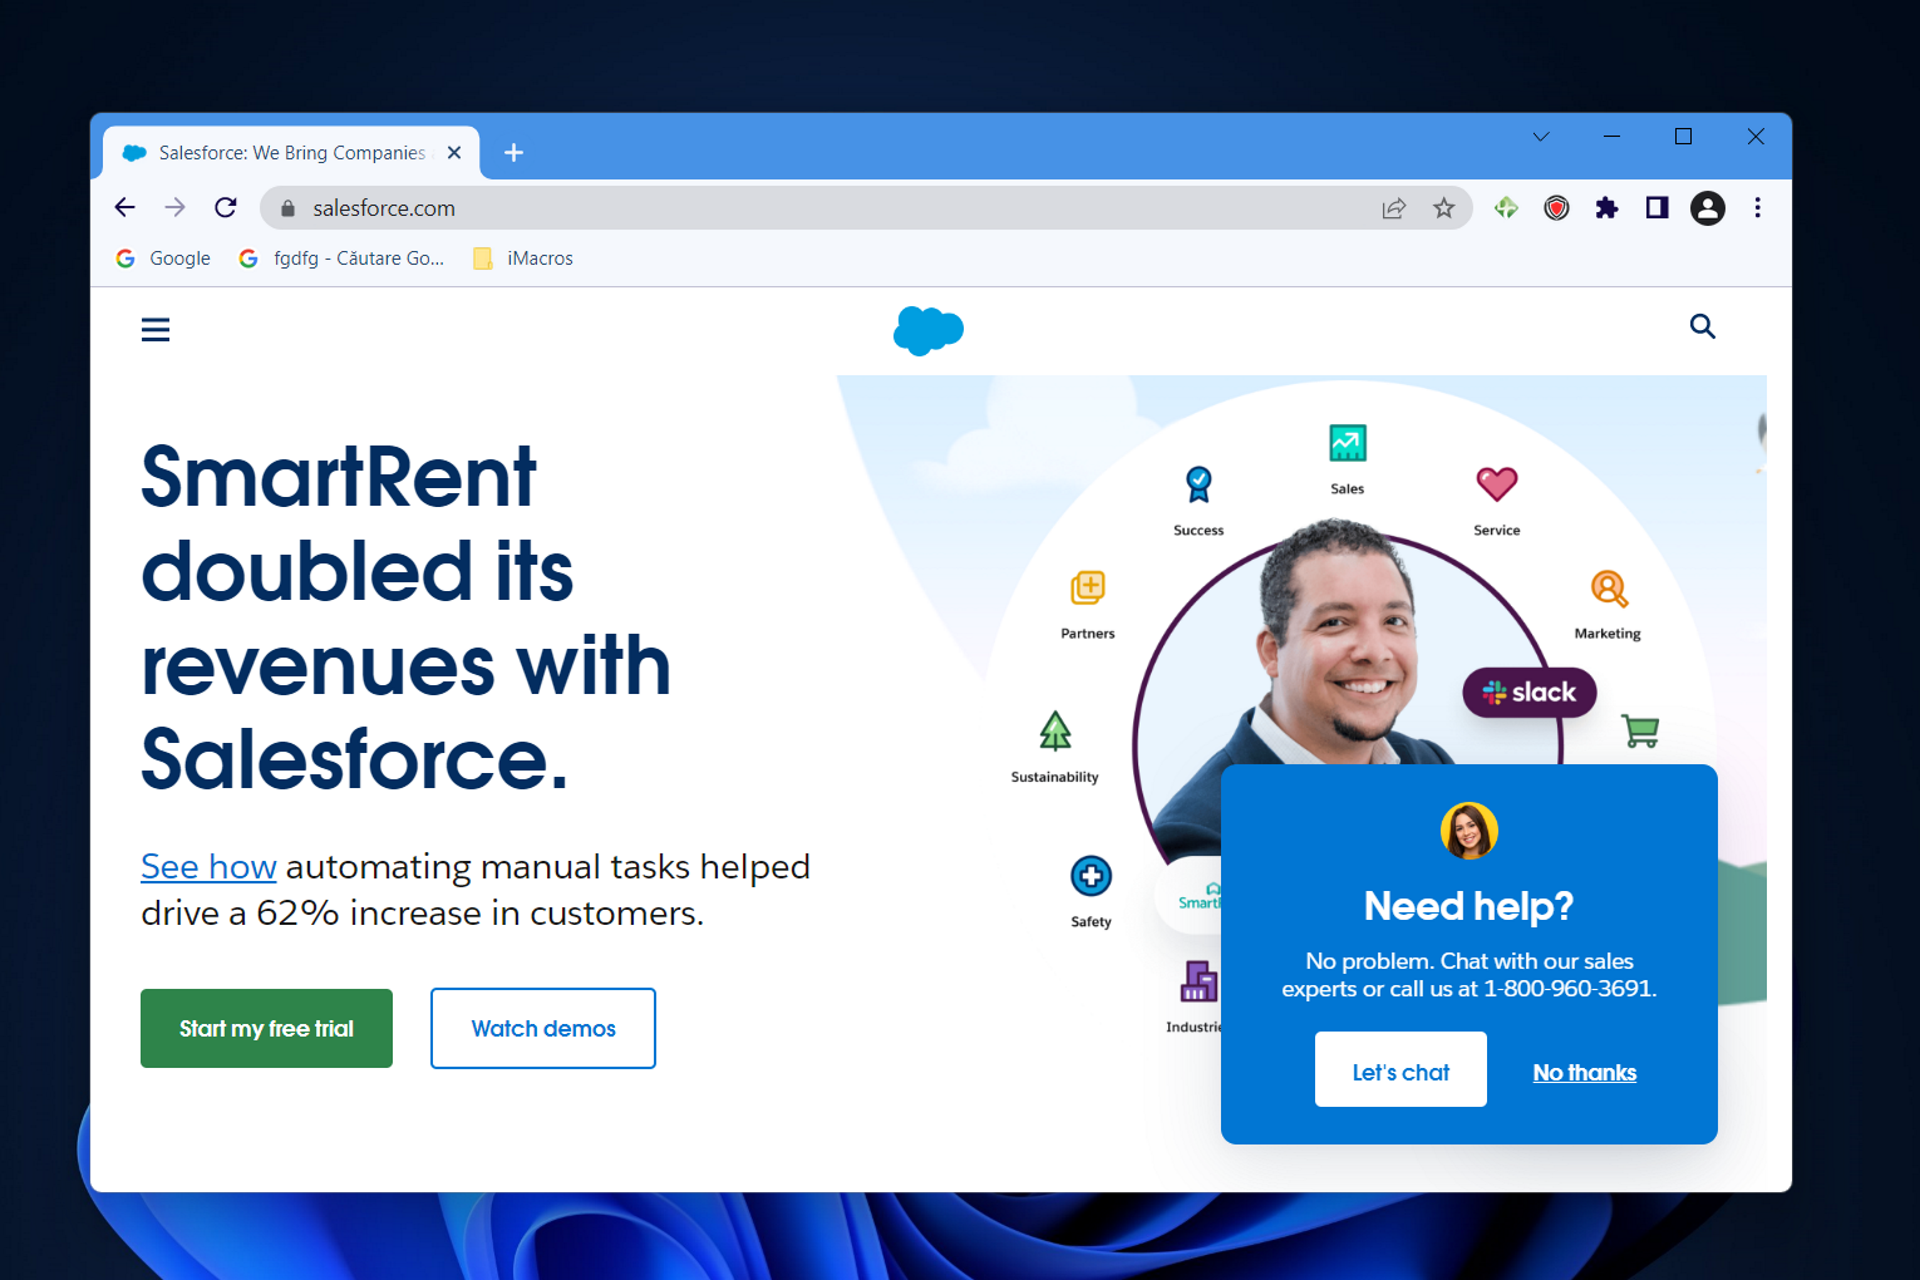
4 Ways to Fix Salesforce if it’s Not Working in Chrome

Salesforce supports almost all the major modern web browsers. However, some users have reported that Salesforce is not working in their Chrome browser.

The reason for this issue can be related to bad cache or browser incompatibility with Salesforce. If you have encountered the same problem, this is the article you need.

Below, we have listed a couple of troubleshooting tips to help you resolve the Salesforce problem with ease.

Why is my Salesforce not loading?

It’s possible that the problem stems from the cache or cookies stored in your browser, in addition to any malfunctioning add-ons.

However, there is no need to be concerned because we have provided solutions to each of these possibilities in the list that follows.

Users reported similar issues to the Salesforce not loading one. The following are the most common ones:

  • Salesforce Chrome extension not working – Like we presented below, you will have to turn off your extensions one by one to see which one causes the issue.
  • Salesforce freezing in Chrome – Blocked cookies can cause websites to freeze due to not being able to send their data.
  • Salesforce not responding – Websites don’t respond from time to time, and even though it might be your fault, their servers could also be down.
  • Salesforce lightning not working in Chrome – Clearing your cache is the first to go solution that you need to consider.
  • Salesforce images not showing in Chrome – Just like before, their servers or your cookies settings might be at fault.
  • Salesforce SSO not working in Chrome – If SSO are not working, it is due to a bad request. We recommend that you check in with your VPN.

What is the best browser to use with Salesforce?

Before we jump to the solutions, we’d like to recommend opening Salesforce in another browser. On this note, we suggest trying the Opera One browser, since it’s faster and considerably lighter compared to Chrome.

Opera One is free to install and use, and it comes with multiple exclusive features including an ad blocker, built-in messenger apps, customizable speed dials,  separate workspaces, and visual bookmarks.

To protect your identity while browsing, Opera One includes a free VPN, with no subscription or traffic limit. This way, you’ll be able to access any program, from anywhere across the globe.

Opera One

Improve your workflow today by using Salesforce in Opera One.

What can I do if Salesforce won’t work in Google Chrome?

1. Clear bad browser cache

  1. Press the Windows key, then enter Chrome inside the search bar and click the first result in order to open the browser.chrome-search twitch extensions not working
  2. To access the Clear browsing data menum use the following shortcut: Shift + Ctrl + Delete and select All time as the time range.all-time-chrome images not loading in chrome
  3. Check the Cached images and files option then click Clear Data.cache-delete salesforce not loading in chrome

Modern web browsers are configured to perform automatic cleanup to prevent data buildup resulting in network issues.

Clearing the cache and browsing data can help you resolve the issue if Salesforce was working fine earlier.

2. Check Chrome extensions

  1. Tap the three dots menu in the top right corner of Chrome.chrome-menu images not loading in chrome
  2. Choose New Incognito Window and check whether Salesforce is working. If it does, then the issues lie somewhere in your extensions.new-incog-window images not loading in chrome
  3. Thus, click again the three-dot menu then go to More tools followed by Extensions.chrome-extensions=button salesforce not loading in chrome
  4. Here, turn off your extensions one by one by clicking the toggle button next to them, then check Salesforce to see which one is buggy.turn-off-ext salesforce not loading in chrome

If you can’t access the Incognito mode in Chrome, take a look at the article linked in order to fix the issue quickly.

3. Allow third-party cookie

  1. Open the Chrome menu and select Settings.chrome-settings images not loading in chrome
  2. Select the Privacy and Security tab followed by Cookies and other site data.privacy-cookies salesforce not loading in chrome
  3. Lastly, click the Allow all cookies option to enable it.allow-cookies salesforce not loading in chrome

4. Restore to default/reinstall Chrome

Restore Chrome settings

  1. Start by clicking on the three-dot menu followed by Settings.chrome-settings windows 10 blocking chrome install
  2. From the left panel select Reset and clean up.
  3. Now click on the Restore settings to their original defaults option.restore-settings windows 10 blocking chrome install
  4. Finally, click Reset settings to address the Salesforce not loading in Chrome.reset-settings-yes windows 10 blocking chrome install

Reinstall Google Chrome 

  1. Press Windows + I then go to Apps followed by Apps and features.apps-features salesforce not loading in chrome
  2. Here, search for Chrome then click the three-dot menu and choose Uninstall. uninstall-chrome salesforce not loading in chrome
  3. Lastly, go to Chrome’s download page and hit the Download Chrome button.download-chrome salesforce not loading in chrome

Make sure to restart the computer after installing Google Chrome. To see how to install Chrome properly, be sure to check our in-depth Chrome installation guide. After the restart check for any improvements.

What can I do if Salesforce Inspector is not working?

  1. Open Chrome and click on the three-dot menu icon followed by Settings.chrome-settings images not loading in chrome
  2. Lastly, click About Chrome from the left side panel then wait to see whether Chrome is up to the most recent version available. An Update button will appear in case it is not up to date.about-chrome can't make chrome my default browser

Your browser’s lack of current version support is the most likely explanation for why the Salesforce inspector is not functioning properly.

Hopefully, at least one of the steps in this article helped you access Salesforce in your Chrome browser.

We recommend that you take a look at the 7 browsers that Salesforce works best in [Lightning Experience].

For any other questions or suggestions, don’t hesitate to reach us using the comments section below.

5 Best Opera GX Settings to Optimize Your Gaming Experience

Installed Opera GX and looking to maximize its potential? This article is your guide.

Designed specifically for gamers, Opera GX offers exclusive features alongside its original browser functionalities. But is it truly optimized for gamers?

We’ll explore all that below, but first, let’s take a look at some cool settings that’ll make Opera GX shine.

What are the best Opera GX settings for gaming?

1. Control your resource usage with GX Control

This feature will be incredibly useful to gamers, especially if you don’t have a lot of RAM but need to keep the browser open during gaming sessions.

First, a Hot Tabs Killer feature allows you to see how much CPU or RAM your tabs are using.

If you notice a tab that uses more resources than it should, you can quickly close it from this menu.

gx control panel in opera gx

Another option that will be useful is the ability to limit your network, RAM, and CPU usage by the browser.

This can be extremely useful if your PC can’t handle your browser and open games simultaneously.

Limiting how much RAM and CPU power Opera GX uses will ensure that your games are using more of your resources, thus running smoothly and without any lag.

ram and cpu limiter in opera gx

Overall, this is an exciting feature, especially if you don’t have a high-end PC or have dozens of tabs open that can interfere with your gaming sessions.

Essentially, this is how to optimize Opera GX for gaming. Managing your computer’s resources is a top priority.

2. Use the built-in Twitch and Discord to communicate in-game

Opera already has various integrations, allowing you to use popular messaging services such as Facebook Messenger, WhatsApp, Telegram, VK, Instagram, and Twitter.

With Opera GX, you’ll get access to Discord, so you can chat and stay in touch with your friends at all times without having to open Discord in a new tab.

opera gx discord

Twitch integration is also available, allowing you to see if the streamers you follow are online easily. Click your favorite streamer, and you’ll open its stream in a new tab.

twitch integration in opera gx

Although these are welcome additions, we hope the Twitch feature will be expanded with additional functionality soon. Nevertheless, Discord integration is helpful, especially if you’re a gamer.

Communicating with your teammates is essential, and the readily available integrations help you use Opera GX for gaming seamlessly.

3. Clean your cache quickly with GX Cleaner

GX Cleaner isn’t a gaming feature, but it allows you to easily clean your cache, browsing history, and other data.

gx cleaner cache cleanup to in opera gx

The feature is effortless to use, and it takes only a few seconds for you to remove your data. Then, of course, you can choose between three available presets or customize the settings any way you want.

4. Get the latest gaming news with GX Corner

The browser has a special GX Corner tab that brings you the latest news from the gaming world at your fingertips.

The first feature you’ll notice is the release calendar, and in there, you can see the upcoming games along with their release date, so you won’t ever miss a new title.

gx corner news panel in opera gx

You may click each title to access more information about it or go to the purchase page and preorder the game.

A list of free games is also available, allowing you to find new titles without purchasing them. Remember that this section includes games that need an Xbox Games Pass and PS+ subscription.

free game listings in gx corner

Game deals are also available so that you can easily find and purchase games at a discount. Of course, links to online stores are included too.

With GX Corner, you can also see the best games of the current year and upcoming titles. Lastly, there’s a game trailer and news section, so you’ll always keep up with the latest information.

game trailers in gx corner

This is a great feature, especially if you’re looking for game deals or want to keep up with the gaming news.

5. Customize the Opera GX design

The first thing you’ll notice about Opera GX is its sleek design. The browser has a dark theme by default that is easy on the eyes and visually appealing.

Of course, you can choose between several available themes and wallpapers, and you can even add your backgrounds if you wish.

Color customization allows you to select one of many available colors or fine-tune them as you wish.

opera gx customization options

Using devices that support Razer Chroma or CORSAIR iCUE, you can sync your browser theme with your peripherals to get visually appealing results.

As you can see, the browser offers a sleek user interface and a high level of customization, and it’s a great choice if you’re using a mouse or keyboard with a compatible RGB lighting feature.

Overall, Opera GX is an excellent browser for gamers, especially if you have Razer Chroma devices if you want to keep up with the gaming news or limit resource usage in your browser.

Is Opera GX better than Opera?

Opera made this gaming browser not too long ago. So in a way, Opera GX could be considered better than the regular version. First off, all features from the original browser are available.

Opera vs Vivaldi

However, in our opinion, GX also offers a couple of unique options that separate it from other browsers, making it better.

Opera GX

Go with a full-featured browser with specific gaming features and optimized speed.

We suggest reading our Opera vs. Opera GX guide for more in-depth information.

Does Opera GX make gaming smoother?

Opera GX has a series of features that takes gaming to a whole new level. Firstly, its interface is smooth, with a unique blend of colors that enhances your gaming environment.

Also, it boasts an excellent resource limiter that allows you to control your browser’s resource usage. We will discuss more of these features in detail in the following sections of this article.

Is Opera GX good for performance?

Opera GX has a series of performance optimization features. An important one is the Hot Tabs Killer, which lets you monitor your tabs’ CPU and RAM usage.

There are so many of these features to look forward to in this browser, as you will find out later.

Summary

We barely scraped the surface of all the features, and if you want to learn more about it, we strongly advise you to check our Opera GX in-depth review for more information.

What are your thoughts on this browser? Let us know in the comments section below.

13 Ninja Turtles video games are coming to Xbox consoles next month

Teenage Mutant Ninja Turtles: The Cowabunga Collection, a collection of 13 classic TMNT video games, is coming to Microsoft’s Xbox One and Xbox Series X console families next month on August 30th. Digital pre-orders are now open.

Titles range from several classic arcade and handheld Nintendo Gameboy Ninja Turtle games to the mega-popular NES and Super NES Teenage Mutant Ninja Turtles and Teenage Mutant Ninja Turtles: Tournament Fighters titles.

Here’s the full list of TMNT video games in the Teenage Mutant Ninja Turtles: The Cowabunga Collection:

  • Teenage Mutant Ninja Turtles (Arcade)
  • Teenage Mutant Ninja Turtles: Turtles in Time (Arcade)
  • Teenage Mutant Ninja Turtles (N)
  • Teenage Mutant Ninja Turtles II: The Arcade Game (N)
  • Teenage Mutant Ninja Turtles III: The Manhattan Project (N)
  • Teenage Mutant Ninja Turtles: Tournament Fighters (N)
  • Teenage Mutant Ninja Turtles IV: Turtles in Time (SN)
  • Teenage Mutant Ninja Turtles: Tournament Fighters (SN)
  • Teenage Mutant Ninja Turtles: The Hyperstone Heist (SG)
  • Teenage Mutant Ninja Turtles: Tournament Fighters (SG)
  • Teenage Mutant Ninja Turtles: Fall of The Foot Clan (GB)
  • Teenage Mutant Ninja Turtles II: Back From The Sewers (GB)
  • Teenage Mutant Ninja Turtles III: Radical Rescue (GB)

Of the above 13 games, TMNT (Arcade), TMNT Turtles in Time (Arcade), TMNT The Hyperstone Heist, and TMNT Tournament Fighters will have online functionality to allow for online multiplayer gameplay.

Local multiplayer is supported for two to three players depending on each title’s original programming.

Here’s the full store description for Teenage Mutant Ninja Turtles: The Cowabunga Collection:

Teenage Mutant Ninja Turtles: The Cowabunga Collection assembles thirteen classic TMNT games by Konami in one incredible package. This collection provides a unique opportunity for gamers to experience these immensely popular and very influential games on XBOX and includes a fantastic set of new quality of life features:

  • Added Online Play for certain games and Local Couch Play
  • Save Anytime and Rewind
  • Eleven Japanese Regional Version Releases
  • Button Mapping
  • Unique Development Art & Sketches
  • Historic TMNT Media Content

The games are based on the characters and themes from on the 80’s children’s cartoon and comic book series, The Teenage Mutant Ninja Turtles. The game often takes place in a fictionalized New York city, in the sewers, inside futuristic enemy bases and even across time itself! Teenage Mutant Ninja Turtles: The Cowabunga Collection will be available on XBOX in 2022!

It’s a good time to be both an Xbox and TMNT fan as this month also saw the release of the new Teenage Mutant Ninja Turtles video game, Shredder’s Revenge, and a special TMNT Xbox Series S console.

Slack Cannot Download Files? Here’s How to Fix That

It’s frustrating to deal with errors regarding operations such as a basic download of Slack files, right? Choosing Slack as an ultimate communication tool is all about improving workflow and getting smarter in dealing with everyday tasks.

Even so, it happens once in a while and we’re sure that you would love to have a workaround for issues involving the download of Slack files.

Uploading and sharing files via the Slack desktop app is essential to gather feedback on a team’s work in progress and keep the discussion going.

Moreover, members of a workspace can create an external link to share important files outside of Slack.

Then, it’s only natural to view and download any shared files on your desktop. It all just turns into a nightmare when you only get Slack file download errors or find that the Slack download button refuses to work.

Quick Tip:

Use the Slack web app from a reputable browser. Sometimes, the desktop app may not work properly, in which case you should try using Slack in-browser. For best performance, try Opera One.

It’s very lightweight and fast, with a lower error rate than most browsers. It includes anti-tracking, VPN, Ad blocker, AI, messaging and social media integration and a modular AI-ready design as well.

Opera One

Download from Slack with no issues with this fast and secure browser!
Free Download Visit website

What can I do if the Slack download button is not working?

1. Change your default download location

  1. Click your workspace name in the top left.
    Slack cannot download files default location
  2. Select Preferences.
  3. Choose Advanced to set your location.

On your mobile device, you’ve probably downloaded and saved many shared image files a hundred times before. From your desktop, you are also supposed to easily download any type of file that’s been shared to your workspace.

Just hovering over the file you’d like to download and clicking the download icon should do the trick just fine. If it doesn’t, then re-choosing the download folder after every new startup of Slack seems to rectify the issue.

Assuming that you’ve downloaded the Slack desktop app from the Slack website, change your default download location on desktop as described above.


Slack is superior than Skype. Read on to find out why!


2. Add support for downloading files in the same window

Slack cannot download files Rambox

Slack users also describe on forums another way to easily troubleshoot the problem. Slack cannot download files if your session in your browser is not the same as in Rambox.

That’s the ideal workspace browser that allows you to manage as many applications as you want, so here’s the trick to apply this time: just add support for downloading files in the same window and you’re good to go.


3. Check your Internet connection

  1. Sign in to Slack workspace.
  2. Access Slack testing page to check Internet connection.
    Slack cannot download files Internet issue
  3. Up next, see the results for WebSocket (Flannel [Primary]) and WebSocket (Flannel [Backup]).
  4. Look for the checked circle icon as a sign of a successful test.

If you only see the warning icon, you know that a spotty Internet connection is the cause of your problem this time. Don’t worry, we’ve got the right fix for you: Slack does not connect to the Internet.

If you’re experiencing one of the previously mentioned download of Slack files issues, these are the recommendations that may help. Give them a try and let us know how your experience was.

[wl_navigator]

How to Restore Last Session in Edge: 3 Ways to Do It

Today we’ll show you how to restore the previous session in Edge.

So if you’re pissed off because you’re frequently losing your tabs after a crash or accidentally closing the browser, don’t be. Just follow the steps below.

How do I restore the previous session in Microsoft Edge?

1. Change Edge startup settings

  1. Click the Menu button and select Settings.
    edge settings
  2. Select Start, home, and new tabs.
    start, home, and new tab settings
  3. Make sure to select Open tabs from the previous session.
    open tabs from previous session

By making these changes, you’ll always restore previous session in Microsoft Edge when you open the browser.

Want to customize what Edge opens at launch? Follow our step-by-step guide to set a homepage in Edge.

2. Use Restore window option

  1. When the Edge starts, don’t open any new tabs.
  2. Right-click the tab bar.
  3. Select Restore window.

This is a simple method, and it should help you Restore previous session in Microsoft Edge Chromium version.

3. Use the History feature

  1. Press Windows key + H.
  2. This will open the History panel.
  3. Hold Ctrl and select the websites that you want to restore.

Alternatively, you can use Ctrl + Shift + T to restore tabs in Edge.

You can check more methods to bring back lost tabs by using this guide on how to restore browser tabs after restart for extra recovery options.

How to restore previous session in Edge after crash?

  1. Start Edge again.
  2. A new window will appear asking you to restore pages. Click on Restore.
    restore button
  3. Your previous session will now be restored.

How do I restore a closed window in Edge?

  1. Right-click the address bar.
  2. Select the Restore window option.
  3. Alternatively, use Ctrl + Shift + T keyboard shortcut to quickly restore it.

As you can see, it’s pretty easy to restore previous session in Microsoft Edge, and you can do it by using any methods that we mentioned above.

In case you’re having additional problems, we suggest reading our guide on how to reopen Edge tabs if Reopen closed tab has disappeared.

We also have a guide that tackles Edge crashing, so don’t miss it if you want to fix the core of the problem. This isn’t the only issue, and we already wrote about Edge freezing in detail in previous guides.

In case you have any comments, questions, or suggestions, just let us know in the comments below.

Can’t Connect Securely To This Page: Fix it in IE/Edge/Chrome

Edge, Chrome, and IE users have stated that some webpages don’t open for them in that browser. For example, a Can’t connect securely to this page tab opens when they try to open a required page.

The tab states, This might be because the site uses outdated or unsafe TLS security settings. If this keeps happening, try contacting the website’s owner.”

These are a few resolutions that have fixed the page connect error for some Edge users, so be sure to check them out below.

Why am I getting can’t connect securely to this page error?

Well, according to the error message itself, it occurs because the website is using outdated or unsafe TLS security settings.

Furthermore, there are other causes too that can trigger this error, as you might experience this issue if the website you are trying to visit uses a different TLS version and your browser uses a different TLS version on your system.

How can I fix the Can’t connect securely to this page errors?

  1. Switch to an alternative browser
  2. Select the TLS settings
  3. Enable mixed content
  4. Disable your antivirus
  5. Update the network drives

1. Switch to an alternative browser

Consider using Opera One’s built-in ad blocker and VPN when you get the error notice implying you can’t connect securely to a webpage. It may be more secure for your needs, and you won’t have to deal with intrusive pop-ups.

It is simpler to shield oneself from tracking in Opera One than in any other browser and provides greater encrypted security than Google Chrome.

Our testing findings on Opera One show some excellent results in the rendering process, which includes decoding and processing HTML, CSS, graphics, and javascript files.

You can switch to Opera One, and all your bookmarks, passwords, and other cookies will be transferred. After installing Opera, you will be prompted to transfer data from other browsers, and it syncs information across platforms and devices.

Opera One

Switch from any browser without losing any data, passwords, or bookmarks through synchronization.

2. Select the TLS settings

  1. Press the Type here to search button to Open Cortana’s search box.
  2. Enter the keyword Internet options in the search box.
  3. Select Internet Options to open the window shown directly below.
  4. Select the Advanced tab.
  5. Then scroll down and select the SSL and TLS checkboxes shown directly below.
  6. Press the Apply button to apply the options.
  7. Select the OK button to close the window.

The Can’t connect securely to this page tab states that the issue might be due to TLS settings. So, that’s a clue for the resolution. Some Edge users have fixed page connect errors by selecting the TLS options.

If you’re having trouble finding the Cortana search box on Windows 10, check out our guide to find the best solutions to the problem.

3. Enable mixed content

  1. Open the Internet Properties window by entering Internet options in Cortana.
  2. Then select the Security tab.
  3. Press the Custom level option to open the window in the snapshot directly below.
  4. First, select Medium on the Reset to drop-down menu.
  5. Scroll down to the Display mixed content option shown directly below.
  6. Select the Enable radio button for the Display mixed content option.
  7. Click the OK button.

Edge will block more pages when the Display mixed content isn’t enabled. Enabling mixed content might resolve the Can’t connect securely to this page error. This is how you can allow diverse range.

4. Disable your antivirus

  1. Press the Windows key + X, and select Task Manager to open the utility’s window.
  2. Choose the Start-up tab to open a list of startup items.
  3. Select your anti-virus utility there, and press the Disable button.
  4. Restart your PC.

Some Edge users have confirmed that disabling their third-party anti-virus utilities fixed the Can’t connect securely to this page issue for them.

To disable anti-virus software, right-click its system tray icon and select a disable or turn off option on its context menu.

Alternatively, open the software’s primary window and look for a disable option on its settings tab. As explained above, you can also remove anti-virus utilities from the Windows 10 startup.

The Settings app also includes startup software options in the latest Windows 10 build. Enter apps in Cortana’s search box to configure startup software with Settings.

Select Apps & features and click Start-up to open the Startup app list shown directly below. Then you can toggle the anti-virus software off from there.

5. Update the network drivers

Edge’s page connects error might also be due to incompatible network drivers. You can update and fix drivers manually from Windows Settings.

Just open the Device Manager, find your Network drivers in the list, right-click them, and select Update Driver. Then, wait for the process to complete and see if the process persists.

You can also download the drivers directly from the manufacturer’s website, as long as you know precisely what hardware you use. However, we advise you to be careful because a faulty driver can cause even more problems.

However, using dedicated software may be a better option because it saves you time and ensures you always match your hardware with its correct driver version.

Mismatched drivers can cause severe problems, so be careful if you install them yourself.

We recommend you try an up-to-date driver updater such as Outbyte Driver Updater that will scan your PC and automate driver updates without using too many resources.

One, or more, of those resolutions, might fix the Can’t connect securely to this page error so that you can browse the page that otherwise isn’t opening in Edge.

Remember that this might be because the site uses outdated or unsafe TLS security settings, and if this keeps happening, try contacting the website’s owner.

People have been getting Can’t connect securely to this page errors for Internet Explorer and Can’t connect securely to this page errors for Edge for quite some time.

If you have another resolution for the page connect error, share it below. Also, if you have more questions, post them in the comments section, and we’ll surely take a look.

Msedge.exe application error: What is it & 7 ways to fix it

MicrosoftEdgeCP.exe is an error associated with the Microsoft Edge web browser. However, this error is most common on Windows 10 PCsm even though it varies quite a lot.

Edge is not immune to errors, and even though some issues are more common than others, the msedge.exe application error, the exception breakpoint issue, is one of the most annoying.

Here are some of the common MicrosoftEdgeCP.exe Error messages include:

  • MicrosoftEdgeCP.exe is not running.
  • MicrosoftEdgeCP.exe failed.
  • MicrosoftEdgeCP.exe Application Error.
  • Error starting program: MicrosoftEdgeCP.exe.
  • Faulting Application Path: MicrosoftEdgeCP.exe.
  • MicrosoftEdgeCP.exe has encountered a problem and needs to close. We are sorry for the inconvenience.
  • Cannot find MicrosoftEdgeCP.exe.
  • MicrosoftEdgeCP.exe not found.
  • MicrosoftEdgeCP.exe is not a valid Win32 application.
  • Msedge.exe system error

This error also occurs due to virus infection, missing or corrupt registry entries, incomplete Windows 10 installation, and corrupt program files.

What is Msedge.exe?

Msedge.exe is the executable file for Microsoft Edge, the newest Chromium-based browser from Microsoft.

This file allows you to install Microsoft Edge on your device by double-clicking it and following the on-screen instructions.

It can also be observed as a running process in your Task Manager if and when you use Edge to browse the internet.

Why does msedge.exe crash?

Various reasons could cause the msedge.exe application error on Windows 11, but the issue can appear on Windows 10 as well.

Here are some of the most common reasons:

  • Conflict with antivirus software
  • Not having an updated version of the software
  • Missing Windows updates
  • Errors within the software

The Windows Report team has compiled the following solutions applicable to solving this error, so make sure to read through the entirety of this article for the best results.

Quick Tip:

Use another browser. This is an Edge-specific error that won’t appear in alternative browsers like Opera One. The tools tool is safe and less prone to errors.

Not only that, but it’s one of the fastest browsers, with very low CPU and RAM usage. Its intuitive UI should make for a smooth transition. It has a built-in adblocker, messengers, VPN, bookmarking tools, and much more.

Opera One

Errors will be a thing of the past with this safe and fast browser that you can install in seconds.

How can I fix the Msedge Exe error?

  1. Run a full system scan
  2. Repair PC Registry
  3. Run DISM RestoreHealth
  4. Create a new user account
  5. Install the latest Windows updates
  6. Run the apps troubleshooter for Windows
  7. Reset Microsoft Edge through PowerShell

1. Run a full system scan

  1. Go to Start > type defender > double click Windows Defender to launch the tool.
  2. In the left-hand pane, select the shield icon.windows defender
  3. In the new window, click the Advanced scan option.
  4. Check the full scan option to launch a whole system malware scan.

You can also install a third-party antivirus tool. Windows Defender has limitations, and the best antivirus software on the market can add a significant layer of protection to your system.

You can also access a VPN, a password manager, and more. Another advantage is that this software uses cloud technology to avoid consuming many resources from your computer.

2. Repair PC Registry

  1. Go to Start, type cmd, then click on Run as Administrator under Command Prompt.
  2. Now, type the SFC /scannow command.microsoftedgecp exe error
  3. Wait for the scanning process to complete, and then restart your computer. All corrupted files will be replaced on reboot.

You can also use professional cleaning software to scan and repair your PC registry following these steps:

  1. Download the CCleaner software
  2. Open CCleaner on your PC.
  3. Go to the Registry section and press Scan for issues.
  4. Wait for the process to finish.
  5. Click on the Review the selected Issues button.
  6. Select Yes to back up your registry before making changes.

This cleaning tool has been on the market since 2004, and it has helped billions of users to clean their PCs and free up storage space of millions of GB per month.

If you need support to delete additional storage space, this experienced cleaner will erase temporary files or duplicates from your PC and free up your registry.

3. Run DISM RestoreHealth

  1. Open Command Prompt as shown in the previous solution
  2. Type the following command  to scan and correct any causes of MicrosoftEdgeCP.exe error: DISM /Online /Cleanup-Image /RestoreHealth
  3. Press Enter and reboot your PC afterward.

DISM can be useful in fixing this error, but it can also help you if you’re dealing with uihost.exe error.

4. Create a new user account

  1. Go to Settings.
  2. Choose Accounts and then select People on this device towards the left and click on Add someone else to this PC plus the sign button on the right.
  3. Enter a user name and hit Next, then Finish.
  4. Sign out from the current account and log into the new version.
  5. Check if the issue persists.

5. Install the latest Windows updates

  1. Go to Start, type update in the search box, and then click on Windows Update to proceed.
  2. Check for updates and install the available updates.

6. Run the apps troubleshooter for Windows

Run the app’s troubleshooter and check if it helps with the issue. Visit the official Microsoft Apps Troubleshooter page to do this.

7. Reset Microsoft Edge through PowerShell

  1. From the Start menu, type PowerShell, right-click on Windows PowerShell from the results, and select Run as administrator.
  2. Type this command that will delete and re-register the Microsoft Edge data: Get-AppXPackage -AllUsers -Name Microsoft.MicrosoftEdge | Foreach {Add-AppxPackage -DisableDevelopmentMode -Register “$($_.InstallLocation)AppXManifest.xml” -Verbose}

If you run into other Edge problems, you can go straight to the Microsoft Edge section for a solution or a tip.

How do I reinstall Msedge.exe?

If you’re interested in knowing more about browsers, you can find plenty of information in our Browsers Hub.

Have any of these solutions helped? Let us know in the comments section below.

DownloadThemAll Not Working in Firefox? 3 Simple Ways to Fix It

The DownThemAll extension, otherwise known as Download Them All, is one of the best Firefox extensions you can use. It is a great productivity add-on that allows you to download multiple files simultaneously.

This add-on also helps to organize your files and considerably reduces download time. However, users are starting to complain that the Download Them All extension is not working on Firefox.

This has slowed down the work of most people and has been frustrating. This guide will show you how to make the extension again on Firefox. 

Why are downloads not working in Firefox? 

Downloads depend on many factors on Firefox and other browsers. If any of them fails, you might encounter problems.

Below are some of the reasons your downloads are not working on Firefox:

  • Poor internet connection
  • Dangerous download file
  • Interference from antivirus software
  • Corrupt browser data

Quick Tip:

Install the extension to a more responsive browser. We recommend Opera One because it’s fast, and uses fewer system resources. Because it runs on a Chromium engine, Opera One supports all Chrome extensions.

The DownloadThemAll add-on can be added to Opera One by opening the Chrome Webstore page and just adding it to Opera One. This browser also features unique functions, such as a native AI.

Opera One

Use DownloadThemAll on Opera One for fast downloads and an error-free experience!
Free Download Visit website

How can I fix the Download Them All extension if it’s not working on Firefox?

1. Remove and reinstall the extension

  1. Launch Firefox and click the menu button (three horizontal lines) in the top right corner.
  2. Select the Settings option.
    settings download them all not working firefox
  3. Choose the Extensions & Themes option in the left pane.
    extensions download them all not working firefox
  4. Click the more button before the DownThemAll extension.
  5. Click the Remove option.
    extension more
  6. Now, click the Remove button when prompted to confirm the action.
    remove download them all not working firefox
  7. Visit the Mozilla addons store to download the latest version of DownThemAll.
  8. Click the Add to Firefox button.
    add to
  9. Click the Add button when prompted, and the extension will be installed on your browser.
    add

The DownThemAll developer has recently released a new version of the extension. This has rendered the old one redundant.

Hence, if you are still running the older version, it might be the reason Download Them All is not working on your Firefox browser.

2. Update Firefox

  1. Launch Firefox and click the menu button.
  2. Click the Settings option.
    settings download them all not working firefox
  3. Scroll down and click the Check for updates button under the Firefox Updates section. 
    check
  4. This will show you the available updates to install.

The latest Download Them All extension is not working on outdated Firefox versions. So, to have any chance of using the extension, you need to keep your browser updated.

Remember to relaunch your browser after the update to sync the changes.

3. Disable other extensions

  1. Click the menu button on Firefox and select the Settings option.
    menu
  2. Choose the Extensions & Themes option in the left pane.
    extensions and themes
  3. Toggle the switch before all extensions aside from DownThemAll backward to disable them.
    disable
  4. Restart your browser.

If you have too many extensions on your Firefox, one of them might be stopping Download Them All from working well. It might be because it contains a counter program that can disrupt the activity of DownThemAll. 

This fix is especially useful if you noticed the problem after installing some extensions. If you can pinpoint the exact add-on causing the issue, you disable them and use the elimination method to know the faulty one.

When the Download Them All extension stops working on Firefox, it puts a lot of tasks on hold and limits your productivity. Thankfully, it is not the most difficult problem to solve, as shown in this guide.

Are you facing other extension-related problems like Video DownloadHelper not working in Firefox? You should check our guide on the topic to know how to resolve the issue.

Feel free to let us know the fix that worked for you in the comments below.

How to remove a remembered account on Instagram from phone

By remembering your Instagram account login credentials on your device, the app makes it convenient for users to log in to their accounts after logging out.

However, there are some instances when a user would prefer to remove Instagram remembered accounts from his or her phone.

When you open the Instagram app with your account logged out, instead of requiring you to enter your login details, you see the Continue as option.

With this option, anyone can access your Instagram account, so far as you have logged in on the device in the past.

In this guide, we will show you how to remove Instagram remembered accounts from your phone quickly and protect your account.

Quick Tip:

Use Instagram in a browser instead. Opera One’s mobile app offers dedicated support for social media, including Instagram. You can easily connect/disconnect your account, without having to go through much hassle.

You can check direct messages and view your feed without having to open a different tab for Instagram. The browser is packed with modern features like an adblocker, custom workspaces, VPN and AI.

Opera One

Access Instagram via Opera One and get straightforward controls for adding or removing accounts, in just a few steps.
Free Download Visit website

How do I remove Instagram remembered accounts from a phone?

1. Remove account locally

If you’re logged into your account

  1. Launch Instagram on your device.
  2. Go to your profile page.profile
  3. Tap on the hamburger icon on the top right-hand side of your screen.hamburger-icon
  4. Go to Settings.
  5. Tap on Log out of your username.
  6. On the popup box, choose not to remember your login information.forget login info

The above steps are applicable for when you wish to remove Instagram remembered account after logging in to the app. If you want to do it without logging in, use the method below.

If you’re logged out of the account

  1. Ensure that you’re logged out of Instagram.
  2. Open the Instagram app.
  3. Tap on the three vertical dots beside the Log In button of one account.three dots
  4. Tap on Remove.
  5. Repeat steps 3 and 4 for every account listed on the page.

3. Log out of Facebook

log out facebook

Facebook owns Instagram; so, users can log in to Instagram using their Facebook credentials.

If this is what you did, then the other solution in this guide may not work for you.

To remove Instagram remembered account from your phone when you logged in with the Facebook app, you have to sign out of Facebook.

Next, launch the Instagram app, and you’ll notice that you have successfully removed your Instagram remembered account from the phone.

You can go ahead to log back into Facebook.


4. Clear data from Settings

clear android data
  1. Open the Settings app on your Android device.
  2. Go to Apps (this could also be Apps & notifications or Application Manager, depending on your device and Android edition).
  3.  Find Instagram from the list of apps and tap on it.
  4. Tap on Storage.
  5. Select the Clear storage or Clear data option.

5. Change your password

Changing your password keeps you logged in on the phone you changed it with. However, it logs you out of other devices on which your account is logged in.

  1. Launch the Instagram app.
  2. Go to your profile page.
  3. Tap on the hamburger icon on the top right-hand corner.
  4. Go to Settings.settings
  5. Tap on Security.
  6. Select Password.password
  7. Type in your current password and enter your new, preferred password.
  8. Save the settings.

Note: This method doesn’t technically remove your Instagram remembered account from your phone. It only makes it impossible for anyone to log in to your account even if the account is still on the device.

All the solutions (except solution 5) apply to Android, iOS, and desktop Instagram interfaces.

With these methods of removing Instagram remembered accounts, you no longer have to worry about anyone accessing your account.

HTTP Error 413 in Chrome: What is it & 4 Ways to Fix it

The HTTP error 413 in Google Chrome usually occurs when loading webforms or accessing background server-side services.

Interestingly, the error seems to happen only on the Google Chrome browser and does not affect other browsers like Edge and IE. This isn’t the only error you can get, and many reported that This site is not a secure message either.

The full error reads:

HTTP Error 413. That’s an error. Your client issued a request that was too large. That’s all we know.

This article explores a few troubleshooting steps to help you resolve the HTTP error 413 on the Chrome browser.

What is an HTTP 413 error?

The HTTP error 413 usually occurs if the request is more significant than the server can handle due to incorrect configuration. However, the error can also occur due to browser issues.

The corrupted cache can sometimes cause this error, but sometimes, you need to fix the issue with web sockets to resolve this error.

How do I fix Error 413 on Chrome?

1. Check the Chrome browser for issues

Clear browsing data 

  1. Launch Google Chrome and click the three-dots button. Select More tools. Next, select Clear browsing data.
  2. Select a time range and select the browsing data you want to clear.
  3. Click the Clear data button.
  4. Once done, relaunch Chrome and check for any improvements.

Clearing the browser data reportedly has fixed the error from many users. If the issue persists, proceed with other steps below.

Flush the Socket Pools from your browser 

  1. In Chrome, navigate to chrome://net-internals
  2. From the left pane, click on Sockets.

  3. Click the Flush socket pools button. It may break pages with an active connection; make sure you don’t have an active connection.
  4. Once done, close the tab and relaunch Chrome.

Flushing the socket pool can quickly fix the error 413 is triggered due to a browser issue. If the problem persists, try resetting the browser to factory default.
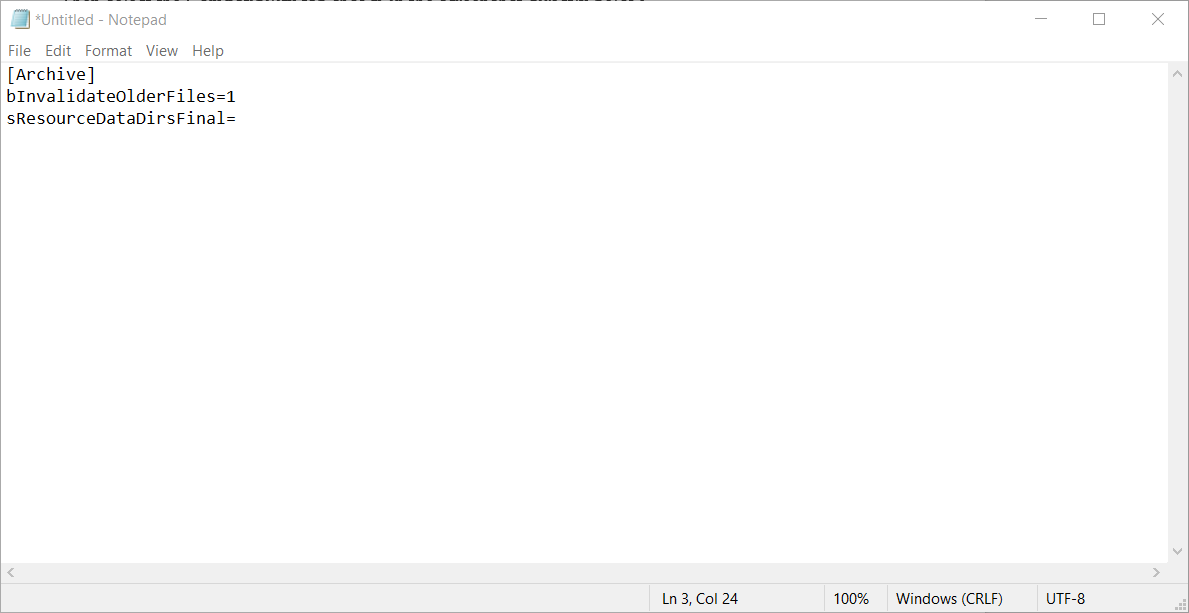
2. Reset Chrome to factory default

  1. Launch Google Chrome.
  2. Click Menu (three dots) and select Settings.
  3. Select Reset and clean up.
  4. Click Restore settings to their original defaults.

  5. Read the description carefully and click on Reset settings.
  6. The process may take some time; wait till it is completed and then relaunch the browser.

Resetting the browser to factory default will reset your startup page, new tab page, search engine, and pinned tabs. It will also disable all extensions and clear temporary data like cookies. Other data, like bookmarks, history, and saved passwords, will not be cleared.

If you don’t want to reset your Chrome browser yet, skip this step and proceed with the next steps.

This is a quick and easy solution, so try it if you’re getting Request entity too large on Chrome.

3. Reset the network adapter

  1. Press the Windows key, type cmd, then click on Run as Administrator for Command Prompt.
  2. In the Command Prompt window, type the following command and hit enter to execute:
    netsh Winsock reset
  3. Once done, close the Command Prompt and then restart the computer.
  4. Launch the browser and check for any improvements.

This is a simple solution, but it might help you with 413 that’s an error, your client issued a request that was too large that’s all we know message. This also helps with Error 503 Maximum threads for service reached.

4. Modify the PHP.ini and Nginx.Conf file

Modify PHP.ini 

  • Login to your PHP server.
  • Enter the following command to access the php.ini file:
    nano /etc/php.ini
  • If you are using PHP_FPM, use the following command:
    nano /etc/php5/fpm/php.ini
  • Find the path for these files:
    upload_max_filesize
    post_max_size
  • Once we have the file, increase its limit to 100M. It will look something like this:
    upload_max_filesize = 100M
    post_max_size = 100M
  • Save the file and exit.

Make sure to restart PHP to apply the changes.

Modify Nginx.conf

  1. Login to your cloud server.
  2. Enter the following command to access the Nginx.conf file:
    nano /etc/Nginx/nginx.conf
  3. Find the following variable:
    client_max_body_size
  4. Increase the size limit to 100M. It will look something like this:
    client_max_body_size 100M;
  5. Once done, restart Nginx to apply the changes:
    sudo service Nginx restart

This is a quick and easy solution, and it should help you with the 413 error code on Nginx, so be sure to try it.

If the HTTP error 413 occurs only on your Chrome browser, you can mostly fix the issue by clearing the browser cache, flushing the socket pool, or resetting the browser default.

However, if the issue persists, try increasing the file size limit by following the article’s steps. This isn’t the only error, and many reported that HTTPS is not working in Chrome as well as 406 Not acceptable error, but we cover those in separate guides.

Before you go, you might want to check our Error parsing HTTP request header guide if you’re a developer.

Did you find a different solution for this problem? Let us know in the comments below.

Browser Not Supported In Netflix: 5 Quick Ways To Fix It

Netflix is a popular streaming service whose quality is pretty much related to how well your browser supports it.

Many users are reporting that watching Netflix in the Edge browser is not working, which is pretty frustrating.

In this article, we will explore a few easy ways to solve this issue, so keep reading.

What does browser not supported mean on Netflix?

Don’t think this is a severe problem, because it’s not. This annoying Netflix error code is generated when Netflix detects an unsupported web browser.

By that, we mean you are either using a browser that is not on Netflix’s compatibility list or an outdated version of any supported browser.

What can I do if my browser is not supported on Netflix?

1. Use a specialized browser

Opera One allows for excellent streaming on Netflix thanks to the loading speed and the built-in ad-blocker.

Moreover, with the tab management options such as working spaces and built-in social media, you can easily organize your time.

The built-in VPN is also great for accessing Netflix and protecting your device when streaming online.

Opera One

Watch your favorite shows on Netflix with this error-free and reliable browser.

2. Update your browser

2.1. Microsoft Edge

  1. Click the menu button in the top-right corner of the Edge.edge options
  2. Next, click the Help & Feedback option and select About Microsoft Edge.about microsoft edge
  3. Now Edge will search for available updates and install them.edge update

2.2. Google Chrome

  1. Click on the three dots located in the top right-hand corner.chrome options
  2. Select Settings.chrome setings
  3. Click the About Chrome button.about chrome
  4. Chrome will find available updates and install them.update chrome
  5. Restart your browser.

2.3. Mozilla Firefox

  1. Click on the Menu button in the top right-hand corner.firefox menu
  2. Select Help.firefox help
  3. Click the About Firefox button.about firefox
  4. Firefox will search for and install all the latest updates.firefox update
  5. Restart browser.

3. Clear browser data

3.1. Microsoft Edge

  1. Go to the top right-hand corner and select History from the drop-down list.Edge History
  2. Click on the three dots and select Clear Browsing Data.edge clear browsing data
  3. Select Browsing History, Cookies and saved website data, Cached data and files, and Download history and press Clear now.delete cookies edge
  4. Restart the browser

3.2. Google Chrome

  1. Click on the three dots on the top right-hand side.chrome options
  2. Click on History, and then select History again.chrome history
  3. Select Clear browsing data.clear browsing data chrome
  4. Select Browsing history, Cookies, and other site data, and Cached images and files, and click on Clear data.clear cookies chrome
  5. Restart the browser.

3.3. Mozilla Firefox

  1. Click on the Menu button located in the top right-hand corner.firefox menu
  2. Select History.firefox history
  3. Click on Clear recent history.firefox recent history
  4. Select Browsing History, Cookies, Cache, and click the OK button.firefox cookies
  5. Restart browser.

4. Modify Netflix playback settings

The video quality being streamed can sometimes cause Netflix not to be supported by your browser.

For example, if your internet connection is not very fast, having high-quality streaming can be troublesome.

You can fix this quickly by accessing your Netflix account and selecting Playback settings. Here choose the Medium or Low option for the playback.

Restart your browser and check to see if the problem is still there.


5. Check the Netflix server status

If you have worked through all the above recommendations and cannot access Netflix, then checking the server status is recommended.

You can perform this check by visiting the Netflix website and verifying if the website is down or not.

If the Netflix website is not down, but you are still experiencing issues, then you can contact the Help center for further investigations on the same page.


It looks like your browser is no longer supported. Netflix is an annoying yet common issue, and we hope that the solutions provided in this article have helped you fix it. For any Netflix connection errors, check out our comprehensive article.

If you’re a Firefox user, our latest guide covers what to do if Netflix is not working on Firefox, so check it out for more solutions.

We would love to hear which recommendation worked best for you in the comments section below, so don’t hesitate to leave us a comment.

6 Ways To Fix Opera GX If It’s Not Downloading Any Files

Opera GX gaming browser has taken the internet by storm. This browser is built specifically for gamers with features to optimize in-browser gaming.

With all the perks and features of the original Opera browser, Opera GX adds a cyberpunk feel to surfing the web with its techy interface. So it’s no surprise that this browser has become so popular.

However, some users have reported issues when trying to download files in Opera GX. This guide will offer several solutions to solve this problem.

Why is Opera GX not downloading files?

Well, there are many reasons you are experiencing this problem, among which is the Windows Firewall blocking these downloads for security reasons.

It can also happen due to your browser not being updated, conflicts with browser extensions, the integrated VPN or ad blocker, or maybe even the lack of permissions.

All of these together, or just one of them, can prevent your Opera GX browser from downloading the files you need.

Is Opera GX secure?

Opera GX is one of the safest browsers out there. It’s based on the Chromium engine, so it operates similarly to other popular browsers. However, Opera GX has advanced security features to protect user privacy and data.

Opera GX secure browser.

Opera GX has Dynamic Link Libraries (DLL) hijacking prevention for downloads and files. It also protects your preferences, homepage, and extensions from malicious activity.

Like the original Opera browser, Opera GX has a built-in ad-blocker and unlimited VPN that encrypts user data and keeps them safe while browsing. However, while Opera browsers have similar features, Opera GX and Opera have quite a few differences that separate them.

How do I fix Opera GX not downloading files?

1. Check for updates

Ensure you have installed the latest version from the official page to ensure you’re running a glitch-free Opera GX.

  1. Click the Opera GX logo in the top right corner, then click on Update & Recovery. Click on updates and recovery.
  2. Opera GX will automatically check for any available updates. Opera GX check for updates.
  3. Click Update if there is an available update.
  4. Relaunch Opera GX.

Opera is constantly updating and improving its browsers. These updates often fix bugs and problems like downloading issues. Opera GX will usually update automatically, but if you’re running into issues, check if any are available.

Opera GX

A powerful browser built for an immersive browsing and gaming experience.

2. Disable all extensions

  1. Click the Opera GX logo in the top right corner, then go to Extensions and select Extensions (or press Ctrl+Shift+E). Click on extensions.
  2. Go through and disable all your extensions. Opera GX disable extensions.
  3. Relaunch Opera GX.

Sometimes extensions can interfere with downloads. For example, if your downloads are working, it was due to a faulty or interfering extension. After downloading files, the wings can be enabled again.

3. Disable ad-blocker and VPN

  1. Click the Opera GX logo in the top right corner, then select Settings (or press Alt+P). Open up settings.
  2. Under Privacy protection, disable the Block ads feature. Disable ad-blocker.
  3. In the side panel, select Privacy & security. Click on privacy and security.
  4. Could you scroll down to VPN and disable it? Disable VPN.
  5. Relaunch Opera GX.

Disabling the ad-blocker may solve the issue as the ad-blocker might prevent some files from downloading. However, the built-in VPN might also cause download limitations, so try downloading files after disabling these features.

4. Check app permissions

  1. Click on Start and open Settings (or press Windows + I).
  2. Click Privacy & security. In settings, open privacy and security.
  3. Under App, Permissions, click the Downloads folder. Under App permissions, open downloads folder.
  4. Ensure that Downloads folder access and Let apps access your downloads folder is turned on. Make sure permissions are enable if Opera GX is not downloading files.

If Opera GX doesn’t have permission to access the downloads folder, then downloads won’t work correctly. Adjust the permissions accordingly.

5. Adjust site settings

  1. Click the Opera GX logo in the top right corner, then select Settings (or press Alt + P).
  2. Click Privacy & security under Advanced.
  3. Then, under Security and Privacy, click Site Settings. Click on site settings.
  4. Scroll down to Content and expand Additional content settings. Expand additional settings
  5. Open Insecure content. Expand additional settings
  6. Add the URL of the website you are trying to download files from under Allowed to show insecure content. Add URL to allow insecure content.

Opera GX protects its users from the content it deems insecure so that users don’t download malware by mistake. However, this feature may be blocking downloads from specific web pages.

Adding the website you wish to download files from will permit it to download.

6. Temporarily turn off the firewall

  1. Click on Start and search Windows Security, then hit enter. Search for Windows Security.
  2. Select Firewall & network protection from the side panel. Open firewall options.
  3. Choose the network that relates to you.
  4. Toggle Microsoft Defender Firewall to off. Disable Microsoft firewall.

The firewall helps protect devices from malicious attacks, but it may also prevent downloads from the internet. Try downloading your files after disabling the firewall, but remember to turn it back on as soon as your download is finished.

Is Opera GX good for downloading?

The short answer is yes, it’s excellent for downloading. It’s so good that you even have a Network Limiter switch that lists the various network speeds to which you can limit Opera GX.

You can choose download speeds, the lowest being 64 Kb/s, and the maximum limit is 25 Mb/s. You can learn more about the best browsers for downloading large files in our dedicated article.

Since it’s a browser made for gamers, and most games nowadays take up a lot of space, it will suit your downloading needs perfectly.

So, if Opera GX won’t download your files, or Opera GX is taking too long to download them, now you know exactly what to do about it.

We hope these solutions solved the issue of Opera GX not downloading files. If Opera GX is downloading correctly, but your downloads folder is not responding, there are solutions for that issue.
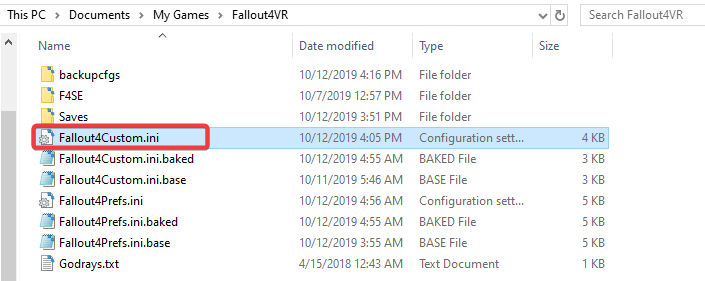
Let us know in the comments below what solution worked for you.

How to Add Discord to Opera GX [Step-by-Step]

Today, we’ll show you how to add Discord to Opera GX in just a few quick steps.

And if you’re a nosy parker like us and want to know the nitty gritty about this browser, where it’s going, and what else it supports besides Discord, you’ll find some useful info further below.

But first, let’s see how to use the Opera GX Discord integration:

How can you add Discord to Opera GX?

  1. Click on the Settings (the gear icon) on the left pane.
    opera gx settings
  2. Scroll down to the Sidebar menu and click on the Manage sidebar.
    opera gx manage sidebar settings
  3. From the list of sidebar elements, tick the checkbox for Discord.
    discord checkbox in opera gx

Note that having the sidebar on Opera GX is optional, and you can choose to enable or disable it. To enable or disable the sidebar, including Discord and all other elements, follow these steps:

  1. First, click on the Settings (the gear icon) on the left pane.
    opera gx settings
  2. Scroll down to the Sidebar menu and click on the Manage sidebar.
    manage sidebar settings opera gx
  3. Toggle on the switch for Show sidebar to enable a sidebar, and google it off to disable a sidebar.
    opera gx enable or disable sidebar

Note that typing the address below on your address bar will give you access to enable on your sidebar the opening of user-selected webpages on Opera GX.
opera://flags/#sidebar-site-panel

What is Opera GX and who is it for?

Opera GX is a robust gaming browser for any computer OS, but it’s not designed for low-power computers.

Opera GX lets you decide how much network bandwidth, RAM, and CPU you wish to dedicate to it to allow other programs and software to run smoothly.

The browser has introduced a slew of customization choices, including UI/UX, themes, and sound effects.

Various third-party applications designed specifically for the gaming market are compatible with the browser, and these are only a few of its qualities.

Some additional essential features include:

  • Network Limiter
  • Tabs Killer
  • Ad Blocker and VPN
  • RAM Limiter

If you love this browser, you would love to know all your choices for the best browsers for gaming.

Let’s talk about Opera GX and its Discord compatibility and features without much ado.

Opera GX Discord integration: how it works

Opera Gx, as a gaming-first browser, has one of the most advanced integrations for Discord. The two tools are a gamer’s paradise in exploring the ultimate gaming experience and work very well together.

The Opera GX Discord-rich presence is one reason for you to do all your Discord from the browser. This feature makes you display whatever you do on the server in the Discord now playing status.

opera gx discord

Opera is not limited to Discord and is also the browser with the best integration for Twitch.

Opera GX

Get the latest version of the best browser for Discord and gaming and enjoy its unparalleled performance.

What are some of the most common in-browser Discord errors?

The integration of Discord on this browser is a welcome feature to many users. This integration means you can watch your favorite YouTube videos while chatting away on Discord or playing browser games and chatting concurrently.

That said, just like with all tech, here are some of the common in-browser Discord errors users have faced:

  • An Opera GX Discord stream issue is when your browser stops streaming on Discord and is typically caused by your browser configuration.
  • Opera GX Discord server problems – It could be a problem of Discord’s inability to connect to Opera GX servers and may need you to wait it out sometimes.
  • The Opera GX Discord is not working error – Here, after enabling Discord on your browser, it will still not work.
  • Opera GX Discord RTC connecting – With this error, your Discord is stuck perpetually connecting a call and will not allow you to do much more with the service.
  • An Opera GX Discord microphone not working problem – This problem means you lose the functions of your microphone but is often fixed by simple updates to your settings.
  • Opera GX Discord black screen – With this error, you only hear the audio while the whole display goes black.

More often than not, Discord in-browser errors have, at their root, simple and easy-to-fix issues. Unfortunately, one of the most frequent ones is out-of-date software.

We advise you to run the latest release of the Opera GX browser. If you have an older version, uninstall it and head to the official website to download the up-to-date version.

Wrapping up

This article has all the info you need if you want to know how to add Discord to the Opera GX sidebar.

We’ve also covered some useful info about frequent errors with Discord as well as how this integration works and why it is extremely useful for Discord users and gamers.

If you got stuck somewhere along the way or want to share your experience with Opera, feel free to use the comment section below.

Minecraft server admins can’t integrate NFTs for in-game purchases

We know that, just like the Gold Fever in the 19th century, people are going crazy over all kinds of cryptocurrencies and NFTs, that others will pay ridiculous sums for.

In fact, it’s almost impossible to surf the web today without seeing all sorts of ads, bids, or other people talking about the subject.

Even some video games have embraced the idea of adding NFTs for purchasing all sorts of in-game stuff, which some people are totally against.

However, if you were hoping that Minecraft will gain some cool NFTs and create an interesting trading system, that is never going to happen, according to Mojang.

Mojang rejects blockchain integrations for Minecraft

The company behind Minecraft, Mojang, recently updated its Minecraft Usage Guidelines, which ban the use of blockchain technologies, including non-fungible tokens.

As a result, these technologies can never be integrated into the Minecraft client, server applications, or be used in any way associated with buying and selling in-game content including worlds, skins, persona items, or other mods.

You are surely wondering why the situation turned out to be this way, so let’s take a closer look. The actual reasons behind the decision are multifaceted.

Primarily, Mojang seems most concerned about items being sold at very high prices, and also concerned that NFTs will lead to a situation where items are very scarce and create a culture of exclusion, and it doesn’t believe this is what Minecraft should be about.

Furthermore, while the company isn’t at all interested in allowing blockchain technologies right now, this could probably change in the future.

According to Mojang, it will continue monitoring the space and may implement some of the more inclusive applications of the technology.

As for all the people who want to sell in-game items, Mojang stated that it will strive to provide a marketplace where its values are recognized.

As you are aware by now, Mojang is not the first tech firm to distance itself from blockchains, NFTs, and cryptocurrencies.

That being said, people are beginning to be a lot more open-minded about this subject, but many are still not willing to take a huge risk.

So, if you were hoping to trade NFTs or other cryptocurrencies for some in-game Minecraft items, you won’t have the chance very soon.

Before we conclude, we’d like to offer some solutions for problems such as the Failed to download file, the file contents differ, or the You Don’t Have Permission to Access Minecraft.net error codes.

We can also show you how to update Minecraft on Windows 11 if you are looking for such information but can’t find it.

What is your opinion on Mojang’s latest decision on Minecraft and NFTs? Share your thoughts with us in the comments section below.

Google Search Not Working on Firefox? 2 Simple Ways to Fix It

Google Search is by far the most-used search engine. It has a wide reach and many excellent features that keep users coming back.

When paired with one of the best cross-platform browsers like Firefox, the syncing and data protection possibilities are endless. Unfortunately, users are having problems making Google Search work on Firefox these days.

As always, we have provided three surefire fixes to this problem to let you get back to exploring Google’s search engine on your favorite browser.

Why did Google Search stop working on Firefox?

There are several reasons Google Search might not be working on Firefox. Most problems are in-app, while some can be hard to trace. 

Below are some of the popular causes:

  • Corrupt cache, cookies, and other browser data
  • Malfunctioning extensions
  • Temporary browser glitches

How do I enable Google on Firefox?

  1. Launch Firefox and click on the menu button.
  2. Select the Settings option.
    settings
  3. Click on Search on the left pane.
    search option
  4. Click the dropdown under Default Search Engine and select Google.
    choose

With these steps, you have not just enabled Google search but also set it as the default search engine.

Quick Tip:

The quickest way to be able to use Google Search is to simply use a different browser. And there is no better Firefox alternative than Opera One.

Opera One is an excellent browser that has Google as its default search engine. It is one of the fastest browsers for all devices, which makes you lose nothing in terms of the speed you get from Firefox.

Opera One

Use Google Search without any errors with this modern, performance-optimized browser!

How do I fix Google Search if it’s not working on Firefox?

1. Clear browser data

  1. Open Firefox and click the menu button.
  2. Select the Settings option.
    settings google search not working firefox
  3. Click on Privacy & Security in the left pane.
    privacy
  4. Click the Clear Data… button under the Cookies and Site Data section.
    clear data
  5. Click the Clear button to confirm the action.
    clear button
  6. Scroll down and click the Clear History… button under the History section.
    history button google search not working firefox
  7. Click the drop-down next to Time range to clear and select Everything.
    everything
  8. Check the boxes for Browsing & download history, Cookies, Cache, and Form & search history.
  9. Finally, click the OK button.
    ok button

Browser data is only useful when it is not corrupt. Once corrupt data accumulates, it leads to all sorts of issues, including Google Search not working in Firefox.

After clearing the browser data, restart your PC to effect the changes.

2. Disable/remove extensions

  1. Click the menu button on Firefox and select the Settings option.
    settings
  2. Select Extensions & Themes on the left pane.
    extensions  google search not working firefox
  3. Toggle the switch before each extension backward to disable it.
    disable
  4. To remove an extension, click the more button before it and select Remove.
    extension more
  5. Click the Remove button to confirm the action.
    remove google search not working firefox

Too many extensions can mess up your browser. This is because some might contain programs that alter how the browser works. 

This can cause Google Search not working on Firefox. In this case, you should remove any unwanted extension and disable the others temporarily.

When Google Search is not working on Firefox, it makes you miss out on the endless features and reach of the most-used engine in the world. With the solutions provided in this guide, you should be able to regain access to Google Search in no time.

Are you facing issues like Facebook not working on Firefox? Then, check our detailed guide on how to fix it easily.

This issue is somewhat similar to the Firefox search bar not working error that we recently covered, so don’t miss it for more solutions. Our latest guide covers Error displaying search results in Firefox, so don’t miss it for more information.

Feel free to let us know the fix that helped you get the search engine working in the comments below.

Something Went Wrong on Our End PayPal Error [Fix]

If you use Paypal frequently, you may have encountered Something went wrong on our end PayPal error. This issue can arise when you’re trying to reset your password or when attempting to log in to your PayPal account.

Additionally, the issue which is sometimes accompanied by the message about PayPal having some trouble completing your request may also arise when trying to checkout from an online store.

Now, Paypal tries to self-correct the hitch and some users succeed in carrying out their desired transaction after retrying some minutes later. However, there are things you can do to rectify the frustrating issue. Let’s go through them:
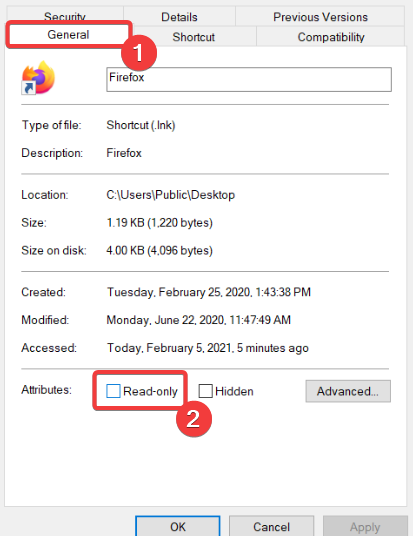
How can I fix Looks like something went wrong PayPal error?

1. Change your browser

Your browser may be in very bad shape because of malware, harmful browser extensions, and faulty plugins so the only remedy could be to shift to a new browsing program.

If you want a highly responsive browser, we suggest trying Opera One. It’s fast and includes anti-tracking features as well as a VPN that can contribute to better online privacy, which is a must when using PayPal.

The browser is very customizable, allowing users to create their workspaces with everything they need. It supports tons of verified browser extensions, including PayPal official extensions.

Opera One

Access PayPal with no errors and benefit from advanced security for your transactions!

2. Wait then retry

As I mentioned, Something went wrong on our end error is just a temporary glitch, and it can go away on its own.

Therefore, wait for a few minutes before retrying.

3. Use an alternative to PayPal

If the solutions in this guide yield no results, then maybe it is time to consider replacing PayPal and managing your finances using other means.

In the case at hand, the best solution to go for in case you can’t use PayPal anymore is to check out other finance-type apps.

Multiple apps can provide useful services for managing your money via credit cards. Using one of these services, you will transfer money easily to your peers, change the currency, or even trade crypto.

Plus, you can benefit from excellent features of transferring money to others, in just a few taps. It is also possible to manage monthly expenses and always be on time with your bills.

If you need to get these services now it’s advised to be informed first, so make your move considering the best virtual credit card apps.

4. Clear your browser cache and cookies

Accumulated browsing history, cookies, passwords, and other browsing information may slow down your browsing software and make it unstable.

Subsequently, that can lead to Something went wrong on our end error message. fix this issue by clearing your cache like this:

  1. Open Chrome.
  2. Click More ( top right corner).
  3. Select More tools then Clear browsing data.something went wrong on our end paypal clear browsing data
  4. Choose a relevant time range or select All time to erase everything.Something went wrong on our end PayPal clear browsing data
  5. Check the boxes next to Cookies and other site data as well as Cached images and files (see above) then Click on Clear data.

Firefox

  1. In Firefox, select the Menu button  (three horizontal bars) then choose Options.options paypal something wrong on our end transfer
  2. Choose the  Privacy & Security panel.
  3. Under Cookies and Site Data, click Clear Data….privacy and security paypal looks like something went wrong
  4. With the Cached Web Content check-marked, click on the Clear button.

Edge

  1. Open Microsoft Edge, click on the three dots in the upper right corner of your screen then choose Settings.settings paypal something went wrong
  2. Locate the Clear browser data section and click Choose what to clear.
    choose what to clear paypal something went wrong with your payment
  3. Check the applicable boxes including Cached data and files.clear button something went wrong on our end paypal
  4. Click the Clear button.

5. Other Tips

Other ways that you can use to tackle the Something went wrong on our end PayPal setback includes trying to log in to PayPal from a different computer (on a different Internet connection) or even your phone.

Always try refreshing your page any time you’re logged in and a PayPal problem such as this emerges. Still, your antivirus might be messing up your PayPal gateway again bringing this nagging issue.
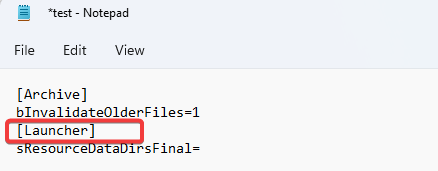
We, therefore, recommend that you temporarily pause your protection and see if the payment provider will work.

6. Contact PayPal supportsomething went wrong on our end paypal

If after all these attempts you haven’t managed to fix Something went wrong on our end PayPal issue, reach out to their support team.

You can start by writing them an email explaining your situation.

Steps:

  1. Log in, as usual, to your PayPal account.
  2. Click on Contact us (check the link near the bottom of the home page).
  3. Select a topic and sub-topic that best matches the something went wrong at our end PayPal fault.
  4. Click on Email us as shown.
  5. Type your message describing the details then click Send Email.

You can also call PayPal support on 000 1 402-935-2050.

It’s best not to select any options when your call goes through. Instead, wait until you are transferred to one of their agents.  Alternatively, press 0 or say the word ‘Agent’ to access an agent.

PayPal is overall secure and responsive, but errors happen now and then. Make sure to verify your connection. As mentioned, trying a different browser is a quick and easy solution, good options are Opera One and UR Browser.

If you have problems with other payment methods, we also have a guide on handling Google Pay error OR_PMCR_32, so don’t miss it.

We hope these solutions helped you with Something went wrong on our end  PayPal error, so be sure to try them all.

FIX: Tor Browser is Already Running But is Not Responding

Tor is a free and open-source browser focused on anonymous communication, but many users reported Tor Browser is already running error messages.

If you’re unfamiliar with Tor, let us remind you that it is straightforward to download and use Tor on Windows 10, as you can see in this quick guide.

However, if you’re getting this error message while running Tor, we’ll show you how to fix it today.

Here’s how one user on Stack Exchange described this issue:

When I launch Start Tor Browser.exe it indicates that the circuit is established but then immediately gives the following error message: Firefox is already running, but not responding. To open a new window, you must first close the existing Firefox process, or restart your system.

Why is my Tor Browser not working?

If you are in a situation where Tor Browser was working and is not working now, your system may have been hibernating, which means that a simple reboot is in order.

Other users mentioned that the Windows Virus & Threat protection feature got in the way, or it could just be that the browser’s files became corrupted.

For more info on how to do that, check the guide below.

Quick Tip:

Use a different browser that is more responsive. We recommend Opera One because it’s light and very private. It includes a built-in VPN and adblocker, as well as crypto mining protection.

It blocks many unnecessary cookies and has up-to-date web filtering options, so it’s a good alternative to Tor in terms of online security.

Opera One

When Tor fails to meet your expectations, just download this great alternative.

What can I do if the Tor browser is not working?

1. End Tor process in Task Manager

  1. Press Ctrl + Shift + Esc on your keyboard to open Task Manager. process tab task manager Tor browser isn't working
  2. Once in Task Manager, under Processes, click on the Name tab to sort all the processes alphabetically.
  3. Now find tor.exe (or firefox.exe, if it’s the case), and click on End Task in the bottom-right of the window.
  4. If you see multiple Tor processes, close them all simultaneously. Few users reported that Task Manager wouldn’t end tasks, and if that’s the case, be sure to check our guide on how to fix that.
  5. Now try again to open the Tor Browser.

2. Delete parent.lock file

  1. Go to Tor Browser > Data > Browser > profile.default > parent.lock.
  2. Click on the parent.lock file and then hit Del.
  3. Check if the problem is still there.

3. Install Tor Browser on a different partition

  1. Remove Tor Browser from your PC.
  2. Once you remove it, install it again on a different partition and check if that solves the problem.

To altogether remove Tor Browser from your PC, we advise using an automated uninstaller utility. Our top recommendation is CCleaner’s uninstaller. It will clear your app and all registry entries and related files.

The tool is available in the free version and allows you to quickly select Tor from a list of all your apps, confirm that you want to uninstall it, and wait for the process to complete.

Suppose you already uninstalled the browser with a different method. In that case, we recommend you run the CCleaner scanner and remove any junk files found, as there is a high possibility for your regular uninstaller wizard to leave behind unnecessary files.

⇒ Get CCleaner

As you can see, situations such as the Tor browser is already running but is not responding, or The old Tor browser process must be closed to open a new window can appear out of nowhere.

You could also run into an error such as Close tor browser, a copy of tor browser is already open on your Mac device.

However, these problems are easy to fix, as we’ve shown you above. Leave a comment below if you managed to solve this issue.
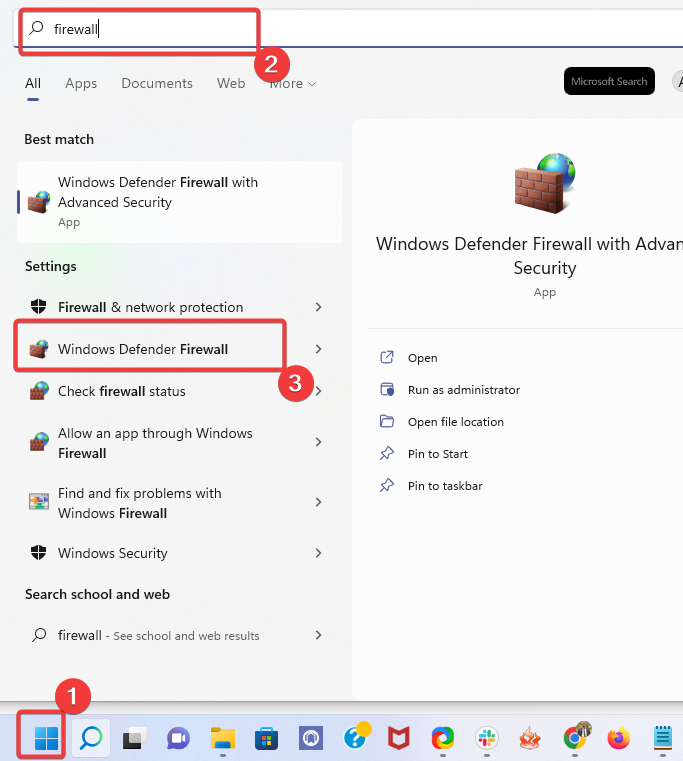
Latest Microsoft Store update comes with important improvements

We know we haven’t spoken about the Microsoft Store lately, so it was about time for an update from the Redmond tech giant.

As you know, Microsoft released Build 25163 for the Windows 11 Insiders in the Dev channel, an update packed with improvements and changes.

And, as a part of this update, are the changes that we are about to take a closer look at and analyze.
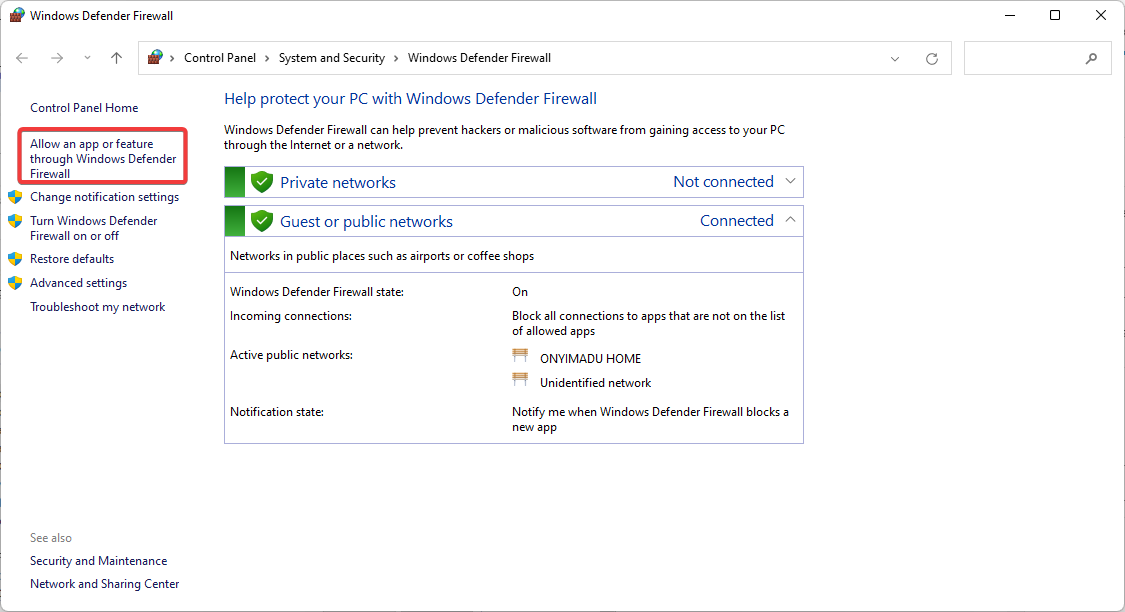
New price tags and many other improvements coming

Through the above-mentioned Windows 11 update, Microsoft announced a fresh update for the Microsoft Store as well.
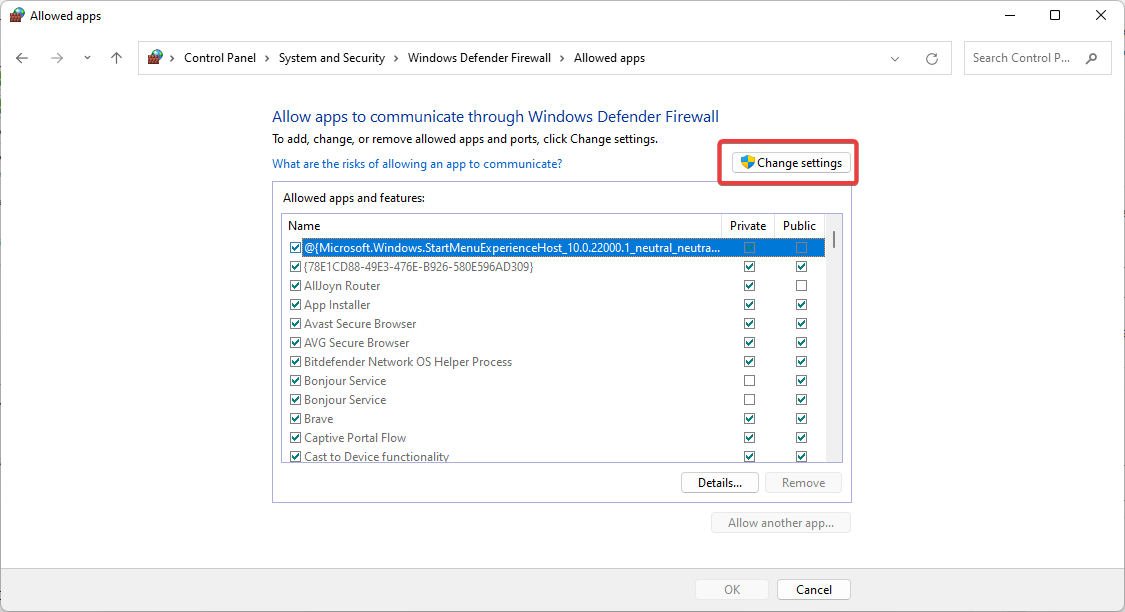
Store version 22206.1401.2.0 is now available in the Dev channel with a few necessary tweaks and discoverability improvements.

However, by far, the main highlights include an updated price tag design and a new way to find different editions for a specific game.

So, developers to tweak the Browse and search section with updated price designs. Now it’s easier to understand the prices, so we have the info we need when searching for a new app, game, or movie.

Updated pricing designs in the Microsoft Store.

Also coming with this new update are improved ways to find game editions, as it is easier to find different editions of a game.

With this new feature, you can easily view standard and deluxe editions so you can choose the game you want to play. How cool is that?!

Comparison between different game editions in the Microsoft Store.

Remember that this is only for Insiders, for the time being, so don’t go looking for these changes if you are on the stable version of Windows 11.

And, as you would have imagined already, like with all preview software, Microsoft wants to know our feedback regarding the latest enhancements in the Microsoft Store.

If you want to give feedback regarding the Store’s performance, you can share your thoughts by opening the Microsoft Store and pressing Win + F.

Have you already tested the new Dev Channel Microsoft Store changes? Share your experience with us in the comments section below.

How to Play Doom in Your Browser [No Download Required]

The origin of the first-person shooter genre can be traced back to the video game Wolfenstein 3D (1992), which is widely regarded as the game that established the fundamental template for the genre and served as the foundation for later games.

Another OG is Doom (1993), which is generally regarded as the most influential title in this genre. For a number of years, the phrase Doom clone was used to characterize this genre as a result of its influence. It was the progenitor of the genre’s greater public acceptance and success.

There are several Doom games available, but did you know that you can run Doom in your web browser?

That’s right, you can play the original Doom in your browser, and today we’re going to show you how to do it.

Can you play Doom in a browser?

Yes, you can. This classic video game is available in a variety of formats, and can even be played online in a web browser thanks to the availability of many platforms that host it.

Where can I play Doom for free?

There are several different gaming platforms that provide you the option to play Doom for free on your web browser, and one of those options is Playclassics.games. The website Browser-doom.io is also an excellent source.

This being said, let’s see in more detail how you can play Doom inside your browser. Keep on reading!

Quick Tip:

If you want to have that old-school feeling while gaming, this is exactly what you are looking for. Get yourself a browser that enhances the browser gaming experience.

Opera GX gives you control over your gaming experience, no more ads with the pre-installed Ad Blocker, Discord, and WhatsApp built right into the browser, Dark mode on any page are just some of its features.

Opera GX

Destroy hordes of hapless demons with the world’s best web browser created specifically for all gamers.

How can I play Doom in my browser?

1. Use Playclassics.games

  1. Visit Playclassics.games’ website that hosts Doom.playclassics how to play doom on browser
  2. Click the Play online button in order to start playing Doom online multiplayer.play-online how to play doom on browser

Doom is hosted on various gaming websites and you can use them to play it for free. These websites are running an emulator in the browser, so you’ll basically emulate Doom in your browser.

2. Use Browser-doom.io

  1. Open Browser-doom.io’s page inside your browser.
  2. Then, click Play under Doom.play-doom how to play doom on browser

Although Doom should work in any browser, you might encounter slowdowns and other issues. To get the best performance, be sure to use a gaming browser such as Opera GX.

The browser has a GX Control feature that allows you to allocate resources such as your CPU, RAM, and network bandwidth to your browser.

By doing that, you’ll ensure that you have enough hardware power for other tasks.

It has Twitch integration and it allows you to keep track of your favorite streamers with ease. There’s also a GX Corner feature so you can keep up with the latest news from the gaming world.

The browser is fully customizable and it allows you to change the highlight color, wallpapers, and themes. There’s also a built-in messenger so you can easily text your friends without ever leaving the game.

Other features from the Opera One browser are also there, so you’ll also get a built-in ad blocker, tracking protection as well a free and unlimited VPN.

How to play Doom on Chromebook?

The fact that Chrome OS wasn’t precisely made for gaming doesn’t change the fact that you’re in this predicament. On a Chromebook, you have the option to play Doom from within the browser if you so want.

Archive.org is another great online source to play the 1993 game that changed the gaming scene, and feels like you’ve gone back through time.

Playing Doom in your web browser is incredibly simple, and you can do it as long as you have the right browser for the job. Don’t hesitate to leave a comment in the section below and tell us what you think. Thanks for reading!

5 Quick Ways to Make Mouse Scroll Work Again on Firefox

Firefox is one of the few excellent all-round browsers that work on virtually all devices. It thrives on all the major features that matter to users.

Unfortunately, there is no perfect machine, and Firefox is not flawless either. Users have had to deal with the keyboard not working on Firefox issue in the past, limiting the accessibility of the browser.

Now, users are complaining that it is the mouse scroll that is not working. This takes away a crucial navigation tool when using the browser.

To help you regain that ease of navigation, we have gathered five effective fixes for the mouse scroll not working issue in this guide.

Why is mouse scrolling not working on Firefox?

The potential causes of mouse scroll not working on Firefox are numerous. It can be due to temporary glitches with your browser or the wrong settings.

The following are some of the popular ones:

  • Corrupt browser data
  • Malfunctioning browser feature
  • Faulty extensions or themes

How do I enable smooth scrolling on Firefox? 

  1. Open Firefox and click the menu button in the top right corner.
  2. Select the Settings option.
    settings mouse scroll not  working firefox
  3. Select General on the left pane.
  4. Scroll down and tick the box for Use smooth scrolling under the Browsing section.
    use smooth

How do I make my mouse scroll on Firefox again?

1. Switch to another browser

If all the fixes above prove abortive in solving the mouse scroll not working on Firefox issue, you might be better served using another browser. And there is no better alternative to Firefox than Opera One.

Opera One is a stunning browser that boasts lots of accessibility features. It is easy to use and has a simple and intuitive interface.

Based on the Chromium engine, Opera One is currently one of the fastest browsers in the industry. What’s more, it comes with built-ins such as VPN, Ad blocker and AI.

This allows you to sync your data effortlessly. Lastly, you can import your browser data from Firefox to Opera One. With this, you have nothing to lose in terms of continuity.

Opera One

Upgrade to a better browsing experience using this tool with a very low error rate!
Free Download Visit website

2. Restart Firefox

Sometimes, the predictable fix might be the most effective. If the mouse scroll is not working on Firefox, it might be due to a minor problem with the browser’s processes.

In this case, closing and relaunching the browser should do the trick. You can proceed to other sophisticated fixes if this does not solve the problem.

3. Disable hardware acceleration

  1. Launch Firefox and click the menu button (three horizontal lines) in the top right corner.
  2. Choose the Settings option.
    settings mouse scroll not working firefox
  3. Select the General option on the left pane.
    general
  4. Scroll down and uncheck the checkbox for Use recommended performance settings.
    use recommended
  5. Lastly, uncheck the box for Use hardware acceleration when available.
    use hardware

Hardware acceleration is an excellent feature that improves the efficiency of Firefox. It uses the GPU to carry out some of the graphics processes tasks. This offloads the load from the CPU. 

However, this feature might cause the mouse scroll not working in Firefox issue. While it is a good feature, it is not the most important. So, you can disable it and check if your mouse is now scrolling on Firefox.

4. Restart Firefox in Safe Mode

  1. Open Firefox and click the menu button in the top right corner.
  2. Select the Help option.
    help
  3. Select the Troubleshoot Mode… option.
    troubleshoot mode
  4. Click Restart when prompted to confirm the action.
    restart

With the number of extensions and themes in the Mozilla addons store, you’ll be tempted to install many of them and improve your browser features. However, too many of them can cause Firefox to misbehave and lead to problems like the mouse scroll not working.

With this fix, you can use Firefox with the extensions, themes, and custom settings disabled temporarily. 

5. Clear browser data

  1. Click the menu button on Firefox.
  2. Select the Settings option.
    settings mouse scroll not working firefox
  3. Choose the Privacy & Security option in the left pane.

    security  mouse scroll not working firefox
  4. Now, click the Clear Data… button under the Cookies and Site Data section.
    clear data
  5. Click the Clear button to confirm the action.
    clear button
  6. Go back to the Privacy and Security window and click the Clear History… button in the History section.
    clear history
  7. Click the dropdown next to Time range to clear and choose Everything.
    everything
  8. Tick the checkboxes for Browsing & download history, Cookies, Cache, and Form & search history.
  9. Click the OK button to confirm the action.
    ok button

When corrupt data accumulates on your browser, they cause problems. In this case, all you need to do is clear all browsing data and restart your browser.

The mouse scroll is not working Firefox problem limits you to the arrow keys on your keyboard. This not only removes a major accessibility feature of your browser but also strains your keyboard. Fortunately, the fixes in this guide can help you solve the problem for good.

Do you want to know how to fix Firefox when it’s not responding? Then check our guide for the detailed steps to follow.

Feel free to let us know the solution that helped restore normalcy to your mouse in the comments below.

Tor Browser vs. Opera: Which One is Better for Privacy?

Your online privacy is important, and if you want to protect it, you need to use a proper browser. There are many browsers that offer some form of privacy protection, but they won’t hide your identity online.

Some browsers, on the other hand, have a built-in VPN or use other methods to hide your identity. Speaking of which, today we’ll compare Tor Browser and Opera and see which browser is better for you.

Is Opera browser anonymous?

One of the few browsers that come with a virtual private network already installed is Opera. This browser will allow you to view material that is restricted based on your location, encrypt your connection, and mask your IP address.

Opera is the web browser with the most robust incognito mode. Users of this browser may remain completely anonymous on the internet by utilizing Opera’s built-in VPN service.

Even while Opera’s Private Browsing tab performs the same function as Chrome’s Incognito Mode, the fact that Opera additionally allows users to activate a virtual private network (VPN) elevates it to the position of being the most superior browser alternative currently available.

Is there anything more secure than Tor?

The Tor browser is a piece of software that may be downloaded by anybody for use on Linux, Mac, or Windows computers, as well as mobile devices.

While virtual private networks (VPNs) and the Tor anonymizing browser may both keep you anonymous while browsing the web, using a VPN correctly makes for the safest experience. Tor is a free web browser that will encrypt your requests.

However, it is incredibly sluggish, does not allow access to all websites, and can get you in problems with the law. VPNs, on the other hand, are lightning-fast, encrypt all of your traffic, grant you access to any website you choose, and put you in complete command of where you appear online.

What is the most secure web browser, Opera or Tor?

1. Opera

1.1 What is Opera?

Opera browser has been present for two decades, and it has changed a lot throughout its lifetime. The latest version of Opera is available on all major desktop and mobile platforms, allowing you to easily sync your data.

1.2. What are Opera’s pros and cons?

Pros:

  • Completely free
  • Available on all major platforms
  • Built-in VPN with unlimited bandwidth
  • Low hardware requirements
  • Built-in ad blocker

Cons:

  • VPN has just 3 locations
  • Might load slower with certain websites

1.3 What features does Opera have?

Opera has a built-in VPN that provides you with unlimited bandwidth. In addition, the browser supports cryptocurrencies, so it lets you make payments directly from your Crypto Wallet.

Another useful feature is Flow and it allows users to easily share files, links, and notes between other devices that use the Opera browser.

Opera also supports workspaces for better tab management. Other features include advanced search, visual bookmarks, and a customizable start page that supports RSS feeds.

Opera

An ultra-fast and ultra-modern web browser that features unparalleled customization and privacy features.

2. Tor Browser

2.1 What is the Tor Browser?

Tor Browser is built on top of Mozilla Firefox, and it’s specially designed to protect your privacy. Tor Browser connects to the Tor network that masks your identity online and makes your browsing sessions private.

2.2 What are the pros and cons of Tor Browser?

Pros:

  • Privacy-oriented
  • Multi-layer encryption
  • Protection against digital fingerprinting
  • Comes with privacy-focused extensions
  • Disables potentially unsafe plug-ins

Cons:

  • Slow browsing speed
  • Adding extensions can compromise your privacy
  • Not available on iOS

2.3 What features does Tor Browser have?

With its focus on user privacy, Tor Browser will disable Flash, RealPlayer, QuickTime, and other plug-ins that can reveal your IP address.

Of course, Tor Browser comes with various plugins such as HTTPS Everywhere and NoScript that will ensure your privacy stays protected.

The browser will also block trackers and ads, so websites can’t follow your online activity.

Keep in mind that it’s not recommended to download and install additional addons or plugins since they can be used to compromise your privacy.

⇒ Get Tor Browser

3. Opera vs. Tor Browser: The final verdict

While Tor Browser offers great privacy features, its speed might be a problem for most regular users.

On the other hand, Opera browser offers a free unlimited VPN that is just as fast as your regular connection, so you won’t experience any slowdowns.

Our verdict is that the difference between Opera’s VPN vs Tor is what makes Opera an overall better choice for users.

Tor vs Brave vs Opera

Tor offers the greatest degree of privacy and anonymity. Although this does not necessarily suggest that Tor Browser is perfect, it does give an extra layer of security to your ordinary browsing. Using it along with a VPN will ensure your online safety.

The Brave browser blocks advertising and removes ad-tracking cookies, which can speed up your browsing. It also protects you from malicious software that may be hidden in online adverts. You may also choose to route your traffic over the Tor network.

But again, without a third-party VPN service, you won’t be completely or almost completely covered when browsing the Internet.

In terms of security and user privacy, Opera provides an adblocker, removed ad-tracking cookies, and offers an Ethereum-based cryptocurrency wallet.

The browser also has a VPN, which protects your IP address from hackers. With this feature, you may completely encrypt your online sessions, without having to resort to another third-party service.

Check out our in-depth security and feature comparison between Opera and Brave to see which one suits your needs.

We also have a great guide that compares Opera and Waterfox, so don’t hesitate to check it out.

What browser do you use? Feel free to share your thoughts in the comment section below.