3 Easy Tips to Fix This Email is Part of a Reserved Domain

Many Microsoft accounts can be managed with one main account. Although security improves when using input devices, Microsoft perceives changes as threats to an existing Microsoft account. 

Whether these changes are from Hotmail, Outlook, OneDrive, or adding a new account and something goes else goes wrong while trying to manage from the main account, Microsoft tries to be sure that your account is safe and they put in measures to cross-check these. 

However, these security measures do not stop you from setting up your email, so you can read them on multiple platforms.

Why am I getting This email is part of a reserved domain?

There are reasons why you would get this response if you are using a Windows domain. Some of the reasons are:

  • You used a third-party domain email address to create a Microsoft account
  • Chances are you deleted your Hotmail account and wanted to migrate to Outlook
  • You deleted an account from a computer and would like to add it back as a new user
  • You want to manage all your Microsoft accounts from one mailbox

If the case is any of these, here are things that you can do to fix this issue and stop receiving this response.

What can I do when seeing This email is part of a reserved domain?

1. Create an alias account

  1. Go to Gmail.
  2. Click on Create an account.
  3. Enter your phone number on the signup form and then click on Next.
  4. A verification code will be sent to the phone number provided.
  5. Another form asking for your personal information will appear, fill that up.
  6. Review the privacy policies and click on agree.
  7. Your Gmail will be created. 

To create an alias account that can work without any hitch, create an account that isn’t a Microsoft account. This is because you cannot set up an active Windows account as an alias for another Microsoft account, or you risk a This alias cannot be added to your account error.

Using a Google or Yahoo account as an alias account is best. Also, you cannot use a third domain that is registered in Windows Live Admin as an alias account. 

Now that you have created an alias account that is not linked to a Microsoft account go back to the tab and type in the Gmail account. The good thing is that you can use the same password for your alias account, and all your information, contacts, and messages are synced.

2. Use your domain name with outlook.com

  1. Login to your Microsoft account.
  2. Click on Your Info.
  3. Click on Manage your sign-in email or phone number.
  4. Enter your already existing password.
  5. Click on add email.
  6. Enter your email address using your domain name and @outlook.com.

This should work just fine. With this method, all your contacts are synced, and the primary email is picked up. You do not lose any vital information as all the settings and OneDrive files are also synced across. 

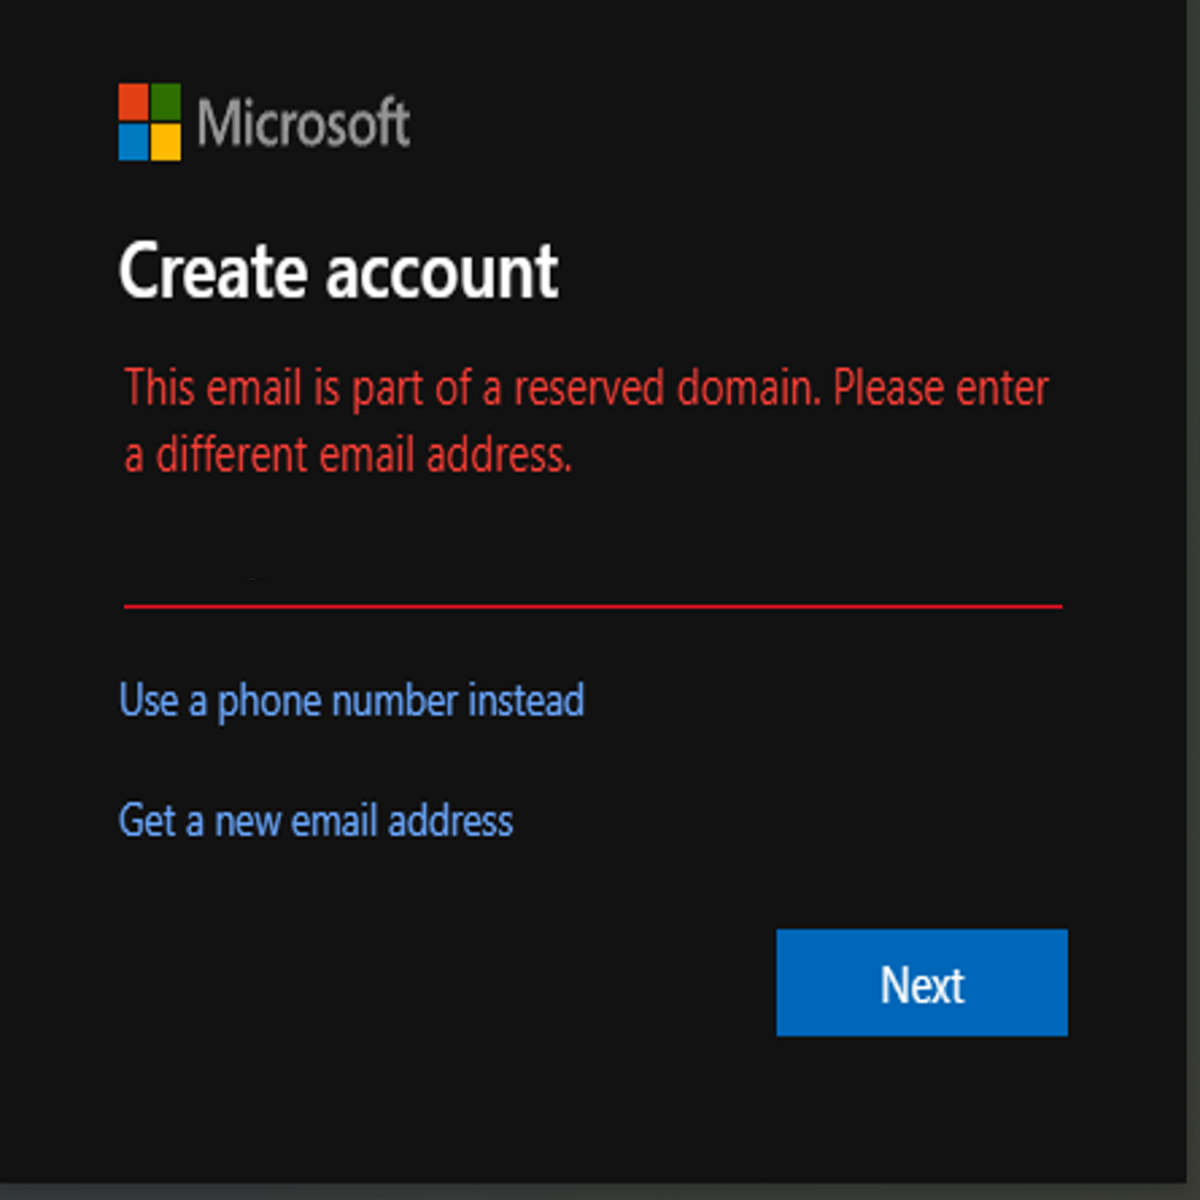
It could be that it allows you to log in with account.live.com, on another computer, and on your OneDrive. However, when you add it as a new user on any computer, you will keep getting: The email is part of a reserved domain. Please enter a different email address as a response. 

This could be because the account you are trying to use is registered on a custom domain. For this, you can use an alias with outlook.com.

3. Avoid unnecessary third party emails

  1. Open Outlook.
  2. Sign in with your existing Hotmail account.

You want to stop getting the error: Email is part of a reserved domain response, and you do not want to get an alias from Google or Yahoo. Having other aliases not linked to Microsoft doesn’t make sense when you have decided to use Microsoft emails. 

Using Windows Live Mail allows you to use Outlook to create an alias account, which means you are using a Microsoft account as your alias account and not a third-party email.

Outlook also allows you to send and receive emails from other POP accounts. You can have up to 15 aliases with a maximum of 5 per year, and you can receive emails from all the aliases and access them with only one inbox. 

It is important to note that if you have permanently deleted your Hotmail address, it cannot be reverted or reused. You can also not use it as an alias because it is already part of a reserved domain. The reversal from Hotmail is not possible because Hotmail has migrated to Outlook.

Many users have wondered why they have to use aliases when trying to access their Microsoft account in cases when they upgrade or try to manage from one mailbox, and Microsoft has explained that it is a matter of security. 

When users complain, Microsoft has explained that linked accounts aren’t safe if one is hacked. And this is why they advise that aliases are better when they are third-party email accounts like Google or Yahoo.

Windows 11 Kiosk Mode: What is it & How to Use it

It has been a long time since Windows has had a feature called Kiosk mode, which changes a regular device into a single-purpose device that can only run one application. Thus, today we will show you how to set up Kiosk mode in Windows 11.

The most common application for this feature would be to set up an internet-accessible computer as a kiosk machine for guests to use to access the Internet. Or fill out an application, and convert an existing device into an interactive digital sign to demonstrate a product or promote a business to customers.

Follow along as we will show you how to enable and disable Kiosk mode in Windows 11, right after we see in more detail what it is and how it works.

What is Windows Kiosk mode?

Windows enables you to create fixed-purpose devices like ATM machines. Or point-of-sale terminals, medical devices, digital signs, and kiosks using the Microsoft Azure platform.

Using Kiosk mode on these fixed-purpose devices, you may provide a dedicated and locked-down user experience to your customers.

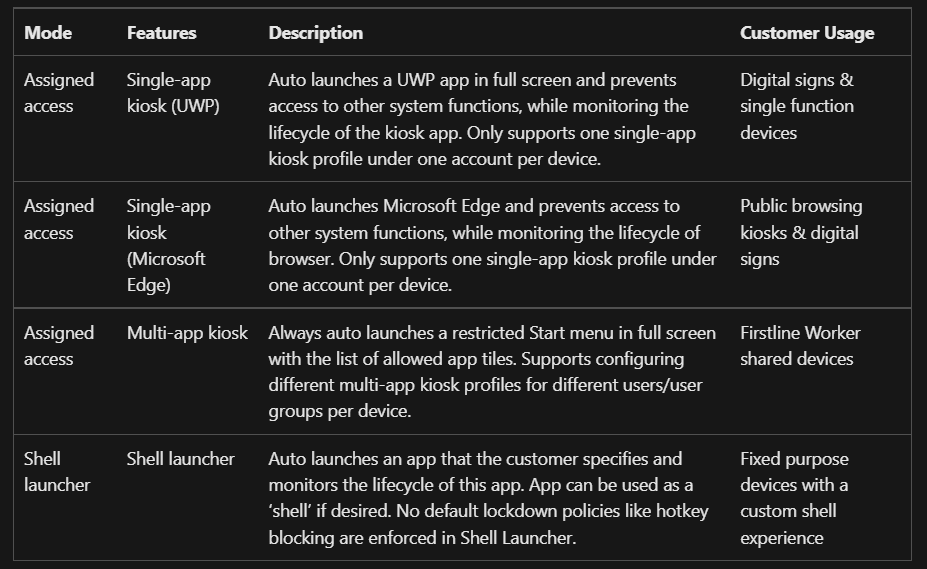
Kiosk capabilities (Source: Microsoft)

In order to provide a more secure environment for public or specialized usage, Windows provides a number of various locked-down experiences. Including assigned access single-app kiosks, assigned access multi-app kiosks, and shell launchers.

Depending on the kiosk configuration, either assigned access or a shell launcher is used. In accordance with your responses to the following questions, you can select from a variety of different kiosk configuration approaches.

Alternatively, if you only want a single program running on your kiosk that anybody can see or use, consider an assigned-access single-app kiosk that runs either a Universal Windows Platform (UWP) app or a Windows desktop application.

Keep on reading our Windows 11 Kiosk mode guide to learn how to enable and disable it whenever you want.

How can I enable & disable Kiosk mode in Windows 11?

1. Enable it from Settings

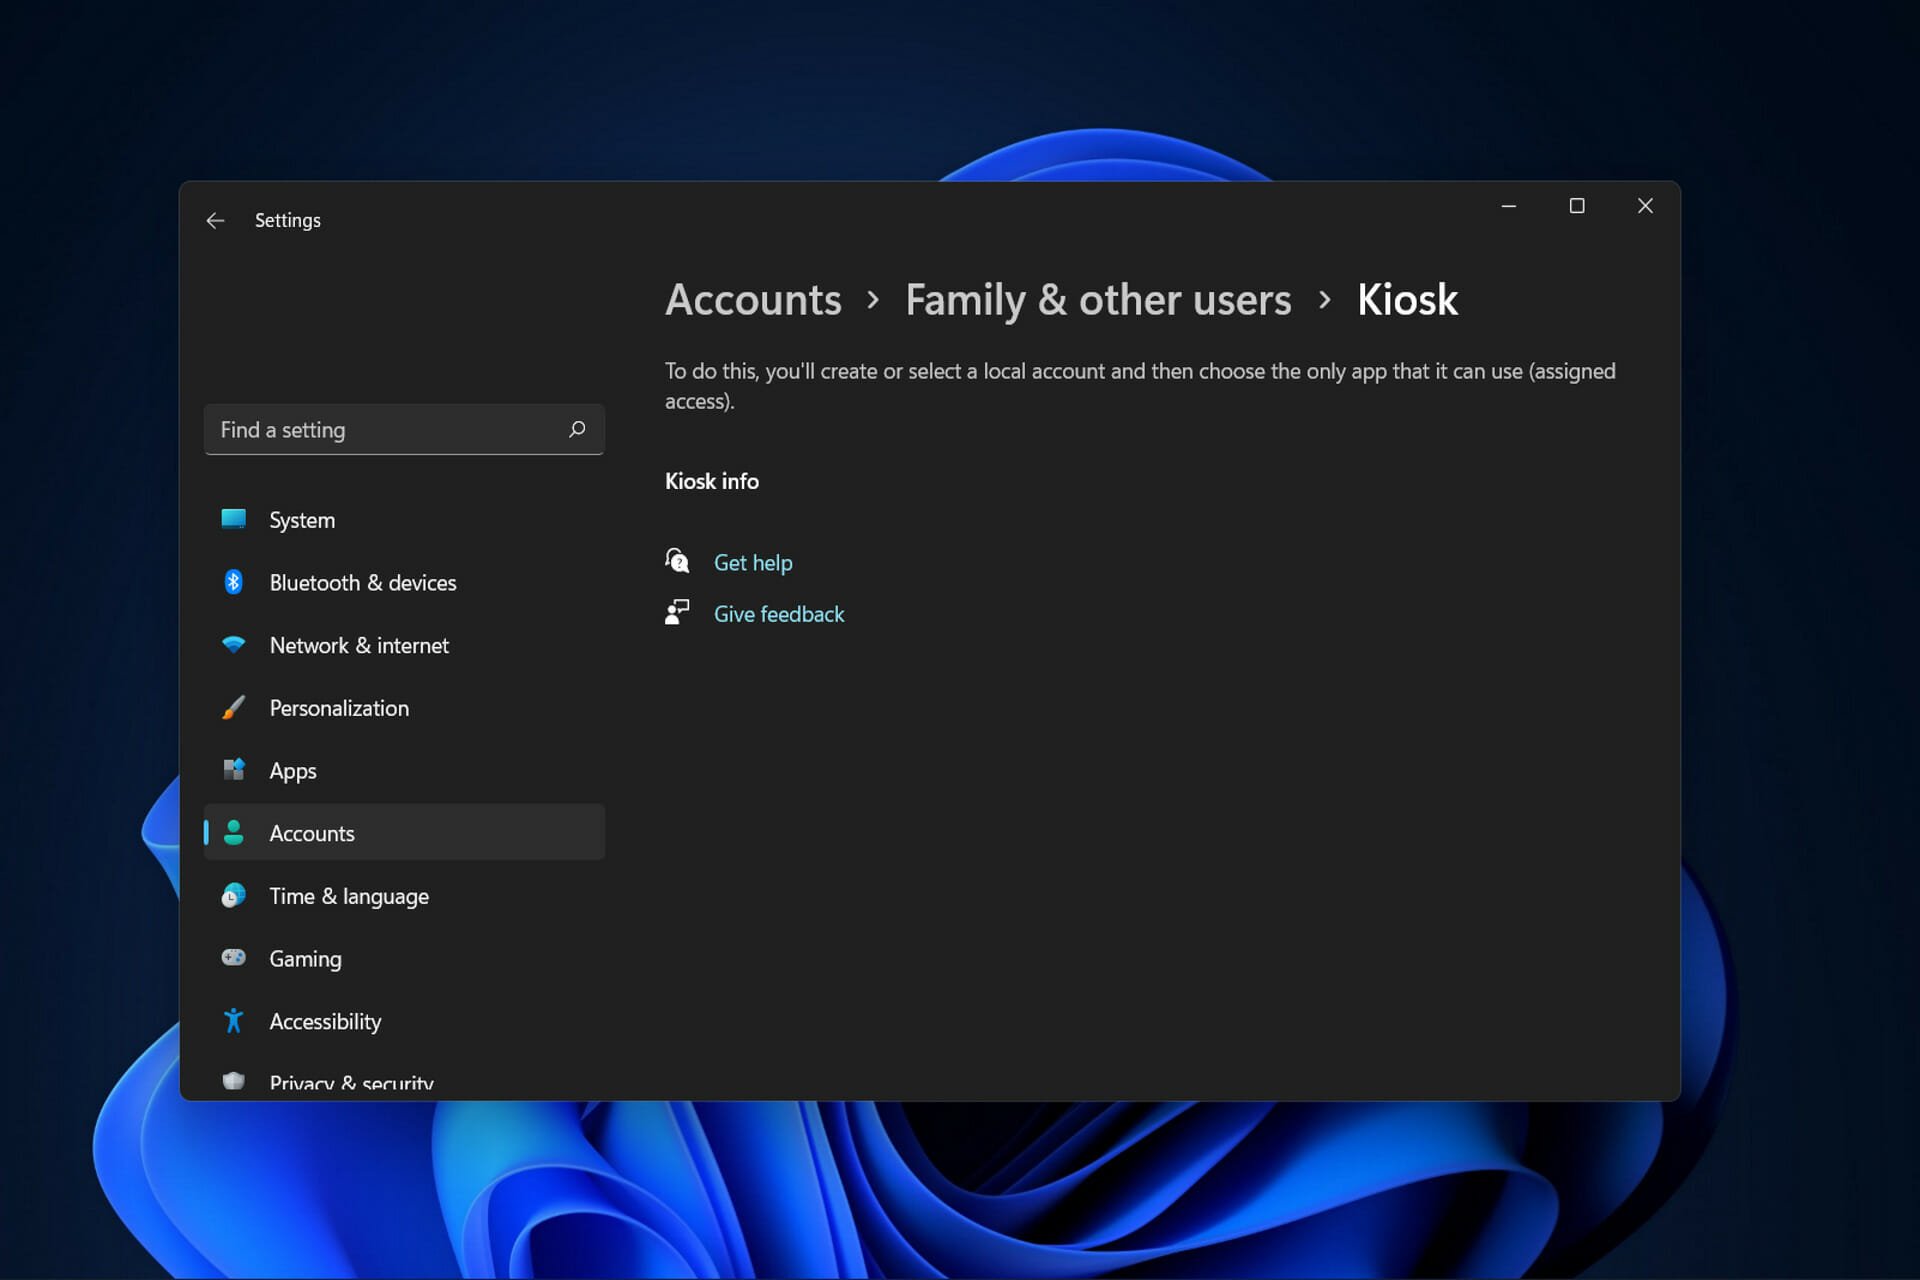
  1. Hold Windows + I to open the Settings app and go to Accounts followed by Family & other users.account0family windows 11 kiosk mode
  2. Under the Set up a kiosk section select the Get started button.get-kiosk windows 11 kiosk mode
  3. Enter the name of the kiosk then click Next.name-next windows 11 kiosk mode
  4. Select the app that you want to use in the Kiosk mode then click on Next and continue with the configuration settings.
  5. After you complete the steps, sign out of the primary account then sign in with the Kiosk account to enter the mode.

Using the CTRL + ALT + DEL keyboard shortcut will bring up a menu of alternatives for exiting the session. Such as shutting down the computer, restarting the device, or signing in with another account.

Note that there is no Windows 11 Kiosk mode for multiple apps, as the feature is only available in Windows 10. If you need to use the multiple apps kiosk mode, check out how to roll back to Windows 10.

2. Disable it with your admin account

  1. Press Windows + I to access Settings and navigate to Accounts followed by Family & other users.account0family windows 11 kiosk mode
  2. Under the Set up a kiosk section select the Remove kiosk button. Once you’ve done this, the kiosk will be removed from your Windows 11 computer.


Does Windows 10 have a Kiosk mode?

Windows Kiosk mode is supported for Windows 10 Pro (there’s also Windows 11 Pro Kiosk mode), Enterprise and Education editions, and Windows 11. Kiosk mode is not available for Windows 10 Home edition devices.

However, there is a Kiosk mode in Windows 11 Home. If you decide to upgrade to it, don’t hesitate to use our guide on how to download or upgrade to Windows 11 as a reference.

For more information on the differences between Windows 10 and 11, take a look at our post on some of the features that were removed from Windows 11.

It is especially useful for locking down Windows 10 and 11 devices that are used for a specific purpose. Such as self-check-in kiosks at airports, point-of-purchase (POS) terminals at self-service restaurants, and digital signage used for advertising.

Moreover, it ensures that users cannot modify device settings and access other features or apps on the device. Or use it for purposes other than those for which it was intended.

Check out the five best kiosk software for Windows 11 / 10 to keep track of regular entrances, exits, and visits in your building.

Was this guide useful to you? Let us know by leaving a comment in the section below. Thanks for reading!

5 Ways to Fix Wacom Pen Pressure not Working

Artists, illustrators, and graphic designers say using the Wacom tab and pen is a more efficient work method that produces seamless results.

Even photographers adopt it as running your cursor with a mouse over an image can be less exciting than using a pen on a tab that gives a feeling of physical work. 

However, having a Wacom error or glitch and experiencing unresponsive pressure from the pen is not fun. The reason for getting the device in the first place is defeated if the user cannot use it.

Devices come with pressure sensitivity support, enabling the Wacom to connect with your laptop or PC.

Why is Wacom pen pressure not working?

  • Window ink disabled – chances are that there is no interaction between the Windows ink and the Windows software. 
  • The battery of the pen is too weak to function – face it, you may be too busy to notice the battery of your pen and how weak it may be. Between doing that great design for Disney or designing the next character for that big blockbuster movie, you may forget that your pen battery needs changing. Wacom pen lasts for five months and you may need to change it after that period.  
  • Dirt accumulated on the Wacom and pen is encountering interference – it may sound basic, but your Wacom may accumulate dirt over time, and this could interfere with the pen’s responses. 
  • Pressure capabilities not turned on – applications come with built-in support for pressure sensitivity. If this feature is not turned on in the application, your pen pressure may not work.
  • Faulty mouse or touchpad driver – if a part of your hardware is faulty like the mouse, it may interfere with the functionality of the pen pressure on the Wacom. Think of it this way, the function that your mouse is to do is what your Wacom is doing with all the extra features. If the mouse is not functional, your device interprets Wacom as your mouse. You don’t want this either, because it robs you of all the other functionalities. 
  • Missing or outdated Wacom driver – the Wacom driver you are currently using may be outdated, and you may have to update the drive. If the driver is not updated, the pressure pen will not function.
  • A lack of synchronization – you would think that when the software or Wacom driver is updated, there will be synchronization with the software, Wacom device, and your PC but it is not often the case.  

What apps support pen pressure sensitivity?

Here is a list of apps that support pen pressure sensitivity. And because they do, you may also experience a lack of pen sensitivity or lack of pen pressure, when there is an error.

  • Adobe Photoshop – the error in Adobe Photoshop shows up with a triangle warning box with a message that says: Pen sensitivity is not available.
  • Autodesk – in Autodesk, an error in pen pressure sensitivity occurs when the pen acts like you are using full pressure when you are not.
  • Corel – users experience errors in Corel in the form of a lag in the tab and an unsmooth drawing.
  • CLIP STUDIO PAINT PRO – pen pressure in the Clip Studio Paint PRO app often presents as a disappearance in the pen drawing visibility. Instead of pen drawing, it erases.
  • Boris FX Optics – users experience a lack of pen pressure in this app when light pressure is interpreted as heavy pressure when drawing.
  • Adobe Sketch – pen pressure error in Adobe sketch occurs when pressure is incorrectly interpreted. Light pressure is interpreted as heavy pressure, and heavy pressure is interpreted as light pressure.
  • Concepts – pen pressure sensitivity error in Concepts can be experienced when there is no fluidity in the lines drawn by the user.
  • MediBang Paint – users experience pen pressure in Medibang Paint, in the form of glitches.
  • Bamboo Paper – the error in pen pressure as experienced in Bamboo Paper often shows up in the pen causing a left click, instead of its actual function, which is to draw, illustrate or create on the tablet.

There are many ways to get your Wacom pen to work, depending on the software that is used at the time.

Several users have experienced difficulty in one rule fitting all the software. Still, there are basic things that you can do to fix your pressure pen not working, whether you are using Photoshop, Autodesk, or one of the programs mentioned above. 

How do I fix my Wacom pen pressure?

1. Inspect your hardware and software

  1. Inspect the battery of the pen.
  2. Check the connection of the Wacom to your device.
  3. Unplug the USB cable to the Wacom tablet and plug it in again.
  4. Change the portal and see if this works, and if it doesn’t, find a cable that works and ensure that it is properly plugged in. 
  5. Ensure that the pressure sensitivity of the software you are using is turned on.
  6. Open the Photoshop software.
  7. Click on the icon at the top right corner to get the right kind of pressure from your pen.
  8. Click on the other icon at the top left to control the opacity of the pen.
  9. Inspect the battery of the pen.
  10. Check the connection of the Wacom to your device.

Furthermore, use a towel and a cleaning detergent that contains 75% propyl alcohol and thoroughly wipe your Wacom tablet and the pen.

2. Enable window ink

  1. Go to Settings by clicking on the Windows key on your keyboard.
  2. Search for system icon, and click on the turn system icon on or off.
  3. Turn on the Windows Ink icon.

3. Uninstall the Wacom program from my PC or laptop

  1. Type the R and Windows button on your keyboard, to access the Run command system.
  2. In the tab, type in services.msc and click on Enter.
  3. Select Wacom professional services, right-click, and select the Restart option.
  4. Ensure that all the preferences you may have configured are backed up.
  5. Save and close all your work before you get started.
  6. Try to remember the username and password of your PC and keep it handy. 
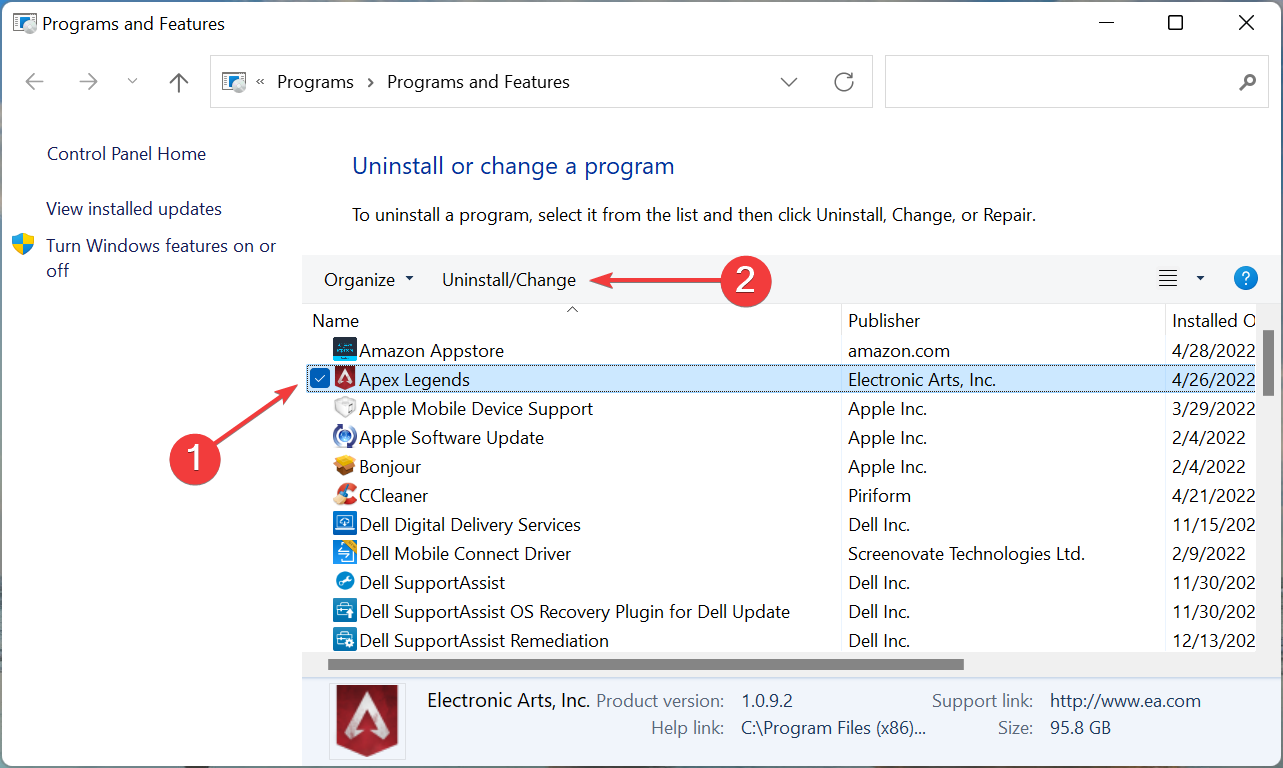
  7. Click on the Control Panel and click on Programs.
  8. Go to Programs and Features.
  9. An option to Uninstall or change a program will come up.
  10. Select the Wacom tablet.
  11. Click on Uninstall.
  12. Restart your PC and type in your username and password.

There is another way to uninstall specific software or applications from your system entirely, and that is with professional tools.

iObit Uninstaller is the proper method to remove applications from your PC without leaving junk or registry entries behind.

4. Update the Wacom driver

  1. Visit the Wacom website.
  2. Click on Support.
  3. Go to Drivers & Software.
  4. Click on Drivers & Download.
  5. Confirm download.
  6. You may now start the installation.
  7. Accept the Terms and conditions.
  8. Then click on Restart.

Similarly, updating the driver also works when XP-PEN pressure is not working in Photoshop.

5. Revert the WinTab functionality

  1. Go to Settings by clicking on the Windows key on your keyboard.
  2. Unable Windows Ink.
  3. Disable Windows Ink from the drive.
  4. Go to a text editor and create a file. 
  5. Type in UseSystemStylus 0.
  6. Save the file name as PSUserConfig.txt.
  7. Follow these steps on your PC: Cdrive:\Users\[User Name]\AppData\Roaming\Adobe\Adobe Photoshop CC 2015\Adobe Photoshop CC 2015 Settings
  8. Put (copy) the file into the Photoshop settings folder.
  9. Restart Photoshop. 

In all, these steps should enable your pen pressure to work. There is a synchronization between these software apps, Windows, and Wacom, however, if there is a glitch, one should not panic.

These issues can be resolved as long as the appropriate steps are followed, just like users fix things when XP Pen is detected as a keyboard.

This issue can often be related to a wintab32.dll error, and in our latest guide, we’re taking a closer look at it, so why don’t you check it out?

Let us know which solution worked for you in the comments area below.

Microsoft Rewards Account is Suspended? 3 Ways to Fix it

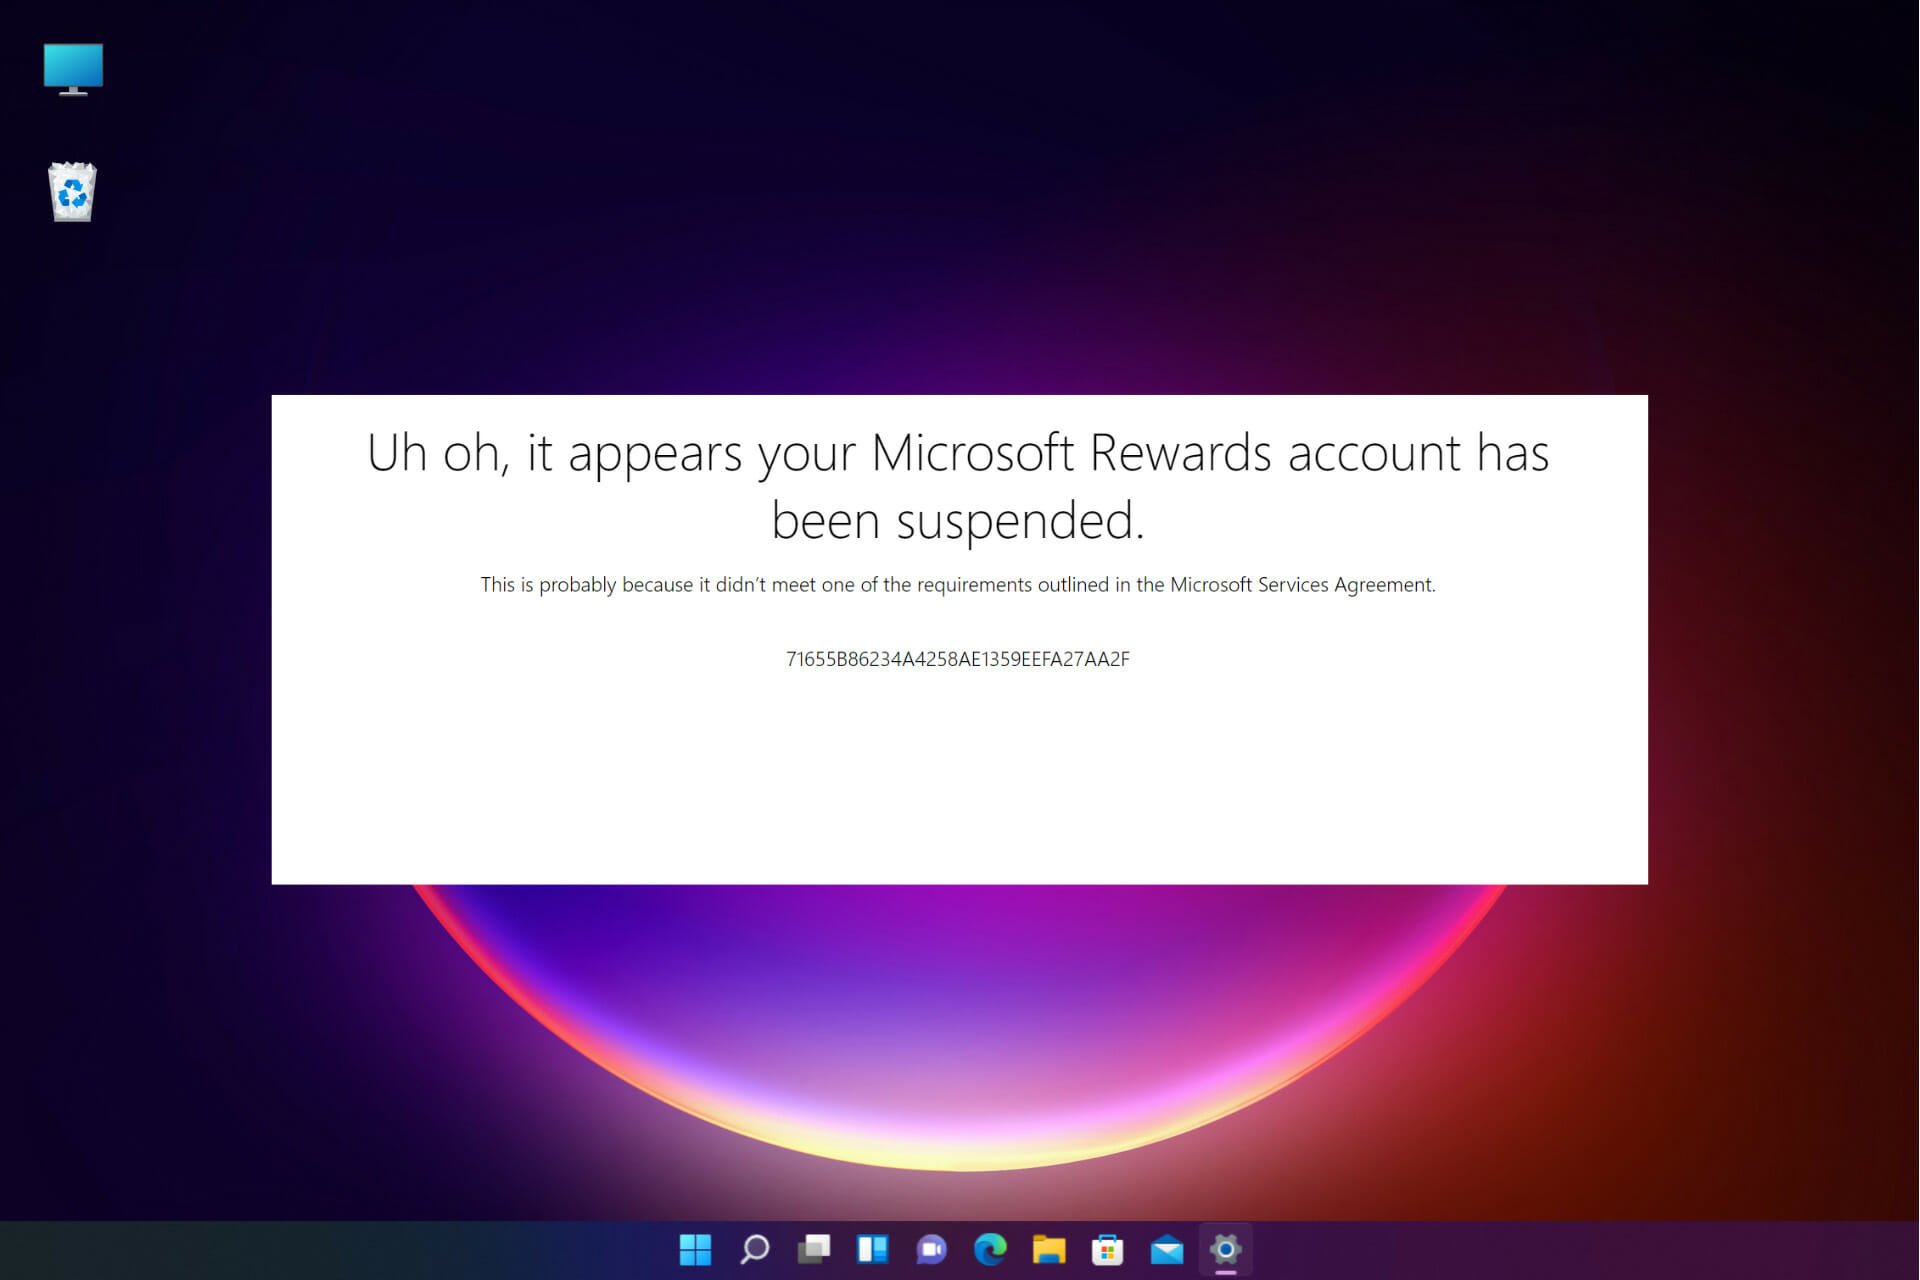
If you are trying to unsuspend your Microsoft Rewards account that recently got suspended, then you are at the right place.

Users often raise a concern when they have been trying to redeem the Microsoft Rewards in the morning or the day after, and all of a sudden, the platform says their account is suspended.

This is a common issue, where they first come across an error while trying to redeem the rewards, and then they are banned abruptly.

Therefore, while you must pay attention to the terms stated in the Microsoft Service Agreement, here are a few suggestions on how to unsuspend your Microsoft Rewards account if it already is.

Why is my Microsoft Rewards account suspended?

Microsoft keeps changing its rewards account rules every so often, and hence, you must stay updated at all times. Make sure that you review the Microsoft Service Agreement once every month to check if there are any new changes.

Some of the common reasons related to the agreement that may lead to the rewards account suspensions are:

  • Have multiple Microsoft Rewards accounts with different email addresses
  • Trying to use points beyond the limit
  • You have already redeemed 550,000 points per calendar year in the Program as per the agreement
  • The number of points or Rewards per person, per household, exceeds the set limit
  • Have multiple accounts on your mobile phone number
  • If you use a bot to perform searches
  • Using a VPN circumvents any restrictions on access to or availability of the Services
  • Online fraud, like phishing, account theft, etc.

So, if you are now wondering: How do I unsuspend my Microsoft Rewards account?, the below methods answer your question.

How to get unbanned from Microsoft Rewards?

1. Contact Microsoft Rewards Support

  1. Visit the Microsoft Rewards Support page and contact them about the issue.
  2. Under Describe the issue, enter the Issue Title. Enter the issue title in Microsoft Rewards support page
  3. Then proceed to enter your First Name, Last Name, the e-mail address where they will respond to you, and the email address associated with your Microsoft Account. Add the name, email address details in About You fields
  4. Next, go to What would you like assistance with? field and select your problem from the drop-down list. select problem from What would you like assistance with drop down
  5. Select Time Zone and then under the Please explain further section, fill in all the details related to your issue and click on Submit. Enter time zone and other details and submit
  6. They will investigate the account and determine whether or not it should have been suspended.
  7. When you receive an email from the support, save it to a folder for future reference, if the account remains suspended.

So, to answer your question – how long will my suspension last on Microsoft rewards? It may take 2 months or more to get unbanned. But you can get unbanned from Microsoft Rewards.

However, if it still doesn’t, move on to file an arbitration request.

2. Fill out the Binding Arbitration form

  1. To file an Arbitration request with Microsoft, begin by reading the Microsoft Services Agreement.
  2. Go to the Microsoft Rewards section and check the clauses if you have violated any of the requirements. Read the Microsoft Rewards clauses in the agreement
  3. If according to you, you have not broken any rules, navigate to the Binding Arbitration section.
  4. Click on the Arbitration and dispute resolution link in this section. open arbitration form link under Binding-arbitration
  5. Go to Demand for arbitration, expand, and download the Notice of Dispute form (PDF).download Notice-of-Dispute-form pdf
  6. Fill out the form and mail it to Microsoft. Then wait for 60 days for the dispute to be resolved.
  7. If unresolved after 60 days, download the Demand for Arbitration form (PDF). Fill it out and mail it to Microsoft. download Demand for arbitration form pdf
  8. Follow the rest of the process as mentioned in the section.
  9. An unbiased panel will be assigned to resolve your case, once they have all the facts in place.

Now, wait till the Microsoft Rewards support team gets back with an email response.

Note icon NOTE
Filing an arbitration with Microsoft is completely free unless you hire an attorney.

3. Turn off the VPN

If you are wondering, why did my Microsoft Rewards disappear, it could be well due to the fact that you are using a Virtual Private Network (VPN).

Considering that many of us are now working from home, using a VPN is common these days. It could also be possible that you are trying to use rewards from a country using a VPN, where it’s not officially supported.

Your Microsoft Rewards account may also get banned if you use a VPN to earn rewards on more than one account. Besides, it could also be due to an ad-blocker, some of which work actually work as VPNs.

In such a case, you can temporarily turn off the VPN when using the Microsoft Rewards website.

But if you are technically proficient, you can try and exclude all Microsoft apps and any browsers or other programs you might use to search Bing from your VPN.

What else can I do to fix my suspended Microsoft Rewards account?

If you performed all the steps above and you have contacted the Microsoft Rewards support team about the account suspension, please be patient till they revert.

However, here are some additional tips you may find useful:

  • Make sure to save all the emails you receive from the team in a separate folder
  • If you do not receive an answer from them that’s good enough, proceed to file the Arbitration form and include all the emails you’ve received from them
  • Before that, makes sure you read the Microsoft Services Agreement carefully, especially the Microsoft Rewards section
  • This will help you identify if you have breached any of the terms mentioned in the agreement

This issue is also reported with the Xbox game pass, and hence, in such cases also, you may contact Microsoft Rewards support.

To learn more about Microsoft Rewards, we have a guide that answers if it’s possible to get Microsoft Rewards without a phone number, so don’t miss it.

If you know any other reason why your Microsoft Rewards account is suspended or a solution for it, do leave a comment below in the comments box.

Windows news recap: Nvidia GeForce Now gains 4K 60 FPS streaming, Internet Explorer users urged to move on before it’s phased out, and more

Welcome back to our Windows news recap, where we go over the top stories of the past week in the world of Microsoft’s flagship operating system.

Nvidia GeForce Now gets 4K 60 FPS streaming on PC and Mac

The native Nvidia GeForce Now apps on PC and Mac have received support for streaming at 4K 60 FPS on compatible devices, allowing higher quality game streaming.

Nvidia GeForce Now gets 4K 60 FPS streaming on PC and Mac - OnMSFT.com - May 5, 2022

Outlook on Windows is getting a notification pane to help you find your @mentions

A notification pane is to be added to the Outlook app on Windows, in an effort to make it easier to find mentions, so that you can keep on-top of what requires your attention. The feature is expected to launch in June.

Microsoft Outlook Windows 10

Microsoft urges users to stop using Internet Explorer before it’s phased out

Internet Explorer is set to be retired on June 15, but some are still holding onto the web browser despite this looming end of life. Microsoft has pushed users still using Internet Explorer to switch to another browser, such as Microsoft Edge, ahead of the actual retirement date, rather than waiting for the date to roll around.

Internet Explorer IE 11

That’s it for this week. We will be back next week with more Windows news.

Logitech G Hub Not Detecting Mouse: Best Ways to Fix It

The Logitech G Hub not detecting the mouse is a common problem. Luckily, it’s easy to fix and we’ll show you how.

It might not detect your mouse due to admin privilege issues, multiple app instances, OS or app updates, or sudden detection issues after a restart. Follow the steps below to make it work.

How do I get my Logitech G Hub to recognize my mouse?

1. Run the software as an administrator

  1. Right-click Logitech G Hub and choose Open file location.
  2. Right-click the Logitech G Hub exe file and choose Properties.
  3. Go to the Compatibility tab and check Run this program as an administrator and save changes.

After doing that, the software will always start with administrative privileges, and the problem should be gone.

2. Close additional G Hub apps

  1. Click the arrow icon in the system tray.
  2. Look for G Hub application.
  3. If you notice two applications available, right-click one and close it.

This can be annoying, but it’s usually easy to fix as long as you follow the instructions from this guide.

Once G Hub recognizes your device, you can change the DPI on your Logitech mouse to adjust sensitivity and make the most of its features.

If Logitech G Hub is not working in Windows 11, check out the article linked to fix the issue and get back the sound functionality.

Was this guide useful to you? Don’t hesitate to tell us what you think in the comments section below. Thanks for reading!

Wave Browser Virus: What is it & How to Safely Remove it

Users have been asking what Wave browser is and today we will answer it. Wave is a program developed by Wavesor Software that has been classified as a PUP (potentially unwanted program) due to its aggressive advertising behavior and questionable data-collection practices.

Although the Wave Browser is not a virus, it has the potential to cause security issues if it is not removed. Further explanation will be provided later in the article. But for now, let’s take a look at how the Wave browser got onto your computer in the first place and how you can get rid of it.

How did Wave browser get on my computer?

While the Wave Browser appears to be a legitimate application that can be used in the same way as a conventional browser at first glance. There are some characteristics that you should be aware of before you use it.

Although this app is built on Chromium and, for the most part, behaves as you would expect it to, it has been reported that the Wave Browser is prone to causing sudden page redirects and/or displaying aggressive and obstructive advertisements on the screens of its users.

Usually, it is automatically installed through the process of file bundling. Thus resulting in users not being aware that they have installed it at all.

As a result, when you no longer have control over your computer and it begins to make changes on its own, things might become frightening and confusing.

But don’t worry as we will show you how to remove it completely from your computer and avoid any future software damage.

Is Wave browser the same as Microsoft Edge?

Microsoft Edge is a cross-platform web browser that was invented and developed by the company Microsoft in 2010. Windows 10, Windows 10 Mobile, Windows 11, Xbox One, and Xbox Series X and Series S consoles all ship with Microsoft Edge as the default web browser.

Wave browser is not related to Microsoft Edge, as the former is an entirely separate browser developed by a different company.

Quick Tip:

If you want a Chromium-based browser with advanced security features like an adblocker, anti-tracking, a VPN, and built-in fraud, and malware filtering, try Opera One.

Opera One

Use this reputable browser to surf the net securely and customize it to your own liking with add-ons, themes, and extensions.

How do I remove Wave browser from my computer?

1. Use Control Panel

  1. Open the Windows Search function by clicking on the magnifying glass icon from your Taskbar. Then type Control Panel and open the topmost result.control-panel-search what is wave browser
  2. Next, go to Programs followed by Programs and Features.programs what is wave browser
  3. Look for the Wave browser program, click on it and choose Uninstall.uninstall-program what is wave browser
  4. Press CTRL + SHIFT + ESC in order to open Task Manager and navigate to the Details tab.details what is wave browser
  5. Make sure that you don’t have any Wave processes left by clicking on them and choosing End task. In our case we don’t have any left, thus we showcased how to do it with on Notepad process.end-task what is wave browser

Once you delete any leftover processes, make sure to reboot your computer in order to start from a blank slate.

2. Use the Settings app

  1. Open Settings by holding Windows + I together then navigate to Apps followed by Apps and features.apps-apps&features what is wave browser
  2. Here, search for the Wave browser by typing its name in the search bar. Then click on the three-dotted menu and choose Uninstall. In our case, we used Chrome to show how to do it, since we don’t have Wave installed.uninstall-app what is wave browser
  3. Like before, open Task Manager by holding CTRL + SHIFT + ESC simultaneously and go to the Details tab.details what is wave browser
  4. Look for any Wave processes left, click on them then select End task.end-task what is wave browser

3. Use a third-party tool

To speed up your process, you can use a third-party PC cleaning utility. This will ensure there is no trace of the Wave browser left on your PC.

We recommend CCleaner because it has both a software uninstaller feature as well as a powerful scanner that detects junk files.

  1. Download and install CCleaner.
  2. Open the application and select the Tools section.remove wave browser
  3. Select the Uninstall option at the top and identify Wave Browser in the list of software.what is wave browser
  4. Click on it and select Uninstall.

To remove leftover files with CCleaner:

  1. Head to the Registry section.
  2. Select all options and click Scan for issues.what is wave browser
  3. Check the data found and find all entries related to the Wave browser. They should contain the name of the app, for example, C:\Program Files\ Wave Browser.
  4. Tick the boxes to all entries related to Wave and click Review Select Issues.what is wave browser
  5. It will ask if you want to create a backup, we recommend you select Yes.

When the process is complete, the Wave browser and all its files should be completely removed from your computer.

Is Wave browser malicious?

Wave Browser is considered hazardous by many cyber-security professionals. This is due to the undesired changes it makes to the system without the user’s knowledge or permission.

Another reason why it is a potentially harmful software is because of the program’s questionable advertising and data-collection methods.

In today’s world, data collection is standard practice. Consumers have become accustomed to the fact that a variety of apps and websites are continually collecting information from their devices to utilize in various ways.


Although this is not always the case, most of the time the user is told about what information is being gathered, who has access to it, and how it will be used. In the case of the Wave Browser, on the other hand, the waters are a little murkier.

With a little more investigation, it becomes evident that Wavesor Software is a trading name for a corporation known as Polarity Technologies Limited. Further investigation reveals that Polarity Technologies is affiliated with a corporation known as Genimous Technology.

This company has been linked to the development and distribution of malicious software. Adware and browser hijacker apps that are masqueraded as genuine applications are some examples.

The origins of this application are still a mystery. Since it exhibits suspicious and frequently intrusive behavior, it appears that the best course of action is to just delete it from your computer. Or never download the Wave browser in the first place.

We recommend that you take a look at our post on the five best secure and fast browsers for Windows 11 to use instead.

Alternatively, check out some browsers with a built-in VPN and adblocker service in order to ensure your privacy.

Don’t hesitate to leave a comment in the section below and tell us what you think. Thanks for reading!

Age of Empires 2: Error Loading String Table. How To Fix

Many of us just didn’t get enough of the beloved old Age of Empires 2 title since its 1999 release. Time passed, systems got updated and some found themselves unable to keep playing it.

Developers then decided to come back with a remastered version of the game, thus giving birth to Age of Empires 2: Definitive Edition.

But this doesn’t mean that the newer version of this remarcable strategy masterpiece came totally bug-free and without any of the old issues.

In fact, some players are still struggling with some pretty annoying bugs and errors, so we decided to lend a helping hand and show you how to deal with such situations.

Just in case you can’t start Age of Empires 2: Definitive Edition because of an issue that says Error loading string table, we’ll show you exactly what you need to do.

No, you don’t have to cancel the rest of your schedule, as this will only take a few minutes. After that, you can enjoy some quality gameplay and help other civilizations prosper.

How can I fix error loading string table for Age of Empires 2?

1. Update your graphics driver

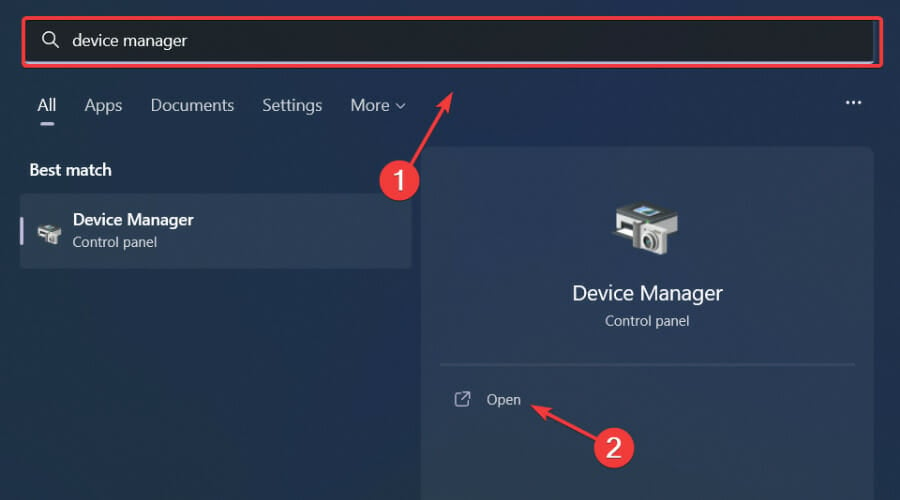
  1. Press the Windows key, search for Device Manager and click on Open.run device manager
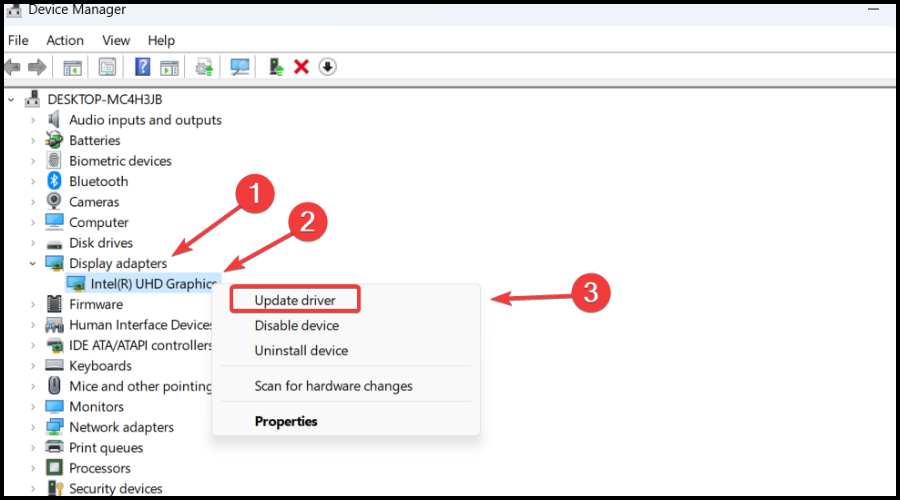
  2. Expand Display Adapters, right-click on your GPU and select Update driver.update gpu
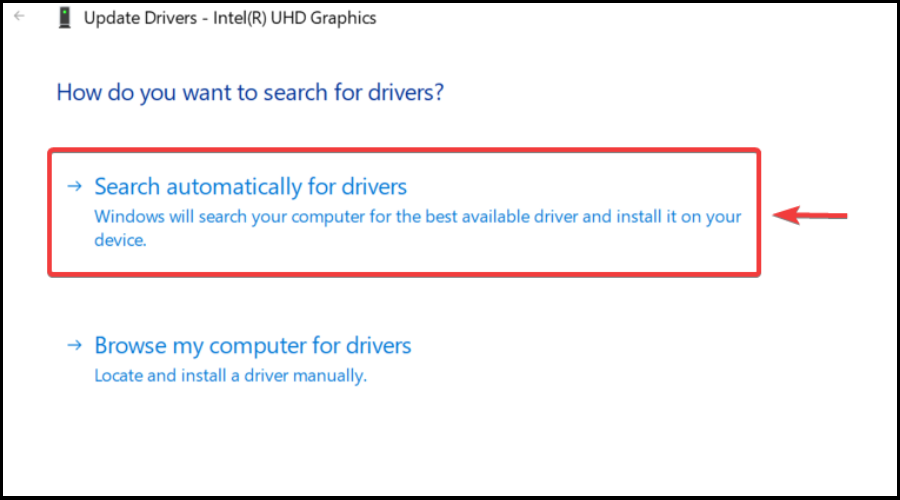
  3. Select Search automatically for drivers.search for driver automatically

If you’re into gaming, surely you can do without all the crashes, lags, or freezes by keeping all drivers up to date and error-free easily. 

Sometimes, manual checks are hard to perform, that’s why we recommend using an automated assistant that will scan for fresh driver versions daily.

In case you’re a beginner, you don’t have to worry! Outbyte Driver Updater is smart, simple, engaging and its user interface was built to make your life easier.

⇒ Get Outbyte Driver Updater

2. Run the game as an administrator

  1. Locate the folder where Age of Empires 2: Definitive Edition is installed.aoe 2
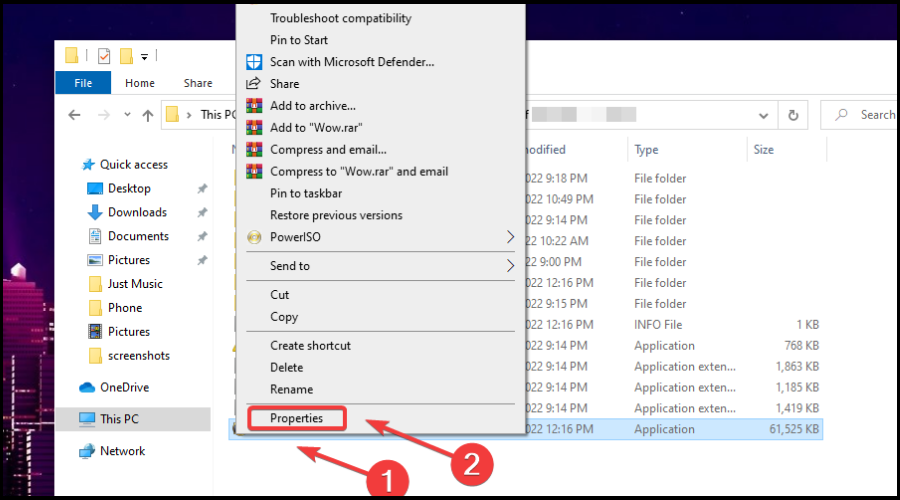
  2. Right-click on the Age of Empires 2 executable and click on Properties.propreties
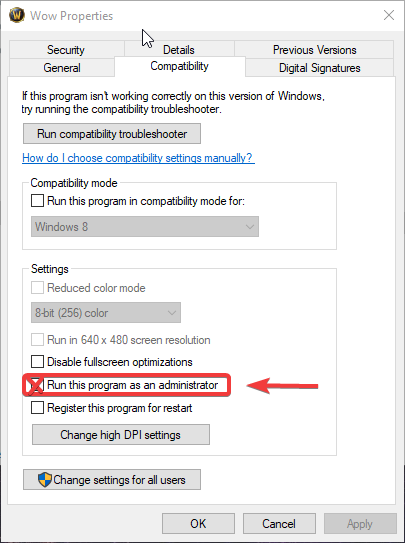
  3. Select the Compatibility tab and check the Run this program as administrator box.run werid west as admin

3. Update Windows to the latest version

  1. Press Windows + I to access Settings.
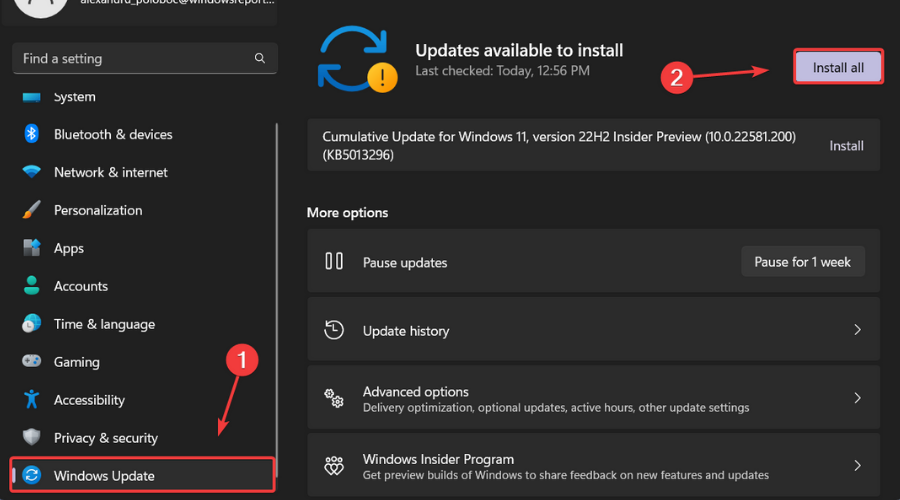
  2. Select the Windows updates tab and click Install all.install Windows updates
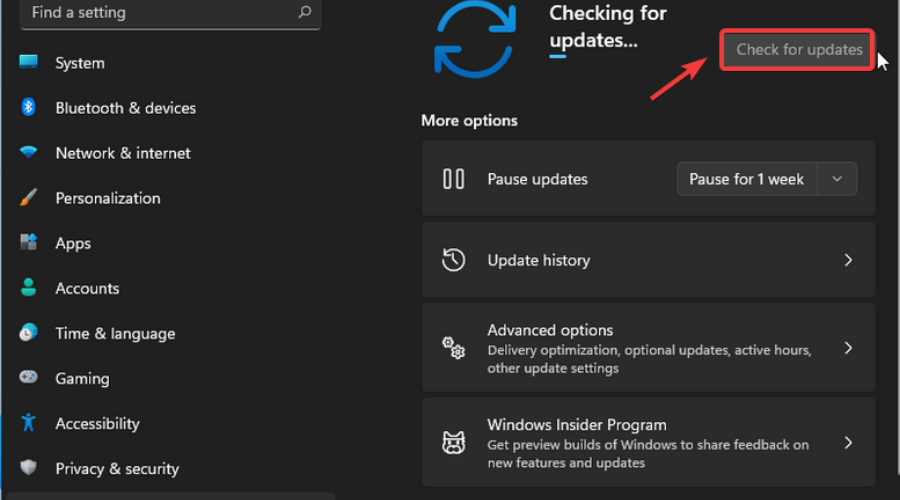
  3. If no updates are queued for installation, press the Check for updates button.check for updates

Going through these steps will allow you to fix this problem and get back to overpowering your enemies both with your huge army, but also with a sustained flow of resources that will keep the battle going.

Defeat all who stand in your way and conquer as much of the Age of Empires 2 world as you see fit.

Has this guide been helpful to you? Let us know in the comments section below.

3 Easy Solutions For Fixing The Roblox Internal Server Error

We think it’s safe to say that pretty much all of us heard about Roblox, right? It’s an online platform and storefront that users access in order to play games.

You might think it is, but Roblox is actually not a game. It is merely the place where people play games made by other developers. Makes sense, doesn’t it?

In fact, if we really think about it, Roblox is a lot more similar to Steam than it is to any online children’s game, as many thought after seeing pictures on the internet.

And, given the fact that we are talking about software, it too can run into problems, errors, or be affected by some nasty bugs, just like everything else nowadays.

Lately, more and more users are complaining about having to deal with the internal server error, which prevents users from logging in and accessing the popular platform.

The answer is yes, we know how to fix it, and we are about to share this knowledge with you. So, if you are having trouble with this error, here’s what you need to do.

What can I do to fix the internal server error for Roblox?

1. Check Roblox server status and uptime

  1. Open your go-to browser.
  2. Visit the official Roblox server status page.access roblox page
  3. Check server status.roblox server status

2. Clear the Browser Cache and Cookies

  1. Open your go-to browser.
  2. Click on the browser’s options dropdown.chrome options
  3. Select History.history chrome
  4. Press the Clear browsing data button.clear browsing data
  5. Select Cookies and other site data, as well as Cached images and files, and press the Clear data button.cookies and cache

3. Troubleshoot your internet connection

  1. Test if your network connection is working
  2. Restart your router (make sure you unplug the power cord and leave it for 30 seconds switched off)
  3. Right-click the network icon in the Taskbar and select Troubleshoot problems
  4. Open a Command Prompt and type the following commands (one by one):
    • ipconfig/release
    • ipconfig/all
    • ipconfig/flushdns
    • ipconfig/renew
    • netsh winsock reset

These are the solutions you should use when you find yourself unable to log in to the Roblox service because of an internal server error.

Has this guide proven to be useful to you in solving your problem? Let us know in the dedicated comments section below.

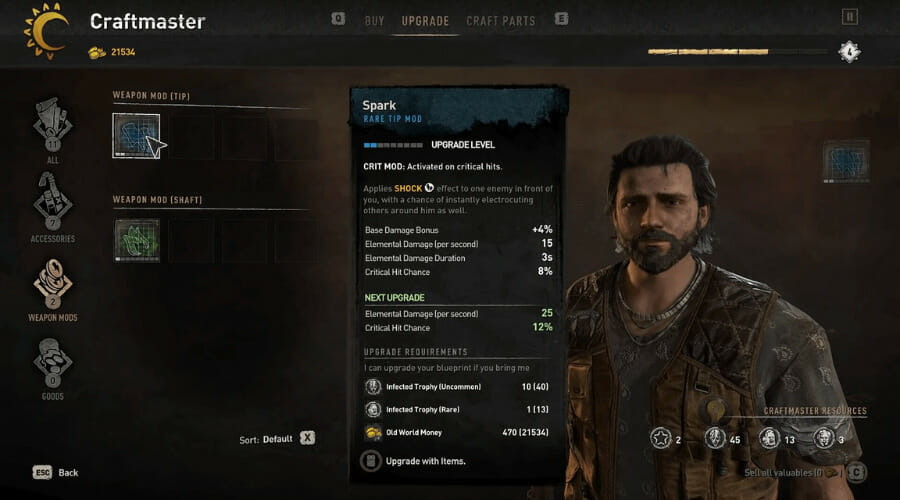
20 Need-To-Know Tips Before Playing Dying Light 2

So, you finally decided to pick up Dying Light 2 Stay Human and test your skills against the zombies that are roaming the city?

First of all, let us say you made a great choice in terms of video games. Secondly, there are some things you need to know before embarking on this exciting but dangerous journey.

Surviving in Villedor is a bit more challenging than you might initially think, so we’re about to share some tips that will surely come in handy when you find yourself in a tight spot.

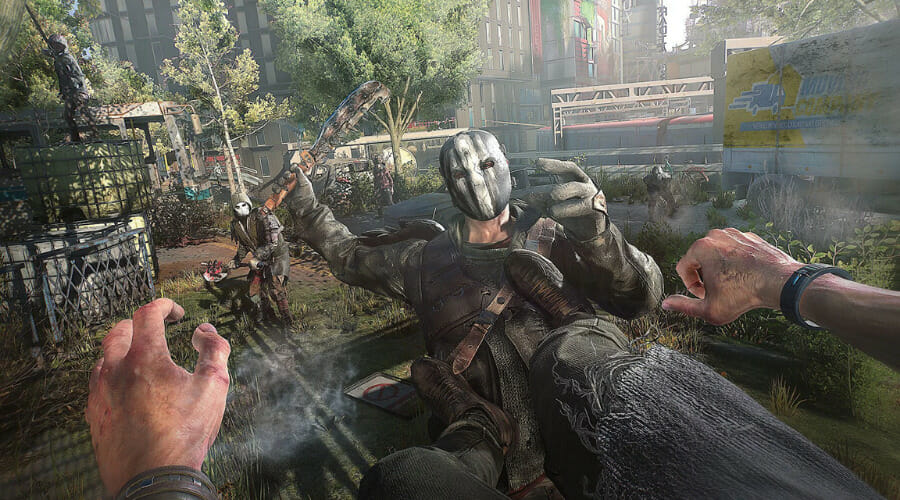
Remember that you are fighting blood-thirsty zombies, after all, not some rowdy teenagers that had a bit too much to drink.

That being said, if you are 100% percent sure about doing this, here’s what you need to know in order to have an easier and longer life in Dying Light 2.

What do I need to know before playing Dying Light 2?

1. Avoid exploring buildings at the start

We know you’re probably thinking: “What’s the point of developers allowing building access if we’re not even supposed to explore them?”

We’re not saying don’t explore them, just don’t do it at the very start. Sure, you might be tempted to do so even during the opening few hours of the game.

However, as brave as you consider yourself to be, this isn’t really recommended too early because some of these buildings are packed with sleeping zombies and other powerful enemies.

Yes, you can rely on your stealth to avoid waking them, but it only takes one wrong move to wake an entire horde of sleepers.

Needless to say what will happen if you end up doing so. On the off chance that does happen, however, make sure you run as fast as you can and get out of their range.

2. Avoid exploring during the night at the start

If you’ve also played the first Dying Light game, then you know that nighttime is full of dangers that you are not yet prepared to face.

You should really think about limiting the time you spend outside at night before Aiden has access to the game’s Nightrunner tools.

These are the hours in which the deadliest and most powerful infected in the game, such as the Volatile, wake from their slumber and start hunting.

Of course, tools such as the UV Flashlight are a great way to deal with the undead. However, specialized tools like these aren’t available until much later in the game.

Thus, if you are just beginning Dying Light 2, it is recommended that you focus on sleeping through the night and do all your exploring by day.

If, by any chance, you absolutely have to explore at night, make sure you are as fast and efficient as possible and use parkour and stealth if you want to see the morning again.

3. Your stamina is more important than your health

Stamina is really useful and drains pretty fast, so make sure you prioritize this stat if you want to be able to get yourself out of sticky situations.

A lot of Dying Light 2 players have constantly complained about the stamina gauge or its lack in the early parts of the game’s campaign.

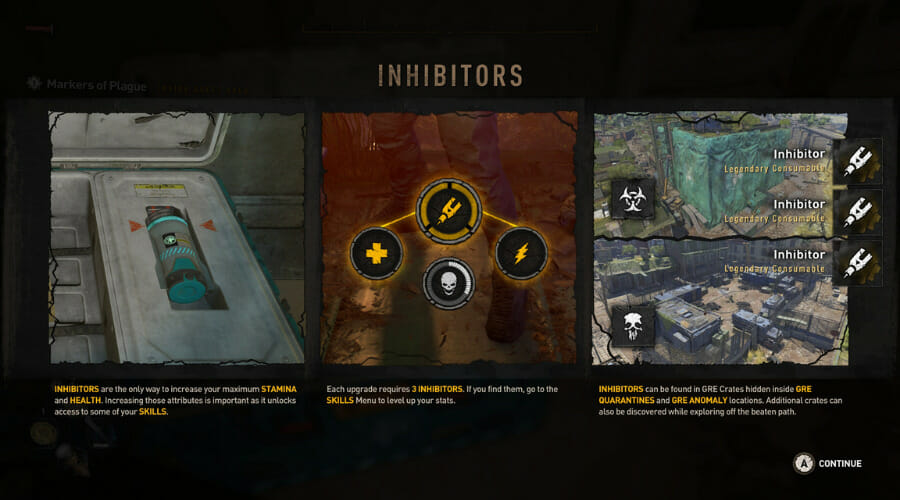
While playing, you will loot Inhibitors which, when used, will give Aiden the chance to upgrade his stamina. 

New players may be under the impression that in a world with a never-ending horde of infected beings, building up health for a tank-like run would be exactly what they needed.

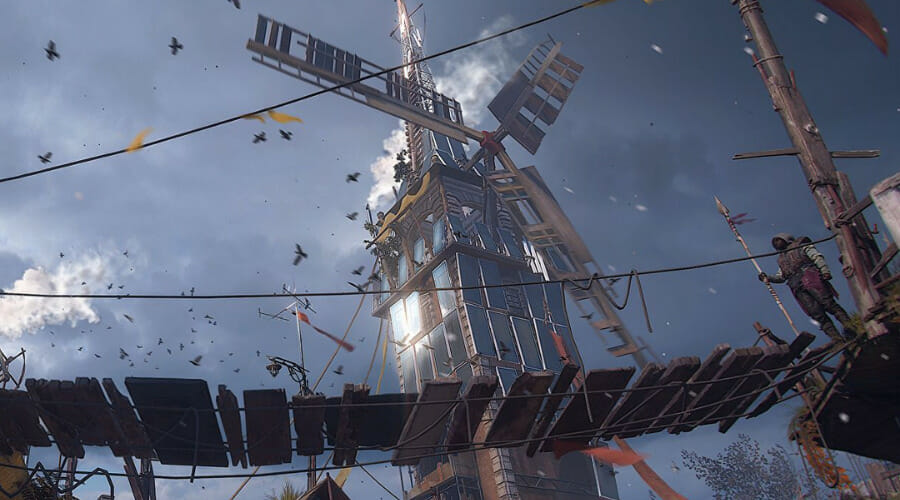
That is wrong, as leveling up stamina is far more useful in the early stages thanks to its improvements to climbing, escaping, and activating windmills.

Actually, stamina also impacts combat, so think about that as well. It goes without saying that running out of stamina and being unable to defend yourself will likely get you killed.

4. Stack on Inhibitors early in the game

Remember the Inhibitors we were telling you about a few seconds ago? Well, hunting for them and stacking up as many as you can at the start will go a long way and make your life much easier.

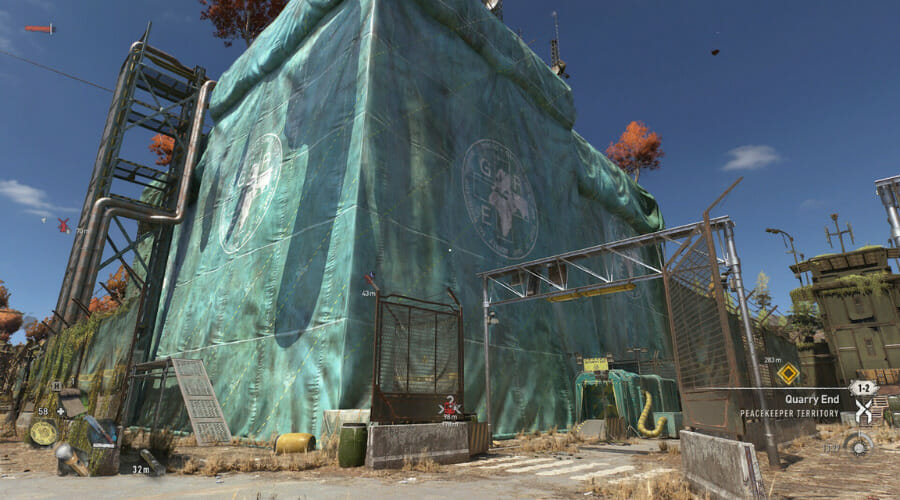
In Old Villedor you can find about half a dozen of easily explorable and beatable Quarantine Sites and GRE Anomalies where you can loot inhibitors.

Don’t worry, you will receive plenty of inhibitors in story missions early on, but finding extras can really open your character’s capabilities earlier.

It goes without saying that doing so will give you a bigger edge against enemies that are the same level or one rank lower than you.

Thus, seeing how the combat perk tree is governed by your health total, and the parkour perk tree is gated by stamina, looting as many as you can in the early stages can prove really useful.

5. Use parkour as much as you can

If you are just starting Dying Light 2, you’re probably not aware that the title features some of the best parkour mechanics we’ve seen in a long time, maybe even seen since Mirror’s Edge. 

In fact, Dying Light 2’s open-world city is actually built around and designed to be an athletic playground for the main character to run, climb and explore.

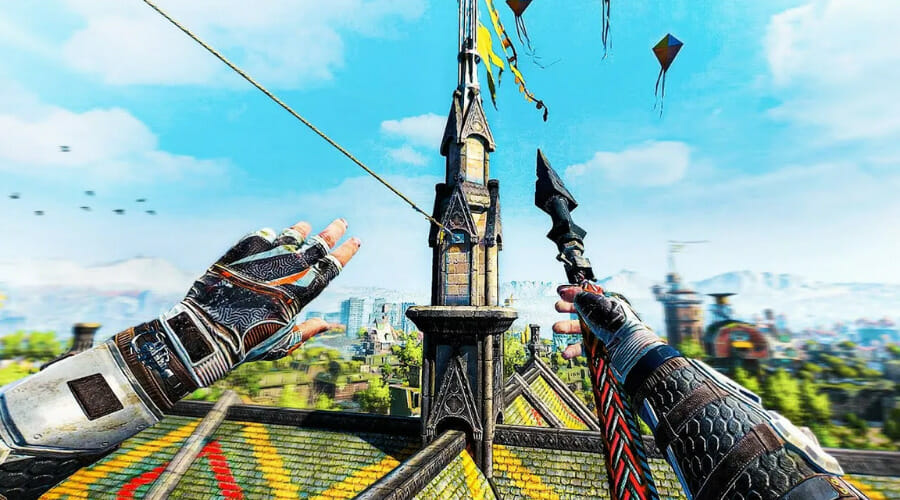
Making the most of this skill you can leap rooftops, grab ledges, scale walls, and swing from ropes to traverse this extremely dangerous environment.

It goes without saying that practicing the parkour mechanics as much as possible is imperative. Because Dying Light 2 is an RPG, the more you use your abilities, the more skills you can unlock.

Beginners should really avoid fighting the undead unless it’s absolutely necessary and there’s no better way to escape.

We can even show you how to get double parkour XP in Dying Light 2 by using a tiny glitch that allows you to gain skills faster.

6. Learn how to use the paraglider

Moving fast, safe, and efficiently through Villedor is one of the keys to survival. After playing Dying Light for a few hours, you’re going to get your hands on the paraglider.

As fun as it is, know that it’s one of the handiest tools you’ll be given and will therefore change how traversal works in-game significantly. 

However, use it wisely, as the paraglider is not a parachute. Yes, it stops any fall damage, but it only does so if you’re actually gliding.

So, if you were thinking about trying to jump off a high building and activating the paraglider at the last second in order to avoid taking any damage, think again. 

We strongly urge that you activate it as you’re falling, but far before you hit the ground if you want to see the rest of the adventure through.

7. Weapons are a lot less durable but can be repaired with mods

You were also probably wondering about the weapons you are about to use so we’re going to show you what is different from the first game.

In the prequel to Dying Light 2, weapons would break fairly quickly but could only be repaired a limited number of times before you had to discard them.

This time around you won’t find any repair kits, which means you have to be more careful, as most weapons are highly disposable.

Weapons can be found literally everywhere and they’re mostly intended to use until they completely break, because of the lack of a traditional repair system like there was in the original game.

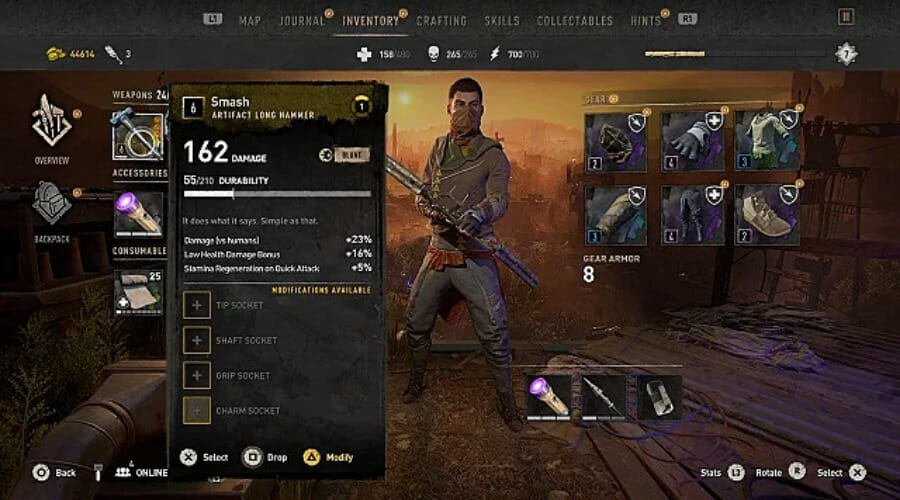
You should definitely know that, when you install a Gear Mod to your weapon, the action will also repair said weapon.

Thus, seeing how you can install more than one Gear Mod per weapon, you’re basically looking at least two repairs for each weapon.

8. Seriously invest in Gear Mods

We mentioned Gear Mods earlier when we were talking about weapon repairs. However, you might not have understood how important they really are.

Basically, you’re going to want to invest in these Gear Mods more than you would invest in anything else in Dying Light 2.

So you better think twice about buying the flashiest weapon a vendor has for sale. A much better alternative would be to go for the GearMods that also give your weapons elemental abilities such as fire, or lightning.

These Gear Mods act as blueprints, meaning that once you’ve bought them, you can craft them as many times as you want.

9. Always utilize your useable items

For new and experienced players alike, it’s sometimes easy to forget completely about the usable in-game items, which can save your life if used properly.

This happens mostly because items like the grapple and UV flashlight both take up the left trigger slot, which is also where other useable items go.

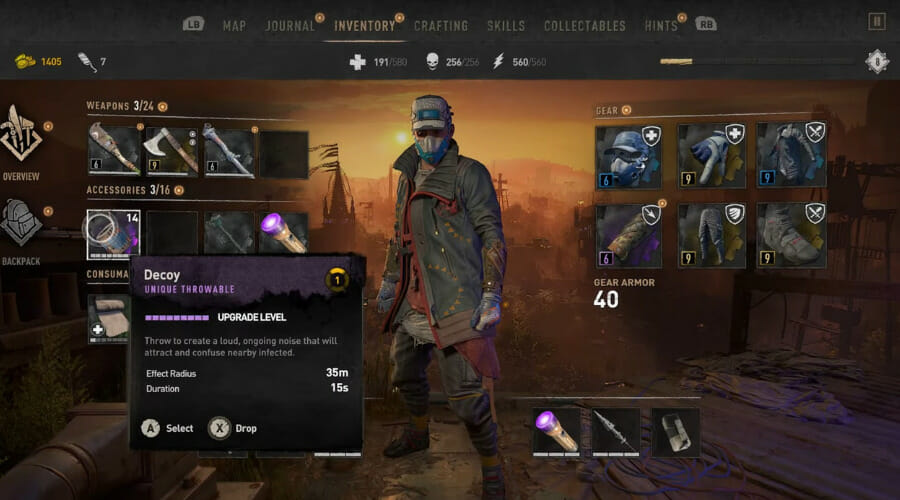
We’re talking about Molotov cocktails, throwing knives, decoys, and grenades. Overlooking these and not using them could prove to be the difference between success and failure. 

In fact, Molotovs and grenades are incredibly powerful, easy to craft, and can come in handy when you’re up against lots of human foes.

So, bottom line is, use everything at your disposal to make your life easier, longer, and more meaningful while playing Dying Light 2.

10. Make sure you prioritize the main missions

It’s easy to get lost and stray away from your course while doing all there is to do within the massive world of Dying Light 2.

Yes, there are a lot of tasks to perform, but the recommended way to level up and obtain the best equipment within the game is by focusing on the main story quests as much as possible.

As a matter of fact, the game doesn’t open up properly until much later so prioritizing the main missions will better prepare you for what is to come.

Nightrunner tools like the Paraglider will take several hours to unlock, but they’ll only become available by moving forward with the game’s main story missions, so keep that in mind.

11. Don’t neglect side missions

Sure, we just told you about prioritizing the main game missions, but that doesn’t mean you have to completely neglect all of the side activities.

For beginners, it’s not really recommended to wander too far off the beaten path, especially in the early stages of the story.

You will be under-geared and won’t possess enough skills for the challenges ahead, which will make the journey harder than it needs to be

With that in mind, know that taking on side missions appropriate to your character’s level is a good way to gain more experience and unlock additional skills.

All of these secondary missions will also reward you with weapons, currency, and blueprints to use and upgrade Aiden’s weapons.

But, just as with the main missions, make sure you are well prepared for the endeavor you are about to undertake.

12. Always check the mission level recommendations

As with most RPGs, the leveling process can be slow at times. This means that players can get bored easily and try to take on more than they bargained for.

Biting more than you can chew will be the last mistake you will do in Dying Light 2, so never ignore the mission level recommendations.

We said that because even going on a mission or engaging an enemy that’s only one level above Aiden’s can quickly overwhelm you and give you a real headache.

In order to avoid this, simply start missions that have as a requirement the same level you are at or face the consequences.

13. Go out during nighttime as much as you can

You’re probably going to find this funny, as we’ve just told you not to stay out at night that much. Well, that was for people only beginning the game.

Just like in the first Dying Light, daytime is much safer and has weaker enemies, while nighttime has a lot more powerful foes and zombies altogether.

That being said, if you consider yourself properly equipped and prepared, you’re going to want to play in the dark as much as possible.

Why? Well, the main reason is that you’ll get a pretty significant XP boost for combat and parkour while the moon is up in the sky.

The map is also sprinkled with Dark Hollows that can only be entered in the night and that contain rare loot and crafting materials. How’s that for an incentive?

14. Be sure to unlock hideouts, windmills, and fast travel locations

You might think that such tasks aren’t as exciting or action-packed as others in the game, but taking care of them will make your life so much easier in the long run.

So, unless you’re in the middle of a story mission, you should really take the time to take care of these open world objectives whenever you stumble upon them.

Besides being the best way to travel during the night, these places can really save your life if you’re doing a lot of nighttime scavenging.

With that in mind, make sure you don’t avoid them and you will thank yourself for doing that later on in the game. That’s a guarantee.

15. Not everything is a decoy and some decoys only work on certain enemies

Distracting your enemies and slipping past them is a much better alternative than actually fighting them. This is an important lesson that will save you more than once.

However, if you want to achieve that, unless you are using a dedicated decoy you are not going to distract large numbers of infected by blowing up a propane tank.

Bricks and golden coins are only useful as lures on human enemies. If you’re trying to lure, move, or delay Infected, use a device that was made specifically for that purpose.

It’s safe to say that decoys are vital if you’re going to be scavenging at night. All you have to do is learn the difference between them and how to properly use them to your advantage.

16. Don’t use all your Gear Mods at once

As we said above, installing a mod will repair up to 50 durability points on a weapon. That being said, consider saving one or two mod slots for when you really need to extend the weapon’s durability.

Even if you have a mod slot available on a unique-class weapon you earned early on, it may not be worth putting a new mod on it and partially repairing it.

Given the fact that you can’t craft weapons, you should routinely check vendors’ supplies, especially after you level up.

Learn how to be patient and only do certain things when it bests suits you, thus making sure nothing is wasted and you maximize your overall efficiency.

17. Prioritize kicking and dodging over blocking

As your level grows, so will your enemies. At higher levels, enemies will vary their strikes and evasions, making the combat more challenging.

We know it can be tempting to block and counterattack everything, especially since the window for perfect blocks is more than generous.

Keep in mind that blocking still consumes a lot of stamina and can leave you with little room for a counterattack if you’ve been parrying a large enemy.

You should know that kicking enemies away is just as useful as a block, especially if you’re on a rooftop, which means you’ll send them falling towards their demise.

Dodging is yet another essential perk for your Dying Light 2 character. It staggers enemies when you dodge them, meaning heavy enemies and those using power attacks can be set up for vault kicks.

18. Use survivor sense as much as you possibly can

Did you know that in the first chapter, you can find enough honey and chamomile in the wilderness to craft six health patches before you even get to Villedor’s tunnel entrance?

How, you ask? By using your survivor sense, which is one of the most essential and useful tools at your disposal throughout the entire game.

This survivor sense is also good for alerting you, indirectly, that you’re about to step into a major battle. So, it goes without saying that activating it should become more than a habit.

You can also find weapons and other loot with the survivor sense, so just make sure you don’t forget about it while playing Dying Light 2.

19. Talk to craft masters and upgrade your gear

Some of the best tools you have at your disposal will also need to be upgraded from time to time if you want to get the most out of all of them.

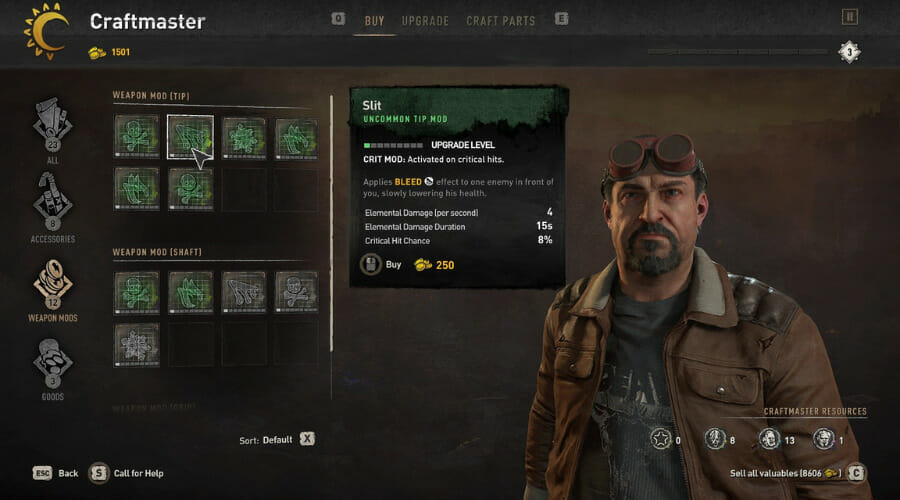
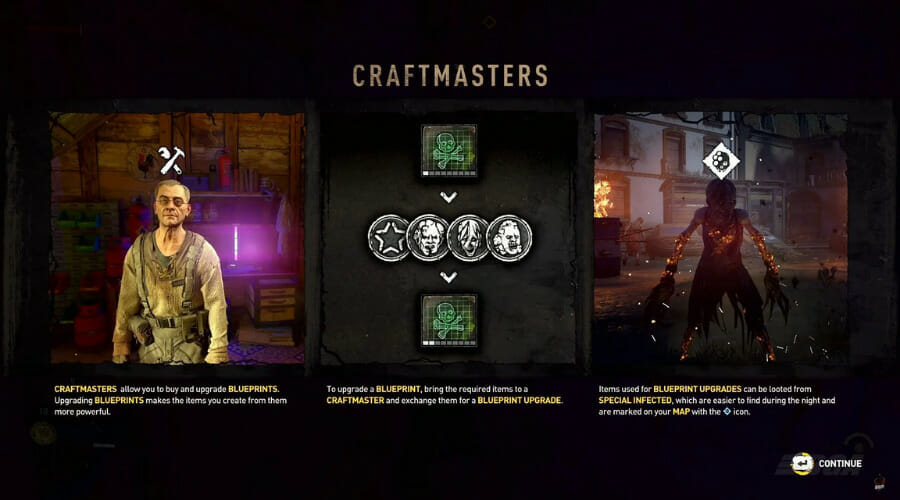
Craftmasters allow you to upgrade some of the useable items, among which are the grappling hook and paraglider.

But which of the available items would you prioritize? Paraglider upgrades, for example, allow it to go much faster and rise in the air.

Keep in mind that you’re going to need Military Tech to upgrade most of your gear. This crafting resource can be found from Military Drops across the map.

20. Join The Survivors for better rewards

Making choices is a key mechanic for every decent RPG. Within Dying Light 2 you will be given the choice to either side with the Survivors or with the Peacekeepers.

Besides getting different missions and interactions, you’ll also make decisions such as who to give certain structures.

Developers are under the impression that either side gives equally good rewards, when in fact that is not the case at all. 

The Survivors give out better rewards, as Peacekeeper upgrades are mainly focused on traps. The rewards you get from the Survivors build structures for you to parkour from.

Honestly, would you pick some car trap that won’t give you any combat XP whatsoever, or ziplines all over the city? It’s all up to you to decide who you want to be.

⇒ Get Dying Light 2 Stay human from Amazon

⇒ Get Dying Light 2 Stay Human from Kinguin

⇒ Get Dying Light 2 Stay Human from G2A


There are, of course, other things to know about this great game as well, but with these 20 tips you will have a basic idea of what is good for you.

You might also run into some bugs or errors while playing, but we got you covered. We can show you how and where to download Dying Light 2, or what to do when you get the Unable to initialize Steam API error.

And, if you want to make the most of this experience, we’re prepared to guide you through activating ray-tracing for some astonishing visuals while in-game.

If you are having trouble deciding what to pick between Dying Light 2 Stay Human and Horizon Forbidden West, we will assist you in making a choice.

Have you tried Dying Light 2 Stay Human? Share your experience with us in the comments section below.

Dying Light 2: How Many Worldwide Players Are There? [Latest Stats]

A lot has been said about Dying Light 2 since the game was released in December 2021. Even though the game came with some nasty bugs and glitches, it’s still a success among players.

The great majority that tried both Dying Light 2 and its predecessor say that the sequel proved to be even better than the original, contrary to what people initially thought.

This open-world, first-person zombie survival game has captivated audiences that didn’t even like this sort of title, to begin with.

It’s safe to say that Dying Light 2 has been a huge success and the numbers do it justice. You’re probably wondering what numbers we’re talking about, so allow us to shed a bit more light on the matter.

We’re referring to the number of players that choose to spend their time fighting the zombie outbreak and surviving against all odds.

According to the Steam charts, literally hundreds of thousands of players bought Dying Light 2 and took it for more than a test drive.

So, if you were wondering just how many people are playing the same title as you, we’re about to show you just that.

How Many People Play Dying Light 2 On A Daily/Monthly Basis?

Even though there is still a lot of hype around Dying Light 2 Stay Human, the player base has seen a dramatic decline over these last few months.

February 2022 has been, by far, the best month for Dying Light 2. We pulled out some interesting numbers just to show you how much of a success this title was.

The second month of 2022 had an average of 91,226 players that were invested in the above-mentioned game, with a peak of 274,983 people.

Compared to other titles that we’re being enjoyed at the same time, this number is crushing. Dying Light 2’s main competition during this period has been none other than Elden Ring.

Even though there are a lot of other popular games out right now, these are the two most-played ones for February 2022.

However, March brought an almost dramatic decline in Dying Light 2 players on Steam. More than 86% of people simply gave up on the popular game.

Either because they finished it, or they just got bored with it, March 2022 only had an average of 12,679 players, with a peak of 30,261.

And, just when you thought it couldn’t get any worse, April came along with another 57.75% decline in the Dying Light 2 player base.

Therefore, during April 2022, Steam only witnessed an average of 5,382 players, with a peak of only 11,901.

That being said, know that the last 30 days have brought only a slight 1.61% increase. In this last month, only 5,469 people were playing this game, with an average of 12,857.

That’s not too bad, even by Steam standards, considering that most people are still invested in older games that are still popular to this day, such as Dota 2.

As of right now, the most played games on Steam are Elden Ring, Lost Ark, Cyberpunk 2077, and, as we mentioned above, Dota 2.

So, all in all, not really a bad choice, considering all the adventures and foes that await you within Dying Light 2 Stay Human.

Thus, if you decide to pick up this game and take it for a spin, know that this title is a fan favorite and will surely provide the entertainment you seek.

However, you might also run into some bugs or errors while playing, but we got you covered. We can show you how and where to download Dying Light 2, or what to do when you get the Unable to initialize Steam API error.

We can also help if you aren’t getting any skill points in Dying Light 2, or if you want to get double parkour XP.

You could also encounter problems such as the game not launching at all on Steam, and we can show you how to deal with that as well.

And, if you want to make the most of this experience, we’re prepared to guide you through activating ray-tracing for some astonishing visuals while in-game.

If you are having trouble deciding what to pick between Dying Light 2 Stay Human and Horizon Forbidden West, we will assist you in making a choice.

There you go. Now you basically have pretty much all the information you need to make an educated guess about picking up this game or not.

If, however, you do, you will find anything Dying Light 2 related right here. Have you decided to also play Dying Light 2 Stay Human? Share your opinions with us in the comments section below.

How To Fix Rogue Legacy 2 Crashes

This game actually feels like a reimagined version of what its predecessor could have been with the benefit of more time, money, and hindsight of how the genre has evolved since 2009.

Sure, the basic premise is still the same and still just as strong as ever, meaning you play as a hero with a randomized name, class, and trait, explore a massive castle; collect loot, and attempt to beat bosses.

Rogue Legacy 2 really encompasses a lot of elements that most gamers look for within every title they try out for the first time.

And even though everyone loves this game, there still are some bugs that limit or prevent quality gameplay, which is unacceptable.

But, in order to experience the in-game ones, you will first have to manage to successfully run Rogue Legacy 2. Some players, however, are finding it hard to do that.

So, if you too are experiencing crashes when playing Rogue Legacy 2, today is your lucky day, as we are about to show you how to fix this problem.

How do I stop Rogue Legacy 2 from crashing on my PC?

1. Check system requirements

Minimum

OS: Windows 7


Processor: 2.0 Ghz

Memory: 8 GB RAM


Graphics: Nvidia GTX 680, AMD R9 280X

DirectX: Version 9.0c

Network: Broadband Internet connection

Storage: 2 GB available space


Recommended

OS: Windows 10

Processor: 3.0 Ghz

Memory: 8 GB RAM

Graphics: Nvidia GTX 680, AMD R9 280X

DirectX: Version 10

Network: Broadband Internet connection

Storage: 2 GB available space

2. Check game file integrity

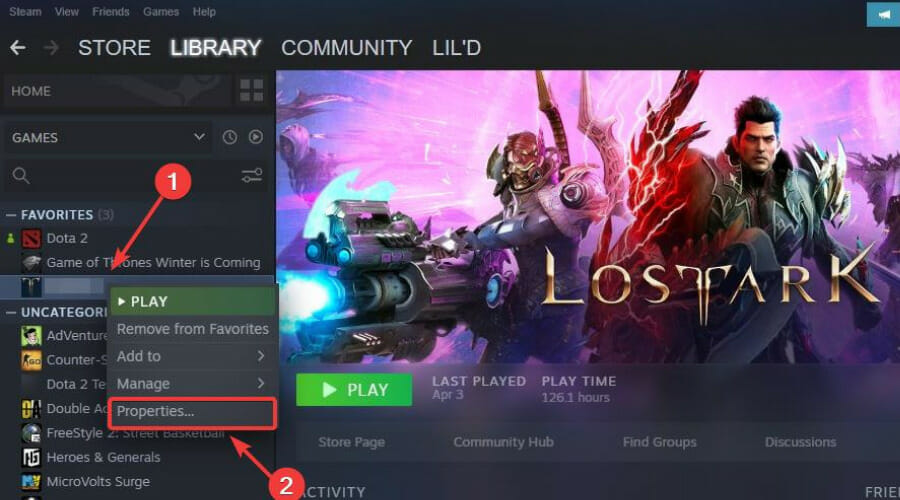
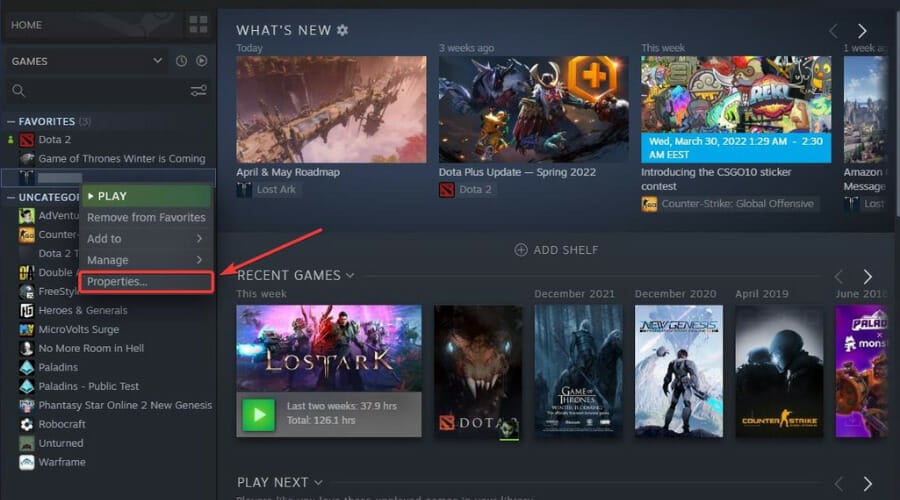
  1. In Steam, right-click Rogue Legacy 2 and select Properties.dying light steam properties
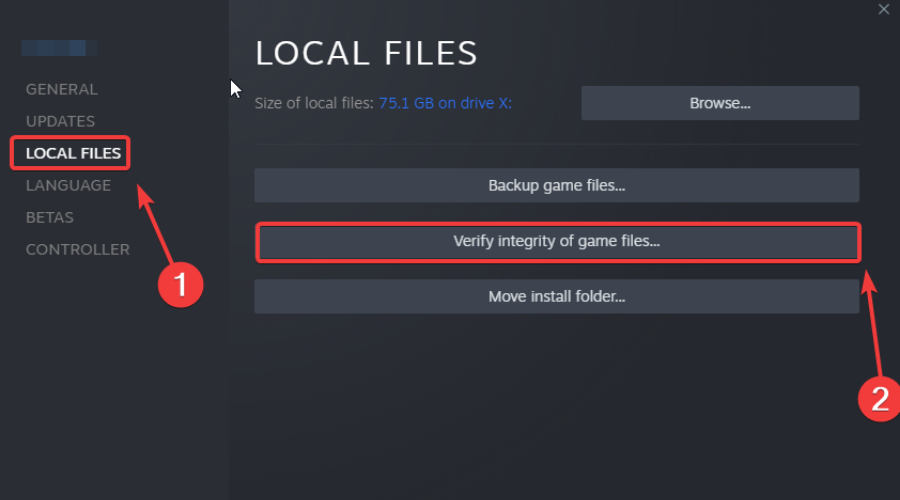
  2. Select the Local Files tab and click on the Verify integrity of game files.game file integrity

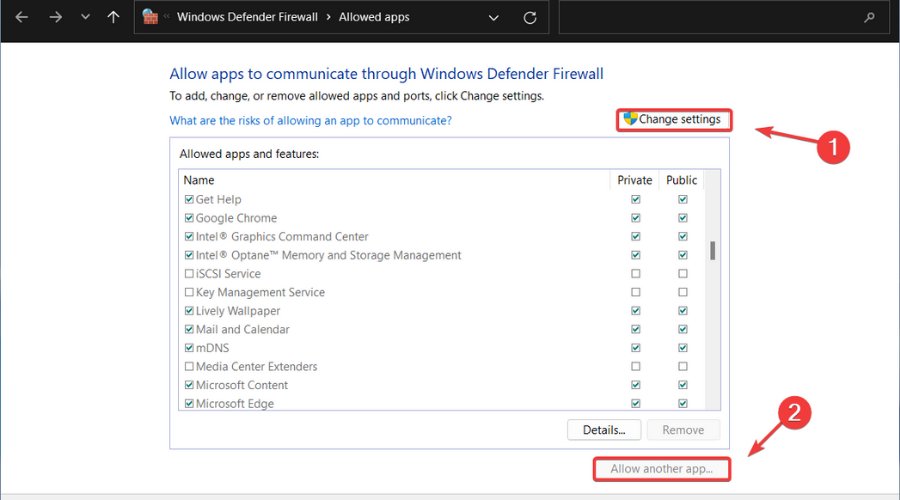
3. Allow Rogue Legacy 2 through the Windows Firewall

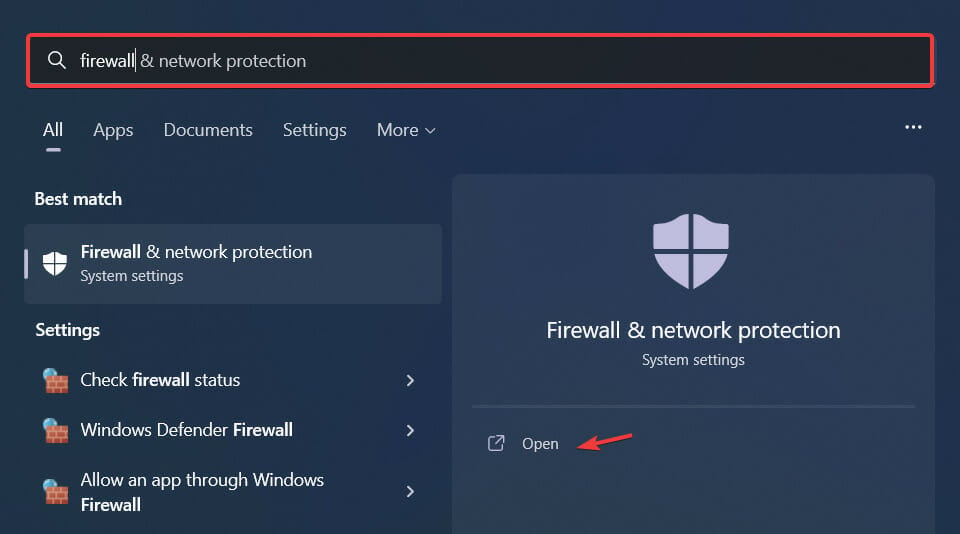
  1. Press the Windows key, search for Firewall and select Open.open firewall
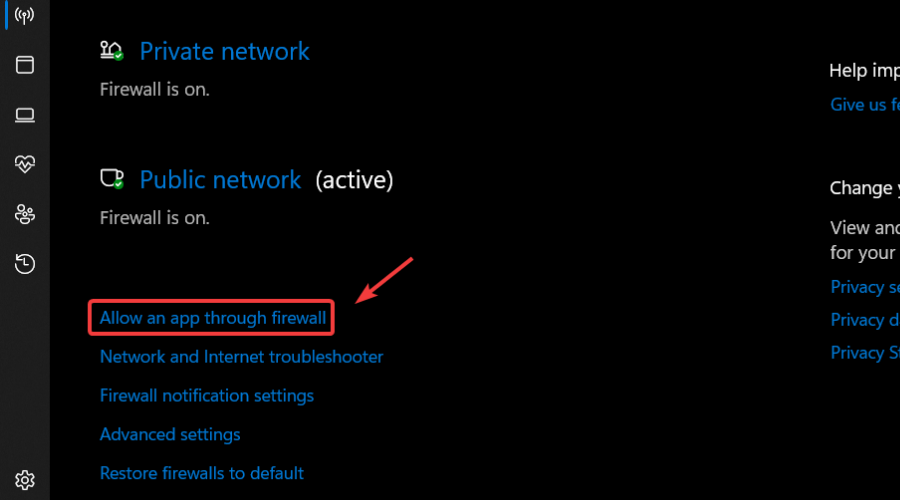
  2. Click on Allow an app through Firewall.allow app through firewall
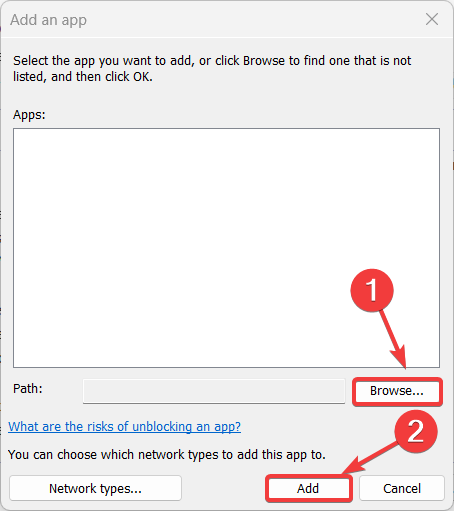
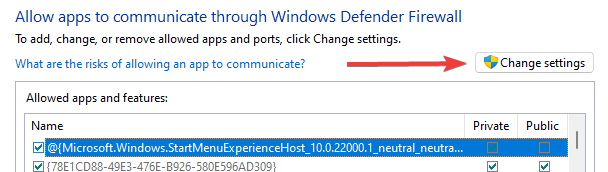
  3. If Rogue Legacy 2 isn’t in the list, click Change Settings, then Allow another app.Allow another app
  4. Click the Browse button, locate your game and press the Add button.browse firewall games

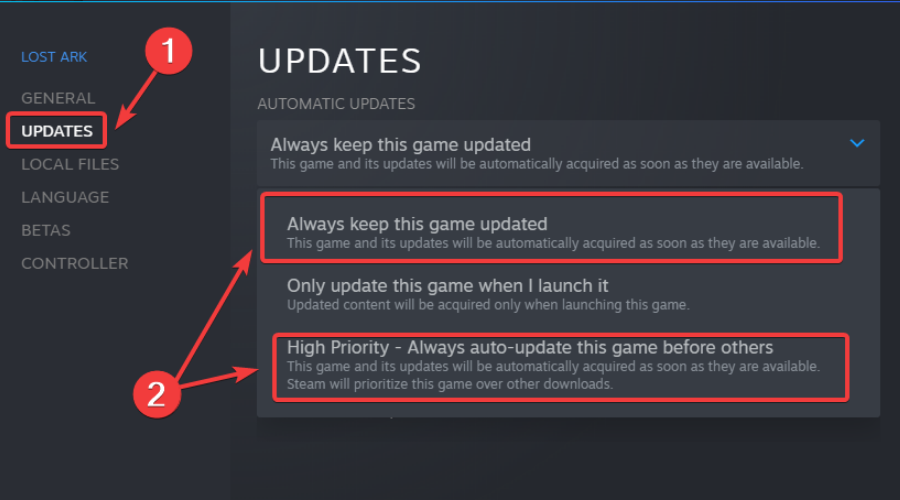
4. Update Rogue Legacy 2

  1. On Steam, right-click Rogue Legacy 2 and select Properties.steam game properties
  2. Select the Updates tab and activate one of the two Auto-update options.update steam games

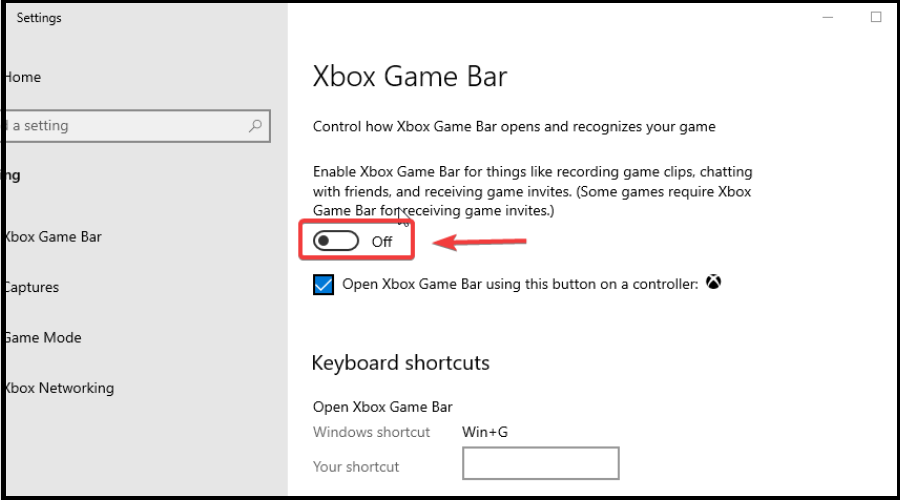
5. Disable Xbox Game Bar and other overlays

  1. Click on the Start menu and then on the Settings button.settings
  2. Select the gaming category.gaming
  3. Turn off the Xbox Game bar.xbox game bar

6. Update your GPU

  1. Press the Windows key, search for Device Manager and click on Open.run device manager
  2. Expand Display Adapters, right-click on your GPU and select Update driver.update gpu
  3. Select Search automatically for drivers.search for driver automatically

Gaming can be enjoyed without any crashes, lags, or freezes by keeping all drivers up to date and error-free easily. 

Sometimes, manual checks are hard to perform, that’s why we recommend using an automated assistant that will scan for fresh driver versions daily.

In case you’re a beginner, you don’t have to worry! Outbyte Driver Updater is smart, simple, engaging and its user interface was built to make your life easier.

⇒ Get Outbyte Driver Updater

Have you managed to fix the Rogue Legacy 2 problem using this useful guide? Let us know in the comments section below.

Steam Not Accepting Your Card Payments? Here’s What You Can Do

It’s pretty safe to say that we’ve all been there at a certain point in our lives, so this is a more common problem than you can possibly think of.

Ever since credit/debit cards started showing up in people’s wallets, there has always been the risk of your card getting declined for one reason or another.

It doesn’t even have to be empty to get declined either. Certain retailers may not accept some payment methods or card variants, or maybe you even entered the wrong information.

The Steam platform also has a history of customers getting their payment methods automatically rejected without any explanation whatsoever.

A lot of Steam users reported not being able to make purchases and receiving this error message: This card number is not valid for the payment method you selected.

If you find yourself in this type of situation, there are some areas you have to go over and ensure that all your work isn’t futile.

There have even been PayPal to Steam payment issues, so make sure you look into that as well, just in case you might need the information.

How can I make sure my card doesn’t get declined?

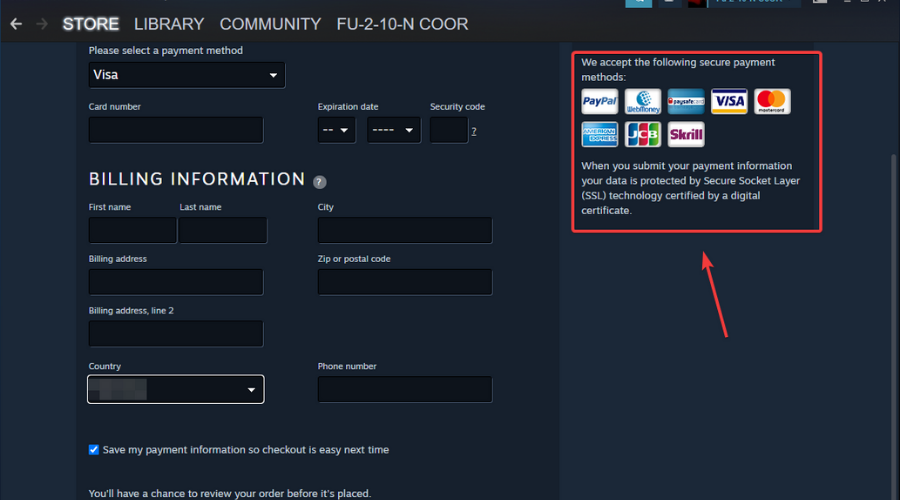
1. Make sure you are using a supported payment method

Different retailers have different preferences when it comes to secure online payments. Just to save you the trouble, be sure this is the first aspect you check.

Some vendors might not accept Visa, PayPal, or even MasterCard. Checking this field will save you a lot of time along the way.

Valve does from time to time drop certain payment providers, usually when there are problems or security issues, so keep that in mind as well.

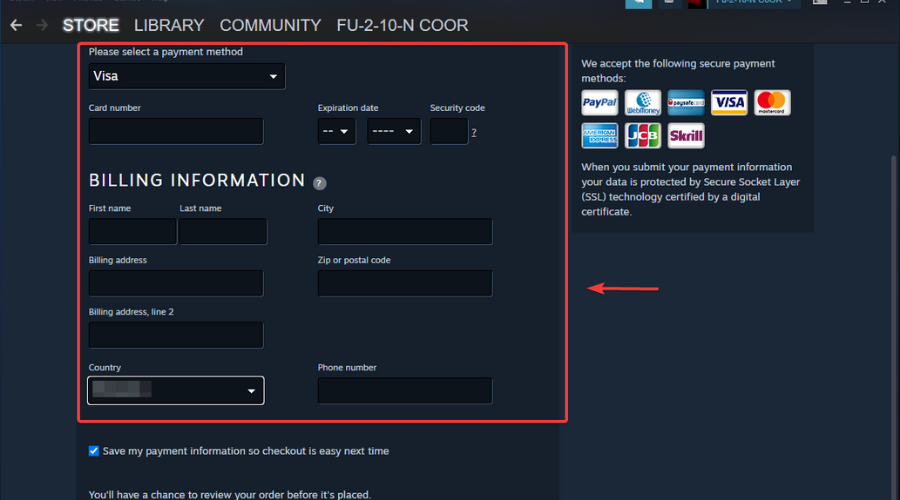
2. Enter the correct payment information

Entering the correct payment information is crucial for the payment itself to go through. One typo and you will be stuck in this cycle for hours if you don’t notice.

Make a habit of always double, maybe even triple-checking the information you entered in order to be sure that this doesn’t happen.

Be patient and enter your correct name, address, zip or postal code, phone number, and card details. This is the area where the maximum focus is needed, as one wrong number means failure.

3. Contact your credit/debit card provider

The bottom line is that whenever you get stumped you should always talk to the card provider or the bank that issued it.

Valve can’t help in instances like this unless it is some weird glitch on their end. You should mainly focus on two things:

  • the funds are indeed on your account and available
  • the card is not blocked and able to use online

Keep in mind that some banks issue debit cards that require you to ring up and unlock them for online use beforehand.

If all else fails, and your bank confirms everything is as it should be, then all you can really do is either find another method of payment, such as Revolut, or use your card to put a balance on PayPal.

Thus, all you need to do is make sure whatever method you want to use for payment will be supported by the vendor, which in this case is Steam.

Was this guide helpful to you? Share your experience with us in the comments section below.

Age Of Empires 2 Failing Because Of DirectDraw Error? Here’s What To Do

We all get nostalgic from time to time and want to relive some of the experiences that made us happy and brought us together with friends and family.

Many of us grew up playing some of the video games that kids today consider vintage, many of which don’t work anymore on modern systems.

But that doesn’t necessarily mean you can’t make it happen if you really want it. That being said, backward compatibility isn’t always the trusty friend we thought it would be.

That’s why Forgotten Empires, Tantalus Media, Wicked Witch Software, and the people over at Xbox Game Studios put in the extra work and brought us a remastered version.

Age of Empires 2 Definitive Edition came out in 2019 and fans have been more than grateful for the revival of this beloved oldie.

However, the new version also came with some horrendous bugs which, although totally fixable, ruin the gaming experience.

For example, Age of Empires players have been struggling with the loading string file error while trying to launch the title.

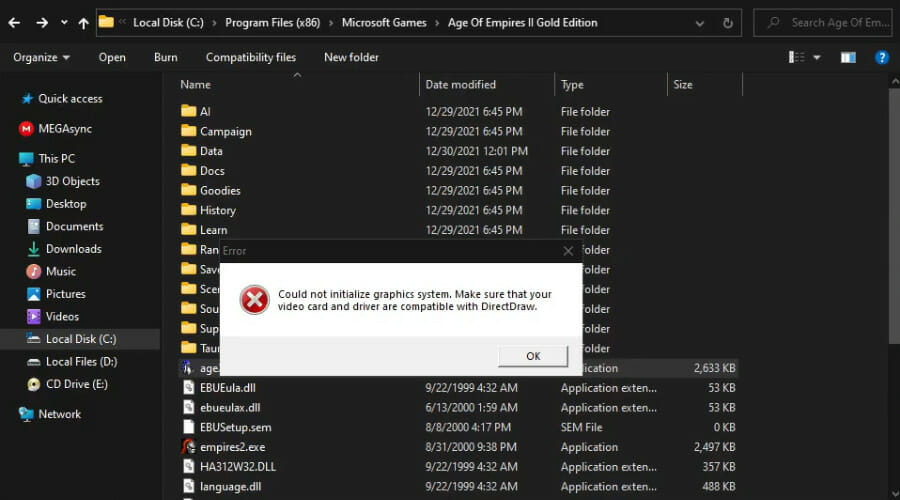
Another issue that drives gamers insane is the DirectDraw error. This error message, even though often seen in video games, can also manifest for programs that run Microsoft DirectX.

The error could appear at any point during the game, (or when using the software program, but you’ll most likely see it during startup.

So, how do we fix this? We prepared a guide for you and going through it will bring you one step closer to enjoying your favorite game again.

How can I fix the Age Of Empires 2 DirectDraw error?

1. Restart your PC

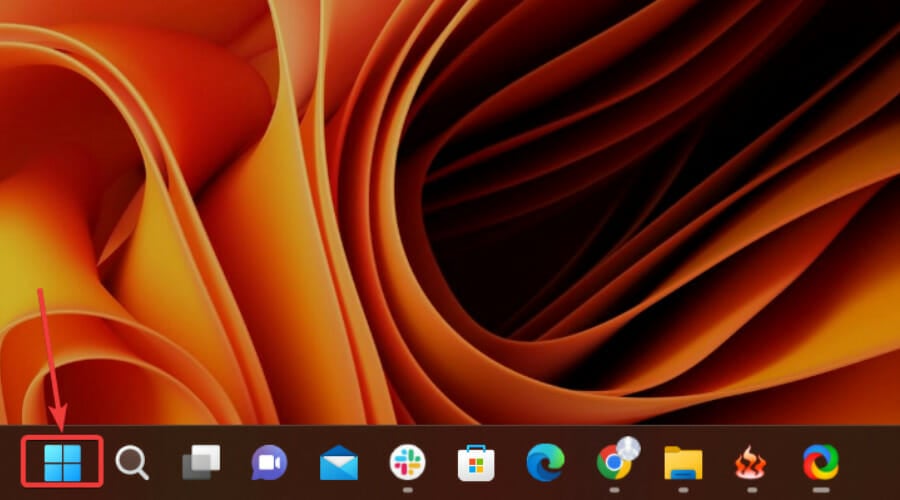
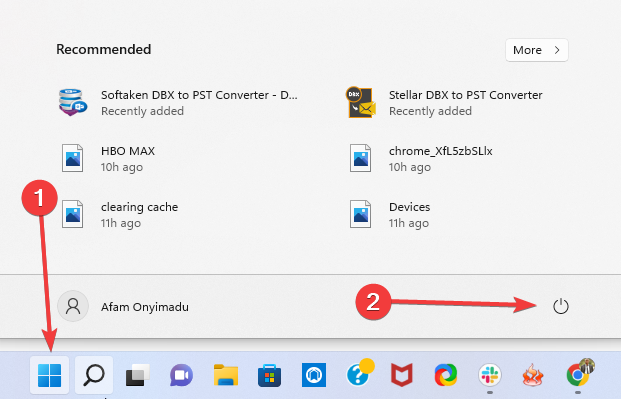
  1. Press the Start button.press start
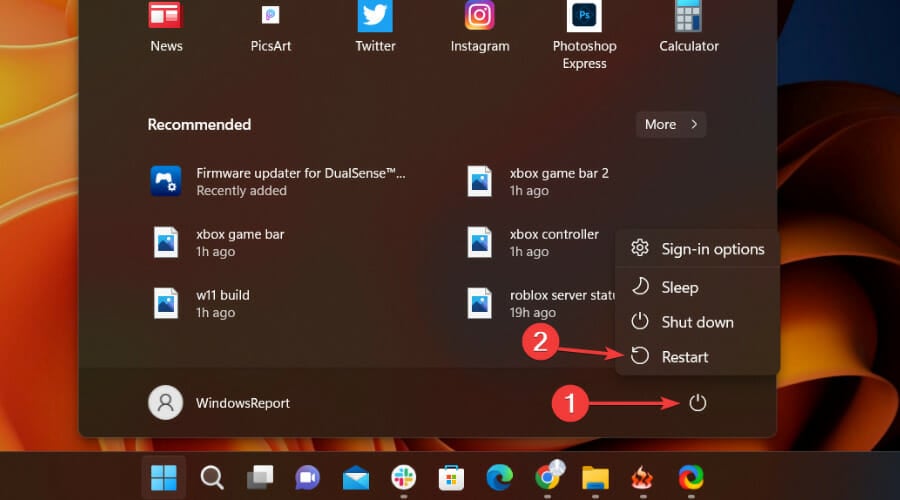
  2. Click on the Power button and select Restart.restart

2. Install the latest version of DirectX

To update your DirectX version, all you have to do is head on over to the official Microsoft website and download the DirectX End-User Runtime Web Installer.

This tool will install a number of runtime libraries from the legacy DirectX SDK for some games that use D3DX9, D3DX10, D3DX11, XAudio 2.7, and XInput 1.3, XACT, and/or Managed DirectX 1.1.

But you can also get the latest versions of DirectX, such as 12, if that is what you need in order for everything to function properly.

Just go through the steps and you will surely accomplish what you set out to do in the first place.

Note that DirectX updates also come through Windows updates, so make sure to also keep your operating system updated. You can do it like this:

  1. Press Windows + I to access Settings.
  2. Select the Windows updates tab and click Install all.install Windows updates
  3. If no updates are queued for installation, press the Check for updates button.check for updates

3. Update your GPU

  1. Press the Windows key, search for Device Manager and click on Open.run device manager
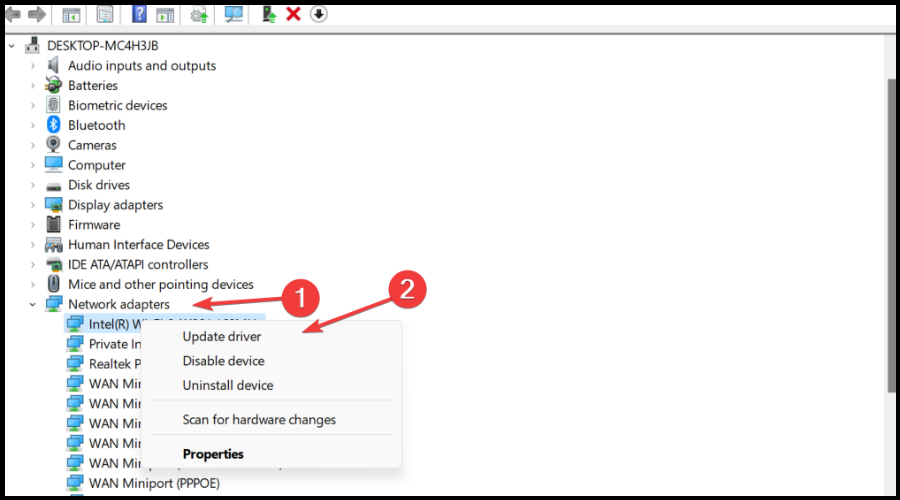
  2. Expand Display Adapters, right-click on your GPU and select Update driver.update gpu
  3. Select Search automatically for drivers.search for driver automatically

    Would you like to also be able to enjoy quality gaming without having to constantly worry about any crashes, lags, or freezes by keeping all drivers up to date and error-free easily?

    It’s true that sometimes, manual checks are hard to perform, that’s why we recommend using an automated assistant that will scan for fresh driver versions daily.

    In case you’re a beginner, you don’t have to worry! Outbyte Driver Updater is smart, simple, engaging and its user interface was built to make your life easier.

    ⇒ Get Outbyte Driver Updater

4. Run the game as an administrator

  1. Locate the folder where Age of Empires 2 Definitive Edition is installed.aoe 2
  2. Right-click on the Age of Empires 2 executable and click on Properties.propreties
  3. Select the Compatibility tab and check the Run this program as administrator box.run werid west as admin

5. Uninstall/Reinstall Age of Empires 2 Definitive Edition

These are basically the solutions you’re looking at if you are dealing with the above-mentioned situation and would like to fix it.

Be sure to carefully follow each step and you will be done in no time. Has this guide been helpful in fixing this error? Let us know in the comments section below.

[Fix] HP Envy x360 fingerprint reader not working

While they were not very common earlier, fingerprint sensors now come built-in with every high and mid-range laptop. These facilitate a quick and secure sign-in process. But, several users reported that the HP Envy x360 fingerprint reader is not working.

Built-in fingerprint sensors generally don’t run into problems unless there’s a manufacturing defect. In case it’s not working, the problem most likely lies with the driver. Or, the data for the configured fingerprints may be corrupt or missing.

No matter what’s causing the issue in your case, the methods listed here should get things up and running in no time.

Also, we have listed the fixes for the HP Envy x360 fingerprint reader not working issue under two sections. Remember, the methods under one can be executed on the other as well.

What can I do if the HP Envy x360 fingerprint reader isn’t working in Windows 11&10?

1. HP Envy fingerprint reader not working in Windows 11

1. Reset the fingerprints

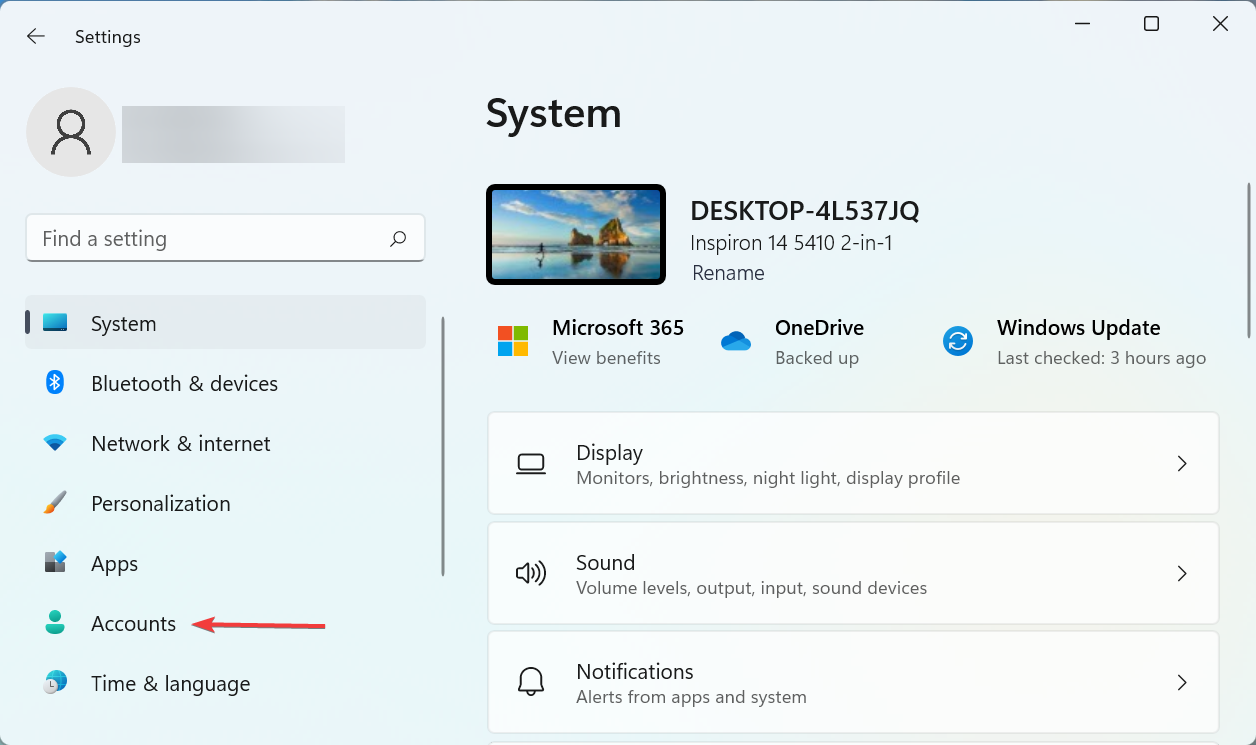
  1. Press Windows + I to launch the Settings app and select Accounts from the tabs listed in the navigation pane on the left.Accounts
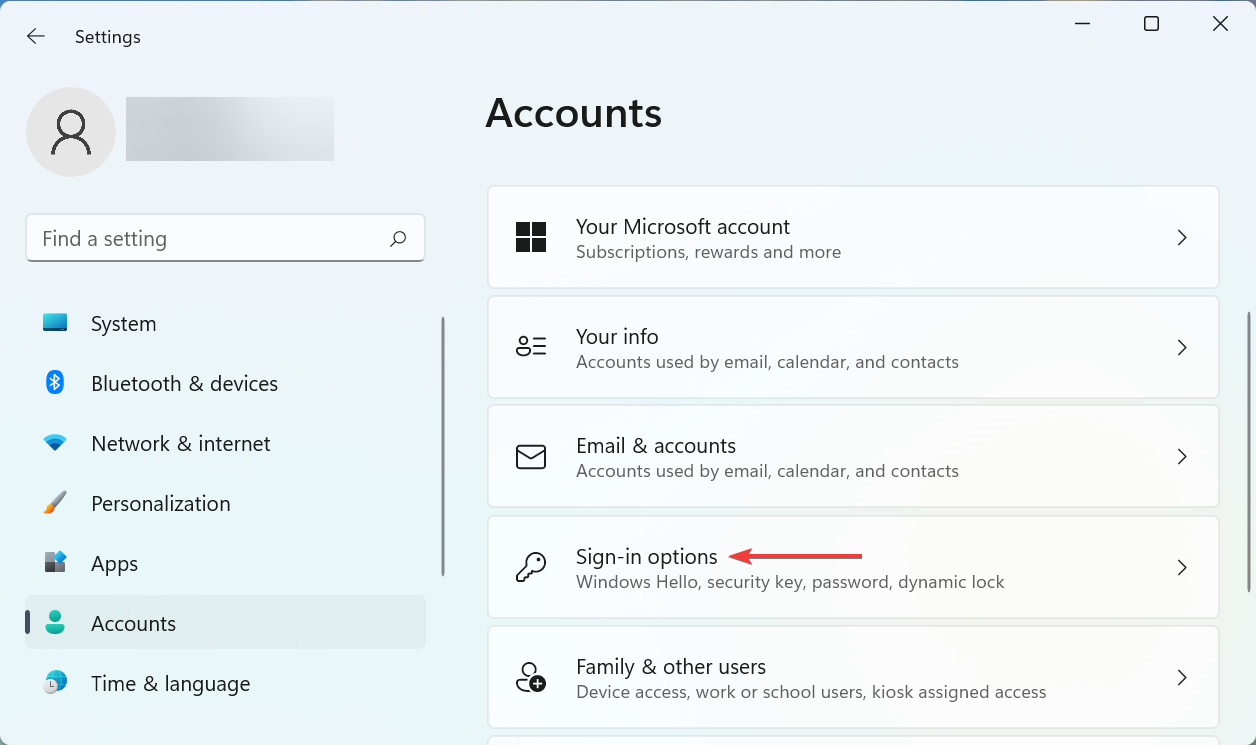
  2. Next, click on Sign-in options on the right.Sign-in options
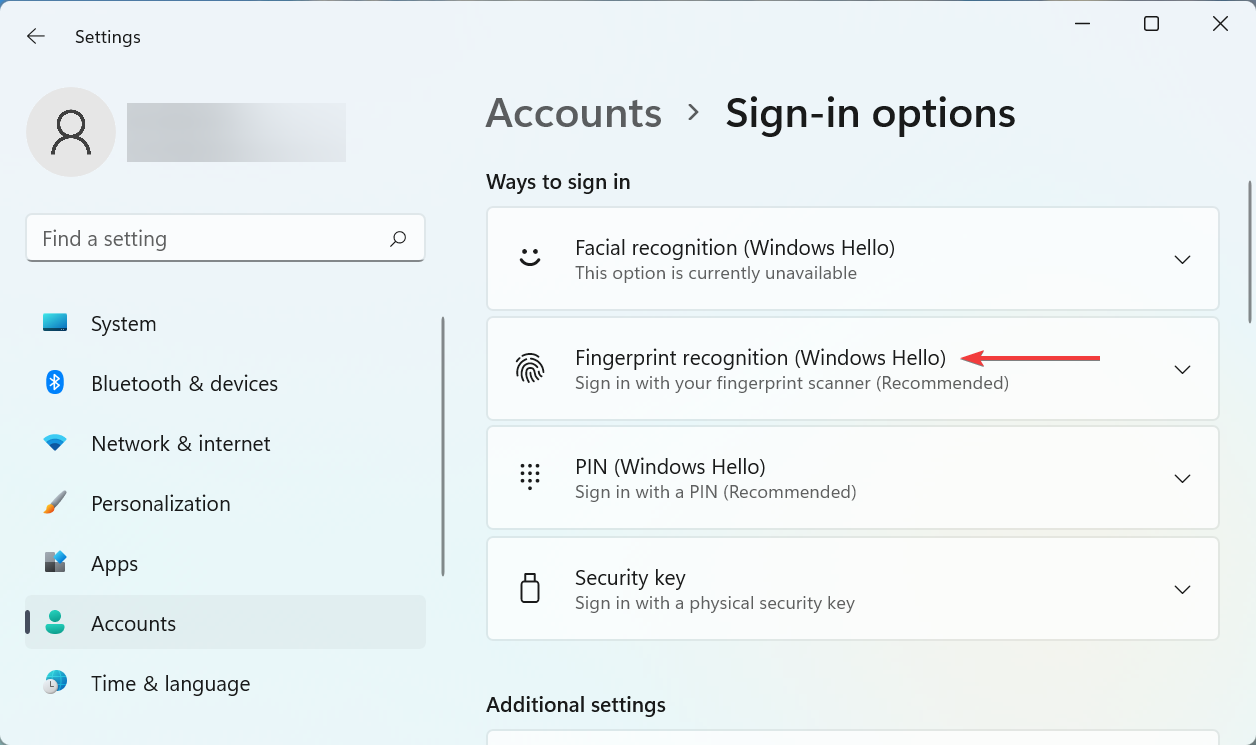
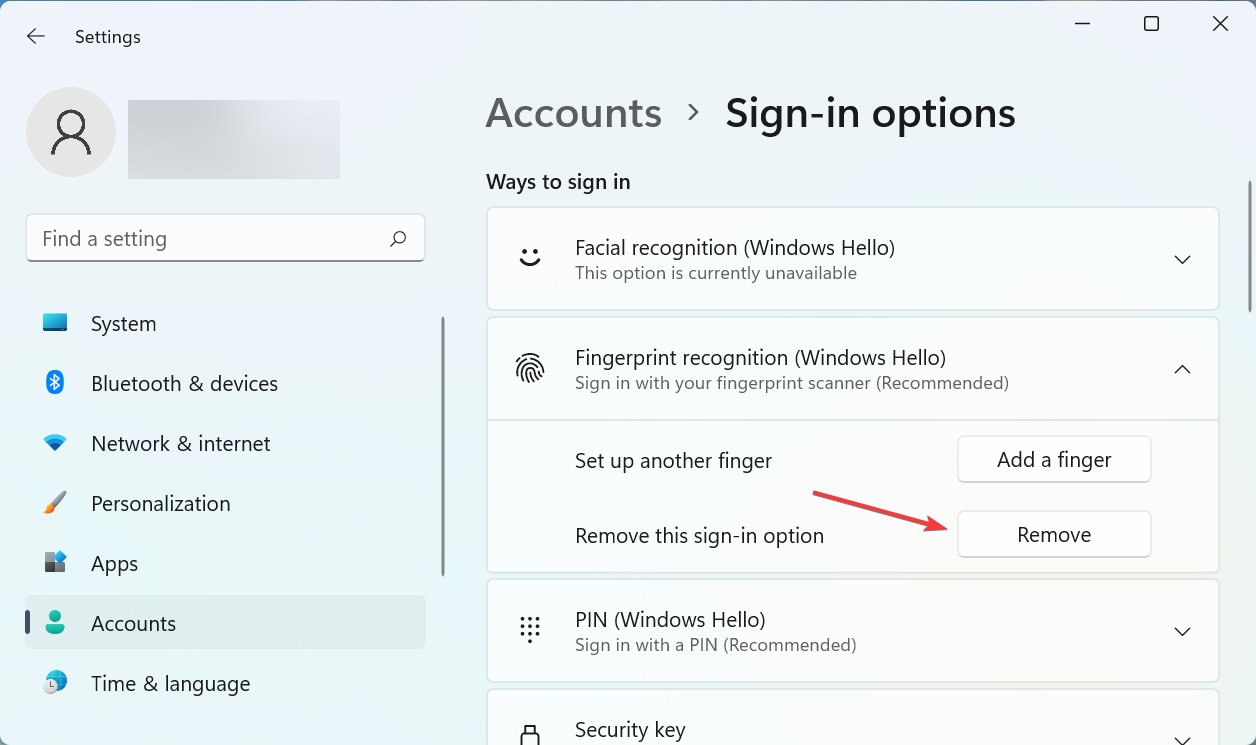
  3. Click on Fingerprint recognition (Windows Hello) here.Fingerprint recognition
  4. Now, click on the Remove button.Remove to fix hp envy fingerprint reader not working
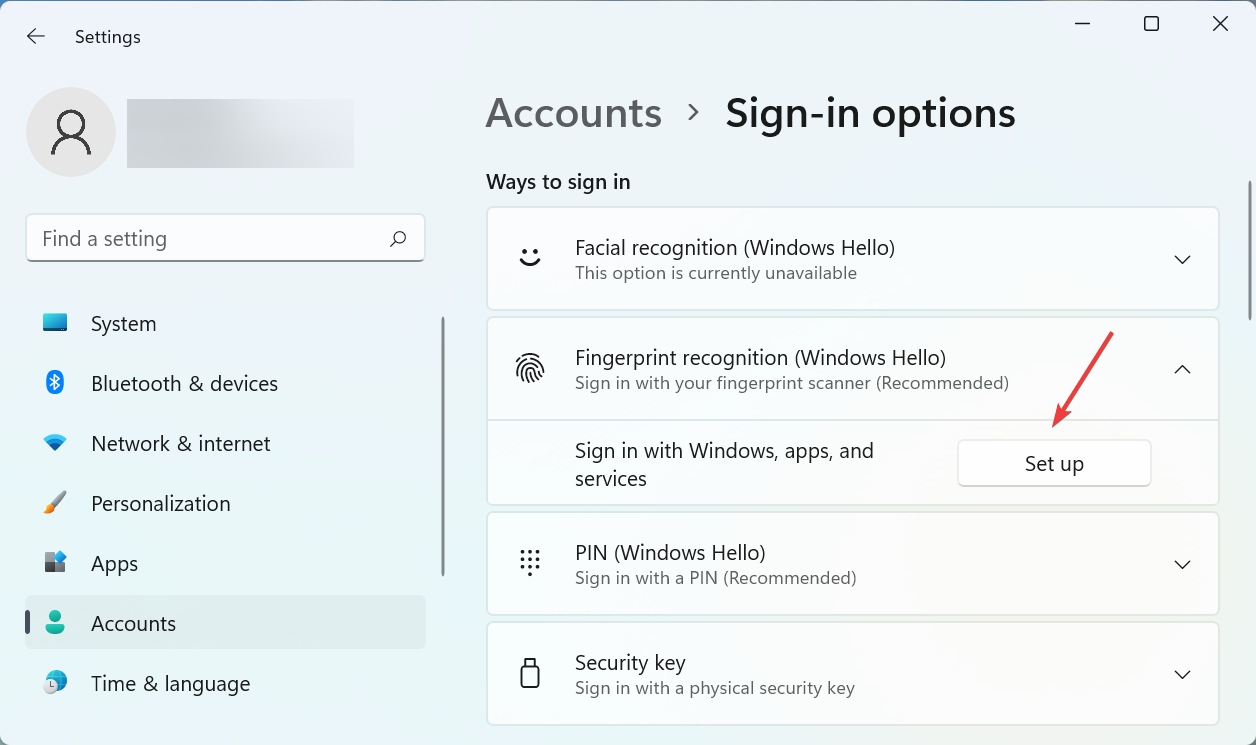
  5. Once done, click on Set up.Set up to fix hp envy fingerprint reader not working
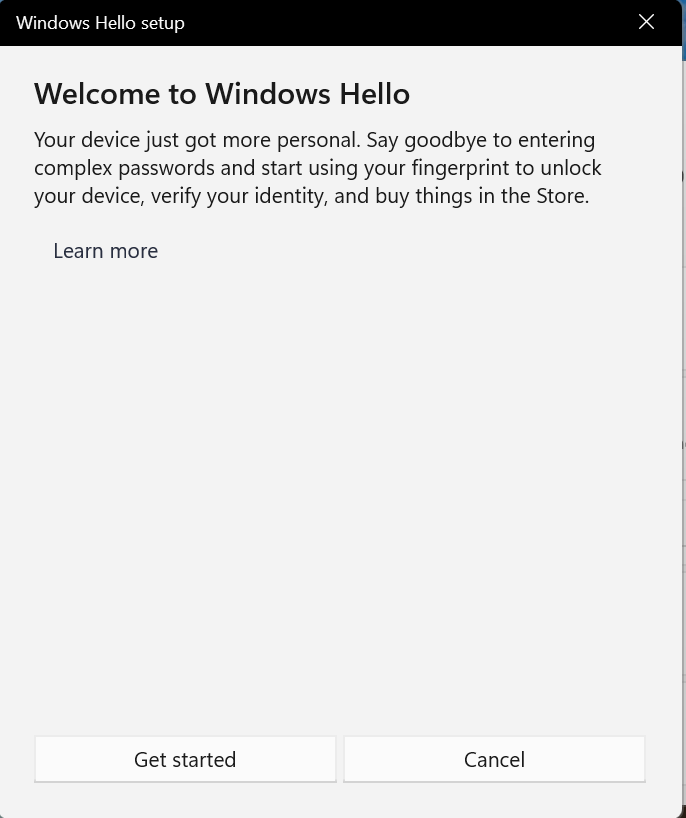
  6. Follow the on-screen instructions to add your fingerprint.Follow instructions

Oftentimes, the data for configured fingerprints may corrupt or there could be a problem reading it. In this case, the scanner wouldn’t be able to identify your finger and it would appear as if the HP Envy x360 fingerprint reader is not working.

If the error persists after following these steps, head to the next method.

2. Reinstall the fingerprint reader driver

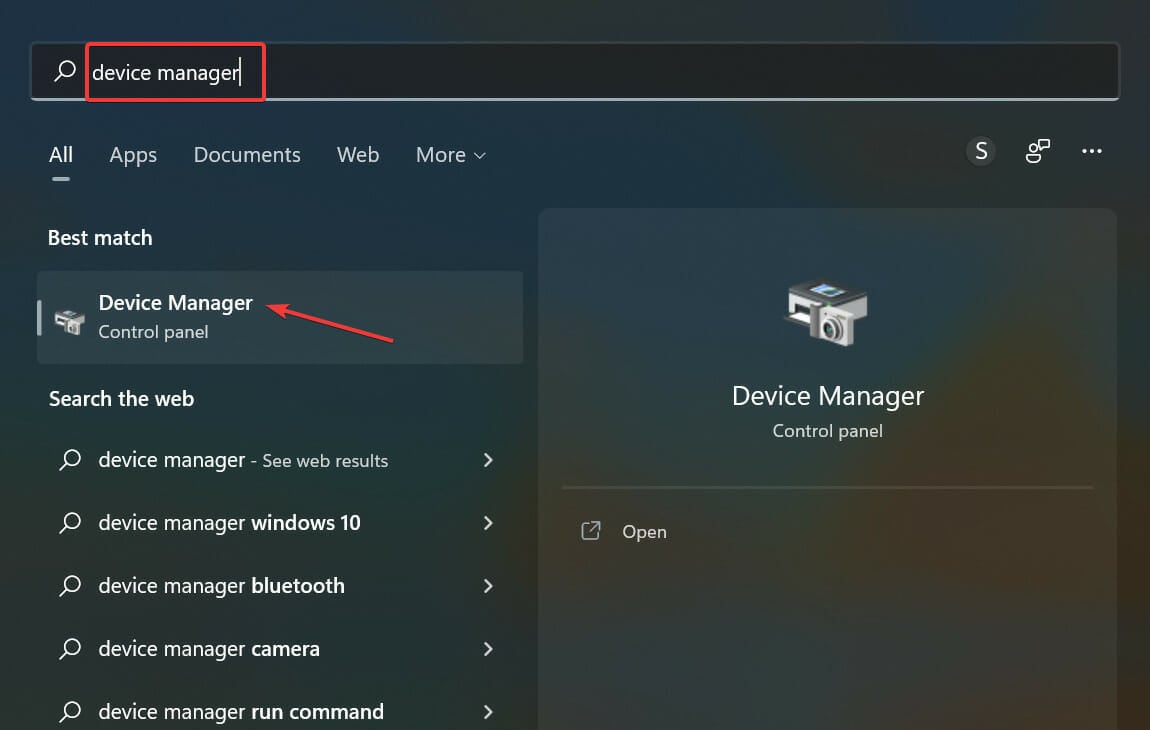
  1. Press Windows + S to launch the Search menu, enter Device Manager in the text field, and click on the relevant search result.Device Manager
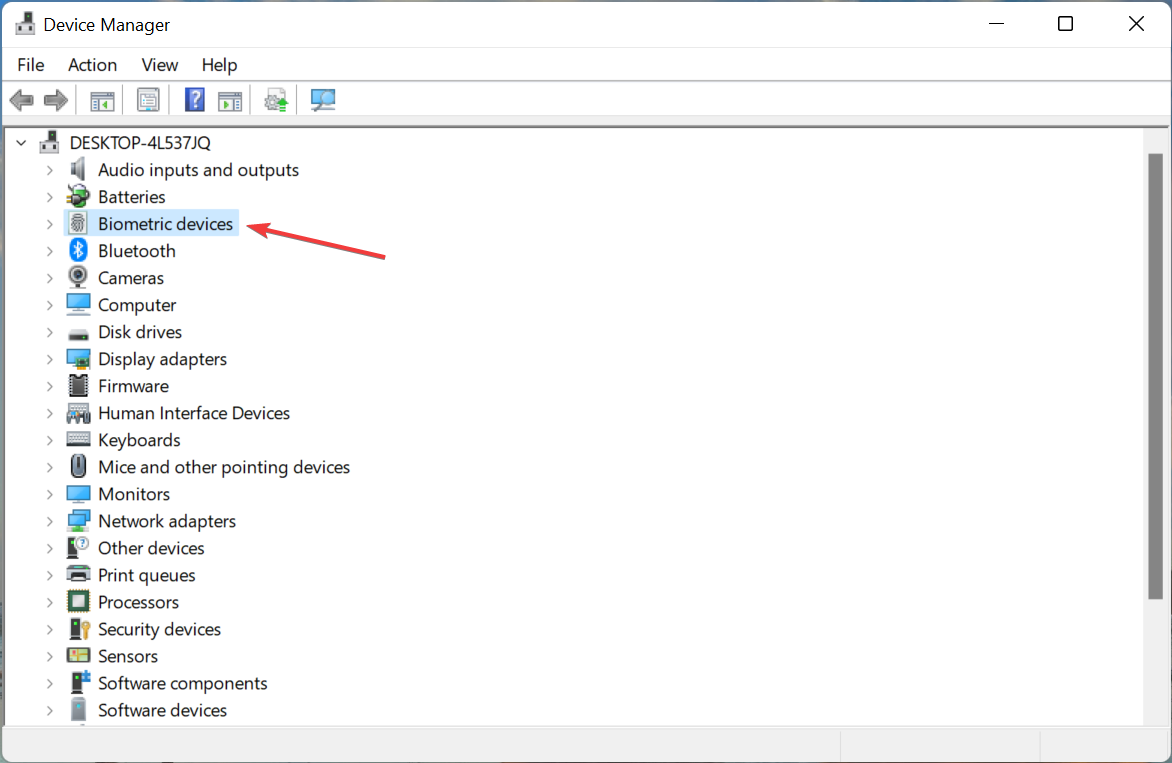
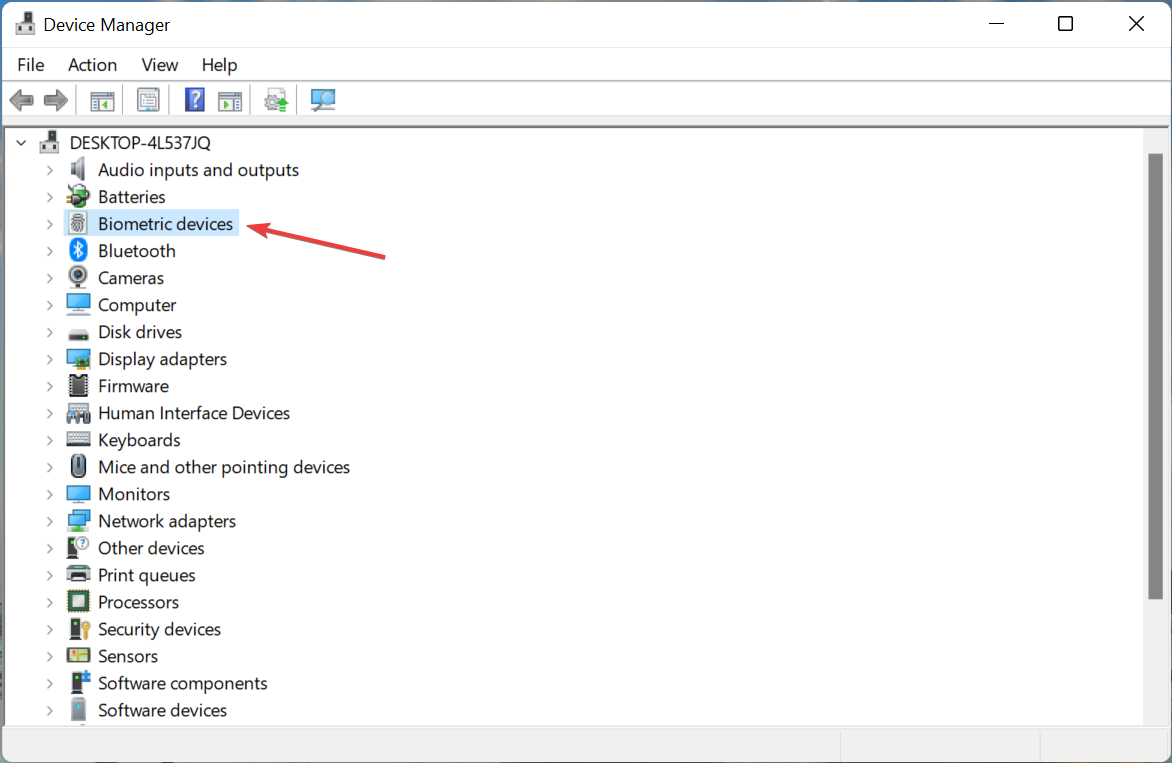
  2. Double-click on the Biometric devices entry here.Biometric devices
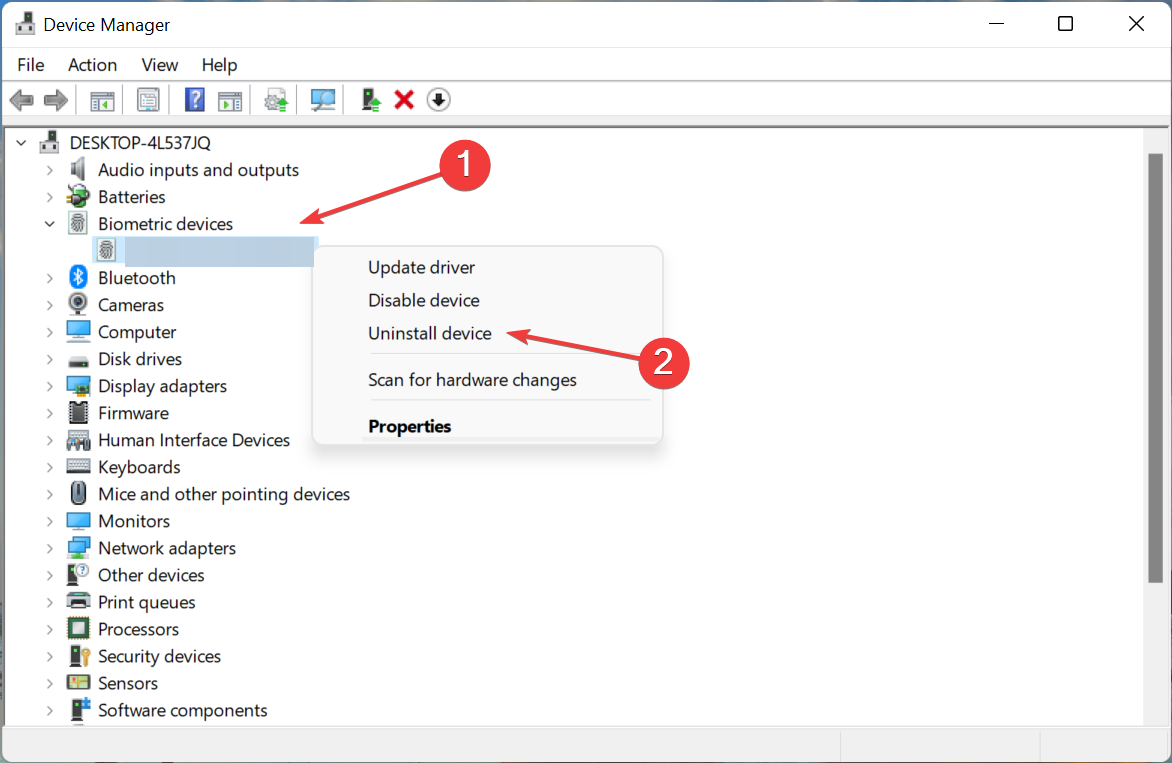
  3. Now, right-click on the fingerprint scanner, and select Uninstall device from the context menu.Uninstall device to fix hp envy fingerprint reader not working
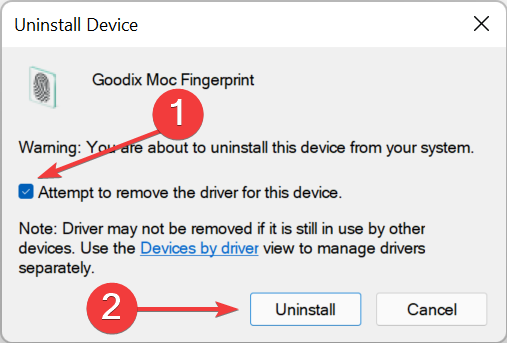
  4. Tick the checkbox for Attempt to remove the driver for this device, and then click on Uninstall.Attempt to remove the driver for this device
  5. After the process is complete, restart the computer, and Windows will automatically install a fresh driver for the fingerprint reader.

If the driver for a device is corrupt, it may throw errors or stop working altogether, though that is rarely the case. And, even if it does, you can easily reinstall a fresh one. But, you will first have to identify these. A corrupt driver will have a warning sign at the corner of the device’s icon.

After reinstalling the driver, verify if the HP Envy x360 fingerprint sensor not working issue is eliminated.

3. Update the fingerprint reader driver

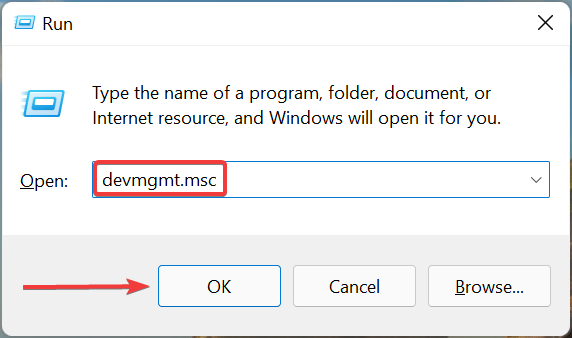
  1. Press Windows + R to launch the Run command, enter devmgmt.msc in the text field, and either click on OK or hit Enter to launch the Device Manager.devmgmt.msc
  2. Double-click on Biometric devices to expand it and view the fingerprint scanner.Biometric devices to fix hp envy fingerprint reader not working
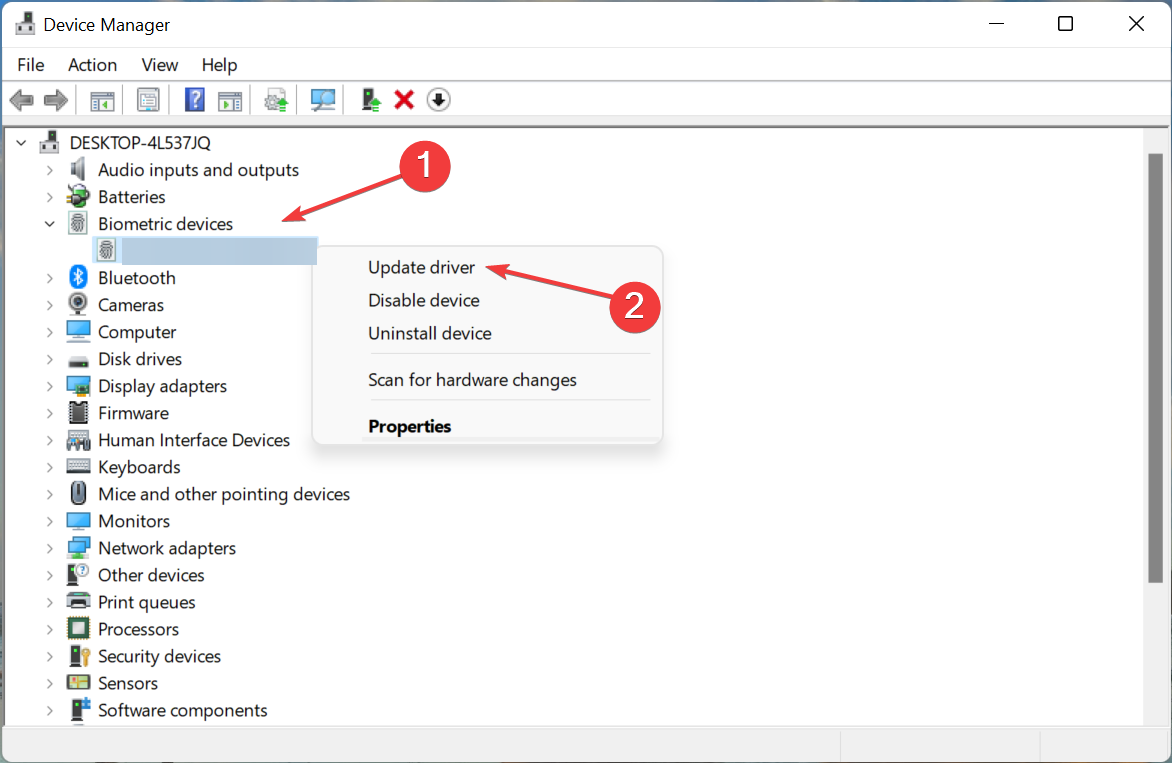
  3. Now, right-click on the fingerprint reader, and select Update driver from the context menu.Update driver to fix hp envy fingerprint reader not working
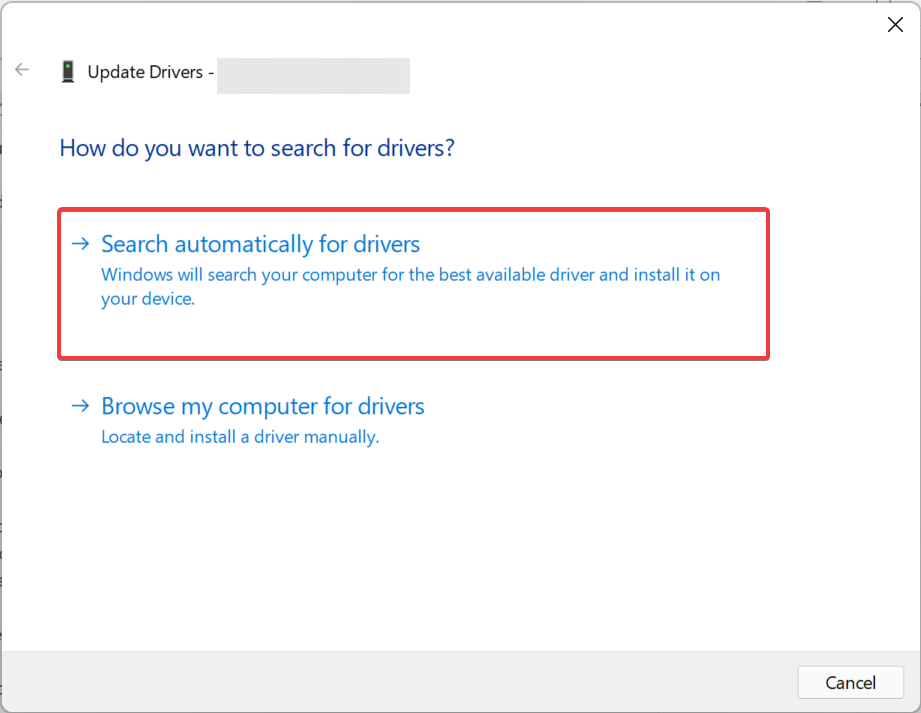
  4. Select Search automatically for drivers from the two options here.Search automatically for drivers
  5. Windows will now look through all the drivers available on the system and install the best one.

Outdated drivers are just as likely to cause the HP Envy x360 fingerprint reader not working in Windows 11 problem. Therefore, it’s recommended that you keep all the installed drivers up-to-date.

In case the Device Manager couldn’t find an update, you can try the other methods to manually install the latest driver version in Windows.

You also have the option to use an automated tool like Outbyte Driver Updater. It’s a light soft that will install new versions for your drivers whenever they become available. It can also take care of corrupt and missing drivers.

HP Envy Fingerprint Reader not working in Windows 10

4. Update Windows

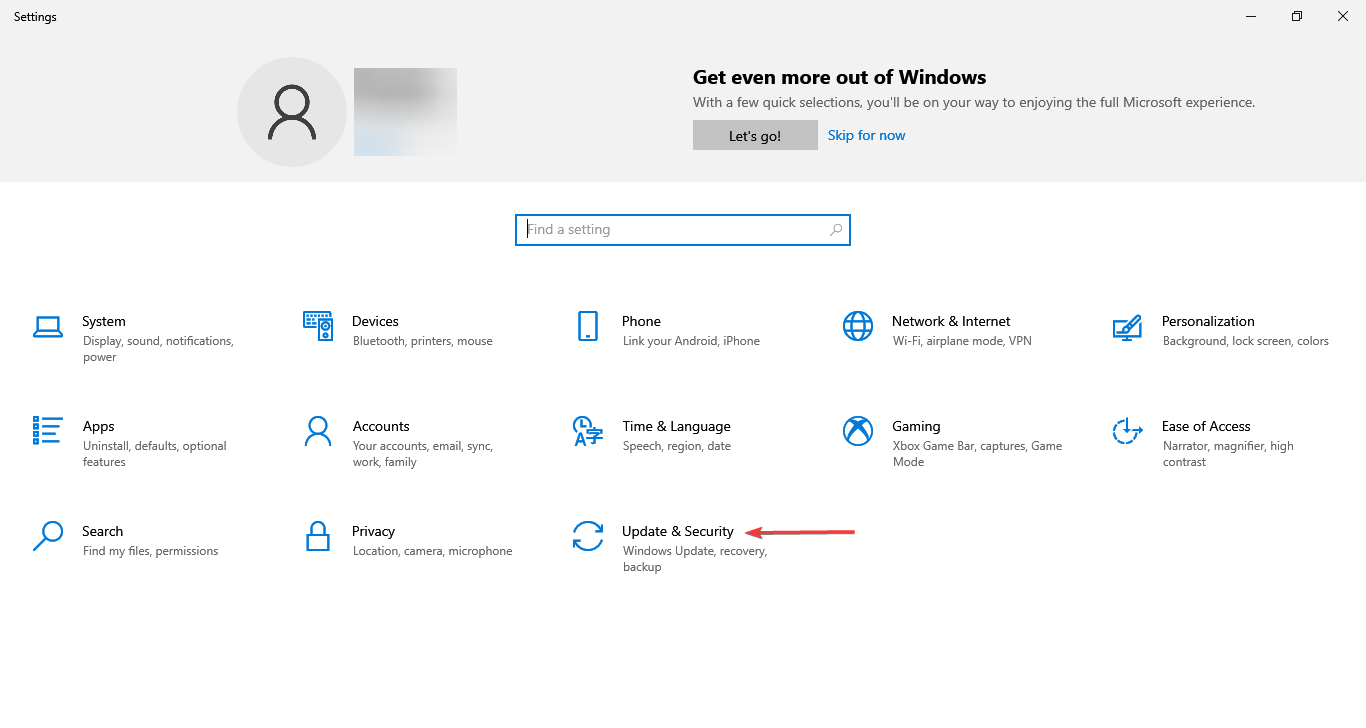
  1. Press Windows + I to launch the Settings app, and click on Update & Security from the options listed here.Update & Security
  2. Next, click on Check for updates on the right.Check for updates
  3. If an update is listed after the scan, click on the Download & install button.Download & install

An outdated OS can lead to many errors and also put your computer at risk. So, if you haven’t updated Windows in a while, it’s time you do that now.

That’s it! One of the four methods listed here should have helped fix the HP Envy x360 not working issue. If the problem persists, you can either perform a system restore or reset Windows to its factory settings.

Also, find out what to do if the HP Envy x360 sound is not working.

Tell us which fix worked and your review of HP Envy x360, in the comments section below.

5 Best Website Scanner Tools to Detect Malware Before it Strikes

Even if you know and follow all the necessary security measures on your own when you’re managing your website, you will never be able to keep up and catch all malware and the vulnerabilities on your own.

That’s when a website vulnerability scanner comes in quite handy. Vulnerability scanners can help you automate security auditing, and they can play a massive role in your overall IT security.

These tools can scan the website for malware and all kinds of security risks, at the same time producing a prioritized list of those that you should patch.

Vulnerability scanners also describe the vulnerabilities and offer you steps on how to fix them.

There are lots of website scanner tools on the market, and we picked five of the best to help you make your choice easier. Make sure to check out their features to be able to make the best decision.

What are the best website scanners to use this year?

Guardio

Guardio is a browser extension that uses advanced cloud-based detection technologies to identify and stop web-based cyber attacks.

This utility works as an antivirus for your browser and it blocks threats before they get a chance to reach your PC.

It is easy to install and set up. Once you get it, it starts scanning your browsers and lets you know if it finds anything suspicious.

Web browser threats come in the form of trackers, malicious scripts, and malicious browser extensions.

Guardio is able to find and remove all these, allowing you to have a cleaner browsing experience.

Not only that, but it is also able to detect real-time threats such as phishing attempts.

These are most often disguised in emails that require your information and form-filling websites. The tool will alert you and block these attempts.

Other key features of Guardio include:

  • Blocks pop-ups and unwanted notifications
  • Dangerous site blocks
  • Social account protection
  • Identity & data leak monitoring
  • 24/7 customer support

Guardio is compatible with Google Chrome, Mozilla Firefox, and Edge. And, with the latest updates, this amazing tool is also available for Android and iOS.

Guardio

Keep hackers at bay with this powerful anti-malware browser extension.
Free trial Visit website

Quttera

This is a website vulnerability scanner online that offers complete security for websites. Using this tool, you will be able to protect your online success.

You can check out the complete set of features that are included in Quttera and try this free website vulnerability scanner on the official website.

Take a look at the best features that are included in this website scanner tool below:

  • The website scanning engine is backed up with a reliable infrastructure, and it is undergoing all kinds of harness tests in order to deliver fantastic performance.
  • This tool is continuously enhancing malware detection capabilities to provide customers effective tools against the most sophisticated and evolved web threats.
  • You will get instant alerts to remove malware from your website before the significant engines including Bing, Google, and Yahoo blacklist it in their search results.
  • When you face an online attack, the experts from Quttera will offer their help.
  • The program provides both internal and external monitoring.
  • It can detect 0-day threats with non-signature based technology.
  • You will receive instant notifications and also malware reports.

⇒ Get Quttera

Detectify

Detectify is a web security scanner that is able to perform a fully automated set of tests in order to identify security issues on your website.

It will check for more than 700 vulnerabilities, and it will scan your website for malware continuously.

Detectify Crowdsource is a network of more than 100 handpicked security researchers who combine extensive knowledge with automation.

Check out more features of this impressive tool:

  • The program comes with a scanner that checks your website for various vulnerabilities.
  • The latest security tests are submitted by ethical hackers.
  • You will benefit from an unlimited number of scans.
  • There’s an extensive knowledge base that includes over 100 remediation tips.
  • You will be able to share reports thanks to the team functionality easily.
  • This website scanner provides integration with popular tools such as Slack, Jira, and PagerDuty.

⇒ Get Detectify

SiteGuarding

SiteGuarding includes a website antivirus, website firewall, and website files change monitoring services. This security tool will successfully protect your website against malware and hacker exploits.

When you’re in trouble, you will be able to get a professional consultation from engineers and security experts.

You can read the complete set of features that this website vulnerability scanner has to offer and try out SiteGuarding on the official website.

Take a look at the most important features that are packed in this program:

  • This service develops the highest-grade security tools for maximum website protection.
  • The release of a virus update is immediate once a new threat pops up and is analyzed.
  • You will get 24/7 professional support from security experts.
  • This tool uses strong and unique algorithms for detecting unknown viruses and the newest threats.
  • SiteGurading provides a deep scan of each and every file on your website, and it offers unique security solutions that are able to guarantee that your website will be up all the time.
  • It can also help remove your website from blacklists if that is the case.
  • The security tools included in this program can work on any type of servers, any CMS and custom developed websites and apps.
  • SiteGuarding provides an online tool to check your files and a complete antivirus solution for your websites.
  • You will get a daily update of the virus database.

⇒ Get SiteGuarding

Comodo Web Inspector

This is another excellent website malware scanner. This tool will scan online a particular webpage. All you have to do is enter the URL of the desired webpage in the designed space, and you will get a malware report.

Comodo Web Inspector also provides businesses website malware scans and even removal services for free.

All you have to do is provide your personal details along with your website address, and this tool will scan the website for malware and vulnerabilities. The security analysts will fix your website for free.

Check out more exciting features that are included in this tool:

  • Your website security scan report will be available within a couple of minutes.
  • In order to get a sufficiently detailed website security scan report, you have to sign up with Comodo Web Inspector.
  • The scan limit is 50 web pages if you select the Starter plan.
  • If you select the Pus option, you will be able to perform 250 scans.
  • If you decide to choose the Premium plan, you can perform 700 scans.
  • If you go for the Enterprise plan, you can scan 1000 web pages.

⇒ Get Comodo Web Inspector

Tinfoil Security

Tinfoil Security will first audit your website against the top 10 vulnerabilities, and it will let you know other known security holes.

These are five of the best website scanner tools that you can currently find out there, and they each come with their very own unique set of features.

We recommend that you head straight to their official websites and analyze their capabilities before you decide which one is the best tool for your needs.

Check out more features that you will benefit from if you choose Tinfoil Security:

  • You will get an actionable report and the option to re-scan once you are done with all the necessary fixes.
  • The entire setup process will require about five minutes.
  • You will be able to scan if your website is protected or if it’s behind single sign-on.
  • Using, Tinfoil Security, you will be able to push security up to stack and empower developers to fix the website’s vulnerabilities.
  • This tool was able to discover 2,453,930 vulnerabilities by now, and the usable reports make it really easy to fix them.

⇒ Get Tinfoil Security

These tools will help you scan your website for malware on-demand whenever you want to, but we also recommend that you schedule them for automatic security scans just to be sure that you get enhanced chances for total protection.

You can also use AdwCleaner to clean adware and unwanted browser components for a more complete security setup.

If you have a website, it’s essential to use a tool that scans it for security vulnerabilities to make sure that everything works great. Never underestimate the security area of your website.

Fix: There is a Problem With This Windows Installer Package

From minor third-party tools to complex games and applications, one thing is certain: you need to install a program in order to use them.

There are quite a few Windows Installer errors in Windows 10, and the There is a problem with Windows Installer package error is one of the most resilient.

This isn’t the only message that you can encounter, and you can also get This installation package could not be opened error as well.

If you’re stuck with this error and you’re not sure how to deal with it, we recommend you keep reading this.

How can I fix Windows Installer package error in Windows 10/11?

1. Make sure you have administrative permissions

  1. Locate the setup file that you want to run.
  2. Right-click and choose Run as administrator from the menu.
  3. Now follow the instructions on the screen to complete the process.

As you already know, in order to install any application coming from a third-party source, you’ll need administrative permission. Luckily, you can make yourself an administrator easily on Windows.

Hence, you’ll need to authenticate using the Administrator account or have permission to make system-related changes on an alternate account.

Do keep in mind that There is a problem with this Windows Installer package can affect uninstall process as well.

2. Disable the antivirus and download the file again

  1. Press Windows key + X and type defender. Select Windows Security from the list.
  2. Navigate to the Virus & threat protection and click on Manage settings.
  3. Disable Real-time protection.
  4. Now try to install the application again.

You can also try downloading the installation file again and try to reinstall the software.

Users reported There is a problem with this windows installer package with iTunes, Chrome, Microsoft Edge, and Cisco AnyConnect, but it can also affect any other software.

Note icon NOTE
Disabling your antivirus protection will leave your system at risk, so use it only with the files you trust. Don’t forget to turn the protection back on once you’re done.

3. Run Program Install and Uninstall Troubleshooter

  1. Visit the troubleshooter download page.
  2. Click on Download troubleshooter.
  3. Once the file is downloaded, run it.
  4. Follow the instructions on the screen to complete the process.

Once you run this software it will check and resolve installation-related errors. It’s also worth mentioning that this tool is provided by Microsoft, so you won’t need to take unnecessary risks with suspicious third-party solutions.

4. Check Windows Installer for errors

  1. Right-click the Start menu and and select PowerShell (Admin).
  2. Type the following command in the command line and press Enter: MSIExec
  3. If everything is good, you’ll see the pop-up window with Windows Installer details.
  4. If you see an error report, you should re-register Windows Installer.

In a system as complex as Windows is, you have various services that partake in everything you do. The MSI engine foundation is responsible for the installation, maintenance, and uninstallation of third-party programs.

You don’t need to be a tech enthusiast to get where this is going. If MSI engine (Windows Installer) is down, corrupted, or disabled by mistake, you’ll have a hard time installing anything.

See our guide on Windows Installer Service missing for targeted steps to restore the installer service on Windows 10 and 11

5. Re-register Windows Installer

  1. Right-click Start and choose PowerShell(Admin).
  2. In the command line, type the following commands and press Enter after each:
    msiexec.exe /unregister
    msiexec.exe /regserver


  3. Close PowerShell and look for changes. If the problem is still there, move to the Step 4.
  4. Press Windows key + R, type services.msc and press Enter.
  5. Locate Windows Installer. It should be at the bottom of the list.
  6. Right-click on the service and select Stop.
  7. Now right-click it again and choose Start.
  8. Restart your computer.

This is a simple solution, and it can help with There is a problem with this windows installer package error 1722 or any other error.

How can I fix Windows Installer package error on Windows 11?

This error affects all versions of Windows, and if you encounter the issue on Windows 11, you should know that all these solutions can be applied to it as well.

Windows 10 and 11 are pretty similar when it comes to core functionality, so most problems can be fixed by using the same solutions.

That should be enough to rid you of the There is a problem with this Windows Installer package installation error.

If you’re having more issues, we suggest reading our Windows Installer Service could not be accessed article for more useful solutions.

Should you know an alternative solution to this, feel free to tell us in the comments section below.

Fix the Call of Duty Cold War UI Error 85118 with this easy guide

There’s no denying the fact that Call of Duty is one of the most, if not the most, popular games on the planet, with hundreds of millions of active subscribers each month.

The action-packed first-person shooter has taken us through so many exciting adventures since it first came out, that it’s hard to talk about shooter games without mentioning the franchise.

But not even big games such as Call of Duty are free of bugs, errors, and other game-breaking problems that make players scream with frustration.

Lately, Call of Duty Cold War players have been reporting getting some pretty nasty UI errors while enjoying their favorite title.

It’s called UI Error 85118 and it will crash your game if you are unlucky enough to get it. So what can we do? Fix it, of course.

How Can I Fix The Call Of Duty Cold War UI Error 85118?

Almost all the reports that came in flagged the issue as starting when one would scroll through his friend’s list, while in-game.

Almost all of a sudden, boom, the game crashed just like that. As of right now, developers haven’t released an official fix patch, but there are certain workarounds we are about to share with you.

1. Update your game

  1. Exit Call of Duty Cold War.
  2. Check for updates.
  3. If there aren’t any updates queued, right-click Call of Duty Cold War and select Properties.steam game properties
  4. Select the Updates tab and activate one of the two Auto-update options.update steam games

2. Restart your PC

  1. Press the Start button.press start
  2. Click on the Power button and select Restart.restart

3. Check game file integrity

  1. In Steam, right-click Call of Duty Cold War and select Properties.dying light steam properties
  2. Select the Local Files tab and click on the Verify integrity of game files.game file integrity

4. Update your graphics driver

  1. Press the Windows key, search for Device Manager and click on Open.run device manager
  2. Expand Display Adapters, right-click on your GPU and select Update driver.update gpu
  3. Select Search automatically for drivers.search for driver automatically

It goes without saying that quality gaming can be enjoyed without any crashes, lags, or freezes by keeping all drivers up to date and error-free easily. 

However, sometimes, manual checks are hard to perform, that’s why we recommend using an automated assistant that will scan for fresh driver versions daily.

In case you’re a beginner, you don’t have to worry! Outbyte Driver Updater is smart, simple, engaging and its user interface was built to make your life easier.

⇒ Get Outbyte Driver Updater

For the time being that is all you can do in order to deal with this annoying problem. Everyone is still waiting for Activision to solve it.

You should also check out the textures not loading error and Call of Duty Cold War not updating on Xbox guides, just in case you or someone you know needs them

Have you also experienced this error while playing Call of Duty Cold War? Share your experience with us in the comments section below.

Fix This Client Is Not Compatible Fortnite Error With 3 Easy Steps

Are you a Fortnite fan? Great, it means that you care about the game enough to want to do something when it backfires.

And, since you’re here, you are most likely experiencing a game-breaking problem that won’t allow you to carry on enjoying your favorite title.

We already showed you what to do when you get an unexpected error has occurred message for the Xbox One/Series X|S version of the game.

Fortnite players are now dealing with another super annoying issue that won’t let them log in. The only message they get is this client is not compatible with the currently deployed server.

Now, we know you might have gotten so annoyed that you feel like simply exiting the game and calling it a day, but we’re here to help you in your time of need.

We’ve compiled 3 easy solutions that proved to do the trick for other Fortnite players in the same situation as you are in right now.

What can I do to fix this client is not compatible error?

1. Restart Fortnite

Most players that had to deal with this error while playing Fortnite stated that a simple game restart fixed the problem for them.

So, before we get to the next two steps of our guide, we recommend you do the same. If it works, you can keep enjoying Fortnite without worrying.

2. Check game file integrity

  1. In Steam, right-click Fortnite and select Properties.dying light steam properties
  2. Select the Local Files tab and click on the Verify integrity of game files.game file integrity

3. Update your network driver

  1. Press the Windows key, search for Device Manager and click on Open.run device manager
  2. Expand Network Adapters, right-click on the one you use, and select Update Driver.network driver
  3. Select Search automatically for drivers.search for driver automatically

It goes without saying that quality gaming can be enjoyed without any crashes, lags, or freezes by keeping all drivers up to date and error-free easily. 

However, sometimes, manual checks are hard to perform, that’s why we recommend using an automated assistant that will scan for fresh driver versions daily.

In case you’re a beginner, you don’t have to worry! Outbyte Driver Updater is smart, simple, engaging and its user interface was built to make your life easier.

⇒ Get Outbyte Driver Updater

This is pretty much all you can do for the moment if you are facing the above-mentioned situation, so you better get right to it and continue enjoying Fortnite.

If you are dealing with other problems, such as Fortnite not working on Xbox One, or something went wrong with your Fortnite payment, we can help with that as well.

Has this guide been helpful in solving your problem? Let us know in the comments section below.

How To Fix Controller Not Working For Rogue Legacy 2

If you are also a fan of Rogue Legacy 2, then surely you came to the right place to solve any problems you might have with your favorite game.

Some players reported their game crashing for no apparent reason and we showed you how to fix that issue if you ever run into it.

However, that’s not the only thing that can go wrong with Rogue Legacy 2, as you can find out by simply asking people that play it.

And not everyone enjoys this title the conventional mouse and keyboard way. Some gamers actually prefer the controller approach.

But what do you do when your controller simply won’t work in Rogue Legacy 2? That’s the question you came here to find the answer to and we will, of course, oblige.

So, if you are in a similar situation, here’s what you need to do on your end for this issue to quietly go away and enjoy some good old quality gaming.

What can I do if Rogue Legacy 2 is not recognizing my controller?

No, you won’t have to crack open the controller and perform some intricate circuit surgery. All you have to do is tweak some compatibility options in Steam.

We will guide you through this process and you will be back in the game before you can say Rogue Legacy 2 is not recognizing my controller.

Before we start though, make sure to disconnect any other USB devices you are not using, such as joysticks, hotas, or headsets.

1. Configure the controller in Steam

  1. Click on the Steam button and select Settings.steam settings
  2. Select Controller and General Controller Settings.general controller settings steam
  3. Select the configuration support appropriate to the type of controller you are using.controller settings steam
  4. Right-click on Rogue Legacy 2 in Steam and select Properties. game properties
  5. Select Controller and then Enable Steam input from the dropdown.enable steam input controller

If the controller still doesn’t work for you in-game after these steps, try revisiting the last one and select Disable Steam Input instead of Enable Steam Input.

Some players stated that the Enable option didn’t work, they switched, and then the controller was functioning perfectly while in Rogue Legacy 2.

2. Launch the game in Big Picture mode

  1. Click on the Big Picture mode button.open steam in big picture mode
  2. Select Library and start Rogue Legacy 2.steam big picture mode library

3. Force on controller input in Big Picture mode.

  1. Click on the Big Picture mode button.open steam in big picture mode
  2. Click on the Library button.big picture mode library
  3. Select Rogue Legacy 2.rogue legacy 2 steam big picture mode
  4. Click the Manage Game button.Manage Game steam
  5. Click on Controller Options.controller options steam big picture mode
  6. Under Controller Application Options select Forced On and press the OK button.advanced controller options steam

After completing these steps you should be able to enjoy Rogue Legacy 2 with a controller, as other players that found themselves in a similar situation did after completing this guide.

Has this article been helpful for you in solving this annoying problem? Share your experience with us in the comments section below.

FIX: Windows Media Player has Stopped Working

A wide number of users have reported issues when trying to run Windows Media Player on their Windows 10 PCs, seeing an error message Windows Media Player has stopped working. There are various reasons for this occurrence, starting with system or application conflicts.

Some of the affected users shared their problems on Microsoft’s forum.

Windows Media Player has stopped working.
A Problem has caused the program to stop working correctly. Windows will close the program and notify you if a solution is available. This just started happening today, didn’t install anything to my knowledge. Tried uninstalling & reinstalling but didn’t do anything.

Resolve the error with the steps provided below.

Why is my Windows Media Player not working?

1. Disable and enable Windows Media Player

  1. Press ‘Win + X’ keys on your keyboard, and select the Apps and features option
  2. Click on ‘Manage optional features’, and then search for Windows Media Player in the listmanage optional settings apps & features Windows Media Player has stopped working
  3. Once you found Windows Media Player, click on it, select Manage, and deactivate it
  4. Restart your PC
  5. Follow the steps 1 to 3 and install the Windows Media Player from the same list
  6. Check to see if the error occurs when trying to open WMP.

2. Disable and re-enable Windows Media Player in Windows Features

  1. In the Windows Search bar, type Windows features and select Turn Windows features on or off.
  2. Navigate to Windows Media Player and disable it by unchecking the box.
  3. Reboot your PC and re-enable Windows Media Player again.windows media player windows features Windows Media Player has stopped working
  4. Check for improvements.

3. Try an alternative video player

If none of the solutions for troubleshooting Windows Media Player work, you could always consider using a different video player altogether, since the Windows Media Player is pretty limited in terms of functionality anyway.

A great media player software that exceeds other competitors’ solutions is Cyberlink PowerDVD 21. Using this tool, you will enjoy flexible support for Blu-ray, 8K, and 4K video quality for your Windows device.

This ultimate media player software can bring you qualitative visual and audio performance for all your videos. Plus, you can manage the entire library of photos, music, and videos on your PC.

Additionally, this solution can support ISO files, ultra HD videos, and Dolby True HD audio with Hi-Res audio support for memorable audiovisual results in your own home.

Plus, you don’t need to worry about unavailable video or audio files due to great support for all major file formats.

Cyberlink PowerDVD 21

Upgrade your audio-visual experience with this media player tool with 8K and 4K HDR media support on your Windows PC.
Check price Visit website

4. Update Windows and uninstall AMD Media Foundation Transcoder

  1. Navigate to Settings > Update & Security > Check for updates to update Windows 10.
  2. In the Windows Search bar, type Control and open Control Panel.open control panel Windows Media Player has stopped working
  3. Choose Uninstall a program.
  4. Uninstall AMD Media Foundation Transcoder and try running Windows Media Player again.

Windows Media Player is indeed a great tool, so follow these steps if you notice that it stopped working for no reason.

If all else fails, don’t pass on the opportunity to try a better video player, since the features and capabilities far outweigh the price tag.

Let us know what other solutions you tried and worked by telling us about it in the comments section below.

How to Restart Remote Computer With CMD [3 Ways]

If you have multiple computers set up in your office or home and in different rooms, it can be difficult to restart each one of them. Instead of having to physically restart the computers, you can restart remote computers using Windows CMD.

However, for this to work, you need to make sure that the remote computer you are restarting is in the same network as the one you are using. In addition, you need the administrative credentials or username and password.

You also need to enable remote shutdown on the host computer for this to work. If you do not want to use the CMD, you can use some of the best remote reboot software to control Windows 10/11.

Using the Windows shutdown command to restart a remote computer

Windows OS comes with a shutdown command that can be used to restart a remote computer using the CMD. It can be used by Windows 11, 10, 8, and even 7 users. This command is shut down.

The command provides users with multiple options for use when restarting or shutting down computers. Some of the most common options include;

  • /r – used for restarting a computer.
  • /s – used when shutting down a computer.
  • /m \\computer – used to specify the remote computer to restart or shutdown.
  • /l – used for logging off the computer.
  • /t xx – used when setting time out period before restart or shutdown to xx seconds.
  • /c “comment” – used when you want to display a certain message on the screen before restart or shutdown.

How do I restart a remote computer using CMD?

1. Use the shutdown command

  1. Click the start button at the bottom left corner in Windows 10 or previous versions of Windows OS. However, the start button is at the center of the taskbar in Windows 11.
  2. Type cmd or command prompt on the search box.
  3. Right-click Command Prompt to get a menu on the right side of the CMD icon.launching windows cms
  4. Select Run as administrator to launch the command prompt with administrative privileges. However, you need to be logged in as an administrator to ensure that command-line access is not denied.
  5. Type the following command, and replace the computer name with the name of the PC you want to restart: shutdown /m \\computername /rshutdown command
  6. Type /f one space after /r if you would like to close all programs before the restart. However, notify users to save their work.
  7. Add /c after /f, then type a message in quotes to send a message to the remote computer before restarting. Your command will now look like this shutdown /m \\computername /r /f /c “This computer is about to restart"shutdown command opions
  8. Type /t xx where xx represents the number of seconds the remote computer should restart. Your new command will, therefore, be shutdown /m \\computername /r /f /c “This computer is about to restart” /t 30
  9. Press Enter.

2. Remote Shutdown Dialog

  1. Follow the first four steps above to launch the command prompt as an administrator.
  2. Type the following command and press Enter shutdown -i remote shutdown i command
  3. You will get a remote shutdown dialog window. Click Add on the right-hand side of the Remote Shutdown Dialogue window.add computer to restart
  4. Type the IP address of the computer you want to restart and then click the OK button. This allows you to restart a remote computer using its IP address.add computer to restart
  5. Choose what you want the remote computer to do. In this case, choose Restart.
  6. Click the Warn users of the action checkbox to set a timer for the computer to restart. This is, however, optional. 
  7. Type the number of seconds the computer should delay before the computer restarts.
  8. Click the Planned checkbox to create an event tracker for the remote restart. Again, this is optional.
  9. Select a reason from the dropdown list for the restart and type a comment to be displayed on the computer before it restarts.
  10. Click the OK button.leave comment before restart

3. Windows Powershell

  1. Click the start button and type Powershell. 
  2. Right-click on Windows Powershell and select Run as administrator.launching windows powershell
  3. Run the following command to restart a remote computer with Powershell even when it is in use. Restart-Computer -ComputerName REMOTE_COMPUTER_NAME -Force
  4. Replace REMOTE_COMPUTER_NAME with the name of the computer to restart and press enter.restart command

The three options discussed above will help you restart a remote computer using CMD easily without having to physically access the computer. However, make sure that you have saved any work before starting the process. If you don’t, you might end up losing the unsaved work.

You can also use a special tool such as Redmi 3 to access any remote computer within few moments. This software will give you secure access to safely restart any remote pc within your network.

Also if you have any other suggestions feel free to share them!

Couldn’t Download Network Issue in Edge: 5 Methods to Try

Microsoft Edge is one of the best browsers for Windows and the first choice of many, along with being Microsoft’s recommended browser. But it still found to bump into issues from time to time. One of the common ones is the Couldn’t download Network issue error in Edge.

Despite the fact that Edge has significantly improved since its initial release, it is not error-proof. And you may have a variety of problems, including the inability to download files. So, let’s find out all about the problem and the solutions that should work.

Why am I getting Couldn’t download network issue in Edge?

Here are a few reasons you are encountering the error:

  • Corrupt browsing data: The problem could arise due to corrupt browsing data, and the only viable solution is to clear it.
  • Issues with the Internet: If the Internet speed is slow or the network keeps disconnecting randomly, it would affect the ongoing downloads.
  • Missing browser or OS updates: Oftentimes, running an outdated version of Windows or Edge could lead to the problem.
  • Third-party apps triggering conflicts: When Microsoft Edge is blocking downloads, it could also be the third-party apps to blame.

How do I fix Microsoft Edge couldn’t download network issue?

Before we head to the slightly complex changes, try these quick ones first:

  • Check the Internet speed using SpeedTest by Ookla or a reliable tool, and if it’s slow, speed up the Internet.
  • Switch to a different network. Also, if you are using a wireless connection, switch to a wired one.
  • Disable any third-party antivirus or firewall software installed on the PC and verify whether the Couldn’t download Network issue in Microsoft Edge is fixed.
  • Ensure the website you are downloading the data from is safe and reliable because Edge might be blocking the download for security reasons.
  • Check for any pending Windows updates and install them all.
  • In case you are downloading the file on a public network or at work, administrator policies might be in place to prevent downloads over a given file size. So, check for that.

If none work, move to the solutions listed next.

1. Update Microsoft Edge

  1. Launch Microsoft Edge, click on the ellipsis near the top-right, hover the cursor over Help and feedback, and select About Microsoft Edge.microsoft edge
  2. Now, if an update is available, it will automatically be downloaded.update to fix couldn't download network issue edge
  3. After the update is installed, click on Restart for the changes to come into effect.restart

After updating the browser, check whether the Microsoft Edge Couldn’t download – Network issue message in Windows 11 is gone. If not, move to the next solution.

2. Reset the network settings

  1. Press Windows + I to open Settings, choose Network & Internet from the navigation pane, and click on Advanced network settings on the right.advanced network settings
  2. Click on Network reset.network reset to fix couldn't download network issue edge
  3. Now, click the Reset now button.reset to fix couldn't download network issue edge
  4. Click Yes in the confirmation prompt.confirm

3. Try a different browser

When trying to download files and Edge is making it difficult to do everyday tasks and view your files, you could try another browser.

One of the trustworthy browsers is Opera One, a well-known multiplatform web browser with a long history of providing the greatest surfing experience to millions of users worldwide. Opera One is an all-rounder web browser for everyone, offering a range of functions as well as being secure, quick, and safe.

Opera One is your perfect light and fast browser, whether you are managing the built-in capabilities like Ad Blocker, VPN, AI or you are looking for more organization with features like workspaces, tab islands or faster access to social media and messaging apps.

In comparison, Microsoft Edge is more difficult to manage your downloads and requires more storage, and the speed can sometimes be a nuisance.

Opera One

Make your browsing experience more secure and organized with Opera One.
Free Download Visit website

4. Use Registry Editor

  1. Press Windows + R to open a Run window and type regedit inside the search bar.regedit edge couldn't download
  2. After you enter Registry Editor, navigate to the following location: Computer\HKEY_LOCAL_MACHINE\SOFTWARE\Microsoft\Windows\CurrentVersion\Policies\Attachmentsattachment edge couldn't download
  3. Now, double-click on the ScanWithAntiVirus key and set its value to 1, and click OK in order to stop it from scanning the Edge download.save-1 edge couldn't download

A tangle of seemingly incomprehensible character combinations makes up the Windows registry, making it one of the scariest aspects of your computer.

5. Repair Microsoft Edge

  1. Press Windows + I to open Settings, go to Apps from the left, and click on Installed apps.installed apps
  2. Locate Microsoft Edge, click on the ellipsis next to it, and select Modify.modify to fix couldn't download network issue edge
  3. Click Yes in the UAC prompt.
  4. Click on Repair.repair to fix couldn't download network issue edge
  5. Waif for the repair process to complete.repair

That’s it! If the previous solutions didn’t work, repairing Microsoft Edge should get things up and running when you are getting the Couldn’t download – Network issue message for files over 20 GB or, in some cases, even less.

Before you leave, check some quick tips to speed up Microsoft Edge and learn about the Efficiency Mode on Edge.

Tell us which fix worked for you in the comments section below.

Received an Onlyfans Internal Error? 3 Tips to Fix It

A strong pitch is made to youths to join OnlyFans as a quick and easy method to get money, with the caveat that some do not actually need to be naked in order to make easy money from the site. However, the website might sometimes experience issues such as internal errors.

There’s also the allure of the possibility of earning as much as $40,000 per month as a Creator, despite the fact that only a very small number of Creators actually earn that much.

If you want to manage your income and track your spendings, take a look at the five best software to control your finances.

OnlyFans announced a new account verification method, in which a Creator must now upload a selfie with their ID in it to demonstrate their authenticity.

However, according to our research, underage users have successfully made accounts using other people’s IDs, indicating that the age verification process is not rigorous enough as of now.

Follow along as we will show you how to address different OnlyFans internal error messages, right after we respond to one of your most asked questions.

What is the real OnlyFans?

OnlyFans is an online platform and mobile application that was launched in 2016 that allows users to pay for material (pictures and videos, as well as live streams) by subscribing to a monthly membership.

YouTubers, fitness trainers, models, content creators, and public celebrities are the primary authors of content in order to monetize their respective professions.

OnlyFans Home Page (Source: OnlyFans)

The site, which is situated in the United Kingdom, has become increasingly popular among those who have lost their jobs as a result of the coronavirus outbreak, but it is also popular among sex workers.

Several recent BBC documentaries, including #Nudes4Sale, examined the rise of underage people selling sexual content on sites such as OnlyFans as well as Twitter and Snapchat Premium.

According to facial analysis technology developed by Yoti, as many as a third of Twitter users advertising sexual photographs with hashtags nudes4sale or buymynudes are under the age of 18.

Unfortunately, a big number of young producers are using social media to sell nudes in exchange for money and gifts, which is extremely concerning.

How do I fix the OnlyFans internal error?

1. Check your payment method

If you are having difficulties making a payment, the first thing you should do is determine whether your card is 3D Secure or not. If your card does not have 3D Secure, you should consider upgrading it, due to the fact that OnlyFans accepts only 3D Secure Cards.

2. Wait for account approval

If you have submitted all relevant papers and are over the age of 18, you will almost probably be approved for a credit card account.


OnlyFans is a very popular website that receives millions of visits per month from individuals throughout the world, thus it can take some time for your account to be approved.

However, if your account hasn’t been approved in 24 hours then it might be a server error just like the 500 internal server error OnlyFans. Since these are errors on their side only they can fix them. Thus, further patience will be needed until developers address the issue.

3. Contact Customer Support

An array of customer services designed to assist clients in making the most cost-effective and correct usage of a product are known as customer support.

It entails assisting with the design, installation, training, troubleshooting, maintenance, updating, and disposal of a product, among other things.


When it comes to providing web-based assistance to your consumers, phone calls and emails are the most common methods of communication. Email-based communications have a number of advantages, including the fact that they are low-cost, non-intrusive, and accessible from any location.

Thus, we recommend that you contact customer support as they will let you know whether the OnlyFans chat internal error, or any of the others mentioned above, you are facing is due to their servers and when it will be fixed.

Since OnlyFans is a browser-based app, check out our article with the four best browsers to watch videos without buffering.

Alternatively, if you decide to create some content yourself, take a look at the five best software to turn pictures into videos.

Was this guide useful to you? Let us know by leaving a comment in the section below. Thanks for reading!

Microsoft explains how Bing maps helped with COVID-19 vaccines in the U.S.

Ever since COVID-19, there has been an influx of information, specifically about the shipment of vaccines and their availability. As such, Microsoft used this premise to come up with a platform where people could easily access credible information in one convenient location.

This is where Microsoft capitalized on the Bing Maps platform. They used it to create a “one-stop website” where individuals could easily get precise visualized information in regards to worldwide cases, vaccine distribution plans, and vaccination deliveries.

According to the blog post by Microsoft:

To tackle the challenge, Microsoft Bing leveraged the versatility of the Bing Maps Web control to power the Bing Maps COVID-19 Tracker. This comprehensive tracker was built around the philosophy of promoting action by democratizing information through sharing of the Bing Maps COVID Tracker Data set.

The COVID-19 tracker has provided insight on the virus’s case distribution and vaccination plans of multiple countries at a glance. The data provided here is sourced from credible entities such as the CDC and WHO. The tracker also relies on Location Intelligence resources like Location Recognition API and Spatial Data Service Geodata API to incorporate vital features. Bing Maps is effective and efficient, hence its extensive use when providing aggregated COVID-19 and vaccination information.

Bing Maps uses AnimatedTileLayer events to enhance the visualization of vaccine availability and the current predicament of each state. AnimatedTileLayer helps developers come up with map tiles that are updated at predetermined intervals. The tracker is integrated with Power BI and Excel which are helpful especially when it comes to the automation of data visualization and presenting real-time graphs for any region.

These facilities are still available for use and have proven to be quite effective when it comes to providing reliable information about the distribution of vaccines and has also helped people isolate in regions with a high infection rate.


Play Call of the Sea, Overcooked! All You Can Eat and Sid Meier’s Civilization VI this weekend with Xbox Free Play Days

Three more Xbox games will be available for Xbox Game Pass and Xbox Live Gold members to install and play this weekend from Thursday, May 5 to Sunday, May 8 as part of the Xbox Free Play Days feature.

Call of the Sea

In Call of the Sea, you’ll take on the role of a young woman named Norah as she explores a beautiful tropical island in search of her missing husband. Along the way you will encounter remnants of a lost civilization and unravel a series of mysteries in this award winning first person puzzle adventure.

Sid Meier’s Civilization VI

The latest installment of this legendary turn-based strategy game series has you assuming the role of one of 24 different leaders from around the world including Cleopatra and the Roman Emperor Trajan. Discover new lands, build new technology, and build the greatest civilization ever known to man.

Overcooked! All You Can Eat

With the inclusion of 4K resolution, cooperative cooking has never looked so good. This follow-up to Overcooked 2 also introduces online functionality for its multiplayer aspect, for the first time in the series. All You Can Eat features new chefs to play as and all-new levels.

Xbox Free Play Days is another perk of having a subscription to Xbox Game Pass or Xbox Live Gold. New games are introduced each week for players to install and play. It is a great way to try out something new and maybe even find a new favorite.


[Video] Hands-on with the leaked “One Outlook” Windows 11 client: A glorified PWA?

It’s no secret that Microsoft is working on a new desktop version of the Outlook app on Windows 11, known as “One Outlook,” or the current internal code-name of Project Monarch. We’ve seen leaks in the past, and today, a fully working version of the app has shown up online (warning, direct download!) as shared by the folks at Windows Central. This working version of the app only supports work / school accounts at the moment, but it offers a great first look at what we can expect when Microsoft fully reveals the app when ready. Yet, is it just a glorified PWA? Let’s dive deeper with this hands-on look.

The interface & first boot

When you install the One Outlook Client on Windows 11, you’ll be guided to import your settings from the existing Outlook app on Windows. This could be a confirmation that One Outlook isn’t meant to replace anything, but rather live alongside the desktop app for the time being. Our theme settings, and density settings were just a few things that were imported from the existing Outlook app. Changing the theme in the One Outlook also changes it in the Outlook Web App too, so there seems to be some cloud syncing going on here.

Once you boot up into this One Outlook client you should notice that it is basically the same as Outlook.com. The only difference we noticed is a ribbon at the top, which looks more like Outlook desktop with a “View” and “Home” buttons. It also carries the theme color you choose. Additionally, the “Chat” button in the One Outlook doesn’t work just yet either and it doesn’t open Teams as it does on Outlook.com

In other areas of the interface, there are the usual theme settings, as well as notifications, To Do, and OneNote links at the top right side of the app. Settings has a toggle for dark mode, focused inbox, desktop notifications, conversation view, a reading pane, and everything you’d expect from the Outlook web experience. There’s nothing different there.

The performance and creation emails


One big difference between One Outlook and the regular Outlook.com experience is the way the app handles opening windows. Creating a new message in One Outlook opens it in a new window that you can float around. This is exactly like what would happen in the old and existing desktop app.

Overall, the One Outlook app does seem to boot a lot faster than the desktop app, too. This is because it is based on Edge. Deleting messages, and switching between various parts of the new app is snappy. Even creating messages is a quick task, with the window popping up right away. Otherwise, this does feel exactly like Outlook.com would. Some things are missing though, as we weren’t able to add a connected calendar.

A glorified PWA

Overall, this One Outlook experience is quite nice but is also very similar to the Outlook.com experience. That’s not a problem, either, as most people are familiar with Outlook.com as it is.

The ongoing rumor is that this app might eventually replace Mail & Calendar in Windows, and also ship on MacOS as well as Linux. Yet, it looks like that might still be well off in the future. There’s still some work to do, and Microsoft could announce this One Outlook experience at Build 2022, then give Office Insiders a chance to send in feedback on the app. Let us know what you think of this app in the comments below.

How to make Apex Legends game chat work again in 1 minute

Apex Legends is one of the most thrilling games on the market. Initially released in March 2019, it now has a considerable fan following and a high user base. But, several users reported that game chat is not working in Apex Legends.

The game is available on various platforms and gamers across these faced issues with the game chat. This likely indicates that the problem lies with the game itself, but in most cases, it is a malfunctioning microphone to be blamed.

And if you search the web for it, there isn’t a lot of information available. Read the following sections to understand all about the problem, find out the fixes and by the time you are done, the problem should be long gone.

Why is my Apex Legends game chat not working?

When Apex Legends game chat is not working on PC, it is likely that the connected microphone is not working, the game settings have been configured incorrectly, the necessary permissions have not been granted, or there are issues with the driver.

On Xbox, the problem most likely lies with the network settings, or MAC address to be precise. For some users, it was also an outdated controller firmware, and installing the latest version did the trick.

For PS4, it was generally a low Audio Microphone Level that caused that problem. Other than that, if you have selected the wrong devices for audio input and output, the other players would be able to hear you in Apex Legends.

If you can identify the problem, just head to the relevant fix and execute it. Otherwise, you can try the methods in the listed sequence to quickly fix the Apex Legends game chat not working issue. We have first listed the solution for PC followed by the ones for Xbox and PS4.

What do I do if game chat is not working in Apex Legends on PC?

1. Check if Apex Legends has access to the microphone

  1. Press Windows + I to launch the Settings app, and select Privacy & security from the tabs listed in the navigation pane on the left.Privacy & security
  2. Scroll down and click on Microphone under App permissions on the right.Microphone
  3. Now, locate the Apex Legends app, and check if it has access to the microphone. If not, click on the toggle for it.Check permissions to fix apex legends game chat not working

After making the changes, restart the computer once for these to fully come into effect. If the Apex Legends game chat not working issue persists, head to the next method.

2. Reconfigure game settings

  1. Launch Apex Legends and click on the gear icon near the bottom-right corner.Gear icon
  2. Select Settings here.Settings to fix apex legends game chat not working
  3. Now, navigate to the Audio tab from the top.Audio tab
  4. Select the desired modes for Voice Chat Record Mode from the two options listed next to it.select mode

For voice chats, there are two modes available to users, Push to Talk and Open Mic. In the former, you will have to press and hold the T key to turn on the microphone and chat, while in the case of the latter the mic is always enabled.

Choose the desired setting here, restart the game for the changes to come into effect, and check if the Apex Legends voice chat not working issue is fixed.

3. Make your microphone the default device

  1. Press Windows + S to launch the Search menu, enter Change system sound in the text field at the top, and click on the relevant search result.Change system sounds to fix apex legends game chat not working
  2. Navigate to the Recording tab from the top.Recording
  3. Right-click on the microphone you use for in-game chat, and select Set as default device from the context menu.Set as default device to fix apex legends game chat not working
  4. Next, click on OK at the bottom to save the changes.OK

If the device is not set as default, there’s a chance that it may not be detected, though that’s rare. But, to be on the safe side, try setting it as the default device and check if the Apex Legends mic not working issue is resolved.

4. Update the microphone driver

  1. Press Windows + S to launch the Search menu, enter Device Manager in the text field at the top, and click on the relevant search result.Device Manager
  2. Next, double-click on the Audio inputs and outputs entry to expand and view the devices under it.Audio inputs and outputs to fix apex legends game chat not working
  3. Right-click on the microphone, and select Update driver from the context menu.Update driver to fix apex legends game chat not working
  4. Select Search automatically for drivers from the two options that appear in the Update drivers window.Search automatically for drivers
  5. Now, let your system scan and install the best driver for the microphone.

If you haven’t updated your microphone drivers in a while and don’t have any driver updater software installed, it’s time you do either one of these things.

With each update, various new features along with patches for previously known bugs are introduced which may help eliminate the problem.

In case the Device Manager is unable to find a better version, you can also manually install the latest driver in Windows.

However, if you want to be certain that you’re updating the correct driver for your Windows device, you can use a reliable third-party program like Outbyte Driver Updater. This tool, not only will identify, replace, and update the microphone driver, but it will also update any other drivers that your computer requires.

After you are done updating, the Apex Legends game chat not working problem should be fixed. If not, head to the last method.

5. Reinstall Apex Legends

  1. Press Windows + R to launch the Run command, enter appwiz.cpl in the text field, and either click OK it hit Enter to launch the Programs and Features window.appwiz.cpl
  2. Select the Apex Legends app,, and click on Uninstall.Uninstall to fix apex legends game chat not working
  3. Click Yes in the UAC (User Account Control) prompt that pops up.Click Yes
  4. Again, click Yes in the confirmation box, and wait for the process to complete.Yes
  5. Now, reinstall Apex Legends, as you did earlier.

If nothing else has worked, you are left with no other option but to reinstall the game, since the problem most likely lies with the game files or the installation did not go through successfully.

What do I do if game chat is not working in Apex Legends on Xbox?

1. Restart Xbox

In most cases, it’s a minor bug that causes the text chat to stop working in Apex Legends on Xbox series X. If that’s indeed the case with you, restarting the Xbox console should help fix the problem.

This is probably the simplest and quickest of all the fixes, and you should try it first before moving on to the more complicated ones. After restarting the Xbox, check if the game chat now starts working.

2. Clear the MAC address

  1. Press the Xbox button, click on the Settings icon, and then select All Settings.All settings to fix apex legends game chat not working
  2. Go to the Network tab on the left and then select Network Settings on the right.Network settings
  3. Select Advanced settings.Advanced settings
  4. Next, select the Alternate MAC address option on the left.Alternate MAC address
  5. Select Clear.Clear MAC address to fix apex legends game chat not working
  6. Finally, select Restart for the changes to come into effect.Restart

Issues with the MAC address have also been found to be a common reason behind game chat not working in Apex Legends on Xbox. The MAC (Media Access Control) is a unique number assigned to every device and can be found in the NIC (Network Interface Controller).

Simply clearing the MAC address should do the job and help eliminate the problem. If this too doesn’t work, head to the last method.

3. Update the Xbox controller

  1. Press the Xbox button, navigate to the Settings (gear icon) tab from the top, and select the Settings option.Settings
  2. Next, select Devices & streaming from the options listed on the left.Devices & streaming to fix apex legends game chat not working
  3. Select Accessories on the right.Accessories
  4. Now, click on the ellipsis (three dots) under the problematic controller.ellipsis
  5. Select Firmware version.Update firmware to fix apex legends game chat not working
  6. Finally, select Update now and wait for the process to complete. It may take a few minutes for the update to go through successfully.Update now to fix apex legends game chat not working

If the Xbox controller has not been updated in a while, chances are that it’s the outdated version of it that is causing the problem. Manually updating the controller should help when Apex Legends game chat is not working on Xbox.

Also, make sure to check if your controller can be updated wirelessly or has to be connected via a cable. Different models have different requirements, but you should be able to find this information on the official website.

What do I do if Apex Legends game chat is not working on PS4?

1. Restart your PS4

The easiest thing to do here would be to simply restart the PS4. Turn it off, unplug from the power source, wait for a minute or two, and then plug it back in. Now, turn on the device and you should be able to use Apex Legends game chat on PS4.

This method has worked for a lot of users and thus, should be your primary approach. In case it doesn’t work, the problem lies with the microphone level or the game settings, so try the other two methods.

2. Adjust the microphone level

  1. Go to the Settings option.Settings
  2. Locate and select Devices from the options here.Devices to fix apex legends game chat not working
  3. Next, select Adjust microphone level.Audio devices to fix apex legends game chat not working
  4. Select Adjust Microphone Level.Adjust microphone level
  5. You can now adjust the microphone level by dragging the slider. Moving it to the right will increase the level and dragging the slider to the left will decrease the level.Drag slider

In most cases, it’s the microphone level that’s causing the problem. If you have it set at low, just make sure to increase it a bit. It’s recommended to keep the slider somewhere near the middle for best results.

After you are done making the changes, check if Apex Legends game chat now starts working on PS4.

3. Verify that the audio input device is right

  1. Open the Settings on your PS4.Settings to fix apex legends game chat not working
  2. Go to Devices.Devices to fix apex legends game chat not working
  3. Now, select Audio devices from the options here.Audio devices
  4. Next, make sure that the Input Device and Output Device are correctly configured.Input and output device
  5. After making the required changes, save these, and you shouldn’t face the game chat issue on PS4 anymore.

4. Reset Apex Legends on PS4

  1. Go to Settings on your PS4.Settings
  2. Select Storage from the various options here.Storage
  3. Wait for the PS4 to calculate the total storage, and then select Saved Data.Saved data to fix apex legends game chat not working
  4. Next, select Apex Legends from the list of games.Apex Legends
  5. Tick the checkboxes for the entries here, and select the Delete option.Delete game files to fix apex legends game chat not working
  6. Select OK to confirm the reset.OK

If the methods listed earlier didn’t work, there might be a problem with the game itself. In which cases, resetting it seems to be the only viable option. Once the game files are deleted, restart Apex Legends, and game chat should now be working on your PS4.

These are the most effective methods to fix Apex Legends switch voice chat not working, be it on the PC, Xbox, and PS4. One of these must help you eliminate the error and use the in-game chat feature.

Also, find out what to do if Apex Legends won’t launch on the PC.

Tell us which fix worked and your review of Apex Legends, in the comments section below.

KB5012643 for Windows 11 breaks .NET Framework 3.5 apps

A week has passed since we were talking about the new Safe Mode bug that affected users who installed KB5012643 for Windows 11.

This nasty issue was not present on the known issues list that Microsoft published on the day of the release, so it caught everyone by surprise.

Well, just when you thought the situation couldn’t get any worse, Microsoft drops another bomb for the users that installed this cumulative update.

Windows 11 Build 22000.652 is causing more problems

The tech company has therefore warned Windows 11 users that they might experience issues launching and using some .NET Framework 3.5 applications. Sounds familiar?

Don’t be alarmed, however, as this known issue only impacts systems running Windows 11, version 21H2, after KB5012643 has been downloaded and installed.

The affected software uses optional components such as Windows Workflow (WWF) and Windows Communication Foundation (WCF).

How can I fix this problem?

The short answer is you can’t. That being said, know that the tech giant took it upon itself to remedy this issue as soon as possible.

In the meantime, Microsoft kindly asked affected users to uninstall KB5012643 while it works around this issue and restore their .NET Framework 3.5 apps’ functionality.

Users that find themselves unable to immediately uninstall this cumulative update can actually mitigate the known issue by re-enabling .NET Framework 3.5 and the Windows Communication Foundation from the Windows Features dialog.

Furthermore, IT Admins can accomplish this using an elevated Command Prompt, which they launch as administrators, by running these commands:

dism /online /enable-feature /featurename:netfx3 /all
dism /online /enable-feature /featurename:WCF-HTTP-Activation
dism /online /enable-feature /featurename:WCF-NonHTTP-Activation

How do I uninstall KB5012643?

  1. Press Windows + I in order to open Settings.
  2. Select the Windows Updates tab, then click on Updates history.update
  3. Click on Uninstall updates.uninstall updates
  4. Click the Uninstall button for the update you want to remove.update uninstall

Have you managed to successfully uninstall KB5012643? Share your experience with us in the comments section below.

9 Ways to Fix Battlefield 2042 2002g Error Code For Good

Battlefield 2042 was released not long ago, and gamers are definitely raving about it. The game is available for players on PS 4, PS 5, Xbox One, Xbox Series X/S, and Microsoft Windows, among other platforms.

However, several players have already reported problems with this game. A common problem is a 2002g error code encountered when connecting to the game servers.

This article will explore all the best ways to resolve this issue on Battlefield 2042, and get back to your gaming sessions.

However, there are other similar games and any of the best first-person shooter games for PC might be worth the try.

Are the servers down for Battlefield 2042?

This has been a recurring question among players of the game. While we will dive into detailed solutions later in the article, it is good to note that the game has very good support and a great online following.

You will be able to confirm the status of the game online on their social media handles, or via the support input on the official website.

It’s also advised to check with other members of the community and see if they are experiencing the same problem.

When servers are down, you usually can only wait for them to be restored.

Why do I keep getting error codes on Battlefield 2042?

Error codes indicate that there has been a malfunction in software. The reasons will always depend on specific error codes.

This 2002g error might be caused by network connection problems that prohibit your PC from connecting to Battlefield servers. In rare cases, your firewall may be responsible for obstructing the connection to the game servers, resulting in the error. 

The error was also reported by certain players who had the Crossplay functionality activated in their game settings. Whichever is the case, this tutorial will assist you in resolving it using a variety of methods. 

Let’s have a look at these fixes.

What should I do to fix a 2002g Battlefield 2042 code?

1. Confirm that the servers are not down

  1. Navigate to Battlefield 2042’s support page.
  2. Select your platform from the list of gaming platforms.
    error code 2002g battlefield 2042
  3. Next, filter through the posts listed below to see if there are any mentions of a down server.
    error code 2002g battlefield 2042

Another way of knowing if there are server problems is from the official Twitter handle. Here, you will typically get the latest news and updates surrounding the game.

We suggest that you verify whether Battlefield 2042’s servers are offline before trying other solutions. For example, you may encounter disconnection or login troubles on the servers due to the latest patch changes. In this case, you can only wait for the server to come back on.

2. Relaunch Battlefield 2042

One of the first things you must try is relaunching Battlefield 2042 to see if that resolves the issue because a brief glitch or fault might generate the error within the game.

In such situations, you may try closing and relaunching the game. First, make sure that the platform you’re using is completely shut off (Steam or Origins).

After doing that, start the game and check if the issue is still there. This is just a workaround, but sometimes even the simplest solutions can work, so feel free to try this one.

3. End the Battlefield 2042 task

  1. Right-click on the Start menu and select the Task Manager.
    error code 2002g battlefield 2042
  2. Click on the Processes tab and check through the least of processes for any related to Battlefield 2042.
    error code 2002g battlefield 2042
  3. Right-click on the Battlefield processes, and select End task.
    error code 2002g battlefield 2042

Once you’ve completed these actions, restart the game to determine whether the 2002g error still exists. This solution will be only helpful on PCs.

4. Restart your router and internet connection

  1. Unplug your router from the source, wait for three minutes and replug it.
  2. Plugin your Ethernet cable, or click the Wi-Fi icon on your Taskbar for a wireless connection.
    error code 2002g battlefield 2042
  3. In the pop-up window, click on the arrow beside your Wi-Fi icon.
    error code 2002g battlefield 2042
  4. Click on your internet connection and click on the connect button.
    error code 2002g battlefield 2042

Restarting the router can help resolve network connection issues that may be generating the error code. It will compel your router to establish a fresh, more efficient connection with the ISP servers.

Additionally, if you do not use a static IP, the router will give you an IP, which should help resolve the 2002g Battlefield 2042 error code.

5. Disable Crossplay in the game settings

  1. Launch the game.
  2. Click on the Options tab and the General tab, then scroll down and toggle off Cross-Play.

6. Launch the game on a different platform

If the server controlling your Battlefield 2042 platform is down, try launching it on PC or other platforms. This is a good solution as long as the other platforms are also not down.

This solution will also require that you own a console and a PC or two different kinds of consoles that run the game.

7. Allow Battlefield 2042 through your firewall

  1. On your Start menu, type Windows Defender and select the Windows Defender Firewall option.
    error code 2002g battlefield 2042
  2. On the left pane, select the option to Allow an app or feature through Windows Defender Firewall.
  3. Click on the Change settings button.
  4. Scroll through the list of applications and check the option for Battlefield 2042/Origin and click OK at the bottom of the window.

8. Restart your PC or console

  1. Click on the Start menu, and click on the power button.
  2. Select Restart, then wait for your PC to turn off and come back on.

If this does not fix the 2002g Battlefield 2042 error code, you should try the final solution.

9. Launch the game through Origins

You may test whether the problem is repaired by running the game straight from Origins. Battlefield 2042 is available on a variety of platforms, including Steam. 

However, to play the game, you must first install Origins. It runs automatically in the background once you launch Battlefield 2042 through any client.

A couple of the players impacted by this error have resolved the issue by running the game using Origins. You may want to try this. 

What error codes may I get if I can’t connect to the server?

This article explores the single error, but that’s not the only one that you can get. Many users reported Battlefield 2024 error code1004G, 1300P, and 1302P when trying to connect to the server.

While it is the most common server-related error code, there are very similar errors that could be triggered when you can not reach the servers.

While all the fixes in this article may not apply, you must first double-check to see if the server is down before trying any other complex solutions.

There you have a roundup of our top recommended fixes. These have been potent solutions for many players.

If none of the solutions work, you’ll need to wait for an official patch to be provided. The game developers have already identified the issue, and they are working to resolve it.

Keep in mind that 2002g Battlefield 2042 error code can also appear PS5 and Xbox since it’s a server-side problem. This isn’t the only issue, and we wrote about Battlefield 2042 error code 1 8600 1S in our latest article.

As a last check, remember that you will have fewer gaming errors if you use the best Windows 11 edition for gaming.

Windows 11 22H2 will also have a revamped Task Manager

We know you’re always curious to find out new stuff about Windows 11, and we have some great news about the new operating system.

Apparently, the 22H2 version of Windows 11 will also bring with it a completely overhauled Task Manager interface, which is much more intuitive.

This information surfaced during a recent webcast, where Microsoft explained the new design and features coming to the Task Manager.

Dev Channel Insiders can already test the new Task Manager

If you grew fond of the current Task manager, you better start preparing for the future, because the tech giant plans to ditch the tabbed-based interface for a hamburger menu.

Redmond developers said they wanted the Task Manager to follow the design principles that were set by the modern UI framework and Windows 11.

The general idea here was for Task Manager to also feel lighter and decluttered, just the way that the tech giant plans to approach version 22H2.

Furthermore, by performing this switch to the hamburger menu, Microsoft is also hoping to declutter the navigation system and align the legacy areas with the Windows 11 look and feel.

Navigation is really simple, as you can click on the hamburger menu and flip through the pages or use the Ctrl + Tab keys to flip through the pages as well.

This keyboard friendliness will surely please many users that would rather navigate through the Task Manager pages without the mouse.

Another interesting feature is the fact that the original tab area now has common actions that are unique to each page of Task Manager.

By using this, you can perform actions such as creating or running a task without opening any additional menu as the options are displayed in the command bar.

Also, the new settings page which can be used to toggle between dark and light mode, and the set default landing page as well

Microsoft continued by saying that it decided to actually replace the suspended icon with a pause icon, in order to further reduce the confusion.

But wait, there’s more. Since we were speaking of new features, there’s a new addition called Efficiency Mode, which will help you bump up or slow down CPU resources for a particular process.

You can actually use efficiency mode to not only throttle your CPU resources but also improve your UI responsiveness.

You should know that, for the time being, Task Manager’s Efficiency Mode can only throttle CPU-intensive apps.

That being said, know that Microsoft is also exploring support for memory and network usage which could be enabled in a future release.

Remember that the Redmond-based tech giant declared version 22H2 ready for broad deployment, so it won’t be long until it will be released.

Many users are now wondering if Windows 11’s first major update won’t be ready this month, as internet speculations would have us believe.

Excited about the new Task Manager overhaul? Share your thoughts with us in the comments section below.

Google Earth Download for Windows 11 [64 Bit Pro]

Google Earth is a computer application that creates a three-dimensional picture of the Earth using satellite images as its primary source. Thus, today we will show you how to download Google Earth for free.

By superimposing satellite pictures, aerial photography, and geographic information system (GIS) data onto a 3D globe, it maps the Earth allowing users to view cities and landscapes from a variety of perspectives.

Users can travel around the world by inputting addresses and coordinates, or by using a keyboard or mouse to navigate the map.

The program can also be downloaded and used on a smartphone or tablet, with the navigation being accomplished through the use of a touch screen or stylus.

But now, let’s see what the difference between Google Earth and Google Earth Pro is, and note that the method we have shown below also lets you download Google Earth for Windows 10.

What is the difference between Google Earth and Google Earth Pro?

In addition to displaying a 2D map of the Earth, Google Earth Pro now displays a 3D model of the planet. This software enables its users to both study and record information about the Earth’s geographical features.

Just to put it another way, Google Earth Pro is a step up from Google Earth because it is packed with extra capabilities that may be used for professional applications.

In fact, Google Earth Pro used to cost $399 a year precisely for this reason. Fortunately, since 2015, it has been available to anyone for no charge.

The Pro edition of the software has all of the same basic features as the free version. With this in mind, you may utilize Google Earth Pro for practically every task you normally perform with Google Earth itself.

There are some significant changes, however. Google Earth Pro provides its customers with comprehensive measurement capabilities that can be used to measure land projects, parking lots, and other such things.

It is clear from the examples above that Google Earth is an excellent starting software that anyone can use to investigate the Earth, learn more about our globe, or navigate to a certain location.

Google Earth Pro, on the other hand, is intended for more serious and professional applications. Of course, you can make your own judgment in this matter. It all depends on what you want to accomplish and what you want to use the tools for.

How can I download Google Earth for Windows 11?

  1. If you wish to get Google Earth, navigate to their official website and click on the Agree and Download button. Note this will download Google Earth Pro for Windows 11, as it is the latest version available.agree-download google earth download for windows 11
  2. Alternatively, follow the link to Google’s website and click on the Download Earth Pro on desktop button. Note this Google Earth download is for Windows 11 64-bit as well.download-pro google earth download for windows 11

The Desktop version will work on all Windows iterations that are higher than Windows 7, on Mac computers as well as Linux-based ones.

The desktop program of Google Earth has a number of different capabilities, including a measure distance tool, additional globes for the Moon and Mars, and a tool for observing the night sky.

Moreover, a flying simulator game is offered, the ability to browse images from various locations published to Panoramio, and information about specific locations supplied by Wikipedia, among other things.

For a more immersive flying experience, try the free Google Flight Simulator, which allows you to explore the world in a whole new way.

If you find that Google Earth is not working or responding, check out the article linked in order to learn how to fix the issue.

Alternatively, take a look at our guide on what to do if Google Earth cannot connect to its servers in order to get it back up and running. It’s important to mention that this software is available for older versions as well, and we have a great guide on how to download Google Earth on Windows 10.

Was this guide useful to you? Let us know by leaving a comment in the section below and sharing your thoughts with us. Thanks for reading!

Fortnite comes to Xbox Cloud Gaming for Free on Android, PC, iOS, iPadOS

Microsoft just announced that they’ve partnered with Epic Games to bring Fortnite to Xbox Cloud Gaming. The popular game is now going to be available on supported browser-enabled devices for free in 26 different countries. This should benefit gamers who might not have been able to play on lower-end devices and also marks the return of the title to iOS and Android after Epic game’s battle with Apple and Google over app store fees.

To get started, you’ll just need a Microsoft Account and an iOS, iPadOS, Android phone or tablet, or Windows PC with internet access. You won’t need to install anything or subscribe to any of Microsoft’s Game Pass tiers. All you need to do is go to Xbox.com/play on your web browser and sign in and then select Fortnite.

Funny enough, in a Tweet, Tim Sweeney, Epic Games’ founder, and CEO played fun with the announcement. He added a “No 30% Apple Tax,” to his tweet calling the Xbox Cloud Gaming moment “monumental news.”

Microsoft is also planning to add more Free-to-play games to the Xbox Cloud Gaming catalog heading into the future. The company, in a separate post, detailed Xbox Cloud Gaming’s growth and evolution. The service went from Android-only Xbox One S servers, now supports iOS, Windows, and Xbox One, and is powered by the Xbox Series X server blades. Microsoft claims that players in 26 countries have played on more than 6,000 types of devices.

Fix Sling TV Error Code 4-310 and 4-402 with 4 Quick Methods

If you are experiencing the Sling TV error 4-310 when watching a show or movie from the guide, it can be due to the content being no longer available for you to watch.

The Sling TV error 4-402, on the other hand, can occur due to a bug in the software, causing the content not to play correctly. A Reddit user reported a similar error in the community forum as well:

Error 4-310 unable to watch recordings of games until the next day
Does anyone else have this problem? I can’t watch any of my recorded soccer games until at least 24 hours later.

This isn’t the only error, and many have reported TV too many devices Sling error, and we wrote about that one in a separate article.

In this article, we explore how to resolve the Sling TV error 4-310 and the Sling TV error 4-402, so be sure to check it out below.

What are some common Sling TV error codes?

  • Sling temporarily unable to load content 9-400, 27-1: These types of errors are usually caused by issues with the persionalization services.
  • Sling temporarily unable to load video 6-9: Server-side errors are the common cause of this issue. If you encounter it, it means that video isn’t able to reach you from the server.
  • Sling TV error 16 109, 5-423: App problems can cause this issue, so it’s advised to restart the app to fix it.

How do I fix the Sling TV errors 4-310 and 4-402?

1. Use the Search

  1. Search the program by using the built-in search function to find your favorite show, movie, or game.
  2. Click on the Search bar in the top right corner.
  3. Enter the name of the show and open it.
  4. Click on Play to start playing the selected show.

After using this method, Sling TV error 4-402 should be gone.

2. Play directly from the thumbnail

  1. On your PC, log in to your Sling TV account.
  2. On the main page, click the Play button on the thumbnail.
    Sling TV error 4-310
  3. Sling TV should play your recorded shows without any error.
  4. At times, simply starting a recorded program from the app will clear the error in the browser.

After doing this, check if Fix Sling TV error 4-310 is gone.

2. Relaunch the app

For Android smartphone

  1. Open Settings.
  2. Go to Apps.

  3. Open Sling TV from the list of installed apps.
  4. Tap the Force Stop button. Tap Yes to confirm the action.
  5. Close Settings and relaunch the Sling TV app.
  6. Check if the error is resolved.

For Windows 10

  1. Right-click on the Taskbar.
  2. Select Task Manager.

  3. In the Process tab, locate the Sling TV app process.
  4. Select the process and click on End Task.

  5. Next, look for the other Sling TV process that is running and close it as well.
  6. Relaunch the app and check for improvements.

For Android TV

  1. From the Home screen, open Settings.
  2. Select Apps, then the Sling TV app from the option. 
  3. Press the Force Stop button to terminate the application. Sling TV error 4-310
  4. Relaunch Sling TV.

For Apple TV

  1. Press the Home button on your Apple TV remote.
  2. Scroll through the app, and swipe up when you see the Sling TV app.
  3. Go back to the home screen and relaunch the app.

3. Update Sling TV

For Android

  1. Open Play Store.
  2. Search and open Sling TV.
  3. Tap the Update button to install pending updates.
  4. Relaunch the app and check for any improvements.

4. Reinstall Sling TV

For Android smartphone

  1. Open Settings, and go to Apps.

  2. Open the Sling TV app.
  3. Tap on Uninstall. Tap Yes to confirm.
  4. Open Play Store and search for Sling TV.
  5. Install the app and check for any improvements.

For Android TV

  1. Locate the Sling app.
  2. Hold the select button.
  3. Now pick Uninstall.
  4. Confirm that you want to remove the app.

For Roku TV

  1. From the home screen, highlight the Sling TV app.
  2. Press the Star * button on your remote.
  3. Select Remove Channel and then select OK. Sling TV error 4-402
  4. You can reinstall the Sling TV app from the Roku Channel Store.

Uninstalling and reinstalling the Sling TV app can help you fix any error that is triggered due to a glitch or bug in the app.

A newer version of the app usually comes with bug fixes and performance improvements, so be sure to always check it out.

The Sling TV error 4-310 & error 4-402 are common errors and can be resolved by performing some troubleshooting steps provided in the article.

Many users also reported Sling TV authorization error 8-12, and we covered this problem in a separate article, so you might want to check it out as well.

We hope you found our recommendations from above helpful. For more suggestions, please access the comment section below.

5 Fixes for Your Disk Can’t Replace Bad Clusters Error

When executing CHKDSK on a drive, you may have encountered this error message: disk does not have enough space to replace bad clusters. 

Most impacted people tried to perform the procedure but repeatedly had the same result, and unfortunately, this problem isn’t limited to a single Windows version.

In layman’s terms, this error message implies the hard disk is possibly degraded and could crash. Many also reported that Windows was unable to repair the drive.

You might also check our guide on how to recover the data from a hard drive with bad sectors.

In this article, we explore all possible fixes and share some enlightenment on the possible reasons this may happen.

How does chkdsk replace bad clusters?

First and foremost, you must realize that the CHKDSK program’s free space is not the same as your regular disk space. Every hard drive has some unutilized space reserved for replacing defective sectors if they occur.

Even though every sector is given a unique number, your drive has extra sectors at the end that aren’t numbered. These additional sectors are employed if a sector fails and needs replacing.

Here is how CHKDSK replaces the bad clusters:

It corrects defective sectors by deleting the number allocated to them and reallocating it to sectors with no number. If the utility displays the bad clusters error notice, this means that the amount of the identified bad sectors exceeds the number of extra sectors.

What causes bad clusters on my computer?

There are a few possible scenarios that can result in this CHKDSK error warning:

  • A hard disk drive that is failing: Multiple failed sectors indicate that your hard disk is beginning to fail. If CHKDSK finds new bad sectors regularly, your hard drive will soon be unusable. If so, you should make a backup and replace your hard disk.
  • A crash of the littoral disk: You may be experiencing this problem because of a catastrophic disk crash caused by an unplanned computer shutdown or a power outage. In this case, patiently waiting for the CHKDSK scan to finish will ensure what’s left of the drive is in good working order.
Tip icon Tip
Hard disks are engineered to never run out of additional sectors within their intended lifetime. However, for newer hardware encountering this problem, something is undoubtedly causing the hard drive to have many damaged sectors. In this instance, we recommend creating a backup to prevent data loss.

There may be a few minor reasons for this error other than the two major causes above, but regardless of these the solutions proffered in the next section should be effective enough to rectify the problem.

Note that this cluster error is different from the A disk read error occurred c0000483 error, even though they are both very similar.

How do you fix a disk that says there is not enough space?

1. Allow the CHKDSK process to complete

Do not close the CHKDSK dialog when you see the error that says your disk does not have enough space to replace bad clusters. Doing this will cause an unfinished procedure to be interrupted.

The CHKDSK utility will continue to attempt to repair your drive, although this operation could take up to 4 hours.

With too many sectors to repair, the duration of this process may be extended by an additional 1 or 2 hours. However, the faulty sectors should be resolved when the CHKDSK utility scan is performed.

Try implementing any additional solutions listed below if you’re still having the disk problem.

2. Scan and repair bad drive sectors

  1. Download and install the HDD generator.
  2. Right-click on the installed app and select Run as administrator.
    the disk does not have enough space to replace bad clusters
  3. From the Choose drive to Process menu, double-click on the disk to be repaired.
    the disk does not have enough space to replace bad clusters
  4. Type 2 and press enter for a full scan of the selected drive on the terminal that appears.
    the disk does not have enough space to replace bad clusters
  5. In the following prompt that appears, type 1 and click enter to scan and repair the drive.
    the disk does not have enough space to replace bad clusters
  6. Type 1 and hit enter to start the scanning from the first drive sector.
    the disk does not have enough space to replace bad clusters

Each time a damaged sector is encountered in your disk, the program prompts you to repair it. You should have successfully repaired all damaged sectors at the end of the scan.

3. Regenerate bad sectors with Victoria

  1. Download the tool.
  2. Right-click on the victoria EXE and select the option to Run as administrator.
    the disk does not have enough space to replace bad clusters
  3. Select your hard drive from the top-right pane, then click on the SMART menu at the top to begin the analysis.
    the disk does not have enough space to replace bad clusters
  4. If the threshold of the reallocated sector number is more than 10, you have bad sectors on your drive.
    the disk does not have enough space to replace bad clusters
  5. Click on the Test & Repair tab, then click scan on the top-right pane.
    the disk does not have enough space to replace bad clusters
  6. Once the scan is complete, restart the PC, and you should have successfully regenerated your drive. This should suffice in correcting errors in the bad cluster file on your disk.

4. Extend the data volume of your drive

  1. Click on the start menu, type Computer Management, and select the first option that appears.
    the disk does not have enough space to replace bad clusters
  2. On the left pane, select the Disk Management option.
    the disk does not have enough space to replace bad clusters
  3. Right-click on the drive you want to extend and select the Extend volume option.
  4. Click next and follow the prompts from the extension wizard.

5. Decongest the disk

5.1 Uninstall unnecessary programs and apps

  1. Click on the start menu, type Control Panel, and select the option to Uninstall a program.
  2. Search for redundant or unused apps from the program list. Click on the app to be uninstalled and select the uninstall option at the top of the programs window.
  3. Follow the prompts from the wizard to complete the process and restart the PC if required.

5.2 Clean up your desktop

Many people save to the desktop by default, but this is not a good practice. These files occupy working memory since they are constantly displayed. This increases the number of memory places that are unavailable to be reallocated. 

You should remove unnecessary desktop files from the computer and save the rest in the Video, Documents, and Photos folders. You’ll create some extra space on the hard disk when they are deleted.

5.3 Save to the cloud

It’s possible that you won’t be able to fit all you need on your laptop or desktop.

We recommend backing up crucial files to a cloud storage account regularly. Google Drive and One Drive are two common storage examples you may try. 

It will free up space and serve as a way to secure your data in the event of loss or if your hard drive eventually fails.

All these methods that help decongest the drive are effective solutions for when your disk that says there is not enough space.

If you want a central workstation that will help you take care of all disk cleaning tasks, CCleaner is the way to go. The app helps you delete redundant files, has a built-in uninstaller, and can also clean your registry.

Does formatting fix bad sectors? 

All files on that volume are deleted, and the drive is checked for faulty sectors when you perform a full volume. A Quick format removes the partition’s files but does not examine the disk for damaged sectors.

A soft or logical sector is a storage cluster on a hard disk that seems to malfunction. They may be indicated as faulty sectors, but they can be fixed by conducting a low-level format or overwriting your drive with zeros.

Do bad clusters mean failing hard drive?

Bad clusters may sometimes mean that your drive is failing. This could be normal if you have had the drive for a while.

If you’re still having problems after trying the solutions above and your faulty sectors persist, your drive is likely approaching the end of its life cycle, or the disk does not have enough space to replace clusters.

In this case, you must instantly start backing up your data. If there is still time on your warranty, you should claim it.

You should now be able to resolve any problems associated with your disk being unable to replace bad clusters.

Remember that the primary tool on Windows to help with disk-related problems is the CHKDSK utility. Your best bet is to wait patiently for a scan to complete and only proceed to other solutions if the scan is unsuccessful.

This error also indicates that your disk may have served you well and long enough. Every disk has an estimated lifespan, and as that time approaches, you can expect it to malfunction more often than usual.

This isn’t the only cluster error you can encounter and we wrote about Error 1460 cluster shared volume recently in a separate guide.

In this case, or if you have insufficient disk space to correct errors, you should purchase a new HDD or a large SSD hard drive.

Best MKV Player for PC & Mac [Out of 15 We Tested in 2026]

MKV files are associated with high-quality video content on Blu-ray that can reach 4K resolution. But to play back these videos, you will need a dedicated player.

The good thing is that there are many apps out there that can do the job and there are both free and paid MKV players.

If you are just going to watch movies or TV shows on your laptop, a free MKV player will probably do just fine, and you will actually find a great one below.

But you may want to splash out on one of the paid players for more features and options. They don’t cost a fortune, and you do get some smashing add-ons for the money.

What should I know about MKV videos?

Before we start talking about the best MKV players, we should just make clear what an MKV file is.

You might think that there are only some video files, but in fact, MKV files are actually multimedia container formats.

In other words, besides the audio-video file, an MKV container can also have embedded subtitles, and the audio and video can have various formats.

Just to offer an example, the video might be encoded in H.264, and the soundtrack could be an MP3 or an AAC file.

So, it’s also very important to ensure your machine has all the latest video and audio codecs for playback.

This will ensure that if you have any problems playing back MKV files, or any video file for that matter, at least you will know that it is not a codec issue. Your player should tell you if you need any codecs.

If your player lacks the necessary codec, you will receive a message like this one

Most of the media players nowadays come with the latest codec packs but if you miss some, you can visit a dedicated website and download the pack you need.

If one of the players below has problems playing the content, make sure that the MKV file is not damaged. In that case, the highlighted guide will help you fix it.

Now that all that has been cleared up, let’s look at the best MKV players for Windows 10 to watch your favorite videos.

What are the best MKV players for Windows 10?

CyberLink PowerDVD – 4k and 8k playback

Of course, there are other options, and if you don’t mind paying a bit more, then CyberLink’s PowerDVD is also a great option.

PowerDVD is one of the best MKV players for Windows 10. Sadly, there is no free version, but you can try it out for 30 days to see if you like it.

It also has three different options, Standard, Pro, and Ultra, so you must see which one best suits your needs.

In a nutshell, PowerDVD can do many things but downloading YouTube videos is not one of them. However, you can stream Chromecast, Apple TV, Roku, and Fire TV, which is a very nice bonus.

This tool also steps up the resolution scale because it can even play 8K videos and comes with HDR10 support.

That means that you can finally put that big screen TV or monitor to the test and actually feed it some really quality content.

If you want a video player that will give you everything you need in a video player, then you could do a lot worse than PowerDVD.

Take a look at some of its best features:

  • 4K and even 8K playback with HDR10 support
  • Chromecast, Apple TV, Roku, and FireTV streaming
  • DTS HD Audio and Dolby True HD Audio output
  • Support for all major file formats
  • 360° video, VR video playback, and spatial audio

CyberLink PowerDVD

Share and stream with your family the best TV movies and audio files. Get the best deal now!
Free trial Visit Website

Wondershare UniConverter – Snapshots in one click

best MKV players for Windows

The next tool that will help you play MKV files with no issues is a media file converter software with a built-in media player.

UniConverter by Wondershare supports over 1,000 media file formats, including MKV. This application gives you the possibility to upload your MKV file and play it as it is directly on its built-in media player.

However, if you prefer, you can also convert it to a more universal file type, such as MP4, in case you want to use it on other platforms in the future.

This media player can effortlessly replay high-quality video formats, including 4K/8K/FHD and any DVD.

It has a minimalistic and modern user interface gives you quick access to all the options you need.

You can select and switch up subtitles and even change audio tracks for video files/movies that allow that.

Other key features of Wondershare Uniconverter include:

  • Take snapshots in one click
  • Edit, compress, and convert your videos
  • Merge multiple video files
  • Burn video files to removable media

UniConverter combines simplicity and ease of use with great performance and integrates tons of features that will help you take control of your media files.

Wondershare UniConverter

Play MKV files in 8K ultra HD with no interruptions or easily convert them to other file formats for more convenience.
Free trial Visit Website

GOM Player – Impressive subtitles library

GOM Player has been around for some time now, and it seems that its hold on the free video player market has only increased, and for good reason.

The tools look sleek and modern, and regarding video format compatibility, there should be no problem for GOM to run MKV files.

In fact, the player is so popular mostly because it can play any video file you would throw at it, and it’s highly customizable.

Moreover, if you use it on your Windows PC, it helps you find any missing codecs, it can play damaged files, and even allows you to preview a file that is being downloaded.

View all of your favorite movies in style and enjoy many video playback features such as image and sound enhancements, subtitle search, and more.

And about the subtitles, GOM has collected them in a huge database for over ten years, so there is little to no chance of finding the right one for your movie.

To top it all, you can also enjoy 360 degrees and VR videos to get that immersive feeling you were looking for.

Let’s review a few of GOM Player’s most important features:

  • Impressive library of subtitles
  • Great file type support
  • Simple to use and customizable interface
  • Automatically searches and syncs subtitles for the movie being played

GOM Player

A sleek and lightweight video player that can easily handle HD video file formats such as MKV without issues.

Aiseesoft Blu-ray Player – Fast loading speed

Aiseesoft’s Blu-ray Player is one of the best MKV players for Windows 10, and you can acknowledge that when you look at its list of supported formats.

We will list them for you: MP4, H.264/MP4 AVC, H.265/HEVC, MPG, M4V, TS, MTS, M2TS, MXF, RM, RMVB, WMV, ASF, MKV, AVI, 3GP, F4V, FLV, VOB, 4K/HD videos in MP4, H.264/MPEG-4 AVC, H.265/HEVC, TS, MKV, AVI, MOV, FLV, and WebM.

That is probably one of the reasons why Aiseesoft’s Blu-ray Player is very popular among users all over the world.

It loads videos quicker than many other players, has great effects to enhance your viewing experience, and has many easy-to-understand features.

Additionally, with such good reviews and a price that is hard to beat, this should be one of your top choices when looking for the best MKV player for Windows 10.

For this player, there is a free version and a paid version. Of course, its primary purpose is to play Blu-ray videos, but it can also deal as well with a DVD, a file, or an ISO image.

Let’s have a look at some of its best features:

  • It can play a lot of file formats alongside MKV
  • DTS-HD Master Audio and Dolby TrueHD sound output
  • Audio and video playlist creation and management
  • Super-fast loading speed especially for onlline videos
  • Quick captioning during movie watching

Aiseesoft Blu-ray Player

Your MKV movies and classic media will never look better with this complex software.
Check price Visit Website

Leawo Blu-ray Player – Modern interface

If you’re looking for a 100% free alternative to play MKV movies, don’t look further than the Leawo Blu-ray Player.

This software is close to reaching 3.5 million downloads and will probably not stop there because it has all that it takes to play all kinds of multimedia files.

Apart from the 4K videos in MKV format, this beauty can also handle the same huge 4K files in the MP4, and TS formats.

Of course, it’s also friendly with 1080P and 720P videos in HD MP4, HD MKV, HD MOV, and many other files.

And if you have some BDAV movie folders on your PC or other media, this app will play them seamlessly.

Can it play your camcorder recordings or the videos you got online? The answer is yes, and it will play almost any media you come across.

It can even become your music player of choice because if you trust it with your playlists, it will do a great job managing them.

The cherry on top is that this free 4K Blu-ray player is fully customizable. You can change its skin, language, and background as you desire.

Let’s review some of the best features of Leawo Blu-ray Player:

  • Watch 4K movies in MKV, MP4 and TS formats
  • Also compatible with 1080P and 720 videos in HD MP4, HD MKV, HD MOV and many more
  • Built-in online video recording features
  • BDAV movie folder playback
  • New, modern interface

Leawo Blu-ray Player

Play your MKV movies even in 4K with this great free player that will become your movie pal!

VLC Media Player – Open-source media player

No best MKV players list would be complete without the VLC Media Player. VLC is an open-source media player developed by the VideoLAN project.

It has been around since 2001 and has a reputation as being a play anything video player. And a good reputation it is!

However, it does have some disadvantages. For example, one of the biggest annoyances is the time it takes to open up a file.

We’re not sure why that happens but probably some added features have slowed it down considerably.

Still, knocking something that is free and open-source is not particularly good manners in our opinion.

Even more, you can change its skin or even create one yourself with the VLK Skin Editor to personalize it to your own liking.

So, if you are looking for something that costs nothing and does what it says on the tin, then the VLC Media Player is for you.

Let’s review some of its best features:

  • Runs on all platforms, including mobile
  • Plays most codecs with no codec packs needed
  • It can playback any video file, including streaming
  • Fast hardware decoding
  • Subtitle synchronisation, video and audio filters

⇒ Get VLC Media Player

Kodi – Low resource usage

One of the biggest problems with writing review articles is that there are only a few possible choices.

Hence, while there are many MKV players that we could have included in this last position, we have decided to go for Kodi.

Firstly, we chose it because it is available in the Microsoft Store, so it is easier to use for those who are not so confident when it comes to downloading and setting up software.

Like all the other video players above, Kodi plays all the usual video formats. It is also very easy to use and plays back videos in great quality.

Clicking the link below will take you to the Kodi download page. Click on the Windows logo and you will be taken to the Microsoft Store.

Take a look at its best features:

  • Friendly UI with simple and intuitive menus
  • Great quality playback
  • Supports most popular file formats
  • Access to radio and TV shows
  • Low resource usage

⇒ Get Kodi

Does Windows Media Player play MKV?

The short answer to this question is no, Windows Media Player doesn’t support MKV video natively. However, you can play them back if you install the proper codecs. Here’s how to do that:

  1. If you try to open an MKV file, you will get an error message that your player might not support the codec.
  2. Open a browser, navigate to a codec dedicated service like Codec Guide and look for a pack that includes the codecs for MKV.
  3. Install the codec and next time you will be able the MKV video.

These are the best MKV players available to you. Our usual advice is that the best MKV player for you is the one that suits you best.

So, you’ve probably got your player now, but you probably understand that you also need a good graphics card and screen to support 4K and a display that is MKV goodness.

First, ensure your graphics card has a 4K output and get a proper HDMI or DisplayPort cable to connect your monitor.

You can hook it up to your PC if you have a great 4K TV. You can also look at our updated list, including the best 4K monitors with HDMI 2.0.

What is your favorite MKV player? Let us know in the comments section below.