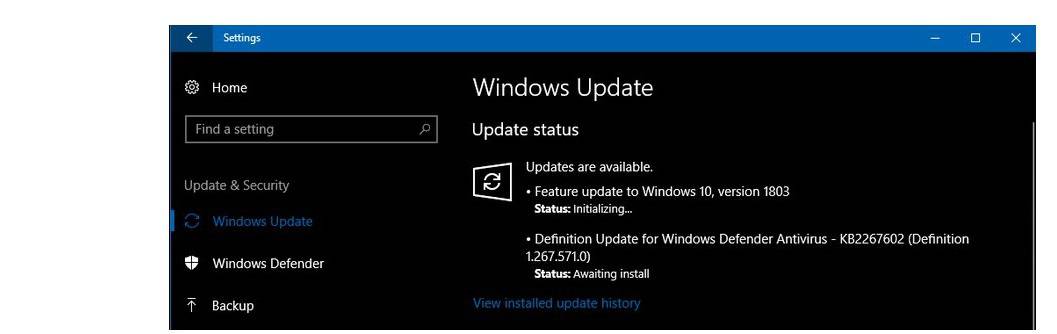
The Windows 10 April 2018 Update just got its first Patch Tuesday update. If you’re running this OS version, you can download KB4103721 via Windows Update or you can simply install the stand-alone update package from Microsoft’s Update Catalog.
Update KB4103721 fixes a series of severe issues affecting Windows 10 version 1803, including Chrome freezes and Remote Desktop connection problems. Unfortunately, this patch also brings quite a few bugs of its own.
KB4103721 reported issues
1. Computers won’t boot up
This is perhaps the most common issue affecting Windows 10 April Update users. Many complained their computers failed to start after installing KB4103721.
This update has some serious issues, specifically. Do NOT install this update after updating to Windows 10 version 1803. It will prevent your computer from booting up. I am stuck on the spinning circle for a long time.
2. Black screen issues
Other users managed to boot up their computers (well, sort of) but can’t use them. The devices remain stuck on a black screen and the only solution to fix this problem is to simply use a restore point.
The update is bricking my computer. After the update (KB4103721) download and installs, after restarting my computer will hang on a black screen and do nothing. The only way to fix it is to restore my PC to a previous restore point, where the PC will boot up normally again.
IObit Advanced System Care 11 users confirmed this tool messes up the update. To fix this issue, restart your PC and when the initial boot screen appears, simply press and hold the power button to enable Advanced Configuration. Then follow these steps:
Go to Start > type ‘run > launch Run
Type msconfig > go to the Services tab
Uncheck IObit’s Advanced System Care 11 service > hit OK
Restart your computer > install KB4103721 normally.
We hope this quick workaround helped you fix the problem. If you encountered other bugs after installing KB4103721, let us know in the comments below.
The Windows 10 April Update received an important patch that fixes a series of bugs affecting early adopters. Update KB4103721 landed this Patch Tuesday and takes the OS version to build 17134.48. The update includes only quality improvements and it doesn’t introduce any new operating system features.
As a quick reminder, Remote Desktop connection issues and Chrome crashes are some of the most common Windows 10 April Update bugs. Last week, Microsoft acknowledged that its latest Windows 10 OS version was indeed affected by random Chrome freezes and system crashes. Fortunately, KB4103721 fixes all these problems and many more.
Windows 10 KB4103721 changelog
Fixed the problem with the April 2018 Windows Servicing update that caused App-V Scripts (User Scripts) to stop working.
Addressed the issue that may cause some devices to stop responding or working when using applications, such as Cortana or Chrome, after installing the Windows 10 April 2018 Update.
Microsoft also fixed the issue that prevented certain VPN apps from working on builds of Windows 10, version 1803.
Addressed the issue that may cause an error when connecting to a Remote Desktop server.
The patch also brings new updates to Windows Server, Microsoft Edge, Internet Explorer, Microsoft scripting engine, Windows app platform and frameworks, Windows kernel, Microsoft Graphics Component, Windows storage and filesystems, HTML help, and Windows Hyper-V.
You can install KB4103721 automatically by going to Settings > Update & Security > Windows Update and hitting the ‘Check for updates’ button. You can also download the stand-alone update package from Microsoft’s Update Catalog.
Microsoft is not aware of any issues affecting KB4103721. If you noticed any bugs after installing this update, tell us more about your experience in the comments below.
OFX (Open Financial Exchange) is a financial file format. Microsoft and Intuit established OFX as an open file format for financial data. Thus, OFX files include financial data for transactions and statements.
How to Open OFX Files With Supported Software
OFX is not a widely supported file format. As such, there aren’t many applications that are compatible with the OFX format. However, Intuit Quicken and GnuCash are finance applications that you can open OFX files with. GnuCash is a freely available accounts application for Windows, Mac and Linux platforms. You can also open OFX files with the Sage One web-based software.
Press the Download button on that page to save the software’s setup wizard. Then you can add GnuCash to Windows with its setup wizard.
After installing the software, right-click the OFX file you need to open and select Properties to open the window shown directly below.
Press the Change button to open the window in the image below.
Click More apps > Look for another app and select GnuCash as the default software for the OFX format.
Then all your OFX files will open with GnuCash when you click them in File Explorer.
Import OFX Files in Excel Spreadsheets
OFX is not one of Excel’s supported data formats. However, you can still import OFX files in Excel as they include XML data. You can import OFX files in Excel as follows.
First, open the Excel spreadsheet application.
Select the File tab and click Open to open the window in the snapshot directly below.
Select All Files from the drop-down menu on that window.
Then select the OFX file, and press the Open button.
An Excel dialog box window will then open. Press the Yes button on that window.
Then select the As an XML table option, and press the OK button.
Another dialog box window opens stating that Excel will generate a table schema for the data. Press the OK button on that window to import the OFX file.
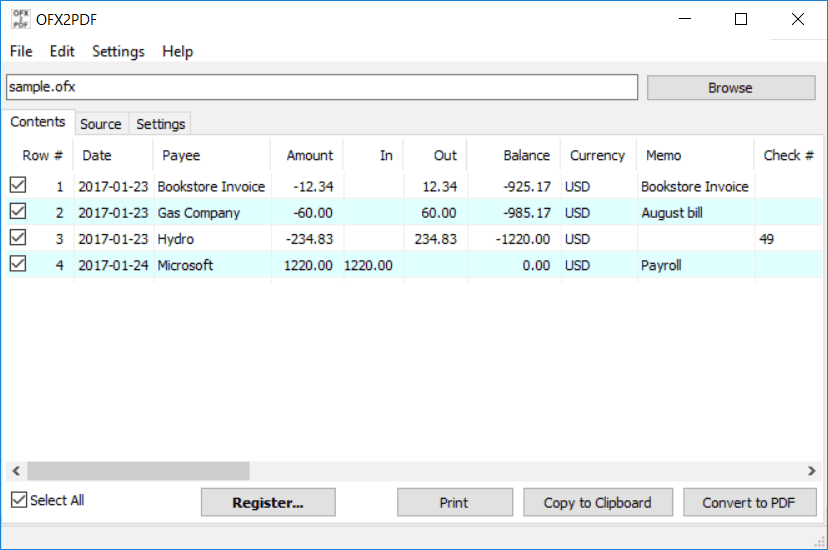
You can also convert OFX files to the PDF format with the OFX2PDF software. Then you can open the PDF you converted the OFX to with Adobe Acrobat, Edge, Google Chrome and other PDF software. OFX2PDF is not freeware software, but you can try out a trial version by clicking the Download Free Trial button on this website page. The full OFX2PDF software is retailing at $19.99 on the publisher’s website.
So that’s how you can open OFX files in Windows 10 and other platforms. Note that you can also convert OFX to other formats such as CSV, which is a supported Excel file format. Open this page to check out the OFX2CSV software.
When it released in theaters back in February, Marvel Studio’s Black Panther broke box office records with a $218 Million holiday weekend debut. Several months later, the hit superhero movie is set to become available in 4K on Microsoft Movies and TV on May 15th, and Microsoft is giving away five special Black Panther Xbox One X consoles to celebrate.
As you can see, the special Xbox One X consoles (valued at $525) features a custom Black Panther logo running along the top, and gold colors the sides. To go along, there is also two matching Xbox Wireless Controllers with the Black Panther movie emblem. Microsoft will also throw in a physical copy of “Black Panther” in 4K Ultra HD with each of the five consoles. To enter the sweepstakes, all you need to do is head to this website and enter your email and personal information. You don’t need to buy anything to win, and the sweepstakes are open to anyone who is 13 years old and older living in the US, and Canada.
This is not the first custom console that Microsoft has given away. The company previously gave away a custom Xbox One S for the Chaimsokers, and even an Air Jordan III-inspired Xbox One X. Will you try your luck at winning? Let us know in the comments below.
Seems Microsoft’s Windows engineers saved all their exciting news for after the Build 2018 keynotes. After a feature-packed day one and day two keynote presentations regarding new Windows and Microsoft 365 enabled experiences coming to consumers and developers in the near future, the Windows team just pushed live the latest Insider preview 17666 for Fast Ring and Skip Head release.
As with most early rounds of a new Windows 10 update testing, there is almost equal parts features and issues associated with each release. Below are a list of outstanding issues that may give some Insiders pause before downloading this latest build.
Known issues
After completing the Windows Mixed Reality First Run experience, OOBE is black. Motion Controllers are also not recognized in exclusive apps. If you need your Mixed Reality experience to be working it is advised you not take this build until these issues are fixed.
On resuming from sleep, the desktop may be momentarily visible before the Lock screen displays as expected.
When Movies & TV user denies access to its videos library (through the “Let Movies & TV access your videos library?” popup window or through Windows privacy settings), Movies & TV crashes when the user navigates to the “Personal” tab.
We’re aware of an issue that causes Narrator to read extra text when invoking Alt + Tab, and we’re working on a fix.
If you complete the setup for a Windows Mixed Reality headset on this build, the headset will remain black until it is unplugged and reconnected to the PC.
Known issues for Sets & Office
Sets UX for Office Win32 desktop apps is not final. The experience will be refined over time based on feedback.
The top of some Win32 desktop app windows may appear slightly underneath the tab bar when created maximized. To work around the issue, restore and re-maximize the window.
Closing one tab may sometimes minimize the entire set.
Tiling and cascading windows, including features like “View Side by Side” in Word, will not work for inactive tabs.
The Office Visual Basic Editor window will currently be tabbed but is not intended to be in the future.
Opening an Office document while the same app has an existing document open may cause an unintended switch to the last active document. This will also happen when closing a sheet in Excel while other sheets remain open.
Local files or non-Microsoft cloud files will not be automatically restored, and no error message will be provided to alert the user to that fact.
But it’s not all bad news. There are several fixes that come with build 17666 that may actually push those annoyed with 17661’s stability or performance such as:
General changes, improvements, and fixes for PC
We fixed an issue with dll from the previous flight that could result in explorer.exe crashing every few minutes.
We fixed an issue resulting in VPN potentially not working after updating to the previous build.
We fixed an issue from the previous build where apps may appear to be missing in secondary accounts after receiving app updates from the PC’s primary account.
We fixed an issue from the previous flight resulting in a bugcheck with the error IRQ_NOT_LESS_OR_EQUAL in tcpip.sys.
We fixed an issue where a border would be visible when you maximized windows in the last few flights.
We’ve updated the design of This PC so that there’s no longer space displayed for the cloud files state icon (which isn’t relevant on this page).
The snipping toolbar (with WIN + Shift + S) will now follow your desired theme, light or dark.
We fixed an issue that could result in the Emoji Panel and the touch keyboard not displaying correctly if invoked immediately after restarting explorer.exe.
So there you have it, a choice between potentially accidentally minimizing all Sets tabs or finally being done with the flashing taskbar as explorer.exe kept crashing.
After announcing several upcoming Windows features on Day 2 of Build 2018, Microsoft followed up today to release Windows 10 build 17666. This release is massive, and packs plenty of new features and improvements, from enhancements to Sets, a new clipboard experience, a dark mode in File Explorer, and more. Here’s what you need to know before installing on your Fasts Ring or Skip Ahead PC.
Sets improvements
We love Fluent Design as much as you do – in today’s build you’ll find that Sets now have an acrylic title bar. We’re also adjusting the window border so that it’s now grey.
Do you use Alt + Tab to quickly switch back and forth between apps? All of your recent Microsoft Edge tabs will now be included, not just the active one. Prefer it the old way? Use the “Pressing Alt + Tab shows the recently used…” setting in Multitasking Settings.
The Sets section of Multitasking Settings now lets you set your windowing preference. If you choose “Window”, new windows won’t open into a new tab unless you explicitly click the + or drag with your mouse. Choosing “Tab” opens any new windows invoked from your running apps into tabs. As a reminder, if you would like to exclude any particular app from Sets, you can do this from this same settings page.
When a webpage in Sets starts playing audio, you’ll now see a volume icon on the tab. Simply click it and the audio will mute, just like in Microsoft Edge.
Tabs will now restore with better performance – they’ll open in the background and use no resources until you go to the tab. This means you can restore a lot of tabs at once with no issues.
Fluent Design in Sets
New clipboard experience
But what do you do if you need to copy the same few things again and again? How do you copy content across your devices? Today we’re addressing that and taking the clipboard to the next level – simply press WIN+V and you’ll be presented with our brand-new clipboard experience!
Not only can you can paste from the clipboard history, but you can also pin the items you find yourself using all the time. This history is roamed using the same technology which powers Timeline and Sets, which means you can access your clipboard across any PC with this build of Windows or higher.
Our new settings page for enabling this experience is under Settings > System > Clipboard – please try this out and share feedback! This link will open the Feedback Hub to where you can tell us about your experience and what you’d like to see next.
The new Clipboard experience is on the right
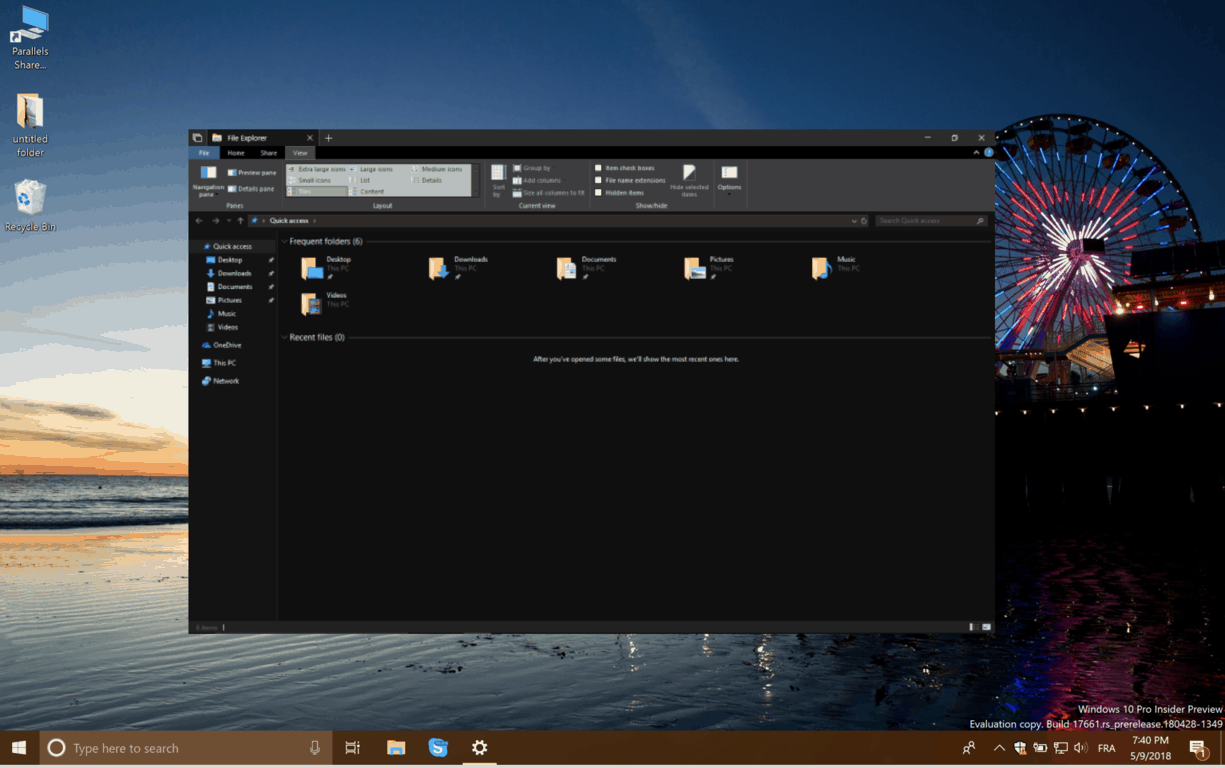
Dark Theme in File Explorer
This setting is available under Settings > Personalization > Colors, and if you switch it any apps and system UI that support it will follow suit. Since releasing this feature, our top feedback request from you has been to update File Explorer to support dark theme, and with today’s build it’s happening! Along the way, we also added dark theme support to the File Explorer context menu, as well as the Common File Dialog (aka the Open and Save dialogs). Thanks again for everyone’s feedback!
Dark mode in File Explorer
Notepad Search with Bing
To use simply highlight any words or phrase in Notepad and you can search Bing using the following methods: Right click on the selected text and choose “Search with Bing” via the right-click (context) menu. Edit menu ->”Search with Bing…” CTRL + B.
Notepad
Search Previews
Now we have expanded previews to support apps, documents, and more. Search previews are here to help you:
Get back to what you were doing, such as a recent Word doc or Remote Desktop sessionJump-start your task, be it a new Outlook meeting, a quick comment in OneNote, or changing a setting
Disambiguate between files by seeing more info including file location, last modified, or author
Access quick answers from the web like “are bananas good for you?” “height of mt everest”
Search Preview
Other features included in this build is the ability to name start name your tile folders in start, and some new Bing-powered questions which appear in settings when looking through to complete common Windoows settings tasks. Oh, and there’s also the extended line endings support which was announced yesterday at Build 2018.
Fire up those machines now, and head to Windows Update now to get downloading! Once you’ve updated, do feel free to let us know how this new build experience is working for you by dropping us a comment below.
The popular digital note-taking app, Nebo, has just received an important update on Windows 10 devices that fixes a bug that was causing it to crash for some users after the Windows 10 April Update. No other changes were made nor features added with this update but it’s important nonetheless and is worth installing if you haven’t already.
Nebo is a note app that’s designed for Windows 10 devices and digital pens such as the Surface Pen and boasts a variety of features that make it a solid competitor to Microsoft’s own OneNote app.
Call of Duty: WWII Gold Edition comes with the base game plus the first downloadable content pack, The Resistance, and 1,100 Call of Duty: WWII Points which can be used in-game. Here’s the official title description.
Call of Duty®: WWII creates the definitive World War II next generation experience across three different game modes: Campaign, Multiplayer, and Co-Operative. Featuring stunning visuals, the Campaign transports players to the European theater as they engage in an all-new Call of Duty® story set in iconic World War II battles. Multiplayer marks a return to original, boots-on-the ground Call of Duty gameplay. Authentic weapons and traditional run-and-gun action immerse you in a vast array of World War II-themed locations. The Co-Operative mode unleashes a new and original story in a standalone game experience full of unexpected, adrenaline-pumping moments.
Call of Duty: WWII has been a very successful video game since it launched on Xbox One, PS4, and PC in late-2017 and generated over $1 billion of revenue within its first two months of release across all versions.
Are you going to buy Call of Duty: WWII Gold Edition or do you already own the main game? Let us know in the comments below and make sure to follow us on Pinterest for more Xbox content.
The Xbox 360 video game, Burnout Revenge, has just been added to the Xbox One’s growing library of backwards compatible titles.
Burnout Revenge was very well received when it initially launched on the Xbox 360 in 2006 with many reviewers praising its online matches. Unfortunately, the Burnout Revenge servers are no longer online so the game is now limited to its offline content only, which is still substantial. The game can be purchased from the Xbox Marketplace here.
Here’s the official game description.
This time it’s not about winning. It’s about total domination and an utter disregard for the rules of the road. Burnout™ Revenge launches you into the fastest, most dangerous racer on the road. Exact revenge on rush hour traffic, vindictive rival racers, and everything else that gets between you and the finish line. This time it’s personal. This time it’s about revenge.
KEY FEATURES
Prepare for Carnage—Battling is the only way to advance in Burnout Revenge. Use the new Revenge Meter to track your progress as you reap rewards for playing dirty
Choose Your Car, Choose Your Weapon—Every vehicle is a potential weapon, whether you’re ramming an unsuspecting commuter into your rival or orchestrating an explosive multi-car pileup
Tracks Tricked Out for Takedowns—Navigate multi-level race tracks loaded with alternate routes, extreme jumps, hard stops, and nasty chokepoints. Burnout Revenge is built for battle.
Car-to-Car Combat—Smash through traffic and wreak havoc to beat the clock in the fast and furious Traffic Attack mode.
Crash Mode Revolutionized—This popular game mode is back, overhauled from the ground up to include more destruction and devastation than ever before.
Did you enjoy Burnout Revenge when it first came out and will you be playing it again? Let us know in the comments below and make sure to follow us on Twitter for more Xbox news.
Conan Exiles is now live after 15 months of Early Access. Survival game fans can now enter the game and try to stay alive in a world where everything is out to get you. At the same time, Conan Exiles will test your patience as the title is still affected by quite a few technical issues.
In this post, we’ll list the most common Conan Exiles bugs reported by gamers, as well as their corresponding workarounds whenever available.
Conan Exiles issues
1. Combat animation issues
Many gamers said that the game somehow looks unpolished. Combat animation is particularly buggy and feels unbalanced.
Combat feels unbalanced, PVP fighting with a 13 damage weapon with someone that have a 130 damage weapon. Fighting with a 130 damage weapon with a monster that have 50000Hp ends i a endless and sensless Fight! Difficulty in this game scales only with the Hp of enemys, why there cant make special attacks or something, why there cant dodge. Hit feedback feels like there is no feedback. Unpolished.
2. Server overload
Players also complained about server overload issues. However, this is a good sign as it indicates that gamers are indeed eager to play Conan Exiles.
Add more servers please. I’m trying to play but all the officials servers PVE are full (40/40) !! I think i’m not the only player who don’t succed to find a server ?
Other gamers can’t even enter the game due to various fatal error codes.
i was an early access player and was playing conan exiles till yesterday . for some reason i cant get into the game today after the update . i keep getting this error
The good news is that you can quickly fix fatal errors by deleting the mods folder in Conan’s directory.
4. Gamers can’t harvest animals
Conan Exiles is a survival game that challenges you to use absolutely all the resources that you find to stay alive. From time to time, you also need to harvest animals but that’s not always possible.
When I look down it seems that I am looking down, through my own body. Also am unable to harvest anything flat against the ground with a tool. This is most noticeable when trying to harvest an animal with anything other than a skinning knife.
Unfortunately, we’re not aware of any workaround that could help you fix this issue. Most likely, Funcom needs to roll out a hotfix to solve this problem.
These are the most frequently encountered Conan Exiles bugs. We’ll update this post with new issues as soon as new information is available.
Meanwhile, if you already played Conan Exiles, tell us more about your experience in the comments below.
Conan Exiles is a great game, but many report that Conan Exiles crashes to the main menu. This is just one of many Conan Exiles errors that you can encounter in the game.
This will make the game almost unplayable, and you’ll get stuck to the main menu, so it’s important to fix this issue, and today we’re going to show you how to do it.
Why does Conan Exiles keep crashing on startup?
Invalid Steam user ID ticket can sometimes cause the game to crash.
Lack of administrative privileges also can lead to crashes.
Certain Steam configuration files can interfere with the game.
What can I do if Conan Exiles crashes to main menu?
Start Steam as administrator and run the game again
Log out of Steam.
Go to the Steam install folder and delete the config folder.
Run Steam again as Administrator.
Log in again and enter your Steamguard token if you have one.
Launch Conan Exiles again.
The root cause of this issue seems to be an invalid Steam user ID ticket.
By reentering your login information again, you refresh your session, and this temporarily eliminates the bug.
Keep in mind that you need to keep Steam Overlay disabled for this method to work. If you’re having problems with this feature, we have a great guide on what to do if Steam Overlay is not working.
As you can see, it’s relatively simple to fix Conan Exiles if it crashes into the main menu. However, this isn’t the only issue, and many report that Conan Exiles won’t launch at all.
Luckily, we also have a dedicated guide for this issue, so feel free to check it out.
If you’ve come across other workarounds to fix this issue, please list the troubleshooting steps in the comment section below.
In April, Google started to roll out a brand new version of Chrome that addressed autoplay videos. Chrome version 66 came with autoplay video changes that prevented Chrome from playing videos automatically if the sound was on by default. Google has been rolling out the changes in personalized ways.
The reason is that Chrome can learn user preferences by which websites should or shouldn’t be blocked. All this would prevent audio from blasting from users’ speakers when they least expect it. The changes involve the fact that after you clicked and played videos on a website in the past, Chrome will remember the preferences in the future.
Google reveals a new policy for blocking autoplays
Now, Google announced a brand new policy on its desktop for blocking unwanted autoplay videos. Chrome will initially allow the autoplay feature for more than 1,000 websites where the highest percentage of visitors usually pay media with sound. Based on the users’ browsing preferences and habits, Chrome will steadily learn and enable autoplay only on websites where users play media with sound during most of their visits and it will disable it on websites where they don’t.
Chrome will gradually learn your preferences
Here’s what Google product manager John Pallett said about these changes:
As you browse the web, that list changes as Chrome learns and enables autoplay on sites where you play media with sound during most of your visits, and disables it on sites where you don’t. […] As you teach Chrome, you may find that you need to click ‘play’ every now and then, but overall the new policy blocks about half of unwanted autoplays, so you will have fewer surprises and less unwanted noise when you first arrive at a website.
On the other hand, it will take a while until the Chrome browser will completely understand users’ preferences and until it does, users may have to click play once in a while. But, according to Google, this latest policy of theirs will be able to block at least half of the unwanted autoplay videos. This policy has been already made live in the last version of Chrome.
If you’re wondering what a PST file is and how to view and modify it on your Windows 10 PC, then this post will show you how to open this file format.
A PST file is the default file format that is used to store information created by Microsoft Outlook. PST files usually include address, contacts, and email attachments. However, PST files generally have a storage limit of 2GB and Microsoft Outlook software performance becomes reduced when the PST file is close to the storage limit.
How to open PST files in Windows 10
PST files can be opened by only programs that support its file format; this article consists of five of the best software programs that can access PST program on your Windows 10 PC.
Microsoft Outlook 2016
Microsoft Outlook is the industry standard email client and information manager used by millions of persons on their Windows 10 computers. This software is an excellent choice to use in order to open PST files in Windows 10.
In addition, Microsoft Outlook has many features that make it a unique program; MS Outlook can keep track of all your schedule and contacts. The program also filters your email and sorts it out in order of importance. Outlook also allows you to synchronize your information with your mobile devices so that you can access your schedule and contact anytime.
Although, Outlook supports many formats but the files created by the program are saved in PST format. Also, Outlook has many features that allow you to have more access to modify PST files to your preference. The program also allows for easy exporting and importing of PST files. Microsoft Outlook is an excellent Email and schedule client and gives good value for money.
This program is an industry standard business server which delivers information such as email, schedule, and contacts to your PC and mobile devices. If you want to open PST files in Windows 10 without stress, then the Microsoft Exchange server is the best tool to use.
Exchange server offers lots of features which enable you to effectively manage your business with its user-friendly interface and easy to use tools. Exchange Secure supports various file formats such as PST and allows you to modify and read PST files. You can import PST files to your internet service or mobile devices easily using Microsoft exchange server.
Furthermore, if you want effective management of your small business webmail; this tool is an excellent program to have running on your Windows 10 PC.
Outlook PST Viewer is a new utility program that serves as an email and schedule client. This program allows you to sort out your email and has features that enable you to convert your PST file into other file formats.
This tool supports numerous file formats such as CSV, ODT, TXT, HTML, JPG, BMP and most especially PST files.
You can easily access PST files and view the information contained in them using this program. The user interface is simple and easy to use and the program is lightweight compared to other rival software.
Another tool which you can also use to open PST files in Windows 10 is Remo Repair Outlook. Remo Repair Outlook is utility software that is used to repair, corrupted or inaccessible PST files. This tool scans the corrupted PST files for data files, contacts, and other Outlook data.
In addition, Remo Repair Outlook is excellent software for accessing PST files as it can scan both good PST files and corrupted PST files. Using this tool you can extract, modify and fix corrupt PST files. The tool reads the files and restores the files to their original state without altering any of your information.
Also, the program is lightweight to use with a simple interface which makes it a must-have for users with PST files.
Microsoft Outlook Express is an email and information client which was developed by Microsoft. This tool enables users to manage email and allows for multiple email accounts on a single system.
In addition, Outlook Express also integrates popular email systems such as POP and IMAP and you can do basic HTML editing features and customize your Email messages.
Meanwhile, Outlook Express supports various formats such as PST and EDB file formats. Hence, this program enables you to open PST files on your Windows 10 computer. Also, you can view, edit and modify PST files as well.
However, Outlook Express is no longer supported by Microsoft and has been replaced with Windows Mail but the program is still handy if you want to access your PST files.
Conclusively, any of the programs we mentioned above can open PST files in Windows 10 computers. Although, some of the programs are available at a premium price, but they are applicable in opening PST files in Windows 10.
Have you used any of the programs we mentioned above recently, let us know by sharing your experience with us. Feel free to comment below.
Microsoft introduced a very interesting and useful feature with the Windows 10 April Update. Timeline allows you to sync your PC activities on your phone. In this manner, you can resume your tasks and continue where you left off.
However, many Windows 10 users don’t want to use Timeline due to privacy concerns. Indeed, if you connect to your Microsoft Account website, you’ll find all the data collected about your activities. Obviously, some users don’t like that and want to disable Timeline. Here’s how you can do that.
How to disable Timeline in Windows 10
Navigate to Settings > Privacy > Activity History. There, you’ll find two options:
Let Windows collect my activities from this PC
Let Windows sync my activities from this PC to the cloud
Make sure to uncheck both to disable Timeline. You can then clear your activity history by going to Settings > Privacy > Activity History > Clear activity history. Click on the ‘Clear activity history‘ button to delete all the date Windows collected about your activities.
In case you want to be secure while surfing the internet, you will need to get a full-dedicated tool to secure your network. Install now Cyberghost VPN and secure yourself. It protects your PC from attacks while browsing, masks your IP address and blocks all unwanted access.
The privacy debate around Windows 10
There has been a fierce debate around Windows 10’s privacy issues ever since Microsoft released the OS. Many said the company collected user data without their consent and asked the company many times to stop its telemetry services.
The Redmond giant listened to its customers and introduced a more transparent privacy policy with the Windows 10 April Update. The new privacy settings lay out clearly how and why Microsoft gathers particular pieces of information about Windows 10 users.
Many users said that Microsoft still has a lot of work to do in order to refine its privacy policy, but agreed the company already took a step in the right direction.
Being able to perform currency conversions on your Windows 8 or Windows 10 tablet is something awesome, and XE Currency App is perhaps the best one you should use. Find below more information about it.
When traveling, you always need to check what the local currency is and do some conversions to see if you have enough money. And if you carry with you a Windows 8 tablet, then you really need to download and use one of the best Windows 8 travel apps. The XE Currency app is probably the best Windows 8 currency converter you’ll find in the Windows Store.
XE Currency has already built a name for itself, being among the most used and reliable converting tools in the world. It comes with a plethora of built-in features that you can benefit for free, as the app comes gratis in the Windows Store. Of course, it has advertising, so it’s actually a freemium currency converter for Windows 8.
Besides the main currency converter where you can add and compare up to thirteen currencies in the same time, there is also the option of seeing live currency rates and charts. Actually, the XE Currency app for Windows 8 has all the world’s currencies and precious metals. What’s really awesome is that you can also use the app offline. Here are some other nice features in the app:
30,000+ currency charts
The ability to rate high & lows in currency charts
Calculate prices straight from the app
Pin your base currency to a live tile
Use the app in Portrait, landscape, and snap view
The latest update that XE Currency app has received in the Windows Store is focused on bringing full support for Windows 8.1 and Windows 10, which brought the option to add a currency pair to the lock screen.
[UPDATE 2018] The app has received full support in the Microsoft Store and you can enjoy its great features for free on your Windows 8.1/10 devices. You might know that Windows 10 Calculator can now convert currency, but this app has more handy features.
Bitcoin lovers that do bitcoin mining on Windows 8 and not only them will also be glad to hear that it even supports the Bitcoin currency. Follow the link from below to get it on your Windows 8/10 devices.
Back in April, many Windows 10 Insiders complained about an annoying clean install error message that occurred when using ISO files. Performing a clean installation from an ISO file failed with the following error message: “Windows Setup could not configure Windows to run on this computer’s hardware.”
Windows 10 17643 was the first to introduce this error on a large scale, among other issues. Unfortunately, this error code still plague Insiders and many reported that it affects newer Redstone 5 builds as well.
Well, I think you can add build 17661 to the title, at least for me it’s not clean installing on my HP OMEN Desktop.
Insiders have been complaining about this problem for quite a while now, but Microsoft has yet to issue any comments. Honestly speaking, nobody knows why this error occurs. Insiders launched several hypotheses — suggesting that this issue affected only particular GPU cards – but nobody could pinpoint the exact root-cause of the problem.
So, is there a way to fix this annoying error code? Well, the answer is not that simple. There are indeed a couple of workarounds that you can use, but there’s no guarantee they’ll work for all Insiders. Anyway, we’ll list them below.
How to fix Windows 10 ISO file clean install errors
1. Run the Update Troubleshooter
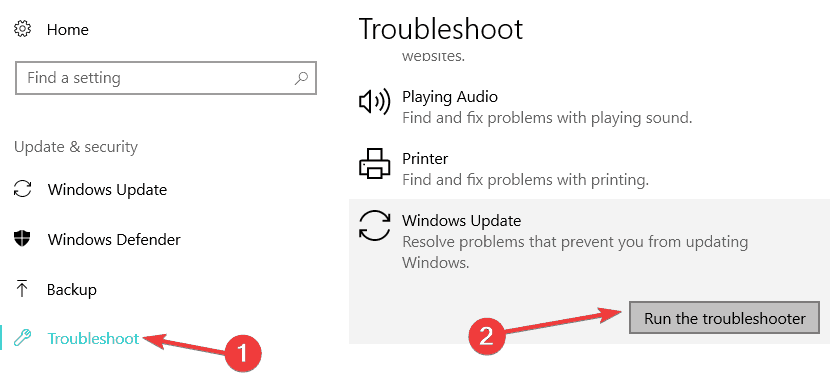
Surprisingly, a few Insiders managed to fix this error by running the built-in troubleshooter. So, go to Settings > Update & Security > Troubleshoot > select Windows Update and run the troubleshooter.
Wait until the troubleshooting process completes and then try to clean install Windows again. If you get the same error, restart your computer and try again. Maybe this time it will work.
2. Use EasyBCD to boot your computer
One resourceful Insider found another solution to fix this problem but it requires using EasyBCD. So, basically, you need to download and install EasyBCD to add the partition to your boot menu. Take out the SSD of the problematic computer and put in a second computer. Boot up your machine using the build partition to install the latest updates.
That’s pretty much all we know about the annoying “Windows Setup could not configure Windows to run on this computer’s hardware”.
If you’re an Insider and you came across this problem, tell us more about your experience in the comments below.
Now that the Windows 10 April 2018 Update is rolling out, some updated users might have spotted that they have about 29 gigabytes less hard drive storage than was previously the case. That’s because the previous Windows 10 installation folder is still retained for a few weeks after a big update. Consequently, you’ll have less disk storage space until that folder gets automatically deleted 10 days after the update. If you can’t wait a week and a half, this is how you can free up at least 10 GB HDD storage space.
Free up 30GB of storage space
1. Free up Storage Space With Disk Cleanup
You don’t need any third-party utility to free up lots of HDD storage space after the Windows 10 April 2018 Update. Windows 10’s Disk Cleanup utility will do just fine. You can erase the previous installation files with Disk Cleanup as follows.
First, click the Cortana button on the taskbar.
Input the keyword ‘Disk Cleanup’ and select Disk Clean-up to open the window shown directly below.
Select C: on the Drive Selection’s drop-down menu, and press the OK button.
Then press the Clean up system files button to open the Drive Selection window again.
Select your C: drive on the drop-down menu. The Disk Cleanup utility will scan the HDD again, and then the window below opens.
Now you can select a Previous Windows Installation check box on that window. Select the Previous Windows Installation check box, and press the OK button.
The latest Windows 10 also includes a new Free up space tool in the Settings app. So you can also delete the previous Windows installation with the Settings app. However, note that you can’t restore Windows 10 to the previous build after deleting the previous installation files. This is how you can free up some HDD space via Settings.
First, open the Cortana app.
Input the keyword ‘storage’ in Cortana’s search box, and click Storage to open the window shown directly below.
Then click Free up space now to open a list of items you can delete.
Select the Previous Windows Installation check box.
Press the Remove files button to delete the files.
3. Free up HDD Space With CCleaner
Of course, you don’t need to delete the previous Windows installation to free up some hard drive space after the April 2018 Update. If you only need to free up a few gigabytes on a full hard drive after the update, check out the freeware CCleaner utility. CCleaner is a more extensive HDD cleaner than the Disk Cleanup tool. This is how you can free up some hard drive space with CCleaner.
Click Download on this page to save the CCleaner installer.
Add CCleaner to Windows 10 with the software’s setup wizard, and then open its window below.
CCleaner’s Cleaner utility includes Windows and Applications tabs. Select on the Temporary Files, Empty Recycle Bin and Edge Internet Cache check boxes on the Windows tab.
Then select the Applications tab shown in the snapshot below.
Select the Internet Cache check boxes for all browsers on the Applications window.
Furthermore, you can also select the third-party software check boxes listed under Applications to free up more space.
Then press the Analyze button to see how much space CCleaner will free up for you as in the snapshot directly below. It will probably free up quite a bit of space, but you can always select more Cleaner check boxes to get some more HDD space back.
Click the Run Cleaner button.
If you still need to free up some HDD space, click Tools > Uninstall in CCleaner to open the uninstaller below.
Then look out for superfluous programs you really don’t need. Press the Uninstall button to remove selected software.
There are also other ways you can free up HDD space after the April 2018 Update. Erasing duplicate files, saving HDD folders to cloud storage (or external storage) and converting image and video files to more compressed formats can also save hard drive space. Check out this article for further tips that will free up some hard drive space.
It looks like every step forward leads to two back when it comes to Microsoft’s update distribution. The Windows 10 April Update hit the general population after numerous tests and fixes on various security loopholes. However, even though the Redmond Giant complied with the release date expectations, the system is full of issues, causing the public outburst. Until they sort it out, you can always roll back to a previous Windows 10 iteration.
Today, we offer two ways to roll back to previous system version. Make sure to check them out below if you’re in dire need to dispose of the April Update.
There are two ways to roll back from the Windows 10 April Update. The first way is utilized through the system since the option resides in the Settings app. Using this way implies that you’re able to access the Settings app in the first place. Even though this procedure won’t cost you your data and installed applications, we still recommend backing up everything you deem worthy of the system partition. As the saying goes “Microsoft misfortune does not come alone”, so things can still get even worse.
Follow these steps to roll back via the Settings app:
Press Windows key + I to open theSettingsapp.
ChooseUpdate & Securitysection.
Select theRecoveryfrom the left pane.
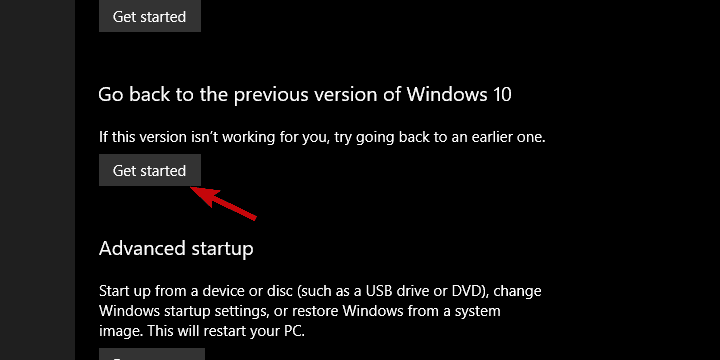
Under the “Go back to the previous version of Windows 10” option, click Get started.
Keep your files and start the resetting procedure.
2: Roll back from the Advanced boot menu
On the other hand, if you’re stuck in the system limbo, you won’t be able to boot and access Settings in a standard manner. You can do so by booting into a Safe mode, but there’s really no a dire need to do so. The Advanced boot menu offers the option to roll back to the previous Windows 10 iteration in a few simple steps.
Follow these instructions to roll back the Windows 10 April Update via the Advanced boot menu:
Hard power offyour PC3 timesuntil theAdvanced Recovery environment appears.
ChooseAdvanced options.
Select the “Go back to the previous build” option and confirm the selection.
Wait until the procedure ends and restart your PC.
That’s it. Hopefully, after the redraw, you’ll be able to get back to seamless Windows 10 experience. At least, until Microsoft deals with the issues plaguing Windows 10 users around the world. Don’t forget to share your questions or suggestions in the comments section below. We look forward to hearing from you.
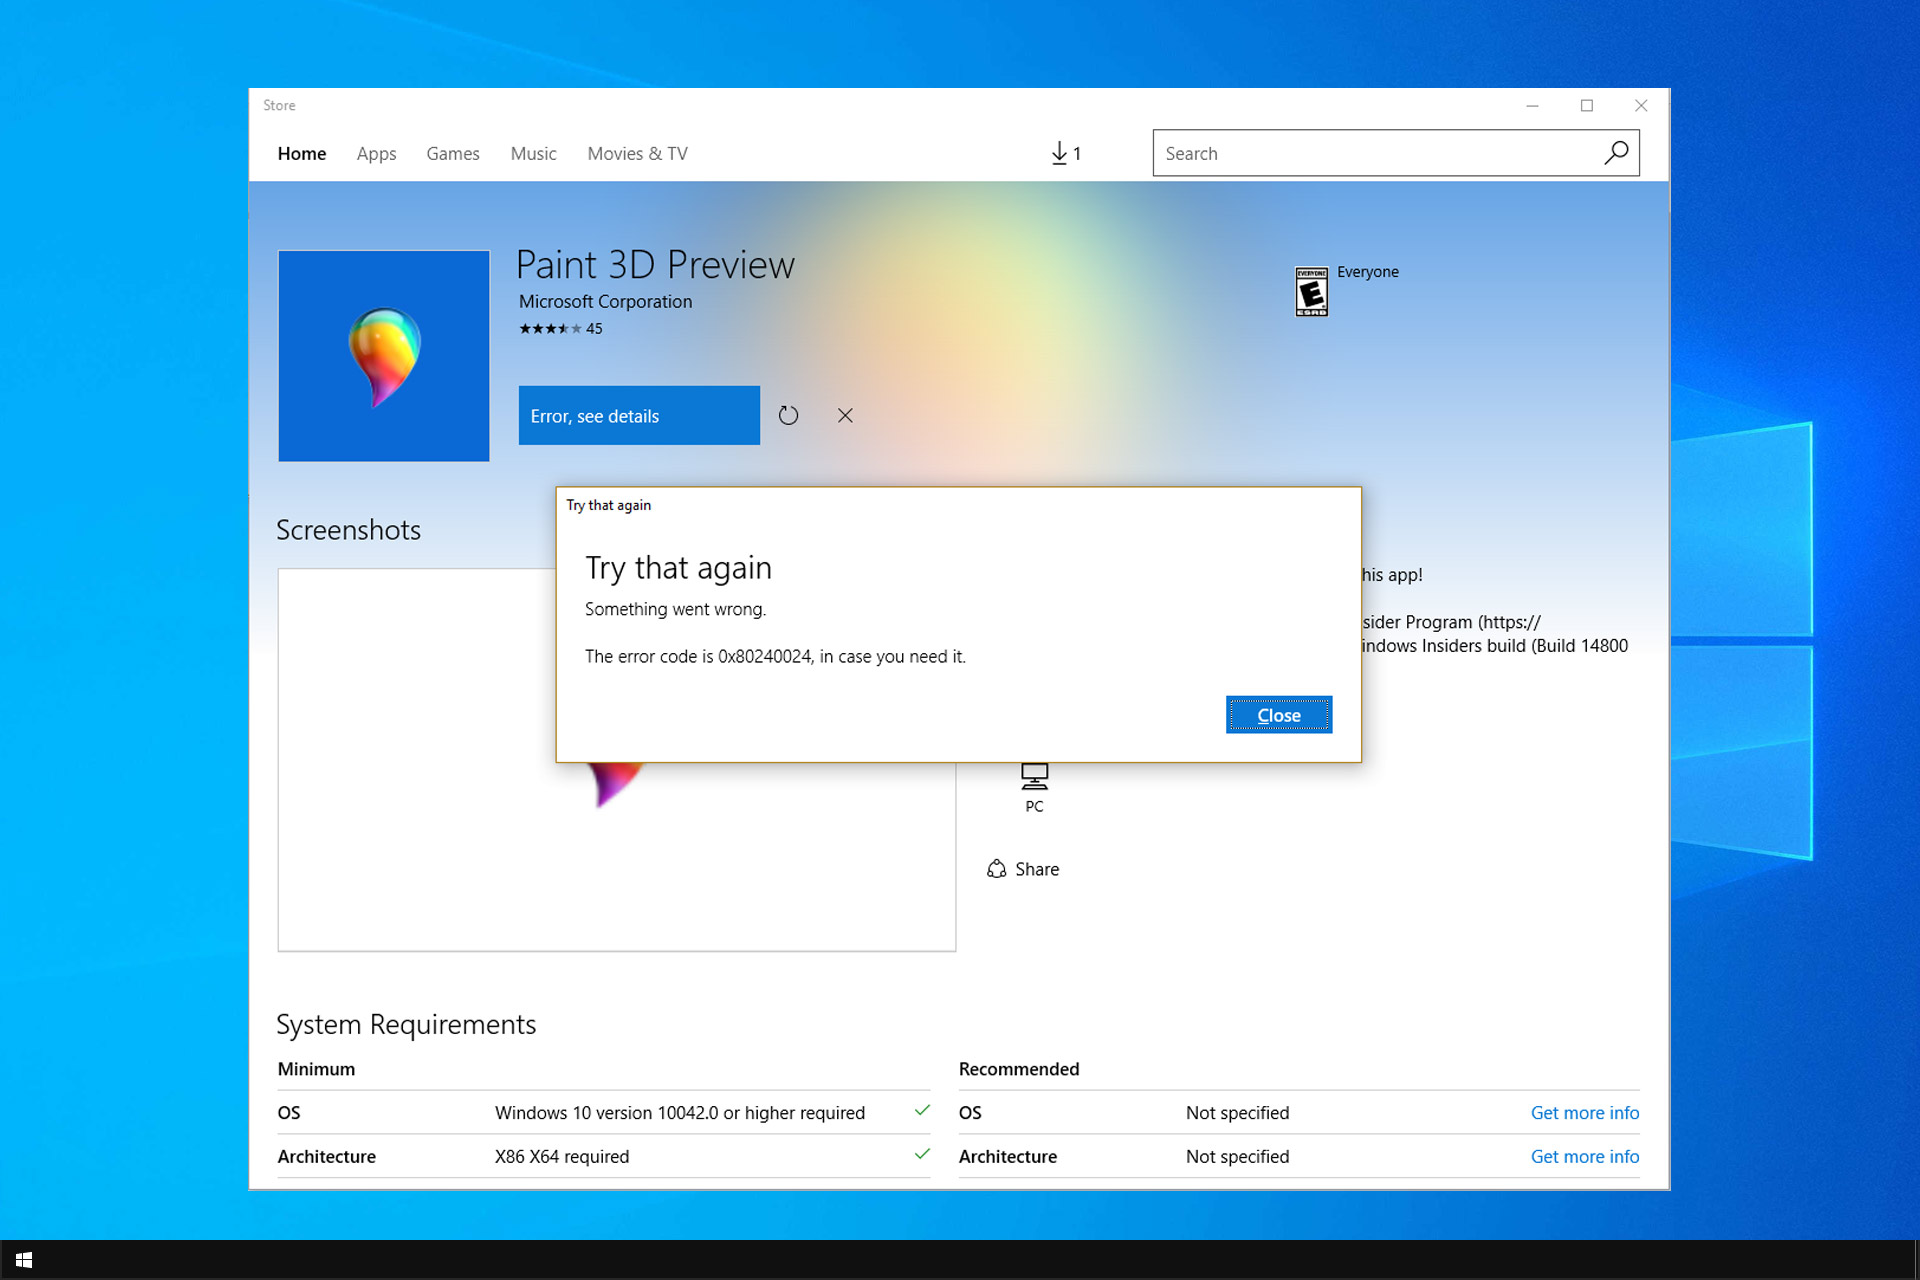
Microsoft Store is a major component of Windows 10, but unfortunately, many users reported error 0x80240024.
This can cause download problems, so it’s not similar to Microsoft Store won’t open issue we covered earlier. Nevertheless, this is a serious issue that needs to be addressed, so let’s start.
Why does error 0x80240024 appear?
Your current downloads might interfere with the process.
Improperly configured settings can cause this and many other errors.
Microsoft Store cache can sometimes lead to this and other issues.
Damaged system files are one of the reasons for this error.
How do I fix error 0x80240024?
1. Stop all current downloads
Open the Microsoft Store. You can do that by pressing the Windows key + S, entering store and selecting Microsoft Store from the list.
Once the Microsoft Store opens click the little icon next to the search bar and choose Downloads and updates from the menu.
Cancel all current downloads and try downloading your application again.
2. Disable Sideload apps option
Open the Settings app and go to Update & security section.
Navigate to For developers tab and select Microsoft Store apps.
Close the Settings app.
After choosing this option you’ll be able to download apps only from Microsoft Store, and you’ll hopefully fix error 0x80240024.
3. Check if your region is correct
Start the Settings app and go to Time & language section.
Now go to Region and language tab and be sure that the correct region is selected.
Close the Settings app.
After selecting the correct region the issue should be completely fixed. In addition, you might want to try changing your region to the United States, Canada, or the United Kingdom.
Open the Settings app. Go to Update & security section.
Go to Windows Update tab and click the Advanced options.
Uncheck the Defer upgrades option.
Alternatively, you can turn this option off by doing the following:
Press Windows key + R and enter gpedit.msc. Press Enter or click OK.
When Group Policy Editor opens navigate to Computer Configuration > Administrative Templates > Windows Components > Windows Update in the left pane.
In the right pane find Defer Upgrades and Updates and double click it.
Select Disable and click Apply and OK to save changes.
5. Set your antivirus to gaming mode
Open your antivirus settings.
Navigate to Components.
Disable Game Mode.
Keep in mind that these are general instructions and actual steps might differ depending on your antivirus.
6. Reset Microsoft Store cache
Press Windows key + R, type wsreset.exe.
Press Enter.
Just wait for the process to finish and restart your computer.
7. Use the Store Troubleshooter
Open Settings.
Head over to Updates & Security > Troubleshooting.
Now, click Windows Store Apps, and go to Run the troubleshooter.
Follow further on-screen instructions, and let the troubleshooter finish the process.
Restart your computer.
8. Run the SFC Scan
Go to Search, type cmd, and open the Command Prompt as Administrator.
Type in the following command and press Enter: sfc/ scannow
Wait for the process to finish (it will take some time).
Restart your computer.
9. Use DISM
Type cmd in the Windows search bar, right-click on the Command Prompt and run it as an administrator.
In the command line, copy-paste these lines one by one and press Enter after each: DISM /online /Cleanup-Image / ScanHealthDISM /Online /Cleanup-Image /RestoreHealth
Wait until the procedure ends (it might take up to 10 minutes).
Restart your PC.
10. Reinstall the Microsoft Store
In the Windows Search bar, type PowerShell, right-click on PowerShell, and run it as admin.
Copy-paste or type in the following command in the command line and press Enter: Get-AppxPackage -allusers Microsoft.WindowsStore | Foreach {Add-AppxPackage -DisableDevelopmentMode -Register “$($_.InstallLocation)AppXManifest.xml”}
Once the process ‘reinstalls’ Microsoft Store, restart your PC.
Error 0x80240024 can cause you certain problems while trying to download applications from the Microsoft Store, but we hope you managed to fix it using one of our solutions.
Major system updates aren’t built in a day but we can confirm that they tend to go south fast. The Windows 10 April Update has a lot of improvements going for it, but, seemingly, there’s a LOT of critical issues, as well. One of the issues which are hard to cope with is constant screen flickering and stutters after the system update.
The first thing you can do is wait it out for some time. It tends to stabilize over some period of time and there are some hotfix updates on the way. On the other hand, if you’re through with waiting, check the steps we provided below.
Screen flickers after Windows 10 April Update? Here’s how to fix it
When something goes awry with the display, the first point of interest should be on display drivers. Frequent changes Windows Update makes to drivers, in addition to the Legacy support compatibility, and we’re looking at a major issue. And this is something all of us experienced at least once on Windows 10.
In this scenario, chances are that you had a fully functioning driver on the previous iteration of Windows 10. However, Windows 10 April Update updated the driver on its own and the flickering started. In order to address this, we suggest navigating to the OEM’s site and downloading the official driver for the Display adapter.
Follow these steps to reinstall proper GPU drivers on Windows 10 April Update:
Navigate to OEM’s site and download the latest Windows 10 drivers. You can install Windows 8 and Windows 7 drivers in the compatibility mode, too.
Restart your PC.
2: Remove third-party antivirus
The love-hate relationship between Windows 10 and certain third-party drivers is there from the start. Even though their respective developers worked out the compatibility issues, there is some still antimalware software with issues. For the sake of troubleshooting this, we recommend removing your antimalware temporarily.
Later on, you can always install the antivirus again, if the problem persists. This means that the third-party antimalware is indeed not to be blamed for the screen flickering. Just navigate to Control Panel and uninstall the application. If there are some supporting programs, make sure to ditch those, too.
3: Update BIOS
The BIOS/UEFI version which got the job done for the Creators Update should work for the April Update, as well. On the other hand, you can never be sure enough. Updating BIOS/UEFI to its latest version isn’s something users do often. Updates are not administered automatically and you’ll need to either access BIOS/UEFI settings or use a third-party program to update your BIOS.
Updating (flashing) BIOS can be a severe procedure for an inexperienced user, but it’s actually rather simple. Check on this article to find out how to do it on Windows 10 PC.
4: Reset PC to factory settings or roll back to the previous iteration
This is where the recovery options in Windows 10 come into play. If the problem is persistent and you’re unable to address it, resetting your system to factory settings or rolling back to Creators Update are next steps. Both options will keep your data and applications, so you can choose what you prefer on your own.
Follow these steps to “Reset this PC” in Windows 10:
Press Windows key + I to open the Settings app.
Choose Update & Security section.
Select the Recovery from the left pane.
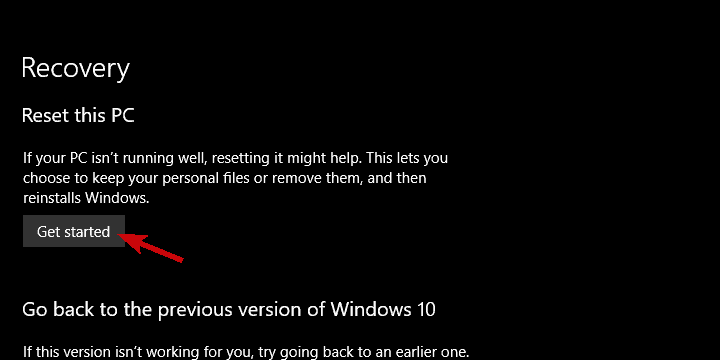
Under the “Reset this PC” option, click Get started.
Keep your files and start the resetting procedure.
And this is how to roll back to the previous Windows 10 version:
Navigate to Settings > Update & Security, again,
Select the Recovery from the left pane.
Under the “Get back to the previous version of Windows 10” option, click Get started.
Follow the instructions until the procedure ends.
5: Clean reinstall Windows 10
Finally, if the issue is persistent even after you’ve taken the aforementioned steps, the clean reinstallation is the only solution that comes to mind. Clean reinstallation is the last resort and we recommend it only when you’ve depleted all alternatives. However, taking into consideration this is fast and simple with Media Creation tool, it shouldn’t take too much time.
You can find the in-depth explanation of the clean reinstallation for Windows 10, here. Just don’t forget to backup your data from the system partition.
That’s a wrap. Make sure to share your alternative solutions or questions in the comments section below.
If your apps and programs can’t access your computer’s camera or microphoneafter installing the Windows 10 April Update, you’re not the only one. Believe it or not, absolutely all the Windows 10 users who installed the latest OS version on their machines encountered this problem.
I installed the Windows 10 April 2018 Update, and now one of my apps that uses the camera or webcam no longer has access to it. How can I resolve this problem?
Microsoft decided to give users better control over their Windows 10 devices. The company blocked third-party apps and programs from accessing your computer’s webcam and microphone to protect your privacy. If you downloaded and install a third-party camera app, Windows 10 now automatically blocks its access to your camera. These limitations don’t apply to apps and programs downloaded from the Store.
Microsoft believes in giving you better control over your Windows 10 device, and starting with our most recent update, we are one step closer to that goal. You may have noticed that after taking the update, your favorite apps no longer have access to your webcam and/or microphone. We have beefed up camera privacy in this update, and this could be related.
You can unblock these camera and microphone restrictions by going to Settings > Privacy > Camera and checking the option ‘Allow apps to access your camera‘.
What do you think about Windows 10’s automatic privacy settings and limitations? Let us know in the comments below.
After it was postponed, Microsoft still gets to sneak in the Windows 10 Spring Update in April. Thus it’s named the April Update. Initial thoughts are mainly positive when it comes to improvements and added features. However, there are more than a few emerging issues after the update got some traction. To make the things even worse for some users, they got trapped in the neverending boot loop during the installation.
We made sure to offer a workaround for this error. And, yes, only a workaround. We’re looking at the major compatibility issue and it’s hard to apply a single set of solutions. Nonetheless, it should help you get rid of the boot loop.
How to unstuck PCs stuck in boot loops during Windows 10 April Update install
The first advice is to just wait it out. The second is to boot into a Safe mode and uninstall the GPU driver. Finally, if none of the two methods were productive, we recommend restarting the update procedure. Just, this time instead of relying on the subpar Windows Update feature, you should try installing April Update manually. But, let’s restore Windows 10 to fully functional state.
Now, as the case has shown on this and previous iterations, you can get stuck in the boot loop during the installing of the major update. In order to avoid the recurrence of the boot loop, we’ll need to confirm that you have enough storage space and meet the system requirements for Windows 10 April Update.
Now, let’s use an installation media to reset the PC to factory values. After that, you can use the same USB/ISO to update to April Update. However, maybe you should consider avoiding this update. Due to lack of the driver support on the older machines, critical errors are not uncommon.
Reset your PC
Resetting your PC to factory state should get you in the clear. This recovery option won’t affect your files and applications. It’s much faster than the clean reinstallation and you get to keep your data. Furthermore, you won’t need any installation media, USB nor DVD, to repair your system.
Follow these instructions to reset your PC to factory settings and get out of the boot loop:
Hard power offyour PC3 timesuntil theAdvanced Recovery environment appears.
ChooseAdvanced options.
SelectTroubleshoot.
Click Reset this PC.
Choose whether you want to keep or delete your files and apps.
ClickReset.
Choose to keep the files and continue with the procedure.
After that, you should be able to boot into Windows 10 without any issues. For the sake of functionality, think twice before deciding to update again. Just one tip for users who experience a lot of obscure issues. Postpone the automatic updates by navigating to Settings > Update & Security > Windows Update > Advanced options. Once there, enable the “Pause updates” option.
What you’ll do next whenever you want to try installing the major update is relying on the Update Assistant. That might require a by-hand approach but you’ll see the eligibility and compatibility evaluation. In addition, if it happens that the April Update broke your drivers with the generic update, make sure to reinstall the old ones. Before that, though, navigate to Advanced system settings > Hardware > Device installation settings. Disable automatic distribution and restart your PC.
We’ll end it on that note. Don’t forget to share your thoughts, suggestions, or questions with us and other readers. The comments section is just below.
The Windows 10 April Update is finally out and some folks are already comparing it to the Anniversary Update. And not for the reasons Microsoft expected prior to the release. Namely, there’s a myriad of jaw-dropping issues which are heavily downgrading the overall experience. And it’s only a couple of days since the April Update hit the general population.
One concerned user sparked the discussion on the official Microsoft’s community forum. It concerns Lenovo Thinkpad and substantial performance downgrade after the April Update took over. This is what he had to say, besides recommending to avoid the update for all Lenovo ThinkPad users.
“I’d like to let anyone know that it is not recommended to update to the latest version of windows 10. It’s causing system failures just the same way as the anniversary update. Microsoft is not learning from their mistakes. My thinkpad is freezing every few minutes and this is something that didn’t happen before updating.” JensMueller1988
Furthermore, the concerned user also stated that his ThinkPad E480 worked exceptionally prior to the update and that it’s a brand new model. So, even if the freezing/BSOD issues are doubtfully common on the old configurations due to compatibility issues, this is a new model which is strictly optimized for Windows 10.
We can only hope that Microsoft provides some solutions for the affected users. Meanwhile, we recommend avoiding the over-the-air updates. Rather, we recommend using the Update Assistant. You can get it here. That way, the compatibility issues are to be avoided.
Meanwhile, don’t forget to share your experience with the April Update. Is everything running nice or this is another hastily appended major update?
RELATED STORIES YOU SHOULD CHECK OUT:
PC won’t wake up from sleep after Windows 10 April Update install [FIX]
Microsoft already confirmed the Windows 10 April Update won’t install on particular Alienware laptops. The company took the decision to block the update on a five Alienware laptop models due to compatibility issues. The laptop models concerned are the following:
Alienware 13 R3
Alienware 15 R3
Alienware 15 R4
Alienware 17 R4
Alienware 17 R5
The Redmond giant explained that the latest Windows 10 OS version could trigger black screen issues after resuming from battery saver mode.
Microsoft is currently blocking these models from installing the update due to a known incompatibility that may cause these devices to display a black screen after resuming from battery saver mode.
Alienware also offered additional details about this problem, confirming that a stable hotfix should land at the end of May:
There is no application you SHOULD uninstall. The block put in place is intentional from Microsoft due to a graphics related bug in Windows 10 version 1803 which affects hybrid graphics platforms. They have a fix on the way planned around the fourth week of May.
Windows 10 April Update install failed on Alienware laptops [FIX]
Uninstall all your GPU drivers > disable the GPU in Management
Turn on airplane mode and restart your PC
Use the update wizard to install the update. Using the Windows 10 Update tool won’t work.
Turn off airplane mode > start downloading the update
Turn airplane mode back on when the download is complete.
This quick solution should help you install the latest Windows 10 OS version on your Alienware laptop, even if Microsoft blocked the update process. Keep in mind that the Redmond giant doesn’t recommend attempting to work around the current block to install the April 2018 Update– so, proceed at your own risk.
Microsoft today released Windows 10 build 17661 to Windows Insiders, and it’s jam-packed with lots of new features. Since this build puts Skip Ahead and Fast Rings on the same page, Microsoft is reminding users that the Sets experiment is continuing, so we’d like to know if you’re seeing it on your machine as well.
According to Dona Sarkar, even though Skip Ahead and Fast Ring are now getting the same build, the Sets feature is still a controlled study. This means that not everyone will be seeing it, but everyone who has opted into Skip Ahead before will continue to have the feature on their machines. She also added an interesting note in the blog post, which hints that more people might see the feature:
Unlike the controlled study we did in December, the large majority of Insiders in the Fast ring will see Sets and a smaller group won’t.
So, are you seeing Sets on your machine? Let us know your thoughts below. And be sure to check out our detailed look at Sets, and how it can change your workflow.
After teasing us yesterday that new builds would be coming soon, Dona Sarkar and the Windows Insider team have delivered. The team today released Windows 10 Insider Preview build 17661 for Fast Ring and Skip Ahead. This build merges Skip Ahead with Fast Ring, but also comes with a new Screen Snipping experience and Fluent Design in Task View. Here’s what you need to know.
A modern snipping experience:
Today we’re taking the first step toward converging our snipping experiences. The new modern snipping experience is here to help you effortlessly capture and annotate what you see on your screen. While working on this we’ve been carefully going over all your feedback about taking screenshots in Windows – you’ll find the flow and tools are optimized for sharing and make communicating visually with others quick and easy.
Screen Sketch is now an app! Originally introduced as part of the Windows Ink Workspace, this comes with a variety of benefits, including that it can now be updated via the Microsoft Store, it will now show up in the list when you press Alt + tab, you can set the window size to be your preference if you like multitasking, and it even supports multiple windows (and tabs, thanks to Sets!).
Easy snipping is only a single step away. One of the loudest things we heard is that you want to be able to quickly snip & share a screenshot, and we’re making it happen! WIN + Shift + S will now bring up a snipping toolbar – snip a rectangle, something a bit more freeform, or full screen and it will go straight to your clipboard. If that’s all you need, you can take it from there. Want more, though? Immediately after taking a snip you’ll now get a notification that will take you and your snip to the Screen Sketch app where you can annotate and share away!
New ways to screen snip:
Just click the pen tail button. If you have a pen, go into Pen & Windows Ink Settings – you’ll find Screen Snipping is now an option for single click. This will launch you directly into our snipping experience:
It’s not enabled by default – go to Keyboard Settings – you’ll see a new option that says “Use the Print Screen key to launch screen snipping”. Opening Settings and searching for “print screen” will take you to the right page.
Press the quick action button in Action Center. Called “Screen snip” – it should be there as soon as you upgrade, but if not you can always enable it via Notifications & Actions Settings.
More Fluent Design: Introducing acrylic in Task View:
We’ve heard you like acrylic! We like it too – when you update to this build you’ll find that the entire Task View background now has a soft blur effect.
Windows Defender Security Center is now called Windows Security. You can still get to the app in all the usual ways – simply ask Cortana to open Windows Security or interact with the taskbar icon. Windows Security lets you manage all your security needs, including Windows Defender Antivirus and Windows Defender Firewall.
We’re also bringing some changes to how we present threats and actions that need your attention, and we’re continuing to refine that over the coming months.
Now Focus assist will turn on automatically when you’re playing any full screen game. No more interruptions when you’re crushing it. This behavior should be turned on automatically, but you can always check by going to Settings > System > Focus assist and ensuring the “When I’m playing a game” automatic rule is enabled.
We’re happy to announce the next piece of that with today’s flight. Device properties has now been integrated into Settings – just click on the links in Sound Settings and you’ll find a new page where you can name your device and select your preferred spatial audio format.
As you can tell, there is a lot to look forward to with this new build. You should be seeing it now under Windows Update, so fire up those machines and get downloading! Once you’ve downloaded, do let us know how the build is going for you by dropping us a comment in the section below.
With the Windows 10 April 2018 Update now available to download, everyone should soon be able to discover a new type of Windows 10 app called Progressive Web Apps. PWAs are web apps on steroids that look and work just like native apps. This is possible thanks to standards-based technologies such as push notifications and service workers, which are supported on Windows 10 version 1803.
In some ways, PWAs are bringing back a pretty old debate: should developers continue to develop native apps for the most popular computing platforms, or can cross-platform PWAs be good enough for the majority of use cases? This is still a hard question to answer, but it’s already clear that PWAs could have a big impact on the Microsoft Store and the company’s app strategy.
PWAs have some undeniable advantages
Thanks to service workers, cache and push APIs, PWAs can support push notifications, background tasks and even limited offline functionality. As we’ve seen with the new Twitter app, which is probably the best PWA you can use on Windows 10 today, devs can also add support for Live Tiles, Jump lists, and even pull to refresh.
The Twitter PWA.
As Microsoft explained in its documentation about PWAs, these apps work just like standard UWP apps and they can leverage the following features over running in the browser:
When installed on Windows 10, PWAs run as Universal Windows Platform apps and gain these technical advantages over running in the browser:
Standalone window
Independent process from browser (isolated cache, less overhead)
No storage quota (for IndexedDB, local storage, etc.)
Offline and background processes
Access to native Windows Runtime (WinRT) APIs via JavaScript
Appearance in “app” contexts such as the Windows Start menu and Cortana search results
Because PWAs are built on web technologies, they should also be always up to date. In general, Windows 10 users shouldn’t have to download a new version to enjoy new features, though app updates may still happen for some of them. There are a lot of advantages for developers, especially since a well-built PWA should work the same across browsers and different. platforms. Charlie Croom, Web engineer at Twitter recently pointed out that supporting a PWA is much less work for app developers.
A strong core app means we don't duplicate effort making each feature for every platform. Leveraging PWA support per-platform means add-on enhancements when you install the app. It might surprise you how small the web team at Twitter is; PWAs multiply effectiveness + reach.
Is Microsoft right to publish PWAs to the Microsoft Store?
Since the launch of Windows 8 back in 2012, Microsoft has struggled to get developers to supports its Windows Store. To be fair, Apple also has its own problems with the Mac App Store, but so far the Cupertino giant has refused to prioritize quantity over quality.
The fact that Microsoft intends to publish PWAs on the Microsoft Store on its own seems to be problematic for a couple of reasons. The company detailed its plans back in February:
We’ve been using the Bing Crawler to identify PWAs on the web for nearly a year, and as we’ve reviewed the nearly 1.5 million candidates, we’ve identified a small initial set of Progressive Web App experiences which we’ll be indexing for Windows 10 customers to take for a spin over the coming weeks…Throughout this process, we’ll continue to vet our quality measures for PWAs, to make sure we’re providing a valuable, trustworthy, and delightful experience to our mutual customers on Windows devices… Once in the Store, the publisher will have the option of claiming their apps to take complete control of their Store presence.
We gave these PWAs published by Microsoft a try, and they’re nothing like the excellent new Twitter app. In short, they seem to be basic web wrappers that don’t leverage service workers and other PWA features. And despite Microsoft saying that PWAs would require the Windows 10 April 2018 update, all these apps require Windows 10 version 1507 or newer, and they also work on Windows 10 Mobile. However, it’s really not a good look when you see pop-ups asking you to download an Android app.
In the end, these “PWAs” don’t offer much value, and there are also some UI/UX issues worth mentioning:
We’re not sure it makes sense for Microsoft to continue pushing such low-quality apps to the Microsoft. It doesn’t look good at all, and despite Microsoft saying that publishers can take control of these apps to improve them, we doubt many will care.
What does this mean for native apps?
Native apps usually have the advantage of close-to-the-metal code, but while this is generally true for Win32 apps, it obviously doesn’t apply to all UWP apps. Indeed, some of Microsoft’s own UWP apps have terrible performance such as OneDrive or the Xbox app, so PWAs certainly make sense for some use cases.
However, PWAs being added to the Microsoft Store means that users can now find three types of apps over there: bridged desktop apps (such as Spotify or iTunes), UWP apps and PWAs. Microsoft is still investing in its UWP platform, but it’s hard to see developers ever embracing it in a big way.
Some of the “PWAs” published by Microsoft.
In a blog post titled “Microsoft and the UWP Enterprise Delusion,” Dean Chalk, a former Xamarin developer who recently switched to Google’s Flutter alternative summed up all the issues with Microsoft’s UWP platform:
UWP is a mobile-first platform. Its designed for small devices that are being used by people touching a screen with sausage-shaped fingers. Yes, you can have the app adapt to different screen sizes but its still the same issue — powerless and simplified, with low levels of information density — if that’s all you needed, then you’re going to build a web app instead anyway.
Chalk isn’t convinced that we’ll ever see any serious PWAs being developed either. “Web apps have been done where required, and PWA’s aren’t on any enterprise roadmap,” he explained, adding that Microsoft should rather focus on its strength, which is desktop software.
It’s probably too early to tell if developers will jump on the PWA bandwagon, but we already know that Microsoft has dedicated many Build 2018 sessions to the topic. One of them will feature the Twitter team explaining how they re-built their Windows app as PWA, leaving the previous UWP version behind.
In some way, it’s been weird to see Microsoft promote both the new Twitter PWA and iTunes finally coming to the Microsoft Store this past couple of days. iTunes is pretty much the type of app that could have become a web app a long time ago, but for some reason, Apple still thinks that having a desktop app for Windows remains valuable. The debate between web and native apps is still ongoing, and so far Microsoft wants to welcome all types of apps in its Store. Whether this can lead to more developers and Windows 10 users embracing the Microsoft Store remains to be seen.
Since the Windows 10 April 2018 Update is now generally available, it’s now time for Windows Insiders to check their Ring settings. Indeed, the first Redstone 5 builds should soon start rolling out to Fast Ring and Slow Ring Insiders, Dona Sarkar said yesterday.
#WindowsInsiders: if you don't want to start receiving RS5 builds, you should switch to Release Preview TODAY. Both WIP Fast and Slow will see RS5 builds….why, yes, SOON ™ pic.twitter.com/I9oHGDNIyq
— Dona Sarkar at #MBAS #a11y (@donasarkar) May 2, 2018
So if you do want to stay on Redstone 4 for the time being, you’re invited to switch to the Release Preview Ring. Because Sarkar wrote “today” in all caps, the first RS5 build could well roll out to Fast Ring Insiders as soon as this week. The last Redstone 5 build (17655) was released for Skip Ahead Insiders on April 25, a little more than a week ago. So far, the main new RS5 feature is Windows Sets, which adds a tabbed interface to all UWP apps as well as some legacy apps such as File Explorer.
If you’re planning to jump on the Redstone 5 bandwagon, we remind you that these first builds have their fair share of bugs. If you don’t want to deal with too many bugs, it’s probably best to choose the Slow Ring, even though this means you may have to wait a little bit more to get these first RS5 bits.
Every major Windows 10 update brings new features and improvements to the table. At the same time, new OS versions remove a series of features previously available on older versions. The Windows 10 April Update follows the same line, removing a bunch of features — to users’ disappointment. Microsoft explained that these features have been removed in order to add a better version.
The Redmond giant already published a list of all the features that are no longer supported in the Windows 10 April Update. In this post, we’ll list the most important ones.
Windows 10 April Update says goodbye to these features
Groove Music Pass — you can now use Spotify to play and stream music on Windows 10.
People – Suggestions no longer include unsaved contacts for non-Microsoft accounts.
Language control in the Control Panel is no longer available. Instead you can use the Settings app to change language preferences.
Microsoft removed HomeGroup from File Explorer, Control Panel and Troubleshoot.
The ‘Connect to suggested open hotspots‘ option has been removed from the Wi-Fi settings page.
You can no longer access Conversations in the People app when you’re offline. The Windows 10 April Update
lets you see new emails in the People app provided that you’re online and you signed in with your Office 365 account.
In Windows 10 version 1803, you may need to install XPS Viewer from Apps and Features in the Settings app after a clean installation.
Microsoft also revealed that it stopped developing a series of features, such as Phone Companion, and is planning to remove them in future updates. You can read more about Microsoft’s plans on its Support Page.
If you want to get stable 160-180 FPS when playing Overwatch, then this post is for you. The Windows 10 April Update finally fixes the annoying FPS drops and low performance issues that have been affecting the game for months. Without further ado, here are the steps to follow.
Fix Overwatch FPS and low performance problems
1. Install the Windows 10 April Update
You can download the latest Windows OS version from Microsoft’s official webpage or you can check for updates to see if there are any updates pending for your computer.
2. Download the latest graphics driver updates
Both Nvidia and AMD released dedicated driver versions for the latest Windows 10 OS.
However, if your computer is equipped with an Nvidia 1060 graphics card, you should stick to the driver before version 397.31 as this one can be pretty buggy for this particular graphics card type.
3. Customize your Nvidia/ AMD settings
You need to use a specific series of settings in order to get maximum performance on your Windows 10 computer. Turn off ambien occlussion, anisotropic filtering, anti-aliasing, DSR factors, keep the number of maximum pre-rendered frames to 1, enable single display performance mode, set the power management mode to maximum performance. As for the preferred refresh rate, set it to application-controlled. Turn off triple buffering and vertical syn as well. Allow texture filtering and set texture filtering quality to high performance.
If you want to customize only Overwatch, then you can select the ‘Program settings‘ tab. In this manner, you won’t be nerfing the graphics for everything on your Windows 10 computer.
While this solution won’t work for absolutely all Overwatch players, it is worth giving it a try. Many gamers confirmed it helped them to significantly increasethe FPS rate:
So far I have seen drastic improvements in fps I went from 80-90 fps during teamfights to 130+ fps in teamfights It feels great
Even with a lot of issues, OneDrive have had over the years (it succeeded SkyDrive after the renaming in 2013), it slowly becomes the essential part of Windows ecosystem. In Windows 10 even comes pre-installed and integrated within the system shell. However, a lot of bugs and inconsistencies followed by errors are sometimes hard to cope with. For example, the “This item might not exist or is no longer available” error when accessing synced files.
Allegedly, this error is hard to overcome and the only viable solution is the hotfix provided by Microsoft. On the other hand, this implies that cause isn’t on your side. In order to make sure that you’re into clear and OneDrive is indeed culpable, follow the solutions and workarounds we provided below.
How to address “This item might not exist or is no longer available” error in OneDrive
First things first. No matter how much this workaround seems obvious, the OneDrive has its own share of tantrums and bugs. And those can be, more times than not, resolved with a simple approach. This, of course, applies to the desktop client or the app. For the web-based client, you can try to sign out and sign in again.
Follow these instructions to Unlink your account and re-link it again:
Right-click on theOneDriveicon in the notification area and openSettings.
Select theAccounttab.
Click on theUnlink this PC button.
Sign in with your credentials.
Select the location of the OneDrive folder.
Another viable thing to do is to check your Recycle Bin on OneDrive. You might have archived some files by accident and they’re to be found there.
2: Clear browser’s cache for the online version (MarcAristotle workaround, as well)
When we consider covering OneDrive issues, our main concern is addressing free version issues. With that said, it seems that OneDrive for Bussines iteration has this issue occurring more frequently. In order to resolve this, as a premium customer of the premium service, we recommend sending the ticket to the responsible support team. On the other hand, there are two things you can do.
READ ALSO: The upcoming OneDrive UI focuses on new files
Both apply to the web-based version. Firstly, we suggest clearing the browser’s cache. It can be pilled-up and thus corrupting the preserved credentials and cookies. Here’s how to do it on Chrome and Edge:
Open Chrome or Edge and write down your passwords or back them up.
Press Ctrl + Shift + Delete to open the “Clear browsing data” dialog box.
OneDrive has a few downloadable troubleshooting tools. The sole presence of those tools speaks volumes about various issues OneDrive has. We give our insight on 3 respective downloadable tools, here. Their main role concerns diagnosticating issues, but they might resolve them, as well.
Since the two of the aforementioned tools are for OneDrive for Bussines, we’ll show you how to use the universal troubleshooter for OneDrive. Here’s how to use it in a few simple steps:
After the procedure is finished, try to log in and access your files.
If they’re still missing, you can send the report to Microsoft for a revaluation.
4: Check Network for issues
Since the OneDrive relies on the connection, making sure that your network is working as intended is of the utmost importance. Even the slightest issues with your bandwidth might provoke errors while loading the stored files. For that reason, make sure to check whether your connection is stable.
If there are any issues, we suggest trying out these steps, gradually progressing through the list:
Run network troubleshooter.
Restart your PC and router/modem.
Contact your network administrator.
Disable third-party firewall and VPN/Proxy solutions temporarily.
Update router’s firmware.
5: Reinstall the app/client and re-establish the sync folder
Reinstallation is another option. Depending on the way you access OneDrive cloud storage, you can reinstall the app (Microsoft Store) or desktop client (built-in desktop client). Moreover, we advise deleting and re-establishing the sync folder located on your local storage. This will, most of the time, restart the sync sequence and the “This item might not exist or is no longer available” error should be resolved.
Double-click theOneDriveSetup.exe file and run the installer.
After the installation completes, log in and look for changes.
6: Update Windows 10
Finally, if all previous resolutions fell short, there are only so many things you can do. You can update your Windows 10, for starters. When this error firstly emerged it affected a lot of users. In response, Microsoft provided a hotfix which dealt with the problem. Besides that, sending a ticket to Microsoft might help. There’s the Live support and we recommend using your end-user privileges and ask for the resolution.
Those who have been keeping an eye out for Microsoft’s Windows 10 April Update know that the update was promised a long time ago and since then, Microsoft has been hard at work adding polishing the OS. The update’s release has taken so long because it is actually a huge patch that incorporates updates and new features across pretty much every aspect of Windows 10. Moreover, some unexpected BSOD errors ruined Microsoft’s release plans forcing the company to delay the update.
That being said, the wait is finally over. You can now upgrade to the Windows 10 April Update with the help of Microsoft’s Update Assistant. We’re sure that many Windows fans have eagerly waited for this new update as it’s one of the most anticipated updates ever released by Microsoft.
However, certain preparations need to be made before installing the Windows 10 April Update. While these are not mandatory, performing them will help tremendously both during and after installation. Here are the top things to do before upgrading to the Windows 10 April Update.
Checklist for installing the Windows 10 April Update
1. Backup and clean your computer
Both the update process as well as its results will be much more pleasant to look at if there is a little bit of a spring cleaning done beforehand. As such, delete any unnecessary files because they may slow down the upgrade process.
Make sure you have enough free space on your hard drive to install the Windows 10 April Update. Microsoft’s Update Assistant will first check the available free space, but you can always give the tool a helping hand by deleting unnecessary files and programs. Also, don’t forget to clear your browser’s cookies and cache.
Additionally, backup all the important files stored on your computer. In this manner, you’ll avoid being subject to various errors that might just delete important documents or files.
RELATED: PC won’t wake up from sleep after Windows 10 April Update install [FIX]
2. Run a full system scan
Make sure your antivirus is up to date and run a full system scan to detect and remove any malware and virus programs that may have snuck into your computer.
3. Update your OS and programs
It is also very important that you install the latest Windows updates on your computer. Additionally, refresh your drivers and install the latest updates for all your programs.
4. Keep product keys and software licenses at hand
Should your computer fail to activate some programs after the upgrade, you’ll need the product keys or licenses to enable them again. Print this information so you can always have it in hand in case something goes wrong.
5. Create recovery media
Should your computer become completely unresponsive after the upgrade, having recovery media handy is a real treasure. For more information on how to create a recovery drive, check out Microsoft’s Support page.
6. Check system requirements
Last but not least, make sure that your computer meets the system requirements necessary to run the OS:
Processor: 1 GHz or faster processor or SoC
RAM: 1 GB for 32-bit or 2 GB for 64-bit
Hard disk space: 16 GB for 32-bit OS 20 GB for 64-bit OS
Graphics card: DirectX 9 or later with WDDM 1.0 driver
The official Microsoft Developer blog post was updated to confirm the release date of the Windows 10 April Update. The document shares a clear view of Microsoft’s plans for the release of the Redmont-based technology.
Windows 10 Redstone 4 is now available for download
Microsoft has provided an overview of the new operating system and now updated the end of support date for Redstone 4: October 2019. Since we know the company’s policy for the support to last 18 months, we can close the bets now and get ready for the Windows 10 April Update.
Update: Microsoft delayed the end of support until November 2019. Check out this list below of Windows 10 versions always updated.
The official release date of the Windows 10 April Update remained shrouded in mystery for a long time which caused a lot of stir among users:
I hope the Release Date is 05.04.2018 for Spring Creators Update, Windows 10 everytime in Dependency with .NET Framework. Now this Framework (4.7.2) is Testphase, is that right ????.
Hi Christian, we don’t have a final release date for the 1803 version yet but it’s probably around this date. Framework 4.7.2 will be most likely be released with RS4.
Bringing developers the opportunity to create engaging experiences with apps they build using AI and ML, Windows 10 is improving with more features.
The headlines in this edition are about artificial intelligence (AI) and machine learning (ML). Giving a heads-up to developers, the new platform will have the support to incorporate AI and ML into their apps.
Windows Timeline is included in the OS and allows you to sync your work seamlessly across multiple devices and also keep track of all the recent apps.
For sure, many more exciting new features will come with the Windows 10 April Update . Above all, many of us are waiting for new privacy settings to keep our private data private and trust the company’s transparency about user data collection.
Well, despite all the rumors and inside information regarding the launch date of the Windows 10 April Update, Microsoft changed its mind more than once. Many expected the tech giant to release Windows 10 version 1803 on April, 10 but apparently something came up and Microsoft decided to wait a little bit longer before pushing the red button.
The Windows 10 April Update is now available for download, and the company already rolled out the first ever cumulative update for the new OS version. Update KB4100375 takes Windows 10 to build version 17133.73.
Windows Insiders running build 17133 in the Fast, Slow, and Release Preview rings were the first to download this cumulative update, but now all users can download and install KB4100375 on their machines.
Sometimes Internet Explorer failed to identify custom controls. This bug should no longer affect SCU users.
Security updates to Internet Explorer, Microsoft Edge, Microsoft scripting engine, Windows kernel, Microsoft graphics component, Windows Server, Windows cryptography, and Windows datacenter networking.
You can automatically download KB4100375 via Windows Update. Go to Settings > Update & Security > Windows Update > click on the ‘Check for updates‘ button. Your computer will then download and install all the available updates.
Update KB4100375 has been available for all Windows 10 April Update users immediately after Microsoft rolled out the new OS version. Fortunately, Dona Sarkar’s team managed to fix all the major bugs that blocked the initial release.
If you already installed the first Windows 10 April Update patch on your machine, use the comments below to tell us more about your experience.
Meanwhile, you can check out the guides listed below to learn how you can install the latest Windows 10 OS version on your computer:
The Command Prompt is one of the hallmark features of the Windows operating system, but for average and novice users, it can sometimes be too technical to understand. Well, Microsoft recently released a Windows Command Reference, which details over 250 Windows console commands (via BleepingComputer.)
The reference guide can be found here for download on Microsoft’s official website. It can prove to be pretty useful for IT Pros and even those looking to learn more about Windows Commands. It lists all commands from A-Z in a total of 948 pages, but also includes step-by-step descriptions of each command and even examples on how to use commands in any given environment.
Feel free to check it out for yourself, as the guide might refresh your memory, or leave you with something that you never knew about before. Have you ever used Command Prompt in Windows 10 to accomplish simple tasks? Let us know your thoughts in the comments below.
Red Dead Redemption 2 is definitely one of the most anticipated games of 2018, and the talented folks over at Rockstar Games know how to capture gamer’s attention. A brand new trailer for the Western-themed action-adventure game has been published today, and it already crossed 345,000 views at the time of this writing.
The action of Red Dead Redemption 2 is set in 1899 in America, and the game will be a prequel to the 2010 title Red Dead Redemption. This new episode will focus on outlaw Arthur Morgan, a member of the Dutch van der Linde gang who is forced to flee after a robbery goes wrong in the western town of Blackwater.
Red Dead Redemption 2 was originally due for release in the second half of 2017, but the game has since been delayed to October 26, 2018. As a result, the game will likely have to compete with Call of Duty: Black Ops IV and other AAA games to be released this Fall. Rockstar Games already released one of the most popular games of all time with GTA V, and it remains to be seen if Red Dead Redemption 2 could reach the same level of momentum.
For now though, we remind you that the Xbox 360 version of Red Dead Redemption is now enhanced for the Xbox One X, so it’s a pretty good time to revisit the first episode before playing the prequel later this year.