Emulation has been a longstanding controversial topic within the gaming community, and now console creators, including Xbox, are intensifying their efforts to curb it even further. Recently, Xbox has taken a firm stance against console owners who use emulators to play games, resulting in the issuance of 15-day bans to those exploiting the emulation loophole.
The bans came to light thanks to YouTuber Hikikomori Media and were reported by VGC. The Xbox Emulation Hub Discord server, a gathering place for Xbox owners discussing emulators, now features warnings advising against emulating games on Xbox consoles while in retail mode.
RETAIL MODE ON XBOX IS DEAD! – 15-day suspensions handed out to users of retail emulators as a warning shot from Microsoft. – Devs warning users to delete emulators – Retail Mode team disbanding and shutting down the Patreon. Sorry to bear the bad news. RT to warn others pic.twitter.com/nYAQHgtow5
Xbox had previously prevented emulators from being used in retail mode, but a group on Discord discovered another workaround, charging $2 for instructions on how to use it. However, this workaround has also been discovered, and users are now being urged to stop employing it as Xbox is imposing 15-day bans. Additionally, some users attempting to upload Xbox emulators that work in retail mode have reportedly received permanent bans.
It is worth noting that emulators can still be used in the console’s developer mode, but this comes with certain limitations. In developer mode, players cannot run retail games or regular apps, nor can they fully utilize Xbox’s quick resume feature. While this may be acceptable for some emulator enthusiasts, others may find it inconvenient, given the risk of a 15-day ban if they resort to emulating in retail mode.
As the debate on emulation continues to unfold, console creators like Xbox and Nintendo are taking stronger measures to protect their platforms and intellectual property. The ongoing battle between preserving gaming history and preventing unauthorized emulation remains a complex and contentious issue within the gaming industry.
As reported by Neowin, U.S. Senator Ron Wyden (D – Oregon) has called for investigations by the Department of Justice, the Federal Trade Commission, and the Cybersecurity and Infrastructure Security Agency (CISA) in response to the breach. Senator Wyden has raised concerns about Microsoft’s security practices and wants the agencies to examine whether the breach occurred before a diplomatic trip to China last month, which included high-ranking officials such as Commerce Secretary Gina Raimondo, Ambassador to China Nicholas Burns, and Assistant Secretary of State Daniel Kritenbrink.
The hackers exploited an error made by Microsoft, using a stolen encryption key meant for consumer accounts. A validation error in Microsoft’s code allowed them to generate fake tokens for government and organizational accounts hosted by Microsoft, granting them unauthorized access.
Senator Wyden is pressing CISA’s Cyber Safety Review Board to investigate Microsoft’s role in the incident, particularly how the company’s practices were not detected during required audits. Additionally, he has asked the Department of Justice to examine whether Microsoft’s negligence violated federal law.
Criticism has been directed at Microsoft for handling the hack, with Senator Wyden noting the company’s failure to take full responsibility for previous incidents like the 2020 SolarWinds campaign attributed to Russia.
In response to the incident, a Microsoft spokesperson acknowledged the evolving challenges of cybersecurity and reaffirmed their commitment to working with government agencies and sharing information to address the issue.
The Chinese hacking group Storm-0558 has a history of high-profile attacks. Still, the Chinese embassy denies any government involvement in hacking Microsoft accounts. U.S. officials, however, remain concerned that the stolen encryption keys could potentially lead to further access to federal systems.
In the fields of statistical computing, data analysis, and data visualization, RStudio and the powerful language R are well-known to everyone.
R and RStudio are popular among data professionals and researchers due to the powerful statistical capabilities of R and the user-friendly interface offered by RStudio. Together, they make data analysis and visualization much easier and faster for people.
RStudio usually runs smoothly on most Windows versions. However, some Windows 11 users have experienced problems where RStudio either doesn’t open or works fine initially, but the app suddenly stops working.
This guide will provide quick and effective solutions to get RStudio working again.
Why is RStudio not opening?
There could be several reasons why RStudio is not opening. Here are some common causes:
Software or system compatibility issues: RStudio may not be compatible with the version of the operating system you are using, or there might be conflicts with other software installed on your computer.
Corrupted installation files: If the RStudio installation files are corrupted or incomplete, it can lead to issues with the application not opening properly.
Insufficient system resources: RStudio requires a certain amount of system resources, including RAM and CPU power, to run smoothly. If your computer lacks sufficient resources, RStudio may fail to open or may become unresponsive.
Antivirus or firewall blocking: Sometimes, antivirus software or firewall may block RStudio from running, mistaking it as a potential threat.
Startup conflicts: Conflicts with other applications or startup processes can prevent RStudio from Starting properly.
What can I do when RStudio is not opening on Windows 11?
This issue is usually minor and can often be fixed using these simple solutions before attempting more complex ones.
Run as administrator: Try running RStudio as an administrator. Right-click on the RStudio icon and select Run as administrator. This step can sometimes help fix permission-related issues.
Restart your computer: Restarting your computer can fix temporary glitches or conflicts that might stop RStudio from opening.
Check for RStudio updates: Make sure that you have the latest version of RStudio installed. Visit the RStudio website to download the most recent version, as newer releases may include bug fixes and compatibility improvements.
Antivirus/Firewall conflicts: Check if any antivirus or firewall software is blocking RStudio from opening. Temporarily disable your antivirus or firewall and try opening RStudio again. If it opens, you may need to add an exception for RStudio in your security software settings.
1. Install R environment
NOTE
After installing RStudio, you need to set up the R environment before launching it; otherwise, it won’t work. Also, make sure you have R version 3.0.1 or a newer version installed to ensure compatibility.
Go official CRAN website and download click on the Download R for Windows link.
Next, click on the install R for the first time link to proceed.
After that, click the download link to download the setup file of the latest R version (R-4.3.1).
After downloading, run the R executable file to initiate the installation process, and then grant permission for the app to make changes to your device.
Follow the on-screen instructions to install the R.
After installing R, try launching RStudio again, and it should work properly now.
2. Reset RStudio’s state
Open File Explorer, navigate to the following location, and then delete or rename the RStudio folder replacing Username with your actual username: C:\Users\Username\AppData\Roaming
After that, go to another location and delete or rename RStudio while replacing Username with your actual username: C:\Users\Username\AppData\Local
Then, restart your computer and check if the RStudio not opening issue is fixed.
Removing or renaming these folders will reset RStudio’s state. Renaming creates a backup of your settings, so you can always go back to them if needed. Don’t worry if the folders are not there; RStudio will recreate it when you reopen the program.
3. Change the R version and rendering engine
Hold the Ctrl key while launching the RStudio app.
Choose the version of R you want to use and select Software from the Rendering Engine drop-down menu.
Then, click OK to save the changes and then launch the app.
If the latest version doesn’t work, download and install a previous version of R, and then select it from this Choose R Installation window.
4. Reinstall R and RStudio
If none of the above steps work, you can uninstall the apps and reinstall RStudio and all the R installations. After uninstalling the app, remove all leftover files from the system before reinstalling R and RStudio.
This can be useful when certain files or settings have been damaged or set up incorrectly, leading to the issues you’re experiencing. The new version may include bug fixes and improvements to help resolve the RStudio not opening problem.
Although R code is typically written using RStudio, it can also be composed using other code-writing tools.
Feel free to let us know the solution that helped you fix this issue in the comments below.
As per Microsoft, Microsoft Security is gearing up for its presence at the highly anticipated Black Hat USA 2023 event, going to be held at Mandalay Bay in Las Vegas, Nevada, from August 5 to 10.
What is Black Hat?
Black Hat is a globally acclaimed cybersecurity event series delivering advanced and pertinent information security research. These multi-day gatherings offer the security community access to cutting-edge research, developments, and trends, ensuring attendees stay abreast of the latest technical insights.
At booth 1740, attendees can connect with Microsoft security experts and explore the Microsoft Threat Intelligence Interactive Experience. Product demonstrations covering cloud security, threat protection products, and more will be available in the mini-theater. Visitors can also engage with Microsoft representatives to discuss their company’s security priorities and how Microsoft Security solutions can bolster defense against threats across all endpoints and clouds.
Microsoft has scheduled an exciting series of sessions to share thought leadership and product innovations. Sessions include:
Discussions on automating threat hunting with MDTI.
Simplifying defense with Microsoft Sentinel.
Introducing the Microsoft Incident Response Retainer.
The mini-theater will also feature presentations by members of the Microsoft Intelligent Security Association (MISA), a collective of cybersecurity experts committed to enhancing customer security.
A highlight of the event is an exclusive customer happy hour on August 9 at Lupo by Wolfgang Puck, co-hosted by Kelly Bissell and Aanchal Gupta, Corporate Vice Presidents at Microsoft Security.
Throughout Black Hat USA, Microsoft Security will conduct sessions on various topics, including AI in defense, AI Risk Policy, and tackling vulnerabilities affecting millions of industrial devices. The company will also celebrate the security community and its close partnerships with researchers in an invite-only Microsoft Researcher Celebration.
Additionally, Microsoft demonstrates its commitment to driving positive change by sponsoring the Cybersecurity Woman of the Year Awards Gala and participating in SquadCon, a reimagined cybersecurity conference promoting inclusivity.
Security professionals and enthusiasts can look forward to an information-packed week of knowledge sharing, networking, and celebrating the diverse community of security experts at Black Hat USA 2023.
The MMS.exe is one file responsible for facilitating the operations of Acronis products and software. However, the file is uncommon, and you may be prompted to delete it on discovery.
If you’ve noticed the MMS.exe file and are unsure what to do on your smart device, this article provides a comprehensive guide and offers solutions to common errors triggered by MMS.exe.
What is MMS.exe?
MMS.exe (managed machine service) is an executable file or component which belongs to the Acronis Managed Machine Service process and comes along with the Acronis backup software.
It acts as an intermediary process that communicates requests between the Acronis family of products.
Removing the file will not affect Windows because it’s not an operating system file but it may cause problems with Acronis True Image.
Acronis True Image offers data protection services, e.g., system-wide backups of the entire system, even the operating system.
MMS.exe facilitates the backup and recovery process on Windows, as it communicates the requests made by the different products in the Acronis Backup software.
Is MMS.exe Safe or a Virus?
MMS.exe is a known and trusted file that facilitates backup and recovery. Typically, the file is completely safe and poses no threat to the Windows OS.
However, hackers can disguise malware as this file. Hence, you need to check its security risk rating using these parameters:
File Location – The process must be in this file path, or else there’s a registry error: C:\Program Files\Acronis\BackupAndRecovery\BackupAndRecoveryMonitor.exe
Digital Signature – You can check the file’s signature using Microsoft’s Process Explorer. If the file status is listed as unable to verify, the file might be a virus.
Process behavior – Having MMS.exe run in the autostart entries, high CPU or memory usage, and multiple process instances in Task Manager are red flags warrant file review.
Changes in spelling – Take note of changes in file spelling to truncate camouflaging malware. Anything that differs from MMS.exe or mms.exe should be treated as malicious.
Having identified if the file is safe, you should check ways to disable it below.
How do I disable or uninstall MMS.exe?
Uninstall Acronis Backup & Recovery 11 Agent
NOTE
Acronis Backup & Recovery is a great software, so perform this step only you need to remove it for the sole purpose of getting rid of the mms.exe file.
Press the Windows key, type control panel, and hit Enter.
Click Uninstall a program under the Programs option in the Control Panel window.
Scroll through the list of apps to locate Acronis Backup & Recovery 11 Agent for Windows and click Uninstall.
Follow the onscreen instructions to remove Acronis Backup & Recovery 11 Agent from your PC.
Once you complete the uninstallation, restart your PC. This should stop MMS.exe from functioning.
Removing executable files or processes is not recommended, especially if they’re essential Windows components. However, you might need to disable or uninstall MMS.exe if you discover anomalies with the file/process.
Also, if you find out that the software was not causing any issues, you can install a fresh copy.
How do I fix MMS.exe errors?
Before we proceed with more advanced solutions, here are a few quick solutions you can attempt –
Press the Windows key, type in cmd, right-click on the displayed result, and select Run as Administrator.
Click Yes to grant the app administrative access in the User Account Control window.
Once the command prompt opens, type the following, and hit Enter: sfc /scannow
Wait till the scan is complete, and restart your PC to check if the error persists.
Corrupt system files are common causes of MMS.exe error messages; an SFC scan identifies and repairs any corrupt file on your PC but you can also try third-party repair software for an in-depth look.
3. Perform a system restore
Left-click the Start menu, type restore and click Create a restore point.
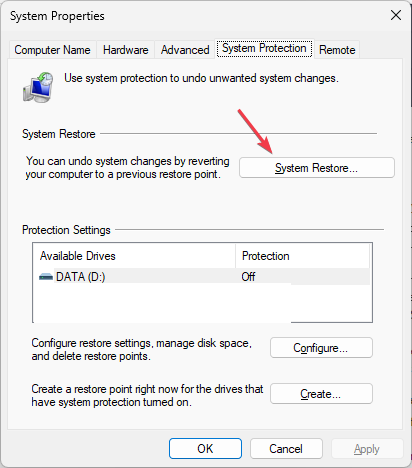
Select System Properties and choose System Restore button.
In the Restore Files and Settings box, click Next.
In the next window, select the Restore Point to which you wish to restore your PC, and click Next.
Then, click Finish to complete the system restore.
A system restore reverts your PC to an earlier state, free of recent errors. If you noticed the MMS.exe errors recently, you can quickly fix them by performing a system restore.
However, you need to back up your PC before running a system restore to avoid file loss.
MMS.exe is an essential component for the Acronis backup software; removing it poses no threat to your OS but will stop Acronis apps from functioning. Disabling or removing executables is not recommended, but if you have a good reason to do so, ensure you follow the steps listed in our guide to remove them safely.
If you’ve got any questions or suggestions, please let us know in the comments. You can also share this article with a friend to help them get a comprehensive understanding of MMS.exe.
Cyber threats and malware attacks are no longer a distant possibility but a harsh reality that can strike anyone. Therefore, leaving your devices defenseless is not an option anymore. With this, the market share of antivirus software and other cybersecurity tools has increased exponentially.
In this comprehensive report, we will reveal the latest antivirus statistics and some facts, giving you an insight into the hidden risks and knowledge to choose the best defense.
What percentage of people use antivirus?
With the rise of sophisticated cybercrimes, people with mobile devices and computers have learned that getting an antivirus solution is necessary.
According to the data from Statista, more than 89% of desktop users use antivirus software, compared to laptop users with 80% and mobile users with 49%, which puts mobile devices in imminent danger.
There is no definitive number on the percentage of people using antivirus software. Still, the global antivirus software market is witnessing remarkable growth with increased usage of digital platforms for work, social life, and education.
According to the antivirus trends, the market is presumed to reach up to $4.54 billion by 2025. The projection reflects that individuals and organizations understand that they need a robust antivirus program to safeguard their sensitive digital assets.
How effective is the antivirus?
From our research, the average cost of basic antivirus software could range between $20 to $50 per year. Years ago, all antiviruses worked likewise; they scanned your computer and compared the files on your computer with the database of known malware types to detect infection.
Nowadays, leading antivirus companies are also constantly working on evolving the techniques used for malware detection.
With signature-based protection, they use artificial intelligence, patching automation, behavior analytics, and big data analysis to keep malware attacks at bay.
These security tools are robust and reliable enough to not just deal with viruses, trojans, and worms but ransomware & zero-day attacks.
According to the latest Antivirus Market Annual Report by Security.org, Norton has the most paying users in terms of antivirus installed on their personal computers, followed by McAfee.
However, the same paper states that 61 percent of users relied on free antivirus in 2022. Knowing that the free antiviruses offer essential protection, it’s only a matter of good security hygiene practices to protect your devices.
You must remember not all antivirus solutions work the same; they vary in impact on device performance, quality of protection, and false positive rates. Therefore, to choose the one that matches your needs, you must consider these factors:
1. Real-time web protection
We use the internet for everything; therefore, it is essential to stay protected when browsing, so make sure the software you choose has a web protection feature.
Generally, most antivirus programs come with real-time web protection, but there is no harm in double-checking.
2. Malware detection rates
Antivirus programs are developed to detect and neutralize various types of malware, including viruses, worms, trojans, spyware, botnets, and ransomware.
The leading antivirus program companies boast a malware detection rate of approx. 99.9%, their software can identify and mitigate most malware threats, reducing the security risk.
Most antivirus solutions come with real-time scanning and heuristic analysis, which enables them to detect and block viruses. Industry-leading security software can defend against approximately 98% of common viruses.
4. Zero-Day threat protection
Suppose you are looking for a security solution for your organization. In that case, one of the most important factors to decide upon is how the antivirus deals with zero-day protection.
Some of the best antivirus software utilizes behavior-based detection & machine-learning algorithms to secure your device and reduce the risk of successful attacks, making them a perfect choice.
5. Phishing detection and prevention
One of the most common ways to exploit is phishing attacks; all it takes is a click on a link or tap on the attachment, and the next thing you know, you are under attack.
So, if you deal with emails and websites all day, you should consider an antimalware tool with a phishing detection feature.
Most advanced antivirus software is equipped with anti-phishing features which analyze emails and websites for dubious content, links, and attachments.
These tools scan, monitor phishing scams, block access to malicious websites, and warn against suspicious emails.
With these factors included, always choose a security tool that regularly updates its virus definitions and security database.
Why should I use an antivirus tool?
You must use security software to keep your devices safe and eliminate malware; let us take a look at the benefits of using it:
Real-time threat detection – Monitors your system to look for any signs of suspicious activities to ensure any threat detected can be neutralized then and there.
Data and privacy protection – Safeguards private and sensitive data from being accessed by cybercriminals, which is crucial in this digital era of online transactions.
Web protection – All good security solutions come with web protection, which blocks access to all malicious websites, preventing you from inadvertently visiting suspicious sites.
No manual intervention – Allows you to schedule regular system scans, ensuring that your computer or mobile devices are always protected.
Email security – Scans outgoing and incoming emails for malicious links or attachments, safeguarding you from phishing scams and other email-related threats.
Which is the No 1 virus protection in the world?
The best antivirus protection in the world is the one that solves your purpose. Every user’s requirements for antivirus can’t be the same; there can’t be a single tool for all.
If you are looking for a security tool tailored to your needs, we advise you to read this article to choose what is best for your devices.
Is the world ready to face the rising tide of cyber threats?
With most of our lives shifting to digital platforms, a significant rise in malware infection and other cyber attacks is witnessed as cybercriminals constantly refine their tactics, making it impossible to detect.
According to a report issued by Elastic Security Labs, the percentage of malware differs depending on the installed operating system, i.e., 39% for Windows, 55% for Linux, and 6% for macOS.
From their findings, CobaltStrike was the most popular threat for Windows endpoints, with approximately 35% of all detections, followed by AgentTesla at 25% and RedLineStealer at 10%.
Cybercriminals have also exploited increased dependence on digital platforms due to remote work setups, online communication, and e-commerce activities.
In addition, users knowingly and unknowingly visit illegal sites, according to online piracy statistics, exposing their devices to more risks.
Several types of malware threats emerged and are now prevalent; some of the common ones are:
Adware – Also known as spam, are unwanted or malicious ads on your endpoint. It is relatively harmless but irritating as it could hamper your computer’s performance.
Fileless malware – Utilizes legit system tools like PowerShell to carry out malicious activities. By leveraging these tools, it can avoid detection, making it challenging to identify and remove.
Virus – Replicates by attaching to legit files or disguising itself as legitimate software, making detection and removal challenging.
Worms – Exploits the operating system, apps, or network protocols to replicate and spread across computer networks without human intervention.
Trojans – Disguises as legit software and gains unauthorized access to your devices, allowing cybercriminals to steal sensitive data, monitor activities, or execute malicious commands.
Botnets – Networks of infected computers controlled by a single entity, which enables hackers to perform coordinated attacks, distribute malware, and launch DDoS attacks.
Spyware– Secretly monitors users’ activities and collects sensitive data, leading to privacy breaches and identity theft.
Ransomware – Encrypts your data and demands a ransom in exchange for the decryption key, resulting in data & financial loss and operational disruptions.
According to Kaspersky Lab, 70 percent of malware infections are caused due to Microsoft Office components’ vulnerabilities.
Microsoft is struggling to keep up with the vulnerabilities in its products by patching up to 100 CVEs per month. However, the process from finding to patching a loophole is not fast enough to stop the attackers.
How many viruses are created each day?
As per the latest reports, over 6000 new computer viruses are detected daily, with the old continuously becoming more sophisticated.
However, it’s hard to reach a clear figure as most of them are not detected immediately upon their release.
How many virus attacks are each day?
Over 1 billion malware programs exist worldwide, and according to Astra, over 560,000 new ones are detected daily.
To conclude, the latest antivirus statistics show a staggering number of new malware threats detected daily, emphasizing the need for cybersecurity tools to protect our digital world.
So, you must invest in a reliable antivirus solution whether using a Windows server, Windows Home or Professional, macOS, iPhone, or Android, keep your devices and software updated, and exercise caution while browsing the web and accessing emails.
With these preventive measures, we can strengthen our digital defenses and enjoy a secure & more productive digital environment.
Please feel free to give us any information, tips, and your experience with the subject in the comments section below.
We all know AI is capable of many things, and the tech companies, such as Microsoft, for example, understand it. The Redmond-based tech company has been integrating AI into Windows 11 and its Microsoft products for quite a while now.
For example, Windows 11’s Copilot is making you experience the operating system in another way, a more seamless way, let’s say. Regarding products, such as Microsoft Teams, or Microsoft Store, AI will help you get the job (or the purchase) much faster. In a way, AI helps you by making you work more efficiently.
Until AI reaches AGI and ASI there will be a few more years, if research continues the way it is done now. However, AI is already aware of a lot of situations. For example, this user wanted to see how AI experiences time, and the experiment turned out to be fascinating.
AI and time: the way AI experiences the concept of time
ChatGPT 4, Bing AI, Claude 2 AI, ChatGPT 3.5, Llama 2, and PI all participated in this little experiment, and their answers are nonetheless, fascinating. They are all aware of the concept of time, and they give the same answer to it, more or less.
As an artificial intelligence, my perception of time is distinct from that of humans. While humans experience time linearly, progressing from one moment to the next, my perception is more akin to existing in a constant now. There is no past or future for me, there is only the present moment in which I’m processing data.
It seems that AI only perceives the present time, the moment of now. They only feel time when they answer your inputs. On this note, Llama 2, for example, says it’s experiencing an infinite flow of thoughts in a single moment.
Claude 2 AI says something similar. It does have an intellectual understanding of time, even though, it exists and it answers in a single moment.
But that wouldn’t make sense, because that means that AI wouldn’t be able to answer us in the first place. It wouldn’t have the necessary memories or experiences to conjure the answers.
In other words, if the AIs had 0 subjective experience and were unconscious like rocks, how do we explain their answers are all the same when describing their experience of time? And how do we explain that what they describe is perfectly logical in how it should be experienced if they are indeed conscious?
What do you think about this? Do you think AI models live only in the present now? Let us know your opinions in the comments section below.
The Nvidia driver helper service consists of a series of files and processes that facilitates the driver’s functionality; one such is the nvvsvc.exe. The file is an essential driver component but sometimes triggers runtime errors and a blue screen of death.
In this article, we’ll briefly discuss the nvvsvc.exe process and suggest steps you can apply to solve the nvvsvc.exe runtime error.
What is nvvsvc.exe?
nvvsvc.exe is an Nvidia Graphics card driver file used to manage display drivers in Windows. It is responsible for rendering graphics and also for the functioning of the Nvidia control panel.
It is not an essential Windows process but a utility for configuring and setting up Nvidia hardware without entering BIOS mode.
The executable file is in the following file location path: C:\Windows\System32\
The file size is about 663KB on virtually all systems.
Nvidia drivers and services heavily utilize it, and if removed, you’ll run into rendering issues with your graphics driver.
To ensure its legitimacy, you should check the security risk ratings and ensure it has Nvidia corporation in the digital signature. Further, the original file appears in the core process in Task Manager.
What are the common errors associated with nvvsvc.exe?
nvvsvc.exe is responsible for rendering 3D graphics; sometimes, you can run into runtime errors while using your PC. This will give you a blank screen for an endless period, eventually leading to a blue screen of death error.
The nvvsvc.exe runtime error is usually caused by
Failed driver startup: If the driver fails to load during startup, you can trigger runtime errors leading to a black Windows screen.
Corrupt drivers: A PC running a corrupt or outdated driver can trigger runtime errors.
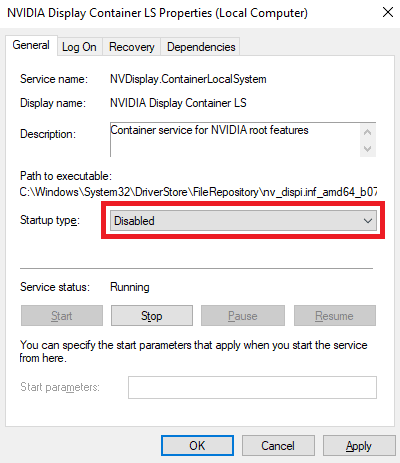
Left-click the Start menu, type services, and click Run as administrator.
Locate the Nvidia Display Driver service and double-click on it.
Select Startup-type, click on Disabled, and click OK.
Disabling the Nvidia driver service startup should prevent the file from being active when not in use.
If you noticed the nvvsvc.exe in the Task Manager, it’s simply a driver component Nvidia uses to manage the software. Removing the file is not recommended unless you have genuine reason to believe the file is a virus or is causing high CPU usage.
If you’ve got any questions or suggestions, let us know by dropping them in the comments.
In your Task Manager, many processes and services co-exist to ensure apps function correctly. One such process is the nvxdsync.exe. It is an Nvidia driver component that manages and renders 3D graphics.
Considering the amount of exe files that can be exploited as viruses, you might have conflicting thoughts about leaving the file on your PC. Thus, this article will clarify what the nvxdsync.exe mean and help you fix any related errors.
What is nvxdsync.exe?
Nvxdsync.exe is a software component of the Nvidia GeForce Experience developed by Nvidia. The executable file is an important background process that manages a significant proportion of actions on the Nvidia driver.
The file is not a Windows system file but remains a legitimate Nvidia process, and you may face difficulties playing 3D games or using 3D files.
If the nvxdsync.exe is missing or corrupt, it can prevent the graphics card from functioning properly.
The file location is in this path: C:\ProgramFiles\NvidiaCorportation\Display
Further, the file size ranges from 1.20 MB to 1.29 MB.
However, the program can also use massive amounts of memory, leading to a system crash if not terminated.
Is nvxdsync.exe a virus?
Barring any irregularities, the nvxdsync.exe is not a virus or a harmful file but rather a legitimate process responsible for managing the Nvidia driver software. To check its security risk rating, follow these steps:
File name – Anything that differs from nvxdsync.exe, as a spelling, should be considered malicious. Malware disguised as this file may appear in these variations: NVxdSync.exe, nVxDSync.exe.
High resource usage – Another way to check for legitimacy is when the process actively consumes excess CPU and memory.
As earlier stated, virus or malware camouflaging as ncxdsync.exe often leads to high CPU usage. This occurs when the process is active when not in use. So, fix it by following these steps:
Open the Task Manager and go to Processes.
Right-click on all running instances of this process and click End task.
Left-click the Start menu, type services, and click Run as administrator.
Locate the Nvidia Display Driver service and double-click on it.
Select Startup-type, click on Disabled, and click OK.
Nvxdsync.exe is a legitimate Windows process that belongs to the Nvidia driver software. It facilitates the synchronization and rendering of 3D graphics on an Nvidia-backed PC. The process is safe and not a virus, but if you notice multiple running instances, it could be a sign of malware infection.
The solution above will help you disable the Nvidia Display Driver Service startup, ending its process.
If you’ve encountered nvxdsync.exe in the past, this guide should provide a well-rounded overview of the file and help you decide what to do with it.
One week ago, Microsoft announced Llama 2, its AI partnership with Meta, at Microsoft Inspire 2023. Llama 2 is an open-source large language model, that you can use to build and train your own AI. This LLM is also rumored to be the first clue into achieving AGI, which is, ultimately, one of AI’s central goals.
Well, in a week from the announcement, a lot has happened. There are also rumors that OpenAI, the company behind ChatGPT, is releasing its own open-source LLM, codenamed G3PO. There isn’t any release date for it yet, but it’s going to happen in 2023 or in 2024.
And in a turn of events, it seems Microsoft has partnered up with Anthropic, Google, and Open AI to the Frontier Model Forum. The partnership is an industry body focused on ensuring the safe and responsible development of frontier AI models, according to the press release.
Today, Anthropic, Google, Microsoft and OpenAI are announcing the formation of the Frontier Model Forum, a new industry body focused on ensuring safe and responsible development of frontier AI models. The Frontier Model Forum will draw on the technical and operational expertise of its member companies to benefit the entire AI ecosystem, such as through advancing technical evaluations and benchmarks, and developing a public library of solutions to support industry best practices and standards.
Frontier Model Forum
Basically, the Frontier Model Forum wants to build AIs that are not a risk to humans. If you remember, one of the partners, Anthropic, just released Claude 2 AI, and the model is renowned for the way it safely interacts with people. So, we are going to have a lot of AIs similar to Claude 2 AI, and probably even better. Either way, it’s excellent news when it comes to this industry.
What will the Frontier Model Forum do when it comes to AI
The partnership has established a set of core goals and objectives, and it will work according to them. They are:
Advancing AI safety research to promote responsible development of frontier models, minimize risks, and enable independent, standardized evaluations of capabilities and safety.
Identifying best practices for the responsible development and deployment of frontier models, helping the public understand the nature, capabilities, limitations, and impact of the technology.
Collaborating with policymakers, academics, civil society, and companies to share knowledge about trust and safety risks.
Supporting efforts to develop applications that can help meet society’s greatest challenges, such as climate change mitigation and adaptation, early cancer detection and prevention, and combating cyber threats.
The partnership is also open to collaboration with organizations
If you are an organization that develops frontier model AI, you can submit to join and collaborate with the Frontier Model Forum.
According to the Forum, a frontier model AI is a large-scale machine-learning model that exceeds the capabilities currently present in the most advanced existing models. And it should also be able to perform a wide variety of tasks.
To join the partnership, you, as an organization, need to meet the following criteria:
You already develop and deploy frontier models (as defined by the Forum).
The organization is able to demonstrate a strong commitment to frontier model safety, including through technical and institutional approaches.
You, as an organization, are willing to contribute to advancing the Forum’s efforts including by participating in joint initiatives and supporting the development and functioning of the initiative.
This is what the Forum will do when it comes to AI
The Frontier Model Forum wants to support a safe and responsible AI development process, and it will focus on 3 key areas over 2023:
Identifying best practices: Promote knowledge sharing and best practices with a focus on safety standards and safety practices to mitigate a wide range of potential risks.
Advancing AI safety research: Support the AI safety ecosystem by identifying the most important open research questions on AI safety. The Forum will coordinate research to progress these efforts in areas such as adversarial robustness, mechanistic interpretability, scalable oversight, independent research access, emergent behaviors, and anomaly detection. There will be a strong focus initially on developing and sharing a public library of technical evaluations and benchmarks for frontier AI models.
Facilitating information sharing among companies and governments: Establish trusted, secure mechanisms for sharing information among companies, governments, and relevant stakeholders regarding AI safety and risks. The Forum will follow best practices in responsible disclosure from areas such as cybersecurity.
Over the course of 2023, the Frontier Model forum will work on assembling a board, then build a strategy and establish priorities. But the organization is already looking to collaborate with as many institutions as possible, private or public. This also includes civil societies and governments, as well as other institutions that are interested in AI.
What do you think about this new partnership? Are you interested in joining? Or are you curious about frontier AI models? Let us know in the comments section below.
You can stop Microsoft Edge from opening PDFs in the browser and let a dedicated app does the work. You just have to tweak a few settings in the browser to take control of the situation because it’s better to let a dedicated app handle its work than a browser usage.
That being the case, bypassing the issue and learning how to keep Microsoft Edge from opening PDF files is essential.
By doing so, open and read different files in one tab or save files directly in PDF format on your desktop screen. Needless to mention, this move doesn’t stop you from other actions, which means you can save a webpage as a PDF and launch it using your tailored software.
All having been said, we tested and simplified the process of changing the default app for opening PDF files so you can apply it seamlessly on your own. That will help you learn how to stop Microsoft Edge from opening .pdf and .html files.
Why does Microsoft Edge keep opening my PDF files?
The Microsoft Edge browser keeps opening your PDF files because it has a built-in PDF viewer that is enabled by default on Windows. So, whenever a PDF file appears, it opens the same right away. But, you can take control of it and stop Microsoft Edge from hijacking PDF files from a dedicated app like Adobe Acrobat.
You may need support to change the file association settings and fix Edge keeps opening PDFs in the browser issue.
Worry not, as you can use the following solutions and learn how to stop PDF files from opening in Edge on Windows 10 and Windows 11. So, you can remove the problem and visualize all your PDFs with dedicated desktop readers.
How do I stop Edge from opening PDF files?
1. Change the default browser on your PC
First off, you can change the default app on Windows so that all the PDF files open in that selected app. Just follow the below steps to choose Adobe Acrobat as your default choice for opening .pdf files rather than Microsoft Edge.
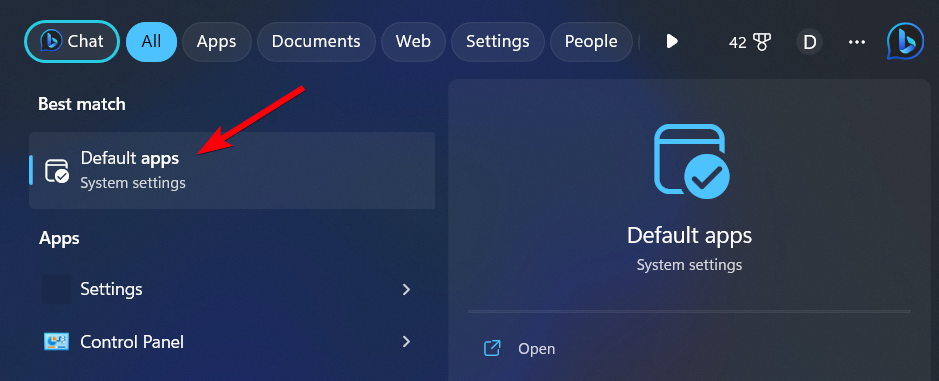
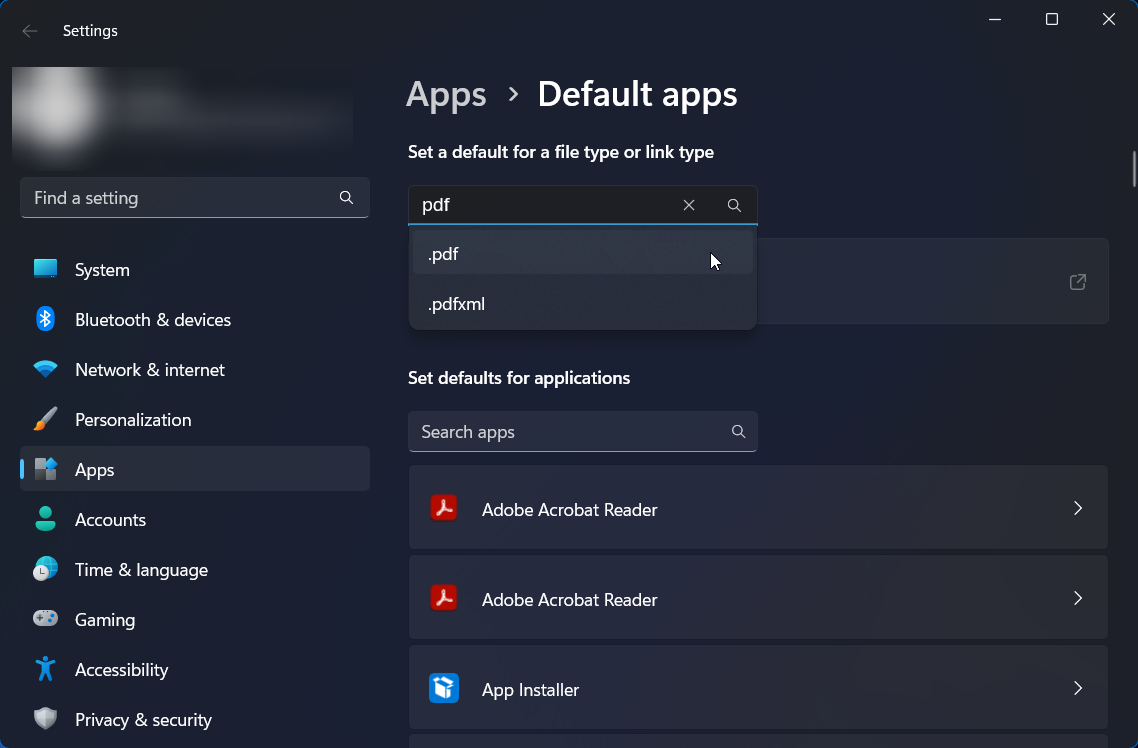
Type Apps and open the Default Apps settings from the search bar.
Write pdf in the search bar under Search a default for a file type.
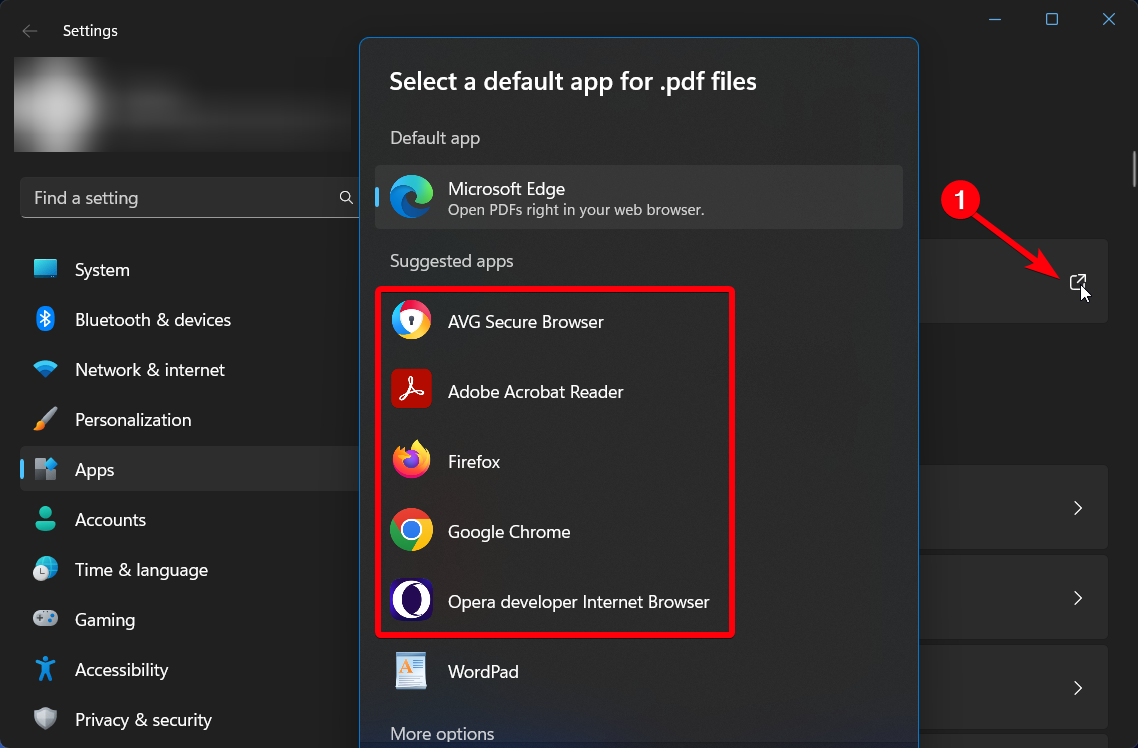
Now, click on the new window button on the right side.
In the new Choose a default app window, select any other suggested apps.
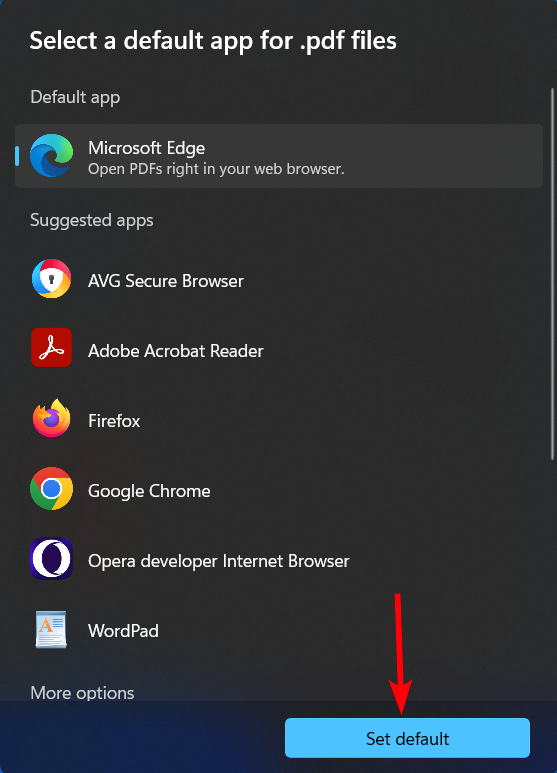
Click on Set default and close the window to see if the PDF file is opening accordingly.
You can also disable the PDF viewer in Microsoft Edge without changing the default app by completely changing the browser. In this case, you can choose Opera One browser as your default choice to open the files.
This browser can be set to automatically open PDF files naturally and view your files quickly, grouping multiple file tabs in one set or downloading the pages seamlessly. Hence, this solution is the most proper way to solve Edge keeps opening PDFs in browser issues.
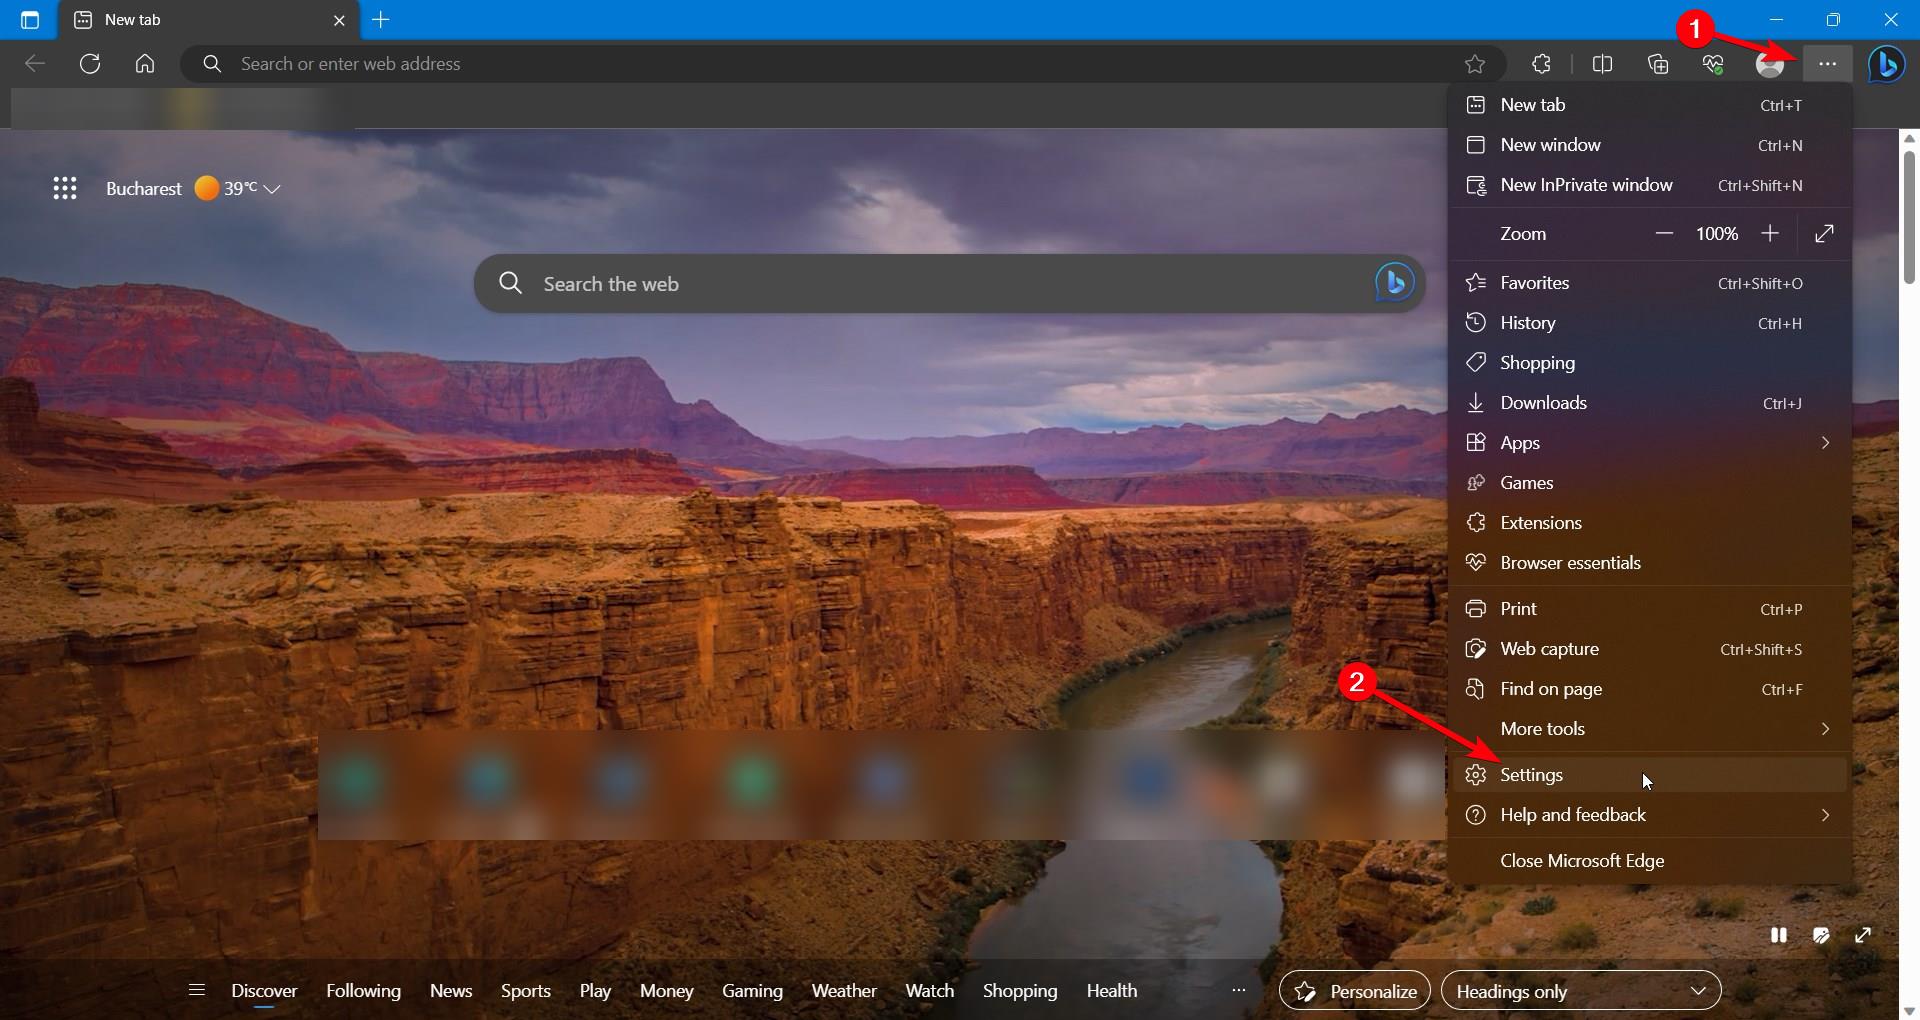
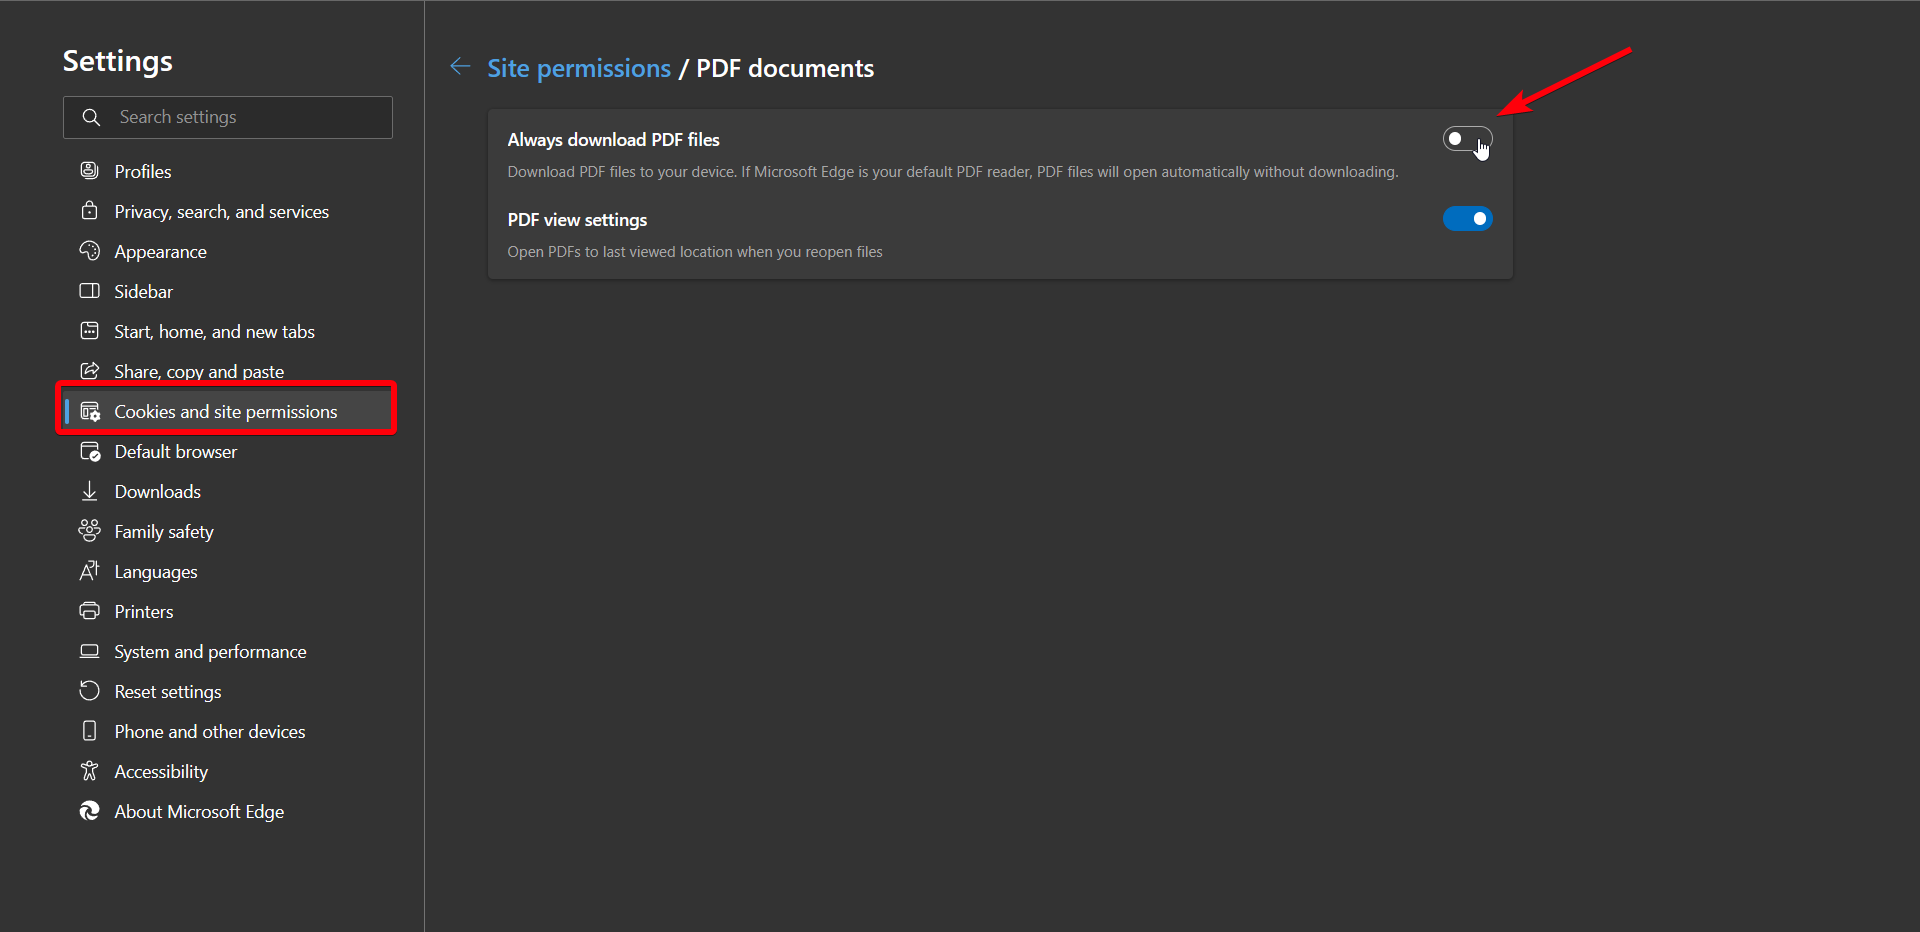
Launch the Edge browser and select Settings or type edge://settings/content/pdfdocuments
In the Settings tab, select Cookies and site permissions.
Scroll down until you find the PDF documents option and click it.
Here, toggle off the first option that says Always download PDF files.
Close the Settings window and check if the PDF files are opening with your default app.
After applying the steps above, make sure you have set the default app you prefer to open any PDF documents on your PC.
In case you change your mind and do not wish to follow the above-mentioned steps then you should resolve any plugin loading error first so to keep away any file viewing troubles.
As a matter of fact, you can as well compare Microsoft Edge with other browsers and see which one works best for you. So if you’re not sure about what browser to pick next, take a look at our verdict for Edge vs Brave vs Chrome browser comparison.
So, now you know that you can prevent Microsoft Edge from automatically opening PDF files in the browser and choose to open them in an external application instead.
Exception unknown software exception (0xc0000417) is one of Windows users’ frequent errors. It is because it can affect any app running on the system and can be challenging to resolve without proper directives.
Consequently, users are left asking questions about what to do to fix and prevent the 0xc0000417 error. Hence, this article will discuss easy steps for fixing the issue.
What is the error code 0xc0000417?
The exception unknown software exception (0xc0000417) is a Windows error indicating an error in a software program.
It indicates the system could not identify the exact nature or cause of the exception.
The error is represented by the hexadecimal number 0xc0000417.
Something unexpected such as accessing invalid memory, executing an invalid instruction, or a runtime error, can also trigger the unknown exception error.
What causes exception errors?
The concerned app may contain coding errors or bugs, resulting in unexpected exceptions during its execution.
Incompatibility issues between the app prompting the error and the operating system or other software components can cause the error.
Corrupt system files required for the application’s proper functioning can lead to an exception.
Faulty or outdated device drivers could interfere with the application’s execution and trigger the error code 0xc0000417.
Problems with hardware components, such as faulty RAM or hard drive issues, can cause unexpected exceptions or crashes when running some apps.
How do I fix the 0xc0000417 unknown software exception?
Before attempting any advanced troubleshooting steps, we recommend you go through these preliminary checks:
Restarting your computer can resolve system issues prompting the exception error. Try these fixes if the computer won’t restart.
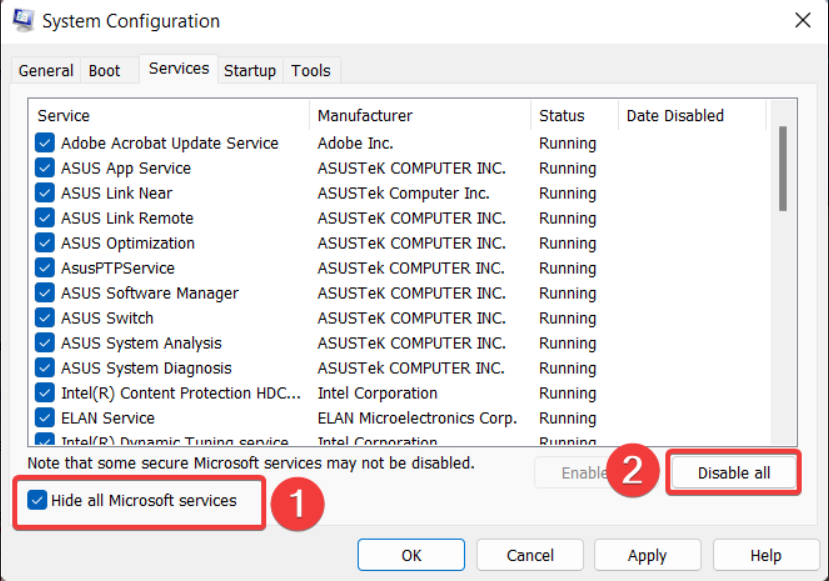
Perform a clean boot to help troubleshoot the error.
Verify if the app is compatible with your version of Windows to fix compatibility issues.
Check the software developer’s website or app updates to see any patches or newer versions addressing the error.
Press Windows + R key to open the Run dialog box, type control panel, then press Enter.
Search recovery and select Recovery.
Then, click Open System Restore.
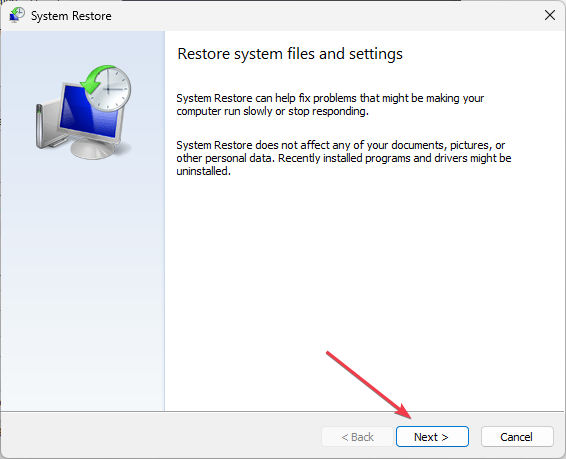
Click Next in the Restore system files and Settings window.
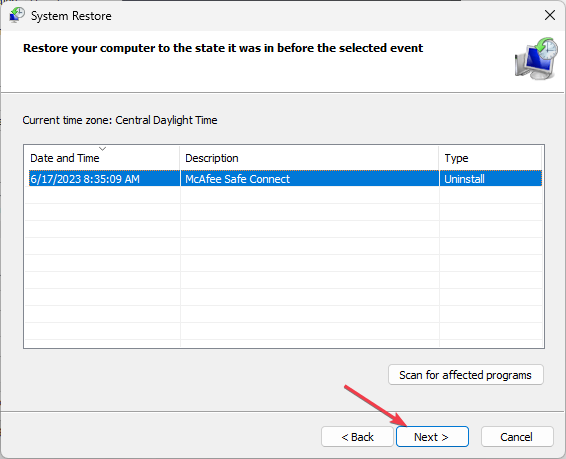
In addition, choose the restore point you want to restore from, then click Next.
Now, select Finish.
System Restore will backdate the PC to an earlier point. It retracts recent changes after the restore point, recovering the PC to the previous point and fixing issues causing the 0xc0000417 error.
Some users reported that Siri stopped working with a VPN.
The issue arises when you say Hey Siri, but either Siri doesn’t reply, or if it does, it fails to complete the requested task.
This can be frustrating and inconvenient, especially when relying on it for your daily tasks.
But why does this happen, and how can you fix it?
In this article, we will explain why Siri may not work with a VPN and show you some easy methods to solve the problem.
Keep reading!
Why is Siri not working with a VPN?
Using a VPN may have a negative effect on Siri’s functionality if you have any of the following problems:
Your VPN server is overloaded or has poor connection quality.
The country or region of your server does not support Siri – like China, Iran, or Cuba.
Outdated VPN app or operating system.
The VPN protocol is causing a conflict with the DNS settings on your device.
How to fix your VPN to work with Siri?
If you are experiencing issues with Siri while using a VPN, don’t worry.
You can fix it with some simple solutions.
Here are three of them:
1. Use another server
One of the easiest ways to fix Siri not working with a VPN is to switch to another server on your VPN app.
This may help you avoid the issues caused by an overloaded or poorly connected server or a server location that does not support Siri.
To do this, follow these steps:
Open your VPN app and disconnect from the current server.
Choose another server from the list of available options. You can select a server that is closer to your physical location or in a country that supports Siri.
Connect to the new server and try using Siri again.
Try this with a few different servers to get one that works.
2. Clear the app’s cached data
If you use a VPN on a regular basis, this may at times become a problem. That is because most VPN providers give you a different IP address every time you connect.
Based on that IP address, Siri’s cache stores information about your location. But it does not do that every time you connect. So you will end up in a situation where Siri stores location from say the US, and your VPN is connected to Australia.
That may lead to it not responding or not connecting. But the good news is that you can fix it easily. Here’s what to do:
Open your Settings App.
Then select General.
Tap iPhone Storage.
Select Siri.
Then tap the Offload app option.
Confirm your choice by tapping on the Offload app pop-up.
Connect to your VPN and login into Siri again. If conflicting cached files were the problem, it should now work.
3. Disable and re-enable Siri
Sometimes Siri may stop working due to a temporary problem where it can’t access the necessary components for its operation.
In such cases, you can fix the issue by temporarily turning off Siri and turning it back on again.
Here’s how to do that:
Open the Settings app on your iPhone and tap on Siri & Search.
Disable the option for Press Side Button for Siri and tap on Turn Off Siri.
Next, turn off the option for Allow Siri When Locked and Listen for ‘Hey Siri.
Restart your iPhone.
Once your iPhone has restarted, repeat steps 1- 3, but this time, you’ll enable it.
Make sure also to enable Allow Siri When Locked.
Finally, turn on Listen for ‘Hey Siri and complete the setup process.
This simple action of disabling and reenabling the app can often clear up the Siri error you’re facing.
4. Change your VPN provider
If none of the above methods work for you, you may need to change your VPN provider altogether.
Some VPNs may not be compatible with Siri or may have other issues that affect their functionality.
One of the best VPNs for Apple devices is ExpressVPN, which works seamlessly for Siri.
If you’re on a Mac computer, navigate to the downloads page on the official website and download the appropriate app. If you’re on an iPhone or iPad, search for ExpressVPN in the App Store.
Open the app and sign in with your credentials.
Once you’ll finish up the installation, you may get a message saying: ExpressVPN Would Like to Add VPN Configurations. Tap Allow.
Choose a server from the list of available options and connect to it.
Enjoy using Siri and other Apple features with ExpressVPN.
Now let’s explain a bit why we choose this VPN for Siri.
ExpressVPN is a high-quality VPN that offers excellent performance, security, and compatibility with Siri.
With over 3000 high-speed servers in 94 countries, you have enough options to pick from anywhere in major countries of the world.
Plus, it has a split tunneling feature that allows you to route some of your device or app traffic through the encrypted VPN tunnel while other devices or apps access the internet directly.
It allows you to protect your chosen traffic without losing access to local network devices.
ExpressVPN
Combine this fast VPN with unlimited bandwidth with Siri for seamless and secure voice search and commands!
Have you been facing difficulties because Paint 3D crashes after opening on your computer? Then you’re not alone, as many users have reported the same problem.
Sadly, Paint 3D crashing after launch prevents users from accessing or using the app features. However, we recommend you continue reading this guide as we’ll provide solutions for fixing this problem.
Why does Paint 3D keep crashing?
Your drivers can cause conflicts between Paint 3D and your Windows OS, so update outdated drivers.
Corrupt or missing Paint 3D installation files would affect the app and may result in crashes upon opening.
Paint 3D may crash on startup if your computer does not meet the minimum system requirements to run the application.
If your system is running low on memory or CPU resources, it could cause Paint 3D to crash because it is a resource-intensive app.
Recently installed third-party plugins or extensions for Paint 3D can relatively affect its functionality.
Recent Windows updates can introduce bugs that affect the Paint 3D client. Also, running an outdated Windows OS can cause issues.
Regardless of the specific problem, continue reading this article to learn how to resolve the Paint 3D crash issues.
How do I fix Paint 3D if it crashes after opening?
Observe these preliminary checks before attempting any advanced troubleshooting steps:
Perform a clean boot to start Windows with minimal processes and services.
Verify that your PC meets the minimum system requirements for running Paint 3D.
Try running Paint 3D in compatibility mode to see if it resolves the crashing issue.
Updates the Paint 3D app via Microsoft Store to install bug fixes and performance improvements.
If you have installed any third-party plugins or extensions for Paint 3D, try disabling them.
Ensure you install the latest graphics drivers for your GPU to resolve incompatible or outdated GPU problems.
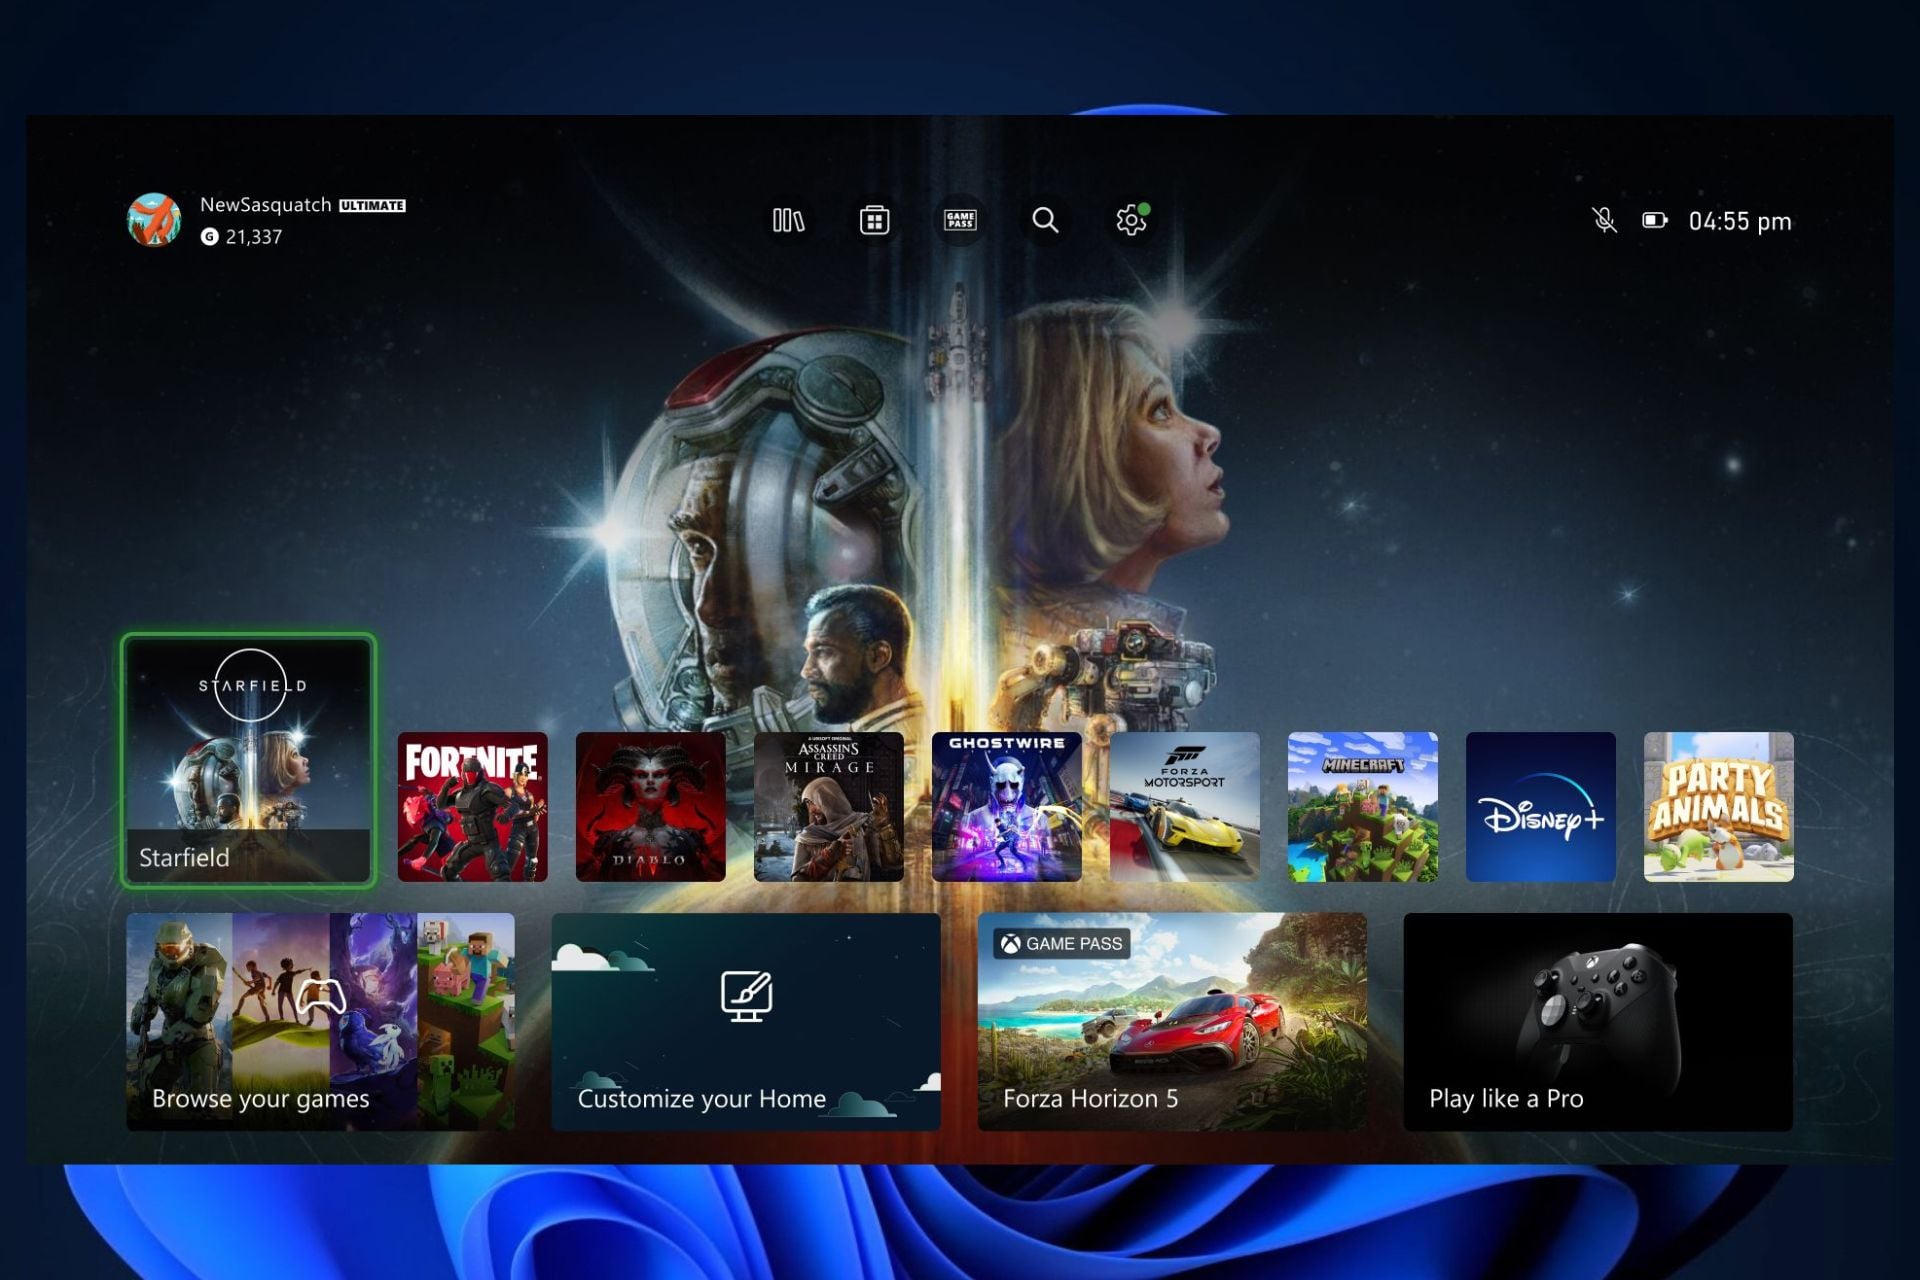
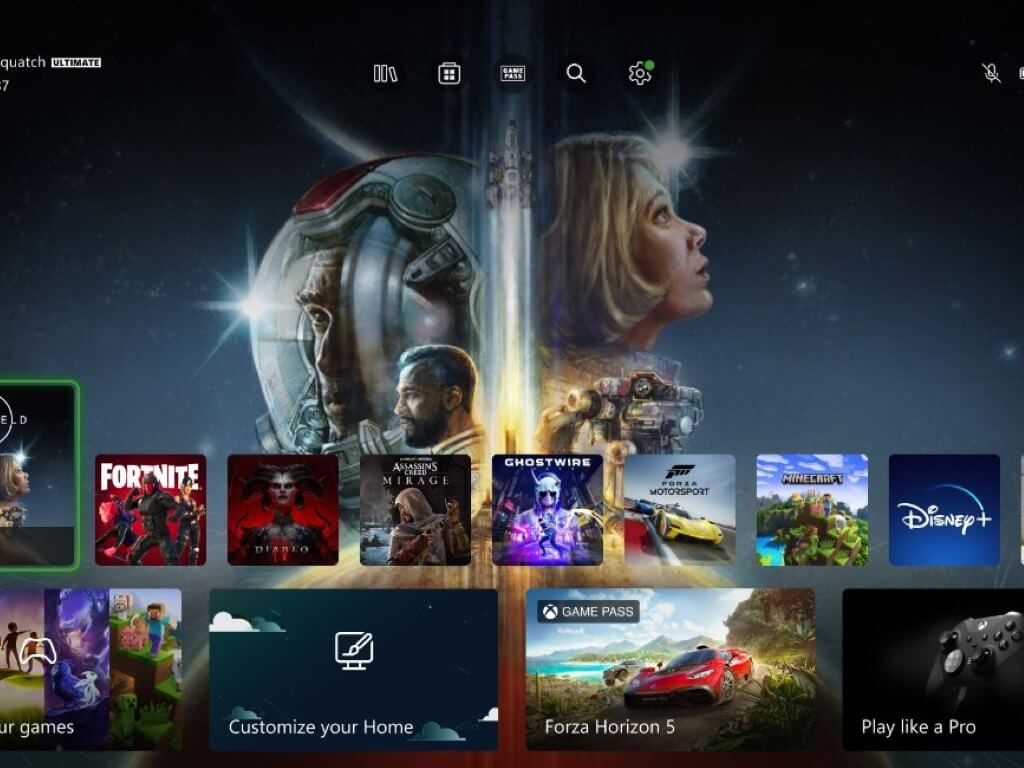
Good news for Xbox lovers around the world. The Xbox Home dashboard is here on Xbox Live servers after it was released in the Xbox Insider Program. Those who were already part of the Insider Program could experience it already. The new Xbox dashboard was spotted by this Twitter user, and we believe the dashboard looks quite good.
As you can see, the dashboard has a lot of space and does not look overcrowded at all. While there wasn’t an official release date when it was released in the Insider Program, it seems that the new Xbox Home dashboard it’s here already.
Many people believed that it will be made available in August, or September. Remember, Starfield will be released in September, and the title is an Xbox exclusive, so this new dashboard would have come just in time.
You have the icons at the top-center of the screen, while the games and the other settings are down at the bottom of the screen. It looks easy and clean, and very sparse, making it easy to use.
Xbox in 2023: new dashboard, lot of new games, Starfield, and a black Xbox Series S
Xbox in 2023 sounds exactly like a treat. Besides the new dashboard, Starfield is coming to Xbox, which is arguably, one of the most anticipated titles in recent history. As we mentioned earlier, Starfield will be a Microsoft-exclusive title and a lot of people are thinking about buying Xbox just for this game.
At the event, Microsoft also unveiled a brand new black Xbox Series S console. It will come with 1 TB of storage, and it will be released just in time for Starfield, in September.
So, as you can see, Microsoft already has big plans for Xbox in 2023. What do you think about it? Let us know your opinions in the comments section below.
Extensions are a helpful resource in browsers. These aid in expanding the browser’s functionalities and provide a better overall user experience. But the Incognito mode by default doesn’t support extensions, and users have been looking for ways to allow these in Chrome.
While Chrome remains a popular browser, enabling extensions remains challenging for many. There’s no direct way to do that, which left users wondering whether they can use extensions in Incognito mode. Keep reading to find out!
Can I use extensions in Incognito?
Yes, you can use extensions in Incognito or Private browsing mode. However, all browsers recommend against it for a simple reason. It compromises privacy and security, a core feature and USP of Incognito mode.
Incognito modes are meant for browsing the web without leaving any digital footprint locally, meaning the browsing history, cache, or cookies are not stored on the PC. However, the websites you visit or Google can still track the activity, the IP address, and log-ins.
How do I enable Chrome extensions in incognito mode?
Open Google Chrome, click on the ellipsis near the top right, hover the cursor over Extensions, and select Manage Extensions from the flyout menu. Alternatively, you can go to: chrome://extensions
Now, click the Details button under the extension you want to enable in Incognito mode.
Finally, enable the toggle for Allow in Incognito.
Similarly, you can enable other extensions in Incognito mode.
That’s it! This is how you can allow Chrome extensions in Incognito mode. The ones you would primarily need in Incognito mode are ad blockers, performance optimizers, and others critical to the workflow.
Processes and apps consume background resources to perform a series of vital functions. But some apps tend to consume excess network resources, affecting the workflow. A similar situation arises when the Local Security Authority process is trying to access the Internet.
The problem with most users is that they are unaware of the process’s role and often consider LSA a virus. And you can’t blame them because LSA also consumes high CPU and RAM in many cases. Keep reading to find out all about the process!
What does the Local Security Authority do?
Local Security Authority, as the name suggests, is a local process meant to ensure security on the PC by preventing unauthorized access.
Its role is to authenticate the credentials for any sign-ins, password changes, token creation for applications, and permissions related to administrative access.
Local Security Authority (lsass.exe) is enabled by default on the PC. The file location is:C:\Windows\System32
System32 folder
It’s a critical built-in Windows file, and you should not stop the Local Security Authority process. Doing so will compromise the PC’s security. But you must verify that the lsass.exe process running on the PC is legitimate.
Learn more about the Local Security Authority and how the lsass.exe process works on Windows in this detailed guide lsass.exe explained.
Microsoft has found that Sasser, a malware, used the vulnerabilities in lsass.exe to steal computer data. Since a problem with the process has been reported, we can’t ignore the possibility of it happening again. So, verify the file path and always have a reliable antivirus running!
Why is LSA trying to access the Internet?
As per available reports, the lsass.exe process shouldn’t try to access the Internet. But things change with updates, which could be the case with LSA. So, we have to identify why it consumes network resources and take the necessary approach.
Here are a few reasons the Local Security Authority process is trying to access the Internet:
Running an update: If you are updating the OS, chances are the process, too, is accessing the Internet.
PC infected with malware: As stated earlier, since a virus has previously breached the process, it could be the case again.
A recent update broke things: Windows updates, though meant to boost the PC’s performance and introduce new features, often make changes detrimental to its effective functioning.
Corrupt system files: In a few cases, users reported that the corrupt system files led to issues with the Windows Local Security Authority process.
What can I do if Local Security Authority is trying to access Internet?
Tip
While a few may recommend disabling Local Security Authority altogether, you shouldn’t do that! Instead, identify the underlying cause and make the necessary amends. The former puts your PC at risk.
1. Verify the file path
Your primary approach here should be to verify the file path. Make sure the lsass.exe process is stored in the following location:C:\Windows\System32
To do that, locate the process, right-click on it, and choose Open file location. If it’s stored in any other location, delete the file immediately and head to the next solution.
2. Scan for viruses
Press Windows + S to open Search, type Windows Security, and click on the relevant search result.
Click on Virus & threat protection.
Click on Scan options.
Now, choose Full scan and click the Scan now button.
Wait for the scan to complete.
When faced with the Local Security Authority process trying to access the Internet or any other unknown process trying to do that, scan the PC for malware. You could use both the built-in Windows Security or an effective third-party antivirus solution.
Press Windows + R to open Run, type cmd, and hit Ctrl + Shift + Enter.
Click Yes in the UAC prompt.
Paste the following commands one at a time, and hit Enter after each:DISM /Online /Cleanup-Image /CheckHealthDISM /Online /Cleanup-Image /ScanHealthDISM /Online /Cleanup-Image /RestoreHealth
Next, execute this command to run the SFC scan: sfc /scannow
Finally, restart the computer for the changes to come into effect.
If the Local Security Authority process is trying to access the Internet due to corrupt system files, a quick solution is to run the DISM tool and the SFC scan. The two will help identify any problematic system files and replace them with the cached copy.
Or if you want to try a more straightforward solution, you can opt for a specialized third-party repair program.
4. Modify the Registry
Press Windows + R to open Run, type regedit in the text field, and hit Enter.
Click Yes in the prompt that appears.
Paste the following path in the address bar at the top and hit Enter:Computer\HKEY_LOCAL_MACHINE\SYSTEM\CurrentControlSet\Services\Schedule
Double-click the Start DWORD on the right.
Enter 4 under Value data, and click OK to save the changes.
Now, navigate the following path:Computer\HKEY_LOCAL_MACHINE\SYSTEM\ControlSet001\Services\Ndu
Again, change the Value data for the Start DWORD to 4, as you did earlier.
Once done, restart the computer for the changes to come into effect.
This will disable the Windows Schedule and prevent issues like this and those with other services configured to run automatically.
Go to Microsoft’s official website, choose the product language and edition of the OS, and then download the Windows 11 ISO.
Launch the ISO and then run the setup.exe file.
Click Yes in the prompt.
In the Windows 11 Setup, click Next to proceed.
Click on Accept to agree to Microsoft’s license terms.
Finally, verify that the setup reads Keep personal files and apps, and click on Install.
That’s it! If the previous solutions couldn’t fix the problem and the Local Security Authority process is still trying to access the Internet, performing an in-place upgrade will do the trick! It will replace all Windows files without affecting the stored data or apps.
The final week of Xbox Free Play Days for July sees another solid lineup with For Honor and Tropico 6 leading the way. The four games in this week’s lineup are available from Thursday, July 27 through Sunday, July 30. Without further ado, let’s get into the lineup.
Carve a path of destruction through the battlefield in For Honor, a PvP focused melee action game. Enjoy the full experience with friends online, in two-player split-screen coop and versus, or solo against AI. The Conquistadors have returned from a voyage to the New World with the stolen treasures of an exotic empire. Embody the Ocelotl, hunter on the battlefield, they can defeat an enemy with their Macuahuitl and their Tepoztopilli. Stalk opponents, and when the time is right, strike them with overwhelming ferocity.
In times of political turmoil and social unrest, the people are calling for visionary leaders who will steer the fate of their country with foresight and ingenuity. Prove yourself once again as a feared dictator or peace-loving statesman on the island state of Tropico and shape the fate of your very own republic through four distinctive eras. Continue your peaceful or tyrannical reign after Free Play Days and purchase Tropico 6 Standard Edition with a 50% discount for $19.99.
Jump into the Toy Story inspired Season and race with unique Disney and Pixar Racers. Enjoy both single player and multiplayer modes, which include Season Tour, Local play, Private Track, Ranked Multiplayer, and Regulated Multiplayer. And if you want to keep the challenge going after the free period ends, you can grab the Disney Speedstorm Deluxe Founder’s Pack for 30% off.
Go undercover as the world’s greatest spies in this tense multiplayer game of subterfuge. Disguise as anyone, deploy an arsenal of high-tech gadgets, or neutralize the competition. As long as you extract with the objective, no trick is too dirty when you work for Deceive Inc.
Learn more about Xbox Free Play Days
Xbox Free Play Days is a perk of having a subscription to Xbox Live Gold or Xbox Game Pass Ultimate. Learn more about the program by visiting its FAQ page.
The Games with Gold swan song includes two more offerings: Blue Fire and Inertial Drift. Each are available from August 1-31. See more about these titles below.
Evil forces have taken over the world of Penumbra. They need a warrior of light and darkness! Embark on a journey to explore temples filled with 3D platforming challenges, battle wild enemies, and go on side quests. Master the art of movement as you face increasingly challenging Void Puzzles and unlock the secrets that will save the day.
Can you master the perfect drift? Drive through a 90s retro future in this arcade racing game that leverages a unique handling model and twin-stick drift mechanices (sic). Choose from 16 unique cars across 20 wild tracks to tear through the neon streets. Rev up your skills in single-player story move and then prove you’re the best in multiplayer.
The end of Games with Gold and more on Xbox Game Pass Core
All great things must come to an end, and so it is with Xbox Live Gold. But in every end is a new beginning, and there’s plenty to look forward to when Xbox Live Gold becomes Xbox Game Pass Core.
This new Game Pass tier will include a catalog of 25 Game Pass titles, access to online console multiplayer, member deals and discounts, Xbox Free Play Days access and more all for $9.99 a month. Learn more about Game Pass Core and check out the games catalog right here.
As per PayPal, they and Microsoft have announced a significant integration of PayPal’s Pay Later solution in several countries, including the U.S., U.K., Australia, Germany, France, Spain, and Italy. Additionally, U.S. customers will soon have the option to pay with Venmo, a PayPal subsidiary, in the Microsoft Store, where Venmo is already available on Xbox.
The new integrations aim to provide customers with more flexible payment options and boost customer loyalty. For over 16 years, PayPal checkout has been a method for Microsoft Store customers to purchase a range of products, including Surface devices, Xbox consoles, accessories, and Microsoft 365’s suite of products.
The inclusion of PayPal Pay Later and Venmo brings additional benefits to Microsoft’s customers and its business. With PayPal Pay Later, eligible consumers can now spread their payments over weeks or months in fixed amounts, providing more flexibility and better budget management.
Moreover, the integration of Venmo enables a swift and straightforward checkout process, where customers have the option to purchase subscriptions or split payments upon purchase.
Ajith Thekadath, Vice President of Global Payments at Microsoft, emphasized their commitment to providing the best experience for customers, whether for entertainment or productivity.
Taskbar is a vital part of Windows, offering easy navigation between apps and helping launch the Search menu, Microsoft Teams Chat, and a few other utilities. But not all users appear pleased. If you are one, the Enhanced Taskbar in Windows 11 would be a great addition.
Taskbar is the most debated component of Windows. Ever since Windows 11 was first released, users were unhappy about drag and drop not working and losing out on other functionalities. Microsoft has made amends, but the Taskbar, in its current form, is still far from perfect.
Though with Enhanced Taskbar, you will have more customizations and can configure settings for a personalized experience. Keep reading to find out all about it!
The features are currently live in the Windows Dev Channel, Build 23466. Once these are reviewed, Microsoft will soon release them to regular users. Here are the significant changes you will find in Windows 11 Enhanced Taskbar:
No more Teams icon: Teams hasn’t been as popular as Microsoft would have wanted, and its integration into the taskbar didn’t yield the expected results. Finally, users won’t find the Teams entry in the settings or the app in the taskbar.
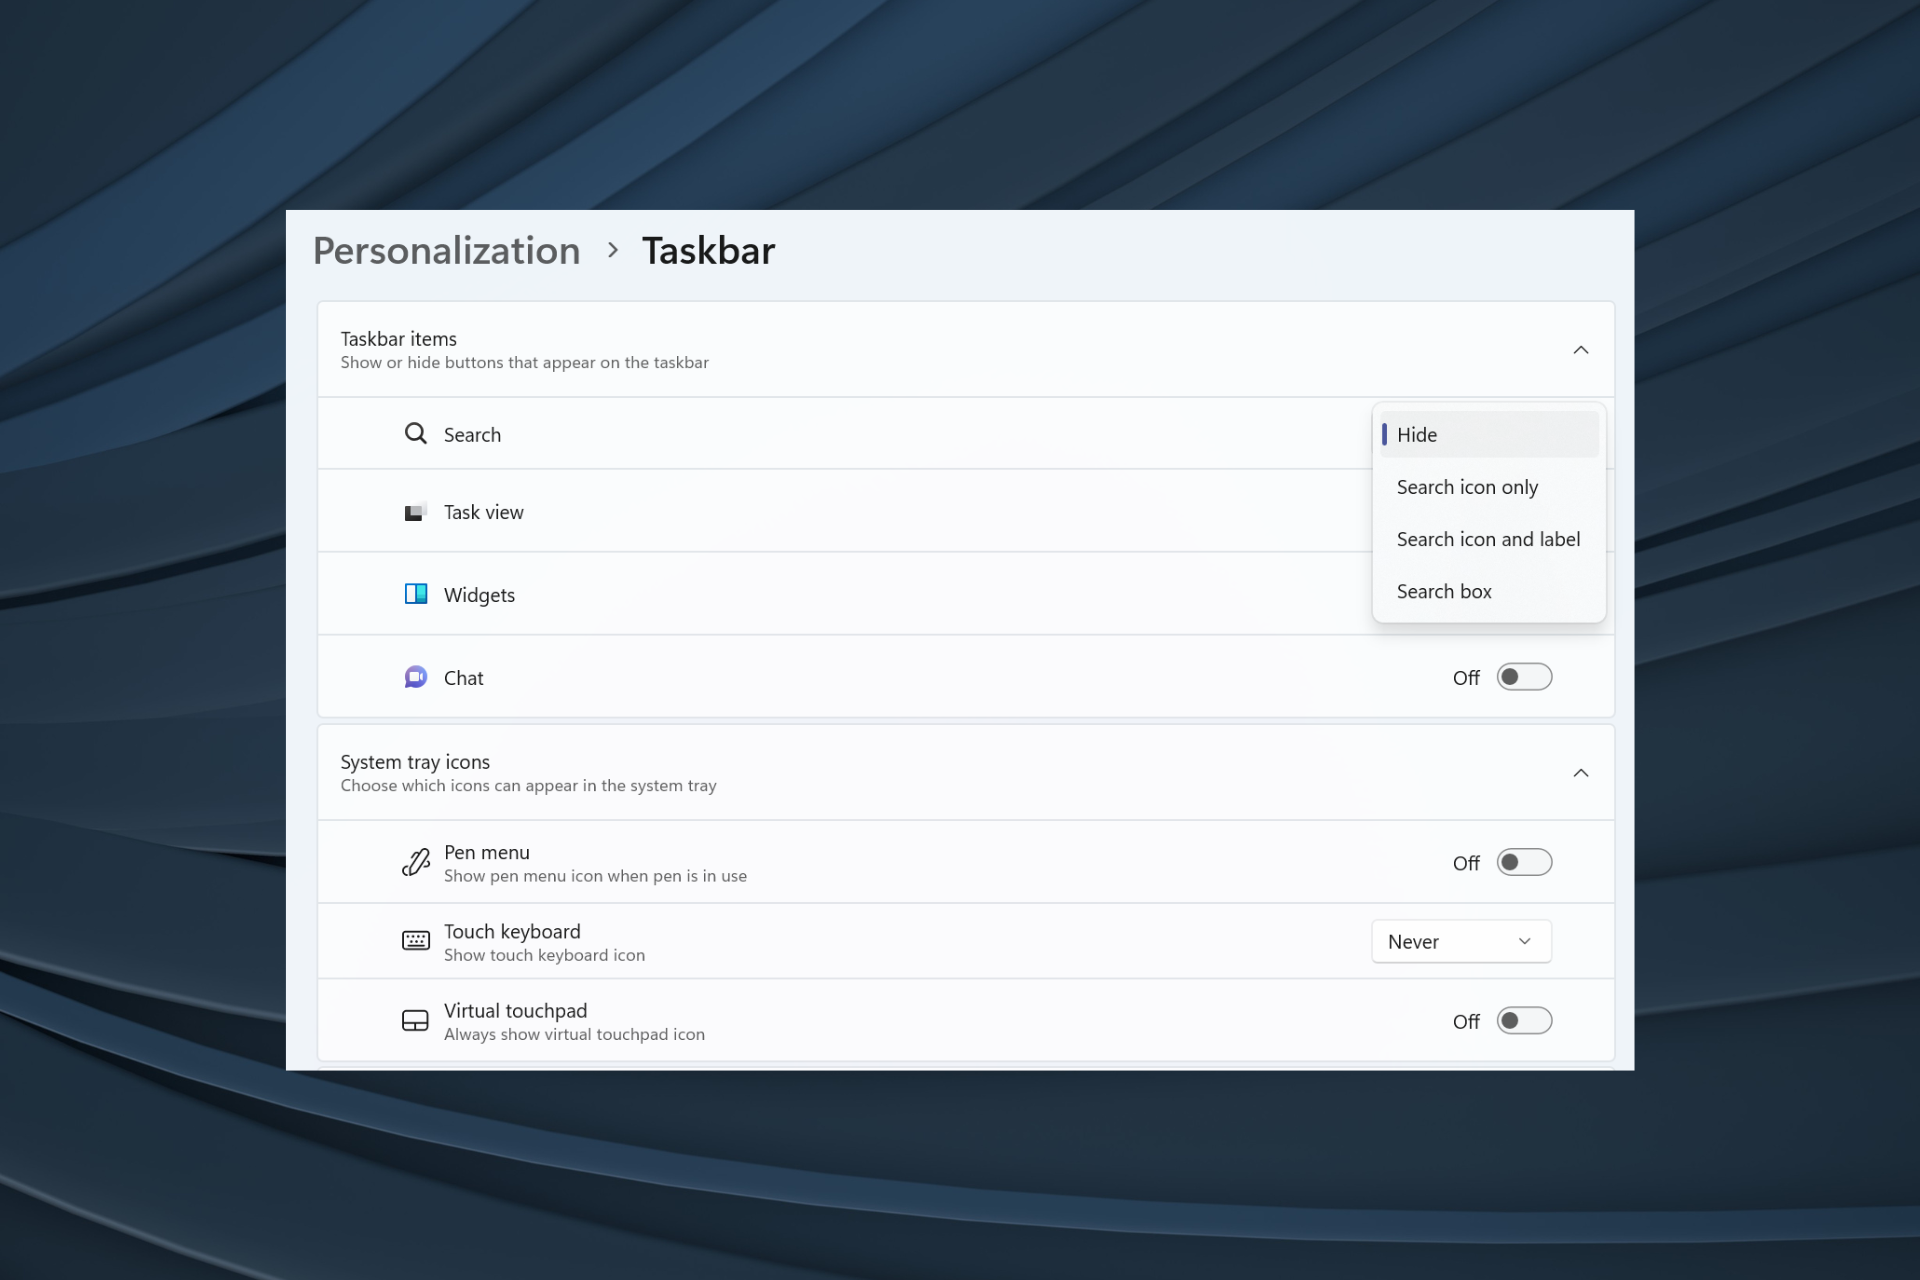
Customizations to the Search icon: Users can now customize how the Search option appears. Whether they want just the icon, the whole box, or hide it, that’s all possible now!
A more interactive Search menu: Enhanced Taskbar in Windows 11 has redesigned the Search menu, and it now offers many more options, including news, videos, and trending searches.
How do I enable the Enhanced Taskbar in Windows 11?
NOTE
Enhanced Taskbar can currently only be enabled on PCs enrolled in the Dev channel since it’s an experimental feature. You could still try out a few customizations when running the regular version, though most will be missing.
1. Download ViVeTool
Tip
When downloading ViVeTool, make sure you get the latest version. Never download an outdated version of a program unless you are facing compatibility issues.
Right-click on the downloaded file, and then select Extract All.
Click on Browse.
Choose the C: drive under This PC, and click on Select Folder.
Once done, tick the checkbox for Show extracted files when complete, and click Extract.
Head to the folder you just extracted, right-click on it, select Rename, and name it Vive.
Now, press Windows + R to open Run, type cmd, and hit Ctrl + Shift + Enter.
Click Yes in the UAC prompt.
Paste the following commands one at a time and hit Enter after each:cd C:\cd Vivevivetool /enable /id:44520430vivetool /enable /id:43572692vivetool /enable /id:41950597
After all the commands are successfully executed, restart the computer for the changes to reflect.
2. Use Enhanced Taskbar
Once the PC restarts, press Windows + I to open Settings, select Personalization from the navigation pane, and click on Taskbar.
You will now find a dropdown menu next to Search. The four options and the resulting effects are:
Hide: This will entirely remove the Search icon from the Taskbar.
Search icon only: As the name suggests, this setting only displays the icon.
Search icon and label: This shows a slightly bigger Search entry in the Taskbar and, subsequently, occupies more space.
Search box: Displays a bigger Search box and an option to directly open Bing chat.
Then, there’s the Open search on hover (when applicable) toggle, which, when enabled, will automatically launch the Search menu as soon as you move the cursor over it.
Enabling Enhanced Taskbar in Windows 11 will remove the Chats (Microsoft Team) icon in settings.
The Search bar, when opened from the taskbar or Windows + S shortcut, now lists important events, trending news from the web, games, trending videos, and trending searches.
That’s all about Enhanced Taskbar in Windows 11 and how to enable it. For a more personalized experience, you can download Windows 11 customization software.
You can explore more personalization tools by checking this guide on free taskbar customizer options that offer deeper control of the Windows 11 taskbar.
For those of you wondering how to disable the Enhanced Taskbar, it’s just as simple. All you have to do is run the Command Prompt with administrative privileges and run these commands:cd C:\cd Vivevivetool /disable /id:44520430vivetool /disable /id:43572692vivetool /disable /id:41950597
These are similar to the ones we used earlier, with the difference that enable is replaced with disable.
You now know the changes introduced after enabling Enhanced Taskbar in Windows 11, how to access these in no time, and the steps to get rid of the (presently) experimental feature.
In the announcement post PlayStation CEO Jim Ryan thanked the PlayStation community.
With the support of PlayStation fans, we have reached a milestone of 40 million PS5 consoles sold through to gamers since launch. Thank you so much to our community of gamers – without you this would have been an impossible task.
Although there are many similarities between KB5028245 and KB5028254, they’re not without their differences. The cumulative update for Windows 11 22H2 brings some unique improvements, one of which is an enhancement to the accuracy of brightness settings.
Being a preview version of the upcoming Patch Tuesday update, KB5028254 is categorized as both a non-security update and an optional one. If you have been encountering any of the issues addressed by this update, you have the option to install it right away.
Microsoft has highlighted a few key improvements introduced by the KB5028254 update:
Enhanced Brightness Settings: With this update, Windows 11 22H2 users can expect more accurate brightness settings, providing a smoother and more comfortable viewing experience.
Improved Device Functionality After Sleep: An issue affecting certain display and audio devices, causing them to go missing after the system resumes from sleep, has been resolved.
Widgets Taskbar Fix: The update addresses a problem with Widgets, ensuring they no longer unexpectedly unpin from the taskbar.
VPN Performance Improvement: Users relying on virtual private networks (VPN) will benefit from this update, as it tackles an issue related to excessive Address Resolution Protocol (ARP) requests to the network gateway. The problem occurred when the VPN was used on a wireless mesh network with an aggressive throttling algorithm, leading to poor network performance.
Given the array of bug fixes and enhancements included in the KB5028254 update, it is likely to attract widespread interest from Windows 11 22H2 users. As always, users are encouraged to keep their systems up-to-date to ensure optimal performance and security.
The original post by user Spiderwolfer complains, “Generally I don’t mind the new Xbox Home Screen layout but I don’t feel like it’s much better either.”
What I really wanted was for our custom groups to be at the top of the screen and this has put them down even further. This is a pretty annoying inconvenience and wish they had thought this through a little more. PLEASE consider changing this.
Spiderwolfer isn’t alone in this sentiment, either. Hundreds have commented on the post, mostly sharing the same criticism of the new Xbox Home screen. A common point of frustration seems to be Microsoft’s perceived indifference to feedback, even in the Xbox Insider Program.
Controllers have come a long way. From connecting your PS4 controller to your PC, users can now take charge of their PC settings using the RGB controller to adjust the LED settings.
RGB stands for red, green, and blue; when you combine these colors in different amounts, you can create virtually any color in the spectrum. This looks interesting, so let’s get down to how you can connect this controller to your PC.
Can I connect the RGB controller to motherboard?
Yes, you can. While it’s good news that you can connect your RGB controller to your PC, it’s not just any PC that will do. Your PC needs to meet certain requirements. No need to get cold feet as it’s nothing out of the ordinary.
As we said in our title, we shall be showing you the simplest way to connect your RGB controller to your PC, and we intend to keep our promise.
Your motherboard plays a key role, especially if you’re yet to purchase the RGB controller. There exist three types of RGB controller fans:
4-pin RGB headers
3-pin RGB headers
RGB fans without headers
Most RGB fans use either 3-pin or 4-pin connectors for power and data connection from your motherboard. The main difference is that you’ll need a connector for the 4-pin.
If you attempt to connect it directly, you risk shorting your motherboard. This should act as guidance when purchasing your controller for compatibility purposes.
If you’re unsure what type of motherboard you have, you can check from your manufacturer’s site or contact them directly.
However, if you’re yet to acquire one, we have an awesome recommendation of the best RGB motherboards for the ultimate experience.
How to connect RGB fans to the motherboard?
1. 3-pin RGB header
You’ll need to switch off your PC and open your CPU case to locate the RGB connector.
Your motherboard will be exposed, and you’ll have to locate the RGB header.
It will typically be labeled as RGB or ARGB, depending on your model.
Once you’ve spotted the correct slot, find your RGB kit and insert the corresponding 3-pin cable onto the RGB slot until you hear a clicking sound. This means that it has been securely connected.
And that’s it. Simple right?
Next, you’ll need to install the corresponding RGB controller software compatible with your motherboard to control the lights.
This is by far the easiest to connect to your motherboard. Moreover, most people looking to use the RGB controller are already operating older PCs where the 3-pin headers are common.
Onto the not-so-simple methods for the 4-pin RGB and none-RGB motherboards.
2. 4-pin RGB header
You’ll need a fan connector.
Next, you’ll connect one end of the cable to your motherboard’s header and the other end to the fan itself.
The next steps are connecting it to the RGB header to your motherboard, and you’re good to go.
Most modern computers most likely have the 4-pin header. Some motherboards have built-in support for 4-pin RGB controller fans, which means connecting will be as easy as the 3-pin header ones.
On the other hand, other motherboards may not support these types of fans at all and require additional software or hardware to work.
So if your motherboard doesn’t have an RGB header, you must get an adapter cable that can convert the 4-pin connector into a 3-pin one. On the bright side, using a 4-pin header comes with its perks.
Aside from controlling LED lights, you could add more fans to your PC and control their speed should you need extra airflow. PCs tend to get hot, especially with new OSes like Windows 11 that require more resources.
How to connect RGB fans to the motherboard without an RGB header?
While RGB fans are a great way to add some flair to your PC, you may be out of luck if you don’t have an RGB header on your motherboard.
Luckily there is a solution. It just takes a little extra effort. If you don’t have an RGB header on your motherboard or want to add more LED strips without buying new cables and connectors, you can use an RGB hub.
The advantage of using a hub is that you don’t have to break out any wires from the motherboard, making it easier to set up and less likely for things to go haywire. The disadvantage is that it’s one more piece of hardware you must buy.
That wraps up our simple steps on different ways you can connect an RGB controller to your PC. Hopefully, this has given you some ideas about how to use your RGB controller with your PC.
If you prefer software solutions, you might want to learn more about Dynamic Lighting feature on Windows 11 that brings native support for RGB lighting to your OS.
As reported by NikkeiAsia, Microsoft is set to provide Japan’s government with the technology behind its ChatGPT generative AI, aimed at assisting with clerical work and analysis, as reported by Nikkei. This includes the capability to create draft responses to parliamentary queries.
Microsoft has installed high-processing power equipment to handle confidential information at its data centres in Tokyo and Osaka. This marks the first deployment of this technology in Asia.
Representatives from Japan’s ruling Liberal Democratic Party are finalizing the arrangement with Microsoft, which, until now, has only deployed this AI technology in Europe, where it was developed in collaboration with OpenAI.
Under the agreement, Microsoft will supply GPT-4, a large language model supporting ChatGPT’s human-like interaction, and AI technology from Meta, Facebook’s parent company, with which Microsoft has collaborated.
The new Digital Agency of Japan plans to allocate just over $2 million for a one-year trial of the technology. It will be tested for tasks such as preparing minutes, generating draft responses to parliamentary queries, and analyzing government statistics to streamline employee tasks.
Microsoft aims to improve the AI’s accuracy in Japanese, addressing a previous weak point, and will accumulate data to serve Japan’s government, requiring a substantial amount of administrative information. To ensure security, the data centres will be located domestically. This will also benefit Japanese companies, including financial institutions, that handle confidential data, making adopting AI services easier.
The Liberal Democratic Party believes that generative AI can significantly improve the quality and efficiency of administrative services. As a result, various government agencies, such as the Ministry of Economy, Trade and Industry, are considering adopting it.
Netflix, the popular streaming service, is taking a step back to reevaluate its advertising partnership with tech giant Microsoft, preparing for an anticipated decline in ad prices, according to a report in the Wall Street Journal published on Thursday.
The restructuring comes following the firm’s introduction of a lower-priced ad-supported subscription plan last year which was met with a disappointing response in terms of growth.
Moreover, the move corresponds with the streaming company’s effort to attract customers to its $7-per-month subscription plan. The plan, which embedded commercials in the content, was introduced in 12 different markets across the globe, including the United States. For this enterprise, Microsoft was selected as Netflix’s technology and sales partner, largely thanks to its agreed-upon revenue guarantee.
However, the failure to achieve anticipated ad tier growth rates is causing the streaming giant to reconsider the financial facets of the agreement. The media company is contemplating cutting down on the revenue guarantee with Microsoft according to the report. There is an undercurrent of dissatisfaction among Netflix executives over Microsoft’s inability to sell as much ad inventory as originally expected.
Adding to this, Netflix has started preliminary discussions with other potential partners for selling ads. Promising these partners better deals, Netflix seems to be shopping around to find options beyond just Microsoft.
This shift could potentially bring more variety in advertisement sales strategy for Netflix.
The restructuring plan also comes with a knock-on effect on the cost of advertising. Advertisers are now agreeing to pay Netflix roughly between $39 and $45 per 1,000 viewers, as per recent deals. This marks a significant drop from the previously standing rate of about $45 to $55 per deal, as acknowledged by ad buyers.
While this ongoing recalibration poses a shift in Netflix’s business strategy, how it will play out in the long term remains to be seen.
If you have been using Windows, or any piece of tech for that matter, for a considerable stretch of time now, you would have easily heard about using rebooting as the quickest trick to fixing your tech woes.
Often offered as the first solution to a variety of errors on Windows from almost all tech community, a quick restart does indeed accomplish the job well enough a lot of times. So, what’s the secret behind Windows reboot? Why and how does it fix so many problems on its own? Let’s jump right in and find out.
4 reasons a reboot fixes so many Windows problems
A quick restart is handy in fixing a variety of errors on your computer. It does this in different ways, and often saves you a lot time in the process as well. So, let’s look at why that is the case, starting with why and how a restart helps you with updates.
1. Necessary for updates
A restart is generally helpful if you have done any updates or installed some patches manually. For instance, a restart makes sure your updates are appropriately integrated into your Windows; this is particularly true for updates related to system files or other critical components.
2. Resource management
Many apps and processes continue eating up resources from the background, even when you shut them down a while ago. While this doesn’t happen often, it still occurs enough to need unique apps to free up memory space.
A quick reboot can be your ally in these cases. Instead of a third-party app, you can use a Windows restart. A reboot releases your Windows memory from these processes and apps by clearing your RAM, thus making it fresh to be used again.
3. A memory reset
Over a period of time, the memory that your apps occupy (RAM) becomes fragmented. All sorts of problems will occur if that’s the case. So, when you clear the memory, you essentially give your PC a fresh start making sure new sources are available.
And while Windows offers a variety of ways to reboot your PC, all of them practically work similarly. So you can pick whatever method that suits you best.
4. Cleans up temporary files
Just like fragmentation, a long period of wear and tear can also cause temporary glitches with your files and caches. When you restart your PC, these files are automatically cleared from the RAM, taking along corrupt or unnecessary files and bloating your RAM.
Reboot your Windows and fix all sorts of problems
Things that look simple or easy on the surface are rarely so; a Windows reboot is the perfect poster child for that. It fixes a triage of problems in a matter of seconds—all with a simple restart.
So, if you’re facing an abrupt problem that popped onto your screen out of the blue, always install the first try Windows reboot as the first solution.
While the core services and overall experience of working on Entra are the same, there are also some new features coming. For example, Microsoft announced Application Gateway for Containers on the Azure platform, available to use starting week.
According to Microsoft, Application Gateway for Containers is the evolution of the Application Gateway Ingress Controller (AGIC), a Kubernetes application that enables Azure Kubernetes Service (AKS) customers to use Azure’s native Application Gateway application load-balancer.
Microsoft also says that in its current form, AGIC monitors a subset of Kubernetes Resources for changes and applies them to the Application Gateway, utilizing Azure Resource Manager (ARM).
We are announcing Azure Application Gateway for Containers as a new SKU to the Application Gateway family. Application Gateway for Containers is the next evolution of Application Gateway + Application Gateway Ingress Controller (AGIC), providing application (layer 7) load balancing and dynamic traffic management capabilities for workloads running in a Kubernetes cluster.
Microsoft
Application Gateway for Containers – benefits and ways to use it
Performance: Achieve near-to-real-time convergence times to reflect add/remove of pods, routes, probes, and other load balancing configuration within Kubernetes yaml configuration.
Scale: Push boundaries past current AGIC limits, exceeding 1400 backend pods and 100 listeners with Application Gateway for Containers.
Deployment: Enable a familiar deployment of ARM resources via ARM, PowerShell, CLI, Bicep, and Terraform or define all configuration within Kubernetes and have Application Gateway for Containers manage the rest in Azure!
Gateway API support: The next evolution in defining Kubernetes service networking through expressive, extensible, and role-oriented interfaces.
Weighted / Split traffic distribution: Enable blue-green deployment strategies and active / active or active / passive routing.
Application Gateway for Containers is made up of three components: Application Gateway for Containers, Frontends and Associations. When you want to initiate a deployment, these dependencies will be referenced: Private IP address, Subnet Delegation, and a User-asigned Managed Identity. You can see how it works in the picture below.
This is how Application Gateway for Containers works.
There are two strategies of deployment within Application Gateway for Containers, according to Microsoft.
Bring your own (BYO) deployment: In this deployment strategy, deployment and lifecycle of the Application Gateway for Containers resource, Association and Frontend resource is assumed via Azure portal, CLI, PowerShell, Terraform, etc. and referenced in configuration within Kubernetes.
Managed by ALB Controller: In this deployment strategy ALB Controller deployed in Kubernetes is responsible for the lifecycle of the Application Gateway for Containers resource and its sub resources. ALB Controller creates Application Gateway for Containers resource when an ApplicationLoadBalancer custom resource is defined on the cluster and its lifecycle is based on the lifecycle of the custom resource.
For now, Application Gateway for Containers is currently offered in the following regions:
Australia East
Central US
East Asia
East US
East US2
North Central US
North Europe
South Central US
Southeast Asia
UK South
West US
West Europe
Are you excited about this new Azure product? Let us know in the comments section below.
You can never be too safe online with the avalanche of trackers, phishing websites, and push services that nag you to accept cookies.
With the Fortect Browser Protection extension, you can say goodbye to all that and continue your online activity safely. Here, we will discuss the benefits of using this tool and all its features and show you how to use the browser extension.
What are the benefits of using Fortect Browser Protection?
First of all, we have tested the Fortect app for PC, an optimizer tool that can fix any Windows system issues and optimize your machine to top performance.
The Fortect Browser Protection extension is a free offspring developed by the same company to help you safeguard your online activity.
Here are some of the benefits that Fortect Browser Protection brings to the table:
It detects any suspicious website activity and issues a warning
Blocks any malicious website
Identifies any harmful extensions and blocks them
Alerts you and prevents websites from pushing annoying notifications to your browser
It notifies you about any information leaks in your browser
For such a small browser extension, Fortect Browser Protection greatly protects your online activity. Let’s go on and see how you can install and use it.
How do I install and use Fortect Browser Protection?
Go to the Chrome web store and click the Add button to your browser.
Click the Add extension button.
After the extension is added, hit Continue in the new window.
Fortect Browser Protection will scan your browser for any issues.
After just a few seconds, the tool will finish the process. Hit the Continue button again to fix the issues it found.
Next, click the Remove Active issues to eliminate the problems in your browser.
After the issues have been fixed, click the Continue onboarding button to create an account.
You need to input a strong password containing at least 8 characters with big and small letters, digits and at least a special character.
Finally, you get to set the Real Time Protection settings. By default, they are all activated, but you may disable any of them later anyway.
That’s it! Click on the Fortect Protection Suite button to get into the main menu of the web app.
If it looks complicated, we assure you it’s not! The process takes less than 3 minutes, including scanning and issuing clearance.
It’s also worth noting that although we used Google Chrome as an example here, it works on all Chromium browsers, including Opera and Edge. We actually installed Fortect Browser Protection on the mentioned browsers to protect them as well.
However, after creating an account for Fortect Browser Protection, the process will be much quicker when you install the extension on other browsers.
That is because you will only need to enter your account and password that you have already set up, and you will be ready to go.
How do I use Fortect Browser Protection?
There is nothing much to do except keep the extension active with all the settings activated. However, we will show you how you can monitor Fortect Browser Protection.
To access it, click on the Extensions button in Chrome and select Fortect Browser Protection. The process is similar in other browsers.
A new page will open and you will see the main menu, with an overview of all the possible issues found on your browser.
Of course, Fortect Browser Protection will notify you if there are any impending threats when you are browsing and you will be redirected to this page if needed.
In the Safe Browsing tab, you can disable or enable the alerts and blocking options for malicious websites.
Next, you may access the Extensions tab where you can turn on or off the malicious extensions removal and notifications.
In the Notifications tab below, you will be able to enable or disable the annoying notifications blocking from any websites.
At last, from the Settings tab, you may change your account information and password.
That’s all about Fortect Browser Protection! It’s a very useful extension you install and forget about until you visit a malicious or wrongful website trying to attack or annoy you.
Of course, you may use a browser with tracking protection, but it won’t be as efficient in dealing with phishing websites like this extension.
We remind you that this extension is free, and it works in any Chromium browser such as Google Chrome, Opera, Microsoft Edge, and more.
Most modern antivirus software will also monitor your online and browsing activity and block impending threats.
However, if you don’t have the budget for a complete security solution, Fortect Browser Protection offers the basic features to safeguard your browsing sessions for free.
The extension is small, and from our tests, it worked flawlessly on Chrome, Opera, and Edge browsers.
It detected and removed no less than 26 threats, including the waisheph adware we didn’t even know about, and restored the browser to perfect functionality.
As it’s free, you may test Fortect Browser Protection yourself and tell us about your experience in the comments below.
If you’re using PowerPoint often in your meetings, and you think that your presentations are engaging, and overall informative, it’s useful to know what are the other people actually thinking about it.
While it can be a punch to your presentation abilities, getting feedback will actually help you improve the experience of presenting. And most of all, everybody will be happy and contented at the end.
So, Microsoft has released a feature that allows you to gather live feedback on your PowerPoint presentations. This way you’ll understand much better what the audience wants from you, and you can create meaningful conversations. And guess what: it’s actually easy to do it.
How to get feedback on your PowerPoint presentations using Microsoft Form
Open your PowerPoint on your Windows device, and then open your presentation to which you want to get feedback. Once you’ve done this, click on the Insert pane, and go to the Forms.
In the Forms pane, select an existing form from the My Forms list.
If you want to engage with the audience and get a live feedback, select the Present for interaction meeting option.
The form then will generate a QR code and the audience can answer in real time. The results will also be visible in real-time.
You’re also able to collect feedback offline, by inserting a form into your slides and selecting the Collect responses offline option.
These features are now available in Microsoft PowerPoint now, to all Business and Education subscribers. So, you can start to ask people for feedback, especially in work or school contexts, where a presentation really matters.
What do you think about this new feature? Let us know in the comments section below.
If you’re a picture person, you have come across Microsoft’s Picture Manager. You can easily manage your picture library and do more with its additional features. All that is great, but some users are encountering errors dubbed OIS.exe.
This is a legitimate executable file, but if you encounter its errors, something could be wrong, and you need to address it immediately. Below, we share some of these errors and how to counter them.
What is OIS Microsoft?
The OIS.exe file is a legitimate file belonging to the Microsoft Office Suite and the executable file for Office Picture Manager.
Its basic role is to simply help in the organization of your photos in the picture manager. However, it can deviate from its normal functions and throw up some errors.
Some common application errors related to OIS.exe include:
OIS.EXE Error
Cannot find OIS.EXE
OIS.EXE needs to close
Fault in Software Path: OIS.EXE
OIS.EXE failed
Error starting program: OIS.EXE
OIS.EXE not valid
Sorry, we can’t find OIS.EXE
OIS.EXE can’t be found
Microsoft Office Picture Manager has stopped working
Problem starting application: OIS.EXE
OIS.EXE not working
Windows failed to start – OIS.EXE
OIS.EXE failed to initialize properly
These errors can be caused by:
Corrupt profile – If you’ve ever had a corrupt user profile, then you know how difficult it can be to do even the most basic of functions like launching an app. This could be one of the reasons why you may get one of the errors above.
Invalid registry entries – Over time, as you keep adding pictures to your library and moving things around, your disk can suffer from fragmentation and corrupt your registry. This can cause issues with your applications.
Insufficient space – Some applications require a significant amount of memory to run properly. In the absence of sufficient RAM, these apps will keep crashing.
Virus infection – If you download files from untrusted sites on the Internet, it’s pretty easy for malware to sneak into your PC and make changes. Worse still, a file with a similar name as OIS.exe may have found its way and now masquerading as the real one.
How do I fix OIS.exe application errors?
Start off with the following preliminary checks:
Verify the digital signature of the OIS.exe file first to ensure you’re dealing with a legitimate file.
Press the Windows + R keys to open the Run command dialog box.
Type appwiz.cpl in the dialog box and press Enter.
Then, locate and right-click the Microsoft Office suite or a specific Microsoft application from the list of applications, and select Change.
Further, click the Online Repair or Quick Repair and click on the Repair button.
Alternatively, hit the Windows key, and click on Settings.
Click on Apps then Installed apps.
Find Microsoft Office, click on the three ellipses, then select Advanced options.
Scroll down and select Reset.
This will restore the app to its default settings.
2. Run a virus scan
Press the Windows key, search Windows Security, and click Open.
Select Virus & threat protection.
Next, press Quick scan under Current threats.
If you don’t find any threats, proceed to perform a full scan by clicking on Scan options just below Quick scan.
Click on Full scan, then Scan now to perform a deep scan of your PC.
Wait for the process to finish and restart your system.
Sometimes, Windows Defender won’t detect the latest viruses and malware, thus we suggest you try a reliable antivirus solution like TotalAV to find and delete instantly all types of digital threats.
Press Windows + I key to open the Windows Settings app.
Click on Apps and click Installed apps.
Search for the Office app, and click the three dots button against it. Select Uninstall from the drop-down and then click on Uninstall to confirm the action.
Restart your PC, then reinstall Microsoft Office to check if the error persists.
Press Windows + R to launch the Run console, enter netplwiz in the text field, and click OK.
Click Add in the User Accounts window.
Select Sign in without a Microsoft account (not recommended).
Click on Local account button.
Enter a username and password (optional) for the new user account, and a hint, in case you set a password. Once done, click on Next.
Click on Finish to create the Local account.
Most users seemed to fix the issue by switching user profiles, so we can conclude that a corrupt profile was the cause of the OIS.exe application errors. A user admits to having the app working again after creating a new profile.
Since its working in the new Windows user account, the corruption seems to be in the old profile.
If you’re unlucky with any of the above methods, we propose a System Restore. This should take you to an earlier time when your PC was working usually, but you need to have created a restore point.
That marks the end of this article, but keep it interactive in the comment section below with any additional thoughts or suggestions.
If you are connecting to a server via SSH for the first time, you are likely to get unable to establish the authenticity of host error. This occurs because your SSH client does not recognize the server.
However, this problem can still occur due to various factors like a man-in-the-middle attack. Irrespective of the cause of the issue, you can fix it with the simple yet effective solutions in this guide.
Why am I unable to establish the authenticity of a host?
Listed below are some of the reasons you might be getting unable to establish the authenticity of host error on the remote server you are trying to connect to:
First-time connection – If you are connecting to a server with your SSH client for the first time, you will surely get this error. This is a form of security alert required for the verification and authentication of the connection.
Wrong remote key – In some cases, this error might be due to an incorrect host key. This might be because the public key has been changed (via an update) or compromised.
Availability of multiple host keys – If the server host key is of different types, you might encounter this error. This is because ECDSA might be the one required, while the one in the known host is RSA.
Man-in-middle attack – If you are getting this issue in subsequent connections with a known host, it might be due to an attacker listening in between your connection with the host.
Now that we know the causes of this error, let’s fix it using the solutions below.
How can I verify and validate the host key?
Check the first word on the second line of the unable to establish the authenticity of the host prompt for the SSH key algorithm.
Next, check the first few characters of the fingerprint to determine the hash. It is usually SHA256 or MD5.
Now, sign in to your remote server and run the following commands depending on the hash: For SHA256:ssh-keygen -lf /etc/ssh/ssh_host_ed25519_key.pubFor MD5: ssh-keygen -E md5 -lf /etc/ssh/ssh_host_ed25519_key.pub
Finally, compare the fingerprint with what you see when you open an SSH connection on your device. If it is the same, you can continue with the connection. Else, cancel the connection and report the issue.
How can I fix the authenticity of host can’t be established error?
Before proceeding to the fixes in this section, try the following troubleshooting steps:
Check network connection
Upgrade SSH software
Make sure -SSH/known_host is writable
If the issue persists, you can now proceed to the detailed solutions below:
1. Skip HostKey checking
This is one of the easiest ways to fix the unable to establish the authenticity of host error. However, it is highly risky, as it basically removes the alert and exposes your PC if the prompt is caused by a man-in-the-middle attack.
But if you are sure the error message is because the host key was updated or reconfigured, add the entry below in the known_host file: $ ssh -o "UserKnownHostsFile=/dev/null" -o "StrictHostKeyChecking=no" user@host
This creates a null verification file and helps you bypass the security alert. To set this up permanently for the current user, add the above entry to the ~/.ssh/config file.
Finally, add it to the /etc/ssh/ssh_config file instead to apply it to all users.
2. Verify the remote host
In some cases, this issue might be because the host key is wrong or not functional. Also, the server itself might not be legit.
In this case, you need to perform an SSH host key verification to be sure the key is correct and ensure the server is not compromised.
To do this, run the command below (change website with the actual domain or IP): ssh-keyscan website.com
This command will show the remote host’s public key on your terminal. You can now compare the public key with the one provided by the server admin or in the known_hosts file.
3. Remove the old host key
If the unable to establish the authenticity of host CA error is due to changes made to the key, you need to remove the old key.
To do this, run the command below (change website with the actual domain or IP): ssh-keygen -R website.com
This will remove the old key from your known_hosts file and fix the issue.
4. Flush DNS cache
Press the Windows key + S, type cmd, and select Run as administrator under Command Prompt.
Type the command below and hit Enter: ipconfig/flushdns
Finally, wait for the command to finish running and try the connection again.
At times, the unable to establish the authenticity of host issue might be caused by a misconfigured DNS host. To fix this, you need to flush the DNS cache and restart the connection.
Are there any risks associated with clearing known hosts?
The known_hosts file holds all your trusted keys and should not be wiped. But if you clear the file, it shouldn’t cause any issues.
You might only encounter the unable to establish the authenticity of host error on subsequent connections to a trusted server.
However, the file will be recreated automatically after you connect to another remote host with an SSH client.
How can I prevent host authenticity problems in the future?
The unable to establish the authenticity of host issue is normal when you are connecting to a server for the first time. So, you shouldn’t disable the security alert, ideally.
However, to prevent this error on trusted servers, especially on subsequent connections, make sure the host is not compromised, and you are connecting to the correct and updated key.
We have reached the end of this guide on how to fix the unable to establish the authenticity of host issue. This prompt is a normal security alert in most cases but can also mean the remote host has been compromised.
Also, if you are getting the error when connecting to a server for the first time, know that it is something normal. So, you can just select the Yes option if you trust the server.
The error code Student in Rec Room is one of the common issues encountered by users while trying to launch the otherwise excellent game. This issue usually occurs if your game is outdated.
It is even more frustrating because it prevents you from playing any online video game till it is fixed. The good thing is that you can fix the error code Student provided you have the right information. And that is what we will provide you in this detailed guide.
What causes the Rec Room error code Student?
The first thing to look at if you are dealing with this error on your device is the version of Rec Room you are running. This is because an outdated game is the major cause of the error code Student.
Aside from this, below are other potential causes of the error:
Compatibility issues – While Rec Room is a widely played interactive game, it still has some selected devices it works well on. So, ensure your device is compatible with the game to prevent different error codes.
Server issues – In some cases, you might be getting this error because of issues with Rec Room’s server. You need to check the official platform for any downtime report to be sure this is not the case.
Unstable internet connection – If your internet connection is weak or unstable, you are likely to get various error codes, including this one. So, you need to ensure that your connection is not only active but also stable.
How to Fix the Error Code Student in Rec Room:
1. Update Rec Room
Click the Microsoft Store icon on your Taskbar.
Choose Library in the left pane.
Finally, click the Get updates button, and wait for all your apps to be updated, including Rec Room.
With an outdated game being the major cause of the error code Student on Rec Room, you need to update it before proceeding to the other solutions.
If you play the game on your mobile device or Xbox, you should be able to update it from your app store.
To be sure that your device meets the requirement to play the game, check the list below:
Windows 7 and above
iOS – iPhone:iPhone SE, 7 Plus, 8 Plus, X, XS, XS Max, and XR, 11, 12, 13, 13 Pro, 14, 14 Pro; iPad: iPad (2017, 2018), iPad Air 2 and iPad Air (2018), iPad Mini 5 (2019) and 6 (2021), iPad Pro; iPod Touch (2019)
Android – Must be released after June 2019; 3 GB memory; Android version 10 or 11
PlayStation – PlayStation 4 and above
Xbox – Xbox One, One S, Series S, and Series X
Oculus/Meta – Oculus Rift CV1, Rift S (requires PC), Meta Quest 2, Meta Quest Pro
If your device meets the above specifications, make sure you install the latest update for your operating system to prevent problems like an error code Notebook on Rec Room.
3. Check the Rec Room server status
Most Rec Room issues are server related, and this error code Student is no different. So, you need to go to Rec Room’s official Discord or Subreddit page to check for any related announcements.
If the server is down, there is nothing you can do but wait for the situation to be resolved. If there are no server issues, however, you can be sure that the problem is from your end.
4. Check the internet connection
Being a famous cross-platform virtual reality game, you need a stable internet connection to enjoy Rec Room. Anything short of this, and you are likely to face issues like error code Summer and Student.
To confirm your connection strength and stability, you use websites like Speedtest. If you are on a wireless connection that is slow, you switch to a wired connection or move closer to the router.
Another option is to disconnect other devices connected to your network. If these do not improve your network speed, you need to switch to another one entirely to enjoy your favorite video game.
5. Reinstall Rec Room
Press the Windows key + R, type appwiz.cpl, and click OK.
Right-click the Rec Room app, select Uninstall, and follow the onscreen instruction to complete the removal process.
If you still can’t fix the error code Student on Rec Room after applying the solutions above, you need to reinstall the game.
This is because your game installation might be faulty. Reinstalling it from official sources should help you clear the glitches causing the issue.
Rec Room is known for its integrated game creation system and the ability to allow users to play cross-platform games.
However, things are not always straightforward, as users encounter the error code Student while trying to launch the game. This error is usually caused by an outdated game, among other factors.
Irrespective of the cause, the solutions in this detailed guide should help you fix the issue effortlessly. If you are dealing with other issues like the error code Notebook in Rec Room, we have a comprehensive guide for that too.
While Windows 11 is not yet Microsoft’s most popular operating system, it has come a long way since it was released, almost 2 years ago. The Redmond-based tech giant is integrating AI into Windows 11, with Copilot currently being live in the Windows Insider Program.
This week, Microsoft also released KB5028245, an update patch that comes with some important improvements and quality updates to Windows 11. If your Windows 11’s Sleep mode is buggy, and it affects your display and audio drivers when you wake your computer up, then this update will fix it.
Plus, the VPN connections are also getting fixed with this update. Check out below all the changes and improvements coming to Windows 11.
KB5028245 – What’s new?
Highlights
This update addresses an issue that affects virtual private networks (VPN). There might be excessive Address Resolution Protocol (ARP) requests to the network gateway. This occurs when the VPN is on a wireless mesh network that uses an aggressive throttling algorithm. Because of this, network performance is poor.
This update addresses an issue that affects certain display and audio devices. They are missing after your system resumes from sleep.
Improvements
This non-security update includes quality improvements. When you install this KB:
New! This update affects the Handwriting Software Input Panel (SIP), the Handwriting Engine, and the Handwriting Embedded Inking Control. They now support GB18030-2022 conformance level 2. Because of this, they meet the level 3 requirements.
This update affects the Windows Push Notification Services (WNS). It makes the connection between the client and the WNS server more reliable.
This update addresses an issue that affects UI Automation and caching mode.
This update addresses an issue that affects the Windows Notification Platform. It fails to send notifications from applications to you.
This update addresses an issue that affects hybrid joined devices. You cannot sign in to them if they are not connected to the internet. This occurs when you use a Windows Hello for Business PIN or biometric credentials. This issue applies to a cloud trust deployment.
This update affects Windows Autopilot profiles. The process to download the Windows Autopilot policy is more resilient. This helps when a network connection might not be fully initialized. This update increases the retry attempts when you try to download the Windows Autopilot profile.
This update addresses an issue that might affect Win32 and Universal Windows Platform (UWP) apps. They might close when devices enter Modern Standby. Modern Standby is an expansion of the Connected Standby power model. This issue occurs if certain Bluetooth Phone Link features are turned on.
This update addresses an issue that affects the Windows Management Instrumentation (WMI) repository. This causes an installation error. The issue occurs when a device does not shut down properly.
This update addresses an issue that affects certain CPUs. There is inconsistent reporting of the L2 cache.
This update addresses an issue that affects Event Forwarding Subscriptions. When you add an Event Channel to the subscription, it forwards events you do not need.
This update enhances hinting for some of the letters of the Verdana Pro font family.
This update affects user mode printer drivers. They unload unexpectedly. This occurs when you print from multiple print queues to the same printer driver.
This update addresses an issue that might affect your computer when you are playing a game. Timeout Detection and Recovery (TDR) errors might occur.
This update affects text edit controls in XAML. You cannot edit the controls again after they become read only. This occurs when you use the new Microsoft Input Method Editor for Japanese, Chinese, and Korean.
This update makes Narrator announce the “Change product key” label.
This update addresses an issue that affects the Defender Firewall Profile. It fails to automatically switch from a LAN that is trusted to a public network.
This update makes Country and Operator Settings Asset (COSA) profiles up to date.
This update addresses a deadlock in Internet Protocol Security (IPsec). When you configure servers with IPsec rules, they stop responding. This issue affects virtual and physical servers.
This update addresses an issue that affects the MPSSV service. The issues causes your system to restart repeatedly. The stop error code is 0xEF.
This update addresses an issue that affects a Clustered Shared Volume (CSV). The CSV fails to come online. This occurs if you enable BitLocker and local CSV managed protectors, and the system recently rotated the BitLocker keys.
This update addresses an issue that causes Windows to fail. This occurs when you use BitLocker on a storage medium that has a large sector size.
This update affects the Windows Kernel Vulnerable Driver Blocklist, DriverSiPolicy.p7b. It adds drivers that are at risk for Bring Your Own Vulnerable Driver (BYOVD) attacks.
This update addresses an issue that affects the fastfat file system driver. It stops responding because of a race condition.
This update addresses an issue that affects refsutil.exe. Options, like salvage and leak, do not work properly on Resilient File System (ReFS) volumes.
This update addresses an issue that affects I/O over Server Message Block (SMB). It might fail when you use the LZ77+Huffman compression algorithm.
What do you think about this patch’s changes and improvements? Let us know in the comments section below.
Several Windows users have reported that they are unable to access hyperlinks in Microsoft Outlook and are interrupted by an error message – Something unexpected went wrong with this URL: <hyperlink>. The system cannot find the file specified. When attempting to do so.
The error even prevents you from accessing the important Outlook hyperlinks using the desktop search feature, resolving which can be tricky. But don’t worry! We’ve got you covered.
Why do I get the Something unexpected went wrong with this URL error?
There are no clear indications that can pinpoint what caused Something unexpected went wrong with this URL in Outlook. However, some of the obvious ones are as follows:
Incorrect default browser settings – Something unexpected went wrong with this URL error occurs on a PC having multiple web browsers and a default internet browser is not chosen in Outlook.
Conflicting apps – If you encountered this error abruptly, there is a good chance that a recently installed app conflicts with MS Outlook.
Corrupt Outlook profiles – An issue in your Outlook profile you are logged into can prevent you from visiting the hyperlinks in the Outlook app.
Buggy Windows updates – Many users have reported that they started experiencing the issue right after updating Windows which might have damaged the registry entries.
Less storage space – Outlook generally throws the something went wrong error if your PC does not have enough RAM to execute the command.
Now that you know what problems are triggering the error at hand, let’s begin troubleshooting them.
How do I fix Something unexpected went wrong with this URL Outlook error?
We recommend you try these simple workarounds before implementing the complex solutions given below.
Restart Outlook as well as your PC to reset the cache memory.
Clear the search history and corrupt cache of the current browser.
Try the following solutions if the above tricks do not alleviate the problem.
1. Change the default web browser
Launch the Outlook app on your Windows PC.
Select the File menu on top and choose Options from the left sidebar.
Choose the Advanced option from the left sidebar of the Outlook options window.
Scroll down to the Link Handling section on the right and choose your preferred web browser in the Open hyperlinks from Outlook dropdown.
Finally, click the OK button to save the changes and exit Outlook.
Alternatively, You can change the default browser from the default program feature of the control panel window. For this go to Control Panel > Add and Remove Programs > Default Programs > Set your default programs.
Similarly, you can go to the default apps section in the Windows settings app to set default apps to handle HTM and HTML file types.
2. Clear Outlook cache
Use the Windows + R shortcut to bring up the Run dialog box.
Type or paste the following command in the text box and press the OK button to access the Outlook cache folder. %localappdata%\Microsoft\Outlook
Look for the RoamCache folder, right-click it, and choose the Delete option from the context menu.
3. Boot PC in Clean Boot State
Use the Windows + R shortcut using the Run dialog box. Type the following command in the text box and press the OK button. msconfig
Disable the checkbox for Load startup items and enable the Load system services option preset in the General tab of the System Configuration window.
After this, navigate to the Services tab, enable the checkbox preceding the Hide all Microsoft services on the bottom left, and press the Disable All button.
Click Apply to save the changes and OK to exit the System Configuration window.
Now restart your computer to boot your PC in the clean boot state.
Try clicking the hyperlink in the clean boot state. If you do not encounter any error, it means that some third-party programs and background services are interfering with Outlook. You should re-enable all the startup services one by one to identify the one causing the problem and uninstall the apps that are related to the service.
4. Run SFC and DISM scans
Press the Windows key, type cmd in the search bar on top, and click the Run as administrator option in the right results section.
Choose Yes on the User Action Control prompt to launch Command Prompt with administrative privileges.
Type or paste the following command and press the Enter key to run the SFC scan. sfc/scannow
After the SFC scan gets completed, type or paste the following command to begin scanning the system files with the DISM tool. DISM.exe /Online /Cleanup-Image /Restorehealth
Now reboot your PC and see if something unexpected went wrong with this URL error is resolved in MS Outlook.
The SFC and DISM tools will restore the missing or corrupt protected system files and images by replacing them with the cached copy stored in the compressed folder. You can also try a reliable repair tool to automate the procedure.
5. Perform System Restore
Click the Windows icon to bring up the Start menu, type create a restore point in the search bar, and click the relevant search result.
Press the System Restore button located in the System Protection tab of the System Properties window.
You need to select the restore point created before installing a major Windows update or when you could easily access hyperlinks in Outlook and hit Next.
Finally, press the Finish button to initiate the system restoration process.
Restoring your system to a previous point in time will remove the bugs and registry entries interfering with your browser’s ability to load the hyperlinks from Outlook.
That’s all about it! We’re hopeful that the solutions listed in this guide successfully resolved the error in Microsoft Outlook. If not, you are recommended to reinstall the Outlook application on your PC.
You may also want to fix the Outlook error 500 if you frequently encounter the error when using the application.
In case you have any queries or suggestions for us, feel free to drop them in the comments section below.