Netflix, the popular streaming service, is taking a step back to reevaluate its advertising partnership with tech giant Microsoft, preparing for an anticipated decline in ad prices, according to a report in the Wall Street Journal published on Thursday.
The restructuring comes following the firm’s introduction of a lower-priced ad-supported subscription plan last year which was met with a disappointing response in terms of growth.
Moreover, the move corresponds with the streaming company’s effort to attract customers to its $7-per-month subscription plan. The plan, which embedded commercials in the content, was introduced in 12 different markets across the globe, including the United States. For this enterprise, Microsoft was selected as Netflix’s technology and sales partner, largely thanks to its agreed-upon revenue guarantee.
However, the failure to achieve anticipated ad tier growth rates is causing the streaming giant to reconsider the financial facets of the agreement. The media company is contemplating cutting down on the revenue guarantee with Microsoft according to the report. There is an undercurrent of dissatisfaction among Netflix executives over Microsoft’s inability to sell as much ad inventory as originally expected.
Adding to this, Netflix has started preliminary discussions with other potential partners for selling ads. Promising these partners better deals, Netflix seems to be shopping around to find options beyond just Microsoft.
This shift could potentially bring more variety in advertisement sales strategy for Netflix.
The restructuring plan also comes with a knock-on effect on the cost of advertising. Advertisers are now agreeing to pay Netflix roughly between $39 and $45 per 1,000 viewers, as per recent deals. This marks a significant drop from the previously standing rate of about $45 to $55 per deal, as acknowledged by ad buyers.
While this ongoing recalibration poses a shift in Netflix’s business strategy, how it will play out in the long term remains to be seen.
If you have been using Windows, or any piece of tech for that matter, for a considerable stretch of time now, you would have easily heard about using rebooting as the quickest trick to fixing your tech woes.
Often offered as the first solution to a variety of errors on Windows from almost all tech community, a quick restart does indeed accomplish the job well enough a lot of times. So, what’s the secret behind Windows reboot? Why and how does it fix so many problems on its own? Let’s jump right in and find out.
4 reasons a reboot fixes so many Windows problems
A quick restart is handy in fixing a variety of errors on your computer. It does this in different ways, and often saves you a lot time in the process as well. So, let’s look at why that is the case, starting with why and how a restart helps you with updates.
1. Necessary for updates
A restart is generally helpful if you have done any updates or installed some patches manually. For instance, a restart makes sure your updates are appropriately integrated into your Windows; this is particularly true for updates related to system files or other critical components.
2. Resource management
Many apps and processes continue eating up resources from the background, even when you shut them down a while ago. While this doesn’t happen often, it still occurs enough to need unique apps to free up memory space.
A quick reboot can be your ally in these cases. Instead of a third-party app, you can use a Windows restart. A reboot releases your Windows memory from these processes and apps by clearing your RAM, thus making it fresh to be used again.
3. A memory reset
Over a period of time, the memory that your apps occupy (RAM) becomes fragmented. All sorts of problems will occur if that’s the case. So, when you clear the memory, you essentially give your PC a fresh start making sure new sources are available.
And while Windows offers a variety of ways to reboot your PC, all of them practically work similarly. So you can pick whatever method that suits you best.
4. Cleans up temporary files
Just like fragmentation, a long period of wear and tear can also cause temporary glitches with your files and caches. When you restart your PC, these files are automatically cleared from the RAM, taking along corrupt or unnecessary files and bloating your RAM.
Reboot your Windows and fix all sorts of problems
Things that look simple or easy on the surface are rarely so; a Windows reboot is the perfect poster child for that. It fixes a triage of problems in a matter of seconds—all with a simple restart.
So, if you’re facing an abrupt problem that popped onto your screen out of the blue, always install the first try Windows reboot as the first solution.
While the core services and overall experience of working on Entra are the same, there are also some new features coming. For example, Microsoft announced Application Gateway for Containers on the Azure platform, available to use starting week.
According to Microsoft, Application Gateway for Containers is the evolution of the Application Gateway Ingress Controller (AGIC), a Kubernetes application that enables Azure Kubernetes Service (AKS) customers to use Azure’s native Application Gateway application load-balancer.
Microsoft also says that in its current form, AGIC monitors a subset of Kubernetes Resources for changes and applies them to the Application Gateway, utilizing Azure Resource Manager (ARM).
We are announcing Azure Application Gateway for Containers as a new SKU to the Application Gateway family. Application Gateway for Containers is the next evolution of Application Gateway + Application Gateway Ingress Controller (AGIC), providing application (layer 7) load balancing and dynamic traffic management capabilities for workloads running in a Kubernetes cluster.
Microsoft
Application Gateway for Containers – benefits and ways to use it
Performance: Achieve near-to-real-time convergence times to reflect add/remove of pods, routes, probes, and other load balancing configuration within Kubernetes yaml configuration.
Scale: Push boundaries past current AGIC limits, exceeding 1400 backend pods and 100 listeners with Application Gateway for Containers.
Deployment: Enable a familiar deployment of ARM resources via ARM, PowerShell, CLI, Bicep, and Terraform or define all configuration within Kubernetes and have Application Gateway for Containers manage the rest in Azure!
Gateway API support: The next evolution in defining Kubernetes service networking through expressive, extensible, and role-oriented interfaces.
Weighted / Split traffic distribution: Enable blue-green deployment strategies and active / active or active / passive routing.
Application Gateway for Containers is made up of three components: Application Gateway for Containers, Frontends and Associations. When you want to initiate a deployment, these dependencies will be referenced: Private IP address, Subnet Delegation, and a User-asigned Managed Identity. You can see how it works in the picture below.
This is how Application Gateway for Containers works.
There are two strategies of deployment within Application Gateway for Containers, according to Microsoft.
Bring your own (BYO) deployment: In this deployment strategy, deployment and lifecycle of the Application Gateway for Containers resource, Association and Frontend resource is assumed via Azure portal, CLI, PowerShell, Terraform, etc. and referenced in configuration within Kubernetes.
Managed by ALB Controller: In this deployment strategy ALB Controller deployed in Kubernetes is responsible for the lifecycle of the Application Gateway for Containers resource and its sub resources. ALB Controller creates Application Gateway for Containers resource when an ApplicationLoadBalancer custom resource is defined on the cluster and its lifecycle is based on the lifecycle of the custom resource.
For now, Application Gateway for Containers is currently offered in the following regions:
Australia East
Central US
East Asia
East US
East US2
North Central US
North Europe
South Central US
Southeast Asia
UK South
West US
West Europe
Are you excited about this new Azure product? Let us know in the comments section below.
You can never be too safe online with the avalanche of trackers, phishing websites, and push services that nag you to accept cookies.
With the Fortect Browser Protection extension, you can say goodbye to all that and continue your online activity safely. Here, we will discuss the benefits of using this tool and all its features and show you how to use the browser extension.
What are the benefits of using Fortect Browser Protection?
First of all, we have tested the Fortect app for PC, an optimizer tool that can fix any Windows system issues and optimize your machine to top performance.
The Fortect Browser Protection extension is a free offspring developed by the same company to help you safeguard your online activity.
Here are some of the benefits that Fortect Browser Protection brings to the table:
It detects any suspicious website activity and issues a warning
Blocks any malicious website
Identifies any harmful extensions and blocks them
Alerts you and prevents websites from pushing annoying notifications to your browser
It notifies you about any information leaks in your browser
For such a small browser extension, Fortect Browser Protection greatly protects your online activity. Let’s go on and see how you can install and use it.
How do I install and use Fortect Browser Protection?
Go to the Chrome web store and click the Add button to your browser.
Click the Add extension button.
After the extension is added, hit Continue in the new window.
Fortect Browser Protection will scan your browser for any issues.
After just a few seconds, the tool will finish the process. Hit the Continue button again to fix the issues it found.
Next, click the Remove Active issues to eliminate the problems in your browser.
After the issues have been fixed, click the Continue onboarding button to create an account.
You need to input a strong password containing at least 8 characters with big and small letters, digits and at least a special character.
Finally, you get to set the Real Time Protection settings. By default, they are all activated, but you may disable any of them later anyway.
That’s it! Click on the Fortect Protection Suite button to get into the main menu of the web app.
If it looks complicated, we assure you it’s not! The process takes less than 3 minutes, including scanning and issuing clearance.
It’s also worth noting that although we used Google Chrome as an example here, it works on all Chromium browsers, including Opera and Edge. We actually installed Fortect Browser Protection on the mentioned browsers to protect them as well.
However, after creating an account for Fortect Browser Protection, the process will be much quicker when you install the extension on other browsers.
That is because you will only need to enter your account and password that you have already set up, and you will be ready to go.
How do I use Fortect Browser Protection?
There is nothing much to do except keep the extension active with all the settings activated. However, we will show you how you can monitor Fortect Browser Protection.
To access it, click on the Extensions button in Chrome and select Fortect Browser Protection. The process is similar in other browsers.
A new page will open and you will see the main menu, with an overview of all the possible issues found on your browser.
Of course, Fortect Browser Protection will notify you if there are any impending threats when you are browsing and you will be redirected to this page if needed.
In the Safe Browsing tab, you can disable or enable the alerts and blocking options for malicious websites.
Next, you may access the Extensions tab where you can turn on or off the malicious extensions removal and notifications.
In the Notifications tab below, you will be able to enable or disable the annoying notifications blocking from any websites.
At last, from the Settings tab, you may change your account information and password.
That’s all about Fortect Browser Protection! It’s a very useful extension you install and forget about until you visit a malicious or wrongful website trying to attack or annoy you.
Of course, you may use a browser with tracking protection, but it won’t be as efficient in dealing with phishing websites like this extension.
We remind you that this extension is free, and it works in any Chromium browser such as Google Chrome, Opera, Microsoft Edge, and more.
Most modern antivirus software will also monitor your online and browsing activity and block impending threats.
However, if you don’t have the budget for a complete security solution, Fortect Browser Protection offers the basic features to safeguard your browsing sessions for free.
The extension is small, and from our tests, it worked flawlessly on Chrome, Opera, and Edge browsers.
It detected and removed no less than 26 threats, including the waisheph adware we didn’t even know about, and restored the browser to perfect functionality.
As it’s free, you may test Fortect Browser Protection yourself and tell us about your experience in the comments below.
If you’re using PowerPoint often in your meetings, and you think that your presentations are engaging, and overall informative, it’s useful to know what are the other people actually thinking about it.
While it can be a punch to your presentation abilities, getting feedback will actually help you improve the experience of presenting. And most of all, everybody will be happy and contented at the end.
So, Microsoft has released a feature that allows you to gather live feedback on your PowerPoint presentations. This way you’ll understand much better what the audience wants from you, and you can create meaningful conversations. And guess what: it’s actually easy to do it.
How to get feedback on your PowerPoint presentations using Microsoft Form
Open your PowerPoint on your Windows device, and then open your presentation to which you want to get feedback. Once you’ve done this, click on the Insert pane, and go to the Forms.
In the Forms pane, select an existing form from the My Forms list.
If you want to engage with the audience and get a live feedback, select the Present for interaction meeting option.
The form then will generate a QR code and the audience can answer in real time. The results will also be visible in real-time.
You’re also able to collect feedback offline, by inserting a form into your slides and selecting the Collect responses offline option.
These features are now available in Microsoft PowerPoint now, to all Business and Education subscribers. So, you can start to ask people for feedback, especially in work or school contexts, where a presentation really matters.
What do you think about this new feature? Let us know in the comments section below.
If you’re a picture person, you have come across Microsoft’s Picture Manager. You can easily manage your picture library and do more with its additional features. All that is great, but some users are encountering errors dubbed OIS.exe.
This is a legitimate executable file, but if you encounter its errors, something could be wrong, and you need to address it immediately. Below, we share some of these errors and how to counter them.
What is OIS Microsoft?
The OIS.exe file is a legitimate file belonging to the Microsoft Office Suite and the executable file for Office Picture Manager.
Its basic role is to simply help in the organization of your photos in the picture manager. However, it can deviate from its normal functions and throw up some errors.
Some common application errors related to OIS.exe include:
OIS.EXE Error
Cannot find OIS.EXE
OIS.EXE needs to close
Fault in Software Path: OIS.EXE
OIS.EXE failed
Error starting program: OIS.EXE
OIS.EXE not valid
Sorry, we can’t find OIS.EXE
OIS.EXE can’t be found
Microsoft Office Picture Manager has stopped working
Problem starting application: OIS.EXE
OIS.EXE not working
Windows failed to start – OIS.EXE
OIS.EXE failed to initialize properly
These errors can be caused by:
Corrupt profile – If you’ve ever had a corrupt user profile, then you know how difficult it can be to do even the most basic of functions like launching an app. This could be one of the reasons why you may get one of the errors above.
Invalid registry entries – Over time, as you keep adding pictures to your library and moving things around, your disk can suffer from fragmentation and corrupt your registry. This can cause issues with your applications.
Insufficient space – Some applications require a significant amount of memory to run properly. In the absence of sufficient RAM, these apps will keep crashing.
Virus infection – If you download files from untrusted sites on the Internet, it’s pretty easy for malware to sneak into your PC and make changes. Worse still, a file with a similar name as OIS.exe may have found its way and now masquerading as the real one.
How do I fix OIS.exe application errors?
Start off with the following preliminary checks:
Verify the digital signature of the OIS.exe file first to ensure you’re dealing with a legitimate file.
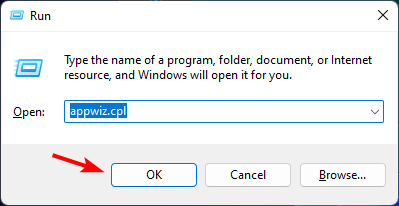
Press the Windows + R keys to open the Run command dialog box.
Type appwiz.cpl in the dialog box and press Enter.
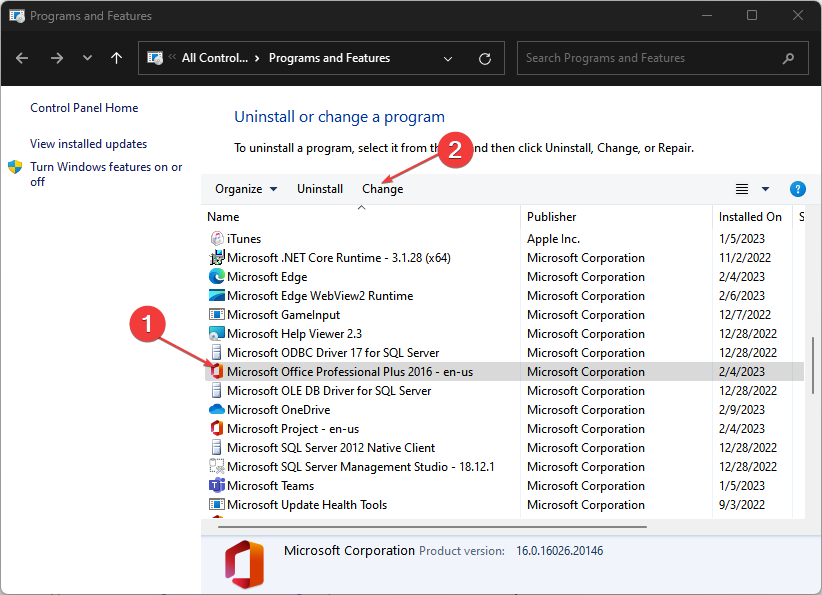
Then, locate and right-click the Microsoft Office suite or a specific Microsoft application from the list of applications, and select Change.
Further, click the Online Repair or Quick Repair and click on the Repair button.
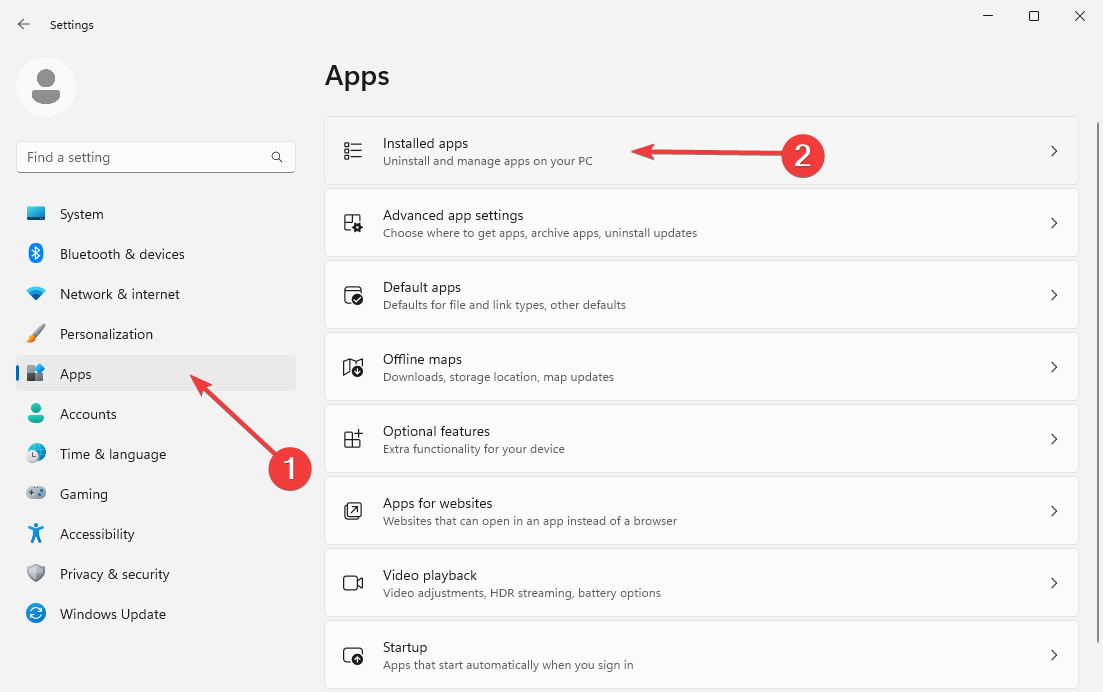
Alternatively, hit the Windows key, and click on Settings.
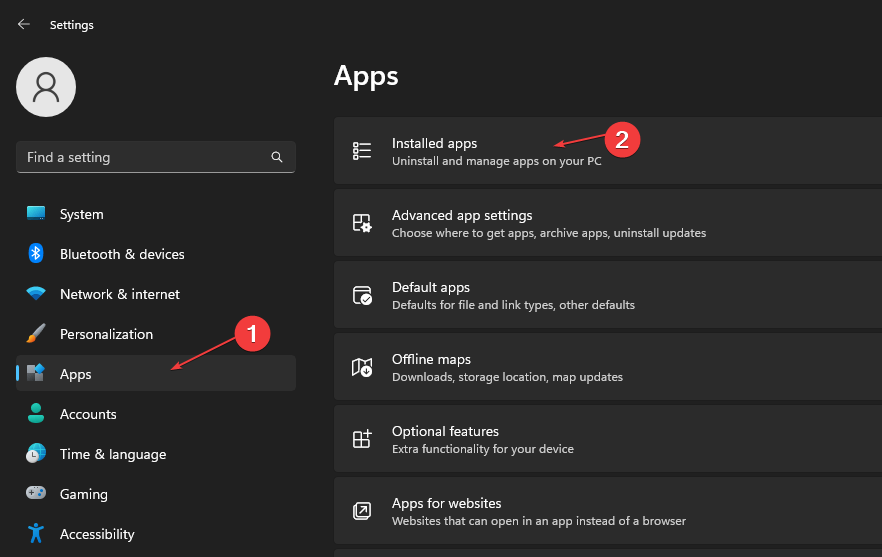
Click on Apps then Installed apps.
Find Microsoft Office, click on the three ellipses, then select Advanced options.
Scroll down and select Reset.
This will restore the app to its default settings.
2. Run a virus scan
Press the Windows key, search Windows Security, and click Open.
Select Virus & threat protection.
Next, press Quick scan under Current threats.
If you don’t find any threats, proceed to perform a full scan by clicking on Scan options just below Quick scan.
Click on Full scan, then Scan now to perform a deep scan of your PC.
Wait for the process to finish and restart your system.
Sometimes, Windows Defender won’t detect the latest viruses and malware, thus we suggest you try a reliable antivirus solution like TotalAV to find and delete instantly all types of digital threats.
Press Windows + I key to open the Windows Settings app.
Click on Apps and click Installed apps.
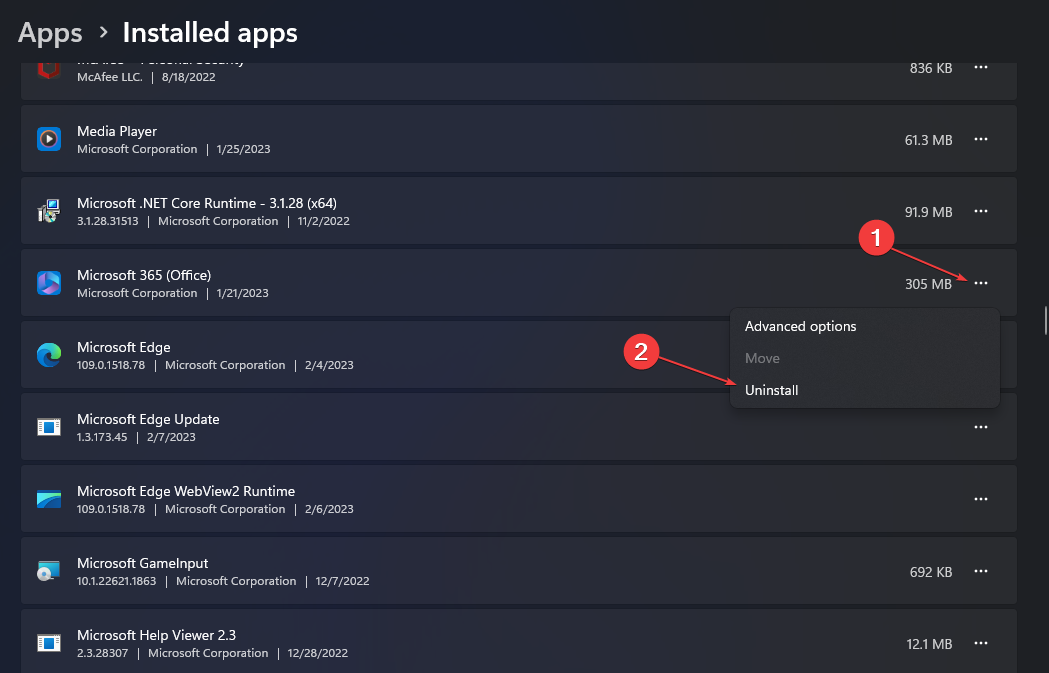
Search for the Office app, and click the three dots button against it. Select Uninstall from the drop-down and then click on Uninstall to confirm the action.
Restart your PC, then reinstall Microsoft Office to check if the error persists.
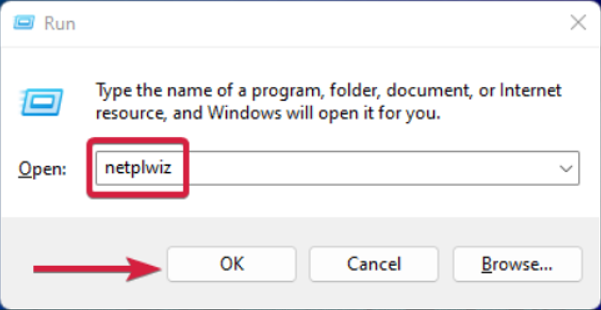
Press Windows + R to launch the Run console, enter netplwiz in the text field, and click OK.
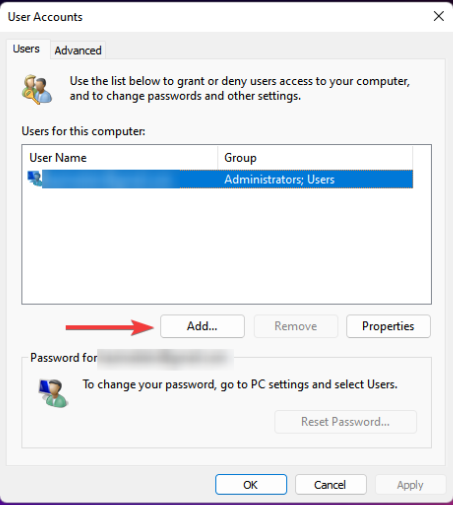
Click Add in the User Accounts window.
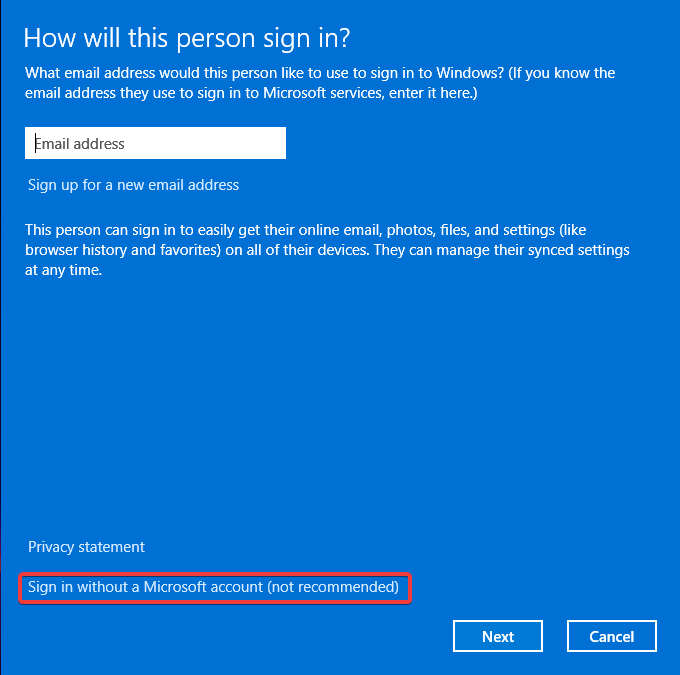
Select Sign in without a Microsoft account (not recommended).
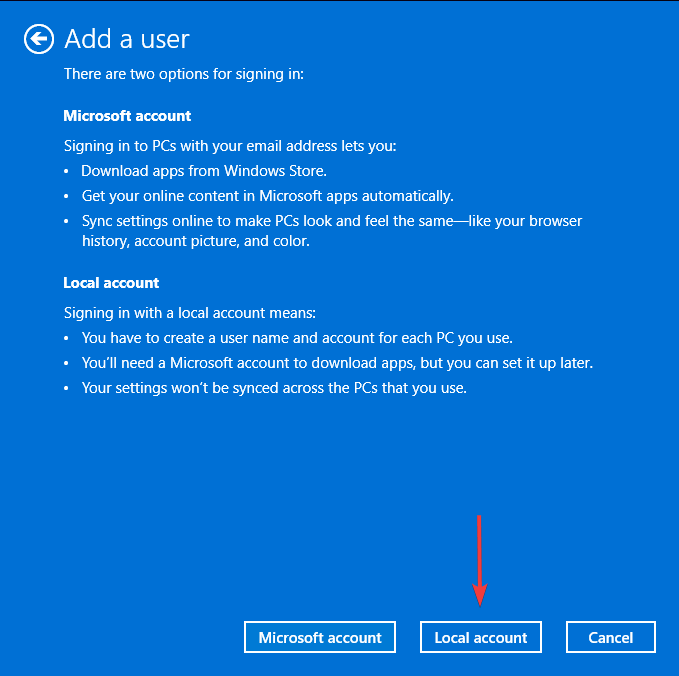
Click on Local account button.
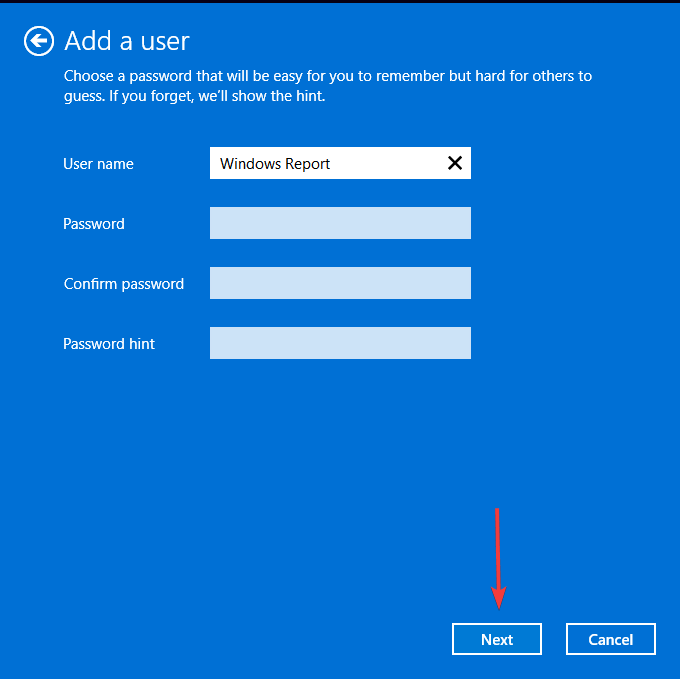
Enter a username and password (optional) for the new user account, and a hint, in case you set a password. Once done, click on Next.
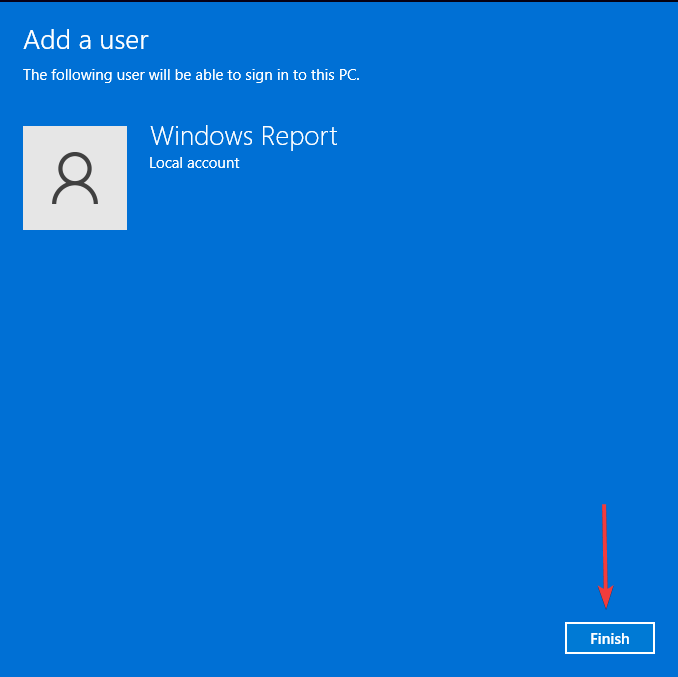
Click on Finish to create the Local account.
Most users seemed to fix the issue by switching user profiles, so we can conclude that a corrupt profile was the cause of the OIS.exe application errors. A user admits to having the app working again after creating a new profile.
Since its working in the new Windows user account, the corruption seems to be in the old profile.
If you’re unlucky with any of the above methods, we propose a System Restore. This should take you to an earlier time when your PC was working usually, but you need to have created a restore point.
That marks the end of this article, but keep it interactive in the comment section below with any additional thoughts or suggestions.
If you are connecting to a server via SSH for the first time, you are likely to get unable to establish the authenticity of host error. This occurs because your SSH client does not recognize the server.
However, this problem can still occur due to various factors like a man-in-the-middle attack. Irrespective of the cause of the issue, you can fix it with the simple yet effective solutions in this guide.
Why am I unable to establish the authenticity of a host?
Listed below are some of the reasons you might be getting unable to establish the authenticity of host error on the remote server you are trying to connect to:
First-time connection – If you are connecting to a server with your SSH client for the first time, you will surely get this error. This is a form of security alert required for the verification and authentication of the connection.
Wrong remote key – In some cases, this error might be due to an incorrect host key. This might be because the public key has been changed (via an update) or compromised.
Availability of multiple host keys – If the server host key is of different types, you might encounter this error. This is because ECDSA might be the one required, while the one in the known host is RSA.
Man-in-middle attack – If you are getting this issue in subsequent connections with a known host, it might be due to an attacker listening in between your connection with the host.
Now that we know the causes of this error, let’s fix it using the solutions below.
How can I verify and validate the host key?
Check the first word on the second line of the unable to establish the authenticity of the host prompt for the SSH key algorithm.
Next, check the first few characters of the fingerprint to determine the hash. It is usually SHA256 or MD5.
Now, sign in to your remote server and run the following commands depending on the hash: For SHA256:ssh-keygen -lf /etc/ssh/ssh_host_ed25519_key.pubFor MD5: ssh-keygen -E md5 -lf /etc/ssh/ssh_host_ed25519_key.pub
Finally, compare the fingerprint with what you see when you open an SSH connection on your device. If it is the same, you can continue with the connection. Else, cancel the connection and report the issue.
How can I fix the authenticity of host can’t be established error?
Before proceeding to the fixes in this section, try the following troubleshooting steps:
Check network connection
Upgrade SSH software
Make sure -SSH/known_host is writable
If the issue persists, you can now proceed to the detailed solutions below:
1. Skip HostKey checking
This is one of the easiest ways to fix the unable to establish the authenticity of host error. However, it is highly risky, as it basically removes the alert and exposes your PC if the prompt is caused by a man-in-the-middle attack.
But if you are sure the error message is because the host key was updated or reconfigured, add the entry below in the known_host file: $ ssh -o "UserKnownHostsFile=/dev/null" -o "StrictHostKeyChecking=no" user@host
This creates a null verification file and helps you bypass the security alert. To set this up permanently for the current user, add the above entry to the ~/.ssh/config file.
Finally, add it to the /etc/ssh/ssh_config file instead to apply it to all users.
2. Verify the remote host
In some cases, this issue might be because the host key is wrong or not functional. Also, the server itself might not be legit.
In this case, you need to perform an SSH host key verification to be sure the key is correct and ensure the server is not compromised.
To do this, run the command below (change website with the actual domain or IP): ssh-keyscan website.com
This command will show the remote host’s public key on your terminal. You can now compare the public key with the one provided by the server admin or in the known_hosts file.
3. Remove the old host key
If the unable to establish the authenticity of host CA error is due to changes made to the key, you need to remove the old key.
To do this, run the command below (change website with the actual domain or IP): ssh-keygen -R website.com
This will remove the old key from your known_hosts file and fix the issue.
4. Flush DNS cache
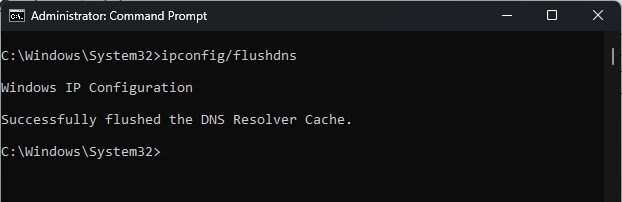
Press the Windows key + S, type cmd, and select Run as administrator under Command Prompt.
Type the command below and hit Enter: ipconfig/flushdns
Finally, wait for the command to finish running and try the connection again.
At times, the unable to establish the authenticity of host issue might be caused by a misconfigured DNS host. To fix this, you need to flush the DNS cache and restart the connection.
Are there any risks associated with clearing known hosts?
The known_hosts file holds all your trusted keys and should not be wiped. But if you clear the file, it shouldn’t cause any issues.
You might only encounter the unable to establish the authenticity of host error on subsequent connections to a trusted server.
However, the file will be recreated automatically after you connect to another remote host with an SSH client.
How can I prevent host authenticity problems in the future?
The unable to establish the authenticity of host issue is normal when you are connecting to a server for the first time. So, you shouldn’t disable the security alert, ideally.
However, to prevent this error on trusted servers, especially on subsequent connections, make sure the host is not compromised, and you are connecting to the correct and updated key.
We have reached the end of this guide on how to fix the unable to establish the authenticity of host issue. This prompt is a normal security alert in most cases but can also mean the remote host has been compromised.
Also, if you are getting the error when connecting to a server for the first time, know that it is something normal. So, you can just select the Yes option if you trust the server.
The error code Student in Rec Room is one of the common issues encountered by users while trying to launch the otherwise excellent game. This issue usually occurs if your game is outdated.
It is even more frustrating because it prevents you from playing any online video game till it is fixed. The good thing is that you can fix the error code Student provided you have the right information. And that is what we will provide you in this detailed guide.
What causes the Rec Room error code Student?
The first thing to look at if you are dealing with this error on your device is the version of Rec Room you are running. This is because an outdated game is the major cause of the error code Student.
Aside from this, below are other potential causes of the error:
Compatibility issues – While Rec Room is a widely played interactive game, it still has some selected devices it works well on. So, ensure your device is compatible with the game to prevent different error codes.
Server issues – In some cases, you might be getting this error because of issues with Rec Room’s server. You need to check the official platform for any downtime report to be sure this is not the case.
Unstable internet connection – If your internet connection is weak or unstable, you are likely to get various error codes, including this one. So, you need to ensure that your connection is not only active but also stable.
How to Fix the Error Code Student in Rec Room:
1. Update Rec Room
Click the Microsoft Store icon on your Taskbar.
Choose Library in the left pane.
Finally, click the Get updates button, and wait for all your apps to be updated, including Rec Room.
With an outdated game being the major cause of the error code Student on Rec Room, you need to update it before proceeding to the other solutions.
If you play the game on your mobile device or Xbox, you should be able to update it from your app store.
To be sure that your device meets the requirement to play the game, check the list below:
Windows 7 and above
iOS – iPhone:iPhone SE, 7 Plus, 8 Plus, X, XS, XS Max, and XR, 11, 12, 13, 13 Pro, 14, 14 Pro; iPad: iPad (2017, 2018), iPad Air 2 and iPad Air (2018), iPad Mini 5 (2019) and 6 (2021), iPad Pro; iPod Touch (2019)
Android – Must be released after June 2019; 3 GB memory; Android version 10 or 11
PlayStation – PlayStation 4 and above
Xbox – Xbox One, One S, Series S, and Series X
Oculus/Meta – Oculus Rift CV1, Rift S (requires PC), Meta Quest 2, Meta Quest Pro
If your device meets the above specifications, make sure you install the latest update for your operating system to prevent problems like an error code Notebook on Rec Room.
3. Check the Rec Room server status
Most Rec Room issues are server related, and this error code Student is no different. So, you need to go to Rec Room’s official Discord or Subreddit page to check for any related announcements.
If the server is down, there is nothing you can do but wait for the situation to be resolved. If there are no server issues, however, you can be sure that the problem is from your end.
4. Check the internet connection
Being a famous cross-platform virtual reality game, you need a stable internet connection to enjoy Rec Room. Anything short of this, and you are likely to face issues like error code Summer and Student.
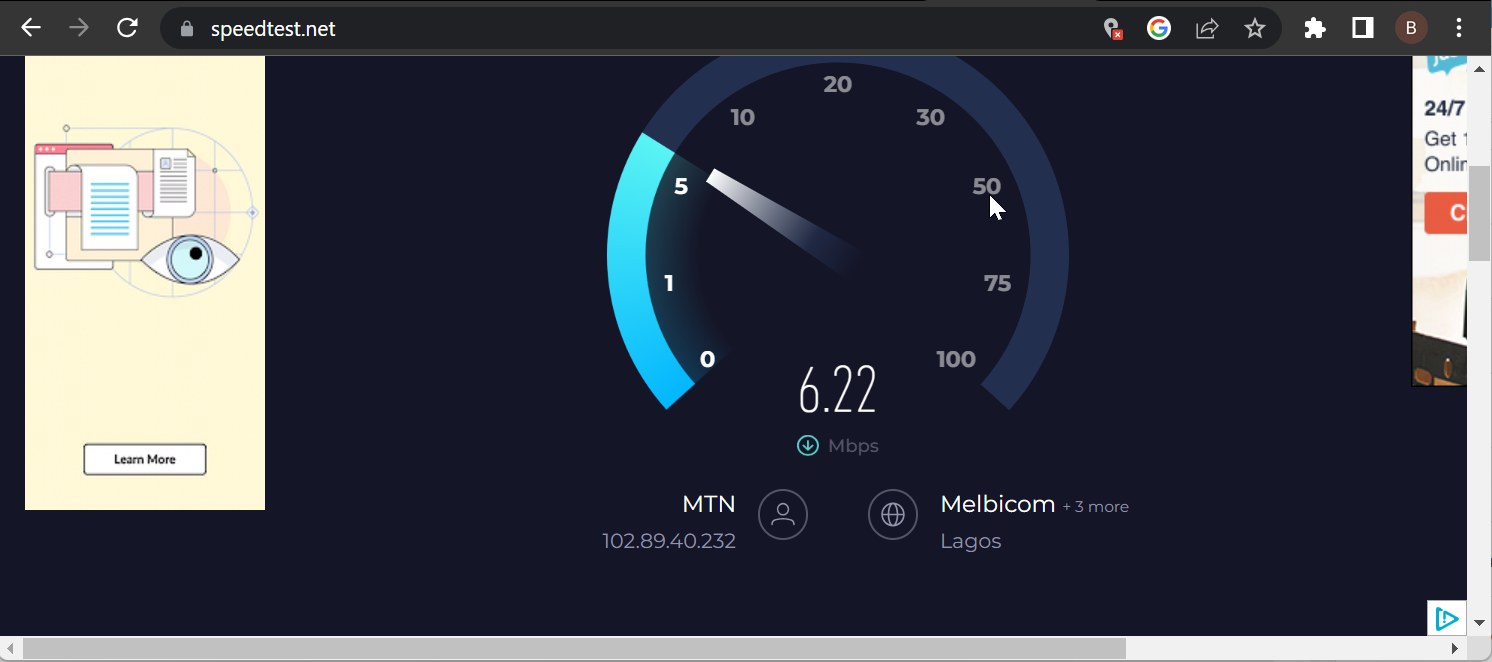
To confirm your connection strength and stability, you use websites like Speedtest. If you are on a wireless connection that is slow, you switch to a wired connection or move closer to the router.
Another option is to disconnect other devices connected to your network. If these do not improve your network speed, you need to switch to another one entirely to enjoy your favorite video game.
5. Reinstall Rec Room
Press the Windows key + R, type appwiz.cpl, and click OK.
Right-click the Rec Room app, select Uninstall, and follow the onscreen instruction to complete the removal process.
If you still can’t fix the error code Student on Rec Room after applying the solutions above, you need to reinstall the game.
This is because your game installation might be faulty. Reinstalling it from official sources should help you clear the glitches causing the issue.
Rec Room is known for its integrated game creation system and the ability to allow users to play cross-platform games.
However, things are not always straightforward, as users encounter the error code Student while trying to launch the game. This error is usually caused by an outdated game, among other factors.
Irrespective of the cause, the solutions in this detailed guide should help you fix the issue effortlessly. If you are dealing with other issues like the error code Notebook in Rec Room, we have a comprehensive guide for that too.
While Windows 11 is not yet Microsoft’s most popular operating system, it has come a long way since it was released, almost 2 years ago. The Redmond-based tech giant is integrating AI into Windows 11, with Copilot currently being live in the Windows Insider Program.
This week, Microsoft also released KB5028245, an update patch that comes with some important improvements and quality updates to Windows 11. If your Windows 11’s Sleep mode is buggy, and it affects your display and audio drivers when you wake your computer up, then this update will fix it.
Plus, the VPN connections are also getting fixed with this update. Check out below all the changes and improvements coming to Windows 11.
KB5028245 – What’s new?
Highlights
This update addresses an issue that affects virtual private networks (VPN). There might be excessive Address Resolution Protocol (ARP) requests to the network gateway. This occurs when the VPN is on a wireless mesh network that uses an aggressive throttling algorithm. Because of this, network performance is poor.
This update addresses an issue that affects certain display and audio devices. They are missing after your system resumes from sleep.
Improvements
This non-security update includes quality improvements. When you install this KB:
New! This update affects the Handwriting Software Input Panel (SIP), the Handwriting Engine, and the Handwriting Embedded Inking Control. They now support GB18030-2022 conformance level 2. Because of this, they meet the level 3 requirements.
This update affects the Windows Push Notification Services (WNS). It makes the connection between the client and the WNS server more reliable.
This update addresses an issue that affects UI Automation and caching mode.
This update addresses an issue that affects the Windows Notification Platform. It fails to send notifications from applications to you.
This update addresses an issue that affects hybrid joined devices. You cannot sign in to them if they are not connected to the internet. This occurs when you use a Windows Hello for Business PIN or biometric credentials. This issue applies to a cloud trust deployment.
This update affects Windows Autopilot profiles. The process to download the Windows Autopilot policy is more resilient. This helps when a network connection might not be fully initialized. This update increases the retry attempts when you try to download the Windows Autopilot profile.
This update addresses an issue that might affect Win32 and Universal Windows Platform (UWP) apps. They might close when devices enter Modern Standby. Modern Standby is an expansion of the Connected Standby power model. This issue occurs if certain Bluetooth Phone Link features are turned on.
This update addresses an issue that affects the Windows Management Instrumentation (WMI) repository. This causes an installation error. The issue occurs when a device does not shut down properly.
This update addresses an issue that affects certain CPUs. There is inconsistent reporting of the L2 cache.
This update addresses an issue that affects Event Forwarding Subscriptions. When you add an Event Channel to the subscription, it forwards events you do not need.
This update enhances hinting for some of the letters of the Verdana Pro font family.
This update affects user mode printer drivers. They unload unexpectedly. This occurs when you print from multiple print queues to the same printer driver.
This update addresses an issue that might affect your computer when you are playing a game. Timeout Detection and Recovery (TDR) errors might occur.
This update affects text edit controls in XAML. You cannot edit the controls again after they become read only. This occurs when you use the new Microsoft Input Method Editor for Japanese, Chinese, and Korean.
This update makes Narrator announce the “Change product key” label.
This update addresses an issue that affects the Defender Firewall Profile. It fails to automatically switch from a LAN that is trusted to a public network.
This update makes Country and Operator Settings Asset (COSA) profiles up to date.
This update addresses a deadlock in Internet Protocol Security (IPsec). When you configure servers with IPsec rules, they stop responding. This issue affects virtual and physical servers.
This update addresses an issue that affects the MPSSV service. The issues causes your system to restart repeatedly. The stop error code is 0xEF.
This update addresses an issue that affects a Clustered Shared Volume (CSV). The CSV fails to come online. This occurs if you enable BitLocker and local CSV managed protectors, and the system recently rotated the BitLocker keys.
This update addresses an issue that causes Windows to fail. This occurs when you use BitLocker on a storage medium that has a large sector size.
This update affects the Windows Kernel Vulnerable Driver Blocklist, DriverSiPolicy.p7b. It adds drivers that are at risk for Bring Your Own Vulnerable Driver (BYOVD) attacks.
This update addresses an issue that affects the fastfat file system driver. It stops responding because of a race condition.
This update addresses an issue that affects refsutil.exe. Options, like salvage and leak, do not work properly on Resilient File System (ReFS) volumes.
This update addresses an issue that affects I/O over Server Message Block (SMB). It might fail when you use the LZ77+Huffman compression algorithm.
What do you think about this patch’s changes and improvements? Let us know in the comments section below.
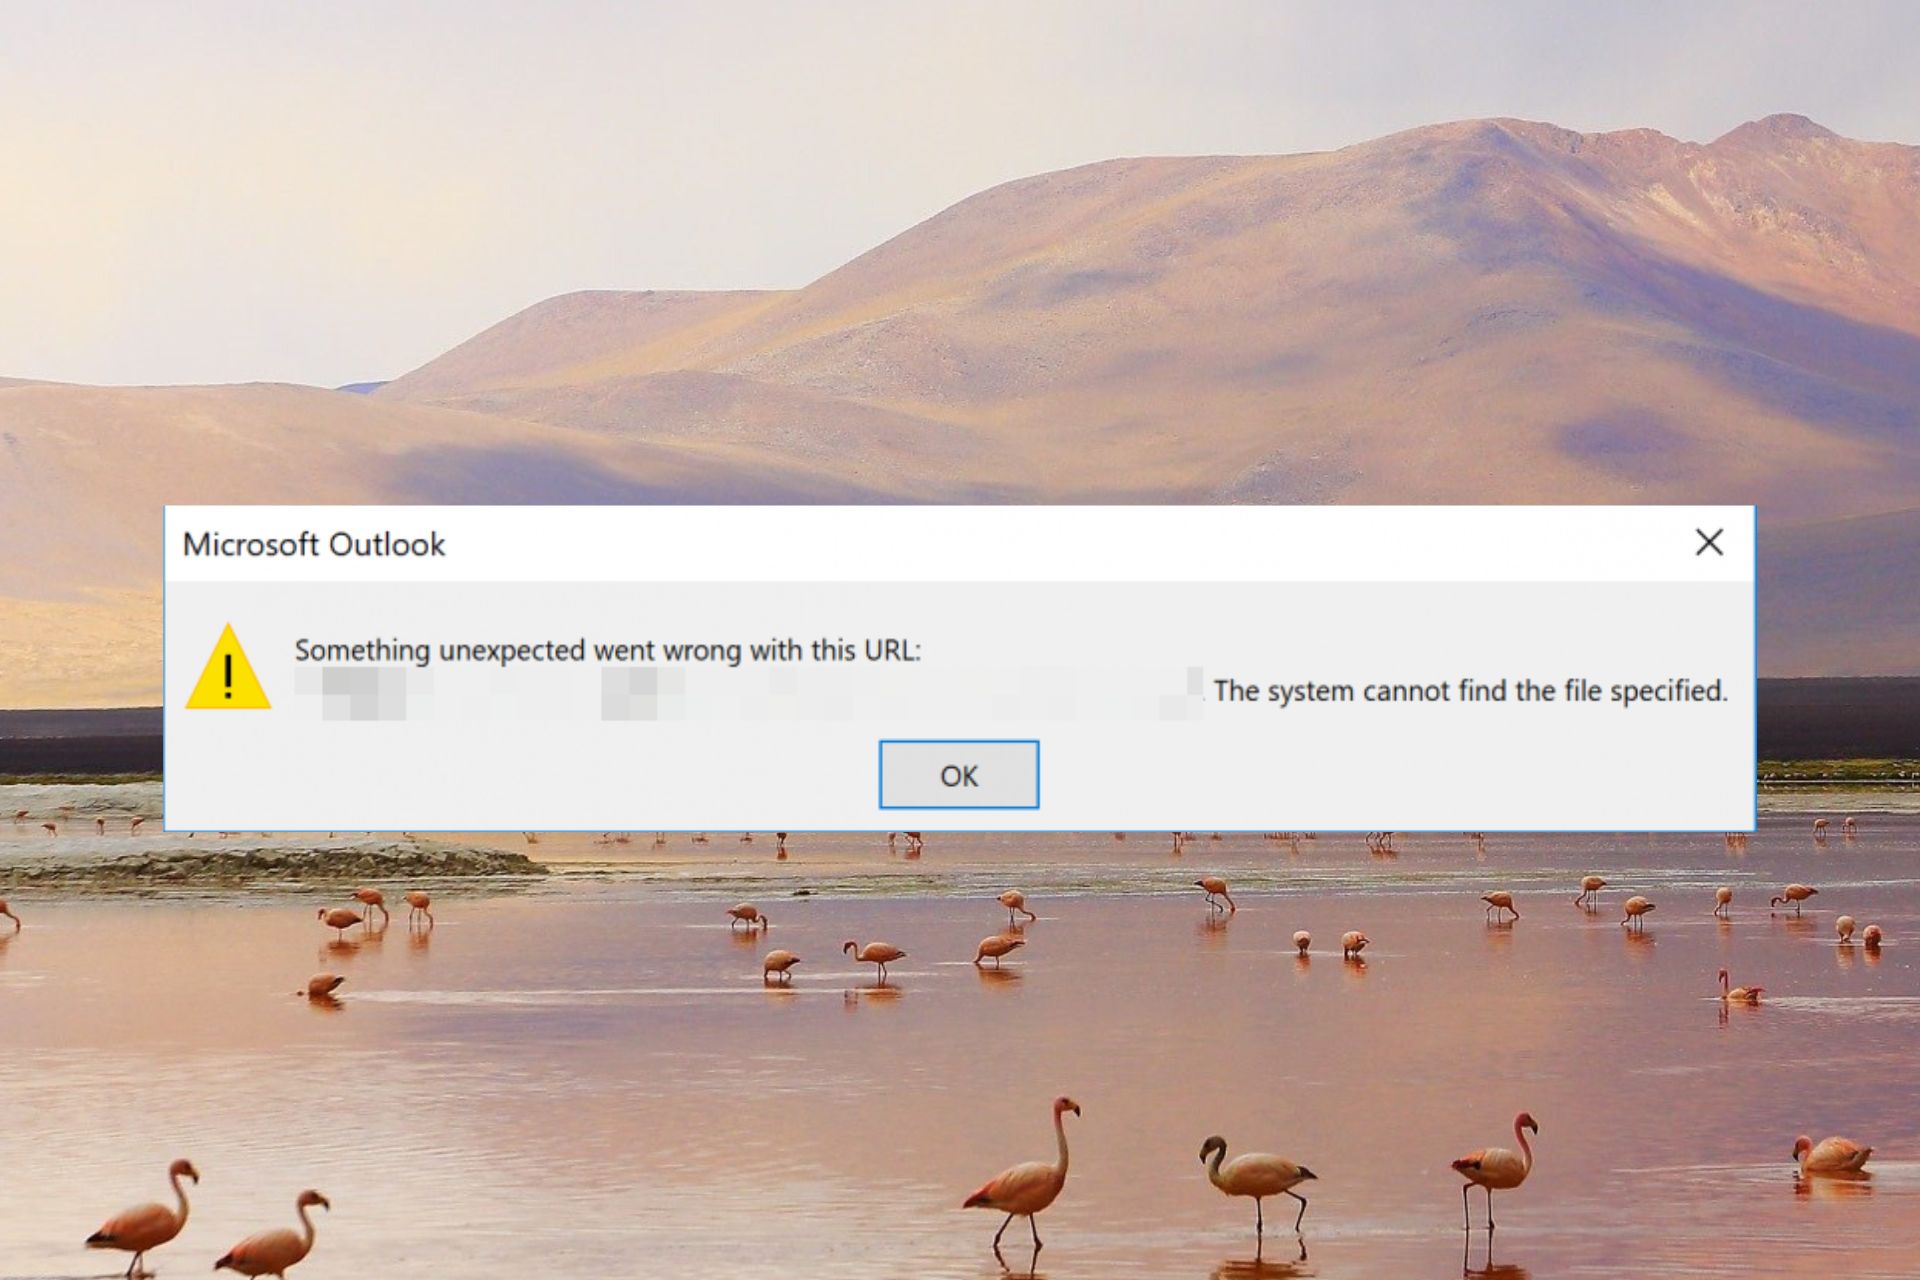
Several Windows users have reported that they are unable to access hyperlinks in Microsoft Outlook and are interrupted by an error message – Something unexpected went wrong with this URL: <hyperlink>. The system cannot find the file specified. When attempting to do so.
The error even prevents you from accessing the important Outlook hyperlinks using the desktop search feature, resolving which can be tricky. But don’t worry! We’ve got you covered.
Why do I get the Something unexpected went wrong with this URL error?
There are no clear indications that can pinpoint what caused Something unexpected went wrong with this URL in Outlook. However, some of the obvious ones are as follows:
Incorrect default browser settings – Something unexpected went wrong with this URL error occurs on a PC having multiple web browsers and a default internet browser is not chosen in Outlook.
Conflicting apps – If you encountered this error abruptly, there is a good chance that a recently installed app conflicts with MS Outlook.
Corrupt Outlook profiles – An issue in your Outlook profile you are logged into can prevent you from visiting the hyperlinks in the Outlook app.
Buggy Windows updates – Many users have reported that they started experiencing the issue right after updating Windows which might have damaged the registry entries.
Less storage space – Outlook generally throws the something went wrong error if your PC does not have enough RAM to execute the command.
Now that you know what problems are triggering the error at hand, let’s begin troubleshooting them.
How do I fix Something unexpected went wrong with this URL Outlook error?
We recommend you try these simple workarounds before implementing the complex solutions given below.
Restart Outlook as well as your PC to reset the cache memory.
Clear the search history and corrupt cache of the current browser.
Try the following solutions if the above tricks do not alleviate the problem.
1. Change the default web browser
Launch the Outlook app on your Windows PC.
Select the File menu on top and choose Options from the left sidebar.
Choose the Advanced option from the left sidebar of the Outlook options window.
Scroll down to the Link Handling section on the right and choose your preferred web browser in the Open hyperlinks from Outlook dropdown.
Finally, click the OK button to save the changes and exit Outlook.
Alternatively, You can change the default browser from the default program feature of the control panel window. For this go to Control Panel > Add and Remove Programs > Default Programs > Set your default programs.
Similarly, you can go to the default apps section in the Windows settings app to set default apps to handle HTM and HTML file types.
2. Clear Outlook cache
Use the Windows + R shortcut to bring up the Run dialog box.
Type or paste the following command in the text box and press the OK button to access the Outlook cache folder. %localappdata%\Microsoft\Outlook
Look for the RoamCache folder, right-click it, and choose the Delete option from the context menu.
3. Boot PC in Clean Boot State
Use the Windows + R shortcut using the Run dialog box. Type the following command in the text box and press the OK button. msconfig
Disable the checkbox for Load startup items and enable the Load system services option preset in the General tab of the System Configuration window.
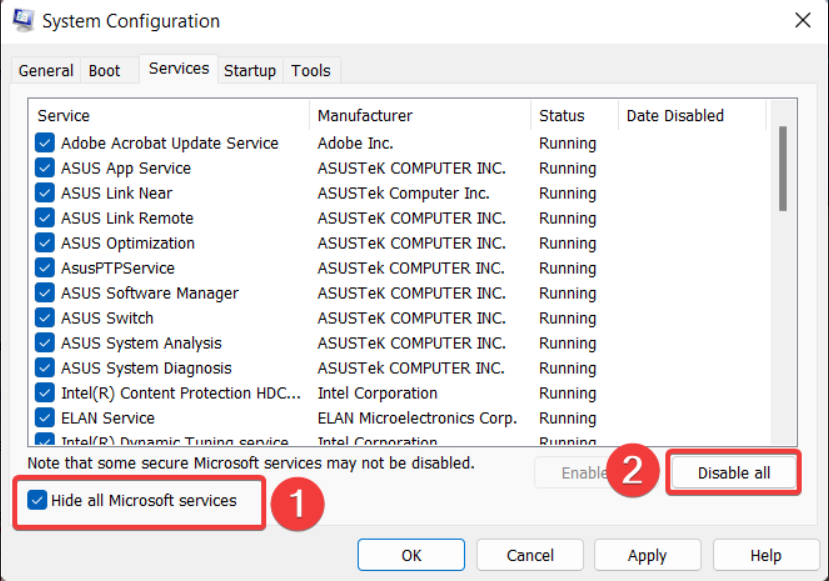
After this, navigate to the Services tab, enable the checkbox preceding the Hide all Microsoft services on the bottom left, and press the Disable All button.
Click Apply to save the changes and OK to exit the System Configuration window.
Now restart your computer to boot your PC in the clean boot state.
Try clicking the hyperlink in the clean boot state. If you do not encounter any error, it means that some third-party programs and background services are interfering with Outlook. You should re-enable all the startup services one by one to identify the one causing the problem and uninstall the apps that are related to the service.
4. Run SFC and DISM scans
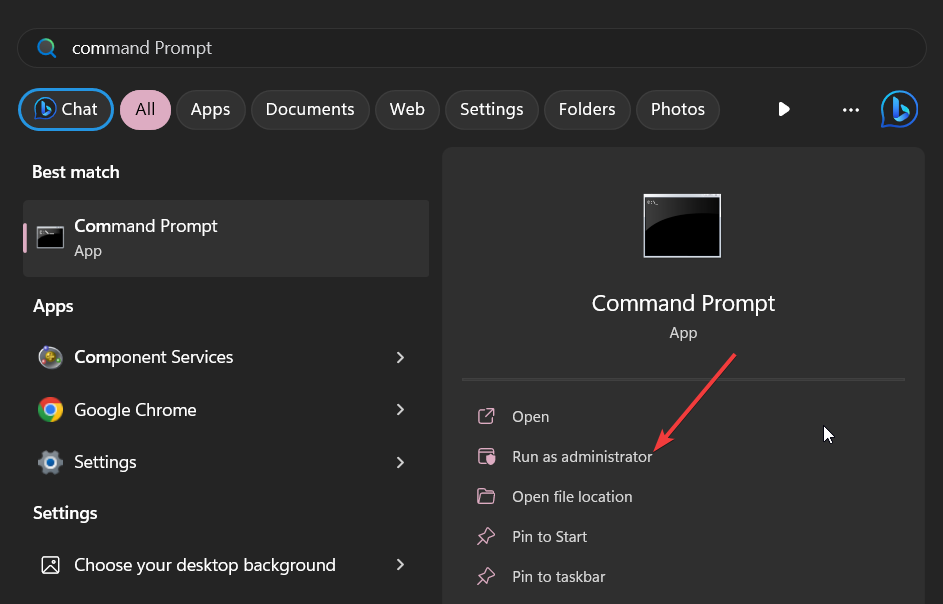
Press the Windows key, type cmd in the search bar on top, and click the Run as administrator option in the right results section.
Choose Yes on the User Action Control prompt to launch Command Prompt with administrative privileges.
Type or paste the following command and press the Enter key to run the SFC scan. sfc/scannow
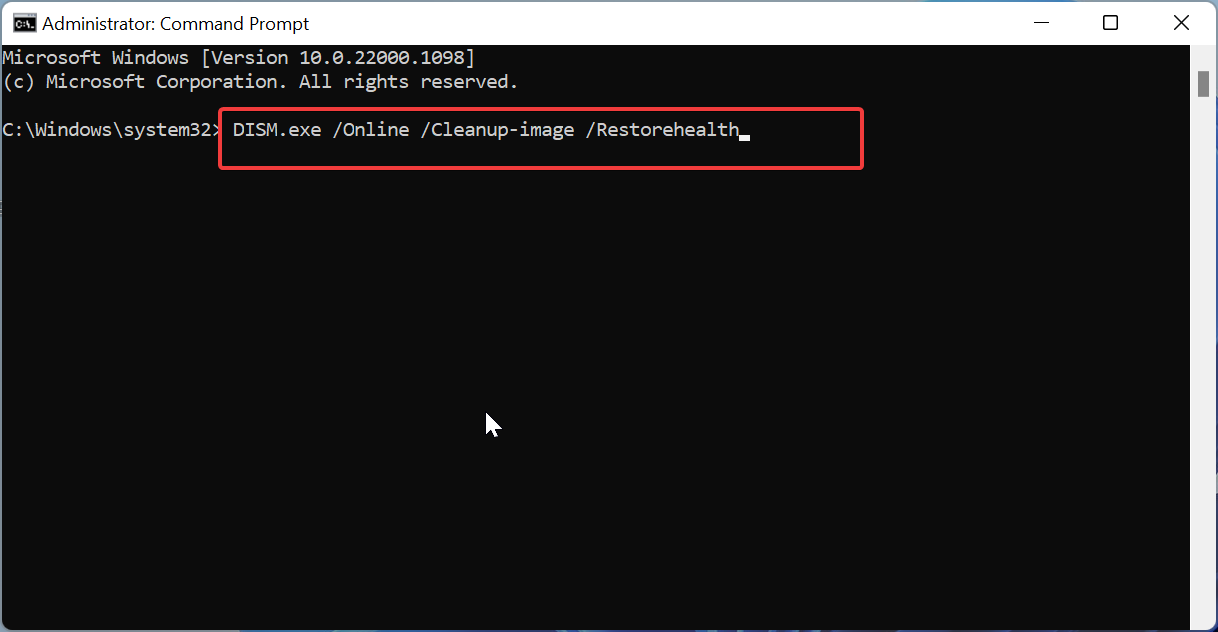
After the SFC scan gets completed, type or paste the following command to begin scanning the system files with the DISM tool. DISM.exe /Online /Cleanup-Image /Restorehealth
Now reboot your PC and see if something unexpected went wrong with this URL error is resolved in MS Outlook.
The SFC and DISM tools will restore the missing or corrupt protected system files and images by replacing them with the cached copy stored in the compressed folder. You can also try a reliable repair tool to automate the procedure.
5. Perform System Restore
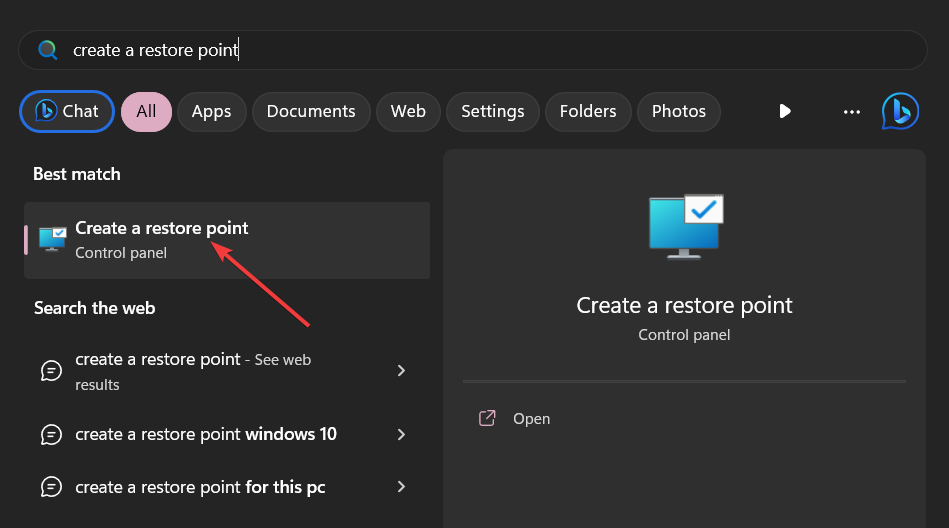
Click the Windows icon to bring up the Start menu, type create a restore point in the search bar, and click the relevant search result.
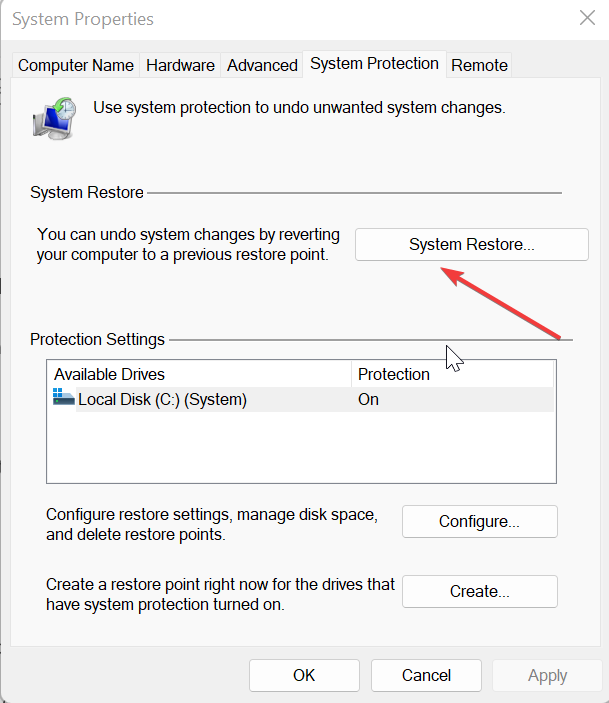
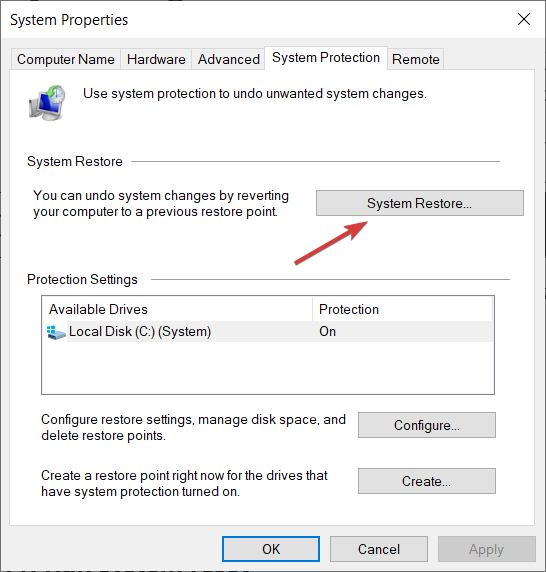
Press the System Restore button located in the System Protection tab of the System Properties window.
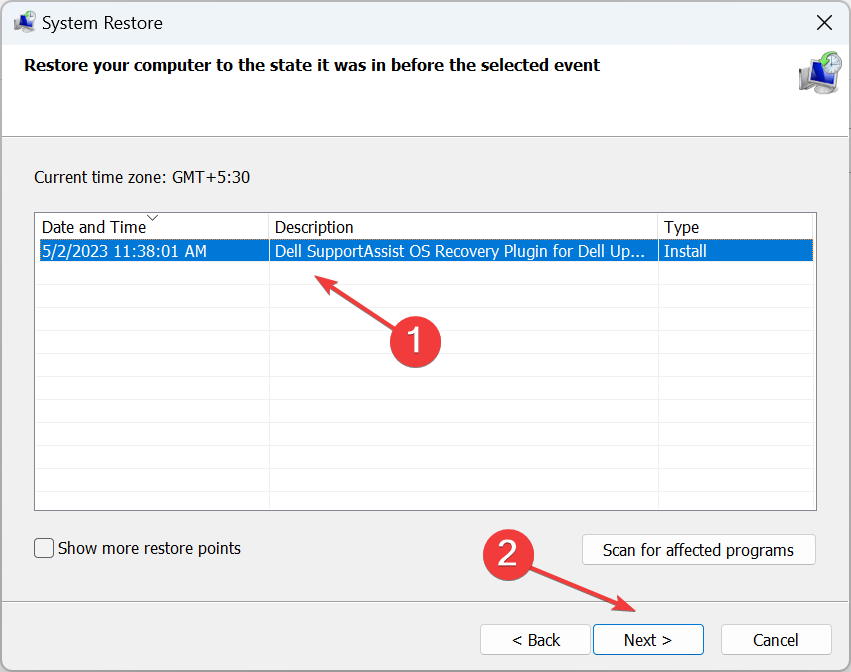
You need to select the restore point created before installing a major Windows update or when you could easily access hyperlinks in Outlook and hit Next.
Finally, press the Finish button to initiate the system restoration process.
Restoring your system to a previous point in time will remove the bugs and registry entries interfering with your browser’s ability to load the hyperlinks from Outlook.
That’s all about it! We’re hopeful that the solutions listed in this guide successfully resolved the error in Microsoft Outlook. If not, you are recommended to reinstall the Outlook application on your PC.
You may also want to fix the Outlook error 500 if you frequently encounter the error when using the application.
In case you have any queries or suggestions for us, feel free to drop them in the comments section below.
If your VPN is not working with TVNZ, it’s likely because the service has blocked the server you’re trying to use.
However, there’s no need to worry because I have a set of solutions that worked for me.
Keep reading to find a detailed guide on how to overcome this issue.
TVNZ not working with VPN? Here’s how to fix it!
Whenever the VPN is not working, it shows the error:
Whoops! Looks like you’re trying to watch from outside of New Zealand. Our videos are only available to watch within New Zealand due to rights issues.
However, the good news is that there are reliable methods I’ve used to resolve these issues quickly. After that, I was able to watch TVNZ abroad hitch-free.
So let’s get started.
1. Clear browser cookies
Cookies are small files that online services use to improve your experience. They store various information about you, including your location.
Therefore, if you initially accessed TVNZ from a location like the United States, and TVNZ recorded that location, using a VPN won’t grant you access.
This is because TVNZ doesn’t check your location for every session, and the previously stored location will still be recognized, even if you’re connected to a VPN.
Luckily you can quickly end this by clearing them from your browser.
Here’s how to do it in Chrome:
Access your browser’s settings by clicking on the three dots or lines in the top-right corner of your screen.
Click on Privacy & Security.
Select Clear Browsing Data.
Delete all cookies and other site data, then select ‘Clear Data.’
Launch the TVNZ website to access its content.
Clearing your cookies to improve browsing speed and protect online privacy helps resolve TVNZ not working with VPN.
I used Chrome as an example because it’s the most popular browser right now.
However, the method works on any other one, including Opera, Edge, or Firefox, and the steps you have to follow are the same.
2. Use another server
If you connect to a server other than New Zealand, you will not be able to access TVNZ due to restrictions.
Also, the streaming service might not work if too many people connect to the same server or if there are IP leaks.
You can use run an IP check for IP leaks. If it does not correspond to your VPN, then your real IP address is exposed.
Therefore, if your VPN has stopped working, consider switching to a different server.
Here’s how to do it:
Disconnect from the server by clicking the VPN’s Disconnect button.
Click on the search bar to access the correct server.
Search and connect to a New Zealand server from the drop-down list by clicking on it.
Once connected, launch your TVNZ.At this point, it should work perfectly.
When you switch to a different server in New Zealand, you’ll be greeted with a fresh IP address.
Now, for the secret to an extraordinary streaming experience, look for a VPN that allows you to switch servers without limitations.
3. Update your VPN app
If TVNZ is not working with your VPN, it may be because you’re using an outdated app.
How to fix it?
Simply update to the latest version.
Luckily, most VPNs are designed to scan for the latest version automatically and notify you if there’s a new update to download.
Click on the Update Available notification.
It will redirect you to the Download page on the VPN’s website. Then, an auto-download will start. It is an exe file that contains the latest version of the VPN.
Open the Download folder and double-click on the file to execute it.
After you do so, the device will prompt you to ask permission to replace the older version. Select Yes, and the uninstallation and subsequent installation will begin.
VPN software updates often include important security patches and bug fixes.
Therefore, by keeping your VPN client up to date, you ensure you have the latest security measures in place, protecting your online activities and personal information.
Also, it frequently includes performance enhancements and optimizations that improve stability, speed, and overall performance, providing you with a smoother streaming experience.
4. Reinstall your VPN
When your VPN is corrupted, it can hinder it from masking your IP address or connecting to your desired server. However, reinstalling can help resolve this.
Here is how to do it on Windows:
Click the start button at the bottom left of your screen, search for the Control Panel, and open it.
In the Control Panel, click on Programs and features..
You will then see a list of all the applications on your device. Find the Surfshark application alongside the TAP and TUN adapters.
Right-click on Surfshark and select Uninstall.
In the new pop-up, select Yes.
Complete the uninstallation process for the Surfshark TAP and TUN drivers as well.
Visit the Surfshark website to download it again.
Install the app by following the on-screen instructions.
Log in with your credentials.
Connect to a New Zealand server.
Try streaming from TVNZ again.
4. Change to a different protocol
Try switching to a different VPN protocol to fix the problem of TVNZ not working with a VPN.
Protocols are rules that determine how data is routed through the server.
To get started, follow the steps below:
Open your VPN app.
Click on the gear icon (Settings).
Select VPN settings.
Click on the expand button under Protocol.
Select Wireguard from the list.
Go back to the TVNZ website to access it again.
Check if your VPN supports multiple ones like OpenVPN, IKEv2, or Wireguard.
It’s best to use the WireGuard protocol due to its fast speeds and strong security. OpenVPN is also a reliable option with good encryption, but it may not be as fast.
5. Change to a better VPN provider
If you’ve tried everything else and still can’t find a way to get around TVNZ, your current VPN might be unable to help you.
But there is hope! Upgrading to a premium VPN that works with TVNZ can unlock it.
I recommend Surfshark because of its seamless streaming ability and strong server in New Zealand.
Download the Surfshark app on your device and log in to your account.
Connect to a New Zealand-based server from the server list.
Once connected, navigate to the TVNZ website and start streaming.
Does TVNZ block VPNs?
Surprisingly, TVNZ attempts to block VPNs, but its success rate is not very high.
You might be wondering how that’s possible.
Well, let me shed some light on it.
While TVNZ cannot directly block VPNs, it has come up with a clever strategy to reject certain IPs associated with specific servers.
Why does it do this?
Its top priority is to protect the interests of copyright holders.
To ensure that only authorized viewers can access the content, it attempts to block access from areas it doesn’t cover.
So, if you’re using a VPN to deceive TVNZ into thinking you’re in a different location and unlock those thrilling geo-restricted shows, it actually goes against their terms and conditions.
That said, there’s no known case of anyone being banned on the platform because of using a VPN. It just blocks certain IPs and you generally can fix that by just switching to another server.
How does TVNZ detect my VPN?
TVNZ employs sophisticated techniques to detect the use of VPNs and protect their content from unauthorized access. Here’s a closer look at how TVNZ identifies VPN usage:
GeoIP Blocking: TVNZ utilizes GeoIP databases that contain information about IP addresses associated with VPN servers. By comparing the detected IP address with these databases, TVNZ can determine if it belongs to a known VPN provider or falls within a range commonly associated with VPN services. If a match is found, TVNZ may block access to the content.
DNS and WebRTC Checks: TVNZ goes beyond IP address analysis and may inspect DNS (Domain Name System) and WebRTC (Web Real-Time Communication) information to identify VPN usage. DNS queries from your device can reveal VPN-related configurations, while WebRTC can expose your real IP address even when using a VPN. TVNZ examines these details to gather clues about potential VPN activity.
Behavioral Analysis: TVNZ employs advanced algorithms to analyze user behavior patterns. It may detect suspicious activity, such as multiple connections originating from a single IP address or abrupt changes in IP addresses. These anomalies can trigger further scrutiny and potentially result in access restrictions.
And what happens if TVNZ catches you in the act?
It swiftly pinpoint your true location and shut the gate on your access to its platform. But as I said, that’s only based on your IP, your account will likely not get suspended.
Does TVNZ work with a VPN?
Yes. It’s indeed possible to access TVNZ from anywhere in the world, whether you are in Europe, America, or Africa.
Once you connect to a VPN sever located in New Zealand, TVNZ will believe you are located in the permitted region for streaming.
This means you’ll be able to easily access the platform, hitch-free.
That said, it’s best you use a reliable VPN, that has up-to-date protocols and preferably several server locations in New Zealand.
That’s because, the more options you have, the better the chance of finding a fast and reliable server for buffer-free streaming.
Now, let’s see which VPNs qualify for this.
Best VPNs for TVNZ
Are you excited to explore the enthralling realm of TVNZ’s lineup, featuring captivating movies like Baby Driver and No Escape, regardless of your location?
My carefully curated selection includes VPNs that seamlessly enable streaming and offer user-friendly applications for both desktop and mobile devices.
Below are the recommended VPNs compatible with TVNZ:
Get ready to enjoy TVNZ content from anywhere in the world with Surfshark’s impressive features.
With over 3200 servers spread across 100+ countries, including 91 servers in one server location in New Zealand, you can access the shows you love, regardless of location.
One of its standout features is its rock-solid security – AES-256-bit encryption.
It ensures your online activities remain completely anonymous and untraceable—no need to worry about your traffic data falling into the wrong hands.
But that’s not all! Surfshark goes the extra mile by including a built-in kill switch.
Picture this: your VPN connection drops unexpectedly, and just like that, all your internet traffic is halted. No data leaks, no risks.
Also, it seamlessly works on all major operating systems, allowing you to watch TVNZ on your preferred device without hassle.
With this VPN, the world of streaming is at your fingertips.
Pros:
Connect unlimited devices
Excellent streaming speeds
Extra features like virus protection
Cons:
Inconsistent P2P performance
Surfshark
Get unrestricted access to TVNZ with Surfshark VPN!
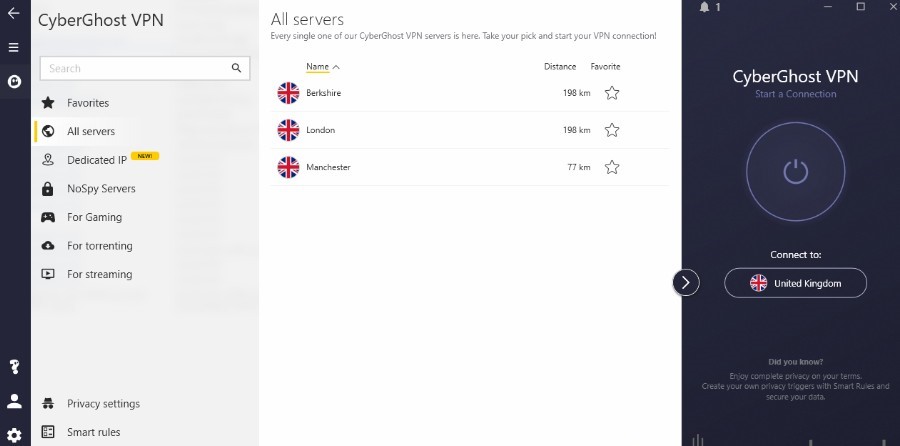
CyberGhost is an excellent VPN for watching TVNZ on demand from outside New Zealand, thanks to its advanced unblocking capabilities and extensive server network.
With 13 servers in New Zealand, CyberGhost gives users access to a wide range of TVNZ’s content, no matter where you are.
It also offers fast connection speeds, which is crucial for streaming high-quality content without buffering or lag.
The user-friendly interface and intuitive design make CyberGhost easy to navigate, even for VPN newcomers.
What sets CyberGhost apart is its impressive speed, making it one of the fastest VPNs on the market.
You can enjoy streaming on TVNZ without buffering or lag.
Additionally, it provides robust security features like 256-bit AES encryption and a kill switch, ensuring that your online activity and personal data remain safe and secure while accessing TVNZ from abroad.
Pros:
Large server network with over 9000 servers in 90 countries
High-speed connections with no throttling or bandwidth caps
It supports popular devices like Windows, Mac, iOS, and Android.
Automatic Kill-Switch
Strict no-logs policy
45-day money-back guarantee
Cons:
Some servers may experience occasional downtime or connectivity issues.
CyberGhost
Experience TVNZ without limits with CyberGhost VPN!
4. PIA – excellent streaming performance with fast speed
Private Internet Access (PIA) is another excellent VPN for accessing TVNZ abroad, thanks to its impressive streaming capabilities and robust security features.
It offers lightning-fast speeds with a vast network of over 84 countries, including New Zealand.
In addition to its streaming capabilities, it offers strong encryption, a strict no-logs policy, and a kill switch.
These features ensure your online activity remains private and secure while accessing TVNZ or any other geo-blocked content.
Also, PIA offers a Smart DNS feature that lets you change your virtual location directly from your Smart TV.
With up to 10 simultaneous connections allowed on a single account, you can share your PIA subscription with family or friends and watch TVNZ together from anywhere.
Say goodbye to frustrating lags,buffering, and freezing thanks to its powerful 10 Gbps NextGen servers. And you can enjoy seamless 4K streaming without annoying delays.
Pros:
Double VPN capability
Kill switch
Offers a 30-day money-back guarantee
Cons:
Headquarters is located in a country that is part of the Five Eyes intelligence alliance.
PIA
Stream TVNZ freely with PIA VPN – no boundaries, no restrictions!
5. NordVPN — multiple servers for unblocking TVNZ movies
When it comes to TVNZ, NordVPN ensures a seamless streaming experience.
Its vast network of 5,700+ servers, including 20+ servers in New Zealand, guarantees that you can unlock streaming content from anywhere in the world.
NordVPN lets you change your IP address, bypass restrictions, and ensure uninterrupted access to TVNZ.
Beyond just unlocking content, ensuring your online security and privacy is a top priority.
NordVPN goes the extra mile by offering essential features like a kill switch that instantly disconnects if the VPN drops.
But that’s not all; NordVPN also boasts an extensive library of how-to pages and guides, ensuring you have all the necessary resources to set everything up correctly.
And if you ever need assistance, their 24/7 support network is always available to lend a helping hand.
If you’re experiencing issues with your VPN not working with TVNZ, there are several potential fixes you can try.
Changing the VPN server, clearing cookies and cache, or switching to a provider known for its compatibility with streaming services like TVNZ can help bypass the VPN compatibility issues.
By utilizing these methods, you can enjoy seamless access to TVNZ’s content and stream your favorite shows and live events from anywhere in the world.
From social media to online banking, passwords play a significant role in ensuring that our virtual accounts stay protected from hackers. In fact, according to a LastPass paper, 36% of the users do not improve their password strength believing their account will not be targeted by hackers.
Ironically, we put little or no thought into creating a strong password, our defense against cyber-attacks. In this guide, we have completed the list of interesting password statistics along with password trends that will make you question whether your passwords will stand against hackers and brute force attacks.
What are the most common weak passwords?
Despite password managers gaining popularity, more than half of internet users are guilty of reusing their passwords. But that’s not it!
From the security firm Keeper Security, we learned that 62% of Americans prefer noting down their login credentials in a notebook or journal, which might be a good thing if they keep the paper safe.
However, 82% of them keep it near their work desk and accessible to anyone at home or in the workplace which certainly defeats the purpose of password safety. Not only that but according to Security.org, shockingly, 15% of internet users use their first name and 18% use their pet names in the password.
Luckily, nowadays, many of the services and websites don’t accept a password that doesn’t have a capital letter and a special symbol.
However, not all do! According to research from Specops Software, 88% of passwords used in successful attacks consisted of 12 characters or less, and 18.83% of the passwords successfully cracked had only lowercase characters.
Data breach statistics
Weak passwords are easy to guess and expose your sensitive information, thus becoming vulnerable to ransomware and other attacks.
In Verizon’s Data Breach Investigation Report, 80% of data breaches occur because of weak passwords and enterprise networks are the most vulnerable to these threats.
Another piece of information spawn from a study held by security firm Bitwarden reveals that 1 in 4 people have been affected by a data breach in the last 18 months.
It may seem hilarious but Password, admin, welcome, and p@assw0rd are the most common base terms used by hackers to attack networks across multiple ports. The fact that they target the terms and succeed in breaching the systems successfully tells us that many users are still considering them.
In another blog post by Beyond Identity, we learned that 23% of internet users have had their personal emails hacked at some point in time.
Business password statistics
Organizations generally have sophisticated security protocols and password policies to protect their passwords. However, the remote work culture has created a new set of online security challenges.
If personal data can be dangerously revealing, for businesses, the situation is a lot more critical.
According to a security report released by the Yubico and Ponemon Institute, nearly half of IT security users reuse their personal passwords for workplace accounts. Also, the paper states that 49% of the IT security professionals and 51% of the users admitted to sharing their passwords with colleagues.
Of course, using a two-factor method of authentication will solve this problem but from the same report, we learned that only 35% of them employ this method.
And if the sharing is happening on smartphones and unsecured channels, there is no wonder that the systems get hacked.
Storing the passwords and credentials in spreadsheets is another practice discovered for 46% of IT security and cyber security professionals. You can only Imagine what sharing that spreadsheet may cause to the firm’s security.
Another research study from Keeper Security reveals that 57% of those participating write down their passwords on sticky notes and 67% of them have lost these notes at some point. Not only that, but 62% of them use text messages and emails to share passwords leaving organizations vulnerable to cyberattacks.
Password security statistics
Internet users are slowly adopting the latest security measures such as two-factor authentications and password management software. If the information above was alarming, we still have some mildly good news as well.
According to the State of the Auth report by Duo Labs, two-factor authentication has been used by 79% of the participants at least once in their lifetime. Also, SMS (85%) and Emails (74.3%) are the two most command methods of Two-factor authentication.
Another encouraging information is that 65% of the users participating in the study now go for biometric methods like fingerprint or facial recognition instead of using traditional passwords.
Aside from two-factor authentication, password managers are a very good way of securing them.
However, according to Bitwarden, 66% of Americans don’t use them in the workplace although 73% think that they should use one. The good news is that 40% of Americans prefer password managers to store passwords with 9% more than the rest of the world population.
Password security by industry
Despite cyber-attacks on the rise, several businesses and industries still do not have proper security practices to secure sensitive information. Keep reading to find out.
Disconcerting enough, the term Password is still one of the most popular choices for passwords across all industries. And also, password, aaron431, 123456, student, and default are the most in the finance industry, according to NordPass.
From the same source, we also found that vacation is one of the most popular passwords in the healthcare industry.
Aside from personal or sensitive data, credit card information is certainly the most critical for any individual or business.
But unsurprisingly, 67% of individuals forget their passwords for online banking platforms, although 68.8% of the participants think that their online banking account’s password is safe, according to Beyond Identity.
In the same report, we found out that only 28.7% of the respondents used a password generator to generate strong passwords for work-related accounts.
Password trends
If your password is often based on something you are less likely to forget, you are not alone. These statistics will show the trends internet users often stick to when creating passwords.
Apparently, according to a NordPass study, the most commonly used passwords are password, 123456, and 123456789 which unfortunately take less than 1 second to get cracked.
It may seem unusual, but films and TV shows often influence the password-creation process. Batman (2,562,776), Euphoria (53,993), and Encanto (10808) are very popular passwords.
And to top it off, you should know that from the same paper, we learned that Guest, 123456, and password are the most common password used in the United States.
It seems that 57% of the users admit to old password reuse by changing @ for a or 1 for i when changing passwords on a platform, according to Security.org.
The future of password security
With the rapid advancements in technology, users are now choosing safer password security like biometrics and multi-factor authentication. Let’s take a look.
Until AI takes over our lives and makes it impossible for anyone to guess our passwords and even intent, we still need to struggle with the reality facts.
From the data acquired by Ping Identity, 96% of global IT professionals consider that passwordless authentication would offer a better user experience to employees.
So, the future would seem to rely on biometrics instead of any traditional methods used right now.
In fact, from the study cited above by Yubico and Ponemon Institute, 65% of respondents believe that biometrics would improve the security of their organization.
In the meantime, 42% of respondents from the Duo Laps study use a biometric method of authentication (such as a fingerprint) for at least some platforms and 32% of them have adopted the use of a password manager.
Tips & tricks for improving password security
Here are some valuable tips for you to improve password security so that your online identity stays protected.
Have unique passwords – Always create a unique password for each online account having a high password entropy value. Such a password is hard to predict and has a proper mix of uppercase and lowercase letters, digits as well as special symbols.
Do not use personal information – Include your personal information like your name, pet’s name, and partner’s name when creating a password is considered a bad habit in terms of online security.
Use password manages – Instead of creating memorable passwords, you should start using password managers, a centralized place to store and secure passwords with encryption techniques.
Use multi-factor or two-factor authentication – Enable two-factor or multi-factor authentication to add an extra layer of security that prevents unauthorized assess despite password breaches. You should check out these password managers with multifactor authentication.
Adopt passwordless authentication techniques – Start switching to passwordless methods of authentication such as biometrics, hardware tokens, and OTPs which are more secure alternatives.
Hopefully, you now understand the necessity of using strong passwords and implementing advanced security measures as a defense against hackers and cyber-attacks.
Rec Room is an interesting, multiplayer, and interactive game that allows you to connect with other creators. It also consists of an integrated game creation system that allows content creators to build games.
While this might sound tantalizing, there are a series of Rec Room error codes that users encounter. Among them is the Rec Room error code Notebook, which is usually due to server problems.
However, there are other potential causes for this issue which makes it a bit less predictable. Fortunately, you can get rid of this error with the right information, and we will provide that for you in this guide.
What are the causes of the error code Notebook in Rec Room?
The major cause of the error code Notebook in Rec Room is issues with the server. This is understandably so with the number of people that play the multiplayer game.
Only when you are sure that it is not a server problem should you consider the other potential causes below:
Internet connection issue: Being an online multiplayer game, Rec Room depends a lot on the strength of your internet connection. Hence, you need to ensure your connection is stable to prevent issues like this.
Outdated app: In some cases, this issue can be caused by an outdated app. If you have not updated the game for some time, now is the time to do it.
Issues with the game: In rare cases, glitches with the game app can lead to this problem. You can fix this by uninstalling and reinstalling the game.
Now that we know what we’re dealing with, let’s fix the Rec Room error codes summer and notebook.
How do I fix the error code notebook in Rec Room?
1. Check the Rec Room server status
The first thing you need to do to fix the error code notebook is to ensure Rec Room is not having server issues. You can determine this by going to Rec Room Inc. Discord or Subreddit page to check for any related announcements.
If the server is down, there is nothing you can do but wait for it to be fixed. But if there is no server issue, you can proceed to the solutions below, as the issue might be from your end.
To get the best out of Rec Room and prevent so many error codes, you need to make sure you have a stable and strong internet connection. You can check your internet strength on websites like Speedtest to know if your connection is causing the problem.
If your network is slow or unstable and you use a wireless connection, try to move closer to the router. You can also opt for a wired connection instead to improve the stability and speed.
If these fail, you need to switch to a better one to get rid of the error code notebook in Rec Room.
3. Update Rec Room
Click the Microsoft Store icon on your Taskbar.
Select the Library option in the left pane.
Now, click the Get updates button, and Windows will automatically update the apps on your PC, including Rec Room.
The error code notebook or note can sometimes be due to Rec Room being outdated. If you are looking to update the game on your mobile devices, you need to go to the Appstore, search for it, and install all available updates.
4. Reinstall Rec Room
Press the Windows key + R, type appwiz.cpl, and click OK.
Right-click the Rec Room app, select Uninstall, and follow the onscreen instruction to complete the removal process.
If everything you have tried to fix the error code Notebook on Rec Room fails, you need to uninstall and reinstall the game.
Reinstalling the latest version of the game from the official website or your app store, the issue should be fixed for good.
5. Check device compatibility
Below is a list of all devices supported by Rec Room:
Windows 7 and above
iOS – iPhone: iPhone SE, 7 Plus, 8 Plus, X, XS, XS Max, and XR, 11, 12, 13, 13 Pro, 14, 14 Pro; iPad: iPad (2017, 2018), iPad Air 2 and iPad Air (2018), iPad Mini 5 (2019) and 6 (2021), iPad Pro; iPod Touch (2019)
Android – Must be released after June 2019; 3 GB memory; Android version 10 or 11
PlayStation – PlayStation 4 and above
Xbox – Xbox One, One S, Series S, and Series X
Oculus/Meta – Oculus Rift CV1, Rift S (requires PC), Meta Quest 2, Meta Quest Pro
If your device meets the above specifications, make sure you install the latest update for your operating system to prevent problems like an error code Notebook on Rec Room.
With this, we can now conclude this detailed guide on the error code notebook. The issue is usually caused by server problems but can sometimes be due to minor issues on your end.
However, you should be able to eliminate the error for good, provided you follow the steps in this detailed guide.
To wrap it up, if you are dealing with a similar issue in Rec Room error code summer, check our detailed guide to fix it quickly.
Being able to right-click, copy and paste while using Outlook makes it easier to go about the process without needing any key combinations. However, many users have complained about how disheartening it is when Outlook is not copying and pasting.
As a result, users are stuck with what to do when this issue occurs. Thus, we’ll discuss the potential causes of the problem and the steps for fixing it.
Why is Outlook not copying and pasting?
The clipboard may become corrupted or stop working properly, leading to copying and pasting content issues.
Other programs or background processes running on your computer may interfere with its functionality.
Some installed Outlook add-ins may conflict with the copy-and-paste feature.
Temporary data used by Outlook to facilitate copy and paste may become corrupt and affect functionality.
Left-click the Start button, type Command Prompt, and click the Run as administrator option.
Click Yes on the User Account Control (UAC) prompt.
Type the following and press Enter: echo off | clip
Restart your PC to check if the issue is fixed.
Running the above command will clear the clipboard content and resolve the corrupt clipboard affecting Outlook. Read our guide on how to fix Command Prompt not working on your PC.
The above fixes are tested and confirmed for resolving Outlook not copying and pasting. However, you may be interested in our comprehensive guide on Outlook crashing after Windows updates and ways to fix it.
Starting today (July 26) an updated Home experience goes live for select Xbox One and Series X|S consoles. According to the announcement post on Xbox Wire,
This update is designed from player feedback and makes it easier to discover new games, rediscover games you already love, connect with communities, and create a more personalized experience.
The new Xbox Home screen is designed to make it easier for users to navigate to their game library, Settings, the Microsoft Store, and access search, with the inclusion of a quick access menu.
It is also designed to allow for more space for user’s personalized backgrounds—something that gamers have been clamoring for for quite a while now. There’s even a new option to change the background to match highlighted games in the Recently Played list.
The new Home UI is being soft-launched to a subset of all modern Xbox consoles. The new Home will be rolled out to all Xbox One and Series X|S consoles over the coming weeks. If your Xbox has the new Home, you may want to avail yourself of this handy guide to get the most out of it.
Microsoft has successfully resolved a known issue that was causing video recording and playing failures in certain apps on Windows 10 and Windows 11 systems. The problem was related to apps utilizing the WVC1 (Windows Media Video 9 Advanced Profile) codec, as disclosed by Microsoft in a recent update to the Windows release health dashboard.
The WVC1 codec is designed to enhance the traditional video codec model, incorporating discrete cosine transform (DCT) techniques shared by codecs like H.261, H.263, MPEG-1, MPEG-2, and MPEG-4. It also serves as an alternative to the popular MPEG-4 AVC (H.264) video codec standard.
The issue emerged after installing specific updates, such as KB5027303 or later, causing some apps to malfunction while playing back, recording, or capturing video using the WVC1 codec (VC-1). Additionally, certain cameras or webcams that defaulted to the WVC1 codec also experienced failures.
Impacted platforms included Windows 10 22H2, Windows 11 21H2, and Windows 11 22H2. The issue was triggered by preview cumulative updates released in the last two months, namely KB5028244, KB5027303, and KB5028245.
Thankfully, Microsoft promptly addressed the problem using Known Issue Rollback (KIR), a Windows feature designed to revert faulty non-security updates delivered via Windows Update. As a result, the fix has been applied, and users should see the improvements automatically within 24 hours on consumer and non-managed business devices. For those who wish to expedite the deployment, a simple restart of the Windows device can help.
For Windows enterprise-managed devices that were impacted, Windows administrators must install and set up a KIR Group Policy to ensure that the video recording and playing issues are completely resolved.
GlobalProtect may fail to connect if it doesn’t ask for your credentials.
Why does this happen?
Common causes include network congestion, firewalls, antivirus software, proxies, outdated clients, or misconfigured settings.
So, what can you do about it?
Below, you’ll find simple fixes like restarting the app, temporarily disabling firewalls or antivirus software that can cause GlobalProtect connection issues, closing background programs, and clearing browser cache.
1. Remove your MS account
Press Windows + I keys to open the Settings app.
Select Accounts from the menu and click on Email & accounts.
Select the email address you wish to remove, then click Remove.
Click Yes on the new prompt to confirm your actions.
Restart your PC and try to sign in to GlobalProtect to see if it prompts for credentials.
Several users have reported using the above steps to fix the GlobalProtect sign-in credentials not appearing. It will disconnect from your Microsoft account from Azure Active Directory, causing it to request on the new attempt.
2. Uninstall recently installed apps
Click the Start button, type control panel, then press Enter.
Click on Programs, go to the Programs and Features tab, and find the app from the list.
Select the app, and click Uninstall.
Follow the on-screen instructions to complete the uninstallation process.
Uninstalling the app will remove the credentials from GlobalProtect, allowing it to request credentials rather than taking other apps such as Outlook, and Visual Studio credentials.
In some cases, you might even have to remove and download GlobalProtect again to fix this issue.
3. Clear the GlobalProtect app cache
Close the GlobalProtect client.
Press the Windows + E keys to open File Explorer.
Go to the following directory path: C:\Program Files\Palo Alto Networks\GlobalProtect
In the GlobalProtect folder, select the Cache folder, right-click on it, and select Delete from the context menu.
Confirm the action when asked if you want to proceed with the action.
After deleting the cache folder, right-click the Recycle Bin icon on your desktop and select Empty Recycle Bin from the context menu.
Start the GlobalProtect client to recreate a new cache folder, then check if it shows the credentials prompt.
Clearing the GlobalProtect cache will remove corrupt app data in the folder and resolve any issue impeding the credential prompt.
Click the System tray button, and right-click the GlobalProtect (GP) client icon.
Select the Show Panel option from the context menu.
Click on the icon next to your username.
Click OK on the prompt asking if you want to clear the saved credentials from GlobalProtect.
The above steps will clear your saved credentials on GlobalProtect, allowing you to log onto the GlobalProtect VPN client with new credentials for a secure connection.
Although the VPN portal may encounter difficulties prompting credentials on the login screen, following the steps provided above, you should bypass the GlobalProtect pre-logon loop to get the sign-in prompt back.
Payday 2’s players complain about the game not working in VR mode, one of the common issues encountered. The issue makes it impossible to use Virtual Reality settings and accessories, such as motion controllers, grip buttons, etc., with the game.
Since most players are challenged with what to do when the Payday 2 VR is not working, this article will explore the steps for fixing the issue.
Why Payday 2 VR might not be working?
Outdated or incompatible graphics drivers, VR headset drivers, so to fix this issue, update your graphics drivers.
The VR setup might not meet the hardware specifications to run Payday 2 VR smoothly, causing motion sickness.
Issues with the Steam VR integration or settings can affect the game graphics and Payday 2 UI, prompting it to stop opening.
Other apps like antivirus software running in the background might interfere with Payday 2 VR, causing it to crash or malfunction when accessed.
If the VR firmware headset is outdated, it could lead to compatibility problems with the required hardware specs, causing the game to crash.
Other problems with the VR headset’s tracking or calibration may cause discomfort or misalignment, leading to Payday 2 VR not opening.
Some mods or add-ons might conflict with the VR version of Payday 2.
Network connectivity issues can affect the gameplay if the game relies on multiplayer features. You might be able to remedy this issue by using VPN with Payday 2.
Nonetheless, we’ll take you through some detailed steps for resolving the problem. Read about the best VR software for PC in 2023.
How do I fix Payday 2 VR if it’s not working?
Before proceeding with any advanced troubleshooting steps, you can go through these preliminary checks:
Restart Steam and your PC to resolve temporary issues causing the Payday 2 VR not to work.
Check both the game’s system requirements and your VR headset’s specifications to ensure your PC meets the minimum hardware requirements.
Verify that your VR headset and controllers are properly connected and functioning.
Update your VR headset’s software (SteamVR, Oculus software, etc.) to improve compatibility and fix issues.
If you have installed mods or add-ons for Payday 2, try disabling them to see if they are causing conflicts with the VR version of the game.
Update your graphics drivers and disable overlay to prevent interference with the game or VR experience.
Click the Download button to reinstall it and add the VR mode.
The game will start and close immediately, then restart the Steam client.
Go to the Games library, locate Payday 2, and click Play. It will give you the option to start the game in VR mode.
The above steps will resolve issues caused by game bugs causing the Virtual Reality DLC to uninstall or malfunction. It reinstalls a new VR copy and fixes the Payday 2 VR not launching.
2. Clear the Steam client’s download cache
Left-click the Start button, type Steam in the search bar, and open it.
Click the Steam Menu and select Settings.
Then, click on Downloads and click the Clear Download Cache.
Click OK until Steam prompts you to log in to your account.
After logging into your Steam account, check if the Payday 2 VR not opening persists.
Clearing your download cache will delete the corrupt update or download files that can cause issues with the Virtual Reality mode. However, this solution is also effective in the non-VR mode.
How do I enable VR in Payday 2?
1. Enable it in the DLC section on Steam
Navigate to the game’s Steam Store page and go to the Content for this game.
Click on See All to view all available DLCs.
Find the Payday 2 VR expansion and click on it to be redirected to the store page.
Click the Download button to add the game’s DLC.
Open the Steam client, and open the Steam library.
Find the Payday 2 game from the list, right-click on it, and select Properties.
Navigate to the DLC Section and ensure the box for the Payday 2 VR option is checked.
Follow any on-screen instructions to calibrate your VR headset and controllers, then click the Play button to launch the game.
From the available option, launch the game in Steam VR mode.
Once the game is running in VR mode, you can enjoy playing PAYDAY 2 with the immersive experience provided by your VR headset and controllers, which is not affordable to non-VR players.
The jump to virtual reality in video games has improved the immersion for players, especially in the first-person genre. Thus, Payday 2 follows suit in delivering quality VR mode but with minor hiccups sometimes.
With Payday 3 on the horizon for VR mode, learning how to troubleshoot it when it’s not working will be handy.
Call of Duty has been very popular recently, especially the old Call of Duty games. Microsoft recently fixed the servers, and now you can play online matches on old Call of Duty games with your friends again.
While they are best enjoyed on a PC, any Windows 11 device should support Call of Duty games. We’re talking about Steam Deck. If you play Call of Duty from there, it should be able to run smoothly and properly. You shouldn’t run into any issues.
However, it seems that sometimes the game crashes. Especially Call of Duty: Modern Warfare 2. It seems that if you play it on a Steam Deck, the game will crash unexpectedly, and the following message will appear:
It seems that Call of Duty: Modern Warfare 2 did not quit properly the last time it ran. Do you want to run the game in safe mode? This is recommended for most people. It will change your system settings but not your controls.
And then you are given the options of Yes, No, and Cancel.
If Call of Duty: Modern Warfare 2 has suddenly crashed while playing on Steam Deck, it means the game encounters an internal conflict and can’t pass it. Make sure your game is updated with the latest patches, but if that doesn’t work, let’s see the solutions.
Install Call of Duty: Modern Warfare 2 from Steam, instead of Battle.net
Go to the Call of Duty: Modern Warfare’s Steam Page.
Download the package of your choice.
Install and Play the game.
Several users noted that the Battle.net version of the Call of Duty: Modern Warfare 2 is somehow running into this issue, while the Steam version works properly. You might want to try the Steam version, even if you’re an Activision Blizzard fan.
Install Call of Duty: Modern Warfare 2 in the same drive partition as your Steam Deck’s Windows 11
If you want to keep playing Call of Duty: Modern Warfare 2 from your Battle.net account, then it seems you need to install the game in the same drive partition as your Steam Deck’s Windows 11.
To do that, just uninstall your Call of Duty game, then reinstall it again in the same partition as your Windows 11. You can easily do this inside your Battle.net platform.
Let us know if any of these solutions worked for you in the comments section below.
MSI Mystic Light is a lighting control software available standalone or within the Dragon Center that enables you to control the RGB lighting to enhance the gaming experience.
The software has quite popular. However, users have reported that MSI Mystic Light is not working on their Windows PCs, making it impossible to control the RGB lighting.
Why is the MSI Mystic Light not working?
It is very difficult to determine the exact reason for the problem. But, one of the following reasons may be its root cause:
Incompatible apps – Some resource-hungry third-party apps may interfere with the functioning of the MSI Mystic Light and may restrict it from working.
Conflicting BIOS settings – The RGB lighting settings in the system BIOS may conflict with those of the MSI Center app preventing MSI Mystic Light from working.
Outdated Dragon Center – Using an outdated version of the Dragon Center and MSI Center will cause performance issues like the one you are facing currently.
Corrupt Installation – Similarly, MSI Mystic Light may not be working because the installation procedure was interrupted somehow making it corrupt.
Regardless of the reasons for the non-functional MSI Mystic Light, you can troubleshoot the problem easily by employing the solutions given below.
How do I fix the MSI Mystic Light if it’s not working?
Before proceeding towards the solutions listed below, perform these preliminary steps:
Ensure that the hardware components, such as the motherboard and connectors, are inserted properly.
Check if any optional updates are available and install them as well.
If the MSI Mystic Light is still not functional, try the solutions given below.
1. Update the device drivers
Use the Windows + X shortcut combination to launch the Quick Links menu and choose the Device Manager option.
Look for a warning sign next to the device category in the Device Manager window and expand it.
Right-click the outdated driver and choose the Update driver option from the context menu.
Choose Search automatically for the driver‘s option from the pop-up that appears.
Wait for Microsoft to look for available driver updates and install them automatically. Alternatively, you can also visit the manufacturer’s website to update the outdated drivers.
2. Update Dragon Center
Press the Windows key to launch the Start menu, type dragon center in the search box and choose the Run as administrator option from the context menu.
Select the Support icon located on the left navigation menu to access the Live Update menu.
Click the Scan button on the top right to look for any Dragon Center or Mystic Light updates.
If any update is listed, press the Install button next to them to initiate the download process.
After the download and installation are completed successfully, reboot your PC, and hopefully, MSI Mystic Light will now function flawlessly.
MSI regularly releases new updates for Dragon Center and Mystic Light with performance improvements and bug patches so try to keep it updated at all times.
Use the Windows + R shortcut to bring up the Run dialog box. Type the following command in the command box and hit Enter to access the System Configuration window: Msconfig
Uncheck the box preceding the Load startup items and enable the one for the Load system services option.
Now go to the Services tab and enable the checkbox for Hide all Microsoft services located on the bottom left.
Press the Disable All button and click Apply to save the changes.
Now exit the System Configuration window and reboot your PC normally. Upon restart, your PC will launch in the clean boot state.
In our extensive research, we discovered that the presence of conflicting apps and anti-cheat software causes resource starvation on your system hindering the working of MSI Mystic Light.
You can boot your PC in a clean state to determine if there is interference by some third-party apps.
If Mystic Light functions in the clean boot mode, re-enable each of these processes one by one to catch the problematic app. Once you identify the culprit you can easily uninstall them from your Windows PC.
4. Reset the RGB lighting settings
Restart your system, and as soon as the startup screen appears, hit the F2 key ( or any other BIOS key) to access the BIOS settings.
Go to the Advanced section and look for the LED Lighting option.
Disable the When the system is in working state and When the system is in sleep, hibernate or soft off state options.
Save the changes and then reboot your Windows PC.
Access the BIOS settings once again and enable both the options you disabled earlier.
Now reboot your Windows PC and check whether or not the MSI Mystic Light is working.
It is possible to use the Mystic Light feature if your motherboard has a different configuration. However, the RGB settings in the BIOS might conflict with those of the Dragon Center. Resetting the RGB settings in the BIOS should fix it.
There you go! The MSI Mystic Light should now be working on your Windows PC.
In case you are still struggling to make it work, you should uninstall Dragon Center from your system and then download the software from the official website and reinstall it.
If you have any further queries in this context feel free to drop us a message below.
Between Microsoft battling FTC for the right to buy Activision-Blizzard, July has been a month of changes for the Redmond-based tech giant. Microsoft Inspire 2023, which happened last week, also brought forward a lot of new products, partnerships, and updates from Microsoft.
We’re seeing AI in almost everything Microsoft-related, from Microsoft Store to Microsoft Teams and Windows 11. It’s safe to say AI is slowly changing everything.
There is one feature, specifically, which causes a lot of confusion. We’re talking about the Microsoft Authentication Broker feature which is present on the platform. One user, for example, found out that Microsoft Authentication Broker bypasses Multi-Factor Authentication. So what is Microsoft Authentication Broker?
What is Microsoft Authentication Broker?
Basically, Microsoft Authentication Broker is a token broker service that is used to enable SSOs, which is Single Sign-On. With the Single Sign-on option, you can practically log in to several related but independent software applications with a single ID.
Single Sign-on is the opposite of Multi-factor Authentication, that sort of authentication that requires you to take several steps to log in to an app.
And these Single Sign-ons are sometimes enabled by Microsoft Authentication Broker. You can find it on different devices such as:
Windows 10/11 devices: they have it built into the OS
Android devices use Microsoft Authenticator or Microsoft Company Portal
IOS/IpadOS uses Microsoft Authenticator
MacOS uses Company Portal with the MacSSO extension deployed
Microsoft Authentication Broker is used in Microsoft platforms, including Entra. It acts like an authority that certificates and validates the authentication of clients, including users and services.
What do you think about it? Is Multi-factor authentication preferable to it or not? Let us know in the comments section below.
If you are an advanced Windows user and want to know full details about a variety of events, including account logon and logoff activity, system information, warnings, etc., then you need to view the Microsoft Windows Event Viewer logs.
In this guide, we will explain to you all the steps that you need to understand how you can take a Windows event log backup and export the Windows event log on your PC. Let us check out the guide.
What is Microsoft Windows Event Viewer? With the Microsoft Windows Event Viewer, you can view a log of all application and system messages. These messages will include error information, warnings, account login/logoff information, etc.
How do I open Windows Event Viewer? Just type event viewer in the Search bar and select the Event Viewer app from the results.
You may also open Event Viewer by right-clicking the Windows button and selecting it from the context menu, or by typing eventvwr.msc into a Run console and press Enter.
This works on all the latest and previous versions of Windows OS. Let us now learn how you can perform Windows Event Viewer backup and export functions in the below segment.
How do I export or backup Windows Event log?
1. Export logs to CSV file
Press the Win key to open the Start menu.
Type Event Viewer and open the appropriate result.
Expand the Windows logs section.
Select the type of log you wish to be exported.
On the right side of the log to be exported, select Save all Events as… option.
In the Save as type drop-down select CSV (Comma Separated Value) (*CSV).
In the File name box, type the name of the file and save it in your preferred location.
Hit the Save button.
You can open this CSV file with Microsoft Excel and then troubleshoot the issues based on the information that you obtained from the Windows Event viewer.
Type Event Viewer and open the appropriate result.
Expand the Windows logs section.
Select the type of log you wish to be exported.
On the right side of the log to be exported, select Save all Events as… option.
In the Save as type drop-down select Event Files (*.evtx).
In the File name box, type the name of the file and save it in your preferred location.
Hit the Save button.
When you perform the above steps, it will backup the Windows Event Viewer log file in .evtx format and also create a folder called LocaleMetaData in the destination where you have saved the log file.
How can I open the CSV file in MS Excel and sort events by ID?
Launch Microsoft Excel.
Open the CSV file on it.
Choose Delimited on the first page of the Text Import Wizard.
Hit the Next button.
Select Comma and uncheck the Tab under the Delimiters option and click OK.
Under the Column data format box select General and select Finish to view the Windows Event Viewer log in MS Excel.
Click on the Event ID column to highlight the entire Event IDs.
Hit Data from the menu options.
Select Sort from the Data menu tab and select Expand the selection in the warning prompt that appears and click on Sort.
In the Sort by drop-down, select Event ID and specify the sort order available under the Order drop-down and click OK.
Following the above steps, you can easily back up and view the Windows Event Viewer log file sorted in the order of Event IDs. This will help you locate the problem that you are looking to troubleshoot quicker.
That is it from us in this guide. We have a guide that lists down some of the best Windows Event Log Viewer tools and also detailed steps on how you can use them.
Moreover, you can also check out the solutions to quickly resolve Event ID 4103. For more information on Event ID 800, we would suggest you apply the fixes mentioned in our guide to resolve it at your end.
Feel free to drop a comment below and let us know if you understood without any issues regarding how to backup the Windows log event on your computer.
Many users have reported that when they reboot their PCs, the Windows Settings reset to default and all of their personal files and settings are changed.
In this guide, we will show you multiple ways via which you can fix the Windows settings reset to default on reboot issue on your PC. Let us check out the solutions.
Does resetting Windows reset settings?
Resetting your PC helps you get your PC back to a state when everything was working normally. However, a reset is advised as a probable solution when nothing else seems to work.
When you reset your Windows PC, you get the option to perform a clean installation and update Windows while keeping most of your personal files and settings intact. So, resetting Windows does not reset settings, as long as you have selected the correct option.
Why is Windows resetting to the default setting on reboot?
We did some careful research and went through multiple user reports and have found some common reasons which is why Windows is resetting to the default settings after reboot.
Corrupt system files – In case your PC has corrupt system files or important system files are missing, you will come across multiple issues including the one at hand.
The user profile is corrupt – A third-party program or a background app can misbehave and corrupt the user profile causing such issues where the Windows settings are reset to default on reboot.
Startup issue – Some important startup files might be missing which is why all the settings and personal files are removed or reset on startup. Such cases require startup repair.
Presence of virus – Chances are your PC is infected with a virus or malware causing the Windows PC to malfunction.
Let us now check out the different solutions that will help you resolve the Windows settings reset to default on reboot problem.
How do I stop Windows from resetting to default settings on reboot?
1. Run SFC and DISM scans
Press the Win key to open the Start menu.
Type command prompt and open it as an administrator.
Type the below command and press Enter:sfc /scannow
The process will begin resolving the corrupt system files.
Type the below commands and press Enter after each one:Dism /Online /Cleanup-Image /CheckHealthDism /Online /Cleanup-Image /ScanHealthDism /Online /Cleanup-Image /RestoreHealth
Restart your computer.
If some important system files are corrupt or missing, your PC will not behave normally and cause several problems including Windows settings reset to default on reboot.
To open the Settings window, press the Win + I keys.
Select Recovery on the right side.
Hit the Restart now button next to Advanced startup.
When your PC reboots, select Troubleshoot.
Select Advanced options and click Startup repair.
Follow the on-screen steps to complete the automatic startup repair process.
Windows comes with a built-in startup repair tool that will help you resolve any issues related to startup. Often, we change some system settings because of which the problem of startup repair occurs.
Simply follow the above steps and run the automatic startup repair and check if this resolves the problem or not. In case the automatic repair doesn’t work, you can apply the solutions mentioned in our guide to fix the startup repair.
Navigate to the below path and press Enter. HKEY_LOCAL_MACHINE\SOFTWARE\Microsoft\Windows NT\CurrentVersion\ProfileList
In the ProfileList folder, you will see multiple profiles starting with S-1-5, which correspond to the different user accounts on your computer.
Identify the correct account by checking the ProfileImagePath key on the right side. If anyone of them matches your username, then it is your account with administrative privileges.
Open the RefCount and Statekeys and change the Value datafrom 1 to 0.
Click OK to save changes.
Reboot your PC and check if this resolves the Windows settings reset to default on reboot or not.
Follow the above steps and check if this fixes the startup repair issue that you have on your PC because of which all of your personal files and settings were reset to default.
4. Uninstall the recently installed updates
Press the Win + I keys to open the Settings menu.
Select Windows Update from the left pane.
Choose Update history.
Hit the Uninstall button next to the recently installed update. Select Uninstall again.
Restart your computer.
Chances are that there is an underlying bug in the latest Windows update that was causing the automatic reset issue on your PC and resetting all of your personal settings.
In such a case, we would suggest you uninstall the latest update and check if this fixes the Windows settings reset to default on reboot.
5. Clean Boot your PC
Press Win + R keys to open the Run dialogue.
Type msconfig and press Enter.
Switch to the Services tab.
Check the Hide all Microsoft services, and then select Disable all.
Select Apply to apply the changes.
Click on the Startup tab.
Hit the Open Task Manager link button.
For each enabled item, select Disable and close the Task Manager.
Restart your computer.
Check if the automatic reset issue happens in the clean boot state or not. If not, then there is a problem with the recently installed program. Simply uninstall the recently installed third-party program and check if this fixes the issue or not.
6. Perform System Restore
Press the Win key to open the Start menu.
Type create a restore point and open the appropriate result.
Click on the drive where you have installed the OS and click on System Restore.
Choose the restore point and click Next.
Click Finish to begin the restore process.
Try running the system restore to repair the startup process and fix the problem at your end. Note that the system restore process will work, only if you have a system restore point created on your PC. In order to do that, you can read the guide on how you can create a system restore point.
That is it from us in this guide. If your PC is stuck in a restart loop, then we would suggest you apply the suggested solutions in our dedicated guide to fix it.
In case your computer won’t restart, then we have listed 7 of the most effective solutions to resolve the problem.
Feel free to let us know in the comments below, which one of the above solutions resolved the problem for you.
If you click Shutdown and leave your PC in a hurry, expecting it to shut down automatically, Outlook may prevent your system from shutting down, and it would remain on until you get back, which can be annoying.
Force-closing the Outlook app and reopening it is the best way to resolve the problem when Outlook doesn’t fully close, freezes, becomes unresponsive, or shows errors.
Why is my Outlook not fully closing?
If Outlook is not closing properly, it’s probably due to add-ins or other integrated programs interfering with it. Some common causes include:
Background Processes: Outlook might have background processes or tasks running in the background, which can prevent it from fully closing.
Software Conflicts: Conflicts with other software or applications running on your computer can make Outlook freeze or not close properly.
Outlook Updates: Sometimes, updates or fixes for Outlook can introduce new bugs that affect how it shuts down.
Antivirus Software: Some antivirus programs might interact with Outlook and keep it running to ensure the security of your emails and attachments.
How do I force close Outlook?
Before attempting the various methods to force terminate the Outlook app, consider trying these quick workarounds:
Use the Shortcut: Press ALT + F4 keys simultaneously to force quit the app. It gives the program some time to close on its own, but keep in mind that it may take a few moments and won’t happen immediately.
Terminate the interrupting programs: Close the applications that might be preventing Outlook from closing properly, such as Fax software, virus scanners, synchronization software, Skype, or Anti-spam filters. By closing these apps, you can ensure that Outlook closes without interference.
Restart your PC: Restarting your PC will terminate Outlook and all its related processes. However, if some other important tasks are ongoing, and you don’t want to restart your PC in the middle of them, you can restart your PC if all other attempts to terminate Outlook fail.
1. Kill the Outlook processes in Task Manager
Press Ctrl + Shift + Esc shortcut keys to launch the Task Manager.
Go to the Details tab and locate the OUTLOOK.EXE process. Then, right-click on it and select End task.
When prompted by a dialog box, click End process to force kill the Outlook app.
But remember, forcing Outlook to close may lead to potential data loss or corruption, especially if you have unsaved changes in emails or other items.
2. Run the taskkill Command
On your desktop, right-click on an empty space and select New, then Shortcut.
Type the following command in the Type the location of the item field and click Next: taskkill /f /fi “status eq not responding”
Type a name for the shortcut and click Finish.
Now, you’ll have a shortcut on your desktop that executes the taskkill command.
Simply double-click the shortcut if the Outlook app fails to close.
After running the shortcut, Outlook should force close immediately.
Press Windows + R to open the Run command box, type cmd, and press Enter.
Type the following command to list all the running processes: tasklist
Under Image Name column, locate and confirm the name of the Outlook app process(es). It’s usually OUTLOOK.EXE or OUTLOOK.EXE*32.
Now, type the following command and press Enter, replacing OUTLOOK.EXE with the name of the process (if required): taskkill /IM OUTLOOK.EXE /f
Once the command is executed successfully, it will forcefully close the Outlook app.
If you are experiencing issues such as Outlook not closing or not responding, starting Outlook in Safe Mode can help troubleshoot problems with the app effectively.
Have you faced any issues while following these steps, or did you find a different way to force close the app? Please feel free to let us know in the comments section below.
Good news for all of you Bing Chat AI users. The beloved AI tool is finally available on Chrome and Safari, according to the latest reports. And the best part? It also comes with a Dark mode, so you’ll be able to use it however you like.
There were ways to get Bing Chat on other Internet browsers before, but the methods were unofficial, and a bit more complicated. But now, you can go to bing.com on your Chrome or Safari browser, and click on Chat. Bing will appear and then will integrate itself into your Google searches.
This follows a long period of time when Bing had not been available to any browser than Edge, and it would cause frustration, especially if you loved the tool, but not Edge. But those days are behind now, and you can freely use Bing Chat whenever you want.
However, you should know that there are limitations. Microsoft still wants you to use Bing Chat on Edge, and for now, it is discouraging you to use it on Chrome and Safari. We don’t know if the limitations are temporary or not.
Bing Chat AI limitations on Chrome
It seems that your prompts in Bing Chat AI on Chrome are limited to 2,000 characters (in Edge the limit is 4,000 characters, for example).
Even more, your whole conversation with Bing Chat AI on Chrome is limited to just 5 messages before it resets. In Edge, that limit is 30 messages before the conversation reset.
However, these limitations might be temporary, even if Microsoft hasn’t released an official statement on it just yet. As the tool has just been released on these browsers, maybe the limitations are intentional, but they could be expanded in future patches and updates.
Bing Chat AI is also set to compete with Google’s Bard AI. As you might know, Bard AI is currently available to use on other browsers as well, but unfortunately, the tool is not as popular as Bing Chat.
However, Google’s DeepMind AI is quickly catching up with Microsoft, meaning that Bard AI will also get some important improvements in the future. This means Bing Chat will have to become better, faster, and not limited if it wants to compete with Bard on the world’s most popular Internet browser.
But Bing AI also benefits from the huge AI research Microsoft is currently undergoing. The Redmond-based tech giant is keenly approaching AGI with its AI research. While it won’t happen in the next months, AGI will most likely happen sometime this decade. Specialists say it will solve a lot of humanity’s issues.
And of course, ultimately AI tools such as Bing Chat will greatly benefit from it too.
What do you think about it? Will you use Bing Chat AI on Chrome? Let us know in the comments section below.
With the advent of smartphones, capturing images to preserve your precious moments has become so easy. However, with thousands of photos stored on your PC, organizing them has become a challenge.
If you are looking for a way to sort your images by Name on your Windows 10 or 11 computer, this guide can help!
We will explore two methods using Windows utility tools, Windows File Explorer and Photos app, to get the job done.
How can I sort my photos by name on Windows?
1. Use the Windows File Explorer
1.1 Windows 11
Press Windows + E to open the Windows File Explorer. Go to the folder that contains images.
Now, go to Menu Bar, click Sort, and from the context menu, choose Name. By default, the photos will appear in alphabetical or numerical order.
Further, you can organize them in Ascending (photos’ name starting from letter A or number 1 will list first) or Descending (photos’ name starting from letter Z or the largest number in the folder will appear first) order. To do that, go to Sort, then select any of the two.
1.2 Windows 10
Press Windows + E to open the File Explorer.
Go to the folder that has pictures you want to sort.
Right-click the empty space, and from the context menu, select Name.
You can also organize them in Ascending and Descending order; for that, again, right-click the empty space, and choose any of the two.
Once you make a choice, your photos will be sorted by name in ascending order by default if not chosen otherwise.
If you are looking for a way to sort images by date, we recommend you check this guide to find the step-by-step instructions to get it done.
2. Use the Photos app
1.1 Windows 11
Press the Windows key, type photos and click Open.
Windows Photos app will open, and you will see the photos stored in your default folder, i.e., Pictures.
Photos app comes with options to change the source of photos. From the left pane, you can choose among OneDrive, iCloud, Favorites, Folders, and External Devices. Select the option for which you want to sort pictures.
Once done, click on the Upward-downward arrows icon and choose Name.
If you want to change the order of their appearance according to their name, click the upward-downward arrow icon again and choose Ascending or Descending.
As soon as you choose the option, the photos will be sorted and organized as per your preferences.
1.2 Windows 10
Press the Windows key, locate Photos, and click it to open.
Go to Albums, locate Sort by:, and choose Alphabetically.
This is how you can arrange photos on your Windows 10/11 computer by name in ascending or descending order.
How can I fix the Photos app not sorting images issue?
1. Run the troubleshooter
Press Windows + I to open the Settings app.
Go to System, then click Troubleshoot.
Click Other troubleshooters.
Locate Windows Store Apps and click Run.
Follow the onscreen instructions to complete the process.
2. Check for updates
Press the Windows key, type microsoft store, and click Open.
Click Library from the left pane to access installed apps.
Now click Get updates.
Locate Microsoft Photos from the result, and check if it has the Update option available. If yes, then click it and wait for the process to complete.
3. Reset/Repair the Photos app
Press Windows + I to open the Settings app.
Go to Apps, then click Installed apps.
Locate the Photos app, click the three dots, and select Advanced options.
Now navigate to Reset and click the Repair button and check if the issue persists.
If yes, go to Advanced options, navigate to Reset, and click the Reset button.
This will clear the app cache; once it is done, restart your computer and try to sort photos. If you are still not able to do that, wait for the Windows update, or try another photos organizer tool to arrange your photos collection.
So, these are methods you can follow to sort your photos by name on your Windows 10/11 PC. Use any of the methods and arrange your photos the way you like.
The battle of AIs is fascinating. Ever since Microsoft announced that it will implement AI in its products, including Windows 11, a lot of tech giants, including Meta, and Twitter wanted to be a part of it, one way or the other.
Microsoft has been at the forefront of AI right from the start and now the Redmond-based tech giant is surely integrating AI in everything Microsoft-related. For example, Microsoft Store is getting AI help, and it will be able to automatically summarize reviews for you. This way you won’t have to go through all of them.
Even more, Meta is already collaborating with Microsoft in an AI partnership, and their collaboration focuses on Llama 2, which is an open-source AI model with 70 billion parameters available. With it, you’ll be able to build and train your own AI model.
And now, it seems that OpenAI, the company behind the popular ChatGPT, is also coming with its own open-source large language model (LLM), codenamed G3PO, according to the latest reports.
OpenAI’s G3PO – what we know so far about this AI language
Firstly, G3PO is a codename for the LLM model developed by OpenAI. Apparently, the Microsoft x Meta AI partnership put a lot of pressure on the other tech players, Google and OpenAI including. Llama 2 will be open source, but it also comes with a commercial license, allowing anyone to utilize and profit from it.
OpenAI has been keen on releasing an open-source LLM for quite some time now, and it seems G3PO is finally that product. However, meanwhile, it will have to compete with Llama 2 and possibly other LLMs.
While the project has a codename, unfortunately, it doesn’t have a release date for now. It seems that OpenAI might be thinking about other endeavors. Recently, the company has established a group, Superalignment project, which wants to achieve AGI in 4 years from now.
With a VPN, you can have access to Freeview Play content from outside the UK, but what if it’s not working?
If you can’t seem to open the content library and get errors on FreeView, you’re not alone. I’ve been there and figured out how to fix it.
So let’s get started. I’ll show you all you need to know to easily watch FreeView with VPN. By the end of this, you’ll be able to access its content abroad as if you were in the UK.
After that, I’ll also outline a quick overview of the best VPNs for it.
FreeView Play not working with VPN?
If you find that Freeview Play is not working when you’re connected to a VPN, try any of these five solutions to resolve the issue:
1. Switch to a different UK Server
Sometimes, the VPN server you’re connected to might be blocked by Freeview Play, or you’re connected to a server location where Freeview Play is not supported.
Whichever category you fall into, try switching to a different server in the UK.
This works because all servers have separate IP addresses, which might not be on Freeview Play’s blocklist.
Disconnect from the current VPN server by clicking on the power icon.
Choose another UK server from your VPN provider’s options.
Reconnect to the VPN using the new UK server.
Launch Freeview Play and check if it is now functioning properly.
You may need to try a few UK servers in different locations to find the best one that works for you.
NOTE
I used CyberGhost as an example, but following the same principle should give the same results, even if you use a different VPN service.
2. Clear your cached data
When you download Freeview Play on your device, it creates a cache saved on your device’s internal memory.
The cache stores some data and settings, which include your location. This is meant to improve your user experience, but it can also tamper with your VPN.
Luckily, clearing it is simple, quick and may fix the issue for good.
➡️ On TV
Follow the steps below to clear your device’s cache, using LG Smart TV as an example:
From your device’s home screen, go to Settings and select Device Preferences.
Select Storage from the list of options.
Select Internal Storage.
Scroll down the list to select Cached data.
Click okay, and then reconnect to a UK server on your VPN.
Open Freeview and start streaming your favorite show.
Note that some SmartTVs like FireStick only have options to clear the cache data individually for each app. In that case, you’ll need to clear the streaming app’s cached data only.
➡️ On mobile
If you are using a mobile phone to access Freeview Play, follow the steps below to clear your app cache data:
Open your Settings app.
Tap on Apps or Applications.
Find the Freeview Play app and tap on it.
Tap on Storage or Storage & Cache.
Tap on Clear cache.
Try reconnecting to your Freeview Play while connected to a UK server on your VPN.
3. Check your split-tunneling settings
Split tunneling is a technique that allows you to direct specific internet traffic through the VPN while allowing other traffic to access the internet directly, bypassing the VPN.
You can use it to ensure that Freeview Play traffic does not go through your regular internet connection, eliminating potential blocks from the streaming service.
Here is how to activate Split Tunnel for Freeview Play on CyberGhost:
Tap the gear icon for Settings.
Open the VPN tab.
Tap App Split Tunnel.
Ensure the mode is on Custom rules.
Now, look if Freeview Play’s box is checked. If it is not, check it.
Reconnect your VPN.
Enjoy streaming Freeview Play.
4. Reinstall your VPN
If your VPN app is corrupted or outdated, it may fail to hide your IP address or connect to your desired server.
A simple solution to try is to reinstall the app.
Here is how to do it on a Samsung Smart TV:
Press the Home button on your remote and scroll down to Apps.
Select settings on the top right corner of your screen.
Navigate to your VPN app, then select Delete.
In the new pop-up, select Yes.
Press the Return button on your remote, then select the Search icon to type in your VPN provider’s name.
Select your VPN provider and install it.
Log in with your credentials.
Connect to a UK Server and try streaming on Freeview Play again.
This will also update your app to the latest version, ensuring you have the latest security features, bug fixes, and improvements for a smoother and safer VPN experience.
5. Change your VPN provider
If Freeview Play is not working with VPN after trying the fixes above, switching to a different VPN provider is the last resort.
Some VPNs, especially free ones, may have DNS leaks or fewer servers that are often overloaded.
This can result in slower speeds and Railpay suspecting and blacklisting the server.
I recommend CyberGhost for its great speed and numerous UK servers.
On your Smart TV or app store, search for CyberGhost to download and install the app.
Open the app and accept the Terms and Conditions by clicking on Agree and Continue.
Log in with your credentials.
Search and select a UK server.
Click Okay to accept VPN connection request.
Once connected to the server, try streaming on Freeview Play again.
CyberGhost works best with Freeview Play. Nevertheless, remember to clear your app cookies before tying it out.
Does Freeview Play block VPNs?
Freeview Play doesn’t officially block VPN usage.
However, they might have measures in place to detect and restrict access from VPN IP addresses to comply with content licensing agreements.
This could be the reason why some VPN users face difficulties accessing Freeview Play.
How does Freeview Play detect my VPN?
Freeview Play may detect your VPN through several methods, including:
IP Address Blacklisting: Freeview Play might maintain a list of known VPN server IP addresses and block access from those addresses.
Deep Packet Inspection (DPI): Freeview Play could use DPI technology to analyze network packets and identify VPN traffic characteristics.
DNS Leaks: DNS leaks can occur when your device unintentionally reveals its actual location to Freeview Play servers, even when connected to a VPN.
WebRTC Vulnerabilities: WebRTC can sometimes bypass VPN connections, potentially revealing your actual IP address to Freeview Play.
Does Freeview Play work with a VPN?
Yes, Freeview Play works with a VPN if you use a reliable and reputable VPN service that can evade its blocks.
A good Freeview Play VPN will have an extensive network of servers in the UK, a fast and consistent performance, strong encryption and security features, and a user-friendly interface.
However, not all VPNs work with Freeview Play. Some VPNs are too slow, weak, or outdated to bypass Freeview Play’s blocks.
To save you the hassle of searching for a good enough VPN, I have compiled a list of the best Freeview Play VPNs in the next section.
Check them out!
Best VPNs for Freeview Play
In a bid to access Freeview Play from Nigeria, I tested several top VPNs, and I was able to compile a list of the five best ones.
My selection of these VPNs is based on the following set of criteria:
Works well with Freeview Play
Fast and reliable servers in the UK
High-quality streaming and no buffering
Unlimited bandwidth and data
Strong encryption and security
User-friendly apps and customer support
Money-back guarantee
Here are the tools I swear by:
CyberGhost VPN – overall best for streaming on Freeview Play
If you want to stream on Freeview Play hassle-free, CyberGhost VPN is the perfect choice.
With over 724 UK servers spread across London, Berkshire, and Manchester, you have plenty of options for high-speed connections.
It works wonders on FreeView Play. I’ve also tested it on other UK TV platforms such as BBC iPlayer and it did just as good of a job.
No need to worry about crowded servers! Enjoy unlimited bandwidth, fast VPN protocols like WireGuard®, and streaming-optimized servers with speeds up to 10 Gbps in busy locations.
This ensures uninterrupted streaming on Freeview Play.
Not only that, CyberGhost takes your online security seriously. With powerful 256-bit AES encryption, your sensitive data is safe from prying eyes and cybercriminals.
The Kill Switch feature blocks all traffic if you get disconnected, so your location remains hidden from Freeview Play.
Plus, you can connect up to 7 devices simultaneously with just one subscription.
Whether it’s Windows, macOS, Linux, Android, iOS, Android TV, or Amazon Fire TV Stick, CyberGhost’s user-friendly VPN apps have got you covered.
And if you ever need help, their friendly 24/7 Customer Support team is ready to assist you via live chat or email with guided walkthroughs.
Stream Freeview Play content with peace of mind using CyberGhost VPN!
Pros:
User-friendly apps with dedicated streaming profiles.
No-logs policy and strong encryption for enhanced privacy.
Specialized servers for various use cases, including streaming.
Cons:
Some servers may experience occasional slowdowns.
CyberGhost
Never miss out on your favorite shows & unblock FreeView Play with CyberGhost!
ExpressVPN – great streaming quality for Freeview Play
If you’re looking to bypass geo-restrictions on Freeview Play, ExpressVPN is an excellent choice.
With servers in Docklands, London, Midlands, Wembley, and East London, you can always rely on finding a UK server to access your favorite content.
What sets ExpressVPN apart is its strong commitment to security. Utilizing robust 256-bit AES encryption and advanced leak protection, you can stream with confidence, knowing your connection is secure.
Moreover, ExpressVPN’s MediaStreameris a standout feature, allowing you to extend VPN protection to devices that don’t support native VPN connections.
Whether it’s smart TVs, gaming consoles, streaming media players, or other devices without VPN apps, ExpressVPN has you covered.
On top of that, ExpressVPN seamlessly works on popular devices such as Windows, Android, macOS, iOS, and Linux, ensuring a smooth and uninterrupted streaming experience.
Your privacy is of utmost importance to ExpressVPN, demonstrated by its strict no-logs policy and use of the TrustedServer feature, which wipes server data after each session.
To make it even more enticing, ExpressVPN offers a risk-free 30-day money-back guarantee. You can try it out and see if it suits your needs without any worries.
With ExpressVPN, streaming on Freeview Play becomes easy and worry-free, allowing you to enjoy your favorite shows without restrictions or privacy concerns.
Stream with peace of mind and unrestricted access to Freeview Play’s content library.
Pros:
Fast and consistent performance for seamless streaming.
User-friendly apps for various devices.
Excellent customer support with 24/7 live chat.
Cons:
Slightly more expensive compared to other VPNs.
ExpressVPN
Keep enjoying British TV packages on FreeView Play even abroad with this reliable VPN!
NordVPN – enough UK servers to unblock Freeview Play
NordVPN offers convenient access to more than 440 secure servers located in the UK, providing you with an effortless way to enjoy Freeview Play.
Its SmartPlay feature is designed to bypass geographical blocks on streaming platforms, which could come in handy for accessing Freeview Play.
Enjoy blazing-fast speeds and unlimited bandwidth with NordVPN, ensuring smooth HD or 4K streaming without interruptions on Freeview Play.
Regarding security and privacy, NordVPN has robust measures in place. It uses AES-256 encryption, a strong standard, to protect your data and identity.
The kill switch automatically disconnects your internet if the VPN connection drops, preventing any accidental data leaks, which is useful for other online activities.
For added security, NordVPN offers a Double VPN feature, routing your internet traffic through two separate servers to enhance your privacy.
NordVPN provides user-friendly apps for various platforms, including Windows, Mac, Android, iOS, and Linux, as well as compatibility with smart TVs, routers, and other devices, catering to other streaming services and online activities.
The best part is that NordVPN has a 30-day money-back guarantee, allowing you to try the service risk-free and explore its features and benefits.
While Freeview Play may not work with VPN services, NordVPN can still offer secure and uninterrupted streaming on platforms compatible with VPN usage.
Pros:
Extensive server network with specialty servers optimized for streaming.
Strong encryption and a strict no-logs policy for enhanced privacy.
User-friendly apps for multiple devices.
Double VPN and Onion over VPN features for extra security.
Cons:
Speeds can vary depending on the server.
NordVPN
Start streaming FreeView Play internationally with NordVPN!
Surfshark – 4K streaming quality at an affordable price
Surfshark is a fantastic option that offers excellent security at an affordable price, just $2.49 per month.
With about 212 servers in 4 different UK cities, you can easily access Freeview Play without any data restrictions or caps.
One of the standout features of Surfshark is its ability to provide unlimited data and unrestricted bandwidth, allowing you to connect multiple devices simultaneously.
You can stream on Freeview Play worry-free, enjoying your favorite shows and movies in high-definition or even 4K quality without interruptions.
To ensure your online security and privacy, Surfshark utilizes top-notch protocols like OpenVPN, IKEv2/IPsec, and WireGuard, all equipped with the robust AES-256-GCM algorithm.
This advanced encryption keeps your data safe and hidden from prying eyes while maintaining impressive connection speeds.
Surfshark also offers a kill switch feature that automatically cuts off your internet connection if the VPN connection drops. This ensures that your data remains private and your identity is always protected.
Additionally, Surfshark provides valuable features like CleanWeb, which blocks ads, trackers, and malware to give you a clean and uninterrupted streaming experience.
Setting up and using Surfshark is a breeze, with its user-friendly apps available for various platforms such as Windows, Mac, Android, iOS, and more.
With Surfshark, there’s no need to wait. Enjoy secure and private streaming with its impressive features and affordable pricing.
It’s a reliable choice for accessing Freeview Play and other streaming services while maintaining online privacy and security.
Pros:
Unlimited simultaneous connections on a single account.
CleanWeb feature to block ads, malware, and trackers.
MultiHop feature for added privacy.
Affordable pricing with a 30-day money-back guarantee.
Cons:
Smaller server network compared to other providers.
Surfshark
Enjoy FreeView Play no matter where you are using this reliable unblocking tool!
PIA offers lightning-fast speeds with a wide selection of servers in 3 UK cities, ensuring a smooth and seamless streaming experience in Freeview Play.
Thanks to its powerful 10 Gbps NextGen servers, you can say goodbye to frustrating lags, buffering, and freezing, even when streaming in 4K.
Enjoy unlimited bandwidth with PIA, allowing you to stream your favorite content on Freeview Play without worrying about data caps or restrictions.
PIA prioritizes your data security by employing strong encryption, giving you peace of mind during your streaming sessions.
You can choose between 128-bit or 256-bit AES encryption ciphers, adding an extra layer of security to protect your online activities from ISPs, third parties, and even Freeview Play.
PIA offers a Smart DNS feature for added convenience, allowing you to change your virtual location directly from your Smart TV.
While this feature doesn’t encrypt or redirect your data, it ensures that your connection speeds remain unaffected, making it a suitable option for accessing region-locked content.
Suppose you want to protect your entire network and all your devices. In that case, PIA provides the option to install the VPN directly on your router, extending its security benefits to all devices connected to the network.
With PIA, you can enjoy a seamless streaming experience on Freeview Play with lightning-fast speeds, unlimited bandwidth, and strong encryption to safeguard your online privacy and security.
Pros:
Strong commitment to user privacy with a strict no-logs policy.
Multiple security protocols and encryption options.
10 simultaneous connections on a single account.
Affordable pricing with a 30-day money-back guarantee.
Cons:
The interface may be less intuitive for beginners than other VPNs.
PIA
Access your favorite UK channels on FreeView using PIA’s strong UK servers!
If you’re facing issues with Freeview Play while using a VPN, don’t worry.
Following the solutions above and choosing the right VPN service, you can bypass the restrictions and enjoy uninterrupted streaming on Freeview Play.
Remember that the streaming landscape constantly evolves, so always check for the latest updates and workarounds. And for other like issues like the Freevee ITV-101 error, visit our guide for a detailed account on how to fix it.
Many users have reported that when they schedule to run a task on Windows Task Scheduler, they sometimes encounter the error message – The directory name is invalid.
The directory name is invalid error message in Task Scheduler typically occurs when the task you’re trying to run cannot find the directory or does not have permission to access it. This guide will walk you through easy fixes to resolve the error.
What does The directory name is invalid error in Task Scheduler mean?
The directory name is invalid is a type of runtime error that occurs when Task Scheduler tries to execute a scheduled task, but encounters a problem related to the directory path specified for the task.
It can occur due to various reasons. Below are some common causes for this problem:
Incorrect Path: The most common cause is an incorrect path specified in the task settings.
Spaces or Special Characters: If the path contains spaces or special characters, it must be enclosed in double quotes (“). Otherwise, Task Scheduler might interpret the path incorrectly.
Permissions: If you don’t have enough permission to access the folder or make changes to the directory, it can cause this error.
Antivirus/Firewall Interference: Sometimes, antivirus or firewall programs may prevent Task Scheduler from accessing certain directories.
How do I fix a directory name is invalid?
Before you try the below solutions, here are a few preliminary steps you can try:
Restart the PC: Restarting your computer sometimes resolves the invalid directory error.
Rename the .bat file to .cmd: If you are trying to run a .bat file in Task Scheduler, changing the file extension from .bat to .cmd might resolve the issue you were facing with the task.
Move the file to the physical drive: If you are attempting to run a file located on a mapped drive, move the file to a physical drive, and update the file path in the task accordingly.
Provide admin rights: Make sure that the user account running the task has the necessary permissions to access the file or directory.
1. Correct the Start-in path
Press the Windows key, type Task Scheduler and select the Task Scheduler app from the results.
Select the Task Scheduler Library on the left navigation panel.
Then, find the task that’s giving you the error. Right-click on it and select Properties.
Go to the Actions tab, select the action, and click the Edit button.
Now, remove the quotes (“) from the path in the Start in (optional) field, and then click OK.
Click OK again to save the changes.
After that, re-run the task again or wait for the next scheduled time, and it should work fine without the directory name is invalid error in Windows Task Scheduler.
Similarly, specifying a path in the Program/script field should be enclosed in double quotes if it contains any space or special character.
Also, when you modify the path in the Program/script field, remember to update the Start in field as well.
2. Change the directory permissions
Navigate to the directory specified in the task, right-click on it, and select Properties.
Switch to the Security tab and click Edit.
Next, select the user account and make sure the Full control box is checked.
Click Apply and OK to save the settings.
3. Run the chkdsk tool
Press the Windows key, type cmd, and select Run as administrator.
Type the following command and press Enter, making sure to replace C with the letter that corresponds to your hard drive partition: chkdsk C: /f /r
If you are prompted to schedule the scan on the next restart, type Y and press Enter.
Chkdsk will scan your hard drive partition for errors and repair any corrupted directories.
The Nvidia GeForce Now error code 0x800b1004 typically points to a problem with the game’s installation or an error in the connection between the user’s device and the GeForce Now servers.
In this guide, we will list some of the best solutions to help you resolve the Nvidia GeForce Now error message 0x800b1004. Let us check it out.
What can cause the Nvidia GeForce Now error 0x800b1004?
The Nvidia GeForce Now error message 0x800b1004 means there is a server issue or you do not have a stable internet connection.
Several reasons could trigger this problem with the cloud gaming service, some of which are listed below:
Unstable Internet connection – For playing games on a cloud gaming service, you should have a stable Internet connection.
Server status of GeForce Now – Chances are that the GeForce Now server is undergoing maintenance or there is a problem with the server. This also causes the GeForce NOW Error Code 0x800B0000.
Nvidia GeForce app issue – If you haven’t updated the Nvidia GeForce app then you will come across such issues as there could be an underlying bug within the app.
The antivirus program is interfering – There is a good chance that the antivirus or the firewall program is blocking the connection between your device and GeForce Now.
Outdated graphics driver – You should also make sure that you have an updated graphics driver installed on your PC to avoid such problems.
You are using a VPN service – The usage of a VPN to unblock geo-restricted content is also one of the main reasons for the error code 0x800b1004.
Let us now check out the solutions that will help resolve the Nvidia GeForce Now error code 0x800b1004.
How do I fix the GeForce Now error code 0x800b1004?
Before applying the advanced solutions, let us go through the simple solutions and hopefully resolve the problem at our end.
Make sure that you have a stable internet connection. If you have issues with your Wi-Fi, try using a wired connection.
Check if the Nvidia GeForce service status is OK. You can do that by heading over to the official server status website.
Try rebooting your PC, as it could be a temporary bug that is causing the GeForce Now error code 0x800b1004.
If you are using a VPN service or app, then you should disable it, as it could be causing the problem with the connection.
Now, let us shift to advanced solutions to resolve the problem.
1. Update the GeForce Now app
Launch the Nvidia GeForce Now app on your PC.
Click on the Drivers tab at the top of the window.
If there is a new update available then you will see a message A new Game Ready Driver is available. Click on the Download button.
Finish the installation by following the on-screen prompts.
Restart your computer.
Ensure you have the latest version of the GeForce Now app installed on your computer. This will ensure the bugs are fixed, and you have the latest features to enjoy.
2. Disable the Firewall
Open the Start menu by pressing the Win key.
Select Control Panel.
Click on Windows Defender Firewall.
Click on Turn Windows Defender Firewall on or off option on the left pane.
Check the Turn off Windows Defender Firewall (not recommended) radio buttons for both Public and Private networks.
Click OK and restart your PC.
Windows Firewall is known to block certain programs as it may falsely detect them as a threat to your PC. You should disable the Firewall and then check if this resolves the GeForce Now error code 0x800b1004 or not.
Double-click on your GPU to open it and switch to the Driver tab.
Select the Update driver option.
Select Search automatically for drivers option.
Install the latest drivers, and restart your computer.
Graphics drivers are an important part to play games from cloud streaming services on your PC. You should make sure that you have the latest version of the graphics drivers installed on your PC.
4. Change the server location
Open the GeForce Now app.
Click on the hamburger menu at the top left.
Select Settings.
Under the SERVER LOCATION section, select Auto from the drop-down menu.
If you feel that the server location that you are using on your Nvidia GeForce Now app is unreliable and you are facing connection issues, then we would suggest you change the server location to Auto and then check if this resolves the error code 0x800b1004 or not.
5. Flush the DNS cache
Press the Win key to open the Start menu.
Type Command Prompt and open it as an administrator.
Type the below command and press Enter. ipconfig /flushdns
Restart your computer and launch GeForce Now.
After this, set up a wired connection or use your Wi-Fi to connect to the internet and then check if this resolves the issue or not.
Setting up your Windows development environment can be a time-consuming and cumbersome task. However, with the help of Windows 11 Dev Home, a machine configuration tool, you can streamline the process and get your PC ready for coding in no time.
Windows 11 Dev Home brings all your development environment setup tasks into one convenient place. Whether you’re setting up a new machine or onboarding new projects, this tool allows you to efficiently manage the entire process. Say goodbye to the fragmented and tedious steps involved in preparing your machine for development.
By using Windows 11 Dev Home, you can easily search for project requirements, clone repositories, and find specific versions of software and tools to install. It eliminates the hassle of managing multiple tool sign-ins and minimizes context switching, allowing you to reach productivity faster.
With Dev Home, you can focus on what you do best – developing.
Understanding the Importance of Windows 11 Dev Home
Efficient machine configuration is the cornerstone of a seamless development experience. By optimizing your system, you can significantly enhance your development workflow and reduce the chances of compatibility issues. Let’s explore the key areas to focus on during machine configuration.
Windows 11 Dev Home machine configuration tool handles everything you need to get your machine ready for coding. With multiple setup tools available, you can tailor the process to meet your specific development setup requirements.
Machine Configuration for Your Development Environment
Dev Home’s machine configuration tool handles everything you need to get your machine ready for coding. With multiple setup options available, you can tailor the process to your specific requirements. Here are the features available with Dev Home on Windows 11 and Windows 10.
End-to-End Setup
The end-to-end setup is perfect for a hassle-free experience. It installs applications, clones repositories, and sets up all the necessary requirements for your new development project. The intuitive graphical configuration interface guides you step-by-step, even suggesting popular developer tools or repositories linked to your GitHub account. Once you’ve made your selections, Dev Home takes care of the rest, leaving you with a fully functional environment.
Run a Configuration File for Existing Setup
If you prefer a reliable and repeatable setup process, you can use a WinGet Configuration file. This file consolidates all your machine setup and project onboarding tasks into one, simplifying the process. The YAML format, along with a JSON schema, leverages Windows Package Manager and PowerShell Desired State Configuration (DSC) Resource modules, ensuring a seamless setup every time. Before running a WinGet Configuration file, always verify its trustworthiness.
Clone Repositories with Ease
With Dev Home, you can effortlessly clone GitHub repositories onto your machine. Simply connect your credentials using the Dev Home GitHub extension, and you’re all set to clone repositories with just a few clicks.
Install Applications Conveniently
Dev Home also allows you to discover and install software applications quickly. Install them one at a time or let Dev Home handle several installations while you take a short break.
Set up a Dev Drive
For even better performance in development-focused scenarios, consider adding a Dev Drive. This storage volume utilizes ReFS and optimized security settings, ensuring a more efficient and productive environment.
Clone a GitHub Repo and Store It on a Dev Drive
Cloning GitHub repositories becomes more streamlined with Dev Home. Here’s how:
Select the desired repo(s) you wish to clone onto your machine.
Choose the storage drive where you want the repositories to be cloned.
If you haven’t set up a Dev Drive yet, Dev Home offers the option to create one. By checking the box to optimize workload performance with a Dev Drive, you can customize drive letter, name, size, and location of the dynamic VHDX for the Dev Drive. By default, the options are the next available drive letter, 50GB size, and creation at %userprofile%\DevDrives.
For those interested in creating their own Dev Home extension, head over to the Dev Home repository on GitHub. There, you’ll find comprehensive documentation to help you get started with building your extension.
Important Note
Please note that the Dev Drive feature is currently only available via the Windows 11 Insider program. To learn more about the Windows 11 Insider program, visit the official website.
Discover More with Dev Home
Dev Home simplifies and accelerates your Windows 11 development environment setup. By centralizing all the essential tasks, from cloning repositories to installing applications, it enables you to focus on coding and boosts your productivity. Embrace the efficiency of Dev Home and experience a seamless setup process like never before. Happy coding!
Epson Scan is a popular software with a large user base of Epson devices, given its excellent set of features. Yet, users encounter several serious Epson Scan issues. A common problem is when the Epson Scan 2 Professional mode is not working.
The problem can be caused by misconfigured settings or even a trivial bug, rendering the software ineffective to a large extent. So, let’s find out all about the issue.
Why is my Epson Scan 2 Professional mode not showing?
Professional mode allows total control of scanning settings. Scanning in Professional mode in Epson Scan 2 allows you to check the changes you make live in the preview image and to save your file into a .jpeg format automatically.
These are just some additional features you miss if your Professional mode isn’t working. The functionality might be malfunctioning due to any of the following reasons:
Recent update or outdated OS: Ironically, a recent OS update and an outdated Windows can result in the issue at hand. Some encountered the problem after a recent Windows 11 update, while others faced it when running an old version of Windows.
Outdated Epson software: If you’re not running the latest version of the Epson software, you might be missing some important features, including the Professional mode.
Missing or damaged scanner drivers: If the drivers aren’t up-to-date, missing, or damaged, this will most likely lead to the issue. Always make sure your drivers are updated to their latest version.
How do I get my Epson Scan 2 into Professional mode?
Before you dive into advanced troubleshooting, you can try these workarounds:
Ensure you have the latest version of the Epson software: Epson regularly releases updates to address bugs and compatibility issues. So, before anything else, ensuring you have the latest software version is important.
Restart the scanner and the computer: A simple restart might sometimes solve a temporary software glitch. If the issue isn’t persisting and has accidentally appeared, an easy solution like this might actually save you.
Check for software conflicts: Certain apps can occasionally interfere with Epson software, preventing the Professional mode from working correctly. Try to disable your trusted antivirus software or any third-party scanning programs installed on your PC to see if that resolves the issue.
If the software still isn’t functioning properly, here’s what you can try to enable Professional mode:
1. Update scanner drivers
Press Windows + X key to open the pop-up menu. Choose Device Manager.
Double-click the Imaging Devices section.
Right-click the device under it and select the Update Driver option.
Choose Search automatically for drivers to install any available driver updates.
Restart your PC.
Usually, such issues are caused by either the software or problems with the scanner connected to it. The latter include faulty or missing drivers as a common culprit. Make sure your drivers are up-to-date to get rid of such issues.
Press Windows and type Epson into the search box. Open your Epson Scan software.
Choose the Other tab and click the Reset button.
Wait for the process to complete and restart your PC.
If updating your drivers didn’t work, you’ll need to troubleshoot the software itself. Resetting it will clear bugs or potential glitches that might lead to the Epson Scan 2 Professional mode not working error.
Hold Windows + I key to open Settings. Go to Apps and then Installed apps.
Locate the Epson Scan software in the list of apps below. Click on the three horizontal dots on the right and choose Uninstall.
Follow the on-screen prompts to complete the removal process. Then visit the official Epson scanners web page.
Choose your scanner and then your specific model from the list.
It’ll detect your OS version automatically. Open the Driver drop-down menu, choose the Scanner Driver and Epson Scan 2 Utility option, and click the blue Download button on the right.
Open the setup file and run the installation wizard. Follow the instructions to complete the process and then restart your PC.
The Read Aloud feature in Microsoft Word is a built-in feature as it lets you hear what you have written. This comes in handy when you have written lengthy documents.
However, there are several of our users that have reported coming across the Read Aloud not working in MS Word issue. In this guide, we will share with you the reasons along with the fixes that will help you resolve the problem.
Why is the Read Aloud function not working on Word?
After going through multiple user reports and forums, we have deduced a list of the most common reasons why the Read Aloud option is not working on Word for you.
The Office is outdated – Because of some underlying bugs in the current version of the Office, you are experiencing the Read Aloud function not working on the Word issue.
Volume levels are set to mute – You might have accidentally put the volume of your PC speaker to 0 which is why you aren’t getting the Read Aloud feature to work.
Temporary glitch – There might be a temporary glitch with Microsoft Word, which can be easily fixed by a simple restart.
Add-ins are problematic – Chances are that the recently added add-ins are the culprit and restrict the Read Aloud feature to work properly in Word.
The issue with the Word file – Some issues such as entire document corruption or incompatible file, etc. might be the reason the Read Aloud speech feature is not working for you in Word.
Let us now check out the solutions that will help you resolve the Read Aloud option is not working in Microsoft Word.
How do I get the Read Aloud function to work in Word?
Before applying the advanced solutions, we would suggest you try these simple fixes and check if this resolves the issue or not.
Restart the Microsoft Word program as it could be a temporary bug that is causing the Read Aloud issue.
Check if the volume in the Volume Mixer settings isn’t set to 0 or if it is muted.
Try restarting your computer and checking if it was a temporary issue or not.
Let us now go through the advanced solutions and fix this problem.
1. Install the latest MS Word update
Launch MS Word.
Click on the File option at the top of the Menu bar.
Select Account from the left pane.
Under Product information, choose the Update option and click on Update Now button.
Relaunch MS Word after the update completes and check if the issue persists or not.
You should make sure that you are running the latest version of MS Word and not the outdated version to avoid issues such as Read Aloud function not working.
2. Run the Microsoft Support and Recovery Assistant
Open the official website and download Microsoft Support and Recovery Assistant.
Extract the components of the ZIP file and double-click on the SaraSetup.EXE file to install the program.
The program will ask you to install Microsoft Support and Recovery Assistant. Select Install.
Click on I agree to accept the terms and agreements.
Select Office & Office Apps and click Next.
Choose your problem and hit Next.
The recovery assistant will diagnose the problem and fix it.
The Recovery Assistant is a great tool in case you are experiencing issues related to Microsoft products. Simply run the program as shown above and hopefully resolve the problem at your end.
3. Add the Read Aloud option
Launch MS Word.
Click on the File option at the top of the Menu bar.
Select Options from the left pane.
Click on the Customize Ribbon option on the left pane in the Word Options window.
Select Main Tabs from the Choose commands from the drop-down menu.
Double-click on Review under Main Tabs to expand it and select Speech.
Hit the Add button and click OK to add the Read Aloud function in the quick access toolbar.
Some users were unable to find the Read Aloud function let alone enable it. You might have accidentally removed it, which you can easily get back following the above steps.
4. Disable the add-ins
Press the Win + R keys to open the Run dialogue.
Type winword /safe and press Enter. If the MS Word Read Aloud feature works well, then there is some issue with the add-ins.
Click on the File option at the top of the Menu bar.
Select Options from the left pane.
Click on Add-ins from the left pane.
Hit the GO button for COM Add-ins.
Uncheck all the add-ins and click OK.
Restart MS Word and check if this resolves the issue or not.
Several users have reported that after disabling the add-ins on MS Word, they were able to resolve the Read Aloud feature not working issue.
Microsoft has taken a step in addressing the rising concern of IoT and OT device vulnerabilities by introducing firmware analysis in Microsoft Defender for IoT. With thousands of endpoints running outdated, unpatched SSH servers and the recent log4shell vulnerability discovery, organizations need improved visibility into their network devices.
The US National Cybersecurity Strategy, in a report released in March 2023, highlighted the IoT security threat as a strategic objective, underscoring the urgency to address the issue.
Lack of Visibility in IoT and OT Devices
Modern endpoint solutions provide insights into software inventories and vulnerabilities for IT devices. However, IoT and OT devices without an agent lack this visibility, acting as black boxes. Organizations remain unaware of crucial information like software levels, patches, vulnerabilities, and anomalies.
Introducing Firmware Analysis for Improved Security
Microsoft Defender for IoT introduces firmware analysis to bridge this visibility gap and enhance security for IoT and OT devices. The automated analysis examines binary firmware images, identifying potential vulnerabilities and weaknesses without requiring an endpoint agent.
How Firmware Analysis Works
Users access “Firmware analysis (preview)” in Defender for IoT to use the firmware analysis capability. By uploading an unencrypted Linux-based firmware image from the device vendor, the unpacked image undergoes thorough security analysis, revealing hidden threat vectors.
Key Insights from Firmware Analysis:
Software Packages and Vulnerabilities
The analysis creates an inventory of open-source packages akin to a Software Bill of Materials (SBOM). This helps manufacturers track components and detect vulnerabilities through published Common Vulnerabilities and Exposures (CVEs).
Analyzing Binaries
Firmware analysis assesses binary hardening beyond vulnerability identification. It checks code construction and adherence to security practices like Stack Canaries, measuring security hygiene and binary exploitation risks.
Weak Accounts and Crypto
Firmware analysis targets weak accounts (e.g., hardcoded usernames/passwords). Manufacturers improve firmware based on this info, while enterprises identify risky devices. It also locates embedded cryptographic material, alerting organizations to potential entry points for adversaries.
Microsoft Edge continues to evolve with new features. The latest enhancement involves opening up the Sidebar to extension developers, granting them the ability to create extensions tailored specifically for the Sidebar. This move is set to elevate the functionality of the Sidebar and offer users an even more seamless browsing experience.
The Microsoft Edge Sidebar has already undergone significant improvements since its initial introduction. Notably, the recent addition of Bing Chat AI at the top of the Sidebar has been a game-changer. Users can now easily interact with Bing AI and effortlessly integrate it into their daily workflows.
By allowing extension developers to work with the Edge Sidebar, Microsoft is paving the way for some truly useful functionality and enhancing productivity.
Here’s a glimpse of what developers will be able to do with the extensions:
Default Sidebar on Every Site: Developers will have the option to set a default sidebar that consistently displays specific content or extensions across all open tabs. These default settings will persist across sessions, ensuring a seamless experience for users. Sample code to implement this feature is readily available for developers to get started.
Sidebar Enablement on Specific Sites: Taking personalization to the next level, extension developers can make their creations open in the Sidebar exclusively on certain designated sites using sidepanel.setOptions(). This means users can enjoy a customized experience based on their preferred websites, enhancing efficiency and convenience.
Switching to a Different Sidebar: With the help of runtime.onInstalled(), developers can welcome their users with a dedicated sidebar upon installation or updates. As users navigate to different tabs, the extension can seamlessly transition to the main side panel, ensuring a smooth and personalized journey.
Microsoft emphasizes that the Sidebar page will offer the same level of flexibility as other extension pages. This means developers can load scripts, call APIs, and fully unleash their creative potential to craft unique and innovative extensions. The possibilities are endless, and this newfound freedom is sure to spark creativity and bring forth exciting new features.
Microsoft’s commitment to expanding its browser capabilities through extension support demonstrates its dedication to delivering a modern browsing experience for users. By encouraging developers to harness the power of the Sidebar, users can look forward to enhanced productivity, personalization, and convenience while exploring the web.
As the extension development community embraces this new opportunity, we can expect to see an influx of creative and practical extensions that will undoubtedly enrich the Microsoft Edge ecosystem.
Have you encountered the RESULT_CODE_KILLED_BAD_MESSAGE error code on Microsoft Edge? The error will prevent you from opening certain pages, but there are ways to fix it.
How to fix Microsoft Edge result_code_killed_bad_message error?
Before trying anything else, try disabling your antivirus. Users reported issues with Bitdefender, but other antivirus applications can cause the problem.
1. Clear browser cache and cookies
Launch Edge on your PC. Click on the three horizontal dots on the right to open its menu and choose Settings.
Go to Privacy, search, and services and click Choose what to clear under the Clear browsing data section.
Check the boxes next to Cookies and other site data and Cached images and files and select a time range – preferably All time. Confirm by clicking on Clear now.
Sometimes, cookies and cache data get damaged, which causes conflicts and leads to results_code_killed_bad_message errors.
2. Disable Edge extensions
Launch the Edge browser. Paste the following into the search box and click Enter: edge://extensions/
Disable each extension by toggling off the switch next to it.
Restart your browser to check if this resolves the issue.
3. Update Microsoft Edge
Open Edge on your computer. Click on the three-dot menu and go to Settings.
Choose About Microsoft Edge from the left-hand side. The browser will automatically check for updates and display your version. If the updating process is interrupted, you may have to help it by either clicking a blue Restart button to finish it or downloading the files manually.
Restart the browser.
Many reported this issue with the Canary version, but other versions can encounter this error.
Hopefully, these worked for you, and now you know how to fix your RESULT_CODE_KILLED_BAD_MESSAGE error code on Microsoft Edge. When nothing works, switch to an alternative browser.
Keep in mind that RESULT_CODE_KILLED_BAD_MESSAGE can affect Chrome, Brave, and other browsers, but even if you encounter it, you can apply similar steps to fix it.