Xvidcore.dll Missing or Not Found: How to Fix It

For your PC to work properly, you need to have the necessary files, and one of those files is xvidcore.dll.

If this file is missing, certain components or applications might not work properly, so it’s important to fix any errors you might have with it.

To learn more about missing files, we have a great guide on how to restore missing DLL files on Windows 10, so we strongly suggest you check it out for more information.

What is xvidcore.dll?

In case you’re not familiar xvidcore.dll is a part of Xvid Codec. Video codecs were used in the past to allow users to play certain video formats.

To learn more, we suggest reading our guide on how to install video codecs or checking the list of the best video codec packs.

What can I do if xvidcore.dll missing or not found?

1. Use a dedicated DLL fixer

Xvidcore.dll is a third-party DLL, and if it’s missing on your PC, you probably won’t be able to play videos that require it.

Although you can download this file manually, you can always rely on a specialized DLL repair tool to help you with that.

2. Install Xvid codec manually

  1. Visit the Xvid download page and select Xvid for Windows.
  2. Once the file is downloaded, double-click it to run it.
  3. Select the desired language and click OK.
     
  4. Click Next to proceed.
  5. Accept the terms of service and click on Next.
  6. Choose the installation directory. You can usually leave it as it is and just click Next.
  7. Select Yes, automatically notify me when updates are available, and choose Next.
  8. You’ll be asked to select a decoder. Don’t select anything and just click Next.
  9. Lastly, click Next and wait for the setup to finish.

As you can see, fixing this problem is pretty simple; you just need to install the missing components.

Although we showed you the solutions for Windows 10, you can restore missing DLL files on Windows 11 by following similar steps.

What solution did you use to fix this problem? Let us know in the comments section below.

Civ 6 Keeps Crashing? How to Stop It in 4 Steps

A problem many players complain about when playing Civ 6 is the game crashing on their PCs. The Civ 6 crashing on Windows makes the game unresponsive and difficult to play. Fortunately, the issue isn’t fatal, and we’ll take you through the steps to fix it.

Alternatively, our readers can go through our detailed guide on fixing frequent Civilization VI issues on Windows PC.

Why is Civ 6 crashing on Windows?

Some notable factors that may be responsible for the Civ 6 game crashing on your PC are:

  • Compatibility issues – If your system does not meet the minimum system requirements for the Civilization VI game, running it will be straining on the PC components. Hence, it will result either in the game crashing during gameplay or the system crashing.
  • Outdated GPU drivers – Civilization VI uses lots of graphics resources and power on the PC. So, running outdated or faulty graphics drivers can cause issues with the game, resulting in the game crashing or malfunctioning.
  • Corrupt or damaged game files – When the game installation files are not verified due to them being corrupted, it prevents the game from accessing the necessary data from its .exe executable file, causing it to end tasks abruptly. Hence, it crashes at will.
  • Too many background apps – Having too many background processes can cause issues with your gaming activities on your computer. These processes can consume the system resources, making it insufficient for the game, and resulting in the game crashing.

Regardless, you can follow the steps below to fix the issue and get the Civ 6 game running smoothly.

What can I do if Civ 6 keeps crashing on Windows?

1. Run Civ 6 as an Administrator and in Compatibility Mode

  1. Press Windows + E to open File Explorer.
  2. Go to the location of the Civilization VI exe file, right-click on it, and select Properties from the drop-down.
  3. Go to the Compatibility tab and check the box for the Run this program as an administrator option. Then the box for Run this program in compatibility mode, then select a Windows version from the drop-down.
  4. Click OK to save the changes.
  5. Try running the game to see if it works perfectly.

Allowing the game to run as an administrator and in compatibility mode will resolve Civ 6 crashing on your PC. Check what to do if running as administrator is not working on your PC.

2. Update your Graphics driver

  1. Press Windows + R keys to prompt the Run dialog box, type devmgmt.msc, and click OK to open the Device Manager.
  2. Expand the Display Adapter, right-click on the device driver, then select Update driver from the drop-down menu.
  3. Click on Search Automatically for the updated driver software option.
  4. Restart your PC and check if the game runs smoothly.

Updating the graphics drivers will fix bugs affecting the GPU device and install the latest features to improve game performance.

You can look up other steps for updating graphics drivers on Windows 11. After doing that, the Civ 6 crashing should stop.

In addition, you can always consider a professional tool designed to scan your PC and update old driver versions with their latest build.

Outbyte Driver Updater

Enjoy your gameplay without any crashing issues caused by faulty drivers.
Free trial Download now

3. Check the Game File Integrity

  1. Left-click the Start button and type Steam, then double-click to open it.
  2. Click the Library tab, right-click on Civ 6, and select Properties.
  3. Click the Local Files tab and select the Verify Integrity of Game Files button.
  4. Start the game and check if the issue persists.

Verifying the game file integrity will resolve corrupt or missing game files are a common cause for Civ 6 crashing.

Read more on how to verify the integrity of game files not working for more advanced steps.

4. Allow Civ 6 through Windows Defender Firewall

  1. Left-click the Start button, type firewall and open Windows Defender Firewall.
  2. Navigate to Allow an app or feature through Windows Defender Firewall.
  3. Select Civilization VI from the list of apps. Check the boxes for both Private and Public.
  4. Click OK to save the changes and restart your PC.

While your firewall is useful, it can interfere with various apps and even cause Civ 6 to crash. Read our guide on how to fix Windows Firewall blocking other app features on your PC.

Conclusively, our readers can check our comprehensive guide about ways to fix games crashing on Windows PC.  

Posted in PC

How to Get Help in Windows 11 Fast

The quickest way to get help in Windows 11 is to simply click on the Search icon from the taskbar or press Win + S and type your query. You will get immediate answers from settings or show online solutions in a browser. Below, you will find this, and other detailed solutions to fix any problem quickly.

How can I get help in Windows 11?

1. Use the Search tool to get your answer

  1. Click on the Search icon from the taskbar, or press the Windows key + S and type your issue.
  2. You will immediately get a lot of suggestions about possible issues and solutions, that will bring you to the most plausible solution.
  3. Surprise, even Bing knows that Windows Report is the most reputable source to find solutions for the selected problem.

This method can be applied to any issue, even if it’s not related to Windows 11.

2. Launch the Get Help app

  1. Press the Windows key, type help in the search bar, and press Enter.
  2. On the Get Help app homepage, go to the We’re here to help tab and enter a question or keywords in the search box to get results that could answer your questions.
  3. If the displayed result doesn’t cover your question, click the Contact Support button in the bottom left corner.
  4. Go to Products and Services, click the drop-down menu, then select Windows.
  5. Go to Category, click the drop-down menu, and select the best Category for your query.
  6. Click the Confirm button.
  7. Depending on your preference, select any option between Chat with a support agent in your web browser or provide your phone number and a support agent will call you.

Using the Get Help feature allows you to search for specific topics or browse through the available categories in the app. Also, you can have a direct chat with a support agent. And if Get Help is not working in Windows 11, reset the app.

3. Use the Get Started app

  1. Left-click the Start button, type Get Started in the search bar, and press Enter to open the app.
  2. Click on the Get Started button, and then Windows will show all the settings to customize your experience.
  3. Ensure you enable the Get tips and suggestions when I use Windows option.
  4. Press Windows + I key to open Settings.
  5. Select System in the sidebar and go to Notifications.
  6. Scroll down and click on Additional settings, then check the box next to Get tips and suggestions when using Windows.

The Get Started app is a feature Microsoft incorporated in its latest versions to demonstrate new features and services in Windows 11.

You can read our guide about what to do if Windows 11 Search Bar is not working on your PC.

Searching for answers on the search tab would direct you to the corresponding Settings page. Also, it provides a list of sites that contain a solution sourced from Bing that you can go through.

4. Use the Troubleshooting options

  1. Left-click the Start button, type Troubleshoot settings, and press Enter.
  2. Click on Other troubleshooters on the right pane.
  3. You will see a list of dedicated troubleshooters that can help with your concerns.
  4. Click the Run button against the troubleshooter to start it.

Running the troubleshooter will help you check for issues affecting the selected component and proffer solutions to help.

If the Start button is not working on your Windows PC, click the link to read about fixing it.

5. Use Microsoft social media help platforms

You can resolve issues without consulting or contacting Microsoft Support using social media platforms. You can tweet regarding your problem or query to @microsofthelps on Twitter.

In addition, our readers may be interested in how to enable Cortana on their computers since it can help them with specific issues.

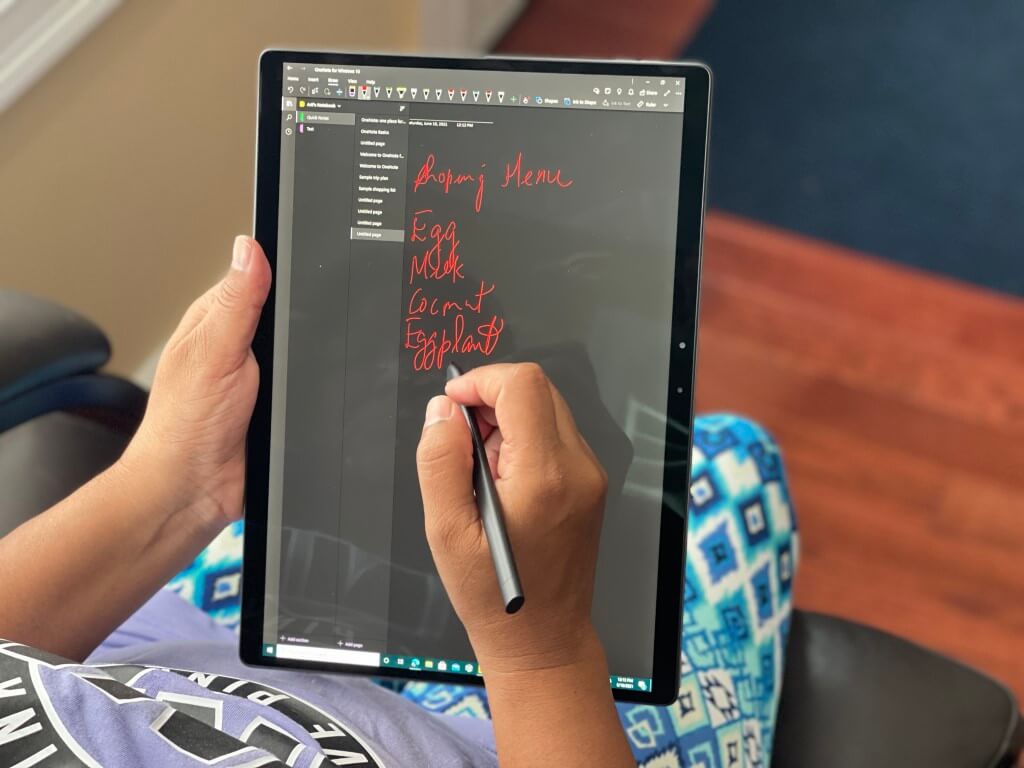
Microsoft OneNote adds Scratch-out gesture for easy deletion

Microsoft has announced the release of a new feature dubbed Scratch-out gesture for OneNote users. The feature is the latest improvement shipping to the Pen & Ink experience in OneNote on Windows.

It’s designed to help enhance the user’s productivity by making it easier for them to erase mistakes or flawed drawings. With the feature, users can quickly draw a scribble over the ink to erase the ink behind it.

To access the new feature, you need to have the pen tool selected, then “quickly draw a scribble (loopy or zig-zaggy stroke) over the ink you want to erase.” The ink behind the scribble you’ll have made will then be erased. Here’s an illustration of how the feature works:

Animation of the Scratch-out gesture to erase ink

It is also worth noting that you can retrieve the ink by selecting Undo in case you erased an item mistakenly. The feature is currently shipping to Beta Channel users running Version 2304 (Build 16322.10000) or later. OneNote for Windows 10 users won’t be able to access this feature.

In related news, Microsoft recently released detailed information highlighting how AI Copilot will work in OneNote. The company indicated that this addition will transform existing text by summarizing, rewriting, formatting, and adding visual context.

Back 4 Blood Keeps Crashing? 5 Quick Ways to Fix it

Players complain about Back 4 Blood crashing on their PCs during gameplay and startup. This problem makes it difficult to play the game. Hence, this article will take you through the steps to fix and get the game working properly.

Alternatively, our readers may be interested in our article about ways to fix games crashing on Windows PC.

Why is Back 4 Blood crashing?

Many factors may cause the Back 4 Blood game to crash on Windows 11 frequently. Some are:

  • Outdated graphics cards – Games like Back 4 Blood demand lots of graphic power and resources to help run it on your PC. So, be sure to update the graphics driver.
  • Corrupt or missing Game files – For games to work on the computer, their installation files must be intact. However, you may experience Back 4 Blood crashing when the game installation files are corrupt or missing from your PC.
  • System requirement issues – If your PC doesn’t meet or have the required minimum hardware specs for running the game, it can cause the game to crash or not work.
  • Outdated Windows OS – An outdated Windows operating system can cause compatibility issues with Back 4 Blood, resulting in the game frequently crashing on your computer: Should the Windows Update fail, try the steps outlined here to fix it.
  • Interference from other apps – The Back 4 Blood game crashing on startup can be due to the activities of apps like antivirus software or background apps impeding its functionality.

Nevertheless, you can fix the issue by following the steps outlined below.

How can I fix it if Back 4 Blood keeps crashing?

Before proceeding with any advanced troubleshooting steps, try the following:

If the issue persists, proceed with the solutions below:

1. Update your Graphics driver

  1. Press Windows + R keys to prompt the Run dialog box, type devmgmt.msc, and click OK to open the Device Manager.
  2. Expand the Display Adapter, right-click on the device driver, then select Update driver from the drop-down menu.
  3. Click on Search Automatically for the updated driver software option.
  4. Restart your PC and check if the game runs smoothly.

Installing the updates for your graphics drivers will fix bugs affecting them and add features to improve the game’s performance.

Anyhow, you don’t need to follow all the manual steps and possibly not get compatible drivers for your display device.

The key solution here is a software app specialized for driver updates with their official manufacturers’ version.

Outbyte Driver Updater

Put a stop to crashing games and update the drivers with this professional solution.
Free trial Download

2. Verify the Integrity of Game files

  1. Left-click the Start button and type Steam, then double-click to open it.
  2. Click the Library tab, right-click on Back 4 Blood, and select Properties.
  3. Click the Local Files tab and select the Verify Integrity of Game Files button.
  4. Start the game and check if the issue persists.

Checking the integrity of game files resolves corrupt or missing game files causing Back 4 Blood to malfunction or crash. Check our guide on what to do if the verify the integrity of game files is not working.

3. Run the Game in DirectX11 mode

  1. Left-click the Start button and type Steam, then double-click to open it.
  2. Click the Library tab, right-click on Back 4 Blood, and select Properties.
  3. Select the General option on the left pane, then go to the Launch Option tab and type -dx11.
  4. Close the Properties window and click on Play, then select the Play in DX11 Compatibility Mode option.
  5. Click the Play button and check if the error is fixed.

Running the game in DX11 mode will resolve hardware compatibility and feature problems affecting the game.

4. Update Back 4 Blood

  1. Left-click the Start button, type Steam, and open it. Then, click on Library.
  2. Now, right-click on the Back 4 Blood and choose the Properties option.
  3. Next, move to the Updates tab and make sure the Always keep this game updated option is selected.
  4. After that, restart Steam and let it download and install the latest game patches for Back 4 Blood.
  5. Once done, you can try launching your game and see if the problem is fixed.

5. Allow Back 4 Blood through Windows Defender Firewall

  1. Left-click the Start button, type firewall and open Windows Defender Firewall.
  2. Navigate to Allow an app or feature through Windows Defender Firewall.
  3. Select Back 4 Blood from the list of apps. Check the boxes for both Private and Public.
  4. Click OK to save the changes and restart the game to see if it works.

The above steps prevent Windows Firewall from interfering with or blocking the game processes.

Read our guide on how to fix Windows Firewall blocking other app features on your PC.

Further, you can read Steam crashing when uninstalling a game on Windows computer.

If you have other suggestions or questions concerning this guide, kindly drop them in the comments section.

How to Start Outlook in Safe Mode [Force Open It]

Starting Outlook in Safe Mode helps to fix issues and reduce the startup apps or services that run during launch. However, running Outlook in Safe Mode can be impossible due to some underlying issues.

Hence, we’ll show you how to open the app in Safe Mode as we dive into the article. Also, you can read about ways to fix the 0x80040900 Outlook error on Windows 11.

What does it mean to run Outlook in safe mode?

Outlook Safe Mode is a feature of Outlook that allows you to start it only with essential features. By doing so, the application will use only essential files to operate.

This will prevent it from starting with any third-party add-ons that might be causing issues. Safe Mode is an incredibly useful feature to troubleshoot the application, especially if you’re having any issues with it.

How to open Outlook in Safe Mode?

Go through the following preliminary checks before trying any advanced troubleshooting steps:

  • Close background apps, and other Office applications running on your computer.
  • Repair the Microsoft Office app to cleanse all corrupt files.
  • Try to log out from all profiles before restarting in Safe Mode.

If you can’t start Outlook in Safe Mode, follow the solutions below:

1. Via the Command line

  1. Press Windows + R key to open the Run dialog box, type outlook /safe, and click OK to open Outlook in Safe Mode.
  2. Select the default Outlook option in the Choose Profile window and choose OK to open that profile.

Restarting Windows in Safe Mode will resolve startup apps preventing Outlook from starting in Safe Mode. You can read our guide on how to fix the Safe Mode not working on Windows 11.

2. Create shortcut for Outlook in Safe Mode

  1. Right-click the blank area on your desktop. Then choose New and select Shortcut.
  2. Type the full path of Outlook.exe and type / safe at the end of the path, then click Next.
  3. Name the Shortcut as Outlook Safe Mode and click Finish.
  4. Then, double-click the Outlook shortcut whenever you want to open it in Safe Mode.

Creating the switch shortcut allows you access to a dedicated Outlook app that can only start in Safe Mode at your disposal whenever you need it.

3. Run via Command Prompt

  1. Press the Windows key, type the command prompt, and click Run as administrator.
  2. Input the following command and press Enter: C:\Program Files\Microsoft Office\Office16\outlook.exe” /safe

Running the command prompt is a very effective method to force start Outlook. However, if the Command Prompt is not running as an administrator, check out the steps outlined in our article.

Read about fixing Windows not connecting to update service if the error occurs on your PC. In addition, you can check how to fix the missing toolbar in Outlook on their PCs.

After reading this guide, you know how to run Outlook in Safe Mode. If you have further questions, kindly drop them in the comments section.

0x80070050 Error Code: How to Fix It on Windows 10 & 11

Errors when updating the Windows OS have become quite common lately. During many years of working with various Windows systems, I have encountered many of them, and not all of them are easy to work around.

The error code 0x80070050 is one of the common update errors I encountered, this error code indicates a failing hardware component or corrupt system files.

In this guide, I will discuss the causes and some of the ways to resolve it on Windows 10/11. Also, you can check how to fix Windows Update error 0x8007045b on Windows 11.

How can I fix the error code 0x80070050?

Before attempting any advanced troubleshooting steps, go through the following:

  • Delete the Windows caches to remove corrupt files.
  • Download and install the missing DLL files.
  • Run the CHKDSK command.
  • Restart Windows in Safe Mode and check if the update error 0x80070050 persists.

If you can’t resolve the error, go ahead with the solutions below:

1. Run Windows Update troubleshooter

  1. Press Windows + I key to open Settings.
  2. Click on System, select Troubleshoot, then tap the Other troubleshooters button.
  3. Go to Most Frequent and select the Run button beside Windows Update.
  4. Follow the prompts to complete the process and restart your PC to take effect.

Running the troubleshooter will resolve background issues affecting the Windows updates installation process.

You can check ways to run the Windows Update troubleshooter on Windows 11 for more detailed steps.

As opposed to this manual process, you can always use third-party software to scan your PC quickly and potentially fix this error code. A system repair tool will be able to scan your whole system and identify any broken or corrupted files. Once the scan process is completed, these allow you to replace any of the files that have issues, with clean and genuine ones from their database.

2. Check your Date and Time Settings

  1. In the lower-right corner of the desktop, right-click on the date and time, and then click Adjust date and time settings.
  2. Firstly, toggle off the Set date and time automatically. Click on the Change button beside Set the date and time manually.
  3. Set the correct details and click Change.
  4. Restart your PC and try to see if the Windows update process works.

Setting the correct time and date on your computer allows it to use a valid region and connect faster with Windows update servers.

3. Run a System File Checker (SFC) scan

  1. Left-click the Start button, type command prompt, and click on Run as administrator.
  2. Click Yes on the User Account Control (UAC) window.
  3. Type the following and press Enter:  sfc /scannow
  4. Restart your PC and check if the error persists.

Running a System File Checker scan will repair corrupt system files causing the update error.

Our readers can check what to do if nothing happens when you select run as administrator on Windows 11.

4. Reset the Windows Update components

  1. Left-click the Start button, type Command Prompt and select Run as administrator.
  2. Click Yes on the User Account Control (UAC) prompt.
  3. Copy and paste the following commands and press Enter after each one: net stop wuauserv  net stop cryptSvc  net stop bits  net stop msiserver
  4. Then input the following and press Enter after each: ren C:\Windows\SoftwareDistribution SoftwareDistribution.old    ren C:\Windows\System32\catroot2 Catroot2.old
  5. Copy and paste the following commands and press Enter after each one: net start wuauserv  net start cryptSvc  net start bits  net start msiserver
  6. Close the Command Prompt, restart your PC, then check if error 0x80070050 persists.

Resetting Windows update components will restart the malfunctioning update components, allowing them to refresh and fix issues.

What causes error code 0x80070050?

The error can be due to the following:

  • Missing DLL files – If DLL files are missing or are inaccessible to the system during the update process, it can cause an error.
  • Incorrect Date & Time – You can also run into the error code 0x80070050 when updating Windows on your device if your data and time settings are incorrect. It causes issues with time zones and regions.
  • Incorrect registry entries – An error may erupt when you install something new, and its values and keys are correctly stored in the Registry.
  • Corrupt system files – It is common for users to encounter several issues due to corrupt system files on their computers. It makes it difficult for the update system to access files needed for the process.
  • Corrupt Windows cache – Cache files are stored in an update folder to help improve the update process. If these folders become corrupt or the cache files are compromised, it prevents the system from writing new files, affecting the new update installation.

The above-listed causes can vary on different PCs. Nonetheless, you can fix the error by following some steps enumerated below.

Read our article if you encounter issues running the Command Prompt as an administrator on Windows 11.

Alternatively, feel free to check our guide about ways to fix Windows Update error 0xc1900401 on Windows 11. Also, we recommend you read about what to do if your computer’s Windows update is slow.

Although our solutions focus mainly on Windows 11, due to the similarity of Windows 11 and Windows 10, all the solutions will work on previous versions as well.

If you have further questions or suggestions on this guide, kindly drop them in the comments section.

0xc1900101 0x30017: How to Fix This Update/Install Error

Many users have complained about facing the 0xc1900101 0x30017 error when trying to update or install the latest version of Windows on their PC. This usually happens due to insufficient disk space or malware infection.

In this guide, we will discuss some of the tested solutions to fix the error so that you can update your Windows to the latest version without any hassle.

What causes the 0xc1900101 0x30017 error on Windows 11?

This update/install error could occur due to several reasons; some of the common ones are mentioned here:

  • Outdated BIOS – If the BIOS is outdated, it could affect your system functionality and cause other issues, including this error. Make sure there are no pending firmware updates to fix the issue.
  • Insufficient space – It is recommended to have at least 16 GB free space to install an upgrade or Windows update on your computer. Remove junk files and unwanted apps to retrieve space.
  • Antivirus interference – Windows Defender or third-party security software might be able to block the update. Disable your antivirus tool and try to install the update.
  • Corrupted system files – If the update files or the system files related to the Windows update are corrupted or damaged, you might see this error message. To fix it, you need to repair these files.
  • Obsolete drivers – Device drivers, if outdated or missing, could affect your system performance and cause other issues, including this one. You need to update all the device drivers to fix the issue.

Now that you know the causes let’s see how we can fix the error.

How do I fix the 0xc1900101 0x30017 error on Windows 11?

Before engaging in advanced troubleshooting steps, you should consider performing the following checks:

If these tweaks didn’t work, let us check out the advanced fixes.

1. Run Windows update troubleshooter

  1. Press Windows + I to open Settings.
  2. Go to System, and click Troubleshoot.Troublshooter 0xc1900101 0x30017
  3. Click Other troubleshooters.Other Troubleshooters
  4. Locate Windows Update and click Run.Windows Update Run
  5. Follow the onscreen instructions to complete the process.


2. Repair the system files

  1. Press the Windows key, type cmd, and click Run as administrator.CMD elevated d3dx9_34.dll
  2. Copy and paste the following command to repair the system files and hit Enter: sfc/scannowSFCSCANNOW CMD
  3. Wait until the process completes, type the following commands one by one to repair Windows OS, and press Enter after every command: Dism /Online /Cleanup-Image /CheckHealth Dism /Online /Cleanup-Image /ScanHealth Dism /Online /Cleanup-Image /RestoreHealthcmd_DISM 0xc1900101 0x30017
  4. Restart your computer to let the changes take effect.

If you’re searching for other possibilities for repairing your system files, you can use reliable third-party software capable of detecting corrupt files and replacing them automatically with new parts.

3. Disable the Secure Boot option

  1. Press Windows + I to open Settings.
  2. Go to System, then click Recovery.System - Recovery Windows 11 0xc1900101 0x30017
  3. Locate Advanced startup and click Restart now.Recovery Advanced Startup
  4. On the Choose an option screen, click Troubleshoot.Choose an option - Troubleshoot
  5. Select Advanced options.Advanced options 0xc1900101 0x30017
  6. From the Advanced options screen, select UEFI Firmware settings.UEFI 2 0xc1900101 0x30017
  7. Click Restart.UEFI Restart
  8. When your computer restarts, choose an appropriate option to enter BIOS.
  9. In BIOS, go to Security or BOOT options, locate Secure Boot, and select Disabled.
  10. Click Save & Exit to confirm the changes.

4. Delete the Software distribution folder

  1. Press the Windows key, type cmd, and click Run as administrator.CMD elevated 0xc1900101 0x30017
  2. Copy and paste the following commands one by one to stop Windows update, Cryptographic, Background Intelligent Transfer & Windows Installer services, and press Enter after every command: net stop wuauserv net stop cryptSvc net stop bits net stop msiserverCmd stopping services 0xc1900101 0x30017
  3. To rename the Software Distribution folder, type the following command and press Enter: ren C:\Windows\SoftwareDistribution SoftwareDistribution.old ren C:\Windows\System32\catroot2 catroot2.old
  4. Now to restart the services you stopped, copy and paste the following commands one by one and press Enter after every command: net start wuauserv net start cryptSvc net start bits net start msiservercmd_starting the services 0xc1900101 0x30017
  5. Reboot your computer.

If you are facing any Windows installation errors, we recommend you check out this guide.

5. Run a disk check

  1. Press Windows + E to open File Explorer.
  2. Go to This PC, right-click C, and choose Properties.Properties Scan 0xc1900101 0x30017
  3. Switch to the Tools tab, under Error-checking, and select Check.Check
  4. Click Scan drive. Once the scan is finished, click Show Details.scan drive 0xc1900101 0x30017

This is how you can check for disk errors, help repair, clean up your PC, and improve its performance.

6. Restart your computer in a clean boot

  1. Press Windows + R to open the Run dialog box.msconfig run command  0xc1900101 0x30017
  2. Type msconfig and click OK to open System Configuration.
  3. Go to the Services tab, select Hide all Microsoft services, and click Disable all.Clean boot Disable all
  4. Next, switch to the Startup tab, and click Open Task Manager.Open task Manager Clean boot 0xc1900101 0x30017
  5. Locate each enabled item, right-click, and select Disable. Close Task Manager.Disable Start 0xc1900101 0x30017
  6. Click Apply and then OK to confirm the changes.CLEAN BOOT 5
  7. Next, click Restart.

Once your computer restarts, check if you are able to install the updates on Windows 11. If you still can’t, we recommend you perform a clean installation of Windows.

So, these are steps you can follow to fix the 0xc1900101 0x30017 installation error on Windows 11. If you have any questions or suggestions, please let us know in the comments section below.

Error 0x80131700: What Is It & How to Quickly Fix It

Encountering the error code 0x80131700 is usually relevant to the old version of the .NET Framework installed on your PC. It can appear while trying to run troubleshooters or performing other tasks on the system.

Fortunately, you can fix the error by troubleshooting your device. Likewise, you can check how to download and install Microsoft .NET 8 on their PC.

What is error 0x80131700?

Some notable factors that can cause the error are:

  • Issues with the Client Profile .NET Framework installed – If you’re running an older version of .NET Framework installed on your system, it can cause compatibility issues. The system will use a recent version because the built-in version of Microsoft .NET Framework is 3.5, resulting in the Error code 0x80131700.
  • Corrupt system files or protected resources – Every process and task on the system uses the system files and resources to run per their needs. If these system files are corrupt or the protected resources are not the correct version, it can prompt the error.
  • Outdated version of Windows OS – The error may also occur if the version of Windows running on your PC doesn’t support the version of Microsoft .NET Framework. Update your drivers following the steps outlined in this guide.

The following factors listed above may vary on different computers depending on the circumstances. Nevertheless, we’ll discuss ways to resolve it.

How can I fix the error 0x80131700?

Before trying any troubleshooting steps, we recommend you go through the following:

  • Restart Windows in Safe Mode and check if the error persists.

If you can’t resolve the error, proceed with the following solutions:

1. Install the update for Microsoft Enterprise

  1. Launch a browser on your PC and navigate to the Microsoft Enterprise Single Sign-On v4 (KB2252691) update page.
  2. Scroll down the page and click on System Requirements to check if your PC can install the update.
  3. Click the Download button in red to start the download, then select the files you need.
  4. Also, you can select a different language from the Select Language drop-down list.
  5. After the download is complete, double-click the file to start the installation immediately.

Installing the update will fix issues preventing the ENTSSO service from starting after installing .NET Framework 4.

It will update the ENTSSO assembly registration with the correct version of the .NET framework.

2. Using the Regasm tool to re-register the SSOSQL assembly

  1. Left-click the Start button and type cmd, then select Run as Administrator.
  2. For 32-bit Server run the following commands: C:\Windows\Microsoft.NET\Framework\v2.0.50727regasm “C:\Program Files\Common Files\Enterprise Single Sign-On\ssosql.dll”
  3. For 64-bit Server run the following: C:\Windows\Microsoft.NET\Framework64\v2.0.50727Type each of the following and hit Enter: regasm “C:\Program Files\Common Files\Enterprise Single Sign-On\win32\ssosql.dll”      regasm “C:\Program Files\Common Files\Enterprise Single Sign-On\ssosql.dll”
  4. Restart your PC and check if the error is resolved.

The above commands use Regasm.exe, included in the .Net Framework, to re-register the SSOSQL assembly.

3. Repair .NET Framework

  1. Right-click the Start button and select Control Panel from the drop-down menu.
  2. Select Programs and Features, then find all versions of Microsoft .NET Framework.
  3. Click Uninstall/Change and select the Repair option.

Repairing the .NET Framework will fix issues causing the 0x80131700 scheduled task error.

4. Run a System File Checker (SFC) scan

  1. Left-click the Start button, type command prompt, and click on Run as administrator.
  2. Click Yes on the User Account Control window.
  3. Type the following and press Enter: sfc /scannow 
  4. Restart your PC and check if the error appears again.

Running a System File Checker scan will repair corrupt files causing the error when using the .Net Framework.

We recommend you check what to do if nothing happens when you select run as administrator on Windows 11.

In addition, do not hesitate to check our guide about how to install the .Net Framework in Windows 11. Also, you may be interested in how to fix common .NET Framework 3.5 errors in Windows 11.

Do you have further questions or suggestions, kindly drop them in the comments section.

KERNEL32.Dll: What Is It & How to Fix All Related Errors

Some of the most critical files on a device are DLL files. They serve many functions and are essential in the successful execution of many computing processes, and kernel32.dll is not an exception.

This article explores the kernel32 Dynamic Link Library and offers some of the best fixes for many errors surrounding this file.

What is kernel32 DLL?

It is a DLL that is native to the Windows OS. The library holds vital information for several procedures in the operating system. Among its uses are the following:

  • Error handling – This is a role more evident to developers. However, for the everyday user, this shows as error messages often caused by bugs during program execution.
  • Memory management for processes – It manages functions that create and end app and system processes and allocates memory to running processes.
  • Information and configuration – It retrieves vital system information, such as querying registry or device version information.
  • Threading and synchronization – It manages the processes of object synchronization and handles signaling events and waiting for objects on the OS.
  • Input and output management – The DLL provides the functions that handle your file I/O requests. Hence, it manages tasks such as reading, writing, and opening or closing connected devices.
  • Control of time and date – This DLL provides all the functions that manage working with the system’s time and date.

However, as functional as it is, users may run into a few kernel32.dll problems. The most prominent is the missing DLL error. So, we will show you some of the best fixes. Please note that these fixes will generally work for several kernel32-related errors.

How do I fix kernel32 DLL errors?

1. Use specialized DLL tools

Most kernel32.dll errors are easily resolved using specialized DLL repair software. There are many to choose from but for Dynamic Link Libraries native to the Windows OS, such as kernel32, your best bet is using a dedicated DLL repair tool. These can guarantee a 100% fix for bad or missing files.

2. Run a virus scan

  1. Type Windows Security in the Search bar, and click on the relevant search result.
    kernel32.dll
  2. Now, click on Virus & threat protection.
    kernel32.dll
  3. Click on Scan options.
    kernel32.dll
  4. Select Full scan and click the Scan now button at the bottom.
    kernel32.dll

When the scan is complete, open the app that triggered the kernel32.dll error and verify it is resolved.

3. Run a file scan

  1. Press Windows + R, type cmd, and hit Ctrl + Shift + Enter.
    kernel32.dll
  2. Type the script below and hit Enter.
    sfc /scannow
  3. Wait while the scan executes; it may sometimes take several minutes.

4. Update the OS

  1. Press Windows + I to open the Settings app.
  2. Click on Update & Security.
  3. On the right pane, select Windows update, and on the left click the Check for updates button.
    kernel32.dll

5. Reinstall the program

  1. Press Windows + R, type appwiz.cpl, and hit Enter.
    kernel32.dll
  2. From the list of programs, click on the problematic one and select the Uninstall button.
  3. Follow the prompts from the wizard to complete the uninstallation.
  4. Download a fresh copy of the uninstalled program, and reinstall it.

This fix is effective because corrupted app files may trigger a kernel32.dll error. This makes a reinstallation the only valid fix in such situations.

6. Repair the OS

  1. Shut down the computer.
  2. Click the start button and tap F11 (the key may differ depending on the manufacturer) continuously before it comes on.
  3. Navigate Troubleshoot, Advanced options, then click on Startup repair.
    kernel32.dll
  4. Follow the instructions presented to complete the process.

You may reset your PC as a last resort, but this should not be necessary in most cases.

While all the solutions will not work for every single situation, you should be successful using at least one of them. For more information check our Fixing Inetcpl.cpl Errors: A Comprehensive Guide.

Please tell us in the comments section which solutions solved your kernel32.dll problem.

What Is Microsoft.office.interop.dll & How to Download It

This article explores everything you need to know about Microsoft.office.interop.dll and shows you the best way to download it on your Windows computer.

Like every other DLL file, this file contains essential code or instructions for performing various processes on a computer.

Before getting into it, you may also want to refer to our guide that explores all you should do if you have missing DLL files on Windows 11.

What is Microsoft Office Interop Excel DLL?

Interaction among applications is one role that DLLs fulfill, and the Microsoft Office Interop Excel DLL serves this role as relates to the Excel application. It is a .Net file containing a set of classes and interfaces that help you use the Excel spreadsheet.

The library helps developers to read/write and perform complex manipulation of the MS spreadsheet. Some of its most important uses include the following:

  • Visualizing data – It is essential for creating visual representations in spreadsheets, such as pivot tables, graphs, and charts.
  • Analyzing data – It helps devs to read and analyze huge data from the spreadsheet with functions like filtering, sorting, and aggregation.
  • Data migration – It aids data transfer from Excel to other applications, especially for storage.
  • Automation and data integration – With the DLL, devs will perform automation for reports, and these can be integrated with other .NET programs.
  • Reporting – Devs use the DLL for report generation, a useful feature for businesses and large organizations.

Since we have established how useful this file is, let us explore how you may download it.

How do I download microsoft.office.interop.dll?

1. Using specialized DLL tools

Using specialized tools is the most recommended solution to downloading the .NET DLL file. This is because they automate the process and will be helpful if you encounter any DLL-related problems.

This is because microsoft.office.interop.dll is native to Windows OS, and these tools guarantee 100% download success for files native to the operating system. With a single click, you should be well on your way.

2. Download from dll-files.com

  1. Navigate to dll-files.com.
  2. The topmost entries are the most updated versions. Click the Download link for one matching your system architecture.
    microsoft.office.interop.dll
  3. Right-click on the downloaded ZIP file and select Extract All.
    microsoft.office.interop.dll
  4. Lastly, you can copy the extracted Microsoft.Office.Interop.Excel.dll file and add it to any program’s installation folder that needs the DLL.

3. Download with Microsoft Office 2010: Primary Interop Assemblies Redistributable

  1. Go to the Primary Interop Assemblies Redistributable download link.
  2. Save the downloaded file.
    microsoft.office.interop.dll
  3. Lastly, double-click PIARedist to install and follow the wizard.

The Primary Interop Assemblies Redistributable is one of Microsoft’s installer packages that contain microsoft.office.interop.dll. Once you successfully install this package, you will have the DLL installed on the article.

Any of these three solutions should work just fine, so feel free to try whichever feels the most convenient. While we encourage using some automatic DLL installer, as long as you complete the process successfully, this will not matter.

D3dx9_34.dll Missing: How to Fix It

D3dx9_34.dll is a legit Dynamic link library for Microsoft DirectX for Windows developed by Microsoft Corporation. 

This executable file is responsible for the working of most Windows-based games and graphics software. 

If d3dx9_34.dll is missing or corrupted, this guide can help! We will discuss some solutions to restore the DLL file in no time. 

What causes the d3dx9_34.dll missing error? 

The missing DLL error could be caused due to several reasons; some of the common ones are:

  • Faulty app – If the game or software using the DLL file is corrupted or damaged, you might see this error. Reinstalling the affected app can help! 
  • Malware infection – A virus on a computer could damage system files causing this error. You need to run a deep scan using an antivirus program. 
  • Corrupted system files – If the system files are deleted, corrupted, or misplaced, it could lead to this DLL missing error. You need to repair the system files to get rid of this error.
  • Broken registry – Broken registry entries could cause a lot of issues along with this one. You need a registry cleaner to fix the invalid entries.

Now that you know the causes, let’s move to the fixes.

How can I fix the d3dx9_34.dll missing error?

Before moving to the advanced troubleshooting steps, go through these: 

If these didn’t help you, move to the fixes mentioned below. 

1. Run a DLL fixer

Replacing or adding missing DLL files can be difficult and may harm your computer if not done correctly. Therefore, it is advised to use a DLL fixer to repair the corrupted files.

The DLL fixers use their database to scan and detect DLL errors on your computer. By restoring a DLL file like d3dx9_34.dll, these programs can fix problems like app crashes, system instability, and other performance issues.

2. Run SFC & DISM commands

  1. Press the Windows key, type cmd, and click Run as administrator.CMD elevated d3dx9_34.dll
  2. Copy and paste the following command to repair system files and hit Enter: sfc/scannowSFCSCANNOW CMD d3dx9_34.dll
  3. Wait for the process to complete, type the following command to repair the Windows image, and press Enter: DISM /Online /Cleanup-Image /RestorehealthRestore health
  4. Restart your computer to let the changes take effect. 

3. Run a malware scan

  1. Press the Windows key, type windows security, and click Open.Windows Security open Windows key  d3dx9_34.dll
  2. Go to Virus & threat protection and click Scan options.V& T Scan options
  3. Select Full scan and click Scan now to run a deep scan. Full scan - d3dx9_34.dll
  4. The tool will scour your computer for infected files; once the scan is complete, it will list out the bad files and delete them to fix the issue. 

4. Perform a System Restore

  1. Press the Windows key, type control panel, and click Open.Control Panel start menu d3dx9_34.dll
  2. Select View by as Large icons and choose Recovery. Recovery Control Panel d3dx9_34.dll
  3. Click Open System Restore.Open system restore
  4. On the next window, go with the recommended restore point or select Choose a different restore point and click Next. Next Choose a different restore point
  5. Select the restore point and click Next. Choose a point
  6. Click Finish to start the restoring process. This may take a few minutes. Finish d3dx9_34.dll

If the System Restore option is greyed for you or if it is not working, then we recommend you check this guide.

5. Download DLL files from a trusted source 

  1. Download the DLL file from the DLL-Files website.
  2. Double-click on the folder and copy the d3dx9_34.dll file from it.
  3. Navigate to this path and paste this file: C:\windows\System32System 32 d3dx9_34.dll
  4. Reboot your computer to confirm the changes.

If you are facing trouble because of missing DLL files on Windows 10, we suggest you read this guide to get your PC back to normal.

So, these are the steps you need to follow to fix the d3dx9_34.dll missing issue. If you have any questions or suggestions, feel free to mention them in the comments section below.

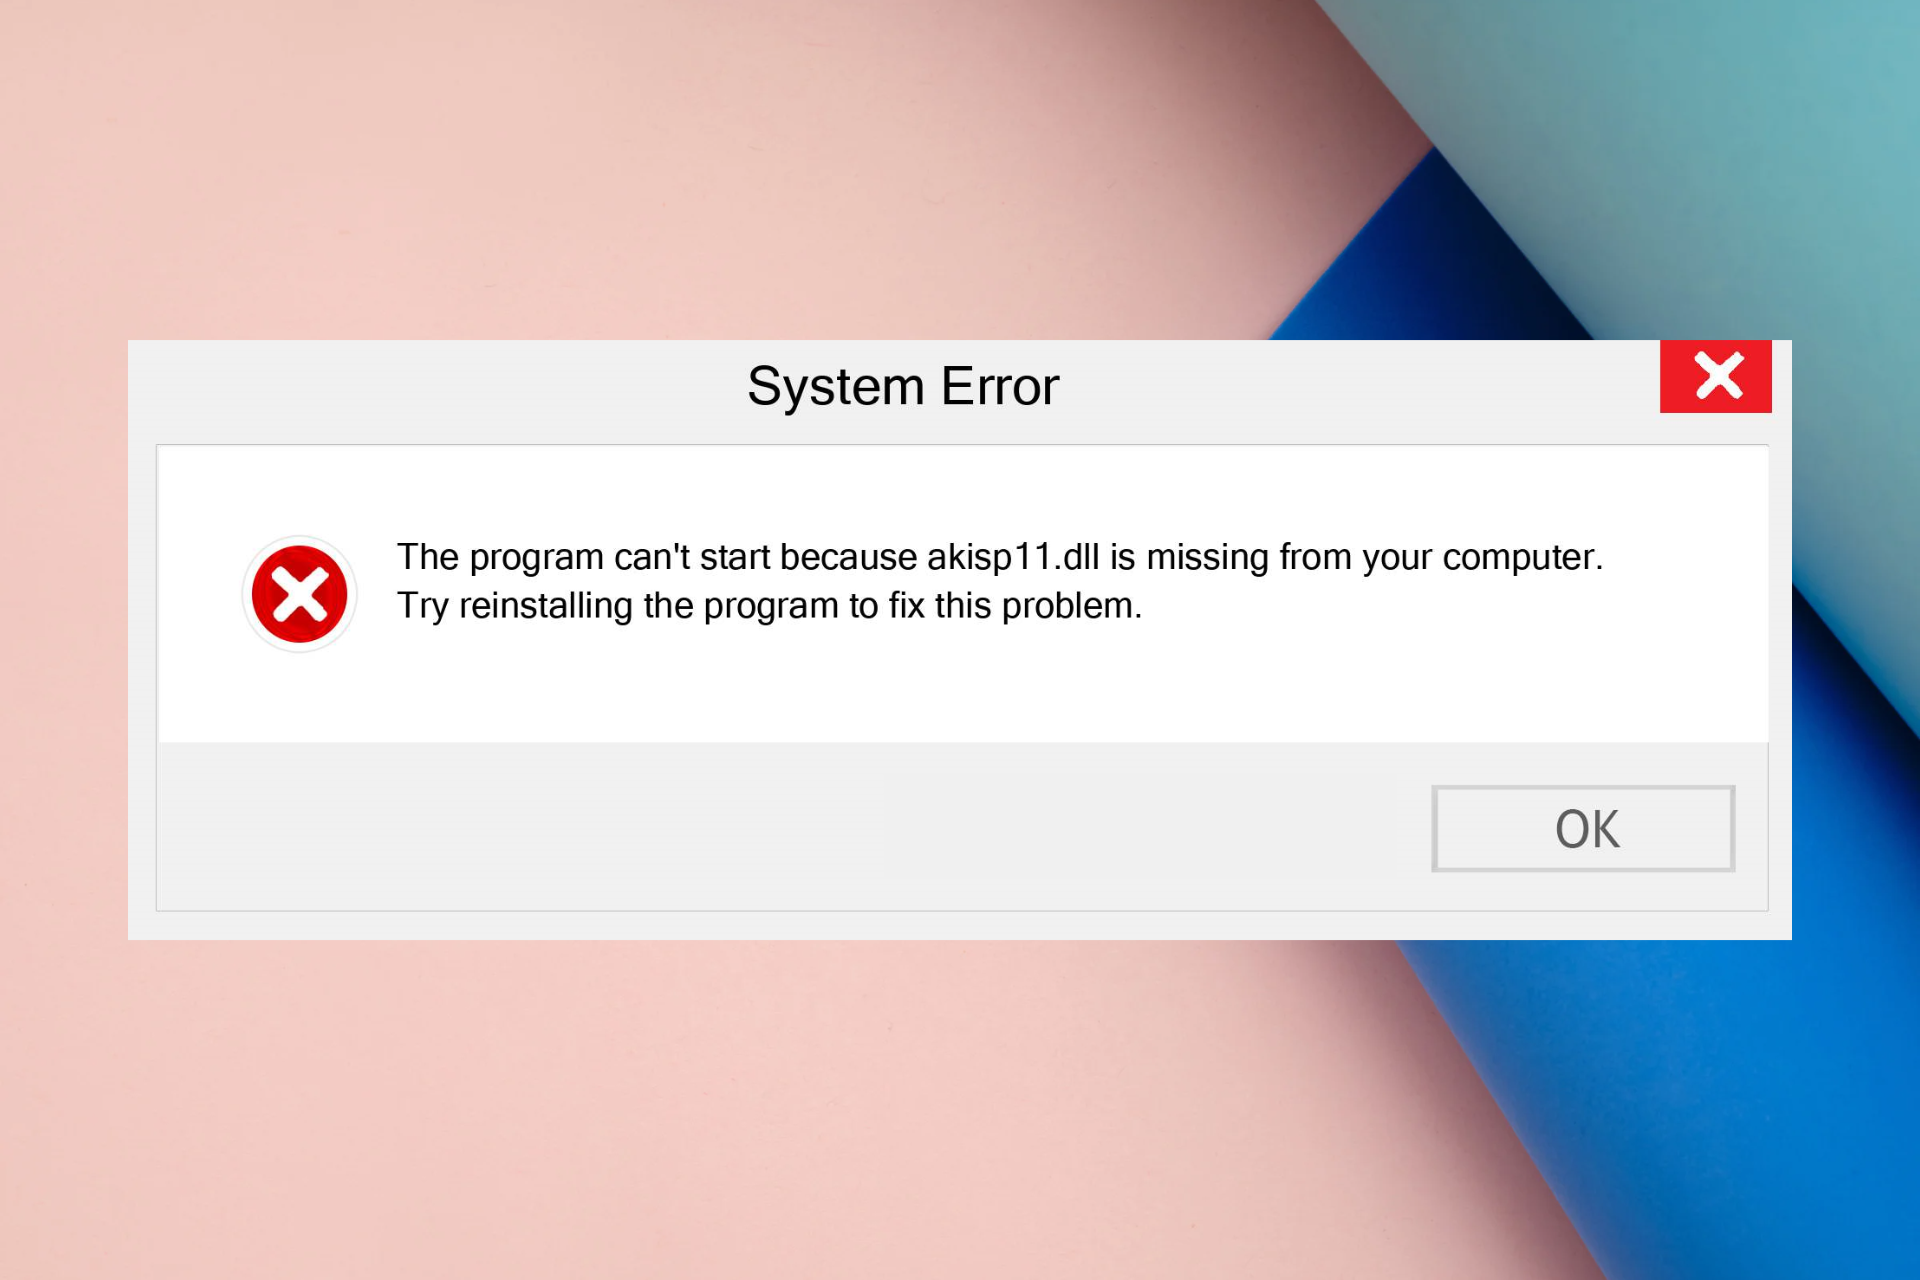
Akisp11.dll Missing? Here’s How to Fix It

Akisp11.dll is an executable Dynamic link library file developed by some third-party developer. This DLL file could be useful to run some apps smoothly on your computer.

If you are facing the akisp11.dll missing error, this guide can help. We will cover tested solutions to restore the missing DLL file and enhance system performance.

What causes the akisp11.dll missing error?

This DLL file could be missing due to various reasons; some of the common ones are mentioned here:

  • Incorrect installations – If any applications using the DLL file are incorrectly installed, you might face this error. You need to check for any recently installed apps and reinstall them.
  • Malware infection – A virus or malware, if present on a computer, can corrupt your system files, including these files. You must use an antivirus tool to remove the infection.
  • Faulty programs – If the software or program using the DLL file is corrupted, you can encounter this error. Reinstall the app causing the issue to resolve the problem.
  • Registry issues – If the registry files of your computer are broken, deleted, or corrupted, you might face various issues, including this one. You must use a registry fixer tool to fix the problem.

Now you know why the DLL file is missing, let us find out how to recover it.

What can I do if akisp11.dll is missing?

Before we go to the advanced fixes, here are a few preliminary checks you should do:

  • Sometimes, restarting your computer could fix the issue.
  • Reinstall the program which shows you the error.
  • Ensure there is no pending Windows update.

If these workarounds didn’t help you, move to the troubleshooting steps below.

1. Run a DLL fixer

DLL files are essential components of Windows OS and could cause issues if misplaced or deleted. To restore them and fix the problem, you need a DLL fixer.

These file repair tools have an extensive database of DLL files, registry entries, and more to help you with several system errors.

Some DLL fixers can help you restore third-party DLL files like akisp11.dll, resolving the conflict between third-party programs and the Windows operating system.

2. Run SFC & DISM scans

  1. Press the Windows key, type cmd, and click Run as administrator to open the elevated Command Prompt.CMD elevated akisp11.dll
  2. Type the following command to repair system files and hit Enter: sfc/scannowSFCSCANNOW CMD akisp11.dll
  3. Wait for the scan to complete. Now copy and paste the following command to repair the Windows OS image and press Enter: Dism /Online /Cleanup-Image /RestorehealthRestore health
  4. Once the process is complete, restart your PC to let the changes take effect.

3. Run a full scan using Windows Security

  1. Press the Windows key, type windows security, and click Open.Windows Security open Windows key akisp11.dll
  2. Go to Virus & threat protection and click Scan options.V& T Scan options
  3. Select Full scan and click Scan now to initiate a deep scan.Full scan - akisp11.dll
  4. Now the tool will search for malicious files on your computer and show you results if found. Delete the infected files and check if the issue persists.

4. Use a reliable source to download the DLL file

  1. Go to the DLL-files website and download the appropriate version of the akisp11.dll file.AKISP11.DLL
  2. Double-click the folder to open and copy the DLL file.
  3. Now navigate to this path and paste the file here: C:\windows\System32
  4. Restart your computer to save the changes.

5. Perform a System Restore

  1. Press Windows + R to open the Run dialog box.Run command Sysdmcpl akisp11.dll
  2. Type sysdm.cpl and click OK to open System Properties.
  3. Go to the System Protection tab, and click the System Restore button.System restore 1 akisp11.dll
  4. Now either go with the recommended restore point or select Choose a different restore point and click Next.Next Choose a different restore point api-ms-win-crt-string-l1-1-0.dll
  5. Select the restore point and click Next.Choose a point
  6. Click Finish to initiate the restoration process.Finish

Are you troubled by missing DLL files on Windows 10? We recommend you read our guide and discover expert tips and solutions to fix the issue and get your system back on track.

We hope the solutions listed helped you in fixing the akisp11.dll missing error. If you have any questions or suggestions, please feel free to use our comments section below.

How to Use Ashampoo Photo Optimizer App to Improve Your Images

If you are looking to enhance your pictures and make them truly stand out, you need an image optimizer. Its powerful features and an easy-to-use interface can help you achieve stunning results.

Here we are talking about one such tool Ashampoo Photo Optimizer, which can help you unleash your creativity and bring out the best in your images.

What are the benefits of using Ashampoo Photo Optimizer?

Ashampoo Photo Optimizer is a versatile photo editing software that offers a wide range of features to help you bring out the full potential of an image.

Here’s how this photo editor can enhance your photographs:

  • Auto optimization automatically analyzes and enhances your pictures in a single click. This feature is helpful for beginners and a quick way to improve image quality without manual editing.
  • Manual photo editing – The software gives you complete control over the editing process. You can adjust brightness, contrast, color saturation, sharpness, & more to fine-tune a photograph to your liking.
  • Batch processing – It allows processing multiple images at once by applying the same optimization settings in a few clicks, thereby saving time and effort.
  • Advanced editing– The addition of tools to reduce digital noise, fix red eyes in portraits, whiten teeth, and remove stains & other impurities make this program a must-have for photo editing.

Now that you know how it can help you, let us see how it works!

How do I use Ashampoo Photo Optimizer to edit images?

1. Download and install the tool

  1. Download Ashampoo Photo Optimizer from the official site.
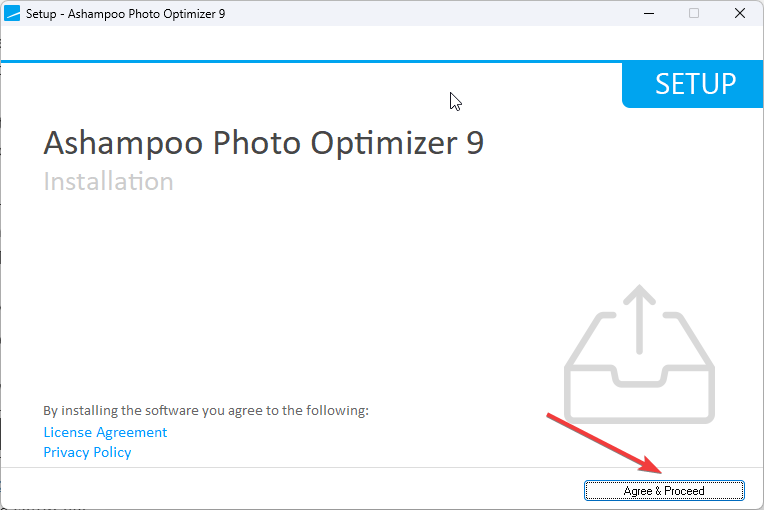
  2. Double-click the setup file on the Setup wizard, and click Agree & Proceed.Setup process 1 Ashampoo
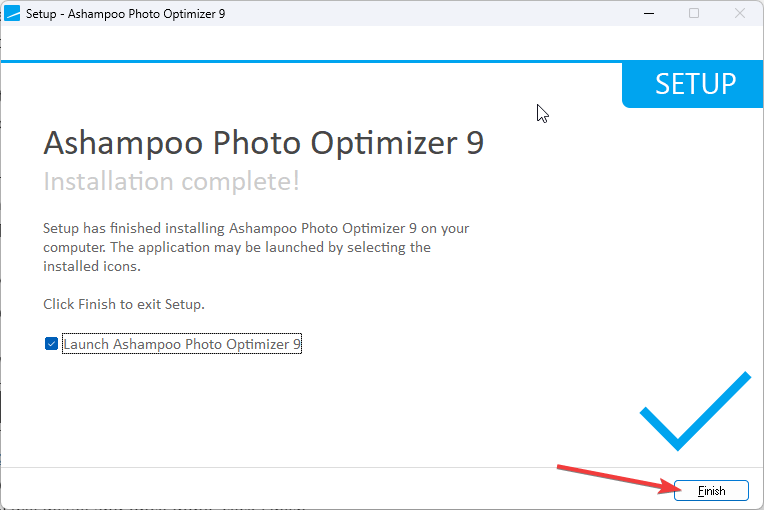
  3. Click Next. The tool will install, and once done, click Finish.Finish Setup

2. Optimize your images

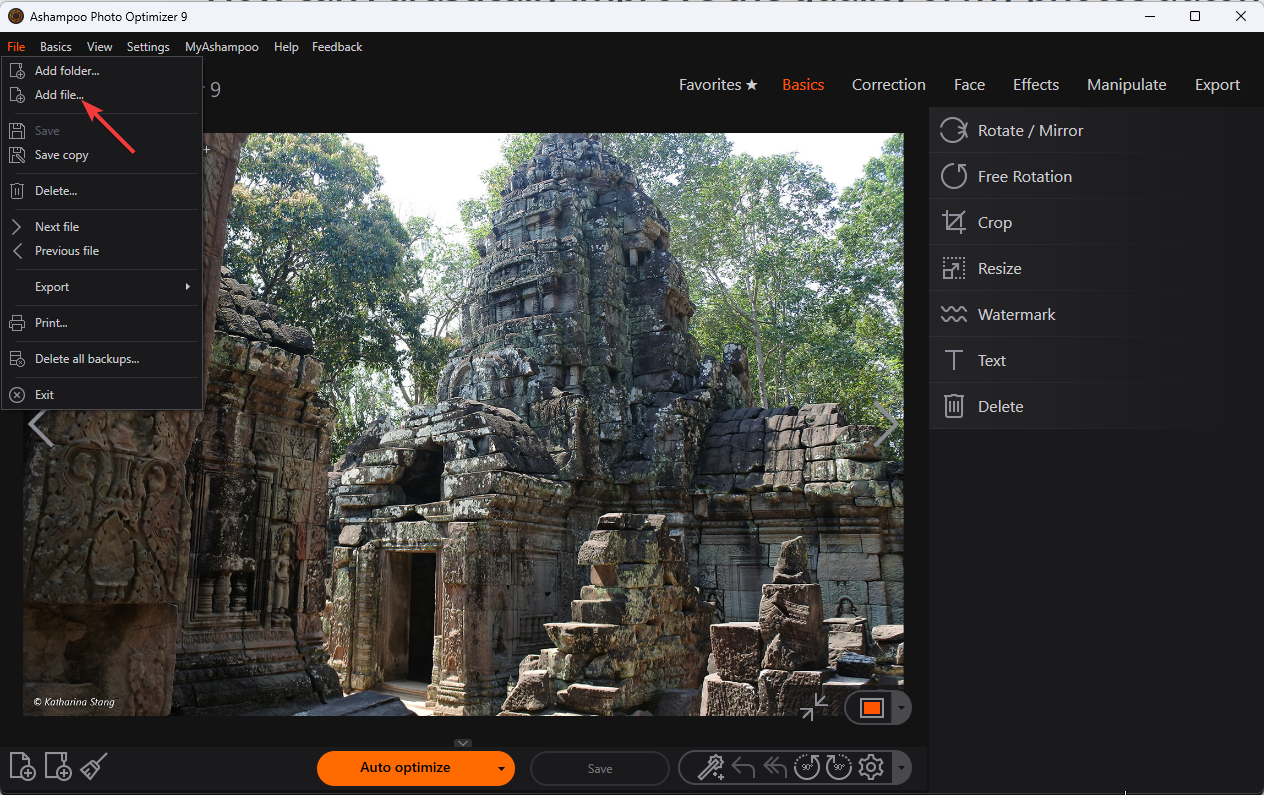
  1. On the home screen, click File, then select Add file to add a single picture or Add folder button to add a folder.Add file step 1 Ashampoo Photo optimizer
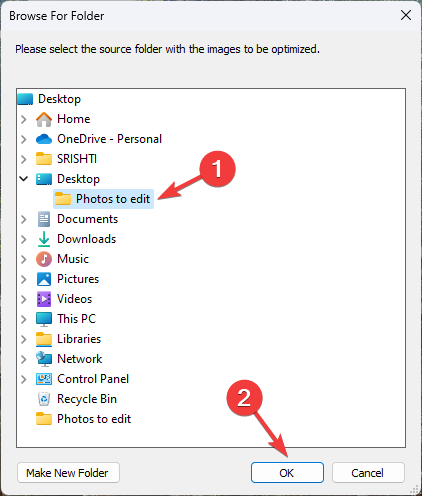
  2. Now locate the photos with the images and click OK. Repeat the same process if you want to add more folders.Step 2
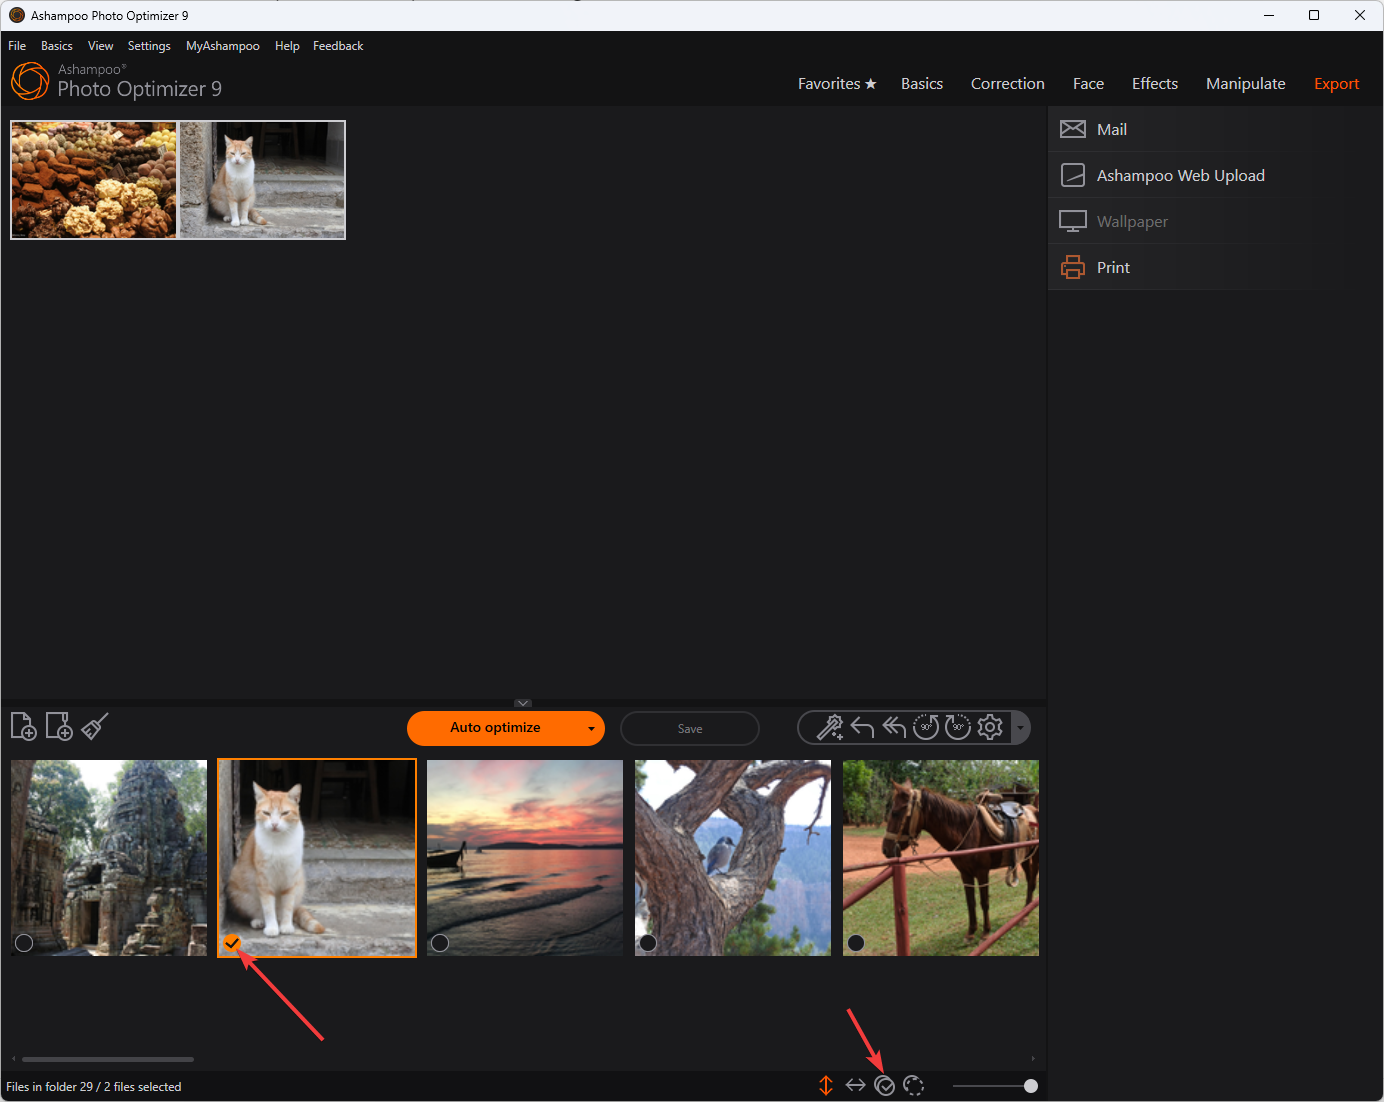
  3. Click the Double-sided arrow to see all photos. Select an individual picture by clicking on them or all by clicking the Select all button.Step 3 Ashampoo Photos optimizer
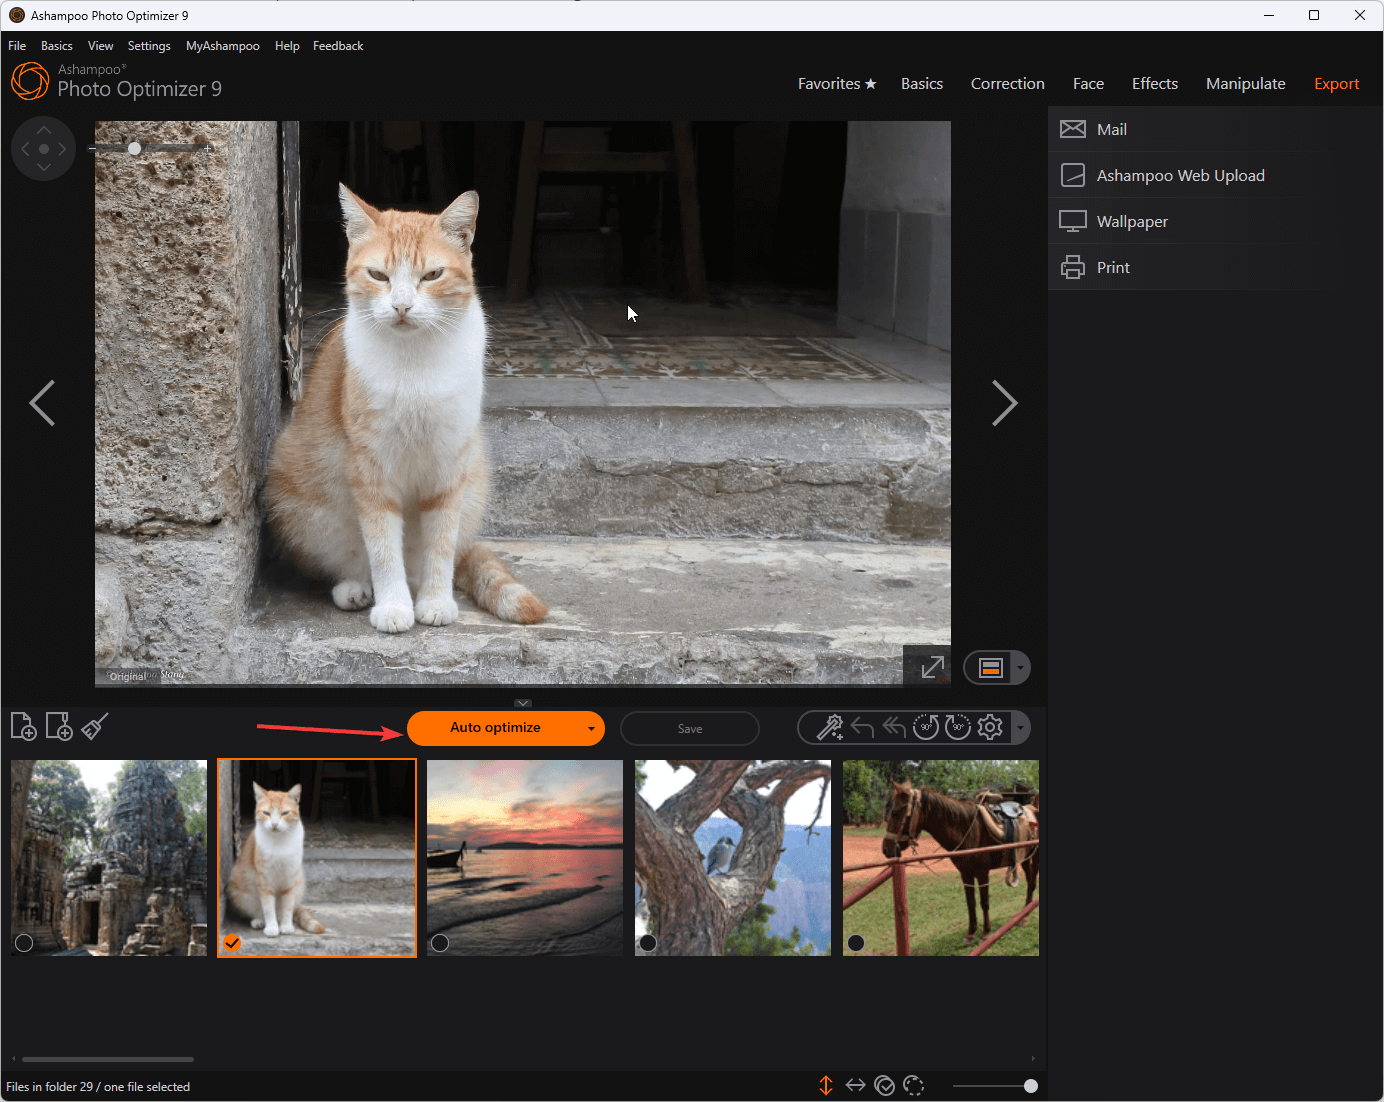
  4. Click Auto optimize.step 3 Ashampoo Photo optimizer
  5. Click Yes to confirm the choice. The optimization process can take a few minutes.
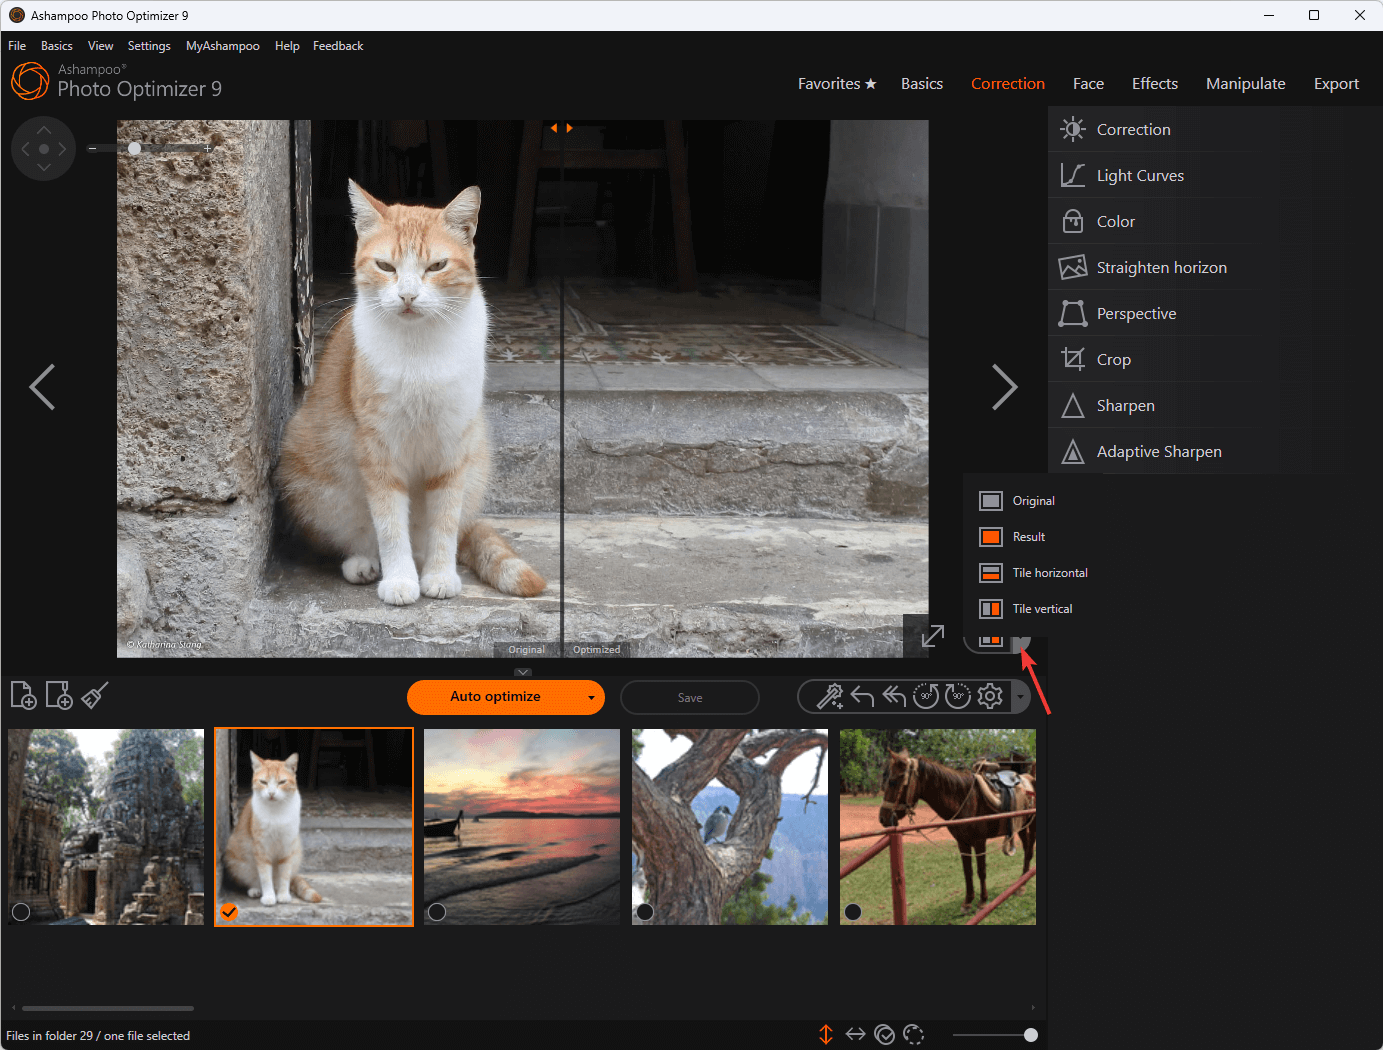
  6. Once optimized, click on the button on the right side of the image to choose from Original, Result, Tile horizontal, and Tile vertical to view the image. Select view
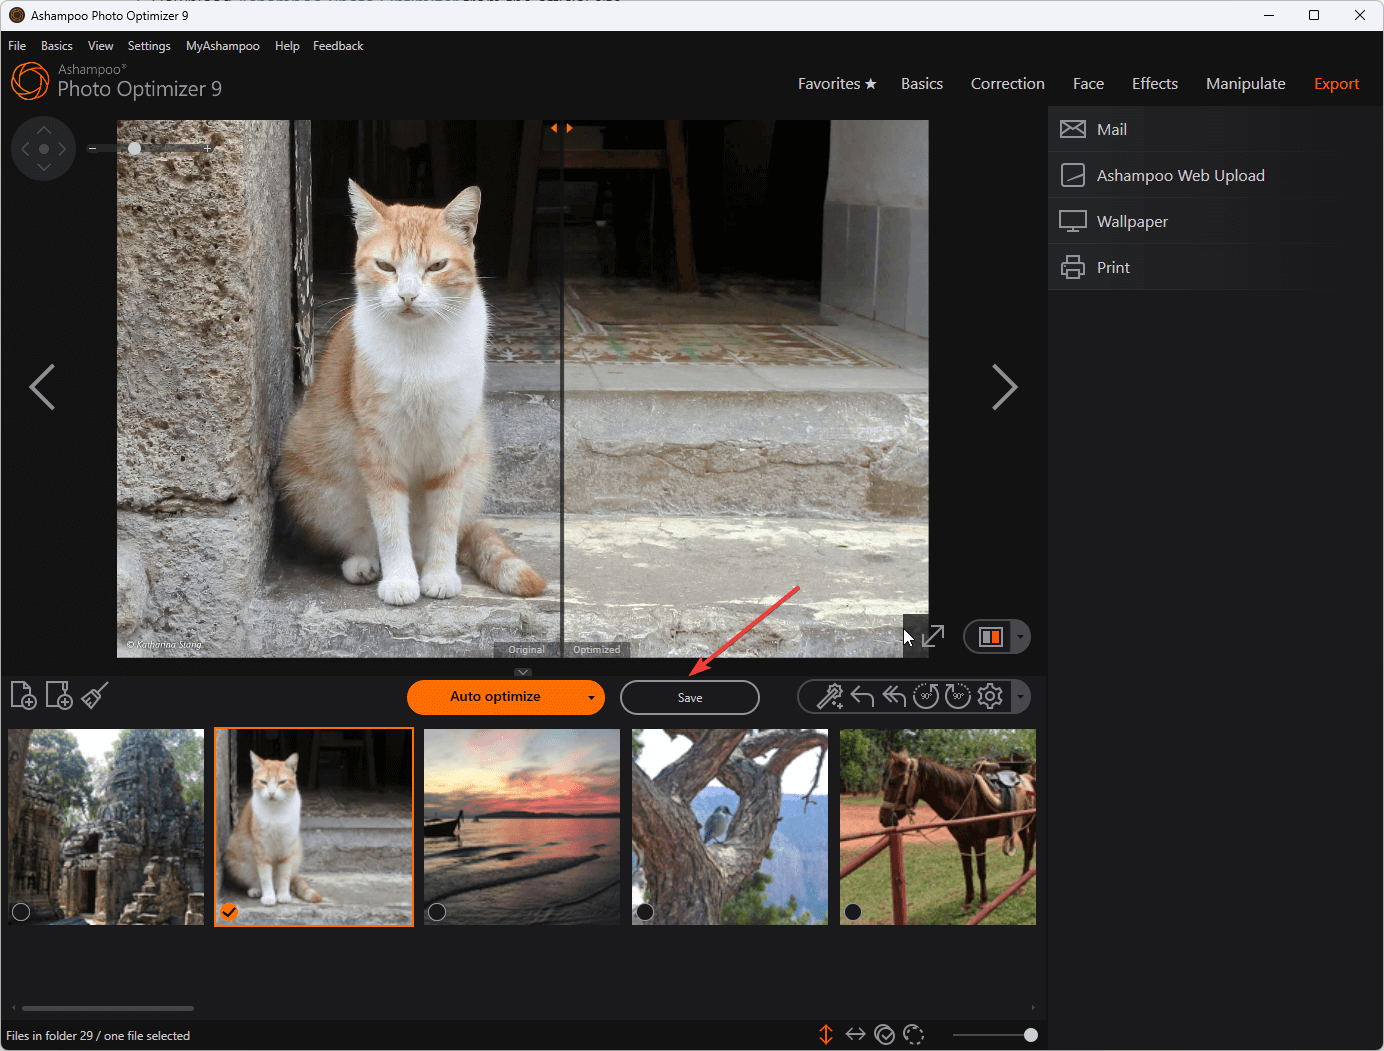
  7. Click Save.Photooptimizer Save the changes
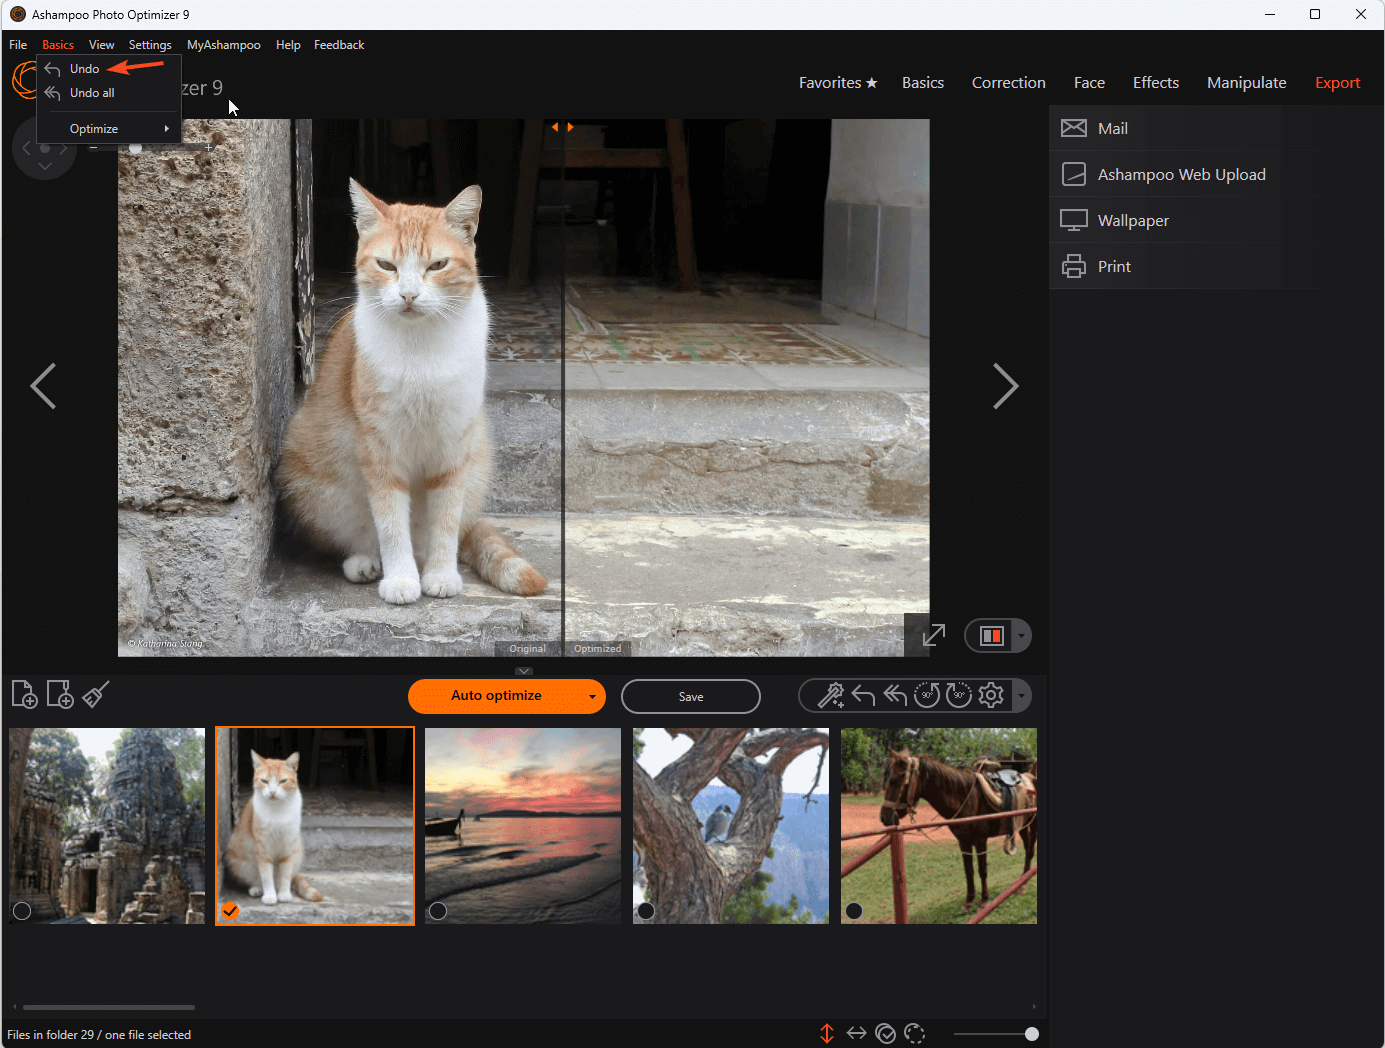
  8. The photos are saved on your computer in the Ashampoo folder. If you don’t like the changes, go to Basics, then click Undo to revert the changes.Undo changes

3. Edit the images manually

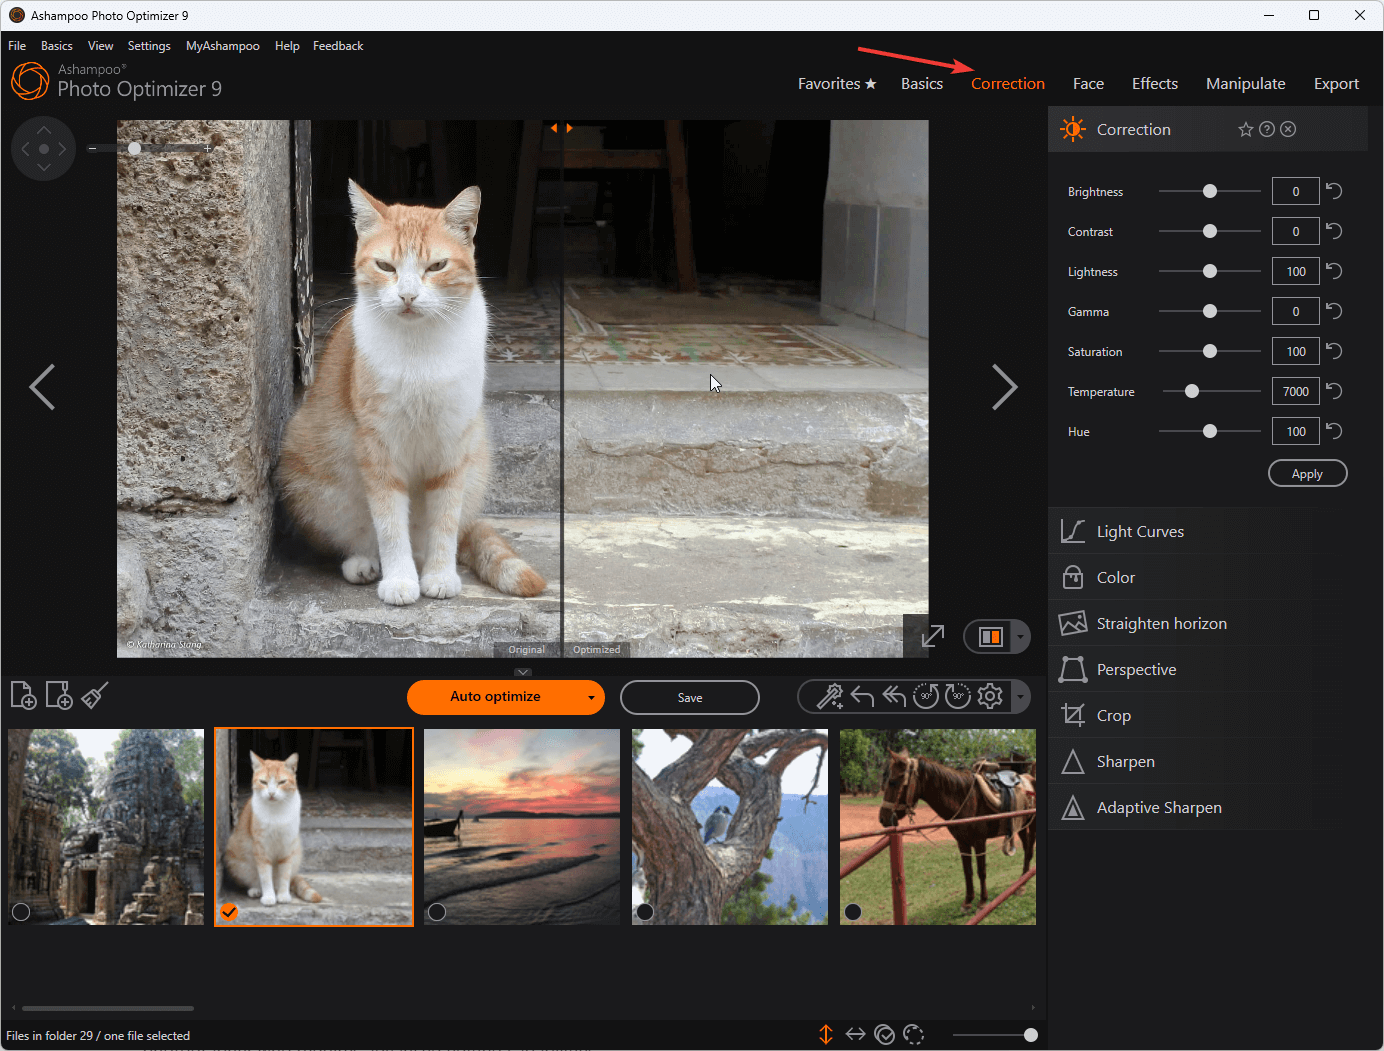
  1. To edit photos manually, use the options available in the top right corner of the tool. The options are:Photooptimizer9_Ashampoo® Photo Optimizer 9
    • Favorites – Save favorite features for easy access
    • Basics – Rotate/Mirror, Free Rotation, Drop, Resize, Watermark, Text & Delete
    • Correction – Correction, Light Curves, Color, Straighten horizon, Perspective, Crop, Sharpen, & Adaptive Sharpen
    • Face – Remove Red Eyes, Whiten Teeth, & Remove Spots
    • Effects – Image Age, Image overlay, Frame, Emboss, Shade, Blue Shift, Oilpaint, Charcoal, Sketch, Posterize, Solarize, Threshold, &Adaptive Threshold
    • Manipulate – Clone Area, Blur, Motion Blur, Adaptive Blue, Noise, Median, Spread, Shear, Wave, Swirl, Implode/Explode
    • Export – Mail, Ashampoo Web Upload, Wallpaper & Print.
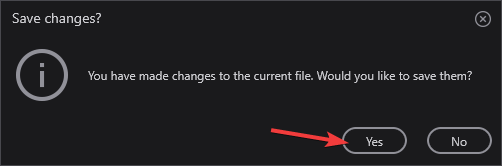
  2. Once you have made the changes, click Yes on the Save changes window to confirm the changes.Photooptimizer Save the changes

This is how you can manually edit the photos.

Right now, Ashampoo has an incredible limited offer for Photo Optimizer: you can get the tool for $25 instead of $40. Hit the link below to benefit from this opportunity!

Ashampoo Photo Optimizer

Transforms your photos from ordinary to extraordinary in a few simple steps.

What are the best features of Ashampoo Photo Optimizer?

Ashampoo Photo Optimizer is a comprehensive editing tool that offers advanced functionalities to create breathtaking images. Some of the key features of the software are:

  • Perspective correction – This image optimization tool comes with a perspective correction tool that can fix distorted lines and help you achieve a visually pleasing composition.
  • RAW image support – It supports RAW image files, which is a useful feature for a professional photographer who requires advanced editing capabilities.
  • Backup and restore – The software allows you to create backups of your original photos before making edits, ensuring you can always revert to the original version.
  • Preview option – You can compare the original image to the optimized one in real time to observe the differences, and it helps you make informed decisions during the editing process.
  • Easy sharing – You can upload the optimized images on social media platforms, send them via email, set them as wallpaper, and more.

Ashampoo Photo Optimizer is the go-to choice for transforming photos into stunning masterpieces. While using the tool, we observed that it was light on system resources, efficient, & responsive, and we were able to optimize the images without any problems.

Have you tried Ashampoo Photo Optimizer? If so, tell us all about your experience in the comments section below.

Api-ms-win-crt-string-l1-1-0.dll Missing: 5 Ways to Fix

Api-ms-win-crt-string-l1-1-0.dll is a legit Dynamic link library (DLL) file developed by Microsoft Corporation for Windows 11, 10, and other earlier versions. Several apps or games may need this file to function properly.

However, if api-ms-win-crt-string-l1-1-0.dll is missing, it could throw an error message when you try to open games or apps.

Why is api-ms-win-crt-string-l1-1-0.dll missing?

There are several reasons why the DLL file can’t be found, some of them are mentioned here:

  • Malware infection – When your computer is infected with viruses, it could corrupt your system files, including the DLL files. You must run a deep scan using trusted antivirus software.
  • Damaged Windows registry – If your Windows registry files are damaged or broken, it could cause various issues, including this error. To fix it, you need to run a registry cleaner tool.
  • Corrupted software – The DLL file could be damaged or missing if the software using the file is corrupted. You need to reinstall the program to fix the issue.
  • Accidentally deleted – If you have deleted or misplaced the DLL file by mistake, it could lead to this error message. You need to restore the file to its original location.

Now that you know the causes, let us move to the methods to fix the problem.

How can I fix the api-ms-win-crt-string-l1-1-0.dll file is missing?

Before engaging in advanced troubleshooting steps, you should consider performing the following checks:

  • It seems unusual, but rebooting your PC can help.
  • Make sure Windows is up to date.
  • Reinstall the program which is throwing the error.

If these tweaks didn’t help, don’t sweat! Let’s check out the solutions mentioned below.

1. Run a DLL fixer

Fixing DLL errors can be cumbersome, especially if you don’t know your way around your computer. It is advised to use a DLL repair tool.

DLL fixers are Windows repair tools designed to repair and restore missing DLL files, including api-ms-win-crt-string-l1-1-0.dll, fixing issues like application crashes, system instability, etc.

With its extensive database of Windows DLL files, these can fix your problem. Also, you can rest assured that your DLL files are always up to date.

2. Run SFC & DISM scans

  1. Press the Windows key, type cmd, and click Run as administrator.CMD elevated api-ms-win-crt-string-l1-1-0.dll
  2. Copy and paste the following command to repair system files and hit Enter: sfc/scannowSFCSCANNOW CMD api-ms-win-crt-string-l1-1-0.dll
  3. The tool will scan your computer and fix the broken or damaged system files.
  4. Type the following command to repair Windows image files and press Enter: Dism/Online /Cleanup-Image /RestorehealthRestore health
  5. Wait for the scan to complete, then restart your computer to let the changes take effect.

3. Run a malware scan

  1. Press the Windows key, type windows security, and click Open.Windows Security open Windows key api-ms-win-crt-string-l1-1-0.dll
  2. Click Virus & threat protection from the left pane, and select Scan options from the right.V& T Scan options api-ms-win-crt-string-l1-1-0.dll
  3. Select Full scan and click Scan now to initiate the deep scan.Full scan - api-ms-win-crt-string-l1-1-0.dll
  4. Now the tool will scan all the areas on your computer to scour malicious files. Once completed, it will show you the infected files and delete them when prompted.
  5. Reboot your PC and check if the issue persists.

4. Perform a System Restore

  1. Press the Windows key, type system restore and click Create a restore point from the results.System restore API-MS-WIN-CRT-STRING-L1-1-0.DLL
  2. Under System Restore, click System Restore button.System Restore System config
  3. Now, you can either go with the recommended restore point option or choose a different one and click Next.Next Choose a different restore point api-ms-win-crt-string-l1-1-0.dll
  4. Select the restore point before the api-ms-win-crt-string-l1-1-0.dll missing error and click Next.Choose a point
  5. Click Finish and wait for the process to get completed. Finish api-ms-win-crt-string-l1-1-0.dll

If you cannot restore your computer to the previous version, we recommend you go through our guide on System Restore not working.

5. Download the DLL file from a reliable website

This method is not recommended as the file might harm your computer or contain malware.

DLL file download manually api-ms-win-crt-string-l1-1-0.dll

However, if you choose a trusted source like DLL-files, download the DLL files to fix the problem. On the other hand, you can copy the file from a healthy computer and paste it into this folder on your PC to make it work: C:\Windows\System32

So, this is how you can fix the api-ms-win-crt-string-l1-1-0.dll missing error and improve the overall performance of your Windows operating system.

This isn’t the only file that can cause issues, and we have a guide on api-ms-win-core-localization-l1-2-0.dll error, so don’t miss it.

For any other questions or advice, please feel free to mention them in the comments section below.

Lame_enc.dll Missing: How to Fix This Error

Lame_enc.dll is an encoder module that also functions as an audio compressor. It is employed by some of the top open-source apps like Audacity for different tasks.

However, some users complain about a lame_enc.dll file missing error on their PC. If you are also troubled by this issue, we will show you how to fix it and restore normalcy on your device.

What is a lame_enc DLL file?

Lame_enc.dll is known as one of the best encoders at mid-high bitrates. This MP3 encoder module is a standard for audio compression.

Among the top apps that make use of Lame_enc.dll are VideoLAN and Audacity. Hence, if this DLL file is missing on Windows 10 or 11, these apps will suffer greatly.

How can I fix the Lame_enc.dll missing error?

1. Use a dedicated DLL fixer

Lame_enc.dll is a non-system file that comes with software installed on your PC. Hence, any error concerning this DLL file is likely due to compatibility issues between the DLL file and your PC.

The easiest way to rectify this and get the file firing again is to use a dedicated DLL repair tool. This is because this tool fixes compatibility issues and eases the sync between your PC and any third-party DLL file.

2. Update your PC

  1. Press the Windows key + I and select Windows Update in the left pane.
  2. Click Check for updates in the right pane.
    update lame_enc.dll
  3. Finally, download and install all available updates and restart your PC.

Sometimes, the lame_enc.dll missing issue can be due to an outdated PC. You can fix this easily by updating your operating system.

3. Reinstall the faulty program

  1. Press the Windows key, type control, and select Control Panel.
    control panel
  2. Select Uninstall a program under the Programs option.
    uninstall a
  3. Now, right-click the faulty app and choose Uninstall.
    uninstall
  4. Finally, go to the official website to reinstall the program or use the original installation disk.

At times, the app giving the lame_enc.dll missing might cause the issue. Reinstalling the app should do the trick here.

4. Perform a system restore

  1. Press the Windows key + R, type rstrui.exe, and click OK.
    rstrui lame_enc.dll
  2. Now, click Next.
    next
  3. Select your preferred restore point and click Next.
    restore point lame_enc.dll
  4. Finally, click the Finish button.
    finish

In some cases, this lame_enc.dll issue might show up because of some changes made to your PC. You need to restore your PC to a point when everything is working perfectly.

5. Download from a third-party website

  1. Go to a trusted third-party website like DLL me.com.
  2. Click the Download button.
    download
  3. Next, unzip the downloaded file if it is zipped and move the lame_enc.dll file to the path below on a 32-bit PC:C:\Windows\System32
  4. If you are on a 64-bit PC, move it to the path below instead:C:\Windows\SysWOW64
  5. Finally, restart your PC.

If you still can’t get past this error after applying the fixes above, you have no choice but need to download the lame_enc.dll file from a third-party website. While this is not encouraged, some secure websites are still out there.

Also, if you are facing this issue on Audacity, follow the steps below to upload the DLL file on it:

  1. Launch Audacity and select Edit > Preferences.
  2. Click the Libraries option.
  3. Now, select Locate after MP3 Library.
  4. Click the Browse button and select the folder containing the lame_enc.dll file.
  5. Finally, click the Open button.
    audacity

With this, we can conclude this detailed guide on the lame_enc missing error. All that is left for you to do is follow the instructions carefully, and things should return to normal.

Similarly, if some DLL files are missing on Windows 11 besides this one, check our detailed guide to restore them. We also have a new guide on avformat-52.dll, so don’t hesitate to check it out.

Feel free to let us know the solution that helped you fix this issue in the comments below.

D3d9.dll is Missing: How to Fix & Download It Again

D3d9.dll is an integral DLL file used by Windows PC to run graphics-intensive programs. However, an important file can sometimes misbehave, as some users complain of a d3d9.dll missing error.

While this error can be caused by a series of factors like corrupt files and a faulty app, it is not the most difficult to fix, as we will show in this guide.

What is d3d9 DLL?

D3d9.dll is one of the many files that make up Microsoft DirectX. DirectX is an important software used by many games and advanced graphics software on Windows PC.

Hence, if d3d9.dll or any other DirectX DLL file is missing on your PC, it will affect most of these Windows-based programs.

How do I fix the d3d9.dll missing error?

1. Use a dedicated DLL fixer

While the d3d9.dll missing error can be frustrating, it is not the end of the world because the file can be restored. Restoring it doesn’t necessarily have to involve downloading or copying the file.

Instead, you should consider using a top-notch DLL fixer that can restore the d3d9.dll file automatically. And with this being a system DLL file, you know this tool will 100% restore it.

2. Install the latest version of DirectX

  1. Visit the official website to download the latest version of DirectX.
    download d3d9.dll
  2. Double-click the downloaded file to run it and accept the license terms.
    accept d3d9.dll
  3. Finally, follow the onscreen instructions to complete the process.

Since the d3d9.dll file is part of DirectX, installing the latest version of the software should help restore it if it is really missing on your PC.

3. Reinstall the faulty program

  1. Press the Windows key + S, type control, and select Control Panel.
    control panel
  2. Now, click Uninstall a program under Programs.
    uninstall a d3d9.dll
  3. Next, right-click the faulty app and choose Uninstall.
    uninstall
  4. Finally, go to the official website to reinstall the program or use the original installation disk.

Sometimes, the app giving the d3d9.dll error might be faulty, leading to the error message. In this case, you need to uninstall the app and reinstall it from official sources.

4. Run an SFC scan

  1. Press the Windows key, type cmd, and select Run as administrator under Command Prompt.
    cmd admin d3d9.dll
  2. Type the command below and hit Enter:sfc /scannowsfc scan
  3. Finally, wait for the command to finish running and restart your PC.

Sometimes, the d3d9.dll can be due to broken or missing system files. Restoring these files should help you get past the error message.

5. Perform a system restore

  1. Press the Windows key + R, type rstrui.exe, and click OK.
    rstrui
  2. Click the Next button on the next page.
    next
  3. Now, choose a restore point and click Next.
    restore point d3d9.dll
  4. Finally, click the Finish button.
    finish

At times, you might face this d3d9.dll issue because of recent changes to your PC. Performing a system restore to a point when everything was working well should do the trick.

6. Download from a third-party website

  1. Visit a trusted third-party website like DLL files.com.
  2. Click Download.
    download
  3. Now, unzip the downloaded file and move the DLL file to the path below on a 32-bit PC:C:\Windows\System32
  4. If you use a 64-bit PC, move it to the path below instead:C:\Windows\SysWOW64
  5. Finally, restart your PC.

If none of the solutions above helped you restore the d3d9.dll file, you might need to download it from a third-party website. This is the last resort, but you can still get some safe websites out there.

Also, ensure you scan any file you download to ensure its safety.

The d3d9.dll missing error can be frustrating, as it affects a lot of apps and software. Fortunately, it is an issue that can be easily fixed, provided you follow the steps in this guide.

In the same vein, if DLL files are missing on Windows 10, check our detailed guide to restore them.

Feel free to let us know the solution that helped you fix this issue in the comments below.

How to Convert OST Into PST Using Stellar Converter for OST

Whether you use Microsoft Outlook with Microsoft Exchange Server or IMAP mail protocol, OST (Offline Storage Table) files are automatically created and saved on your computer.

Despite the popularity of Outlook, it is not free from errors, and users often complain about random crashes. Sometimes due to crashes, the OST file might get corrupted, and you may lose access to your mailbox.

Therefore, you need a reliable OST to PST converter that can help you recover important emails, contacts, calendars, and other data stored in the OST file. One such reliable software is Stellar Converter for OST.

In this guide, we will discuss how to convert OST into PST files and repair your Outlook emails without any hassle.

Why do you need an OST to PST converter?

Converting an OST (Offline Storage Table) file to PST (Personal Storage Table) format can be significant for recovering your mailbox content. Here are some scenarios wherein you can need it:

  • Inaccessibility – If the Exchange Server crashes or the OST file becomes corrupt, you might lose access to your data on email. OST to PST conversion can help you recover emails, contacts, calendars, and other data.
  • Migrating data – If you are switching to a new email client or migrating to a different Exchange Server, then OST to PST converter can help you transfer your data from one system to another.
  • Backup and archiving – The conversion can also be useful for creating backups or archives of your data. PST files can be easily stored, transferred, or backed up to a different location.
  • Limited storage space – Outlook has a limit on OST file size, and if the file exceeds the size, there may be performance issues. You can convert this file to PST to reduce the size.
  • Lost your mailbox data– If your mailbox data is deleted, converting the OST file to a PST file can help recover data.

No matter why you want to do this, Stellar Converter for OST checks all the boxes.

How can the Stellar Converter for OST help you?

PST and OST files are both file formats used by Microsoft Outlook to store mailbox data. The former is available on the local computer or network, and the latter is located on the Exchange server.

If the server becomes inaccessible or the OST file is corrupt, you can’t access your emails. To repair these emails, you need an OST to PST file converter such as Stellar Converter for OST.

With the OST PST conversion tool, you can recover all your mailbox content, including emails, calendars, tasks, attachments, journals, contacts, notes, etc, and save them in RTF, PDF, EML, HTML, and MSG.

The software allows you to scan and preview the converted OST file contents and can convert the first 20 emails per folder for free.

Let’s see how we can use this software to support OST PST conversion and recover Outlook emails.

How do I recover my emails using Stellar Converter for OST?

1. Convert OST to PST

  1. Go to Stellar Converter for OST website and click Free Download.Download Stellar  Convert OST to PST
  2. Double-click the installer file and click Yes on the UAC prompt to launch the installation wizard.
  3. Follow the on-screen instructions to install the software on your computer. Once the process is complete, click Finish to close the setup and the tool will be launched.Finish convert OST TO PST
  4. If you know the file’s location, click Browse to choose the OST file or the Find option to search and choose the PST file. Click Convert.Convert Browse Convert OST Into PST
  5. If you don’t know the location, go to the Profile List tab. Click List Profiles. It will show you all the OST files related to Outlook profiles from the default location. Choose the OST file and click Convert.List profiles profile list Convert OST Into PST

Once the process is complete, you can see the preview Outlook mailbox folders and deleted items (red colors) in the left pane.

If you want to find a specific email, go to the Home tab, click the Find Message option, enter parameters such as To, From, Subject, & Date, and click Find Now. You can double-click on the email to see the preview.

2. Recover your PST file

  1. Go to the Home tab and click Save Converted File.Save converted file
  2. On the Save as window, click the radio button next to Save as PST and click Next. You can select a different format by clicking the drop-down next to Other Formats.Save as page
  3. On the Save as PST window, you will get three points:Save PST NORMALLY Convert OST Into PST
    • Save PST normally will allow you to save data as a PST file normally
    • Compact and Save PST compresses the PST file and reduces the amount of disk space they occupy
    • Spilt and Save PST can split converted PST files into different sizes
  4. On the Select Destination page, either choose the default location mentioned or click Browse and select a preferred location. Here you will get three more options:Select Destination of OST file
    • Recover Deleted Items is selected by default. You can uncheck it if you don’t want to recover deleted items.
    • Auto split PST file is selected by default. You can remove the checkmark if you don’t wish to split the converted OST file.
    • Apply Advance Filter option can be used to apply various filters on recovered emails such as Include Junk Email older, Include Deleted Items folder, Date Range, and more.
  5. Click OK.
  6. The conversion process will start, and it may take some minutes, depending on the size of your mailbox.File scan Convert OST Into PST
  7. You will get a window that will show you the location and the file size, click OK to close it.OK done Convert OST Into PST

This OST to PST converter tool is intuitive and simple to use. The process of conversion is also quite straightforward, and the app instructs you throughout to get to the result.

Hurry up and get the latest deal for Stellar Converter for OST Corporate Edition. By using the EMAILOFF10 coupon, you will get a 10% discount on this product.

Stellar Converter for OST

Recover your lost emails by converting the OST file to PST, RTF, PDF, EML, HTML, and MSG.
Free trial Visit Website

3. Import the recovered data into Outlook

  1. Launch Outlook. Click File.File tab Convert OST Into PST
  2. Now click the Account Settings dropdown and select the first option.Account settings outlook
  3. Click the Data Files tab, select the existing OST file, and click Remove.Click CLOSE Convert OST Into PST
  4. Go to the File menu again, and click Open & Export.Open export
  5. Click Import/Export.Import export Convert OST Into PST
  6. Select Import from another program or file and click Next.Select a program
  7. Choose Outlook Data File (.pst) and click Next.import file
  8. On the next page, either go with the default file or click Browse choose a different one, and click Next.BROWSE IMPORT
  9. Click Finish to complete the process.OUTLOOK_j file imported

Stellar Converter for OST tool is intuitive and simple to use. The process of conversion is also quite straightforward, and the software instructs you throughout to get the best results. Overall, this OST to PST converter tool is very useful for admins in critical scenarios, as listed above.

This is how you can recover your deleted or lost emails from Outlook and import them back into the email client.

What are the benefits of using Stellar Converter for OST?

This comprehensive OST PST conversion tool can easily convert inaccessible OST files to PST files. It gives you the option to either save the PST file or export mailboxes directly to Microsoft Office 365 or Live Exchange.

Here is the list of key advantages:

  • Quick and efficient – The software has a user-friendly interface and can quickly convert the OST files to the desired format without any data loss.
  • Supports batch conversion – You can select multiple OST files and convert them to PST files in a single process, saving you time.
  • Advanced Scanning – The tool can even scan corrupt or inaccessible OST files, extract data from them and convert it.
  • Selective conversion – It allows the selection of specific folders or items from the OST file, saving disk space.
  • Preview feature – You can preview the converted items before saving them, which allows you to determine the accuracy of the recovered file.

What are the other methods to convert OST into PST?

1. Use the Import/Export option

  1. Launch Outlook and click File.File tab
  2. Go to Open & Export.Open export Convert OST Into PST
  3. Click Import/Export.Import export
  4. Select Export to a file and click Next.ClicK Export
  5. Choose the Outlook Data File(.pst) option and click Next.export1
  6. Select the folder you want to export and click Next.Select folder
  7. Click Finish to complete.Finish export Convert OST Into PST

Now that you have the PST file, you can export it to another system or replace it with the existing one whenever you like using the steps mentioned above.

2. Use the Auto Archive Settings

  1. Launch Outlook and click File.File tab
  2. Go to Options.Options Convert OST Into PST
  3. Select Advanced from the left pane and click AutoArchive Settings.Archive settings
  4. Place a checkmark next to the Run AutoArchive entry option, and select the other settings accordingly and click OK.Autoarchive

This method will save all your emails and other content except your contacts. So, if you don’t wish to save contacts, you can use these steps.

Final words

Losing important emails or access to your mailbox is scary, as you could lose your important data. However, with the help of this OST PST conversion tool, you can retrieve deleted or lost mailbox data in no time.

Stellar Converter for OST tool is intuitive and simple to use. The process of conversion is also quite straightforward, and the software instructs you throughout to get the best results.

Overall this OST to PST converter tool is very useful for admins in critical scenarios as listed above.

We hope the information provided helped you recover your emails using Stellar Converter for OST. If you have any suggestions or questions, please mention them in the comments section below.

Microsoft reportedly working on a Dev Home app for Windows 11

Toward the end of last year, we saw that Microsoft was pushing Windows 11 to Windows 10 22H2 users via the OOBE.

It seems that the tech giant wants to use the out of box experience for even greater things, and we’re about to look at one option right now.

Before we do, be sure to check this month’s Patch Tuesday rollout. Microsoft released fixes for a total of 97 CVEs in April.

The Windows 11 OOBE reveals a lot about upcoming plans

As you know, a few days ago, Microsoft released a special OOBE (Out of Box Experience) update for Windows 11 22H2 and 21H2, as well as all supported versions for Windows 10.

In truth, these new updates address some compatibility issues, similar to the previous release, so there’s really nothing new and exciting going on yet.

Furthermore, the Redmond tech giant is also looking at making changes to the OOBE with a new Development customization preset for configuring the PC.

And, the description of this feature mentions a new Dev Home app, and it goes on to briefly discuss what the function of the new Dev Home app will be. 

Apparently, when using it, you can monitor your workflows with the widgets dashboard and see suggested tips to boost PC performance and discover new developer settings.

Also, if Development is pre-selected, Windows has found that your previous PC has been used for developer workloads and might benefit from this customization.

Keep in mind that this change was spotted in Canary build 25336, even though the option was not yet available inside the Device Usage section in Settings.

Microsoft has apparently removed the Development option since then in the most recent Dev build, in case you weren’t aware.

The tech giant is also working on a Dev drive or developer volume option, based on the ReFS file system. Leave a comment below expressing your opinion on the matter.

Zlib1.dll Not Found: 6 Ways to Fix It or Get It Back

Different DLL files play important roles in the execution of different processes. One of them is zlib1.dll, which is used by a wide range of software.

However, some users are complaining about the zlib1.dll not found issue while trying to open some apps. If you are one of those encountering this issue, be sure to read this guide to the end for effective solutions to fix it.

What is zlib1 DLL?

The zlib1.dll, otherwise known as the Zlib data compression library, is associated with Zlib. It plays an important part in file compression and operating different apps.

Hence, if the DLL file is missing on Windows 11, the associated apps will be affected.

How do I fix zlib1.dll if it is not found?

1. Use a dedicated DLL fixer

The zlib1.dll not found issue is likely due to file corruption. While some might recommend manually downloading and installing the file, we recommend using a DLL fixer tool.

This automatically detects and replaces any missing DLL files with little to no input from you. Also, with zlib1.dll being a system file, rest assured that this special tool will 100% restore it.

2. Reinstall the faulty app

  1. Press the Windows key + R, type control, and click the OK button.
    control zlib1.dll
  2. Select Uninstall a program under the Programs section.
    uninstall a
  3. Now, right-click the faulty app and select the Uninstall option.
    uninstall
  4. Finally, go to the official website to reinstall the program or use the original installation disk.

In some cases, the zlib1.dll not found error message might be due to issues with the app you are trying to run. The easiest way to get the file working again is to uninstall and reinstall the app from official sources.

3. Download from a third-party website

  1. Visit a trusted third-party website like DLL files.com.
  2. Click Download.
    download zlib1.dll
  3. Next, unzip the downloaded file if it is zipped and move the DLL file to the path below on a 32-bit PC:C:\Windows\System32
  4. If you are using a 64-bit PC, move it to the path below instead:C:\Windows\SysWOW64
  5. Finally, restart your PC.

If everything else fails to restore the zlib1.dll file, you might need to download it from a third-party website. While this is the least preferred option, there are still some safe websites.

However, ensure you scan any file for malware to ascertain its safety.

Another option is to copy the DLL file from a perfectly working PC and move it to the paths above on your device.

4. Update your PC

  1. Press the Windows key + I and select Windows Update in the left pane.
  2. Click the Check for updates button.
    windows update
  3. Finally, download and install all available updates and restart your PC.

Sometimes, the zlib1.dll not found issue can be due to an outdated operating system. You can fix this effectively by updating your PC.

5. Scan for malware

  1. Press the Windows key, type virus, and select Virus & threat protection.
    virus zlib1.dll
  2. Click the Scan options link.
    scan options
  3. Finally, select your preferred scan option and click Scan now.
    scan now

At times, this zlib1.dll issue can occur because of system file corruption caused by viruses. The solution is to perform a full virus scan to eliminate malware.

Another option is to use excellent antivirus software in ESET NOD32 to scan for and eliminate the most hidden malware on your PC.

This software scans deeply into your PC, including the Windows files, and removes viruses before they can cause issues.

We have reached the end of this comprehensive guide. You only need to follow the instructions therein, and the zlib1.dll file not found issue will be history.

Similarly, if DLL files are missing on your Windows 10 PC, check our detailed guide to restore them effortlessly.

Feel free to let us know the solution that helped you fix this issue in the comments below.

Valve releases Proton 8.0 update with Steam Deck and Linux gaming improvements

Proton 8.0 is out now, bringing with it a slew of improvements for Linux gaming, including for Steam OS.

For those unfamiliar, Proton is the compatibility layer tool (note: not an emulator) used by Steam OS to run Windows games, similarly to Wine on other Linux distros like Ubuntu.

Aside from a ton of bug fixes, Proton 8.0 introduces a long list of newly compatible games for Steam OS, including some heavy hitters like Dead Space Remake, Forspoken and Nioh 2. See the complete list of newly playable titles below.

  • Forspoken
  • Samurai Maiden
  • Dead Space (2023)
  • Creativerse
  • Nioh 2 – The Complete Edition
  • One Piece: Pirate Warriors 4
  • Atelier Meruru
  • Atelier Lydie & Suelle: The Alchemists and the Mysterious Paintings
  • Atelier Sophie: The Alchemist of the Mysterious Book DX
  • Blue Reflection
  • Atelier Rorona: The Alchemist of Arland
  • Disney Dreamlight Valley
  • Romance of the Three Kingdoms XIV
  • ToGather:Island
  • Warriors Orochi 3 Ultimate Definitive Edition
  • Exceed – Gun Bullet Children
  • Gungrave G.O.R.E.
  • Chex Quest HD

This along with last week’s news that Microsoft may be planning a Windows 11 handheld mode for devices like the Steam Deck, mean that it’s an exciting time to be a Steam Deck owner.

As for the requirements for Proton 8.0, gamers will need a GPU with Vulkan 1.3 support. Proton Experimental will also see an update later this week. View the full Proton 8.0 patch notes here.

Via Steam Deck HQ.

Featured image via Rockpapershotgun. 

Coming soon to Xbox Game Pass: Minecraft Legends, Redfall and more

April 2023 is turning out to be pretty stacked in terms of Xbox Game Pass. Along with several other additions we’ve already seen a major first party release in April with Bethesda’s Ghostwire: Tokyo. And today (April 18) another big game arrives on Xbox Game Pass with the release of Minecraft Legends (check out our Minecraft Legends review roundup, by the way).

And there is plenty more on the slate for the remainder of April heading in to May. Check out the games headed to Xbox Game Pass in the next few weeks.

Minecraft Legends (April 18)

Minecraft Legends

The piglins’ Nether corruption is spreading across the Overworld, scorching everything it touches. Are you the hero who will protect this gentle land? Plan your strategy and face the piglins in epic battles – but be warned: they always fight back. Take on piglin bases by day and defend your allies after dusk. Explore lush biomes filled with treasures and perils, meet new friends, and reunite with familiar mobs. With the allays by your side, all that’s left to do is save the world.

Coffee Talk Episode 2: Hibiscus & Butterfly (April 20)

Coffee Talk Episode 2: Hibiscus and Butterfly

In a time where people are isolated from each other, Coffee Talk is a place where we can reconnect over a cup of warm drink.

It’s time to revisit your favorite late-night coffee shop and reconnect with your fantasy friends over a warm drink or two. You are a barista, and your customers aren’t always humans, listen to their stories and influence their hearts with a warm cup of coffee or two.

Medieval Dynasty (April 20) (Xbox One)

Medieval Dynasty

In Medieval Dynasty, you take on the role of a young man who has fled from war and wants to take his fate into his own hands. From being alone, inexperienced and poor you will develop into a master of many skills, a leader of your community and the founder of a prosperous dynasty which is meant to last and prosper for generations to come.
Defending against wild animals while hunting for food, gathering resources and crafting equipment, building a house and erecting a whole bustling village while founding a family all contribute to a unique gameplay experience across many genres. Tough winters and unexpected events challenge your skills and dexterity as you strive to build your own legacy.

Homestead Arcana (April 21)

Homestead Arcana

Become a farming Witch and pioneer the range that has been mysteriously corrupted with Miasma. Discover the secret behind its appearance, grow plants to power up your spells, and use nature’s magic to heal the land.

Cassette Beasts (April 26)

Welcome to New Wirral, a remote island inhabited by strange creatures you’ve only dreamed of, nightmares you hopefully haven’t, and a cast of brave folks who use cassette tapes to transform for battle. To find a way home you’ll need to explore every inch of the island, and record monsters to your trusty cassette tapes to gain their abilities!

BlazBlue: Cross Tag Battle Special Edition (April 27)

BlazBlue: Cross Tag Battle Special Edition

BlazBlue: Cross Tag Battle lets you create your own cross-over dream team with the beloved characters from a total of 8 titles! Fight with your favorite characters from the popular titles BlazBlue, Persona 4 Arena, Under Night In-Birth, RWBY, and more. Get ready for a dream tag battle crossing series lines!

The Last Case of Benedict Fox (April 27)

update main gallery with image: Benedict Fox explores a dimly lit cellar.

Dive into a twisted world of secret organizations, forbidden rituals, and cold-blooded murders. Enter the consciousness of the victims to explore their memories in search for clues. Take up the last case of Benedict Fox, a self-proclaimed detective bound to his demon companion.

Redfall (May 2)

Redfall

Redfall is an open-world, single player and co-op FPS from Arkane Austin, the award-winning team behind Prey and Dishonored. Continuing Arkane’s legacy of carefully crafted worlds and immersive sims, Redfall brings the studio’s signature gameplay to this story-driven action shooter.

Wrap up

Whew! That’s a lot of Xbox Game Pass goodness right there. There’s so much for Game Pass subscribers to get excited about. And if you don’t already have a subscription, there’s never been a better time to join. If interested, you can do so here. With so much on the Game Pass slate, gamers might be hard-pressed finding the time to play all these awesome games.

How to hide your email address from login screen on a Windows PC

So you want to hide your email address from the Windows login screen? If you work in cafes or similar public places, it is, in fact, an excellent idea if you want to keep yourself protected peeping possible hackers.

Let’s look at the best ways to remove your personal information, in this case, your email address, from the login screen for good.

1. How to hide your email address from the Windows login screen with Settings app

The Windows Settings app is your recourse to fix almost all kinds of problems, big and small, on your PC. For example, you can also use it to remove your email address on Windows PC.

Here’s how:

  • Head to the Start menu search bar, type in ‘settings’, and select the best match.
  • Now, move to Accounts > Sign-in options.
  • Under the Additional Settings option, toggle off the Show account details such as my email address on the sign-in screen switch.

sign in options

That’s it; your email address details will be removed from the login screen from here on.

2. Registry Editor

While the above method is straightforward and the most recommended one, like everything in tech, it can sometimes fail. If that happens to you, you still need a way to hide the email address.

This is where the Registry editor can help.

The second way to hide your email address is by editing the Registry Editor. 

Note that before you jump in to edit the registry, we highly recommend you first create a backup for your registry. This is because even a slight error in your registry can wreck the working of your operating system.

Now that you’ve backed up your registry follow the steps below to hide your email address using the Registry editor:

  1. Head to the Start menu search bar, type in ‘run’ and select the best match.
  2. There, type in ‘regedit’, and hit Enter.
  3. Now head to following address:
    HKEY_LOCAL_MACHINE > SOFTWARE > Policies > Microsoft > Windows > System
  4. Right-click on System key and select New > DWORD (32-bit) Value.
  5. Now rename the DWORD to BlockUserFromShowingAccountDetailsOnSignin.
  6. Double-click the newly created DWORD and set the Value data field to 1. Finally, click on OK.

Your registry will be edited, and the email address will be hidden from the login screen moving on. From here, you’ve to restart your PC for the changes to take effect.

Hiding your email address from the login screen on Windows PC

Leaving your details, such as your email address, on your login screen can be a doorway to getting hacked later on, especially if you work at places other than your home or office. So follow the simple tricks from above and remove your email address from the login screen for good.

DFS_FILE_SYSTEM (0x00000082): How to Fix This BSoD

The Distributed File System (DFS) enables users to access file storage from multiple hosts through a computer network. However, this process can result in an error DFS_FILE_SYSTEM (0x00000082). Hence, this guide will take you through steps to resolve the error.

Likewise, you may be interested in our guide about DistributedCOM 10005 error and some ways to fix it.

What causes DFS FILE SYSTEM (0x00000082)?

A couple of factors can be responsible for the DFS file error on your computer. Some are:

  • System files are corrupted – If your system files are corrupt, they can prevent the Distributed File System (DFS) from allowing clients to access file storage from multiple hosts.
  • Permission issues – The error can appear when you try to access a distributed file without enough permission from the remote server. It can cause the DFS_FILE_SYSTEM error accompanied by a Blue Screen of Death.
  • Corrupt or outdated drivers – The DFS_FILE_SYSTEM errors are often caused by related hardware, software, and device drivers, that are corrupt to outdated. They impede the activities of the component accessing the distributed file system.
  • DFS_FILE_SYSTEM-related files corrupted from virus infection – The activities of viruses and malware on your computer can cause issues with the system’s performance. Important files related to DFS may be infected, causing the error.

These factors can be distinct from each other in different computers, depending on why the error occurred. Nonetheless, you can fix them by following the troubleshooting steps highlighted below.

How can I fix the DFS FILE SYSTEM (0x00000082)?

Before proceeding with any advanced troubleshooting steps, try the following:

If you can’t resolve the error, try the steps below:

1. Run SFC and DISM scans

  1. Left-click the Start button, type Command Prompt, and click the Run as administrator option.
  2. Click Yes on the User Account Control (UAC) prompt.
  3. Type the following and press Enter: sfc /scannow
  4. Type the following commands and press Enter: DISM /Online /Cleanup-Image /RestoreHealth
  5. Restart your PC and check if the error persists.

Running an SFC scan will detect and repair corrupt system files causing the Blue Screen DFS_FILE_SYSTEM errors and restore disk health. Check how to fix the run as administrator option if it’s not working on your PC.

Anyhow, you can also consider a specialized repair solution to troubleshoot your PC and repair broken system files automatically.

2. Update device drivers

  1. Press the Windows + I key to open the Windows Settings app.
  2. Go to Windows Update and select the Advanced options.
  3. Click on the Optional Update button.
  4. Click the drop-down button on the Driver Update and checkmark the list of updates available.
  5. Select the Update and Install button and wait for the drivers to install.

Updating your device drivers via Windows update allows you to fix bugs causing them to malfunction and improve performance.

You can read about ways to diagnose and fix Windows Update if it’s not loading on your PC.

3. Run the CHKDSK command

  1. Left-click the Start button, type Command Prompt, and click the Run as administrator option.
  2. Click Yes on the User Account Control window.
  3. Type the following commands and press Enter: chkdsk C: /r chkdsk/f
  4. Restart your PC to see if the error 0x00000082 Blue Screen of Death appears.

Running the Chkdsk command scans the disk drives and fixes the STOP error (DFS_FILE_SYSTEM) from the corrupt hard disk. Check our guide on what to do if Command Prompt keeps crashing on your PC.

4. Update Windows OS

  1. Press Windows + I to open the Settings app.
  2. Click on Check for Updates on the left pane of the Windows Update screen. Wait for the Windows update result and click on Install Update if a Windows update is available.
  3. Restart your PC to see if you can access the DFS system.

The Windows update installs new updates and patches for fixing bugs affecting your PC and resolving the remote connection with other devices.

Read about ways to fix Windows updates not working if you encounter any problems during the update process.

5. Run System Restore

  1. Press Windows + R key to open the Run dialog box, type control, then press Enter to open the Control Panel.
  2. Type recovery in the Control Panel search bar and select Recovery.
  3. Then click Open System Restore.
  4. Click Next in the Restore system files and Settings window.
  5. Choose the restore point you want to restore from and click Next.
  6. Click on Finish when the process is complete.

The above steps will restore the system to the previous point with its files intact, allowing you to use the Distributed file system. Read our guide on how to fix Restore Point if it’s not working on your PC.

Alternatively, there are various causes of BSoD errors. If you encounter BSoD, check out our guide to figure out why.

Kindly drop your comments if you have any questions or suggestions regarding this guide.

0x0000004E BSoD: 7 Ways to Fix It

If you have encountered the Blue Screen of Death with stop code 0x0000004E, this guide can help! This error is also called  Stop 0x00000004 or STOP 0x4.

We will discuss some expert-recommended fixes to resolve the problem right after explaining the causes.

What causes the 0x0000004E BSoD error on Windows?

  • Corrupted or incompatible system drivers – If your device drivers are outdated or incompatible with the OS on your PC, you may see this error. Keep your drivers updated to fix the issue.
  • Malware infection – Viruses on your PC can corrupt important system files and cause various issues, including this BSoD error. To fix this, you must run a deep scan using an antivirus tool.
  • New hardware issues– Sometimes, new hardware could cause compatibility issues, leading to problems like this stop error. Remove the component and check if it resolves the issue.
  • Missing or broken system files – If your computer’s system files are corrupted, you might face this issue. You need to repair system files to fix the problem.
  • Bad Windows update – If you started facing this issue right after updating your operating system, uninstall the update or check for more updates to fix the error.

How can I fix the 0x0000004E BSoD error on Windows?

Before moving to the advanced troubleshooting methods, restart your computer, check the updates available for Windows, delete the temporary files using Disk Cleanup, uninstall any recently installed application, and remove any newly installed hardware.

1. Run a malware scan

  1. Press the Windows key, type windows security, and click Open.Windows Security open Windows key 0x0000004E
  2. Go to Virus & threat protection and click Scan options.V& T Scan options
  3. Select Full scan and click Scan now.Full scan - 0x0000004E
  4. The tool will initiate a deep scanning process to scour infected files. Once the scan is complete, you will get a list of malicious files, select and delete them to fix the issue.

For more in-depth scanning, you can always rely on third-party software such as TotalAV, this tool will provide you with more powerful scanning tools, allowing you to identify better and remove threats.

⇒ Get TotalAV

2. Run an SFC scan

  1. Press the Windows key, type cmd, and click Run as administrator.CMD elevated 0x0000004E
  2. Copy and paste the following command to repair system files and hit Enter: sfc/scannowSFCSCANNOW CMD
  3. The scan will look for corrupted files and try to restore them to fix the issue. Restart your computer to let the changes take effect.

3. Check the system memory

  1. Press the Windows key, type Windows Diagnostic tool, and click Open.Memory diagnostic tool 0x0000004E
  2. Now click Restart now and check for problems (recommended).MdSched_ restart now
  3. Your computer will restart, and the test will initiate. It will take a few minutes to complete. memory-diag-tool 0x0000004E
  4. Once done, the computer will restart, and the tool will present the results.

Performing this test is essential to check if the memory is going bad, as it is one of the significant reasons for the blue screen error.

4. Check the disk

  1. Press Windows + E to open File Explorer.
  2. Go to C drive or the drive which has Windows installed, right-click it, and select Properties.Properties  C drive  0x0000004E
  3. Switch to the Tools tab, under Error checking, and select Check.Check
  4. On the Error Checking window, click Scan drive.scan drive 0x0000004E
  5. Follow the on-screen- instructions to complete the process.

5. Update the drivers manually

  1. Press Windows + R to open the Run dialog box.Device Manager Run command
  2. Type devmgmt.msc and click OK to open Device Manager.
  3. Go to each hardware component and update them. For example: For Display adapters, double-click Display adapters to expand it. Select a graphics driver and click Uninstall driver.Graphics Driver update 0x0000004E
  4. Click Search automatically for drivers.Update driver 2
  5. Follow the on-screen prompts to complete the process.

6. Perform a System Restore

  1. Press the Windows key, type control panel, and click Open.Control Panel start menu 0x0000004E
  2. Select Large icons for View by and click Recovery.Recovery Control Panel
  3. Click Open System Restore.Open system restore 0x0000004E
  4. On the System Restore window, select Choose a different point and click Next.Next Choose a different restore point
  5. Select the restore point and click Next.Choose a point 0x0000004E
  6. Click Finish to initiate the process of restoring your Windows settings to the previous version.Finish

7. Run System Repair

  1. Press Windows + I to open the Settings app.
  2. Go to System, then click Recovery.System - Recovery Windows 11
  3. Next, locate Advanced Startup, and choose Restart now.Recovery Advanced Startup 0x0000004E
  4. On Choose an option screen, click Troubleshoot.Troubleshoot2
  5. From the Troubleshoot options, select Advanced options.Advanced options  0x0000004E
  6. From the Advanced options, select Startup Repair.Startup Repair
  7. Choose Shutdown.
  8. Now, the tool will start performing the repairs. Once done, it will restart. To check a log file of the scan and understand the issues, navigate to this path: %windir%\System32\LogFiles\Srt\Srttrail.txt

Want to discover the common causes of the dreaded Blue Screen of Death (BSoD) and gain essential knowledge to troubleshoot and prevent this frustrating error? We recommend you take a closer look at our guide. For more solutions to apply, check out this article on solving BSoD Only when gaming.

So, you can follow these methods to fix the 0x0000004E BSoD error on Windows. Try them and let us know what worked in the comments section below.

Synapse.dll: What Is It & How to Download It

DLL files play an integral part in the smooth running of Windows PC. Synapse.dll is one of these really important files, as it stores important procedures for opening apps.

However, it is one of the lesser-known DLL files, and some users are curious about it and what it does. In this guide, we will walk you through what the Synapse.dll file is and how to download it if it is missing on your PC.

What is Synapse.dll?

The Synapse.dll is a non-system DLL file installed with software or an app on your PC. It is initiated when you launch the Synapse.dll Module on your PC and is stored on your hard drive.

Synapse.dll houses machine codes, and it plays an integral role in the startup process of the Synapse.dll Module and other related software. Hence if this DLL file is missing on your Windows 10 PC, those apps will not launch.

How to download Synapse.dll

1. Use a dedicated DLL fixer

Synapse.dll is a non-system file that is from software that you installed on your PC. Hence, you are getting a Synapse.dll missing or not found error message, likely due to compatibility issues between the DLL file and your PC.

The best way to get the file working is to use a dedicated DLL repair tool. This tool fixes compatibility issues and ensures that your DLL file and PC are in sync.

2. Reinstall the faulty app

  1. Press the Windows key + R, type control, and click OK.
    control synapse.dll
  2. Choose Uninstall a program under the Programs section.
    uninstall a
  3. Now, right-click the faulty app and choose Uninstall.
    uninstall  synapse.dll
  4. Finally, go to the official website to reinstall the program or use the original installation disk.

At times, the Synapse.dll missing or not found error message might be due to a faulty app. The quickest way to get it back is to uninstall and reinstall the app from official sources.

If you used an installation disk, reinstall the software using the original version from the developer.

3. Download from a third-party website

  1. Visit a trusted third-party website like DLL me.com.
  2. Click Download.
    download
  3. Now, unzip the downloaded file if it is zipped and move the DLL file to the path below on a 32-bit PC:C:\Windows\System32
  4. If you are on a 64-bit PC, move it to the path below instead:C:\Windows\SysWOW64
  5. Finally, restart your PC.

If none of the solutions above helped you regain your Synapse.dll file, you might need to download it from a third-party website. While this is not advisable, there are still some safe websites out there.

However, you are advised to scan any file you download to ensure its safety.

Another option is to copy the DLL file from a perfectly working PC and move it to the paths above on your device.

This is everything you need to know about the Synapse.dll DLL file. We have provided you with different options to download it; hopefully, one of them works effectively for you.

Similarly, if DLL files are missing on your Windows 11 PC, check our detailed guide to fix it.

Feel free to let us know the option that helped you get the DLL file on your PC in the comments below.

SCCM Task Sequence Error Code 0x80091007 [Fix]

The SCCM task sequence error code 0X80091007 occurs when the user selects a task sequence for a Windows deployment in Configuration Manager, but the task sequence does not start.

When translated, it can be interpreted as error 0x80091007, where the hash value is incorrect. It is possible that the SCCM client could be trying to connect to an old version of the site server, leading to this error. Let’s now delve into possible solutions.

Why does the 0x80091007 error occur?

A task sequence error is an unexpected condition that occurs during the execution of a task. It could be an app deployment or installation. The task sequence can be used to install software, configure settings, and more.

In Configuration Manager, a task sequence error is triggered when the processed content does not match the expected content. 

This error code indicates that there has been a problem with the installation source. If you try to install an application and see this error, it could be caused by:

  • Server issues – It is possible that the SCCM client could not connect to the site server because of network connectivity issues.
  • Incorrect configurations – If there is some issue with the SCCM client configuration, it may be preventing it from connecting to the site server.
  • Missing or corrupted files – If you have a package with multiple source files and one is missing, this will cause an error in your task sequence. This is because the remaining file cannot be processed correctly.
  • Inconsistent content location – If the content location specified in the task sequence doesn’t match up with where the content exists on your server or distribution points, the task may be interrupted midway.
  • Problem with distribution point – If the distribution point is unavailable, client computers will be unable to install applications or software updates and may fail any task sequence steps.

How do I fix error 0x80091007?

Before any in-depth solutions, try the following first:

  • Check network connectivity between the client and the distribution point.
  • Perform a disk check on your hard drive using the CHKDSK command.

1. Redistribute package to the distribution point

  1. Launch your SCCM console and navigate to the following location: Monitoring/Overview/Distribution Status/Content Status
  2. Navigate to the Failed column and select a package displaying the error 0x80091007.
  3. Click on the Error tab, select all distribution points under Asset details, right-click on it, and select Redistribute.

The Distribution Point is an SCCM component that stores packages and programs to be sent to client computers.

When you deploy an application, it will first be copied to the DP and then sent out to the clients. Redistribution refreshes the content and sends new updates and deployments.

2. Disable Binary differential replication

  1. Launch the Configuration Manager console and navigate to the following location: Software Library\Overview\Application Management\Packages
  2. Click on the problematic package and select Properties.
  3. Navigate to the Data Source tab and uncheck the Enable binary differential replication option.
  4. Click on Apply and OK to save the changes.

Binary differential replication is a method of deploying software updates to clients. When you use this method, SCCM sends only the changed data in an update package instead of sending the entire contents of the package. 

This feature aims to speed up the process of patching clients by only sending changes since the last update. In addition, it’s also great for bandwidth savings. 

It is particularly useful when deploying large applications but only needs to update a small portion of the binaries. The issue crops up when you have deployed a package, but there are two different versions of this package in your hierarchy.

Another solution that seemed to work for a handful of users was switching out their RAM sticks. If your memory allocation is insufficient or you somehow end up with corrupt RAM, swap out the system memory with another one and try to run the task sequence again.

Other task sequence errors you may encounter include the 0x8007000f, but we’ve already covered its fixes in our expert guide.

Share with us in the comment section which solution worked for you. We’d also love to hear of other solutions we have not pinpointed.

0x87d101f4 Intune Compliance Error: How to Fix It

When you use Microsoft Intune to manage your devices, you might notice that some devices don’t comply with the required security settings. The device compliance settings are based on your organization’s security policy requirements. 

If a device is not compliant, it needs to be rectified to meet these standards. In this article, we will walk you through how to fix the 0x87d101f4 Intune compliance error to ensure that all your devices comply with your Intune policies’ requirements.

How do I make my device Intune compliant?

Intune will automatically check your device compliance when you enroll it. If you have already enrolled a device in Intune and it is not compliant, it will be marked non-compliant in the Azure portal.

To make your device Intune compliant, you need to register the device with Intune. When you register a device, you will be asked for information about the device and its configuration.

Intune has a list of supported OSes, devices, and browsers. To use your device with Intune, you must ensure it’s compatible. That can be done by ensuring the OS is supported and the device has a valid certificate. 

If you’re not sure whether your device is Intune-compliant, check the following:

  • Is there a Microsoft Intune certificate on your device? If yes, it is Intune compliant. The Microsoft Intune certificate is a trusted, secure certificate used by the Intune service to authenticate and enroll devices.
  • Is a Mobile Device Management (MDM) profile installed on the device? If yes, it is Intune compliant. The MDM profile allows you to manage devices through the Intune console. They’re used to set up and configure devices so that they work with your organization’s policies.

How do I fix Intune non-compliant devices?

Before you settle on performing the advanced solutions, ensure you check off the following:

  • Check that the configuration of your managed devices is correct.
  • Ensure your device meets the system requirements to enroll for Intune.

1. Sync Intune policies

  1. Hit the Windows key and click on Settings.
  2. Click on Accounts on the left pane, then select Access work or school.
  3. Locate your account connected to Azure, then select Info.
  4. Select Sync under Device sync status.
  5. Consequently, you can do so via your organization’s portal from the Company Portal app.
  6. You’ll need to download the app from the Microsoft Store first.
  7. Once downloaded, open the Company Portal app and click on Settings at the bottom left.
  8. Press the Sync this device button.

Manually forcing syncing allows your policies to automatically apply the most recent settings to your users, groups, and devices. This allows Intune to enforce the policies on the device and report compliance status.

In case you encounter issues with Intune not syncing, check out our detailed article on how to navigate this issue. Still, it could take up to 24 hours for enrolled devices to show up, so you need to be patient if the synchronization process doesn’t yield immediate results.

2. Reset the non-compliant device

Resetting a device means removing it from Intune, wiping it, and then adding it back into Intune. This will remove all the settings from Intune, such as VPN profiles, MDM policies, and more. 

When the device returns online, it will automatically download the latest policies and settings from Intune again.

If you still have problems with compliance after resetting your devices, another issue may be at play that is causing the 0x87d101f4 error.

What is the grace period for Intune compliance?

Microsoft Intune has a grace period for compliance, which is the amount of time you have to fix any non-compliance issues before your device/account is considered non-compliant. The default grace period for compliance is 30 days, but your admin can change it.

When you create a new compliance policy, you can choose whether or not to enable the grace period. You can use Configuration Manager to remediate your devices against compliance violations during this grace period.

Hopefully, with these steps, you have been able to resolve the 0x87d101f4 error in Intune. While you’re still here, check out our list of network management software, especially if you’re interested in automatic policy updates.

This isn’t the only error you can encounter, and many reported error code 0x87d1fde8, but we covered that one in another guide.

For any additional thoughts on this topic, leave your comments down below.

Wcl.dll Was Not Found: 5 Ways to Fix It

Wcl.dll, otherwise known as Windows Class Library, is one of the crucial system files on your PC. It houses some procedures and functions that are important to the operation of your system.

Unfortunately, some users can’t seem to fix the Wcl.dll on their PC. While there are several potential causes for this, the DLL file can be easily restored, as we will show in this guide.

Why is Wcl.dll not found?

Below are some of the reasons you are getting the Wcl.dll was not found error on your PC:

  • Outdated PC: One of the major causes of this issue is an outdated operating system. So, you need to update your PC to solve the problem.
  • Faulty system files: Sometimes, the Wcl.dll DLL file might be missing on your Windows 11 PC because of faulty system files. The solution is to repair these files using a top-notch DLL fixer.
  • Faulty app: Another potential cause of this problem is incomplete or corrupt installation. Uninstalling the app and reinstalling it from official sources should do the trick.

How can I fix Wcl.dll if it is not found?

1. Use a dedicated DLL fixer

If Wcl.dll is not found on your PC, it is likely due to DLL file corruption. Instead of manually downloading and installing the file, we recommend using a DLL fixer tool.

These tools automatically detect and replace any missing DLL files with a few mouse clicks.

2. Update your PC

  1. Press the Windows key + I and select Windows Update in the left pane.
    windows update wcl.dll
  2. Click the Check for updates button.
  3. Finally, download and install all available updates.

Sometimes, the Wcl.dll not found issue can be due to an outdated OS. You can fix this quickly by installing the latest patches on your PC.

3. Reinstall the faulty program

  1. Press the Windows key + S, type control, and select Control Panel.
    control panel wcl.dll
  2. Click Uninstall a program under the Programs option.
    uninstall a
  3. Now, right-click the faulty app and select Uninstall.
    uninstall
  4. Finally, go to the official website to reinstall the program or use the original installation disk.

Sometimes, problems with the app giving the Wcl.dll not found error might be the cause of the issue. The solution to this is to uninstall the app and reinstall it from official sources.

4. Run an SFC scan

  1. Press the Windows key, type cmd, and select Run as administrator under Command Prompt.
    cmd admin
  2. Type the command below and hit Enter: sfc /scannowsfc
  3. Finally, wait for the command to finish running and restart your PC.

Some users have found this issue to be due to corrupt, broken, or missing system files. You need to repair and restore these files to get past the error message.

5. Perform a system restore

  1. Press the Windows key + R, type rstrui.exe, and click OK.
    rstrui wcl.dll
  2. Click the Next button.
    next  wcl.dll
  3. Now, choose your preferred restore point and click Next.
    restore point wcl.dll
  4. Finally, click Finish.
    finish wcl.dll

In some cases, you might be facing this Wcl.dll issue because of some changes you made to your PC. The solution is to restore your PC to a point when everything is working perfectly.

We have reached the end of this guide on the Wcl.dll not found issue. Hopefully, you are able to solve the issue before exhausting the solutions on our list.

If you are still dealing with the issue, you might have to download the file from a trusted site like DLL file.com. Alternatively, you can copy it from another PC.

Similarly, if some DLL files are missing on your Windows 10 PC, check our detailed guide to restore them.

Feel free to let us know the solution that helped you solve the problem in the comments below.

Microsoft pulls down Swiftkey forums page after pushing AI capabilities to the platform

If you use Microsoft Swiftkey and often frequent its forums support page to ask questions, share experiences, and even learn more about new features then you might not be so lucky. It seems that Microsoft has shut down that page.

If you happen to visit the page, you’ll run into this error:

oops

The page you were looking for doesn’t exist

You may have mistyped the address or the page may have moved

Take me back to the home page

Ever since Microsoft extended its partnership with OpenAI by making a multibillion-dollar investment, we’ve seen the company integrate AI across its products. Just last week, the company announced that it was expanding AI capabilities to Swiftkey to enhance its usability through Search, Chat, and Tone.

To this end, Microsoft is yet to comment on the matter and give an explanation as to why it decided to do away with Swiftkey’s forums page. However, there’s a lot of speculation going around indicating that Microsoft sort to this change to avoid backlash from users after adding the new Bing AI button as spotted by the folks over at SamMobile.

However, the support page isn’t entirely redundant as there are still some articles linked to the page that will help users get started with the platform as well as links to their social media pages.

Microsoft has previously indicated that it has big plans for the Swiftkey keyboard moving forward, even after scrapping the iOS version from App Store and then restoring it back shortly after. The latest update for the platform shipping with AI capabilities is an indication that it could be here for the long haul but we can only wait and see.

Twitter.dll is Missing? Here’s how to Fix It

Twitter.dll is an essential DLL file that plays an important role in the effortless running of many Windows programs. It is usually associated with Twitter plugin binary components.

However, some users report that this DLL file is missing on their Windows 10 or 11 PC for some reason. If you are also facing this issue, this guide will show you quick ways to get the Twitter.dll file back.

Why is Twitter.dll missing?

Listed below are some of the factors that can cause the Twitter.dll missing issue:

  • Presence of malware: Sometimes, you can face this issue because of the activities of viruses on your PC. You need to perform a full virus scan with Microsoft Defender or a third-party antivirus to fix this.
  • Faulty app: At times, this DLL file might be missing on your Windows 11 PC because of problems with the app you are trying to open. You might need to uninstall the app and reinstall it from official sources.

How do I fix a missing Twitter.dll file?

1. Use a dedicated DLL fixer

While there are different reasons for the Twitter.dll is missing error, all hope is not lost because the file can be restored. To make things better, you don’t necessarily need to download the file to get it working again.

Instead, we recommend using a top-notch DLL fixer that can restore the file with a few mouse clicks. And with Twitter.dll being a system DLL file, rest assured that this tool will restore it successfully.

2. Scan for malware

  1. Press the Windows key, type virus, and select Virus & threat protection.
    virus twitter
  2. Click Scan options.
    scan options
  3. Now, select your preferred scan option and click the Scan now button.
    scan now

In some cases, problems with Twitter.dll occur because of system file corruption caused by viruses. The solution to this is to perform a full virus scan to eliminate malware.

Alternatively, you can also use excellent antivirus software in ESET NOD32 to eliminate even the most hidden malware on your PC.

This software takes a no-nonsense stand against malware, as it detects and removes them before they can cause problems on your PC.

3. Reinstall the faulty program

  1. Press the Windows key + R, type control, and click the OK button.
    control twitter.dll
  2. Choose Uninstall a program under the Programs option.
    uninstall a
  3. Now, right-click the faulty app and choose the Uninstall option.
    uninstall twitter.dll
  4. Finally, go to the official website to reinstall the program or use the original installation disk.

Sometimes, this problem is caused by issues with the app that is giving the Twitter.dll is missing error. What you need to do in this case is to uninstall the app and reinstall it from official sources.

4. Perform a system restore

  1. Press the Windows key + R, type rstrui.exe, and click OK.
    rstrui
  2. Click the Next button on the page that pops up.
    next twitter.dll
  3. Now, select your preferred restore point and click Next.
    restore point
  4. Finally, click the Finish button.
    finish

In some cases, you might be facing this Twitter.dll issue because of some changes you made to your PC. The solution to this is to restore your PC to a point when everything is working perfectly.

5. Download from third-party sites

If you still can’t get the Twitter.dll file back on your PC after trying the fixes above, you might need to download it from a trusted third-party site like DLL files.com.

Alternatively, you can copy the file from another PC of the same architecture and operating system. All you need to do is to move it to your Windows system directory.

With this, we can conclude this guide on restoring Twitter.dll if it is missing on your PC. All you need to do now is to follow the instructions carefully, and things should be back to normal.

If you are dealing with a similar issue in Swresample-ttv-0.dll is missing, check our detailed guide to restore it.

Feel free to let us know the solution that helped you fix this issue in the comments below.

Swresample-ttv-0.dll: How to Download It if It’s Missing

Swresample-ttv-0.dll is an important DLL file crucial to the smooth running of PC apps. However, some users complain that this vital DLL file is missing on their PC.

Thankfully, there are simple ways to download this file and get back to running your apps normally.

Why is Swresample-ttv-0.dll missing?

Below are some of the reasons the Swresample-ttv-0.dll DLL file might be missing on your PC:

  • Accidental deletion: One of the major reasons this DLL file might be missing on Windows 10 or 11 is that it was deleted accidentally deleted. The solution to this is to download and install it.
  • Faulty app: In some cases, this problem might be down to the app you are trying to run. You need to uninstall and reinstall the app from the official sources to get past this issue.
  • Broken DLL file: Sometimes, you might be getting the Swresample-ttv-0.dll DLL file missing error on your PC because the file is broken. What you need to do here is to use a top-notch DLL fixer to repair it.

How can I download Swresample-ttv-0.dll if it is missing?

1. Use a dedicated DLL fixer

DLL files are delicate, and it is usually not advisable to copy them from another PC or download them from third-party websites.

The best thing to do in this case is to use a dedicated DLL repair tool to restore the Swresample-ttv-0.dll file. And with this being a Windows DLL file, the solution below surely adds the missing file with a few clicks of the mouse.

2. Reinstall the faulty app

  1. Press the Windows key + R, type control, and click OK.
    control swresample-ttv-0.dll
  2. Select Uninstall a program under the Programs option.
    uninstall a
  3. Now, right-click the faulty app and select the Uninstall option.
    uninstall
  4. Finally, go to the official website to reinstall the program or use the original installation disk.

At times, the Swresample-ttv-0.dll missing error message might be due to a faulty app. The solution to this is to uninstall and reinstall the app from official sources.

If you used an installation disk, ensure you use the original one from the developer.

3. Download from a third-party website

  1. Visit a trusted third-party website like DLL file.com.
  2. Click the Download button.
    download swresample-ttv-0.dll
  3. Now, unzip the download file and move the DLL file to the path below on a 32-bit PC: C:\Windows\System32
  4. If you are using a 64-bit PC, move it to the path below instead: C:\Windows\SysWOW64
  5. Finally, restart your PC.

If push comes to shove, you might need to download the DLL file from a third-party website. While this is not advisable, you can still get a pretty safe file from sites like DLL file.com.

Another option is to copy the DLL file from a perfectly working PC and move it to the paths above on your device.

We have reached the end of this guide on downloading the Swresample-ttv-0.dll if it is missing. We have provided you with different options; hopefully, one restores normalcy on your PC.

If you are facing other issues like Rsaenh.dll error corrupted file, check our detailed guide to fix it.

Feel free to let us know the solution that helped you fix this issue in the comments below.

Minecraft Legends review roundup: worthy spinoff or legendary failure?

Minecraft Legends reviews are pouring in with the game releasing April 18th. An action-strategy spinoff of the best-selling video game ever, Minecraft Legends is the latest big release in a year that is going to be stacked with them.

Minecraft Legends tells the story of a great hero who saves the Overworld from an invasion by the Piglins—mobs from the Nether who seek to bring its corruption to the Overworld. Gameplay entails the player (as the great hero) directing allies in real-time strategic skirmishes against the Piglin mobs. The player must also gather resources in the game world with which to build defenses against the Piglins. Action elements will also be present in the Minecraft Legends, and the game also supports up to 4 player multiplayer, for both competitive and cooperative play.

But does Minecraft Legends live up to its namesake? Find out in our review roundup.

IGN Minecraft Legends review (7/10)

Minecraft Legends is an engaging strategy game that does a great job streamlining a notoriously complex genre without sacrificing the ever-important element of choice and consequence…The difficulty curve does have the potential to make the late game frustrating, but stellar cooperative and PVP play still make this RTS very worthwhile.

But Why Tho? Minecraft Legends review (8/10)

For long-time fans of Minecraft, Legends presents a new way to play with the familiar, simplifying the tasks of creating structures so players can focus on leading an army of old foes and new friends to save the world from the invading Piglins…At its heart, Minecraft Legends presents a fun, new adventure that shows how versatile the franchise can be. It can be enjoyed in a variety of modes, and as long as your friends are along for the ride, it’s hard to resist coming back for more.

Polygon Minecraft Legends review

Minecraft Legends is a charming portmanteau of genres that manages to simplify the RTS formula while still demanding a fair amount of concentration and strategy…Players might use its mechanics to create truly terrifying multiplayer strategies that escalate in amazing ways. Or they might just enjoy the campaign and then go back to their own realm, to tame their own wilderness away from the chimes of quest givers. Legends is a charming and colorful adventure, and it’s nice to finally befriend the humble Creeper.

Attack of the Fanboy Minecraft Legends review(3/5)

Minecraft Legends has the potential of being an innovative action RTS genre blend, but ultimately, it sets its sights a little too high. Without a multi-layered system of deep and accessible strategy, Minecraft Legends is fun to frolic in but fails to fulfill…the core of Minecraft Legends lacks flavor, depth, and purpose…those who play it will likely enjoy it for a week or two and then bounce to something else.

God is a Geek Minecraft Legends review (9/10)

Minecraft Legends is a fantastic strategy title that has more layers to it than I expected…Despite some issues controlling my mobs, or having them fall off cliffs or down chasms when I least needed it, I can’t think of a similar game in recent memory that I’ve enjoyed playing quite this much. It’s a nice reminder that Minecraft is, at its core, about being creative and having a great time doing it.

Wrap up

Overall the critical reception of Minecraft Legends is generally positive, and it’s looking like another win for the Minecraft brand. There is little doubt the game will do well in terms of sales. Of course, Minecraft fans on Xbox will have the benefit of it being a day one Xbox Game Pass release.
Will you be among the millions playing Minecraft Legends this week? Feel free to let us know what you think of the game down in the comments section.

Minecraft Legends
Minecraft Legends
Developer:
Xbox Game Studios
Price:
Free

Featured image via Steam. 

Xerces-c_3_2.dll Missing Error: How to Fix It

DLL files are essential for certain applications to work, and one of those files is xerces-c_3_2.dll. Many applications rely on this file, and if it’s unavailable, the application won’t work properly.

Missing files can cause a lot of trouble, but it’s relatively simple to restore missing files on Windows 10.

Before we show you how to get this file back, let’s look closer into it and see what it does and why it is so important.

What is xerces-c_3_2.dll?

This is a DLL of Shared Library for Xerces-C++, and it’s used as a part of software libraries for parsing, serializing, and manipulating XML.

Many applications rely on this file, and one is AMD Vivado. If there’s a problem with the DLL file, the application that uses it won’t be able to run at all.

Therefore, you must fix this issue as soon as possible, and this guide will show you how to do it.

How can I fix xerces-c_3_2.dll is missing error?

1. Use a dedicated DLL fixer

Since xerces-c_3_2.dll is a third-party DLL, and it’s used in various applications, you must repair it and fix any issues that it might’ve caused.

While it’s possible to do this by hand, it can be a tedious process, especially if you’re not technically inclined. There are also certain security risks when working with DLL files on your own.

Instead, why don’t you use a DLL repair tool? Usually, DLL issues occur because the third-party file isn’t fully compatible with the operating system.

2. Copy the file to the System32 directory

Note icon NOTE
This solution is for Vivado software. Modifying the System32 directory can cause stability issues, so keep that in mind before using this solution.
  1. Go to the Vivado installation directory. It should be: <Install path>/Vivado/2022.1/lib/win64.o
  2. Locate xerces-c_3_2.dll file and copy it.
  3. Next, navigate to the following directory: C:\Windows\System32
  4. Look for xerces-c_3_2.dll. If you find it, right-click it and choose Rename. Change its name to old_ xerces-c_3_2.dll.
  5. Now paste the new xerces-c_3_2.dll in the System32 directory.

This method can also work for other applications, so you might want to give it a try.

3. Download the file manually

Note icon NOTE
This solution is intended only for advanced users and developers.
  1. Visit the Xerces C download page.
  2. Select the version that you want to download.
  3. Follow the instruction on the page to verify the files.
  4. Add the DLL file to the required location.

As you can see, xerces-c_3_2.dll is an important DLL file, and if it’s missing, certain applications won’t work at all. Luckily, our solutions are here to help.

If you’re on Windows 11, we also have a great guide on how to fix missing DLL files on Windows 11, so be sure to check it out if you’re still having issues.

What method did you use to fix the problem with missing xerces-c_3_2.dll on your PC? Let us know in the comments below.

Docagent.dll: How to Download & Fix All Errors

DLL files, such as docagent.dll for example, are core components of the Windows operating system. As such, it’s important that aren’t corrupted or missing.

However, you can easily fix missing DLL files on Windows 10, and the process can be done by running a couple of commands on your PC.

Before we start fixing this issue, let’s familiarize ourselves with this file and see what it does on your PC.

What is docagent.dll?

Not much is known about docagent.dll, and the software seems to be associated with Microsoft Corporation, so it should be a component of Windows.

In case such a file is missing or damaged, certain Windows features won’t work properly; therefore you must repair it, and this guide will show you the right way to do it.

How can I fix docagent.dll errors?

1. Use a dedicated DLL fixer

Issues with docagent.dll can cause big problems on your PC. To fix this, you might need to repair the file or download it again. This isn’t always easy, especially if you’re not tech-savvy, plus there are potential security concerns to worry about.

To stay safe, it’s better to use DLL repair tools like the one below. This kind of software can fix 100% of issues you have with missing or corrupted Windows files.

2. Perform an SFC and DISM scan

SFC scan

  1. Press Windows key + X and choose Windows PowerShell (Admin). You can also use Command Prompt.
  2. Now type sfc /scannow and press Enter.
  3. Wait for the scan to finish.

If the scan was unsuccessful, you might need to run a DISM scan as well to fix docagent.dll file.

DISM scan

  1. Open PowerShell or Command Prompt as administrator.
  2. Run the following commands:
    DISM /Online /Cleanup-Image /ScanHealth

    DISM /Online /Cleanup-Image /RestoreHealth

After the scan is finished, check if the problem is still there. Alternatively, try running the SFC scan again.

A missing docagent.dll file can cause many problems, but fixing this issue on Windows 10 is quite simple, as you can see.

If you’re using Windows 11, we have a special guide on how to fix missing DLL files on Windows 11, so be sure to check it out for additional solutions.

How did you fix the problem with this DLL file? Share your findings in the comments section below.

Glib-2-vs11.dll Not Found: How to Fix or Download It Again

Every application requires DLL files to work properly, and one of those files is glib-2-vs11.dll. If this file isn’t present, applications that require it won’t be able to work at all.

Missing DLL files can be a major problem, but if you’re having problems with them, we have a great guide on how to repair missing DLL files on Windows 10, so we advise checking it out.

Before we start fixing this issue, let us familiarize ourselves with this DLL file and see what it does.

What is glib-2-vs11.dll?

Glib-2-vs11.dll is a third-party DLL file, and it’s usually associated with the Android Studio application, however, other software can also use it.

As a part of Android Studio, it’s mostly required for Android app developers so they can test their apps in a virtual Android environment on their PC.

If this file is missing, the Android Studio won’t be able to run and the developers won’t be able to continue working on their app.

What can I do if glib-2-vs11.dll was not found?

1. Use a dedicated DLL fixer

The loss or corruption of DLL files can cause major issues on your PC, and in this case, it can prevent Android Studio and other applications that use this DLL file from running.

To fix this issue, it’s advised to download the glib-2-vs11.dll file. However, doing so from third-party sources as this could compromise the security of your system.

Instead of taking such risks, we recommend using the DLL repair software described below. Most issues with third-party DLLs occur because of compatibility issues with the operating system.

2. Reinstall Android Studio

  1. Press Windows key + X and choose Apps and features.
  2. Locate Android Studio on the list and select it.
  3. Click on Uninstall and follow the instructions on the screen.
  4. Once the software is removed, install it again.
Note icon NOTE
To ensure this issue doesn’t reappear, install the application again along with all of the required components.

Missing Glib-2-vs11.dll errors will prevent you from running certain applications, so you must fix this problem as soon as possible.

Our solutions are universal, and they will work on both Windows 10 and 11. Speaking of which, we also have a great guide on restoring missing DLL files on Windows 11, so be sure to check it out.

What solutions did you use to fix this error? Let us know in the comments section below.