7 best Razer deals to buy [Black Friday & Cyber Monday]

Razer is a name that needs no introduction if you’re into technology and gaming.

Enthusiasts will be ecstatic to know that Razer just launched their best deals for the coolest T-shirts, hoodies, jackets, and backpacks among others. Check out their killer offers.

Show off your love for Razer!

Note: All the prices and offers in this article are subject to change, so be sure to check the official product page to get the latest deal. If the product or offer you’re looking for is no longer available, you can try to find it on its official manufacturer page or get another one from our list.

What are the best deals and sales on Razer?

Razer Backpacks

Razer Rogue 17-inch Backpack V3

  • Allows you to attach an assortment of compatible pouches and accessories
  • Tear and water-resistant exterior with rain cover
  • Dedicated slot for laptops up to 17-inches
  • Its ample interior is lined with TPU
  • Chromatic wordmark
  • The price tag

Razer gear is expensive, so carrying around in just any old bag won’t do, especially when you live in an area where the weather is not all that forgiving.

That’s when something like the Razer Rogue 17″ Backpack V3 will truly shine, thanks to the multitude of protective features that it has to keep your laptop safe.

This includes weather-resistant materials, several covers, lair and linings, and interior padding that will keep your laptop protected from physical shocks.

Razer Rogue 13 Backpack V3

  • Tear and water-resistant exterior with rain cover
  • Dedicated slot for laptops up to 13-inches
  • Its ample interior is lined with TPU
  • Chromatic wordmark
  • Can’t fit any laptop bigger than 13 inches

If you own a much bigger Razer laptop, such as the Razer Rogue 13 Backpack V3 is the perfect choice for you.

Made from the same weather-resistant materials as our previous entry, this bag sports a much more rugged design, befitting something you would take in the woods with you.

Besides, the TPU padded scratch-proof interior ensures that even if the bag is dropped, whatever is inside of it will stay in one piece.

Razer Recon 15 Rolltop Backpack

  • Soft padded shoulder straps and back panel
  • Flexible minimalist design
  • Adjustable chest buckle
  • Military-grade durability
  • Carry with comfort
  • Not very eye-catching

Walking over long distances while carrying something is never comfortable, but the Razer Utility Backpack begs to differ, providing maximum user comfort.

It comes with soft padded shoulder straps and a back panel along with an adjustable chest buckle so that it molds to the shape of your body.

More so, this isn’t just to carry your laptop, since the multitude of inner and outer pockets make it ideal for carrying much-needed accessories and utilities as well.

Colletion Brands

Unleashed Collection

If you loved the previous products from Razer, you will surely want to check out more from this amazing collection. Razer always creates the best gear for gamers.

Unleashed collection comes with a bold expression. Make a striking statement in limitless comfort with versatile streetwear designed for indoor and outdoor use.

Be sure to check the products we loved and much more on their website.

Razer T-shirts

Razer Unleashed Oversized Tee

  • Iconic black/green motif
  • 100% soft-touch cotton
  • Crew neck T-shirt
  • Lets your skin breath
  • Might have looked better in a slim fit

Gaming is when you most likely get really heated up in front of a PC, so a T-shirt might be your best choice of clothing, regardless of the season.

That being said, the razer Seeker Tee is there to let you feel comfortable, and let your skin breathe, but still, showcase your love for the Razer brand.

Speaking of which, the Seeker tee features the stylized razer logo right on the chest, so anyone who talks to you will know what you’re into.

Razer hoodies

Razer Unleashed Zip Hoodie

  • Lets your skin breathe over long gaming sessions
  • Comfortable to wear due to the cotton interior
  • Official Razer logo placed right on the chest
  • Hood with adjustable drawstring
  • Ribbed trimming
  • None

The Razer Unleashed hoodie is what the boys wear to showcase how much they love Razer gear, and the ribber trimming will let anyone know that they take gaming seriously.

Like the Seeker hoodies, these hoodies also only come in black with acid-green trimming, a trademark of pretty much any type of Razer gear.

Luckily, the hoodie isn’t just for looks, since they are also extremely comfortable to wear as well thanks to the predominant cotton composition.

Razer Glasses

Razer Anzu Smart Glasses

  • Blue Light Filtering and Polarized Sunglass Lenses Included
  • Low Latency Audio
  • Built-in Mic and Speakers
  • Touch-Enabled and Voice-Assistant Compatible
  • None so far

Its blue light filter lessens screen glare to protect your eyes, reducing eyestrain so they feel fresh and focused while enjoying entertainment or working, while the polarized replacement lens shields your eyes from the sun.

With more than 5 hours of battery life on a single charge, it’ll never run out during long gaming sessions. When folded up and not in use, it conserves power by shutting off automatically

This concludes our list of the best Razer deals that you can take advantage of this year. Let us know which one you might consider getting by leaving us a message in the comments section below.

How to Fix Low FPS in PC Games

If you want to learn how to fix low FPS, bear with us. We found a few ways in which you can get rid of choppy and laggy visuals that ruin your gaming sessions.

To cut short your search, we put together a step-by-step guide that should get rid of all frame-per-rate issues in the like of Fortnite, Roblox, Valorant, Overwatch, and others.

How can I fix low FPS in gaming?

1. Change graphics preference

  1. Press Windows + I to open Settings, and click on System.system
  2. In the Display tab, click on Graphics settings.graphics setting to fix windows 10 low fps
  3. Now, select the app that has low FPS, and click on Options.options
  4. Choose High performance from the options and click on Save.high performance to fix windows 10 low fps

Setting graphics preference to High performance will give the app the necessary boost and it shouldn’t have low FPS anymore. Also, make sure to make the same changes using NVIDIA Control Panel, if that’s the GPU on your computer.

2. Update the graphics driver

  1. Press Windows + R to open Run, type devmgmt.msc in the text field, and hit Enter.device manager
  2. Double-click on Display adapters to expand the entry, right-click on the graphics adapter, and select Update driver.update driver to fix windows 10 low fps
  3. Now, select Search automatically for drivers and let Windows install the best available version.search automatically for drivers

Your drivers are one of the most critical pieces of software, and issues with them can lead to low FPS in Windows 10. Also, if an update cannot be found automatically, there’s always the option to manually install the driver.

Besides, you could get the drivers from the manufacturer’s official website. Here are the links for the major players:

All of your drivers need updating, so we recommend you download a driver updater tool that is 100% safe and tested by us, and it will update your drivers automatically.

Fortect Driver Updater excels at this task, you can use this software to scan, identify, and replace any broken or out-of-date driver in one go. Not only that but this software can also be used for long-term monitoring of your system, so you can make sure the drivers never get outdated again.

⇒ Get Fortect Driver Updater

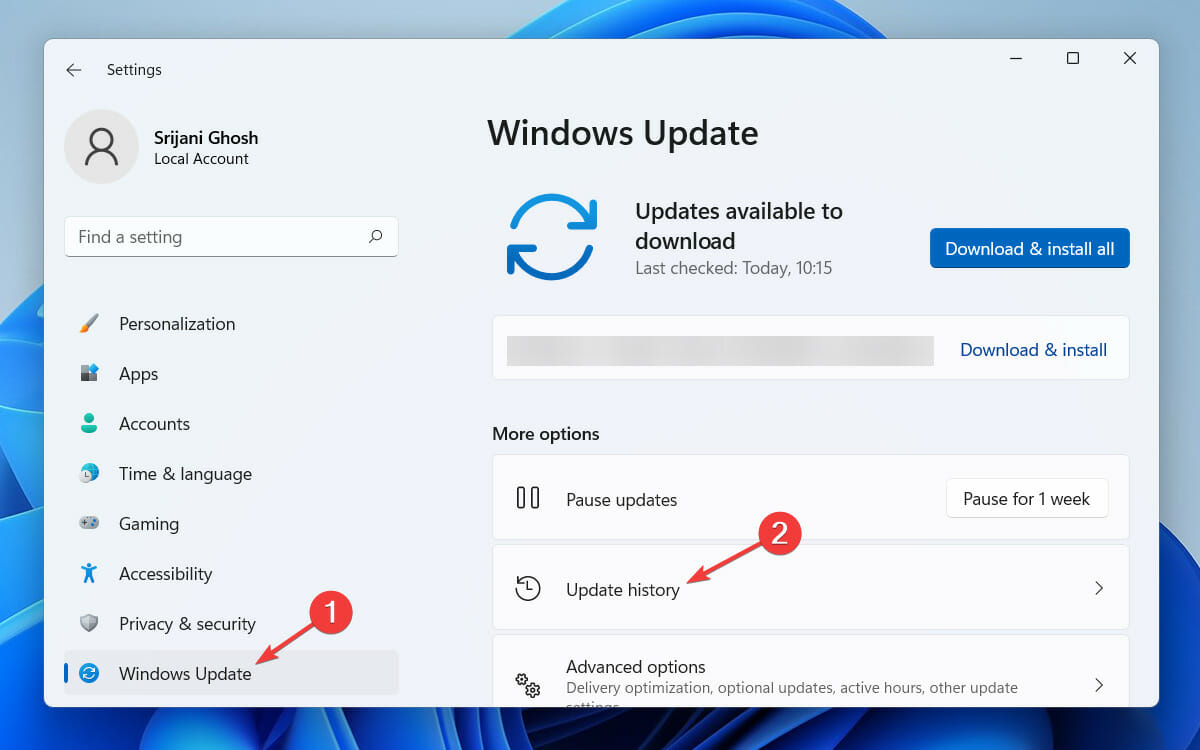
3. Uninstall recent Windows update

  1. Press Windows + I to open Settings, and click on Update & Security.update & security
  2. In the Windows Update tab, click on View update history on the right.update history
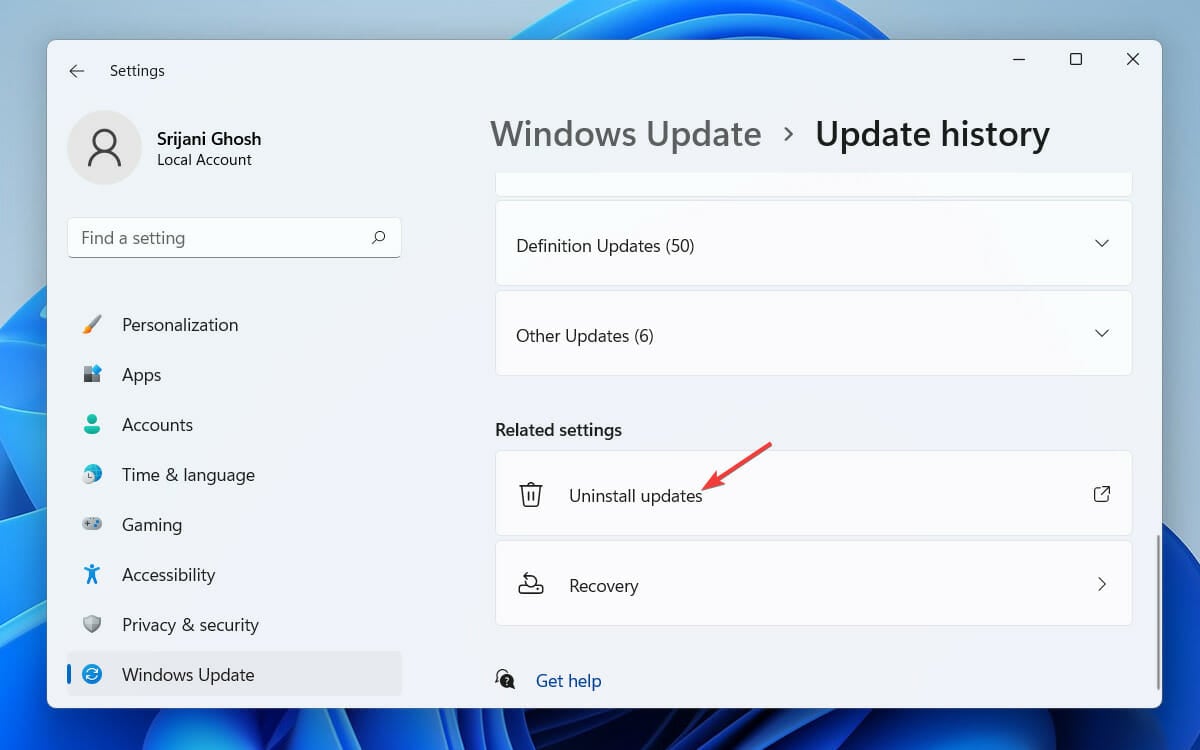
  3. Choose the Uninstall updates option.uninstall updates
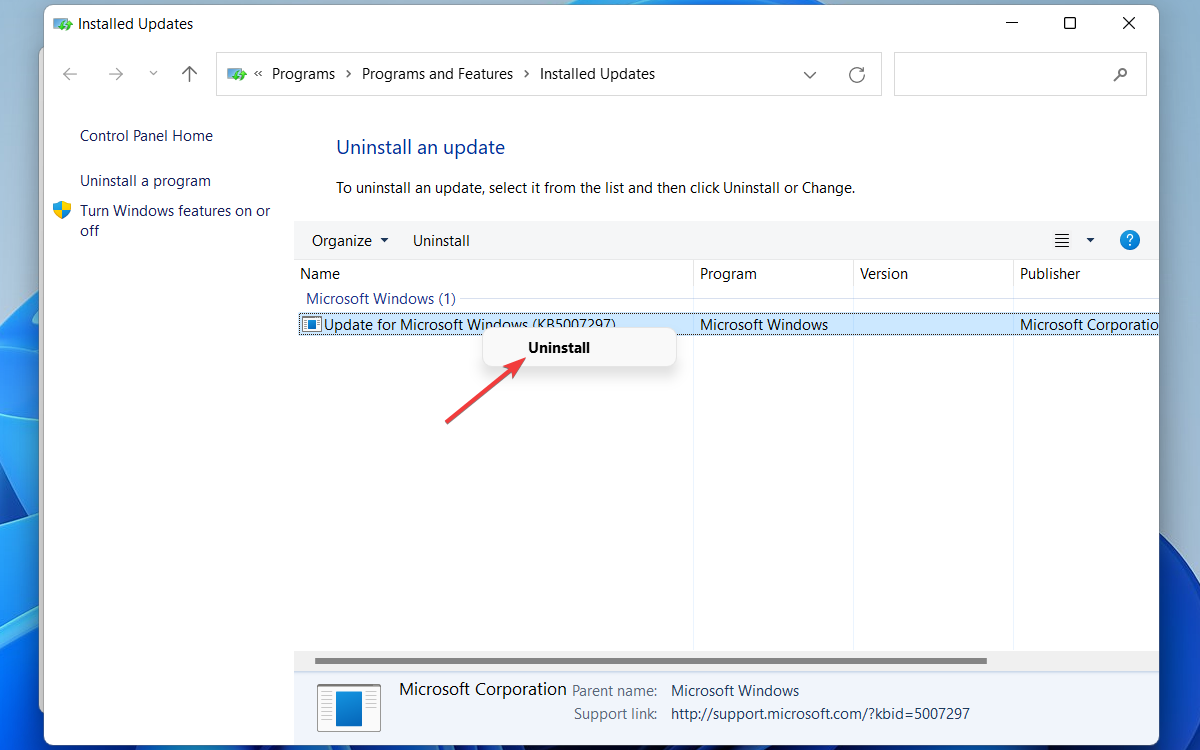
  4. Select the recent major update, and click on Uninstall.uninstall updates to fix windows 10 low fps
  5. Finally, click Yes in the confirmation prompt and wait for the process to complete.yes

If you want to find out how to fix low FPS on a laptop, recollect if the problem started after updating Windows 10. And if that’s indeed the case, uninstalling the updates should fix things right away.

4. Disable Windows features

  1. Press Windows + I to open Settings, and then choose System.system
  2. Now, navigate to the Notifications and actions tab, and untick the checkbox for Get tips, tricks, and suggestions as you use Windows.disable to fix windows 10 low fps
  3. Once done, restart the computer for the changes to come into effect.

5. Perform a system restore

  1. Press Windows + R to open Run, type rstrui, and click OK.system restore
  2. Click on Next to proceed.Next
  3. Choose a restore point from the list and click on Next. Make sure to select one created before the problem first appeared.restore point
  4. Now, verify the restore details, and click Finish to start the process.system restore to fix windows 10 low fps

Still not working? Here are other things to try:

We figured out that the solutions above are the most likely to work for most people, but if they didn’t work for you, here are a few other tricks that might solve the puzzle:

  • Conflicting apps – If the problem suddenly appeared, a recently installed third-party program is likely causing the issue. Simply uninstalling the app should get things running.
  • Outdated graphics driver – In many cases, it was an outdated driver that led to low FPS in games in Windows 10.
  • A buggy update – Many reported low FPS after a Windows update, which indicates a bug in the installed version of the OS.
  • Hardware issues – Oftentimes, the hardware isn’t advanced enough to run an app or game, which could lead to low FPS in Windows 10.

For those facing high FPS drops on Windows 10, we’ve put together a detailed guide on how to address high FPS drops.

That’s it! A system restore would revert any changes made in the past and get things up and running. And you wouldn’t lose any files, though the apps installed after the creation of the restore point may be removed.

Once you have managed to fix low FPS in Windows 10, do not forget to find out how to boost the PC’s gaming performance. As for more tips on the main topic, make sure to check our article including the best Warzone FPS settings.

Tell us which fix worked, and share your queries in the comments section below.

PC Health Check Not Opening: 6 Ways to Make it Work

We were the first to report that Microsoft made available the PC Health Check app right after the event so that you could see if a device was ready for Windows 11 or not. But, many users have since reported that the PC Health Check app is not opening.

It’s not a very complex issue and can easily be fixed within a few minutes. And if you can’t get it to run for some reason, there’s a viable alternative available. Read the following sections to find out.

Why is PC Health Check not opening?

Here are some of the reasons the PC Health Check won’t open:

  • Corrupt system files – In most cases, users found that it was the corrupt system files that led to the problem, and running the DISM tool and SFC scan should fix things.
  • Running an outdated version of the OS – The PC Health Check app may throw errors or simply won’t open on an outdated OS, so make sure to update it.
  • Third-party conflicts – A third-party antivirus or security software could very well be responsible here.

How can I fix PC Health Check if it’s not opening?

Before trying the slightly intricate solutions, here are a few quick ones that might help:

  • Restart the computer and then launch PC Health Check if it was not opening earlier.
  • Check for Windows Update and install any available version.
  • Disable any third-party antivirus installed on the computer. Or even better, if you don’t have a reliable one installed, check out the best antivirus for Windows 10 and 11.

If none of these work, head to the solutions listed next.

1. Run the setup file again

  1. Press Windows + E to open File Explorer, Go to the Downloads folder or the destination where you saved the WindowsPCHealthCheckSeup.msi file or search for it, and then run it.

The only problem with this is that every time you want to check for Windows 11 compatibility, you have to do the same thing, but the solution would fix things when the PC health check won’t start.

2. Repair the app

  1. Press Windows + R to start Run, type appwiz.cpl, and click OK.
  2. Look for the Windows PC Health Check app in the list, right-click it, and select Repair.
  3. After repairing the app, the system will start it.

3. Run the SFC scan

  1. Click the Start button, type cmd, and then click on Run as administrator to start Command Prompt with full privileges.
  2. Click Yes in the UAC prompt.
  3. Type the following command and press Enter to run it: sfc /scannow
  4. Wait for the scan to finish, then reboot your PC and see if the app works

Sometimes, this problem may be caused by corrupt system files, so running the SFC scan will fix it quickly.

Of course, you can also use a dedicated tool for repairing your system that will be a lot quicker and fix more problems in the process.

4. Uninstall third-party apps

  1. Press the Windows key and select Settings.
  2. Now, go to Apps.
  3. Find the third-party app you installed lately, click on it and select Uninstall.
  4. Again, click Uninstall in the confirmation prompt that appears.uninstall to fix pc health check not opening

If the Windows PC Health Check app is not working after you installed a third-party app, that is probably causing a conflict and blocking it. And uninstalling the app should do the trick.

5. Reinstall the app

  1. Press Windows + I to open Settings, and select the Apps option.
  2. Look for the Windows PC Health Check app on the right pane, click on it, and select Uninstall.
  3. Run the WindowsPCHealthCheckSetup.msi installer again to reinstall the app. If you can’t find it, download the app again from Microsoft’s official website.

Reinstalling the app is the last resort to fix the issue with the Health Check app, but the whole process won’t take long, and it’s worth the time.

6. Try an alternative

If the PC Health Check is still not working or opening, there are several alternatives that do the exact same job. One of the more reliable options is WhyNotWin11.

WhyNotWin11

The tool will identify the current computer configuration, verify whether it matches the requirements for Windows 11, and list that, along with the reason, if the PC is not compatible.

You now know how to fix the Windows PC Health Check app if it’s crashing, not opening, or getting stuck. And after you have upgraded to the latest iteration, do not forget to check the best Windows 11 tips and tricks for an enhanced experience.

If you have any other problems with the app or found other solutions that worked, feel free to mention them in the comments section below.

EU investigating Microsoft for Teams antitrust complaints made by Slack

There’s no denying the fact that the online communication tools market has had its fair share of competition even prior to the COVID outbreak.

Since the need for such utilities has seen a meteoric rise with the relatively recent shift to hybrid work trends, the competition got even more fierce and unfair.

There has always been friction between platforms such as Teams and Zoom, or Slack, and now things are taking a more legal turn.

Slack complaints against Teams trigger EU investigation

Even though Microsoft’s Teams is the software of choice for many firms that are already leveraging Microsoft’s suite of products, let’s not forget about other competitors such as Slack and Zoom.

The people behind Slack have always been displeased with how Microsoft conducts its business, especially after the tech giant bundled Teams with the new OS it launched (Windows 11).

Now, it seems like European Union regulators are looking to investigate Microsoft over some antitrust issues related to the way the Teams service functions.

Thus, the European Commission (EC) is looking to launch an investigation against Microsoft for purported anti-competitive practices related to its Teams software.

We anticipated your next question, so know that the basis for this scrutiny is a complaint filed by Slack back in 2020. 

In this complaint, the company stated that bundling Teams with the Microsoft 365 suite of products forces it to be installed on many machines while hiding the true cost to enterprise customers.

Slack actually urged the regulator to force Microsoft to remove Teams from its Microsoft 365 suite and offer it separately at fair commercial prices.

This is much bigger than Slack versus Microsoft – this is a proxy for two very different philosophies for the future of digital ecosystems, gateways versus gatekeepers. […] Slack offers an open, flexible approach that compounds the threat to Microsoft because it is a gateway to innovative, best-in-class technology that competes with the rest of Microsoft’s stack and gives customers the freedom to build solutions that meet their needs. We want to be the 2% of your software budget that makes the other 98% more valuable; they want 100% of your budget every time.

Furthermore, according to this report, the European Commission sent out a new set of questionnaires last month, which is a sign that it’s considering ramping up its investigation against Microsoft.

We know that the Commission is looking at Microsoft’s interoperability and bundling but more detailed this time.

They are looking for information that allows them to define remedies and preparing the ground for an investigation, according to credible sources.

As you surely know by now, this isn’t the first time Slack and Microsoft have clashed, with Microsoft even considering acquiring Slack for $8 billion at some point. 

That didn’t happen, but the Redmond tech giant ended up launching the Teams app itself, thus starting this ever-burning fire.

No matter how you slice the matter, the truth is that this would not be a good time for Microsoft to be engaged in another antitrust investigation.

Microsoft is already being probed by European regulators over its $69 billion proposed acquisition of Activision Blizzard.

This surely won’t help the Redmond-based company’s case, but we’ll just have to wait and see the results of this investigation.

What is your take on this whole matter? Share your thoughts and opinions with us in the comments section located below.

5 Best Wi-Fi Speakers for Music Playback [Cyber Monday sale]

Music has been part of our society for a very long time. It has been used in rituals, dancing, healing, etc. It is such a powerful way of representing feelings that almost anybody can say they have a favorite song.

Music represents an important element in the evolution of society as well. We all love music, and some of us can’t even live a day without it.

For this reason, it is very important that you have the right speaker equipment in order to experience the entire array of high and low sounds in a song at high-def clarity.

If you want to find out what are the best deals for Wi-fi speakers on Cyber Monday, then read on.

Note: All the prices and offers in this article are subject to change, so be sure to check the official product page to get the latest deal. If the product or offer you’re looking for is no longer available, you can try to find it on its official manufacturer page or get another one from our list.

Which speakers are best for listening to music?

JBL Flip 5

  • Can connect up to 2 smartphones or tablets to the speaker
  • Up to 12 hours of playtime thanks to the li-on battery
  • Waterproof
  • The battery does not hold as well after some weeks

JBL Flip 5 is one of the best waterproof wireless speakers on the market. These speakers have a powerful sound thanks to dual external passive radiators.

This amazing JBL Flip 5 is waterproof and can pair multiple speakers with a party boost.

This speaker system from JBL has a built-in 3000mAh Li-ion battery that supports up to 12 hours of playtime.

Oontz Angle 3 Plus

  • Extremely clear sound
  • Volume booster 10+ watt power AMP
  • No distortion at higher volume
  • The Bluetooth connection drops at times

Oontz Angle 3 is a super portable speaker that has 10W power, is IPX5 water-resistant, and offers high-quality sound. This speaker can easily connect to iPhones, iPad, smartphones, tablets, and computers.

It has a 4400 MaH battery that can last up to 30 hours on one charge. It also gives you the capability to play non-Bluetooth devices and TVs by using Amazon Echo and Amazon Echo Dot.

MusiBaby Speaker

  • IPX5 Waterproof
  • Small size, easy to carry around
  • Long battery lifetime with 1500 minutes playtime
  • Pairing mode seems to be faulty at times

MusiBaby Speaker is a great wireless speaker that offers you a very good listening experience on the go. With a long battery lifetime, you can have up to 15000 minutes of playtime, good enough for outdoor activities, or while traveling.

It comes with a powerful app that bolsters a wide range of presets. This speaker can also be part of a larger speaker system that connects your entire house under one network with its 802.11 b/g/n compatibilities.

The stereo sound along with the full base sound enriches the music experience. Moreover, even at higher volumes, the sound quality remains the same.

MIATONE Outdoor Portable Bluetooth Wireless Speaker

  • Handles crisp treble and mid frequencies excellently
  • You can pair 2 Bluetooth speakers for a total of 32 Watts surround sound
  • Voice Reminder for power on and off, paired Bluetooth and battery level
  • Sound cand drop when the battery level is low

This is a smaller yet still powerful speaker that can easily connect through Wi-Fi or Bluetooth to any device compatible.

MIATONE Outdoor Portable Bluetooth Wireless Speaker can be used to create a wireless network of speakers throughout your house while the sound quality of the speaker continues to remain unaltered.

Thanks to the TWS function you can pair 2 Bluetooth speakers and the combined output will generate a full stereo sound.

DOSS SoundBox XL

  • DSP technology
  • Wireless stereo pairing
  • Up to 10 hours of playtime
  • Can lose Bluetooth signal at times

This is a 32W Bluetooth speaker with enhanced bass thanks to its 12W built-in subwoofer.DOSS SoundBox can easily connect and play music from your phone, tablet, TV, and other devices.

The stereo sound produced by DOSS SoundBox offers a rich bass, tight mids, and crystal-clear highs. The Booming Bass feature is perfect for use at home and even at parties, because of its clear bass that offers a perfectly clear sound without any distortions.

DOSS SoundBox XL is capable of 10 hours of playtime at 50% with just one charge of its 2200mAh battery, and it can fully recharge in just 3-4 hours.

Let us know what your choice is in the comment section below.

Windows Management Files Missing: 5 Ways to Repair Them

When the Windows Management files are missing, you won’t be able to access the details in the System Information app. The error code reads, Cannot access the Windows Management Instrumentation software. Windows Management files may be moved or missing.

This is an intricate error since most users aren’t really acquainted with Windows Management Instrumentation. In short, it’s basically responsible for managing applications and devices on the network. Let’s now find out how to fix things.

Why are Windows Management files missing?

Here are some of the reasons that Windows Management files are missing:

  • Running an outdated OS – If you haven’t updated Windows in a while, there might be issues, including the Windows Management Instrumentation service stopping.
  • Corrupt system files – If the system files are corrupt, it affects the core functioning of the OS and prevents services from running and apps from operating effectively.
  • Critical services are not running – If the Windows Management Instrumentation service failed or was not running, you will receive the error.

How can I fix missing Windows Management files?

Before trying the slightly complex and lengthy solutions listed below, here are a few quick ones:

  • Restart the computer and check if it resolves the problem.
  • Check if there are any available updates for Windows and install them.

If these don’t work, try the solutions listed next.

1. Run the Windows Management Instrumentation service

  1. Press Windows + S to open the Search menu, type Services in the text field, and click on the relevant search result.services
  2. Scroll down, locate the Windows Management Instrumentation service, right-click on it, and select Properties.properties
  3. Now, select Automatic from the Startup type dropdown menu, select Start to run the service, and then click OK to save the changes.run the service to fix windows management files missing
  4. Now, head to the Dependencies tab, and make sure all the services listed here are running. You can follow the same steps for the Remote Procedure Call and other relevant services.dependencies

2. Rebuild the repository

  1. Press Windows + R to open Run, type cmd, and hit Ctrl + Shift + Enter.command prompt
  2. Click Yes in the UAC prompt.
  3. Paste the following command and hit Enter:net stop winmgmtstop service to fix windows management files missing
  4. Again, press Windows + R, type system32, and then click OK.system32
  5. Open the webm folder here, and then rename the Repository folder to Repository.old.repository.old
  6. Now, head back to Command Prompt, and execute the following command:net start winmgmtservice

Once done, verify if the Windows Management files missing error is fixed. Also, the solution might work when you get The Windows Management Instrumentation service has detected an inconsistent system shutdown error.

3. Register WMI components

  1. Press Windows + S to open Search, type Command Prompt, and then click on Run as administrator.command prompt
  2. Click Yes in the UAC prompt that appears.
  3. Now, paste the following three commands one at a time, and hit Enter after each:cd /d %windir%\system32\wbem for %i in (*.dll) do regsvr32 -s %i for %i in (*.exe) do %i /regserver
  4. Once done, restart the computer and check if the error is fixed.

4. Reregister the msinfo32.dll

  1. Press Windows + R to open Run, paste the following command, and hit Enter:regsvr32 "C:\WINDOWS\PCHealth\HelpCtr\Binaries\msinfo.dll"Reregister the msinfo32.dll to fix windows management files missing
  2. Once the process is complete, launch System Information and check if it now opens properly.

This should fix things for good when you receive the Windows Management files missing error. If it doesn’t, head to the last solution.

5. Perform an in-place upgrade

  1. Go to Microsoft’s official website, choose the appropriate options from the dropdown menu, and download Windows 11 ISO file (or Windows 10, depending on the iteration you are running).iso file
  2. Launch the ISO file and then click on Open in the prompt.open to fix windows management files missing
  3. Next, double-click the setup.exe file.setup
  4. Click Yes in the UAC prompt.
  5. Wait for things to initialize and click on Accept to agree to the license terms.accept
  6. Once everything is set, make sure the setup lists Keeps personal files and apps, and then click on Install.install to fix windows management files missing
  7. Now, wait for the installation process to complete.

If nothing else worked yet, an in-place upgrade would fix the Windows Management files missing error effortlessly, though it would take some time to complete. Also, you wouldn’t lose any files and, in the process, eliminate several other trivial issues.

Also, while you are fixing things, find out a few quick tweaks to improve Windows’ performance.

Tell us which fix worked for you in the comments section below.

Keyboard Makes Clicking Noies But Won’t Type [FIXED]

If your keyboard is making clicking sounds but not typing anything, the issue could be due to software glitches, hardware failure, or incorrect accessibility settings. This guide walks you through practical fixes—from checking USB connections to disabling “Filter Keys” so you can get back to typing normally.

Here’s how:

How do I fix keyboard clicking sounds?

1. Change keyboard settings

  1. Press the Windows key + I to open the Settings app and select the Ease of Access option.
    ease keyboard making clicking noise
  2. Choose the Keyboard option in the left pane.
  3. Now, toggle the switch under the Use Sticky Keys option backward to disable it.
    sticky
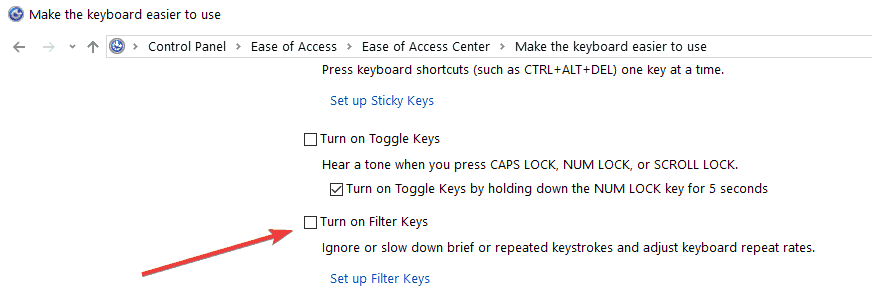
  4. Toggle the switch for Use Toggle Keys and Use Filter Keys backwards to disable them too.
    use toggle
  5. Finally, sign out of your user account and sign in again.

The chief cause of the keyboard making a clicking noise is its ease of access features. While these features improve overall user experience, they can cause problems going forward. However, following the steps above will solve the problem.

2. Run the Keyboard troubleshooter

  1. Press the Windows key + I and select the Update & Security option.
    update and  keyboard making clicking noise
  2. Choose Troubleshoot in the left pane and select Additional troubleshooters.
    troubleshoot
  3. Select the Keyboard option and click Run the troubleshooter.
    run troubleshooter keyboard making clicking noise
  4. Finally, apply the recommended fixes.

Running the troubleshooter is another solution for fixing the keyboard making clicking noise issue. If these solutions do not work, you might need to take the keyboard to an expert, as that will mean a hardware issue.

3. Update your keyboard drivers

  1. Press the Windows key + R, type devmgmt.msc, and click OK.
    devmgmt keyboard making clicking noise
  2. Double-click on Keyboards to expand the section, and right-click on the driver option.
  3. Click the Update driver option.
    update driver
  4. Select the Search automatically for drivers option and install any available updates.
    search auto

If the Windows driver updater does not work, you can download the driver and install the driver directly from the manufacturer’s website.

However, the most convenient software you can get regarding driver concerns is Fortect Driver Updater, so you can keep track of outdated drivers or scan the PC to download the best drivers for your device.

Are you facing other issues, like the left Shift key not working? Check our detailed guide to fix it for good.

Feel free to also check out this guide on automatic typing issues, why your keyboard might be beeping, or what to do if your keyboard types backward.

If you’re dealing with double letters not registering, wrong characters appearing, or unexpected language switches, those links will help you troubleshoot related issues.

Feel free to let us know the solution that helped you fix this problem in the comments below.

Nas Servers With The Best Deals Today

All NAS servers offer hybrid cloud designs, which allow data to be stored on-premise on the NAS as well as off-premise on a second NAS or through a public cloud service provider.

While someone else is backing up their PC, you may watch an HD movie on your tablet or at home theater, without being slowed down or interrupted.

You’d also be able to access your files and data from anywhere in the globe if you use a NAS. You only need to set up the remote access capability to have your own private cloud.

What, on the other hand, is the best offer you can get on Amazon? We suggest that you try out the ones that we have listed below because you’ll find great discounts.

Note: All the prices and offers in this article are subject to change, so be sure to check the official product page to get the latest deal. If the product or offer you’re looking for is no longer available, you can try to find it on its official manufacturer page or get another one from our list.

What are the best NAS deals this year?

All these items have special prices.

One significant benefit of adopting NAS is that it consolidates file protection in a single area because it is a single system for distributing and storing information.

Furthermore, installation and configuration are relatively simple because no changes to your present network infrastructure are required.

Added to the list are the very low costs today, thanks to these amazing Amazon Christmas deals. Take advantage of them before the discount ends!

Let us know in the comment section below which one fits your needs.

.NET Runtime Optimization Service High CPU [Why & Quick Fix]

Some Windows OS processes can result in high CPU usage thus slowing down your computer. .NET runtime optimization service high CPU usage issue is among the most reported problems in the Microsoft community forum.

The occurrence of this issue is typically unpredictable, although it may also take place after an update to the .NET Framework has been applied.

If you are also troubled by this issue, here are a couple of troubleshooting tips to help you resolve it. Alternatively, you can opt to use one of the best CPU usage cleaner software to speed up your PC.

What is .NET runtime optimization services?

Windows has a component called NET runtime optimization service, which is also known as mscorsvw.exe.

This component helps your system perform more efficiently by accelerating the launch of applications and programs.

Why does .NET runtime optimization use so much CPU?

There is a possibility that your computer is infected with malicious software that is masquerading as the service itself, or that the service itself has been compromised thus causing the .NET Runtime Optimization Service server 2019 high CPU usage.

Moreover, it might be that the service has become corrupt; thus, you should attempt to restart it. Or, the performance of your computer is noticeably slower than usual; in this scenario, you will need to optimize it completely.

How can I fix .NET runtime optimization service high CPU issue?

1. Optimize the .NET framework process

  1. Press Windows then type cmd and select the Run as administrator option.cmd-run-admin 0x80070002 windows update
  2. In the Command Prompt enter the following command one by one and then hit Enter to execute:
    For 32-bit:
    cd c:Windows\Microsoft.NET\Framework\v4.0.30319
    For 64-bit:
    cd c:Windows\Microsoft.NET\Framework\64v4.0.30319cmd-comand FIX: .NET runtime optimization service high CPU
  3. Next, enter the following command and hit Enter:
    ngen.exe executequeueditemsngen FIX: .NET runtime optimization service high CPU
  4. Close the command prompt and open the Task Manager by pressing Ctrl + Shift + Esc.
  5. Check if the .NET Runtime Optimization Service is still using the CPU at 100.

The above command will help you to optimize the process allowing it to make use of more CPU cores so that it can finish the process faster.

2. Check for malware infection

If your PC is infected with malware or virus, it can slow down your PC by using the CPU resources in the background. If you have an antivirus installed, make sure you run a full scan of your system.

This may take longer than a quick scan, however, it will help you find any malware in your system.

If you don’t have a specialized tool installed, try TotalAV, an excellent malware protection tool that quarantines suspicious files immediately.

When TotalAV detects any malware, click on Removed Selected option to quarantine the suspicious files.

Malicious programs usually hide in plain sight and look like normal system processes while getting a hold of your system’s resources. By performing a complete scan, you can find and remove any infection from your computer.

If you’re looking for the best antivirus solution to protect your Windows 10 PC, check out this list with the best options you have at this moment.

3. Restart NVIDIA Telemetry Container

Note: This step only applies to the computer that has the NVIDIA graphics card installed.

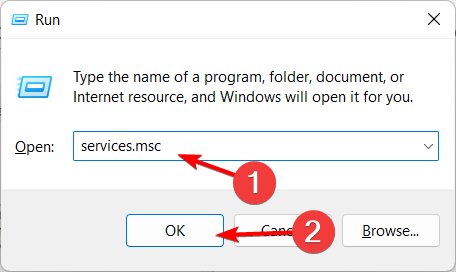
  1. Press Windows Key + R to open Run. Type services.msc and click OK. This will open the Windows Services window.services-ok error printing windows 10
  2. Locate the NVIDIA Telemetry Container service on the list. Right-click on the service and select Properties.properties-nvidia FIX: .NET runtime optimization service high CPU
  3. In the Properties window, under Service status, click on the Stop button. Next, click the Start button to restart the service again.stop-automatic FIX: .NET runtime optimizaFIX: .NET runtime optimization service high CPUtion service high CPU
  4. Make sure the Startup status: is set to Automatic.
  5. Click Apply and OK to save the changes and fix the .NET Runtime Optimization Service high CPU usage after update.

4. Perform a clean boot

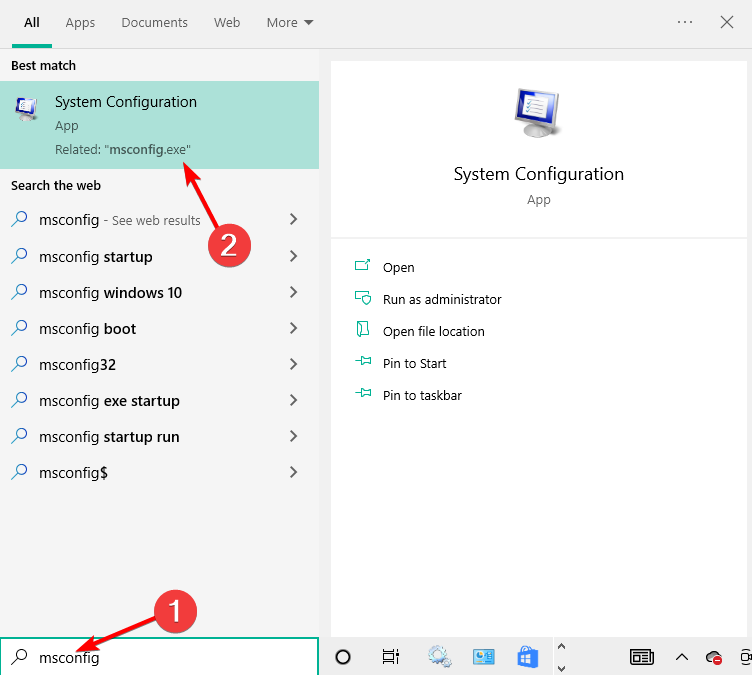
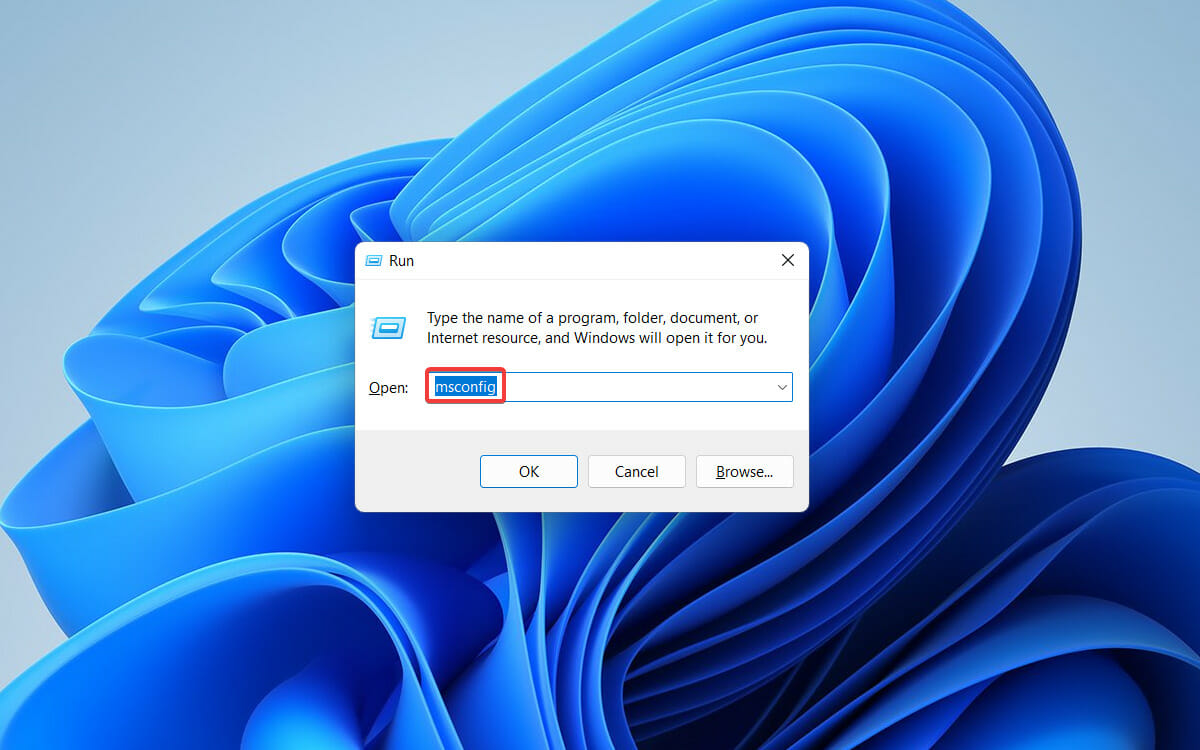
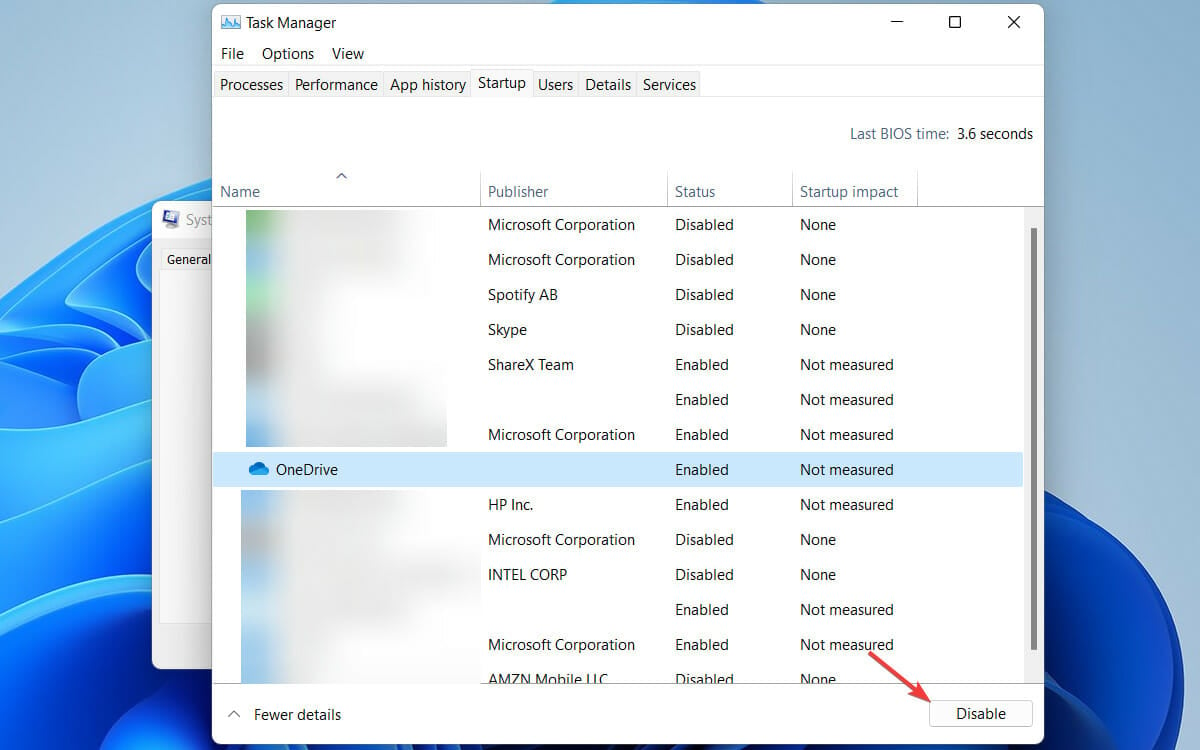
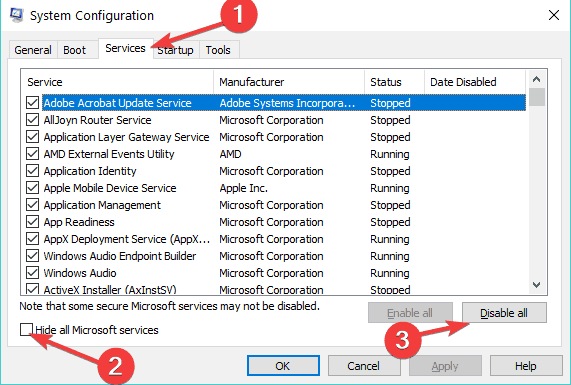
  1. Press Windows then enter msconfig and select System Configuration.msconfig 0x80070002 windows update
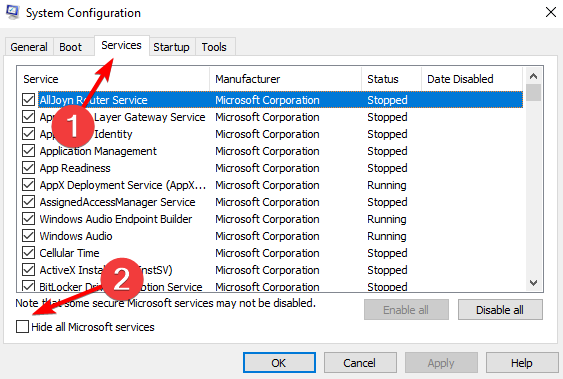
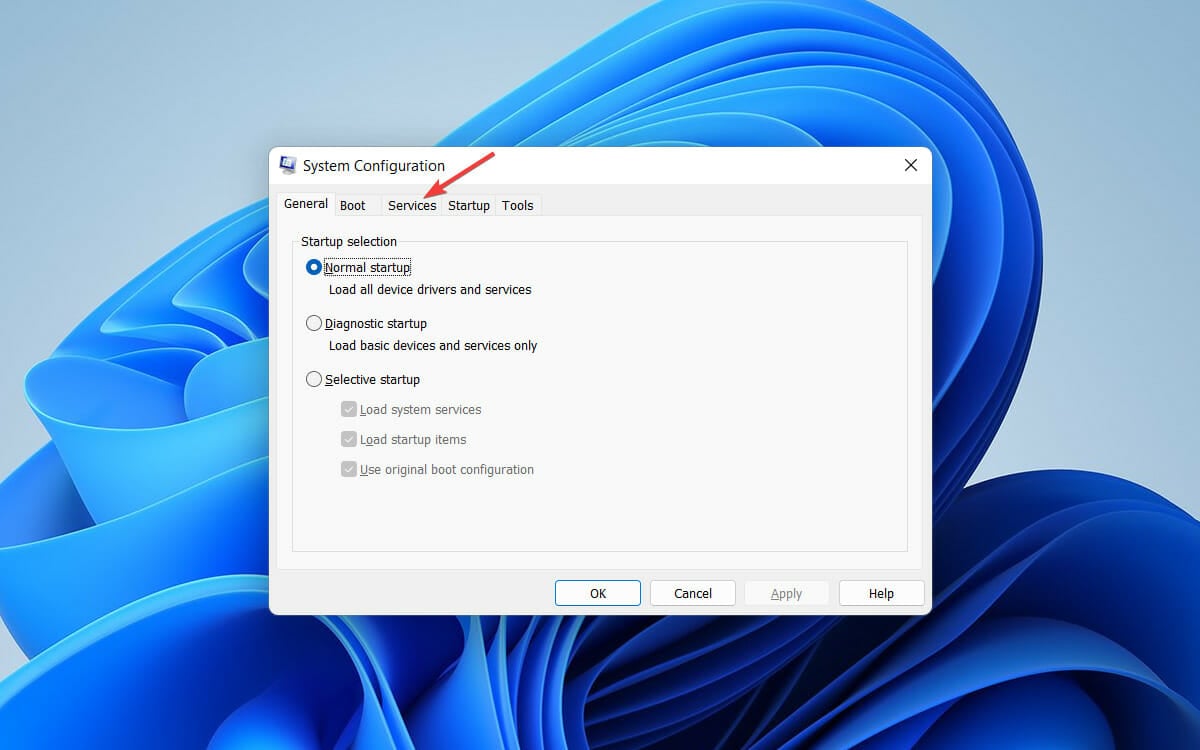
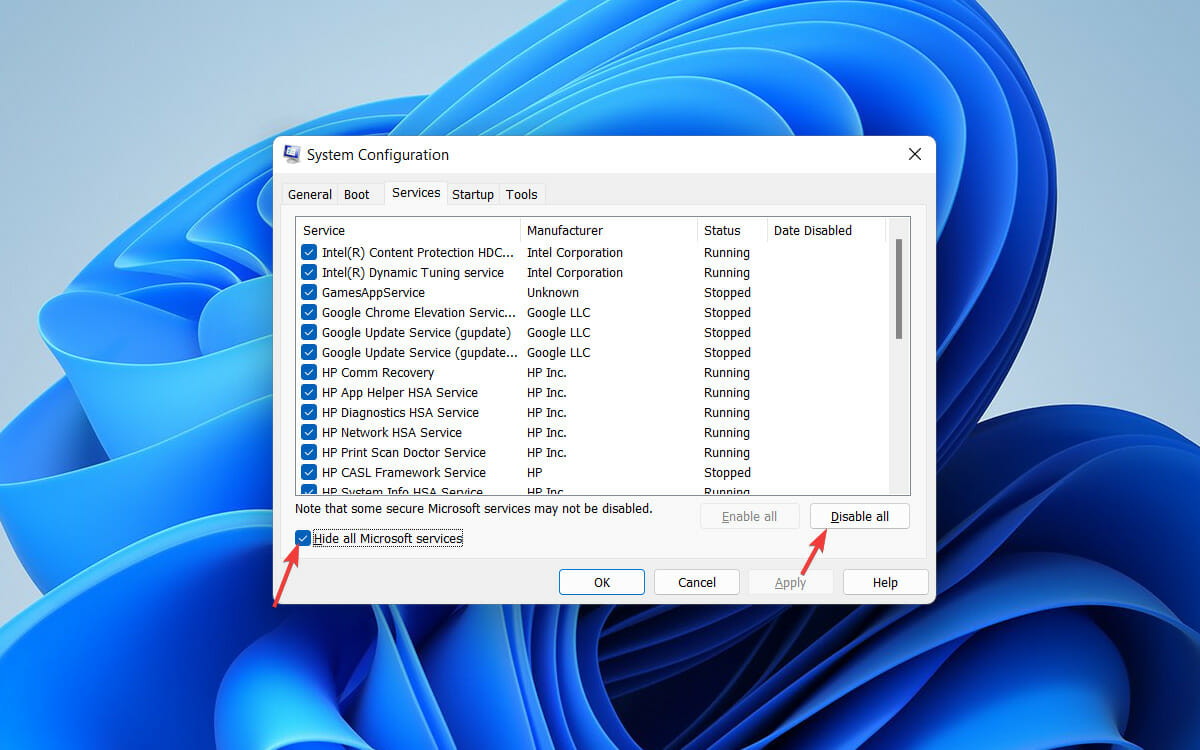
  2. Look for the Services tab and select Hide all Microsoft services.hide-services 0x80070002 windows update
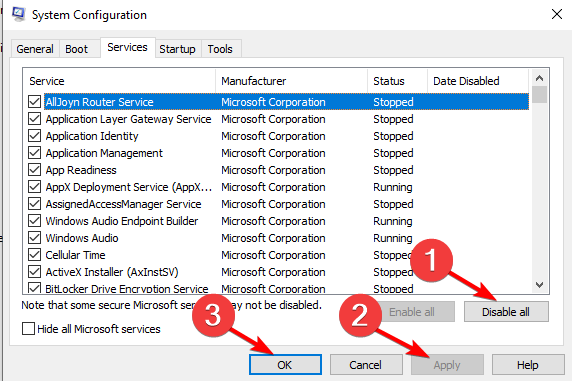
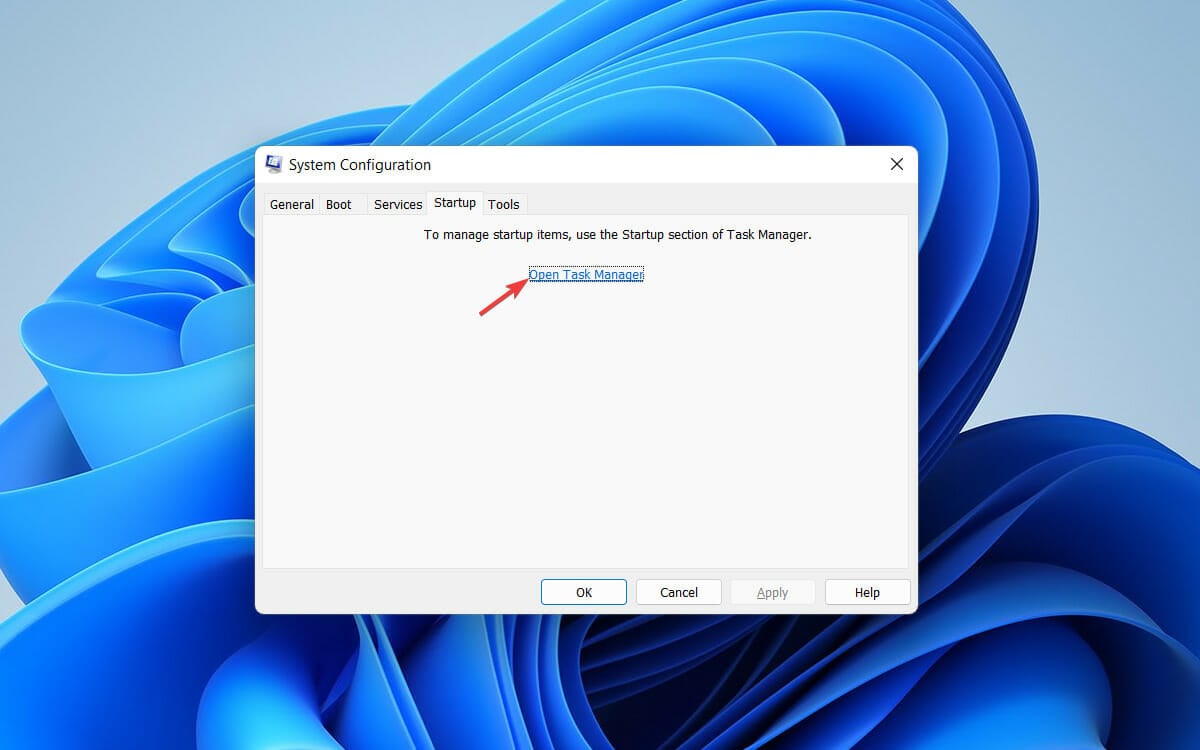
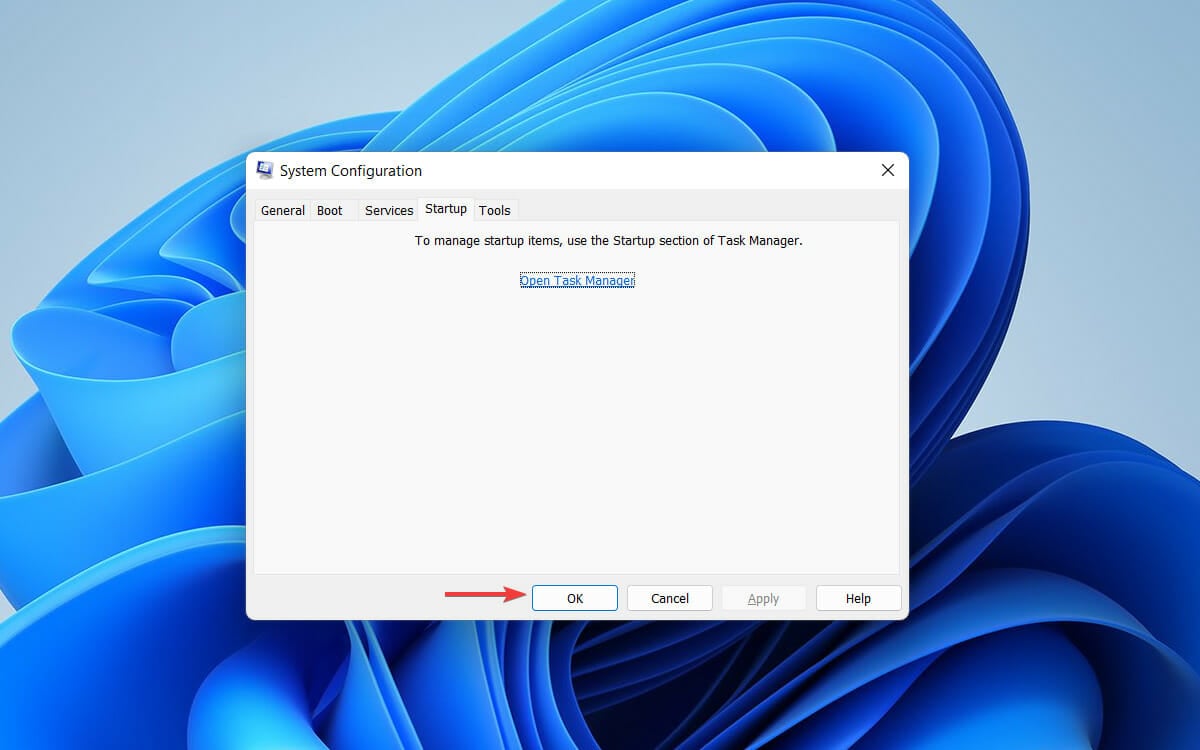
  3. Select Disable all followed by Apply and OK then restart your PC to fix the .NET Runtime Optimization Service high CPU Windows server 2012 r2 usage.disable-ok 0x80070002 windows update

The .NET runtime optimization service is an essential Windows service and mostly goes away once it is done. However, in case it does not go away, you can follow the steps in this article to fix the high CPU usage issue caused by the process in Windows.

For more solutions, check out our guide on how to fix CPU at 100 for no reason.

If you have any other questions or suggestions, don’t hesitate to reach out in the comments section below.

Fix: Adobe Acrobat An Internal Error Occurred

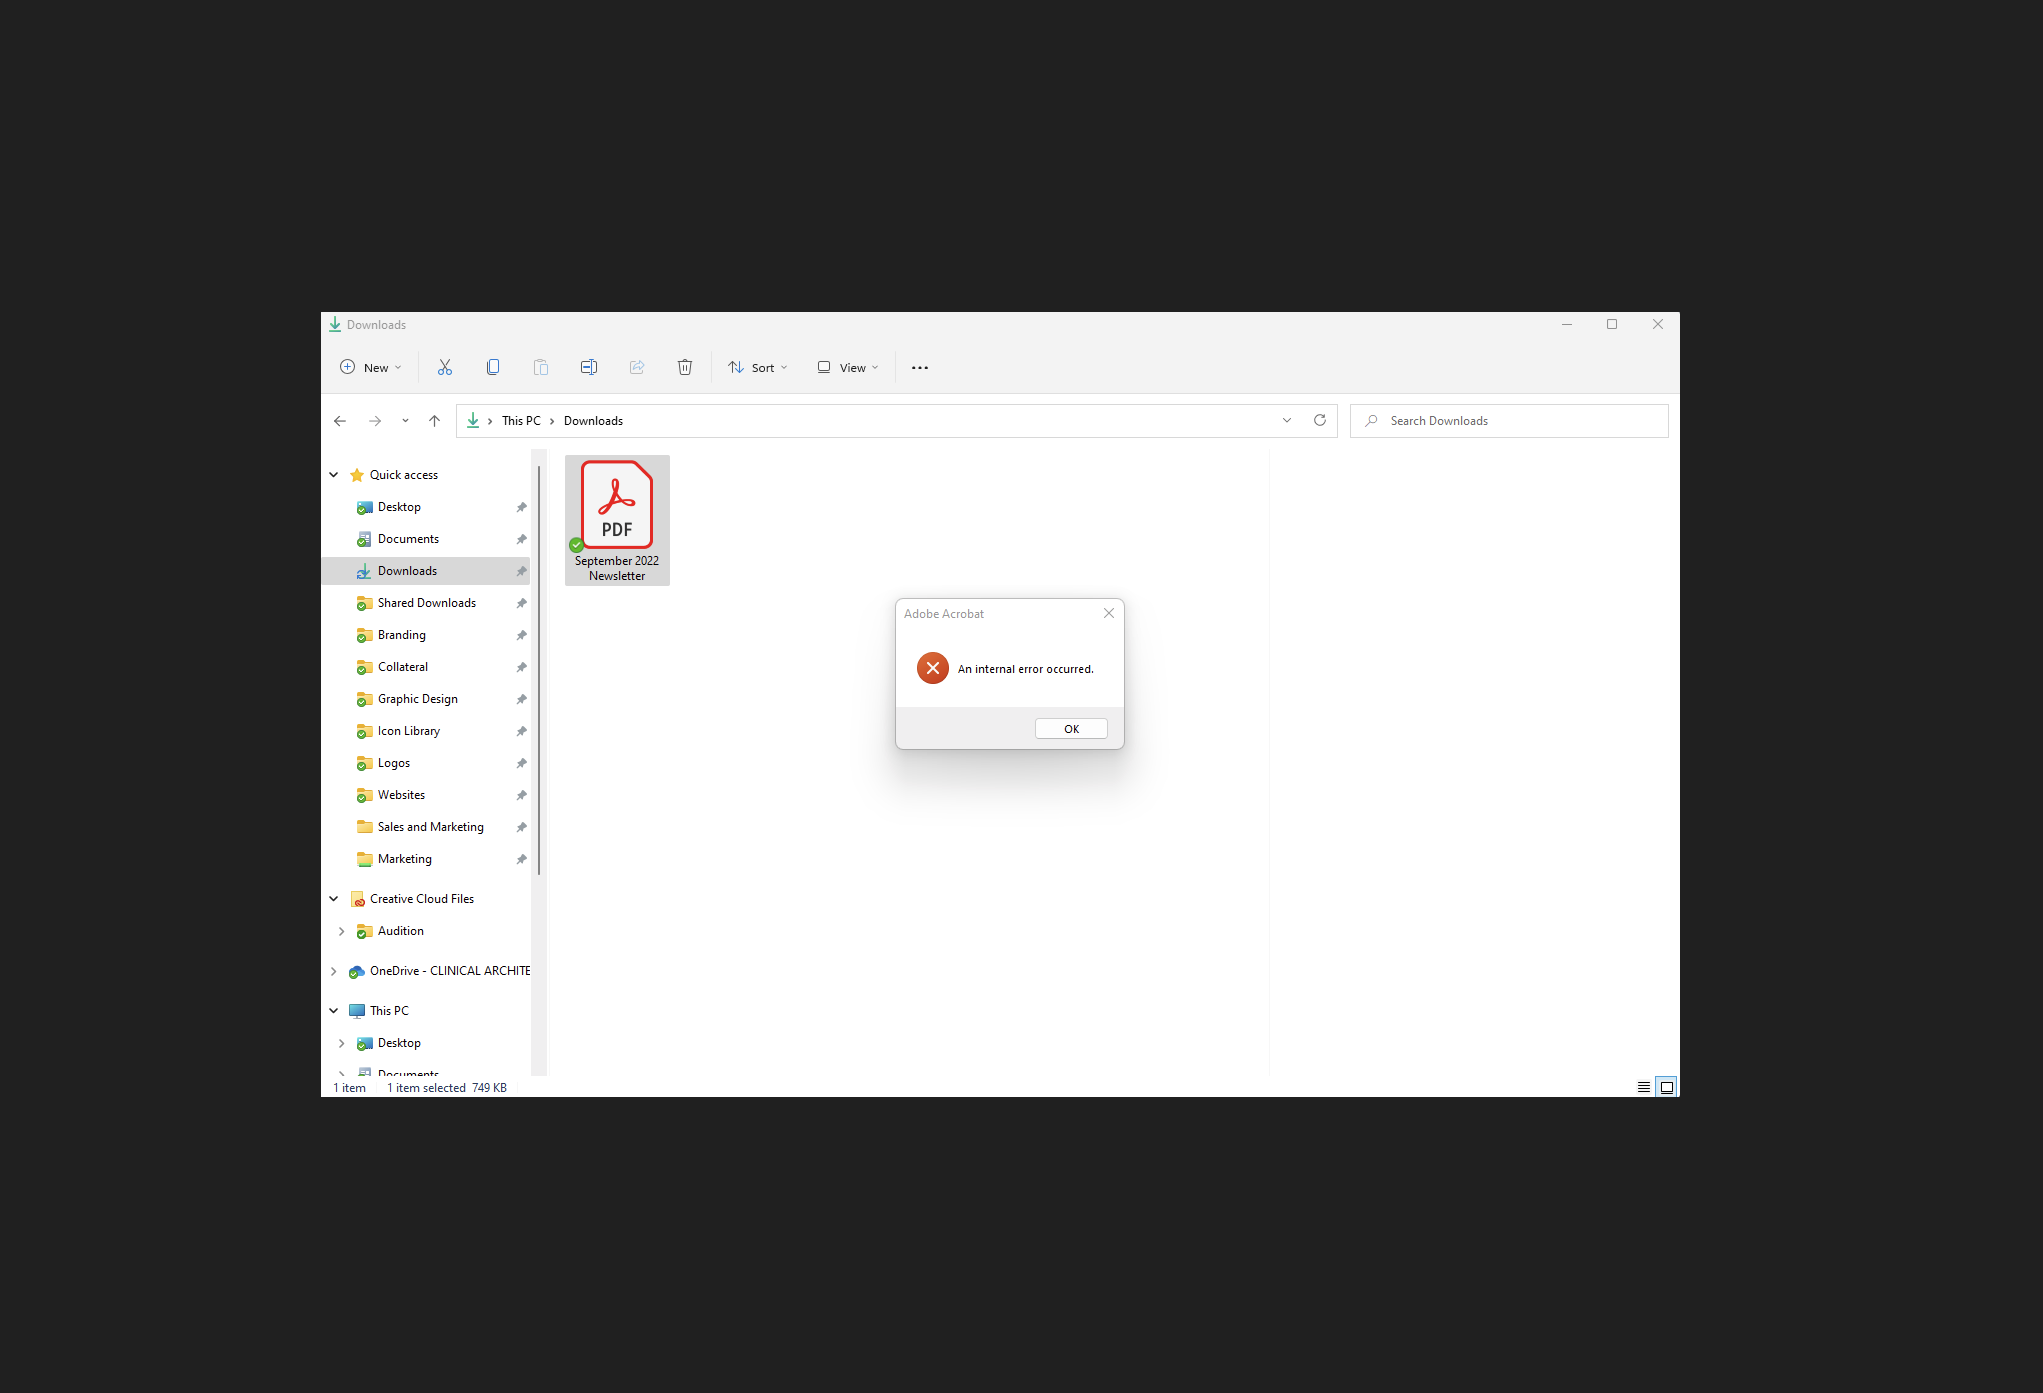
When trying to open a document in Adobe Acrobat Reader and Acrobat X, you may encounter An internal error that occurred error followed by a blank page.

This error occurs when accessing a password-protected page. The reason for the error can vary, including permission issues as well as incorrect Adobe Acrobat Reader configuration.

If you are also troubled by this error, here are a couple of troubleshooting steps to help you resolve the An internal error occurred error in Acrobat on Windows 10.

 How to fix an internal server error occurred for Adobe Acrobat?

1. Reinstall Adobe Reader

failed to load application resource
  1. Press Windows Key + R to open Run.
  2. Type control and click OK.
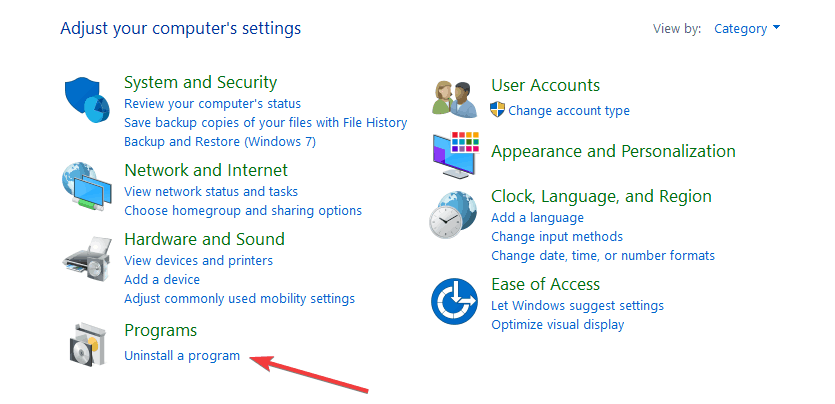
  3. Go to Programs > Programs and Features.
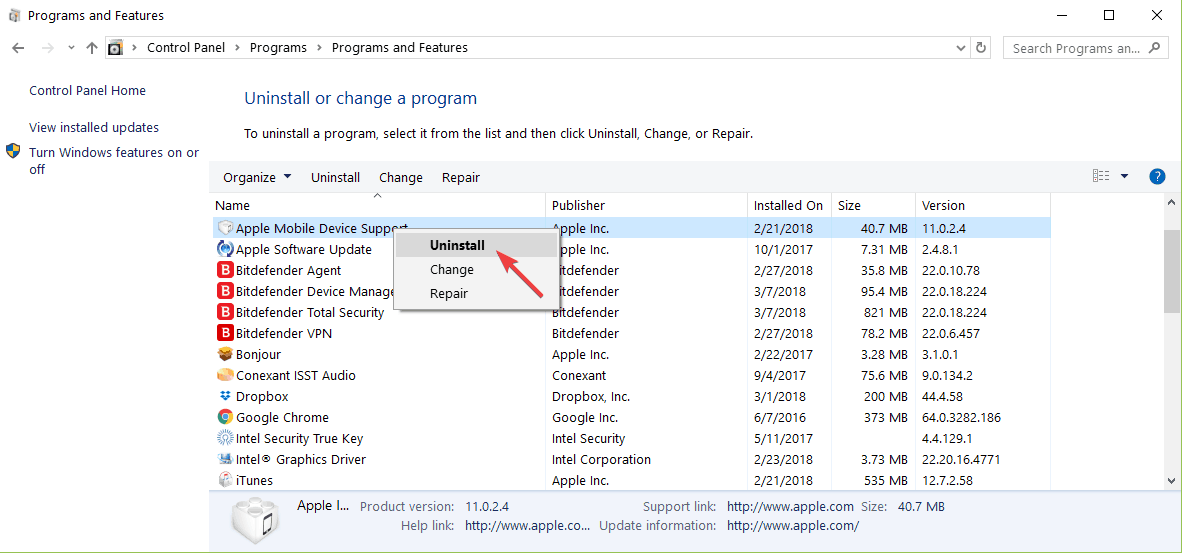
  4. Select Acrobat Reader from the list of installed apps.
  5. Click on Uninstall.
  6. Select Yes to confirm the action.

Wait for the app to uninstall successfully. If the app is not removed completely, you can use the Adobe Creative Cloud Cleaner Tool to solve the installation files.

  1. Download the Creative Cloud Cleaner Tool.
  2. Right-click on the file and select Run as Administrator.
  3. Select the program to remove.

Once uninstalled, you will need to download and install the latest version of Adobe Acrobat Reader.

This great software enables you to have the full Adobe experience, while also taking advantage of its amazing PDF writing and editing.

⇒ Get Adobe Acrobat Reader

2. Disable Protected Mode at Startup

internal error occurred
  1. Launch Adobe Reader X.
  2. Go to Edit.
  3. Select Preferences.
  4. In the new window, select the General tab.
  5. Scroll down to the end of the page.
  6. Uncheck the “Enable Protected Mode at Startup”.
  7. Click OK to save the changes.

Once you have applied the changes, close and relaunch Adobe Acrobat Reader. Try to open the password-protected PDF file and check if the error is resolved.

Disable Protected View on Adobe Acrobat Reader DC

  1. Click Edit.
  2. Select Preferences.
  3. Select the Security (Enhanced) category from the left.
  4. Uncheck ‘Enable Protected View Mode at Startup‘.
  5. Click OK to save the changes.

Note: Make sure you enable the Protected View option once the error is resolved.

3. Check for permission issues

internal error occurred
  1. Open File Explorer.
  2. Navigate to the following location:
    C:\Users\[user_name]\AppData\Roaming\Adobe\
  3. Make sure all the files and folders are visible (Unhidden). To do this, click the View tab, and check the Hidden Items box.
  4. Right-click on the Adobe folder.
  5. Select Properties.
  6. Open the Security tab.
  7. Click the Advanced button.
    internal error occurred
  8. Click the Change link beside the Owner tag.
  9. Enter the name of your user account and click on Check Names.
  10. If found, click OK to save the changes.

Once done, close the properties window, and then try to access the PDF file with the error to see if the error failed to load the application resource (internal error Acrobat) is resolved.

At times, permission issues can prevent the Adobe software from making changes to the PDF file resulting in an error.

3.1 Run as Administrator

internal error occurred
  1. From the desktop, right-click on Adobe Acrobat Reader shortcut.
  2. Select Run as Administrator.
  3. Check if the file opens without any issues.
  4. If the error is resolved, right-click on the Adobe Acrobat Reader shortcut again.
  5. Open the Compatibility tab.
  6. Under Setting, check the ‘Run this Program as an administrator’ box.
  7. Click Apply, and then OK to save the changes.

By setting to run the Adobe AR as an administrator, you don’t need to run the software in administrator mode manually every time.

4. Repair Installation

failed to load application resource
  1. Launch the Adobe Acrobat Reader app installed on your system.
  2. Click on Help.
  3. Select Repair Installation.
  4. Click Yes when the confirmation box appears.
  5. The repair tool will scan and repair any issues with the software.
  6. Once complete, relaunch the Acrobat Reader app and check if the error is resolved.

The built-in repair tool can fix many issues with the app. By doing so, you can avoid having to reinstall the app all over again.

5. Force open the files with Adobe Reader

failed to load application resource
  1. Open File Explorer.
  2. Navigate to the location where your file is stored.
  3. Right-click on the PDF file.
  4. Select Open With > Choose another app.
  5. Scroll down and click on More apps.
  6. Scroll down again and click on Look for another app on this PC.
  7. Navigate to the Adobe Reader installation, such as:
    C:\Program Files (x86)\Adobe Reader
  8. Select the .exe file and click Open.

Double-click on the PDF file and check if the file opens without any error.

The Adobe Acrobat An internal error occurred error can occur due to several reasons, including permission issues as well as incorrect configuration.

Follow all the steps in the article one by one to resolve the error. If you continue to face issues, you may also encounter similar problems like Acrobat Distiller error 5 access is denied, which can be fixed with dedicated troubleshooting steps.

Setting Mic in Windows 11: How to Activate, Permissions & More

Today we’ll explain all you need to know about setting up your microphone on your Windows 11 PC. Because of security concerns, the mic may not always be enabled by default and won’t work during calls.

You might need to enable it by making some changes to your PC. Here’s what we suggest:

How do I enable my microphone on Windows 11?

1. Change Privacy Settings to give microphone permissions

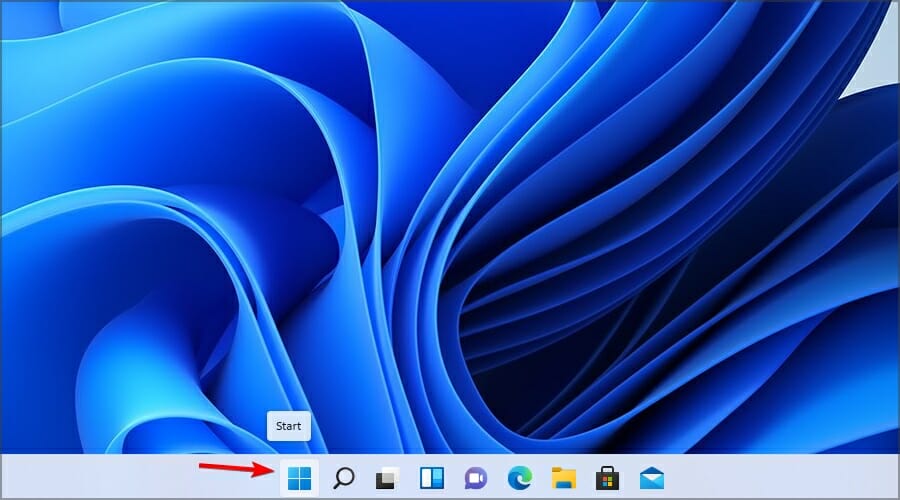
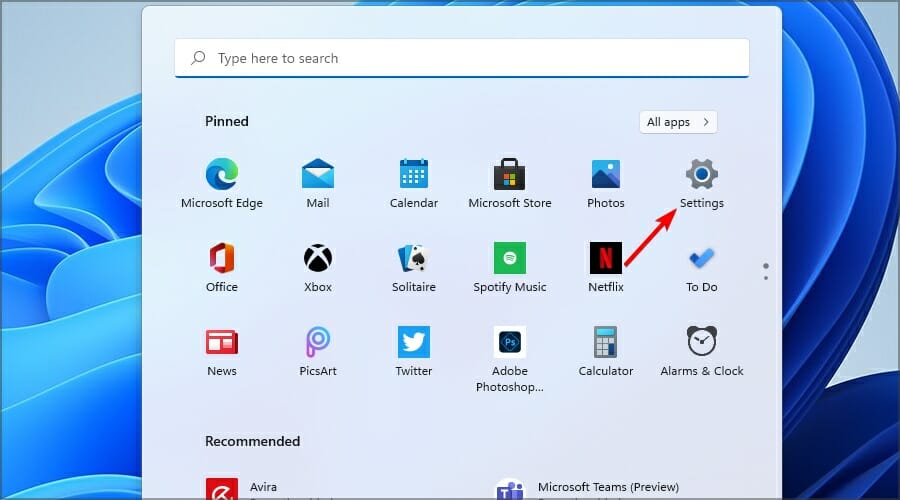
  1. Click the Start button and select Settings from the menu.
  2. Select Privacy & security from the left pane. In the right pane, select Microphone.
  3. Make sure that Microphone access is enabled.

The first thing to do to be able to enable your microphone is to change the privacy settings to access the microphone on Windows 11. This will make it accessible on other apps.

2. Change Sound Settings

  1. Click the Start button.
  2. Select Settings from the list of apps.
  3. In the left pane, make sure that the System is selected in the right pane, and select Sound.
  4. Select your microphone from the Input section.
  5. Now click the Allow button in the Audio section to enable your microphone.

Keep in mind that if you disable your microphone from this section, this is the only way to enable it properly once again.

3. Use Device Manager

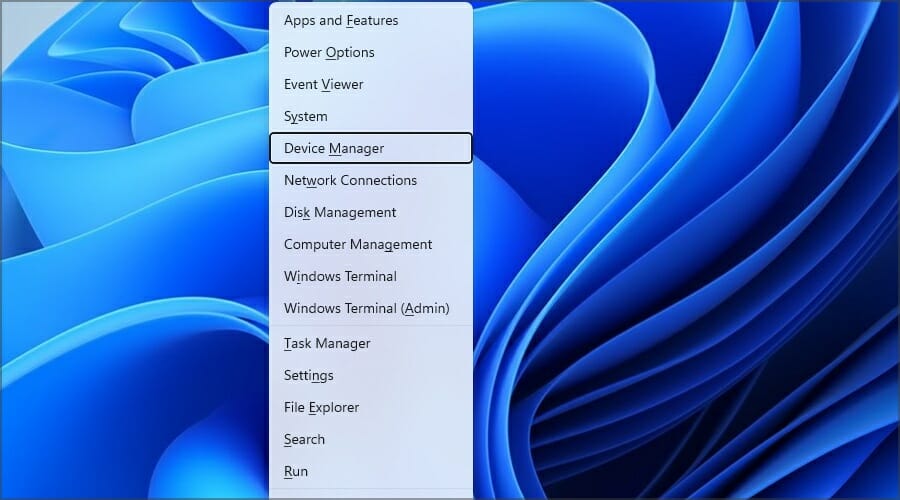
  1. Press Windows Key + X and choose Device Manager from the list.
  2. Expand the Audio inputs and outputs section. Locate your disabled microphone, right-click it and choose Enable device from the menu.

Using the Device Manager is one of the simplest ways to enable your microphone in Windows 11, but depending on your settings, it doesn’t always work.

To disable the microphone in Windows 11, follow the same steps, but choose Disable device instead of Enable.

While in Device Manager, we advise you to update your drivers. By doing so, you’ll ensure that your hardware is working correctly. If you want to do so for all your drivers quickly, we suggest using specialized driver updating software.

Why can’t I enable my microphone?

There are numerous factors to consider if you can’t enable your laptop microphone in Windows 11. Below are some of the prominent ones:

  • Microphone disabled in Device Manager: If you can’t configure or enable your headset microphone to work on Windows 11, it might be because it is disabled in Device Manager. This can sometimes happen to new devices. You can easily get past this by enabling the device.
  • Wrong privacy setting: In some cases, if you have not granted access to your microphone, you might not be able to turn on the microphone in your apps. The way out here is to change the privacy setting

That’s about it for this guide. To deal with microphone issues, the first thing that you should do is to check if your microphone is detected by the PC using some advanced microphone test tools.

Alternatively, check out our post that will give a detailed response to the how do I fix my Discord microphone in Windows 11 question. Few users reported that their microphone is not showing up in Device Manager, but we have a guide that can help with that.

Are you having any issues with your input device? Let us know in the comments section below.

Fix: Laptop Won’t Connect to TV via HDMI on Windows 10

Users tend to connect a TV to their PC, and while this usually works, many have reported that their Windows 10 laptop won’t connect to the TV via HDMI.

This is usually a hardware issue but could also be due to some problems with your software too. This guide will show you the easy ways to fix this effectively.

Why won’t my TV detect my laptop HDMI?

Several reasons your Windows 10 laptop cannot connect to the TV via HDMI. Below are some of them:

  • Outdated display driver: Outdated display driver could be why your HDMI works on the monitor but not with a TV. The quick way around this is to update your driver with one of the best driver updaters.
  • Wrong display output setting: You need to extend or duplicate your display to use your TV to Windows 10 via HDMI. You need to change the settings to fix this.
  • Hardware issues: Sometimes, you might get no HDMI signal on TV because the cable or ports are faulty. Sometimes, it might also be down to glitches with your PC. You need to check all the components and run the Hardware and Devices troubleshooter to ensure everything works well.

What can I do if Windows 10 laptop won’t connect to the TV via HDMI?

Before proceeding to the detailed fixes in this section, perform the following prerequisite checks:

  • Connect the TV to another PC
  • Clean the ports
  • Try another HDMI cable

If the following checks did not fix the issue, you could now proceed to the solutions below:

1. Reset display output

  1. Connect your PC to your TV using an HDMI cable.
  2. On your PC’s desktop window, right-click and select Display settings.
    display settings laptop wont connect to tv hdmi windows 10
  3. Select Display. This should show you the connected TV (as a second monitor).
    display
  4. If you can’t detect the TV, proceed.
  5. Press the Windows key + P and select Duplicate or Extend.
    extend

If the display output on your computer is not appropriately set, your laptop won’t connect to TV HDMI on Windows 10. The steps above should help you rectify this.

2. Update the display driver

  1. Press the Windows key + X and select Device Manager.
    device manager
  2. Expand the Display adapters option and right-click on the device there.
  3. Click on Update driver.
    update laptop wont connect to tv hdmi windows 10
  4. Choose the Search automatically for drivers option and install any available update.
    search

If the Windows 10 Laptop to TV connection via HDMI shows no signal, it might be due to your display driver. Updating it would fix the error, and your PC can detect the connected TV.

Alternatively, you can update all your drivers automatically with just a couple of clicks using third-party tools.

We strongly recommend the Outbyte Driver Updater tool to update your drivers to avoid damage to your PC by manually downloading the wrong driver versions.

To keep your PC, including hardware components, safe and efficient, the latest drivers should permanently be installed, like a display driver.

This great tool was developed, so you do not have to manually download and install your drivers.

⇒ Get Outbyte Driver Updater

3. Run the Hardware and Devices troubleshooter

  1. Press the Windows key, type cmd, and choose Run as administrator under Command Prompt.
    cmd laptop wont connect to tv hdmi windows 10
  2. Type the following command and hit Enter: msdt.exe -id DeviceDiagnosticmsdt
  3. Once the troubleshooter displays, follow the on-screen instructions to complete the process.

If your laptop is not connecting to the TV via HDMI on Windows 10, you might need to run the Hardware and Devices troubleshooter to diagnose the possible causes of the issue.

The good thing about this troubleshooter is that it will recommend the fixes you need to apply.

4. Install drivers in compatibility mode

  1. Navigate to the official download site of your PC manufacturer, and download the driver from there.
  2. Right-click on the driver installation file and select Properties.
    properties
  3. Locate and click the Compatibility tab and check the Run this program in compatibility mode for box.
  4. Now, choose Windows 8 from the dropdown menu.
    compatibilty laptop wont connect to tv hdmi windows 10
  5. Click Apply, followed by OK to complete the installation.
    apply
  6. Finally, run the installer and follow the on-screen instructions to complete the installation.

If you have tried all the fixes above and none of them are fixed, the Windows 10 laptop won’t connect to the TV via HDMI issue; you might need to run the display driver in compatibility mode with an older version of the OS.

This has proved effective for many users, and you should try it too.

We have come to the end of this detailed guide. If you still can’t fix the laptop that won’t connect to the TV via HDMI on Windows 10 issue after applying these fixes, you might need to consider seeing an expert to check your hardware.

If you want to know how to fit the laptop screen on TV over HDMI, check our guide for the following steps.

Feel free to let us know the solutions that helped you fix this issue in the comments below.

5 Best HP Deals to Buy Right Abway [Cyber Monday]

Hewlett-Packard is a multinational technology manufacturer that gained a reputation for its laptop computers, convertibles, monitors, keyboards, tablets, printers, and not only.

The products manufactured under the HP brand are reliable and focused on security, which are essential factors if you want to keep your data or your organization safe.

Without the most up-to-date hardware, you clearly can’t do so. Therefore, waste no more time and take a closer look at the best HP products you can buy these days.

Note: All the prices and offers in this article are subject to change, so be sure to check the official product page to get the latest deal. If the product or offer you’re looking for is no longer available, you can try to find it on its official manufacturer page or get another one from our list.

What is the best HP deal to grab right now?

HP 17.3″ laptop computer

  • 8th Generation Intel Core i5-8265U processor
  • Display resolution 1600 x 900
  • Intel UHD Graphics 620
  • Great volume
  • Realtek RTL8723DE 802.11b/g/n
  • Limited Wi-Fi capabilities

Firstly, we invite you to take a closer look at a great HP 17.3″ laptop model that packs an 8th Generation Intel Core i5-8265U Quad-Core processor with Intel Turbo Boost Technology.

Its vivid and crisp 17.3″ diagonal HD+ SVA BrightView WLED-backlit display is waiting to be enjoyed, while the volume is amazing.

As for the 8GB DDR4 RAM and 256GB PCIe SSD, take them both as a sign that you’re about to get a laptop that’s ideal even for gaming.

HP Pavilion x360 14 convertible

  • Four versatile modes
  • BIOS recovery and protection
  • 14.0-inch multitouch-enabled display
  • Incredibly fast processor
  • High bandwidth memory
  • No lit keyboard

If you want an HP device that can boot up in seconds and transfer files without waiting hours, then you should take a look at this HP Pavilion x360 14 convertible 2-in-1 laptop.

Well, you can easily convert from laptop mode to tablet, stand, or tent mode for drawing and other activities that feel as natural as using a pen on classic paper.

No less important, it is very easy to set up and the 10th Generation Intel(R) Core(TM) i5-1035G1 Quad-Core processor with Intel Turbo Boost Technology will give you the needed power all the time.

HP EliteDisplay E243 monitor

  • 3-sided micro-edge bezel
  • 100mm VESA pattern mount
  • Two USB 3.0 ports
  • Slim bezels
  • Three-year warranty
  • Not the best viewing angles

This HP EliteDisplay E243 HD monitor is also worthy of your attention. You’ll like how easy it is to find your most productive position with adjustable tilt, height, swivel, and up to 150 mm height adjustment settings.

Do note that crisp visuals from any angle are guaranteed thanks to the included 1920 x 1080 Full HD resolution IPS screen.

Even more, we are talking about a low-halogen, ENERGY STAR certified, so it is a great investment for the future.

HP 22-inch desktop computer

  • FHD anti-glare widescreen
  • Stereo speakers
  • Wired keyboard and mouse combo
  • HP privacy camera
  • Windows 10 Home
  • Not the quickest startup

This powerful HP 22-inch all-in-one desktop computer cannot disappoint you with its fast AMD Athlon 3050U Dual-Core processor and 256 GB PCIe NVMe M.2 Solid State Drive.

You can easily connect it directly to the Wi-Fi via an Ethernet cable, then pump up the volume to your favorite games or music with the included stereo speakers.

As for those of you worried about privacy, keep in mind that the HP privacy camera is only enabled when in use.

HP USB business keyboard

  • Very quiet
  • Wired USB
  • Ergonomic model
  • Durable keyboard
  • Inexpensive
  • The keys don’t light up

This HP USB Slim business keyboard is perfect if you want simplicity and durability. The keys work properly and your fingers can literally fly across the letters without stopping.

Moreover, it is one of the few quiet, slim keyboards that you can carry around with you with ease. That’s also essential if you travel a lot and don’t want a bulky model.

Besides the flat and narrow look, also consider that the special keys CAP-LOCK, TAB, SHIFT, and ALT don’t have a different feel from the other keys.

These are just some of the greatest HP products you can find on the market these days. Let us know which one is your choice in the comments area below.

How to Control Your Fan Speed in Windows 11 [4 Ways]

Keeping an eye on your fan speed is crucial for preventing overheating. We’ve all been there—forced to shut down our laptops because of high temperatures and loud fan noises.

While regular maintenance like cleaning the fan and applying fresh thermal paste is a must, you can also monitor and adjust your fan speed through your operating system. Check out all methods explained below:

How can I control the fan speed on a PC?

1. Use your manufacturer’s fan control software

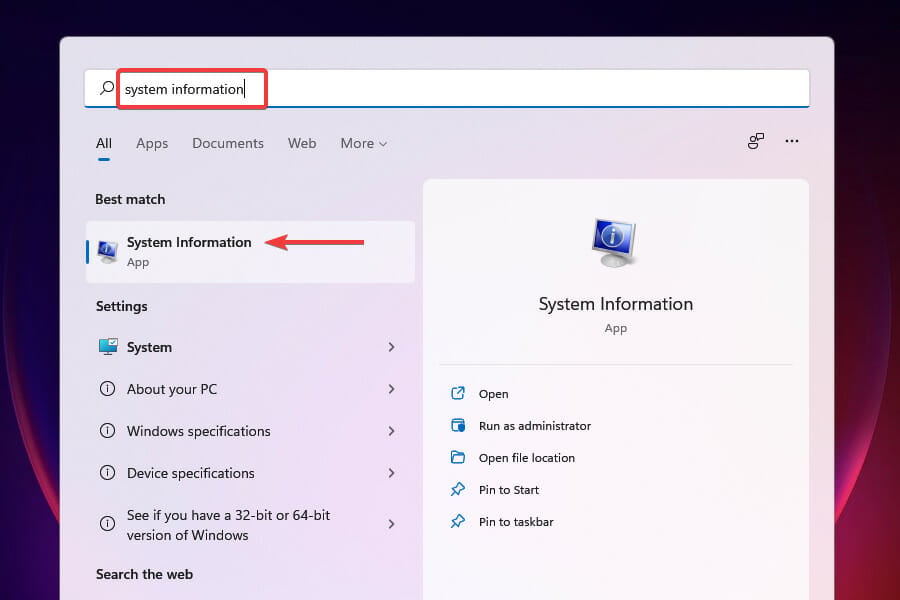
  1. Press Windows + S to launch the Search menu.
  2. Enter System Information in the text field at the top and click on the relevant search result that appears.System information
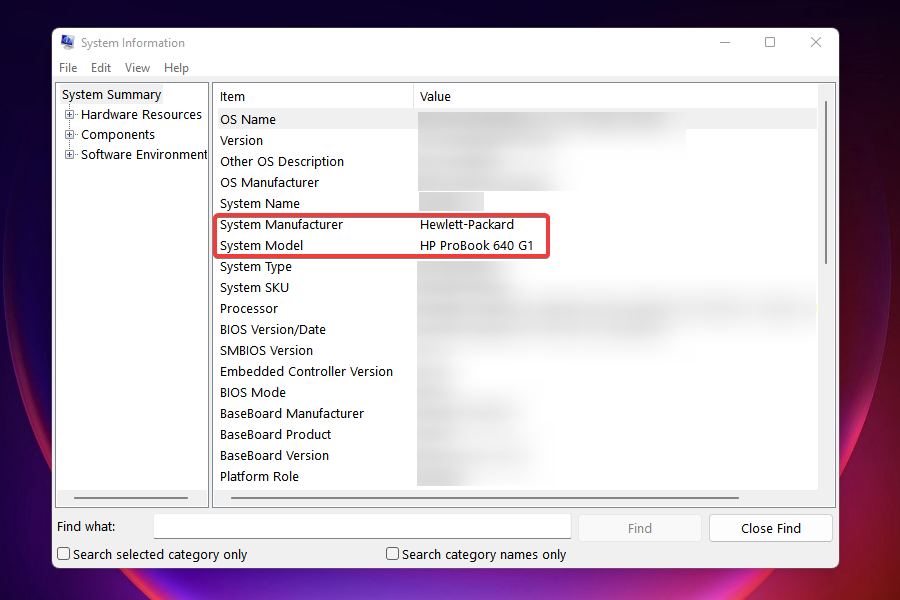
  3. Locate the System Manufacturer and System Model the in the System Summary tab.Check computer name and model
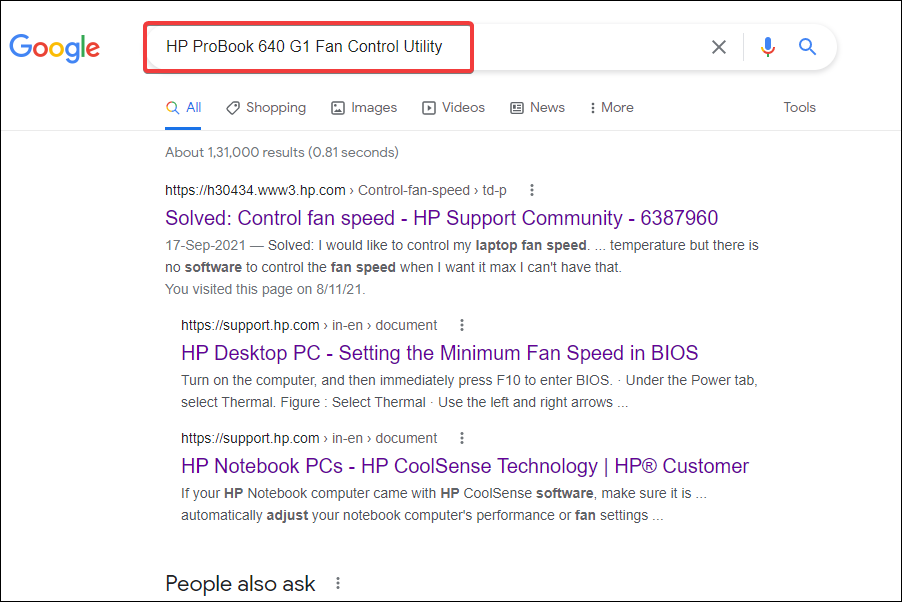
  4. Next, go to Google or any other search engine, and look up the fan control software in Windows 11 using the Manufacturer’s name and model followed by Fan Control Utility as the keywords.Search for fan control utility in Windows 11
  5. Next, open the OEM’s website, locate the relevant utility and download it.
  6. Locate the downloaded file and double-click on it to launch the installer.
  7. Follow the on-screen instructions to complete the installation process.

After installing the software, you can start controlling the computer fan and set it to run at the desired speed. Unfortunately, not all manufacturers release such tools. If yours doesn’t, try the next method:

    2. Control fan speed on Windows 11 in BIOS

    You can easily control fan speed on PC through BIOS. Controlling the PC fan from the BIOS is both time-consuming as well as an intricate affair. You have to be careful while making the changes since a minor lapse can prove fatal for the computer.

  1. 1. Navigate to the desktop and press Alt + F4 to launch the Shut Down Windows box.

  2. 2. Select Shut down from the dropdown menu and click on OK at the bottom.

    Enter BIOS to control fan in Windows 11
  3. 3. Next, press the Power button to turn on the computer.

  4. 4. As soon the screen lights up, press Esc or F12 key (depending on the computer settings) to enter the BIOS.

  5. 5. Navigate through the different options (Advanced, Overclocking, or something similar) and look for settings related to the computer fan.

  6. 6. After finding the relevant options, you can now control the computer fan and run it at the desired speed for optimal results.

    fan control windows 11 bios
Note icon NOTE
The previous steps will be different for various computer manufacturers. However, with a basic concept idea, you can navigate to the relevant section and make the changes.

Note: do not change any other settings unless you know the results.

3. Use Control Panel

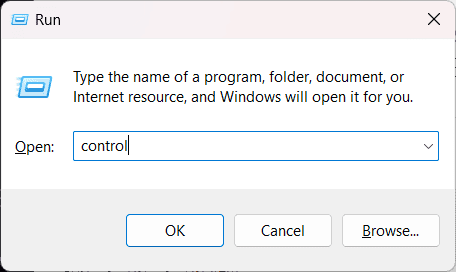
  1. Press the Windows key + R, type the “control” command and hit Enter.control panel command in run dialog box
  2. Locate the Power Options section.power options control panel
  3. Select your power plan and click on Change plan settings, then Change advanced power settings.changed advanced power settings
  4. Expand the Processor power management tab.processor power management settings
  5. Adjust the Maximum processor state to reduce CPU usage, and, as a consequence, overheating. For optimal performance, you can set it up to 80%-90%.adjust maximum processor state

You can’t control fan speed directly through the Control Panel, but you can adjust power settings, which can reduce overall system load and temperature, thus indirectly affecting fan behavior.

4. Download a third-party utility to control the fan speed on Windows 11

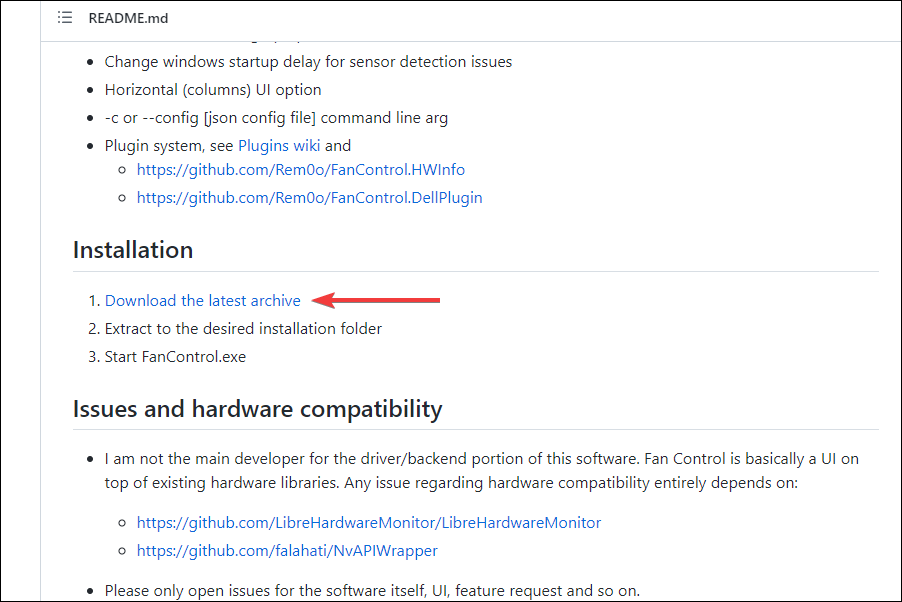
  1. Go to the GitHub page of Fan Control, scroll down, and click on Download the latest archive under Installation.Download fan control
  2. Navigate to the folder where the downloaded file (.zip format) is stored, right-click on it, and select Extract all from the context menu.Extrack Fan Control files
  3. Choose a destination to store the files and click on Extract in the window that appears.
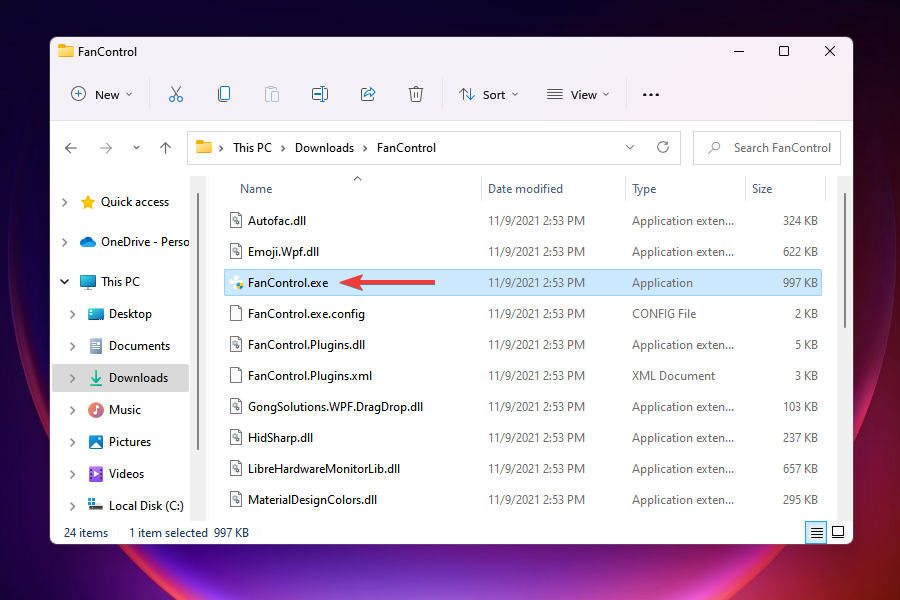
  4. Open the folder where the extracted files are stored, and double-click on the FanControl.exe file to launch the app.Launch fan control in Windows 11
  5. Choose the appropriate response in case a warning pops up, and then click on Yes in the UAC (User Account Control) prompt that appears.
  6. Let the Fan Control app scan the system and choose the relevant response when prompted.
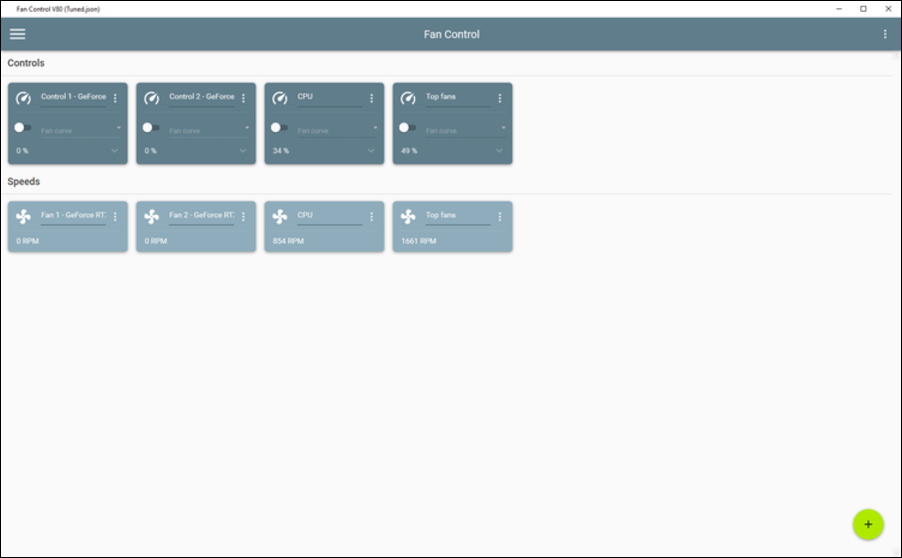
  7. After scanning, it will list all the fans connected to the system under Controls and their subsequent running speed under Speeds.Fan control app in Windows 11
  8. You can now make the relevant changes to the fan speed and set it to the desired value.

Fan Control is one of the best open-source third-party utilities available in the market and is free to use. It offers a simple interface and allows users to quickly change the settings and control the fans in Windows 11.

How do I reduce the fan noise on Windows 11?

There are various ways to control the fan noise on a Windows 11 laptop. Below are some of the easy methods:

  • Via power settings: Your power settings can significantly add to your Windows 11 fan speed problem. To get this under control, switch to either the Best power efficiency or the Balanced plan instead of high performance.
  • Clearing of air vents: When the Windows 11 air vents are blocked by dust and debris, it can increase fan noise. The solution here is to clear the dirt using a vacuum or other suitable methods.
  • Using a fan control tool: You can still experience high fan noise in some cases despite using the best power plan and cleaning the vents. In this case, you need to use a control tool to keep the noise in check. There is the option of using the tool released by OEM for your PC or fan control software for Windows 11.

That’s all there is to know about PC fan control in Windows 11. Before controlling and modifying the fan speed, do thorough research to understand the required settings.

You can also check the best available fans in the market if you are facing trouble with the installed one.

Tell us which of the above methods worked for you or whether you want to choose a utility not listed here in the comments section below.

5 Best 144hz Gaming Monitors for Cyber Monday [4K, 24 inch+]

Getting geared up for gaming is no easy task – after all, there is so much to take into account – but it is undoubtedly worth it.

The refresh rate is just one of the many guests invited to a gamer’s dream party and it can seriously affect your gameplay for better or for worse.

When competition is fierce, you know every second counts if it’s to obtain an advantage over your opponents.

Even if you’re in it more for the story, you will still appreciate a higher refresh rate monitor that can make your entire experience smoother, and more immersive.

So, without further ado, here’s our selection of the 5 best 144hz gaming monitors to not miss this season.

Note: All the prices and offers in this article are subject to change, so be sure to check the official product page to get the latest deal. If the product or offer you’re looking for is no longer available, you can try to find it on its official manufacturer page or get another one from our list.

What is the best 144hz monitor for gaming?

ViewSonic XG2402

  • FHD 24 inch display
  • USB, DisplayPort, HDMI, and USB 3.0
  • AMD FreeSync Premium technology
  • Ergonomic design
  • Some users reported issues with dead pixels

Why settle for decent gameplay, when you can conquer your entertainment and get a taste of the most intense and immersive gaming sessions?

This FHD monitor delivers ultra-fast 1ms response time and 144Hz refresh rate so that you won’t even remember what lagging feels like.

To further increase your edge for future gaming quests, in comes the AMD FreeSync Premium. This technology allows for smoother refresh rates to build your advantage and transport you into a new dimension quite literally.

Of course, immersion cannot be dissociated from comfort. Hence, the monitor is lightweight and equipped with an adjustable ergonomically-designed stand that will bend any way you like it.

SAMSUNG 32-Inch G5 Odyssey

  • 1000R Curved Screen
  • FreeSync Premium technology
  • Ultra-fast response time (1ms)
  • Vibrant HDR10 graphics
  • The image has a slight tint that requires calibration

Unparallelled immersion is what this curved, 1000R Odyssey panel promises to deliver.

But don’t just take our word for it – its high-end specs will convince and even impress you starting with the FHD, and WQHD resolution combined with ultra-fast 144Hz refresh rate.

A 1ms response time sounds too good to be true? You can take it for granted!

And just when you thought more smoothness to your gameplay is not possible, the AMD FreeSync Premium technology steps in to ensure flawless graphics.

Sceptre E255B-1658A

  • Fast refresh rate
  • AMD FreeSync technology
  • FHD LED monitor
  • Build-in speakers
  • The stand does not allow height adjustments

This gaming monitor is built to deliver spectacular graphics at surprisingly smooth speeds for you to enjoy the most immersive gameplay.

Boasting an ultra-fast refresh rate that can stretch up to 165Hz and fast, but accurate response times combined with the AMD FreeSync technology, this edgeless monitor will show you all about anti-flicker, blur-free crisp-looking images that flow seamlessly to transport you into fast-paced action.

With versatile display ports and connectivity options and equipped with a Vest mount, you can place your monitor wherever you need it to take the best performance out of it.

Asus VG248QE

  • Ergonomic design
  • Color temperature selection
  • Built-in 2W stereo speakers
  • Multiple ports
  • 144hz not available on Xbox

144 Hz-ready can only mean one thing in the gaming world: a smooth and seamless refresh rate. And this gaming monitor is all about fast-paced action beautifully rendered.

To complete your immersive experience, there is an ergonomic design that you can adjust in the most comfortable viewing position, built-in stereo speakers, and a multitude of ports to fit all your needs.

Acer XFA240 bmjdpr

  • FHD display
  • Adjustable ergonomic design
  • G-Sync compatibility
  • 2 built-in speakers
  • 144 Hz not available on PS4

Designed to bend to your will, this monitor will pivot, tilt, and swivel to perfectly fit into the most comfortable viewing position.

With your comfort secured by its ergonomic design, you can focus on what truly matters in gaming: speed and beautiful visuals.

And you can achieve this effortlessly with a 24-inch FHD display that is also G-Sync compatible, 144 Hz refresh rate, and Blue Light Filter plus Low-dimming technology.

Windows Update not Showing: Get it Back With 5 Solutions

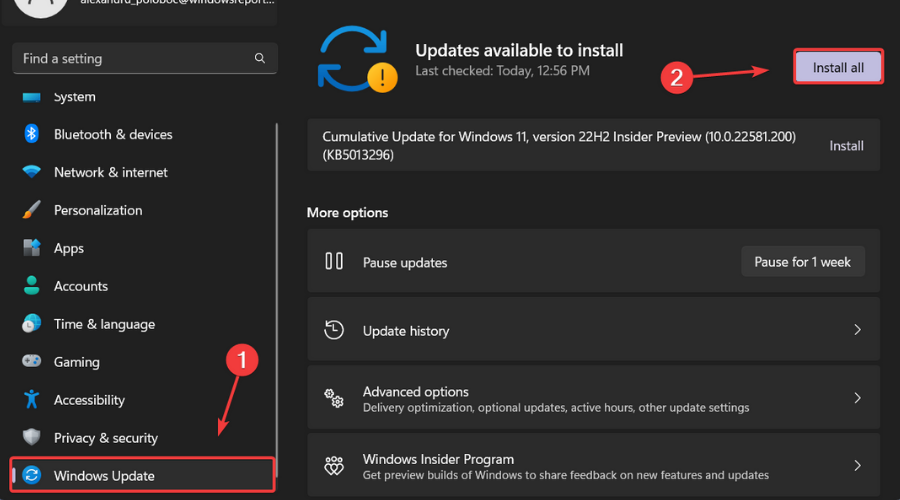
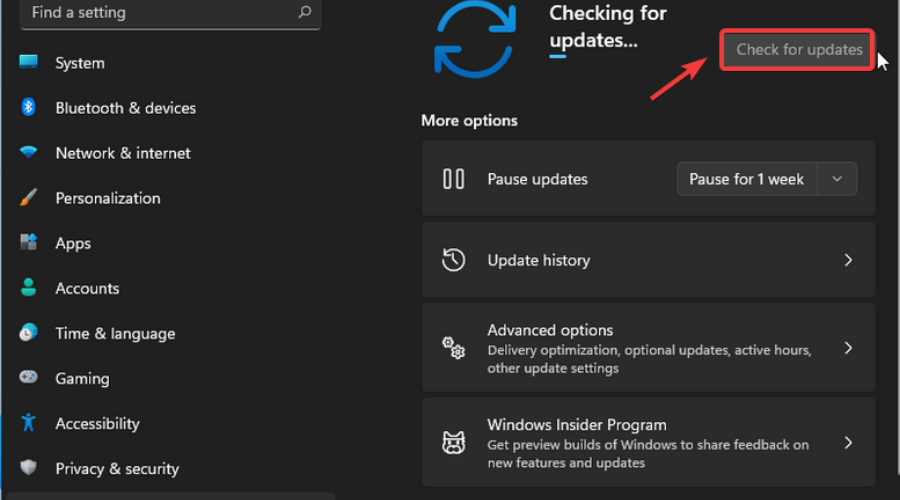
Many users reported the Windows update is not showing up on their PCs. Sometimes, the Windows Update service is not even running for some users. This is usually happening because the Windows Update service is disabled, or because the Windows update components encountered issues.

To eliminate this, you need to run the Windows Update troubleshooter or an update repair tool.

What can I do if the Windows Update is not showing?

1. Run the built-in troubleshooter

  1. Press the Windows key + I to open the Settings app and navigate to the Update & Security section.
    update and windows update not showing
  2. Choose Troubleshoot from the left pane and select Additional troubleshooters.
    additional trouble
  3. Now, select Windows Update and click the Run the troubleshooter button.
    run trouble
  4. Follow the instructions on the screen to complete the troubleshooting.

Once the troubleshooter is finished, check if the Windows update is still not showing up. Running the troubleshooter can help you fix other issues like Windows Update error code 0xd000034; read this guide to learn more.

2. Reset Windows Update components

  1. Press the Windows key, type cmd, and select Run as administrator under Command Prompt.
    cmd windows update not showing
  2. Type the following commands and press Enter after each: taskkill /f /fi "SERVICES eq wuauserv" net stop cryptSvc net stop bits net stop msiserver ren C:WindowsSoftwareDistribution SoftwareDistribution.old rmdir C:WindowsSoftwareDistributionDataStore rmdir C:WindowsSoftwareDistributionDownload

After doing that, check if the problem is still there. If the issue persists, you can also try running the following set of commands: Net Stop bits Net Stop wuauserv Net Stop appidsvc Net Stop cryptsvc Ren %systemroot%SoftwareDistribution SoftwareDistribution.bak Ren %systemroot%system32catroot2 catroot2.bak Net Start bits Net Start wuauserv Net Start appidsvc Net Start cryptsvc

After running the commands above, the components should start running again. If this seems too complicated or tedious, you can always create a Windows Update reset script and run it to reset all the necessary components automatically.

3. Restart the required service

  1. Press the Windows key + R, type services.msc, and click the OK button.
    services
  2. Locate the Windows Update service. If it is running, right-click it and select the Restart option.
    restart windows update not showing
  3. If it is not running, select the Start option instead.
    start
  4. Finally, close the System services window and restart your PC.

Some services need to be running to check for and install updates effectively. If this service is disabled, you can face a series of errors, including this case where the Windows update is not showing up.

Ensure that you restart your PC after enabling the services and check for the updates manually in Settings.

If the Get updates as soon as they’re available option is missing, read this guide to fix the problem quickly.

4. Use the Windows Update Assistant tool

  1. Visit the Windows 10 download page to download the Assistant tool.
    update now
  2. Click the Accept button on the license page.
    accept windows update not showing
  3. Tick the button for the Upgrade this PC now and click the Next button.
    upgrade
  4. Now, follow the onscreen instructions to complete the upgrade.

If all the solutions above fail to fix this issue, using the assistant tool will help force install the latest version n of Windows 10. This should override all errors and fix the update issue.

5. Use a debugging software

One of the easiest ways to quickly troubleshoot the problem, even if you don’t know the cause, is to use system restoring and optimization software.

There you have it: All the info you need to fix the Windows update not showing up issue. You must only follow the instructions carefully, and everything should return to normal.

If you face other issues like Windows update not working or loading, check our detailed guide to fix it quickly.

We also have a great guide on what to do if the Windows Update is stuck on pending install, so don’t miss it.

Feel free to let us know in the comments below the solution that helped you fix this issue.

The best Surface Pro 3 deal to grab today

If you’re looking to buy a Surface Pro 3 right now, you have two options. Either go to the official Microsoft Store and get a new product for approximately $1000 or more, or try an Amazon deal like the one we suggest below, for nearly half the price

Microsoft is already teasing some offers on its website targeting most Surface laptops. You will see that all deals include a Microsoft 365 subscription and an antivirus software.

How about a 50%-off deal?

  • 8GB of RAM
  • 12'' touchscreen display
  • 9-hrs battery life
  • The product is renewed

What we’re recommending, though, is an Amazon deal that we’ve spotted and it comes at $529.99 + free shipping.

What’s included is the Surface Pro 3 tablet (12-inch, 256 GB, Intel Core i5, Windows 10), plus a Microsoft Surface Type cover.

Digging a little deeper into the specs, you’ll be able to enjoy the crisp-clear image of the 12″ Full HD touchscreen display in various kickstand-adjustable positions.

The device comes with a 1.9GHz Intel Core i5-4300U Dual-Core CPU processor, which will satisfy basic everyday business & free time needs for 9 uninterrupted hours.

8GB of RAM will surely incorporate all your favorite apps and programs.

This Surface Pro 3 offer also includes a pen or a keyboard.

The important difference – and we suggest you pay attention to this detail and also read the seller’s return policy – is that the product is renewed, though guaranteed by Amazon.

This means that the device might come with little imperfections such as a small chip on the screen or shorter battery life (though the latter might just be a flaw in the Surface line, overall). The device is verified in advance by Amazon for smooth working.

So in the end, it all comes to whether you want to take a chance and invest less in a not-so-new, but functional product or you prefer the more expensive, brand new one.

Best Wireless Backlit Keyboards Deals

Backlit wireless keyboards are in high demand due to their versatility and capacity to allow users to easily work on their computers regardless of the external light sources in the room.

For this reason, many users prefer to get laptops with built-in backlit keyboards or attach such hardware to their already existing devices, not to mention that they are also slowly becoming the device of choice for many desktop users as well.

This is the perfect time to get your hands on top-quality wireless backlit keyboards. You can buy Bluetooth keyboards with high battery autonomy at a fraction of their regular price.

There are many special offers available right now. We carefully picked the best options when it comes to excellent value for money, so make sure to check the listings below.

Note: All the prices and offers in this article are subject to change, so be sure to check the official product page to get the latest deal. If the product/offer you’re looking for is no longer available, you can try to find it on its official manufacturer page or get another one from our list.

What are the best wireless backlit keyboard deals in 2022?

All these items have special prices


As you can see, our list provides a wide range of options when it comes to design, functionality, and price.

Most of these are compatible with all major operating systems and can be connected to mobile devices as well.

We recommend you take a look at the information available under each of these Amazon listings, as it offers an in-depth description of the products’ usability.

If you have any suggestions or want to share which of these products is your favorite, please feel free to use the comment section below.

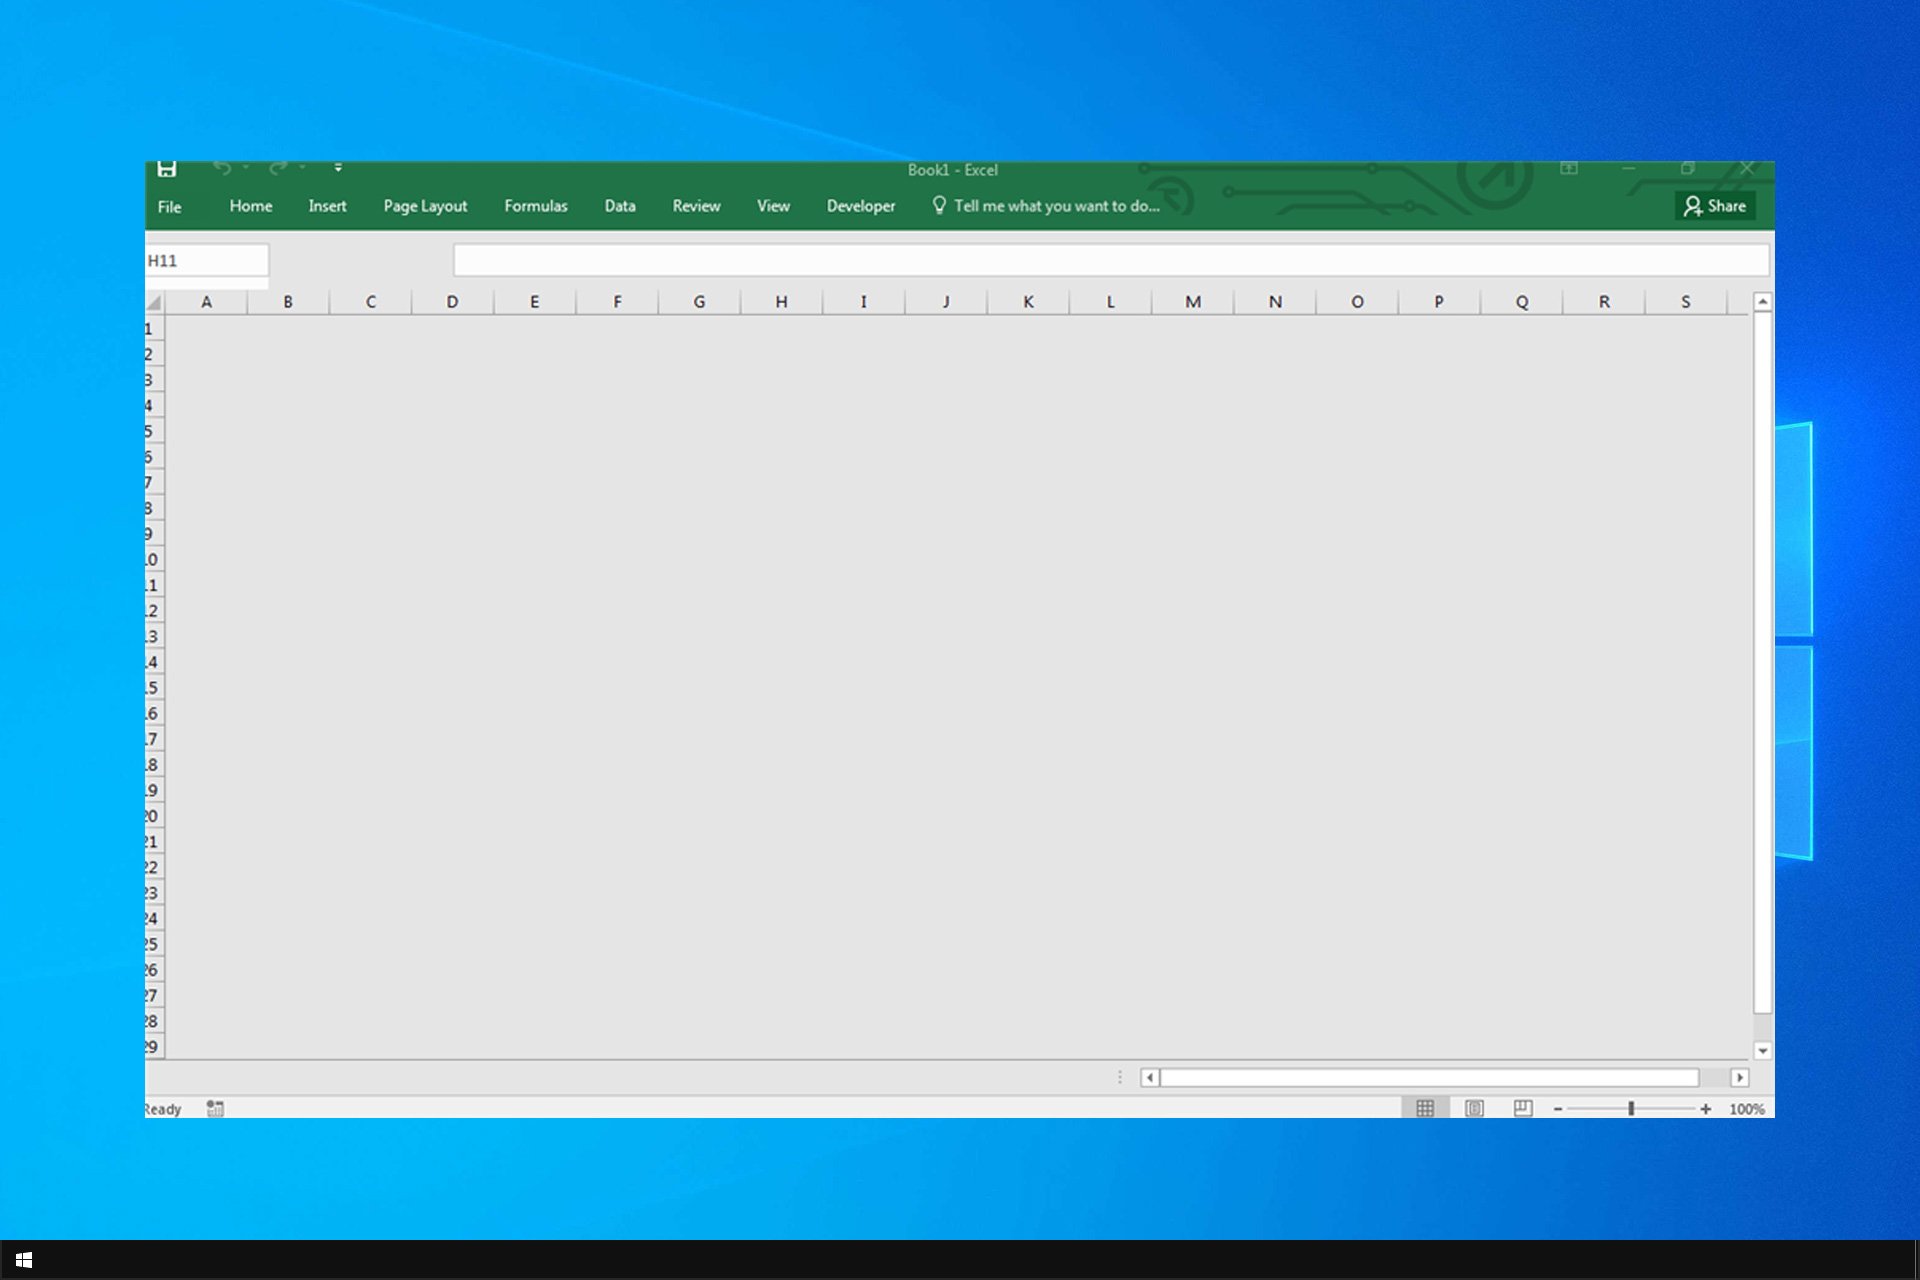
Excel File Not Opening by Double Click? How to Fix it

If Excel is not opening files, you won’t be able to view your sheets, and your projects will have to be delayed until you fix this issue.

While it’s possible to circumvent this issue, in today’s guide, we’ll show you how to fix this problem once and for all, so let’s get started.

Why Excel file is not opening by double click?

  • Certain settings, such as DDE in Excel, can cause this problem.
  • Your file association might not be correctly configured.
  • Specific add-ons can cause this problem.
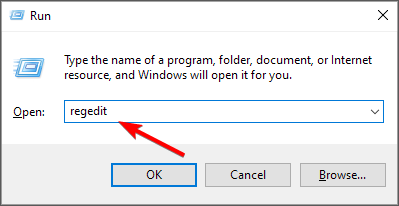
  • In some cases, your registry might not be configured appropriately.

How do I fix an Excel file that won’t open?

Before we can fix this issue, be sure to perform a few preliminary checks:

  • If you’re opening a file from cloud storage, make sure it’s synced, or download it to your PC.
  • In some rare circumstances, using the older graphics driver can help.

1. Uncheck the ignore DDE option

    Fix Excel file not opening by unchecking the ignore DDE box

    One of the reasons your Excel program is not opening files may be caused by the Ignore other applications that use Dynamic Data Exchange (DDE) option selected.

    The function of the DDE is to send a message to the program once you double-click, which then instructs it to open the file or workbook you have double-clicked to open.

  1. 1. Open Microsoft Excel.

  2. 2. Go to File in the top left corner of the screen.

    Excel File open
  3. 3. Click on Options.

    excel options
  4. 4. Select Advanced from the menu.

    Excel advanced options
  5. 5. Navigate to the General tab.

    Excel general tab
  6. 6. Uncheck the Ignore other applications that use Dynamic Data Exchange (DDE) box.

  7. 7. Click Ok to apply and save the changes.

  8. 8. Check if you can open the desired Excel file.

Note: if you select Ignore, Excel ignores all DDE instructions sent from other programs to itself, thus it will not open the workbook you have double-clicked.

You can fix this issue and open hundreds of other file formats with a single application.

File Viewer Plus is a universal file viewer for Windows that can open and display over 300 different file types, with support for Word, PowerPoint, Excel, Visio, and Project files.

Then, if you want to resolve this issue using useful Windows file viewer software, have a try now with File Viewer 4 Plus.

You can download it for free from the official website or buy it at an affordable price.

2. Reset file associations to fix Excel file not opening

  1. Right-click the Start button.
  2. Select Control Panel.
  3. Click Programs then click Default Programs.
  4. Under Default Programs, click the Set your default programs. A search process will begin to find your default programs.
  5. From the list of default programs, choose Excel.
  6. Now, click on Choose default for this program.
  7. The Set Program Associations screen will open up. Click Select All.
  8. Click Save which sets off the saving process and OK.

3. Fix Excel file not opening by repairing the program

  1. Right-click the Start button and select Control Panel.
  2. Click Programs and select Uninstall Programs.
  3. Now, click Microsoft Office and select Change.excel won't open files
  4. Finally, click Online Repair, then select Repair.

4. Turn off add-ins to fix the Excel file not opening error

  1. Open Excel program
  2. If it opens a new workbook, go to File.
  3. Click on Options and select Add-Ins from the left pane.
  4. Locate Manage at the bottom of the open screen.
  5. On the drop-down, select COM Add-ins and click Go.
  6. From the open box, clear one of the add-ins on the list and click OK.

Once all these steps are followed, restart the Excel program by double-clicking on a file or icon of the workbook you want to open.

Note: in case the problem recurs, repeat the first seven steps, then choose a different add-in to clear, and try this as you go along.

If it opens, then you’ll know the add-in you selected last is the one causing the issue. Then, you can find an update or newer version of the add-in from the manufacturer’s website, or turn it off if unavailable.

5. Disable Hardware Graphics Acceleration if Excel won’t open files

  1. Open the Excel program and go to File.
  2. Now, click Options and select Advanced.
  3. Find the Display tab. Then, locate and check the Disable hardware graphics acceleration box.
  4. Click OK and you should be done.

6. Change file extension

  1. In File Explorer, locate the file you can’t open.
  2. Go to View and check File name extensions.
  3. Right-click the file and choose Rename.
     
  4. Change the end of the file name from .xlsx to .xls.
  5. When asked to confirm, click Yes.


7. Modify the registry

  1. Press the Windows key + R and enter regedit.
  2. Navigate to the following path: HKEY_CLASSES_ROOT\Excel.Sheet.12\shell\Open\command
  3. In the right pane, double-click on Default.
  4. Now add “%1” at the end and click OK.

Follow these steps to disable hardware graphics acceleration, and let us know if you managed to fix the Excel file not opening issue.

If none of the above solutions worked, then contact Microsoft Support for further options. In case you’re having additional problems, our Excel keeps crashing guide should be able to help you. You can also learn how to unlock an Excel sheet if you forget the password.

Did any of these solutions work for you? Share with us in the comments section.

5 Ways to Fix Outlook if it’s Not Refreshing Automatically

A lot of Outlook users have reported problems throughout time and today we are going to take a closer look at one of them

Many Outlook users say that, sometimes, the software refuses to automatically update, a fact that causes confusion and frustration among the community.

But, you don’t need to worry, as you came to the absolute right place to see what can be done about Outlook not updating automatically in Office 365.

Before we begin though, since we are talking about Outlook, we’ll also show you how to use the Outlook scheduling assistant on your PC.

Why is Outlook not automatically refreshing?

There isn’t just one reason that can cause Outlook to not automatically update, but among them could be the corruption of the PST file.

Furthermore, if the auto-update feature is disabled, you can kiss all of those automatic updates goodbye, as you will have to do it manually.

Not being logged in with your Outlook account will not trigger the app to automatically update, and we could be looking at some bugs as well.

How do I get Outlook to auto-refresh?

1. Set the Auto-Refresh feature

  1. Select the Send/Receive tab, then click on Send/Receive groups.send groups
  2. Click on Define Send/Receive Groups.groups
  3. Tweak the Schedule an automatic send/receive every timer to your preference.schedule outlook

2. Work offline

  1. Select the Send/Receive tab.
  2. Click on the Work Offline button.work offline outlook
  3. Close Outlook.
  4. Run Outlook, select the Send/Receive tab, and disable the Offline mode.

3. Delete offline items

  1. Right-click the Inbox folder and select Properties.clear outlook offline
  2. Press the Clear Offline Items button, then press OK.outlook offline items

4. Delete the OST file

  1. Press Win + R to open the Run box.
  2. In the Run box, paste the following text and press the OK button: %LOCALAPPDATA%\Microsoft\Outlook\run
  3. Browse and open the .ost file from the folder, right-click it and select Delete.

5. Update Windows

  1. Press Windows + I to access Settings.
  2. Select the Windows updates tab and click Install all.install Windows updates
  3. If no updates are queued for installation, press the Check for updates button.check for updates

How do I make Outlook sync more often?

It’s understandable you would ask that, so allow us to shed more light on the matter. All you need to do is access the Send/Receive tab and tweak the timers.

In fact, we covered how to do this in solution number one of this guide, so it will be a lot easier for you to follow the process.

Don’t worry, it will only take a couple of minutes of your time so you shouldn’t spend too much on this action.

If your Outlook web is not refreshing automatically, follow the steps above and you will be back on track before you can say Outlook is not updating folders.

Users have been reporting Outlook 365 not refreshing automatically for years now, but it seems that Microsoft can’t fix this once and for all.

Has this guide been helpful? Share your thoughts with us in the dedicated comments section located below.

0x800f0831: How to Fix This Install/Update Error

Error code 0x800f0831 is an update error that may occur in Windows 11. Whenever you get this error message in the Windows Update tab, it restricts you from updating your OS. 

These alphanumeric characters indicate nothing, but there are problems while installing the updates. The reason can be why this error occurs, and your System halts the OS update for an infinite time. And it is not a pleasant scenario to come across.

Many Windows 11 users have reported not being able to install the update files even after downloading them. Unfortunately, this is a bug check that can’t be fixed yet with any official patch.

Also, many reported the 0x800f0831 update error while installing the 22H2 version for Windows 11.

However, nothing to worry about! There are different ways to fix the Windows Update error on Windows 11. But before that, know the actual causes to apply the proper troubleshooting method.

What causes the Install Error – 0x800f0831 on Windows 11?

0x800f0831 Windows 11 update error

The potential triggers are pretty similar to that of other Windows update errors. We’ve listed all significant aspects that may lead to a 0x800f0831 Windows 11 error. 

  • Conflict with another software: If the Windows update service is inaccessible due to conflict with an existing VPN, antivirus software, or a potentially unwanted program, you will see this error. You can remove any pre-installed software using AdwCleaner. 
  • Corrupted system files: Update file corruption can also be the trigger to show you this error code.
  • Limited disk space: In case your disk drive is filled up with junk files and there is little to no storage left to save the Windows update files, error code 0x800f0831 will pop up. Remove junk files and free up space using CCleaner, one of the most-trusted PC cleaning tools. 
  • Damaged Windows update components: If the Windows update components are corrupted or damaged, your System can’t run the update service. 

Many reported the 0x800f0831 error while installing KB5008212 or KB5005033 update, and in this guide, we’ll show you how to fix that.

Note icon NOTE
Apart from the error code 0x800f0831, there is a list of Windows update errors you may encounter at any point in time.

For example., error codes 0x80080005, 0x80072EE7, 0x800f0988, 0x800f0986, 0xc1900107, 0x80070652, 0x8024a10a, 0x8024200D, or the annoying error message There were some problems installing updates but we’ll try again later ,etc.

Troubleshooting these errors in Windows 11 is similar to the process in Windows 10.

How do I fix the 0x800f0831 Windows 11 update error?

1. Run the Windows Update troubleshooter

  1. Press Windows + I keys to open Settings, then select System from the left pane and click on Troubleshoot from the right side.How to fix the 0x800f0831 Windows 11 update error
  2. In the next window, click on Other troubleshooters.Windows 11 Update Error
  3. Navigate to Windows Update and click on the Run button on the right.How to fix the 0x800f0831 Windows 11 update error
  4. Finally, give the Windows Update troubleshooter a few minutes to scan and detect the problems in your system. Then, choose the necessary response when prompted.

Once the diagnostic results are displayed, you can manually view detailed information about the problems and resolve them. Then try to install the update again, and you shouldn’t face any issues anymore.

If nothing is found in the scan, close the troubleshooter and proceed to the following method to understand whether or not your system files are corrupted.

2. Run System File Checker

  1. Click the Start icon from the Taskbar.0x800f0831 Windows 11 update error
  2. Type cmd in the search bar, and then click on Run as administrator on the right.Fix the 0x800f0831 Windows 11 update error
  3. In the Command Prompt window, type the command and press Enter to run it: sfc/scannowHow to fix the 0x800f0831 Windows 11 update error
  4. Give it a few minutes to complete and restart your computer.

Now try to install the updated files again. If there was any system file corruption, it should be repaired. This is a simple method, and it will help you if you’re getting install error 0x800f0831 while installing the KB5012592 update in Windows 11.

If that does not help, we recommend using a dedicated repair program, which will automatically repair your PC after scanning it for any corrupted files or damaged registry entries.

3. Run the DISM command tool

  1. Click the Windows icon from the taskbar.How to fix the 0x800f0831 Windows 11 update error
  2. Type cmd in the search bar and choose Command Prompt to Run as administrator. Windows 11 update error
  3. Type/paste the following commands individually and hit Enter after each command: DISM.exe / Online / Cleanup-image / Scanhealth DISM.exe / Online/ Cleanup-image / RestorehealthDISM
  4. Once done, close the Command Prompt and reboot the computer.

The DISM tool will take time to finish the scan and fix the damaged system files. It is mainly used to select different Windows corruption errors.

So, in this case, if your update files or service packs are not installed because of the corrupted system dependencies, and you were getting the CBS called Error with 0x800f0831, the issue will get resolved.

4. Perform a clean boot

Note icon NOTE
First, log into your PC with administrative privileges to perform a clean boot.
  1. Press Windows + R keys to open the Run dialog box, type in msconfig, and hit Enter.0x800f0831 Windows 11 update error
  2. In the System Configuration window, navigate to the Services tab.How to fix the 0x800f0831 Windows 11 update error
  3. Check the box next to Hide all Microsoft services and click Disable all from the bottom.0x800f0831 Windows 11 update error
  4. Now move on to the Startup tab and click on Open Task Manager.How to fix the 0x800f0831 Windows 11 update error
  5. In the Task Manager window, click each entry and Disable them individually.How to fix the 0x800f0831 Windows 11 update error
  6. Head back to the System Configuration window, and click OK.Windows 11 update error
  7. Finally, restart your computer.

Your System will restart in a clean boot environment. Now try to install the Windows update once again. Finally, try our following method if you still get the Install Error – 0x800f0831 in Windows 11.

5. Reset Windows Update components manually

  1. Click on the Windows icon from the taskbar first. How to fix the 0x800f0831 Windows 11 update error
  2. Type in cmd in the search box and choose Run as administrator option for Command Prompt.Windows 11 update error
  3. In the Command Prompt window, type the following commands and hit Enter after each one: net stop wuauserv net stop bits net stop cryptsvc net start wuauserv net start bits net start cryptsvc %systemroot%SoftwareDistributionSoftwareDistribution.bak %systemroot%system32catroot2catroot2.bak

When done, go to Task Manager to check whether the Windows Update service, BITS service, and Cryptographic service got stopped or not.

All the mentioned services should be stopped, and you must not see the error code 0x800f0831 again on Windows 11.

What is the KB number?

KB stands for Knowledge Base and was previously designated to Microsoft articles used to fix issues with the OS. However, of late, Microsoft Started releasing updates with a KB number signifying the article or piece of information used here.

Except for the drivers, every update you see has a dedicated KB number, which can even be used to locate and update them.

How to manually download and install Windows 11 updates from Microsoft Catalog?

  1. First, access the Microsoft Update Catalog.
  2. Next, enter the KB number of the update you want to download in the Search box.How to fix the 0x800f0831 Windows 11 update error
  3. Now, download the one that matches your Windows OS version and system architecture from the search results.How to fix the 0x800f0831 Windows 11 update error
  4. Once downloaded, open the file and install Windows 11 update.

If your Windows Update service remains unresponsive even after trying all the solutions mentioned above, don’t worry. There is a way to download and install Windows 11 update files manually. This comes in handy when you are receiving 0x800f0831 due to a missing package.

Microsoft Update Catalog includes a repository of Windows updates where you can find and install timely updates on your System.

As you can see, you can use the Windows Update standalone installer to fix the Install Error – 0x800f0831 on Windows 11 on your PC with ease.

What to do if my PC doesn’t work as expected after an update?

  1. Press the Windows + I buttons, select Windows Update, and navigate to Update History. How to fix the 0x800f0831 Windows 11 update error
  2. On the next page, scroll down to find and click Uninstall updates.How to fix the 0x800f0831 Windows 11 update error
  3. A new window will open now comprising all the updates, choose the one you want to remove, right-click on it, and select Uninstall.How to fix the 0x800f0831 Windows 11 update error

The latest Windows update version will get uninstalled now. However, you should always try a fresh installation of the latest OS version, as Windows updates are necessary for your PC to run smoothly.

That’s all! Our list of the five best methods to fix the 0x800f0831 Windows 11 update error ends here. Remember that the 0x800f0831 error was reported in Windows 10 while installing 21H1 or 20H2 and other updates.

Even if you’re on Windows 10, you can use the solutions from this guide to fix 0x800f0831 since they are universal for all iterations and versions of Windows.

Let us know which method worked for you to fix the Install Error – 0x800f0831 on Windows 11. And, if you have anything else to add to this list, let us know through the comments box below.

5 Best TV Cyber Monday deals [Smart, Led, Vizio]

Since the apparition of the first TV, back in the ’20s, TV technology evolved a lot. From display resolutions to connectivity options, TVs are getting better and more affordable.

A Smart TV has the capability to connect to the internet by ethernet cable or Wi-Fi and is relatively a new trend among TV customers. Added to this, it can also play movies from applications like Youtube or Netflix.

Most of them come with a variety of already installed apps with the possibility to install others from the Store.

This guide will help you pick the best Smart TV solution available on the market with great prices.

Note: All the prices and offers in this article are subject to change, so be sure to check the official product page to get the latest deal. If the product or offer you’re looking for is no longer available, you can try to find it on its official manufacturer page or get another one from our list.

Which brand is best for Smart TV?

Insignia NS-32DF310NA19

  • Voice Remote with Alexa
  • Multiple device input/output options
  • Automatic over-the-air software updates
  • Suitable only for small rooms

The Insignia NS-32DF310NA19 model is the best deal Smart TV you can get at a very affordable price.

It does not have a large screen size, but 32 inches is enough if you want it for a small room. It features an FHD resolution with rich contrast and brilliant colors.

It’s powered by a quad-core CPU and Multi-core GPU for instant search results and fast and fluid responsiveness. Moreover, you can connect it easily to your Wi-Fi network for internet access.

TCL 40S325

  • 1080p Full HD Resolution
  • Works with Alexa
  • Sleek, modern design
  • Does not support HDR

The TCL 40S325 model is a 40 inches Smart TV that offers you access to more than 500,000 movies and TV episodes via Roku TV.

With the Roku application, you can transform your smartphone or tablet into a remote with voice control. It offers the ability to browse and add new channels and even listen to TV audio on headphones connected to your mobile device.

The super-simple Roku TV remote has only 20 buttons to make navigating easier. With around half the buttons of a traditional TV remote, you won’t have to struggle to find the button you need.

SAMSUNG TU-8000

  • Can be wall mounted
  • HDR
  • Great price for value
  • No variable refresh rate support

The Samsung TU-8000 is a very performant 4K Smart TV with a large range of screen size options.

Depending on your budget or the size of your room, you can choose from 43 inches to 85 inches screen size. Any size you choose, the TV will have a Cristal Processor 4K which delivers powerful picture quality.

Used as a monitor, the Samsung TU8000 has a decent response time and low input lag for gaming. It also displays proper chroma 4:4:4 for clear text.

LG 65UN7300PUF

  • HDR 10 Pro
  • Includes popular apps like Disney+, Apple TV app, Netflix, Hulu, etc.
  • Very good surround sound
  • Low contrast ratio

The LG 65UN7300PUF model is another excellent Smart TV for your home if you are looking for a 65 inches TV.

It comes with a powerful Quad-Core Processor 4K that paints images, action, and color in the best possible light from the source to the screen.

Furthermore,  the UHD screen features realistic, accurate color, enhanced contrast, and clarity.

The Auto Low Latency Mode will automatically select the setting for less lag. It allows your console to set your TV’s low-latency mode automatically without having to set it on your TV, for a better experience.

With a Smart TV, you don’t have to find a solution to connect your laptop to your TV, in order to watch movies. With access to the Netflix app, you can log in and play any movie directly from your Smart.

Some of them came even with a dedicated button on the remote control for easy access to your favorite media app.

Any of the above Smart TVs you choose to buy, offer you a great video experience and excellent image quality.

How to Fix “Keyset Does Not Exist” (Error Code 80090016) in Office 365

Running into the “Keyset does not exist” error in Office 365—often linked with error code 80090016 can be frustrating, especially when it blocks access to apps like Outlook or Teams.

This issue usually points to a problem with your device’s Trusted Platform Module (TPM) or corrupted user certificates.

In this guide, we’ll break down what this error means, why it happens, and walk you through the exact steps to fix it, so you can get back to work without the tech headache.

How do I fix error code 80090016?

1. Delete the contents of the Ngc Folder

  1. Close Outlook.
  2. Open File Explorer.
  3. Copy and paste the path below into the Address Bar:
    C:\Windows\ServiceProfiles\LocalService\AppData\Local\Microsoft\NGC
  4. Delete all contents of the displayed folder.

2. Delete work or school account

  1. Press the Windows key + I and select Accounts in the left pane.
    accounts error code 80090016
  2. Select the Access work or school option.
    access
  3. Now, click the Disconnect button in front of the affected account.

Sometimes, the Outlook error code 80090016 or even on OneDrive and MS Teams can be due to a faulty work or school account. You can fix this by deleting the said account. After deleting the account, you can create a new one on your Windows 11 PC.

3. Rename the AAD.BrokerPlugin folder

  1. Sign in to your PC with another administrator account.
  2. Launch Run by pressing the Windows + R simultaneously.
  3. Type the command below and press the Shift + Enter keys:
    C:\Users\%username%\AppData\Local\Packages
  4. Scroll to find Microsoft.AAD.BrokerPlugin_cw5n1h2txyewy folder.
  5. Copy the folder by pressing Ctrl + C keys and paste it to Home Screen by pressing Ctrl + V keys. This is for backup.
  6. Go back to the Packages folder and rename the Microsoft.AAD.BrokerPlugin_cw5n1h2txyewy folder to Microsoft.AAD.BrokerPlugin_cw5n1h2txyewy.old.
  7. Go back to the affected user account and relaunch Outlook.
  8. Select Yes to Allow my organization to manage this device if you get the Organization Prompt.
  9. In case the Error Code 80090016 Office 365 reappears, ignore it this time and continue your use of Outlook.

4. Uninstall and reinstall Outlook

  1. Press the Windows key and type Outlook in the Search Box.
  2. Right-click on Outlook and select Uninstall.
    Uninstall Outlook
  3. You can reinstall Outlook by downloading it from Microsoft Store.
Tip icon Tip
To fully remove Outlook and clear any leftover files that might be causing the error, use a tool like Fortect. It goes beyond a basic uninstall by cleaning up broken registry entries and system conflicts linked to Office 365 errors. A quick scan can help prevent the same issue from coming back after reinstalling.

Why is my TPM corrupted?

Most of the time, the TPM error is displayed because of interference with the PC Health Checkup. This application alerts you about your system’s compatibility with software, such as checking if you have the required resources for Windows 11.

It is also possible to get the keyset does not exist Office 365 error when malware infects your computer.

We hope the TPM keyset does not exist code 80090016 has been resolved by now, and you can operate your Outlook like before. However, if the issue persists, check our guide on how to fix the keyset does not exist error.

We also recommend reading our guide on what to do if Trusted Platform Module has malfunctioned for more solutions.

If the solution in this guide helped you solve the error code 80090016, don’t hesitate to share the tip that worked for you in the comments below.

7 Best LG Monitors on Cyber Monday Sales [4K, Gaming]

Retailers have raised their pitch wooing buyers with the latest stuff. And of all things you might be tempted to buy during the holiday season, investing in a monitor can be a smart choice, more so if you are looking to spruce up your desktop PC setup.

And a new monitor can work wonders on your desktop. You need to see that by yourself.

Here also is a compilation of some of the best deals currently available on LG’s range of monitors.

What are the best deals for LG monitors?

  • Is Windows 10 Still Supported?
    • Security Updates
    • Feature Updates
    • Non-Security Updates
    • Annual Updates
    • Upgrade process for business customers
    • Manufacturer Warranty and Support

LG 27GL83A-B

  • NVIDIA G-SYNC compatible
  • 1 ms response time
  • QHD (2560 X 1440) resolution
  • Pivot adjustable stand
  • Expensive

You can make the most of the expansive 27-inch screen real estate using the 4-screen split feature so that you can run multiple programs at the same time.

The 2560 X 1440 resolution display is also flicker-free, which means you can work for long hours without eye fatigue.

What’s more, there is the Reader Mode as well that will kill the harmful blue light for more efficient reading.

LG 27UK850-W

  • 4k resolution (3840 X 2160)
  • HDR 10 compatibility
  • sRGB 99% color gamut
  • AMD Free sync technology
  • Expensive

The 27-inch 4K UHD LG monitor on sale for Christmas allows for sharp displays and rich contrasts, making it perfect for multimedia applications or entertainment.

The monitor also boasts an sRGB 99% color gamut and is HDR 10 compatible. The monitor is AMD-free sync tech compliant as well.

A really welcome feature is the USB-C connector available in more and more gadgets nowadays.

LG 34WK650

  • DisplayPort and HDMI connectivity
  • 5 Milliseconds response rate
  • 75 Hz Refresh rate
  • The HDR option is limited

This ultra-wide monitor supports a maximum resolution of 2560×1080 which is 33% more screen space compared to full HD.

It’s a great companion for productivity and multi-tasking, allowing you to create the perfect workspace.

The monitor is also great for video games, doing an amazing job at the highest graphics settings.

LG 24UD58-B

  • Low price
  • UHD (3840 x 2160) resolution
  • HDMI 2.0 (x2) and DisplayPort
  • Game Mode and Black Stabilizer Gaming Features
  • Thick bezel

The 24-inch 4K monitors comes with four times the resolution of the standard high-definition monitor, which means stunning colors and contrasts.

It supports split-screen features too and it’s FreeSync ready for seamless, fluid movement throughout hi-res, fast-paced games. But you need to connect it through DisplayPort to take full advantage of FreeSync.

Moreover, the monitor has 3 gaming modes: 2 FPS modes and an RTS pre-set mode so you can really enjoy your gaming session.

LG 27UD58P-B 27 IPS Gaming Monitor

  • 4K resolution (3840 x 2160)
  • Pivot and height adjustable
  • 2 USB ports
  • 27 inch IPS monitor
  • Thick bezels

Apart from the UHD 4K display that renders exceptional quality pictures, what makes the monitor just right for gaming is its response time of just 5ms. Another salient feature of the monitor is its 1000:1 contrast ratio.

Besides, the monitor is also tilt, height, swivel, and pivot adjustable, which means finding the right viewing angle is just a breeze.

LG 32MA70HY-P 32 Inch FHD

  • 32 inch full HD
  • Screen Split 2.0 for multi-tasking
  • Vesa-compatible for wall mounting
  • Must be straight for clear image

The biggest monitor on the list is this 32-inch LG high-performance monitor that offers 75% more viewable area compared to a 24-inch monitor.

It comes with plenty of input options: HDMI, D-Sub, or display port to meet all your needs. Besides, it allows for 4 simultaneous windows to be displayed at once, using 14 possible configurations.

LG 25UM57 25-Inch Screen LED-lit Monitor

  • Ultra wide monitor (21:9)
  • PIP mode in screen split
  • sRGB over 99 percent color gamut
  • On-screen control with Screen Split 2.0
  • Full HD

The 25-inch ultrawide Full HD monitor with its 21:9 aspect ratio is perfectly suited for both multi-tasking (supports 4-screen split) as well as gaming.

It boasts of 250 cd/m2 brightness besides also supporting Dynamic Action Sync.

What’s the best monitor size for 4K?

It is recommended that you use screens with the greatest available resolution in order to achieve the finest image reproduction possible.

Because screens of the same size have more detail sharpness at higher resolutions than screens of the same size at lower resolutions, the following basic rule of thumb applies: the higher the detail resolution the better.

This has a significant impact on readability, which is particularly crucial when spending most of one’s day staring at a screen.

As a result, a 32-inch screen with a resolution of 3840 x 2160 pixels (UHD 4K) and an aspect ratio of 16:9 is the greatest choice because it provides the maximum space and the optimal display size for your contents while also dividing up your screen area effectively.

For more options to pick from, take a look at this list including the best LG ultrawide monitors. These ultrawide monitors truly are worthy of your full attention.

Comment below and let us know which LG monitor you bought. We’d love to see your choices. 

Windows 11 Not Activated After Upgrade: Error 0xc004c003 [Fix]

If you have recently transitioned to Windows 11 its possible that your Windows 11 is not activated after upgrade.

The error code 0xc004c003 is an issue that users encounter when their system attempts to activate the OS using the OEM Activation Digital Product Key.

Although this might seem as a serious issue, you should be able to fix it with one of our solutions.

What is the Windows 11 activation error 0xc004c003?

This error appears on Windows 11 when one is trying to activate the license of Windows because the operating system is faced with an error on the server. The cause cannot be singled out. 

The error will appear in the following format: 

We can’t activate Windows on this device because you don’t have a valid digital license or product key. If you think you do have a valid license or key, select Troubleshoot below. Error code: 0xC004C003

What causes the 0xC004C003 Windows 11 activation error? 

To access the registry hive and verify the product key one has to go through the licensing code component in Windows. The 0xc004c003 error code is triggered when the access is denied due to using incorrect access. 

It is also worth noting that an unsuccessful key validation can cause this error. However, the reasons as to why the key validation was not successful vary.

How do I fix the error code 0xC004C003 on Windows 11?

1. Use Command Prompt to activate Windows 11

  1. Press the Windows key and type cmd on the search bar.search
  2. Then, right-click on Command Prompt and select Run as administrator. Click Yes if prompted by User Account Control.run as admin
  3. Key in the following command, then press Enter: vbs –rearmrun
  4. Click on OK and restart your device once the request is successful.
  5. Open the activation page and check if the error has been resolved. 

Sometimes, the Microsoft server fails to verify and activate your license because of server issues. However, you can still use the Command Prompt to activate your license.

2. Use a PC optimization utility

We can’t activate Windows on this device 0xc004f074 message is often caused by underlying issues with the system files or the registry.

Dedicated repair tools can quickly scan and identify the problematic file and either fix it or replace it with a fresh one in just a few minutes.

3. Check the Windows version you are on

Note icon NOTE
The installed operating system can change, depending on how you installed Windows 11 on your device. Especially if you performed an in-place upgrade, Windows will automatically detect the existing edition and install the appropriate edition that you should be using. 
  1. Press the Windows key + I key to open Settings.open
  2. Click on System, scroll down, and click on About.about
  3. Then, scroll down to the Windows specification section. Find the Edition section to view the Windows 11 edition installed on your PC. If your Windows 11 matches the previous edition you had installed, then this is not the problem that is causing the error code to appear. check

4. Get Microsoft to reactivate Windows

The first time you register a Windows 11 license, it automatically associates itself with the hardware on your device. This helps Microsoft ensure that the license is being used as per the terms indicated. 

Therefore, users do not need to manually activate Windows on their operating system every time they make a clean install.

However, if you have made changes to your device in terms of hardware (for instance, you got a new motherboard), Microsoft will not be able to verify the validity. As such, the 0xc004c003 error code appears. 

To counter this issue, you can use the Digital Product Key or even run the troubleshooter to verify and activate Windows. 

Use Microsoft’s resources especially if Windows 11 is not activated after clean install or after a hardware change. 

5. Switch to Windows 11 Home

If you used the Home edition license key to upgrade your device to Windows Pro from Windows 11 Home, this is the reason why the activation error code appears. 

Therefore, you can either downgrade to the previous version you had installed or upgrade to the Pro version by buying it. 

6. Adjust the Registry to install Windows 10 Home

  1. Press Windows key + R key to open the Run dialog box.open
  2. Key in the following code and click on OK. Also, click on Yes when prompted by the User Account Control: regeditenter
  3. Navigate through the following code in the Registry Editor: Computer\HKEY_LOCAL_MACHINE\SOFTWARE\Microsoft\Windows NT\CurrentVersionfollow
  4. On the right, find and double-click on the ProductName value.select
  5. Then, type Windows 11 Home Single Language. Then, click on OK to save changes. edit
  6. Then, find and double click on the EditionID Value. select
  7. Then, type CoreSingleLanguage and click on OK to save changes.rename
  8. Next, navigate to the following location in the Registry Editor: Computer\HKEY_LOCAL_MACHINE\SOFTWARE\WOW6432Node\Microsoft\Windows NT\CurrentVersionfollow
  9. In the right pane, look for the ProductName value and change it to Windows 10 Home. Then, click OK to save the changes.rename
  10. Then, find the EditionID, double-click on it, and change it to CoreSingleLanguage. Click OK to save the changes.rename
  11. Close the Registry Editor.

This is an advanced solution, but as long as you follow the instructions closely, it should help you if your Windows 11 is not activated after upgrade.

7. Switch to Windows 11 Home

  1. Go to Microsoft’s official Home Windows 11 obtain web page.
  2. Scroll down to the download Home Windows 11 Disk Picture (ISO) part. Click on the drop-down and choose Home Windows 11. Click on the Download button.download
  3. Then, select the language you want to use. Click on Next.select
  4. Click on the 64-bit Obtain button. This will initiate the process of getting Home windows 11 ISO.download
  5. Once the ISO is downloaded, open the folder. Then, click on the ISO picture and choose Mount.click
  6. Home Windows will mount the ISO and open the drive folder automatically. If not, click on the DVD Drive icon beneath This PC. Then, double-click on the Setup.exe file, in the ISO folder. Then, click on Yes if prompted by User Account Control.click
  7. Then, click on Change how Setup downloads updates.
  8. Click on Not proper now. Then, click on Subsequent to proceed.
  9. Choose Notices and license phrases.choose
  10. In Prepared to put in window, ensure the Set up Home Windows 11 Home and Maintain private records data and apps choice is displayed. Click on Install and wait. install
  11. Then, restart your device.
  12. Navigate to the Settings page. Then, select About. Locate Home Windows Specs and test the Version.select
  13. Activate Windows by opening the Settings page. Then go to the Activation section located under System. activate
  14. Follow through the on-screen directions to activate your version of Home Windows 11.

That’s how you can reinstall Home Windows operating system, without necessarily losing important files or applications.

The activation error is not present on devices that are currently running on the January 2021 security release or an earlier release. 

If you are currently facing the activation issue, run the January 12, 2021 release or an earlier one to fix the problem.

How can I resolve activation error codes on Windows 11?

Microsoft does not allow users with inactivated Windows licenses to make use of some personalization and other functionalities on systems. Therefore, you need to verify your Windows 11 version and product key. 

Alternatively, you may use the Command Prompt. Even more, verify the validity of your license and perform a downgrade to the correct edition of Windows 11 if it is necessary. You can take a look at our guide on how to restore reset Windows 11 to its factory settings for this.

Moreover, feel free to make use of third-party repair applications that will help you deal with a wide range of Windows update difficulties, even if Windows 11 is not activated after upgrade.

However, if the same issue persists, you should consider rolling back from Windows 11 as we wait for Microsoft to come up with a solution for these bugs and glitches. 

Have you encountered the 0xc004c003 activation error code on Windows 11 and were you able to solve the issue using the methods we listed above? Share your thoughts with us in the comments section below.

Excel is Not Opening: How to Fix It in 5 Steps

Many issues may occur with Microsoft Excel when it comes to running accordingly on your Windows 10 or 11 PC.

As an example, it’s possible that your Excel application will not open because it gets corrupted due to problematic add-ins or faulty system files.

You may also encounter Excel not opening errors due to operating system issues, which means it can’t communicate with Windows services that allow the application to launch normally.

There are various causes for this Excel issue that may happen on your Windows device, and the most frequent scenarios are:

  • Excel won’t open after an update (on Windows 10 frequently)
  • Excel files won’t open when double-clicked
  • Excel not opening files directly
  • Excel is not opening correctly

In addition, you can experience opening errors on both Windows 10 and 11 because of application running issues or operating system malfunctions.

For instance, some users reported an Excel-related failure that seems to occur after installing Windows 10 Creators Update.

After the system update, certain files can’t be opened with Excel for no apparent reason. Needless to say, everything was functioning fine before.

How do you fix Microsoft Excel not opening?

1. Make sure that the files are supported and not corrupted

The first step you should take when addressing issues with specific file formats is to check their eligibility. So, ensure the file is supported and not corrupted before we move to the additional steps.

Moreover, some users reported the Office update was the culprit rather than the system, so consider that also.

Updates for Office are too often the same as the ones for Windows in general: full of issues. If you’re positive that the Office update instigated problems, make sure to send a ticket to support.

On the other hand, you can update it since the problem may have already been sorted out with the latest available release.

2. Disable Protected view

    Some protective measures are known to cause issues. Namely, in order to protect your surroundings, Excel (and other Microsoft Office programs, too) may prevent certain files from opening. Protective View might be completely blocking Excel from accessing your files. Therefore, disabling it could fix the problem.

  1. 1. Open Microsoft Excel.

  2. 2. Go to Options.

  3. 3. Navigate to Trust Center.

    navigate to trust center excel
  4. 4. Click on Trust Center Settings.

    trust center settings microsoft excel
  5. 5. Navigate to Protected View.

    microsoft excel protected view
  6. 6. Uncheck the boxes for all 3 options. This will completely disable Protected View.

    disable protected view microsoft excel
  7. 7. Click OK to apply and save the changes.

  8. 8. Launch the Excel file and check whether it runs without problems.

That should help you overcome possible issues inflicted by the overprotective Protected View.

Protective measures look great on paper since there’s not too much security, to be fully honest. But things in practice beg to differ.

3. Repair Excel

Office 365 has its drawbacks but online support is not one of them. At least for the majority of users. One of the nifty features that should help you substantially with this Excel issue is Repair.

Namely, you can repair an individual program from the package by using Online Repair. In this case, we’re, of course, referring to Excel. If the update changes something within the Excel installation or renders it unusable, you can fix it with this tool.

Follow the procedure below to repair the Excel:

  1. Right-click the Start menu and open Programs and features.
  2. Right-click Excel and select Change.
  3. You should see the How would you like to repair your Office Programs screen.
  4. Click on the Online Repair and wait for the procedure to finish.
  5. Restart your PC and look for changes.

Repairing Excel can also help you fix issues like Exception from HRESULT 0x800a03ec; read this guide to learn more.

4. Restore Component services values to default

In addition, besides some common bugs that the update induced into the system, it also may have changed some essential settings. These can impact the usage of all 3rd-party programs, including the semi-native Office 365 or older variations of Microsoft Office.

There is one option that may impact file issues, and that’s Component security. For that purpose, follow the instructions below to restore it to default values and, hopefully, resolve the issue:

  1. In the Search bar, type dcomcnfg and open it from the results list.
  2. Under the Component services in the navigation pane, navigate to Computers > My Computer.
  3. Right-click My Computer and open Properties.
  4. Under the Default Properties tab, make sure that these options have these values:
    • Default Impersonation Level: Identify
    • Default Authentication Level: Connect
  5. Confirm with OK and try accessing the files again.

If this wasn’t the thing that affected the misbehavior of Excel, move on to additional steps.

5. Reinstall Office

If the problem is persistent and you’re certain that it lies in the Office corruption, reinstallation is the next obvious step. However, have in mind that some of your custom settings may be gone once you delete Office.

Additionally, you’ll need to redeem your code in order to obtain Office from Microsoft’s official site.

Follow these instructions to reinstall the Office:

  1. Right-click Start Menu and open Programs and Features.
  2. Right-click Office 365 and uninstall it.
  3. Restart your PC.
  4. Go to this Office official site.
  5. Sign in with the Microsoft Account connected to Office.
  6. Select the preferred version, architecture, and language, and click Install.
  7. Once the setup file is downloaded, double-click to start the installation.
  8. After the installation is finished, activate your Office, and you’re good to go.

The brand-new installation should relieve you of the issues at hand. However, if the system is the culprit and you’re in a hurry to use Excel, there’s nothing left to do but perform a reset or clean reinstall.

We’re perfectly aware that this isn’t the best-case scenario for all of us, but sometimes, it’s obligatory in order to make things work as intended.

Until then, we hope that Microsoft will release some of the fixes for various issues reported by users worldwide.

Why Excel is not opening in Windows 10?

The Excel app hasn’t been updated or installed correctly on your PC so that it won’t launch with Windows 10.

Because this problem may prove to be a hard nut to crack, you can apply multiple solutions we tested and provided here to resolve Excel launching errors on Windows devices.

Why is Excel not opening in Windows 11?

One of the reasons why Excel won’t open in Windows 11 is that it is configured to disregard other apps that use DDE. When you double-click a file, the DDE aims to send a message to Excel.

As said before, another factor can be the third-party add-ins that run on your Excel application. You may consider disabling this feature to fix the issue quickly.

Finally, we conclude this article. Don’t forget to post your questions or alternative solutions in the comments section below. It will mean a lot.

Also, if you’re still unable to resolve the problem, we advise you to contact Office support as soon as possible and provide them with details regarding the problem you’re experiencing.

Best Ark: Survival Evolved Black Friday & Cyber Monday deals

If you love action, adventure, jungles, dinosaurs, and any combination of the above, then you will definitely like to know about Ark: Survival Evolved.

While this game has been around for quite some time now, Not everyone managed to try it out, and this game has far too much to offer for you to miss out on it.

Well, now’s your chance to get it at a special price during the Holiday season.

Note: All the prices and offers in this article are subject to change, so be sure to check the official product page to get the latest deal. If the product or offer you’re looking for is no longer available, you can try to find it on its official manufacturer page or get another one from our list.

Which is the best ARK: Survival Evolved deal?

Not everyone buys physical disks anymore, and most games are now up for grabs as digital downloads keys.

That being the case, Ark: Survival Evolved can be bought from many places, but Steam manages to offer the best deals yet.

Now that the game is down by 80%,, with the original price not being all that high anyway, it would be a shame to miss out on this fantastic deal.

Ark: Survival Evolved

Hund for the ultimate prey and avoid becoming dino food in this fantastic action-adventure survival game!
Check price Visit website

Now that you’re on your path to buying this game, it is only a matter of time until you get to see what it’s like to survive the true raw power of the wilderness.

Keep in mind that this game isn’t a simple walk in the park, it’s more like Jurassic Park! And speaking about Jurrasic, you might want to take a closer look at this Ark Survival Evolved mouse pad with dinosaur anime.

What other fantastic deals do you think deserve to be covered? Let us know by leaving us a message in the comments section below.

Fix: Error Code 0xc004e016 on Windows [Activation Issue]

Error code 0xc004e016 on Windows 10 is an activation error that occurs when you try to upgrade to Windows 10. It’s mostly happening when you use the wrong product key, but there might also be other problems.

Let’s get it fixed.

How do I fix error 0xc004f015 on Windows?

Note icon NOTE
For a stable Windows 10 installation, switch to a wired connection or disconnect extra devices from your Wi-Fi to free up bandwidth..

1. Activate Windows with Command Prompt

  1. Press Windows then type cmd and select the Run as administrator option.cmd-run-admin 0x80070002 windows update
  2. Now type the following command and press Enter to run it: slmgr /ipk W269N-WFGWX-YVC9B-4J6C9-T83GX slmgr  Error Code 0xc004e016 on Windows
  3. Wait until the process is done, then type the following command and press Enter again: slmgr /skms kms.xspace.inspace-in  Error Code 0xc004e016 on Windows
  4. Lastly, type this command and press Enter to activate Windows 10: slmgr /ato ato Error Code 0xc004e016 on Windows

2. Clean boot your computer

  1. Go to Start > type msconfig > hit Enter
  2. Go to System Configuration > Services >  check the ‘Hide all Microsoft services’ check box > Disable all.hide all microsoft services
  3. Go to the Startup tab > Open Task Manager.
  4. Select each startup item > click Disable.disable startup programs
  5. Restart your computer and try to activate Windows 10 again.

In rare cases, third-party apps and software may interfere with your Windows installation service. To eliminate this risk, you can clean boot your computer so that it boots up using only a minimum set of drivers and programs. Here are the steps to follow:

3. Run the slui.exe 3 command

  1. Open a new Run window by pressing the Windows key + R key.
  2. Type slui.exe 3 an hit Enter.slui.exe
  3. Enter your product key and check if this solves the issue.can i use the same windows product key on multiple computers
  4. If error 0xc004e016 keeps appearing, open a new Run window again.
  5. This time, type slui.exe 4 and hit Enter and follow the on-screen instructions.

4. Perform a clean install of Windows 10

To do this you’ll need to format your partition and download Windows 10 ISO. After you’ve installed Windows 10 you’ll be asked to activate it, but you can just choose to skip this step.

If, for some reason, you don’t know how to do this on your own, you can ask someone to help you, or hire someone to do it. Before doing this, please backup your important files.

5. Additional troubleshooting methods

If the issue persists, here are some other quick potential solutions to fix it:

  • Unplug unnecessary peripherals
  • Disable your antivirus, firewall or VPN
  • Run the Windows Update troubleshooter

We hope that these answers have helped you to fix error code 0xc004e016 on Windows 10, but if none of these answers work for you, maybe it’s best to contact Microsoft and to see what’s causing this issue.

If you have any other Windows 10-related issues you can check for the solution in our Windows 10 Fix section.

8 Amazing Cyber Monday Portable Projectors Deals & Sales

Today we want to show you the best portable projectors that you can get at a discount for this season.

Portable projectors are great. You can easily connect them to any device that has an HDMI output.

This allows you to carry your projector in your bag and connect it easily to your smartphone or tablet and enjoy multimedia with your friends.

Portable projectors can also be useful if you need to give presentations but you don’t want to deal with old and cumbersome tools.

Many portable projectors are on discount this year, so without further ado, let’s see some of the best options.

Note: All the prices and offers in this article are subject to change, so be sure to check the official product page to get the latest deal. If the product or offer you’re looking for is no longer available, you can try to find it on its official manufacturer page or get another one from our list.

What is the best affordable portable projector?

Auking Mini Projector

  • Full HD 1080p resolution
  • Built-in speakers
  • Incorporated fan cooling technology
  • Cross-platform compatibility
  • More suitable for movie-watching than PPTs

Why go to the movies when you can easily enjoy a premium cinema experience from the comfort of your own home?

This home theater projector will deliver everything you could expect and more.

From FHD resolution and a 35% boost in brightness, built-in speakers to enhance the audio quality, and low noise plus cooling technology, you are in for a big treat.

ViewSonic M1+ Portable Smart Wi-Fi Projector

  • Dual Harman Kardon Bluetooth speakers
  • HDMI plus USB Type C ports
  • Long-lasting built-in battery
  • Wi-Fi-enabled
  • Max SD card size you can use is 32GB

This portable project will deliver countless hours of entertainment – its built-in battery will make sure of that.

Enjoy a big screen with crystal-clear images and high-end audio powered by Dual Harman Kardon Bluetooth speakers.

The projector can easily be paired with your smart TV as well thanks to its Wi-fi-ready design. Just plug and play to enjoy!

GooDee G500 Mini Video Projector

  • Portable design (carry bag included)
  • Supports 1080P resolution
  • Cross-platform compatibility
  • 5-year service guarantee
  • The battery is not included in the package

Equipped with HDMI/USB/headphone/AV/VGA ports to meet all your needs, this mini projector will redefine your viewing and listening experience.

Boasting an 80% brightness boost, 1080P resolution, and a giant screen, the projector delivers accurate images, vivid colors, and smooth video.

Sound is also not neglected as you will enjoy crystal-clear audio thanks to its built-in dual powerful speakers.

Lightweight, compact, and quiet, the projector can easily become the perfect to-go entertainment provider.

ELEPHAS WiFi Movie Projector + Sync Smartphone Screen

  • 1080P HD resolution
  • Cross-platform compatibility
  • No external adapter required
  • Noise reduction technology plus built-in speaker
  • Does not directly support streaming services

With Full HD 1080P input and 24-bit true-color support, this mini projector will deliver a spectacularly big screen to enhance your movie-watching.

Highly versatile, the mini projector can be paired with all your favorite devices through its numerous ports, and of course, you can go completely wireless.

The projector is Wi-Fi ready and it only takes one synchronization with your smartphone to work seamlessly time and again.

Meer YG300

black friday portable projector deals

Meer YG300 is light, and due to its small size, it can fit in your pocket or bag with ease.

The projector supports multimedia and all standard media formats, and it’s powered by and 5V/2A source.

Thanks to the number of input ports you can connect almost any device to this projector, but if you want to connect your smartphone, you might need an additional adapter.

Meer YG300 specifications:

  • Brightness: 400 lumens
  • Contrast: 800:1
  • Native Resolution: 320*240 Support: 920*1080
  • Projector distance: 1-3m
  • Screen size: 24-80 inches
  • Color Reproduction: 16.7k
  • Input: USB/micro SD/HDMI/AV
  • Speaker:8Ω1w
  • Imaging Tech: TFT LCD
  • Unit size: 14.7*3.4*1.9inches
  • Net weight: 0.64pound

⇒ Check price on Amazon

AAXA Technologies KP-101-01

black friday portable projector deals

AAXA Technologies KP-101-01 is a small and fully portable projector with a built-in battery that lasts up to 80+ minutes.

The projector is compatible with a wide range of devices, and it even supports MicroSD cards and USB storage devices.

This projector also comes with an adjustable tripod, so it’s a perfect choice if you need a portable projector.

AAXA Technologies KP-101-01 specifications:

  • Resolution: 1280 x 720px
  • Brightness: 25 Lumens
  • Contrast Ratio:1000:1
  • Light: 3 LEDs that can last up to 15,000 Hours
  • Projection size: Up to 60″
  • Inputs: Mini-HDMI, MicroSD & USB 2.0 Inputs
  • Multimedia: Onboard Video, Picture & Music Player
  • Battery: Built-in, can last up to 80+ minutes
  • Size: 4.25″ x 2.36″ x 0.7″

⇒ Check price on Amazon

These are some of the best portable projectors that you can get for this season, so be sure to get them while they are on discount.

4 Cyber Monday Deals on Streaming Sticks [Roku, Fire TV]

Many devices will be on discount this year, and the same goes for streaming sticks. If you’re looking for a new streaming stick for your TV, today we’re happy to show you the best streaming stick deals.

Note: All the prices and offers in this article are subject to change, so be sure to check the official product page to get the latest deal. If the product/offer you’re looking for is no longer available, you can try to find it on its official manufacturer page or get another one from our list.

What are the best streaming stick deals?

  • Fire TV Stick 4K – high definition image streaming
  • Fire TV Stick – great value
  • Roku Streaming Stick – basic features
  • Roku Ultra – 4K image quality

Now let’s take a closer look at the pros and cons of each streaming device.

Fire TV Stick 4K – high definition image streaming

  • Processor: Quad-core 1.7 GHz
  • GPU: IMG GE8300
  • Storage: 8 GB internal
  • Wi-Fi: Dual-band, dual-antenna with MIMO support, supports 802.11a/b/g/n/ac standards
  • Some Wi-Fi minor issues

Fire TV Stick 4K allows you to enjoy in 4K video on your TV, so it’s perfect for all your media needs. With this streaming stick, you can enjoy over 500,000 movies and TV episodes.

In addition to your favorite TV shows and movies, you can also listen to your favorite songs using Amazon Music, Spotify and iHeartRadio services.

We also have to mention that Fire TV Stick 4K has a built-in Alexa support, so you can perform various tasks using voice commands.


Fire TV Stick – great value

  • Processor: Quad-core ARM 1.3 GHz
  • GPU: Mali450 MP4
  • Storage: 8 GB internal
  • Wi-Fi: Dual-band, dual-antenna with 2×2 MIMO support, supports 802.11a/b/g/n/ac standards
  • Bluetooth: Bluetooth 4.1
  • Volume controls issues

Unlike the previous entry on our list, Fire TV Stick doesn’t support 4K video, due to less hardware power. However, this streaming stick offers the same access to online services such as Netflix, Hulu, HBO, YouTube, etc.

This version also supports various music services such as Pandora, Amazon Music, and iHeartRadio. You can even play a hundred of available games right from it.

Fire TV Stick also has an Alexa Voice Remote so you can perform various actions just by using your voice.


Roku Streaming Stick – basic features

  • Video resolution: 720p, 1080p
  • Audio: Digital stereo over HDMI, DTS Digital Surround, pass through over HDMI
  • Network: Dual-band wireless, supports 802.11 b/g/n standard
  • Voice support: Yes
  • The HDMI extender must be ordered

Roku Streaming Stick allows you to stream online content and you can enjoy in over 150,000+ movies and TV episodes. In addition, you can view content from Netflix, BBC iPlayer and many other services.

Roku Streaming Stick supports voice control so you can play various content simply by using your voice.

In addition, there’s also a mobile app available that you can use to remotely control your Roku or use it to cast videos, photos and music to your screen.

Overall, Roku Streaming Stick offers great features, and its only flaw is the lack of 4K support.


Roku Ultra – 4K image quality

  • Video resolution: 1080p, 720p, 4K (2160p)
  • Audio: Digital stereo, DTS Digital Surround, Dolby Audio, and Dolby ATMOS
  • Network: 802.11ac MIMO dual-band wireless
  • Voice remote with buttons for TV power and volume, plus lost remote finder
  • The first time setup involves downloading a system update

Roku Ultra allows you to enjoy in 4K video on your PC, and just like its predecessor it allows you to access over 150,000+ movies and TV episodes. In addition, you can stream content from other paid services such as Netflix, HBO, etc.

Overall, Roku Ultra is an improvement over the older model, and if you have a 4K TV, this streaming stick might be perfect for you.


A streaming stick can be a welcome addition to your TV, especially if you stream online content frequently. These are some of the best streaming sticks available, so be sure to get them while the discount lasts.

5 Dell Alienware Deals & Sales

Gaming laptops are always a good investment, considering that they can also be used for creative workflows and intensive tasks. And if you’re looking for a great bang for your buck, season sales are the perfect moment to get one.

Alienware is already teasing fans with major discounts. The tech giant is offering these amazing gaming laptop deals that allow you to gear up and save up.

Note: All the prices and offers in this article are subject to change, so be sure to check the official product page to get the latest deal. If the product/offer you’re looking for is no longer available, you can try to find it on its official manufacturer page or get another one from our list.

What are the best Alienware deals?

  • Alienware m15 R4 – very powerful yet portable
  • Alienware m17 R3 17.3 inch FHD Gaming Laptop – huge display
  • New Alienware m15 R3 15.6inch FHD Gaming Laptop – ultra thin laptop
  • New Alienware Area 51M Gaming Laptop – awesome design
  • Alienware AW510H 7.1 PC Gaming Headset – memory foam ear pads
  • Alienware AW610M – long battery life
  • Alienware AW510K – customizable RGB caps

Alienware m15 R4 – very powerful yet portable

  • i7-10870H CPU
  • Nvidia RTX 3080 GPU
  • 32GB RAM
  • 1TB SSD
  • Windows 10 Home
  • Expensive

The Alienware m15 R4 is our top pick for the best laptops in this domain, as it offers a powerful CPU and a great GPU to go along with it – the Nvidia RTX 3080.

The 32GB RAM ensures that you will be able to run any games without worrying about tweaking your graphics settings, and the powerful CPU supports this fully as well.

This device comes with a 1TB SSD, which ensures both fast writing and reading speeds, and provides you with some fast booting times as well.

The OS installed on this device is Windows 10 Home, but you can always change it to a more suitable option if you need to.

Alienware m17 R3 17.3 inch FHD Gaming Laptop – huge display

  • 10th Gen Intel Core i7-10750H processor
  • 16GB DDR4 RAM plus 1TB SSD
  • Nvidia Geforce RTX
  • Full HD display
  • Some minor issues with overheating

Alienware is a cherished brand among gamers for good reason – it delivers the kind of performance a gaming aficionado needs in order to go fully immersive and act quickly in order to conquer opponents.

With a unique combo of powerful CPU and GPU, this Alienware laptop allows you to achieve just that.

The powerful10th Gen Intel Core i7-10750H processor fuels your gameplay, while the 17-inch full HD screen plus the Nvidia Geforce RTX graphics deliver beautiful, high-speed motion graphics.


New Alienware m15 R3 15.6inch FHD Gaming Laptop – ultra thin laptop

  • 10th Gen Intel Core i7-10750H processor
  • 16GB DDR4 RAM plus 512GB SSD
  • Nvidia GeForce RTX GPU
  • Anti-ghosting keyboard with per-key Alien FX lighting
  • Some users complained about the life of the battery

Incredibly thin, yet enormously powerful – this is what you can expect from this Alienware equipment that will take your gaming to a whole new dimension.

When combined, high-end durable materials on the outside and high-tech ultra-modern technology on the inside can only deliver top-notch results.

Fueled by the 10th Gen Intel Core i7K processor and equipped with a Full HD display with 144Hz refresh rate and 300-nit brightness, this laptop will offer countless hours of intense gameplay with smooth, high-speed motion graphics.


New Alienware Area 51M Gaming Laptop – awesome design

  • Intel Core i7-10700K processor
  • Nvidia GeForce RTX 2070 graphics
  • 1TB SSD plus 16GB RAM
  • 17.3-inch Full HD Display
  • 2.5Gbps bandwidth Ethernet connection
  • No knows issues

Unprecedented power and performance in all the right places – this is what this ultimate gaming-optimized laptop promises to deliver.

Understanding the importance of a long ping, Area-51m R2 provides a 2.5Gbps bandwidth Ethernet connection that will redefine your notion of speed.

Gamers will undoubtedly appreciate the TactX keyboard that enables programming allowing you to obtain a quick response for any keystroke.


Alienware AW510H 7.1 PC Gaming Headset – memory foam ear pads

  • 7.1 headset
  • Hi-resolution drivers
  • Noise-canceling microphone
  • Compatible with multiple platforms
  • 3.5 mm jack
  • Not compatible with Xbox One

The Alienware AW510H headphones have an alien design indeed and you will be able to wear them for hours thanks to the hybrid of plush memory foam, sports fabric, and leatherette on the ear pads. The fabric combination is also designed for optimal cooling and to enhance noise isolation.

Of course, as their name suggests, they feature 7. 1 surround sound, perfect for full immersion and for pinpointing every sound in the virtual space.

All this effect is produced by custom-tuned 50 mm 20Hz – 40kHz drivers for a high-resolution audio experience.


Alienware AW610M – long battery life

  • 16000 DPI optical sensor
  • 350 hours battery life
  • Fully rechargeable
  • 7 buttons
  • 3-zone AlienFx RGB ligthing
  • Click buttons are loud

The Alienware AW610M is a mouse you must try out if you’re a fan of this series, offering you an amazing scroll quality and a premium ergonomic build.

This device has a 16000 DPI optical sensor, ensuring that any movement will be represented on screen without any issues.

One battery charge gives you about 350 hours of usage, and the cable the mouse comes with can charge the mouse quickly, while also allowing you to use it as a wired mouse if needed.

The 7 buttons this mouse features can be customized to suit your needs, while the 3-zone AlienFx RGB lighting ensures that this mouse will fit perfectly with your Alienware gaming setup.

Alienware AW510K – customizable RGB caps

Alienware AW510K is a low profile keyboard for gaming but the low profile denomination doesn’t mean that it doesn’t stand out, it only means that the keys themselves have a short travel lenght and are less protuberant.

The key durability recommends them for 50 million keystrokes with no loss of quality and the AlienFX offers 16.8 million colors per-key RGB lighting.

Of course, AW510K comes with fully programmable keys for macros and also media keys with a volume roller that makes controlling sound a lot easier.


That is our selection for the best Dell Alienware deals & sales. We hope that you found at least one product to your liking. If we missed something, let us know in the comments section below.

ESC key not working in Windows 10 [BEST SOLUTIONS]

The Escape key on a keyboard has been the standard get me out key for computer software since the beginning of computers.

This was a very easy method of exiting different scenarios on a computer but for the last 10 years, developers have started to focus on usability features, and having a single key on the keyboard that if pressed by accident can close an application is a big problem.

In this article, we’ll discuss how we can troubleshoot the Escape key in Windows 10 in different scenarios.

What can I do if the ESC key won’t work on Windows 10?

  1. Check your driver
  2. Use SHIFT + Escape
  3. Test your keyboard
  4. Check for viruses
  5. Run the keyboard troubleshooter
  6. Uninstall the Synaptics Pointing Device driver
  7. Turn off Filter Keys
  8. Uninstall the recently downloaded software
  9. Check the keyboard for dust or foreign matter

1. Check your driver

The keyboard driver translates the input from the keyboard so it can be read by the operating system. Drivers, like any other computer file, can get corrupted by different software or viruses.

This can also be caused by upgrading or downgrading your operating system if the installed driver isn’t fully compatible with the new version.

Update the driver manually

The method that we usually recommend to try and fix this is uninstalling the current driver and letting Windows reinstall it again:

  1. You can achieve this by right-clicking on the Start button and selecting Device Manager.
  2. From here expand the Keyboards list, right-click on your current keyboard and select Uninstall, like in the image below.uninstall keyboard driver
  3. Confirm this by click OK on the next dialog.

Once the keyboard has been removed from the list reboot your computer to reload your operating system and force it to detect the keyboard. It will then proceed to reinstall the driver and hopefully fix the problem.

NOTE: Newer USB keyboards are more complicated than they used to be. In order to use them at their full potential, you will need to install the driver provided by the manufacturer.

Update drivers automatically

The safer and easier way to update drivers on a Windows computer is by using an automatic driver updating tool.

It automatically identifies each device on your computer and matches it with the latest driver versions from an extensive online database. Thus, you will keep your system safe from downloading and installing the wrong driver versions.

2. Check for viruses

The Esc key not working might hide a bigger problem caused by malware so it is recommended to run a full antivirus scan on your computer.

You can use the built-in Windows Defender to run a full PC scan. To do so, just open Windows Defender from the taskbar, click Open Windows Defender Security Center, then click the Virus and Threat Protection button. Click Advanced Scan and wait for the process to complete.

Alternatively, you can use third-party antivirus software. We strongly recommend looking into the best antivirus software because dedicated tools have higher detection rates than Windows Defender.

Plus, there are many antivirus software that won’t interfere with Windows Defender, allowing it to run its scans. Generally, Windows Defender detects when you install another virus protection software and lets you set it up accordingly.

We recommend getting an antivirus with a large and constantly updating threat database. On top of that, we recommend you look into tools that provide multi-layered protection and some sort of online privacy features.

After you decide and install your preferred antivirus, run a scan and see what it reports. The user interface varies from one software to another, but the scan button is generally really easy to access, just like in Windows Defender.

Wait for the scan to complete and see the results report. If you have any viruses, the antivirus should be able to remove and quarantine them.

To avoid such problems in the future, check the name of the threat and see if you can find where you could have gotten it from. Viruses usually come from malicious websites or suspicious links, so if you can trace your steps and avoid accessing these in the future, you will save yourself from a lot of trouble.

Make sure to keep your antivirus running at all times, as it is easier to remove a threat before it gets to permanently damage your system. 

3. Use SHIFT + Escape

Like I said in the first paragraph, the ease with which the Escape key could be used in the past posed a lot of problems if it was pressed by accident.

This is why most of the newer applications have now switched to using the Shift + Escape keys combination.

For example, Google Chrome uses the SHIFT + Escape keys combination to give you access to its internal task manager, as you can see in the image below.

task manager chrome

4. Test your keyboard

Sometimes the problem isn’t with the operating system but with the hardware. Keyboards and mice are probably the most used and abused input components on a computer, meaning that they tend to break more often than other components.

If your keyboard is connected to your computer using a USB or PS/2 socket than you can disconnect it and install it on a different machine. This way you can test if the problem is with your computer or with the keyboard.

You can also try connecting a different keyboard to your machine and try using the Escape key on that one. Or simply purchase a new keyboard.


5. Run the keyboard troubleshooter

  1. Go to Settings, then click on Update & Security and click on Troubleshoot in the left-hand panel
  2. Navigate to Find and fix other problems
  3. Select the keyboard troubleshooter,  run it, and then check if the ESC key is working.
keyboard troubleshooter

If you’re having trouble opening the Setting app, take a look at this expert guide to solve the issue.


6. Uninstall the Synaptics Pointing Device driver

If your default driver comes into conflict with Windows 10, certain keys may fail to work. You can fix this problem by uninstalling the Synaptics Pointing Device driver.

Simply navigate to Control Panel and go to the Uninstall program section. Uninstall Synaptics Pointing Device driver from there.

uninstall synaptics pointing device driver

7.  Turn off Filter Keys

  1. Go to Control Panel, type ease of access in the search box  and open Ease of Access Center.
    ease of access control panel
  2. Navigate to Make the keyboard easier to use option.
    keyboard settings control panel
  3. Scroll down and select Filter Keys. Uncheck the Turn on Filter Keys option, then hit Apply and OK.
turn off filtered keys

8. Uninstall the recently downloaded software

  1. Go to Start, type control panel, and double click on the first result to launch Control Panel
  2. Go to Programs, then click on Uninstall a programuninstall program control panel
  3. Select the software that you recently installed and select Uninstalluninstall programs windows 10
  4. Restart your computer and check if the ESC key is responsive now.

9. Check the keyboard for dust or foreign matter

Make sure that your keyboard is free of dust, dirt, or other foreign matter. You can simply turn it upside down so that any specs of dust or debris may fall out.

You can also use compressed air to blow out dust from the crevices on your keyboard. If you’re a tech-savvy person, you can disassemble the keyboard.

However, keep in mind that this approach may void the manufacturer’s warranty, so proceed at your own risk.

If the steps above failed to fix your Escape key, please provide more details about your problem in the comment section below and we’ll try to help as best as we can.

Xbox Live Gold Offers Many Hot Game Deals on Cyber Monday

The discount season is here and it also just officially went live on Microsoft’s website. This means that there are 800 game deals available on the official Xbox website. Some of them are now up to 65% off.

In other words, if you were looking to extend your game library, or gift a loved one his or her favorite title, this is the perfect chance to do that and save some money.

The only thing left to do now is make your choice, click on it, and get it before these awesome deals expire. That’s right, these bargains are time-limited, so don’t waste any time.

What are the Xbox Live Gold deals this year?

As always, Gold members also get an extra 10% discount for all the games on the Christmas holiday list. So, if you want to purchase one of the major game titles released this year, act quickly.

Speaking of games, if you need additional gaming gear, here are some more deals for all the gamers out there:

It’s no secret that Xbox Live Gold Cyber Monday sale can save you a lot of hard-worked money on everything from quick three-month memberships to a full year of online services.

However, the Xbox Live Gold price isn’t the most expensive online multiplayer subscription in the industry, but it certainly pays to scour some discounts when the time comes to renew.

Xbox Live Gold 1 month

Check out discounts on the Xbox Live Gold subscriptions and choose the one that best fits your style.

The main draw to that Xbox Live Gold price is access to online multiplayer, as it’s the only way to play cooperatively or competitively online on Xbox.

That being said, there are other benefits included to sweeten the deal a little, like two free monthly games and exclusive discounts at the Microsoft Store as well.

Games are also massively discounted on the Xbox Store

In addition to the Xbox Live Gold membership Black Friday deal, there is a vast collection of games that are now discounted on the Xbox Store.

Not all titles are discounted by the same amount, but you can definitely find what you are looking for and pay up to 65% for your favorite game.

But trust us when we say that, after you see these titles and how much they go for, you will surely want a piece of the action.

However, you better move quickly because these offers won’t last forever. So, without any further ado, these are the most popular choices right now:

Far Cry 6

This blockbuster title thrusts players into the adrenaline-filled world of a modern-day guerrilla revolution, which takes place in Yara.

FIFA 22

Take on the world’s greatest players, inside of the world’s biggest stadiums, as a part of the world’s toughest competitions.

NBA 2K22

Whether you play in the NBA or WNBA, dominate the court and show your opponents what it means to be a true superstar.

Cyberpunk 2077

Customize your character’s cyberware, skillset, and playstyle, and explore a vast city where the choices you make shape the story and the world around you.

As we said, this is just a tiny fraction of all the awesome games you can find a discount on the Official Xbox Store. Check out the entire offer and decide what you want to add to your collection.

Also, make sure to also check all the other game deals available during the seasonal sales event.

Holiday Sale comes with generous offers across the board, whether we are talking about hardware or software, so be sure to check our dedicated deals.

What are some of the offers you are hunting for this season? Share your thoughts with us in the comments section below.

5 Best Rugged Hard Drives for Your Data [Cyber Monday]

With rugged hard drives, the keyword is more — hardier, more shockproof, more water-resistance, more dustproof. Everything is more.

This is the word on every photographer’s, videographer’s, researcher’s, journalist’s, or deejay’s lips when hunting for a rugged hard drive.

Note: All the prices and offers in this article are subject to change, so be sure to check the official product page to get the latest deal. If the product or offer you’re looking for is no longer available, you can try to find it on its official manufacturer page or get another one from our list.

What are the most dependable hard drives?

LaCie Hard Drive 1TB

  • It resists drops even from 4 feet, dust, water, pressure, shock
  • It comes with a built-in password protection
  • Uses USB 3.0, usually 4 x faster than ordinary USB 2.0 (But it’s still USB 2.0 compatible)
  • 1 TB storage at 5400 rpm (rotational speed)
  • It must be handled gently

Among the all-time best rugged hard drives is the monstrous LaCie 1TB Portable hard drive.

It’s a robust hard drive with a built-in ability to impressively fight back and overpower any attempts by drops, shocks, and water to mess up your data.

SanDisk 1TB

  • 360 degrees Protection: water and dust-resistant (IP55), shockproof. Can survive 2-meter drops on concrete.
  • Greater Durability: Its reinforced solid state core guarantees lasting service.
  • Slim: The hard drive is compact and perfect size for the pocket.
  • USB Type-C: The drive works with the super-fast USB type C port. (Still USB-A Compatible)
  • The drive must be formatted

This SanDisk Extreme rugged Portable SSD typically delivers high-speed transfers (up to 550 Megabytes per second read speeds).

This explains why it’s a favorite of photographers and video editing professionals.

Plus, you can trust its solid-state technology with all your creative designs thanks, especially to its standout shock resistance.

Silicon Power 1TB

  • High-speed Transfers: It rapidly moves extra-large files (even 4GB) to and from devices
  • PS4 / XBox Compatibility: One of the best for gaming enthusiasts (supports various versions of Xbox & PS4s)
  • All-around Data Protection: Shockproof and water-resistant
  • Cable-carry Design: Stores the cable easily so you won’t worry about missing cables
  • Not exactly plug and play

The manufacturer promises and delivers a high-end military-grade shockproof and water-resistant hard drive in the silicon rugged portable hard drive.

The ultra-rugged rubber casing combines with a resilient internal suspension system to implement a super-power-like buffer effect. And so all efforts by dust, fall, and water to destroy your files fail miserably.

WD Elements 2TB

  • Shock-resistant: Doesn’t budge under any circumstances
  • Interconnectivity: choose the popular USB 3.0 or the good old USB 2.0 depending on the device
  • Fast data transfers: It offers swift data transfer thanks to the extreme rotation speed
  • High Capacity: It delivers 2 TB of clean storage
  • Hardware encryption: More security for your files
  • The driver must be formatted for Mac users

From Western Digital comes this high-performance, universal connectivity rugged hard drive.

It packs thoughtful features such as foolproof password protection, auto backup software for convenience, and a premium finish.

Buffalo MiniStation 1 TB

  • USB 3.0 Compatible: Universal connectivity for PCs
  • Military grade ruggedized protection
  • Hardware Encryption: This delivers more security against unauthorized access
  • Water (IPX3 standard ) , dust (IP5X), and shock resistant
  • Integrated USB cable: Easy to plug in and convenient
  • There is no USB-C cable

One of the most versatile options in our Cyber Monday rugged hard drive deals, this rugged hard drive comes with its unique wrap-around USB data cable.

It, in addition, uses built-in NFC technology to permit you to unlock and access the stored files conveniently using the accompanying smart card. You, therefore, don’t have to cram passwords.

Rugged hard drives offer the best degree of dust, water, and fall resistance. They thus withstand harsh conditions including extreme temperatures so your files are pretty much protected.

10+ Best Portable Speakers on Cyber Monday Deals & Sales

If you’re frequently on the move and use your smartphone to listen to your favorite music or podcasts, your next piece of hardware might be a portable speaker.

You can take it with you wherever you go, connect it wirelessly via Bluetooth and share your favorite tracks with your friends and family. They’re usually quite easy on the budget, but some discounts make many of them a no-brainer bargain.

We enlisted our list of top 6 portable speakers with their distinctive features to make your choice easier. You can check them out below.

Note: All the prices and offers in this article are subject to change, so be sure to check the official product page to get the latest deal. If the product or offer you’re looking for is no longer available, you can try to find it on its official manufacturer page or get another one from our list.

What is the best small Bluetooth speaker on the market?

JBL Flip 4

  • 3000mAH Rechargeable Battery (12 hours of playtime)
  • 2.8 x 6.9 x 2.7 inches, comes in Black color and it’s cylinder shaped
  • IPX7 Waterproof
  • Dual external passive bass radiators.
  • JBL Connect+ (link all Connect+-ready JBL speakers to amplify the sound).
  • Voice Assistant Integration
  • Cannot use when charging if the battery is too low

JBL is the leader in the portable speaker‘s niche for a good reason. Their products offer great sound and ultra-portability. Flip 4 is one of the best Bluetooth portable speakers you can get at the moment.

It comes with a mini USB charging cable. It’s waterproof and can be immersed in water up to 1 meter without leaving any damage to it.

The speaker also comes with 6 buttons to help you optimize the sound control, play/stop option, call answer, and so on.

OontZ Angle 3

  • 5.25 Inches long 2.6 inches high and 2.8 inches wide.
  • 2200 mAh battery size plays up to 12 hours on a full charge.
  • Black color and triangular design with no hard corners.
  • Water resistant IPX5 standard.
  • Easy to pair over the Bluetooth with all imaginable devices.
  • The black buttons are very difficult to see

This nifty portable speaker is a great acquisition for all people who like some clear audio playback without distortion while on the move.

Thanks to the Bass Radiator feature, Angle 3 has quite a strong punch for such a small portable device.

JBL Charge 3 Red

Features: 

  • IPX7 Waterproof.
  • 9.1 x 3.5 x 3.5 inches, comes in red color and a cylinder-like chassis.
  • Built-in rechargeable Li-ion battery supports up to 20 hours of playtime.
  • JBL Connect+ (link multiple JBL speakers to create a surround effect or amplify the sound).
  • The noise and echo-canceling speakerphone.

Description: While we’re at JBL products, it’s worth mentioning a bit larger option with the code name Charge 3. It brings all the usual JBL features all their Bluetooth speakers have.

If you prefer a larger portable speaker to pair with your device while on the move, this might be the speaker for you.

⇒ Check it now on Amazon

Ultimate Ears WONDERBOOM

Ultimate Ears WONDERBOOM

Features:

  • IPX7-rated waterproof.
  • 4.2 x 4.7 x 5.3 inches, super-compact and comes in a variety of colors.
  • 360-degree sound and big bass.
  • Option to link two WONDERBOOM speakers for amplified sound.
  • 10 hours of playtime after a full battery charge.
  • Great aesthetics.

Description: Now this is a welcome change from all pill-like portable speakers. This ultra-compact speaker looks great and offers a brilliantly crispy sound with no distortion.

It fits great both in your home and as an attachment to your traveling rucksack while on the move.

⇒ Check it now on Amazon

DOSS E-go

DOSS E-go

Features:

  • Powered by 12W stereo drivers with enhanced bass.
  • Small size and lightweight (7.8 x 2 x 2.5 inches).
  • IPX6 Waterproof, Dustproof, Crashproof (made out of resilient fiber, black color).
  • Supports Aux-In, TF card, as well as the Amazon Echo Dot.
  • Up to 12 hours of playtime

Description: This portable Bluetooth speaker checks all the marks in the budget category. It’s quite affordable and offers a lot for a price, quite compact, and resilient.

It would be a worthy acquisition or a great present for everyone who fancies some high-quality music on the go.

⇒ Check it now on Amazon

Tribit X-Boom

Tribit X-Boom

Features:

  • 360° Immersive Sound
  • Innovative XBass Technology activated by the dedicated Bass button.
  • Advanced IPX7 waterproofing
  • Amazing 20h Playtime with the 5200 mAh battery.
  • 7.1 x 2.7 x 2.7 inches, comes in black, cylinder-shaped chassis.
  • Compact design makes it quite portable

Description: The selling point of Tribit’s portable Bluetooth speaker is the battery. Up to 20 hours of playtime after a full charge is just an amazing performance.

Add to that a great design and an extra bass feature and we got ourselves a fan favorite in this ever-growing niche.

⇒ Check it now on Amazon

What’s your favorite? Feel free to tell us in the comments section below.

Update Drivers in Windows 10 in 6 Steps

Here are 6 easy ways to manually update your Windows 10 drivers. While Windows Update handles most automatically, important ones like graphics, audio, or chipset drivers can get missed.

Manually updating them helps fix hardware issues and can boost your PC’s performance. Let’s get started.

How can I update drivers in Windows 10?

1. Via Windows Update

  1. Press Windows + I and click Updates & Security.
    how to update drivers windows 10
  2. Click on Windows Updates, and then on Check for updates on the right.
    how to update drivers windows 10
  3. Your PC will now check for driver updates in Windows 10 and install the available ones.

Microsoft has partnerships with more significant hardware manufacturers like Intel, Nvidia, AMD, etc. Therefore, these companies regularly release driver updates for their components via Windows Update.

And the best part, you can update drivers on Windows 10 for free via Windows Update. So, if you’re rocking a newer Nvidia or ATI graphics card, check for Windows updates regularly to keep the device drivers up-to-date.

2. Use the Device Manager

  1. 1. Go to Search, type device, and open Device Manager.

  2. 2. You’ll now see the list of all your hardware listed in Device Manager.

  3. 3. To check for driver updates for any component, just right-click on it, and choose Update driver from the list of options.

    update graphics driver device manager
  4. 4. Now, you will have two choices. You can select the first one if you want the system to automatically search for a driver. The second is for when you already downloaded a driver and so you will have to point its location

    device manager search automatically for driver
  5. 5. If a driver update is available, the wizard will automatically install it, if not, your driver is already up to date.

  6. In case you don’t receive your driver updates via Windows Update, the most common way to check for driver updates is with the Device Manager.

    You can manually update your drivers through it. This built-in tool allows you to separately update every driver for your devices.

    It might take some time to check every single driver manually, but you can solve a lot of problems by doing that.

3. Install dedicated driver downloading software

There are various third-party tools that you can use to install the latest drivers on your Windows 10 computer automatically. However, professional driver updater software is one of the most efficient options.

You need to know from the start that a professional tool makes updating drivers simple, even for newbies. More precisely, the device runs automatically to find outdated drivers.

Fortect Driver Updater is the perfect tool for this task as it is very powerful and easy to use. In just a few moments you can have all your drivers updated and you can set up automatic scans for the future, so you’ll never have to worry about this issue again.

⇒ Get Fortect Driver Updater

4. Update your drivers from the manufacturer’s website

Microsoft already has agreements with all the noteworthy manufacturers and provides the necessary drivers within regular Windows updates. However, some manufacturers can release special updates to tweak specific problems in some exceptional cases.

In most cases, these versions will also be released via updates for your PC, but there seems to be no harm in checking for driver updates on the manufacturer’s website as long as it’s a trusted brand. The drivers can usually be found on the Support page.

Here are the official driver download links for the most common drivers used on Windows PCs:

5. Use the Compatibility Mode

  1. Locate the driver installation program on your computer or a media (CD/DVD).
  2. Right-click on the program’s setup file (an executable file usually has the word set up in its name), and select Troubleshoot compatibility.troubleshoot compatibility windows
  3. The Program Compatibility Troubleshooter will look for any problems.
  4. Click on Troubleshoot program.troubleshoot program windows update
  5. Now select which is the problem with the program. If the driver worked fine in a previous version, select the first option and click Next.rollback to earlier version windows driver
  6. Choose the Windows version where the driver worked fine, and click Next. We selected Windows 7 in our example.compatibility driver windows
  7. Now click on Test the program and then hit Next again.windows test the program
  8. Now follow the instructions to install the drivers as you usually do.
  9. Finally, you can save these settings if the installation and the drivers work fine.

In the unlikely event that you fail to update your drivers with the previous methods, there is still the option to troubleshoot compatibility. This is a way to convince older drivers to work on a supported version of Windows.

6. Via BIOS

  1. Download the latest BIOS (or UEFI) from the manufacturer’s website.
  2. The BIOS update file is usually in a .exe format, so you can copy it on a bootable USB flash drive. (Make sure you unzip the file before the move and double-check that there is no other file stored on the industry).
  3. The next step is to insert the USB stick into the system.
  4. To activate the booting sequence, press and hold the power button a few times.
  5. Choose Troubleshoot.
    how to update drivers windows 10
  6. Click Advanced options and select UEFI Firmware Settings.
  7. Finally, select Restart and use the menus to update the BIOS / UEFI.

As you can see, updating the drivers through BIOS is closely linked to flashing the BIOS itself.

We know that handling the BIOS can be daunting, but an expert guide for updating the BIOS is all you need. Nevertheless, we recommend using this method as the last resort as it is both risky and time-consuming.

Every piece of hardware requires a proper driver to work correctly because drivers are the soul of every computer. If a particular component of your computer is missing or has an outdated driver, various problems may occur.

While updating all drivers is often essential, here are a few you must not skip:

  • Display drivers – This driver is the software component that enables a computer to display images from a video card. This program is crucial because your video card isn’t used to its full potential.
  • Controllers – You can find a list of vendors and drivers for devices that aren’t built into your motherboard on the controller drivers page.
  • Network card drivers – To connect your computer to the internet, you need software called a network adapter driver. It would be best to keep your network adapter drivers up-to-date to prevent potential issues.
  • Sound card drivers – A sound card and its accompanying driver software are responsible for managing the audio output of your PC. This sound card might be a separate piece of hardware slotted in via an expansion port or an integral part of the motherboard itself.
  • Mouse drivers – To put it simply, a mouse cannot interact with a computer without a device driver known as a mouse driver. In most cases, the mouse driver will already be installed on your computer.

These are the different ways to update the device drivers in Windows 10. Of course, you can always use any method that seems most accessible, but all of them are guaranteed to work and get you the latest drivers for HP, Dell, and other manufacturers.

Should you have any problems, make sure to check out our dedicated troubleshooting guide for drivers not installing.

If you’re using a legacy system, we also have a great guide on how to roll back a driver on Windows 7, so don’t miss it. You can also learn how to update NVIDIA drivers on Windows 11.

Do not hesitate to refer to our above tips and update drivers in Windows 10 in no time. Let us know how the procedure went for you in the comments below.