Not long ago, in response to the Zoom surprise due to the infamous pandemic, Google decided to implement Google Meet inside Gmail.
That made it free for everyone and capable of managing up to 100 people with no time limits in a meeting.
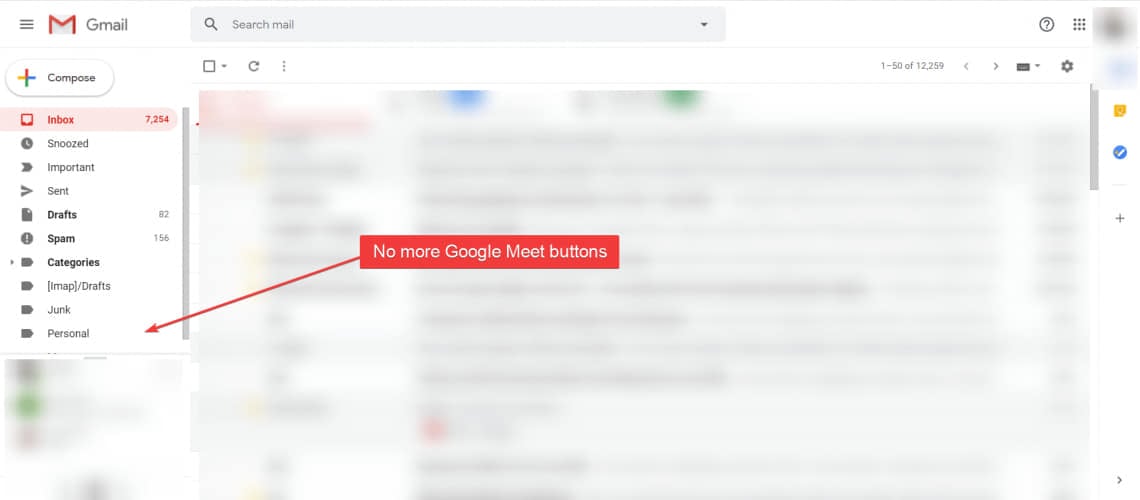
That was a nice move but some users either complained about losing the precious estate from the left pane or that they just don’t want to use Google Meet.
Because of the negative feedback from the users, Google decided to offer a way of hiding the Google Meet buttons from Gmail.
Whatever your reasons for removing the Google Meet buttons, read our article to find out what exactly to do to get rid of them.
How can I hide the Google Meet buttons from Gmail?
You can easily hide the Google Meets buttons via Gmail’s built-in Settings. From there, you can configure whether you want these buttons to be visible or not on the main menu.
1. Open your browser.
2. Go to Gmail.
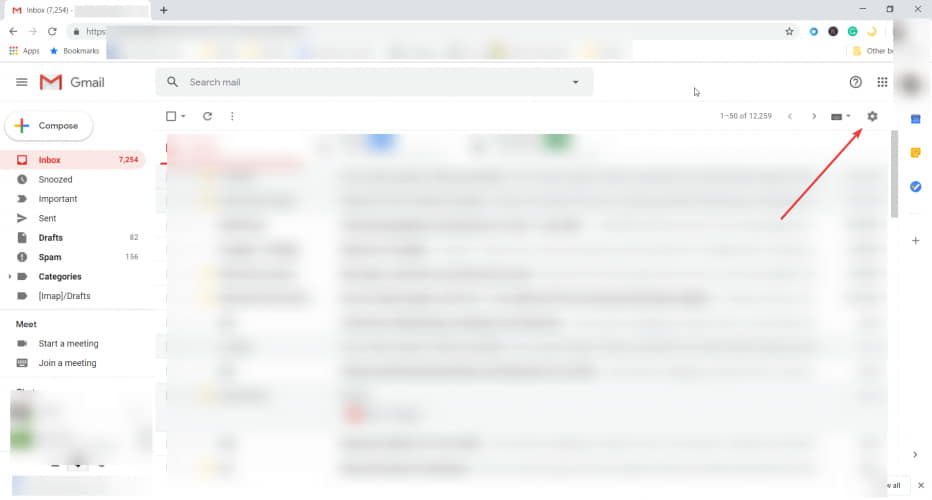
3. Click on the Settings button (the cogwheel) from the top right corner of your Gmail window.
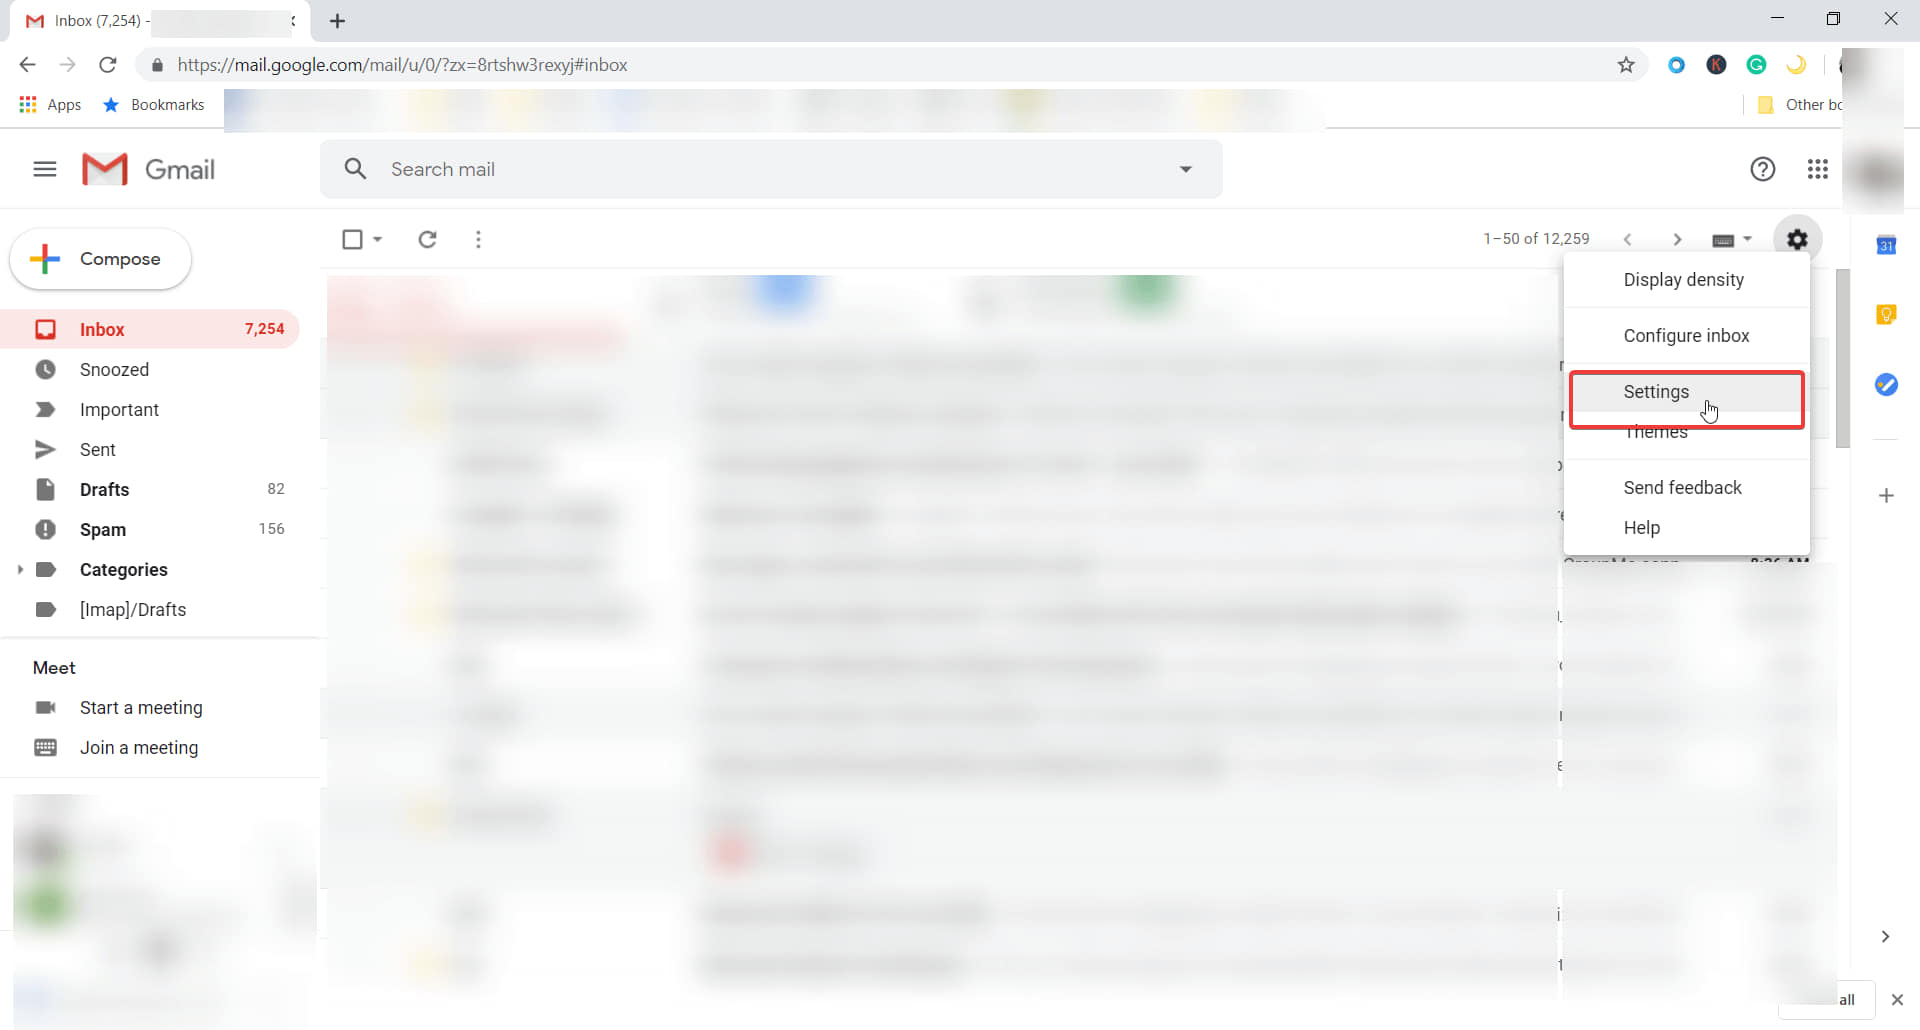
4. Choose the Settings option from the drop-down menu that opened.
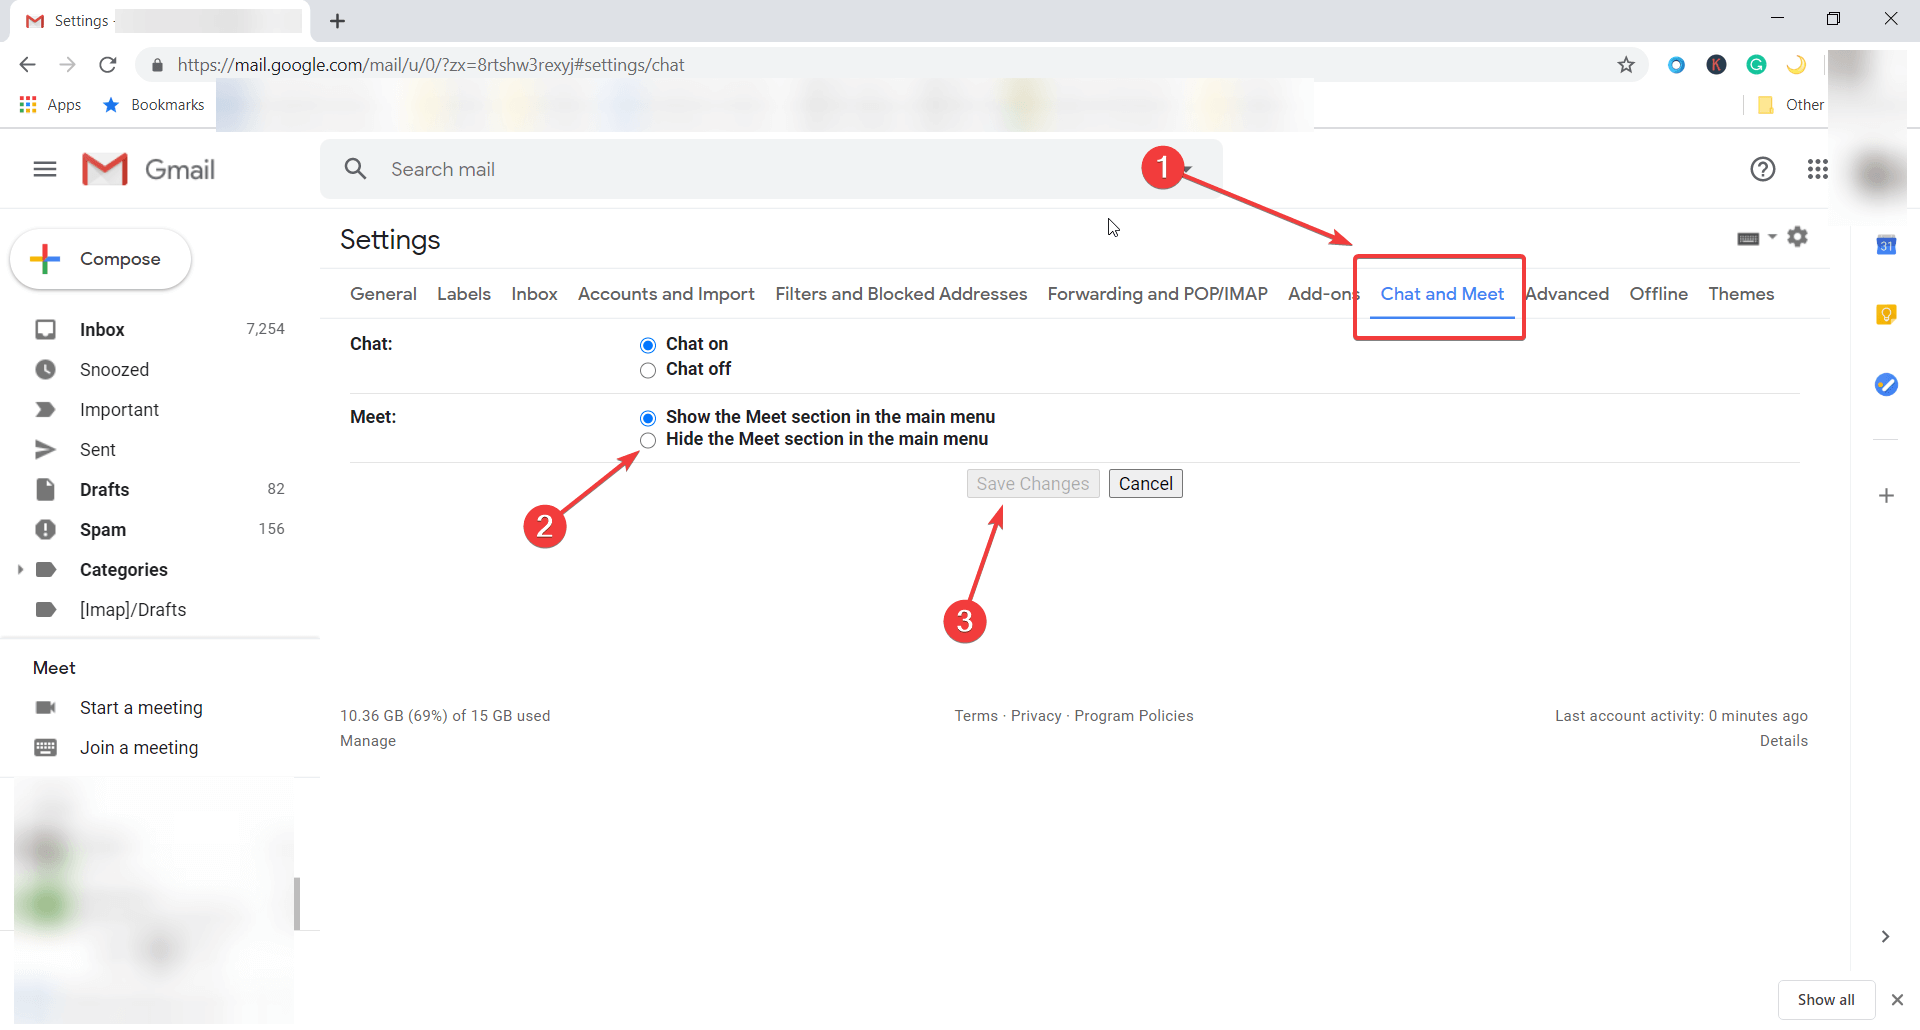
5. In the Settings window, click on the Chat and Meet tab.
6. Tick theHide the Meet section in the main menu checkbox.
7. Click on the Save changes button below.
8. The Gmail window will refresh and Google Meet buttons will be a thing of the past.
Of course, you can reverse this following the same steps if you change your mind and start embracing Google Meet.
Today, we’ll show you how to enable location permissions in your browser. This will help you get correct local information such as weather, maps, and local news.
This guide shows you exactly how to turn location access on or off in Chrome, Firefox, Opera, and more, so you stay in control of what your browser shares.
On the right-hand corner of the screen, click on the three dots to prompt the Menu tab.
Scroll down and select Settings.
Click on Privacy and security, then select Site Settings.
On the new tab, select location.
Choose the option you want as your default setting.
Restart your browser for the changes to sync.
After this process, browser geolocation permission would be disabled on your Google Chrome. Hence, it will not tie your activities to your location anymore.
2. Opera One
Launch the Opera One browser on your computer.
Click on the Menu button.
Select Settings from the drop-down and click on Privacy and Security.
Click Site setting and choose location.
Here, you can change your browser location settings whenever you like.
However, we recommend you close and relaunch your browser for the changes to sync correctly.
3. Mozilla Firefox
Launch the Mozilla Firefox browser on your computer.
On the right-hand corner of the screen, click on the Menu button, and choose Options.
Select Privacy and security on the left side of the screen.
Go to Permissions, then click on Settings right in front of the location.
While in the location permission settings tab, you can change your browser geolocation access in your browser settings.
4. Microsoft Edge
Launch the Microsoft Edge browser on your device and select Menu.
Click on the Settings button.
Select cookies and site permission from the drop-down.
Click on Location.
Users can on and off location access and manage it for specific websites in the browser location permission settings.
How do I stop my browser from knowing my location?
Disable location access for your browser on Windows
Press the Windows + I key simultaneously to prompt Settings.
Go to the bottom of the screen and click on Privacy.
Click on the location, scroll down and toggle off the switch for the Allow apps to access your location option. (It will disable location access for all apps)
However, to disable geolocation access for a specific app, do these:
In location, toggle on the Allow apps to access your location option.
Scroll down to Choose which apps can access your precise location and turn off the switch for your browser.
Why do websites want to know my location?
Websites use your location to show local content, services, and ads, like nearby restaurants on maps or in-stock items on shopping sites. It can improve your experience, but it also raises privacy concerns. Some sites may misuse that data, so it’s smart to keep location access off by default and only allow it when it’s actually needed.
These are the best ways to disable browser location permission on your device. Although you can disable browser location with Javascript, it requires understanding some codes. Hence, we have provided more straightforward approaches to it.
Nonetheless, turning on your browser location services can result in security breaches. Hence, users must know how to protect their browsers from online thefts. We recommend you read our article about the methods to protect yourself from browser information leaks.
Furthermore, VPNs are suitable for online protection. They protect you from being detected online while going about your online activities by connecting you to the internet through encrypted servers. So, it may be beneficial to know the best VPNs for laptops with enhanced security and speed.
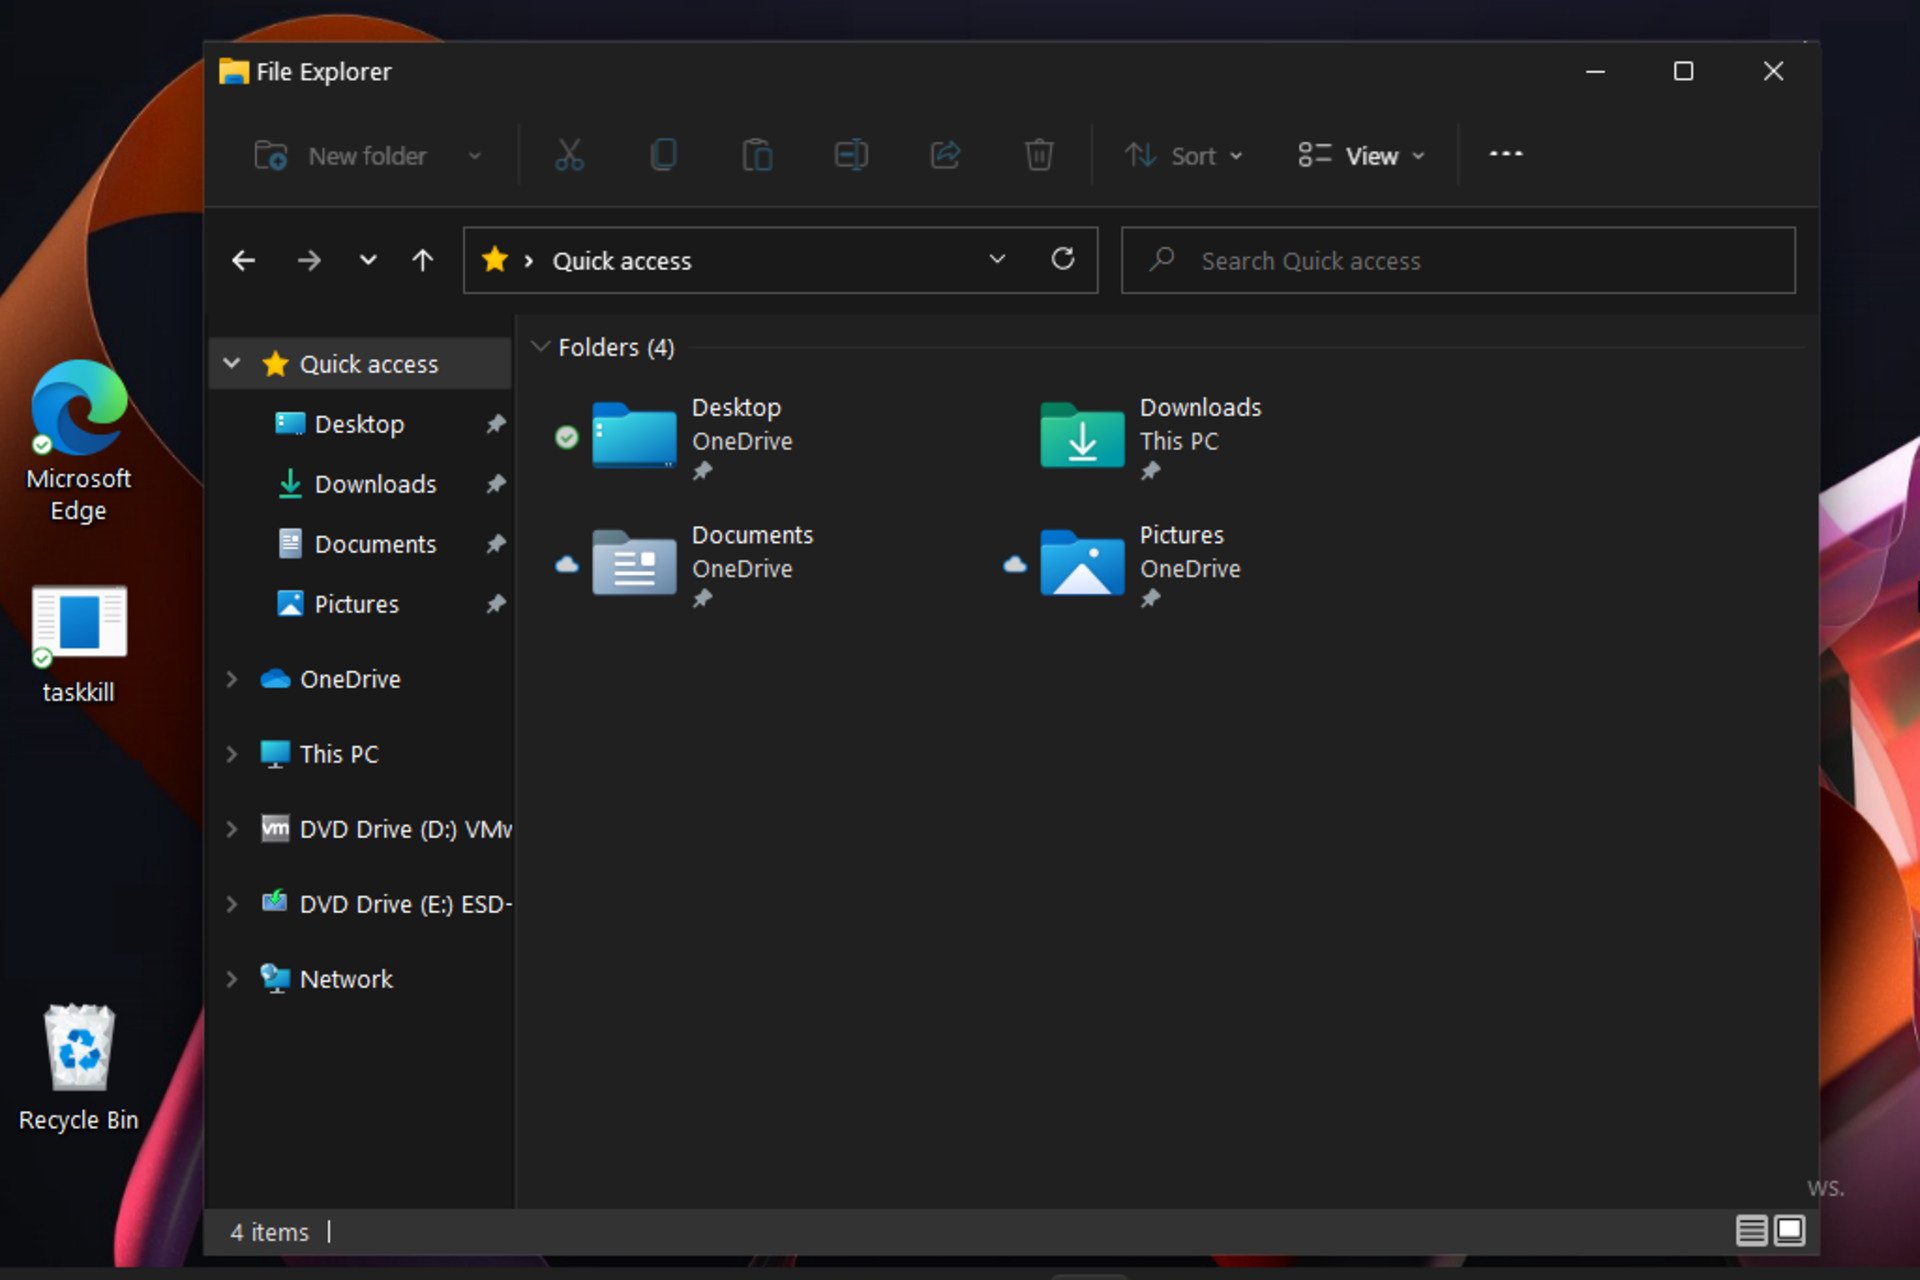
Thumbnails are great, and it seems like some PS owners are most likely to use them over icons. They refer to the displayed content of the folder.
You should be able to view pictures, videos, documents, and even code files depending on what the folder contains.
However, users reported that Windows 11 folder thumbnails aren’t showing in File Explorer.
From what they describe, folders are not previewing thumbnails of inside content. So, they have to open each folder to see what’s there.
Why can’t I view Windows 11 folder thumbnails?
Microsoft has improved Windows 11 File Explorer. Although it is better and easy to use, the thumbnail function has been quietly removed.
Producers didn’t announce this change but keep in mind that you can easily get the default aspect through the Windows 11 beta version.
After canceling this function users discovered that this feature is very useful. And why is that? Because the folder file type can be recognizable by the thumbnail.
But now it has been deleted, so subsequent versions will no longer see folder thumbnails, which may cause inconvenience to some consumers.
Let’s see some efficient options that will help you to view Windows 11 folder thumbnails.
What can I do if Windows 11 folder thumbnails aren’t showing?
1. Roll-back to the previous OS
Click on the Windows icon, then open the Settings menu.
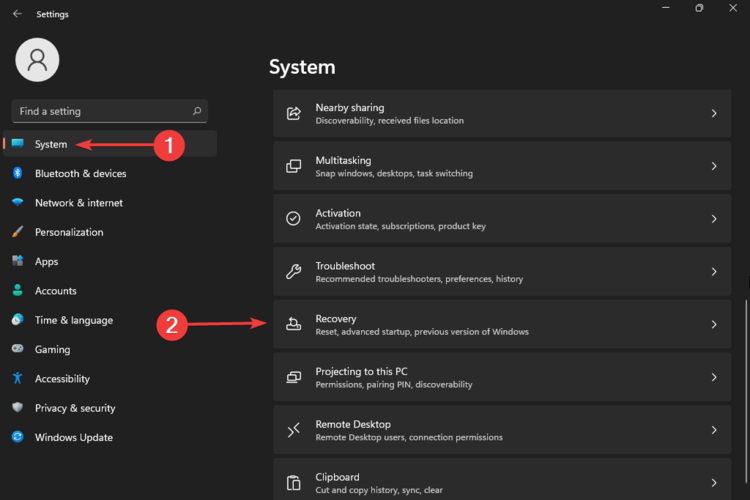
Go to System, then select Recovery.
Look at the Previous versions of Windows section, then click on the Go back button.
You’ll be asked Why are you going back to the previous Windows version. Choose an answer, then click on the Next button.
Choose whether or not you want to update your Windows before performing the rollback.
Read the implications of the rollback, then click on Next.
Microsoft will remind you to not forget your password or PIN. After saving them somewhere safe, click on Next.
Now select the Go back to earlier build option to start the roll back process.
Go to Windows Update, then select Windows Insider Program.
Look at the Choose your Insider settings section, then click on it.
Checkmark the Beta Channel option.
Restart your PC.
As mentioned before, even if Microsoft canceled folder thumbnails in Windows 11, the beta version will help you get the desired File Explorer aspect.
If you’re not happy with the idea of Beta Windows versions, you can easily downgrade Windows 11 to Windows 10 and get back the design that shows folder thumbnails.
3. Restore File Explorer settings to default
1. Press the Windows key on your keyboard to open the search box.
2. Type explorer options in the search box and click on the result.
3. The File Explorer Options window will now be opened on your screen.
4. Navigate to the View tab.
5. From this tab, click on Restore Defaults.
6. Select Apply and OK to save the changes.
7. Check if the folder thumbnails are showing now.
Another solution to make folder thumbnails show is to reset File Explorer to its default Settings. It could be that some Settings changes were preventing thumbnails from showing.
Even if they create a much more recognizable environment, Windows 11 folder thumbnails are not necessary. In fact, having them disabled could be a benefit due to some specific aspects:
➡ Windows will feel much faster
Keep in mind that every time you open a folder, your OS will use resources to load all the thumbnails.
This isn’t a huge deal for folders with few documents, but opening one with 500 pictures could take several seconds to load them all.
Storing thumbnails might take up a lot of space on your computer, especially since Windows 11 doesn’t support old devices.
However, you can save some storage by removing those with paltry amounts of disk space.
➡ Keep your data secured
Last but not least, without folder thumbnails, your privacy will be more secure. For example, someone can gain access to sensitive information by simply walking behind your desk. In these terms, your private data could be compromised.
However, when it comes to restoring Google thumbnails, you should because they make your work easier in quickly accessing your most frequented sites.
It’s worth keeping in mind that Windows 11 isn’t at its final version, so what it gives you today may be finished later this year.
Note that you can also contribute to the future OS aspect by using the Feedback Hub app and giving your suggestions.
And since your opinion is the most important, do not hesitate to share it with us by leaving a comment in the section below.
Windows Mixed Reality support is available for the most popular browser in the world — Google Chrome. It looks like the company is enhancing the capabilities of its browser on the Windows 10 operating system.
Windows Mixed Reality has been highly popular amongst users who prefer amplifying the virtual experience or seamlessly integrating it with the real world.
So, let’s find out all about Windows Mixed Reality and how you can enable it in Google Chrome.
Does Windows 10 have Mixed Reality portal?
Yes, Windows 10 does have a Mixed Reality Portal. Although the app has not been there since the start but was introduced in the Windows 10 Fall Creators update.
So, if you want to use Windows Mixed Reality on the desktop, make sure that you are running a later version of the OS.
Is Windows Mixed Reality good?
Windows Mixed Reality is good but certainly not the best. Though having a built-in app developed by Microsoft is certainly not a bad idea either.
Mixed Reality combines the real and virtual world and offers users an instinctual interaction. You can easily get the Windows Mixed Reality portal for Windows 10, and try it out. In case it doesn’t suit your purpose, you may check the other available options.
How do I open Chrome in Windows Mixed Reality?
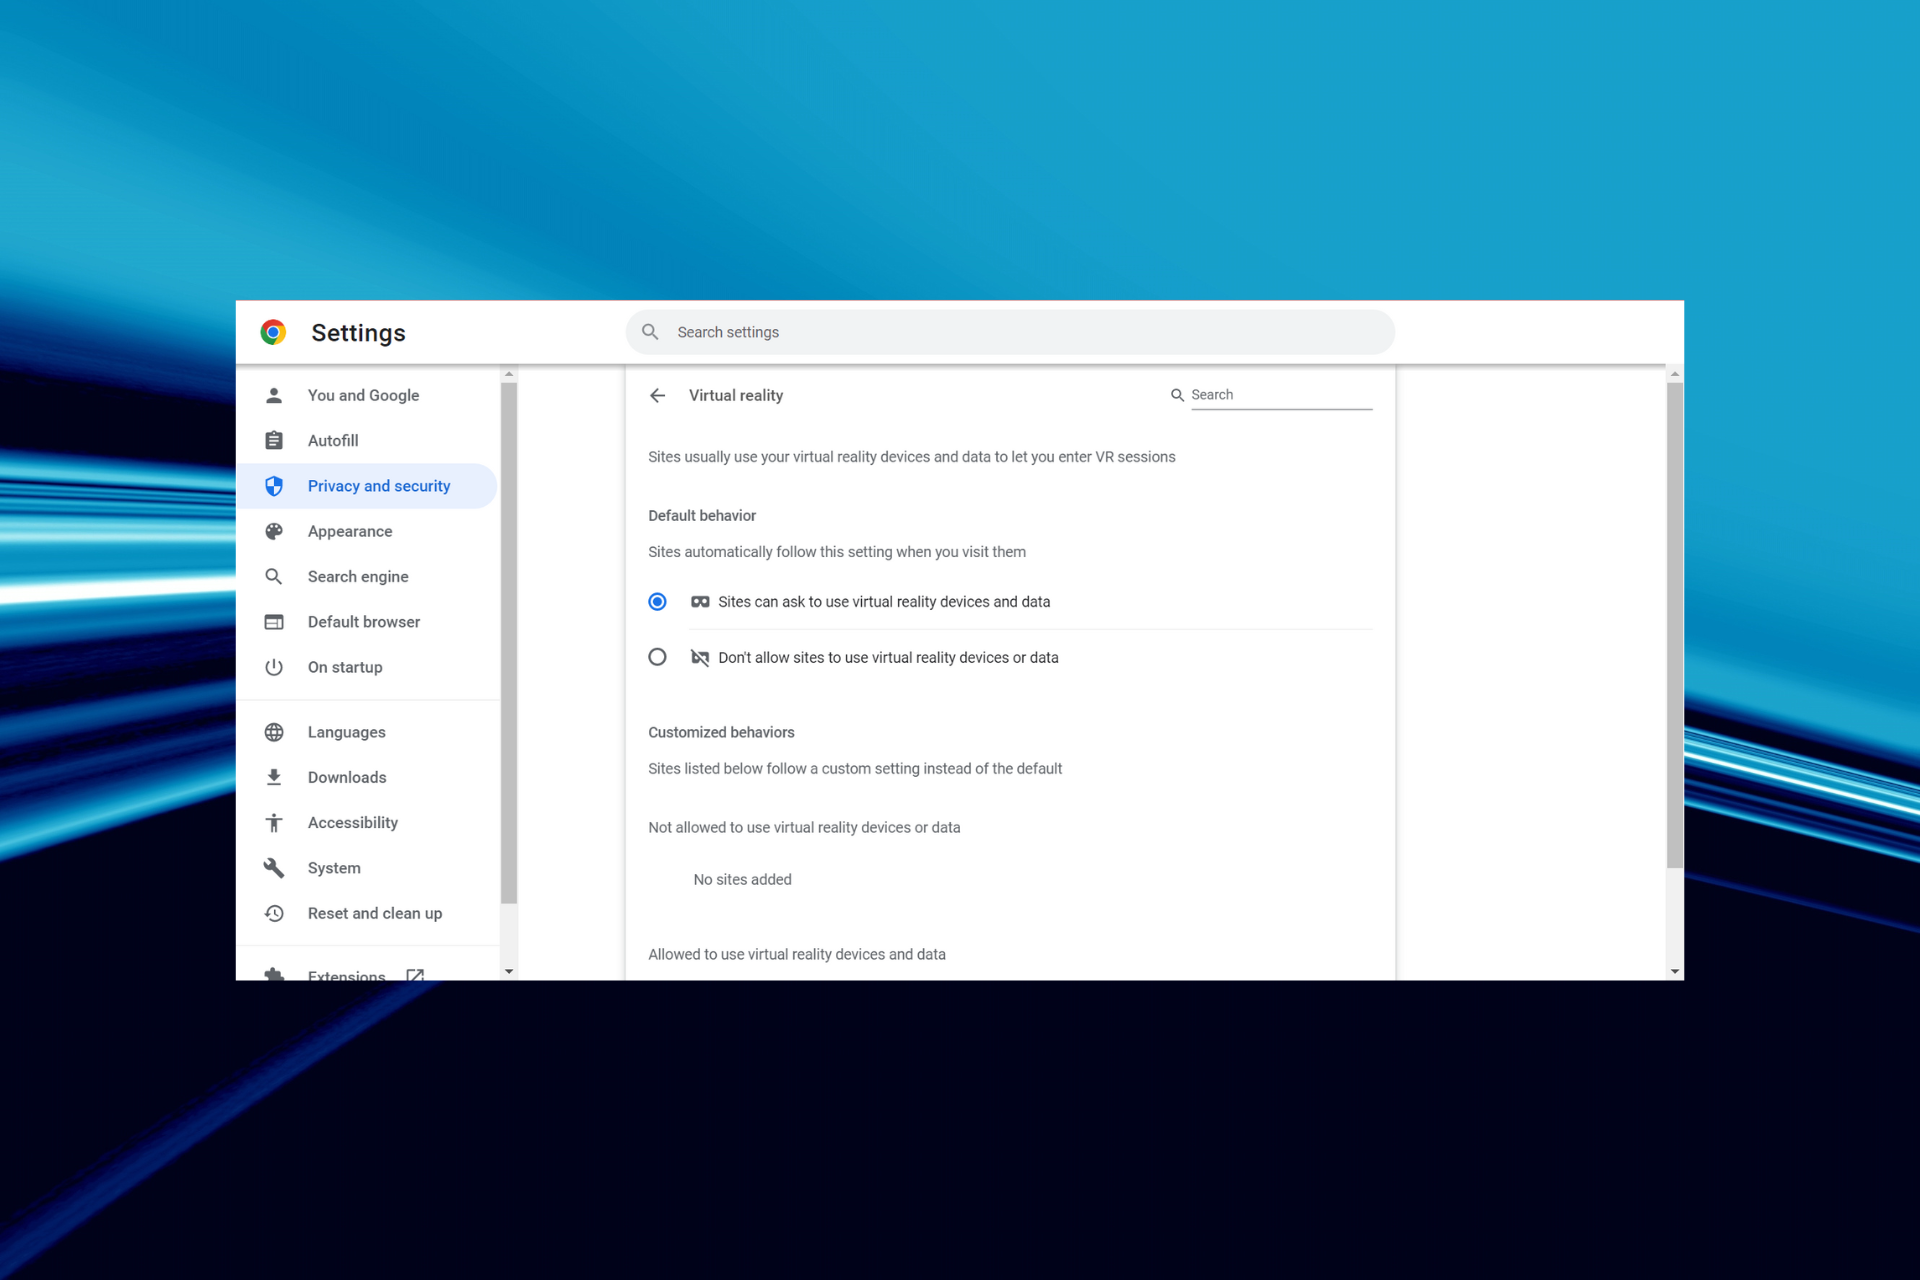
Paste the following path in the address bar and hit Enter:chrome://settings/content
Locate and click on Augmented reality here.
Now, select the Ask when a site wants to create a 3D map of your surroundings or track camera position option.
Similarly, enable the Virtual reality setting as well in Chrome.
When the Chrome WMR feature was first released, it was available as a flag in Chrome Canary. Over time, it became more polished and soon found its way into the browser settings.
Does Windows 11 support Windows Mixed Reality?
Yes, Windows 11 comes with the Windows Mixed Reality app preinstalled, so you don’t have to get it manually. Just search for it, follow the on-screen instructions to complete the setup, and you are good to go!
Also, make sure the headset you are trying to connect supports the feature and do not plug it near the Bluetooth or other adapters to avoid interference and get the best experience.
That’s all there is to Windows Mixed Reality in Chrome and the steps to enable it. Also, many use Windows Mixed Reality for Beat Saber to amplify the experience, so you may just as well try it.
Besides, find out what to do if high CPU usage in Chrome is affecting the computer’s performance.
Tell us your experience of Chrome VR in the comments section below.
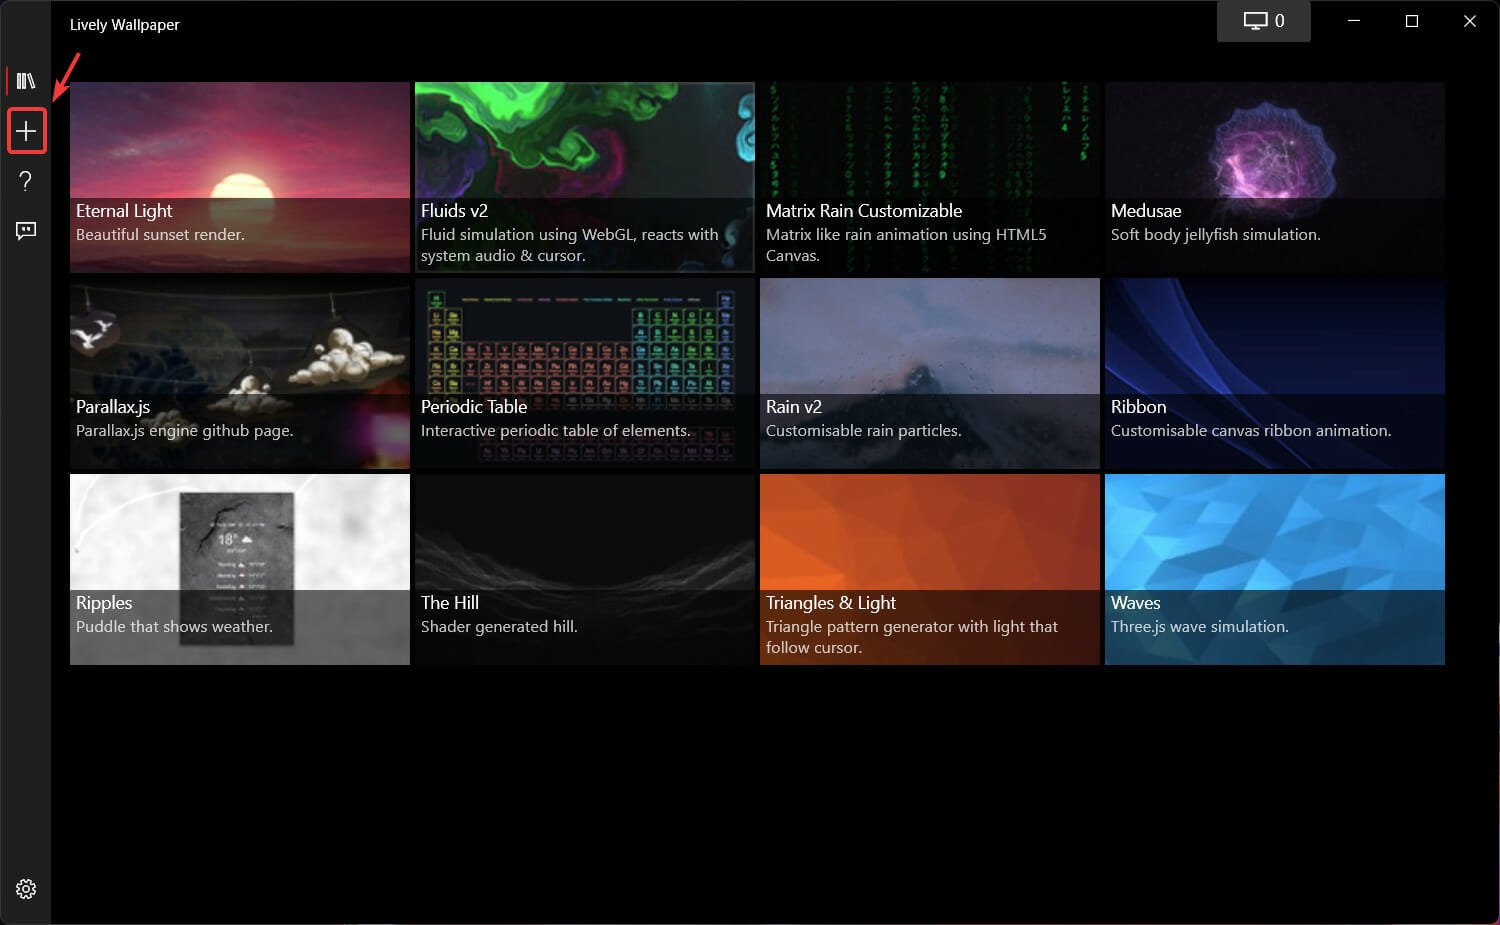
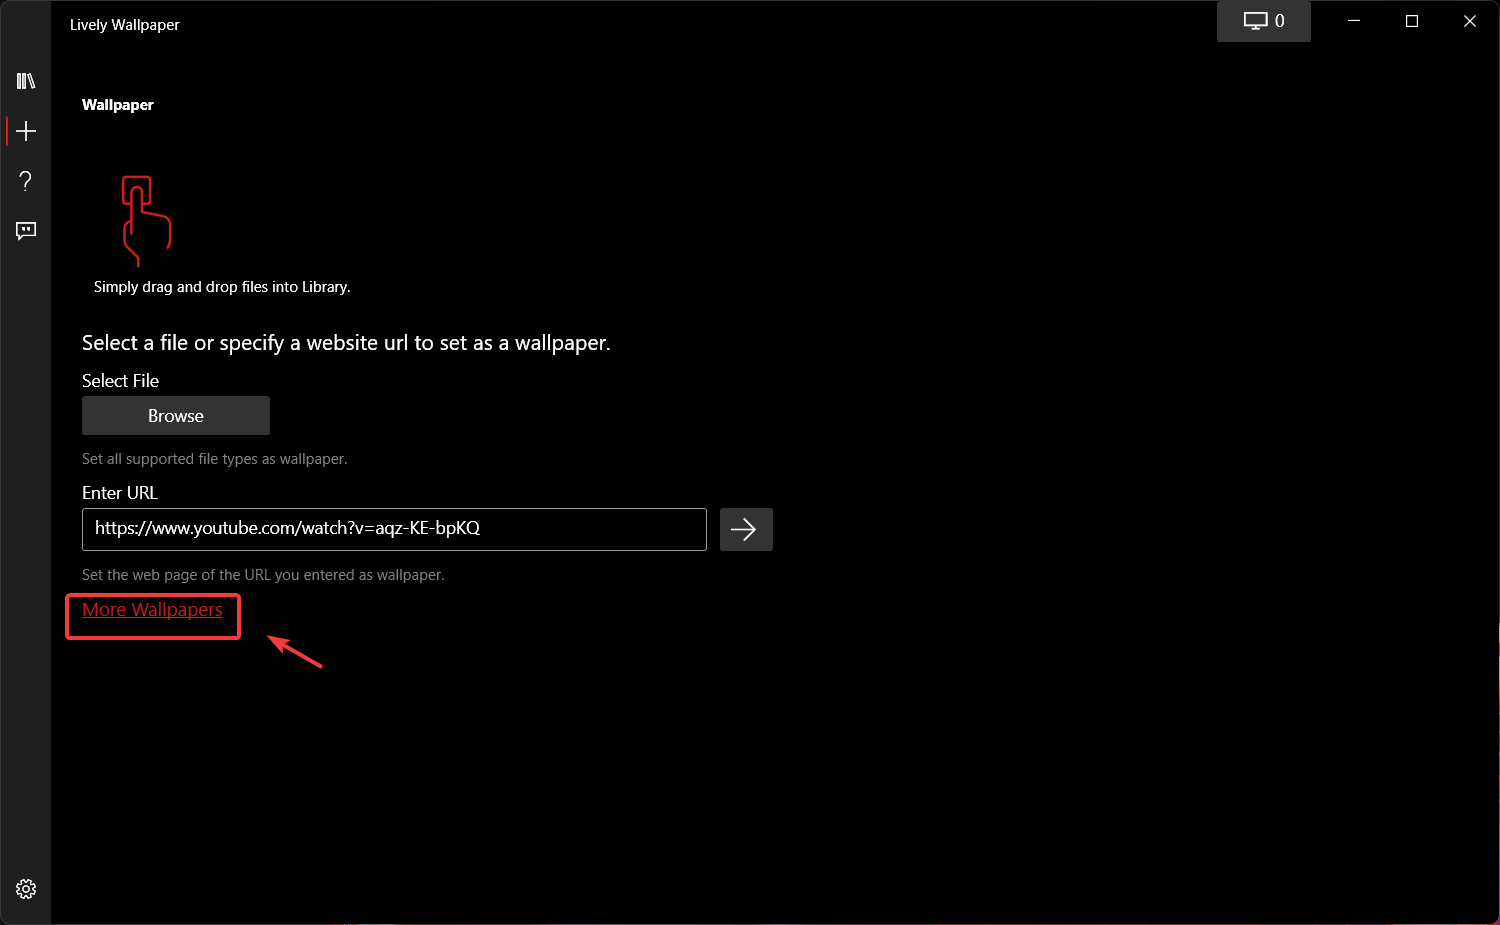
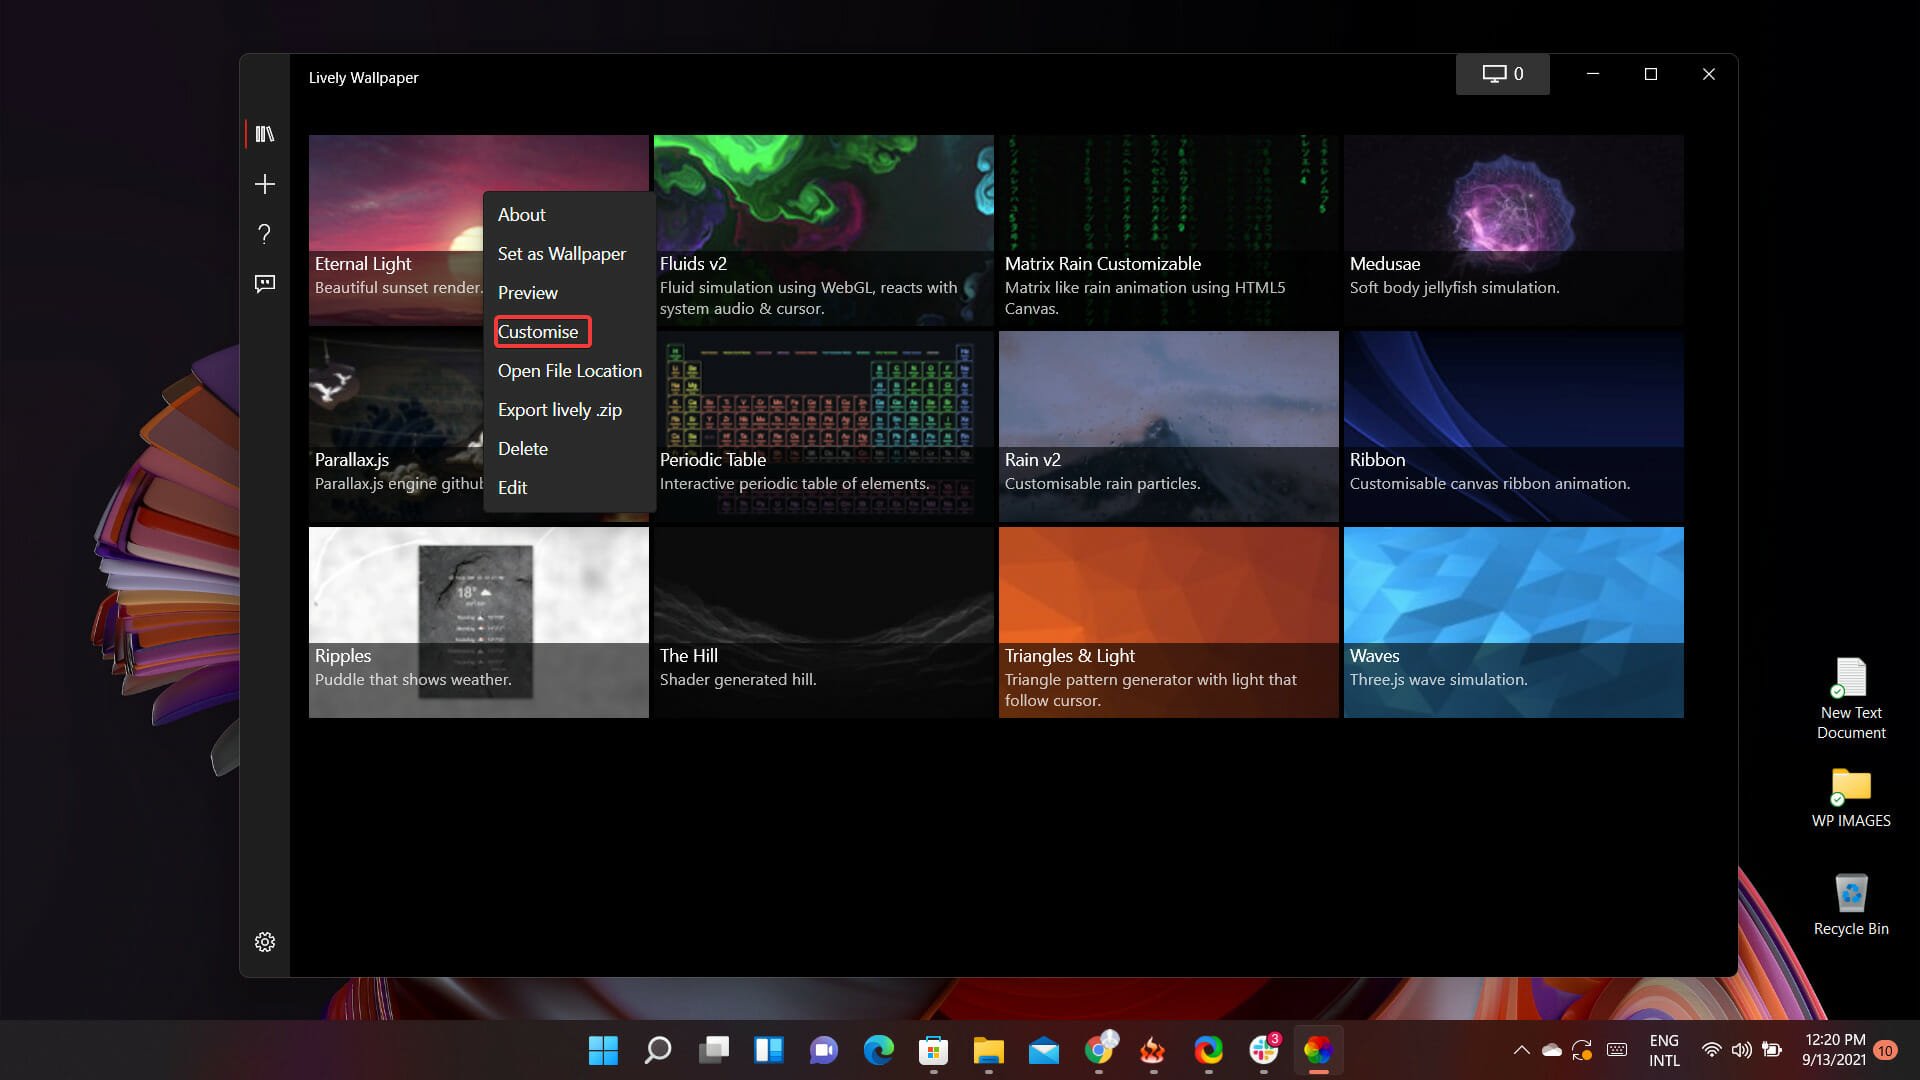
We know that it’s hard to please everyone, so if you are not at all happy with the current selection provided by developers, you can add more wallpapers with just a few clicks. Here’s how:
In the Lively Wallpaper app, press the plus button.
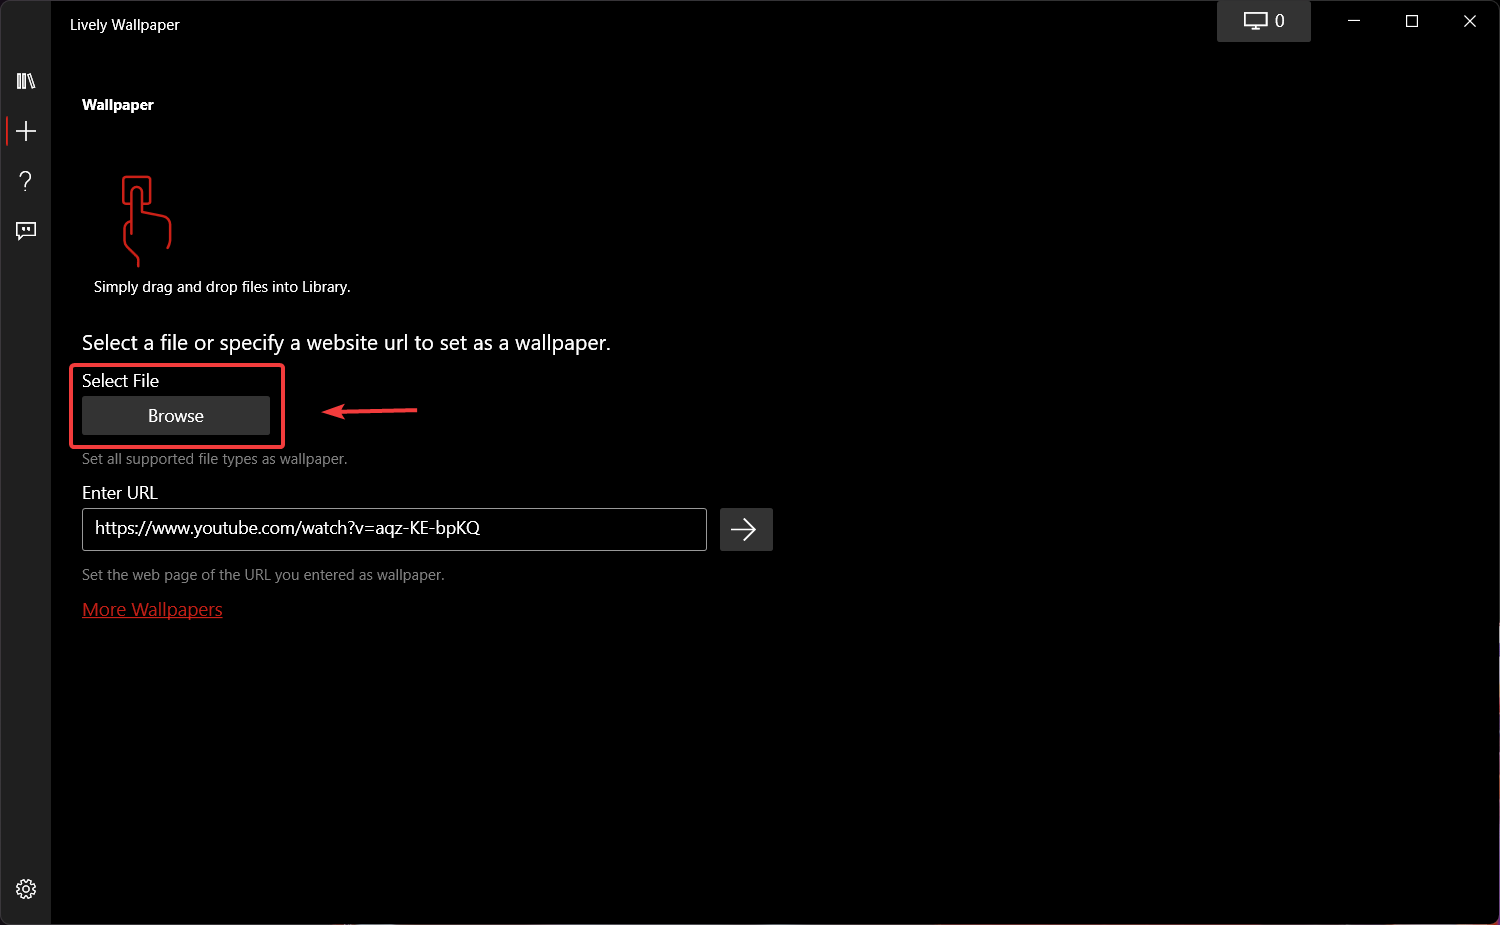
If the file you are trying to add is already in your PC, click on the Browse button.
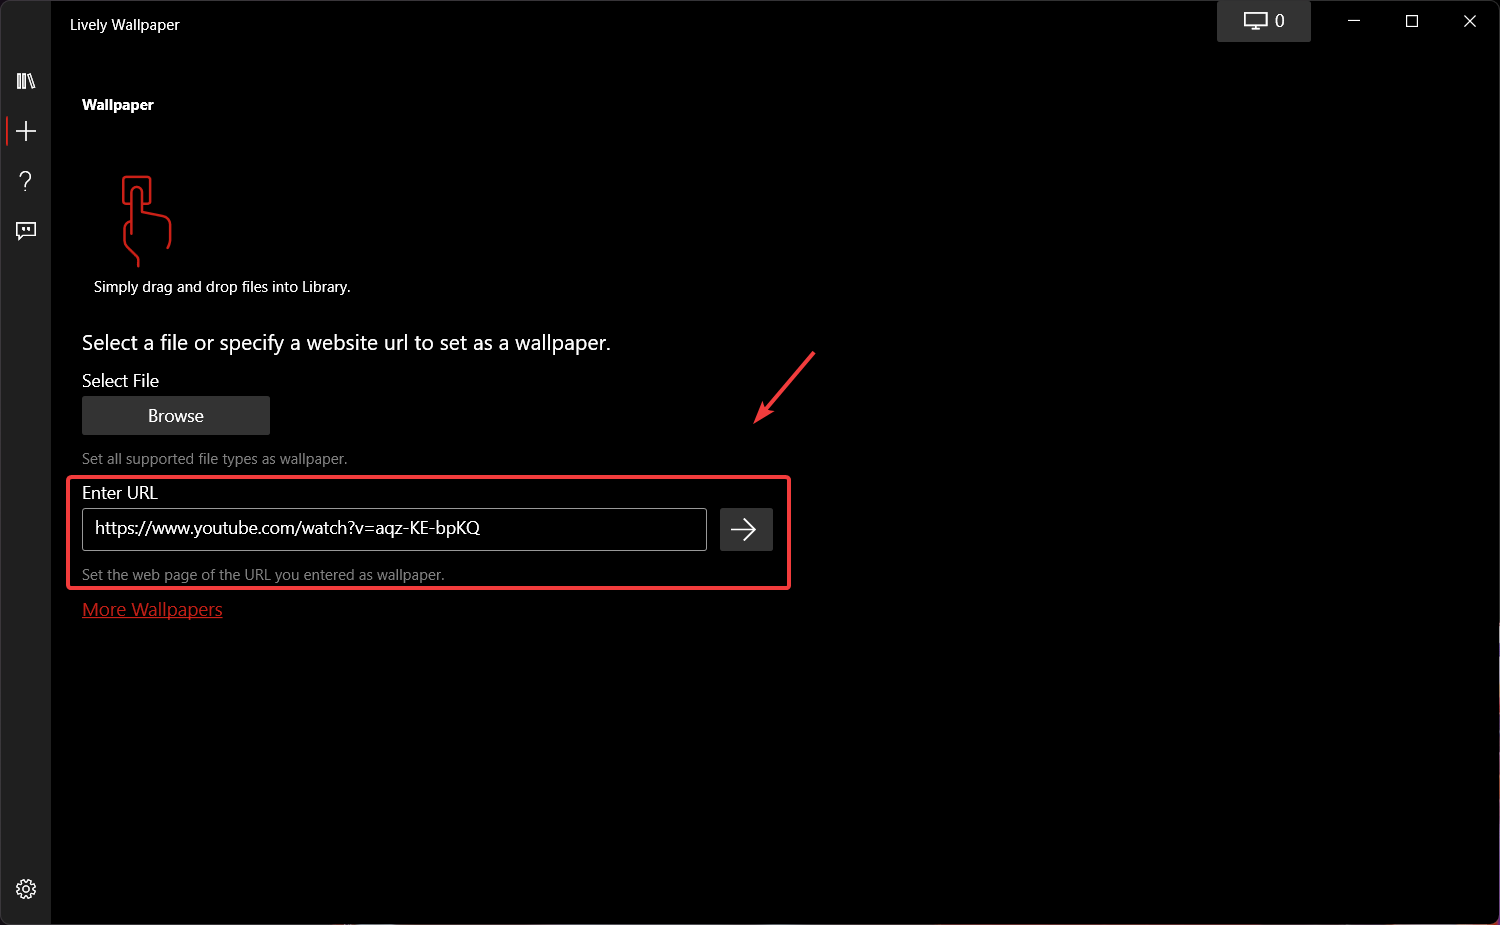
If you want to make a live wallpaper out of your favorite Youtube video, copy the video’s URL and paste it here.
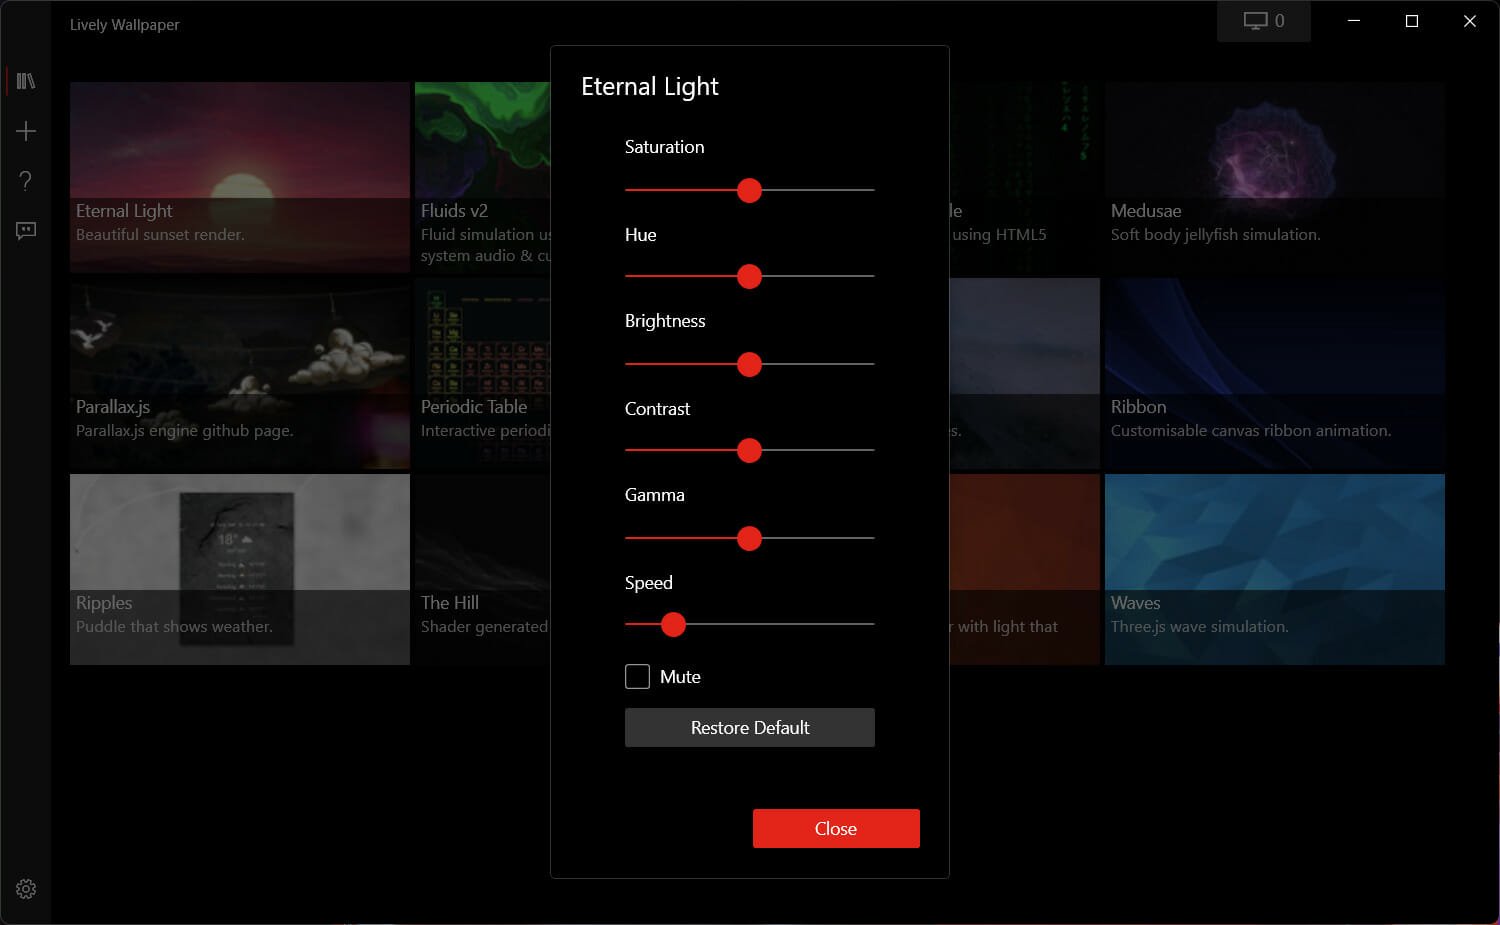
You can also tweak certain aspects of your new live wallpaper, such as saturation, hue, brightness, contrast, gamma, or speed. How can you do that you ask?
Well, easier than one might think. In the Lively Wallpaper app, just right-click on any wallpaper and select Customize.
After doing so, a dropdown menu with all the above-mentioned options will appear and you will be able to make the desired modifications.
There you go! Now you are all set to set up your first Windows 11 live wallpaper. This is great news for many early adopters, as they weren’t sure if this software will also be compatible with the new OS.
FAQs
What is lively animated wallpaper?
Lively animated wallpaper refers to motion backgrounds on Windows that play videos, GIFs, or interactive WebGL scenes on your desktop while staying behind apps and icons.
Does lively animated wallpaper affect performance?
Yes, a little; expect a small CPU/GPU load that scales with resolution and frame rate. Use pause on battery, lower playback FPS, or stop on full screen to keep gaming and battery smooth.
How do I set lively animated wallpaper on Windows 11?
Install a trusted wallpaper app, open it, pick a video/GIF/HTML scene, then click Set as Wallpaper; enable startup and pause rules, and choose “Stop playback when a game is detected” if available.
Which formats work best for lively animated wallpaper?
MP4 (H.264/H.265) is the most compatible, followed by WebM and GIF for short loops; HTML/WebGL scenes are lightweight and interactive, while high bitrate 4K clips need stronger GPUs.
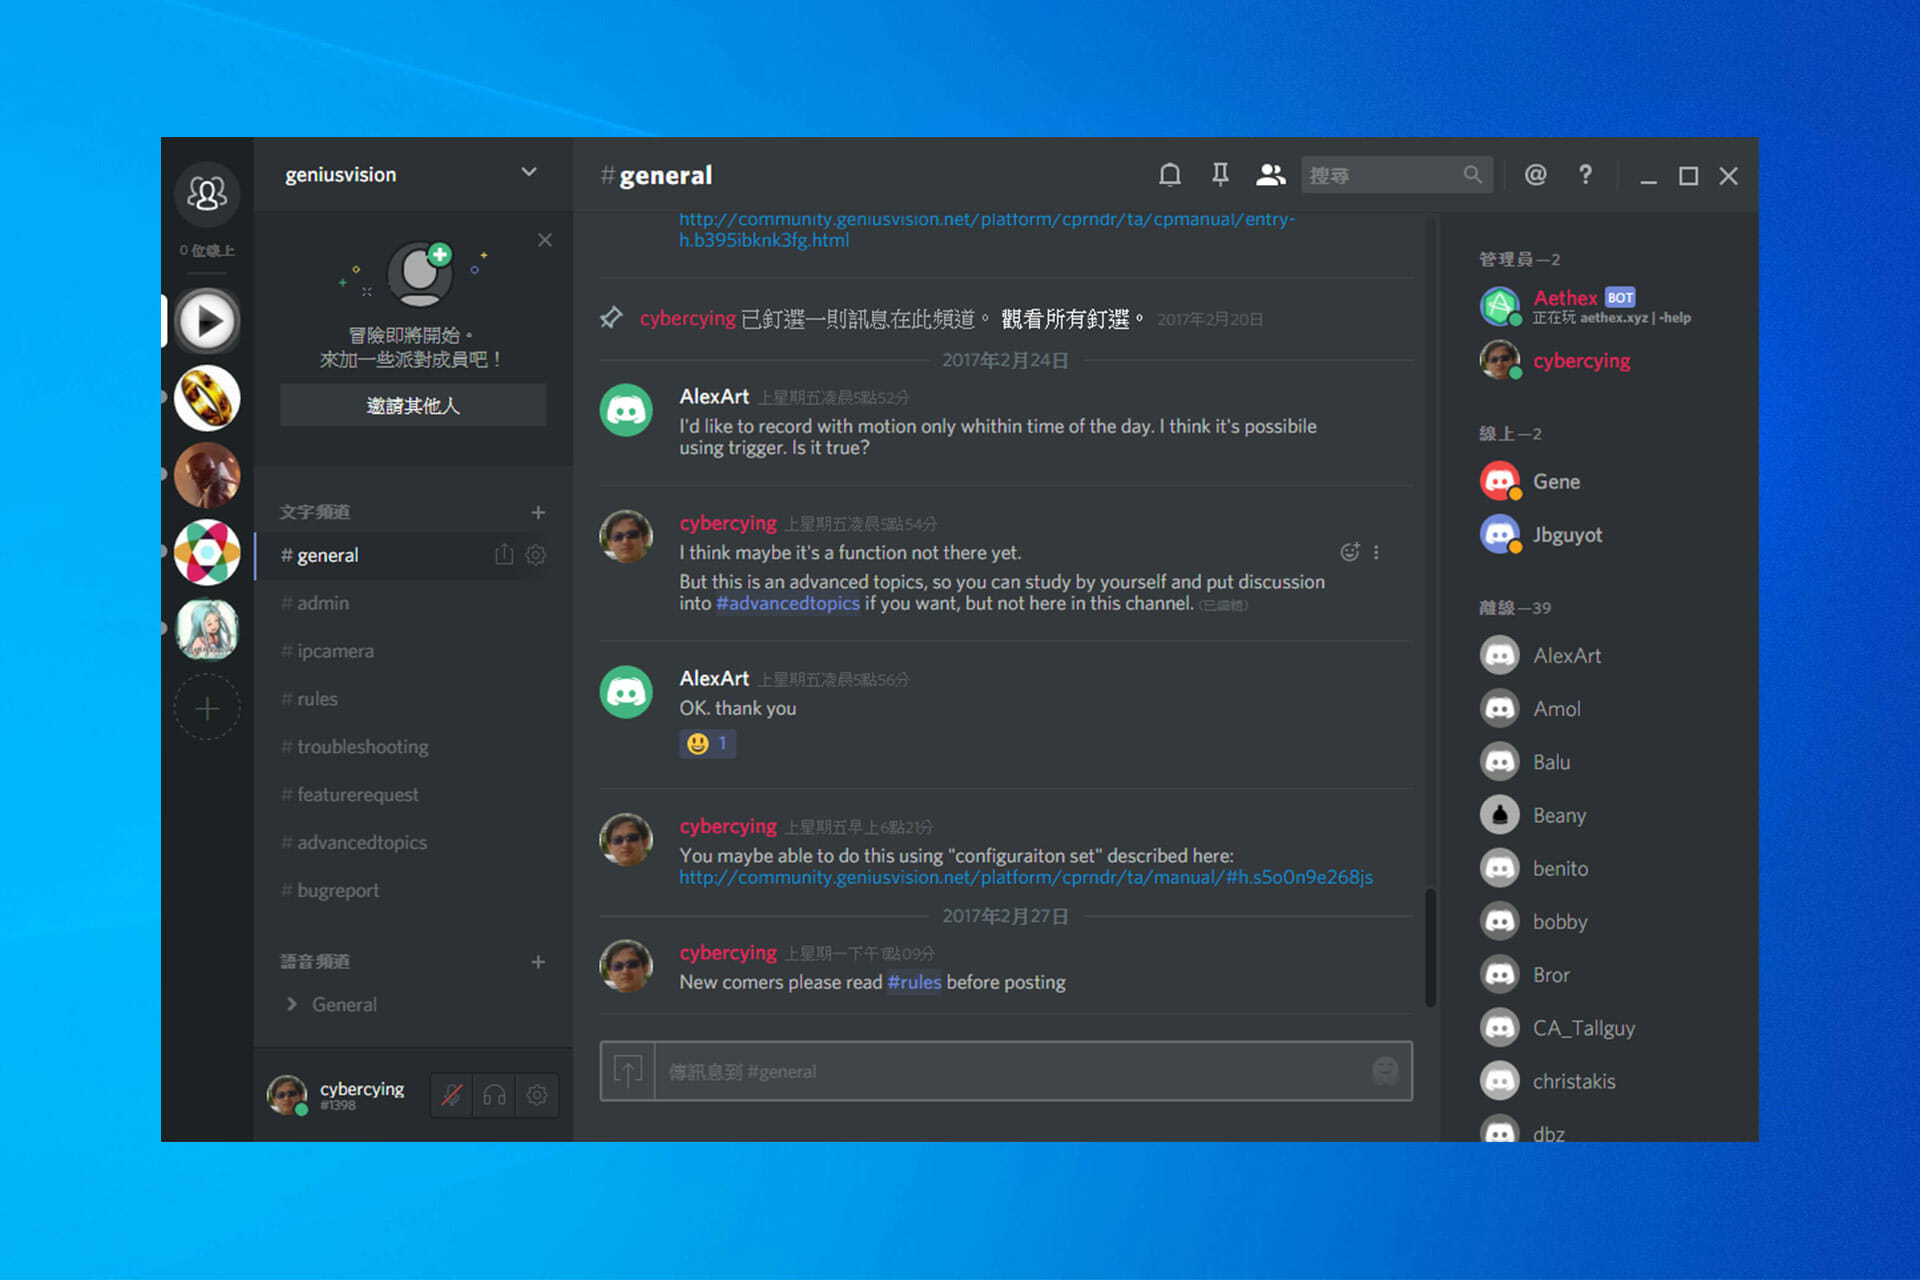
Discord is a very useful app if you are a fan of online gaming, and can help you communicate with your teammates during gameplay and outside of it.
This app helps users develop strategies for different games, organize buying gaming gear, and also coordinate online item purchasing for increased efficiency of the team.
In this case, the Discord app is plagued with an audio issue that results in cutting the stream randomly. This creates a lot of frustration and here is what one user had to say about this issue:
When I’m on a private call or either a public voice channel on Discord and go in-game on Overwatch, my and the other people’s voices all start cutting out and we hear maybe 5% of what we’re actually saying. Has anyone got any suggestions on what might be causing this, and then have possible fixes?
To try and solve this annoying issue, we’ve compiled some of the best troubleshooting steps. Check the details out by scrolling down.
Why does Discord audio keep cutting out?
Before discovering the most efficient solutions to fix this annoying issue, it’s great to know some common causes for Discord audio cutting out:
Inefficient Discord settings — There are several configurations that have a direct bearing on the audio stuttering at certain points. We strongly suggest that you attempt alternating these characteristics, and in this section, you will learn how simple it is to carry out this recommendation.
Windows 10/11 settings — Your operating system provides you with access to a wide variety of functionality and configuration options. If the audio in Discord keeps going out, you may need to adjust certain settings on Windows 10 or 11.
Faulty Drivers — This is one of the most often encountered issues. The audio cutting out in Discord might be the result of a number of different issues, including missing, corrupted, or obsolete drivers.
Internet connection issues— This indicates that your connection to the Internet is not very good. There is a possibility that you will encounter audio loss as a result of your Internet continuously fighting to maintain its connection to the voice channel.
Peripherals— There is a possibility, albeit a remote one, that the perpetrators are the peripherals that you utilize. Cutouts in the audio are almost certainly going to occur in the event that, for instance, your headset sustains damage or the microphone fails.
This guide will dive deeper into the issue and it will help you fix the Discord audio cutting out while playing games error and more in Windows 10 and 11.
How do I fix the audio glitch on Discord?
1. Check the Discord servers
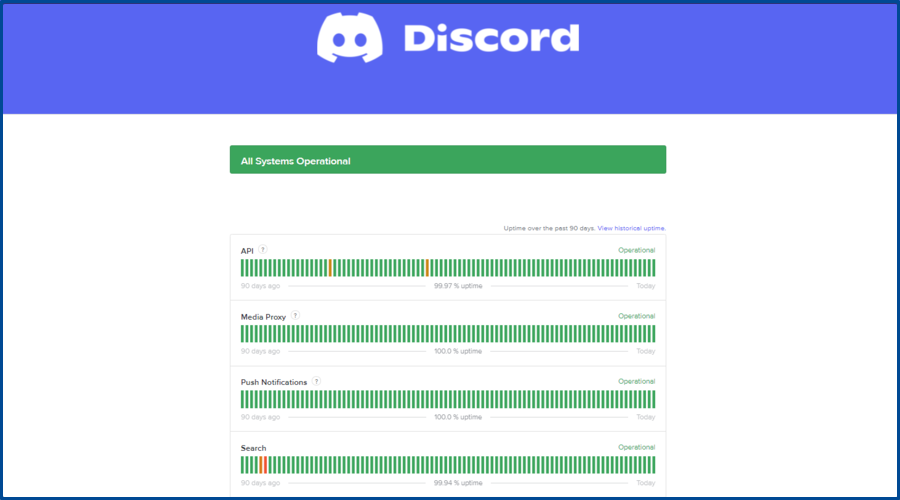
Sometimes, issues like the Discord audio cutting out when in a game can be caused by a problem related to the main servers. We strongly recommend you constantly verify the Discord Status.
In case everything looks good and the result of the Status is All System Operational, then try the next method presented in this list.
2. Restart Discord
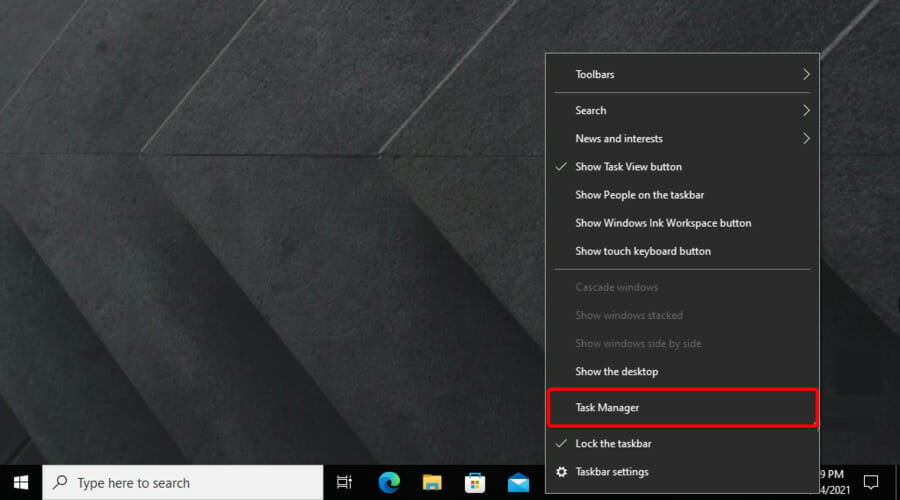
Right-click on your Windows taskbar, then choose Task Manager.
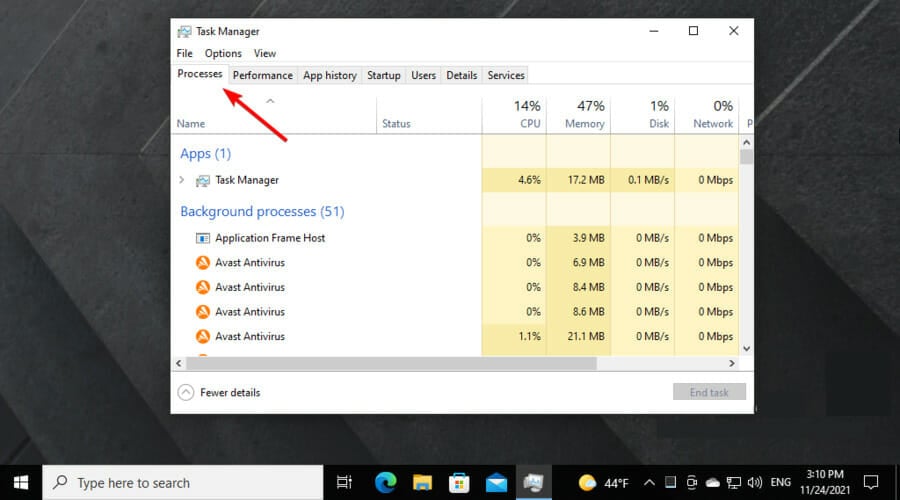
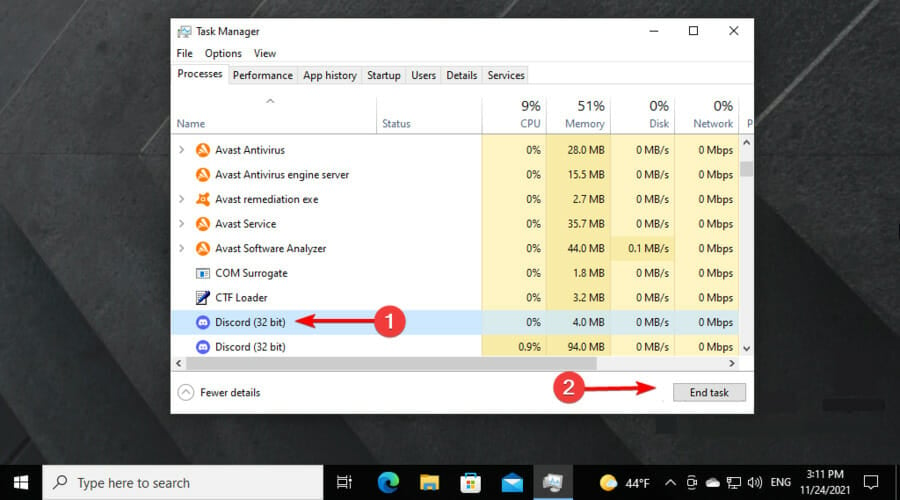
Click the Processes tab and search for Discord in the Background processes list.
Click on the app, then choose End Task.
Navigate to the location of Discord on your hard drive and open it again.
This option would help in case you encountered some random bugs. If Discord audio is cutting out when streaming, follow the above solution in order to fix it.
3. Update your Windows 10 audio drivers
When you’re facing Discord audio cutting-out issues, the proper action you should perform is to check and update your audio drivers. Follow the steps below for technical support.
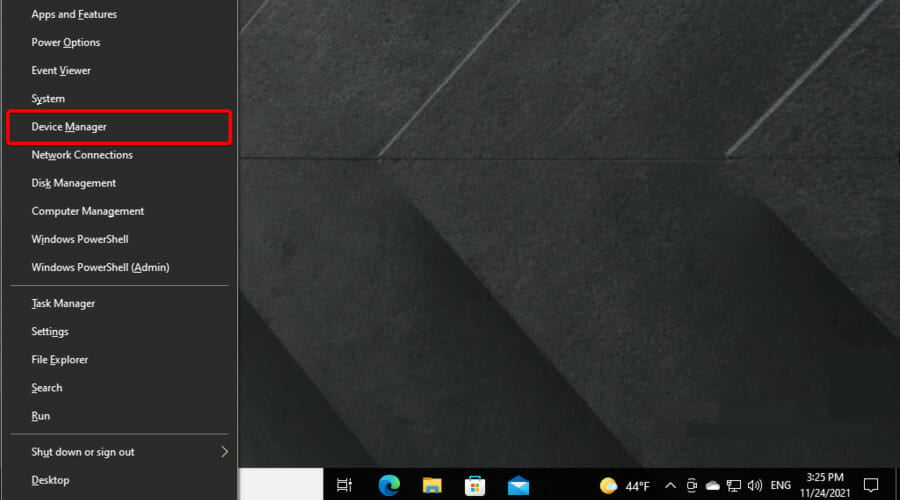
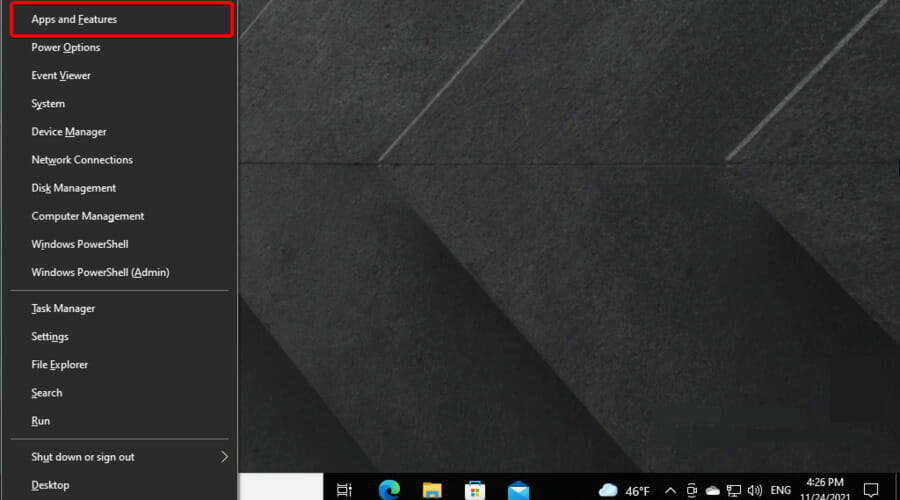
1. Use the following keyboard shortcut: Windows + X then select D
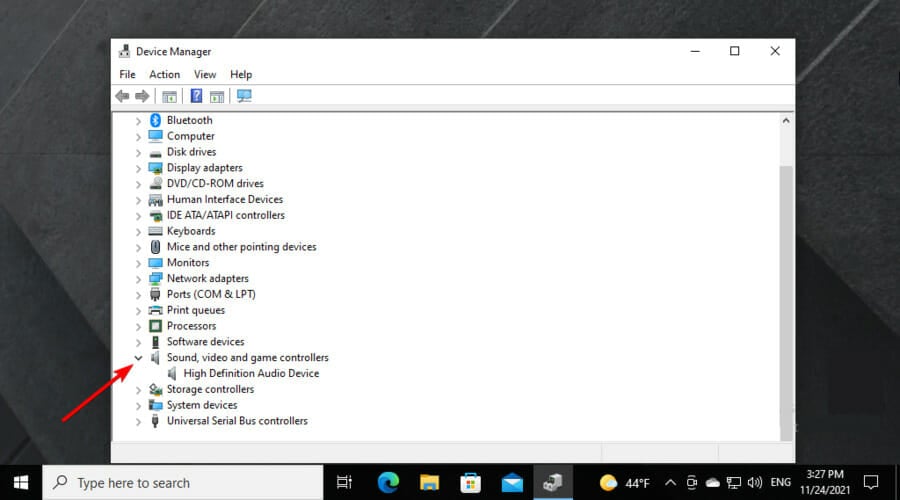
2. Expand the Sound, video and game controllers section.
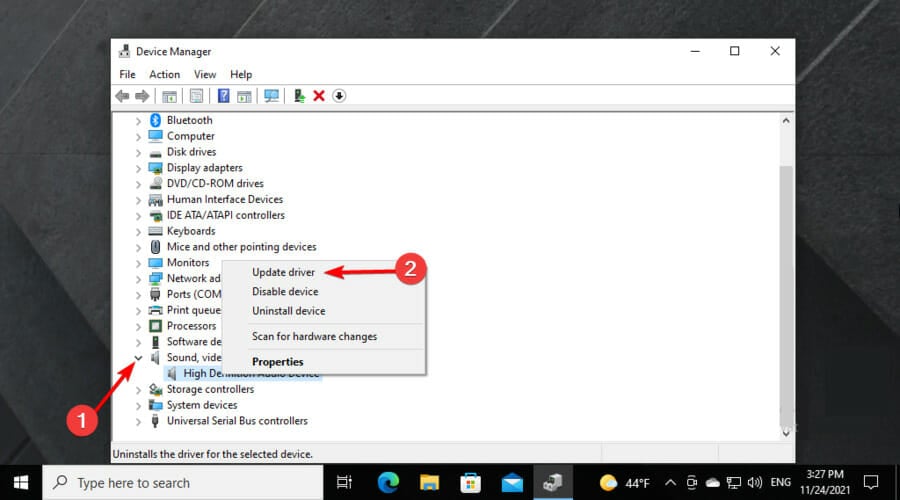
3. Right-click on the system audio driver (usually High Definition Audio device), then click Update driver. Note that this will address the Discord cuts out after a League game issue as well.
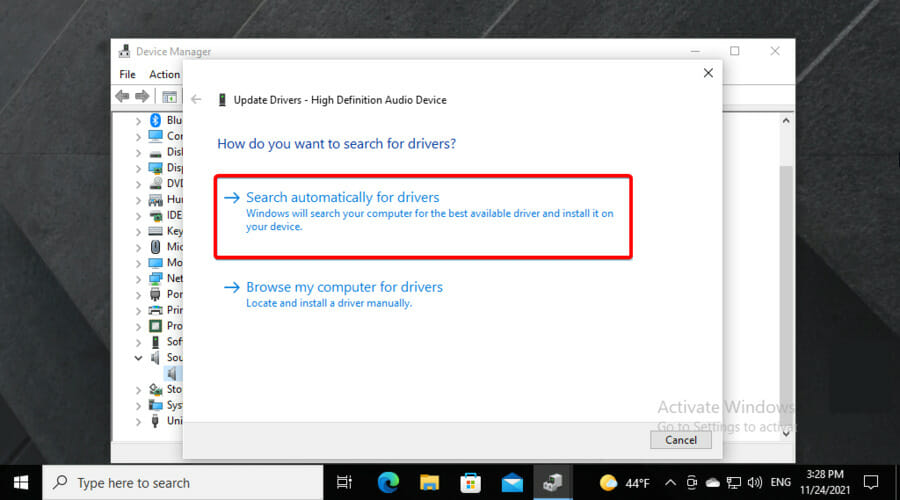
4. Choose to Search automatically for drivers and wait for the process to finish.
5. If you can’t find any drivers to update, try the next methods.
Check the Sound, video, and game controllers section for any exclamation marks. If you can find any, follow the same steps from this method and update them all.
In addition, updating your drivers manually increases the chances to get incompatible or corrupted drivers on your Windows PC.
If you want to stop this, you can simply use automated software like Outbyte Driver Updater that allows you to install or update audio drivers without getting additional driver versions that generate errors.
Outbyte Driver Updater
Resolve Discord issues right away with this driver updating tool with millions of files.
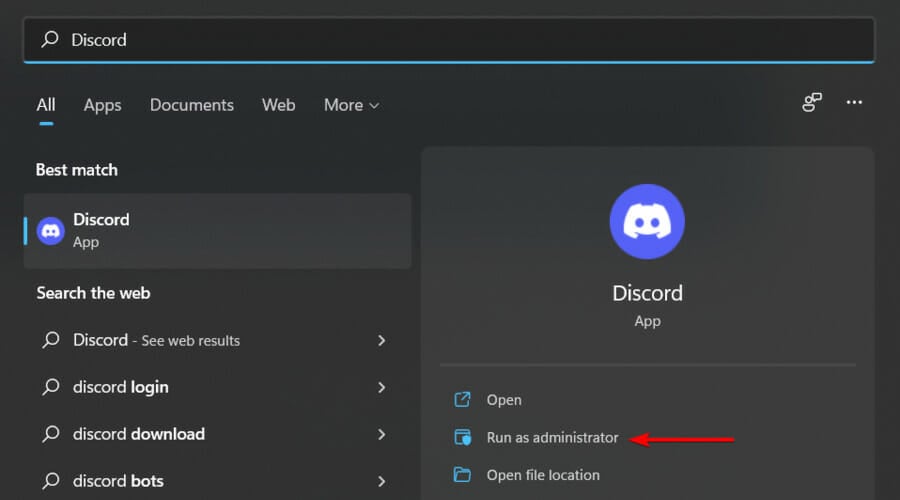
Open Discord by right-clicking it, then click Run as administrator.
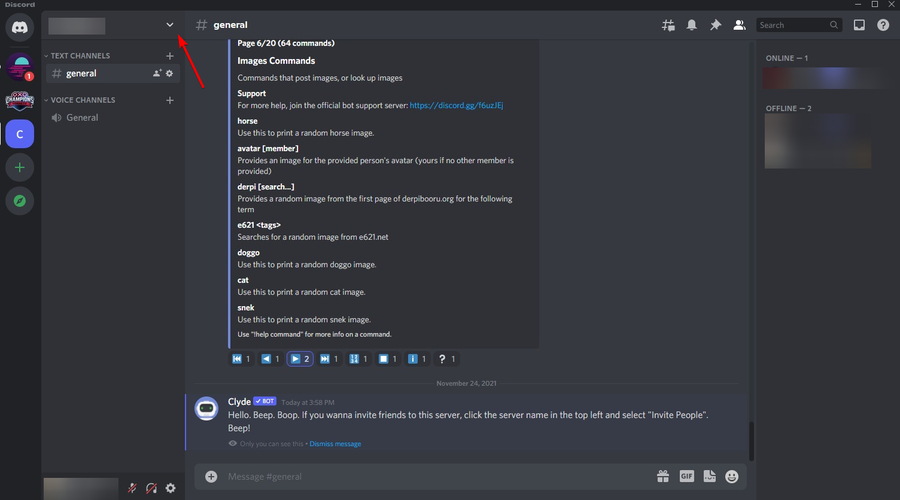
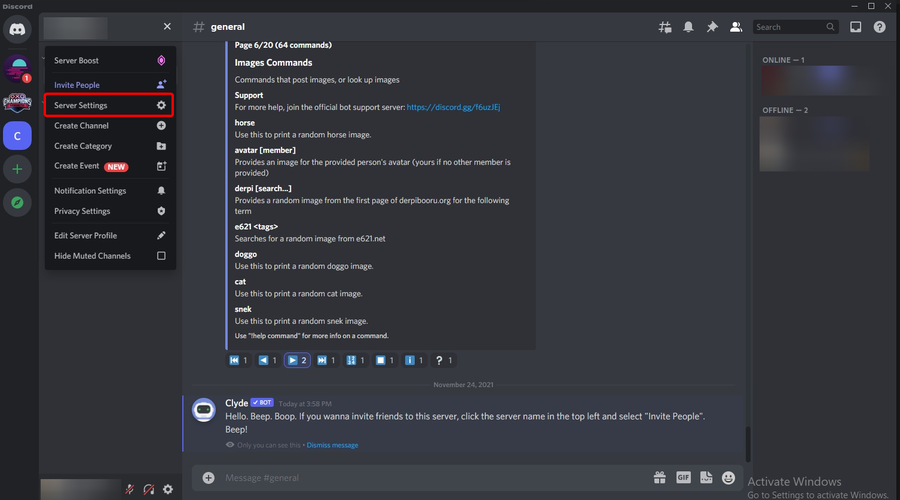
Click the down arrow found in Discord.
Select Server Settings.
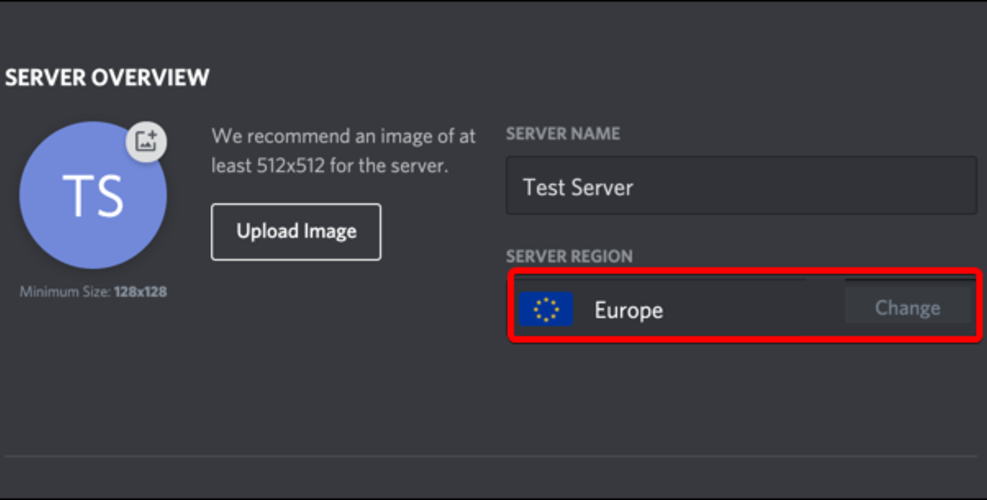
Inside the Server Region tab click on Change.
Try different options until you can find one that works properly.
Discord automatically selects the server region through which you communicate with your friends. However, choosing a different option might improve the quality of voice chats, especially if you’re chatting with people in other regions.
If your teammates experience the same issue, it would also be recommended that you all try the same Server Region for optimal results.
In case Discord keeps cutting out, we have one more solution that will help.
Run the installer and complete the setup process by following the instructions.
Log into your account again and check to see if the issue is resolved.
The audio problem inside Discord can be caused by a variety of reasons. Because of this, in today’s guide, we covered all the possible options.
Checking if your audio drivers need updating, making sure the official servers are working properly and reinstalling the app are some of the solutions mentioned above.
It indicates that there might be a server problem, or that your audio device isn’t properly configured. You can also try different input methods, but many reported that Discord Push to Talk isn’t working for them.
What are the most common Discord audio problems?
Besides our today’s presented error, many others might appear while you’re running the app. Because it’s important to be prepared for any situation, make sure you check the following info:
Discord picking up game audio issues – This one can also occur due to incorrect sound settings and corrupted sound drivers. If you encounter this error, do not hesitate to check some valuable solutions.
Discord screen share no audio/audio quiet – As its title says, this problem generates troubles with the audio component while you’re running the screen sharing function. We also composed a guide dedicated to this trouble.
Discord static noise when streaming – The last example can occur due to incorrect output configuration, Windows sound problem, issues with your headset, Discord app glitch, and more. To discover how you can fix it, make sure you verify our recommended solutions.
We hope that the methods presented above have managed to solve your audio problem. Also, we suggest keeping in mind the above Discord audio errors, so you can solve them with ease whenever necessary.
If you would like to share with us which of these options was helpful, leave a comment in the section found below this article.
You can add a VPN connection to Windows 10 in several ways, whether you’re a seasoned computer user or just a casual home user.
A VPN creates a secure tunnel to divert your network traffic to another service. It can be used for two main reasons: to remotely connect to another LAN or to secure your Internet access.
In this article, we’re showing you how to set up a VPN connection on a Windows 10 desktop, laptop, or tablet for both reasons.
How do I add a VPN connection on Windows 10?
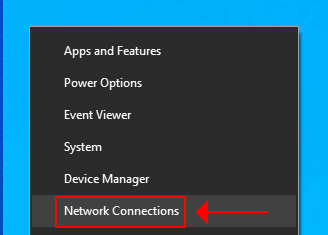
1. Press the Windows + X keys at the same time to bring up the WinX menu.
2. Select Network connections from the menu.
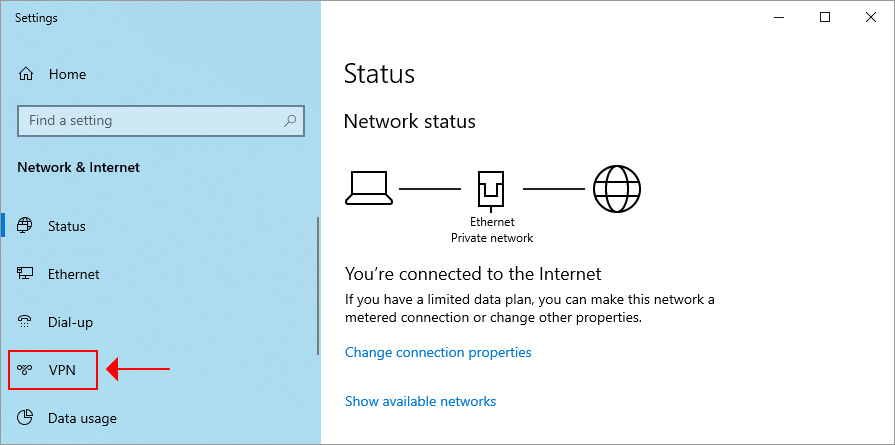
3. You are now in the Network & Internet center. Select the VPN tab from the left pane.
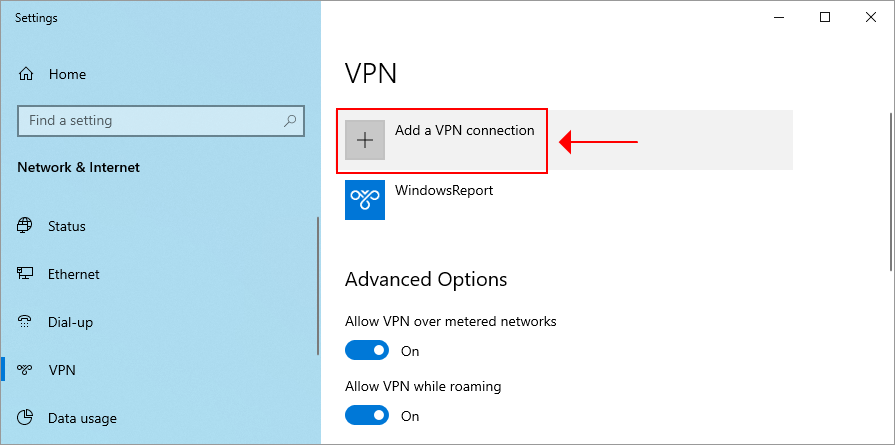
4. Click on Add a VPN connection.
5. Set the following properties:
VPN providertoWindows (built-in)
Connection nameto a display name of the VPN connection
Server name or addressto the remote VPN server address or domain
VPN typetoAutomatic(unless you have specific instructions about the VPN protocol)
Type of sign-in infotoUser name and password(usually)
User name (optional)andPassword (optional)to the login credentials provided by your VPN service
6. Check theRemember my sign-in infobox.
7. ClickSave.
Windows 10 has a built-in VPN provider, which means that you don’t have to install anything to connect to a VPN. All you need to do is navigate to the Network & Internet settings menu and configure your VPN.
However, keep in mind that the built-in VPN provider doesn’t support modern protocols like OpenVPN or WireGuard.
If your office administrator shared VPN connection details for OpenVPN or WireGuard, then you have to separately install the OpenVPN or WireGuard clients.
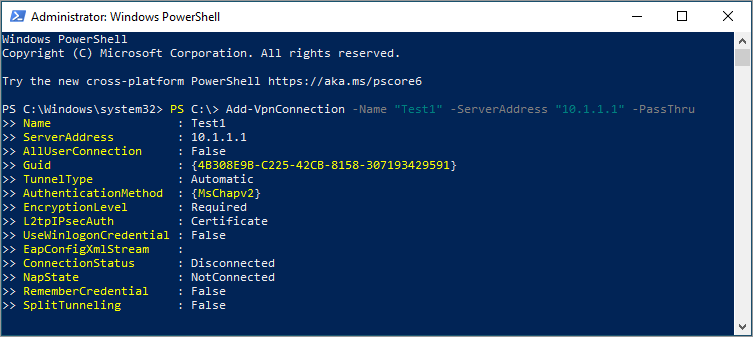
Use the Add-VpnConnection cmdlet in PowerShell
You can also set up a VPN connection on your Windows 10 PC by adding it to the Connection Manager phone book.
To do this, you need PowerShell and advanced computer skills:
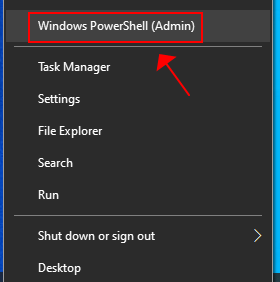
Right-click the Windows 10 Start button
Select Windows PowerShell (Admin) and click Yes if prompted by UAC
If you’re looking for a solution to change your IP address, protect your online privacy, and remain anonymous when browsing the Internet, use a commercial VPN service.
It’s the easiest way to not only set up a VPN connection on your Windows 10 computer but also to change VPN servers. Plus, you can benefit from advanced security settings and effortlessly customize your options.
And we can’t think of a better VPN for the job than Private Internet Access. It’s compatible with Windows, Mac, Android, iOS, Linux, and even routers. And it allows 10 simultaneous device connections through the same account.
PIA comes with some awesome advanced options that can be easily explored: OpenVPN and WireGuard protocols and Shadowsocks proxy (which Windows 10 lacks), split tunneling, kill switch, private DNS servers, and native port forwarding.
Here’s how you can add a VPN connection on Windows 10 using PIA:
To sum up, you can easily add a VPN connection using the Windows 10 built-in provider, without having to install any software.
Or, you can use the Add-VpnConnection cmdlet in PowerShell to achieve the same results, although this requires expert skills.
The fastest way for casual users to secure their Internet connections is by turning to a reliable commercial VPN service like Private Internet Access. It’s easy to install, set up, and customize preferences.
We hope that our article helped you set up a VPN connection on your device. Let us know in the comments section below if you have any questions.
MOV file type is associated with QuickTime file format, but what if your device can’t play MOV files? Then the only option that you have is to convert the file to a different format.
In today’s article, we’re going to show you how can you easily convert MOV to MP4 on Windows PCs. The process is simpler than you think, as long as you have the right tools.
How can I convert .MOV to MP4 on Windows?
1. Convert MOV to MP4 on Windows with WinX HD Video Converter Deluxe
If you need to convert MOV to MP4, then WinX HD Video Converter Deluxe is the easiest way to do that. The software supports 4K videos, so you can easily edit or convert them.
Speaking of conversion, you can convert files and optimize them for mobile playback or for online sharing. The software can also work with videos from action cams, drones, DSLRs, and other sources.
WinX HD Video Converter Deluxe also supports basic video editing, so you can easily cut videos, adjust subtitles, crop videos, combine videos together, or adjust the video volume.
Other useful features:
Compatible with over 370 input and 420 output formats
Ability to download videos from over 1000 websites
Slideshow creation
WinX HD Video Converter Deluxe
WinX HD Video Converter Deluxe is an advanced file converter that can convert MOV to MP4 with ease.
2. Use Wondershare UniConverter to convert MOV to MP4
If you want to change MOV to MP4, you can do that using the Wondershare UniConverter software. This application supports all major popular formats, so you can convert almost anything.
The software supports batch conversion, so you can convert several videos at once, and you can even convert files without quality loss. Of course, you can customize conversion settings as you please.
Speaking of conversion, you can convert files to formats compatible will all sorts of devices, including phones and consoles.
Other useful features:
Basic video editing features
Ability to convert DVDs
DVD and CD burning
Ability to download online videos
Screen, webcam, and audio recorder
Wondershare UniConverter
Wondershare UniConverter can convert MOV files to MP4, but it can also support additional 1000+ file types.
4. Convert MOV to MP4 on Windows using Cloudconvert
You can easily convert your mov files to mp4 format using Cloudconvert. It is a converter service available for free on browser for up to 25 conversions per day.
Click on Choose MOV Files and select how you wish to add your MOV file.
If needed, adjust the advanced settings. This is completely optional and intended only for advanced users.
After the conversion process is finished, you can download your MP4 file.
Changing MOV to MP4 isn’t that hard, and you can do it in a matter of minutes by using software such as WinX HD Video Converter Deluxe or Wondershare UniConverter.
Windows users sometimes find it difficult to launch a program and in such a case may get an error message demanding the use of the command-line sxstrace.exe tool for more details.
The sxstrace.exe was first introduced for Windows in November 2006 by Microsoft and since then, it has been an integral part of Windows.
What is sxstrace exe?
The sxstrace.exe is an executable application file in Windows. Generally, these kinds of files contain a number of instructions that are executed by your computer when a file is opened.
How can I fix sxstrace.exe issues on my computer?
If you have been searching for a way to solve issues related to this Executable File, read along as we highlight easy processes for fixing it.
1. Update Windows to fix the sxstrace.exe error
Open Windows Settings by pressing Windows key + I.
Select Windows Update. Click on Check for updates.
Next, Download and Install the updates if any are found.
Restart the PC to effect the new changes.
2. Run the System file checker to fix the sxstrace.exe error
Open Windows Search by pressing the Windows key + Q.
Type cmd. Select Command Prompt and then choose Run as administrator.
Type the command below: sfc/scannow
Press Enter. Then wait for the Verification to complete.
If no corrupted system files were found, enter the command below: DISM.exe /Online /Cleanup-image /Scanhealth
Next, type this command: DISM.exe /Online /Cleanup-image /Restorehealth
Close the Command Prompt and then Restart your computer.
3. Run the Program Compatibility Troubleshooter
Open Settings by pressing the Windows key + I.
Select System. Then choose Troubleshoot.
Click on Recommended troubleshooter preferences.
If there are no recommended preferences, select Other troubleshooters.
Next, click Run to launch the Program Compatibility Troubleshooter.
In the list of options, Select the program you’re having problems with. If not listed, click the Not Listed option to locate it and troubleshoot.
After completion of the troubleshooting, Restart the computer.
Windows might not be able to find the file on your computer because it is missing. That is why you can fix the sxstrace.exe error by manually registering the file using Command Prompt.
1. OpenRunby pressingWindowskey +R.
2. Type cmd then hit Enter.
3. A permission dialogue box will be displayed, selectYes.
4. Type this command: regsvr32 /u sxstrace.exe
5. Press Enter to execute the command.
6. Next, input the command below: regsvr32 /i sxstrace.exe
7. Hit theEnterkey to execute this command.
8. Restart the computer and retry the program you were trying to run.
5. Reinstall Windows to fix the sxstrace.exe error
Open Settings by pressing Windows key + I.
Select System.
Find and locate Recovery.
Click on Reset PC.
Next, choose whether to Remove apps and settings or Remove everything before reinstalling Windows.
Any combination of the methods highlighted so far should be able to help you fix issues with your sxstrace.exe tool in Windows 11.
If the problem persists, you may want to reinstall the program that is prompting the issue.
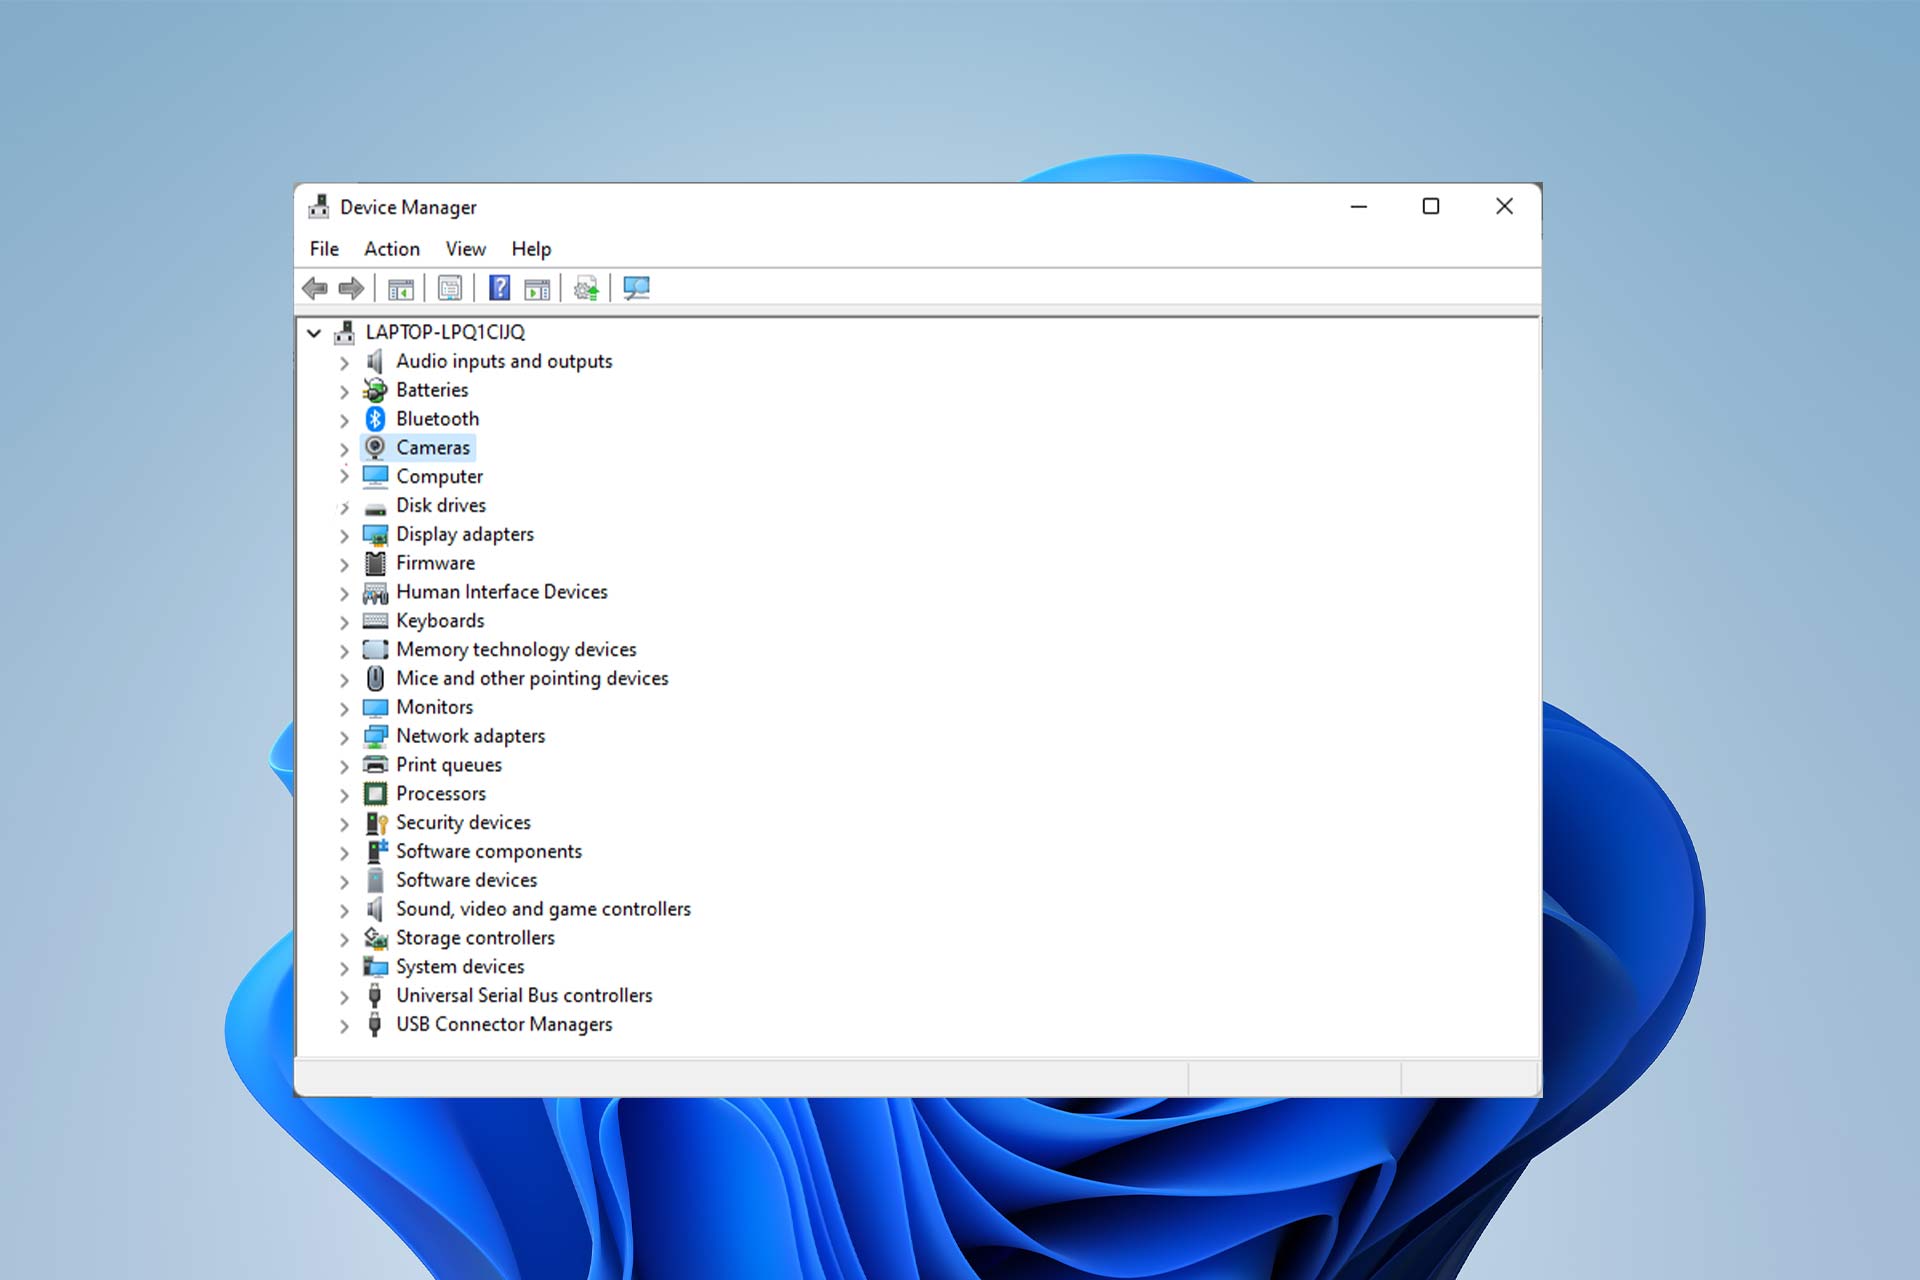
Should the program require the use of peripheral hardware such as a gamepad or mouse, try updating the driver of the device. You can check out our guide on how to use Device Manager to do just that with ease.
Let’s know your experience in the comments box. We also welcome personal views in case you were able to fix this error using a completely different method.
While it’s straightforward to shut down your computer, sometimes you don’t feel like using your mouse and making a couple of clicks to achieve your goal.
Luckily, several methods don’t require a computer mouse, and you can use them to turn off your device in a matter of moments.
This isn’t anything new, and the feature has been present in almost all versions of Windows, but certain people don’t know about it and don’t use it.
So, sit tight and join us while we show you the best shutdown shortcuts you can use on your Windows 11 PC.
What happens when you shut down your computer?
When you shut down your PC, the operating system checks if other user accounts are logged in, and if they are, you’ll be presented with a warning message.
Next, your PC closes all active applications. If any unsaved changes are left in an application, you’ll be asked to save your changes. Once the applications are closed, Windows slowly stops its services.
Lastly, your computer sends the shutdown signal that cuts the power, and your device is shut down.
How often should I shut down my PC?
Many users don’t turn off their computers at all. Instead, they rely solely on Hibernation and Sleep Mode. While these features can be helpful, it’s a good idea to shut down your computer once in a while completely.
When your operating system runs, cache files will keep being created, which can sometimes cause certain issues. This is why it can benefit your device to shut it down at least occasionally.
As for how often you should turn off your PC, it’s advised to do it at least once a week, but if you don’t notice any performance issues, you don’t have to do it at all.
How can I shut down Windows 11 using keyboard shortcuts?
1. Use the Win + X shortcut
Press Windows Key + X.
Now press the U key twice.
If you perform this correctly, your PC will start shutting down. The great thing about this shortcut is that it will work even if you have any other application running, which will surely come in handy.
2. Use the Alt + F4 shortcut
Click on your desktop or Taskbar.
Now press Alt + F4.
The Shut down option should be selected.
Simply press Enter to turn off your PC.
Although this Windows 11 shutdown shortcut works, it requires you to have your desktop or Taskbar focused. If you don’t do so properly, you might end up closing the currently open window.
1. Right-click your desktop and expand the New menu.
2. Select Shortcut from the list of options that appeared.
3. Now enter the following command:shutdown /s /t 0
4. Enter the desired name for your shortcut and then click on Finish.
5. Now right-click the newly created shortcut on your desktop and choose Properties.
6. Set the desired shortcut key.
7. Click Apply, then OK to save the changes.
8. You can now use that shortcut key to shut down your Windows 11 device.
If you don’t like using the default shortcut key for shutting down your Windows 11 device, you can create a new personalized shortcut. You can use your custom shortcut to shut down your PC globally even if you have other apps open.
NOTE
If you’re using Fast Startup, we suggest the shutdown /s /hybrid /t 0 command instead since it will activate the hybrid boot and help your PC boot faster once you turn it on.
What’s the difference between shutdown, hibernation, and sleep?
The regular shutdown will turn off your computer completely and close all open applications. The next time you turn on your device, you’ll have to wait for your system to boot and then start the desired applications manually.
Sleep Mode tackles this issue, and when you use it, it immediately puts your computer in a low-powered state.
Once you wake up your PC, it will boot instantly and load your opened applications from the memory, allowing you to continue where you left off.
Hibernation is a great mix of shutdown and Sleep Mode, and it will turn off your computer completely, but it will save all opened applications on your hard drive.
Doing so lets you continue where you left off when you turn your PC back on. Keep in mind that hibernation takes a bit longer to boot since it’s loading an opened application from the hard drive.
Your computer won’t experience any issues if you never turn it off. However, it’s advised to set up automatic Sleep Mode or Hibernation to save power.
This is especially useful if you’re not going to be around your PC for several hours or if you’re going to bed and your computer is standing idle for an extended period of time.
As you can see, using Windows 11 shutdown shortcuts is fast and easy, and it will help you turn off your PC like a pro without ever using your mouse.
Our preferred method is to use the Windows Key + X shortcut since it works in all newer versions of Windows, and it’s the easiest to perform. Also, for seamless operations, you may change the power button action in Windows 11.
What other interesting shortcuts are you using? Let us know in the comments section below.
If you can edit and add HTML codes to your website or post, you can also embed YouTube videos to make your article informative. Embedding YouTube videos is simple; however, what if you want to enable autoplay for embedded YouTube videos?
Autoplaying embedded videos is useful if you want to show your products and how they work. While the embedded videos do not increase the views, they can be handy when used cautiously.
In this article, we show you how to enable autoplay for embedded YouTube videos on your website with ease.
How to autoplay embedded YouTube videos on your website?
1. Use HTML script
1. Open YouTube on your preferred web browser.
2. Find and play the video that you want to embed.
3. Below the video’s title, click onShare.
4. Select theEmbedtab. This will show you an HTML embed script.
5. Copy the HTML code and paste it into the page where you want to add the video.
6. For example, in WordPress, go toNew Post > Text(by default Visual tab is selected) and paste the code.
7. Add?autoplay=1code right after video ID.
8. After adding ?Autoplay=1, the HTML code will look like this: “<iframe width=”560″ height=”315″ src=” https://www.youtube.com/embed/[Video ID]I?&autoplay=1″ frameborder=”0″ allowfullscreen></iframe>
9. Update the page before existing the page to save the changes.
10. Open the web page and check if the video plays automatically for the new users.
11. If the changes are not visible, try to clear the cache and try again.
The first method you can apply to autoplay Youtube videos on a website is by using an HTML script on it. Basically, you need to embed the Youtube video’s HTML code on your website.
Make sure you have activated the plugin after installation is over.
From the left pane of your WordPress dashboard, click on YouTube Embed and select Profile.
Scroll down to the Playback section and check the “Autoplay” box.
Enabling Autoplay will automatically play the video when the player loads.
If you want to play a video on a loop, check the “Loop Video” box. In the case of a playlist, this will play the entire playlist and then play it on a loop.
The YouTube Embed plugin also comes with some advanced features. You can change the video player size, make them responsive, enable or disable annotations, allow captions, show related videos from other channels, and change the default style.
Note – This is a WordPress plugin. If you are using any other CMS (Content Management System), search the plugin repository of your CMS to find an alternative to the YouTube Embed plugin.
Before you proceed with the steps, note that auto-playing videos without user input can annoy the visitors and force them to close the site.
Adding an autoplay tag to the HTML code provided by YouTube is the easiest way to autoplay embedded YouTube videos on your page. However, if you want more customization, you can use the YouTube Embed WordPress plugin.
Do let us know your preference in the comments below. Also, leave there any other questions or suggestions that you may have.
TAR files are similar to ZIPfiles in many ways since they allow you to store multiple files into a single file. This file type is mostly used on Linux, but you can sometimes encounter it on Windows as well.
How can I open a tar file in Windows 10?
If you encounter a TAR file, how do you open it? In today’s article, we’ll show you methods that you can use to open the TAR file on your PC.
1. Convert TAR files in Windows 10 with WinZip
WinZip is one of the best-known file archiver software on the market. The software can work with various file types including, RAR, 7Z, TAR, ISO, IMG, ZIP, GZ, TAZ, TGZ, and many others.
The software is incredibly simple to use and to open a TAR file or any other archive, you just need to double-click it and WinZip will do the rest.
WinZip also offers file protection, allowing you to encrypt and protect your files from unauthorized access.
Other useful features:
Ability to access files on PC, network drive, and cloud
Works with Dropbox, Google Drive, One Drive, and other cloud services
Ability to convert PDF files
Available on Mac and PC
Ability to split ZIPfiles
WinZip
WinZip is powerful file archiver software that works with all popular file extensions, including TAR files.
Another software that can open TAR files in WinRAR. The software also works with other formats including RAR, CAB, ZIP, ARJ, LZH, GZ, UUE, BZ2, JAR, ISO, 7Z, XZ, Z, and others.
The software is simple to use, and you can open a TAR file like any other file. The software also offers strong AES 256-bit encryption, so you can easily protect your files.
Other useful features:
Supports both graphical and command line interface
Built-in wizards that can help you extract your files
Can work with large files
WinRAR
WinRAR is a file achiever software used predominantly to create RAR files, but it fully supports TAR files.
Click on the Add Files button and upload the file. If you want, you can also link files that are hosted elsewhere.
Make sure that ZIP is selected as the output format.
Now click on Convert Now and wait for the process to finish.
After the conversion is done, download your ZIPfile.
Keep in mind that this service is limited to 50MB per file for free users. Opening TAR files on Windows PC is simple, as long as you have the right software for the job.
If you don’t want to use a third-party software, you can always convert the TAR file to a ZIP archive online.
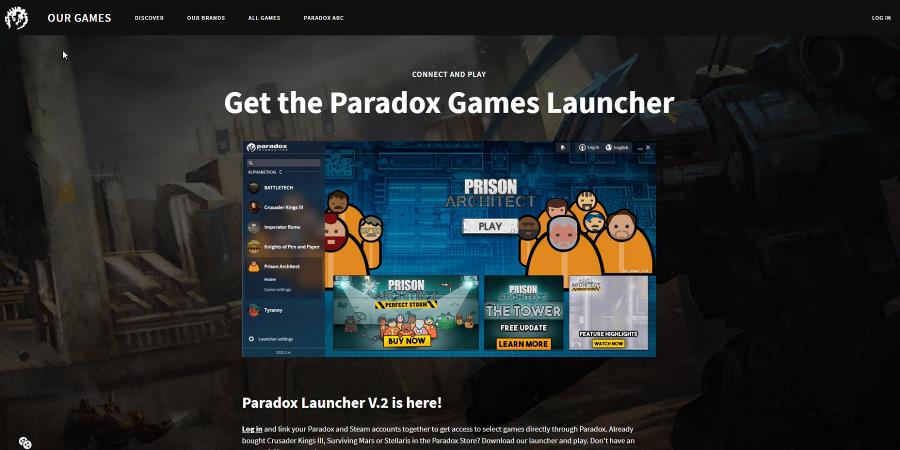
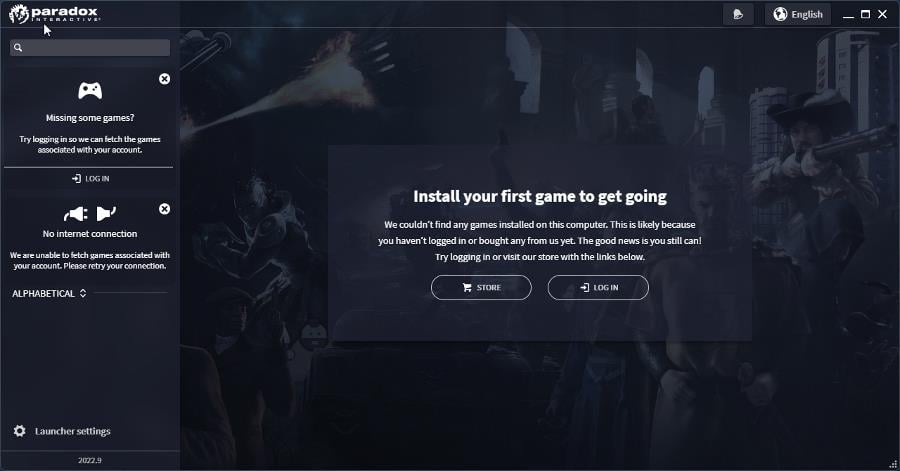
Paradox Interactive is a video game based in Stockholm, Sweden that has its own launcher: the aptly named Paradox Launcher. Essentially, it’s the developer’s version of Steam; an app which you can launch its games from.
You can connect Paradox Launcher to Steam, but some people prefer having the two pieces of software separate. Whatever the case may be, it’s clear that Paradox is trying to establish their own online platform.
If you’re a fan of Paradox games, we recommend that you download the launcher. However, you should be made aware of several problems with the app.
Is Paradox Launcher safe?
Absolutely. Paradox Launcher is totally safe to use. There are no reports of any kind of malware or virus uploading to a user’s computer as a result of downloading this app.
The problems plaguing the Paradox Launcher involve games not being recognized or the app crashing. Roughly, there are some common issues with the launcher and this guide will address them.
How do I fix the most common issue with Paradox Launcher?
1. Already installed
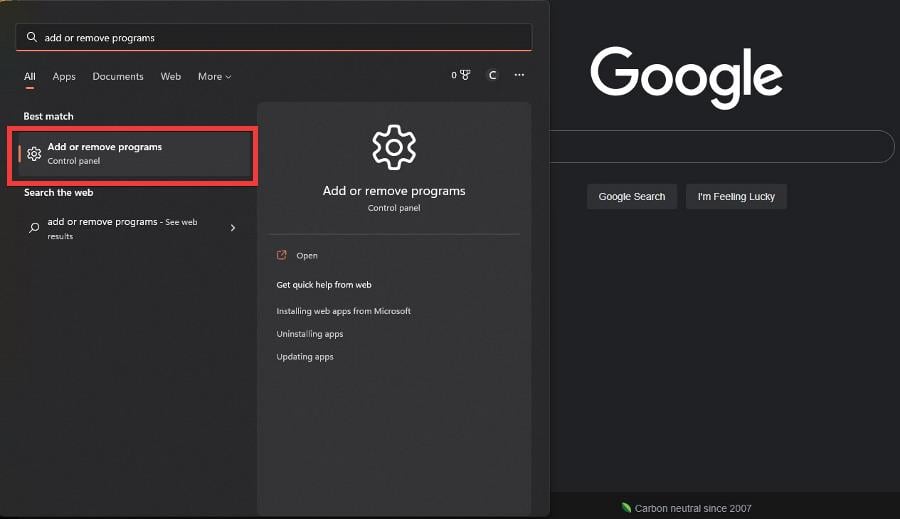
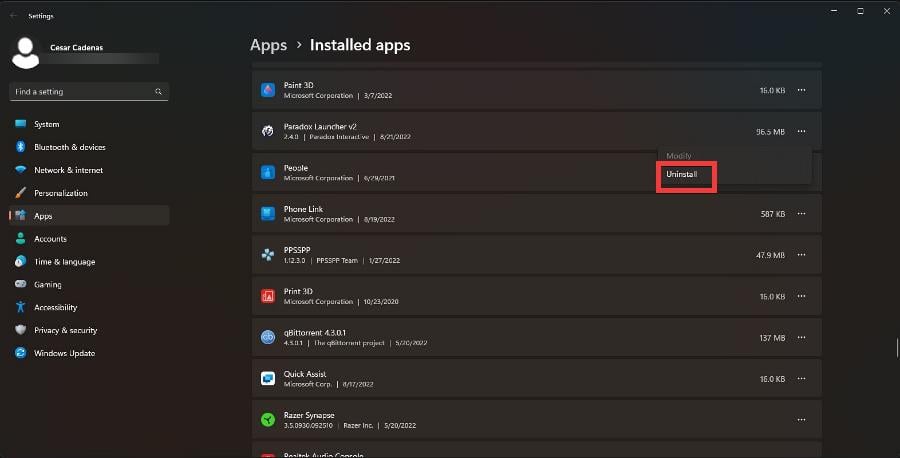
Start by opening the search bar on Windows and type in add or remove programs.
Click the entry that appears.
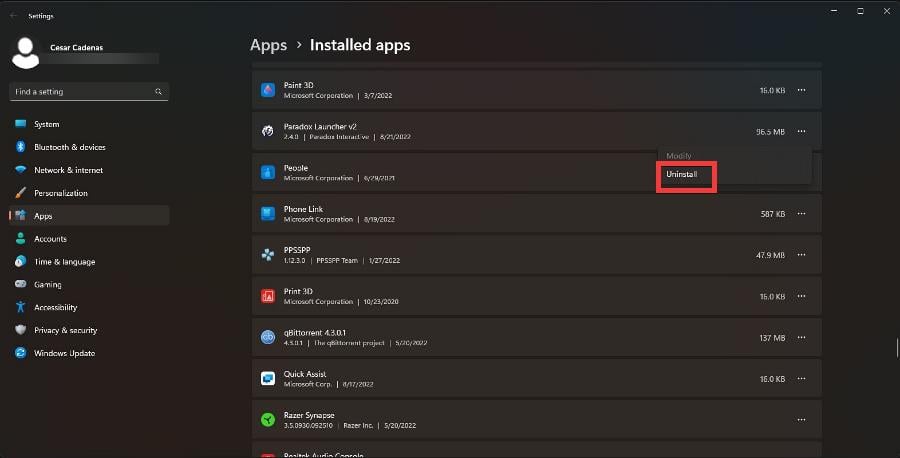
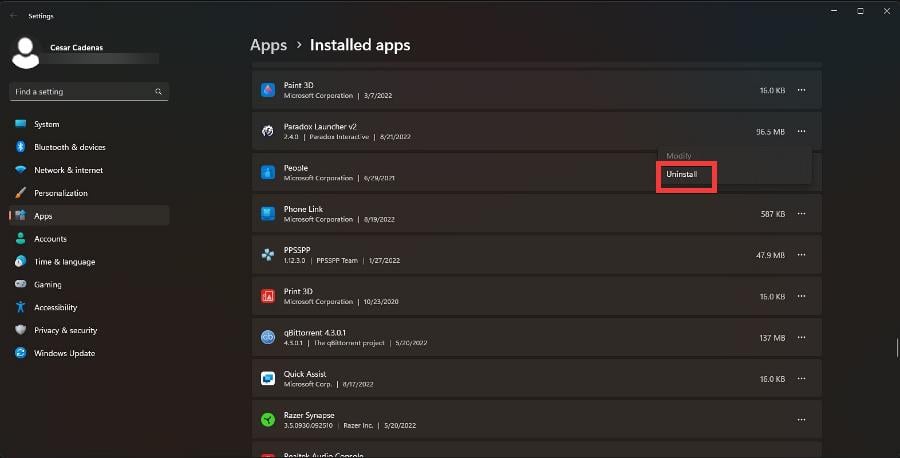
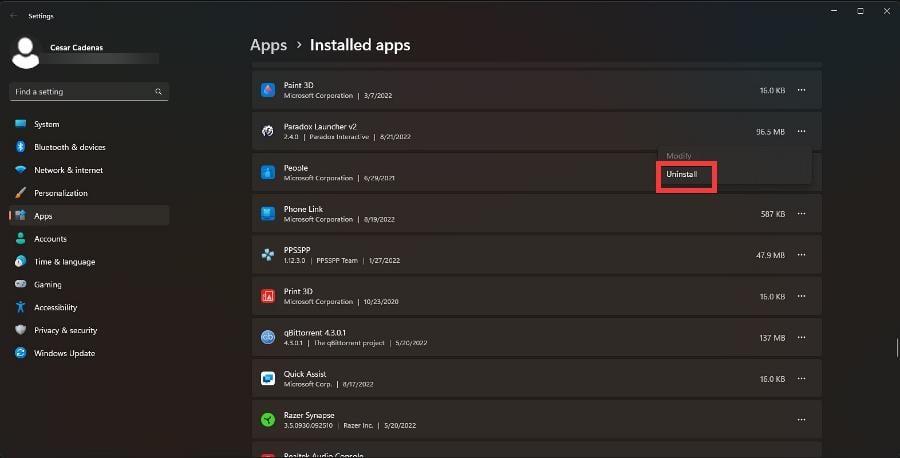
Scroll down until you find Paradox Launcher. Click the three dots to the right.
In the context menu, click Uninstall.
Once uninstalled, you will have to delete three specific folders. If they’re not there, skip forward to step 9.
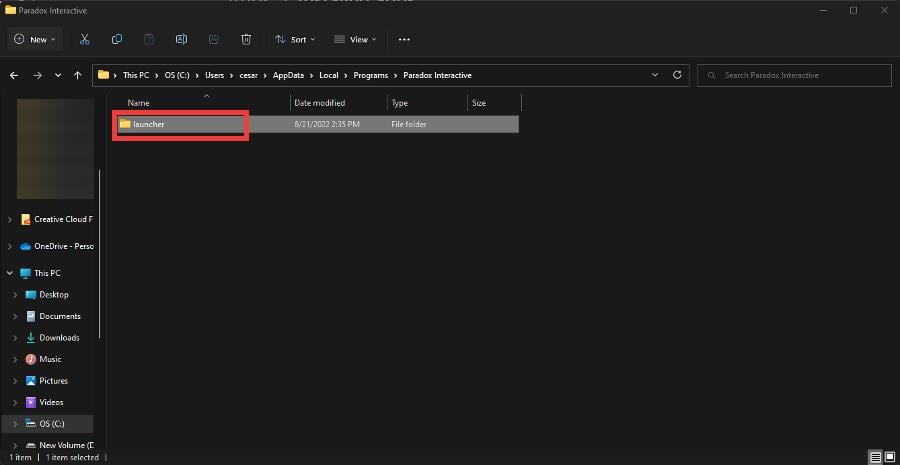
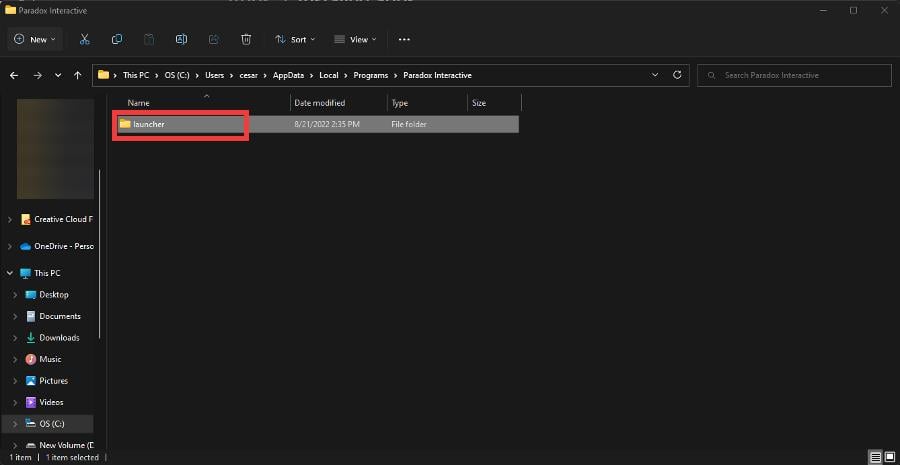
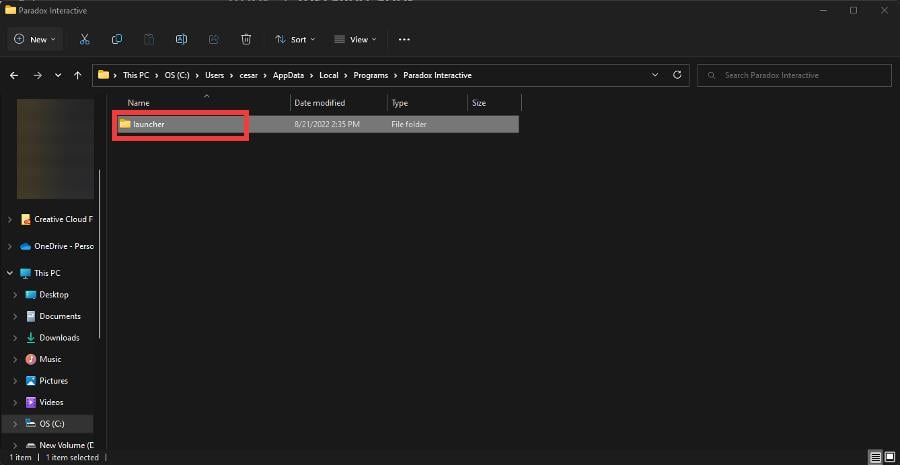
For the first folder, open the File Explorer and enter the following address: C:/users/<UserName>/AppData/Local/Programs/Paradox Interactive/
Where it states “<UserName>”, enter your username for the account on your computer.
Delete the folder titled launcher.
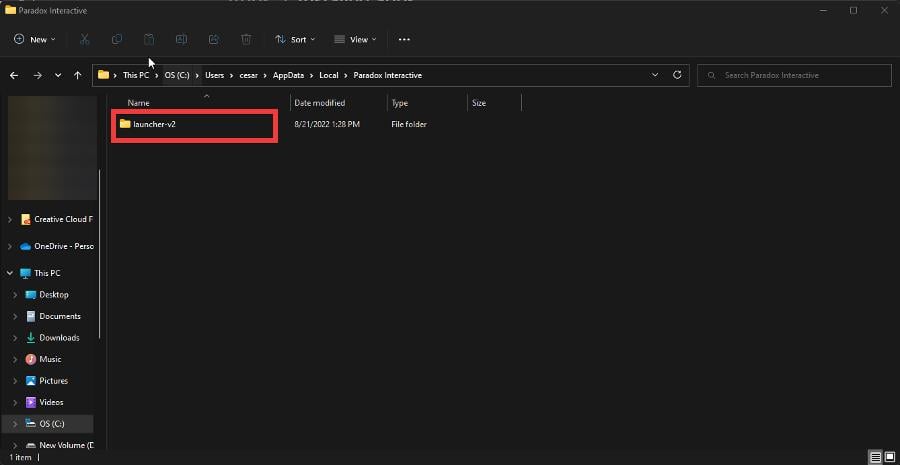
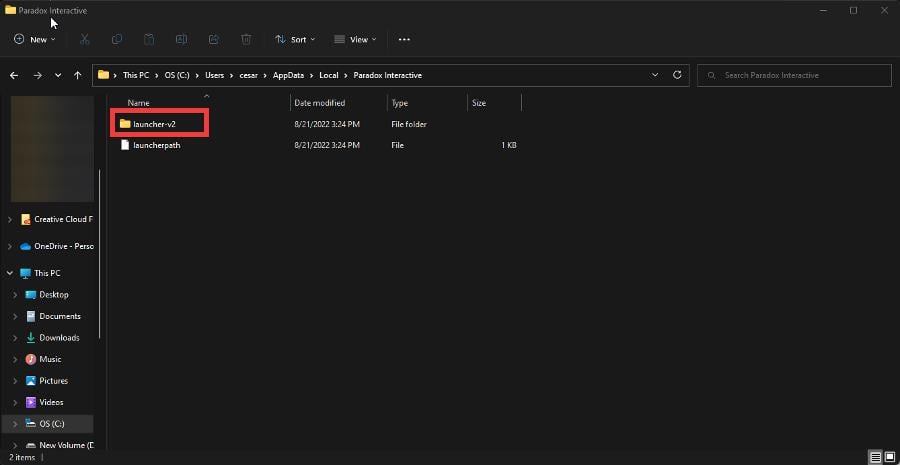
Next, delete the file you see here: C:/users/<UserName>/AppData/Local/Paradox Interactive/
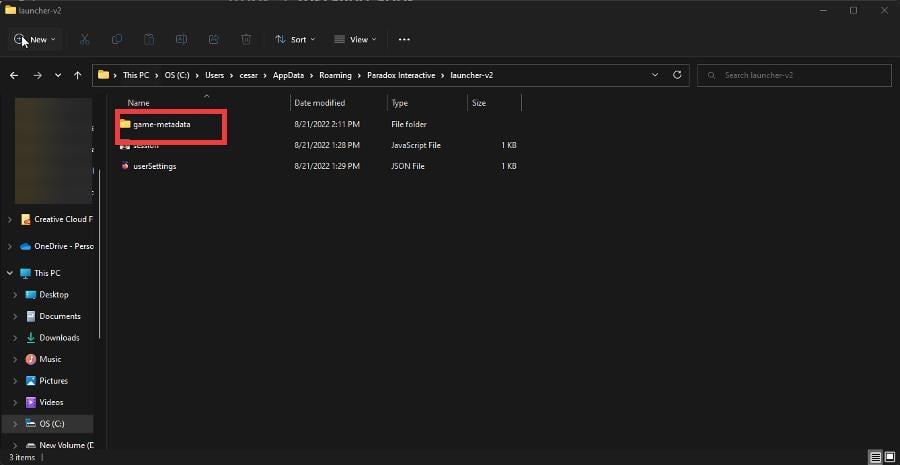
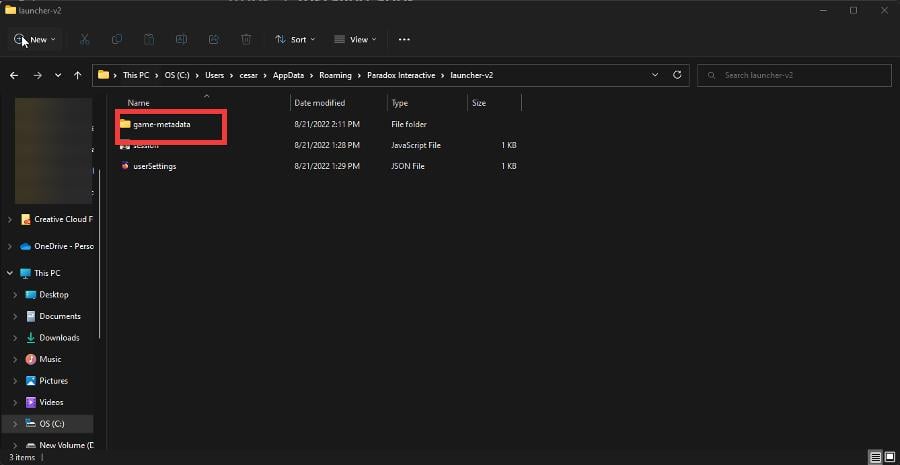
Finally, delete the file you see here: C:/users/<UserName>/AppData/Roaming/Paradox Interactive/launcher-v2/
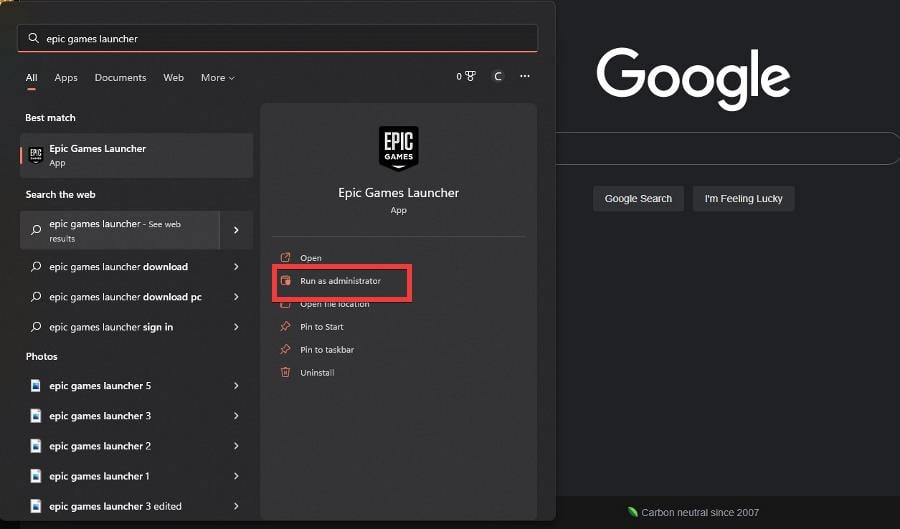
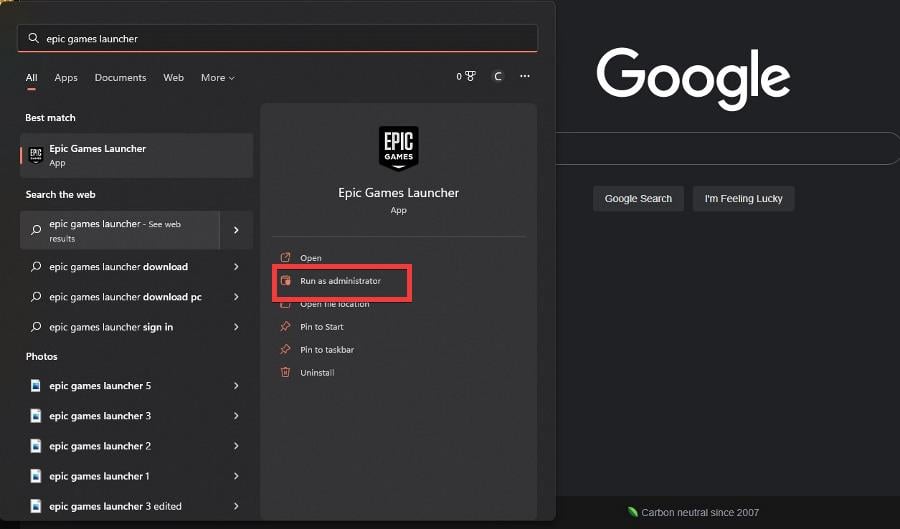
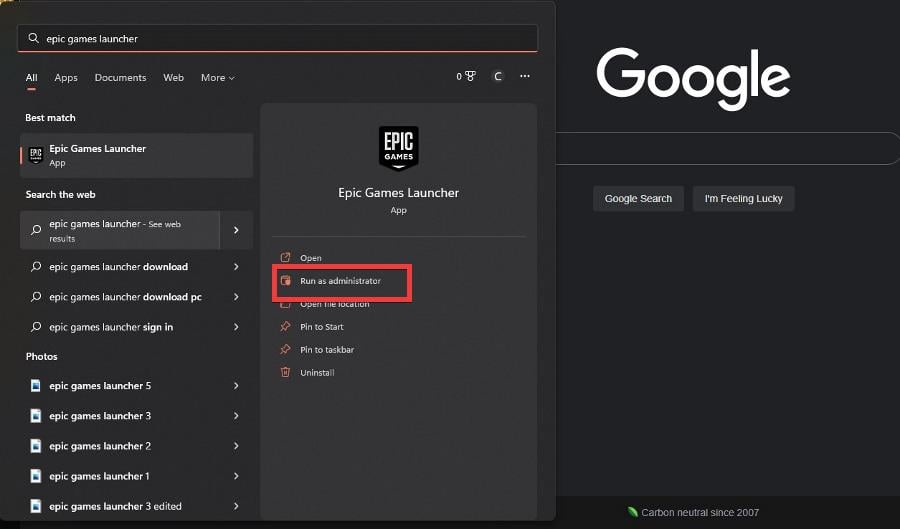
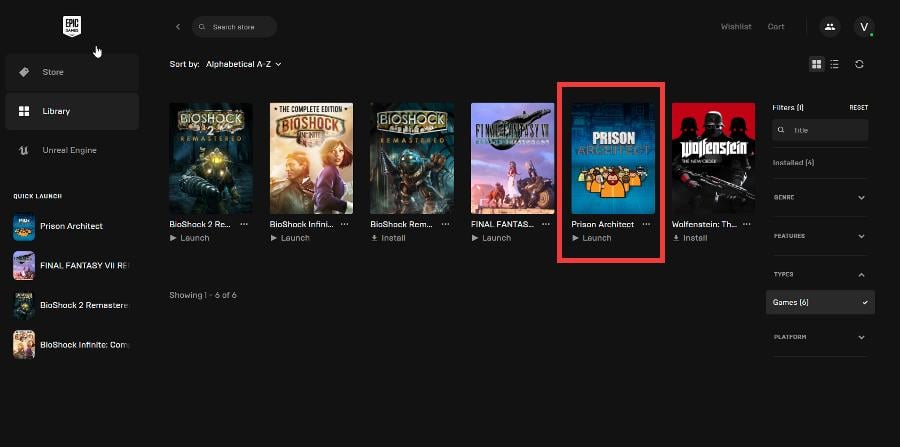
Once those folders are deleted, search for either Steam or the Epic Games Launcher and run it as an administrator.
A small window may appear asking you if you want to make changes. Select Yes.
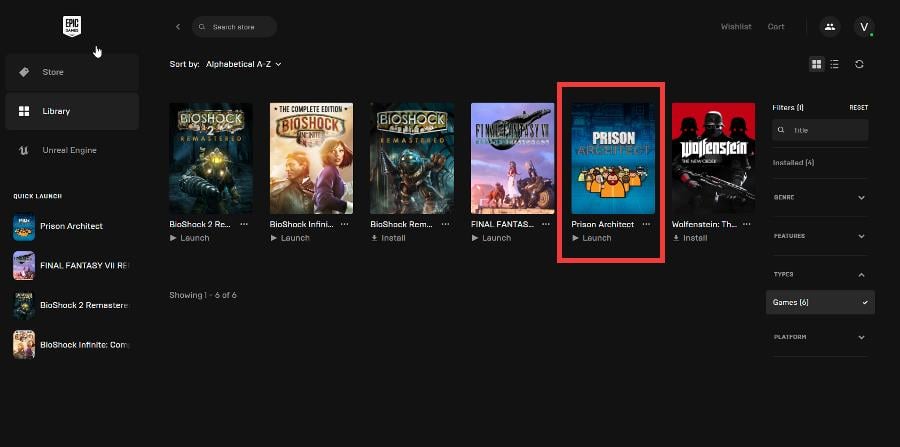
Now in the launcher, run the Paradox Interactive game that you want to play and launch it.
By performing these steps, the Paradox Launcher will reinstall and get rid of any problems you may have.
2. Black screen
Start by closing the Paradox Launcher.
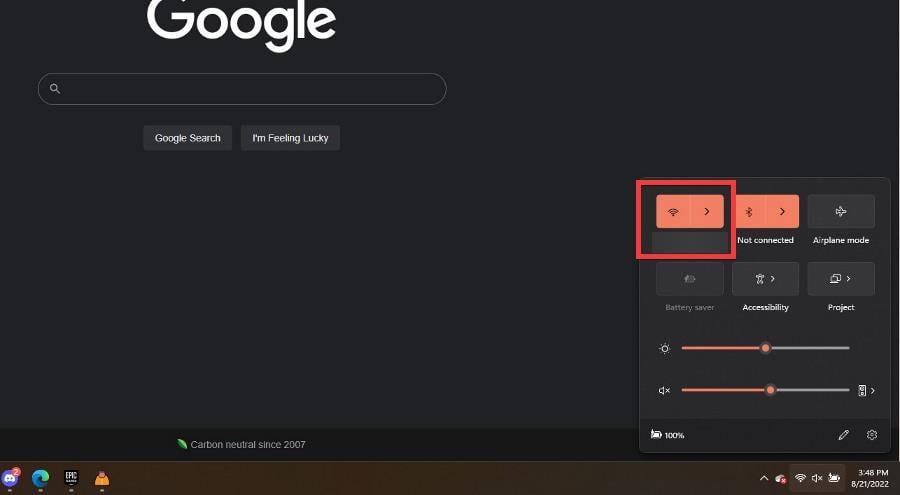
Disconnect from the internet. You can do this by clicking the Wi-Fi icon on the bottom right-hand corner and then clicking the said icon to turn it off.
Open Paradox Launcher again and sign out if your account is still logged in.
Reconnect to the internet and the problem should be fixed.
3. Blue screen
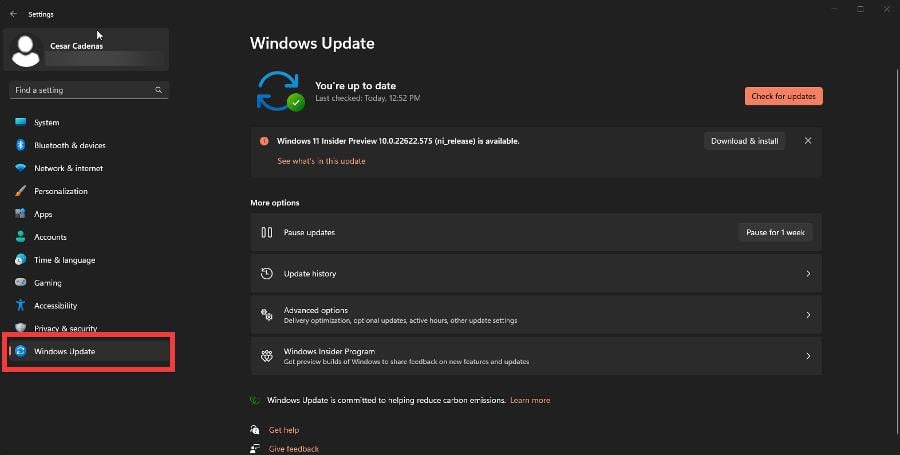
The first way to update drivers is to go to the Windows Update section in the Settings menu.
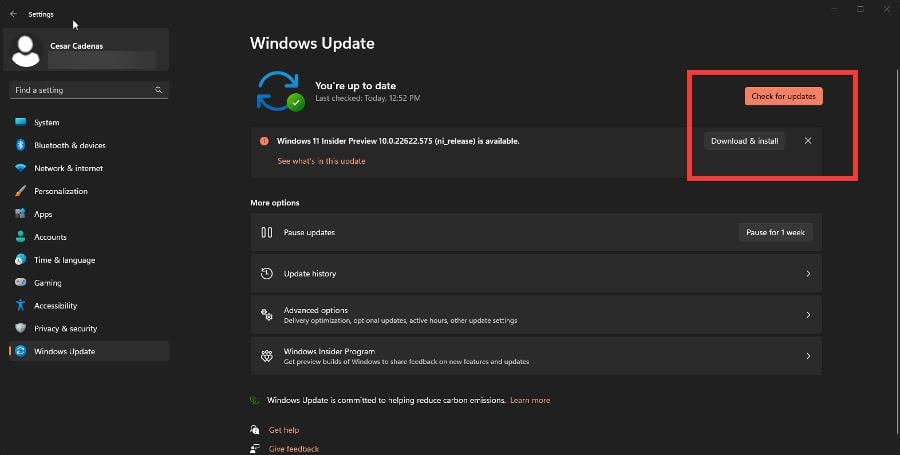
You can click the Check for updates button in the upper right-hand corner if any updates are available.
You can click Download & install to update your computer.
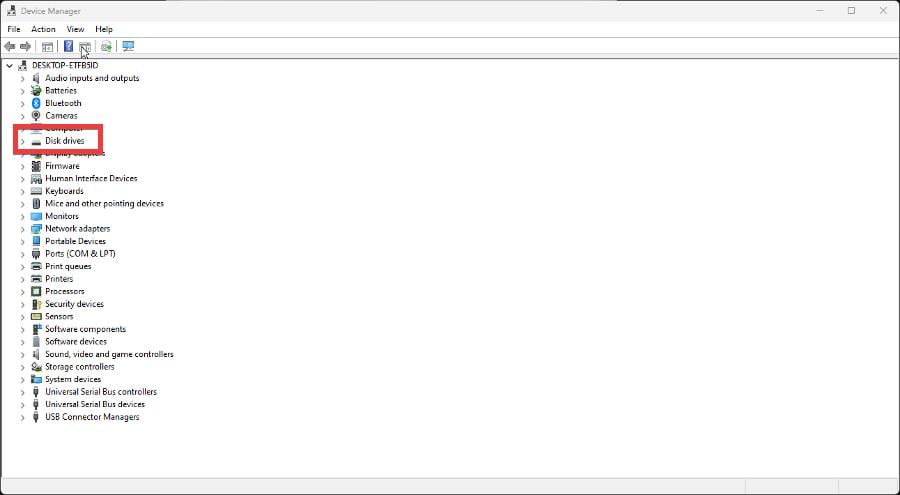
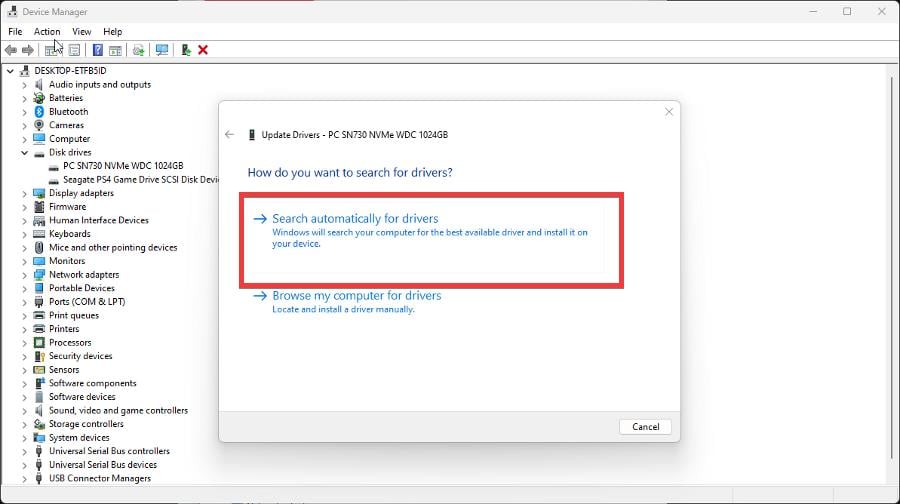
Conversely, you can open the Device Manager and click on Disk drives.
Right-click the driver and select Update drivers.
In this new window, select Search automatically for drivers to update. Once done, the window will close automatically.
Blue screen problems are more a result of hardware or driver problems than with the Paradox Launcher.
Computer has tens of drivers and if one of them is outdated, you can spend a lot of time searching for it. If you want a safer and faster alternative, you should consider using a tool that specializes in driver updates like Outbyte Driver Updater.
4. Blank screen
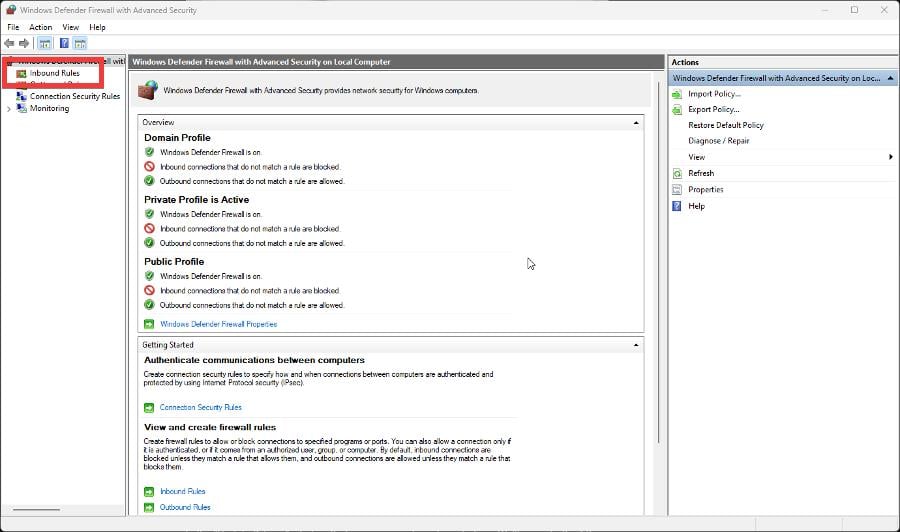
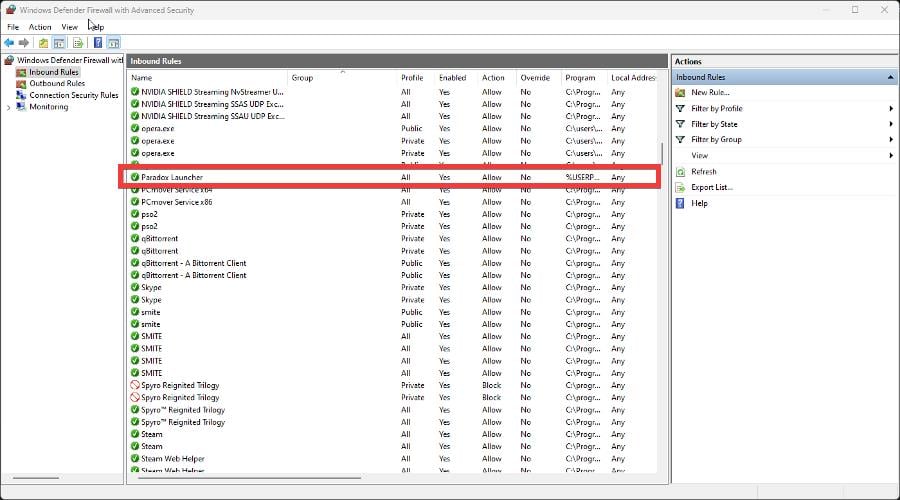
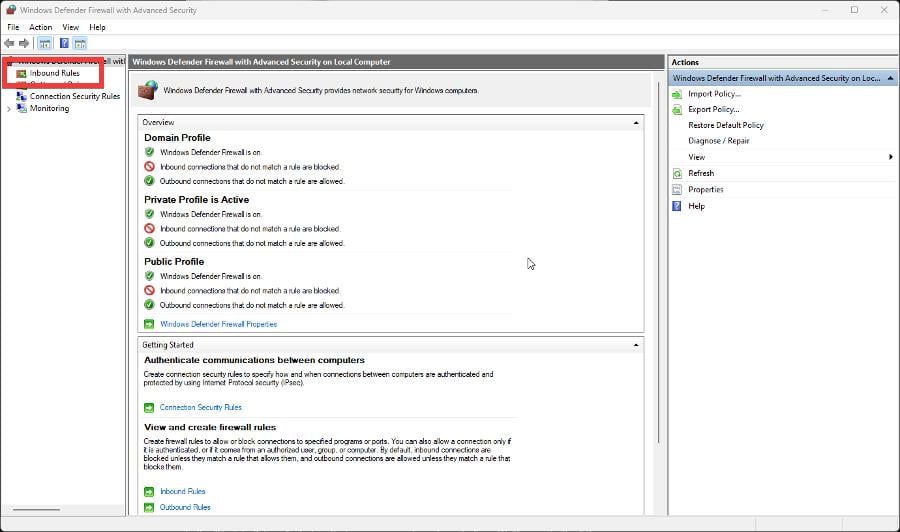
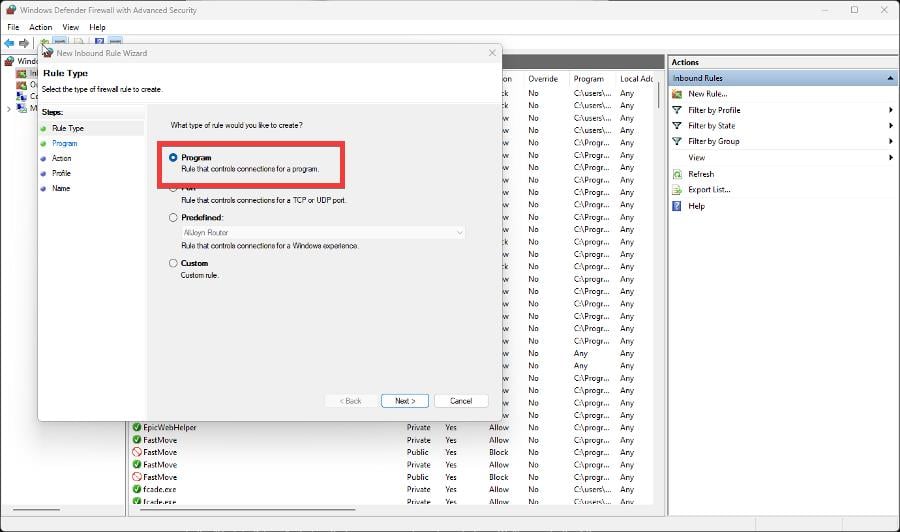
Search for and open Windows Defender Firewall with Advanced Security.
Click Inbound Rules on the left-hand side.
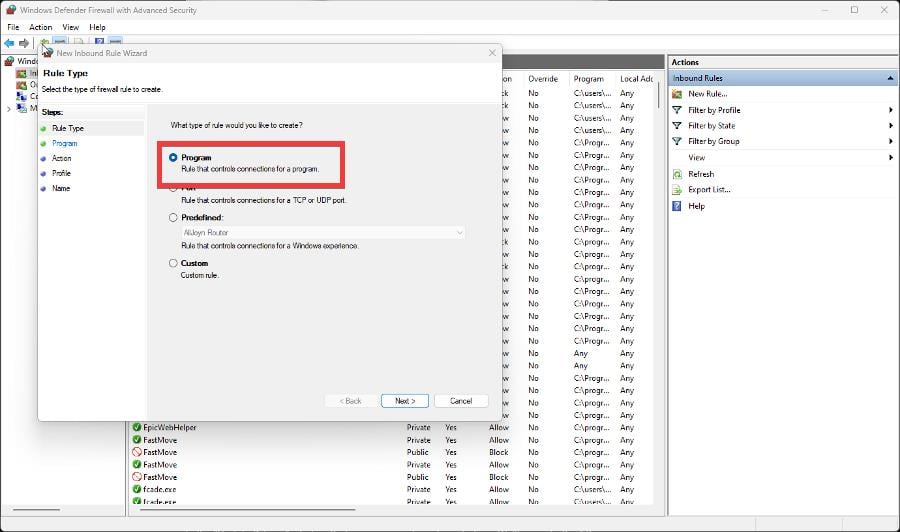
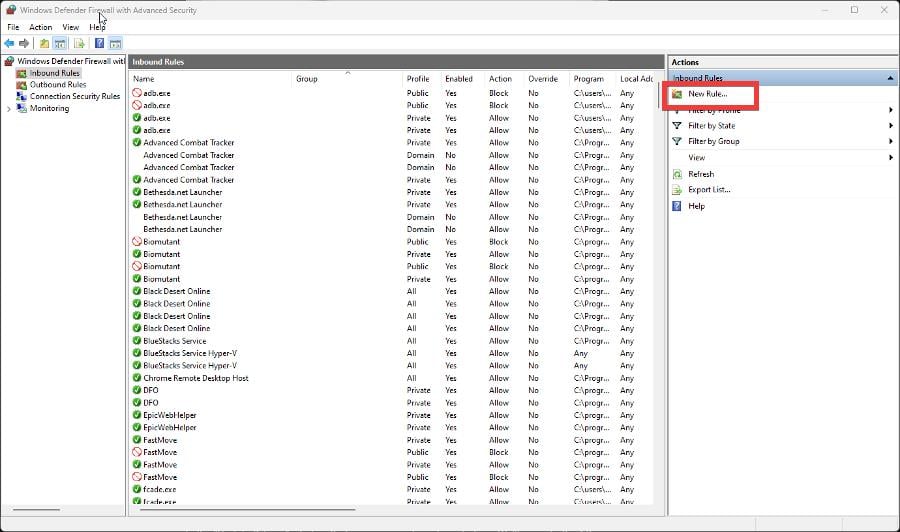
Click New Rule on the right-hand side.
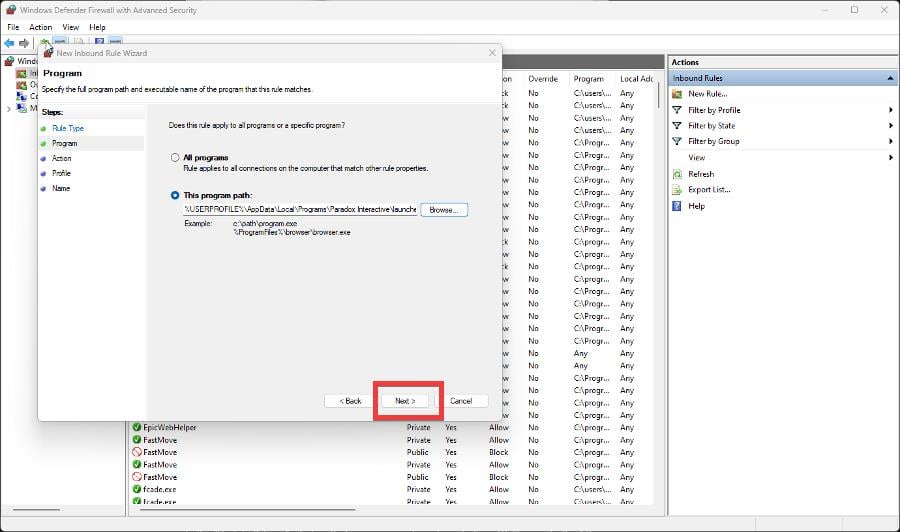
In this new window, click Program, then Next.
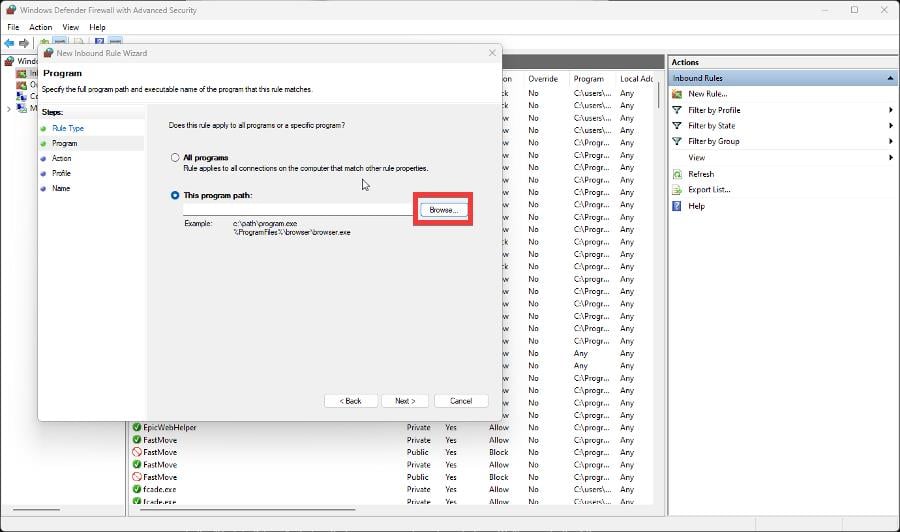
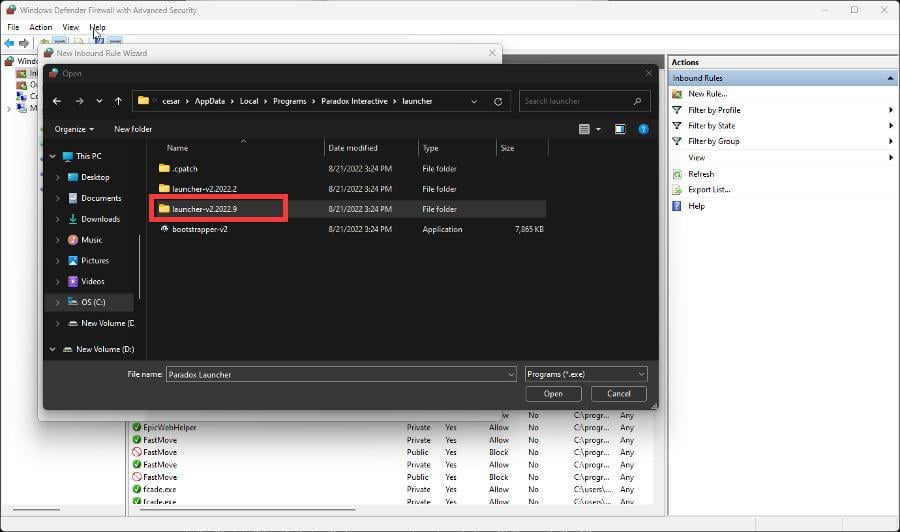
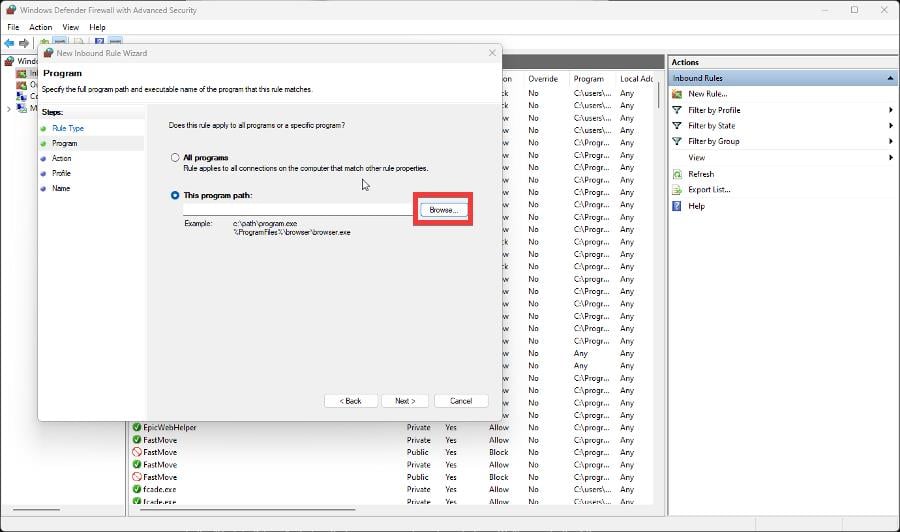
Click Browse.
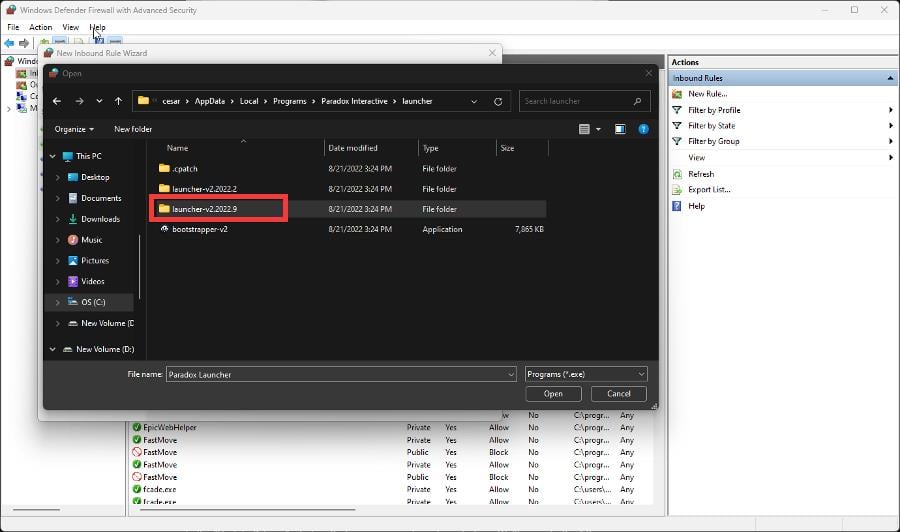
In the File Explorer, go to: C:\Users\<User Name>\AppData\Local\Programs\Paradox Interactive\launcher
Select the most recent version.
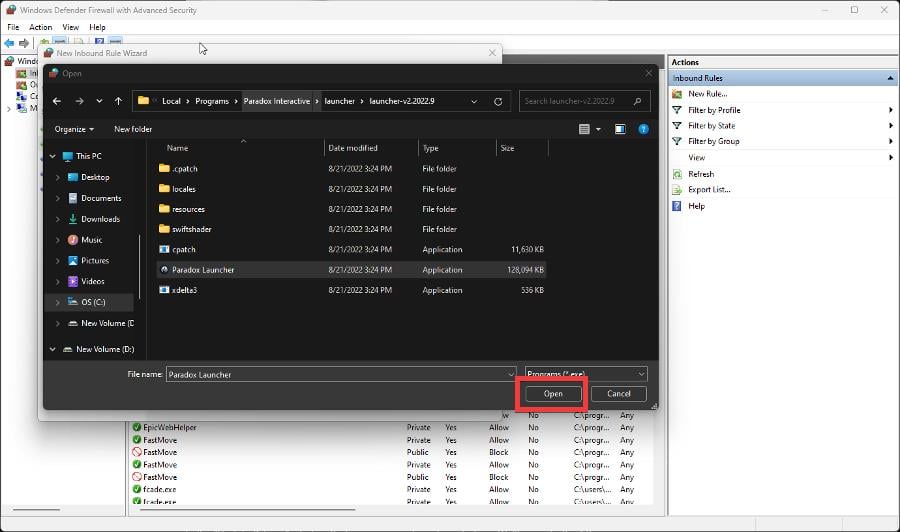
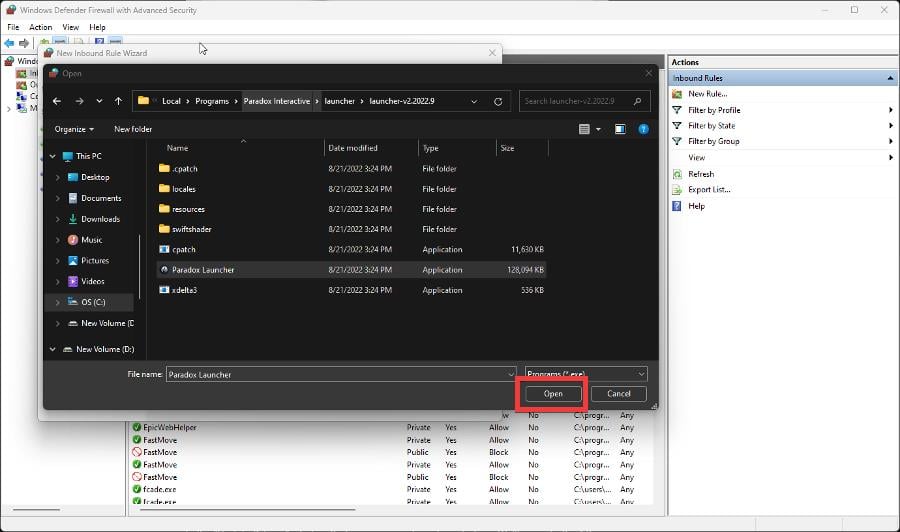
In the following folder, select Paradox Launcher then Open.
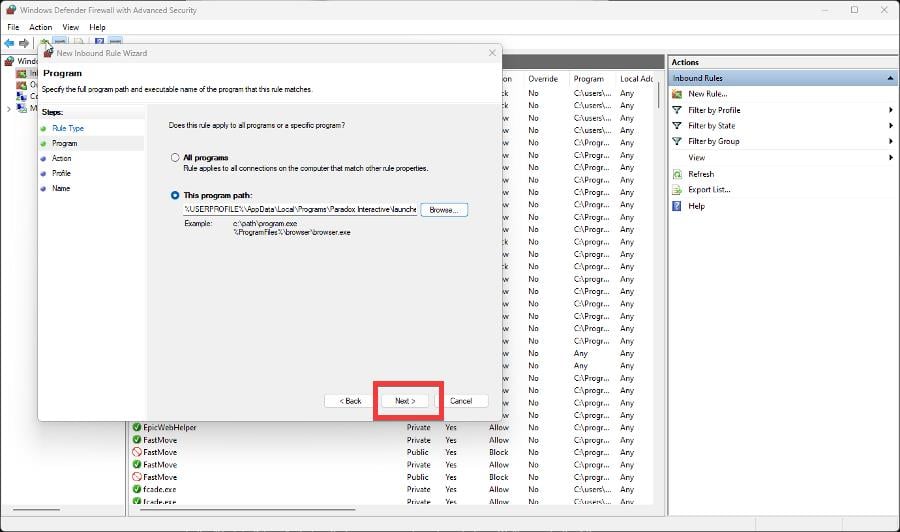
Back in the Inbound Rule Wizard, click Next.
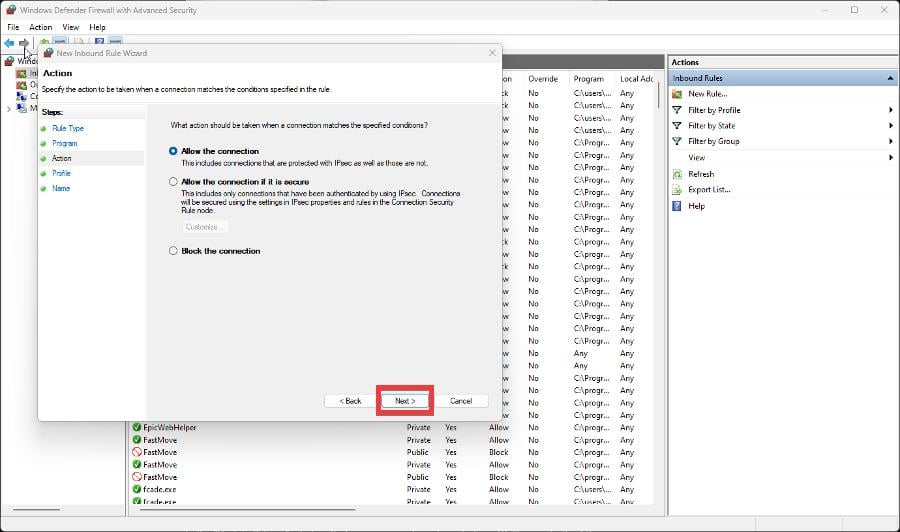
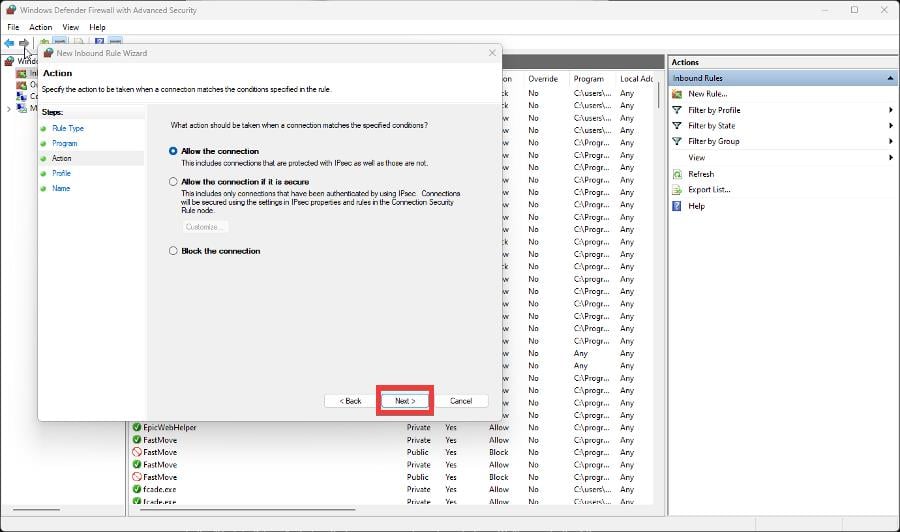
Click Allow the connection, then Next.
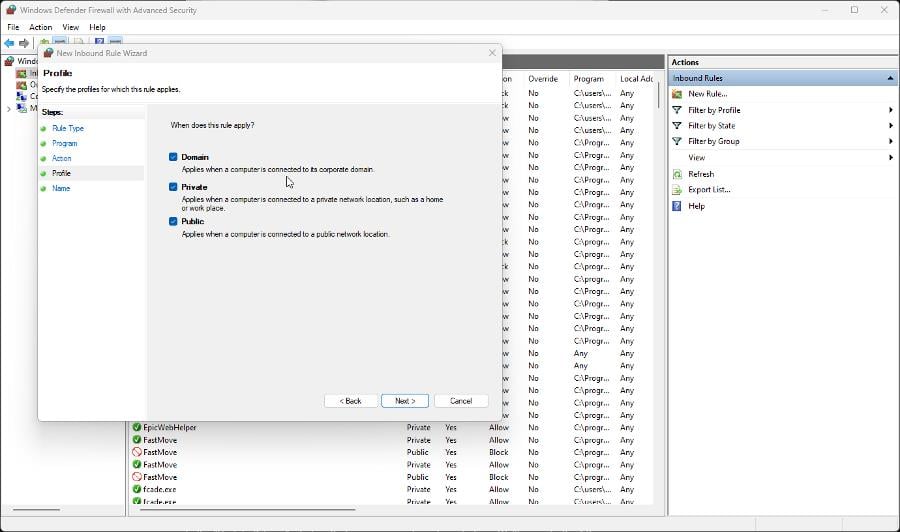
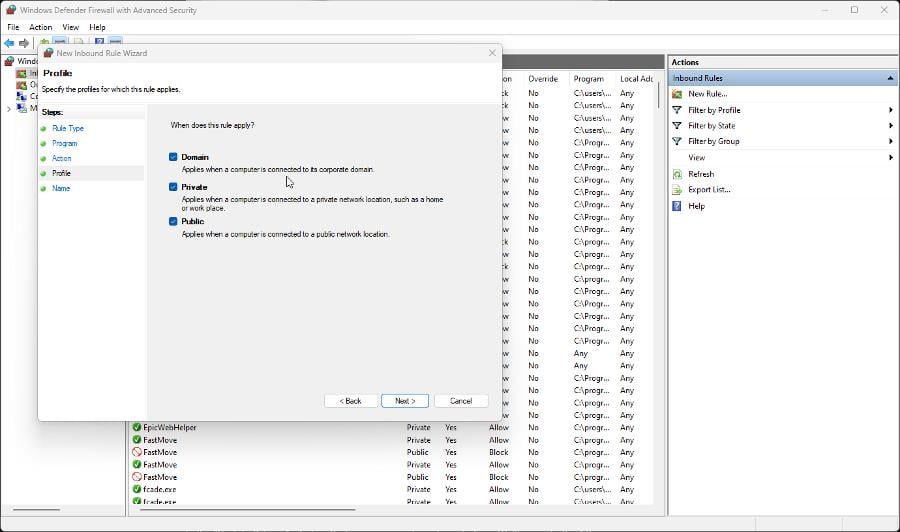
Configure how the rule will be applied then click Next.
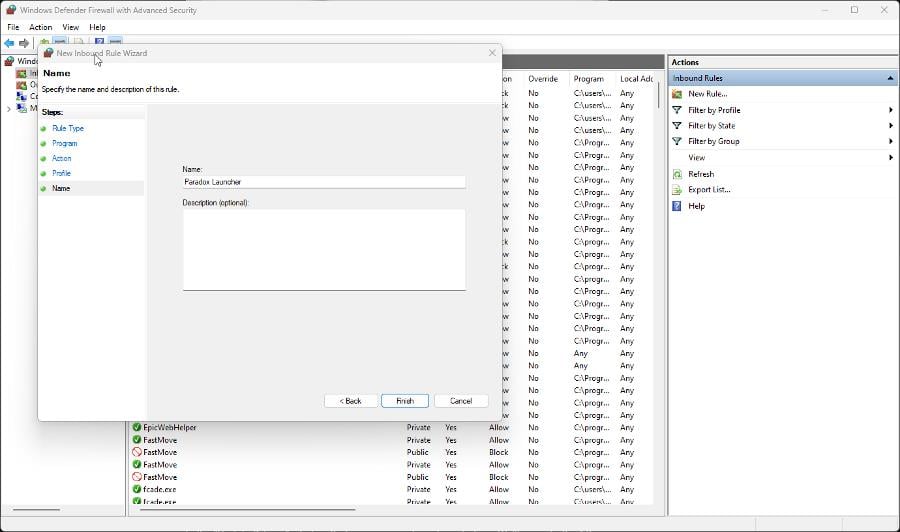
Give the rule a name and a description if you’d like.
Click Finish.
5. App crashing
To solve the Paradox Launcher crashing problem, you essentially have to repeat the steps from the first solution.
Uninstall the Paradox Launcher in the Windows Settings menu.
And just like before, you’ll have to go to the File Explorer and delete three specific folders.
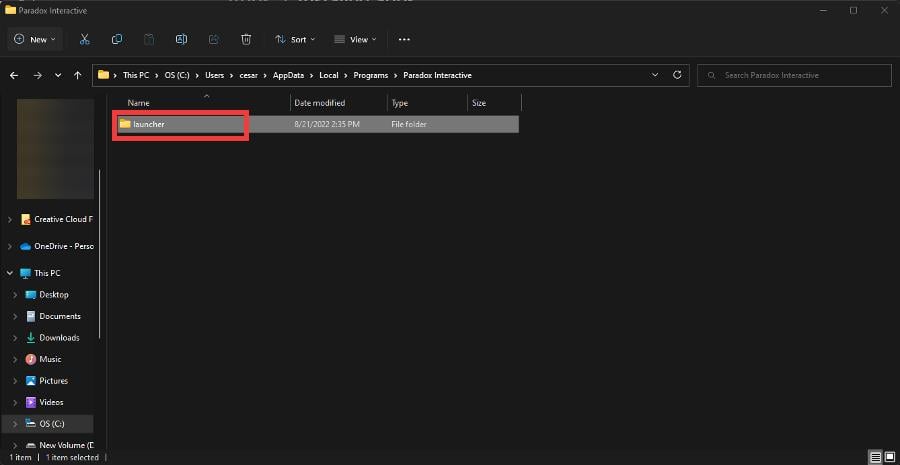
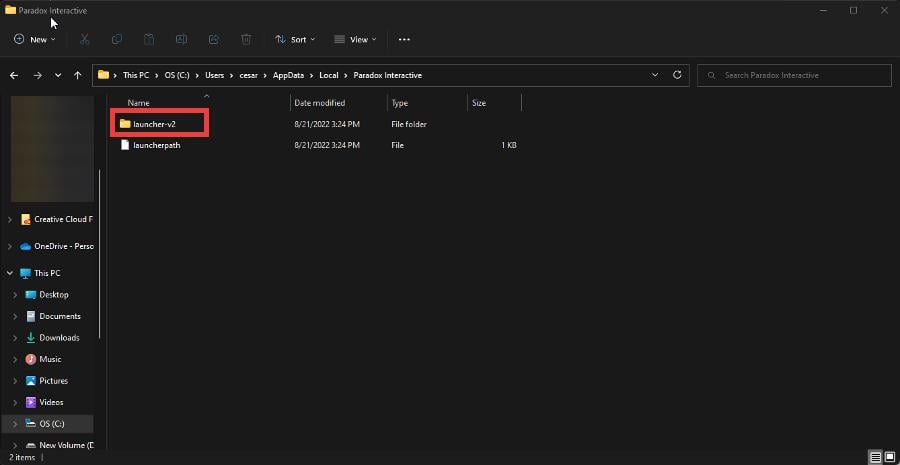
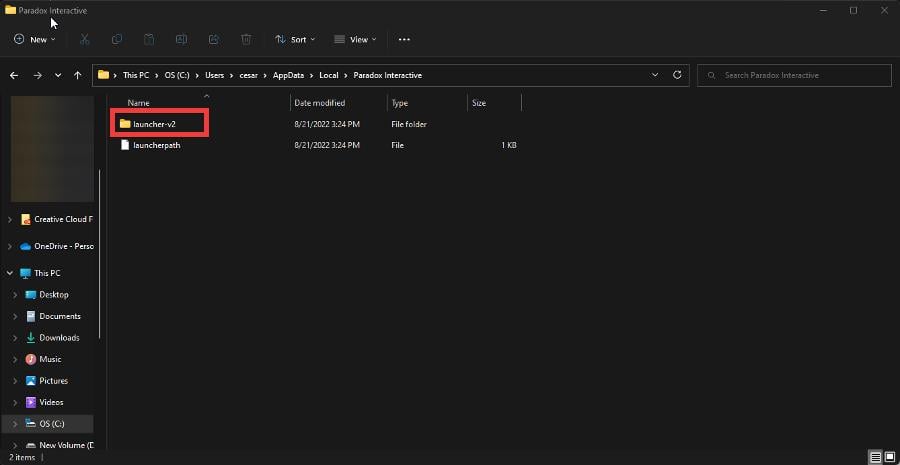
Go to: C:/users/<UserName>/AppData/Local/Programs/Paradox Interactive/
Delete the folder shown in the image. Remember that <UserName> needs to be replaced with the username that you use for your computer.
Now go to: C:/users/<UserName>/AppData/Local/Paradox Interactive/
Delete the folder shown in the image:
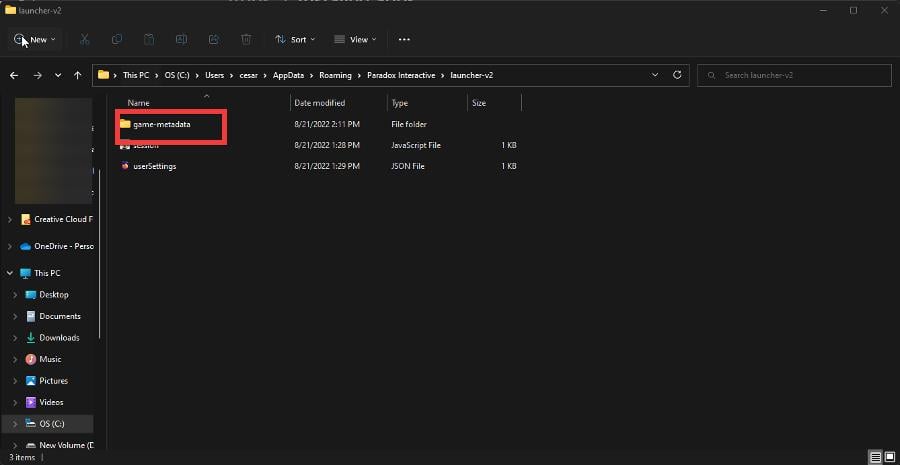
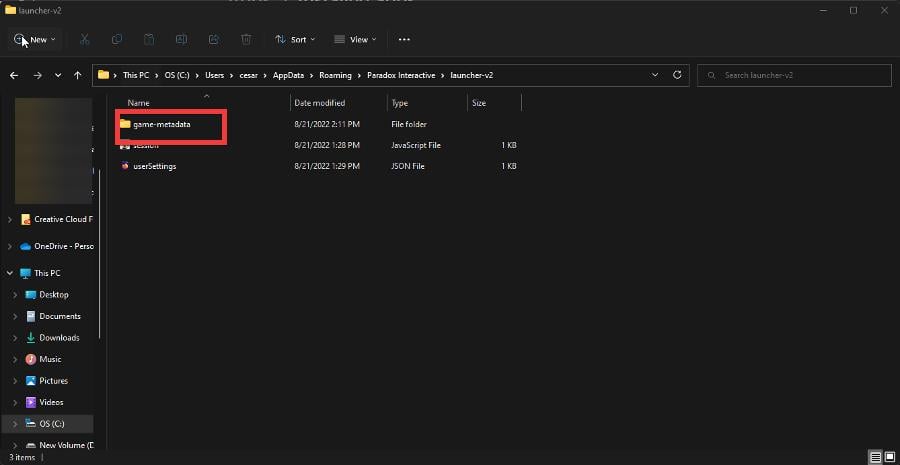
Go to: C:/users/<UserName>/AppData/Roaming/Paradox Interactive/launcher-v2/
Delete the folder there:
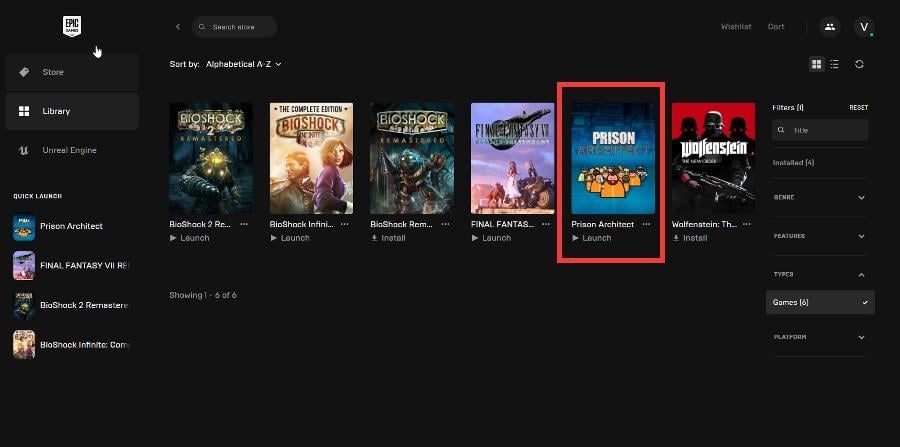
Now run either Steam or the Epic Games Launcher, whichever has the Paradox Interactive title, and run it as an administrator.
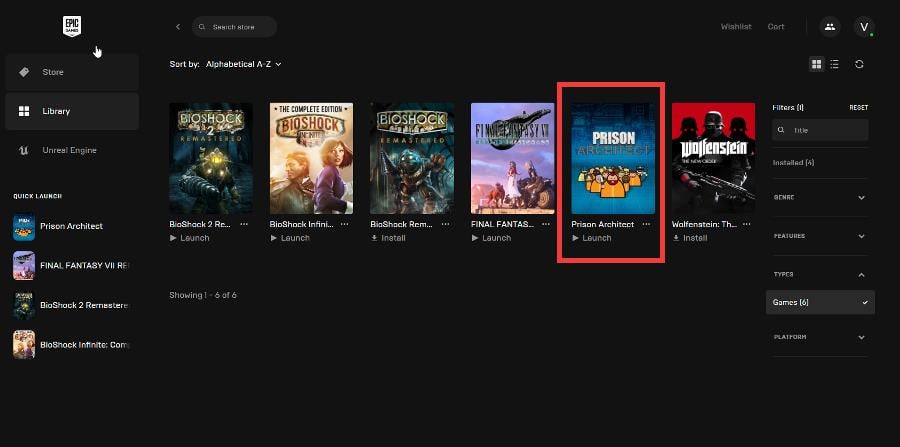
Launch the Paradox Interactive title from the third-party app.
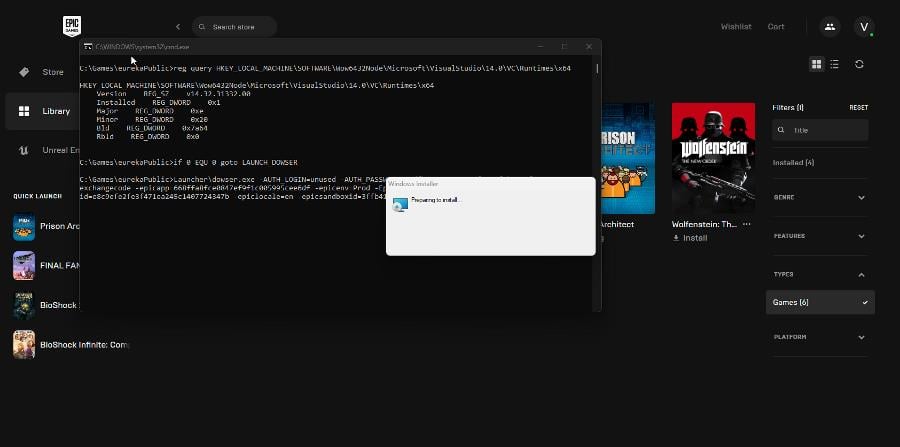
This will reinstall the Paradox Launcher and have the game ready.
6. Game already installed
Start by uninstalling the Paradox Launcher and go to the following locations in the File Explorer.
First, go to: C:/users/<UserName>/AppData/Local/Programs/Paradox Interactive/
Delete the file there:
Then go to: C:/users/<UserName>/AppData/Local/Paradox Interactive/
Delete the folder there:
Finally, go to: C:/users/<UserName>/AppData/Roaming/Paradox Interactive/launcher-v2/
Delete the folder there.
Launch the Paradox Interactive game from a third-party launcher like Steam or the Epic Games Launcher.
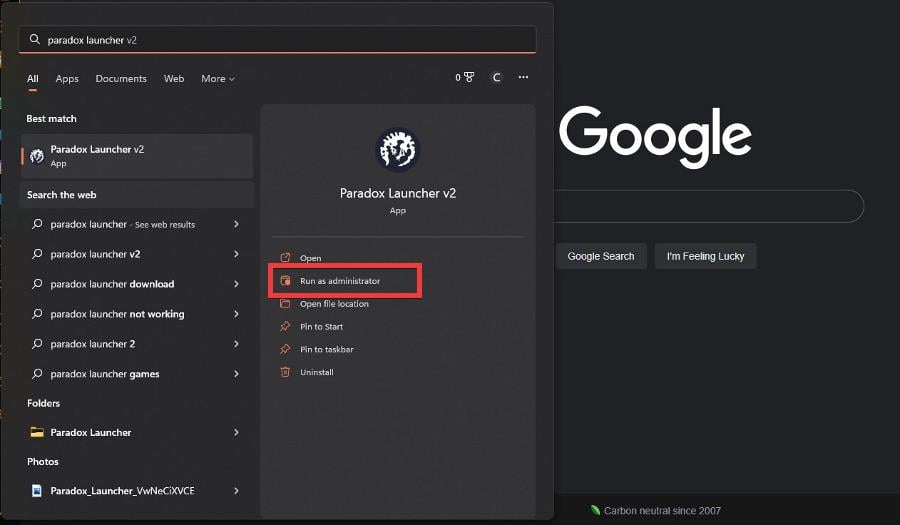
There are two methods you can try. First, you can run the Paradox Launcher as an administrator. Bring up the search bar and type in Paradox Launcher.
Select Run as administrator.
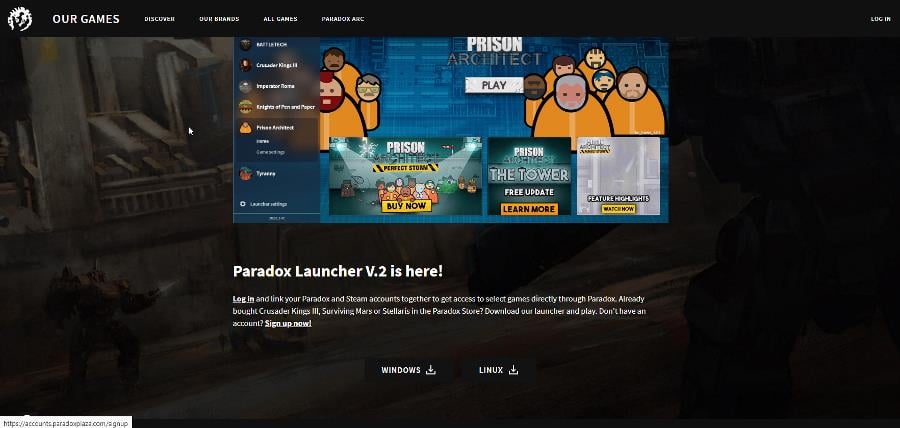
The other thing that you can do is manually update the app if it hasn’t done so automatically. Go to Paradox Launcher’s website and redownload the app to update it.
8. Unable to locate the configuration file
Fixing this issue requires you to perform the first solution. Start by uninstalling the Paradox Launcher from your computer.
Now go to: C:/users/<UserName>/AppData/Local/Programs/Paradox Interactive/
Delete the folder there:
Now go to: C:/users/<UserName>/AppData/Local/Paradox Interactive/
Delete the folder:
Finally, go to: C:/users/<UserName>/AppData/Roaming/Paradox Interactive/launcher-v2/
Delete the folder titled game-metadata:
9. Unable to verify ownership
The inability to verify ownership of a game on the Paradox Launcher is due to some issue with Windows.
One way you can fix it is to start the game through a third-party launcher like Steam or the Epic Games Launcher.
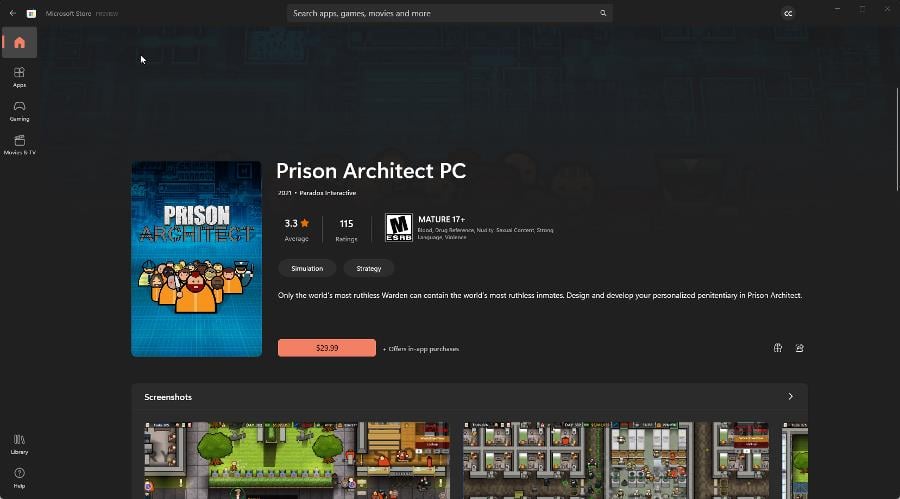
If you bought the game through the Microsoft Store, you should first restart your computer.
After you restart the computer, go to the Microsoft Store and launch the game from there. The problem should be fixed.
10. V2 setup error
Make sure that the Paradox Launcher is within the inbound rules of Windows Defender Firewall with Advanced Security.
To add an inbound rule, click Inbound Rules on the left-hand side.
To add an inbound rule for Paradox Launcher, click Inbound Rules.
Click New Rule in the upper right-hand corner.
In the new window, select Program and then click Next.
In the following window, click Browse.
Go to: C:\Users\<User Name>\AppData\Local\Programs\Paradox Interactive\launcher
Open the most version of Paradox Launcher.
Select Paradox Launcher and then click Open.
With the launcher now in the program path, click Next.
In the next window, select Allow the connection and then click Next.
Select when the rule applies in the following window. Click Next when done.
Name the rule and give it a description if you like. Hit Finish when done.
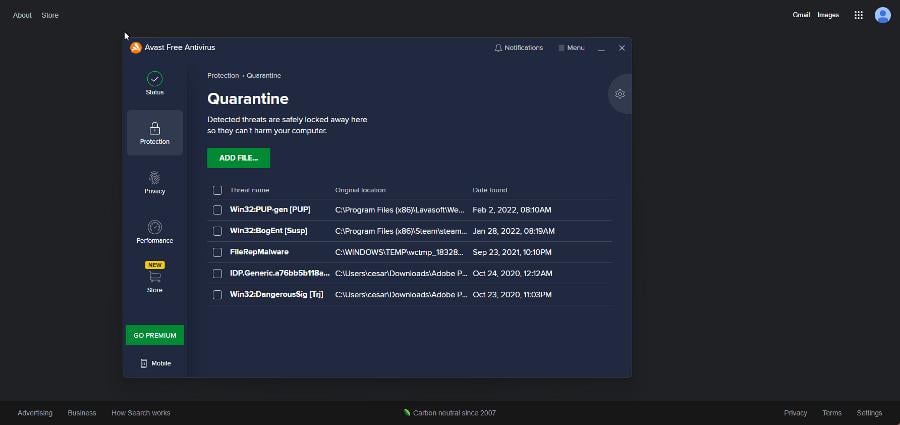
You should also check the quarantine section on your antivirus software. Sometimes the EXE file gets flagged as a virus. If it’s there, restore the file and open Paradox Launcher.
In this example, the EXE file is not in the quarantine section, but it would look similar to this.
If the previous steps didn’t work, there is another method.
Run a third-party launcher, like Steam or the Epic Games Launcher, as an administrator.
Run the game directly from the third-party launcher.
Close the third-party launcher and uninstall the Paradox Launcher from your Windows computer.
Open the third-party again and start the game. This will cause the reinstallation of Paradox Launcher.
11. Please wait
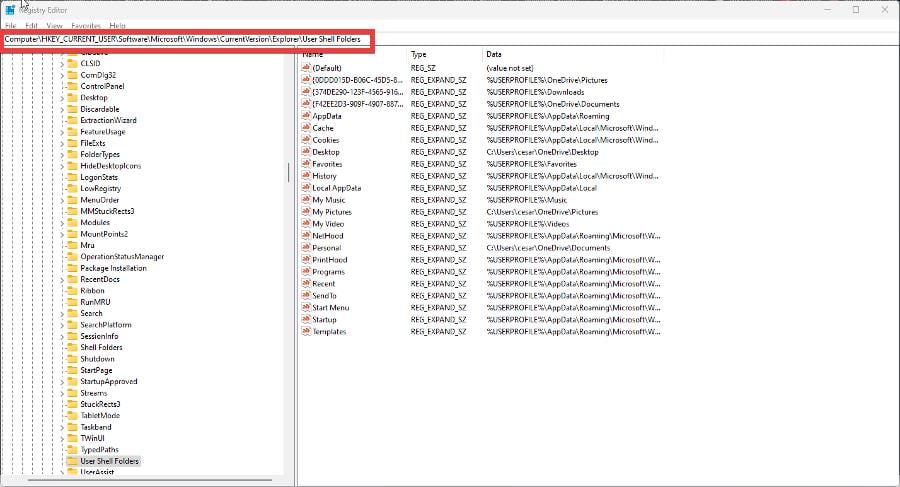
Sometimes the launcher will begin to load endlessly. Fortunately, there is a solution for this, so click on the search bar and search for the Registry Editor. Click the first entry you see.
A window may appear asking you if you want to make changes. Click Yes.
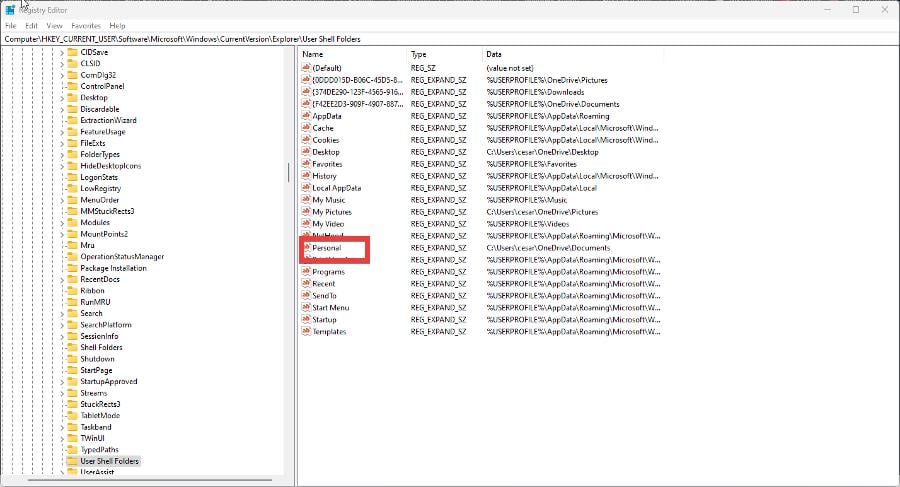
In the Registry Editor address bar, enter: HKEY_CURRENT_USER\SOFTWARE\Microsoft\Windows\CurrentVersion\Explorer\User Shell Folders
On the right-hand side, double click Personal.
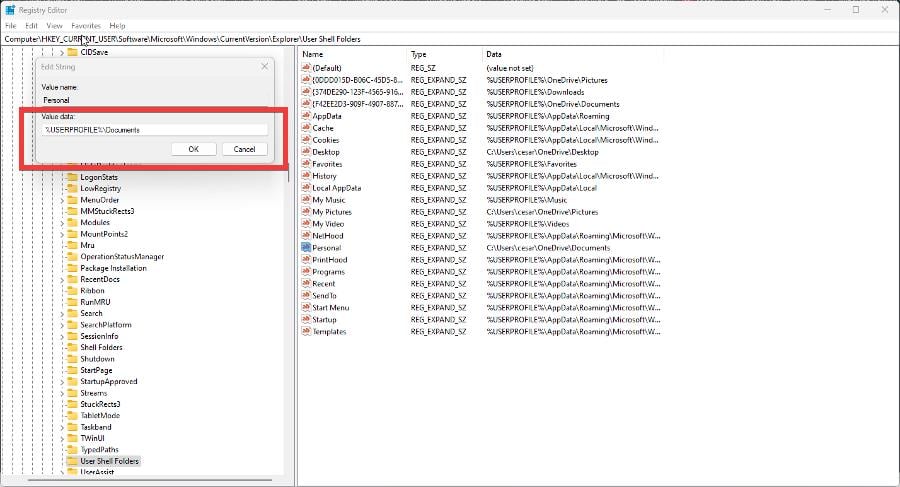
In the value data, type in%USERPROFILE%\Documents. Click OK.
Restart your PC afterward.
12. Paradox launcher – the game doesn’t open
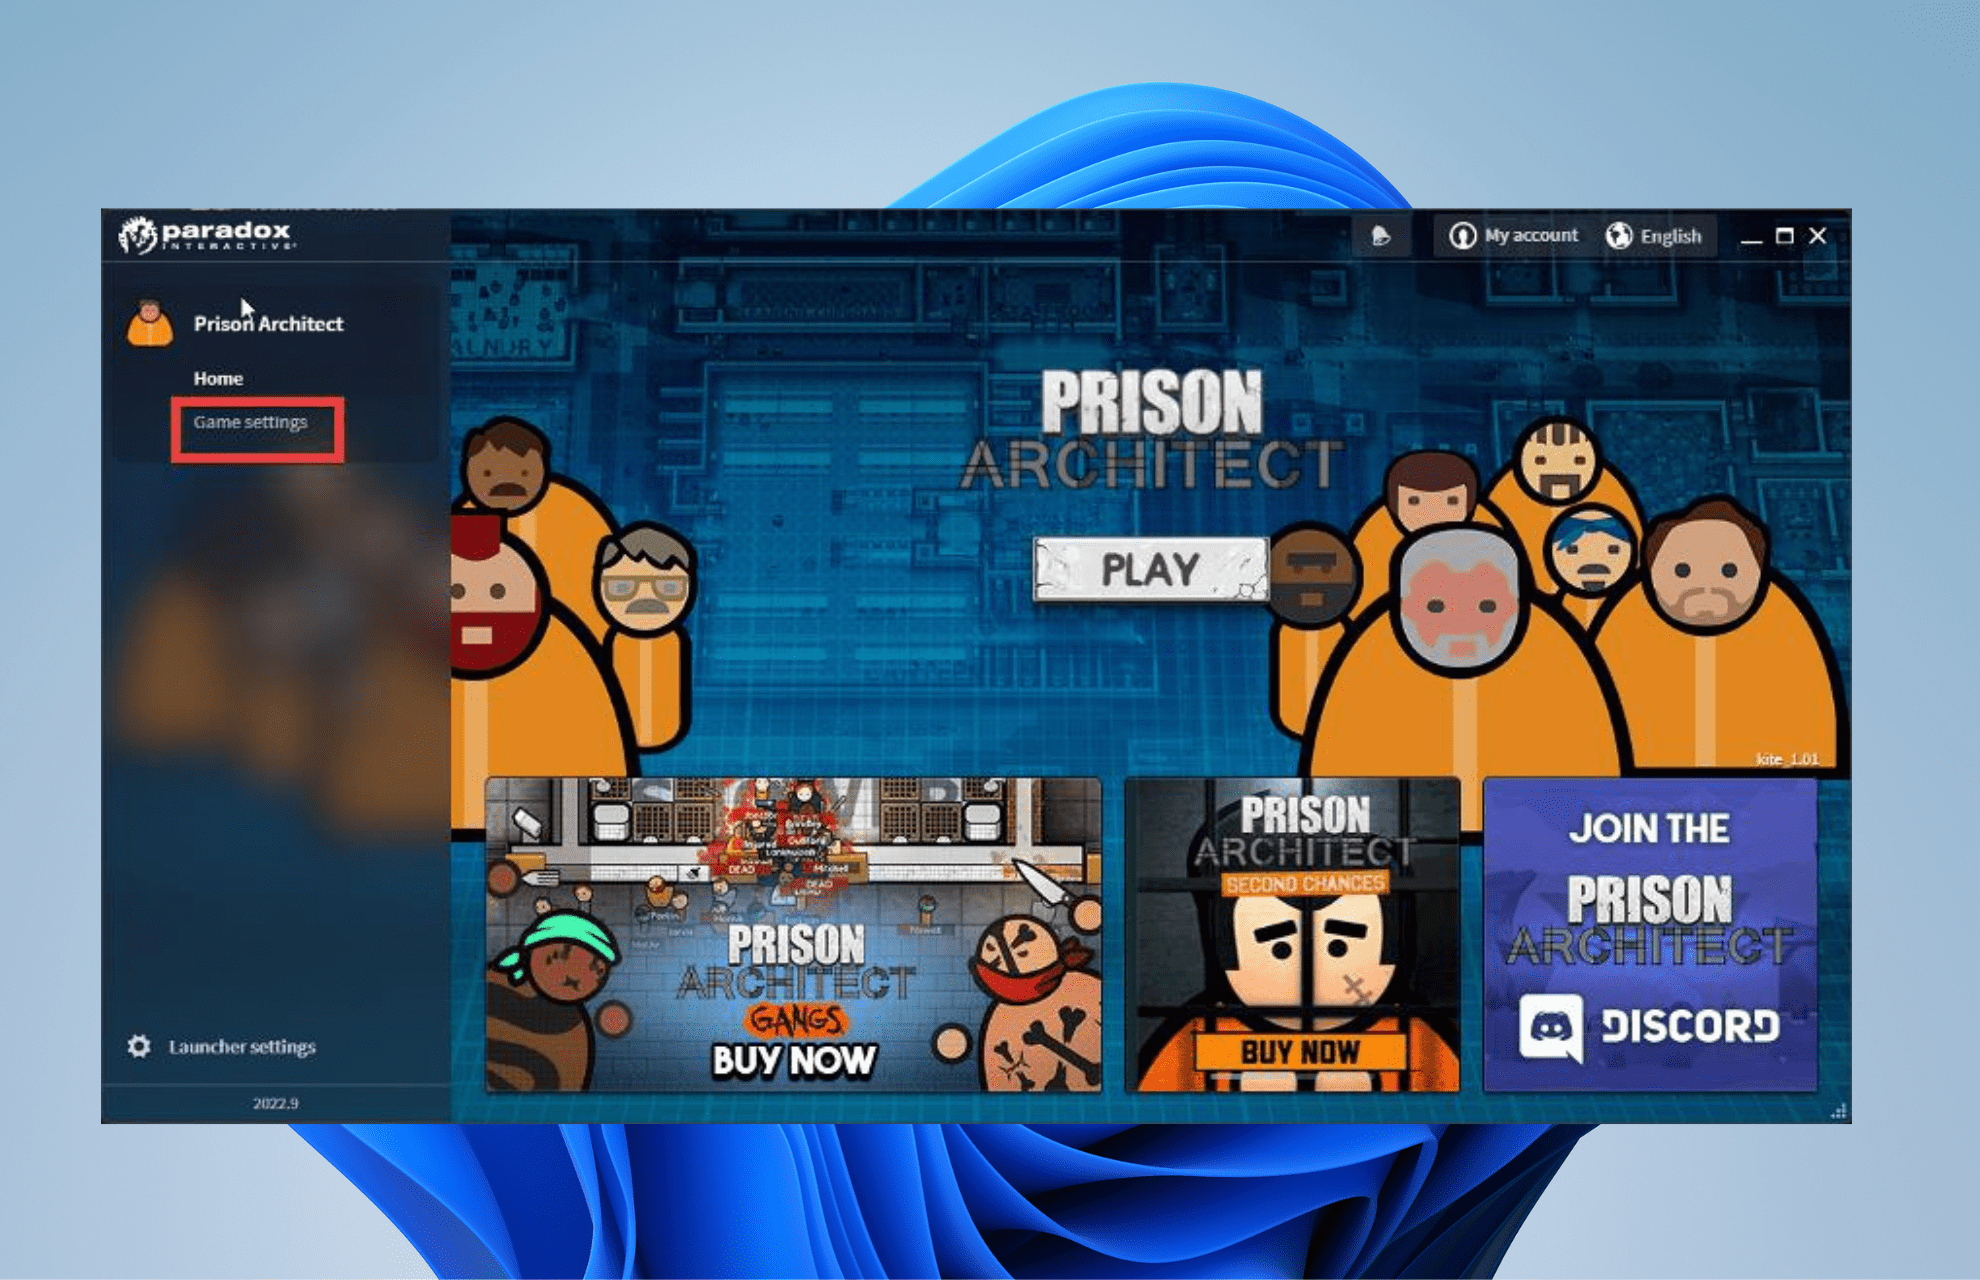
In Paradox Launcher, select Game settings for the title.
Set the display mode to Borderless fullscreen.
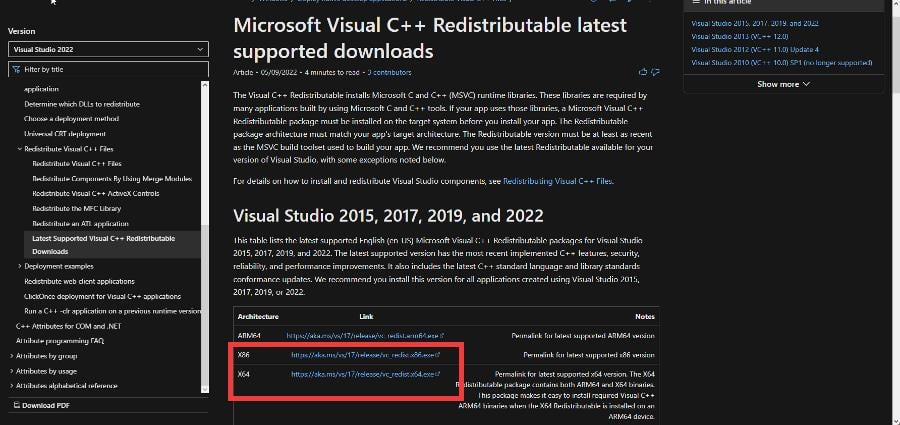
Then go to the Microsoft Visual C++ Redistributable page. Download the x86 and x64 installers.
Go to the downloaded file’s location. Double click it to begin the installation.
How do I bypass the Paradox Launcher?
Bypassing the Paradox Launcher may cause certain games to launch faster. It’s possible to do this on Windows, Linux, and Mac OS, each with its own method of doing so. A helpful thread on the Steam Community forums lists out the bypass methods.
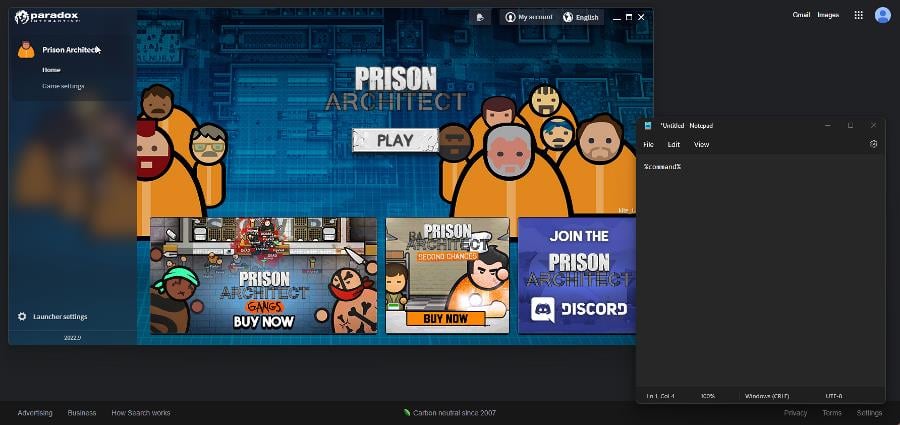
The typical method involves uninstalling Paradox Launcher and then creating a batch file for the games that will be bypassing the app. Next, you’ll have to edit the game’s batch file in Notepad and add %command% to the file.
Afterward, you integrate the patch file with Steam and launch the game from there. Do this correctly and the game will open faster.
Feel free to leave a comment below if you have any questions on other apps or if you have some that you recommend. Also, feel free to leave comments about guides you’d like to see or information on other web browsers.
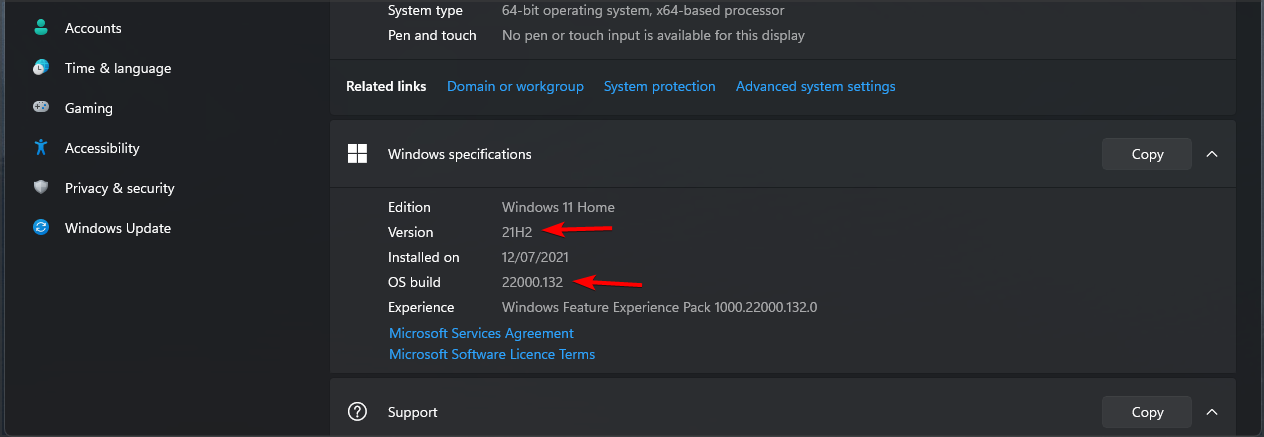
It can be very useful to know what version of Windows you’re using, especially if you’re using a Beta or Dev release of the OS. As there are several different versions of Windows 11, they all have some minor differences.
Certain versions of Windows might have compatibility issues or bugs, so it’s crucial to know if your version is affected.
Sometimes security vulnerabilities target a specific version of Windows, so knowing your version and whether it’s susceptible to this type of vulnerability is essential.
Besides the security reasons, many users just want to know if their version of Windows has certain features and if it can run specific software.
These are all reasons why it’s important to check your Windows 11 version, and in this guide, we’re going to show you a couple of ways to do that.
Check out our Windows 11 hub for more insightful articles about this OS.
What’s the difference between a version and a build?
As you may have noticed, Windows software is usually accompanied by the version and the build number. The two are not the same, and the build is usually considered a part of the application.
On the other hand, the version is considered an extension of the build, a finished application. On the other hand, build numbers are usually associated with test products.
This is why build numbers are frequently updated, as soon as anything is changed in the application. If you’re using a test version of Windows, be sure to pay close attention to the build number.
If you’re on a finished version, then you should be considered only with the version number.
How many Windows 11 editions are there and what are the differences?
A Windows edition is a separate version of Windows with a couple of unique features that differentiate it from other versions of Windows.
There are 7 different editions of Windows 11 available and they are the following:
Not much is known about the exact differences between editions, but we do know that the Home edition will require a Microsoft Account to sign in and use it, which isn’t the case with the Pro version.
We assume that the Pro version will have several exclusive features that aren’t available in the Home edition, just like with the previous versions of Windows.
How to check the version of Windows 11?
1. Use the Settings app
Open the Start Menu and select the Settings app.
Now select System from the menu on the left. In the right pane select About.
In there you should see your Windows 11 version and other useful information.
1. PressWindows Key+R at the same time to open the Run window.
2. Type control in the box, then press Enter or click OK.
3. Control Panel will now open.
4. Navigate to the System and Security section.
5. Go to the System section.
6. Now theAbout page will appear with your Windows 11 version information.
Finding your Windows 11 version via Control Panel is very simple and can be done in a few clicks. All you need to do is navigate to the System tab, where you can see information about your computer’s software and hardware.
3. Use the winver tool
Open the Run dialog. You can do that with Windows Key + R shortcut.
Now enter winver and press Enter or click OK.
A new window will appear and you’ll be able to see Windows 11 version information.
Press Windows Key + R and type cmd. Press Enter or click OK.
When the Command Prompt opens, type ver and press Enter.
You should now see the build version of Windows 11 that you’re using.
5. Use the msinfo32
Press Windows Key + R and enter msinfo32. Press Enter.
A new window will appear showing you the OS Name and the version that you’re using.
Is there a 32-bit version of Windows 11?
There’s no 32-bit version of Windows 11, and since the operating system requires a 64-bit processor to install, it’s apparent that Microsoft is planning to drop the support for 32-bit processors.
Even the official hardware requirements don’t mention 32-bit processors, so we’re confident that there won’t be a 32-bit version of the latest Windows version.
32-bit CPUs have been replaced by 64-bit processors almost completely, so it’s no wonder that Microsoft wants to drop the support for 32-bit Windows and focus solely on the 64-bit version.
What will happen if I don’t use the latest version of Windows 11?
In most cases, nothing will happen if your Windows is out of date. However, keep in mind that it’s necessary to update your system regularly to keep your system protected.
New malware is released every day, and if you don’t keep your system updated, there’s a small chance that your system might get infected, especially if your version has a security vulnerability.
Besides security, if your system isn’t up to date, you might miss out on many improvements, new features, and bug fixes.
If you want to check your Windows 11 version, you should know that this process is incredibly simple and fast, and you can perform it in a matter of seconds with our solutions.
Knowing which version you have installed can be useful, especially if you want to ensure that you have the latest version that isn’t
What is your favorite way to check your Windows information? Let us know in the comments below.
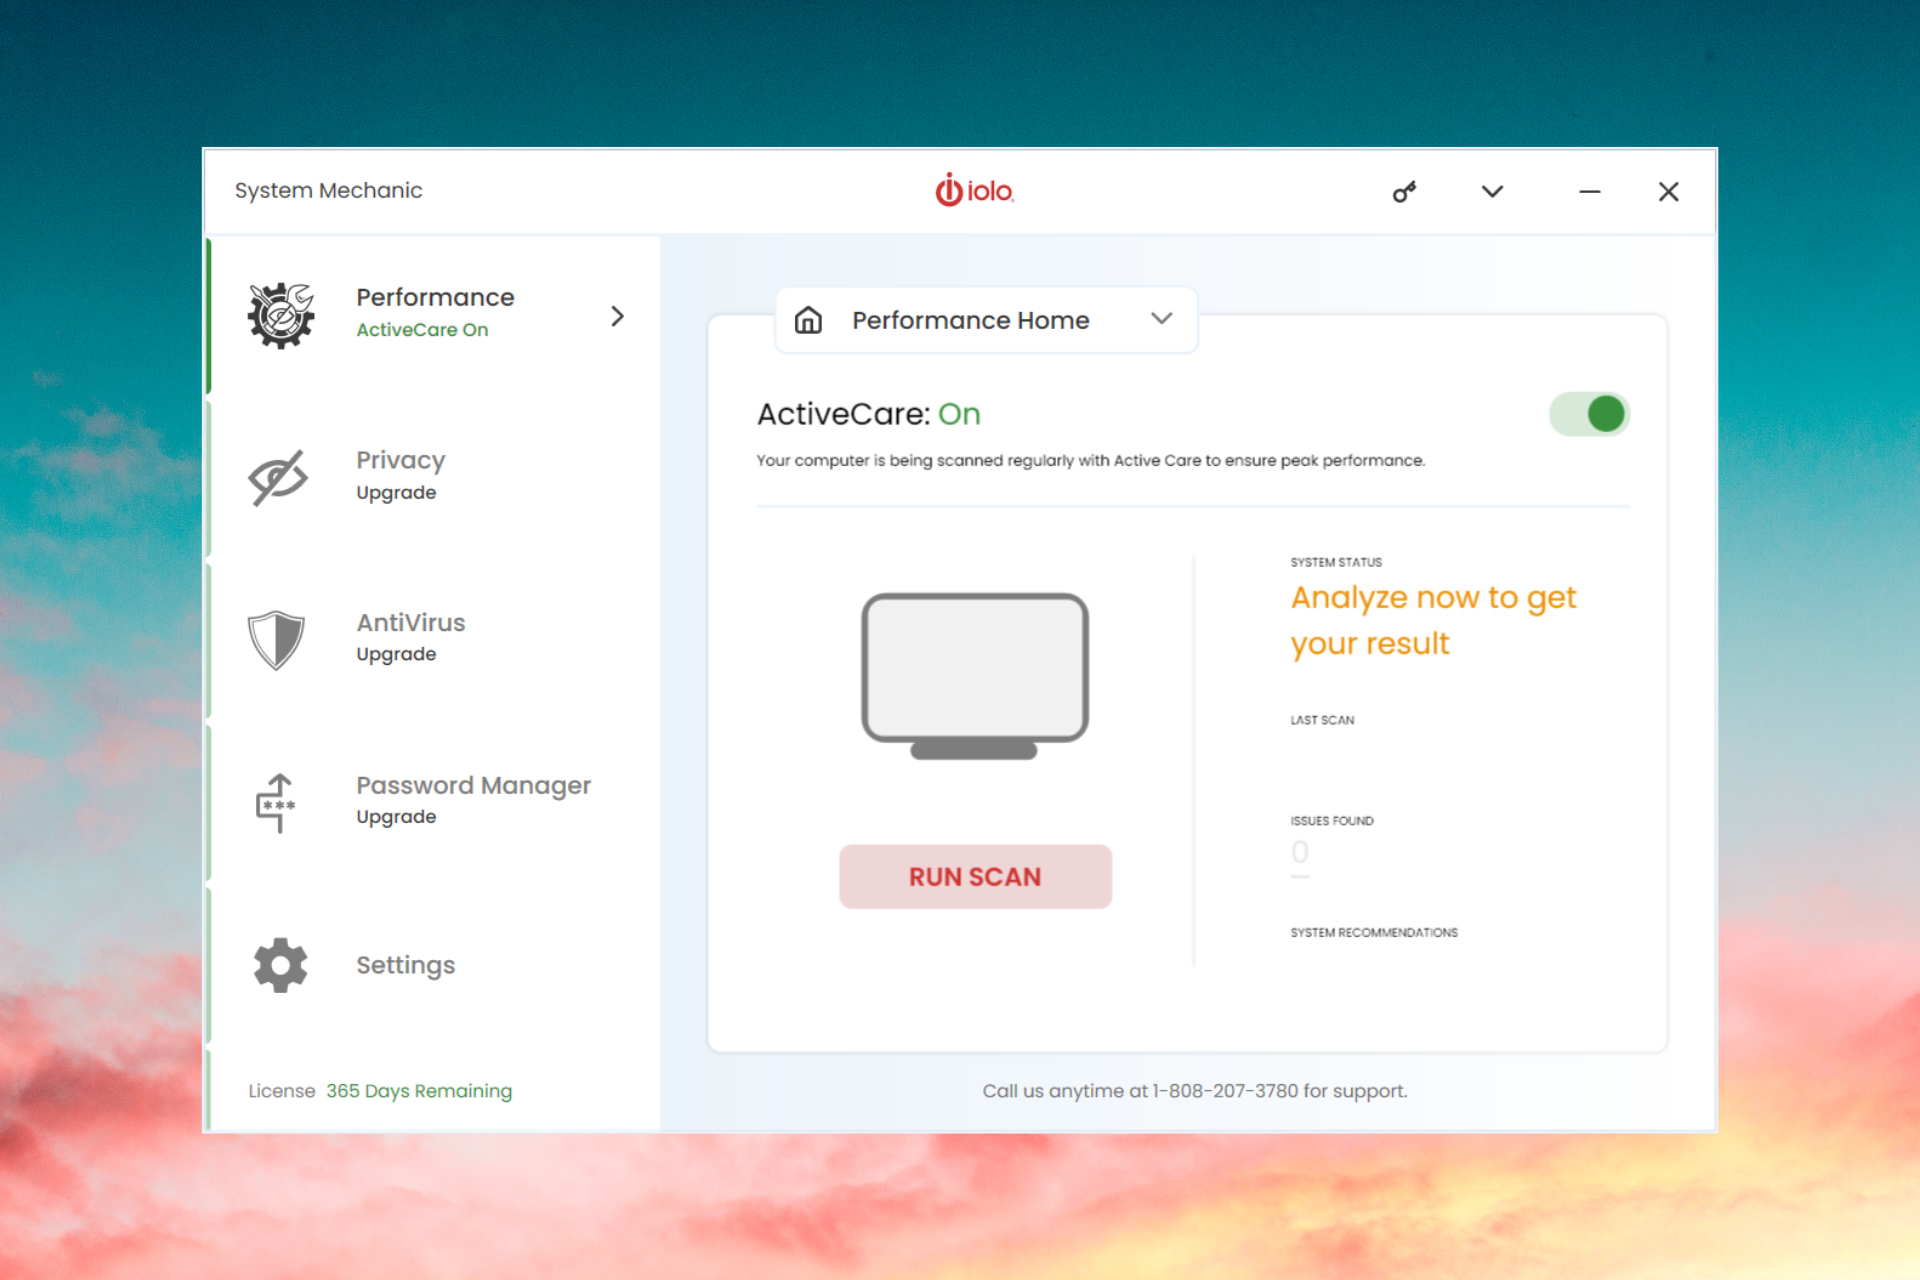
If you’re looking to optimize your PC and improve your performance, Iolo System Mechanic might be the right tool for this task. In case you’re not familiar with it, this review will tell you everything you need to know about it.
Iolo System Mechanic review, everything you need to know
Interface
The interface of System Mechanic is incredibly simple and friendly, and you’ll be able to find any feature that you need in a matter of seconds.
Although powerful, the software is incredibly simple to use, so it’s perfect for both experienced and first-time users, so regardless of what type of user you are, you won’t have any issues using this software.
Functionality
System Mechanic
The core feature of System Mechanic is its performance optimization, and with the Deepclean feature, the software will scan your browser cache and Windows files.
There’s a RAM recovery feature that will show you your current memory usage and allow you to clean your RAM.
With System Mechanic, you can remove bloatware and over 50 types of junk files and free up precious storage space. You can even securely delete browsing history and patch Windows vulnerabilities right from this application.
Thanks to the NetBooster feature you can optimize hidden Internet settings and improve download speed and page load time.
The software also has an ActiveCare feature that will automatically optimize your PC when it’s not being actively used, so it won’t interfere with your work in any way. With it, you can configure how often you wish to optimize your PC and what type of files you want to remove.
With ActiveCare you can find and fix more than 30,000 different issues, thus ensuring that your PC is always running at maximum performance and without a hitch.
System Mechanic Pro
This version has all the features of the previous one, but it also offers virus and threat protection, so it will provide you with real-time malware protection.
This version also can permanently delete data thus making it unrecoverable, but it can also recover data that has been deleted by accident.
System Mechanic Ultimate Defense
While this version has all the features of the previous two, it also expands them in terms of privacy protection by allowing you to choose which data websites are allowed to collect while browsing the web.
Speaking of privacy, with this version you can wipe your drives using the U.S Department of Defense standards thus ensuring that all files on your drives aren’t recoverable.
Lastly, this version also has a built-in password manager, so you can rest assured that each online account you create has a strong and unique password that can’t be abused by hackers.
It’s worth mentioning that Ultimate Defense is available for up to 10 PCs with a single subscription, so it’s perfect if you need to protect multiple devices in your network.
Yes, there’s a free version of Iolo System Mechanic available, but it only comes with a basic cleaning features, so it can only remove the browser and system cache and clean up your RAM.
The free version also comes with reminders to upgrade to a different version if you want to get access to more advanced features.
Is System Mechanic a one-time purchase?
No, all System Mechanic editions come with a 1-year subscription, so you’ll need to renew your license yearly.
Iolo System Mechanic
Speed up & optimize your PC and Internet speed with a top-performance software suite.
System Mechanic is an amazing tool that can optimize your performance and it can also work as an all-in-one security and privacy tool and protect you from online threats.
If you’re looking for software that will boost your performance and make your PC snappy again, System Mechanic is the right tool for the job.
While this is the best PC optimizer software, we also have a guide on other great tune-up utilities that you shouldn’t miss.
The Windows 10 registry is an important database that holds crucial settings, and in this article, we’ll show you how to prevent access to registry editing tools on your PC.
For more info, check the guide below.
How can I disable access to Registry editing tools?
1. Using Group Policy Editor (Windows 10 Pro/Enterprise/Education)
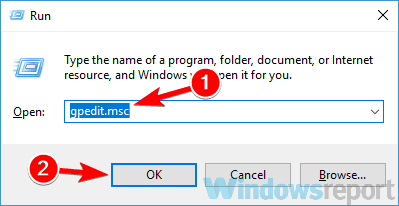
1. Press Windows key + R at the same time on your keyboard to open Run.
2. Type gpedit.msc in the dialog box and hit Enter.
3. TheLocal Group Policy Editorwill open.
4. Now, in the left panel, navigate toUser Configuration > Administrative Templates > System.
5. In the right section you will see aPrevent access to registry editing toolspolicy. Double-click it.
6. In the new window that appears, selectEnabled.
7. ClickApplyand thenOK.
You can prevent access to the Registry via the Group Policy Local Editor. It is a built-in tool that allows you to configure PC settings. What you have to do is open this tool and enable the Prevent access to registry editing tools Policy.
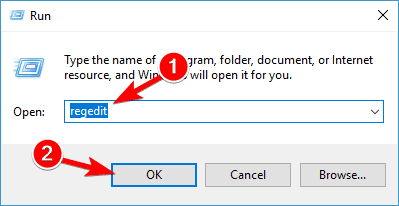
Press Windows key + R to open Run, type regedit and hit Enter.
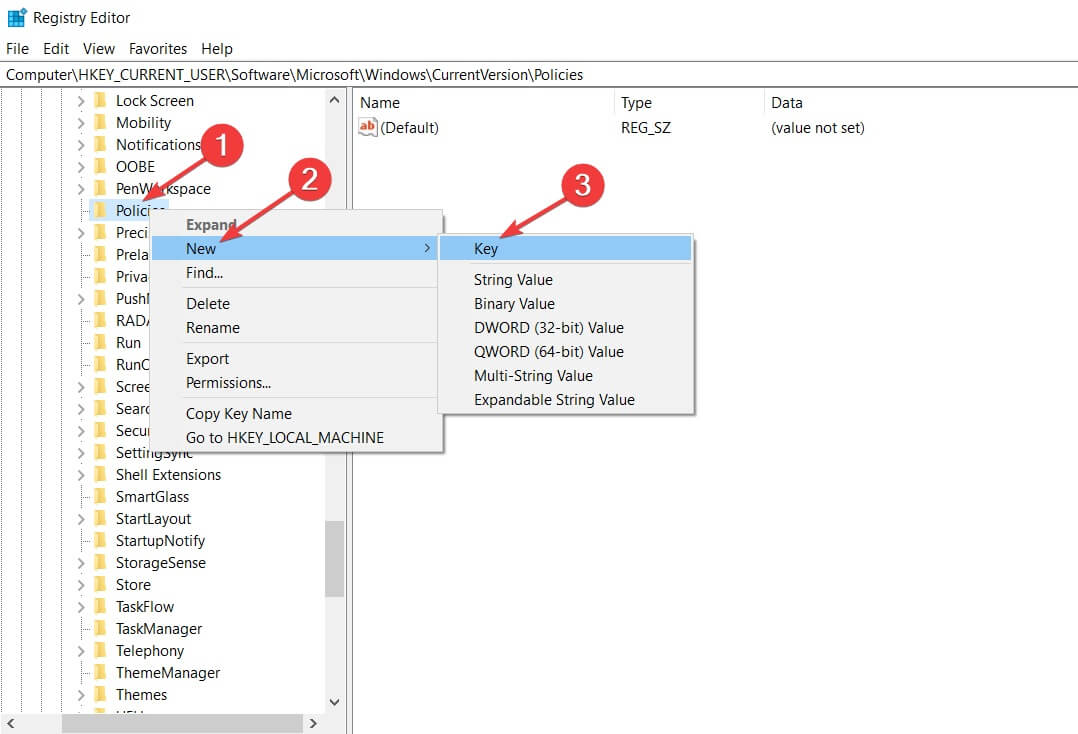
Navigate to HKEY_CURRENT_USER\SOFTWARE\Microsoft>Windows\CurrentVersion\Policies
Right-click the Policies folder, select New and then click on Key.
Name the newly added key System and press Enter.
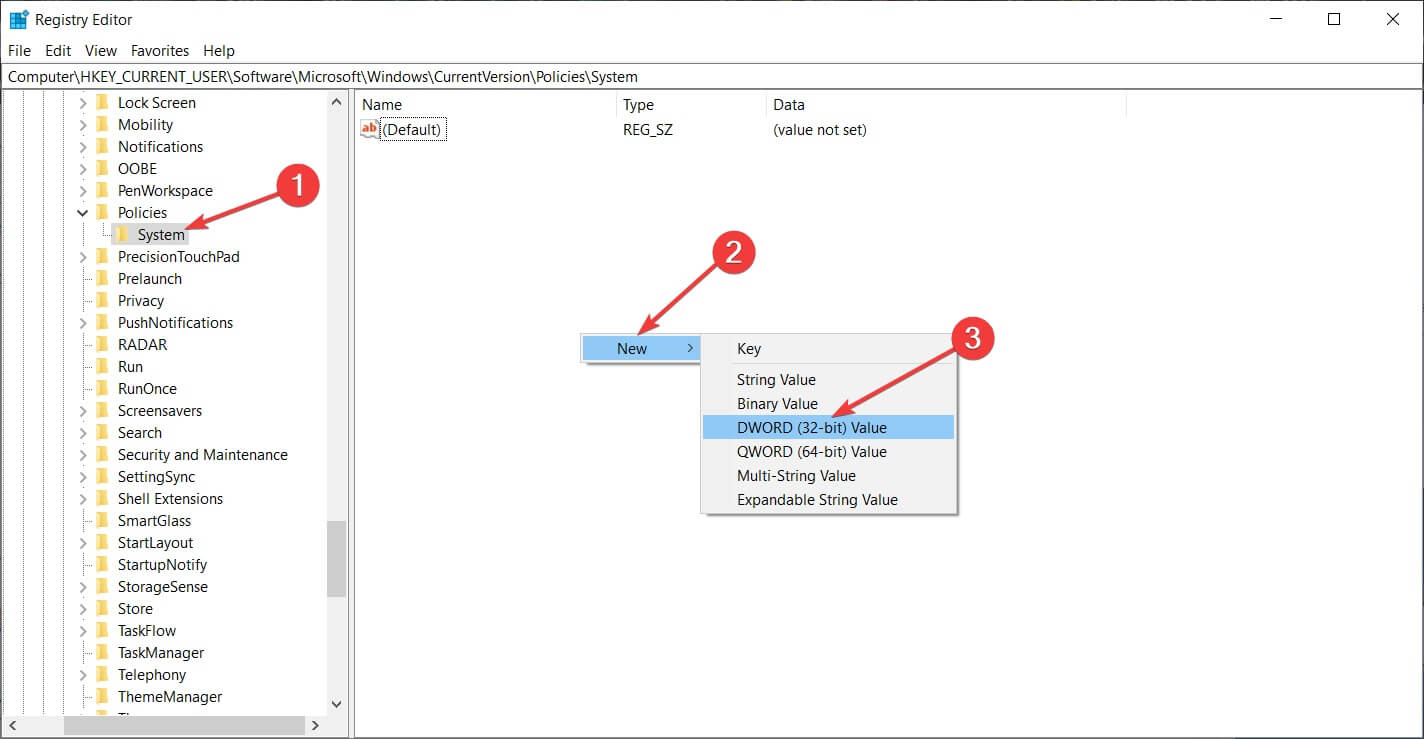
In the System folder, right-click on an empty space, select New and then click on DWORD (32 bit) Value.
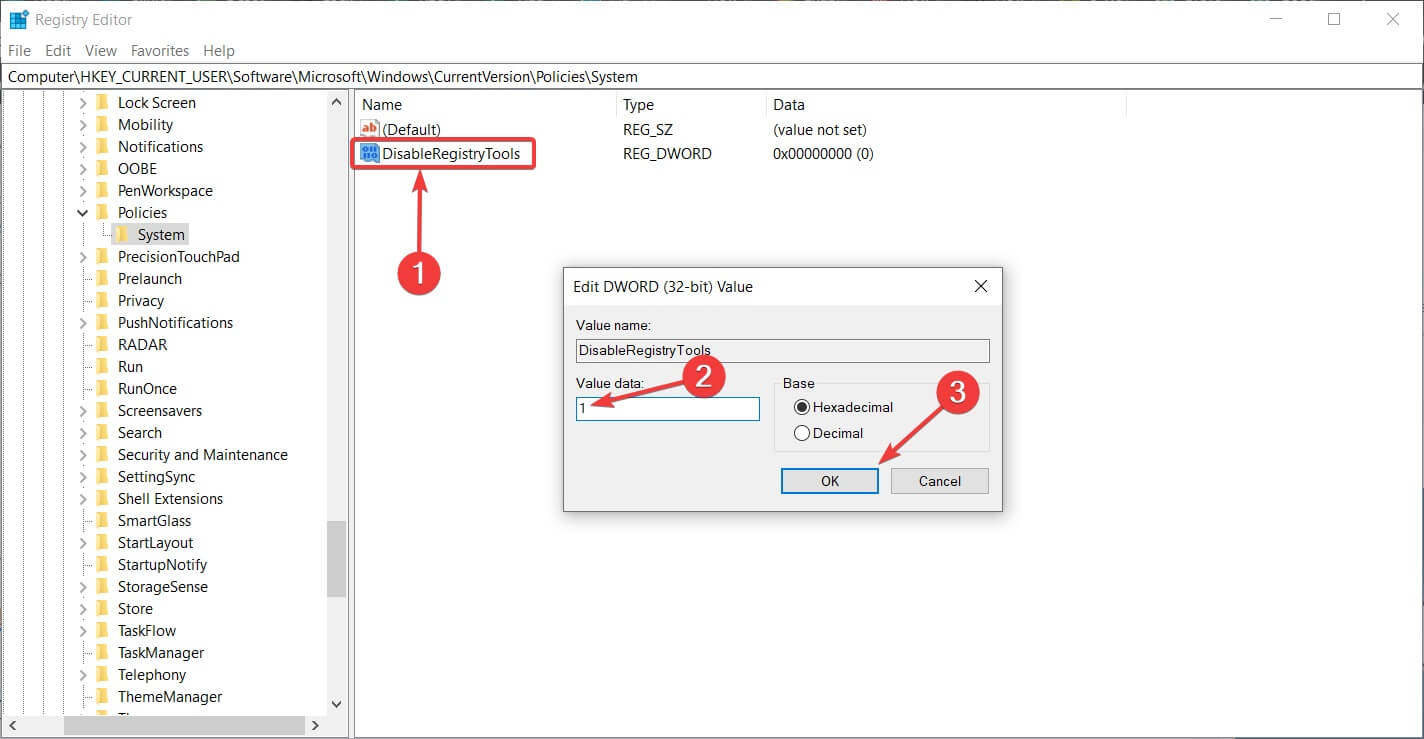
Name the key DisableRegistryTools.
Double-click the DWORD you just created and change its value from 0 to 1 or 2. The values meaning is: 0 – Registry editor works normally, 1 – Registry editor won’t open, but it can be started in silent mode using the /s switch while using commands, 2 – Registry editor cannot be started normally or silently.
Hit OK.
Few users reported that they can’t access Registry Editor on their PC. If that’s the case, be sure to check our guide for that issue.
There you go, these are the best ways to prevent access to registry editing tools on your PC, so feel free to try them both.
If the process got you confused or you have any additional questions, feel free to drop them in the comments section below.
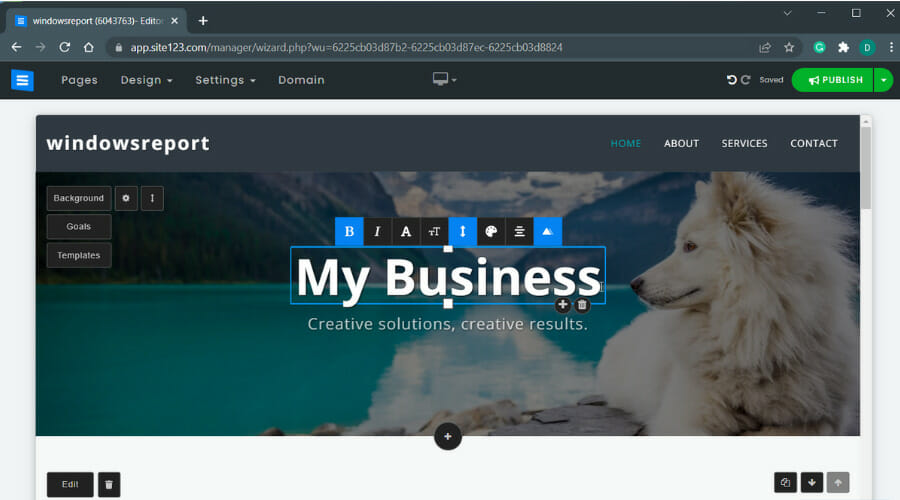
Whether you want to build a website for a personal blog, professional blog, or to offer services, or start an eCommerce store, knowing what website designing tools to use is essential.
If you want to build an eCommerce store to sell a few products, Shopify is good. If you’re going to sell services, you can use Weebly as website builders.
However, if you want a more sophisticated website to offer web services, you may need to build a custom website from scratch.
How can website design software help me?
Regular users don’t need to spend a fortune to build custom websites these days as CMSs (Content Management Service) have made it easy to create and customize websites with a few clicks on any server.
However, using CMS may need some knowledge or at least involves a learning curve, which may not be for everyone.
If you are one of those, you can use website design software without coding for creating your website.
Website builder software does have its cons when compared to CMS and custom websites, but when it comes to ease of use, these tools offer enough resources to get you started.
We have created this guide on the best software to design websites without coding after spending hours testing these services to find the best website builders on the internet.
What’s the best website design software without coding?
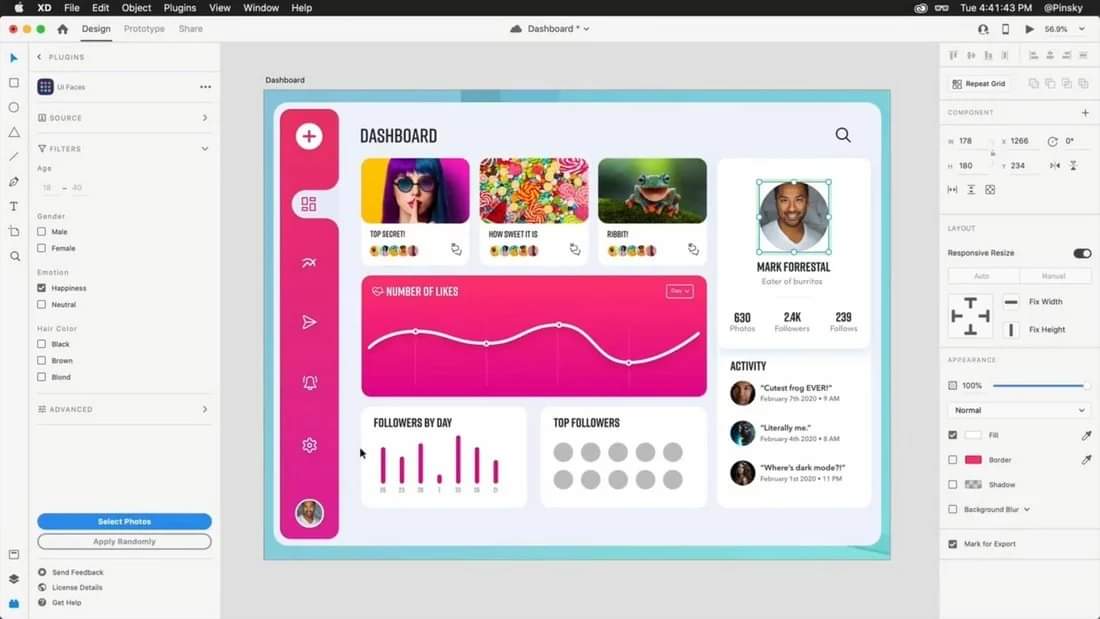
Topping out our list is a software tool that allows you to create your own website without coding software and this magic software is called Adobe XD.
Adobe XD is a powerful, collaborative, easy-to-use platform that helps you and your team create designs for websites.
Of course, this platform’s capabilities are not limited only to this, as you can also use it to create mobile apps, voice interfaces, games, and more.
The intuitive interface makes it so that both you and whatever teammates are working on the same projects will always know what to do, without ever bothering each other.
More so, this program comes with plenty of templates within its library that you only need to tweak to fit your needs. You’ll enjoy the features of coediting capabilities and the large library of templates.
Adobe has made this program available for free download from the Creative Cloud Suite, with no fees or time constraints.
You may save multiple.xd files to your PC/Laptop (both Windows and Mac) and utilize all of the application’s plugins, including Typekit and CC Library Integration. With some modified animations, even a prototype may be built.
You might call it wireframing software – the basic interface focuses on working with several artboards at once – but you can add vector or raster art, text blocks, and so on as you go, so the final wireframe looks much more like a complete product.
With real-time syncing, you and your teammates are always on the same level, not to mention that you can create your own UX and UI components and achieve fantastic transition animations for elements.
Let’s see some of its best features:
Create mobile apps, voice interfaces, games, and more
Extensive template library
Save multiple.xd files to your PC/Laptop
Typekit and CC Library Integration
Real-time syncing for live collaboration
Adobe XD
Create amazing designs for websites using this versatile software. Get the best deal now!
Podia is an online service that will help you create your website without any coding knowledge and within everyone’s reach.
It includes a drag-and-drop website builder, web hosting, content delivery, eCommerce, and custom checkout pages.
The platform is also recommended for whoever is interested in selling products and services online. One of the most important advantages is that Podia provides its users with a lot of video and text resources that could boost their marketing and sales efforts.
Registration is free and easy, it takes a few minutes to create your website on the platform and sell your digital products. It comes with all kinds of built-in sales and marketing services that course creators need to promote and sell their courses.
Podia offers you multiple ways to promote your product and engage with your audience: emails, embedded analytics, affiliate programs, coupons, discounts, and much more. You have two payment options: Stripe or PayPal, and when you want to sell, the platform handles the payment processing.
Take a look at its key features:
Easy site creation
Build a community of learners around your course.
Affordable plans
Pre-built templates to build your website with no coding required
No transaction fees on any sales you make
Podia
Enjoy your passion by selling online courses, memberships, webinars, coaching, and digital downloads to your audience.
If you’re looking for website design software that can help you create a custom website in
minutes, Pagecloud is the right tool for you!
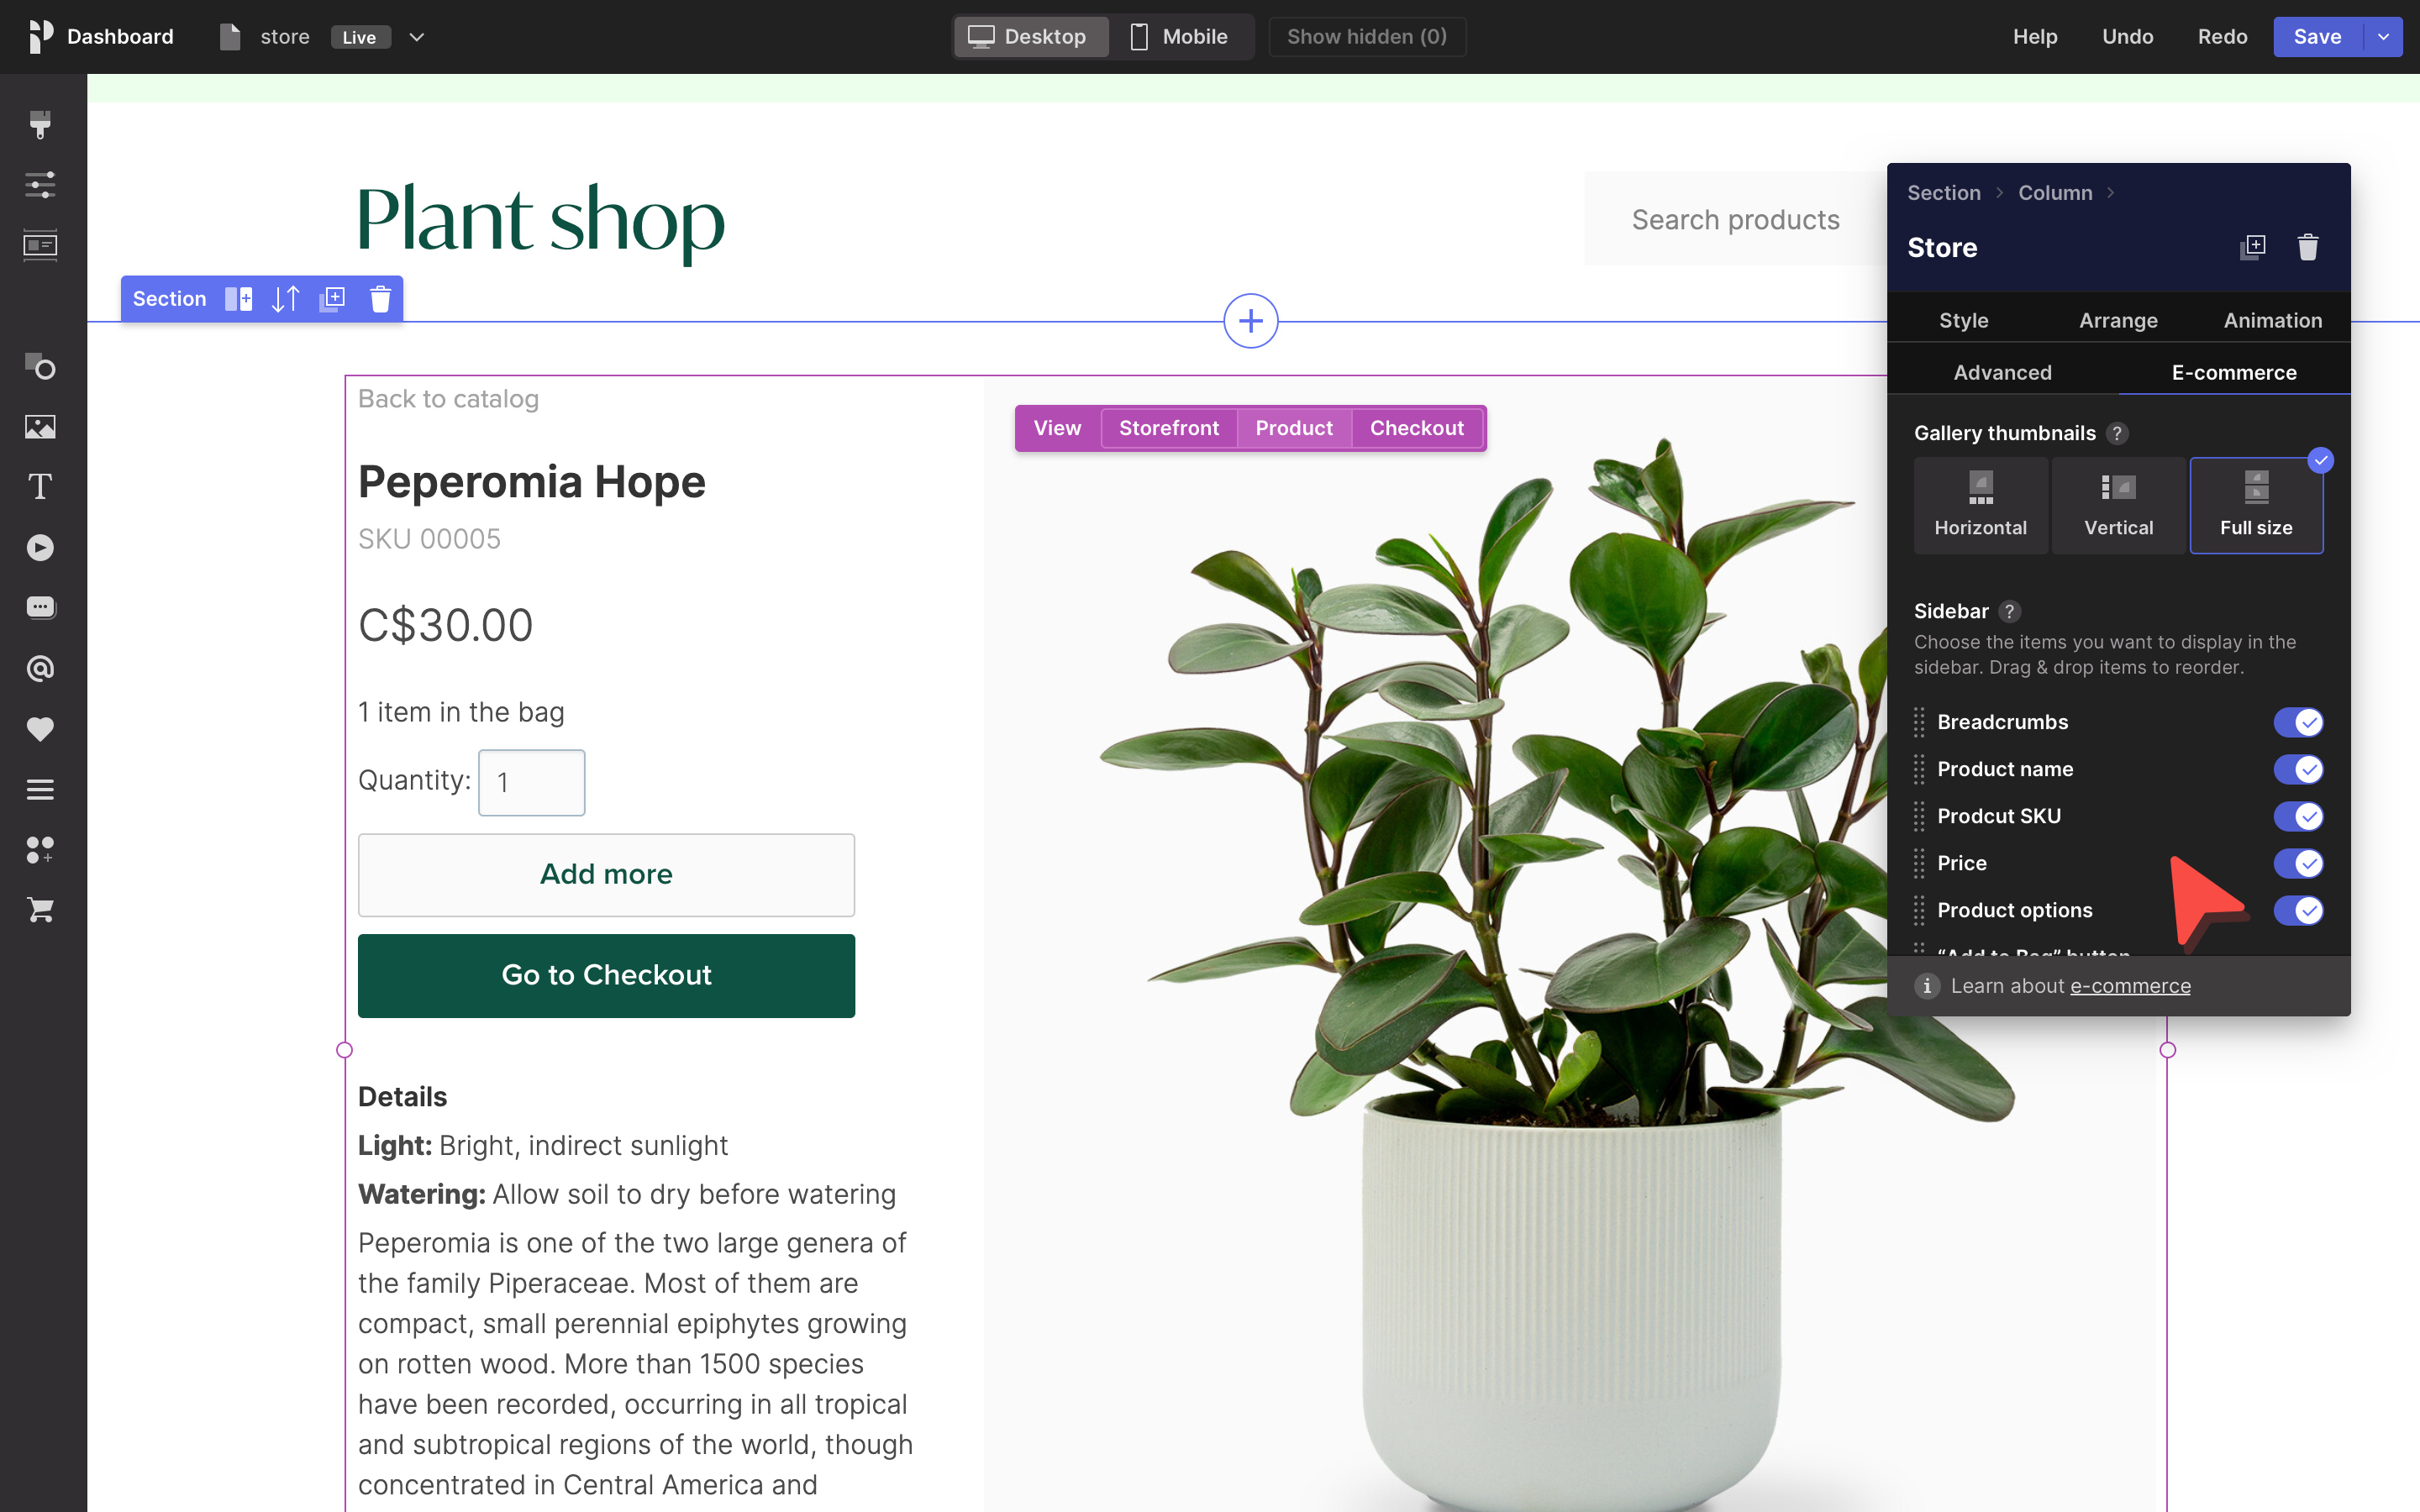
This cloud-based app features modern templates, uses section-based building, and comes packed with design elements and integrations.
You can use the drag-and-drop functionality to place your content anywhere on your page, like a blank canvas!
Pagecloud’s Manual and Auto design tools make creating responsive pages that look great on desktop and mobile devices easy.
You can create any website you desire including a portfolio, a link-in-bio page, small business sites, and landing pages.
Pagecloud also offers e-commerce! You can easily create custom online stores, and track and manage inventory and sales through your dashboard. You can add product, cart, and search widgets to any page.
With the intuitive editor, you can add buttons, and icons, build custom forms, and even copy-paste fonts and embeds directly onto your website.
There is absolutely no need for any coding skills. You can create your website navigation, add animations, and embed videos in just a few clicks.
From picking the suitable template to publishing your website, it only takes time, the right choices, and your limitless imagination.
Take a look at Pagecloud’s best features:
Modern, cloud-based dashboard you can access from anywhere
Great library of templates, sections, and graphical elements
Fully featured e-commerce solution
Design your website in minutes using drag-and-drop
Duplicate, hide, and reuse Sections across your site
Easily create forms and image galleries
Pagecloud
Create any website you want, including stores with plenty of modern themes and e-commerce integrations.
Squarespace has one of the most annoying homepages among website builders, or maybe it is just me.
However, it does offer domains, website builders, online stores, marketing tools, and other essential features to help you start your website with no-coding website design software.
Registration is free and easy, and your account will be in a trial mode for 14 days. Start with picking a template. The page builder looks similar to the WordPress theme customizer layout.
On the left side, you can manage pages, and customize design by changing the logo, title, template, site tyles, lock screen, checkout page, error pages, and advanced settings like custom CSS and type kit ID.
There is a commerce tab for online stores with the option to customize orders, and inventory, manage customers, offer discounts, and handle payment and checkout options.
Other options include SEO, social media, and sharing settings under the Marketing tab, the Analytics tab for customer tracking, and the Setting tab includes general site settings including domain settings.
On the right side, you can customize the selected template by clicking on the element and editing it. Menus, content, sections, and widgets all can be edited and customized the same way.
To be able to go live, you need to upgrade to one of the premium plans and connect the domain.
Squarespace is among the easiest website builders. If you are someone who hasn’t built a website before, it may take some time to figure out the work, but nothing complicated that one can’t understand.
Take a look at its key features:
Drag and drop functionality
Built-in e-commerce tab
SEO, social media, and sharing settings functionalities
Cloud-based dashboard
Great template library
SquareSpace
Create your own amazing website even if you are not a professional by using this excellent tool!
Wix is another well-known website builder, all that annoying ads on YouTube aren’t for nothing after all! However, the working of Wix is similar to Weebly and offers an intuitive user interface.
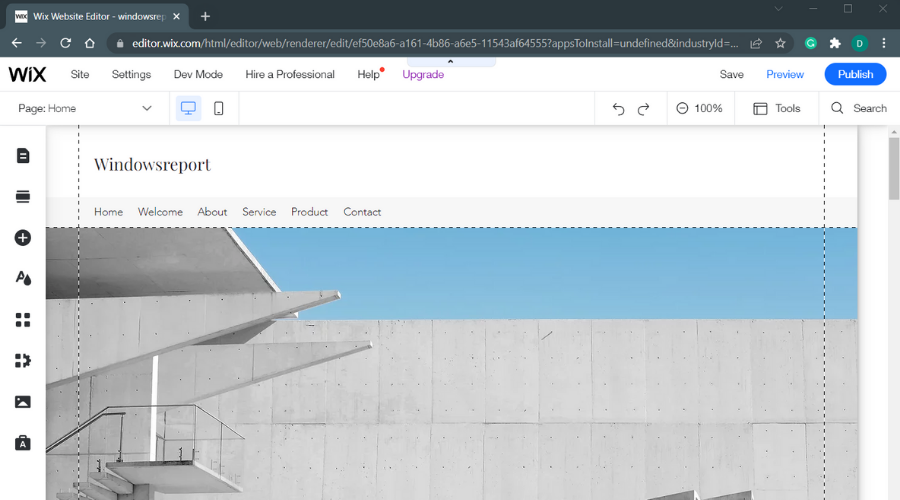
You can begin for free by registering on the site. Proceed with selecting a template if you want to customize the site, if not let Wix ADI create your website.
There are several templates for every niche. The website page editor lets you customize every inch of the web page with intuitive drag-and-drop elements. You can add pages to the menus, change the background image, etc.
The Add button lets you add all kinds of elements to the page from texts to the image gallery and from the box to the contact form. Wix also has an app market to integrate third-party apps into the website.
The website can be customized by uploading your own images, vector art, videos, fonts, and docs. It also has a schedule management tool to take the booking and accept payments.
The main toolbar consists of all the administrative options including settings to connected domains, mailbox, analytics and tracking, and social share. For the nerd in you, it has a Code tab with a developer tools function.
Click on Publish to get your website live. However, you need to add your custom domain or get a free subdomain from Wix before making the site live.
The custom domain is available only on a premium plan, and also there will be a Wix ad on the top of the web page if you choose the free plan with a sub-domain.
If you want to continue using the free plan, the subdomain first uses your email ID as a prefix and then your preferred name as a suffix with wix.com in between.
Wix is not the most affordable website builder, but for beginners or for people who don’t want to manage their own site, Wix is a good choice.
Here are some of its best features:
Extended administrative options
Customize the webpage with drag-and-drop
Upload your own content including images, vector art, videos, fonts, and docs
Publish your website straight from the dashboard
Wix
Create and customize your website with drag-and-drop elements using this intuitive software!
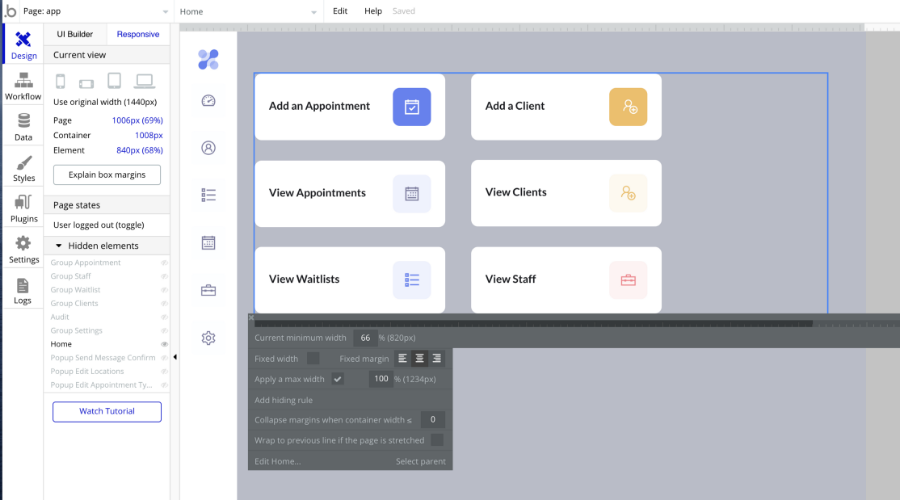
Bubble is an intuitive website builder software without coding that enables its users to easily create beautiful web designs with drag-and-drop.
This web design app provides UX customization tools that you can use to determine how your website interacts with the user.
You can build logic and determine the response triggered by each click within your website or application.
Bubble gives you a lot of freedom when it comes to design. The builder is very simple and intuitive, allowing you to drag and drop objects and easily scale them to fit the page.
The visual elements you can add include text, buttons, icons, links, images, videos, maps, and many more. You can also include third-party plug-ins and integrate HTML codes.
Another important thing that makes Bubble stand out is the fact that it offers you the possibility to translate your website. This can be of great help if you have an international audience.
Bubble is an overall great and uncostly choice that lets you build beautiful websites in a rather short period of time.
Take a look at some of its key features:
Translate your website with one click
Easily include third-party plug-ins and integrate HTML codes
Simple and intuitive builder
Built-in UX customization tools
Bubble
Design stunning websites and web applications with this easy drag-and-drop builder.
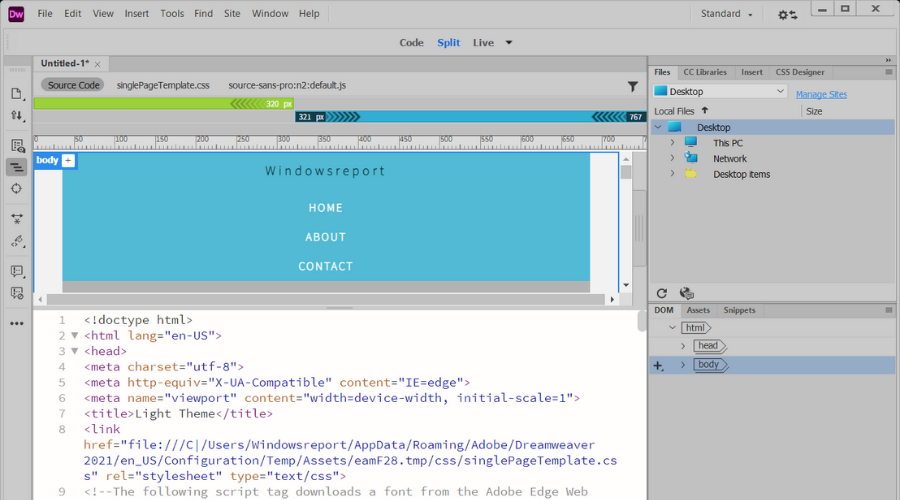
Another Adobe product will help you design your website and focus more on the technical part of web designing.
Besides web design, it is also an Integrated Development Environment (IDE) application that is used to develop and design websites.
It is Adobe’s main web development tool, and it is compatible with both Windows and macOS. The program includes additional support for ASP, CSS, and JavaScript.
Nonetheless, the app is highly configurable. It will never get in the way if you fine-tune its settings to your own tastes.
You don’t even have to utilize cool buttons or interact with visual gadgets. Even if you only used the code editing tools, it would be really useful to have this amazing software on your PC.
This means that you do need to know a minimum of coding, but in no way at a professional level. This is because it includes a code editor that will assist the user in writing code.
The greatest aspect is that if you are a website designer, you may see the live preview while working on HTML and CSS. It not only displays the progress but also provides an excellent indication of where you are at.
Furthermore, while it is great software, novices may find it difficult to master, while more expert designers may find it overly simple.
Another asset that makes it so great is that you can import all matter media elements such as audio, video, and images from other Adobe programs easily, such as Photoshop, Premiere Pro, or Audition.
One great feature is that it supports syntax highlighting and in addition, it helps with code completion and also features real-time syntax checking. Adobe Dreamweaver also comes with code introspection for generating code hints.
Here are some of the key features you’ll benefit from:
Great integration with other Adobe software
Additional support for ASP, CSS, and JavaScript
Integrated Development Environment (IDE) application
Supports syntax highlighting and real-time syntax checking
Adobe Dreamweaver
Use this complex tool and create the most amazing design websites in no time. Get the best deal now!
A new approach for marketing campaigns and website designs is offered by Unbounce, with the asset called Conversion Intelligence.
You have superior outcomes in terms of client interaction on your website thanks to your know-how combined with the mathematics behind machine algorithms.
When you don’t have time to do it yourself, use the build, optimize, and learn cycle to ensure your website’s consistent performance.
With the Classic Unbounce tool, you have access to customizable templates with drag-and-drop functionality, integrated marketing tools, and design pages that automatically resize for mobile devices and tablets.
Go the extra mile with some fancy technical tweaks for pixel design, the custom script for greater conversions, and dynamic text replacements.
Besides the plethora of smart builder and classic builder integrations, Unbounce offers a large variety of account management tools, privacy and security measurements, and customer care along the way.
In the popups and sticky bars sections, you can take advantage of triggered-by-action functions based on clicks and pages visited, targets by URL, set frequency on when to show popups or sticky bars, and more.
Unbounce combines solutions for industry, such as e-commerce, SaaS, agencies, and professional services, as well as solutions by case, such as PPC, social ads, email marketing, and building lead generation landing pages.
The app provides it all if you want to develop a website, optimize it, increase your income, or expand your business. Try it for 14 days for free and decide for yourself!
Here are a few of its most important features:
Smart builder and classic builder integrations
Large variety of account management tools
Privacy and security measurements
Customizable templates with drag-and-drop functionality
Custom script for greater conversions, and dynamic text replacements
Unbounce
With this all-inclusive AI builder, you can create a website without coding that includes smart features and integrations.
Whether you want to create a website or an online store, Weebly offers different plans based on your requirement. It is a premium website builder that handles hosting, domain, SSL certificate, etc.
Signing up on Weebly is free and easy. Once the registration is done, give your website a name and follow the onscreen instructions.
Next, you need to connect a domain if you own one else skip the step. Make sure you create a page by clicking on create a page. It will open the website builder tab.
Select one of the free themes, and it will load a preview. Click on Start Editing to get the website editor. The visual editor lets you edit the website name, tagline, and any button present.
You can further customize the page by adding sections or simply drag and drop the elements from the left panel to add them to the page.
You can add elements like images, text, video, slideshow, buttons and product catalog and social icons, etc.
There is an option to add apps from third parties and Weebly. The toolbar lets you add more pages, change themes, and add apps while the admin dashboard can be accessed from the Settings tab.
Weebly does offer some advanced tools like the ability of 301 permanent redirects to new URLs. An online store has options to add a price chart, product catalog, shipping rates, etc.
Weebly is undoubtedly one of the best website development software without coding. You can get started for free, however, to go live you need to connect a domain that requires a premium account.
Let’s review some of its key features:
Also handles hosting
Drag and drop any elements to the page
Upload content such as images, text, videos, slideshows, and more
Built-in app integrations
Create an online store easily
Weebly
You can create a website or an online store easily now with this great tool.
The days when you needed to create websites using programming and would lose hours to arrange pictures on a page are long gone.
Xara Web Designer is a service that allows you to design websites just the way you want them, and all you need to do is know what you like.
Choose from hundreds of professionally designed templates, all without any programming knowledge.
Recreate the same website in order to be compatible with an entire variety of devices, and at the same time know that they will always be just as responsive.
For example, you can export tablet and mobile versions as a single HTML file.
Need to make your website that will gather an audience? Use their filters and photo editing tools to turn a plain picture into a masterpiece that will catch the public eye.
More so, you don’t have to hire a professional photographer to get you any pictures, since a subscription to Xara Web Designer gets you instant access to millions of stock photos of the highest quality.
Once page elements are set, you can program them to act a certain way, according to your needs.
This includes arranging photos to present themselves in a slideshow or putting sticky objects on the screen so that they are always at the customer’s disposal no matter how much they scroll.
In short, if you are looking for a service that will create the most beautiful and modern-looking websites that money can buy, then few can rival Xara Web Designer.
Take a look at its best features below:
Hundreds of professionally designed templates
Built-in photo editing tools and filters
Access to millions of stock photos
Cloud-based dashboard for easy access
Xara Web Designer
Build an excellent site with just a few easy clicks by using this advanced tool!
Site123 is the latest website builder’s lot and claims to offer the easiest website builder on the Internet. Site123 offers a free limited plan and a premium plan.
In fact, there are more than two plans which make it look sketchy, even when it is not. Moving on, the registration is free, and the free plans come with a subdomain with limited storage and features.
Begin with selecting the type of website you want to create like Business, Online store, Photography blog, etc, and there will be subcategories among those options as well.
Give your blog a name and finish the registration. The website builder layout is not the easiest of the lot but offers all the options nicely on the front page.
To customize anything on the website, simply double-click on the section, and the editing options will appear.
On the left side, Site123 has a Homepage tab – to customize the website name and logo, title and slogan, image design and layouts; Pages tab – to add or remove pages.
Design tab – to change website structure, styles, fonts, header menu options, footer options, etc.
Settings tab – to change website type, search engine optimization, website languages, and to add/remove plugins; Domain tab – to connect the custom domain to the website.
The Dashboard consists of Edit, Settings, and Domain sections. The Settings section lets you manage site’s status, website password, create 301 redirects, add contributors, and transfer options.
You can create a new website by clicking on the add button. To view all the premium plans, click on the Upgrade button.
To make the site live you need to add a subdomain. Click the Domains tab in the dashboard and type your preferred subdomain. If you have a custom domain, you can add it but requires a premium pan.
Site123 seems to have got the Ease of Use keyword in the website builder market right and is definitely the easiest of the lot.
The fact that it does offer a proper subdomain unlike Wix, I would suggest you create a free site to test and later upgrade to the premium plan based on your requirement.
Here are some of its top features:
Customize website name and logo, title and slogan, image design and layouts
Change website structure, styles, fonts, header menu options, footer options, and more
How to choose the best website design software without coding
If you are a business owner who is looking to list their services online or a hobbyist looking for an easy-to-create blog builder, then you definitely need one of the best website design software.
However, you need to take certain aspects into consideration when deciding to use one of these website-building tools that can help you create the website you want in an hour.
A very important aspect to keep in mind when looking for website design software without coding is that it should be easy to use and intuitive.
It’s certainly the coding that you avoid when you choose to opt for such an alternative, so make sure it offers a user-friendly interface and things will certainly become easier than ever.
With a friendly UI, you and your teammates will always know what to do when working on the same projects, without ever having to bother each other.
Pay attention to the software features
When compared to CMS and shared hosting platforms, these website builders may look slightly expensive, but for the features on offer, it is money well spent for the less tech-savvy users.
So, if the thought that a lower-priced software will help you do your job anyway compared to a more expensive one, then reconsider what you think, and check the quality of the features it implies.
You might be disappointed with the free versions and wish you’d gone straight into business with software that knows what you want and gives you more than you thought you needed.
Test and enjoy the free trial versions of great software to get an idea of what it’s like to work with real website design software without coding.
We hope this list of website design software without coding recommendations has helped you find something that suits your needs.
A Bugsplat.dll error on your PC can make it slow down and not run properly. The most obvious sign of having a Bugsplat.dll error is getting the Bugsplat.dll is missing from your computer error message.
DLLs are extremely useful because they allow you to load up a file once and then use it many times, which saves memory and allows your computer to run efficiently.
Bugsplat.dll is a dynamic link library file that contains functions and data including instructions on how to run programs.
Some of the reasons you may encounter the error include:
Corrupt files – If your computer is experiencing intermittent crashes, it may be due to files that have become corrupted. You’ll start seeing varied errors related to Bugsplat.dll such as BUGSPLAT.DLL could not be located or There was a problem starting BUGSPLAT.DLL.
Virus attack – Your computer could also be infected with a virus that causes the program to crash. To solve this error, you’ll need to look into your application’s installation files and make sure nothing is corrupted.
Registry errors – The registry is the database that stores all of your system’s settings and information. Anytime you make a change to a setting, the change is stored in the registry. If there’s an error in the registry, it can cause problems for your computer.
How do I fix the Bugsplat.dll error?
Bugsplat.dll is part of the essential DLL files that ensure your computer programs run smoothly. Although it is a critical file, it can still cause errors when it’s the wrong version or missing from your system.
1. Use a repair tool to fix the Bugsplat.dll missing error
A well-rounded automatic repair utility will help you scan for, identify, and replace any broken DLLs. These kinds of tools use an up-to-date Windows system file database to check if you have missing or corrupt DLLs and then replace them with the best versions available.
2. Run a virus scan to fix the Bugsplat.dll missing error
Press the Windows key, search Windows Security and click Open.
Select Virus & threat protection.
Next, press Quick scan under Current threats.
Wait for the process to finish and restart your system.
If you prefer to use a third-party antivirus, you probably know that the scanning process is very similar. A modern-day tool like TotalAV may in fact bring extra benefits.
In addition to the full PC scan, you get more in-depth options including a scanner for your UEFI, registry, system memory, and more. These can contribute to more accurate detections and quicker threat removal.
3. How to fix the Bugsplat.dll missing error using CMD
The Bugsplat.dll error is likely to be caused by corrupt files on your pc or registry errors. Therefore, performing SFC and DISM commands through Command Prompt can help you get rid of the error.
1. Hit the Windows key and type cmd in the search bar.
2. Right click on the result and select Run as administrator.
3. Type the following command and press Enter: DISM.exe /Online /Cleanup-image /Scanhealth
4. Wait for the process to finish then type in the following command: sfc /scannow
5. Restart your PC and see if the problem persists.
4. How to fix the Bugsplat.dll missing error using System Restore
Hit the Windows + R keys simultaneously to launch the Run command.
Type rstrui in the Run dialog box and hit Enter.
Click on Next when the System Restore window launches.
Select a date to restore Windows 11. (You’ll need to select a time when the bugsplat.dll error was not present).
Click Next then Finish restore point.
As a precaution, it is recommended that you install a DLL software tool that will automatically check your computer for any errors and repair them early in advance.
We hope you were able to bypass this error and that your computer’s performance is now back to its optimal level.
Let us know of any other solutions you may have tried that worked for you in the comment section below.
Many users want to take a screenshot quickly, and luckily for them, there are ways to auto-save a screenshot on Windows 11.
By doing so, you’ll quickly save the screenshot, and you’ll be able to focus on editing later. There are a few ways to do that, and in this guide, we’ll show you the ones we use.
Does Windows save screenshots?
Yes, Windows can save screenshots without any third-party tools. There are several keyboard shortcuts that you can use to take a screenshot on your PC.
How can I automatically save screenshots on Windows 11?
1. Use the keyboard print screen shortcut
Open whatever page you want to capture or launch a program you need to capture.
Press the PrtScr key on your keyboard. Note that on some keyboards, it is called Print Screen. This key is often found on the top right corner of the keyboard.
Select the desired tool to take a screenshot.
Now open the File Explorer and navigate the path below, substituting afamo with your username. C:\Users\afamo\Pictures\Screenshots
The screenshot should be automatically saved in this location.
Next, navigate to C:\Users\WindowsReport\Videos\Captures
Your screenshot will be saved there.
It’s important to mention that Windows saves all screenshots in PNG by default. By doing so, your image will always be of maximum quality. Currently, changing the default save format for screenshots is impossible.
Where does Windows 11 save screenshots?
Windows saves screenshots in: C:\Users\Your_username\Pictures\Screenshots
If you’re using Game Bar, screenshots are saved in: C:\Users\Your_username\Videos\Captures
If you have read this far, you know easy ways to auto-save a screenshot in Windows 11. To learn more, don’t miss our guide on how to take a screenshot on Windows 11.
Remember that Windows built-in solutions offer limited functionality, which is why many prefer using third-party screenshot tools instead.
Let us know in the comments if you found any cool ways of automatically saving your screenshots in Windows.
Upgrading to Windows 11 is usually a simple and smooth process, as long as your PC meets the hardware requirements. However, sometimes an Edge bug can prevent that.
Many reported issues with Edge that prevent the Windows 11 update, and in today’s guide, we’re going to show you how to fix that.
Why is Edge preventing Windows 11 upgrade?
All this situation triggered Microsoft to activate safeguard ID 37820326, which is where this whole conundrum began.
But, rest assured, Microsoft says the problem is now history so there’s really no need to concern ourselves anymore.
An internal investigation revealed that updating Microsoft Edge to version 99.0 or newer restores the lost data from Internet Explorer on systems that have already upgraded to Windows 11.
How do I fix Microsoft Edge bug?
Upgrade Edge to the latest version
Open Microsoft Edge.
In the search bar type: edge://settings/help
Check the browser’s version and make sure to install the latest updates.
Microsoft has addressed this issue, and you just need to upgrade your browser to fix it, so be sure to download the latest updates and try to upgrade again.
Can I reinstall Edge on Windows 11?
Yes, it’s possible to reinstall Edge on Windows 11 by using PowerShell. Keep in mind that this is an advanced procedure, and issues can emerge if you don’t do it properly.
Edge is a core component of Windows, so it should be reinstalled only in rare cases. If you choose to do so, please create a System Restore point and back up your data.
Customizing your digital environment should be a must in your day-to-day work actions. You can do it in various ways, but today, we will show how to quickly rename your Windows 11 PC.
It seems like many users are concerned about this aspect, so we prepared 5 accessible options that will take no more than a few seconds.
Because renaming your computer is recommended, let’s look at some valuable reasons.
Why should I rename my Windows 11 PC?
Customize your digital workplace – Firstly, when renaming your Windows 11 PC, you’ll personalize the digital environment, making your device easier to identify if you use multiple computers with your Microsoft account.
Protect your data – Data protection is becoming increasingly important every day, so renaming your PC will also contribute to the amount of information third parties can access without your knowledge.
Use certain Internet service providers – Note that some ISPs require using a specific computer name to identify your PC, and then validate your account. If the Internet Service Provider requires a specific title, do not change the name they give you.
After you find out why you should rename your Windows 11 PC, let’s see how you can do that.
How can I rename my PC in Windows 11?
1. Use the Settings menu
Hit the Windows key, then open the Settings menu.
Remain on the System page.
In the right side, look at your PC’s name, then click on the Rename button.
Enter the new desired computer name, then click on Next.
Nou, you’ll be asked to rename your PC for the new name to come into effect.
Reboot your computer and you’ll find the changes the Settings menu.
After renaming your PC through Settings, you might also want to confirm its updated name by following our guide to find your computer name in Windows 11.
2. Modify the System Properties settings
Hit again the Windows key, then type sysdm.cpl, and open it.
Remain on the Computer Name tab, then click on the Change button.
In the Computer Name section, type the new desired name, then click on OK.
You’ll now be asked to reboot your PC, so click on Restart now.
3. Use the Control Panel
1. Press the Windows key on your keyboard to open the search box.
2. Type control panel in the search box and click on the first result to open the app.
3. Navigate to the System and Security section in Control Panel.
4. Under the System section, click on the Allow remote access option.
5. Select the Computer Name tab, then click on the Change button.
6. In the Computer Name section, type the new desired one, then click onOK.
7. Restart your PC.
The Control Panel menu comes in handy when it comes to making changes to your PC. You can set up a new PC name in just a few clicks from the System and Security tab.
4. Run some commands in Command Prompt
Click on the Windows icon from your taskbar.
Type cmd, then right-click on the result, and choose to Run as administrator.
In the opened window, copy and paste the following command, then press on the Enter key: wmic computersystem where name="Present Name" call rename name="New Name"
Now, the command will be executed.
Next to the ReturnValue, look for 0.
If it shows 5, it means that you haven’t launched the Command Prompt with administrator privileges.
Restart the computer to apply the changes.
NOTE
In the above command, you should replace the Present Name with the current PC name and the New Name with the new one.
Can I change the name of my Windows 11 Remote Desktop?
Some of you might need more specific names for additional Windows 11 instances. This happens particularly if you have a Remote Desktop Web Access server displaying multiple apps or desktops.
You can easily do it by logging on to the Remote Desktop Session Host server as an administrator.
Also, remember that remote desktops are only available for Windows 11 Pro and Enterprise editions. If you’re running the Windows 11 Home version, use a suitable third-party remote desktop app.
If you often face display issues, check the monitor details and determine whether it’s the underlying cause. Should you feel like you want to modify the names of other devices, check out our article on how to rename your printer.
You can keep your folders organized as well by following this guide on how to rename a file in Windows 11.
If you have other questions or curiosities, feel free to leave a comment in the section below.
Do you want to disable website not trusted warning on web browsers? This article will help you to do it.
We can include This website might not be trusted by your browser pop-up message in the most common network issues.
If you are sure that the error occurred while you are trying to navigate toward a trusted webpage, don’t hesitate and learn how to add that website to the browser-trusted sites list.
As already outlined, this system alert can be addressed if you include the webpage in your browser-trusted sites list.
And here is how you can do that on the most popular web browser apps available for Windows 11 and 10.
But first, did you know there is a web browser out there that automatically redirects you to the secured version of the websites you’re trying to visit?
Why does my computer keep saying this site is not secure?
When you see a message like this site is not secured or anything similar, it means your browser could not establish a secure connection with the website. There are several reasons behind this problem:
A third-party extension is interfering
The website is using a wrong SSL certificate
Your internet settings have some problems
What are untrusted sites?
The websites which don’t have a valid SSL certificate or use HTTP instead of HTTPS connection are untrusted sites. It is because the connection between your device and the remote server is not secured.
As a result, if you share sensitive data on this site, that can be very risky, and third-party may get access to it.
Opera One takes you straight to the secure HTTPS version of websites
The core of the issue with Trusted or Untrusted websites concerns HTTP or HTTPS encryption protocols.
The former is outdated and poses some security risks, while the latter is modern and works under a secured SSL certificate.
You can avoid visiting outdated websites with Opera One, which automatically redirects you to secure HTTPS. Keeping you safe at all times while staying reclusive.
Add the 2048-bit RSA encryption key for SSL certificates (standard browsers have 1024-bit encryption), and you can safely roam the internet without worrying about a thing.
Or being frequently interrupted by an annoying prompt.
You can see everything firsthand by downloading Opera One and trying it out today.
Opera One
You can’t bother with untrusted sites, and Opera takes you straight to the HTTPS secure versions.
If you’re not yet ready to switch to Opera One, you can follow the steps listed below to secure your connection.
How do I disable a security certificate not trusted in my browser?
1. Add the website to the trusted list
Open the Start Menu, type internet options, and hit Enter.
Go to the Security tab and select Trusted sites.
Click on Sites.
Add the problematic website to the trusted site list.
Restart your computer.
This method works great to disable website not trusted on most web browsers, including the old Edge and Internet explorer, to any modern web browsers.
2. Disable HTTPS warning in the browser
2.1 Disable warning on Chrome
Open Chrome.
Type the following address in the address bar and press Enter: chrome://flags/#unsafely-treat-insecure-origin-as-secure
Set it to enable and input the problematic websites separated by the comma.
Relaunch Chrome.
2.2 Disable warning on Firefox
Open Firefox.
Type the following command in the address bar and press Enter: about:preferences#privacy
Click on Exceptions next to the Block pop-up windows.
Add the problematic site.
2.3 Disable warning on Microsoft Edge
Open Edge.
Go to the following location using the address bar: edge://flags/#unsafely-treat-insecure-origin-as-secure
Enable it and add sites to the list.
Restart Edge.
In this way, you can disable website not trusted messages on Chrome, Firefox, and Microsoft Edge.
3. Ask the website admin to use a valid SSL certificate
Some websites don’t have a valid SSL certificate, or there is a misconfiguration in their SSL settings. As a result, users will get warnings while accessing these sites. Though you can add it to the exception list, it is still not a secure way.
So, you can consider contacting the web admin via the contact page or any other medium to inform them that the website is showing such errors. Website admin may take steps to fix this.
WordPress site owners disable website not trusted messages using a specific plugin if a valid SSL certificate is already there. If the site owners don’t fix this, browsers like Chrome, Edge, and Firefox may trigger a message: The website is not secured, but the certificate is valid.
When you visit an unsecured website, what will happen depends on your activity. If you are just casually browsing, no problem should occur. However, if the sites serve malicious ads or content, it can be dangerous.
But, a catastrophe may happen if you share your credentials like username/email, passwords, personal information, including payment information, etc. It is because such websites don’t encrypt your connection between your PC and their server.
As a result, any third party may get access to your data when your device sends a request to the remote server.
The general idea remains the same: when getting This website might not be trusted by your browser security alert, you need to include the affected webpage in the trusted sites list.
Otherwise, the web browser will prevent any further access.
Now, you know how a certain webpage can be added to the trusted list but if your trusted sites is greyed out when you try to add it, this can be another sign that the website is not safe.
So, that’s how you can fix the annoying pop-up error. Remember that you should always choose to set additional security settings to make sure that your files and your identity are protected.
Lenovo’s seventh iteration on its Yoga 7 line is another refinement that brings sublet changes to the chassis design but otherwise middling performance upgrades. The true selling point of the Yoga 7i lies in Lenovo’s pricing and customization range for the laptop.
As the Lenovo Yoga 9i comes in at that higher end of the lineup price wise, the 7i 16-inch settles right in the middle above the 6i AMD versions but also carries the same load of configurable options that brush up against the premium laptop range of computer offerings in the industry.
From improved Intel Arc GPUs to SSD upgrades, the Yoga 7i can be as cheap or as expensive as your current workload requires, and this sort of price flexibility is a welcomed feature of the laptop as not everyone is stuck between choosing a fan busting performance hog or glorified web browser.
If customers time their purchase just right, they can snag the 16-inch version of the Yoga 7i for as little as $700 depending on configuration.
The review unit OnMSFT received is toward the higher end models of the 7i offered from Lenovo, sporting a 12th Gen Intel Core i7 processor with 16GB of memory and a 512 GB SSD,
Specs
Lenovo Yoga 7i 16-inch
Processor
Up to Intel 12thGen Corei7-1260P
Operating System
Up to Windows 11Pro
Display
16″ 2.5K LCD (2560 x 1600) IPS, 400 nits, 100% sRGB, 60 Hz, 16:10, Low Blue Light
Storage
Up to 1TB PCIe NVMe
Graphics
Intel Iris Xe Graphics
Camera
720p HD f2.0 camera (front-facing)
Memory
Up to 16GB LPDDR5
Dimensions
12.47″ x 8.67″ x 0.68″(361.51mm x 249.65mm x 19.20mm)1.9kg / 4.19lbs
Audio
2 x 2W user-facing tweeters and 2 x 3W woofers Dolby Atmos Speaker System
Weight
2.44 lbs (1,110 g)
Color
Colors: Arctic Grey or StormGrey Display cover: Aluminum Bottom: Aluminum
Ports/Slots
1 x USB-A (USB 3.2 Gen 14)2 x USB-C (Thunderbolt™ 4.0 / PD /DisplayPort™ / USB 4.0)1 x HDMI™ 2.01 x Full-size SD Card Reader (UHS-1(104) PCIe Gen 1)1 x USB-A (USB 3.2 Gen 1)1 x Audio Combo Jack1 x Power Button
Battery
71Whwith Rapid Charge Express (3 hours battery life in 15 min)
What’s in the box
6-row, multimedia Fn keys, LED backlight
Precision Touchpad
We’ll talk about performance on Lenovo’s Yoga 7i as it’s mostly noteworthy in the battery department. Despite having Intel’s 12th Gen CPU on board, the actual day-to-day difference in performance is minimal.
When comparing the Yoga 7i against other similarly configured laptops in the market now, Lenovo’s offering comes in lower to mid rankings routinely. Granted the marker for laptops’ performance has been raised across the board as more OEMs stuff 12th Gen Intel chips into their computers, but as far as the 7i is concerned it’s doing just above average when keeping up with the Jones’.
I believe the contention in performance comes with the duration of the testing period for the Lenovo 7i. Opting for the Core-U series processor in Intel’s line means the device is designed for shorter bursts of computing power that can peak with an impressive 30 percent gain over similar computers but tapers off over time and eventually results in more like single digit improvement.
That is all to say, synthetic benchmarks just confirm that 12th Gen processors are all an improvement over 11th Gen but depending on OEM tweaks in software, fan configurations, connectivity technology and SSDs, there’s only so much that can be squeezed out of a individual laptops these days.
Of note however, is that because the 7i is an Intel EVO certified device, the ceiling on cooling and noise is relatively low and thus, the device will throttle performance when unplugged and it’s noticeable.
Despite the bump from Iris Xe 96 models sporting the upgraded Iris Xe GPUs leveraging LPDDR-4800 RAM over DDR4-3200 configurations, users may run into issues with dealing with DPC latency which can happen on sites heavy with interactive charts or graphics.
However, for someone in data processing or data work, the system still feels snappy and takes a lot of open programs over the course of a several hours before things need to refresh or feel bogged down.
As far as gaming is concerned, look elsewhere. I suppose unless a device is sold specifically as a gaming device, we can start to cut these anecdotal gaming experiences out of reviews. Yes, you can play the Sims, a little bit of GTA V and even Cyberpunk 2077 (on very low settings) but why bother, when you can almost as easily play those games from the cloud and never worry about taxing the system.
If you’re looking to game on a consumer-grade laptop, you might rethink your priorities.
Look and Feel
Moving on to the actual look and feel of the device, the biggest changes are the “comfort design” Lenovo is applying across its consumer laptop line that offers rounded corners on the chassis akin to the iPhone 6.
While Lenovo is not bending its OLED panels like it had in the past, the rounded corners on the lid do help blend the 16-inch 2.5K resolution display into the aluminum chassis very eloquently.
Speaking of displays, the new 16L10 aspect ratio is a welcomed change up from the 16:9, offering more screen real estate for content viewing. Unfortunately, while Lenovo claims 400 nits of brightness, the reality is that the panel looks to peak around 320 in most lighting conditions.
Fortunately, the 7i comes with a full HDMI out port that will let users connect to their favorite monitors for larger screen viewing or potential content editing. The port selection on the 7i remains unparallel on the 16-inch version which houses two USB-A (USB 3.2 Gen 1 port, two USB-C Thunderbolt ports, full-sized SD card reader, and audio/mic combo.
Despite all the cut outs along the side of the laptop, the design remains flush to the eye and touch.
The 16-inc version of the 7i is a bit hefty at around 4 1/2 pounds which made using it in tablet mode just as cumbersome as usual. The rounded corners did help to alleviate the old handling issues a bit as the laptop didn’t dig into palm rests as it used to.
The new Bluish Storm Grey does help the 7i stand out this year, but also picks up fingerprints pretty easily. Fortunately, as easily as fingerprints are absorbed, they can just as easily be wiped away, so it’ll depend on your OCD how much the new color and matte finishes bother you.
As for the rest of the design, the 7i comes with a modern 1080p web cam that supports IR and Windows Hello authentication this year. Lenovo offers some software customizations to tweak the image capture but nothing more impressive than most webcam enabled chat services around.
With the 16-inch demanding more real estate, Lenovo accommodated with a larger touchpad for the 7i that’s increased in size by 54 percent with support for Windows 10 & 11 multi-gestures.
Lenovo also aligned the speakers down the flanks of the device, similar to Apple’s MacBook and the sound is excellent for laptop speaker performance. With 2W woofers and 2W tweeters pushing out unobstructed sound, watching movies, shows and YouTube was rather nice.
Summary
The Lenovo 7i 16 is a great laptop for anyone who wants a larger screen but doesn’t want to sacrifice style, I say this as often 16-inch devices can often look and feel like cumbersome stationary devices. The 7i 16-inch looks and feels like a slightly larger version of Lenovo’s flagship consumer 9i laptop.
The 7i retains all the things that make the 9i a flagship while offering configuration options that are a bit more considerate of someone’s budget, while keeping a baseline quality standard.
Who the devices aren’t for, are gamers or anyone who uses specialized graphical applications. While a year over year leap a couple of years ago, the Iris Xe graphics still fall short of a content creators’ day-in and day-out dream. The throttling from either the U-Series and EVO specifications or simply Lenovo’s Vantage software also means users will need to be mindful of their usage, especially unplugged.
Summer is winding down. And while that kind of a bummer, there is a silver lining in the form of the Xbox End of Summer Sale. The sale kicks off August 23 with over 300 deals on Xbox games. Here are just a few of the highlights from the End of Summer Xbox Sale. Most of these deals will expire on August 30, so be sure to grab these discounts while they last.
Back 4 Blood: Ultimate Edition—55%
Battlefield V Definitive Edition—70%
Bioshock: The Collection—80%
Blasphemous—75%
Borderlands 3—75%
Call of Duty: Modern Warfare Remastered—50%
Castelvania: Lords of Shadow 2—75%
Destiny 2: The Legacy Collection—60%
Grand Theft Auto V: Premium Online Edition & Great White Shark Card Bundle—55%
Metal Gear Solid Peacewalker HD—67%
Resident Evil Village—25%
Star Wars Squadrons—75%
The Quarry—33%
Tiny Tina’s Assault on Dragon Keep: A Wonderlands One-shot Adventure—50%
Tomb Raider: Definitive Edition—85%
Yakuza: Like a Dragon Legendary Hero Edition—65%
As you can see, there are some pretty incredible discounts to be had as part of the Xbox End of Summer Sale, with some games 50% and even 75% off, some even more.
Will you be jumping on any of these deals? If you are an Xbox gamer at all then there is likely something on the Xbox End of Summer Sale that will catch your eye. And you can check out all the other deals available right now as part of Deals with Gold over on Xbox Wire.
With this in place, it is now possible to develop specialized business applications that allow users to make calls directly from Teams. You can also come up with new workflows for applications that need custom management of Teams phone calls. What’s more, Teams calling capabilities will be availed to devices that were not previously supported.
According to the blog post, “by matching with the Graph API, developers can build custom communications apps for Teams users on any endpoint, with opportunities to add and manage chats, channels, and Teams Meetings, as well as server and client-side calling bots, and to integrate information about people in the organization”.
Welcome to Xbox Classics Revisited. In this new series we aim to take a look back at the previous three generations—the original Xbox, the Xbox 360, and the Xbox One—of Xbox games. These mini-retrospectives serve as a tribute to some of the best gaming that Xbox has given us over the last 20+ years.
For those who were lucky enough to have been there for all of it, read on and savor the nostalgia. For those Xbox fans too young to remember Maude Flanders or Pepsi Twist: get ready to meet your Xbox gaming backlog.
MechAssault (Xbox)—November, 2002
The original MechAssault reached cult classic status on the first Xbox with its fast, satisfying third-person shooting and destructible environments. It was also one of the first games to feature Xbox Live multiplayer.
This Xbox 360 Classic is the game that spawned one of Xbox’s biggest franchises. Gears of War was hotly anticipated leading up to its release back in 2006, almost exactly one year into the 360’s lifespan. Having won over 30 game of the year awards, it became an instant classic with its thrilling sci-fi horror setting and masterfully-implemented tactical third-person shooting.
Gears of War got a remaster in 2015 with the Ultimate Edition. The franchise is still going strong, with many sequels, prequels, and spinoffs in addition to other related media in the form of books, comics and an upcoming Gears of War film.
2019’s Control is a third-person action-adventure game set within a structure known as the “Oldest House” in New York City. The game has a huge nonlinear world map, however, for the Oldest House contains a supernatural realm where the laws of spacetime do not apply.
The game has definitely made a mark with the 10+ million who’ve played it, thanks to its thrilling combination of psychokinetic powers and reactive environments. But what really makes Control a modern classic is that it’s chock-full of those watercooler moments that’ll have gamers talking about—and replaying—it for years to come.
Wrap up
We hope we’ve gotten off to a decent start with this series. What are your favorite Xbox classics? Do you have any special memories from the games featured here? Share them in the comments.
One of the most popular laptop series is the Dell XPS lineup. But, like any other laptop, the Dell XPS series isn’t perfect, and users sometimes run into technical issues.
You may resolve most of these issues by updating the driver according to the forums; however, others call for specific actions to be taken to fix the problem.
In this article, we are going to discuss the top 15 Dell XPS 13 problems.
Is it worth getting a Dell XPS 13?
The XPS 13 is a reliable little laptop ideal for corporate applications. The portable device is compact and has a high-speed CPU.
It won’t be difficult for you to accomplish a little bit of anything, such as creating presentations, streaming videos, and playing low to medium spec games. So, it isn’t made for graphically intensive applications.
What are the common problems with Dell XPS 13 laptops?
1. Bluetooth problems
Enter BIOS by pressing F2 while the system is booting.
Select Reset BIOS to factory settings.
After the PC restarts, disconnect the Bluetooth accessory.
Search device manager in the taskbar and select the best match.
Right-click on Dell Wireless 1820A Bluetooth 4.1 LE device and select Update Driver. This will download and install an update.
Restart your PC.
A simple driver update will fix the Dell XPS 13 Bluetooth not working issue, but some users claim that you need to do a factory reset in BIOS for the problem to disappear.
2. Wi-Fi/internet connection issues
In the search box, enter troubleshoot and select the best match.
Click View all or Other troubleshooters.
Then select Network Adapter.
Running the troubleshooter requires following the on-screen directions.
The first step in identifying the cause of dell XPS 13 not connecting to the internet should be troubleshooting network issues.
However, if the problem persists, you should take your laptop to a technician and request that they replace the wireless adapter.
This is because the original one is to blame for having bad performance and causing the Dell 13 not to connect to Wi-Fi.
3. Camera detection issues
To reinstall the webcam drivers, shut off any programs using the webcam. Any open apps should be saved and closed since the laptop needs to restart.
Click on Start menu, type device manager in the search field, and select the best match.
Click the arrow to the left of the Cameras option.
Right-click the integrated webcam or USB camera and click Uninstall.
Clicking OK will confirm the removal procedure.
Restart the computer after uninstalling.
Reinstalling the webcam drivers will help your laptop to recognize the camera and solve the dell XPS 13 camera not detected an error.
After following the steps above your PC should be able to identify the camera now.
Still, if you are using an external camera, then the Dell XPS 13 camera not working issue might be due bad port or an incompatible camera brand.
4. Dell XPS 13 not detecting headphones
Press Ctrl + Alt + Delete, and select Task Manager.
Select the Startup tab and look for the MAXXAUDIO program.Right-click on it and select enable.
A preinstalled piece of software is at blame in this situation. If you have turned it off, the headphones won’t function.
The Waves MAXX AUDIO program takes care of the XPS 13’s need to distinguish the output and regulate the switching procedure.
Therefore, the MAXXXAUDIO program, which isn’t necessary for audio but is for switching, is turned off if you have switched off nonessential software at startup.
So that it can recognize your headphones and fix the Dell XPS 13 not detecting headphones issue, you should ensure that you have enabled it at launch.
5. Hard Drive not recognized
While booting the laptop, rapidly press F2 to enter BIOS.
Check the setup to see whether the laptop recognizes the hard drive. If it doesn’t, the hard drive has either died or disconnected.
If the hard drive is recognized, you must install the operating system onto it.
Next, put the USB drive with the Dell Windows Recovery Image in the computer (the instruction can be found on the website linked below.)
Restart your computer, and when you see the Dell logo, press the F12 key on your keyboard. The boot menu should show up.
Then, choose the UEFI boot option.
Choose your keyboard layout and language.
After that, select the Troubleshoot menu option.
Choose Recover from a Drive.
To perform a clean installation, choose one of the recovery alternatives.
For the procedure to begin, click Recover.
Dell gives the customer an ISO-formatted recovery disk for Windows 11 and 10. This Dell Windows Recovery Image ISO recovery media is available from this page.
You can use this ISO file again if a subsequent reinstallation is required because it is not directly linked to the computer’s service tag.
You can use it to install or reinstall Windows 11 or Windows 10 on a different Dell laptop.
By following the steps on the official page, you can create a bootable image and reinstall Windows on the drive, which your machine fails to recognize and displays the Dell XPS 13 not detecting hard drive error.
6. Black display
After turning the system off, hold the D key while pressing the power button to bring up the built-in LCD self-test.
If the test fails to diagnose the problem, the LCD cable would need to be changed; if that didn’t work, the LCD assembly would need to be changed.
A poor connection between your graphics drivers and operating system is the major root of the Dell XPS 13 display not working problem.
A defective LCD or display panel is another potential factor. Either way, a technician must disassemble the laptop to determine the problem.
7. HDMI problems
The cause of the Dell XPS 13 HDMI not working should be a hardware problem if you’ve successfully tested the adapter and cord with another system.
We suggest using a console or another device to test the display.
Nothing could go wrong with this laptop because of its simple setup other than display and laptop compatibility issues or hardware problems.
8. Keys/keyboard issues
Turn off the computer.
Turn on the computer while holding down the Fn key.
Allow it to run the test. If everything is fine, proceed to restart the computer.
During the reboot, keep the F2 key pressed.
Select Load default setup config from the Exit menu.
ClickSave, Exit, and then restart.
If you encounter a Dell laptop keyboard not working intermittently, you should update the driver first to see if it helps.
The fix presented above is mainly for those who encounter the Dell XPS 13 keyboard not working completely. You can also apply it for Dell XPS 13 keys not working issue.
To open the Settings app, press Windows + I and select Privacy & Security from the tabs on the left.
Scroll down and choose Microphone under App permissions.
Ensure the Microphone access and Allow apps to access your microphone toggles are switched on.
You should reinstall the Realtek driver if this doesn’t work.
Reinstall Maxx Audio Driver next.
Ensure that you have permitted the apps to use the microphone. If this doesn’t help, you might want to update the drivers as the last resort to solve the Dell XPS 13 microphone not working issue.
10. Mouse and touchpad problems
Let us talk about the touchpad first and then about the mouse itself. The most typical reason for the touchpad to stop working is that the user accidentally disables the touchpad feature.
Most laptops have a TouchPad-specific function key merged with the F keys. The F9 key is the most used location.
To re-enable the touchpad on your Dell computer, press the button with an icon that looks like a TouchPad and verifies if the TouchPad functionality returns.
Specific models need you to hold the Function key while pressing the TouchPad key.
However, if your mouse has a problem, ensure it works properly. If it does, change the port to see if the Dell XPS 13 mouse not working problem persists.
11. PEN connection issues
PEN would frequently lose screen contact and changing the battery is typically sufficient to fix the issue.
However, pressing gently on the barrel near the tip will also restore the connection and potentially fix the Dell XPS 13 pen not working problem.
12. USB recognition problems
If the USB cable or the computer’s USB ports are damaged, USB issues such as Dell XPS 13 not recognizing USB could occur.
When you attach a USB device to a computer, you could notice symptoms like the apps stop working, USB operating only occasionally, or the USB cable wiggles.
The factors that USB cables and ports are exposed to could result in a buildup of dust or even physical harm resulting in the Dell XPS 13 USB not working.
Use a can of compressed air to clean the ports and connectors if you see any dust or other pollutants there.
Unplug the USB device from the computer and plug it into another computer to see if the USB device is malfunctioning.
The USB device is defective if it cannot be identified and does not function on a different computer that is known to be reliable.
To learn about the USB device’s repair options and warranty status, get in touch with the manufacturer.
13. External monitor detection issue
Ensure that the laptop is connected to the monitor using the proper cable. Damaged cables will fail to transmit data to the display resulting in Dell XPS 13 cannot connect to the external monitor problem.
You might try utilizing a USB-C to DisplayPort cable to connect to your monitor as a workaround for Dell XPS 13 not detecting external monitor issues if you’re not using the USB-C port for anything else.
14. Fast draining battery
The Dell XPS 13’s battery lasts a long time; however, it sometimes runs out sooner than planned for various reasons.
Naturally, if you use your XPS 13 for work, you’ll want to remedy this issue immediately because you’ll need a portable device that won’t need immediate charging.
You can decrease the screen brightness on your laptop to use less power and extend the battery life. You can also update the BIOS to extend battery life by up to 25%.
Finally, if none of these fixes worked, you might need a new battery.
15. Shutting down issues
There may be issues with your XPS 13 shutting down. No matter what you use your laptop for, this is a real pain.
You might try uninstalling third-party applications like antivirus software by going to the apps and features menu in the Settings app and closing background-running programs.
Dell Inspiron laptops are targeted toward the lower end of the market with lower price points. In other words, the more you spend on a laptop, the better its performance.
The fixes offered above are all tried-and-true fixes that the Dell forum has validated working for laptop users.
You can take your laptop to a specialist if the problem you are trying to resolve still exists after the fix.
Dell typically offers warranties or replacements if you just purchased it, allowing you to switch out your laptop or have it serviced by Dell professionals.
Such issues are unavoidable, which is why the manufacturer provides take-back services, allowing you to get a new device if something goes wrong with your old one.
In the comments section below, let us know what was your Dell XPS 13 problems and how did you fix them.
Even Windows 10 users are having audio issues after installing one the more recent cumulative updates from Microsoft.
Now, Microsoft has released an update for Windows 11 Build 25182, which was released to Windows Insiders last Wednesday.
What’s new in KB5017600 for Windows 11?
Well, the truth is that this update brings nothing new, as the Redmond-based tech giant designed it to test its servicing pipeline.
These types of updates are sometimes released by Microsoft, much to the disappointment of Insiders everywhere, so we just have to live with it.
That being said, there still are a lot of new things to check out with this build, or rather its previous form, so we’re going to go into that.
However, since maybe you weren’t completely up to date with the latest changes and innovations for the Dev Channel builds, we will show you what you missed.
The Camera app can now understand the state of the privacy shutter on supported hardware, such as the Microsoft Modern Webcam or the integrated camera on many new Windows 11 laptops.
That being said, if the shutter is blocking the view or if the laptop lid is closed, the Camera app will inform you and offer guidance.
Microsoft also stated that it has actually improved the Camera app experience on Arm64 devices, which means you will see faster and better performance when you use the app.
The tech giant also began to roll out a Microsoft Store update (version 22207.1401.x) with the following improvements:
Screenshots in search results: View screenshots in search results to help improve your browsing experience.
Install games directly from the Microsoft Store app: When you find a game you like, you can install it right from the Microsoft Store, without switching apps.
Fixes
[General]
Fixed the issue that was causing devices with low disk space to receive download error 0x80070001 in Windows Update trying to install the latest Dev Channel build.
Fixed an issue leading to some Insiders experiencing a decrease in FPS when playing certain games in recent flights due to the wrong graphics card being used.
[Taskbar]
Fixed an issue which could lead to the taskbar overflow flyout unexpectedly appearing on the opposite side of the screen. This was incorrectly noted as fixed in Build 25179.
Fixed an issue that was causing the animation on the taskbar that plays when a user switches from using a device in tablet posture to desktop while in overflow to incorrectly show when logging in.
Fixed an explorer.exe crash which could happen when determining if the taskbar overflow should display. This could happen when switching out of a full screen game.
[Start]
Fixed a Start menu crash that could prevent apps from launching from Start.
[File Explorer]
Fixed an issue causing the left-half of the File Explorer title bar to not be draggable via mouse or touch for some Insiders.
Fixed an issue causing Home, Documents, Pictures, and potentially other folders to become unexpectedly duplicated in File Explorer’s navigation pane or appear on the desktop.
Selecting multiple folders and then using the context menu option to open them in a new tab will now actually do that, rather than opening the first folder in a new tab and all the others in a new window.
Updated the logic for Narrator so that if you navigate to a OneDrive folder using the navigation pane in File Explorer, Narrator will now explicitly say it’s a OneDrive folder, and not just something like “YourName – Personal”.
[Other]
Fixed an issue which could cause the camera light on a laptop to get stuck on after logging into your PC.
Fixed an issue believed to be the root cause of some Insiders seeing bugchecks when opening and copying files from network locations.
Known issues
[General]
Some games that use Easy Anti-Cheat may crash or cause your PC to bugcheck.
Looking into reports that audio stopped working for some Insiders after upgrading to the last flight.
Investigating reports of a few different apps having started crashing in recent builds.
A small percentage of Insiders are experiencing repeated explorer.exe crashes after attempting to access certain folders on your system on Builds 25179+. Insiders who have the Xbox Dev Kit installed will hit this. We’re working on a fix for this in a future flight.
[File Explorer]
The up arrow is misaligned in File Explorer tabs. This will be fixed in a future update.
Working on the fix for an issue where the search box background in File Explorer might be the opposite color of your current mode.
Working on the fix for an issue causing the delete key to unexpectedly not work on files in File Explorer. If you encounter this, you should still be able to use the context menu to delete.
Working on the fix for an issue where the taskbar isn’t able to display if File Explorer is maximized and you have the taskbar set to auto-hide.
[Widgets]
Notification badge number may appear misaligned on the taskbar.
In some cases, the notification banner for some badging will not appear in the widgets board.
[Printing]
Working on the fix for an issue in recent Dev Channel flights causing lines to not be included when printing tables from certain apps.
What can I do if Build 25182 fails to install?
Press Win+ I to access Settings.
Select the System category and click on Troubleshoot.
Press the Other troubleshooters button.
Press the Run button next to Windows Update.
Be sure to report any other issues you might come across, in order for Microsoft to address and improve the overall OS experience for us all.
There you have it, folks! Everything you can expect if you are a Dev channel Insider. Leave a comment below if you found any issues since installing this build.
In the ad, Jennifer Walters, aka She-Hulk, uses a Surface Pro 8 to manage her busy day as part lawyer and part superhero with setting client meetings via Outlook, trial research, web browsing, and more casual use at home with a presumably made-up dating app designed for Windows 11’s tablet mode.
At the end of the day, the ad does a decent job of showcasing the Surface Pro 8’s versatility as well as informing the customer that there is a dedicated app in the Microsoft Store to stream the latest Marvel show.
As a fan of both Surface devices and the comic character She-Hulk, I think Microsoft could have sold a few of its left-over Surface Studios with its She-Hulk promotion. For one, she’s much larger than the average woman or man and a Surface Studio might be more up her alley as well as her cousin Bruce, (Hulk).
Secondly, they’ve already shown a Surface Studio being used in the courtroom during the first episode of the show. Perhaps, after whatever Surface event we’re given, Microsoft may revisit its Marvel Entertainment promotions calendar.
The She-Hulk tie-in is perhaps the most public display of Microsoft and Marvel Entertainment coming together, but Surface devices have been popping up in Marvel properties over the past decade with notable appearances in Agents of S.H.I.E.L.D frequently, Shang Chi and Marvel Defenders.
Microsoft has also ramped up its appearances in other Netflix and network shows such as Never Have I Ever where everyone uses a Surface Pro or Surface Laptop as well as in famously showing off the Surface Neo that never-was in Netflix’s Red Notice.
I suspect we’re nowhere near the apex of Microsoft’s Surface product placement or entertainment partnerships with this latest Marvel She-Hulk ad.
In this article, we’ll show you how to update your keyboard drivers on Windows 11. It’s a simple process that can fix issues like unresponsiveness and unusual behavior and also boost performance.
Sounds good? Here’s how to do it:
How do I update my keyboard drivers in Windows 11?
1. Update via Manufacturer’s website
If you’re using a keyboard from one of the more popular manufacturers, then it’s likely that you can download the latest drivers from their website (In this case Dell). This is the easiest way to update your keyboard drivers because it doesn’t require any technical expertise.
Some manufacturers also offer a downloadable software app that allows you to check if there are any updates available for your device. If there are updates available, then the app will automatically download and install them on your PC without requiring any input from you.
You can also let specialized software do all the work for you. With its help, you can scan, identify, and install all the drivers you need in just a few minutes.
Hit the Windows key, type Device Manager in the search bar, and click Open.
Expand Keyboards.
Right-click on your keyboard and select Update driver.
Select Search automatically for drivers.
3. Update via Windows Update
Hit the Windows key and select Settings.
Click on Windows Update on the left pane then select Advanced options on the right pane.
Now click on Optional updates.
Select Driver updates then check the updates you wish to install.
How to reinstall keyboard drivers for Windows 11?
Uninstalling drivers is a common practice in the computer world. It allows you to remove old drivers and replace them with newer ones. To do so, follow the steps below:
Hit the Windows key, type Device Manager in the search bar, and click Open.
Expand Keyboards.
Right-click on your keyboard and select Properties.
Navigate to the Driver tab, click on Uninstall Device then press OK.
Restart your PC and the drivers will automatically reinstall.
Alternatively, you can install driver removal tools that do the job faster and more efficiently. They ensure there are no corrupt files left behind and free up storage space.
Saints Row is out now for Xbox consoles. This series reboot puts you in the role of “The Boss,” (who is completely customizable, especially when you download the Boss Factory) joined by your allies Neenah, Kevin, and Eli. The game brings a new city to explore, with new characters and a new story.
There are three new factions to contend with as you endeavor to build up your empire: Lost Panteros, The Idols, and Marshall Defense. Rising to the top will involve a fair share of gunfighting and high-speed chasing through the city of Santo Ileso. Thankfully, you will be able to modify your arsenal as well as your fleet of vehicles and eventually even your headquarters.
The entire campaign can be played cooperatively with two players, and is a great way to experience the game. Plus, players who register and link their Saints Row profile on SaintsRow.com will receive the Marshall Rocket Launcher to get their journey started off right.
Head over to the Xbox Store to get the game. It is available in Standard, Gold and Platinum editions.
In a press release provided to news media, Kalypso Media has announced that two of their recent titles, Railway Empire 2 and Dungeons 4, are coming to Xbox Game Pass in 2023. The announcement, coming with an unveiling at gamescom 2022, reveals that both titles will be released in 2023 for the PC, Xbox Series X|S, PlayStation 5, and the Nintendo Switch, as well as Game Pass for both Xbox and PC (via GamingTrend).
Railway Empire 2
The announcement trailer released by Kalypso gives some glimpses of the Railway Empire 2 train simulator. Those who love to play simulation games like this should keep eye on Railway Empire 2.
Dungeons 4
Dungeons 4 is the fourth upcoming part of the Dungeons franchise, continuing the legacy of its predecessors. Fans can expect an updated take on the concept when the game will release.
What are your thoughts on the upcoming games for Xbox? Let us know in the comment box.
What do you do when a greater Flash version is required? We will tell you all about this in this guide.
Installing Adobe Flash Player isn’t necessary anymore. All browsers come with the built-in Flash Player provided by Adobe. However, this isn’t a rule of thumb for some.
You also need to know that as Adobe Flash reached its end of life on December 31st, 2020, fewer browsers support Flash by the day.
Some users experienced issues when trying to play videos or access any Flash-related content. They were met with the Flash version 10.1 or greater is required error.
We decided to shed some light on this issue and provide possible solutions below.
Can you still use Adobe Flash in 2022?
For about two years, Adobe Flash has been retired. So in 2022, you will not be able to use it, but there are still a few alternatives that will work, and we will discuss them in this article.
You must note that Flash is no longer supported natively by almost all the major browsers, and users will rely on third-party vendors.
However, it would help if you were cautious of using any Flash technology since the tech is old and can be very vulnerable to viruses and other attacks.
What can I do if Flash version 10.1 or greater is required?
1. Use the Opera One browser
Opera One, like many of the new browsers, does no longer support Flash natively. So you might be wondering why to bother using it.
Well, in the absence of native support, thanks to its extensive extension library, you would find extensions that plug the Flash gap perfectly.
One of our favorites is the Flash Player for YouTube. You may set Flash player as the default player for YouTube, and it is very light with little memory and CPU utilization.
But that’s not all. Opera One has many valuable features like an ad-blocker, integrated social media buttons for WhatsApp, Facebook, and Instagram, smartphone integration, and many more.
The browser even comes with a free, unlimited, built-in VPN service that will protect your privacy from your ISP.
Opera One
Opera One supports Flash natively, so it’s the best possible browser to enjoy your content. And it’s free!
Note that the two extensions mentioned will work on all Chromium browsers, especially Opera One. So you do not have to use Chrome if it is not already your default browser to get the most out of these extensions.
In the past, you will be able to allow Flash by navigating to your Site Settings in Chrome. However, this is no longer true in Chrome and most modern browsers. The only way you will enable Flash is by using any of the methods listed above in this article.
That is all you must know about Flash. It is a dying tech, and we recommend not using it, but if you must, be careful what sites you visit and make sure you trust the content on such sites.
You can still play Flash content using the extensions discussed without downloading a free standalone Flash player.
With that said, we can conclude this article. If you have any additional questions, suggestions, or explanations, feel free to share them with other readers in the comments below.
Myst was released in 1993, and it’s one of those old-school games that will never be forgotten. Back then, gamers had never seen such a game, and it inspired many games we’re playing these days.
Next year the game will have existed for three decades, and there has been a lot of evolution.
Many are geared towards adapting the game to newer operating systems. So, in this article, we shall explore how you can play Myst game on Windows 10 and 11.
Is there a Myst game for Windows 10?
Installing and running Myst on 64-bit PCs running Windows 10 or 11 will be impossible if you use the original Myst CD. This is due to Myst’s 16-bit installer, which won’t run on 64-bit systems.
So really, is there a Myst game for Windows 10? The answer is yes. And we will be showing just how to enjoy the game on recent Windows OSs.
These tips will work for Windows 10 and 11.
Quick Tip:
To have a smooth experience when playing Myst, we recommend you connect to the game from a dedicated gaming browser. Opera GX is a great option.
It’s specifically optimized to reduce latency issues and let you play without interruptions. It’s packed with performance-oriented features such as a RAM and CPU limiter, hardware acceleration, and much more.
Opera GX
Play the Myst in-browser version for great quality and reduced risk of latency.
Myst and Myst: Masterpiece Edition are 2D games, but realMyst is a 3D game. This is the primary distinction between the two games, except for the Rime age, which is absent from the 2D games, both recount the same tale.
You may only go to specific areas and turn to fixed perspectives in 2D versions of Myst. However, Myst’s 3D version allows you unlimited exploration.
Additionally, realMyst has a 24-bit color palette compared to Myst’s 8-bit one. If you compare the two games, you can clearly see the difference.
Finally, realMyst employs newly created textures of considerably better quality and operates at a higher screen resolution.
Now you can play your favorite Myst game on your Windows 10 and 11 devices. Simply follow the steps above.
We are curious to know your favorite Myst game. Please tell us in the comment section and also let us know which of the solutions you prefer for playing the game on your PC.
The operating system is a key element of the computer, so you should choose it with care. Microsoft has always been trying to make Windows more secure, and the versions discussed here are no exception.
The latest version of the software comes with many security features that make it one of the most secure operating systems available.
Despite the mounds of criticism that have been heaped on Microsoft’s latest operating system, Windows 11, its adoption rate is actually increasing quickly. Even more interesting, many users are switching to other versions, notably the Pro version.
Both Pro and Pro N are the two most prominent versions of Microsoft’s flagship operating system. They are both professional editions of Windows, but they have some distinct differences that make one better than the other for certain uses.
So, let’s find out, of the two, Windows 11 Pro vs Pro N, which is better?
What is N version of Windows 11?
N version of Windows 11 is a special edition of Windows. It is designed to meet the requirements set out by the European Commission’s anti-competitive law.
The N version also includes other features in other Windows versions, but there is no such thing as Windows Media Player. However, these features can be downloaded from the internet for free after the installation of the operating system.
What’s the difference between Windows 11 Pro and Pro N?
The Pro and Pro N are both versions of Windows that can be installed on your PC. They share the same code base, but they have different features and licensing options.
Pro is the professional version of Windows 11. It’s designed for business users, and it includes more features than the standard version of Windows 11. It’s for people who need to do more than just get things done at work.
This version delivers a range of new features and enhancements that will make you more productive, help you connect with others more effectively, and make you feel safer and more secure online.
When it comes to Pro N, it is similar to Windows 11 but without media-related technologies. Media-related technologies are those that enable digital media and entertainment experiences on Windows devices.
For example, if you want to play music or watch videos on your device, you need the appropriate codecs installed.
Security
Pro offers better security with enhanced protection against cyberattacks by using the Microsoft Defender antivirus software.
This can be used to protect your devices from harmful viruses, malware, spyware, and other types of malicious programs that can affect your computer’s performance.
In addition, the cloud management feature comes with multiple layers of protection which comes as a big plus for business owners who deal with sensitive and confidential information all the time. For Pro N, the security features are pretty much similar to those of Pro.
Performance
Pro provides improved performance by offering better multitasking capabilities along with faster boot times and shutdowns.
The OS also allows you to easily switch between apps without any issues or delays in between tasks. You can easily access virtual desktops especially if you work with multiple monitors or windows at once.
It’s hard not to feel impressed by Pro N. The operating system runs smoothly and consistently, with little in the way of performance issues or bugs. Booting is done quickly, and applications open almost instantly.
Gamers are the obvious winners with this feature as they get to enjoy less lagging while playing and experience a faster response time.
Productivity
The Pro version is a productivity-focused operating system that allows users to get the most out of their devices. It’s ideal for businesses and individuals who want to run multiple applications at the same time while also having access to advanced security features.
With the Pro version, you can use multiple apps simultaneously without having to close them down manually every time you want to work on something else.
You can even use multiple desktops to keep all your workspace organized so that you don’t get distracted while working on something important.
Pro N wasn’t designed with productivity in mind given the absence of some of the productivity-focused features. While they may be missing, you can certainly install productivity apps to boost your performance.
Windows 10 Pro N is a great platform for gaming. It has all the advantages of Microsoft’s latest operating system, plus some extra features that can improve your PC experience and make it easier to game. And the same applies to Windows 11 Pro vs Pro N for gaming.
The main reason why you’d want to use Windows 10 Pro N is because of Game DVR, which allows you to record game highlights.
Another great thing about this version of Windows 10 is that it allows you to create virtual machines on your computer. This means that if you want to use multiple operating systems on one computer, then you can easily do so.
A controversial reason is that since most apps do not come pre-installed in the N version, the computer does not consume too much CPU because of too many programs, and hence its performance is enhanced.
This makes playing games smooth and enjoyable. On the downside, users complain about some games that are not able to run properly because they require certain features not included in this edition of Windows 10.
Windows 11 Pro vs Pro n vs Education
Microsoft features an Education OS that is tailored for use in education environments. It is designed to meet the needs of both students and teachers.
Given that the three versions all serve different purposes for select audiences, the absence or presence of some features may not be considered a hit or a miss.
That being said, the Pro version is definitely the superior version of the three because of its enhanced features. If you need more advanced features like remote desktop or encryption, then it is a no-brainer.
For the education version, a few features are stripped down from Windows 11 and a few restrictions but with an impeccable list of tools for education.
It’s essentially the same thing as the Pro version, except it includes additional security features specifically aimed at schools and universities. You can also play some games on the Education version, so it is not entirely all work and no play.
A tabular comparison below showcases some of the common features in all versions.
Windows 11 Pro
Windows 11 Pro N
Windows Education
Microsoft Store
✓
✓
✓
Remote Desktop
✓
✓
✓
Limited functionality
✖
✓
✓
Cortana
✓
✖
✖
Webcam
✓
✖
✓
Windows versions are not the only OS we have the scoop on. You can also find our detailed comparison of Windows 11 and Linux to find out if either is a match for you.
If you’re also comparing broader editions beyond Pro and ProN, check out this guide on the differences between Windows 11 Home, Pro, and Enterprise.
Be sure to let us know which of the versions you find appealing in the comments section below.
Gone are the days when you need an expensive setup to record videos. These days, some tools allow you to take recordings with ease on some of the best browsers.
There are many online services you can use. Some are available as extensions, while you only need to use the web version of others.
In this guide, we will show you the best webcam recorders to use on your browser for quality recording.
How can I record my webcam online?
Recording your webcam online is easier now than it has ever been. You can install some free or paid recording extensions on your browser.
Also, there are web apps to use that will capture everything you do on your browser. So, you are not short of quality options.
Can you screen record on Chrome?
Thanks to its extensive functionality and massive extension store, Chrome is one of the most used browsers. The Chrome Web Store houses a series of screen recording extensions to record your screen on the browser.
What’s more, you can use other available web apps to record Chrome’s screen. Actually, it’s incredibly simple to capture video with Chrome using this guide, so don’t hesitate to take a closer look.
This webcam recording software is ideal for communication efficiency without typing one single word to transmit essential information.
The first aspect, the tool can be used for free and is designed for different work areas to enhance productivity for team management, sales, engineering, and so on.
Loom is perfectly suited to sending quick videos in various contexts, such as meetings directions or details. This way, you can connect and better interact with other people in the company.
You can record your screen and use the webcam to explain any project to your team or present an important deck to the whole team more efficiently.
In other words, you can share useful insights with different employees or in your team. The video support can help anyone to retain more information and understand tasks practically.
In conclusion, you should suggest and implement the method offered by Loom for real communication with your team in work-related environments.
Loom
Accelerate direct communication within your organization with this video recording tool designed for every department.
Bandicam – Browser webcam recorder with file compressor
Bandicam is another efficient screen recorder tool for Windows you can utilize to capture anything on your PC, including awesome gaming sessions.
This tool can record the screen at maximum quality and show anything in detail, so you have no reasons to worry about graphics.
You can capture the screen with a full compression ratio while keeping the video quality in its original state.
This free-to-use recording tool can help anyone capture their desktop and compile descriptive guides or record long gameplay sessions.
If you wonder about webcam recording, don’t worry; Bandicam supports external devices like webcams, Xbox or Play Station, mobile phones, or IPTV devices.
There are practical features to use with this tool, including real-time drawing to outline your video, webcam overlay for games, scheduled recording time, recording the system audio and voice at once, or chroma key effects.
Hence, try this professional recording software and catch detailed videos on your PC to best serve your purposes.
Bandicam
This trusted software provides the highest quality videos or 24-hour long screen recordings.
This helpful software is an open-source and productivity solution to capture your screen or record it to share what you need.
With ShareX, it’s possible to capture every part of your desktop. Using multiple screenshot options, you have customizable workflows and multiple options to screenshot your desktop.
There are multiple capture methods that can be useful for showing various screenshots. For example, you have region capture, full-screen capture, active windows capture, and so on.
Furthermore, the after-capture tasks are of great help in managing screen pictures. You can edit the screenshot, copy the images to the clipboard, save to the desktop, or print them. So, you manage all your shots instantly from the main panel.
In addition, the upload option lets you add images easily in the tool using different methods, including URL sources or drag-and-drop upload.
You can benefit as well from productivity tools on the platform. The image editor is perfect for displaying your guides, video converter options, screen color picker, image splitter, video thumbnails, etc.
Capture screenshots with various desktop windows and create descriptive guides or recordings in a short time.
Therefore, this desktop capturing software improves work productivity with intelligent tools and intuitive utilities.
Webcamera.io allows you to record webcam videos easily. The web app can process files quickly and record videos of any length.
You can adjust the video quality or volume if needed to minimize the echo effect. As for storage, you can save recordings locally or on Google Drive and Dropbox.
This is a simple-to-use webcam recording tool that you can use directly in the browser with no additional extensions or tools.
Practically, it’s possible to set up video or audio settings in the browser and configure video parameters to change the quality or switch the webcam window size.
You should know that if you’re using the Opera browser, it’s possible to use this webcam recorder as an extension for this modern-age browser.
Moreover, it’s possible to record long video sessions to cover anything you need to say. Whether you record a tutorial or talk to a friend, it’s all covered.
HTML5 Webcam Recorder is incredibly simple to use, and you need to visit the page and allow the browser to access the camera.
Now click the Record button, and that’s it. The web app allows you to upload videos directly to YouTube, or you can save it locally for further editing.
Using this webcam tool, you should not worry about privacy threats because the recording is local and not transferred to other remote parties.
At the same time, the website uses the native recording capabilities of your browser and delivers qualitative video results.
That said, go with this video recorder for enjoyable webcam video sessions and instantly share them online.
Clipchamp works as a video editor, but it also supports webcam recording. Create a Clipchamp account and go to the Webcam Recorder section.
After that, click the Record button, and that’s it. Your recording will appear in Media Library, and you can use it inside the video editor.
Bear in mind that Clipchamp is available only in Google Chrome.
In addition, using this recording option, you have flexible tools that make your work as simple as possible. You can turn on your camera on the sidebar, select camera settings and you’re all set.
Afterward, you can edit the recorder video using drag and drop options and improve your clips. You have options like trim or cut, split, crop, and rotate videos, plus add audio and images to your recordings.
This video provider is also suitable for creating video clips for social media platforms like YouTube, only using your webcam and the in-house editing features.
Webcamtests is another web app that can easily record your webcam and microphone audio. You can also configure the bitrate and resolution while recording.
The service supports various formats and codecs when downloading videos, but some browsers have limited format support.
It’s worth mentioning that all videos that you create are private, and only you can view or download them.
Plus, the advantage offered by this online webcam tool is that you can check your webcam functionality with one click without installing other additional tools.
Windows 10 has a built-in screen recorder. It is originally meant for Xbox gaming. However, you can use it to record anything on your screen, including your browser.
To use the tool, press the Windowskey + G. This will open the Xbox game recorder, and you can begin to record your screen.
Concluding here, you can use any of the listed solutions to record qualitative webcam sessions on your Windows 10 PC.
Using webcam software for online meetings or efficiently recording your screen without other advanced knowledge or requirements is intuitive.
Using a webcam recorder in your browser can be done in minutes, and if you found this article helpful, let us know in the comments below.