If you have used Windows long enough there’s a possibility that you’ve encountered a hard disk error before.
One of these errors you might encounter includes a locked drive, which can annoy most users, but this guide should prove helpful.
This is usually a frustrating issue because, without proper technical help, you might lose important files.
While this issue is serious for Windows users, recovering your PC drive without losing your files and documents is possible.
NOTE
It is essential to have a backup plan to avoid losing data when something like this happens. Consider using EaseUS Todo Backup to keep your data safe at all times.
How do I reset my PC drive if it is locked?
1. Refresh your PC
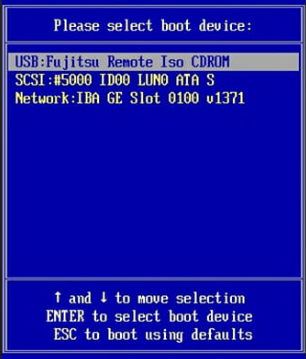
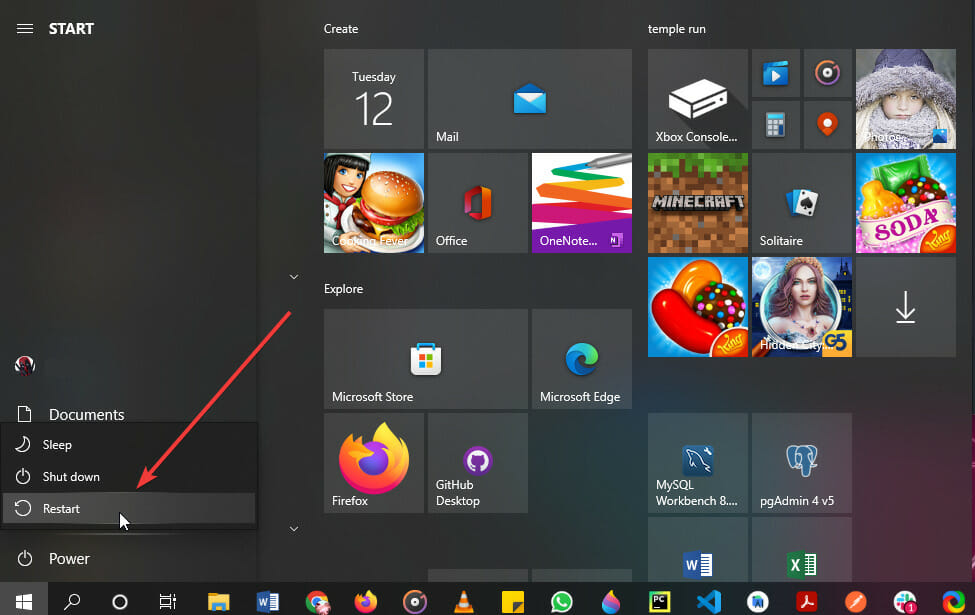
Switch off your computer and install a boot disk or USB drive.
Switch it back on and press F12 or F8 to access the boot menu.
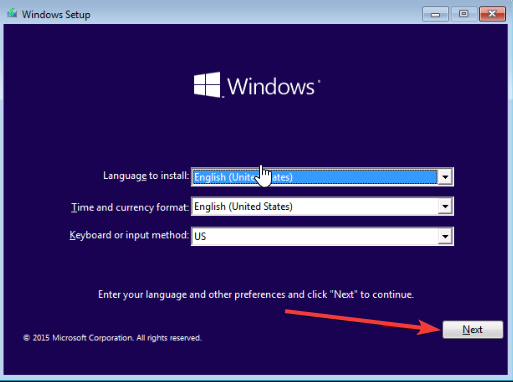
Click Next.
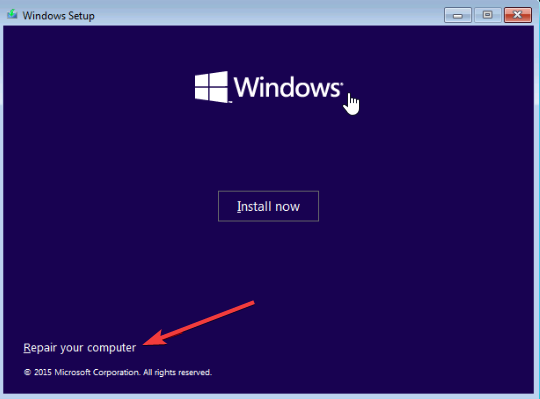
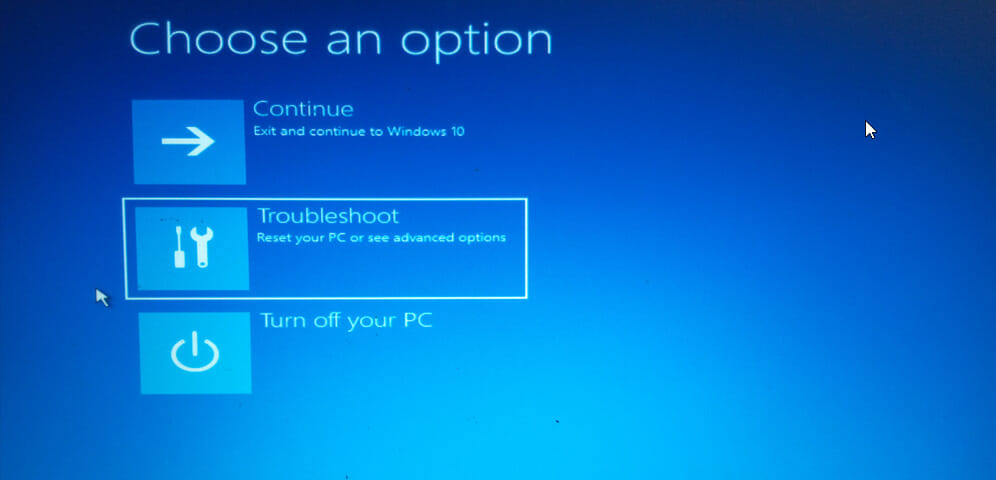
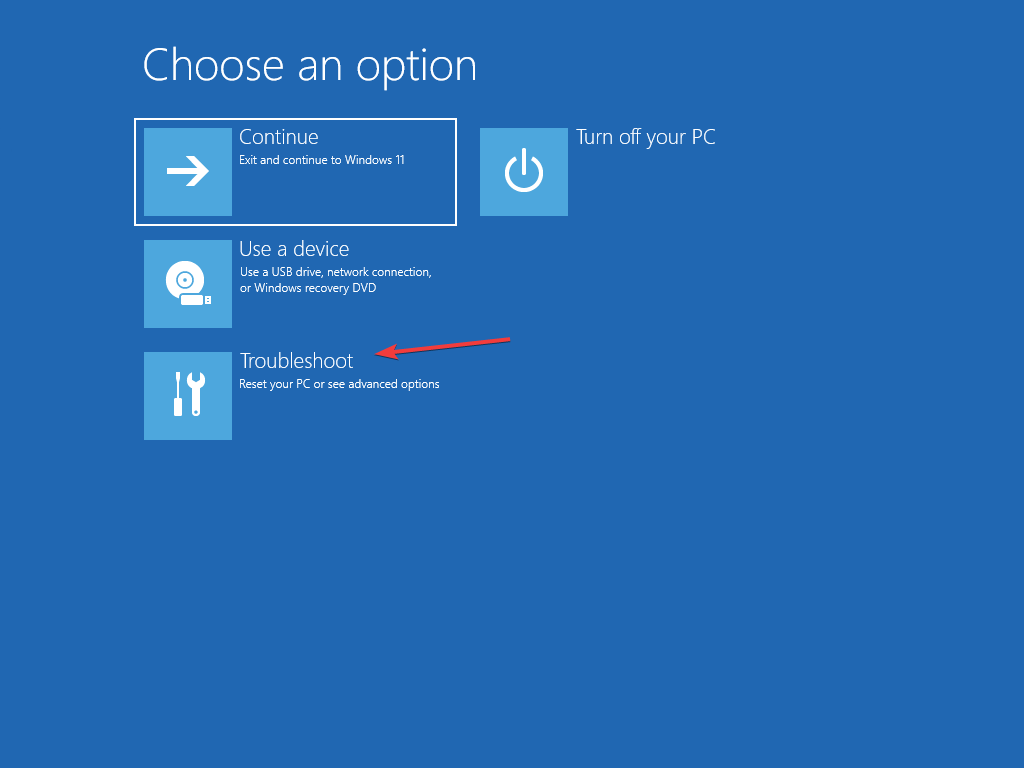
Select Repair your computer.
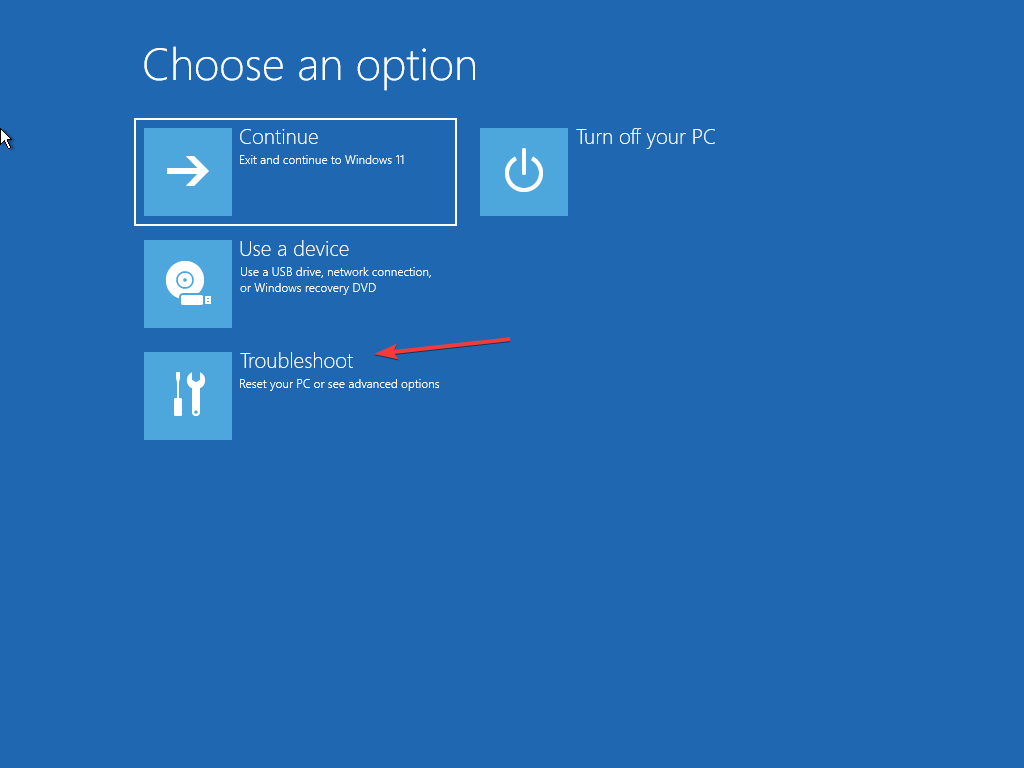
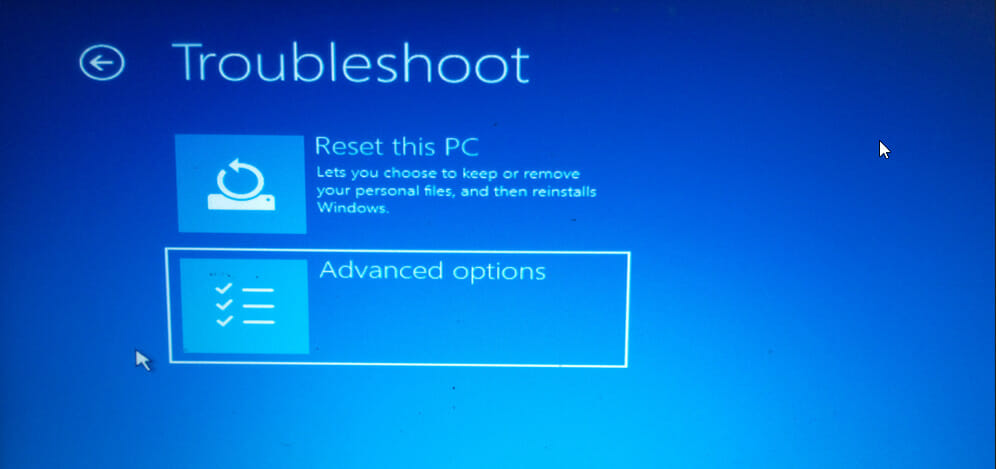
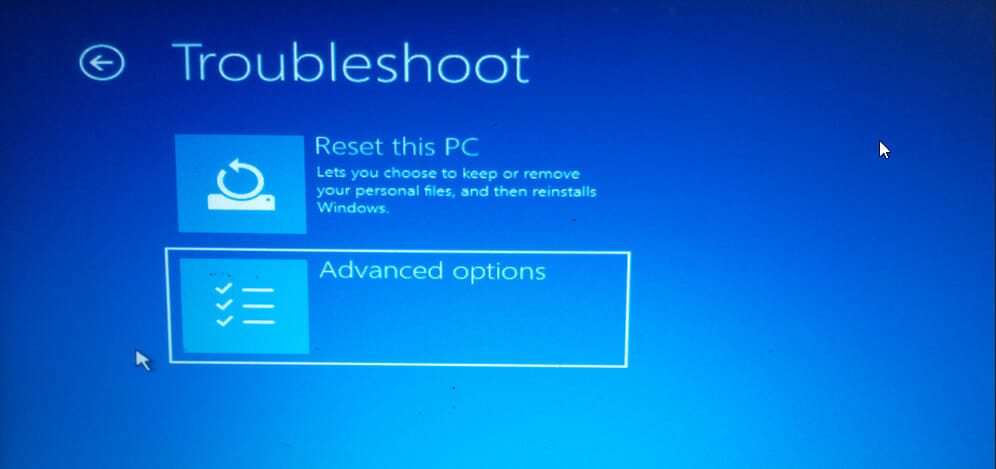
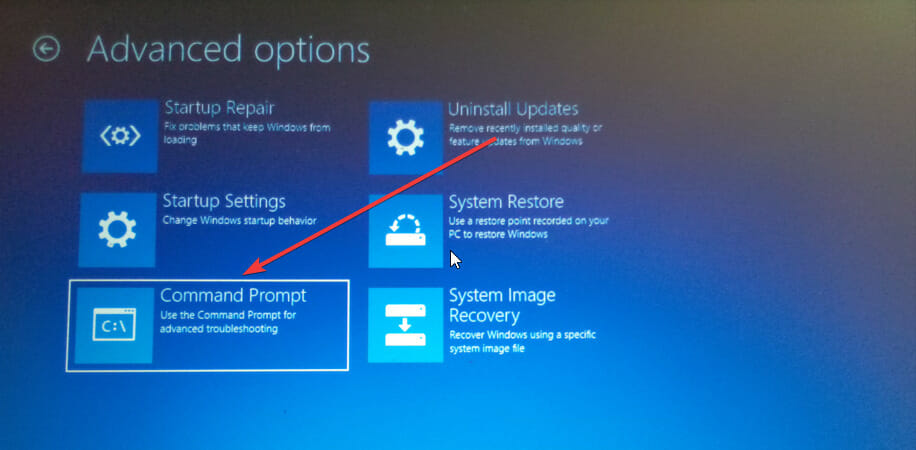
Once opened, click Troubleshoot.
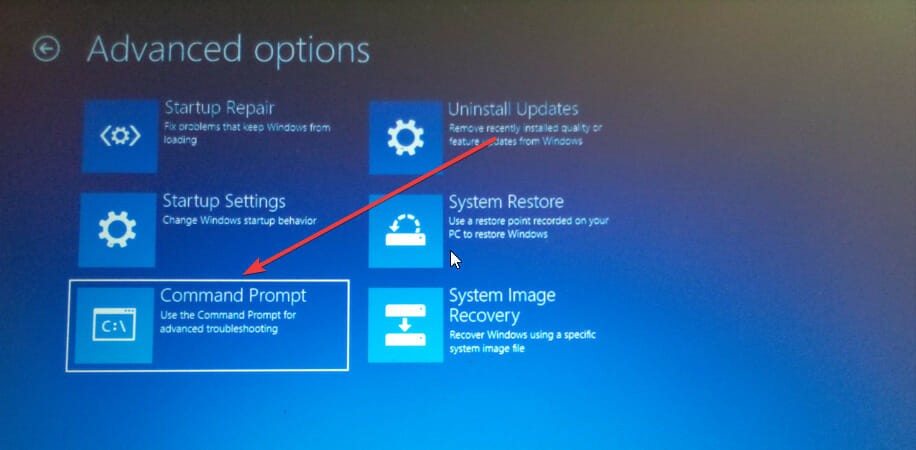
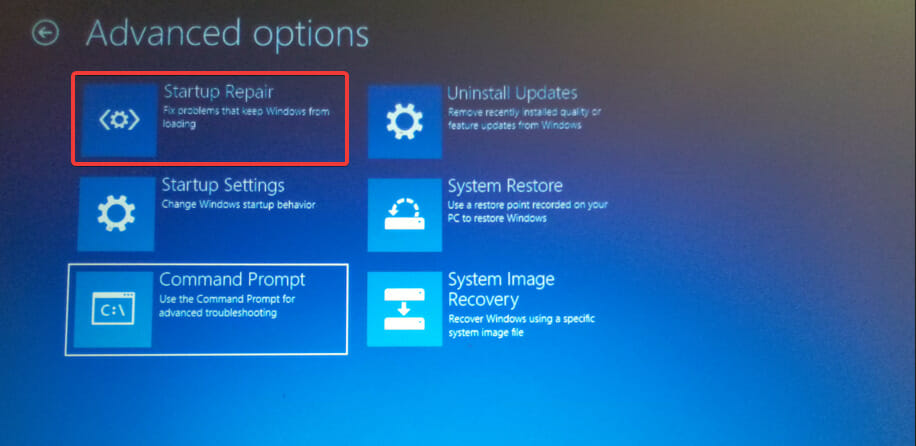
Select Advanced options.
Click Refresh Your PC and follow the prompts.
Once finished, restart your computer and check if your hard disk is working again.
RSAT or Remote Server Administration Tools is a component that allows administrators to remotely manage the other computers running the same OS. But, if things are not right, you might not be able to install RSAT in Windows 11.
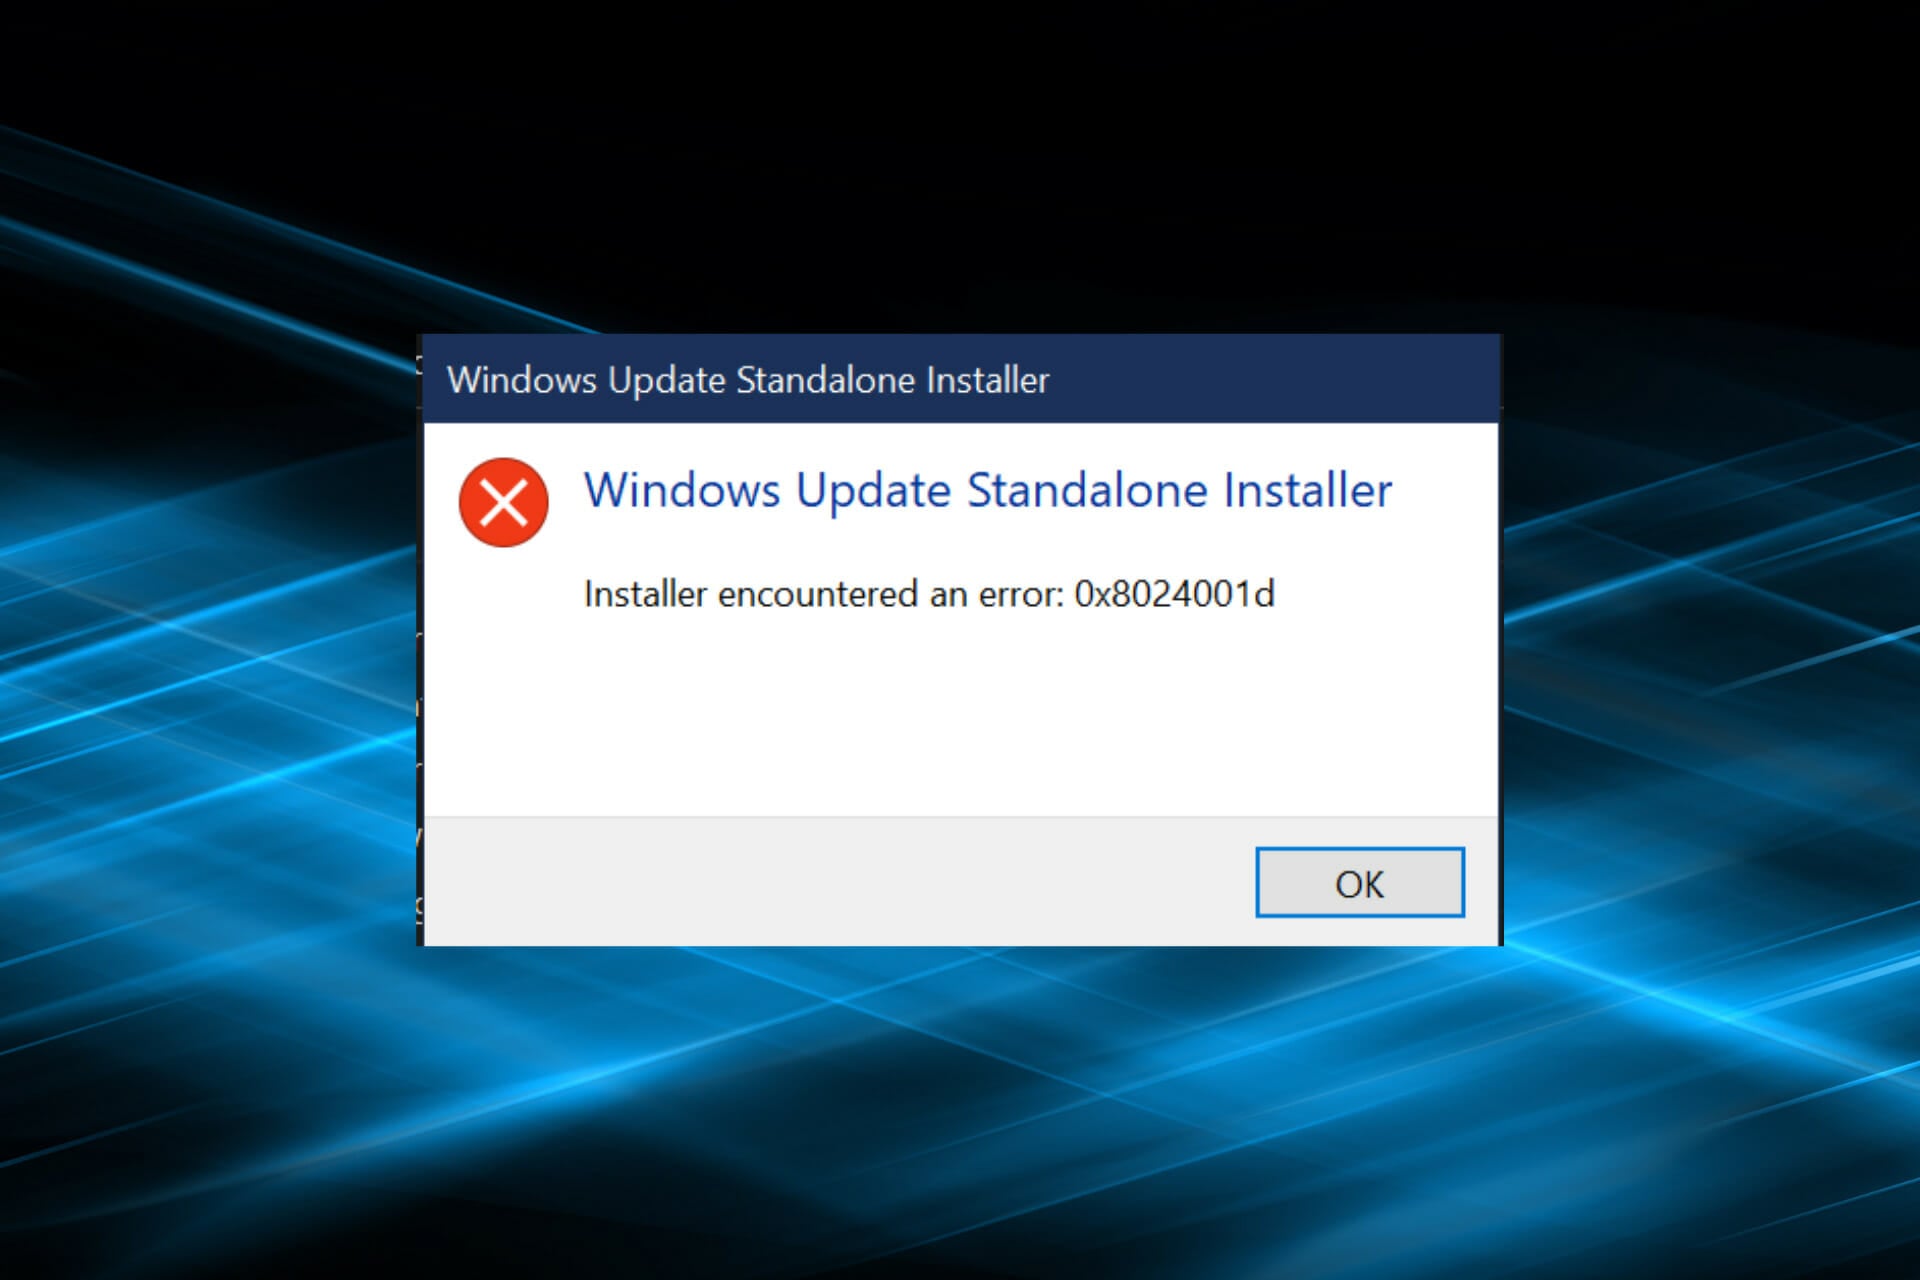
There are a bunch of errors that you encounter here, for instance, the RSAT installer encountered an error 0x8024001d. No matter the cause, there are a bunch of methods that prove effective in every situation.
So, if you couldn’t install RSAT in Windows 11 yet, execute the fixes listed in the next section.
What can I do if I couldn’t install RSAT in Windows 11?
NOTE
Remember that RSAT is only available for the Pro and Enterprise edition of Windows 11. If you are running the Home edition, first make the upgrade and then proceed with the installation.
1. Use the PowerShell command
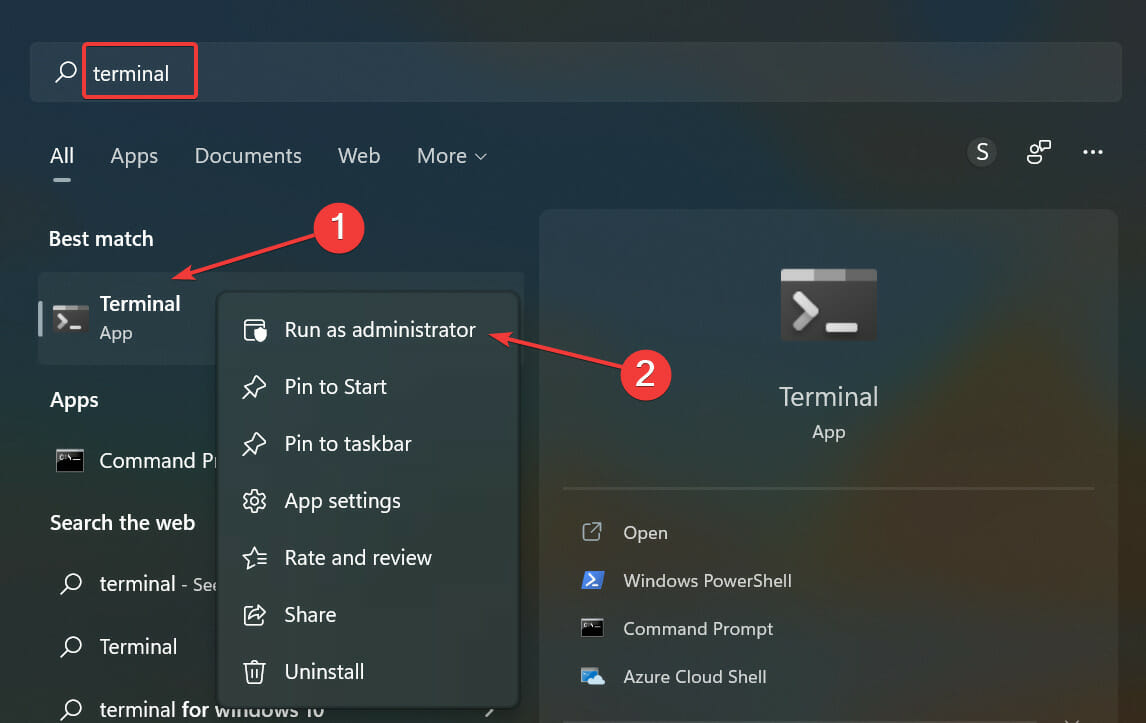
Press Windows + S to launch the Search menu, enter Terminal in the text field, right-click on the relevant search result and select Run as administrator.
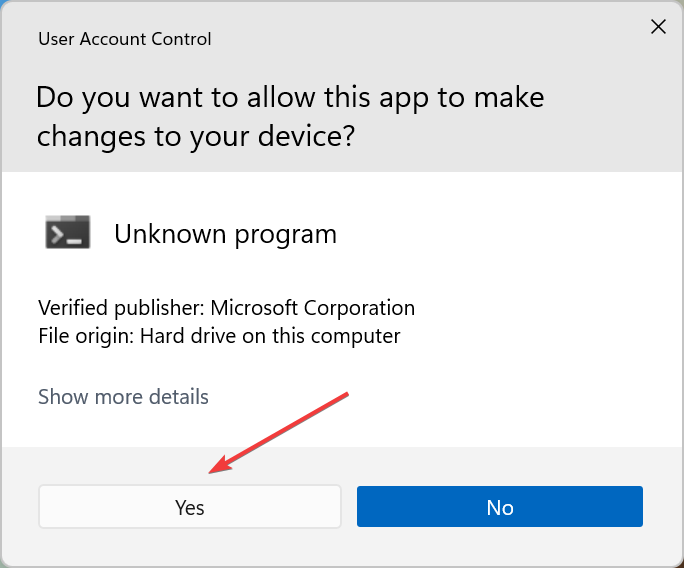
Click Yes on the UAC (User Account Control) prompt that pops up.
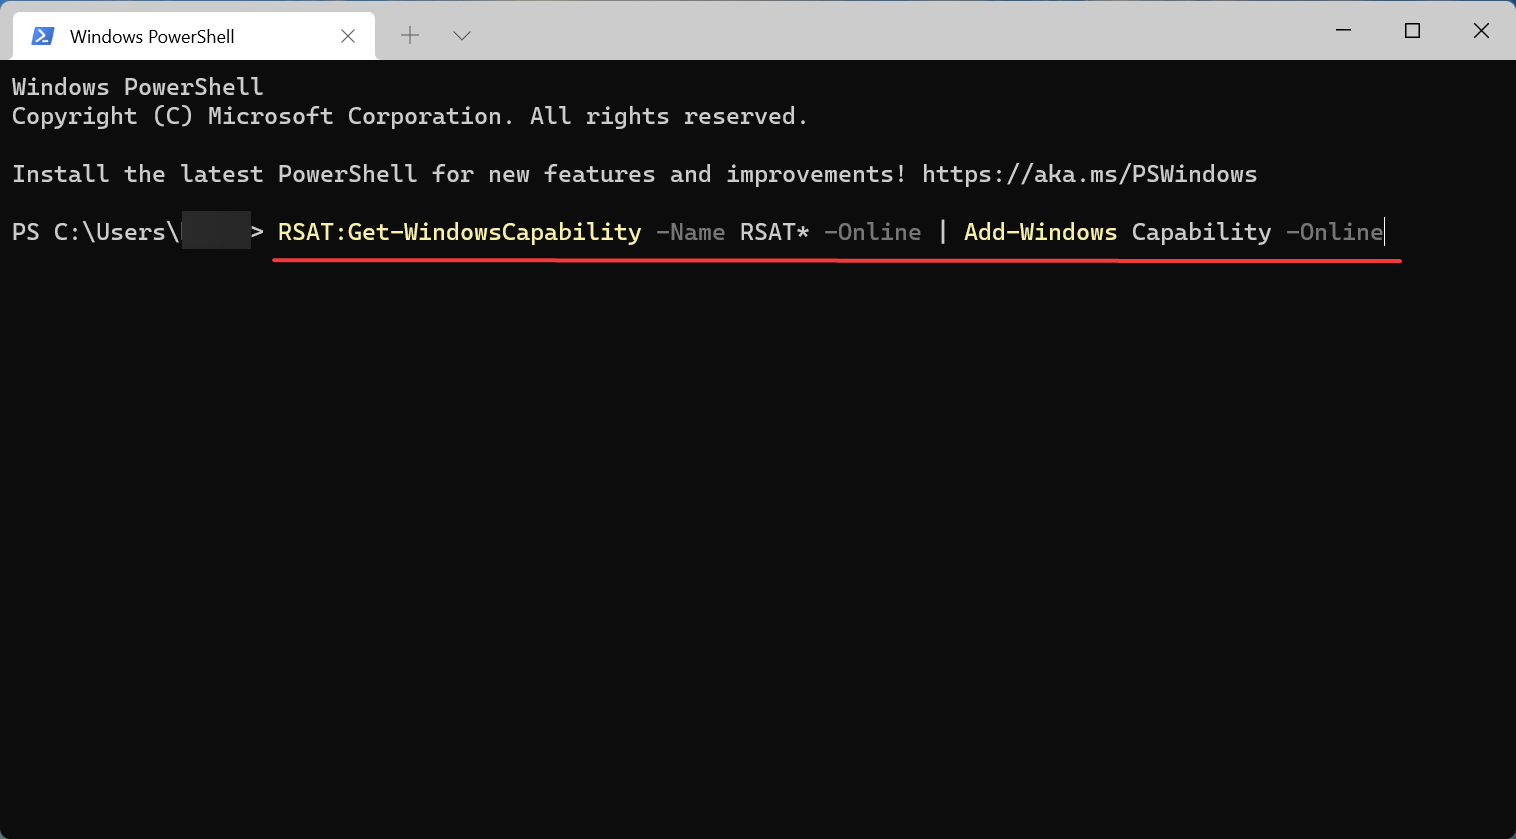
Now, paste the following command in PowerShell and hit Enter to install RSAT:Get-WindowsCapability -Name RSAT* -Online | Add-Windows Capability -Online
This is probably the quickest way to install RSAT but is not known to many. Also, the chances of encountering an error while installing RSAT in Windows 11 using PowerShell are minimum. So, make sure to try this method, and if it doesn’t work, head to the next one.
2. Modify the Registry
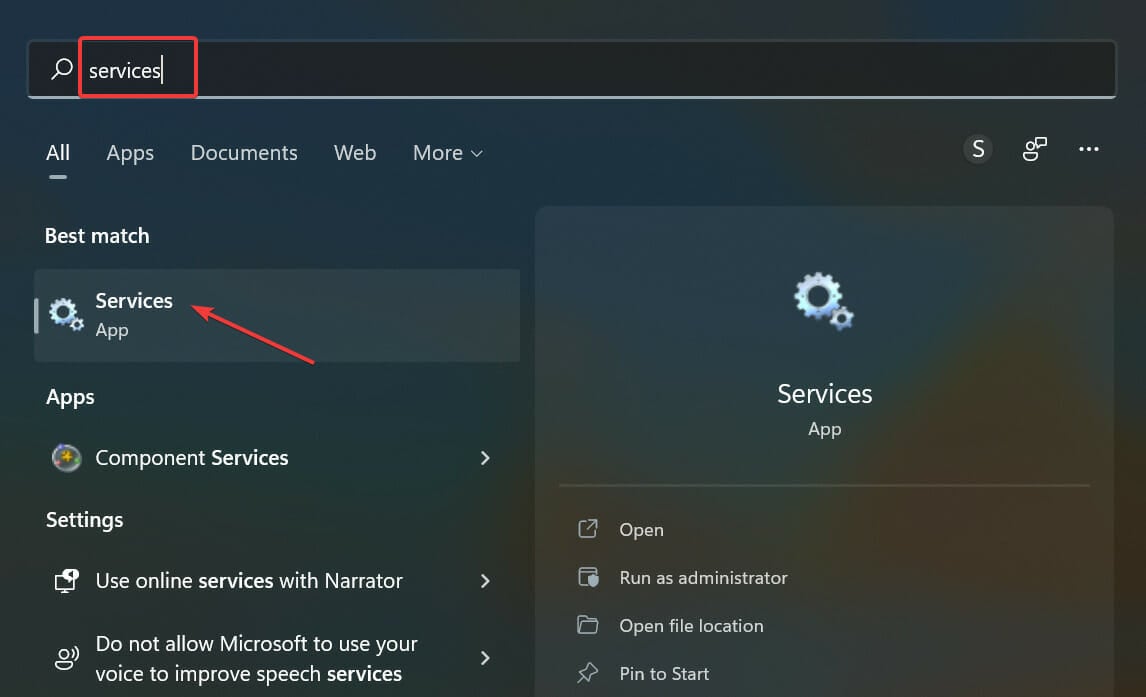
Press Windows + S to launch the Search menu, enter Services in the text field at the top, and click on the relevant search result.
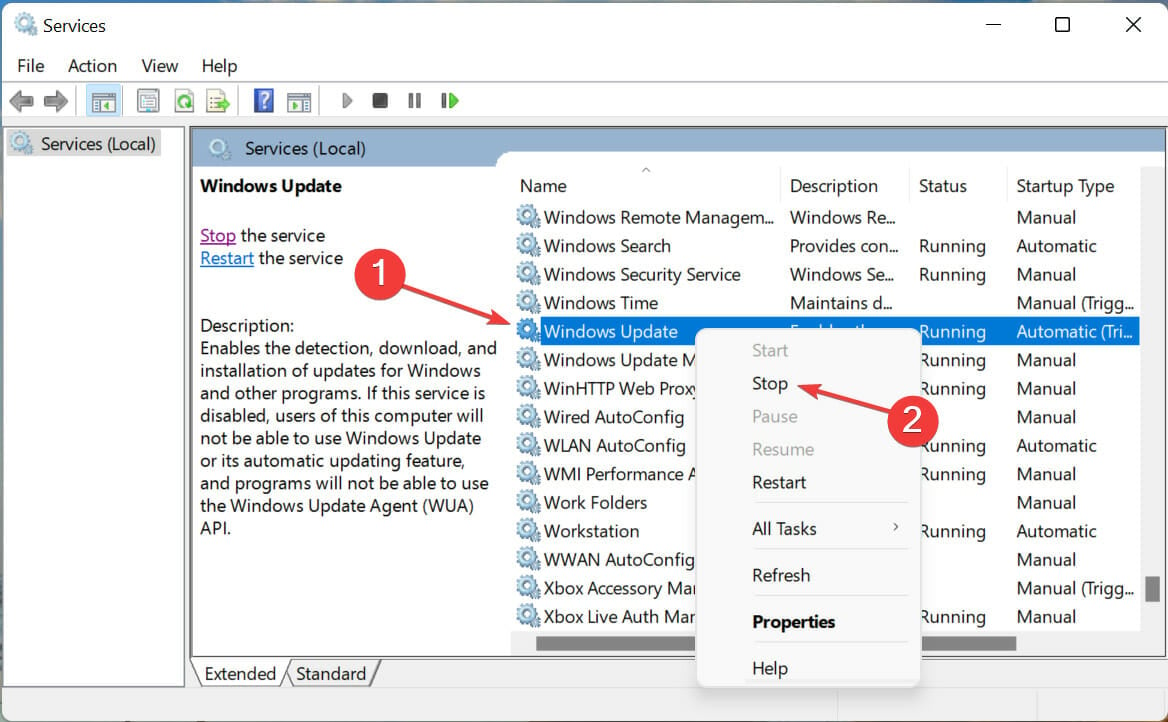
Locate the Windows Update service, right-click on it, and select Stop from the context menu.
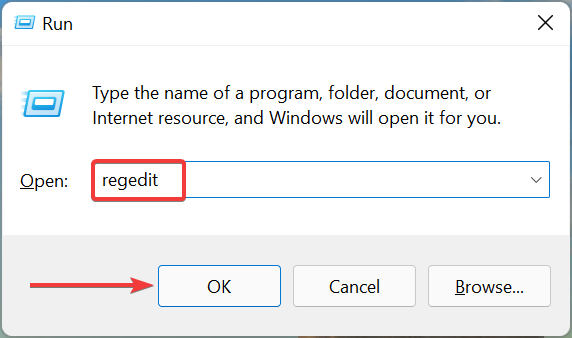
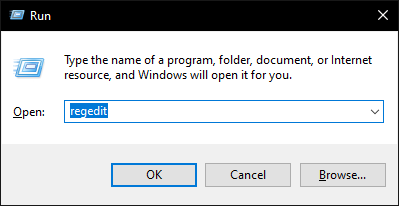
Now, press Windows + R to launch the Run command dialog box, type/paste regedit in the text field, and either click on OK or hit Enter to launch the Registry Editor.
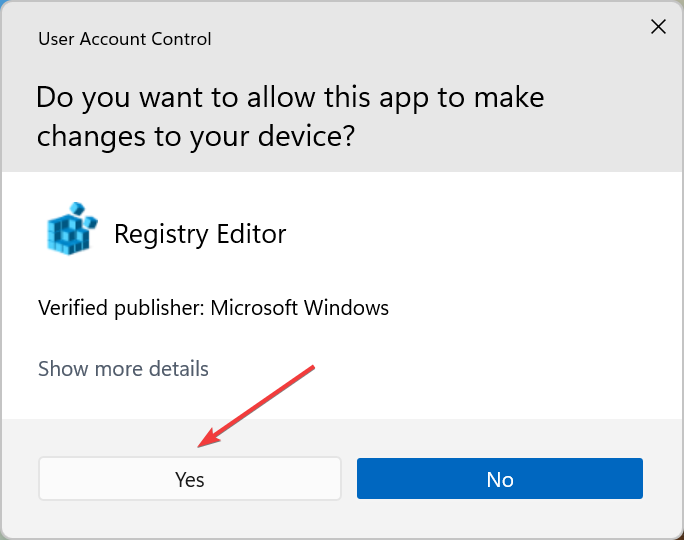
Click Yes on the UAC prompt that appears.
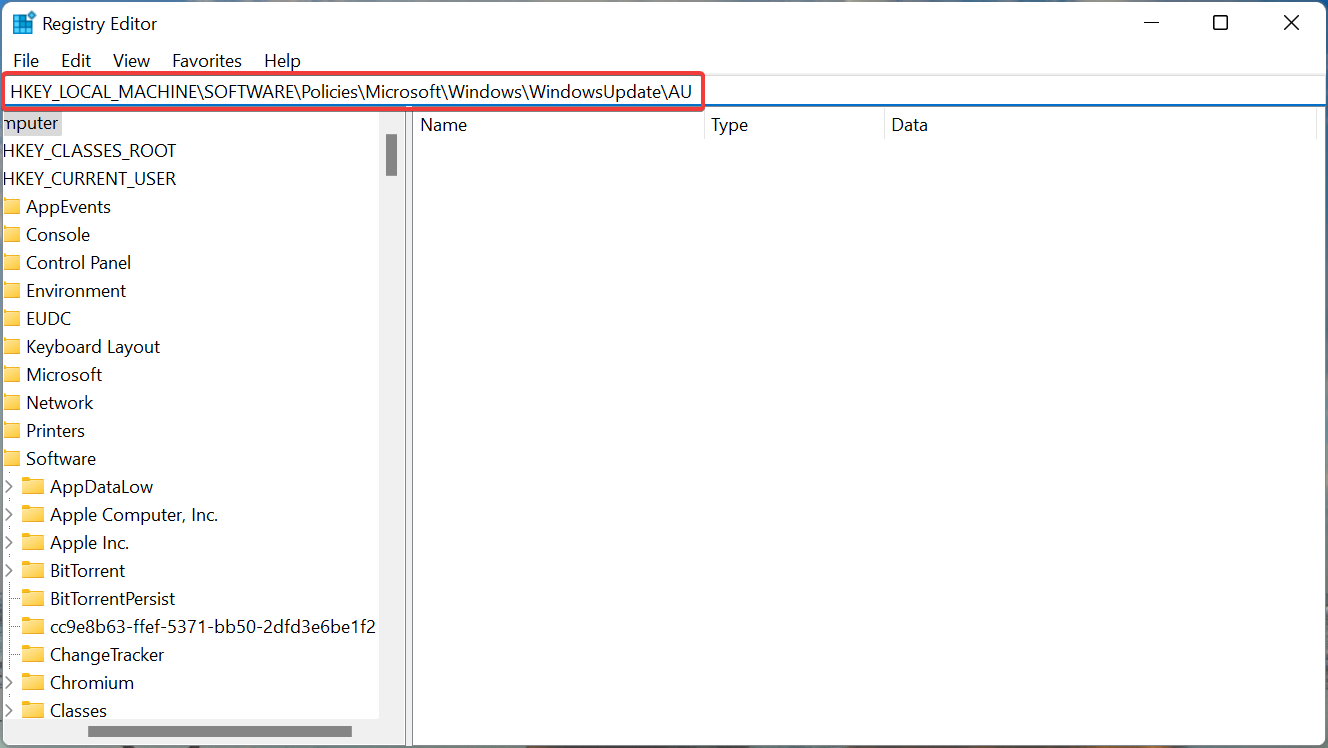
Paste the following path in the address bar at the top, and hit Enter:HKEY_LOCAL_MACHINE\SOFTWARE\Policies\Microsoft\Windows\WindowsUpdate\AU
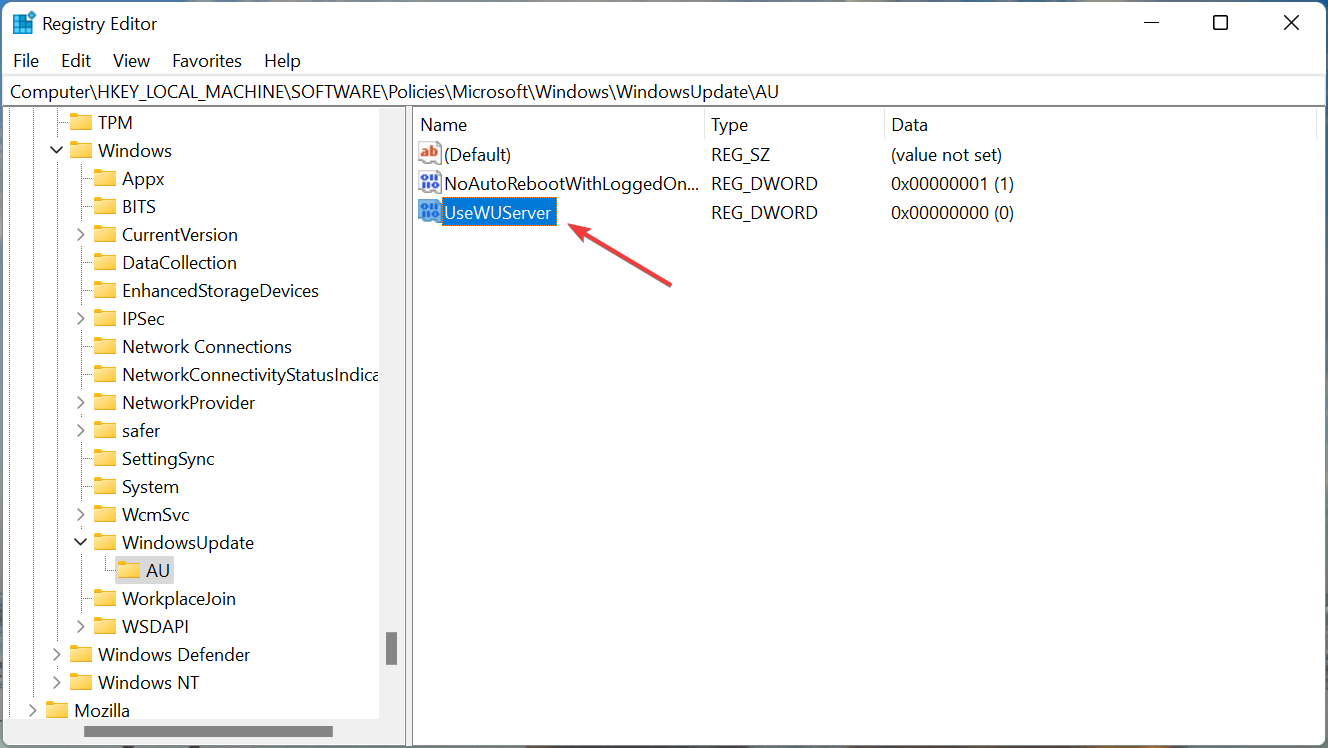
Double-click on the UseWUServer key.
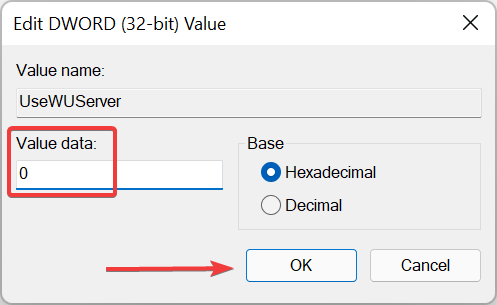
Next, enter 0 under Value Data and click on OK to save the changes.
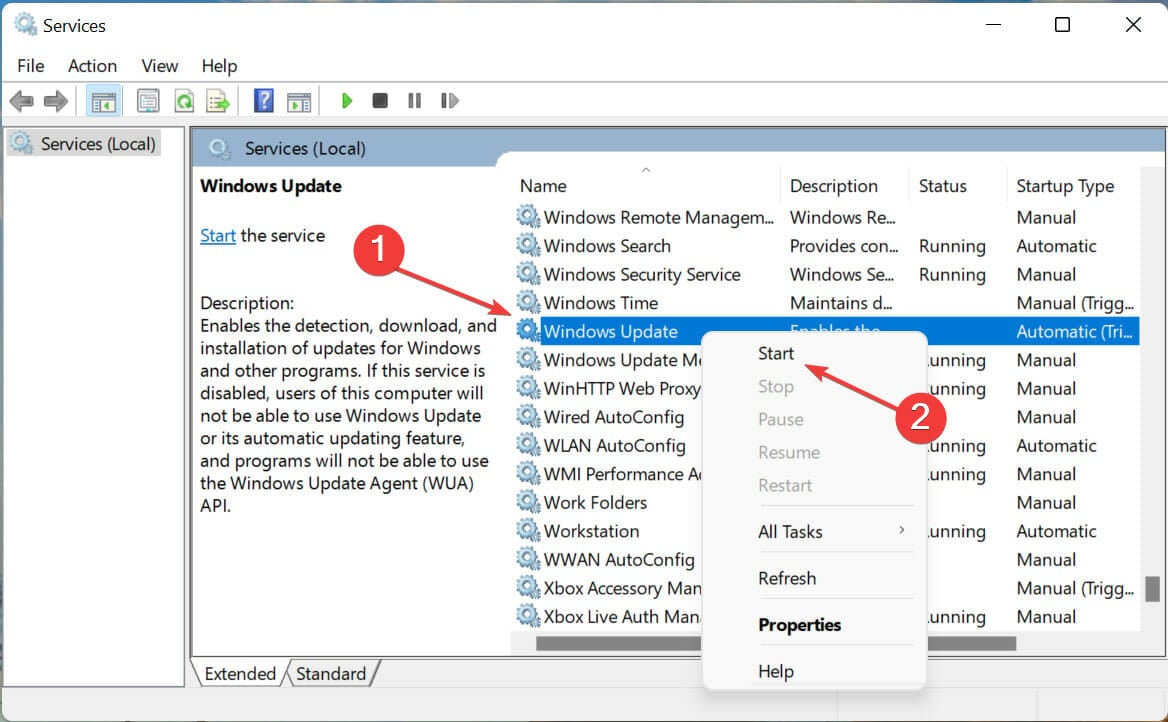
Once done, again go to the Services app, right-click on Windows Update, and select Start from the context menu.
Restart the computer for the changes to come into effect and check if you are able to install RSAT in Windows 11.
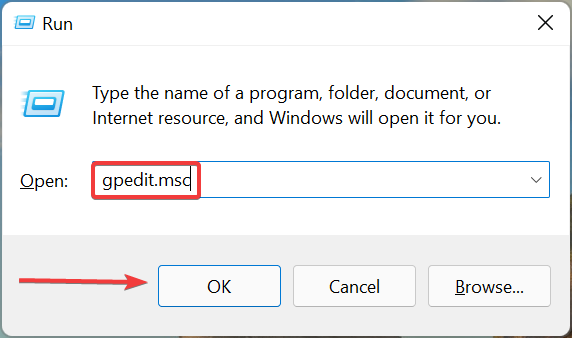
Press Windows + R to launch the Run command, type gpedit in the text field, and either click OK or hit Enter to launch the Local Group Policy Editor.
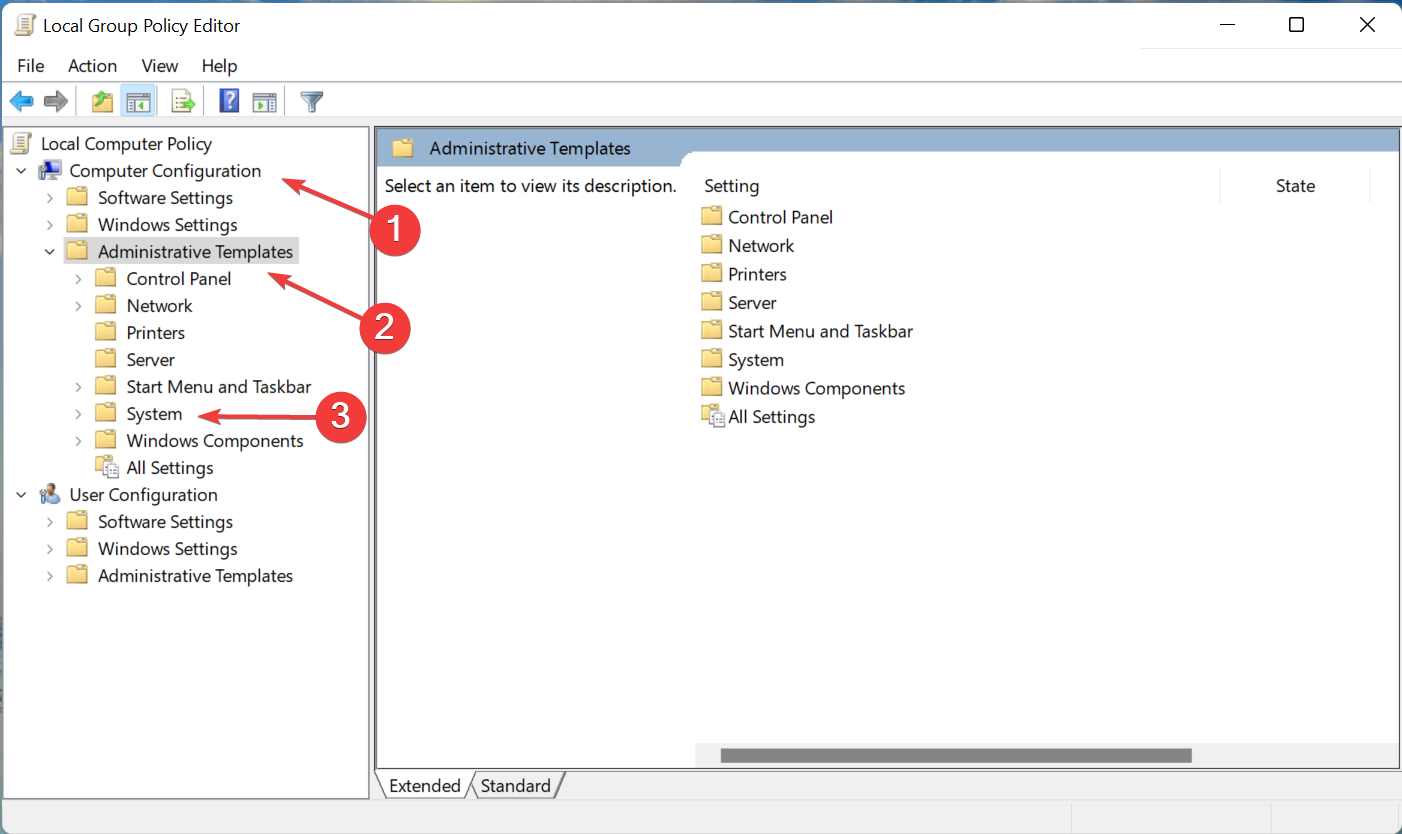
Now, double-click on Administrative Templates under Computer Configuration and then on System from the options under it.
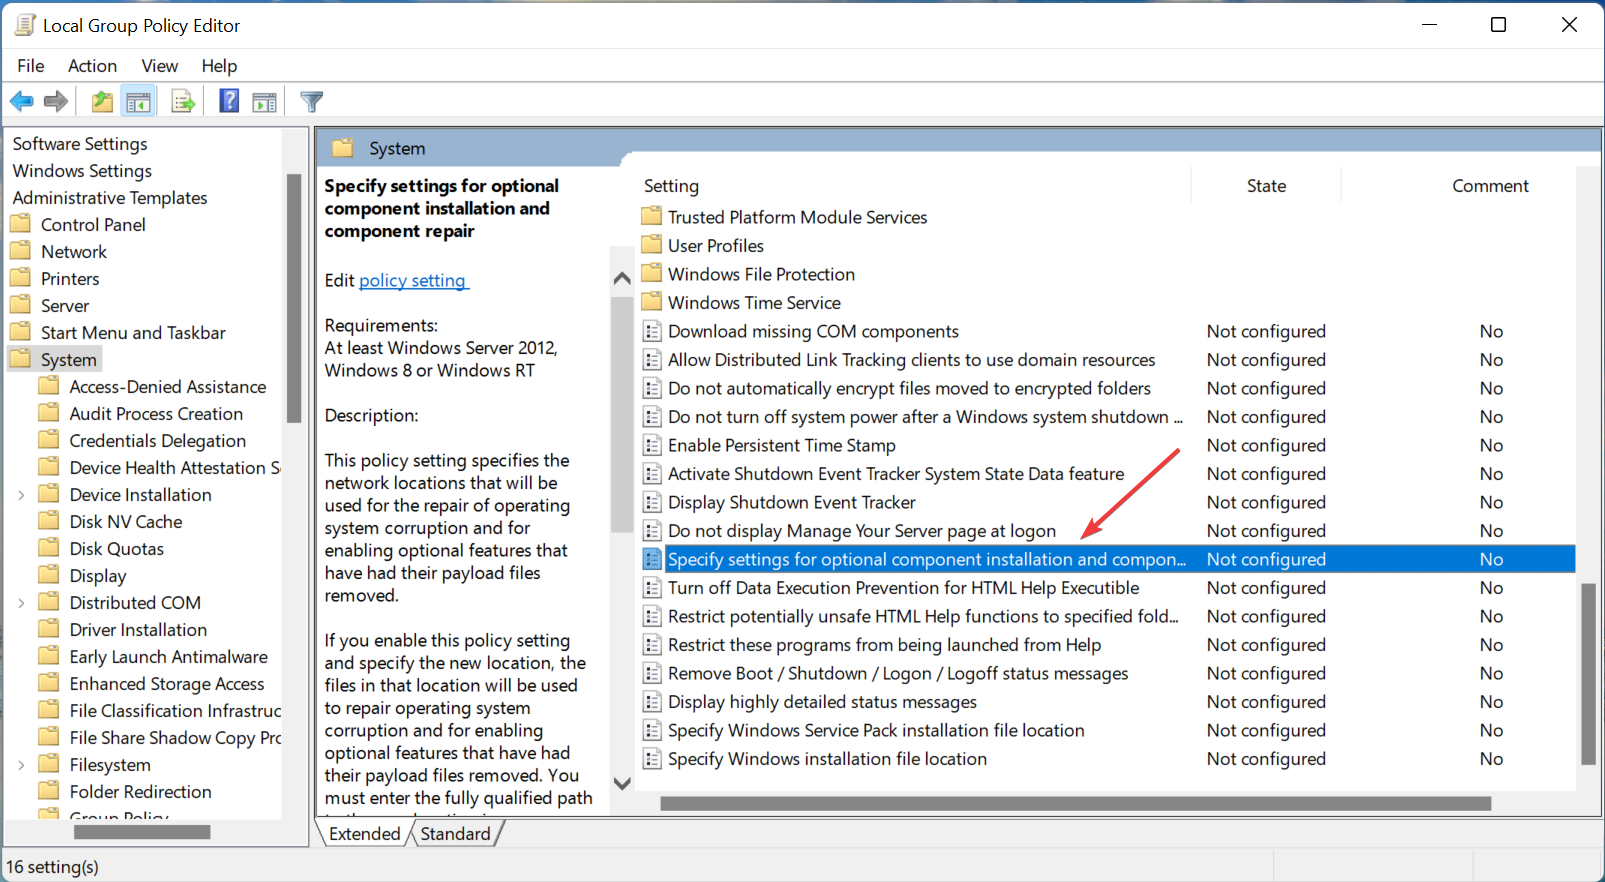
Double-click on the Specify settings for optional component installation and component repair policy on the right.
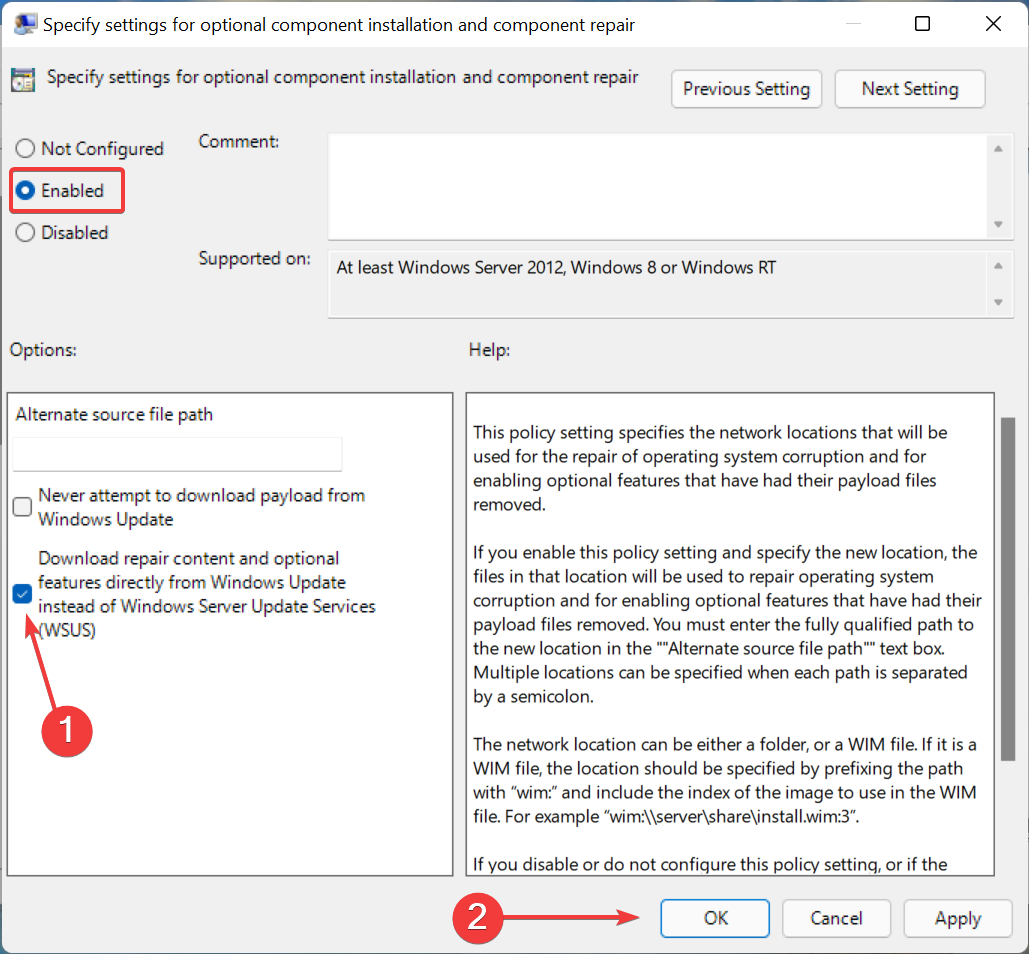
Next, select Enabled from the top, tick the checkbox for Download repair content and optional features directly from Windows Update instead of Windows Server Update Services (WSUS), and then click on OK at the bottom to save the changes.
Once done, restart the computer for the changes to come into effect.
The three methods listed here should have helped you install RSAT in Windows 11, and prevented or bypassed any error.
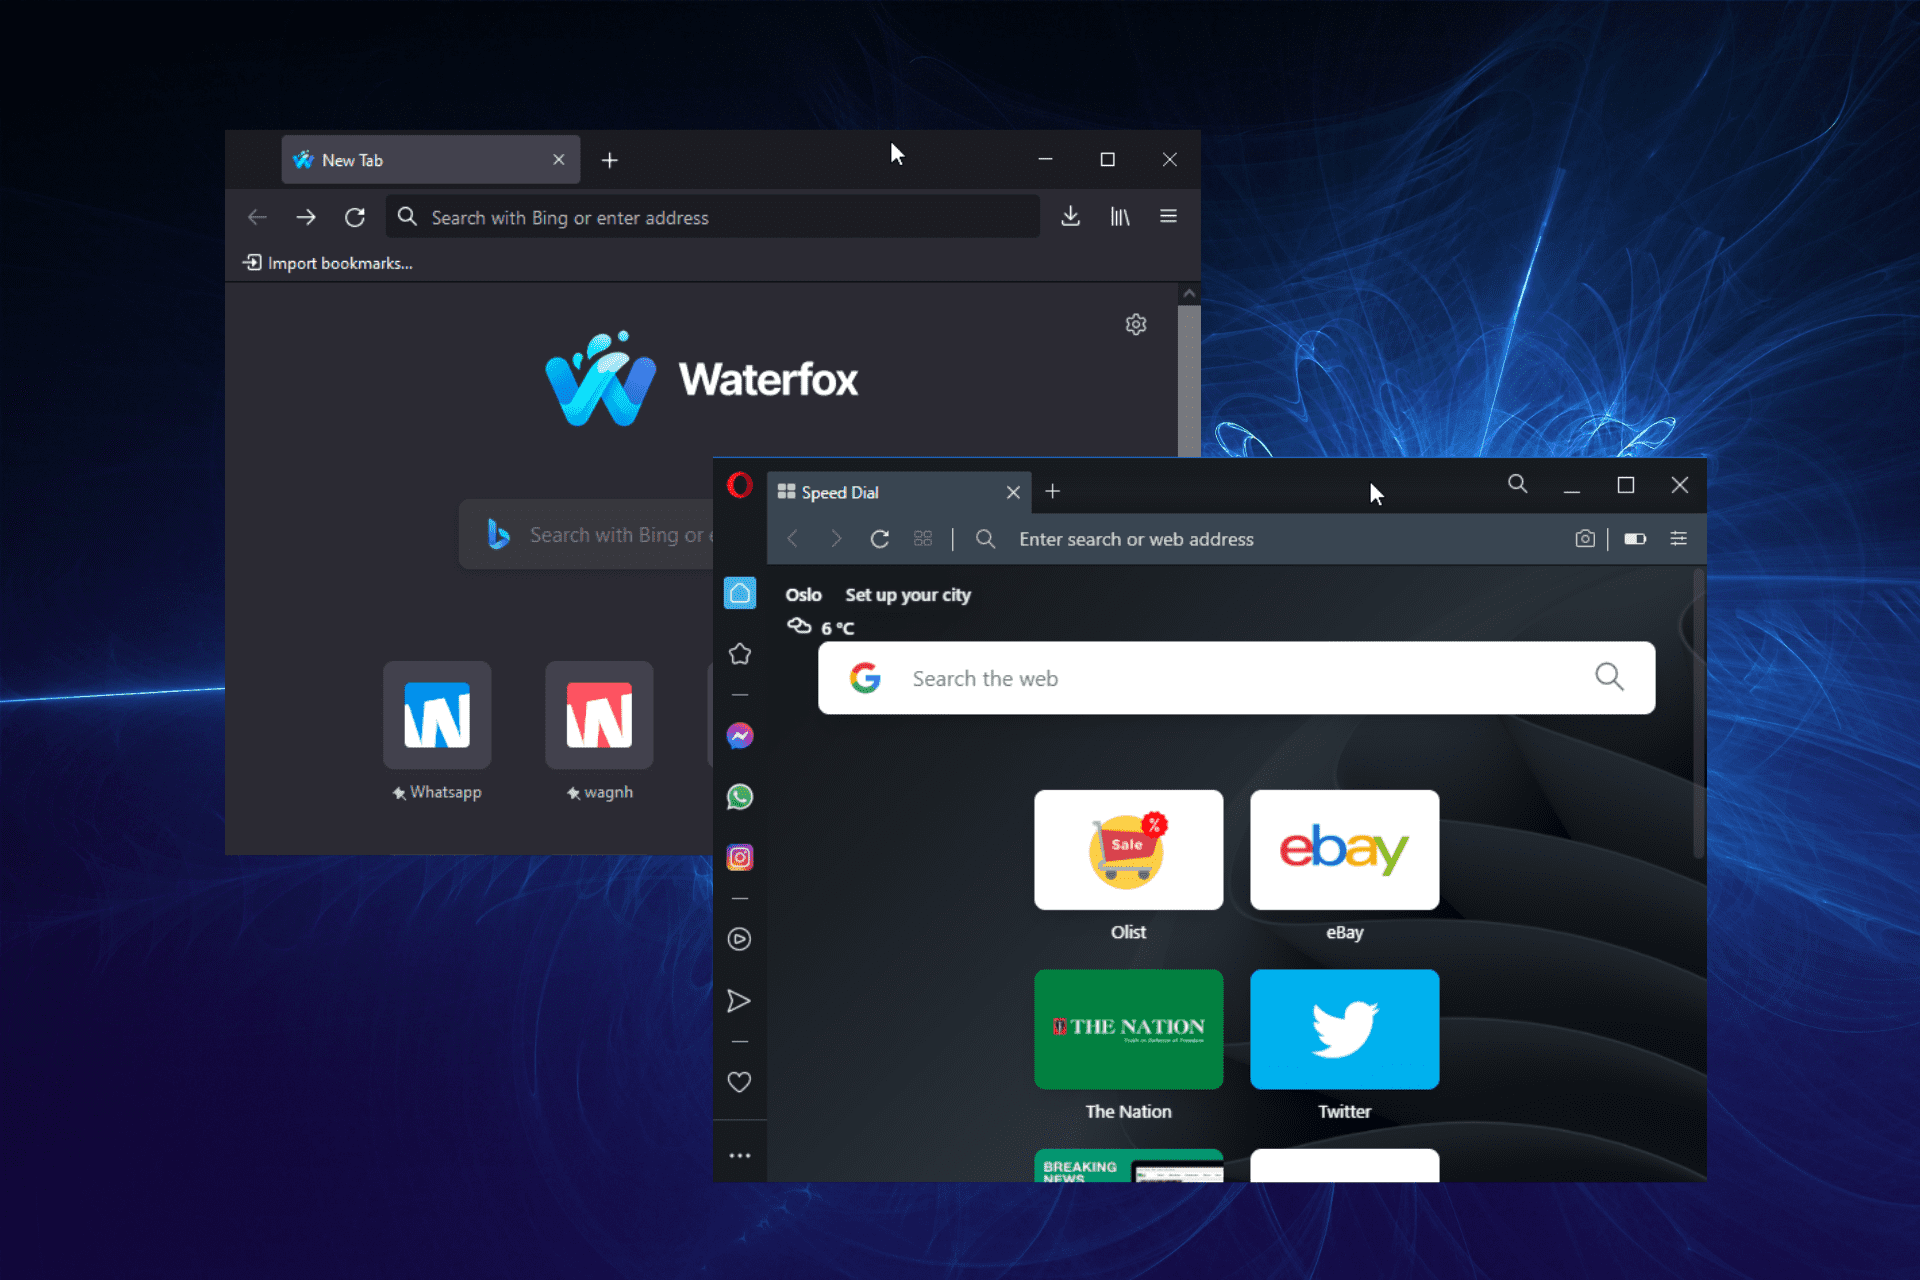
Opera is a solid browser, but how does it compare to others? This comprehensive Opera vs Waterfox guide will take a closer look and analyze the similarities and differences between the two.
Opera vs Waterfox: Which one should you choose?
Supported platforms
As expected from a browser that has been around since 1995, Opera has a wide range of coverage. It is compatible with Windows, Mac, Linux, iPhone, iPad, and Android.
Waterfox, on the other hand, is only compatible with Windows, Mac, and Linux.
Though there was news of an Android compatible version in the works, it is safe to say it has stalled, and nothing is happening anymore.
Also, nothing is happening on the iOS front, with no plan to develop a compatible browser anytime soon.
With the ability to sync Opera browsers across platforms, it is without a doubt that Opera is the obvious choice when it comes down to supported platforms.
Design and Interface
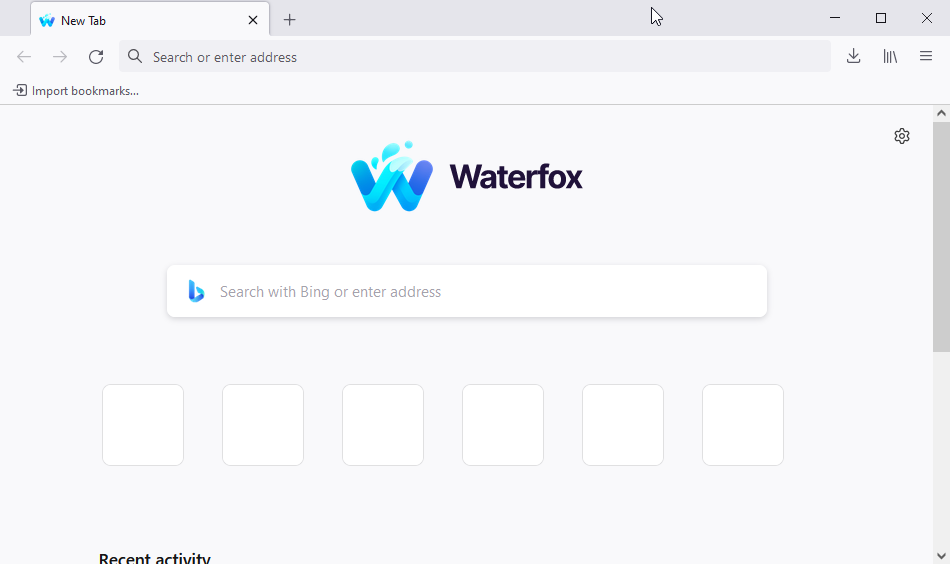
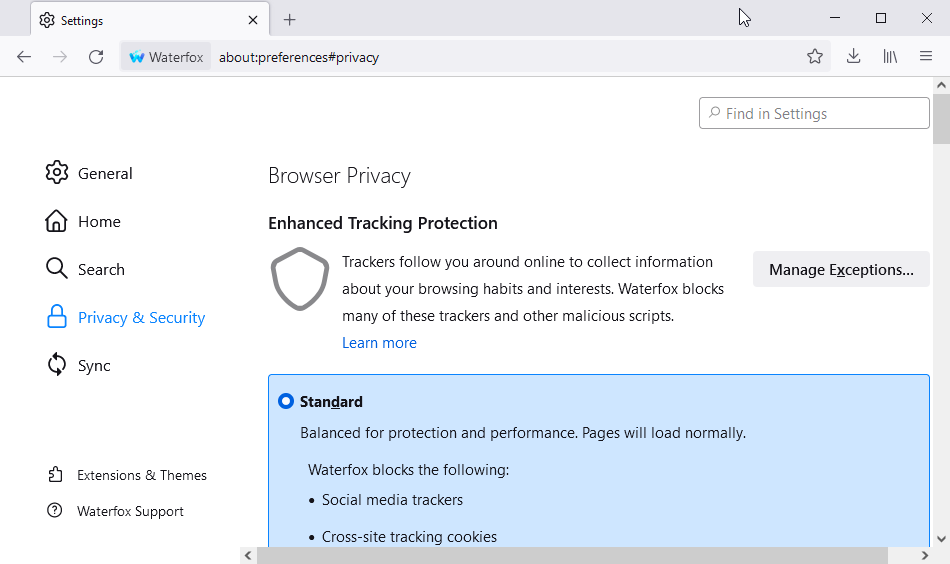
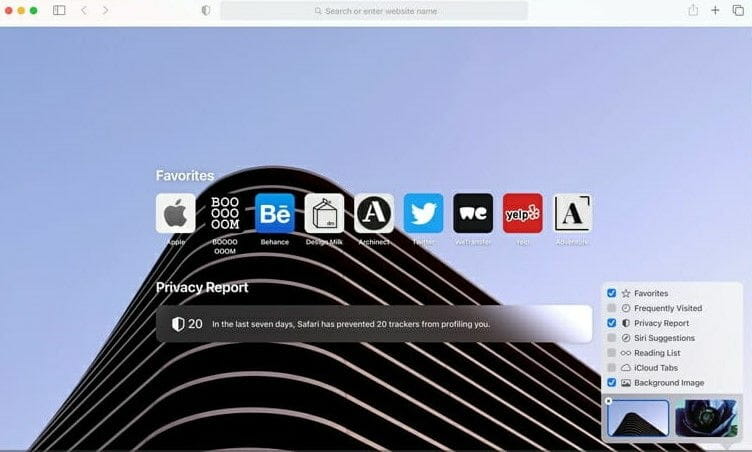
Waterfox’s interface is identical to that of the Firefox Proton interface. It comes with empty buttons to be customized with links to your favorite websites. Just below the buttons is the recent activities tab.
Overall, its interface appears blank and boring, but it is purposely designed that way to allow you to customize it to your taste.
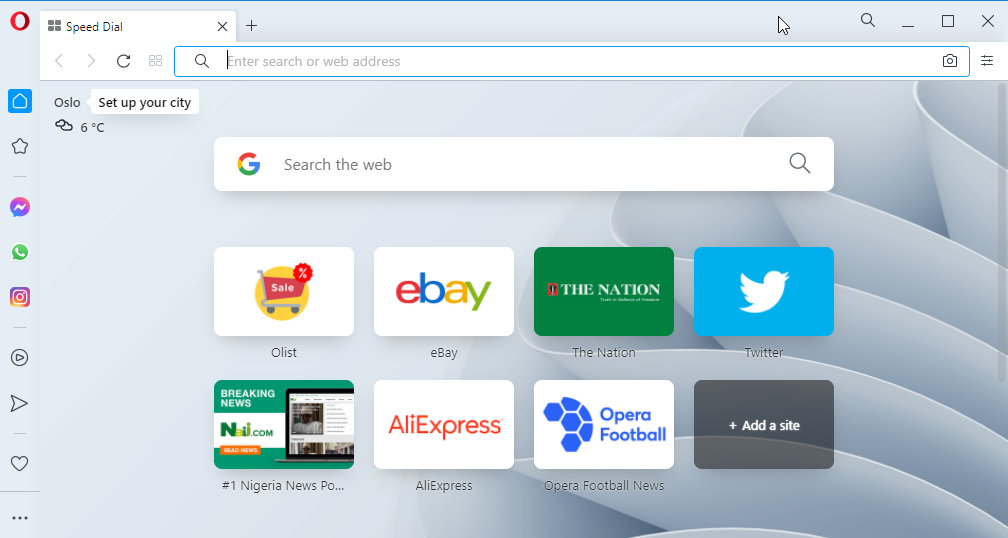
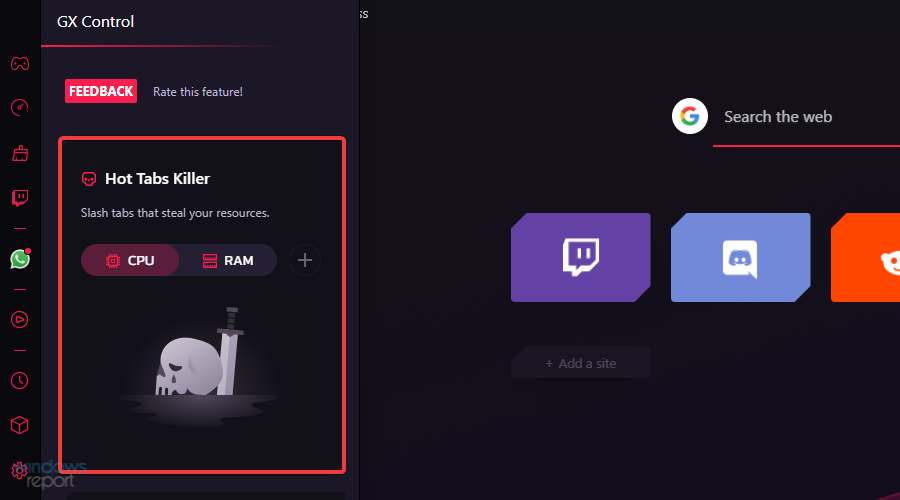
Opera’s interface is minimalistic and simple. Upon launching, you will be greeted by its signature speed dial page.
The speed dial page packs in buttons for some of the popular sites. It can be customized to save you the stress of typing the URL of your most visited sites.
The address bar, bookmarks, and tabs are located at the top of the page. On the left is the sidebar, which contains more buttons for integrations such as WhatsApp, Facebook Messenger, Twitter, and Instagram.
This sidebar is also fully customizable to suit your needs, among other wonderful features.
Performance
This is one of the strongest selling points of the Waterfox. It is a very fast browser boasting a better speed than Firefox. It does not use too much memory and CPU, freeing up vital resources for other activities.
Being a Chromium-based browser, Opera is no slouch on the speed front either. It boasts respectable numbers and does not experience any slowdowns.
There is also the Turbo feature that helps to trim data usage. This is especially useful for users who want to surf the web quickly without a fast broadband internet connection.
The only downside is that Opera uses a lot of RAM.
Features
Ad Blocker
With ads being a prominent part of the web in the 21st century, getting a browser that can block the sometimes-frustrating ads is a blessing.
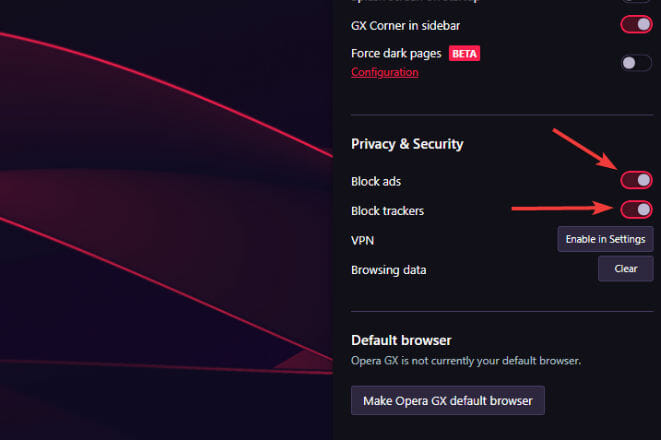
Opera offers a strong ad blocker that gives you a smooth and ad-less browsing experience. Although this feature is not enabled by default, you can easily activate it in the settings.
Waterfox, on the other hand, does not have an ad-blocking feature. And with System 1 – an advertising company – being the majority shareholder of the browser, you shouldn’t expect an ads blocker anytime soon.
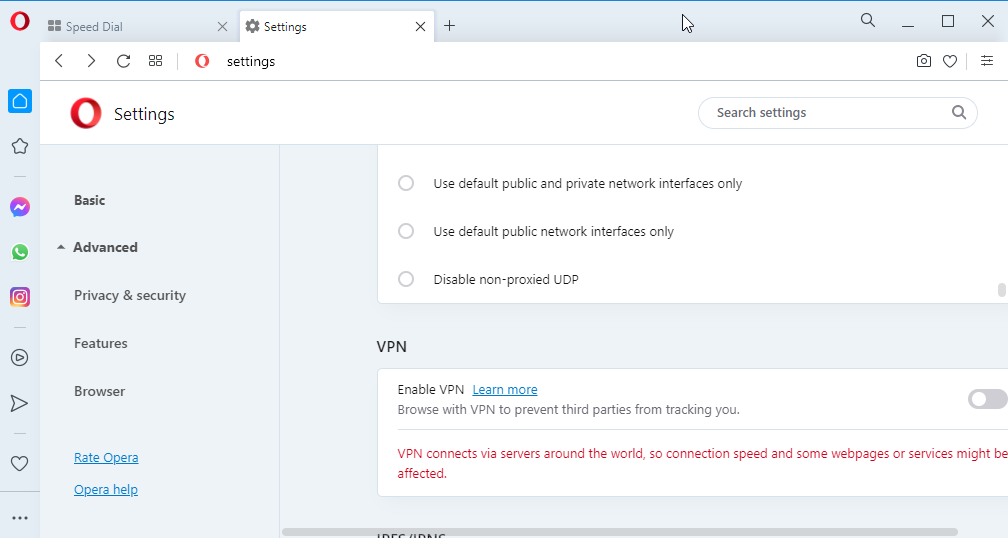
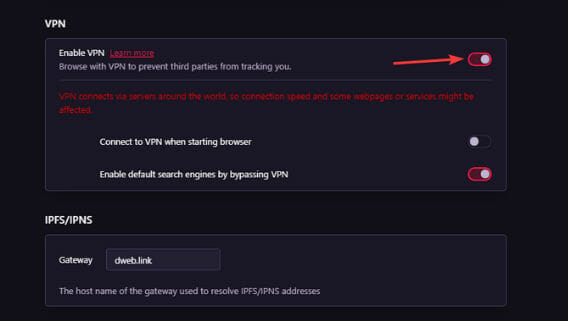
Opera incorporates a free VPN that allows you to browse the web anonymously. The VPN protects your identity and allows you to browse websites with location restrictions.
The Opera VPN is one of the best free VPNs you can ever use. Although being a free VPN, there are limitations. So, you can always get a paid VPN for added data security.
There is no VPN integration on Waterfox. If you need a VPN, you will need to get a paid one or other less secured free VPNs.
Extensions and integrations
Waterfox allows you to install extensions from Chrome, Firefox, and Opera stores. This gives you limitless options and allows you to use the browser for various functions.
Opera is a monster when it comes to extensions and integrations.
It currently has 126 integrations covering instant messaging sites like Facebook, Facebook Messenger, and WhatsApp; Social Media platforms like Twitter and Instagram; extensions from the Chrome web store; and a series of other far-reaching integrations.
In this aspect of comparison, Opera is just in a world of its own.
Privacy and Security
A whole lot of our data is used on our browsers. This makes privacy and security an integral part of any browser comparison.
Waterfox comes with the uBlock Origin, which is known as the gold standard for free, privacy-enhancing browser plugins. The uBlock Origin is a wide spectrum tracker blocker that prevents you from being tracked on the internet
Unlike Firefox, Waterfox has removed the data collection and use from its privacy and security section. With this, you can be sure that it does not collect, use, or share your data.
What’s more, Waterfox is updated frequently. This helps fix bugs and security issues and adds some exciting new features.
Opera, with its VPN, offers some level of privacy and security. There is also the ad-blocker that protects you from malicious links and ads.
What’s more, Opera incorporates the sandboxing security characteristics that stop codes from websites from entering your system. Add its fraud and malware protection feature, and you have a safe browser on your hands.
Why use Waterfox instead of Firefox?
Waterfox is advertised as a more ethical version of the Firefox browser, thanks to eliminating data collection. It also offers better performance than Firefox.
Is Waterfox more secure than Firefox?
Yes, it’s more secure since it’s doesn’t come with Pocket, Telemetry, and other data collection features.
Did Mozilla make Waterfox?
Waterfox was created as a fork of Firefox, so they share the core functionality, however, Waterfox isn’t created or maintained by Mozilla.
Who owns Waterfox?
It has been owned by the advertising company System1 since 2019, but since July 2023 it has been independent.
Opera vs Waterfox: Verdict
These two browsers are some of the best modern browsers currently available.
However, if you are left with just a single browser to choose from, we recommend Opera. This is because it has many features and properties that are unique to it.
It also suits so many use cases and gives you limitless options. What’s more, it thrives in the strong points of the Waterfox browser, and the same cannot be said the other way around.
From a general and specific-use suitability perspective, Opera is indeed the smart choice.
To learn how Opera compares to other browsers, don’t miss our Opera vs Brave guide as well as our Tor Browser vs Opera for more information.
You can also explore more lightweight and lesser known options in this guide to alternative browsers for Windows 11 to see how other choices compare in performance and features.
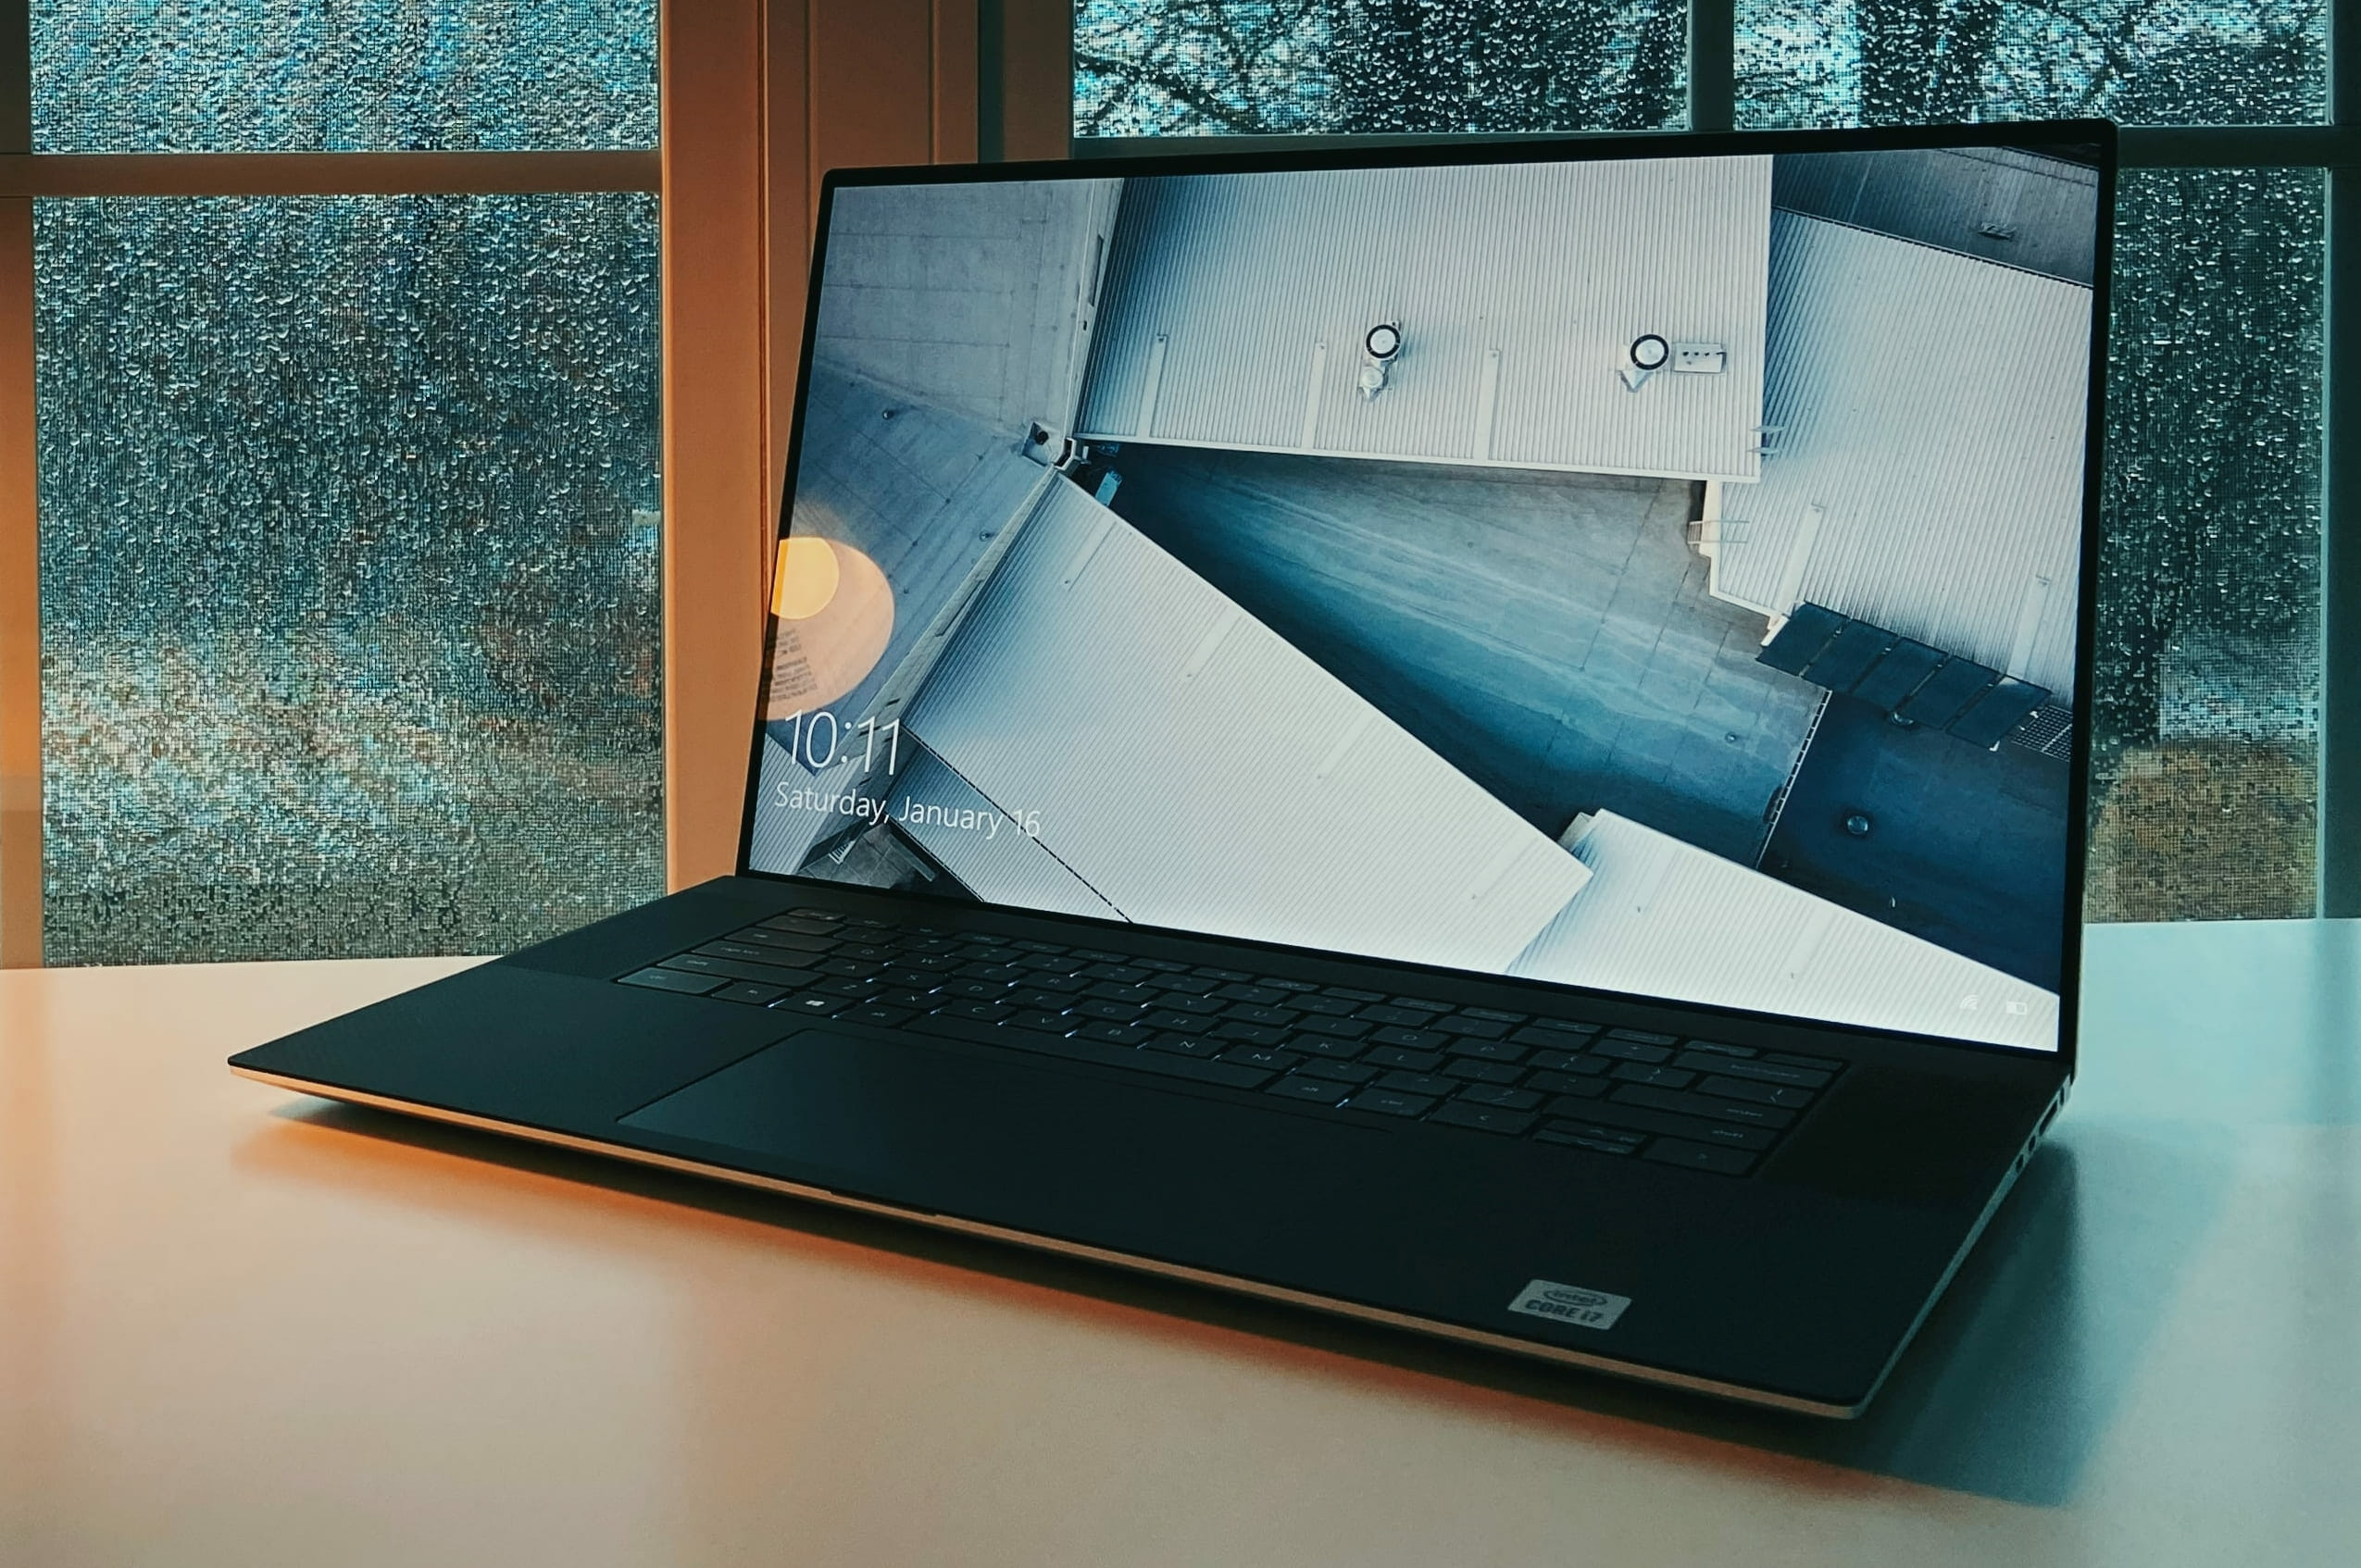
Issues with the webcam are common, and honestly, it’s easier to fix those with an external one. When the internal webcam stops working, you have a limited number of methods at your disposal. This problem is faced on Dell XPS 17 when the webcam stops working.
The issue generally arises due to an outdated or corrupt driver, or a conflicting app affecting the webcam. In some cases, it could also be a faulty camera, which would require repair or replacement.
So, before you go ahead and purchase an external webcam, try the methods here to fix the Dell XPS 17 L702X webcam not working issue.
What do I do if Dell XPS 17 webcam is not working?
1. Some basic checks
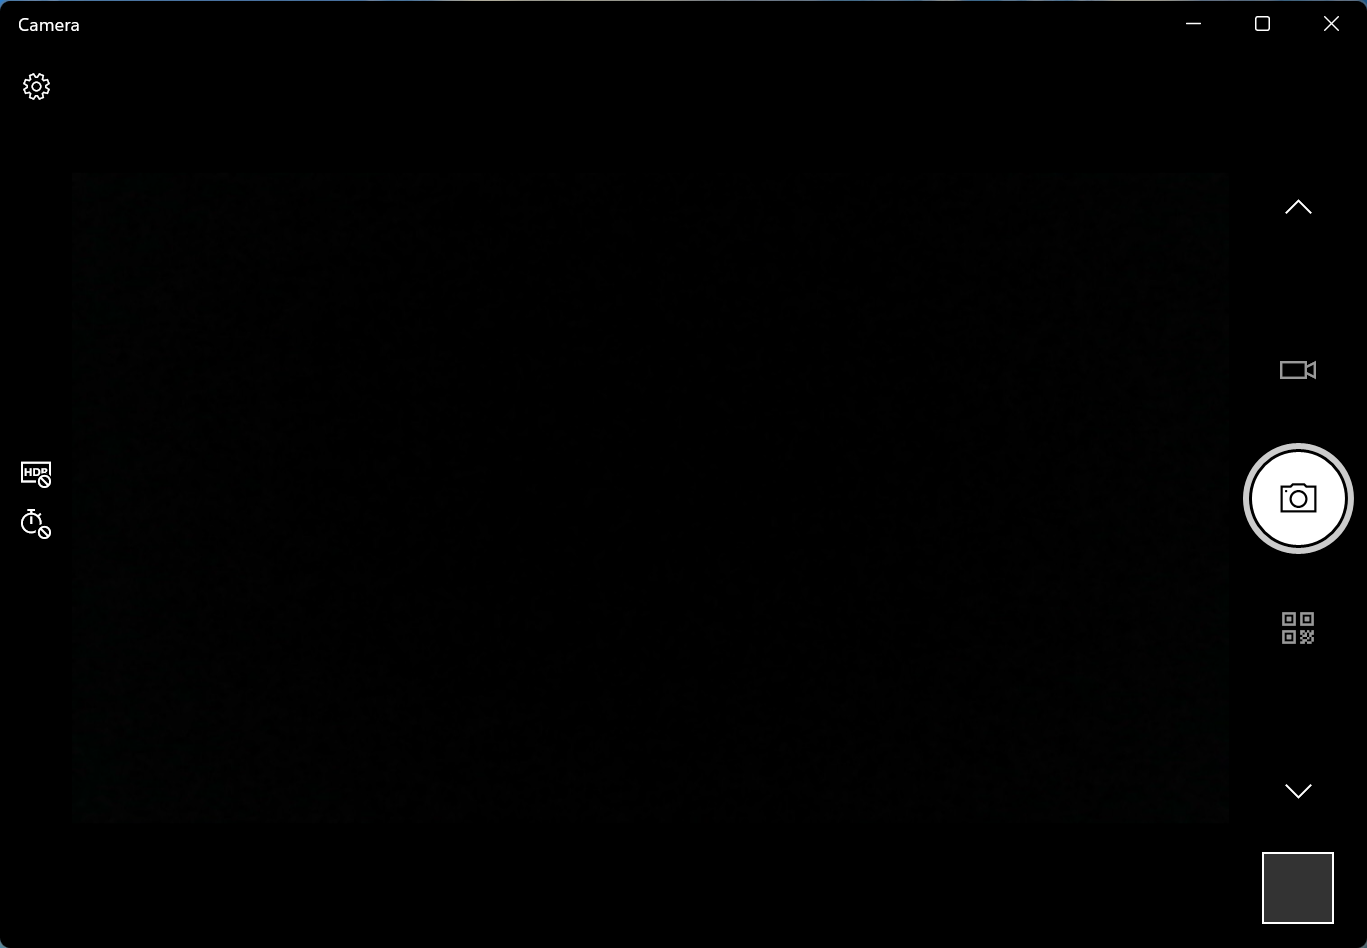
Whenever you are facing issues with the webcam, first verify if it’s limited to a single app or is system-wide. To do that, just check the camera app, and see if the webcam works fine there.
Camera app
If the problem is limited to a particular one, it could have to do with misconfigured app settings, and you should go with fixes specific to that app. For instance, issues with the webcam on Zoom are common, or even sometimes Skype is unable to detect a camera.
In case the Dell XPS 17 webcam is not working on every app and the problem is system-wide, the methods listed below could help.
2. Reinstall the drivers
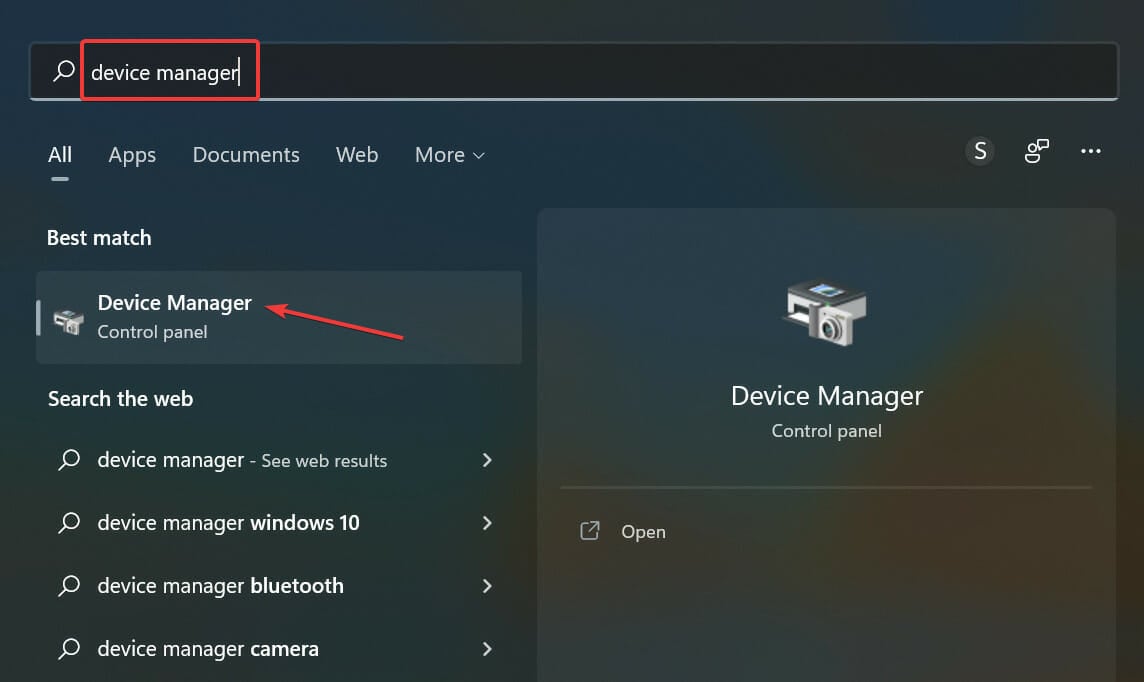
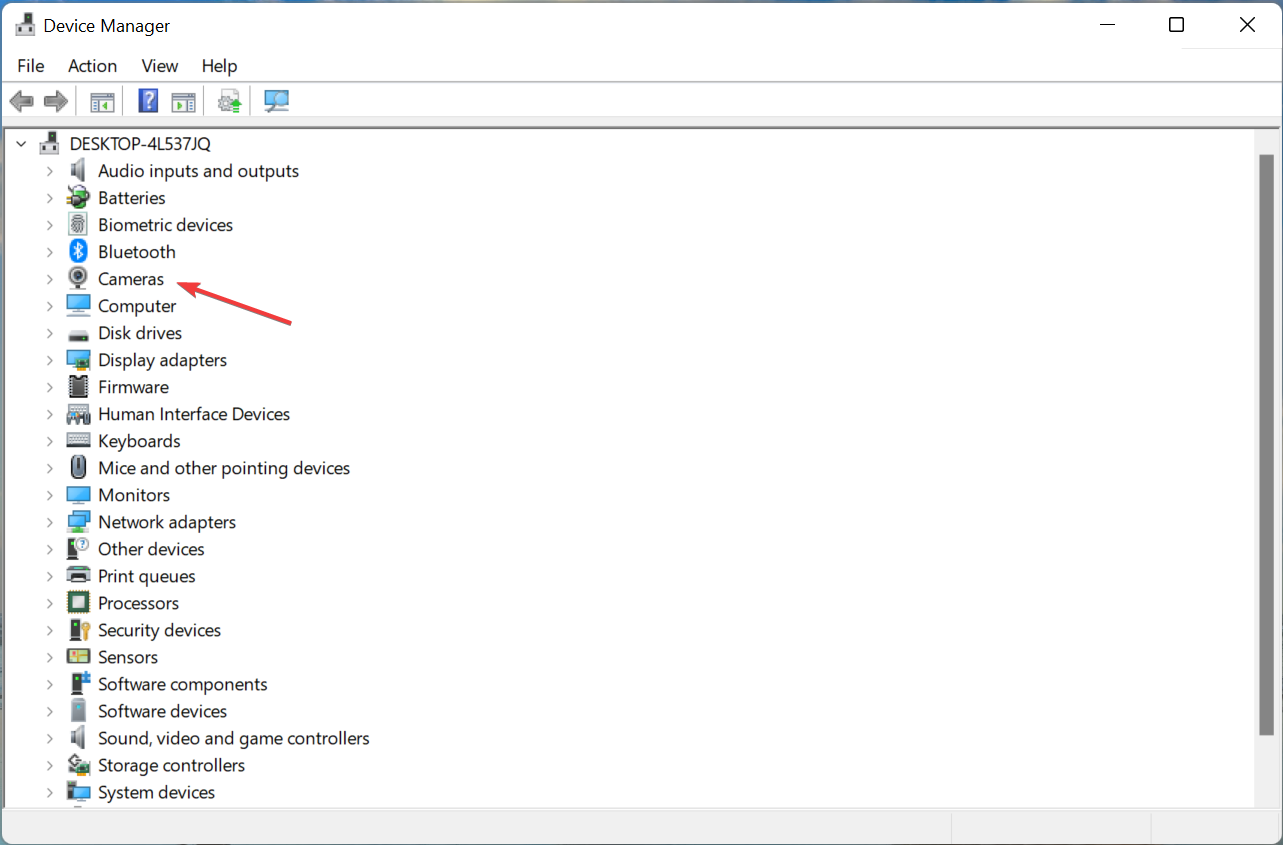
Press Windows + S to launch the Search menu, enter Device Manager in the text field at the top, and click on the relevant search result.
Next, double-click on the Cameras entry here.
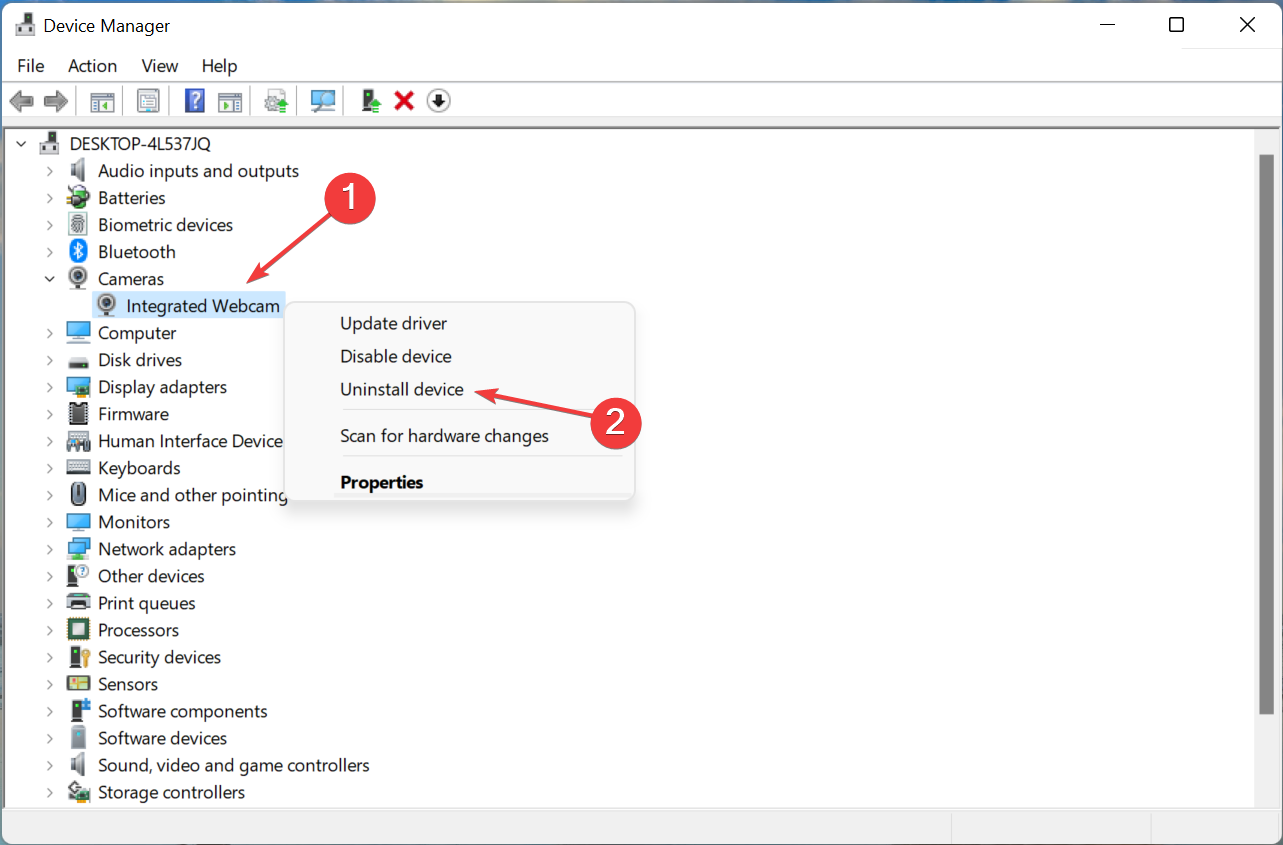
Right-click on the problematic webcam, and select Uninstall device from the context menu.
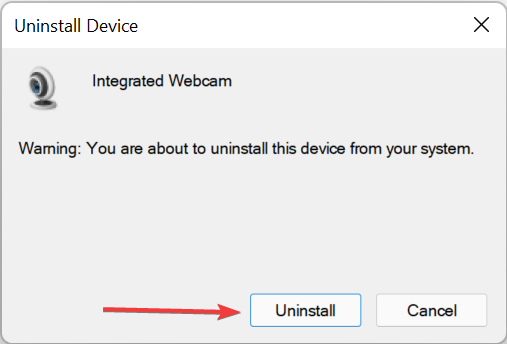
Click Uninstall in the confirmation prompt that pops up.
If the currently installed driver is corrupt, you will face the Dell XPS 17 camera not working issue. Simply reinstalling the driver should work here.
Also, several users reported that the webcam was listed under another entry instead of Cameras, so make sure to go through them all in the Device Manager.
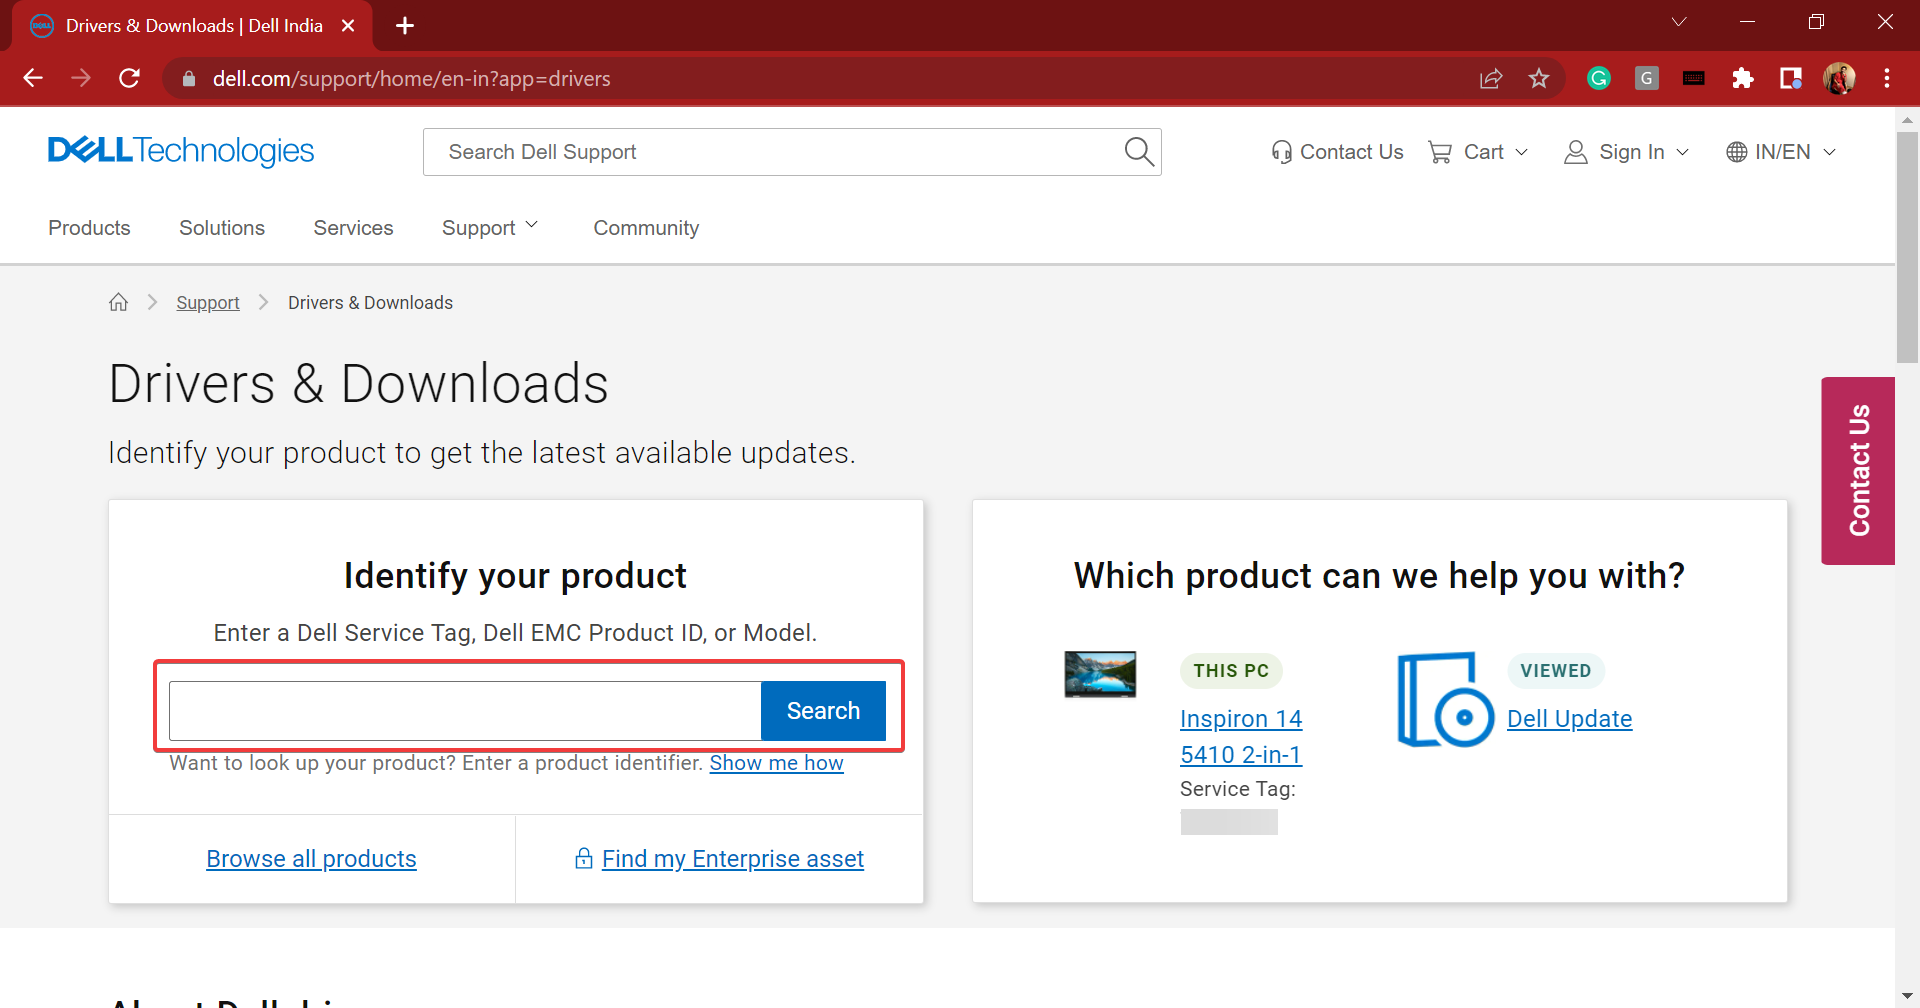
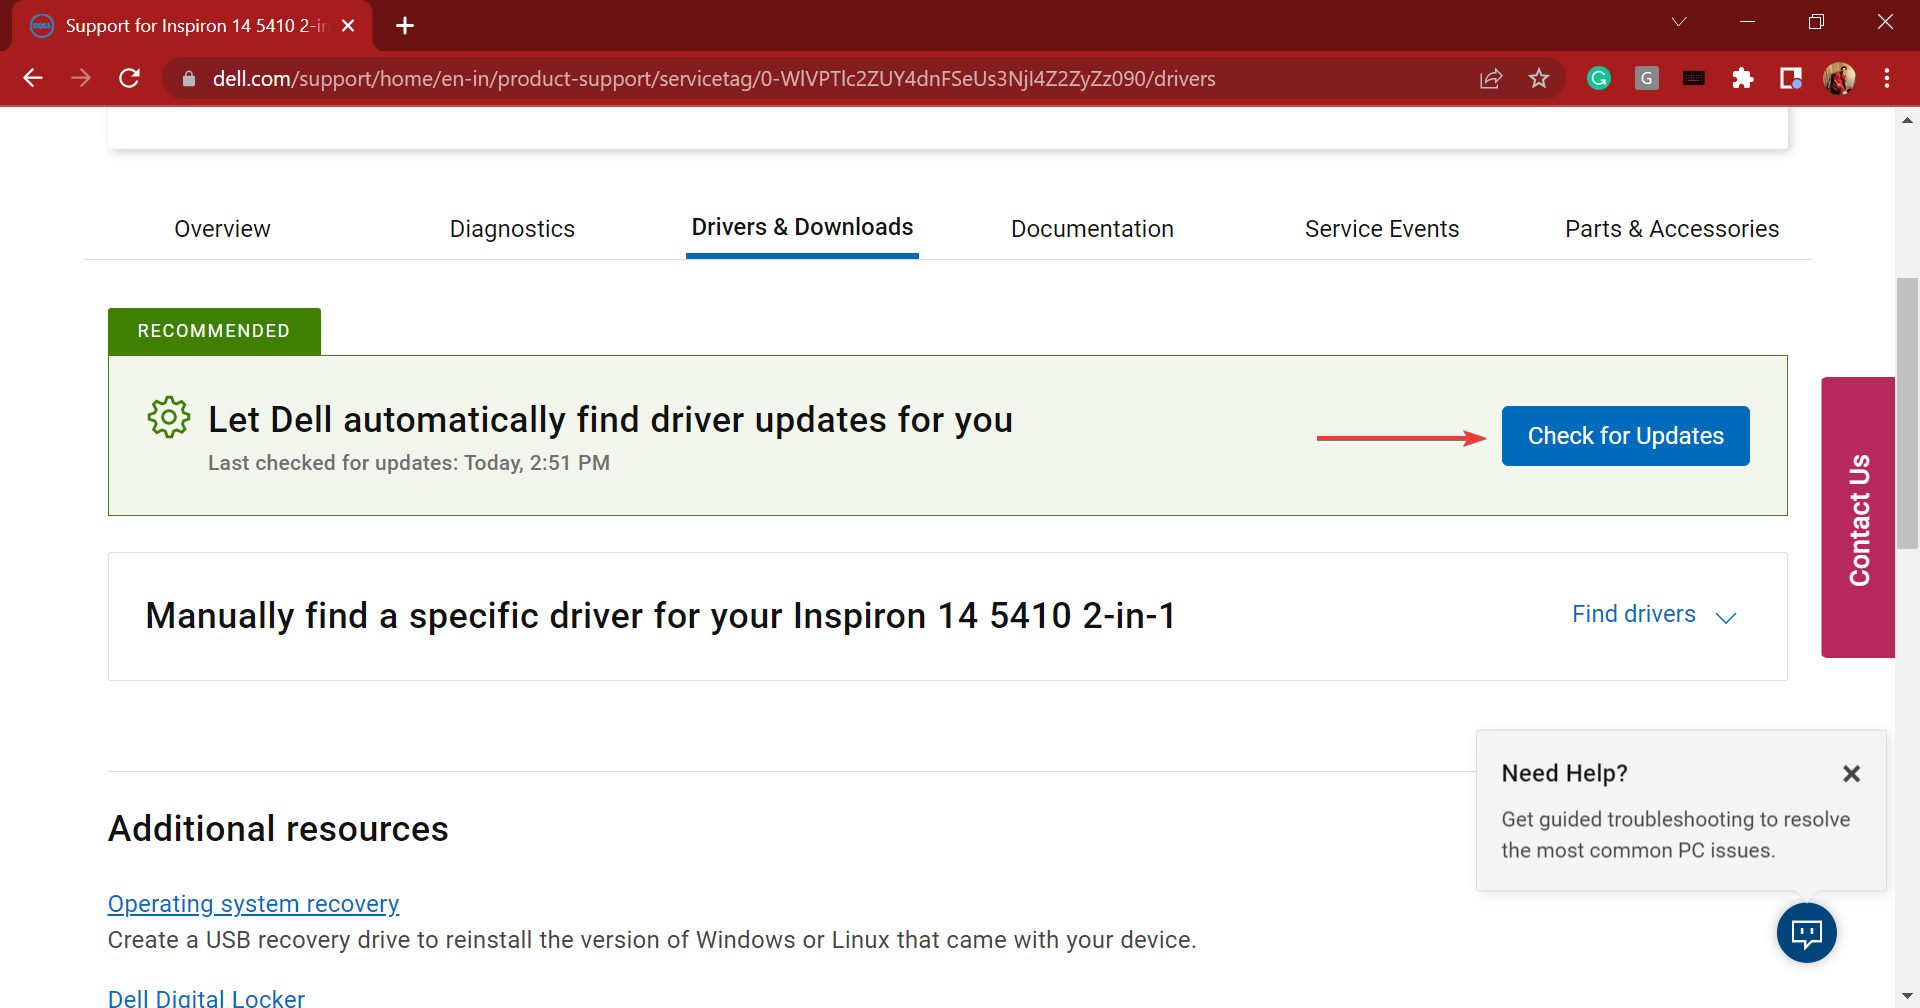
Go to Dell’s Driver and Download page, identify your product using any of the identifiers listed here, or if you have previously searched for drivers, just click on your laptop on the right.
Now, click on the Check for Updates button next to Let Dell automatically find driver updates for you.
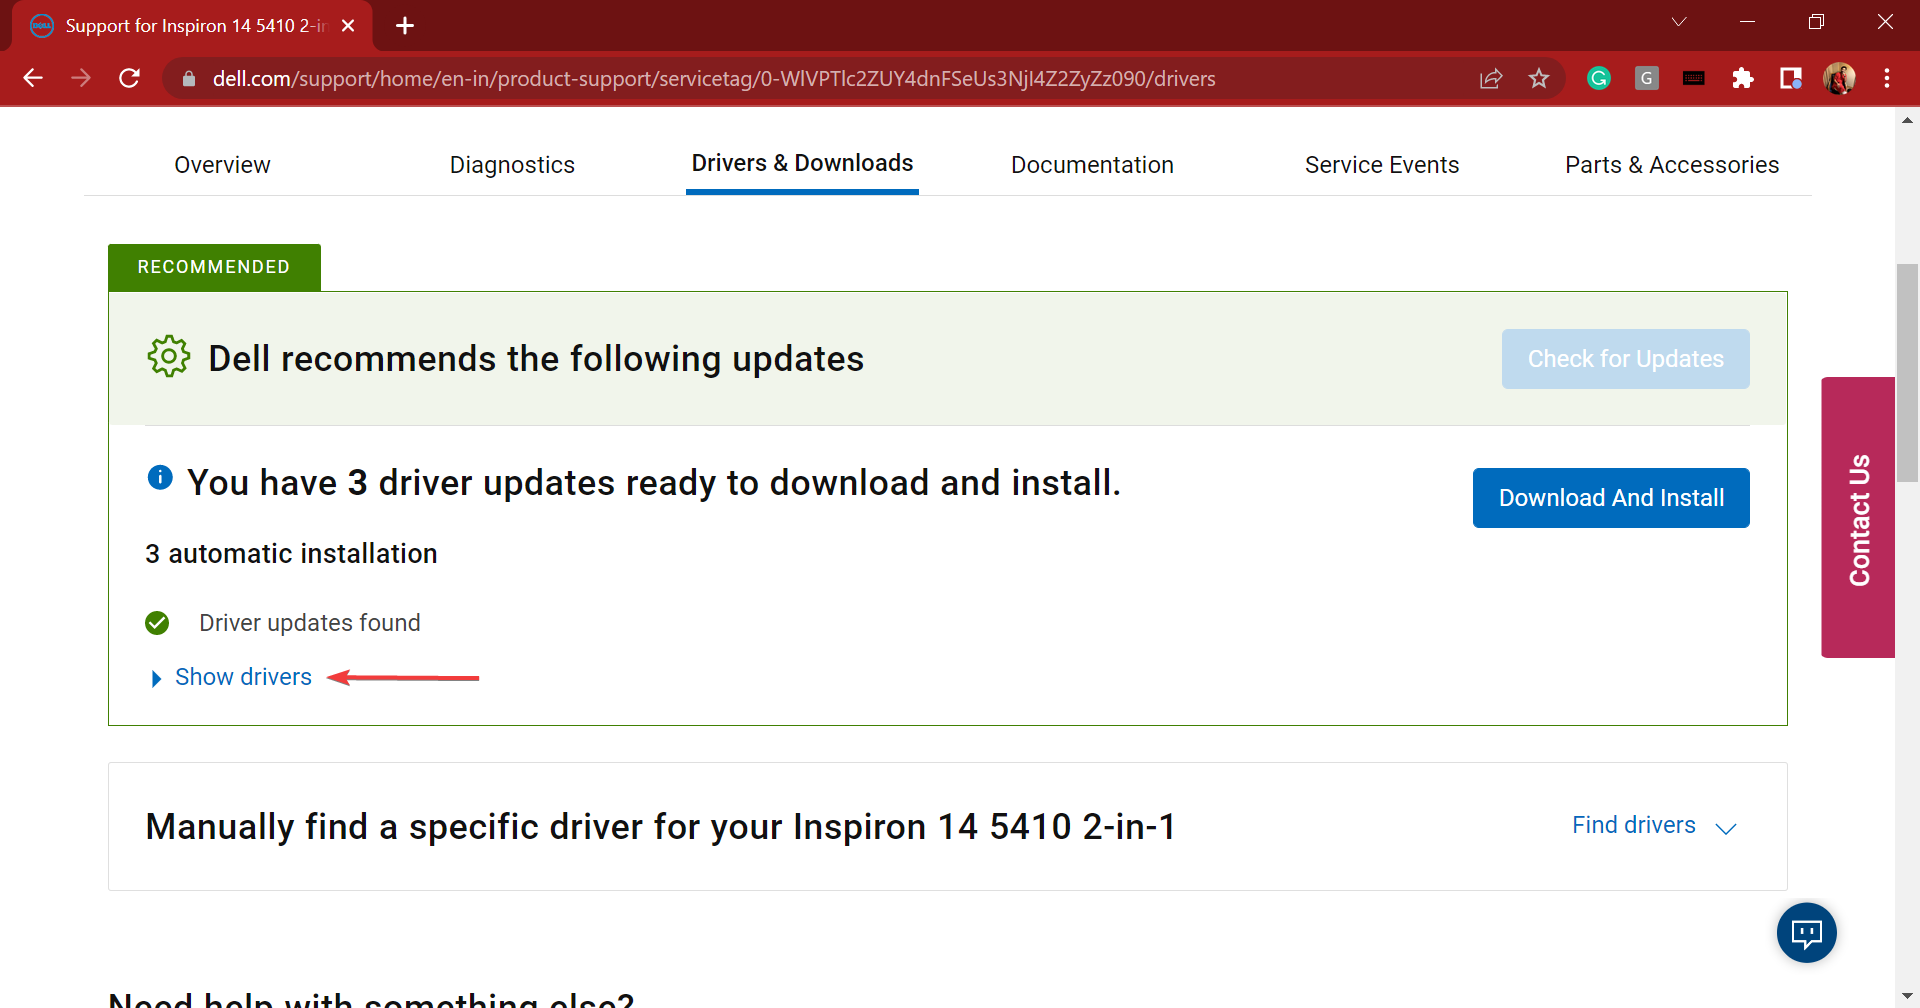
Once the scan is complete, click on the Show drivers option.
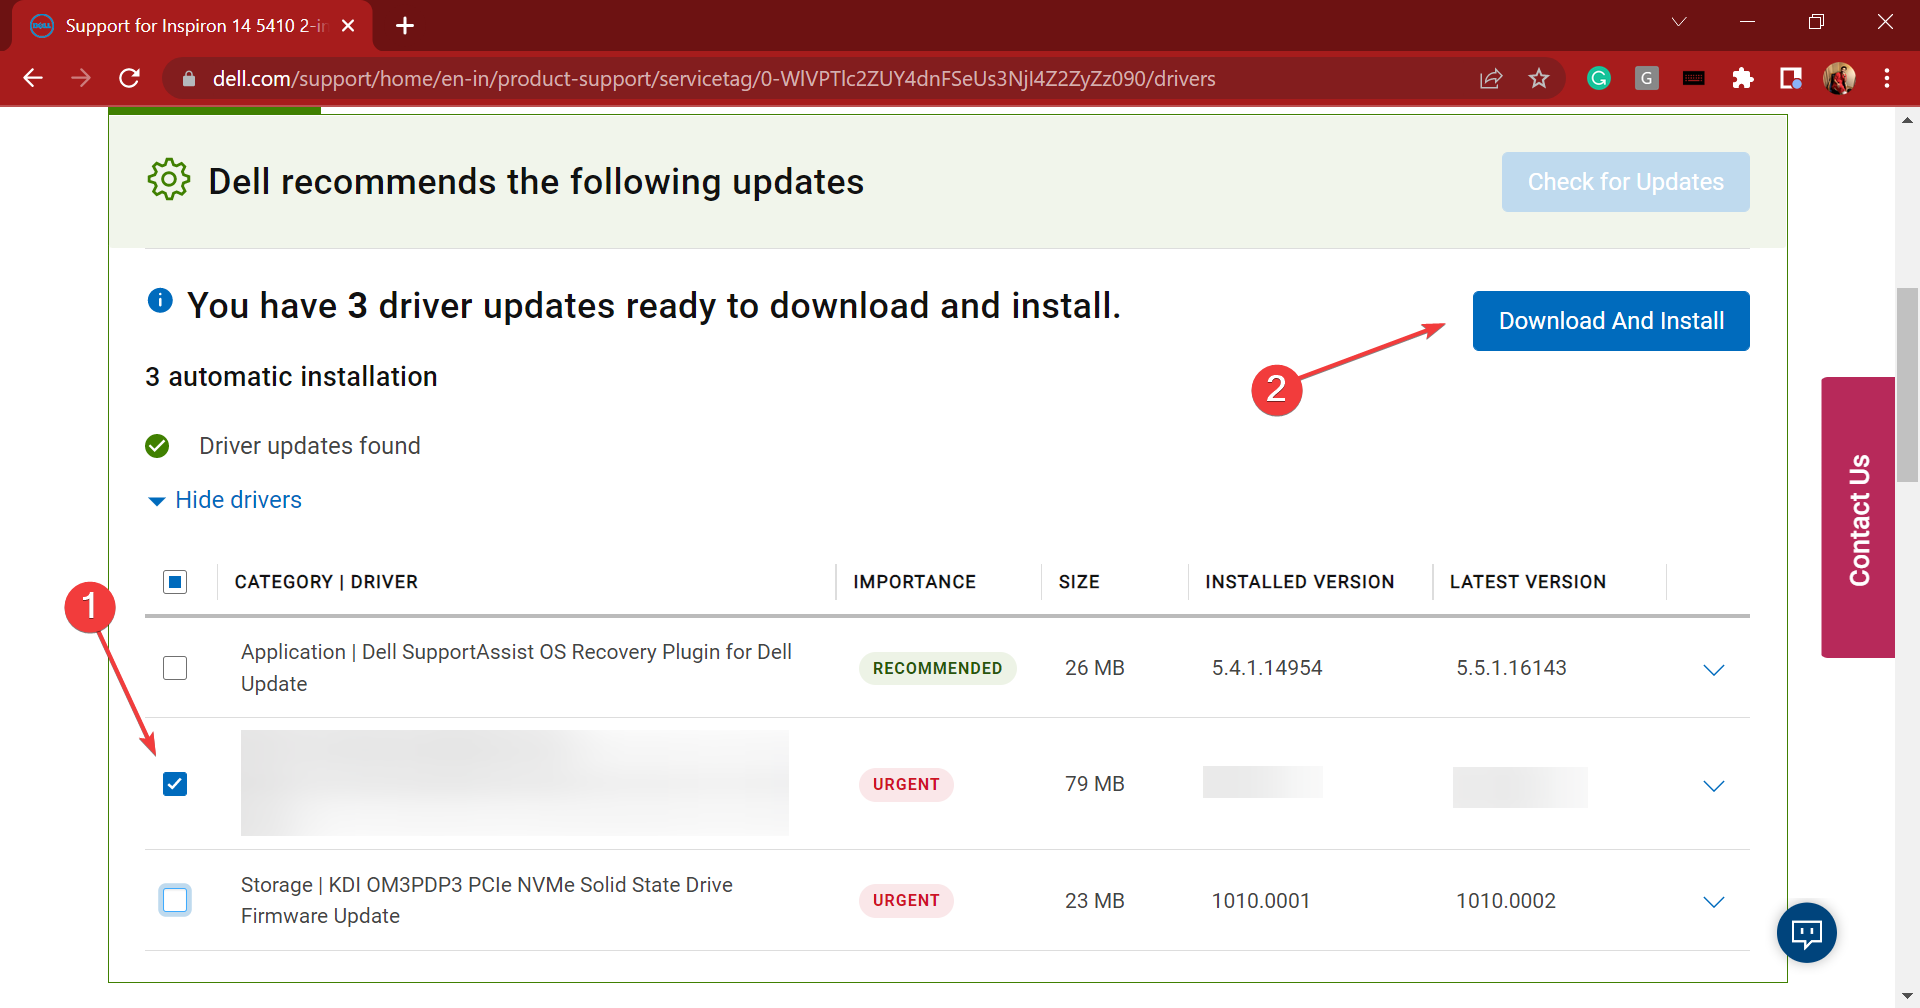
Next, make sure to tick the checkbox for the webcam drivers, and click on Download and Install at the top.
After the driver is installed, restart the computer for the changes to fully come into effect.
Once the computer restarts, check if the Dell XPS 17 webcam not working issue is fixed. Drivers are a critical piece of software and these should be updated from time to time for the effective functioning of the device.
There are various ways to update a driver, and it’s recommended that you try them all when installing the latest version.
Or, you could use a reliable third-party app to take care of the updates. We recommend Outbyte Driver Updater, a dedicated tool that will automatically install the latest version, when available, for all the drivers on the system.
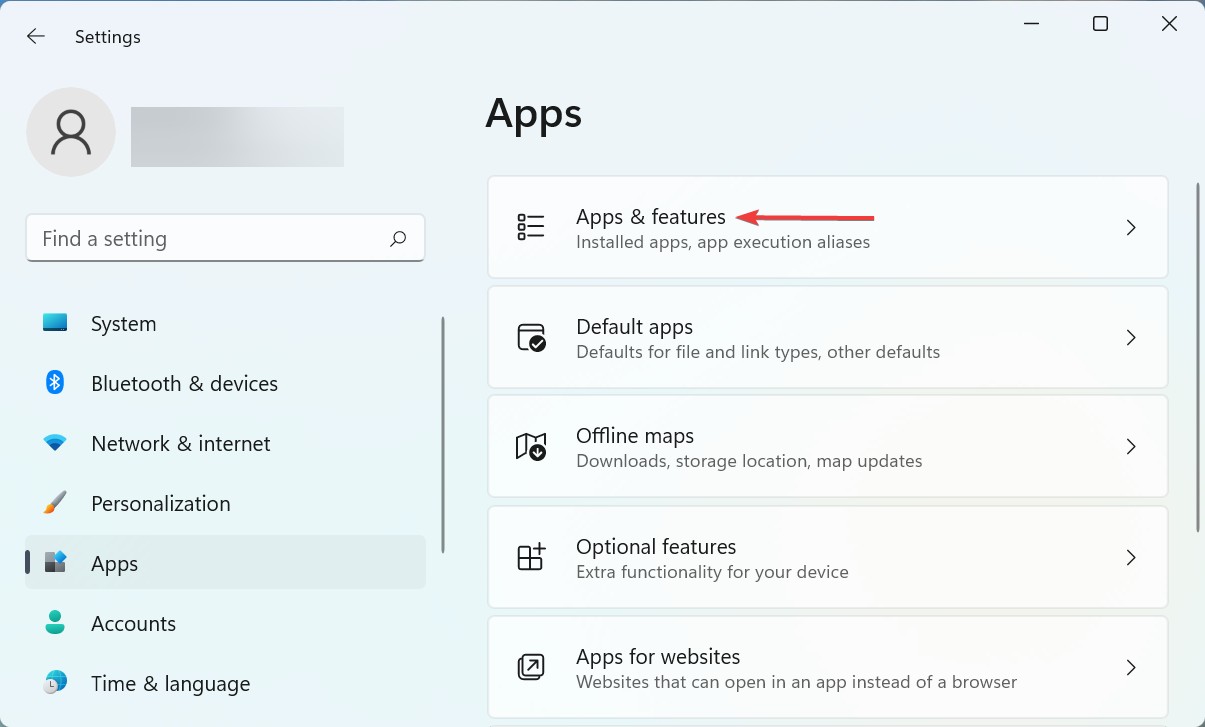
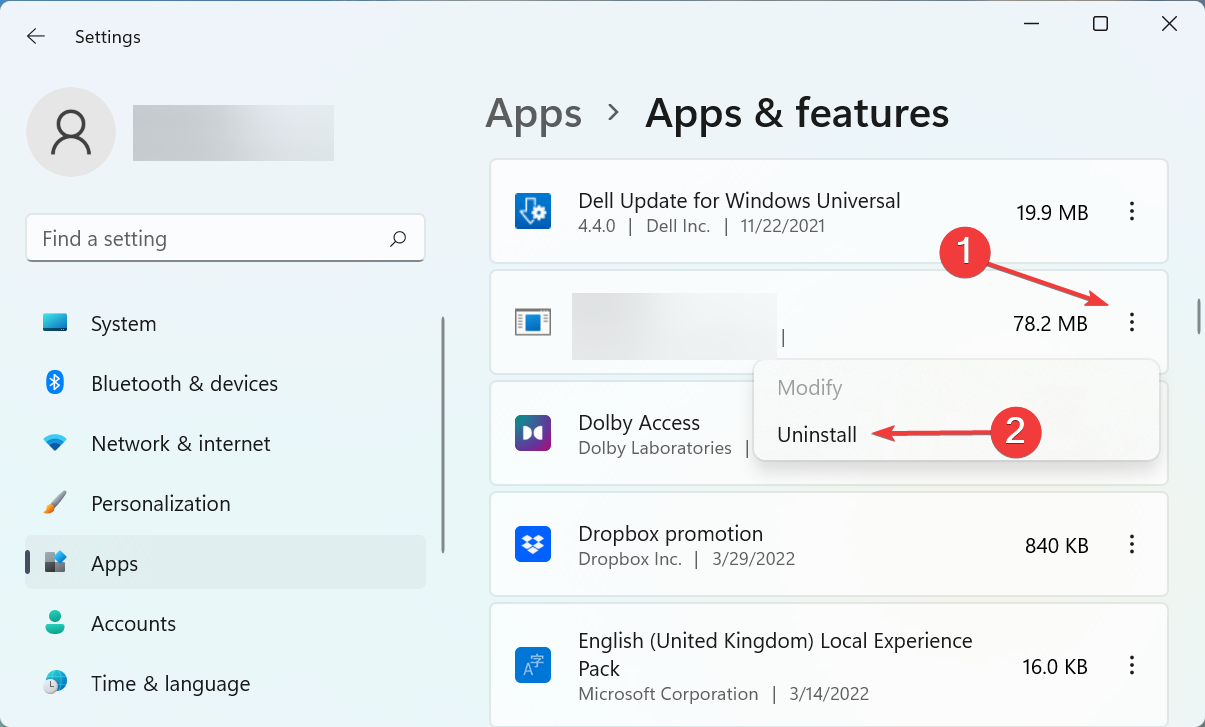
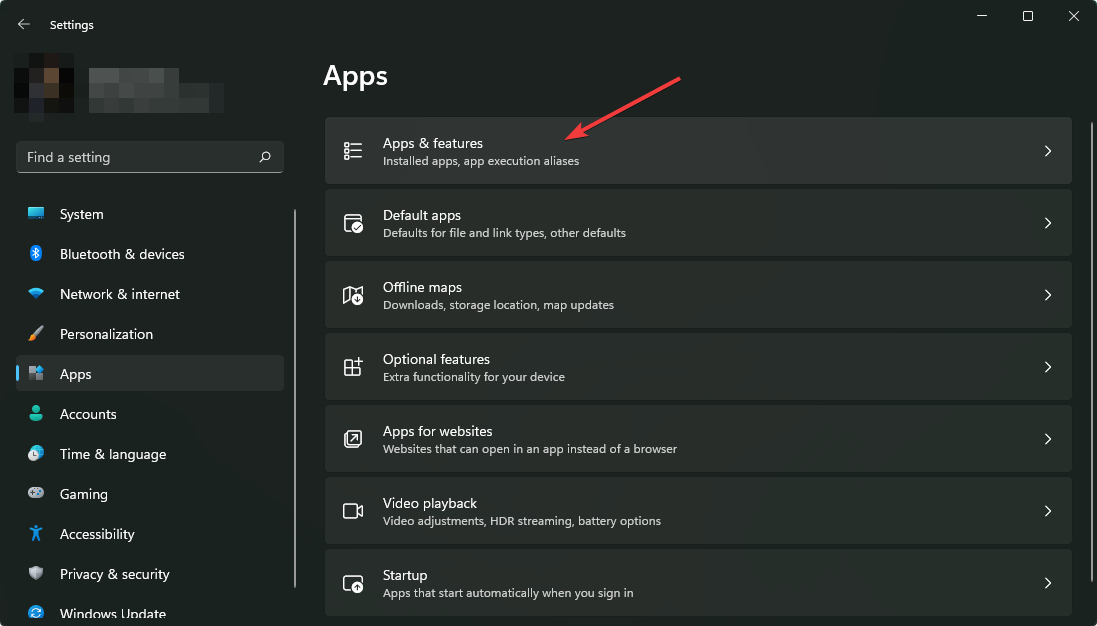
Press Windows + I to launch Settings, and select the Apps tab from the navigation pane on the left.
Next, click on Apps & features on the right.
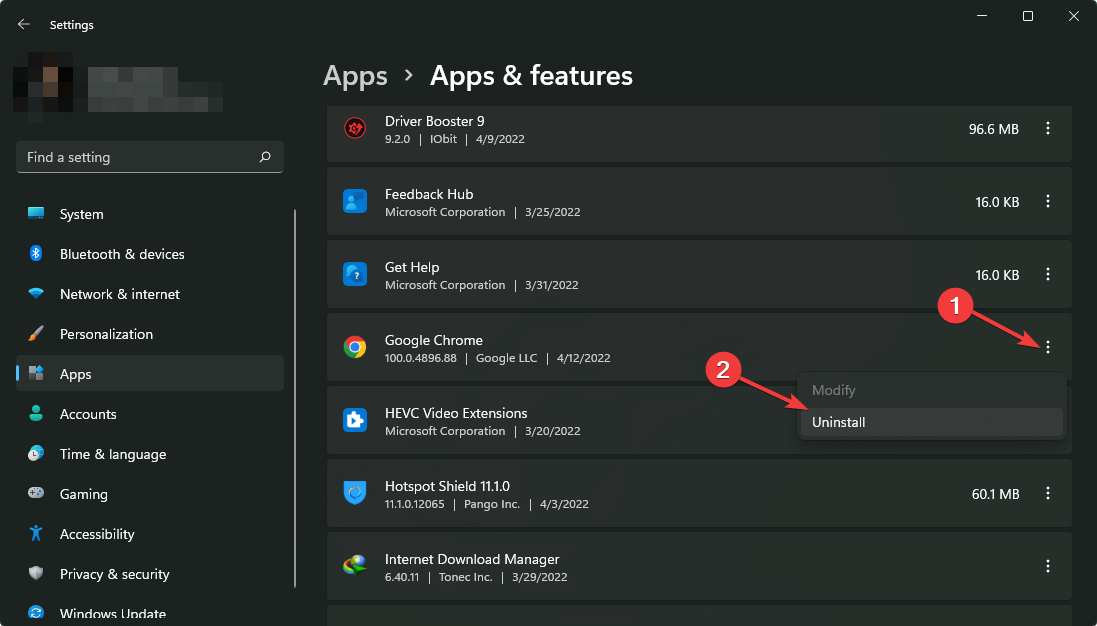
Locate the conflicting app, click on the ellipsis next to it, and select Uninstall from the context menu.
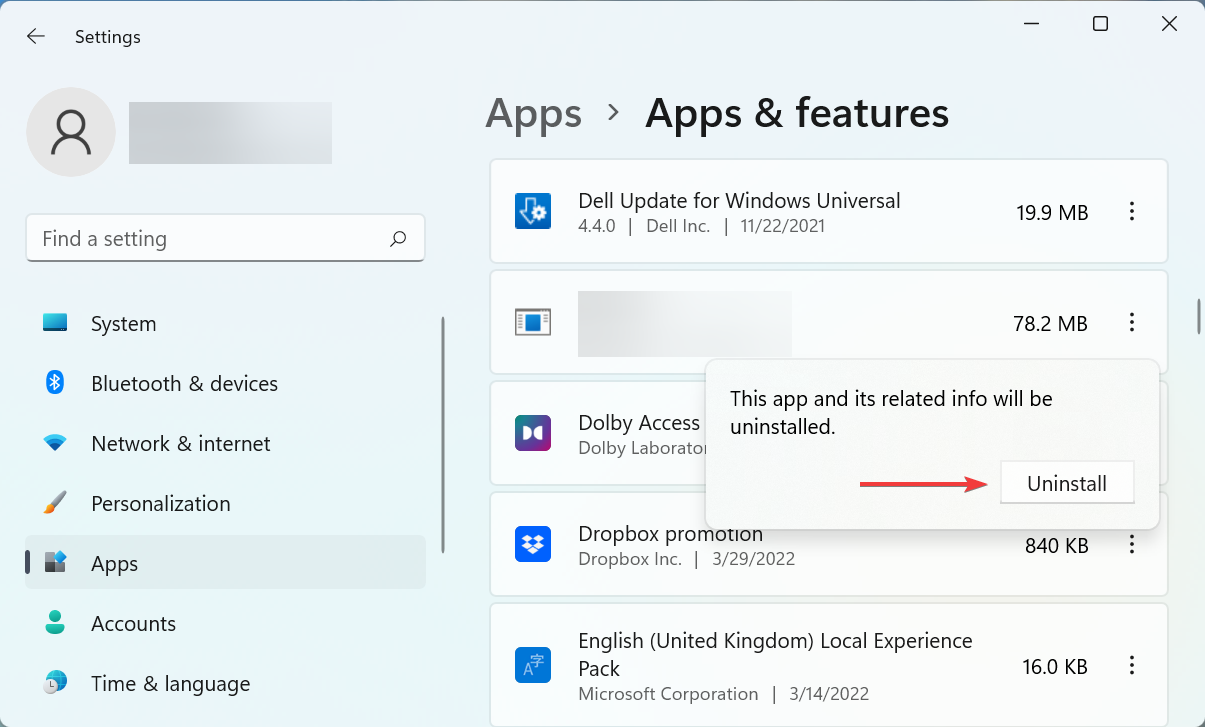
Again, click on Uninstall in that prompt that pops up.
Once done, restart the computer for the changes to fully come into effect.
In some cases, a third-party app or even an antivirus can cause the webcam to stop working. Here, all you have to do is identify and remove the conflicting app. But the real challenge is to find the app which is actually causing the trouble.
For that, just make a list of apps that were installed or updated around the same time you first encountered the error, remove them one at a time while restarting the computer after each, and verify if the Dell XPS 17 webcam starts working.
Once it starts working, the app removed last was causing the error. Just keep it uninstalled for a while and check the web or the manufacturer’s website for a resolution.
The methods listed here should have helped get the webcam up and running on your Dell XPS 17 laptop. In case the problem persists, you can perform a system restore.
Also, check some general troubleshooting methods if the webcam is not working on any other device.
If you have any queries or know of a fix that’s not been listed here, please drop a comment in the section below.
A handshake may be used to welcome someone or seal a deal with them in person, and the same is true for the Internet.
An SSL handshake occurs when devices on a network – such as a web server and a browser – discuss keys, encryption methods, and other parameters about their connection before agreeing to transmit data. During a handshake, browsers and servers may request to examine and validate each other’s SSL certificates.
It’s essential to understand an SSL handshake and how to resolve errors related to it, including the SSL code 1 error.
How can I fix an SSL code 1 handshake failed error?
1. Correct the date and time on your computer
Right-click on the date and time on your taskbar and select adjust date and time.
Under the date and time menu, toggle on the option to set time automatically.
Problems with the SSL handshake failing might be caused by an incorrect system time and date on your PC. SSL certificates have limited lifespans and become invalid when they expire.
If the time and date on your computer are incorrect, the certificates will always assume the time has elapsed. Even more, the same trick to set up the correct time and date on your PC is recommended to quickly fix the errors related to gws_rd=ssl parameter.
2. Add the website to your allow list
Launch Chrome, click on the ellipses button at the top right corner, and select the settings option.
Select privacy and security, then click on the option for site settings.
Scroll down and expand the Additional content option, then click on insecure content.
Click on the Add button in front of Allowed to show insecure content.
Input the URL and click add.
You should attempt this solution because it’s conceivable that your firewall is producing the SSL handshake failed error by blocking your inspection requests.
Note that adding a website to the allow list may expose you to malware, so you should only try it if you are sure that it does not contain viruses.
The handshake error is more common in Chrome, but using an alternative browser could help you avoid it.
While there a many to choose from, we recommend Opera One. It is built on Chromium and benefits from its extensive extension library. Opera One comes with the added advantage of a VPN that lets you choose servers between the Americas, Asia, and Europe.
It is also compatible across several platforms and will be a great option regardless of your device.
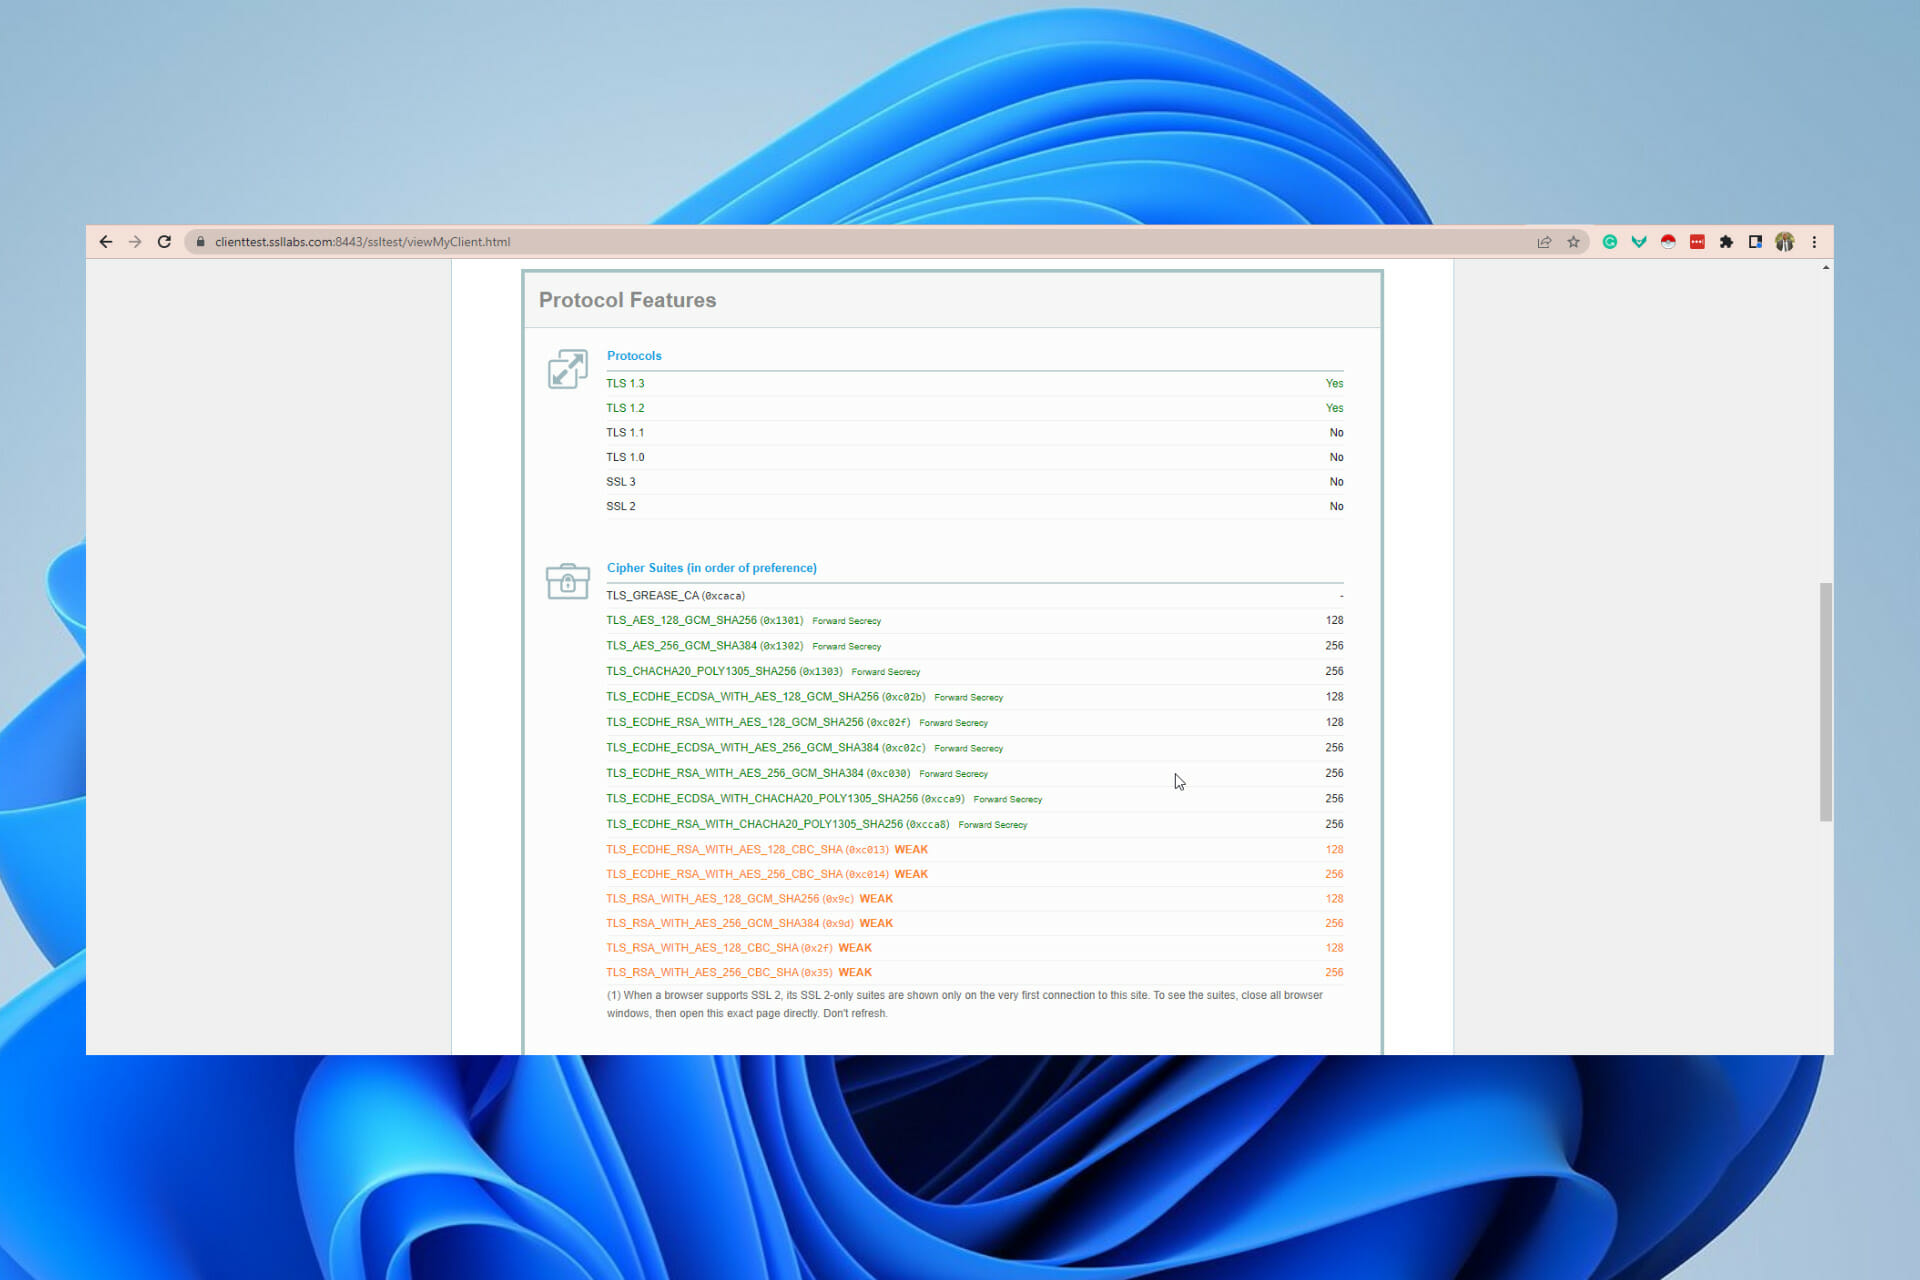
Under the Protocol Support menu, you can see whether the browser supports the latest SSL/TLS versions.
Note that if you’re experiencing SSL handshake failed errors and, after running this test, realize that your client (your device) and server don’t support the same SSL version, you’ll need to upgrade your browser.
TLS 1.2 is enabled by default in most recent major browsers like Google Chrome.
4.2 Update your browser
Launch Chrome, click on the ellipses button at the top right corner, select Help, then About Google Chrome.
If there is an update, it will start automatically, and you will have to click relaunch to complete the update.
Because an SSL handshake is a critical step in ensuring data security over the internet, this guide has shown steps to resolving your SSL handshake Code 1 error. This isn’t the only issue you’ll encounter, and we recently covered error during SSL handshake with remote server in a separate guide.
It has been a busy week for the .NET Team over at Microsoft. Not only are we getting Entity Framework 7 Preview 3, but now .NET 7 Preview 3 is hitting the shelves as well. It comes with some very much awaited features that we’ll dig into in a bit. Let’s get to it!
Native AOT
In a nutshell, Ahead of Time ( AOT ) Compilation builds everything upfront, to avoid needing to “JIT” when an app runs for the first time. For quite some time the team has been working tirelessly to bring proper Native Ahead-of-Time compilation to dotnet. While partial AOT has always been present, full “true” support was never there out of the box.
Jon Douglas Senior Program Manager from Microsoft gives us a bit of insight into what’s different.
Native AOT is similar to .NET’s existing AOT technologies, but it produces only native artifacts. In fact, the Native AOT runtime does not know how to read the .NET assembly file formats – everything is platform-native. The executable file format parsing is fully handled by the underlying operating system.
For more information on how Native AOT works and how to get started check out the official docs.
Write-Xor-Execute
We were told .NET 7 would focus on performance. With Preview 3 the team has been able to realize an improvement of ~15% to startup times with Write-Xor-Execute enabled. The change has improved performance even when Write-Xor-Execute is disabled, however the team found some regression problem which will be addressed in an upcoming release.
Upgrading from .NET 6
As we’ve discussed before, upgrading from .NET 6 to 7 should be straightforward and the chances of things breaking are slim, however not impossible.
Make sure you have a backup of your project before going forward, then open your project file and modify the target framework property.
<TargetFramework>net7.0</TargetFramework>
For more information on this latest release check out the official post from Microsoft. It also contains some very interesting information on roadmap items. Have you been tinkering with .NET 7 already? How has it worked out for you? Let us know in the comments below.
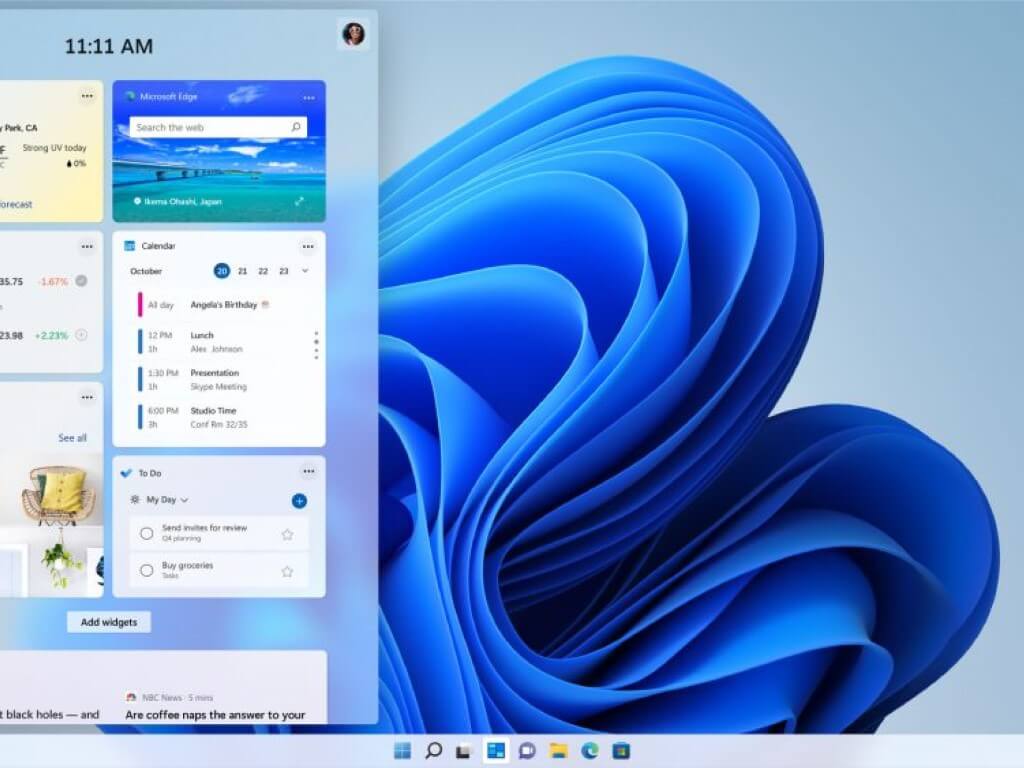
Earlier this year, there was an indication that the Microsoft Windows Team was on the verge of creating support for third-party widgets installation from the Microsoft Store. Well, it seems those plans might actually come to fruition. As spotted by Firecube on Twitter, a screenshot was shared highlighting that indeed the feature was well on its way in a widgets manifest update.
As such, this integration will help address the numerous complaints lodged by users concerning the Windows 11 unpopular widget pane. With that said, users will be able to put this feature to more use. Third-party widgets will allow you to curate this feature to meet your preference, as compared to the current arrangement where it provides you with the basics, that is, calendar, to-do list, weather, etc.
Microsoft only shared a glimpse of the feature during the recent Windows 11 event. The most notable enhancement spotted was the full-screen user interface, which is ideally supposed to accommodate the third-party widgets installations.
Did you know that Microsoft released yet another Insider Preview build for its latest operating system? Whatever the answer is, you will surely want to know more details about what’s new.
And, yes, we are about to share all this information with you in this article. This new build is for Insiders on both the Dev and Beta channels.
Build 22598 brings Windows Spotlight on the desktop by default for new installations, and there is also a new Media Player build, new ISOs, and more.
What new features did build 22598 bring to the table?
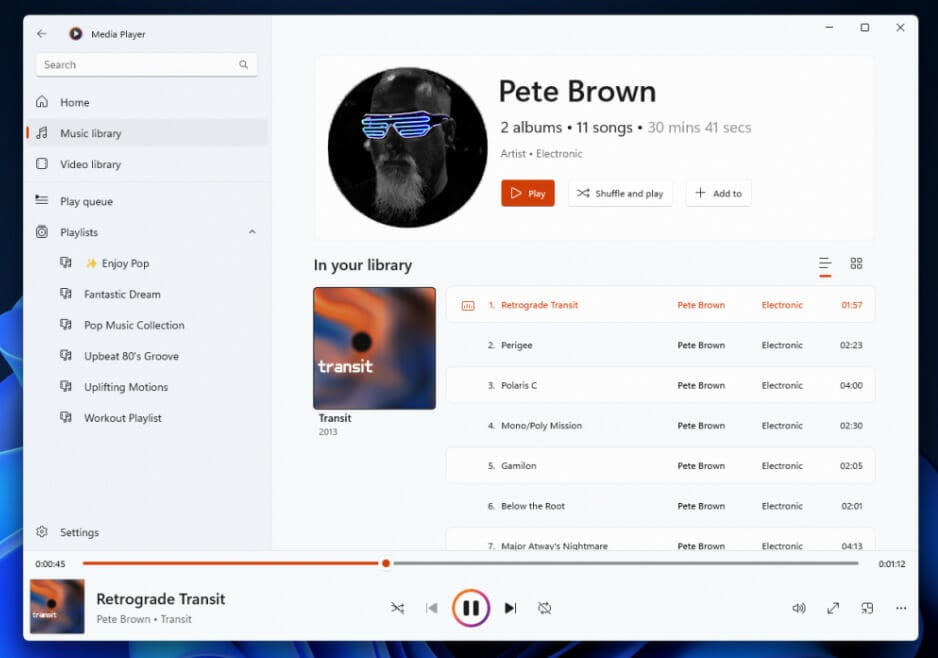
The latest build is starting to roll out with a new update to Media Player for Windows 11 (Version 11.2203.30.0), for Insidersin the Dev Channel.
Switch between two different views on the artist page when browsing your collection. One view shows you all the albums in a grid, while the other shows all the songs, grouped by album.
You now also have quick actions to albums, artists, videos, and playlists when you hover over them for quick selection and playback.
A handy context menu is available if you right-click on the now playing screen. From here you can open new files without navigating to another page.
A new video enhancements feature has been added as well, which allows you to adjust the brightness and contrast of your video.
Changes and Improvements
[General]
We are now offering new builds to Windows Insiders in China on Lenovo PCs starting with Build 22598. These users should connect to the internet for a minimum of 15 minutes to allow the Lenovo PC Manager to auto update to the latest version (version 5.0.0.3292 or later) to receive an important fix with the app.
We are trying out auto-launching of the Get Started app with some Windows Insiders after upgrade to help people get started with their PC.
[Windows Spotlight]
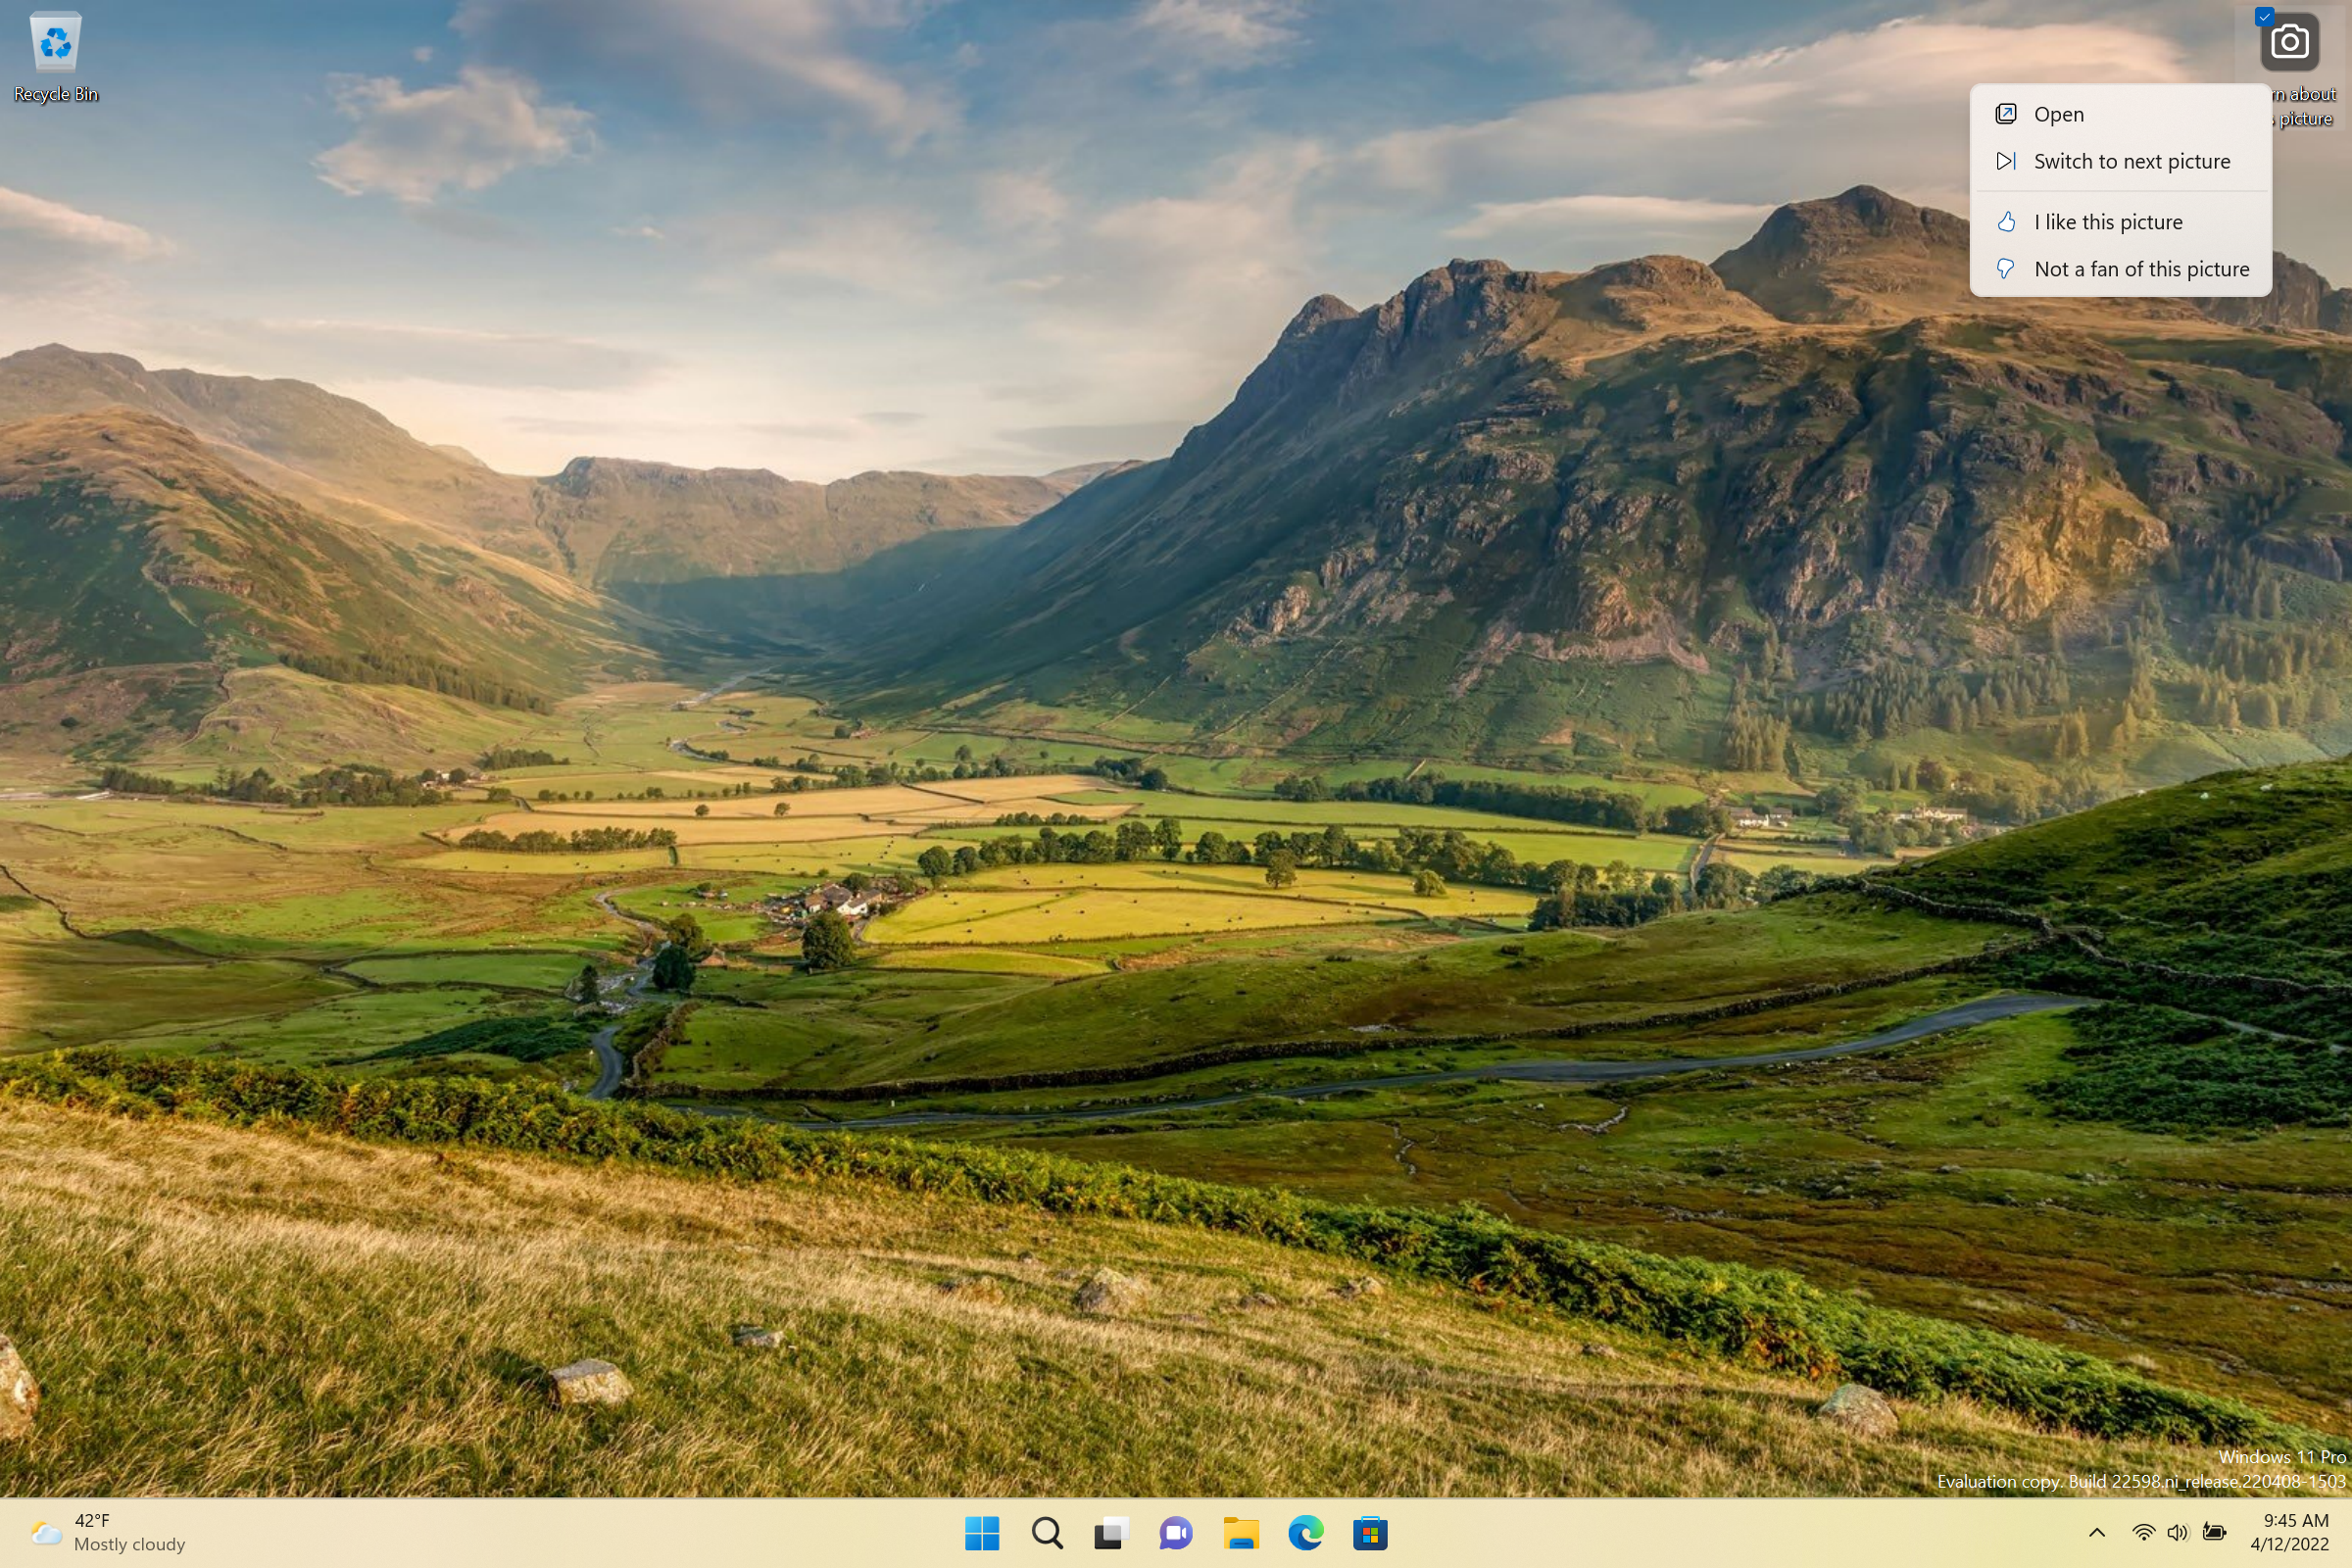
We are trying out Windows Spotlight on desktop is on by as the default background for new devices (clean installs using the ISO) and for upgrades where the background the Windows 11 default. We are trying this experience out with a limited number of Windows Insiders at first.
We are also trying out displaying 4K desktop backgrounds in Windows Spotlight. We are also trying this experience out with a limited number of Windows Insiders at first.
[Taskbar]
Updated the tooltip on the volume icon to tell you when you’re using spatial sound.
Fixes
[General]
Devices using Windows Information Protection (formerly EDP) policies can now access controlled data via protected apps such as Outlook, Word, Microsoft Edge, etc. as expected.
[Taskbar]
We fixed an issue where if you used keyboard focus on taskbar, hovers like previews would stay up during all taskbar interactions.
Fixed an issue that was causing taskbar badges to come back after explorer.exe crashes even if you had them turned off in Settings.
Made a fix for an issue where some mouse move events weren’t being passed to apps for icons in the system tray.
Fixed an issue where hovering over some app icons in the system tray wasn’t showing previews or tooltips.
App icons in the system tray should now be showing more reliably when opened again in this build.
Fixed an issue that was delaying or preventing the show hidden icons flyout from opening.
Fixed an issue where Chinese characters weren’t displaying in the taskbar calendar when the Lunar calendar was turned on.
Addressed an issue where the visual indicator around an app icon when sharing a window might not go away once you’d stopped sharing.
[Start menu]
We fixed a crash when selecting the More button in Start’s Recommended section.
Addressed an underlying issue which could lead to Start crashing on launch when invoked with a gesture.
Fixed an issue that was causing the buttons and labels in Start to be the wrong colors while using contrast themes.
Addressed an issue where if you swiped to scroll the contents of a folder in the pinned section of Start, it would unexpectedly close Start.
[File Explorer]
Addressed an issue which was causing the context menu to not render completely sometimes and be transparent.
[Input]
Improved the performance of launching the touch keyboard on the login screen.
Fixed an issue where if you had selected text with touch in certain apps like Settings, the backspace key in the touch keyboard would have to be tapped twice for it to delete.
Voice typing should no longer stop responding if you repeatedly press WIN + H.
Fixed an issue for people with a large number of input methods, where the currently selected one might not be in view when you opened the input switcher.
Fixed the link at the bottom of the Chinese (Simplified) IME appearance settings so it points to Settings > Personalization > Text Input.
Addressed an issue where the emoji panel’s background image and color might not be rendered correctly after using options in Settings > Personalization > Text Input.
[Settings]
Fixed an issue where high DPI options in the Compatibility tab of the properties for an executable weren’t working.
Narrator should now read the view options we added in Settings > Apps > Installed apps
[Windowing]
Returned the missing animation when pressing WIN + D or clicking the Show Desktop button.
We addressed an issue when using snap layouts with touch which could result in an acrylic sheet getting stuck on top of the window.
The thumbnails in Task View should no longer be inverted when using Hebrew or Arabic display languages.
Fixed an explorer.exe crash when invoking Task View.
If you have a lot of windows open, they should no longer become superimposed on top of Desktops in Task View.
Fixed an issue when using ALT + Tab with a screen reader, where if you ALT + Tabbed back to certain app windows, focus would be set to a pane within the window rather than the whole window.
Fixed an underlying issue where accented colored title bars (when enabled) for certain apps and File Explorer were only displaying when the windows were maximized.
Mitigated a rare issue that could lead to the system hanging when changing the resolution sometimes in certain games.
Addressed an issue causing white pixels in the corners of some apps when using dark mode.
Did some work to address an issue where certain app windows wouldn’t move to the expected area after selecting them using snap assist.
Fixed a glitch in the animation when using snap layouts at the top of the screen to snap windows.
[Live captions]
Fixed an issue where the very top of maximized apps (e.g., title bar window management buttons) couldn’t be reached with touch while live captions were positioned at the top.
Live captions will now tell you when it’s done downloading and ready to caption.
[Task Manager]
Mitigated an issue causing the Performance page CPU graph to be colored as if Show Kernel Times was enabled even though it wasn’t.
Did some work to further improve Task Manager reliability.
Added access key support for Run New Task (ALT + N), End Task (ALT + E), Efficiency Mode (ALT + V), and other buttons on each page. If you press ALT, the letters will display next to the button.
With a process selected, pressing the Delete key will now end the process like it used to.
CTRL + Tab and CTRL + Shift + Tab will now cycle through the pages in Task Manager.
Fixed an issue where the memory composition graph was blank instead of filed in with the appropriate color.
Mitigated an issue leading to the GPU graph on the performance tab not being displayed in some cases.
The icons in the status column of the Processes page are no longer touching the side of the column.
Fixed an issue where “Efficiency mode” was missing status column of the Users page.
[WSL]
Fixed an issue that would prevent WSL2 from mounting the host file system on ARM64.
[Other]
Fixed an issue from the previous flight where the acrylic might not extend across the entire login screen.
Fixed an issue that was causing the volume and brightness keys that appear when your use your hardware keys to be cut off in the middle.
Running powercfg /query should work now when launched from syswow64 or from a 32-bit process.
Fixed an apostrophe that wasn’t rendering correctly in the text when doing an offline scan from the Windows Security app.
Removed an extra “be” in the text describing Smart Account Control in the Windows Security app.
Fixed an issue for certain language which could lead to question marks being displayed in the place of some of the text when upgrading to a new build.
If you have increased the text size under Settings > Accessibility > Text Size and launch setup from a Windows ISO while booted into your currently installed OS, the text displayed in the setup window will now be increased to match your preferences.
Known issues
[General]
Windows Insiders running Windows 10 who join the Dev or Beta Channels to get the latest builds may encounter a download error code 0xc8000402 while trying to download the latest build. As a workaround, please join the Release Preview Channel first, install Windows 11 from there (Build 22000.xxxx), and then switch to the Dev or Beta Channel to receive the latest Insider Preview build. This issue is understood and will be fixed in an upcoming build.
We’re investigating reports that a few Insiders have been experiencing an issue where explorer.exe is crashing repeatedly in a loop in the latest builds and unable to successfully load. This build includes another fix that may help some Insiders who were experiencing this.
When opening Group Policy editor, an Administrative Template error will pop up. Click “Ok” to dismiss and continue using Group Policy editor normally.
[Taskbar]
The taskbar doesn’t always automatically collapse after launching an app or tapping outside of the expanded taskbar on 2-in-1 devices.
Some areas of the OS are not yet tracking the height of the expanded taskbar on 2-in-1 devices so you may see overlapping components.
[File Explorer]
Using context menu options in File Explorer or on the desktop for rename, copy, paste, and delete may cause explorer.exe to crash when the context menu dismisses. As a workaround if you are impacted you will need to use other methods for the desired action, for example, pressing F2 to rename a selected file or folder.
The option to “Add to Favorites” does not show when right-clicking on a file on Home. As a workaround, this option can be accessed by choosing “Show more options”.
[Widgets]
The widgets board may not open successfully when using the gesture from the side of the screen. If you are impacted, please tap the Widgets icon in the taskbar for now instead.
[Network]
We’re investigating reports from Insiders about internet connectivity issues when certain VPNs are connected.
[Live captions]
Certain apps in full screen (e.g., video players) prevent live captions from being visible.
Certain apps positioned near the top of the screen and closed before live captions is run will re-launch behind the live captions window positioned at top. Use the system menu (ALT + Spacebar) while the app has focus to move the app’s window further down.
Have you already installed and tested this build? Share your experience with us in the comments section below.
Productivity is at the heart of every professional or anyone running a business. For somebody who works online or whose work entails a significant amount of time on a browser, the Todoist Chrome extension is a beneficial tool.
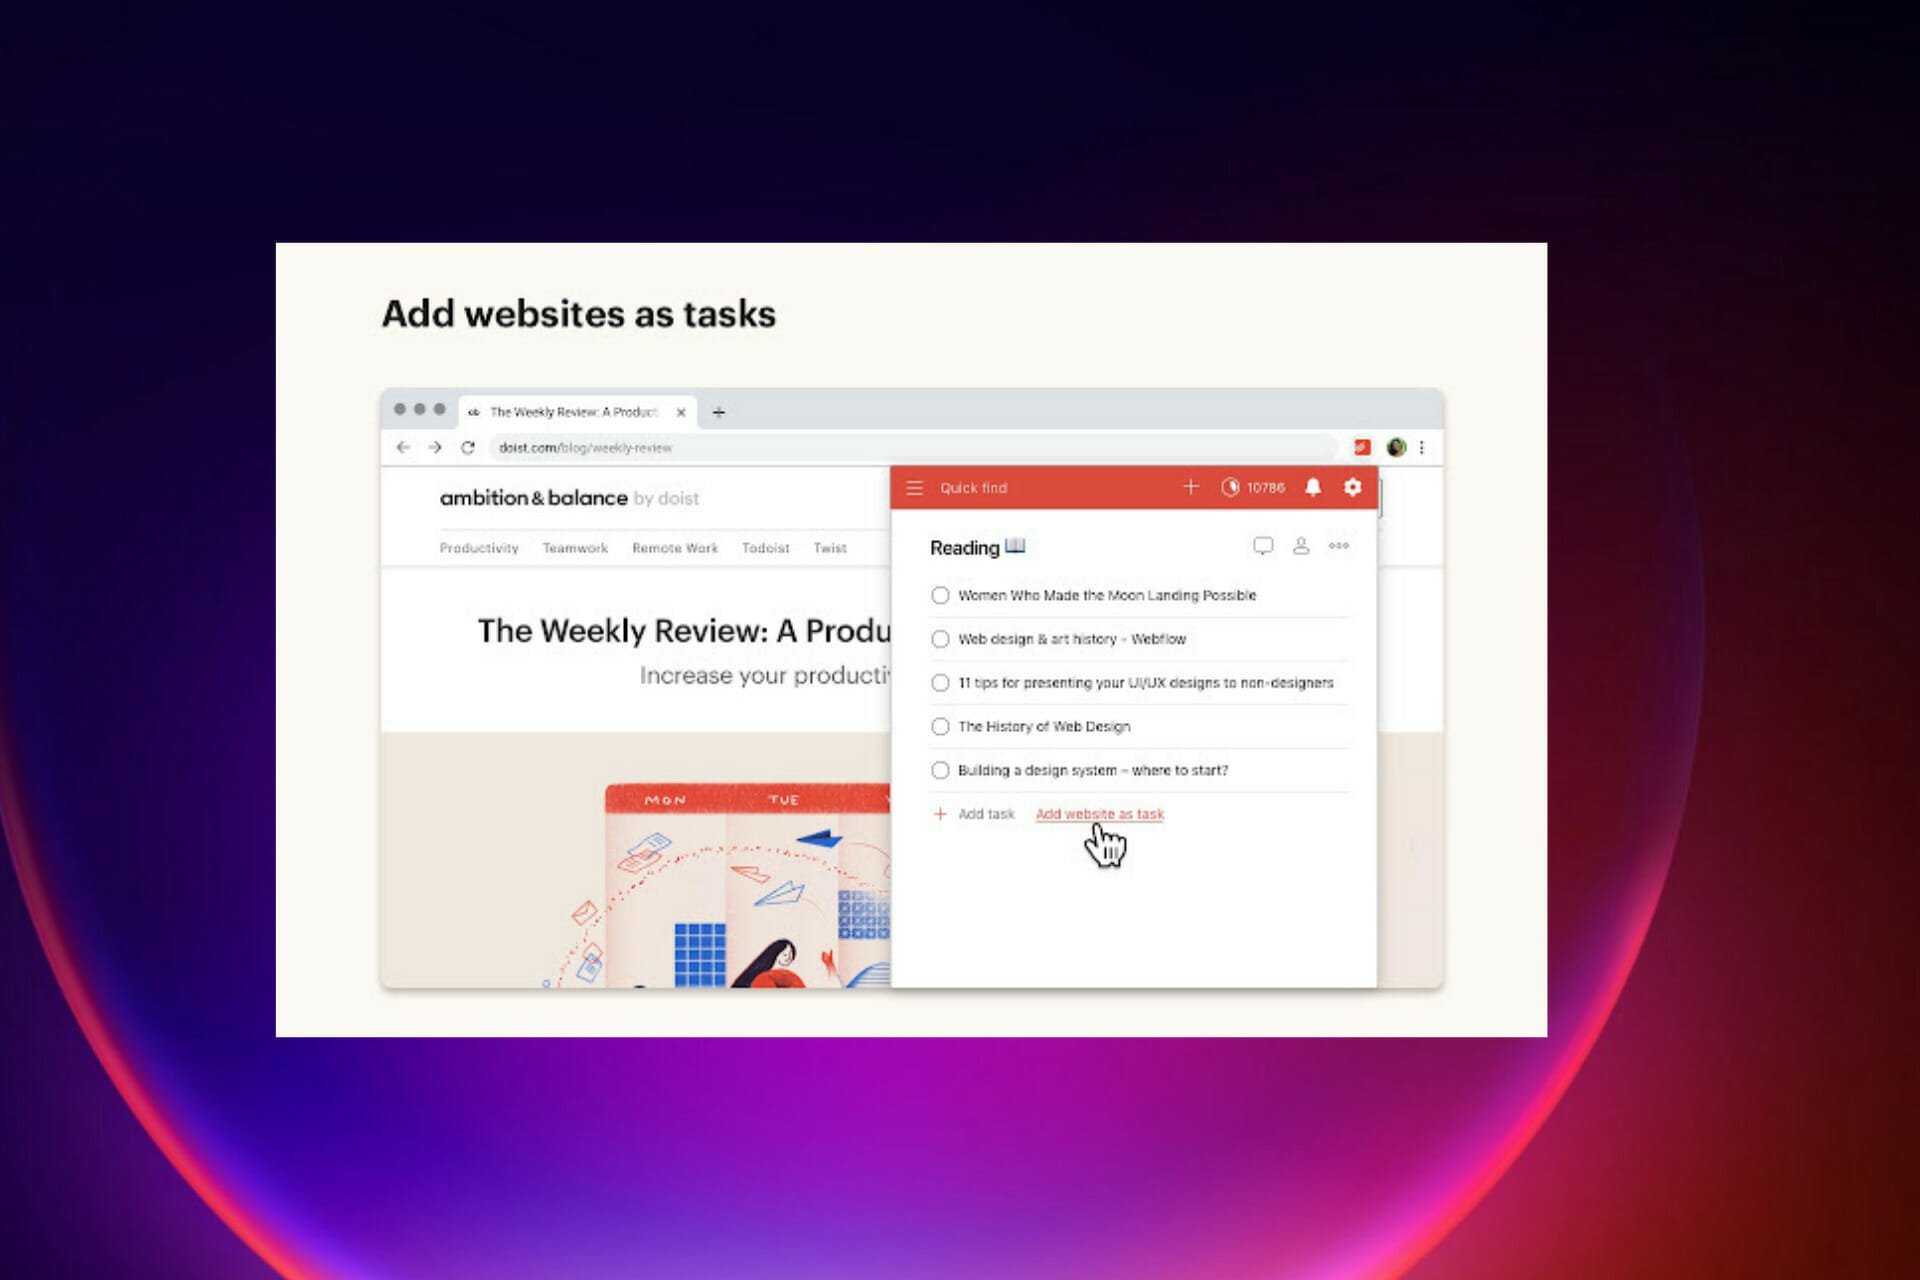
It is a tool that helps you to organize and plan for tasks. You can add blogs to your reading list, save an item to your wishlist, plan your day, and once you are done with tasks, you can check them off right on the browser.
Working online comes with many distractions, and having an extension that keeps you organized and tracks your productivity is of the utmost importance. The great thing about having the Todoist Chrome extension is tailored for browser-related tasks.
Why does the Todoist Chrome extension stop working?
Chrome extensions can stop working for a number of reasons, and each scenario has its repair strategy. While you may not be able to pinpoint a specific cause initially, you can try out different fixes until one of them ultimately solves your problem.
One of the reasons why your Todoist Chrome extension is not working is because you have an outdated Chrome or Windows build version.
Editor’s tip
We recommend the Opera browser which has numerous tools in the addons store, easy to install and use. This browser with a full-fledged navigation experience with various built-in packages, improved resource consumption, and great design is used every day by 350 million people.
There is a particular version of Windows OS that has a security feature that inadvertently prevents the use of extensions, add-ins, and add-ons to improve the browser’s functionality. Ensure both your Windows and Chrome versions are up to date to ensure this doesn’t happen.
Another reason might be because the main Chrome process has a glitch, or it is hanging. This can be fixed by ending the Chrome process in the Task Manager and then restarting the Browser. Below are some methods to resolve issues with the Todoist Chrome extension.
How do I fix the Todoist Chrome extension not working?
1. Clear your cache
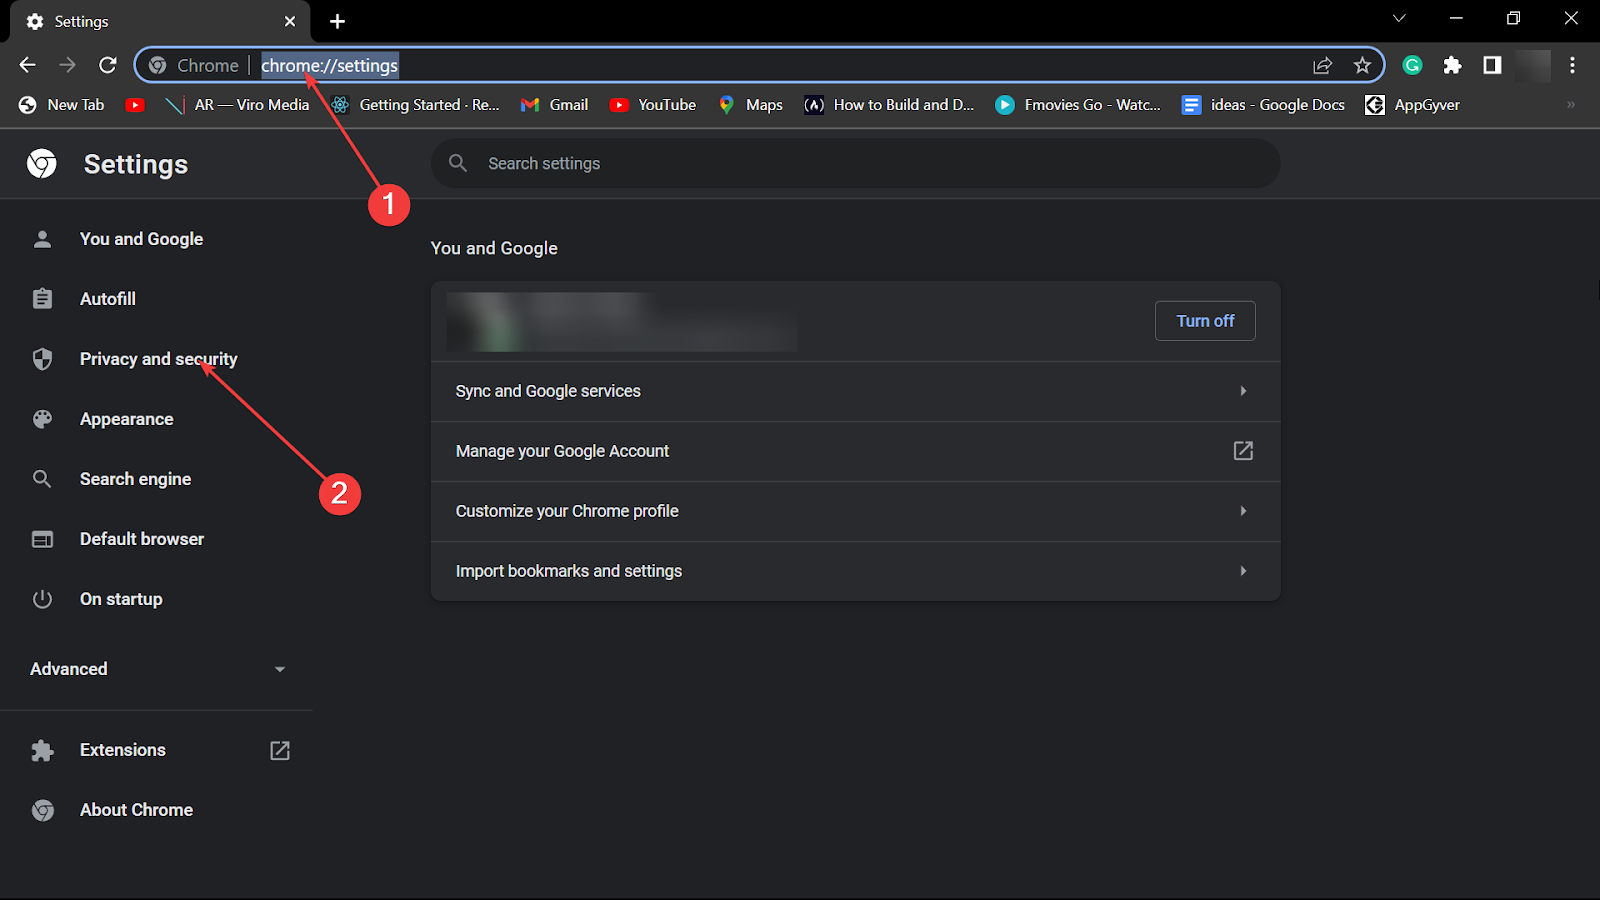
In the Chrome address bar, type chrome://settings, hit Enter, and then click Privacy and security.
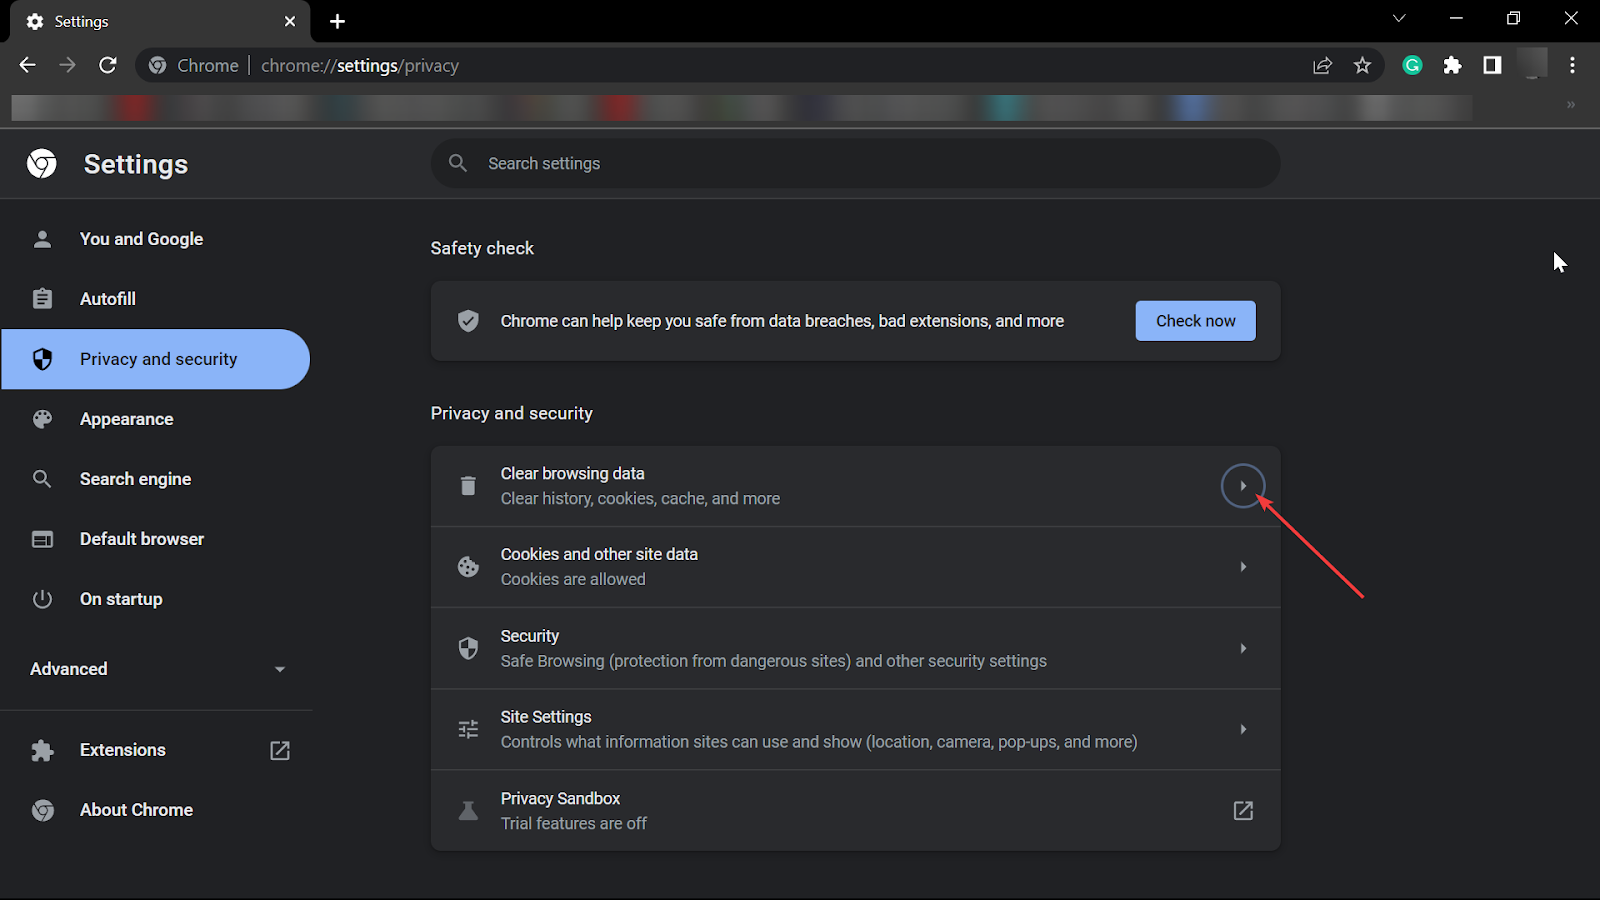
Click Clear browsing data.
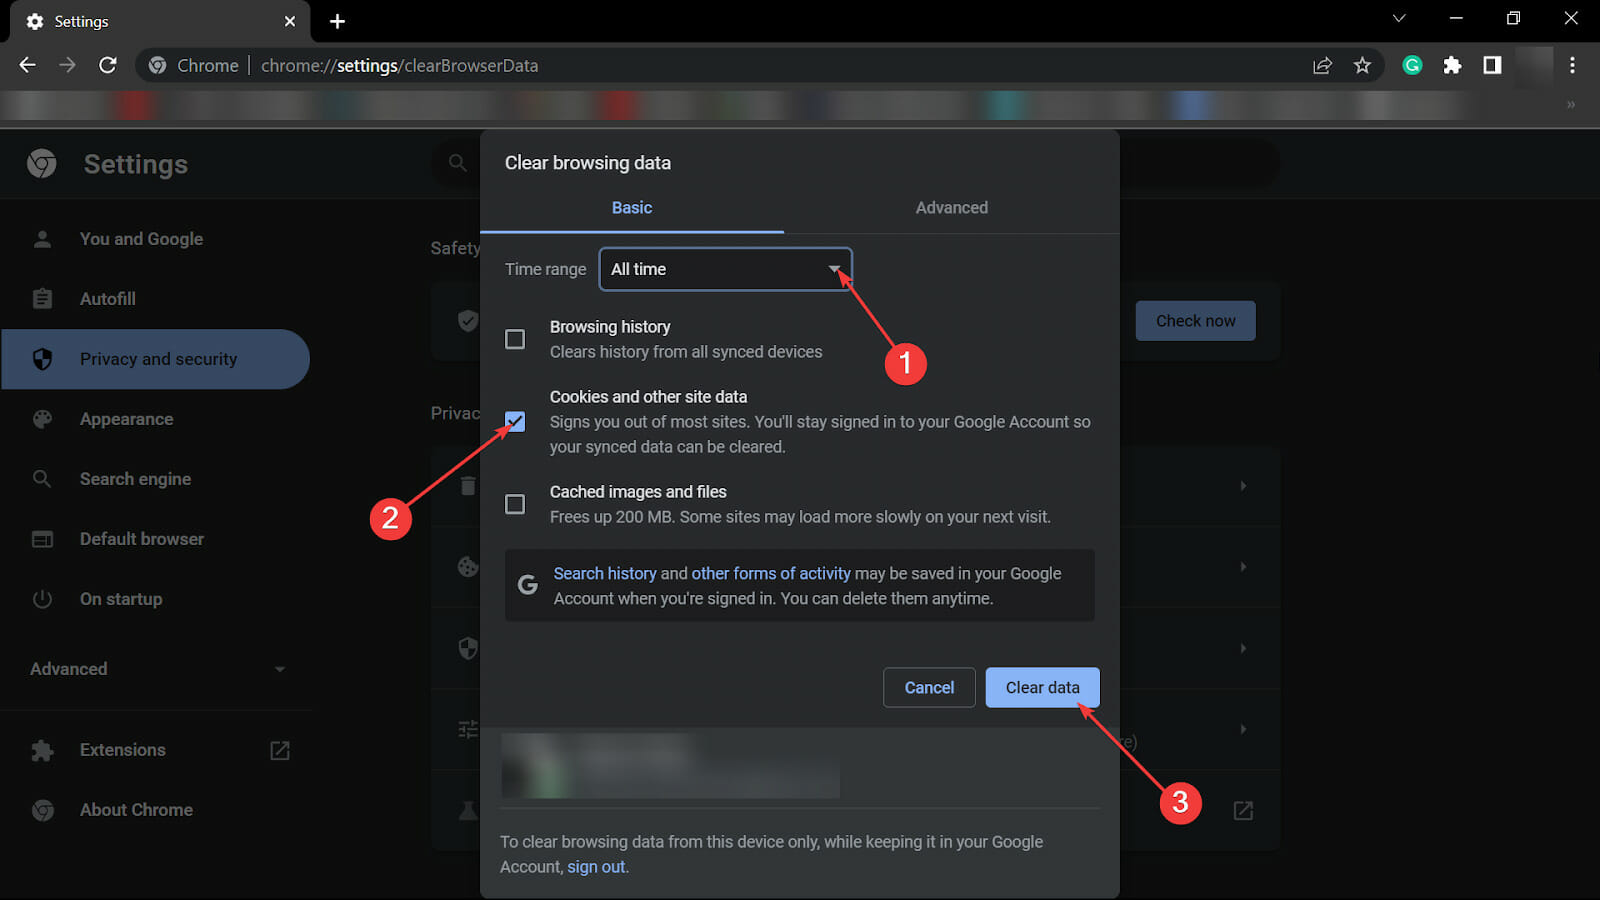
Set the Time range to All time, check Cookies and other site data, and finally click Clear data.
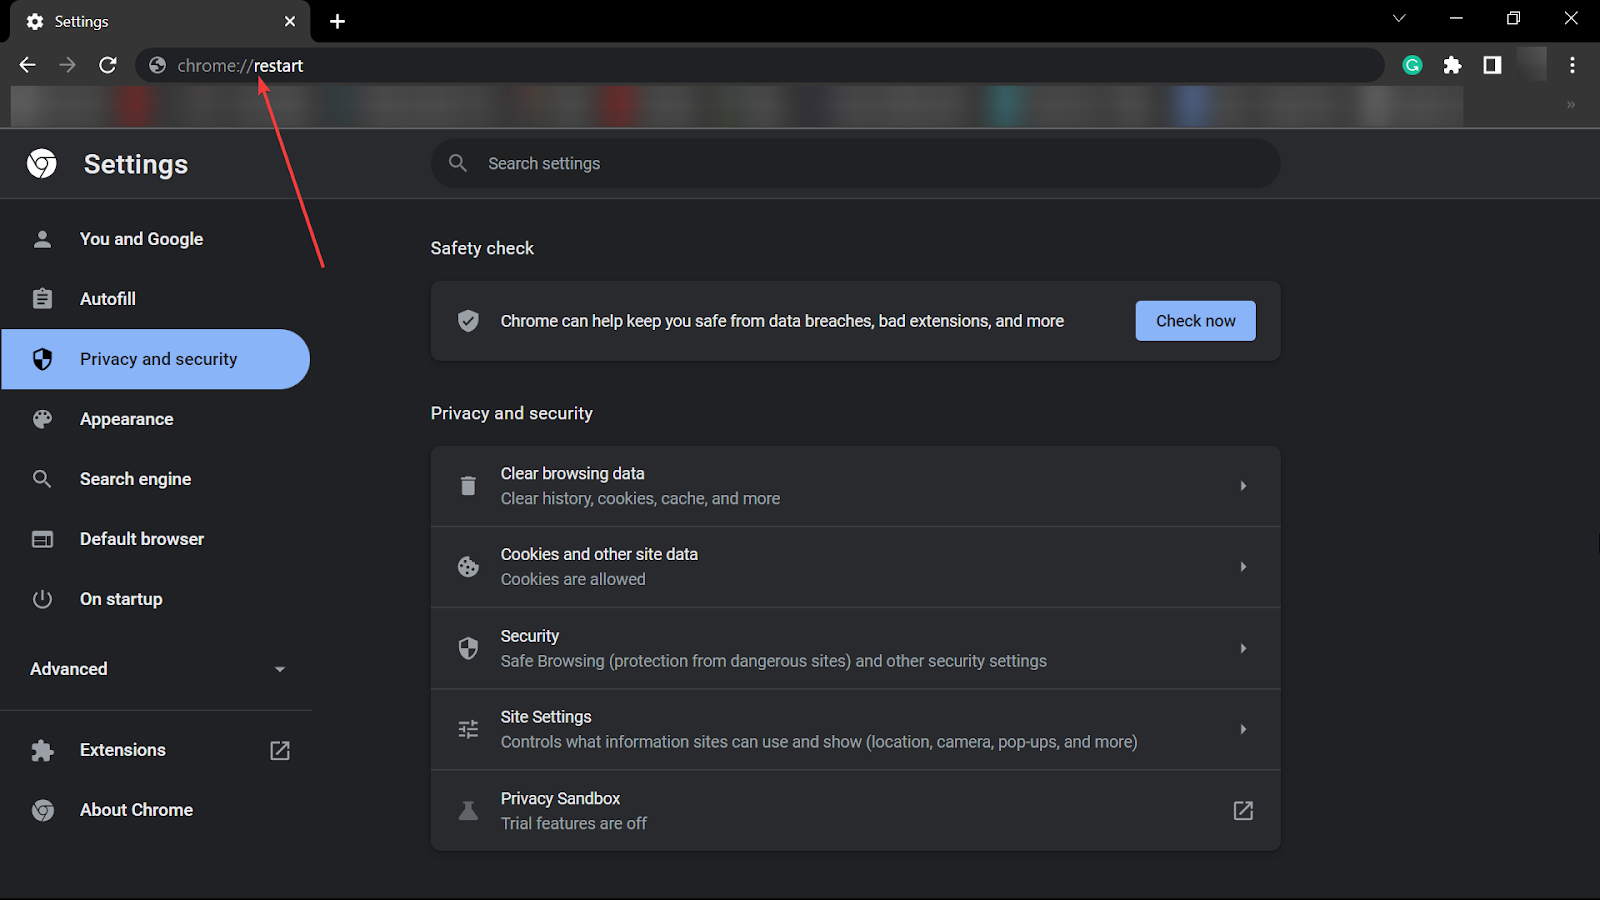
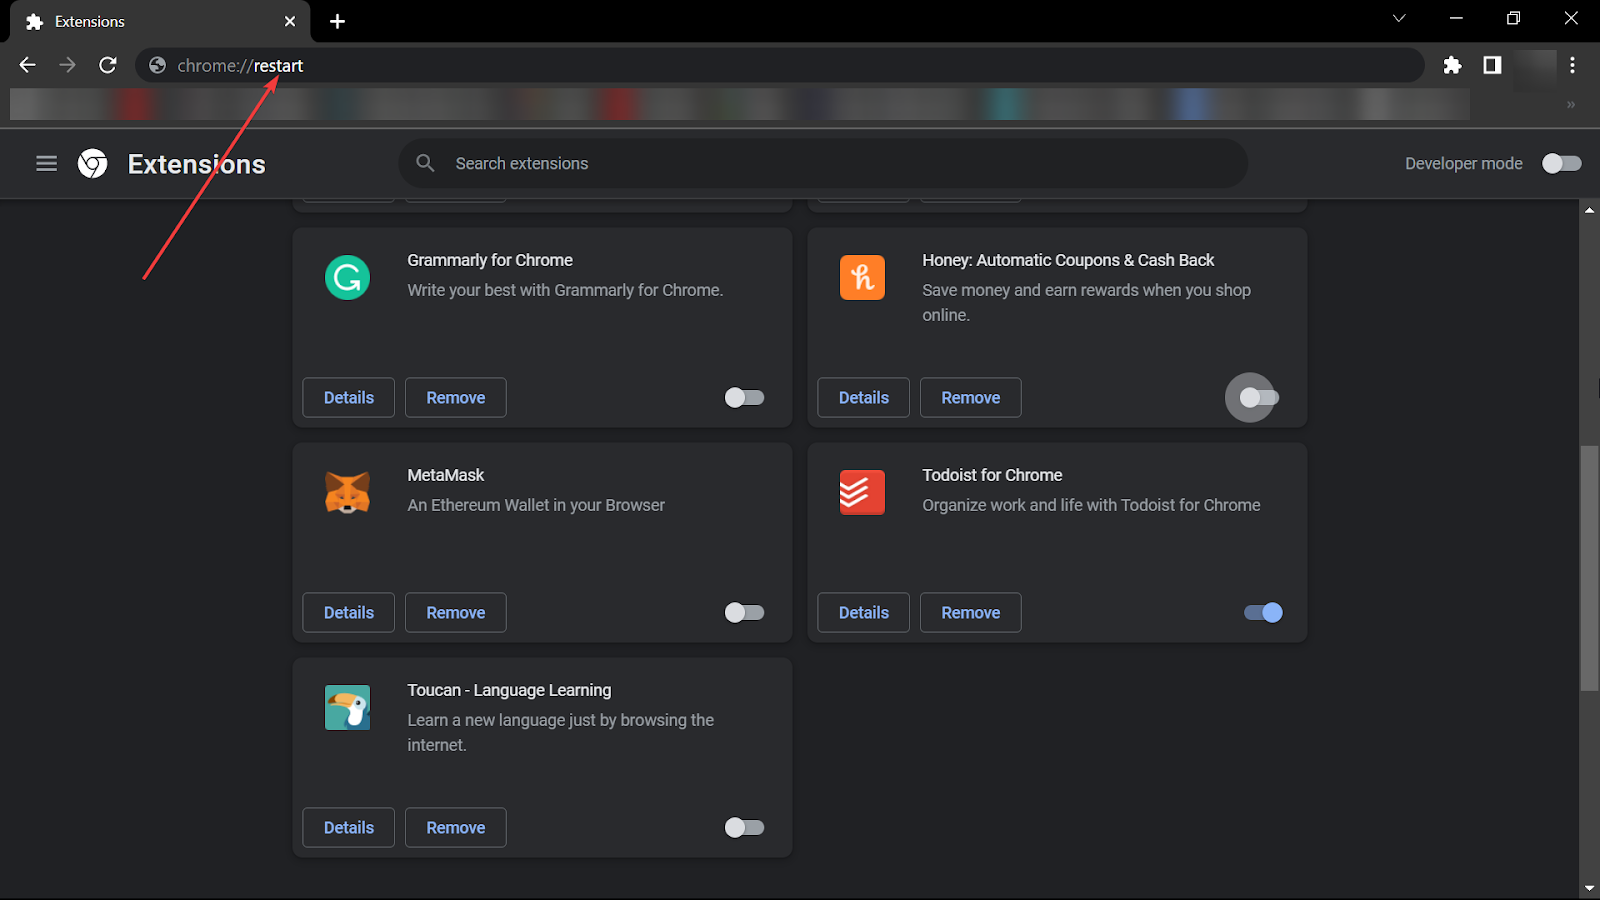
Type chrome://restart in the address bar and then hit Enter to restart Chrome.
The web cache can be the reason for Todoist Chrome extension not working issue. As a result, you must use an automated tool to clear your web browser cache and cookies.
CCleaner is a powerful full-featured PC optimization software that also includes a browser cleaner tool.
2. Reinstall the Todoist extension
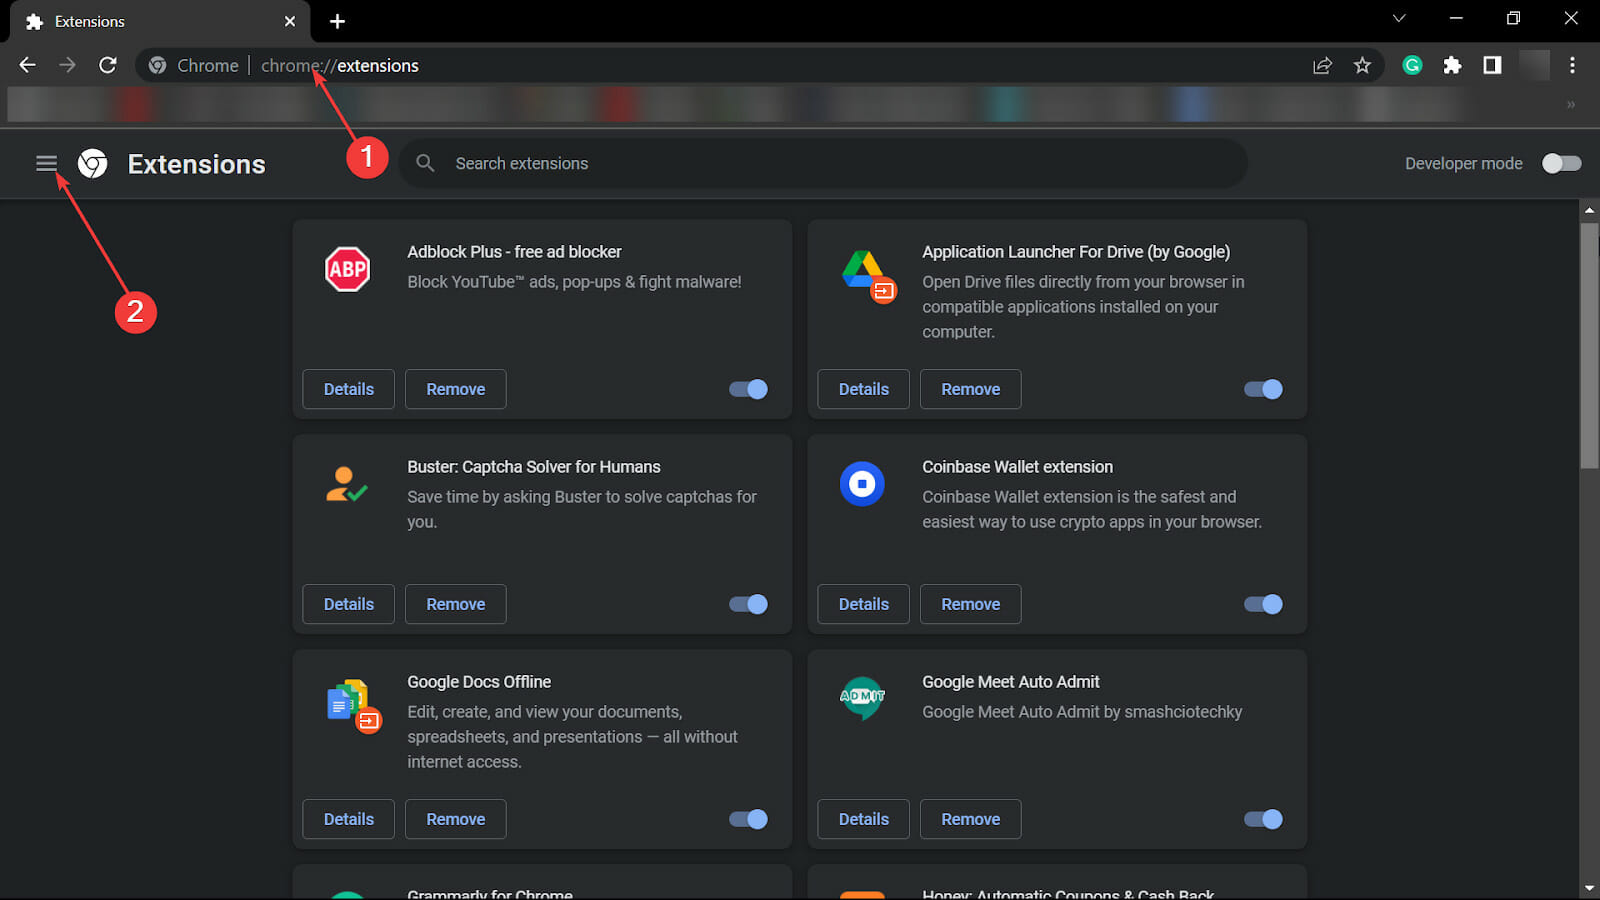
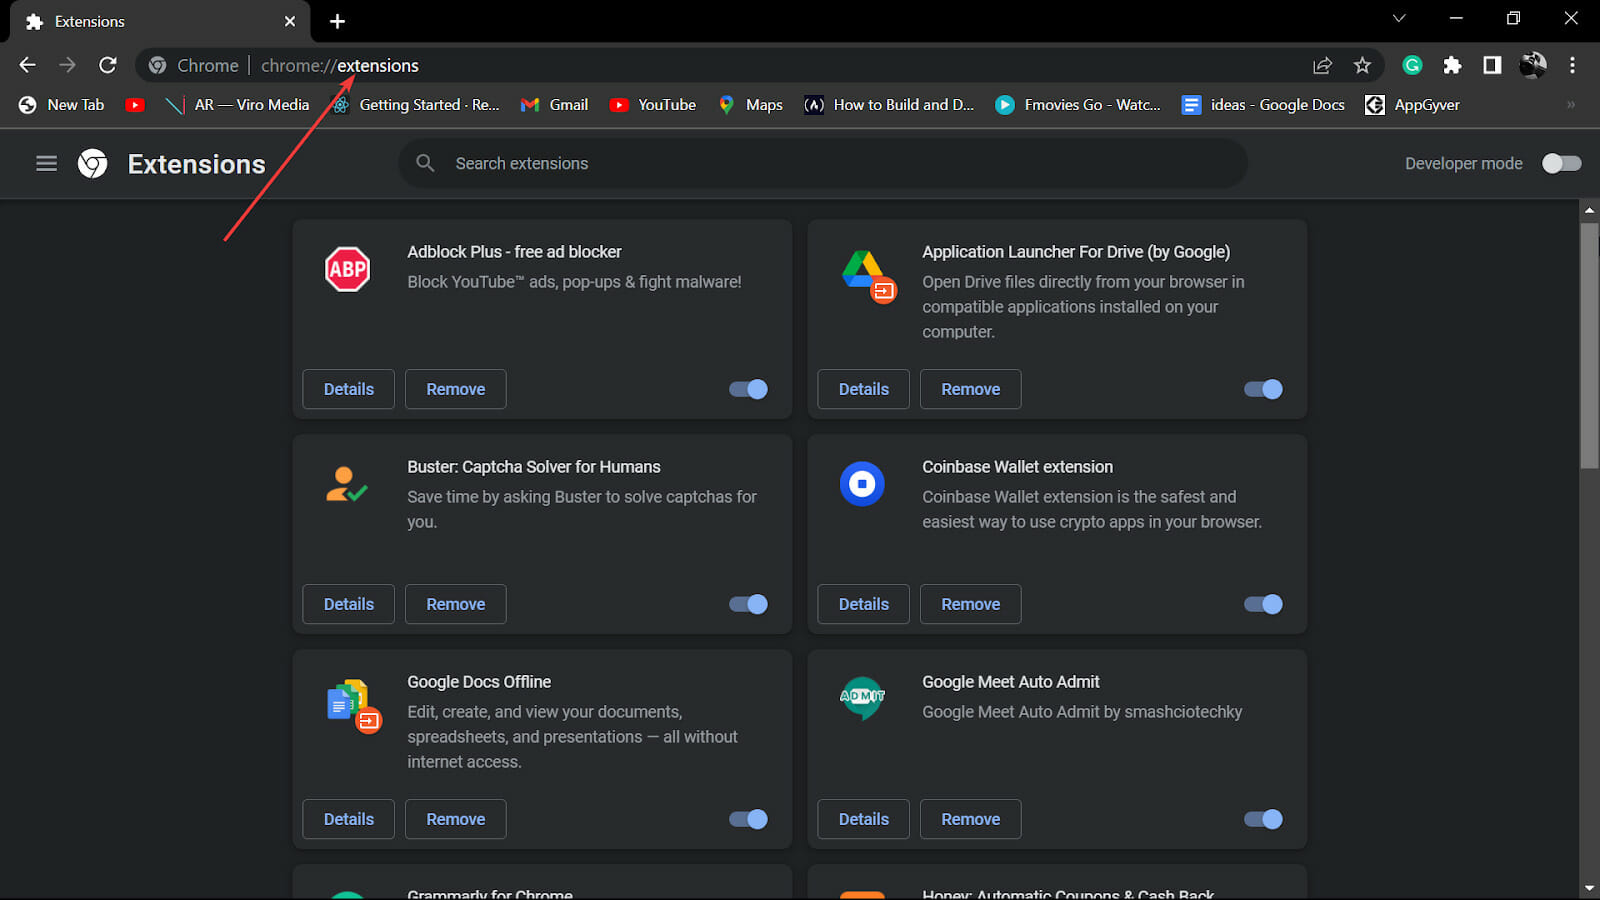
Type chrome://extensions in the address bar hit Enter, and click on the Menu button.
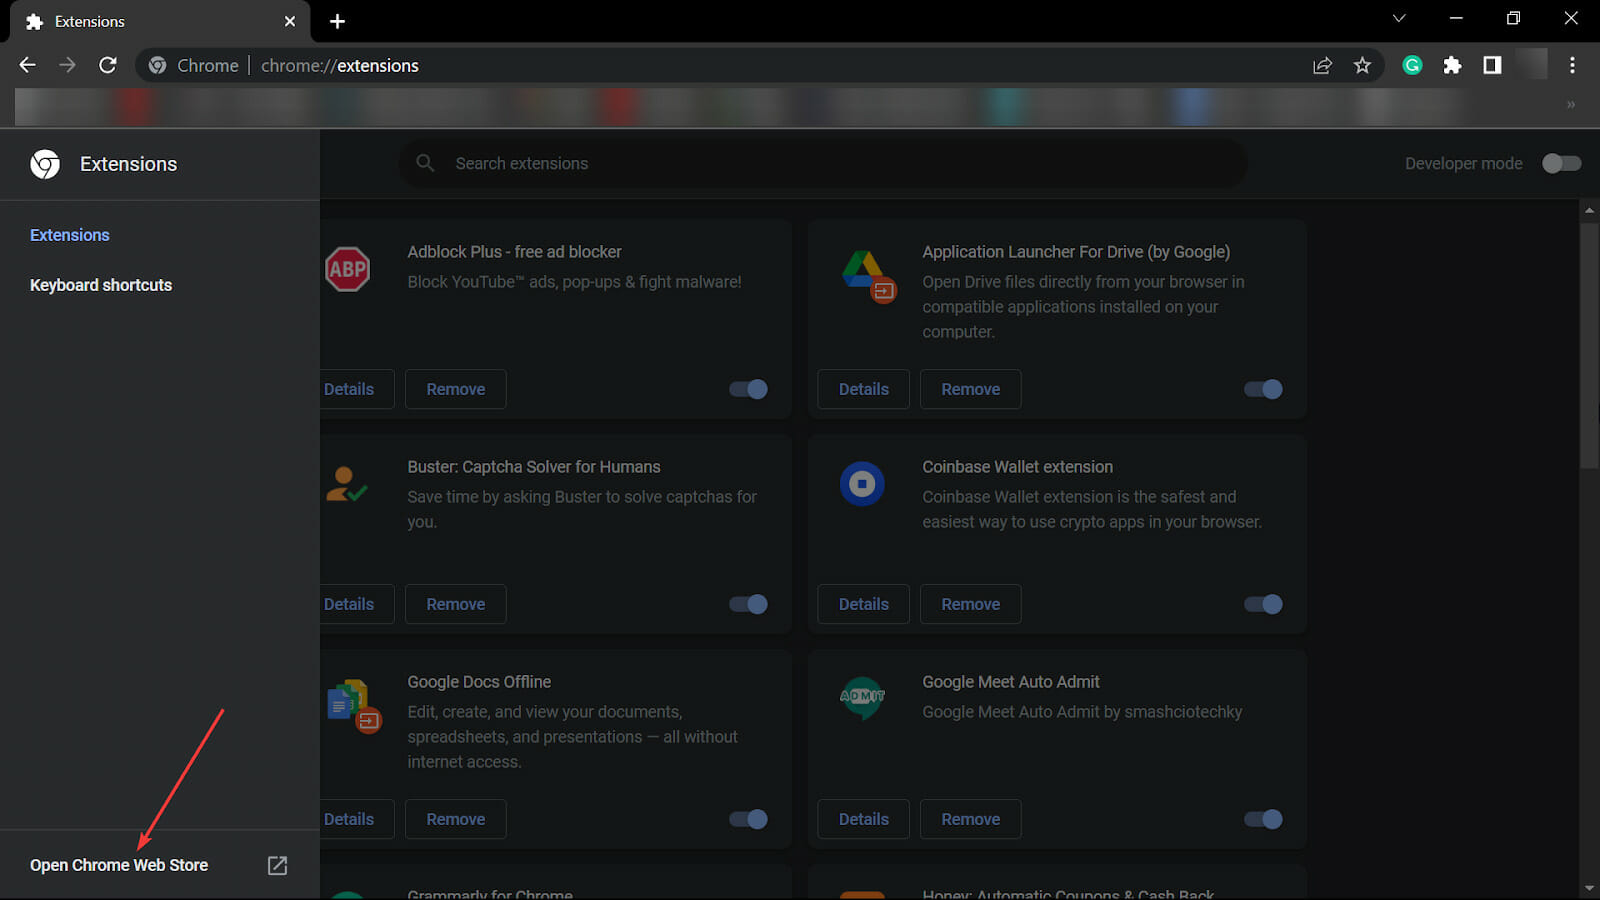
Click Open Chrome Web Store, which will launch you into a new window.
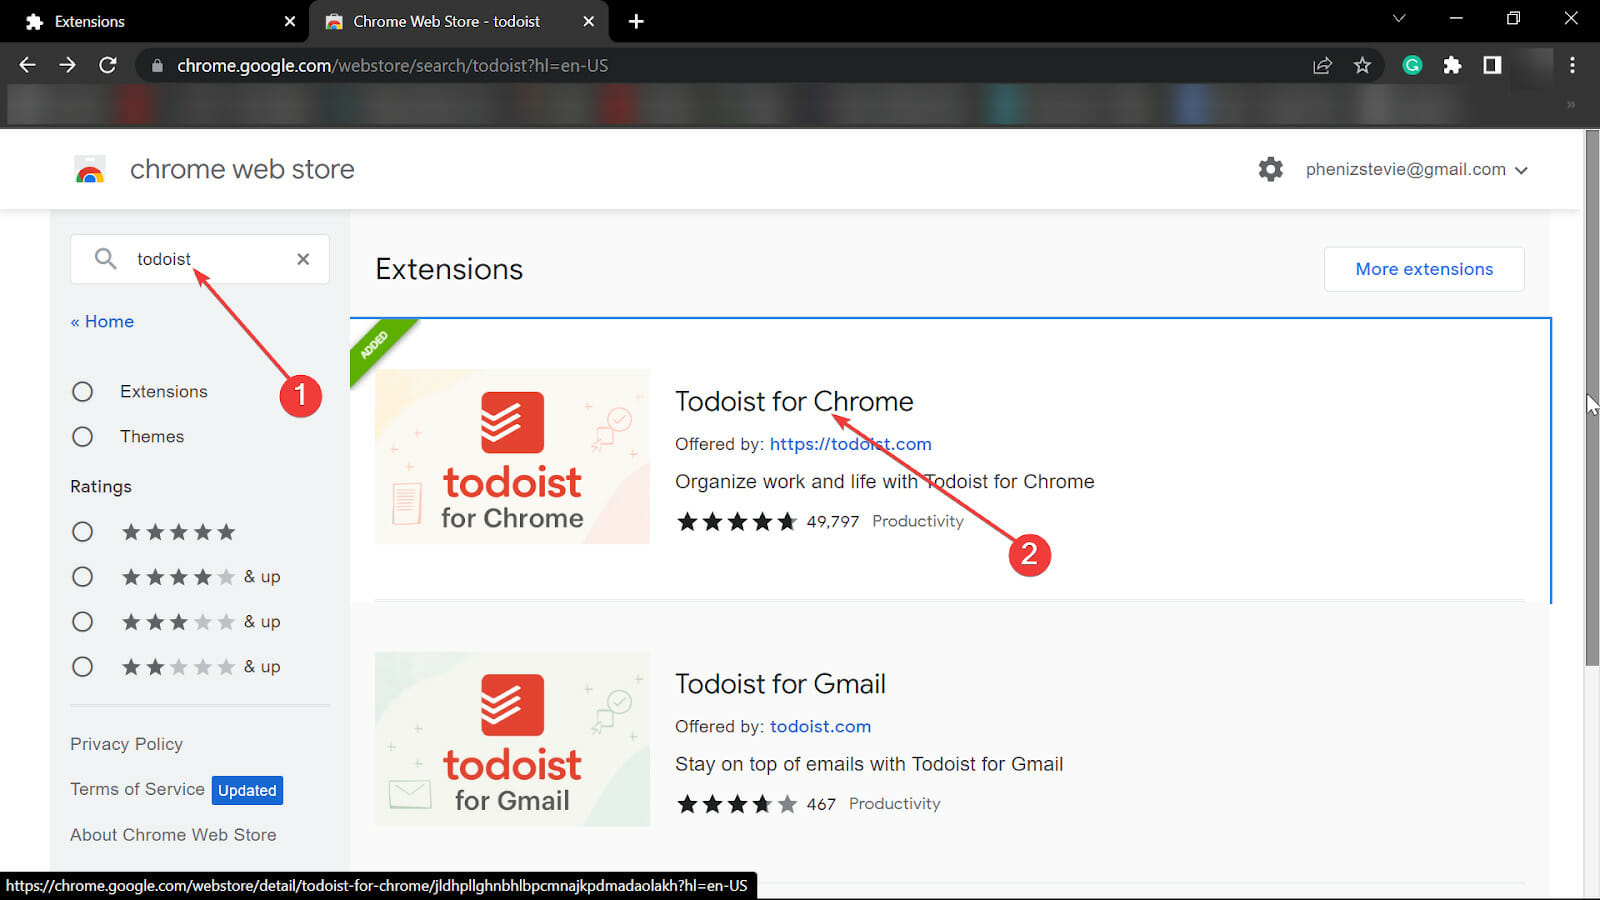
Type todoist in the search bar, then click on Todoist for Chrome.
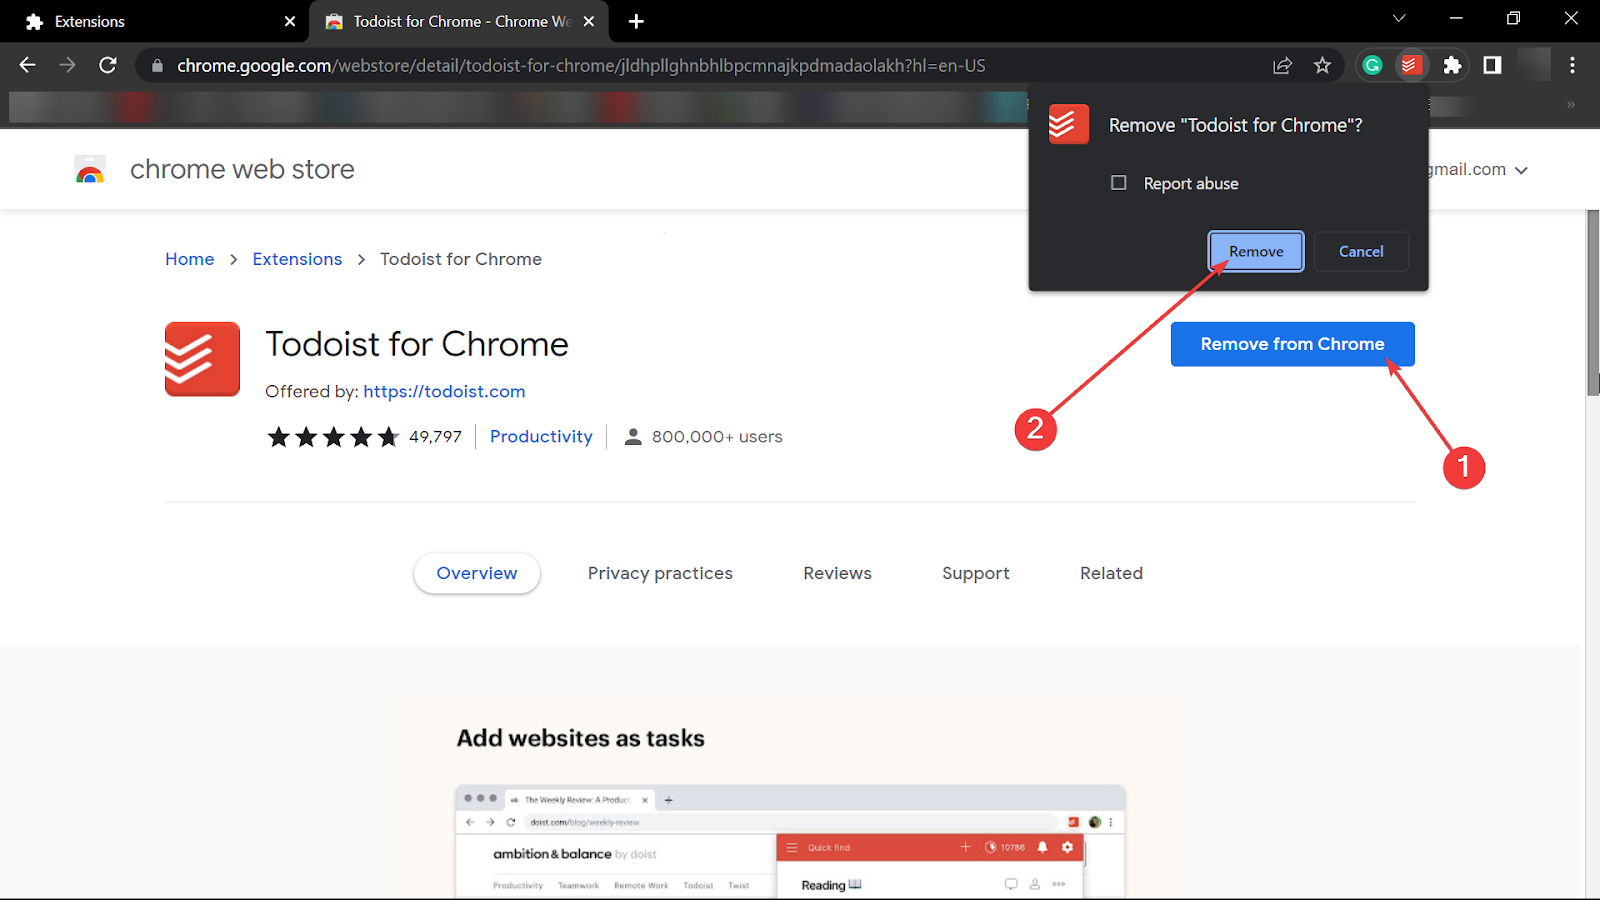
Click Remove from Chrome, then confirm by clicking Remove.
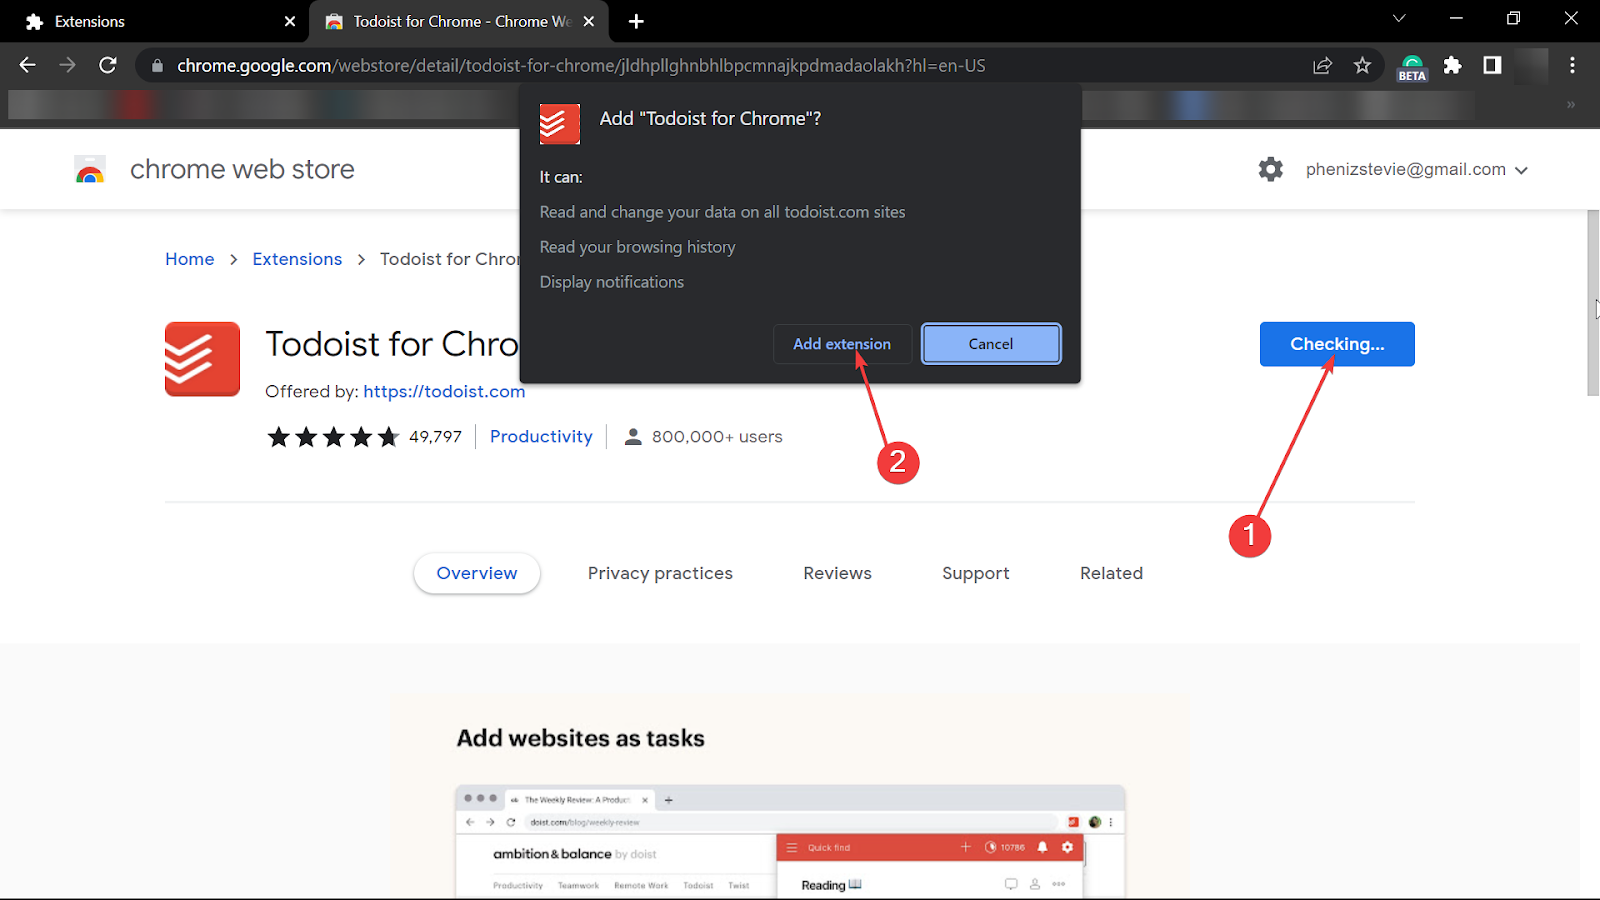
After the extension has been removed, click Add to Chrome, then confirm by clicking Add extension.
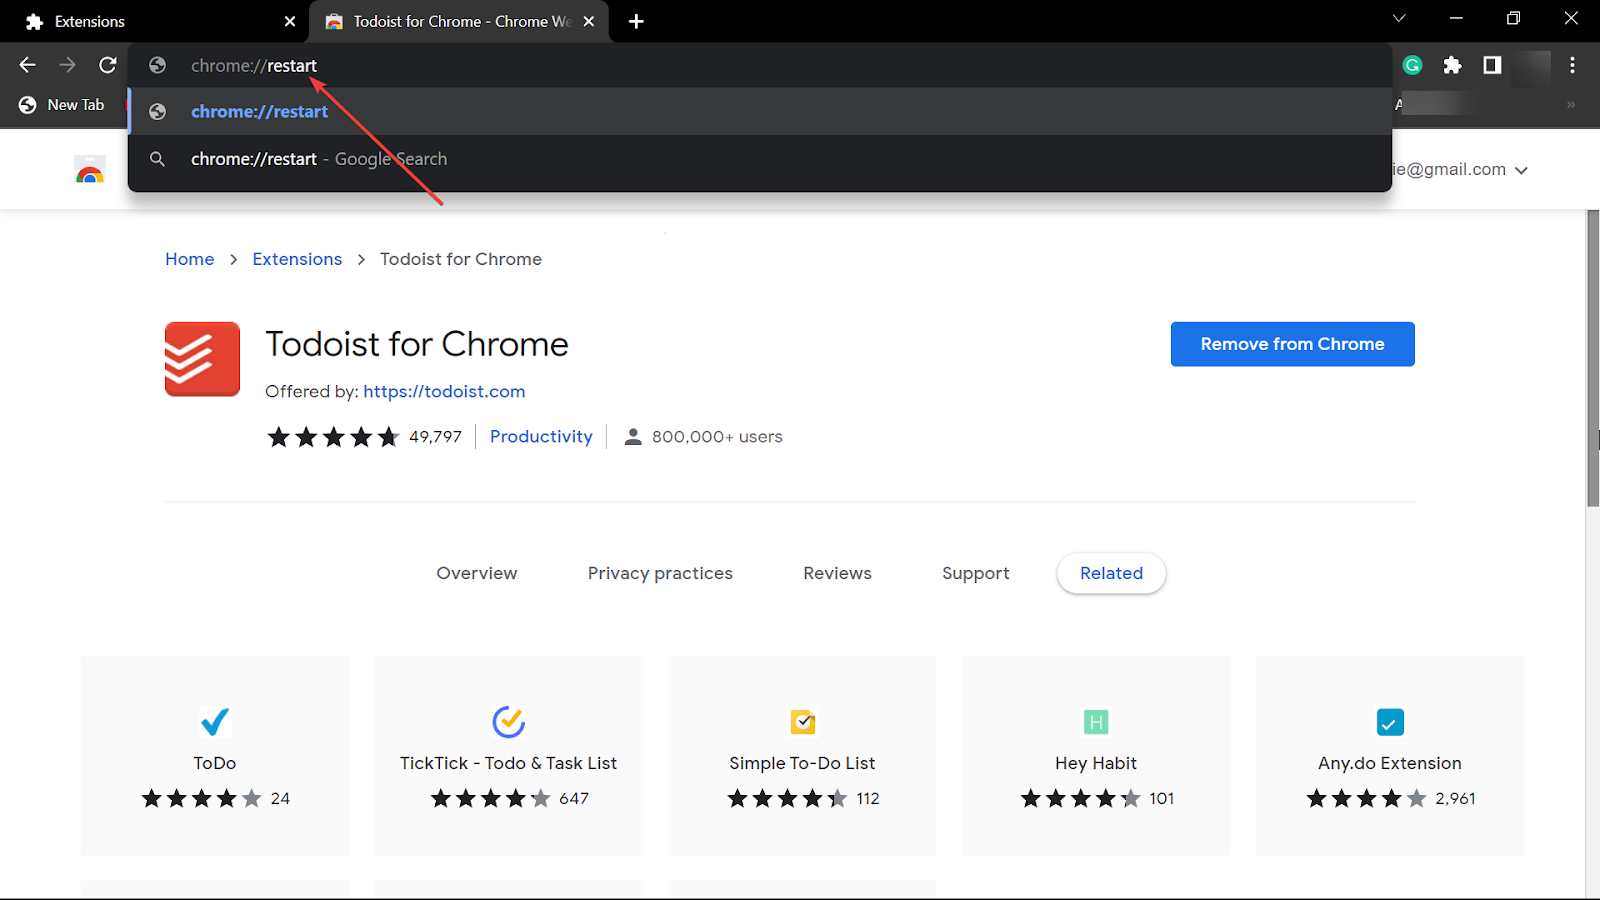
Type chrome://restart in the address bar and then hit Enter to restart Chrome.
3. Disable other extensions
Type chrome://extensions in the address bar then hit Enter.
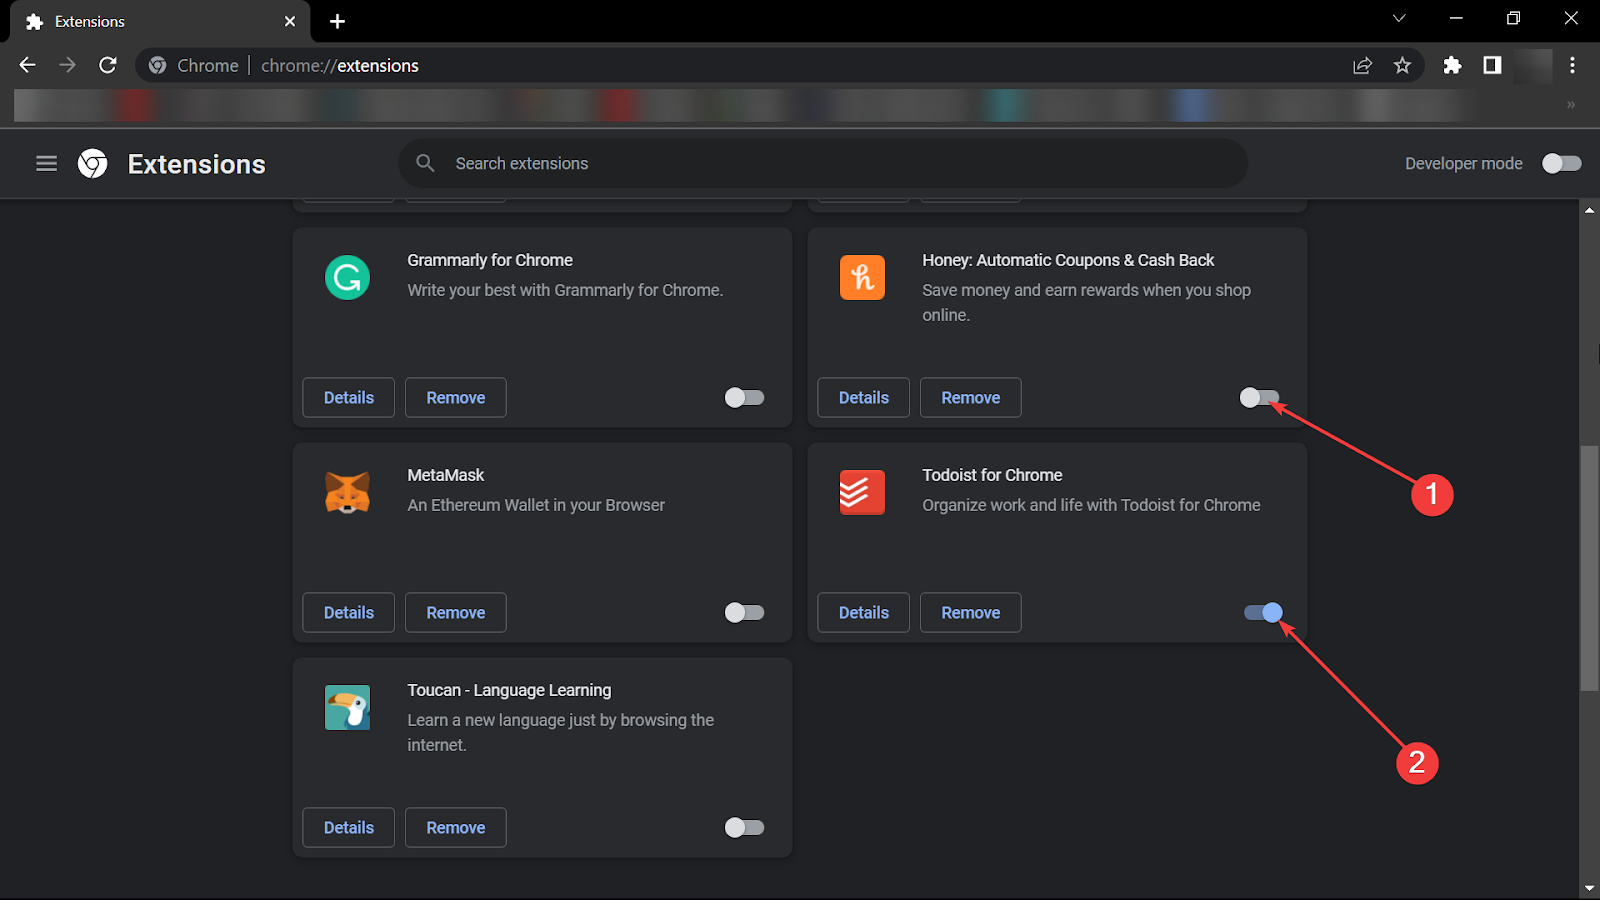
Disable everything except for Todoist.
Type chrome://restart in the address bar and then hit Enter to restart Chrome.
4. Ending the Chrome process through the Task Manager
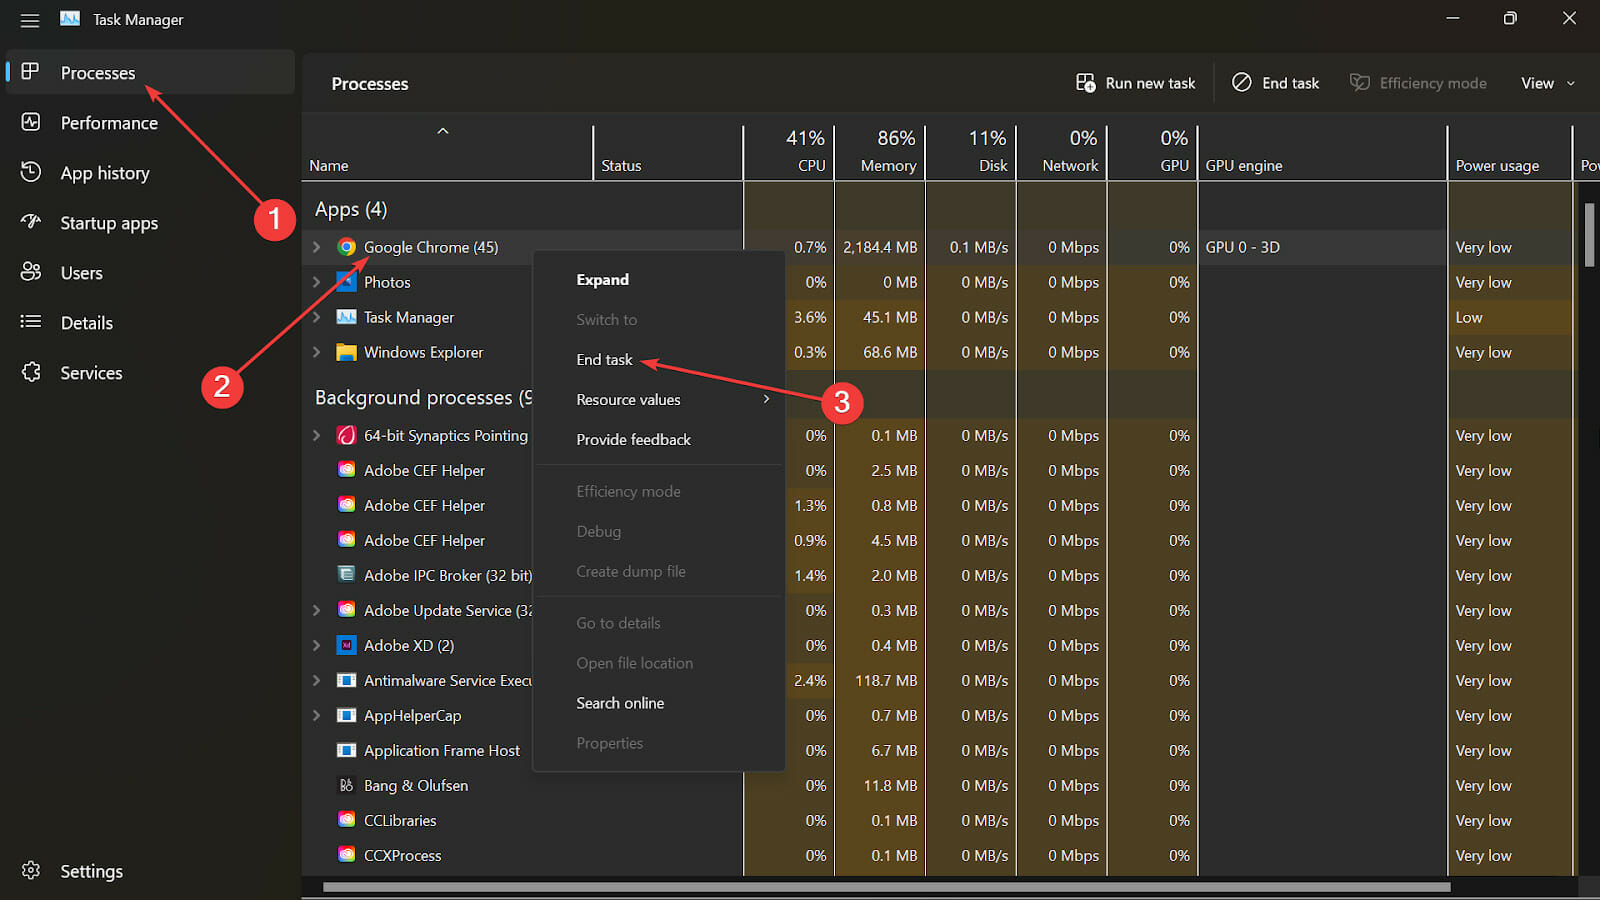
Press Ctrl + Shift + Esc on your keyboard to open up Task Manager.
Click on the Processes tab, right-click on Google Chrome and then click End Task.
Restart Chrome and check if the issue has been fixed.
Todoist has an app on all major platforms and a range of plugins and integrations.
For instance, if you need to sync due dates with another calendar like Outlook or Google Calendar, there are convenient buttons on the app to enable integrations coupled with a calendar link to connect to any other calendar that supports an external subscription feed.
By adding a plugin on Gmail or Outlook, you can turn emails into tasks, so you no longer forget to email back or go through an attachment. Learn how to fix Gmail does not load in Chrome if you find yourself in that predicament.
If you wish to create a list of companies or people you want to research on your browser, Todoist is available across multiple browsers to keep track of those online tasks like virtual sticky notes.
The part that makes Todoist such a great tool is the interoperability and effortless synchronizing.
Whether it is macOS, Windows, iOS, Android, Android wear, Apple watch, browser extensions, and web, a Todoist is available to make sure your productivity is optimized across the board. Some great list-making applications exist across a range of platforms, so do not hesitate to check out our list.
Tell us how you use Todoist and if the issues were fixed. Feel free to leave a comment below.
Some gamers reported errors when they downloaded several add-ons for games like World of Warcraft, Starcraft II, Diablo III, and Overwatch. Most of them use the Lua programming language, which uses scripts to add modules and content.
When gaming, users tend to install add-ons that help modify and change the game’s User interface. The majority of the add-ons get categorized according to the size, scope, and dependency on other plugins to provide more functionalities.
There are different types of add-ons that perform other functions like:
Boss mods to provide timer and warnings
Information displays show more information during gaming like stats, measurements, and distance.
Action bars to improve the game abilities
Unit frames to customize the display of group/team appearance.
Some users report different errors after installing the add-ons. It becomes annoying if you have a lot of reliance on the add-ons. This article will look at causes and ways of fixing the errors.
What are the causes of your add-ons experiencing a large number of errors?
There are several reasons why the error pops up when using the add-ons. Some of the potential causes of this error include:
Add-on malfunctioning-some of the add-ons can be corrupt due to bad code written by developers.
Corrupt add-on files-some add-ons consist of corrupt files that throw errors when gaming.
Use of custom variables-some gamers uses custom variables to support add-ons that no longer exist. It may lead to errors.
Outdated add-ons-some users install outdated or unsupported add-ons that might interfere with the gaming experience.
How can I fix add-ons experiencing a large number of errors?
1. Reset the interface
All the add-ons get saved in the Interface folder that also carries screenshots and cache. Resetting the interface folder removes all the corrupted files and code, making it hard for the game to function well.
When you delete the folder, the game automatically creates a new one when it launches.
You can do this by starting the task manager and seeing if the tasks are running, end them. Then back up the folder’s contents and delete it from the game directory. Try launching the game after that and installing all the add-ons you need afresh.
2. Make sure the add-ons are in the correct folder
When installing the add-ons, make sure they go to the sub-directory of the game folder. This makes it easier for the game to recognize the add-ons. Some people confuse the add-ons folder during installation, putting the add-ons in a different folder.
If you have the same issue, copy the add-ons from the wrong folder to the subdirectory of the game. Restart the computer to confirm if the error persists.
In some cases, if you download an add-on and it doesn’t show up in the game, it means it’s unsupported by the game.
3. Uninstall all the add-ons and confirm if you have a Cartographer add-on
Most outdated add-ons aren’t compatible with the game, producing the error. Uninstalling the add-ons depends on the documentation provided by the developer, where each has its own, and you have to follow it for it to be successful.
One common add-on with this issue is the Cartographer add-on which turns the Cartographer mode on. This add-on stopped receiving support from its developers, making it outdated and causing many problems during gaming.
After the uninstallation, reboot the game and see if the error still exists. If it still exists, try the other methods.
4. Reset the consoles variables
Confirm if you have any console variables in your game. If they exist, you have to reset and remove them. It mainly applies in cases where users install and run multiple add-ons that use different parameters, causing collisions with each other.
Many users report that when you open the game and run the following commands, the procedure resets all the custom variables and brings back the default variables:
/Console Cvar_reset
/console cvar_default
Sometimes you receive a Permission error when you run the two commands, ignore it and proceed with your process.
When doing this, you must understand that resetting removes all the existing add-ons, and you will have to reinstall everything afresh.
5. Reload the game interface
The majority of the error used to appear when someone launches the game. To avoid this, try reloading the game to ensure that add-ons that failed loading during the first launch get loaded, and the error disappears.
It is common for one of the add-ons to have an outdated code and doesn’t integrate well with the other add-ons. You can do it manually or type the following command in the chat box:/reload.
This issue mainly affects the latest versions of games, and it can also affect the earlier versions, but it’s rare.
6. Disable the error prompts
There are several commands you type in the chatbox that will help you in avoiding the error from the add-ons every time you launch the game.
You can type /console scriptErrors 0 in the chatbox after launching the game, and you will never see the errors again. If you change your mind, you can still enable them by typing /console scriptErrors 1 command in the chatbox.
There is another alternative where you can install BugSack and BugGrabber, and they will help you do the same step.
You will get most of the errors when you launch your game and get a notification of what the error entails. If you lack a way of getting the error, turn the game consoles on, or you can check through your console and get all the errors.
Once you know which add-ons have errors, you can use the above methods to get rid of them.
In the gaming world, you should be aware of and able to fix Lua errors from scripts, among many other errors.
Let us know which method fixed your error in the comments section.
Have you been encountering MetaMask not connecting to the Ledger problem? Go through this article to find the solutions along with some other helpful information.
Mertamask is a cryptocurrency wallet that can interact with the Ethereum blockchain. It has become very popular among crypto lovers, particularly the less technical users.
The Ledger is a device that acts as a crypto wallet. It can hold multiple currencies offline. You can easily connect the Ledger hardware with MetaMask.
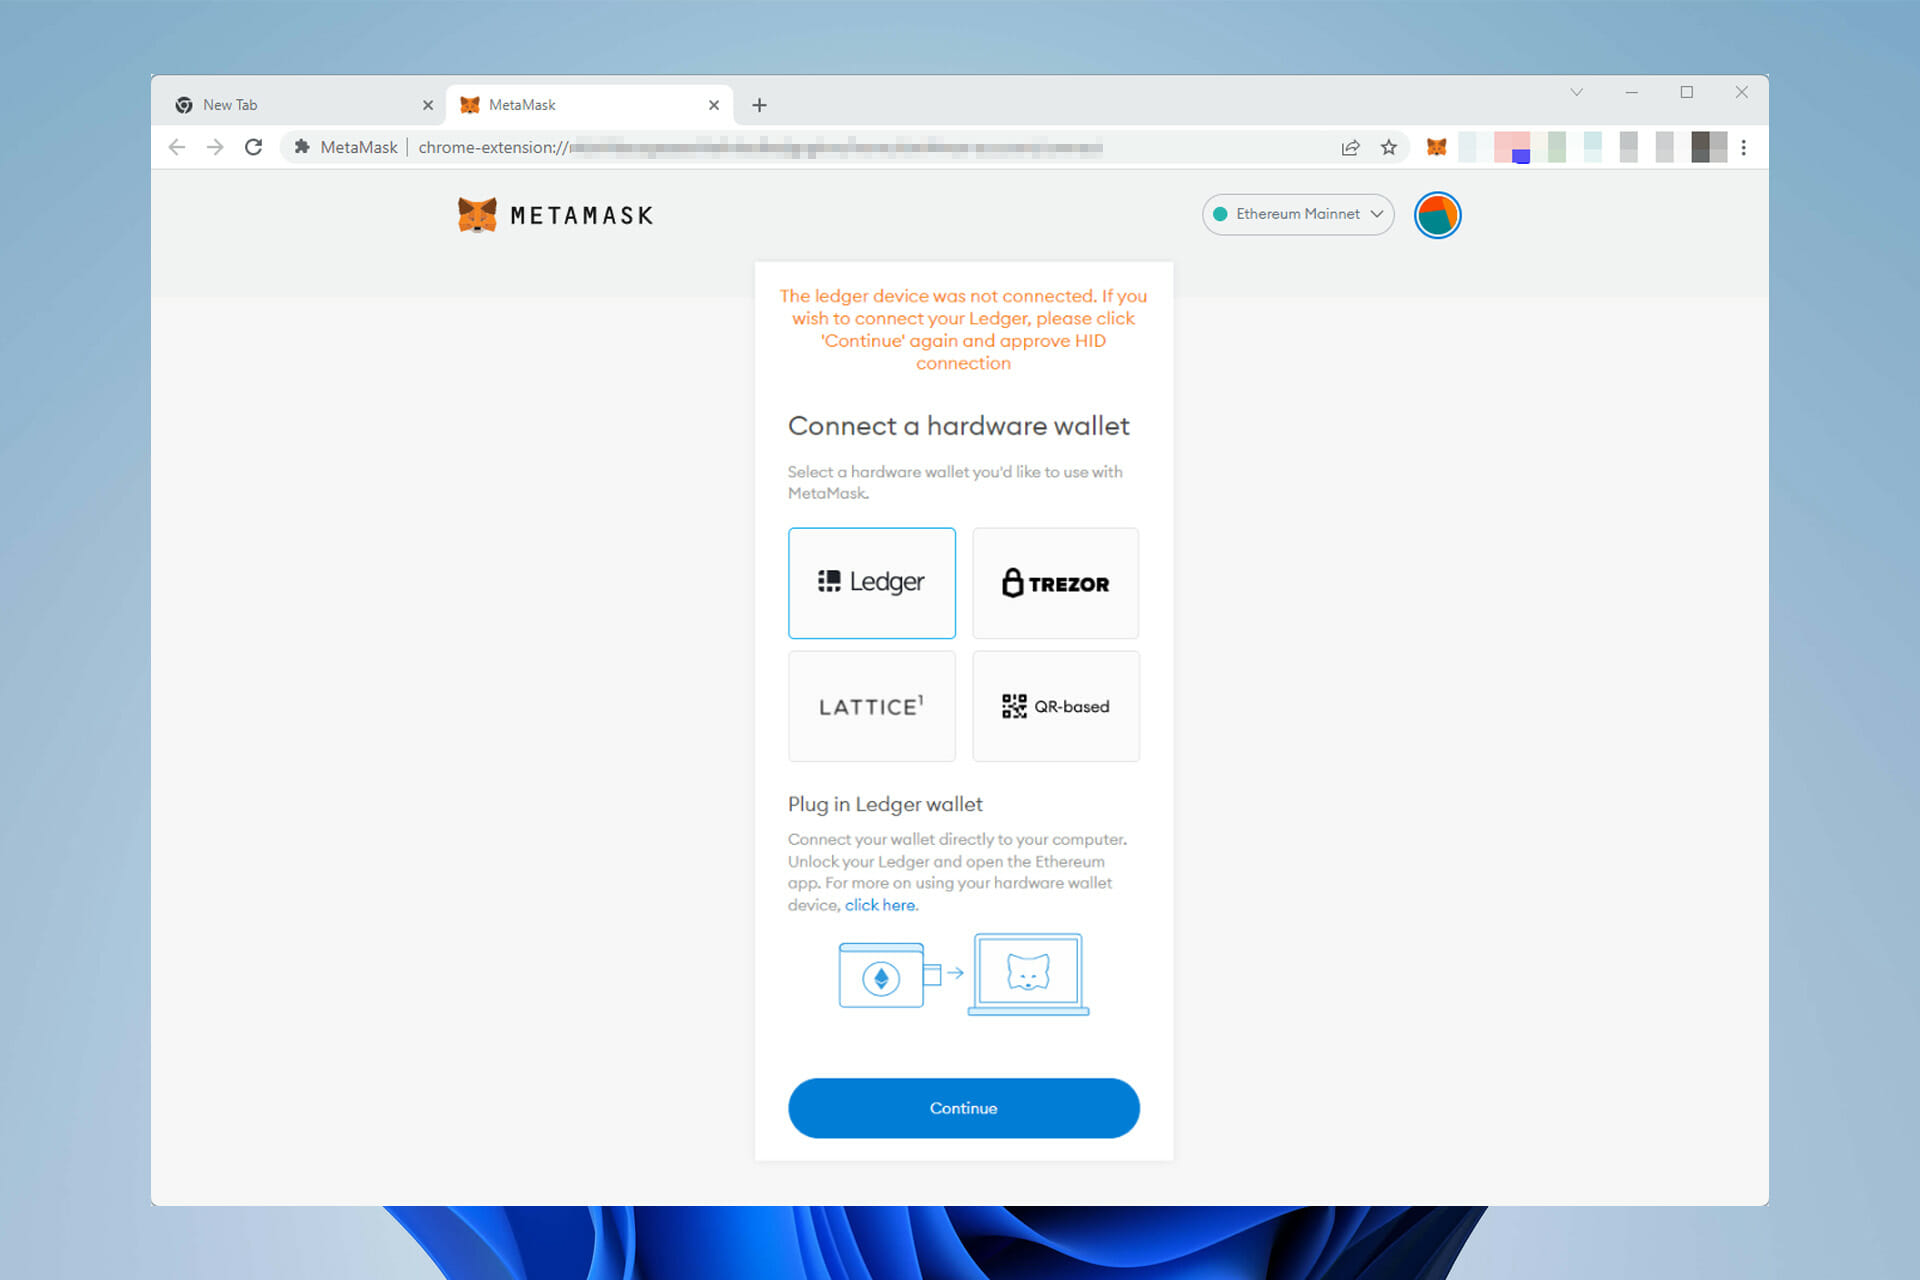
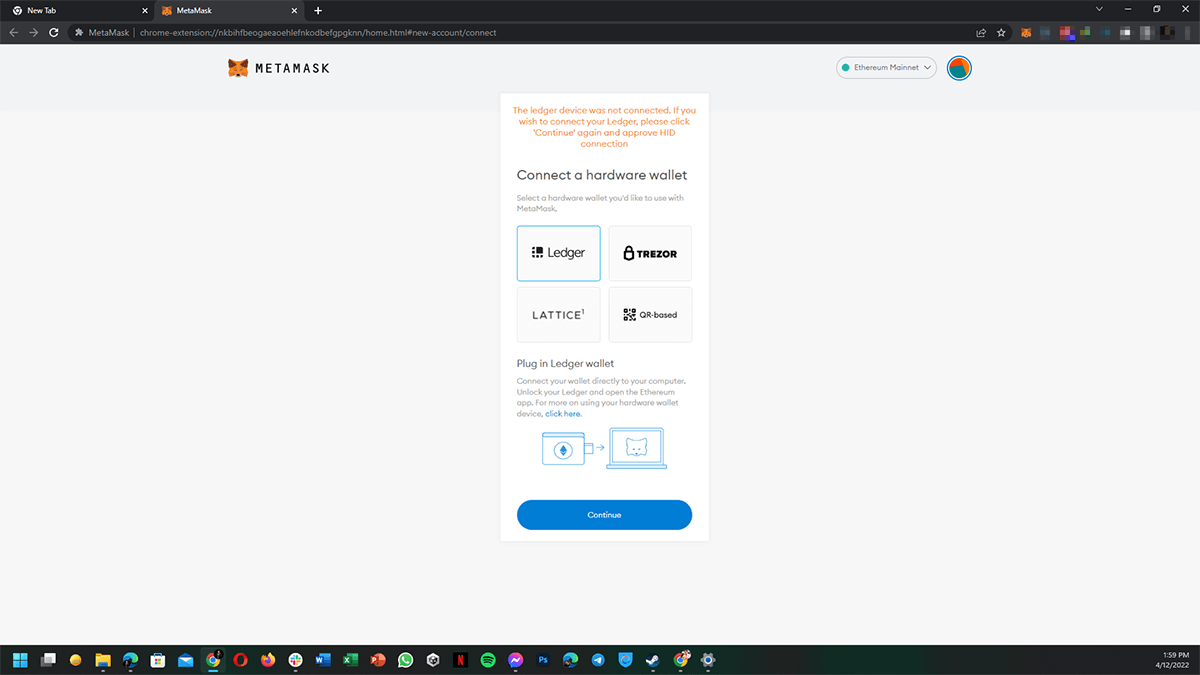
However, sometimes, you may encounter MetaMask not connecting to the Ledger issue. That is enough to ruin your experience with that software crypto-wallet. When you face this type of problem, you may see similar messages to the following one.
The Ledger device was not connected. If you wish to connect your Ledger, please click ‘Continue’ again and approve HID connection.
But, if you take the proper steps, you can easily fix this type of Ledger connectivity issue with MetaMask. Before going through the troubleshooting methods, let’s know about a few more things.
What causes Ledger connectivity problem with MetaMask wallet?
Usually, MetaMask should not have any problem connecting to Ledger or any other hardware wallets. But, for some technical issues, errors may occur.
We have tried to find out what may cause such problems in most situations. After doing some deep research, we have found the following ones:
Incompatible version of the browser and extension
Not connecting the Ledger in the proper way
Outdated Ledger firmware
Outdated Ethereum app
Problematic browser
Moreover, there can be other technical issues that can produce Ledger connectivity issues with MetaMask. Fortunately, you can quickly get rid of it if you follow some tricks.
These troubleshooting methods are given below with clear instructions. Any of these should fix the problem.
How can I fix MetaMask not connecting to Ledger?
1. Update MetaMask extension
1.1 Update Chrome extensions
Open the Google Chrome.
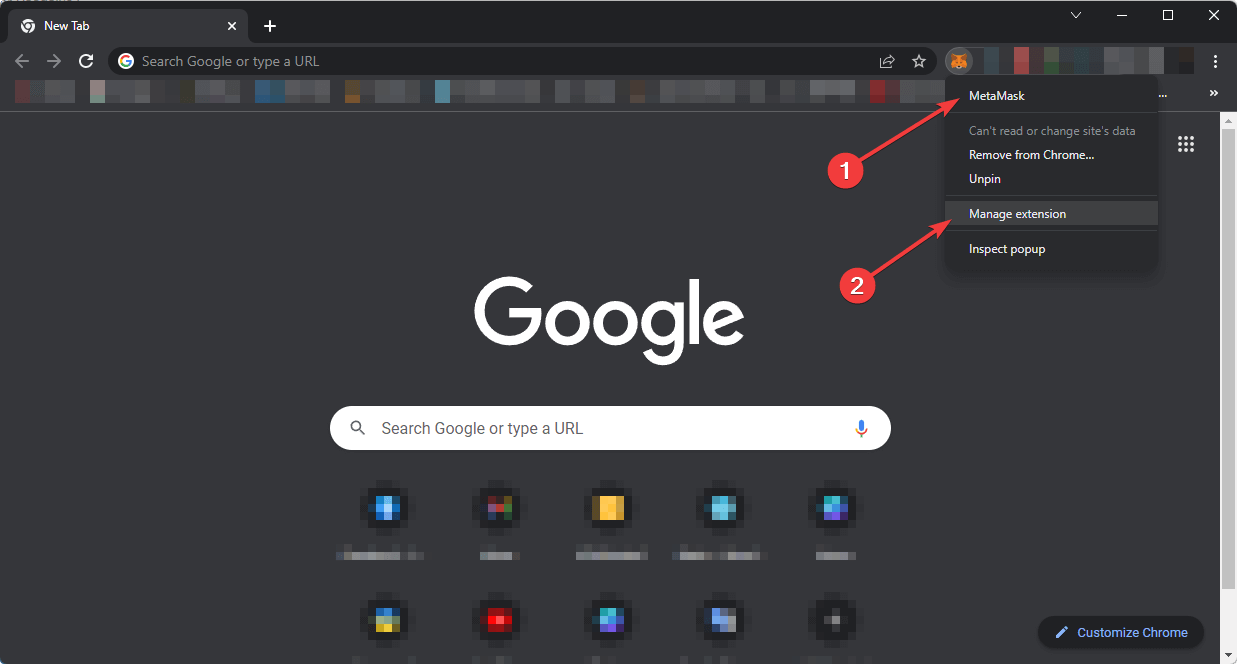
Right-click on the MetaMask icon and go to extensions.
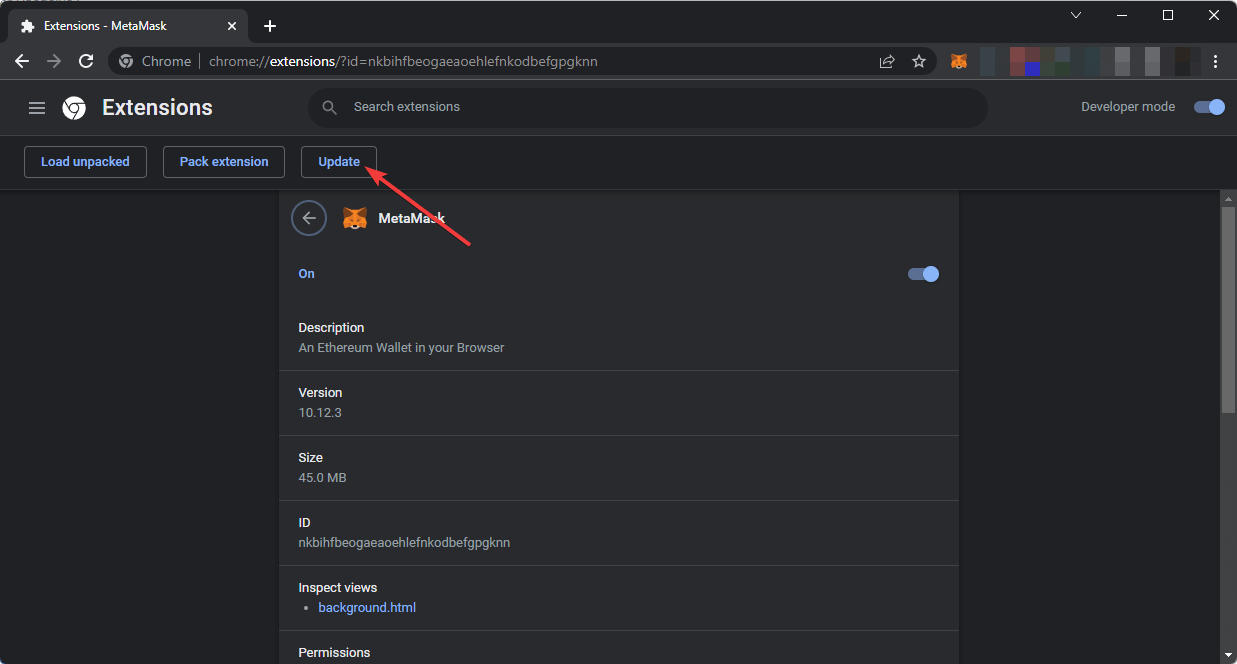
Click on Update.
1.2 Update the Firefox add-ons
Open the Mozilla Firefox browser.
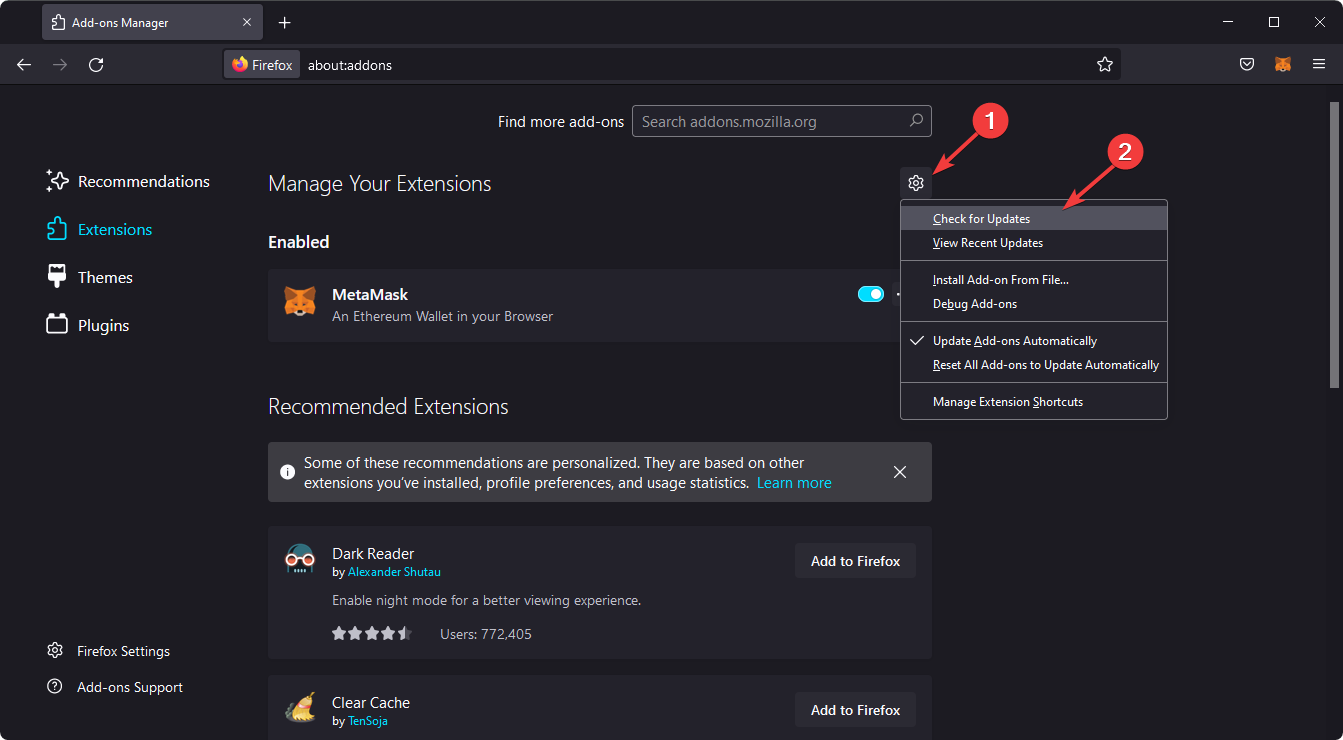
Type the following address in the address bar and press enter. about:add-ons
Click on the gear icon and then select Check for updates.
2. Update browser
2.1 Update Chrome
Open Chrome again.
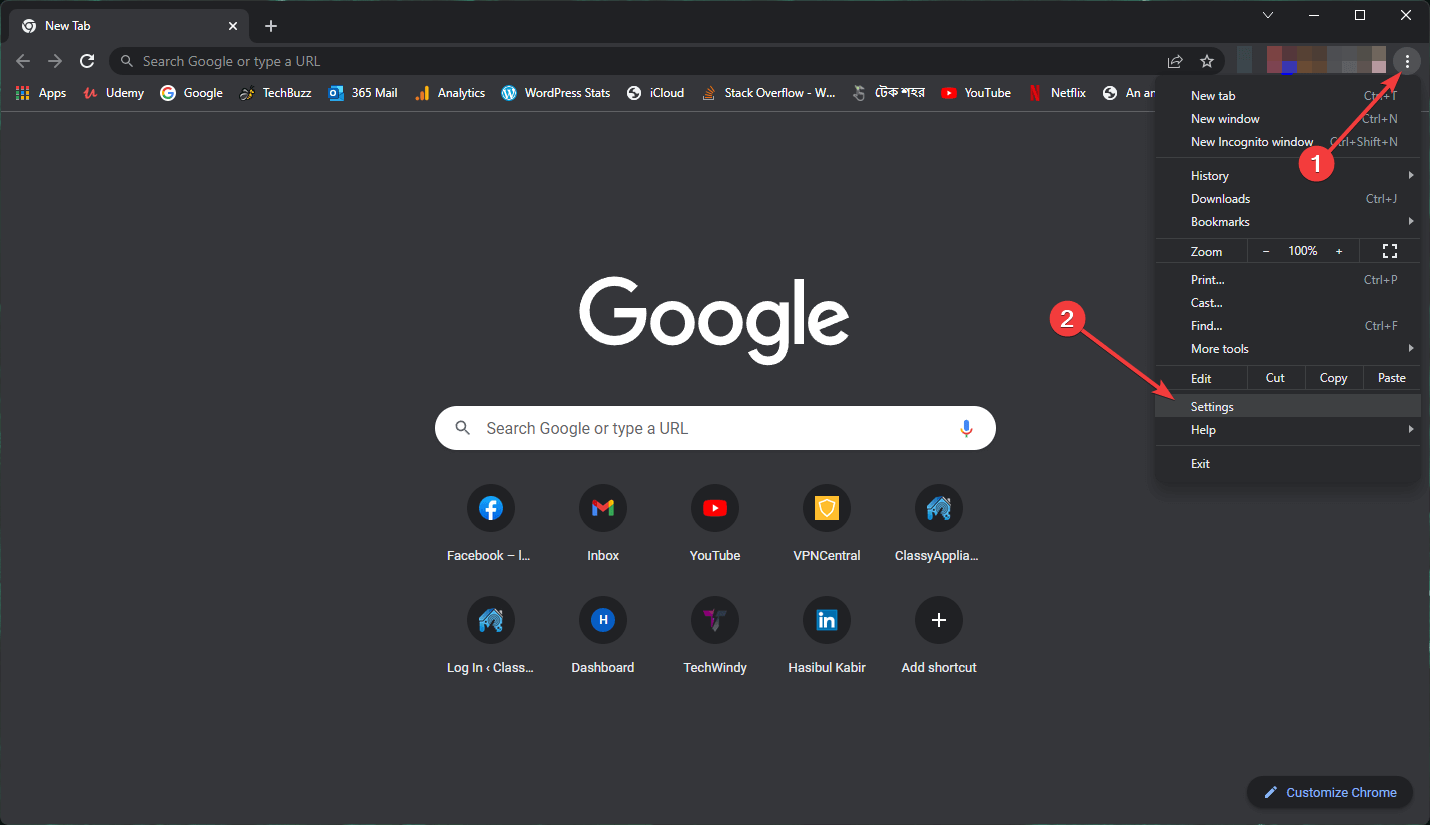
Click on three vertical dots on the top right corner and then go to Settings.
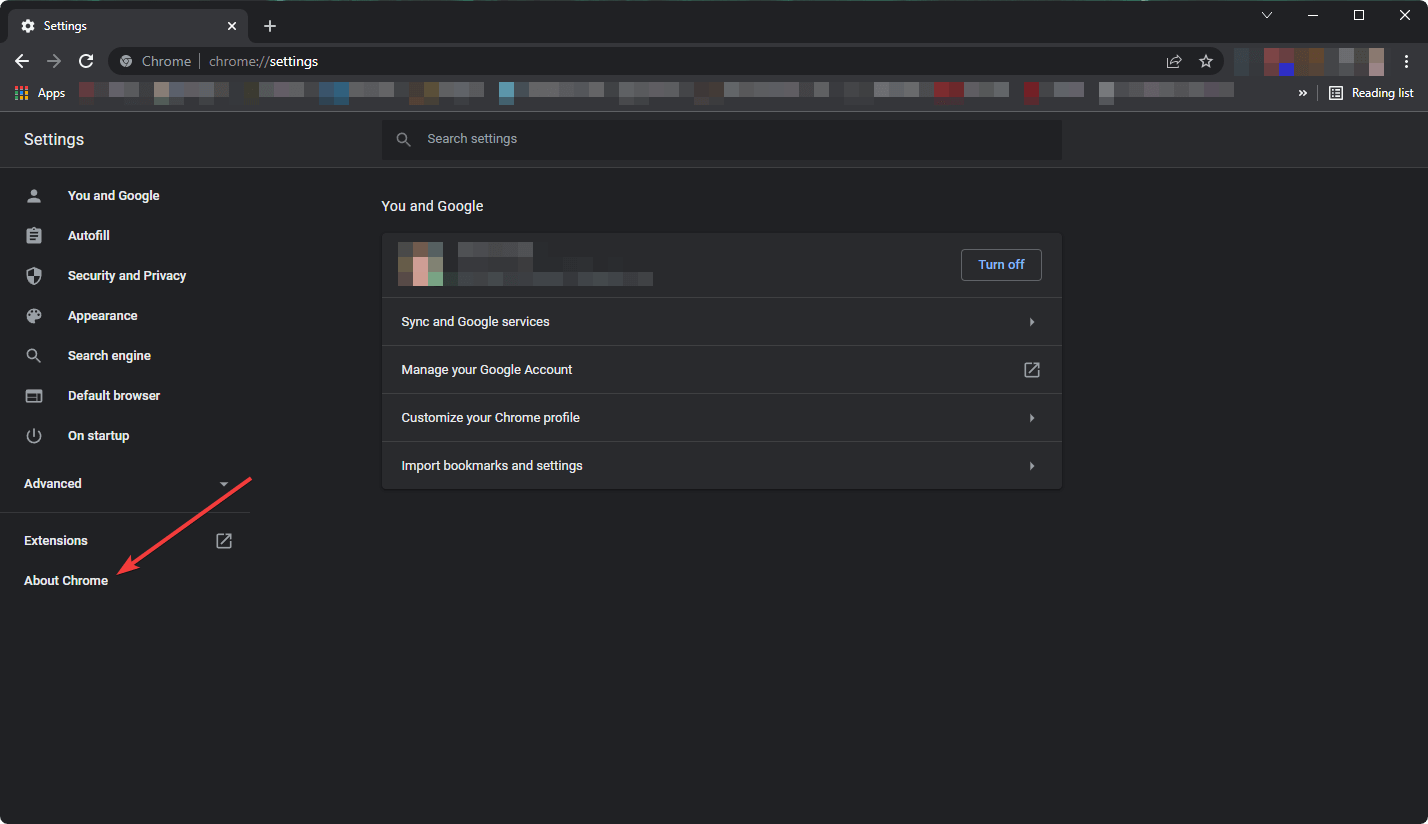
Click on About Chrome.
Google Chrome will check for the update and install automatically if it finds any newer versions available.
Relaunch Chrome.
2.2 Update Firefox
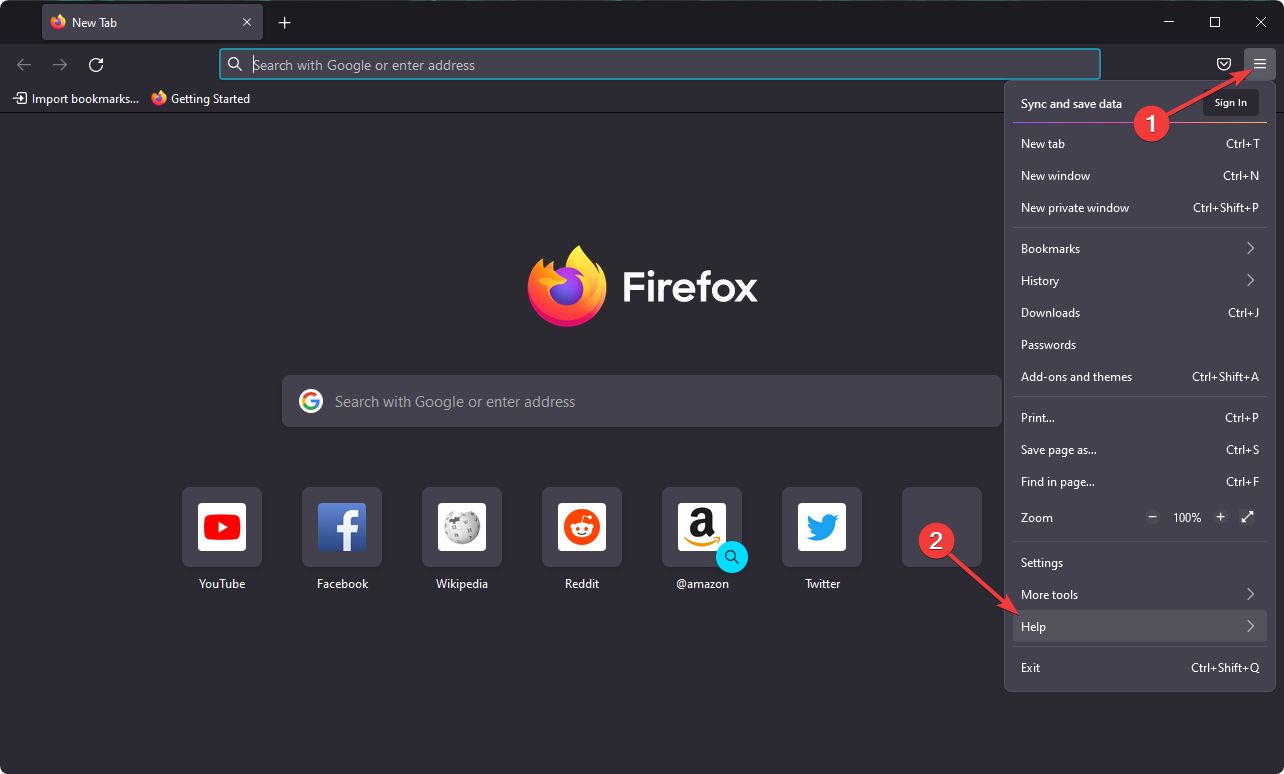
Click on three vertical lines and go to help.
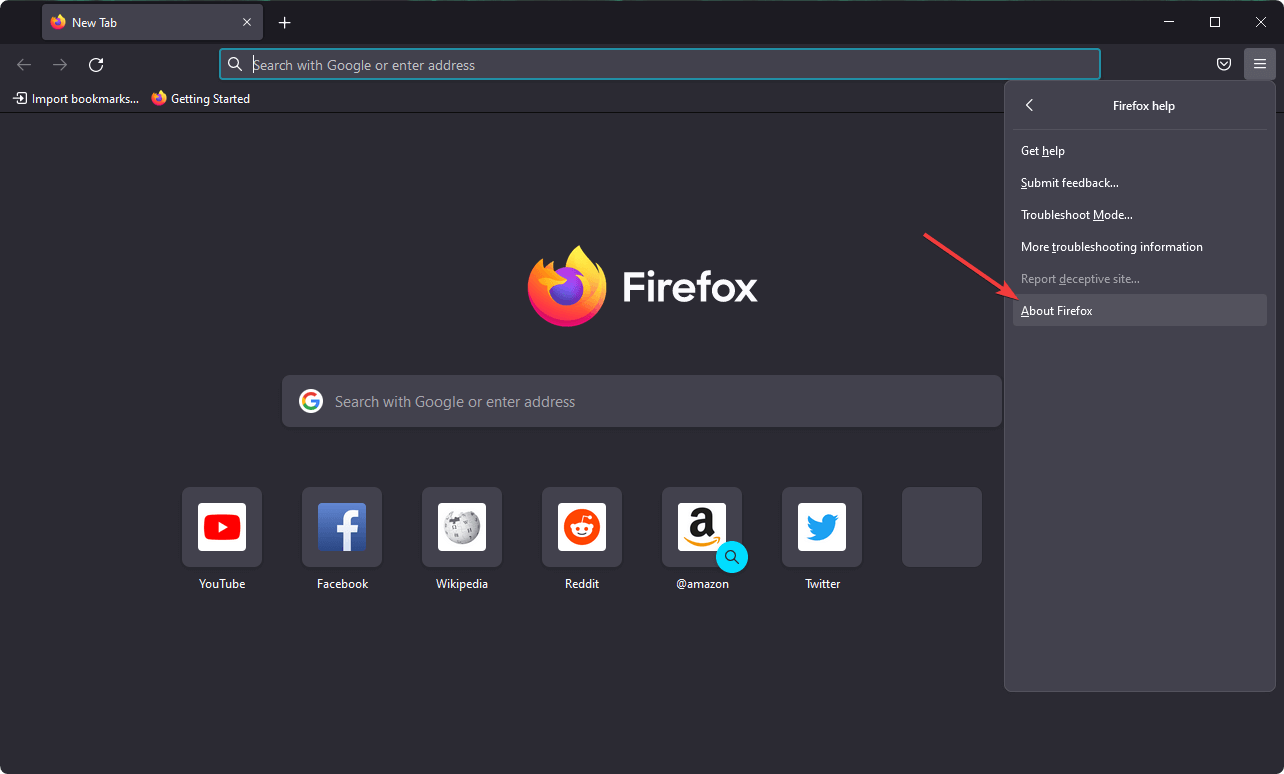
Go to About Firefox.
Firefox will update itself automatically.
Some versions of specific browsers may have problems with the MetaMask. For example, Chrome 91 had broken Ledger support of this extension. Later an update fixed the bug. So, updating your browser also may work in your case.
Press Win+ I on the keyboard to open Windows settings.
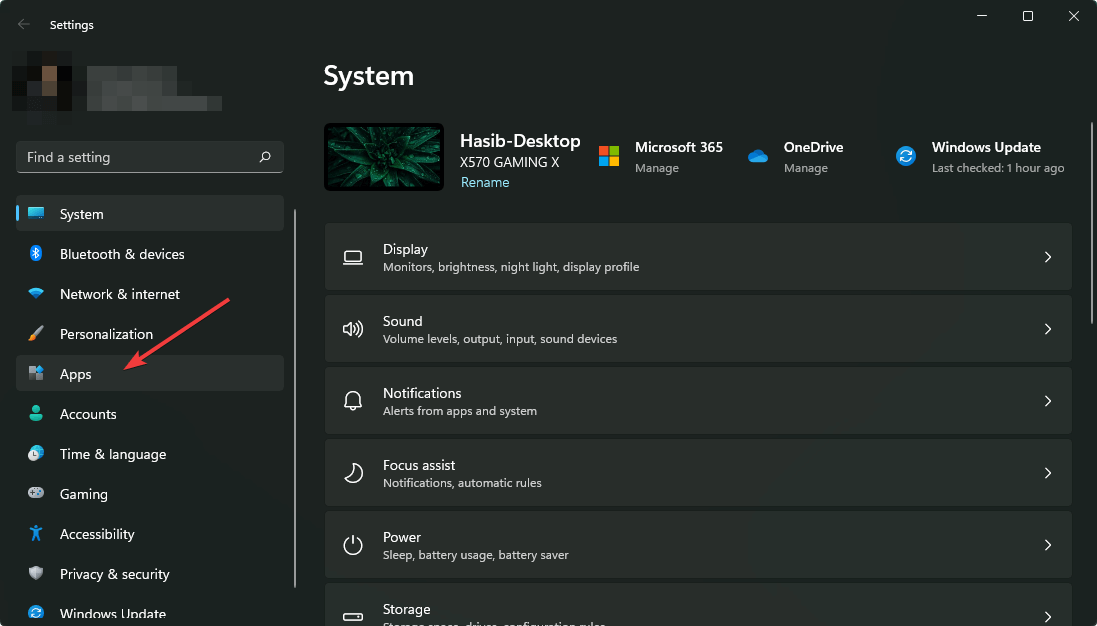
Go to Apps.
Click on Apps & features.
Click on three vertical dots next to the browser name you want to uninstall and choose Uninstall.
3.2 Install the previous version of the browser
Now, try to find the older version of your browser to download. FileHippo and Softonic are two popular platforms where you can download the older version of any browser.
3.3 Disable automatic update
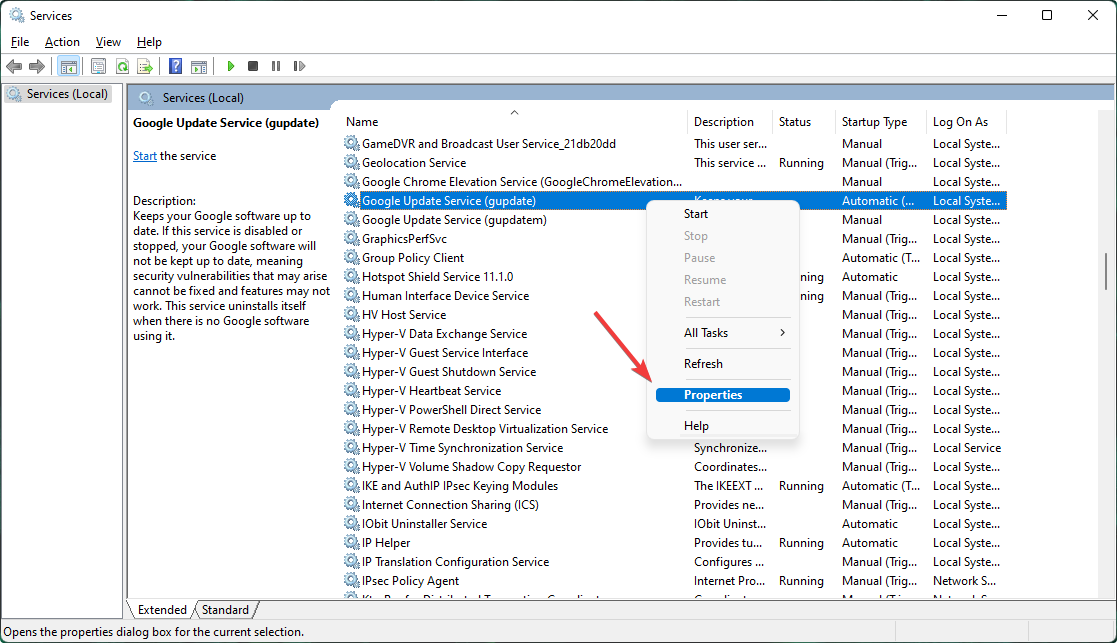
Open the start menu and type services.msc and press enter.
Right-click on Google Update Service (gupdate) and go to its properties.
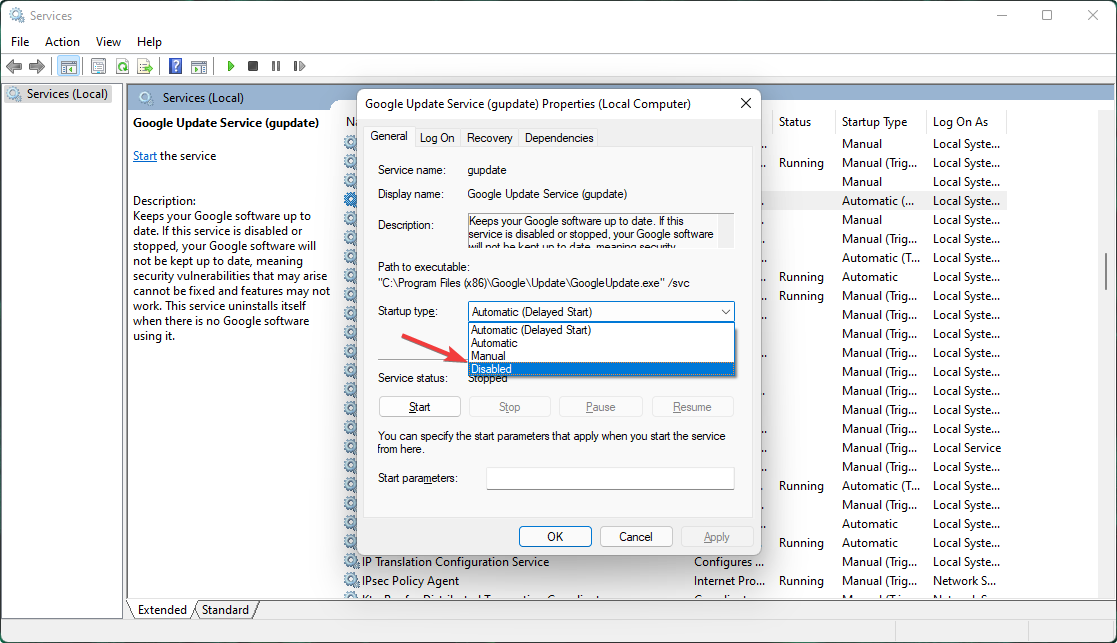
Set the startup type to Disabled.
Click on Apply and then OK.
Do the same for Google Update Service (gupdatem).
Restart your computer.
4. Try in a different browser
Though you can use MetaMask in Firefox and any Chromium-based browsers, you may still face some problems. We recommend you to consider Opera One if you face MetaMask and Ledger connection problems on any other browsers.
Opera One is a chromium-based browser that supports Chrome extensions without any problem. Else, unlike many other browsers using the same rendering engine, Opera One can provide a very fast and reliable experience.
So, if other browsers on your computer show error with MetaMask Ledger connectivity, it will be wise to try this browser.
5. Close Ledger Live
Click on the MetaMask extension icon.
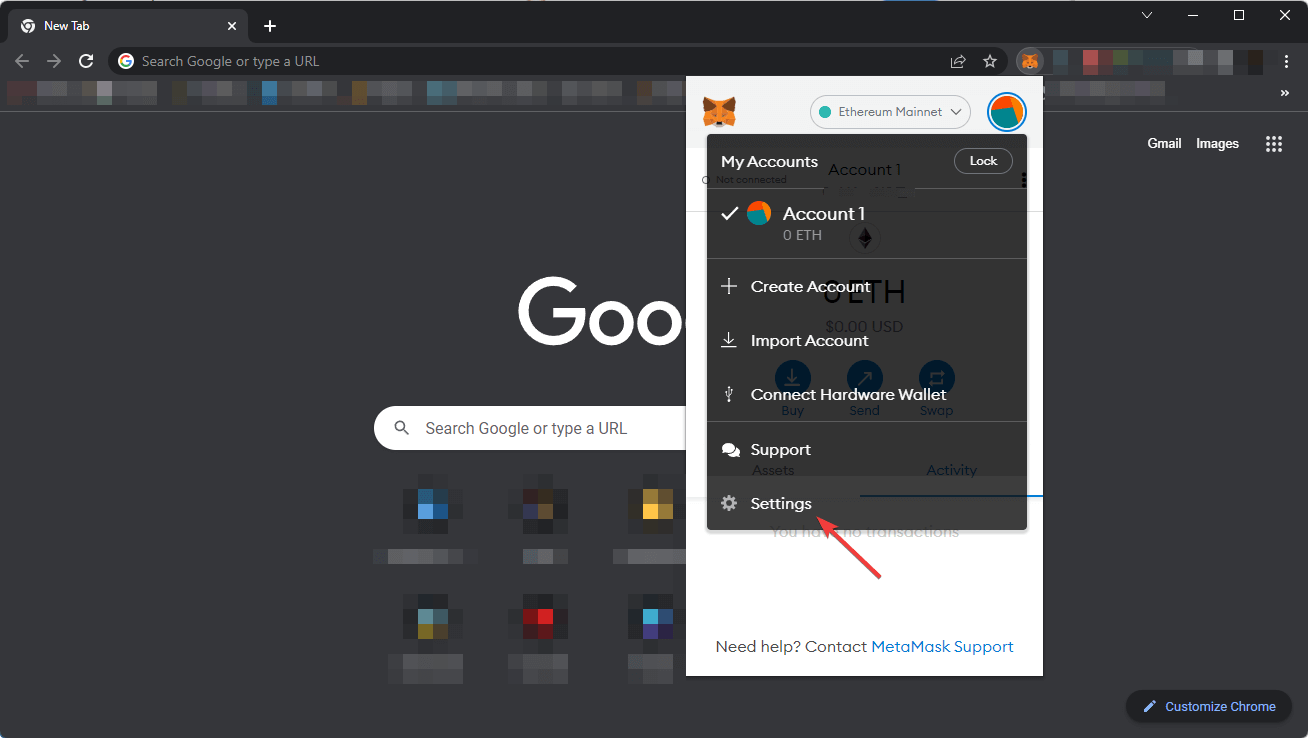
Click on Profile and go to Settings.
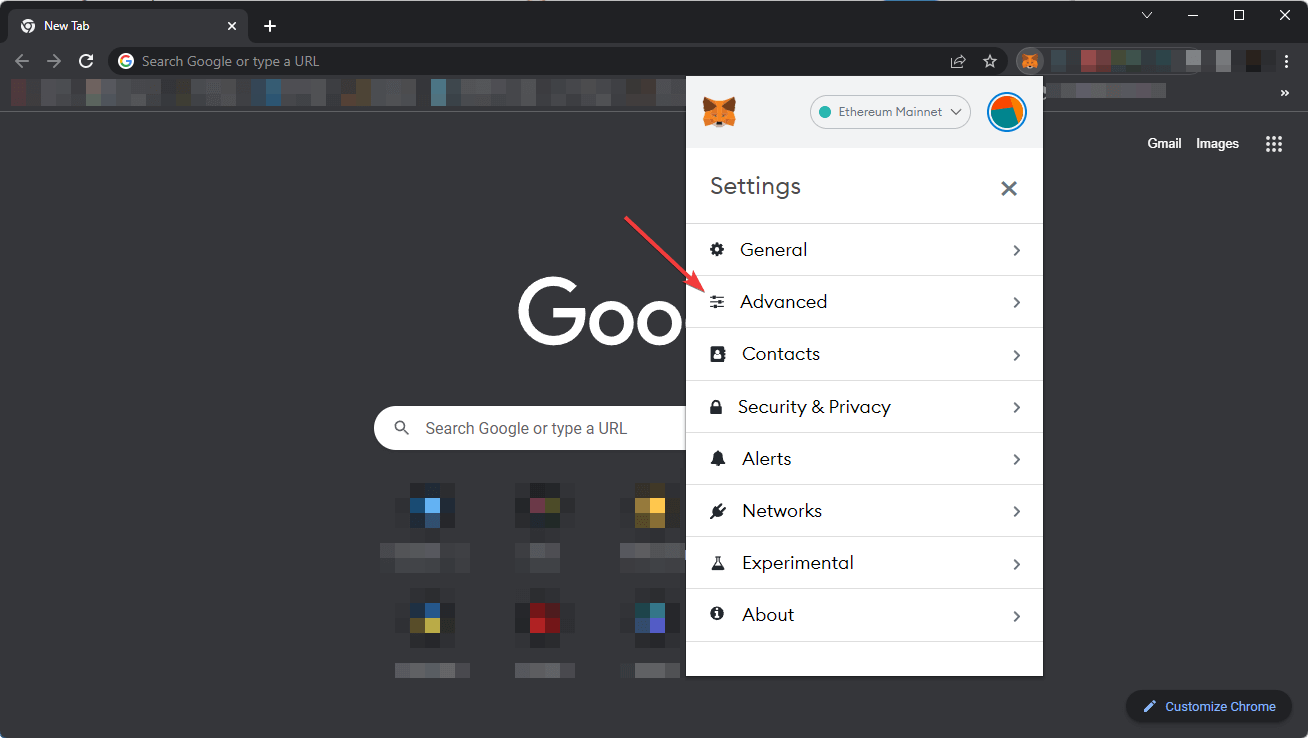
Go to Advanced.
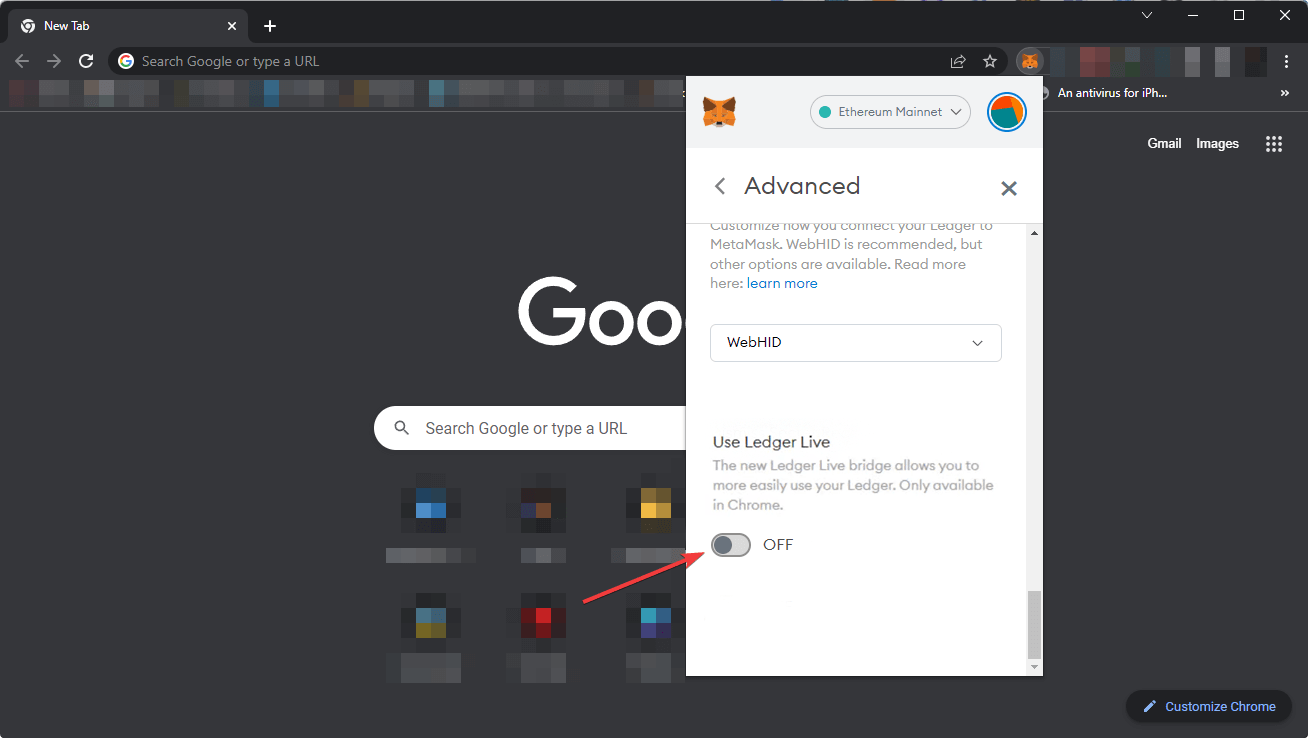
Toggle off the Ledger Live.
Now try to connect the Ledger again.
6. Open the ETH app before connecting
Another working method to fix MetaMask not connecting to Ledger is opening the Ethereum (ETH) app before clicking connect on the MetaMask.
So, if you encounter the problem, try this technique and see if it helps or not.
7. Update the ETH app
Open the Ledger Live app on your computer.
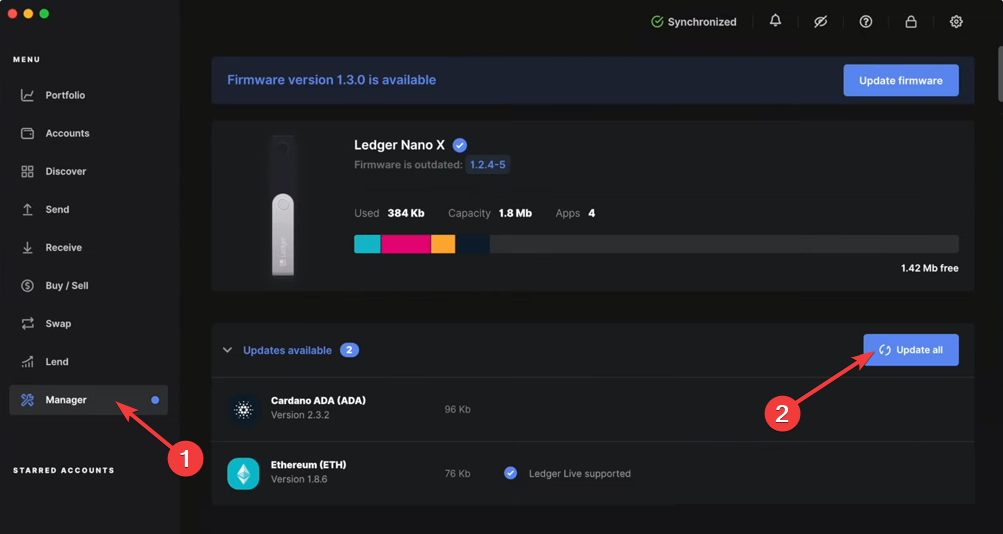
Go to the Manager tab.
Connect the Ledger device.
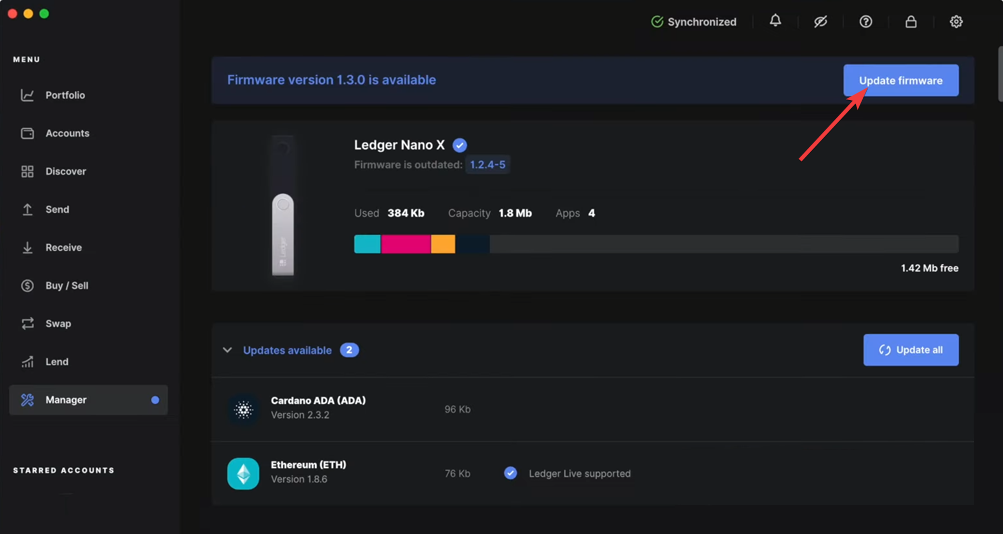
You should see the ETH app in the Updates available section. If yes, click on the Update all button.
8. Update the Ledger device
Open the Ledger Live app like before and go to the Manager tab.
If the latest version of firmware is available, you will see it. In this case, click on Update firmware and go ahead.
Pressing both buttons will change the blind signing status and show it in the display.
After enabling blind signing, try to connect the Ledger with MetaMask again. You should not face the problem again.
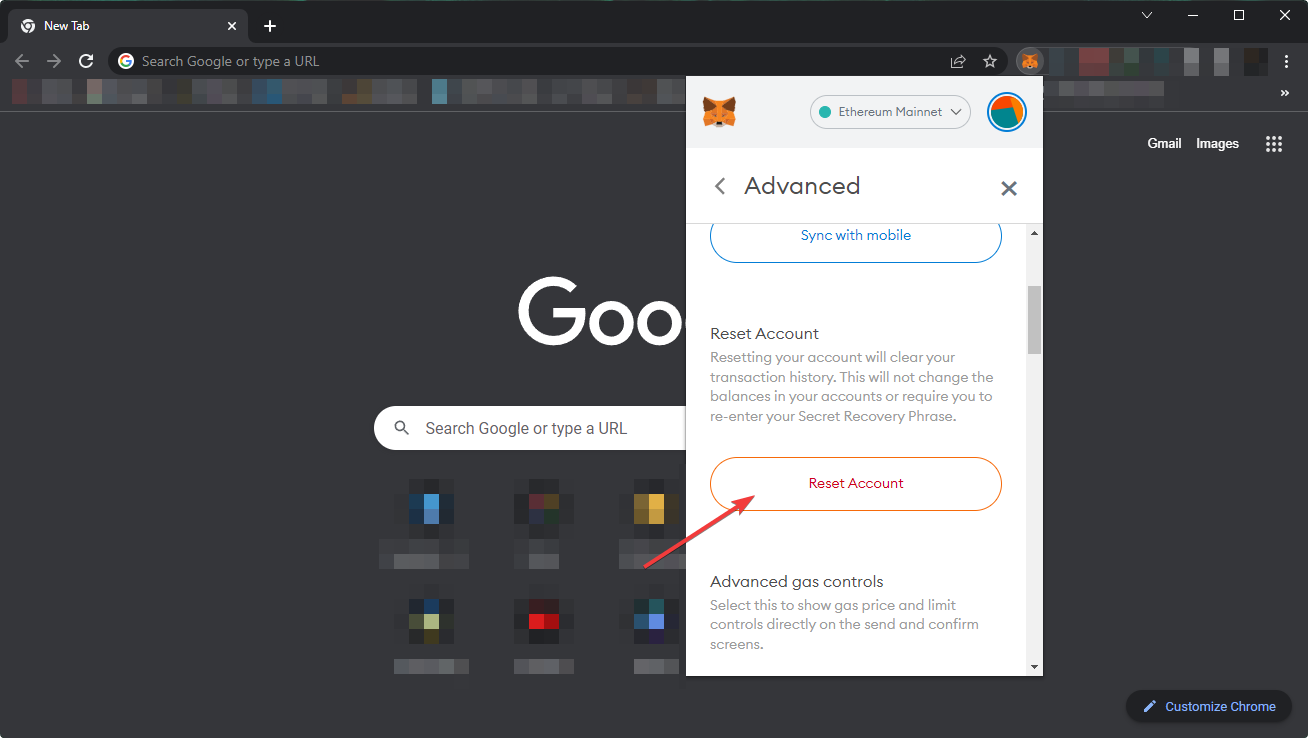
10. Reset Metamask account
Go to the MetaMask settings as shown in method 3.
Click on Advanced.
Find and click on Reset Account.
Restart your browser.
If there is any problem with your account, it will fix MetaMask not connecting to the Ledger issue.
Is Ledger safe?
Yes. Ledger is a totally safe hardware wallet for cryptocurrency. In fact, you should use it to protect your currency with an extra layer of security.
A ledger device can securely store your cryptocurrency and protect them with your own private keys. It acts like a bank vault that you own, and only you have the access.
The private key remains on the Ledger only. So, there is no possibility that someone using the internet can have access to that key.
It has physical buttons which should be pressed to validate each request. As a result, your crypto transactions remain less vulnerable and get maximum security.
Besides, Ledger has desktop and mobile apps that are very convenient to use and give you a very secure and smooth experience.
The Ledger firmware and each app on this platform get regular updates that come with security improvements. As a result, you will always get the best protection if you update on a regular basis.
The above methods are the best ways to fix MetaMask not connecting to Ledger error. This article also gave you some other useful information. If you have an opinion on this, feel free to let us know in the comment box.
The Snipping Tool has changed, and many unsatisfied users want to return the old Snipping Tool to Windows 11.
This is easily achievable, and in today’s guide, we’ll show you the best ways to do that on your PC.
What happened to the Snipping Tool in Windows 11?
Windows 11 introduced a new Snipping Tool that works similarly to the Snip & Sketch tool. On Windows 10, those were two different tools, but in the latest version, they are combined into one.
How do I get the old Snipping Tool back on Windows 11?
1. Download old SnippingTool online
Download the Snipping Tool. Do keep in mind that you might get several popups on this page, so be sure to ignore them. You’ll also have to click the Download button several times.
Next, open the downloaded zip file.
Click on Extract all.
Choose the extract location, check Show extracted files when complete and click Extract.
Once done, just run the SnippingTool.exe.
We tested this solution and it worked for us, and since our antivirus didn’t report anything, we assume that the file is safe to use. If you don’t feel safe downloading files from third-party sources, go to the next solution.
2. Restore the Snipping Tool from the older Windows version
Create a new folder on your old PC and name it SnippingTool for example.
Go to C:\Windows\System32
Copy the SnippingTool.exe to the SnippingTool folder you created in Step 1
Next, go to C:\Windows\System32\en-US
Locate the SnippingTool.exe.mui and select the copy option.
Go to the SnippingTool folder from Step 1.
Inside of it, create a new folder called en-US.
Paste the SnippingTool.exe.mui into the en-US folder you just created.
Lastly, copy the SnippingTool folder from Step 1 to your Windows 11 PC.
Double-click on SnippingTool.exe to launch the Snipping Tool on your Windows 11 PC.
NOTE
You’ll need another Windows 10 or older PC to complete this step.
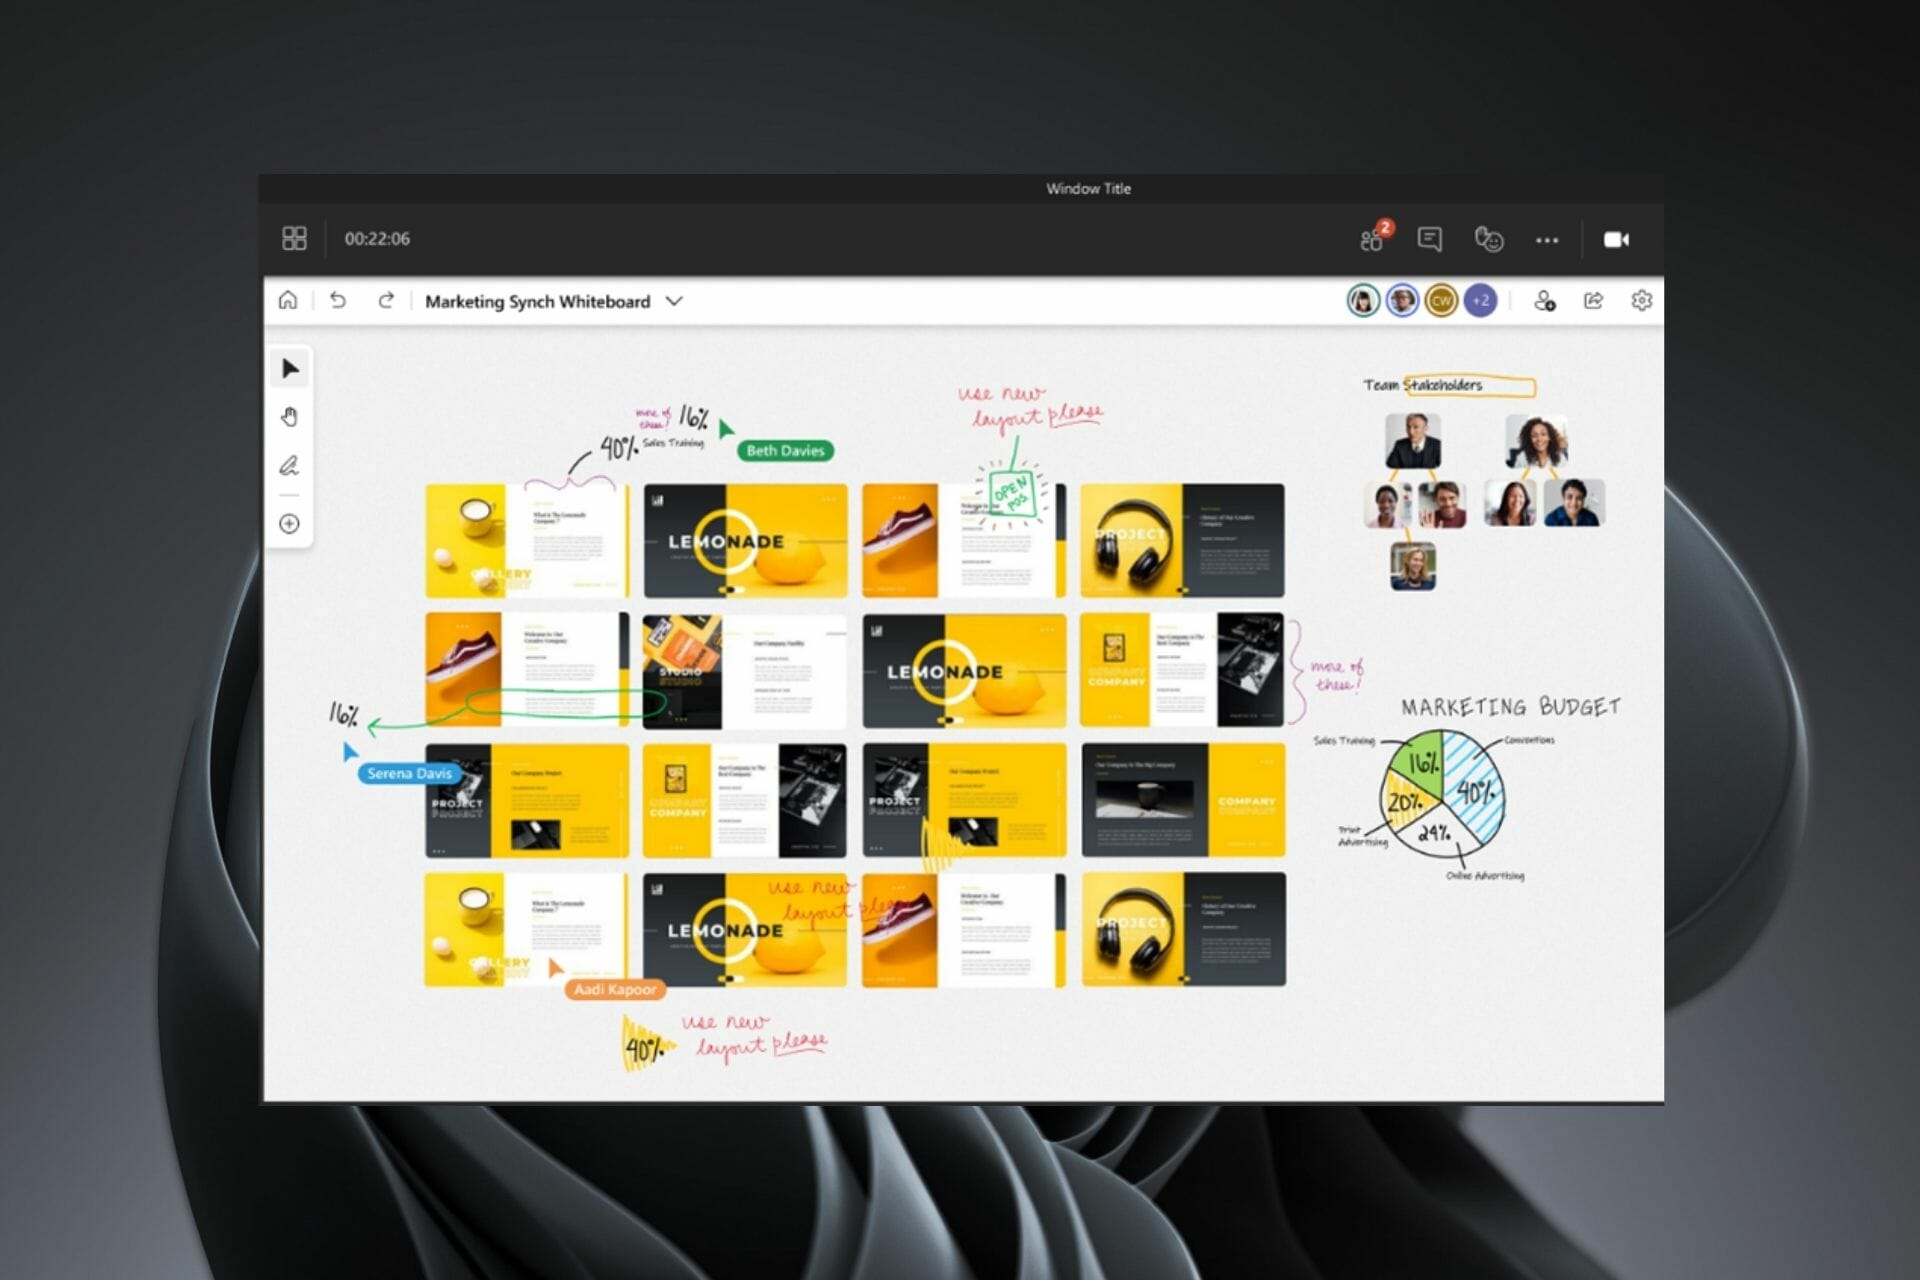
Microsoft Whiteboard is a great tool for collaborating with others on the same whiteboard in real-time. However, the app has its own set of issues. One such issue is that the Microsoft Whiteboard does not sync across devices.
With the Microsoft Whiteboard app, you can use your device to create a freeform canvas to capture and share your ideas with others. The app is available for Windows 11 and iOS devices.
If you have been facing this issue, then you are in the right place because today we will discuss possible ways to fix this issue.
There was a problem syncing Whiteboard Teams. Why is this happening?
Loss in connectivity – If your device loses connectivity during a sync operation, you may experience some lag time before your content is considered offline and becomes editable again. Once your device regains connectivity, the app will attempt to resume the sync operation.
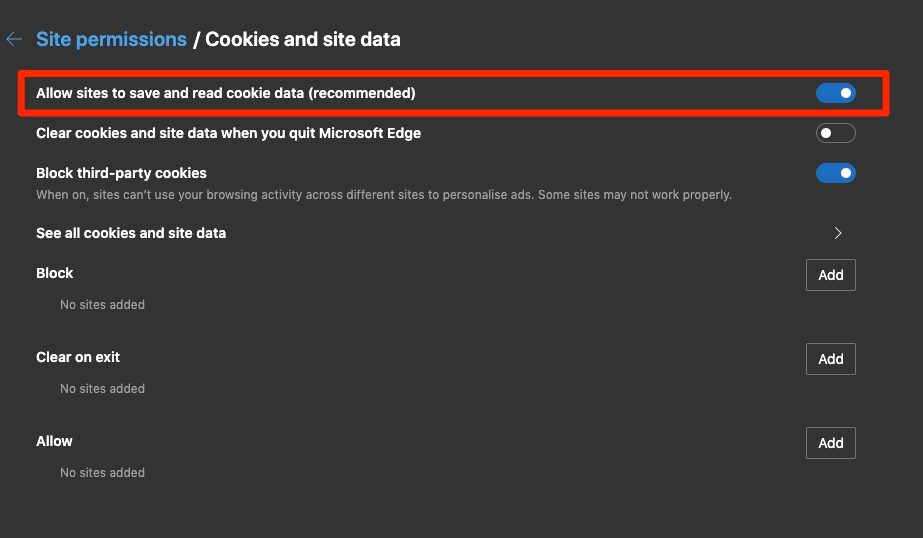
Third-party cookies – Your browser may be blocking third-party cookies from Microsoft’s websites. These cookies are required for Whiteboard to function properly because they contain information about your session and the whiteboards you’ve created or joined. You need to allow third-party cookies from microsoft.com and office365.com.
Faulty device – The issue might be that your device is not syncing correctly. This could be due to a faulty device or a setting in the app. You can try switching to a different device and see if the problem persists.
Outdated app – Sometimes, the Microsoft Teams app or the Whiteboard app may be outdated. Simply log into the Microsoft Store and update your app.
Luckily, if you encounter any of the above issues, there are quick fixes you can try to get syncing working again.
What can I do to fix the Microsoft Whiteboard not syncing issue?
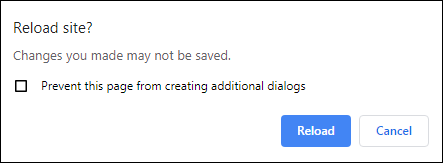
1. Reload the site
The problem may be your servers and your internet connection is unstable. Try reloading the site and try again.
2. Check file size
Sometimes, the file size may be the cause of the problem. Ensure your file does not exceed the recommended limit then try again.
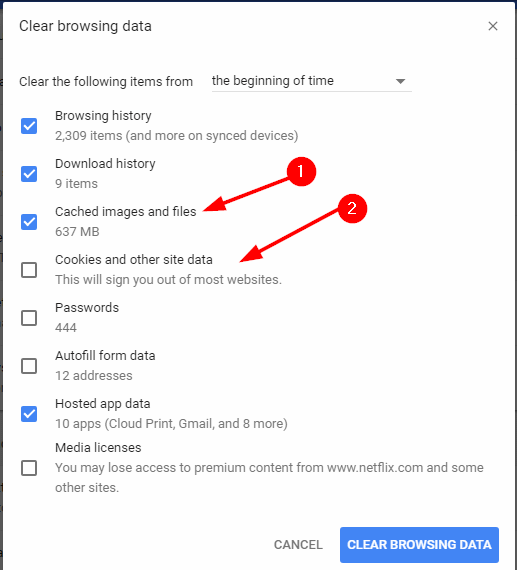
If you are using Microsoft Whiteboard on the web, try clearing cache and cookies then see if the problem persists.
You can also use a third-party tool to get things done faster. CCleaner is a program that cleans your Windows computer in a couple of minutes. It removes unneeded temporary files, cookies, and other junk that can accumulate on your PC.
With the correct options selected you can set CCleaner to run automatically at Windows start-up or on a schedule. This is valuable for users that don’t know how to clean their computers manually or those that don’t have time to do so.
Toggle Turn Whiteboard on or off for your entire organization on.
We sure hope that after trying the above solutions, your Microsoft Whiteboard is syncing again. While you are here, you can also check out other whiteboards for teaching and learning
It isn’t uncommon for the printer to develop errors during use, just like other electronic devices. Hence, the reason you have to familiarize yourself with basic troubleshooting hacks.
Often, the problem displays an error message as windows/words cannot print due to a problem with the current printer setup. It could be either windows or words depending on the problem.
This problem is often associated with Microsoft Word and other Office applications. Although it could be caused by different reasons which include, the printer developing fault itself.
To troubleshoot this problem, this guide will provide some troubleshooting fixes with step-by-step instructions on how to fix it.
What can I do if I get a problem with the printer setup?
1. Reset Default Printer
Click the Windows button, type control panel, and click on the Control Panel from the search result.
Select Devices and Printers from the options displayed.
Randomly select any of the printers and right-click on it. Click to Set as Default Printer from the pop-up.
Then, select the original printer and right-click on it to Set as Default Printer back.
By changing the default printer, Windows will overwrite the previous entry which might be faulty for the default printer.
2. Uninstall and reinstall the printer driver
Click the Start button and select Settings.
Choose Devices and click on Printers & Scanners.
Select your printer and choose Remove device.
Click the Add a printer or scanner from the top. Once your printer has been detected, proceed with the installation. Then click Finish once the installation is complete.
If it fails to work after this, it could be an issue with the driver or the local printer’s connection. If you have connection issues with your printer, check this article on what can I do if the printer is not connecting to the PC.
Right-click the Start button and choose Device Manager from the list.
Scroll down and select Print queues or Printers. Right-click on your printer from the pop-up list and select Update Driver.
Select Search automatically for drivers.
If the system finds a new driver, it will be installed automatically. Then, proceed to restart your PC to effect the changes.
Drivers update is essential for the proper functioning of the printer on the OS. However, if the drivers couldn’t be updated, you may need to update them via a third-party app.
We strongly recommend you install Outbyte Driver Updater to get the latest drivers for your PC. It auto searches for the best and recommended updates for your drivers.
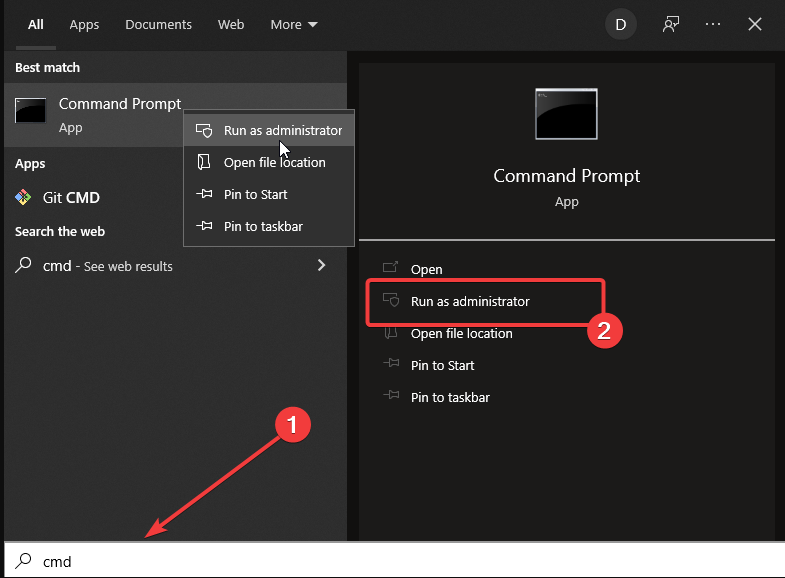
Close all running applications and search for cmd in the Start button search area.
Select Command Prompt from the result and Run as Administrator.
Input this code sfc/scannow and press Enter key. Then wait for the result after some minutes.
Type exit to close the prompt. If the Windows found corrupt or bad files, they will be repaired. Then Restart the PC.
This article has analyzed the best solutions tofix problems with the printer setup. However, if none of these worked for you, you can check out our article on fixing printer configuration problems.
We’d like to hear more from you about your experiences, so leave your suggestions or questions in the comment section below.
ExpressVPN is one of the most popular virtual private networks on the market. It has received a lot of positive feedback for its lightning-fast speeds, user-friendly service, and a firm commitment to protecting users’ privacy. Thus we will show you today how to install ExpressVPN on Windows 11.
Even if a VPN provider has a stellar reputation, we try to avoid blindly putting our trust in any company to protect our security and personal information. After all, we don’t always have a clear picture of what is going on behind the scenes.
We appreciate it when VPN providers embrace transparency and take concrete steps to earn our genuine trust in their products and services.
Follow along as we will first see whether ExpressVPN can be trusted, and then jump to the download and install process on Windows 11.
Can ExpressVPN be trusted?
Earlier this month, ExpressVPN released the findings of an independent security audit of their browser extension conducted by cybersecurity firm Cure53. They have also announced that the code for their browser extension will be made available for public use.
We’ll walk you through the findings of Cure53’s security audit of ExpressVPN’s browser extension and discuss what this means for you. Cure53 is a well-respected and reputable cybersecurity company, and we can say that with confidence.
The company has made significant strides in the direction of greater transparency. A new audit conducted by the accounting firm PwC between May and June of this year has been detailed in a recently released report.
PwC was also tasked with auditing the technology behind its TrustedServer feature, which was developed in partnership with Cisco. This was done to ensure that it operates in accordance with the claims made by ExpressVPN.
The findings of the audit demonstrate that ExpressVPN is genuinely committed to providing high levels of security, privacy, and anonymity.
Browser extensions are difficult to get right, but ExpressVPN’s extension provides users with all of the protection of a true VPN without the need to install any additional software.
ExpressVPN is sending a strong message to both VPN users and other VPN providers by making their browser extension code available for download. They are stating that trust and transparency should be the industry standard.
How can I download ExpressVPN on Windows 11?
Navigate to ExpressVPN’s website and hover over Products to choose the Windows icon. You will be redirected to the page which contains the ExpressVPN file for Windows 11.
Next, click on Download now to download the executable file. Save it to your Downloads folder and double-click on it to run it.
Once you run the installation file, choose the Sign-in option. Alternatively, you can sign in with an activation code if you already have one. You can create one on their website after you purchase one of their plans. Note that ExpressVPN has one of the lowest prices and best deals out there.
Next, choose Sign In with Email Sign-In Link, enter your email and choose Email My Sign-In Link.
Once you complete the setup, you can choose the location you want to be connected to. Pretty simple, isn’t it? This is how to download and install ExpressVPN on Windows 11. The company has made it as easy as possible for its users.
The most significant advantages of ExpressVPN are its enterprise security, value for money, and general usability, among other things. You can use it to access restricted websites and content from any location, while also increasing the security of your online accounts and transactions.
It protects your data and files from hackers who hide behind random IP addresses by encrypting them with 4096-bit CA-based encryption.
ExpressVPN provides you with access to more than 145 VPN locations in 94 different countries, allowing you to increase the speed of your device regardless of where you are located.
Express VPN
Increase your online security with one of the most powerful VPNs on the market!
Other virtual private networks (VPNs) do not include a built-in feature that protects you from surveillance and censorship. It also allows you to connect to Wi-Fi hotspots without having to worry about being tracked or monitored.
Aside from its security features, ExpressVPN also offers an advanced feature known as the Kill Switch, which can be used to automatically stop incoming and outgoing traffic if the VPN is disabled.
And lastly, it employs Zero-Knowledge DNS, which means that no DNS from third-party sources is used in the course of its operations. Users can connect to the network and carry out activities completely anonymously as a result of this.
If you need further assistance with the installation process, check out our post on what to do if ExpressVPN won’t launch.
In order to improve our future posts, leave us a comment in the section below and tell us what you think. Thanks for reading!
When facing issues with your Teredo Tunneling adapter, the first instinct in troubleshooting is to check your legacy hardware settings.
Most times, the solution is as simple as activating the adapter. However, sometimes you can’t find Teredo legacy hardware, and it takes a long time to figure things out.
Left unchecked, this issue will affect your system’s ability to communicate with other systems and consequently affect your workflow. It is a bit similar to when your Wi-Fi adapter stops working.
What does Microsoft Teredo Tunneling Adapter not in legacy hardware mean?
When triggered, this message implies that you are missing the Teredo Tunneling Pseudo-Interface. This situation is often started by any one of the following:
Problems with some settings – Improperly configured or disabled network adapter settings will often trigger the problem.
Malware – Especially when you do not use a good or reliable antivirus, you may have underlying malware problems that will trigger this issue.
Driver issues – This is often related to missing or outdated network adapter drivers.
Compatibility issues – The problem starts with some users installing unsupported or incompatible network hardware.
Registry issues – Mostly, this is related to bad registry entries or your corrupted system files.
We now explore some solutions to help rectify the problem.
How can I fix Teredo is not in legacy hardware error?
1. Use Windows Registry to modify TCPIPv6 parameters
Use the Windows + R buttons to start a run box.
In the dialogue box, type regedit and hit Enter to start the Windows Registry editor.
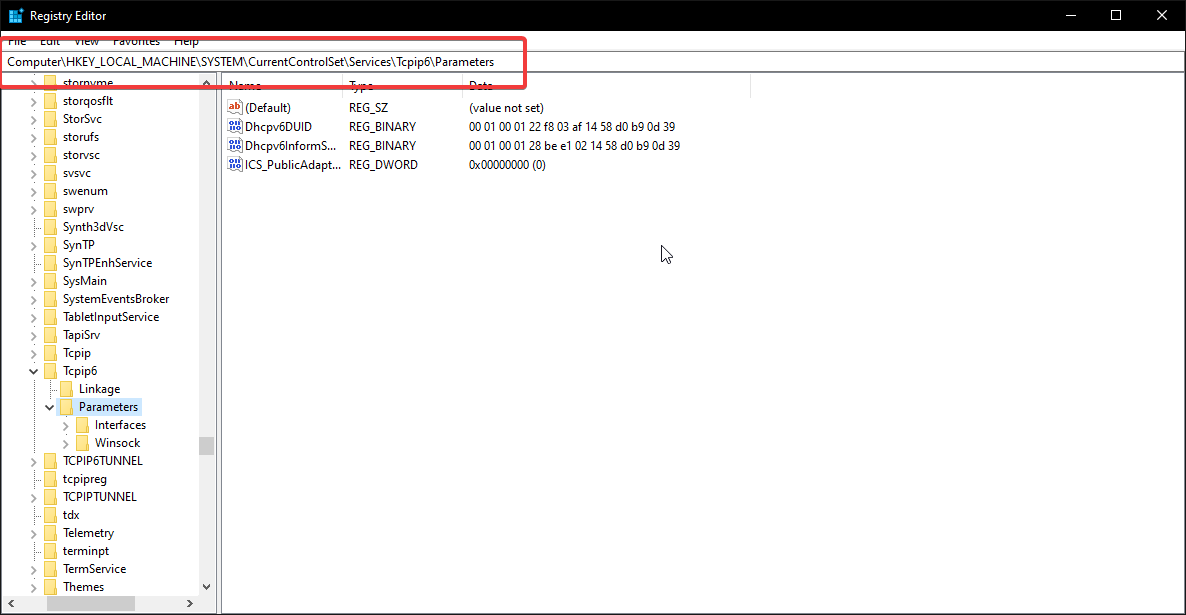
Once in the registry, follow this path: HKEY_LOCAL_MACHINE\SYSTEM\CurrentControlSet\services\TCPIP6\Parameters
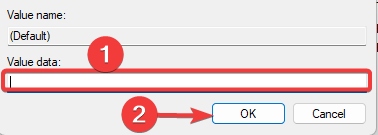
Look for the DisabledComponents key, set the value to 0, then select OK.
Close the registry and restart your computer.
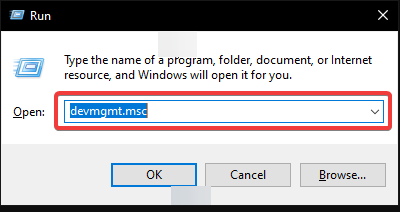
Start your device manager by clicking on Windows + R and typing devmgmt.msc, then hitting Enter.
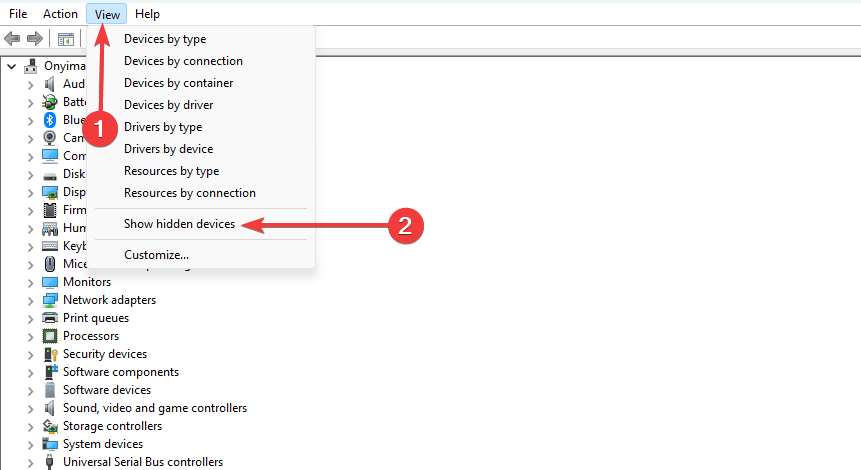
Check to see if the Teredo Tunneling Adapter exists in the device manager by clicking the View button at the top and Show hidden devices.
You should see your Teredo Tunneling adapter without any warning signs next to it.
2. Uninstall all Teredo Tunneling Adapters & Interfaces
Start your device manager by clicking on Windows + R and typing devmgmt.msc, then hitting Enter.
In the device manager, right-click the Teredo Tunneling Pseudo-interface and select Uninstall driver.
When prompted, confirm your choice.
Ensure also to uninstall all the Microsoft Tunneling Adapters. They should be displayed with numbers at the end.
Restart your computer.
If you still have issues after reinstalling the adapter, consider solution 3.
Did something else work for you? Let us know in the comment section below. If you have trouble downloading the Teredo Tunneling adapter, follow this detailed guide.
Otherwise, these solutions should work on your Teredo Tunneling Adapter.
Virtual desktops are not a new concept in the Windows world. Creating a separate desktop in Windows 10 was a straightforward process, allowing you to have one desktop dedicated to one project and another for another, but users reported their Windows 11 multiple desktops is not working.
Or one desktop dedicated to your work and another dedicated to personal apps. Windows 11, on the other hand, has received an improvement.
It’s also possible to have a different wallpaper for each desktop, which makes it easier to distinguish one from another (as well as providing you with a different mood depending on what you’re using it for).
A number of other features make the use of virtual desktops simple and efficient, including the ability to share resources with other users.
It should be noted that some of these features were actually introduced in Windows 10, but when combined with the new features of Windows 11, they form a useful toolbox.
Follow along as we will show you what to do if Windows 11 multiple desktops is not working, right after we see what other productivity features the OS provides us with.
What are other Windows 11 productivity features?
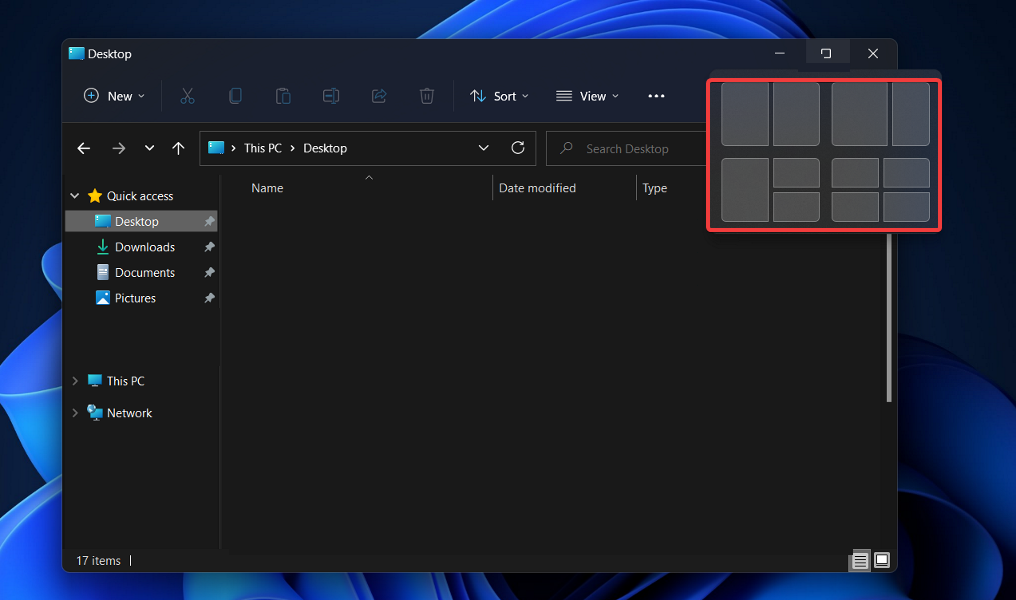
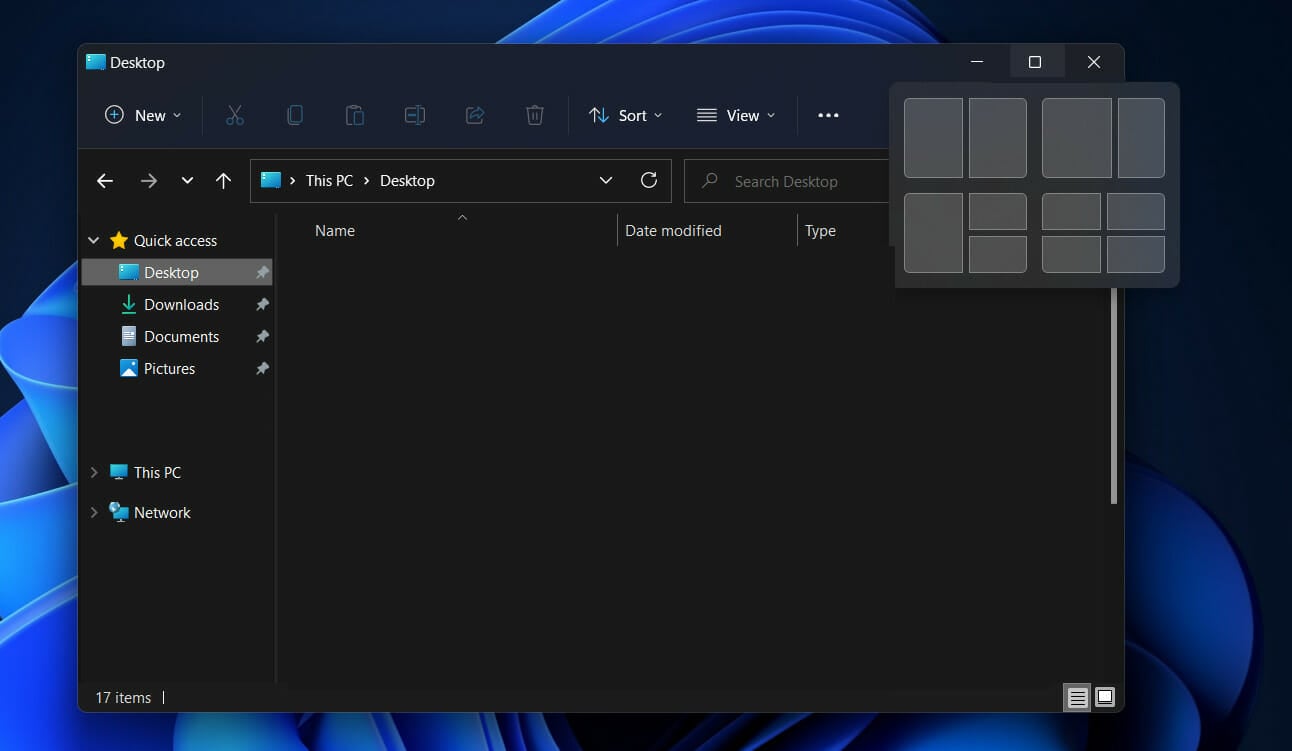
When using snap layout, you can hover over the maximize button of an application to see different possible window positions for that application.
Examples of available options include a dual split-screen option, which would snap the window to half the display, and a four-way split-screen option, which would snap the window to one-quarter of the display, among others.
When you hover your cursor over one of the panels, you’ll notice that it turns blue, indicating that Windows is ready to move your window to that location in the panel. Simply click, and the window will snap into place, allowing you to resize it.
You can use this feature to quickly reorganize your screen and group windows together into groups of related windows.
In that vein, Snap group is a feature that allows you to group apps together within your snap layout. As soon as you’ve finished creating a layout, you can hover your mouse over the taskbar to reveal your newly created Snap group, which contains all of the apps you’ve organized in conjunction.
It is possible to switch between multiple layouts without having to restart your computer by minimizing or restoring the group. You can also switch between multiple layouts without having to restart your computer.
You can use this technique to move grouped windows out of the way when you don’t need them, but quickly bring them back when you do need them. Now, let’s move on to troubleshooting the Windows 11 multiple desktops not working error.
What can I do if Windows 11’s multiple displays feature isn’t working?
1. Update Windows
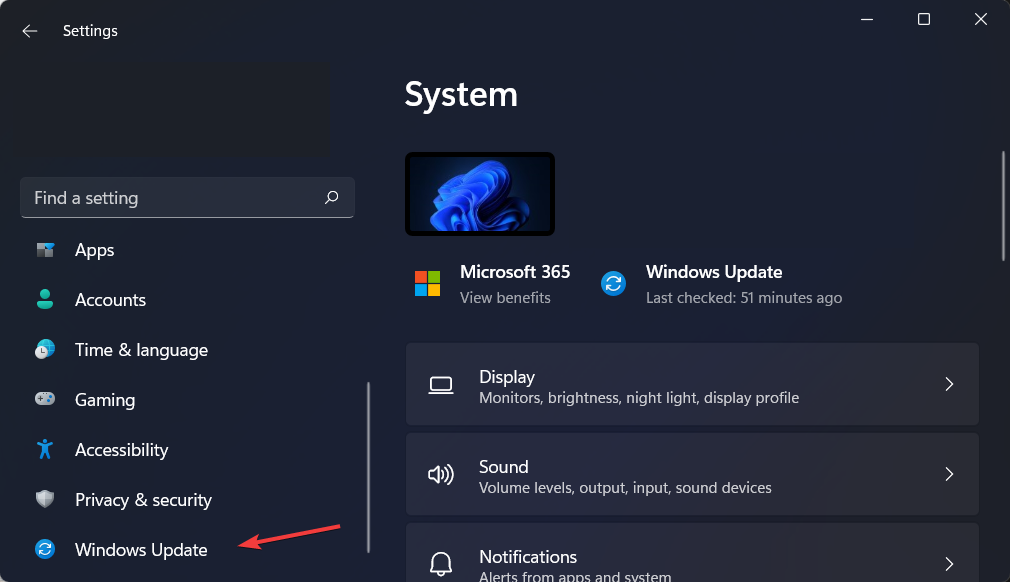
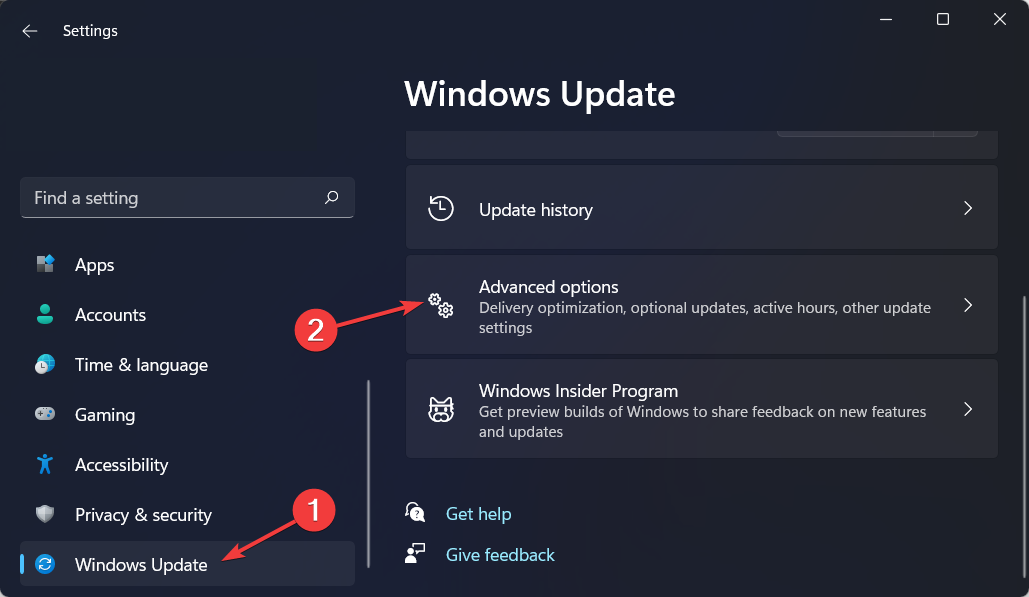
Open Settings and navigate to Windows Update from the left menu.
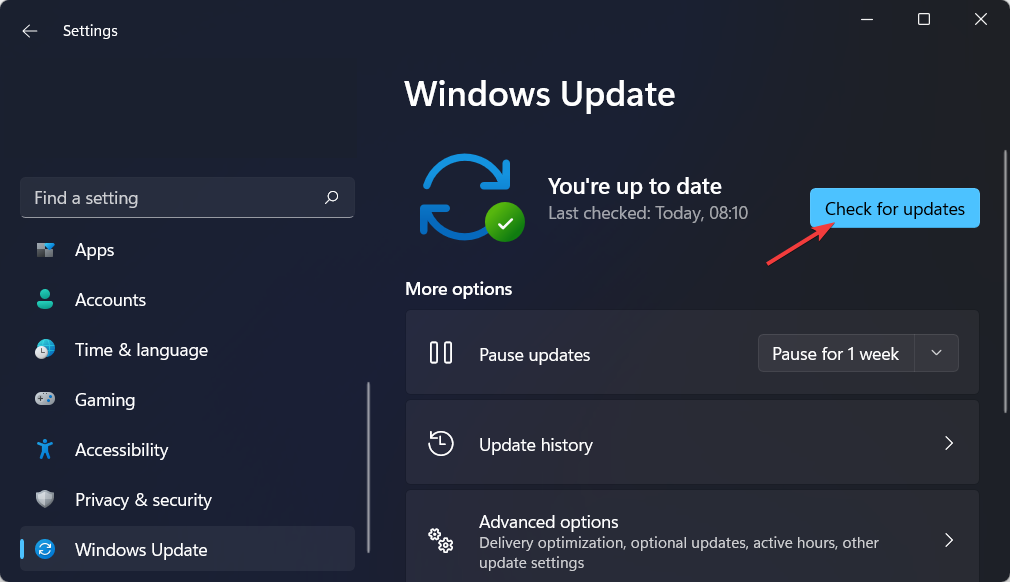
Here, click on the blue button that either says Check for new updates or Install now and wait for the process to complete.
Windows updates are designed to fix bugs and issues that have arisen. Despite the fact that they are not responsible for security vulnerabilities, they may have an impact on the stability of your operating system or simply be irritating.
Finally, but certainly not least, Windows Updates can include both new features and fixes for previously reported issues, as well as security measures that need to be applied in order to keep your computer safe.
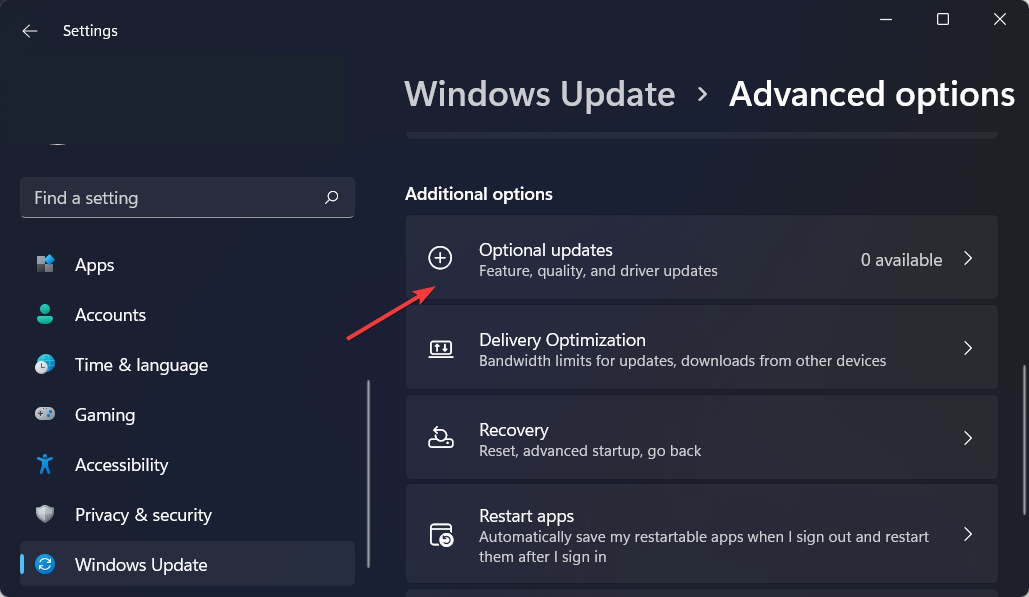
Open Settings and go to the Windows Update section from the left-side menu, followed by Advanced options on the right side.
Now go to Optional updates and select all the boxes you are provided then click on Download and Install.
Note that you can opt for an automatic driver updating solution. These tools perform a quick scan of you system in which they identify the drivers that need to be updated and prompt you to download them.
Thus you will be able to save time and avoid future driver-related errors that might pop up due to an irregular driver update routine.
3. Sign in and out
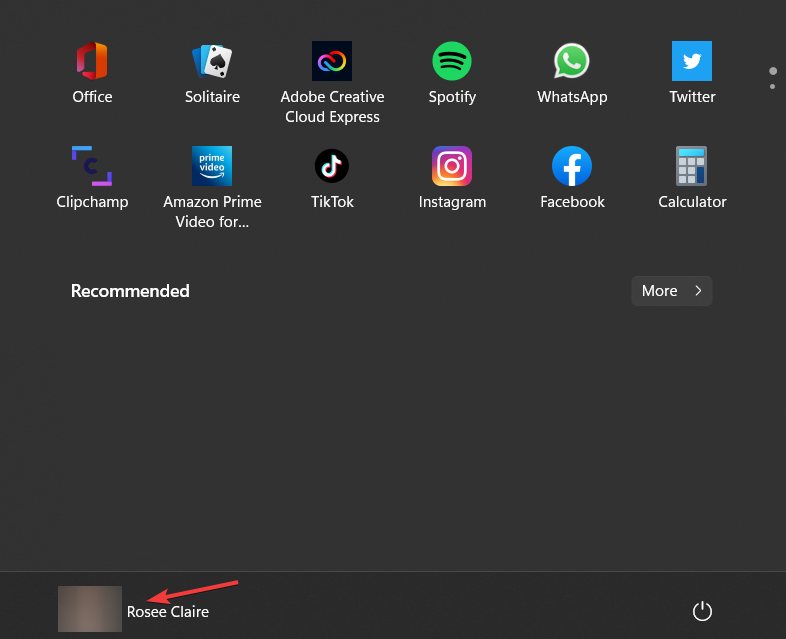
Click on the Start icon from your Taskbar then right-click on the account icon.
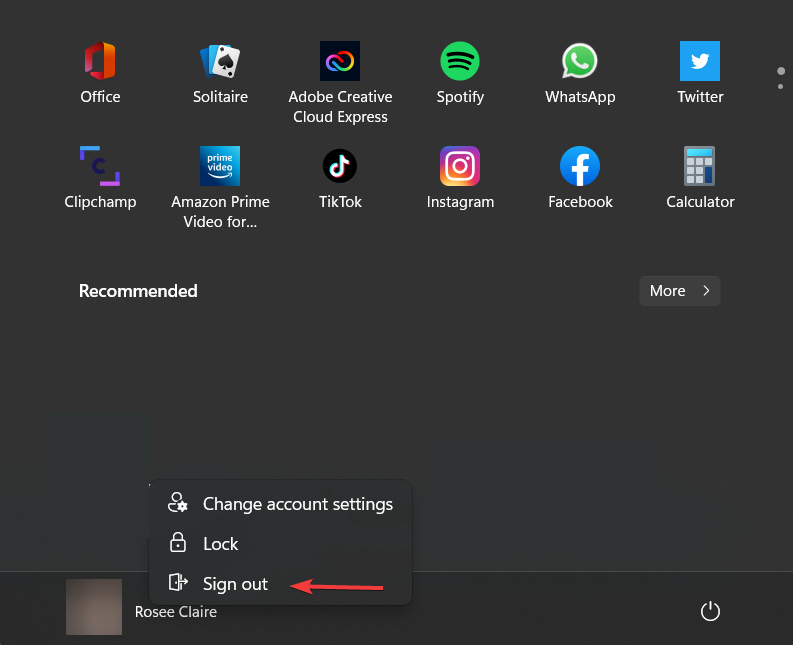
Next, choose to Sign out then log in back again with your account. Make sure to also reboot your computer. This will allow you to start from a blank slate and apply the changes made.
Your Microsoft account enables you to manage everything from a single location. Keep track of your subscriptions and order history, organize the digital lives of your family, update your privacy and security settings, track the health and safety of your devices, and earn rewards.
You would need a Microsoft account if you have other devices such as a Windows smartphone or an Xbox because it would allow you to access unified apps and games.
What are Windows 11’s performance gains?
When compared to Windows 10, Windows 11 has the potential to improve the overall performance of your computer by a significant amount.
In a YouTube video, Microsoft discussed the performance enhancements and optimizations that are included in Windows 11.
As a whole, the performance improvements in it are largely due to changes in the way the newer operating system handles system processes, which are typically visible when you open Task Manager.
The OS performs a significant amount of memory management work in order to favor the app windows that are currently open and running in the background.
This should ensure that they receive more CPU power than they would otherwise receive from other system resources.
Microsoft demonstrated this by showing how the Excel app in Windows 11 opens quickly even when the CPU is running at 90 percent of its maximum capacity, despite the fact that the CPU is extremely busy.
Other performance improvements in Windows 11 are related to the way your computer wakes up from sleep and manages standby time.
In comparison to Windows 10, Microsoft stated that in Windows 11, your RAM can remain energized while the PC is in sleep mode, allowing it to have power while the rest of the computer does not. This will allow your computer to wake up to 25 percent faster when it is in sleep mode.
Spotify is one of the most popular online music platforms, it covers all genres, has a sleek design and it’s easy to use.
But the big downside is that it all happens online. Without an Internet connection, you’re stuck with what you have in your storage.
When there’s a will, there’s a way and that is where Pazu Spotify Converter springs into action to help you grab all your favorite tunes and store them wherever you want.
And you don’t even need to have a Premium Spotify account to do that so you’re good to go even with the free one.
We’ve tested the software and we’re happy to give you a rundown of its best features and how to use it in just a few steps.
How can Pazu Spotify Converter help me download Spotify music?
With a free account on Spotify, Pazu Spotify Converter will log in, and then on, it’s just about selecting and downloading the favorite songs in M4A, MP3, AAC, FLAC, WAV, and AIFF formats.
Of course, after getting the songs in a designated location on your drive, you can transfer them to your favorite players or devices, including the mobile you take with you when running.
You don’t even need to install the Spotify app because the tool can log into your account from any PC, wherever you are.
What are the best features of Pazu Spotify Converter?
1. Built-in Spotify web player
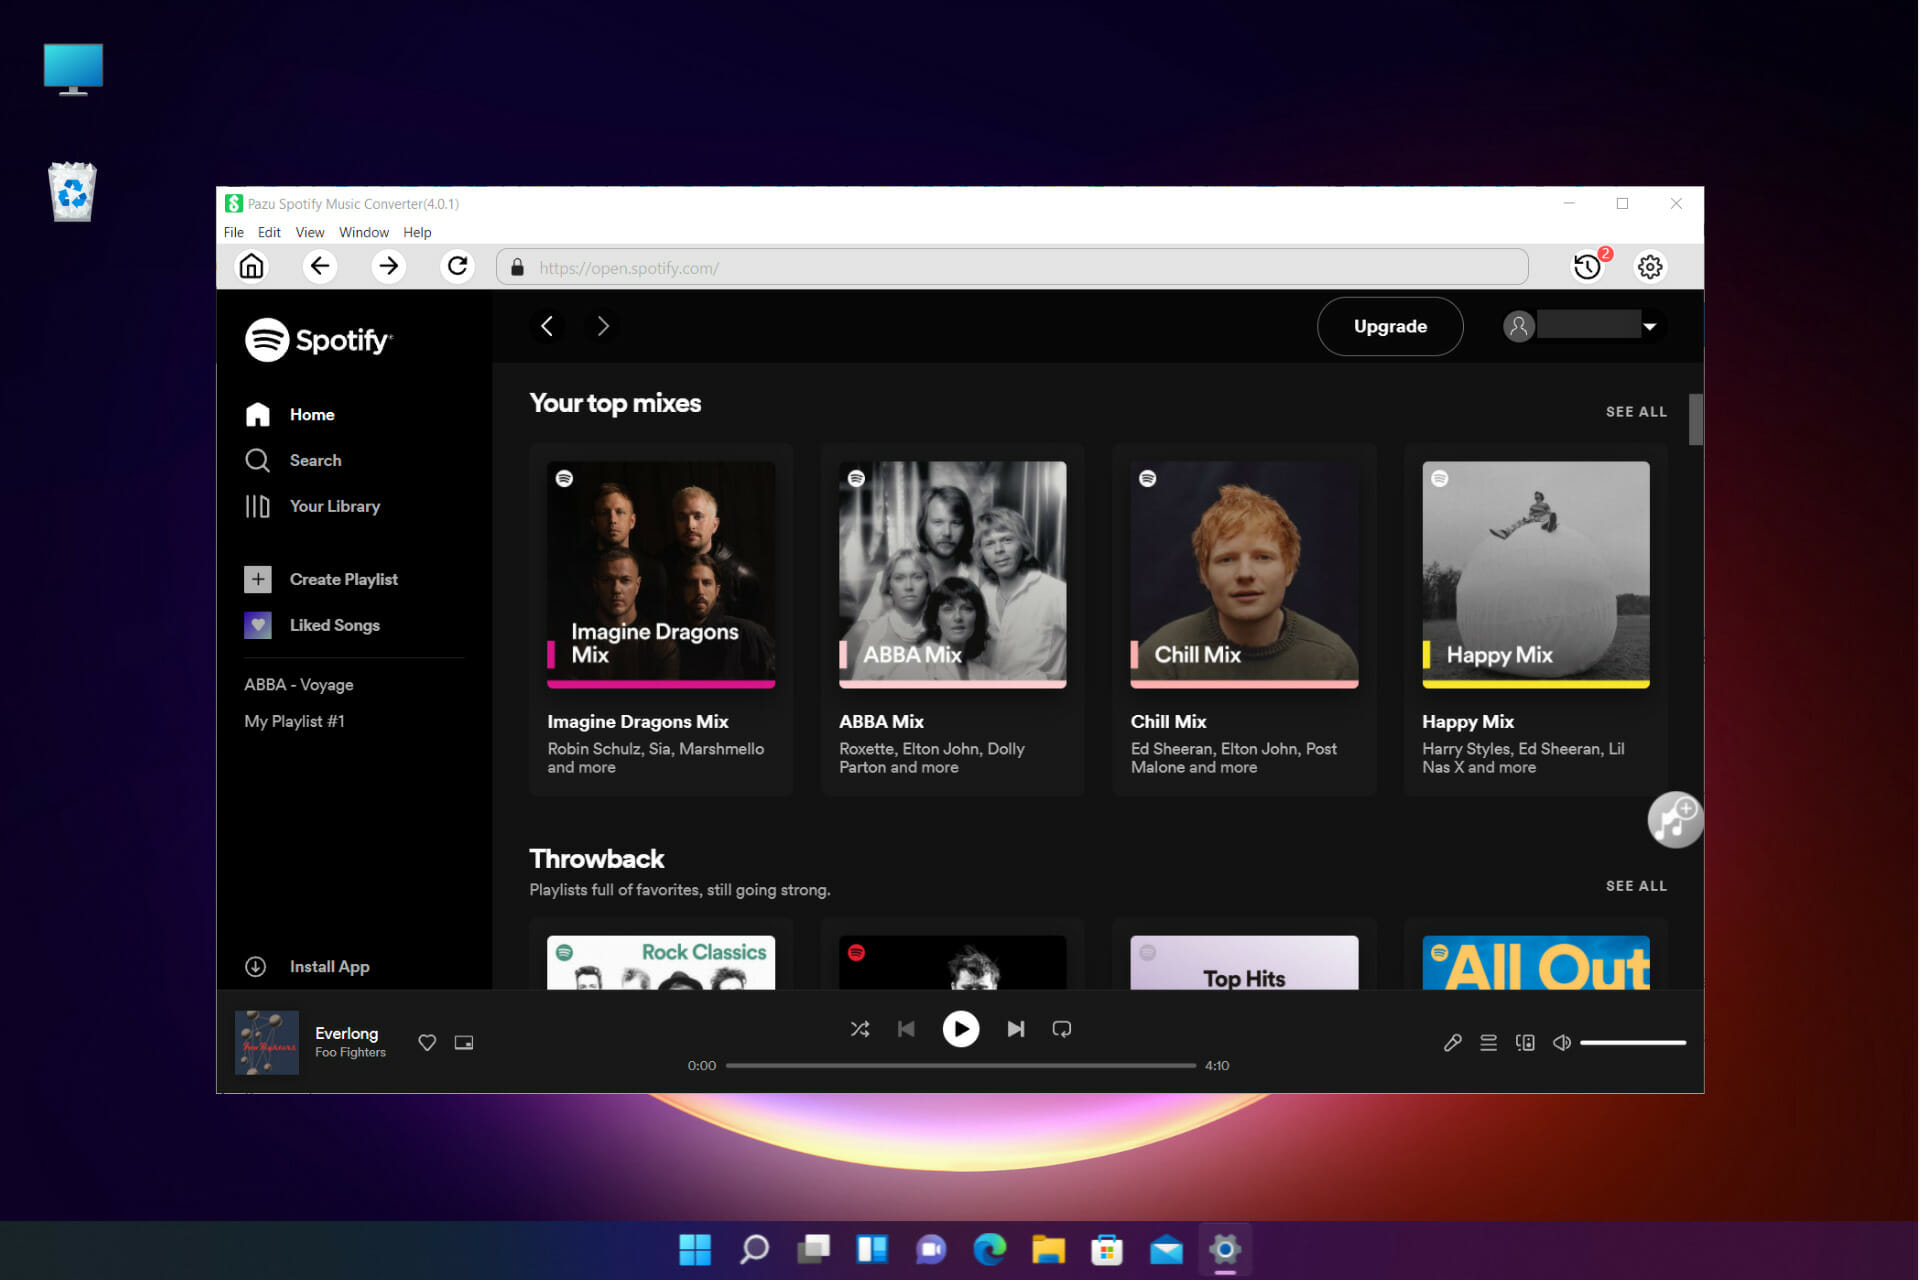
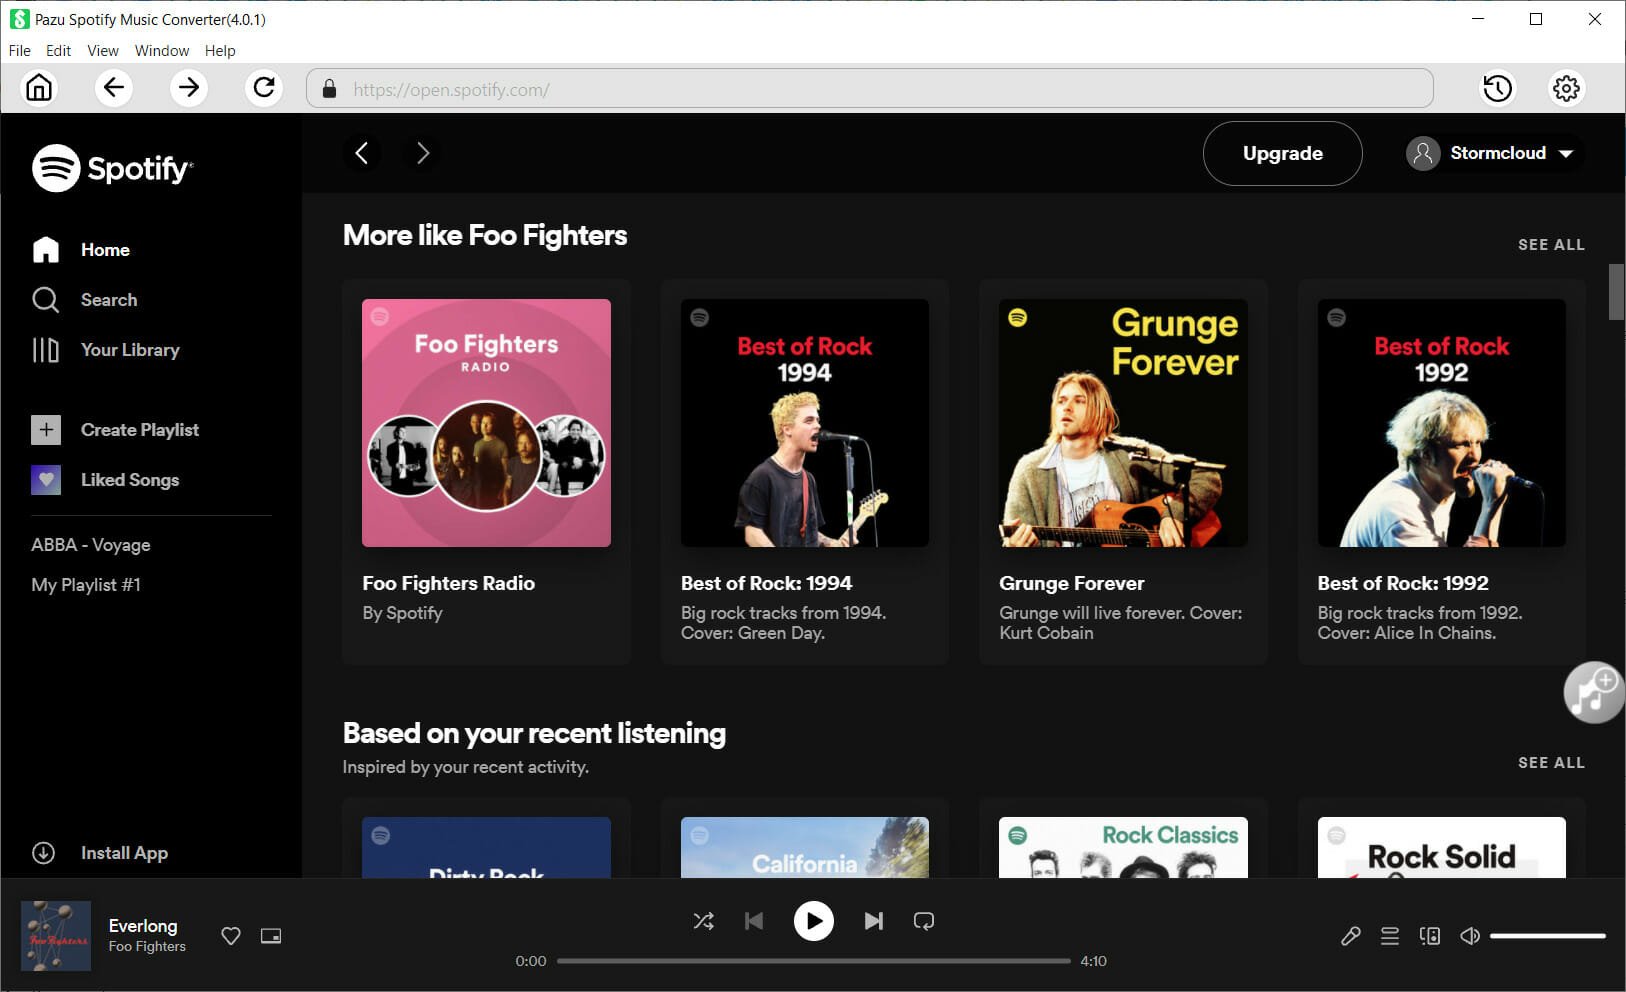
Forget about the Spotify app because the Pazu Spotify Converter has a built-in web player.
That means, it’s just like opening the Spotify account on a browser or the app but this time, you can download and convert any song.
Think of it as a tiny browser that can access your music account and is able to get all your songs for any offline usage.
2. High-quality downloads
Not only that you download any of your songs, but with Pazy Spotify Converter you get them at top quality.
You can save the songs as WAV and FLAC but even for MP3, you can set up the sampling up to 320kbps.
That means quality-wise that the tool will grab the songs as the original copies and you can’t get better than that.
3. Keep original ID3 tags & metadata
Most common audio grabbing tools out there just download the songs and if you want to organize them afterward, you will have to do that manually.
The tool from Pazu will get the songs together with ID3 tag information, including title, artist, album, genre, year, etc.
Moreover, you will already have them organized in the History screen with all the criteria you need and play them seamlessly.
After getting the file, run it, select the destination folder, and select Install.
In a few seconds, the installation will be over so just hit the Finish button to start the app.
Now, hit the Login button from the top-right corner of the window.
In the next window, you just need to log into your Spotify account with either the social network account, the Google account, or your distinct credentials.
Next, if you bought the tool, click on the Key button to register it.
Just enter the code you received when you purchased the product and hit the Register button.
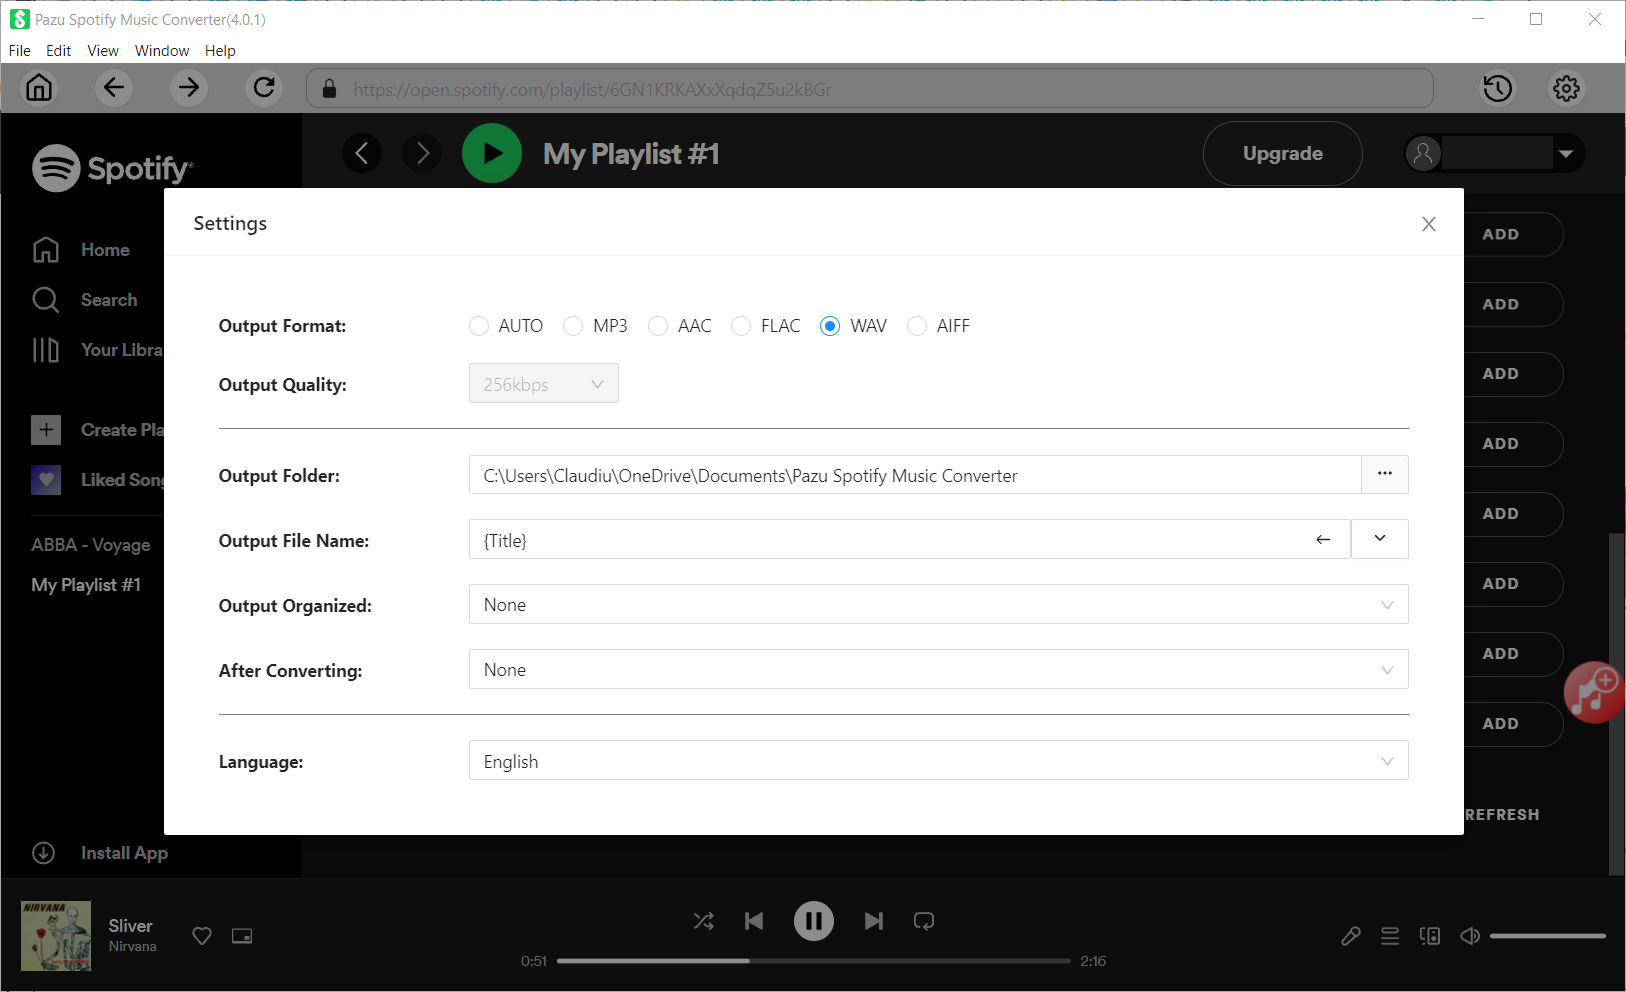
Now, click on the Settings cogwheel from the top-right corner to select the output format.
On Auto mode, it will save the file in M4A format. For MP3 and AAC, you can also set the output quality, depending on the song. You may also change the output folder, the title, and the organizing criteria.
Next, close the window, open your playlist and click on the Add to list button from the side.
On the top-right, you will see a smart button that is very helpful because toggling will not show you the songs you already converter. Now, check all the songs you want to convert and hit the Convert button from the bottom-right corner.
The only thing left to do is to sit and wait or do anything you want until the app converts the songs you’ve selected.
After that, with a single click on the Folder icon of any song, you will open the location in a File Manager window.
And after it’s done, you can click the History button from the top-right corner and see all your conversions organized by date, artist, and album.
You also have the option to sort your output files and even play or delete them with a single click.
What can be any easier than that?! Grabbing any songs from Spotify with top-quality audio rendering is simply a piece of cake.
Of course, the more songs you select and convert, the longer it will take, but you don’t need to stay with your eyes pinned on the screen because the process is completely automatic.
You can get as many songs as you want and leave your PC to do this overnight because within the Settings, you can program it to put the computer to sleep when it finishes.
As for the price, Pazu Spotify Converter is only $14.95/month. Of course, paying for the whole year upfront will save you a lot of money and there’s also a $99.95 price for a lifetime license option.
The tool also has a Mac version so hit the link below to get the right version for your system.
There are plenty of online music grabbers out there in different forms but from our experience, they don’t work on any songs and they can be very shady.
In other words, installing an add-on on your browser will not always do the job and you might be risking some serious consequences.
With Pazu Spotify Converter, everything worked incredibly smooth and easy. We’re confident that anyone can use it without any kind of introduction and training.
Getting the songs with their ID3 tags and artwork and top-quality audio was like magic, with an automatic process.
In this piece we’ll show you how to enable Ping on Windows 11 and all the steps you have to take in case it’s not working.
Ping, short for Packet Internet or Inter-Network Groper, is used to test and confirm if a particular IP address exists and measure the response time of that IP address.
Ping is also used for troubleshooting purposes to ensure that a client computer that the user is attempting to contact is up and running. All operating systems, such as Windows, Linux, and macOS, use ping.
Let’s see how you can enable it.
How to enable Ping in Windows 11 + troubleshooting
We’ll show you the exact steps for enabling ping, along with tips on diagnosing network issues, understanding ping results, and optimizing your connection for smoother performance.
1. Enable IPCM through Windows Defender
Click on Start.
Search for Windows Defender Firewall.
Click on Advanced Settings.
Right-click on Inbound Rules in the left pane and select New Rule.
Click on Custom in the New Inbound Rule window.
Click on Next.
Select All Programs in the Does this rule apply to all programs or specific programs? Page.
Now click on Next.
Select ICMPv4 in the Protocol type drop-down menu that is under To which ports and protocol does this rule apply? Page.
Click on Customize.
Click on Specific ICMP types in the Customize ICMP Settings window.
Enable Echo request In the ICMP types list.
Click on Ok.
Now click on Next in which ports and protocol does this rule apply?
Now select the radio button to Any IP address for both Which local IP addresses does this rule apply to? And Which remote IP addresses does this rule apply to?
And to create an ICMPv6 rule, repeat the same steps, but in To which ports and protocols does this rule apply? Click on the Protocol type and select ICMPv6.
If you’re having any issues after this step, keep reading.
2. Try the Network Adapter Troubleshooter
Click on the Start menu and search for Settings.
Click on System.
On the right windows, scroll down and select Troubleshoot and then Other Troubleshoot.
Select Internet Connection and then click on the Run.
Wait for the troubleshooter to diagnose the problem.
Restart your PC.
If the troubleshooter didn’t fix the issue, you can try the below solutions.
3. Check your Antivirus
If you can’t ping computers on your network, your antivirus may be at fault. Check its settings to ensure it allows ping.
You can also reset the settings to default or temporarily disable the antivirus to see if that resolves the issue.
Should disabling the antivirus fix the problem, consider switching to a more user-friendly solution like TotalAV, which offers robust protection features without complicating your network settings.
If you are not satisfied with your existing antivirus software and want a more robust and feature-rich antivirus software, you can try TotalAV.
4. Turn off IPv4 and IPv6 Using Command Prompt
To disable IPv4 and IPv6 using the command prompt, follow the below steps:
Click on the Start menu.
Search for the command promptand click on Run as administrator.
Type the following command into the command prompts.
netsh int ipv6 isatap set state disabled
netsh int ipv6 6to4 set state disabled
netsh interface teredo set state disable
Now restart your computer.
Now confirm if the problem has been resolved and if you can ping commands properly.
Under Programs and Features click on Uninstall a program.
Find applications that can be blocking HTTP traffic.
Click on Uninstall.
Once uninstalled, restart your computer and test if everything is fixed.
6. Confirm if your PC is a member of the same domain
Click on the start button and search for View advanced system settings.
Click on the tab called Computer name and click on Change.
Confirm if your computer is a member of the same domain, and click on Ok.
7. Disable VPN
VPNs have become an integral tool that we use in our day-to-day life for various purposes, be it for entertainment, work, or any other reason. VPNs play an important part in our lives.
There is a high probability that your Windows 11 not responding to ping is because of your VPN. Try disabling the VPN, restart your computer, and confirm if your Windows 11 is responding to ping now.
Is it safe to enable ICMP?
Generally, the network administrator considers the Internet Control Message Protocol (ICMP) a security threat, and it is recommended to keep it blocked at the firewall. While ICMP is notoriously known for its security risk, you can still allow some ICMP traffic and it is safe.
On your Windows 11 computer, it is safe to allow Type 3 and Type 4 ICMP traffic. To send out the ping request, Type 8 OUT and Type 0 IN must be allowed.
The word Ping comes from sonar terminology, where a sound wave (pulse) is let out and listens for an echo (ping) in return. The greater the interval, the greater the distance to an object.
The same principle is also used in networking. By pinging, you can determine if your internet connection is working properly, see if there is any network congestion, resolve any latency issues, and also find out if the server is down.
Windows 11 and previous Windows versions have been found to fail to respond to ping, and this is not uncommon with Windows.
Although it is unclear why a Windows computer can stop responding to ping, with the fixes we provided above, you should be able to fix this.
Let us know your experience solving this, as we would love to hear from you!
Some people have found Windows 11 to be bloated with a lot of unnecessary files and apps that only slow down the OS. At least to these people as Windows 11 does come with genuinely great apps.
Gamers have also found that, because of the perceived Windows 11 bloat, a lot of their games don’t run as well as they should. So, people took the Windows 11 ISO file from Microsoft and created their own version.
This guide will show some of the best custom ISO files for Windows 11. Across the internet, many of them are compact and easy on the hardware.
What are the best custom ISO files for Windows 11?
Ghost Spectre Superlite is a custom Windows 11 version focused on speed and performance. It removes resource-heavy features like OneDrive, Windows Defender, and NFC.
Benchmarks show smoother gameplay in demanding titles like Cyberpunk 2077, thanks to reduced bloat.
We like its focus on performance but caution: losing security features may leave some users feeling exposed. Still, it’s a fantastic choice for power users seeking peak efficiency.
ReviOS is built for gamers and power users, cutting excess baggage like typing personalization, UAC, and unnecessary services.
It balances minimalism and functionality by keeping essentials like Xbox Game Bar and optional updates. We especially enjoy the Workspace feature for post-installation tweaks, making it feel personal and efficient.
Though lighter than Windows 11, you’ll want an antivirus since Defender’s out. Overall, ReviOS delivers solid customization and seamless gaming.
Phoenix Lite OS removes unnecessary features but stands out by bypassing TPM and Secure Boot, broadening compatibility.
Versions like Ultra-Lite retain basics like Microsoft Store and pre-install useful frameworks. What caught our attention is its efficiency: reworked Bluetooth support and pre-installed tools make it ready to go.
While it lacks Hyper-V, its stripped-down design keeps functionality intact. Perfect for older or underpowered hardware.
Are there other things I should know about Windows 11 ISO files?
TPM is a major factor holding back Windows 11 installation on computers. Fortunately, there is a way to do this beyond buying a special microchip. It may require you to modify the ISO file or the Registry Editor.
It may also interest you to learn how to create a bootable USB drive for Windows 11. The process will require you to download the Rufus software to complete this. The process is easy to do. Just make sure your computer can run Windows 11 beforehand.
All these systems have their benefits, and we featured them in our latest article on the best Windows for older laptop guide, so don’t miss it.
Feel free to leave a comment below if you have any questions on other Windows 11 apps. Also, leave comments about guides that you’d like to see or information on other Windows 11 features or list guides.
We pretty much all know how important backing up our files really is. Whether we’re talking about important company documents or your favorite family pictures, all personal possessions are important.
Sometimes, stuff happens without us having any control over it and we always run the risk of our devices malfunctioning or getting destroyed, resulting in us losing all stored data.
So, having a backup of all your existing content is crucial if you don’t want to take that risk and end up in a situation where recovering everything is simply impossible.
That’s why Microsoft created One Drive, and that’s why so many people use it. Storing data in the cloud is one of the best and safe ways to keep your personal cyber-possessions.
If you are a Windows 11 user, you surely know by now that the default homepage of File Explorer is now called Home.
The name Quick access has been repurposed for the pinned/frequent folders section and Pinned files are now called Favorites, in order to align with Office and OneDrive.
Setting One Drive up on your Windows 11 device is actually easier than you might think and we’re about to show you how to do just that.
How can I set up my File Explorer One Drive?
Click to open the fly-out taskbar menu and click on One Drive.
Click on the Sign-in button.
Press the Create an account button if you don’t have one already, or input your email address and press the Sign in button.
Type in your password and click the Sign in button.
If you agree with the selected One Drive folder press Next, or select Change folder to choose a new one.
In File Explorer, click the One Drive dropdown located under Home.
Now you can access all your One Drive content directly from its File Explorer dedicated section.
Also, recent and pinned files displayed in Home are now searchable using the search box in File Explorer even if they are not local files, so you can find Office files recently shared with you.
For a detailed walkthrough of the sign in screens and options, see our guide on how to login to OneDrive.
That’s pretty much all you have to do in order to sync up your One Drive on your Windows 11 device, making it a lot easier to access what you need, really fast.
Let us know if you had any trouble completing this process in the dedicated comments section below.
In the Microsoft Store, there is now a version of AlmaLinux that is compatible with the Windows Subsystem for Linux. This provides users with an impressive array of new options, thus we will show you how to install AlmaLinux on Windows 11.
It was released in March 2021 that the first stable build for production was made available, and the nonprofit foundation has since added a slew of new members. Most recently AMD, who joined last month, in March 2022.
With the Windows Subsystem for Linux, developers, system administrators, and hobbyists who work in both the Windows and the Linux worlds have had their lives made a little bit easier.
WSL 2 was introduced by Microsoft in 2020. This new version of the architecture that enables it to run ELF64 Linux binaries on Windows makes use of a true Linux kernel.
It also changes the way these Linux binaries interact with Windows and your computer’s hardware and provides the same user experience as WSL 1 while maintaining the same level of performance.
WSL 2 provides significantly improved file system performance as well as full system call compatibility, allowing you to operate more like Docker.
Follow along as we will show you how to install AlmaLinux on Windows 11, right after we see in more detail if it is stable.
What are the advantages and disadvantages of using AlmaLinux?
AlmaLinux is a free and open-source Linux distribution that was originally developed by CloudLinux to provide a community-supported, enterprise-grade operating system that is binary-compatible with Red Hat Enterprise Linux.
Its first stable release, which was released on March 30, 2021, was the first one of the operating system. AlmaLinux OS 8.4 is now available, and it includes full secure boot support, and OpenSCAP support, among other features.
Individuals and organizations who require an enterprise-grade, Fedora-like distribution but do not wish to or are unable to pay for an RHEL® license, can take advantage of AlmaLinux.
Initial evaluations of AlmaLinux have been overwhelmingly positive, with no significant issues reported so far. It is also a relatively simple operating system to install and get up and running.
Those who have used CentOS in the past have generally regarded AlmaLinux’s commitment to providing a forever-free downstream distribution as a positive development.
However, it is subject to the same limitations that apply to new software versions. Because it is in a downstream position in the development process, this is likely to continue unless the team changes its approach.
The OS also has a dated look and feel to its graphical user interface. Users who have had negative experiences with CloudLinux in the past may transfer those negative feelings to AlmaLinux.
But given the community-driven nature of AlmaLinux, it is likely too early to draw those conclusions at this point in time.
How can I install AlmaLinux on Windows 11?
Open the Windows Search function and type in Microsoft Store in order to access it.
After you enter the store app, type AlmaLinux in the search bar and select the most relevant result.
Here, click on the Get button in order to install AlmaLinux on Windows 11.
Dedicated CentOS Server may be the better choice between the two operating systems if you are running a business. Because it is (arguably) more secure and stable than Ubuntu due to the reserved nature of the OS and the lower frequency with which it is updated compared to Ubuntu.
Ubuntu is an open-source project that is based on the Debian operating system, and it implements a free, community-supported computing platform that is compatible with the corresponding upstream source, Red Hat Linux.
If you are part of a business, you have to be online. This implies having an authorized business website and social media presence as well.
While Facebook, Twitter, and Google AdWords might be the preferred marketing mediums for businesses, Instagram has apparently become a favorite among marketing experts as well.
However, unlike other social media platforms, managing an Instagram account with consistent posts and updates takes a lot of time.
This is where the Instagram schedule software helps you get more productive. Our list of automated checklist software will help you increase your productivity even more.
Social media management and scheduling tools allow you to schedule posts at your convenience and let the tool publish the content automatically.
For any social media and scheduling service to work with your Instagram account, note that you need a business profile.
There are various social media management and scheduling tools online, but no single tool fits all sizes.
We have selected the most reliable Instagram schedule software with a distinct set of features to help you find the one that meets your requirement.
Therefore, let’s have a look at the best software for direct Instagram posting and scheduling. Most of these tools have a free plan or trial period that will help you determine their value.
Combin is a dedicated Instagram account management software that offers you the tools necessary not only to schedule your posts but also to get insights on how they’re doing and what you can do to improve them in the future.
This service integrates a scheduling feature for Instagram posts and stories that lets you plan your posts in advance.
You can prepare them, add them to the calendar, and Combin will automatically publish them on the time and date you set up.
The app’s main aim is to make things simpler, so it will just post your scheduled content without any annoying reminders or notifications.
The tool also has some image optimization features that let you crop out your image so it better fits the Instagram ratios.
When it comes to Instagram stories, the system is pretty similar. You can select one or multiple images and schedule them to be posted as stories.
Combin also includes other useful tools that can help you improve your social media presence. For example, it can give you a quick list of the accounts that do not follow you back.
Not only that, but it can also give you a quick assessment of your audience. With machine learning, it will be able to distinguish real followers from bots and see how engaged these users are with your posts.
Other key features of Combin include:
Add location tagging to your scheduled posts
Manage hashtags and account tags
Manage multiple accounts simultaneously
Gender, language, and audience size targeting
Automates repetitive actions
Combin
Set up a beautiful feed with simple scheduling, grow your following, and automate repetitive actions.
Canva is well known for being an easy-to-use app that lets you create professional-looking designs even if you have never made any type of design before.
A less well-known feature of the app, specifically the Canva Pro app, is that it also lets you create scheduled posts for multiple social media apps.
The cool thing about this app is that you can use it both to create and post your designs. Canva has tons of Instagram post presets that you can use as a basis for your own.
The Content planner feature connects to your Instagram account and lets you post your design directly from Canva.
You can create and schedule both Instagram stories and feed posts. You can find the feature in the main menu. Just like all the other features in Canva, this one is very simple and intuitive. When you open it, you get a calendar view with the current month.
To schedule a post, select a day. Then you have two options: to create a new design that will be posted on that day, or choose a design you already made and saved into your Canva account.
Then you just have to click the share button, pick Instagram or another social media platform of your choice, edit the date and time, set a caption for your post, and then press the Schedule Post button.
That’s about it. You can schedule multiple posts for the same date and if there’s anything you want to change about your original scheduled post, you can easily do so by just selecting it from the calendar view.
Besides Instagram, Canva also lets you connect and schedule posts for other popular platforms. These include Facebook pages and groups, Twitter, Pinterest, Linkedin, and Tumblr.
You can connect multiple accounts of the same type. So if you want to schedule posts for more than just one Instagram account, you just have to add your credentials.
Other key features of Canva include:
Drag and drop editor
Templates and presets for all social media platforms
Huge library of royalty-free images and videos
In-app guidelines and courses
While the scheduling is a Canva Pro feature, you should know that the app has a free version that is somewhat limited but gives you a good understanding of what it has to offer.
Plus, they do offer a 30-day free trial, if you want to try it out without commitment.
Canva
Create stunning designs and use the Content Planner feature to schedule and automatically post them to Instagram and other platforms.
Visme is another good option if you want to take care of all your endevaours in one place. It’s a graphic design app with several tools that will help you build your brand and create a marketing strategy.
One of this tools is of course the Content Calendar. You have to connect your Instagram Business account with your Visme account.
The process is straightforward. You get a calendar view, select the date you want to schedule a post for, and add your post.
Visme has many social media templates. There’s a lot of diversity in its catalog. You will find presets for pretty much any type of post, from product promotions, campaigns, and more.
If you want to create and implement your marketing strategy at a higher level, you can even use its marketing plan templates.
This can be of help if your approach is more elaborate. It can be a good addition to the Content Calendar.
Visme has many useful resources that will help understand how to successfully create your designs and how to implement them in your strategy.
Other key features of Visme include:
Stock images and videos
Support for animation and video editing
Brand kit creator
Drang and drop editor
Visme is available as a free tool, but also has a premium plan with some more advanced tools. The free version is however highly functional, with minimal limitations.
Visme
Design and schedule your Instagram post with this resourceful and intuitive app.
When starting a small business or scaling up, you need a tool that could streamline things and make them quicker and easier. Especially when it’s about social media posting.
Content creation does take a lot of time. But when you have the right tool, you can really grow your business.
Spare yourself from the tedious task of constantly having to post things on various social media platforms. You won’t have to keep track of anything either.
This tool can be mastered pretty fast and once it becomes a part of your working routine, you can plan everything and massively reduce the time spent before.
Additionally, you can check how your posts fare on social media. Engagement rates will showcase the number of times your posts have been accessed by people and their reach rate.
Beyond words are the facts, and you can test it yourself for free without a credit card to benefit its efficiency.
Here’s a list of its key features:
Multiple social media app integration
Engagement rate
Quick scheduling
SaaS support
5 offices across the globe and counting
PromoRepublic
If you have your own personal brand and want to market it on social media the professional way, then PromoRepublic is what you need.
Regarding automation tools, Sprout Social is clearly on top with many targeted features that will help you create a strong connection with your audience.
For instance, in just a few minutes, you can make and deploy your own chatbots on Twitter and Facebook with Sprout’s Bot Builder.
The tool uses unique conversational components with rules-based logic to engage the users and provide them with meaningful information.
Sprout Queue helps you automatically publish your messages at scheduled times or when your audience is at peak engagement.
That’s because the ViralPost built-in technology analyzes your audience, engagement patterns, and other criteria to send and deliver the content at the right moment for the greatest impact.
Another great feature is the Suggested Replies, which formulates automated replies to make your job easier when answering Twitter messages.
But that’s not all! Sprout Social measures your NPS and CSAT scores and sends automated surveys after every customer interaction.
The solution is trusted and used by 30,000 world-class brands and organizations of all sizes, so it’s definitely a strong choice to consider.
Take a look at Sprout Social’s key features:
Strong automation features
AI and machine learning algorithms
Measures your NPS and CSAT scores
Easy chatbot creation with great conversational components
Publish messages at scheduled times or when the engagement rises
Sprout Social
Automate your posts, and answers to messages with the best AI and machine learning algorithms.
Keyhole is a very complex web app that can perform social listening, create marketing campaigns, profile analytics, and a lot more.
However, it also features a very easy-to-use publishing tool that allows you to schedule all your posts on social media, including Instagram, Facebook, Twitter, and LinkedIn.
It also comes with a simple composer where you can insert your text and media for the post.
You will see all your posts in a list or Calendar view, allowing you to map out your campaigns in advance and analyze your strategy.
The really interesting part comes after because, with Keyhole, you also have full-scale access to analytics.
You will be able to see the impact of your posts, the engagement and actually assess the progress of your project.
With the Listening & Campaigns feature, you can effectively monitor your brand, the products, or the topics you are addressing on the entire social media spectrum.
Moreover, all the members of your marketing team and even your clients may see the campaigns and projects you are working on to collaborate. That’s because you can give them access to see the posts before they are published.
Keyhole is free to try so why don’t you test it and see if it fits your requirements?
Let’s review some of its best features below:
Monitor your brand, products, and topics on Instagram and other social media accounts
Simple and comprehensive posting and scheduling tool
Collaborate with your team and clients on the projects
Buffer is a social media management and scheduling software with the Instagram scheduling feature. You can manage Pinterest, Twitter, Facebook, LinkedIn, and Instagram accounts through the dashboard.
It is a premium service but offers a free starter account for new users. Buffer makes it easy for business and marketing teams to analyze social media performance, schedule posts, and manage multiple accounts.
Premium account members can add multiple team members and assign each account different access right. Buffer is also available as a smartphone app for Android and iOS and a browser extension for Chrome.
Using the free account, you can enjoy three social media accounts and schedule 10 posts per profile.
While the free account has access to the image editor and GIF and video uploader, it misses out on RSS feed, Calendar access, and advanced social media analytics features.
The Pro account is divided between the premium, small and medium plans that offer more user access, posting slots, etc. depending on your business size.
The working of Buffer is similar to Later. After creating an account, you need to link your Instagram account with the service.
Next, schedule a post with media, and a caption and buffer will post the content to your account on time.
Here’s a list of its key features:
Manage Pinterest, Twitter, Facebook, LinkedIn, and Instagram accounts
Add multiple team members and assign each account different access
Analyze social media performance, schedule posts, and manage multiple accounts
Diverse automation features
Friendly, web-based interface with intuitive menus
Hootsuite is another premium social media management platform that allows you to schedule and post on multiple social media accounts at the same or different times.
It offers a limited free plan to the new users that offers access to 3 social profiles, 30 scheduled messages, and 1 user access.
Thirty scheduled messages mean you can only schedule 30 messages at any point unless the scheduled messages are deleted or published.
The premium plan, on the other hand, comes with more features. It includes key performance metrics, automated post scheduling (no limit), increased ad spent limit, team message assignments, and more.
You can also benefit from custom analytics reports that can be exported and increased user access with up to 35 social profiles limit.
The Hootlet extension allows you to find content on any web page and curate a post from it.
In addition, Hootsuite also allows you to import content from third-party cloud storage services including OneDrive, Dropbox, Google Drive, Box, and more.
Hootsuite is a powerful social media management and scheduling platform with analytics and collaboration features.
You can begin with the free plan to understand if it is something that can benefit your business and solves your social media management woes.
Here’s a list of its key features:
Schedule and post on multiple social media accounts at the same or different times
Comprehensive web-based dashboard
Cloud storage services include OneDrive, Dropbox, Google Drive, Box, and more
Custom analytics reports
Find content on any web page with the Hootlet extension
Later is among the most popular applications for scheduling and posting. It is a social media management service that offers direct scheduling and publishing to Twitter, Facebook, Instagram, and more.
It is premium indeed, but anyone can get started for free. The free account offers 1 social profile per platform, 1 user access, 30 Instagram posts, 50 Twitter posts, plus 30 Facebook and Pinterest posts.
With premium plans, you get more posting slots as well as additional features such as video and story scheduling, tag locations and users in photos, Basic + Pro Instagram and Pinterest analytics, and more.
Note that the feature varies across plans, so read the official pricing page for the detailed features list.
After creating an account, proceed with setting up the Instagram account using Later. It asks you to link your Instagram account with Later for direct posting.
You can now start uploading photos from your PC to your Later calendar and schedule them for direct publishing on your Instagram business account.
It’s also possible to upload media from Google Drive and Dropbox accounts. Later is an excellent tool for new users to learn social media automation and you can always upgrade to the premium account if you need more features.
Here’s a list of its key features:
Very easy to use
Cloud storage integration
Direct scheduling and publishing to Twitter, Facebook, Instagram, and more
Zoho Social is a social media management and scheduling service from Zoho. Create posts and schedule them when your audience is most active to get more clicks and views.
Apart from scheduling and publishing content, Zoho offers a powerful set of tools for businesses and agencies to grow their presence on social media platforms
Zoho offers a free account for a new user with limited features. This account offers one user access, social profile set up for Facebook, Twitter, Instagram, Google my Business, and LinkedIn accounts.
It also has a publish feature alongside engagement insights from the earlier-mentioned social media accounts. Unfortunately, the free account does not support post-scheduling.
Scheduling and other features like SmartQ, Pause/Resume Scheduled post, bulk scheduler, repeat post, publishing calendar, custom audience targeting, and a few others are only available for premium users.
The Social Media Calendar lets users craft posts at any date in the future. There is a button to post something instantly, and if you change your mind, you could reschedule the posts.
Moreover, if you plan to create content in bulk, you can schedule it in one go, right from the spreadsheet, and also post it under multiple authors.
Zoho Social is an excellent social media management service with Zoho CRM integration. If you already use Zoho tools for your business, Zoho Social might fit your bill.
Here’s a list of its key features:
Create posts and schedule them when your audience is most active
Powerful set of tools for businesses
Engagement insights for all connected social media accounts
Supports Facebook, Twitter, Instagram, Google my Business, and LinkedIn accounts
Social Media Calendar for scheduling and managing posts
Sendible is an all-excellent social media management and scheduling solution for agencies, offering the best tools for teams to manage the social media accounts of multiple clients.
You can customize, edit, and post on each platform simultaneously. More so, Sendible lets users create their own scheduled slots for each platform.
This is great when working with multiple audiences that wish to see different amounts of content at various times during the day.
For example, LinkedIn users consume business-related content, while Facebook users like lighter content.
Unlike other SM automation tools, Sendible does not offer a free account, but there is a free trial account that you can try.
The service offers a unified social inbox for each brand to keep everything on priority mode. The content recommendation engine analyzes your posting patterns and profiles and suggests the best content for your brand.
You can create a workflow to approve your teams’ content with the calendar. When it’s time to make a presentation show the progress reports generated from social media analytics.
Sendible is specifically designed for social media agencies rather than individuals. If you are an agency looking for a social media automation tool, try it.
Here’s a list of its key features:
Customize, edit, and post on each platform simultaneously
Unified social inbox for each brand
Analyzes your posting patterns and profiles and suggest the best content for your brand
Built-in workflow calendar
Progress reports generated from social media analytics
Tailwind is another visual marketing platform that works with Pinterest and Instagram. The tool offers smart scheduling, profile and board metrics, and a 30-days history archive to the users.
Unfortunately, the service doesn’t offer any free plans, but you can take the tool for a spin and see what it’s capable of using the free trial.
You can begin by creating a free trial account and linking your Instagram account. To schedule a post, start by uploading media files to your account.
Use the Tailwind Create feature to automatically create hundreds of variations and eye-candy designs to attract your audience.
Reach more people with the Hashtag Finder. The feature will search for popular and relevant niche hashtags and mix them up.
Insightful analytics will provide all the data needed to improve your Pinterest posting. See what’s working with Report, Top Pins, Pin Inspector, and Board Insights.
It is possible to schedule an entire week of pins, all at once. Publish your collection of posts from one place with a seamless, time-saving workflow.
You can also capture media and customize it with hashtags, then schedule it. Tailwind will automatically publish the post when it is time. You can easily manage the time slots from the Calendar.
While social media management for your business is important, you can’t have all of your resources allocated for this task only. Let one of these tools do the job for you!
When posting content on social media, you need to follow some unwritten rules if you want your audience to notice your posts.
➡ Do some thorough research
Posts containing relevant information will attract more people. Everyone is thirsty for knowledge! Show them something new, or teach them some facts they didn’t know before.
You may take a little bit more of your time to do thorough research on the subject before posting it. Searching for broader subjects is good, but people have their own interests, so don’t expect to please everyone.
If you plan to gain more followers, posting on social popular social media platforms is really important. At the moment, Facebook is by far the biggest platform, followed by YouTube, which recently added highlights for their content creators.
➡ Cater to your audience
Creating relevant posts is not enough to keep the audience engaged. All of your posts should be written in a manner that speaks and touches the followers.
LinkedIn is made for senior executives, employees, and employers, therefore a post written on that platform needs to be more serious and official.
On the other hand, a Facebook post that will probably be read by children, parents, and everyday people can be heartwarming and use light language.
➡ Make your posts unique
While your social media posts should cater to the audience, they must also reflect your voice, your own opinions, and your character.
Create content that will remind people of you or your company and make it stand out from the crowd.
➡ Positivity goes a long way
Always try to see the glass half full! For many, social media is a way to escape real life in order to cool off after a stressful day – remember that when writing something.
These social management tools help you better organize your social media accounts without waiting for the right time to publish a post. Discover essential AI social media management tools to plan content, schedule posts, and track performance.
Even more, keep in mind that social media has a significant impact on trading, especially cryptocurrency. If interested, check out this list of the best social media trading software.
What do you think? Have you used any of the scheduling/posting services for Instagram? Share your experience with us in the comments.
Microsoft’s latest operating system, Windows 11, includes a new design, improvements to Microsoft Teams, support for Android apps, and the ability to use multiple desktops, among other things.
Many of these new features are beneficial for increasing productivity and multitasking, whether you’re trying to organize files for school or trying to do three things at the same time for work.
Among these features are virtual desktops, which allow you to organize multiple workspaces on a single monitor.
Find out what you should know if you’re unsure about upgrading from Windows 10, and let’s move on to more productivity features that are included in Windows 11. Follow along!
Windows 11 Productivity features you should know about
Many professionals are hesitant to own two-in-one laptops or touchscreen displays because of their perceived security risks. This is due to the fact that navigating Windows with your fingers is less intuitive than it should be.
With Windows 11, this is no longer the case. Microsoft created the operating system to be usable with both your hands and a mouse. When used in computer mode, Windows 11 retains the familiar user interface.
In tablet mode, on the other hand, the interface is tweaked to make it more user-friendly. When compared to cursors, fingers are less precise, and we cannot see what we are tapping.
As a result, they increased the size of the touch targets and the amount of space between icons. Using visual cues to make resizing and moving apps is even more straightforward.
How to use multiple desktops in Windows 11
You can easily set up multiple desktops on your Windows 11 PC directly from the built-in Taskbar. All it takes is a few clicks, then you can enjoy this new Windows feature.
1. Hover over the Task Viewicon from your Taskbar. A small preview of your current desktop(s) should appear, and if you click the button, a preview of the apps that are currently open on your current desktop will appear as well.
2. Click on the New desktop button or alternatively use the Windows + CTRL + D shortcut.
3. You can also rename the desktops if you click on the Desktop X text. Or if you right-click on the desktop.
5. In order to remove a desktop, you can hover over theTask View icon, then hover again over the specific desktop and click on the X button.
Users have been asking if they can have different icons on multiple desktops in Windows 11, or if they can have a different Windows 11 Taskbar on multiple desktops.
Unfortunately, this is not supported as of now, but Microsoft might introduce this feature in the near future.
When you group apps and windows together, Snap Layouts, a new feature in Windows 11, allows you to better organize your desktop.
It’s similar to how you can group your apps on Android and iOS devices, or how you can use Split Screen on a Mac computer.
Microsoft Teams, a messaging and collaboration application, is integrated into the OS. This new feature enables you to send messages and make video calls directly from your desktop computer.
Despite the fact that it is not as popular as other services such as Zoom and Messenger, it is a useful new feature. You can now communicate with anyone, regardless of whether or not they have a Teams account, directly from your desktop.
Additionally, Microsoft Teams is available on iOS and Android devices, which means it has the potential to reach a larger audience. However, only time will tell whether or not this feature will be adopted by the rest of the general public.
If you use our guide, your virtual desktops will look the same and function the same, the only difference being what apps or windows you have open.
No doubt, many of you are waiting for the Patch Tuesday monthly batch of security updates and we’re here to make it a bit easier for you to find what you’re looking for.
It goes without saying that Microsoft isn’t the only company that has such a rollout on a monthly basis. So, in this article, we’re going to talk about Adobe and some of the patches for their products.
As we’re pretty sure you know by now, we will also include links to the download source, so you don’t have to scour the internet to find them.
Acrobat and Reader required the most fixing this month
Last month, Adobe only released three patches addressing six CVEs in Adobe Photoshop, Illustrator, and After Effects.
Pretty light, considering that these last few months really tested major companies in terms of software malfunctions and hacking.
However, April comes with only four updates addressing 70 CVEs in Acrobat and Reader, Photoshop, After Effects, and Adobe Commerce.
Adobe Acrobat and Reader updates are by far the largest, with no less than62 CVEs being addressed just for the two.
And to answer your next question, yes, the more severe vulnerabilities being fixed are the Critical-Rated Use-After-Free (UAF) and Out-of-Bounds (OOB) Write bugs.
Developers pointed out that these vulnerabilities could actually allow an attacker to execute code on a target system if they can convince a user to open a specially crafted PDF document.
If Photoshop is your go-to Adobe software, note that there are 13 CVEs fixed in the patch for the photo editing app.
After Effects patches for April 2022 address two Critical-rated CVEs that could allow for code execution, with both bugs listed as stack-based buffer overflows.
The patch for Adobe Commerce fixes a single, Critical-rated vulnerability, which Adobe rates as a CVSS 9.1, explaining that authentication would be required to exploit this bug.
Admin privileges are also required but, still, if you’re using Commerce, test and deploy this patch as soon as you are able.
Another important aspect is that none of the bugs fixed by Adobe this month are listed as publicly known or under active attack at the time of release.
Have you encountered any other bugs while using Adobe software? Share your experience with us in the comments section below.
Some users need to connect their Apple iPads with Windows 11 PCs to transfer files. However, Windows 11 doesn’t always recognize iPads when some users connect them with PC. When an iPad isn’t recognized, it doesn’t appear within the iTunes software. One user’s MS forum post said this:
When I plug my new iPad Pro 9.7 into any USB port on my desktop PC, it is not recognized. I have other Apple devices, all of which are recognized. I installed the latest iTunes software on my laptop PC and that recognizes my iPad Pro!
Some users might see an 0xE error message when an Apple device isn’t recognized. That error message says this, iTunes could not connect to this iPad because an unknown error occurred (0xE8000003). As a result, users can’t share files between their Apple tablets and Windows 11 PCs.
Do you need also need to fix Windows 11 not recognizing an iPad as well? Maybe one of the potential resolutions below might get that issue sorted on your PC.
How Come Windows 11 isn’t recognizing my Apple iPad?
The iTunes software has an Apple Mobile Device Service that detects Apple devices connected to your PC. Windows 11 won’t recognize your iPad if that service isn’t enabled and running. So, some users might need to enable that service to resolve this issue.
Another possibility is that there’s an issue with the Apple Mobile Device USB Driver. If there is, you might see an exclamation mark by that device in Device Manager. Reinstalling that Apple device driver could be the solution in such a scenario.
There might be something up with the Apple software on your Windows 11 PC. In this case, reinstalling iTunes or at least selecting Repair options for other related Apple software could be a potential remedy.
Or it might just be that you’re utilizing an outdated iTunes version. An outdated iTunes won’t recognize the latest Apple devices. So, maybe you need to update your software.
How can I fix Windows 11 not recognizing my Apple iPad?
1. Remember to Select the Trust Option
When you connect an Apple device with Windows PC for the first time, you need to select a Trust option. Insert your iPad into a USB port on your PC.
Wait for the Trust option to appear. Then tap that option on your iPad.
Then input the required passcode.
Also, make sure you haven’t accidentally tapped the Don’t Trust option by mistake. To do so, you’ll need to reset that option on your iPad by selecting General and Reset in the iPad’s Settings app.
Tap the Reset Location & Privacy option.
2. Update the iTunes Software
Click the taskbar button for the Start menu.
Type Apple Software Update in the Start menu’s search box to find that app, which comes bundled with iTunes.
Click Apple Software Update to open its window.
That app will automatically check for new iTunes software versions. Select the iTunes checkbox if it finds an available update.
Press the Install item button.
3. Run the Hardware and Devices Troubleshooter
Open Windows 11’s search box by clicking the taskbar icon shown directly below.
Then input the keyword cmd to look for the Command Prompt app.
Select Command Prompt to open it.
To open the Hardware and Devices troubleshooter, input this command and press Return: msdt.exe -id DeviceDiagnostic
Click Advanced to select the Apply repairs automatically option.
Press the Next button to initiate the device troubleshooting.
Select the Power and Restart options on the Start menu if the troubleshooter detects and fixes something.
4. Try Connecting the iPad with Different USB Ports
Windows 11 might not recognize your iPad because there’s an issue with its USB connection. So, try connecting your tablet with alternative USB ports. Also, don’t connect your iPad with any kind of USB hub. Plug the tablet into a direct USB port on the PC if you were utilizing a USB hub.
Aside from that, check the condition of the Apple USB cable. If it looks like it might need replacing, that could be why Windows 11 doesn’t recognize the iPad. Try connecting your iPad with a different USB cable.
5. Disconnect all other non-essential peripheral devices
It’s recommended users unplug all superfluous devices and accessories connected to their PC when Windows doesn’t recognize Apple devices. So, that means unplugging anything like gamepads, external hard drives, USB sticks, and joysticks from USB slots. Then, plug the iPad into a USB slot.
6. Repair Apple iTunes, Mobile Device Support, and Software Update
Press the Windows + X keyboard keys both at the same time.
Click Run to open that command window.
Open Programs and Features by inputting this Run command and pressing Return: appwiz.cpl
Then select the iTunes software.
Click the Repair option for it.
Select the Repair options for Apple Software Update and Apple Mobile Device in Programs and Features as well.
7. Check that Apple Mobile Device Service is Enabled and Running
First, launch Run as covered in steps one and two of resolution six.
Open this Run command in the Open text box: services.msc
Click OK to bring up the Services window.
Double-click Apple Mobile Device Service in that window.
If that service is disabled, select the Automatic startup option.
Click Start if the service isn’t running.
Then go and press the Apply button, which will save your selected settings.
Click OK to close the Apple Mobile Device Service window.
Repeat the steps above for the Bonjour Service.
8. Reinstall the Apple Mobile Device USB Driver
Bring up the Power User menu, which opens when you right-click the Start button.
Select the Device Manager option from there.
Double-click the Universal Serial Bus controllers category to view all its devices.
Right-click the Apple Mobile Device USB Driver to select an Uninstalldevice option for it.
Select the checkbox for the Remove device driver software option on the confirmation prompt.
Click Uninstall to remove the driver.
To reinstall the driver, click the Universal Serial Bus Controllers category with the right mouse button to select Scan for hardware changes.
Driver updater software, such as Outbyte Driver Updater, can also fix missing or faulty drivers in Windows. Running a Outbyte Driver Updater scan will show you if the Apple Mobile Device USB driver is outdated, missing, or faulty. Then you can select to install the latest driver for that device with the software.
9. Reinstall iTunes
Open the Programs and Features Control Panel applet as outlined in the first steps of resolution six.
Then select the iTunes software listed there.
Click the Uninstall option for iTunes, and select Yes on any confirmation prompts.
In addition, uninstall associated Apple Software Update, Mobile Device Support, Quicktime, and Application Support software.
Restart your Windows 11 PC after uninstalling the software.
Click the File Explorer taskbar button to open that file manager.
Check if there are any leftover folders from the uninstalled Apple software in the Program Files (x86) folder. If you find any leftover Apple software folders there, select them and click Explorer’s Delete option.
Open iTunes’ download webpage within your browser software. Click the iTunes 12.10.11 for Windows (Windows 64-bit) download link there.
Reinstall iTunes with the setup wizard you downloaded for it.
You can uninstall iTunes and delete its leftovers with third-party uninstaller software. For instance, the freeware IObit Uninstaller includes options you can select to erase leftover residual files and registry keys from uninstalled software.
Those are the most likely fixes for Windows 11 PCs not recognizing iPads. Some of the above potential resolutions might also fix the same issue for Apple iPhones and iPod devices Windows doesn’t recognize.
If Windows 11 doesn’t recognize your iPad after applying all the resolutions above, try connecting it to a different Windows PC if possible. Does the same thing happen on an alternative PC? If yes, consider contacting Apple’s help service about the issue from the big A’s Get Support page.
You can also chat about Windows 11 PCs not recognizing iPads by adding some comments below. The comments section is a good place to ask questions or even share other potential resolutions for fixing Windows 11 not recognizing iPads.
When talking about Opera GX vs Safari, we must mention that, even though they cater to distinct audiences, they overlap in some aspects.
Both focus to increase speed and efficiency. But Opera GX markets itself as the world’s first gaming browser and is cross-platform, while Safari prioritizes integration with the Apple ecosystem.
Let’s take a closer look overlapping and distinct features between the two:
Is Safari better than Opera GX?
Installation process
Safari is seamlessly integrated into the Apple ecosystem and it works flawlessly on macOS, respectively iOS.
You don’t even need to bother installing it since it’s the default tool for browsing.
However, this is only true if you’re running on Apple devices. On Windows, it’s an entirely different story. While it had a short multi-platform run, Apple decided to make Safari a macOS exclusive back in 2012.
If you wish to download and install Safari on Windows 11, for instance, you will have to settle for an older (and yes, deprecated) version of Safari, such as 5.1.7.
Click Configuration and switch the Advanced Configuration button to On.
Here, you can use the sliders or set a HEX value to get that perfectly crisp look you always wanted.
Now, as far as the overall interface is concerned, you will immediately see the main area and the sidebar.
The latter is a super-concentrated shortcut center that allows you to quickly access extensions from the Opera Store, history, and messengers, plus it houses a ton of customization features.
Safari also boasts a sleek interface, and many appreciate its minimalistic look that provides an overall airy experience without the claustrophobic feel.
However, customization options are scarcer, mostly because Apple likes to hold a tight grip on its environment.
Extensions are available via the Safari Menu (in the Safari Extensions section), but diversity is not one of its hugest perks.
In fact, the number of add-ons is limited, so keep that in mind if you’re looking for a versatile, modular, and highly customizable browser. And speaking about the wolf…
➡ Customization and gaming-focused features
Opera GX takes great pride in its fine-tuned features that caters to gamers, known as one of the most pretentious and rigorous breeds of users out there.
Feature
Description
Sounds
Browser sound customization, background music, and Dynamic audio visualizer option to add visual effects as well
Speed Dial
Feature for quick access (pinned pages, shortcuts, and so on)
Wallpapers
Generous wallpaper selection and the possibility to force dark pages into matching the dark theme seamlessly
GX Corner
A great hub to get the freshest updates, news, and deals from the gaming world
GX Control
Manage resource allocation and monitor CPU, Network, and RAM consumption through the Hot Tabs Killer. This function identifies which tab is hogging resources and closes it automatically, plus it allows you to keep a close eye on both download and upload speeds in your browser.
GX Cleaner
Easily clean your cache, cookies, and browsing history. You can select the type of data you want to remove, set the desired time range, and check the amount of space occupied on your PC by browsing data.
Integrations
Easily accessible via the sidebar: Twitch and Discord for gamers, Music Player with direct access to popular services such as YouTube Music, Spotify, Apple Music, or Deezer, trending messaging services such as WhatsApp, Telegram, or Facebook Messenger, and of course, social media support (Instagram and Twitter).
Workspace and Flow
Productivity-focused features that allow you to organize all your open tabs into workspaces and share, but also sync content between your PC and phone.
Safari only goes so far when it comes to customization options.
While it does not flaunt flashy options and seems keen on minimalism, it does put out a good fight, boasting some nifty features that allow it to blend irreproachably with the Apple ecosystem.
Feature
Description
Customizable home page
Pin your favorite websites, reading list, Siri suggestions, or add backgrounds
Tab management
It shows all your tabs in a grid layout that guarantees an easy access
iCloud syncing/Apple Continuity
You can seamlessly sync your bookmarks, history, tabs, images, and text between Safari and your iOS (it covers all your Apple devices)
Native 4K support
Excellent for streaming on YouTube, gaming, and entertainment
Excellent OS X compatibility
Fast page rendering and flawless OSX compatibility compared to other browsers
Safari’s features and customization options
Security and privacy features
Opera GX shares many privacy and security features with the Opera browser, and the legacy speaks for itself. Here’s what to expect:
Privacy and tracking protection (that prevents third parties from monitoring your online activity, collecting your data, and so on)
DLL hijacking and homepage hijacking protection (specific to Chromium-based browsers)
Built-in ads blocker to prevent aggressive/intrusive marketing techniques and targeted ads
Integrated VPN with no data caps and unlimited bandwidth
Security is a big deal for tech companies, and Apple does not fall short in this department. All Apple products are built with security in mind, and the entire ecosystem reflects this principle graciously.
Here’s what to expect from Safari:
Machine learning-powered Tracking Prevention to keep websites from spying on your browsing history and online searches + Privacy Report
Fingerprint lock with rigorous defense mechanisms in place against browsing habits’ recognition
Password and anti-phishing protection to quickly identify and flag fraudulent websites
Apple Pay-ready for secure online payments (with the possibility to add a Touch ID or a Face IDe as part of the purchase authorization process)
Battery saving
Safari is adamant about battery consumption and missed no opportunity to flaunt its very high battery duration when compared to rival browsers.
We turned on Netflix and gave it a go. While we did not get that one and half hours of extra battery lifetime, we were pleased to confirm that it outlasted other browsers that received the exact same treatment.
Now, Opera also competes ruthlessly in this department. The built-in battery saver feature allows you to get more juice and increase the lifetime of your battery with every charge.
And it is useful in more than one way. We received a notification when the battery level went under 20%.
Moreover, you can see at any point how much of your battery is left and take measures to avoid drainage and tempestuous shutdowns.
So, where does that leave us?
Minimalistic, neat, and distraction-free Safari is a great choice for Apple products. It delivers seamless synchronization across all your iOS and macOS devices, and its excellent OS X compatibility enables smooth page rendering.
However, we must stress that the same elitism is also its major befall. As opposed to Opera GX, Safari:
Has limited customization options, and its extension library is capped
No cross-platform support (it’s only suitable for OS X and does not support other platforms, Windows included)
The proprietary infrastructure makes it not suitable to support open-source formats
Its WebKit rendering engine makes it particularly reluctant to embrace new technologies as opposed to Blink-based browsers (Opera included)
There is no adblocker or VPN included for privacy enhancement
When comparing Opera GX vs Safari, we can see that both browsers are strong contenders for privacy-loving netizens who don’t feel like compromising on performance.
As far as Opera GX is concerned, the only drawback we could find is that enabling all the additional features requires some tweaking since they are not ready to use out of the box.
If gaming is on your mind more than anything else, we’d say that Opera GX is the perfect browser for you, on PC or Mac.
However, if you’re keen on a minimalistic browser that blends perfectly with the Apple ecosystem solely, then Safari is probably a better option. So, what’s it gonna be?
We also put Safari and Firefox toe to toe so if you want to compare it with another one, check out our comprehensive breakdown.
Don’t be shy to share your choice (and maybe a bit of the motivation behind it) with us, we would love to hear you out!
Yes, you guessed it! The third round of the monthly Patch Tuesday updates of 2022 have arrived, and they bring an entire array of changes for both Windows 10 and Windows 11, regardless of whether it is a newer or an older version.
As we announced earlier today, the April Patch Tuesday updates are expected to fix some of the issues that were still pending, and in the article below we will be looking to see exactly what we get.
We’ve included detailed changelogs for each cumulative update, and we will also be providing you with direct download links from Microsoft’s Windows Update Catalog, so you know that they are secure.
Alternatively, you can always use other methods to get the latest updates, including:
The Windows Update menu on your OS
The WSUS (Windows Server Update Service)
Group Policies set up by your admins if you’re part of a larger network.
Changes included in the March Patch Tuesday Updates
Windows 10 versions 21H2, 21H1, and 20H2
Windows 10 v21H2 is the latest major version of Windows 10, and as such has the most experimental features on it.
Fortunately, most bugs that were first present when it was first made available have been weeded out, and this version of Windows 10 is far more stable.
Addresses an issue that causes a Denial of Service vulnerability on Cluster Shared Volumes (CSV). For more information, see CVE-2020-26784.
Known issues
Devices with Windows installations created from custom offline media or custom ISO image might have Microsoft Edge Legacy removed by this update, but not automatically replaced by the new Microsoft Edge. This issue is only encountered when custom offline media or ISO images are created by slipstreaming this update into the image without having first installed the standalone servicing stack update (SSU) released March 29, 2021 or later.
After installing the June 21, 2021 (KB5003690) update, some devices cannot install new updates, such as the July 6, 2021 (KB5004945) or later updates. You will receive the error message, “PSFX_E_MATCHING_BINARY_MISSING”.
After installing this update, when connecting to devices in an untrusted domain using Remote Desktop, connections might fail to authenticate when using smart card authentication. You might receive the prompt, “Your credentials did not work. The credentials that were used to connect to [device name] did not work. Please enter new credentials.” and “The login attempt failed” in red.
After installing the Windows updates released January 11, 2022 or later Windows versions on an affected version of Windows, recovery discs (CD or DVD) created by using the Backup and Restore (Windows 7) app in Control Panel might be unable to start.
NOTE
Devices that connect directly to Windows Update to receive updates are not affected. This includes devices using Windows Update for Business. Any device connecting to Windows Update should always receive the latest versions of the SSU and latest cumulative update (LCU) without any extra steps.
After installing the June 21, 2021 (KB5003690) update, some devices cannot install new updates, such as the July 6, 2021 (KB5004945) or later updates. You will receive the error message, “PSFX_E_MATCHING_BINARY_MISSING”.
After installing this update, when connecting to devices in an untrusted domain using Remote Desktop, connections might fail to authenticate when using smart card authentication. You might receive the prompt, “Your credentials did not work. The credentials that were used to connect to [device name] did not work. Please enter new credentials.” and “The login attempt failed” in red.
As the Redmond-based tech company said not long ago, Windows 10, version 1909 reached the end of service on May 11, 2021, for devices running the Home, Pro, Pro for Workstation, Nano Container, and Server SAC editions.
Devices still running this version of the OS will no longer receive monthly security and quality updates that contain protection from the latest security threats.
So, if you still want to receive security and quality updates, Microsoft recommends updating to the latest version of Windows 10.
After installing the Windows updates released January 11, 2022 or later Windows versions on an affected version of Windows, recovery discs (CD or DVD) created by using the Backup and Restore (Windows 7) app in Control Panel might be unable to start.
This version of the OS is outdated and will no longer receive any updates from the tech company. Users that are still running this old version on their devices are strongly advised to choose a more recent one to update to.
If you still want to use Windows 10 and are not willing to upgrade to 11, you don’t have to do so right away. After all, Microsoft announced that the support for Windows 10 will go on until 2025.
Addresses an issue that causes DNS stub load failures on a Windows Server that is running a DNS Server.
Addresses an issue that causes a Denial of Service vulnerability on Cluster Shared Volumes (CSV). For more information, see CVE-2020-26784.
Addresses an issue that prevents you from changing a password that has expired when you sign in to a Windows device.
Known Issues:
After installing KB4493509, devices with some Asian language packs installed may receive the error, “0x800f0982 – PSFX_E_MATCHING_COMPONENT_NOT_FOUND.”
After installing KB5001342 or later, the Cluster Service might fail to start because a Cluster Network Driver is not found.
After installing updates released January 11, 2022 or later, apps that use the Microsoft .NET Framework to acquire or set Active Directory Forest Trust Information might have issues. The apps might fail or close or you might receive an error from the app or Windows. You might also receive an access violation (0xc0000005) error.
After installing the Windows updates released January 11, 2022 or later Windows versions on an affected version of Windows, recovery discs (CD or DVD) created by using the Backup and Restore (Windows 7) app in Control Panel might be unable to start.
This wraps up our brief overview of this month’s Patch Tuesday updates, and we hope that by reading the changelogs above, you will make a more informed decision regarding whether to update or not.
However, keep in mind that if you choose not to update for too long, you will risk exposing yourself to subsequent malware attacks that usually follow the Patch Tuesday updates, called Exploit Wednesday.
All in all, it is important to remember that the Patch Tuesday updates are released for a reason, so installing them, eventually, is something that you should do.
Was this article helpful to you? Let us know in the comments section below.
The cloud gaming service, alongside Xbox Game Pass or Game Pass Ultimate, allows users to find and try out different Game Pass titles before installing them. Gamers can also join a game they haven’t yet downloaded when receiving an invite from a friend, and Xbox One owners can even play games that aren’t normally playable on that console – such as Microsoft Flight Simulator – via the cloud service if they have Game Pass Ultimate. Such is the beauty of cloud gaming.
To be clear, Xbox Cloud Gaming (Beta) launched in September 2021 in Brazil for Game Pass Ultimate users with PCs, tablets and mobile devices. Today’s launch makes the service available in Brazil for Xbox consoles. Xbox Cloud Gaming (beta) has now brought cloud gaming to over 1 billion devices worldwide.
Microsoft released Windows 11 build 22593 last week to both Dev Channel Windows Insiders and Beta Channel Insiders, and there was an interesting feature that wasn’t mentioned in the release notes. As spotted by Neowin, it recently became possible in this build to disable all icons in the system tray to the left of the clock area.
It already was possible to hide system tray icons in Windows 11, by adding them to an overflow menu by going to Windows 11’s settings (Personalization, Taskbar, Taskbar corner overflow.) Yet, this new option lets you remove them entirely. In the Dev channel, Windows 11 now shows a new third option in this settings menu called Hidden icon menu. And when this is clicked, along with toggling all the other switches for icons to off, you’ll see a clean space to the bottom right of your taskbar with just the time and usual indicators for Wi-Fi, volume, and battery on laptops.
Of course, it might not make sense to do this, as some apps will only quit from the system tray, but it is nice to see that you can clean up this area a bit. Do note, though, that this doesn’t mean the feature will make it to the retail version of Windows 11.
Features that are tested in the Windows Insider program are known to come and go. Yet, the fact that this feature is in testing with the Beta Channel, too, could hint at a possible release for all Windows 11 users in a future update, but don’t hold your breath for it.
Just Like Microsoft, both Nintendo and Sony have followed suit and stopped billing dormant game subscriptions in the UK. Earlier this year, Microsoft had indicated that they will no longer bill dormant Xbox Live Gold and Game Pass subscriptions in the UK, instead, they would notify their customers about their dormant accounts, and if no action was taken they would then stop the payments. (via Engadget)
UK’s Competition and Markets Authority and Sony are already in agreement that they will no longer charge dormant PlayStation Plus accounts. Sony has also taken it upon themselves to send out reminders to dormant users on how to end these payments.
On the other hand, Nintendo does not auto-renew its Switch Online Subscriptions. This move has led to the conclusion of an investigation launched by the CMA back in 2019 that was mainly focused on auto-renewals and how difficult it was for one to get a refund back.
Most of the apps crash, making users annoyed and stressed with the services they were to get. Like the other apps, Opera crypto wallet crashes and displays the Something went wrong error.
Opera crypto wallet has over 2 million users worldwide, and from time to time, it crashes.
Luckily enough, there are several options for fixing that. Many users report the error daily, and there are several things you have to look at.
This guide will look at different ways of fixing something that went wrong error on the Opera crypto wallet.
What causes the Opera crypto wallet Something went wrong error?
Many things can make you get the error when trying to access your opera crypto wallet. This error arises typically due to the following reasons:
Sometimes system updates may bring issues that may make Opera throw the error
You may be having storage issues that affect the performance of the browser
The cache memory may affect the Opera crypto wallet, making it raise the error
The user’s internet connection is unstable, making it hard to reach the wallet servers
Several browser extensions block the IP addresses causing the wallet to be unreachable
There are a few things you can do before going into the steps we prepared for you so try to perform them as preliminary measures:
➡ Wait and try again after a few minutes
Sometimes, the system handles a lot of users, which affects the server’s performance, making it slow and down.
When you get the error, take a break and resume after a few minutes, there will be less congestion, and the error will be gone.
➡ Restart your PC
When we’re talking about Windows, we all know how this goes. Restarting the PC will refresh the processes and if the system installed any updates, they will be completed.
So, most of the issues you might have, even the one with your Opera crypto wallet may be gone mysteriously after a restart.
➡ Make sure you have a stable Internet connection
If your internet connectivity is weak, you may face the Something went wrong error so try to verify if your network devices and cables are all in good order.
Also, if you’re connected to a public network, try changing it into a private one to remove the poor Internet routing. It gives you more privacy and unlocks the geo-restricted IP addresses.
How do I fix the Opera crypto wallet Something went wrong error?
1. Clear Opera cache and cookies
Launch the Opera browser and click on the Settings tab on the left menu of the browser.
Select the Advanced option.
Click on Privacy and Security.
Click on the Clear browsing data option to expand.
Choose the timeline and data you want to clear and click on the Clear data button.
This solution will help remove any cookies and files that may interfere with your wallet.
You can use a specialized tool like CCleaner to automatically clear cache and cookies. It works as a browser cleaner allowing you to remove temporary files, history, and cache from all your browsers.
2. Update Opera to the latest version
Click on the Opera logo to open the menu, go to the Help option and select About Opera.
The browser will show your version, and if there are any pending updates, the browser will install them.
After this, try accessing your wallet once more.
3. Remove all the extensions
Click on the Opera logo at the corner, choose Extensions then Extensions to see the list of all the installed add-ons.
Click on the X sign of each extension to delete them.
Sometimes, an extension you might have installed lately can cause interference with others, including your crypto wallet so uninstalling it is the logical choice.
4. Reset the browser
Click the Settings icon from Opera.
Click on the Advanced option to expand all the other menus.
Choose the Reset options and select the Restore settings to their original defaults option.
Click the Reset button.
Resetting the browser removes all the tabs and default settings, disables all extensions, and deletes cookies and cache.
5. Delete the Opera profile from the PC
Close the Opera browser and press the Windows + E keys on the keyboard to open File Explorer.
Go to your local disk and locate the following path: C:\Users\UserName\AppData\Roaming\Opera Software\Opera Stable
Click the Profile folder to open it and delete all the files in that folder.
Go to the Opera Local app data folder. Navigate to this path: C:\Users\UserName\AppData\Local\Opera Software\Opera Stable
Delete the cache from that folder.
Now, try re-accessing the wallet.
6. Uninstall and install the Opera browser
Click the Start button and select Settings.
Choose Apps.
Now scroll through the list of apps on the right pane, click on Opera to expand it, and select Uninstall, then follow the procedure to uninstall the browser.
Click on Settings and turn off the ads and tracker blockers by flipping their switches to the left.
Opera comes with an ad blocker which should be disabled. Enabling an ad blocker affects the wallet and makes the page not load.
After disabling the blocker try accessing the wallet to see if the error still exists.
9. Disable the Antivirus
Click on the Start Search box, type windows security, and hit Enter.
Click on the Virus and threat protection tab.
Under Virus & threat protection settings, choose Manage Settings.
Toggle the Real-time protection button to turn it off. Try accessing your wallet once again to see if the error exists.
If you have a third-party antivirus installed, go through its menus and disable it at least temporarily and see if you can access the Opera crypto wallet.
Should you discover that the antivirus was blocking your wallet, consider installing a better antivirus that won’t interfere with your apps and services.
Can I solve the Something went wrong error without investing money?
Yes, it is possible to solve the error without spending any money. All you need is to follow our step-by-step guide, and everything will be okay.
You have to be careful when dealing with your crypto wallets due to the targets from malicious hackers by making sure everything is up to date.
Apart from the Opera browser, the Brave browser supports the same business and pays using blockchain.
Several crypto wallets can help you transact your cryptocurrencies on a PC. Drop a comment by letting us know which method worked for you.
The modification uses multiple snap-on parts that allow buttons on the right side of the controller to be accessed with the left hand. The right thumbstick is used by laying the controller on a flat surface and swaying it, manipulating the thumbstick via an attached mechanism.
Kuumeri has also made a similar one-handed mod for the PlayStation 5 Dual Sense controller. He says he is looking to complete the set by making a one-handed solution for the Switch JoyCon controllers. He has made the blueprints for the Xbox controller mods available on printables.com. The mod can also be purchased through Kuumeri’s Etsy store.
dApps take out the middleman and are slowly shaping a new digital experience that aims to eliminate obsolete concepts such as monopoly, censorship, and others alike.
Instead of depending on a single computer, dApps run on decentralized networks such as blockchain and rely on peer-to-peer services, thus taking out the control factor provided by an intermediary authority.
End users get full control of their data, privacy, and finances and there is no organization to mediate this flow.
How do dApps work?
Contrary to centralized apps that are operated by a single company, dApps don’t require you to interact with controlled servers.
Instead, you will be able to pursue transactions directly without revealing confidential information or paying a cut to the central authority.
Thus that ring a bell? It should. The entire cryptocurrency market is based on similar principles. For instance, the famous Bitcoin is a dApp.
BitTorrent or Tor are other relevant examples of popular decentralized apps and platforms and the line-up goes on and on. All it takes to get in the game is a suitable browser for dApps.
What is a dApps browser and how do they work?
To run on decentralized networks, you need a browser that is equally focused on placing control in the user’s hands. This is where the Web 3.0 browsers come in.
Web 3.0 browsers are changing the online experience by liberating the digital economy. They leverage blockchain technology in order to shift control points from institutions to individuals, allowing everyone to keep track of their data, make a profit, and more in a secure, private, and economically viable environment.
So, where does one find such a browser? Is there a Web3 browser? In fact, most Web 2.0 browsers allow you to access Web 3.0 apps. You just need to add a Web 3.0 wallet in order to become fully operational.
But there are some great options that you can use directly to surf the decentralized Web.
Opera One is a well-known browser with a high focus on privacy and productiveness. It provides a plethora of functionalities, integrations, and workflows designed to streamline your digital experience and make it as smooth as possible.
What you probably did not know is that it’s also one of the few browsers to support a native Web 3.0 experience on both mobile and desktop platforms.
Opera One integrates Web 3 functionalities that are crucial for dApps’ usage such as a cross-network crypto wallet to store your tokens and cryptocurrencies. It can also act as a hardware wallet that allows you to store private keys on your smartphone.
This best browser for dApps supports networks and assets such as TRX, CBK, and ETH, but many others are planned to come on board in the near future.
It’s safe to say that Opera One is at the forefront of new technologies and fully embraces the concept of decentralization through a tailored browsing experience that includes a privacy VPN, an ad-blocker, a crypto wallet, and a native AI.
Opera One
Explore the decentralized market securely and on your own terms thanks to Web 3.0-ready Opera One!
Chromium-based, this nifty tool boasts a tighter wallet integration, full support for interacting with decentralized apps without the need for any other additions (such as extensions), and focuses on Web 3 services in particular.
One of its most interesting features, the Crypto Corner delivers educational content, news, and fresh updates from popular crypto communities, NFT galleries, and more, thus making sure you’re always up to date and up to speed with your topics of interest.
It also features a non-custodial Crypto Wallet that currently supports Ethereum tokens and NFTs, allowing you to purchase, swap, and trade cryptocurrencies directly from the browser. Easy, right?
First things first: Is Brave browser dApp? Actually, it’s one of the chosen few, alongside OperaOne. But unlike Opera One, Brave brings a slightly different approach.
Brave has a built-in cryptocurrency wallet that allows you to purchase and swap tokens with great ease, but with a twist. It focuses on BATs, which are basically Ethereum-based tokens designed to reward you for viewing ads.
Of course, you can customize the amount of attention you want to invest in advertisement viewing and even turn it off completely.
In addition to this mutually beneficial transaction, Brave also boasts IPFS support. This highly praised feature facilitates native and implicitly decentralized file storage to reduce the pressure coming from data clumping.
Open source and decentralized to the core, Brave thrives thanks to its Web 3 functionalities as well as its privacy-focused nature that makes it one of the most reliable browsers to not save your history and personal data.
Due to its unprecedented levels of privacy, the Tor browser has garnered a large audience base and is globally used by people from different sectors, including crypto mining and crypto trading.
Tor browser directs traffic through a global network of servers called Onion routers whose layers of encryption make it particularly appealing for dApps users who value their privacy.
This innovative browser incorporates Web 3 functionalities including support for multiple blockchain networks, an in-built crypto wallet, and extended dApp compatibility.
Is Osiris a good browser? With a sleek interface and all the privacy features you could dream of, Osiris makes for a top contender for the title of the best browser for dApps.
We reckon it could make it to our top 3 anytime soon as long as it keeps up the good work.
Is MetaMask a dApp or a Web3 wallet? In this case, it’s a browser extension that facilitates interaction with decentralized apps. And it acts both as a dApp intermediator and as a cryptocurrency wallet.
While most Web 2.0 browsers such as Chrome, Firefox, Safari, and so on allow you to access Web 3.0 domains, they require an additional item such as a wallet for working with dApps.
MetaMask is that missing link that helps bring everything together.
There you go, now you know where to find the best browser for dApps that can support you in all your ventures, no matter how experimental or audacious they are.
Microsoft To Do is an app that can help you increase your productivity by helping you remember the tasks you need to accomplish each day. It’s designed for users of all ages and skill levels, and it’s compatible with other Microsoft apps like Outlook, Teams, and more.
It is a powerful tool that syncs across several computers and devices and works across different platforms and can sync to other smartphones via the Microsoft cloud. This makes it a great app for the average user who wants to be able to view their lists anywhere.
The app can be downloaded for free on Windows, Android, and iPhones. The system works integrally with Cortana which makes using it super easy. You don’t have to worry about remembering your tasks when you are away as they will sync automatically so that they are ready for you when you need them on your computer or any other device you’ve synced the app onto.
Recently, Microsoft introduced new features to the app, smart due date, and reminder recognition. These features are geared toward providing a better, fast, and convenient way for users to add due dates, reminders, and repeat information by naturally typing all the necessary information in a task title.
Integrating Microsoft To Do with Microsoft Outlook
Microsoft To Do is available across a number of different platforms, making it easy to stay organized no matter where you are or what device you’re using. It works well on its own, but it can also be integrated with Microsoft Outlook, letting you manage your tasks from the same place as your email. Furthermore, the flagged emails can be renamed, assigned due dates, and even given reminders.
Note: If you want to escalate the importance of a particular task, then you can mark the email flag in Microsoft Outlook as high-priority. It will then appear in Microsoft To Do starred.
Microsoft To Do and Cortana integration
Cortana is a digital assistant that works across your devices and other Microsoft services. Depending on the capabilities of your device and the version of Cortana you’re using, Cortana can provide a range of functionality, including the ability to answer questions; send emails and text messages and other important details; set reminders and alarms; create and manage lists, join a meeting in Microsoft Teams; and more.
Microsoft To Do’s integration with Cortana allows users to use the app from any Cortana-enable device, be it Windows, Smart Home devices, Android, or iOS. Moreover, through this integration users are able to create both reminders and to-do lists directly from the app, as opposed to the conventional way where you have to use Cortana. Cortana has access to all the tasks that you have created and can read them out.
To Do and Microsoft 365 integration
Users have the ability to integrate Microsoft To Do with Microsoft 365 apps, however, some of the apps come with in-built integrations.
There are some instances where you will be required to customize your own. Here you will need an assistance tool, Microsoft Power Automate. The main focus of Power Automate is on automating workflow processes and business logic across applications and services. It uses connectors to interact with applications such as SharePoint, Office 365, and others.
Enhance your productivity with Microsoft To Do
For an app to be effective, it has to be easily accessible and used. Microsoft To Do is an app that can help you increase your productivity by helping you remember the tasks you need to accomplish each day. It’s designed for users of all ages and skill levels, and it’s compatible with other Microsoft apps like Outlook, Teams, and more.
To Do makes it easy to keep track of everything in one place. You can add, organize, complete and review tasks on your phone or computer, so no matter where you are, you’ll always have access to what needs to get done.


 NOTE