Kernel Power 137: What is This Event ID & How to Fix it

As a Windows user, you will come across multiple system-related issues. While some issues are normal and can be fixed by a simple restart, for some, you need to go a step beyond simply restarting your PC.

One such error is the Kernel Power error 137. Notably, this issue is a critical system error, and if you come across it, you need to apply some measures to cure it otherwise, your system will crash.

The Kernel Power error 137 can trigger multiple system problems. It is related to a power issue, but just like every other Windows error, it could trigger because of multiple reasons.

According to the user reports, Kernel Power error 137 isn’t always triggered because of a power supply issue. It can be related to your system hardware or some important system files.

While the exact reason isn’t known, there are a few solutions that you can apply and possibly resolve the issue.

In this guide, we will give you some effective solutions that will help you fix the problem. Let us check them out.

What is Kernel Power error 137 on Windows?

Before we go ahead and check out the solutions, let us first understand the reasons why Kernel Power error 137 pops up on Windows.

Although, after multiple bugfix updates, both Windows 10 and Windows 11 are termed as quite stable, you will experience multiple issues using the OS.

Kernel Power error 137 is considered to be one of the most critical errors that your Windows PC will throw up and the cause of it can be a variety of reasons.

The most common reason for this issue is a power supply failure. A power supply failure to the hardware attached to the system isn’t always the reason for this issue.

Reportedly, out-of-date Windows, corrupt system files, faulty PSU, etc., are some of the reasons that could trigger the Kernel Power error 137 on the Windows issue.

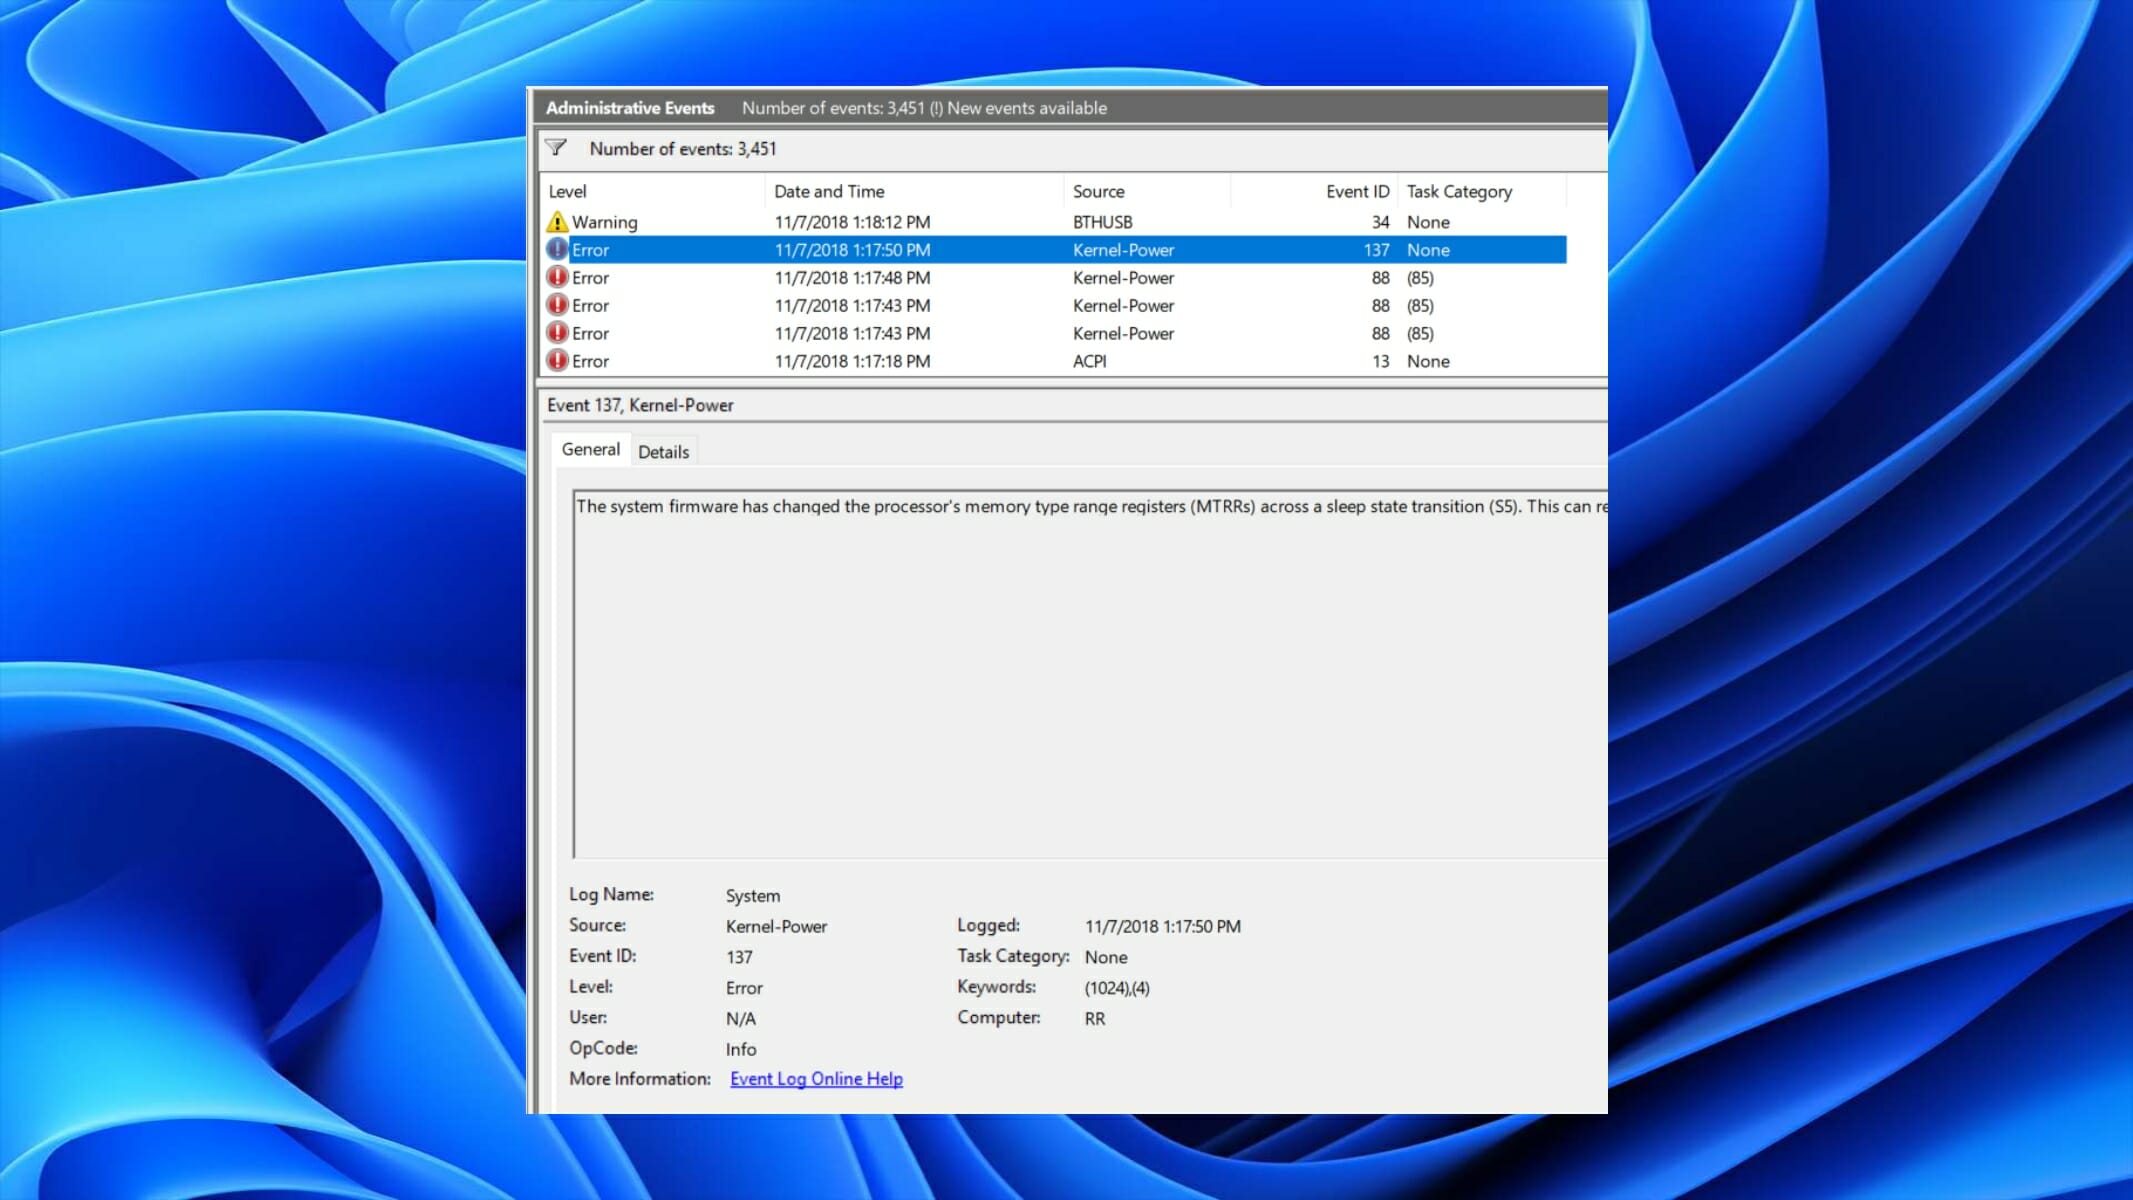
Moreover, the Kernel Power error comes attached with an Event ID. This Event ID accompanied by keywords makes it easier to pinpoint the bug and troubleshoot the process.

How can I fix Kernel Power error 137 on Windows?

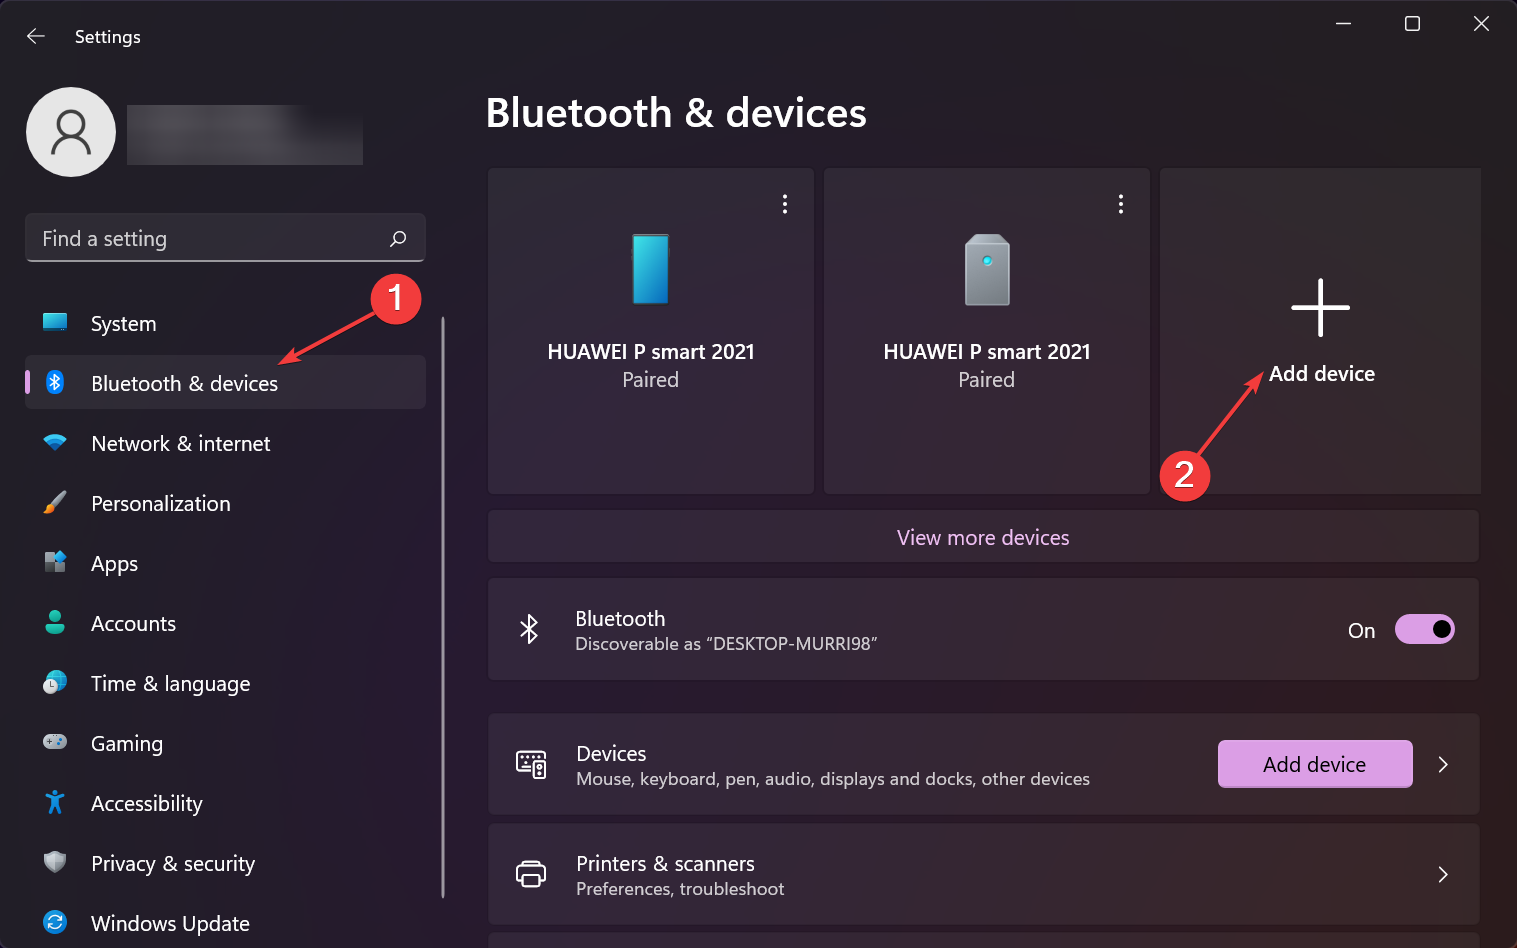
1. Update drivers

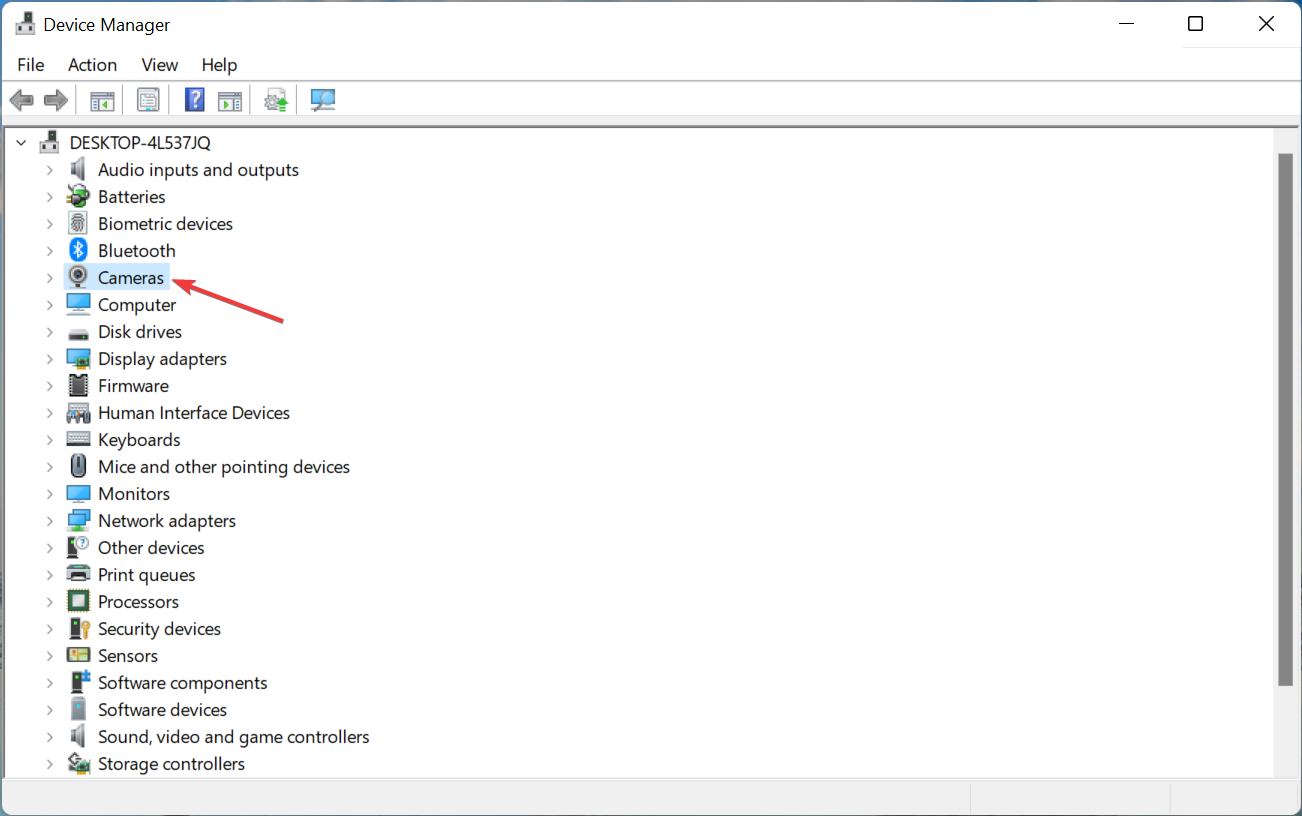
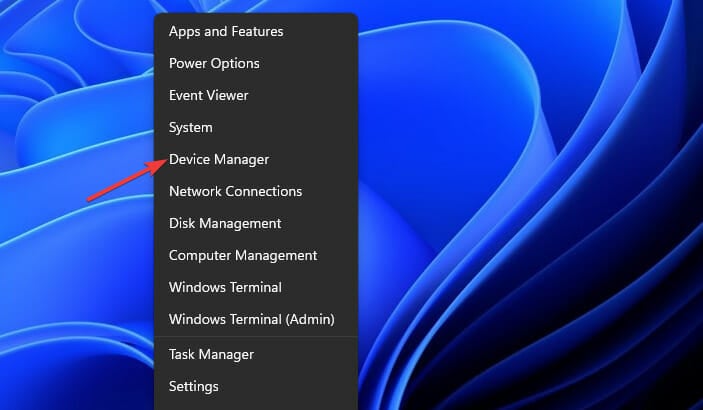
  1. Right-click on the Start menu icon.
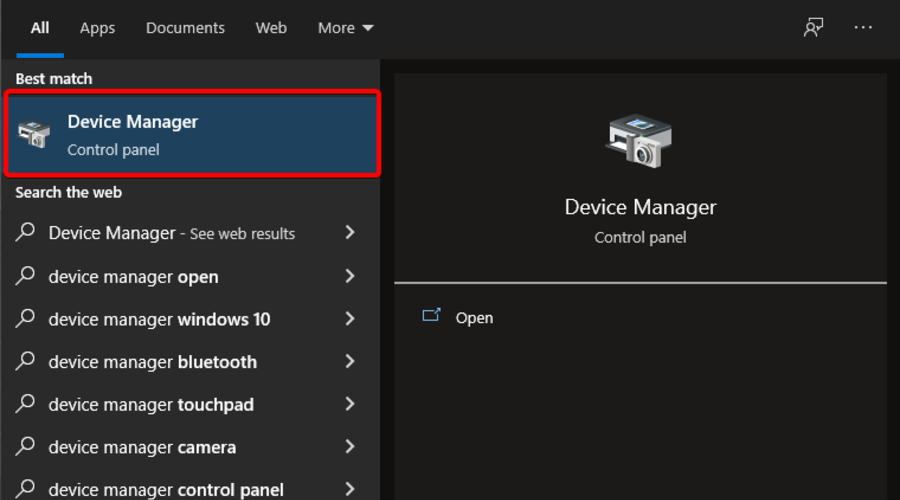
  2. Select Device Manager.
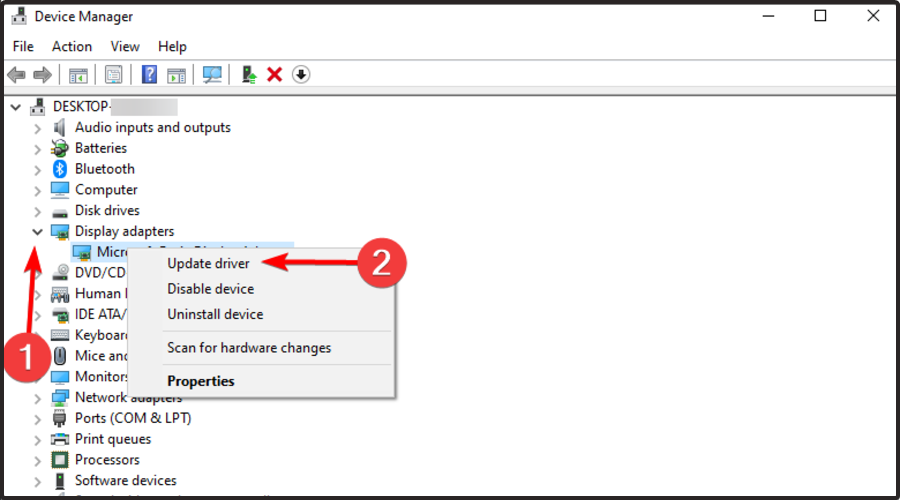
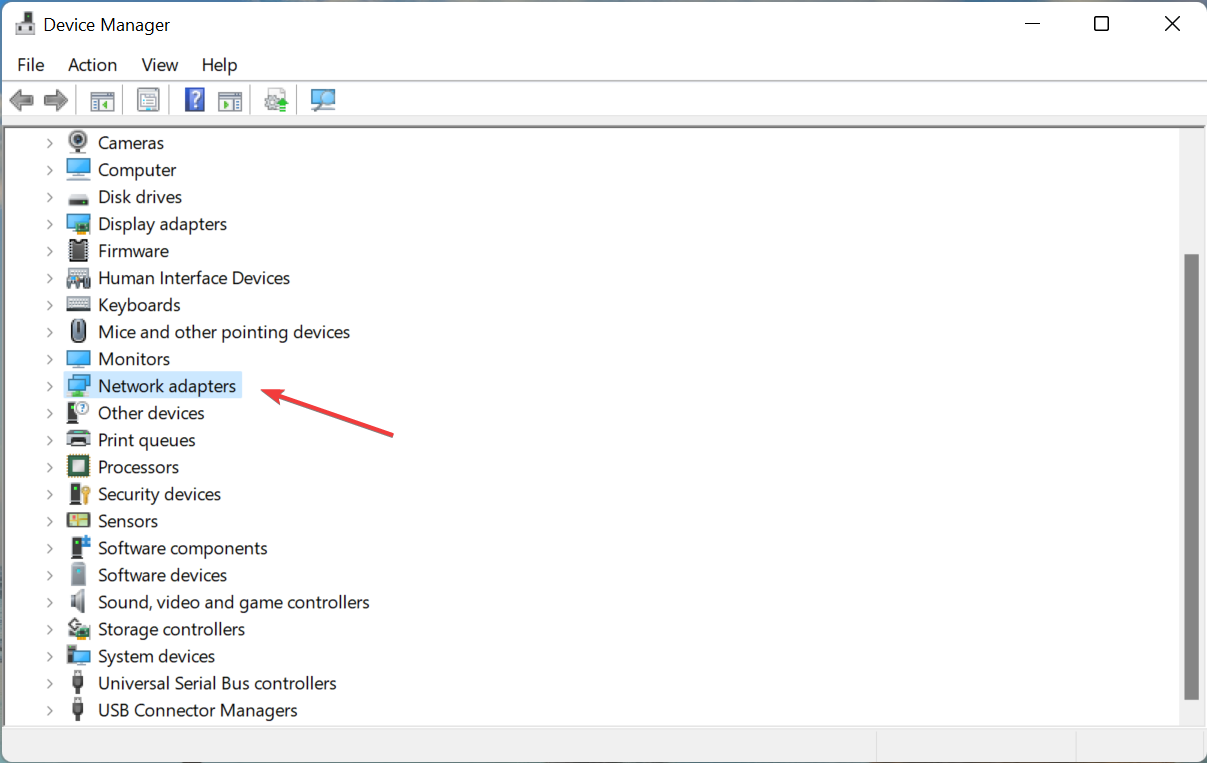
  3. Expand the Display adapters.Display adapters
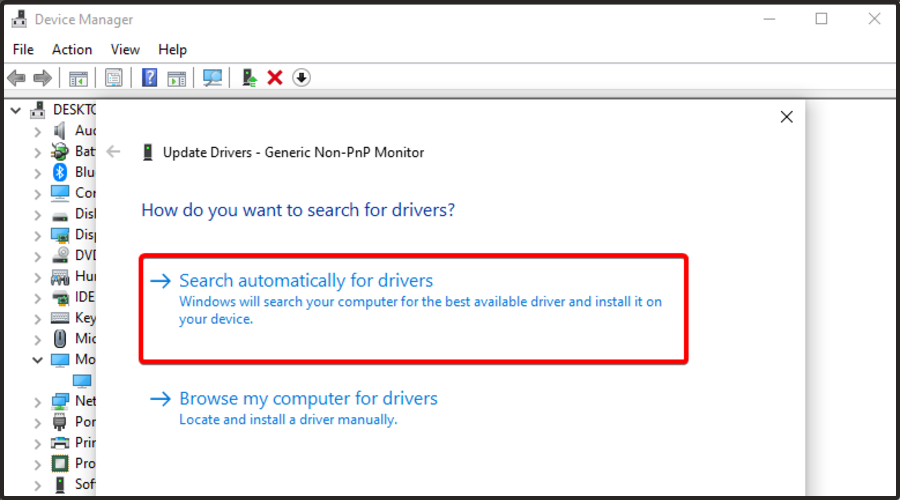
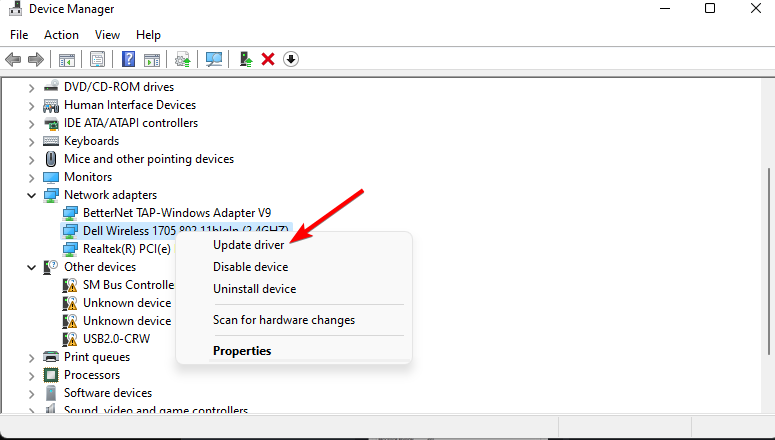
  4. Right-click on your graphics driver and choose Update driver.
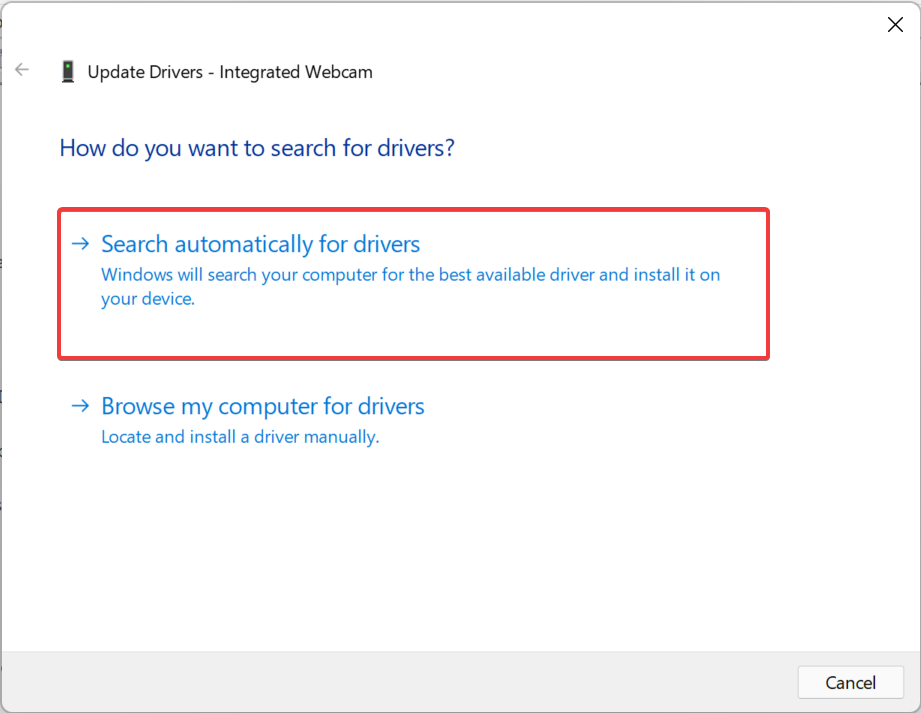
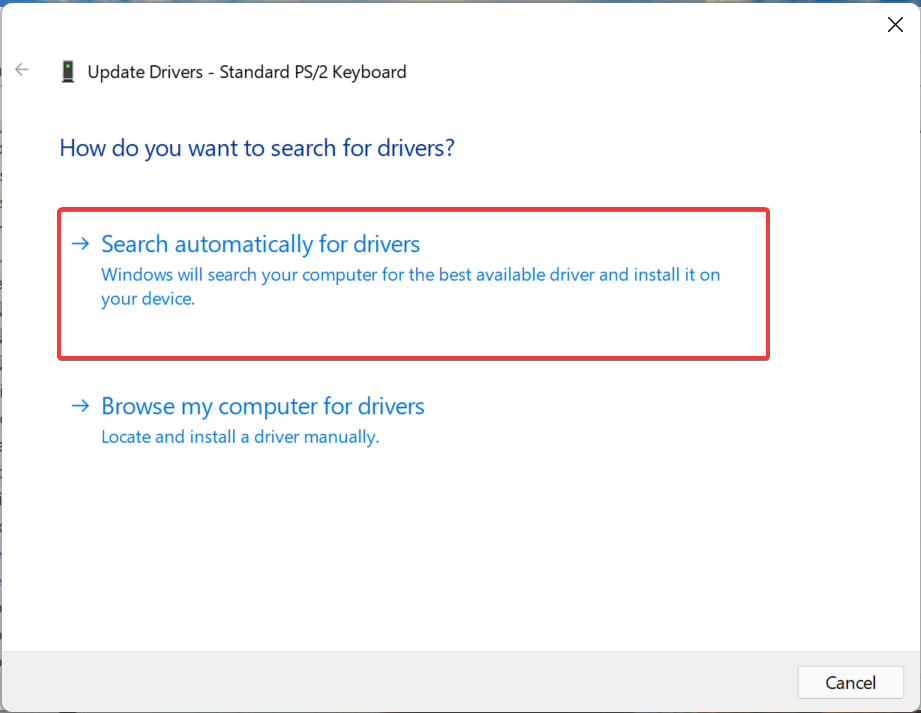
  5. Chose the Search automatically for drivers option.

Your system will now search the official servers for a driver update and, if available, will prompt you to install it.

Updating the graphics driver has helped multiple users fix the Kernel Power error 137 on Windows. Although the above method is easy to follow, there is a better way of updating all of your device drivers in one go.

You can use a reliable all-in-one tool called Fortect Driver Updater. It is a multi-specialty tool for all your driver-related needs. This software scans your PC for all outdated drivers, displays the result, and prompts you to take the necessary action to fix the driver-related problems.

Some of the other notable features of the tool are fixing faulty or broken driver files, updating old device drivers, locating missing drivers, etc.

⇒ Get Fortect Driver Updater

2. Disable the fast startup option

  1. Open the Start menu.
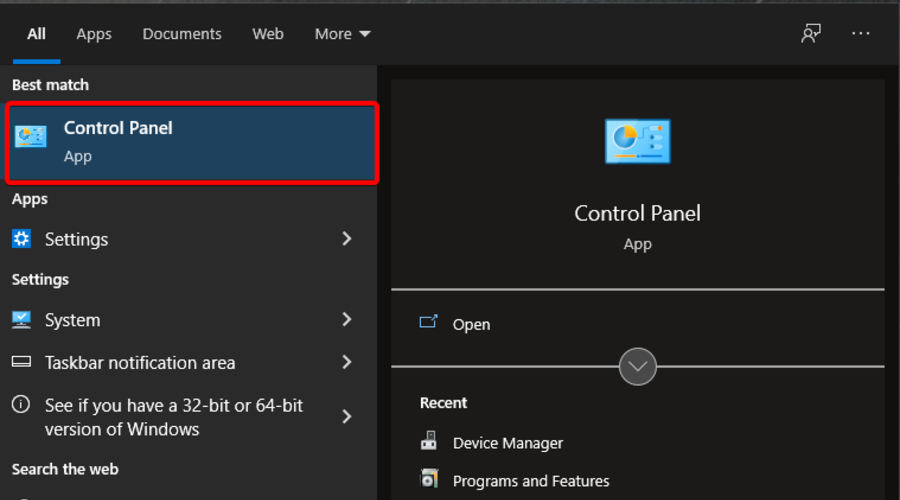
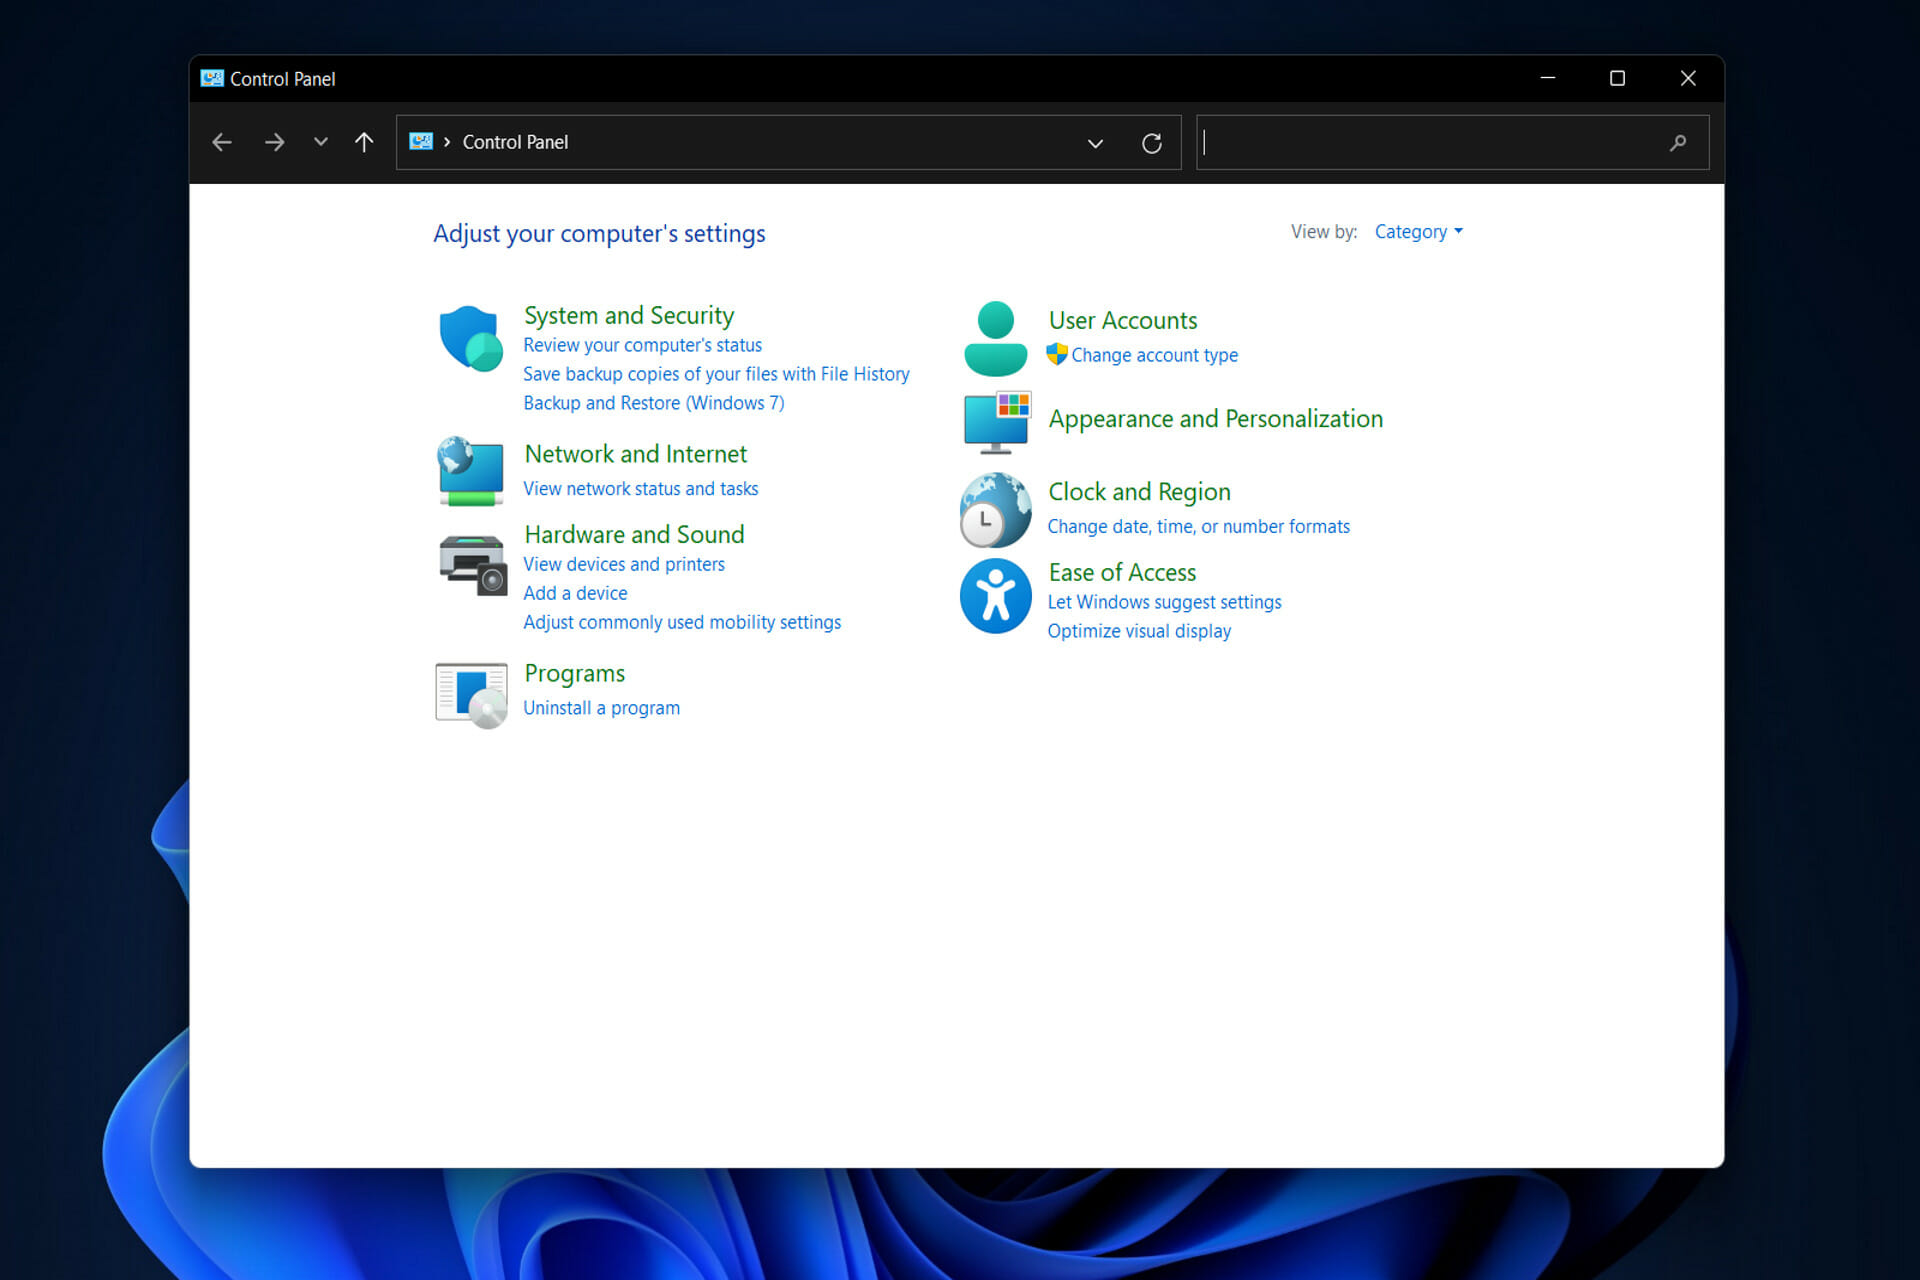
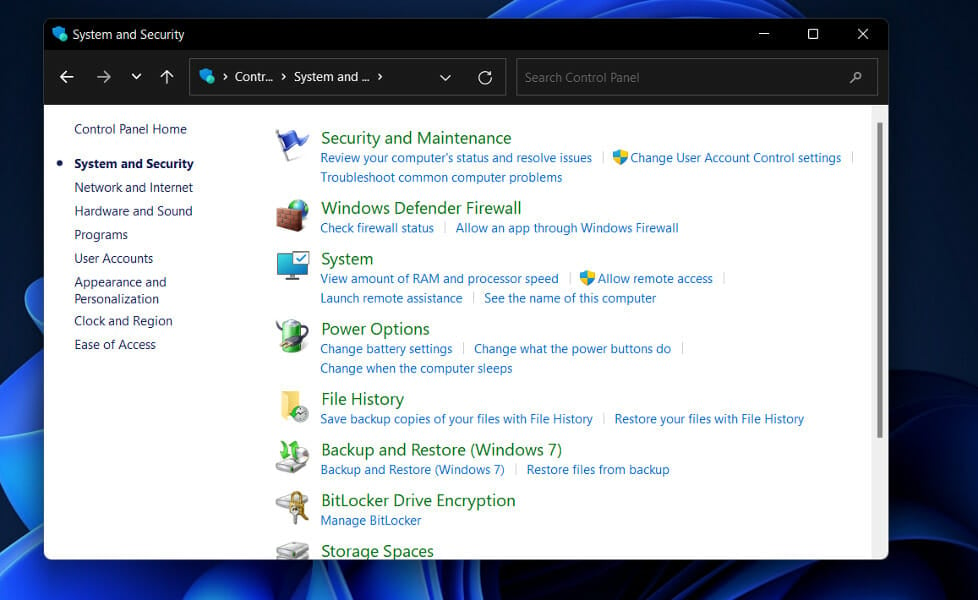
  2. Search for Control Panel and open it.Open up Control Panel
  3. Click on Power Options.
  4. On the right side, click on Change what the power buttons do.
  5. Click on Change settings that are currently unavailable.
  6. Scroll down and uncheck the Turn on fast startup (recommended) option.

Turning off or disabling the fast startup option lets your PC startup take its own time loading all the necessary files, from scratch.

When this mode is turned on, while it won’t cause issues often, it does not shut down your PC completely. Rather, it puts your PC in a sort of hibernation mode.

You can follow the above steps and disable the fast startup option to see if this resolves the Kernel Power error 137 on Windows.

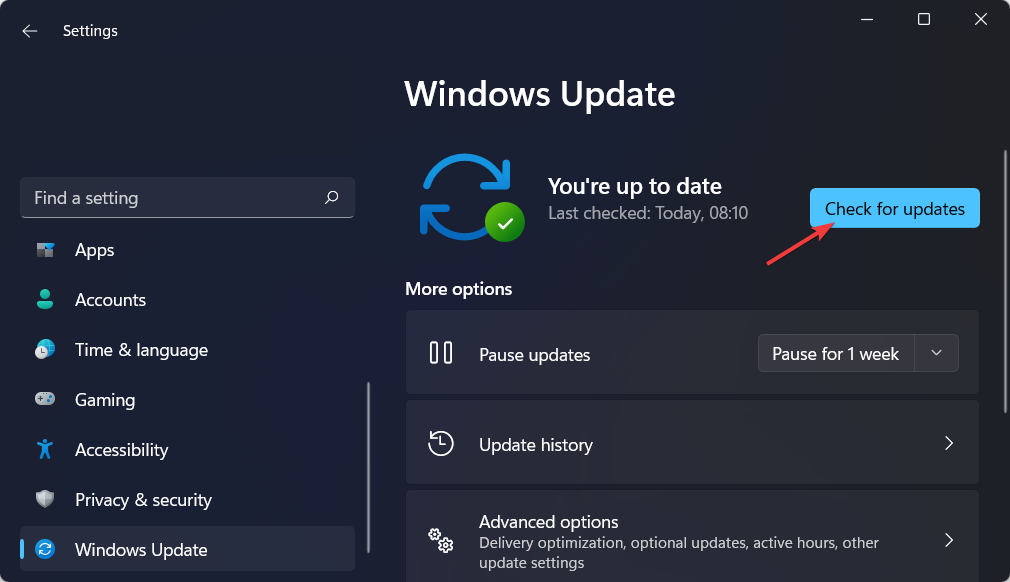
3. Update Windows

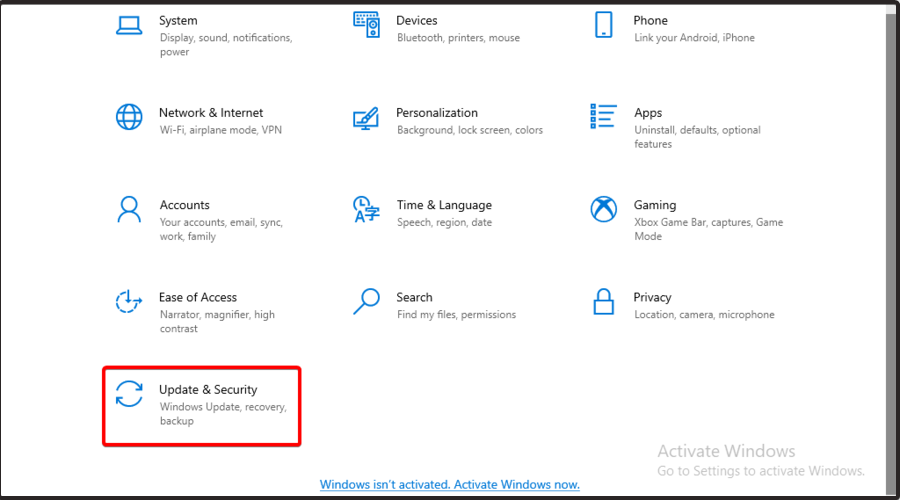
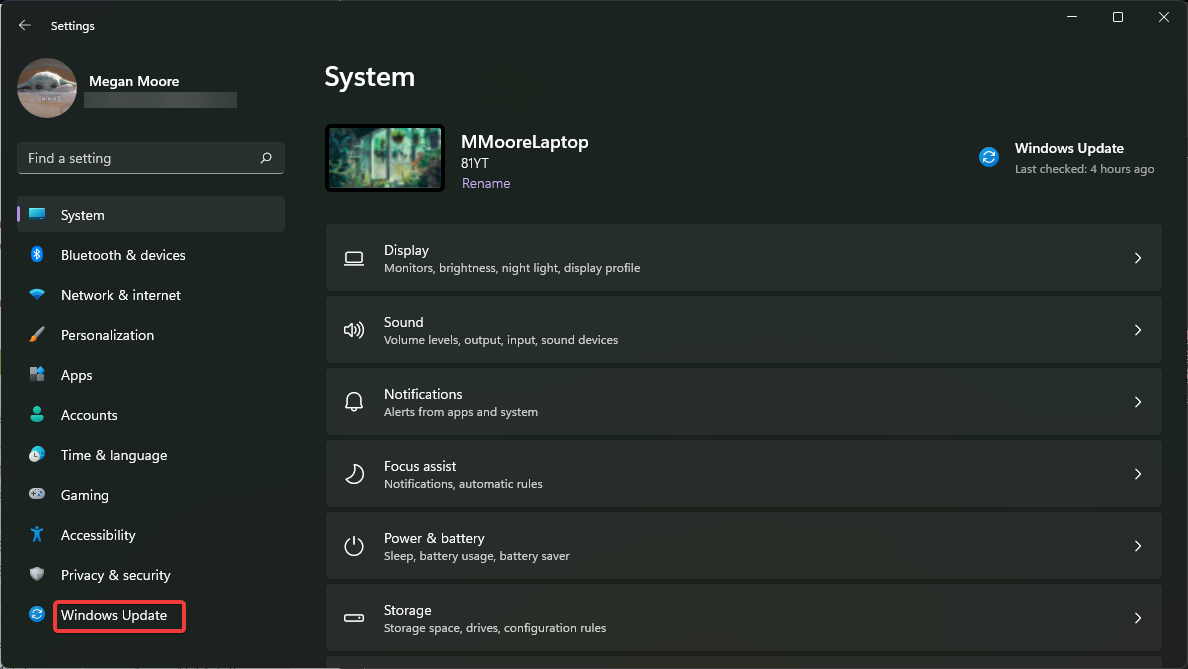
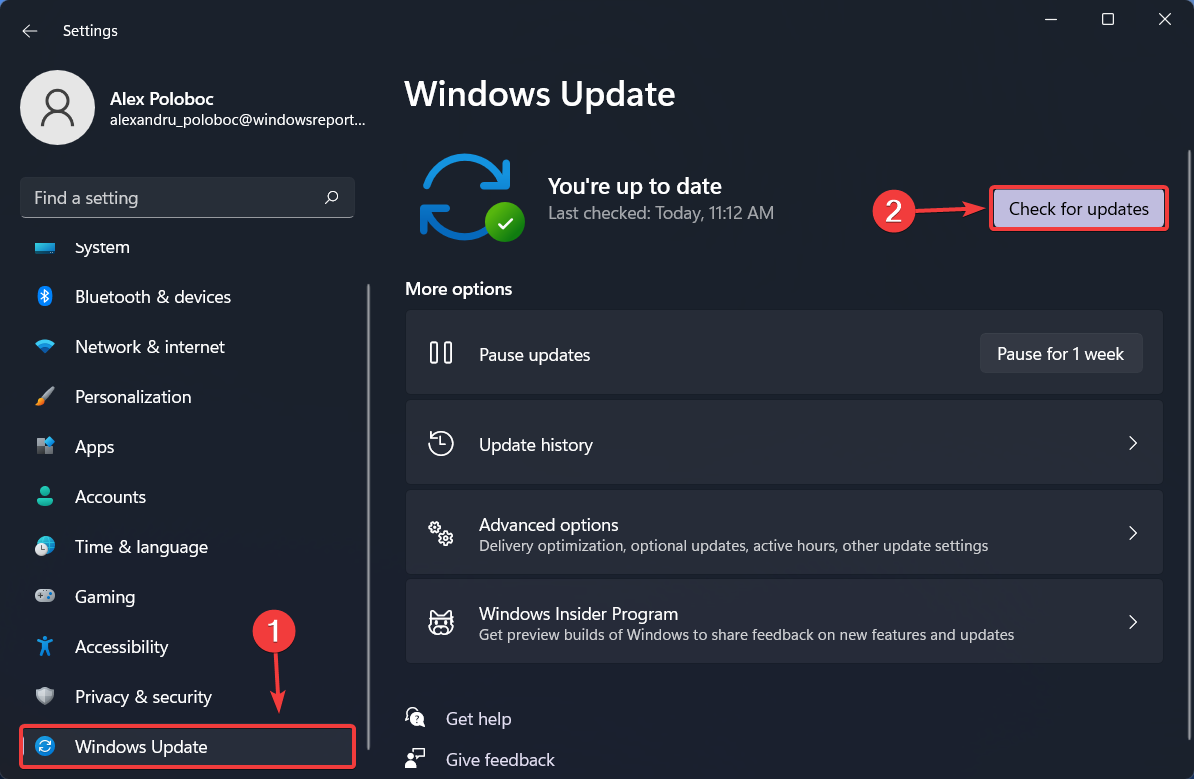
  1. Press the Win + I buttons to open Settings.
  2. Select Windows Update from the left pane.windows-update unable to create new documents office 365
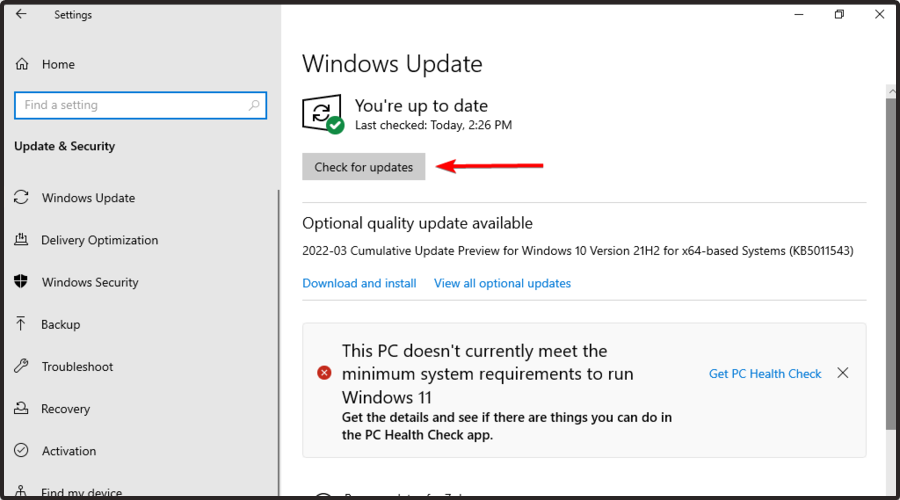
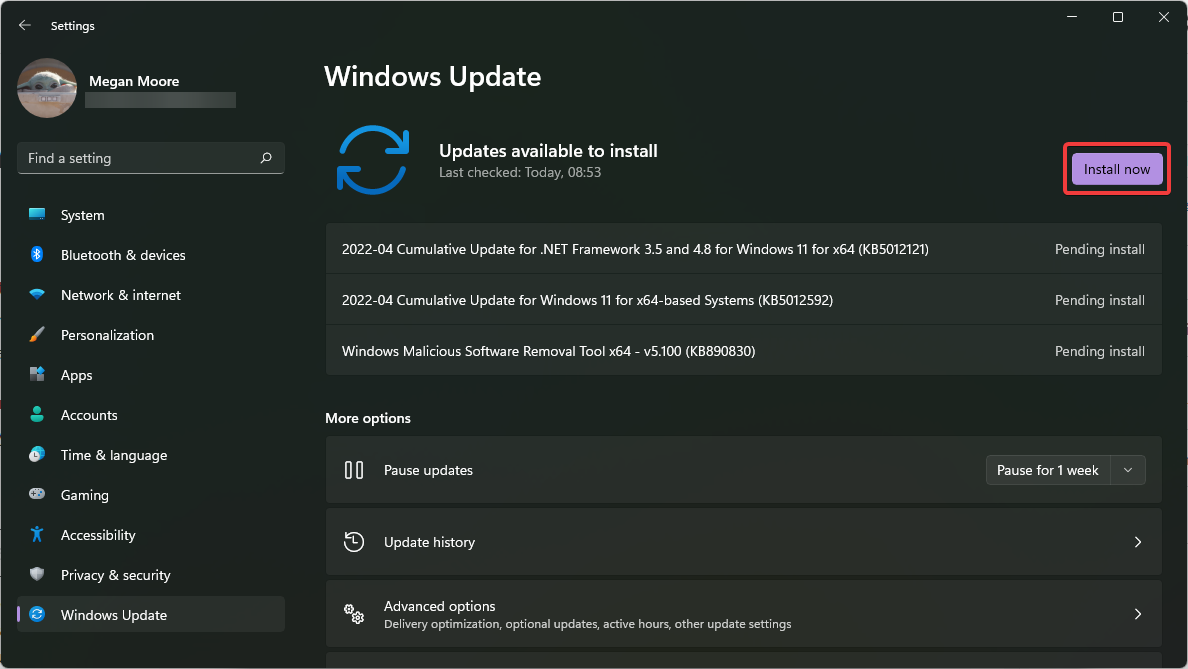
  3. Click on Check for updates button.

Microsoft releases updates quite frequently, that not only add features but also multiple bug fixes. There are chances that a bug in the previous version of the update has triggered the Kernel Power error 137 on your Windows PC.

We recommend you keep your PC up to date, along with all the drivers, to enjoy the optimum performance from your drivers and PC.

4. Run the System File Checker

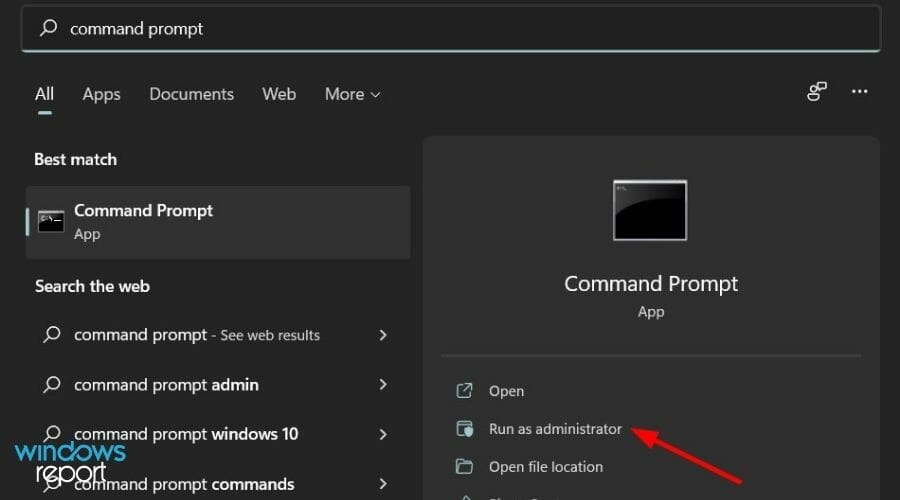
  1. Search for Command Prompt in the Start menu.
  2. Run it as an administrator.
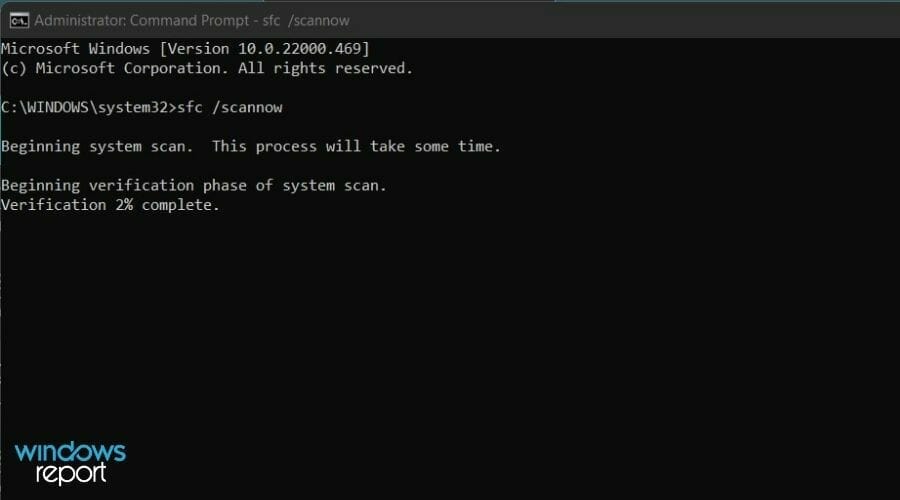
  3. Type in the below command and press Enter: sfc/scannowRun SFC scan to fix windows 11 error recovery
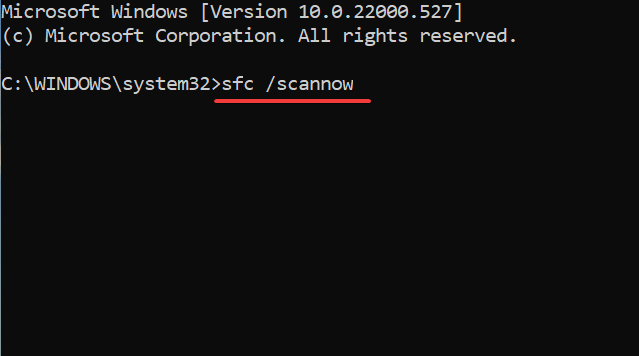
SFC scan command will check your PC for any corrupt or faulty drivers and system files. If it finds one, the System File Checker will automatically fix it.

Once the scan is completed, restart your PC and see if this fixes the issue or not. To take things a step ahead, you can use trusted third-party software that will help resolve the issues caused by corrupt system files. It is a known fact that corrupt system files can hamper the smooth functioning and stability of the PC.

In such a scenario, you can give a try to PC repair tool and see if it resolves your problem or not, which it probably should, because of all the features it packs.

5. Run CHKDSK and DISM command

  1. Search for Command Prompt in the Start menu.
  2. Run it as an administrator.
  3. Type in the below command and press Enter. chkdsk /rCommand chkdsk
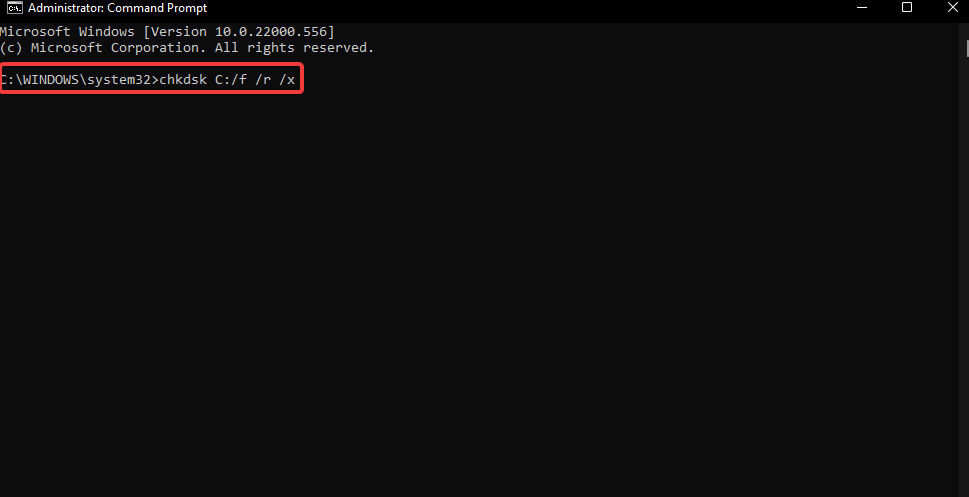
  4. Once the chkdsk process completes, type the below command and press Enter. DISM /online /cleanup-image /restorehealthdism windows 10 apps close when minimized
  5. The process can take up some time, but do not interrupt it.
  6. Restart your PC after the process gets completed.

6. Check for viruses and malware

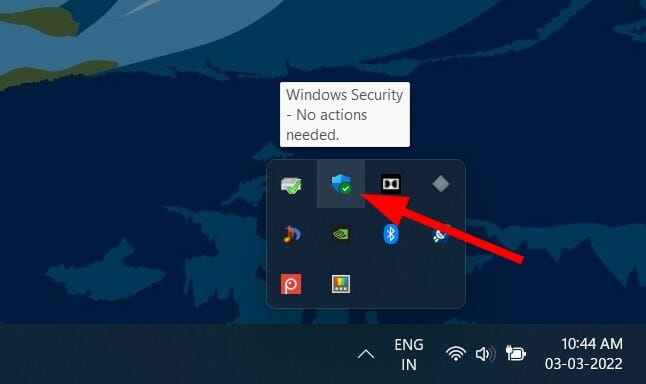
  1. Click on the upward arrow button on the bottom-right taskbar panel.
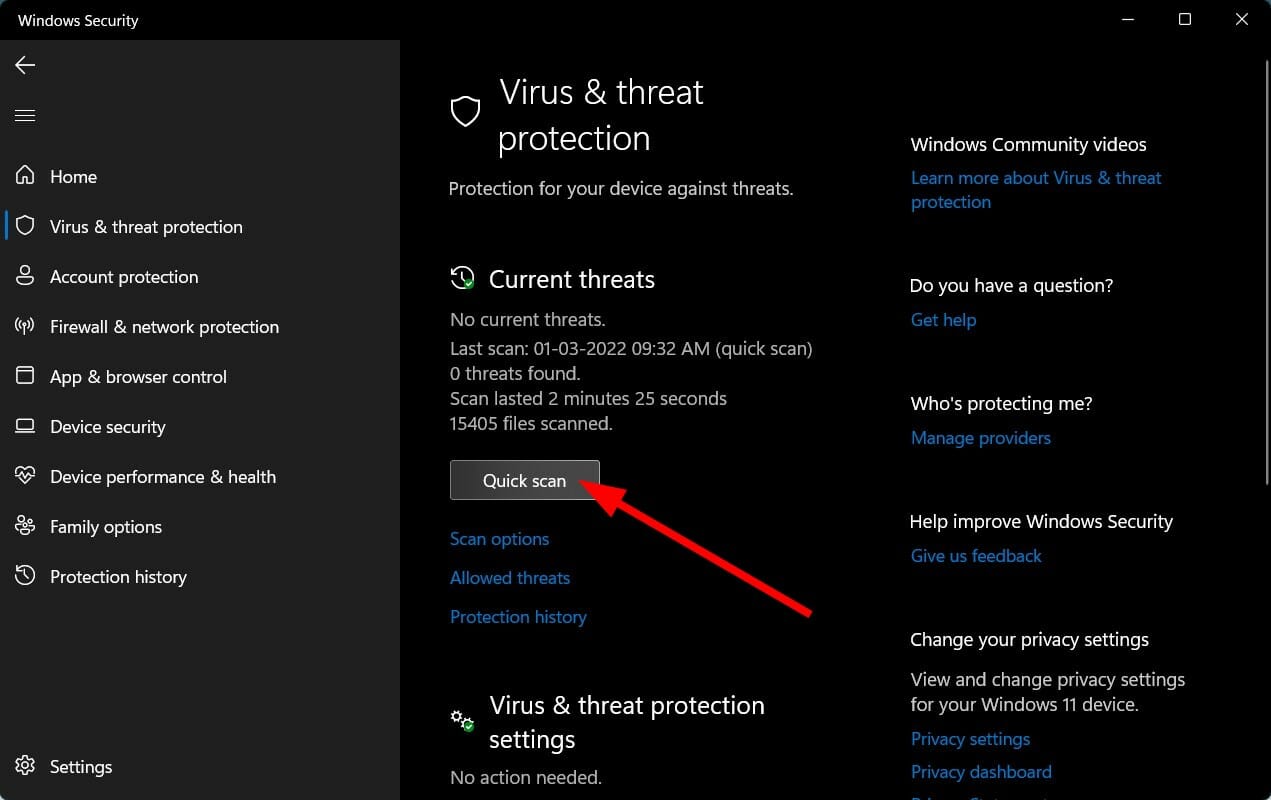
  2. Select Windows Security.windows security
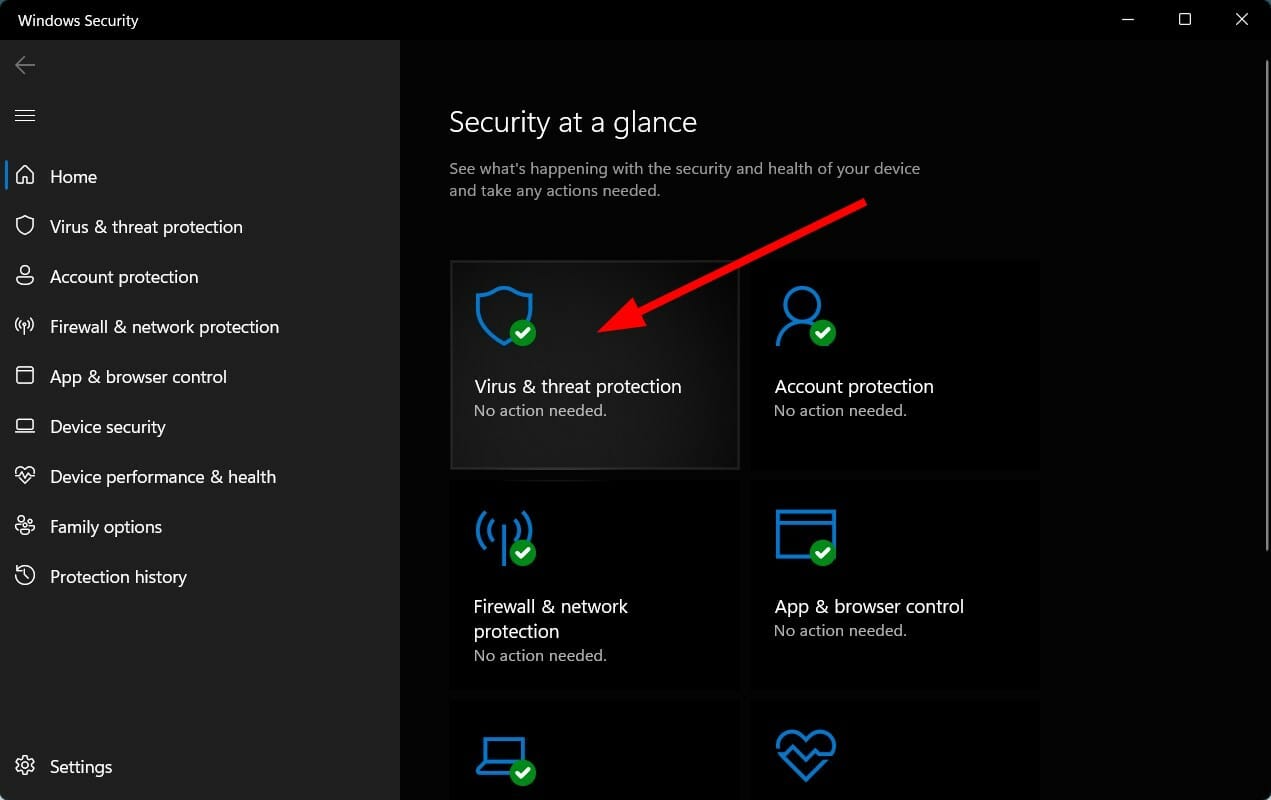
  3. Click on the Virus & threat protection option.
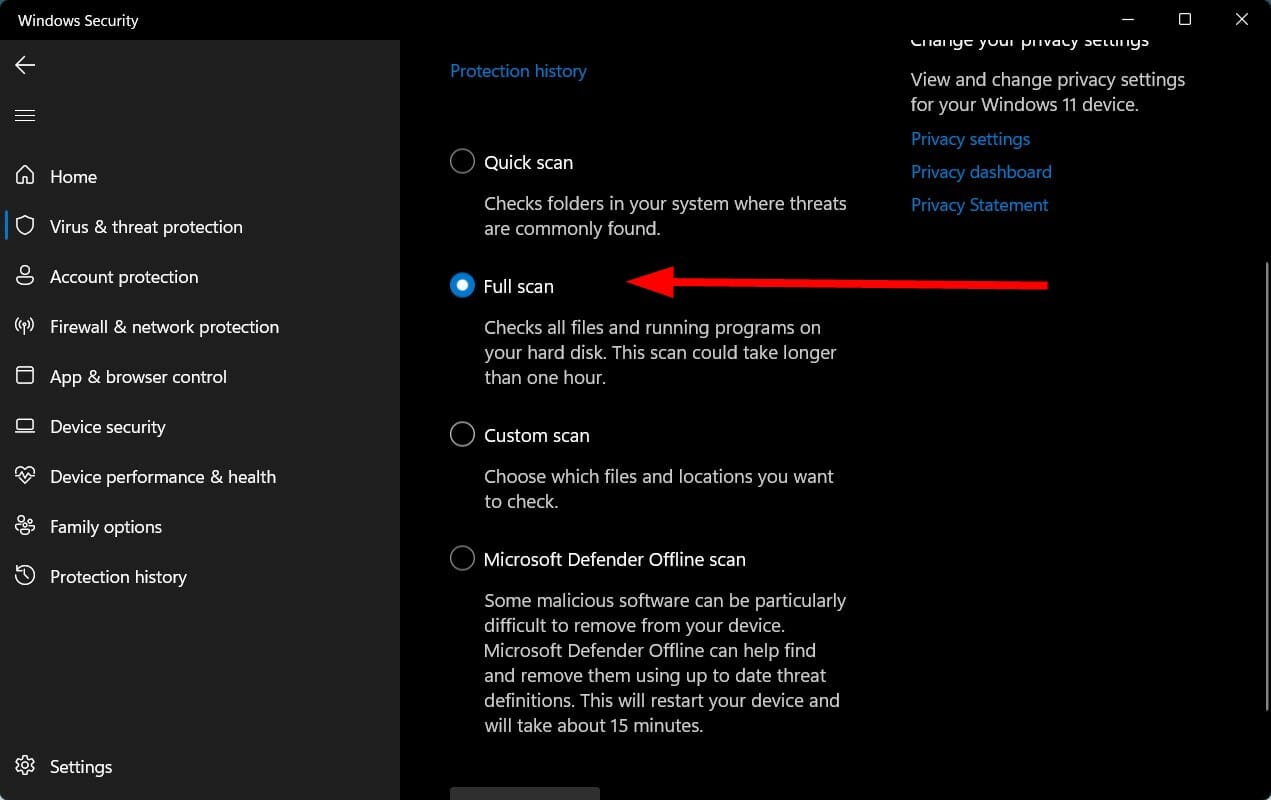
  4. Select Quick Scan.virus and threat protection steam error e502 l3
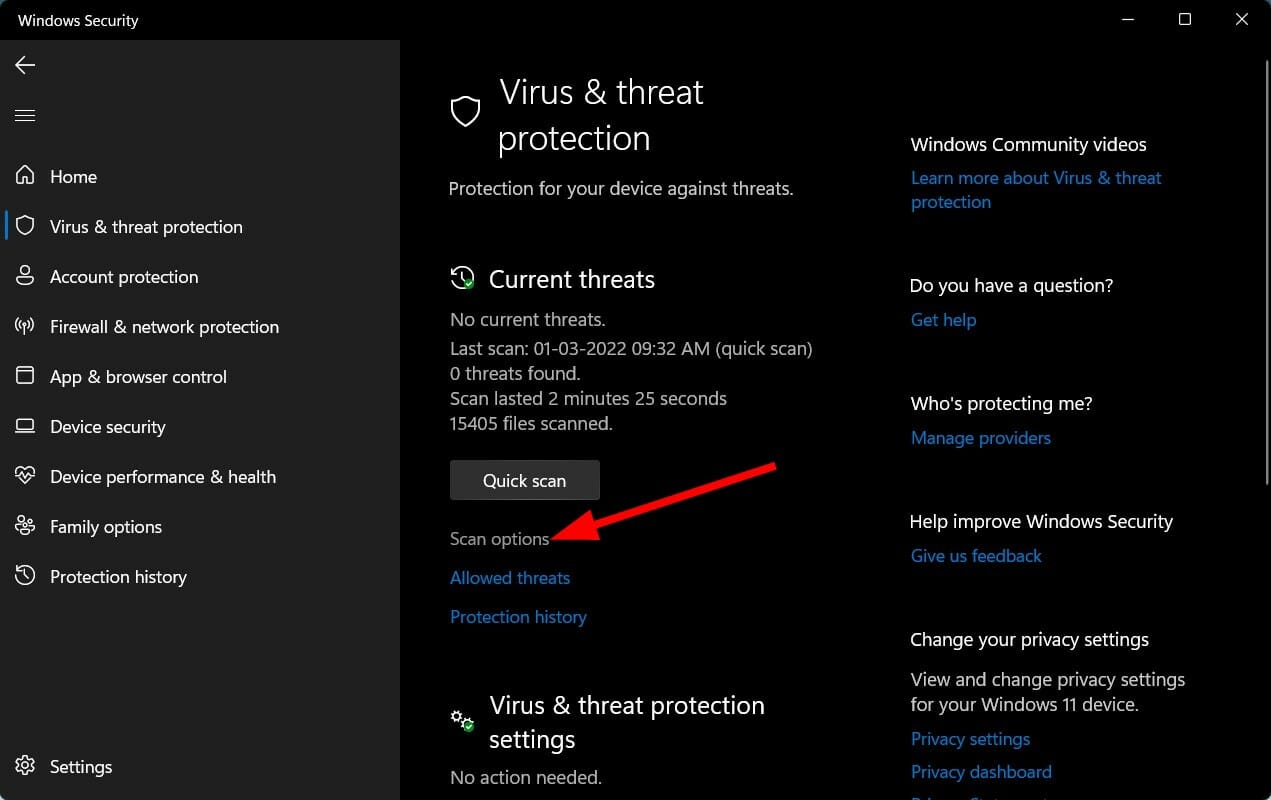
  5. You can also select the Scan options button.scan options
  6. Under Scan Options, choose Full scan to deeply scan your PC for viruses or malware.

There is no denying that presence of a virus or malware could interfere with the normal functioning of a PC. When your PC is infected by a virus or malware, you will experience multiple issues, including error messages, etc.

While Windows Security Essentials can be used, there is numerous multiple third-party antivirus software that can assist you in detecting and removing viruses or malware from your PC.

However, we would recommend that you use ESET HOME Security Essential. This antivirus software comes with payment protection, firewall, parental control, antivirus, anti-ransomware, anti-phishing, and much more. You can give ESET HOME Security Essential a try and scan your PC for viruses or malware.

If you use Norton antivirus software, then we’ve got a dedicated guide for Norton users. Moreover, if you’re using McAfee, you can check out our dedicated guide to learn how to use it and remove viruses or malware from your PC.

7. Change power plan

  1. Open the Start menu.
  2. Search for Control Panel and open it.Open up Control Panel
  3. Click on Power Options.
  4. On the right side, select Additional power settings.
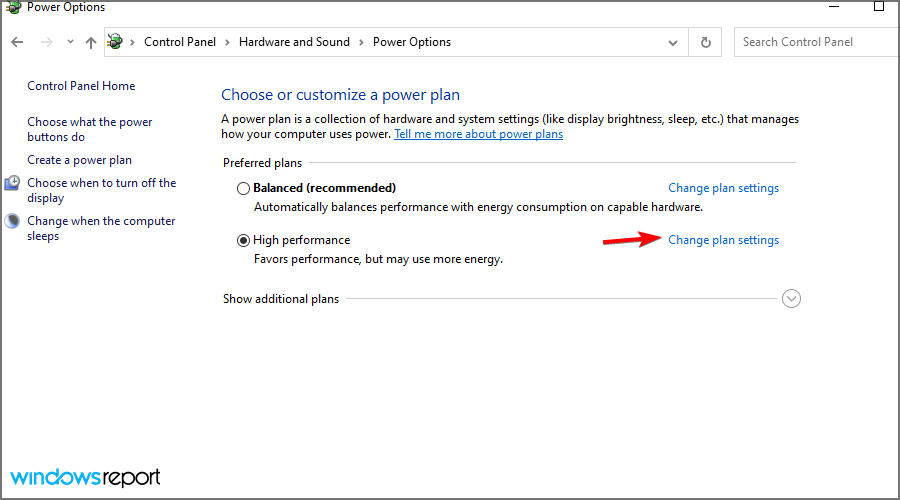
  5. Select High performance, under Preferred plans.
  6. Click on Change plan settings.
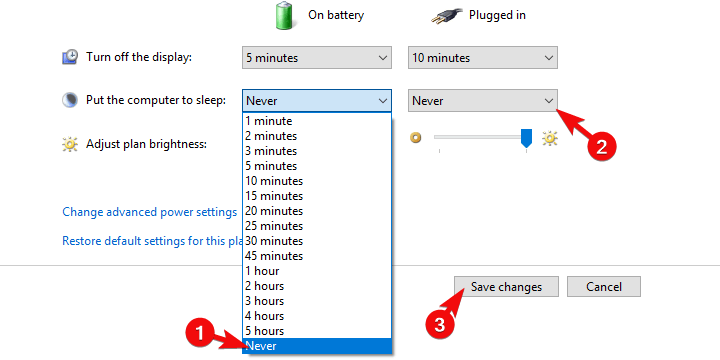
  7. Select Never from the drop-down menu for Put the computer to sleep.prevent computer from sleeping automatically when the display is off
  8. Click on Change advanced power settings.
  9. Expand Hard disk.
  10. Expand Turn off hard disk.
  11. Change the Settings (Minutes) to 0.
  12. Click Apply and OK.
  13. Restart your PC and check if this fixes the issue or not.

It might be best if you could change or tweak your power plan settings, as several users have reported that tweaking the power plan of their PC helped them fix the problem.

If you cannot find the Power Plans option on your Windows PC, then you can check out our dedicated guide on it.

8. Turn off hibernation

  1. Open the Start menu.
  2. Search for Command Prompt and open it as an administrator.
  3. Execute the below command. powercfg /hibernate off
  4. Restart your PC and it should fix your problem.

9. Reset Windows 11

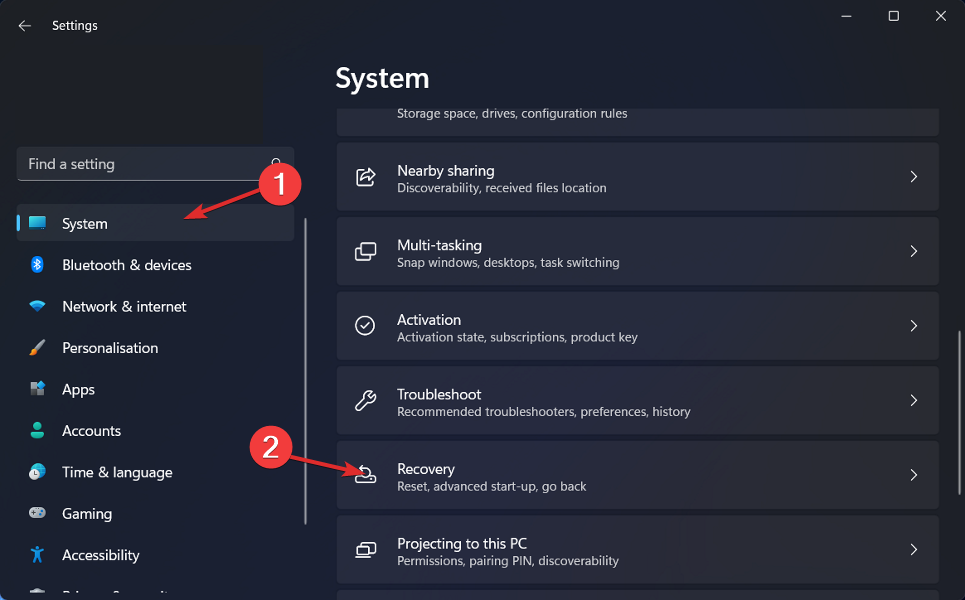
  1. Press the Win + I buttons to open Windows Settings.
  2. Click on Recovery from the right side.Recovery Mode Windows 11
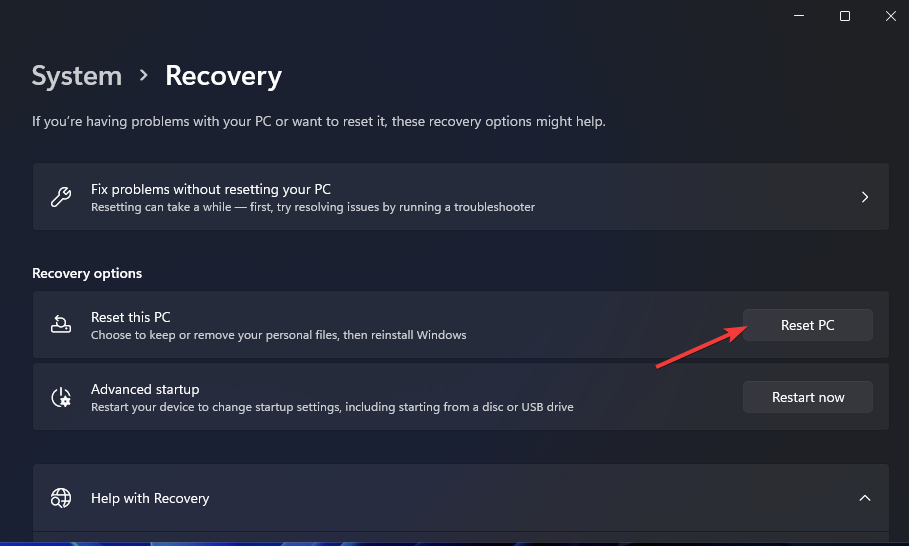
  3. Under Recovery options, press the Reset PC button.reset-pc video memory management internal windows 11
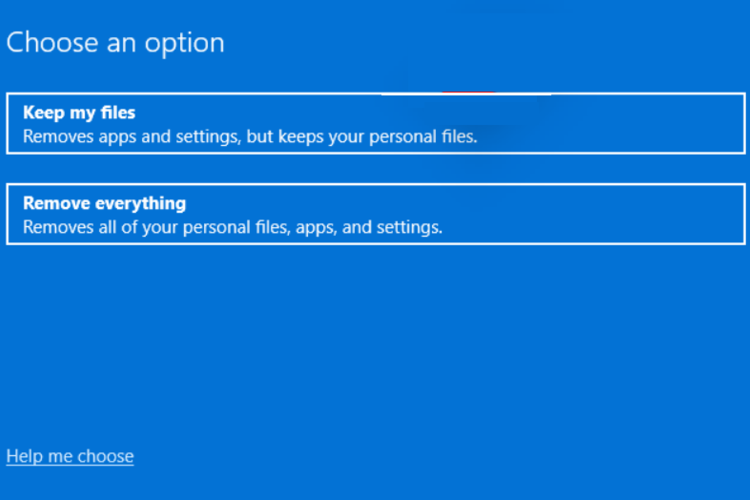
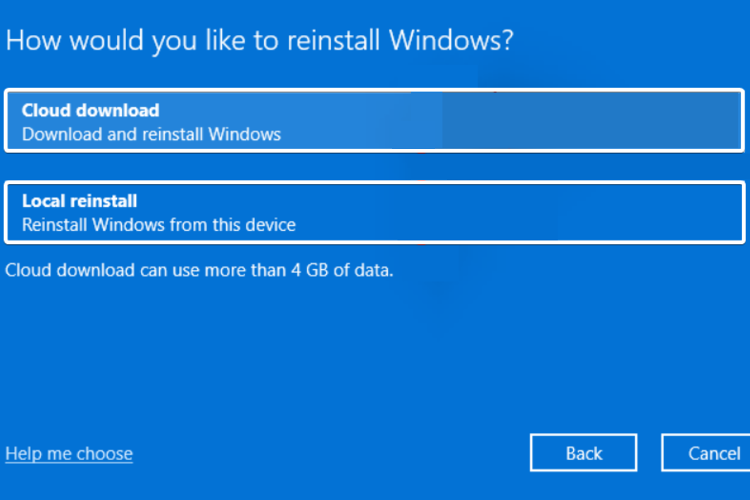
  4. Select the type of factory reset your want to perform.
  5. Choose the option how you would like to reinstall Windows.
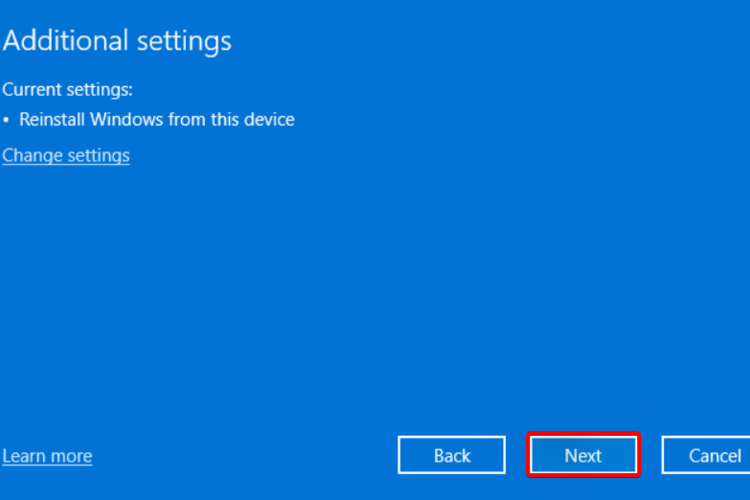
  6. Click Next.
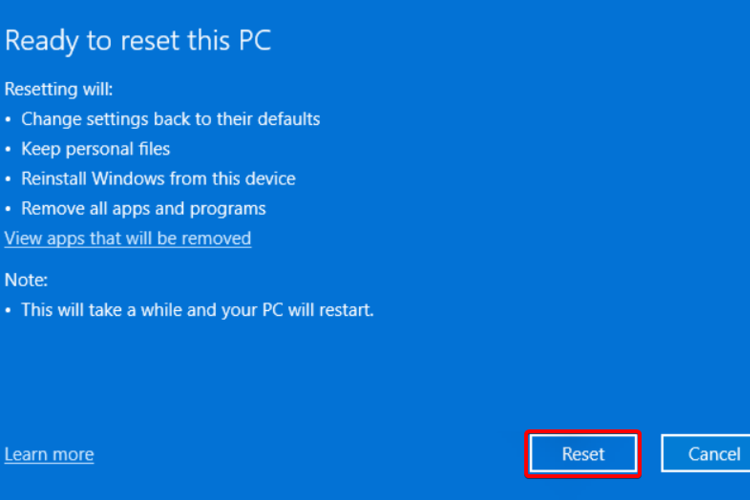
  7. Hit the Reset button.

You should only use a factory reset if none of the other methods have worked for you. Resetting gives a clean slate for your PC to work on.

There are chances that some files went missing during the previous installation, and that is what is causing the Kernel Power error 137. You can reset your PC and check if this fixes the issue or not.

10. Replace the PSU

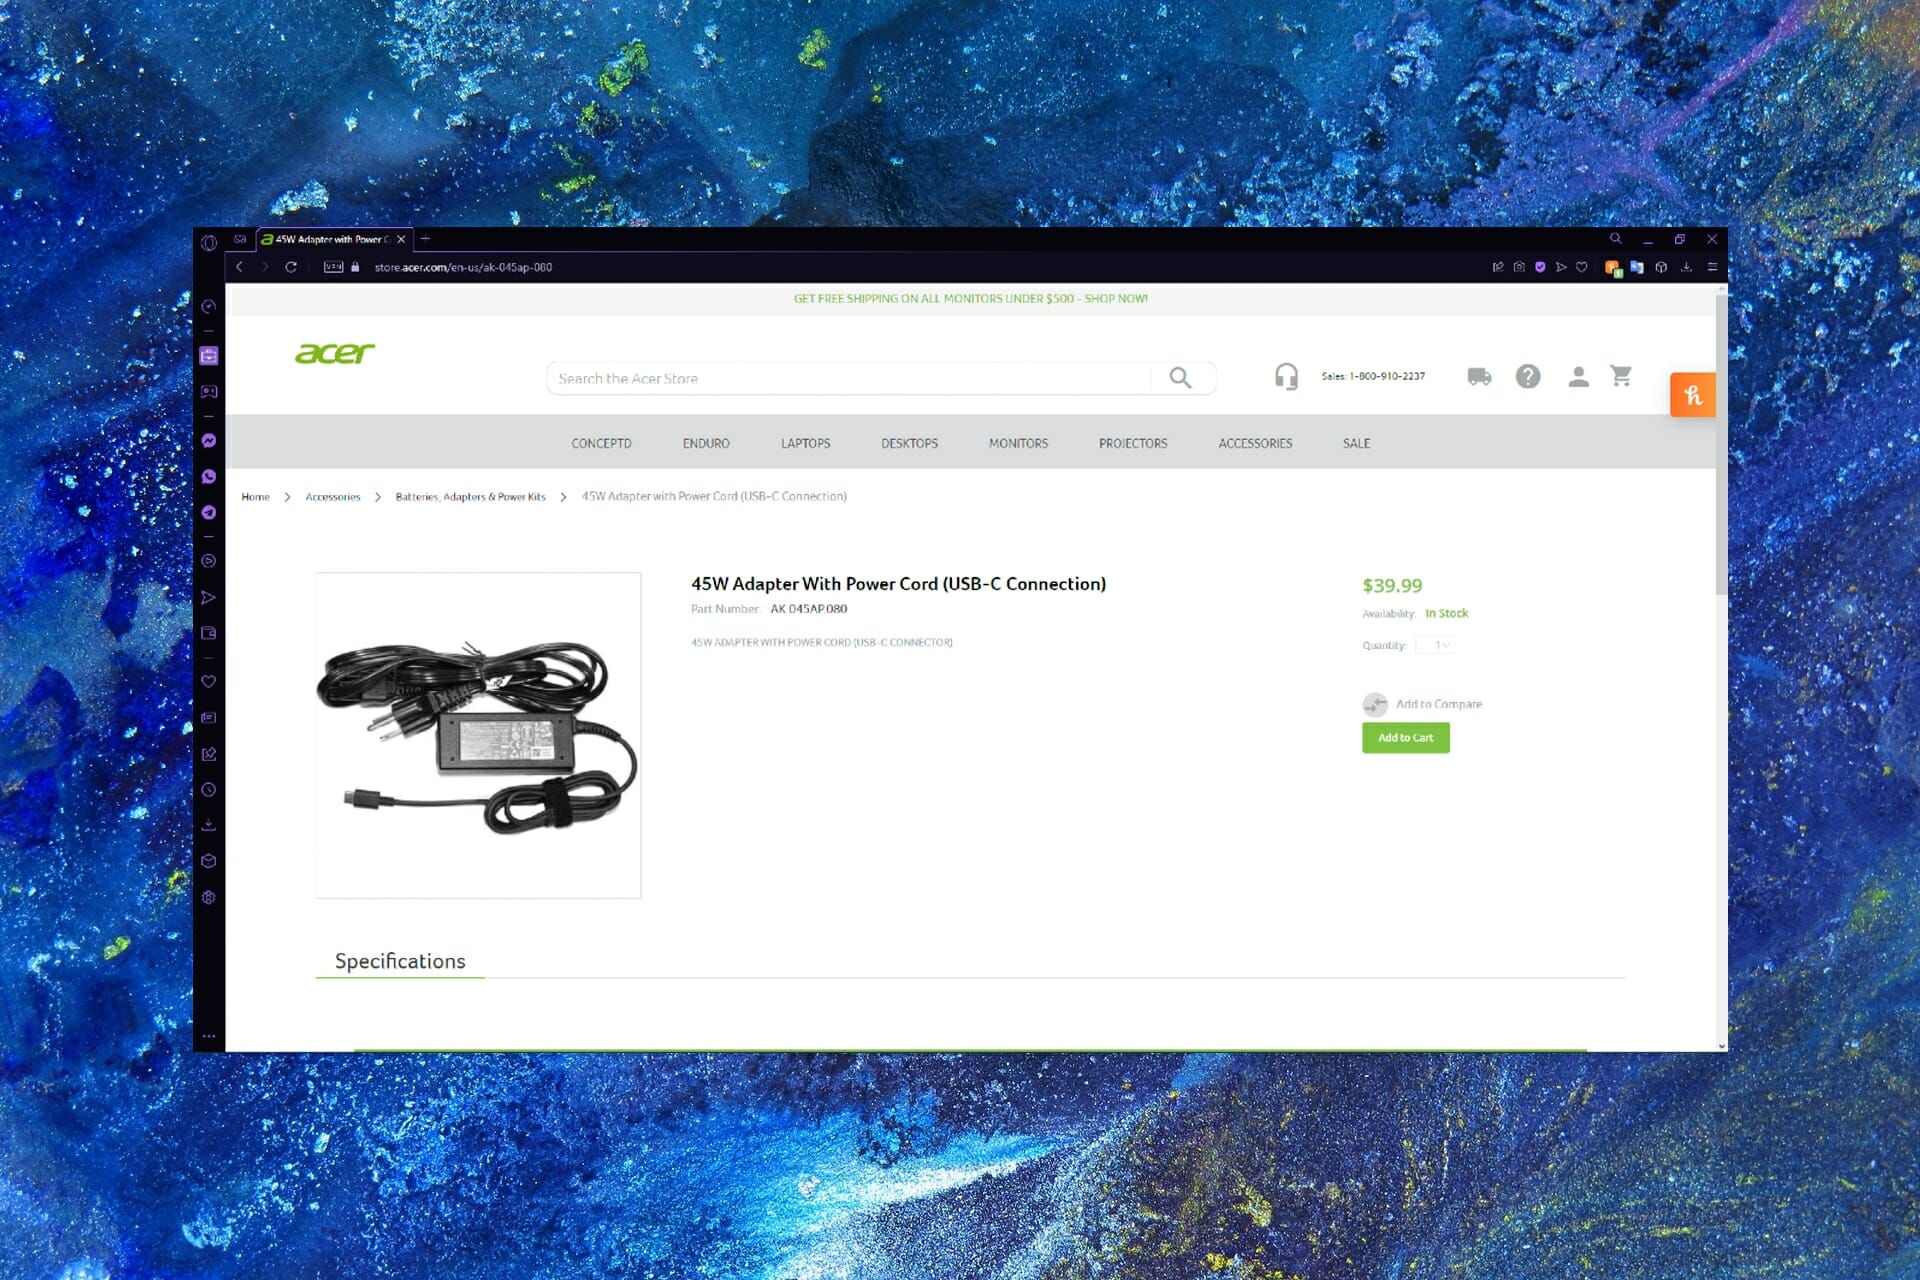
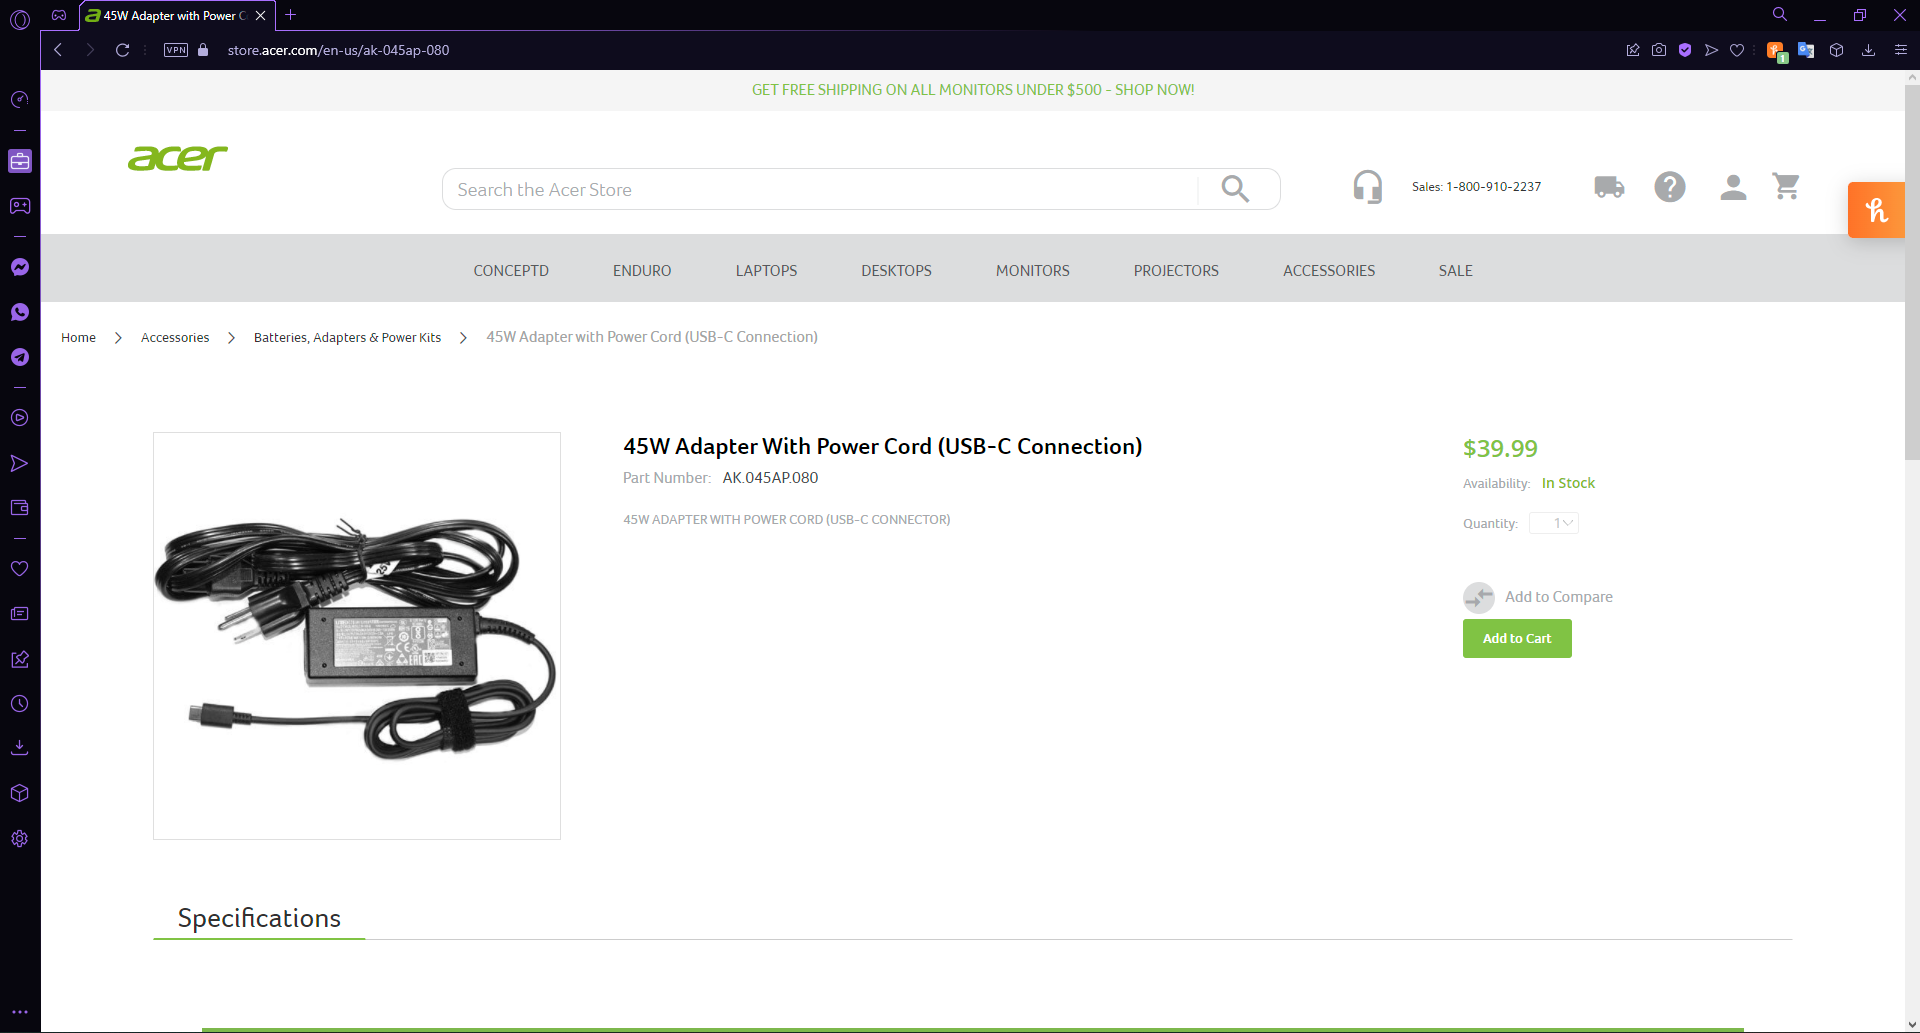
As a last resort, you can try replacing the PSU (Power Supply Unit) with a new one. It would be better if your PC is still under warranty, as you could get the PSU replaced for free.

If it isn’t under warranty, then you have to replace the PSU by yourself. However, before you buy a new PSU, it is recommended that you test it.

If you have no idea how to replace the PSU or which PSU to buy, you should seek the help of an expert or go to the computer repair store.

What else can I do to prevent or solve Kernel Power error 137?

Although the above methods or solutions should be sufficient enough to tackle and resolve the Kernel Power error 137 on Windows, if nothing helps you fix it, we have a bunch of other tips that you can apply and possibly fix the problem.

➡ Update the BIOS

If you have the technical knowledge and know the whereabouts of your PC, then you can go ahead with this method of updating your BIOS.

To safely update your BIOS, you need to refer to the manual for your motherboard. The instruction manual will include all the details about how you can update your BIOS without causing any damage to your PC.

If you aren’t comfortable doing this, then again, we would advise you to call or take your PC to a computer technician and let them update your BIOS.

➡ Check for faulty hardware

Faulty hardware is one of the main reasons you will come across Kernel Power error 137 on Windows. Below is a list of hardware problems that can cause this error.

  • If any of your PC’s hardware is overheating or overclocking, this could put an immense load on the motherboard, causing it to restart multiple times. Ultimately throwing up the Kernel Power error 137.
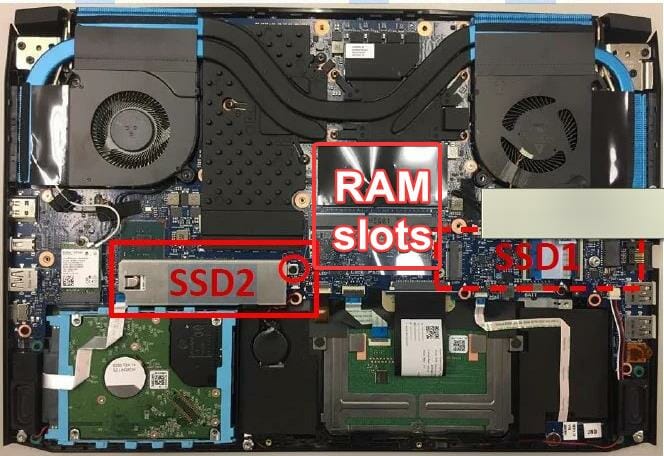
  • If your RAM has not been cleaned for years or the connectors have attracted dust, then your PC will have a hard time communicating with the RAM. Simply take out the RAM clean it with a soft, dry cloth, clean the connectors with a soft brush, and insert it back again.
  • If the power connectors of the graphics card are full of dust, wrongly attached, or damaged, then also you will get Kernel Power error 137.
  • If the power supply is faulty, damaged, or not connected properly to your PC, then it can cause multiple issues, including the one at hand.

Let us know which one of the above-mentioned solutions helped you fix the Kernel Power error 137 on Windows in the comments section below.

Feel free to share any other tips, tricks, or solutions that helped you get the job done. This might help others facing the issue resolve the problem.

Fix: Intel Rapid Storage Technology Driver is not installing

The Intel Rapid Storage Technology (RST) is responsible for managing any SSD connected to your computer. It allows you to back up and restore data, monitor drive health, monitor driver performance, and customize it according to your needs.

Before moving to the Intel RST driver not installing correctly or failing to install on your Windows PC, you need to check whether all the other hardware devices installed on your computer are working correctly.

If they are working properly, then you can proceed to fix the problem with the Intel Rapid Storage Technology driver not installing correctly.

How can I install the Intel Rapid Storage Technology Driver successfully?

Several reasons could be behind the issues with your Intel Rapid Storage Technology installation. The most common reasons might be that you are trying to install incorrect versions of drivers or incompatible drivers.

However, there is no need to worry. There are several solutions that you can try to solve this problem.

1. Download the driver directly from the Intel site

  1. Download the correct executable of the Intel RST setup directly from the Intel site according to your system requirements.Intel site
  2. Right Click on the driver file and Click on Run it as an administrator.Run intel rst as administrator
  3. Follow the installation steps and restart your system.

If the issue persists, try the method below.

2. Run driver in Compatibility Mode

  1. Download and save the Intel Rapid Storage Technology driver.
  2. Right-click on the driver icon, and click on Properties.Open properties
  3. Click the Compatibility tab.
  4. Check the box next to Run this program in compatibility mode and select the respective Windows.Run with compatibility
  5. Click on Apply and then click OK.
  6. Double-click on the driver file to run it, and follow the prompts to finish the installation.

If the error occurs again, try the method given next.

3. Try slightly older versions of the Intel RST driver

If none of the methods or troubleshooting work for installing the Intel Rapid Storage Technology driver, try installing an older and stable version of this driver, as it is more likely to be compatible with your device.

If you are frequently having other driver updates issues, we strongly recommend you install a professional driver updating software to get the latest drivers for your PC. It auto-searches for the best and recommended updates for your drivers.

These methods should resolve the installation issue of the Intel Rapid Storage Technology Driver.

Which solution works for you? Share your experience in the comments section below.

Weird West 1.0.1 Update is out: Check the latest Patch Notes

If you’re a Weird West fan, this Patch Notes guide will definitely be extremely functional when it comes to issues and improvements.

Weird West was recently released and there is no wonder that it is already one of the most popular video games all around the world.

Even if it seems to perfectly work, some players reported encountering related bugs that were interfering with and crashing their gaming experience. Some others indicated their need for new improvements.

That’s why Weird West’s engineers have announced this April the latest Patch Notes, available through the 1.0.1 update.

Keep in mind that you’ll be able to take advantage of all of them on both PC (via the Steam gaming platform) and VR.

The latest update added critical bug fixes and a few QoL improvements pertaining to the inventory and shops. Apart from this, Weird West Patch 1.01 also includes various stability improvements.

Now, let’s discover everything you need to know about this subject.

What are the latest Weird West Patch Notes?

1. Improvements

  • If you’re Horse was moving while you were attempting to search their Saddlebags (and Saddlebags won’t auto-close if you restart moving for whatever reasons, but will still auto-close if you move away from your Horse), it now stops.
  • In order to resell items directly from your inventory, the Companions and Horse inventory can now be accessed directly from the Shop UI.
  • Wanderers now also buy Junk Items to give more opportunities to resell such items while on the road
  • The game now cycles through 5 x AutoSave Slots instead of 3. In this manner, you can now backtrack through save files more easily.
  • Game Pass PC Build now uses 10 Manual Save Slots like on Xbox (up from 5), so it matches for Save Roaming between both platforms.
  • The Protector Journey Hero recruited as a Companion will no longer wrongly quit your Posse when receiving friendly fire.
  • Bolt-Action Forester Rifles now have their correct icon in the Weapon Wheel.
  • Improved throwable weapons (eg dynamites etc) throw arc and speed so they are easier to use in combat and can easily be sent through door frames, and so on.
  • Engineers decreased HOLD time on Scrap Weapon interaction to be standard HOLD interact time. In this way, it would be less annoying to scrap multiple weapons in a row.
  • Developers added an option that allows gamers to transfer at once all junk items from their inventory to a companion, horse, or container inventory.
  • It was added a Bounty Targets Intro Line non-blocking so that you won’t get derailed by a blocking conversation while fighting or sneaking on their target.
  • Developers have also tuned distraction noise made by throwing props around. So, AIs will react to it from further away, allowing players more control over this system.
  • You can now drop items from your inventory when browsing containers/NPCs inventory and opening your inventory side panel

2. Fixes

  • Opening of the Shop UI – According to some users, it was sometimes wrongly auto selling a random item from Player inventory, if you pressed USE for too long when validating the choice Browse Goods. Fortunately, it is fixed now.
  • Crafting of items – Until now, crafted items were not dropped at the Player’s Feet if the player’s inventory was full.
  • Keyboard+Mouse issue – In this case, users were not able to navigate to the Abilities and Perks TAB of the Journal if they had used LMB on any of the Abilities or Perks. Alongside the latest updates, this annoying issue is now solved.
  • Heathen Travel Encounter – It was not triggering on a specific story path, but this issue won’t give you headaches ever again.
  • Canker and Fighting Pit Sigil – Many gamers reported it as being wrongly destroyed when using a generic Sigil to access a secondary Temple. Similar to the other situations, this problem has been fixed.
  • The issue with the abandoned mine – As the abandoned mine was sometimes not being correctly populated with Sirens when using Sirens Scenario, manufacturers took care of this issue.
  • Foliage/Bushes areas in Canyon Location – These were fixed in order to have fewer holes in them so you won’t get surprised detected while walking hidden in the middle of a bush Patch.
  • Weapon Shops Guards – The related problems were also solved, as now you won’t have to worry about being pulled to guard banks in Town instead of staying inside the Weapon Shop.
  • Easy Prey/Terror on the Trailside quests – Users reported having their quest item disappearing when entered the abandoned wagon location and re-entered it prior to finding the item. With the latest Weird West Patch notes, this won’t be a problem anymore.
  • Finding husband in Bounty Hunter Journey – This was also fixed, without freeing him and then returning to Galen’s Crossing and completing local objectives prematurely and wrongly completing the Journey.
  • Tanning Racks in Trapper Camps – A wide range number of worldwide players reported having nav mesh beneath them which could result in side quest NPCs spawning inside tanning racks and blocking side quest progression. This, developers managed to fix this annoying situation.
  • Rope issue – Now, Rope is no longer removed from your inventory every time you reloaded into a location where you had attached the rope to a skylight.
  • Ability Wheel – It seems like it was not showing weapon abilities when having set AIMING to TOGGLE MODE and aiming with your weapon. Fortunately, it is now solved.

What other rare fixes are gone alongside the Weird West Patch Notes?

The above fixes apply in the most common reported situations. However, there are other rare issues that were solved by developers, and to discover them check the list below:

  • Essex Mast in Quickbend couldn’t follow up with his blocking conversation when you free him, resulting in an objective blocker
  • Rare blocker bug where Pigman Hero would not go to the destination during a specific Objective in the last Journey
  • Documents, Relics, Keys, Golden Ace were not transferring from 4th to 5th Hero
  • Reputation Notification sometimes was displaying a placeholder text
  • Oneirist was leaving the location while talking with her about the cursed statuette during the Ritual travel encounter
  • The Sheriff was wrongly going hostile during the side quest where they open the cell after being bribed

So, this is all you have to know about the latest 1.0.1 Weird West update Patch Notes. As you can see, engineers have come up with various fixes and improvements, so you can get the best gaming experience.

Keep in mind that even if the game is now updated, fixed, and improved, Weird West can still generate specific bugs. In order to discover them all, feel free to check our dedicated gamer guide.

Are you excited about all of this news? Make sure you share your opinion with us by leaving a comment in the section below.

How to replace the battery in the Razer Blade Stealth 13

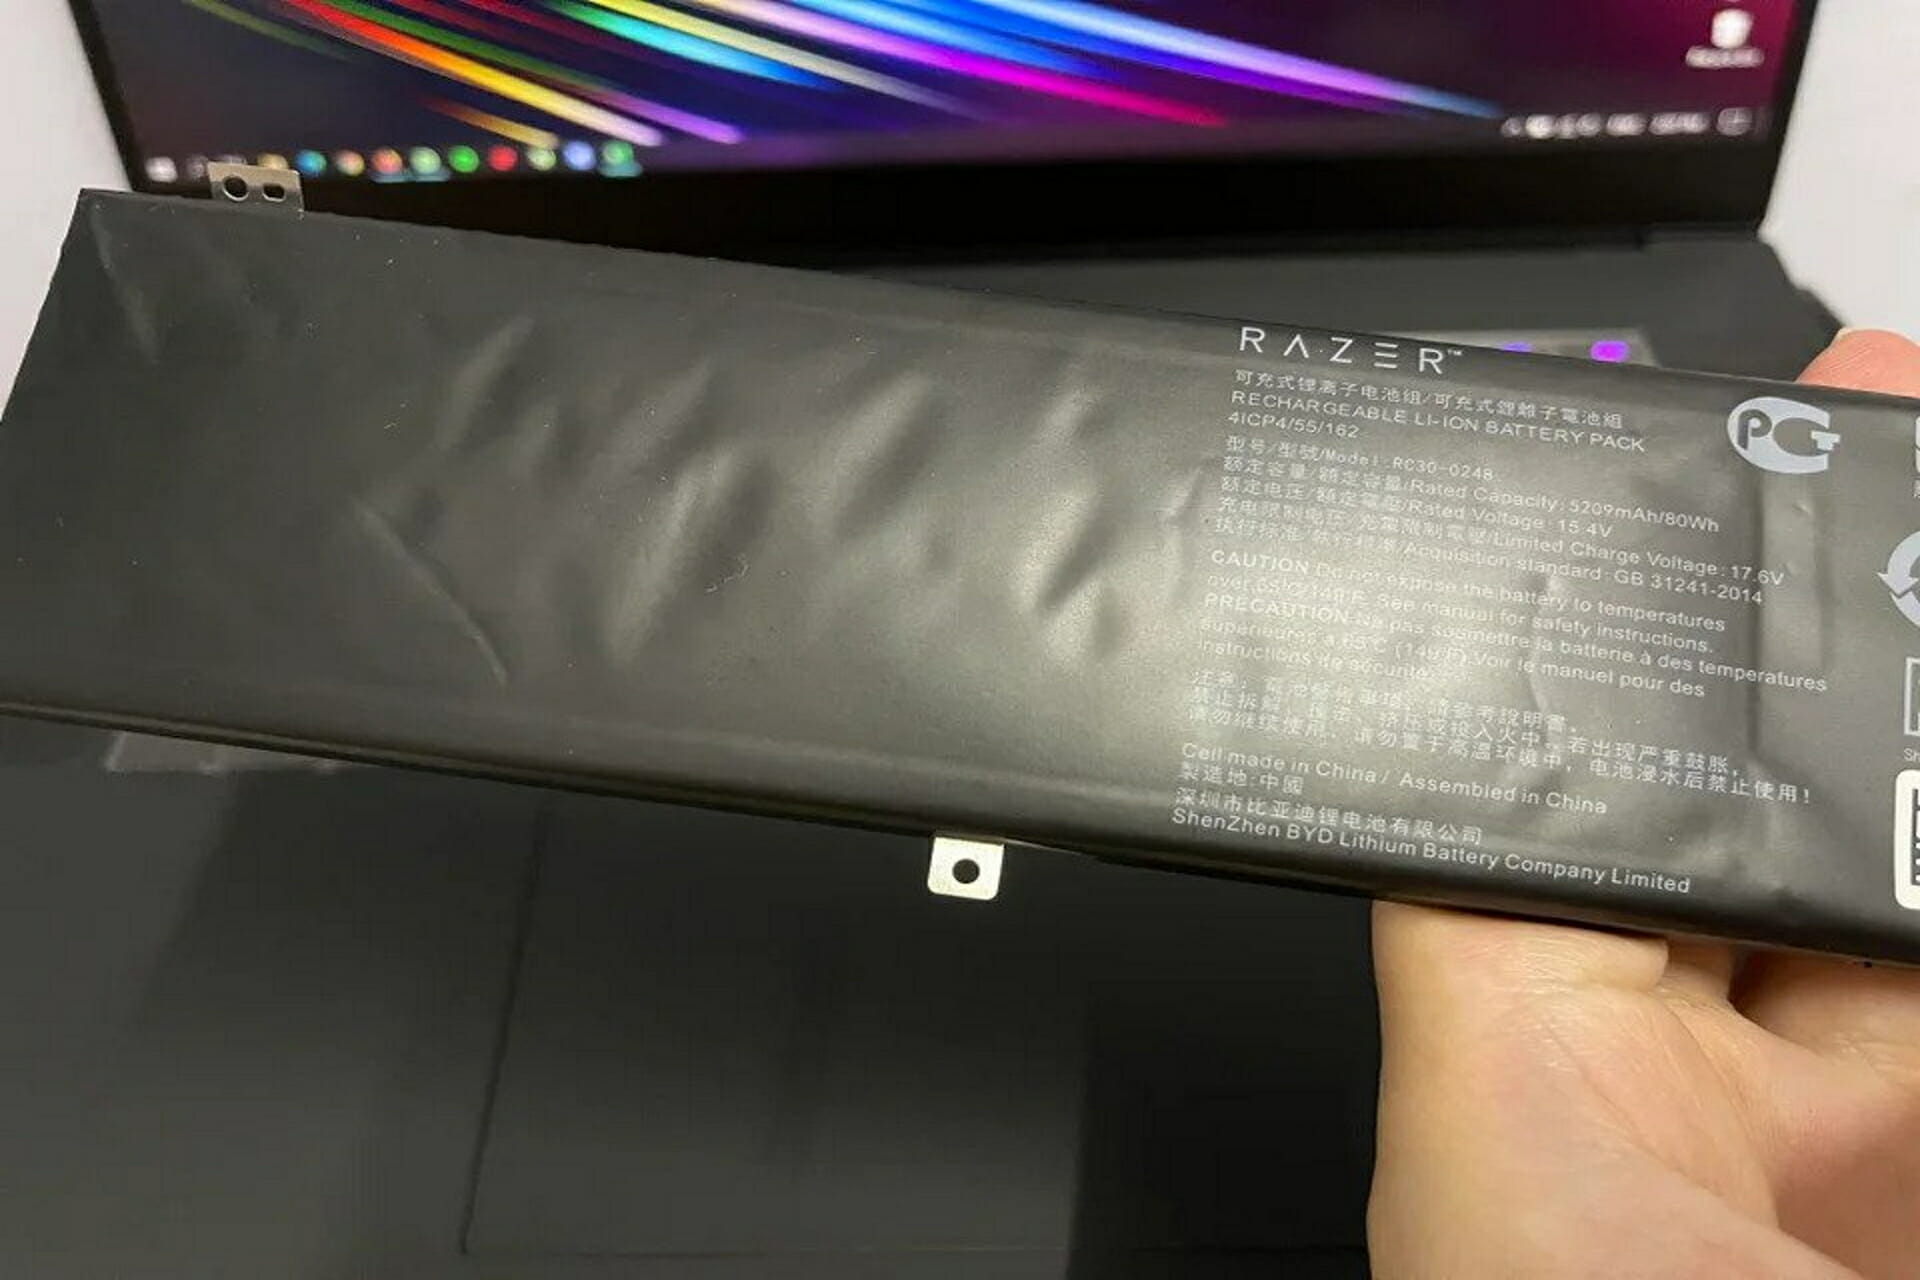
Your Razer Blade Stealth 13 laptop comes with a built-in Li-ion battery. It is responsible for keeping the computer running and providing power to all of the other components.

That means that when your battery starts losing its ability to hold a charge, you may notice a drop in your computer’s performance, including shorter battery life and poor performance overall. You may also see an increase in how hot your laptop gets while using it.

So if your laptop isn’t working as well as it used to and is facing problems like your laptop being slow, overheating, the battery draining out very fast, randomly shutting off, or simply not turning on, it means that your battery has failed. Fortunately, replacing the battery is easy.

How can I replace the battery in the Razer Blade Stealth 13?

1. Remove the back panel

  1. Power off and unplug the laptop.
  2. Disconnect all external devices, peripherals, and cables such as Personal Media Drives, USB drives, printers, and faxes.
  3. Remove the screws holding your computer case together. 
  4. Pry up slightly on both sides to separate the top and bottom halves of the case. Lift from the side without any ports, as you progress with prying.
  5. Lift on both sides as you move back towards the rear of the device until you can separate and lift the back panel. Use a plastic opening tool, if necessary.open Razor 13

2. Locate and unlatch the connecting cable

  1. Locate the connector head and battery cable attached to it.Locate connecting cable
  2. Carefully disconnect the battery cable connector from its socket on the motherboard by carefully pulling it away from the connector head.

3. Replace the battery

  1. Remove all the screws securing the battery to the base enclosure. detach battery
  2. Remove and replace, if necessary, the defective battery with a new one that is compatible with your computer model.
  3. Secure its cable to the socket on the motherboard to connect it to the system.
  4. Proceed to secure the battery and reassemble the laptop in the reverse order of disassembly.

4. Verify the battery performance

  1. Start your computer. 
  2. Press Win + X on the keyboard and select Windows Terminal (Admin) from the list.Open Window Terminal (Admin)
  3. When the power shell opens, execute the powercfg /batteryreport command.generate battery report
  4. Note and navigate to the file path in the output and open the battery report.battery report

You can verify the improved battery health and performance from this detailed report.

Laptop batteries have a limited lifespan and can deteriorate a laptop’s performance over time. It is recommended to change batteries at least once a year.

Replacing your battery is easy, and you’ll notice the difference in performance right away. It is also recommended to calibrate your laptop battery for a long and healthy life span.

First Dying Light 2 DLC: Discover all that you need to know

It’s been almost half a year since the biggest Dying Light 2 release and there is no wonder that tons of worldwide gamers are extremely impressed with what it has to offer.

Plus, those players that haven’t experienced its capabilities yet seem to be pretty excited about accessing this world.

Fortunately for most of the Dying Light 2 fans, Techland has announced that the first DLC will be big and unexpected.

Dying Light 2’s first major story DLC is set to launch in June, and at least one more big story expansion is already planned for the future.

Even if we don’t have a large spectrum of related details, there are some aspects you should be aware of, before the great release.

We’ve ensured to compile anything we know about the first Dying Light 2 DLC and you’re going to discover it only if you read this guide completely.

What will Dying Light 2 DLC has to offer?

Keep in mind that this new DLC will likely include new weapons. According to gamers’ declarations, guns were absent from the second game, so developers might come up with related updates.

Notably present in the original, it was a bold move to remove them in the second. While it may have played very differently, it may have made combat more invigorating than mashing melee weapons on the undead.

You’ll also be able to take advantage of the new areas on the map opening up and some subtle changes to the original map take place to accommodate these new missions.

Plus, we may even discover a new protagonist and new characters.

For now, that is all we can think about when it comes to the Dying Light 2 first DLC. The lead designer also reported the following:

But for now, that’s the idea: to surprise players and to give them content they don’t expect but which also works within the formula of Dying Light 2

Keep in mind that it is important to get the best deal on Dying Light 2. That’s why we’ve compiled a list of the most popular platforms that include this game:

⇒ Get Dying Light 2 from G2A for PC

⇒ Get Dying Light 2 from Kinguin for PC

⇒ Get Dying Light 2 from Amazon for PS5

We also strongly suggest checking the Dying Light 2 patch notes, because you’re going to discover some new incredible game-related fixes and improvements.

Until developers come up with some more details regarding this subject, make sure you share your opinion with us by leaving a comment in the section below.

How to download Weird West: 4 best deals to pick from

Weird West was released at the end of March 2022, and even if tons of worldwide gamers already got deeper into the main scenario, some others are still wondering how and where they can download the game from.

It is true that it is a newly announced one-of-a-kind masterpiece, but you should know that it is also extremely versatile.

Weird West is available on various trusted sources, so you’ll always have options to choose the best deal from.

In today’s article, we’re going to show you how to easily get this game on your desired platform and enjoy the best gaming experience you can get.

How and where can I download Weird West from?

As some of you might probably know, Weird West is available for playing on platforms such as PlayStation 4 or Xbox One, as well as on Windows PCs.

A good option would be purchasing, downloading, and playing it through Steam or Epic Games, some of the most popular gaming platforms around the world.

However, keep in mind that there are more other service providers that list this game probably with more advantageous deals. In this case, you should check G2A, Kinguin, or Amazon.

⇒ Get Weird West from G2A

⇒ Obtain Weird West from Kinguin

Before downloading Weird West, we strongly recommend checking if your system meets the game’s minimum requirements:

  • CPU: Intel Core i5-2380 or equivalent / AMD FX-6100 (6 * 3300) or equivalent
  • RAM: 6 GB RAM
  • GPU: GeForce GTX 650 Ti (1024 MB) / Radeon HD 7770 (1024 MB) or equivalent
  • OS: Windows 10, 64-bit
  • STO: 16 GB available space

Even if meeting the Weird West minimum requirements is good, in order to get the best gaming experience, you should ensure having these recommended specifications:

  • CPU: Intel Core i7-6950X (10 * 3000) or equivalent / AMD Ryzen 7 2700 (8 * 3200) or equivalent
  • RAM: 12 GB RAM
  • GPU: GeForce GTX 1050 (2048 VRAM) / Radeon RX 460 (4096 MB) or equivalent
  • OS: Windows 10, 64-bit
  • STO: 16 GB available space

In conclusion, as you can see, there are various sources you can consult to find the best deal and download Weird West.

Also, because, like any other game, it can generate some specific problems, we suggest checking how to prevent and fix the Weird West bugs.

Make sure you share your related experience with us by leaving a comment in the dedicated section below.

IKEv2 on Windows 11: How to Set Up & Use

With the increasing need for secure and private browsing, users are itching to know how to use Windows 11 IKEv2 VPN type.

Using this security protocol might have been harder in the past as most VPN providers didn’t provide support for it. However, the story is different now as the leading VPN services now offer full IKEv2 support.

Setting up the IKEv2 VPN on Windows 11 is pretty easy, as shown in this article. But you will need to go to your VPN provider’s website to download and install the certificate to set it up successfully.

How can I set up and connect Windows 11 IKEv2 VPN?

Set up IKEv2 manually on the PC

  1. Press the Windows key + I to open Settings on your PC.
  2. Select the Network & Internet option on the left pane.network setting vpn windows ikev2
  3. Select the VPN option.
  4. Click the Add VPN button.add vpn ikev2 windows 11
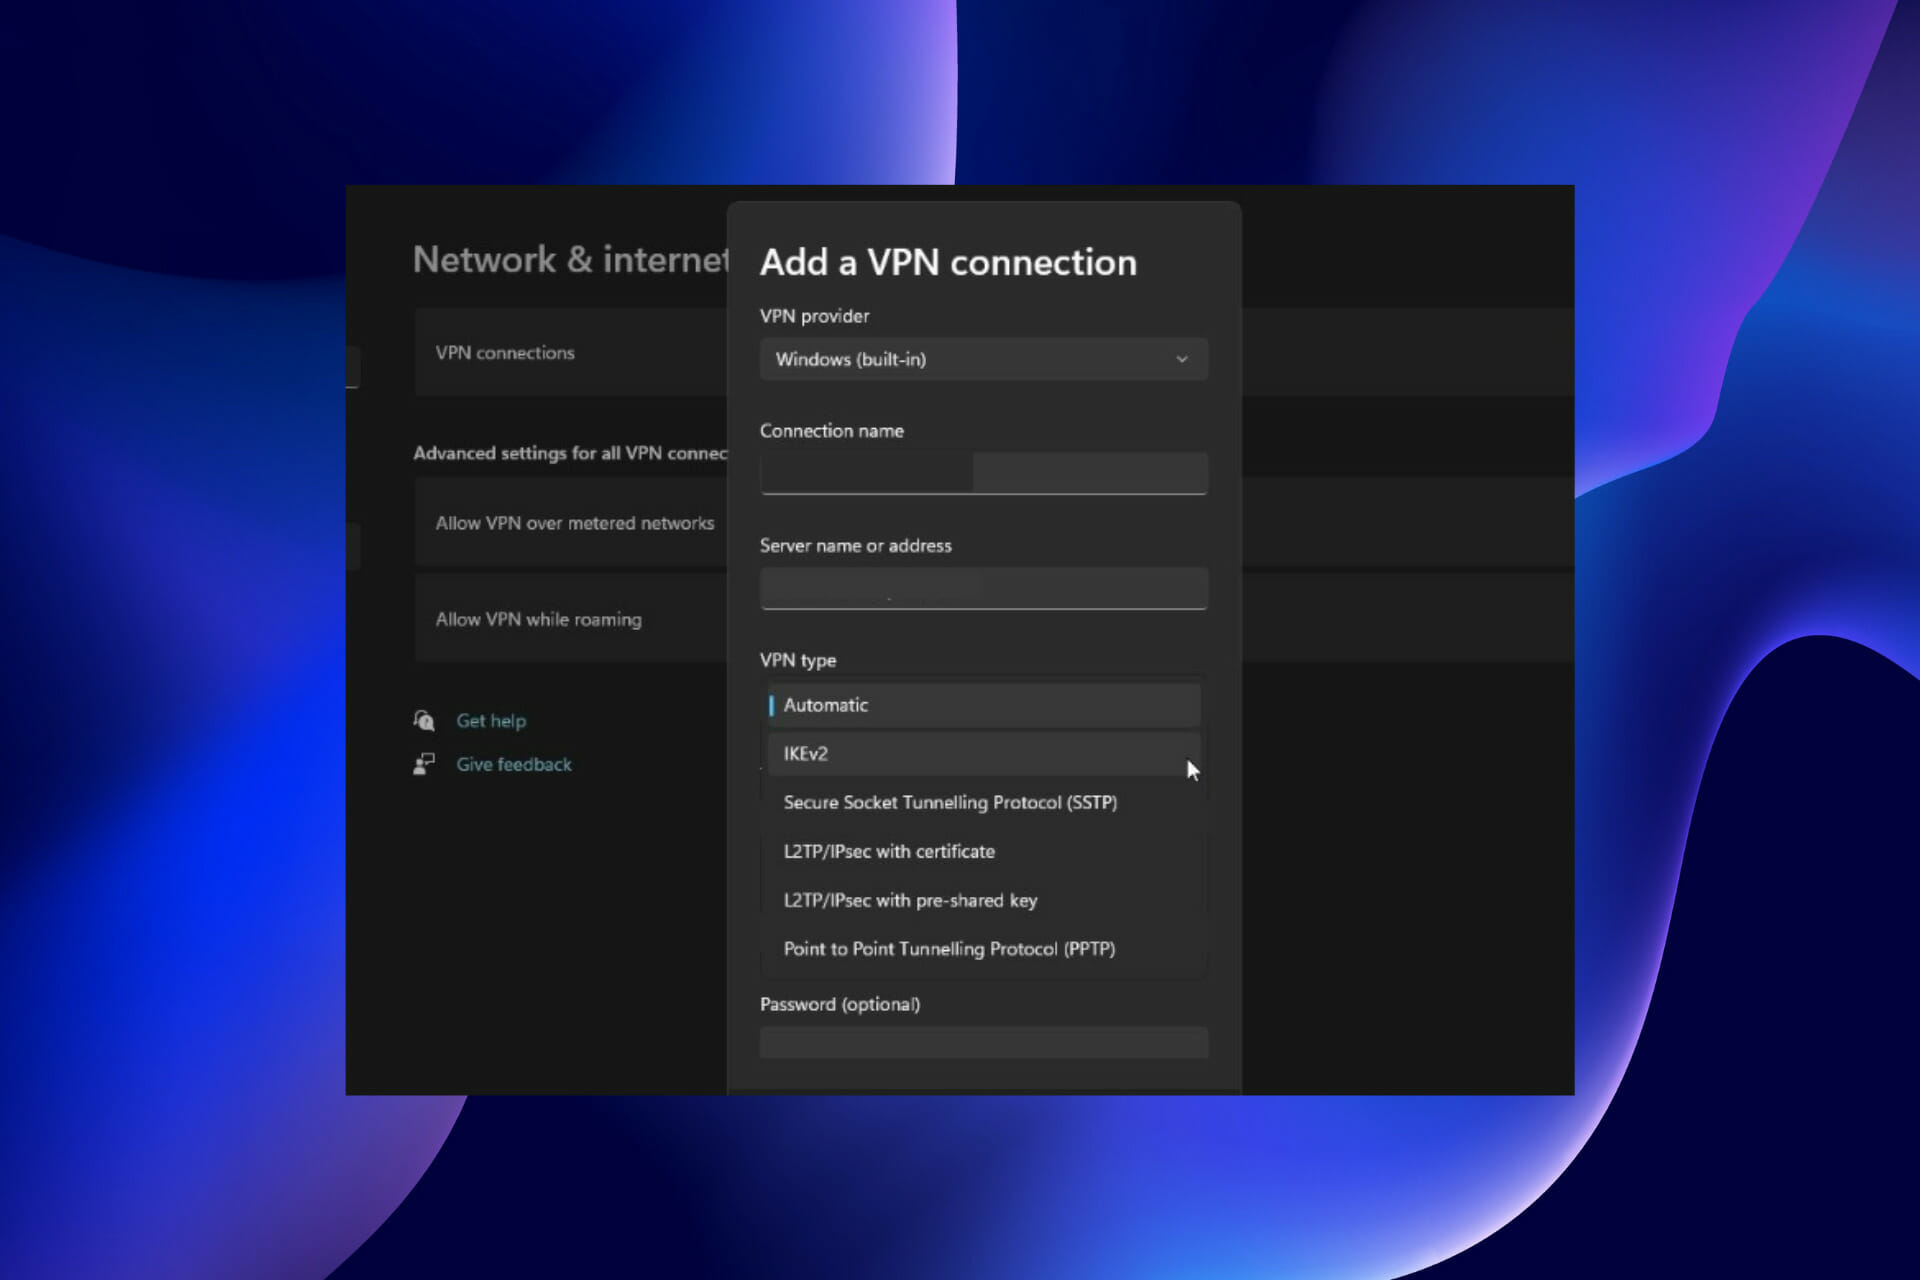
  5. Choose Windows (built-in) as the VPN provider.
  6. Enter a Connection name. This can be any name of choice.
  7. Enter the Server name or address provided on your VPN provider’s website.set ikev2
  8. Set the VPN type to IKEv2.
  9. From here, fill in the other simple info, such as setting a username and password.
  10. Lastly, check the Remember my sign-in info checkbox and click the Save button to finish the setup.

2. Connect to IKEv2 VPN

  1. Click the desktop-like icon at the bottom right corner of the taskbar.choose ikev2 windows 11 vpn
  2. Click the VPN option.connect vpn
  3. Select your VPN and click the Connect button.

Having a secure protocol such as the IKEv2 VPN on Windows 11 could save you from trouble online.

It offers advanced protection and privacy to surf the net with maximum security and anonymity.

Thankfully, setting up the protocol is a breeze, provided you follow the instructions above carefully. Feel free to drop a comment if you encounter any problems during the setup process.

Meraki VPN on Windows 11: How to Fix Connection Issues

The Windows 11 Meraki VPN issues start after users install the Windows 11 KB5009566 update. It displays all sorts of errors in the initiation stage and stops your VPN from connecting.

Microsoft later acknowledged the VPN inhibiting feature with this Windows 11 build and has remedied the problem accordingly.

This guide will take you through simple fixes to solve these issues and get your VPN back working perfectly.

How can I solve Windows 11 Meraki VPN issues?

1. Update Windows

  1. Press the Windows key + I to open the Settings app.system update meraki windows 11 vpn
  2. Choose the Windows Update option on the left pane.check for update windows 11 meraki vpn
  3. Finally, click the Check for updates button on the right pane.

After a series of complaints from users about VPN failure on the Windows 11 KB5009566 update, Microsoft released an update labeled KB5010795. With this update comes the fixes for the VPN connection breakage and other bugs.

If you can’t find this update on your PC, you will have to download and install it manually. Your Meraki VPN should connect again without any errors after the installation.

2. Try an Alternative VPN Provider

If you still can’t fix the Meraki VPN issues after the windows update, you should try another highly-rated alternative in Private Internet Access.

Private Internet Access is a renowned VPN provider that offers unrestricted access to worldwide servers. It is widely accepted as one of the most secured and privacy-focused VPNs ever created.

What’s more, it works at blazing-fast speed for effortless streaming and file sharing. With its offer of simultaneous access on up to ten devices with just a single subscription, it just about covers all devices you have at your workplace or home.

It might just be all you need to forget about your Meraki VPN issues.

 ⇒ Get Private Internet Access

3. Perform a system restore

  1. Press the Windows key and type system restore.
  2. Select the Create a restore point option.system restore
  3. Click the System Restore button.next window
  4. Choose Next in the System Restore window to continue.
  5. Choose a later restore point than when you installed the Windows update causing the problem.choose restore point
  6. Finally, click the Next button and follow the simple onscreen instructions to complete the restoration.

Since this problem occurs after a Windows 11 update, restoring to your previous Windows build solves the problem.

The Windows 11 VPN issues are not limited to only Meraki VPN alone, as other users have also reported them updating their OS.

Thankfully, Microsoft was swift to release another update to counter this problem. And as always, we have explained the effective ways to apply the fix.

However, you can check our list of best VPNs for a variety of options if you can’t make the Meraki VPN work.

Feel free to let us know if these fixes solved your Meraki VPN issues in the comment section below.

3 easy fixes for Creative Cloud Express not loading issues

Even if Creative Cloud Express is one of the best online and mobile design apps, some users reported that it is sometimes not loading, and it can be an extremely annoying situation. 

The reasons placed behind this issue are unclear for now, but keep in mind that it can appear due to corrupted elements related to the software.

Fortunately, if you face this problem, you can try some workarounds that could help, and in this guide, you’re going to discover the 3 most efficient ones.

What can I do if Creative Cloud Express is not loading?

1. Reset the CC app

  1. To reset the CC desktop app, you should make sure that it is in the foreground.
  2. Press simultaneously on the Ctrl, Alt, and R keys.

2. Try to repair Creative Cloud

  1. Close all your Creative Cloud apps and make sure you have a stable Internet network connection.
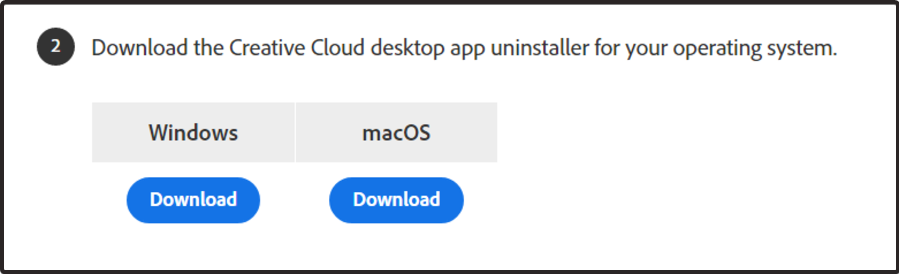
  2. Access the Adobe Help page, and download the Creative Cloud desktop app uninstaller for your Windows operating system.
  3. Double-click the .zip file and then double-click Creative Cloud Uninstaller.
  4. When prompted, click Repair.
  5. Once the Creative Cloud desktop app is repaired, open it and install your app (You may be prompted to sign in first).

3. Perform a clean CC install

  1. Uninstall every CC app. To do that, open the CC desktop app, then on the All Apps page, select the More actions icon (marked as three dots).
  2. In the drop-down list, select Uninstall.
  3. Select Cancel (cancels the uninstallation), Remove (removes app notifications, alerts, interface settings, plugins, and other preferences), or Keep (retains the app notifications, alerts, interface, settings, plugins, and other preferences), based on your preference.
  4. Now, you’ll need to uninstall the CC desktop app.
  5. Clean your computer of CC files.
  6. Update your OS. To do that, press simultaneously on the Windows and I keys to open Windows Settings.
  7. Navigate to Update & Security.
  8. From the right window pane, click on the Check for updates button.
  9. Wait until your OS scans for newly available updates and download the recommended ones.
  10. Restart your PC.
  11. Now, you’ll need to repair all MS Visual C++ versions that can be repaired.
  12. Update your MS Visual C++, if it can be updated.
  13. Restart your computer (don’t skip this).
  14. Reinstall the CC desktop app.

So, these are the best workarounds to try if your Creative Cloud Express is not loading. Which one helped you? Make sure you share your experience by leaving a comment in the section below.

3 tips to fix LockDown Browser Update server not supplying update information

To maintain a secure testing environment, learning institutions use a LockDown Browser that they must install on each student’s computer. It is a modified version of Google Chrome that blocks accessibility.

It’s a software used by educational institutions to prevent cheating during online exams. A specialized web browser prevents students from accessing other websites or applications during an exam.

When an exam is launched, the LockDown Browser checks for updates from the server. If an update is available, it will download and install the update before proceeding with the exam.

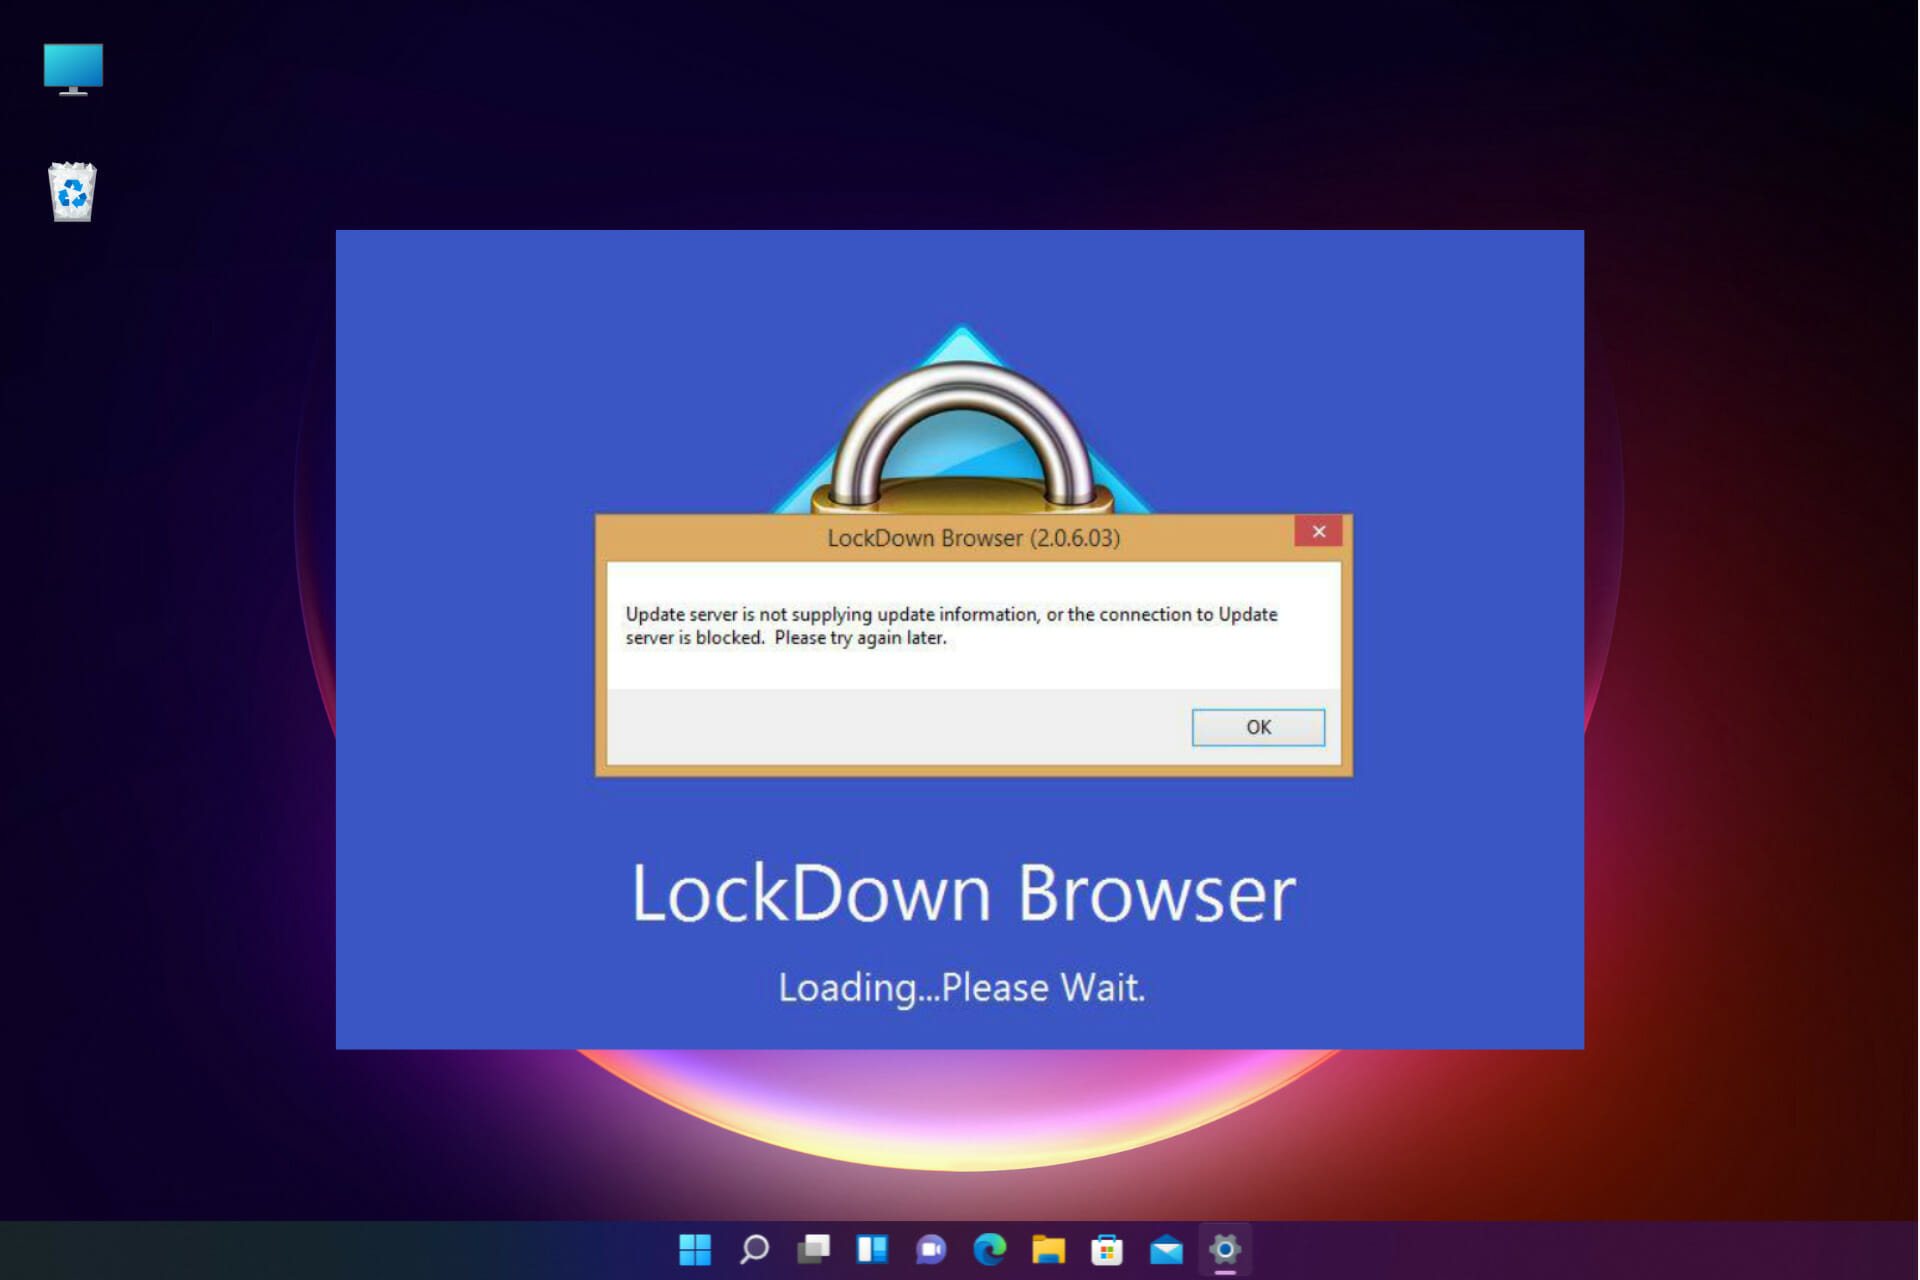
If the server is unavailable when it attempts to check for updates, it will display the error message – LockDown Browser update server is not supplying update information – due to security threats.

It is crucial to keep LockDown up to date to maintain the security of online exams. If you have difficulty updating the browser, you can take a few steps.

Does LockDown Browser harm your computer?

This browser doesn’t mess up your computer. It’s designed to work with your existing antivirus and anti-malware software to help keep your computer safe while you’re using it.

It is a safe and secure way to browse the Internet and access online courses and exams. It’s designed to work with your existing antivirus and anti-malware software to help keep your computer safe while you’re using it.

LockDown Browser is a free download, and it’s available for Windows, Mac, and iOS devices. However, if you’re not careful, it could end up causing some problems. Here are a few things to keep in mind:

  • Don’t install LockDown Browser on a computer already infected with malware. This could give the malware access and allow it to infect your computer
  • Be careful when downloading it from the Internet; make sure you get it from a trusted source, such as the official website
  • Suppose you’re prompted to install any additional software during the installation process, decline; these programs could be malicious and could cause problems on your computer
  • Once LockDown Browser is installed, keep an eye on your computer for any unusual behavior; if you notice anything suspicious, uninstall it and run a malware scan on your computer

How do I fix the LockDown Browser update server not supplying update information?

1. Reinstall the LockDown Browser 

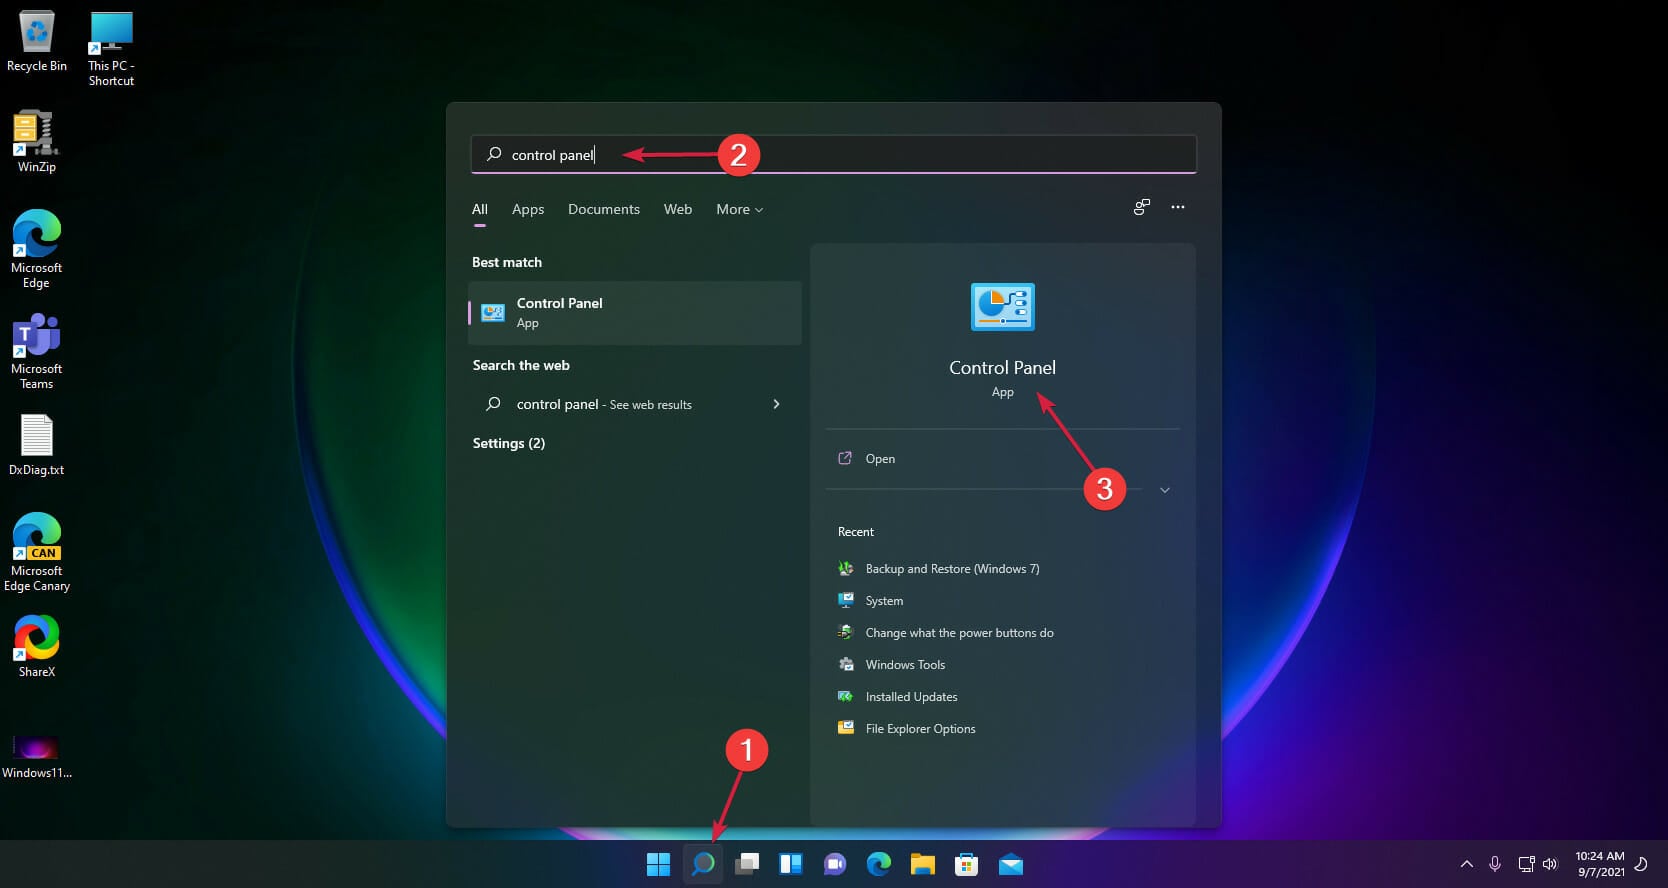
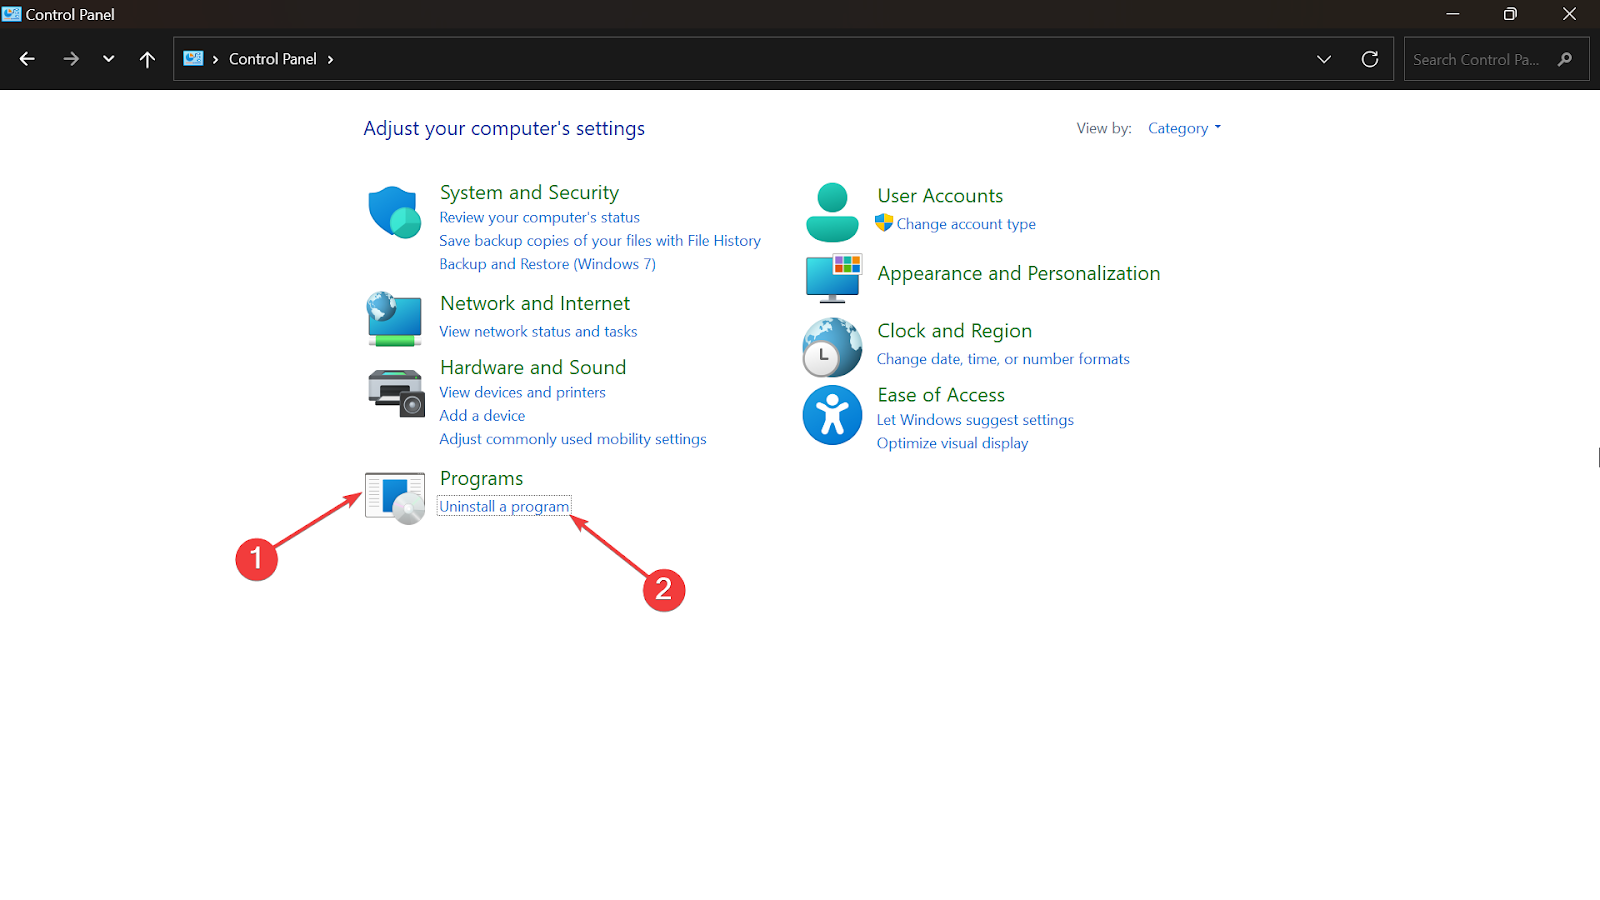
  1. Click on the Search icon, type control panel, and select the app from the results.
  2. Under Programs, click on Uninstall a program.LockDown Browser update
  3. Select LockDown Browser from the list of installed programs and click Remove.
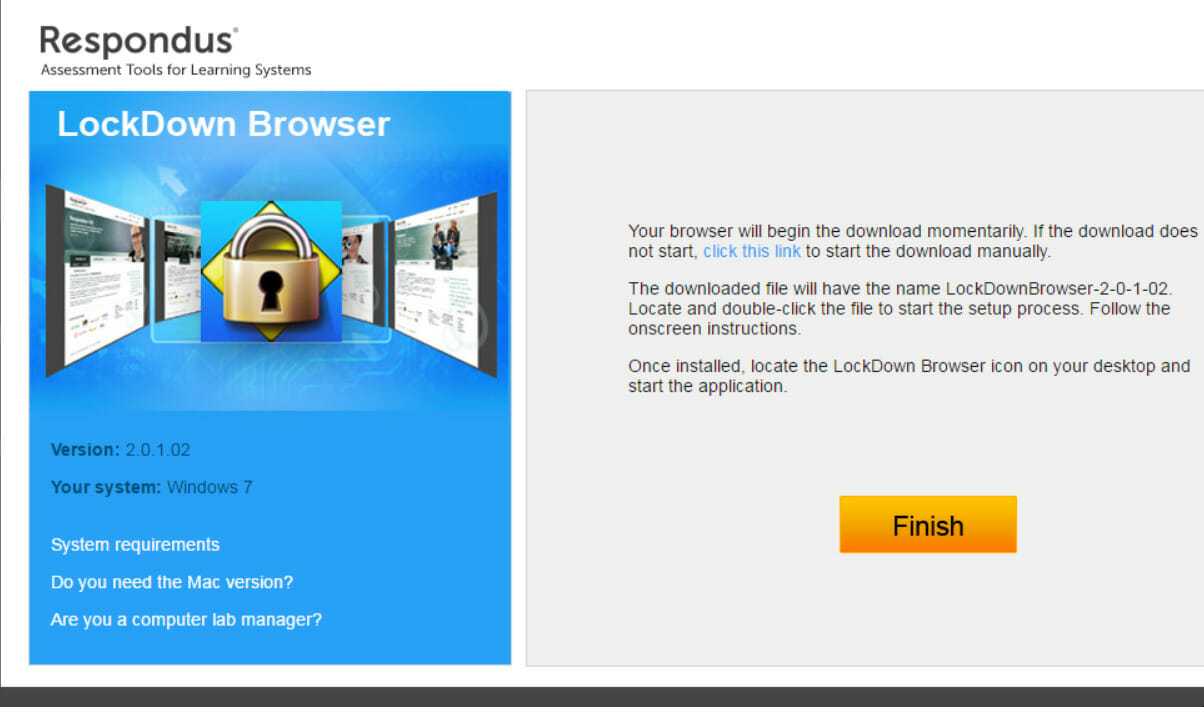
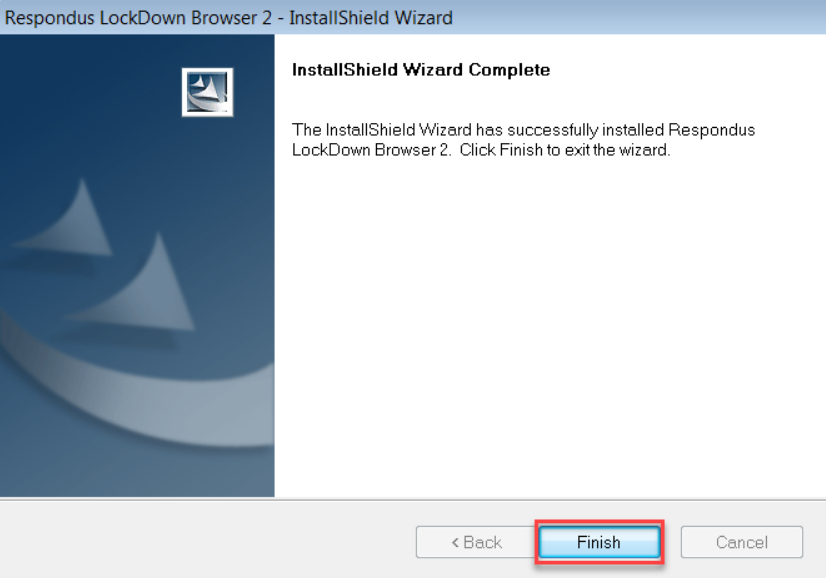
  4. Restart your computer and then reinstall the software from the Respondus website.
  5. Launch the LockDown Browser and click Run as administrator. Follow the on-screen directions to reinstall it.

2. Add the LockDown Browser servers to the trusted list

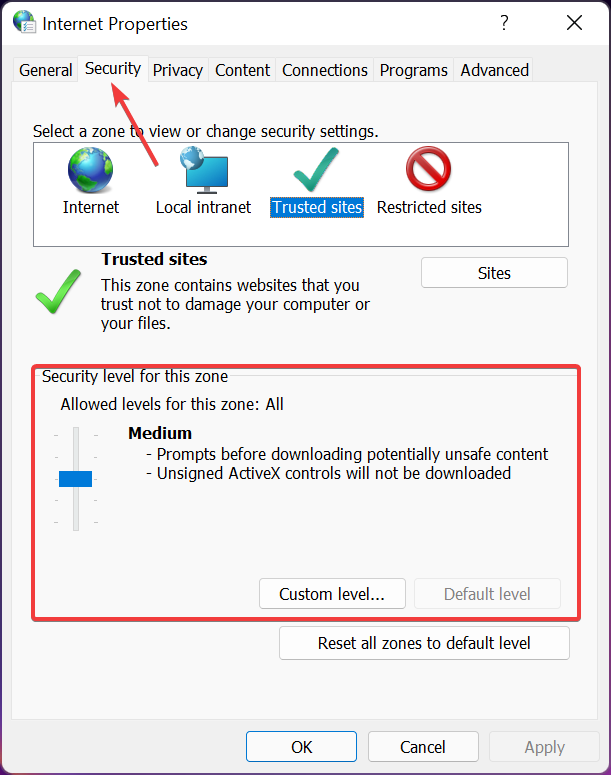
  1. Click the Search icon from the taskbar, type internet options and click the link from the results.
  2. Click on Security and verify that the level is not higher than Medium.
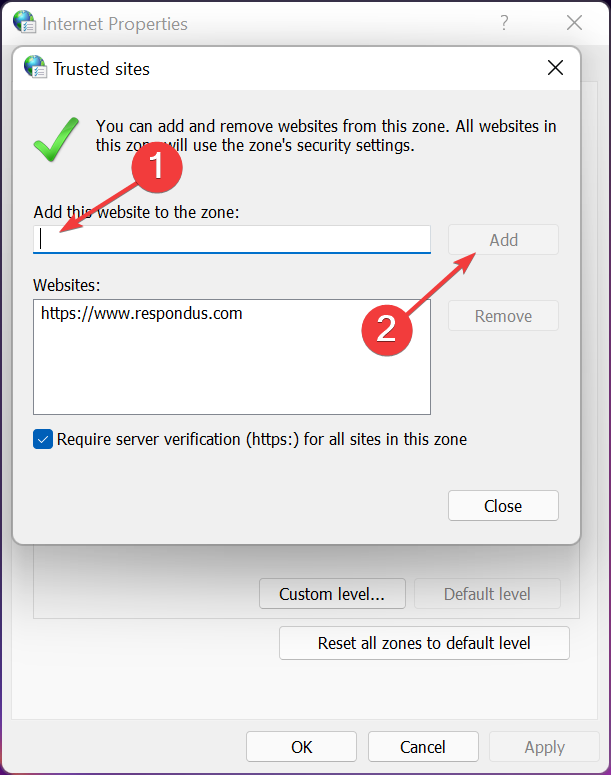
  3. Now, click on Sites to add the server links.
  4. Add the following URLs one by one and click on Add after each to populate the trusted list:
    • server-profiles-respondus-com.s3-external-1.amazonaws.com
      static-public-downloads-cloud.respondus.com
      www.respondus.com
      help-center-respondus-com.s3.amazonaws.com
      smc-service-cloud.respondus2.com

3. Disable your antivirus temporarily

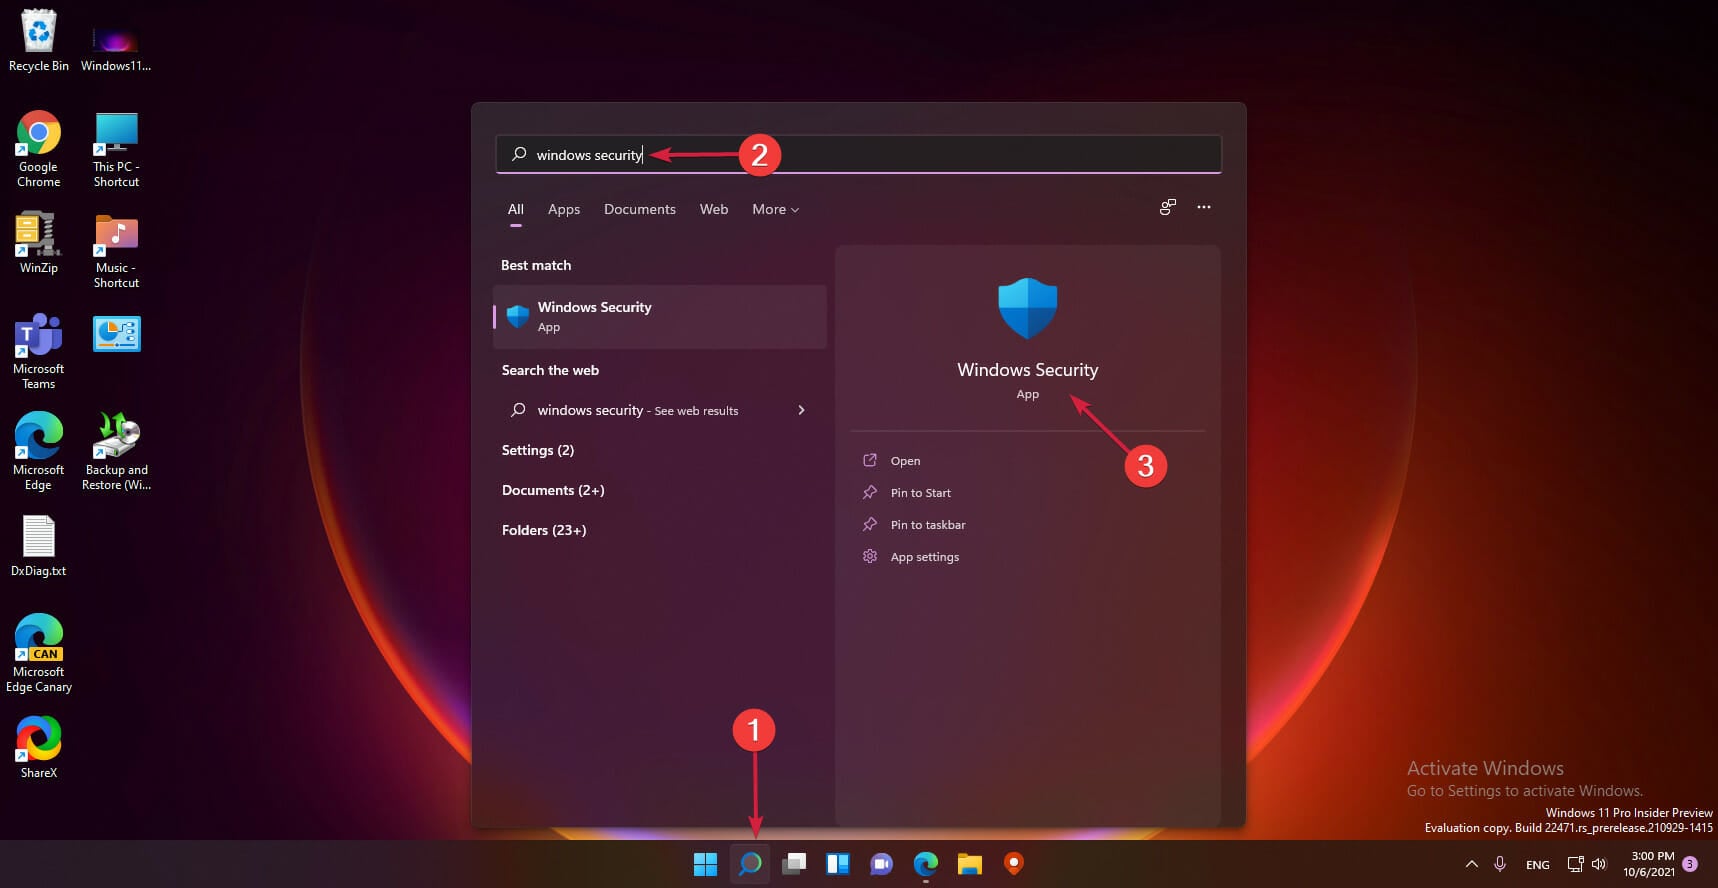
  1. Go to the Search icon and type windows security, then open the app from the results.
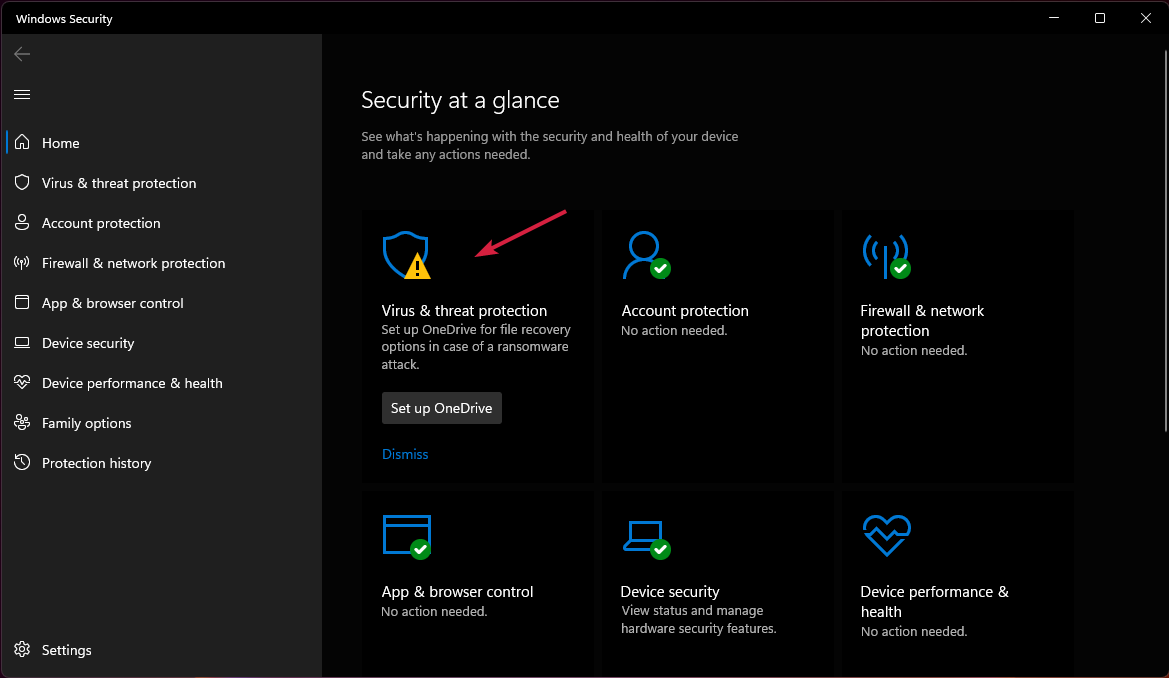
  2. Click on the Virus & threat protection section.
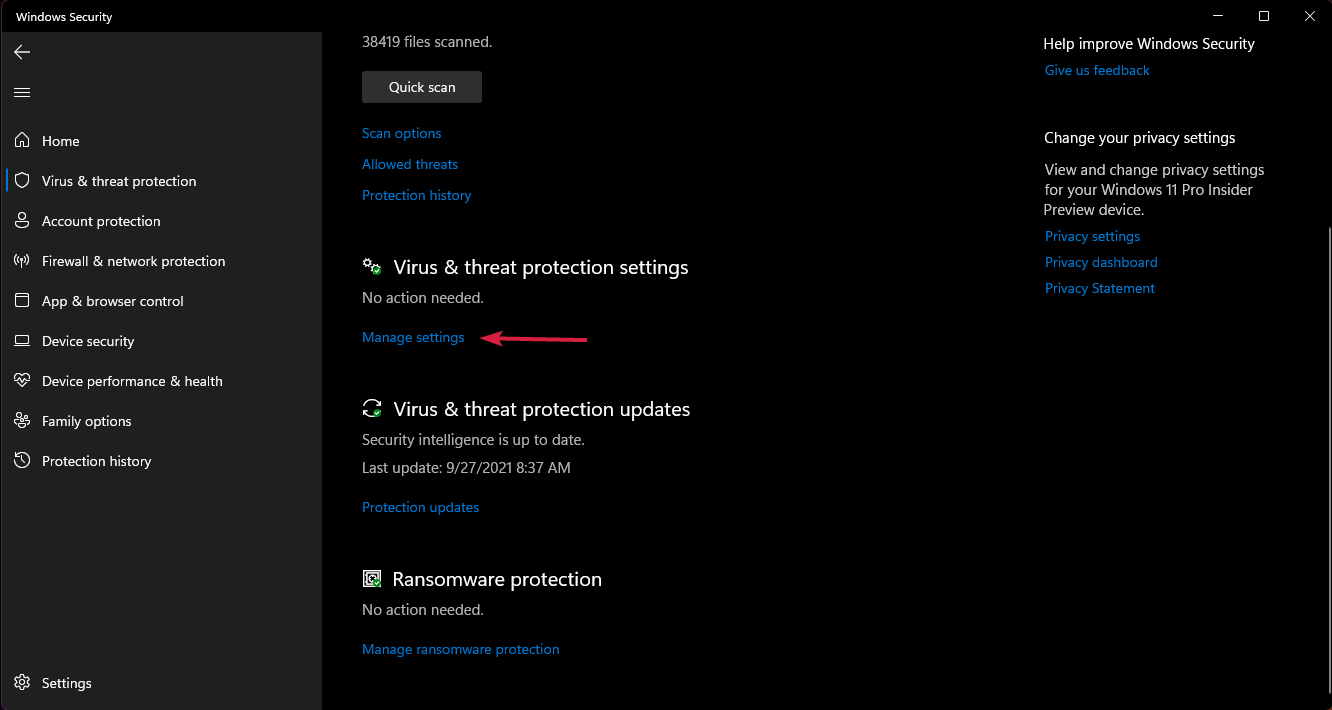
  3. Choose the Manage settings option.
  4. Click on the Real-time protection tab to turn it Off.
  5. Try to access the LockDown Browser again.

LockDown Browser is created to work with antiviruses and firewalls but sometimes, those can be overzealous in blocking some apps.

We described how to disable the protection from Windows Defender but if you have a third-party antivirus installed, go through its security menus and disable it.

4. Reset your Internet connections

You need to check your Internet connection and make sure that you can access the LockDown Browser Update server.

If you are using a proxy server, check to ensure that it is configured correctly and that you can access the Update server.

For more information, we have an excellent guide on how to reset the network settings on Windows 10. Don’t worry because the steps are pretty similar in Windows 11 as well.

Try restarting your computer, and then try updating the browser again. If you still cannot update it, don’t hesitate to contact the technical support team.

Why can’t I use the LockDown Browser?

A particular-purpose web browser locks down the testing environment within a learning management system.

It prevents cheating by disallowing other applications, printing, copying, going to different URLs, or accessing other browser tabs during an assessment.

This helps ensure that students can only focus on the test material and not get distracted by other things.

If you are trying to use LockDown and it is not working, there are a few possible reasons why:

  • LockDown Browser may not be compatible with your computer’s operating system. Check the system requirements to ensure that your computer meets the minimum requirements for using it.
  • It may be incompatible with your web browser. If you are using a browser other than Edge, you will need to install the Firefox Add-on to use LockDown.
  • You may not have permission to install software on your computer. If you are using a school or work computer, you may need to get permission from an administrator before you can install LockDown Browser.
  • Your antivirus software may be blocking LockDown Browser from being installed. Try temporarily disabling your antivirus software and then installing it again.

Finally, this could be because the site is down or undergoing maintenance or because your institution has not yet upgraded to the latest version of the browser. 

Either way, you will need to contact your institution’s IT department for further assistance. 

For a student, this could mean that you will not be able to take your online exam. In this case, you should contact your instructor as soon as possible.

If you are a teacher, this could mean that your students will not be able to take their online exams. In this case, you should contact your institution’s IT department for further assistance.

Which option worked for you? Please let us know in the comments area if this helped you.

The first Microsoft Build 2022 Sessions have appeared in the online catalogue

Microsoft leaker WalkingCat has highlighted some of the first (and most interesting) sessions for Microsoft’s upcoming Build developer conference. The two sessions cover the Metaverse, as well as Windows app development with some “exciting news” (via Thurrott.com.)

Titled “Microsoft Build Into Focus: Metaverse,” the first session of interest pointed out by WalkingCat is set for Tuesday, May 24 from 3:30 PM to 4:14 PM EDT. It is set to feature Microsoft Teams GM Nicole Herskowitz, as well as Sam George, who is the CVP of Azure IoT. Matt Fleckenstein is also set to appear, too. There is no actual description of the session just yet, however, but it won’t be surprising if some Teams product news is part of this.

The second session is a bit more interesting if you’re a Windows fan. Titled “Develop Windows apps on and for a rich ecosystem of platforms and devices,” this one is set for Wednesday, May 25, from 4:00 PM to 4:45 PM EDT. In the description, Microsoft mentions that “in this session, we’ll explore Windows’ power and flexibility, tools, and unveil some exciting news … you don’t want to miss this session!” It’s likely that this is related to Linux or Android app development, or possibly the work of the new Android Microsoft Platform and Experience Team.

If you’re curious as to what other sessions are available for Build 2022 right now, you can visit the Sessions Schedule page to check things out. There’s a total of 82 sessions, though many do seem to just be blank for now while Microsoft fills out the action content. There are a couple of other interesting listings for Teams apps, notifications in Windows, as well as the Microsoft Store, so be sure to check it out, as it is free to attend and register.

Origin friend request not working? 8 tested solutions

Origin is Electronic Arts’ online gaming platform where users can download and play games.

The gaming platform also allows its users to find friends, interact and play games together.

However, many users reported encountering an issue when trying to add friends on Origin.

Upon sending a friend request to the desired user, no error message is shown. The friend request seems to go through normally.

The problem is that the receiver does not get the friend request.

This issue seems to be caused by problems related to app permissions, internet connection issues, certain app errors and others.

In order to fix this problem, we managed to come up with a series of fixes that we’ll list below.

What to do if you can’t add friends on Origin

  1. Run Origin as administrator
  2. Turn Windows Firewall Defender off
  3. Disable your antivirus
  4. Check your internet connection
  5. Re log on to your account
  6. Clear the cache
  7. Log in as invisible
  8. Reinstall Origin

1. Run as administrator

Make sure to always run Origin as administrator.

Allowing the app to run as administrator enables it to make system changes, therefore being granted privileged access.

In order to run Origin as administrator, simply right click the app and select Run as administrator.

2. Turn Windows Firewall Defender off

Windows Firewall Defender could be blocking permission for Origin to send/receive friend requests.

To turn off the firewall follow these steps:

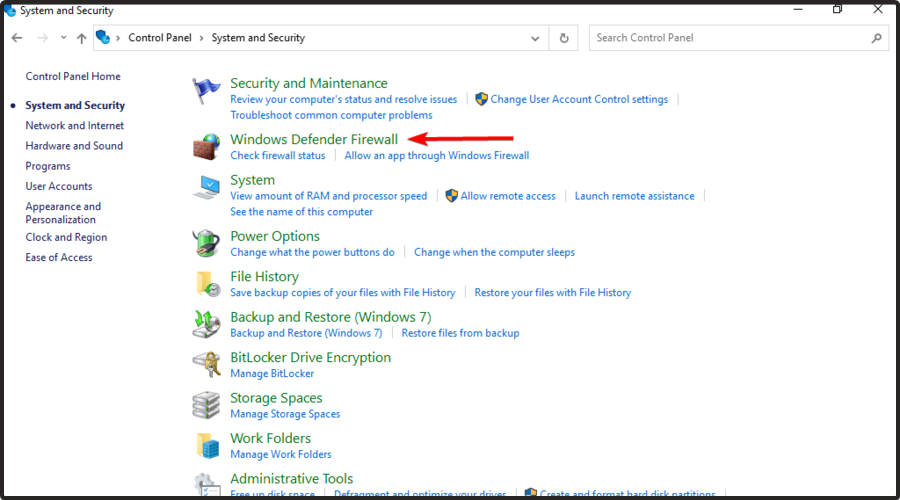
  • Open the Control Panel
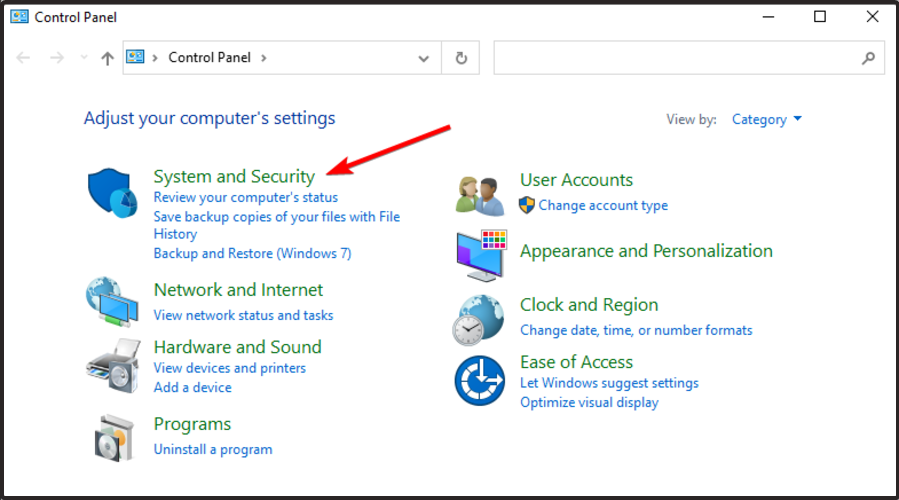
  • Click System and Security
  • Select Windows Defender Firewall
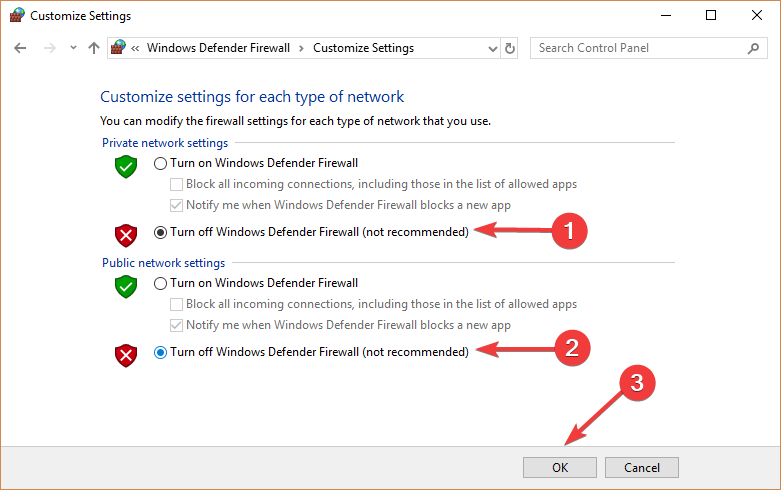
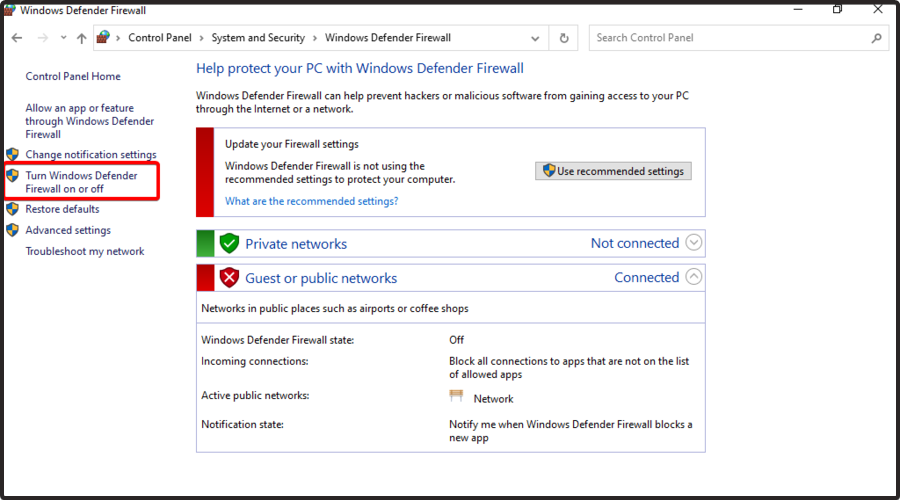
  • Choose Turn Windows Firewall on or off
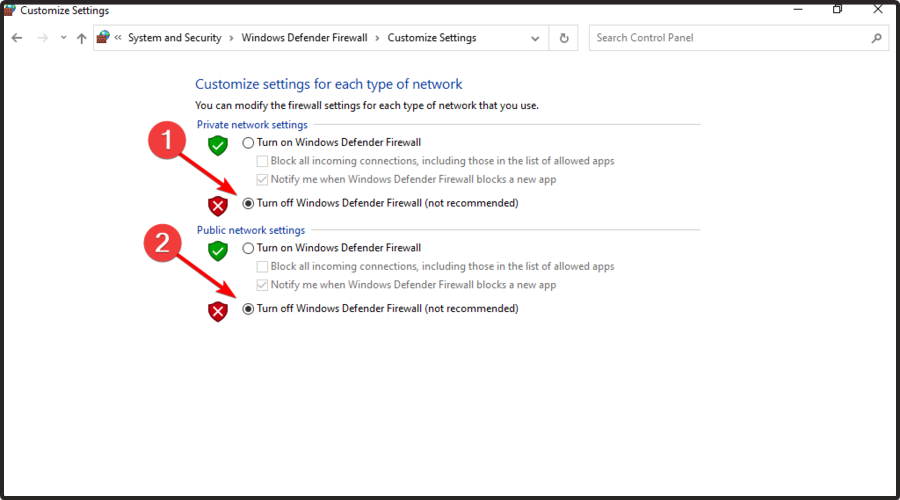
  • Select Turn Windows Defender Firewall off (not recommended)
  • Click OK to make sure the changes were saved.

3. Disable your antivirus

In some cases, your antivirus could be blocking Origin’s access.

  • Open your antivirus software and locate the option that enables you to disable its features.
  • Check to see if disabling your antivirus had any effect on Origin.
  • If it didn’t work, make sure to turn your antivirus back on.

4. Check your internet connection

Making sure that you have a fast and reliable internet connection is important, as a slow connection could stop Origin from performing certain actions.

  • Open your internet browser to see if web pages load fast and without stuttering.
  • If you notice your internet running slower than usual, perform a hard reset on your router/modem.
  • Contact your internet provider if this doesn’t make any difference and let them know about your internet issue.
  • Try using a wired connection ahead of a wireless connection as well. Wireless connections tend to be slower and less stable.

— RELATED: Internet connection is limited in Windows 10/11

5. Relog on to your account

Some users fixed this issue by attempting to log out of their account using every Origin platform, then logging back in.

Follow these steps:

  • Open the Origin app and click the Origin button in the top left corner > select Go offline
  • Go to the Origin website and log out of the account there as well
  • Close both the app and the website
  • Log back into the account using the website and try to perform the friend request through it
  • Open the Origin app and log back in to see if it fixed the issue.

6. Clear the cache

Storing too much data into the Origin app could cause certain issues and even stop the app from working properly.

In order to clear the Origin cache, follow these steps:

  • First you need to close the Origin app, go to the Task Manager in order to make sure that the process isn’t running in the background
  • Press the Windows logo key + R on your keyboard > type %ProgramData%/Origin in the Run box and hit Enter
  • In the window that pops up, delete all the folders except for the folder named LocalContent
  • Press the Windows logo key + R on your keyboard > type %AppData% in the Run box and hit Enter
  • Roaming folder will open, there you need to delete the Origin folder
  • Click App Data in the address bar
  • Access the Local folder and delete the Origin folder located there
  • Restart your PC and see if it fixed the issue.

7. Log in as an invisible user

Another solution that fixed the issue for many users is logging in on invisible mode.

  • You first need to log out of your account in the Origin app by clicking the Origin button and then selecting Go offline.
  • When you are in the Log in screen, under the username and password, select Sign in as invisible.
  • Afterwards you can try adding friends both via the app or website and see if it fixed the issue.

8. Reinstall Origin

If none of these solutions worked for you, then you should eventually try reinstalling Origin.

Your Origin app could be damaged, therefore you could experience different issues.

Uninstall Origin through the Control Panel, then perform a new install by downloading the setup from the official EA website.

We hope that at least one of our solutions helped you to fix this Origin error.

If you found this article helpful, leave a comment in the comment section below.

How to Download Cisco AnyConnect For Windows 11 (32-bit & 64-bit)

You can download Cisco AnyConnect for Windows 11 for free, and we’ll show you all you need to know about setting it up on your Windows PC.

Whether you need VPN for secure remote access, bypassing geographical restrictions, or protecting your privacy online, Cisco AnyConnect is a reliable solution

How can I download and install Cisco AnyConnect VPN on Windows 11?

Download the software from a reliable source

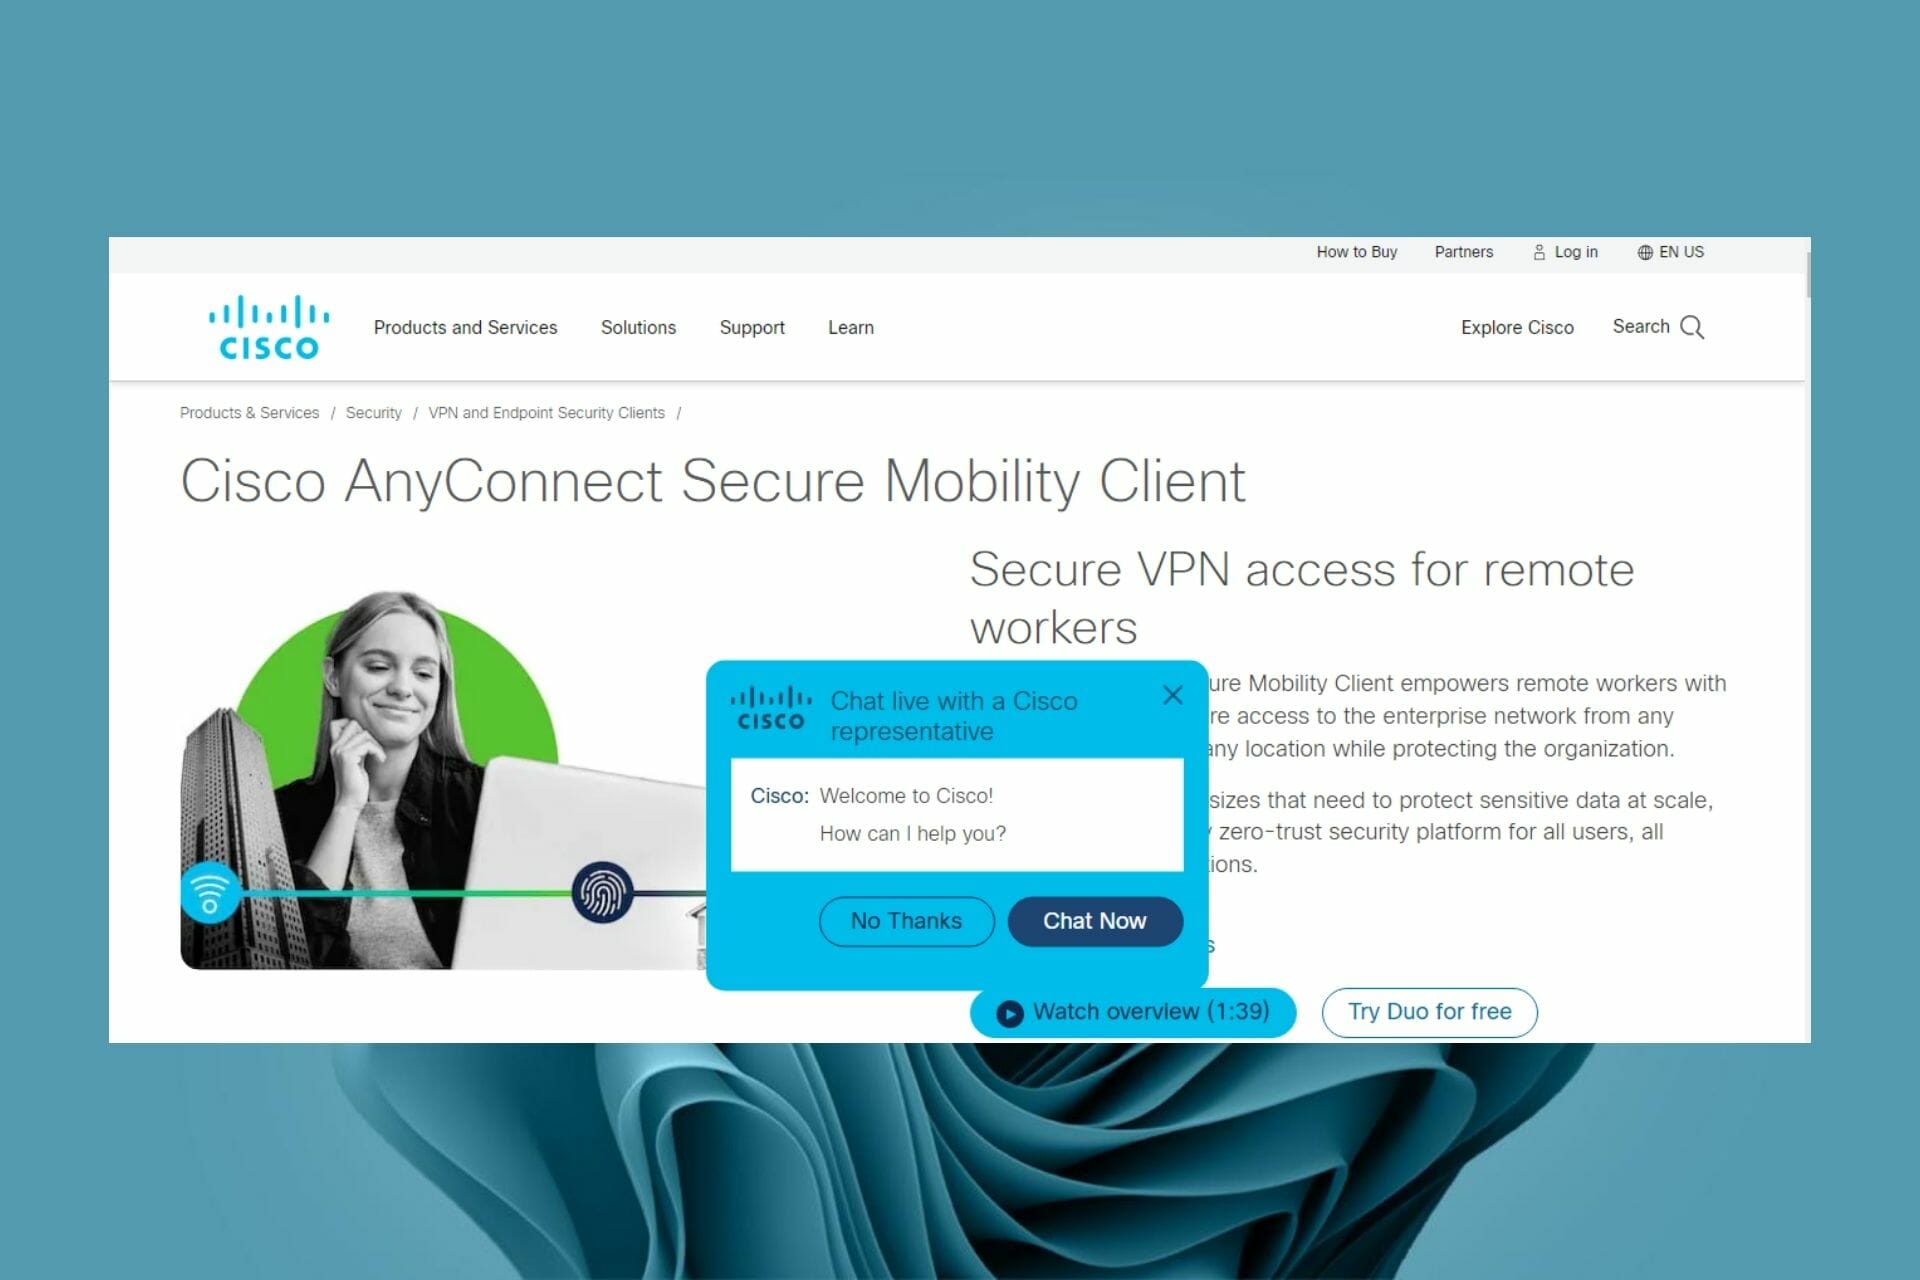
  1. Navigate to your browser and Download Cisco AnyConnect VPN.
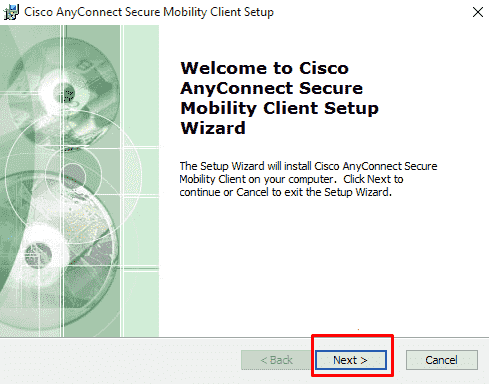
  2. Select Next when the installation wizard opens.
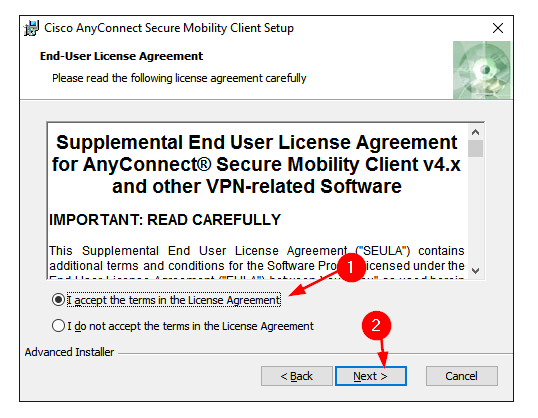
  3. In the next window, select I accept the terms in the License Agreement then select Next.
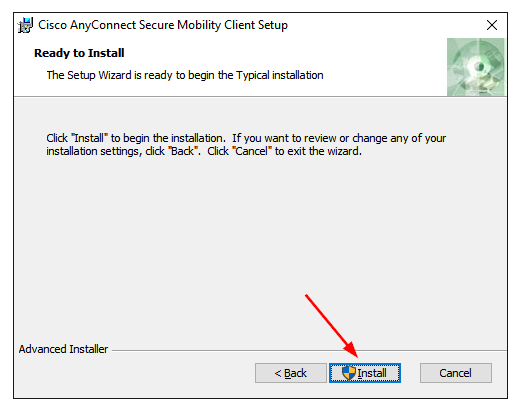
  4. Click Install.
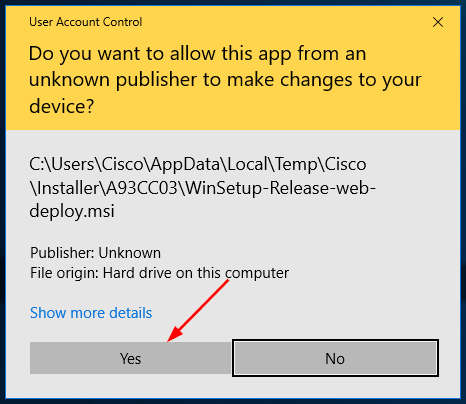
  5. Select Yes when prompted to install Cisco AnyConnect VPN.
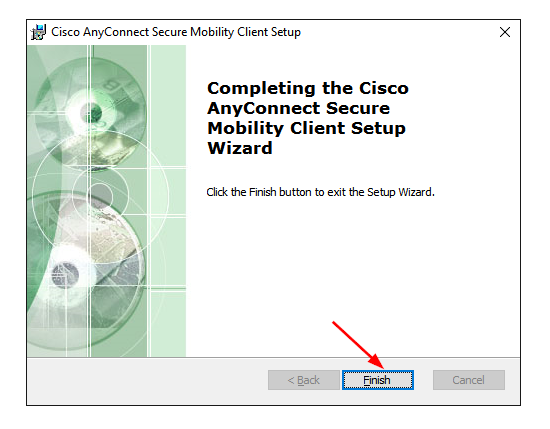
  6. Press the Finish button when the setup is complete.
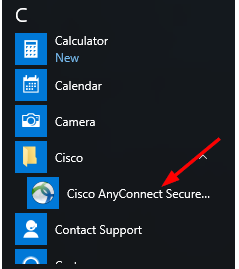
  7. Now press the Windows key and search for Cisco AnyConnect VPN to launch.

You can also use similar steps to download Cisco AnyConnect for the Windows 11 ARM version.

Is Cisco AnyConnect reliable?

Cisco AnyConnect is generally reliable with strong security and scalability features. However, some users experience occasional issues, such as connectivity problems, which may require technical troubleshooting.

For people who have trouble with Cisco AnyConnect or prefer a more user-friendly and flexible cloud-based solution, NordLayer is a recommended option, offering robust security and user-friendly management.

We hope the above guide helped you configure Cisco Anyconnect on your PC.

➡️ If you’re having any trouble, check out our installation failed troubleshooting guide and Cisco AnyConnect authentication failed guide.

If you have been using Cisco AnyConnect VPN on your Windows 11, we’d love to hear your thoughts so far. Leave us a comment down below.

Microsoft is already hiring people to work in the new Android Microsoft Platform and Experience Team

Microsoft is not wasting time boosting its Android efforts. Just two weeks after it was first created, Microsoft is already hiring people to work on the new Android Microsoft Platform and Experience (AMPX) Team (via Windows Latest)

There are two (1, and 2) specific job openings at Microsoft relating to the AMPX team. Both are for Senior Software Engineers, and both mention that “The Android Microsoft Platform and Experiences Team is building the future.” Naturally, the listing also mentions “powerful connections to Windows, M365, and Azure” as well. You’ll also find the necessary requirements to apply for the jobs. Amongst others, Microsoft is looking for someone with experience driving quality with Android OS, application, or service products and features, as well as experience building tools and automation for Android applications and/or OS.

The job listings don’t reveal much about what’s happening at the AMPX teams, but it does indicate that Microsoft really wants to take Android seriously. We already saw this when Microsoft rebranded Your Phone to Phone Link, and delivered the ability to run Android apps on Windows 11. So, things can only get better from here on out.

3 best Razer Book 13 screen protectors to guard your device

Slim, sleek, and packed full of competitive functionalities, the Razer Book 13 is a productivity powerhouse catering to results-driven professionals as well as vetted gamers with a soft spot for performance enhancements.

In fact, it’s one of the best ultraportable gaming laptops for Windows 11 and that says a lot about it. The Razer Book 13 is built to maximize visual accuracy and it flaunts in-built state-of-the-art features such as Gorilla Glass 6 protection as well as Touch Screen support in FHD as well as UHD versions.

But does that mean you don’t need a Razer Book 13 screen protector? Far from it. In fact, Razer itself recommends using a screen guard for laptops, a skin, or a wrap for airtight protection.

Are screen protectors really necessary?

If it’s any good, a Razer Book 13 screen protector should not sabotage this laptop’s superb default features, but compliment them.

In fact, adding a screen guard for your laptop will protect your display from smudges, scratches, and other physical damage such as keyboard markings that can occur while the lid is closed.

Of course, high-quality products that go the extra mile have even more to offer such as anti-blue light and radiation protection for your eyes, unobstructed views even in the poorest lighting conditions, and so on.

Some are more focused on confidentiality and if the lack of it is a deal-breaker for you, you might want to focus your searching efforts on a privacy screen protector for laptops.

Speaking of that, we tried to anticipate your needs in this department and came up with a useful list of criteria to consider when choosing the best Razer Book 13 screen protector.

Tip icon Tip
Here are the main points that guided us in choosing the best screen cover for Razer Book 13 laptops:

➡ High quality, shock, and scuff-resistant materials (tempered glass is a good example, but it is not exhaustive)
➡ Transparency and lightness to make sure your view is not obstructed in any way
➡ Touch screen sensitivity-compliant that allows for a smooth and highly responsive control (smudge or fingerprint protection is preferred)
➡ Flexibility that ensures an easy installation
➡ Anti-glare, and anti-blue light protection for your eyes (enhanced comfort)
➡ Privacy features are a welcomed addition

Which screen guard is best for Razer Book 13 laptops?

Screen Protector For Razer Book 13 2020 13.4 Inch Laptop

  • Anti-glare and anti-blue screen protection
  • Crease-resistant high-grade nano-PET film material
  • The package includes 2 screen protectors
  • Repels glue residues and oil stains
  • Thin, transparent, and flexible
  • Even though it advertises a precise cut for 13.4-inch screens, it is a bit tricky to fit the film in the right position.

Designed by Xusi, this excellent Razer Book 13 screen protector has a lot to offer, starting with its praised anti-glare and anti-blue light filters specifically conceived to relieve ocular fatigue and provide enhanced visual comfort.

Now, we were saying earlier that a sturdy and resistant material such as tempered glass is essential for this type of accessory.

But there are plenty of other materials that provide the same endurance, without being so fragile themselves.

Such is the case with the Xusi screen cover for laptops. Polyethylene Terephthalate-based, this high-quality nano-PET film is resistant to scratches, glue retention, and oil stains, but it’s also more flexible than tempered glass, which makes it less likely to crease.

To further enhance your visual acuity, this best anti-glare screen protector boasts a matte finish that makes it perfect for Screen Touch-enabled Razer models.

As far as we are concerned, the only downside has to do with its installation. While the package includes all the necessary tools as well as comprehensive installation indications, the cut makes it a bit tricky for fitting on a Razer Book.

Do bear in mind that this particular screen guard for laptops is only suitable for 13.4-inch screens and it caters to Touch Screen models exclusively.


Screen protector compatible with Razer Book 13 13.4 inch screen

  • Bubble-free fit, easy to apply + residue-free removal
  • Antireflection coating for a dazzle-free effect
  • Robust shock-absorbing TPU layers
  • Matte finish to repel dirt and stains
  • We did not identify any major drawbacks.

Unlike the previous product, this AtFoliX screen protector is super easy to install. Fully compatible with the 13.4-inch screen Razer Book 13, the film can easily be applied and repositioned without leaving behind any residual traces.

Due to its optimized adhesive layer, you will enjoy a bubble-free mounting that guarantees the perfect hold.

The package contains a dedicated installation tool, a cleaning cloth, 2 films, and the most comprehensive and intuitive indications with both illustrated and video mounting instructions available in multiple languages.

This Razer Book 13 screen protector integrates an advanced antireflection coating that neutralizes the dreaded dazzle effect and improves readability even when your laptop screen is exposed to strong lighting sources.

The matte surface not only removes glare, but acts as a dirt repellent that keeps fingerprints, scratches, and impurities at bay.

As if it weren’t enough, the FX protector film flaunts impressive anti-shock capabilities and 4H-grade surface hardness to eliminate screen breakage risks.

Furthermore, this Razer Book 13 screen protector integrates TPU shock-absorber layers, making it a robust and safe screen guard for your laptop.


13.3-inch screen protector with blue light and anti-glare filter

  • Advanced blue light anti-glare filters
  • Radiation and UV400 protection
  • Ultra-high transparency
  • Anti-static and scracth protection
  • Unless your measurements are accurate, only the display area will be covered, leaving the edges exposed.

At the forefront of screen filter manufacturing, FORITO strives to constantly improve its products and high quality has been a company staple for quite a while.

They make a big deal of their eye protection-focused features and we dare say, they are entitled to a bit of an innocent bragging due to their excellent technology addition.

In their own words, it is not just a blue light screen filter. It’s an enhanced 7 layers anti-blue light filter with 100% UV400 and radiation protection that reduces eye strain and visual fatigue like no other.

You’re probably thinking that such a robust shield would take a toll on the natural colors and we cannot blame you for it.

Instead, we are happy to confirm that this Razer Book 13 screen protector preserves the original brightness, does not yellow the screen, and renders the intended colors superbly.

And we have its ultra-high (95%) transparency to thank for that. This is one nifty feature that not only neutralizes the annoying glare effect but also preserves your battery life. Win-win, right?

To top it all, it also includes anti-static and anti-scratch filters as well as a bubble absorption design to remove any installation flaws.

Speaking about the installation, Forito insists that you correctly measure your screen size and assess if the glass has a raised bezel or a flat front before proceeding with the purchase.

If you’re using a bezel glass, only the display area will be covered, while the edges remain exposed and this is also what we noticed.


Should I put a screen protector on my laptop?

We strongly advise you to do so. And it’s not just for the laptop’s wellbeing, but for yours as well. Blue light is harmful and repeated or constant exposure can irreversibly damage your retina in the long term.

Confort-wise, you are likely to feel much better, much sooner because an anti-blue light screen protector for laptops will relieve eye pressure and boost your overall experience pretty much in the same way as a curved monitor would for a gamer. So why not give it a try?

Back to downloading content: 2 tips to fix Twitch Leecher errors

Twitch Leecher users have reported experiencing difficulties while attempting to download content from the streaming service. Thus, today’s topic is how to fix any Twitch Leecher error that you encounter.

Error 410 is the most common code that affected users, although there are a variety of other error codes as well.

If you are experiencing this problem, there is currently no solution and the only thing you can do is wait for the situation to be solved by the developers.

Furthermore, it has been discovered that the version of Twitch Leecher that you are currently using may no longer be functional due to a change in Twitch’s architecture that has rendered the download feature inoperable.

In this scenario, if the developer has released an updated version of Twitch Leecher, you can resolve the problem by uninstalling the current version and installing the most recent one on GitHub.

Follow along as we will show you how to solve the Twitch Leecher error and what alternative software you can use if you can’t seem to get the tool up and running.

How can I fix the Twitch Leecher error?

1. Download the latest version available

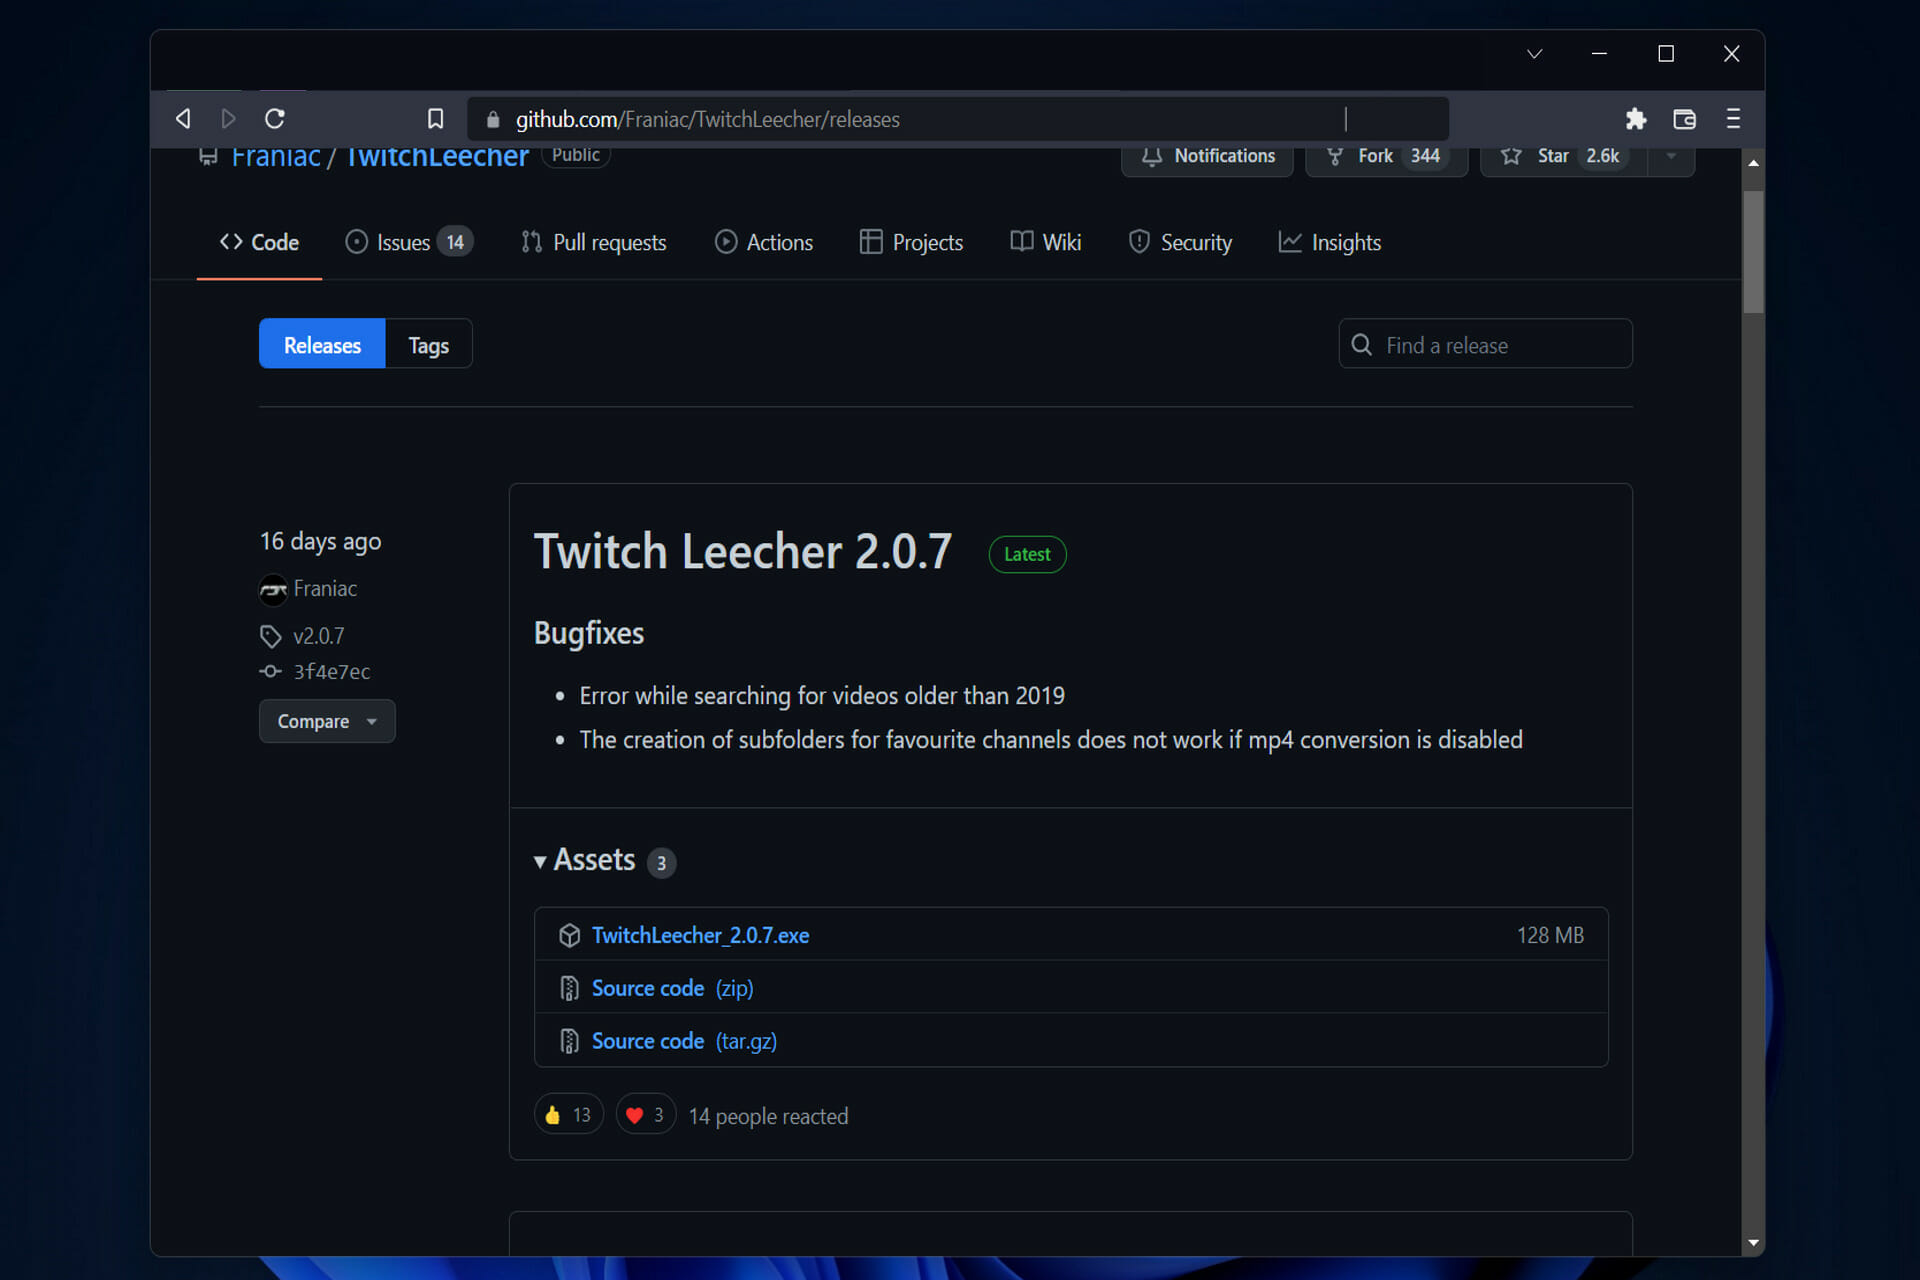
  1. Head to the Twitch Leecher GitHub repository and look for the latest version available. It will usually have a tag next to it saying Latest.latest-twitch twitch leecher error
  2. Download the executable file by clicking on it, then double-click on the downloaded file in order to start the installation process.twitch-exe twitch leecher error
  3. Note that if the error still lingers, you might want to uninstall Twitch Leecher first, and then download the version you intended to install. The Twitch Leecher error should be now resolved.uninstall twitch leecher error

In addition to security fixes, software upgrades may offer new or enhanced capabilities, as well as improved interoperability with various devices or applications.

They can also make your app more stable by removing out-of-date features and improving its overall stability. All of these enhancements are intended to improve the overall user experience.

2. Use an alternative software

Untwitch is one of the alternative websites that claim to be able to download any twitch video, so you can be able to watch them offline.

You simply have to copy-paste the twitch video link inside the website, click on the Submit button, and the download process will start.

untwitch twitch leecher error

Twitch Leecher allows you to download video-on-demand (VOD) files from Twitch in order to view and watch your favorite content while not connected to the internet.

It’s possible that this particular problem is completely out of your hands if none of the solutions described above have worked for you, and you don’t want to resort to another way of obtaining Twitch content in the meanwhile.

Note that this issue has only occurred a number of times in the past and that in the vast majority of cases, the Twitch Leecher error occurred as a result of circumstances beyond their control.

Moreover, if this problem was caused by a failure of Twitch’s entire infrastructure, SteamLink was also rendered inaccessible.

In order to determine whether the error code will fix on its own, we propose waiting several hours up to a day. If this won’t be the case, you should reconsider using other software.

If you are keen on watching videos offline, take a look at our comprehensive review on Pazu Netflix Video Downloader and start downloading Netflix movies as well.

Alternatively, here are the five best browsers for Twitch streaming, in case you are interested in starting your own channel.

Was this guide helpful to you? Let us know by leaving a comment in the section below. Thanks for reading!

Deck of Ashes launches on consoles for the first time alongside new DLC

Tactical card battle game Deck of Ashes is set to release its most action-packed DLC as well as open up its gameplay to console users on April 21, 2022. Deck of Ashes has been available for a bit now on PCs via Steam, but on Thursday, April 21, 2022, console gamers will be able to play the turn-based card game on their couches via an Xbox, PlayStation, or Nintendo Switch for the first time.

For those who have played Darkest Dungeon, the art style and turn-based action may feel a bit resemblant, but the card-based abilities, attributes, and powers open up a wider range of first-combat opportunities that are more akin to Slay the Spire. Here’s a little more about the game, if you’re not familiar.

Lead a group of rugged antiheros through a hellish fantasy world decimated by the Ash Curse, a plague that unleashed monsters and other mutations upon the land. Deck management is key, and every choice a player makes can strengthen their odds in battle or make things significantly more tricky. Find resources and upgrade items to further bolster HP and attack power. Deck of Ashes’ roguelike element means it’s especially vital to keep an eye on health–if the player dies, only the help of dark magic can prevent permadeath.

In addition to the game’s first launch on consoles, gamers across the board will also be able to try out the latest DLC titled Tome of Dimensions. Tome of Dimensions introduces the game to a new character named Sibly who also brings with her two new battle assists in the form of Fear and Hysteria. Sibly mission is to resurrect her race and is aided by her Deadly Shot ability which can deal critical hits using various arrowheads at her disposal as well her ability to bring fallen enemies back to life (sort of) in the form of skeletons to strengthen her powers.

For anyone who hasn’t already been playing Deck of Ashes, the game is currently on PC via Steam for $19.99 for the base game and $39.97 for the Deluxe Edition that includes a Digital Artbook and unique character skins. For $24.99 console gamers can snag the base game plus the latest DLC while Tome of Dimensions retails for $4.99 as a stand-alone addition. All gamers are eligible for a 10 percent launch discount but the developer YA Games hasn’t detailed how long.


Storing Cryptocurrencies: 4 Tips if Trezor One is Not Recognized

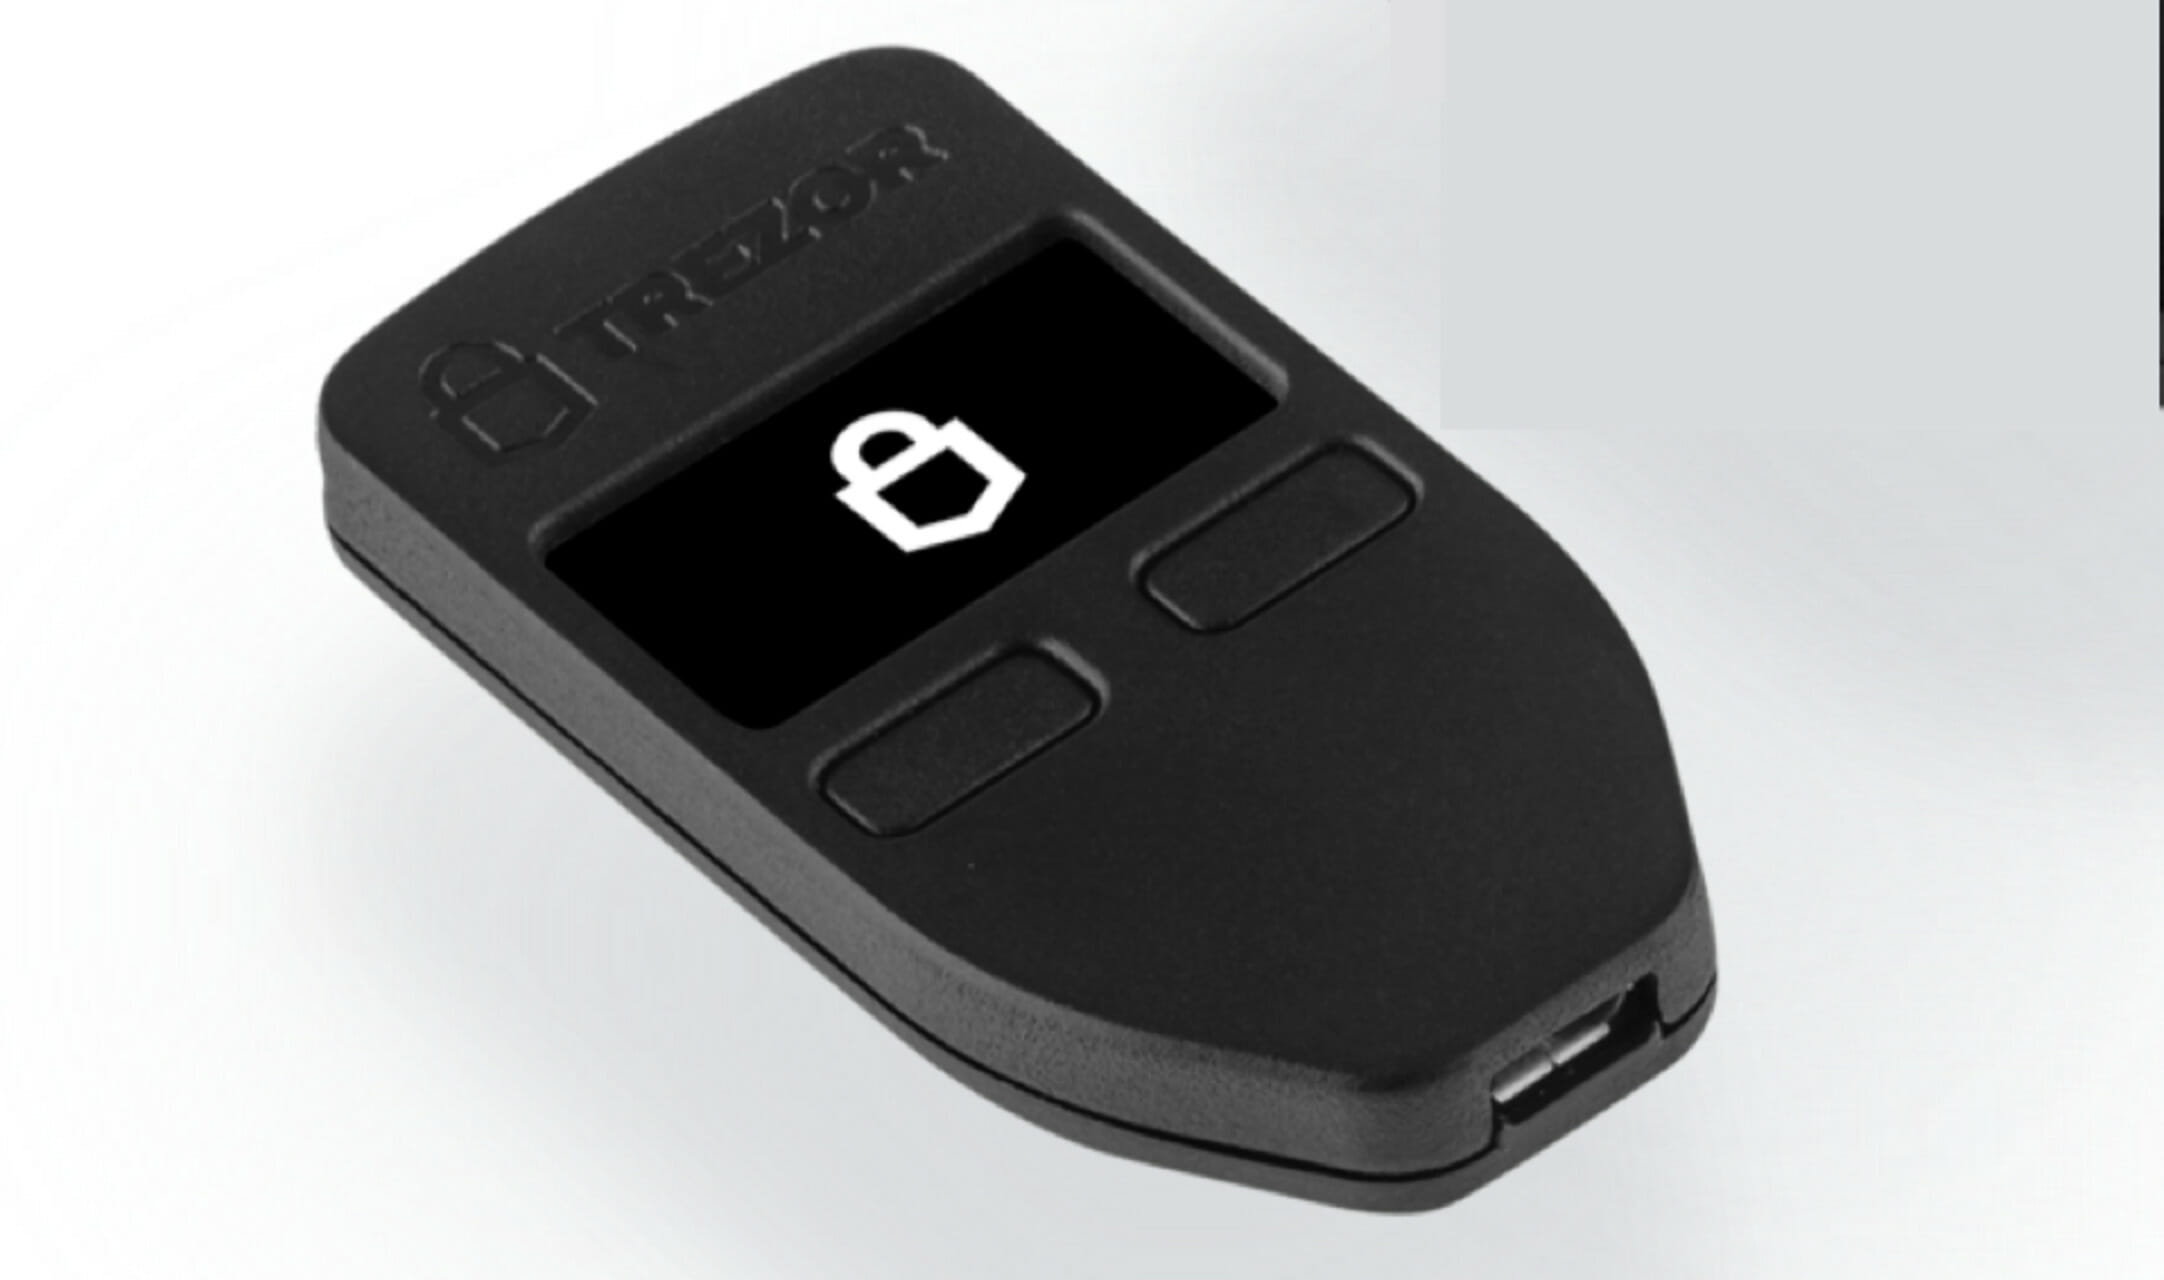
Trezor One is one of the best available hardware wallets to store cryptocurrencies. It’s secure, quick, and supports hundreds of tokens. However, several users reported that Trezor one could not be recognized after connecting to the computer.

This generally happens if there is a problem with the connection or the device has not been properly set up. Also, for some users, it’s a corrupt driver that causes the problem.

If this is your first time using the device, try setting it up properly. You can find the steps in the manual that came along with it. But, if you have been using Trezor one for a while and it is not being recognized suddenly, try the methods here.

What can I do if Trezor one is not recognized on my computer?

1. Check the connections

The first thing you should look for it is if the connections are in order. More often than not, it’s an improper connection. Make sure that the cable is plugged in properly at both ends. If you have another cable, try using that.

Also, do not use a USB hub or another similar device, instead directly connect Trezor one to the computer. If it still doesn’t work, try connecting it to another port on the same computer.

In case Trezor one is still not recognized, connect it to another computer to verify if the problem lies with the device itself or the PC it was previously connected to. If it works on the new computer, try the methods listed here on the PC that did not recognize Trezor one.

2. Install the latest Trezor Bridge version

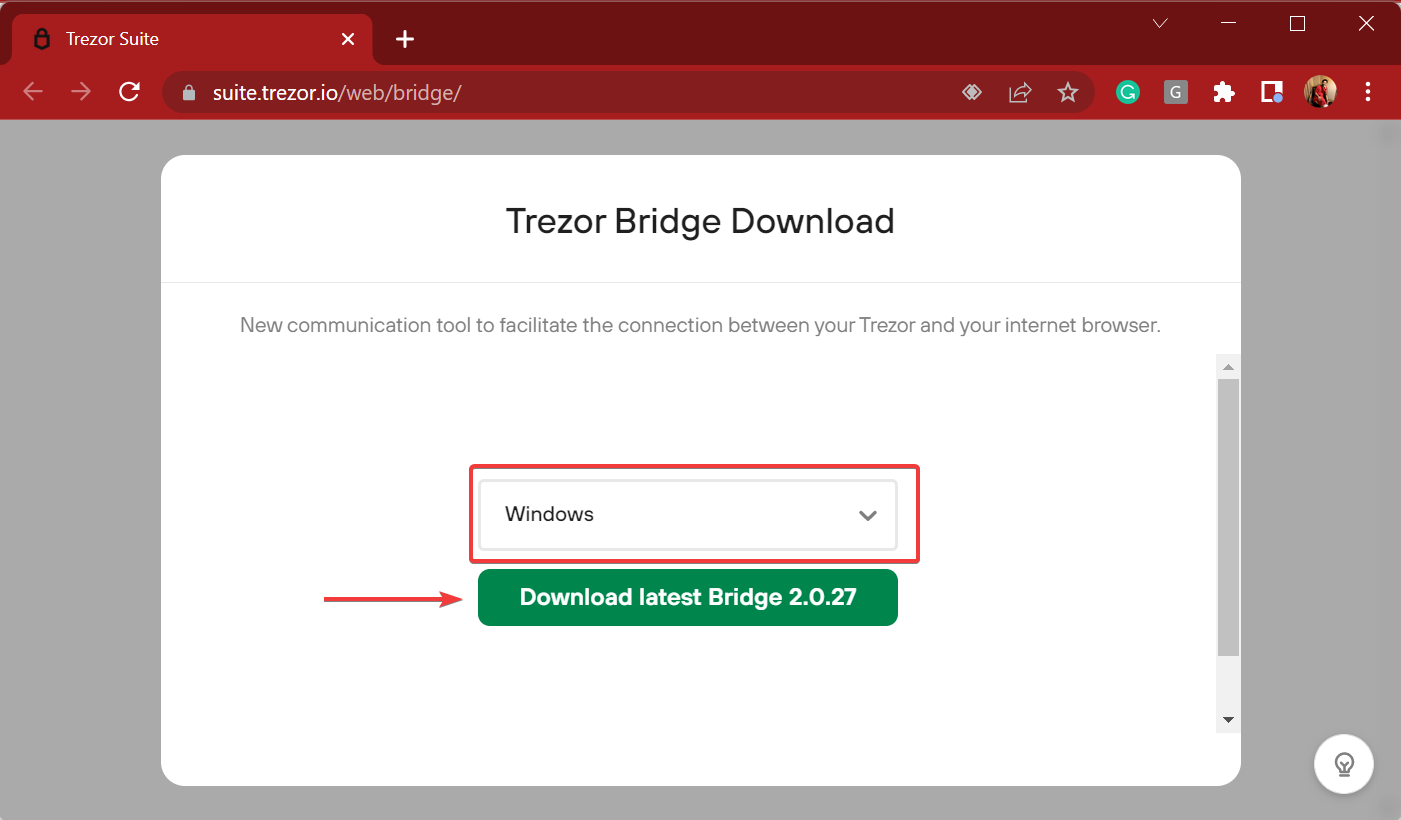
  1. Go to the Trezor Bridge Download page, select the operating system from the dropdown menu, and click on the Download latest bridge button.Download bridge to fix trezor one not recognized
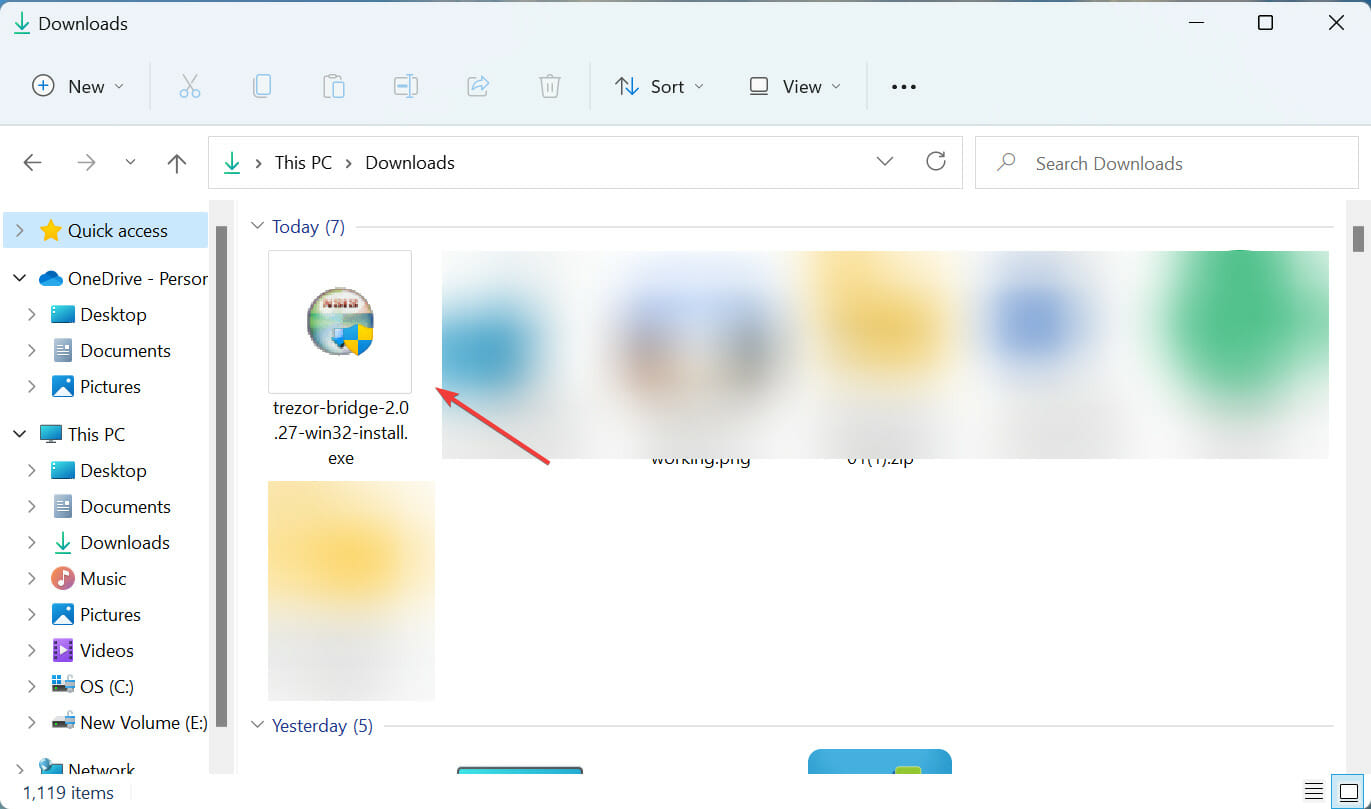
  2. Once downloaded, go to the location where it’s stored, and double-click on the file to launch the installer.Installer
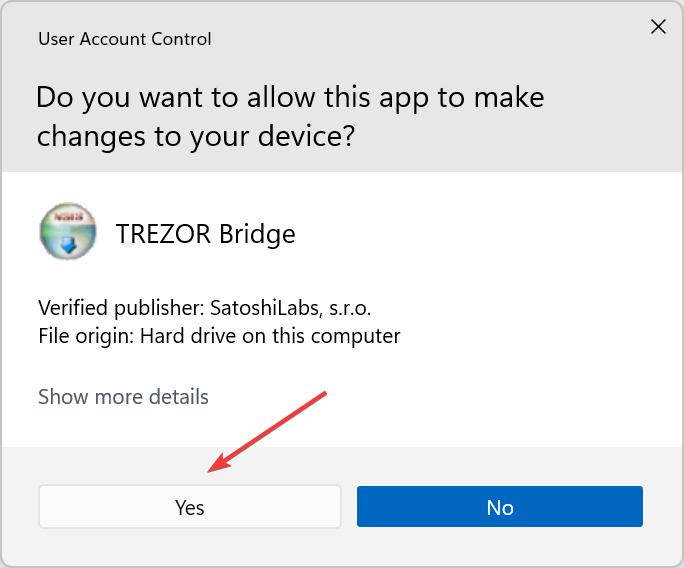
  3. Click Yes on the UAC (User Account Control) prompt that pops up.Click Yes
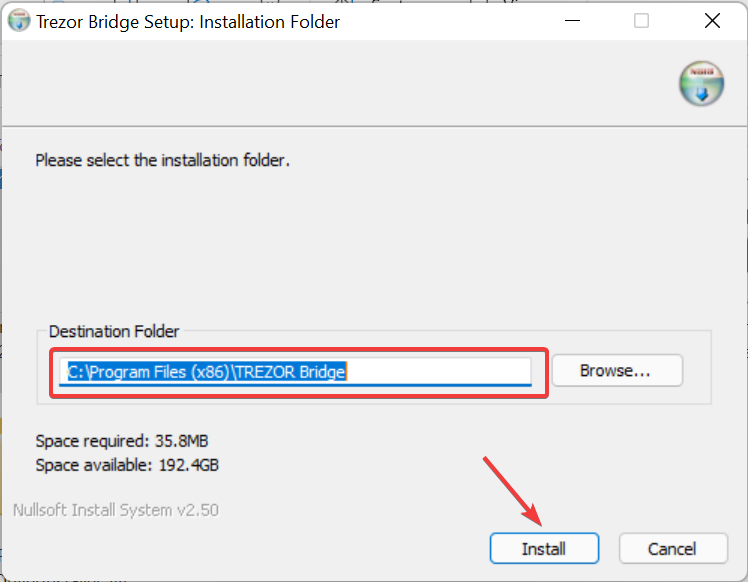
  4. Choose the destination folder for the program, and then click on Install at the bottom to start the installation process.Install to fix trezor one not recognized
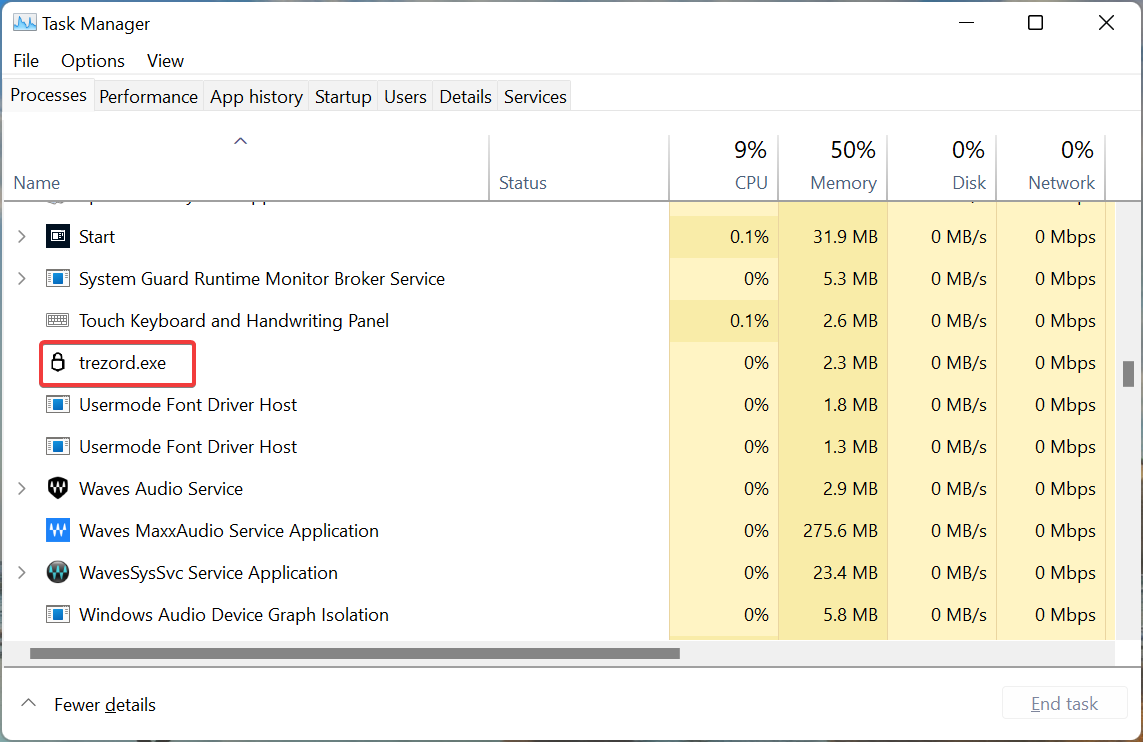
  5. After the installation is complete, verify if the Trezord process appears in the Task Manager.Task Manager

Once you have made these changes, Trezor one should now be recognized. In case it’s not, head to the next method.

3. Reinstall the drivers

  1. Press Windows + S to launch the Search menu, enter Device Manager in the text field at the top, and click on the relevant search result.Device manager to fix trezor one not recognized
  2. Now, double-click on the Other devices entry.Other devices
  3. Right-click on Trezor Interface, and select Uninstall device from the context menu.Uninstall device to fix trezor one not recognized
  4. Click Uninstall in the confirmation prompt that pops up.Uninstall
  5. Once done, restart the computer and Windows will automatically install a fresh driver for Trezor one.

If you find a warning sign at the corner of Trezor one icon in the Device Manager, it signifies that the relevant driver is corrupt. And in this case, the simplest fix is to reinstall the driver. Once done with the process, check if Trezor one not recognized issue is resolved.

To keep your drivers in check and don’t experience this type of issue in the future, we recommend you use an automated utility such as Outbyte Driver Updater. It uses its own driver database to detect outdated or corrupt drivers and automatically replaces them with new, functional ones.

⇒ Get Outbyte Driver Updater

4. Disable Firewall and conflicting apps

In some cases, the built-in Windows Defender Firewall, similar third-party apps or antiviruses, or some cryptocurrency apps may conflict with the functioning Trezor one and will not be recognized as a result. As a result, you may encounter something like error authenticating with Venmo, preventing access.

To fix the issue, it’s best that you disable all these types of apps installed on your computer. But, make sure not to disable the Firewall or antivirus for long since it leaves your computer exposed to threats.

These are all the ways you can fix issues that lead to Trezor one being not recognized on the computer. Also, find out the best cryptocurrency wallets for PC to keep your holdings secure.

Tell us which fix worked and your experience with Trezor one, in the comments section below.

PL2303 Driver on Windows 11 is Not Working [3 Fixes]

The PL2303 cable is one of the most popular ones to connect serial devices to USB ports. But as is the case with any other, it too requires a functional driver to work effectively. However, several users have reported that the PL2303 driver is not working in Windows 11.

An issue with the driver is likely due to four reasons, corrupt state, outdated, incompatible, or there’s a bug in it. And, these problems can be easily eliminated with two quick and simple fixes.

Though if there’s an issue that triggers these, you will have to follow a different approach, as discussed in the last method.

Some users also reported seeing This is not Prolific PL2303. Please contact your supplier, but we have it covered as well in this guide.

So, let’s find out what you can do if the PL2303 driver is not working in Windows 11.

What can I do if the PL2303 driver is not working in Windows 11?

1. Install a compatible driver version

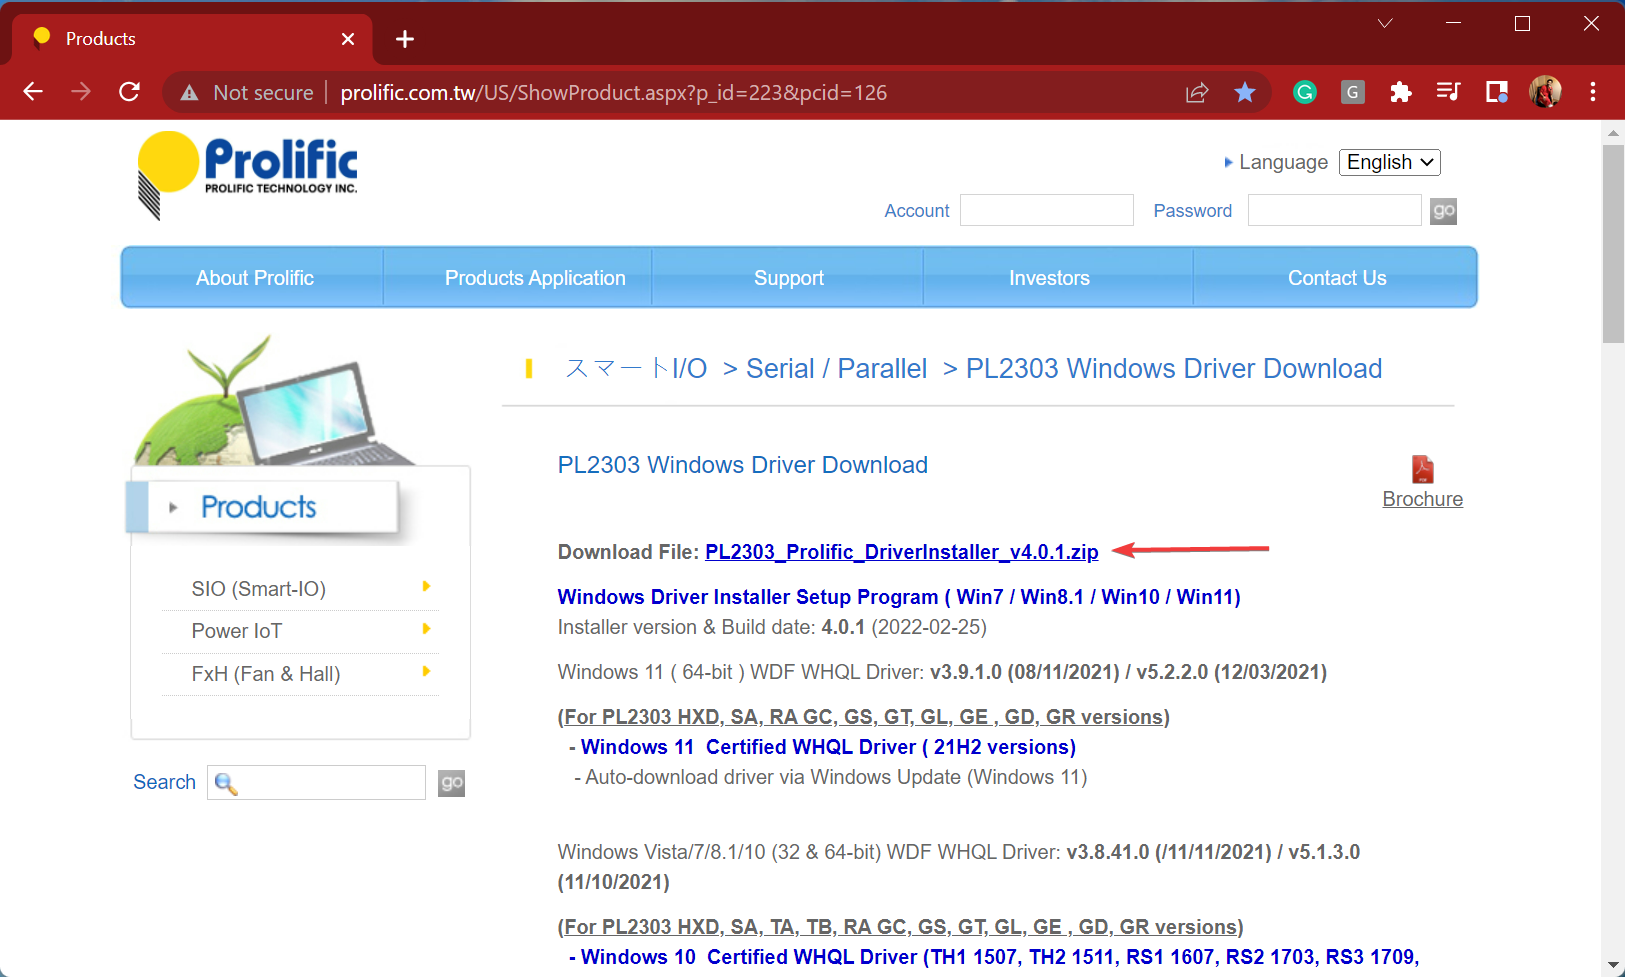
  1. Open any fast and reliable browser, go to the official Prolific website, and click the PL2303_Prolific_DriverInstaller_v4.0.1 link. Download to fix pl2303 driver windows 11 not working
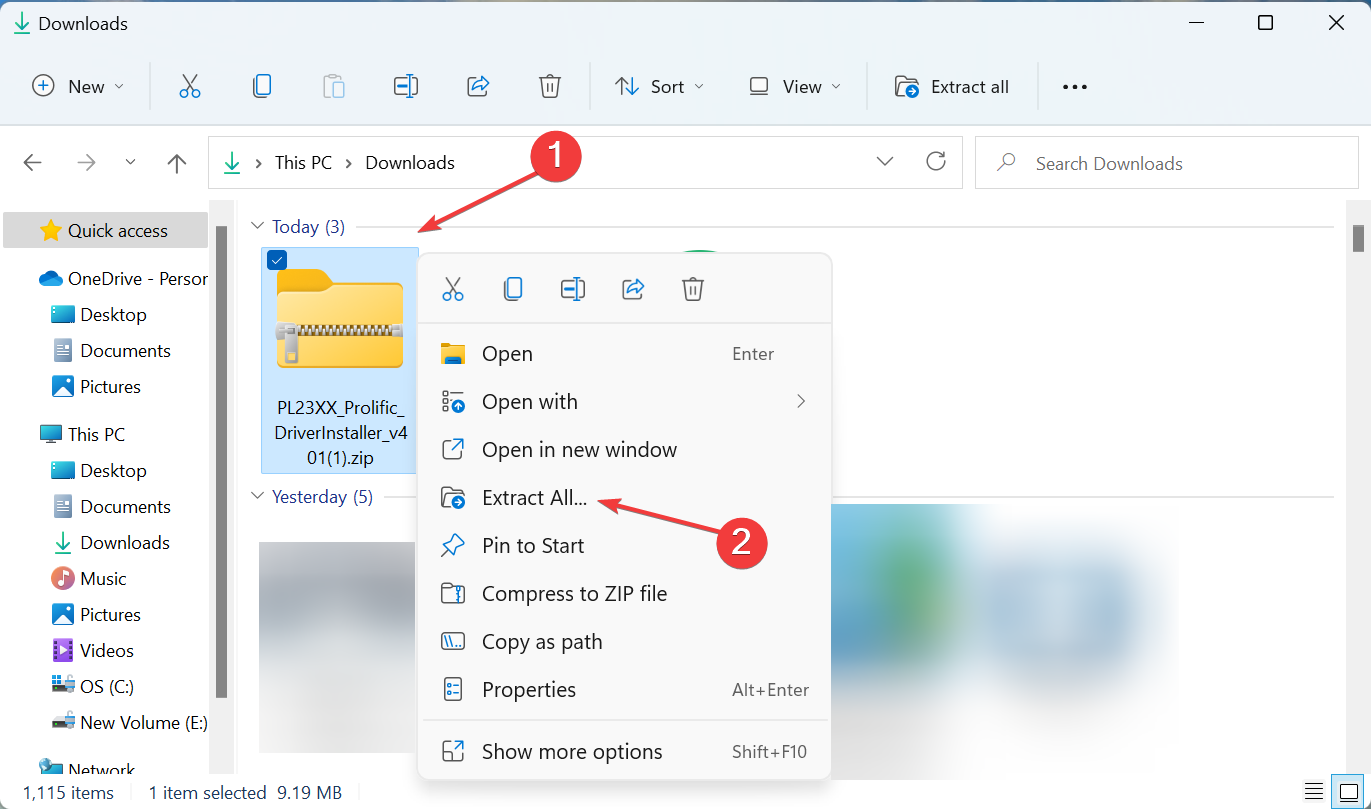
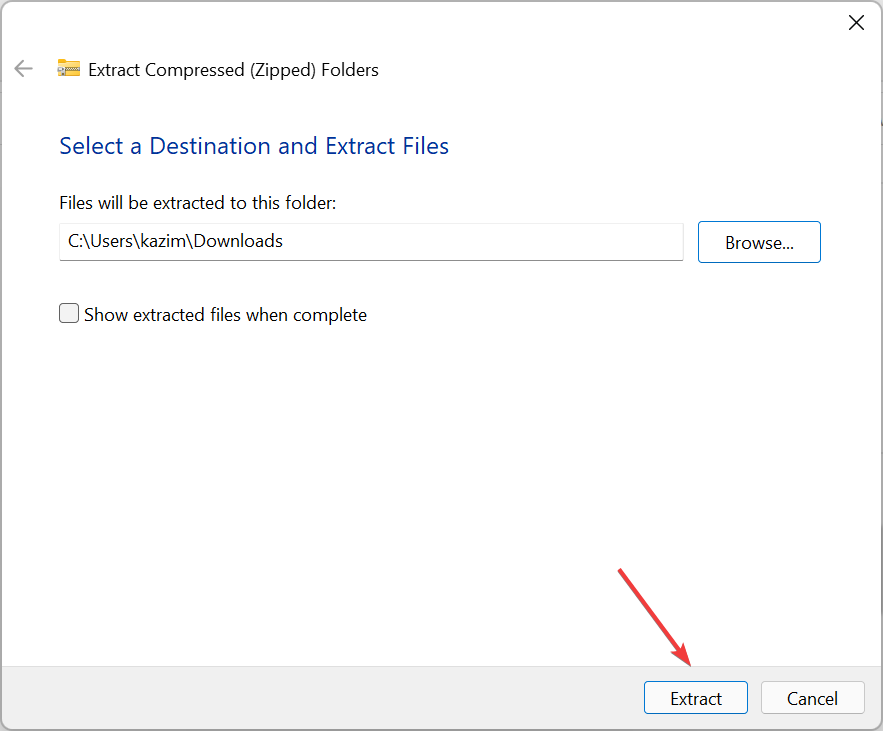
  2. After the ZIP (.zip format) file is downloaded, go to the folder where it’s stored, right-click on it, and select Extract All.Extract files
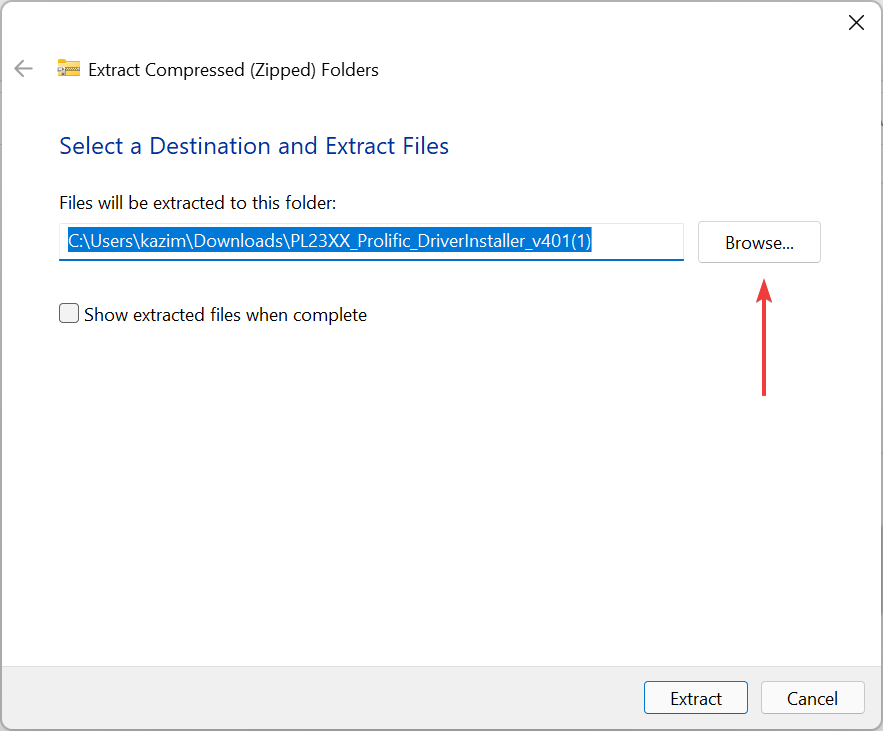
  3. Now, click on Browse. Browse
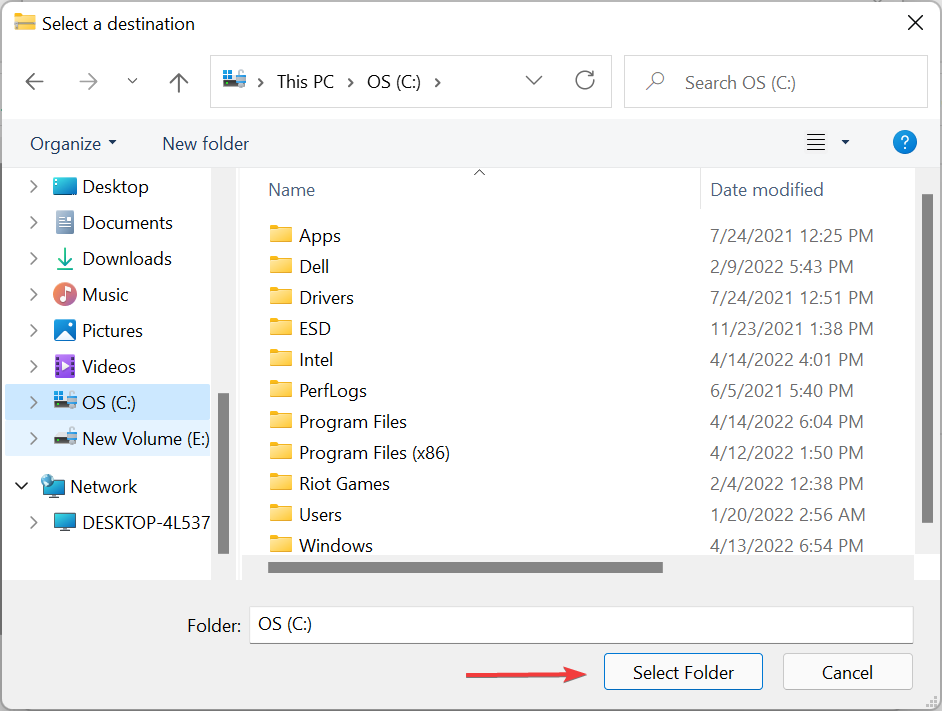
  4. Choose a location for the extracted files and click on Select folder at the bottom.Select folder
  5. Click on Extract at the bottom and wait for the process to complete.Extract to fix pl2303 driver windows 11 not working
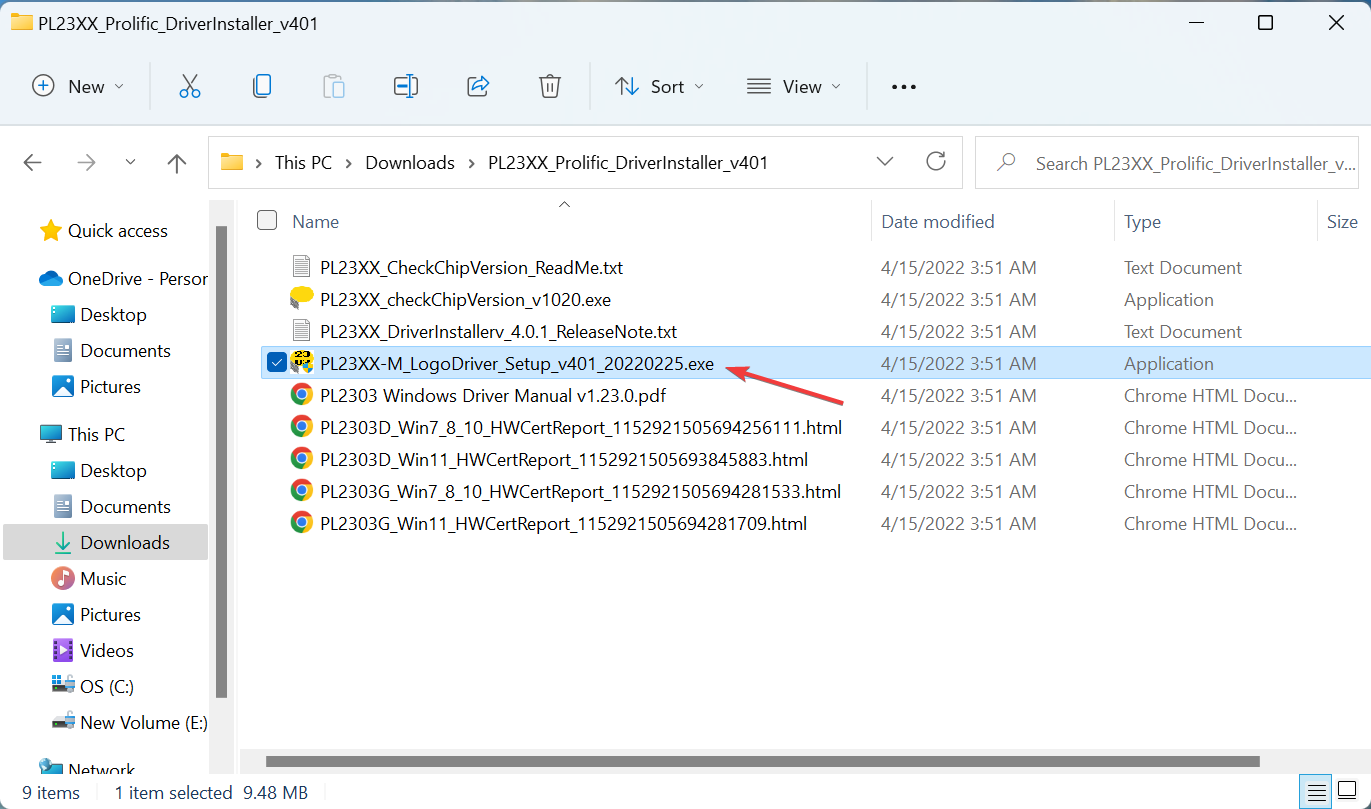
  6. Double-click on the installer to launch it.Launch installer to fix pl2303 driver windows 11 not working
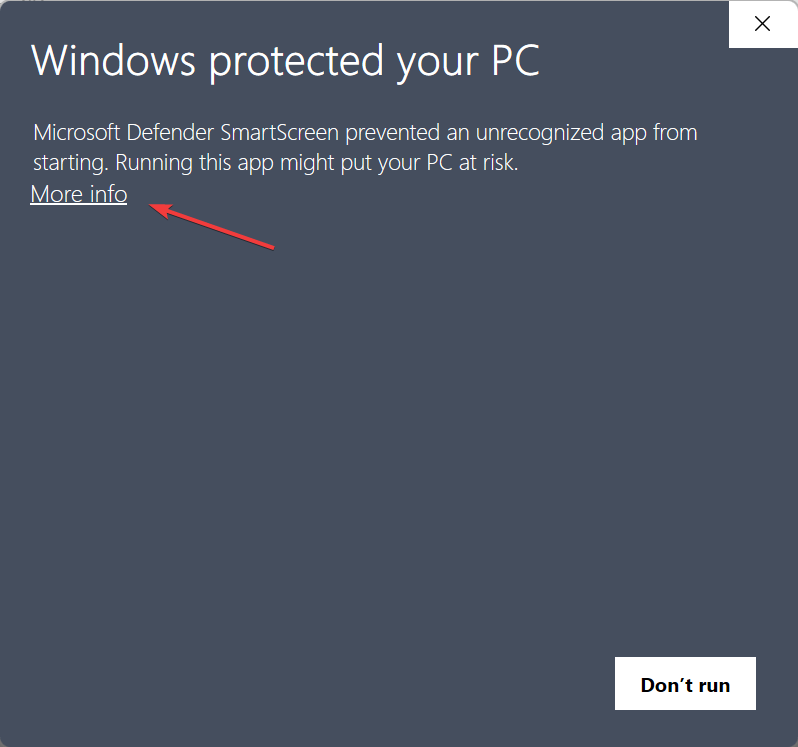
  7. If you see the following screen, click on More info.More info
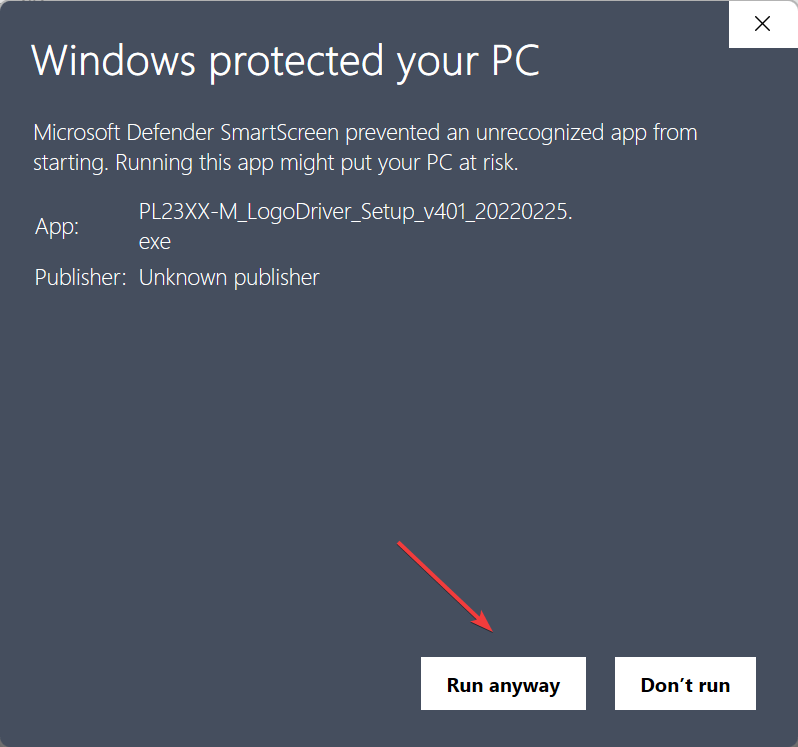
  8. Next, click on Run anyway.Run anyway to fix pl2303 driver windows 11 not working
  9. Once the UAC (User Account Control) prompt pops up, click on Yes.Click Yes
  10. Now, follow the on-screen instructions to complete the installation process.Install to fix pl2303 driver windows 11 not working

If you realised, we haven’t installed the latest version of the PL2303 driver but an old one, since it is compatible with Windows 11 and works perfectly fine without throwing any errors.

You can try installing the latest version but if that doesn’t work, go ahead with this one as it has worked for most of the users facing the PL2303 driver not working issue in Windows 11.

Or you could simply use a specialized driver updating software. A dedicated tool will automatically locate and install the best available driver for every device connected to the system.

2. Roll back driver update

  1. Press Windows + S to launch the Search menu, enter Device Manager in the text field at the top, and click on the relevant search result that appears.Device manager
  2. Double-click on the Ports (COM & LPT) entry here.Ports to fix pl2303 driver windows 11 not working
  3. Now, right-click on the PL2303 USB-to-Serial device, and select Properties from the context menu.Properties
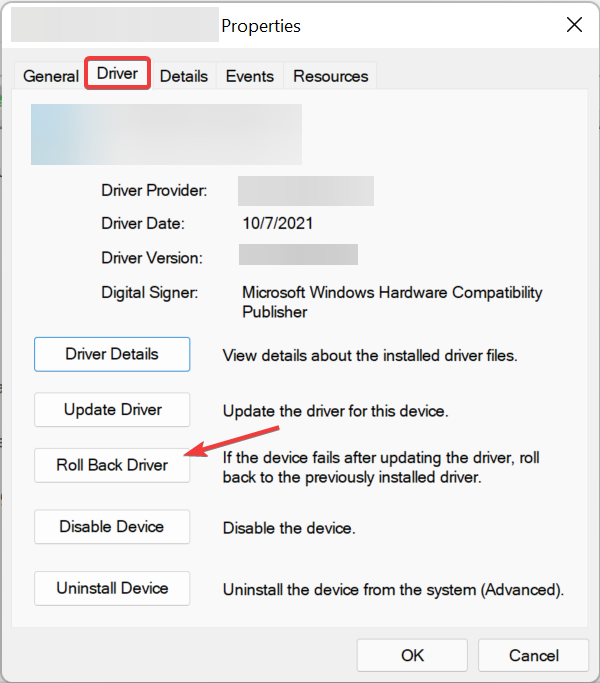
  4. Navigate to the Driver tab, and click on the Roll Back Driver button.Roll back driver to fix pl2303 driver windows 11 not working
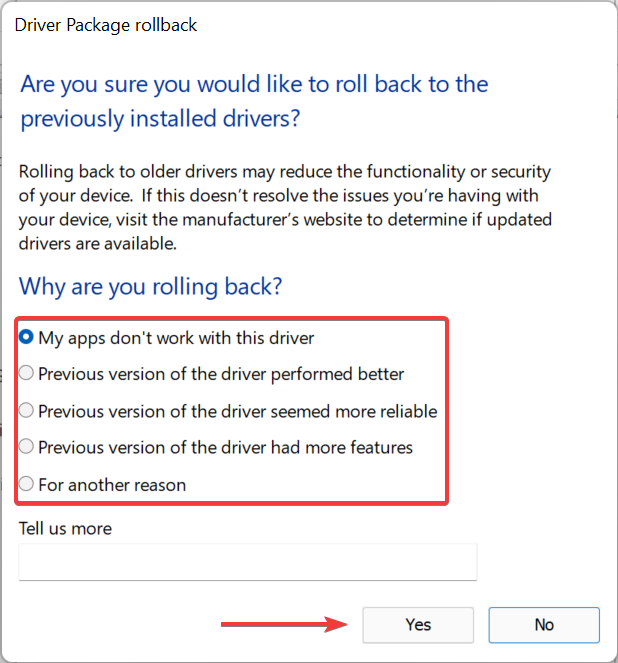
  5. Select a reason for rolling back the update, and then click on Yes.select reason

If the PL2303 driver stopped working in Windows 11 after an update, could be both manual and an automatic one via Windows Update, reinstalling the previous version would help fix the problem.

3. Perform a system restore

If the PL2303 driver is not working in Windows 11 after following the steps here or stops working within a short while, something might be triggering the issue. To fix that, all you have to do is perform a system restore.

This is a quick way of getting the system back to a healthy state, otherwise, you would spend a lot of time identifying and eliminating the underlying cause.

By the time you reach this part, one of the methods listed here must have fixed the Pl2303 driver not working problem in Windows 11.

Also, if you are facing trouble getting it, find out how to install the PL2303 driver in Windows 11.

Tell us which fix worked and your experience with the PL2303 cable, in the comments section below.

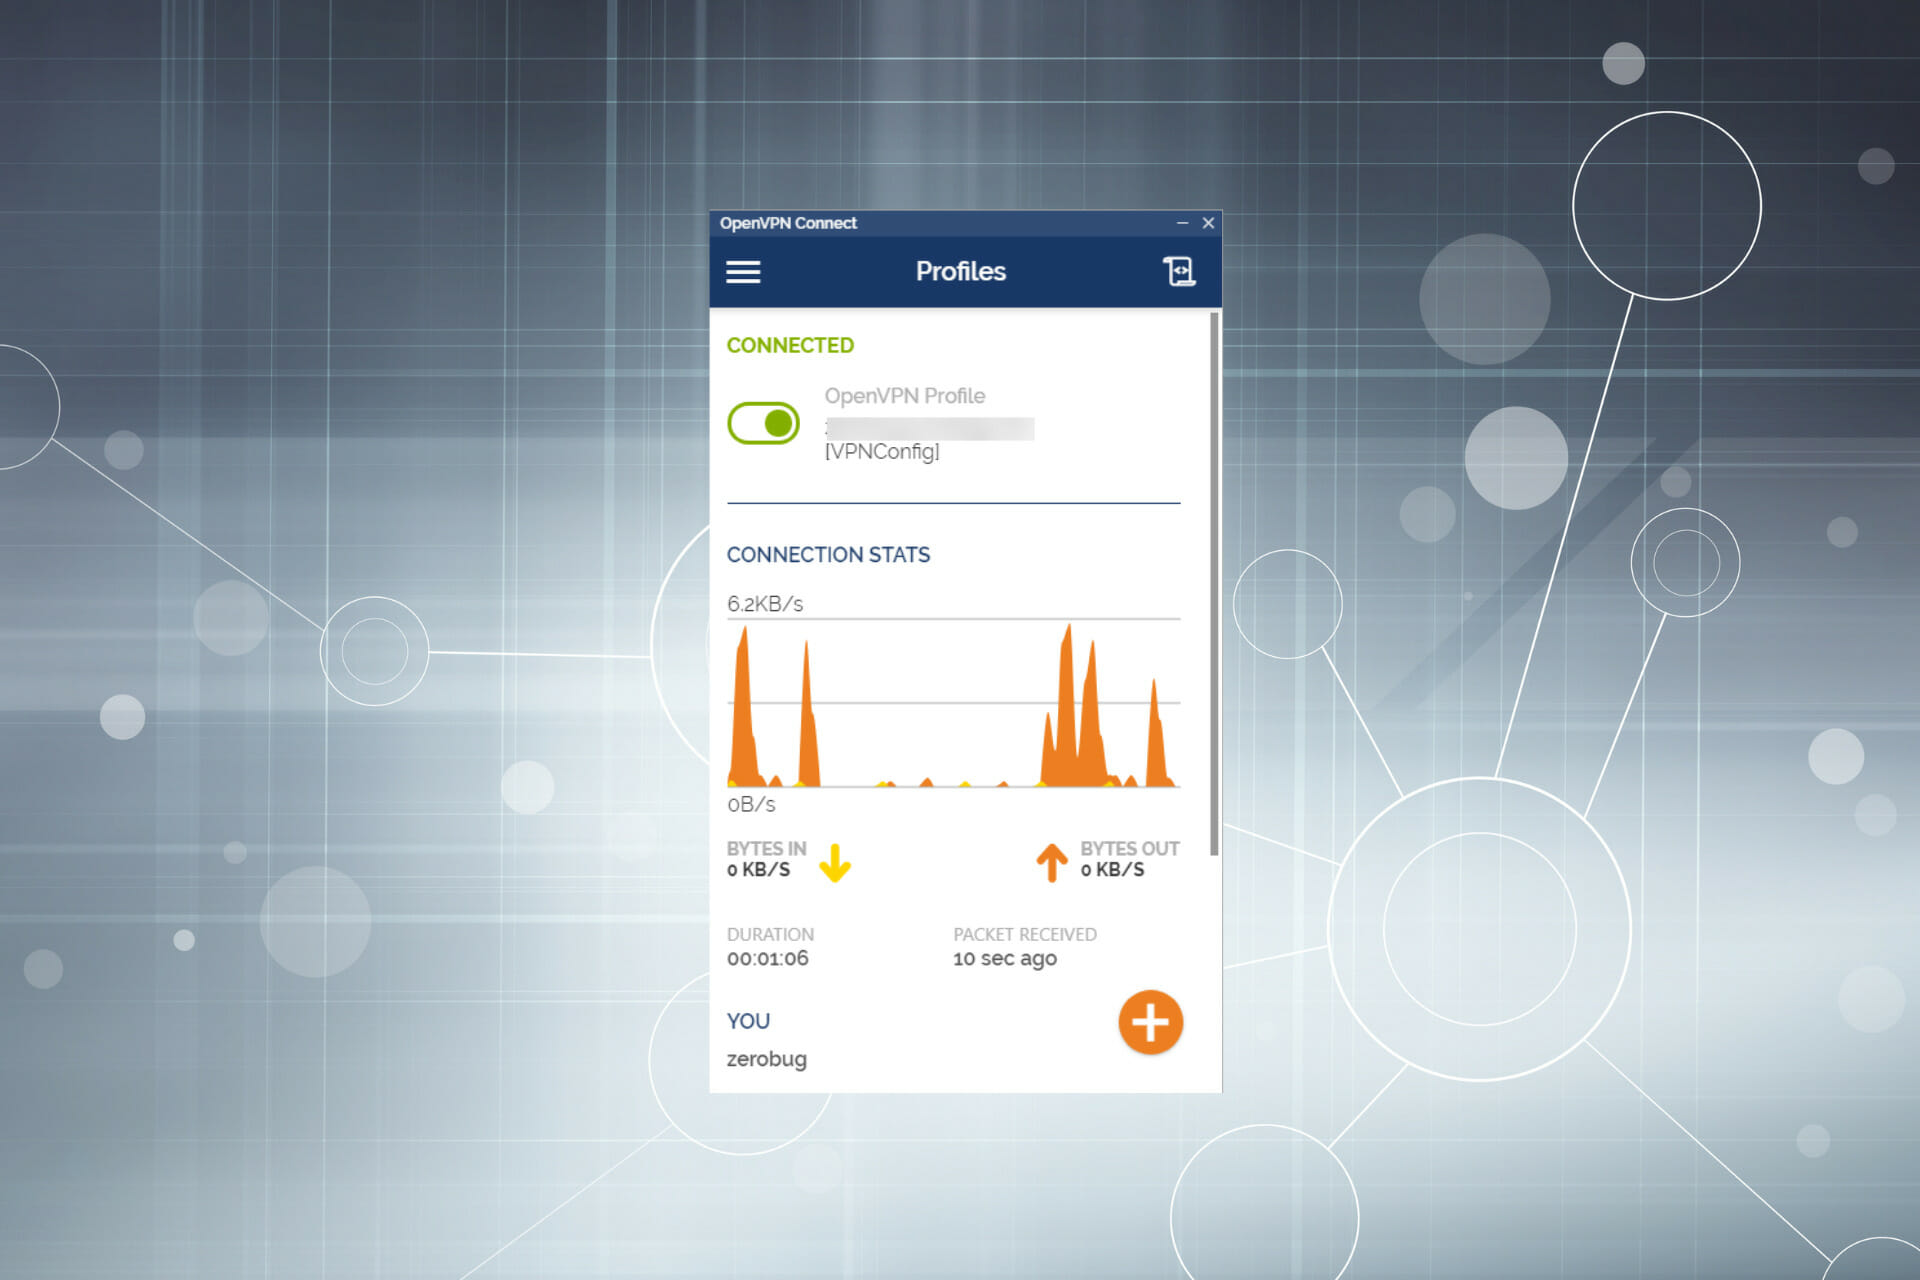
OpenVPN Not Working in Windows 11? Here’s What to do

The popularity of VPNs has soared in recent years, owing to cyber threats and regional restrictions on accessing websites. Many users who went with the OpenVPN client reported that it’s not working in Windows 11.

This particularly happens when an installed third-party antivirus is blocking the VPN connection, or it could be the Windows Defender Firewall. Other than that, there are some critical services to be run in order to have a stable connection, so make sure these are running.

Now that you have a basic understanding of the underlying causes, let’s walk you through the most effective fixes for OpenVPN not working issue in Windows 11.

What do I do if OpenVPN is not working in Windows 11?

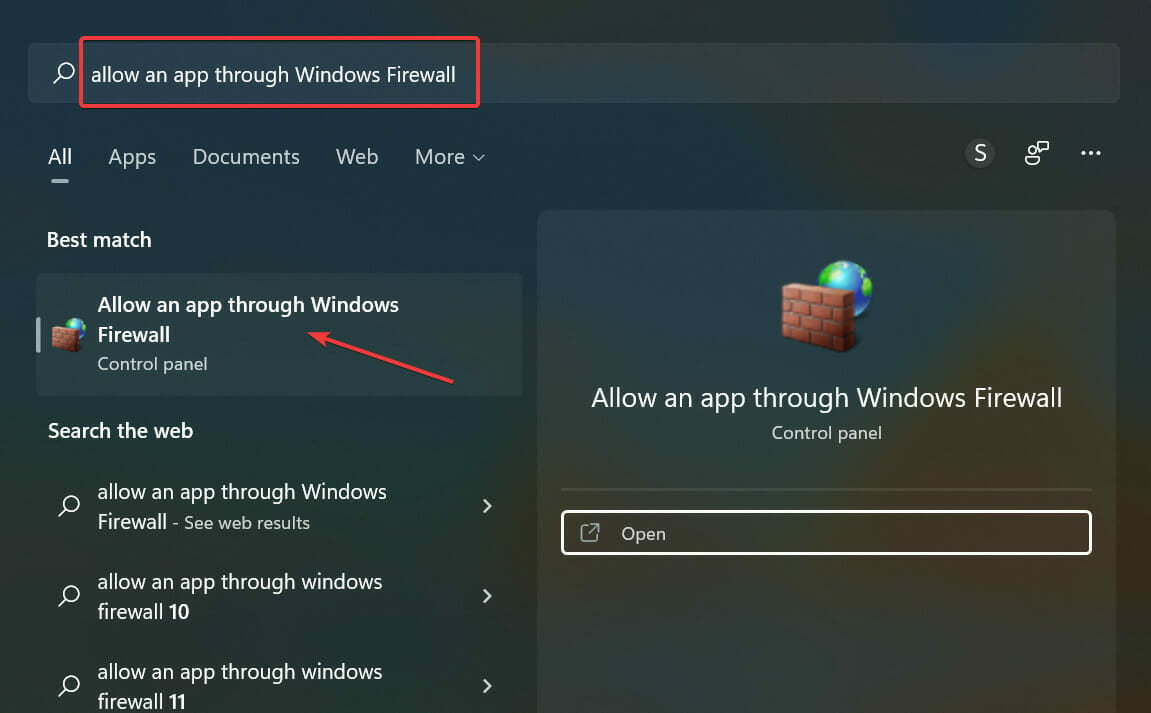
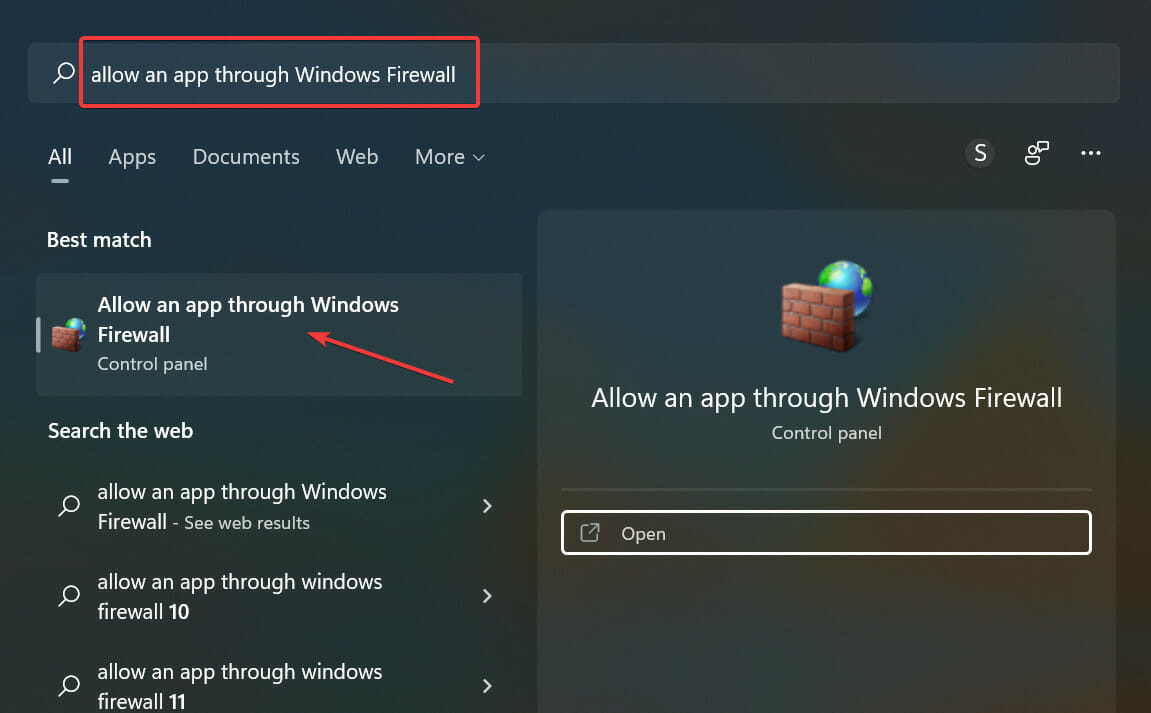
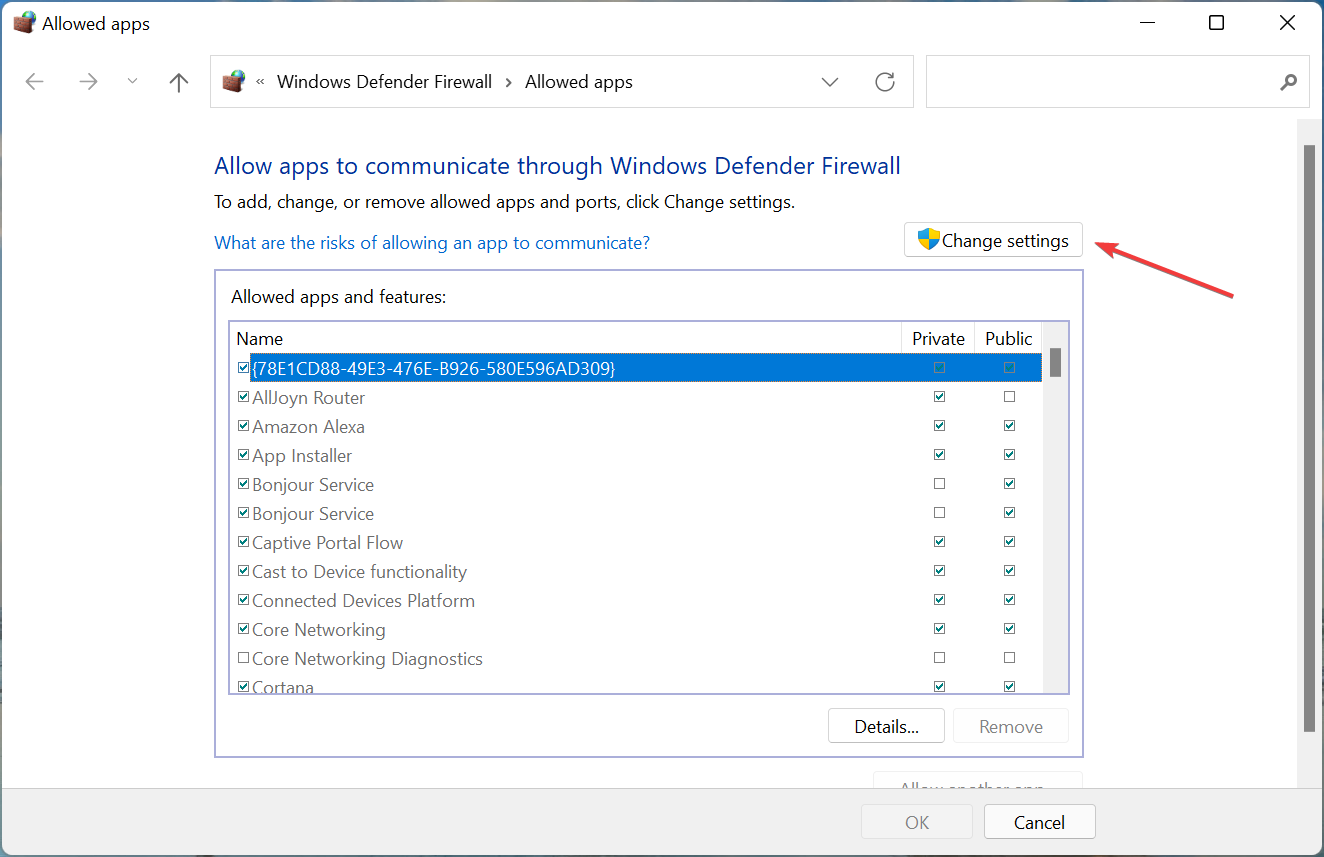
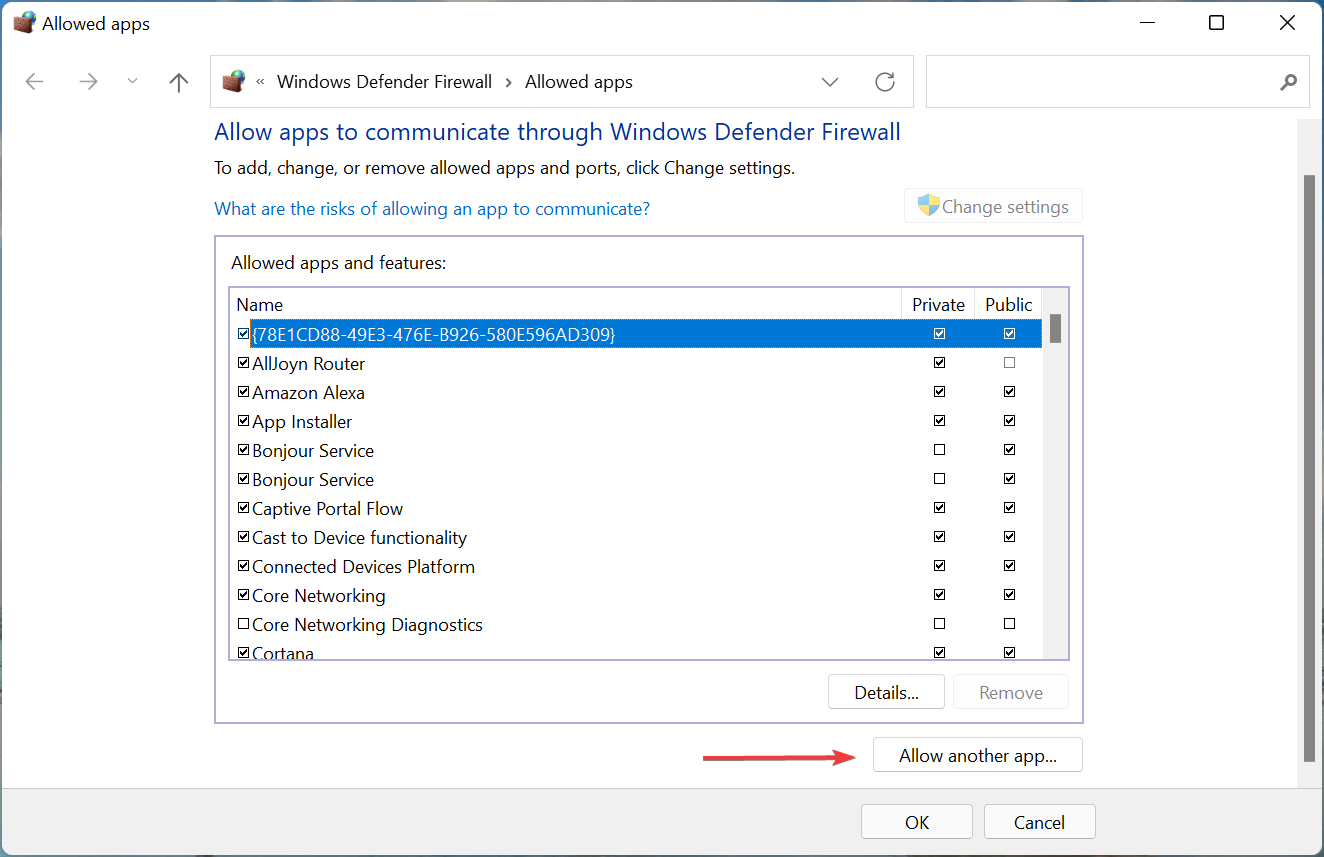
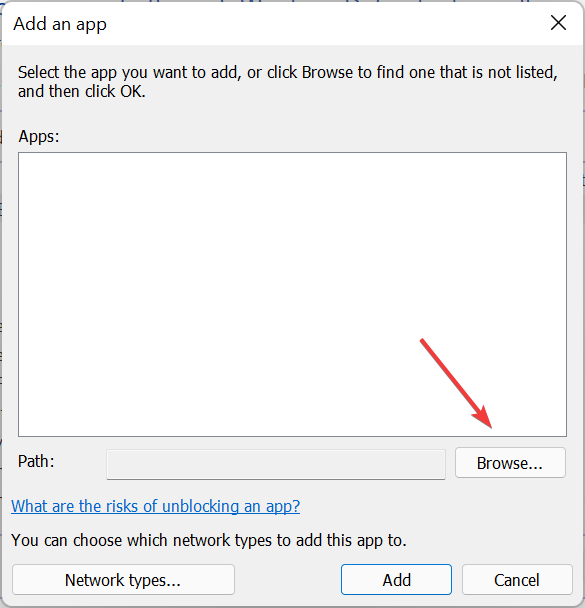
1. Add an exception to the firewall

  1. Press Windows + S to launch the Search menu, enter Allow an app through Windows Firewall in the text field, and then click on the relevant search result that appears.Allow to fix openvpn windows 11 not working
  2. Click on the Change settings button near the top-right corner in the Allowed apps window.Change settings to fix openvpn windows 11 not working
  3. Next, click on Allow another app at the bottom.Allow another app to fix openvpn windows 11 not working
  4. Click Browse.Browse
  5. Go to the folder where OpenVPN is stored, select it, and then click on Open.Select OpenVPN
  6. Now, click on Add at the bottom.Add
  7. Once OpenVPN is added to the list of allowed apps, make sure the checkboxes for both Private and Public networks are checked, and then click on OK at the bottom.tick checkbox

After making the changes, restart the computer and check if OpenVPN now starts working in Windows 11.

2. Make sure the DHCP Client service is running

  1. Press Windows + R to launch the Run command dialog box, enter services.msc in the text field, and click on OK to launch the Services app.services.msc
  2. Now, locate the DHCP Client service, right-click on it, and select Properties from the context menu.Service properties to fix openvpn windows 11 not working
  3. Click on the Startup type dropdown menu, and select Automatic from the list of options.Select Automatic
  4. Next, if the service is not running, click the Start button under Service status, and click on OK at the bottom to save the changes.Click Start

3. Use a reliable VPN client

If the methods listed above have not worked, you may consider switching to another VPN client. And, if you do, we recommend going with PIA (Private Internet Access). It’s a fast and secure VPN with over 3000 servers in 78 countries.

Also, you can access up to 10 devices with the same account. The best part, PIA does not store any browsing history and offers the feature to block ads and trackers for a safe browsing experience.

⇒ Get Private Internet Access

4. Uninstall third-party antivirus

  1. Press Windows + I to launch Settings, and then select Apps from the tabs listed in the navigation pane on the left.Apps to fix openvpn windows 11 not working
  2. Click on Apps & features on the right.Apps & features to fix openvpn windows 11 not working
  3. Locate the third-party antivirus, click on the ellipsis next to it, and then select Uninstall from the menu.Uninstall
  4. Again, click Uninstall in the prompt that pops up.Confirm change

Once done, you can restart the computer, and OpenVPN should now be working in Windows 11. Also, the built-in Windows Security is more than capable of keeping your PC secure, so you should worry about that aspect.

If you have another system running the previous iteration, learn what to do if OpenVPN is not working in Windows 10. Also, if you plan to go with another one, check out the 5 best VPNs as per experts after 3 months of usage.

Tell us which fix worked, and your experience with the OpenVPN client, in the comments section below.

Slow VPN in Windows 11? 5 Game-Changing Fixes to Apply

VPNs have become an important part of our lives, be it to access other networks or to mask the identity. But oftentimes, we face a slow Internet speed over VPN in Windows 11.

This could be due to a bunch of reasons, but the most common one is using an unreliable and ineffective VPN. Other than that, misconfigured settings, firewall or third-party apps affecting the connection, or problems with the Internet itself could lead to issues.

As is the case with any other error, there’s always a solution for it. So, let’s walk you through the most effective fixes for a slow VPN in Windows 11.

How do I fix a slow VPN in Windows 11?

1. Some basic checks

The first thing that you have to check is whether it’s the VPN that’s actually causing the problem or is it the Internet connection. In some cases, users later realized that they were not receiving the speed as per the chosen Internet plan and were blaming the VPN all this while.

So, a simple way to check the Internet speed is to use a platform like Speedtest. Check the speed once while you are connected to the VPN and once without it.

If there’s a major drop, say 50% or more, it’s likely that the VPN is at fault, and you may want to consider switching. But before you do that, make sure to try the other methods below and if the VPN remains slow in Windows 11, proceed with it then.

Speed test results

In case the drop is minimal, check if you are receiving the speed as per your Internet plan. If not, contact your ISP (Internet Service Provider).

2. Change the server

Another common reason behind a slow VPN in Windows 11 is choosing the wrong server. The idea behind using a VPN is either to mask the identity or evade regional restrictions. In this process, many users end up selecting a server that’s far away.

So, if your VPN provider has a server that’s geographically close and meets your requirement, go ahead with that. Choosing a faraway server often strains the Internet speed.

Also, if your VPN shows the load on each server, make sure to select one that has a lower load. A higher load on the server is also a major reason behind a slow VPN in Windows 11.

3. Use a reliable VPN

Another quick way to fix the slow speed problem in Windows 11 is to switch to a reliable and dedicated VPN.

We recommend PIA (Private Internet Access), a quick VPN with over 3000 servers in 78 countries. So, you can now always find a server that is geographically close to you.

Also, it has been tuned for 10 Gbps connection speed, so no more buffering, stuttering, or freezing while browsing the web on a VPN from now on. Apart from that, it uses some of the safest protocols, which ensures security and privacy on the web.

⇒ Get Private Internet Access

4. Add an exception for the VPN in Windows Firewall

  1. Press Windows + S to launch the Search menu, enter Allow an app through Windows Firewall in the text field at the top, and click on the relevant search result.Allow an app through Windows Firewall to fix windows 11 vpn slow
  2. Click on the Change settings button.Change settings to fix windows 11 vpn slow
  3. Now, click on Allow another app near the bottom.Allow another app to fix windows 11 vpn slow
  4. Click on Browse.Browse
  5. Navigate to the folder where the app is stored, select it, and then click on Open.Locate and select app
  6. Next, click on Add at the bottom to let the app communicate through Windows Firewall.Add
  7. Finally, make sure that the checkboxes for both Private and Public networks are ticked, and click on OK at the bottom to save the changes.Allow

It’s highly likely that the Windows Defender Firewall or a similar third-party app might be lowering the Internet speed. The basic job of a firewall is to monitor the incoming and outgoing packets traffic, but in doing so, it may affect the functioning of the VPN.

The steps here would help you add an exception for the built-in Windows Firewall. In case you are using a third-party firewall, check the manufacturer’s website for the exact steps.

5. Uninstall conflicting applications

  1. Press Windows + I to launch Settings, and select Apps from the tabs listed in the navigation pane on the left.Apps
  2. Next, click on Apps & features on the right.Apps & features to fix windows 11 vpn slow
  3. Locate the conflicting app, click on the ellipsis next to it, and select Uninstall from the flyout menu.Uninstall app to fix windows 11 vpn slow
  4. Click Uninstall in the prompt that pops up.Confirm change
  5. Finally, restart the computer for the changes to fully come into effect.

There are various third-party apps, generally anti-viruses, that throttle the Internet speed and lead to a slow VPN in Windows 11. First, try disabling it, and if it works, uninstall the app.

To find out the problematic app, search the web and verify if the apps installed on your PC affect the speed over a VPN for other users as well. If that’s the case, others must have shared it.

6. Change the encryption protocol

A VPN protocol, as the name suggests, is basically the set of rules through which the VPN interacts with the server. There are various protocols available out there with each having a different encryption level. And, the higher the encryption level, the lower the Internet speed.

So, here you will have to create a perfect balance and choose the one that best meets your requirement. PPTP is probably the fastest of them all but is not as secure. SSTP offers a slightly lower speed but is more secure than PPTP.

For most users, we recommend sticking with OpenVPN, which is the default protocol for most and offers high security without affecting the Internet speed considerably.

The actual steps to change the encryption for every VPN would be different, but a quick glance over the FAQ section on the manufacturer’s website, and you should find the exact steps.

That’s it! By the time you reach this part of the article, the slow VPN problem in Windows 11 would be eliminated and you can now browse the web at a good Internet speed.

Also, if you notice that the VPN is not working in Windows 11, here’s how you can fix it. Besides, if you are planning to switch, do check our curated guide that lists the 5 best VPNs after 3 months of usage and tests.

Tell us which fix worked and the VPN you were having trouble with, in the comments section below.

Solved: Microsoft Edge pop-up blocker is not working

Some of our readers complain that the Edge pop-up blocker is not working despite being enabled. This problem can be due to reasons such as outdated browsers and malware, among other reasons.

First, make sure that the pop-up blocker is enabled in Edge. Enter the browser’s Settings and go to Cookies and site permissions. Then, select Pop-ups and redirects from the All permissions menu and turn on the Block toggle button. If the pop-up blocker still doesn’t work in Edge, apply the solutions below.

What can I do if the Edge pop-up blocker is not working?

1. Update Microsoft Edge

  1. Click the menu button.
  2. Select the Settings option.general-microsoft pop-up blocker not working
  3. Now, click the General option.about app microsoft pop-up blocker not working
  4. Scroll to the bottom of the page and check the About this app section. You will find updates here if they are available.

An outdated browser performs below standards and could be why the Microsoft Edge pop-up blocker is not working. In this case, you only need to update the browser, and the bugs causing the problem will be eliminated.

2. Scan for Malware

Viruses cause all manner of problems. They can be the reason your browser can’t block pop-ups.

Performing a full scan virus scan with Windows Defender should do the trick. You can try a more accomplished and all-rounder third-party software like the TotalAV app.

The TotalAV scans your PC thoroughly and removes the most hidden virus that would be otherwise downright impossible to remove. It does not wait for malware to cause problems before it swings to action.

Instead, it detects and blocks viruses before they get to your PC and keeps you protected online and offline. It just might be all you need to protect your PC from errors such as Microsoft Edge pop-up blocker not working.

⇒ Get TotalAV

3. Block third-party cookies

  1. Click the menu button and select the Settings option.
  2. Now, select the Privacy & Security option.privacy and security
  3. Locate the Cookies dropdown box and click it.cookies dropdown
  4. Select the Block only third-party cookies option.block only third-party cookies

Cookies help to improve your browsing experience. They allow you to take full advantage of what a site offers.

However, this might become a problem if the cookies include allowing pop-ups to display. This will counter your pop-up blocker and might stop it from working. The only way around this is to disable the cookies and restart your browser.

For trusted sites that require pop-ups, follow this guide on how to allow pop-ups in Edge so you can permit them per site without turning off protections globally.

4. Clear the browser cache

  1. Click the menu button and select the Settings option.
  2. Select the Privacy & security option on the left plane.choose what to clear
  3. Go to the Clear browsing data section and click the Choose what to clear button.
  4. Check the Cached data and files checkbox.clear cache
  5. Finally, click the Clear button.

The cache holds data that helps to automate some of your activities online. However, it might contain data stopping the Microsoft Edge pop-up blocker from working. By clearing your cache, this data will be removed, and your browser will be back to normal again.

5. Switch to another browser

If all the fixes above do not work, you can disable Microsoft Edge and try Opera One for a change. It is a top-class browser with an ad blocker that does not just block ads but also keeps you protected when surfing the internet.

It is a real modern browser that packs lots of security and privacy features such as a built-in free VPN, and tracker blocker and native AI. What’s more, it is fast, efficient and has a friendly and sleek design. With Opera one, browser errors such as this will become history.

⇒ Get Opera One

Pop-ups can be frustrating. Some of them might even contain malicious links that can harm your PC. This makes the pop-up blocker a good weapon to have in Microsoft Edge.

If the built-in pop-up blocker on Microsoft Edge is not working for you, this article contains simple yet effective solutions to solve the problem. If you are facing other problems aside from this one, you can check out our other detailed guides on Microsoft Edge.

We hope you find them useful and get back to enjoying your browsing experience. Feel free to discuss the solution that worked for you in the comments section below.

Fix Edge_auth_error and enjoy seamless cross-device syncing

Microsoft-propelled Edge is coming out strong and the sync feature is one of its perks.

Whether we’re talking about the Enterprise version or the regular one, by signing into your Microsoft account via Edge, you can sync your data across all your devices.

From browsing data to tabs, passwords, bookmarks, and so on, everything is stored on the server and is easily accessible thanks to the built-in sync functionality.

But that does not mean Edge is exempt from errors, nor are its synchronization capabilities. Sometimes, Edge simply won’t open, but users reported more sync related issues:

  • Edge not syncing across devices
  • Edge sync isn’t available for this account
  • Edge not syncing work account (with Edge_auth_error followed by various numeric codes: 6 2 0, 3 15 caa2000b, 3 49 0)
  • Microsoft Edge tab sync not working
  • Sync is Paused, sign in again
Tip icon Tip
Before we go any further, here’s an awesome tip you can try.

➡ Instead of wrestling with an Edge sync that refuses to work, you can switch to Opera One and get only the perks, without the hassle.

➡ Along with this new browser, you can import all your settings and preferences and make use of its neat sync feature that allows you to stay organized, focused, and up to date across all your devices while enjoying seamless integration with numerous services, including collaboration-focused apps.

The Edge_auth_error is one particular error that stands out and it’s usually related to the Edge Enterprise Sync feature and its dependency on AIP (Azure Information Protection).

How do I get Microsoft Edge to sync?

1. Reset Edge sync or force the browser to reset to defaults

  1. Launch the Microsoft Edge browser.
  2. Open the Settings menu and choose Profiles.
  3. On the main page, select Sync to unfold the menu.
  4. In the new window, press Turn off Sync and wait for a few minutes.
  5. Then, turn synchronization back and scroll towards the bottom of the page.
  6. Here, you will see the Reset sync section. Press the Reset sync button.
  7. Make sure you uncheck the Resume sync on this device after resetting sync option and press Reset one more time.

Can you reset Microsoft Edge?

  1. Open or stay on the Settings menu and scroll down to the bottom of the page.
  2. From the left pane, select the Reset settings option.
  3. Next, click on Restore settings to their default values.
  4. In the new dialog window, press Reset one more time to confirm.
  5. Alternatively, you can type the following in the URL address bar: edge://settings/resetProfileSettings
  6. Make sure you sign back into your Microsoft account once the reset is complete.

2. Tweak the sync option in Azure Active Directory

  1. Open Azure Active Directory and go to Device settings.
  2. In the central panel, locate the User may sync settings and app data across devices option and set it to All.
  3. Restart your PC and relaunch the synchronization feature from the Edge browser as shown above.

Edge_auth_error can be triggered by both identification and sync issues, so make sure the Azure AD settings are not blocking the synchronisation process with MS Edge.

What else can I do to make Edge sync?

  • Delete cookies, cache, and browser history
  • Disable all Edge extensions
  • Whitelist the Microsoft service account site in Edge’s cookies list
  • Tweak GPO profile settings to disable, respectively enable sync in MS Edge
  • Verify that your enterprise has a valid and supported AD subscription and that AIP is available

These are some essential Edge sync troubleshooting steps that could also help you solve pesky errors such as Edge_auth_error 6 2 0, 3 15 caa2000b, or 3 49 0.

If you need further help in diagnosing common sync issues with MS Edge and the Azure AD environment, don’t be shy to explore the Microsoft sync solutions repertoire as well.

Windows 11 Pen Menu Not Showing: How to Fix it in 2 Steps

The stylus Pen in Windows 11 is an excellent tool for taking quick notes and creating beautiful digital designs.

But sometimes, the Windows Pen menu shortcut on the taskbar will not show. This can frustrate the user, especially when he wants quick access.

Windows 11 Pen tool equips you to draw on a whiteboard or to create that beautiful design of yours without the hassle of going through the Windows Start Menu.

To access the Pen tool on your computer, use the Pen to tap the screen, and the Pen icon will appear at the corner of the taskbar.

However, there are cases where the Pen menu will not show on the taskbar. The Windows Pen menu is not the only Windows 11 widget that can’t function as expected. When that happens, what do you do?

What can I do if Windows 11’s Pen menu is not showing?

1. Pin Windows 11’s Pen menu on the taskbar

  1. Press the Win + I keys to open the Settings app.
  2. Select Personalization from the window’s left pane, then click Taskbar on the right side.
  3. On the taskbar window, expand the Taskbar corner icons and toggle the Pen menu button to turn it on.

To turn off the Pen menu from showing on the taskbar, follow the above steps from 1 to 4, and toggle the Pen menu button to hide the Pen menu.

Microsoft doesn’t automatically pin the Pen menu on the corner of the taskbar. Most users want quick access to the Pen tool. This makes it essential to have the Pen menu on the taskbar.

2. Pair the Pen with your laptop

  1. Press Win + I to open the Settings app.
  2. Select Bluetooth & devices, then hit the + button to add a new device.
  3. Select Bluetooth to pair with your Pen.
  4. Hold down the shortcut button on your Pen for a few seconds to turn on pairing mode, then choose the Pen from the list.

Before you can use your stylus or Microsoft Surface Pen, you’d have to pair it with your computer using the Bluetooth connection on both devices.

How to enable my Pen settings in Windows 11?

  1. Press Win + I keyboard combination to open the Settings app.
  2. Click on Bluetooth & devices and select Pen & Windows Ink.
  3. Under Click once, choose Windows ink Workspace.
  4. From the first box, Windows Ink workspace, choose what part of the workspace you want to open from the second box.

Now that the Windows 11 Pen menu has been pinned to the corner of the taskbar, there are other issues the user might face when using a stylus pen.

Check out our in-depth guide on how to fix the Surface Pro intermittent pen accuracy issue. Once the Pen menu is on the corner of the taskbar, it’s easy to use the Pen tool.

Lastly, a common issue reported in forums is the XP Pen being detected as a keyboard, and updating the driver does the trick!

Let us know if the methods above help you solve the issue with a comment in the dedicated section below.

5+ best mouse for Logic Pro X

Having a top-quality mouse will improve your job productivity and make it simpler to complete tasks efficiently.

Not only will you be able to complete your job more successfully, but it is a great tool for other things such as gaming, music creation, and online surfing. All of these activities are only enjoyable if you have purchased a high-quality mouse.

But the primary problem that you may have is that it’s never simple to get a mouse that not only performs well but also fits within your budget.

The good news is that you no longer need to be concerned since this article has been written to offer you fast access to the most dependable and sophisticated mice for Logic Pro X. So, whether you have to work in the office or from home, you will be able to complete tasks quickly.

What should I look out for when purchasing a mouse for Logic Pro X?

Before you go out and purchase a mouse for Logic Pro X, think about the following elements:

  • Performance: Your mouse should perform smoothly and quickly to eliminate the majority of your work-related troubles and allow you to function more efficiently.
  • Ergonomics: Choosing a mouse with an ergonomic build would make it much easier for you to complete your tasks faster.
  • Design: In terms of design, you should choose a mouse with ergonomics since it will significantly improve your gaming performance. Not only will you be able to perform better, but it will also minimize hand fatigue and enable the user to operate more efficiently.
  • Price: It’s essential to get a mouse that fits your budget correctly so that it’s a decent investment that you’ll be able to enjoy for a long time.
  • Programmable buttons: A high-quality mouse always comes with extra buttons that give improved performance and make it simpler for you to complete tasks.

What are the best mice for Logic Pro X?

Logitech G604 Wireless Gaming Mouse

  • Perfect for all thumb shapes
  • Has a good battery life
  • Features a solid grip
  • With constant use, it exhibits lag

This mouse has six programmable buttons that are grouped in two rows.

One of the mouse’s outstanding characteristics is the wheel, which rotates easily and without resistance. It is made of a physical switch and a  metal scroll. The wheel allows you to click in the center, left, and right directions.

There are a total of 15 programmable controllers included. The power button is on top, while the wireless control is at the bottom.

Another nice feature of this mouse is that it works with various connection choices. For example, the USB connection connects multiple devices to the mouse. Whether used for business or play, the Logitech G604 Mouse will not fail to amaze you; that is why it has remained in great demand.

The Logitech G604 comes with a solid handgrip that makes it a fantastic mouse for gaming. It is waterproof, so it will not slip out of your hand.

Read our guide on best palm grip mouses for gaming to learn more about mice with good grip.

Razer Lancehead Mouse

  • It has a timer
  • Features an ambidextrous design
  • Fast acceleration
  • A low-quality grip

The Razer Lancehead Mouse is one of the highest-quality mice on the market.

The most attractive feature of this mouse is that it is wireless, making it simple to use, allowing you to do more tasks in less time.

A 16000DPI 5G laser is included with this mouse, and it can be used in both wireless and wired modes, allowing you to have a choice for convenience. 

Aside from work, you’ll find it an excellent gaming mouse because of its smooth performance and quick movement. These characteristics make it an ideal option for you.

The Razer Lancehead Mouse’s most prominent feature is that it has all of the primary functions found in costlier mice, notably its nine configurable buttons that provide easy access to most of the mouse’s capabilities.

Razer Atheris

  • 5 Programmable Buttons
  • Rubberized Scroll Wheel
  • 7200 DPI Optical Sensor
  • Heavy for its size

The Razer Atheris is packed with dual connectivity, signal stability, and long battery life, making it ideal for both work and pleasure.

You don’t want to bother about changing batteries while you’re always traveling for business or busy with a tight meeting schedule. As a result, this mouse is designed to provide you with over 300 hours of uninterrupted usage.

It boasts a 7,200 DPI optical sensor and allows you to work with headshots or spreadsheets with exceptional precision and control. Multiple monitors, as well as 4K and beyond, benefit from the increased resolution.

Thanks to Razer’s unique wireless technology, the Razer Atheris has top-of-the-shelf transmission stability. So your mouse retains a strong connection, whether at a café or in the office, where several wireless devices transmit different frequencies. 

All of these functions are housed in a pocket-sized ergonomic body designed to maximize productivity and performance.

Logitech G502 Proteus Spectrum

  • A great grip
  • Thumb rest for prolonged work
  • Programmable buttons
  • It is long and may get uncomfortable

The Logitech G502 is another dependable, top-quality mouse that enables you to work for extended periods since it has a strong thumb rest that prevents your hand from being fatigued from working long hours.

This mouse has a 50 million click lifespan, making it suitable for long-term usage.

It has 11 programmable buttons that may be conveniently customized. These buttons give you quick access to all of the mouse’s features.

The mouse is available in various colors, which is great for aesthetics. It also has a DPI sensor of 16000, which gives you more professional and accurate performance. In addition, the RGB lighting on the programmable buttons may be altered, and the colors can be changed.

Superlight Wireless Gaming Mouse

  • Weighs less than 63 grams
  • Has HERO 25K sensor
  • Features a USB report rate of 1 ms (1000 Hz)
  • It is expensive

Its pro-grade wireless technology for swift performance and reliable connection lets you concentrate on nothing but winning during gameplay.

Pro X Superlight is a technological innovation that weighs less than 63 grams, making it roughly 25% lighter than your basic PRO Wireless mouse.

It comes with Logitech G’s HERO 25K sensor, enabling unsurpassed speed, accuracy, and consistency. Pro X Superlight provides high precision and ultra-fine control for total confidence, particularly during tournament play’s frantic, split-second moments.

Its broad, zero-additive PTFE feet slide effortlessly, providing a pure, fluid connection with the game.

Because it is a 100% carbon neutral product, Pro X Superlight satisfies the highest sustainability criteria.

Before purchasing a mouse for Logic Pro X, it is critical to do thorough research and all due diligence. This article has been written to satisfy this need.

We have listed our favorite mice in no particular order and expect that after you have gone through our list, your final decision will come down to your personal preferences.

As usual, we look forward to hearing from you. Let us know in the comments which of these mice you will rather have.

How to fix the most irritating Dying Light 2 bugs

The gaming world is an extremely unpredictable environment, where any game or extension can get you headaches.

Of course, this also applies to the newly released Dying Light 2 masterpiece, as many worldwide users already reported facing related bugs on both PC and console versions.

Even if Internet forums are generally listing favorable reviews, critics have condemned a slew of bugs and issues present in the final game.

It seems like these are pretty various and common, so if you’re also encountering some of them, do not panic! You’re not the only one.

Fortunately, any issue can be easily solved by following certain steps and we’re going to highlight all of them.

How can I fix the most common Dying Light 2 bugs?

1. Install/launch issues and poor performance on Xbox/PlayStation/PC

1.1 For Windows PC

1.1.1 Update your graphics drivers
  1. Hit the Windows keys, type Device Manager, and open the first result.
  2. Expand the Display adapters section, right-click on the desired component, then choose to Update driver.
  3. Now, select to Search automatically for drivers.
  4. Wait until your system will scan and recommend any available options.
  5. In case there are no reliable solutions to get, you’ll be notified accordingly.

Keep in mind that up-to-date drivers allow you to work and play your favorite games on a healthy operating system. In this manner, it is important to constantly check for related updates.

Because the above steps can consume time if performed weekly, we decided to come up with a more efficient solution.

Outbyte Driver Updater will automatically take care of all of your outdated, missing, or corrupted drivers, regardless of their type.

⇒ Get Outbyte Driver Updater

1.1.2 Ensure your system meets the minimum/recommended game specifications

For the PC version, you’ll only have to navigate to the Device specifications, located in Windows Settings (Windows + I keyboard shortcut).

If you’re not sure what requirements your OS and hardware should meet, make sure you take a look at the minimum ones listed below:

  • CPU: Intel Core i3-9100 / AMD Ryzen 3 2300X
  • RAM: 8 GB
  • OS: Windows® 7
  • Video Card: NVIDIA® GeForce® GTX 1050 Ti / AMD Radeon™ RX 560 (4GB VRAM)
  • Pixel Shader: 5.1
  • Vertex Shader: 5.1
  • Free Disk Space: 60 GB
  • Dedicated video RAM: 4096 MB

Even if your system meets the game’s minim requirements, it is better to have something better. That’s why we’ve also compiled a list of our recommendations:

  • CPU: Intel i5-8600K or newer/AMD Ryzen 5 3600X
  • RAM: 16 GB
  • OS: Windows® 10
  • Video Card: NVIDIA® GeForce RTX™ 2060 6GB or AMD RX Vega 56 8GB or newer
  • Pixel Shader: 5.1
  • Vertex Shader: 5.1
  • Free Disk Space: 60 GB
  • Dedicated Video RAM: 6 GB (AMD 8GB)
1.1.3 Temporarily disable your antivirus software
  1. Press on the Windows key, type Control Panel, then click on the first result.
  2. Navigate to System and Security.
  3. Click on Windows Defender Firewall.
  4. From the left window pane, choose to Turn Windows Defender Firewall on or off.
  5. Now, make sure you checkmark the two sections shown directly below.

1.2 For console

1.1.1 Update your console

For Xbox consoles:

  1. Press the Home button on the Xbox console to open the Dashboard menu.
  2. Now, select Settings from the bottom of the menu.
  3. Choose All Settings.
  4. Go to System.
  5. Select Updates.
  6. Choose to Update Console (if available).
  7. Follow the on-screen prompts to complete the update process.
  8. Once done, make sure to restart the console to apply changes.

For PS4 consoles:

  1. Make sure that the connection between your PS4 and the Internet is stable.
  2. Now, navigate to PS4 Settings.
  3. Click on System Software Update.
  4. Press the X button.
  5. You’ll get a message that informs you if the latest version of your system console has already been installed.
  6. Otherwise, the message will let you know that you should upgrade your system. To install it, click on Upgrade now.

For PS5 consoles:

  1. Open Settings.
  2. Go to System.
  3. In the System Software section, click on System Software Updates and Settings.
  4. Choose the type of update you want to perform.
  5. Click on the Update button, then wait until your console is updated and restarted.
1.1.2 Free up some disk space

For Xbox consoles:

  1. Press the Xbox button on your controller to open the guide.
  2. Select Profile & system.
  3. Go to Settings.
  4. Choose System.
  5. Navigate to Storage.
  6. On the Manage storage devices screen, select: Clear local saved games.
  7. This deletes games saved to your hard drive, but they’ll still be saved to the cloud.

For PS4 consoles:

  1. Open your PlayStation 4 Settings.
  2. Scroll down to System Storage Management.
  3. Now, you’ll be able to view the disk space distribution and how much free space you have.
  4. In case it doesn’t seem like having enough space, make sure you clear some saved data from your controller.
  5. To do so, go back to your Settings menu, and choose the Application Saved Data Management section.
  6. Choose what you want to clear.
  7. Click on Delete.

For PS5 consoles:

  1. Open PS5 Settings.
  2. Navigate to Storage.
  3. There, you’ll be able to view both the Console Storage and the Extended Storage.
  4. Click on each of them and check the free disk space.
  5. If you don’t have enough, make sure you delete other saved data.
  6. To do so, go back to your PS5 Settings, and navigate to Saved Data and Game/App Settings.
  7. Choose from Saved Data (PS5) or Saved Data (PS4).
  8. Select Console Storage.
  9. Click on Delete.
  10. Tick the box next to the files you want to delete and select Delete.
1.1.3 Reset the controller and rebuild its database

For Xbox consoles:

  1. Hold the power button until it turns off.
  2. Turn it on by holding the power button and wait for two quick beeps.
  3. Release the button and you will be automatically redirected to the Recovery menu.
  4. From here, you can restore the file system or rebuild the database.

For PS4 and PS5 consoles:

  1. Power off your controller then press and hold the power button.
  2. Release the button after you hear the second beep.
  3. For PS4, you’ll need to connect your controller via USB, then choose to Rebuild Database.
  4. For PS5, you’ll now boot into Safe Mode. Plug your controller in with the cable, then go down and select Clear Cache and Rebuild Database.
  5. After that, click on Rebuild Database, then on OK.

2. Flickering and black screen flashes

According to worldwide declarations, display issues appear to be among the most widespread impacting Dying Light 2 players at launch.

Usually, they manifest as black screens and flickering present, especially on console editions. As many gamers claimed, it seems like PS5 versions are the worst impacted, letting users unable to play the game at all.

In this case, until developers come up with some new dedicated fixes, you should try updating your console, as we showed you when presenting the previous Dying Light 2 bug.

If it’s happening to encounter this issue on a PC, for now, you should definitely try updating your graphics drivers, as outdated or corrupted ones are the main reason why you might experience screen issues.

As mentioned before Outbyte Driver Updater is the best tool that can automatically perform this process in a matter of time.

3. Can’t connect to online friends

Dying Light 2 provides cooperative multiplayer, as gamers are allowed to bring friends into a shared adventure open world.

Unfortunately, it seems like server issues didn’t wait to arise right in the early hours after the release.

While your mileage may vary, don’t be surprised if online connectivity isn’t slick. Many users reported this as being one of the most annoying Dying Light 2 bugs.

Techland advises players to complete the Prologue, demanding around two hours of playtime, before attempting to play through friends.

The company’s support page states gamers must reach the Markers of Plague quest, which unlocks multiplayer support.

4. Preorder items missing

Last, but not least, keep in mind that some Dying Light 2 users claimed that their preorder items are unavailable after the game’s launch.

Engineers have acknowledged issues with items, which seemingly include preorder cosmetics and supplementary content, with an official fix assumedly on the way.

So, these are the most common known Dying Light 2 bugs. As you can see, there are simple solutions you can follow to fix most of them.

In case you’re aware of other problems or solutions, make sure you leave a comment in the dedicated section below.

How to upgrade RAM on an Acer Predator Helios 300

If you are into gaming, you already know that RAM is one of the most significant components in a gaming PC. It makes a big difference in how fast your computer operates and responds when it comes to gaming.

It facilitates faster input and writing, allowing you to focus on the game rather than waiting for things to load or quit freezing up, thus ensuring a better gaming experience.

Acer Predator Helios 300 is a gaming laptop, and it has a lot of potential. It can support up to 2x 16GB DDR4 memory modules, which adds up to 32GB RAM.

If you think your Helios 300 is running slow because of games like Overwatch or Fortnite, you can upgrade your RAM by opening up the back of your computer and switching out one of the current RAM sticks with a new and upgraded one.

How can I upgrade the RAM on my Acer Predator Helios 300?

1. Remove back panel

  1. Remove the screws holding your computer case together. 
  2.  Remove the back panel.

2. Locate RAM slots

From there, locate where your RAM slots are stored—they should be between two M.2 SSD slots of the motherboard.

Depending on your configuration, the setup might be different, but using the laptop’s manual is the best way to go about changing your RAM.

3. Replace RAM sticks

  1. Now, grasp the sides of your current RAM stick and gently pull it straight out. You may need to give it a little tug to get it out. But if you find yourself struggling too much, double-check that you are pulling on the correct part.
  2. Line up the notch on your new stick with the pin on the slot sides, and gently slide it into the slot. Replace your case and screw it back together.

4. Verify RAM upgrade

  1. Start your computer and go to System from the Start menu.Open System from Start menu
  2. Look for the field Installed RAM under the Device Specifications to ensure that upgrade is successful.Verify RAM upgrade

You will feel the improvements in your computer performance right away. If your computer is still not using the upgraded RAM, read our article on how to increase usable RAM.

How to fix Acer Swift 7 battery not detected

The Acer Swift 7 is one of the thinnest and lightest laptops out there. Partly because it has an internal battery, unlike older Acer models.

However, users have reported receiving the error battery not detected on their Acer Swift 7 despite having not made any changes to the battery or power settings.

Battery issues can be frustrating as it prevents you from doing anything on your laptop. Before you purchase a new battery, try the solutions listed below to save you time and money.

How do I fix the error battery not detected on Acer Swift 7?

1. Check for updates

  1. Click on Start and open Settings (or press Windows + I)
  2. Select Windows Update. Select Windows Update.
  3. Click Install Now to install any available updates. Install any available updates.

A battery error could be due to an outdated system. Make sure you’re using the most updated version of Windows for optimal performance.

2. Double check Volt and AMP rating

  1. Close your laptop and flip it over.
  2. Locate the sticker on the back cover and find the Volt and AMP rating.
  3. Double-check that the Volt and AMP rating matches the information on the AC adapter. Acer AC adapter.

If you are using the charger that came with your Acer Swift 7, then you can skip this solution. However, if you have a different charger than the original, the Volt and AMP ratings must match exactly, or you will run into issues with your battery.

If the charger Volt and AMP rating do not match what your PC requires, you can purchase the correct charger from the Acer website.

3. Run power troubleshooter

  1. Click on Start and open Settings (or press Windows + I)
  2. Scroll down to Troubleshoot. Click on troubleshoot.
  3. Select Other troubleshooters. Open other troubleshooters.
  4. Find Power and click Run. Run power troubleshooter.
  5. Examine issues found.

Running the power troubleshooter will locate any problems with the battery on your Acer Swift 7.

4. Perform a power reset

  1. Shut down your device.
  2. Unplug the charger and external cables/devices from your Acer Swift 7.
  3. Turn the laptop over and remove the screws from the back. Carefully remove the battery. Acer Swift 7 internals.
  4. Turn your device back over and hold down the power button for 30 seconds then release.
  5. Carefully replace the battery and ensure that there is no debris or dust, then reattach the back cover.
  6. Plugin your charger and turn on the laptop.

This solution requires a small screwdriver to remove the tiny screws on the back cover of your laptop to access the battery. Make sure you’re working in a clean, dry space to avoid internal damage.

Performing a power reset gets rid of any built-up power and resets the battery. You can find a disassembly tutorial for Acer Swift 7 online which will show you how to properly remove the internal battery.

5. Replace the battery

If all else fails and you’ve tried everything, it may be time to get a new battery. You can purchase a new battery for your Acer model on the Acer website.

The Acer website allows users to input their device’s serial number, SNID, or model number to find the correct battery or accessory.

Acer website.

Hopefully, the above solutions helped solve the error message battery not detected. If not, it may be time to replace the battery, luckily, the Acer website makes it easy to get the correct one.

The solutions above are for Windows 11 users, if your battery is not detected in Windows 10, we have a guide for that as well.

Let us know in the comments if there is a different solution that helped you solve this issue.

Why Businesses Should Use Barracuda VPN for Windows 11

A lot of the workforce has moved to remote work, companies need to keep their employee’s data protected.

Using a client VPN is the best way for businesses to protect their data. Companies need a VPN that can handle hundreds of users and offer a fast and secure connection for Windows 11.

Barracuda SSL VPN is made for companies that need to keep their employee’s PCs secure. This VPN client is easy-to-use and set up and provides security for travelers and remote employees.

Why should businesses use Barracuda VPN?

Barracuda VPN provides a secure connection for those who work from home with their device. It provides security for those traveling with company laptops.

The VPN is accessed through CudaLaunch, which is an app that gives users secure access to their business or company.

This app is available for Windows, macOS, Android, and iOS so users can access Barracuda VPN from both their PC and mobile device.

CudaLaunch app for Barracuda VPN.

Zero Touch Provisioning makes Barracuda VPN easy to use and hassle-free. This feature makes it easy to manage all Barracuda services from the CudaLaunch portal. It also reduces costs for support and administration.

The transport-independent network architecture (TINA) protocol improves network connection and reliability. This feature gives users a high-speed VPN connection while on the go and switching from network to network.

Pricing for Barracuda VPN varies depending on the size of the company and what security features they want. Barracuda also offers several other services, including app and cloud security and email protection.

Barracuda VPN features.

Barracuda VPN is perfect for businesses and companies that have employees who travel, work from home, or use their own devices. The VPN has a simple interface and can handle a large number of connections without jeopardizing security.

With a central management portal and Zero Touch Provisioning, clients can easily manage and access all of their Barracuda services from one central location.

For more information on this type of VPN, we offer an in-depth look at how corporate VPNs work and how they are different from individual VPNs.

⇒ Get Barracuda VPN

Fix: Unable to create new documents in Office 365

It is common to have issues with Microsoft Excel becoming stuck while opening, Word becoming unresponsive while opening, or Outlook displaying an error message. Now users are reporting that they are unable to create new documents in Office 365 as well.

While Windows 11 is free to download and install on eligible PCs, customers must separately purchase a subscription to the Microsoft 365 Family or Personal plan in order to gain access to popular applications such as Word, Excel, and Powerpoint (on a desktop or in the cloud) and other features.

Microsoft 365, formerly known as Office 365, is a popular office suite that is used by many people. Although not as frequently as other applications, the office suite is prone to crashes, hangs, and other errors.

With the all-new Windows 11 operating system, which includes numerous new settings and changes to existing features, it has proven difficult for users to find a solution to the problem.

Follow along as we will show you how to solve the unable to create new documents in Office 365 error, right after we see what the latest build offers for you.

What does the 15028.20160 build offer?

Subscribers to Office 365 (Microsoft 365) receive more frequent software updates than those who have purchased Office without a subscription. Ensuring that they have access to the latest features, security patches, and bug fixes, as well as the most recent versions of the product.

However, it can be difficult to keep track of the changes in each update and to determine when new ones are available.

 office version unable to create new documents office 365


Excel’s navigation pane, which allows you to see the layout of your workbook at a glance and navigate through its elements more quickly, is one of the new features included in this build.

The build also fixes a slew of bugs, including one in Excel in which using custom command bars could cause it to crash. Another one in Outlook in which the Index out of date message was displayed too frequently.

Furthermore, another issue from Word was fixed in which opening documents with thousands of track changes caused a performance issue.

And lastly, the problem across the entire Office suite in which contact cards were displayed incorrectly was fixed.

What can I do if I’m unable to create documents in Office 365?

1. Repair the app

  1. Open Settings and navigate to Apps followed by Apps & features.apps-apps&features unable to create new documents office 365
  2. Search for Office in the search bar and click on the three-dot menu to choose Advanced options.advanced-office unable to create new documents office 365
  3. Here, scroll down until you see the Repair button and press it in order to fix the unable to create new documents in Office 365 error.repair-app unable to create new documents office 365

When you repair an app, it must first check and replace all of the files in the program’s folder. It may also need to check and replace entries in the Registry Editor. Furthermore, it re-runs the program’s installation process, but it makes an effort to preserve any customizations you’ve made.

2. Reset the app

  1. Access the Settings app and navigate to Apps and Apps & features.apps-apps&features unable to create new documents office 365
  2. Enter Office in the search bar and go to Advanced options after you click on the three-dot menu.advanced-office unable to create new documents office 365
  3. Find the Reset button and click on it to reinstall the app quickly.reset-app unable to create new documents office 365

When you reset an app in Windows 11, it means that it will be restored to its original state and settings, and will behave exactly as it did when it was first installed on your computer.

3. Update Windows

  1. Inside your Settings app, navigate to the Windows Update section from the left-side menu.windows-update unable to create new documents office 365
  2. Here, click on the blue button that either says Install now or Check for updates, depending on your case. Make sure to do this regularly to ensure your computer’s functionality.check-for-updates unable to create new documents office 365

Installing software updates is also important in the long run, not only for accessing new features but also for staying on the safe side in the event that security loopholes are discovered in out-of-date programs.

4. Use alternative software

Almost everyone is familiar with Microsoft’s Office suite and understands how useful it is. However, not everyone has the financial means to purchase it, let alone maintain a continuous subscription to the most recent version year after year.

Fortunately, there is a less expensive alternative, which goes by the name of WPS Office. It includes three programs that are fully functional: a text editor, a presentation creator, and a spreadsheet.

wps unable to create new documents office 365


Once you have purchased the premium version, you will have access to the same features as if you had purchased Microsoft Word, PowerPoint, and Microsoft Excel, and their file formats are even cross-compatible with one another.

WPS Office comes with a large collection of templates that can be used for a wide range of documents and presentations, from educational materials to social media plans and recipe books, and more.

⇒ Get WPS Office

These are the ways in which you can fix the unable to create new documents in Office 365 error. But, if you need further information and potential solutions, check out our guide on how to fix Office 365 known issues.

Was this guide useful? Don’t hesitate to share your thoughts with us in the comments section below. Thanks for reading!

Windows news recap: third-party widgets may come to Microsoft Store, all Windows 11 users can now easily switch default browser, and more

Welcome back to our Windows news recap, where we go over the top stories of the past week in the world of Microsoft’s flagship operating system.

Microsoft makes it easier to provide feedback on Windows 365

Windows 365 is being integrated into the Microsoft Feedback Portal, making it easier for users to provide feedback. This replaces the feature request board in the Windows Tech Community.

Microsoft makes it easier to provide feedback on Windows 365 - OnMSFT.com - April 15, 2022

Windows 11 users may soon be able to install third-party widgets from Microsoft Store

More evidence has surfaced of third-party widget support coming to the Microsoft Store, as details in a widget manifest highlight.

All Windows 11 users can now easily switch default browsers

The process of setting the default browser in Windows 11 has been simplified in the latest cumulative update. What was originally a tedious process has been simplified.

change default browser in Windows 11

That’s it for this week. We will be back next week with more Windows news.

Windows Control Panel: What is it & How to Use it?

Users have been asking what Windows Control Panel is; answering it is our goal today. To put it briefly, it is a collection of applets, or little programs, that allow you to adjust different components of the Windows operating system.

Even though it has been available since Windows 1.0, it is a little more challenging to locate these days.

This is because much of its functionality has been transferred to the modern Settings menu, which is why you may be having problems finding the Windows 11 legacy Control Panel or questioning if the OS has one.

Even while the feature is still present, it is not prominently displayed, and you must reach it using the search function or Command Prompt.

Microsoft has announced that Windows 11’s Control Panel will be phased out soon as a number of modifications were made to the Settings app to include some of the former’s functionality.

Follow along as today we will show you how to open and use Control Panel, as well as address some of your most asked questions about it.

Does Windows 11 have a Control Panel?

Microsoft introduced the Settings menu in Windows 8 but did not remove the Control Panel from the operating system entirely.

The majority of its functionality has been consolidated into the Settings menu, which duplicates rather than replaces the functionality of applets in the process.

In addition, the Control Panel is still present in Windows 11, indicating that the migration of functionality has been slower than Microsoft perhaps wanted it to be.

control panel system and security what is windows control panel

Examples include being able to manage your apps from two different locations: the Apps & Features section of the Settings app, or from the Uninstall or change a program section of the Programs and Features applet accessed through Control Panel.

The Apps & Features menu follows the design structure of Windows 11, whereas the Programs and Features applet appears to resemble the one that appeared in Windows 8 & 10.

Since we are on the topic, users have been asking what Immersive Control Panel is in Windows 10. When you use it on your computer, it may save excess temporary data, which can eat up valuable hard drive space.

Although Settings has not entirely replaced Control Panel, Microsoft is encouraging users to switch to this interface instead.

How can I use Control Panel to tweak Windows 11′ system settings?

1. Use Windows Search

  1. Press on the magnifying glass icon from your Taskbar to open the Windows Search function then type in Control Panel and click on the top result.control-panel-search what is windows control panel
  2. It is still fairly easy to find it, although Microsoft’s desire for people to start using the Settings app can be felt as the feature will also appear in this search.settings-control-search what is windows control panel

When utilizing your computer, Windows Search is an extremely useful feature. It works by using your preferred indexing options to assist you in locating what you are looking for.

The indexing process operates in the background, essentially creating a table of contents for all of the files that you have stored on your computer, without interrupting your work.

2. Use Run

  1. Hold the Windows + R keys simultaneously to open a Run box, then type in control.control-run what is windows control panel
  2. The Control Panel window will be immediately displayed after you press Enter, showing you all the applets categories.control-panel-small what is windows control panel
  3. Alternatively, open a new Run window and type in cmd.cmd-inside-run what is windows control panel
  4. Inside the Command Prompt tab, type in control and then hit Enter.control-cmd what is windows control panel

The Run command on an operating system such as Microsoft Windows or Unix-like systems is used to open a program or document that has a known path by opening it straight from the command line.

7 things to know about the Windows Control Panel feature

Control Panel is still the heart of Windows and may be used to handle virtually every aspect of your operating system. It has access to everything, whether it’s keyword or mouse settings, password and user records, or playing with the sound and other hardware tweaks.

Even though Microsoft is working to replace it with the Settings app, you may still control your computer from it, and in certain cases, it is the only place to find specific options.

Here are seven things you should know about the Windows Control Panel feature before we completely forget that it even existed:

  • The initial release date is 1985 – Since Windows 1.0, Control Panel has been a part of Microsoft’s OS, with each subsequent version introducing new applets.
  • It is a special folder – Since Windows 95, it has been implemented as a special folder, which does not physically exist but only contains shortcuts to various applets such as Internet Options.
  • When System and Security (Windows 11) was added – Security Center (Windows 7), Action Center (Windows 8), or Security & Maintenance (Windows 10) was first included in Windows XP. It provides access to built-in security features and information on existing antivirus software.
  • It can include third-party applets – Third-party applets, such as audio and video drivers, VPN utilities, input devices, and networking tools, are available. Microsoft has disabled any shortcuts or third-party software that could have been used to access the defunct System page.
  • Efficient search function – When browsing Control Panel by icons, type the initial letter of the item’s name in the search bar at the top, to easily locate it in the list.
  • Storage spaces were moved to Settings – Storage Spaces allows you to construct a Pool of several disks of varying sizes and interfaces. The feature used to be available in Control Panel, but it was later moved to the Settings app.
  • It will probably become obsolete – Microsoft is slowly improving the Settings interface and migrating features into it, thus ending the legacy Control Panel after more than 30 years of existence and usage.

You often open up the Settings application when you want to make a configuration change in Windows 11. On the other hand, the dependable Control Panel continues to play a vital part during numerous configuration operations.

Check out our post on what to do when Control Panel is not responding in Windows 10/11, if you need further assistance opening it.

Alternatively, we have prepared for you a guide on how to fix the Settings app if it crashes due to file corruption or various other causes.

Leave us a comment in the section below and tell us whether this guide proved to be helpful to you. Thanks for reading!

Lenovo IdeaPad 5 camera not working? Here’s how you fix it

Webcam has become an integral part of our work-life owing to the amount of time spent in virtual meetings. And this is why it must work effectively. But, several Lenovo IdeaPad 5 users have reported that the camera is not working.

It could be something as simple as a closed shutter, or the slightly complex ones like misconfigured settings and driver issues behind the problem.

But, no matter what’s causing it, the troubleshooting part shouldn’t take more than a few minutes, provided that the camera is not defunct.

Here are the most effective ways to eliminate the Lenovo IdeaPad 5 camera not working issue.

What do I do if the camera is not working on Lenovo IdeaPad 5?

1. Some basic checks

The first thing you have to make sure of is that the camera shutter is not closed. Just move the physical slider near the camera to the other side and check if it now starts working.

Also, make sure that nothing is blocking the camera. In case you have a new laptop, there could be a sticker pasted on the camera to protect it from scratches but it might lead to hazy picture quality. If you find one, remove it.

If everything seems fine here, it’s likely a software issue, so head to the fixes listed next.

2. Make sure that the camera is not disabled

  1. Press Windows + R to launch the Run command, enter devmgmt.msc in the text field, and then either click OK or hit Enter to launch the Device Manager.Device Manager to fix lenovo ideapad 5 camera not working
  2. Double-click on the Cameras entry here.Cameras
  3. Now, right-click on the problematic camera, and if there’s an Enable device option, click on it.Enable device to fix lenovo ideapad 5 camera not working

After making the changes, check if the Lenovo IdeaPad camera not working issue is fixed.

3. Update the camera drivers

  1. Press Windows + S to launch the Search menu, enter Device Manager in the text field at the top, and then click on the relevant search result.Device Manager
  2. Now, double-click on Cameras to expand and view the devices under it.Cameras
  3. Right-click on the camera that’s not working, and then select Update driver from the context menu.Update driver to fix lenovo ideapad 5 camera not working
  4. Next, select Search automatically for drivers from the two options in the Update Drivers window.Search automatically for drivers

A driver is a critical piece of software that helps in the functioning of a device. If there’s a problem with it, the camera on your Lenovo IdeaPad 5 may stop working. In most cases, it’s an outdated driver to be blamed, and updating it should do the trick.

Sometimes, the Device Manager may not be able to find an update, in which case, you will have to try other ways to update a driver in Windows 11.

Or, to steer clear of the trouble, you can use Outbyte Driver Updater, a dedicated tool that will automatically update all the drivers installed on your system. After downloading the app, you don’t have to worry about updating drivers ever again.
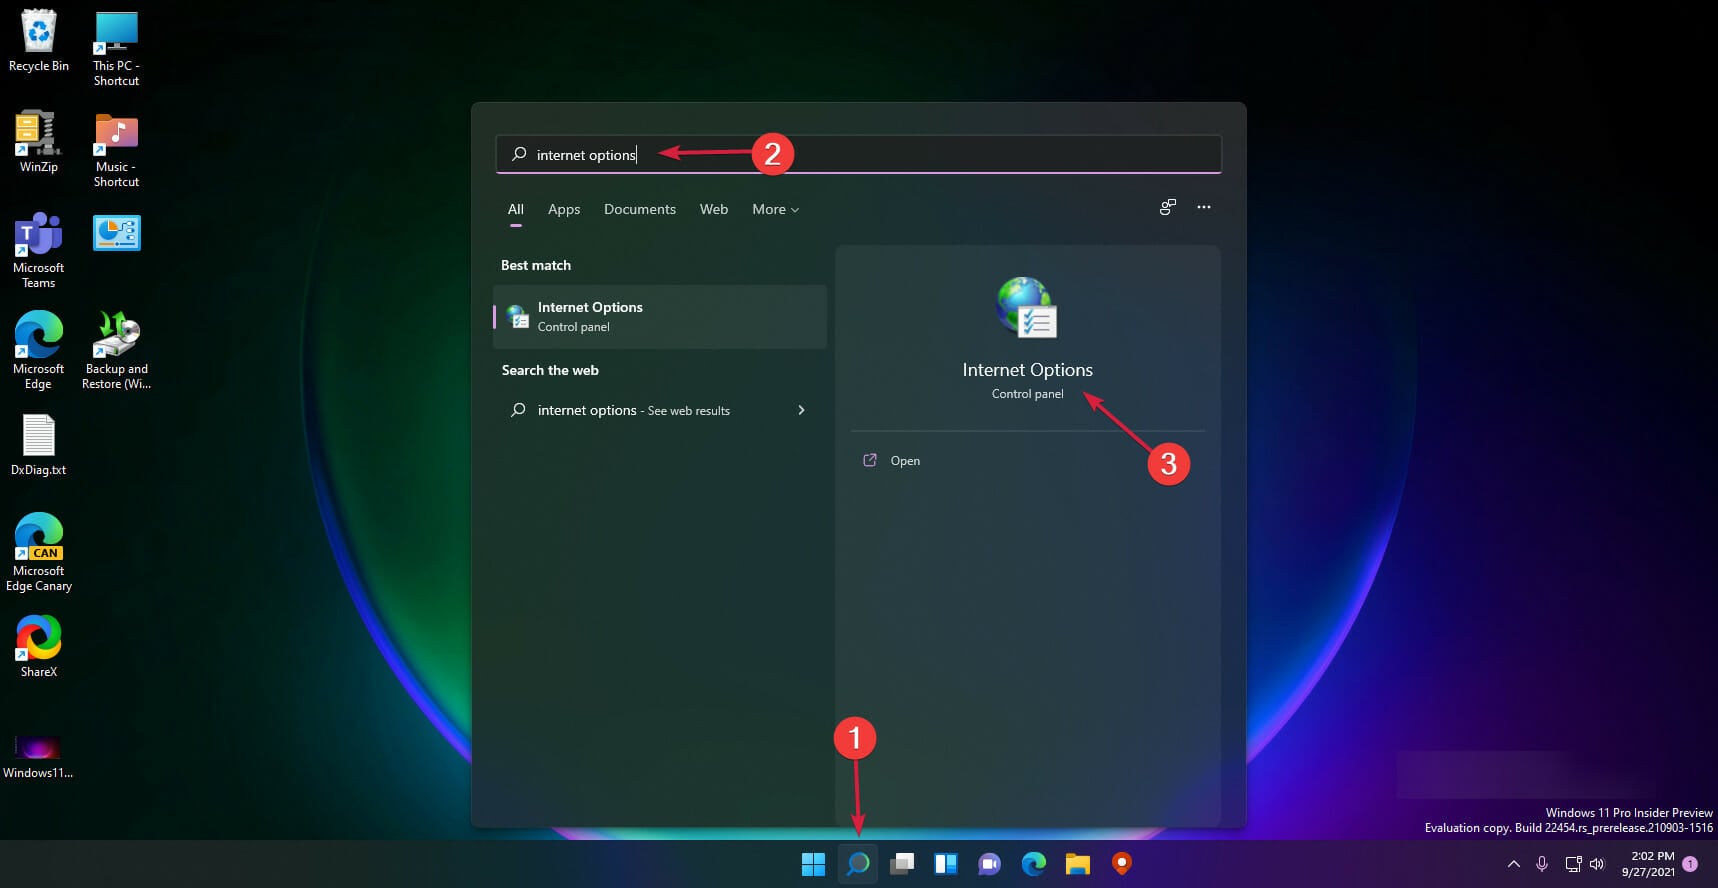
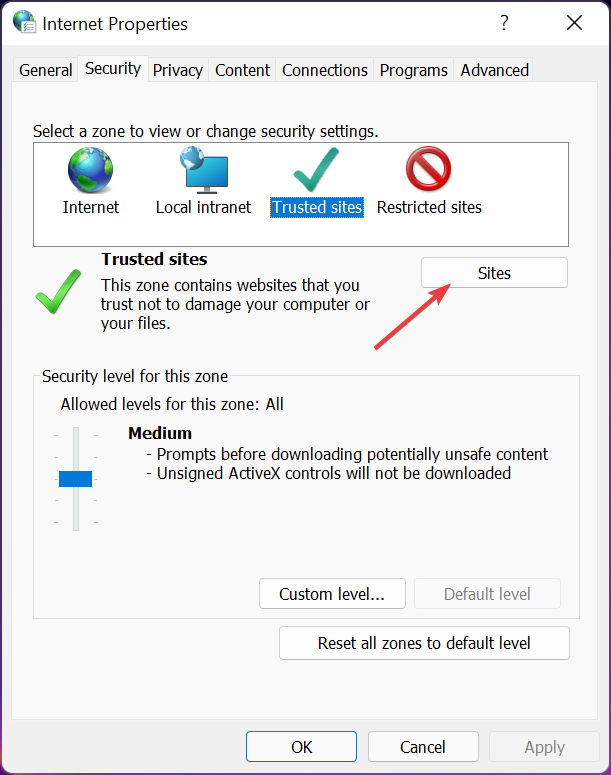
⇒ Get Outbyte Driver Updater

4. Check privacy settings
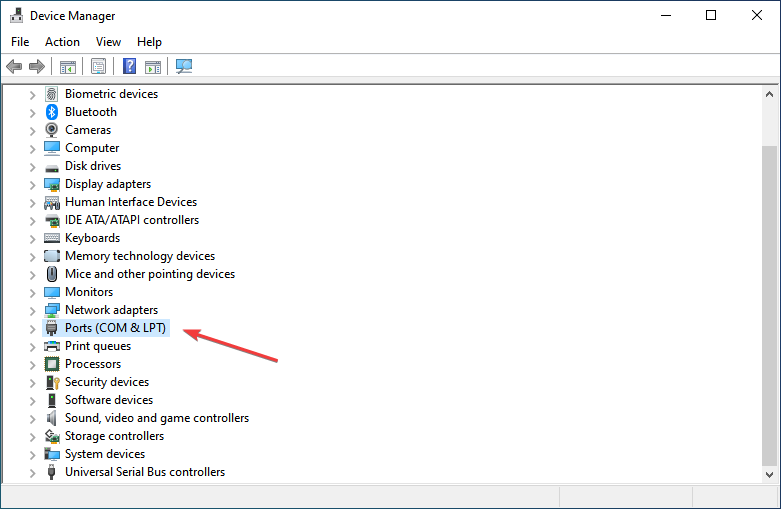
  1. Press Windows + I to launch the Settings app, and then select Privacy & security from the tabs listed in the navigation pane on the left.Privacy & security
  2. Next, scroll down and then click on Camera under App permissions on the right.Camera to fix lenovo ideapad 5 camera not working
  3. Now make sure that the Let apps access your camera option is enabled. Also, verify the app you are having trouble with has access to the camera from the list underneath.Enable option to fix lenovo ideapad 5 camera not working

If you are having problems with a particular app, it’s likely that the app does not have access to the camera. So, just verify that and provide the necessary permissions to fix the Lenovo IdeaPad 5 camera not working issue.

5. Uninstall the Lenovo Settings app

  1. Press Windows + R to launch the Run command, type appwiz.cpl in the text field, and then either hit Enter or click OK to launch the Programs and Features window.appwiz.cpl to fix lenovo ideapad 5 camera not working
  2. Locate the Lenovo Settings Dependency Package, select it, and then click on the Uninstall button at the top.Uninstall to fix lenovo ideapad 5 camera not working
  3. Click Yes in the confirmation prompt that pops up.Click Yes

If none of the methods listed here have worked, you can try uninstalling the Lenovo Settings Dependency Package and the problem should now be eliminated.

Though highly unlikely, if you still haven’t gotten the Lenovo IdeaPad 5 camera working, check some general troubleshooting to fix webcam issues in Windows 11.

Also, if you are encountering camera issues, particularly with Zoom, check our dedicated guide.

Tell us which fix worked for you in the comments section below.

How to Download Mozilla VPN for Windows 11

The VPN market is slowly becoming saturated. This makes most of the VPNs available today not up to the task.

They are faced with issues like speed throttling, unreliable connections, intermittent disconnections, DNS leaks, and a lack of privacy protection.

Mozilla’s free Firefox Private Network offers a secure connection for your browser traffic with none of these problems. It’s also an excellent way to get started with VPN services since it’s free!

Do I need Mozilla VPN for Windows 11?

There are many VPN services in the market so why go for Mozilla VPN? Below are some compelling reasons:

  • You benefit from high-level device encryption to keep your personal information private, so you can safely access the internet at home, work, or anywhere else.
  • Mozilla VPN encrypts your connection on up to 5 devices so you can take full control of your privacy and location, no matter where you are.
  • No matter where you are in the world, Mozilla VPN gives you access to servers in 30+ countries around the world. You can connect to services that would otherwise be blocked by geo-restrictions.
  • Mozilla VPN doesn’t throttle your speed so you can enjoy streaming in high definition and download large files without having to wait.
  • You can rest assured that Mozilla VPN will not collect or share your personal information, browsing history, or online activity – including your location – so you can browse with confidence. No activity logs. No connection logs. Just peace of mind wherever you go on the web.

How do I install Mozilla VPN for Windows 11?

  1. Navigate to your browser and open the Mozilla VPN download page.
  2. Select Already a subscriber on the top right corner.
  3. Click Download VPN for Windows 10/11.

Feel free to check out our other dedicated articles to help you manoeuver around any VPN issues you may be facing. For instance, if your VPN is blocked, we have an excellent guide to fix the issue. 

We also have a step-by-step guide on how to set up VPN with Remote Desktop so be sure to refer to that article too.

If you have downloaded Mozilla VPN, we’d love to hear your thoughts so far on your experience. Share your thoughts in the comment section below.

Lost Ark g0x9-spelpwp1p2nt Error: 5 Methods That can Fix It

Lost Ark is a top-down 2.5D fantasy massively multiplayer online action role-playing game that seems to be at the center of worldwide players’ attention. Sadly, the gameplay experience is reduced by errors like g0x9-spelpwp1p2nt. Let us explore its possible causes and solutions.

What causes Lost Ark g0x9-spelpwp1p2nt error?

We have investigated the problem and can confirm that serval elements may trigger the problem, including the following:

  • Network connectivity issues – This may be the case for most users with weak or unstable internet connections.
  • Server issues often arise due to server maintenance or any other downtime.
  • File corruption – This is a huge factor, especially if the corrupted files are essential game files for Lost Ark.
  • Firewall issues – This revolves around restrictions from your antivirus. In some cases, conflicts may cause a firewall to treat your legitimate files as harmful content.
  • Inadequate resources – Most games like Lost Ark are resource intensive. Hence you may expect errors if you do not have enough system resources to handle the game.

We will now explore solutions that should work regardless of the triggers.

How can I fix Lost Ark g0x9-spelpwp1p2nt error?

Before proceeding with any of our suggested solutions, please try the following workarounds:

  • Restart your computer – Something as easy as a reboot can reset some processes and fix minor networking issues.
  • Check your internet connection – Since a bad network often triggers the error, you should consider switching networks as it may save you the time of complex troubleshooting.
  • Wait out the problem – If the problem is triggered by server issues or downtime, you cannot help it. You may check the server status before trying any fixes.
  • Verify your system meets the minimum requirements – Below, we have listed the system requirements; if your system falls short, you will need an upgrade before playing the game.
    • Requires a 64-bit processor and operating system
    • OS: Windows 10 (64-bit only)
    • Processor: Intel i3 or AMD Ryzen 3
    • Memory: 8 GB RAM
    • Graphics: NVIDIA GeForce GTX 460 / AMD HD6850
    • DirectX: Version 9.0c
    • Network: Broadband Internet connection
    • Storage: 50 GB available space

1. Use a VPN

Of course, to improve your overall gaming experience, you can try a reliable VPN solution that will help you avoid server-related errors, such as the g0x9-spelpwp1p2nt Lost Ark error, and will decrease latency instances.

Private Internet Access is the best option you can go for. Regarding its Tunnel Network, remember that you can choose from over 3000 VPN and Proxy servers spread across more than 40 countries worldwide.

Private Internet Access has VPN servers optimized for gaming, and it also comes with OpenVPN, WireGuard, Shadowsocks, SOCKS5, split tunneling, and a kill switch.

Plus, if you’re a beginner, do not forget that PIA provides a straightforward and intuitive user interface, and the software is easy to set up.

Manufacturers allow you to create ten simultaneous connections to share a secure gaming experience with your close ones.

Take a look at the most impressive key features of Private Internet Access:

  • AES-256 bit encryption
  • Powerful protocols like OpenVPN or WireGuard
  • Thousands of servers in more than 40 locations
  • 10 simultaneous connections

Private Internet Access

If you want to prevent server and network game-related issues, PIA is a trustworthy solution.
Check price Visit website

To discover more VPN solutions that can reduce ping, check our dedicated guide.

2. Check if your system is updated

  1. Open Windows Settings by using the following keyboard shortcut: Windows + I.
  2. Navigate to Update & Security.
  3. If there are any available updates, the Check for updates button will appear on the right side of the window.
  4. Click on it, then wait until your system scans for updates. 
  5. Download the recommended ones.
  6. After the process, restart your PC and check if the G0X9-SPELPWP1P2NT Lost Ark error persists.

3. Update your graphics drivers

  1. Hit the Windows key, type Device Manager, and click on the first result.
  2. Expand the Display adapters section, right-click on the needed element, and choose to Update driver.
  3. Select Search automatically for drivers.
  4. Your OS will now scan for any available options and notify you accordingly.

The above steps are the easiest to update your graphics drivers manually, but they still might consume much more time than an automatic solution.

There is software that can greatly simplify this task. A specialized driver updater will be able to scan your system, identify broken or out-of-date drivers, and automatically download new ones or update them to their newer versions.

4. Customize the game’s video settings

  1. Open Lost Ark.
  2. Navigate to Settings.
  3. Go to Video.
  4. Select the Auto Settings.

5. Temporarily disable your antivirus software

  1. Press on the Windows key, type Control Panel and open the first result.
  2. Navigate to System and Security.
  3. Click on Windows Defender Firewall.
  4. From the left window pane, choose Turn Windows Defender Firewall on or off.
  5. Checkmark the two options shown directly below.

So, as you can see, even if developers didn’t announce any specific workaround that could help gamers with the G0X9-SPELPWP1P2NT Lost Ark error, several solutions might solve it.

Lastly, if you face any additional related questions or misunderstandings, share them with us by leaving a comment in the section below.

Opera For Samsung TV: How to Download & Install it

Many users are using smart TVs, and they are wondering if it’s possible to install Opera for Samsung TV. In today’s guide, we’re going to answer this question.

How can I install Opera on my Samsung Smart TV?

Download it from third-party source and sideload it

  1. Access the current browser installed on your Samsung Smart TV and search for Opera One TV browser. Note that the browser will work on Android TVs, excluding the ones that run on Web OS.google search for opera TV browser
  2. Look for the APKmirror website and enter it.select opera tv browser google search
  3. Scroll down to the download button and click on it to start the process.download opera tv browser apk
  4. Once the file is downloaded, you need to enable sideloading on your device, if it supports it, to install the APK.

Keep in mind that Opera doesn’t have a version for smart TVs anymore, so this version is likely outdated, unsafe, and incompatible with your smart TV. And since it comes from a third-party source, it might not be safe to use.

Can I install another browser on Samsung TV?

No, it’s not possible to install another browser on Samsung TV, so you’re forced to use the built-in browser.

Is Opera available for TV?

Opera used to be available on certain smart TVs in the past, but not anymore, and the company isn’t maintaining or releasing new versions for smart TVs.

If you’re on Android TV, we have a great guide on how to download and install Opera on Android TV, so don’t miss it.

We also have a guide on how to install the Opera browser for Roku, so you might want to check it out.

Was this guide useful for you? Leave us a comment in the section below and tell us what you think. Thanks for reading!