Those of you who are looking to spice up your life with a bit of adventure in the open seas have probably at least heard of Sea of Thieves. This outstanding first-person multiplayer co-op/PvP pirate game has been quite popular ever since it was launched.
However, like any other game, it has its fair share of issues. For example, there are situations where players say that they cannot even launch the game, let alone play it:
As the title says the game will not launch on my pc. It stays on the splash screen for 5 minutes or so and just closes
Not being able to launch the game does spoil a lot of the potential fun a game can bring. Fortunately enough, there are a few things you could try to bypass this issue.
Since the game is so popular, and this type of issue is quite severe, we’ve decided to create this step-by-step to help you get into the open waters again as soon as possible.
How can I make Sea of Thieves launch again?
1. Make sure your OS is updated
While it is a common problem that many users face, updating your OS to the latest version is frequently the go-to (sometimes the only) solution that you should try.
Press Start
Select Settings
Scroll down and select Update & Security
Press Check for Updates to make your PC search for any update sit may be missing
If updates have already been found and they were pending, select Download now
Reboot the PC
If this solution doesn’t work, please proceed to the next one listed below.
2. Login as an administrator
This solution may sound strange enough at first glance, but a lot of players have reported that logging to Windows 10 with a local Admin Account fixes the majority of cases reported.
When you log into your Windows 10 PC, just make sure you log into an account labeled administrator, and that is pretty much it.
PowerShell is a great overall tool when trying to perform a variety of tasks in Microsoft Windows. In the case at hand, it cna even help you with your Sea of Thieves issue.
Press Windows + R
Type Powershell and press Enter
Copy and paste the following into the PowerShell window and press Enter
This may sound strange enough, but it is a known fact that having a different time setting than the one you are actually in can cause a variety of issue with online content, not just Sea of Thieves. Thus, follow these steps to get rid of any such issues:
Right-click the clock on your Taskbar
Select Adjust date/time
Untick then retick Set time zone automatically
Reboot your PC
By following these steps, you will be able to play Sea of Thieves once more and enjoy the freedom of the open sea. In case you’re having network problems, our latest Alabasterbeard error in Sea of Thieves guide should be able to help.
Google has announced that it will continue providing Chrome support for Windows 7 beyond the Operating System’s end of life on January 14, 2020. The development is a much-needed reprieve to users who are yet to migrate to Windows 10 and are concerned about the cybersecurity risks of not migrating.
Microsoft had promised to keep supporting the Windows XP successor for 10 years from 2019. Withdrawal of support for Windows 7 means that technical assistance and software updates, including security patches, will no longer be available for the OS.
Traditionally, Microsoft provides regular security updates to mitigate specific threats to PCs and information technology (IT) systems. On September 10, 2019, the software-maker released the KB4516033 security-only patch to protect 32-Bit (x86) versions of Windows against vulnerabilities known as microarchitectural data sampling. Such Windows 7 security updates won’t be available for free for much longer, and that’s part of the issues Google is trying to resolve with the Chrome browser.
You can keep using Chrome on Windows 7 safely until 2021
Chrome support for the OS will benefit business users, according to Max Christoff, Engineering Director, Chrome.
We have enterprises covered, even if they haven’t yet made the full move to Windows 10. We will continue to fully support Chrome on Windows 7 for a minimum of 18 months from Microsoft’s End of Life date, until at least July 15, 2021.
With Chrome, enterprises that are still on Windows 7 will be able to address numerous security threats, especially when interacting with web-based applications. The browser includes a range of internet-safety features, such as anti-phishing and advanced password protection.
Site isolation is also a key cybersecurity function that Google promises to deliver with extended Chrome support for Windows 7. The extra layer of protection makes it more difficult for suspicious websites to access or steal data from enterprise applications or sites.
Also, users can look forward to automatic Chrome security updates and proactive protection to secure their cloud-hosted systems. If there’s a significant number of enterprise users on Windows 7 by July 15, 2021, Google might extend Chrome‘s support for the OS beyond this date.
The stalledDueToTarget_MdbAvailability status you’re seeing is such a buzz kill. Maybe you were moving mailboxes from Exchange 2010 to Exchange 2016 using migration batch in EAC and finally noticed that some mailboxes take a long time to complete migration.
Others describe getting the same stalledDueToTarget_MdbAvailability migration error message when transferring a mailbox from Exchange 2013 to Exchange Online and examples may continue.
This is often an indicative of a target database issue. That’s where you’re moving the mailbox to, and it should be an active copy.
There are instances when no unique solution can be given. In this short guide, we’ll though make sure there’s something you can do to fix this.
How can I fix stalledduetotarget_mdbavailability error?
1. Move a single mailbox by using the New-MoveRequest
For troubleshooting this migration error, you should first try to move a single mailbox by using the New-MoveRequest. Don’t hesitate to specify the target mailbox as a new one.
This should work if the issue was indeed caused by a database copy.
2. Increase the number of simultaneous mailbox moves
Open Explorer on the Exchange server.
Go to C:Program FilesMicrosoftExchange ServerV14Bin. This is the default path; the path on your server might be different.
Make a backup copy of the file MSExchangeMailboxReplication.exe.config.
Change these parameters to fix the error: MaxActiveMovesPerSourceMDB = “5” MaxActiveMovesPerTargetMDB = “2” MaxActiveMovesPerSourceServer = “50” MaxActiveMovesPerTargetServer = “5” MaxTotalMovesPerMRS = “100”
Use the following command: Restart-Service MSExchangeMailboxReplication to restart the Mailbox Replication service and keep the changes.
If you see the migration error after successfully moving a few mailboxes, then it may be caused by a limit for the number of simultaneous mailbox moves.
Increase it by modifying some parameters’ value in MSExchangeMailboxReplication.exe.config file.
3. Microsoft Office 365 Support
In case the issue still persists even after performing the steps listed above, then create a ticket within Microsoft Office 365 Support. Other users did the same and the support team suspected it could be an issue with Throttling.
They have decreased the throttling thus solved the problem.
You can always use a third-party email client program that supports Exchange to access and manage your mailboxes. The software will allow you to connect to your Exchange account with your email address and password. In case it won’t be able to detect your server details automatically, you will have to enter them as well in order to use the email client program.
Make sure that this stalledduetotarget_mdbavailability Office 365 migration error isn’t here to stay! Just apply the above tips one by one. For those whom we’ve helped, spread the word as others face the same issue too.
Blizzard released its ever-popular Destiny 2 game on Steam on August 2019 and since then many users have been trying to figure out a way to migrate from Blizzard to Steam.
This is a simple process, but for some users, it can be a nerve-wracking experience, considering the time they have spent playing the game on their PCs.
In this article, we will walk you through the step by step by guide to migrate from Blizzard to Steam and move your Destiny 2 account successfully to it.
How can I transfer a Blizzard account to Steam?
To transfer Blizzard account to Steam, go to Bungie.net. Click the red bar at the top.
If you don’t see the red bar, then go to PC Movepage.
Login to your Blizzard account.
Click on Begin Transfer button on the page.
Select Steam from the list of services.
If you are not logged in, you will be asked to enter the username and password. Enter the details and sign in.
Once signed in, select I’m Done to complete the Blizzard account transfer to steam.
Once the Blizzard account is migrated to Steam, you can play Destiny 2 from your Steam client.
This is a one-time offer from Blizzard that allows the Destiny 2 users to move from Blizzard to Steam. Blizzard discontinued Destiny 2 on its own server and the users are encouraged to move to Steam.
If you don’t have a Steam account, you can create one for free during setup.
Follow the steps above to migrate from Blizzard to Steam once the account is ready.
Steam is a popular platform that distributes digital games. The service offers all the major PC titles under one roof and also allows you to manage all the games from a single source.
What gets transferred to Steam?
If you were wondering what are the Destiny 2 properties from your Blizzard account that will be migrated to the Steam account, here they are:
Cosmetic items like Ghosts, Sparrows, emblems, Weapons and armour, Triumphs
Silver and Bright Dust, Expansions, Annual Pass, DLC
Everything the user had while playing the game on Battle.net will be moved to the Steam account. However, you may have to add your friends individually due to both the platforms having different userbase.
Conclusion
By following the steps in this article you can successfully migrate from Blizzard to Steam while retaining all the saves and game data. Just make sure you follow the steps carefully not to lose any details in the process.
If you have any other questions or suggestions, don’t hesitate to leave them in the comments section below.
If you get the error message No boot device available in Windows 10, you can follow the tutorial posted below and find out how to fix the No boot device available/No boot device found issue.
You will also need to follow the methods in the order they are posted to minimize your debug time on the Windows 10 device.
First of all, before you begin, you will need a DVD or an external memory like a USB device with Windows 10 on it to be able to boot from it. Also make sure the CD/DVD you have with Windows 10 is not damaged in any way thus preventing any errors in the boot process.
No Boot Device Available message can be a big problem, and in this article we’re going to show you how to fix the following issues:
No boot device found Windows 10 Dell – This problem can appear on almost any Windows device, and many Dell users reported this problem on their PCs.
No boot device found press any key to reboot the machine – Sometimes this error message will ask you to press any key to restart your PC. Unfortunately, even after you restart your PC you won’t be able to access Windows.
No Boot Device Available USB, UEFI – Sometimes this problem can occur if you’re using UEFI. To fix this issue, you just need to change your UEFI configuration.
No boot device has been detected – This is a variation of this problem and it can appear if your hardware is faulty. In addition, this issue can appear if your hard drive isn’t properly connected.
Keyboard failure No Boot Device Available – According to users, sometimes this problem can be caused by your keyboard. To fix the issue, you might want to try disconnecting or replacing your keyboard.
No Boot Device Available current boot mode is set to BIOS – This is another relatively common problem. If you’re getting this error message, you just need to switch from BIOS to UEFI and the issue should be resolved.
No boot device connected, found, selected, detected – This is a standard variation of this problem, and many users reported that their boot device isn’t connected or found. This can be a big problem, but you should be able to fix it using one of our solutions.
No boot device SSD – Many users reported that this problem started appearing after using an SSD. This isn’t a serious problem and you should be able to fix it by changing your BIOS settings.
On a side note, this specific error often occurs shortly after migrating from Windows 7 to Windows 10. But it can also occur after installing the latest Windows 10 updates. Judging by the number of reports we’ve come across, Dell computers are particularly affected by this issue. You can use the troubleshooting guide below both for Dell computers, as well as other computer brands.
Place the Windows 10 DVD/USB and reboot the Windows operating system. Note: If you can’t boot from the Windows DVD then you will have to go in the BIOS options of your device and be sure you have the option to boot from the CD/DVD selected and enabled.
After your system boots you’ll get to a Windows setup page. Click the Next button to proceed.
Left click or tap on the Repair your computer option in the next window.
Select the Windows 10 operating system you wish to repair.
Let the automatic repair process run and after it is finished reboot again without the Windows 10 DVD and check if you still get the No boot device available message.
Solution 2 – Run the troubleshooter
Several users claim that you can the problem with No boot device available message simply by running the troubleshooter. If you can’t access Windows normally, you might want to try this solution from Safe Mode.
In the search box write Troubleshooter and select Troubleshooting from the menu.
Select Windows Update from the list and click on Run the troubleshooter button.
After the process is completed reboot your Windows 10 device and check if you still have the same issue.
Keep in mind that this isn’t a universal solution, so it might not work for you.
Solution 3 – Run SFC scan
Press Windows Key + X and choose Command Prompt (Admin) from the menu.
Write in the command prompt the following: sfc /scannow and press Enter to run it.
Let the system file checker process finish and reboot the Windows 10 device.
Check again for the No boot device available message.
If you can’t access your Windows 10 at all, you can run Command Prompt from Advanced Boot Menu. To do that, simply restart your PC couple of times. Now select Troubleshoot > Advanced options > Command Prompt.
When Command Prompt starts, you need to run the following commands:
sfc /scannow /offbootdir=c: /offwindir=c:windows
chkdsk c: /r
chkdsk is giving you headaches? Check out this quick guide to any issues with it.
If those two commands can’t fix the problem, you might have to use DISM scan instead. To do that, just run this DISM /Online /Cleanup-Image /RestoreHealth command.
If the previous command doesn’t work, try using the following commands instead:
These commands will check for file corruption and fix any corrupted files on your hard drive that might prevent Windows from booting. Keep in mind that this isn’t a universal solution, so it might not work if the problem is caused by your hardware.
Solution 4 – Make sure you’re using UEFI
Many users reported No Boot Device Available message after a BIOS update. If you’re getting this error message, the problem might be related to your BIOS. To fix the issue, you need to switch from BIOS to UEFI.
This is a simple process, and in order to do it, you just have to enter BIOS and change a single setting. Since there are many different versions of BIOS, we strongly advise you to check your motherboard manual and see how to switch permanently to UEFI.
After doing that, the error message should be resolved and your PC should start working again.
Solution 5 – Check for loose cables
Sometimes you might get No Boot Device Available message if your components aren’t connected properly. To fix this problem, you need to power down your PC, disconnect it from power outlet and open your computer case.
After doing that, be sure to check all SATA cables and make sure that they are tightly connected to your motherboard and to your hard drive. Several users reported that this problem occurred because their SATA cables weren’t firmly connected to their motherboard.
After connecting everything properly, the issue should be completely resolved.
Solution 6 – Disconnect USB peripherals
Users reported that No Boot Device Available message can be caused by your USB devices. According to users, they were unable to boot to their PC, but after disconnecting their USB devices, the issue was resolved.
Several users reported that their USB keyboard and mouse were the problem, so be sure to disconnect them as well. If your mouse or keyboard are the cause of the problem, try replacing them and check if that solves the issue.
Solution 7 – Set your hard drive as first boot device
According to users No Boot Device Available message can appear if your hard drive isn’t set as the first boot device. However, you can easily fix this issue simply by going to Boot section in BIOS.
From there you need to find First Boot Device setting and set it to your hard drive. After doing that, the issue should be resolved.
Several users are recommending to turn off Secure Boot feature, so you might want to do that as well. You can also try changing the Boot Mode from UEFI to Legacy to see if it helps.
After making these changes, the issue should be completely resolved. To see how to find and change these settings, we strongly suggest that you check your motherboard manual for detailed instructions.
Solution 8 – Fix your MBR
Sometimes damaged MBR can cause No Boot Device Available message to appear. To fix the issue, you need to start Command Prompt like we showed you in Solution 3 and run the following commands:
bootrec.exe /FixMbr
bootrec.exe /FixBoot
bootrec.exe /RebuildBcd
If those commands don’t work, try using these commands instead:
bcdedit /export C:BCD_Backup
c:
cd boot
attrib bcd -s -h -r
ren c:bootbcd bcd.old
bootrec /RebuildBcd
After running these commands, check if your problem is resolved.
The eight methods above are all but sufficient to get your No boot device available message out of the Windows 10 system.
You can also check a detailed guide on resolving boot device detection problems by visiting our Boot Device Not Found guide.
Keep in mind though that you need to follow them in the order they are presented and also be sure not to skip any of the steps presented.
If you have any more questions, don’t hesitate to leave them in the comments section below and we’ll be sure to take a look.
Microsoft’s Surface Neo and Duo aren’t set for release until Holiday 2020, but that doesn’t mean there’s no reason to hype the products up. Recently, both Satya Nadella and Panos Panay were seen showcasing the Surface Neo and Duo.
The most interesting of these moments comes from Surface Chief Panos Pany. Over on his Instagram, Panay showcased the desk and workspace of the Head of Quality over at the Surface team. Obviously, the post reveals how he’s using the Surface Hub 2S as a desktop display, which appears to be a new use case. However, if you look close enough, you can see both the Surface Neo and the Surface Duo on the far left side of the table. This is one of the first times we’ve seen the device on the desk of an employee internally at Microsoft, though we did see the devices out in the wild during Ignite 2019.
Secondly, there is an older Twitter post from Brian Sozzi, the Editor in Chief at Yahoo Finance. Here, we see that Microsoft CEO Satya Nadella himself is showcasing the Surface Duo to him during NRF 2020, the world’s largest retail conference and expo. Nadella is one of the keynote speakers there, but he also seems happy to showcase the Surface Duo, which Sozzi described as a “darn slick device.” It’s unknown if this is Nadella’s personal Surface Duo, but it is great to see that Microsoft’s own CEO is comfortable enough to show the device out in the public with the press.
Holiday 2020 is still well over 10 months away, but now what Microsoft is showcasing its newest devices, the hype is starting to build up. The company even updated its Android launcher today, to a version that many believe will be powering the Surface Duo, so the release date can’t come soon enough.
Sea of Thieves is one of the games which should popularize the multiplatform gaming service that Microsoft is advertising. The game is, for the time being, doing quite well, and we only hope that this co-op multiplayer concept will become the norm in the gaming industry. Now, even though the game is quite good, there are various issues, and most concern Microsoft Store. Namely, a lot of users are unable to update the game via Microsoft Store.
This is a grave problem, especially as there are frequent mandatory patches and fixes for Sea of Thieves. We made sure to collect all viable solutions and put it in a comprehensive list.
How to fix Sea of Thieves update issues in Windows 10
The first thing to do is to restart your PC. For some users, just the casual reboot fixed the problem. However, other users tried out a workaround which worked it out for them. This workaround requires you to restart the update. After the error appears, affected users restarted the PC and, after returning to Microsoft Store, the download process suddenly continued.
After that, they were able to finalize the update procedure and the game is set and ready. There are multiple reports about this procedure being successful but, on the other hand, it might not work for everyone.
2: Download any app to unblock Store’s authentication bug
Since the Microsoft Store overhaul, there seems to be an issue with authorization. Some users resolved it by signing out and signing in again with their account and checking the regional and time/date settings. However, the best solution we come to with the Sea of Thieves update error is to download another application. Any given application will work. Just navigate to the Store and download any given free app.
After that, the authorization bug should be resolved and you can move from there. If the issue persists, continue through the list.
Troubleshooting any given issue in Windows 10 was made easier with the introduction of dedicated troubleshooters. Since Microsoft Store is an essential part of Windows 10, there’s a dedicated troubleshooter for Store and its respective content. Running it might help in this scenario with Sea of Thieves and address the update halt.
Follow these steps to run the dedicated Store troubleshooter:
Press Windows key + I to open the Settings app.
Select Update & Security.
Choose Troubleshoot from the left pane and scroll to the bottom.
Expand Windows Store apps troubleshooter and click on the “Run the troubleshooter“.
4: Clear Store’s cache
Microsoft Store, as any other app, stores cache to speed up the loading speeds. However, piling up of the said cache can inflict various errors. There’s a chance that the cached data stored by the Store is corrupted and you’ll need to reset it in order to resolve the issue.
Resetting the Store’s cache is simple and all you need to do is run a simple command. Here’s how to do it in a few simple steps:
In the Window Search bar, type wsreset.
Right-click on wsreset and run command as an admin.
Open Microsoft Store again and try updating Sea of Thieves.
5: Restart Store installer in Task Manager
This solution showcases well how Microsoft has done a lousy job with Microsoft Store in comparison to Steam, uPlay, or similar third-party launchers. Namely, it seems that the Store’s Installer service tends to fail frequently. As the name itself says, this service covers all installation and downloads in Microsoft Store. As the case has shown, and judging by the frequent reports, this service sometimes stops in the middle of the download process.
Luckily, there’s a way to restart it and, hopefully, the update download will resume where it stopped. Here’s how to restart the Store installer service:
Open Microsoft Store and start updating the game.
When the download stops, right-click on the Taskbar and open Task Manager.
Choose the Services tab.
Find Install Service by pressing the ‘I’ key multiple times.
Right-click on it Install Service and select Start.
6: Use PowerShell command
Installing any application via Microsoft Store has an alternative. Besides the standard approach through the user interface, you can use PowerShell to enforce the update or installation of a certain app. This covers all pre-installed apps, third-party apps, and even games.
Windows 10 updates also bring system optimization improvements meant to help gamers run their favorite games as smoothly as possible. If you’re not running the latest Windows 10 OS build on your device, make sure to check for updates. Install the latest OS updates and then try to update Sea of Thieves as well.
8: Reinstall the game
Finally, if none of the previous steps resolved the error, we can assume that the reinstallation is the only viable solution remaining. We’re aware that this isn’t a quite welcome scenario, as the game in its original form takes up to 20 Gb. With that in mind, it can take a lot of time downloading it, depending on your bandwidth speeds.
Nonetheless, as we already said, it’s hard to find an alternative to this. So, do try to uninstall the game and reinstall it again. With the new installation, you’ll get the latest version of the Sea of Thieves. If you’re still unable to resolve the issue, we recommend sending a ticket to Microsoft support. There were a lot of problems with the game for Game Pass players, but those are seemingly addressed.
That’s it. Don’t forget to tell us whether you’ve managed to resolve the update issue with Sea of Thieves or not. The comments section is below, so feel free to share your thoughts and provide alternative solutions.
Ever since its big rebrand, Microsoft Launcher made its way to the top as one of the most popular launchers on Android. Thanks to its integrations with Cortana and even Windows Timeline, the launcher is the ideal solution if you’re a Microsoft fan.
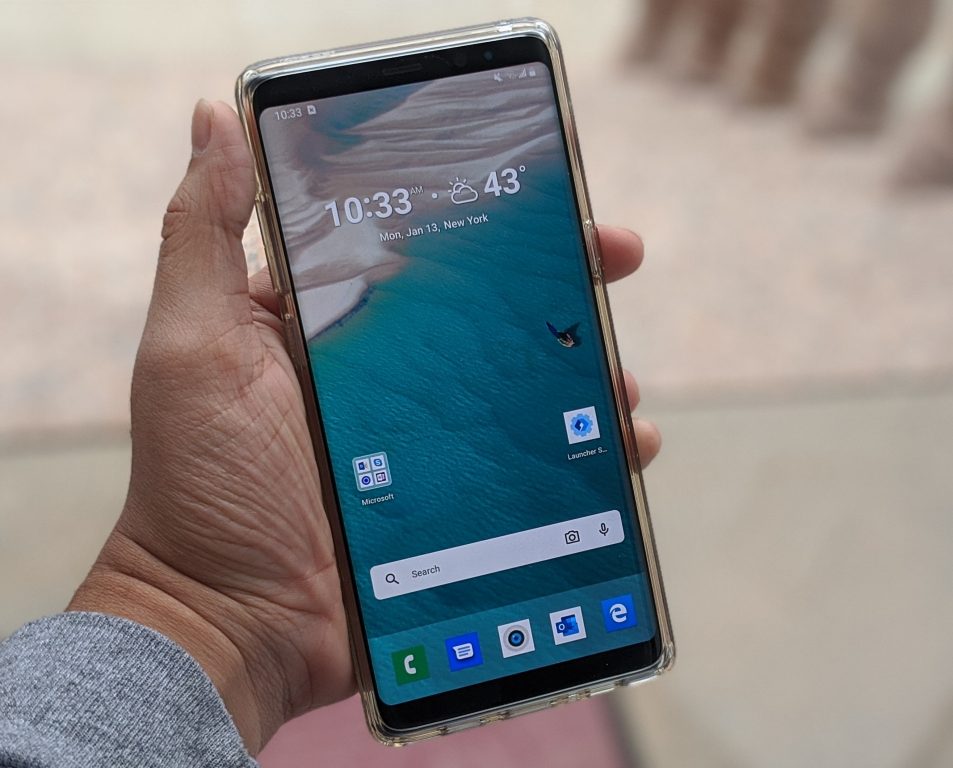
With the incoming Holiday 2020 launch of Microsoft’s first dual-screen Android phone, the Surface Duo, the company has now released an improved version of its Microsoft Launcher. Coming in at version 6.0, this version is available as a separate download, and it will likely power Surface Duo later this year. From the new landscape mode, revamped dock, and improved light and dark themes, it is quite different from the regular Microsoft Launcher experience on Android. Here’s more on what you can expect when downloading it.
A new landscape mode
The biggest change with this preview version of Microsoft Launcher is the new support for landscape mode. This is something that wasn’t available in previous versions of Launcher, and it works just as you expect. Now, when you rotate your phone, the launcher will rotate with you. You’ll be able to see both your home Screen and the activity area in landscape mode. The dock will move to the right side of the screen, and you’ll get an almost tablet-like experience, which might presumably be similar to the one that we might get with the dual-screen Surface Neo.
A new dock
Another big change in this new version of the Microsoft Launcher is the improved dock. A bit similar to the one on older versions of macOS, the dock is now much more front and center. It’s slightly taller and more square and looks exactly like the one we saw when Microsoft teased Surface Neo. Unfortunately, though, it does look like this early preview has removed the options for the quick settings toggles in the dock, as pulling up on it now just shows apps, rather than toggles for airplane mode, brightness, or Bluetooth. This is expected, as the launcher is currently in Alpha, which means you won’t be seeing all the features available in the regular Microsoft Launcher.
Improved light and dark themes and Glance screen
The third improvement in Microsoft Launcher Preview is improved light and dark modes. The light mode now has a different look to it, and when paired with the transparency effects, it essentially resembles the one that was previously introduced in Windows 10 version 1903. The dark theme also sees the same improvements and looks very similar to the Windows 10 dark mode as well.
These light and dark theme improvements are all best displayed in the Glance screen, which you get by swiping to the right. In this area, you’ll notice your profile icon at the top of the screen, similar to what we know the Windows 10X Start Menu will look like. The search bar has also moved so that you need to “pull-down” on it to show it, and even the cards in the Glance screen look different. They now have a more rounded look, and the names of the cards themselves no longer appear inside the card but are floating on top, giving it a cleaner and slimmer look that lets you peek to the background.
A look at what’s to come with Surface Duo
After playing with this preview version of Microsoft Launcher, there’s quite a lot to be excited about. Sure, the changes are small, and there are some bugs in this release, but from the redesigned dock or the improvements to the glance screen, Microsoft is clearly giving things a fresh coat of paint. Ahead of the release of the Surface Duo, this is your chance to help shape the future of Microsoft Launcher by sharing your feedback about new features work. You can take part now and download the Microsoft Launcher preview via the link below.
Windows 10 will soon be scrapped and Windows 11 will rule, but a lot of people still want to install Windows 7.
However, Windows 7 is so old that Microsoft doesn’t officially support it anymore. Luckily, we still found a repository of the genuine version of Windows 7 with SP1 update, readily available to mount on a USB flash drive or DVD.
In fact, if you look closely on the highlighted page, you will also find other Windows 7 versions for different languages or the Enterprise and Ultimate editions. While you are on that, you may also use the best Windows 7 ISO mounting tools and get over with it.
How do I download Windows 7 ISO file?
NOTE
We recommend quarantining and testing the files before using them. Although the Internet Archive website is reputable, we cannot guarantee that all the ISOs on their website are free of viruses or malware.
All you need to do is go to the Internet Archive website and hit the download button. It’s as simple as that:
Keep in mind that you need to first enter a valid 25-digit product key in order to get the ISO files.
Make sure you have sufficient data storage available on your computer, USB or external drive for the download to complete. More specifically, you need a blank USB or DVD that has at least 4 GB of space.
After you download the desired ISO file, you need to create a bootable media and use it to boot your PC from it. If you’re planning to create a bootable DVD, you can use any ISO-burning software.
However, if you plan to use a flash drive, you’ll need to use a tool such as Rufus. This is a free and portable tool that will allow you to create a bootable flash drive from an ISO file. To create a bootable flash drive, just do the following:
Connect your flash drive to the PC.
Start Rufus.
Make sure that your flash drive is selected.
Set Create a bootable disk using to ISO Image.
Click the disc icon next to it and choose your ISO file.
Click Start and wait for the process to finish.
Once the process is completed, use the flash drive and boot from it to install the desired operating system.
After creating your bootable media, you can follow this step-by-step Windows 7 installation guide to complete the setup on your PC.
Many older applications run better with legacy builds, so using a trusted source for these installers makes your Windows 7 setup more reliable. You can find compatible options through the best places to download old version software when modern releases refuse to launch on this OS.
This should not be a problem if you own a new computer. However, do make sure your computer meets the system requirements, especially if you’re planning the install the ISO files on an old computer.
Avast released an emergency update to fix the bugs that came with the recent Windows 7 and 8.1 monthly roll ups. The update fixed the annoying unresponsive Windows startup and booting issues.
Microsoft confirmed users utilizing Sophos and Avast security solutions experienced some serious issues after installing the latest Windows 7 and Windows 8.1 monthly roll-ups and security only updates.
These updates forced systems to become unresponsive and freeze on boot. The bug targeted Windows systems running Avast CloudCare, AVG Business Edition and Avast for Business.
However, Avast was quick to respond to these issues by releasing an update to fix them. The company rolled out an emergency update for various versions (18.7, 18.8, 19.4, and 19.3) to fix the problem.
Microsoft recommended its users to install the latest emergency update as soon as possible to get rid of bugs.
No update block in place for Windows 7 PC running Avast
Furthermore, Microsoft placed an upgrade block on some devices that are running problematic antivirus solutions. But there is a twist in the story.
There is no antivirus solution that comes preinstalled in Windows 7 and users often manually install it. Microsoft will not stop your system from updating if no antivirus is detected on your system.
Avast suggests that if you are facing booting issues, you can keep your device in standby mode for around 15 minutes.
Meanwhile, an update process will run in the background downloading and applying the updates.
The security vendor further stated that some devices can’t log in while others managed to log in after waiting for an indefinite period.
However, it is not clear yet why the issue came up in the first place and Avast is currently investigating the matter. If you’re experiencing this issue, there are few solutions that you can try out.
Update Avast
Notably, users may not download the latest update if they have configured a proxy server in Avast.
If you are one of those users, you should try the following steps to resolve these issues.
First, you need to enter into the Safe Mode
Uninstall the botched updates
Finally, install the latest updates released by Avast
Try different antivirus
If you’re still having issues, you might want to consider switching to different antivirus software. The latest version of Bitdefender comes with advanced threat protection and multi-layer ransomware protection.
In addition, this antivirus is incredibly simple to use, and it won’t take too much of a toll on your system resources. Bitdefender will also provide you with safe online banking, so you can make online purchases without any worries. If you want more protection, you’ll be pleased to hear that there’s a built-in VPN available.
Bitdefender is one of the best antivirus applications on the market, so be sure to get Bitdefender and protect your PC from all online threats.
Apart from Avast, users who are running Avira are also experiencing the same issue. Furthermore, there are some reports that some Windows 10 users are reporting booting issues on their systems as well.
If you haven’t tried Windows 10 because you don’t want to update your current version of Windows, you can easily dual boot Windows 7, or any other version of Windows, and Windows 10 Preview build. This is a relatively simple process, and today we’re going to show you how to do it properly.
How can I dual boot Windows 7 and Windows 10 Preview build?
Create new partition and download the Windows 10 ISO file
As you probably know, you can download Windows 10 for free if you are a member of Insider Program. After you’ve joined the Insider program you can download the preview build in a form of ISO file. Select the version that matches your processor, 32-bit or 64-bit, and download it. You’ll also need Windows USB/DVD Download Tool in order to create bootable USB flash drive or DVD with Windows 10 Preview build.
Before we continue any further, we have to mention that you should probably create a backup in case anything goes wrong. This is usually a relatively simple procedure, but in case something goes wrong, it’s always good to have a backup available.
After you’ve created a bootable USB flash drive, you need to create a new partition to install Windows 10 Preview build. Creating a new partition is mandatory if you want to dual boot any older version of Windows and Windows 10 Preview build. To create a new partition on your hard drive, do the following:
Press Windows Key + R and enter diskmgmt.msc. Press Enter or click OK to run it.
Disk Management tool will now open. Now you need to shrink certain hard drive partition. Choose a partition that has a lot of free space. Right click the partition and choose Shrink Volume from the menu.
In Enter the amount of space to shrink in MB enter the desired size of the new partition in MB. Click the Shrink button. Memorize the size of new partition because you will need it in the future steps.
You should see Unallocated space section, right click it and choose New Simple Volume.
Follow the instructions and make sure to create a new partition using a NTFS file system.
After you’ve created a new partition, you can close Disk Management and restart your PC.
Now you need to enter BIOS and change the boot priority. To enter BIOS you need to keep pressing one of the F keys, Esc or Delete key while your PC boots. If you can’t find the proper key, it’s always good to check your motherboard manual for instructions.
Once you’ve entered BIOS, you need to set your USB flash drive or DVD as the first boot device. To see how to do that, check your motherboard manual for detailed instructions. Save changes that you’ve made in BIOS. Now you can install Windows 10 Preview by following these steps:
Make sure your USB Flash drive or Windows 10 DVD is inserted.
You should see “Press any key to boot from a USB” message. Press any key to start the setup process.
Click Next and Install now.
Follow the instructions until you see “Which type of installation do you want?” window. Choose Custom: Install Windows only(advanced).
This is the tricky part, so make sure to pay extra attention. In this step you need to choose the drive that you created by using Disk Management tool. Since drives aren’t marked by letters, you need to extra careful in order to avoid overwriting your previous version of Windows. The easiest way to find the newly created partition is to check its size. Since newly created partition doesn’t have any files on it, it will have the same amount of free space and total space. Again, be extra careful while choosing the right partition.
After you’ve selected the partition, click Next and the setup process will start.
When the setup process is completed, you’ll get to choose between your current version of Windows and Windows 10 Preview every time you boot your PC.
If you wish, you can also just as easy remove Windows 10 Preview from your PC. To do that, you’ll need to follow these steps:
In the previous version of Windows press Windows Key + R and enter msconfig. Press Enter or click OK.
Go to the Boot tab and select Windows 10 Technical Preview and click the Delete button.
After you did that, Windows 10 Preview won’t be available as a boot option anymore, however, it will still remain installed on your PC. To remove it from your hard drive, you need to do the following:
Press Windows Key + R and enter diskmgmt.msc. Press Enter or click OK to run it.
Once Disk Management tool starts, select the volume that has Windows 10 Preview installed, right click it and choose Delete Volume from the menu. Click Yes. Bear in mind that this process will remove all files and folders from that drive, so make sure to select the correct drive before deleting it.
You should see Unallocated space in Disk Manager. Right click any partition and choose Extend Volume from the menu.
Follow the instructions in order to add unallocated space to that partition.
After you’re done, close Disk Management and restart your PC.
Modify boot options
When you start your PC, you’ll be asked to choose between Windows 7 and Windows 10 Preview. However, you can change certain settings, and to do that, just follow these steps:
When you get to the operating system select screen, click on Change defaults or choose other options.
You should see two options available:
Change the timer – Use this option to set a timer that will boot your PC to the default operating system.
Choose a default operating system – This option allows you to choose which operating system you want to boot to after the timer runs out.
As you can see, customization of boot settings is fairly limited, but it offers enough options for most users.
As you can see, running Windows 7 and Windows 10 Preview build in dual boot mode isn’t as complicated as you think, but before you do that, make sure that you have enough space on your hard drive to run two operating systems. Here are a couple of other articles related to dual bootingWindows 10:
When you cannot log in to Skype for Business on Mac, we’re sure that getting it to work again as soon as possible is your main concern. Users describe they’re a little unclear as to what is required of them in order to fix the problem.
Is this your case too? It doesn’t hurt to remind you of a few essential things. Make sure to always use your organization credentials, not your Skype name or Microsoft account. Even more, if asked to enter both a user ID and a sign-in address, keep in mind that these two are the same for most organizations.
Still having trouble signing into Skype for Business? Then, let’s dive into troubleshooting this issue a bit more seriously.
What can I do if I cannot login to Skype for Business Mac?
1. Confirm that password works with Office 365
In any browser, go to Office.com.
Then, in the top right corner of the screen, click Sign in.
Enter the sign-in address and password you use to sign in to Skype for Business.
Click Sign in.
If there’s no way to complete the above steps, your password might be incorrect. It’s time to reset it. For that, use the Microsoft Online Password Reset site.
Enter your user ID and the characters in the given picture to send a new password request to your workplace technical support.
2. Re-enter your password
On the Skype for Business sign in screen, click Delete my sign-in info.
In the window that appears next, click Yes.
Then, click Sign In.
Under Password, enter your password.
Once again, click Sign In.
Have you recently changed your password? If so, you might need to re-enter your new password in Skype for Business.
3. Clear Skype for Business cache on Mac
Log out of Skype for Business.
Follow this path next: Finder > press Command+Shift+G > type in /users//library.
Here, delete the following files: Containters > com.microsoft.SkypeForBusiness Internet Plug-Ins > MeetingJoinPlugin.plugin Logs > LwaTracing Saved Application State > com.microsoft.SkypeForBusiness.savedState Preferences > com.microsoft.skypeforbusiness.plugin.plist
In the Finder menu, click Go.
Then, click Utilities.
Open Keychain Access.
While here, delete all keychains starting with Skype For Business.
Note: Use your password if required to unlock your keychain.
Skype for Business caches files locally on Mac to quickly pull information. This information can get corrupted, so it is helpful to clear the cache files if you can’t login to Skype for Business.
We hope these solutions helped you finally solve the problem. Everything you need to know is right above. If you need additional info, don’t hesitate to reach in the comments section below.
Having a roll-off dumpster business is hard work. Managing it is no easy task as you deal with employees management and selection, communicating with the drivers that are already on the road, tracking supply, accounting, planning the optimal routes for your drivers, etc.
Even if you manage to maintain your business by doing all of this manually, considering the time it takes, the money it costs, and the stress it produces, it’s not an effective long-term solution.
It is recommended that you use specialized software designed specifically for your roll-off business. This type of software can help you manage every aspect of your business, and because of that, even increase the profit of your company, and also make your employees happier.
One of the best features of roll-off software is that it provides your employees a way to express their concerns, or important information by easily adding notes to jobs, and they can also mark the jobs as completed, check schedules that are managed by the server, etc. These tools provide your technicians with more support and constant communication can also increase overall productivity.
There are some great software options on the market that can help you with all those tasks, and even offer some additional useful features. Read on to find out more.
Make your roll-off business run smoother with these 4 tools
ServiceCore is a great web-based software option that contains a comprehensive set of useful features for both small and enterprise roll-off dumpster businesses.
Because managing a roll-off business is already hard work, this software is designed specifically to offer you an easy solution. The ServiceCore platform offers a wide range of features that cover the needs of various businesses, and also integrates perfectly with QuickBooks, and allows you to easily import data.
The features found in ServiceCore allow you to rest assured that every aspect of your company’s management is covered. Let’s explore some of its best features.
Customer management
Keeps your customers database organized and easy to access
Customer relationship manager – easy access to customer data, status, personal notes, etc.
Site management – allows you to keep job site records that simplify the process of accepting visitors
Job creation – you can create, schedule, track, and complete jobs online
Job management – keeps you informed about upcoming job or unit service by using notifications
Customer search – can search customers by name, company, address, city, phone and email
Business guidance
Can produce visual representations of how your business is performing, all on one dashboard
Print business reports – can access and print professional level reports that analyze the business by technician performance, and also allows you to track completed jobs, the efficiency of your drivers, etc.
Print inventory reports – you can manage all inventory online, and print detailed reports
Inventory rental map – shows you a map on which you can see the real-time location of your rented units
Allows your technicians to be more effective, by the use of the included tools for easy reporting and geo-location services
Roll-off inventory management
Can be accessed from anywhere in the world – computer, tablet, smartphone
Drag and drop job scheduling
Automatically detects job duplicates
Assign and schedule pick-ups
Can show you a visual representation of the units that are in use
Schedule and route management – allows you to optimize the routes of your trucks, and also set times for pre-scheduled jobs
Color-coded scheduling – easily assign jobs to your technicians by dragging and dropping jobs on their route
Route optimization with recommendations based on the task’s location on the map
Allows you to view driver routes and generate better options, and can also print out driver’s routes on a stop-by-stop basis
GPS tracking of your drivers
Work history log – ongoing, scheduled, and completed jobs
Accounting and invoicing – this part of ServiceCore is designed to offer you complete access to all aspects of accounting and can create invoices with ease.
ServiceCore
The roll-off dumpster business is hard, but you can make it a bit easier by using ServiceCore to help with the management.
Trux Haul-It is another great software option that allows you to manage every aspect of your roll-off business. This software is designed to make the closing of the month procedures easy, allows you to input customer data based on classes, and many other useful features.
Key features include.
Account Management
Electronic document storing and management
Can customize database fields by the use of custom fields
Allows you to manage the prices of all your services
Rule-based automation of extra fees and compliances
Billing AR Management
Can create invoices for customer with multiple service types, cycles and end dates
Automatic generation of inactivity fees
Rebates and formula based pricing
Credit card and ACH processing – automation of payment processing
Can send invoices for customers through E-mail or WebPortal
Optional pre-billing – allows you to detect errors before sending
Analytics and reporting
Multiple categories with professional looking report templates
Log analysis – allows you to see a timeline of changes
A daily pop-up with important data from sales, operations, and accounting
Can analyze the productivity of the routes your driver takes and adjust accordingly
Accounting – auditable financials, A/R & revenue analysis, etc.
Operations management
Route management – allows you to manage all aspects of the routes of your drivers
Route audit report – enables you to identify price anomalies and offer key indicators of performance
Google mapping – see schedules and completed jobs with routes included on the map
Productivity reports
Dispatch center
Security data management
The administrator can set access rules based on different profiles
Automatic database update
SQL Relational Database
Keeps a detailed log of all transactions with audit trails
Starlight Pro is another great software option that allows you to manage every aspect of your roll-off business, with GPS tracking of your containers/dumpsters, instant tracking of your roll-off drivers, customer management, and C&D recycling.
Let’s explore some of Starlight’s Pro features in more depth:
Contractor mobile app – gain access to managerial features through a simple to use mobile app
Map-based roll-off dispatch – can adapt real-time to same-day orders, traffic, issues of customers, equipment issues, etc.
You can track and maintain an exact inventory of your containers, and also sort them based on availability
Driver mobile app – allows your drivers to be up to date with any changes in the order or location, and they can add notes and explanations on the map
Can configure and customize – order entry, sales order creation, scheduling, payment receipt by credit card or check, invoice, etc. , with full backup and the ability to adapt pricing for each client profile
Great accounting integration – automatically sync your customer accounts and order details to your accounting system
Soft-Pak is a great software option that allows you to easily manage and control every aspect of your roll-off business in order to increase your order capacity and be more cost-efficient.
This software is designed to be able to adapt to your business’s size and is efficient for both small, medium, and large size company. Using i-Pak allows you to manage all customer service operations, billing, and payments, and routing. You can access the information either by accessing the cloud or by using your own physical server.
Let’s explore some of the best features of i-Pak:
All-encompassing customer service package with an easy overview
Can manage your driver’s routes and send updates and orders through the internet
Integrated billing, accounts receivable, and collections
Can produce reports regarding productivity and profitability of your driver’s routes
Inventory tracking – easily know the availability of every unit, and keep up to date with the container’s location, and for how long it was rented out
Fleet maintenance and LEED reporting
Landfill and scale ticketing
In-cab computing
Can process online payments for client websites
Track your commodities and the handling of hazardous waste
Prospect quotes and customer activity manager
An extensive array of management reporting capabilities – over 100 standard reports
In this article, we explored some of the best software options on the market that allow you to easily manage every aspect of your roll-off business.
These software options will surely cover all your roll-off business needs, with different management capabilities – GPS tracking of your containers and drivers, bar-code scanning, automated invoicing, automatically updated info regarding the time of pick-up/delivery, and many others.
We would love to know what your opinion is regarding the software options presented in this article. Please feel free to let us know in the comment section below.
Since Microsoft no longer supports Windows 7, household users are now left with no other option but migrate to Windows 10. Fortunately, those that are part of business environments can opt for the Windows 7 Extended Support for Business.
However, this is merely a temporary solution, and it can become quite costly the more you choose to stick with it.
That is why upgrading your OS to Windows 10 is the best course of action. Unfortunately, large-scale deployments of a new OS within a company can be an extremely exhausting and costly endeavor if you don’t make the proper preparations.
That is why most of the time, large-scale deployments and migrations are done via third-party tools.
One good example of such a tool is ZENworks Configuration Management, an enterprise client and mobility management that simplifies IT processes and boosts user productivity.
Why use ZENworks to migrate to Windows 10?
As you can imagine, migrating tens of thousands of users simultaneously from one OS to another is no easy job. In fact, migrating PCs one-by-one is definitely out of the question, both in terms of time and in resources.
However, you choose a third-party service such as ZENworks Configuration Management.
These services will not only simplify and rapidly accelerate the Windows 10 migration process, but it will perform automatic imaging tasks and pre-boot services.
Another exciting feature is that it will also allow IT, administrators, to manage multiple Windows desktop operating systems and versions. This is particularly useful when a company cannot migrate all end-users at once, thus making it easier to control the mixed environment until the migration is complete.
What’s more, you can use it to manage the lifecycles of all your current and future assets. It also offers full support for Windows and Linux systems, as well as NetIQ® eDirectory, Active Directory, and more.
The best part about this service is that it also offers a Free Trial, allowing you to try out some of the tools before actually subscribing to the entire service.
Migrating an entire company to a new OS can be a nightmare for the IT department.
This is especially the case when there are thousands upon thousands of end-users. However, a small investment in the right set of tools can provide you with a significant return on investment.
Does your company plan on migrating to Windows 10, but doesn’t know what tools to use?
Tell us what methods your company used in the past in the comment section below.
Since all good things come to an end at some point, Microsoft finally decided to cease support for Windows 7.
Because of this, all Windows 7 users have no other option than to upgrade to Windows 10. Of course, those that re part of business environments can choose to stay with Windows 7, as long as they get the Extended Support for Business.
Migrating to a new OS isn’t all that easy, especially if you want to take off your files and data along with you. Of course, some data is trickier to migrate than others, such as installed programs, games, or user profiles.
Speaking of profiles, there is a method that you can use through which you can also migrate a roaming profile to Windows 10 as well. That is precisely why we’ve created this step-by-step guide on how you can perform that exact operation.
How can I migrate a roaming profile to Windows 10?
1. Change your profile from Roaming to Local
First of all, you will need to know how to convert a roaming account into a local (domain) account:
On the Windows 7 PC, right-click My Computer
Select Properties
On the System Properties dialog box, click the Advanced System Settings tab
On the Advanced tab, click Settings under User Profiles
In the Profiles stored on this computer box, click the profile that you want to change
Click Change Type
This will open the Change Profile Type dialog box
Click Roaming Profile or Local Profile to change to a different type
Click OK until the process is complete
Once your profile has been converted to a local profile, you can then use the Windows Easy Transfer feature to migrate it safely to Windows 10.
2. Migrate your profile to Windows 10
The following steps will be taken on the Windows 7 PC:
Navigate toMy computer
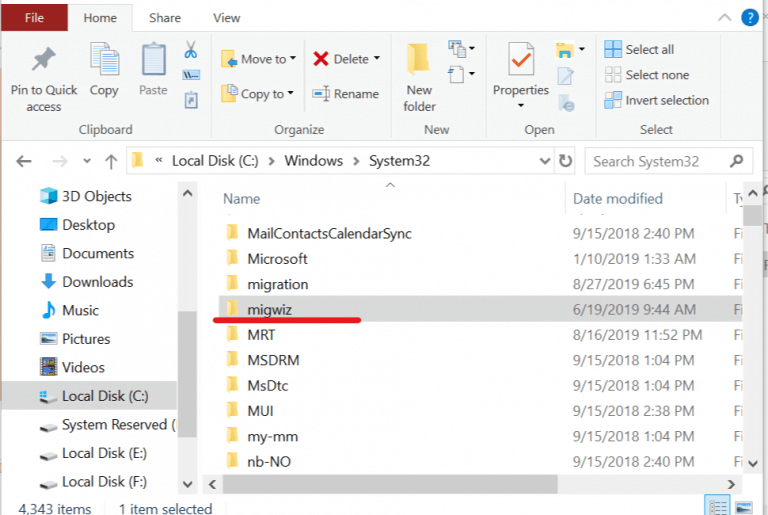
Go toC:\Windows\System32
Select theMIGWIZ folder
Copy the folder
Paste it on an external drive
LaunchWindows Easy Transfer
You will be askedWhat do you want to use to transfer items to your new computer?
ChooseAn external hard disk or USB Flash drive
ChooseThis is my old computer
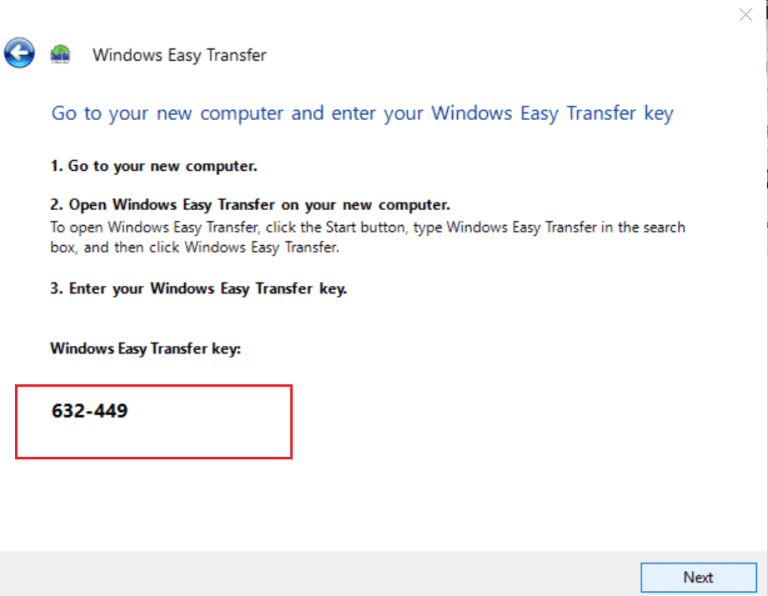
The next window will present you with aWindows Easy Transfer key. Save it somewhere
It is now time to transfer the profile to your Windows 10 PC:
Insert the USB drive in the Windows 10 PC
Copy the MIGWIZ folder on the hard drive
Launchmigwiz.exe
ClickNext
SelectThis is my new PC
ClickNext
Choose My old computer is running Windows 7
Insert theWindows Easy Transfer key
Finish the setup
By following these steps, not only will you convert a roaming profile into a local one, but you will also be capable of migrating in from a Windows 7 to a Windows 10 PC.
Did you find this article useful? Let us know in the comment section below.
Since Microsoft no longer supportsWindows 7, users are now forced to migrate to either migrate to Windows 10 or remain with Windows 7 and stay exposed.
Those that belong to business environments can also opt to go for the Windows 7Extended Support for Business, although this is just a temporary and expensive solution.
Thus, the only viable option left is to upgrade to Windows 10. The only problem is that there are plenty of upgrade processes available.
Of course, the simplest method would be to perform an in-place upgrade, where you basically install Windows 10 on top of Windows 7 and have all of your data transferred from the old OS to the new one.
It admins working for large companies can make this process even simpler if you use a Microsoft Deployment Toolkit (MDT) 2013 Update 2 task sequence to completely automate the process.
The idea of taking an already simple upgrade method and making it even simpler is extremely alluring. That is why we’ve created a step-by-step guide on how you can upgrade your PC to Windows 10 using a Microsoft Deployment Toolkit.
How do I upgrade to Windows 10 using a MDT?
For starters, you will need to use 3 different machines to perform this task:
A domain controller
We will label it DC
A Windows Server 2012 standard machine
We will label it WS
This machine adds support for Windows 10 deployment, which is extremely useful in our case at hand
The actual Windows 7 machine that needs upgrading
We will label it PC
1. Create the production deployment share
On WS, log on as Administrator in the CONTOSO domain with a password of P@ssw0rd
Launch the Deployment Workbench
Right-click Deployment Shares
Select New Deployment Share
Go to the Path page
In the Deployment share path text box, type the following:
E:MDTProduction
Click Next
Go to the Share page
In the Share name text box, type in the following:
MDTProduction$
Click Next
Go to the Descriptive Name page
In the Deployment share description text box, type in the following:
MDT Production
Click Next
Go to the Options page
Accept the default settings and click Next twice, and then click Finish
In order to test out whether this worked, use the File Explorer to verify that you can access the \WS\MDTProduction$ share
2. Add Windows 10 Enterprise
Copy the content of a Windows 10 Enterprise x64 ISO to the E:\Downloads\Windows 10 Enterprise x64 folder
Open the Deployment Workbench
Expand the Deployment Shares node
Expand MDT Production
Right-click the Operating Systems node
Create a new folder named Windows 10
Expand the Operating Systems node
Right-click the Windows 10 folder
Select Import Operating System
Use the following settings for the Import Operating System Wizard:
Since Microsoft ceased support for Windows 7, anyone still running the now-outdated OS is in danger of being unprotected. This means that all users are now required to upgrade their computers to Windows 10.
The same principle applies to virtual machines as well, since Windows 7 virtual machines will now also be left unprotected.
Fortunately enough, there are methods through which you can perform an in-place upgrade of a Windows 7 virtual machine, and bring it up to date with Windows 10.
How do I upgrade to Windows 10 in VMware?
The upgrade process is pretty simple, as all you have to do is have a Windows 7 virtual machine already running, and make a typical in-place upgrade as you would on a regular PC.
Keep note that this method is regardless of what the OS of your physical PC is (it can even be a Mac).
These are the steps that you need to follow:
Boot the Windows 7 machine
Visit this Microsoft website and press Download now
Once the download is finished, launch the executable
When asked what do you want to do, choose Upgrade this PC
Follow the on-screen instructions
Choose whether to save files and data or perform a clean install
When asked to provide the Windows 10 license key, input it accordingly
Wait for Windows 10 to install on your virtual machine
After your virtual machine reboots a couple of times, you should now have Windows 10 installed on it.
By following these steps, you should now have upgraded a Windows 7 virtual machine to Windows 10 in no time. This upgrade process will not affect the base OS of the physical machine you are currently running, so no precautions need to be taken.
However, the virtual machine’s data should be backed up just in case something goes wrong.
Did you find this article to be useful? Let us know in the comment section below.
As you may already know, Microsoft has decided to finally cease support for Windows 7.
What this means for all Windows 7 users is that they will now have to migrate to Windows 10 if they want to continue using Windows in a safe and secure manner.
However, the biggest concern when migrating to another OS is how it behaves in certain scenarios compared to the previous OS.
For example, gamers may be wondering how moving from Windows 7 to Windows 10 will affect their gaming experience, and whether or not things will run more smoothly or not.
Which is better for gaming: Windows 7 or Windows 10?
The best answer to this question boils down to what exactly do you want out of gaming.
1. The gaming-dedicated tools
Ever since the original release, numerous updates were brought to Windows 10 that improved the way it handles games. Additionally, it is the only version of Windows to support DirectX 12, which further enhances the gaming capabilities of the OS.
More so, Windows 10 also comes with dedicated Xbox apps and other tools, like the Xbox Game Bar. This tool can, among other things, act as a screen recording tool specifically designed for games.
2. The drivers needed to play
As you all know, games are usually very resource-intensive, and sometimes having an outdated driver can mean you cannot run it at all. This makes installing and updating drivers rather frustrating on Windows 7.
However, this is no longer the case with Windows 10, since now drivers are automatically updated whenever you update the OS as well.
More so, Windows 10 is perfectly capable of identifying what drivers your PC needs, making initial setups and clean installs a whole lot smoother.
Finally, if for some reason the driver gets uninstalled or corrupted, Windows 10 automatically deploys its own generic drivers. While admittedly they aren’t as efficient as the originals, they are better than nothing, allowing more than some basic functionality.
Numerous tests conducted and even showcased by Microsoft proved that Windows 10 does bring slight FPS improvements to games, even when compared with Windows 7 systems on the same machine.
Speaking of FPS, Windows 10 has a built-in FPS counter. Read more about this neat tool in this in-depth article.
4. Switching tabs
One of the few advantages that Windows 7 has over Windows 10 is the way it handles switching tabs and exiting the game.
Gamers have argued that while Alt-tabbing out of a game can take about 1 second in Windows 7, the waiting times are longer in Windows 10.
5. Game compatibility
Another disadvantage to Windows 10 is that it may have problems running older titles. In fact, unless you buy an older game from a website and it clearly says it is optimized for Windows 10, chances are it isn’t.
This lack of optimization can lead to graphic error, black screens, or even causing the game not to launch at all.
Conclusion
As you can see, most arguments are in favor of using Windows 10 as an OS for gaming.
The differences may not be all that greater, but since Microsoft recommends that you upgrade your hardware to prepare for the migration, you may end up having better gaming experiences anyway.
Did you find this article useful? Let us know in the comment section below.
Outlook users often describe receiving the error Your account has been temporarily suspended. This might happen when you create a new Hotmail/Outlook account without a phone number.
Give it a few days, and it might eventually display this message when signing in. And if you, too, have been facing the problem, keep reading to learn about it!
Why is my Outlook account suspended?
Besides that, Outlook is also extremely strict in keeping its products and services up to its policies. If it happens to discover any suspicious activity, Microsoft temporarily suspends your account.
Using Windows Live at different locations, as well as sending unsolicited promotional or commercial content to people you don’t know, may lock down your account for a temporary period.
What can I do when the Outlook account is suspended?
1. Verify the account
NOTE
The phone number you’re entering doesn’t have to be the one associated with your account.
Enter your phone number to request a security code be sent to you via text message.
After the text arrives, enter the security code you received on your phone.
Immediately change your password to complete the unlocking process.
Once done, you should be able to access the suspended Outlook. And make sure to change the password right away to prevent the issue from reappearing.
2. Try a different phone number
In case of not getting any security code in the next few minutes, you may want to try a different number. That’s also recommended if the usage limit exceeds the error message when requesting the code.
This means the phone number has been used too many times in a short time or that Microsoft detected a form of unusual activity related to the phone number itself.
The procedure varies from one browser to another. This doesn’t change the fact that clearing your web browser’s cache, cookies, and history may remove data such as saved passwords, shopping cart contents, and more.
Launch Chrome, and press Ctrl + Shift + Delete.
Select All time from the dropdown menu, tick the checkboxes for Cookies and other site data, and Cached images and files, then click on Clear data.
Once done, exit all browser windows and then re-open the browser.
One way or another, you’ve done something that violates the Microsoft Services Agreement. That’s why you’ve seen the Your account has been temporarily suspendedOutlook error, but we hope you’ve addressed the issue already.
Some Outlook users will have inboxes that include a plethora of emails. So, it’s just as well Outlook incorporates advanced search tools to help you find specific messages.
Most users will probably utilize Outlook’s Instant Search box to find emails by entering keywords. The software will then scan for emails or attachments that include matching keywords. This is how you can search for keywords in Outlookemails.
How can I search for keywords in Outlook?
1. Basic Outlook keyword searches
The most basic way to search with Outlook’s Instant Search box is to enter keywords independently.
The keywords entered will not be combined with any command. Outlook will search the subject, body, recipient, and sender fields of all emails and their attachments and display results for them. It will find emails with the same or similar keyword phrases to the one entered.
Thus, you might need to configure a search to search for the exact keyword without any variations. To do that, enter the keyword with quotation marks around it. For example, you would enter “October” in the search box to find emails with that exact keyword.
3. Search for subject keywords
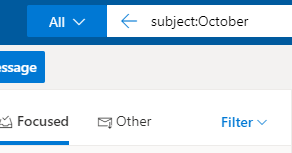
To search for keywords in emails’ subject lines, enter the keyword with a command. Enter this advanced search in Outlook’s box: subject:<keyword>. You’ll need to replace ‘<keyword>’ with the actual keyword to search for.
To search for email subject lines that include October, the command would be: subject:October.
4. Search for email body keywords
You can search just emails’ bodies (content) with a body command. Enter this command in the Instant Search box: body:<keyword>. Outlook will then search for and display emails with the specified keyword in their content.
Some users will need to search for files attached to emails. You can search for keywords within attachments by entering this command: attachments:<keyword>. Then Outlook will find emails with attachments that match the keyword entered.
How do you search for multiple words in Outlook?
You can search for multiple keywords by adding boolean operators to the search. The boolean operators for keyword searches are AND, OR, and NOT.
The NOT operator is added to exclude certain keywords, which isn’t used much for searching multiple keywords. However, the AND & OR operators enable you to find various keywords with a single search.
By including AND in a search query, you can specify two keywords to search for in emails. You can enter an AND search as follows:<keyword> AND <keyword>.
The important thing to note is that the AND operator must always be capitalized. Outlook will then find emails that include both the keywords specified in the search query.
OR is an alternative search operator that will find emails with one or the other specified keyword. The difference from the AND operator is that the OR search query is not restricted to finding emails that include both the specified keywords. This is how you enter an OR search:<keyword> OR <keyword>.
You can combine the AND & OR operators with Outlook’s search commands. For example, you could enter the following search query: subject:<keyword> AND <keyword>. That would find all emails with subject lines that include both the keywords in the search query.
The above search commands and operators will ensure you can find most emails and attachments with Outlook’s Instant Search. There are, however, many more search commands you can utilize in Outlook to refine your searches.
One of Microsoft’s latest decisions involved the company’s announcement that owners of Windows 7 and Windows 8.1 CPUs couldn’t use the newest processors, such as Intel’s Kaby Lake or AMD’s Ryzen, unless they run Windows 10.
How to install Windows 7 and 8.1 updates on Kaby Lake and Ryzen PCs?
No more updates for Windows 7 and 8.1
A computer upgraded to the newest chips but still running Windows 7 or Windows 8.1 is not going to get updates anymore. Microsoft explained in a note that the “PC uses a processor that is designed for the latest version of Windows”, suggesting that users should upgrade to Windows 10.
The patch to bypass the OS limitation
GitHub user zeffy seems to have found a solution to this restriction by analyzing the KB4012218 patch shipped by Microsoft a couple of days ago and found that it was responsible for implementing the limitations blocking Windows Update on CPUs running on the latest chipsets.
Use Wufuc
After investigating the files, zeffy found out that the dynamic link library wuaueng.dll has to be patched in order to remove the limitation. He has since then developed a script that can be used on Windows 7 and Windows 8.1 running 32-bit and 64-bit installations of the OS. Zeffy made the files available on his GitHub page. The script works by patching a system file that you’re strongly recommended to back up before proceeding.
This is only a temporary solution as Microsoft can and probably will introduce the restriction again anytime the company pleases. In other words, users might have to re-apply the patch later on though more modifications might be necessary if Microsoft chooses to block the method presented above.
Use WSUS Offline
If you need want to install Windows updates while using Kaby Lake and Ryzen CPUs, it’s advised to use WSUS Offline. This is an open-source software that will download the updates from Microsoft’s server and allow you to install them offline. To use this tool, just follow these steps:
Extract the files and run the UpdateGenerator.exe file.
Check Verify downloaded updates option and click on Start. You can also check Include C++ Runtime Libraries and .Net Frameworks
The download process will now start. This could take a couple of hours depending on the number of updates.
After the updates are downloaded, run the Updateinstaller.exe file and click Start. You can check the Update C++ Runtime Libraries option as well before you start.
The application will now install the downloaded updates. This might take a while depending on the number of updates.
Users on modern Windows, notably Windows 7 and newer, who are still running Outlook 2003 on their PCs, often encounter the Locate link browser pop-up message/error. At times, when the affected link manages to open, it only takes you to a blank page (or homepage) on your browser and not the link’s address.
Why Outlook 2003 won’t open links in a browser on Windows 7? To fix this, start by using the Registry Editor and deleting a few entries related to Outlook. This is a confirmed solution for Mozilla Firefox but it should work for other browsers, as well. Alternatively, you can reconfigure Registry with a batch file or just upgrade the program to a newer, more functional version.
Read the step-by-step instructions for each solution below.
How to fix the Locate link browser Outlook 2003 error in Windows 7?
If Firefox is set as the default browser on your computer, the Locate link browser pop-up window can easily be closed each time it pops up, after which you can log on to the affected link’s address.
However, this could easily become a nuisance, in which case, it becomes highly essential to remove it. To do this, you’d be required to delete the registry entries associated with the error.
Follow the guidelines below to run this procedure:
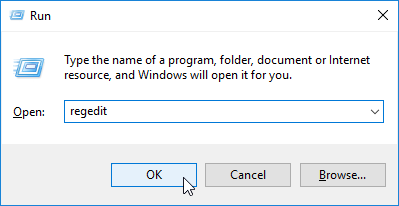
Click on Windows + R keys to open the ‘Run’ dialog box.
In the box, type in ‘regedit‘ and hit the Enter key. This will launch the Registry Editor.
Once in the ‘Registry Editor‘, locate and delete each of the following entries: Computer\HKEY_CLASSES_ROOT\HTTP\shell\open\ddeexec Computer\HKEY_CLASSES_ROOT\HTTPS\shell\open\ddeexec Computer\HKEY_CLASSES_ROOT\FirefoxURL\shell\open\ddeexec Computer\HKEY_CLASSES_ROOT\FirefoxHTML\shell\open\ddeexec
5. Apply changes and close the Registry Editor window.
6. Restart computer.
Once you’ve restarted your PC, check if the issue is resolved.
Note: This method is applicable to Windows Vista and Windows 7 PCs that have Firefox configured as the default browser.
2. Upgrade Program
If you’ve tried the troubleshooting techniques above and the error remains unfixed, you might have to upgrade your Outlook program to a newer version or the latest edition.
The 2003 version of Outlook is old and somewhat outdated to run properly on modern Windows PCs. And in the event that you are finding it difficult to fix the Locate link browser error, you might be left with no option but to upgrade the program.
If you still prefer the “vintage” version of Outlook, you can upgrade to Outlook 2007, which offers more advanced features and better flexibility. For optimum functionality, however, it is recommended you upgrade to the latest – Outlook 2019 – version.
3. Create a .reg file
You can fix this problem by making a few changes to your registry. The quickest way to do that would be to create a .reg file. To do that, follow these steps:
Open Notepad.
Now paste the following code:
Windows Registry Editor Version 5.00[HKEY_CLASSES_ROOT\htmlfile\shell\opennew]
@=”&Open”
“MUIVerb”=”@C:\\Windows\\System32\\ieframe.dll,-5731”
“CommandId”=”IE.Protocol”
Even though Windows 10 is taking over, Windows 7 still the most remarkable OS Microsoft ever produced. When it comes to customization, all Windows platforms have a lot of available options. And Windows 7 custom themes are one of the best ways to personalize and beautify the user interface with a few tweaks. However, some Windows 7 users were unable to install custom themes.
There are a few reasons why this problem might occur and we made sure to provide you with solutions below. Make sure to check them out and we should be able to get that shiny themes in a sec.
How to fix Windows 7 custom themes installation issues
The free custom themes for Windows 7 come in numbers. There’s even a dedicated DeviantArt section with dozens if not hundreds of available themes. However, if you’ve run into a problem and you already patched the system files (you need to do this in order to apply custom themes), try multiple themes.
Sometimes a certain theme won’t work while any other will get you going. The Aero versions of themes come in “themepack” extensions while the standard themes are zipped and require extraction. After that, as you already know, just copy the extracted files to the C:WindowsResources Themes directory.
2. Use Universal Theme Patcher
There are various ways to overcome the system boundaries and enable custom themes but the best (and the simplest way, for that matter) is by using the utility called Universal Theme Patcher. With it, you can enable custom themes installation (or implementation, if you like it more) into Windows 7.
Follow these steps to download and run Universal Theme Patcher in Windows 7:
Download the Universal Theme Patcher, here. Make sure to choose the proper version, since it comes for 32-bit and 64-bit systems separately.
Run the application and choose to patch the 3 files in charge of themes (uxtheme.dll, themeui.dll, and themeservice.dll).
Unpack the ZIP file in which the theme is stored and copy-paste it to C:WindowsResourcesThemes.
Restart your PC.
Right-click on the Desktop and open Personalize.
The custom theme should be applicable now.
3. Check the services
Themes are an essential part of the system shell. You can’t uninstall themes, as these personalization options will always be there. However, there is a dedicated service which, if disabled, prevents you from using the alternative themes. Without it, you’ll have only the blank theme without Aero as an option. Not to speak of customized themes and mods.
So, what we recommend to do is navigate to Services and checking whether the dedicated service is indeed enabled. Here’s how to do it in a few simple steps:
In the Search bar, type services.msc and press Enter.
Navigate to Themes service, right-click and select Start.
Open Personalize windows again and try applying the theme of choice.
4. Make sure that your system is compatible with the downloaded theme
If you can’t install themes on Windows 7, the issue might be that you don’t have a compatible theme format. There are two types of extensions used by themes:
.themepack – Supported by both Windows 7 and 8
.deskthemepack – Supported only by Windows 8
You won’t be able to install the .deskthemepack theme on Windows 7, so be sure to double-check the theme format before trying to install it.
In addition, themes only work in Home Premium and higher editions of Windows 7. If you have Home Basic or Starter version of Windows 7, you won’t be able to install themes at all.
That’s a wrap-up. In case you’re still bothered with the same issue or have, say, some interesting custom themes to recommend, feel free to tell us in the comments section below.
Microsoft news recap is a weekly feature highlighting the top Microsoft news stories of the past week. Sit back, grab some coffee, and enjoy the read!
Microsoft Teams is getting a Walkie Talkie feature, other capabilities for Firstline Workers
Microsoft continues to add new features to Microsoft Teams, and the company is now adding a new feature called Walkie Talkie, which allows users to communicate over a secure WiFi or cellular connection. It’s designed for workers on the first line.
Microsoft launches new Bing Pages for businesses and personalities
Bing is testing a new feature called Pages that allows individuals to control how they appear on Bing. It enables the ability to show social media fees.
Looks like Bing might be letting people create "Profiles" for themselves, similar to what you see in search results for people who are well known.
Virtual machines are becoming more and more popular among common users, mainly because of their advantages and also because they are still a newer form of technology.
As for advantages, advantages for operating system development may include improved debugging access and faster reboots.
Thus, creating virtual machines is something you may want to experiment with at one point in time.
However, one of their best uses is the emulation of actual physical computers. For example, one good example would be how you can migrate your Windows 7 installation to a virtual machine.
VirtualBox is open-source software for virtualizing the x86 computing architecture, and it is one of the world’s most popular programs of this type. It acts as a hypervisor, creating a VM (virtual machine) where the user can run another OS (operating system).
Because of the many uses of virtual machines and Microsoft has pulled the plug onWindows 7, we’ve decided to create this guide that will show you exactly how you can migrate a Windows 7 PC to VirtualBox in no time.
How do I migrate Windows 7 to Virtual Box?
Before starting, you must download Disk2vhd on your Windows 7 PC, as you cannot proceed otherwise. Once you’ve downloaded it, you can follow the steps listed below:
Use disk2vhd.exe to create a VHD Image of a physical Windows machine
You can do this by right-clicking disk2vhd.exe and choosing to run it as an administrator
Select the drives you want to migrate to the image
Make sure you don’t check use Vhdx, nor Use Volume Shadow Copy
Select the path where VHD file will be saved
Press Create button
Open Oracle VM Virtual Box manager and create a new Windows machine
Use the VHD file we have created using Disk2vhd to create a new Hard Disk
Once the process is finished, the new machine will appear in your VirtualBox Manager
You may load the Windows 7Virtual Machine by double-clicking it
By following these steps, an exact copy of your Windows 7 installation should now be available in VirtualBox as a Virtual Machine.
You can load and use it as a regular physical version of Windows 7, except it will be in a more contained environment where nothing can go wrong.
Additionally, in the event that something does manage to go wrong, you can always roll back the virtual machine to a safer state as if nothing happened.
But many find a Windows 7 simulator to be a better option. Do try it out and let us know your thoughts.
Did you find this article useful? In the comment section below, let us know what you think about virtual machines.
Microsoft ceased support on all of its Windows 7 versions, and because of this, many users have now migrated to Windows 10.
However, that isn’t the case with large companies. Upgrades within a company are difficult to roll-out, especially when talking about enterprises with a large computer infrastructure.
Delivering updates alone can be quite a task at a company-wide level. That is why Microsoft created Windows 10 Enterprise LTSB (LTSC).
What is Windows 10 Enterprise LTSB?
Officially, LTSB (Long-term Servicing Branch) is a specialized edition of Windows 10 Enterprise that promises the longest intervals between feature upgrades of any version of the operating system.
It does deliver the same security upgrades that regular users receive monthly. However, when it comes to big feature updates, these only come once every 2 or 3 years.
Because this means less disruption with rolling out updates within companies, businesses big and small should adopt Windows 10 Enterprise LTSB as their main supported OS.
How do I upgrade to Windows 10 Enterprise LTSB?
Unfortunately enough, Microsoft states on their official forums that:
[…] In-place upgrade from Windows 7, Windows 8.1, or Windows 10 semi-annual channel to Windows 10 LTSC is not supported. This was corrected in the Windows 10 LTSC 2016 release, which will now only allow data-only and clean install options.
Thus, in-place upgrades from Windows 7 or 8 to Windows 10 LTSB/LTSC are not possible. All you can do is backup all of your files, and perform a clean install of Windows 10 Enterprise LTSB.
As for upgrading Windows 10 LTSB itself, you can only upgrade from Enterprise LTSB 2016 to Enterprise LTSC 2019 and keep your programs and files.
The old data will not be completely deleted. Instead, it will be saved in a Windows.old folder which you can use later.
How do I get Windows 10 Enterprise LTSB?
Currently, Windows 10 LTSB is only available in the Enterprise Edition for large companies and organizations that have a KMS (Key Management Server). This makes this particular edition of Windows 10 not available to the general public
You can download a 90-day trial, but you would not be able to activate that version as a private user.
Do you think that Windows 10 Enterprise LTSB should be available to the general public as well? Let us know your opinions in the comment section below.
Microsoft has ceased support for Windows 7, which includes all of the supported versions, from Home to Enterprise.
That being said, all Windows 7 users are now forced to update to Windows 10 if they want to benefit from security support from Microsoft. Of course, those belonging to business environments can always opt for the Windows 7 Extended Support for Business.
For those that choose to upgrade, there are a variety of ways one could take to upgrade to Windows 10.
Normally, regular Windows 7 users would just need to get the Media Creation Tool from Microsoft and have a valid Windows 10 license in order to upgrade.
The Media Creation Tool would download the full Windows 10 ISO image to their PC, they would enter the license key, and the install would start from there.
Once you gain access to the key, you can simply use the Media Creation Tool to upgrade to Windows 10:
Download the Media Creation Tool
Launch it
Choose Upgrade this PC
Provide the License Key
Choose whether to keep any data or perform a clean install
Proceed with the install
How do I upgrade from Windows 7 to Windows 10 Enterprise?
Windows 7 Enterprise users that want to upgrade to Windows 10 users have it a bit differently.
Unless they have access to a volume license program, they will not be able to provide the key. If that is the case, they will not be able to use the Media Creation Tool to upgrade.
Thus, the biggest challenge with upgrading to Windows 10 Enterprise is understanding how you can gain access to a volume license program.
Microsoft describes the Volume Licensing Service Center as a platform where you can access your licensing information, view agreements and purchases for your organization.
In the case at hand, you can also use it to access licensing summaries of all entitlements by product and version. You can also view all assigned product keys and download products in the VLSC.
In other words, the Volume Licensing Service Center is a company-wide Microsoft account.
Thus, the only way you can upgrade to Windows 10 Enterprise is to have a valid license key bought through the company’s account and then assigned to you.
For more information on how you can get your Windows 10 Enterprise license key, contact your Volume Licensing Service Center administrator.
Did you find our article to be useful? Let us know in the comment section below.
Microsoft’s SQL Server is a relational database management system. Its primary function is to retrieve data as requested by other software applications.
These applications may run either on the same computer or another computer across a network, including over the Internet.
As you already know, Microsoftceased support for SQL Server 2008 and 2008 R2 in 2019. That said, users are now forced to upgrade if they want to continue using the product securely.
That is why we’ve compiled this step-by-step guide that will show you exactly how to upgrade from SQL Server 2008 to 2012, 2016, etc.
Before proceeding with these steps, there are several things that you need to know about the upgrade process:
When you upgrade SQL Server, the previous version of SQL Server will be overwritten
It is a good idea to back up any SQL Server data you have before the upgrade
You cannot upgrade SQL Server Express or SQL Server Developer, as these are not supported
How do I upgrade from SQL Server 2008?
Insert the SQL Server installation media
Go to the root folder, and double-click Setup.exe.
The Installation Wizard will now start the SQL Server Installation Center
To upgrade an existing instance of SQL Server, select Installation
Click an option to indicate whether you are upgrading to a free edition of SQL Server, or whether you have a PID key
On the License Terms page, select I accept the license terms
TheMicrosoft Update page will appear
Check within the Microsoft Update page to include the latest updates when you scan for Windows Update
Check or uncheck the Include SQL Server product updates checkbox
This depends on whether you want the latest updates or not
The setup should now start downloading, extracting and installing the setup files
On the Select Instance page, specify the instance of SQL Server to upgrade
On the Instance Configuration page, specify the Instance ID for the instance of SQL Server
Click Install
Restart your PC
By following these steps, you should be able to upgrade from SQL Server 2008 efficiently.
Additionally, if you remembered to back up all of your data before proceeding with the process, then you should be able to migrate it to the new OS without any issues. In case you encounter issues, our unable to install SQL Server guide should be able to help you.
Remember that the same process applies when upgrading to later versions of the product, such as 2014, 2016, etc.
Did you find this article helpful? Let us know in the comment section below.
As 2019 draws to a close, software users are now starting to look ahead to 2020. January 14, 2020 is a date Windows 7 users across the world have noted down in their diaries. That is the date Microsoft stops supporting Windows 7.
Consequently, the big M will no longer release patch updates for that platform from then on.
So, lots of Windows 7 users are no doubt now considering upgrading to 10. There are many differences between those platforms in terms of features, software, and hardware support. These are a few good reasons why users should upgrade to Windows 10.
What are the key differences between Windows 7 and Windows 10?
1. Windows 10 gets biannual build updates
Biannual build version updates are a big part of Windows 10. Those add new features to Windows 10 in the spring and fall of each year. The feature updates for Windows 10 are slightly more optional these days, but Microsoft still rolls out automatic build updates for users utilizing older versions of the platform.
Even as a supported platform, Microsoft did not roll out regular version updates for Windows 7; and, of course, that OS won’t get any patch updates after its end of support date.
Additionally, if you’re tired of getting end of support notifications on your Windows 7 PC, check out this handy guide to get rid of them once and for all.
2. Windows 10 is faster
Performance benchmarks highlight that Windows 10 is generally faster than 7. Those benchmarks show that Windows 10 has a faster system startup and wakes more quickly from its sleep and Hibernate modes.
Windows 10’s faster performance can be attributed to things like its fast startup and Game Mode settings. Furthermore, Windows 10 has very similar system requirements to 7; so it isn’t more system resource intensive.
3. Windows 10 supports mixed reality
Mixed reality is Microsoft’s unique brand of virtual reality. There are numerous mixed reality headsets, such as the Dell Visor, Acer Windows Mixed Reality HMD, Samsung HMD Odyssey, and Hololens 2.
Windows 10 is the big M’s exclusive platform for mixed reality. So, Windows 7 users will need to upgrade to 10 before getting new VR headsets. Some users might also need to get new desktops or laptops as not all older Windows 7 PCs will meet the minimum hardware system requirements for mixed reality.
Desktop gadgets are those nifty little calendars, clocks, weather forecasts, picture slideshows, and numerous other things you can add to the Windows 7 desktop. Microsoft discontinued desktop gadgets in Windows 8 due to their security vulnerabilities.
Those vulnerabilities will likely become somewhat bigger when the big M stops supporting Windows 7.
Thus, Windows 10 doesn’t include any gadgets. Nevertheless, users can still add gadgets to Windows 10 with third-party software such as 8GadgetPack and 7 Sidebar. Both those software add a gadget sidebar to the desktop that emulates the one in Windows 7.
5. Different Start menus
Microsoft destroyed the Start menu in Windows 8, which is partly why that platform flopped. The big M restored the Start menu in Windows 10, which is somewhat different from the one in 7.
Windows 10’s Start menu includes flexible app tile shortcuts that you can pin to it. It also incorporates a letter index from which you can select letters to jump to software folders on the menu.
Windows 7’s Start menu includes a Windows search utility. In Windows 10, the Type here to search box is not a part of its Start menu, but it’s right beside it on the taskbar. It’s just as easy to initiate quick searches by clicking the Type here to search button.
6. Windows 10 supports MS Store apps
One of the biggest differences between Windows 10 and 7 is that 10 supports UWP apps. Those Universal Windows Platform apps are distributed on the Microsoft Store. None of the MS Store apps are available for Windows 7. Windows 10 even has an S mode version specifically for UWP apps.
Furthermore, Windows 10 comes with numerous UWP apps, some of which are its default software. Photos, Films (Movies) & TV, Groove Music, Paint 3D, Weather, and Calendar are just a few of 10’s built-in apps.
Cortana and Settings (a Control Panel alternative) are also apps that are more integrated with Windows 10.
Windows 10 is a better gaming platform than 7. Windows 10’s Game Bar enables players to capture screenshots and videos in games, monitor system performance, play Spotify music, configure overlays, and open Xbox Social.
Settings includes a Game Mode option that optimizes system resources for games. The Xbox Console Companions app enables players to stream Xbox games to Windows 10.
On top of that, Sea of Thieves, Killer Instinct, Gears of War 4, and Halo Wars 2 are just some of the Windows 10 games you can’t play on 7.
8. Microsoft Office 2019 isn’t compatible with Windows 7
Microsoft keeps most of its latest software exclusively for Windows 10. The MS Office 2019 suite is the most notable Windows 10 software that isn’t available for 7 (especially from an enterprise perspective).
So, the latest MS Word, Excel, PowerPoint, and Outlook applications are only available for Windows 10.
Those are some of the biggest differences between Windows 10 and 7 that users need to take into consideration. The fact that Microsoft will stop supporting Windows 7 might not be enough to woo some users to 10 as third-party antivirus software can replace the unsupported Windows Defender utility.
However, Windows 10’s mixed reality support, exclusive MS Office 2019 suite, biannual version updates, revamped Start menu, UWP apps, Game Bar, and faster performance are other good reasons to upgrade to it.
Windows 7 is now very near to its January 14, 2020 end of support date. From then on, Microsoft will stop rolling out security patch updates for that platform. This leaves users wondering if they should upgrade from Windows 7 to 10.
Those users who choose to upgrade to Windows 10 can do so in two alternative ways.
You can upgrade to Windows 10 with an in-place upgrade. That is a more direct approach which preserves all files, software, and settings from the previous OSinstallation. Therefore, it’s more like installing Windows 10 over a previous OS as it migrates everything from the old platform to the replacement one.
Or you can opt for a clean install of Windows 10. That’s a less direct method which effectively wipes the hard drive clean and then installs Windows 10. Therefore, it removes all user files and installed software during the upgrade process.
For all the important info that you need about Windows 7 to 10 migration, check out this FAQ page that will answer all your questions.
What are the advantages of an in-place upgrade?
It’s quicker and easier
A lot of users prefer to migrate to Windows 10 with the in-place upgrade method. An in-place upgrade is the more straightforward way to migrate from Windows 7 to 10.
You don’t need to flap around with setting up bootable installation media for a clean install. In addition, you might also need to configure the boot order with BIOS or UEFI settings to ensure the desktop or laptop boots from USB drive for a clean install.
It preserves settings, programs, and files
As an in-place upgrade will preserve your software and files, it’s not so essential to back up anything before upgrading. That will also save you more time. Furthermore, you won’t need to get any external storage device to back up the hard drive’s content to.
However, some users might still prefer to upgrade to Windows 10 with the clean install method. A clean install can provide a completely fresh start.
You’ll get a completely new and fresh Windows 10 with a clean registry when you upgrade with a clean install. Upgrading with in-place upgrade will leave old registry entries and other junk from the previous platform intact.
It will remove incompatible software
As a clean install will remove all apps, it will also get rid of all incompatible software. Older software (especially games) installed before Microsoft launched Windows 10 might not be compatible with that platform.
Thus, you won’t need to uninstall all the incompatible software yourself. You can selectively back up and restore all your most essential software and files, which will leave out potentially incompatible programs.
It provides more control over the upgrade process
The clean install method gives you more control over the upgrade process. You can make adjustments to drives and partitions when upgrading with installation media.
Users can also manually back up and restore the folders and files that they need to migrate to Windows 10 instead of migrating everything. So, upgrading with a clean install is more flexible.
However you choose to upgrade, Windows 10’s Media Creation Tool will come in handy. With that utility, you can carry out an in-place upgrade by selecting its Upgrade this PCnow option.
Alternatively, you can select its Create installation media option to set up a bootable USB flash drive for a clean Windows 10 install.
If you need any additional information about the Media Creation Tool, don’t hesitate to check out this detailed guide and learn everything about it.
By default, the Upgrade this PC option will retain all files. However, you can then click a Change what to keep link to select a Nothing option. Selecting that setting will delete everything. So, that option is similar to a clean install, but it’s not entirely the same.
So, now it’s time to upgrade to Windows 10. If you don’t have sufficient external storage devices for a clean install, then you’ll have to opt for the in-grade upgrade method.
However, some users who do have enough external storage for both the installation media and system backup might prefer the clean install method that will remove a lot of clutter.
Safari is a great web browser, but what if you just started using it recently? Can you import your data and bookmarks from another browser to Safari? The answer is yes, and in this article, we’ll show you how to properly migrate from Chrome to Safari.
How can I migrate from Chrome to Safari?
1. Use the automatic migration option
If you haven’t used Safari before, your bookmarks and history should be imported automatically. You should see a message at the bottom of the Favorites or Top Sites page asking you if you want to keep or remove your old bookmarks.
Just click the Keep button to keep the current bookmarks and you’re good to go. If your bookmarks aren’t imported correctly, you can choose Don’t Keep the option to remove them.
As you can see, this method is fully automated, and Safari should recognize bookmarks, history and other data from Chrome and import it automatically.
2. Import bookmarks and history manually
If the previous method didn’t work for you for some reason, you can always import bookmarks manually. To do that, just follow these steps:
Open the Safari app.
Navigate to File > Import From > Google Chrome.
Now select the items you want to import.
You can also use Bookmarks HTML File option if you have the bookmarks stored in HTML format. For this to work, you need to export bookmarks manually first from Chrome. You can do that by following these steps:
In Chrome, click the Menu icon in the top-right corner and choose Bookmarks > Bookmark Manager.
When Bookmark Manager opens, click the Organize Now select Export bookmarks, and choose a save location.
Repeat the steps from the beginning of this section, but be sure to choose Bookmarks HTML File option and select the file you just exported.
As you can see, migrating from Chrome to Safari is simple and streamlined, and it usually doesn’t require any user action since it’s completely automated. However, if you encounter any issues with automatic migration, you can always import bookmarks and history manually.
Are you unable to expand the Distribution List in Outlook? But many reported getting Cannot perform the requested operation error when trying to expand the distribution list in Outlook.
Microsoft Outlook is supposed to offer one of the most convenient features that allow you to send messages through a handy contact list.
This is called Distribution List, and you can always use a service like Google Groups to create such a list that will send out group emails regardless of what email client people are using.
Long story short, when you want to email a handful of contacts, the Distribution List should step in and make the job easier for you. This doesn’t happen when you type the first few letters of one of your distribution lists. The list gets inserted into the To: field, but trying to expand it fails.
How do you solve this? If you’re short on time, just take a look at the following Outlook troubleshooting methods.
How can I fix Outlook cannot perform the requested operation error?
1. Change the Distribution Group address and display name
Go to the Exchange admin center.
Change the Distribution Group address & display name.
Then, change it back after 5 minutes or so.
Often, the quickest solution when you see Cannot perform the requested operation when trying to expand the expand distribution list in Outlook is to change the distribution group address and display name.
2. Rebuild Outlook email profile
Go to Control Panel, and select Small icons from the View by dropdown menu.
Select Mail and click it.
From the Mail setup, click on the Show Profiles button.
Select the Outlook profile you want to delete, and then click on Remove.
Confirm by clicking OK.
Add a new Outlook profile by selecting the Add button.
Write a new profile name and click on OK.
A new Add account window will be opened. You need to add your name, email address, and password.
Click on Next. Once the account is configured, click on Finish.
Restart Outlook and select the new profile now.
Does trying another profile with the same contact group on the same PC work? If so, you could try to rebuild the user’s email profile after logging into the computer.
For many users, the distribution list expansion appeared to be functioning properly again after applying the above solution.
3. Change the list to a Universal Distribution Group
If the issue persists, change the list to a Universal Distribution Group. You should then be able to expand the list and view the members within Outlook.
However, remember that distribution groups can be used only to distribute messages, while security groups can be used for message distribution and access to resources.
The Distribution List feature takes away the hassle of copying and pasting emails, thus saving you time.
In case you still get the Cannot perform the requested operation error in Outlook when trying to expand the distribution list, there’s always the option to switch to another reliable email client.
Hopefully, one of these tips worked, and you can expand Outlook’s Distribution Lists again. Do tell us which fix worked for you in the comments section.
Microsoft is currently in a complicated position. Although some might argue it’s not complicated at all, there is room for debate. The reality of things however, is that Microsoft is in a competition with itself because while Windows 10 has seen a large market share takeover, there is still a lot left to go.
Currently, many stubborn Windows 7 users won’t give in. Microsoft seems to be having difficulties when it comes to convincing those users to switch and we guess you could say that it’s its own fault for making Windows 7 so well.
Running an operating system that is no longer supported by the developer presents extreme security risks. Avoiding this type of situation can help avoid a lot of other complications, something neither users or Microsoft want to see.
Wannacry ransomware — does that ring a bell? Well, it is Windows 7 that facilitated the spread of this vicious ransomware a few years ago. There is a high risk of a similar or even worse episode happening after Microsoft drops support for the OS. So, why risk getting your computer infected with malware, when you can simply install the latest OS version and leave any worries behind?
QUICK TIP: If you’re planning to upgrade to Windows 10, make sure to check out our wide collection of guides on how to make the transition as smooth as possible.
Microsoft is pushing people towards Windows 10
A while ago, through their subsidiary in Germany, Microsoft has come out with a statement that encourages people to switch over to the growing Windows 10 platform and leave Windows 7 behind. According to that statement, Windows 7 is no longer geared to handle the problems and security threats an operating system deals with today. While it had a good run, Windows 7’s reign must unfortunately come to and end.
Microsoft further pats its own back as it praises the achievements and advances made by Windows 10 in contrast with its predecessors. There is no doubt that Windows 7 cannot stand on equal ground with Windows 10 in terms of security and the available resources granted by being backed up by Microsoft. It’s clear that the latter is desperately trying to get people to switch to their newer OS.
The Extended Security Updates will allow the customers to keep on using their Windows 7 PCs right after Microsoft retires the OS on Jan. 14, 2020.
Only those users will receive security fixes for the reported and uncovered vulnerabilities beyond the official deadline.
In other words, you need to purchase the Windows 7 add-on support in order to keep your computer secure. The extended support will be provided for an additional three years.
Furthermore, Microsoft only plans to release patches for the Important and Criticalbugs based on its four-step scoring system.
The company has released a pretty expensive security plan that offers security updates on a per device basis and most importantly, it doubles each year. The cost of ESU ranges from $25 to $50 per year and the Help Desk support is not included.
Companies and organizations can purchase ESU at any point. However, keep in mind that if a company or organization buys ESU one year or two years after the official end of support deadline, they need to pay for the previous years as well since updates are cumulative.
Use the filter to display only Software Subscriptions > select the 1 year Term
Select Windows 7 Extended Security Updates from the Products list
Mention how many Windows 7 ESUs you need > Add to cart
The keys appear in the Partner Center within one after the order is completed. End customer will find the keys in the Microsoft 365 Admin Center.
Microsoft really want you to upgrade your OS
The tech giant has already made it clear that the support for Office 365 ProPlus running on Windows 7 will also end.
If you buy the Windows 7 ESU the license for applications under Office 365 ProPlus will also be covered. Furthermore, the eligible Windows 7 machines will also receive Internet Explorer 11 (IE11) patches.
The prices are kept lower for users who are using Microsoft 365 Enterprise and Windows 10 Enterprise.
Since Windows 10 was launched, Microsoft has been trying hard to convince its users to upgrade to Windows 10. Windows 7 or 8 users were offered a free upgrade to the latest version and few discounts too. It seems like the idea has not impressed the users.
Although the OS has been released long ago, a report proved that 33.89% users still use Windows 7. The decision for ESU was made keeping in mind that most of the big enterprises face logistical issues in migration.
Moreover, the idea behind charging on a per-device basis might be expensive for some so they will be eventually forced to upgrade.
Quick tip: If you’re planning to upgrade to Windows 10, make sure to check out our wide collection of guides on how to make the transition as smooth as possible.
Not knowing where exactly is your Adobe Creative Cloud installed on your PC can be extremely frustrating if you need to access that folder.
The same applies to the apps that are downloaded through the Adobe app. Not knowing the exact location can confuse you, and beyond this, it will not allow you access to your files.
This issue can stop you from being able to manage your files properly, or it can cause issues when you need to transfer or delete specific files. The question ‘ Where is the Adobe CC download folder?’ can mean one of three things:
You’re interested in the actual download folder of the Adobe CC installer package.
You want to know where the Adobe CC suite is installed on your hard drive.
You need to know where does Adobe CC download all the files from the suite.
No matter what the exact meaning of this question has in your circumstances, in today’s how-to article we will cover all the options mentioned above.
Please read on to find out the answer to your specific question and don’t forget that you can always get into contact with us if you feel that you need more clarification.
How can I find Adobe CC’s download folder?
Where is the download folder of the Adobe CC installer package?
If you want to know where to find the download folder of the Adobe CC installer package, then you will need to check your browser.
Depending on what browser you’re using and the specific settings inside the software, your download can be either in the default location (Downloads folder inside the C partition), or any other location that you chose.
To find out exactly where your Adobe Creative Cloud suite was downloaded to, open the same browser that you used to download the installer and check the download location settings.
The exact steps to follow in order to do so will vary, but almost every browser has a very easily-accessible settings button.
The answer to this question can vary depending on the steps you took when installing the Adobe CC to your hard drive. If you used another location than the default one, then it should be installed at that location.
If you used the default installation folder, then you will be able to find your Adobe Creative Cloud installation folder inside the following location: C:\Program Files (x86)\Adobe\Adobe Creative Cloud\ACC
Where is the software installed through the Adobe CC suite?
In order for the Adobe CC suite to work efficiently, the developers of this app have made it so that the installed applications are first downloaded inside your PC’s Temp folder (temporary files).
The installer package is temporarily stored on your PC, and once the download is installed on your hard drive, the installation files are removed. If for some reason the temporary files are not automatically deleted, check out this handy guide to get rid of them once and for all.
This allows you not to clog your system with unnecessary download files, and can also help you manage the installed Adobe apps easily.
Conclusion
So that’s how you can find the Adobe Creative Cloud download folder easily. Choose any of the scenarios presented, depending on your needs.
If you have any other questions or suggestions, leave them in the comments section below and we’ll be sure to check them out.