Can’t download emails in Microsoft Outlook? Try this

Staying connected to the rest of the world and always knowing what is going on around us is crucial nowadays.

As connections go hand in hand with communication, getting access to information as soon as possible is crucial.

More so, if you or the company you work at using the Microsoft Office Suite, then you are definitely familiar with Microsoft Outlook.

Such would be the case with users that are complaining that they are downloading emails from Microsoft Outlook very slowly.

My Outlook for some reason has started to be very slow in trying to download new emails from my ISP server. I can access the server direct and all the emails are there but outlook will not download them. I let it try for over fourteen hours and it had not managed even the first email which was only 1.1mb in size.

More so, another frequent issue that Outlook users face is the inability to download emails altogether.

Follow this step-by-step guide on how to fix any Outlook email downloading issues.

Why can’t I download emails in Microsoft Outlook?

1. Check to see if you are online

While this may sound simple enough, check that you have an active and stable connection to the Web by running another program that requires online access.

2.Tweak your account settings

  1. Open Microsoft Outlook
  2. Click File
  3. Select Account Settings
  4. Select Account Settings again within Outlook
  5. Choose your account
  6. Select Repair to make automatic adjustments
  7. Select Change to make manual adjustments
Outlook Account Settings

3. Check the Mail Server

Most of the times the problem is that the mail server itself is having issues. as such, it would e a good idea to check the status of the server with the email provider used by your business.

If this issue persists, contact your network administrator, open your email in another application, or contact your email provider directly.

4. Update Microsoft Outlook

  1. Open any Office program
  2. Go to File
  3. Select Account
  4. Click on Update Options button
  5. Click on Update Now
Download problems with Outlook update

It is possible that the automatic update function to be disabled.

To enable this feature, click on the Enable updates button from the Update Options section.

5. Use a third-party email program for Windows

You can access and download your Outlook emails using reliable third-party email software that supports POP or IMAP.

Many alternative email clients have a similar user interface so it won’t take much time to adjust.

Plus, modern-day email clients come with built-in productivity features that will help you manage your inbox more efficiently.

Among the most important things to take into consideration when you pick your email clients are good privacy and encryption.

Along with that, it is important to make sure that it provides good contact management features, advanced mail filtering, and a good search option.

We hope we managed to help you fix this issue. If you have any recommendations or want to tell us more about your experience with Outlook, feel free to use the comment section below.

Export Emails from Outlook to Excel: 3 Easy Ways

While it may not exactly be the most popular email client out there, Outlook is very adaptable and constantly updated, making it very reliable.

Of course, one aspect about Outlook, and other email clients for that matter, is that many people are curious about how you can locally store the emails from it.

While Microsoft Outlook may already store the emails locally on your PC as a PST file, it isn’t all that accessible.

Opening a PST file isn’t easy, as you need Outlook to open it or another third-party tool specialized in email conversion, recovery, and management.

Can you export emails from Outlook to Excel?

Yes, there is an option to export emails from Outlook to your Excel spreadsheet in a few clicks. You can perform this action from your Excel files easily and we explained it below.

So, you should remember that the only thing transferred from Outlook into an Excel spreadsheet will be the data itself, and the basic links and other elements like formatting will be lost. Thus, the operation isn’t exactly foolproof.

How do you export emails from Outlook to Excel?

1. Download Outlook emails to Excel using Import / Export

    If you need to see your Outlook emails on Excel spreadsheets, you can easily do this with the Import/Export function in your file. The steps below shows you how.

  1. 1. Open Microsoft Outlook.

  2. 2. Press File.

  3. 3. Select Open and Export.

  4. 4. Click Import/Export.

  5. 5. Choose Export to a File.

    Choose Export to a File
  6. 6. Click Browse.

  7. 7. Set the file type as CSV.

  8. 8. Check the Export E-Mail messages from folder option to open the Map Custom Fields dialog box.

  9. 9. Add or remove the fields you need in the workbook.

  10. 10. Select the location where you want your file to be saved

  11. 11. Give the file a name for easier recognition

  12. 12. Select Finish

2. Download Outlook emails to Excel using Copy

  1. Open Microsoft Outlook
  2. Go to Mail view
  3. Go to View
  4. Select Reading Pane
  5. Click Off
  6. Click View
  7. Select Add Columns
    • The Show Columns dialog box will appear
  8. Choose All Mail Fields from the Select available columns drop-down list
  9. Click to highlight the Message option in the Available columns section
  10. Click the Add button and OK button one by one
  11. Select all the emails in the email folder
  12. Copy them all using Ctrl + C
  13. Create a new workbook in Microsoft Excel
  14. Paste the emails in that workbook
  15. Save the workbook

3. Use a Microsoft Outlook Add-in

You can use Add-ins for Microsoft Outlook to make mail to Excel conversion far easier.

These programs usually have a wizard-like guide that needs following, and you will be done in no time.

One such example is Kutools for Microsoft Outlook, which will allow you to perform the same process in just 2 or 3 steps.

How to export emails from Outlook to Excel with the date and time?

You can as well export the emails from Outlook to Excel by a date and time range, as exemplified in the steps below:

  1. Go to Outlook and click on File > Open and then Import.
  2. Select Export to a file from the Import and Export Wizard.
  3. Press on the Outlook Data File and click Next.
  4. In the Export Outlook Data File window, click on the Filter button.
  5. Go to Advanced and set Field > Received and Between options.
  6. In the Value box, set the time range from your inbox and press Add to List.

By following any of the tips mentioned above, you can efficiently use any spreadsheet you may receive via email.

If you want to import Outlook contacts to your iOS device, read this guide to know the steps.

More so, these methods work with almost any program that can manage spreadsheets, not just Microsoft Excel.

How to download Microsoft Outlook emails

Microsoft Outlook is the go-to email client for anyone using the Microsoft Office Suite of programs.

It features all the basic tools, including contact management, email sending and receiving, calendar date processing and more.

However, while the emails you receive and send are readily available for access at any time within Outlook, the same cannot be said when you lack an Internet connection.

Because of this, we’ve brought you a short step-by-step guide on how to save your Outlook emails on your hard drive, so that you can access their content even when your network connection is down.

How do I download my Outlook emails?

1. Back up your email from within Outlook

  1. Open Microsoft Outlook
  2. Enter File
  3. Select Open & Export 
  4. Click Import/Export
  5. Select Export to a file and then click Next
  6. Choose Outlook Data File (.pst) and then click Next
  7. Select the mail folder that needs backing up and select Next
  8. Choose a location where to save the backup file
  9. Give the file a name
  10. If you want your file to be safe from public view, enter and confirm a password, and then select OK

All the emails within the folder will be saved in the form of a PST file, which can be opened by a wide variety of email managers and converters.


Having trouble finding a program that can open PST files? Try following  this guide 


2. Use a third-party email extractor or converter

The Internet is filled with third-party tools that can extract emails from within Outlook, or pretty much any other email client for that matter.

All of them function by locating where Outlook usually stores the PST files on your computer, and will automatically retrieve it.

This process is far easier than manually backing up, but the drawback is that most of these email recovery tools aren’t free.

Get access to your emails in no time

Using both of these methods will allow you to access your emails along with their attachments at any time.

In fact, you don’t even need to be on the same computer to access the file, as they can be stored on an external drive.

More so, since the files are stored locally, you don’t need an Internet connection either.

RELATED ARTICLES YOU SHOULD CHECK OUT:

How to get Windows 7 Extended Support for business

For those of you still using Windows 7, you probably already know that the end of support will be coming on the 14th of January 2020.

Your PC will still function normally, but it will become more vulnerable to security threats. This is because the end of support for Windows 7 means you will no longer benefit from:

  • Technical support
  • Software updates
  • Security updates

Now, this may not seem all that much of a deal for the general consumer, but for those of you that own business, this also means the end of Windows 7 for Business as well.

Thankfully, Microsoft is offering Extended Security Updates, also known as ESUs, but it won’t be free.

Everything you need to know about Windows 7 Extended Support

How long will the ESUs be available?

Extended Security Updates will only be available for an extra 3 years after the official end of life of Windows 7. This means that your Windows 7 will still be able to run at full parameters until January 2023.

What Windows 7 editions are eligible for ESUs?

ESUs will be available for Windows 7 Enterprise and Windows 7 Pro.

How much will the ESUs cost?

The price varies based on how long you want to benefit from the ESUs, and what version of Windows 7 you are running. As such, here are some official prices as reported by Microsoft:

Windows 7 Enterprise

  • 1st year (January 2020 to January 2021) – 25$ per device
  • 2nd year (January 2021 to January 2022) – 50$ per device
  • 3rd year (January 2022 to January 2023) – 100$ per device

Windows 7 Pro

  • 1st year (January 2020 to January 2021) – 50$ per device
  • 2nd year (January 2020 to January 2021) – 100$ per device
  • 3rd year (January 2020 to January 2021) – 200$ per device

Things to know before purchasing the Windows 7 ESUs

Organizations can get extended support whenever they want during the 3-year period it is available.

However, you need to remember that in order to make purchases in the 2nd and 3rd years, you will need to also pay all prior years.

This means that paying straight from the 3rd year will end up costing you a total of 175$ per device on Windows Enterprise, and 350$ on Windows 7 Pro.

More so, keep in mind that users are charged on a per device basis, and there is no discount for multiple devices.

Can organizations upgrade to Windows 10 for free?

If they have the necessary resources to leverage Windows Virtual Desktop in Azure, they can get free Extended Security Updates for 3 more years.

Additionally, Microsoft 10 Business comes with a free upgrade for users with a Windows 7, 8, or 8.1 Pro license on their device.

What will the ESUs include?

The subscriptions will give you access to cumulative security updates over the next 12 months.

Technical assistance will be provided only on a best effort basis, as no bug filing or fixing will be available.

We also have a guide on how to download the crucial Windows 7 KB4474419 update, so don’t miss it.

If you have any further questions about the Windows 7 ESUs, let us know in the comments section below.

RELATED ARTICLES YOU SHOULD CHECK OUT:

How to download Salesforce for Outlook

Salesforce is a company that primarily focuses on customer relationship management (CRM) service.

It advertises itself as being able to transform your business by uniting marketing, sales, commerce, service, and IT to deliver the personalized experiences to your customers.

Salesforce is available in both a web-app version, but you can also download it as a desktop client.

Salesforce also features several add-ins, one of which is an add-in for Microsoft Outlook.

Up until very recently, getting Salesforce for Outlook used to be extremely easy.

All you needed to do is download the client from their website, and install it like your typical program.

However, now things are a bit more complicated, and you need to modify some settings both in the salesforce dashboard and in Microsoft Outlook.

So, we’ve compiled this neat guide will help you through the process step-by-step.

How do I install Salesforce for Outlook?

1. Prepare Salesforce for Outlook integration

  1. Log into your Salesforce environment
  2. Select the gear icon in the top-right corner of the screen
  3. Select Setup
  4. Locate the Quick Find bar, and type in Outlook
  5. Select Outlook Integration and Sync
  6. Go to the Outlook Integration tab
  7. Click and activate the sliders next to:
    • Let users access Salesforce records on Outlook
    • Use Enhanced Email with Outlook
  8. Click on Activate and Notify reps next to Email to Salesforce
  9. Click on Edit
  10. Check the Active checkbox
  11. Select Save

salesforce Outlook Integration and Sync

2. Get the add-in through Microsoft Outlook’s add-in library

  1. Open Outlook
  2. Select Get Add-ins
  3. In the Search bar, type in Salesforce
  4. Choose the add-in labeled Boost Productivity by bringing the power of the Salesforce Platform to Outlook
    • It will most likely be the first result of the search, anyway
  5. Select Add
  6. Log in to Salesforce
  7. Input your Salesforce credentials
    • You will be prompted to confirm the connection between your Salesforce account and the email account
  8. Select Confirm

Outlook Add-ins

As soon as you see the Salesforce side-panel within Outlook, the process is complete.

You will now be able to automatically sync contacts, events, and tasks between Outlook and Salesforce.

What’s more importantly, you can see Salesforce contacts and leads related to your Outlook emails.

Do you have other questions regarding how to use Salesforce or any of its services? Let us know in the comments section below.

RELATED ARTICLES YOU SHOULD CHECK OUT:

Mouse Pointer Disappears in Windows 10/11: 4 Ways to Fix it

Some Windows 10 users face various issues post-updates, including the mouse pointer disappearing.

But don’t worry. Solving this problem is very easy:

What can I do if my mouse pointer disappears?

1. Open Task Manager

task manager mouse pointer disappears Windows 10

Though it sounds like a no-brainer, many users find this effective.

If you restart your computer and the mouse cursor is still gone, you should only press CTRL, ALT, and DEL on your keyboard to open Task Manager.

However, if the issue persists, try the following:

2. Edit the Registry

  1. Click on the Windows button + R simultaneously to open the Run box.
  2. When Run box appears, type in regedit and click OK.
  3. This command will open Windows Registry Editor, and then navigate to this path by clicking on the folders in the left-hand panel: HKEY_LOCAL_MACHINE/SOFTWARE/Microsoft/Windows/CurrentVersion/Policies/System
  4. Once you have opened the system folder you should look down the list that appears in the main box to the right of the panel until you find an entry called EnableCursorSupression double click this entryenable cursor suppresion regedit
  5. This will bring up a box that has a value data of 1, Change this to 0 and click OK
  6. Close the Registry Editor window and restart your PC

Windows use the Enable Cursor Suppression feature to prevent wrongful clicks during updates. However, in this case, it’s not doing the job at the right moment.

3. Use the Hardware and Devices troubleshooter

  1. Press the Windows + R key combination to start the Run console.
  2. Type the following command and press Enter to run it: msdt.exe -id DeviceDiagnostic
  3. Click on Next to start the troubleshooting.
  4. The troubleshooter will detect and automatically fix any problems or warn you if there are any malfunctions it cannot resolve. Click on Apply this fix if any solutions are found.

4. Update mouse drivers

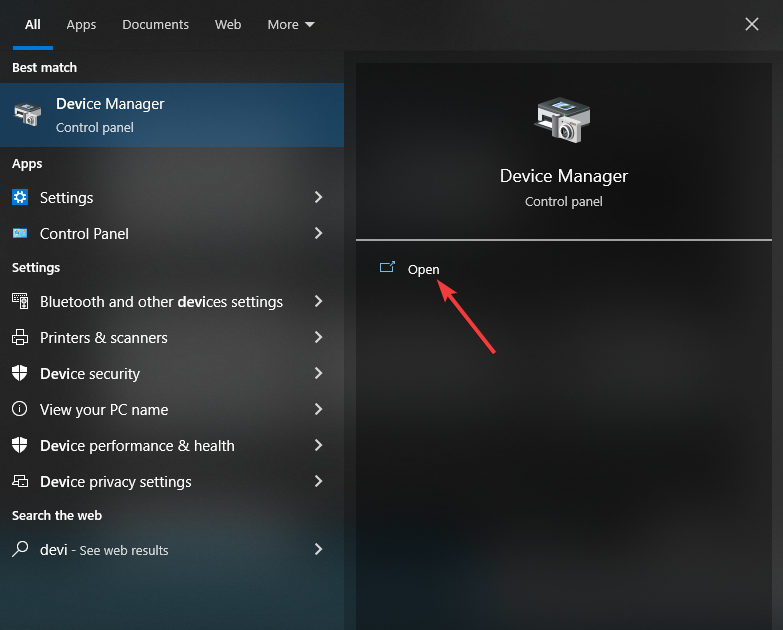
  1. Type device in the Start bar and pick Open Device Manager.device manager
  2. Locate Mice and other pointer devices
  3. Press the → arrow key to expand the list.
  4. Navigate to your mouse, press the minus or - key then the 5 key to right-click and select Update driver.update mouse driver

You can use Windows 10’s built-in Hardware and Devices troubleshooter to fix any hardware-related problems, including mouse issues.

All the solutions above work seamlessly for Windows 10 and Windows 11.

You should also read our guide on how to fix mouse freezing and glitching issues for more information. Many also reported that the mouse is stuck in the corner, and we have a guide that addresses this issue.

If your mouse pointer still disappears on Windows 10, tell us in the comments section. We would love to try to find another fix and help you find the right solution for your mouse cursor problems.

Fix: The RPC Server is Unavailable Outlook Error

The RPC server is unavailable is a common error, and it occurs in many network-based services, not only Outlook. The Remote Process Call server is a protocol that allows programs on one PC to access certain program services on a PC on the same network. It’s quite crucial for a seamless network workflow.

Today, we’ll show you how to fix the error and allow Outlook to work without a halt.

How do I fix The RPC server is unavailable Outlook error?

1. Check the Firewall

The first thing to do is to confirm that the RPC server is allowed to communicate through Windows Firewall. Allowing it to communicate freely is simple, so here’s how to do it:

  1. In the Windows Search bar, type Firewall and select Allow an app through Windows Firewall.
  2. Click Change settings.
  3. Make sure that the Remote Assistance is allowed to access both private and public networks.firewall remote assistance outlook the rpc server is unavailable
  4. Confirm changes, reboot your PC, and look for improvements.

Disabling the firewall helps with the RPC executor service threw an error Googe sign-in error.

2. Make sure that the RPC-related services are running

The next thing to do is to ensure that RPC-related services are running. They usually start automatically, but there are more than a few reports about the system shutting them down. Follow these steps to enable them:

  1. Press the Windows key + R to open the Run command line.
  2. Type Services.msc and press Enter.
  3. Now, find these 3 services and make sure that they are running:
    Remote Procedure Call Locator
    Remote Access Connection Manager
    and Remote Access Auto Connection Manager.
  4. If they are not running, open each service separately and set the Startup Type to Automatic.
    services remote services outlook the rpc server is unavailable

3. Flush DNS

With the services running in the background, the next step is to flush DNS and renew the IP. This seemingly helped many users deal with The RPC server is unavailable error on Outlook.

Follow these steps to flush DNS and renew IP:

  1. In the Windows Search bar, type CMD.
  2. Right-click on the Command Prompt and run it as an administrator.
  3. In the command line, type the following entries and press Enter after each:
    ipconfig/flushdns
    dns flush outlook the rpc server is unavailable
    ipconfig /registerdns
    ipconfig /release

    ipconfig /renew
    netsh winsock reset
  4. Reboot your PC and try reaccessing Outlook.

4. Repair Outlook

Finally, you can try and repair Outlook. This is a far-fetched solution, but it might help on some occasions. Follow the steps below to reinstall Outlook on your PC:

  1. From the Start menu, open Control Panel.
  2. Select Add or remove programs.
  3. Click on the Office and select Change.
  4. Choose to Repair your installation and look for changes.
    repair office outlook the rpc server is unavailable

That should be that The RPC server is unavailable Outlook error. If we helped you, tell us in the comments section below.

The RPC server is unavailable can appear in many Windows network services, not only Outlook, and you can learn more about the general causes in this guide on the RPC server is unavailable problem.

How to remove Get Windows 10 App on Windows 7/8.1 PCs

Windows 10 has been here since July 2015, but some users still don’t want to upgrade their systems. They prefer to stick to the current (older) version of Windows they have. But it seems that Microsoft wants you really bad to upgrade to Windows 10, so it almost forces you to do so.

We already talked about the way to prevent Windows 10 upgrades, and remove the Get Windows 10 button. This method required installing a third-party software called GWX Control Panel. And users who weren’t satisfied by the fact that Microsoft is forcing them to upgrade to Windows 10 constantly complained about this decision. So, the company decided to ‘help’ them.

Microsoft engineers recently provided a tweak which will remove Get Windows 10 app and prevent all upgrade notifications on Windows 7 and Windows 8.1.

But you should keep in mind that this is not Microsoft’s official guide, as the company probably still wants you to switch to Windows 10, but it looks like some of its employees think different (hope they’ll keep their jobs).

How to Prevent Windows 10 Upgrade on Windows 7/ 8.1

As one of Microsoft employees points out on Community forums, to prevent Windows 10 upgrade, you have to perform one registry tweak. Here’s exactly what you need to do:

  1. Go to Search, type regedit, and open Registry Editor
  2. Navigate to the following path:
  3. HKEY_LOCAL_MACHINESOFTWAREPoliciesMicrosoftWindowsGwxmicrosoft windows regedit
  4. Create a new REG_DWORD called “DisableGwx,” and set its value to 1
  5. Reboot your computer

These instructions were suggested by users before, but Microsoft never used them to show people how to block Windows 10 upgrade prompts, for the very obvious reasons that you probably already know. Microsoft wants as many users of Windows 10 as possible.

But even if this action is effective, this can be only temporary, because some people are reporting that Microsoft reset their stings, and re-enabled Get Windows 10 button, with updates.

If you don’t want to bother with registry tweaks and creating DWORDs, you can simply download GWX Control Panel, because it basically does the same thing.

But we can’t tell you how long it will work because it looks like preventing Windows 10 upgrade becomes harder and harder with new system updates.

If you don’t want to use this Registry Tweak, you can try other methods, such as:

  1. Disable the Windows Update Service from Servicesdisable windows update service
  2. Set your internet connection on a metered connection

Many Windows 10 users want to block system updates as well. So, it seems that this attitude is not valid only for Windows 7 or Windows 8.1 users. Even Windows 10 users prefer to use an older Windows 10 version rather than installing a new one.

If you upgraded to Windows 10 and you want to roll back to Windows 7 or Windows 8.1, check out this guide to learn what are the steps to follow.

RELATED POSTS TO CHECK OUT:

Latest Windows Insider builds add support for ONVIF compliant network cameras

Microsoft has announced support for ONVIF compliant cameras is coming to Windows 10, which will allow users to pair Profile S compliment network cameras to their devices. This will allow much more effortless setup process connecting certain wireless camera systems for use on Windows 10 computers.

Of course, you’ll need to be using on the 20H1 branch of Windows 10 on the fast ring, running build 18995 for later. Upon successful pairing, Microsoft says that network camera streams are sent though already existing Windows camera APIs, allowing video feeds on existing camera applications on Intel, AMD, and ARM-based processors. Developers will also be able to take advantage of the more consistent platform to build various monitoring and other security solutions.

Users running the latest Windows 10 20H1 Insider builds can effortlessly add new network cameras from the Add a device setup screen. They can also stream non-compliant camera systems by using RTSP Uniform Resource Identifier as the video source as opposed to directly paring the camera to their devices.

Developers will also be able to take advantage of already existing APIs in Windows to create their own high-performance end-to-end encrypted solutions. Windows Vision Skills, for example, offers pre-built computer vision modules that can be integrated easily into applications without having to understand AI. Microsoft says these can be useful for surveillance scenarios such as people detection or facial analysis.

What do you think about the recently-added support for network camera system in Windows 10? Do you see any applications that can be useful to you?

Want early access to new features in Office 365? Here’s how you can sign up to be an Office Insider

If you’re an Office 365 user, you already have automatic updates that will get you the latest version of the core Office apps. However, did you know that you can live life on the edge and test out new features before they become mainstream, and also help shape the future of Office 365 at the same time? It’s called “Office Insider,” and in this guide, we’ll explain how you can sign up.

On Windows

Signing up to be an Office Insider in Windows is easy. All you need to do is click a few buttons within any one of the core Office 365 apps. That is, Outlook, Word, Excel, or PowerPoint. Here’s how.

  1. Open any Office 365 App
  2. Click File, then Account, and then Office Insider on the left
  3. From the drop down menu choose Join Office Insider
  4. Click the Sign me up for early access to new releases of Office checkbox.
  5. Accept the terms and then procceed

You’ll then notice that you will have two “channels” to choose from. The first channel is “Insider“. With this channel, you’ll be the first to get new features and provide feedback to Microsoft. It is also the riskiest, and they’ll be a lot of bugs. However, for something a bit safer, you can choose the “Monthly Channel, (Targeted).” With this channel, you’ll get fewer updates, and on a slower monthly basis. Builds released here, often are tested with the “Insider” channel first.

On MacOS

If you’re using a MacOS device, then the process will be a bit similar for signing up to be an Office Insider on Windows 10. However, menu options will be different. Here’s what you need to do.

  1. Open any Office 365 App
  2. Select Check for Updates on the Help Menu
  3. Check the Join the Office Inside program to get early access to new releases box
  4. Agree to the terms by pressing Accept
  5. Choose a channel, as we described above
  6. Click Check for Updates to confirm

Again, as we described above, there are two channels for the Office Insider program. However, the names are different on MacOS. Insider Fast will give you access to all the new features, but can also be buggy. Insider Slow is more stable, and is fully-supported, with minimal risk to your Office 365 apps.

On Android

Of course, Office 365 apps are not just available on Windows and MacOS anymore. You can also sign up to be an Office Insider on Android phones. The process is a bit more complicated, however. Here’s how you can sign up to be an Office Insider on Android.

  1. Enroll in the Office Insider Slow Program by clicking these respected links. Word, PowerPoint, Excel, Office Lens, OneNote. 
  2. From your computer, sign in to the Google Play Store, and click the Become a Tester button. 
  3. You also can  enroll by searching for these apps in the Google Play Store, scroll through the listing, and click the Join the Beta button.
  4. On your Phone, close or check the Google Play Store, and go back to it. Then, check for updates.
  5. You should see an update for the respected Office 365 apps. This is the new beta version of your app.

Now for some tidbits. Once you join, you’ll be able to join the Office Insider Fast for Android Group, for whatever apps you’ve installed. After that, you’ll get the Insider Fast updates, but it could take quite a while, or a few hours, for approval.

On iOS, iPadOS

The process for signing up to be an Office Insider on iOS or iPadOS is quite straightforward. You’ll need to use Apple’s Test Flight app, and then request to be invited to join the Office Insider program. On iOS, seating for the program is limited, so not everyone will be accepted. If you want to try your luck, here’s how.

  1. First install Apple’s Testflight App
  2. Then, click these links to request to be invited to the Office Insider program. Word,PowerPoint, Excel, OneNote, Outlook. 
  3. You’ll then be redirected back to the TestFlight app, where you need to press Accept and then Install. 

Again, there are some tidbits to note on the iOS side too. First off, you can’t have two versions of the Office apps on iOS, Android, or Windows. On iOS, specifically, you’ll need to uninstall the production version, which is the standard version of the apps, in order to be an Office Insider.

Other notes

Once you successfully join to be an Office Insider, Microsoft has some recommendations for you. First, you should make note of this page, where you’ll find release notes for all the Office 365 apps, by clicking More and choosing Release notes. You also should check out the Community section of that page too, which has tips and tricks on how you can provide feedback, and links to Microsoft’s Offical social media channels, and other forums for discussion. This will be helpful if you come up with a bug or issue, or have your own suggestion for the Office 365 team.

How to reset Nikon camera to factory settings

Sometimes the only way to fix your camera is to reset it, and in today’s article, we’ll show you how to reset Nikon camera to factory settings.

Resetting a camera isn’t hard, and today we’ll show you how to do that properly.

How can I reset the Nikon camera to factory settings?

1. Use the two-button combination

In order to quickly reset your Nikon camera, you just need to press and hold two buttons on your camera for 2 seconds.

These buttons are usually marked by a green dot next to them on your camera, and by holding them you’ll quickly reset the camera to factory defaults.

Here’s a list of models and how to reset them:

  • D40, D40X – Information button + Playback zoom/Setting button
  • D50 – Shooting mode button + Timer button
  • D70, D70s – BKT button + Metering mode button
  • D90, D80 – Exposure compensation button + Autofocus Mode button
  • D600, D610, D7500 – Exposure Compensation button + Thumbnail button
  • D100 – Flash mode button + BKT button
  • D850, D810(A), D800(E), D700, D200, D300, D300S, D7000, D7100, D7200 – Image quality/size button + Exposure Compensation button
  • D5000 – Information button + Information edit button
  • D5100, D5200, D5300, D5500, D5600 – Menu button + Information button
  • D1 series – Function button + Thumbnail button
  • D60 – Playback zoom in button + Active D-Lighting button
  • D2, D3 Series, D4(S) – ISO button + White Balance button
  • D5 – Release Mode button + White Balance button
  • D500 – Image quality size button + Exposure compensation
  • D750 – ISO button + Exposure compensation

2. Use the Reset option from the menu

With some models, the two-button reset doesn’t work, so your only way to reset is to follow these steps:

  1. Press the Menu button on your camera.
  2. Now select Shooting Menu and highlight the Reset Shooting Options.
  3. Press OK, select Yes and press OK button to confirm.
  4. Repeat these steps for the Setup menu as well.

Note: This method works only for the following models: 3500, D3400, D3300, D3200, and D3100.

3. Use the hidden reset switch

Certain models support the full reset feature that will restore your camera to the factory settings.

The switch is usually located on the side or on the bottom of your camera, and since it’s hidden, you’ll need to use a small and thin object to press it.

Models that have a hidden reset button are: D3000, D80, D40, D40X, D60, D70, D100, and D50.

Working on an instant camera too? Here is how to fix Instax Mini 9 not working.


There you go, a quick and easy guide on how to reset your Nikon camera to factory settings. If you found this guide helpful, feel free to let us know by using the comments section below.

Microsoft’s Word, Excel, and PowerPoint apps update on iOS with new dark mode option

After support for dark mode being added to the iOS Microsoft OneNote app yesterday, the official Microsoft Word, Excel, and PowerPoint iOS apps have gained the new feature with their own app updates today. All three had begun testing dark mode last week.

Interestingly, the activation of the dark mode isn’t mentioned in any of the app release notes but they do all list the addition of a new Move function for changing the location of files.

Here’s the identical release notes for the Word, Excel, and PowerPoint app updates on iOS:

Pick Your Destination: Use the Move command to easily move your cloud-based files from one folder to another.

Do you prefer to use dark mode on your apps? Let us know why or why not in the comments below and then follow us on Pinterest for more Microsoft app content.

‎Microsoft Word
‎Microsoft Word
Price:
Free+


‎Microsoft Excel
‎Microsoft Excel
Price:
Free+


‎Microsoft PowerPoint

Explained: Suspicious login attempt emails on Gmail

There are numerous user reports about certain security emails they are frequently getting. Those are allegedly coming from Google into the Gmail inbox and are reporting about a Suspicious login attempt or Suspicious sign in prevented. Now, there’s the security measure which indeed will prevent login from unfamiliar devices or locations. However, these emails are often phishing scam that’s there to trick you.

How to be sure and what does this email, if legit, usually mean? Learn below.

What’s the Google Security Critical Sign-in alert on Gmail?

In recent years, Google worked to enhance user security and they are doing a solid job. There are two-factor authentications now. They should prevent security breaches into users‘ Google accounts. One of the ‘smart’ features will (based on your common devices and sign-in locations) determine if someone is trying to breach your account.

Thus, the Suspicious login attempt and Suspicious sign in prevented prompts. On the other hand, how often that happens? That someone tries to get your Google Account or just gain Gmail access? Not so frequent occurrence, to be frank. That’s why you should be wary when it comes to emails of that nature.


For the most safest Gmail web experience, we recommend UR Browser. Check out our review and see why.


Firstly, confirm that Google is indeed the sender of the email. Secondly, make sure to flag emails that come from unfamiliar sources. You can do that by clicking the suspicious email and, from the drop-down menu on the right, report phishing to Google.

Suspicious login attempt emails on Gmail

On the other hand, if you are really concerned about account safety, consider navigating to your Google Account dashboard and checking recent activity.

  1. Navigate to myaccount.google.com.
  2. Log in with your credentials.
  3. Select Security from the left pane.
  4. Go through the Security Checkup.Suspicious login attempt emails on Gmail
  5. Also, it’s highly recommended to add a 2-step verification and recovery phone or email address.

So, to sum it up, the Suspicious login attempt email on Gmail or anything similar is usually a false alarm. Sometimes it’s much more as there are reports of phishing scam emails with close resemblance to the ones Google sends. So, secure your account (Gmail included) the best you can and don’t worry.

RELATED STORIES YOU SHOULD CHECK OUT:

Fix Mixer’s broadcasting error in Windows 10 by doing this

It seems that not only gaming in itself is entertaining, but watching other people play can be equally fun.

That is how game broadcasts and streams came to be, as professional gamers get the chance to show off their skills and give tips to others via videos they make while playing.

Up until a while ago, if you wanted to stream and broadcast content, you’d need a third-party program installed on your PC.

However, a growing interest in the gaming industry has led Microsoft to include a build-in broadcasting and streaming service within Windows 10, called the Mixer, which is part of Game Bar.

However, this system isn’t all that tweaked yet, as some users are reporting having issues with it:

Hello, upon attempting to stream/broadcast with the built-in Windows 10 overlay, the small window with the Mixer logo appears with the scrolling blue dots, and then sometime later (maybe 15 seconds?) it closes and I get a notification from Windows that “Broadcasting isn’t working.  Something went wrong.  Try broadcasting again later”. 

How can I get rid of Mixer’s broadcasting issue on Windows 10?

1. Reset the Game Bar

One of the simplest solutions to such an issue is to completely reset Game Bar. Since Mixer is a part of Game Bar, resetting Game Bar’s settings will also reset Mixer’s settings as well.

  1. Press Windows
  2. Click on Settings (the cogwheel-shaped button from the Start menu)
  3. Type in Game Bar in the App Search
  4. Click Game Bar
  5. Choose Advanced options
  6. Scroll down until you see the Reset button
  7. Click the Reset button

Looking for a really powerful tool to record your gaming moments? Here are our top picks.


2. Allow Windows 10 to run apps in the background

The Game Bar will only work whenever Windows 10 detects that you are playing a game.

However, whenever you play a game, some background apps may be disabled so that you can enjoy a smooth gaming experience. Make sure the Game Bar is not included in the list of disabled background apps.

Additionally, make sure that the global setting for letting apps run in the background is set to ON. You can do this by following these steps:

  1. Press Windows
  2. Click on Settings
  3. Select Privacy
  4. Go to the Background apps tab
  5. Make sure the Let apps run in the background slider is turned on constantly

Let apps run in the background

Do you have any other issues using the Mixer to stream your epic gameplay moments? Share some of your experience with us and let us know in the comments section below.

RELATED ARTICLES YOU SHOULD CHECK OUT:

The address list cannot be displayed error in Outlook

Microsoft Outlook is one of the most popular email clients out there. However, we all are aware of the many issues of Outlook.

Of these issues, the error message “The address list cannot be displayed” is one of the most annoying. Many users encountered this problem especially on Office 365 and Outlook 2016.

Fortunately, you can fix this issue in no time. Read this article to learn what to do to recover your address list.

How can I recover my address list in Outlook?

1. Re-add your contacts

  1. Go to Account settings.
  2. Select the Address book tab.
  3. Click on Change.
  4. Highlight ‘Contacts: *** Email address is removed for privacy ***’.
  5. Click on remove address book.
  6. Add your contacts again.
  7. Restart Outlook.

Re-adding your contacts can be tedious work if your address list was large. Also, you might lose several email addresses.


Can’t exchange accounts on Outlook? Don’t panic! Check out our guide to solve the problem!


2. Set an Autodiscover subkey to 0

The issue might appear if the ExcludeHttpsAutoDiscoverDomain value under an Autodiscover subkey is set to 1. Change the value to 0 for the following subkey:

  • HKEY_CURRENT_USERSoftwareMicrosoftOffice16.0OutlookAutoDiscover

After you changed the value, restart Outlook.

You can change the registry value with the Windows Registry Editor. Alternatively, you can choose a third-party registry editor.

Conclusion

Not seeing the address list is a major issue in Outlook. However, you can fix this problem with one of our solutions. Also, keep in mind to update Microsoft Office to avoid the error message “The address list cannot be displayed”.

It is worth mentioning that Microsoft solves errors such as these by releasing patches. So, keep an eye for future updates.

Moreover, to avoid losing important email addresses, we recommend one of these tools to organize your address list.

Did you find our solutions helpful? Let us know in the comments section below!

RELATED ARTICLES YOU NEED TO CHECK OUT:

Posted in Fix

Windows Interface Metric Ignored: 4 Ways to Force it to Work

If the Windows interface metric is ignored, you might experience network issues, and the selected network won’t work properly.

Depending on your setup, this can be a big problem, so in today’s guide, we will show you a couple of solutions that can help you with this issue.

What is the Windows interface metric?

  • This is a network setting that determines which connection will have priority.
  • This is a must-have option if your PC has multiple networks or interfaces.
  • Metric requires you to assign a number to an interface, and an interface with a lower number has higher priority.

What can I do if the Windows interface metric is ignored?

1. Check your network setup

  1. This is a common issue found when users have multiple connections to the Internet.
  2. The problem appears when your PC has to choose between an Ethernet and Wi-Fi connection.
  3. Multiple modems, each with their own Internet connections can cause this problem as well.
  4. If both adapters are using the same subnet or gateway, the problem can occur.

2. Disable your PC’s Automatic metric feature

  1. Press the Windows key + S and enter view network connections. Select View network connections from the list of results.
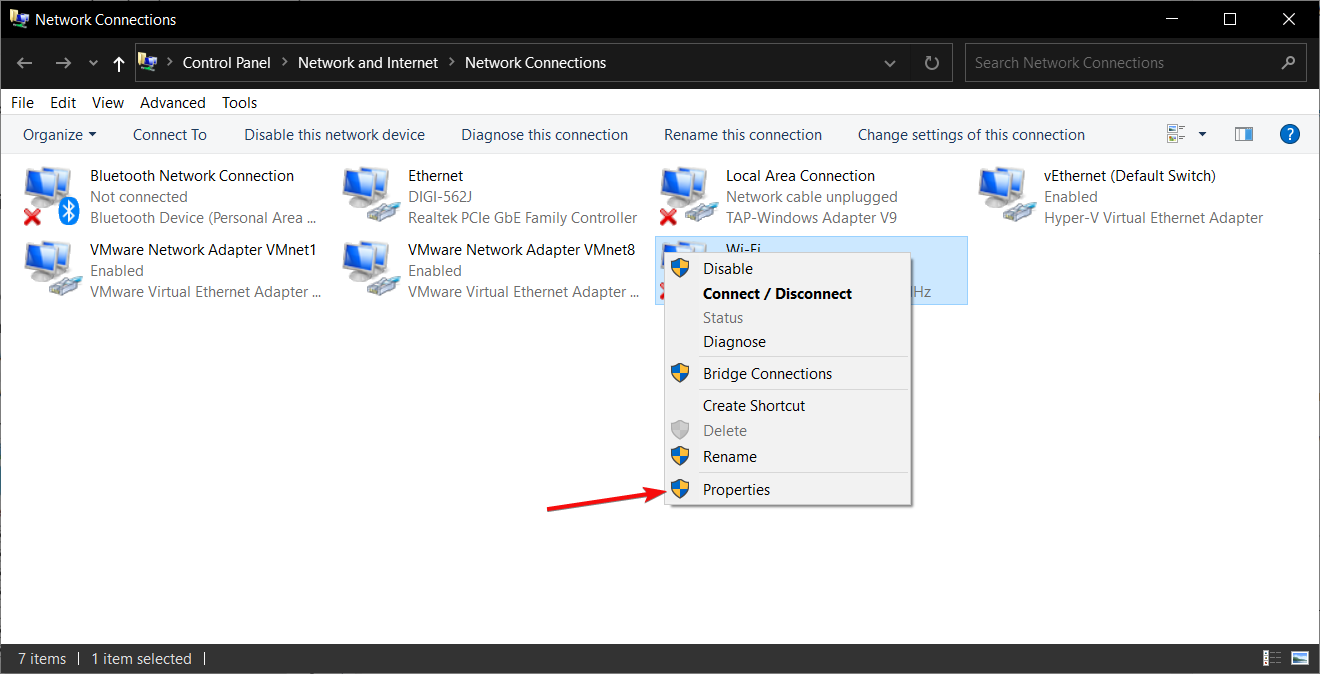
  2. Right-click the adapter you want to set as a priority and choose Properties.

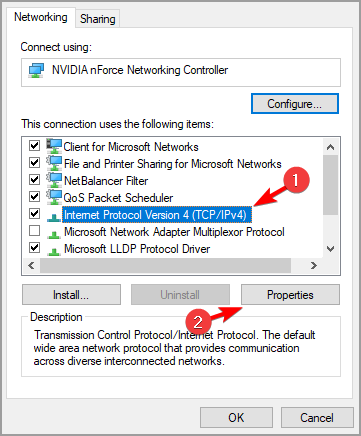
  3. Select Internet Protocol Version 4 (TCP/IPv4) and choose Properties.
  4. After that, click the Advanced button.
     
  5. Clear the Automatic metric and enter the desired value.

3. Disable IPv6

  1. Open the network settings like in the previous solution and navigate to network properties.
  2. Locate Internet Protocol Version 6 (TCP/IPv6) and disable it.
    ipv6 wow 51900 error 319
  3. Save changes.

To learn more, we have an in-depth guide on how to disable IPv6 on Windows 11, so don’t miss it.

4. Reset Windows

  1. Press the Windows key + I to open Settings.
  2. Navigate to Update & Security.
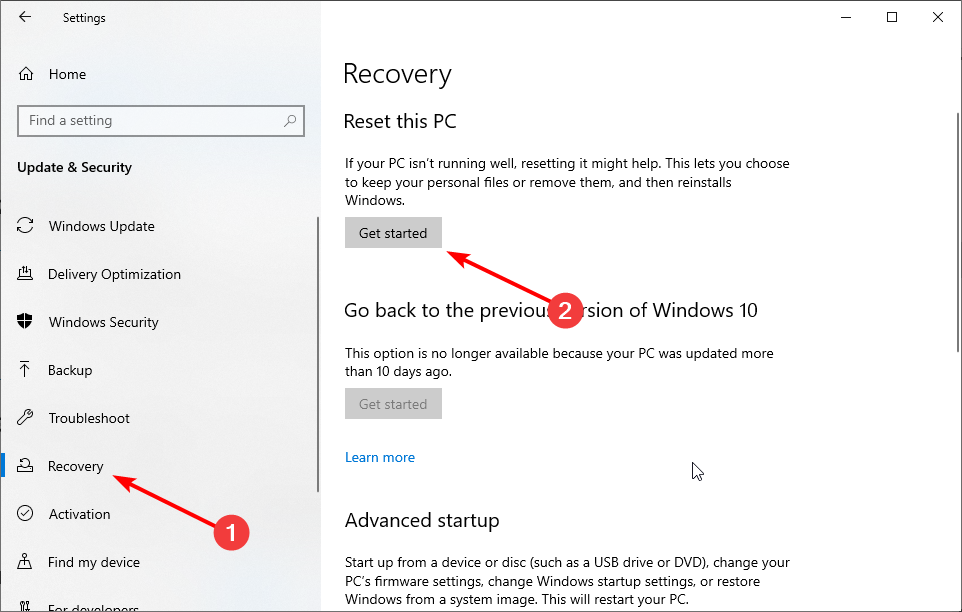
  3. Select Recovery and click on Get started in Reset this PC section.
    get started
  4. Select Remove everything.
  5. Next, choose Cloud download.
    Cloud download
  6. After that, select Just remove my files.
  7. Lastly, choose Reset.

Many reported that this is a reoccurring issue, and that reset is the only option.

Note icon NOTE
Resetting Windows 10 will cause all your files to be deleted from the system drive, so back them up and use this solution as a last resort.

What is the command to check interface metric?

  1. Press the Windows key + X and choose Powershell (Admin).
  2. Run the following command: Get-NetIPInterface
  3. Check the InterfaceMetric column to find the interface metric of your adapter.

By following these steps, you should be able to fix the problem with the Windows interface metric being ignored.

To learn more about networking, we have a great guide on how to correctly add a secondary IP address. Do keep in mind that issues can occur while doing that, but our guide on how to fix wireless adapter problems should be able to help.

Many reported that the Ethernet adapter isn’t showing on their PC, and this is a common issue that can be easily fixed.

Got an even better idea on how to solve this issue? Please share it with us in the comments section below.

How to create blurred background photos with Nikon camera

In order to blur the background on Nikon camera, you need to enable proper settings on your camera.

Blurring a background isn’t hard, and in today’s article, we’ll show you how to do it properly.

How can I blur the background on Nikon camera?

1. Make sure you have the proper hardware

camera lens nikon camera how to blur background

In order to blur the background with the Nikon camera, you won’t need any additional hardware, but your results may vary.

If you want to create high-quality pictures with blurred backgrounds, you might want to invest in a special lens with a larger aperture and a smaller f-number.

We’d recommend using a 50mm lens with an aperture of f1.8 or smaller. This isn’t mandatory, but the smaller the f-number, the better your blurred background will look.


2. Use Macro settings

use macro settings blur background nikon camera

The easiest way to create a blurred background on your camera is to use Macro settings.

To do that, follow these steps:

  1. Select Macro or Super Macro mode on your camera. Also, be sure to disable flash.
  2. Move close to the subject and zoom in.
  3. Focus on the subject, hold the camera still and take your photo.

Autofocus isn’t working on your Nikon camera? You can fix it with our simple guide!


3. Use Aperture Priority mode

appature priority mode blur background nikon camera

Another way to blur backgrounds with your Nikon camera is to use Aperture Priority mode.

To do that, follow these steps:

  1. Make sure that your subject is away from the background.
  2. On your camera, set the Aperture priority It’s labeled A or AV usually.
  3. Select the smallest f-value you can. The smaller value is usually better.
  4. Zoom in on your subject, hold the camera steady and take the photo.

There you go, a quick and easy way to blur the background on your Nikon camera. Most cameras support f-values of 5.6 which should be enough for basic blur effects.

If you want to take your blurred photos to a new level, you might want to consider investing in a lens with a larger aperture.

We hope you found our guide useful. If you did, feel free to leave us a comment below.

READ ALSO:

Windows 10/11 PC ignores boot order? Check out these methods

Whenever you boot your Windows PC, you get a glimpse of a message stating that you should press a button if you want to enter the BIOS menu.

The BIOS menu, among other things, is where you can see your PC‘s boot priority list.

The boot priority list is the order in which your PC will choose where to boot off of.

This means that by changing the boot order, you could set your PC to boot off of a removable disk, a USB stick or even a disk.

However, some users have reported that their PCs sometimes seem to ignore the boot orders all on their own.

What can I do if Windows 10 ignores the boot order?

1. Check to see if the boot media is working properly.

In theory, there is no reason why a PC would ignore a boot order unless the first choices that you nominated were invalid.

This is because the PC will take all the boot options in order, and boot off of the first valid one it finds.

As such, if you changed the boot order recently, make sure your first choices are none of the ones below:

  • A USB stick or disk that wasn’t made to be bootable
  • A drive that doesn’t contain any system files
  • Any USB stick, disk or drive that is empty or damaged

windows 10 ignores boot order disk

Additionally, the problem can also stem from the way the media is connected to the PC, not just the media itself.

As such, you should also try the following:

  • Check to see whether your optical drive is working properly
  • Change the USB port where you inserted the bootable stick
  • If you’re trying to boot off of an external hard drive, make sure the connecting cable is properly inserted and not damaged

BIOS seems too complicated? Get a better understanding of it with the help of this handy guide.


2. Reset your BIOS by removing the CMOS battery

Sometimes resetting your BIOS will remove such issues, so try doing this by following these steps:

  1. You must first disconnect your PC from any power source.
    • If you are using a laptop, this includes removing the battery
  2. Remove your PC‘s cover, and locate the CMOS battery
  3. Remove the battery
  4. Press the power button for around 10 seconds
  5. Put the CMOS battery back in place
  6. Boot the PC

By making sure you avoid any of these common mistakes, you will no longer have an issue with your Windows 10 PC ignoring your designated boot order.

Do you know another solution for this issue? Share it with the community in the comments section below.

RELATED ARTICLES YOU SHOULD CHECK OUT:

OneNote printing cuts off pages? Here’s what you need to do

OneNote, especially the latest iteration of the app for Windows 10 has a lot of formatting issues when it comes to printing. It seemingly cuts off margins or even whole parts of pages which is definitely not something we want from the go-to note-taking tool. OneNote printing cuts off pages is a frequently reported problem and there’s no resolution to this day.

We have a few suggestions, workarounds if you like, to resolve this and they mostly apply to OneNote 2016 (part of the Office 2016 and pre-installed on Windows suite) and OneNote for Windows 10.

How do I format OneNote for printing?

1. Change the page orientation from portrait to landscape

The first suggestion when printing notebooks, PDF files, or documents with OneNote is to select the landscape as the main orientation. With that approach, users managed to avoid pages being cut off for good.

If you are not sure how to change the page orientation from portrait to landscape when printing via OneNote, check these steps:

  1. Open OneNote and the notebook or note you want to print.
  2. Click Print in the top right corner.OneNote printing cuts off pages
  3. Under the Orientation, select Landscape and try printing the document.

If you want to stop printing going to OneNote, follow this guide we wrote for you.


2. Use the Letter as the printing paper size

Alternatively, we encourage you to set the printing paper size to Letter. This allows for some extra space on the sides so you won’t lose your margins. Additionally, it won’t make weird page skips that many users are reporting.

Follow these steps to set the Letter as the printing paper size:

  1. Open OneNote and the notebook or note you want to print.
  2. Click Print in the top right corner.
  3. Click on the More settings hyperlink.
  4. Under the Paper and Quality, select Letter and move to printing.OneNote printing cuts off pages

3. Go for the different printing options

Finally, if you have an option to export the notes from OneNote into a different printer preview application (PDF reader or Microsoft Print) and try printing that way. In other apps, you’ll have better control over the pre-print layout and thus avoid OneNote printing cuts off.

OneNote printing cuts off pages

RELATED STORIES YOU SHOULD CHECK OUT:

Recover Steam password with these simple steps

Forgetting your Steam login credentials is not a big deal these days, with all the recovery options modern services offer. Chances are (I do it often) that you’ll change your password but still would keep the old one in your memory and rely on the “Remember on this device” feature that keeps your credentials. But what if you replace your system or even the device? That’s when the passwords get lost and that’s when you’ll want to recover your Steam password. Don’t worry, we have a swift explanation for you.

How can I reset my Steam password?

The Steam Guard feature offers 3 options to provide you with the code that allows you to access your account and reset the password. One that comes by default as soon as the registration is done is by Steam Guard Authorization via the email address you used to create the account.

Recover Steam password with these simple steps

The Guard will prompt you to insert the code even if you have your password every time you change the system, browser, or device. If you want to reset the code via the email address, just click on the “Forgot your password?”. That’s the first step to recover the Steam password.

Once you are there, confirm that you forgot your password and click on the “I forgot my Steam account name or password“. There, you can enter your email, your account name, or your mobile phone number.

Whatever you choose, the result is the same. It only depends on what service you’ll use to reset your password. With the email, you’ll obviously get the email with the code. With the phone number, well, you guess, you’ll get the SMS containing the code.

Now, if you have the Steam mobile app on your smartphone, the procedure is similar. Steam uses the phone app for account authentication (you can get it here) and it’s the most recommended protective measure. Once you’ve got the code, it’s all simple from there.

Recover Steam password with these simple steps

Enter the code in the field and set a new password for your account. Have in mind that you can’t set the same password that was already used and that you seemingly forgot. Oh, the irony. Either way, that’s it. Those are the ways to recover the Steam password or rather create a new one.

You can also check this detailed guide on Steam password reset issues in case the platform refuses to send the recovery code or accept a new password.

RELATED STORIES YOU SHOULD CHECK OUT:

FIX: The time limit for logging on was reached Outlook error

Microsoft Outlook will always be the go-to mail client for people invested in Microsoft’s ecosystem. And for a variety of reasons, even older versions are still amazing tools. However, users do run into certain issues from time to time. One not-so-common error appears during the log-in. It says that The time limit for logging on was reached in Outlook.

If you are troubled by this error, make sure to check the steps below.

How to fix The time limit for logging on was reached in Outlook

1. Update add-ins

The problem usually occurs due to faulty add-ins. This is especially the case with the Salesforce add-in that frequently invokes this error. Usually, add-ins update on their own, but you might force an update by reinstalling a certain add-in.

The time limit for logging on was reached Outlook error

Now, for the majority of third-party add-ins, you’ll need to get them from a third-party website and install them. It works like any other 32-bit application. Once you’ve done that, restart Outlook and look for improvements.


If you fancy classic Outlook Express on Windows 10, learn how to get it here.


2. Reinstall the Salesforce add-in

The most common reason for The time limit for logging on was reached Outlook error is Salesforce add-in. Firstly, ensure that you have the Dot NET Framework 4 installed. Also, have in mind that the standard Salesforce plug-in is discontinued for new users in the winter of 2019. So ensure that you have succeding tools instead.

However, for the time being, we suggest reinstalling the Salesforce add-in and looking for improvements. Here’s how to do it:

  1. Open Microsoft Outlook.
  2. Select File.
  3. Open Manage Add-ins.
  4. The web client will open. Remove the Salesforce add-in.
  5. Close the Outlook desktop client first and download Salesforce add-in from the official Add-in Store, here.The time limit for logging on was reached Outlook error
  6. Install the Salesforce add-in and check for improvements.

3. Run the Outlook in Safe mode

To pinpoint the exact cause of the problem with The time limit for logging on was reached Outlook error, try Safe mode for Outlook. You can run the Safe mode on Outlook by following these steps:

  1. Make sure that the Outlook desktop client is closed.
  2. Press Windows key + R to open the Run command line.
  3. In the command line, type outlook.exe/safe and press Enter.The time limit for logging on was reached Outlook error
  4. Look for changes.

4. Turn Multi-factor authentification off

Finally, some users suggest that the problem is in the log-in credentials, namely Multi-factor authentication. If you’ve changed your password recently, chances are that Outlook is having a problem to authorize the change. Thus the error. We suggest temporarily disabling Multi-factor authentication and looking for improvements.

Here’s how to disable it:

  1. Navigate to the Security section of your Microsoft Account on a web browser, here.
  2. Choose Two-factor authentification.
  3. Select Turn off two-step verification and exit the browser.The time limit for logging on was reached Outlook error
  4. Try using Outlook again.

RELATED STORIES YOU SHOULD CHECK OUT:

Posted in Fix

Microsoft is bringing updated form controls to Edge and Chromium

Microsoft has announced that new form controls are heading to its Chromium-based Microsoft Edge web browser still under development. The tech giant says it worked closely with Google to bring it to life, so it will also with with Chrome and other Chromium-based web browsers, as well.

The main focus on these new form control changes is to increase their ease of use on touchscreen devices, especially as Microsoft’s Surface and Google’s Pixelbooks all feature touchscreens as standard options. This is achieved simplifying some of the controls such as color selectors to increase the size of buttons, and adding a touch optimized controls such as a time selector.


Via Microsoft

The new controls also feature flatter and more modern designs, opting for more gray and less blue. This should add more symmetry to websites which also tend to prefer more minimalistic designs, and should also be able to work better with other color schemes as well.

Microsoft and Google are also focusing on accessibility, including increasing the contrast of the rectangular input selector that is used when the keyboard is used for navigation. Additionally, for users who use their systems in high-contrast mode, many of the UI elements have also been updated to support it, and web developers are free to adjust these styles to better match the theme of their websites.

What do you think of these new controls? Let us know what you think in the comments area below.

Google officially unveils the Pixel 4 alongside new earbuds, Chromebooks, and Wifi routers

Google has officially joined the Fall rush of hardware announcements as it unveiled a slew of hardware ranging from wifi routers to earbuds.

Google Stadia

There were several mentions early on about Google’s cloud streaming gaming service, Google Stadia, that led the event. Despite the lack of further technical announcements at today’s event, fans and journalists were finally given an official November 19, 2019 release date to applaud about.

Pixel 4 & 4XL

As expected, Google officially took the wraps off its flagship Pixel smartphone, Pixel 4 and 4XL. While much of the phone specs, features, and industrial design has been known by the media for the past few months, the company managed to sneak in a few surprises such as pricing, availability and Live HDR+ image capturing.

Other details include a 90Hz refresh rate AMOLED screen, Face Unlock tech, on-device next-gen Google Assistant and Google’s Project Soli gesture controls.

Unlike previous years, Google has managed to get the remaining US carrier holdouts to sell Pixel 4 this year and interested customers can now walk into AT&T, Sprint, T-Mobile, Spectrum Mobile, and Xfinity Mobile, US Cellular, C Spire, Cellcom on October 24, 2019, to snag the new phone at a starting price of $799.

Pixel 4 and 4XL will come in three colors, black, white and a limited edition peach/orange color with either a glossy black or matte white and peach finish on the phones.

Pixelbook Go

Google also announced the Pixelbook Go which is a slightly more affordable Chromebook sporting several chipsets, storage, and screen technology options this year. Interested parties can grab the Pixelbook Go for as little as $649 with an Intel M3 processor on 8GB memory and 64GB hard drive or max out at $1,399 for the latest Intel Core i7 with 16GB memory and 256 GB of storage. Pre-orders for the Pixel Go start as soon as today.

Nest & Nest Mini

Further down the rabbit hole was the announcement of the Nest Mini and Nest which Google is hoping will bring home automation and voice control to even more homes and living rooms.  The Nest mini will now finally come with a wall mount, improved audio and brand new blue color for the same prices as last year at $49.00.

The Google Wifi Mini comes in a pack of three including the main Nest routed unit and two wifi speakers for $349 and should cover up to 5400 square feet of coverage. Pre-orders are available now.

Pixel Buds

Lastly, there was also some attention paid to the follow up of Googles Pixel Buds from 2017 with the refreshed Pixel Buds 2019. The Pixel Buds this year are truly a wireless solution that Google claims will fit snugly in most people’s ears. The improvements in 2019 include new Dynamic Sound technology akin to noise cancellation and up to 5 hours of continuous use battery.

There was mention of language translation but Google didn’t dive into the presumed improvements over 2017’s technology. Unfortunately, Google will not be selling the Pixel Buds (2019) this holiday season but instead opting for an early 2020 release for $179.

At the close of the event Google claimed there were some more details and possibly even more unannounced hardware that would become available if so, we’ll update accordingly.

Fortnite Chapter 2 is now available on Xbox One

Fortnite Chapter 2 is now available on Xbox One. As noted on the Fortnite blog, Chapter 2 introduces new water gameplay with swimming, fishing, boats, and a new island featuring 13 all-new locations. Chapter 2 also gives players access to new combat with new weapons, hideouts, and explosives. Check out the new Fortnite Chapter 2 gameplay launch trailer below.

Here’s a look at what’s new in Fortnite Chapter 2 on Xbox One:

  • New Island Map: A totally new world with 13 new locations. Some past favorites, like Risky Reels, are also back.
  • Water Gameplay: Swimming, fishing, boats, and watersports.
  • Squad Support: Bandage Bazooka item, the ability to carry teammates and group emotes.
  • Hideouts & Explosives: Hide in haystacks and dumpsters or shoot explosive barrels.
  • Weapons: A new arsenal and the ability to upgrade weapons using resources at an upgrade bench.
  • New Battle Pass: Reworked XP system and less grind with medals earned in-game.

Download Fortnite Chapter 2 on Xbox One today!

Fortnite
Fortnite
Developer:
Epic Games Inc.
Price:
Free

How to use wireless hotspots in Windows 10

You can use your Windows 10 PC to host a wireless hotspot for your other devices. Windows has built-in support for both Wi-Fi and Bluetooth hotspots (provided your PC has hardware for both), so you’re able to connect a wide selection of phones and tablets.

To configure your hotspot, first open the Settings app and click the “Network & Internet” category. Select the “Mobile hotspot” page from the navigation menu at the side.

The settings should be fairly self-explanatory. First, you need to select the network adapter whose Internet connection you want to share. On a desktop PC, this may be an Ethernet port. If you’re using a tablet with mobile connectivity, you might want to share its LTE connection. Select the relevant adapter from the list using the dropdown menu.

Screenshot of setting up a Wi-Fi hotspot in Windows 10

Next, decide whether to host the hotspot using Wi-Fi or Bluetooth. You should generally choose Bluetooth unless the device you’ll be connecting does not support Wi-Fi. Wi-Fi offers transfer speeds far in excess of Bluetooth, making it better suited to Internet traffic.

You should now take the time to customise the name and password for your hotspot. Click the Edit button to change these options. The network name is what devices will display when scanning for available connections. Make sure you use a strong password to prevent any unwanted intrusions.

Screenshot of setting up a Wi-Fi hotspot in Windows 10

The final button on the page, “Turn on remotely,” can be used to make Windows enable your hotspot on-demand. Client devices can request the hotspot is turned on, even if it’s disabled in Windows settings. This only works if the device is already paired with your PC over Bluetooth, so it has a way of communicating with Windows. Only some devices, such as Windows 10 Mobile phones, are compatible.

Finally, toggle the “Share my Internet connection with other devices” button at the top of the page to the “On” position. This will activate your hotspot. After a few moments, it should show up as a Wi-Fi or Bluetooth network on your other devices. Connect using the password you configured above.

Screenshot of Windows 10's networking menu

When you’re connecting with another Windows 10 device, your hotspot will show up in the networking menu in the system tray. Click the Wi-Fi icon in the bottom-right and wait for the networks list to populate. After a few moments, your hotspot should appear, named with the label you assigned back on the Settings page. Click the network to enter the password and connect.

Screenshot of setting up a Wi-Fi hotspot in Windows 10

Once your hotspot is active, you get access to a new option, “Power saving.” This allows Windows to automatically turn off the hotspot if no devices have been connected for a period of time. This saves power and lowers the security risk of your device publicising an available hotspot.

You can disable the hotspot at any time to disconnect all the devices. You don’t need to open the Settings app as there’s a Quick Action tile available in Windows 10’s Action Centre – press Win+A to open Action Centre and then click the “Mobile hotspot” tile to turn off the feature.

How to fix Nikon Camera Battery Exhausted Message

If you’re getting a message on your Nikon camera saying that the battery is exhausted, the problem might be caused by your battery or by your settings.

However, there’s a way to fix this problem, and today we’re going to show you how to do it properly.

How to fix Battery exhausted error on my Nikon camera?

1. Make sure that your battery settings are correct

battery settings Nikon camera battery exhausted

You may get Battery exhausted message on your Nikon camera if your battery settings aren’t correct. However, you can fix that by doing the following:

  1. Turn on your camera and press the Menu
  2. Navigate to the Setup section and choose Battery type from the menu.
  3. Now select the appropriate battery type that you’re using and press the OK
  4. After doing that, the issue should be resolved.

2. Replace the batteries

replace the batteries Nikon camera battery exhausted

Sometimes this error can appear if your batteries are actually depleted. To fix that, you need to replace the batteries.

Several users reported that they replaced their batteries with alkaline batteries and then inserted the rechargeable batteries to fix the problem.

Several users reported that the issue was switched after switching to Lithium batteries, so you can try that as well.

3. Make sure that the batteries are properly charged

charge batteries properly Nikon camera battery exhausted

Charging batteries takes time, and in order to make sure that your batteries are properly charged, you need to charge them for several hours.

According to users, 6 to 8 hours of charging should be enough, but you might need more depending on your battery capacity.

4. Connect the charger in the correct order

properly charge the batteries Nikon camera battery exhausted

In order to charge your camera, you need to connect the charger in the right order. The correct order is the following:

  1. Connect the USB cable to the charging adapter.
  2. Now connect the adapter to the wall outlet.
  3. Make sure that your camera is turned off.
  4. Now connect the USB cable to your camera.

5. Check your battery door cap

check the battery cap Nikon camera battery exhausted

Sometimes Battery exhausted error can appear if your battery door cap is damaged. To fix it, it would be best to take it to the Nikon’s repair center for replacement.

Alternatively, you can try using a wall charger to charge your batteries.

These are our solutions for Battery exhausted error on Nikon cameras. If you found our solutions useful, let us know in the comments section below.

Nikon Camera Taking Black Pictures? 5 Solutions to Fix

If your Nikon camera is taking black pictures, there’s probably an issue with your shutter.

This is a major problem, but in today’s article, we’ll show you how to fix this issue on your own.

What to do if the Nikon camera is taking black pictures?

1. Set the exposure to 30 seconds

change exposure nikon camera taking black pictures

This method might be potentially dangerous if you’re not careful, and we’re not responsible for any damage that might occur.

  1. Take the lens off and turn the camera on.
  2. Now set the camera to work in Manual mode.
  3. Change the exposure to 30 seconds.
  4. Take a photo and check if your shutter curtain is stuck.
  5. Hold the camera in one hand and gently thump the base of the camera with your other hand.
  6. Do this a couple of times and your camera should start working again.

2. Use the Clean Image Sensor option

clean image sensor nikon camera taking black pictures

To fix this problem, some users are suggesting using the Clean Image Sensor option. This option should be available from the menu.

According to users, using a Clean Image Sensor option a few times should fix the problem with your camera.

3. Try removing the battery

remove the battery nikon camera takes dark pictures
  1. Turn your camera off.
  2. Once the camera is off, remove the battery.
  3. Replace the battery.
  4. Not turn the camera back on again.
  5. Check if the issue is still there.

4. Change the ISO value

change iso value nikon camera taking black pictures

According to users, changing the ISO setting fixed this problem for them.

It appears that the issue was caused only when ISO was set to 100.

After changing the ISO to a higher value, the problem was gone.

5. Take your camera to the repair center

contant the repair center nikon camera taking black pictures

If you’re still having this issue, there might be a hardware problem with your camera.

To fix it, it would be best to take it to the Nikon’s repair center and have a professional fix it for you.

There you go, we hope that our solutions helped you fix the problem with Nikon cameras and black pictures. If our solutions were helpful, feel free to let us know in the comment section below.

Run command doesn’t save history in Windows 10/11 [EASY FIX]

The auto-complete feature is probably one of the biggest time-saving features ever invented in terms of PC functionality.

This ranges from account and password auto-complete to the history-based autocomplete in various functions and programs.

However, some users have reported that their Run command is not saving history in Windows 10.

I have several virtual machines with different builds of Windows 10 which I am using for testing purposes. One of my machines suddenly stopped saving the Run history. This was unexpected and very inconvenient, because I use the Run dialog a lot. Here is how you can fix it.

Now, normally all the latest commands you’ve typed in  Run should still be present in the form of a drop-down list.

Additionally, the latest command you used should already be typed in the box as a suggestion, as you can see in the picture below:

run command not saving history

However, this doesn’t seem to be the case with some.

How do I save my Run history in Windows 10?

The steps are pretty straightforward, in that all you need to do is tweak a few Windows 10 Settings.

  1. Press Windows
  2. Click on Settings (the cogwheel-shaped button from the Start menu)
  3. Go to System
  4. Select Personalization
  5. Click Start
  6. Turn on the option Show most used apps

run command not saving history windows 10

There is a chance the Show most used apps feature may be greyed-out. If that is the case, proceed with the following steps:

  1. Press Windows
  2. Click on Settings
  3. Select System
  4. Go to Privacy
  5. Click General
  6. Turn on the Let Windows track app launches to improve Start and search results switch

Let Windows track app launches to improve Start and search results

The Show most used apps feature will no longer be greyed-out now

If Let Windows track app launches to improve Start and search results is greyed out for you, then you need to change one key in the Registry:

  1. Press Windows + R
  2. Type in Regedit
  3. Navigate to the following address:
    • HKEY_CURRENT_USER\Software\Microsoft\Windows\CurrentVersion\Explorer\Advanced
  4. Find the Start_TrackProgs DWORD
  5. Double-click to open and set the value to 1
    • If the DWORD doesn’t exist, create one and set its value to 1

run command not saving history windows 10 DWORD


Can’t access Registry Editor on your Windows 10 PC? Check out this useful guide.


While this issue overall isn’t much of a performance breaker, it does make you spend more time remembering what commands you used in the past.

As such, following these steps will indeed lead to faster commands in the long run.

RELATED ARTICLES YOU SHOULD CHECK OUT:

This Item Name or Type Isn’t Allowed on OneDrive [Fix]

OneDrive is one of the most renowned cloud backup solutions out there for both enterprise and home users. However, there are certain limitations when uploading files on OneDrive. Some keep getting the This item name or type isn’t allowed OneDrive error.

The error appears when uploading files, be it manually or automatically in the background. The entire message reads, This item name or type isn’t allowed. Please rename the item or remove it from your OneDrive. Keep reading to find the solutions!

How do I fix This item name or type isn’t allowed OneDrive error?

1. Make sure that the file name and type are supported

There are certain limitations OneDrive imposes on users, so not every file type or even name is supported. These limitations include:

  • Characters that are not allowed in the file names are “, *, :, <, >, ?, /, and |. File names must contain less than 400 characters.
  • Folder names that are not allowed are .lock, CON, PRN, AUX, NUL, COM0 – COM9, LPT0 – LPT9, _vti_, desktop.ini, and any filename starting with ~$.
  • Usual file types that are not supported are executable files, but this can vary depending on your server administrator’s decisions.

2. Re-link OneDrive to the PC

  1. Right-click on the OneDrive icon in the notification area and then open Settings.
  2. Go to the Account tab.
  3. Click on Unlink this PC and then close the application. OneDrive The name or type isn't allowed
  4. Again open OneDrive settings and then go to the Account tab.
  5. Select the location of the OneDrive folder.
  6. Sign in with your credentials, and you should be good to go.

If you are sure that the file or folder you are trying to upload meets the requirements, but the item name or file type still isn’t allowed, try resetting your OneDrive and re-linking it to your PC.

3. Use OneDrive on the web

Finally, the limitations that are present on the local client won’t affect file uploads on the web-based client. That’s why we suggest logging into your OneDrive account via browser and uploading files that way.

Also, while we are there, allow us to recommend a browser that is probably the best contemporary alternative to Chrome and Firefox.

 OneDrive The name or type isn't allowed

UR Browser is super-private and won’t eat up all your resources while performing simple tasks in a few tabs. It comes with enhanced encryption and quite an intuitive design that closely resembles Google Chrome.

Check it out and see what are the benefits of using UR Browser over others firsthand.

That’s it! By now, you should have fixed the This item name or type isn’t allowed error in OneDrive, by renaming the file, relinking OneDrive, or using the web version of Microsoft’s cloud storage service through a more reliable browser.

In case the problem persists and you intend to switch, check the best cloud storage services for seamless uploads and to access files on the go!

For any queries or to share more solutions with us, drop a comment below.

The Sync Could Not be Initiated: 3 Ways to Force it

Microsoft Intune enables users to sync enrolled devices with their organizations. However, sometimes Intune doesn’t sync user devices, and you get The sync could not be initiated (0x82ac019e) error.

In case you’re not familiar with syncing, we have a great guide on how to sync devices with MS Intune, so we recommend checking it out.

In today’s guide, we will focus on syncing issues, so let’s get started, shall we?

What causes The sync could not be initiated error?

  • Closed ports, such as port 444, can cause sync issues on your PC.
  • Device is registered with other organizations and that’s causing a conflict.
  • Enterprise Mobility and Security E3 aren’t enabled.

How do I force a device to sync with Intune?

1. Open Port 444

  1. Press the Windows key + S keyboard shortcut.
  2. Input Windows Defender Firewall as the search keyword.
  3. Click Windows Defender Firewall with Advanced Security to open the window in the snapshot directly below.
    Windows Defender Firewall window microsoft intune not syncing
  4. Right-click Inbound Rules on the left of the window to select New Rules.The New Inbound Rule Wizard microsoft intune not syncing
  5. Select Ports and click Next.
  6. Select the TCP or UDP protocol option for your port.
  7. Then enter the port number 444 in the Specific local ports box.The Specific local ports box microsoft intune not syncing
  8. Select the Allow the connection option.
  9. Click the Next button to open Profile options.
  10. Click Next again, and then enter a title for the firewall rule.
  11. Press the Finish button.

Speaking of Firewall interference, it could also cause issues like error code 80180006; read this guide to learn the solutions.

2. Unregister the Device From Other Organizations

  1. Click the Start button.
  2. Click the Settings button on Windows 10’s Start menu.The Settings app microsoft intune not syncing
  3. Select Accounts in Settings.
  4. Click Access work or school on the left of the Settings window.The Access tab microsoft intune not syncing
  5. If the device is connected with another organization, select the listed account for it.
  6. Then click Disconnect button for the selected account. Then users should have one organization account for Intune listed there.

After doing that, check if the error message is gone.

3. Check Enterprise Mobility + Security E3 is enabled

  1. Log in to Office 365 portal as administrator.The Office 365 portal microsoft intune not syncing
  2. Select the user account the syncing error arises.
  3. Click the Edit button for Product licenses.
  4. Then turn on Enterprise Mobility + Security E3 if it’s not enabled.
  5. Thereafter, users will need to restart the affected device to resync it. Open the Settings app in Windows 10.
  6. Then click Access work or school and resync the device from there.

Those are some of the resolutions users have fixed Intune’s syncing with. Remember that the service has additional problems, and we wrote about Intune app failed to install error in one of our older guides.

Keep in mind that you can encounter various issues in Intune, and we also covered error code 0x87d1fde8 in our previous guides.

Users who have resolved the sync could not be initiated error with other resolutions are welcome to share their fixes below.

How to terminate Language typing features notifications

Some users have posted on Windows support forums about a Language typing features pop-up notification. That’s a Windows 10 Action Center notification that might pop up about every 30 minutes for some users.

Users have queried support forums in search of a resolution that will get rid of the Language typing features notification. B

elow are some of the resolutions that have disabled the typing features notification for users.

How can Users Disable the Typing Notification?

1. Uninstall Secondary Language Packs

  1. Users have confirmed that uninstalling additional Windows 10 language packs got rid of the typing features notification for them. Click the Type here to search button to open the search utility.
  2. Enter ‘language’ in the search utility’s text box.
  3. Then click Language Settings to open the window shown directly below.Language options language typing features disable notification windows 10
  4. Select the secondary language pack listed under the default one.
  5. Press the Remove button to uninstall the pack.
  6. Most users will have just one additional language pack, but users who have installed other packs might also need to uninstall those to get rid of the typing feature notification.

2. Turn Off Action Center’s Notifications

  1. Alternatively, users can try turning off the Action Center’s notifications. To do that, open the search box in Windows 10.
  2. Input ‘notifications’ as the search keyword.
  3. Click Notifications & actions settings, which opens the Settings app as shown directly below.Notifications & actions options language typing features disable notification windows 10
  4. Turn off the Get notifications from apps and other senders option.
  5. In addition, deselect the Get tips, tricks, and suggestions option.

3. Edit the Registry to Disable Action Center

  1. If turning Action Center notifications off doesn’t do the trick, try editing the registry to disable the Action Center. Before doing so, some users might prefer to set up a System Restore point.
  2. Open Run by pressing the Windows key and R hotkey.
  3. Input ‘regedit’ in Run and click OK to open the Registry Editor.
  4. Next, open this key in the Registry Editor’s window: HKEY_CURRENT_USER\SOFTWARE\Policies\Microsoft\Windows\Explorer.Windows registry key language typing features disable notification windows 10
  5. If there’s isn’t an Explorer key in the registry, add one by right-clicking the Windows key and selecting New > Key. Then enter ‘Explorer’ as the key’s title.
  6. Select the new Explorer key.
  7. Right-click an empty space on the right of the Registry Editor to select New > DWORD (32-bit).
  8. Enter ‘DisableNotificationCenter’ as the title of the new DWORD.
  9. Double-click DisableNotificationCenter to open the window directly below.The Edit DWORD window language typing features disable notification windows 10
  10. Then delete the zero, and enter ‘1’ in the Value data box.
  11. Click the OK button.

4. Turn Off the Autocorrect Misspelled Words Settings

  1. Some users have also confirmed that turning off the Autocorrect misspelled words option can disable the typing features notification. Open the search tool by pressing the Windows key (with the Microsoft logo on it) and S simultaneously.
  2. Then enter ‘typing’ and click Typing settings to open the window in the snapshot below.Typing settings language typing features disable notification windows 10
  3. Turn off the Autocorrect misspelt words setting.
  4. In addition, turn off the Highlight misspelt words option.

So, that’s how players can fix the Language typing notification. Then that notification won’t pop up in Windows 10.

RELATED ARTICLES TO CHECK OUT: 

Posted in Fix

How to fix common Amazon Fire Stick errors

For those of you that want to buy a new Smart TV but are lacking the budget, you should first hear about the Amazon Fire Stick.

This neat little device is basically like a USB stick which you insert into a TV‘s HDMI port, turning it into a Smart TV. This means you can install apps on the TV, go on the Internet and access a variety of streaming services.

Of course, like any piece of electronic equipment, the Amazon Fire Stick is prone to the occasional bug and error.

This article compiles some of the most common Amazon Fire Stick issues encountered, and solutions on how to fix most of them.

What are the most common Amazon Fire Stick issues?

The list of issues that a Fire Stick can encounter is quite large, but thankfully all of them are easy to solve.

  • Wi-Fi connection doesn’t work
  • Issues with the physical connection
  • Fire TV remote problems
  • Bugs with the Firestick’s Audio
  • The image is lacking quality
  • Can’t turn on the Fire TV Stick

How can I fix common Amazon Fire Stick issues?

1. Wi-Fi connection doesn’t work

how to fix common amazon fire stick errors wifi

This is probably the most commonly encountered issue with the Fire Stick, especially since it needs a stable Internet connection t do pretty much anything.

These issues can usually be countered by doing the following:

  • Make sure your modem or router is compatible with the Fire Stick
    • Your modem or router should have the following specifications: B, G, and N routers on 2.4 GHz or A and N routers on 5GHz
  • Remove any obstacles between the Fire Stick and your router
  • Use the Fire Stick’s Network usage tool to diagnose any problem if you think it is related to your network settings
  • Lastly, consider performing a Fire Stick restart or even a router restart, as that may fix your problems

For more details on this particular issue, check out this guide.

2. Issues with the physical connection

how to fix common amazon fire stick errors physical connection

As mentioned above, the Fire Stick is something that you add to your TV. As such, make sure all connections are stable and firm for proper functionality.

Any problems with the physical connection can usually be countered by doing the following:

  • Make sure the Fire Stick is fully inserted in the TV‘s HDMI port, otherwise it may not be recognized
  • Make sure both the Fire Stick remote and the Fire Stick itself are fully charged and receiving enough power
    • You can do this by changing the remote’s batteries, and making sure the Fire Stick is inserted in the USB power block or charger (which is included)
  • If your Fire Stick gets overheated too many times, its motherboard can fry. If that happens all you can do is simply buy a new Fire Stick

3. Fire TV remote problems

how to fix common amazon fire stick errors remote

If your Fire Stick remote is unresponsive, it can be due to lack of power (see above), of the Fire Stick and the remote aren’t paired properly.

As such you can try the following:

  • Reboot both the Fire Stick and the Fire Stick remote and perform another pairing
  • Make sure the batteries in the remote are charged and in full contact
  • Make sure the buttons on the remote function properly

For more details on this particular issue, check out this guide.

4. Bugs with the Firestick’s Audio

how to fix common amazon fire stick errors audio

When it comes to the audio, the problems and solutions alternate between incredibly easy and incredibly complicated.

As such, you should start off by doing the following:

  • First, check if the TV is accidentally set to Mute
  • You may have external speakers which are not compatible with your Fire Stick, so try switching your audio settings to Default Mode
  • If you think you have the wrong audio settings, go to the Fire Stick settings menu and disable the Dolby Digital Output option
  • Try plugging the Fire Stick in another HDMI port
  • Check the connection of all of your cables going to and from the Fire Stick, TV and audio system to see that they are properly plugged in
  • If you’re trying to use Bluetooth speakers or headphones, make sure they are properly paired

For more details on this particular issue, check out this guide.

5. The image is lacking quality

how to fix common amazon fire stick errors image

When it comes to the image, there are many reasons why your Fire Stick may be having issues.

Try some of the following steps to fix any image-related issues:

  • Try plugging the Fire Stick in another HDMI port
  • Check the connection of all of your cables going to and from the Fire Stick, TV and audio system to see that they are properly plugged in
  • Change the image resolution by holding the Up and Rewind buttons pressed for five seconds
  • Replace your Fire Stick
  • Adjust the scaling of the screen by going to Settings and changing the image format

For more details on this particular issue, check out this guide.

6. Can’t turn on the Fire TV Stick

When these types of problems occur, it is most likely caused by insufficient power reaching the Fire Stick.

Because of that, you should start off by trying these steps:

  • Check the connection of all of your cables going to and from the Fire Stick, TV and audio system to see that they are properly plugged in
  • Repair or replace the power cord (any damages or scratches will prevent proper functioning

For more details on this particular issue, check out this guide.

By following this comprehensive guide, you should be able to troubleshoot pretty much any Amazon Fire Stick-related issue you may encounter.

If you know of any other major issues, let us know in the comments section below.

RELATED ARTICLES YOU SHOULD CHECK OUT:

How to change payment method in Payoneer with ease

Payoneer becomes a force to be reckoned with when it comes to online payments. A lot of professionals, mainly freelancers, rely on it to get the funds and distribute them further to their bank accounts. It offers a variety of options and payment methods at fair fees so it might be a better professional option than PayPal. Today, we’ll show you how to change the payment method on Payoneer.
How do I change the payment method on my Payoneer account?

Changing the payment method on your Payoneer account is a rather simple procedure. However, it depends on what way payment services you use. Payoneer offers a variety of options, and they are as follows:

  • Global Payment Service – available in certain countries
  • Billing Service – allows for billing directly from Payoneer
  • Mass Payout company – receive the funds from a different platform
  • and Make a payment service – receive the funds from Payoneer users.

For example, some freelancing platforms don’t support changing the payment option through the standards ways so have that in mind. The procedure is, therefore, different.


Learn how to transfer money using Payoneer in just a couple of easy steps.


However, if you want to change the payment method in the company environment, just log into your account and select the Activity tab. From there, choose Funding sources and select the paying method for a particular company.

How to change payment method Payoneer

Finally, you get to choose whether you’ll get the funds faster with a small additional fee or get them in a standard way. With that, your payment method should be changed and this is applicable to the majority of services.

However, in order to avoid issues with the changes you made or make some things clearer, we highly suggest contacting the Payoneer support. That way you’ll not only learn in-detail how to change the payment method on Payoneer but also additional information regarding your business and transaction.

You can reach them on the official support website, here.

RELATED STORIES YOU SHOULD CHECK OUT:

Xbox adds new safety settings to text messaging

Microsoft has just announced new content safety settings to messages you receive on Xbox Live through the Xbox app on Windows 10 or Android. As noted in a post on Xbox Wire, the new messaging feature is available only to Xbox Insiders and will be generally available in a future Xbox One console update.

Xbox Text Filters help shield adult language content from younger players and allow you what kinds of message content you want to see. Xbox Text Filters have four levels of messaging content settings, including Friendly, Medium, Mature, and Unfiltered.

“We want to give you, the gamer, the control over what messages you want to see when you are engaged in the Xbox community, so we’re enabling new ways to filter content, specifically text. These new automated text filtration capabilities will start rolling out across the Xbox ecosystem soon, starting first with private messages and expanding over time to profiles, LFG, Clubs and your Activity Feed.

With this update, you will set your own specific levels of automated filtration so you can decide what’s acceptable and what isn’t in the text-based messages you receive across Xbox Live. And as always, if you receive a message that violates our Community Standards for Xbox, even with filters in place, you can still report this conduct to Xbox Enforcement for follow up.”

Here’s a video look at Major Nelson describing the new Xbox Text Filters on Xbox One.

On your Xbox One console, you can access your message safety by going to Settings > General > Online safety & family >Message safety. Xbox Insiders will receive the Xbox Text Filters update today, will a future update rolling out later in the fall for everyone else. By default, child accounts are automatically set to Friendly. The adult account holders can choose which text filter level works best for them.

Microsoft Launcher 5.9 goes out of beta, brings “live date” calendar icon and more

If you’re using the Microsoft Launcher on your Android phone, the latest version 5.9 is now out of beta for all users. The main change is that the Calendar icon will now always show the right date, and the icon itself has also been updated with a more simplistic look.

This update also brings a couple of bug fixes and performance improvements. You can check out the full changelog for the version 5.9.0.54736 below:

  • Live date update is now available on your original calendar app icon, and Microsoft Launcher calendar icon is also updated with a cleaner look.
  • General bug fixes on dock, wallpaper, calendar card, and performance improvements.

Along with Microsoft Edge and Your Phone Companion, the Microsoft Launcher is an essential app for Windows 10 users rocking Android phones. The app is getting new features at a regular pace, and you can also sign up for the beta version to get early access to new features.

Microsoft Launcher
Microsoft Launcher
Price:
Free