Microsoft’s training Small Language Models to outperform ChatGPT

Microsoft may have a $10 billion dollar investment and partnership with OpenAI for its ChatGPT Large Language Model but it looks like the company could be hedging its bets with its own smaller transformer technology.

Microsoft researchers recently revealed its Phi-1 1.3B transformer-based language model beat much larger models including HumanEval, MBPP, and even partnered ChatGPT when tasked with coding.

Combing “textbook quality” from The Stack and The StackOverflow datasets to train the artificial intelligence of Phi-1 1.3B and the use of eight NVIDIA A1000 GPUs over four days produced 6 billion high-quality training tokens based on GPT-4 classifiers and 7 billion generated using GPT 3.5 standards.

Not only did Phi-1 1.3B outperform some of its larger language model counterparts, it did so using fewer parameters.

Bing ChatGPT - Small Language Model Parameters

While the researchers may be popping bottles of champagne in excitement, Phi-1 1.3Bs achievements are tempered by its comparative limited versatility. Unlike larger models, Phi-1 1.3B gains ground through its specialized training in Python programming and as such, misses out on specific API programming resulting in less knowledge about domain specifics than larger models tend to have.

At the end of the day, Phi-1 1.3B success highlights the need for higher quality data to flow through these language models to optimize their output.

Microsoft’s other SML Orca has also proven to outperform ChatGPT in similar testing, further lending credence to the necessity for high quality data to shrink the resource question of LLMs.

Microsoft is planning to open-source Phi-1 1.3B through HuggingFace, but as of now, there is no official date for the release.

What is Error Code 999 & How to Quickly Fix it

While using your PC, you can run into an annoying Windows error 999 notification which is often triggered while trying to open an application.

In this article, we’ve outlined the most common causes of the error code 999 and some of the best-known fixes to help you resolve it.

What causes the error code 999?

The error code 999 is usually caused by the following:

  • Virus & Malware – Viruses and malware infections can corrupt system files and restrict Windows apps from functioning correctly.
  • Low memory – If you’re running on low memory, you’ll likely experience crashes and error codes like code 999.
  • Incorrect Registry entries – Incorrect registry entries can damage the Windows registry, leading to the error code 999.
  • Bad graphics driver – If you install an incompatible or outdated driver on your PC, it can lead to conflicts with Windows and trigger errors like code 999.

How can I fix the error code 999?

1. Close the background programs in Task Manager

  1. Press the Ctrl + Alt + Del keys simultaneously to launch the Task Manager.
  2. Navigate to the Processes tab, right-click on any of the processes, and click the End task button.
  3. After ending the process, check if error 999 is fixed.
  4. If it persists, repeat the steps to keep closing all the processes until you discover which is triggering the error.
  5. Once you locate the process, you can uninstall or troubleshoot the parent app hosting the process.

The actions of some third-party apps can conflict with Windows operations. Disabling such processes in the task manager can help fix the error code 999.

Here is a detailed guide on how to fix Task Manager not responding.

2. Perform a full PC scan

  1. Press the Windows key, type in windows security, and hit Enter.
  2. Click on Virus and Threat Protection. Under the Current Threats section, click on Scan Options.
  3. Select the Full Scan option and click Scan Now to initiate the scan.

Viruses and malware are the most common causes of Windows errors; you can resolve the error code 999 by running a virus scan. If you’d like, here are the best third-party antivirus tools for Windows.

The safest option to scan your PC for viruses and also remove them is by using TotalAV because it has the latest antivirus protection and high detection capabilities that will surely keep away all threats.

3. Run a Disk Cleanup

  1. Create a PC backup before attempting a disk cleanup to prevent file loss.
  2. Press the Windows key + E to open File Explorer.
  3. Right-click on your main directory (usually C:), click on Properties, and select Disk Clean up.
  4. In the next window, click Clean up system files.
  5. Then, restart your PC to check if the error is fixed.

Disk Cleanup can remove corrupt App data from your PC; however, you also lose files that aren’t backed up. Ensure you backup your PC before running a disk cleanup.

4. Reinstall the graphics driver

  1. Press the Windows key, type Device Manager, and hit Enter.
  2. Locate your display adapters from the list of drivers, right-click on the graphics driver, and select Uninstall device.
  3. Then, click uninstall again to confirm the process.
  4. Restart your PC once the driver is uninstalled.

After a reboot, Windows should automatically install the drivers. However, if you’d like to install it manually, here is a detailed guide showing you how to manually install drivers on Windows.

5. Run the SFC/ DISM scans

  1. Press the Windows key, type in cmd, right-click on the displayed result, and select Run as Administrator.
  2. Click Yes to grant the app administrative access in the User Account Control window.
  3. Once the command prompt opens, type the following and hit Enter: sfc /scannow
  4. Then, type this and hit Enter: DISM.exe /Online /Cleanup-Image / Restorehealth
  5. Wait till the scan is complete, close the command prompt, and restart your PC.

An SFC scan scans and repairs corrupt system files, causing errors in the system. If you’re experiencing code 999, an SFC scan can help fix it.

If you experience a Windows Resource Protection error during an SFC scan, read our guide to fix it.

Fixing the error code 999 is straightforward when you have the proper steps to follow. By the end of this article, you should be able to fix it.

If you have any questions or suggestions on how to fix the error, let us know in the comments. 

GitHub launches actions-permissions: a tool to strengthen security for GitHub Actions

GitHub, the leading platform for software development collaboration, has unveiled the latest tool called actions-permissions. This tool is specifically designed to address the need for better security and control over the repository token used in GitHub Actions workflows.

GitHub Actions

GitHub Actions, which allow users to automate various tasks and workflows within their repositories, utilize a temporary repository access token known as GITHUB_TOKEN. In the past, these tokens possessed wide-ranging permissions, granting full read and write access to the repository, with only pull requests from forks being an exception. However, GitHub implemented a more fine-grained permission model for workflow tokens in 2021. As part of this change, the default permissions for new repositories and organizations were set to read-only, providing a more secure starting point.

Despite these advancements, a significant number of workflows still rely on a write-all token due to default workflow permission settings. In many cases, writing permissions are not actually necessary. To help users identify if their workflows are using overly broad default permissions, GitHub provides a simple way to check the “Workflow permissions” section in the repository or organization settings.

While switching to a read-only permission setting is considered a security best practice, doing so may inadvertently disrupt existing workflows that rely on write-all permissions. Another challenge arises when applying the principle of least privilege, as complex workflows often involve multiple actions, making it easy to overlook specific permission required for proper workflow execution. Additionally, the diverse steps and error-handling mechanisms present in workflows can make it difficult to determine the precise set of privileges needed for more intricate workflow definitions.

To assist users in transitioning to a more secure workflow permission model, GitHub has introduced a set of powerful tools called actions-permissions. These tools provide monitoring and recommendation features that simplify the process of identifying and assigning the minimum required permissions for a given workflow.

Monitor action

The Monitor action, one of the key components of actions-permissions, installs a local proxy within the workflow runner. It actively collects information about any interactions with the GitHub API initiated by the workflow, allowing users to review and understand the minimum permissions needed. The recommendations are conveniently presented as part of the workflow run summary, providing clear insights into the required permissions.

In addition to the Monitor action, GitHub offers the Advisor action, which functions as both a local tool and a way to summarize the recommendations from multiple workflows runs. This feature provides users with a comprehensive overview of the permissions required across various iterations of their workflows.

Once users have implemented the recommended permissions in their workflows, they can discontinue the use of these tools. If any additional permissions become necessary for future iterations, users can easily add them as required.

GitHub welcomes users to try out these tools and provide valuable feedback, contributing to the ongoing improvement of GitHub’s offerings. With actions-permissions, GitHub continues to demonstrate its commitment to providing a safe and efficient environment for developers and organizations worldwide.

0xc0000218 BSoD Error: How to Fix it on Windows 10 & 11

Several Windows 10 & 11 users have recently complained about the 0xc0000218 BSoD error, which has hindered their system from starting up properly. The error code 0xc0000218 refers explicitly to a registry file failure which can often appear due to misconfigured system settings.

If you’re seeing this post or experiencing similar issues, check some potential fixes to troubleshoot the issue seamlessly.

What causes the 0xc0000218 BSoD error?

There can be several reasons behind the 0xc0000218 BSoD error. Below are some of the potential factors:

  • Incorrect registry edits – If you make incorrect changes using registry editing tools or manually modifying values, it can result in a corrupted registry. Such misconfigurations can trigger the 0xc0000218 error during the system startup process.
  • Conflicting system settings – Certain system settings, such as incompatible driver configurations, can lead to issues with the registry or system stability.
  • Corrupt or missing registry hive files – If the registry hive files are corrupted or get accidentally deleted, they become inaccessible during startup and trigger this error.

Unlike other BSOD errors, you may still have access to your computer. However, you will experience processing failures at different instances while at it.

 How can I fix the 0xc0000218 BSoD error?

Before engaging in any advanced troubleshooting or settings tweaks, you should consider performing the following preliminary checks:

Having confirmed the above checks, if the problem persists, you can work through any of the advanced solutions provided below.

 1. Perform a Startup Repair

  1. Insert a bootable USB or DVD, start your PC, and press any key to boot from the DVD or USB stick.
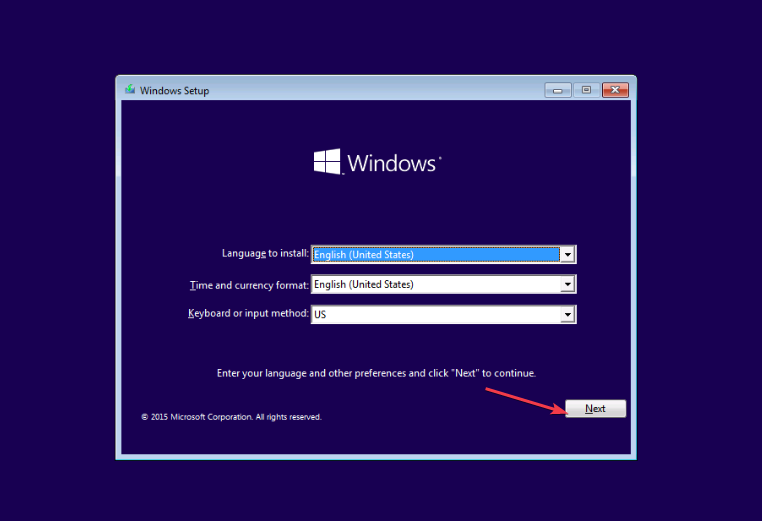
  2. Choose your language preferences and press Next.
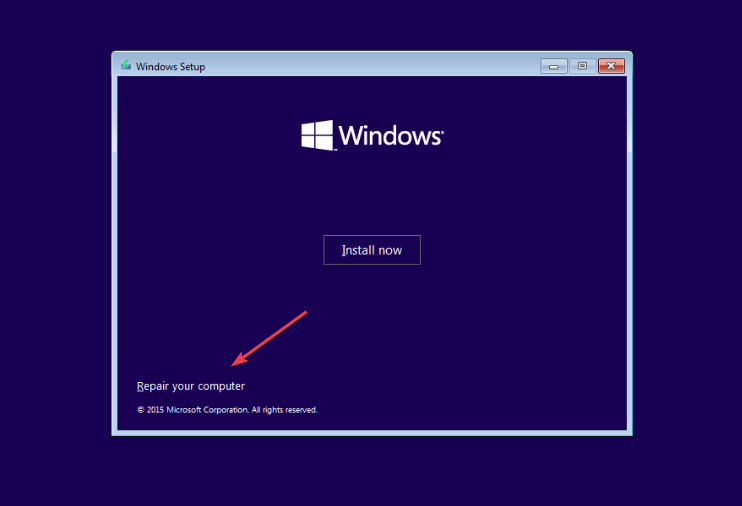
  3. Then, select the Repair your computer option at the bottom left of the screen.
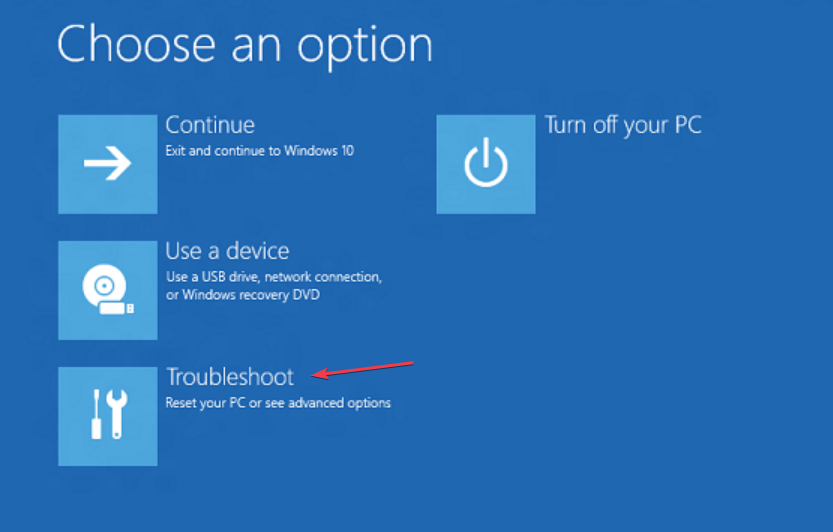
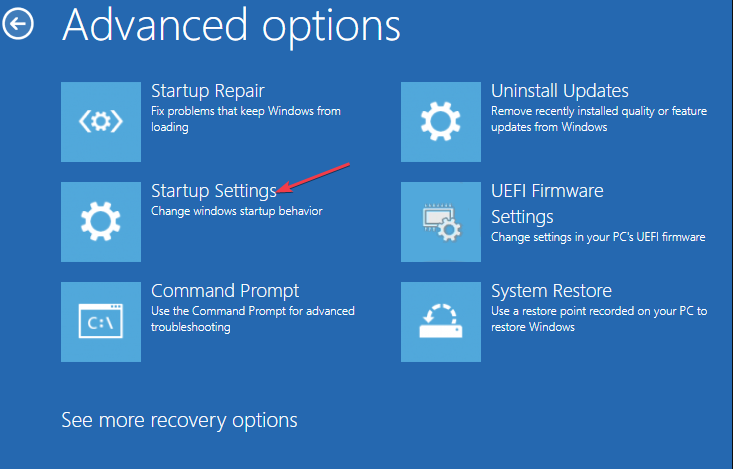
  4. Choose the Troubleshoot option and click on Advanced options.
  5. Select the Startup Repair option.
  6. Next, select the target operating system to fix, and Windows will initiate the repair.
  7. Finally, remove the bootable drive and restart your PC.

After the restart, observe if the 0xc0000218 BSOD error is resolved. If the error persists, you may need to try other troubleshooting methods.

2. Restore the system to a previous state

  1. Press the Windows + R keys to open the Run command dialog. Type rstrui in the text field and press Enter.
  2. Select System Restore under System protection.
  3. Click Next to proceed.
  4. Select the desired restore point and click Next.
  5. Click on the Finish button to confirm your selection and restart your PC.

The system restore should help revert your PC to a perfect state before the 0xc0000218 BSOD error code. Windows automatically creates restore points, but you can check our article to learn how to create a system restore point manually.

If you don’t want to go through the manual procedure, you can let third-party repair software do the job for you.

 3. Manually repair the registry

  1. Follow the instructions provided in Solution 1 to boot from the bootable drive.
  2. In the Windows Setup screen, click on Repair your computer, then select Troubleshoot.
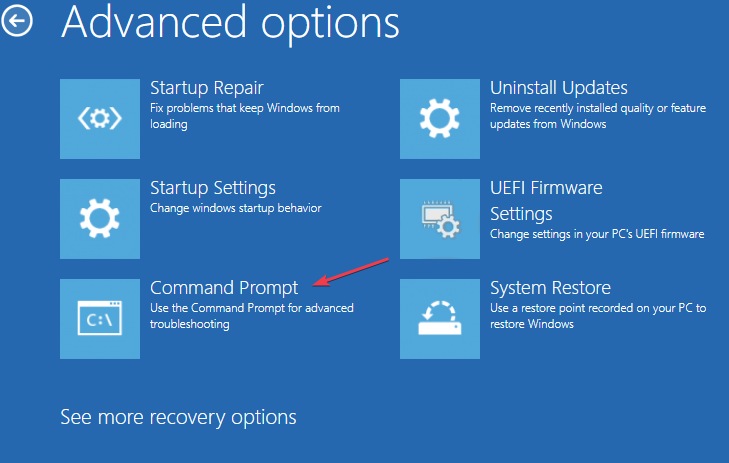
  3. Next, select Command Prompt.
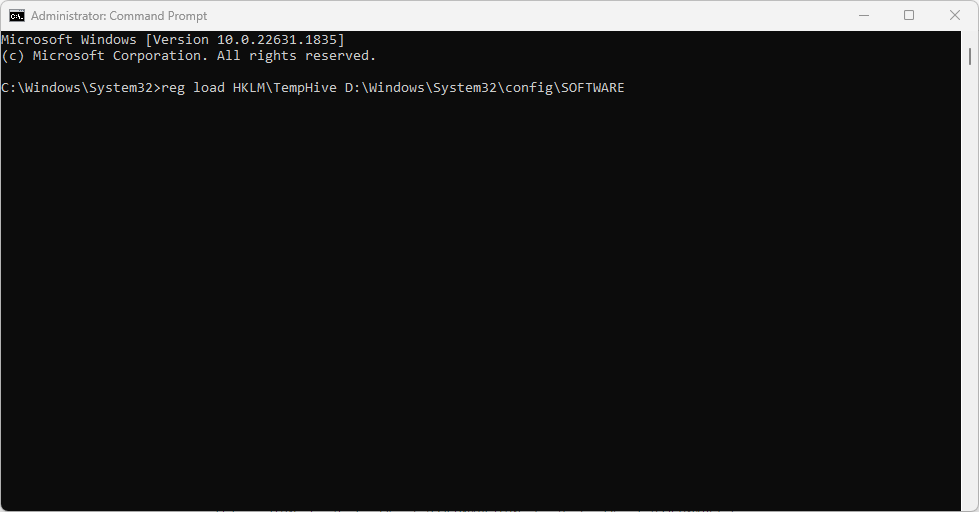
  4. Type the following command and press Enter (replace D with the drive letter of your bootable drive): reg load HKLM\TempHive D:\Windows\System32\config\SOFTWARE
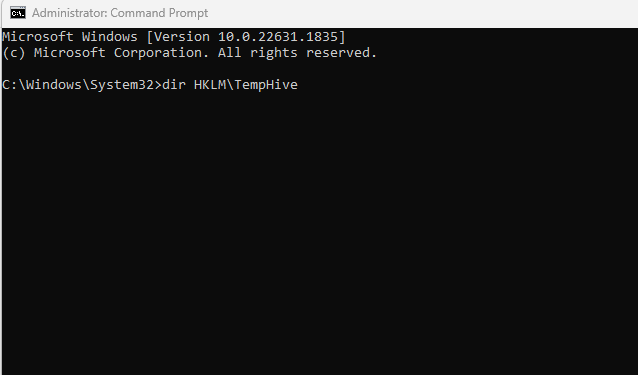
  5. Next, type the following command to check the registry files and press Enter: dir HKLM\TempHive
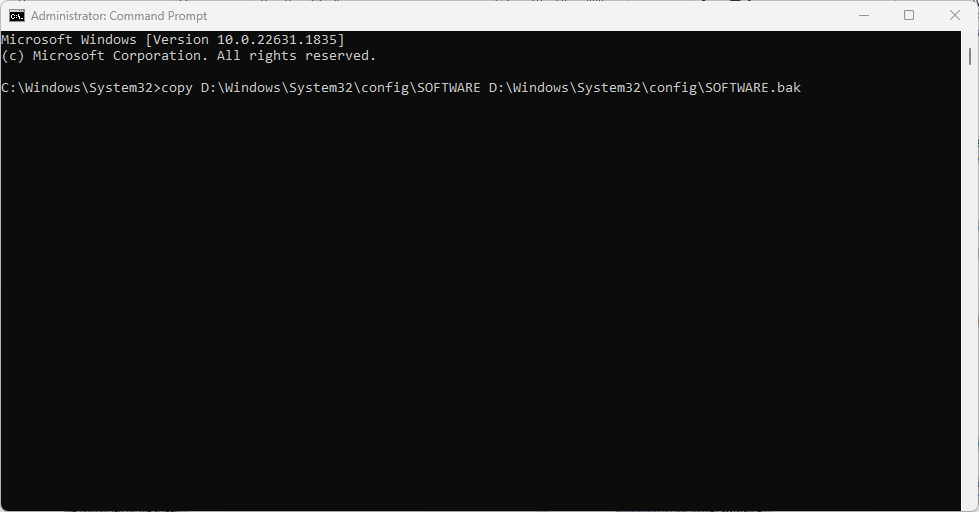
  6. Type the following command and press Enter (make sure that the output displays the SOFTWARE file): copy D:\Windows\System32\config\SOFTWARE D:\Windows\System32\config\SOFTWARE.bak
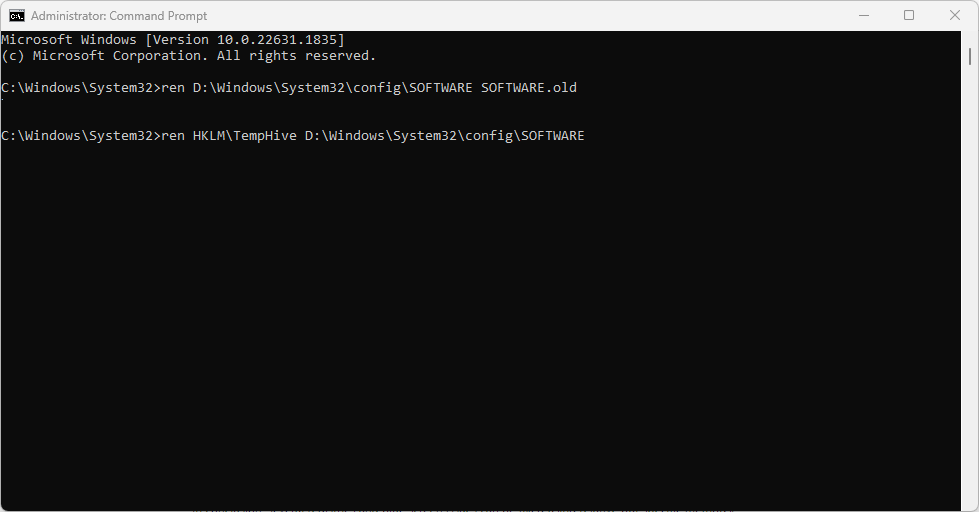
  7. Rename the registry files by entering the following command: ren D:\Windows\System32\config\SOFTWARE SOFTWARE.old  ren HKLM\TempHive D:\Windows\System32\config\SOFTWARE
  8. Type the following in the text field and press Enter to close the Command Prompt: exit
  9. Finally, remove the bootable drive and restart your PC.

Now check if the 0xc0000218 BSOD error has been fixed. If not, seek assistance by contacting Microsoft support to file a query ticket.

 In conclusion, several registries and blue screen issues can be fixed using relative but specific methods. You can check our suggested solutions for the registry & blue screen errors in Windows 10/11 for further assistance.

Please use the comments section below to ask any questions or suggestions regarding this issue. 

Microsoft CEO sets an ambitious plan to double revenue to $500B by 2030

Microsoft CEO Satya Nadella unveiled an ambitious goal to double the organization’s revenue by the year 2030. The company aims to achieve a staggering $500 billion in revenue, more than double its current size.

During a recent Federal Court hearing related to Microsoft’s acquisition of Activision Blizzard Inc, the CEO’s comments shed light on the company’s strategic objectives and unwavering commitment to innovation and growth. In a memo, Nadella outlined Microsoft’s plan to achieve at least 10% annual revenue growth by implementing a growth-oriented strategy aligned with the company’s enduring mission and culture.

The fiscal year 2022 results demonstrated Microsoft’s strong growth trajectory, despite not reaching the exact targets outlined in the “20/20” strategy. The company achieved an impressive 18% increase in top-line revenue, surpassing the industry average and generating $198.27 billion.

Furthermore, the company exhibited its capacity to increase profitability with a solid 19% rise in operating income. This exceptional performance underscores the company’s adaptability, resilience, and ongoing success in delivering innovative products and services that resonate with customers across various industries.

Nadella’s memo also highlighted the driving factors behind the company’s growth. It differentiated between Microsoft Plus, which encompasses consumer-focused products, and Microsoft Cloud, a suite of products primarily targeting commercial clients. With offerings such as Azure, Microsoft 365, and LinkedIn, Microsoft Cloud emerged as the primary driver of growth for the company. Recently, the Redmond company also gained an annual growth of 32% in cybersecurity revenue.

Azure, the company’s flagship cloud computing platform, has experienced significant success, positioning itself as a major player in the industry. Competing directly with Amazon Web Services (AWS) and Google Cloud Platform (GCP), Azure provides organizations with a comprehensive range of cloud services, including infrastructure, platform, and software solutions.

TLDR: Microsoft CEO memo

In summary, Nadella’s memo emphasized the company’s commitment to maintaining growth rates above the market average, enabling the company to extend its lead over competitors like GCP and close the gap with AWS. Microsoft’s strong performance, along with its focus on innovation and strategic expansion, positions the company on a promising path toward achieving its ambitious revenue target of $500 billion by 2030.

Via: Coinspeaker

0x00000bbb Printer Error: How to Quickly Fix it

Some of our readers have recently reported that they are unable to use their printer as it keeps displaying the 0x00000bbb printer error message. Some users in the Microsoft forum have also reported similar issues.

In this article, we will take you through quick steps to fix the issue seamlessly.

What causes 0x00000bbb printer error?

The specific cause of the 0x00000bbb printer error can vary depending on the printer model, software, or operating system used. However, some common causes for this error code include:

  • Printer connection issues – Hardware issues such as loose cables or faulty USB ports can lead to communication errors between the printer and the computer.
  • Outdated or incompatible drivers – If the printer drivers on your computer are outdated or incompatible with the operating system, it can trigger the 0x00000bbb printer error.
  • Network configuration problems – If you use a network-shared printer, incorrect network settings or misconfigurations can result in the 0x00000bbb printer error.

Regardless of your printer model, you can work through any of the solutions below. 

How can I fix the 0x00000bbb printer error?

Before attempting any of the advanced troubleshooting or settings tweaks provided below, you should consider performing the following preliminary checks:

  • Restart your PC to fix the temporary issue prompting this error.
  • Turn off your printer, disconnect the power cable, and wait for a few seconds before restarting the printer.
  • Disconnect all the unnecessary peripherals.

Having confirmed the above checks, if the problem persists, you can proceed to the next section for advanced solutions.

1. Run the Printer troubleshooter

  1. Press the Windows + I keys to open the Windows Settings app.
  2. Go to System and click on Troubleshoot. Then, click Other troubleshooters.
  3. Locate the Printer and click Run next to it.
  4. Follow the troubleshooting processes recommended to complete and click on Apply this fix in the next prompt.

The Printer troubleshooter will automatically detect and resolve any issues affecting the printer or provide further instructions for manual resolution.

2. Create a new port on the faulty printer

  1. Press Windows + I keys to open the Windows Settings app.
  2. Navigate to Bluetooth & devices and click Printers & Scanners.
  3. Now, select the faulty printer and click on Printer properties in the next window.
  4. Navigate to the Ports tab and click on Add Port.
  5. Select the Standard TCP/IP port.
  6. Now, add the IP address of your printer.
  7. Follow the on-screen instructions to complete the process.

Creating a new IP address can also help fix the 0x00000bbb printer error.

3. Update the printer drivers

  1. Press the Windows + X keys to open the Quick Settings menu and select Device Manager from the options.
  2. Expand the Print queues category, right-click on your printer, and select Update driver.
  3. Then click on Search automatically for drivers and follow the on-screen instructions to update the printer driver.
  4. Restart your computer and check if the error is resolved.

If your printer driver is outdated, updating it should fix the issue quickly.

4. Clear the Print queue

  1. Press the Windows + R keys to open the Run dialog box.
  2. Type the following commands in the text field and press Enter after each command: cd C:\Windows\System32\spool   cacls.exe PRINTERS /E /G administrator:C
  3. Now, restart your computer and check if the issue is resolved.

By clearing the print jobs, the printer should be able to work in a refreshed state. If not, try the next fix.

5. Restart the Printer Spooler service

  1. Press the Windows + R keys to open the Run dialog box. Type services.msc and press Enter to open the Services window.
  2. Locate Print Spooler in the list of services, right-click on it, and select Restart from the context menu.

Wait for the Printer Spooler service to restart, then check if the error has been fixed. Most people have been able to fix their printer issues by restarting the Spooler service.

And that’s it on how to fix the 0x00000bbb printer error. Hopefully, one of the methods provided in this guide will help you fix the issue.

Some users have also reported the 0x00000b11 printer error on Windows 10 & 11, and a lot have been able to resolve the issue here. You can also explore the article for further information.

Please use the comments section below to ask any questions or suggestions regarding this issue.

What is Rpcnetp.exe & Should you Delete it?

Some of our readers have reported that they come across a rpcnetp.exe process on their Windows PC, but they don’t seem to know what it is. Others in the Microsoft Community forum are anxious to know whether the file is safe or a virus/Trojan.

In this article, we will discuss the rpcnetp.exe executable file and whether to delete it or keep it on your PC. Also, you may be interested in knowing why exe files are deleting themselves on Windows 11.

What is rpcnetp.exe?

The rpcnetp.exe is a legitimate executable file extension for Remote Procedure Call from Absolute Software Corp.

Although there is no reliable information yet about the file producer, several users in the file.net forum claim that rpcnetp.exe is part of the security software called LoJack for Laptops made by Absolute.

This executable file does the following:

  • Laptop-tracking software that helps recover stolen laptops by sending information about the laptop’s location connected to the Internet.
  • This process does not appear as a visible window only in Task Manager.

 Should I delete rpcnetp.exe?

The decision to delete the rpcnetp.exe executable file is exclusive to the user. However, if you are not using the file to track your stolen laptop, you can delete it.

Moreover, if a rpcnetp.exe camouflages as a virus, it may threaten the System’s security, hence the need to remove it. Also, since rpcnetp.exe is not a Windows file, deleting it from your PC should be a safe call.  

Can I verify if rpcnetp.exe is safe?

We recommend you review some verification processes to determine whether rpcnetp.exe is unsafe and should be deleted. Apply the following checks:

  • Check the file location – Verify if the rpcnetp.exe process on your PC is in the legitimate directory: C:\Windows\System32
  • Check the spelling – The original file is spelled as rpcnetp.exe. If the spelling of the file on your PC differs from this, it is not genuine.
  • Use a third-party tool – Run the Security Task Manager or antivirus tools to verify the file.

Having confirmed the above checks, you can proceed to the next section to remove the rpcnetp.exe executable file from your computer.

 How can I remove rpcnetp.exe?

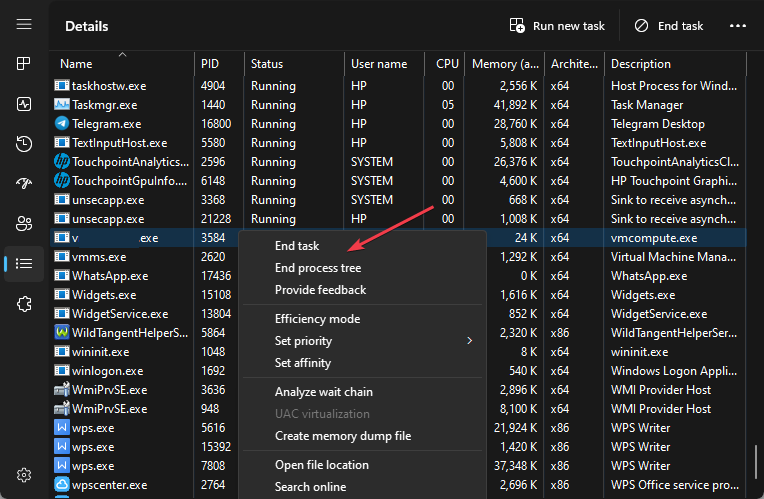
1. End the rpcnetp.exe process in Task Manager

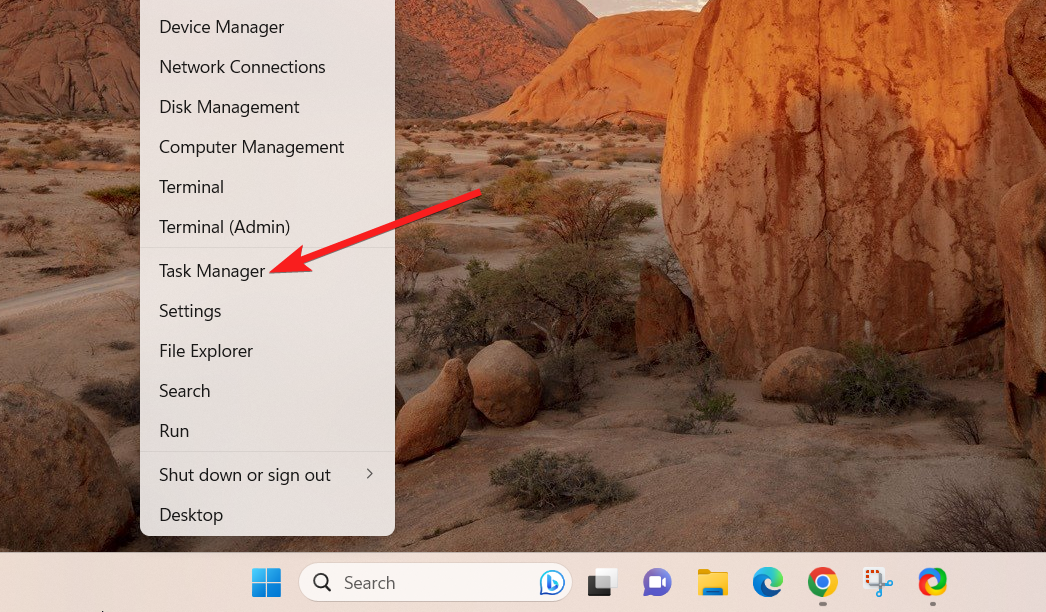
  1. Right-click on the Start button and select Task Manager from the options.
  2. Navigate to the Details or Processes tab. Locate the rpcnetp.exe process, right-click on it, and then click on End task from the context menu.
  3. Click OK to confirm that you want to end the task for the program.
  4. Restart your PC.

If your Task Manager is not responding or opening, you can explore our detailed guide on fixing the issue.

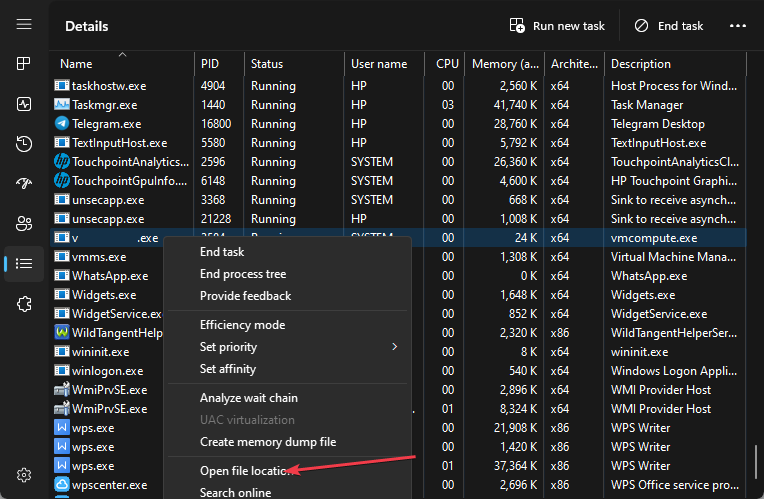
2. Delete the rpcnetp.exe file in File Manager

  1. Right-click on the Start button and select Task Manager from the options.
  2. Navigate to the Details or Processes tab. Locate the rpcnetp.exe process, right-click on it, and then click on Open file location.
  3. Alternatively, open the File Explorer, navigate to your C: drive and search for the rpcnetp.exe file.
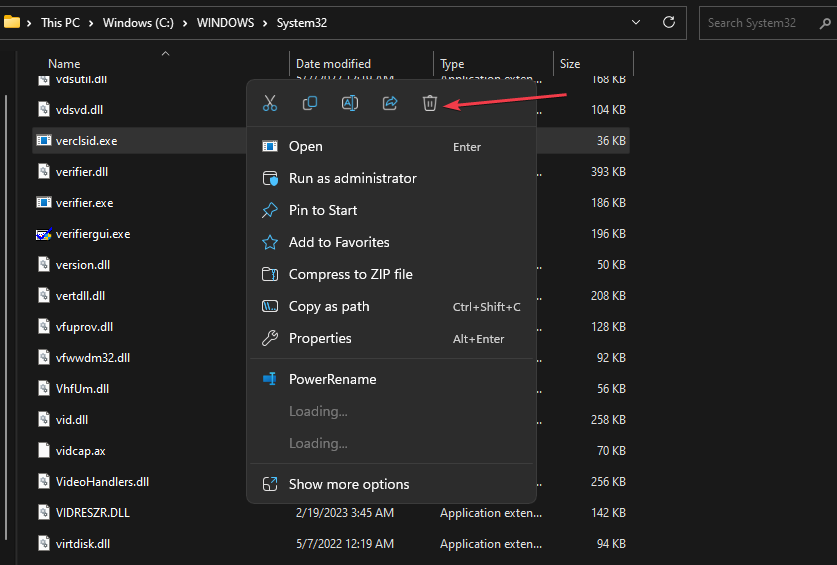
  4. Once you’ve found it, right-click on it and select Delete from the context menu.

You need to provide administrator permissions before deleting the file. In case you encounter permission issues, double-check that you have administrative privileges.

And that’s it on how to remove rpcnetp.exe from your PC. If you cannot open .exe files, you can explore our detailed guide to know why exe files are not opening on Windows 11.

If you have any questions or suggestions, please let us know using the comments section below. 

Victoria 2 keeps crashing? How to quickly fix it

Victoria 2 is a grand strategy game released in 2010, and ever since it has become a cult classic. In it, you are able to control one of approximately 200 states of the world between 1836 and 1936. You’ll be in charge of managing the economy, science, domestic politics, diplomacy, army, and navy.

The game can be played as a single-player, or even multiplayer.

Since it was released in 2010, you would think that Victoria 2 will be having issues while playing on Windows 11.

And truth is, several older games have been experiencing issues on Windows 11: Mirror’s Edge, and Gothic 2, for example, are some of them. But it seems Victoria 2 keeps crashing on Windows 11, Reddit users agree.

But don’t worry, there is a simple fix to solve this issue.

Here’s how to fix Victoria 2 on Windows 11

First of all, for this game crashing might be because the Smart Access Memory on AMD systems is turned on, or Resizable Bar on NVIDIA systems is turned on. So to fix this issue, you need to disable these features, depending on the system that you have.

If you have an NVIDIA video card you’ll need to enable/disable it from BIOS. Make sure you have the latest BIOS installed on your motherboard.

  1. Restart your PC and go to the BIOS setup.
  2. Go to Advanced Mode > Settings > IO ports > Re-Size BAR Support.
  3. Turn it from Auto to Disabled.victoria 2 keeps crashing

On AMD systems, you need to disable SAM (Smart Access Memory), and this is pretty simple.

  1. Follow the BIOS steps, and enable your BAR support.
  2. After restarting your PC, open AMD Adrenaline and go to the Performance label.
  3. Once there, go to the Tuning pane and scroll down.
  4. You’ll see that the AMD SmartAccess Memory is enabled. Disable it.

Reddit users confirmed that Victoria 2 was working again after disabling these features. However, if you’re playing other games, especially, newer games, then make sure the feature is on. When this feature is on, it optimizes GPU performance, but on older video games it might cause the game to crash, or lag.

In AMD Adrenaline, for example, you can easily disable/enable it. In NVIDIA, you can do that in BIOS.

Are you playing Victoria 2? Have you encountered this issue? Let us know in the comments section below.

How to convert to PDF directly in Microsoft Teams

Microsoft has brought some important features to Microsoft Teams over the last two months. for example, AI recap is coming to the platform, allowing you to quickly take notes from a meeting.

You’ll also be able to set working hours and locations, so you’ll be able to know exactly when to schedule meetings. However, there might be another feature coming to Teams in the following weeks. You will be able to use Teams to convert files to PDF.

This developer has initiated a request, showcasing a demo on how to do it on Teams. You’ll be able to convert to PDF through Microsoft Graph API. You can convert one file or multiple, and you can have the option to merge multiple files into a single PDF file.

According to the developer, you’ll be able to convert different types of files, including .xlsx, .docx, and .pptx, and possibly many more formats to come.

Here’s how you can convert to PDF directly in Teams

  1. In Microsoft Teams, you would need to go to the Document Pack pane and click on Create document pack.convert to pdf in teams
  2. Click on Drop files here or click on to browse panel to upload your files.
  3. Select the files you want to upload.
  4. Click on Create document pack and wait for the files to convert to PDF.convert to pdf in teams

However, the feature is not yet on the public servers, and as far as we can tell, it’s still a demo. But there is a possibility that it might come to Teams in the following weeks or months.

The whole demo looks very intuitive and easy to use. Not to mention the option of merging multiple documents into one single PDF file. You could easily deal with a lot of documents, especially if you’re already working in Teams.

What do you think about this feature? Are you excited for it to come to Microsoft Teams? Be sure to let us know in the comments section below.

What is Wscript.exe & Should You Remove It?

Wscript.exe, also known as Windows Script Host is a genuine Windows process file by Microsoft Corporation. This executable file imparts scripting abilities to the Windows operating system and offers a range of system objects and functions. 

The wscript.exe file is also responsible for launching VBScript and JScript components, and it is also capable of interpreting and running plain text Jscript (.JS and .JSE files) and VBScript (.VBS and .VBE files). 

Is the Wscript.exe malware? 

Wscript.exe being a core Windows application file is a relatively safe one. But there have been several instances when cyber criminals name trojan horses and worms as the wscript.exe file to avoid seeking users’ attention. 

However, in some cases, antivirus software also flags legitimate Windows executables as threats providing false positives. In such cases, you should verify the authenticity of the file. 

  1. Bring up the File Explorer window using the Windows + E shortcut. 
  2. Copy and paste the following path in the address bar to navigate to the following location in the C drive. C:WindowsSystem32
  3. Scroll down and find the wscript.exe file, right-click it, and select Properties from the context menu. 
  4. Access the Digital Signatures tab of the Properties window and check whether Microsoft Corporation is mentioned as the name of the signer. Wscript.exe

If the signer is not verified, there is a high probability that a virus or trojan is masquerading as wscript.exe. 

How to fix the issues with the wscript.exe file? 

1. Temporarily disable wscript.exe

  1. Right-click the Windows icon on the taskbar and choose Task Manager from the context menu. Wscript.exe
  2. Look for wscript.exe in the Processes tab, right-click it, and select the End Task option.

Disabling the wscript.exe background process should fix the issues like system freeze due to high CPU usage. However, the solution is temporary, and you should implement the methods discussed below to investigate and analyze the situation.      

2. Get rid of trojans and worms      

  1. Bring up the Settings app using the Windows + I shortcut.
  2. Access Privacy & security settings from the left sidebar and Windows Security from the right.
  3. Choose Virus & threat protection located under Protection areas. Wscript.exe
  4. Next, click Scan options located in the Current threats section. 
  5. Finally, choose the Microsoft Defender Antivirus (offline scan) option and press the Scan now button. Wscript.exe
  6. Wait for the scan to complete and reboot your system.

Of course, if you have access to an efficient third-party antivirus, you can scan your PC to get rid of the threats. 

3. Repair the wsript.exe file

  1. Hit the Windows key to bring up the Start menu, type cmd in the top search bar, and select Run as administrator from the search results section.
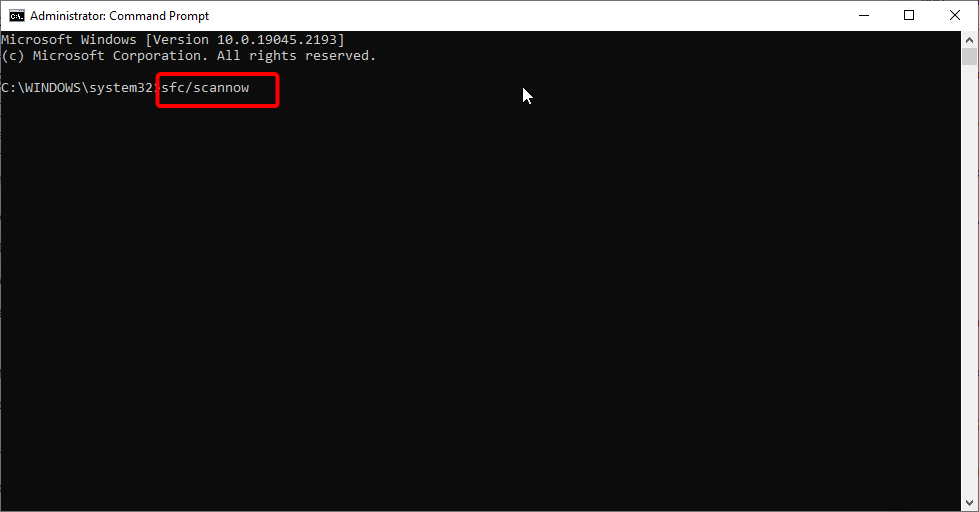
  2. Type or paste the following command and press the Enter key to run the SFC scan. sfc /scannow
  3. Wait for the command prompt to display the Verification is 100% complete message and type the following command and press the Enter key to initiate the DISM tool. DISM.exe /Online /Restorehealth

Performing the System File Checker (SFC) and Deployment Image Servicing and Management (DISM) scans will repair or replace the protected system files with the ones stored in the compressed folder, thus fixing the corrupt or infected wscript.exe. 

4. Modify the registry

Note icon NOTE
We recommend you back up the Windows registry before proceeding and perform the procedure with caution to avoid tampering with the registry keys. 
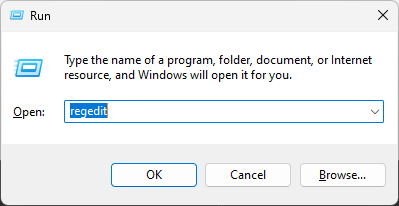
  1. Use the Windows + R shortcut to launch the Run dialog box, type the following command in the text box, and press Enter. regedit Wscript.exe
  2. Navigate to the following path in the address bar to directly access the concerned key. HKEY_CURRENT_USER/Software/Microsoft/Windows/CurrentVersion/Run
  3. Look for other names of this trojan, such as OUzzckky, Shakira, and I-WORM.LEE, VBS/VBSWG.AQ@mm, LEE in the right section, and if you find any, right-click them and choose Delete from the context menu. 
  4. After all the suspicious keys and successfully deleted, exit the registry editor and reboot your PC as you normally would. 

There have been reports of the wscript.exe hiding dangerous worms named VBS_VBSWG.AQ. If such is the case, it will be evident by a malicious registry file that will reside in the above directory.

5. Perform a system restore 

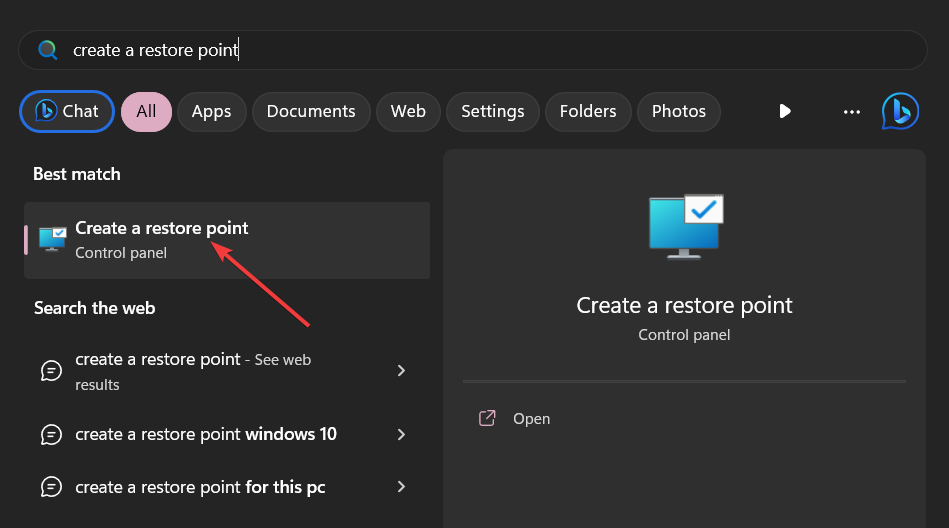
  1. Bring up the Start menu by pressing the Windows key, type system restore in the search box, and select Create a restore point from the search result. 
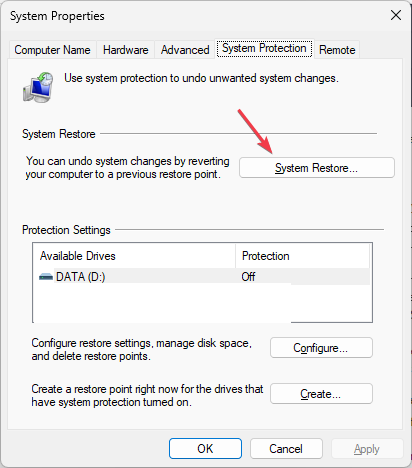
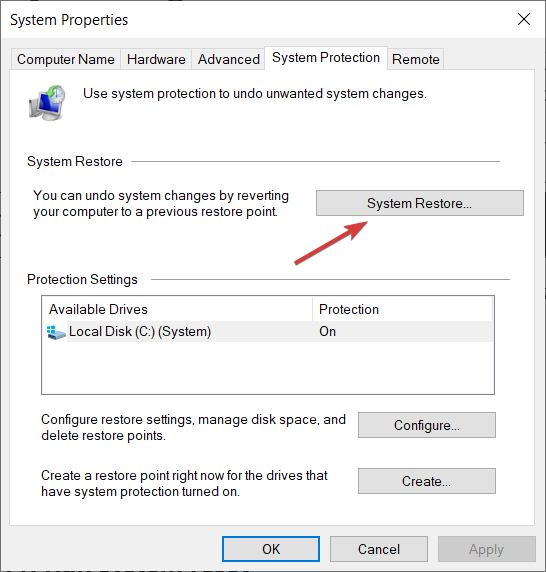
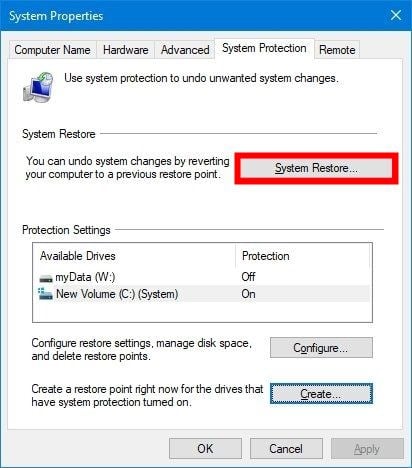
  2. Click the System Restore button present in the System Protection tab of the System Properties window. 
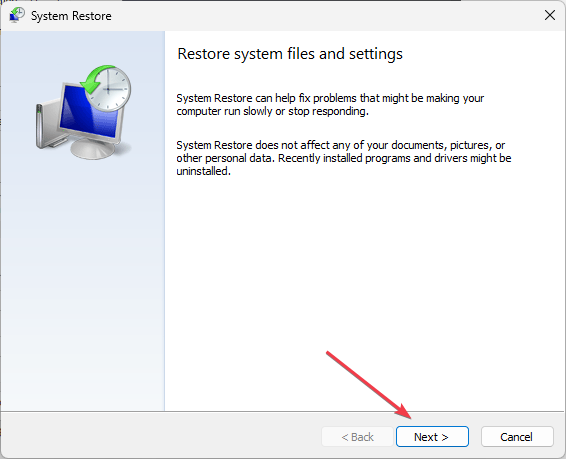
  3. Press the Next button on the System Restore wizard to proceed further. 
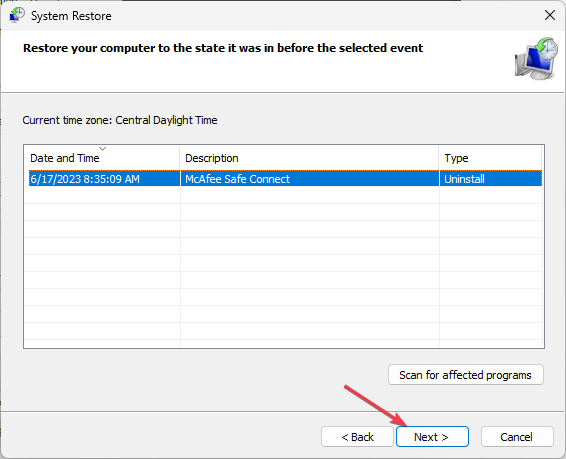
  4. Choose a suitable restore point from the list when you did not witness any issues and press the Next button. 
  5. Review the restore point and press the Finish button on the Confirm your restore point window to initiate the system restoration process.

If the issue isn’t resolved yet, restoring your PC to a previous point in time should roll back all the changes that may have commenced the wscript.exe-related problem. 

In case you still witness suspicious activity by the malware disguising as wscript.exe, performing a clean install of Windows is recommended. 

That’s pretty much it! Hopefully, the tactics explained in this guide proved beneficial in diagnosing and resolving the problems caused by wsript.exe. 

You may also be interested in knowing about the view.exe file and whether you should be concerned about it. Many also reported Dltray.exe, and we have a special guide dedicated to it.

If you need further assistance in this regard, feel free to reach out to us in the comments section. 

Working at Microsoft is not that great, internal poll shows

While Microsoft is making technological breakthroughs with AI, Copilot, and scientific discoveries, it seems that working at the Redmond-based tech giant is not so great, after all.

According to an internal poll at Microsoft, leaked to Insider, Microsoft employees showed less confidence in leadership, and they also gave the worst score to the question about whether working there is a good deal.

This is somewhat a bit difficult, considering just how much Microsoft achieved in the past couple of years. Windows 11 is 2 years old now, and a lot of other changes and improvements on the overall Microsoft products happened.

We were all excited when Microsoft decided to delve deep into AI. At the Microsoft Build 2023 conference, held in May, everyone was thrilled about the excitement of Microsoft. And now, it seems that the employees are not very excited to work at the company.

Are Microsoft employees unhappy?

Well, according to the leaked internal reports, not all of them are unhappy, but a great deal of the Microsoft staff is not really excited to work for the company.microsoft employees unhappy

According to the report leaked to Insiders, when asked about confidence in leaders, 73% of Microsoft employees gave a positive response. That might seem almost generally positive, but last year, 78% of them gave a positive response to the same question.

So it looks like fewer people at Microsoft are really content with the leadership that they have there.

Even more, when asked if they think they got a good deal at Microsoft, and by a good deal, it means work vs. compensations, 69% of the Microsoft employees gave a positive answer. That’s a bit higher than 2022 when 66% responded with a positive answer to the question. Ultimately, it even prompted Microsoft to announce raises and more benefits.

However, it seems that less than of the Microsoft employees would consider staying if they got another and a better offer. That’s lower than when the same question was raised last year.

So it seems that almost half of the Microsoft employees are unhappy, overall.

What do you think about it? Be sure to let us know your thoughts and opinions in the comments section below.

Windows Cannot Find FortniteClient-Win64-Shipping.exe [Fix]

Imagine you had a long day and are looking forward to playing Fortnite to relax. You just downloaded the game when all of sudden you’re greeted with a FortniteClient-Win64-Shipping.exe error message.

Similar to an upload packet loss error, the Win64 error prevents you from playing Fortnite. Don’t worry; this guide has a variety of solutions that you can try out to fix the error so you can play.

What causes the Win64 error?

But before solving this error, it’s important to find out what causes it. Fortnite isn’t the only game that can suffer from a Win64 error, but the culprits are typically the same:

  • There could be an error with internal files, specifically EasyAntiCheat. Other games, like Elden Ring, have been known to into problems with EasyAntiCheat getting in the way.
  • RGB software that interacts with Fortnite can cause your computer’s Firewall or antivirus software to flag everything as malicious. You may have to uninstall the RGB app to bypass the error.
  • Corrupt files can lead to widespread system errors. It’s possible to fix this with an SFC scan or with file repair software instead.

How do I fix the Fortnite Win64 error?

Before going into the more complex solutions, there are a couple of things that you can do to fix the Win64 error. These take almost no time at all.

  • Be sure your computer is running the latest Windows 11 update. Microsoft is always churning out frequent security fixes and it’s important that you stay up to date.
  • Reinstall Fortnite. Go to whichever gaming launcher you use, uninstall Fortnite, and reinstall it all over again.
  • Check if your firewall is blocking Fortnite. Your computer’s security may have flagged the game as malware.
  • And as always, restarting your computer fixes the problem the majority of the time.

1. Delete Fortnite’s game folder

  1. You can delete the FortniteGame folder by opening the Windows File Explorer and going to Program Files.
  2. In this example, Fortnite is located under the Games folder.
  3. Open the Fortnite folder, right-click FortniteGame, and delete it.
  4. If you don’t see the folder, click View at the top, hover over Show, and enable Hidden items.

2. Repair the EasyAntiCheat software

  1. Open up Windows File Explorer and go to the location of Fortnite’s files.
  2. Open the FortniteGame folder.
  3. Open the Binaries folder and then Win64.
  4. Double-click the EasyAntiCheat folder, and in this new window, run the EasyAntiCheat app itself.
  5. In the Easy Anti-Cheat setup page, click Repair Service.
  6. Give the app a few seconds to repair itself.

3. Uninstall Fortnite and run an SFC scan

  1. Open the game launcher that houses Fortnite (in this example, it’s the Epic Game Launcher) and uninstall it.
  2. Go to where Fortnite is located on File Explorer. There shouldn’t be anything there, but if you do see the Fortnite folder, delete it.
  3. Now restart your computer.
  4. After it turns back on, search for the Command Prompt and run it as an administrator.
  5. Type this in the Command Prompt. Your computer will begin scanning and fixing its files: sfc /scannow
  6. Once it’s done, reboot your computer and reinstall Fortnite.

If you want to be safer about this process, you can try using third-party software to help you scan your device in-depth and present complete information about corrupted or missing files. After that, the software will repair or replace them automatically with new elements from its substantial database to keep your PC running smoothly.

4. Clean install GPU drivers

  1. First, find out what kind of GPU you have. In this example, we going to download the drivers for a GeForce RTX 2060 graphics card.
  2. Head on over to the manufacturer’s website and download the necessary drivers from there.
  3. Run the file you download to save the drivers to your computer.
  4. Select Custom (Advanced) in the installation wizard and click Next.
  5. On the NVIDIA installer, click the box next to Perform a clean installation. If you have an AMD Radeon graphics card, you’ll select Factory Reset (Optional).

Besides the Win64 error, there’s nothing worse than launching a game and being greeted with a black screen. This is because of a problem with the graphics car drivers and has been seen affecting Minecraft and Overwatch.

Fixing a plain black screen is simple; most of the time you just update the drivers but you also may have to adjust your computer’s power plan.

For specific titles, we recommend learning how to Assassin’s Creed Black Flag suddenly crashing upon startup. You’ll get a crash course on how to replace DLL files and install Blag Flag in compatibility mode.

Feel free to comment below if you have questions about other video game problems or bugs. And please tell us if there’s a specific guide for a game that you’d like to see.

DRAM Frequency: What is it & How to Properly Set It Up

DRAM (Dynamic Random Access Memory) is the memory your computer uses to manage its running tasks. The DRAM frequency, on the other hand, denotes the percentage of data that can be transferred per second on your PC’s data wire.

This parameter holds a lot of importance, and you need to know how to manage it properly. In this guide, we will delve into everything you need to know about DRAM frequency and how to set it up.

What is DRAM Frequency?

As mentioned earlier, the DRAM frequency denotes the percentage of data that can be transferred per second on your PC’s data wire. It is usually half the speed of Random Access Memory.

This is so because of the DDR (Double Data Rate) clock, which allows you to transfer data twice per cycle instead of the usual one. With this, you will have the double frequency needed.

Is increasing DRAM frequency safe?

Increasing your DRAM frequency is risky, and experts warn against doing it. You should leave it alone unless there is a dire need to increase it. And if it is needed, it should only be done by an expert.

Another option will be to use Intel’s XMP technology. With this tool, your RAM will always run at the factory pre-set frequency. This setting should be enough to meet your PC requirements.

Also, if you are wondering if you should set DRAM frequency to the highest, you should never do that. This is because while you might get a marginal performance benefit, the risk of damage to your PC is incredibly high.

How to check DRAM Frequency?

1. Use CMD

  1. Press the Windows key + S, type cmd, and select Run as administrator under Command Prompt.
    cmd admin dram frequency
  2. Type the command below and press Enter to run it: wmic memorychip get speedwmi
  3. Now, wait for the command to finish running, and you will find the parameters there.

After the command finish running, you will find your RAM speed and DRAM frequency listed there.

2. Use CPU-Z

  1. Download and install the CPU-Z app and launch it.
  2. Click the Memory option under the Timings tab.
  3. You will find the DRAM frequency and other crucial parameters listed there.
    cpu z dram frequency

If you don’t want to use the built-in option to check the parameter, you can use a trusted third-party app. This app will also display other important PC parameters, and it can help you monitor your PC resources.

How can I change my DRAM frequency?

  1. Power off your PC and power it on again. While it boots, keep pressing the BIOS key (Del, Esc, F2, or any one that works for your device).
  2. After entering the BIOS, click the OC button from the main menu.
    oc
  3. Now, locate the Extreme Memory Profile (XMP) option from the list.
    extreme
  4. Next, change the XMP option to Profile 1. You can also change any of its parameters to match your RAM’s timing and speed.
  5. Finally, save the changes and exit BIOS.

With this, you should be able to change your DRAM frequency without issues. This is especially useful if you are overclocking your PC, as it will help your RAM meet the requirements.

It is advisable to choose profile 1 as it is stable and should meet the requirement of RAM. This is because increasing the voltage unnecessarily can cause serious damage to your PC.

What value should I set DRAM frequency to?

Your RAM’s maximum permitted speed determines the maximum speed you can set your DRAM frequency to. So, you can set the DRAM speed to the maximum permitted speed of your RAM.

In cases where the maximum speed of your RAM is too much for your CPU, you will need to set it to the resonant speed of your CPU. If increasing the frequency causes any problems, you can change it back to 1333 MHz.

You should also keep the voltage at 1.5V to prevent further issues. Increasing it above this poses more risks than benefits. While at it, below the DRAM frequency ranges by RAM generations:

  • DDR1 frequency range: 200-400 MHz
  • DDR2 frequency range: 400-1066 MHz
  • DDR3 frequency range: 800-2133 MHz
  • DDR4 frequency range: 1600-5333 MHz
  • DDR5 frequency range: 3200-6400 MHz

For DDR6, there is no official frequency range released yet. But that should be done soon.

With this, we can conclude this detailed guide on everything you need to know about the DRAM frequency. This can be useful, especially if Windows 11 is showing the wrong RAM speed on your PC.

If you want to know what DCOP does, check our guide for trusted information.

Let us know if you encounter any problems with this feature in the comments below.

4 Steps to Change your User Folder Name on Windows 11

The user folder name and the account name are set during setting up your user account. However, there are times when you need to change your user folder name on Windows 11 for some reason.

Unlike renaming standard folders, this process is not as straightforward. But with the right information, the process can be effortless, and that is what we have to offer you in this guide.

Is it safe to rename my user folder name?

As mentioned earlier, changing the user folder name on Windows 11 is not as straightforward as renaming ordinary folders. Even when you change your user account name, the user folder name will still remain the same.

Microsoft advises against changing your user folder name because it might cause some apps not to work. This is because the registered path name for these will have changed from the default.

Though this can be fixed by changing the path of the faulty apps and processes so there is no lasting damage.

But, it is advised not to change your user folder name unless you have a good reason for it.

How can I change my user folder name on Windows 11?

1. Create a new admin account

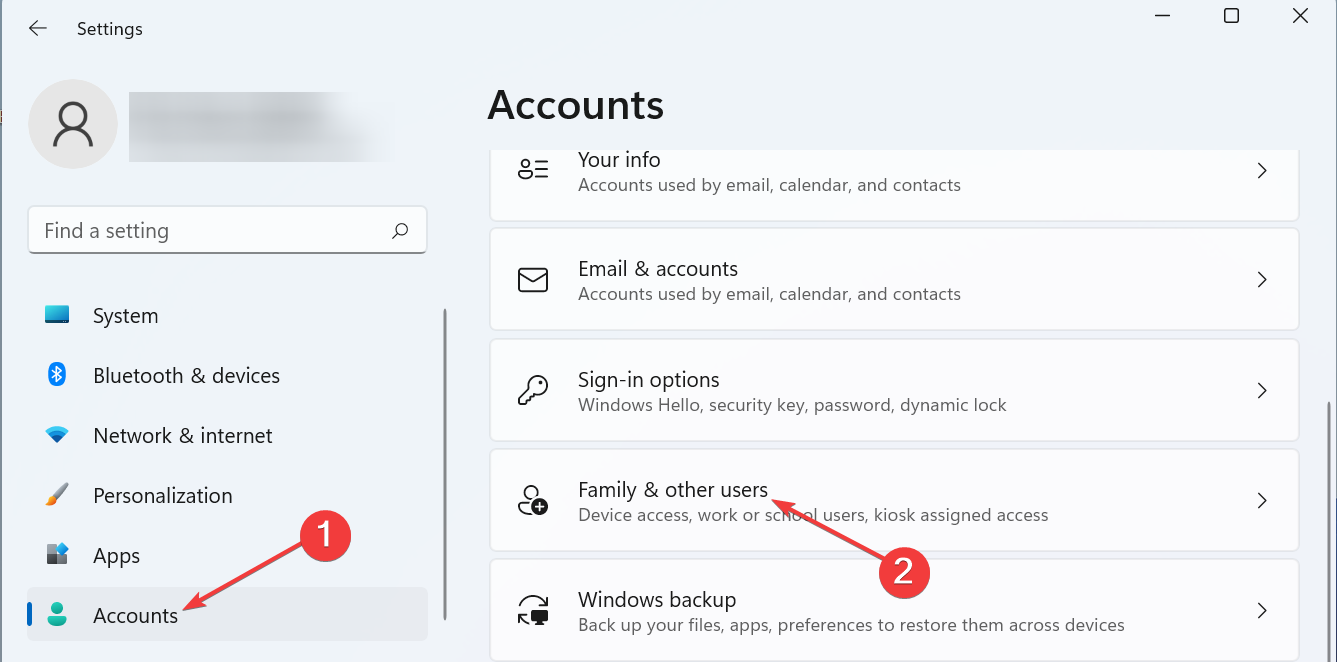
  1. Press the Windows key+ I to open the Settings app and select the Accounts option in the left pane.
  2. Select Family & other users in the right pane.
    accounts change user folder name windows 11
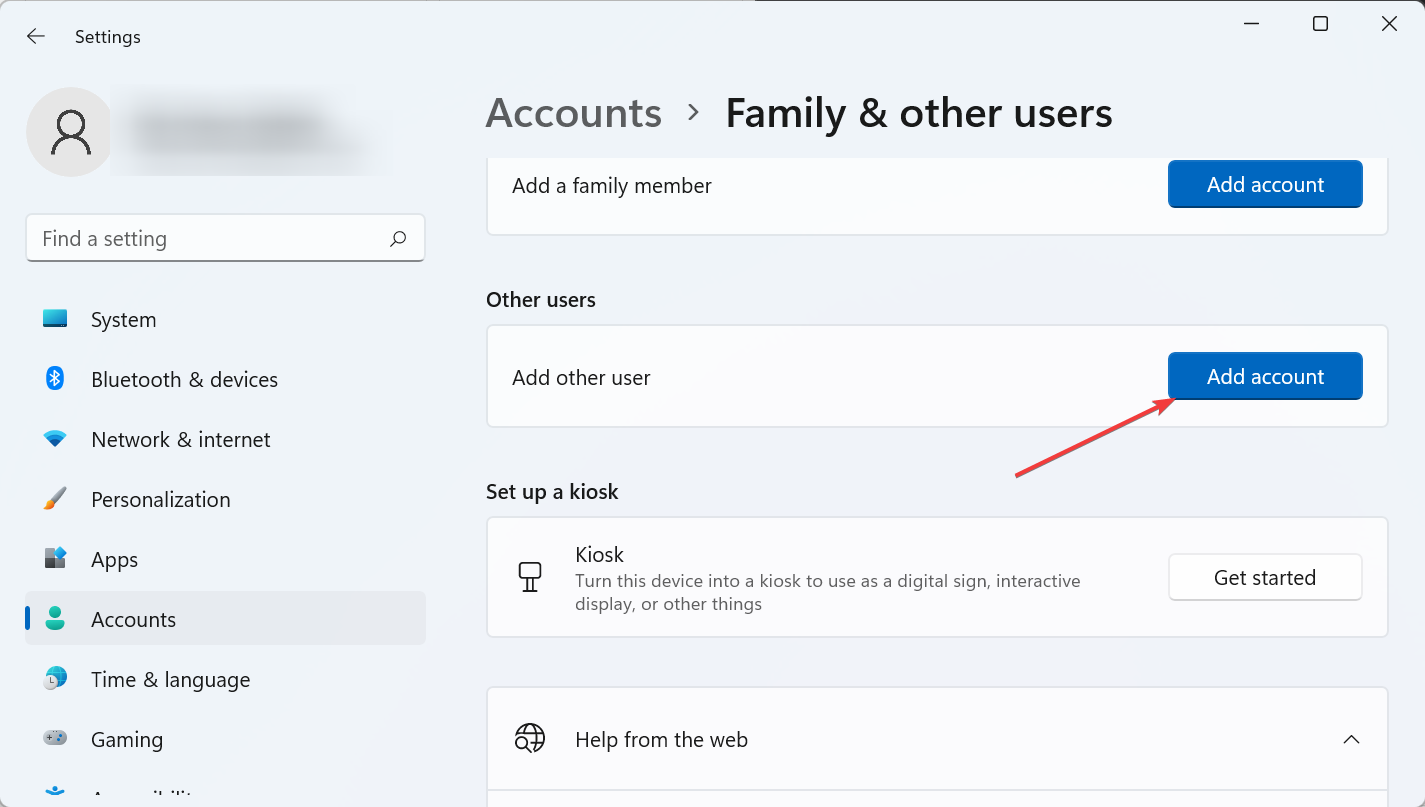
  3. Now, click the Add account button under Other users.
    add account
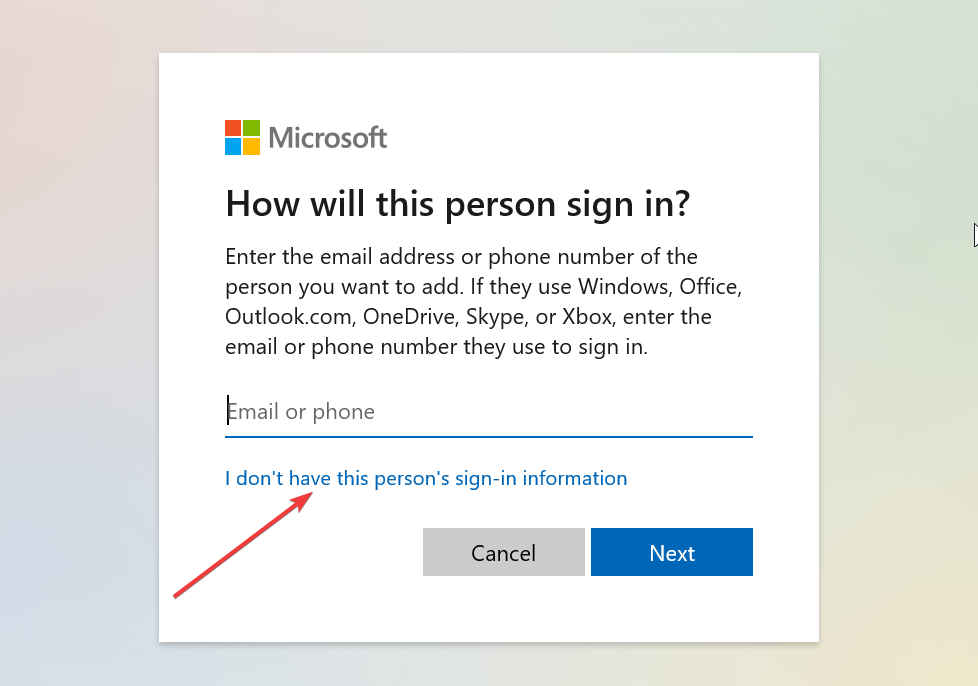
  4. Next, select I don’t have this person’s sign-in information.
    i dont
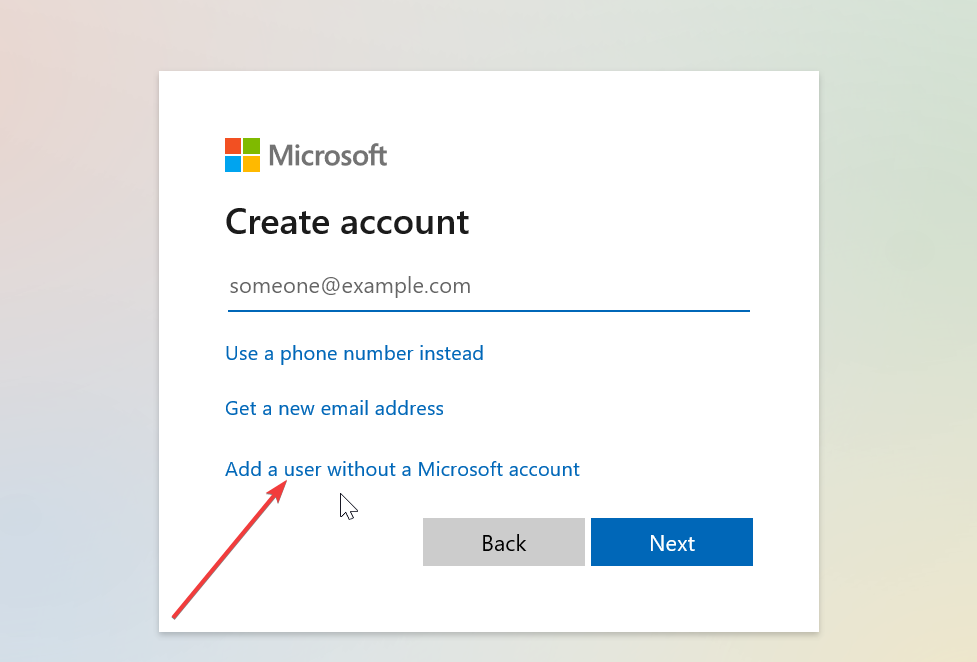
  5. Click Add a user without a Microsoft account.
    add a user
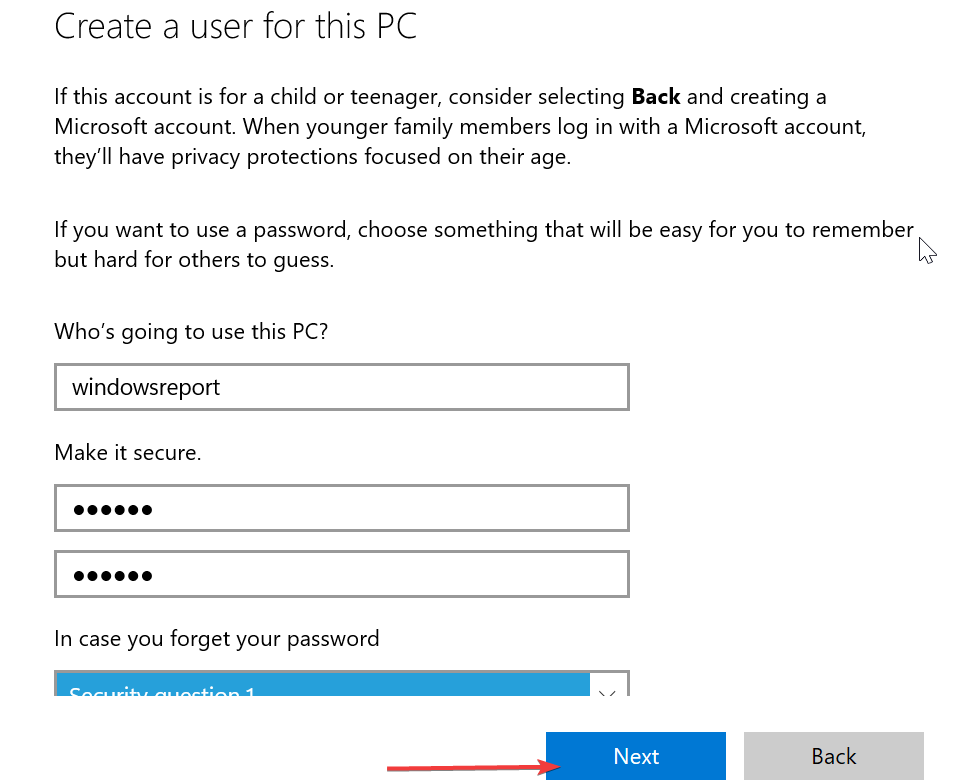
  6. From here, enter the username, password, and other details and click Next to complete the process.
    next change user folder name windows 11
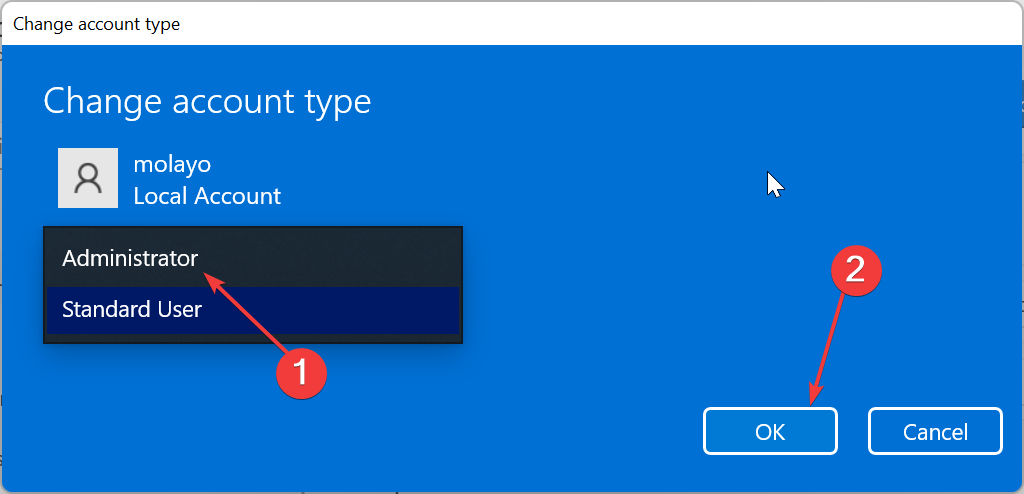
  7. Now, choose the new account you created and select Change account type.
    change account
  8. Click the Account type dropdown and choose the Administrator option.
  9. Click the OK button to save the changes.
    administrator ok change user folder name windows 11
  10. Finally, sign out of your account and sign in to the new administrator account created.

The first thing to do in the quest to change your user folder name on Windows 11 is to create a new administrator account. This is because you cannot make changes to the account you are currently logged into.

If you don’t want to go through the stress of creating a new admin account, as shown above, you can enable the hidden admin account instead.

After creating the new admin account, you must proceed to the next section to determine your account SID.

2. Determine the SID

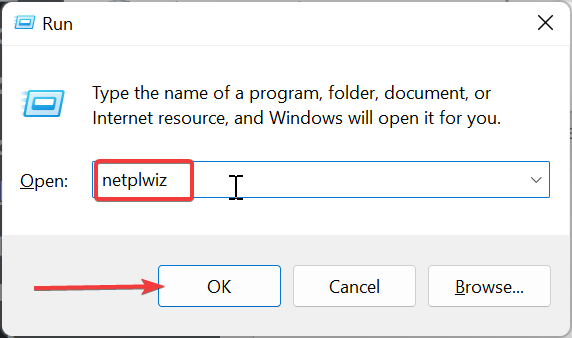
  1. After signing out of your current user account and logging into the new admin account, press the Windows key + R, type netplwiz, and press Enter.
    netplwiz
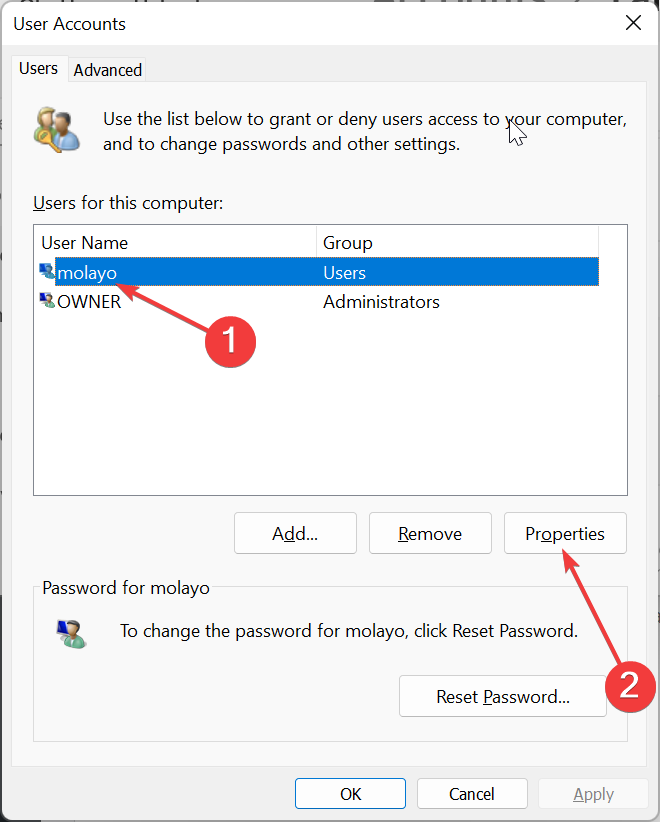
  2. Now, select the account you are logged into and click the Properties button.
    properties
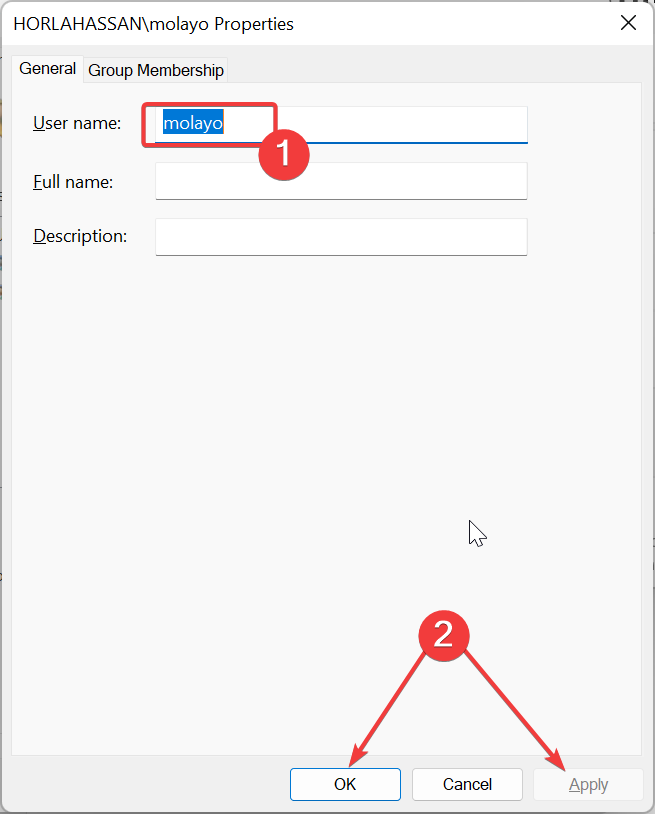
  3. Check the User name and Full name under the User Properties section.
  4. Next, set your preferred user name and full name.
  5. Click the Apply button, followed by OK.
    user change user folder name windows 11
  6. Exit the User Accounts page and restart your PC.
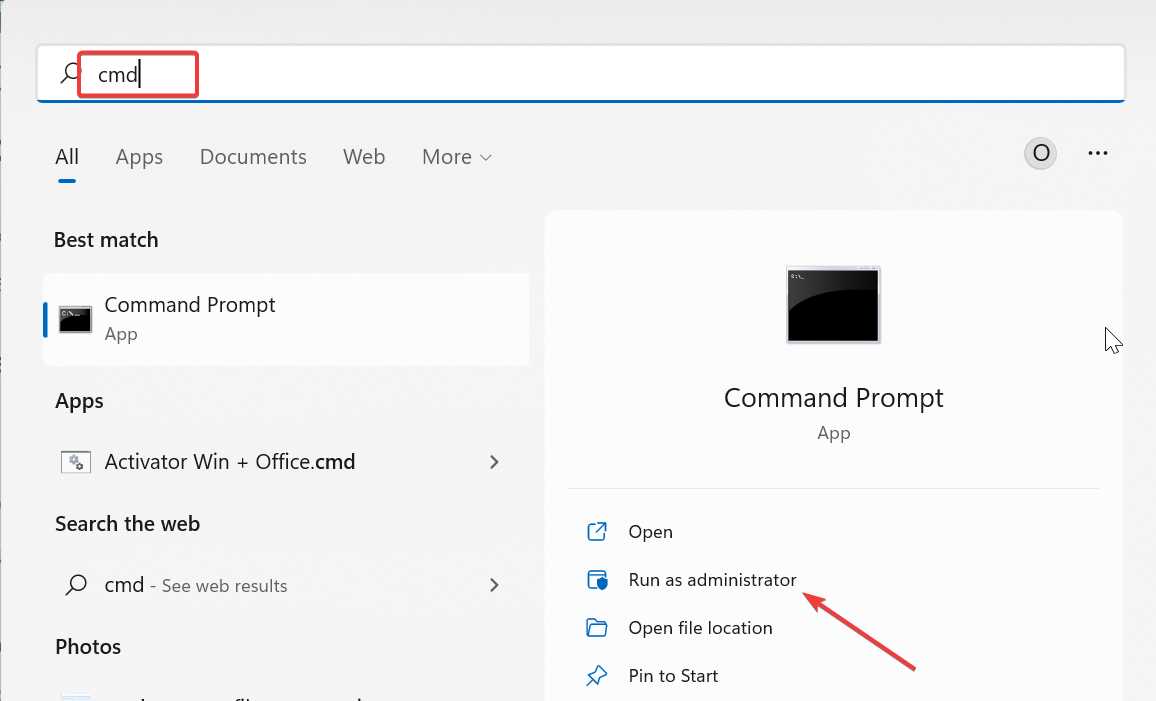
  7. Now, press the Windows key, type cmd, and select Run as administrator under Command Prompt.
    cmd admin
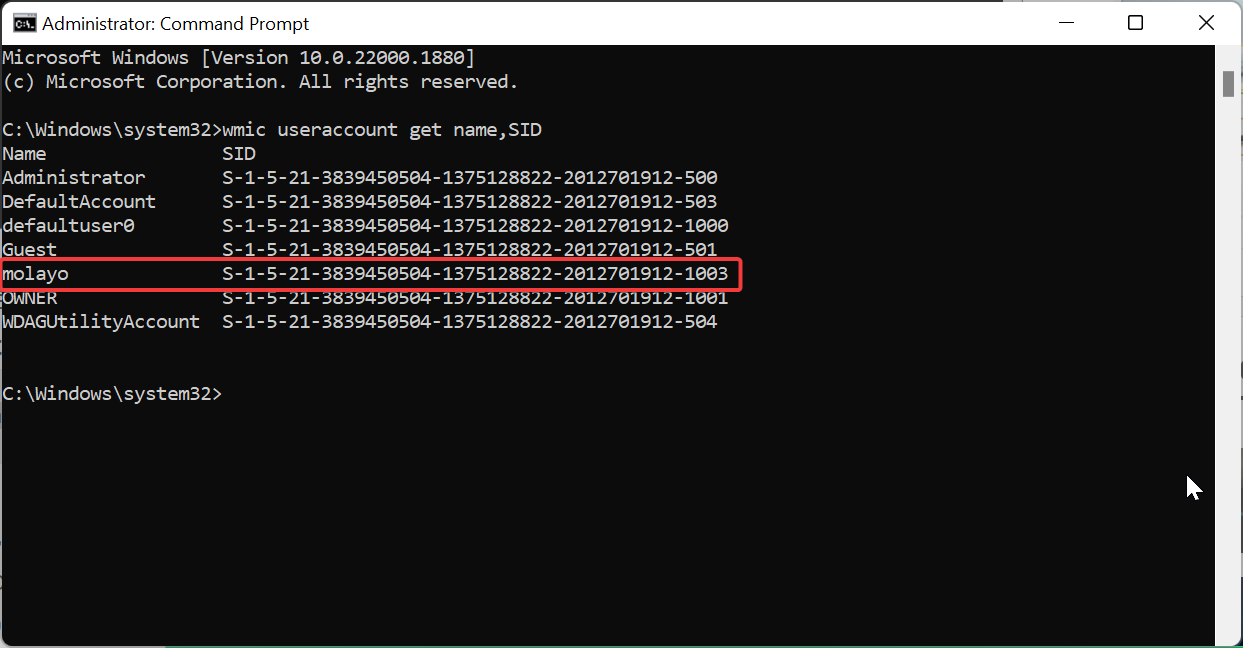
  8. Type the command below and hit Enter to view the SID (Security Identifier) for all users on your PC: wmic useraccount get name,SID
  9. Finally, take note of the SID of the account you want to change the user profile folder name for.
    sid

Before changing your user folder name on Windows 11, you need to determine the account SID. First, you need to set a user name for your new administrator account to differentiate it from the old one.

Then you need to run a command to determine the SID of the account you want to make changes to. After doing this, you must proceed to the next section to change your user folder name from your registry.

Note that you need to proceed with caution in this step, as mistakes can be costly. Preferably you should create a restore point before proceeding.

While you are in Command Prompt, you can quickly check the device name for reference by following our guide to find your computer name in Windows 11.

3. Modify your registry to change the user folder name

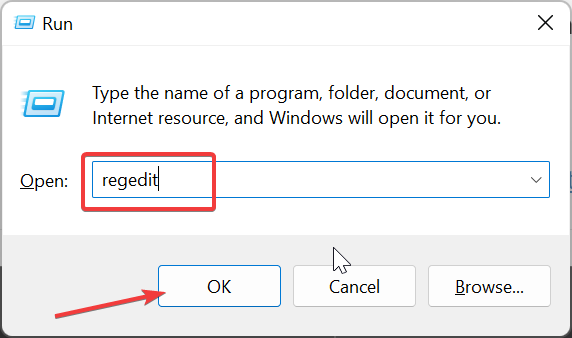
  1. Press the Windows key + R, type regedit, and click the OK button.
    regedit change user folder name windows 11
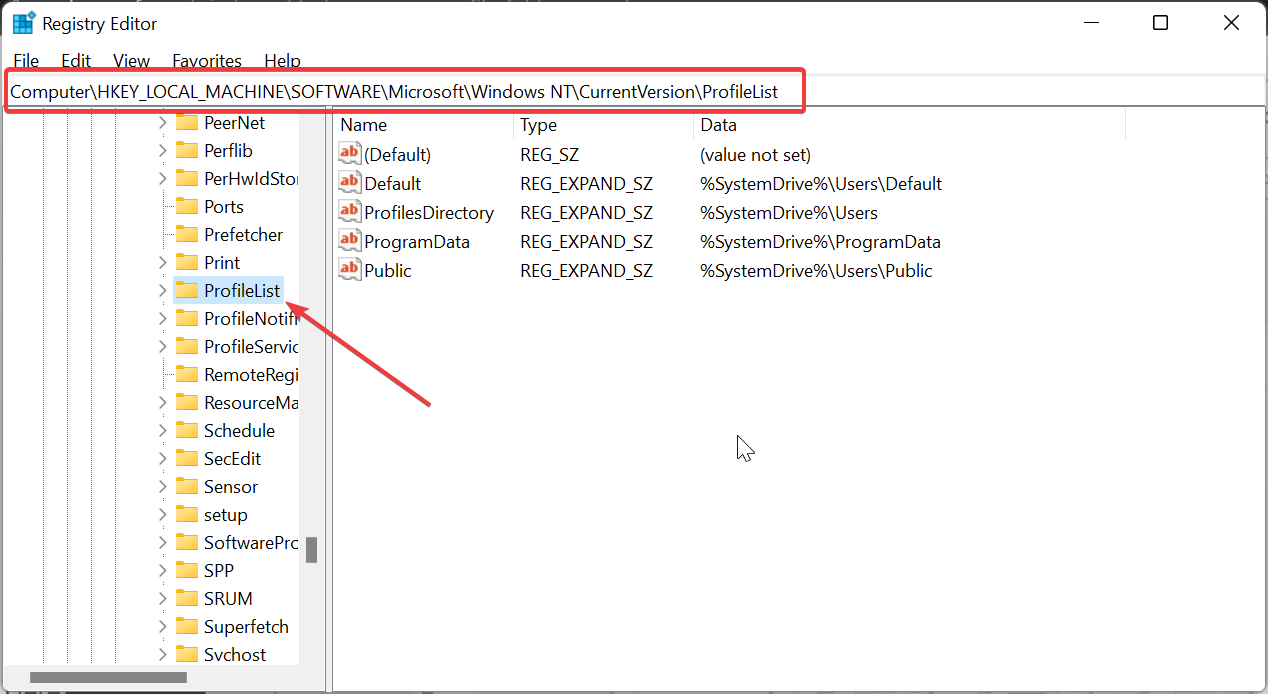
  2. Navigate to the path below in the left pane: HKEY_LOCAL_MACHINE\SOFTWARE\Microsoft\Windows NT\CurrentVersion\ProfileList
  3. Now, select the ProfileList key.
    path
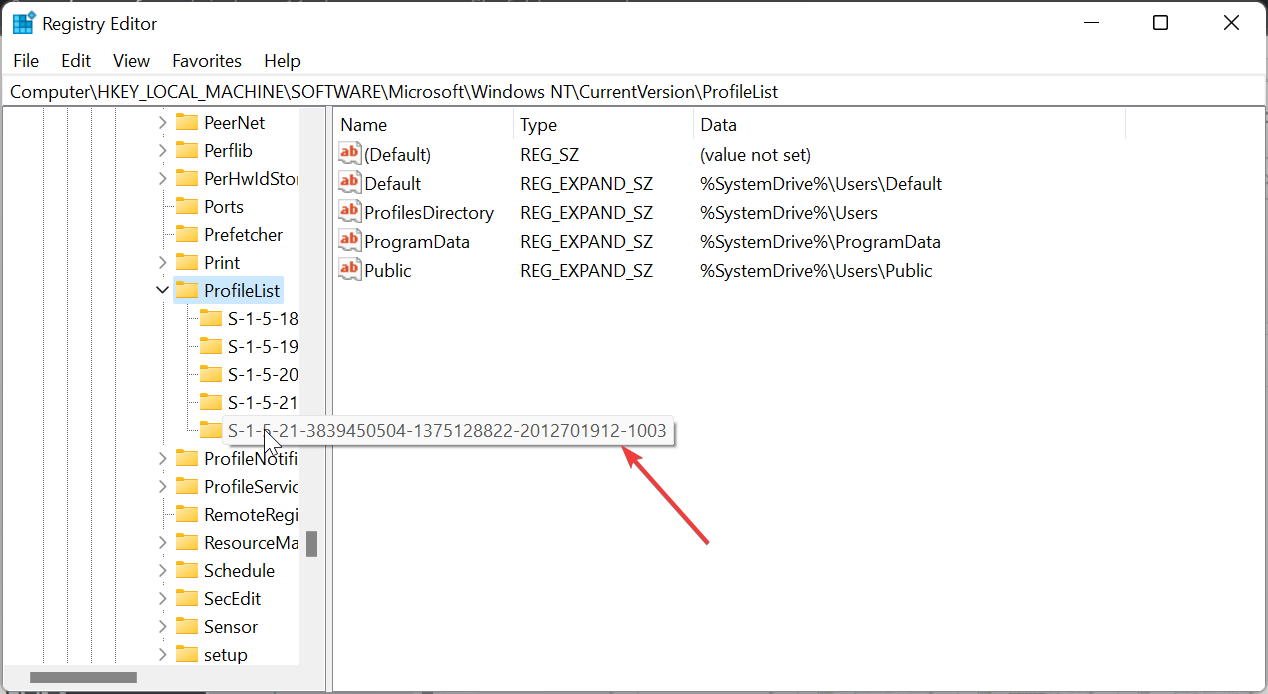
  4. Next, check for the SID you noted in solution 2 above and click on it.
    sid registry change user folder name windows 11
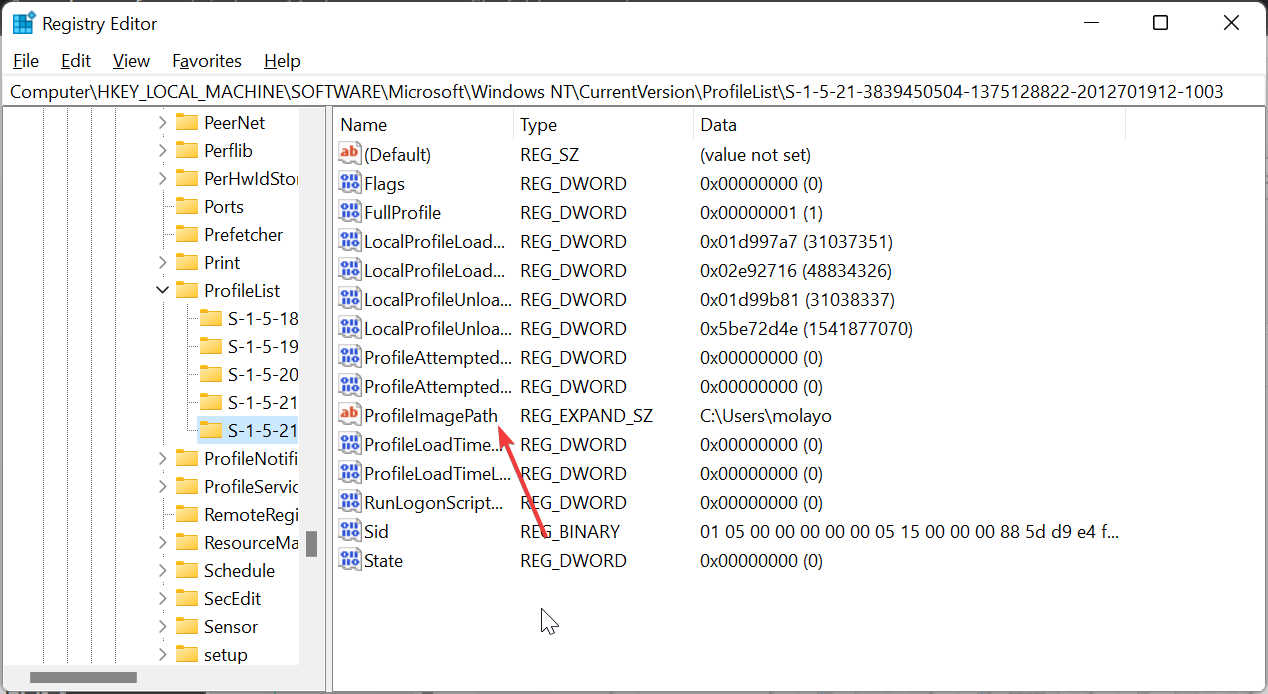
  5. Double-click the ProfileImagePath in the right pane.
    profileimage
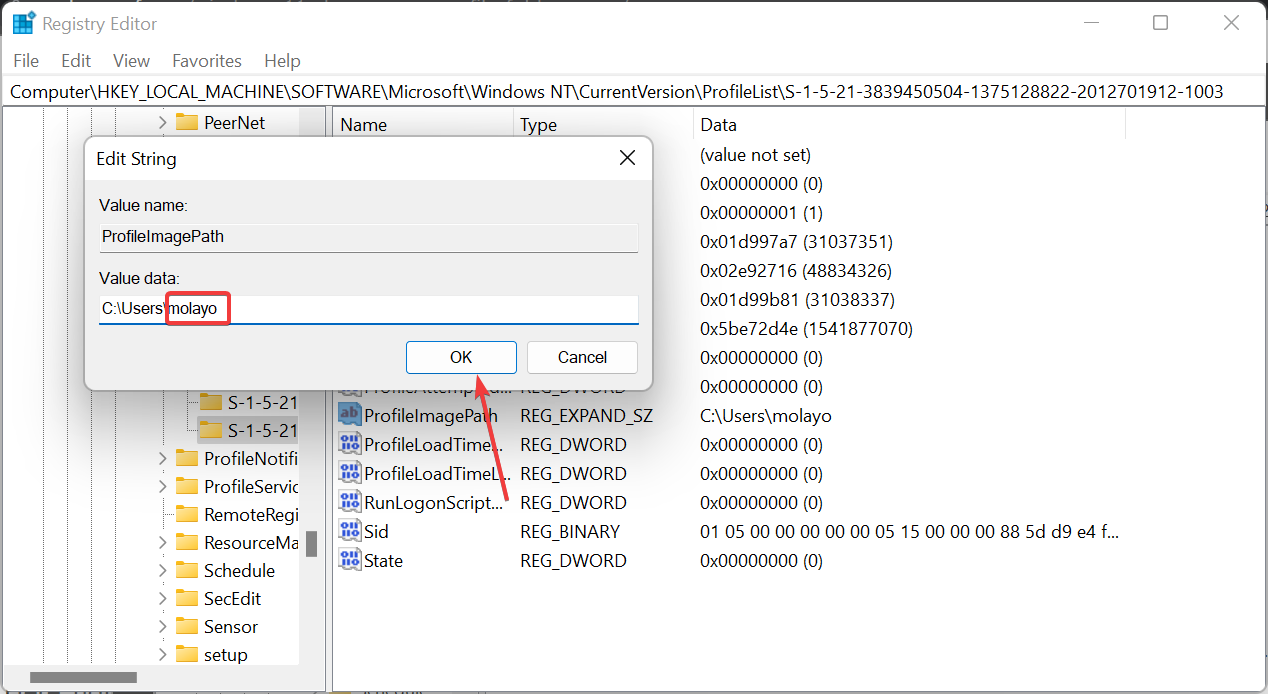
  6. Delete the old name at the end of the path in the Value data box and add the new one of your choice.
  7. Finally, click the OK button and exit the Registry Editor.
    value data

This is the most integral part of this process, and it requires you to be careful. After changing the user folder name in the Registry Editor on Windows 11, you can now proceed to the section below to complete the process.

4. Confirm the change in File Explorer

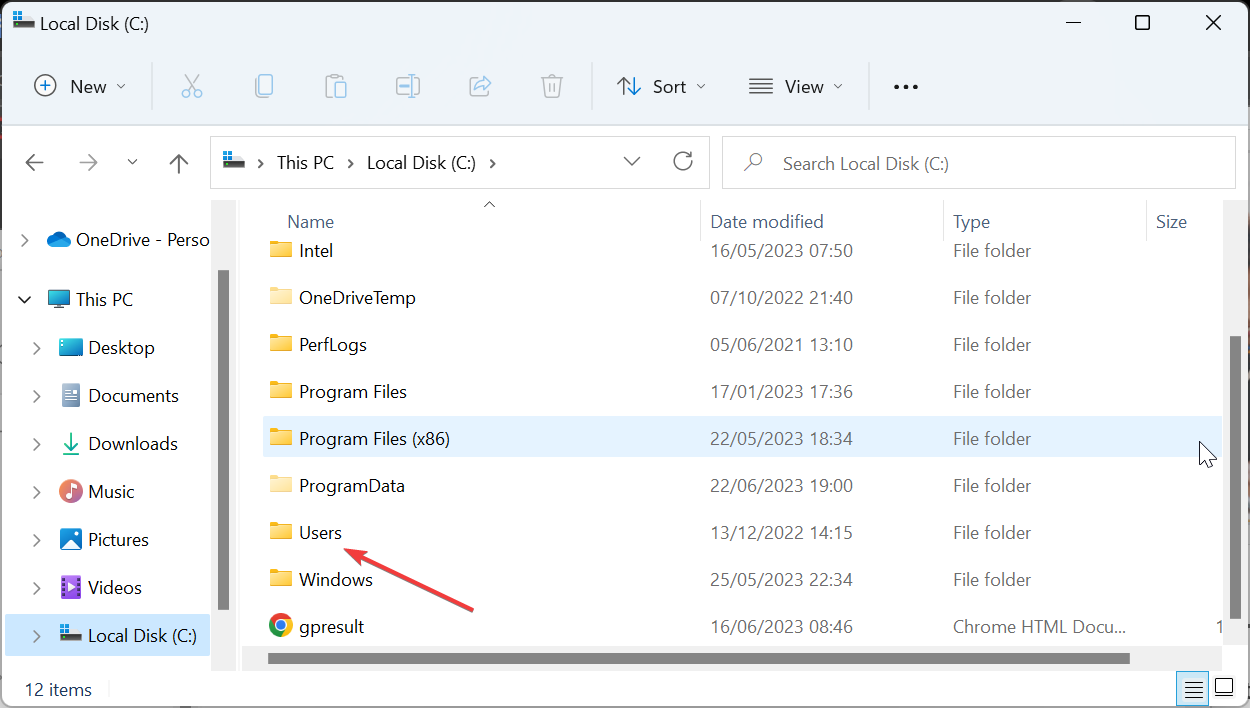
  1. Press the Windows key + E to launch File Explorer and navigate to the path below: C:\Users\users change user folder name windows 11
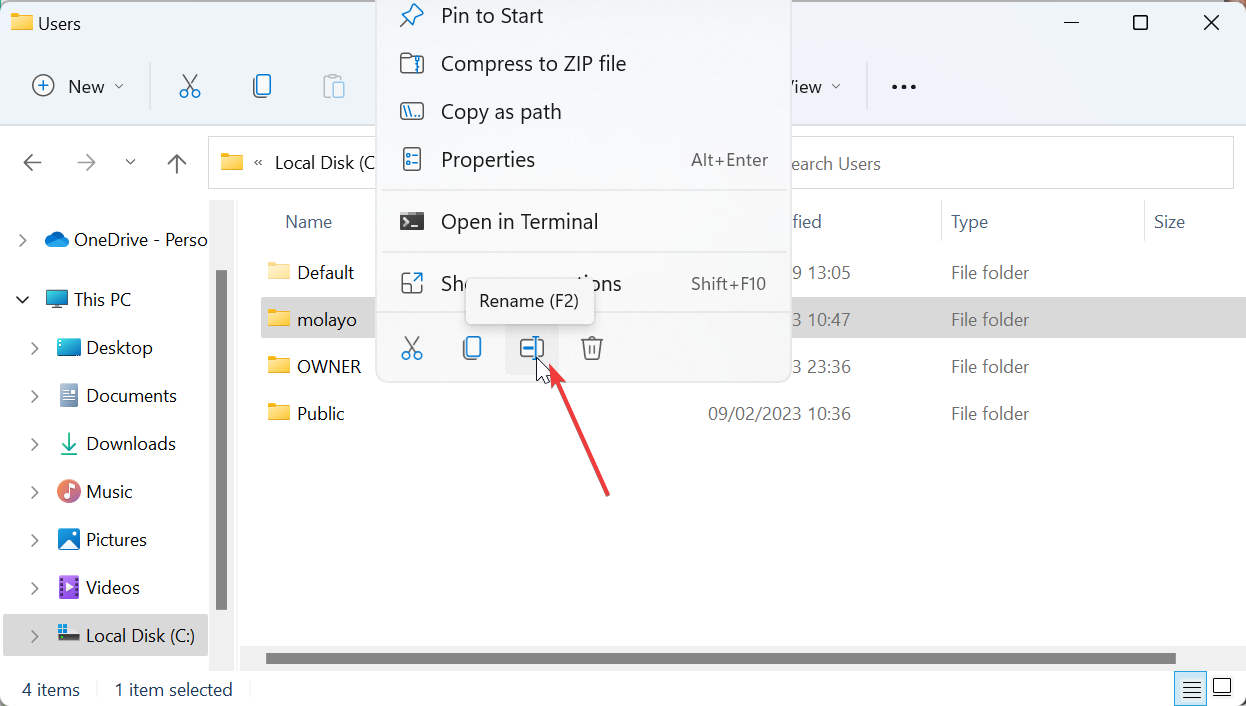
  2. Right-click the user folder you want to change and select Rename.
    rename
  3. Now, type the new name and press Enter. Note that it must correspond with the name you set in the Registry Editor.
  4. Finally, click Continue when prompted.

With this, you have successfully changed your user folder name on Windows 11. If you encounter an error like You can’t perform this action while renaming the folder, it means you did not sign out of the user account properly.

You need to sign out of the account properly or, better still, restart your PC. After completing the process, you can log into the profile with the new folder name and use it normally.

With this, we can conclude this guide on how to change your user folder name on Windows 11. While the process is pretty easy if you follow the steps above, we reiterate that some of your apps might encounter issues.

But you can fix this by changing the path to those apps. In the same vein, if you are unable to rename a standard folder on Windows 11, check our detailed guide to fix it. For more information about this folder, check our guide on how to access a user folder from an old hard drive.

Let us know if you encounter any issues applying the steps above in the comments below.

Does Rog Ally need an antivirus? [We answer]

The Rog Ally gaming handheld device is here, and it’s pretty much one of the best gaming devices you can have right now. It comes with Windows 11, there is a lot of space to store your favorite games, and it’s a monster of a PC in just one little device.

But that’s not all. As it comes with Windows 11, the Rog Ally device also comes with a 3 months Xbox Game Pass Ultimate for free. So that means, you’ll soon be able to enjoy over 5000 new games, currently in development for Xbox.

There’s a lot of hype around this device, and gamers are already discussing new ways to keep the performance of the device at a maximum range. One of the topics focuses on antiviruses and which one is the best for this device.

So, if you’ve just purchased a Rog Ally and want to install an antivirus, you’ve come to the right place. Below we’ll discuss why Rog Ally needs an antivirus and which one is the best.

Rog Ally: does it need which antivirus and which one to pick?

Well, the answer to the first question is yes. Rog Ally definitely needs an antivirus. The device uses Windows 11 as the operating system, so it’s not that different from a standard PC or laptop. It’s only more mobile, but otherwise, it’s still vulnerable to attacks and viruses, just like any other Windows 11 device.

Now, Windows 11 comes with its own antivirus: Windows Defender, and on its own, it does a pretty good job. So, if you’re using Rog Ally just for gaming and streaming, and the games are downloaded and installed from official platforms, Windows Defender should be more than enough.rog ally antivirus

It automatically scans your device and works in the background to protect you from malware and other viruses. As long as you get your games and data from official sites and platforms, your Rog Ally should be just fine. Plus, it doesn’t consume a lot of power, so you’ll have more CPU and RAM power for your games.

However, if you think it’s not enough, then you should do your own research and see what other antiviruses are out there for Windows 11. You can start your research by finding out which is the best antivirus software to have on a Windows 11 in 2023.

You should take into consideration:

  • The price/monthly subscription.
  • The time of the updates, because you’ll need an antivirus that gets updates often.
  • You’ll also need to look into how will it impact the overall performance of your device.

Overall, you need to know that Windows Defender is a very good and free option that can keep your Rog Ally safe from hard. However, if you prefer something else, there are always options available.

Have you purchased a Rog Ally? How do you like it so far? Be sure to let us know your opinions in the comments section below.

YouTube’s new Enhanced Bitrate videos feature on Windows 11 will not be free

When it comes to watching our favorite videos and movies, it all comes down to quality. Who would like to watch anything on a 360p bitrate anyway?

So, you might be pleased to know that the Google company seems to be testing its new 1080p premium tier for an improved streaming experience on Windows 11.

By the way, if you are struggling with streaming quality on your Windows 10 device as well, we can show you how to fix the problem.

Now, let’s get a bit more into today’s topic and see what we can expect from Google. Just as an FYI, it won’t be free.

The feature is still in testing and it only works on 1080p videos

The above-mentioned feature aims to enhance the quality of high-definition videos by improving the video bitrate.

You might surely remember that the feature was previously available to mobile users only as part of the company’s premium tier.

There have been a lot of reports from users that have noticed that YouTube now shows a 1080p Premium option when watching videos in Edge and Chrome browsers on Windows 11.

It only appears for 1080p quality, but it currently doesn’t work on desktops, so make sure you keep that in mind for now.

When clicking on the option, a pop-up on YouTube.com will inform you to subscribe to premium when the account was already premium.

Even though YouTube has experimented with the quality a few times on desktops, this month’s update seems to be testing out a new 1080p Premium tier that improves the quality.’

As a matter of fact, a YouTube employee recently confirmed the company tested the feature with select desktop users last month and expanded it to more desktops, Android phones, and Android TVs in the last few days.

It is important to keep in mind that the 1080p Enhanced Bitrate option is only available on videos with exactly 1080p, not higher. 

Checking out another video that is available in 4k, for example, will show that the 1080p Enhanced Bitrate option is totally missing.

Actually,1080p has been considerably lower, and some users are unhappy that Google has reduced the quality of 1080p streams by lowering the bitrate, which helps the company save bandwidth costs.

This new feature aims to unlock the higher bitrate for 1080p videos for a monthly subscription. You didn’t think there wasn’t a catch, did you?

After Google officially confirmed the rollout of YouTube’s enhanced 1080p playback on mobile devices in April, desktops are apparently next in line to get it.

Please note that it’s still unclear how much this bitrate upgrade could improve the streaming on the platform or when all premium users on the desktop can even use it.

What are your thoughts on the matter? be sure to leave a comment down bellow with your thoughts, opinions, and ideas.

Fix: You Require Permission from Everyone to Change File

Transferring and deleting files are among the daily tasks users perform on Windows PC. However, things are not always effortless, as some users get you require permission from everyone to change file prompt while trying to delete a file.

This error might be due to permission issues or minor problems with your PC. Irrespective of the cause of this problem, the solutions in this guide will help you fix it effortlessly.

Why am I getting you require permission from everyone to change file?

Listed below are some of the causes you require permission from everyone to change file when trying to delete a file:

  • Presence of malware: One of the major causes of this issue is the activities of viruses on your PC. You need to perform a deep malware scan to get past the error.
  • Faulty update: If you started noticing this issue after installing an update on your PC, it might be the cause of the problem. Uninstalling the update should fix the issue quickly.
  • Lack of permission: At times, this problem might be because you don’t have the permission needed to make changes to this file. The solution is to make changes to the file properties and grant the needed permission.

How can I fix you require permission from everyone to change file?

1. Change permissions

  1. Right-click the folder you want to make changes to and select Properties.
    properties you require permission from everyone to make changes to this file
  2. Click the Security tab at the top.
  3. Now, select your user account under the Group or user names section.
  4. Next, click the Edit button.
    edit security
  5. Select your user account again under the Group or user names section.
  6. Check the Allow box for all the entries there.
  7. Finally, click the Apply button, followed by OK.
    allow ok

If you are dealing with you require permission from everyone to change file error, it might be due to a lack of permission to edit the file. What you need to do here is to grant all permissions to the folder.

2. Use Command Prompt

  1. Press the Windows key + S, type cmd, and select Run as administrator under Command Prompt.
    cmd admin you require permission from everyone to make changes to this file
  2. Type the command (replace file or folder path name with the path of the file to make changes to) below and hit Enter to run it: takeown /F file or folder path name /R /D y
  3. Now, run the command below to get permission for the file: icals Folder or file pathname /grant Administrators:F /T
  4. Finally, run the command below to delete the file: rd folderpath /S /Q

If you are getting you require permission from everyone to change file error while trying to delete a file, you need can use Command Prompt to complete the task.

This method is especially important if you are having problems changing permission for the folder using solution 1.

3. Disable antivirus temporarily

  1. Press the Windows key, type virus, and select Virus & threat protection.
    virus
  2. Click the Manage settings link.
    manage settings
  3. Toggle the switch for Real-time protection backward to disable it.
    real time you require permission from everyone to make changes to this file
  4. Finally, if you are using a third-party antivirus, right-click its icon on the Taskbar, and select Disable or an equivalent option.

In some cases, you require permission from everyone to change file can be caused by interference from your antivirus software. So, you need to disable your security software temporarily till you make the required changes.

If you use a third-party antivirus, you can uninstall it if disabling it does not work.

4. Scan your system for malware

  1. Press the Windows key, type virus, and select Virus & threat protection.
    virus
  2. Click Scan options.
    scan options
  3. Now, choose the Full Scan option and click the Scan now button.
    scan now

In some cases, malware can cause the you require permission from everyone to change file errors. You need to perform a full malware scan to restore normalcy on your PC.

Alternatively, you can fix this issue using one of the best antivirus tools. This tool scans your PC quickly and eliminates even the most hidden malware on your PC.

⇒ Get TotalAV

5. Uninstall updates

  1. Press the Windows key + I to launch the Settings app and select Windows Update.
  2. Click Update history.
    update history
  3. Now, select the Uninstall updates option.
    uninstall updates
  4. Next, right-click the faulty update and select Uninstall.
    uninstall
  5. Finally, follow the onscreen instructions to complete the process.

Some users report you require permission from everyone to change file errors after installing a Windows update. Removing this update should eliminate the error effortlessly.

We can now conclude this detailed guide on how to fix the you require permission from everyone to change file error. You should now be able to fix the issue effortlessly with the solutions therein.

If you are dealing with a similar issue, like you need permission to perform this action, check our guide on the topic to fix it.

Feel free to let us know the solution that helped you solve this issue in the comments below.

Get the free Windows 11 Virtual Machines from Microsoft

This isn’t the first time that we bring up Virtual Machines, so we’re pretty sure you already know exactly what we are talking about.

In fact, to help you out, we’ve compiled a list of the best Virtual Machines for Windows 10, after testing them thoroughly.

If you have already upgraded to the new OS, then you might want a list of the best Virtual Machines for Windows 11. Don’t worry, we got you!

You might also like to know that Microsoft has just released a free set of Virtual Machines for Windows 11, through the Moment 3 update.

These VMs are coming to us via the Moment 3 OS update

Indeed, the Redmond tech giant has released a new set of free virtual machines for developers, which is something to be happy about.

Actually, the Windows Development Environment (WDE) has been updated to version 2306, and you can download it for free from the official website.

Just in case you didn’t already know, the Windows 11 Development Environment is a set of virtual machines you can use without activation for free for 90 days.

The main purpose of this project is to provide developers with all the necessary tools to start making apps for Windows.

It also includes the following:

  • Visual Studio 2022 Community Edition with USP, .NET Desktop, Azure, and Windows App SDK for C# workloads enabled.
  • Windows Subsystem for Linux 2 enabled with Ubuntu installed and pinned to the taskbar.
  • Windows Terminal installed.
  • Windows Developer mode enabled.

We also have to mention that WDE version 2306 is actually based on Windows 11 Enterprise SKU with build number 22621.1848, the latest release currently available in the stable channel.

Keep in mind that version 22621.1848 is also known as the Moment 3 update. It is also worth noting that Microsoft is gradually rolling out Moment 3 features.

That being said, the updated virtual machines have the new features disabled by default, but you can bypass that with the corresponding toggle in Windows Update settings.

Remember that Windows 11 Development Environment version 2306 is valid until September 13, 2023. Microsoft said you cannot activate these virtual machines since they are evaluation-only.

All available configurations include VMWare (Workstation and Player), second-generation Hyper-V, VirtualBox, and Parallels (sadly, there is no ARM version of the project).

As you might have expected, you will need at least 70GB of free disk space and a minimum of 8GB of RAM to even use the VMs.

On the off chance you do not need all the developer tools Microsoft provides in WDE, check out the company’s Windows 10 and 11 Enterprise clean evaluation images.

Have you tried any of these free VMs from Microsoft yet? Share your experience with us in the comments section below.

0x8024a204 Windows Update Error: How to Fix It

The 0x8024a204 Windows update error occurs when you try to install a cumulative update. An update for Windows Defender Antivirus antimalware platform error accompanies this issue.

This problem prevents users from installing updates that are important for the security of your PC. If you are also facing this error, we will show you how to fix it quickly with the solutions in this guide.

Why am I getting the error 0x8024a204?

Several factors can be responsible for the 0x8024a204 error on your PC. Listed below are some of the notable ones:

  • Corrupt system files: The major cause of this issue is broken or missing system files. You can fix this issue by restoring these files.
  • Issues with update components: Sometimes, this problem can be due to problems with crucial update components. The solution to this is to restart these components.
  • Minor glitches with the required services: In some cases, this error code can be due to minor issues with the services that are important to update your PC. Running the Windows update troubleshooter should help clear these glitches.

How can I fix the Windows update error 0x8024a204?

1. Restart some services

  1. Press the Windows key + R, type services.msc, and click OK.
    services 0x8024a204
  2. Double-click the Background Intelligent Transfer Service to open its properties page.
    background
  3. Now, set its Startup type to Automatic and click the Start button if it is disabled.
    automatic
  4. Next, click Apply, followed by OK.
    apply ok 0x8024a204
  5. Finally, repeat Steps 2 to 4 for the Windows Update service and restart your PC.

The Windows Update and Background Intelligence Transfer Service are two important services for updating your PC. If these services are disabled, it might cause the 0x8024a204 error.

You need to restart these services and your PC to fix this issue.

2. Reset Windows update components

  1. Press the Windows + S key, type cmd, and choose Run as administrator under Command Prompt.
    cmd 0x802a204
  2. Type the commands below and hit Enter after each: Net stop bits Net stop wuauserv Net stop appidsvc Net stop cryptsvc Del %ALLUSERSPROFILE%\Microsoft\Network\Downloader\qmgr*.dat /Q Del "%HOMEDRIVE%\Users\All Users\Microsoft\Network\Downloader\qmgr*.dat" /Q Del %WINDIR%\SoftwareDistribution\*.* /s /Q Net start bits Net start wuauserv Net start appidsvc Net start cryptsvc
  3. Finally, wait for the commands to finish running and restart your PC.

In some cases, error 0x8024a204 can be caused by issues with vital update components. You can fix this by restarting these components.

3. Run the Windows Update troubleshooter

  1. Press the Windows key + I and choose Troubleshoot in the right pane.
    troubleshoot
  2. Click the Other troubleshooters option on the next page.
    other troubleshooters
  3. Finally, click the Run button before the Windows Update option and follow the onscreen instructions.
    run update  0x8024a204

In some cases, it might be hard to trace the cause of this 0x8024a204 error. It might be a combination of problems with the components and some services.

The solution to this is to run the Windows Update troubleshooter and restart your PC.

4. Repair system files

  1. Press the Windows + S key, type cmd, and click Run as administrator under Command Prompt.
    cmd admin
  2. Type the command below and hit Enter to run it: DISM /online /cleanup-image /restorehealthdism
  3. Wait for the command to finish running.
  4. Next, run the command below: sfc /scannowsfc 0x8024a204
  5. Finally, wait for the command to finish running and restart your PC.

If your system files are broken or missing, you might get the 0x8024a204 error code. What you need to do here is to repair and restore these files by running the DISM and SFC commands.

Alternatively, you can use a dedicated repair tool to fix these files quickly. This software saves you the stress of having to run multiple commands and repairs the faulty file with the original version.

5. Download the update manually

  1. Press the Windows key + S, type update history, and choose View your update history.
    view your
  2. Note the KB number of the update giving the error.
  3. Now, go to the Microsoft Update Catalog and search for the update in Step 2.
    update catalog
  4. Next, choose your specifications and select the Update that matches it.
  5. Finally, run the downloaded file to install it.

If all efforts to install the update automatically keep returning the 0x8024a204 error, you can go to the Microsoft Update catalog to download and install the update manually. With this, you can bypass the potential factors stopping the update.

The 0x8024a204 update error can be annoying, but it is an issue that can be easily fixed. With the information in this guide, getting past the error should now be easier.

If you are dealing with a similar issue in Windows update error 0x800704f1, you should be able to fix it with the solutions in our comprehensive guide.

Were you able to fix the issue? Feel free to let us know in the comments below.

Xbox chief Phil Spencer took center stage during Microsoft’s ongoing battle with the FTC

During another contentious day in court last Friday over the $68.2 billion acquisition of Activision Blizzard, Xbox chief Phil Spencer became the highlight of events for the day.

Despite a witness lineup that included a video deposition from PlayStation CEO Jim Ryan, questioning (behind closed doors) of Microsoft finance director Jaime Lawver and former Stadia head Dov Zimring, it was Spencer’s responses to a battery of questions about Xbox’s financial viability as a company within Microsoft that punctuated the day.

Day two of the FTC v. Microsoft trial over an injunction to the Activision deal was less bombastic than the first but still contained a treasure trove of information for laymen observers and FTC lawyers alike.

Following a 45-minute closed-door session between FTC lawyers and Microsoft’s finance director Lawver due to sensitive financial disclosures, Spencer took the stand for roughly 2 hours of questioning that began with how the Xbox’s “echo-system” operates.

We talk about Xbox ecosystem as the platform where creators build games for players to play.

Is Nintendo a competitor?

The FTC spent some of its early time questioning Spencer as an attempt to disqualify the Nintendo Switch as a competitor in the console gaming market based on its component packaging and specs.

By limiting the market of “viable” console manufacturers, the FTC could argue that any big moves such as acquiring Activision Blizzard harms the market because there are just less options for consumers. The FTC read back several statements from redacted files Spencer provided prior that stated the Switch was akin to “a Gen 8 device” based on CPU and GPU performance.

However, Spencer clarified in court on Friday, that Nintendo simply opted for a different platform play than traditional consoles which needed to be plugged in to operate.

The Switch was designed for people to take on the go. It has a battery; it’s a mobile platform people can take with them. Whereas the Gen 8 [Xbox One] consoles require that they’re plugged into the wall and don’t have a screen. Nintendo built a different platform.”

Spencer then goes on to reaffirm the Xbox has failed to keep up with Sony’s PlayStation or even Nintendo’s various offerings over the last 20 years.

We try to compete, but as I said, over the last 20 years we’ve failed to do that effectively.

It should be noted that the tactic of downplaying the Xbox as a third-rate failure is intentional and has been a through line for Microsoft executives in concurrent court days.

Furthermore, Spender also painted the PlayStation as an “aggressive competitor,” which takes up to 30 percent of revenue gained from games shipped by Microsoft to the platform, and uses that investment to reduce Xbox’s chances of survival in the market.

PlayStation Jim Ryan

Perhaps, feeling as if it was losing headway in the direction of generally defined market competition, FTC lawyers pivoted to AAA content and exclusivity.

AAA content and Exclusivity

Spencer calmly countered assertions from the FTC’s line of questioning that Microsoft acquires content to avoid paying licensing fees and marketing contracts for exclusive titles.

While it’s well-established practice in the gaming market to buy exclusives, Microsoft began shifting away from that model of acquiring content during the roll out of the Xbox One and maintains its avoidance currently, allowing Spencer to rebuttal the FTCs claims with, “we don’t pay for exclusivity on our own platform.”

Spencer did note that Sony not only sign deals to gain access to exclusive content but also enters into contracts to keep games off the Xbox platform.

In what felt like a set for a “gotcha” moment, the FTC tracked out previous statements from Spencer indicating that Microsoft might possibly keep some of AActivision’s titles from its competitor platform, thus validating the FTC’s fears over the acquisition.

Spencer quickly added context to what should have been damning news by identifying that those were strategic cost analysis run by both Microsoft and Activision to see if there was an evaluation worth considering, there was not.

The FTC latched onto the topic and also surfaced communications from Microsoft early on that discussed making Minecraft an exclusive to only Xbox consoles and PCs. Ultimately, common sense prevailed and Minecraft was released to every system that it could be played on.

Following up the Minecraft exclusivity discussion was some talk about PlayStation dev kits and platform degradation. The FTC aided by some Sony talking points sought to get clarification from Spencer on the nature of Minecraft features, updates, and maintenance on PlayStation versus Xbox and PCs.

While Sony points the finger at Microsoft for unoptimized version of Minecraft for the PlayStation 5, Microsoft insist that Sony’s reluctancy to provided PlayStation dev kits to Microsoft for fear of competition, had slowed its own progress on receiving an optimized Minecraft experience for the PS5.

As a side note, Microsoft hasn’t provided an optimized Xbox Series experience either, perhaps nullifying claims of favoritism of unfair distribution from the company.

Spencer also took some time to clarify the details of the Bethesda acquisition and the exclusive titles of Redfall and Starfield as necessary.

Spencer discussed the notion that Sony was in talks to pay Bethesda to keep Starfield a PlayStation exclusive for an undetermined amount of time, thus prompting Microsoft to purchase the studio to make sure Xbox customers had access to the game.

Moving on, FTC lawyers were unable to pin down the exclusivity status of upcoming Elder Scrolls VI but did manage to get Spencer under oath promising to provide CoD to the PlayStation platform, something Microsoft has already drafted up in contract.

Video Thumbnail: Call of Duty Season 4 World Premiere Trailer | Summer Game Fest 2023

Mobile Gaming Future

The FTC briefly touched on the topic of mobile gaming, where Spencer reiterated Microsoft’s failures to be a viable competitor in that space, noting that Minecraft has been its only relative success.

On the topic of mobile gaming, Spencer revealed that Microsoft attempted to buy Zynga at the height of its popularity but lost out to Take-Two in the end.

Spencer also noted how Microsoft and Sony are essentially locked out of mobile with Apple and Google holding the keys to that sector, also educating FTC lawyers about streaming games and mobile app store policies.

Leaving behind exclusivity talk for some time, Spencer talked about the financial viability of the Xbox platform and how it cannot run at a loss unlike the narrative the FTC was crafting.

The Xbox platform as a business

The Xbox couldn’t eat the loss of over 2/3 of the customers that represent the PlayStation community to then hope an exclusivity play works out in the long term.

The Xbox team has internal goals and achievements it must reach, just like any other business and must be profitable at the end of the day.

Spencer also explained why the near $70 billion acquisition bid for Activision is less of a sunk cost but more of a managed asset that will need to justify itself.

No, when you acquire something it’s not a payment. It’s like when you buy a house. You’re buying an asset that has value so it’s really a transfer of cash into an asset called Activision, that you believe retains the value that you acquired. So to try and characterize the $70 billion as somehow spent is incorrect. Financially, it’s really moving $70 billion in cash into an asset, which is a game publisher, that to us is actually worth more than $70 billion, so it is not spent.

How Google Stadia played into this

Dov Zimring took the stand late in the day unclear who he was there to benefit, as much of what he testified to buttressed Microsoft’s general claim that cloud gaming is expensive and competition is stiff.

Don Zimiring Google Stadia

Zimring seemingly admitted that it couldn’t acquire the necessary AAA titles to keep its platform viable despite paying developers for them.

It was going to be far more expensive in the environment that we found ourselves in.

Day two wrapped up with Judge Corley cutting off FTC lawyers from belaboring points and attempts to tie Microsoft to contractual obligations on the stand, which some observers have noted, isn’t a good sign for the FTC.

Day three is scheduled for Tuesday June 27, 2023, at 8:30am PT, 11:30am ET, and 4:30pm UK. Be sure to stay tuned to OnMSFT.com for all the latest!

0x803f800e Error When Launching a Game: How to Fix It

Xbox games are among the most widely played by users on the console or PC. Unfortunately, some users are complaining of the 0x803f800e error when they are launching a game.

This error is frustrating, as it prevents users from playing the affected game. If you are also experiencing this issue, this guide will show you how to fix it and return to enjoying your games.

Why am I getting the error 0x803f800e?

The potential causes of the 0x803f800e error are within a close circle. Below are some of the potential causes:

  • Issues with profile: In some cases, this issue can be caused by glitches with your user profile. This is prominent with users using the Xbox Gold profile. You can fix this by signing in and out of your profile.
  • Verification issues: At times, this problem be caused by issues with the verification of your subscription. The solution to this is to contact Microsoft Support to help fix the issue.

How do I fix the error code 0x803f800e?

1. Power cycle console

  1. Long press the Xbox button at the front of your console for about 10 seconds.
    console 0x803f800e
  2. Wait for the console to turn off completely.
  3. Finally, wait for about 60 seconds and turn on the console again.

Sometimes, the error code 0x803f800e can be due to minor glitches with your console. The solution to this is to power cycle your console.

If you are experiencing this issue on your PC, you only need to restart it.

2. Verify your subscription

  1. Press the Xbox button on your controller to launch the menu settings.
    controller
  2. Choose the Profile & system option.
  3. Now, select Settings.
    settings
  4. Next, select Account.
  5. From here, choose Subscriptions.
  6. Finally, select the subscription you want to check.

If your subscription has expired, you might get the 0x803f800e error. So, you need to verify if your subscription is still active.

If your subscription has expired, you need to visit the Microsoft Store to renew it.

3. Try launching the game again.

  1. Press the Xbox button on your controller to open the menu.
    controller 0x803f800e
  2. Now, highlight the game from the list available and press the Menu button.
  3. Select the Quit option.
  4. Finally, wait for about 10 seconds before trying to launch again.

Sometimes, this error 0x803f800e might occur because the game encountered an error. Restarting the game has proved effective for many users, and you should try it too.

If you are experiencing the issue on your Windows PC, close the game and wait for about 10 seconds before relaunching it.

4. Sign out and into your profile

  1. Press the Xbox button on your controller.
    controller 0x803f800e
  2. Now, select Profile & system.
  3. Next, choose Sign out.
    sign out
  4. Finally, wait for some time and sign back in.

If you are using the Gold profile and experiencing the 0x803f800e error, you need to sign out and into your profile. This should clear the potential issue with your account.

5. Contact support

If the fixes above still can not help you get past the 0x803f800e error, you need to contact Microsoft support. They have helped many users fix this issue quickly. So, you should try it too.

Some users used Xbox chat support instead. In this case, the issue was fixed by canceling and reinstalling their subscription. So, the available option is not limited.

We can now conclude this guide on how to fix the 0x803f800e error when trying to play games. You should now be able to fix the issue for good if you follow the steps carefully.

If you are dealing with other issues like Xbox One not loading games, check our detailed guide to fix it.

Feel free to let us know the solution that helped you fix this issue in the comments below.

Microsoft Teams introduces profanity filtering control and customization for meeting captions

Microsoft Teams has recently unveiled two new features that enhance the captions experience in Teams meetings. Users can now toggle profanity filtering for Live Captions and Live Transcription and enjoy greater customization options.

Profanity filtering toggle

To provide users with more control, Microsoft Teams has introduced a toggle to turn off profanity filtering for live captions. By disabling the filtering feature, users can view captions and transcriptions without any modification, displaying every word exactly as spoken.

By default, profanity filtering is enabled, and to turn it off, users can adjust their preferences in the captions and transcription tab within their user settings. It’s important to note that this preference is at the user level and is not governed by the meeting organizer or tenant admin.

Improvements to the caption experience

Microsoft Teams has made improvements to the overall caption experience, focusing on customization options for positioning and presentation in meetings.

The captions window at the bottom of the meeting interface has undergone layout enhancements. The speaker attribution and captions are now neatly displayed, with the full speaker name shown above the associated captions.

The default number of lines displayed in the caption window has been increased from 2 to 3, and users can expand the window to view additional lines.

A settings button can be found in the top right corner of the caption window. Clicking on it opens the new captions settings pane on the right side of the window. This pane provides various configuration options divided into two sections.

The languages section enables users to specify the currently spoken language during the meeting. Teams Premium license holders gain the ability to choose the language for live translations.

The styles section offers four different caption styles for customization. Users can modify the font color, set the caption panel height, choose the position of the panel, and adjust the font size.

By selecting the appropriate height and font sizes, users can display up to 3-4 additional lines of captions.

Another valuable addition is the ability to scroll up through the previous minute of captions displayed in the panel. This feature proves useful for catching up on missed content or quickly reviewing recently shown captions.

Users can also configure the position of the caption panel to be either at the bottom or top of the meeting view, allowing them to tailor their caption experience to their preferences.

When will these features be available?

Both features are now accessible on the desktop and web clients for commercial and GCC customers.

With these new additions, Microsoft Teams continues to enhance the captions experience, offering users greater flexibility and customization options for an inclusive and seamless meeting environment.

What is Nxlog.exe & How to Fix its High CPU Usage?

Several processes are installed with third-party software, and nxlog.exe is one of them. It runs silently in the background when its parent software is active.

However, this process can sometimes encounter issues due to one or two factors. If you are facing problems with the nxlog.exe process, rest assured that it can be easily fixed, and we will show you how to go about it in this guide.

What is the use of NXLog EXE?

The nxlog.exe is part of the reputable log collection software NXLog. Its parent software is pretty reliable and trusted, so this process is trustworthy.

The original version of the process poses no threat to your PC. When its parent software is active, the process will be loaded into memory and can be viewed in Task Manager.

This process normally does not hog your PC resources, as it only registers low CPU and memory usage. However, just like other processes, malware can take over this process and consume your PC resources.

If you are experiencing unusual resource usage from the nxlog.exe process, we will show you how to fix it in the next section of this guide.

How can I fix nxlog.exe if it is registering high CPU usage?

  1. Press the Windows key + X and select Task Manager.
    end task
  2. Right-click the nxlog.exe entry and select End task.
    end task
  3. Finally, restart your PC.

If the nxlog.exe process is registering high CPU usage, it might be because there are multiple instances of it running or the demand for its parent software is high. In this case, you should end it forcibly using Task Manager.

If there are multiple instances of the process running, ensure to close them all.

2. Scan for malware

  1. Press the Windows key, type virus, and click Virus & threat protection.
    virus
  2. Click the Scan options link on the new page.
    scan options nxlog.exe
  3. Finally, choose your preferred scan option and click the Scan now button.
    scan now

There are a series of ways malware can attack your PC. One prominent method is disguising as one of the trusted processes on your PC to consume your resources.

This might be the reason nxlog.exe is registering high CPU usage. The solution to this is to perform a full malware scan to eliminate the virus.

Another option is to use TotalAV to perform the task instead of Windows Defender. This excellent software will eliminate even the most hidden viruses on your PC, including the ones hidden in your system files.

⇒ Get TotalAV

3. Uninstall third-party software

  1. Press the Windows key + R, type control, and click OK.
    control nxlog.exe
  2. Choose Uninstall a program under Programs.
    uninstall a
  3. Now, right-click the NXLog-CE option and select Uninstall.
    uninstall
  4. Follow the onscreen instructions to complete the process.
  5. Next, press the Windows key + R, type regedit, and click the OK button.
    regedit 0x803f800e
  6. Now, search for nxlog on your registry and delete all its instances.
  7. Finally, restart your PC.

There are times when malware might be the cause of the nxlog.exe high CPU usage issue. In this case, the problem might be due to issues with the NXLog app.

The solution to this is to uninstall the app and clear its registry entry. If you are still using the software, you can reinstall it from official sources.

4. Perform a system restore

  1. Press the Windows key + R, type rstrui.exe, and press Enter.
    rstrui
  2. Click Next on the new page.
    next
  3. Now, choose your ideal restore point and click the Next button.
    restore point 0x803f800e
  4. Finally, click Finish and follow the onscreen instructions to complete the process.
    finish

If you can’t trace the cause of the nxlog.exe high CPU usage on your PC, you need to perform a system restore. This will help reverse the changes made to your PC that might be causing the problem.

There you have it: everything you need to know about the nxlog.exe process. You should now be equipped with the needed information about this process and fix its related issue.

In the same vein, if you are looking for detailed information about the ntkrnlpa.exe process, you will find it in our comprehensive guide.

Feel free to share your experience with this process with us in the comments below.

Here are the devices Apple is reportedly looking to launch by 2026

As per an updated product roadmap shared by Bloomberg’s Mark Gurman, Apple is reportedly developing at least a dozen new devices slated for release between late 2023 and early 2024. He further reports that Apple is currently focusing on wrapping up software development, extending testing, and finalizing the rollout plan of its recently announced Vision Pro headset before proceeding to other crucial business activities, such as preparing to launch the upcoming versions of iPhones, iPads, Apple Watches, Macs, and other products.

Gurman emphasized that Apple plans to launch a new iPad Air to succeed the current M1-powered version, alongside two new iPad Pro models featuring OLED screens by 2024. Additionally, the company has commenced the initial phases of developing third-generation AirPods Pro, an upgraded Apple TV equipped with superior specifications, and other “home equipment,” including Smart Displays.

The report also suggests that Apple is in the early stages of design work for a brand-new iMac model, which will have an expansive display exceeding 30 inches.

Gurman, an industry insider with sources at Apple, asserts that the tech giant has plans to release two new variants of the Apple Watch Series 9 and a next-generation Apple Watch Ultra in conjunction with the launch of the iPhone 15 lineup this fall. Regarding updates to their Mac product line, significant changes are anticipated towards the end of this year or in early 2024.

These updates will include new MacBook Pro models sized at 14 inches and 16 inches and powered by the M3 Pro and M3 Max chips, a refreshed 13-inch MacBook Pro featuring the M3 chip, as well as two new MacBook Air models and new 24-inch iMac models.

The report also highlights how Apple extended access to its Vision Pro headset by granting more employees the opportunity to try out the device. Before this, only a select group knew the device’s features. With the testing pool increased, some users reported discomfort after prolonged usage due to the perceived weight of the headset.

While an exact weight is not officially published, the device boasts high-end materials such as aluminum and glass. To alleviate the issue, Apple has developed a head strap to distribute the weight more evenly. Despite the solution, sources note that this accessory will not be included in the retail version of the product as it is currently considered non-essential.

Via Bloomberg

Desktop vs. Laptop Market Share: What do People Prefer?

Regarding PCs, there are two choices, desktop or laptop, and many are wondering about desktop vs. laptop market share.

This is a pretty exciting subject, and in the past few years, the market has been changing drastically, reflecting PC sales. Speaking of which, why not learn more about Windows market share over the years?

Therefore, join us while we look closely at the market share and analyze the desktop and laptop sales.

What sells more: laptop or desktop?

According to the IDC, laptops sell more than laptops. Here’s the breakdown for 2022:

  • Notebooks sold: 207,534,238
  • Detachable tablets sold: 81,478,058
  • Desktops sold: 76,924,993

Desktop vs. laptop market share analysis

Global market analysis

PC sales were in decline of 19.8% in the fourth quarter of 2022. Here’s the breakdown of the affected devices:

  • 2.3% decline in tablet shipments
  • 28.3% decline for desktop PCs

The PC market share is expected to recover by the end of 2023 since many users are upgrading to Windows 11. Some experts believe that we’ll see a 3.6% growth in 2024.

In the last year, desktops were on a slow decline, and they have been surpassed by detachable tablets by Q4. The numbers say the following:

  • 17,978,951 desktop units sold
  • 26,378,034 detachable tablets sold
  • 47,313,301 notebooks sold

Regarding notebooks, they were also on a constant decline during 2022, and that trend seems to continue.

Are desktops more popular than laptops?

Judging by the market share in 2022, it seems that desktops are losing the battle against laptops. According to data from Q1 2022, 67% of users used laptops to access the Internet.

Out of these users:

  • 60% used personal laptops to access the Internet
  • 29% used company laptops for Internet access

Here’s the visual representation:

As you can see, almost two-thirds of laptops are personal users, which doesn’t come as a surprise, especially after the pandemic.

Who has the biggest market share in laptops?

According to data from Statista from 2021, in the United States, the following brands held the most market share:

  • HP – 35%
  • Dell – 27%
  • Apple – 24%
  • Acer – 13%
  • Lenovo – 12%
  • Asus – 8%
  • Microsoft – 8%
  • Samsung – 7%

Here’s a visual representation:

Worldwide PC market share by brand

In 2022, the major PC brands shipped the following number of units:

  • Lenovo – 68,125,000 (23.9%)
  • Other brands – 64,237,000 (22.5%)
  • HP – 55,206,000 (19.4%)
  • Dell – 49,746,000 (17.4%)
  • Apple – 27,160,000 (9.5%)
  • ASUS – 20,616,000 (7.2%)

It’s important to mention that all brands saw a decline, and the total decline was 16.4%. HP was hit the hardest with a 25.4% decline, followed by Lenovo with 17.1% and Dell with a 16.1% decline.

Why use a desktop instead of a laptop?

There are several benefits to desktops:

  • Highly customizable in terms of hardware.
  • Limitless upgrade features.
  • Easier to repair.
  • More affordable.
  • Better for gaming.
  • Larger screen size.
  • Lower chance of theft.

However, desktops have a share of drawbacks:

  • Not portable.
  • Requires additional peripherals.
  • Takes a lot more space.

While desktops offer more hardware power, better customization, and upgrade options, they aren’t portable, which is their biggest drawback that turns away users.

For students and business users who are always on the go, a laptop is almost always a better solution in the long run.

Final thoughts

It’s safe to say that laptops dominate the market share and are a go-to device for many users who want a portable functional PC that doesn’t take up too much space.

As such, they are preferred devices for students, business users, or users always on the go.

According to Gartner’s Mikako Kitagawa:

The anticipation of a global recession, increased inflation and higher interest rates have had a major impact on PC demand. Since many consumers already have relatively new PCs that were purchased during the pandemic, a lack of affordability is superseding any motivation to buy, causing consumer PC demand to drop to its lowest level in years.

He also said the following:

PC demand among enterprises began declining in the third quarter of 2022, but the market has now shifted from softness to deterioration. Enterprise buyers are extending PC lifecycles and delaying purchases, meaning the business market will likely not return to growth until 2024.

So, what lies in the future? According to IDC’s forecast, 2023 will leave a drop in market share for laptops and notebooks, but the market is expected to recover in the following years slowly.

The gap between laptops and desktops will continue to rise as the number of laptop users slowly but surely increases.

The increase in the number of devices globally also increases technology addiction and brings in the negative impacts of it. To learn more, read this guide.

Also the increasing number of devices has also raised the number of electronic equipment discarded; check the latest e-waste statistics and the importance of proper disposal of a product.

We hope that you found this guide informative. If you want to learn more, our guide on operating system market share should answer all your questions.

What about you? Are you a laptop or desktop user? Let us know in the comments below.

Microsoft expands Azure Remote Rendering support to Meta Quest 2 and Quest Pro

Microsoft recently released a public preview of Azure Remote Rendering support for Meta Quest 2 and Quest Pro, enabling developers to render complex 3D content in the cloud and stream it to these virtual realities (VR) headsets in real-time.

Azure Remote Rendering, which already supports desktop and Microsoft’s AR headset, HoloLens 2, utilizes a hybrid rendering approach that combines remotely rendered content with locally rendered content. Now, with support for Quest 2 and Quest Pro, developers can leverage Microsoft’s Azure cloud rendering capabilities to view large and intricate models on these VR devices.

The addition of Azure Remote Rendering’s support for Meta Quest 2 and Quest Pro perfectly aligns with the growing popularity of these headsets for model visualization. BIM Holoview, a leading company in the construction industry, has integrated the latest Azure Remote Rendering support for Meta Quest. 

Peter Neil, CEO of BIM Holoview, expressed his excitement about this integration, stating, “The availability of Azure Remote Rendering support on Meta Quest signifies a significant milestone in redefining the visualization and understanding of construction models.” This integration allows users to experience the portability of Meta Quest while seamlessly viewing large and complex models, revolutionizing the way construction models are visualized and understood.

Microsoft acknowledges that supporting Quest 2 and Quest Pro has been one of the top feature requests from partners and developers. It eagerly looks forward to seeing the innovative applications and experiences developers will create using Azure cloud rendering capabilities on these devices.

The release of Azure Remote Rendering support for Meta Quest 2 and Quest Pro marks a significant advancement in the field of VR content rendering. With this powerful combination of cloud and local rendering, developers can unlock new possibilities for immersive experiences and visualization of complex 3D models.

0x80072f78 Error on Windows 10 & 11: How to Fix it

Microsoft Store is the official place from where you download games and apps on your Windows 10 or Windows 11 PCs. However, the Microsoft Store can often crash and throw errors such as 0x80072f78.

In this guide, we will share all the details you need to resolve the 0x80072f78 Error on Windows 10 and 11. Let us jump right into it.

What causes the 0x80072f78 Microsoft Store error?

After researching the internet, we have found many reasons that could trigger the 0x80072f78 Microsoft Store error on your PC.

  • Underlying Microsoft Store error: Chances are there might be some bug or glitch that is causing the Store to misbehave and throw the 0x80072f78 error.
  • Microsoft Store cache is corrupt: The Microsoft Store cache files might have gone corrupt, because of this, you will come across various issues, including the one at hand.
  • Corrupt Store registry key: Some important registry keys related to the Microsoft Store are corrupt and causing the 0x80072f78 error.
  • System files are missing or corrupt: Some missing or corrupt system files related to the Microsoft Store might trigger several issues associated with the Windows program.
  • Third-party antivirus conflict: Several users have confirmed that after installation of a third-party antivirus program, they are facing the 0x80072f78 error.

Let us now check out the solutions that will help you to resolve the 0x80072f78 error.

How can I resolve the 0x80072f78 Microsoft Store error?

Note icon NOTE
The solutions below can be applied on Windows 10 and Windows 11 PCs to resolve the 0x80072f78 error.

1. Run the Windows Store app troubleshooter

  1. Press the Win + I keys to open Settings.
  2. Select Troubleshoot on the right.
  3. Choose Other troubleshooters.
  4. Click the Run button next to the Windows Store.
  5. The troubleshooter will start detecting the issues.
  6. Apply the prompted fixes.
  7. Restart your PC.

Most users could resolve the 0x80072f78 error by simply running the Windows Store troubleshooter on their PCs. This helps in fixing the bugs that might be causing the problem.

2. Delete the Microsoft Store cache

  1. Press the Win + R keys to open the Run dialogue.
  2. Type regedit and hit OK.
  3. Navigate to the below path and press Enter.Computer\HKEY_CURRENT_USER\Software\Microsoft\Windows\CurrentVersion\CloudStore\Store
  4. Delete the Cache folder for Store.
  5. Close Registry Editor and restart your PC.

Clearing the cache files of any program helps resolve any temporary issue affecting that particular program, in our case, the Microsoft Store.

You can read our guide that helps you understand how to fix the Windows Store cache if it is damaged.

3. Reset Microsoft Store

  1. Press the Win + I keys to open Settings.
  2. Click on Apps on the left pane.
  3. Select Installed Apps from the right side.
  4. Click the 3-dot icon for Microsoft Store and select Advanced options.
  5. Scroll down and select Reset.
  6. Hit Reset again in the prompt to reset the Microsoft Store.

Resetting the Microsoft Store will remove all the corrupt files and cache files. And when you launch the program after resetting it, it will load all files from scratch, which will help you resolve the 0x80072f78 error.

4. Run the SFC and DISM scans

  1. Press the Win key to open the Start menu.
  2. Type command prompt and open it as an administrator.
  3. Type the below command and press Enter:sfc /scannowStornvme.sys
  4. The SFC Scan process will fix the corrupt system files related to Microsoft Store.
  5. Type the below commands and press Enter after each one:Dism /Online /Cleanup-Image /CheckHealth Dism /Online /Cleanup-Image /ScanHealth Dism /Online /Cleanup-Image /RestoreHealth
  6. Reboot your computer.

Chances are some important system files related to the Microsoft Store are missing from your computer. This can be easily resolved by running the SFC and DISM scans.

You can read our guide and resolve the SFC Scan is not working issue on your PC by applying the solutions.

In addition, we fully recommend you scan Windows devices with dedicated repair apps that can entirely detect missing or corrupted files and fix them accordingly.

5. Disable Firewall

  1. Press the Win key to open the Start menu.
  2. Open Control Panel.
  3. Select Windows Defender Firewall.
  4. Select Turn Windows Defender Firewall on or off from the left pane.
  5. Check the radio buttons for Turn off Windows Defender Firewall (not recommended) for both Public and Private networks.
  6. Click OK to apply the changes.

Multiple users have resolved the 0x80072f78 error by disabling the Windows Defender Firewall on their PCs. You can also try disabling any third-party antivirus software on your PC.

Chances are the antivirus, or the Firewall program is interfering with the network connection of the Microsoft Store.

That is it from us in this guide. Feel free to let us know in the comments below which one of the above solutions resolved the 0x80072f78 error.

What is Wmpnscfg.exe & Is It Safe to Remove It?

There are multiple services that run in the background to facilitate the operation of your computer. However, some services, such as the wmpnscfg.exe, can raise doubts about what it is, especially when it results in high CPU usage.

In this guide, we will share with you all the details you need to understand what the wmpnscfg.exe file is and what its importance is on your computer. Let us check out the guide.

What is wmpnscfg.exe?

The wmpnscfg.exe file is associated with the Windows Media Player. The main work of this wmpnscfg.exe file is to alert the user when a new media device is connected or found on the network.

Moreover, it is also responsible for starting the Windows Media Player Network Sharing Service (NSS) and then waiting for any notifications from the service.

When the user taps on the notification, the wmpnscfg.exe file launches the Windows Media Player and asks the user to either allow or deny the new network found on the network.

The usable location of the wmpnscfg.exe file is C:\Program Files\Windows Media Player\. There is another file that runs along with the wmpnscfg.exe file, which is the wmpnetwrk.exe.

Should I remove the wmpnscfg.exe file?

Since it is an important file, malware or adware can attack it and mask it to steal your data. However, there haven’t been many reports related to this.

So, if you don’t think you need the services of the wmpnscfg.exe file, we suggest you disable the service instead of removing it from your computer.

You can learn the different methods to disable the wmpnscfg.exe file on your computer in the next section below.

How can I disable the wmpnscfg.exe file?

1. Disable media sharing in Media Player

  1. Launch Windows Media Player.
  2. Click on Library and select Media Sharing from the drop-down menu list.
  3. Uncheck both the Find media that others are sharing and Share my media options.
  4. Click OK.
  5. Hit the Yes button in a dialogue prompt that appears.

This is the easiest way to disable media sharing on Windows Media Player and get rid of the wmpnscfg.exe file running on your computer.

2. Disable the feature in Services

  1. Press the Win + R keys to open the Run dialogue.
  2. Type services.msc and press OK.
  3. Locate Windows Media Player Network Sharing Service and double-click on it to open it.
  4. Select the Startup type to Disabled from the drop-down.
  5. Also, press the Stop button under the Service status section.
  6. Click Apply and OK to apply the changes.
  7. Restart your computer.

You can also disable the media sharing feature, the wmpnscfg.exe file, by following the above steps in the Services menu. This will ensure that the service doesn’t run automatically.

We have listed in our guide some of the services that you can easily and safely disable on your Windows computer.

3. Use Registry Editor to disable the feature

  1. Press the Win + R keys to open the Run dialogue.
  2. Type regedit and press OK.
  3. Navigate to the below path and press Enter. HKEY_CURRENT_USER\Software\Microsoft\MediaPlayer\Preferences\HME
  4. Double-click the DisableDiscovery DWORD on the right side.
  5. Change the Value Data to 1 from 0 and click OK.
  6. Restart your computer.

The Media Sharing feature, i.e., the wmpnscfg.exe can also be disabled from the Registry Editor by following the above steps. You can check out our guide that will help you to restore the registry without having a backup.

Also, we have a guide that explains 5 different ways to fix the corrupt registry on a Windows PC. You can also check out our list of the best registry cleaners to easily resolve registry-related issues.

Besides, you can read out guide on how to fix broken registry items in Windows 11. This will also help you mitigate the registry-related issues.

This is it from us in this guide. If you are getting a Wmplayer.exe error on your PC, then you can apply the solutions in our guide to resolve the problem.

Multiple users have also reported that they are coming across the WMVCORE.dll not found error. Fortunately, you can easily resolve this issue by following the solutions in our dedicated guide.

We have also given detailed information on how you can get the Windows Media Center on your computer. Do note that there are only unofficial methods to get it.

Feel free to let us know in the comments below if you understood the wmpnscfg.exe file on your PC.

What is Regsvcs.exe & Should You Uninstall it?

NET Framework is a software development framework, which is developed by Microsoft for building and running applications on Windows. Regsvcs.exe is a file that runs on your PC and performs some vital operations.

In this guide, we will share with you all the details that would make you understand what is Regsvcs.exe and whether you should uninstall it or keep it on your computer. Let us check out the guide.

What is Regsvcs.exe?

Regarding important files, the Regsvcs.exe is a legitimate Windows file published by Microsoft. The main work of Regsvcs.exe is registering Microsoft NET Framework components in the Windows Registry.

According to an official Microsoft explanation, the Regsvcs.exe (.NET Services Installation Tool) performs the following actions:

  • Loads and registers an assembly.
  • Generates, registers, and installs a type library into a specified COM+ application.
  • Configures services that you have added programmatically to your class.

The Regsvcs.exe file is a part of the NET Framework and helps register and configure NET-based components, including libraries and services.

It ensures that the components can be easily accessed and used by applications that require them to run smoothly.

Since it is an important file, malware or adware can infect this file and can mask it to operate in the background. This could be a serious issue because of the importance of the Regsvcs.exe file.

Is the Regsvcs.exe file malicious?

The Regsvcs.exe file is legitimate and is found inside the C:\Windows\System32 folder. It is barely an MB in size. However, in case the file you spot sizes in GBs, and isn’t in the location of the folder above, then it could be a virus.

Some common errors that you could come across related to Regsvcs.exe are:

  • Cannot find file: Regsvc.exe
  • File not found: Regsvc.exe

How can I resolve the Regsvcs.exe errors?

1. Reinstall NET Framework

  1. Press the Win key to open the Start menu.
  2. Open Control Panel.
  3. Click on Programs and Features.
  4. Select NET Framework and hit the Uninstall button at the top.
  5. Restart your computer.
  6. Visit the official website and download the latest version.
  7. Install it and check if this fixes the issue or not.

Most Regsvcs.exe errors can be easily resolved by reinstalling the NET Framework on your computer. Chances are some important files related to it are missing on your PC.

Simply follow the above steps and reinstall the latest version of the NET Framework and check whether this fixes the issue.

2. Run the Microsoft .NET Framework Repair tool

  1. Visit the official Microsoft website.
  2. Download the Microsoft .NET Framework Repair tool.
  3. Launch the program by double-clicking the EXE file.
  4. Accept the terms and conditions and click Next.
  5. The program will begin diagnosing the issues associated with the NET Framework on your computer and present you with a list of Recommended changes that are required to resolve the problem.
  6. Click on the Next button to apply the solutions.
  7. Finally, click Finish to complete the process.

The NET Framework Repair tool will help you diagnose and fix the issues related to Regsvcs.exe. All you need to do is run the program and follow the onscreen steps.

3. Run the SFC and DISM scans

  1. Press the Win key to open the Start menu.
  2. Type command prompt and run it as an administrator.
  3. Type the below command and press Enter:sfc /scannow
  4. The SFC command will resolve the problem.
  5. Type the below commands and press Enter after each one:Dism /Online /Cleanup-Image /CheckHealth Dism /Online /Cleanup-Image /ScanHealth Dism /Online /Cleanup-Image /RestoreHealth
  6. Restart your computer.

Since the Regsvcs.exe file is a system file, you should run the SFC and DISM scans to resolve the corrupt or missing system files.

Chances are some important system files associated with the Regsvcs.exe are missing and causing it to crash. In case the SFC scan is not working, you can apply the changes in our guide to fix the problem.

4. Perform a system restore

  1. Open the Start menu by pressing the Win key.
  2. Type Create a restore point and open the top result.
  3. Select the drive where you have the OS installed and click on System Restore.System Restore System config
  4. Select the restore point and hit Next.restore to fix missing sdl2.dll
  5. Click Finish to begin the restore process.

If you are getting the Regsvcs.exe file-related errors, you can restore your PC to a state where everything was working normally.

However, note that for the system restore to work, you should have a restore point created on your PC. For that, you can read out guide, which gives you a detailed explanation of how to create a restore point.

That is it from us in this guide. Let us know in the comments below which one of the above solutions resolved the Regsvcs.exe file errors.

What is Osppsvc.exe & How to Fix its Errors?

Of the wide array of background processes running in Windows, most perform a critical function, either directly linked to Windows or for a third-party app. But a few are known to trigger more errors than others. One that fits the category is osppsvc.exe.

While high CPU usage is one, most users reported that the osppsvc.exe process could not be located when trying to launch Microsoft Office, and as a result, Office wouldn’t open. Keep reading to find out what osppsvc does and effective ways to fix its errors!

What is Office Software Protection Platform?

The osppsvc.exe process stands for Office Software Protection Platform and is a vital component of Microsoft Office. First introduced in Office 13, the component has been a part of all future versions.

The process plays a critical role, i.e., to acquire and enforce the digital licenses of Microsoft Office applications. For those wondering where is the osppsvc file, it can be found in the following location:C:\Program Files\Common Files\microsoft shared\OfficeSoftwareProtectionPlatform

As per our research, you shouldn’t disable or terminate the osppsvc.exe, given the role it plays, but it, too, ideally shouldn’t throw errors or consume 100% CPU. So, if you are facing problems with the process, a few quick solutions will help!
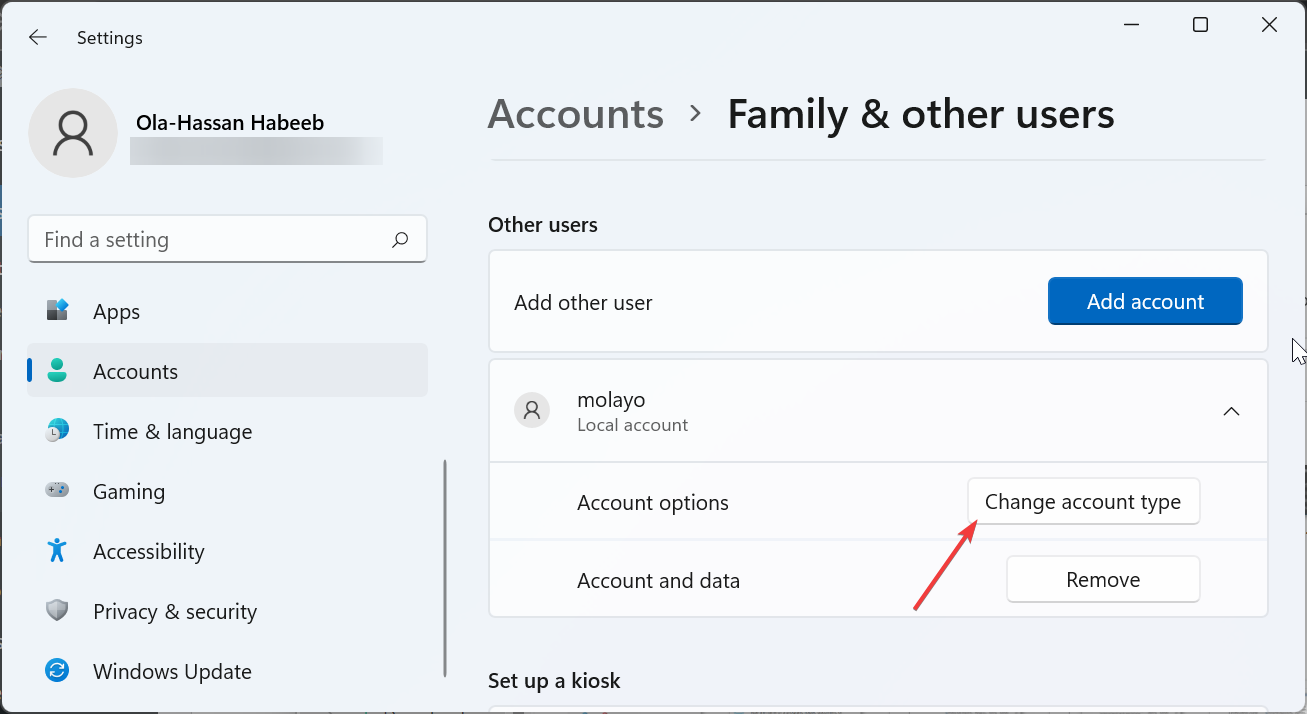
How do I fix osppsvc.exe errors?

Before we move to the slightly complex solutions, try these quick ones first:

  • Check for any pending Windows or Microsoft Office updates and install them.
  • Make sure you are running an activated version of Office.

If none work, move to the fixes listed next.

1. Terminate the process

  1. Press Ctrl + Shift + Esc to open Task Manager, and head to the Details tab.details
  2. Select the osppsvc.exe process, and click on End task.end task
  3. Once done, relaunch Microsoft Office.

If find come across osppsvc.exe Error 1920 and can’t open Microsoft Office, a quick fix is to terminate the process.

2. Scan for malware

  1. Press Windows + S to open Search, type Windows Security in the text field, and click on the relevant search result.
  2. Click on Virus & threat protection.virus & threat protection
  3. Click on Scan options.scan options
  4. Choose Full scan, then click on Scan now, and wait for the process to complete.full scan to fix osppsvc.exe

Before you take any troubleshooting measures, it’s imperative to identify whether osppsvc.exe is a virus or poses any threat. And an easy way for it is to run a malware scan using the built-in Windows Security. Besides, you could go with a reliable third-party antivirus solution.

3. Repair corrupt system files

  1. Press Windows + R to open Run, type cmd, and hit Ctrl + Shift + Enter.cmd
  2. Click Yes in the UAC prompt.
  3. Paste the following commands one at a time and hit Enter after each:DISM /Online /Cleanup-Image /CheckHealth DISM /Online /Cleanup-Image /ScanHealth DISM /Online /Cleanup-Image /RestoreHealth
  4. Now, execute the following command to run the SFC scan: sfc /scannowsfc scan to fix osppsvc.exe
  5. Once done, restart the computer.

Corrupt system files can often lead to trouble loading files critical to third-party apps, and running the DISM tool and SFC scan will help fix things.

Even better, you can try reliable repair software to help you find system stability issues, such as corrupt or malfunctioning files, and replace them with new Windows elements.

4. Modify the registry

  1. Press Windows + R to open Run, type regedit in the text field, and click OK.registry
  2. Paste the following path in the address bar and hit Enter: HKEY_LOCAL_MACHINE\SOFTWARE\Microsoft\OfficeSoftwareProtectionPlatformpath
  3. Locate the InactivityShutdownDelay DWORD. If you can’t find it, right-click on the empty portion, hover the cursor over New, then select DWORD (32-bit) Value, and name it InactivityShutdownDelay.InactivityShutdownDelay
  4. Right-click on the DWORD and select Modify.
  5. In case it already existed, you will find 300 listed under Value data. Change it to a smaller number, and save the changes.change value data to fix osppsvc.exe

The number listed under Value data is the amount of time in seconds the Office Software Protection Platform continues to run after an action is performed. Reducing this time period will help fix high CPU consumption due to osppsvc.exe.

5. Repair Microsoft Office

  1. Press Windows + R to open Run, type appwiz.cpl, and hit Enter.
  2. Select Microsoft 365 from the list of programs, and click Change.change
  3. Choose Online Repair and click on Repair to proceed.online repair to fix osppsvc.exe
  4. Again, click Repair in the confirmation prompt and wait for the process to complete.

If the process is corrupt or triggering major errors, you can download and repair osppsvc.exe issues by running an Online Repair of the Microsoft Office 365 suite. This will re-download any problematic files and get things running.

6. Create a new user profile

  1. Press Windows + R to open Run, type netplwiz in the text field, and click OK.
  2. Click on the Add button.add
  3. Click on Sign in without a Microsoft account.sign in without a microsoft account
  4. Now, click on Local account.local account
  5. Enter the User name, and password if required, and click Next to proceed.enter details
  6. Once done with the account creation, select the new profile and click Properties.properties
  7. Go to the Group Membership tab, select Administrator, and click OK to save the changes.administrator account to fix osppsvc.exe
  8. Now, log into the new account, install Microsoft Office, and the problem should be resolved.

A few users reported that the problem lay with the corrupt user profile, and creating a new local account, then setting the account as administrator, got things up and running. So, do try it and check whether the osppsvc.exe errors are fixed in Windows.

7. Upgrade to the latest version of Microsoft Office

In case nothing else works, the last option is to upgrade the version of Microsoft Office. Every few years, Microsoft comes with an upgrade that introduces new features and enhances security and usability.

But other than the two, upgrades increase compatibility with the OS. So, check for the latest version and download the Office Suite. You can find more information on the official website.

That’s all! One of these solutions should have helped fix osppsvc.exe errors in Windows, and you should now be able to run Microsoft Office seamlessly.

If you want to switch to another suite, check the most preferred Microsoft Office alternatives.

For any queries or to share what worked for you, drop a comment below.

0x87dd0005 Xbox Error: How to Fix it in 3 Steps

The error code 0x87dd0005 on Xbox typically indicates a sign-in issue. It commonly occurs when there is a problem with your Xbox Live account or network connectivity. Hence, this article will discuss why the error occurs and some steps for fixing it.

Also, you may be interested in our article about the error 0x80190190 on Xbox and some ways to fix it.

What causes the 0x87dd0005 Xbox error?

The error means there’s a problem with the Xbox service, or your console or PC has encountered an unexpected error. Here are some potential causes of this error:

  • Xbox Live service issues are a common cause.
  • Incorrect account credentials, expired Xbox Live subscriptions, or other account issues.
  • Network connectivity problems will prevent you from connecting to the Internet.
  • Temporary data or cache issues can sometimes lead to issues.
  • Xbox Live profile conflicts, such as multiple signed in profiles can cause the issue.

How do I fix error 0x87dd0005?

We recommend you go through the following preliminary checks before trying any advanced troubleshooting steps:

  • Check the Xbox Live service status on Xbox Live status page and make sure the service is working.
  • Clear persistent storage and temporary files.
  • Check your internet connection and restart your network connection.
  • Check account credentials and subscriptions.

If the preliminary check above can’t resolve the problem, proceed with the solutions outlined below:

1. Restart your device

1.1 Xbox console

  1. Press and hold the Xbox button in the center of your controller to open the Power Center.
  2. Select Restart console from the menu.
  3. Click on Restart.
  4. After restarting the console, try to sign in and check if the error persists.

1.2 PC

  1. Press the Windows button.
  2. Select the Power button from the drop-down menu, then click on Restart.

Restarting the Xbox console or PC will refresh its process and close background activities impeding the sign-in.

2. Use the Switch account option

  1. On the sign-in error page, click on the Switch account button.
  2. Select your account and continue.

The above steps will allow you to select and switch to your account if you have multiple accounts.

3. Uninstall and reinstall the problematic game

3.1 Xbox console

  1. On the Home screen, select My games & apps.
  2. Highlight the game or app, then press the Menu button on your controller.
  3. Click Manage game & add-ons.
  4. Then, select Uninstall all.
  5. Repeat the restart Xbox console steps in solution 1.
  6. After restarting, download the game or app and try launching it to see if the error persists.

3.2 PC

  1. Press the Windows + R keys, type appwiz.cpl, and click OK to open the Programs and Features.
  2. Locate and click the Xbox game, then click on Uninstall.
  3. Restart your PC afterward.
  4. If the game is a Play Anywhere game, reinstall it. However, you may need to re-buy it if it’s not.

Reinstalling the game will resolve issues causing it not to sign in to your Microsoft account.

Alternatively, you can check what to do if Xbox One is not loading games. Also, you can read about fixing issues with downloading games from the Xbox game pass on your PC.

Do you have any questions or suggestions regarding this guide? Kindly drop them in the comments section.

What Is Armsvc.exe & Should You Disable It?

Armsvc.exe is an essential executable file that is part of the Adobe Acrobat Update Service process or Adobe Refresh Manager.

The .exe file is a part of the Adobe Acrobat Software developed by Adobe Systems and is responsible for detecting the available updates for the application if you’ve enabled the automatic application updates feature. 

Problems caused by armsvc.exe 

This file is generally safe for use but, in some scenarios, has been reported to trigger complexities on a Windows PC. 

Several users have mentioned that the armsvc.exe often consumes an abnormally high amount of CPU or GPU, restricting the other processes from running smoothly. Moreover, the executable file is known to have several security shortcomings, which make armsvc.exe vulnerable to malware and virus attacks. 

Lastly, there have been reports that malicious codes often masquerade with the same name as the original Adobe.exe file and silently hare your Windows PC. 

Hence if you are witnessing frequent armsvc.exe-induced errors and your antivirus software flags the file as suspicious, you should perform the following methods to disable its execution. 

How do I fix the errors caused by armsvc.exe? 

Before we move on to the dedicated solutions, perform the following simple workarounds- 

  • Run a virus scan
  • Ensure that your operating system is up to date.
  • Search for the armsvc.exe in File Explorer and delete the instances not within the Adobe folder in the C drive. 

If the armsvc.exe is still creating issues, the following methods should be implemented. 

1. Temporarily disable the background task

  1. Right-click the Windows icon on the taskbar and choose Task Manager from the context menu. 
  2. Look for the Acrobat Update Service in the Processes tab, right-click it, and choose End Task from the context menu. Armsvc.exe

Forcefully disabling the Acrobat Update Service from the context menu is a temporary yet effective solution to fix annoying issues like sudden system crashes or high CPU usage. 

2. Verify the authenticity of armsvc.exe

  1. Use the Windows + I shortcut key to launch the File Explorer window. 
  2. Navigate to the following location in the file explorer by pasting this path in the address bar. C:\Program Files (x86)\Common Files\Adobe\ARM\1.0
  3. Look for and right-click the armsvc.exe file and select Properties from the context menu. 
  4. Access the Digital Signatures tab of the armsvc Properties window and verify that Adobe Inc. is mentioned under the name of the signer. Armsvc.exe

The digital signature of the executable file helps determine its authenticity. If the file is legitimate move on to the next solutions. Otherwise, you should right-click the application and press the Trash icon to delete it immediately. 

3. Disable Adobe Acrobat Update service 

  1. Use the Windows + R shortcut key to launch the Run dialog box, type services.msc in the text box, and press the Enter key. Armsvc.exe
  2. Locate and right-click the Adobe Acrobat Update Service in the list and choose Properties from the context menu. 
  3. Expand the Startup type drop-down and set it to Disabled and press the Stop button located under the Service Status section. Armsvc.exe
  4. Finally, press the Apply button to save the changes and OK to exit the properties window. 

The Adobe Acrobat Update Service is configured to run in the background, often interrupting several other processes running concurrently. Luckily, you can restrict the background service from running such that it can no longer disrupt other programs.  

4. Repair Adobe Reader

  1. Exit the Acrobat Reader and all the related web browser windows. 
  2. Press the Windows key, type the control panel in the search bar, and choose the relevant search result. armsvc.exe
  3. Choose Category in the View by drop-down and select Uninstall a program option. 
  4. Select Adobe Acrobat or Adobe Reader in the list of installed programs and select the Change option from the top. 
  5. Press the Next button on the repair wizard that pops up. 
  6. Next, select the Repair option and press the Next button to initate the repair process. armsvc.exe

If the above methods did not fix the armsvc.exe-related errors, you should repair the Adobe installation to resolve the underlying problems. 

5. Remove Adobe Reader and related files

1. Uninstall Adobe software 

  1. Access the Control Panel once again on your Windows PC. 
  2. Set View by drop-down to Category and select Uninstall a program option located under the Programs section. 
  3. Look for Adobe Acrobat or Adobe Reader in the list of installed programs right-click it and choose the Uninstall option from the context menu. armsvc.exe
  4. Press the Yes button on the confirmation popup to begin the uninstallation of the program from your Windows PC. 
  5. Follow the step-by-step process to uninstall the Adobe Reader software successfully. Once done, reboot your Windows PC and perform the steps described below. 

2. Delete AdobeARMservice

  1. Press the Windows icon on the taskbar, type cmd in the search bar on top, and choose Run as administrator.
  2. Press Yes on the User Action Control prompt that opens up on the screen. 
  3. Type or paste the following command and press the OK button to execute it. sc.exe delete AdobeARMservice
  4. Now the command is executed successfully, restart your PC to apply the changes. 

Uninstalling Adobe Reader is the last measure to end the problems caused by armsvc.exe.  

You can check out the best PDF Reader alternatives available for Windows, which are free from any security loopholes and other problems.

Which of these methods worked helped you come out of the situation? Do let us know in the comments section. 

What is Verclsid.exe & Should You Remove it?

Many factors complain about seeing a verclsid.exe process running in their Task Manager. It is because it sprouts some concerns, and they want to know if it is safe. However, this article will discuss vercisid.exe, how to verify the file, and how to remove it.

Alternatively, you may be interested in our guide about exe files deleting themselves on Windows 11 and some steps for fixing it.

What is verclsid.exe?

In Windows, verclsid.exe is an executable for the Shell Extension CLSID Verification Host.

It is a component that helps validate and verify the integrity of shell extensions using CLSID (Class Identifier) registration.

What is verclsid.exe used for?

  • It’s sued to validate and verify the integrity of shell extensions.
  • It ensures that registered CLSIDs for shell extensions are valid.
  • The verification process occurs during the initialization of the Windows Shell.
  • It helps prevent potential issues like crashes, performance problems, and conflicts caused by faulty or incompatible shell extensions.
  • Contributes to the overall stability and reliability of the Windows user interface.

Should I remove verclsid.exe?

No, you should not remove the Shell Extension CLSID Verification Host process for the following reasons:

  • It will negatively affect the stability and functionality of Windows Shell.
  • You might experience the malfunctioning of shell extensions.
  • Comparability problems and system errors.

However, system files can become compromised or corrupted by malware and viruses. So, it is possible that verclsid.exe isn’t safe and should be removed. Proceed to the next section to verify.

How to verify if verclsid.exe is safe or a virus?

Observe the following verification steps to check if the verclsid.exe process is safe or a virus:

  • Check if the verclsid.exe file on your PC resides in the legitimate directory: C:\Windows\System32
  • Run a virus scan on your computer with trustworthy antivirus software and scan the file
  • Verify if the verclsid.exe file is digitally signed and Copyright by Microsoft Windows Corporation.

After going through the steps above and if you notice any irregularities in the file properties, you should be able to decide whether it is safe.

How can I remove verclsid.exe?

1. End task for verclsid.exe

  1. Right-click the Start button and select Task Manager from the menu.
  2. Go to the Processes or Details tab. Click the verclsid.exe from the list, right-click on it, then select End Task from the context menu.
  3. Click OK to confirm that you want to end the task for the program.
  4. Restart your PC and check if it is still running.

The end tasks steps will stop the verclsid.exe process on your PC. Check our article on what to do if the Task Manager is slow to open or respond on your PC.

2. Remove the verclsid.exe file via File Explorer

  1. Repeat steps 1 and 2 from the solution above.
  2. Locate the verclsid.exe in the Task Manager.
  3. Then, right-click on it and click on Open File Location from the drop-down menu.
  4. Now, right-click on the verclsid.exe file and delete it.
  5. Restart your PC.

Deleting the executable file in File Explorer will disable and remove the malicious program using the executable.

In conclusion, you can check what to do if antivirus software is blocking .exe files on the PC. Likewise, you can read our detailed guide on why exe files are not opening and how to fix it on Windows 11.

Should you have further questions or suggestions regarding this guide, kindly drop them in the comments section.

What is Usbdriver.exe & Should You Remove it?

Running into usbdriver.exe in the Task Manager is one of the recent complaints Windows users reported. It is because executable processes like these are liable to be malicious, and they must be sure it’s safe. Hence, we’ll discuss whether you should remove it.

Likewise, you may be interested in our detailed guide on why exe files are not opening on your PC and some fixes to resolve the problem.

What is usbdriver.exe?

Usbdriver.exe, also known as USB Remote NDIS (Network Device Interface Specification), is a network driver model developed by Microsoft.

Below are some of the notable things that the usbdriver.exe does:

  • Allows USB devices to appear as network adapters to host computers.
  • It facilitates data transfer between USB devices and computers.
  • Simplifies network connection setup without requiring additional drivers.
  • Commonly used for tethering smartphones to computers for internet access sharing.
  • Provides a standardized method for USB device communication with host computers.
  • Eliminates the need for specific drivers for each USB device.
  • Enables the USB device to share network resources with the host computer.

Should I remove usbdriver.exe?

Disabling or removing usbdriver.exe can lead to the following:

  • Stability and functionality issues for programs using it.
  • It can hinder USB devices from functioning as network adapters for host computers and impact the network connection.

However, malware and viruses can compromise or corrupt system files, using them as a disguise to stay undetected. Hence, it is possible that usbdriver.exe is unsafe and should be removed. Proceed to the next section to check.

Is a USB drive exe a virus?

Go through the checks below to see if the usbdriver.exe process on your computer belongs to a safe program:

  • Check the file location and make sure its in C:\Windows\System32
  • Verify the digital signature and ensure the file is signed by Microsoft.
  • Check the file size and make sure that it matches.
  • Scan the file using reliable antivirus software.

After following the steps mentioned above and observing any anomalies in the file properties, you can determine its safety.

How can I remove usbdriver.exe?

1. Use CCleaner

  1. Download CCleaner from a trusted source and install it on your computer.
  2. Launch the newly installed Cleaner and go to Tools.
  3. Then, select the Startup tab, then click the Disable and Delete suspicious Startups option.
  4. Further, close the Cleaner and relaunch it.
  5. Click the Scan PC button to run an anti-malware and antivirus scan.
  6. After the scanner is complete, restart the computer.

The Disable and delete suspicious startups option in CCleaner helps to detect and remove any malicious files, including usbdriver.exe, automatically.

2. End task and delete usbdriver.exe

  1. Right-click the Windows button and click on Task Manager from the list menu.
  2. Navigate to the Processes or Details tab. Click the usbdriver.exe from the list, right-click on it, then select End Task from the context menu.
  3. Then, right-click on usbdriver.exe and click on Open File Location from the drop-down menu.
  4. In the folder, right-click on the usbdriver.exe file and delete it.
  5. Restart your PC and check if the executable still exists in the Task Manager.

The above steps allow you to stop the usbdriver.exe process on your PC and delete the executable file from File Explorer.

In some cases, USB issues are not caused by malicious files but by missing or outdated drivers. For instance, if your device relies on serial communication, installing the correct FT232R USB UART driver can help restore proper functionality.

You can check our article on what to do if the Task Manager not responding or opening on your computer.

Alternatively, we have a detailed guide on what SecurityHealthSystray.exe does and how to fix its errors on Windows 11.

Also, you can read about exe files deleting themselves on Windows 11 and some steps for resolving it.

What is Osu.exe & Should You Uninstall It?

The osu.exe process is another one of the many processes installed by third-party apps that need them. This process is important to the smooth running of its parent software.

If you want to know exactly what the process does, you will find detailed information in this guide.

What is the osu.exe file?

Osu.exe is a legit file that a reliable company digitally signs. It is associated with the osu software that is developed by ppy.

It runs in the background when its parent software is active. The original version of this file is found in the location below: c:\ program files\ osu!osu!.exe

When any application needs this file, it will be summoned into the memory. And it will run in the background as long as the associated software is active.

Should I uninstall osu.exe?

Like many third-party processes, deleting this process or not depends on the usefulness of its parent software. If you are still using this software, you need to keep the osu.exe process.

However, if you have no use for the parent software, you can remove the file by uninstalling the app that uses it.

But, if you want to uninstall the process because it is causing issues on your PC, we will show you how to fix it in the next section of this guide.

How can I fix issues related to osu.exe?

1. Scan for malware

  1. Press the Windows key + S, type virus, and click Virus & threat protection.
    virus osu.exe
  2. Choose Scan options on the page that opens.
    scan options
  3. Finally, select your preferred scan option and click Scan now.
    scan now

The presence of malware on your PC can be the reason for the problem you are encountering with the osu.exe process. This is because malware can disguise itself as a process and consume your PC resources.

The solution to this is to perform a deep scan using Microsoft Defender.

If the built-in antivirus software can not eliminate the malware, we recommend using a dedicated tool in TotalAV to get the job done.

This excellent software will remove even the most stubborn malware on your PC before it can cause issues.

⇒ Get TotalAV

2. Uninstall third-party software

  1. Press the Windows key, type control, and select Control Panel.
    control panel
  2. Select the Uninstall a program option under Programs.
    uninstall a osu.exe
  3. Now, right-click the Osu software and select Uninstall.
    uninstall
  4. Finally, follow the onscreen instructions to complete the process.

If you are sure this issue with osu.exe is not due to malware activities, you need to uninstall its parent software.

3. Perform a system restore

  1. Press the Windows key + R, type rstrui.exe, and press Enter.
    rstrui
  2. Click Next on the new page.
    next osu.exe
  3. Now, choose your ideal restore point and click the Next button.
    restore point
  4. Finally, click Finish and follow the onscreen instructions to complete the process.
    finish

If push comes to worst and the osu.exe keeps messing with your PC, you need to restore your PC to a point when everything was working well. With this, you can reverse the changes made to your PC that might be causing this issue.

We can now conclude this comprehensive guide on the osu.exe process. You should now be able to decide if the process is worth keeping.

If you want to know about the msseces.exe process, check our dedicated guide for the verified information you need.

Feel free to share your experience with this process with us in the comments below.

3 Ways to Remove All Packages Installed by Pip

Over time, as you work on various Python projects, your environment may become cluttered with multiple packages. So, using pip to uninstall all packages can help resolve it.

Therefore, we will explore ways to remove all packages installed by pip to have a clean Python environment. Also, we have a detailed guide about how to install pip on macOS in simple steps.

What is pip?

Pip is a package management system for installing and managing software packages written in Python. It stands for Pip Installs Packages or Pip Installs Python. Pip is the standard package installer for Python and is widely used in the Python community.

Here are some of the main functions of pip:

  • Pip lets you easily install Python packages from the Python Package Index (PyPI) or other sources.
  • It automatically resolves and installs the dependencies required by a package.
  • Pip enables you to manage installed packages, including upgrading, downgrading, or uninstalling them.
  • You can search PyPI to discover available Python packages and their versions.
  • It helps you manage package versions, allowing you to specify the desired version or range of versions for installation.
  • Pip provides tools for packaging and distributing Python packages, making it easier to share your own code with others.
  • It integrates well with virtual environments, allowing you to isolate and manage dependencies for different projects.
  • Pip can be used to upgrade its own version to the latest release.

What does pip uninstall do?

As its name says, pip uninstall is in charge of uninstalling Python packages. However, it can’t remove the following:

  • Pure distutils packages that leave no metadata
  • Script wrappers

How can I pip uninstall all packages in Windows?

1. Uninstall the individual package

  1. Press the Windows button, type Command Prompt, and select Run as Administrator to open it.
  2. Type the following and press Enter to know the list of packages installed: pip list
  3. Then, type this and press Enter: pip uninstall package_name

Using the command above will uninstall the particular package name entered. Note: substitute the package name with the individual package you want to remove.

You can read our guide about how to fix Command Prompt not working on your PC.

2. Remove all packages

  1. Press the Windows button, type Command Prompt, and select Run as Administrator to open it.
  2. Type the following and press Enter: pip uninstall -y -r <(pip freeze)
  3. Reply with the following and press Enter to confirm your selection: Y

Adding the pip freeze command will remove all packages installed on your system by pip.

3. Remove all packages using use xargs

  1. Press the Windows button, type Command Prompt, and select Run as Administrator to open it.
  2. Type the following in the command prompt and press Enter: pip freeze | xargs pip uninstall -y
  3. THen, input this code and press Enter to exclude the VCS package: pip freeze | grep -v "^-e" | xargs pip uninstall -y
  4. Type the following and press Enter: pip freeze --user | xargs pip uninstall -y

You can only individually remove packages installed from VCS (version control systems). Thus, you will have to exclude them before the command can run.

In conclusion, check our detailed guide about resolving PIP not recognized in PyCharm terminus on Windows OS. Also, we have a complete guide on Visual Studio vs PyCharm to help you decide which IDE is best for your next project.

Should you have further questions or suggestions regarding this guide, kindly drop them in the comments section.