While using word processors, expressing scientific notations and mathematical expressions is often needed. For many accomplishing this may be too much to ask. However, we have done some research, and in this guide, we deal with the exponent in Word, showing you the best ways to write them.
If you do not use the Microsoft tool already, you can learn how to download Microsoft 365 in our other guide.
Why would you want to type exponents in Word?
Exponents are a mathematical notation for expressing repeated multiplication, and you may need them in Word for the following:
To write mathematical equations or formulas.
In representing scientific notation.
To show the power of a number.
To make your documents more visually appealing.
To save space.
You may also be interested in trying other Windows 11 word processors that offer similar functionality to Microsoft Word.
How do I write exponents in Word?
1. Using the Equation Editor
Press the Insert menu.
Click on the tiny arrow by the Equation option, and select an equation you need.
Use the Arrow keys to navigate the equation while substituting the values with any keyboard entry you please.
2. Using the Symbol dialog box
Click the Insert tab.
Select the Symbol button.
From the Subset option, select the Superscript and Subscripts option.
Select the exponent you want to use and click on the Insert button.
Alternatively, press Ctrl + Shift + =, then type the text you need to exponentiate.
3.2 Using Alt combination variations
Place your cursor where you need the exponent in Word.
Press Alt + 0185 for 1, Alt + 0178 for 2, and Alt + 0179 for 3.
After this, you can continue typing normally; nothing else would come in the exponent format.
4. Using the Word superscript icon
Type that value you need to make an exponent.
Press the Home menu.
Select the X2 icon.
How to create exponent shortcuts in Word
Click on the File menu and Options on the left pane.
On the left pane, click on Proofing, the on the right, click AutoCorrect Option.
In the Replace box, enter the shortcut you want to use, enter the superscript it should represent in the With box, then click the OK button.
Now, when you use this shortcut, you will get the exponent you indicated.
This guide has covered all the essential elements of exponents in Microsoft Word. It would be best to use whatever solutions are most convenient for you.
In other guides, we cover some cool features, like how to add watermarks in Word. You may want to check it out.
Moody’s, a renowned global entity headquartered in New York, is expanding its prowess with a newly announced alliance with Microsoft. The collaboration will enable Moody’s to harness the potential of generative AI within its enterprise.
To accomplish this feat, the company will leverage the Microsoft Azure OpenAI service as the dynamic force that unlocks crucial research information and enhances risk assessment capabilities. One of the initial offerings to be implemented is Moody’s CoPilot, an internal tool designed to facilitate smoother data retrieval and research access for its 14,000 employees worldwide.
The tool will combine Moody’s data, analytics, and research with the latest large language models and Microsoft’s AI technology to drive innovation and improve employee productivity within a secure digital environment.
Generative AI represents a once-in-a-generation opportunity to enhance how companies navigate the ever-evolving world of exponential risk. By combining Microsoft’s cutting-edge AI capabilities with our proprietary data, research, and analytics, Moody’s is positioned to lead the next generation of risk analysis, helping our customers make better decisions by unlocking deeper, more integrated, and unmatched perspectives on risk, said Rob Fauber, President, and Chief Executive Officer of Moody’s Corporation.
In addition, the financial giant is adopting Microsoft Teams as a platform to enhance collaboration, productivity, and communication while ensuring compliance standards are met.
Microsoft will also utilize Moody’s solutions, such as the Orbis database, for internal use and co-innovations. This database is renowned for its comprehensive information and can be applied to areas such as reference data, risk assessment, and supply chain management.
Moreover, the research assistant would generate tailored and comprehensive evaluations of a company or industry by seamlessly consolidating data from various dimensions. These dimensions include firmographic data, credit indicators, economic predictions, and risk and reputational profiles.
Bill Borden, the corporate vice president of worldwide financial services at Microsoft, stated that this partnership would amalgamate the exceptional insights from Moody’s with Microsoft Cloud’s wide-ranging capabilities, trustworthiness, and breadth. Specifically, this includes Azure OpenAI Service, Fabric, and Teams.
Microsoft has recently introduced a major feature to Bing Chat for desktops. The company has started testing an image recognition system powered by OpenAI’s GPT-4, aiming to enhance the image search experience within Bing.
The new Bing Image Recognition Feature utilizes OpenAI’s ChatGPT-4 vision model, which employs optical character recognition (OCR) to identify and understand objects within images. Users will receive detailed explanations accompanied by real-life examples. Although this feature is currently being rolled out to a limited group of users, it has the potential to greatly improve the functionality of Bing Chat.
Users who have got access to the Bing Chat vision feature will notice a new option besides the voice icon. This option allows them to paste web images into the chat and request explanations, or directly upload images for analysis. With the integration of image recognition capabilities, Bing Chat has become a more comprehensive tool for visual searches.
Microsoft emphasizes that the image recognition tool is currently in A/B testing mode, with a random selection of users granted access. Less than 10% of frequent Bing Chat users have been included in this testing phase, indicating that the feature is still being evaluated for wider deployment.
It is worth noting that Microsoft has already introduced similar functionality in Copilot, where users can ask the AI to describe or generate similar images by dragging and dropping them. The company plans to expand the availability of the Bing Image option in the coming weeks, providing a broader user base with this innovative feature.
As part of its ongoing efforts to enhance Bing Image Creator, Microsoft is utilizing its own AI technologies. The integration of Bing plugins is expected to further enhance Bing Chat’s capabilities. These plugins will enable users to customize and personalize their Bing Chat experience, enhancing various search aspects within the platform.
The integration of GPT-4 into Microsoft Chat marks a significant advancement in Bing Image Recognition. With GPT-4’s multi-modal artificial intelligence capabilities, users can conduct image-based searches within Bing Chat, providing a comprehensive search experience. Microsoft’s dedication to enhancing Bing through future plugin integration showcases its commitment to delivering an advanced and intelligent search platform.
In previous articles, we have spoken at length about various executables like vapm.exe and vpnui.exe. In this guide, we take a look at the Qualysagent.exe file.
We will explain what it does and give you expert recommendations if the file can be uninstalled on your Windows devices.
What is QualysAgent?
QualysAgent.exe is a legitimate executable associated with the Qualys Cloud Agent, a security software that can protect devices from various malware and threats. The file is normally located in the path below:
C:\Program Files\Qualys\QualysAgent
You may suspect malware and perform a scan with an efficient antivirus program if you find a file with the same name in a different directory.
What is QualysAgent EXE used for?
Collecting data from your devices, such as system information and installed software.
Sending collected data to the Qualys Cloud Platform.
Scanning for threats and providing security recommendations.
Updating and managing the Qualys Cloud Agent software.
Providing support for other Qualys products.
Should I Uninstall QualysAgent.exe?
The choice is up to you. Uninstalling it may be beneficial in the following ways:
You may improve the devices’ performance by removing unneeded software.
You may reduce the risk of your computer being infected with malware.
However, you may experience the following if you uninstall the executable:
Loss of some security features provided by the Qualys Cloud Agent.
A need to reinstall the Qualys Cloud Agent if you have to re-enable it in the future.
How do I uninstall QualysAgent.exe?
1. Using the Control Panel
Press Windows + R to open the Run dialog.
Type appwiz.cpl and hit Enter.
Click on Qualys Cloud Agent and click the Uninstall button.
Finally, follow the wizard to complete the process.
Type cmd and hit Ctrl + Shift + Enter to open the Command Prompt.
Type the script below and hit Enter. "%ProgramFiles%\Qualys\QualysAgent\uninstall.exe" Uninstall=True
Finally, you may verify that qualysagent.exe is no longer on the computer.
How do I know if Qualys Agent is installed?
Use the Task Manager
Press Ctrl + Shift + Esc to open the Task Manager.
Click on the Processes tab.
Check through the processes list, and it is installed if you find Qualys Cloud Agent.
That is as much we cover in this guide. If you actively use the Qualys Cloud Agent on your computer, you will typically need the QualysAgent.exe executable.
If you are looking for alternative Windows security applications, we cover a few that we love in this other guide. So you may take a look.
Finally, let us know in the comment section if we omitted something in this guide. Our readers would love to hear from you.
When you think of computers, Microsoft is sure to enter the chat. It’s almost like the two are synonymous. This just goes to show how big of a name Microsoft really is. After all, in the operating systems market share stats, Microsoft is leading.
And while we all have a rough idea about the tech giant, there are still some interesting facts about Microsoft hiding under the surface.
To give you a little snippet, here are some little-known facts we bet you never knew:
Microsoft was to have a hyphen in its name; Micro-Soft
Although assumed to be rivals in the same market, Microsoft once helped Apple avoid bankruptcy
The first hardware Microsoft ever came up with was a mouse
These are just the tip of the iceberg, so if you want to discover other mind-blowing facts about Microsoft, keep reading.
What are some of the most important facts about Microsoft?
1. Microsoft was not the original name
Microsoft easily makes sense and just flows through the tongue. However, you’ll be surprised that although this was the first name proposed for the company, it was hyphenated. Micro-Soft was to be the name of the company.
The thinking behind this is that the first ever Windows version, 1.0 was on microcomputers, and the OS was new software. Paul Allen, a co-founder of the company, suggested the name.
Years later, we couldn’t imagine Micro-Soft as the official brand name. Microsoft just makes sense whenever it appears in logos.
2. Microsoft’s first-ever hardware was a mouse
Mice today have evolved from wired to wireless and have a bunch of features compared to the first-ever mouse from Microsoft. Despite possessing all these features, they still don’t come close to Microsoft’s first mouse in terms of price.
m
Released in 1993, the mouse was going for a whopping $195! Today, that amount could easily get you a desktop PC. It begs the question: Why was the first mouse so pricey?
Well, it had applications bundled in, such as Microsoft Word and Notepad. Still, the company didn’t make crazy sales as expected.
Since then, the PC accessory has evolved, and so has the price. You can easily get low-budget mice that do a decent job. After all, mice today are simply navigating tools and if your mouse is not working, you can easily use your keyboard.
3. Microsoft once helped Apple out of a rubble
How many people do you know that would help their enemies get back on their feet? Well, Microsoft did. In the tech industry, Microsoft and Apple produce similar software and hardware, so they are always competing for a piece of the market.
Although Microsoft has been leading for years, Apple is a worthy opponent. In 1997, Apple ran into some financial problems and almost closed shop.
Microsoft helped Apple get off the ground when it was on its last legs. Apple was struggling with poor sales and an overly expensive operating system that wasn’t catching on with consumers.
However, their savior would be Bill Gates, the Microsoft founder who would inject $150 million to save the sinking ship.
This move teaches us about healthy competition. Recognizing that you do not kick your opponent when they are down. Bill Gates could have chosen to ignore and build his equally young company at the time, but he didn’t.
4. Microsoft’s startup sound was created on a MAC
You must have heard that distinct startup sound whenever you power up your Windows PC. The startup sound first debuted when Microsoft launched Windows 95 back in 1995. It was a milestone for the company and the world of technology.
Brian Eno is the musical genius behind the 6-second sound that has entertained us when we switch on our computers. Amazingly, the talented musician says he created this sound when he was lost in his career.
It’s almost as if this project gave him the rebirth he needed. He explains that he had become so engrossed with this project that he created 84 sounds.
The most interesting thing about this process is that he used Microsoft’s rival, Apple’s Mac. When asked about it, his answer was simple. He just never liked PCs.
5. The Microsoft original logo was created in a day
If you were to approach a graphic designer and ask them to create a logo for your company in less than 24 hours, they’d probably think you’re crazy. This doesn’t hold for Microsoft, as its first logo was created in a day.
Of course, nobody paid attention to such details back then, but creating a distinct and recognizable logo that will be identified with your company is no small feat.
The logo has since evolved, and anyone can tell from afar that it is a Microsoft product just from the logo.
What is Microsoft most known for? We can already answer what you’re thinking. Of course, it’s Windows. But besides Windows, what else can you associate Microsoft with?
Microsoft is a worldwide software corporation that offers products and services in various areas, including computer hardware, consumer electronics, personal computers, servers, gaming consoles, productivity applications, and mobile phones.
The company has introduced us to some amazing products over the years, and while some have fallen by the wayside, others have continued to thrive and evolve.
Here’s a look at some of the most famous:
1. Windows operating system
Windows is arguably Microsoft’s most successful product ever. It is the name of a series of operating systems developed by Microsoft. Windows has become the world’s most popular operating system, with each iteration better than its predecessor.
Microsoft Office is the most widely used productivity suite in the world, with applications including Word, Excel, PowerPoint, and Outlook.
The software has become synonymous with workplace productivity and can be found on nearly every computer sold today. Although other Microsoft Office alternatives exist, it remains the unquestionable leader in this area.
3. Xbox gaming console/platform
Microsoft launched its first Xbox gaming console in 2001 as an attempt to compete with Sony’s PlayStation 2 console.
The company later released an updated version called Xbox 360, one of the biggest-selling game consoles ever made. Microsoft also released two new versions of Xbox One, a sleeker model in 2013 and a slimmer version in 2015.
4. Bing search engine
Bing search engine is owned and operated by Microsoft. It is the second largest search engine in the U.S., after Google’s web search service.
Microsoft may not come first in the search engine wars, but at least it is among the top ones. The search engine continues to evolve, and now, it has integrated AI into Bing to help users automate tasks.
5. Cortana
Cortana is a digital assistant created by Microsoft for Windows Phone, Bing, Xbox One, iOS, Android, and Windows.
The name Cortana is derived from the fictional artificial intelligence character Cortana in Microsoft’s Halo video game series. Cortana is a voice-activated digital assistant that will help you with searches and other tasks on your PC.
6. Internet Explorer
Internet Explorer (IE) is a web browser developed by Microsoft Corp. It has been the dominant web browser since its inception, but today it faces stiff competition from Google Chrome, Mozilla Firefox, and Opera Software’s Opera Web browser.
Internet Explorer has undergone various enhancements and is today known as Microsoft Edge.
7. Windows Phone mobile operating system
This might be Microsoft’s least-performing product. Microsoft’s mobile operating system has struggled to gain market share against Android and iOS, but it has a decent user base.
If you’re a Windows Phone fan, you can’t help but be a little disappointed that the mobile operating system has yet to make any significant gains in popularity.
But even if you’re not a fan of Microsoft’s mobile OS, there are many other things the company is known for that have nothing to do with smartphones and tablets.
8. Skype
Microsoft acquired this popular messaging app in 2011 and it has since become one of its flagship products.
Skype allows users to make voice calls over the internet, send text messages, and share files. It’s also available on many different types of devices, such as smartphones, tablets, desktop computers, and many others.
Skype was really a hit, but it took a tumble in 2020 during the COVID-19 pandemic when a lot of people were working from home and needed to video call a lot.
Apps like Teams, Zoom and other video-conferencing software took advantage of this situation to put themselves on the map which explains why Skype was left behind.
9. Teams
Microsoft’s Teams feature is a collaborative tool that lets you create and manage team conversations. You can use it to discuss projects, assign tasks and reply to comments with the rest of your team.
It’s a Skype alternative that has made notable strides, especially in the last few years.
10. OneDrive
It wouldn’t be a complete list if we didn’t feature the cloud-based feature that allows us to back up our files.
The service is integrated into Windows and allows users to work on documents offline and then sync them back to the cloud once connected.
In addition to being a great way to organize your life, OneDrive is a great place to store pictures and videos from your phone or camera. And if you want more space for all those holiday photos, you can upgrade your storage plan.
This list is in no way exhaustive of all the products and services that Microsoft has under its belt. The company has acquired other businesses and continues introducing other products and services to the market.
50 things you didn’t know about Microsoft
Now, away from the tech jargon into the fun facts. These fun facts about Microsoft probably won’t help you in any way but are still mind-blowing.
1. Microsoft’s founders Bill Gates and Paul Allen once hacked their school’s computer
The two were a curious lot, but instead of being expelled, they were tasked with working toward the improvement of the overall security of the computer system. This also happens to be one of the few schools with a computer at the time.
2. Both founders of Microsoft dropped from college
Gates dropped out from Harvard after three semesters, and Allen from Washington State after two years. Harvard would years later award Gates with an honorary degree.
3. Microsoft was the second company created by Gates and Allen
Contrary to popular opinion, Microsoft is not the first company created by the two childhood friends. Their first was created while they were still in high school and was called Traf-O-Data.
4. Microsoft and Apple worked together before
In the beginning, the two friends came up with the first Macintosh computer. Gates and Jobs, however, became rivals after Gates announced he was developing Windows, and soon, they parted.
5. Paul Allen parted from Microsoft eight years after it was born
It had nothing to do with disagreements, as he and Gates were childhood friends. He was diagnosed with Hodgkin’s disease, a type of cancer. He, unfortunately, died in 2018.
6. Microsoft could have owned YouTube
The tech giant had the opportunity to acquire YouTube but passed on the chance and let Google acquire it for double the price.
7. Stockholders are in plenty
As of July 2022, Microsoft has 86,465 stockholders, and Gates is the largest individual shareholder at 1.38%.
8. Bill Gates rides in economy
Despite Microsoft’s founder Bill Gates being a billionaire, he flew in economy class until he could buy his own plane.
9. Microsoft’s founder was a time-freak
In its infant years, Microsoft’s founder Bill Gates had memorized many of his employees’ number plates to keep track of when they came in and left.
10. Males dominate Microsoft
Microsoft’s employees are predominantly male, with 76% and 23% females.
11. Windows was not the first OS
Windows was actually not the first OS from Microsoft. Xenix was the first one, but since it was co-developed with Apple, Microsoft abandoned it to create its own unique software.
12. Microsoft created the first smartwatch
The first-ever smartwatch was courtesy of Microsoft. It was water-resistant and required Windows 3.0 to run.
13. Stay hydrated
Microsoft’s Redmond headquarters has 35 cafeteria which offers free drinks to all its employees.
14. Newbies have a nickname
Employees working for Microsoft have been nicknamed softies. It could easily translate that you’re into software.
15. Windows 10 is the most installed OS
Windows 10 is the most installed OS ever. You can check the Windows yearly market share to see what OS has been dominating. It will be interesting to see whether Windows 11 will take this position shortly.
16. The interview at Microsoft is something else
If you ever want to work at Microsoft, forget the usual interview questions. Microsoft uses a different approach that requires you to think outside the box. The famous Why a manhole cover is round is one of the questions you can expect.
17. How many employees does Microsoft have
Microsoft started with three employees but has since grown, and as of 2022, it stands at 221,000.
18. From the screens to the CEO seat
Steven Anthony Ballmer, who was once Microsoft’s CEO for over a decade, was the main character in Windows’s first-ever commercial.
19. Art heals
Microsoft is a huge fan of the artwork, so much so that in its 150 campuses, at least 5,000 art pieces can be found displayed. These artwork pieces help relieve stress and boost productivity.
20. Word is more than just a text editor
The Quick Brown Fox Jumps over the Lazy Dog is not just a sentence that contains all the letters in the alphabet. Microsoft has created a command that, when entered in Word, will produce the sentence. The command is =rand(200,99),.
21. Microsoft may as well be a home for rabbits
The Microsoft Corporate Campus is full of rabbits but not out of choice. It is believed someone dumped these animals as part of a joke, but Microsoft has been unable to get rid of them. The rabbits have continued multiplying, and it seems the company has since given up on getting rid of them.
22. Healthy competition or just good at what it does
Microsoft was once in court for driving its competitors out of the market. It was, however, settled with restrictions imposed on Microsoft to ensure every business had a fair chance at competing.
23. Billionaire at 31
Bill Gates became a billionaire two years in after Microsoft was founded. This cannot be said about other businesses, given that 90% of startups are destined to fail.
24. Largest patent holder
Microsoft is one of the largest patent owners, with over 10,000 under its name. This puts into perspective how vast Microsoft’s creations are. Perhaps a motivating factor is that any employee who secures a patent is rewarded with a $1,500 bonus, among other benefits.
25. Retired but still making bank
It has been over two decades since Bill Gates was the Microsoft CEO. He has also retired from the company but is available to advise on key projects.
26. Space wasn’t an issue back then
The first Windows OS was 256 kb. This is roughly the size of a single JPEG image today.
27. From thousands to millions
When Microsoft first went public, it only made $16,000 in revenue. To put this amount in perspective, a software engineer at Microsoft roughly now earns $106,000.
28. Shares have catapulted since 86
A single Microsoft share in 1986 cost $21. Now, that same stock is worth $15,000.
29. Microsoft has produced at least 12,000 millionaires
Out of all the millionaires in the world, at least 12,000 come from Microsoft.
30. The original names were not cool
Aside from the company name almost being named Micro-Soft. Windows was also almost named Interface Manager.
31. Over 100 businesses acquired
Microsoft has so far acquired over 190 businesses since its inception. How many of these do you know?
32. Worst acquisition ever
The Nokia acquisition is one of the worst and most expensive merger acquisitions by Microsoft. It cost $7.1 billion, and it was so bad that two years later, Microsoft had to let it go. Makes you wonder why it would pass YouTube for $500 million, which has stood the test of time.
33. The first website came later
Microsoft only owned a website in 1993. Yes, it’s weird, and yes, there was a browser back then named Mosaic.
34. Microsoft does not sell software
You will never own any Microsoft software. It sounds ridiculous, as you might be reading this on your Windows PC, but it is true. Although Microsoft has a bunch of software, they never sell. What they actually sell is the licenses and retain the full ownership of the software. This way, they can easily withdraw their license if you ever breach their terms and conditions.
35. Excel was an unexpected success
Microsoft Excel was the first-ever successful app from the company. This prompted the company to venture into the now extensive family available in the Microsoft Office suite.
36. Office was initially for Apple
Before Microsoft Office came to Windows, it was first launched for Macintosh, which belongs to Apple.
37. Cortana’s voice has come from far
Jen Taylor who is the official Cortana voice assistant and was also the voice from the Halo game series.
38. A fair trade
Microsoft did not originally own the domain windows2000.com. It was owned by a gentleman named Bob. Oddly enough, Microsoft had previously launched software named Bob which was a complete failure and had the domain Bob.com and was spearheaded by Gates’s former wife, Melinda. The two parties agreed to exchange their websites.
39. The famous mugshot
Bill Gates was once arrested for overspeeding and forgetting his license. Here’s where it gets interesting. In Microsoft Outlook 2010, the default placeholder picture is his mugshot.
40. Not such a good acronym
The Critical Update Notification Utility wasn’t its original name. It was first named Critical Update Notification Tool but given how Microsoft is fond of using acronyms, this one wouldn’t make the cut for obvious reasons.
41. Pizza is well represented
In the 35 cafeterias available, Pizza is the most popular food among Microsoft employees.
42. Anniversaries are a serious thing
As a company tradition, each Microsoft employee on their anniversary is expected to bring a pound of M&Ms for every year they have worked there.
43. MikeRoweSoft earned an Xbox
You’ve heard of Microsoft but what of MikeRoweSoft? Sounds similar, right? The latter is a website created by a student that Microsoft sued for trademark infringement. After much back and forth, it was an out-of-court settlement with the student getting various Microsoft perks such as an Xbox and an all-expense paid trip.
44. Bing-o
The search engine Bing comes from the word Bingo. This is what you would usually say when you find exactly what you’re looking for.
45. Again, not the original names
Excel and PowerPoint were initially named Multiplan and Presenter.
46. Most viewed image is from Windows
The Windows XP background image is the most viewed in history. It was taken by Charles O’Rear in 1996, and Microsoft purchased the rights to the image four years later.
47. Accurate predictions
Bing accurately predicted that Argentina would win the 2014 FIFA World Cup against Germany.
48. Honest mistake or deliberate sabotage?
Microsoft once developed tablets for an NFL game to be referred to as the official device, but this was a flop as commentators kept referring to the tablet as an iPad.
49. From temps to nooglers
If you’re not a permanent employee at Microsoft, your email will have a – before the @, commonly referred to as dash trash. It has been said that this makes it hard for them to work well with others because they’re often dismissed. However, once you move to the next stage and become part of the team, you become a Noogler.
When I was on the Microsoft contract, I was called "Dash Trash" meaning I was a vendor, where your email starts with "v-" and some people wouldn't deal with you. Now I'm the new person at Google, they call us "Nooglers" – I much prefer that.
While Microsoft has certainly had its ups and downs, the company has a solid track record.
What we can pick from these facts about Microsoft is that they remain in business today partly because of their willingness to try new things and because they are always looking into the future to see what is coming next.
That was quite a mouthful, but hopefully, you’ve learned something about Microsoft that you’ve probably questioned before or were just curious.
And because we’re all about informing you about some interesting facts, check out our other article on facts about Google Drive.
Have you heard about any other Microsoft facts you think we should know? Let us know in the comment section below.
If you have encountered NVIDIA Share.exe on your Task Manager and wondering what it is, this guide can help!
We will delve into the purpose of NVIDIA Share.exe, exploring its functionalities with effective solutions to fix the common issues related to it.
What is NVIDIA Share.exe?
NVIDIA Share.exe is an integral part of NVIDIA’s GeForce Experience software suite, designed to enhance the gaming experience on computers equipped with the company’s graphics cards.
It enables users to capture and share their gaming moments effortlessly, whether recording gameplay footage, capturing screenshots, or streaming live gameplay sessions.
The file is usually located in C:\Program Files (x86)\NVIDIA Corporation\NVIDIA GeForce Experience
However, like any software application or process, NVIDIA Share.exe can encounter errors that hinder its proper functioning.
These errors may manifest in various ways, such as crashes, unresponsive behavior, or issues with capturing or sharing content.
How can I fix the errors related to NVIDIA Share.exe?
Before engaging in advanced troubleshooting steps, you should consider performing the following checks:
Try restarting your computer.
Make sure Windows is up to date.
Once you finish these checks, move to the detailed solutions to fix the problems.
1. Run the app in Compatibility mode
Press Ctrl + Shift + Esc to open the Task Manager app.
Go to the Processes tab, locate NVIDIA Share, and right-click it to select Open File Location.
On the File Explorer window, right-click NVIDIA Share and choose Properties.
Switch to the Compatibility tab, under Compatibility mode, and place a checkmark next to Run this program in compatibility mode for.
Now from the drop-down, select Windows 8. Click Apply, then OK to confirm the changes.
2. Renable NVIDIA Share
Press the Windows key, type geforce experience, and click Open.
Locate and click Settings from the top right corner.
Go to General, then toggle off the switch near Share to deactivate it.
Close the app, restart the computer, follow the same steps, and turn on the NVIDIA Share to check if the issue persists.
3. Disable the Instant Replay option
Press the Windows key, type geforce experience, and click Open.
Now press Alt +Z to open the in-game overlay.
Choose the Instant Replay option and click the Turn off option to disable it.
If you want to enable it afterward, follow the steps mentioned above. Alternatively, you can press Alt + Shift + F10 to turn Instant Replay on or off quickly.
If you have come across upc.exe on your Task Manager, and wondering what it is, then this guide can help!
We will explore the file’s purpose, its use, its common error scenarios, and solutions to fix them effectively.
What is upc.exe?
Upc.exe is a file found within the Ubisoft Game Launcher directory, responsible for managing Ubisoft games on your PC.
The file is specifically located within the C:\Program Files (x86)\Ubisoft\Ubisoft Game Launcher directory.
While Upc.exe plays a crucial role in the functioning of the Ubisoft Game Launcher, there are instances where errors may occur.
These errors can manifest as crashes, error messages, or unexpected behavior generally caused due to corrupted files, malware infection, conflicts with other software, or outdated versions of the Ubisoft Game Launcher.
How can I fix errors related to upc.exe?
Before engaging in advanced troubleshooting steps, you should consider performing the following checks:
Run an antivirus scan. If a virus is disguised under the name of the file, it will detect it.
Once you have performed these, move to the detailed troubleshooting methods.
1. Run SFC and DISM scans
Press the Windows key, type cmd, and click Run as administrator.
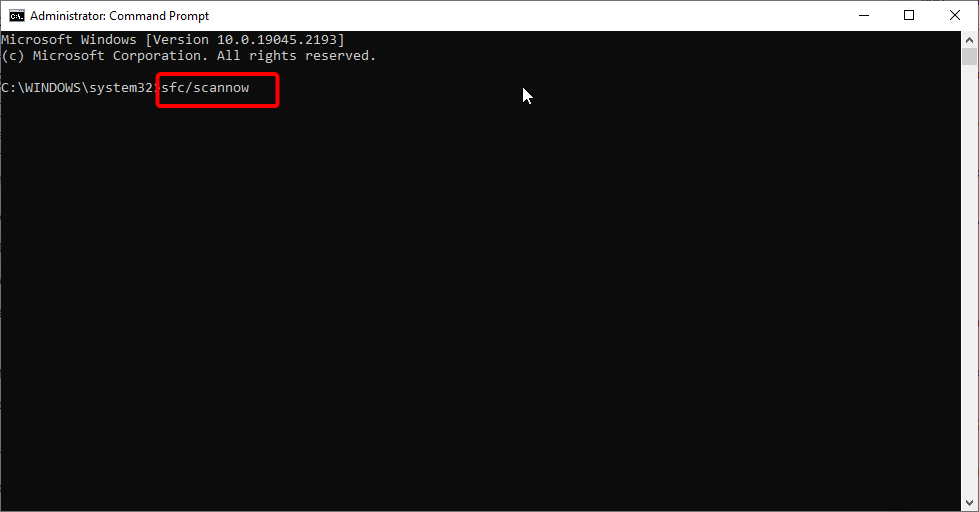
Type the following command to repair system files and hit Enter: sfc/scannow
Wait for the scan to complete and copy & paste the following command to restore Windows OS image files and press Enter: Dism /Online /Cleanup-Image /RestoreHealth
Once the command is executed successfully, restart your computer to let the changes take effect.
2. Verify the game files
Press the Windows key, type ubisoft connect and click Open.
On Ubisoft Connect, click Games.
Select the game that is causing the issue, and click Properties.
Now click the Verify files button. Ubisoft Connect will start the process; wait for it to complete.
Type appwiz.cpl and click OK to open the Programs and Features window.
Scroll down the list of installed programs, locate Ubisoft Connect, and select Uninstall/Change.
Follow the on-screen prompts to uninstall Uplay from your computer.
Visit the official Ubisoft website and click Download for PC to download the latest version of Ubisoft Connect.
Once downloaded, run the installer and, select the language, then click OK.
follow the installation prompts to reinstall Uplay on your PC.
Upc.exe is a crucial component of the Ubisoft Game Launcher; therefore, errors related to this file can disrupt the functionality of the game launcher.
The solutions mentioned above can work for all the general issues and scenarios; however, for specific errors, you might have to reach out to Ubisoft support for further assistance.
Microsoft has been putting a lot of budget into funding AI research lately. Orca 13B is open source to the public after a team of researchers assembled and funded by Microsoft built it.
LongMem is Microsoft’s hope for unlimited context length in AI models. And it’s also a product of research funded by the Redmond-based tech giant.
Phi-1, a new language model for coding, is capable of learning and developing knowledge on its own. Microsoft funded the research for it.
And it seems Embodiment AI is the next quest in AI development. But Microsoft might just have the answer with another research on AI. This time it’s about Kosmos-2, a new AI model that lays the foundation for Embodiment AI.
Microsoft’s Kosmos-2 is the Embodiment AI prototype
Maybe this is the first time you hear about Embodiment AI. Well, the name is pretty suggestive in itself. So what is Embodiment AI, you might ask?
Embodiment AI is a field of artificial intelligence that focuses on the development of intelligent agents that have a physical body and can interact with the world in a meaningful way.
The concept is based on the idea that the physical body plays a significant role in how an agent learns and makes decisions.
In other words, if AI would have a body and would move, then it could learn from this and respond and form answers, as well as interact accordingly. And if you think we enter science fiction territory, hold your ground. AI was always supposed to become physical.
According to the research, Kosmos-2 is a language model that enables new capabilities of perceiving object descriptions (e.g., bounding boxes) and grounding text to the visual world. The researchers represented refer expressions as links in Markdown, i.e., “text span”, where object descriptions are sequences of location tokens.
Together with multimodal corpora, they constructed large-scale data of grounded image-text pairs (called GrIT) to train the model. In addition to integrating the existing capabilities of MLLMs in Kosmos-2, the model also integrates the grounding capability into applications.
This means the language has taken steps forward into perceiving space and coming up with its own perception, action, and world modeling. The researchers think this way Kosmos-2 is the foundation for a physical AI. You can read the research here.
What do you think about Microsoft Kosmos 2? Would it be good if AI has a physical form or not? Let us know in the comments section below.
Node.exe is a downloadable binary executable file developed by Joynet, Inc which contains all the essential files required to run Node.js applications on Windows PC. This exe file is responsible for controlling the important features of an application, including file syncing and input-output tasks such as disk access.
Node.exe file constantly runs in the background and provides an environment to create dynamic web apps and other server-side programs.
Why should I remove the node.exe file?
Generally, node.exe is a safe executable file. However, many Windows users have a constant complaint that the process continuously runs in the background despite the related application not running at the moment.
This results in high CPU usage for no reason, which causes performance issues and PC slowdown. The unwanted burden on the CPU results often prevents the other processes from running and sometimes even results in a system crash.
Apart from this, there are also high chances that a trojan or virus may disguise as a genuine node.exe file causing a series of errors. Some of them are as follows:
Node.exe program error
Node.exe is not a Win32 program
Can’t locate node.exe
Node.exe can’t be found
Node.exe encountered a problem and will close
Error starting program: node.exe
Node.exe not working
Node.exe: app path is faulting
How to check if node.exe is a virus?
The legit node.exe file is located within the C:\Program Files (x86) location and sometimes within some other sub-folder of C:\. Some of its legitimate instances are as follows:
A straightforward way to check the authenticity of the executable file is to verify its digital signature.
Use the Windows + E shortcut to launch File Explorer and navigate to the node.exe file location mentioned above.
Right-click node.exe and choose Properties from the context menu.
Access the Digital Signatures tab of the Properties window and check if Microsoft Corporation is the name of the signer.
On the other hand, if the Name of Signer section of the node.exe process reads Unable to verify, there is a high chance of the executable being a virus or a trojan.
How to fix errors by node.exe file?
We will recommend you try these workarounds before moving on to the below solutions.
Uninstall the recently installed programs to prevent interference.
Search File Explorer (Ctrl + E) for view.exe instances that are not in the System32 folder and delete them.
If you still experience issues, perform the following methods.
1. Temporarily end node.exe
Right-click the Windows icon and choose the Task Manager option from the Quick links section.
Look for and right-click the node.exe file in the Processes tab and select the End task option from the context menu.
If the node.exe file is consuming too much CPU causing the system to freeze, ending the background task will release the occupied resources and should solve the problem temporarily.
2. Disable the startup service
Bring up the Task Manager using the Shift + Ctrl + Esc shortcut.
Switch to the Startup tab of the task manager window.
Right-click Adobe Updater Startup Utility and select Disable option from the context menu.
Now exit the Task Manager window and the node.exe service will not start up automatically in the background upon system restart.
Since Node.exe is used by several Adobe apps, such as Photoshop CC suite, you can disable other Adobe-related startup processes to prevent node.exe from automatically running in the background.
3. Uninstall Node.js
Exit the Node.js app on your Windows PC.
Press the Windows key, type the control panel in the search bar on top, and choose the relevant search results.
Select the Category option in the View by drop-down, located on the top right, and select Uninstall a program option.
Scroll down and select Node.js under the list of apps and click the Uninstall option on the top.
Now follow the on-screen instructions to uninstall the program.
Wait patiently until the application is uninstalled completely from your PC. After this, reboot your computer and see if the problems caused because of the node.exe file are resolved.
There are chances that the stubborn node.exe file may still be lurking behind after the node.js program is uninstalled. In such a scenario, we would recommend a clean install of Windows which will eradicate the malicious files.
In case you need any further assistance, feel free to reach out to us in the comments section.
Many of our readers have come across the 0x800ac472 Excel error, which pops up when the program is loaded. MS Excel immediately crashes and shows a message Error 0x800AC472: Microsoft Excel has encountered a problem and needs to close. We are sorry for the inconvenience.
In this guide, we will give you a list of solutions that will help resolve the 0x800ac472 Excel error at your end. Let us check out the solutions.
What is 0x800ac472 MS Excel error?
The runtime error 0x800ac472 could pop up because the code did not run at that particular time. Chances are it could be fixed with a restart, but there are other reasons that could trigger this error.
MS Excel glitch – Some underlying glitch with Microsoft Excel is causing the problem, which is why you are getting this error.
Graphics driver issue – Often the graphics driver is also responsible for the runtime errors of a program.
Multiple instances of the program are running – You might be running multiple instances of MS Excel, because of which it crashes and shows a 0x800ac472 error.
Runtime libraries aren’t updated – Chances are the runtime libraries on your PC aren’t updated and are causing the runtime error.
Presence of corrupt system files – Some important system files might be corrupt from your computer, which is why you are getting the error.
Let us now check the advanced solutions that will help you resolve the runtime error 0x800ac472 occurring on MS Excel.
How can I resolve the runtime error 0x800ac472?
Before going ahead with the advanced solutions, let us apply the simple solutions and hopefully fix the runtime error 0x800ac472.
Make sure that your PC is running the latest update, as the new update also brings bug fixes, which could be the reason the program is throwing errors.
Scan your PC for viruses. An infected computer can result in multiple errors with the programs installed on it. Here is the list of the best antivirus tools that you can try.
Restart the computer and the MS Excel program itself. Chances are it is a temporary problem.
Reinstall the MS Excel program, which comes as a part of the MS Office suite of apps, and check if this resolves the issue or not.
Make sure that only one instance of Microsoft Excel is opened on your PC. If there are multiple instances, close each one and open only a single instance.
If the above solutions did not help, then we would suggest you apply the below solutions to fix the problem.
1. Re-install Runtime Libraries
Press the Win key to open the Start menu.
Open Control Panel.
Click on Programs and Features.
Choose the Microsoft Redistributable Package and hit the Uninstall button.
Re-installing the Runtime Libraries will help you resolve the runtime error associated with any app, in our case, it is the MS Excel error 0x800ac472.
For Windows 11 users, you should ensure to install the latest Windows update, because the redistributable packages are bundled as a part of the Windows update.
2. Fix corrupt system files
Press the Win key to open the Start menu.
Type command prompt and run it as an administrator.
Type the below command and press Enter: sfc /scannow
SFC Scan will fix the corrupt system files.
Type the below commands and press Enter after each one: Dism /Online /Cleanup-Image /CheckHealthDism /Online /Cleanup-Image /ScanHealthDism /Online /Cleanup-Image /RestoreHealth
Restart your computer.
Some important system files required by Microsoft Excel might be missing because of which you are getting the runtime error 0x800ac472.
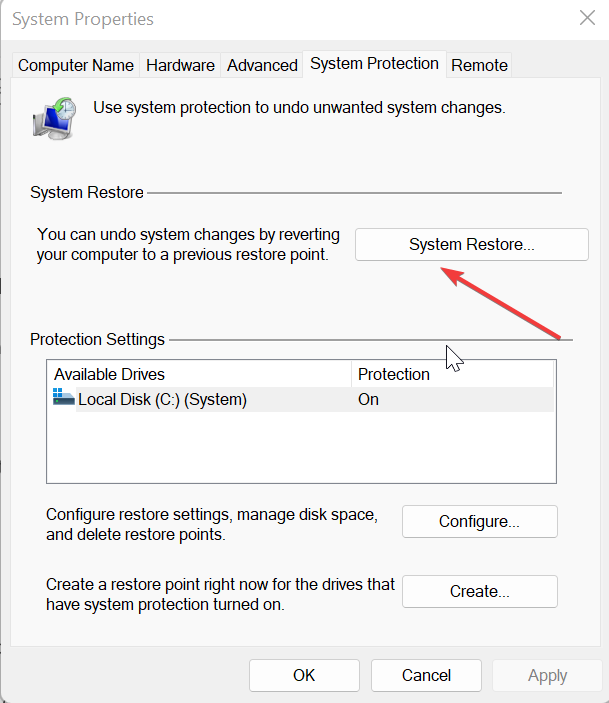
Select the drive where you have the OS installed and select System Restore.
Choose the restore point and hit Next.
Click Finish to begin the restore process.
You should perform a system restore to take your system back to a state where Microsoft Excel was working without any issues, and you weren’t getting the 0x800ac472 error.
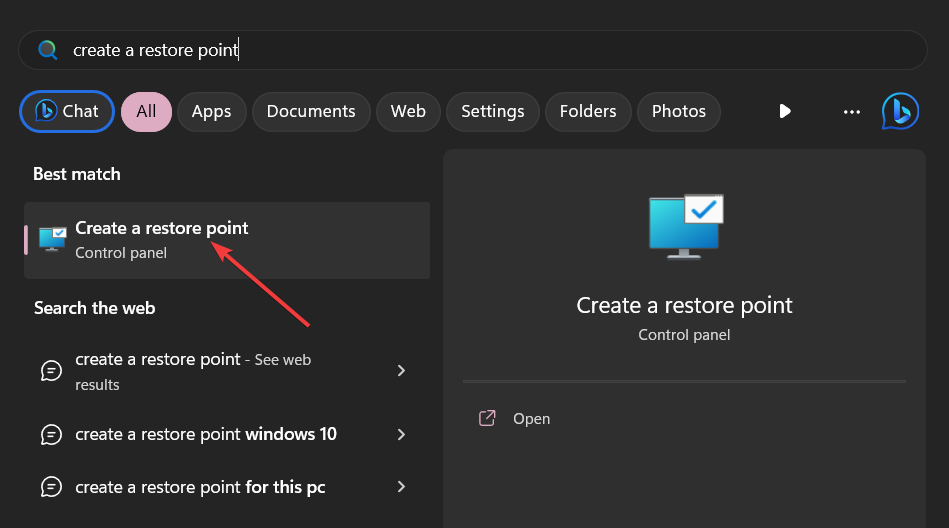
Notably, the system will work only if you have created a restore point on your PC. For that, you can check out our guide, which explains how to create a restore point. If you face other Excel errors like #NAME in your worksheet; read this guide to learn more.
That is it from us in this guide. Let us know in the comments below which one of the above solutions resolved the 0x800ac472 error in Microsoft Excel for you.
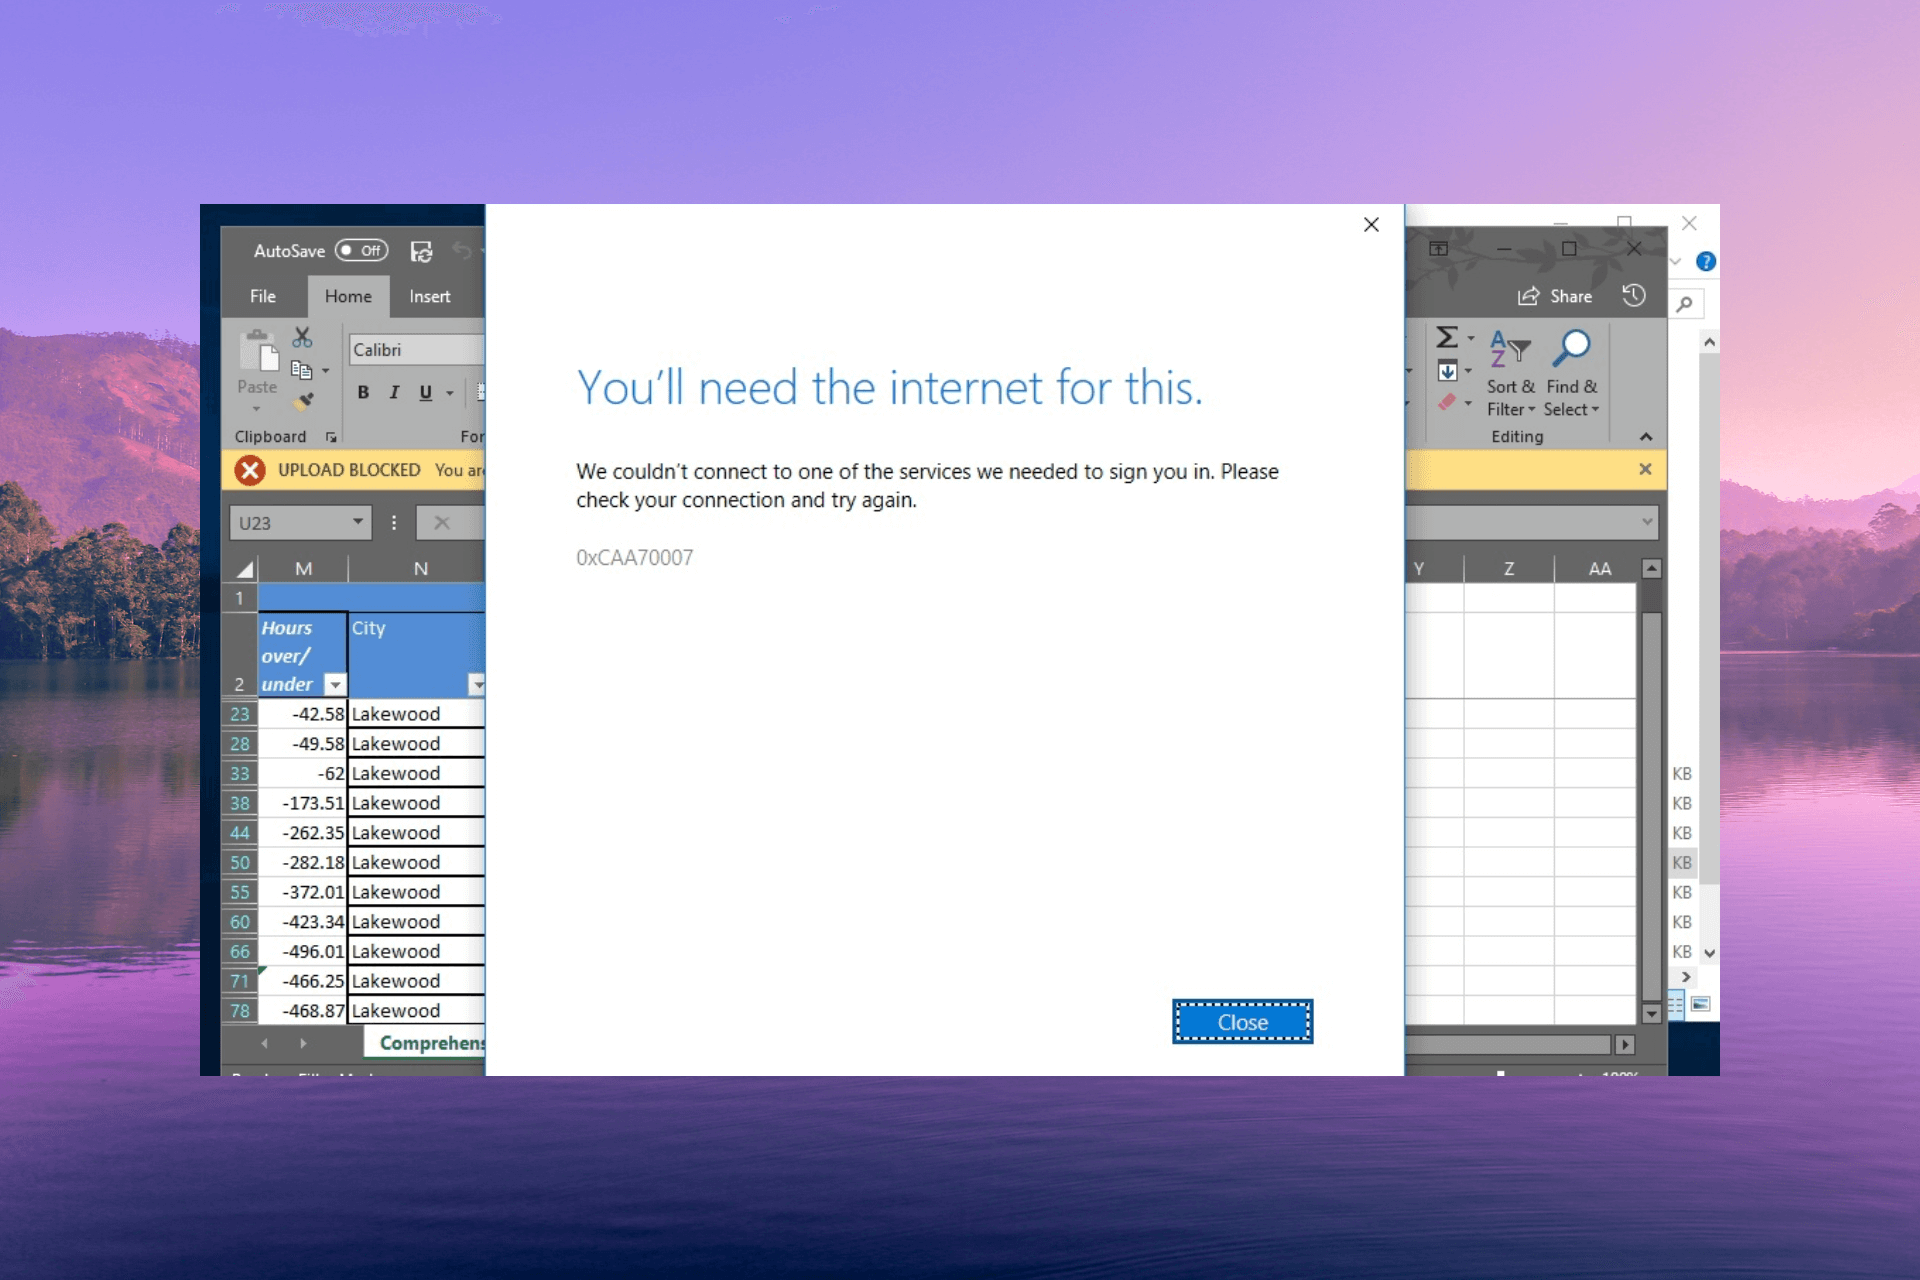
Multiple readers have reported that when they try to activate Microsoft 365, they come across the error code 0xcaa70007.
In this guide, we will share some solutions that will help you resolve the 0xcaa70007 error and explain why this error pops up.
What causes the 0xcaa70007 Microsoft 365 activation error?
There are plenty of reasons that could trigger the 0xcaa70007 Microsoft 365 activation error on your computer. Here are some of them:
Running an old version of Windows – You might have not installed the latest version of the Windows update on your computer, which is why you are getting this error.
Microsoft 365 isn’t updated – Chances are that Microsoft 365 isn’t updated on your PC, which is not allowing you to update the program and throwing a 0xcaa70007 error.
The Firewall is blocking the action – Often Firewall raises false alarms and blocks certain actions, which is why you are getting the error.
Important services aren’t running – Chances are some important services related to Microsoft Office are not running on your computer.
IPv6 is enabled – Often this error pops up because the IPv6 is enabled and it interferes with the activation process.
Let us now check out the solutions that will help you resolve the 0xcaa70007 Microsoft 365 activation error.
How can I resolve the 0xcaa70007 error?
Before applying the advanced solutions, let us apply the simple solutions and hopefully resolve the problem:
You should ensure that your PC has the latest available Windows update installed to avoid any conflicts.
Windows Firewall is often known to block certain actions on the PC related to other apps. You can try disabling the Firewall on your computer and check if this resolves the 0xcaa70007 error.
Let us go ahead and apply the advanced solutions in case the above fixes did not do their job.
1. Reset Microsoft 365 activation state
1.1 From the Registry Editor
Press the Win + R keys to open the Run dialogue.
Type regedit and press Enter.
Navigate to the below path and press Enter. HKEY_CURRENT_USER\Software\Microsoft\Office\16.0\Common\Identity\Identities
Delete all the identities under the Identities registry key.
1.2 From the Credentials Manager
Press the Win key to open the Start menu.
Open the Control Panel.
Select Credentials Manager.
Remove all the credentials mentioned for Microsoft 365.
Following the above methods, you can clear the Microsoft 365 activation state as it might have been partially activated. This has helped several users fix the 0xcaa70007 Microsoft 365 activation error.
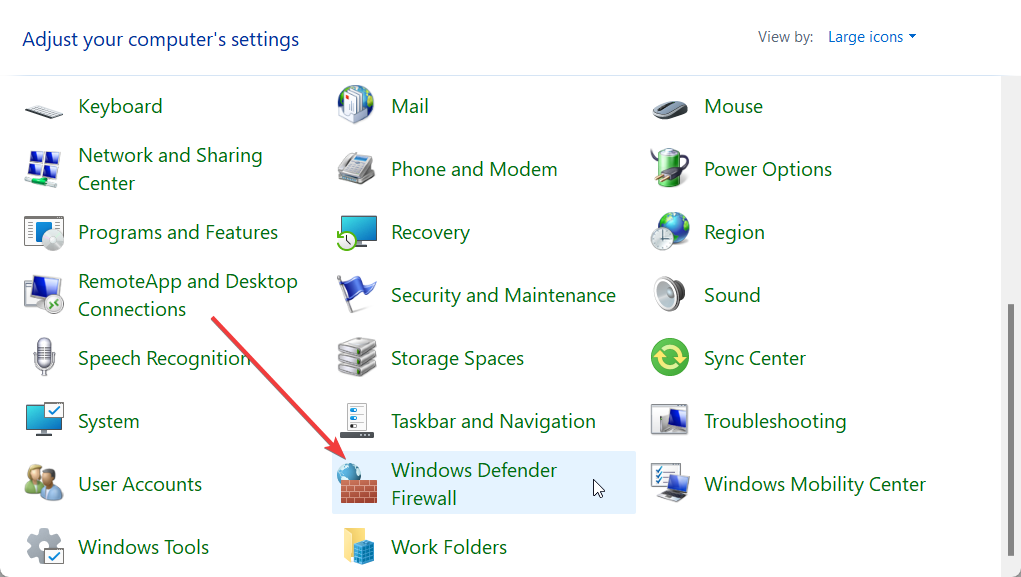
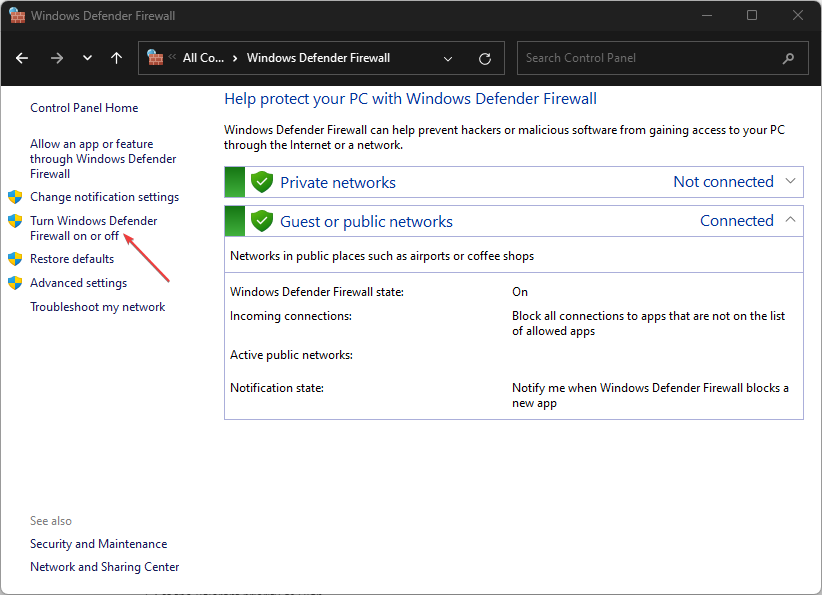
Click on Turn Windows Defender Firewall on or off from the left pane.
Check the radio buttons for Turn off Windows Defender Firewall (not recommended) for both Public and Private networks.
Click OK to apply the changes.
You can try activating the Microsoft 365 app after disabling the Firewall on your computer. Chances are that the Windows Firewall is blocking the URL for activation and causing the 0xcaa70007 error.
Do note that each antivirus or Firewall program has different ways to enable access to the URLs. You should check out the methods for your antivirus program to disable it.
3. Reset Winsock
Press the Win key to open the Start menu.
Type the command prompt and run it as an admin.
Type the below command and press Enter. netsh int ip reset
Execute the below command and press Enter. netsh winsock reset
Restart your computer and try activating Microsoft 365.
Some users have also fixed the 0xcaa70007 error by simply resetting the Winsock on their computers. This is because when you reset the Winsock, it restarts the communication required between your device and the network.
4. Disable IPv6
To open the Start menu, press the Win key.
Open Control Panel.
Select Network and Sharing Center.
Select Change adapter options.
Right-click your network connection, and select Properties.
Uncheck the Internet Protocol version 6 option and try to activate Microsoft 365 again.
Disabling the IPv6 has helped users fix the 0xcaa70007 Microsoft 365 activation error. You can also try the above steps and check if this fixes the issue or not.
5. Ensure important services are running
Press the Win + R keys to open the Run dialogue.
Type services.msc and select OK.
Make sure that the following services are all running by opening them and selecting the Start button under the Startup type:
Network Connected Devices Auto-Setup
Network List Service
Network Location Awareness
Windows Event Log
If any of these services aren’t running, then you should Start them.
That is it from us in this guide. Feel free to let us know in the comments below, which one of the above solutions fixed the 0xcaa70007 error on your computer.
If you don’t feel like showing your face on camera at a Teams meeting, you can have a modern 3D virtual avatar do the job for you.
In this guide, we will discuss the step-by-step instructions to design and use Microsoft Teams Avatars using the avatar creator.
Benefits of Using Avatars on Teams
Provides a visual representation of users, which makes it easier to identify who is speaking or contributing to the meeting.
Lowers your anxiety and relieves you from the pressure.
Maintains a level of privacy by allowing team members to use representations.
Add a human touch to digital interactions, which creates an engaging and cohesive team environment.
How do I set up my own avatar on Microsoft Teams?
Before proceeding with any steps to create a Microsoft Teams avatar, go through the following preliminary checks:
Ensure you have access to an active & valid Teams work or school account, and you must be at least 18 years old to use Avatars for Teams.
A PC with a two-core CPU with 6GB RAM.
Permission to edit your profile settings within Microsoft Teams (if it is an organization account)
Need to be a part of the Technology Adoption Program (Mesh TAP).
Must have Microsoft 365 Enterprise E3, Teams Essentials, Microsoft 365 Enterprise E5, Microsoft 365 Business Basic, Microsoft 365 Business Standard, or Microsoft 365 Business Premium licenses.
1. Download the Avatars app
NOTE
We have used Teams 2.0 here, but you can use the same steps on Teams Classic as well.
Press the Windows key, type teams, and click Open to access Teams client.
Select Apps from the left pane of Teams, and in the search box, type Avatars, then click Add.
Click Add.
If you don’t see it in search results, click Manage your apps from the bottom left corner and locate Avatars.
2. Create a new avatar
Once the Avatars app is added, click Apps and search for it to open.
Click Get started.
Select the + icon and click Create new to start the process.
Select the base avatar that looks most like you to start, and click the Use Avatar button.
3. Customizing your avatar with Mesh Avatars
You can click + and select Duplicate to make a copy of the base avatar, as you can create up to three distinct avatars for different occasions (causal, day-to-day, professional meetings).
Once done, click Customize to edit the base avatar.
Click Avatar builder, select Body, then go to Body Shape, Prosthetic, and Skin Tone, and adjust the body shape, skin tone, and prosthetic (if applicable).
Next, go to Face, then go to Face Shape, Eyes, Nose, Mouth, Ears, and Hearing Aids, and select the appropriate options.
Switch to Hair to choose Hair Style, Facial Hair, & Eyebrow, then switch to the Appearance tab, to select Lip Color, Blush, Eyeshadow, Lashline, Face Lines, & Bindi.
Go to Wardrobe, select Underlayer, Outerwear, Headwear, and Eyewear to complete the look.
Now, use your mouse’s scroll wheel to zoom in or out to preview the avatar. You can also hold down your left mouse button and drag your mouse to rotate the avatar to look at it from different angles.
Once satisfied, click Save.
Every option comes with three customization options, Toggle, Filter, and Rainbow wheel; the Toggle button in the Body and Face section allows you for smaller tweaks like your waist or your head width.
However, the Rainbow wheel in the Hair, Appearance, and Wardrobe section allows you to change the color of certain characteristics like your hair and shirt.
The Filter feature in the Hair and Wardrobe section helps you find what you are looking for more efficiently.
4. Utilizing your avatar in meetings and other interactions
Join the meeting while your camera is turned off. Click the More icon next to the Camera and select Effects & Avatars from the drop-down menu.
Choose a preferred avatar from the Avatars tab.
From the Avatar reactions option, click Show All.
Under All reactions, select the desired emote and click them to Pin to the list. You can only pin up to 5 emotes, so unpin the ones you don’t want to clear up the list.
For Avatar backgrounds, click Show all and select a background according to your meeting setup.
For Avatar mood, move the slider to adjust your avatar’s facial expression.
Next, select the camera angle for your avatar from the Avatar camera option and click Preview.
Search for mesh avatars, select the Avatars app, and choose Allow to set the Status to Allowed.
To preinstall avatars for Teams app users, go to Teams apps> Setup policies.
Choose the policy you want to edit or click Add to create a new one, then add the policy name and description.
Now locate Installed apps, and click Add apps.
Under Search based on this app permission policy, choose Global.
Type avatar, click the Search icon, select Avatars, and click Add.
Select the Add button, then click Save.
Once created a policy, you need to assign it to the users, groups, or teams you created to apply to. You can also pin the apps for them; under Setup policies, select the policy, and click Edit, toggle on the User pinning option. Go to Pinned apps and add Avatars to the list.
Are there any Teams Avatar creators?
Apart from the app Avatars, Live 3D is another Microsoft Teams Avatar creator app that can help you create rich 3D avatars.
Adding these mesh avatars not only prevents video call fatigue but is really cool way to engage with your colleagues during online meetings.
Another incredible addition to Microsoft Mesh for Teams is immersive spaces, which is available in public preview for Teams users as of now.
It allows you to add Avatars, 3D environments, seat assignments, spatial audio & audio zones, in-built interactive activities, and Live reactions, with the goal of bringing people together.
Other than Teams’ 3D avatar, what other features would be a great addition to the app? Feel free to let us know in the comments section below.
The importance of encryption is self-explanatory, especially for IT professionals in organizations that handle sensitive customer data. The data encoding technique is even more critical today as more and more enterprises utilize Microsoft 365-based remote workforce collaboration tools.
It, therefore, comes as no surprise that Microsoft is beefing up security for its Microsoft 365 platform with double-key encryption.
Microsoft 365 Double Key Encryption rolls out to public preview
If you’re a Microsoft 365 E5 or Office 365 E5 user, you will be able to use the Double Key Encryption feature to protect your most sensitive files and emails in Microsoft 365 Apps on Windows, including Word, Excel, PowerPoint, and Outlook.
The feature, which is rolling out next month, in July, comes in handy when you need to protect mission-critical business data. Apart from that, the service covers the kind of information whose loss or theft would get you into legal or financial trouble.
With the new encryption solution, Microsoft keeps one of the keys while you retain the other. Nobody can extract your data without access to both keys in this case.
Double Key Encryption enables you to protect your highly sensitive data while keeping full control of your encryption key. It uses two keys to protect your data—one key in your control, and a second key is stored securely in Microsoft Azure. Viewing data protected with Double Key Encryption requires access to both keys.
Plus, it becomes much more difficult for brute force decryption to work with that level of protection.
According to Microsoft, Double Key Encryption for Microsoft 365 has three main benefits, namely:
You retain full control of your key, and you can keep it in the cloud or on-premises.
You take advantage of the Azure Information Protection unified labeling client.
Microsoft provides you with the code to quickly get started with Double Key Encryption for your Microsoft 365 enterprise data.
Do you think double-key encryption makes a significant difference when it comes to enforcing cloud data security? You can always drop us a message in the comments section below.
If you have encountered a 0x80072f0d error code while trying to update your Windows or open Microsoft Store and other Windows apps, this guide can help!
We will explore the practical methods to fix the issue right after discussing the common causes of the problem.
What causes the 0x80072F0D error on Windows 10/11?
There could be various reasons for this Windows Update error to occur; some of the common ones are mentioned here:
Expired or invalid SSL certificate – The error may occur if the SSL certificate used by the application or service has expired or is not recognized as valid. Check the date or time on your PC.
Proxy server issues – If you use a proxy server to connect to the internet, misconfigured proxy settings can interfere with the SSL certificate validation process, leading to the error.
Firewall or antivirus software – The error could occur if your antivirus software blocks the necessary connections for SSL certification validation. Turn off the antivirus temporarily and try again.
Network connectivity issues – If there are network connectivity problems, such as unstable or intermittent internet connection, it can result in failed SSL certificate validation and trigger the error.
So, now you know the causes of the problems, let us check out the solutions.
How can I fix the 0x80072F0D error on Windows 11?
Before engaging in advanced troubleshooting steps, you should consider performing the following checks:
Type msconfig and click OK to open the System Configuration window.
In the System Configuration window, go to the Services tab.
Remove the checkmark next to Hide all Microsoft services, then click the Disable all button.
Go to the Startup tab and click on the Open Task Manager link.
In the Task Manager, select the enabled startup programs and click Disable.
Close the Task Manager and go back to the System Configuration window. Now click Apply, then OK to save the changes.
Click Restart to reboot your PC.
After the restart, check if the error persists. If not, it indicates a software conflict. You can selectively enable services and startup programs to identify the conflicting software.
5. Reset the Windows Update components
Press the Windows key, type cmd, and click Run as administrator.
Type the following commands to stop Windows Update, BITS & Cryptographic services, and press Enter after every command:
net stop bits
net stop wuauserv
net stop appidsvc
net stop cryptsvc
To delete the qmgr*.dat files, copy & paste the following command and hit Enter:Del "%ALLUSERSPROFILE%\Application Data\Microsoft\Network\Downloader\qmgr*.dat"
To clear the Windows Update cache to allow Windows 11 to re-download the updates, type the following commands one by one and press Enter after every command:
Type the following command and press Enter:cd /d %windir%\system32
To re-register the BITS files & the Windows Update-related dll files, copy & paste the following commands one after the other and hit Enter after every command:
Type the following command to reset Winsock and press Enter:
netsh winsock reset
netsh winsock reset proxy
Copy & paste the following commands to start Windows Update, BITS & Cryptographic services, and press Enter after every command:
net start bits
net start wuauserv
net start appidsvc
net start cryptsvc
Reboot your PC to confirm the changes.
How can I fix the 0x80072F0D error on Windows 10?
To fix this error on Windows 10, you can follow the methods mentioned above for Windows 11.
As a last resort, you can reset your PC using this informative guide to resolve this problem on your Windows computer.
So, these are methods that you can use to fix the 0x80072F0D error on Windows 11/10. If you have questions or suggestions, please mention them in the comments section below.
The future is here, Microsoft boasts, as the Redmond-based tech giant announces a new preview of new tech called Windows 365 Boot. Here’s some good news: in short, you’ll soon be able to boot a physical PC into a virtual, cloud one, so you can stop running an operating system like Windows 11 locally.
On behalf of our team, I’m extremely excited to announce that Windows 365 Boot is now available to deploy in public preview! A feature we worked on over 1,5y across multiple teams in Microsoft. Log on to your Cloud PCs from the Windows 11 initial login screen! A unique new experience to get to your #CloudPC. Exciting times.
With Windows 365 Boot activated, users will experience a seamless login process. The lock screen will display the Windows 11 screen, and users can log in with their Microsoft account. After validation, users are instantly connected to their Cloud PC.
Then, when logging off, the Cloud PC state reflects the local Windows login screen, allowing for easy re-login or for another user to connect to their own Cloud PC.
When will Windows 365 Boot arrive in general availability?
Here’s the bad news. There are no official words from Microsoft regarding the specific release date of Windows 365 Boot for general users yet. The company has not made any public announcements regarding the availability of this feature, but we will keep you updated as we go.
To participate in the preview of Windows 365 Boot, you must be enrolled in the Windows Insider Program Dev Channel. This can be done through the Windows Insider Program page in Settings, where users can sign in with their Microsoft account and select the Dev Channel for enrollment.
Plus, you’ll also need a PC with Windows 11 (obviously), a Windows 365 Cloud PC license, and Microsoft Intune Administrator rights.
Not too long ago, we’ve also reported that Microsoft’s new AI assistance tool, Copilot, is coming to Windows 11. The future is, indeed, here.
Update: it seems that Microsoft wants to fully integrate Windows 11 into the cloud on all devices. That means your device as well. The latest FTC v. Microsoft hearing and internal state of business presentation from June 2022 were brought up.
The document argues that Microsoft wants to build on Windows 365 to enable a full Windows operating system streamed from the cloud to any device, according to The Verge.
What is your opinion on this? Would you see yourself booting Windows 11 from the cloud? Let us know in the comments!
Many Windows users have recently reported encountering a mbamtray.exe application error on their PCs. The error can appear randomly and impede the activities of the system. However, this article will take you through ways to fix the mbamtray.exe error.
There can be several reasons for encountering a mbamtray.exe application error. Here are a few common causes:
Conflicts between Malwarebytes and other security software or third-party applications can lead to application errors.
If the installation of Malwarebytes or its associated files is incomplete or corrupted, it can result in application errors.
Malware or viruses can target and corrupt Malwarebytes files, including mbamtray.exe.
Outdated or incompatible device drivers on your system can cause conflicts with Malwarebytes.
How do I fix the mbamtray.exe application error?
Before attempting any advanced fixes, try the following preliminary checks:
Restart your computer to resolve temporary issues and clear any conflicting processes causing the application error.
Perform a clean boot to start your computer with minimal drivers and programs.
Consider temporarily disabling background apps or uninstalling any recently installed security software
Update Malwarebytes to install bug fixes and improvements that can resolve application errors
If the issue persists after trying these steps, proceed with the solutions below:
1. Disable the Self-Protection module in Malwarebytes
Launch the Malwarebytes client on your computer.
Click the Settings icon in the top bar, then select the Advanced Settings option from the left pane menu.
Then, uncheck the box for the Enable Self-Protection module option.
Exit the Malwarebytes app and check if the mbamtray.exe application error persists.
Disabling the Self-protection module can resolve the security settings causing the mbamtray.exe application error.
2. Uninstall and reinstall Malwarebytes
Launch your browser and download the Malwarebytes Support Tool on your PC.
Double-click the mb-support-x.x.x.xxx.exe file, then click Yes to continue the installation.
Check the box for Accept the License Agreement. Then, click Next to complete the installation.
In the Malwarebytes Support Tool, click Advanced, then Clean.
Click Yes on the Malwarebytes Cleanup pop-up, then click OK to restart your PC.
Then, tap the Yes button on the Reinstall Malwarebytes for Windows prompt.
Follow the on-screen instructions, then click Install. The Malwarebytes client will launch automatically, then check if the mbamtray.exe application error persists.
Reinstalling the Malwarebytes client will fix corrupt files and install the latest Malwarebytes versions. Also, it resolves any configuration conflicting with the mbamtray.exe executable process.
Some of our readers are experiencing similar issues and are eager to know what OfficeC2RClient.exe is and possible methods to address the issue.
What is OfficeC2RClient.exe?
OfficeC2RClient.exe is an executable file associated with Microsoft Office. Further, the C2R in the name stands for Click-to-Run, which is a technology used by Microsoft to deliver and update Office applications.
OfficeC2RClient.exe is part of the Click-to-Run service and is responsible for managing the installation, updating, and maintenance of Microsoft Office applications. Also, it provides automatic updates to keep the Office suite up to date with the latest features and security patches.
Moreover, OfficeC2RClient.exe runs in the background and periodically checks for updates to Microsoft Office. When updates are available, it downloads and installs them silently, without requiring user intervention. It ensures that the Office suite remains current and secure.
Should I disable OfficeC2RClient.exe?
Disabling OfficeC2RClient.exe is not recommended unless you have a specific reason to do so. While some users may experience high CPU or memory usage due to OfficeC2RClient.exe, it is usually a temporary issue that occurs during certain operations, such as updates or background maintenance tasks.
If you’re facing persistent performance issues related to OfficeC2RClient.exe, it is advisable to try the following steps before considering disabling it:
Restart your computer, as it can help resolve temporary resource usage problems.
Monitor the behavior of OfficeC2RClient.exe over time.
Check the location of the executable file – If the officec2rclient.exe process is found under C:\Program Files\microsoft office 15\clientx64\integratedoffice.exe, it is expected to be a safe Windows process.
However, if after confirming the above checks, you still encounter performance issues, you can work your way through any of the methods provided below on how to disable officec2rclient.exe.
How can I disable officec2rclient.exe?
1. Disable officec2rclient.exe in Task Manager
Right-click on the Start button and select Task Manager from the context menu.
Then, navigate to the Processes or Details tab. Right-click the officeClickToRun.exe and selectEnd Task to terminate it.
Now restart your PC.
It’s recommended to only disable it temporarily for troubleshooting purposes and enable it again afterward to ensure the proper functioning and security of your Office applications.
Do not hesitate to explore our detailed guide on how to fix the Start menu issues on your PC.
2. Disable the Microsoft Office Click-to-Run Service
Press the Windows + R keys to open the Run command dialog box. Type services.msc in the dialog box and press Enter to open the Service Manager.
Further, search for Microsoft Office Click-To-Run Service, right-click on it, and then select Properties.
Then, change the startup type to Disabled and click the OK button to save the changes.
3. Limit the resource usage of the officec2rclient.exe
Press the Windows + R keys to open the Run command dialog box. Type appwiz.cpl in the dialog box and press Enter.
Then, locate Microsoft Office 365 in the Programs and Features window. Click on the Change button and wait for a few seconds.
Now, check the Quick Repair box in the pop-up window and click on the Repair button below.
Then, click Repair again and wait for the process to complete.
Restart your PC.
Repairing the entire Office installation is a viable means to fix the high CPU usage.
In case none of the above methods works for you, seek assistance from a professional technician or Microsoft Support rather than disabling the process outrightly.
If you use a browser on your computer, you must have encountered a few add-ons. The Java Plug-in SSV Helper is one such tool. In this guide, we discuss its use and show you the easiest way to enable or disable it.
Before going further, check out our list of the best Edge browser extensions if you like improved browser functionality.
What is the Java TM plug-in SSV helper add-on from Oracle America?
The helper aids in managing and controlling Java applets and programs inside web browsers. It comes as part of the A part of the Java Runtime Environment (JRE). If interested, you may learn how to fix a missing JRE using instructions in our other guide.
What does Java Plug-in SSV Helper do?
The Java helper add-on guarantees the compatibility of Java-based content.
The add-on offers Java Runtime Environment (JRE) automatic upgrades.
It performs security checks to find any potential flaws.
The extension can improve the interoperability of web browsers with Java content.
It makes engaging with online Java-based information a fluid and easy process.
NOTE
Running Java applications in your browser does not require the SSV assistance plug-in; it is different from the JRE, which is required.
How do I enable or disable Java Plug-in SSV Helper?
Launch the setup and click Yes in the UAC prompt, then the Java installation wizard will appear on your screen. Follow the Wizard to complete the process.
Click Close at the end.
Now, the helper should work when you encounter a web applet that needs Java.
How to disable Java Plug-in SSV Helper?
Disable the helper using apps and features
Press Windows + R to open the Run dialog.
Type appwiz.cpl and hit Enter.
Scroll down, click on a Java entry, then click Uninstall and follow the wizard to complete the process.
This decision is ultimately yours to make; however, you may consider the following:
You may want to disable it if you use an older version of Java since you may be more vulnerable to security attacks.
You may prefer to keep it enabled if you visit websites that use Java applets.
Disabling it may be helpful if you notice any reduced performance while using the plugin.
That will be all for this guide. If you have read this far, you should have chosen to keep or disable the tool.
If you need Java running on your computer, remember the helper does not replace the JRE. We have a guide that shows you how to install Java on your Windows 11 computer.
Lastly, please let us know if you have any additional questions in the comment section below.
This guide will walk you through the ins and outs on how to enable Microsoft 365 Copilot so you can integrate it into your workflow and do more for you. Microsoft outlines its frequently asked questions about AI and Microsoft 365 Copilot, and provides a brief roadmap for Copilot as well as existing AI-powered tools in Microsoft 365.
What is Microsoft 365 Copilot?
Microsoft 365 Copilot is a smart, AI-powered productivity tool that helps you navigate your workday with ease. It provides personalized recommendations, tips, and insights based on your work patterns, preferences, and habits. Copilot is designed to work seamlessly with your existing Microsoft 365 tools, such as Teams, Outlook, and Word. At the time of this writing, Microsoft 365 Copilot is only available in a “very limited preview.”
Microsoft 365 Copilot Key Features and Benefits
Microsoft 365 Copilot uses AI and machine learning algorithms to understand your work patterns and preferences. It analyzes your communication, collaboration, and productivity data to provide you with personalized insights, tips, and recommendations.
Feature 1: Proactive Monitoring and Issue Detection
Microsoft 365 Copilot continuously monitors your Microsoft 365 environment, analyzing data and detecting potential issues before they escalate. It provides real-time alerts and notifications, allowing you to address problems promptly and minimize downtime. With proactive monitoring, you can ensure that your organization’s productivity remains uninterrupted.
Feature 2: Automated Troubleshooting and Remediation
Copilot goes beyond monitoring and offers automated troubleshooting and remediation capabilities. It can automatically resolve common issues, saving you time and effort. By leveraging its intelligent automation capabilities, Microsoft 365 Copilot provides personalized recommendations and insights tailored to your organization’s specific needs. It analyzes your usage patterns, security settings, and compliance requirements to offer customized suggestions for improving your Microsoft 365 environment. These recommendations help you optimize your workflows, enhance security measures, and achieve regulatory compliance.
Implementing Microsoft 365 Copilot
Check out this Microsoft Mechanics video to learn what you need to be ready for Copilot.
Step 1: Assess Your Organization’s Needs
Before implementing Microsoft 365 Copilot, it is essential to assess your organization’s needs and goals. Identify the pain points and challenges you are currently facing in managing your Microsoft 365 environment. Determine the specific areas where you require assistance and define your objectives for using Copilot.
Step 2: Familiarize Yourself with Copilot’s Features
To make the most of Microsoft 365 Copilot, take the time to familiarize yourself with its features and capabilities. Explore the proactive monitoring and automated troubleshooting functionalities. Understand how Copilot generates recommendations and insights to help you optimize your Microsoft 365 environment.
Step 3: Plan the Implementation Process
Creating a detailed implementation plan is crucial to ensure a smooth transition to Microsoft 365 Copilot. Define the roles and responsibilities of the individuals involved in the implementation process. Establish a timeline and allocate resources accordingly. Consider any potential challenges or risks and develop contingency plans.
Step 4: Enable Copilot and Configure Settings
Once you have planned the implementation process, it’s time to enable Copilot and configure the necessary settings. Follow the instructions provided by Microsoft to activate Copilot for your organization. Customize the settings according to your specific requirements, such as selecting the workloads to monitor and defining notification preferences.
Step 5: Monitor and Optimize
After enabling Copilot, actively monitor its performance and the insights it provides. Regularly review the recommendations and take appropriate actions to optimize your Microsoft 365 environment. Continuously assess the impact of Copilot on your organization’s productivity, security, and compliance, making necessary adjustments as needed.
Best Practices for Microsoft 365 Copilot
Microsoft 365 Copilot Message Center
With Microsoft 365 Copilot, your team gains access to a motherload of collaborative features designed to enhance productivity and streamline communication. From real-time co-authoring to seamless file sharing and team chat, Microsoft 365 Copilot empowers your employees to work together efficiently and achieve remarkable results.
Encourage Collaboration: Copilot offers a range of collaborative features such as real-time co-authoring, file sharing, and team chat. Encourage your employees to leverage these capabilities to foster teamwork and streamline communication.
Emphasize Security: As with any cloud-based solution, security is of utmost importance. Educate your employees about best practices for data protection, password management, and device security. Enable multi-factor authentication and implement data encryption to safeguard your organization’s sensitive information.
Stay Updated: Microsoft regularly releases updates and new features for Copilot. Stay informed about these updates and ensure that your organization is leveraging the latest enhancements. Regularly review the Microsoft 365 roadmap and explore how new features can benefit your workflows.
As you embark on your Microsoft 365 Copilot journey, remember that security and staying updated are key pillars of success. By prioritizing data protection, password management, and device security, you can ensure the safety of your organization’s sensitive information. Additionally, staying informed about Microsoft’s regular updates and new features enables you to leverage the latest enhancements and maximize the benefits of Microsoft 365 Copilot. By fostering collaboration, emphasizing security, and embracing innovation, your organization can unlock the full potential of Microsoft 365 Copilot and elevate your workflow to new heights.
When users try to install a version of this program that is incompatible with their operating system, they may encounter the 0x80096002 Windows Update Standalone Installer error. This error indicates an incompatibility issue between the software and the user’s operating system.
The topic under consideration is the resolution of 0x8024800c Windows Update error on Windows 11, which we have already discussed in depth.
Nonetheless, in this article, we will focus on fixing this pesky error and provide a comprehensive guide to troubleshooting it. Join us as we unravel the necessary steps to rectify this vexatious issue.
What is error code 0x80096002?
This is an error that occurs while using Windows Update Standalone Installer, and it’s caused by the following:
Missing components such as Windows Identify Foundations.
Issues with Windows Update.
How can I fix the 0x80096002 error?
1. Enable Windows Identity Foundations
On your home screen search bar type Turn Windows features on or off and open it.
Check mark the Turn Windows features on or off option that pops up.
Scroll down to locate the Windows Identity Foundations and check it.
Click OK to save.
Lastly, reboot your PC.
2. Extend the operation duration of WSUS cookie with Command Prompt
On your home screen search bar, type cmd and Run as Administrator.
When the command window opens enter the line command and tap Enter: wuauclt /resetauthorization /detectnow
Tap the Windows key on your PC and inside the search bar, type Troubleshoot settings and open it.
Now select the Other troubleshooters.
Lastly, click Run on the Windows Updates section.
We are confident that this guide has provided you with the necessary assistance to address your concern. While it may initially seem daunting, as demonstrated, resolving this issue is not as difficult as it may seem.
However, if you encounter any further difficulties, we suggest referring to our comprehensive guide on how to run Windows Update Troubleshooter. This invaluable resource provides solutions that could be precisely what you need.
We are eager to hear your feedback on this matter. Please don’t hesitate to comment below and let us know which solution proved most effective for you. Your insights are highly respected and appreciated.
If you’re looking to customize your desktop background in any way possible then DeskSpaces is for you. Deskspaces adds a host of background features, such as animated wallpapers and advanced background customizations. You can use the included design tool for creating animated wallpapers, and use the cloud to share either animated or standard wallpapers.
“The new version of DeskScapes is compelling both for animated and standard wallpapers,” said Brad Sams, Vice President of Stardock Software. “For fans of animated wallpapers, we include DreamMaker Pro, which is both powerful and easy to use for creating or enhancing desktop backgrounds. We also added seamless integration to cloud-based services for finding desktop backgrounds.”
DeskSpaces 11 is designed to integrate with the Windows built-in background manager to support features such as custom directories for backgrounds, fast searching, timed playlists, and even using videos for your background. DeskSpaces 11 supports multi-monitors, wallpaper filtering, and scheduling your favorite wallpaper as well. The included DreamMaker Pro tool makes it easy to create animated backgrounds, using drawing effects, logos, particle effects, and more.
DeskSpaces 11 us available as part if the StarkDock Object Desktop package or separately for $3.99. Head over to Stardock.com to get your copy.
Dealing with the Camera App error 0xa00f4240 on Windows can be a real headache. It’s a problem that can disrupt your ability to engage in videoconferencing, streaming, or even capturing images with your webcam.
However, in this piece, we will delve into troubleshooting a different error that arises when attempting to utilize your computer’s camera. Let us explore the steps necessary to rectify this issue.
What is error code 0xa00f4240?
This is a Camera app error, and it’s caused by the following:
Your PC’s privacy settings may also be incorrect, preventing camera access for certain applications.
Your system may be denied access to the camera due to third-party antivirus software blocking its activation.
Your camera may have incurred some physical damage, leading to its malfunction.
There could be internal glitches within the Camera app that are affecting its performance.
How do I fix error code 0xa00f4240?
Before we start, try the following:
Inspect your PC for physical damage and ensure your webcam is working properly.
Deactivate your Antivirus software since it can interfere with the Camera app.
1. Reset your Camera app
On your home screen hold the Windows + I keys together to open the Settings.
Locate the Apps section and click on Apps & Features.
Now find the Camera app, click on the three dots, and next select the Advanced options.
Finally, scroll down and click on Reset.
2. Check Privacy settings
On your home screen tap the Windows button and select Settings.
Locate the Privacy & Security section and click it.
Next, choose the Camera to open it.
Lastly be certain that the Camera access is on, if it is off you can switch the toggle.
After doing that, check if the Camera error 0xa00f4240 is gone on your PC.
On your home screen hold the Windows + I buttons to open.
Locate the Windows Update section and click on Advanced Options.
Now select Optional Updates.
If the Drivers Update is available will be shown here, just in case it’s available click on Download andInstall to update your drivers.
We sincerely believe that this guide has equipped you with the essential aid to tackle your concern. It might seem daunting at first, but as you have seen, resolving this issue is not as challenging as it may appear.
If you still face difficulties, we recommend consulting our comprehensive manual on how to fix 0xa00f4244 NoCamerasAreAttached error. This valuable resource offers solutions that could be just what you need.
We are keenly interested in hearing your feedback on this matter. Please feel free to leave a comment below and let us know which solution helped you the most. Your insights are highly valued and appreciated.
Getting An internal system error occurred message with references to dxerror.log and directxl.log in Windows 11? It’s a common issue that pops up when people try to install DirectX.
Below, we’ll show you how to put an end to all these issues in just a few steps:
How can I fix dxerror.log and directx.log errors?
To start, disable your antivirus and see if you can install DirectX. Also, run the DirectX installer as administrator and see if that helps. Should you still be facing issues, follow the advanced steps below:
1. Install .Net framework using Command Prompt
On your home screen search bar type cmd.
Choose Command Prompt and click on Run as administrator.
Input the following command and tap Enter: DISM /Online /Enable-Feature /FeatureName:NetFx3 /All /LimitAccess /Source:D:sourcessxs
Next, click on Display Adapter to expand the options.
Now right-click on the Intel HD Graphics and click on Update driver.
With an active internet connection, click on Search automatically for drivers.
When you check for driver updates, the system will inform you if the latest drivers are installed. However, if they are not, it will install the most recent updates available.
Alternatively, you can use professional driver updating software to scan for and update all your drivers. Tools such as Fortect Driver Updater, can identify the correct driver for your system and update them after just a quick scan.
On your home screen search bar type Control panel and click Open.
Now the next screen select Programs, next choose Programs and Features.
Next you will see a list of Programs, locate the Microsoft Visual C++ Redistributable. Note: When it comes to having multiple versions of software installed, it’s not uncommon for different applications to require specific versions. You may need to check if the 2015 version is available, and if so, consider reinstalling it. However, if the 2015 version is unavailable, you may need to download and install it separately.
Click on Visual Studio 2015, 2017, 2019, and 2022.
Lastly, choose the specific package for your system, and once you have downloaded it and completed the installation process,Rebootyour PC.
We hope this guid provided you with the necessary assistance to resolve your concern. The issue isn’t as much of a headache as it ay seem at first glance.
If all else fails, consider removing all files related to DirectX (previous version too) from your PC and reinstall it afresh.
We’re eager to hear your opinion on the matter, so don’t hesitate to comment below and share which solution made the biggest difference for you. Your input is greatly appreciated.
Windows is the most popular operating system on earth. You spend a lot of time on Windows, but what do you know about it? If you’re like most people, probably not much. And that’s OK.
Windows is an extremely complex operating system with a lot going on behind the scenes. We use it to navigate our lives and perform our tasks, but have you taken a second to think about the OS? Why do we love it so much?
Well, some little-known facts include:
Windows was almost called Interface Manager
The first version of Windows occupied 265kb space
Mosaic was the first web browser for Windows
The OS has a lot to offer. There are plenty of hidden gems that can improve your experience if only you knew where to look. So what are all these other features that make Windows so great?
We’ve rounded up some of our favorite lesser-known facts about Microsoft Windows to help you get more out of your PC.
What is Microsoft Windows known for?
Windows is a family of operating systems developed by Microsoft. It consists of several families of client and server operating systems.
If you’re like most people, you know Windows for its intuitive user interface, which has changed little over time and is easy to use even for novices. It’s also known for its compatibility with thousands of applications and devices.
Some know it for its security flaws. Looking at Windows 11 disadvantages will paint a picture of just how some users loathe the OS. Luckily, the good outweighs the bad, so let’s focus on the good things.
After all, when you take the number of computers available in the world and what percentage have Windows installed, Windows wins the war. Not that there was any in the first place.
What are some of the interesting facts about Windows?
1. Windows was not the first OS
Contrary to popular opinion, Microsoft Windows was not the first operating system to be developed by Microsoft.
Xenix was the first debut OS that Microsoft created in the 1970s before they started working on DOS.
This version was meant for microcomputers, but eventually, personal computers were developed to allow people to do their own computing and not depend on large centralized machines.
Also, Microsoft did not seem interested in co-developing the OS and abandoned Xenix for Windows. And that’s how the first Windows version: Windows 1.0, was born.
The complete Microsoft Windows version history includes:
Windows 1.0 – 1985
Windows 2.0 – 1987
Windows 2.1x -1988
Windows 3.0 – 1990
Windows 3.1 – 1992
Windows NT 3.1 – 1993
Windows 3.2 – 1993
Windows NT 3.5 – 1994
Windows NT 3.51 – 1995
Windows 95 – 1995
Windows NT 4.0 – 1996
Windows 98 – 1998
Windows 2000 – 2000
Windows ME – 2000
Windows XP – 2001
Windows XP Professional x64 Edition – 2005
Windows Vista – 2007
Windows 7- 2009
Windows 8 – 2012
Windows 8.1 – 2013
Windows 10 – 2015
Windows 11 – 2021
You’ve probably not interacted with half or more of the Windows versions on this list, as some have been discontinued.
Since then, it has been a journey of success with the subsequent releases, each version topping the other with an enhanced interface and new features.
You can compare the latest Windows version, Windows 11 features and see just how far the OS has come.
2. Interface Manager was the original name for Windows
When you think about it, any other name apart from Windows would not be fit for the software we have all come to love. The billionaire Bill Gates and his team was responsible for coming up with the name, and they thought Interface Manager would do.
Of course, Windows is an interface manager, but it made more sense to name it Windows based on all the tasks one can perform.
A user can easily open multiple windows on the screen and switch between them. This makes it easier for users to multitask within their computer environment than other operating systems.
Here is where the name Windows came from. The graphical user interface provided a view of a desktop with multiple windows that could be moved around and resized.
When you think about it, the name is as literal as it sounds. Whenever you’re using the OS, you’re basically opening and closing different windows on your browser or desktop.
3. The first-ever browser was called Mosaic
Nowadays, the browser pool has expanded vastly you’ll be spoilt for choice on which one to go for. However, when Windows was first launched, there was only one browser called Mosaic. It was released in 1993, years before Microsoft’s Internet Explorer (IE) became dominant on PCs.
As ancient as the name sounds, it was way better compared to other browsers at the time. Picture this. Before Mosaic, you could not view images directly on your browser. You had to download them first.
Given how storage space was not yet advanced back then, you can imagine all the effort it took in downloading and deleting images just to keep your PC running.
Mosaic was the first user-friendly browser and set the tone for today’s browsers. It would later be replaced by Microsoft’s Internet Explorer, now Microsoft Edge, but its influence lives on today’s modern browsers.
In the world of computers, you cannot talk about the evolution of Windows without talking about how viruses have played a role in influencing the security of the OS.
In 1992, a virus was released that would change the course of Windows history. It was called Winver 1.4, the first ever Windows virus that targeted Windows 95.
The many antivirus solutions available today have been influenced by the viruses that occasionally plague Windows systems. It’s almost an oxymoron, as without viruses, there probably wouldn’t be a need for antiviruses.
Cybercriminals have since upped their game, and the viruses today are nothing compared to the first. It just goes to show how with each version, Microsoft is continuously working to mitigate these security threats.
Winver 1.4 would probably not stand a chance today in Windows 11, given all the security settings you can tweak. It has also been voted the most secure OS version yet.
5. Windows has had unreleased versions
Apparently, it’s not only artistes who have unreleased projects. Microsoft also has software that they chose to shelve.
There are some Windows operating systems that you’ve probably never heard of. Microsoft has a long history of releasing new versions of Windows, but some have never been officially released.
Some were canceled as part of Microsoft’s regular development cycle, while others were in development for years before being scrapped.
Among versions that have never seen the light of day include:
Windows Neptune – This was a Windows version planned to be released in 1999. It would have been the successor to Windows 98 and featured a new user interface. Although it never came to fruition, most of its features were seen in Windows XP.
Windows Cairo – The Windows Cairo project was a planned version of Microsoft Windows intended to succeed the Windows NT version. It was canceled, but some of its features were incorporated into later operating systems.
Windows Nashville – Nashville would have been the first of Microsoft’s Windows OS intended to be used with new hardware technologies. This included desktop integration with web. Most of its features were shipped to Windows 98.
5 Facts about Microsoft Windows for students
One thing about Microsoft is that it has all its users’ needs on deck. It’s not just for businesses but also students.
The student-centered OS has a lot to offer, and some of the facts you probably didn’t know include the following:
The education-centered OS works on any device – With most Windows versions, there are usually certain system requirements to run the OS. For instance, older hardware that does not meet Windows 11 system requirements cannot install the software. With Windows for students, you don’t have to own a laptop or desktop PC to learn. Your mobile device can work too.
No Internet is required – Internet is a prerequisite to run some of these Windows versions, but for students, Microsoft has a catalog of affordable learning devices that work whether you are connected to the Internet or not.
Student-tailored devices – Depending on your school level, Microsoft has curated the Windows devices to be intuitive and to meet individual student needs.
Free Product Keys – If you didn’t already know, Microsoft has affiliations with many colleges to offer students free product keys. All you have to do is enroll in a college eligible for the product keys!
5 facts about Microsoft for kids
Windows 11 SE is largely known to be tailored for kids. Users for this OS are between the ages of 5 and 14. Some interesting facts include:
Microsoft Store is unavailable – This may seem like a con at first glance, but given this user group’s age range, it is a win to help them stay focused. Only IT admins are allowed to install apps.
Office apps work without an Internet connection – It is paramount for kids to have a distraction-free experience hence why most learning apps are able to work without the Internet.
Limited devices – Windows 11 SE works only on select devices. You cannot upgrade to Windows 11 SE like you normally would when upgrading to Windows 11.
Edge browser but Chrome capabilities – Although Windows 11 SE comes shipped with Microsoft Edge as the default browser and you can’t install other apps, you’ll be happy to know you can use Chrome extensions to add more functionality.
Snap layouts – You don’t have to keep restoring windows down to view others if you have multiple windows open. With the Snap layout feature, you can easily multitask and enhance your productivity.
5 fun facts about Windows
Other interesting, fun facts about Microsoft Windows include:
Windows 2000 was the first version to be released in multiple languages – The reason why Windows’ market share has catapulted over the years is that it has become more inclusive. Windows 2000 started with three languages, but now, it supports up to 110 languages.
Some folder names are prohibited – Windows will not allow you to create a folder named CON, NUL, or PRN. In addition, any folder that contains any of the following characters: * / \ [ ] : ; , = ? $ & % # is also prohibited. These names and characters cannot be used in file names because they are reserved for system use.
The Start button and Taskbar did not appear until Windows 95 shipped – Could you imagine life without the Start Menu? In earlier versions of Windows, before the Start button was introduced in Windows 95, there was a program called Program Manager that would list all apps.
Windows XP was the first version to introduce the 64-bit version – With earlier versions of Windows, memory was constantly an issue, but with the 64-bit version introduction, you can run RAM-intensive software, plus it’s more secure.
Excel came before Word – It’s easy to assume that Word came first in the Microsoft Office suite as it is one of the most-used apps in the collection. However, Excel came first and was originally called Multiplan. Its first platform was also not Windows but Apple.
Conclusion
Knowing Windows better will help you use it to its maximum potential. Although most of us know some basic things about Windows, there are a lot of interesting and little-known facts about the Microsoft Windows operating system and its history that you probably weren’t aware of.
So, there you have it. Hopefully, some of those interesting facts were surprising to you. It’ll be exciting to see what other facts will crop up in the coming years.
Still, on interesting facts, we have an exciting article on Google Drive facts that we’re positive you were probably not aware of.
What fact surprised you the most about Windows? Do you have any other little-known facts about the OS? We’d love to hear your feedback, so let us chat in the comment section below.
Microsoft Teams is one of the most popular apps to use in organizations or schools for a reason. It gets a lot of new and excellent features very often, almost on a weekly basis. For example, just recently AI recap made its way into the app, and you’ll be able to take notes in the Teams as well.
For teachers, AI will help you build comprehension passages and comprehension questions for your students. The feature is live starting this week. So you’re missing out on a lot of cool stuff if your organization is not on Teams yet.
And some time ago, Teams announced that you can preview and play videos in Chat as well. Speaking of Teams Chat, it seems Compact Chat Lists are coming to Microsoft Teams. And the feature is exciting.
This feature addition will be available in the new Teams desktop experience later this calendar year. But some organizations can gradually experience it sooner.
Here’s how to use Compact Chat List in Microsoft Teams
You will be able to use this feature by switching to compact mode. To do so, you need to:
Go to Settings and then select the General tab.
Once you’re there, go to the Chat density section.
From there, you only need to select the Compact option.
When you exit Settings, you will see a more condensed view of messages in your message pane, as well as a compacted chat list.
The compacted chat list includes hidden message previews and allows you to see more chats on your screen at a given time.
Your screen will look approximately like this.
Microsoft Teams has been very popular in organizations and still is. And the features are always helping users to get work done efficiently.
However, the platform has its misfortunes as well. In a recent study, research has shown that Teams is very prone to malware, and viruses. 80% of Microsoft 365 accounts were hacked in 2022. And unfortunately, it can easily become the target of hackers.
So it might not be a good option for every organization out there, especially the ones that are holding very sensitive information. Alternatively, you can utilize the block feature in Teams to avoid receiving messages from bots and unknown users.
But what do you think? Is Microsoft Teams worth the risks? Let us know in the comments section below.
So the future is looking bright for Xbox. But it seems that the latest FTC v. Microsoft hearing has revealed a lot of secrets from Microsoft. Secrets that involve Xbox. The giant wanted to buy Sony out of business, and also acquire a lot of other video games studio such as Sega. And it seems, Microsoft offered a $117 million sum to Ninja Theory back in 2018.
It seems that Microsoft does this often. And just recently, an internal plan from Microsoft has apparently leaked. If the leak is true, then Microsoft is eyeing no less than 16 video game studios for acquisition.
First of all, take it with a pinch of salt. The leak was first seen on Reddit, and the list numbers 16 video game studios that are in Microsoft’s focus for an acquisition.
A44
Bonfire Studios
Counterplay Games
Dreamhaven
Ember Lab
Facepunch Studios
Fatshark
Ghost Ship Games
Hazelight Studios
Heart Machine
Hello Games
Moon Studios
Mundfish
Proletariat
Striking Distance Studios
Team Cherry
Ironically, Xbox’s acquisition list features Dreamhaven, which is a video game studio founded by former Blizzard employees. Given that Microsoft is in talks to acquire Blizzard, this would be an informal gathering, all over again.
The list also features Hello Games which developed No Man’s Sky, and Team Cherry, which developed the cult Hollow Knight. The studios are from everywhere, which is a sign that Microsoft is looking for global talent for Xbox.
A lot of these video game studios developed amazing video games, and a lot of them are still played all over the world. If this list is true, then at least, Microsoft is keeping an eye on them. And if the Blizzard acquisition will succeed, some of these studios might soon be part of Xbox’s repertoire.
What do you think about this list? Let us know your opinion in the comments section below.
Sunless Sea is an adventure/exploration video game with survival genre elements. The video game is available on a lot of platforms, and Microsoft Windows is one of them. The game, which you can buy from Steam or from its official website, was released in 2015, following a successful Kickstarter campaign.
In the years to come, Sunless Sea has sold hundreds of thousands of copies and has become a classic in the making. The video game is not so old, and thanks to its portability, you can play it on Windows 11, without any issues. Older games, such as Gothic 2 or Mirror’s Edge, often encounter issues on Windows 11.
However, Sunless Sea should work just fine on Windows 11. In case it doesn’t, then you must check for a few things. Some users reported that Sunless Sea is crashing on Windows 11, but you shouldn’t worry. There are solutions that you can try.
Remember, Sunless Sea is perfectly compatible with Windows 11. If it’s crashing, then we have these solutions for you.
How to fix Sunless Sea on Windows 11
Make sure your Windows 11 is up to date to the latest version
If Sunless Sea is not loading on your Windows 11, then it might be due to lacking certain performance updates that often come with Windows 11 updates.
Go to Settings > Windows update > Check for updates.
Wait for your Windows to update, restart the PC and see if Sunless Sea is working.
Make sure your drivers are up to date as well
Sunless Sea might not be loading due to internal conflicts with your drivers. Make sure your drivers are up to date with the latest version. We’re interested in the video card, so make sure it’s updated.
In the Search Bar, type in Device Manager and open it up.
Once there, look for Display adapters, click on them, and select the video card.
Right-click on the video card and select Update driver.
Click on Search automatically for drivers, and let Windows 11 update your cards.
After the process is done, restart your PC, and see if the game is loading.
Here it’s also recommended that you should update your video card drivers on the specific apps that are linked to your card. For example, NVIDIA has a specific app, from where you can update your video card. AMD has one as well. So use these apps to update your drivers, and always perform a restart of your PC for the updates to work.
If any of these solutions worked for you, we’d love to hear from you in the comments section below.
An error Windows users have complained about recently is the error code 0x80073d21 when installing or updating Xbox games on their PCs. The error can occur due to many potential issues. However, this article will outline some causes and ways to resolve the error.
The error code 0x80073d21 indicates a problem with installing or updating Xbox games on a PC.
This error is specific to the Windows Store and often occurs when there is a conflict or issue with the installation files or the Windows Store itself.
What causes error code 0x80073d21?
The installation files for the Xbox game are corrupted or incomplete, it can result in error 0x80073d21.
Insufficient permissions for the Windows Store or the installation directory can lead to error 0x80073d21.
Using an outdated Windows Store or Windows version can cause compatibility issues, prompting the error.
Insufficient or low storage space for games on the local disk may be responsible for the error during installation or updates.
Antivirus software can interfere with the installation process and trigger error 0x80073d21.
How do I fix the error code 0x80073d21 on Xbox?
Observe the following preliminary checks before trying any advanced troubleshooting steps:
Restart your computer to resolve temporary issues with the Windows Store or the installation process.
Ensure you have a stable internet connection, or consider switching to a different network.
In situations where the above preliminary checks are ineffective, we recommend you go ahead with the fixes outlined below:
1. Clear the Windows Store cache
Press Windows + R keys to open the Run dialogue box, type the following, then press Ctrl + Shift + Enter keys to clear the cache as an administrator: wsreset.exe
Wait while the process runs until it closes automatically.
Restart your PC and launch the Microsoft Store to check if the error code 0x80073d21 persists when installing Xbox games.
The above steps will clear the cache data for Windows Store as an administrator, delete any bugs and corrupt cache files, and fix the game installation or update error.
2. Change the installation location for your games and apps
Press the Windows + I key to open the Windows Settings app.
Select System from the left pane, then click on Storage.
Under Advanced storage settings, select where new content is saved.
Navigate to the New apps will save to option, then select the system drive for your device.
Restart the computer and try to install the game again to see if it resolves the issue.
Changing the installation location for new games and apps will allow you to select the system drive for your device.
It seems Microsoft Teams is getting another feature for its Enterprises version. You will be able to use a Notes tab in Teams. The feature is rolling, and you should be able to enjoy it now.
It’s an excellent week for Teams users out there. The app got another feature, for teachers and educators, that uses AI to generate passages and comprehension questions. Plus, it seems that the app will be able to soon convert any file to PDF, via Microsoft Graph. So it’s safe to say, Teams is getting a lot of love from Microsoft.
This new Notes tab is powered by OneNote, and will be added by default on new channels that are created. Its purpose, according to Microsoft, is to enable a rich notetaking experience. However, you should know that this feature will only be available to standard channels. For the private or shared channels, you’ll have to wait until Microsoft implements the feature on them too.
So, while there is nothing you should do to enable the notes, we can show you to use them in Teams. It’s a rather exciting feature, for when you need to drop down some info.
Here’s how to use the Default Notes Tab in Teams for Enterprises
Open Microsoft Teams and go to any standard channels of your organization.
Once you’re there, you can see a new option, Notes.
Click on it, and a new pane will open.
Here you can take notes, you can customize them, you can edit them. It’s pretty much similar to using OneNote.
Since it’s powered by OneNote, working with notes on Teams will be similar. You’ll be able to:
Maintain an easy collaboration on OneNote pages across the team with co-edit and page-level conversation.
All channel notes are organized within a single OneNote notebook, making them easier to find.
Richer OneNote editing with typing, ink annotations, highlighting, file attachments, etc.
Easy recall and search for channel notes within OneNote on any platform.
Access your notes from anywhere, even outside Teams on OneNote.
What do you think about this new feature? Will you use it? Let us know in the comments section below.
Notepad++ is used by developers primarily for editing source code and by casual users to edit text. However, downloading and Installing the app on your system if you just upgraded to Windows 11 may be challenging.
Thus, we will discuss downloading and installing Notepad++ on Windows 11. Also, you can read our detailed guide about fixing Notepad++ not responding on Windows with ease of steps.
Can Notepad++ run on Windows 11?
Yes, Notepad++ can work effectively on Windows 11 without compatibility issues. More specifically, no bloated options or bugs, just all you need in a very small editor.
Also, it is best suited to use a Windows 64-bit processor to install the app for a hitch-free experience.
Which Notepad++ should I download?
Different variants of Notepad++ are available for download on the Official website for Windows 11. The primary determinant of the version to download on your computer depends on your computer’s processor.
The 64-bit Notepad++ can process over 4GB of data while the multiple files are open, while the 32-bit can process less data.
Yes, Notepad++ is free to install. It is an open-source text editor that can be downloaded and used without cost. Being open-source means the source code is free to view and modify.
Further, there are regular updates by the community of developers to fix bugs, provide improvements, and add new features to improve user experience.
What are the advantages of Notepad++ over Notepad?
These are some of the benefits of using Notepad++ over Notepad:
Notepad++ offers advanced features such as syntax highlighting, code folding, auto-completion, and a multi-tab interface.
Personalized customization options for the editor’s display, shortcuts, and coding style.
Provides regular updates with active community support to provide fixes.
Extensive support of plugins to boost performance and increase functionality.
How do I download and install Notepad++ for Windows 11?
Download Notepad++ via their official website
Launch your web browser, go to the Notepad++ Official website, and click Download from the left pane.
Select the Notepad++ vision you want to download from the list. (Notepad++ v8.5.4 is the latest version)
Select Installer under the Download 64-bit x64 if your computer is 64-bit, or Download 32-bit x86 if your computer is 32-bit.
Wait for the download process to complete, and double-click on the downloaded file to open it.
Select Yes if the UAC prompt.
Select your preferred language and click on OK.
Click the Next button on the next window and select the I Agree key on the license agreement window.
Click on Browse if you want to change the installation location and select Next.
Select the installation type you want and click on Next.
Check the Create Shortcut on Desktop box to create a desktop shortcut and click the Install button.
The steps above allow you to download and install Notepad++ on your Windows 11 computer. We have a detailed guide on downloading the Notepad++ app from the MicrosoftStore to your PC.
Microsoft Teams is not just a popular app for organizations, but it’s also very suited for school, especially online courses. While the AI recap helps you take notes from a meeting much easier, Microsoft has come up with a new AI feature for Teams.
And this is, it’s meant for teachers and educators. You’ll be able to generate text passages with Reading Progress in Teams. Using AI, you’ll have the text ready in less than a couple of minutes. Plus, you’ll be able to customize it according to how you see fit.
The Redmond-based tech giant has unveiled the feature this week, and it’s part of Microsoft’s campaign to enhance its products with AI. Plus, Microsoft also has some more useful features in store.
Along with this feature, teachers and educators will be able to use AI to generate comprehension questions based on texts. According to Microsoft, these features will save a lot of time and further customize learning for each class.
We’re excited about the potential for these features to save time and further customize learning for each student or class. Passage generation and comprehension questions leverage the power and security of Azure OpenAI, plus platform innovations to support responsible usage in education. Both features are in an initial private preview with our testing community.
Microsoft
Here’s how to generate text passages with Reading Progress in Teams
Open Microsoft Teams, go to the Assignment pane, and from there head over to Reading Progress.
In the Reading Progress panel, you should be able to see the new options available.
Choose the Generate custom passage feature, and a new window will open.
From here you can customize your passage before generating it.
After you’re done with the customizing, click on Generate Passage.
Your passage is here, and you can use it for your students.
As you can see, you can highly customize your passage. You have a lot of options when it comes to topics, such as Animals, Art, Science, and Space. You can choose the length of the passage. And you can also pick a language that you prefer.
This way you can generate passages for different classes. You can choose the tone of the story, you can set challenging words and you can even set the age. For example, you can generate texts for children that are of different ages.
The feature is available to Microsoft Teams now, in the Reading Progress pane. So you can try it all summer before the new school year begins this fall.
What do you think about this feature? Are you as excited as we are about it? Let us know in the comments section below.
Windows utilizes several .exe programs and processes to facilitate the functionality of the OS. Some of our readers have reported the mediaget.exe process running on their PC and are puzzled about its purpose.
This article will briefly discuss the mediaget.exe process and offer the methods to help you remove it.
What is mediaget.exe used for?
Mediaget.exe is an executable file that belongs to the Mediaget Torrent client. It is not an essential Windows file, but software developed by MediaGet Developer. The .exe file does the following:
Allows you to watch the downloaded media in the same application, even while downloading.
Used as torrent search and download for your favorite media content.
Often, the application runs as a background process to ensure continuous media downloads.
Should you remove mediaget.exe?
If you notice the process running in your Task Manager, your first thought is to disable it. This is because Microsoft didn’t develop the file, which is not essential to the system’s functionality.
The file is not considered malicious but can still be a security threat if corrupted or camouflaged as a virus. In such cases, disabling it is the only way to protect your PC.
Is mediaget.exe a virus?
If you’re still unsure about the legitimacy of mediaget.exe, the following are a couple of verification processes you can follow to check the file’s legitimacy:
Check the spelling – The best way to know a dummy file is to check the file’s name. The file is not genuine if it’s incorrectly spelled with variations other than mediaget.exe.
Verify Digital Signature – Every software a developer releases is digitally signed according to their name; if the signature isn’t Mediaget, the file is not genuine.
If you find out that the file is not legitimate or just want to get rid of it, here’s how you can do that.
How can I remove mediaget.exe?
1. Disable the process in the Task Manager
Right-click on the Windows button, and select Task Manager from the menu.
Locate mediaget.exe in the Processes or Details tab, click on it, and select End Task.
Click OK in the popup window to confirm that you want to end the task.
Restart your PC to finalize the process.
Disabling the mediaget.exe process in the Task Manager stops the software from operating and prevents any threats that the software can cause.
Right-click the Start menu and select Task Manager from the menu.
Then, locate mediaget.exe in the Processes or Details tab, right-click on it, and click on Open File Location.
Further, right-click on mediaget.exe in the next window, and click on Delete.
Once the file is deleted, restart your PC to check if the error is fixed.
Deleting the executable file directly from the software’s folder location will disable the software and its operations.
While deleting, you can run into the can’t delete folder error, ensure you read our guide to fix it.
If you’ve got any more questions or suggestions, please let us know in the comments. You can also check out our guide on how to fix too many background processes on Windows.
— HazzadorGamin, Dragon of Dojima (@HazzadorGamin) June 27, 2023
For those of you who don’t know, Ninja Theory has developed and released the beloved Hellblade: Senua’s Sacrifice, a Dark Souls-inspired action-adventure game set in a dark fantasy world. It went on to sell over 1 million copies in less than a year after its release.
And it was also a critical success, far beyond the scope of an independent game studio, which Ninja Theory was at the time.
However, in 2018 Microsoft approached Ninja Theory with an offer, and the purchase was made then. It is revealed now that Microsoft actually paid $117 million for the studio. Which now is a good deal, because the studio is preparing to release Hellblade 2 in 2024. And it will surely be a win for Microsoft.
Is $117 million enough for Ninja Theory?
Of course, there is also the question of whether $117 million is enough for a game studio such as Ninja Theory. Considering Microsoft plans to pay $68.7 billion for Blizzard, $117 million for Ninja Theory seems very little compared to what the studio offers.
Yes, we can’t really compare the two game studios. Blizzard has some big titles in its repertoire, with names such as Diablo, World of Warcraft, and many more earning a lot of money monthly. But not all agree on the sum received by Ninja Theory.
Seems pretty cheap for such a talented studio.
Reddit user
Let’s not forget that Hellblade: Senua’s Sacrifice sold 1 million copies in less than a year after its release. And the game also established itself as an important point in the gaming industry. It was widely acclaimed by critics, who are seeing it as a fine example of video games as art.
And it also helped revolutionize the genre. It brought a complex story, and its depiction of psychosis in video games made it a cult classic.
So there is no doubt Microsoft will greatly benefit from this release. Ultimately, it’s good that Ninja Theory now has the means to build video games that come from a passionate team. Let’s just see how Microsoft will play into it in the long run.
What are your thoughts on this? Be sure to let us know in the comments section below.
Executable files are indispensable for launching applications but some of our readers have noticed an uncommon file which is the mictray64.exe.
If you’d like to know more about the mictray64.exe file, this article provides a complete overview and steps to help you remove it.
What is mictray64.exe?
mictray64.exe is an audio driver file developed by Conexant Systems, Inc. The file aids the Conexant Audio II driver interface allowing users to control program settings related to Conexant audio chipsets.
The mictray64.exe is not a Windows essential file but plays a vital role in facilitating the functionality of Conexant audio devices.
Should I remove the mictray64.exe?
Traditionally, the mictray64.exe is a legitimate file with a digital signature signed by Verisign. However, you might have reasons to disable the file because it can also act as a keylogger which can cause harm to your PC.
Since the file is not a Windows essential file, you’ll have no problems if you choose to remove or disable it. However, it can affect the functionality of Conexant devices.
How to verify if it’s safe?
If you’d like to keep the mictray64.exe file but need to be sure it’s safe, here are a couple of ways to verify if the file is safe or a virus:
Check the Digital signature – The legitimate mictray64.exe file should have a Verisign digital signature; if it doesn’t, the file is not genuine.
Check the file name – The correct iteration of the file is mictray64.exe; if you notice a file with any variation, the file is not genuine.
If you discover that the file is not legitimate or you just want to get rid of it, here’s how to remove mictray64.exe.
How can I remove the mictray64.exe?
1. Scan for viruses
Press the Windows key, type in windows security, and hit Enter.
Then, click on Virus and Threat Protection. Under the Current Threats section, click on Scan Options.
Select the Full Scan option and click Scan Now to initiate the scan.
If the mictray64.exe is camouflaged as a virus, you can remove the file by running a virus scan. You can also check out our guide on the best third-party antivirus software for Windows.
One of our top products from the third-party antivirus software list is TotalAV because it scans your PC’s system in-depth to eliminate almost immediately any kind of digital threat.
2. Disable and delete via the Task Manager
Right-click on the Start button and select Task Manager from the menu.
In the Task Manager window, locate mictray64.exe in the Processes or Details tab, click on it, and select End Task.
Click on OK if you’re prompted to confirm the operation.
Right-click the mictray64.exe and click Open file location.
Then, right-click the file and select Delete.
Repeat the steps till you’ve disabled all running instances of mictray64.exe and close the Task Manager.
All executable files have running processes that can be accessed in the Task Manager; disabling the mictray64.exe process is one way to restrict the program from functioning. Here are some alternate shortcuts to open the Tasks Manager.
Gone are the days of struggling with complicated editing tools and spending endless hours trying to fix noisy backgrounds or dull colors.
With advanced tools like Filmora Video Editor, you get AI-powered features to enhance clarity, remove unwanted noise, and infuse vibrant colors into your footage.
This guide will discuss the challenges video curators face regarding noise & color correction, how AI can help, and how to use the Filmora Video Editor to create visually striking works of art.
What are the challenges with noise & color issues in your videos?
Removing noise and adjusting colors manually is time taking, but that’s not the only problem you face as content creator; some of the common ones are listed here:
Background noise – Often, you deal with unwanted background noise, such as wind, traffic, or equipment hum, which can distract from the main audio content.
Color inconsistencies – Maintaining consistent color throughout a video can be challenging, especially when footage is captured under different lighting conditions or from multiple sources.
Over/underexposure – Incorrect exposure settings during shooting can lead to washed-out or dark & muddy footage, requiring adjustments during editing.
Technical limitations -Some video editors may not have the hardware capabilities or correct software to address noise & color issues and get desired results effectively.
So, these are challenges that a video editor may face while editing videos with heavy noise and color issues.
What is AI Denoise technology?
AI Denoise technology refers to using artificial intelligence algorithms to reduce or remove noise from audio or visual content.
By analyzing patterns and characteristics of noise, AI Denoise algorithms can intelligently filter out or minimize unwanted noise, resulting in cleaner and clearer audio or visual output.
This technology is particularly useful in video editing, where it helps enhance the quality and overall viewing experience by reducing distracting background noise in videos.
How can Filmora’s color correction capabilities help?
Color correction capabilities can significantly assist video creators in enhancing their footage’s color quality and overall visual appeal. Here’s how it can help:
Efficient color enhancement — Through lookup tables or color temperature features, users are able to quickly unify different clips into the same color tone to have the look they want.
Color accuracy — By balancing out the contrast and lighting in the clips using color match and color correction tools, videos will look more consistent and natural.
Overall, Filmora’s color correction capabilities provide robust and efficient tools to enhance the color quality of videos, enabling video creators to achieve their desired visual aesthetics with ease.
Double-click the installation file and click Install.
Follow the onscreen process to complete the installation.
2. Remove noise
Once the software is installed, launch it and click New Project.
Select Click here to import media. Choose the media file and click Open from the next window.
Once added to the tool, drag the media file to add it to the timeline.
From the toolbar at the top, click Effects.
In the search bar, type smart denoise and select it from the list.
Select the video clip and then drag the Smart Denoise effect to the timeline. You can modify the Opacity, threshold, and Radius.
To denoise audio separately, right-click the video in the timeline and click Detach Audio.
Double-click the Audio track to open the editing panel, locate Denoise and adjust the settings as you like.
3. Adjust colors
Double-click the video to open the editing panel and select the Color tab.
Right below presets, you will find LUTs, where you can find and select one of our LUTs and adjust the strength of it. As seen in the sample below, the Gravity LUT is selected, and the strength is adjusted to 40%.
To adjust color manually, scroll down to find the temperature, tint, vibrance, and saturation adjustment tools. Adjust the toggler based on your desired color look.
Scroll down further in the color tab to find the contrast and lighting adjustments. In the sample below, you can see that the exposure, brightness, and contrast were adjusted using the toggler.
To access the Color Match tool, scroll down to the very bottom of the Color tab. There, you will find a button where you can show the color match tools.
Once the Color Match tool is turned on, you can select Comparison View where you will be able to match the colors of your clip based on another part of your video. Sample shown below.
Filmora Video Editor
Removes pesky background noises and the dull, lifeless colors plaguing your videos.
How can Filmora Video Editor help you as a content creator?
Filmora Video Editor offers several benefits, making it a valuable tool for your video editing arsenal. Here are some key advantages:
Wide range of features – It offers comprehensive features and tools to enhance and refine videos, including trim, crop, merge, color grading, audio mixing, and visual effects.
AI denoise & color correction – These tools help reduce background noise and enhance video quality, producing professional-looking and visually appealing content.
Extensive media library – It provides an extensive library of built-in elements, including royalty-free music, sound effects, transitions, titles, and overlays.
Multiple output options – The tool supports various output formats, including MP4, WMV, AVI, HEVC, MOV, & MKV, which makes publishing content on social media platforms easy.
With a user-friendly interface, AI-powered enhancements, a versatile media library, output flexibility, and ongoing support, Filmora Video Editor is a beneficial tool for content creators.
So, are you ready to take your videos to the next level? Download Filmora Video Editor now and discover the true potential of your videos.
If you have any questions or concerns, feel free to mention them in the comments section below.
While installing the gaming services for your Xbox device, you can trigger the 0x80073d27 error. When it occurs, you’ll be unable to access the Xbox service.
In this article, we’ll discuss some common causes of the error and provide steps to fix this gaming services issue.
What causes the 0x80073d27 error?
The 0x80073d27 error is caused by the following:
Outdated software – If you’re running an outdated version of the Xbox gaming services, it could be the reason behind the 0x80073d27 error.
Conflicting third-party apps – Sometimes, the operations of third-party apps can conflict with Windows essential apps causing the apps to crash or display an error message.
Press the Windows key, type in cmd, right-click on the app, and select Run as Administrator.
Click Yes in the UAC window to open the command prompt as an administrator.
In the command prompt window, type the following and hit Enter: wsreset
This will reset the Microsoft Store application, close the command prompt, and restart your PC to apply the fix.
If the Microsoft Store is not loading due to a corruption by viruses and malware, it can cause errors. Resetting the app reverts it to its default settings, free of errors and bugs.
Press the Windows key + I to open the Settings app.
In the Settings app, click on Apps and select Installed apps.
Click the search bar on the right pane, and type Gaming Services to locate the app. Then, click the options icon and select Advanced Options.
Click Reset in the next window and click Reset again to finalize the app reset.
4. Reinstall the Gaming services
Press the Windows key, type PowerShell, right-click on the app, and select Run as Administrator.
Click Yes in the popup UAC window.
In the PowerShell window, enter the following commands simultaneously: Get-AppxPackage *gamingservices* -allusers | remove-appxpackage -allusersRemove-Item -Path "HKLM:\System\CurrentControlSet\Services\GamingServices" -recurseRemove-Item -Path "HKLM:\System\CurrentControlSet\Services\GamingServicesNet" -recurse
Hit the Enter key after typing each command till you execute the last command.
Close the PowerShell and restart your PC to check if the 0x80073d27 error is resolved.
Running the above commands cleans up corrupt registry entries. If damaged registry entries cause the error, this step will help fix it. Check out our guide on how to fix PowerShell if it’s not working.
Fixing the 0x80073d27 error is easy and involves little technicality; with the steps listed here, you should be able to resolve it.
If you’ve got questions or further suggestions on fixing the error, let us know in the comments.