Microsoft recently shipped a major feature drop bringing tons of new features as well as improvements to Windows 11, version 22H2. The update, also “Moment 3” has been in the testing phase via some Windows Insider and the company started rolling it out to more users on May 24, 2023, as an optional update.
For those not aware, Moment is an internal codename that Microsoft uses to refer to new features and improvements it intends to ship to the OS. And as we had previously highlighted, the Moment 3 update brings with it a plethora of new features designed to enhance the user experience.
This will be the second major feature drop that Microsoft is making this year. The company made the first drop earlier this year in February. Moment 2 featured tons of new features as well as quality-of-life improvements such as the injection of AI capabilities to the OS which saw Bing Chat make its way to the Taskbar’s search box, Phone Link support for iOS, and more.
Moment 3 is currently an optional update, Microsoft intends to bump everyone to the latest version of Windows 11, version 22H2 via the next Patch Tuesday update which is slated to start rolling out on June 13, 2023. And while you can opt to wait till Microsoft starts pushing this update to everyone, you can go right ahead and download it now.
Preliminary checks
The Moment 3 feature drop ships with major updates to the Widget board in Windows 11, the reintroduction of the second clock that most users appreciated. Additionally, the update is also expanding the Live Captions feature in Windows 11 accessibility to more users. Once this update ships, the feature will be available to ten additional languages across 21 regions.
Microsoft is also changing the Print key’s function, after an eternity of using it to quickly grab screenshots. It’ll now launch the Snipping Tool which also ships with a screen recording feature. However, you can revert back to the previous arrangement via the Settings app.
Before proceeding to download and install the Moment 3 update on your Windows PC to access all these features and more, you must first ensure that it meets the following requirements as highlighted by Microsoft:
Windows 11, version 22H2 is broadly available to all users with eligible devices who check for updates. Microsoft is delivering continuous innovation to Windows 11 more frequently. If you’re using Home or Pro consumer devices or non-managed business devices running Windows 11, version 22H2, you can get some of these newest experiences as soon as they’re ready for your device.
How to quickly download and install the Moment 3 feature drop
Now that you’ve already ascertained that your WIndows PC meets the minimum system requirements, you proceed to download the update. Here’s how:
Click on the Start icon on the Taskbar, and select the Settings app.
Next, scroll down the left pane on the Settings app and click on the Windows Update option.
Then, scroll down the Windows Update and select Advanced options.
Select the update you’d like to install on your PC and click on the Download and Install button.
Do more with the Moment 3 update in Windows 11
Be sure to catch up with our feature post to learn about everything new shipping with this new update and more. Admittedly, Microsoft is living up to its promises, as earlier indicated last year when it said it had big plans for Windows 11 in 2023.
As earlier explained, Microsoft highlighted its intentions to start shipping updates to Windows 11 version 22H2 more frequently. This is the company’s second feature drop this year. Windows 11 version 23H2 is already in the works and the company is getting ready to release it to broad availability later this year.
It’s that time of the week. Microsoft just launched a new build for Windows 11 insiders. Now live in the Dev channel, insiders can install Build 23466, containing a lot of new exciting updates that you can try right now.
The good news is, this isn’t just a weekly build with little to no relevance. In our previous reports, we mentioned the inclusion of Microsoft’s Copilot AI assistant tool and the Dev Drive feature in Windows 11. So, out of all the builds released thus far, the current 23466 build is the only one that incorporates the latter feature.
If you’re a developer who often deals with repositories containing thousands of files and directories, this is an exciting feature. Dev Drive introduces a novel storage volume aimed at enhancing performance for critical developer tasks. It utilizes the Resilient File System (ReFS) technology and incorporates various optimizations and features specifically tailored to meet developers’ requirements in terms of performance and security management.
As we’ve previously reported, Dev Drive should also not be used to store developer tools like Visual Studio, MSBuild, .NET SDK, Windows SDK, etc. These tools should be stored on your main C:\ drive.
Additionally, the Windows Backup app is also here. This new application can magically back up your current PC and help you migrate swiftly.
Once your data is backed up, either through the Windows Backup app or via the Accounts/Windows Backup settings, you can explore the new restore functionality during the out-of-box experience (OOBE) when setting up a new PC or by resetting an existing PC with this build.
Besides the Dev Drive and the new backup app, what other feature does this build bring, you may ask? Here’s everything we’ve noted from its official release note if you want to take these for a spin.
H2: What other features does Windows 11 build 23466 bring to the table?
[General]
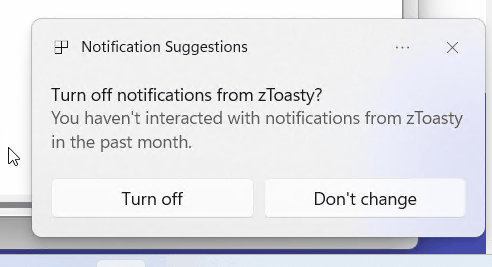
To minimize distractions from notification toasts, we now detect if the user is interacting with toasts or not and provide a suggestion to turn the toast banners off for such apps. This will only stop the banners from appearing, and you can still find the toasts in the notification center. This feature is beginning to roll out, so not all Insiders in the Dev Channel will see it right away.
Suggestions to turn the toast banners.
[Start menu]
We are trying out a different model for ranking the most recently used files in the Start menu’s Recommended section that considers when the file was last used, the file extension, and more. This means you may not see files purely in reverse chronological order of when they were last used.
[Taskbar & System Tray]
We’re excited to bring you an early version of one of our most requested features for Windows 11, never combined mode. In never combined mode, you’ll be able to see each window of your applications on the taskbar individually, as well as their corresponding labels. You can find this feature by navigating to Settings > Personalization > Taskbar > Taskbar behaviors. This feature is beginning to roll out, so not all Insiders in the Dev Channel will see it right away.
Taskbar in never combined mode.
[Search on the Taskbar]
We are beginning to re-roll out the exploration of a new hover behavior for the search box and search highlight gleam. This originally began rolling out with Build 23440 but was disabled to address a bug. The proposed interaction model aims to create a more engaging search experience by invoking the search flyout when you hover over the search box gleam. This behavior can be adjusted by right-clicking on the taskbar, choosing “Taskbar settings” and adjusting your preferred search box experience.
[File Explorer]
The Windows App SDK version of File Explorer is now fully rolled out to Insiders in the Dev Channel and as a result, we are removing the “pizza” icon on the command bar.
[Emoji]
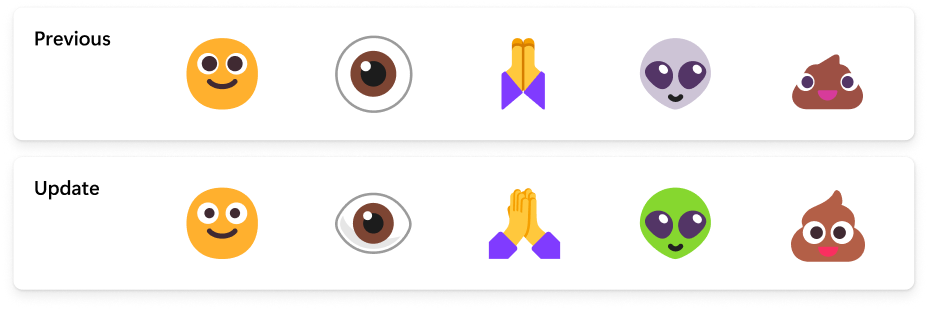
We have seen your feedback and are updating a few emoji in our current set. Everything from making the eye more recognizable to changing our alien to be out of this world. We know there are a few bugs in this release which will be resolved in future flights.
Examples of updated emoji in our current set.
[Windows Security]
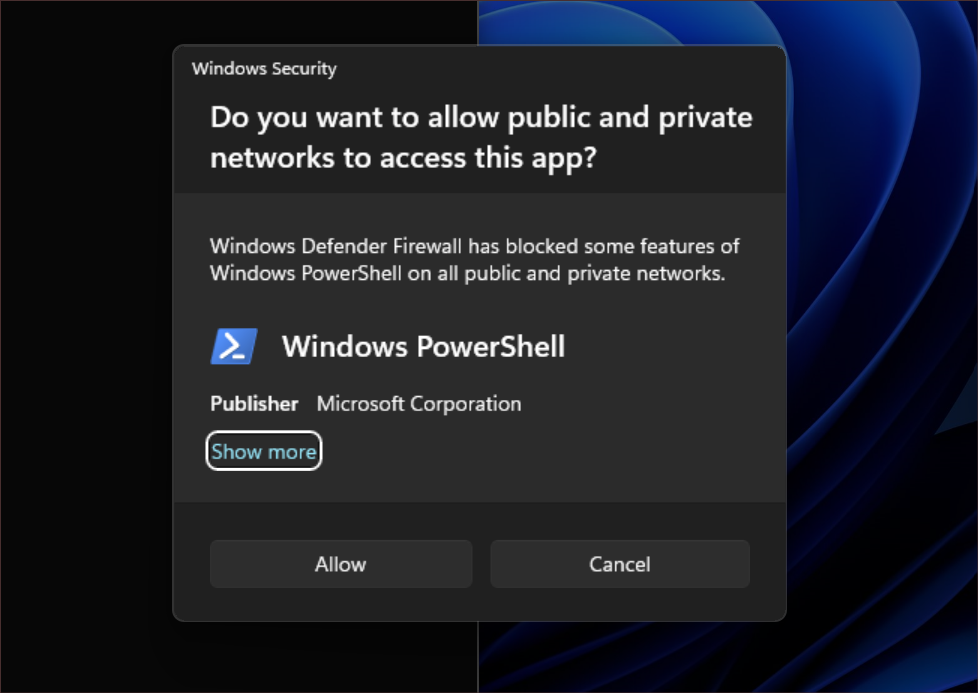
We have updated the Windows Security (firewall) notification dialogs that match the Windows 11 visuals.
Updated Windows Security (firewall) notification dialogs.
[Networking]
Added support for bridging adapters via command line via netsh.
Passpoint Wi-Fi networks will now support enhanced connection performance and will display a URL in Quick Settings to provide information to users about the venue or event.
We added WPA3 support to the Phone Link instant hotspot feature for more secure connections to a phone’s hotspot. Also made fixes to respect metered connection settings, reduce duplicate profiles, and show the phone’s display name in the network list.
[Settings]
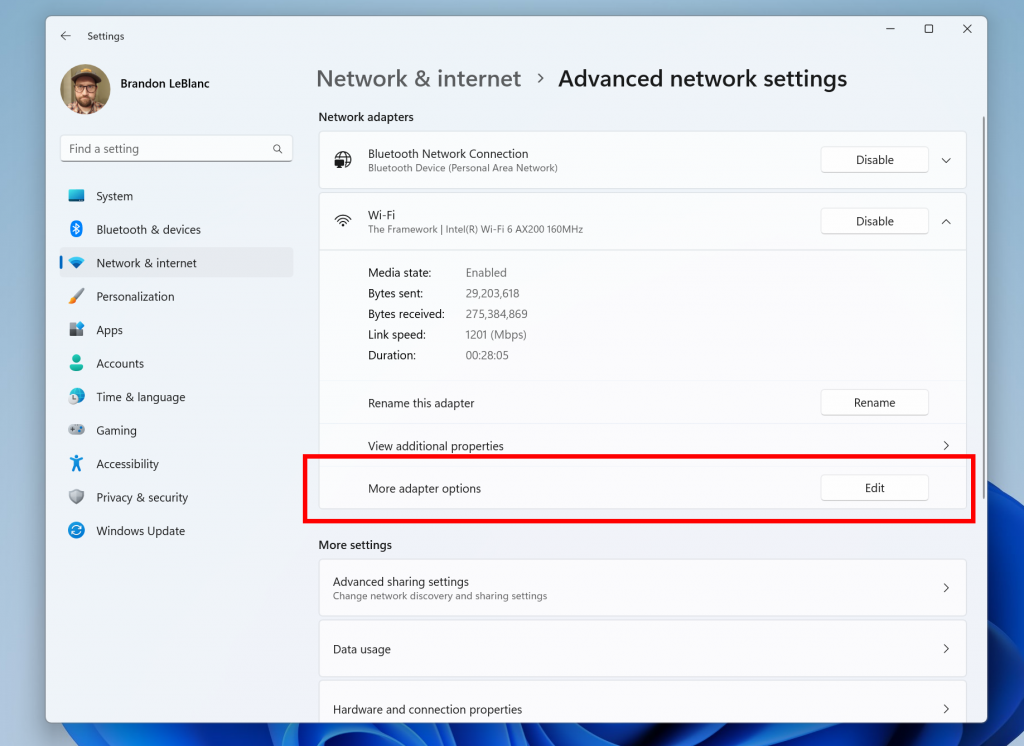
We have added links to advanced properties for network adapters and internet properties under Settings > Network & internet > Advanced network settings.
Link to advanced properties for network adapters in Settings.
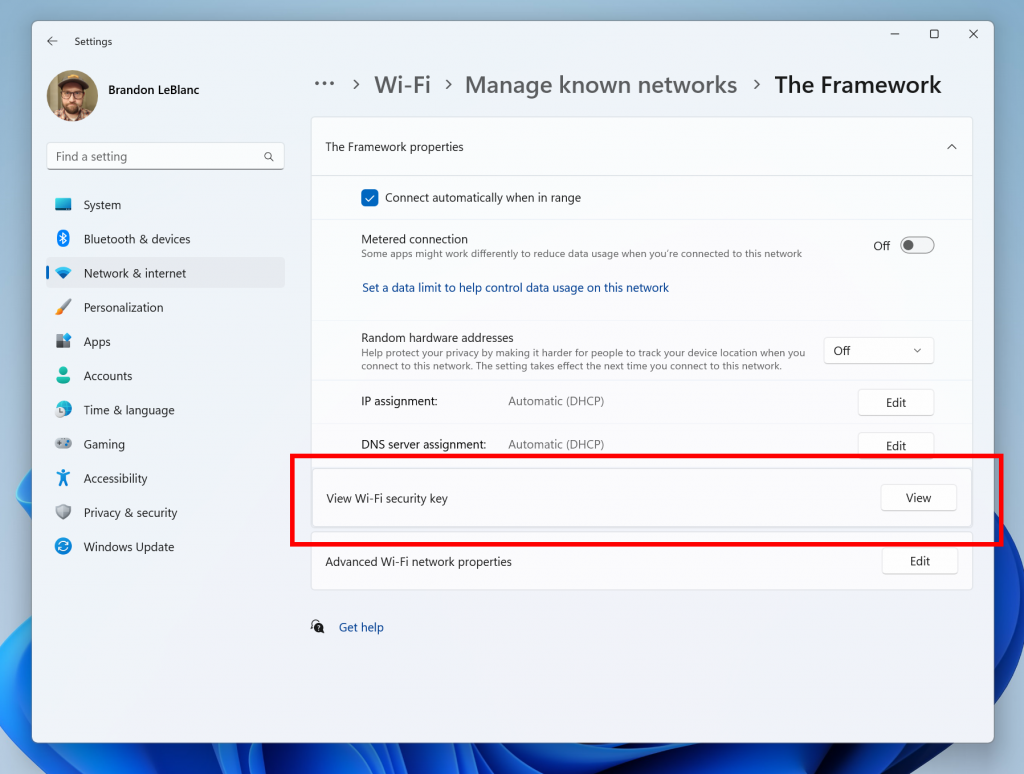
We have added a way to view Wi-Fi passwords for your known networks via Settings > Network & internet > Wi-Fi and “Manage known networks”.
View Wi-Fi passwords for known wireless networks in Settings.
We added the ability to join Bluetooth Personal Area networks under the Settings > Bluetooth & devices > Devices This option will appear for paired devices like Phones that are sharing internet over Bluetooth.
Based on your feedback, we have added additional options to the Data Usage page that allows for daily and weekly data limits. The page will also now show how far a data limit has been exceeded.
Updated the design of the lists displayed under Settings > Apps > Startup Apps and Settings > Apps > Advanced App Settings > App Execution Alias pages to be more consistent with other Settings pages.
Updated Settings > Apps > Startup to make it easier to access more information about the apps listed.
[For Developers]
We are moving the “For Developers” settings page from Settings > Privacy & security to now be under Settings > System.
Fixes
[File Explorer]
We fixed the following issues for Insiders previewing the Windows App SDK version of File Explorer
Fixed an issue which could cause File Explorer or the Control Panel to become unresponsive to clicks after invoking the context menu.
Fixed an issue where File Explorer and taskbar weren’t responding to light and dark mode changes (until explorer.exe was restarted) if you had this version.
We fixed the following issues for Insiders with Gallery in File Explorer:
Added icons for the entries in the Collection dropdown in Gallery.
We fixed the following issues for Insiders with the modernized details pane in File Explorer:
Fixed an issue where Narrator wasn’t saying anything when opening and closing the details pane.
[Taskbar]
Fixed an issue where the taskbar in multi-monitor setups would show the indicator for an app window having focus on your screen when it actually didn’t.
[Search on the Taskbar]
We fixed the issue causing some users to see content flicker before the content finishes loading when the search flyout is opened.
We fixed an issue causing search to crash on launch for some Insiders in the previous build.
[Notifications]
Fixed an issue which was making the Notification Center and Notification page in Settings crash when switching do not disturb status for some Insiders in the last few flights.
[Task Manager]
The search icon should be easier to see now when using a contrast theme.
Pressing enter when keyboard focus is on one of the sections (like Memory) in the Performance page should now actually switch sections.
Made the navigation pane a bit narrower. As part of this change, when necessary, the text will be wrapped now.
The creation of live kernel memory dump file submenu has access keys now.
Resizing Task Manager from the top of the window should work now.
[Settings]
Fixed an issue which was causing Settings to crash randomly sometimes when navigating away from certain pages.
[Windows Spotlight]
Fixed an issue which was causing explorer.exe to crash when selecting “learn more about this picture” in the previous flight.
Have you joined the Dev Channel and installed Windows 11 build 23466? Let us know in the comments!
The Minecraft exit code 6 mostly denotes an issue with your JAVA file. It is usually caused by outdated antivirus software, issues with the runtime libraries, or outdated graphics drivers.
If you are also dealing with this error, rest assured that there are proven solutions that can resolve it, and we will detail them in this guide.
How do I fix Minecraft crash exit code 6?
1. Update your PC
Press the Windows key + I to open the Settings app and select Windows Update in the left pane.
Click the Check for updates button.
Now, download and install all available updates.
If you have not updated your PC in a long time, you are likely to miss out on important security updates. Also, the Windows Defender patches are included in the available updates.
When your security software is outdated, it can lead to the Minecraft exit code 6 error. Hence, it is important to download and install all available updates, including the optional ones.
2. Update the graphics driver
Press the Windows key + X and select Device Manager.
Double-click the Display adapters option to expand it, and right-click your graphics adapter.
Now, choose the Update driver option.
Finally, select Search automatically for drivers and install any available update.
3. Reinstall runtime libraries
Press the Windows key + R, type appwiz.cpl, and click OK. app
Right-click the Microsoft Visual C++ Redistributable Package and select Uninstall.
Now, follow the onscreen instructions to complete the process.
Some users refer to Minecraft exit code 6 as the runtime error. And some users have been able to fix it by updating the runtime libraries. So, you should try it too.
Press the Windows key + S, type cleanmgr, and select Disk Cleanup.
Next, click the Cleanup system files button.
Choose the drive you want clean and click OK.
Finally, tick the files you want to clear and click the OK button.
Sometimes, this issue might be due to the accumulation of junk files on your PC. Clearing these files with the Disk Cleanup feature should solve the problem for good.
The Minecraft exit code 6 error is one of those that is hard to pinpoint its exact root cause. However, you should be able to fix it by applying the solutions in this guide carefully.
If you are dealing with the 0x89245102 Minecraft error, we have a comprehensive guide prepared to help you solve it.
Did you encounter any problems applying the fixes above? Feel free to share your experience with us in the comments below.
The much-requested feature is finally here, with Microsoft saying it should go live today, on the 24th of May.
It seems that the tech giant is releasing a lot of updates for Privacy settings, security issues, and accessibility features, and the glanceable VPN icon on the Windows 11 taskbar feature is a great way to know that you are secure and safe on your PC.
The VPN icon appears just on top of your Wi-Fi connection icon with a locker-shield-shaped form; when it is on, and you can check it out by looking at your Wi-Fi icon, it means everything is ok.
How to add the glanceable VPN icon on your Windows 11 taskbar
Truth is, you don’t really have to do anything to turn your VPN icon on, other than just making sure you are connected to a secure network with a recognizable VPN.
If you are already on such a network, the VPN icon will turn on automatically, as in the picture below.
You should know that this feature is an option, so you can easily disable it by accessing Quick Settings and turning it off.
Besides the VPN icon on your taskbar, Microsoft is also releasing other features for better protection of your PC. For example, the new app privacy settings will give you the ability to allow or block access to presence sensor information.
You can now be able to easily enable and disable presence-sensing features like wake on approach/lock on leave.
Starting in June, you will also get an alert on your Start menu when your account needs attention, making it even easier to ensure your information and PC are protected.
What do you think about the Windows 11 VPN status icon and the other features? Are they helpful or not? Let us know in the comments section below.
Users that create macros either need to change the default security settings of their macros or sign their code with a digital certificate. However, Microsoft has devised a way around this with the SelfCert.exe file.
This tool allows you to sign your macros and run them on Outlook without tampering with your security settings. In this guide, we have explained everything you need to know about the SelfCert.exe file and how to use it.
What is SelfCert.exe?
SelfCert.exe is otherwise known as Digital Certificate for VBA projects. In the early days of VBA support in Microsoft Office, it was usually exploited.
The SelfCert.exe provides the needed level of security by allowing you to create a self-signed digital certificate. With this, you can reduce the impact of rogue codes on your microcode.
Where is SelfCert EXE on Windows 10?
The SelfCert.exe file is located in the Microsoft Office root file. Below is the path to follow to locate it: C:\Program Files\Microsoft Office\root\Office16
Note that the Office16 in the path will depend on the version of your Microsoft Office version. If you are using a 64-bit PC with a 32-bit Office file, you will find the file in the path below: C:\Program Files (x86)\Microsoft Office\Office16
Anytime you need to launch the file, you can do it from either of the paths above.
How do I launch the SelfCert EXE file to create a self-signed digital certificate?
1. Create a digital certificate
Press the Windows key + E to open File Explorer.
Now, navigate to the path below: C:\Program Files\Microsoft Office\root\Office16
Double-click the SELFCERT file to launch it.
Next, fill the Your certificate’s name box appropriately and click the OK box.
You should now get a SelfCert Success message to show that the process is complete.
Creating a digital certificate using SelfCert.exe is the first step in securing your macros. However, you need to know how to use the certificate and make it work properly. We will show you how to do this in the following sections of this guide.
2. Using the digital certificate
Open any Microsoft Office app you want to use the digital certificate you created with.
Click the File tab at the top and select Options.
Now, choose Customize Ribbon in the left pane.
Check the Developer box and click the OK button.
Next, click the Developer tab at the top.
Now, select the Macro Security button under the Code section.
Tick the Enable all Macros radio button and click OK.
Under the Code group, choose Visual Basic.
In the Visual Basic for Applications window, choose Tools > Digital Signature.
Now, click the Choose button.
Finally, select the newly created digital certificate and click the OK button.
With the steps above, you can now use your SelfCert.exe digital certificate with your Office app. After following these steps, make sure you save your work.
Also, we used Excel as an example in this case, but the process is the same for other Microsoft Office apps.
Press the Windows key + S, type internet, and click Internet Options.
Click the Content tab at the top.
Now, select Certificates.
Here, you can now delete and export your certificates.
At times, you might need to delete the signed certificate you created using the SelfCert.exe tool. Also, if you need to export it to another PC, the steps above should help you do it.
We can now conclude this guide on creating a Digital Certificate with the SelfCert.exe tool. You should be able to take full advantage of the tool with the information in this guide.
Are you wondering what the ose.exe process is? Check our detailed guide for the crucial points you need to know about it.
Microsoft is coming with big announcements this week, but the Redmond tech giant always makes sure to give us even more tips for the road ahead. This time it announced that you’ll be able to attach the Edge sidebar to the Windows desktop very soon.
According to the Microsoft 365 roadmap, if you’re an Edge user, you will be able to access your apps and sites directly from your Windows desktop. You will also be able to attach it to your desktop. Microsoft calls it an “opt-in experience.”
This feature will be live next month to the general public worldwide, and it is currently just on the web platforms.
As it is an option, you can choose to attach the Edge sidebar, or not. However, Microsoft says that the option will grant streamlined access to apps and Bing chat without having to open Edge.
There is an advantage if you choose to attach the Edge sidebar to the desktop
Microsoft emphasizes that the option will not only streamline access to your favorite apps, but it will also enhance productivity no matter where you are in Windows, and what you are doing.
The feature will also let you search for information and use your apps without putting Edge to work, thus improving the performance of your system.
And when you think about enhanced productivity, it also makes sense. You won’t need to get lost in tabs because you’re going to search for what you need and continue your work in a seamless way.
Even more, the feature works with every Windows app, including, of course, Edge, so having a sidebar at your disposal when you’re taking notes in OneNote, or working and writing something in Word can be very useful.
What do you think about this feature? Will you enable the Edge sidebar on your Windows desktop? Let us know in the comments section below.
If you encounter the invalid_mdl_range BSOD error, there was an effort to access an inappropriate memory range in the system’s memory descriptor list (MDL).
This error would cause a system crash and may be frustrating; however, with the solutions we recommend in this guide, you should be able to resolve the issue.
What causes the invalid_mdl_range BSOD?
From the complaints of some readers, we gather that any of the following may trigger the BSOD on Windows:
Faulty hardware – If you encounter the invalid_mdl_range error, defective RAM modules, or malfunctioning storage devices are common culprits of such issues.
Outdated or incompatible drivers – Having outdated or incompatible drivers can lead to an invalid_mdl_range BSOD. It is crucial to ensure that your drivers are regularly updated.
Malware or virus infection – If your system files, particularly those related to memory management, get corrupted due to malware or viruses, it can cause the BSOD error to occur.
Memory overclocking – When the clock speeds are increased beyond the memory’s capacity, it can lead to memory-related errors like the BSOD error.
Software conflicts – When software applications or drivers clash, it can disrupt memory management and cause the error to occur.
How do I fix invalid MDL range?
We recommend the following workarounds before exploring detailed troubleshooting options:
Run a malware scan – Since a virus may trigger the error, we recommend using a comprehensive antivirus to run a scan before any other solutions.
Restart the PC – A reboot is often effective in ending problematic processes and may resolve minor glitches.
On the left pane, click Windows update, then select Check for updates on the right.
If there are updates, click Download & Install.
Wait for all updates to be installed, and if required, finally restart your computer.
4. Run the DISM scan
Press Windows + R to open the Run dialog.
Type cmd and hit Ctrl + Shift + Enter.
Type in the script below and hit Enter. DISM.exe /Online /Cleanup-image /Restorehealth
Optionally, type in the script below and hit Enter to run the SFC scan. SFC / Scannow
Restart the computer if required and verify it fixes the invalid_mdl_range error.
There you go. Any fixes we have explored should suffice in fixing the BSOD error on a Windows device. It would be best to start with any that feels most applicable to your situation.
You may also consult our other guide on fixing Windows 11 OS BSOD errors. And lastly, let us know which fixes worked in the comments section.
A few of our readers have complained about the notification AADSTS90014: The required field request is missing from the credential. Ensure that you have all the necessary parameters for the login request.
In this guide, we take you through all you need to know to fix it, including possible solutions you should adopt.
What is the AADSTS90014: required field is missing error?
The error is a code related to Sharepoint or Azure Active Directory (AAD) authentication. It typically occurs for any of the following reasons:
Missing credential fields – It could happen if some necessary information is missing from the credentials provided while authenticating.
Incorrect credential format – Maybe the credentials provided do not match the expected format for authentication. This may be due to a username being in the wrong form or missing a domain prefix.
Invalid or expired credentials – The provided credentials may be invalid, expired, or revoked, preventing successful authentication.
OS updates – You may encounter the AADSTS90014 error if your operating system is not up-to-date and does not support the latest authentication protocols needed for Azure Active Directory.
How do I fix the AADSTS90014: required field is missing error?
Before going into the detailed solutions you may want to try the following workaround:
Check for specific OS requirements – Confirm if there are any particular prerequisites or suggestions for the OS versions when it comes to authenticating through Sharepoint or Azure Active Directory. Please, consult the Azure documentation or reach out to the service provider.
Verify your credentials – Review the provided credentials to confirm that all necessary information has been supplied and is accurate.
Check the credential format – Ensure that your credentials have the correct format for authentication. This means making sure that the username contains the domain prefix if necessary.
Now you may proceed with the solutions that we explore below.
1. Update to the latest OS
Press Windows + I to open the Settings app.
On the left pane, click Windows update, then select Check for updates on the right.
If there are updates, click Download & Install.
Wait for all updates to be installed, and if required, finally restart your computer, which should fix the AADSTS90014 issue.
2. Upgrade your operating system
If your current operating system is no longer compatible with Azure Active Directory, it is recommended that you upgrade to a newer version that meets the requirements. Doing so will enhance security, improve compatibility, and provide better support for authentication processes.
We have written an extensive guide on upgrading to Windows 11 operating system. After the upgrade, verify it fixes the AADSTS90014 error.
Launch your browser (we use Chrome in this example, and the steps may slightly differ on other browsers).
Press Ctrl + Shift + Del.
Select a Time range, tick all the checkboxes, and hit the Clear data button.
Finally, relaunch the service on your browser and verify the fix works.
If the problem continues, we suggest contacting the support channels of the service or app you’re trying to authenticate with. They can offer additional guidance and help in resolving the AADSTS90014 error.
However, you may note that waiting it out may work for some readers, as this may be a server problem beyond your control.
That will be all for this guide. Please let us know in the comments section what solution worked.
You might run into an error message that says There were problems installing some updates, but we’ll try again later. If you keep seeing this and want to search the web or contact support for information, this may help (0x80070426).
This usually happens when you want to install new Windows updates but keep getting this error. If you’re looking for ways to resolve it, this article will be of much help.
What causes the Windows Update error 0x80070426?
The update error 0x80070426 is a generic error that occurs whenever you run Windows updates. Some of the possible reasons behind it include:
Corrupt or damaged system files -This can be caused by software or hardware issues or viruses.
Corrupt Windows Updates – If you have downloaded a corrupt Windows Update, then it will fail to install.
Outdated drivers – Driver problems are one of the most common causes of problems during Windows Update installation attempts.
Low disk space – When your hard drive has low disk space, it will result in slower loading times and freezing issues whenever you’re downloading an update.
Missing update files – Sometimes, due to missing files, Windows updates cannot complete installation because these files are critical for the update process.
How can I fix the Windows Update error 0x80070426?
Before any technical troubleshooting, we recommend that you perform the following basic checks:
Hit the Start Menu icon, type cmd in the search bar, and click Run as administrator.
Type the following commands and press Enter after each one:DISM.exe /Online /Cleanup-Image /Restorehealthsfc /scannow
Furthermore, if you think your Windows system needs other repair actions, you can rely on a specialized system repair tool.
4. Disable firewall/antivirus temporarily
Hit the Start menu icon, type Windows Security in the search bar and click Open.
Click on Firewall & network protection, then select Public network.
Locate Microsoft Defender Firewall and toggle the off button.
5. Reset Windows update components
Hit the Windows key, type cmd in the search bar, and click Run as administrator.
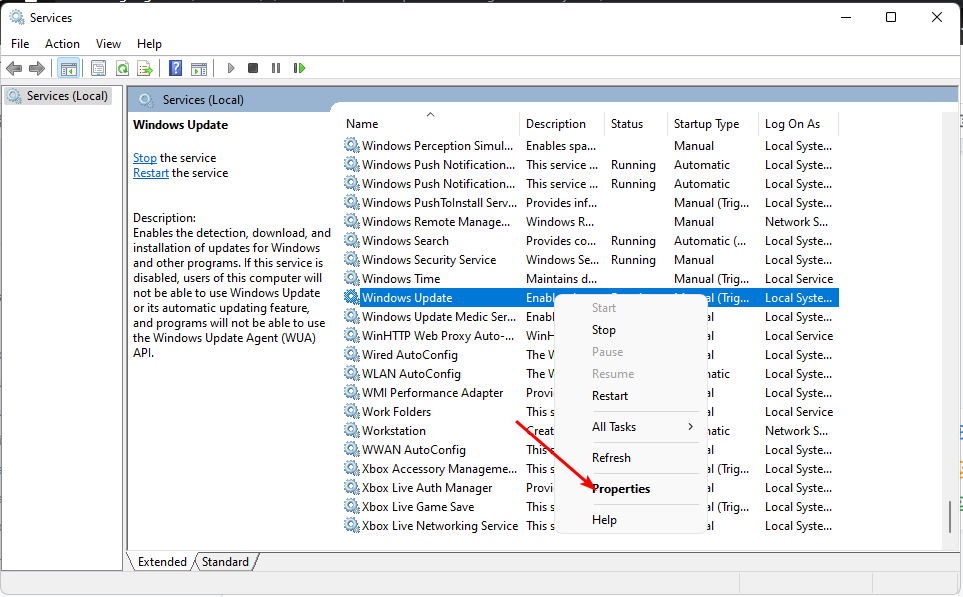
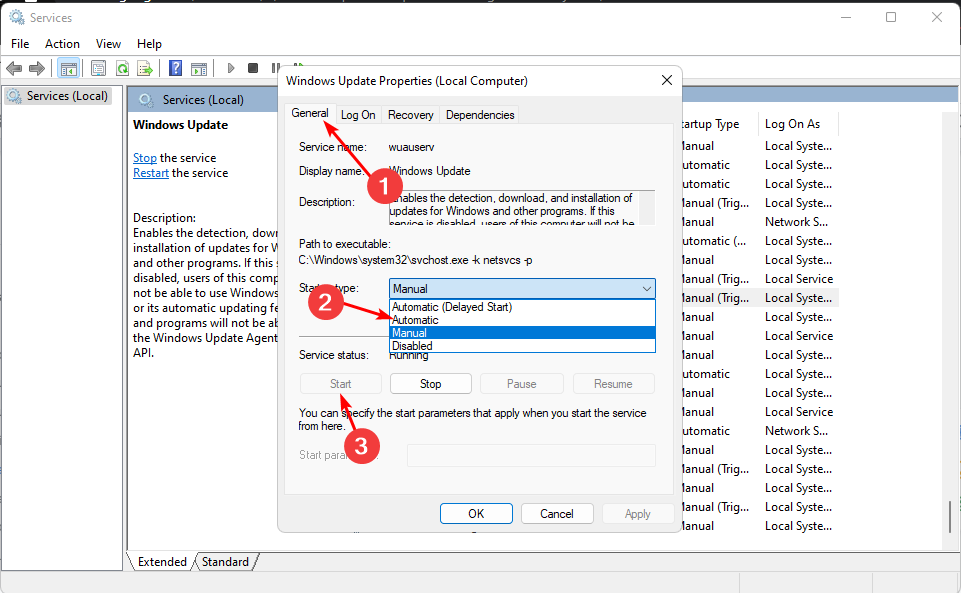
Type the following commands and press Enter after each one: net stop bitsnet stop wuauservnet stop appidsvcnet stop cryptsvcDel "%ALLUSERSPROFILE%\Application Data\Microsoft\Network\Downloader\*.*"rmdir %systemroot%\SoftwareDistribution /S /Qrmdir %systemroot%\system32\catroot2 /S /Qregsvr32.exe /s atl.dllregsvr32.exe /s urlmon.dllregsvr32.exe /s mshtml.dllnetsh winsock resetnetsh winsock reset proxynet start bitsnet start wuauservnet start appidsvcnet start cryptsv
6. Perform a Clean boot
Hit the Windows key, type msconfig, and open System Configuration.
Switch to the Services tab and select Hide all Microsoft services.
Click on the Disable all button, then hit the Apply button to save the changes.
Go back and click on the Startup tab, select Open Task Manager then click OK.
In the Startup tab of the Task Manager, Disable all the Enabled startup items.
Close Task Manager and restart your PC.
7. Perform a System Restore
Press the Windows + R keys, type rstui, and hit Enter.
The System Restore window will open. Click on Next.
Select the restore point you wish to revert to and click on Next.
Now click on Finish.
8. Download the update manually
Finally, if all else fails, download the specific update from the Microsoft Update catalog. Sometimes, all it takes is getting the file from the official site.
Hopefully, you have resolved the 0x80070426 update error using our comprehensive list of solutions.
Sadly, this isn’t the end for Windows update errors. You may also come across the update error 0x80080008, but we’ve already discussed how to bypass it in our article.
Consider getting your hands on one of our recommended Windows update repair tools to resolve such issues quickly.
Leave your thoughts, comments, and suggestions in the comment box below.
Many Windows processes like sysinfocap.exe run in the background and do not require your attention. However, if you notice any suspicious activity, you should check its properties and remove it from your computer if necessary.
The only issue is that it can be difficult for average users to determine whether it is a legitimate file or a malicious program. In this article, we unpack everything about sysinfocap.exe and whether to bin or keep it.
What is the sysinfocap.exe file?
If you’re not familiar with SysInfoCap, it’s a utility for monitoring and analyzing system resources and performance. You can use it to check the health of your computer and get information about different processes running on your machine.
The executable file is not present in every computer as it belongs to the HP company. Some of the important information you can get from it include:
Computer name and operating system
Memory use and CPU utilization
Network connection details (IP address, MAC address)
Hard disk drive information (capacity, free space)
Installed applications and drivers
As you can see, the information provided is basic, and you don’t need an additional application to view it. Windows already has built-in utilities that offer the same service.
There’s no reason to keep it, but if it’s not causing issues, there’s also no need to remove it. However, in some situations, you may find the file has found its way to your PC through malicious code.
In such cases, you need to verify its legitimacy by looking at where SysInfoCap.exe is located. If it’s not in the C:\Windows\System32\ folder, it is most likely a virus that needs to be removed.
When it’s not a legitimate file, it can cause errors such as:
Frequent crashes – Some users reported that they noticed their systems crash randomly right after a restart. On further examination, the sysinocap.exe file was found to be the main culprit.
High CPU/GPU usage – When you check your resource usage and notice that the sysinfocap.exe file is at the center stage, it could be a problem because it is not an essential service.
Degraded performance – You may notice that your PC has become slow or unresponsive due to a malicious sysinfocap.exe file.
How can I remove sysinfocap.exe from my PC?
It is important to note that your removal method will depend on whether the sysinfocap.exe file is a legitimate or malicious file. If it is a legitimate file, solutions 1, 2, and 4 are the best to remove it completely.
However, if you consider it harmful, use the other steps to get rid of it from your system completely.
1. Use Task Manager
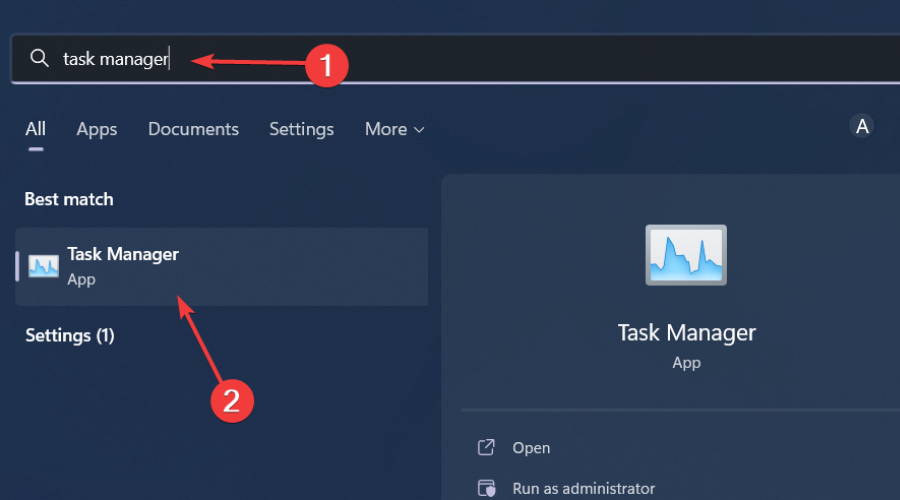
Hit the Windows key, type Task Manager in the search bar, and click Open.
Navigate to the Processes tab, find the sysinfocap.exe process, right-click on it, and select End process.
2. Stop the HSA service
Hit the Windows + R keys to open the Run command.
Type services.msc in the dialog box and hit Enter.
Find the HP System Info HSA service, right-click on it, and select Stop.
3. Run DISM and SFC scans
Hit the Windows key, type cmd in the search bar, and click Run as administrator.
Type the following commands and press Enter after each one:DISM.exe /Online /Cleanup-Image /Restorehealthsfc /scannow
As an automated and more in-depth alternative, we recommend a reliable third-party repair software to do the job for you.
4. Scan for viruses
Press the Windows key, search Windows Security, and click Open.
Select Virus & threat protection.
Next, press Quick scan under Current threats.
If you don’t find any threats, proceed to perform a full scan by clicking on Scan options just below Quick scan.
Click on Full scan, then Scan now to perform a deep scan of your PC.
Wait for the process to finish and restart your system.
Press the Windows + R keys, type rstui, and hit Enter.
The System Restore window will open. Click on Next.
Select the restore point you wish to revert to and click on Next.
Now click on Finish.
And that’s how to remove the sysinfocap.exe file from your system. We’d advise installing a comprehensive antivirus to prevent other malicious programs from sneaking into your system.
Also, learn about the jp2launcher.exe file and whether you need it in your system.
For any further comments, let us know in the comment section below.
Microsoft Fabric, an analytic platform set to reduce your business costs, has been announced at the Microsoft Build 2023 Conference on the 23rd of May. It is one of the conference’s most exciting announcements, and definitely one of the biggest Microsoft releases in a while.
The Redmond tech giant says that Microsoft Fabric is an end-to-end unified analytic platform. It brings together all the analytics and data tools that organizations use on a daily basis. And by unified, it means that Fabric also integrates technologies such as Azure Data Factory, Synapse Analytics, and Power BI.
Fabric not only integrates these technologies but unifies them into a single product. So, while using Fabric, your organization is able to swiftly change between technologies and make use of them to plan and develop the work.
The platform looks very exciting and very intuitive to use, according to the presentation. It also comes with no less than 7 core workloads.
Synapse Data Engineering
Data Factory
Synapse Data Science
Power BI
Synapse Data Warehousing
Data Activator
Synapse Real-time Analytics
Each workload provides plenty of features, from orchestrating data pipelines to building complex AI models and AI-driven analytics.
How to reduce your business costs with Microsoft Fabric
First of all, Microsoft Fabric could greatly reduce your business costs with its inclusive approach. The platform brings together 7 workloads that are capable to handle every part of your organization’s working development.
Let’s say that for a single project, you would have to use different platforms from multiple vendors to get it done. You would have to spend a lot of resources, financial and otherwise on researching the best products, paying for licenses, and so on.
In many cases, the integration with your native workspace would also take a bit of time. Not to mention, the cases where you realize the products you’re using are not really working as you wanted them to.
Microsoft claims that Fabric greatly simplifies resources management, in this regard. And if the presentation comes with any hint, it seems that it really does so.
With the inclusive approach, your organization can create solutions easier, without having to worry about any sort of development issues.
Even more, the Redmond tech giant says that Fabric is already used by several companies such as Fergusson, T-Mobile, and Aon. All three companies lauded the platform, calling it a complete game-changer.
Copilot will help you work efficiently in Microsoft Fabric
Besides having an inclusive approach and proving to reduce costs, Microsoft Fabric makes use of AI to simplify the workflow. AI has become the central focus for Microsoft, and the Redmond tech giant incorporates it more and more in its products.
Copilot will be there in Microsoft Fabric to help you work faster and smarter, basically adding efficiency to your workload.
According to the presentation, you can use Copilot to create dataflow and data pipelines, generate code and functions, build machine learning models, and even visualize results.
You can even create your own conversational language experiences that make use of AI models with your data. Then you can publish them as plug-ins.
Are you excited about Microsoft Fabric? Let us know what you think in the comments section below.
Microsoft Word is one of the best word processors that can be used on computers and mobile devices. The program is jam-packed with features, so it’s no surprise that people sometimes run into problems using it.
Resetting Microsoft Word settings is a great way to troubleshoot problems with your computer like recent documents not showing up in Word. If you’ve been wondering how to reset it, we show you how in this article.
Is there a way to reset Microsoft Word settings?
Yes. There is a way to reset Microsoft Word settings. Like any other program, you can restore its settings to default.
You may wonder why anyone would want to reset the Word application, but there are some compelling reasons to do so, including:
Corrupt files – Sometimes, when you work on a file, you may have trouble opening it later because it has become corrupted. If so, you may need to reset Microsoft Word.
Unable to add plugins – We can all admit how Microsoft Word add-ins add functionality to the program. However, you may have trouble installing them, or the ones installed no longer work. This is a sign that it may be time to reset Microsoft Word.
Accidentally changed settings – Microsoft Word offers a wide range of features that can be customized to meet your needs. However, you may find that sometimes these features don’t work because you unknowingly changed some settings.
Compatibility issues – If you’ve been having trouble opening or saving files in Microsoft Word, it could be due to compatibility issues between the newer versions of the application and older ones.
Virus infection – If you don’t have a reliable antivirus, your computer can be infected by a virus or malware. It may be best to reset the Word settings on your computer so that the virus or malware will no longer be able to affect them.
Other troubleshooting options don’t work – Resetting an app is usually a final step after attempting other repairs, and they have proved futile.
How do I restore Microsoft Word?
Before you reset the settings, ensure you perform the following:
Save any open documents in a safe location on your computer and close them.
Find the Normal.dot or Normal.dotm file depending on your version of Windows, right-click on it, and select the Rename icon.
Rename it to a new name different from the original one e.g OldNormal.dot.
The Normal.dotm template is a hidden file that stores information about all the default formatting in Word. Deleting this file will not affect your ability to create or edit documents in Microsoft Word.
If you delete it, Word will automatically regenerate a new one the next time you open a new document.
Printers are a device that throws errors more frequently than others. Users have been facing issues with the printer for far too long, and there seems to be no end to the ordeal, with HP printer error code 83C0000B being the latest in the list.
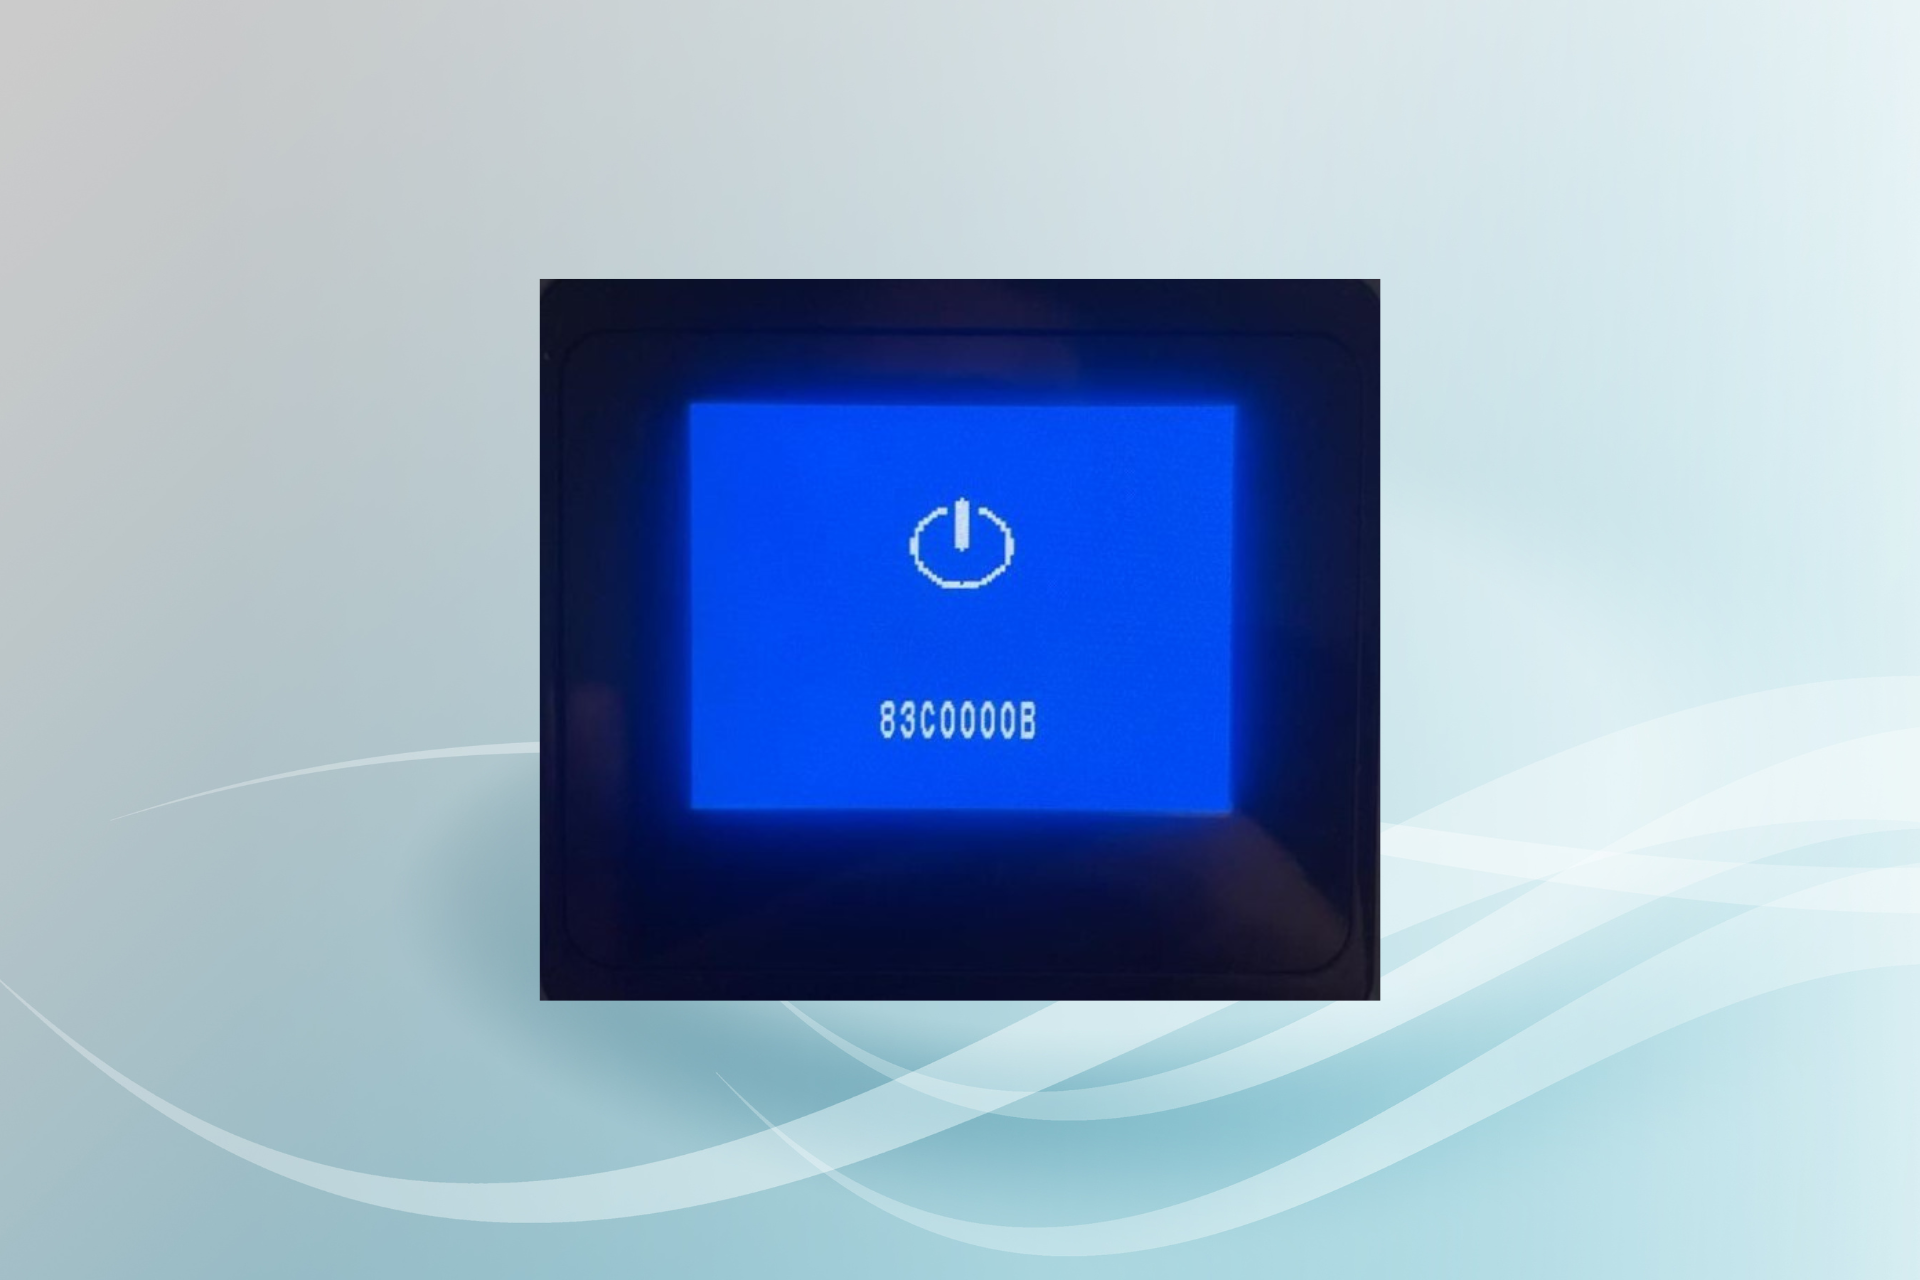
In the last few days, users worldwide have reported the error on HP OfficeJet printers, with the display listing 83C0000B on a blue screen. The absence of any helpful information makes troubleshooting difficult. So, here’s everything you need to know about the error!
What causes HP printer error code 83C0000B?
The latest HP printer blue screen error code 83C0000B is caused by a critical firmware update recently released and installed automatically on devices. While, ideally, this shouldn’t have been the case, it looks like the firmware update wasn’t tested for bugs and compatibility with all HP printers.
Here’s a list of affected devices as per our research:
HP OfficeJet Pro 9020e
HP OfficeJet Pro 9022e
The forums are filled with user complaints, and HP has yet to release a patch or provide a viable solution to users. Though, the good news is that HP has acknowledged the problem and should be coming up with a fix soon, given the large number of people affected.
How do I fix the HP printer error code 83C0000b?
1. Install firmware update from HP
Go to HP’s official website, enter the product name (printer model) in the text field, and click Submit.
Expand the firmware section, and click on Download next to the latest firmware update. Make sure to verify the release date and install the firmware with a patch and not the buggy one.
Run the downloaded executable (.exe) file.
If a security alert appears, provide the necessary permissions for the tool to run.
Select the printer affected printer from the list, and then click on Update.
In case the printer doesn’t appear, connect it via a USB cable, then click on Refresh, and finally update the firmware.
That’s it! Since it’s a problematic firmware update triggering the HP printer error code 83C0000B, the latest one, when available, should address and eliminate the issue. Also, you can update the firmware through the HP Smart App or directly from the printer, as detailed in the dedicated HP guide.
2. Reset the printer
Tip
The reset process for each printer model is different, and we recommend you check the manual that came with the device for the exact steps.
The quickest fix for HP printer error code 83C0000B, which worked for some users, was resetting the printer.
All you have to do is turn off the printer, unplug it from the power source for at least two to three minutes, remove any other cables, then plug it back in and turn the printer on. Also, connect the power cable directly to the wall socket without a surge protector.
For those who have managed to get rid of the error or haven’t encountered it yet, we recommend you disconnect the printer from the Internet to stop it from downloading the buggy firmware update.
Besides, you could disable the automatic firmware updates. Remember, this is a preventive measure and not an actual solution.
4. Contact HP support
When nothing works, the only option is to contact HP support and confirm whether a fix is available and, if not, the timeline. Once the support team has the problem registered, they will inform you as soon as a solution is available.
HP Support
Some users who still had it under warranty replaced the printer or returned it to the vendor when faced with the HP printer error code 83C0000B.
It’s up to you whether to wait for a fix or get the money back! But as we said early on, printers are prone to errors, and no manufacturer has developed the perfect one.
Build 2023 is in full swing, with a focus today on Windows 11 and Windows Copilot, and joining in on the party is the Windows Insider program with a new Dev Channel build, 23466.
It’s a build chock full of new features, let’s check out the highlights:
Dev Drive
Dev Drive, the “new form of storage volume available to improve performance for key developer workloads,” build on ReFS (the Resilient File System) comes to the Dev Channel. Here’s how to set it up:
To setup a Dev Drive, you can create one in free space on an existing drive or create a VHD/VHDX. This is done via Settings app under System > Storage > Advanced Storage Settings > Disks & Volumes, or via the command-line. A Dev Drive must be at least 50GB or higher in size and we recommend having 8GB or higher RAM on your device.
Performance mode, a new capability of Microsoft Defender Antivirus, is designed for Dev Drive to minimize impact on developer workloads.
Backup and Restore improvements
Backup and restore has been updated with these improvements:
Windows Backup app – we’re introducing this new app to quickly get your current PC backed up and ready to move to a new PC.
App pins – your Store apps from your prior PC will be pinned where you left them, both on taskbar and in the Start menu.
Settings – Settings from your previous device will restore to your new PC to help you get back into the flow as quickly as possible.
New text authoring in voice access
User can now say “correct” to fix a piece of text or the last dictated text, or say “click [number]” to select an option from a list, “spell that” or “spell out.”
New natural Chinese voices in Narrator
These new Narrator voices can be downloaded only once and be used offline.
There are a number of changes and fixes, too, so be sure to check out the Windows Insider Blog post for all the details.
Numerous times, users have complained about seeing the Lockapp.exe on Windows 11 and not knowing what it does. In today’s guide, we’ll tell you everything you need to know about this process.
What is lockapp.exe?
LockApp.exe is part of Windows and is the default Lock Screen app. It is responsible for the background immediately after switching on the PC. So, its process is what generates and controls the Lock Screen.
How can I disable LockApp.exe?
1. Disable LockApp.exe via the Windows Registry Editor
Press Windows + R key to open the Run dialog box, type Regedit, and press OK to open the Registry Editor.
Navigate to the following registry keys: HKEY_LOCAL_MACHINE\SOFTWARE\Policies\Microsoft\Windows\Personalization
If you do not see the Personalization key, right-click the Windows entry, click New from the context menu and select Key, then name the new key Personalization.
Right-click the Personalization key, select New, and click DWORD (32-bit) value from the drop-down menu.
Input NoLockScreen as the Value name, set the Value data to 1, and then click the OK button.
Close the Windows Registry Editor page and restart your PC.
2. Disable LockApp.exe via File Explorer
Press Windows + R key to open the Run dialog box, type the following and click OK: C:\Windows\SystemApps\
In the SystemsApps folder, locate Microsoft.LockApp_cw5n1h2txyewy folder.
Right-click on it and then Rename it to Microsoft.LockApp_cw5n1h2txyewy.backup.
Exit the File Explorer and the LockApp.exe is disabled.
Renaming the folder will make it inaccessible when the program attempts to use it, causing the program to stop working.
Every year, Microsoft holds the Store App Awards to recognize apps on the Microsoft Store that have displayed “excellence in their user experience, design, quality, and most of all, customer value.” Back in March, the company announced that nominations for the event were open and invited users to get their favorite apps on the platforms to be featured in the award ceremony,
Shortly after, Microsoft closed the nomination window and transitioned to the voting phase which was open to all Microsoft Store on Windows customers on Windows 10 and 11. And while the criteria used to determine the winners of these awards was quite strict, the voting period has come to an end and Microsoft has announced the winners.
As you might recall, Microsoft split the nominees into five different categories, that is, Utilities & Tools, Productivity, Audio & Video, Creativity, and Personalization. And here are the winners for each one of these categories:
Utilities & Tools Category – Torrex
Productivity Category – Mozilla Firefox
Audio & Video – VLC
Creativity – Sketchable+
Personalization – Lively Wallpaper
Aside from the winners highlighted above, Microsoft also handpicked the finest apps in the same categories, and was as follows:
Creativity – Descript
Entertainment – Amazon Prime Video
Productivity – Concepts
Best Integration with Windows – WhatsApp
Special Recognition – Ava Accessibility
The company further added that:
These apps were examined and chosen based on their user experience, exceptional design, innovation, creativity, overall quality, as well as the value they bring to its customers.
And those were the winners of the Microsoft Store App Awards 2023. Did your favorite apps in the Microsoft Store meet the cut? Let us know in the comments.
Many Windows users have complained about experiencing a slow boot issue on their PC which a Start PXE always accompanies over IPv4 message. The error occurs during startup and can be persistent. However, this article will discuss the error message and how to fix it.
Alternatively, you may be interested in our post about what to do if you’re experiencing a slow boot on Windows 11 to make it faster.
What does it mean when it says Start PXE over IPv4?
In a computer, PXE over IP is the option that allows you to boot from a network source and is a setting in the BIOS. PXE (Preboot execution environment) allows the system to boot over an IPv4 network.
These IP addresses allow computers to start up faster than the traditional boot methods. However, they can cause problems with the boot order and result in Start PXE over IPv4.
Furthermore, seeing an error message saying Start PXE over IPv4 pops on your screen means the system fails to start or is having trouble sorting the boot order. In short, it indicates that other boot devices, like the hard disk, were not available to boot from. Thus, it initiates boot over the IPv4-based network.
Additionally, the boot error occurs due to the traditional storage parts the system boots from is not correctly configured or compromised. Also, you can encounter the Start PXE over IPv4 because of a wrong or reset boot priority order.
How can I fix Start PXE over IPv4?
1. Change the boot priority order
Click the Windows button, select Power from the drop-down menu, then click on Restart to reboot the device.
While the system restarts, repeatedly press the F1, F2, Del, Esc, F10, or F12 to open the computer’s BIOS setup utility. ( the key may differ depending on the PC manufacturer)
Navigate to the Boot, Boot Options, Boot Sequence, or Advanced Options tab, depending on what your manufacturer calls it.
Select the Hard disk or removable devices as the first boot device and press Enter.
The computer will boot from the hard disk instead of a network source.
Choosing the hard disk as the first boot device places it at the top of the boot priority order, allowing the system to boot over the device rather than an IPv4 network.
2. Disable PXE boot
Press the Windows button, select Power from the drop-down menu, then click Restart to reboot the device.
While the system restarts, repeatedly press the F1, F2, Del, Esc, F10, or F12 to open the computer’s BIOS setup utility.
Click on the Advanced tab and find the Integrated Devices option.
Go to the Network Stack option and set it to Disable on IPV4 or IPV6 support.
Restart your PC and check if the start PXE over IPv4 message appears.
It will disable PXE boot, but the exact wording may differ in different systems depending on the manufacturer.
At The Wall Street Journal’s CEO Council Summit, Elon Musk unveiled his plan to introduce a forceful challenger to tech giants such as Google and Microsoft, which dominate the artificial intelligence landscape. Musk expressed his aspirations of establishing a formidable presence in the AI ecosystem by unveiling a rival to major players like Google and Microsoft.
The tech magnate suggested incorporating several components of his corporate empire, including his recent acquisition of Twitter for $44 billion in October 2022, to support his ambitious AI venture.
Musk revealed his intentions to introduce a robust “third horse” to compete against the artificial intelligence dominance of technology powerhouses such as Alphabet Inc. and Microsoft Corporation. When asked about his new company, X.AI, the billionaire stated his belief in the need for a substantial third competitor in the field.
The billionaire also hinted at the possibility of Twitter playing an influential role in the development of his AI business, potentially forming a partnership with Tesla Inc. While refraining from making any official announcements, Musk speculated that there could be a system similar to OpenAI’s relationship with Microsoft in place between X.AI, Twitter, and Tesla.
When questioned about the regulation of AI, Musk reaffirmed his stance on the establishment of an independent oversight committee consisting of industry leaders and third-party entities. He emphasized the committee’s significance in gaining insights into the activities of these enterprises.
“It’s a small likelihood of annihilating humanity, but it’s not zero,” he said
Moreover, the tech entrepreneur remarked that the United States and Europe currently possess the most cutting-edge AI technology, although China is catching up quickly.
Despite expressing concerns about the accelerating progress of AI, Musk remains optimistic about Tesla’s potential to capitalize on the technology, citing the company’s substantial investment in AI and machine learning. Musk has emphasized that Tesla’s Full-Self Driving software, currently in beta, will operate under a comprehensive neural network AI model.
Many of our readers have reported that for them their Oculus controller is not working. Apparently, they are getting this error even though their Oculus controllers are paired.
Thankfully, in this guide, we will give you some effective solutions to resolve the Oculus controller not working problem. Let us get right into it.
Why is my Oculus controller not working?
There could be several reasons as reported by our readers behind your Oculus controller not working. Some of them are listed below:
The battery is low: You should check if the battery levels of your Oculus controller are sufficient for it to work throughout the session.
Connection issues: Chances are that the connection between your Oculus controller and the headset isn’t strong or jumpy.
Outdated firmware: You might not have updated the firmware of the Oculus controller or the update was stopped abruptly.
Hardware issues: Chances are your Oculus controllers are themselves at fault which is why you are not able to use them correctly.
Let us now apply the solutions to resolve the Oculus controller not working problem.
How can I fix my Oculus controller?
Your Oculus headset and controllers won’t perform perfectly if the batteries on them are damaged or worn out.
In such a case, we would suggest you check the batteries. Besides, you can try changing the batteries and check if the problem exists or not.
1. Perform a power cycle
Press and hold the power button on your headset for 10 seconds located on the right side.
Wait for about 1 minute after the headset turns off.
Press and hold the power button again till it turns back on.
Connect your controllers.
You should perform a power cycle on your Oculus headset as this will help you to resolve any technical glitch that might have occurred between our Oculus headset and controllers.
Several of our readers have suggested that performing a power cycle helped them fix the Oculus controller not working problem.
2. Update the drivers
Press the Win key to open the Start menu.
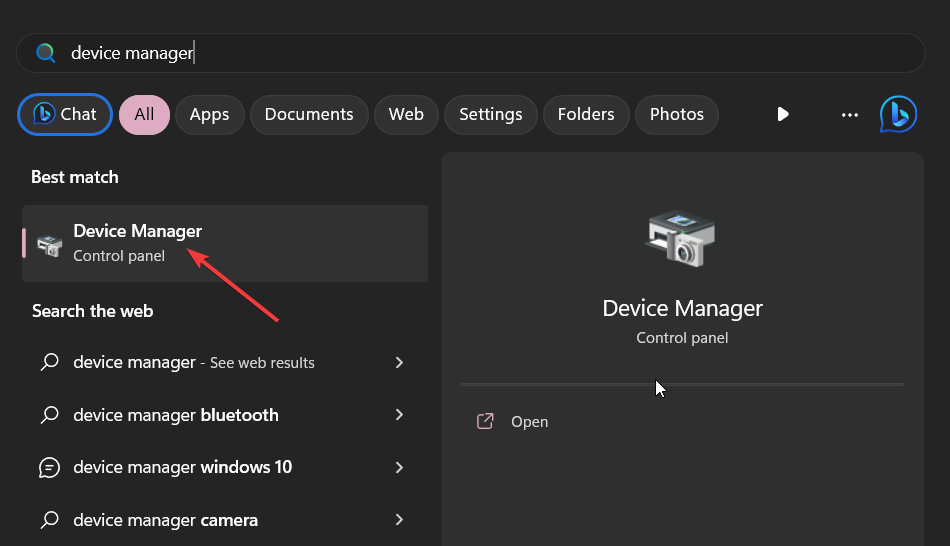
Type Device Manager and open the top result.
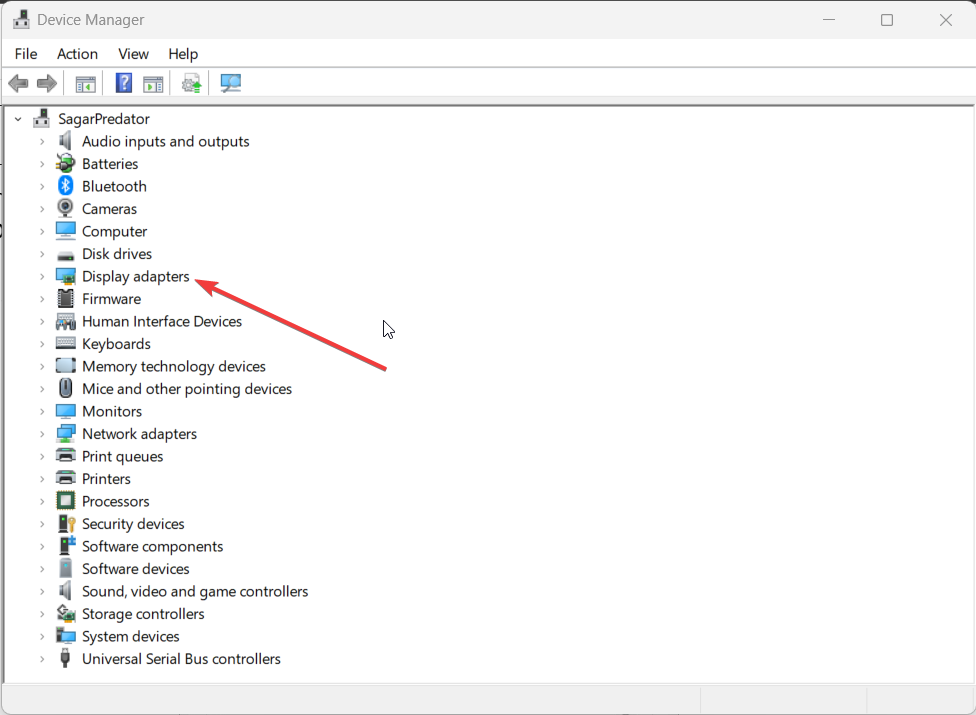
Expand the Display adapters section.
Double-click on your GPU.
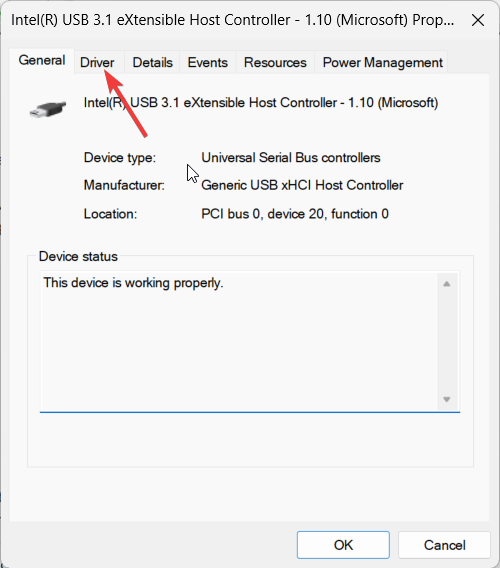
Switch to the Driver tab.
Hit the Update driver button.
Click on Search automatically for drivers.
Let the GPU driver update.
Similarly, expand the Universal Serial Bus controllers.
Double-click the USB device which you have connected the Oculus headset.
Switch to the Driver tab.
Hit the Update driver button.
Click on Search automatically for drivers.
Many of our readers have fixed the Oculus controller not working problem by updating the USB and the GPU drivers on their PCs. You can also try and hopefully resolve the problem.
3. Re-pair the controller
Open the Oculus app on your phone.
Click on the Menu icon.
Select Devices.
Tap on Headset settings.
Select Controllers.
Choose the controller you are having issues with.
Tap Unpair Controller.
Wait for a few seconds and re-pair the controller.
Unpairing and re-pairing your Oculus controllers via the Oculus app on your smartphone will definitely help fix the temporary bugs or glitches that might have occurred during the connection.
In order to enjoy the best VR experience, you need to ensure that the Oculus headset is running the latest firmware.
You can visit the official Oculus setup website and check if there is a new update available for your headset. If yes, then download and install it to avoid such problems.
5. Factory reset the Oculus headset
Press and hold the Power and Volume Down buttons on your Oculus headset to open the USB Update Mode window.
Use the Volume keys on your headset to highlight Factory Reset.
Press the Power button to select the option.
Press the Power button to confirm the action.
Wait for the factory reset process to complete.
Note that performing a factory reset is an irreversible action and will remove all of your account information, downloaded games, and content from the headset.
So, make sure to perform this action only when none of the above solutions resolved your problem of Oculus controllers not working.
That is it from us in this guide. We have a guide that lists some of the best Oculus browser alternatives that you should check out.
Feel free to drop a comment below which one of the above solutions resolved the Oculus controllers not working problem.
Bitsperf.dll is a Dynamic Link Library file & a type of Perfmon Counter Access file developed by Microsoft and used by the Windows operating system.
If you have encountered the bitsperf.dll failed or missing error, this guide can help restore the missing DLL file.
What causes the bitspef.dll failed or missing error?
There are several reasons for this DLL missing error; some of the common ones are mentioned here:
Corrupted DLL file – If the DLL file has been deleted accidentally or become corrupted, then you may see this error. You need to download the DLL file or the program related to fix it.
Virus infection – Viruses on your computer can corrupt or damage system files, leading to various issues, including this one. Run a deep scan using an antivirus tool.
Incomplete installation – If the app associated with this file is installed incorrectly or had issues while installation, you can get this message. Try reinstalling the app.
Registry issues – Invalid or broken registry entries on your Windows computer can cause problems and lead you to such errors. Try running a registry cleaner to fix the issue.
Now you know the causes of the problem, let us check out the advanced fixes to resolve it.
How can I fix the bitspef.dll failed or missing error?
Before engaging in advanced troubleshooting steps, you should consider performing the following checks:
Try restarting your computer sometimes; it may help.
Reinstall the affected app.
Ensure Windows is up to date.
If these tweaks don’t work for you, move to the detailed solutions below.
1. Use a DLL fixer
Fixing DLL missing errors manually could be cumbersome and harm your PC if not done correctly. Therefore, it is advised to use a third-party DLL fixer tool to address this issue effectively.
2. Run SFC & DISM scans
Press the Windows key, type cmd, and click Run as administrator.
Copy & paste the following command to repair system files and hit Enter: sfc/scannow
Wait for the scan to complete, type the following command to restore Windows OS image files and press Enter: Dism /Online /Cleanup-Image /RestoreHealth
Once the scan is complete, your PC will automatically connect to the Windows Update service to download and replace the corrupt files. Restart your computer to let the changes take effect.
3. Run a deep scan using a security tool
Press the Windows key, type windows security, and click Open.
Click Virus & threat protection from the left pane, and then choose Scan options.
Select Full scan and click Scan now.
The tool will scan the computer for all types of malware threats, including viruses, spyware, adware, & rootkits, and list them. Delete them to fix the issue.
Running a malware scan is important as if the DLL missing error is fake and caused by malware, this action will remove it, thereby resolving the problem.
Type sysdm.cpl and click OK to open System Properties.
Go to the System Protection tab, and click the System Restore button.
On the System Restore window, select Choose a different restore point and click Next.
Select the restore point before the DLL missing error and click Next.
Click Finish to start the process.
Windows will restart and restore to the selected version. If the System Restore is not working, we advise you to check out this guide for solutions.
5. Download the file manually
NOTE
Using an unreliable website to install DLL files can be dangerous and is never advised. However, If you know a trusted source, like DLL-FILES, you can follow the steps mentioned to restore the file.
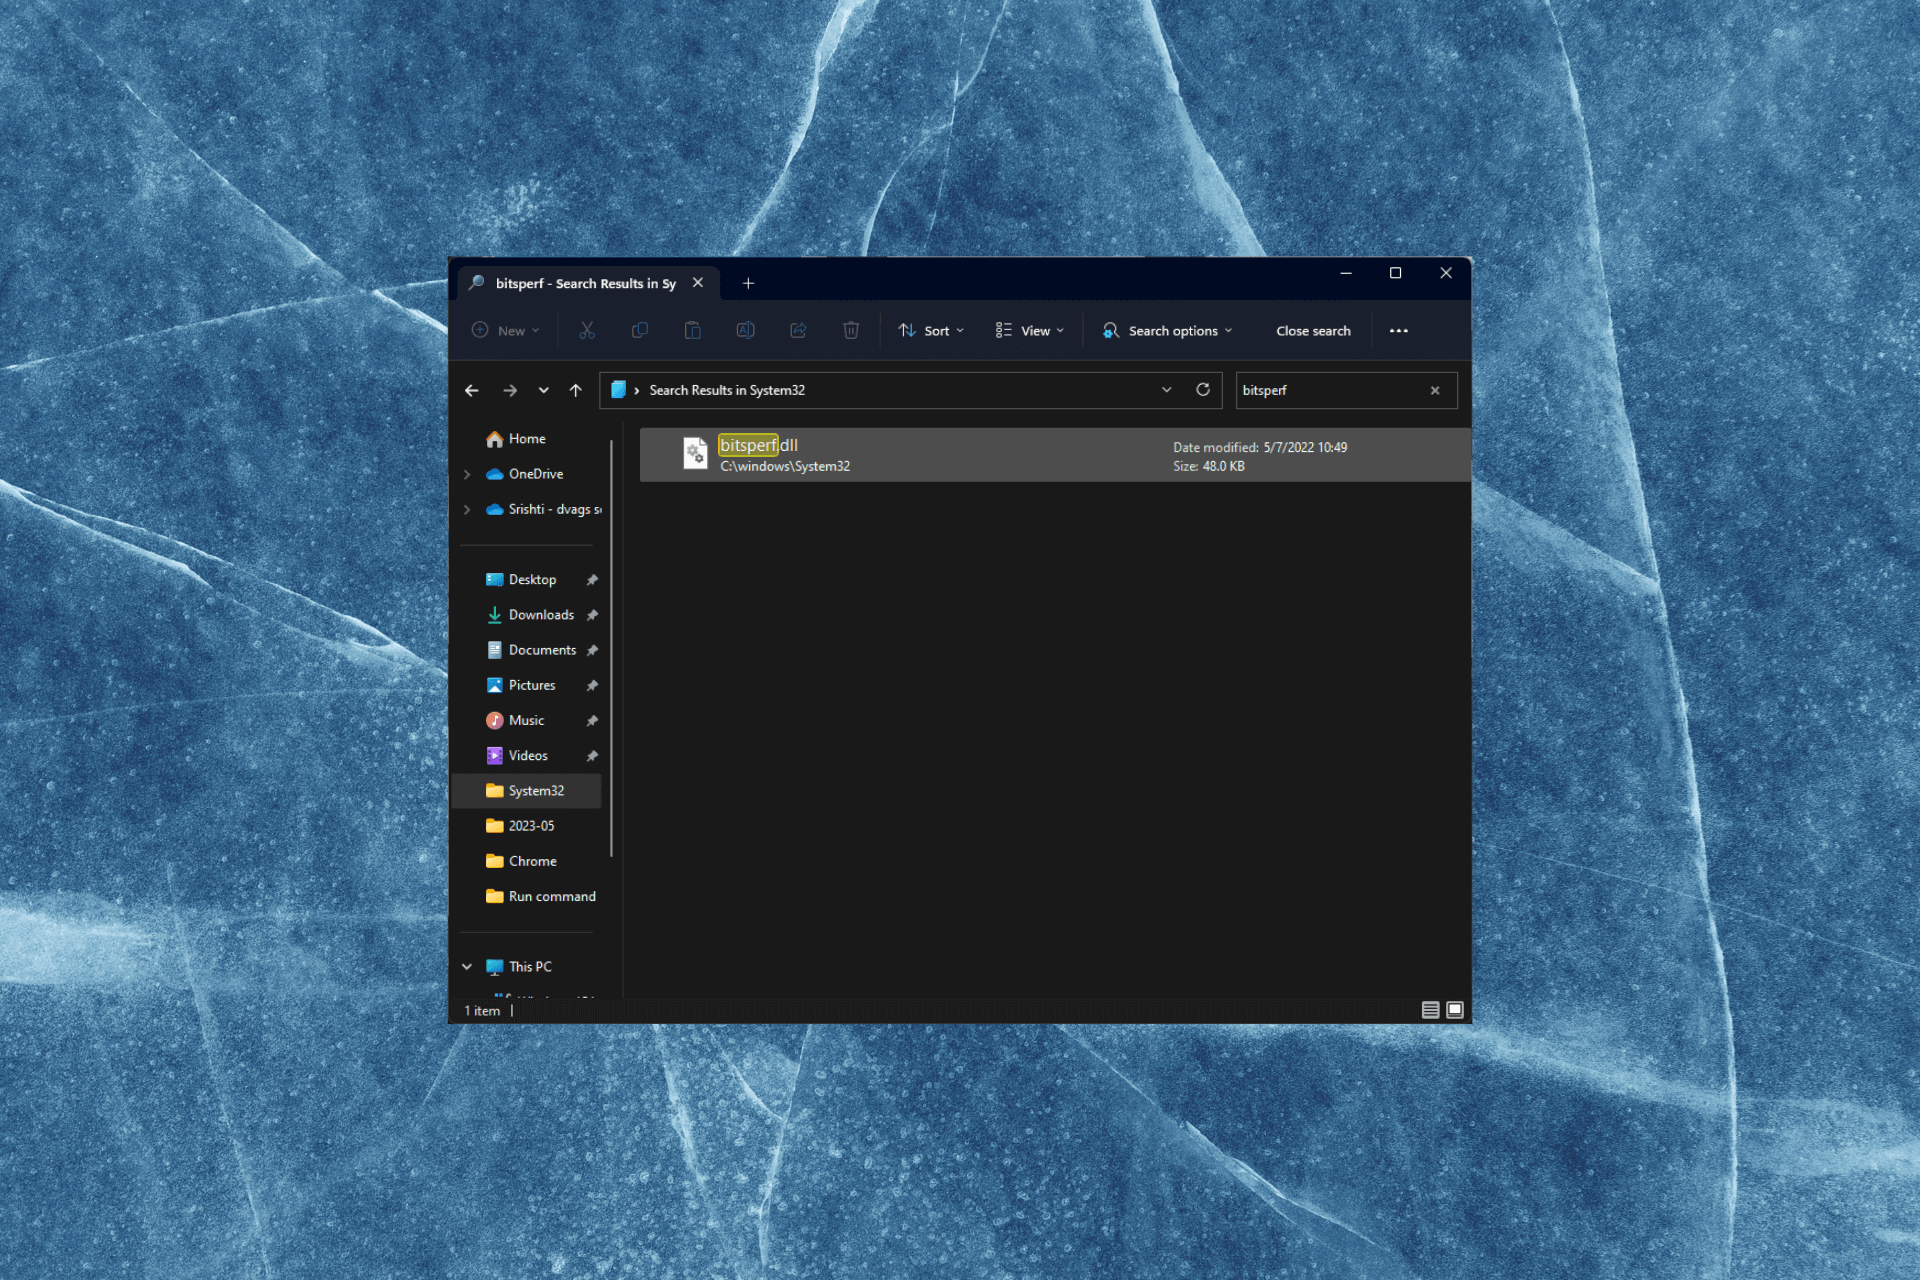
Go to the DLL-Files website, search bitsperf.dll, select an appropriate option, and click Download.
Double-click the downloaded folder to open it, and locate and copy the .dll file.
Go to this path and paste the file: C:\Windows\System32\
So, these are methods that you can use to fix the bitsperf.dll not found issue. If nothing worked for you, you could perform a clean install of Windows to eliminate the problem.
If you have any questions or suggestions, feel free to mention them in the comments section below.
Many Windows users have reported the Winsock Error 10061 that results from trying to connect to a service. The error means a connection wasn’t established, and the server actively refused it, preventing the computer from connecting to the server’s localhost. As we dive into this article, we’ll discuss how to fix the error in a few steps.
Several factors can cause the target machine we are trying to connect to refuse the request, resulting in an error actively. Some notable ones are:
Server issues – When the server is misconfigured or full, it can affect its connection to a new or existing network from the contact address. Also, using an incorrect port to connect to the target machine will result in the Winsock Error 10061.
Poor Internet connection – The error can also occur if your internet connection is not stable or reliable due to network congestion or other network issues. It distorts the communication between the target server and the contact machine.
Service inactive on the destination server – Winsock error 10061 can appear when trying to connect to an inactive service on the target host. Also, the server application you’re trying to contact might not be executing on the foreign host.
Firewall or antivirus software interference – You can also encounter the error if you have a firewall service or antivirus software running on your computer. It can impede the communication between the local host and the target server.
These factors can vary on numerous PCs depending on the circumstances. Regardless, we’ll take you through the basic steps for resolving the error.
How can I fix the Winsock error 10061?
Before trying any advanced fixes, go through the preliminary checks below:
Power cycle your router or modem – It will refresh your network connection and help the router connect faster.
Check the destination address or the hostname – Cross-check the destination address you’re trying to connect with to ensure it is the correct host address. If you use a hostname, ensure it resolves to the appropriate address.
Change outgoing mail SMTP – Switch the outgoing Mail SMTP from 25 to 587 to fix the error.
Temporarily disable antivirus software – It will help prevent the security services from checking or impeding the connection.
Peradventure, you are still unable to get around the error, proceed with the following solutions:
1. Reset Internet Information Services (IIS)
Left-click the Start button, type Command Prompt, and click the Run as administrator option.
Click Yes on the User Account Control (UAC) prompt.
Type the following in the command bar and press Enter: iisreset
Restart your PC and check if the error persists.
Resetting Internet Information Services will restore all services and websites on your server to their default settings and fix any configuration issues. Check our guide on how to fix Command Prompt not working on your PC.
2. Enable port in Windows Firewall
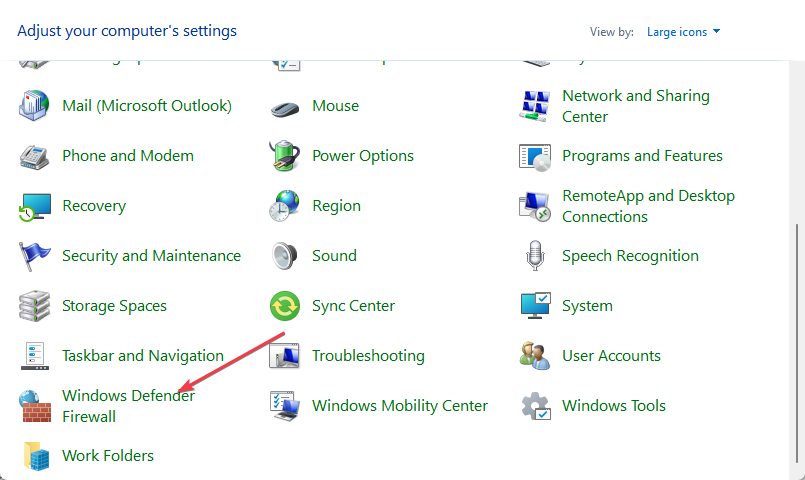
From the Start menu, search Control Panel, and press Enter.
Then, click on Windows Defender Firewall.
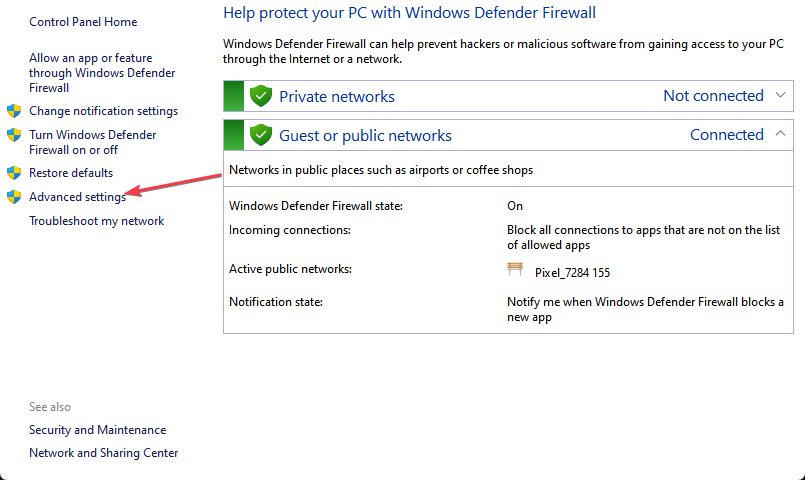
Select Advanced Settings.
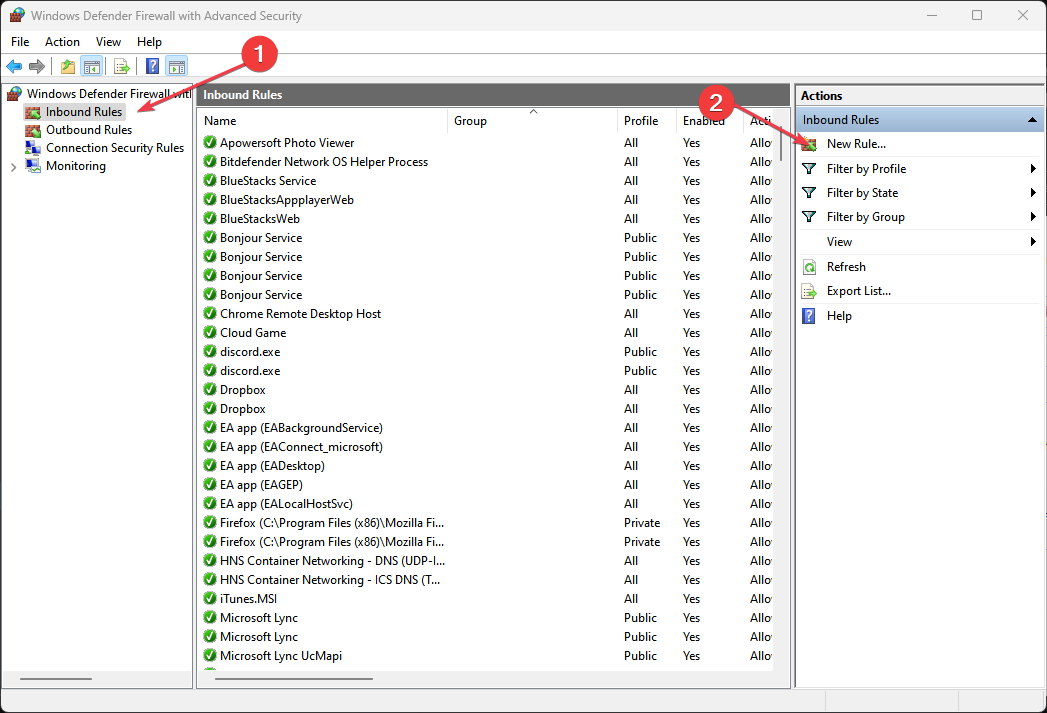
Then, choose Inbound Rules and click New Rule in the Actions window.
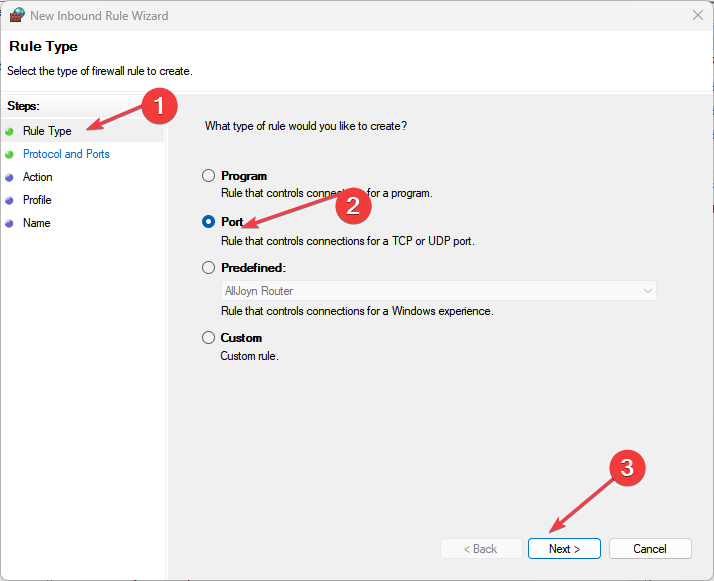
Now, select Rule Type of Port and click Next.
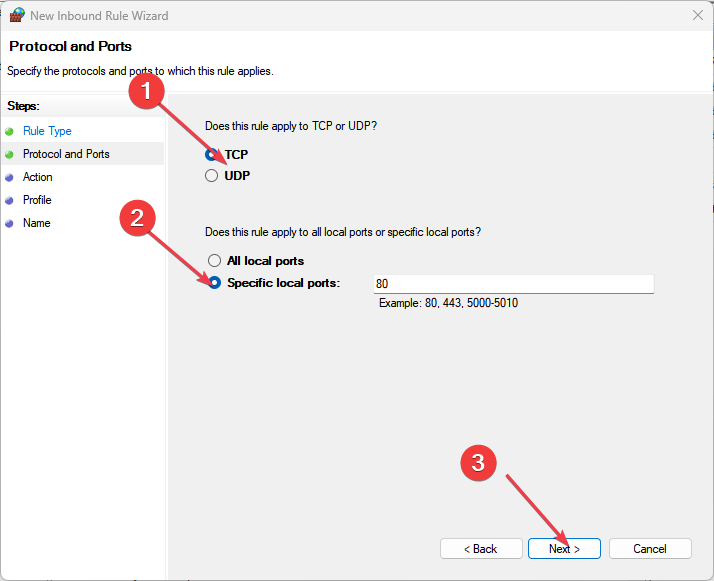
On the Protocol and Ports page click TCP. Select Specific Local Ports, type a value of 80, and click Next.
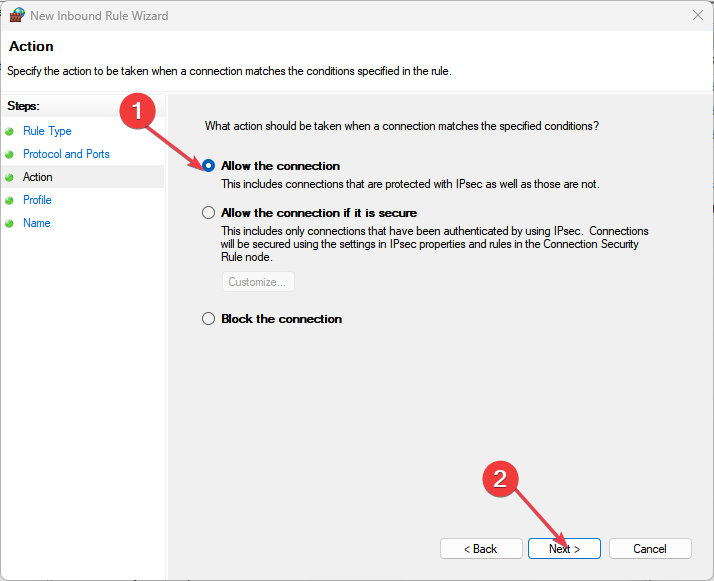
On the Action page click Allow the connection and click Next.
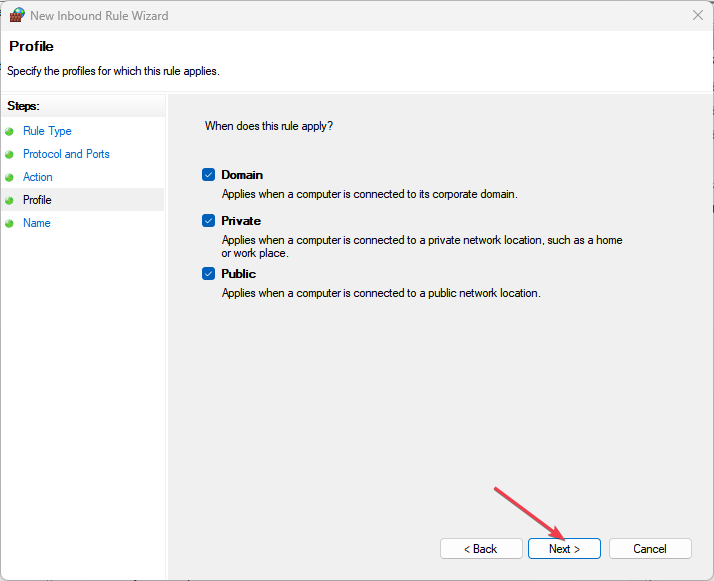
In the Profile page click the appropriate options for your environment and click Next.
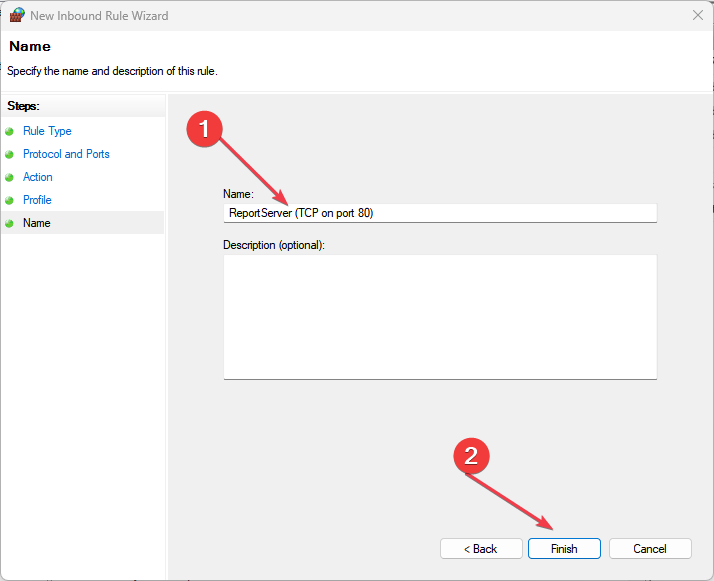
On the Name page enter the name of ReportServer (TCP on port 80) and click Finish.
Restart the computer.
Allowing Winsock to run as an exception in Windows Firewall prevents the firewall from checking or delaying its processes. You can check how to fix Windows Firewall blocking other app features on your PC.
At $30 per month, you can access Superhuman ” the fastest email experience ever made.” The email tool will help you navigate through your inbox twice as fast, and help you save up to three hours or more every single week.
Last year, the company announced the availability of Superhuman for Outlook which featured a visually gorgeous interface, insights from LinkedIn, Facebook, and Twitter built-in, an Undo Send feature, AI-powered important mail detection, and more. During its inception, the company mainly focused on Gmail, but there was a growing need to bring the experience to Outlook.
Since then, the company’s investment in the Microsoft ecosystem has been very apparent. Yesterday, the company announced the debut of Superhuman for Windows. Users had previously expressed their interest to have the experience ship to their Windows devices, and it’s now available.
NEW: Superhuman for Windows ????
The fastest email experience in the world is now available on Windows.
Get through your inbox twice as fast as before, and save three hours or more every single week.
While speaking to OnMSFT the company indicated that:
The Superhuman Windows app enables users to easily separate their inbox from other apps to eliminate distractions and achieve a new level of focus so they can fly through their inboxes. And it’s packed with all of the great features that Superhuman customers have come to know and love, including Split Inbox, Snippets, Reminders, Calendar, and so much more!
It’s also worth noting that you can use Superhuman for Windows with Gmail and Outlook accounts. Do you use the email experience? Share your thoughts with us in the comments.
Every year, Microsoft holds a student developer competition dubbed Imagine Cup. The competition is designed to bring students from across the globe together and “push the boundaries of what’s possible and bring their groundbreaking solutions to a global stage.”
The team came up with a software app called TAWI that’s designed to assist children with Auditory Processing Disorder (APD) to enhance both their communication and auditory skills effectively.
Members of team TAWI indicated that they drew inspiration to create and develop the app from one of their team mate’s personal experiences. Microsoft told OnMSFT.com that:
Team TAWI drew inspiration from personal experiences, with one of the team members witnessing firsthand her younger brother’s difficulties and recognizing the need for a more practical and cost-effective alternative to traditional hearing aids.
The software is built on Visual Studio IntelliCode, GitHub CoPilot, as well as speech recognition tools from Azure Cognitive Services and OpenAI Whisper. As such, it’s possible for children with ADP to leverage the tool’s speech-to-text conversion, speech enhancement, and gamified auditory training exercises to improve their auditory skills.
Team TAWI further highlighted that:
With just earphones and a smartphone and the use of AI for the speech to text and audio enhancement, the application will suppress ambient noise in loud environments so that the user can hear the speaker clearly and focus on what they are saying. In addition the user will be able to read along with speech to text, all of this occurring in real-time.
The team- John Onsongo Mabeya, Muna Said, Syntiche Musawu Cishimbi, and Zakariya Hussein Hassan will receive prize money bundled up with an insightful mentorship session with Microsoft’s CEO Satya Nadella. They’ll also be enrolled in the company’s Startups Founders Hub program to ensure that they are steered in the right direction and that their platform takes off.
Many of our readers have reported that their Xbox turns on by itself. This is a frustrating issue as the console will turn on even if you don’t want to play games.
The Xbox turns on by itself issue has been reported across all Xbox variants. In this guide, we will give you a list of solutions that will help resolve the Xbox turns on by itself issue. Let us get right into it.
Why does my Xbox turn on by itself?
There are several factors that could cause your Xbox console to turn on by itself. Below are some of the common reasons.
The power button is loose: Chances are there is some issue with the power button or the connection is faulty.
HDMI control is turning on Xbox: Some HDMI cables come with the HDMI-CEC that is often responsible to turn on the connected devices, which could also be the reason in our case.
There is a software glitch: There might be a glitch in the system which is why your Xbox turns on by itself.
Let us go through the advanced solutions that will help to resolve the problem at hand.
What can I do if Xbox turns on by itself?
Before applying the advanced solutions, let us go through some simple fixes that may help keep your Xbox from turning on randomly.
Remove the AA batteries from your Xbox controller and reinsert them. Chances are your controllers are faulty.
Clean the Xbox capacitive power button and make sure there isn’t any adhesive or tape applied over it.
Check the HDMI cable you use to connect the console to your PC and turn off the HDMI-CEC option if available.
Now let us apply the advanced solutions to fix the issue.
1. Toggle off the Keep my console up to date option
Press the X button on your Xbox controller.
Select Settings.
Choose System from the left pane and select Updates from the right.
Uncheck the Keep my console up to date option and restart your console.
When you keep the said option turned on your Xbox console, then your console will turn on whenever there is a new update available to keep it updated. Simply turn off this feature and check if this fixes the issue for you.
Select General on the sidebar and choose Power mode and startup option on the right.
Choose Instant-on from the Power mode drop-down and uncheck the Wake up Xbox by saying “Xbox on.” option.
You might have kept this option turned on because of which whenever you are saying Xbox on or Turn on Xbox, the console is turning itself up. Disable this option and check if this fixes the issue or not.
3. Update the Xbox console
Press the Xbox button on your controller.
Click on Settings.
Select System from the left and select Updates & downloads.
If there is a new update available, hit the Update button.
This might be a temporary glitch because of which the Xbox turns on by itself. You can fix this by installing the latest available update as they bring bug fixes for such issues.
If the Xbox isn’t updating, then you should check out the solutions in our guide that will help you resolve the problem.
4. Enable the Don’t allow the Xbox app to connect option
Press the Xbox button on your controller.
Click on Settings.
Select Devices & Connections from the left and choose Remote features on the right.
Select Xbox app preferences.
Check the box for Don’t allow the Xbox app to connect option.
5. Perform a soft reset
Press the Xbox button on your controller.
Choose Settings.
Select System from the left and choose Console info from the right.
Select Reset console.
Choose the Reset and keep my games & apps option.
If nothing works, then to get rid of this glitch, we suggest you simply perform a soft reset to your Xbox console and see if this resolves the issue.
Thanks to the cutting-edge features and robust protection it offers, Bitdefender stands tall as a reliable antivirus solution amongst the top contenders.
However, there are certain situations when the tool becomes overprotective and wrongly considers a potentially safe file as a threat. In such a situation, disabling the Bitdefender temporarily or permanently becomes a necessity.
Why should I disable Bitdefender on Windows?
There can be several reasons why you might consider disabling Bitdefender. Here are some of the obvious ones:
Software incompatibility – In certain cases, antivirus software like Bitdefender may conflict with other programs installed on your computer.
System performance – While Bitdefender is designed to be resource-efficient, however, there are several reports about high CPU usage, particularly during scans or updates.
Troubleshoot network connectivity – Antivirus software, including Bitdefender, employs various network protection mechanisms that can sometimes disrupt network connectivity.
False positives – Bitdefender may occasionally identify innocent files or apps as potentially dangerous false positives. This may cause problems or disruptions when using particular software.
System maintenance – When executing system maintenance procedures, installing software, or changing specific system settings, Bitdefender’s active protection may cause problems.
Having said that, let’s look at the different ways to disable Bitdefender to handle a security-related situation.
NOTE
Always exercise caution when disabling antivirus protection and make sure to re-enable it promptly to maintain a secure computing environment.
How do I turn off Bitdefender temporarily?
Press the Windows key, type bitdefender in the search bar on top, and select Bitdefender Total Security app from the search result.
Locate and choose the Protection option from the left sidebar of the main app interface.
Next, click the Open option listed under the Antivirus section of the Protected Features window.
Switch to the Advanced tab and toggle Off the switch next to Bitdefender Shield.
Select the duration for which you wish to disable the Bitdefender protection in the pop-up that appears. Click OK to save the changes.
Bitdefender’s real-time protection and other security features should now be temporarily deactivated. You can verify this by checking the Bitdefender icon in the system tray, which might change its appearance to indicate that the protection is turned off.
After the selected time duration is passed, the Bitdefender protection shield will automatically be enabled.
How do I permanently disable Bitdefender?
Launch the Bitdefender Total Security application on your computer.
Choose Protection from the left side of the navigation panel.
On the Protection Features window, select Open under the Antivirus section.
Move to the Advanced tab and move the toggle for Bitdefender Shield in the Off position.
Choose Permanently after expanding the drop-down in the additional window that appears and hit the OK button.
Bitdefender gives you the choice to disable the application permanently if the situation requires it. But remember to toggle on the protection once you’re done with the application to ensure your system remains secure against online threats at all times.
Launch the Bitdefender application on your system.
Select Settings from the left navigation panel of the app interface.
In the General tab of the Settings window, toggle off the switch for Special Offers and Recommended Notifications.
If you are wary of the constant pop-ups, renewal offers, or USB scan notifications, you can disable the Bitdefender notifications to keep them at bay.
How do I disable Bitdefender VPN?
Head to the Bitdefender app on your Windows PC.
Choose the Privacy option from the left sidebar of Bitdefender.
Click Open VPN, present under the VPN section.
If the VPN is currently connected, press the button to disconnect it.
And that’s it! To use the VPN later, follow the same steps and press the connect button this time.
When you purchase Bitdefender Total Security, the VPN service is a part of it. However, this package has a limited data allowance of 200MB daily if you haven’t purchased an additional subscription. Given the limitations of the data allowance, you may not want to keep the VPN enabled at all times.
How do I disable the auto-renewal in Bitdefender?
Log in to the Bitdefender Central website using the email associated with your Bitdefender purchase.
Navigate to the My Subscriptions section from the left navigation bar and switch to the My Payments tab on the right window.
Locate the subscription that you need to modify, then click View Details next to it.
Follow the Manage your subscription renewal options link, located on the next page displaying the purchase history.
Press the STOP AUTO-RENEWAL button on the overlay pop-up to disable the auto-renewal feature for your subscription.
After completing the above steps, you will receive an automatic email confirming that the change to your subscription renewal options was successful.
That’s pretty much about it! You can easily disable Bitdefender and related features by following the steps listed in the guide.
Winsock error 10054 can appear with a message saying Connection reset by peer, or An existing connection was forcibly closed by the remote host. It means the target host closed the connection unexpectedly. Hence, we’ll explain why it happened and how to fix it.
Closing the connection midway – Just as the error message says, Windows 10054 can occur when you abruptly close or shut down the session while the computer tries to connect with a server.
Internet connection issues -If there is network congestion between the peer servers or the network is not stable, it can cause the connection to reset or be closed forcibly. Also, it can disable the server connections when connected to a proxy server.
Firewall interference with the connection – The activities of Windows Defender Firewall or other antivirus software may impede the connection between the servers. It checks every connection that goes in and out of the PC and can cause a delay in the process.
Outdated network driver – When the network drivers on your computer are outdated, they can affect your network performance. Also, it can cause incorrect assembling of the TCP/IP transport packets.
Depending on the circumstances of occurrence, these causes may vary on different computers. However, you can resolve the error by following the fixes in this article.
How can I fix the Winsock error 10054?
Observe the following preliminary checks before trying any advanced troubleshooting steps:
Restart the computer – It will refresh the system and is the quickest way to fix temporary issues affecting the computer.
Fix network-related issues – Power cycling the modem or router and updating the router firmware can resolve network issues.
Add Winsock to Firewall’s exception list – This will ensure that the Windows Defender Firewall will not flag anything related to Winsock as a threat or disrupt its activities.
If you can resolve the Winsock error, proceed with the solutions below:
1. Disable Windows Firewall
Press Windows + R key to open the Run dialog box, type control, then press Enter to open the Control Panel.
Click on the Windows Defender Firewall option.
Click the Turn Windows Defender Firewall on or off option.
Go to the Private and Public network settings, then click the radio buttons for the option to Turn off Windows Defender Firewall (not recommended).
Restart your PC.
Disabling the Windows Defender Firewall resolves any interference it’s causing your computer from connecting to the peer server.
Press Windows + R keys to prompt the Run window, type devmgmt.msc, and click OK.
Expand the Network adapters, right-click on the driver, then click Update driver from the drop-down.
Select the Search automatically for drivers option and wait till the update finishes.
Restart your PC and check if the error persists.
Updating the network driver will fix bugs and install the latest features to improve your computer driver performance. Check other steps for updating drivers on Windows 11 if you have any issues.
3. Reset TCP/IP Stack
Left-click the Start button, type Command Prompt, and click the Run as administrator option.
Click Yes on the User Account Control (UAC) prompt.
Type the following in the command bar and press Enter: netsh int ip reset c:\resetlog.txtipconfig /releaseipconfig /renewipconfig /flushdns
Restart your computer.
Resetting the TCP/IP will restore its default settings and fix any configuration issues causing the winsock error 10054. Check our guide on how to fix Command Prompt not working on your PC.
We’ve seen a lot of Windows 11 users complaining about their system’s bloatware and stock apps and want to remove them. Microsoft’s radical approach to advertising has somewhat become a thing that turned people away from the OS.
Luckily, JunkCtrl, a third-party tool designed to tackle clutter and unwanted applications, has arrived, with a sole promise to streamline the cleanup process for Windows 11 users.
With its mission to remove junk, JunkCtrl has undergone a complete overhaul and now features an innovative plugin function that allows users to create custom junk and bloatware categories for almost automated app deletion.
Now live on Github, the newly released version of JunkCtrl boasts significant improvements at its core, enabling users to efficiently declutter their Windows 11 operating systems. While the previously popular BloatBox remains available for Windows 10 users, JunkCtrl is specifically designed for the latest Windows version, offering a more comprehensive approach to junk removal.
As a user, you can also create personalized junk comparisons and systematically delete apps until not a single one remains on their Windows 11 devices. But the question is, how does it work?
How does JunkCtrl work to remove bloatware & stock apps from Windows 11?
Simply execute the program and click on the Search option, which will display a list of pre-installed applications on your device. Choose the ones that are unnecessary for you and click on the Add to Bin button.
JunkCtrl’s development team is also considering incorporating elements of Cleanmgr+ into the software in the future. Although migrating Cleanmgr+ to .Net has been challenging, the integration could further enhance JunkCtrl’s functionality and make it even more robust.
Additionally, we’ve also prepared a set of general guides you can check out if you want to remove Windows 11 bloatware completely, using various other ways.
Are you fed up with bloatware and stock apps on Windows 11? Let us know in the comments!
The specified network password is not the correct error is rampant with Windows users using Remote Desktop. It occurs while using network sharing to transfer files over the network. However, you can resolve the error by following the steps outlined in this article.
Why is the specified network password not correct?
Some factors that can cause the error are:
Incorrect credentials – As the error message implies, you encountered the error due to misconfigured credentials while network sharing with a Remote Desktop. It results in an authentication error because the password can’t link to the Remote computer name.
Firewall services interference – Antivirus or other software running a firewall service can impede the connectivity between your computer and the Remote Desktop, causing an error during the authentication process.
Remote Desktop connections credentials cache – The credentials cache of RDP connections on your PC can also be the reason for the issue. They can become corrupt with time, affecting the recipient of subsequent connections.
Disabled services – When the required network services are disabled, it prevents the connection and authentication process from being successful, prompting The specified network password is not correct error.
The above-listed causes are liable to vary on different devices depending on the situation. Nonetheless, we’ll take you through some detailed steps for resolving the problem.
What can I do if the specified network password is incorrect?
Try the following preliminary checks before proceeding with any advanced steps:
Check the date and time on both ends – Ensuring the date and time on your computer and the Remote Desktop helps the connection sync better and can fix the error.
Specify domain and username – Specify the computer’s domain name before the username and include a backslash symbol in between. e.g. ComputerName\Username
Setup user/password with the same on the Windows account – When setting up your login on FreeNAS, use the same login credentials as the one on your Windows account for NTLM authentication to work.
Check Username and Password – Cross-check the Username and Password to ensure they correlate with the RDP credentials you need.
Recreate the share permission in the directory – Share access to Everyone on the directory and authenticate using your username instead of your Email. Also, recreate the share in FreeNAS.
Open a support case – Some users claim they opened a support case and requested Component Patch 2015-032 to fix the issue.
Peradventure, you can’t resolve the error, proceed with the steps highlighted below:
1. Send NTLMv2 response only/refuse LM & NTLM
Press the Windows + R buttons to open the Run command window, type gpedit.msc, click OK to open the Group Policy Editor.
Navigate to Local Computer Policy, click on Computer Configuration, and select Windows Settings.
Under Windows Settings, choose Security Settings, click Local Policies, and click on Security Options.
Scroll the list to find the policy Network Security: LAN Manager authentication level. Right click on this policy and choose Properties.
Choose to Send NTLMv2 response only/refuse LM & NTLM and click OK to confirm the settings.
Close the Group Policy Editor and check for changes.
While this fix has been claimed to work by several users, you should note that it is more likely to work if applied to Pro (and above) editions of Windows.
2. Use Forgot password at PC sign in page
Press Windows + I to open the Windows Settings.
Locate the Accounts tab and select Sign-in options.
Click on Password.
Input your new password, confirm it, add a hint, and click Next.
Click Finish on the Change your password window.
Restart your PC and click Forgot password on the sign-in page.
Verify your identity with a code and click Next.
Then, reset the password and click Next.
By doing this, the new password will allow you to use SMB and Remote Desktop. Since the Microsoft authenticator may need to access your real password when setting up Windows.
Dynamic Link Libraries are essential files that carry code useful for the proper running of specific applications on a computer. VMProtectSDK32.dll is not an exception.
This guide walks you through basic troubleshooting and download steps if the DLL file is missing on your computer.
What does the VMProtectSDK32.dll missing error mean?
This error means your computer can not find the file, and any of the following may trigger it:
Corrupted or deleted DLL file – It’s possible that the DLL file got lost or damaged because of a software installation mistake, unintentional removal, or a malware attack.
Incompatible software version – If the VMProtectSDK32.dll file used by the software is outdated or differs from the required version, an error might occur since the software is designed to work with a specific file version.
Incorrect file path – Sometimes, the software searches for the DLL file in an incorrect directory or location.
Note that missing errors may come in the following forms, and our solutions below should still be effective; VMProtectSDK32.dll is missing, VMProtectSDK32.dll was not found, or VMProtectSDK32.dll could not be located.
What do I do if VMProtectSDK32.dll is not found on my computer?
Before venturing into any complex solutions, you may employ these workarounds:
Scan for viruses – A virus scan with a robust antivirus may be vital if malware infection is causing the missing file.
Reinstall apps – Try to uninstall the app triggering the issues and reinstall a freshly downloaded copy since the old copy may be corrupted.
Restart your computer – Sometimes, the problem is caused by minor glitches, and a system reboot may be powerful enough to resolve these bugs.
If the above workarounds are unsuccessful, please continue to the more detailed solutions below.
1. Use specialized repair tools
Using specialized DLL repair tools is our recommended solution because these tools do all the heavy lifting for you.
2. Run a file scan
Press Windows + R, type CMD, and hit Ctrl + Shift + Enter.
Type the script below and hit Enter: sfc /scannow
Follow any prompts on the terminal, wait for the process to complete, and verify that it fixes the missing VMProtectSDK32.dll problem.
A manual download can be an effective solution when the DLL is not on your computer. However, you must download VMProtectSDK32.dll from a trusted website.
It’s important to ensure that the source of DLLs is reliable, as some may contain malware that can harm your device.
To avoid triggering an error, place the file in the path below or in the same directory as the problematic program.
C:\Windows\System32
Any of the above solutions should fix the missing DLL error. Using the specialized DLL tools is often very easy, but note that we have not made these solutions in any particular order, and we encourage you to start with whatever seems most convenient.
That is as much as we cover in this guide. Finally, please remember to leave us a comment and let us know what fixed the missing DLL error.
Microsoft has just released an update for PowerToys upping it to version 0.70. The update ships with a couple of new features, as well as the usual fixes and enhancements.
Here’s everything you need to know about this update:
First up, the new update ships with the Mouse Without Borders feature that’s designed to let users interact and engage with multiple PCs using the same keyboard and mouse. What’s more, the feature lets users share clipboards and files between the machines.
It’s also been upgraded to .NET 7 on top of some small adjustments to fit inside the PowerToys model. The new utility further builds on the Mouse Jump utility and enhances navigation across multiple and large screens.
Next up, the update also comes with Peek. A new utility that’s in place to provide users with a quick preview of files selected in File Explorer when you press a shortcut (Ctrl+Space by default).
Additionally, the Registry preview, Awake, and Mouse Jump utilities have all received quality of life improvements to further enhance the tool’s user experience. We invite you to check out the full changelog over at GitHub’s repository for more information pertaining to the fixes.
If you already have PowerToys running on your device, it should automatically notify you of this update. Alternatively, you can get this update today by launching your app, then clicking on General followed by the Check for Updates, and then the Install Now button.
Looking to bring life & restore old photos? You’re in the right place.
Today we’ll walk you through the best tools that can help you remove stains, improve clarity, colorize, and offer other similar features that can turn back the clock on your pictures.
What is the best software for restoring old photos?
Adobe Photoshop CC is a well-acknowledged photo editing software that is used both by beginners and professionals.
It is one of the most suitable software tools to restore old images that are damaged by either scratch, color degradation, or come with the well-known sepia hue.
The main reason why we chose Photoshop CC as the best option is the ability to work on multiple layers, adjust highlights, and shadows, and change RGB colors down to the pixel level.
Apart from restoring old images, you can also work on improving the quality of images by changing skin tone, applying filters, or removing backgrounds.
Let’s quickly look at its key features:
Professional photo editing toolkit (crop, retouch, restore, repair, and combine photos)
Unlimited layers, masks, and effects for stunning imagery
Cross-platform compatibility and full support for stylus or touch technology
Your projects are automatically saved to the cloud
Interactive in-app tutorials and inspirational content available
Adobe Photoshop
Restore your most precious memories to their former glory with this great photo restoration software!
Restoring old photos is no easy task… or is it? It can be with the right tools and Luminar delivers everything you need to remove noise, retouch black-and-white pictures, and adjust tones, clarity, and contrast.
Using AI-based image processing and powerful noise reduction tools, Luminar helps you bring your old photos back to their sharp and crisp state.
This software comes with a full set of old photo restoration tools to remove stains, scratches, splotches, and dirt.
Let’s quickly look at its key features:
Automated AI-based photo editor
Professional-grade noise reduction tools
Erase tool to cover problematic areas with similar-looking textures
Enhance faded photos by fixing contrast, tone, exposure, and color
Color Temperature filter to cool down the temperature of your photos
Luminar
An AI-based app that offers you a full set of features to edit your old photos.
While it is not as feature-rich a software as Adobe Photoshop, for instance, Fotor does a pretty good job at photo restoration.
What’s more, it delivers a complete photo editing toolkit for free.
Fotor’s main focuses are on color correction and RAW image editing, which makes it perfectly suited to adjust balance and enhance faded colors and shades in old photos.
Let’s quickly look at its key features:
Supports all popular graphic file formats
In-built photo restoration feature
Photo editing tools (crop, add or remove objects, bur, adjust contrast, correct color and shade, and more)
Intuitive, easy-to-use interface
Fotor
Restore your old photos and benefit from all of Fotor’s amazing features.
Corel Paintshop Pro is another great tool to restore photos.
With the Fade correction feature, you can adjust the percentage of tint and fade to your liking without the need for complex photo editing skills.
One of the other advantages it has is the scratch remover that can easily handle scratches on damaged photos. It allows you to select a damaged area and then apply a layer of paint over it.
With the Cutout Lab feature, you can easily remove the background of the photo while preserving the quality on the edges.
Let’s quickly look at its key features:
Customizable interface
Stylus and tablet support
360 photo editing
HDR photo manipulation
Creative content integration
Corel PaintShop Pro
Breathe life into your old photos and enjoy forever-lasting memories with Corel PaintShop Pro right away!
Another great entry in our list of reliable photo-restoring tools is PhotoWorks, a user-friendly software solution that will soon become your most trusted photo assistant.
The Healing Brush that you will find in the Retouch tab will help you get rid of small cracks from old photos.
If you choose the right brush size, they will disappear like magic. After you adjust the Feather and Opacity settings for softening the areas that have been touched and the rest of the photo, you are done.
Of course, you can still work on the details and enliven the colors or even replace the background if it’s too damaged, but everything is extremely easy to work with.
Let’s quickly look at its key features:
Impressive AI features
Remove glare and smooth textural inconsistencies with Portrait Magic
Photo quality enhancements
Work with each color on the photo one by one
One-click effects
PhotoWorks
Revive your old photos with this great tool that helps you preserve your memories and heritage.
If you want a powerful photo restoration software tool, PhotoGlory is worthy of your full attention. There is no other option on the market to remove scratches, tears, and stains so easily.
Moreover, when your mission is to bring life to old photos, another useful trick is to colorize them. Don’t even think that you need to find a different tool for that.
A click is all that stays between you and achieving this goal as well. You can even modify the colors manually in order to make the results more personal.
Thanks to the latest built-in technology, all your edits will be precise, smooth, and will look natural even with automatic effects.
Key features that PhotoGlory brings to the table:
Restores colors to faded photos
Ads stylized text labels and date stamps
Removes scratches, stains, and creases
Assembles photos ripped in half
Turns a negative picture into positive
PhotoGlory
Give a new life to your old photos with PhotoGlory! Your loved ones will most likely be surprised.
AKVIS Retoucher is a photo restoration software that helps to remove dust, scratches, and other unwanted objects as well as restructure missing parts.
By removing unwanted details, this software helps to improve photo composition. Since it’s a Photoshop-compatible plugin, it works well with a selection of your Photoshop image editors.
Besides the plugin version, AKVIS Retoucher is available as an independent program (standalone) with a trial version.
There is no registration required to try all the features of the software during the free 10-day evaluation period.
Let’s quickly look at its key features:
Intelligent cloning techniques to cover the selected areas and yield amazing results in removing photo defects
Resolves the problem of extending the borders of a layout that does not have space for cropping
Photo restoration tools
It also removes the date stamp, and distracting details, and increases the image canvas using the image patterns to fill blank areas
Akvis Retoucher
AKVIS Retoucher will help you give a new life to your old, dusty photos by also improving their composition.
Old color photos often fade due to unreliable dyes. To restore them, use dedicated photo restoration software, which repairs damage and revives colors. These apps can remove scratches, creases, and sun damage without altering the originals.
Black-and-white photo restoration tools are particularly useful for rejuvenating faded photos, making them look new again by removing stains and other imperfections.
Summary
We’ve listed some of the renowned old photo restoration software that can assist you in cleaning up all your old photos.
However, don’t hesitate to take a look at our free photo editing apps list and you will also find more interesting tools to try.
We hope you found this article useful and informative. Feel free to comment and share.
And today, at Microsoft’s annual conference for developers, Panos Panay shared a short video on his Twitter account to introduce Windows Copilot alongside the Dev Home.
But the video did more than just debt the new entries, it also confirmed that Microsoft was indeed working towards redesigning and modernizing the File Explorer app in Windows 11. Towards the end of the video, you’ll be able to catch a glimpse of the new app briefly.
Right off the bat, aside from the new look and feel which is very apparent, you can also spot the new address and search bar which has been pushed close to the tabs in the app. You’ll also notice that all actions have been moved down below the address bar, closer to the navigation pane.
Additionally, the redesigned File Explorer also features rounded interfaces as well as blur effects which aligns with Windows 11’s Fluent design. To this end, Microsoft is yet to make the official redesign announcement though we already know that the new app will adopt WinUI 3.
As we speak, it’s already possible for some Insiders to test a version of the File Explorer running on WinUI 3, though it doesn’t feature the changes highlighted above.
Alongside the redesigned File Explorer app, we also got to glance at the new gallery feature which is in preview and should start rolling out to roll out to more users soon. The feature is designed to make it easier for users to access their photo collection.
These advancements get Microsoft one step closer to modernizing some of its legacy apps that have remained untouched and haven’t received any significant updates for a long time.
Gmpopenh264.dll is a Dynamic Link Library file associated with Mozilla Firefox 70.0b13 and was first developed in 2019. It is specifically used for video decoding purposes.
If you are facing any errors related to this DLL file, such as it is missing or corrupted, then this guide can help!
What causes the gmpopenh264.dll missing error?
There could be various reasons for DLL missing errors; some of the common ones are mentioned here:
Missing or corrupted DLL file – The error may appear if the DLL file is missing or has been deleted accidentally. You need to restore the file to fix it.
Malware infection – Viruses on your computer can damage or modify the system files, including DLL files, causing this error. Try running a deep scan using an antivirus tool.
Registry issues – If there are invalid or corrupted registry entries on your computer, it may trigger issues like these. Try using a registry cleaner to fix broken registries.
Third-party software interference – Some programs on your computer may conflict with the DLL file, leading to this error. Try uninstalling unwanted software.
Incorrect installation – If the app related to the DLL file is incorrectly installed or uninstalled, you can see this message.
So, now that you know the causes of the issue, let’s move to the solutions to eliminate the problem.
How can I fix the gmpopenh264.dll not found error?
Before engaging in advanced troubleshooting steps, you should consider performing the following checks:
Restart your computer.
Try reinstalling the affected app.
Make sure there are no pending Windows updates.
If these minor tweaks don’t work for you, check out the detailed solutions below.
1. Use a third-party DLL fixer
Managing and resolving DLL-related issues can be tricky; therefore, using DLL fixer tools is recommended, as they can execute the repair process automatically.
2. Use the SFC & DISM scans
Press the Windows key, type cmd and click Run as administrator.
Type the following command to repair system files and press Enter: sfc/scannow
Wait for the scan to complete, and copy & paste the following command to restore the Windows OS image and hit Enter: Dism /Online /Cleanup-Image /RestoreHealth
Once done, reboot your computer to complete the process.
3. Run a malware scan
Press the Windows key, type windows security and click Open.
Go to Virus & threat protection and click Scan options.
Select Full scan and click Scan now.
The tool will scan the computer for all types of malware threats and list them. Delete them to fix the problem.
Performing a malware scan is critical because if the DLL missing error is a result of malware and not an actual missing DLL, running a scan will eliminate it, effectively resolving the issue.
Press the Windows key, type control panel, and click Open.
Select View by as Large icons and click Recovery.
Click Open System Restore.
On the System Restore window, select Choose a different restore point and click Next.
Select the restore point before the DLL missing error and click Next.
Click Finish to initiate the process.
Windows will restart and take your PC back to an earlier point in time. If System Restore did not complete successfully, we suggest you read this informative guide to find solutions.
5. Download the file manually
NOTE
Using an untrusted website to install DLL files is not advised. However, if you know a trusted source, like DLL-Files, which has been tested and verified, you can follow the steps mentioned to restore the file.
Go to the DLL-FILES website, search gmpopenh264.dll, select the suitable option, and click Download.
Double-click the downloaded folder to open it, and locate and copy the .dll file.
Navigate to this path and paste the file:C:\Windows\System32\
So, you can follow these methods to fix the missing gmpopenh264.dll issue. If you have any questions or suggestions, feel free to mention them in the comments section below.
Windows Security is one of the best anti-virus apps out there, and on its own, it does a wonderful job of keeping your computer safe. However, sometimes it can scan the wrong files and it can flag them as corrupt, thus rendering them unusable.
Apparently, since the last Windows update, this user has lost a save file to corruption, at least once per session. That’s because Windows Security is scanning the file at the same time the user is trying to save it.
Now, there are multiple ways to deal with this issue. One solution is to whitelist the files and the folders. You can even whitelist your gaming platforms, such as Steam. In case you deal with this issue when you’re gaming, you can also add the game to the Defender allowed list. That way Windows Security will not go through it. Another solution is to simply turn Windows Defender off.
But let’s say you already did these things, and Windows Security is still deleting your files, or corrupting them. What to do then? In this case, you still need to do one more thing, and your files should be safe.
Here’s how to stop Windows Security from deleting your files
Press Windows + I to open Settings.
Go to Privacy & Security and click on it.
Go to Windows Security and click on the tab.
Select Virus & threat protection and click on it.
Go to Virus & threat protection settings and click on Manage settings.
Go to Tamper protection and turn it off.
Restart your PC and check the Windows Security app to see whether real-time protection re-activates or not.
Tamper Protection is a Windows feature that makes sure you are protected against malware at any time. For example, if you disable real-time protection, this feature will enable it back after a while. That’s why you need to disable this feature too.
You also need to know that Tamper Protection is automatically enabled after each important Windows update you install to your PC. If you encounter this issue, right after you installed Windows updates, then turning Tamper Protection off should fix it.
Just remember it, next time you update.
Have you encountered this issue? What’s your experience with it? Let us know in the comments section below.
Microsoft is currently testing a visual enhancement for the tab grouping feature in its popular web browser, Microsoft Edge. The feature, which automatically groups tabs when users drag and drop them, is being refined to make it more evident to users that tabs will be grouped.
As spotted by Windows enthusiast @Leopeva64, this change is most noticeable when using the Vertical Tabs feature.
There's a feature in Edge that automatically groups tabs when you drag and drop them, Microsoft is now testing a change to make it more obvious that tabs will be grouped, the change is most noticeable on Vertical Tabs. Before:https://t.co/NIsoljEe32
Tab grouping is a handy feature that allows users to organize their browsing experience by grouping related tabs.
However, some users have expressed the desire to have more visual cues indicating when tabs will be grouped, as it can sometimes be unclear during the drag-and-drop process.
In response to this feedback, Microsoft has been working on a change that will make tab grouping more obvious and intuitive.
While the specifics of the visual enhancement have not been disclosed, it is expected to provide clearer indications when tabs are being grouped for a smoother and more user-friendly browsing experience.
Despite the demand from users, Microsoft has not yet added a toggle option to disable the tab grouping feature. Many users have requested this option to have more control over their tab management.
What does the introduction of tab groups on Edge mean?
The tab grouping feature, along with other enhancements and innovations, has been well-received by Microsoft Edge users. It offers an efficient way to keep related tabs organized and reduces clutter, making it easier to navigate and switch between different web pages.
As Microsoft continues to refine and improve Microsoft Edge based on user feedback, the ongoing testing of the visual enhancement for tab grouping demonstrates the company’s commitment to delivering a browser that meets the needs and preferences of its users.
Not too long ago, we also reported that the tech giant will offer 5 GB of free data on Edge’s built-in VPN.
Although they did offer 15 GB in the past it didn’t work out quite well so Microsoft planned to permanently resort to 5 GB.
What do you think about Microsoft bringing tab groups to Edge? Let us know in the comments!
Many games use a binkw32.dll file, and if this file is missing or damaged, the game won’t start and you’ll be greeted with an error message.
Missing DLL files on Windows 11 are fairly common, and we covered this issue in the past extensively, so if you’re having problems, we suggest that you check some of our older guides.
Before we can fix this issue, let’s take a closer look and see what does this file do.
What is the binkw32 dll?
This file is associated with Bink video codec and is used in many video games. The file is used to compress and decompress videos in games.
If there’s an issue with this file, then the video game that uses it won’t be able to start.
Why is binkw32 dll missing?
This file can go missing for several reasons.
Corrupted installation – If your game installation is damaged or corrupted, the file will be reported as missing.
File not in the right location – In case this DLL file is not in the right location, you’ll get a message saying it’s missing.
What can I do if binkw32.dll is missing?
1. Use a dedicated DLL fixer
Many games use Binkw32.dll, and downloading it manually can be a tedious and sometimes dangerous task.
Instead of downloading files from untrusted websites, why not use a DLL repair software?
This kind of application is straightforward to use. You just need to download it and let it do the job for you.
2. Verify the game files
Open the Steam library and select the game that is giving you this error.
Right-click it and choose Properties.
Next, go to Local Files and click on Verify integrity of game files.
Wait for the process to complete.
If binkw32.dll or any other files are missing or damaged, they will be repaired by this process. If you’re using a different distribution platform, the steps might differ.
Open Windows Explorer and navigate to these locations: C:\Windows\System32 C:\Windows\SysWOW64
Look for the binkw32.dll file in both of these directories.
Once you locate it, right-click it and choose Cut.
Next, go to the game’s directory that reports the missing file, right-click the empty space and choose Paste.
In some cases, it might be better to move it to a random directory on your PC, but before moving the file, we suggest you try copying it to the game directory and see if that solves the issue.
Missing binkw32.dll file can appear on any operating system, and if you’re on Windows 10, we have a great guide on how to fix missing DLL files on Windows 10.
Before you go, don’t miss our guide on missing bink2w32.dll for more potential solutions.
Did you use a different solution? Let us know in the comments section below.