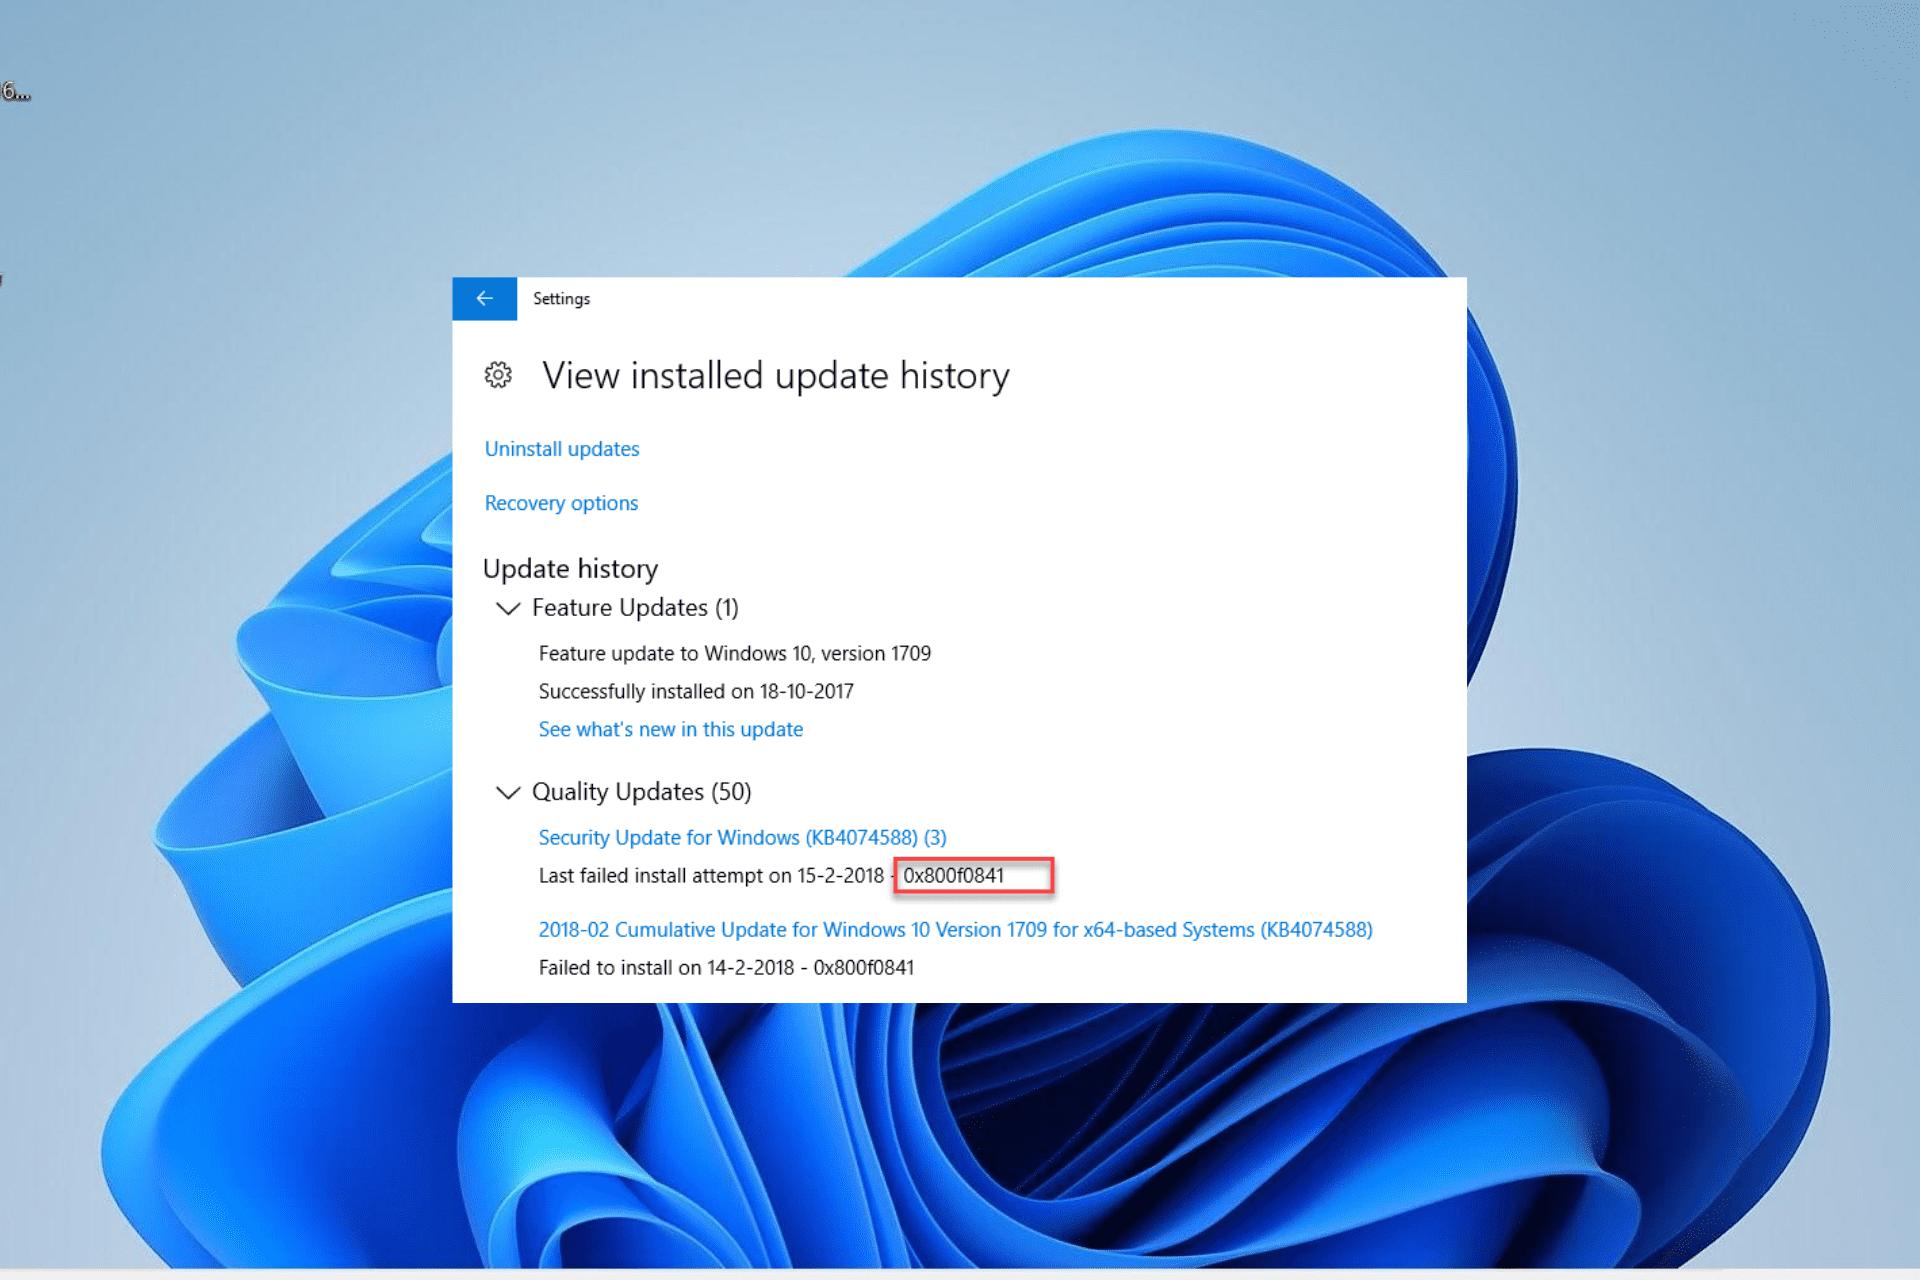
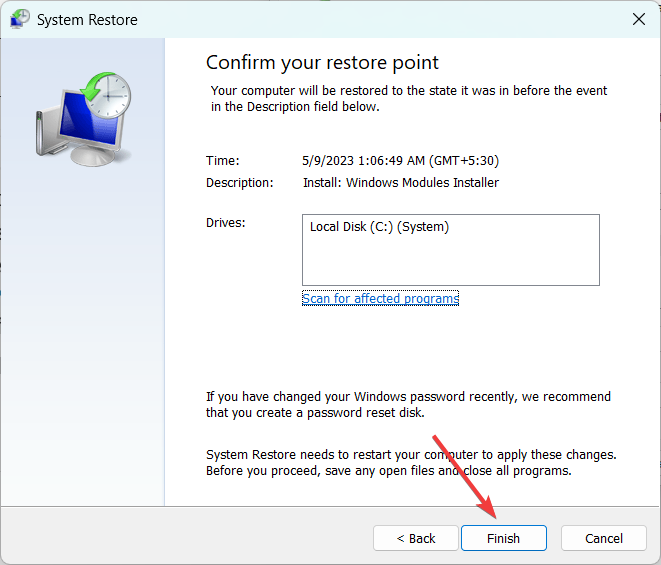
0x80072f9a BitLocker Error: How to Fix It in 5 Steps

The BitLocker 0x80072f9a error is a code that shows up when there is a problem validating a server’s certificate. While problems with WMI class usually cause this issue, other factors can also be culpable.

Irrespective of the cause, we will show you how to fix the issue convincingly in this detailed guide.

Why am I getting the BitLocker 0x80072f9a error?

Below are some of the potential causes of the 0x80072f9a error on Windows 10 and 11:

  • Wrong group policy settings: If your BitLocker policy settings are wrongly configured wrongly, it can lead to this error. Hence, you need to verify that things are set correctly.
  • Corrupt system files: Problems with crucial system files can be the reason you are getting this error. You can restore normal service by repairing these files.
  • Antivirus interference: Sometimes, your third-party antivirus software might be interfering with the operations of BitLocker, thereby causing this issue. Disabling the security software should do the trick here.

How can I fix the BitLocker 0x80072f9a error?

Listed below are some of the troubleshooting steps to try before proceeding to the more sophisticated solutions:

  • Restart the PC.
  • Disable your third-party antivirus.

If the issue persists, you can now delve into the solutions below:

1. Verify BitLocker Group Policy settings

  1. Press the Windows key + R, type gpedit.msc, and click the OK button.
    gpedit
  2. Follow the path below in the left pane: Computer Configuration > Administrative Templates > Windows Components > BitLocker Drive Encryptiongp 0x80072f9a
  3. Finally, configure the settings to suit your needs.

There are a series of Group Policy settings that need to be in place for BitLocker to work properly. Else, you will encounter issues like the 0x80072f9a error.

So, you need to configure the settings required to prevent these problems.

2. Re-register the BitLocker WMI (win32_encryptablevolume) class

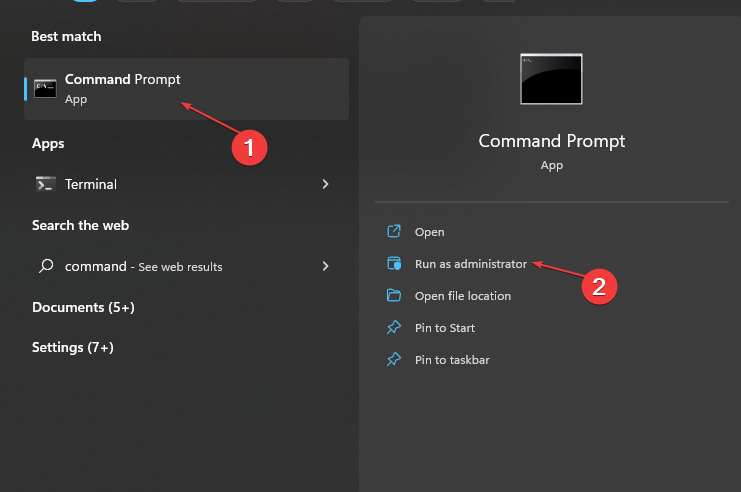
  1. Press the Windows key, type cmd, and click Run as administrator under Command Prompt.
    cmd admin 0x80072f9a
  2. Now, type the command below and hit Enter: mofcomp.exe c:\windows\system32\wbem\win32_encryptablevolume.mofmof
  3. Finally, wait for the command to finish running successfully and restart your PC.

Issues with the WMI class are one of the major causes of the 0x80072f9a error. Re-registering for this class will help you restart the process for good.

3. Clear SSL state

  1. Press the Windows key + S, type internet, and choose Internet Options.
    internet option 0x80072f9a
  2. Click the Content option at the top.
  3. Finally, click the Clear SSL state button and follow the onscreen instructions to complete the process.
    clear ssl 0x80072f9a

Sometimes, the BitLocker 0x80072f9a error can be caused by problems with the SSL certificate state. You can fix this for good by clearing the SSL state from the internet options.

4. Repair system files

  1. Press the Windows key + S, type cmd, and select Run as administrator under Command Prompt.
    cmd admin 0x80072f9a
  2. Type the command below and hit Enter to run it: sfc /scannowsfc
  3. Finally, wait for the command to finish running.

Faulty or corrupt system files might be the reason there is a reason validating your server, leading to the 0x80072f9a error. You can fix this issue for good by running the SFC command and restarting your PC after.

However, to make the process easy and fast, we recommend using a dedicated system file repairer. This tool will repair any broken or corrupt system file with little to no effort from you.

5. Disable and re-enable BitLocker

  1. Launch Command Prompt as an admin.
  2. Now, run the below to disable BitLocker: manage-bde -off C:bde off
  3. Wait for the command to finish running. Now, run the Command below to enable BitLocker: manage-bde -on C:bde on 0x80072f9a
  4. Finally, wait for the command to finish running.

At times, it might be difficult to pinpoint the cause of the 0x80072f9a error. What you need to do here is to disable and re-enable BitLocker. This should clear the potential glitches that might be causing the issue.

We have reached the end of this article. You should now be able to easily fix the BitLocker 0x80072f9a error, provided you follow the instructions therein carefully.

If BitLocker cannot be enabled for some reason, check our detailed guide to restore it.

Feel free to let us know the solution that helped you fix this issue in the comments below.
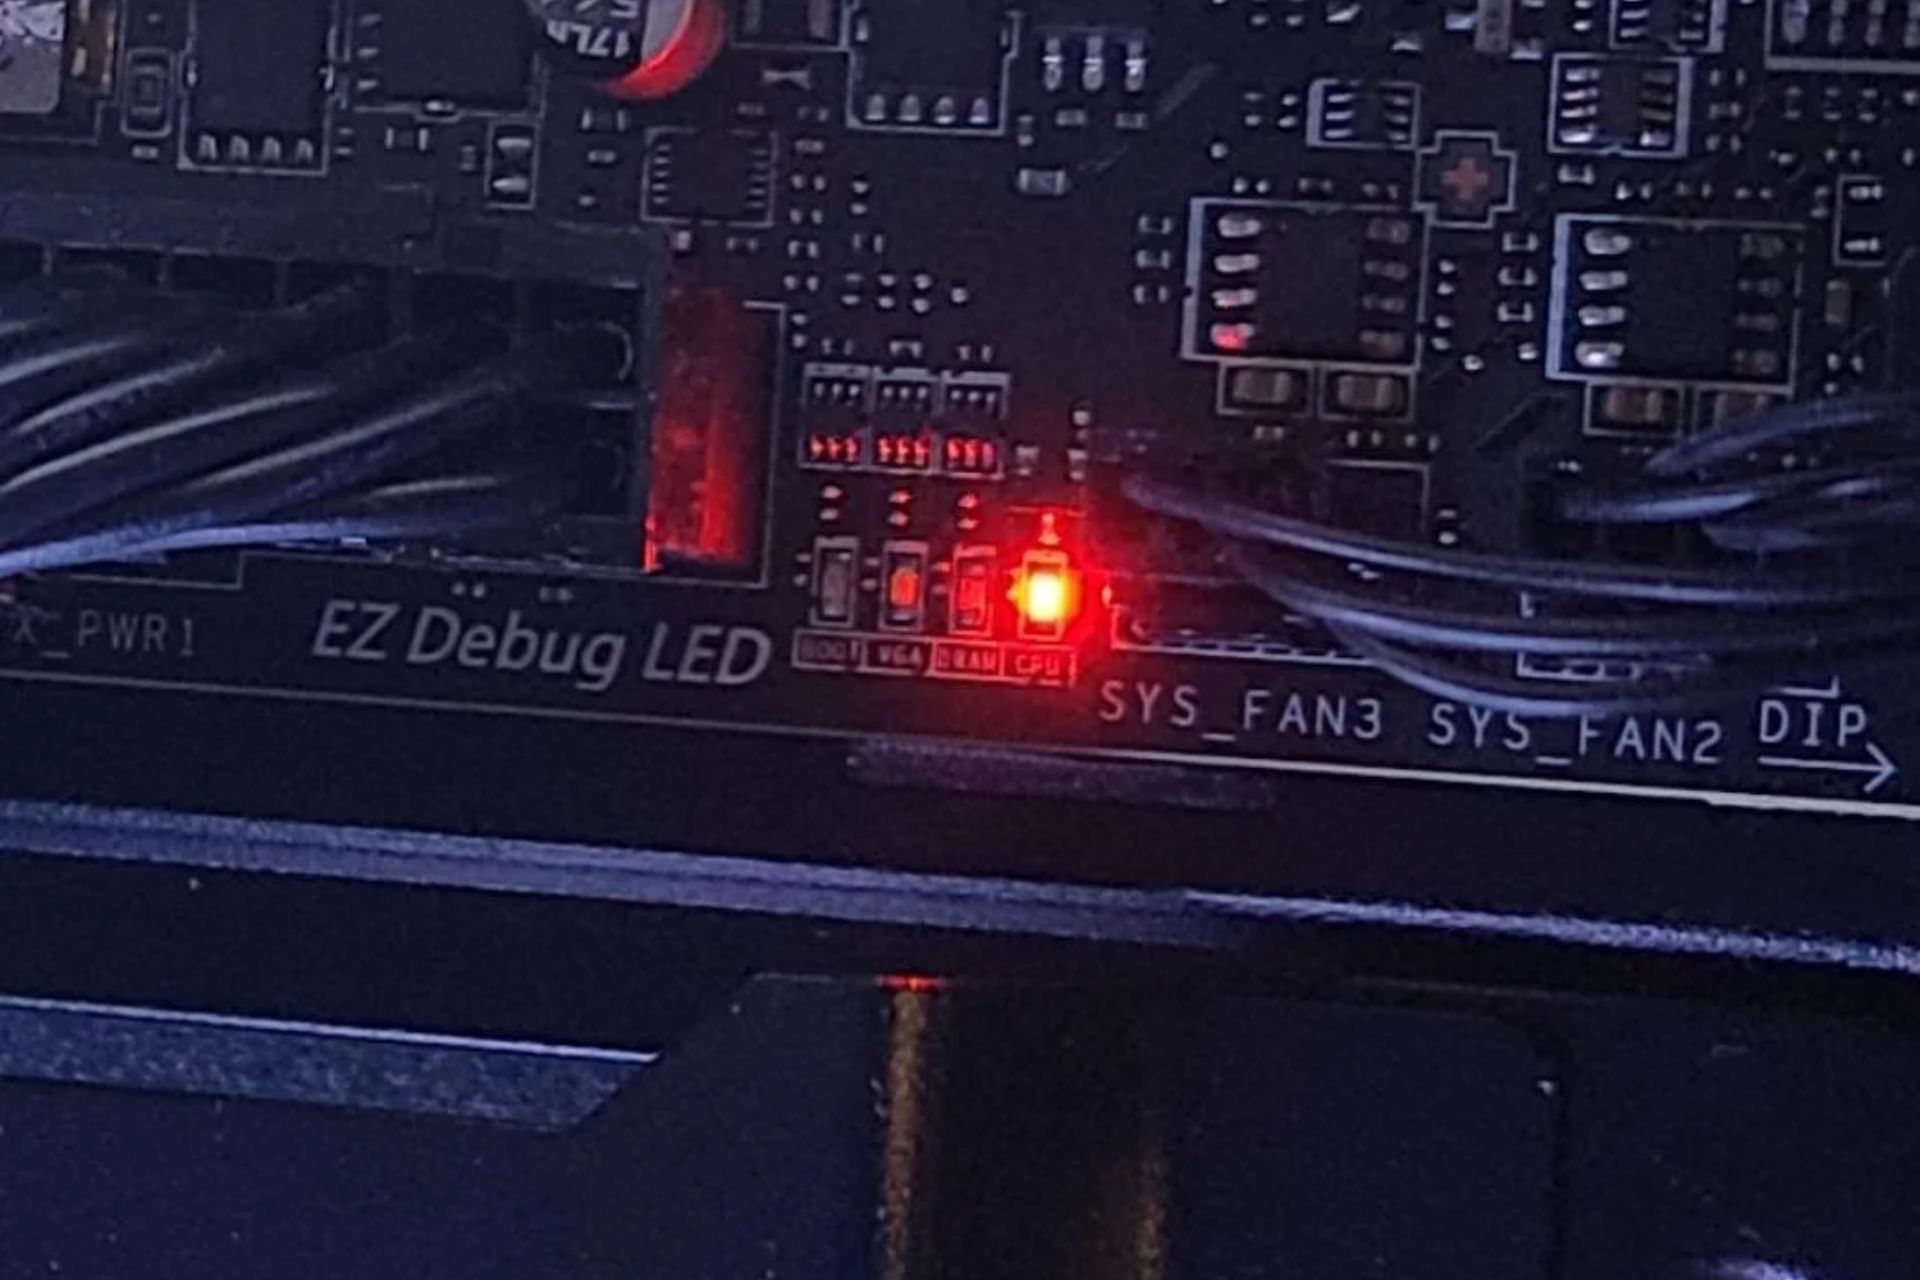
CPU Red Light on Motherboard: What It Means & How to Fix It

If you are using a desktop computer, there is a good chance that you have seen the CPU red light on your motherboard. Being a core component of your computer, CPU failure can be catastrophic on your PC.

The red light is usually an indicator of hardware problems, but there’s no need to panic. If you are able to address the issue early enough, you can save your PC from irrecoverable damage. Below, we share various ways to remedy this situation.

What does the red light in the CPU indicate?

The red light on your CPU could mean anything. It might even be nothing. Sometimes, your PC just fails to boot properly. However, it is not wise to ignore any red lights. After all, it is the color of danger.

When you see a red light on your CPU, it could be because of one or more of the following reasons:

  • Insufficient power supply – The red light could indicate that your motherboard is not getting enough power. This may be due to a faulty power supply or if you do not have enough power outlets for all your components.
  • Overheating – The most common cause of a CPU red light is overheating. If your processor gets too hot or overworked, it can cause permanent damage to your PC.
  • Overclocking – If you have recently installed overclocking software in your system, it can make your PC unstable, especially if you have an older CPU. This could be the reason behind the red light.
  • Hardware changes – If you have recently added or removed any hardware from your computer, such as graphics cards or sound cards, your system may be rejecting these components.
  • Incorrect BIOS settings – If you’re using an old motherboard, your BIOS settings may have become outdated, or when you tried to update them, they failed.
  • Hardware failure – It is possible that a hardware component is the culprit in the red light scenario. You may have bad RAM, a faulty hard drive, or a failing network card.

How do I fix my CPU red light?

Perform the following preliminary checks to ensure the basics are in place:

  • Check your fans to make sure they are spinning and that there is no dust buildup.
  • Check for any broken or damaged cables and replace where necessary.
  • Lift your CPU and check if there are any missing screws holding down parts of your computer together, and tighten where necessary.
  • Ensure your RAM is properly seated.
  • Check whether the thermal paste has dried up and replenish it if necessary.
  • Test your CPU temperature and check whether it’s at optimum levels.
  • Perform a RAM test.
  • Run a PSU test.
  • Perform a hardware diagnostics test.
  • Disable any overclocking software.
  • Turn off your PC and unplug it from the main power supply. Wait for at least 5 minutes before starting it up again. 

1. Run a virus scan

  1. Press the Windows key, search Windows Security, and click Open.
  2. Select Virus & threat protection.
  3. Next, press Quick scan under Current threats.
  4. If you don’t find any threats, proceed to perform a full scan by clicking on Scan options just below Quick scan.Scan options
  5. Click on Full scan, then Scan now to perform a deep scan of your PC.Full Scan Scan Now
  6. Wait for the process to finish and restart your system.

As a more effective solution, we recommend a dedicated antivirus solution, because these have very powerful scanning tools that will help you identify any issue with your system.

⇒ Check the Best Antivirus Software

2. Update BIOS

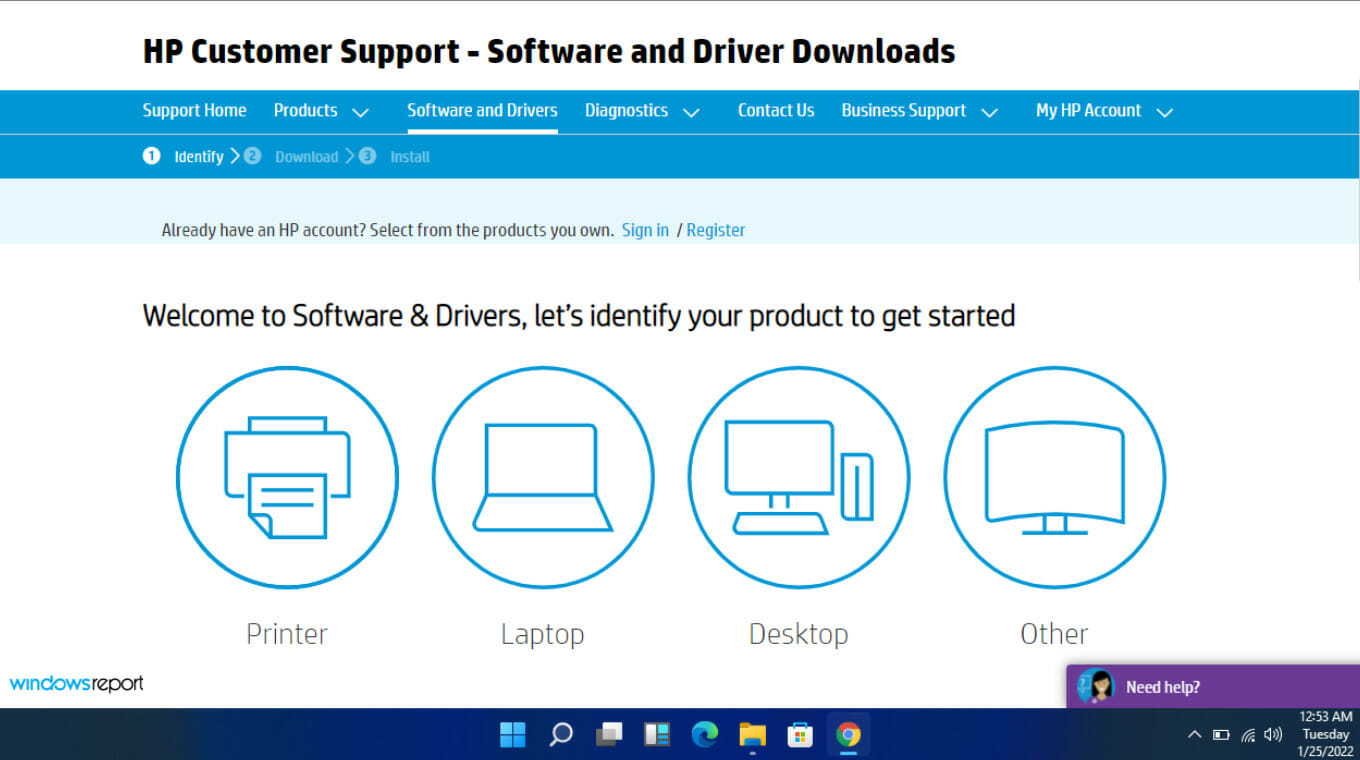
  1. The process of updating BIOS will differ depending on your motherboard. For this step, we shall be updating the HP motherboard.
  2. Navigate to the HP driver and software download website.
  3. Choose laptop or desktop, depending on the type of computer you’re using.
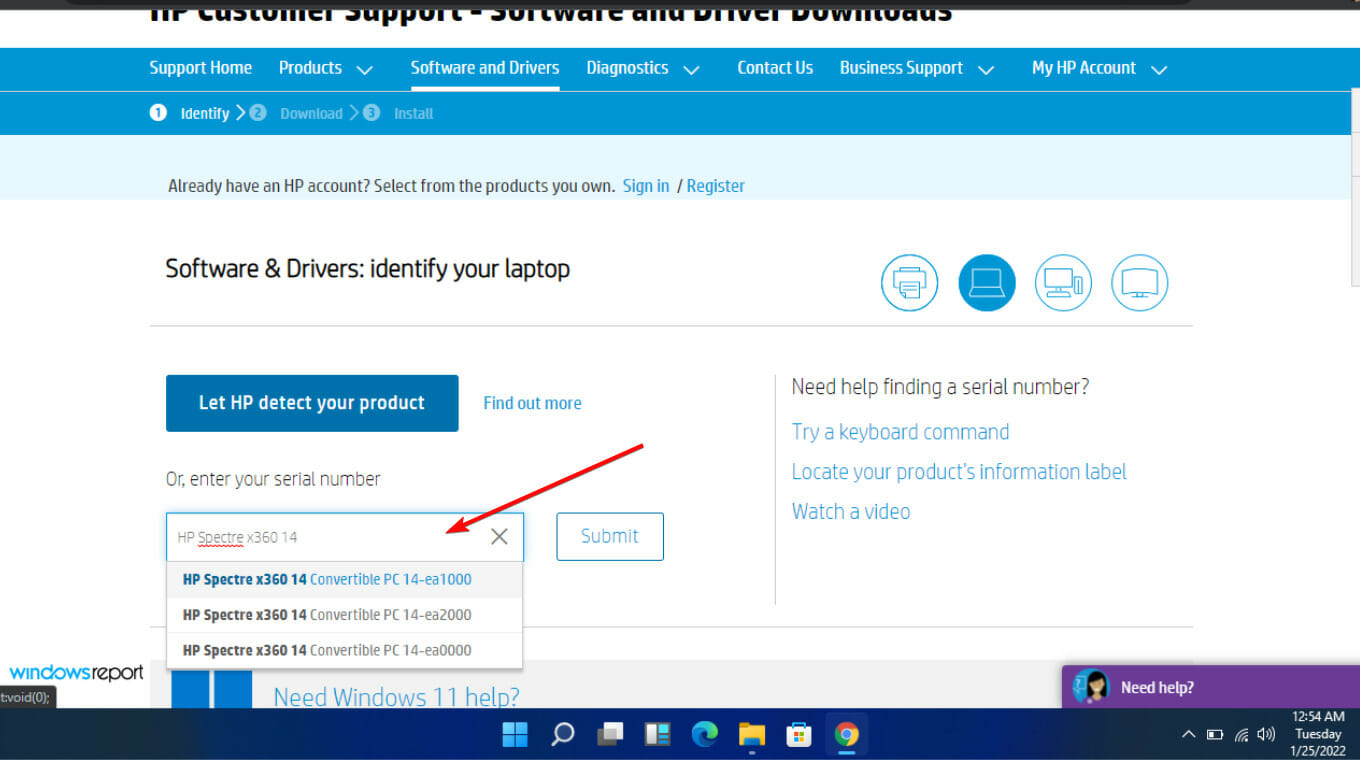
  4. Enter your exact serial number or your exact computer model.
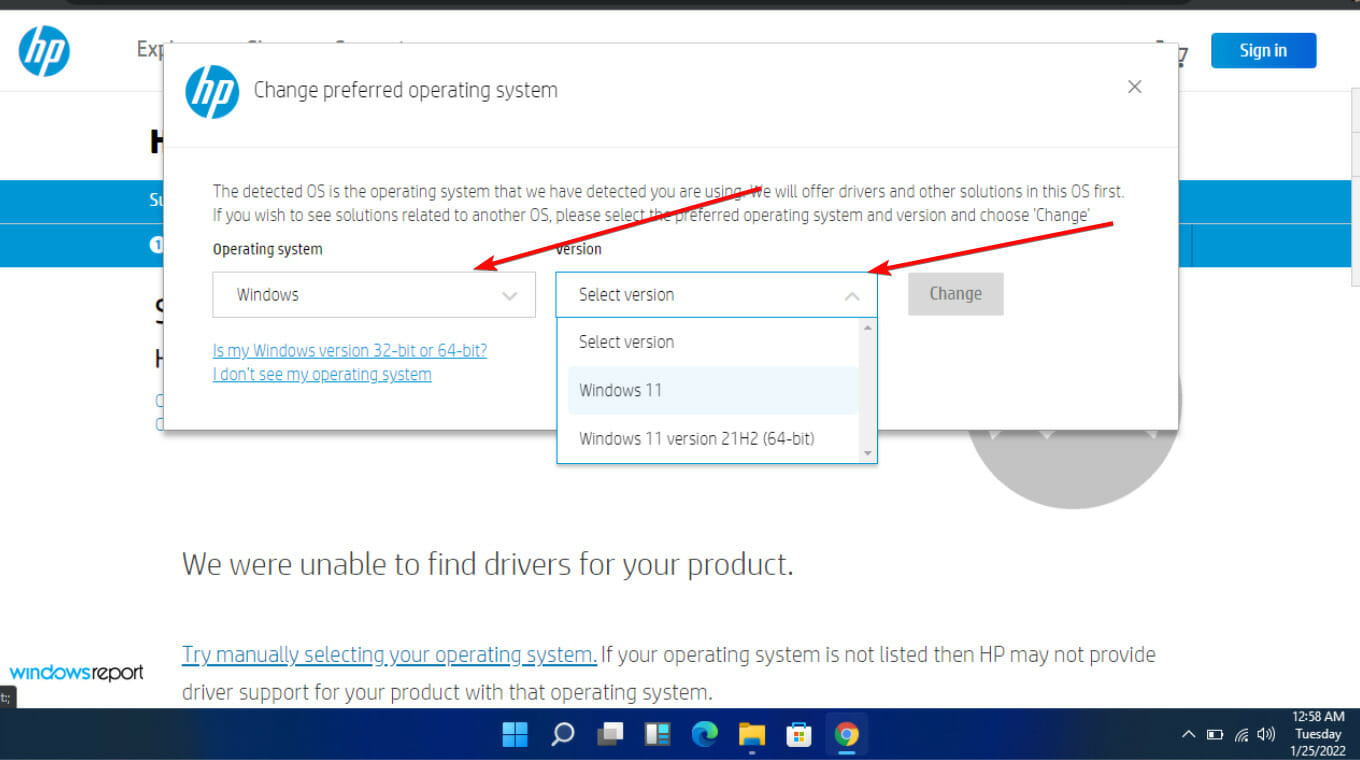
  5. Select your OS and OS version, then click Submit.
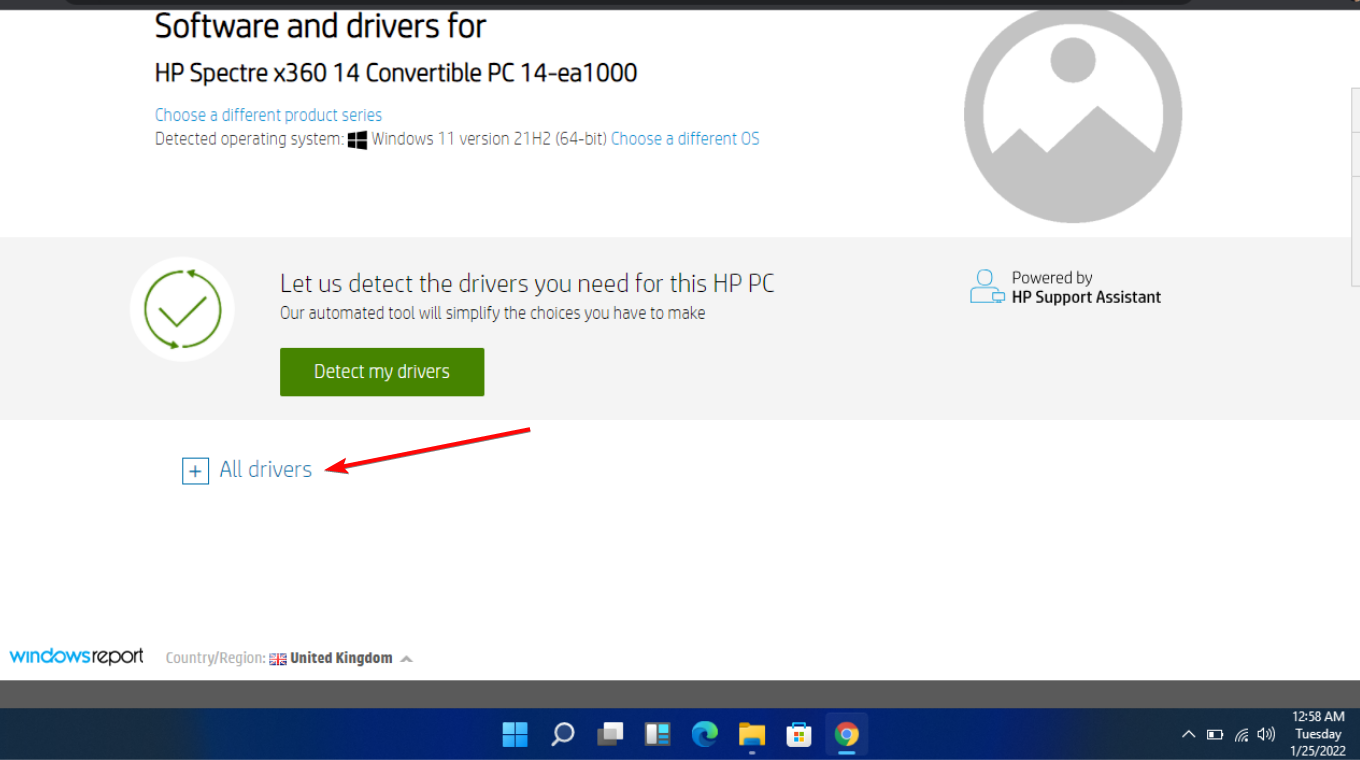
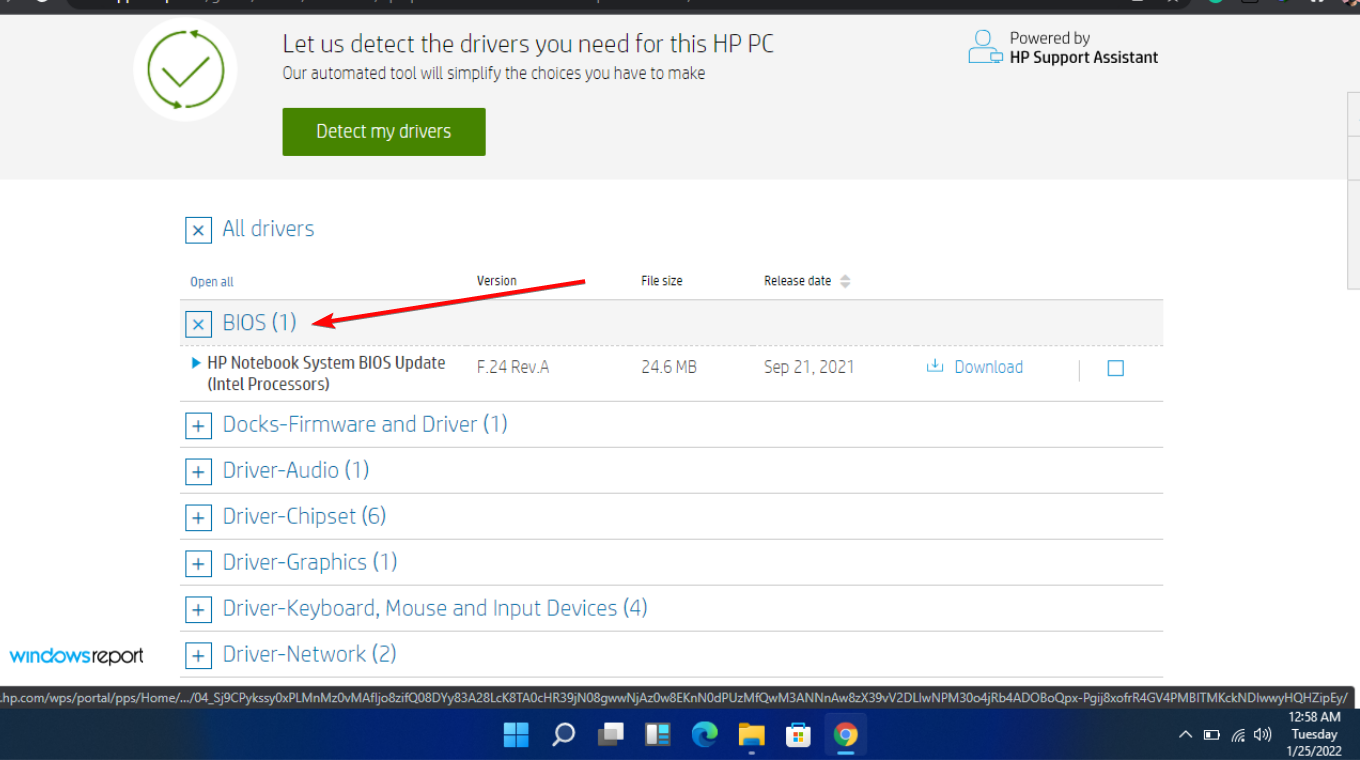
  6. Click on All drivers and then expand BIOS to see available updates.
  7. Click the download icon.
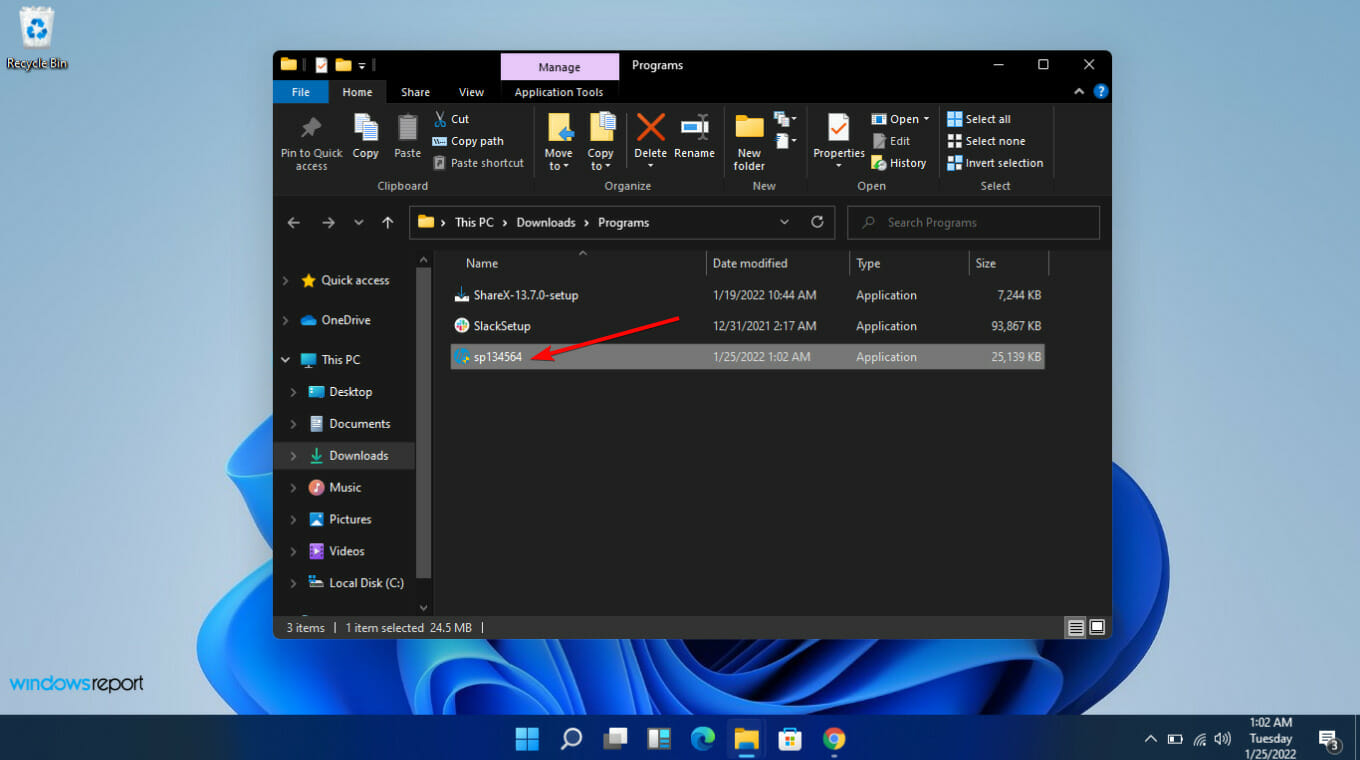
  8. Install the .exe file, following the on-screen instructions.
  9. Restart your PC.

3. Replace your hardware

When it comes to replacing your hardware, you must perform a hardware test and verify which component is behind the red light on your CPU. It could be your motherboard, GPU, RAM module, network card, or hard drive.

Once you’re sure of the culprit, you can replace it. To that effect, we have a recommendation for the best in the game.

Whether you’re in the market for a new hard drive, powerful GPU, or high-performing motherboard, we have compiled a list for you to choose from.

As you can see, anything that triggers an error on your PC can happen. To avoid being caught off guard, we’d recommend you install PC performance monitor software. This will ensure you stay on your toes as you keep tabs on your computer’s health.

Let us know if you have experienced this kind of red light before and any other solutions you used but not mentioned here.

Mqsvc.exe: What Is It & Should You Disable It?

The Mqsvc.exe process is a part of the Microsoft Message Queue Server, a service that delivers messages to applications and services.

It is essential for the proper operation of the application, so you should not disable it unless you are sure you don’t need it anymore.

What is the Mqsvc EXE file?

Microsoft message queue is a messaging system that allows programs to communicate with each other over a network. While it is a Windows process, it is not necessarily required by everyone.

Audiences that may benefit from this file include:

  • End users – The message queue allows end users to receive notifications about events in the system. For example, an end user who has requested a service can receive a notification when it is completed.
  • System administrators – System administrators can use message queues to monitor the status of their applications and services or to send messages to end users.
  • Developers – Developers can use message queues to create scalable applications. It’s also useful if they want interoperability between their applications and other platforms, especially in data retrieval.

For a single user who uses their PC for gaming purposes or school work, this is not an essential service and should be disabled, especially if discovered to be causing high CPU usage.

What is the Microsoft message queue used for?

Message queueing is an effective method of communication between processes, applications, and machines. 

They are designed to be a scalable and reliable way of passing messages between applications and services. Other benefits include:

  • Alternative for old messaging platforms –  As opposed to using email, message queues allow you more control over who gets what information to prevent spam or viruses from spreading through your organization’s email servers.
  • Reliability – Message queues provide reliable messaging protocols in event-based software. You’re guaranteed that regardless of network failures or power outages, messages will not be lost.
  • Asynchronous communication – It allows one application to send a message to another application without waiting for a reply from the recipient. The message is stored in a queue until the recipient retrieves and processes it.

How can I disable the mqsvc.exe file?

To remove the mqsvc.exe file, you first need to determine whether it is a legitimate Windows file. Here’s how:

  1. Press the Windows key + E to start File Explorer.
  2. Navigate to the following path:C:\Windows\System32
  3. Find Mqsvc.exe, right-click on it, and select Properties.
  4. In the pop-up window, select the Details tab and see if the file is registered under the Microsoft trademark. If you can’t find any details about it or if there is something different, that is a sign of infection.
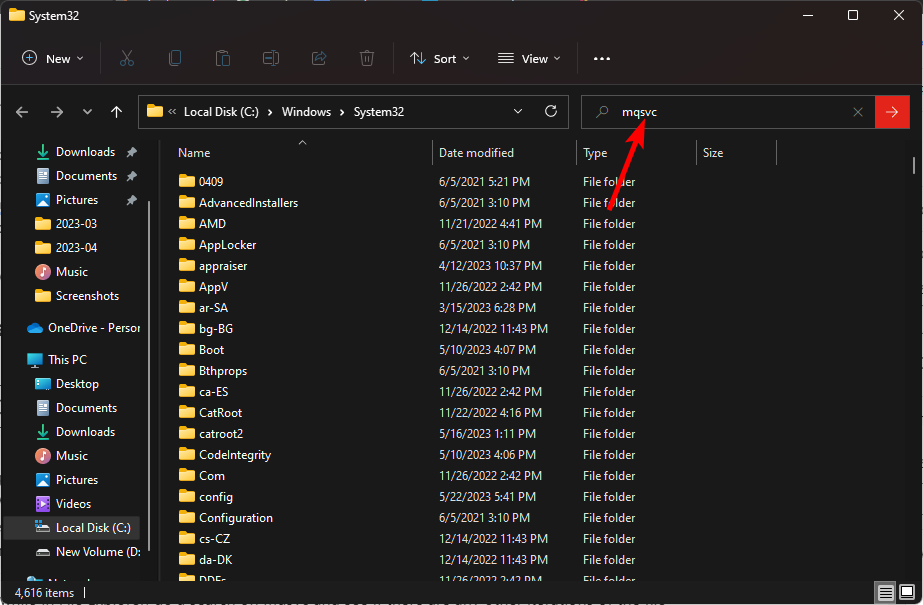
  5. Also, while in File Explorer, do a search on mqsvc and see if there are any other iterations of the file with different extensions, such as SYS or DLL. There should only be one Mqsvc.exe file, so if you find any other, delete it right away.

1. Use the Task Manager

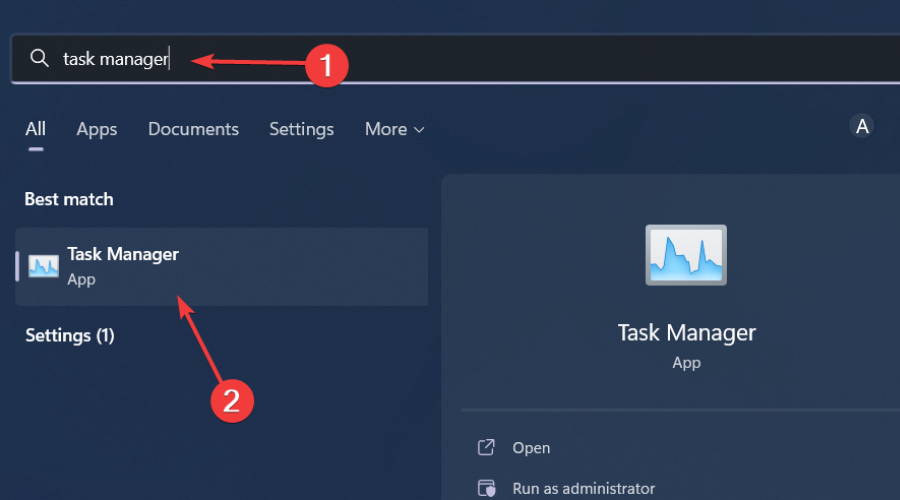
  1. Hit the Windows key, type Task Manager in the search bar, and click Open.task manager search
  2. Navigate to the Processes tab, find the mqsvc.exe process, right-click on it, and select End task.

2. Run DISM and SFC scans

  1. Hit the Windows key, type cmd in the search bar, and click Run as administrator.cmd-run-admin-w11 unexpected kernel mode trap windows 11
  2. Type the following commands and press Enter after each one:DISM.exe /Online /Cleanup-Image /Restorehealth sfc /scannow
  3. Restart your PC.

You should know there is a more reliable method of this process, and that is a handy third-party repair tool.

3. Scan for viruses

  1. Press the Windows key, search Windows Security, and click Open.
  2. Select Virus & threat protection.
  3. Next, press Quick scan under Current threats.
  4. If you don’t find any threats, proceed to perform a full scan by clicking on Scan options just below Quick scan.Scan options
  5. Click on Full scan, then Scan now to perform a deep scan of your PC.Full Scan Scan Now
  6. Wait for the process to finish and restart your system.

Solutions 2 and 3 are for scenarios where you found the mqsvc.exe file in a different location or other instances of the file with different file extension names.

That’s all we had for this article, but be sure to check out our other guide on the bootstrapper.exe file and whether you should disable it on your PC.

We’d love your thoughts on how you use this file. If you do, leave us a comment down below.

2 Quick Ways to Remove Microsoft News from Taskbar

If you want to remove Microsoft News from the Taskbar of your Windows PC, this article will guide you with helpful details.

On Windows 11 and Windows 10, you can see a new widget label on the Taskbar. When you click on it, you will see a new layout where you can see news headlines, weather information, and other details.

For some users, this feature can be super annoying. As noted by user u/iamwarrior_2 on a Reddit forum, an input to bring an option to turn off news in Widgets has been living in Feedback Hub for months and has generated at least 3,5k votes so far.

So, following extensive user complaints, the tech company revealed during their Build 2023 developer keynote that by the end of this year, users will be able to deactivate the News feed entirely.

However, until that option becomes available, we present you with a workaround where you can disable Microsoft News from your taskbar completely. 

Should I disable MS News from the Taskbar?

Indeed, the News and Interests is a fantastic feature. But it doesn’t mean everyone will like it. One thing you should be clear about is that the widget doesn’t really have a big impact on your PC performance.

If you want to disable it to gain performance, it may not be that much appropriate idea. But, if you just want to do it just because you want to get rid of Microsoft News, you can do it without thinking much.

How can I remove Microsoft News from Taskbar?

Before following the appropriate steps, you should check the following things:

  • Make sure you have activated Windows. Inactive Windows won’t let you access any personalized settings.
  • Your Windows is up to date, or at least you are using a recent version of Windows.

After ensuring the above things, follow these methods to remove Microsoft News from Taskbar.

1. Disable Widget

  1. Press Win + I on the keyboard to open Windows Settings.
  2. Go to Personalization and click on Taskbar.going taskbar settings windows 11
  3. Toggle the switch off next to the Widgets.turning off widgets windows 11

This method is applicable to the latest Windows 11 users. You also can learn about more ways to disable widgets on Windows 11.

2. Turn off News and Interest

  1. Right-click on the Taskbar.
  2. Go to News and interests and click on Turn off.turning off news and interests windows 10

This method is available for the latest Windows 10. Right now, Windows 11 doesn’t have any similar option.

However, Microsoft will introduce a feature to turn off/remove News from the taskbar in the next Windows 11 update. Here’s a preview of it will look, according to this Reddit thread.

This article has explained how you can remove Microsoft News from the Taskbar. If you know of any other better ways, feel free to let us know in the comment box.

What is Tvnserver.exe & How to Disable It

If you’re a system administrator or an organization with a handful of workers, you can admit to how useful remote software is in helping you keep track of their activities or just control their computers. The tvnserver.exe file does the same thing.

However, if you did not install this file or you did, but it is now causing issues, you may want to disable it. Let us take you through the steps to remove it from your system safely.

What is the TightVNC service used for?

TightVNC is a program that allows you to view and control computers over the Internet. The TightVNC server program or tvnserver.exe runs on the remote computer and host PC. It can be used to display and control your desktop on the remote machine. 

The genuine TvnServer.exe file is located in the C:\Program Files (x86)\TightVNC\ directory on 64-bit Windows systems, while the same file can be found in the C:\Program Files\TightVNC\ directory on 32-bit Windows systems.

When compared with other screen–sharing programs, TightVNC has several advantages over them: 

  • Open-source – TightVNC is open-source software, meaning anyone can take the source code, modify it and create their version of TightVNC.
  • Lightweight – You won’t need much memory or processor power to use TightVNC, making it ideal for older computers or those with limited resources.
  • Free – You don’t need to subscribe to paid plans to use the software.
  • Cross-platform – TightVNC is available for Windows, Mac, and Linux computers. This makes it useful for companies with a mix of operating systems in use by their employees.

Still, with all these advantages, you may find it unnecessary if it slows down your PC and makes it unresponsive. This necessitates that you disable it.

How do I disable Tvnserver?

Before you permanently disable the tvnserver.exe file, try the following first:

1. Uninstall the TightVNC2 program

  1. Hit the Windows key, type Control Panel in the search bar, and click Open.control-panel-search fallout new vegas runtime error
  2. Navigate to Programs, then click on Uninstall a program.going uninstall program control panel
  3. Find TightVNC2, click on it, and select Uninstall.

Also, perform a clean sweep by removing software leftovers so that you don’t leave instances of the program running in the background and consuming more of your resources.

2. Perform the DISM and SFC scans

  1. Hit the Start Menu icon, type cmd in the search bar, and click Run as administrator.cmd-run-admin-w11 unexpected kernel mode trap windows 11
  2. Type the following commands and press Enter after each one:DISM.exe /Online /Cleanup-Image /Restorehealth sfc /scannow
  3. Restart your PC.

On the other hand, there is also a quicker and more in-depth option for the above procedure, and that is a reliable repair app.

3. Run a virus scan

  1. Press the Windows key, search Windows Security, and click Open.
  2. Select Virus & threat protection.
  3. Next, press Quick scan under Current threats.
  4. If you don’t find any threats, proceed to perform a full scan by clicking on Scan options just below Quick scan.Scan options
  5. Click on Full scan, then Scan now to perform a deep scan of your PC.Full Scan Scan Now
  6. Wait for the process to finish and restart your system.

Is TightVNC safe to use?

Tvnserver.exe is not considered spyware, adware, or trojan because it does not have any malicious code embedded in it for performing any harmful actions on your computer.

However, despite its popularity and wide user base, many people have questioned TightVNC’s security. It’s possible that you may have a trojan camouflaged as the real file, and here is where the problem comes in.

To ensure the safety of the file, you need to download the software from the official site. Any other site could be suspicious and inject malware into your system.

The infected program may change the registry entries of your computer system so that it can start automatically every time you turn on your computer system. 

Other tell-tale signs of a suspicious file include the file name, location, and size. Any discrepancies in this information should be a red flag that you’re not getting the real thing. 

Lastly, you will notice a spike in the usage of resources and a degradation in your system’s performance after installing the non-legitimate file. 

Hopefully, you now know what the tvnserver.exe file does and are in a better position to decide on whether to continue using it or disable it.

Find out more about the consent.exe file and the role it plays in your PC, as unpacked in our detailed guide.

For further suggestions, thoughts, or comments, leave a comment below.

Microsoft president Brad Smith raise concerns against deep fakes

In a recent address delivered in Washington, Microsoft President Brad Smith raised concerns about the rise of deep fakes and emphasized the need for measures to distinguish between real and AI-generated content. Smith’s speech, aimed at addressing the growing demand for AI regulation in the wake of OpenAI’s ChatGPT, shed light on the potential risks associated with the nefarious use of AI technology.

Foremost among Smith’s concerns were deep fakes, which refer to convincingly fabricated media that can mislead and deceive viewers. He stressed the urgency of tackling this issue, particularly with regard to foreign cyber-influence operations already being conducted by nations such as Russia, China, and Iran. Smith called for steps to safeguard against the manipulation of genuine content with the intention to deceive or defraud individuals, utilizing the capabilities of AI.

The Microsoft President further advocated for licensing critical AI applications, accompanied by obligations to uphold security, including physical security, cybersecurity, and national security. His proposal aimed to ensure that the deployment of AI technologies would be governed by strict regulations, mitigating potential risks to individuals, organizations, and national interests.

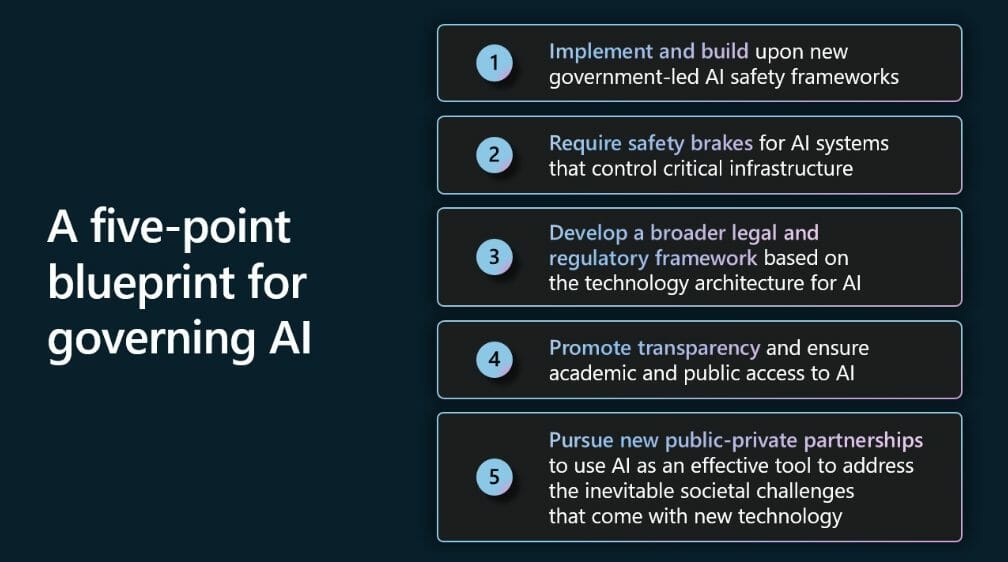
Highlighting the need for enhanced export controls, Smith offers a five-point blueprint for Governing AI that includes implementing new government-led AI safety frameworks, requiring safety brakes for AI systems, developing broad legal and regulatory frameworks, promoting transparency and access to AI, and pursuing public-private partnerships to address societal changes.

Meanwhile, lawmakers in Washington have been grappling with the challenge of legislating AI control while technology companies of all sizes are racing to bring forth increasingly versatile AI solutions. The urgency to strike a balance between fostering innovation and addressing the potential risks associated with unregulated AI development has created a pressing need for comprehensive and effective regulatory frameworks.

As the debate surrounding AI regulation intensifies, Brad Smith’s speech resonates with the growing concerns over deep fakes and the responsible use of AI. His call for greater transparency and accountability and the need to protect against malicious activities provides an impetus for policymakers, industry leaders, and researchers to collaborate in establishing a regulatory framework that balances technological progress with societal well-being.

Via: Ars Technica

Microsoft’s Activision deal rejection led by CMA director with previous connections to Sony

Microsoft faces an uphill battle as it looks to appeal the UK’s Competition and Markets Authorities blockage of its bid to acquire Activision Blizzard. However, recently surface background on a CMA director’s prior work experience may be just the reprieve the two companies need to save their deal.

According to a post from Windows Central’s Jez Corden who cites patent lawyer Florian Meuller @FOSSPatents as a source, Microsoft may be able to point to a possible conflict of interest as it pleads its case to the Competition Appeal Tribunal (CAT).

Meuller unearthed a connection between the CMA’s now-serving senior director of Merger Reviews and Sony through the law firm Cleary Gottlieb, which currently represents the company as it protests the Microsoft and Activision deal.

Mueller ironically points to a LinkedIn profile as evidence of Cleary Gottlieb and Sony connection as well as senior director at the CMA, Colin Raftery’s involvement with the two.

Furthermore, it’s being reported that Raferty may have also been the person who championed the rejection of Microsoft’s bid to acquire Activision Blizzard, despite his historical ties to an opposing party in the whole process.

Unabashedly, Raftery spoke earlier this week at the Merger Remedies in a post Brexit Context conference this week where he was joined by another speaker who shares a vested negative interest in the Microsoft and Activision acquisition as a representative of the legal firm RBB which represents both Sony and Google.

While it has been historically fruitless to get a CMA decision overturned through appeal as the process must prove the body acted irrationally, illegally or with procedural impropriety, it would seem that Microsoft may be able to lean specifically on Raferty’s historical conflict of interest-based decisions.

As Corden highlights in his write up about this new discovery, Raftery was not only central in the decision to block the Microsoft and Activision deal despite his history with Sony, he has also pulled a similar move in blocking the merging of supermarket chains ASDA and Sainsbury’s.

The block, in and of itself is less newsworthy than the fact Raftery served as legal advisory to Tesco, which happens to be the UK’s predominant supermarket chain, and who would have had a vested interest in keeping the chains separate.

As it stands, Microsoft has continued to rack up approvals from other major regulatory bodies in both the EU, China and Japan, since the UKs decision has come out.

Whether or not Microsoft knows of, or leverages Raftery’s potential conflict of interest in its appeal is unknown at the moment, but the company seemed confident going into the process that it could present something worthwhile to the CAT that would keep the acquisition train on the rails and headed towards an ultimate close.

Luafv.sys BSOD: 4 Ways to Fix It for Good

A lot of our readers dread BSODs and for good reason. It comes with sudden system crashes, and often you do not get an explanation. The luafv.sys BSOD is just one of many such problems.

This guide looks into it, explains some probable causes, and gives you the top recommended solutions.

What causes the luafv.sys BSOD?

If you encounter the luafv.sys BSOD (Blue Screen of Death) error, it’s likely due to problems with the luafv.sys driver file that’s linked to the Windows operating system. Any of the following may be a factor:

  • Driver conflicts – If there are issues or clashes between the luafv.sys driver and other drivers on the system, it may result in a BSOD error. Such occurrences can happen because of outdated, incompatible, or faulty drivers.
  • Corrupted system files – In case the luafv.sys file or any other system files associated with it get damaged or corrupted; it can lead to a BSOD error.
  • Malware or viruses – There are instances where harmful software specifically targets and corrupts the luafv.sys file and other associated system files.

How do I fix the luafv.sys BSOD?

Before exploring any complex fixes, we recommend the following workarounds:

  • Restart the computer – A simple restart may suffice after a BSOD crash. The reboot may fix a minor glitch that causes the error.
  • Run a scan – Since malware is a dominant factor, ridding your computer of malware with a robust antivirus is recommended before further troubleshooting.

If the BSOD persists after the above pre-solutions, we recommend you continue with the fixes below.

1. Update drivers

  1. Press the Start menu and click on the Device Manager option.
    luafv.sys
  2. Expand any category with outdated drivers (they usually have a yellow badge), right-click on your driver, and click Update driver.
    luafv.sys
  3. Select the option that reads Search automatically for browsers in the following window.
    luafv.sys
  4. Follow any on-screen prompts to complete the download and update.

2. Run the DISM and SFC scans

  1. Press Windows + R to open the Run dialog.
  2. Type cmd and hit Ctrl + Shift + Enter.
    luafv.sys
  3. Input the script below and hit Enter.
    DISM.exe /Online /Cleanup-image /Restorehealth
  4. Type in the script below and hit Enter to run the SFC scan.
    SFC / Scannow
  5. Restart the computer if required and verify it fixes the luafv.sys BSOD.

If you want to choose an automated procedure, we recommend you use a dependable third-party repair tool.

3. Get the latest OS updates and security patches

  1. Press Windows + I to open the Settings app.
  2. On the left pane, click Windows update, then select Check for updates on the right.
  3. If there are updates, click Download & Install.
    luafv.sys
  4. Wait for all updates to be installed, and if required, finally restart your computer and see if it fixes the luafv.sys BSOD.

4. Perform a system restore

  1. Press Windows + R to open the Run dialog.
  2. Type rstrui, and hit Enter.
    luafv.sys
  3. Click the Next button.
    luafv.sys
  4. Select a restore point and hit Next.
  5. Click on Finish.
  6. The computer would restart in the process, but at the end, verify that it fixes the luafv.sys BSOD.

Any of the above fixes should work for the BSOD error. You should note that we have not written them in any particular order, so you should start with whichever feels the most applicable.

In rare cases, you may need to start the computer in Safe Mode before applying the fixes. So, we have written a comprehensive guide on entering Safe Mode in Windows 11.

Lastly, in the comments section below, let us know which fixes worked for you.

You’ll be able to disable the MSN feed in the Widgets Board on Windows 11 soon

Microsoft’s annual developer conference, Build 2023, came and went. The company made a ton of announcements, mostly affirming its commitment to enhancing the user experience across its products and services as well as the incorporation of generative AI. You can catch up on everything that was announced via the Build 2023 tag on our website, be sure to also check out our recap on the same.

Alongside the host of announcements made during the event, Microsoft also announced a nifty shipping to Windows 11 users later this year that will finally let them disable the Microsoft News feed (MSN) on Windows 11’s Widget Board.

If you’ve interacted with the Widget Board on your Windows PC, then you must be aware of the current layout. The current Widget Board layout features news posts as well as videos pulled from the MSN feed.

But as per the announcement made during the Build 2023 event, Windows 11 users will soon have the option to curate a unique experience in the Widgets Board, one that only features widgets. Previously, we had reported on major changes and improvements that Microsoft was planning to ship to widgets on Windows 11.

This is a step in the right direction for Microsoft as users will now be able to disable the MSN feed from their Widgets Board completely. It should be noted that users can already hide stories and videos that they don’t like, but this new addition will completely block them out from the Widgets Board.

What’s more, Microsoft just shipped the Moment 3 feature drop to Windows 11 users as an optional update. It’s expected to roll out to everyone next month via the Patch Tuesday update.

And aside from the capability to have a Widgets Board layout that’s free of the MSN feed, Microsoft also announced that users will be able to change the orientation of the widgets and arrange them based on their own preferences vertically. Additionally, Microsoft will also be enhancing the pinning experience for widgets such that it will now be easier for users to pin installed widgets on the board.

via Windows Central

Usbccgp.sys: What Is It & How to Download the Latest Version

If you have ever connected devices to your computer, you may be interested to learn about the usbccgp.sys.

This guide will explore the USB Generic Parent Driver or the usbccgp.sys. We will explore the most essential aspects and show you the best alternative to downloading it.

Is usbccgp.sys safe?

Usbccgp.sys is not a virus. This is a legitimate system driver file that belongs to the Windows operating system. The file is safe and essential for properly functioning USB devices and communicating with the operating system.

It is possible for malicious software to disguise itself as usbccgp.sys or replace the genuine file with a harmful version. In such cases, the file will pose a security risk to your system.

For this reason, we recommend having updated and reliable antivirus software to detect and remove any potential threats.

What is the usbccgp.sys?

The Windows OS usbccgp.sys file represents the USB Common Class Generic Parent driver. It manages and provides support for USB devices that belong to the USB Common Class specification.

USB technology has established a range of standardized device classes, including human interface devices (HID), mass storage devices, printers, and audio devices. Such classes enable easy connectivity between these devices and computers.

These classes define a common set of protocols and interfaces that allow USB devices to be recognizable and usable by the operating system without requiring specific device drivers for each device.

How do I download usbccgp.sys?

There is no need for you to download usbccgp.sys separately. However, the system driver is already integrated into the Windows operating system.

So, after installing or updating Windows, you should get an automatic installation of usbccgp.sys as part of the system files. You can find it in the designated system folder on your computer as shown below.

C:\Windows\System32\drivers
usbccgp.sys

If you have any problems surrounding usbccgp.sys and require a download, update your OS and drivers, and you should be able to get the latest available versions.

How do I recognize the legitimate usbccgp.sys file?

  1. Press Ctrl + Shift + Enter to open the Task Manager.
  2. Right-click on any column header and select Publisher.
  3. Finally, search for any processes or apps using usbccgp.sys from the name column and verify the publisher is Microsoft Corporation. If it is a different publisher, then it is likely malware.
    usbccgp.sys

That is as much as we discuss in this article. If you have read through the guide, you should be equipped with all you need to know about this file.

Lastly, remember to reach out to us in the comments section. We love to hear about your experiences using this file.

Dataexchangehost.exe: What Is It Used For?

You will notice many running processes and applications when you open the Task Manager. Many of them will be recognizable, but some, like the dataexchangehost.exe, may seem confusing.

In this guide, we will try to clear any confusion surrounding dataexchangehost.exe and explain everything you need to know.

Is DataExchangeHost.exe a virus or malware?

Under usual circumstances, DataExchangeHost.exe is not considered a virus or malware. However, it is crucial to note that its nature as an executable file can potentially be vulnerable to malicious software attacks that can compromise or replace it, ultimately leading to security concerns.

It’s essential to be cautious as cybercriminals often use names for their malicious files similar to legitimate ones to trick users.

What is DataExchangeHost.exe?

DataExchangeHost.exe is a genuine system file linked with the Microsoft Windows OS. It forms an essential part of the Windows Data Exchange procedure, and it performs the following functions:

  • Facilitates data exchange – The functionality of DataExchangeHost.exe facilitates the transfer of data between various applications and services on a Windows operating system through a standardized mechanism.
  • Communication bridge – It serves as a mediator that facilitates smooth communication and exchange of information among different software components.
  • Integration – It enables the integration of data and functionalities from various sources, allowing different software components to work together effectively.

Even though it is a legitimate program, you may need to verify its legitimacy. So, let us show you how to do this.

How do I verify if DataExchangeHost.exe is a security risk?

1. Via the Control Panel

  1. Press Ctrl + Shift + Enter to open the Task Manager.
  2. Right-click on any column header and select Publisher.
    dataexchangehost.exe
  3. Search for DataExchangeHost.exe from the name column and verify the publisher is Microsoft Corporation or some software application on your computer.
    dataexchangehost.exe

Once you have gone through this process, if the process publisher is not Microsoft Corporation or any known software publisher installed on your computer, you should remove it. Running a virus scan with an efficient antivirus may also come in handy.

How do I remove DataExchangeHost.exe from my computer?

1. Uninstall the application it came with

  1. Press Windows + R to open the Run dialog.
  2. Type appwiz.cpl and hit Enter.
  3. Search for the program bundles with the DataExchangeHost.exe. Click on it and click Uninstall.
  4. Follow the wizard to complete the uninstallation.

That is about all there is to know about this process. In conclusion, it is safe once the process is from Microsoft or any other software you intentionally installed on your computer.

However, users may encounter high CPU usage, so you may want to uninstall processes spiking your memory, including DataExchangeHost.exe.

Lastly, we love to hear from you, so please leave us a comment below and let us know your thoughts on the process.

Want to unlock OneDrive capacity view? Get KB5026440

Plenty of exciting updates are coming to Windows 11: the Dev Drive feature, Copilot for Windows, the native RAR support, and more. For Beta channel insiders, Microsoft rolled out the KB5026440, which features a slight tweak in the OneDrive storage. 

With this update, users like you can make the most out of their storage capacity from all their OneDrive subscriptions. Additionally, the update includes a display of the total storage on the Accounts page within the Settings app, providing users with a comprehensive overview of their available cloud storage space.

You can easily keep track of their combined storage capacity, making it simpler to manage your files and ensure your have ample space for all their data, so that’s a piece of good news.

Besides, there seems to be a neat little tweak in a few areas, including the memory leak issue when printing a rich text document, the audio playback problem, and Server Message Block shared folder. Here’s everything we’ve noted from Redmond’s official release note. 

What other features does the KB5026440 update bring?

  • This update addresses an issue that affects dot sourcing. It fails files that contain class definition in Windows PowerShell.
  • This update addresses an issue that affects exe. It stops working after you sign out. This issue occurs after you upgrade your machine to Windows 11 Azure Virtual Desktop (AVD) and sign in to that machine.
  • This update addresses an issue that affects Server Message Block (SMB). You cannot access the SMB shared folder. The errors are, “Not enough memory resources” or “Insufficient system resources.”
  • This update addresses a memory leak. It occurs every time you print a rich text document.
  • This update addresses an issue that affects audio playback. It fails on devices that have certain processors.
  • This update addresses an issue that affects the Local Security Authority Subsystem Service (LSASS). It stops working. This occurs when you use Azure Virtual Desktop (AVD).
  • This update addresses an issue that affects the touch keyboard. Sometimes, it does not show the correct layout based on the current input scope.
  • This update addresses a multi-function label printer issue. It affects the installation of some of them.
  • This update addresses an issue that might affect a large reparse point. You might get a stop error when you use NTFS to access it. This issue occurs after a canceled FSCTL Set operation changes the reparse tag.
  • This update addresses an issue that affects Narrator. It now announces text attributes correctly for words, such as “misspelled,” “deletion change,” and “comment.”
  • This update addresses an issue that affects a computer when it renders a halftone bitmap. The computer stops working.
  • This update addresses an issue that affects devices that have multiple, discreet GPUs. You cannot choose the high-performance GPUs from the default graphics settings page.
  • This update changes the international mobile subscriber identity (IMSI) ranges for certain mobile providers.
  • This update addresses an Event Viewer issue. It affects the rendering of a forwarded event log.
  • This update addresses an issue that affects the Chinese and Japanese Input Method Editor (IME). When you search within the Emoji Panel (Windows key + period (.)), search might fail for some of you.
  • This update addresses an issue that affects the Chinese and Japanese Handwriting Panel. It does not show text prediction candidates or stops responding. This occurs when you select a word from the candidate list of the Handwriting Panel.
  • This update addresses an issue that stops your device from working when it resumes from Modern Standby. The error is 0x13A KERNEL_MODE_HEAP_CORRUPTION.
  • This update addresses an issue that affects the Windows Firewall. The firewall drops all connections to the IP address of a captive portal. This occurs when you choose the Captive Portal Addresses option.
  • This update addresses an issue that affects devices that are joined to Azure Active Directory (Azure AD). The Windows Firewall cannot apply the correct domain and profile for them.
  • This update addresses an issue that affects the runas It stops working. The device behaves as if you did not sign in to your account.
  • This update changes the support phone number for Microsoft India for Windows activation.
  • This update addresses an issue that affects applications that perform certain actions in a callback. The applications might stop working. These actions include closing a Window (WM_CLOSE).
  • This update addresses an issue that affects the use of the Event Viewer. The issue limits the number of event sources that users who are not administrators can access.
  • This update addresses an issue that affects the Storage Spaces Direct (S2D) cluster. It might not come online. This occurs after a periodic password rollover. The error code is 1326.
  • This update addresses an issue that affects access to Tab settings for IE mode sites.
  • The update addresses an issue that sends unexpected password expiration notices to users. This occurs when you set up an account to use “Smart Card is Required for Interactive Logon” and set “Enable rolling of expiring NTLM secrets.”
  • This update addresses an issue that affects the touch keyboard. It shows the wrong layout for the French-Canadian language.

Have you joined the Beta channel and installed KB5026440 update? Let us know in the comments!

View Saved Wi-Fi Passwords on Windows 11: Use These 3 Ways

Sometimes you need to view saved Wi-Fi passwords on Windows 11, and that is pretty simple to do.

Today we’re going to show you the best way to do that, so let’s get started.

How do I find the Wi-Fi password on Windows 11?

1. Use the Settings app

  1. Go to Start and open the Settings app.
  2. Go to Network & Internet ➜ WiFi.
  3. Click Manage known networks.
  4. On the desired connection, click View next to View WiFi security key.

2. Check your connection settings

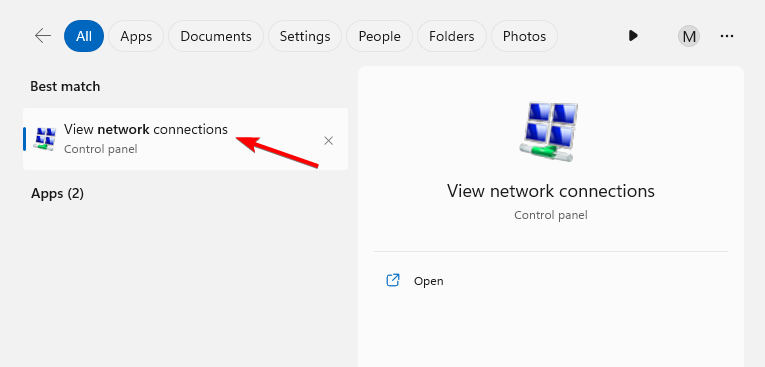
  1. Press the Windows key + S and type network connections. Choose View network connections.
  2. Locate your Wi-Fi connection, and double-click it.
  3. Next, go to Wireless Properties.
  4. Navigate to the Security tab and check Show characters to reveal your password.
     

3. Use Command Prompt

  1. Press the Windows key + S and type cmd. Choose Run as administrator.
    CMD elevated
  2. Enter the following command but be sure to replace WindowsReport with your wireless network name:
    netsh wlan show profile “WindowsReport” key=clear
  3. Your password will now appear on the screen.

Further, you can also view saved passwords on your Windows device and see if they need changes or if you’ve forgotten them.

We also have a guide on how to find Wi-Fi passwords on Windows 11, so don’t miss it.

If you’re on Windows 10, don’t miss our guide on how to find Wi-Fi passwords on Windows 10. In case you’re on another platform, our article on how to view saved Wi-Fi passwords should help you.

Speaking of passwords, if you want others to connect quickly to your network, why not share your Wi-Fi password as a QR code? It’s simpler than you think!

Never Combine Taskbar in Windows 11: How to Enable it

The lack of the ability to Never Combine Taskbar on Windows 11 is one of the biggest weaknesses that this OS has. Windows 10 and earlier versions can ungroup items on the taskbar. But, in Windows 11 there is no setting to ungroup taskbar items, which annoys many users.

This feature adds a text tag to the taskbar icon and shows each app as a single button until the taskbar becomes overloaded. When the taskbar is full of app buttons, multiple open windows of the same app will be combined into a single app icon with a frame.

It seems that the waters have settled a bit now since the significant backlash that Microsoft faced from users that were unhappy with many of the changes that the tech company has in mind for the new OS.

Nevertheless, a recent update suggests that Microsoft has reversed its decision and reintroduced this functionality in Windows 11 Build 23466 (May 2023). Currently available on the Dev channel, this build brings numerous enhancements, such as the inclusion of the Dev Drive feature and the revival of the never combine feature on the taskbar – and it looks like this:

In this guide, we’ll cover both ways where you can set up the never combine feature on the taskbar, whether it’s through Microsoft’s official channel or third-party tweaks.

How to enable the Never combine taskbar feature on Windows 11 OS?

1. Third-party tweak

    You can use the Never Combine Taskbar feature by using Winaero Tweaker to set your Start Menu and Taskbar back to Classic Mode, and then changing notification area icons via Settings on your PC.


  1. 1. Create Powershell and Edge shortcuts on your desktop.

  2. 2. Go to the Winaero Tweaker’s official website and download and install the program.

  3. 3. Open Winaero and set the option: Enable Classic Taskbar and Start menu

    winaero tweaker clasic start menu and taskbar
  4. 4. Restart the PC or re-login into your account.

    Apparently, after performing these steps, the Taskbar changes, but the Windows button doesn’t work, while date, volume, and others don’t appear in the Taskbar. This can be, however, resolved with the following steps:

  5. 5. Press Windows + R to open the Run dialog, paste the following command, and hit Enter:

    shell:::{05d7b0f4-2121-4eff-bf6b-ed3f69b894d9}

  6. 6. Select Turn system icons on or off and enable all of the options, then press OK.

    turn system icons on or off
  7. 7. Open Edge and install the Classic Start menu.

  8. 8. To ungroup the buttons in the Taskbar, launch PowerShell as an administrator and run this command:

    REG ADD "HKCU\Software\Microsoft\Windows\CurrentVersion\Explorer\Advanced " /v TaskbarGlomLevel /t REG_DWORD /d 2

    run command
  9. 9. Restart your PC.

2. Microsoft’s official build

1. Make sure you have Windows 11 Build 23466 installed.

2. Open the Start menu and click on the Settings icon (it looks like a gear). Then, select Personalization.

3. On the left side of the Personalization settings, click on Taskbar.

4. Scroll down in the Taskbar settings until you find Taskbar behaviors. Click on it.

6. Look for the option labeled Never Combined Mode and make sure it is enabled or turned on.

7. Once enabled, each window of your applications will appear individually on the taskbar, along with their corresponding labels.

Have you tried this technique? Share your experience with us in the comments section below.

File System Error 2144927439: How to Fix it

Many of our readers have reported facing File System Error 2144927439. This error pops up when they try to open the Start menu, notification center, or any application downloaded from the Microsoft Store.

In this guide, we have compiled a list of solutions that will help you resolve the File System Error 2144927439 on your Windows PC. Let us get right into it.

What is File System Error 2144927439?

After some research at our end, we have deduced a list of reasons that are responsible for triggering the File System Error 2144927439 on your PC.

  • Issue with the Microsoft Store – Chances are that there is some issue with the Microsoft Store which is why you are getting this problem.
  • Corrupt system files – Some corrupt system files related to the File Explorer process are causing issues on your PC.
  • Windows License Manager service is disabled – Some users have reported that turning on the Windows License Manager service fixed the problem for them.
  • Store apps are de-registered – Store apps may get de-registered because of conflict with third-party programs, which could be the reason for the issue.

Let us now take a look at the solutions that will help you resolve the File System Error 2144927439 on your PC.

How can I fix File System Error 2144927439?

Before applying the advanced solutions, let us first go through the quick fixes that may resolve the problem at hand.

  • Check if restarting your PC help resolve the File System Error 2144927439 or not.
  • Close the problematic application and relaunch it to check if this fixes the issue or not.
  • Reinstall the app and check if the error persists.

If these workarounds didn’t solve the issue, let’s apply the advanced solutions below.

1. Restart the File Explorer process

  1. Close the File Explorer.
  2. Press Ctrl + Shift + Esc buttons to open the Task Manager.
  3. Select the Windows Explorer app and click on Restart.

Some users have reported fixing the File System Error 2144927439 by restarting the File Explorer process. You can also try this solution and hopefully resolve the issue.

2. Run the SFC and DISM scans

  1. Press the Win key to open the Start menu.
  2. Type command prompt and open it as an administrator.
  3. Type the below command and press Enter: sfc /scannowsfc scannow command windows 11
  4. Wait for the process to complete.
  5. Type the below commands and press Enter after each one: Dism /Online /Cleanup-Image /CheckHealth Dism /Online /Cleanup-Image /ScanHealth Dism /Online /Cleanup-Image /RestoreHealth

Fixing corrupt system files can always help you get rid of random errors on your PC. You can run the SFC Scan and DISM commands and check if this resolves the File System Error 2144927439.

You can also repair your corrupt files by using specialized repair tools that have the latest OS repair technology and a massive database with brand-new Windows files.

3. Keep Windows LincenseManager on automatic startup

  1. Press the Win + R keys to open the Run dialogue.
  2. Type services.msc and press Enter.
  3. Locate Windows License Manager and open it.
  4. Under Startup type, select Automatic.
  5. Click OK to apply the changes and restart your PC.

You can also try setting the Windows License Manager to automatic as chances are this error could be because of a licensing issue.

4. Re-register Store apps

  1. Press the Win key to open the Start menu.
  2. Type Windows PowerShell and run it as an administrator.
  3. Type the below commands and press Enter after each one: Get-AppXPackage -AllUsers -Name windows.immersivecontrolpanel | Foreach {Add-AppxPackage -DisableDevelopmentMode -Register “$($_.InstallLocation)\AppXManifest.xml” -Verbose} Get-AppxPackage Microsoft.Windows.ShellExperienceHost | foreach {Add-AppxPackage -register "$($_.InstallLocation)\appxmanifest.xml" -DisableDevelopmentMode} Get-AppXPackage WindowsStore -AllUsers | Foreach {Add-AppxPackage -DisableDevelopmentMode -Register "$($_.InstallLocation)\AppXManifest.xml"} Get-AppXPackage | Foreach {Add-AppxPackage -DisableDevelopmentMode -Register "$($_.InstallLocation)\AppXManifest.xml"}
  4. Restart your PC.

Re-registering the Windows apps helps to register the apps for the account that you are using on your PC. Some third-party apps may cause issues and de-register the apps.

5. Run the Windows Store Apps troubleshooter

  1. Press the Win + I keys to open the Settings menu.
  2. Click on Troubleshoot.
  3. Select Other troubleshooter.
  4. Scroll down and hit the Run button for Windows Store Apps.
  5. Follow the on-screen prompts to fix the problem.

The troubleshooting process will help diagnose the problem and fix the issues at the system level. You can also try running the troubleshooter for Windows Store Apps and see if this resolves the issue or not.

6. Reset the Store cache

  1. Press the Win + R keys to open the Run dialogue.
  2. Type wsreset.exe and press Enter.
  3. A Command Prompt will open and after a few seconds will close down.

That is it from us in this guide and we hope that you managed to fix the File System Error 2144927439 with our solutions.

We also recommend reading our guide on how to fix file system errors on Windows 11 for more information.

You can let us know in the comments box below which one of the above solutions resolved the problem for you.

How to correct dictation mistakes in Microsoft Word

Microsoft has released Windows 11 Insider Preview Build 23466, and it added a feature on how to correct dictation mistakes in Microsoft Word.

This is more than welcome because the Redmond-based tech giant has also announced that you can transcribe and translate your audio files with Windows Copilot, starting in June.

So, it seems that Microsoft is keen on adding quality features that will improve the overall experience of writing or managing texts.

For example, this new feature in Build 23466 aims to make text authoring even easier with voice access. And based on the preview, you can easily correct dictation mistakes with… your voice.

How can I do that, you may ask?

Here’s how you can correct dictation mistakes in Microsoft Word

What you need to know is that you’ll use correction commands to correct mistakes. Microsoft has put out a list of commands that you can use.

To do thisSay this
To correct a specific word or text“correct [text]”, e.g., “correct site”
To correct selected text or the last dictated text“correct that”
To spell a word letter by letter.“spell that”
The correction commands from Microsoft.
  1. For example, you can say “correct [text]” or “correct that” to correct a specific word, piece of text, or to correct dictated text in your Microsoft Word document.
  2. A correction window will pop up and it will give a list of numbered options.correct dictation mistakes microsoft word
  3. To correct your text, choose the right option and say “click [number]”.

If you’re dealing with non-standard words, such as names or topics, you can use this feature to dictate the right spelling of these words.

  1. Use the “spell that” or “spell out” commands on these words.
  2. A spelling window will then appear and here you can dictate letters, numbers, symbols, phonetic alphabet, etc.
  3. You can also say “click 1” to enter the text you just spelled.

You should know all the words and phrases you dictate will be added to the Microsoft Word dictionary, and they will show up the next time you use them.

However, as Microsoft is rolling this feature on the Insider Build, it will be the subject of changes in the future, depending on how users will react to it. So there will be a lot of versions before you can correctly correct dictation mistakes in Microsoft Word.

What do you think about this feature? Let us know in the comments section below.

Filecoauth.exe: What Is It & How to Fix Its Errors

Many users have complained about an error message FileCoAuth.exe that keeps popping out of nowhere on the system. The error prevents users from opening some programs. However, this article will discuss the error and how to fix it.

Alternatively, you can read about OneDrive error 0x8004deef and ways to resolve it on Windows PCs.

What is Filecoauth.exe?

FileCoAuth.exe is an executable exe file that runs on the Windows operating system. It belongs to the Microsoft OneDriveFile Co-Authoring Executable process.

Further, the file comes along as an installation package with the Microsoft OneDrive Software developed by a Microsoft software developer.

How can I fix filecoauth.exe errors?

Before proceeding with any advanced solutions, go through the following preliminary checks:

  • Run a malware scan – It will scan the computer for malware and other malicious files or programs liable to cause FileCoAuth.exe error or infect the file.
  • Update Windows – Installing the latest updates for Windows will fix bugs causing problems with the system and its programs.
  • Reinstall Windows with Installation Media – You can also create a bootable installation media to reinstall Windows if need be.
  • Perform a system restore – Restoring the system will roll back recent changes and software installations prompting errors on the computer. Further, check what to do if the Restore Point is not working on your PC.

If the error persists after trying the above preliminary checks, proceed with the fixes outlined below:

1. Update the Groove Music app/ Windows Media Player

  1. Left-click the Start button, type Microsoft store, and click Open.
  2. Then, type Groove Music player, then expand the option for Windows Media player.
  3. Select the Update button under this and wait for the app to update itself.
  4. Then, close your Microsoft store.

Some of the users have claimed that by updating the Groove Music app, they were able to fix the issue.

2. Create a PowerShell script via Notepad

  1. Left-click the Start button, type Notepad, and click the top result to open the app.
  2. On the Untitled Notepad page, copy and paste the following script into the text file: Get-Event | Remove-Event Get-EventSubscriber | Unregister-Event $Query = 'SELECT * FROM Win32_ProcessStartTrace'            $action = {                $e = $Event.SourceEventArgs.NewEvent    $fmt = 'ProcessStarted: (SessionID={0,5}, ID={1,5}, Parent={2,5}, Time={3,20}, Name="{4}")'                $msg = $fmt -f $e.SessionID, $e.ProcessId, $e.ParentProcessId, $event.TimeGenerated, $e.ProcessName                Write-host -ForegroundColor Red $msg    Write-host -ForegroundColor Green $e.User }            Register-WmiEvent -Query $Query -SourceIdentifier ProcessStart -Action $Action
  3. Click the File option in the left corner of the top bar and select the Save As option from the drop-down menu.
  4. When confirming a descriptive name for the script, ensure you use the ps1 file type and set Save as type to All files. After that, click the Save button.

The PowerShell scripts will help you find the file location that made the calls and remove it, resolving the .exe process and stopping the pop-ups.

3. Reset the PC via the Command Prompt

  1. Left-click the Start button, type command prompt, and select Run as administrator.
  2. Now, click Yes on the User Account Control (UAC) prompt.
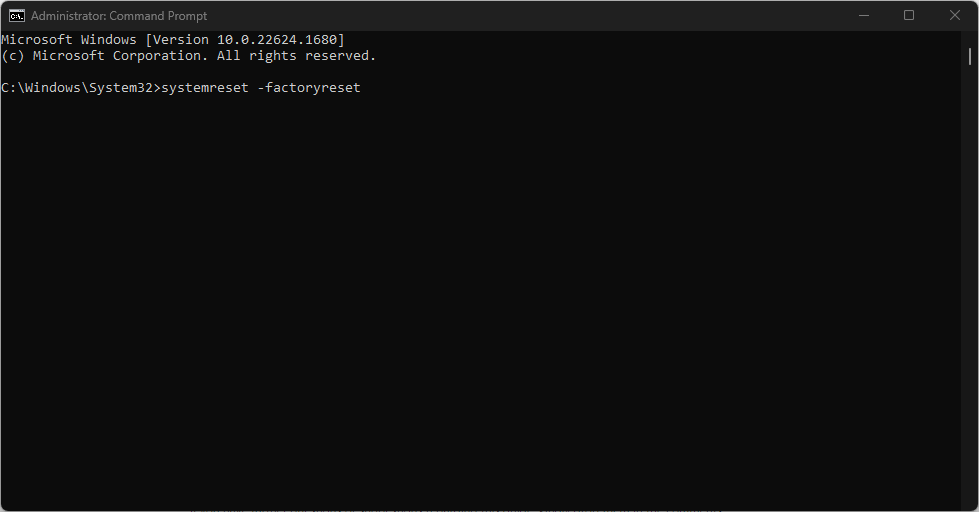
  3. Then, copy and paste the following command and press Enter: systemreset -factoryreset
  4. Now you should see the traditional reset window on your screen.
  5. Follow the on-screen instructions to reset your PC.

Running the commands above will prompt the traditional Windows 11 Reset dialog box from the Command Prompt, allowing you to select your preferred option.

Read through our detailed guide about how to reset Windows 11 to its factory settings on your PC.

Conclusively, we have a comprehensive article about the 0x8004dec5 OneDrive error and ways to fix it on Windows PCs. Also, check how to fix the OneDrive error during shutdown on Windows 11.

For step-by-step instructions on solving related issues, you can check our detailed guide on the filecoauth.exe application error.

If you have further questions or suggestions, kindly drop them in the comments section below.

How to Use Dev Home for Windows Development Environment

It is a big week for all Microsoft lovers out there. Microsoft Build 2023 conference has come with big announcements, including Windows Copilot, Microsoft Fabric, and Microsoft Dev Home.

What is Microsoft Dev Home, you may ask? It is the Redmond-based tech giant’s latest innovation for easing your workflow, as a developer.

According to Microsoft, Dev Home is a new control center for Windows that lets you monitor your projects in your dashboard using customizable widgets.

With it, you can also set up your dev environment by downloading apps, packages, or repositories, to connect to your developer tools, such as GitHub. Plus, you can create a Dev Drive for storing everything in one place.

In other words, Dev Home makes it much easier for you to work from anywhere and to have everything at the tip of your fingertips.

You can easily download it and install it to your PC, and for now, it is only available for preview, but Microsoft will fully release Devs Home in the upcoming weeks.

How can I use Dev Home for your Windows development environment>

As we said earlier, you will use the Dev Drive to store every bit of your work on it. After setting it up, you’ll need to go to your Dev Home.

  1. Log into your Dev Home account.
  2. Once you’re there, go to Machine Configuration.
  3. You’ll see here multiple options which you can choose.
  4. Choose your options. They’re self-explanatory, but Microsoft has a guide that explains them to you.

In other words, Machine Configuration gets your system ready for Dev Home. You will be guided step-by-step on each option you take.

It’s important to take your time, because you can actually connect your GitHub profile here, and the repository will be available for you here to access it, whenever you want.

To connect and access your GitHub repository, you’ll need to clone it into your Dev Drive that you just set up earlier.

Machine Configuration lets you do that by selecting Clone Repositories.how to use dev home

Go down to Browse and select Dev Drive as the storage unit for the repository clone.

How to enable Widgets from your Dashboard

  1. From your Dashboard, go to Pin Widgets.
  2. Click on Add Widgets and a window will pop up.
  3. Here, you can choose your widgets.

There are System Widgets, and you can easily monitor every detail of your PC, including CPU and GPU usage.

And this is how System Widgets look after you install Dev Home on your PC, according to this Reddit user.

There are also GitHub widgets you can use on your Dev Home dashboard.

In general, this is how you set up your development environment on Windows. The platform looks very easy to use, especially if you’re a developer.

If you stumble upon a Dev Home stuck update problem, the highlighted guide will help you.

If you use this tool, you’ll probably have Hotkey for Dev Home Project Ironsides and DevHome.PI.exe on your PC, and we have entire guides dedicated to them, so feel free to check them out.

Will you try it? Does it look exciting to you? Let us know in the comments section below.

Gcapi.dll: What Is It & How to Remove It

Today, we’ll explain what gcapi.dll is, how to remove it, and whether it poses any security risks.

This Dynamic Link Library (DLL) file is part of Google Chrome’s Cloud API and is also used by AnyDesk. While it’s generally safe, it has been exploited by hijackers in some cases.

Here’s how to get rid of it:

How can I remove Gcapi.dll from my PC?

Before proceeding with the steps below, back up your system since removing DLL files can cause stability issues.

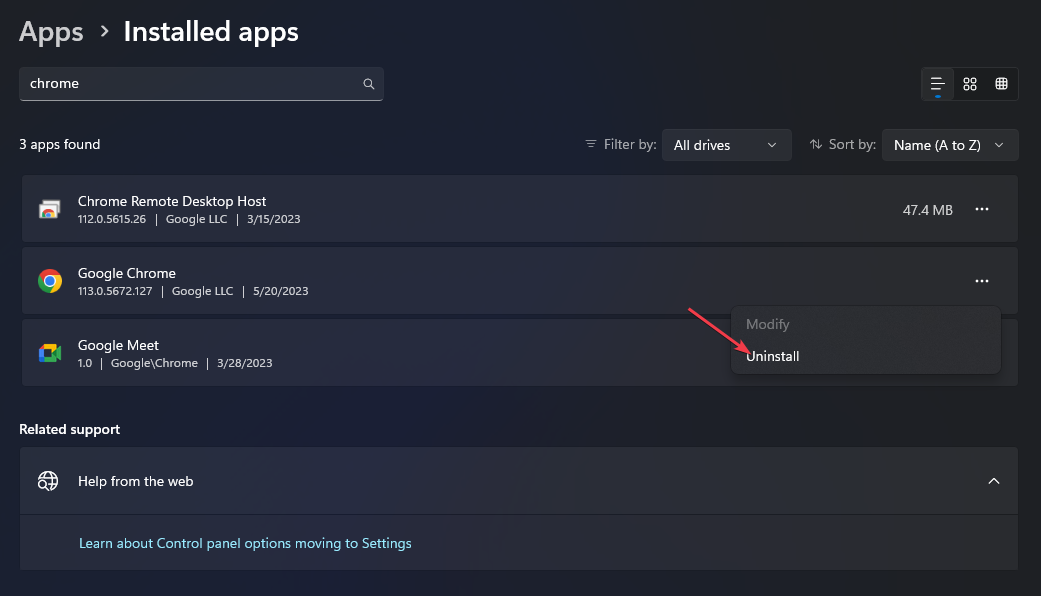
1. Uninstall Chrome / Anydesk

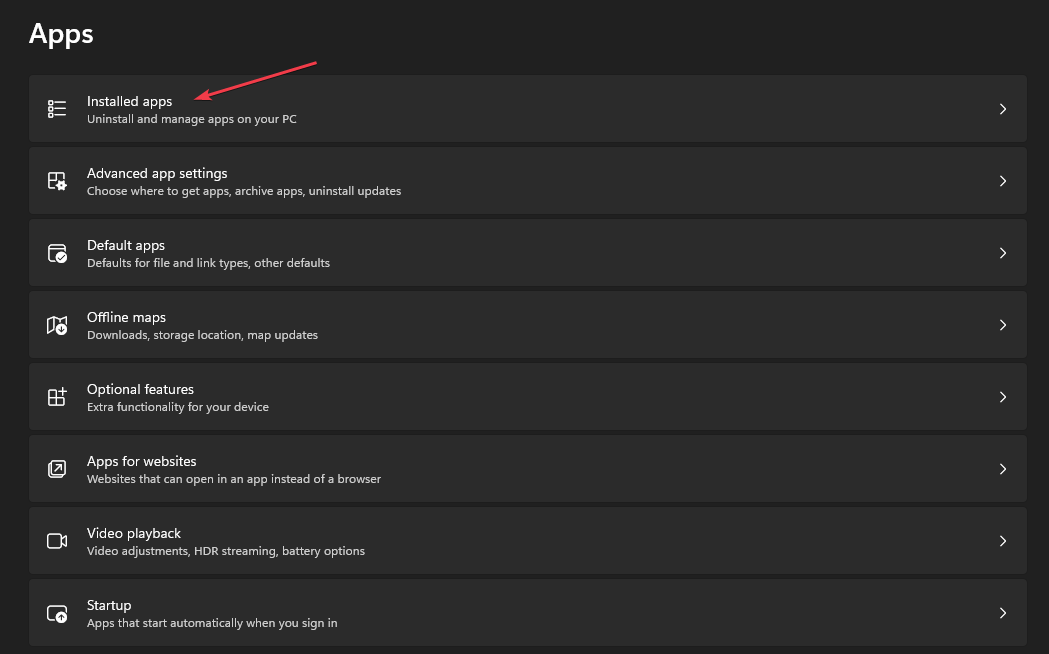
  1. Press the Windows + I key to open the Windows Settings app.
  2. Select Apps from the Settings menu and select Installed apps.
  3. Navigate to Anydesk / Chrome, click on the options, then select Uninstall from the context menu.
  4. Reinstall the Chrome browser on your computer.
  5. Restart your PC and check if the file still exists.

2. End the task for the Gcapi.dll process

  1. Right-click the Start button and select Task Manager from the menu.
  2. Go to the Processes tab. Select the Gcapi.dll from the list, right-click on it, then click End Task from the drop-down menu.
  3. Right-click on Gcapi.dll in the Task Manager and select Open file location from the context menu.
  4. In the file location in Windows Explorer, right-click on the file and select Delete from the context menu.
  5. Restart your PC.

3. Reset the HP desktop via the Command Prompt

  1. Left-click the Start button, type the command prompt, and select Run as administrator.
  2. Click Yes on the User Account Control prompt.
  3. Copy and paste the following command and press Enter: systemreset -factoryreset
  4. Now you should be able to see the traditional reset window on your screen.
  5. Follow the on-screen instructions to reset your PC.

Running the above command option will trigger the traditional Windows 11 Reset dialog box from Command Prompt, allowing you to select your preferred option. This also helps when deleting OCSetupHlp.dll.

As we said in the beginning, gcapi.dll is generally a safe file. It’s mostly associated with Chrome and AnyDesk. However, it’s been exploited in the past by malicious AnyDesk users.

The good news is that you can safely remove it without causing any harm to your system and the process, as you’ve seen, is simple.

If you need more information on DLLs, check out our guides on Psapi.dll missing errors, Dnsapi.dll not found, and SppExtComObjHook.dll.

We hope this piece answered your questions about what gcapi.DLL is, its safety, and how to remove it. Feel free to use the comment section to ask any questions you may still have.

What is NcsiUwpApp in Task Manager?

Seeing the NcsiUwpApp in the Task Manager sprouts concern in many users as they don’t know what it represents and if it’s safe.

Luckily for you, this guide will tell you everything you need to know about this file, so let’s dive into it!

What is NcsiuwpApp.exe?

NcsiUwpApp.exe is an executable file for the Network Connectivity Status Indicator Universal Windows Platform App.

It is a legitimate program related to the Windows operating system. The Indicator helps determine whether the computer has successfully connected to the network, and to check if the network has intranet or internet connectivity.

What is NcsiUwpApp in Task Manager?

NcsiUwpApp is a genuine Microsoft process for the Windows Network Connectivity Status Indicator (NCSI) program that runs in the Task Manager.

However, some users have claimed they started seeing it after installing new apps/ programs on their PC. However, the file should be totally safe. If in doubt, just run a virus scan on your PC.

Should NcsiUwpApp be removed?

Removing the NcsiUwpApp can cause stability issues with your PC since this is a core Windows process.

Since removing a legitimate file can cause stability issues on your PC, we recommend you select from our recommended antivirus software and use it to scan this file. Only if it’s malicious it should be removed.

To learn more about this process, you might be interested in our What is ncsi.dll guide for additional information.

In conclusion, we have a detailed guide on subst.exe not working in Windows 11 and how to resolve the problem.

If you have further questions or suggestions, kindly drop them in the comments section below.

0x80040216 Import Failed: How to Fix This Error

Importing data from Excel into Dynamics 365 is a common task for managing and updating records. If you have encountered the 0x80040216 Import Failed error when attempting to import data from Excel into Dynamics 365, it can be frustrating.

In this guide, we will explore the causes of the error and provide step-by-step instructions to help you resolve it.

What causes the 0x80040216 Import Failed error?

There are various reasons for this error to occur during the import process; some of the common ones are mentioned here:

  • Invalid data format – If the file you are trying to import has an unsupported format or incompatible data structure for Dynamics 365, you can face this error.
  • Incorrect import mapping – Incomplete or inaccurate mapping of fields during the import process can lead to errors and cause this issue.
  • Editable Grid option enabled – If the Editable Grid option is enabled for the entity throwing the error, you can face this issue.
  • Data validation failures – The import process includes data validation checks, and if any records fail validation rules, it can trigger the problem.
  • Insufficient user rights – You may see this error if your user account does not have the necessary privileges to perform the import operation.

Now that you know the causes, let us move to the solutions to fix the error.

How can I fix the 0x80040216 Import Failed error?

Before engaging in advanced troubleshooting steps, you should consider performing the following checks:

  • Check if you are using your device’s updated version of Dynamics 365.
  • Try refreshing the page and repeat the process if using a web version.
  • Verify the Excel file you are trying to import is in a supported format, such as CSV, .xls, or .xlsx.
  • Ensure your user account has the necessary privileges to perform the import operation.

If you have checked these things and can still not perform the operation, check out the detailed solutions to fix the problem.

1. Review and adjust import mapping

  1. Launch Dynamic 365 and click Settings.
  2. On the Settings page, click the drop-down and choose Data Management.Settings - Data Management
  3. Click Imports to access the import management page.Imports option
  4. Click the Imports data option.
  5. Choose a compatible file you want to import and click Next.Import data option
  6. The file will be uploaded; click Next to proceed.Review the selection
  7. Now select the options appropriately to proceed and click Next.
  8. Choose the data map and click Next.Data Maps
  9. Again, on the Map Record Types page, choose an appropriate option and click Next.Data types
  10. On the Map fields page, you will see the Optional Fields on the left and the corresponding Dynamics 365 fields on the right. Now check the mapping for each column to its respective field and ensure the column’s data types match the ones of the corresponding fields. If not, select the option accordingly and click Next.Select the fields and click Next
  11. Follow the onscreen instructions to complete and click Submit to complete.

2. Disable the Editable Grids option

  1. Launch Dynamic 365 and click Settings.
  2. On the Settings page, click the drop-down and choose Customizations.Customizations
  3. Click Customize the System.Customize the system
  4. Now go to Components and click Entities.
  5. Choose the entity for which you want to make the changes.Edtiable grid
  6. Go to Controls, locate Editable Grid, uncheck it for Web, Tablet, and Phone, then click Publish to save the changes.

So, these are the steps to fix the 0x80040216 Import Failed error on Dynamics 365. If you are looking for browsers that support Dynamics 365, we suggest you read this guide.

If you have any questions or suggestions, feel free to mention them in the comments section below.

Show Seconds in System Clock on Windows 11 [5 Steps]

Windows 11 system clock does not show the seconds. Also, it doesn’t have any option to add seconds to it. This is similar to the previous version of Windows. Microsoft even explained in detail why it did not add the seconds in the Taskbar clock.

As per Microsoft, the main reason why seconds aren’t there on the Taskbar clock is that it eats up resources. But not everyone aims to save battery life and is using older PCs. So in this guide, we will explain how you can show seconds in the system clock Windows 11.

How can I show seconds in the system clock on Windows 11?

1. Show clock via Settings (Insider Build 25247 and above)

  1. Press the Win + I keys to open the Settings menu.
  2. Click on Personalization on the left.
  3. Select Taskbar on the right side.
  4. Scroll down and select Taskbar behaviors.
  5. Check the box for Show seconds in system tray clock.

2. Use Registry Editor

  1. Press the Win + R keys to open the Run dialogue.
  2. Type regedit and press Enter.
  3. Navigate to the below path. Computer\HKEY_CURRENT_USER\Software\Microsoft\Windows\CurrentVersion\Explorer\Advanced
  4. Locate the ShowSecondsInSystemClock entry.
  5. Double-click to open it.
  6. In the Value data field, type 1.
  7. Click OK.
  8. Close Registry Editor.
  9. Restart your PC for the changes to take effect.

Tweaking the registry incorrectly could also cause your system to crash. Because of this, we would advise you to create a backup and then tweak the registry.

We have a guide to help you fix a corrupt registry in Windows 10. You can also check out our guide, which will help you restore the Windows registry without a backup.

3. Use Windows PowerShell

  1. Press the Win key to open the Start menu.
  2. Open Windows PowerShell as an admin.
  3. Type the below command and press Enter. Set-ItemProperty -Path HKCU:\Software\Microsoft\Windows\CurrentVersion\Explorer\Advanced -Name ShowSecondsInSystemClock -Value 1 -Force
  4. Restart your PC.

When you run the above command, it will change the value of the ShowSecondsInSystemClock to 1. This will show seconds in the system clock in Windows 11.

To disable the seconds in the system clock, all you need to do is change the value of the ShowSecondsInSystemClock in the above command to 0.

Also, you can run the above command in Command Prompt or Windows Terminal apart from using Windows PowerShell.

4. Use the Run dialogue

  1. Press the Win + R keys to open the Run dialogue.
  2. Type the below and press Enter. cmd /c powershell.exe Set-ItemProperty -Path HKCU:\Software\Microsoft\Windows\CurrentVersion\Explorer\Advanced -Name ShowSecondsInSystemClock -Value 1 -Force
  3. Restart your PC.

The above command you will run on the Run dialogue will force the PC to show seconds in the system clock in Windows 11.

5. Use a dedicated software

  1. Download the ElevenClock software.
  2. Open the EXE file and run it on your PC.
  3. Click OK.
  4. Click Next.
  5. Accept the license agreement and hit the Next button.
  6. Select Install.
  7. Click Finish once the installation completes.
  8. Launch the program.
  9. Expand the Date and Time Settings.
  10. Check the box for the Show seconds on the clock option.

You can tweak multiple settings to change the clock’s appearance, position the clock, and other stuff related to the ElevenClock.

That is it from us in this guide. These are the best ways to show seconds in the system clock on a Windows 11 PC.

We have a guide that will help you fix if the clock on your PC is running behind. There are 4 effective ways mentioned in the guide that will help you fix the issue.

Also, a dedicated guide will help you show seconds on the system clock on a Windows 10 PC, which you should also check out.

We have listed some of the best alarm clock apps to try and keep up with your tasks on time for your PC.

In the comments below, let us know which of the above solutions worked for your Windows 11 PC.

Stornvme.sys BSoD: 5 Ways to Fix It

Stornvme.sys, also known as Microsoft NVM Express Storport Miniport Driver file, is a type of Win64 EXE driver file first created by Microsoft for Windows 8.1. This driver file can sometimes become corrupt and cause your Windows PC to crash randomly into the Blue Screen of Death causing data loss. 

Why do I encounter the Stornvme.sys BSoD error?

A BSoD crash due to the stornvme.sys error can happen for several reasons an it also comes with the DRIVER_IRQL_NOT_LESS_OR_EQUAL stop code. The most recurrent ones are the following: 

  • Corrupt system drivers – Compatibility issues due to corrupt or outdated system drivers are the primary cause of the stop code.
  • Virus infection – A PC damaged due to malware infection becomes vulnerable and causes BSoD errors. 
  • Incomplete software installation – Software-related problems like unsuccessful installation are another reason for the stornvme.sys BSoD error. 
  • Hardware issues – Hardware and disk-related issues like corrupt disk drivers put the system in a compromised state, hence the error. 
  • Broken system files – Corrupt or damaged system files cause the system to malfunction and crash abruptly. 

If you experience a BSoD crash on your PC because of stornvme.sys, the solutions listed in this guide will prove effective in overcoming it. 

How do I fix the Stornvme.sys BSoD error in Windows? 

Before implementing the solutions lined up below, try the solutions listed below:

If these methods do not seem fruitful, proceed to the mainstream solutions listed below. 

1. Restart your PC in Safe Mode

  1. Hold down the power button for a few seconds until your PC powers off. Press the power button to start your PC and quickly power it off as soon as the Windows logo flashes on the screen. Perform the same step until you reach the Automatic Repair screen. 
  2. Hit the Advanced options button to initiate the automatic repair process. Stornvme.sys
  3. Next, select the Troubleshoot option. Stornvme.sys
  4. Click Advanced options.
  5. Choose Startup settings from the Advanced options window.
  6. Press the F5 key to choose Safe Mode with Networking from the list of safe mode variants. Stornvme.sys

In Safe mode, your PC Windows operates in a basic state, with only a limited set of files, drivers, and apps functional. Once you enter the safe mode, execute the troubleshooting methods lined up below to get past the stornvme.sys BSoD error.

2. Run SFC and DISM scans

  1. Hit the Windows key to bring up the Start menu, type cmd in the search bar and choose Run as administrator from the search results. Stornvme.sys
  2. Click Yes on the User Account Control prompt. 
  3. Type or paste the following command and press the Enter key to run System File Checker. sfc /scannow Stornvme.sys
  4. Wait until the message verification is 100% complete appears. Type or paste the below command and press the Enter key to initiate the DISM scan. DISM /Online /Cleanup-image /Restorehealth

System File Checker scan and DISM tool will diagnose the corrupt system files and faulty disk images will restore the original version from the compressed folder. 

If you think the above process isn’t thorough enough for repairing your Windows system, we suggest you try dedicated repair software.

3. Perform System Restore 

  1. Bring up the Start menu by pressing the Windows key, type create a restore point in the search bar, and choose the first search result to access the System Properties window. Stornvme.sys 
  2. Press the System Restore button located in the System Protection tab.
  3. Choose the suitable restore point from the list when your PC was not crashing into BSoD because of the stornvme.sys and hit the Next button. Stornvme.sys
  4. Confirm the restore point and initiate the system restore process by pressing the Finish button.

Restoring your PC to a previous time will revert all the changes that damaged the stornvme.sys file such as incomplete software update which in turn invoked the BSoD. 

4. Update the system drivers 

  1. Use the Windows + R shortcut to bring up the Run dialog box. Type the following command in the text box and hit OK. devmgmt.msc
  2. In the Device Manager window, expand the Display adapter category to view the list of installed drivers. 
  3. Right-click the relevant graphic driver and choose the Update driver option from the context menu. Stornvme.sys 
  4. Select the Search automatically for drivers option on the new window that appears. Stornvme.sys
  5. Windows will now look for the best available driver update for your graphics card system and will automatically download and install it.

If no update is available, you will see a message saying the best drivers are already installed. In this case, follow the other methods for updating the graphics drivers on Windows PC.

Similarly, update all the obsolete system drivers under each category to resolve the BSoD crash issue. 

5. Reset Windows

  1. Bring up the Settings app using the Windows + I shortcut key.
  2. Scroll down the System settings and select Recovery option from the right section. Stornvme.sys
  3. Press the Reset PC button located under the Recovery options.
  4. A Reset this PC pop-up will appear. Choose the Keep my files option to reset Windows without affecting your files and data. 
  5. Select the method you would like to opt for reinstalling Windows from the next screen. We recommend Local reinstall to quickly reset Windows locally. Stornvme.sys

Resetting your Windows PC will reset and wipe out all misconfigured settings and will restore the system files to the default state. After the local install is completed, the stornvme.sys BSoD error will no longer bother you. 

That’s all in this guide! Before you leave, you may want to know how to resolve the ACPI.sys error on your Windows PC. 

So which of the troubleshooting methods listed in this guide did the trick? Do let us know in the comments.

How to Transcribe & Translate Audio Files with Copilot

At the Microsoft Build 2023 conference, the Redmond-based tech giant announced that you can transcribe audio files and translate them with Windows Copilot, among other useful things that you can do with it.

The presentation for this particular feature was short, but it’s very exciting that Microsoft is adding it to Copilot. Being able to easily transcribe and translate audio files will be an excellent feature for those who work in creative industries.

Without going into too much detail, the feature seems straightforward to use on Windows 11. And since Copilot is an AI tool, it will do all the work, and you would only have to check for potential misspellings.

Copilot will be available to preview on Windows 11 in June 2023, so you won’t have to wait too long.

Microsoft only showed a hint of the feature, but as we said earlier, it looks effortless.

How to transcribe & translate audio files with Copilot?

  1. Go to your audio files folder
  2. Select any audio file that you want to transcribe or translate
  3. Drag that audio file onto the Copilot taskbar
  4. Copilot will then show you your options: transcribe or translate
  5. Select transcribe or translate
  6. Let Copilot transcribe or translate your audio filestranscribe audio files windows copilot

As you can see, the whole process looks very intuitive. After Copilot is done, you can copy and paste and correct your text. Microsoft has not said anything yet, but there might be a possibility that Copilot will also correct the text.

So, all you have to do is take it and use it wherever you need it.

You need to know that Windows Copilot will not only help you transcribe and translate the text and possibly even correct it. You can do many other things with this AI tool coming to Windows next month.

You’ll have easy access to Microsoft Office if you need to use your text in a PowerPoint sheet or a Word doc. It will also have Bing at its disposal, so you can easily search for related topics and info that might be helpful to you.

You will also be able to create your own workflow, as Copilot will assist you in making the best working environment possible. Yes, to dark mode. Yes, to personalized music playlists.

Speaking of innovation and AI assistant, you can also try using Copilot in Microsoft Word; here is the guide explaining how to enable it.

What do you think about this feature? Will you use it? Let us know in the comments section below.

Wormate.io Tips: Extension & Best Browser for IO Games

What is the best worm IO game? With Wormate.io rising in popularity, we have a detached winner. Thus, finding the best IO games is not hard at all. But what about finding the right web browser for IO games? Or a good Wormate.io extension?

It’s essential to have reliable tools at hand and that’s where we come in to show you the ultimate Wormate.io tips and tricks for guaranteed fun. So, here we go.

What is the extension for Wormate io?

WormXTIt’s an all-in-one Wormate.io extension, mod, and skin package that works on Chrome, Opera / Opera GX, and more.
Worm World ConnectWornate.io game platform extension for Chrome and more
Wormate Friends ConnectFirefox, Google extension

Wormate.io is an online multiplayer game where users play with others on a server. But can you play Wormate.io with friends? Yes and no, bear with us.

While there is a chance to end up on the same server as one of your friends, there is no way to play in an arena only with your friends. So are there others?

What online games are like Wormate IO?

First things first, there are many different types of .io games such as platform .io games, puzzle .io games, speed .io games, and more. There are Diep.io and even FPS.io games such as Krunker – and speaking of that, you may want to grab an optimized browser to play Krunker in fullscreen.

However, one of the most popular and addicting .io games is Slither.io, where players play as a worm-like creature and collect glowing orbs to grow as big as possible without running into other players, which is more difficult than it sounds.

Slither.io one of best .io games.

There is no sign-up necessary to get going. Simply visit Slither.io in your preferred browser and create a nickname to begin playing. Users can also customize the skin of their snake-like creature to set them apart from others.

And speaking of skins, you’re about the enter a magical universe of wormate.io mod APK, skins, and extensions – all available along with the best web browser for IO games.

What is the best browser for Wormate IO?

1. Opera GX

Opera GX best browser for Slither.io.

Opera GX is a browser developed by Opera that caters to gamers. This browser is optimized for playing browser games, especially .io games, and even provides exclusive access to GXC, a gaming website where users can play games only using Opera GX.

In addition to being optimized for browser games like .io games, Opera GX is also easy on PC resources. With the GX Control panel, users can limit the amount of RAM, network, memory, and CPU that the browser uses.

With an integrated messenger system easily accessed from the handy sidebar, users can connect with friends using Discord, Twitch, and more. And speaking of that, you’ll probably never have to deal with Twitch’s high CPU usage again.

In addition, Opera GX doesn’t only have enhanced gaming functions, and it also has a ton of customization features that gives users a personalized gamey feel.

Key features of Opera GX:

  • Exclusive access GXC
  • GX Control panel to conserve PC resources
  • Integrated messaging apps
  • Gamey customization options
  Opera GX

Opera GX

Optimize your .io gaming experience with the GX Control panel.

2. Mozilla Firefox

Firefox best browser for Diep.io.

Firefox has been a fan favorite for many years, but it makes number two on our list because it’s light on your PC’s memory without sacrificing performance or speed. This is especially helpful for .io games as it makes for fast and smooth gaming.

Firefox also values user privacy with a built-in security feature that prevents trackers and crypto miners from harming your PC. Users can choose between standard or strict security protection or customize which trackers and scripts to block.

With a massive extension library, users can install add-ons that enhance their gaming experience for a fully customized browser.

Key features of Mozilla Firefox:

  • Open-source browser
  • Enhanced tracking protection
  • Adjustable and customizable security levels
  • Extensive add-on library

⇒ Get Mozilla Firefox

3. Brave Browser

Brave best browser for Wormate.io.

Brave Browser is an excellent choice for .io games if you value speed and security. Another Chromium-based browser allows users to install extensions from the Chrome Web Store. It was also the first browser featured on the Epic Games Store.

With built-in tracking protection and Tor integration, users can play the .io game securely and with peace of mind that their privacy is protected. Users can also customize their level of security using Brave Shields.

Key features of Brave Browser:

  • Chromium-based
  • Built-in tracking protection
  • Tor integration
  • Brave Shields

⇒ Get Brave Browser

4. Google Chrome

Chrome best browser for diep.io.

Because of its cross-platform compatibility and speed, Chrome is arguably one of the best browsers for HTML5 games like Slither.io, and Wormate.io. It’s also an excellent choice of browser for reading manga magazines, among others.

Google is constantly adding to and improving Chrome, and one recent update is the built-in ad blocker that prevents ads that violate the Better Ads guideline from slowing down page loads.

However, Chrome is notorious for hogging PC resources like RAM and memory because it runs several processes in the background to ensure seamless and lag-free browsing. It also consumes a lot of resources to support its efficient multitasking functions.

Key features of Google Chrome:

  • HTML5 support
  • Built-in ad blocker
  • Lag-free gaming
  • Multitasking functions

⇒ Get Google Chrome

5. Microsoft Edge

Microsoft Edge best browser for Wormate.io.

In Microsoft Edge, users can customize their My Feed page to load only content that interests them, including the latest gaming news and information.

The Collections feature allows users to group pages and organize them based on topic. This is perfect for users that want to group .io games in a collection to keep it separate from other pages in Edge.

Efficiency mode reduces the browser’s resource consumption while gaming on Windows, making for a lightweight browser that can handle any browser game.

Key features of Microsoft Edge:

  • Customizable My Feed page
  • Organize pages with Collections
  • Efficiency mode conserves PC resources
  • Chromium-based

⇒ Get Microsoft Edge

That’s it for now. Let us know in the comments below which browser you use to play .io games and which .io game is your favorite.

How to Access & Use Bard AI in India

AI (Artificial Intelligence) is growing at a rapid pace, and we are seeing new AI conversational tools frequently pop up. We used to only have ChatGPT, then came along Chatsonic.

Google also has its own AI conversational tool Bard AI, which is now available to use in India. In this guide, we will show you how you can access Bard AI in India. Let us get right into it.

What is Google Bard AI?

At the Google I/O 2023 event, Google announced the availability of the Bard AI tool across 180 countries, including India.

Google’s Bard AI is a chatbot that simulates human conversations using natural language processing and machine learning. Additional data is infused into the Bard AI using Google Search.

You can integrate Bard AI into websites, messaging platforms, or applications. Businesses can take advantage of such chatbots to provide resolutions to queries or handle customers.

Bard AI can be used to ask questions, solve math problems, write poems, find entertainment, and create a resume and the possibilities are endless.

Differences between Bard AI and ChatGPT

Bard AIChatGPT
Google is the brains behind Bard AI.Microsoft is the brains behind ChatGPT.
Information was feeded using infiniset.LaMDA, Common Crawl, articles, books, and Wikipedia along with access to Google searches.Trained with huge data sets including Common Crawl, articles, books, and Wikipedia.
The language model is LaMDA.ChatGPT is based on GPT-3.5/GPT-4 (ChatGPT Plus).
Bard AI is free to use. You can use ChatGPT for free but ChatGPT Plus costs $20/month.
Requires a personal Google account to use the Bard AI.You can use any email address and hop onto the chatbot.
It supports English, Japanese, and South Korean languages with support for 40 languages soon.ChatGPT supports English, Chinese, Spanish, French, German, and many other languages.

How can I access Bard AI in India?

  1. Visit the official website of Bard AI.
  2. Click on the Try Bard button at the bottom right corner of the screen.
  3. Sign up to Bard using your Google account.
  4. Agree to the terms and conditions.
  5. Start shooting your questions to Bard AI.

Bard AI was previously available only for users in the US and UK via a waitlist. Now, Google has expanded its availability to more than 180 countries and support for more countries is coming soon.

One of the most important things to note about Bard AI is that it is in the beta stage and you may get wrong answers and explanations. So, do not trust the AI chatbot completely.

Here is an example of using Bard AI

We asked Google’s Bard AI to write a poem about nature. and below is the result that we got. To be fair, the output was pretty great, and it is so interesting that it did all of that by itself, within some seconds.

What are some benefits of using Bard AI?

Since Google has trained Bard AI with a huge dataset, you can ask the AI tool about anything. Here are some of the benefits of using Bard AI.

  • You can use Google Bard AI to generate ideas for your YouTube video, content writing, or any other plans. It can even help you plan your next vacation.
  • Bard AI can be helpful to learn about new things. It can interpret information from the real world and help enhance your knowledge.
  • Google Bard AI can generate results promptly which can be even better than manually searching for responses over the internet.
  • You can use it to create your resume, compose emails, create a to-do list, develop presentations, and much more.

Well, that is it from us in this guide on how you can access Bard AI in India. You can learn more about the Bard AI and its features and how it stands in the AI war that is currently going around in the tech world.

We also did a comparison between the Bard AI and the Bing AI so that you can read and understand which one has an edge over the other AI chatbot.

You can also check out our guide that explains how you can easily delete the Google Bard history and activity data.

Feel free to let us know in the comments below if you were able to access and use Bard AI in India using the above steps or not.

Microsoft Dev Home: How to download & install

A lot of new exciting updates are coming to Windows 11 now: the Copilot AI assistant for Windows 11, the Dev Drive feature, the AI inclusion into Microsoft Store, and the latest Build 23466 on the Dev channel. We’re also excited to break down Microsoft Dev Home, the tech giant’s latest innovation to boost your productivity.

Now live in the preview, Dev Home is designed to empower developers like you to dive into their work with unparalleled ease.

One of the standout features of Dev Home is the WinGet configuration, which simplifies and accelerates the setup process. Developers like you can now effortlessly install and configure their preferred tools and packages, allowing them to hit the ground running in no time.

And, you name it – the Dev Drive feature is also here to enhance the filesystem’s speed and efficiency. By leveraging advanced technologies, developers can experience improved file handling and smoother operations, ensuring a seamless coding experience.

Dev Home takes devs’ collaboration to new heights by seamlessly integrating with GitHub. Connecting to GitHub is now even easier and easier than ever, so you can effortlessly set up your development environment for your preferred repositories. 

Ready to take Dev Home for a spin? Here’s how you can download and install it. 

How to download & install Microsoft Dev Home?

1. Open your browser.

2. Head over to Microsoft Dev Home’s download page (preview). 

3. Click Get to initiate installation.

4 Click Get Started and you’re good to go!

Plus, you’ll also have the option to leverage cloud-based coding environments through Microsoft Dev Box and GitHub Codespaces. This cloud integration enables developers to access their coding environments from anywhere.

For some of our readers, the Dev Home update gets stuck at 90%. Read the highlighted guide to learn how to fix the problem.

Many users also reported Hotkey for Dev Home Project Ironsides and DevHome.PI.exe appearing on their PCs after using Dev Home, but we have guides that can help you learn more about them.

Have you tried Microsoft Dev Home? Let us know in the comments!

What’s new with spotlight tool on your Windows 11 desktop?

Microsoft always continues to improve. Whether it’s performance or security updates, you can always expect the tech giant to revamp its beloved operating system Windows 11.

Features and improvements are constantly being tested on the Windows Insider program before its general availability. So, in Windows 11 Insider Build 25309, Microsoft is trying something new with the desktop spotlight feature. 

As spotted by Windows enthusiast @PhantomOnEarth, Windows 11 is trying out different default positions for the desktop spotlight icon (bottom right, bottom middle, bottom left). By default, the feature is living on the top right of your desktop screen but things may be changing in the future.

“A desktop spotlight experiment not mentioned in the blog post is rolling out – different default positions for the icon (bottom right, bottom middle, bottom left)

(vivetool /enable /id:41861575 – optionally add /variant:X and replace X with 2 or 3 for a different variant)”

The update doesn’t stop there. As spotted by Windows enthusiast @techosarusrex, the desktop spotlight gets a new look on Build 25324 from the Canary channel. You can see the screenshots below.

And, as spotted by the same insider from the recent Build 23466 (Dev channel), this spotlight feature is getting neat little animations within its UI, so that’s good news.

What is Windows spotlight on desktop?

Windows spotlight feature on the desktop allows the system to constantly change your wallpaper to some of the freshest looks from around the world. 

First introduced in Windows 10, the feature brings out a nice accentual change to your screen. It may not seem too much, but if you’re working on your desktop for hours, it can be pleasing to the eyes.

After clicking Learn about this picture, a Microsoft Edge window will open with more details about the scenery from the web. 

Some users, however, may find it annoying, and rightfully so. Some even reported that it’s been plagued by a few errors, and we’ve prepared simple guides for you here.

In the meantime, it’s still worth noting that being an insider-only feature that isn’t out for primetime yet, you may be running into some performance problems here and there, so, patience is a virtue. 

Are you excited about this upcoming feature? Let us know in the comments!

Fix: Microsoft 365 has Been Configured to Prevent Individual Acquisition of Office Add-ins

Office 365 is a one-stop suite and is the preferred option for most users across the globe. Given that Microsoft develops it, users expect a far superior experience. But, Microsoft 365 has been configured to prevent individual acquisition of Office Store add-ins error troubles many.

The error is primarily faced by Mac users, with a few instances in Windows, on devices controlled by an organization, say the workplace or educational institution. But things aren’t as complex as they appear and can easily be fixed in no time. Let’s find out how!

Why is Microsoft 365 preventing the installation of add-ins?

Here are a few reasons you are facing the problem in Office 365 on your device:

  • Organization prevents installation of add-ins: Administrators can impose restrictions on devices within the organization to prevent users from installing add-ins, and this is primarily the reason you are facing the issue.
  • Problems with the Office installation: In some cases, users reported being unable to edit in Excel, with the Microsoft 365 has been configured to prevent individual acquisition of Office add-ins message appearing. This could be linked to localized problems.
  • Issues with the imposed restrictions: In case a user, though whitelisted, is facing issues while installing add-ins in Office 365, it could be the misconfigured restriction settings to blame.

How do I get Microsoft 365 to allow individual acquisition of Office Store add-ins?

Before we start with the slightly complex solutions, here are a few quick ones to try:

  • Check with the administrator whether they allow users to access the Office Store. If not, you will have to request the privilege.
  • Restart the device you are using for Office and try adding the add-in.

If none work, move to the fixes listed next.

1. Reconfigure the Office settings (on Admin’s end)

  1. Go to the Office365 portal, select Settings from the navigation pane, and then choose Org settings under it.Org settings to fix microsoft 365 has been configured to prevent individual acquisition of office add-ins
  2. Now, in the Services tab, click on User owned apps and services.user owned apps and services
  3. Finally, tick the checkbox for Let users access the Office store and, if required, Let users install trial apps and services.
  4. Once done, save the changes, and wait for a few hours for these to come into effect for devices that are a part of the organization. Remember, it may take up to 24 hours for the changes to apply.

This is by far the simplest solution and one that works for most users when getting the Microsoft 365 has been configured to prevent individual acquisition of Office Store add-ins error. But, in case it’s not a problem at the administrator’s end, we will have to explore localized issues.

2. Re-login to Office 365

  1. Open Microsoft Excel or any other software which is a part of the Office suite, then click on the File menu.file
  2. Click on More in the bottom-left corner, and select Account.account
  3. Now, click on Sign out.sign out to fix microsoft 365 has been configured to prevent individual acquisition of office add-ins
  4. Once logged out of Office 365, restart the device, and log back in with the account credentials previously used.

Another quick way to fix things is to re-login to Microsoft 365 because it could be login-related issues to blame for the error.

3. Update Office 365

  1. Open Microsoft Excel, and click on the File menu towards the top left.
  2. Click on More, and then choose Account from the flyout menu.more
  3. Now, click on Update Options, and select Update Now.update now to fix microsoft 365 has been configured to prevent individual acquisition of office add-ins
  4. If there are any available updates, wait for these to install, and then restart the computer.

If you recently started encountering the Microsoft 365 has been configured to prevent individual acquisition of Office add-ins error, it could be a bug in the recent version. And a viable solution is to update Office365.

4. Repair Office installation

  1. Press Windows + R to open Run, type appwiz.cpl in the text field, and hit Enter.appwiz.cpl
  2. Select Microsoft 365 from the list of installed programs, and click on Change.change
  3. Click Yes in the UAC prompt.
  4. Now, select Online Repair and then click Repair to proceed.online repair to fix microsoft 365 has been configured to prevent individual acquisition of office add-ins
  5. Again, click Repair in the confirmation prompt to start the process.repair to fix microsoft 365 has been configured to prevent individual acquisition of office add-ins
  6. Office 365 will now re-download the most critical files to fix the issue, which may take 10-15 minutes to complete.

If the previous solutions didn’t work and you are sure it’s an issue at the user’s end, an Online Repair of Microsoft 365 should do the trick. You need an active Internet connection for it. So sit back and wait while the repair tool does the job!

After you have fixed the error, check the best Office add-ins and get some today for an effortless experience.

Tell us which fix worked for you in the comments section below.

You’ll soon be able to reorder sidebar widgets on Edge

Do you often use Edge? If so, we’ve got some good news for you. Microsoft is actively working on addressing user requests in the latest testing phase of Edge Canary, the experimental version of the popular web browser. That feature is the ability to reorder the Sidebar widgets on Edge.

As spotted by a Windows enthusiast @Leopeva64, it is important to note that the feature is currently experiencing some bugs and may not be fully functional at this stage. 

It’s been a long time coming for this hot-wanted feature. The decision to introduce the option to reorder Sidebar buttons comes in response to numerous user requests. 

Also, according to the same insider, Edge’s Sidebar is also expected to have extension support in the near future. While evidence of this feature is present, it is not yet functional, preventing a demonstration at this time.

This is particularly valuable in cases where certain widgets are used more frequently and, as a result, require placement at the top of the sidebar for quick and easy access.

What does this mean for Edge users?

reorder sidebar widgets and thumbnail for favorites on edge

In the pursuit of offering a more personalized browsing experience, Microsoft’s commitment to listening to user feedback and implementing requested features like Sidebar button reordering demonstrates its dedication to meeting the needs and preferences of its users.

Recently, we’ve also learned about an upcoming feature in Edge that will allow users to bring thumbnails to their Favorite hub. 

This feature provides three size options for the thumbnails: small, medium, and large. This addition aims to enhance the visual experience and customization options for users accessing their favorite websites and content through the Favorite Hub in Edge. 

With that being said, as previously mentioned, it is important to take into consideration that this particular feature is exclusively available for insiders. As a result, it is crucial to acknowledge that being in the testing phase, there is a possibility that errors and glitches may still be present.

What are your thoughts on Microsoft bringing the recorder sidebar widgets to Edge? Kindly let us know in the comments!

Fix: A User is Unable to Reach Google.com by Typing the URL Error

The Internet is in an advanced form right now. Even though we witness significant upgrades every now and then, users still come across issues. And one such that leaves many in a tricky spot is when a user is unable to reach google.com by typing the URL.

The browser problem has been faced by many, and forums are filled with reports of it. And though there are platforms covering the error, none offer viable and executable solutions. So, let’s find out why you can’t reach Google!

Why can’t you reach Google?

Here are the primary reasons for it:

  • Issues with the DNS servers: The DNS plays a vital role in locating the corresponding website address when a domain name is entered into the browser. And issues with the DNS can prevent users from accessing a website.
  • Problems with the ISP: There’s also the likelihood that a problem at your ISP’s end triggers the error.
  • Issues at the user’s end: Lastly, we can’t rule out localized problems with the Internet, say a security setting over the network or an app conflicting with the process.

What happens when Google com is typed in the URL?

This is a multi-step process but takes place within less than a second. Here’s how things work out behind the scenes:

  1. Identifying the IP address: When you enter google.com in the web browser, the DNS server comes into action and identifies the IP address for Google, which is 172.217.3.110, though there are more. Once found, the PC will try to connect with Google servers.
  2. Verifying the connection: Before it is established, the network’s firewall will look for any imminent threats and only allow the connection when there’s no harm.
  3. Establishing a connection: After the server address is identified and the firewall approves the connection, the Google website will appear on the browser.

What can I do when unable to reach Google.com using the URL?

Before we head to the complex solutions, here are a few quick ones to try:

  • Restart the computer and verify whether you are still unable to reach google.com by typing the url in the web browser.
  • Connect to a different network, preferably a mobile hotspot or another router.
  • Install the latest updates for both the OS and the browser.
  • Switch to another browser. Check the best browsers for PC that don’t throw errors and deliver superior experience.

If none work, move to the fixes listed next.

1. Run the Internet Connection troubleshooter

  1. Press Windows + I to open Settings, and click on Troubleshoot on the right in the System tab.troubleshoot
  2. Click on Other troubleshooters.other troubleshooters
  3. Click on the Run button next to the Internet Connections entry here.internet connections to fix a user is unable to reach google.com by typing the url in the web browser
  4. Wait for the troubleshooter to run and follow the on-screen instructions to complete the process.

A quick solution to automatically fix things when a user can’t reach Google through the IP address is to run the dedicated troubleshooter. Though remember that the buit-in utility is only helpful as long as the problem has been identified by Microsoft and a solution to it made available.

2. Change the DNS server

  1. Press Windows + R to open Run, type ncpa.cpl in the text field, and hit Enter.ncpa.cpl
  2. Right-click on the active network adapter, whether Wi-Fi or Ethernet, and choose Properties.properties to fix a user is unable to reach google.com by typing the url in the web browser
  3. Select Internet Protocol Version 4 (TCP/IPv4), and click on the Properties button.IPv4
  4. Now, select the Use the following DNS server addresses option, and enter this in the available fields:
    • Preferred DNS server: 8.8.8.8
    • Alternate DNS server: 8.8.4.4change DNS server to fix a user is unable to reach google.com by typing the url in the web browser
  5. Once done, click OK on all open windows to save the changes.

For most, it was the DNS server that led to the user being unable to access Google. And in this case, switching to Google’s DNS server makes perfect sense. Besides, you can find out the fastest DNS servers and use one.

3. Make sure the DNS service is running

  1. Press Windows + R to open Run, type services.msc, and click OK.services
  2. Locate the DNS service, right-click on it, and select Properties.DNS service to fix a user is unable to reach google.com by typing the url in the web browser
  3. Make sure the service is running. If it’s not, click the Start button to run it.

That’s it! After running the DNS service, your browser should be able to reach Google with the domain name instead of the IP address.

And once you have things up and running, check some quick tips to increase the Internet speed in Windows.

For any queries or to share what worked for you, leave a comment here.

Microsoft raises alert: copying and saving files in Windows 10 and Windows 11 pose intermittent failures

Microsoft has recently acknowledged an issue impacting certain 32-bit applications when it comes to saving and copying files across various versions of the Windows operating system. The problem primarily arises during file transfers to network shares, particularly on Windows 11 21H2 and 22H2 (after installing KB5023774 or later updates) or Windows 10 21H2 and 22H2 (after installing KB5023773 or newer updates).

The intermittent nature of this issue means that only apps that are both large address aware and utilize the CopyFile API are affected. Microsoft has clarified that Windows devices are more susceptible to this problem when using certain commercial or enterprise security software that employs extended file attributes.

The issue does not impact the file-copying functionality of File Explorer itself. Instead, it affects the CopyFile API, which is utilized by specific applications. Microsoft has identified Microsoft Office apps such as Word and Excel as potentially being susceptible to this problem, but only when using 32-bit versions. Users may encounter “Document not saved” error messages as a result.

It is worth mentioning that this known issue is unlikely to be encountered by consumers using Windows devices in personal or non-managed commercial settings. The problem primarily affects enterprise-managed devices that utilize specific software and configurations.

While Microsoft has addressed the file copying and saving failures on Windows 10 and Windows 11 21H2, the latest Windows 11 release, version 22H2, is still awaiting a fix. However, Microsoft advises affected customers to employ a temporary workaround by attempting to save or copy the files again until an official solution becomes available. The availability of a workaround and a solution for other affected versions offer some relief to users and administrators dealing with these file transfer and saving failures.

What is Scrobj.dll & How to Fix It if It’s Missing

The scrobj.dll file contains essential components and functions for scripting tasks, including file system operations, string manipulation, and other related operations. If scrobj.dll is deleted or corrupted, or there are software conflicts on the computer, it can result in an error indicating that the file is missing.

This guide will help you understand what scrobj.dll is and show you how to fix the problem if it’s missing from your computer.

What is scrobj.dll?

The scrobj.dll file is part of the Windows Script Component Runtime, which provides support for Windows Script Components (WSC) in the Windows operating system.

It provides the necessary infrastructure for creating, executing, and managing Windows Script Components. The DLL file contains the required functions and resources for the runtime to function correctly.

The scrobj.dll missing DLL error can occur due to a variety of reasons. Here are some of the common causes for this error:

  • File Deletion: The file may have been accidentally or intentionally deleted by a user or a program, either manually or during a cleanup process.
  • Corruption: The file may have become corrupted due to a hardware or software issue, such as a disk error, improper shutdown, or malware infection.
  • Software Conflict: Another program or software installation may have overwritten or modified the scrobj.dll file, leading to its removal or incompatibility.
  • System Update: During a Windows update or upgrade, the file may have been replaced or removed if it was considered obsolete or incompatible with the new version.
  • Malware or Virus: Malicious software or virus infection on your system could potentially target and delete or modify the scrobj.dll file.

How do I fix the scrobj.dll is missing error?

Before attempting any complicated troubleshooting methods, try these quick workarounds:

  • Restart your PC: Start by restarting your computer. In some cases, a simple restart can resolve DLL-related errors.
  • Check the Recycle Bin: Sometimes, DLL files can accidentally be deleted. Check your computer’s Recycle Bin to see if the scrobj.dll file is there. If it is, restore it to its original location.
  • Run a Virus Scan: Perform a thorough computer scan using reliable antivirus software. Sometimes, malware or viruses can corrupt or remove DLL files.
  • Reinstall the Software: If the error occurs with a specific application, uninstall it completely. Then download the latest version from the official website and install it again.

1. Manually download and install the file

  1. Visit trusted DLL file repositories like DLL-Files.com.
  2. Download the appropriate DLL file version for your operating system, whether it’s 32-bit or 64-bit.download dll
  3. After downloading the DLL file, perform a thorough scan using a reliable antivirus or anti-malware program.
  4. Then extract the downloaded file and copy the scrobj.dll file. 
  5. For the 64-bit DLL file, paste the file into the below folder:C:\Windows\System32system32
  6. For a 32-bit DLL file, paste in the following location:C:\Windows\SysWOW64\SysWOW64
  7. Reboot your computer.

2. Re-register the DLL file manually

  1. Press the Windows key, type command prompt, and select Run as administrator.cmd
  2. Click on Yes to the UAC prompt.
  3. In the Command Prompt, enter the following command to register the scrobj.dll file and press Enter:regsvr32 scrobj.dllregv32
  4. You should see a message indicating whether the registration was successful or not. If the registration is successful, you can close the Command Prompt.dll reg success
  5. Restart your computer.

3. Reinstall the Microsoft Visual C++ Redistributable Package

  1. Visit the official Microsoft website to download the latest Microsoft Visual C++ Redistributable Package.
  2. Download the appropriate version of the Visual C++ Redistributable Package for your system.download Visual C++
  3. Once the download is complete, double-click on the file to start the installation.run the file
  4. Follow the on-screen instructions to complete the installation process.install
  5. Restart your computer and then verify if the scrobj.dll error is stopped.

4. Run the System Checker

  1. Press Windows + R to open the Run command box, type cmd, hold the Ctrl + Shift key, and click OK.cmd
  2. Click Yes on the User Account Control (UAC) prompt window.
  3. In the Command Prompt window, type the following command and press Enter:sfc /scannowsfc
  4. After the scan is complete, restart your computer.

5. Restore your PC

  1. Click the Start button, type restore, and select Create a restore point.restore
  2. In the System Properties window and click the System Restore button.system restore
  3. Then, select Choose a different restore point, and click Next.choose a different restore point
  4. Select the restore point you want to use, and click Next.select restore point
  5. Then, click Finish.click Finish

If you recently made changes to your system or installed/uninstalled software before encountering the error, you can try using the System Restore feature to revert your system to a previous working state. This can potentially restore the missing scrobj.dll file.

For problems with other similar files, there are some sure-shot ways to fix missing DLL files on Windows 11.

If you have any questions or suggestions, please don’t hesitate to share them in the comment section below.

Microsoft provides AI governance principles following ChatGPT popularity

A day removed from Microsoft’s developer conference where it plastered its artificially intelligent Copilot platform across almost all facets of its business portfolio, company vice chair and president Brad Smith talks about how to govern AI going forward.

Starting off his latest Microsoft On the Issues post, Smith posits, “Don’t ask what computers can do, ask what they should do.”

Smith’s statement opens his discussion on what he and Microsoft believe are the best ways to interact with this new resurgence of artificially intelligent-led platforms and services, namely, the best way to make sure AI doesn’t spiral out of control like previously lauded technologies such as social media.

As part of constructing guardrails for the use of AI in the future, Smith and company focus on the accountability aspect of their six adopted ethical principles for AI, which he sums up as, “we must always ensure that AI remains under human control.”

To maintain “human control”, Smith offers the following Five-point blueprint for Governing AI that includes, implementing new government-led AI safety frameworks, requiring safety brakes for AI systems, developing broad legal and regulatory frameworks, promoting transparency and access to AI, and the pursuit of public-private partnerships to address societal changes.

AI - Governess - Brad Smith

Details of the blueprint include, a need to develop new laws and regulations for “highly capable” AI systems, and Smith suggest these be implemented by a new governing agency that understands and traffics in the knowledge of licensing AI models and AI infrastructures.

Another standout details in Smith’s blueprint plan are calls for “safety brakes” for AI systems tasked with operating critical infrastructure such as electrical grids, water systems, city traffic, and domestic travel among others. Following this point, governments would require operators to build in and regularly test the thresholds of these systems that would be siloed in licensed AI datacenters for an added layer of protection.

Perhaps the most consequential point of the plan is the ambitious plan to avoid the quicksand-like mistakes of social media by using AI to protect democracy and rights of people by providing broad access to AI skills. While most people have access to social media as platform, AI presents an opportunity for most people (with adequate AI skills) to create their own platforms to create technologies that affect sustainability, protections, and democratized economies of scale.

Smith goes on to highlight a few more key points of he and Microsoft’s blueprint to governing AI, and I suggest you take a read if you’re interested in the high-minded and nuanced future of all of the technologies the company showcased at BUILD 2023 this week.

Bcryptprimitives.dll: What Is It & How to Fix its Errors

Many users have reported encountering an error related to the bcryptprimitives.dll file while trying to launch or use an application on their Windows PC. This is a common issue where the bcryptprimitives.dll is missing or damaged on Windows, resulting in the error.

bcryptprimitives.dll errors can arise from various causes, such as a malfunctioning program, deletion or damage to the file, file corruption, outdated drivers, or a damaged Windows registry.

How do I fix the Bcryptprimitives.dll errors?

Before attempting any complicated troubleshooting methods, try these quick workarounds:

  • Restart your PC: Start by restarting your computer. Restarting helps refresh the computer’s processes and can resolve temporary errors caused by problems with the system components.
  • Check the Recycle Bin: Check the Recycle Bin for the missing DLL. If it’s there, restore the file to its original location.
  • Temporarily disable the antivirus: Sometimes, antivirus software may flag the DLL file, preventing its installation. Try disabling the antivirus and retry.

1. Reinstall the Microsoft Visual C ++ Redistributable Package

  1. Visit the Visual C++ 2015 Redistributable download page.
  2. Choose the language and click Download.Download
  3. Look for the version of the Microsoft Visual C++ Redistributable Package that corresponds to your operating system architecture (32-bit or 64-bit).
  4. Then, choose the package installer file and click Next.choose 32bit or 64 bit
  5. Run the installer file and follow the on-screen instructions to complete the installation.Run EXE
  6. Once the installation is complete, restart your computer.

2. Manually download and install the file

  1. Visit trusted DLL file repositories like DLL-Files.com.
  2. Download the appropriate DLL file version for your operating system, whether it’s 32-bit or 64-bit.download dll
  3. After downloading the DLL file, perform a thorough scan using a reliable antivirus or anti-malware software to confirm its safety.
  4. Then extract the downloaded file and copy the bcryptprimitives.dll file. copy the dll file
  5. For 32-bit DLL, paste the file in the below folder:C:\Windows\System32system32
  6. For 64-bit DLL, paste in the following location:C:\Windows\SysWOW64\SysWOW64
  7. Restart your computer.

If you don’t want to compromise your system by manually installing the DLL file, you can rely on specialized repair software.

3. Repair or Reinstall the affected application

  1. Open the Windows Settings app with Windows + I.
  2. Go to Apps and then select the Installed apps tile.go to installed apps
  3. Locate the app that is showing the error, click the three dots next to it, and select Advanced options.advanced options
  4. Scroll down the app settings page, and click the Repair button.Select Repair
  5. If it doesn’t work or the repair option is not available, you can try re-installing the program and see if it solves the problem.

4. Run SFC and DISM scans

  1. Press the Windows key, type command prompt, and select Run as administrator.cmd
  2. Click Yes to the User Account Control (UAC) prompt.
  3. Enter the following command and press Enter:sfc /scannowsfc
  4. Wait for the scan to complete, then run the following command one after the other:DISM /Online /Cleanup-Image /ScanHealthDISM /Online /Cleanup-Image /RestoreHealth DISM scan
  5. Then, reboot your PC.

5. Run a full virus scan

  1. Press the Windows key, type in Windows Security in Windows search, and select the Windows Security app.windows security
  2. On the Windows Security app, click on the Virus & threat protection tab on the left and select Scan options.scan options
  3. On the Scan options page, choose Full scan option and click the Scan now button to perform a thorough scan of your computer.select full scan
  4. Wait for the scan to complete, then reboot your PC.

For those interested in knowing more about the bcryptprimitives.dll file, it is a dynamic-link library (DLL) part of the Windows operating system. It handles cryptographic functions and provides essential security-related features and functions for various applications and system processes.

Apps and system components use it for cryptographic operations like securing data, protecting passwords, verifying digital signatures, and other security-related tasks.

When there is an issue with bcryptprimitives.dll, it can cause errors in apps and system components that rely on cryptographic operations.

Here are the common error messages associated with bcryptprimitives.dll, including:

  • The program can’t start because the bcryptprimitives.dll file is missing from your computer. 
  • bcryptprimitives.dll not found.
  • Error loading bcryptprimitives.dll. The specified module could not be found.
  • bcryptprimitives.dll is either not designed to run on Windows, or it contains an error.
  • The file bcryptprimitives.dll missing.
  • The code execution cannot proceed because bcryptprimitives.dll was not found.

Regularly running a virus scan is essential for ensuring the safety of your computer against viruses and malware. To help you with this, we have compiled a list of robust antivirus tools to protect your PC.

Before you go, you might want to check our guide on BCrypt Hash could not be located error. We also have a guide on libcrypto-1_1.dll is not found error, so don’t miss it for more information.

Our latest guide covers the termsrv.dll, so feel free to check it out for more information.

If you have any questions or suggestions, please don’t hesitate to share them in the comment section below.

0x800f0841 Windows Update Error: How to Fix It

Many of us have encountered errors when trying to update our Windows operating system. I for sure did, on multiple occasions.

One of the more annoying issues I have encountered and tried to work around is error code 0x800f0841 which can be very frustrating, as it will stop you from installing the latest patches.

The Windows update error 0x800f0841 usually occurs due to issues with your system files. Irrespective of the cause of this error, rest assured that the fixes in this guide I will try to help you solve it.

Why am I getting error 0x800f0841?

Below are some of the factors that can cause the Windows update error 0x800f0841:

  • Issues with update components: There are a series of components that come together that make the update process tick. If these components falter, you are likely to experience different issues. You can fix this by resetting the Windows update components.
  • Corrupt system files: Accumulating faulty or missing system files can make this error code appear on your PC. Repairing these files should help you push the update process through.

How do I fix the Windows update error code 0x800f0841?

1. Reset Windows update components

  1. Press the Windows key, type cmd, and select Run as administrator under Command Prompt.
    cmd admin 0x800f0841
  2. Type the commands below and press Enter after each: Net stop bits Net stop wuauserv Net stop appidsvc Net stop cryptsvc Del %ALLUSERSPROFILE%\Microsoft\Network\Downloader\qmgr*.dat /Q Del "%HOMEDRIVE%\Users\All Users\Microsoft\Network\Downloader\qmgr*.dat" /Q Del %WINDIR%\SoftwareDistribution\*.* /s /Q Net start bits Net start wuauserv Net start appidsvc Net start cryptsvc
  3. Finally, wait for the commands to finish running and restart your PC.

Most times, the update error code 0x800f0841 on Windows 10 and 11 is due to issues with the update components. Running the commands above should help restart the necessary components and push the update through.

2. Repair system files

  1. Press the Windows key, type cmd, and select Run as administrator under Command Prompt.
    cmd admin 0x800f0841
  2. Type the command below and hit Enter to run it: DISM /online /cleanup-image /restorehealthdism restore
  3. Wait for the command to finish running. Now, run the command below: sfc /scannowsfc
  4. Finally, wait for the command to finish running and restart your PC.

Broken or missing system files are another prominent cause of the 0x800f0841 error. Luckily, you can fix these files by running the DISM and SFC scans.

Alternatively, you can eliminate this error automatically by using a dedicated repair tool with a reliable database.

3. Run the Windows Update troubleshooter

  1. Press the Windows key + I and choose Troubleshoot in the right pane.
    troubleshoot 0x800f0841
  2. Click the Other troubleshooters option on the next page.
    other troubleshooters
  3. Finally, click the Run button before the Windows Update option.
    run update 0x800f0841

The 0x800f0841 error on Windows PC can be due to minor problems with the update services. Running Windows Update troubleshooter will help restart these services and processes.

4. Use the Media Creation tool

  1. Visit the Windows 11 download page and click the Download Now button under the Create Installation Media section.
    download now
  2. Launch the downloaded file.
  3. Now, accept the terms and conditions and click the Next button.
  4. Tick the Upgrade this PC now radio button and click the Next button.
  5. Finally, follow the onscreen instructions to complete the process.

If you still can’t complete the Windows update due to the 0x800f0841 error, you need to use the Media Creation tool for the job.

This will allow you to bypass the potential cause of the error and force the update through.

The 0x800f0841 error can be traced to many potential factors. Fortunately, you can fix it by applying the solutions in this guide.

If you are dealing with the Windows update error 0x80240009, you can fix it with the solutions in our detailed guide.

Feel free to let us know the solution that helped you fix this issue in the comments below.