Those of you who are both Xbox fans and basketball fans, and who happen to be in New York this week are in for a real treat at the Barclays Center.
The Brooklyn arena – which is home to both the NBA’s Brooklyn Nets and the New York Liberty of the WNBA – is hosting an Xbox/Roblox themed court during this week’s New York Liberty home games against the Los Angeles Sparks. The two games will take place on August 2 and August 3.
NEW YORK – August 2nd, 2022 – The New York Liberty in collaboration with @Xbox has unveiled the @WNBA’s first-ever gaming inspired basketball court for the team’s August 2nd and August 3rd home games versus the Los Angeles Sparks at Barclays Center. 1/2 pic.twitter.com/VfAQDaFuyx
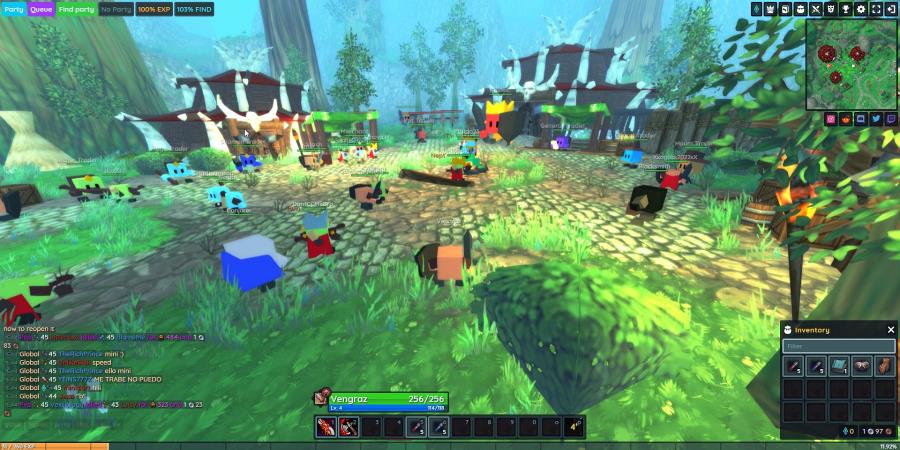
Those who can’t make it to the Barclay Center can still experience the Xbox court in the Roblox game Infinite Canvas’ Dunking Simulator. And unlike its real-life counterpart, the Roblox experience will feature pyrotechnics, fan chants, and 11-year-old sports journalist Pepper Persley as host. Access the Infinite Canvas’ Dunking Simulator experience here, just create a Roblox account if you don’t already have one.
Fans can also visit Power her Dreams to share their experiences. Microsoft will donate $10 for every submission to either the Mamba & Mambacita Sports Foundation or Girls Who Code, with a maximum $50,000 to each nonprofit organization.
It is nearly back-to-school time. And while that may not seem like the most joyous of news to some, the silver lining is that it is also the time to stock up on the most important study essentials: back-to-school gaming accessories. And we’ve got the best already picked out for you. You’re welcome. Now let’s have a look at the best back to school gaming accessories 2022.
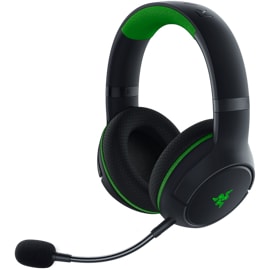
Game-changing audio is yours with this wireless Bluetooth® headset designed for Xbox Series X|S and mobile Xbox gaming.
Heading back to school usually means you’ll be making new friends. And what is the point of having friends if you can’t invite them to join you in some online gaming? That’s why you will need a good gaming headset. And when it comes to hurling good-natured insults over a tense round of deathmatch, only the best will do. That’s why you need the Razer Kaira Pro for Xbox Series X|S. Check out these tech specs:
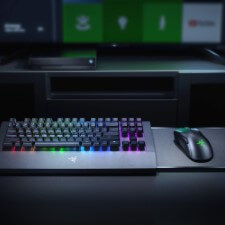
Meet Razer’s first wireless keyboard and mouse designed for Xbox One (and Series X|S). Get incredible precision on a tenkeyless keyboard with an inbuilt mouse mat, paired with a mouse featuring the acclaimed Razer 5G Advanced Optical Sensor. It’s the one-device solution for advanced gaming – on the couch.
Only PC gamers can really appreciate how much a great keyboard and mouse can enhance the gaming experience. With the Razer Turret Mechanical Gaming Keyboard and Mouse – compatible with Xbox One and Xbox Series X|S consoles – you now have access to a keyboard/mouse combo that will feel like an extension of you. Not to mention it looks snazzy as all get out, and will add a ton of flair to your setup.
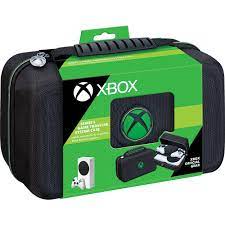
Introducing the XBOX Series S Game Traveler System Case by RDS Industries. This sleek Game Traveler XBOX Series S Case holds and protects your complete XBOX Series S system, controllers, along with cables/power cords. The case has a padded divider with elastic straps to securely hold 2 controllers. A mesh pocket holds the HDMI cable and power cord with inner pocket for Seagate Storage Expansion Cards. The hard shell case with comfortable carry handle provides maximum protection. Take your XBOX Series S system anywhere you need to with ease and confidence.
If you often find yourself taking your Xbox Series S console on the go, say to a friend’s house, then you no doubt can already appreciate just how much a good carrying case – particularly one specially-designed for the Series S – can simplify your life. And this here is the perfect solution: the RDS Industries Xbox Series S Game Traveler System Case. It stores and protects all your Series S gear – console, two controllers, cables and power cords.
In celebration of Xbox’s 20th Anniversary, Microsoft and adidas have teamed up to release a special edition of the Forum Tech Boost. These sleek shoes update an iconic style with modern adidas technologies and some serious Xbox-inspired flair.
You are going to need a little personal swag to go with all that gaming goodness. What better way to add some flair to your everyday look than with these sick kicks? Celebrate 20 years of Xbox and look cool doing it.
Inspired by the look and feel of the PS DualSense™ wireless controller, the Backbone One gives users tactile controls to enhance their gaming experience on iPhone®. Pair with the PS Remote Play App and you can play your PlayStation® games anywhere* with ease. Simply plug your iPhone® into the Backbone One and start playing.
Though Sony’s Remote Play for PlayStation isn’t anywhere near as robust as Xbox Cloud Gaming, the news is that Sony is looking to drastically expand its mobile game streaming offerings over the next few years. And that’s why you are going to need this latest, PlayStation-oriented controller from Backbone.
Charge or display your Xbox Wireless Controllers with this officially licensed Dual Charging Station that eliminates the cost of replacement batteries. Included are four battery doors (two for Xbox Series X|S / two for Xbox One) plus two 1100 mAh rechargeable batteries for up to 40 hours of gameplay*. To charge, simply click controller down on the Charging Station and monitor for LED color change from amber to white. When fully charged, click up to store. Focus on the game and not on your battery life.
Say goodbye to those AA batteries with the PowerA Dual Charging Station for Xbox One and Series X|S consoles. This will save you money in the long run. Not to mention it will help tidy up your gaming space. An essential item for any Xbox fan.
Wrap up
There you have it: the best back to school gaming accessories 2022. Which items featured here are you most excited about? Will you be purchasing any of the back to school gaming accessories? Let us know down in the comments. And happy gaming – um, we mean studying.
Sniper Elite 5: Landing Force Mission and Weapon Pack – Available now
Sea of Thieves: Season Seven – August 4
Game Pass Ultimate Perks
Fall Guys: Coconut Milk Costume – Available now
Skate 3: Upgrade Bundle – August 11
The Elder Scrolls Online: Noweyr Pack – August 16
Games leaving Game Pass on August 15
There are also some games set to leave Game Pass at the midpoint of August. Be sure to dive back into these games while they are available to Game Pass subscribers.
No doubt there will be more announcements coming throughout the month, so consider this just a preview of what Game Pass subscribers have to look forward to in August. If you don’t already have an Xbox Game Pass subscription, you can sign up here. New members can currently get their first month for only $1. To find out more about Game Pass, head on over to its FAQ page.
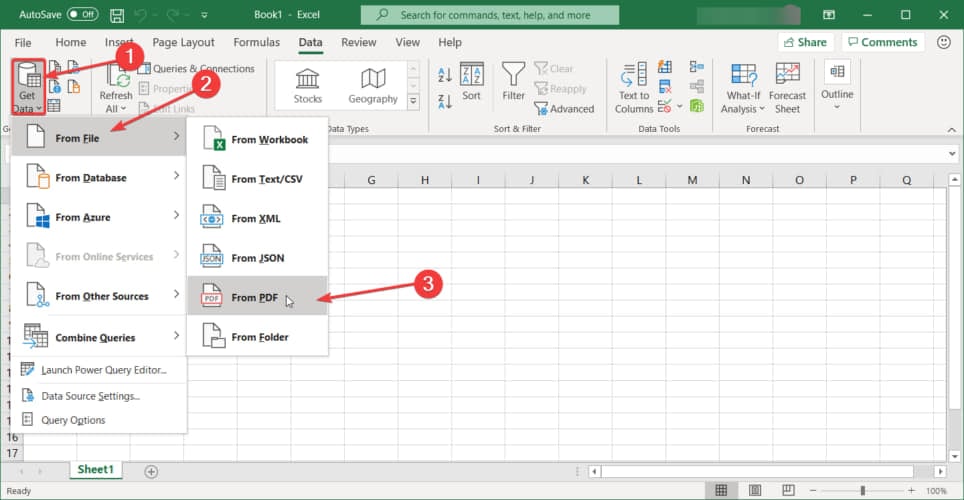
You can open PDF documents and put them in a spreadsheet in Microsoft Excel, but most of the time, the result is not going to be satisfactory.
You can also try to save a PDF document as an Excel file using Acrobat DC but it’s merely something rather than nothing.
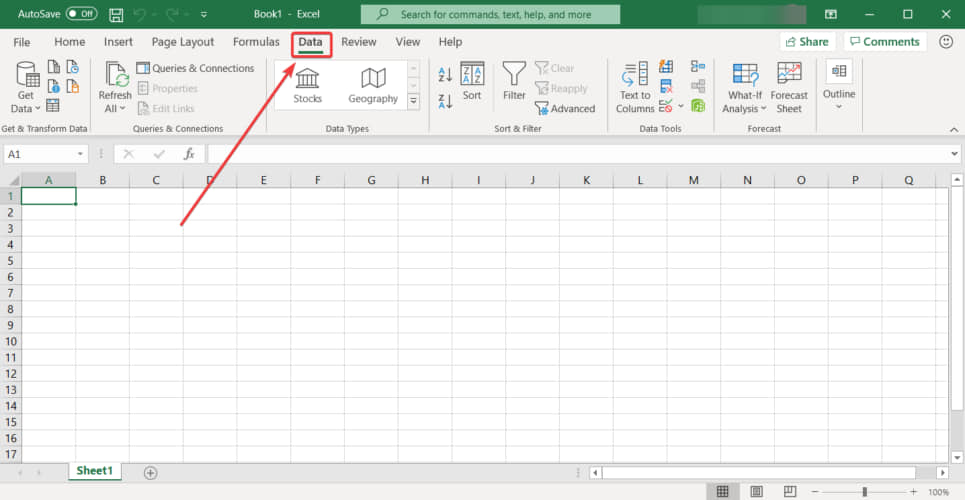
That’s why we got pretty excited when we found out that Microsoft introduced a PDF data connector in Microsoft Excel that allows you to import data from PDF files.
The new PDF connector feature is available if you have an Office 365 subscription.
How can I import data from PDF to Microsoft Excel?
In the guide below, we will show you how to easily import data from PDF to Excel in just a few minutes.
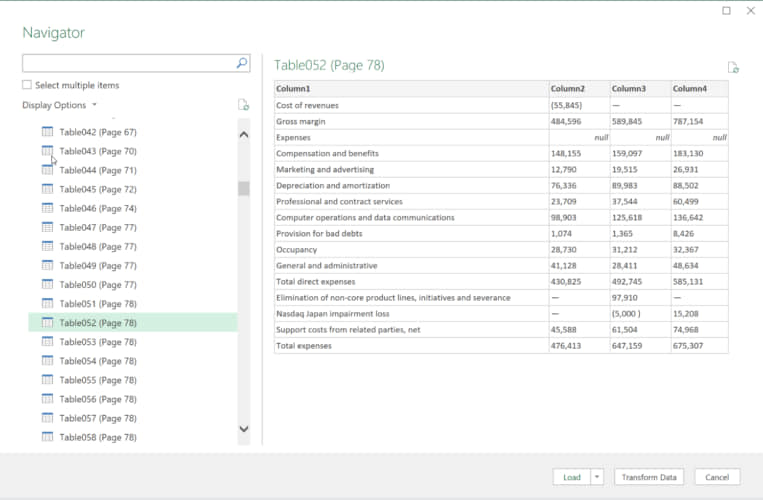
You can use the PDF Data Connector to identify and retrieve relevant data and have it ready for transfer in a spreadsheet-optimized format in no time.
Check out this quick, yet comprehensive guide and quickly overcome any file format limitations to make the most of your data.
Quick Tip:
If you don’t know about an intuitive way to import multiple data from PDF to Excel or open PDFs in Excel then you haven’t heard about SodaPDF.
This efficient PDF tool has the Convert and extract utility that lets you import any data to Excel files. Plus, it’s possible to go wild and edit your PDF files with thousands of options.
SodaPDF
Quickly import your data from any PDF files into Excel databases with this best PDF editor.
League of Legends is probably the most popular online multiplayer game today with more than 100 million players monthly.
With immersive play and vivid graphics, this MOBA has changed the way we experience PvP gaming.
However, there’s never been complex software without technical issues. That is the case with League of Legends, too.
Most of the reported issues have a specific set of solutions and fixes. Some of them are widespread while others are less so.
Nevertheless, there is a last resort to every technical issue and it’s called a reinstall. You can fix your errors with the game if you reinstall League of Legends.
How can I reinstall League of Legends?
We prepared a walkthrough for you with a step-by-step explanation of the reinstallation process using 2 different methods.
1. Reinstall League of Legends using Hextech Repair Tool
The developer of the League of Legends, Riot Games, launched an interesting software solution to fix common technical issues related to the game. It is called Hextech Repair Tool and its main features are:
Easy reinstallation or repatch
Firewall management
Restores the health of nearby turrets.
Display the known issues in your region.
Hextech Repair Tool can perform a clean reinstall of your client in a few simple steps. All you need is to follow the instructions on the screen.
If you encountered errors with your League Client and the game does not work properly, you can perform a manual game reinstallation.
In doing so, you need to uninstall the game from Control Panel, then download and install the newest version from the official League of Legends website.
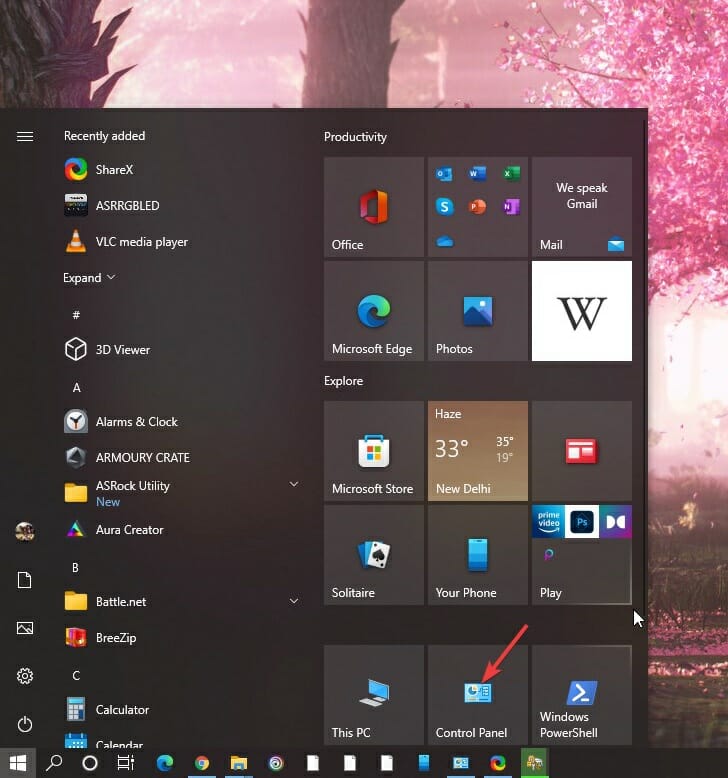
1. Open the Start menu on your computer by pressing the Windows key.
2. Select Control Panel from the list of results.
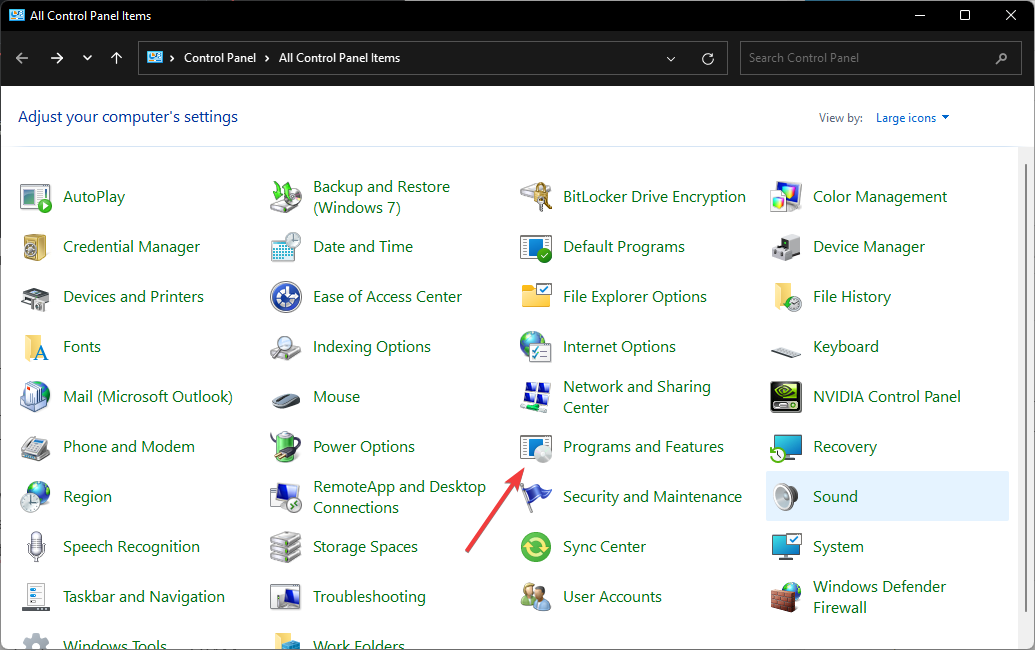
3. Click on Programs and Features.
4. Scroll down until you find League of Legends in the list. Click on it.
5. SelectUninstall/Remove.
6. The uninstall process will begin. Follow the instruction until the process is finished.
7. Navigate to the directory where League of Legends was installed (the C: drive by default).
8. Delete the old setup files you used to install the game and any unnecessary registry files.
9. Restart the PC.
After you finished the entire uninstallation process, the next step is downloading and installing the game’s client.
11. RunLeagueofLegends.exeto download the setup files. These will be placed in a new League of Legendsfolder on your desktop by default.
12. After the setup finishes downloading, the installation process will begin automatically. If possible, install League of Legends to the default C: drive. Though, you can change it in custom install.
13. When the installation process finishes, the game’s launcher will open automatically.
14. If the game does not automatically start, you can manually open it by double-clicking theLeague of Legends desktop shortcut, or by runninglol.launcher.exein the directory to which you installed League of Legends.
If you’re looking to reinstall League of Legends to fix persistent issues, follow the steps in our League of Legends uninstall guide for a complete and clean reinstallation process.
There are also reported cases of registry issues that impact fresh installs. Our advice is to use a specialized registry cleaner such as CCleaner and get rid of unnecessary registry entries related to LoL.
This was our walkthrough of the reinstallation process. We hope you managed to reinstall the game and start from scratch.
Keep in mind that this is just a game client, so none of your in-game statistics are affected in any way.
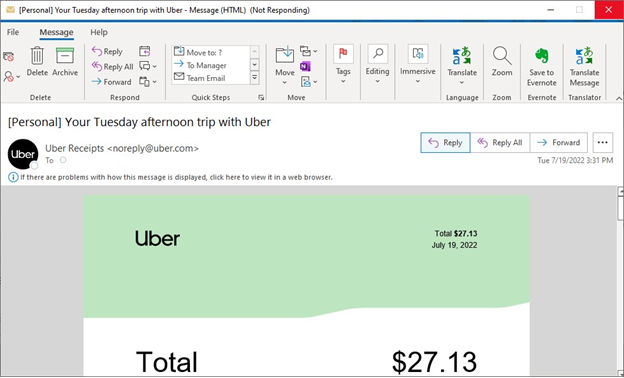
If you’re someone that takes a lot of Uber rides and uses Outlook on Windows to file and print receipts, then we have a fair warning for you. Noted by Bleeping Computer, there is an ongoing issue with Outlook where the client on Windows might crash when you try to open emails with complex tables.
Microsoft actually has a support page for this, first published on July 29, and mentions that the issue started in the Current Channel version 2206 Build 15330.20196 and higher. The same issue also happens in current builds of Beta and Current Channel Preview. It even applies to Word, where similar table contents might cause Word to stop responding.
Officially, Microsoft is working on a fix that should come out on Patch Tuesday, timed for August 9, 2022. The fix is from the Word Team, and will be released to the Beta channel first. In the meantime, you can workaround any issues you have by reverting the Outlook build to a previous version. Here’s how.
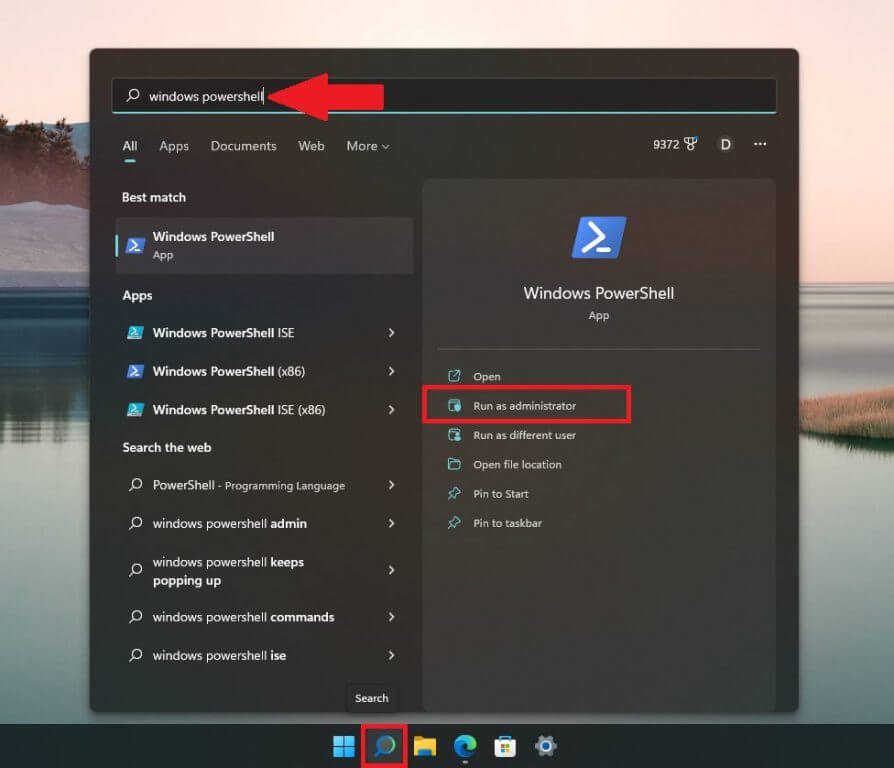
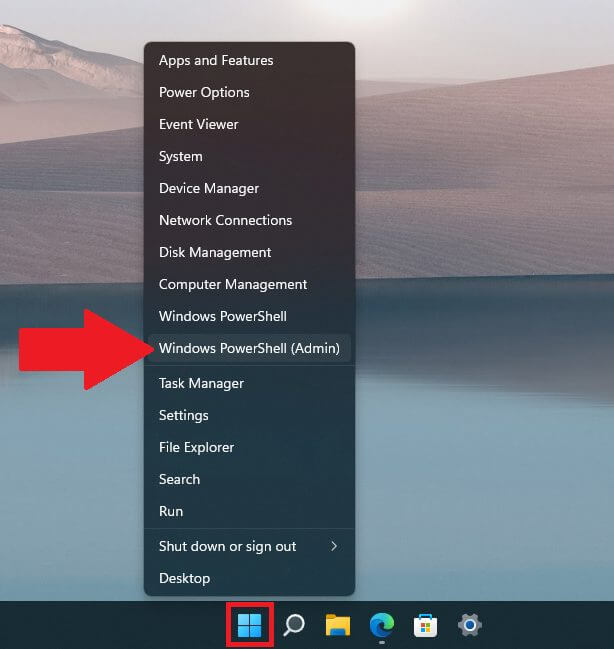
Open a Command Prompt in Administrator context
Type or paste the two commands into the Command Prompt window and press Enter after each.
cd %programfiles%\Common Files\Microsoft Shared\ClickToRun
officec2rclient.exe /update user updatetoversion=16.0.15225.20288
It has been a rough patch for Outlook as of recent. As you might recall, Outlook had issues where there were issues with search, and even Outlook.com going down. We’ll be following this story closely and will have an update once Microsoft has a fix.
Microsoft has announced two new products under the Microsoft Defender lineup. Designed for businesses, and powered by their acquisition of cyber security company RiskIQ, Microsoft hopes the new Defender Threat Intelligence, and Defender External Attack Surface Management can aim to help companies reduce their chances of getting hit by cyber-attacks.
We’ll begin by getting into the details of Microsoft Defender Threat Intelligence. This new product is all about offering real-time data from Microsoft’s security signals. It builds on the real-time detections of Microsoft Sentinel. and lets organizations hunt for threats more broadly, and helps them uncover more adversaries. According to Microsoft:
Microsoft Defender Threat Intelligence maps the internet every day, providing security teams with the necessary information to understand adversaries and their attack techniques. Customers can access a library of raw threat intelligence detailing adversaries by name, correlating their tools, tactics, and procedures (TTPs), and can see active updates within the portal as new information is distilled from Microsoft’s security signals and experts. Defender Threat Intelligence lifts the veil on the attacker and threat family behavior and helps security teams find, remove, and block hidden adversary tools within their organization.
Now, for Microsoft Defender External Attack Surface Management. This second product under the Microsoft Defender offering is all about helping businesses see their operations the way an attacker can. More specifically, security teams can use this product to see and discover unmanaged resources that are visible from the internet, which is what an attacker might usually see. In Microsoft’s words:
Microsoft Defender External Attack Surface Management scans the internet and its connections every day. This builds a complete catalog of a customer’s environment, discovering internet-facing resources—even the agentless and unmanaged assets. Continuous monitoring, without the need for agents or credentials, prioritizes new vulnerabilities.
Microsoft says these new offerings come at a time when ransomware losses are hitting businesses hard. The company is citing an FBI report which found that these types of losses totaled more than $50 million, with total cybercrimes costing 6.9 billion. Defender Threat Intelligence and Defender External Attack Surface Management should help reduce these threats.
Back in 2014, they made encryption free for all customers, and a few years ago, they made DDoS mitigation free and unmetered across all of their plans.
It all culminated with the launch of an alternative cooperate VPN.
What is DNS service 1.1.1.1 and how to use it?
You might have read in our articles that your ISP can also sell your browsing data. And this is legal in many parts of the world. Now, you can secure your connection from the directory of the Internet.
Heading to take on Google’s 8.8.8.8 alternate DNS provider, Cloudflare’s set its focus on privacy.
They’ve stated to never log your IP address (the way other companies identify you). And have retained KPMG to audit their systems annually to ensure that they’re doing what they promise.
The independent DNS monitor performance and analytics places 1.1.1.1 to be the Internet’s fastest DNS directory in the world as you can see below.
DNS server is a crucial component of the Internet. If you want to access any website on the Internet, you need to access the DNS server first.
After the DNS server receives your request, you’ll be directed to the desired website. Thus, choosing the fastest DNS directory across all your devices will increase the speed of your access online.
How to change DNS to 1.1.1.1 on Windows 10
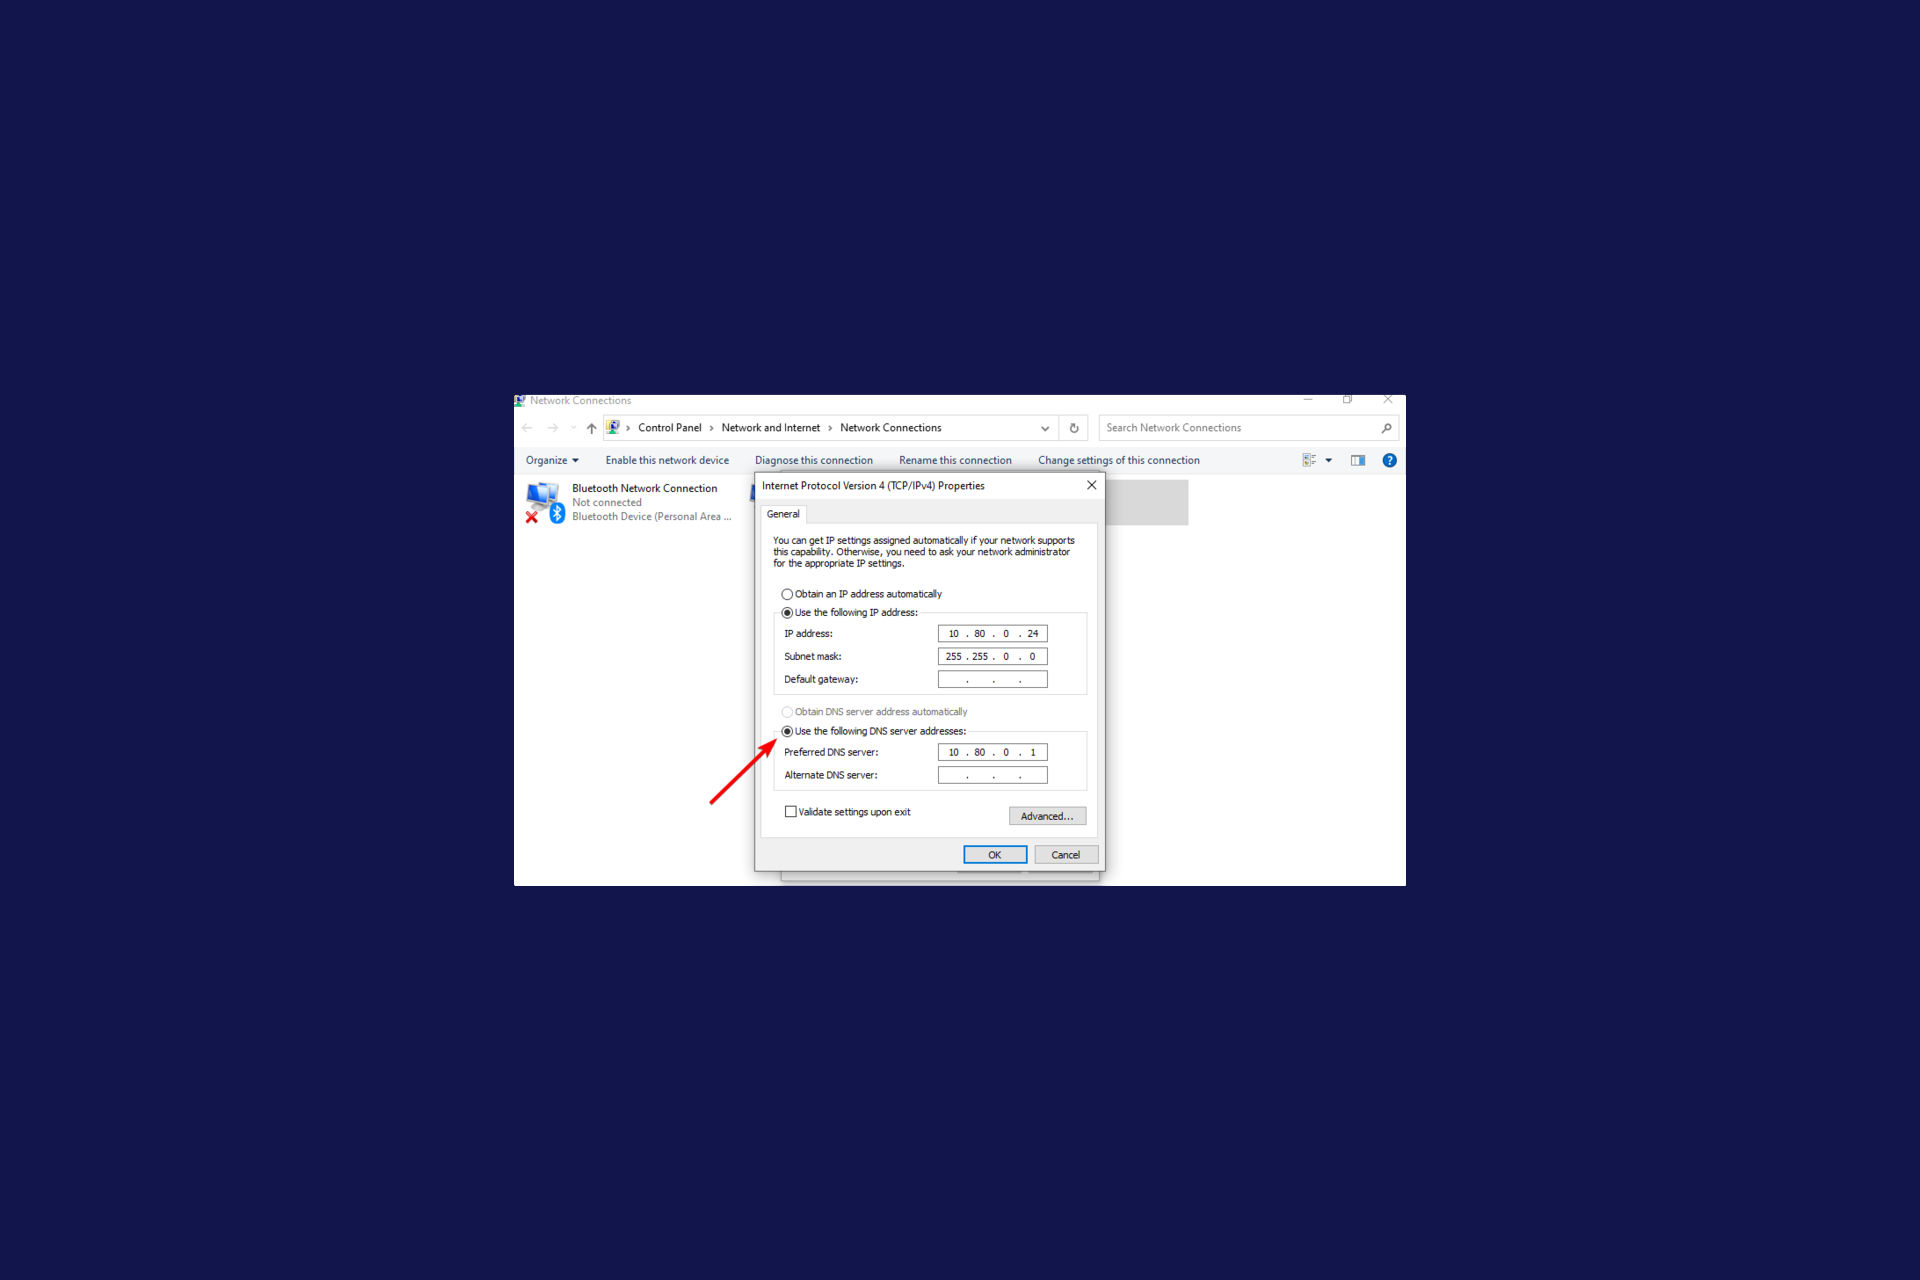
Changing your DNS to 1.1.1.1 is very easy and does not require technical expertise. You can configure your IPv4 and IPV6 DNS server settings through the Network and Sharing Center in Control Panel.
1. OpenControl Panelfrom theStart menu.
2. Go to Network and Internet.
3. Go to Network and Sharing Center > Change Adapter Settings.
4. Right-click your Wi-Fi network and go to Properties.
5. Navigate to Internet Protocol Version 4 or Version 6 depending on your network configuration.
6. Go to Properties.
7. Write down the existing DNS server settings in a document.
8. Replace those addresses with the 1.1.1.1 DNS addresses:
For IPv4: 1.1.1.1 and 1.0.0.1
For IPv6: 2606:4700:4700::1111 and 2606:4700:4700::1001
9. Click OK and restart thebrowser to apply and save the new DNS settings.
If you set it up on your router, all your devices connected will use the new DNS from Cloudfare. Should the IPv4 proprieties not work as intended on your Windows 10 PC, don’t worry. We’ve got the right solution for you.
The configuration is equally straightforward (or even more so) on Windows 11. You will be able to adjust the DNS settings from the Network Properties. Now, errors may occur and Windows 11 is by no means perfect.
If you’re not able to change the DNS server on Win 11 from the first go, you can always rely on native Windows tools such as Powershell or the Command Prompt to get it to comply.
Needless to say, we will make sure you won’t get stuck with the DNS and static IP provided by your ISP, so make sure you keep our guide at hand.
The main concern in the digital world still is privacy and security.
We can see improvements along. The fast-approaching release of new Windows updates always brings new privacy settings, but we have to keep our eyes open and stay informed.
If you’re not satisfied with this DNS, we have a guide on the fastest DNS servers and how to find them, so don’t miss it.
As always, for more questions and suggestions, reach for the comments section below.
If the download in Opera gets stuck at 100%, you won’t be able to download any files or run them. This is a major problem, but the solution is already available.
Why is my download stuck at 100% in Opera?
This can happen due to Opera VPN, your antivirus/firewall settings or due to corrupted Opera settings and installation.
What can I do if the Opera download gets stuck at 100%?
1. Disable Opera VPN
Open Opera and navigate to the following path: opera://settings/vpnWithDisclaimer
Make sure that your VPN is disabled.
Restart the browser and try again.
2. Disable background programs
Open the Task Manager window.
Switch to Task Manager’s Startup tab.
Select a non-essential program listed in the Startup tab.
Click the Disable option to remove it from the startup.
Repeat the previous two steps for all superfluous startup software.
Click Task Manager’s Processes tab.
Select unneeded third-party background programs and apps there, and click End task to close them.
There might be other ways to fix that download issue as well. Any users who’ve fixed stuck Opera One downloads with alternative methods are most welcome to share their resolutions in the page comments.
A real estate agent has to manage potential clients, and to do that he needs a marketing software for real estate.
While the purchasing process needs to be handled manually (it can be automated, although not as popular) the marketing process can be automated for better productivity and efficiency by using CRM tools for property management.
In the past, real estate agents had to keep track of all the data including rental agreements, payment due, tax information, and a list of rental property expenses manually.
These days, the automation software for real estate agents makes it easy to keep track of all the data including disclosure agreements,s and keep a tab on client leads.
This marketing software for Realtors makes it easy for you to keep everything organized and ready when needed.
There are tons of marketing software available for real estate agents catering to the need of different types of Realtors. So, which software you should use?
To answer this question, we have looked at the best real estate software for marketing and automation and jotted down this list consisting of the best of the lot.
The automation software is selected based on its abilities to make the information sharing task easier between agents and clients, store all the required information in a database, and also the ability to integrate with other programs for extended functionality.
What is a CRM in real estate?
CRM stands for Customer Relations Management system, and it’s used to for communications between the customer and brokers.
Having a reliable real estate CRM is crucial so you can keep track of all of your potential customers and appointments, so it’s important to pick the right one.
In today’s guide, we’re going to show you some of the best real estate tools, so be sure to keep on reading.
What are the best software tools for real estate agents?
Rental Property Manager from IT Source allows you to manage data about every property that your clients have for sale and rent. It also allows you to store data about tenants including tenants contacts, photographs and Identity proof etc.
For automated reminders, the event calendar automatically reminds you of any pending rent, rent review due, inspection due, and scheduled events and appointments.
It can also help you in generating reports with practical information that includes income and expenditure, property and tenant details, inspection results and tenant rent payments reports.
The property data management features enable you to keep track of every property that you have sold or rented including the clients’ address, specific notes, detailed customizable lists of assets and property dimensions.
You can further add full inspection records along with photos, expenses, and user-defined data. Rental Property Manager can manage one to several hundred property portfolios consisting of commercial, rural and residential type.
The user interface is simple, and the software is easy to use. You can navigate through the different tabs from the workspace and access any required information with ease.
This is a great real estate software for investors, so it’s worth checking out.
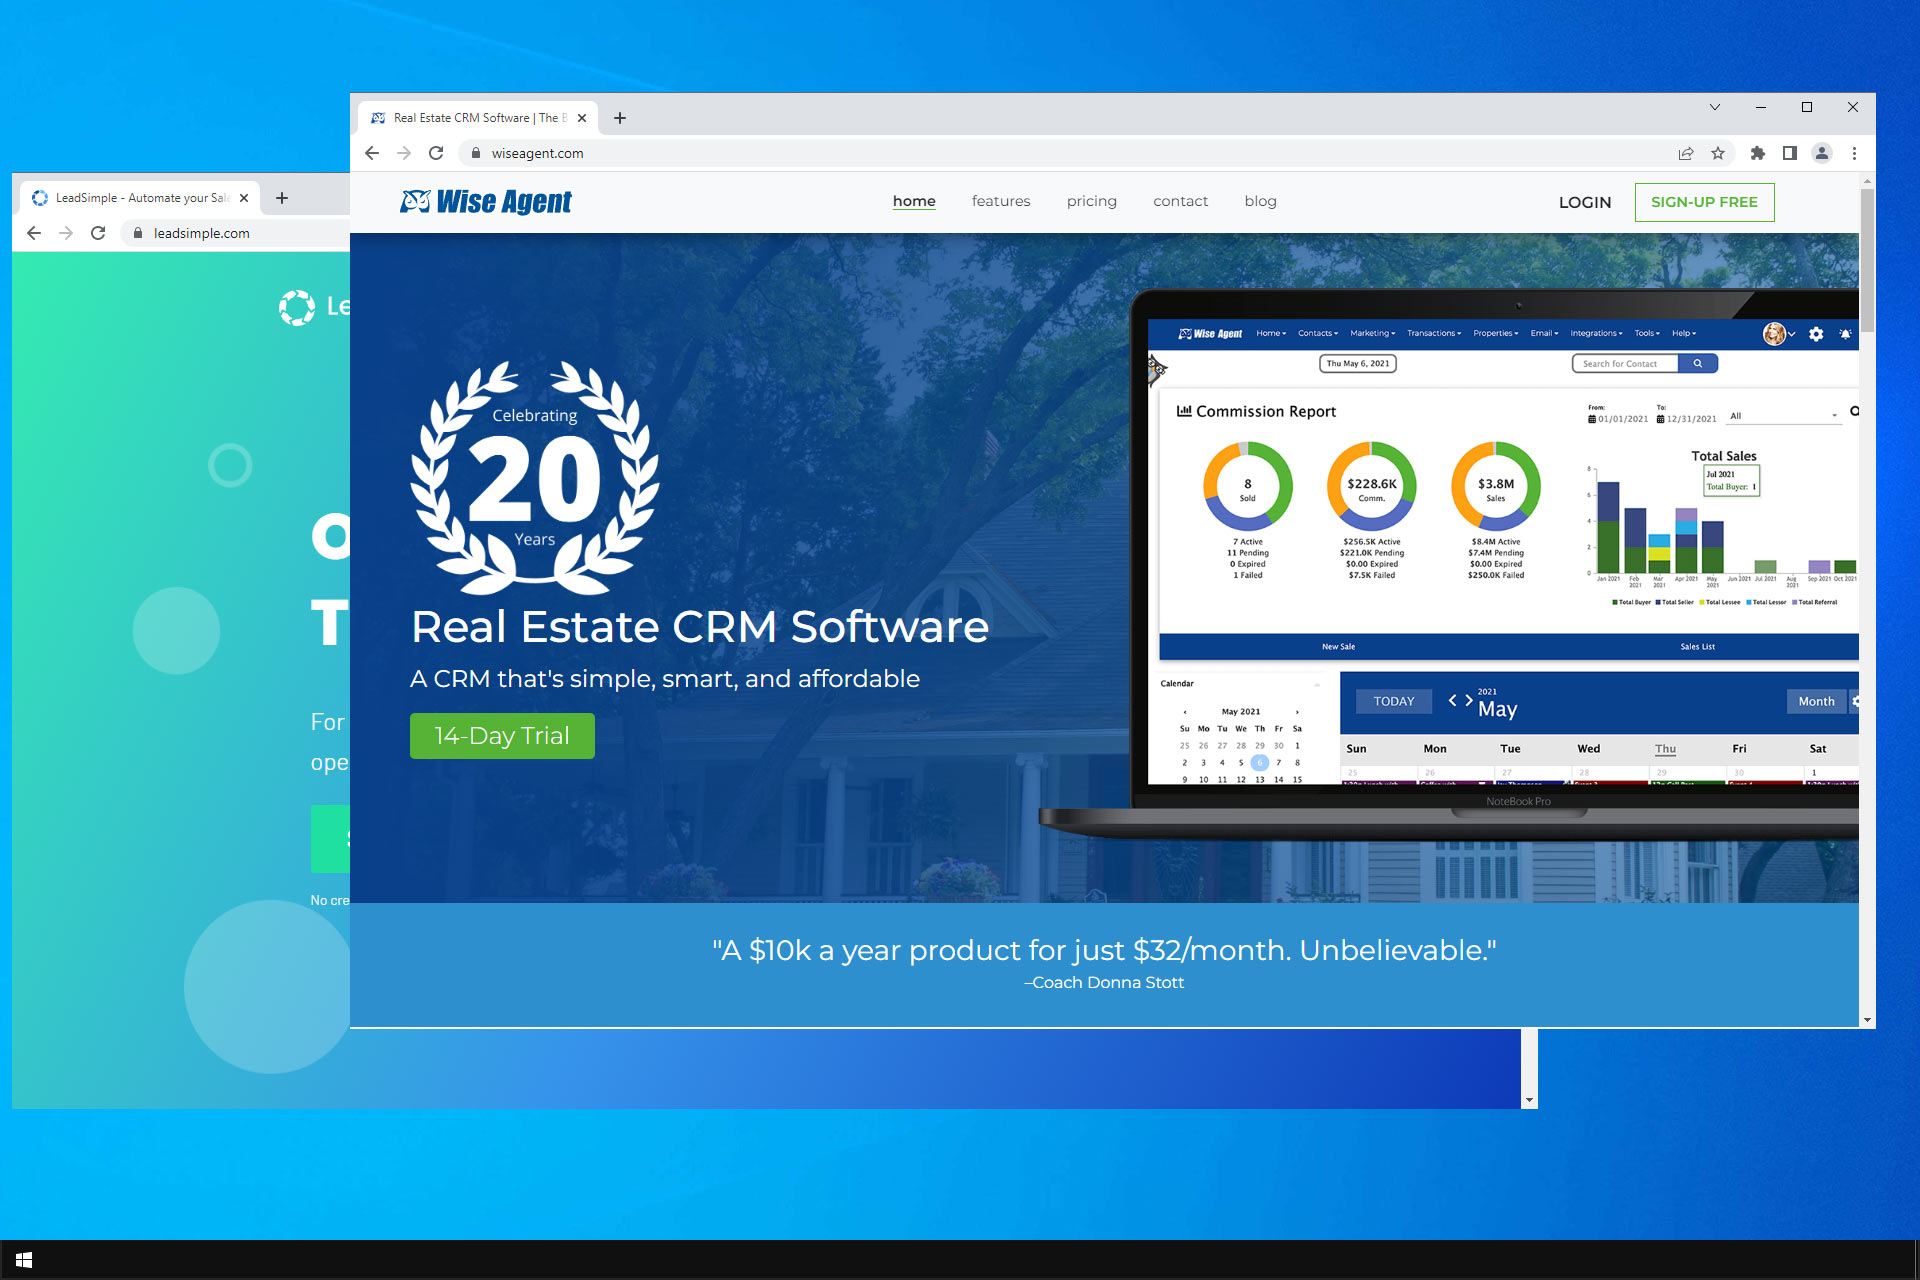
Wise Agent is known for its best in class email automation that can help you in automating email lead task. You set up it once, and it will take care of the leads, responses, appointments, and transactions.
Wise Agent offers transaction management from initial outreach to the closing table, centralized client info and drip marketing that allows the users to automatically send new content to potential clients for lead generation with the help of a simple calendar tool.
Wise Agent comes with many customization options including third-party app integration that includes support for Cloud CA, Zapier, zipForm Plus, etc.
You can link and share an appointment with clients and vendors, set up email and text alerts for your staff, make use of the to-do list feature to create daily or monthly tasks and monitor progress.
The appointment Calendar keeps you organized and boosts your productivity.
Wise Agent’s team friendly CRM allows the owners to decide and assign roles to the staff and team. Other marketing features in the CRM include the ability to create landing pages, transaction management, lead automation, and contact management.
Wise Agent is a great commercial real estate software. It is a cost-effective solution, and you can use it risk-free for 30 days before committing to any plan.
If you need a real estate CRM software that can track agents in real time, distribute leads and analyze marketing performance, LeadSimple checks all the right boxes.
LeadSimple can be effectively utilized to close more deals by improving contact rates through quick responses, view calls, emails, and updates in real-time, use call recording and emails to train new agents, and reduce manual data entry by a large margin to increase productivity.
Third-party app integration allows you to import leads from services like Google AdWords, unbounce, Trulia and Zillow, etc. You can also sync SimpleLead with apps like Google Drive, Gmail, DropBox, and MailChimp.
The leads can be then directly forwarded to the staff who can contact the potential client to fix a meeting or to know their requirement.
You can analyze the analytics report to track RoI (return on investment) from each lead source, check agent performance and find new opportunities to capture more sales.
The realtors can devise a custom followup plan for your team to ensure consistent results while not compromising on efficiency.
SimpleLead costs $65 a month but offers a free 14 days trial for you to test the CRM before opting for the premium plans.
Follow Up Boss is a powerful real estate analytics software that allows the realtors to do more in less time.
You can respond faster with the automated system through text, set appointments, and do more. This results in better followups with clients.
Whenever a lead appears, you can assign it to any available agent. The manager can customize the rules and flow, and assign the leads to the agents based on the price, zip code, round robing and First to Claim option.
Follow Up Boss instantly responds to any lead generation with personalized text and email resulting in 70% response rate from the cold leads. It will also notify the agents via text or push notification through the app and allows them to connect to the clients instantly.
The CRM also sends easy tracking and reminders to the real estate agents. This let’s them follow up with the lead and not miss the appointment with the potential buyers.
You can import your old client database to your Follow Up Boss CRM account. Follow Up Boss can also train your team to use the CRM software giving a head start.
Effective communication is a highlight of Different Property Managment and it allows is users to get fast responses from the experts.
The service is optimized, so you’ll get real-time information and answers. Thanks to the dedicated app, you can easily keep track of incoming and outgoing expenses.
The app also allows you to get alerts and notifications, so you can easily see what needs your notifications. This also applies to maintenance, so you can easily keep track of it from the app.
You can also keep track of your lease, allowing you to see the amount of rent, the remaining lease and other useful information.
Overall, Different Property Management offers a wide array of features and great support. As such, it’s a perfect software for real estate management.
This is a property real estate asset management software that can automate your home showing schedule and appointments with buyers, sellers, and agents.
Showing Suite offers sellers the much-required transparency and ways to automate home showing task to save time and money.
The automated scheduling for buyers informs all the involved parties including the buyer through calls or texts to confirm the home showing appointment and then notify the showing agent about the appointment.
Showing Suite can pull showing information from Sentrilock and Supera lockbox to gather feedback. The information is synced into your Showing Suite account. This allows you to keep track of all showed residencies.
This property showing management solution offers seller feedback along with transparency. You can also access to Showing Note feature and find the perfect home as per your need.
Other features for seller account include email notification and manage house showing options.
For the agent, Showing Suite helps to organize and automate the listings. Agents can select any listing to view more details including listing price, address and agent details about the property. If not interested the agent can select and delete any properties.
It also offers analytics and reporting tools that can be used by agents. With them you can measure performance in the field and also monitor client satisfaction.
Showing Suite is an excellent property management software that can automate the property showing process for all the parties involved in the deal.
However, it is important to understand that no one app will do all the task for you.
While there is multiple lead generation software, you may also need to subscribe to software like Showing Suite to automate the property showing process.
Take these marketing software for a spin using the free trial, and I am sure you will find software that meets your requirement and help you automate most of the work with ease.
APNG or Animated Portable Network Graphic can be considered to be a more advanced version of GIF files for adding animations just about anywhere, be it on websites, in social interactions, and so on.
While the basic working of APNG remains the same, in that it can combine multiple images in a single file, the quality of the sequence created is far better in an APNG file than with GIFs.
However, there might be times when you are not able to open APNG files in a Windows 10 environment. That however is a temporary situation as the same can be remedied easily.
What programs support APNG?
For the different operating systems out there, you have different software that has APNG support and will therefore allow you to access such files.
For Windows, you might want to use File Viewer Plus, XnViewMP, Opera, Mozilla Firefox, Google Chrome with APNG extension, or Bandisoft Honeyview to play APNG files.
And do you know what all of the above-mentioned software choices have in common? They are all free and ready to serve your every need
Do browsers support APNG?
Yes, they do. As you can see from the list above, some of the choices we described as having APNG support include browsers such as Google Chrome, Opera, and Firefox.
How do I play an APNG file?
1. Try to use your browser
In the past, the APNG format was supported only by Firefox. As expected, that changed over the years and now almost all major browsers support APNG natively.
At the moment, if you want the best APNG support, feel free to download and install Opera. Once you do that, you’ll never find playing APNG files on your PC challenging.
Even if it has the same features that Chrome does, that’s a browser that focuses heavily on security. Since it is built to protect you and your data, you’re about to enjoy Opera’s ad blocker, built-in VPN, and tracker blocker.
Opera
Looking for a quick way to play APNG files on your Windows 10 PC? Use Opera and you’ll do so in no time!
XnView is one of the best APNG viewers and it also comes free. Apart from serving as a free animated PNG viewer, the XnView application also comes as an image file viewer, photo converter, and image organizer.
With an in-built navigating pane, finding and selecting APNG files becomes far more convenient than elsewhere.
You will just have to navigate to the APNG file that you wish to playback, and the file will play automatically.
The animation gets played back at the bottom narrow portion of the XnView’s interface though you can always expand the section to make viewing more comfortable.
From what we can tell, although this seems to be a pretty common problem, it almost always has something to do with file integrity.
The reason why you might be experiencing this is either the software you are using for preview is bugged, or infected with malware, or the APNG file itself has become corrupted.
That being said, we recommend a full system scan, just to be on the safe side, a reinstallation/update of the preview software, for the same purpose, and re-downloading the APGN files.
But, if you stick with some of the APNG player suggestions we made above, we’re sure that your APNG Windows will be a great one indeed.
This should be all that you will need to do if you wish to play APNG or Animated Portable Network Graphic files in Windows 10.
Were out tips helpful? Let us know your opinion in the comments section below.
Finding the best universal media player for Windows can save you the frustration of dealing with unsupported file formats. Whether you watch movies, stream online content, or listen to music, the right player can handle almost anything you throw at it.
If you are looking for the best software that can play a multitude of video formats, then we recommend you try Cyberlink Power DVD.
It has some great features such as Watch On-The-Go or the option to save your video files in the Cloud.
Once your movie is saved you can share it or stream it with your friends and family at any time, even if you are not connected to the Internet.
The cinematic TrueTheater option for video and audio will make you feel that you are at the cinema.
More exactly, you can get maximum quality for your devices, from 8K to Blu-ray, plus offering HDR10 support for a satisfying audiovisual experience on all your devices.
You should therefore benefit from superior YouTube quality of 8K, also supporting major formats like HEVC or AVC to playback your media anytime.
In addition, the sound will impress anyone with the detail and realism of movies, using Dolby Digital Surround and HI-Res audio support.
Cyberlink Power DVD
Share and stream with your family the best TV movies and audio files. Get the best deal now!
Gom Player is another amazing software which we think you should give a try. This player supports all kinds of file formats, such as AVI, MP4, MKV, FLV, WMV, MOV, DVD, and Audio CD.
Moreover, if your file is damaged no worries, Gom Player has you covered. It can even play damaged files.
In the GOM Player Subtitle Library, you will have access to data that has been collected in the past 10 years.
All you need to do is press Play on your movie and then the software will automatically search for subtitles and sync it with your movie.
The interface is extremely easy to use and in just a few clicks you can relax and enjoy your favorite movie or TV show.
What’s more, the tool lets you find codecs or play damaged files or video files that are being downloaded. So you can playback any video format on your device thus playing your favorite movies seamlessly.
Another worthwhile feature provides 360 degrees VR Playback for the videos you have, and enjoy high immersion on your favored videos.
GOM player
Play all kinds of video formats, including damaged files and access an amazing subtitle library. Try it now!
Kodi is a digital media center and entertainment hub for all your media content, from famous movies to music or TV shows.
This media player software is an open-source and completely free solution, developed by a team of volunteers for all users to play any digital files they prefer.
So with this multifunctional solution, you can save media files from all types and classify them by categories. Thus you have your favorite films, music collection, TV shows, photos, and more to go.
To get the full picture of what Kodi can do, you will be able to see your movies in any video format, including streamable online media. Further, you can play your podcasts, music, or even games from local or network storage.
Moreover, the platform offers a TV shows library with episodes or seasons views, watched labels, and descriptions. Just like paid streaming services, this free platform offers the whole pack.
However, it’s not only passive content to watch on this media hub, but you can play games too. Thus you can pick from various emulators or choose stand-alone games.
With that being said, this solution offers universal multimedia services for any media consumer that needs valuable digital media in one simple entertainment platform.
AllPlayer is a freeware universal media player for Windows platforms from XP to 11 that you can add to your software library.
This media software recognizes almost any type of video file thanks to its built-in codecs and supports 4K and Ultra HD playback.
Aside from its universal media file format support, AllPlayer also downloads matching subtitles for files. You can also utilize AllPlayer to play downloaded torrent movies.
More on that, the software will detect when your movies don’t have a proper subtitle and quickly find one. Working as a video player, it also finds automatically movie subtitles in all languages.
Additionally, you can benefit from the movie search option to find your shows or movies, internet radio, computer reader for subtitles, passwords for video files as Parental Control, and more.
Hence, AllPlayer software will deliver the support for multiple video file formats and manage your films without mistake, so you can customize them exactly how you like.
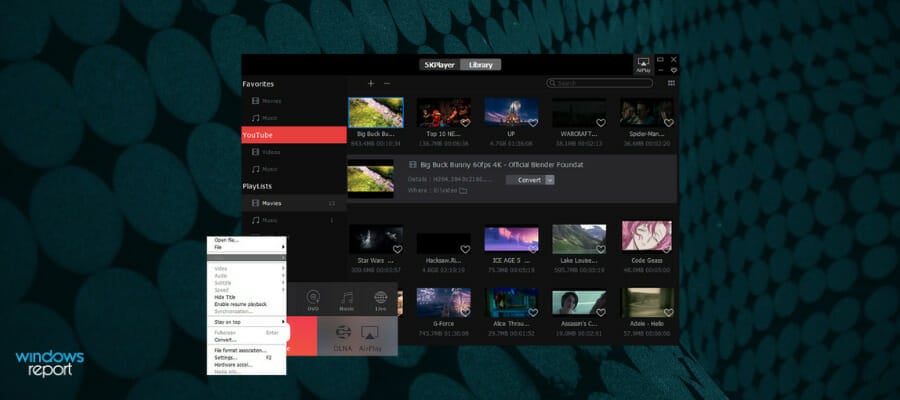
5KPlayer is an exciting rising media player with extensive video file format support.
This media software incorporates the VLC, Windows Media Player, and Quicktime Player codecs, which ensures you can play almost any type of video with it.
Thus, this is media software that can play movies in the 4K, 5K, and even 8K UHD resolutions.
You can utilize the software for playing 360-degree VR videos. Furthermore, the software also enables its users to download 4K videos from more than 300 video-sharing sites and supports AirPlay for streaming media across devices.
On the same note, it can also support Airplay for screen mirroring and video music Airplay. Plus, it also has DLNA wireless stream option.
Hence, the player can blend the DLNA controller with the renderer and server, so you can interconnect your home devices and share video content immediately.
You can thus stream MKV, MP4, AVC, or other music files from your Android on PC and Mac. Also, you can stream media files from your PC/Mac on Smart TV or PlayStation.
Hence, with hardware-accelerated technology, this software maximizes your media entertainment using low consumption of CPU and GPU resources while decoding and rendering at the same time.
VLC is one of the best open-source media players precisely because it plays almost everything with most codecs already built-in.
The developers boast that the software plays everything, but VLC’s supported codec list highlights that it doesn’t play the On2 VP7, Indeo Video 4/5, and Real Video 3.0 codec file formats.
Nevertheless, it’s still very nearly a genuine universal media player that you can utilize for playing Blu-ray Discs, YouTube videos, podcasts, streamed radio, webcams, and more besides.
As it includes a media file converter, you can always convert a file that doesn’t play in the VLC media player to a compatible format.
This is also multiplatform media software that you can run on Windows, Linux, iOS, and Android devices.
Another worth mentioning aspect is the diverse functionality of the player, supporting CDs or DVDs, devices, streaming. Besides, it offers fast hardware decoding and support for all video formats or advanced media formats.
KMPlayer is another freeware universal media player that includes numerous internal codecs to ensure that you can play almost all video files with the software.
MPEG-1, VP3, MPEG-2, WMV, MPEG-4, DIV X, Digital Video, H.264, MJPEG, and RealVideo are just a few of its internal video codecs.
Aside from that, KMPlayer also supports numerous subtitles, incoming HTTP stream, audio, playlist, and image formats.
So you can utilize KMPlayer to play high-res 4K and UHD movies and almost any video media format.
Moreover, there are lots of video formats for each file you may want to play on KMPlayer, supporting also audio and images, CD image files, playlists, and subtitles.
With all being said, this video player program provides a very customizable interface with helpful features like screen controls or 3D subtitle control features.
Universal file opener software can also open an extensive range of video files.
Universal Viewer is one universal file opener with which you can play more than 170 video and audio files without any external codecs required.
This software only includes relatively basic playback options, but it still supports more video file formats than many media players.
In addition, you can utilize UVF to open many other file types that aren’t compatible with any media software.
With this complete file opener, you can manage multiple types of files and not only images or audio. Namely, it can open Word documents, PDF format, Rich Text format, excels or plugins.
Thereby, you don’t need any other programs to open your files, and no other codecs in order to play multimedia files.
Those are the best programs that have the widest video file format support. They’ll probably play almost every video format that you throw at them.
We hope that you have found the best video player for Windows 10 & 11 on our list. If you have any other suggestions, don’t hesitate to share your opinion in the comments section below.
Roblox is an ultimate virtual universe that lets you play, create and be anything one can imagine in the virtual world.
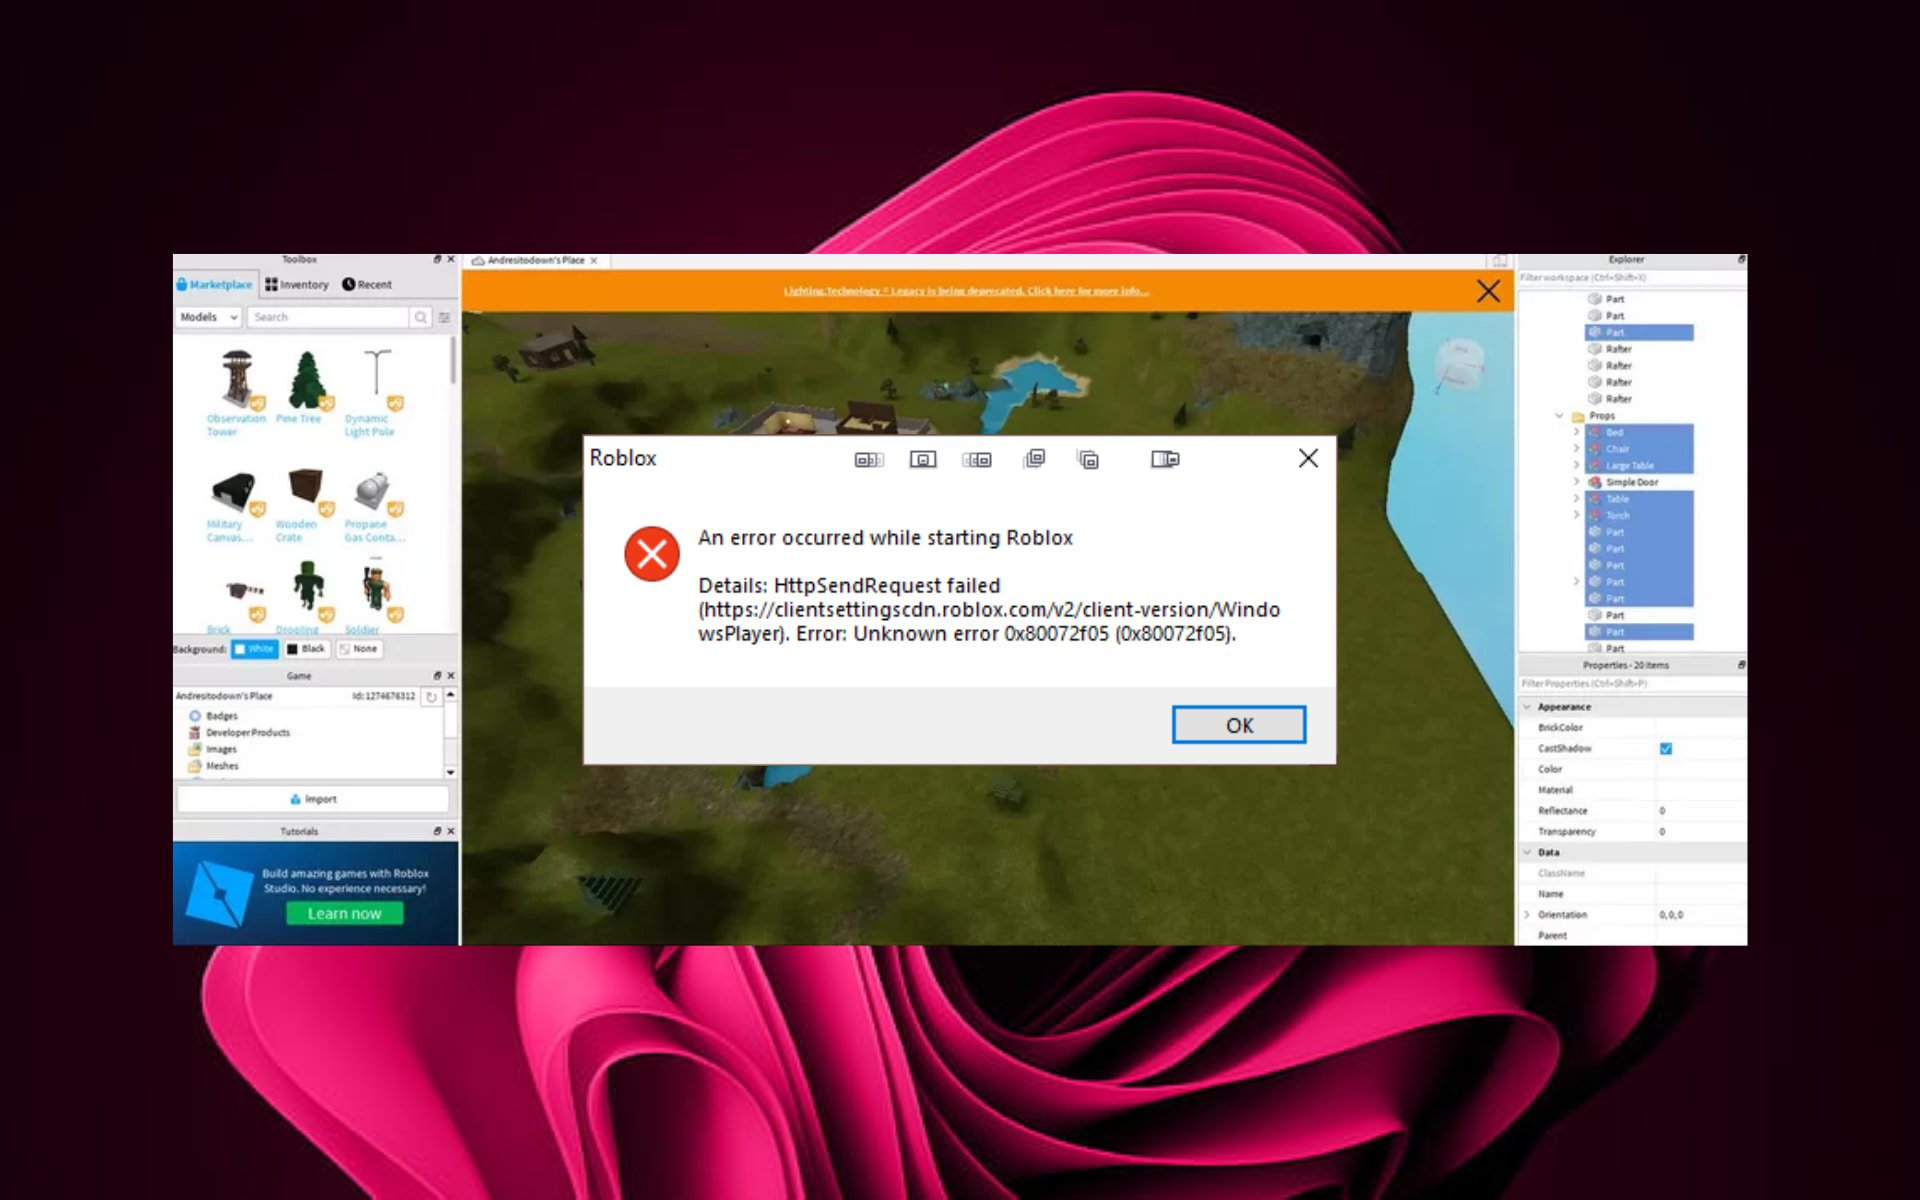
However, some users have reported that their Roblox client can’t connect to the Roblox game server which results in Could not join due to join script failure as the game failed to fetch join script.
When trying to connect to a game in Roblox, I always get that I cannot connect to their server – ID 17. Does anyone know why? Roblox emailed that I have to allow them in but how do I do that?
Fix the problem by following the steps below.
Why does Roblox Studio keep saying Publish failed?
That is an excellent question you asked there, as many Roblox users asked the same one and it was about time to clear the air and provide an answer.
Know that, whenever you get a message in Studio stating that your upload has failed, it is usually the result of your place being too big or having too many items or scripts in it.
To thoroughly and correctly test this, you need to actually save your place to your computer first by opening it in Roblox Studio and using the Save option in the File menu.
Quick Tip:
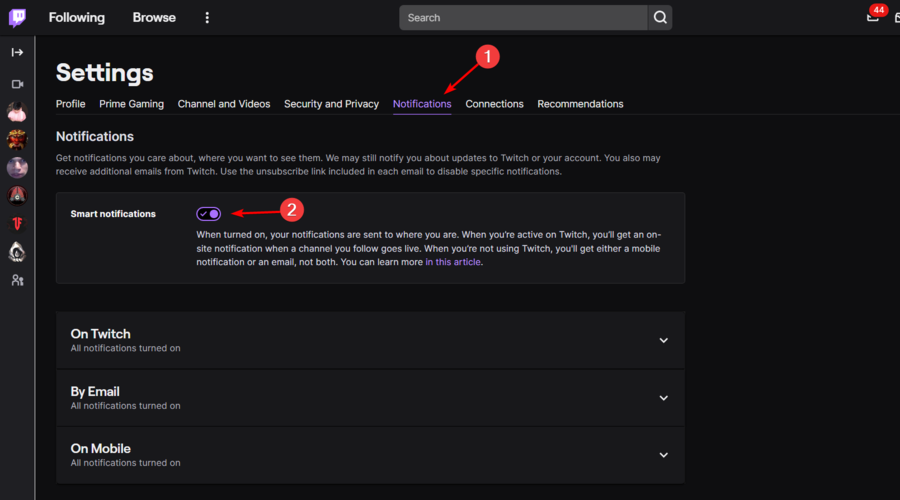
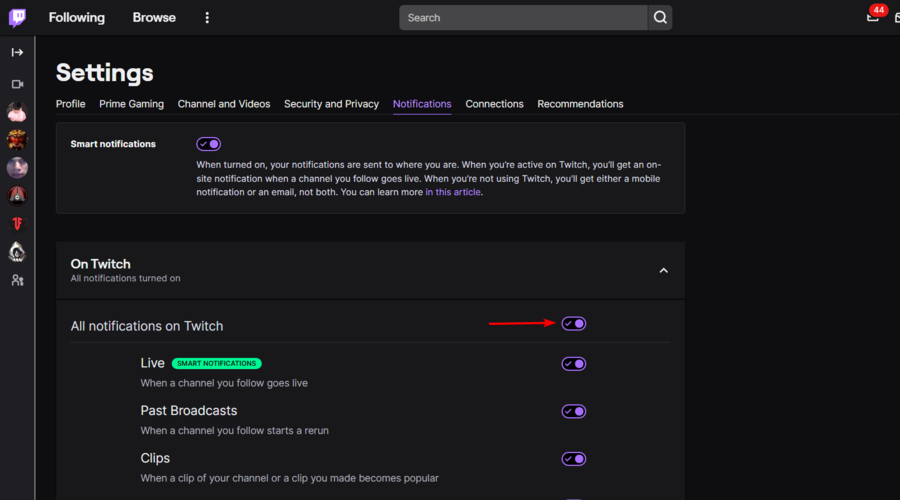
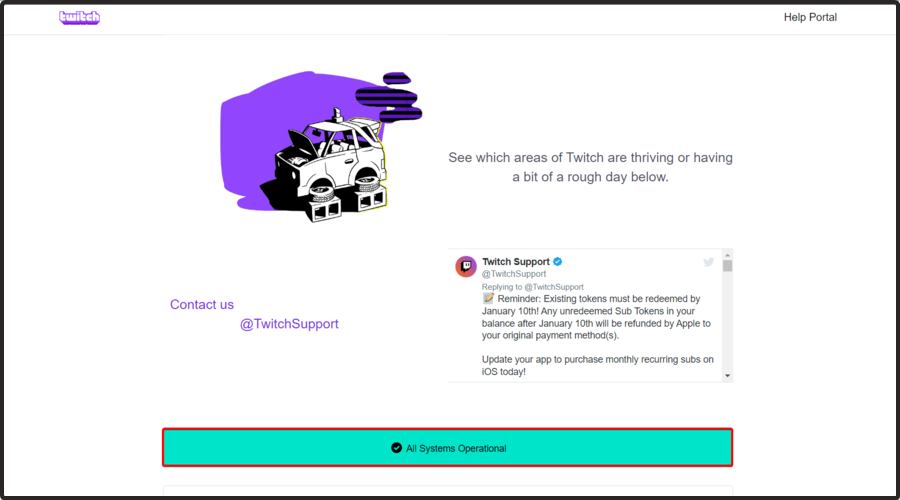
First, let’s make things easy by verifying your account using the Roblox web version. You can use the Opera GX browser to get account information and verify whether the problem is with your account.
The built-in VPN in Opera GX may change your location if there is a server issue, and you can set some limiters to avoid a memory crash when playing Roblox.
Opera GX
Access Roblox through this game-focused browser and test credentials and internet speed.
How do you fix failed to fetch account on Roblox studio?
1. Check your Firewall
Click on the Start button and select Settings.
Click on Update and Security.
Go to Windows Security Tab.
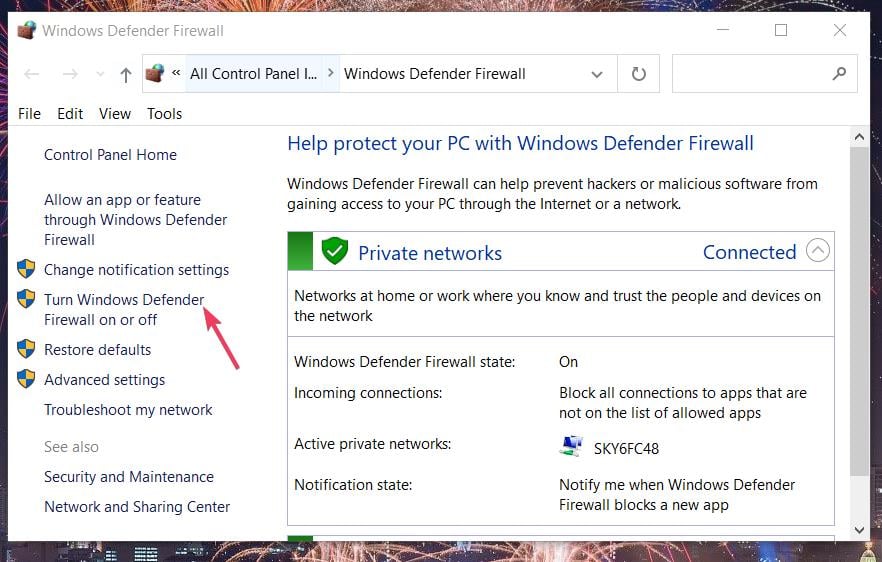
Under Protection areas click on Firewall and Network Protection.
In the new window, click on your currently active network (Private, Domain, or Public Network).
Now turn off the Windows Defender Firewall using the toggle switch. Click Yes, when prompted by the UAC.
Also, check if your Antivirus program has its own Firewall running. If running, turn it off as well.
Now try to play the game and check if the error is resolved. Make sure you enable the Firewall once you are successfully connected to the game servers.
2. Log out and reboot
If the error appears frequently then you can try to log out of your Roblox account and then log in again.
Users have reported that a simple restart after logging out has helped them resolve the issue. So, log out, reboot the system, and then log in again.
You may also want to consider the possibility of being banned by the developers. Although an unlikely situation, the developers may ban some users if they violate any community rules.
Check if the server you are trying to join has VIP access. If your friend has VIP access and playing using that server, then you won’t be able to join them unless you have VIP access as well.
The Could not join due to join script failure error occurs if the game has reached a bug point. In this case, the users cannot do anything because the issue is at the developer’s end.
When in the game, press F9 to open the Developer Console. Press the PrtSc key on your keyboard and save the screenshot in the paint app.
Now send the screenshot to the Roblox developers explaining the issue.
Users also asked questions such as: Why can I not connect to Roblox? The answer is, that if you can’t connect to Roblox, try using a VPN as this should solve the issue.
And, if your Roblox game keeps losing connection, your firewall might actually be blocking Roblox. By changing a few settings on your computer, you can easily fix this problem.
How do you completely reset Roblox studio?
Surely you would like to know how you can reset your Roblox registry keys and Roblox’s AppData files without losing any of your settings.
This could be because you have issues with a corrupt Roblox install, or corrupt settings and need to reset everything but you don’t want to have to set up all your Roblox & studio settings after.
How to reset your Roblox AppData files
Press Win + R, and hit Enter after typing: %LocalAppdata%\Roblox
Find the Versions folder and delete it.
Locate the Downloads folder and delete it.
Find the ClientSettings folder and delete it.
Also, delete the LocalStorage folder
How to clear Roblox cache
Press Win + R press Enter after typing: %Temp%\Roblox
Press Ctrl + A and delete everything in the folder.
There you have it, folks! All you need to know is if Roblox failed to fetch account info, was unable to fetch the current version of Roblox, Roblox studio failed to fetch configuration settings, or if Roblox was unable to fetch the current version.
Leave a comment below if you run into any other problems, so we can come up with a solution for them as well.
Internet Explorer is the default browser that starts whenever you install a fresh copy of Windows 10. Unfortunately, this means that even if you don’t want to, you will have to use it at least once until you get the browser that you like.
But constant updates and improvements brought to browsers mean that sooner or later, you will want to go for an upgrade. But the problem is that after using Internet Explorer for too long, all of your bookmarks will be stuck there.
Can you Import Bookmarks from Internet Explorer to Google Chrome?
Yes, if you plan on migrating to Google Chrome, you’ll have to know the required steps, but importing your bookmarks from Internet Explorer will be relatively easy.
To import your IE Favorites to Chrome, we recommend that you follow the steps presented in this guide, as they will also help you with the following tasks:
Import IE bookmarks to Chrome
How to import Internet Explorer Favorites into Chrome
Import Favorites from IE to Chrome
Import IE Favorites to Chrome
How to import IE Favorites to Chrome
Covering all these elements will ensure you’ll be able to use your computer to browse the internet on your terms.
As you will see, you will only be required to follow a few steps to copy bookmarks from Internet Explorer to Chrome, so check the details below.
Quick Tip:
In order to import previous browser bookmarks, you should try OperaOne, a web browser built with the same engine as Google Chrome but with much faster response times.
Importing your settings from other browsers is extremely easy, and it is merely a process of pressing two buttons and then choosing the source of the old bookmarks. Opera One also brings it’s own built-in AI.
Opera One
Start using Opera One and import your bookmarks from Internet Explorer in the blink of an eye!
Usually, when you install Google Chrome on your system, it will automatically ask you whether you would like it to become your new default browser.
It will also ask you if you want it to import any settings from the other browsers detected on your system. If you skip this step, you’ll need to know how to access the Bookmarks menu later.
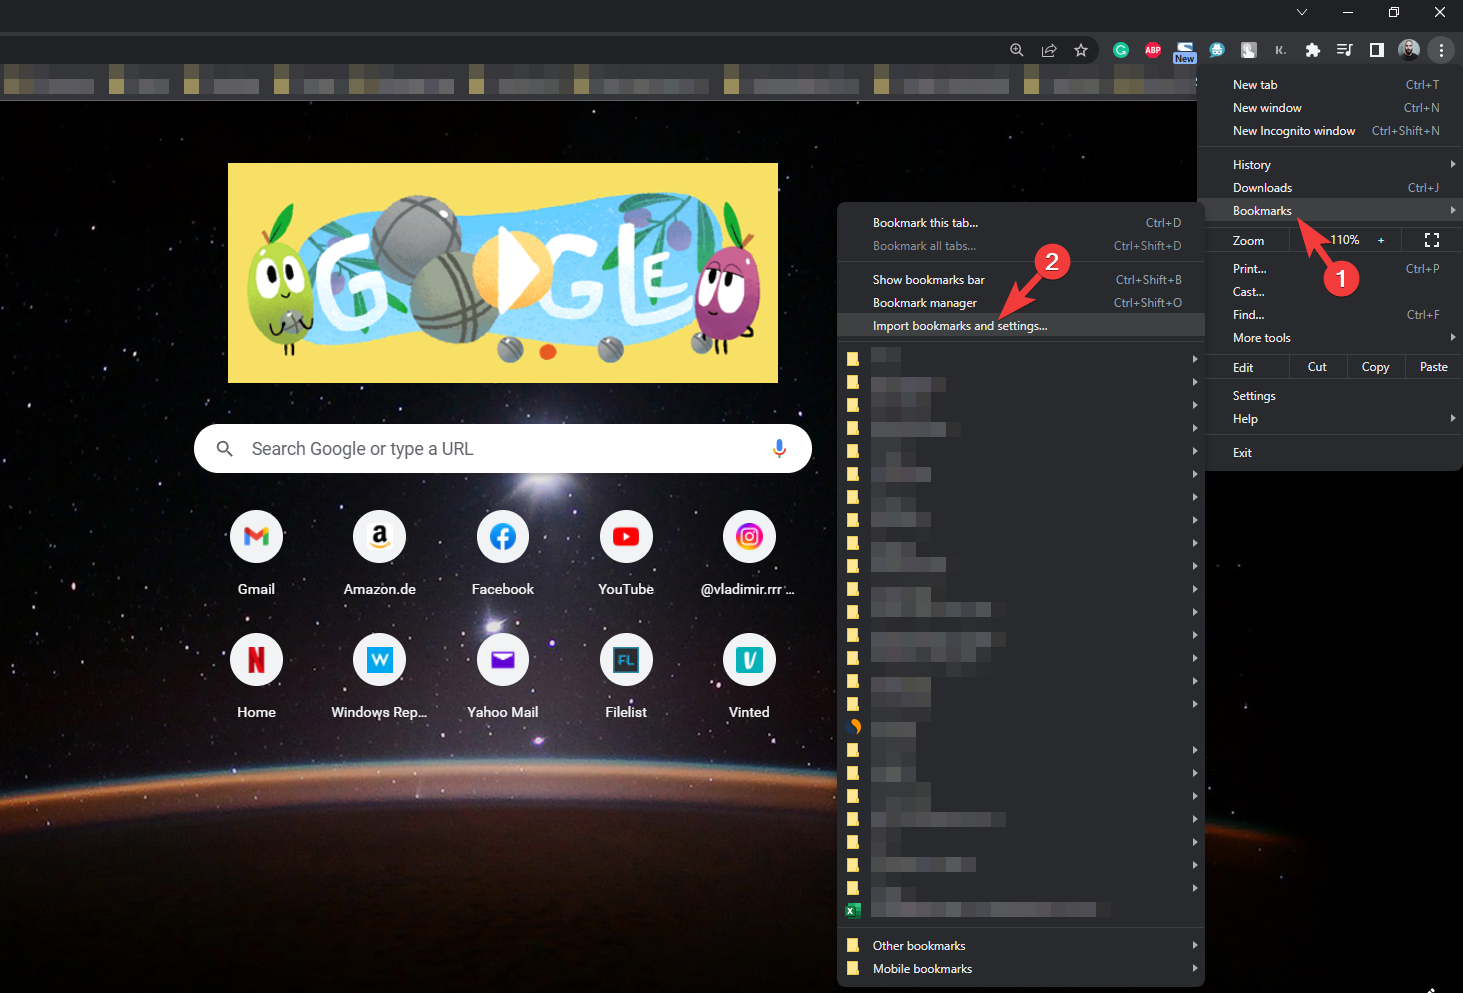
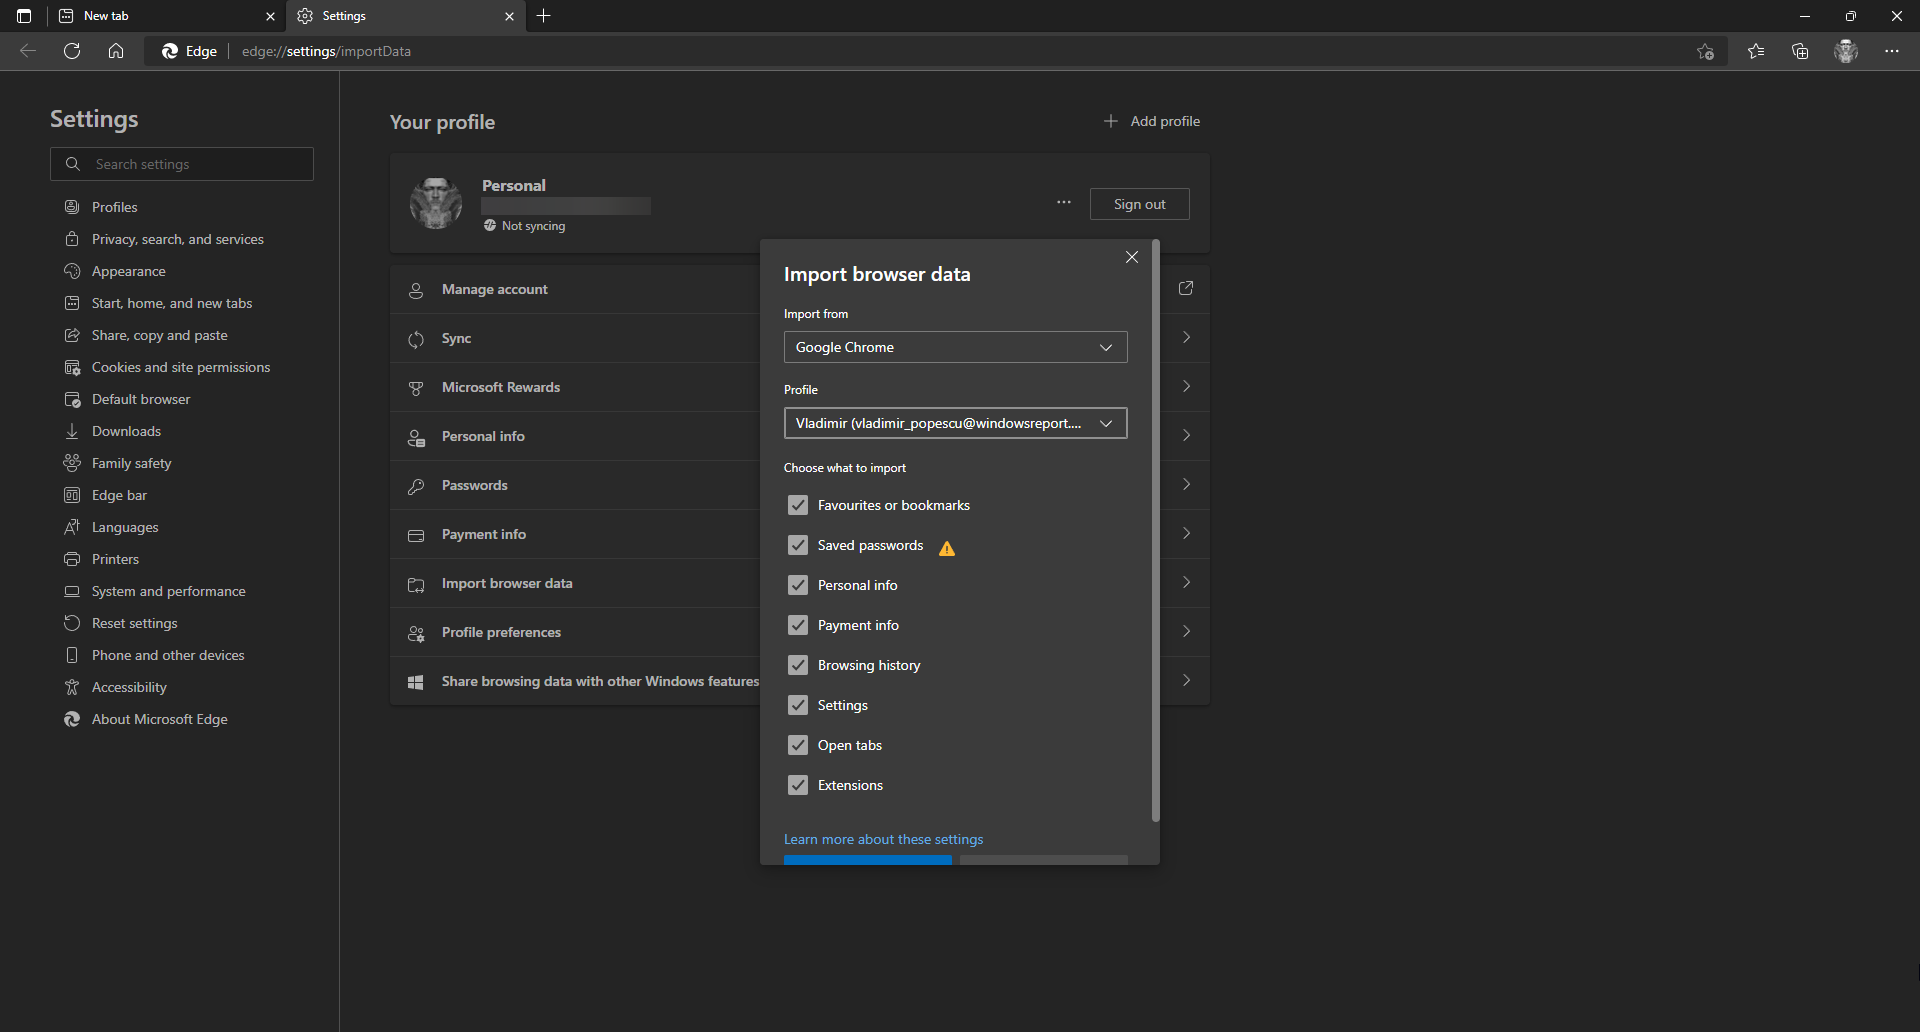
Open Google Chrome.
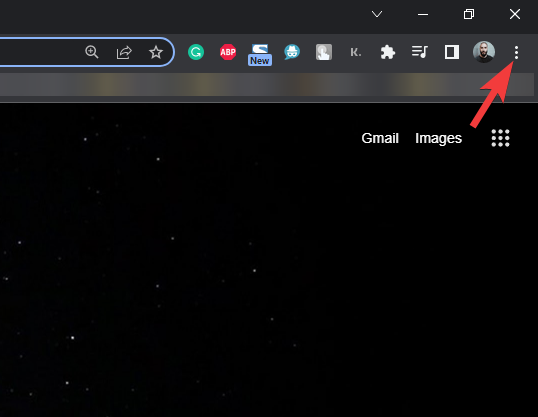
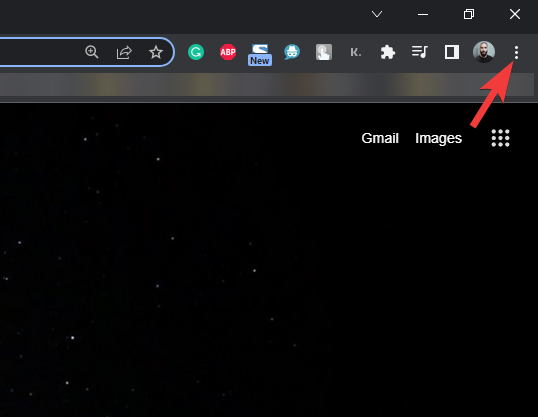
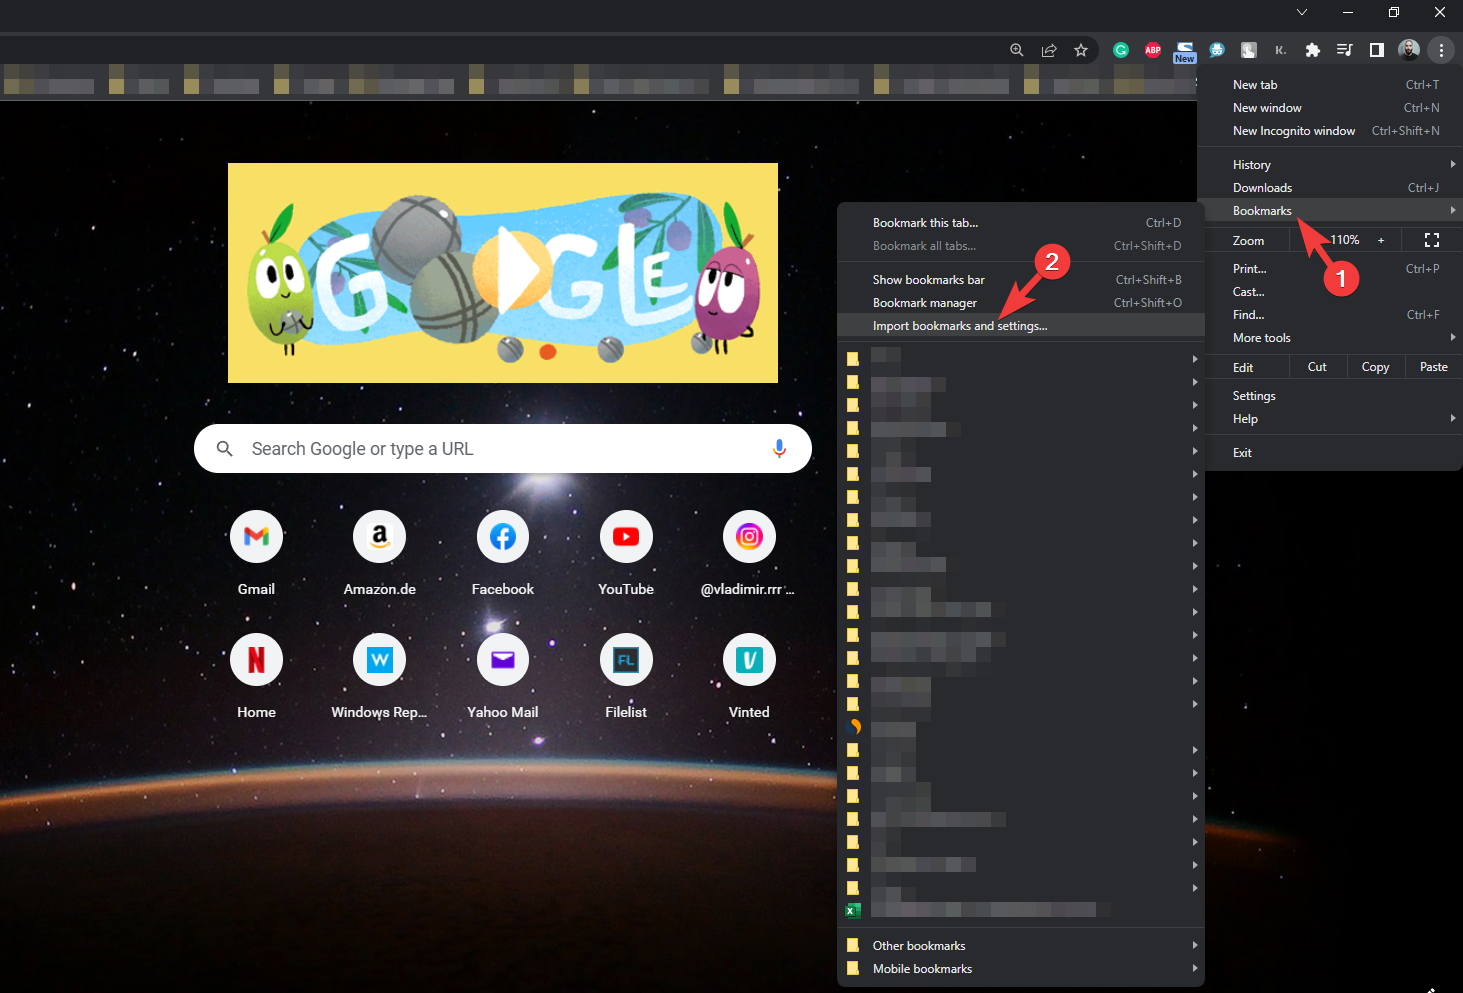
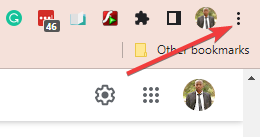
Click on the three dots in the top-right corner of the UI.
Hover your mouse over the Bookmarks option, and click Import Bookmarks and Settings.
Choose Microsoft Internet Explorer from the drop-down list.
Check the Favorites/Bookmarks box.
Select Import.
A warning message will appear telling you that all instances of Internet Explorer will need to be closed.
Click Done.
I cannot import Internet Explorer bookmarks into Chrome
Some people have reported having issues when following the methods listed above:
I cannot transfer my favorites from Microsoft Edge to Chrome, though the Import proceedure in settings/import shows it was sucessful. The favorites from Internet Explorer were transferred sucessfully and show-up on the bookmark toolbar.
It would seem that Chrome uses a different way to store bookmark information than IE or other browsers on their latest builds.
Because of this, a workaround method is needed, where you will need to access Microsoft Edge instead of Internet Explorer.
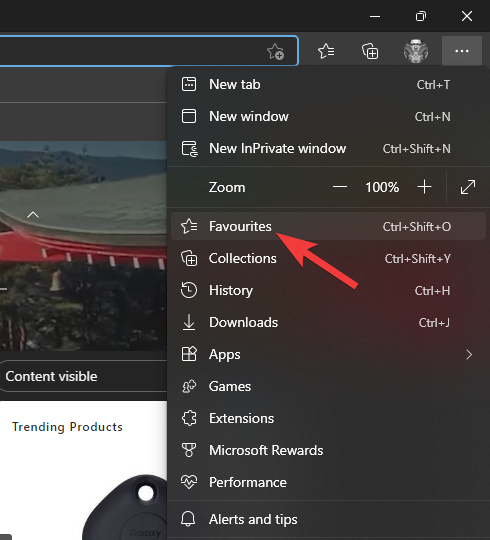
Open Microsoft Edge.
Click on the three dots in the top-right corner of the UI.
Choose the Favorites option.
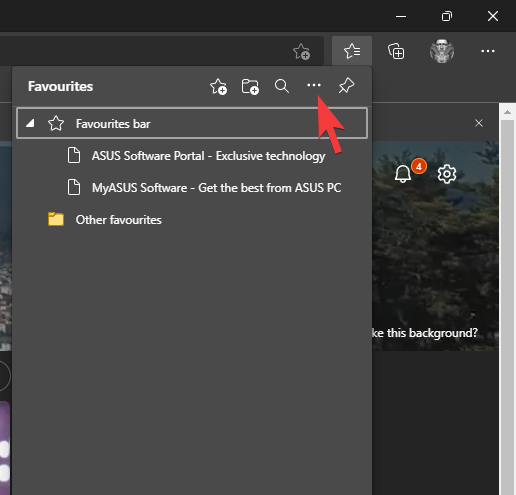
Click the More option three dots.
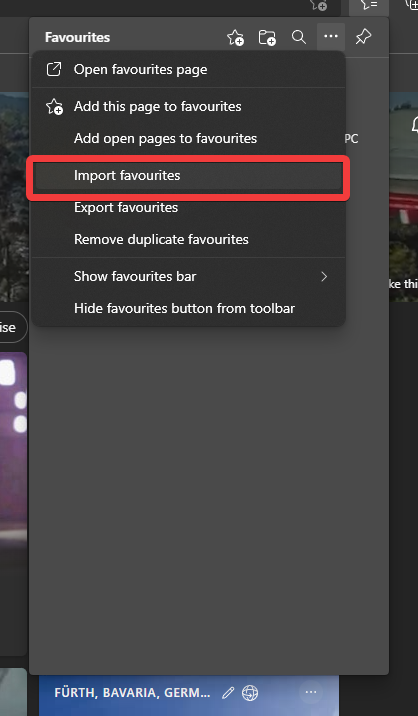
Choose the Export favorites options.
Choose the browser you want to export bookmarks to, and then tick the boxes next to the elements to be imported.
Click the Export button.
Now that your Internet Explorer Favorites have been exported, it is time to import them into Chrome.
Open Google Chrome.
Click on the three dots in the top-right corner of the UI.
Go to Bookmarks, and click Import Bookmarks and Settings…
Select Bookmarks HTML File from the drop-down list.
Select Import.
Click Done.
Following these steps, you can successfully import all of your IE browsing data into Chrome without a problem. Remember that you can also do the exact opposite as well, in case you change your mind.
TIFF, which is short for Tag Image File Format, came into existence in 1986 by the Aldus Corporation for use in desktop publishing. Later, it was updated in 1992 with an Adobe Subsystem copyright.
It is an image format popular among the publishing industry and photographers. TIFF is widely used in scanning, faxing, OCR, image manipulation, desktop publishing, etc.
The TIFF file format evolved alongside scanners, which became capable of capturing both grayscale and color images. For low-color images, TIFF sits alongside PNG and JPG file formats.
In simple terms, if you save images that have been edited by using multiple layers, tags, and transparency as TIFF files, you can open and edit them layer by layer, which you cannot do with JPG or PNG formats.
Some notable features of the TIFF format include support for lossless compression, handling of very high-quality images, saving multiple layers of details, support storage of multiple high-quality images in a single file, etc.
Now the question arises, is there any browser that supports TIFF? This guide will explain the answer to that question, as well as other details about TIFF files. Let us get right into it.
Is TIFF supported in browser?
The simple answer is no. Google Chrome, Firefox, Opera One, etc. cannot open TIFF image files and is valued as a download format.
TIFF saves high-quality and in-depth images, making it unsuitable to be used in browsers.
Meaning, that when you open any TIFF image with a browser, you will be asked to re-download the file. So, you cannot actually view them in any browser.
You require special software such as Ms. Paint, Microsoft Photos, Microsoft Windows Photo Viewer, etc. in order to view TIFF files.
However, if you still want to use a browser to open TIFF files, then you need to take support of an extension or third-party software.
Also, you can download TIFF files, use online converters to convert them to more popular formats such as JPG or PNG, and open them.
How do I view a TIFF image in a browser?
As mentioned, you need to install an extension in order to view a TIFF image in a browser. In order to explain this method, we will use Google Chrome.
Google Chrome has an extension (as mentioned in the above section) that lets you view and download TIFF images. So, the same can be used for Opera One, and other Chromium browsers.
Opera One is one of the most well-rounded and versatile web browsers available. Using Opera One in Windows 11 or Windows 10 will give you a nice and snappy web browsing experience.
There are multiple features that make Opera One a great package. For instance, it comes with a built-in VPN, Ad Blocker, AI and it also brings more organizational features like workspaces, tab islands, social media and messaging apps buttons on the side bar.
And since the Opera One browser is based on Chromium, you can install the TIFF viewer extension for Google Chrome in Opera One and view TIFF images. This is because Opera One supports Chrome extensions.
Opera One
Quickly install a verified extension and visualize TIFF images without having to download them!
Google Chrome is the most used web browser across the globe. Although it does not natively come with as many features as its competitors, its ease of use makes it a popular browser.
There is no built-in ad-blocker or VPN, but by using Chrome Webstore, you can install extensions to enhance its functionalities.
You can use the TIFF Viewer extension and add it to Chrome to view and download TIFF images. Do note that Google Chrome is a resource-extensive browser. If you are using an old PC, then you can look out for other browsers to have a better experience.
Firefox has been the first choice for power users. Over the years, it has received multiple features and design changes, making it a great alternative to some of the best browsers available in the market.
Mozilla has updated Firefox in terms of security features and it makes use of DNS instead of HTTPS to block internet providers from tracking your browsing data.
It is snappy in performance and comes with multiple features such as an ad-blocker, password manager, several customization options, picture-in-picture, etc.
Since it is not based on Chromium, you need to install the TIFF viewer extension separately for Firefox.
Brave browser is another Chromium-based browser. This means you can install Google Chrome extensions on it.
The browser isn’t as resource-hogging as the Google Chrome browser and gives you fast and reliable performance.
It is a privacy-focussed browser that blocks online ads and offers other tracking methods, built-in. Brave allows its users access to Tor, which is the most secured browser engine. It masks your location and hides your browsing history.
You can make use of the TIFF Viewer extension found in the Chrome Webstore and install it on the Brave browser.
Another Chromium-based browser, which comes in-built with Windows 11 OS is the Microsoft Edge browser.
Since it comes from the house of Microsoft, it offers the best compatibility with Windows OS and has been receiving a bunch of new features with new updates.
It comes with a new user interface, vertical tabs, reader mode, sleeping tabs, startup boost, extensions, and much more.
Microsoft Edge also comes with multiple customization options, and many of Edge’s extensions can be downloaded from the Microsoft Store, making it easier to add them to the browser.
You can install the TIFF viewer extension from the Edge Add-ons store and view TIFF images directly on the Microsoft Edge browser.
JPG, GIF, or PNG are the three major image formats, that major browsers available in the market support. But lately, a new image format, called WebP has also made its way to mainstream browsers and is supported by major browsers such as Chrome and Firefox.
The main advantage of supporting the WebP image format is that it does not compromise the quality of the image, but compresses the size of the image by 25-30%.
In the case of JPG, the images are efficiently stored, meaning compressed which reduces the quality of the image (both colored and grayscale).
It does not offer transparency, and if you want that, you need to convert the JPG image into another format. Whereas, GIF and PNG images use index color and are deemed ideal for images with flat colors.
Moreover, both support transparency and let you play around with the images and use them as layers over other images.
Here is the complete list of image formats supported by various popular web browsers:
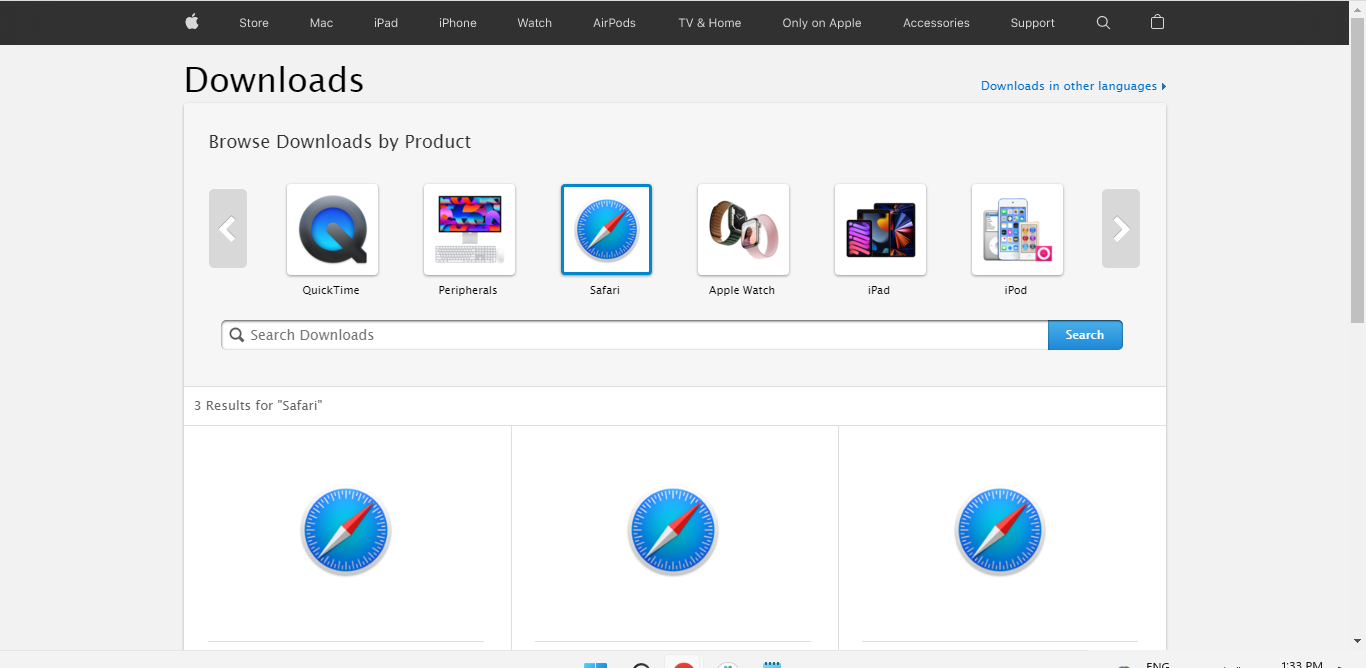
Safari is the only browser among the most popular browsers that support the TIFF image format.
If TIFF image format isn’t a big deal for you and you are looking for some of the best browsers for your Windows 11 PC, then you can check out our dedicated guide that can get the help you select the best browser as per your need.
Also, if you are on the lookout for the best lightweight browser that you can use on your Windows PC, that isn’t resource-extensive, then you can check out our guide on best lightweight browsers for Windows which includes 10 of the best lightweight browsers.
It lists down some of the best-tested Chrome extensions, which you can install on other popular Chromium browsers and enhance security.
That is it from us in this guide. Let us know in the comments below which extension and browser did you use to open the TIFF image format. You can also let us know if you used a different browser other than the mentioned ones to open TIFF images.
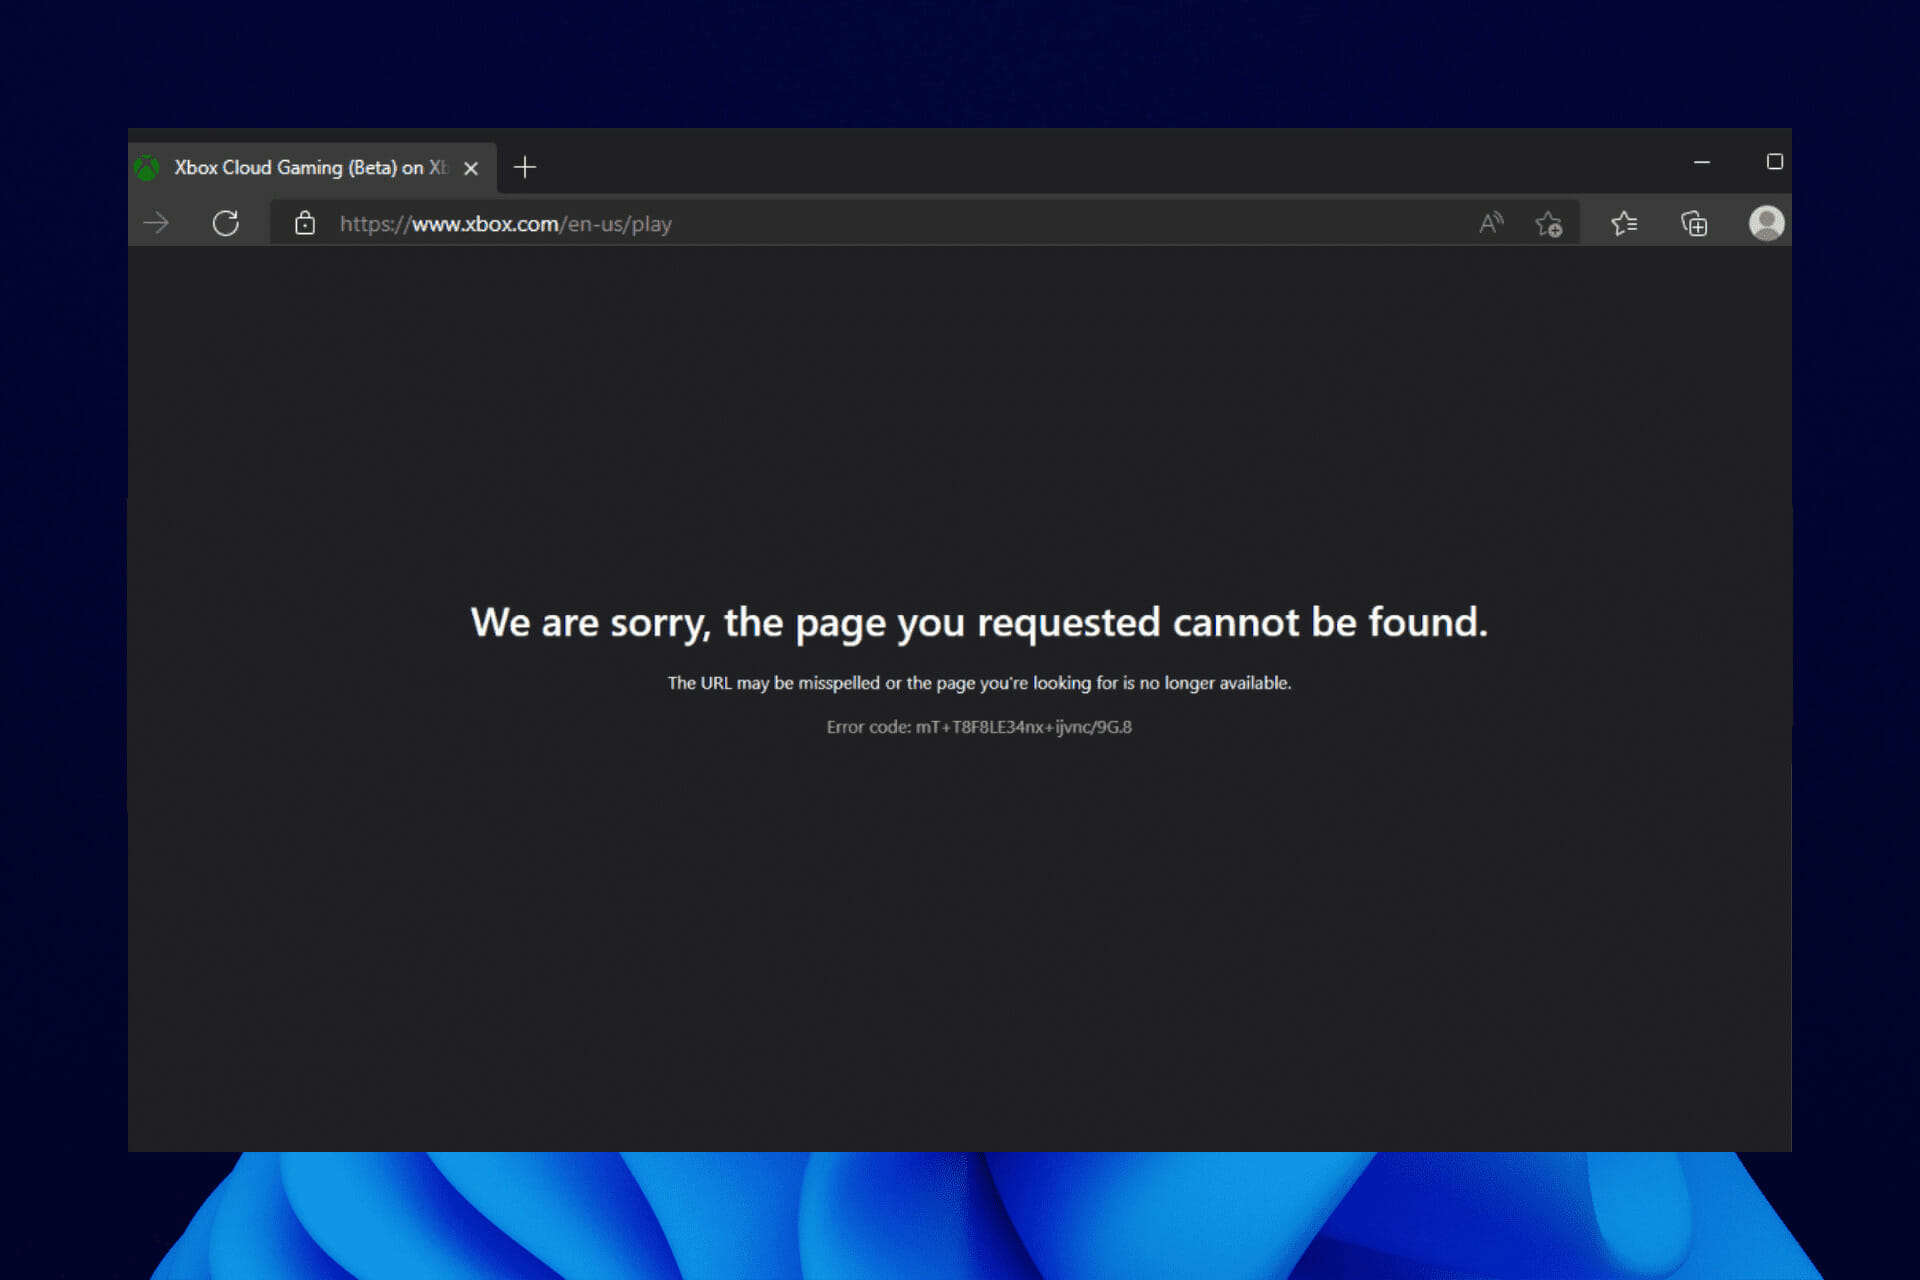
Many players enjoy the convenience of Microsoft’s service, but recently some have faced issues with Xbox Cloud Gaming not working in browsers, leaving them unable to access their favorite titles online. This guide will walk you through practical solutions to fix the problem and get you back to smooth cloud gaming quickly.
How can I fix Xbox Cloud Gaming not working in browser?
1. Clear browser cache
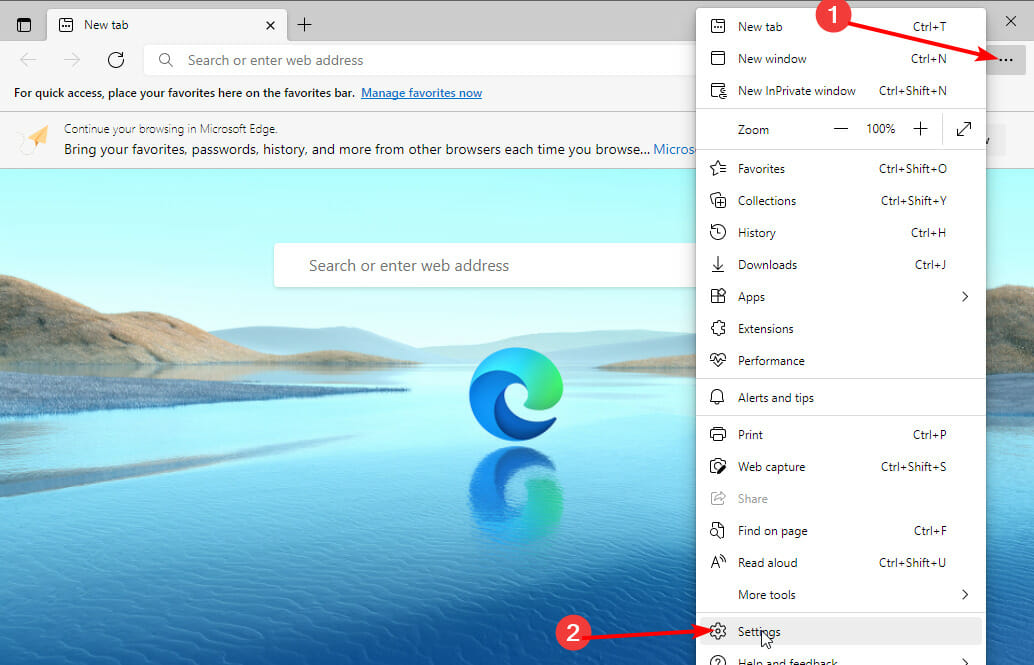
Click the menu button (three horizontal dots) in the top right corner.
Select the Settings option.
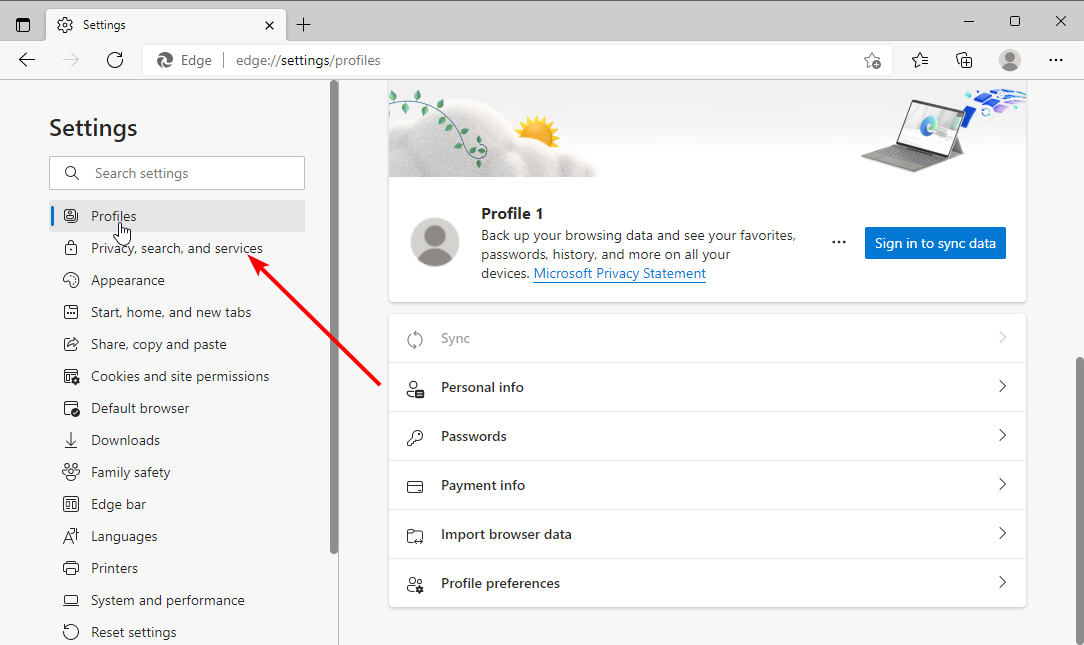
Choose Privacy, search, and services in the left pane.
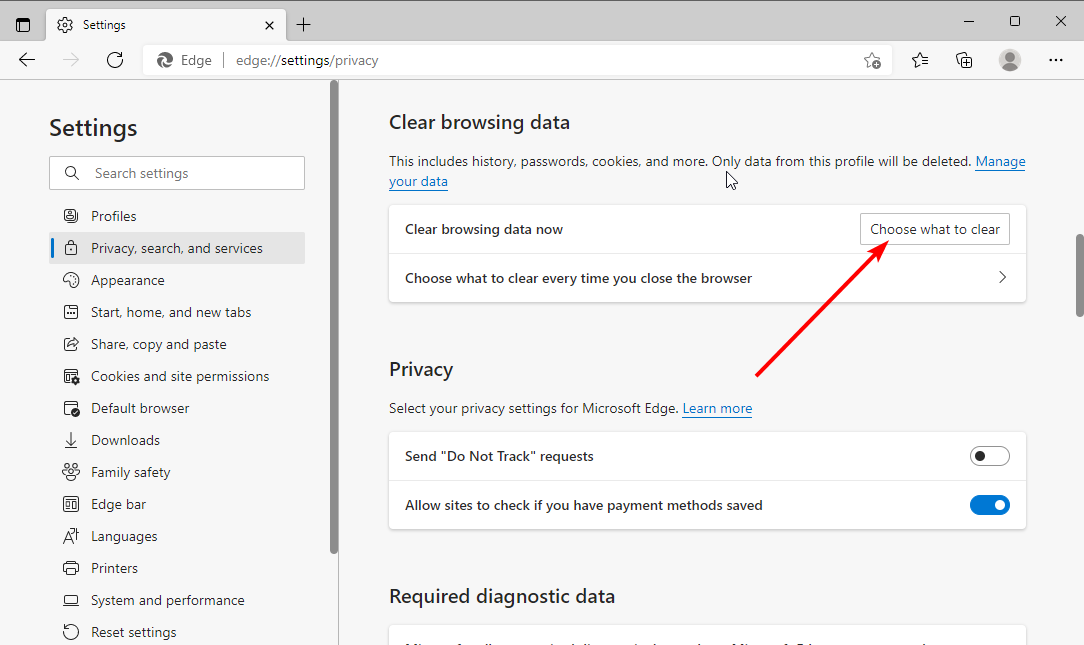
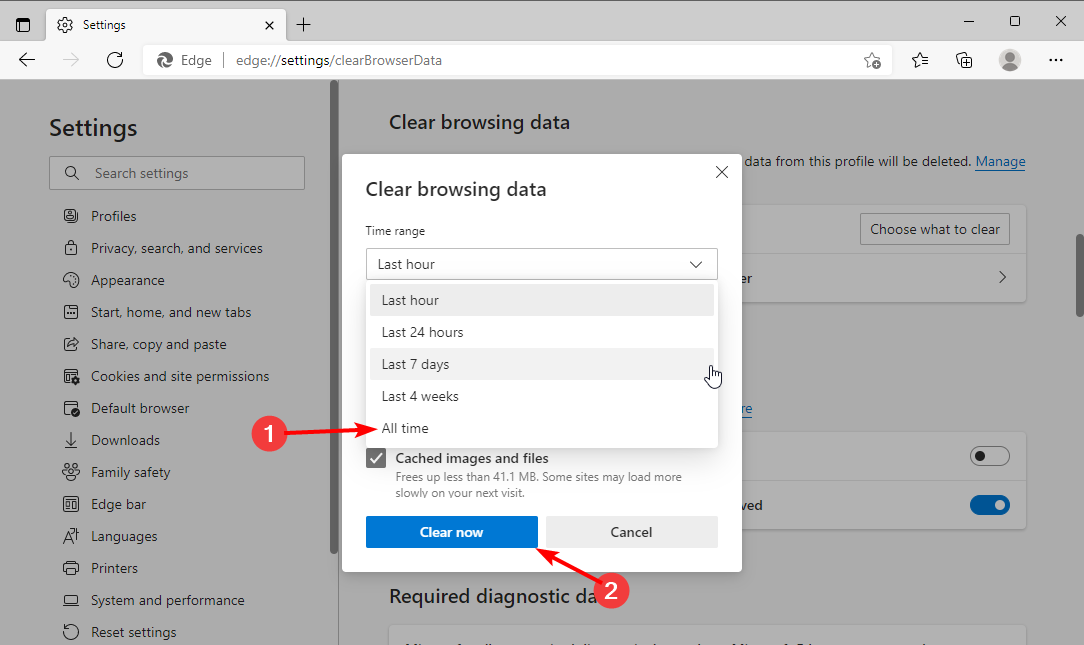
Click the Choose what to clear button under the Clear browsing data section.
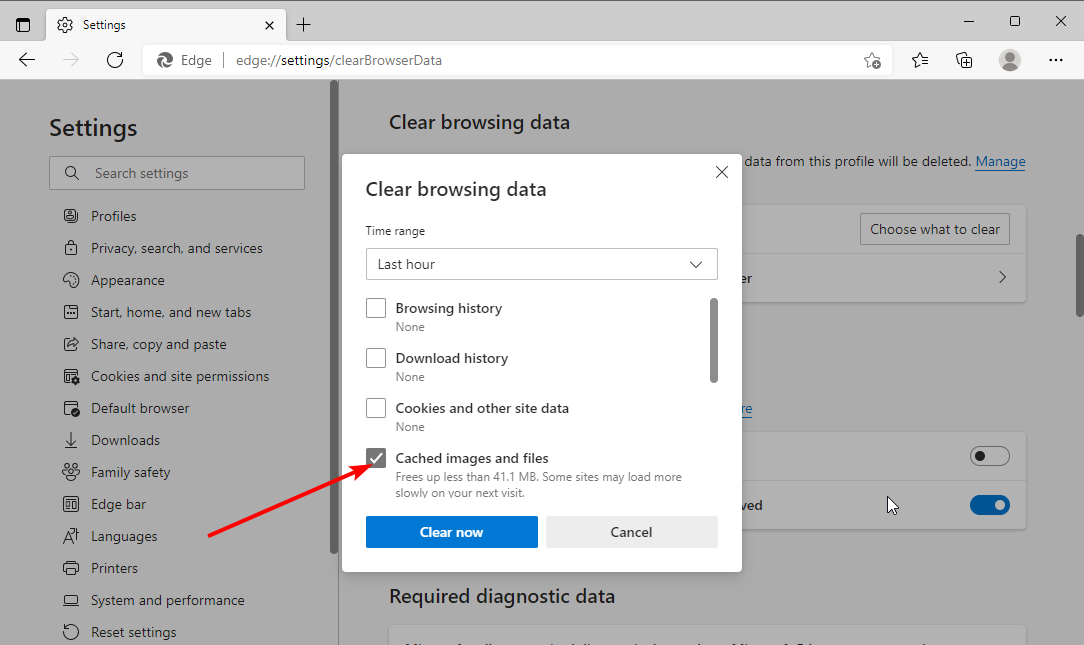
Check the checkbox for Cached images and files.
Now, click the dropdown under Time range and select All time.
Finally, click the Clear now button.
As much as caches help to better your browsing, it is a well-known cause of different problems when it is corrupt. And it has been pinpointed by some users why Xbox cloud gaming is not launching on the browser.
Ensure to relaunch your browser after clearing the cache to effect the changes.
2. Reset modem/router to default
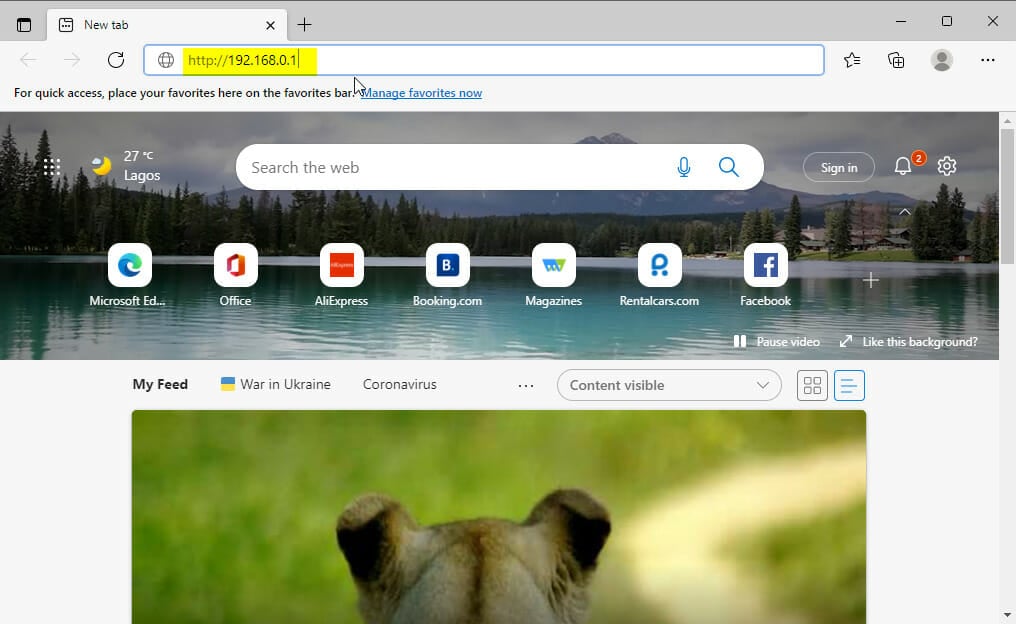
Open a browser on a PC connected to your modem.
Copy the address below into the Address bar. https://192.168.0.1
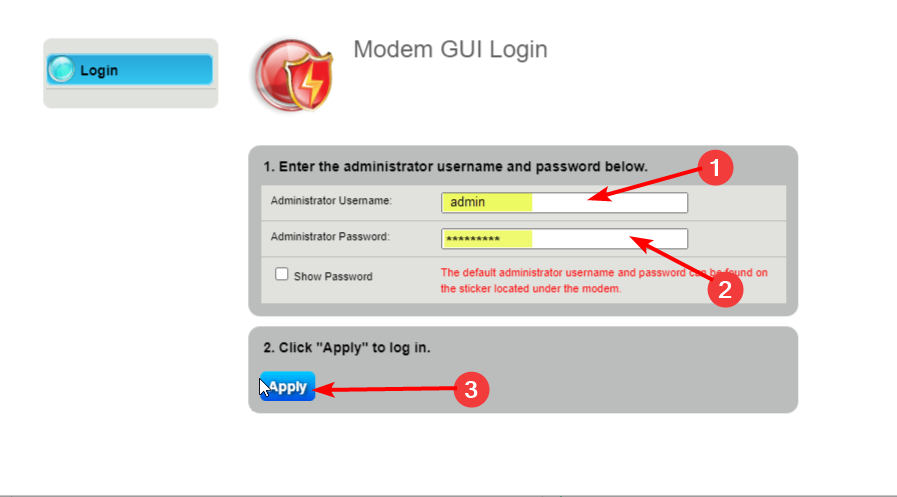
Input your modem or router’s username and password and click the Apply button to log in.
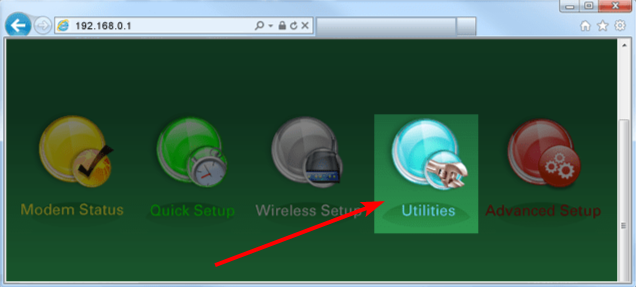
Choose the Utilities from the menu displayed.
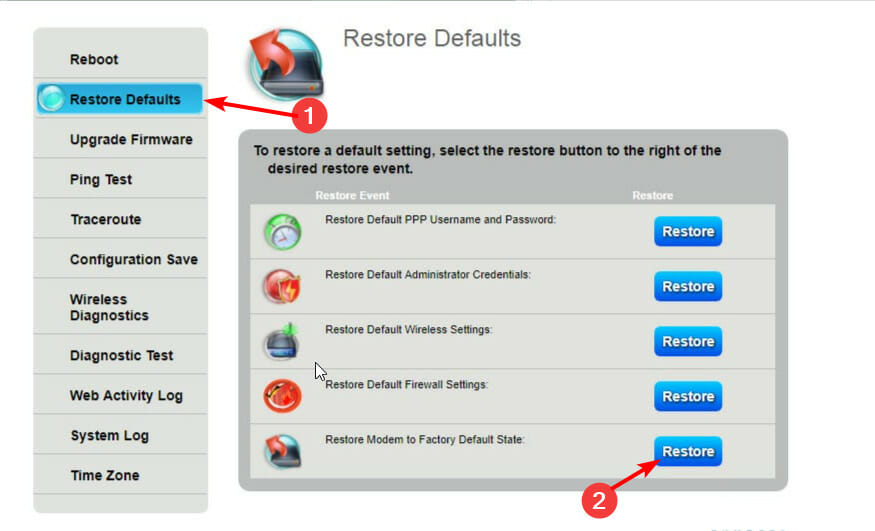
Select the Reset Defaults option from the left pane.
Finally, click the Restore button in front of Restore Modem to Factory Default State.
Note that the default username for your modem is admin, while the default password is password. But if you changed the values and can’t remember them, you will need to use the reset button at the back of your modem to restore the factory settings.
After the restoration, you will need to configure your modem just like you did when you bought it. Once done, check if the Network Unsupported Xbox cloud gaming error is fixed. If not, head to the next method.
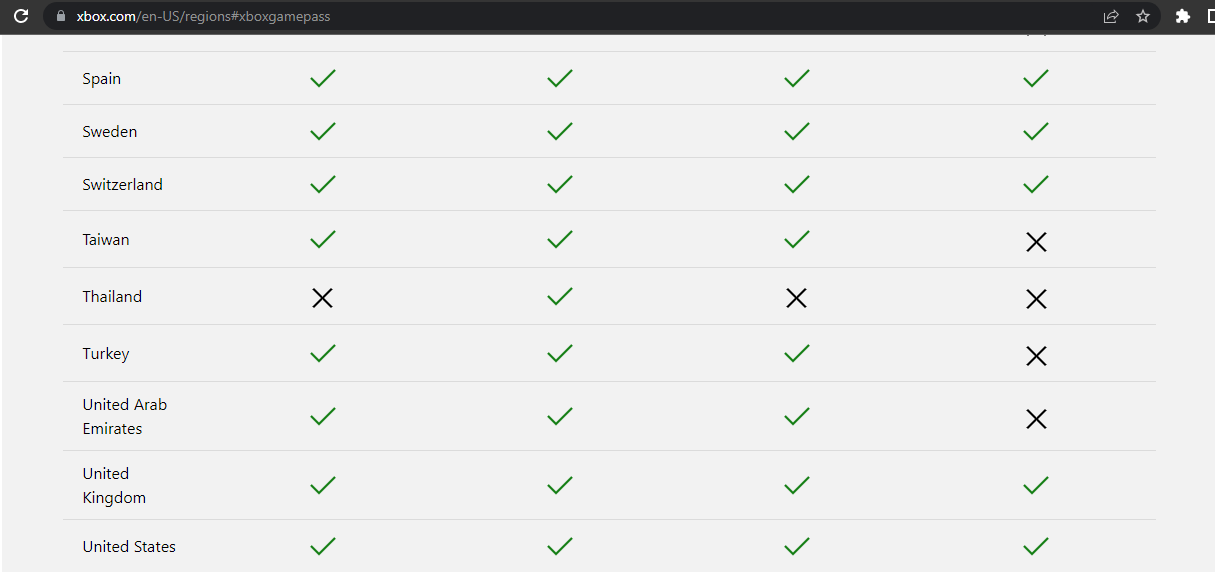
Xbox cloud gaming is not supported in some regions. If you are based in such places, you might need to switch your location to popular areas like the US or UK with a VPN.
And there is no VPN service better at this than Private Internet Access (PIA). It is a world-class virtual network provider that gives you access to location-restricted content without being noticed.
Interestingly, it is not just limited unanimity, as it offers lightning-fast connection speed. This is all thanks to its next-gen servers located in 78 countries around the world.
What’s more, unlike other VPN services that only allow two to three devices per package, PIA allows a whopping ten devices to be connected at a time. Add its real-time malware protection and fast and customizable scanning feature, and you know there is nothing getting past your security online.
What are the causes of Xbox cloud gaming not working in the browser?
The reason Xbox cloud gaming does not work on a browser is within a close circle. It can sometimes be a problem with the browser itself or your network connection.
Below is a list of some of the well-known causes:
Accumulation of faulty browser data
Unstable network
Presence of bugs on browser
Location-based restricted access to Xbox cloud gaming
What are the supported browsers for Xbox cloud gaming?
There are only a handful of browsers supported for Xbox cloud gaming. Though these browsers are popular, hopefully, we can have more options in the nearest future.
Below is the list of Xbox cloud gaming supported browsers.
Microsoft Edge– only supported on Windows 10 version 20H2 or later
Google Chrome – only on Windows 10 version 20H2 or later
Safari – only on iOS 14.4 or later and iPadOS 14.4 or later
Quick Tip:
Use a browser with built-in support for Xbox gaming, such as Opera GX. This gamer’s browser allows cloud gaming with no issue.
It offers a unique and sleek interface that takes your gaming to a new level. It also has a CPU and RAM limiter to make sure you don’t take up too many resources and slow down your PC.
Opera GX
Get the best Xbox experience with this dedicated browser for gamers!
Xbox cloud gaming works well on Chrome on Windows PC. And with Chrome being one of the top browsers for cloud gaming, the experience is usually fantastic.
However, the best browser for Xbox cloud gaming is Microsoft Edge. This is because of the impressive partnership between Xbox and the browser.
This has led to the creation of optimization features like Clarity Boost, which improves the visual quality of the user’s video stream immensely.
Does Xbox cloud gaming work on iPad?
iPad is another one of those devices that you can use for Xbox cloud gaming. However, you will need to be running iPad OS 14.4 and above on your device to use it.
Also, it should be noted that Safari is the only browser you can use to play Xbox cloud gaming on iPad. Trying to use any other browser will only be an effort in futility.
There you have it: four effective fixes for the Xbox cloud gaming not working on browser problem. These solutions are simple and can be easily implemented if you follow the steps carefully.
Are you looking for the best browser for Xbox One instead? Check out our guide for reliable picks. Many users are also wondering how to get Xbox Cloud Gaming unblocked, and our latest guide can help you with that.
Experiencing issues with your controller and Xbox Cloud Gaming not working? Check out this step-by-step Xbox Cloud Gaming controller fix guide to solve the problem quickly.
FAQ
Why is Xbox Cloud Gaming not loading?
This usually happens due to server outages or unstable internet. Check Xbox server status and restart your connection.
Does Xbox Cloud Gaming need a fast internet?
Yes. A minimum of 10 Mbps is required, but 20 Mbps or higher ensures smoother gameplay with less lag.
Why do I get black screen on Xbox Cloud Gaming?
A black screen often points to browser or app cache issues. Clear cache and try relaunching the session.
Can VPNs affect Xbox Cloud Gaming performance?
Yes. VPNs can cause higher latency. Disconnect the VPN to improve stability unless your region restricts access.
Why does my controller not work on Xbox Cloud Gaming?
Controller issues may come from outdated drivers or unsupported devices. Update drivers and ensure your controller is properly paired.
Feel free to let us know the fix that helped you get back to enjoying your game on your browser in the comments section below.
Your online security is of utter importance, and in order to achieve that, you’ll need to use a secure browser.
There are many browsers that provide additional security, and today we’re going to compare Avast Secure Browser and Opera One and see which one offers better protection.
Is Avast Secure Browser a good browser?
The Chromium operating system was used in the development of the Avast Secure Browser by Avast. Because of this, if you use the Avast browser, you will have access to your Chrome account.
As well as your bookmarks and the great majority of other browser-based access functions linked to your Chrome account.
The majority of the bells and whistles that can slow down Google Chrome’s browser are absent from this alternative. This indicates that the Avast Secure Browser offers a higher level of protection and is a lot quicker than Chrome.
Moreover, the majority of other browsers do not offer some of the special capabilities that are available in Avast, such as a bank mode and protection against fingerprinting. Anyone who is susceptible to phishing attempts should give serious consideration to enabling the anti-phishing function.
Is Opera One the safest browser?
Opera One provides a number of helpful features that are beneficial to the user’s safety and privacy. To begin, there is a built-in ad blocker available for use.
Ads and trackers that keep a trail of your surfing behavior in order to provide you with tailored advertisements will be blocked by the adblocker.
Furthermore, the browser is equipped with a virtual private network (VPN) that shields your IP address from hackers. You can ensure that no one can see any of your browser activity if you make use of this option.
It is important to note that the virtual private network (VPN) provides users with three different locations from which to pick, and the connection speed might change depending on which location the user chooses.
Vulnerabilities, cyber threats, malware, and other forms of malicious activity can affect any online browser, including Opera One browser. On the other hand, Opera One does not currently have any critical vulnerabilities that need to be fixed, thus it is completely secure to use.
Which is more secure: Avast Secure Browser or Opera?
Opera One is a web browser that focuses on customization and user security. The browser offers various security-related features, as well as a wide array of extensions to choose from.
What features does Opera One have?
The Opera One browser is incredibly fast thanks to its low hardware requirements. Moreover, the built-in ad block allows you to experience up to 90% faster loading time on certain websites.
It also has tracking protection, so you can rest assured that websites such as Facebook won’t track your online activity. For an extra layer of security, there’s a built-in free VPN with unlimited bandwidth.
The browser is available on all major platforms and thanks to the Flow feature you can easily share files and notes between devices.
Let’s look at the best features of Opera One:
Built-in adblocker and tracker blocker
Free VPN with unlimited bandwidth
Integrated messengers: Facebook Messenger, WhatsApp, Instagram, Telegram, and VKontakte
Currency and time zone converter
Video pop-out
Tracking protection
Hundreds of available extensions
Battery saver feature
Opera One
Close to zero errors, modular browsing and secure VPN – making your digital privacy a top priority.
Avast is a security-oriented browser made by a famous antivirus developer- Avast. The browser is available on both Mac and Windows, as well as Android.
What features does Avast Secure Browser have?
Avast Secure Browser has a built-in ad block, so you can surf freely without any pesky ads. In addition, the browser also forces all websites to use encryption, thus ensuring that your data can’t be stolen.
It’s important to mention that the browser can block all tracking cookies and mask your digital identity. There’s also a malware detection feature that will warn you if you encounter any malicious websites or files.
Note that Avast Secure Browser also has a VPN included with the browser, but you will need to pay in order to use it, unlike in Opera.
Lastly, Avast Secure Browser lets you manage all your security features from a single place, which is incredibly useful if you need to change a certain setting.
Let’s see the Avast Secure Browser’s best features:
Tracking protection
Malware scanner
Paid VPN service
Anti-phishing protection
Simple to use
Available on multiple platforms
Avast Secure Browser
Using this browser is the best move for non-stop privacy, malware defense, or encrypted data.
3. Opera One vs Avast Secure Browser: The final verdict
Both browsers share similar features, but Opera One has a free built-in VPN that does the job, and it uses fewer resources, which makes it a better choice in our opinion.
Avast Secure Browser is a great browser, but with the free and unlimited VPN, there’s no reason not to use Opera, since it already has all the same features as Avast Secure Browser.
Which browser do you use? Feel free to let us know in the comments section below.
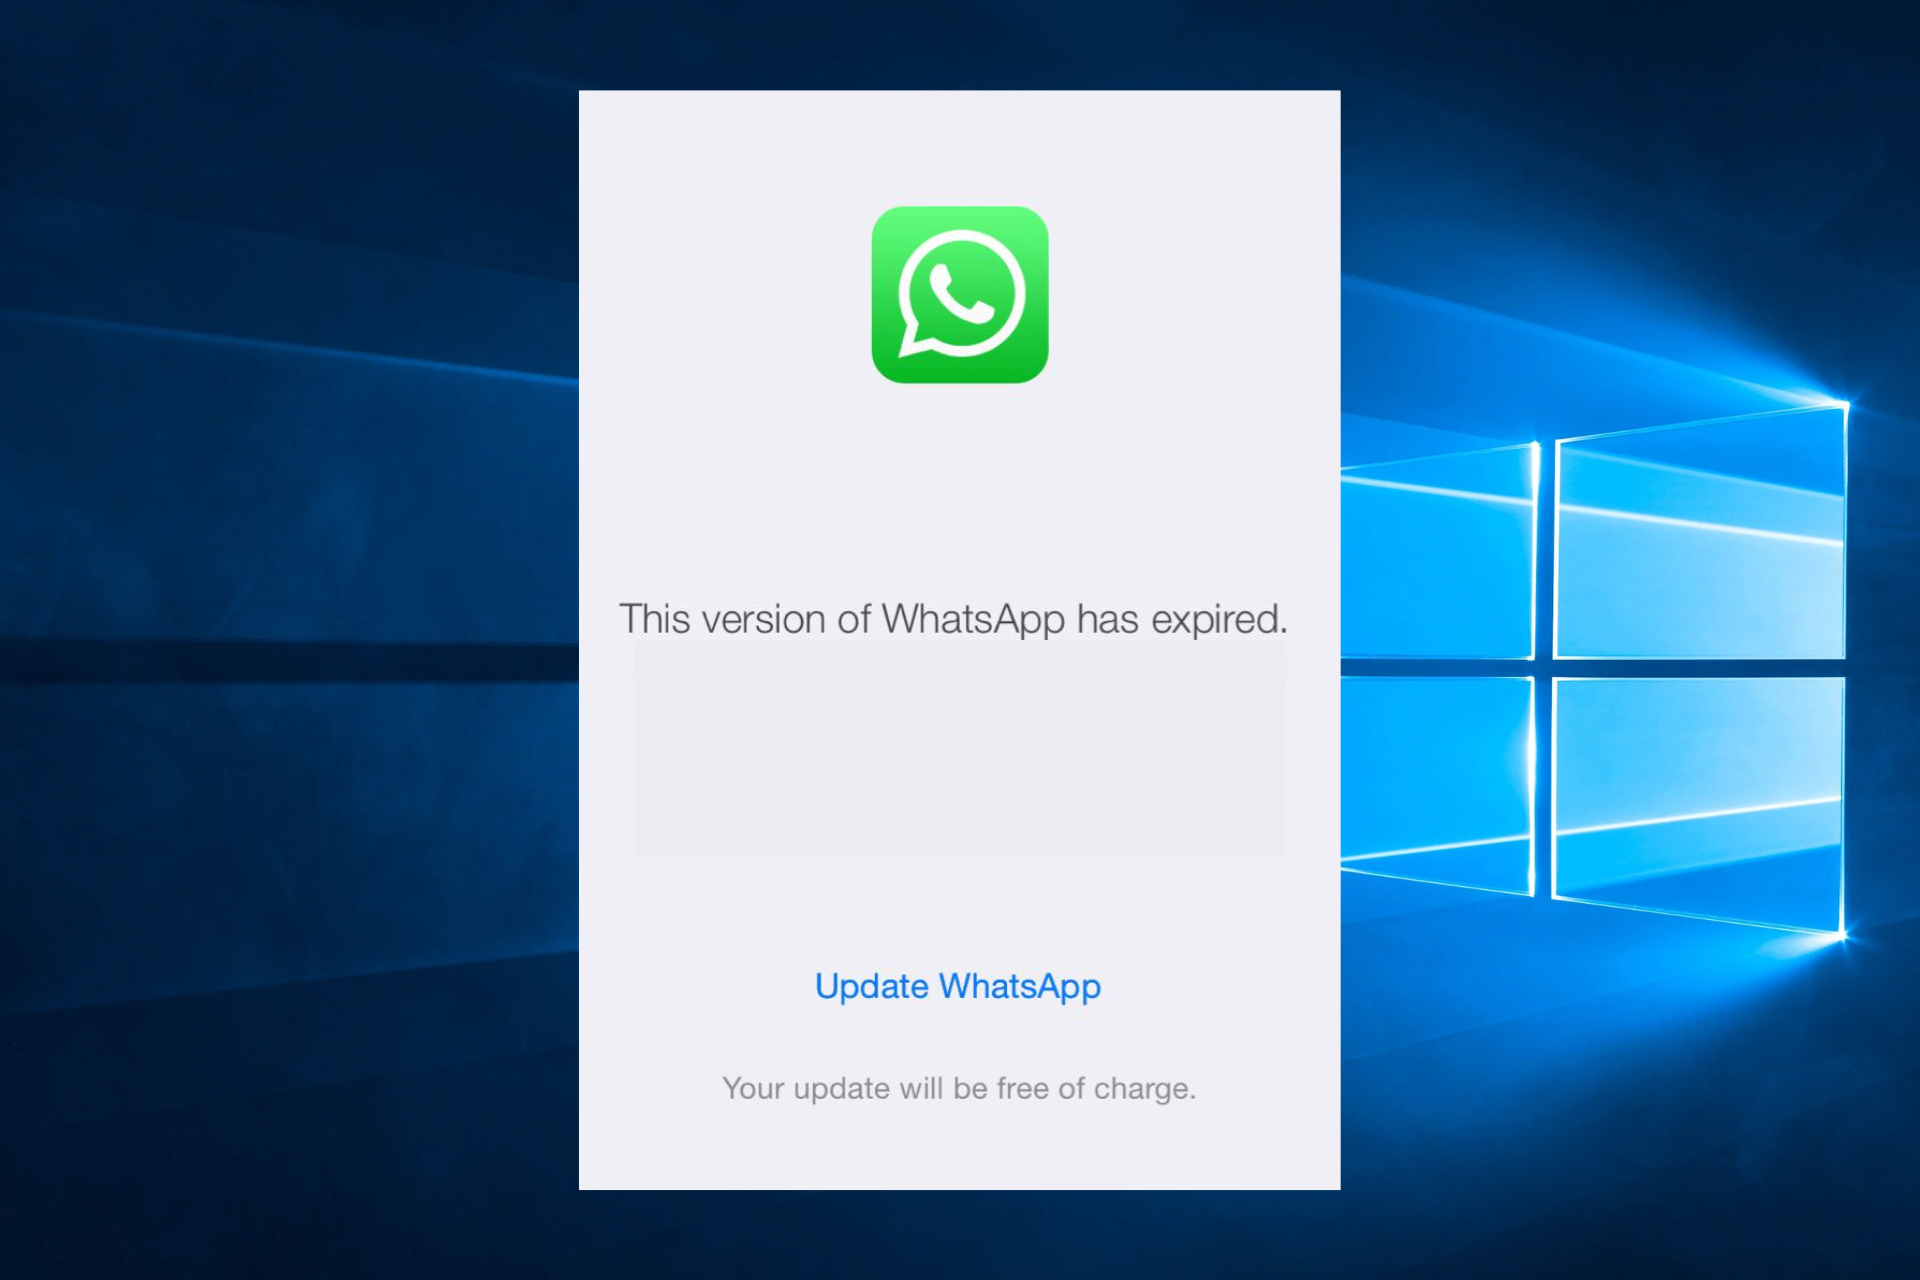
This version of WhatsApp has expired error has appeared on the screens of many people. WhatsApp Web on your PC works through your phone. And if your phone isn’t connected to the Internet or the WhatsApp network, you’ll encounter this and many other problems.
The only thing you can do on your PC is to check your Internet connection. But you might be able to fix the problem by changing a few WhatsApp settings on your phone.
How do I fix This version of WhatsApp has expired error?
1. Update WhatsApp on your phone
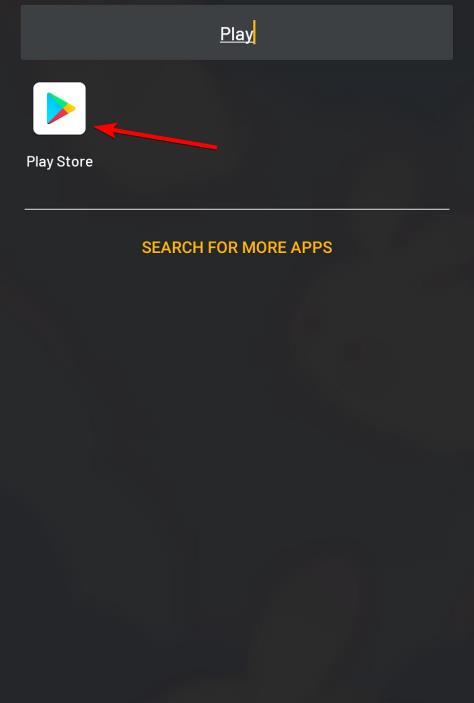
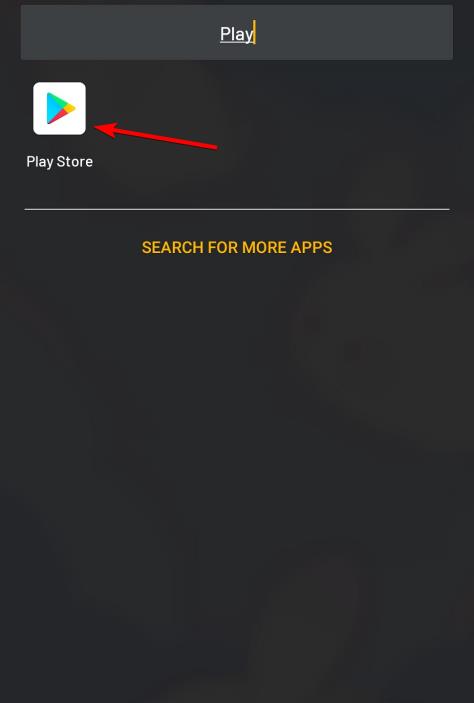
Scroll through your phone’s application list and select Play Store.
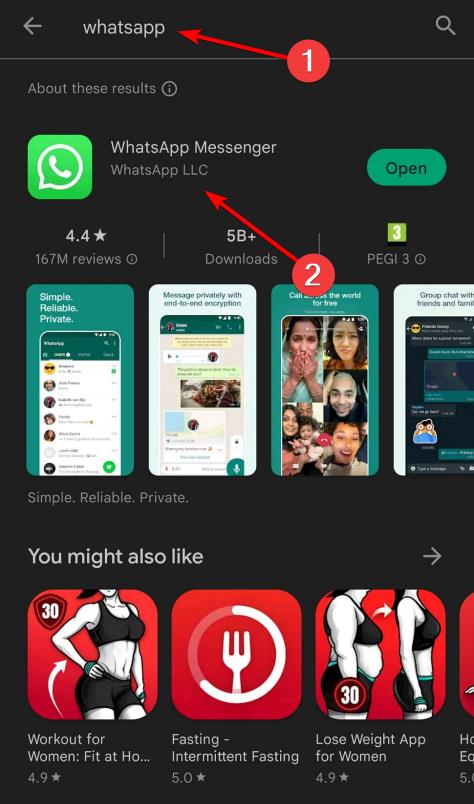
Inside the Play Store search for WhatsApp and select the first result from the top.
If the Update button is available, press it and wait for the update process to finish. This is one way to fix This version of WhatsApp has expired.
When seeing This version of WhatsApp has expired on iPhone you can do the same but go to Apple Store instead of the Play Store. You will find your WhatsApp app there, along with the Update button.
2. Restart your mobile device
Some people have stated that they could resolve their issues by rebooting their phones, which may appear to be a simple option.
It is recommended that you turn off and restart your phone at least once every week for various reasons. All of these serve a worthwhile purpose, including the following: preserving memory, avoiding system failures, improving overall performance, and elongating the life of the battery.
Thus, we recommend you restart your device if you get the This version of WhatsApp has expired issue, then check if it has been resolved.
Open Play Store or App Store on your mobile device.
Search for WhatsApp then tap it to open the page.
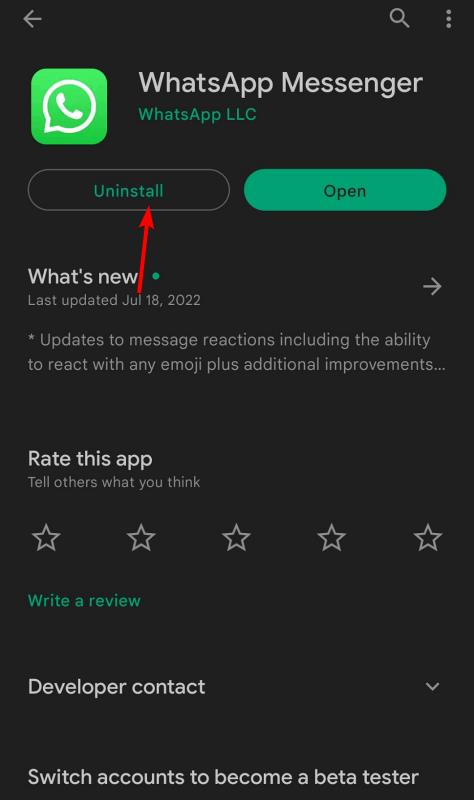
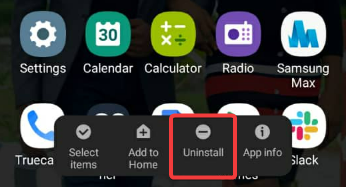
Click Uninstall and wait for the process to complete.
After the process is completed, you can simply click Install to download the app again then check to see if this solved your issue.
4. Change the date and time on your phone
Open WhatsApp and keep it running in the background.
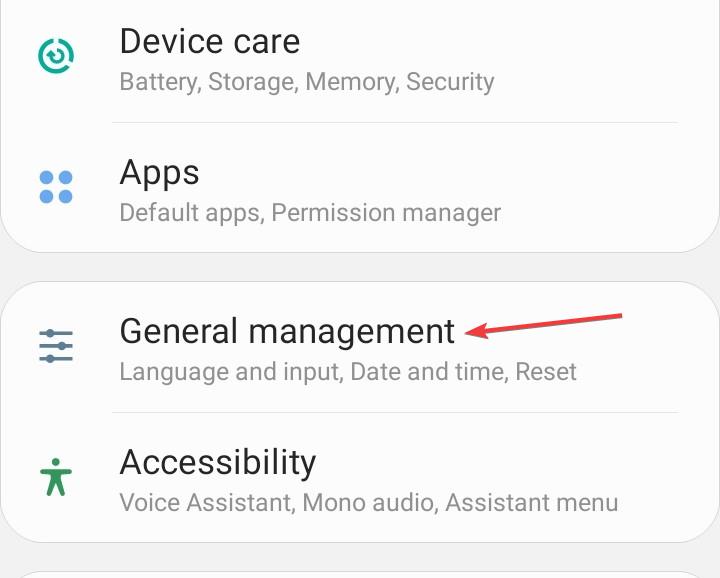
Now, go to Settings, and tap on General Management.
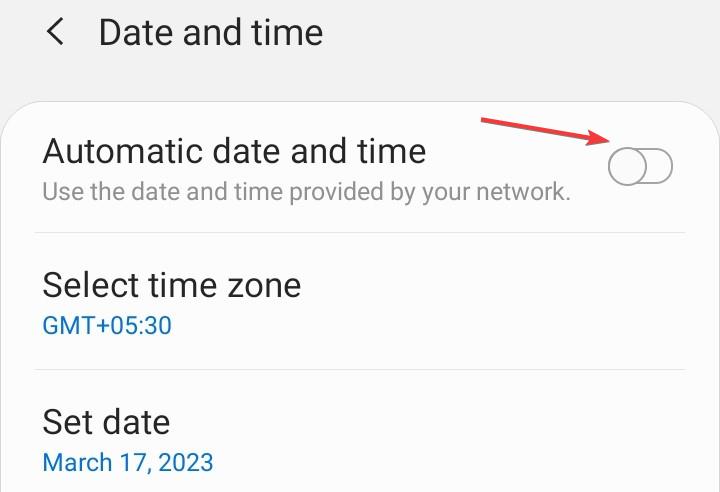
Select Date and time.
Disable the toggle for Automatic date and time if it’s turned on.
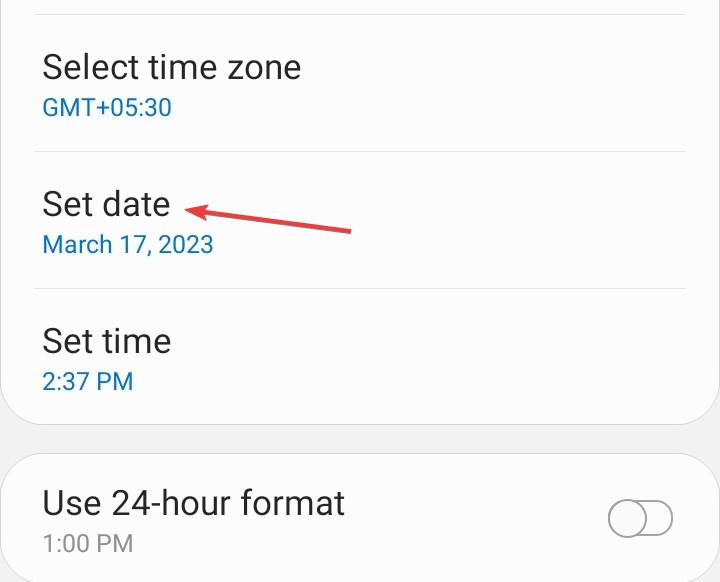
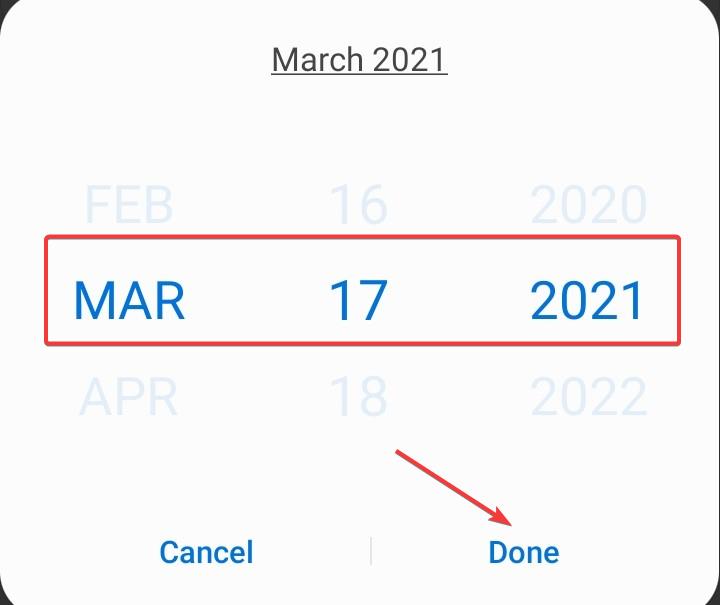
Now, tap on Set date.
Change the date and time from the settings on your phone to a date a year or two years in the past, and tap on Done.
WhatsApp will show you a notification, and you will receive some automated messages because of the change.
Wait for 5 minutes, and without closing the app, head to Date and time settings, then enable the Automatic date and time option.
This should make WhatsApp run normally.
Although we don’t recommend this method, it is an efficient workaround if you don’t want to update your WhatsApp app.
You can always use the web-based WhatsApp client if you have it connected to your mobile device.
This is a more reliable way, and we highly suggest it. Just navigate to WhatsApp for Web and start chatting.
What happens if I don’t update WhatsApp?
If you refuse to accept WhatsApp’s updated policy on user privacy, you may gradually lose access to most of the app’s services.
WhatsApp will constantly send out the reminders to accept the new policy, and after a few weeks, the business will begin disabling some of the capabilities for users who have not accepted the upgrade and have not accepted the new policy.
One of which is the ability to connect to the web version of the app to persuade you to perform the update.
After that, WhatsApp will begin sending what it calls persistent reminders. Once this begins, users won’t be able to see their WhatsApp conversation list, and the only functionality available to them will be the ability to answer or make audio or video calls.
When a notice from WhatsApp arrives on your phone, you will have the option to either read the message or respond to it.
Thus, if you want to continue using the app, it is recommended that you keep it updated to be up to date with its terms and conditions, and features.
In this article, we explored the best way to deal with the This version of WhatsApp has expired error message. Let us know if this guide helped you by using the comment section below.
Being an Insider for Microsoft means you are on the frontline of it all, taking each problem head on and battling against odds.
Microsoft is constantly adding new features and functionalities to its operating systems and its flagship browser, in the Canary Channel, which means work here is never done.
And, of course, the tradeoff of using Edge Canary and testing daily updates is a high risk of encountering nasty bugs and instabilities.
Since we’re on the topic of browser bugs, one of such issue hit Canary users real hard and made the browser incapable of opening.
Edge Canary no longer working after 105.0.1334 update
Yes, it has been quite a disaster for the Edge Insiders, after a large number of testers reported that Edge Canary does not open after installing the latest update.
As you would have imagined, the Redmond tech giant since quickly pulled the problematic release, leaving many users stuck with a botched browser.
And, if you are one of those unlucky insiders that had no say in the matter, there is a way you can bring Edge Canary back to life.
No, we’re not talking about raising it on top of your castle on a stormy night and hoping for some lightning bolts. We’re going to use the system to do so.
Remember that the easiest way to launch Edge Canary is to right-click its icon on the taskbar and select InPrivate Mode.
This will actually be enough to launch and update Canary once Microsoft releases a new version with the much-needed fix.
That being said, if you are in need of a permanent solution, restore the previous Canary version using the steps below.
Quick Tip:
With cutting-edge capabilities, Opera Beta is intended for early adopters and web developers to test new features, technologies, upgrades, and changes that Opera will deliver in feature major versions.
If you want to give this a try, you can download the normal version of Opera, create an account and then test the Opera Beta. Its similarity with Edge Canary cannot be overlooked, so it’s worth giving it a try.
Opera
Test the capabilities on Opera Beta until the issue with Edge Canary is resolved.
Open and unzip the downloaded file using archives software.
Open the folder inside the executable file and copy all the files inside it.
Go to C:\Users\Your username\AppData\Local\Microsoft\Edge SxS\Application\105.0.1336.0.
Paste the copied files and replace existing ones if necessary.
Microsoft Edge Canary should now launch without issues.
That just goes to show you that, as we said several times, using Canary as your primary browser is a bad idea, considering its unstable and experimental nature.
Microsoft allows running various Edge channels side-by-side, so the best option is to have a stable release for daily work and Canary or Dev for testing purposes.
This isn’t the only issue that Edge users had to deal with lately, as we’re sure you remember that the Microsoft team is also investigating a Collections Sync issue.
We have a lot of Edge-related articles you might want to check out, especially if this is your go-to browser. You can also catch up on the latest changes, among other stuff.
Remember that Microsoft has big plans for Edge, starting with making the browser less power-hungry and more likely to improve your entire system, due to cache compression.
Another quick and easy way to launch Windows PowerShell as an admin is by using the Power User Menu. In order to access the Power User Menu, right-click on the Start menu (Windows icon) on your Windows 11 Taskbar. Alternatively, you can use the Windows key + X keyboard shortcut to open the Power User menu right away.
When the Power User menu appears, click Windows PowerShell (Amin)
Once you confirm the UAC prompt, Windows PowerShell will open as an administrator.
3. Use the Run application
One of the fastest ways to open Windows PowerShell in administrator mode is by using the Run application. after using a couple of keyboard shortcuts, you can have a Windows PowerShell window open and running in no time, here’s what you need to do.
1. Open the Run application by using the Windows key + R keyboard shortcut. 2. Type powershell in the text box.
3. Use the Ctrl + Shift + Enter keyboard shortcut and confirm the UAC prompt to run and open PowerShell as an admin.
4. Switch to Windows PowerShell Admin
If you are already using PowerShell and want to switch to admin mode, just copy and paste this command and press Enter: start-process powershell -verb runas
Once you confirm the UAC prompt, a new PowerShell instance will open with administrator privileges.
Once you know how to open PowerShell as an administrator, you can start learning practical commands and automation basics in this detailed Windows PowerShell scripting tutorial designed for beginners.
You can also upgrade your experience by installing the latest version of PowerShell 7, and you can follow this guide to complete the setup easily: install PowerShell 7.
If you don’t use or have Windows PowerShell installed on your PC and feel more comfortable using Command Prompt, you can follow the first 3 ways in this guide to open Command Prompt in admin mode.
Obviously, you’ll need to type “cmd” in the Windows Search, using the Run application, and the Power User menu from the Start menu, but the steps largely remain the same.
If you are already using Command Prompt, you can change to Command Prompt (Admin). Just copy and paste this command and press Enter: powershell -Command Start-Process cmd -Verb RunAs
FAQ
How can I pin PowerShell to the Start menu for easy access?
Search for “PowerShell,” right-click the result, and select “Pin to Start” for quick access to launch it anytime.
Why would I need to run PowerShell as an administrator?
Running PowerShell as an admin grants elevated privileges, allowing you to execute commands that require administrative access to the system.
What if I can’t find PowerShell in the Start menu?
You can search for “powershell” in the search bar, or navigate to C:\Windows\System32\WindowsPowerShell\v1.0 to find the executable directly.
How can I ensure PowerShell always opens with administrative privileges?
Right-click the PowerShell shortcut, select Properties, go to the Shortcut tab, click Advanced, and check Run as administrator.
Once you confirm the UAC prompt, Command Prompt will open as a new instance in admin mode.
Which do you prefer to use Windows PowerShell or Command Prompt? Let us know which one you use and why in the comments!
When a service or tool is free to use, this means that you are the product. Or more specifically, the data collected on you and your behavior is the product.
Online privacy has been one of the hottest topics of debate in recent years. Naturally and rightfully, users want to better control the amount of data collected on them, but this is not always an easy task.
We all agree that it’s impossible to prevent user data collection while surfing the web. However, users can indeed limit the data collected, as well as decide which type of data tech companies can collect.
Browser privacy extensions are one of the best and most simple tools to use in order to control what data is collected on you.
Since Google Chrome is the most popular browser in the world, in this article we’re going to list the best Chrome privacy extensions to install in order to protect your privacy.
Quick Tip:
Instead of going through the process of adding extensions to Chrome, why not go for a web browser that comes with a VPN that is already included?
One such browser is Opera One, and the VPN that comes with it is very efficient, primarily because it is both free and because you don’t have a traffic limit.
Opera One
If you value privacy when surfing the Internet, choose Opera One as your default browser!
You should know that, while most Chrome security extensions claim to protect your online privacy, not all of them are as efficient or safe to use.
These tools are also very different from one another, and some might even end up doing more harm than good.
The extensions are written using web technologies like HTML, JavaScript, and CSS, and then distributed through Chrome Web Store.
It’s important to know that all users with a Google Account are able to add extensions to this source after developing them.
That being said, some Chrome extensions can be created with malicious code from the very start or they can be updated with malicious code once they gain a certain level of popularity.
So, to answer your question, not all Chrome extensions are as secure as you might think, even though you downloaded them from a safe source.
Do extensions slow down Chrome?
Yes, they do. Each extension adds bloat to the browser and therefore can eat up more of your PCs memory and slow it down.
Can I use a VPN with extensions?
Yes, but there are some limitations to know about. Installing a VPN plugin/extension for the Chrome browser will protect all your activity and data whilst using that browser, that’s it.
What are the best Chrome extensions for extra security?
Guardio is a lightweight Chrome extension that runs in your browser and secures everything within it to preserve your online privacy. Guard.io is a one-click installation to safeguard your privacy and keep you and your browser secure from attacks.
This Chrome extension is an anti-malware tool that both eliminates current malware and prevents new malware attacks from infecting your device.
It does this by preventing malicious websites, extensions, and push notification providers that attempt to install malware on your device.
The safeguard tool prevents invasive pop-ups and pushes notifications from appearing in your browser and warns you when your data has been compromised, allowing you to take action fast and avoid identity theft.
Guardio operates continuously monitoring, checking, and blocking off bad sites, extensions, and pushes, rather than doing scheduled scans.
Guardio
For a safe and private Chrome browsing experience, it quickly scans your device for viruses, abusive alerts, and information leaks.
AVG security is recognized worldwide as reliable virus protection. Their security extension doesn’t disappoint with its privacy tools.
This browser extension can protect you from phishing threats on different sites, malicious programs, and malware threats reported by others.
A great advantage of this secure extension is its community of +400 users which can rate any website security issues and warn others right away.
Plus, it can also stop tracking cookies from different sources that gather your data for marketing purposes. So test this exhaustive online privacy extension on Chrome and never worry about your data.
Privacy Badger is perhaps the most popular privacy extension for Chrome. The tool is a project of the Electronic Frontier Foundation, the same group that publicly criticized Windows 10’s privacy policy.
Privacy Badger blocks tracking tools and spying ads so that nobody can track your browsing activity without your consent.
The extension also blocks third-party trackers that load invisibly when you launch Chrome. Or as its creators describe it: Nothing can stop the Privacy Badger from eating cookies when it’s hungry!
Ghostery protects your online privacy and also shows you who’s tracking your web browsing. In this manner, companies can no longer build a profile about you in order to manipulate your behavior.
The extension allows you to control with whom you share your personal data. Oftentimes, trackers reduce your browsing speed.
By blocking them, Ghostery can also speed up your browsing. Another advantage of this tool is that it removes page clutter, so you can focus on the content.
This extension also focuses on offering you all the information you need to understand the different types of trackers and how they may affect your browsing experience.
Blur – It’s time to secure all your personal information
Blur is an excellent Chrome extension that really keeps your private information private. The tool allows you to secure all your personal information online.
Blur saves, encrypts, and organizes your passwords. The extension keeps you safe from hackers’ attacks.
For example, if a website where you’ve shopped gets hacked, your personal information, including your credit card info won’t even be there.
Blur also blocks companies from collecting data about your online activity, including non-cookie trackers.
Thanks to Blur, Facebook and other social media websites won’t be able to track you when you are not logged in.
Privacy Cleaner blocks websites and apps from accessing your private information and helps you regain control of your privacy.
This tool scans, tracks, and controls how apps access your personal information online. You can then approve, remove or report them. Privacy Cleaner allows you to clear your apps’ permissions in just one click.
Moreover, it also alerts you when apps gain access to your private information so that you can confirm your authorization or revoke permissions immediately.
MyPermissions, the company behind Privacy Cleaner guarantees that all of your information stays within the company’s accounts and is not shared with third-party groups.
ZenMate VPN encrypts your traffic and hides your IP address so that third-parties groups can’t steal your data and follow you online.
The tool also lets you change your virtual location and access region-restricted websites. The ZenMate VPN extension doesn’t affect your browsing speed, unlike many VPN services.
Moreover, installing this Chrome extension is much simpler than installing a classic VPN program. With just one click, the plugin installs and you’re ready to go online safely.
As its name suggests, Fair AdBlocker blocks ads, popups, malware, and tracking tools. This Chrome extension allows you to browse faster and protects your privacy at the same time.
You can use Fair AdBlocker to block autoplay video ads, YouTube ads, expanding ads, interstitial page ads, Facebook ads, Webmail ads, search ads, and more.
You can always choose to whitelist the pages that you wish to support. Fair AdBlocker doesn’t track you in order to prevent others from tracking you.
As its name suggests, this Chrome privacy extension is brought to you by the creators of DuckDuckGo. With the help of this extension, you can protect your personal data and privacy as you browse the Internet.
The extension blocks hidden trackers on the web pages you visit and loads encrypted versions of respective websites when possible.
When you visit a website with poor privacy practices, you will be notified about them.
DuckDuckGo Privacy Essentials also offers you information about the advertising networks tracking you over time. In other words, you can see who’s trying to track you.
Once you’ve installed the extension, you’ll see a toolbar icon that shows you an A-F Privacy Grade rating.
This score is generated automatically and represents the sum of all the hidden trackers, encryption methods, and website privacy practices.
Many websites use unencrypted HTTP protocol in order to show you various information. In case you’re not familiar, the HTTP protocol is an unencrypted protocol, which means that a third party can easily intercept your data.
This means that if you register to a specific website that uses HTTP protocol, all your sent information can be intercepted by malicious users.
This can be a safety concern, and in order to fix this problem, it’s advised that you always use an HTTPS connection. This connection is encrypted, and third parties won’t be able to intercept and steal your data.
Many websites will redirect you to an HTTP version of their website, and this is where HTTPS Everywhere extension comes in handy.
The extension is created by The Tor Project and Electronic Frontier Foundation, and it will force any website that you visit to use the HTTPS protocol.
Bear in mind that this extension can sometimes block crucial website elements, so if the website you’re visiting isn’t rendered properly, you’ll have to disable HTTPS Everywhere.
Overall, HTTPS Everywhere is a great extension, and if you want to enhance your privacy, be sure to check it out
Tipically, Google Chrome extensions do not work in Incognito mode. But here’s how you can bypass that:
Open Chrome, and click ⋮ at the top of any window or tab, then Settings.
Select Extensions.
Click Details for the extension you want to allow in Incognito Mode.
Toggle on Allow in Incognito.
These are the best privacy extension available for Chrome. As you can see, this list includes several types of privacy extensions.
You are naturally going to look for the best Chrome privacy extensions VPN, the best security and privacy extensions for Chrome, but just make sure you don’t infect your device.
Also check out the Privacy Test extension for Chrome, for an extra layer of safety in this ever-chancing world full of malware and malicious third parties.
Some offer VPN-like features, while other target specific tracking methods, such as your search history. Select the extension that best suits your needs.
Blocking certain websites is a necessity in some cases as you may not want children to access certain content on the Internet, for instance.
While blocking websites on other browsers is relatively easy, this operation is not as apparent on Microsoft Edge.
Currently, no direct option allows you to block certain websites on Edge, as Microsoft is still tweaking and upgrading its browser.
How do I set parental controls on Microsoft Edge?
Microsoft Edge has more parental control features, in contrast to Chrome. Most of these settings are nonetheless controlled by the Windows Family Group function due to Edge’s flawless integration with the Windows OS.
Here are some tips for using the Edge browser to make your kids’ internet use secure.
Block autoplay on media – To prevent your children from being surprised, you may also disable Edge’s automatic video playback feature.
Use Windows Security’s SmartScreen – To detect phishing websites and malware, Edge integrates with SmartScreen. Although SmartScreen wasn’t created expressly as a parental control function, it certainly fulfills the need.
Use Family Options – This part of Windows Security helps you monitor and regulate kids’ internet use. For example, you can watch what sites they visit and how much time they spend on their devices.
Can I block all websites except one in Microsoft Edge?
Yes, it is possible. If, for some reason, you want to restrict access to everything but one, then the browser can allow you to configure this setting.
How do I block websites on Microsoft Edge?
1. Use another browser
Plenty of browsers used to be completely useless when it comes to privacy. But things had changed with time, and secure browsing became possible.
Perhaps not surprisingly, Opera One is the best choice for parents trying to filter inappropriate content and keep their children safe online.
Besides, it’s an excellent choice for fraud and malware protection, while the included ad blocker stops the countless malicious ads targeting your PC.
As for Opera One’s virtual private network, remember that data sent back and forth is encrypted and routed through a remote server so that you and your loved ones are always safe from prying eyes.
Opera One has a lot to offer in terms of organization, workspaces, tab islands, and native AI, making it not only the safest choice but also the smart one.
Opera One
Since it’s a privacy-oriented browser, it’s easy to configure blocked websites
Go to the path below: C:\windows\System32\drivers\etc
Find and select the hosts file. To make the search easier, click Drivers, press CTRL + F, and type hosts. Then, double-click on the search result.
Right-click on it and click on Open with.
Click on Notepad and then OK.
To block a specific website, add the following sequence on the Notepad hosts file: 127.0.0.1 the website's address
There is no limit regarding the number of websites you can block. Simply type the sequence 127.0.0.1 followed by the website’s address, press Enter to go to the next row, and type a new sequence.
Save and close the Notepad hosts file.
If you try to access one of the websites you put on the block list, Edge will inform you it can’t reach that page.
The good news is that this method also blocks the respective websites on other browsers. This relatively simple solution will help you block YouTube or any other website on Edge.
Also, you can use a program that will block unwanted websites and content for more browsers, including Microsoft Edge.
FocalFilter is a free tool that will help you focus on your work by blocking websites that could distract you.
It is simple to use, just copy the site’s address into FocalFilter and set up a timer for the period you want a specific website to be blocked.
If the temptation is too big, the app has a response to this. You can’t modify the settings of FocalFilter before the timer runs out, and uninstalling the program will not remove the blocks.
This is a perfect tool, especially if you need a personal blocklist in Edge, so be sure to try it out.
In the browser’s Kids Mode, guardians and parents may choose which web pages their kids can access. You may activate Kids Mode in Microsoft Edge by tapping your profile symbol in the app’s top-right. The Kids Mode for Microsoft Edge is designed for users between 5 and 12.
These are three simple ways you may block websites on your browser. Additionally, you may try installing the block site extension on Edge. This is also an easy alternative you may try.
If you still use Windows Vista and are looking for a browser that can handle the tasks well, we got you. In this guide, we’ll show you how to download and install Opera for Vista in just a few simple steps.
Many users reported that Microsoft Sway is not working on their PCs for unknown reasons. The most common cause of Sway not working is issues relating to Microsoft servers; Microsoft Sway may be down. In such cases, sway.office.com would have refused to connect. The latest was incident SW806219. In these cases, you have not much to do except waiting it out. However, there are a few things you can do.
How do I fix Microsoft Sway when it doesn’t work?
1. Use the Microsoft Store app troubleshooter
Click on the Start menu and open the Settings app.
Under the Systems menu, select Troubleshoot from the left pane.
Click on Other troubleshooters.
Now under Windows Store Apps and click on Run.
Once the troubleshooter starts, follow the instructions on the screen.
After the troubleshooter is finished, check if the problem is still there.
If the Microsoft Sway app isn’t working, you might fix it by using the Microsoft Store app troubleshooter.
2. Use the Sway website instead
Optional: Log out from OneDrive and close all browsers.
In case of Microsoft Sway app isn’t working, you can always use the Sway website as a workaround.
3. Try using Sway in Private/Incognito mode
Open your browser.
Click the Menu icon in the top-right corner.
Now choose the New incognito window.
After the Incognito window opens, try accessing the Sway website.
If this still doesn’t solve your problem, check our other solution below.
The interface will be different depending on your browser; however, they should all look very similar. We’ve used Google Chrome as an example.
4. Wait for Microsoft to address the issue
If Microsoft Sway is not working, the issue may be related to Microsoft and their server, not your PC.
In that case, you’ll have to contact Microsoft support and explain your problem. If the problem comes from their side, wait for them to fix it.
Make sure you contact the Microsoft support team, who will guide you through everything you need to know and do to solve the issue or inform you regarding their problem.
5. Switch to another third-party program
Microsoft Sway isn’t the only software tool that you may use to create and share interactive personal stories and presentations. There are many others available; you just need to choose one most suited to your preferences.
When used correctly, most professional presentation software allows you to create fascinating presentations with minimum effort and leverage templates’ power to focus and polish the material to be delivered.
This issue is not unrelated to other problems you may face with the service. In most cases, it could be a server-side error; you can only wait until Microsoft fixes it.
If this is not the case, you should try the other solutions recommended in this article. They would also come in handy.
Nonetheless, the quest for better and more accessible presentation software resulted in the wide range of solutions we now have. Even though there are so many other possibilities, don’t be too concerned with the software at first.
Instead, concentrate on communication and storytelling, and choose software based on the storyline you wish to tell. But don’t worry; even if you’re not a storyteller, the professional presentation tools will give you everything you need to shine.
This isn’t the only issue, and many reported that Microsoft Sway is lagging, but luckily we have a guide dedicated to this issue.
There you go, several quick and easy solutions that can help you solve problems with Microsoft Sway. Please let us know if you found our article useful by leaving a comment below.
FlexiSpot has been making a name for itself in the custom standing desk industry with its wide variety of offerings that range from L Shaped standing desk to single use height adjustable mobile desks.
Anyone looking to upgrade their home or fleet office setups couldn’t start at a better business than FlexiSpot which expands its customization offerings into the fit and finish of each desk order that include chipboard, bamboo, fiberboard and solid wood desktop options, various frame colors, differing keypad arrangements and more.
As someone who has self-diagnosed as suffering from analysis paralysis, the Pro Plus E7 Standing Desk from FlexiSpot hit the right balance of a premium experience for a minimalist office aesthetic.
Look and Feel
Despite the moniker of Pro Plus, the E7 is among the most straightforward offering at FlexiSpot. Unlike other desks that offer discrete drawers and shelving options, duplex desktops, and adjustable drafting tops, the Pro Plus is a basic single top desk arrangement.
For anyone looking to begin a minimalistic office revamp, the E7 is a great option that comes with a discrete cable management tray built in and a wide 43.4″ to 66.99″ canvass to be arranged to content.
The other standout feature of the FlexiSpot E7 is the thicker leg columns used in the assembly. While it adds a lot of weight to the packaging of the E7, the wider leg arrangement led to the smoothest height adjusting experiences I’ve had with an adjustable standing desk.
There were no stutters or snags as it moved up and down the columns and the carbon steel material used for the legs doesn’t seem likely to bend, warp, or deteriorate any time soon.
No matter the height, the E7 remained strident and as immovable as a solid oak desk from the 70’s, where I was able to use make use of the old too-much-coffee-in-the-coffee-mug test.
As described, I was able to place an overpoured cup of coffee on the desk and watch as not a single drop breached the top rim while adjusting the height or even during heavy handed typing.
I got the smallest E7 that’s offered at 43.4″ x 22.8″ and it fits snugly in my small home office. Other options include the E5 and E1 which represent difference in load capacity, monitor support and height range with the E7 being the top tier frame at 355lbs load capacity, the E5 at 220lbs and the E1 at 154lbs.
Lastly, there is the LCD keypad panel to discuss. In addition to its clear and easily readable monochrome digital numbering, the keypad is also programmable with 4 height presets and houses a USB-A charging port on the premium keypad options.
I do wish it was a USB-C port rather than the USB-A but it’s will probably not be a deal breaker for most people who still use USB-A for most devices or own a USB-C converter.
As a parent of two 3-foot-tall children who think button pressing is the bee’s knees, there is fortunately a child-lock button to keep your desk from being a barbie elevator.
Summary
There are plenty of standing desk options that come in under the relatively steep price for the Pro Plus E7 and fortunately, FlexiSpot makes many of them, however, FlexiSpot does not live in a vacuum and some of the lesser-known Amazon competitors can lean on their lower prices to seem competitive.
Fortunately, FlexiSpot is constantly putting the E7 on sale for various holidays and seasonal discounts.
However, if you value quality material, customization, and a 15-year warranty, I doubt you’ll find a better standing desk out there.
My only gripe would be that it would be nice to see a Pro Plus with a starting width smaller than 48×24.
You probably enjoy streaming and are wondering what the best browser for Sling TV is. So let’s give you all the info you need.
Since the 90s, browser tech has evolved, increasing its use case. From gaming to streaming, there is just so much utility they afford.
Streaming platforms like Sling TV have taken advantage of this tech. Sling TV is a fantastic streaming service; no wonder is so popular since it offers access to more than 30 channels of cartoons, movies, TV shows, and many more.
Your viewing experience will be enhanced on the right browser, and we will give you our top recommendations.
Can I watch Sling TV on a web browser?
Yes, you can watch Sling TV on your browser without doing anything more than using a browser that offers good quality streaming.
The process is simple. Launch your browser and navigate to the Sling TV service. Once you log in, you can start viewing.
Moreover, in this article, you will find a list of the best browsers for watching Sling TV to get enhanced stream quality.
Which browser is best for streaming?
There are a lot of excellent streaming browsers. Users may love using the new and improved Edge on Windows, while on Mac, you may use iOS.
However, we generally recommend Opera One for streaming. It has many great features, and we will discuss them more deeply in the article.
Google Chrome – Huge number of extensions and add-ons
Today, Google Chrome has a huge user base. It often offers the most comprehensive HTML5 support and combines the most recent web technologies to provide the finest video playback.
One of the quickest browsers for streaming videos is Chrome. Users may also install a variety of fantastic streaming video extensions to Chrome, like Magic Actions, YouTube Plus, Turn Off the Lights, and others.
The downside is that the browser is infamous for being a memory hog, so you must plan for adequate memory and a modern device to get the best of Sling TV streaming on this browser.
It is, however, a very fast browser and one we also love to recommend.
We hope one of the browsers mentioned above will also be your choice when watching Sling TV online. Of course, these are not the only Sling supported browsers, but they are about the best browser for TV streaming.
Opera GX is the go-to browser for gaming, featuring exclusive and high-quality titles. In fact, Opera GX has a ton of exclusive browser games on GX.games website. Many of them are free to play.
Today, we look at the best games you can play on Opera and Opera GX, from addictive arcade classics to immersive RPGs and competitive multiplayer games.
Starting off the list is Operius, a game that you can play right now on Opera GX. All you have to do is enter opera://operius into the address bar of Opera GX and hit Enter on your keyboard.
It’s a lot like the old Atari game, Tempest. You’re a spaceship just shooting 3D shapes as you go through a tunnel at high speeds and collecting powerups. It is simple, but really addicting.
Friday Night Funkin’ GMR is a remake of the original game from Newgrounds.
It’s a rhythm game where you control a character named Boyfriend from a bunch of guys that try to steal his Girlfriend. The game resembles Dance Dance Revolution a lot.
If you’ve ever played Plants vs Zombies, you’ve essentially played this game. Notice me Leena-senpai is a tower defense game where you have to help the princess named Leena defend the castle from monsters.
You got a swordswoman slicing zombies, mages shooting magic from the back, and archers firing at ghosts. Winning is simple. Defend the castle from zombies, dragons, and ghost samurai.
Trial by Night is a mix between a tower defense game and a survival horror game. You play as a mage and you’re tasked with defending a village at night from a horde of ghouls, zombies, and other monsters.
The goal is to reach 15 nights of survival. During the daytime, you buy all the defense you’ll need to survive the monsters. And you can unlock special abilities by buying certain buildings.
GX.games has a decent amount of rouge-like titles. Treasures of Tristenwald is one of the best. If you’ve ever played Hollow Knight or a Metroid game, you’ll feel right at home here.
You play as a vampire lady traversing the forest of Tristenwald looking for treasure. Wielding a giant purple sword, you hop from platform to platform, exploring caves, and looking for treasure.
Rounding out the list of the best free games on Opera GX’s browser is BlastNet.
The game has you play as a green diamond trying to destroy the enemy’s red shapes; that’s it. That’s all you have to do: survive multiple waves to try and get a high score. But it’s so addictive.
There are different versions of this game available on the internet, but this is more of a remake.
The music nor the graphics are as good as the base game, but it still brings over the fun gameplay. But what is it? It’s Metroid-style RPG title where you play as a cute robot who finds himself stuck in a cave.
You can’t have a list of classic games without mentioning the big granddaddy of all first-person shooters: Doom. You can play the title on Dos.zone and you don’t have to pay a single dollar.
Unfortunately, there is no multiplayer with this version of Doom. That said, it’s still one of the best versions of Doom you play on the internet.
There are several ways you can play Pac-man including a Google Doodle version. But we recommend the Pacman.live version.
You can play the original Pac-man plus Ms. Pac-man. And there’s a new game starring a character named Cookie-man. Not sure who this other character is, but it’s still fun.
A reimagining of the classic arcade game Snake, Slither.io has you play as a brightly colored worm who needs to eat these pellets.
The goal of the game is to create the biggest possible worm and get the highest score. Like some of the other entries on this list, it’s simple yet addicting. What we find the most fun is competing with other people.
In Spelunky, you play as an unknown treasure hunter descending underground trying to collect as much treasure as you can while avoiding traps and enemies. Each level is randomly generated meaning everyone has a unique experience.
No two playthroughs are the same and it keeps the game fresh no matter how many times you play.
Worlde is easy to play. You have six guesses to figure out a five-letter word. Each time you incorrectly guess a word, you’ll get a clue as seen by highlighted letters. If the letter is green, you got it in the right place.
If the letter is yellow, it means that the letter is the word but located somewhere else. When Wordle first came out, it exploded in popularity. While the hype has settled, the game still has a ton of fans.
If you want to play an MMORPG without paying a cent for a subscription, you should try out Hordes.Io.
You can play as either a warrior, mage, shaman, or archer. Player vs player combat is a major draw as it can happen at any time. Don’t let the simplistic style fool you; it’s anything but easy.
Quick, Draw! is a pretty interesting game created by Google. It’s similar to Pictionary where an AI has to guess what you’re drawing. It can be as simple as an object or more abstract like an idea.
You only have 20 seconds to complete a drawing according to a random prompt given to you by the website. Unfortunately, you can’t pick your own word. And each time you play, the AI gets smarter.
Doomed to Hell is a shooter where you play as Rose, a skeleton trapped in hell who needs to fight off a horde of demons to escape.
It’s a lot like Treasures of Tristenwald where you fight off against a bunch of monsters trying to get a high score. You get money to buy weapons to get demons faster. By killing demons faster, you get more money for more weapons and it goes on forever.
Granblue Fantasy is a turn-based RPG that has a group of adventurers go on a globe-trotting journey to defend the evil empire and save the world from giant monsters. You don’t have a cent to play this game, but spending money does speed up the process.
The meaningful process can be rather slow if you don’t pay. But if you pay, you’re rewarded with a fantastic story and beautiful art.
If you liked Hordes.io but are looking for something more, you should try out Runescape. It’s 20-plus years since its launch, the title has grown to house over 200 million accounts.
The game itself is free, but you can pay for an optional membership that unlocks more content like skills and new quests.
Forge of Empires is an epic free-to-play browser game that’s like a mix between SimCity and Clash of Clans. You start with what essentially are cavemen and you begin to create an empire them, hence the name of the game.
The world goes through all of the major eras of human history and into a fictional future. You go through the Middle Ages to the Industrial Age and into the far-off future of colonizing space.
It’s similar to Forge of Empires. You start off with a settlement that you’re tasked with growing. And with that settlement, you are off and conquer the other players.
The game can be pretty tricky and require some luck, but nothing is more satisfying than managing that total conquest.
What is the best browser to use for gaming?
Well, Opera GX is certainly the best browser for gaming. As we just showed you, GX.games has a massive library of games exclusive to the browser. On top of that, the browser comes with features that enhance gaming such as reducing CPU usage.
Besides Opera GX, Chrome is also pretty good. It’s not a gaming browser but does have features that gamers would like. For example, it has a built-in password manager for protecting your Runescape account and you can sync passwords to other devices.
Firefox is also pretty good thanks to its security features. Vivaldi is recommended for its advanced tab management.
Feel free to comment below if you have any questions on Opera, other browsers, and video games. Also, leave comments about reviews you’d like to see or information on other web browsers.
Many users might install some of the best emulator software to play retro games from the 1980s and 1990s. However, you don’t need to install any software to play games these days.
With the improvement in technology, virtually everything is available online. This includes sites with a game emulator that allows you to enjoy your classic games on your browser.
The gaming option available includes a plethora of NES, Master System, Genesis, SNES, DOS, Game Boy, and arcade retro games. So, you are not short of options for retro games online unblocked.
This guide has gathered the best retro games you can play with your friends online for absolutely nothing.
Can new computers play old games?
New computers can play old games effectively. Some old games have been improved to work with modern computers.
However, if the game cannot work natively, you can use an emulator. Lastly, some of these old games are now available on emulator websites to play online.
What is the best browser for gaming?
Playing games within your browser, no matter how retro or simplistic they may look, will always feel better when the interface through which you’re doing it has an intense gaming vibe.
The best browser for gaming is undoubtedly Opera GX. Being the first browser specially created for gamers, Opera GX boasts features that will take your gaming experience to the next level.
This browser has everything from a clean and high-quality interface to gaming-centered integrations like Twitch and Discord. Lastly, it excels in all the features that make a modern browser. So, you can always use it as your default.
Opera GX
Opera GX is the world’s first and only gaming-oriented browser, so use it to play your online games in style!
Pac-Man is a points-scoring game originally launched in the arcades during the 1980s. This is one of the highest-grossing arcade games in history that won the hearts of players worldwide.
It’s a simple maze chase game in which players clock up scores by gobbling up all the dots and fruits on its levels. The simplicity of Pac-Man, like other retro games, is in many respects its beauty.
There are loads of websites and retro games online stores you can play Pac-Man games on. To play the original Pac-Man, check out the Original Pac-Man site. Or you can play a Google doodle variation of Pac-Man.
The Legend of Zelda: A Link to the Past was one of the best games on the 16-bit SNES console.
This is one of the RPGs of Nintendo’s Zelda series, and for many fans, it remains one of the best additions to the franchise. Many Zelda fans can now play this epic RPG all over again online on retro games websites.
You can play Zelda: A Link to the Past at numerous retro game sites that include SNES emulators. Play Emulator is one of the good websites to play A Link to the Past at. That website also consists of many other Zelda games for fans of the series to play.
Super Mario World was the launch title for the SNES console, and it’s one of the best 2D platform games ever. This Mario game introduced Yoshi, the dinosaur for players to ride on through levels.
The game includes a map with 96 levels for players to discover and play through. It was a big leap forward from the more linear platform games of its time.
Doom defined the 3D first-person shooter genre on Windows and consoles and the best multiplayer online retro game. This is a first-person shoot ’em up in which players blast through demonic hordes throughout a series of levels.
It was one of the first games that seriously embraced online multiplayer gaming during the earlier years of the web. So, Doom was the game that redefined PC gaming a few years before Microsoft launched Windows 95.
Doom got released on lots of gaming platforms. You can play the original DOS Doom at Legendary videogames ONLINE. Play Emulator includes five of the Doom games for consoles.
This is a 1980s arcade game in which players jump barrels tossed down levels by Donkey Kong to rescue the princess. Donkey Kong has its place in the gaming hall of fame primarily because it was the first game to include Mario in it, and is currently the best free online retro game.
This was one of Nintendo’s very earliest game titles from the big N’s foremost game designer Mr. Miyamoto. Aside from being the first game with Mario in it, it also started the Donkey Kong game series.
Sonic the Hedgehog was the first game in SEGA’s Sonic series, launched in the early 1990s.
This is a 2D side-scrolling platform game comparable to the early Mario titles. However, Sonic the Hedgehog has faster-paced gameplay than many of the alternative platform games of its time.
This was the game that sold the SEGA Genesis. The original Sonic the Hedgehog online game will provide a lot of nostalgia for fans of the series.
Tetris is another of the most widely played games in gaming history. This is a game of Russian origin in which players rotate falling blocks into lines to amass points and stop them from stacking up.
The game’s designer originally released Tetris on the Electronika 60 in the 1980s. However, the golden age of Tetris was when Nintendo had rights to the game and distributed it with the Game Boy.
Tetris was an ideal game for gaming with the portable Game Boy.
There are many variants of Tetris you can play online. If you want to play the classic Tetris Game Boy game, check it out on the arcade spot (linked in a subheading).
You can also play a color variant of the game on the Tetris website.
There are some online multiplayer retro games you can play with your friends on your browser. A good example is the PiePacker game which can be played with up to three friends.
On the other hand, some other retro online games require you to download an emulator software before you can play with friends. If it is just for fun, playing from one of the emulator sites should do the job.
Those are just a few of the great retro games online. You can have loads of fun on your browser with your friends playing the classic games we have listed in this guide. So, be sure to explore all the options there.
Google Chrome is one of the best browsers for all devices, with millions of users. It excels in the aspects that matter most to users, boasting ease of use, security, and browsing speed.
However, it is not free from the occasional error. One of such is the Chrome not showing most visited sites issue.
This problem comes in different variations, as reported by users. Below are some of the issues users face with their most visited sites:
Google Chrome most visited thumbnails not showing: This might can happen if Chrome clears off your browsing data when you exit the browser.
Chrome new tab page not showing most frequently visited pages: This issue can occur if Chrome is set not to store any cookies on your PC.
GoogleChrome frequently visited sites disappeared, not showing, sites missing – Sometimes this issue can occur due to your graphics card drivers.
Chrome most visited gone – According to users, this can happen if Chrome is out of date.
Irrespective of the cause and the variation of the problem, we have gathered the proven solutions that will help you get your favorite websites back.
Why does Chrome not show frequently visited sites?
The Google Chrome frequently visited sites missing issue can be caused by varieties of factors. It revolves around issues with your browser and not the sites.
Below are some of the popular causes:
Outdated browser
Wrong browser settings
Buggy browser
Quick Tip:
While there are many Chrome alternatives, none comes close to the Opera One browser, based on the same Chromium engine. Even so, Opera One boasts more customizations when setting up most visited sites, without loosing it’s speed.
This browser automatically adjusts its most visited website preview page as your habits change. It also allows to better organize your browsing with Workspaces, Tab Islands, built-in AI and a great modular AI-ready design.
Opera One
A lightweight browser that cleverly displays your most visited websites on the launch tab and let’s you resume your browsing.
How do I make Google Chrome show the most visited websites?
1. Update Chrome
Click the menu button in the top-right corner.
Now, choose the Help option.
Select About Google Chrome.
It will show if there is any update to install.
If Google Chrome is not showing your most visited sites, the problem might be related to an issue with your outdated browser version.
Although Chrome automatically installs updates when you restart your browser, you can easily miss out on some if you don’t close your browser often. So, updating and relaunching your browser should fix the issue.
2. Ensure Chrome isn’t clearing your history
Launch Chrome and click the menu button in the top right corner.
Choose Settings from the menu.
Click the Privacy and security option on the left pane.
Select Site settings.
Choose the Cookies and other site data option.
Finally, toggle the switch for Clear cookies and site data when you close all windows backward to disable it.
After disabling this option, Google Chrome will store cache and history on your PC and you’ll be able to see the most visited websites once again.
3. Visit one of the websites on the Most visited list
Sometimes, it is not that the top sites Google Chrome doesn’t show most visited websites properly. Users reported that websites are on the list, however, no the websites don’t have any thumbnails.
Simply visit any website with a missing thumbnail by clicking it from the Most visited list. When the website opens, use it for a couple of seconds.
After doing that, that website’s thumbnail should be updated in the most visited list. Do this for all websites on the list in order to update all of their thumbnails.
4. Check the new page zoom in level
Open Chrome and click the menu button.
Ensure that the Zoom option is at 100%.
Click the + or – sign to increase to set the zoom level.
According to users, if Google Chrome is not showing the most visited sites, the issue might be your zoom level. Sometimes users zoom their pages in order to see better or simply by accident.
In this case, just set your zoom level back to normal. Aside from the steps above, you can press Ctrl and +/- keys to zoom in or out the page faster.
5. Reset Google Chrome
Click the menu button on Chrome and select Settings.
Click the Reset and clean up option.
Select Reset settings to their original defaults.
Click the Reset settings button to confirm the action.
After Chrome resets to the default, your extensions will be disabled, cookies and cache will be cleared, and settings will be returned to normal. With this, you will be able to remove the browser data that could be causing your favorite sites not to show.
It is important to note that your important data like passwords, bookmarks and history will not be affected. So, you have nothing to lose.
6. Reinstall Google Chrome
Press the Windows key + I to open the Settings app.
Select the Apps option.
Scroll down to locate Google Chrome and right-click on it.
Click the Uninstall button.
Now, go to the official website to download the Chrome installer.
Click the Download Chrome button.
Finally, click on the downloaded file and follow the simple onscreen instruction to complete the installation.
If Chrome is not remembering your most visited sites, it might be due to a buggy browser. While the Windows uninstaller does a good job, using one of the best uninstaller software makes the process faster and more effective.
How do I save frequently visited sites on Google Chrome?
The easiest way to add a frequently visited site to the list of thumbnails on the Chrome new tab page is to delete one of the icons there. This is because when you delete one of the thumbnails, the next most visited site on the list replaces it.
Another way is to bookmark the site. This is more preferable, as you can access the site from various devices.
Not being able to see your most visited websites can be frustrating. But with the right information such as this, you should be able to solve it easily.
If you’re a web developer, you’ve probably heard about HTTP2 and its benefits. But how do you know if your browser supports HTTP2? The protocol has been around for years but only recently began to gain traction with web browsers and server software providers.
Most users are familiar with HTTPS, so is there a difference between HTTPS and HTTP2? HTTP2 is a protocol designed to improve web performance by enabling faster connections, more streamlined data delivery, and reduced latency.
It is the latest version of the HTTP protocol, which is the language web browsers and servers use to communicate with each other. In simple terms, it makes your web browsing experience faster, more secure, and more efficient.
This is a common question for developers interested in trying out HTTP2. There are no universal tests that prove that your browser supports HTTP2 because it’s not a standard feature.
It’s only supported by some browsers and servers, so you’ll need to check whether your client software and the servers you want to access support it.
Is HTTP2 faster than HTTP?
Yes, HTTP2 is faster than HTTP. The protocol allows for multiplexing and header compression, which results in fewer round-trips and less data transfer overall. HTTP stands for Hypertext Transfer Protocol, and it’s how computers send data over the internet.
When you click on a link on your browser, it sends a request to the server that hosts that website and asks for the website’s HTML code — the code that makes up what you see on the screen when browsing a site.
The server then sends back all those pieces of code in one big file called a response. This process can take time: The more information your browser needs from the server (for example, if there are many images), the longer it will take for everything to load completely on your screen.
HTTP2 is a major upgrade to HTTP. The main goal for this new version of HTTP was to reduce page load times by increasing speed, efficiency, and security.
A browser that supports the HTTP2 protocol can establish a single connection to a server, send multiple requests, and receive multiple responses.
This means that pages load faster than before because there’s less overhead involved in establishing new connections for every request. Opera One is supported by all major operating systems, including Windows, macOS, and Linux.
It is, however, important to note that not all versions of Opera One are compatible with HTTP2. Earlier versions are incompatible so ensure your version is anywhere between version 28 to 53.
Additional features:
The browser comes with a built-in ad blocker and VPN feature
Battery saver option that allows users to reduce CPU usage and save battery life
Built-in AI and modular AI-ready design
Opera One
Browse fast and error-free and get up-to-date features for quick social media access, customized workspace, and more!
Chrome’s biggest advantage over other browsers is its speed and performance. Users can expect faster page loading times and better overall performance when using this browser.
If you’re looking to increase performance and reduce latency, Google Chrome is your best bet from version 41 and above. Chrome also has a great developer toolset that lets you easily monitor performance, debug and test your site with ease.
Microsoft Edge is an excellent choice for users who want a reliable web browser without worrying about security issues or privacy concerns. From version 12 upwards, you can enable HTTP2.
Edge was released as part of Windows 10 and was designed to be an alternative to Internet Explorer. In fact, Microsoft has stopped updating Internet Explorer and recommends that users switch to Edge instead.
Its High-Performance Mode allows Microsoft Edge to use a higher number of concurrent TCP connections per hostname than other browsers do.
This can give Microsoft Edge an advantage when loading large images or other media-heavy content from websites that take advantage of HTTP/2’s multiplexing capabilities.
Firefox is also a very popular browser, especially among developers. It is constantly evolving and is one of the few browsers that support HTTP2, starting from version 36.
If you’ve ever been frustrated by slow-loading pages or sites that don’t work properly on your computer, then you’ll love the memory usage improvements in Firefox.
Safari is already one of the fastest browsers on iOS devices, so it makes sense that Apple would want to make it even faster with HTTP/2 support but only from version 9 upwards.
It also uses less memory and fewer system resources than other browsers, so you never have to worry about lagging or high CPU usage.
Some browsers support HTTP2 by default, but you will have to enable it manually in other browsers. To enable HTTP2 on your web browser, you’ll need to check browser support for HTTP2 first. In most cases, this is as simple as updating your browser to the latest version.
If your browser already supports HTTP2, you should see a green padlock icon on the left side of the address bar. If not, you can either update to the latest version or use an alternative browser that supports HTTP2.
You may also be interested in browsers that support HTML, so don’t hesitate to check our article for more recommendations.
Let us know your preferred browser for HTTP2 in the comments section below.
There are many web browsers available that you can download, and each one serves the needs of different people.
Notably, there are browsers for more privacy-focused people. You can also download browsers that facilitate productivity and offer many features but are not that good at securing your data.
Google Chrome is one of the most widely used web browsers across platforms. It has various features, but it isn’t regarded as one of the privacy-focused browsers.
However, questions might arise about what if you use Google Chrome with a VPN, and will it be safe as the Incognito mode? What is the difference between Google Chrome Incognito mode and a VPN?
If you have the same question and are looking for a comprehensive guide on Chrome Incognito vs VPN, then you are in the right place. Because here, we will try to answer all the questions you might have regarding this topic. Let us check it out.
Do Chrome VPNs work on incognito?
There are a few different VPNs you can use on Chrome. Some are extensions found on the Chrome extensions store; others are the regular cross-platform VPNs you will usually use on your device.
Each of these options may work differently on Chrome incognito. But generally speaking, a VPN that works well on Chrome will work regardless of your browsing mode.
And if you need a VPN, we encourage enabling it even if you are browsing in incognito since private mode does not offer total privacy.
What is private browsing mode or Incognito mode?
Private browsing mode, otherwise known as an incognito mode in Google Chrome, lets you surf the internet without allowing other people using your device to see your browsing history.
Google Chrome Incognito mode does not store your history or the websites you visit. But several users have reported that their web searches in Incognito mode are being stored and showing up as suggested searches in the Omnibox.
There are some benefits of using Chrome Incognito mode:
It doesn’t store the websites you visit.
It does not store cookies. So, if you are logged in to a website in normal mode, you won’t see yourself logged in to the website when you browse through Incognito mode.
None of the extensions work. This gives you a great environment to test and resolve specific issues with the browser if an extension is causing the problem.
Information entered in the forms will not be saved. So, Incognito mode comes in handy when using a payment gateway or banking website.
Permissions you have given to the website won’t be saved.
That is it when it comes to the benefits of using Google Chrome Incognito mode. Do note that Incognito mode doesn’t make you visible to everyone.
Your IP and online activities are still visible to others, including your Wi-Fi network administrators or people sharing a Wi-Fi network with you.
Additionally, the Incognito mode does not hide locations or sites visited by your ISP, search engines, employers, or schools. Incognito mode just hides you from those who have physical access to your PC or laptop. Downloads and bookmarks are also saved.
Tip
The comparison between Chrome Incognito vs VPN is that Google Chrome Incognito mode isn’t a full-proof method of securing your data or presence when browsing the internet.
There are a few caveats that we have listed above and will list in appropriate sections, which make using a trusted and premium VPN the best option if you are privacy-focused.
However, Chrome Incognito mode isn’t worthless altogether. For example, suppose you are looking to browse the internet casually but do not want your internet traces to be viewed by anyone using your PC or laptop.
In that case, you can use the Incognito mode and avoid investing in a premium VPN service that would cost you a monthly or annual subscription.
Chrome Incognito vs. VPN
How does Chrome Incognito keep your browsing private?
As already mentioned, Google Chrome Incognito mode is a feature that helps you keep your browsing history and data private from other people that use your device.
The functionality of Chrome Incognito mode is pretty simple. For example, when you switch to an incognito tab, Google Chrome creates an Incognito browsing session.
You will notice that when you open an Incognito tab, it takes you to a new tab, away from the regular tabs you might have left open. All the new tabs you open within the Incognito tab will be part of the same session.
All the corresponding tabs will be closed when you close the Incognito tab.
In Google Chrome Incognito mode, the browser does not keep track of your browsing history, cookies, or site data. Even the permissions that you give to a particular website aren’t saved.
Besides, using the Incognito mode also means you will not be signed into any of your accounts. Therefore, you will have to manually enter your credentials to log in to the websites in Incognito mode.
On the other hand, your activity is still visible to your employer, ISP, or parental tracking software if it is in use.
What are the benefits of Google Chrome Incognito mode?
Let’s take a look at the advantages of using Google Chrome Incognito mode:
When you use Google Chrome Incognito mode, your activity isn’t saved to the browser, on your device, or in your Google account.
After you close the Incognito window, all your browsing sessions, including site data, will be deleted.
You are not prone to the code-injection technique. For example, hackers can inject a code (a JavaScript tag) when you visit a website to hack information about your account or get inside your PC.
It saves you the pain of clearing your browser history every time you hand over your PC to another person.
When you use Incognito mode, you will see fewer fluctuations in the price of flight tickets or other booking sites.
You will not see targetted ads in Incognito mode, which you see based on your searches, cookies, or saved website data in normal mode.
None of the data you enter in a form or on a baking website will be saved by the browser.
You also get the option to block third-party cookies that track you across the web.
What are the disadvantages of Google Chrome’s Incognito mode?
Let us discuss the disadvantages of using Chrome Incognito mode:
Incognito mode hides your internet activity locally and not on a network level. Anyone physically accessing your device won’t have access to your browsing history, etc. However, someone monitoring your networks, such as your ISP, employer, or school, can still view your activity.
To use Incognito mode, you need to enable it. By enable, we mean that you need to follow a few steps to open a special window for the Incognito mode, which is unavailable when you open the default window.
Advertisers can still track you based on your searches while in Incognito mode. For example, if you search for a pillow, you will be shown ads for pillows throughout your Incognito browsing session.
You cannot get the Incognito tabs back when closed. This is one of the main disadvantages of using Incognito mode.
All the downloaded files are not saved within the browser but inside a folder, the Downloads folder by default. So, anyone with access to your PC can view or open the files that you have downloaded using Chrome Incognito mode.
Anyone who queries your DNS can get the hang of all the websites you have opened, even with the Incognito mode.
How to use Incognito mode in Chrome?
Open the Google Chrome browser.
Click on the menu or 3-dot iconnext to your profile picture at the top-right corner and select the New Incognito window option.
Alternatively, you can press Ctrl + Shift + N keys on your keyboard to open a new Incognito tab in Chrome.
How does a VPN protect your privacy?
We are connected to the internet in almost every walk of our lives. Right from shopping, to booking tickets, to payments, to entertainment, everything is done online.
Whenever you visit a website, it stores cookies as website data. This allows advertisers to target you with ads based on your searches.
But this can be avoided if you use a trusted and good VPN app or service. A VPN stands for Virtual Private Network. Unlike the Incognito mode, which provides online safety on a local level, it also adds a security layer on a network level.
Using a VPN allows you to access restricted websites, download apps or software that aren’t available in your region, access your files from anywhere in the world securely and privately and use torrents for all the stuff you already know.
The advertisers will have a hard time tracking you. However, your location is practically impossible to track since a VPN encrypts your connection.
When VPN is enabled, it connects to the internet through a private server. This makes it appear that a private server is trying to access a website rather than an individual, hiding your IP address.
If you use Windows, you can also use the built-in VPN that comes with Windows 10 and 11. We have a dedicated guide that details it and how you can use the Windows built-in VPN.
What are the benefits of using a VPN?
Apart from the brief benefits of VPN mentioned above, below is a comprehensive list of the benefits of using a Virtual Private Network, i.e., VPN.
A VPN encrypts your network. Whether you use your home or public internet, your privacy and anonymity must be maintained by encrypting the traffic with AES 256-bit encryption.
It is also beneficial for remote workers who download and use the company’s essential files on their preferred network. A VPN encrypts the traffic, making it nearly impossible for anyone to hack the files.
You can bypass any geo-restricted content. This means you can download restricted apps, software, TV shows, movies, etc.
VPNs can also prevent bandwidth throttling, which ISPs and administrators might do to keep users under their download limits. Since the network traffic is encrypted, no one can throttle the bandwidth.
A VPN can bypass firewalls. It becomes difficult for the firewall to know if the connection needs to be blocked or not. In addition, people in regions like China can also stream Netflix and Amazon Prime Video where the services aren’t accessible.
VPNs are suitable for gamers as well. It shields them from DDoS attacks, swatting, or doxxing attempts, and can help download region-locked DLCs or add-ons.
What are the disadvantages of VPN?
After looking at the different benefits of using a VPN, let us check out the downsides of using a VPN.
A VPN may decrease your network speed. A VPN sends your internet traffic via an encrypted tunnel and connects you to a server anywhere in the world. For long-distance travel, the traffic can result in slow internet speeds. For this reason, you may need to opt for a premium VPN.
If you use a free VPN, you will encounter a dropped connections issue. This small window is enough for hackers to breach the security of your device since your actual IP address is exposed. It can be avoided by using a paid VPN service that comes with a Kill Switch feature.
Some countries do not allow the usage of a VPN app.
You have to be very careful while selecting a VPN app because several imposter VPN apps look legit but give hackers a gateway to your device.
Not every VPN provides you with the best features. So, to avail yourself of the top-of-the-line features and security, you have to shell out money for the subscription cost of a premium VPN.
A VPN cannot protect you from outside intrusion. This means that a virus, trojan, or malware can still enter your PC or smartphone if you are unaware of which websites you should access and which ones you should not.
Download and install PIA from the official website on your PC.
Launch the Private Internet Access VPN app.
Log in with your credentials.
Press the power button to connect to a VPN server.
Private Internet Access is one of our recommended VPNs that you can opt for. It comes with servers in over 77 countries, is 100% open-source, and does not store VPN logs or leaks.
If you are encountering issues with the PIA VPN, you can connect with its world-class 24/7 customer support, and if you do not like the VPN services, there is a 30-day money-back guarantee.
For a list of other trusted and some of the best VPNs available, you can check out this guide on the 5 best VPNs for Windows 11, selected after three months of usage and tests.
Why should you use Incognito mode with a VPN?
Be it Chrome Incognito mode or any VPN, there are certain drawbacks or disadvantages attached to both; however, there is a way to fill this gap.
You can use a VPN with the Chrome Incognito mode. In doing so, the gaps in the VPN can be filled by the Incognito mode and vice-versa.
And for those who are wondering whether VPNs work with the Incognito mode, the answer is yes. VPNs work with Chrome’s Incognito mode and other browsers.
When you use a VPN with Chrome Incognito mode, all your internet traffic will be routed via the encrypted channel by the VPN, and the no-logging policy gives you total privacy.
So, for example, when you use private browsing mode, you are not logged in to Google or any other services. This will prevent the service providers from storing the cookies and targeting your ads based on your searches.
On top of this, the VPN will reroute your network traffic to a different location, not allowing the websites to see your actual IP address.
Duckduckgo vs Chrome incognito
Cookies, history, and any data you’ve input into forms are deleted from your computer when you use the incognito mode to browse.
This deleting only happens after you close all your open tabs to conclude your session. Therefore, even if you keep the incognito tabs open for days or hours, that information will continue accumulating.
DuckDuckGo is unique in that it prevents trackers while you browse and doesn’t keep any of the information about your surfing.
Is a VPN better than incognito mode?
Every major browser has some incognito mode, whether it goes by the name InPrivate, Private Window, or anything else. However, a VPN is more efficient than the incognito mode in protecting your online identity.
In contrast to VPNs, incognito mode is perfect for keeping your online activity hidden from other users of the device.
Apart from this, if you are experiencing Chrome VPN issues, you can check out our guide on how to fix it, and if you are facing VPN not working with Google Chrome, then we have a guide that will also resolve the issue.
The next featured update for Windows 10, known as Windows 10 22H2, is now out for testing in the Release Preview channel, but there’s a bit of story beyond that. As spotted by Thurrott.com, Microsoft quietly updated the original blog post for that Windows 10 22H2 news to tease some possible new features for the operating system in the future.
To be clear, Microsoft didn’t officially list or get into any new features up for testing in Windows 10 22H2. This specific 22H2 build is still only for validating servicing technology, and Microsoft specifically mentioned IT admins when talking about this Windows 10 22H2 build. Yet a note from Microsoft’s Brandon LeBlanc at the top of the page gets into the tease. Here’s what he says.
“Windows 10, version 22H2 has a scoped set of features and Microsoft will share more details on this update later this year.”
Beyond that simple quote, it is not apparent what these scoped sets of features might be. If we use Windows 11 as an example, Microsoft might enable new Windows 10 22H2 features via enablement packages. That, though, is also doubtful. Windows 11 is the future for Microsoft, getting new features like a tabbed File Explorer. Windows 10, version 22H1 was also a minor update, mainly coming with IT-centric features, so we expect more of the same. Either way, this is a story worth watching and we’ll do our best to update you on all the latest news and rumors.
If you wonder how to fix the most common following issues on Twitch, you are not the only one. A large number of users have encountered problems with their following. A common one is the Twitch follower count not updating.
Twitch became one of the most used streaming platforms in the world, with the increase in the number of users, the number of issue reports has also increased.
In today’s article, we will find out how to fix the most common following issues on Twitch. Read on to find out the details.
What are the most common follower-related issues on Twitch?
Before discovering the best solutions to solve them, it is essential to take a look at the most common issues you can encounter on Twitch:
Followers are not getting notifications – In most cases, this one appears due to some wrong Twitch settings. Fortunately, you’ll find how to enable them quickly and get notifications without any problem.
Twitch following is not working – Many users reported that this issue occurs because of Twitch servers’ glitches. In addition, keep in mind that the app can also get into trouble, so reinstalling it might be efficient.
Followers are not updating – In this situation, you’ll probably need to update your software.
Twitch followers are not showing up – Even if some people are not considering it, you should ensure that your browser isn’t zoomed in.
Why is my Twitch not updating followers?
Since this is a widespread error among users, it is good to know why you may be faced with it.
Sometimes it takes 24 to 48 hours for your achievement statistics, like your follower count, hours streamed, and average viewers, to sync with your dashboard data. So, if that hasn’t been updated yet, don’t worry!
Also, your follower count may be hidden because the browser is zoomed in.
Let’s see what you can do to solve these annoying issues in less than five minutes.
What browser can I use to avoid the most common issues on Twitch?
Here comes Opera GX, the world’s first gaming web browser and the best one yet. It features a fantastic-looking UI that can be customized in various ways, just like the Opera browser.
More so, it features dedicated integrations with services such as Twitch, and the homepage takes you to the best gaming deals and freebies you can get at that moment.
Thanks to this browser, you can finally enjoy your favorite gaming streams, which were meant to be error-free.
Check out these other amazing features of Opera GX:
Free VPN
Built-in AdBlocker
Easy to use and friendly user interface
Opera GX
Get quick access to Twitch and enjoy high-speed streaming with this performance-oriented browser.
In the upper-right corner of the window, click on Log In.
Enter your credentials, then click on Log In.
Click on your profile image.
Navigate to Settings.
Select the Notifications tab, then enable the Smart Notifications box. This will get you notified when a channel you follow goes live.
Now, expand the On Twitch section, then enable the All Notifications on Twitch option.
Relaunch your browser.
Because of a large number of users complaining that they didn’t get a notification when their favorite streamers came online, Twitch has reacted.
They created a Google Chrome and a Mozilla Firefox notification service. Once connected, it will show you all the notifications available, even if you don’t have the Twitch site or app opened on your PC.
If all systems are operational as indicated in the image, you will have to wait it out.
If you can’t follow any new channels or people, it might be due to a glitch in Twitch servers. In this case, we recommend checking the Twitch servers’ status.
2.2 Reinstall Twitch
Uninstall Twitch by long tapping on the Twitch app, then selecting the Uninstall option in Android or Remove app in iOS.
Open your Play Store.
Search for Twitch in the search box.
Click the Install button.
We recommend that you uninstall your software and download the latest version. This is a valuable fix if the Twitch follow button is not working, Twitch followers are not showing up, or when your Twitch following list is gone.
Even though this is not an official fix, it helped some users solve their issues, so it is worth a try.
3. Twitch followers not updating
Open your Play Store.
Search for Twitch in the search box.
If there is an update, you will have an Update button rather than the Open button. Click on it, and the update should start.
Even though this issue occurred relatively often in the previous years, the Twitch developers have declared that they identified the problem and solved it by releasing an update.
If your Twitch software is already updated, then it might be the case that the number of Twitch followers that you gained unfollowed your account.
Also, you should try an update if Twitch is not sending notifications to followers or Twitch can’t follow a channel.
4. Twitch follower count not updating
Launch your browser.
Navigate to the Twitch service.
Use keyboard hotkey Crtl and + to zoom out.
Several users have complained about this issue, saying that the sidebar showing followers suddenly disappeared.
This issue is caused by changes that the Twitch developers are rolling out. The update allows you to toggle on and off the sidebar and show extended details about your followers.
To work around this issue, please check that your browser is not zoomed in too much.
With the Lenovo Chromebook Duet 3 (2022) update, the company continues to nail the cross section between budget and value.
Representing a sequel to the Chromebook Duet 3 from 2020, the Duet 3 (2022) updates its processor, speaker placement, 2K resolution screen, thinner kickstand back, sturdier keyboard and stronger magnets, all for around $350.
With component shortages still lingering, getting the “perfect” laptop for school may be a bit of a timing issue for some students, but getting solid computing experiences are fortunately easier than ever these days thanks to devices such as the Duet 3 (2022).
For just $350, students and casual users alike can grab the Duet 3 (2022) and have versatile computing experiences that span binge watching on the couch to processing Office docs.
10.1″ FHD (1920 x 1200) IPS
Glossy touchscreen
400 nits
11.0 2K (2000 x 1200)
Glossy multi touchscreen
400 nits
TUV Rheinland low blue certification
Storage
64GB
Up to 128GB eMMC 5.1
Graphics
Qualcomm Adreno GPU
Camera
Front: 5.0mgp RGB, fixed focus
Rear: 8.0mpg RGB auto focus
Front: 5.0mgp RGB, fixed focus
Rear: 8.0mpg RGB auto focus
Memory
4GB RAM LPDDR
Up to 8GB LPDDR4x
Dimensions
258.04x 164.55x 7.90mm10.16x 6.48x 0.31inches
Audio
1W x 2Stereo Speakers, Dual Array microphone: supports Google Assistant
1W x 2Stereo Speakers, Dual Array microphone: supports Google Assistant
Weight
Starting at 0.99 lbs/ 450g
Tablet: around 516.6g(1.14 lbs)Folio: around 429.3g (0.95lbs)Total(Folio + Tablet): around 945.8g (2.09lbs)
Color
Color: MistyBlue, Storm Grey
Color: MistyBlue, Storm Grey
Ports/Slots
1 x USB-C 3.2 Gen 1 (support data transfer, Power delivery 3.0 and DisplayPort 1.4)1 x Pogo pin connector
2 x USB-C 3.2 Gen 1 (support data transfer, Power delivery 3.0 and DisplayPort 1.4)1 x Pogo pin connector
Battery
29Wh supports Rapid Charge
29Wh supports Rapid Charge
What’s in the box
Full keyboard/ Kickstand Pack included
Dock with non-backlit keyboard, anti-pry, water-resistant
Full keyboard/ Kickstand Pack included
Dock with non-backlit keyboard, anti-pry, water-resistant
Look and Feel
The Chromebook Duet 3 (2022) may look an awful lot like its predecessor but Lenovo has made some incremental but meaningful changes that evolve the feel of the overall device nicely.
This time around Duet 3 (2022) comes with a sturdier kickstand attachment which addressed my concerns from my previous review. The magnetic connection to the back of the tablet is much stronger so there is much less incidental movement of the piece during use.
Perhaps in an effort to shave off some ounces, the kickstand attachment is also a bit slimer than the one used in 2020 which has led to me leaving it attached more often than not and just incorporating it into the average weight of the tablet when in use.
While Lenovo hasn’t added backlighting to the keyboard, it did manage to make the underneath plating feel more rigid than the 2020 model with much less flex resulting in a more solid typing experience on the lap.
Lenovo added an additional USB-C port which can now serve as a connection to a secondary monitor while also charging the device or connecting a external hard drive simultaneously.
The display on the Duet 3 (2022) got an upgrade from 10.1 at 1920 x 1200 panel from 2020 to 11.0 at (2000 x 1200) for a slightly crispier viewing experience. The bezels on Duet 2022 feel roughly the same as before and continue to glide into the rounded display aesthetic.
I’ve spoken about the keyboard experience in my previous review of the Duet (2020) as,
“…the keyboard is limited in space and the compromises Lenovo chose to accommodate the placement of keys can be felt when typing or using the trackpad for extended periods. Another nitpick is the lack of ergonomic positioning that comes with Microsoft’s magnetic Surface Type Cover connection to the bottom of the screen allowing for a raised typing experience. “
In 2022, the experience remains roughly unchanged. While the plate underneath the keyboard offers less flex and is water resistant treated, it’s still a cramped typing experience and one that’s exacerbated by the fact that the device is a pleasure to use for longer periods of time.
Everyday Use
In 2020 the overall experience of the ChromeOS felt disjointed and less cohesive than it is today. The improvements brought on by two more years of ChromesOS development have refined the user experience a great deal for me and has made my use go from the answering the occasional email and binge-watching shows to binge watching shows and writing long form articles, processing data in Excel, creating PowerPoint presentations and the occasional light image editing.
Perhaps, much of the credit in my change of opinion might stem from the switch to the Snapdragon 7c Gen Qualcomm processor over the performance throttling MediaTek one from 2020.
While it’s not a silver bullet to address various other annoyances I’ve had with ChromeOS, it is definitely a great addition on a sub $400 computer that can serve as a go to device for many people.
As for everyday use, Duet (2022) lasted about 10 hours of use on the battery for most days, and depending on the workload, I could squeeze out a day and half.
The 29-Watt hour battery paired with a 45W charging brick meant I was up and going after about 30 mins if and when the Duet (2022) happened to be on its last leg.
From a sheer performance stand point the Duet (2022) serves best as a single task device. Trying to load it up with Android games while simultaneously trying to sort through “Desks” (virtual desktops) will confuse the device at times and result in black screens while background music plays.
However, if you manage to play well in the sandbox of Chrome tabs and the occasional casual mobile game you would be hard press to identify any issues.
Summary
For $350, there are few complaints this time around from me on the Duet 3 (2022). Not that price is an overwhelming factor in my use-case scenarios, but for many budgets are a real constraint, and Lenovo has addressed many of the complaints I had with the hardware and performance of the original Duet.
Going into school season this year, Duet 3 (2022) is definitely recommended for anyone who lives and breathes Google and Android.
With the addition of a second port, users can now enable the Duet (2022) to power their home office, or dorm room setup for as little as $300.
Video conferencing is something we’re all still doing in 2022, even with the pandemic restrictions easing up. You might buy an external webcam to help boost your calls or even an external monitor, so you can multitask, but what if we told you there’s a solution you can use on your desk that does both?
This time around it’s the Dell Ultrasharp 32 4K Video Conferencing Monitor, which was sent to me for review. After using one in my setup for two weeks, I think it’s now officially the best monitor you can use for your Teams, Zoom, or Skype Calls. It even can help you work better. Here’s a little more on why.
Specs & Price
The Dell Ultrasharp 32 4K Video Conferencing Monitor retails for $1,600 at Dell.com or around $1,280 when on sale. For that price, there are a lot of specs for your buck. Generally speaking, the screen size is 31.5 inches. The resolution comes in at 4K 3840 x 2160 at 60 hertz, and this is a 3-sided narrow bezel panel, like most of Dell’s monitors.
For the first time on one of Dell’s conferencing displays, the technology being used onboard is IPS black. It comes with a response time of 8ms under normal operation and 5ms gray-to-gray. The contrast ratio is rated at 2000:1, according to our colorimeter. Brightness is rated at 400 nits. Oh, and this is a 16:9 aspect ratio screen. You’ll also get 100% of the Rec 709 spectrum, 100% of the sRGB spectrum, and 98% DCI-P3 spectrum. Viewing angles are rated at 178 degrees.
Ports include the following. HDMI (HDCP 2.2) DisplayPort 1.4 (HDCP 2.2) USB-C 3.2 Gen 2 upstream, USB-C 3.2 Gen 2 upstream/DisplayPort 1.4 Alt Mode (power up to 90W),USB 3.2 Gen 2 downstream (power up to 15W), 4 x USB 3.2 Gen 2, USB 3.2 Gen 2 downstream with Battery Charging 1.2, and DisplayPort out for daisy-chain. You’ll also get a headphone jack.
Dimensions come in at 28.1 in x 9.1 in x 19.6 in with the stand in the lowest position as we reviewed. Weight is around 26.23 lbs. Typical power consumption is 240 watts.
Design & Teams functionality
If you’ve ever seen a Dell monitor before, then the design of this monitor should feel familiar. The rear is colored in Dell’s signature silver colorway, as is the stand. As I’ve said many times before, it’s a welcome design that isn’t overly distracting and is quite welcoming for your desk when compared to black-colored displays.
Other than that, this monitor has a lot of great ways to be positioned on your setup. My desk has low clearance, and I was able to bring it down to eye level. It’s one of the things I always appreciate about Dell’s displays. You can tilt and pivot this one between -5/+21 degrees. The swivel angle is rated at 60 degrees. And, the height is rated at up to 5.9 inches. You even get compatibility with a VESA mounting interface.
Outside of the normals, there are two signature things about this design. Unlike most monitors, this one has a speaker var up top, instead of the bottom. I’ll have more on that later, but the two speakers in the bar are rated at 14 watts. The speakers work across all inputs, too, which is huge for me, as I used this monitor with my Xbox.
As for the second thing? It’s the Microsoft Teams buttons and controls. These touch controls are on the lower left of the display. You can click the Teams icon here with your finger to launch Microsoft Teams, You also can answer calls, too, and control the volume of your speaker. The final two buttons let you disable the monitor’s microphones and activate the electronic shutter on the webcam.
I really liked these quick controls, as it meant I spent less time touching buttons and reaching for sliders and triggers on my PC. Instead, I ended up using these buttons on the fly, right within hand reach. It’s also nice to see them lit up during a call, in red or white, knowing when your mic and webcam are off.
Ports & buttons
We touched on the ports at the top of our piece, but we’ll mention them again here in a more specific order. The spoiler, though, is that I’m very pleased with the number of ports and the types of ports. No matter which type of device you own, I think you’ll be able to connect it to this display.
From left to right on the display are the following ports. On the main ports, there’s a Kensington lock and a power connector. That’s then followed by the HDMI port, a DisplayPort In (for daisy chaining), and a USB-C upstream port. Other main ports include the DisplayPort out, and USB-C upstream. The hub of ports includes three USB-A ports, a USB-A Superspeed port, and an ethernet jack.
Under the lip of the display, you’ll find a Superspeed USB-A 10GBps port, another USB-C downstream port, and a headphone jack. These extra ports on the lip are appreciated, great for plugging in dongles for keyboards and mice. Your monitor becomes the hub, in this case.
I connected my Mac Mini up via Display Port, my Surface Laptop Studio via USB-C, as well as my Xbox Series X via HDMI. That’s three devices getting one use out of a video conferencing monitor, which is honestly not what I expected!
As for buttons, you’re getting joystick controls. This is my favorite part of Dell monitors as it makes menu navigation and switching inputs easy. It really needs to be a standard across all of Dell’s products.
Webcam, Speaker, Microphone performance
The signature part of this monitor is the webcam, speaker, and microphone. In these three cases, we have some really good news. All three perform excellent, making this monitor better than any typical external mic, webcam, or speaker you can buy for productivity. Check it out in the video above, where I used the monitor for my podcast.
I’ll start first with the webcam. In concept, this monitor takes the Dell Ultrasharp 4K webcam and fits it into the top bezel of the display. All the same great features from that webcam, including Windows Hello, are now built into this display. You can see my full review of that webcam for more, but it boils down to a few things.
You get AI auto framing, a 4K sensor, true color, HDR, and video noise reduction. The webcam on the monitor though has an automatic shutter, that comes on when not in use, helping protect your privacy. The other difference is that you can position the tilt adjustable camera to the angle you want and customize how much you want to show your surroundings.
In software, you also can change the resolution, and adjust the field of view to 65°, 78°, or 90°. If you use USB-C to connect your monitor to your PC, the webcam works without extra cables. If you don’t you’ll need to use one USB-C to USB-A cable, provided in the box. Note you can’t use the webcam on MacOS, as the Dell Peripheral Manager app is Windows-only.
During my time with this monitor, my colleagues said I looked really good on calls, not grainy or blurry at all even in direct sunlight or under the LED lights from the fan in my room. During the heatwave when I was sitting in my warm room. one of my colleagues even noticed my beads of sweat. That’s how good this webcam is! It really depicts you in the most human way possible, even down to the exposure.
The audio and microphones are great, too. With the speakers being top-facing, the audio sounds much more natural, almost as if the people on the other end of the call are in the room with you. I do want to mention that most monitors have 10-watt speakers, so this is a great change to see the upgrade to 14 watts.
The microphones, meanwhile, picked up my voice quite well, though some of my colleagues felt like they heard echoes when I was speaking. Most people, though, had no issues hearing me.
Display quality
Now, for the most important part, display quality. It should be noted that this is the first time that Dell is using IPS black technology on board one of their conferencing displays. It is also in use on other products, including the Ultrasharp 4K monitors.
IPS black technology is supposed to bring a better contrast ratio and higher color accuracy than regular IPS, and I will say that this is true, as according to my colorimeter, I got nearly double the contrast than the typical 1,000:1 on other monitors I’ve previously reviewed. This puts new meaning to the term “UltraSharp.”
I shared my numbers at the top of this review, but generally speaking, this is one of the most vibrant and accurate-looking displays I’ve used, outside of OLED displays. Webpages look very bright, and in windows that use grayer or creamy or bluer colors for backgrounds (say WhatsApp and ArsTechica), the content looked a lot more alive than what I’m used to on my regular IPS display. Pair that up with the peak 400 nit brightness, and things look really alive on this display. It is part of the reason why this display is HDR 400 certified.
And watching TV shows like Family Guy brought all the animations to life. Peter’s dog, Byran, looked brighter than usual, and so did the orange-red outfit in Stewie’s clothes. Even in video conferencing, this display lights up people’s faces more. Everyone on my calls looked a lot less dull when compared to what I usually get on my laptop display.
And for multimedia? Well, it’s almost a TV-like performance, especially when gaming. Playing Microsoft Flight Simulator on my Xbox with this display felt life-like due to the accurate colors and contrast. Flying over Citi Field in New York, I made out the greens of the trees in Flushing Meadows Corona Park.
In terms of resolution, 4K is also a jump from the QHD on Dell’s other conferencing monitors, meaning more fits on the screen. I stacked 3 Microsoft Edge Windows side by side, and still had room for other apps. For this price, 4K is appreciated.
Extra features
This Dell monitor sports some extra features. The first of those is support for Dell Easy Arrange and Dell Display Manager, which lets you tile your applications in multiple ways and allows IT admins to manage displays.
There’s also support for daisy chaining monitors, or hooking up more than one PC and using it in PIP mode and PBP mode. You can connect up to two PCs, and intelligent Auto KVM detects a second PC and seamlessly switches controls over.
The final extra feature comes with Dell Peripheral Manager. This app is really sophisticated and lets you control the webcam in a lot of different ways. You can change resolution, toggle HDR, switch the field of view, autofocus zoom, image quality, use it as a recording studio, or weak other things like brightness, sharpness, contrast, and flickering. This is one of the most in-depth webcam solutions out there.
Buy it for the best video conferencing experience
The Dell Ultrasharp 32 4K Video Conferencing Monitor has everything you need to be a proper video conferencing solution. The display is bright and vibrant thanks to IPS Black technology. The display also has really amazing built-in webcam and speakers, daisy chain support, a USB hub, and even can work with game consoles.
It can be a bit tricky to find out the right browser that still offers support for RC4, a stream cipher that is no longer supported by the major browsers.
RC4 was once widely supported by all major browsers and online services for encryption.
However, in 2015, Chrome, Edge, IE 11, and Firefox dropped support for this outdated technology.
But people using legacy devices still feel the need to run RC4 and hence, they have been looking for browsers that still support the encryption technology.
The original RC4 (Rivest Cipher 4) encryption used an outdated security technology that became increasingly vulnerable to attacks.
But, even after RC4 support was stopped, there were still many people using legacy devices like the old phones (Nokia 6210 classic), or older browsers like iCab, with RC4-based requests.
Hence, despite being outdated, encryption technology still remains prominent even in the current times.
Does TLS 1.2 support RC4?
Yes, TLS 1.2 supports RC4, because enabling it along with TLS 1.1 on servers and in browsers can alleviate the risk of BEAST attack.
But, if you fail to enable TLS 1.1 and TLS 1.2, you can configure SSL to insist on RC4 ciphers than block-based ciphers.
Therefore, thanks to TLS 12. support, you can still enable the encryption in some browsers.
But, if you are wondering which browsers support RC4 ciphers, here we have a list of some of the best browsers where you can enable the feature.
When talking about secured browsing, the first name that pops into your mind is the Opera One browser.
Promising absolute privacy and security online, the browser offers one of the safest browsing experiences of all.
Therefore, when you think of enabling the RC4 encryption in Opera One, you can be assured that even with the deprecation, you can still be safe with the added browser security.
From blocking advertisements, or trackers to a free built-in VPN and easy access to privacy and security controls, the browser is a safe haven for all Opera One fans.
Its other major features include:
Sidebar shortcuts for social media like Twitter, Instagram, etc.
Allows to save web content in Pinboards
Integrated messages for social media
Floating videos on top of webpages
Battery saver, data syncing, and crypto wallet
Opera One
Get the best browsing experience with advanced support for RC4 as well as tons of modern features.
The next best browser in the list would be Microsoft Edge which can support RC4 and is known for offering improved security features.
Apart from its Super Duper Secure Mode which is an instant hit with the users, it also boasts the control-flow Enforcement Technology (CET) and Arbitrary Code Guard (ACG).
Besides, it also supports both forward and backward control-flow protection which, in combination with the other security features can prevent JIT attacks and beyond.
Moreover, it also features browser sandboxing that safeguards your PC from the after-effects of browsing by blocking websites with malicious codes.
Here are some of its other important features:
Clear privacy options (Basic, Balanced, Strict)
SmartScreen feature protects from phishing attacks
Identifies and blocks known trackers
Manage which extensions should be allowed
Stay safe online with Password Monitor, InPrivate search, and Kids Mode
If you are looking for a browser that not just offers support for RC4 encryption, but is also fast and consumes fewer resources, Firefox can be a great choice.
While it offers extensions that are useful yet fun, it also offers a smooth experience by using only as much memory as required.
At the same time, it boasts a strong password management system that helps you create strong passwords for the complete protection of your accounts.
Best of all, you can also use containers to stay organized and keep trackers off while you are surfing the web.
Below are some of its other significant features:
Blocks third-party trackers
Private browsing for smaller digital footprints
Firefox Monitor to stay protected from a data breach
Apple Safari – iCloud Keychain for secure passwords
Safari is Apple’s proprietary browser that’s only available on Mac and its M1 chip brings a shared architecture for security.
From protecting your login credentials or ensuring file-level encryption to automatically encrypting your data, Safari boasts powerful security capabilities.
Talking about enabling RC4, TLS 1.1 and TLS 1.2 are automatically enabled in Safari version 7 or beyond.
But, since RC4 is deprecated in iOS 10 and macOS 10.12, the services or apps that require RC4 should be upgraded to utilize secure cipher suites.
Here are some of its other major features:
Built-in antivirus with strong malware protection
Stay in control of your data with app permissions
Safe and secure data with FileVault 2
Intelligent Tracking Prevention to detect and block trackers
iCloud Keychain securing passwords across all devices
Instead of RC4, you can use Triple Data Encryption Standard (3DES) and the Advanced Encryption Standard (AES) which also provide built-in support for many RC4-based programs.
As an alternative to symmetric encryption, you can use a public key or asymmetric algorithm, where each user of the communicating parties has pair of keys (one private and one public key).
How do I enable RC4?
Fortunately, you can still enable the RC4 encryption technology in some of the major browsers due to the TLS 1.2 protocol and the supported cipher suites.
Here’s a list of the RC4 cipher suites that are supported in TLS 1.2 and TLS 1.3:
Supported Cipher Suites in TLS 1.2
Supported Cipher Suites in TLS 1.3
TLS_ECDHE_ECDSA_WITH_AES_128_GCM_SHA256
TLS_AES_256_GCM_SHA384
TLS_ECDHE_ECDSA_WITH_AES_256_GCM_SHA384
TLS_CHACHA20_POLY1305_SHA256
TLS_ECDHE_ECDSA_WITH_AES_128_CBC_SHA256
TLS_AES_128_GCM_SHA256
TLS_ECDHE_ECDSA_WITH_AES_256_CBC_SHA384
TLS_AES_128_CCM_8_SHA256
TLS_ECDHE_RSA_WITH_AES_128_GCM_SHA256
TLS_AES_128_CCM_SHA256
TLS_ECDHE_RSA_WITH_AES_256_GCM_SHA384
–
TLS_ECDHE_RSA_WITH_AES_128_CBC_SHA256
–
TLS_ECDHE_RSA_WITH_AES_256_CBC_SHA384
–
TLS_ECDHE_RSA_WITH_AES_128_CBC_SHA256
–
TLS_ECDHE_RSA_WITH_AES_256_CBC_SHA384
–
TLS_DHE_RSA_WITH_AES_128_GCM_SHA256
–
TLS_DHE_RSA_WITH_AES_256_GCM_SHA384
–
TLS_DHE_RSA_WITH_AES_128_CBC_SHA
–
TLS_DHE_RSA_WITH_AES_256_CBC_SHA
–
TLS_DHE_RSA_WITH_AES_128_CBC_SHA256
–
TLS_DHE_RSA_WITH_AES_256_CBC_SHA256
–
TLS_ECDHE_ECDSA_WITH_CHACHA20_POLY1305_SHA256
–
TLS_ECDHE_ECDSA_WITH_CHACHA20_POLY1305
–
TLS_ECDHE_RSA_WITH_CHACHA20_POLY1305_SHA256
–
TLS_ECDHE_RSA_WITH_CHACHA20_POLY1305
–
If you are wondering how to check if RC4 is disabled, here’s how you can:
Press the Win + R keys together on your PC to launch the Run console.
Type regedit in the search bar and hit Enter.
In the Registry Editor, navigate to the below path: HKLM\System\CurrentControlSet\Control\SecurityProviders\SCHANNEL\Ciphers
Now, check that the RC4 40/128 does not exist. If it does, then go to the right side, and double-click on the Enabled entry.
This will open the Edit DWORD (32-bit) Value dialog. Here, set the Value data field to 0. Press OK.
If you see other keys like RC4 56/128, RC4 64/128, and RC4 128/128 exist, then repeat steps 3 through 5 for them as well.
But if you want to enable RC4 in Chrome, Opera One
, Edge, and Firefox, you can follow the below instructions.
1. Enable RC4 in Chrome, Edge, and Opera One using Internet Options
Press the Win + R keys together to open the Run console.
In the search bar, type inetcpl.cpl and hit Enter to open the Internet Properties dialogue.
Here, go to the Advanced tab, and under Settings, scroll down to the Security field.
Now, check the boxes next to Use TLS 1.1and Use TLS 1.2. Press Apply and then OK.
Your Chrome, Edge, or Opera One browsers are now compatible with the RC4 encryption.
NOTE
If your PC supports even the TLS 1.3 protocol, make sure to enable that as well.
2. Enable RC4 in Firefox through about:config
Open Firefox and navigate to the below path: about:config
Next, click on Accept the Risk and Continue.
Now, search for security.tls.version.min and change it to 0.
Next, look for security.tls.version.fallback-limit and change the value to 0.
Again, search for security.tls.unrestricted_rc4_fallback and set it to true.
Finally, look up security.tls.version.max and set the value to 3.
Now, your Firefox browser should support RC4 encryption.
If you are using a legacy device and you are in utter need to enable RC4 cipher, you can try the above methods to turn on the TLS protocols that help a browser support the feature.
Apart from that, it’s recommended to steer clear of the deprecated cipher suite to avoid any attacks or exploits.