How to reverse a string in JavaScript [Step-by-step]

A palindrome is a word or list of characters that read the same when reversed. A good example of this is the word ‘RADAR’.

The easiest way to check for a palindrome in JavaScript is to create a copy of the original string, reverse it, and then compare it. If you want to build an algorithm that does this effectively, you’ll need to learn how to reverse a string in JavaScript. In this guide, you’ll learn how.

How do I reverse a string with JavaScript?

1. Convert it into an array and reverse it

  1. Split your string into an array of substrings using the split() method from the String object class. The split method requires a string as its argument. In this case, you’ll use an empty string. So the method should look like this:
    split("")
  2. Reverse the order of the array using the reverse() method.
  3. Convert the array back into a string using the join() method. Much like the split method, the join method requires a string as an argument. Once again, you’ll use an empty string:
    join("")

The best way to implement the above steps is through a function. Here’s a quick source code example that you can copy, test, and modify:

<!DOCTYPE html>
<html>
<body>
<H2> The Great Reverso! </H2>
<p>Current String: "Reverse this String!"</p>
<button onclick="myFunction()">Reverse</button>
<p id="demo"></p>
<script>
function myFunction() {
var str = "Reverse This String!";
var res = str.split(""); //Split the string into an array of characters
res.reverse(); //Reverse the order of the array of characters
str = res.join("");
document.getElementById("demo").innerHTML = str; //Attach the string to the HTML demo
}
</script>
</body>
</html>

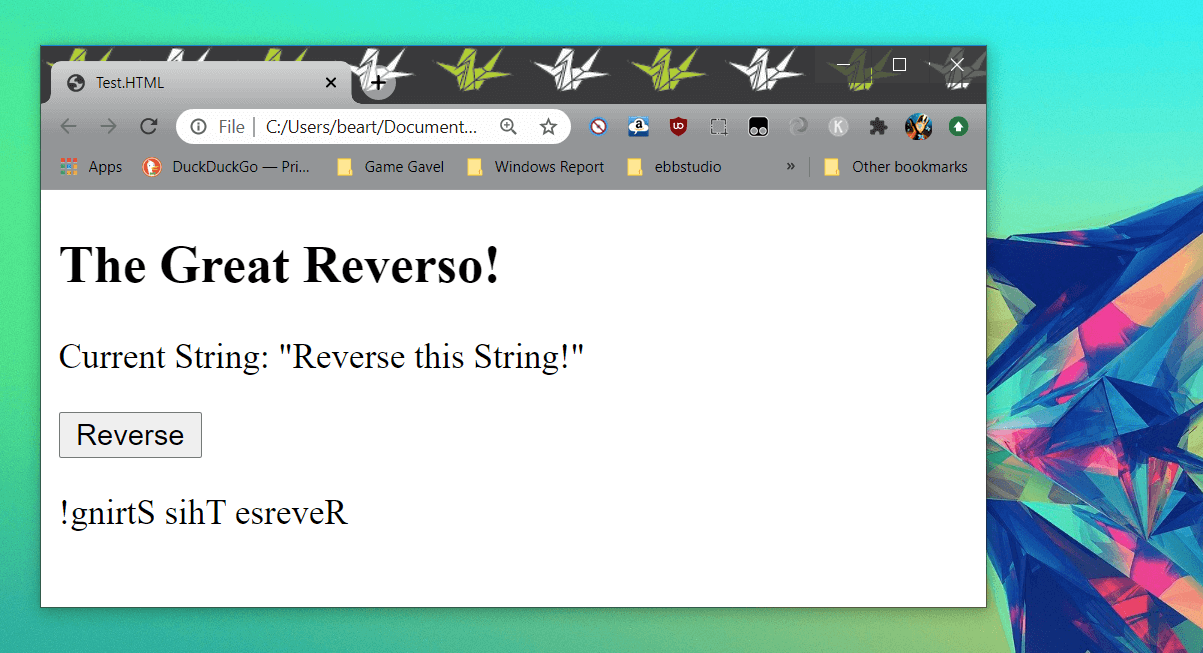
In the above example, we create a function that reverses a hard-coded string and then sets a document element to it.  The function is then called from a button labeled ‘Reverse’.

There are numerous ways you can shorten and modify this code. For instance, instead of assigning the joined string to the str variable, you can reassign it to to the res variable and then point the  demo HTML document element to it i.e.

res = res.join("");
document.getElementById("demo").innerHTML = res;

Alternatively, you can condense all three steps into a single line:

var res = str.split("").reverse().join("");

Either way, the results should be the same:

reverse-javascript-string-example


Want to learn JavaScript even faster? Learn why you should download JavaScript Code by reading this article!


2. Reverse the string in JavaScript using a for loop

  1. Create a new empty string variable that will house the reversed string.
    var reverseString = "";
  2. Construct a for loop with the following characteristics:
    • Initializer: initialize a counter whose value is the length of the string to be reversed subtracted by 1.
    • Condition: make sure that the counter is greater than or equal to 0.
    • Iteration: the counter should decrement with every successful loop.
    • The body of the for loop should add a character from the original string to what will become the reversed string while using the for loop counter to set the character position.
      for (var i = fwdStri.length - 1; i >= 0; i--) { 
             reverseString = newString + fwdStr[i]; 
      }

Once again, you should apply the above operation in a function within scripting tags. Whether you want to include the JavaScript as an external file or embedded code is up to you. Here’s how the above solution looks in action:

<!DOCTYPE html>
<html>
<body>
<H2> The Great Reverso! </H2>
<p>Current String: "Reverse this String!"</p>
<button onclick="myFunction()">Reverse</button>
<p id="demo"></p>
<script>
function myFunction() {
var fwdString = "Reverse this String!";
var reverseString = "";

for (var i = fwdString.length - 1; i >= 0; i--) {

reverseString += fwdString[i]; //Alternative to newString + fwdString[i]

}

document.getElementById("demo").innerHTML = reverseString;

}
</script>
</body>
</html>

The above code works by looping through your original string in reverse and clones it character by character. If you’re not interested in explicitly casting your string into an array, then you may find this solution more suited to your goals.


3. Reverse the string in JavaScript using recursion

  1. Create a new function with a string as its parameter e.g.
    function reverseString(str) {
  2. Within the body of the function, create an if statement that checks if the string passed to the function is empty. If true, it should return an empty string e.g.
    if (str === "")
    return "";
  3. Add an else statement.
  4. In the body of the else statement, return a recursive call to the current method with a substring of the method’s string parameter, starting from the second character i.e str.substr(1). Append the first letter of the new substring e.g.
    else
    
    return reverseString(str.substr(1)) + str.charAt(0);

You should call this method from another function that’s responsible for displaying the results. The complete code should look something like this:

<!DOCTYPE html>
<html>
<body>
<H2> The Great Reverso! </H2>
<p>Current String: "Reverse this String!"</p>
<button onclick="myFunction()">Reverse</button>
<p id="demo"></p>
<script>


function myFunction() {

var str = this.reverseString("Reverse this String!");
document.getElementById("demo").innerHTML = str;

}

function reverseString(str) {
if (str === "")
return "";

else

return reverseString(str.substr(1)) + str.charAt(0);


}
</script>
</body>
</html>

Recursion works a lot like a for loop, but you’re tricking JavaScript‘s logic to work for you. Instead of appending characters to the end of the string, it attaches it to the front with each loop. Nevertheless, the results are much the same.

The above examples can be tested by using Windows Notepad and a web browser. However, we suggest using a cross-platform code editor or an integrated development environment to save yourself some time.

How to reverse a string in a Javascript is a common interview question. Therefore, understanding it may be imperative to your success as a software developer.

Nonetheless, let us know which method worked best for you in the comments below. As always, thank you for reading.

[wl_navigator]

Gmail won’t download attachments [QUICK SOLUTIONS]

A few Gmail users have found that they can’t download files attached to their emails on Windows 10. The documents stop downloading after selecting to save them to HDD.

So if that’s a familiar scenario, this is how you can fix Gmail attachments that aren’t downloading.

What can I do if Gmail attachments won’t download?

  1. Check that Gmail supports your browser
  2. Use Mailbird email client
  3. Update the browser
  4. Uncheck the Do not save encrypted pages to disk setting
  5. Switch off the Gmail Labs setting
  6. Switch off antivirus software
  7. Clear browser cache

1. Check that Gmail supports your browser

First, check you’re opening Gmail emails in one of its supported browsers. Gmail works in Chrome, Firefox, Safari, Internet Explorer and Edge, which are its supported browsers.

As such, Vivaldi, Maxthon, and Opera are not among Gmail‘s supported browsers. Also note that Gmail requires JavaScript and cookies switched on in browsers.


If you want the latest and greatest browser available right now, check out our best picks.


2. Use Mailbird email client

Switching to an email client has some considerable advantages.

First of all, Gmail and others are quite heavy web apps, which means that the browser will consume more memory and CPU to display the content. Since we use email all the time, most likely there’s always one or two tabs permanently open for emails.

Using an email client offloads that effort from the browser, making it snappier. It also means better offline support. Using Mailbird, the winner of most popular Mail alternative 2020 as your primary email client is even better.

Why? Because you can connect your Gmail account and have all your attachments readily available on your computer. You can also connect other providers for increased productivity.

Going one step further means you can connect your other favorite calendar apps or messaging apps (Whatsapp, Facebook, WeChat, etc.) and have them all in one central place. No more tab switching with the websites you visit.

Other powerful features:

  • Snooze messages to focus only on the important emails
  • Connect with LinkedIn to quickly see details about a sender
  • Search through your attachments to find anything faster

Easily and safely connect Gmail to Mailbird using IMAP port 993 for SSL and SMTP port 587 for TLS.

⇒ Get Mailbird

3. Update the browser

Perhaps you are unable to download attachments from Gmail in Chrome. Make sure that your browser is the most updated version.

You can update Google Chrome by pressing the Customize Google Chrome button and selecting Help > About Google Chrome.

The browser will then automatically update if it’s not the latest version. You can also ensure that any browser is the most updated version by downloading its installer from its website and then reinstalling the software.


4. Uncheck the Do not save encrypted pages to disk setting

  • Press the Cortana taskbar button and entering the keyword internet options in the search box.
  • Select to open the Internet Options window shown directly below.
  • Then click the Advanced tab in the snapshot directly below.
  • Now uncheck the Do not save encrypted pages to disk option if that’s selected.

Some Gmail users have fixed Gmail email attachments that aren’t downloading by deselecting the Do not save encrypted pages to disk set.


5. Switch off the Gmail Labs setting

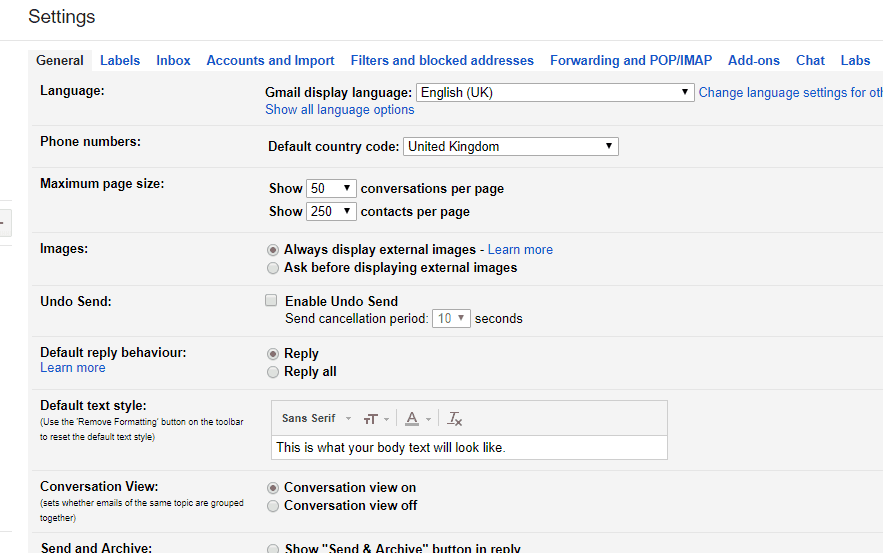
  • Press the Settings button in Gmail and select Settings from its menu to open the General tab below.
  • Click the Labs tab to open the Gmail Labs options in the snapshot directly below.
  • Now you can disable those options by selecting the Disable radio button for each one.
  • Press the Save Changes button to confirm the new settings.

Gmail includes a variety of experimental settings in Gmail Labs. However, they are only experimental settings that might not always work. If you have lots of Gmail Labs settings selected, switching off those options off might fix Gmail attachments.

The quick way to switch those options off is to add ‘labs=0’ to the end of Gmail‘s URL.


Your Gmail settings are out of date? Don’t worry, we’ve got you covered.


6. Switch off antivirus software

  • Right-click the taskbar and select Task Manager on the context menu.
  • Select the Start-up tab shown in the snapshot below.
  • Now select the anti-virus utility and press its Disable button.
  • Then you can restart Windows.
  • Thereafter, open Gmail email and download an attachment.

Antivirus software can hamper both email client software and webmail. To ensure that isn’t the case, switch off third-party antivirus software.

You can usually do that by right-clicking anti-virus utilities’ system tray icons and selecting a disable or exit option from their context menus.


Can’t open Task Manager? Don’t worry, we’ve got the right solution for you.


7. Clear browser cache

  • Press the Customize Google Chrome button at the top right of the browser to open its menu.
  • Select Settings to open the tab below.
  • Click Advanced to expand the Settings tab.
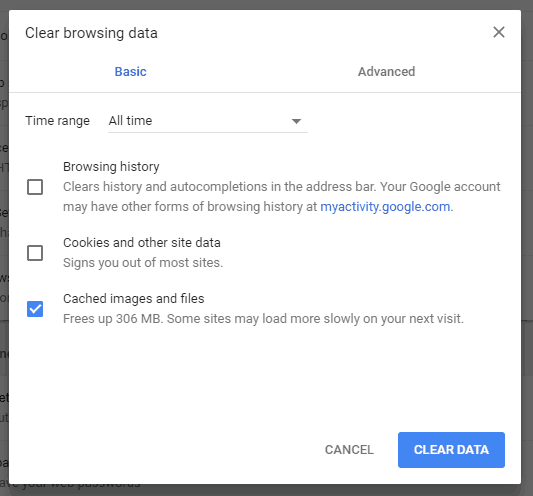
  • Select the Clear browsing data option to open the window in the shot directly below.
  • Select the Cached images and files checkbox, and then press the Clear Data button.
  • Restart Chrome after clearing the cache.

Clearing browser caches can often be an effective resolution for a variety of web issues and frees up hard drive space. How you clear the cache varies from browser to browser.

If you have any other suggestions or questions, leave them in the comments section below and we’ll surely take a look.


[wl_navigator]

Outlook won’t connect to server & Gmail [Solved]

Outlook is the defacto email service used by most businesses and individuals, and just like other programs, this too can have issues in performance, among other technical issues.

One of the common and known issues is Outlook not responding or won’t connect, which usually happens for one of the reasons below:

  • Latest updates have not been installed
  • Outlook is being used by another process
  • Outlook is loading external content in an email
  • An installed add-in is interfering with the program
  • Mailboxes are too large
  • AppData folder is redirected to a network location
  • Office programs need repairing
  • Data files are corrupted or damaged
  • Security software is outdated or in conflict with Outlook
  • Your user profile is corrupted

Other causes have to do with software and hardware like insufficient computer specifications, insufficient write performance for Outlook files, search indexing issues, incomplete file (PST/OST) closure, and many RSS feeds, among others.

Similar issues that can be solved the same way:

  • Outlook not connecting to exchange server – since the error is not related to the type of server, the solutions will fix this issue as well.
  • Outlook won’t connect over VPN – it might be possible that SMTP is blocked by the VPN. See how to fix Outlook if it won’t connect via VPN.
  • Outlook won’t connect to Office 365 account – if the credentials are all right, apply the solutions from this article.

Whatever the case, if you find Outlook not responding or won’t connect, try the solutions below to resolve it.

How do I fix Outlook not responding or not connecting?

  1. General fixes
  2. Fix PST file
  3. Disable AppData directory redirection
  4. Cancel Outlook integration with Microsoft Office Communicator
  5. Disable antivirus software add-ins installed in Outlook
  6. Create a separate send/receive group for your RSS feeds
  7. Create a new Outlook profile
  8. Close any open dialog box
  9. Repair Office programs

1. General fixes

  • Ensure your computer meets system requirements for the Office suite you’re using – minimum system requirements don’t give optimal performance
  • Check that you’re running the latest Outlook build
  • Check that your PST/OST files are not large as size may cause performance issues like the app pausing during typical operations in Outlook like reading, moving, or deleting emails.
    • A size of up to 2GB will give a good user experience.
    • More than 4GB is where pauses start, and as it increases to 10GB or larger, you’ll get Outlook not responding or won’t connect.
  • Check that your computer has a first-gen SSD or slow rotational HDD s these will cause Outlook not responding or won’t connect issue due to performance in the operations
  • Check that you don’t have too many items in one folder as these will affect performance. move several items to separate folders in one store or an archive store, and use Arrange By: Date
  • If you connect to Exchange in Online mode, it affects Outlook’s performance and overall user experience
  • If you have nonessential add-ins installed, remove them from Outlook.
    • To view the installed add-ins, click Trust Center>Tools>Add-ins.
    • Outlook can also use Microsoft Exchange Server client extensions that may cause performance issues.
      • To see these extensions, click
        Exchange Client Extensions > Managelist > Add-ins > click Go.
      • The Add-In Manager dialog box will display these extensions.
  • Run Outlook in Safe Mode to determine if the performance problem is caused by add-ins.
    • In Safe Mode, Outlook’s COM add-ins and Exchange Server client extensions are disabled.
    • If the problem goes away in safe mode, then probably one of the add-ins is causing the performance issue.
    • Disable any items that you do not use regularly, then restart Outlook, or, disable the remaining add-ins one by one.
    • If that does not fix Outlook not responding and won’t connect issue, then it may not be caused by an add-in.

2. Fix .PST file

Use Stellar Repair for Outlook to perform a repair operation on the .pst file.

Since the .PST file is crucial for how Outlook performs, keeping it in a good shape is critical. Microsoft Outlook already performs some cleanup operations in the background.

A combination of factors, however, can prevent the cleanup to perform and the file to get corrupted.

IT technicians usually repair damaged pst files in order to fix a number of issues with Outlook such as low response time from the app, Outlook search not working, and connection issues.

This tool has low system requirements and is compatible with all Windows versions. It supports MS Outlook 2019, 2016, and earlier.

3. Disable AppData directory redirection

  • Exit Outlook.
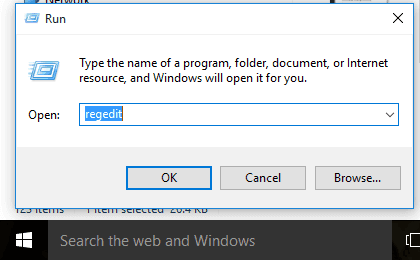
  • Right-click Start and select Run, then type regedit.exe and then press OK.
  • In Registry Editor, locate and then click the following subkey:
    HKEY_CURRENT_USERSoftwareMicrosoftWindowsCurrentVersionExplorerUser Shell Folders
  • Locate and then double-click AppDataappdata windows 10
  • In the Value data box, type %USERPROFILE%AppDataRoaming and then click
  • Exit Registry Editor.

If your AppData folder is redirected to a network location, this can affect Outlook’s performance, as some data like email signatures and dictionaries are stored in that folder, which it must wait for reading and write operations in the directory to finish.

4. Cancel Outlook integration with Microsoft Office Communicator

  • In Outlook, click Options under Tools
  • Click Other tab, and uncheck the Display online status next to a person name checkbox under Person Names
  • Click OK.
  • Restart Outlook.

5. Disable antivirus software add-ins installed in Outlook

If your antivirus includes Outlook integration, performance issues may arise. You can disable the integration or antivirus software add-ins installed in Outlook.

You may have to contact the antivirus manufacturer on how to configure the antivirus software to exclude any integration or scanning in Outlook.

6. Create a separate send/receive group for your RSS feeds

Outlook won’t respond or won’t connect if you’re synchronizing many RSS feeds into Outlook.

By default, the RSS feeds are automatically synchronized at set intervals. If you have too many feeds, Outlook may become unresponsive.

A separate send/receive group for your RSS feeds will allow you to sync them on-demand compared to set intervals.

7. Create a new Outlook profile

  • Close Outlook.
  • Open Control Panel
  • Choose User Accounts
  • Click Mail
  • Click Show Profiles.
  • In TE103999994, open the Apps menu, choose Control Panel > Mail > Show Profiles.
  • Choose Add, and in the Profile Name box,
  • Type a profile name, and click OK.
  • Enter an email address and a password for the primary email account you use in Outlook and then follow the steps to create the profile.
  • Go to Show Profiles dialog
  • Choose Prompt for a profile to be used.
  • Start Outlook and choose your new profile.

Your Outlook messaging profile may be misconfigured, so creating a new profile may fix Outlook not responding or won’t connect.

If this fixes Outlook not responding or won’t connect problem, return to Show Profiles dialog and delete your old profile.

8. Close any open dialog box

There are times Outlook won’t respond until you close an open dialog box. Check for these and see which ones may be stopping Outlook from responding.

If there isn’t any, check that Outlook isn’t working on a large or long process as this causes performance issues.

9. . Repair Office programs

This resolves issues with Outlook not responding or won’t connect.

  • Quit any running Office programs
  • Open Control Panel
  • Choose Programs and Features.
  • In the list of installed programs, right-click Microsoft Office (your version) and then choose Repair
repair microsoft office

Did any of these solutions help fix Outlook not responding or won’t connect? Let us know by leaving a comment below.

Op-Ed: Now that Microsoft Stores are shut down, will it be harder to service Surface devices?

Microsoft Stores had always been a great way to experience the company’s latest products. You could have walked right into a physical store, played with a Surface or Xbox, and then purchased one right on the spot. And, if you later suffered from device failures or other technical problems, you would have had the support of the Microsoft Answer Desk to help you out.

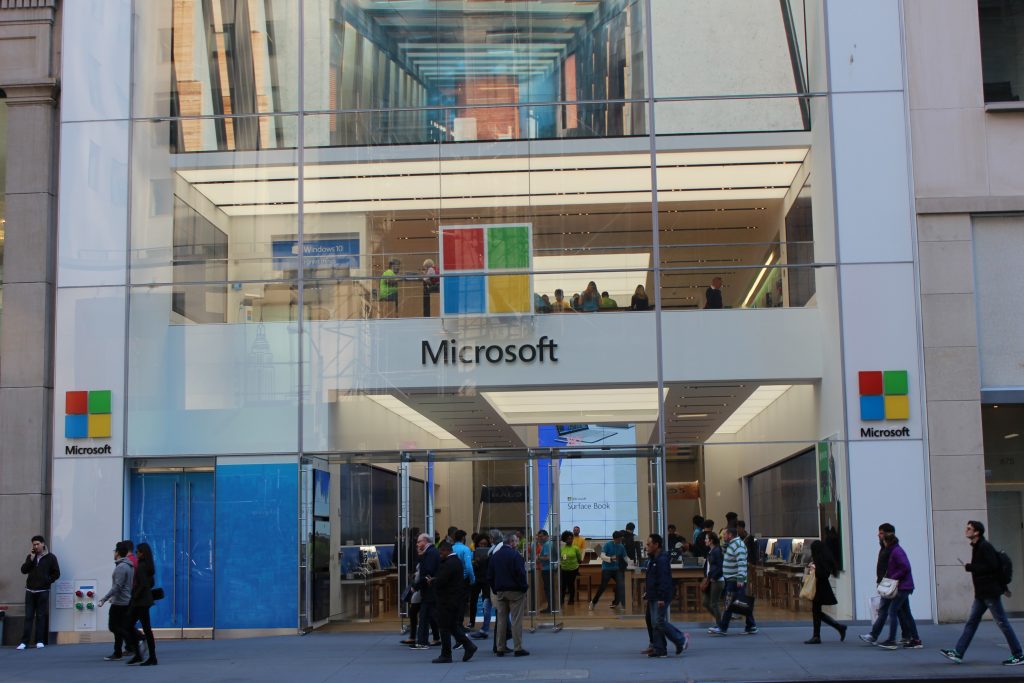
That experience, though, is now changing. As someone who once frequented the Flagship 5th Ave Microsoft Store in New York City, I now have one lingering thought. With Microsoft Stores shutting down, service options for Surface devices will be limited — so will it impact sales or make Surface devices a risky buy?

No more friendly Microsoft Store helpers

Going back to the start, one of the benefits of physical Microsoft Stores was the in-store service. If your Surface or Microsoft Product went bad, you could have scheduled an appointment online, go into the store, and meet someone face to face to resolve your problem.

Even if you didn’t have an issue, but curious about Surface, you could have still chatted with someone in the store, and have them find you the right PC for you. Microsoft Store employees were truly respectable, knew how to help, and had the patience and people skills to walk you through your issues or curiosity.

It’s something I experienced many times. My Surface Pro 4 suffered from Flickergate, and an employee in the Microsoft Store walked me through the process of replacing it (for free) with a Surface Pro 2017 model. When I wasn’t happy with the Surface Pro X, I walked into the Microsoft Store, spoke with an associate about why I didn’t like it and he helped/suggested me to exchange it for a Surface Laptop 3, which is now my daily driver. Finally, after returning home from a vacation in Los Angeles, my Surface Headphones stopped working. I walked right into the store and got a free replacement with almost no questions asked.

In all three of these situations, the physical Microsoft Store was there to help me. I didn’t have to mail in a device, wait weeks to get it back, or deal with people on a phone call or chat. I got the service I needed, right away, and came out as a happy customer. Not to mention, there were also cool demos of Microsoft products in the store, like HoloLens, and Surface Hub 2 to keep me engaged with Microsoft experiences.

While it is true that some Flagship Microsoft Store locations in London, NYC, Sydney, and Redmond campus will retain this customer experience, this still isn’t something that everyone will be able to experience. From what we know, these will only be at flagship stores, and Microsoft will instead train Microsoft Store employees from other store locations to do remote service.

That’s a problem, as Surface devices are sold worldwide, and across the USA.  With only two stores in the US, folks will have to deal with all-online support, which just isn’t the same. In fact, some people have said it is “god awful,” having to “go through hoops to get hardware replaced” with “hours of hours of documentation, multiple reimages, etc.”

Nothing beats face-to-face interactions, and with stores closing, getting Surface devices fixed might end up being a pain. If your Surface breaks, you’ll lose access to it while you ship it, and you’ll have to deal with shipping services. You’ll also have to explain your problem in words by typing it out on a keyboard or speaking over the phone, which isn’t something that isn’t as easy as just showing someone your problem. It’s a legitimate worry, especially for folks who aren’t as technology savvy.

With Surface troubles, things can only get more troubling

Microsoft, Surface, Windows, Xbox, Microsoft Store

I won’t lie, Surface products are not perfect. Surface Pro 4 suffered from Flickergate and the Surface Book from issues of its own. Consumer Reports at one time dropped their recommendation to buy Surface products, too, though they later restored it.

That in mind, this makes me worry. It is true that Microsoft has since fixed these issues (and even made it easier to repair devices) but if newer Surface products do have more reliability issues going forward, would it even be worth buying for some people?

If you purchase a Surface, it’s supposed to be a long term investment. And, without a proper place to go to get support, getting a device fixed would be a huge pain (as I said above.)

I may be overreacting, but people are used to Apple Care, where you can go to a store to get your product fixed. Without Microsoft having its own version of this, it would become a frustrating experience for most people, and make them never want to buy a Surface again.

The community is concerned, and I am too

I am just one Microsoft fan, writing an op-ed, but I am not alone. On the Surface subreddit, many other Microsofties share my concerns. There are over 211 comments in a thread about the store closures, and most of them are not good. If this doesn’t show why closing Microsoft Stores is a problem, then I am not sure what will.

“Will be picking up the Duo, but I’m not really sold on owning another tablet/laptop having experienced just how bad their customer support is outside of the stores,” said one user. “That’ll probably be the end of me with surface then. I only made the switch from Mac to PC due to the Apple Store-quality service you received in Microsoft Stores. Not gonna risk having to deal with online service,” said another.

Another user also makes are fair point. Surface devices are not really meant to be “repairable.” In most cases, Microsoft would just swap your unit out for another one. You used to be able to do this at a physical Microsoft Store right away, but now, you’ll have to wait.

On the business side, Microsoft obviously knows what it is doing by closing its retail stores, but for consumers, it could end up being a huge loss.

Fix: Word isn’t your default program for viewing and editing

Some MS Word users have posted on Microsoft’s forum about a dialog box that says, Word isn’t Your Default Program for viewing and editing Docs.

The dialog box window keeps opening for some users when they try to open document files with Word. That issue can still arise even when users have configured the selected file type for Word.

Microsoft Word isn’t your default program for viewing and editing documents

Disable Word’s default program dialog box

  1. Select the File tab in Word.
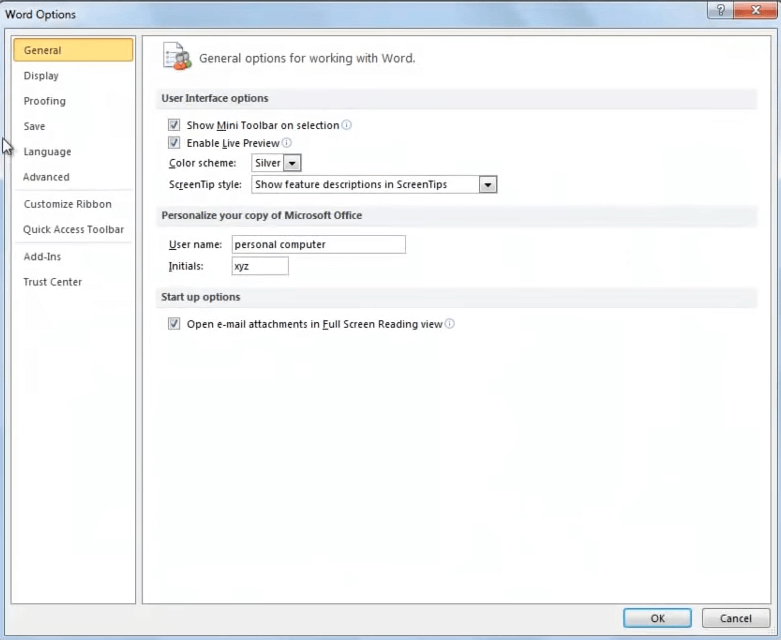
  2. Click Options to open a Word Options window.
    Word Options window microsoft word isn't your default program for viewing and editing documents
  3. Select General on the left of the Word Options window.
  4. Scroll down the window until you get to Startup options.
  5. Deselect the Tell me if Microsoft Word isn’t the default program for viewing and editing documents option.
  6. Click the OK button.

Repair Word’s Office Installation

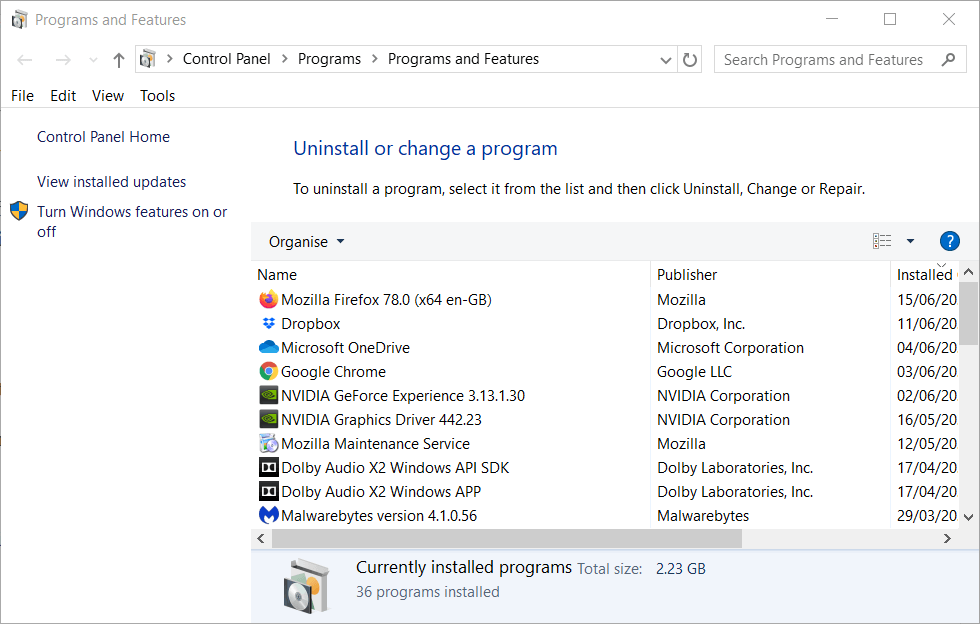
  1. Open the Run dialog by pressing its Windows key + R keyboard shortcut.
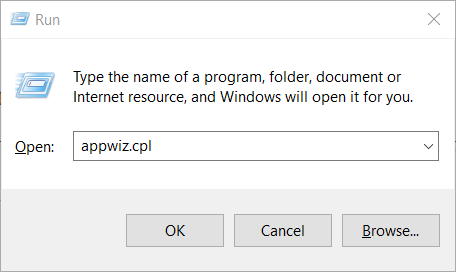
  2. Type appwiz.cpl in the Run box and click OK to open the uninstaller Control Panel window.
    The Programs and Features window microsoft word isn't your default program for viewing and editing documents
  3. Select your MS Office suite listed there.
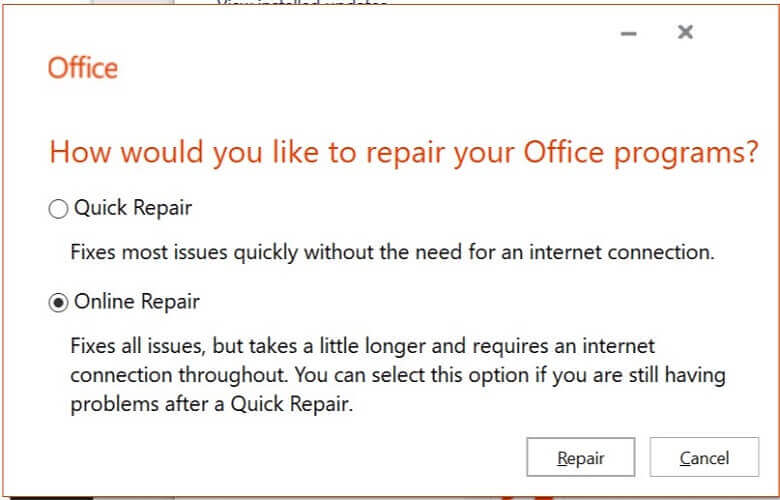
  4. Click the Modify button to open repair options.
    Online Repair option microsoft word isn't your default program for viewing and editing documents
  5. Select the Quick Repair or Online Repair radio button.
  6. Press the Repair button.
  7. Restart Windows after repairing Office.

Check the default apps by file type settings

  1. Check that all the file types for Word are configured to be the default ones. To do so, click Windows 10’s Type here to search taskbar button.
  2. Next, enter the keyword default in the search box.
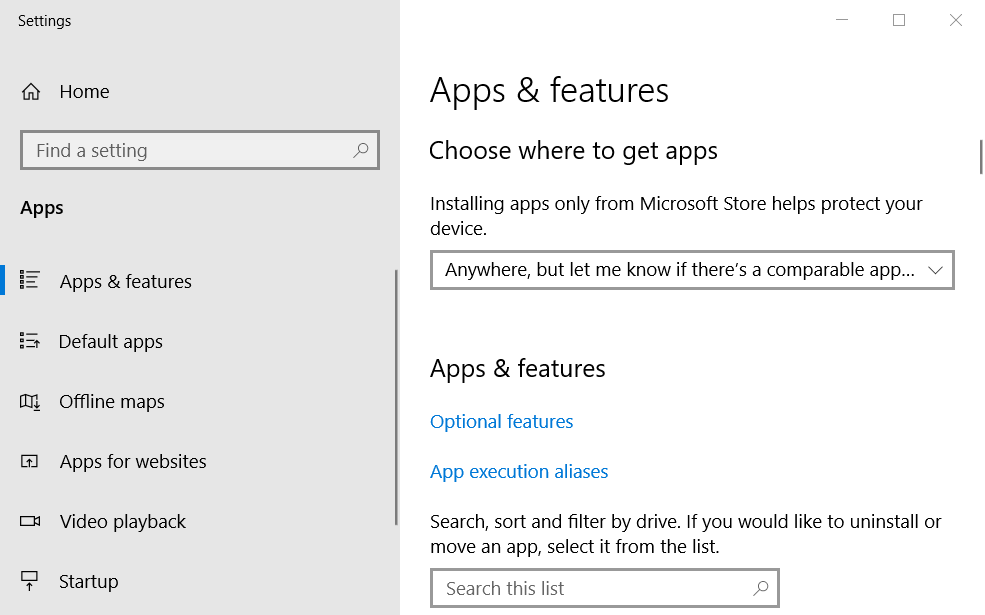
  3. Click default apps to open the window in the shot directly below.
    The Apps & features tab microsoft word isn't your default program for viewing and editing documents
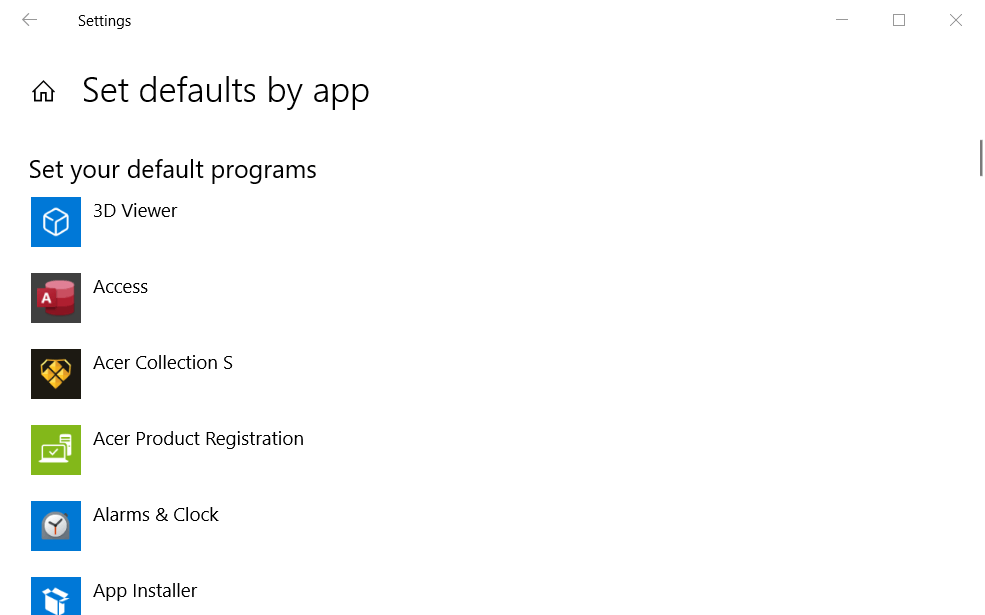
  4. Click Set defaults by app to open a list of software.
    Set defaults by app list microsoft word isn't your default program for viewing and editing documents
  5. Select the Word software, and click the Manage button for it.
  6. Then you’ll see a list of file types Word can open. Select Word for all file types its not the default app for.
  7. Select Word again for file types its already the default for just to refresh.
  8. Thereafter, restart your laptop or desktop.

Uninstall old Office suites

  1. Open the Run dialogue box.
  2. Then you can open the uninstaller by entering appwiz.cpl in Run and clicking OK.Run accessory microsoft word isn't your default program for viewing and editing documents
  3. Next, look for an old Office installation listed in the Programs and Features.
  4. Select an old Office installation (not your current one), and click its Uninstall button.
  5. Click Yes on uninstall confirmation prompts.
  6. Restart Windows after uninstalling your old Office software.

Select Notepad and then Word as the default file type

  1. Right-click the file the dialog box opens for to select Open with.
  2. Select Choose another app > More apps > Notepad.
  3. Select the Always use this app checkbox.
    The app selection window microsoft word isn't your default program for viewing and editing documents
  4. Click the OK button.
  5. Then right-click the same file again to select Open with > Choose another app > Word.
  6. Select the Always use this app option again, and click the OK button.

Those are some of the most probable resolutions for fixing the Word isn’t your default program dialog box.

If you still need further resolutions, you can get in touch with Microsoft support agent via the Contact Office Support page.

[wl_navigator] 

Public preview of Microsoft Defender ATP web content filtering is now free for enterprise users

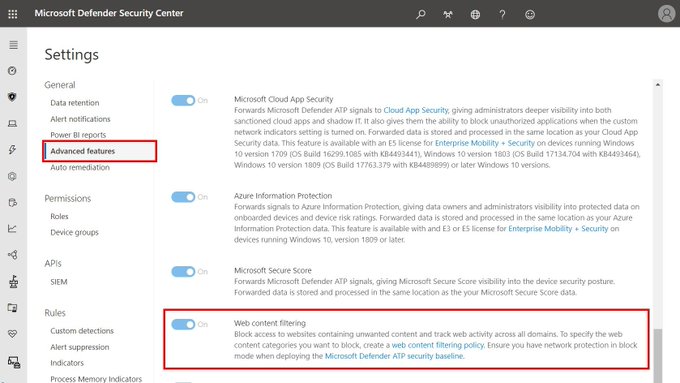
Microsoft Defender ATP Web Content Filtering, a new feature allowing security administrators to regulate access to websites based on specified content categories, will now be free to use for enterprise customers during the public preview that kicked off earlier this year. In a recent blog post, Microsoft explained that they decided to make the feature free during the public preview as a result of customer feedback.

“We have heard your feedback and are excited to share that going forward, web content filtering will be offered as part of Microsoft Defender ATP without any additional partner licensing. Now you get the benefits of web content filtering without the need for additional agents, hardware, and costs,” explained the Microsoft Defender ATP Team.

Until this announcement, enterprise customers needed an active 60-day trial subscription with a partner license in order to use Web Content Filtering with Microsoft Defender ATP. The feature will continue to be in public preview for the time being and will allow system admins to set access policies based on device groups, monitor and block certain online tools, and certain websites. Notably, the tool supports all browsers including Microsoft Edge through SmartScreen, Firefox, and Chrome through Network Protection.

enable Microsoft Defender ATP web content filtering tool

Enterprise customers who have preview features turned on can check out web content filtering in Microsoft Defender ATP today. If you haven’t yet opted in, follow the process mentioned in Microsoft’s support article to turn on preview features in the Microsoft Defender Security Center. You can also read the official documentation to learn more about the new security feature.

MTG Arena Installer Not Working: 3 Fixes if It Won’t Install

MTG Arena is one of the popular collectible card games for Windows, Mac, and mobile platforms. Several thousand users play the game daily, but many trying to get it for the first time reported that the MTG Arena installer is not working.

The problem has been encountered on different operating systems, though it’s most prominent on Windows, with some even receiving the MTG Arena Invalid drive error. So, let’s see how you can work things out in this case!

Why won’t MTG Arena install?

Here are a few reasons MTG Arena is not installing:

  • Network issues: Often, it’s a slow Internet or loss of connectivity, so the MTGA installer is not working.
  • Installed apps conflicting with the installer: Several antiviruses and firewalls, including the built-in Windows Defender Firewall, can conflict with the process, and as a result, you can’t install MTG Arena.
  • Missing permissions: For some programs to work or install, they need administrative privileges. And for that, you will need to run the app as an administrator.
  • Running an outdated version of the OS: Some users even found out that their version of the OS was outdated and became the reason the MTG installer was not opening.

What can I do if the MTG Arena installer is not working?

Before we start with the major changes, here are a few quick things you can try:

  • Check the dedicated MTG Arena Status Page to determine whether the servers are operational. If they are not, wait a few hours and run the installer again.
  • Run the installer with administrative privileges. All you have to do is right-click on the installer, choose Run as administrator, and then click Yes in the prompt.
  • When running the installer, proceed with the default settings and verify whether the process goes through.
  • Install any available Windows updates.
  • Make sure you don’t have a slow Internet connection.
  • If you have a reliable VPN on the PC, connect to a server based in the United States and then run the installer.
  • Disable any third-party security software installed on the PC, and check whether the MTG Arena installer is still not working. In case it does, we recommend you switch to a more effective and OS-friendly antivirus.
  • For those who previously had MTG Arena, use an uninstaller software to clear any leftover files or Registry entries, and then retry the installation.

If none work, move to the solutions listed next.

1. Disable the firewall

  1. Press Windows + S to open Search, type Windows Defender Firewall in the text field, and click on the relevant search result.windows defender firewall
  2. Click on Turn Windows Defender Firewall on or off from the navigation pane.turn windows defender firewall
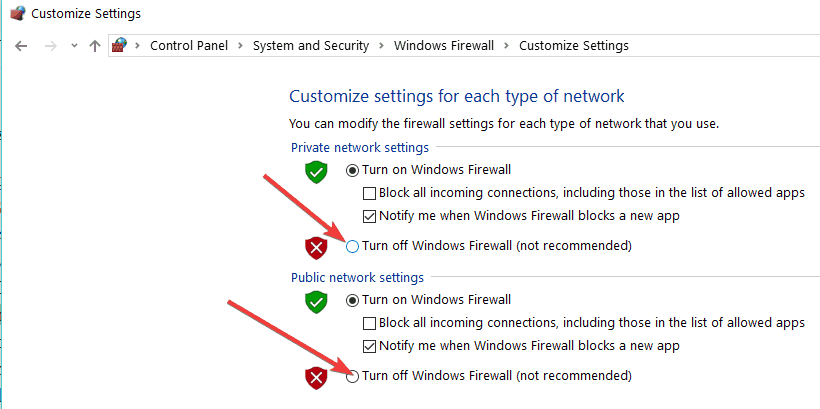
  3. Select the Turn off Windows Defender Firewall (not recommended) option under both Private network settings and Public network settings, and then click on OK.disable firewall to fix mtg arena installer not working
  4. Now, run the MTG Arena installer, and check whether the process goes through.

In some cases, the built-in Windows Firewall led to the MTG Arena installer not working. For those using a third-party firewall software, make sure to disable it as well. And remember to re-enable the firewall once done with the installation.

2. Use the MSI installer

  1. Open a browser, and download the Windows Installer Package for MTG Arena.
  2. Once done, double-click on the downloaded file to launch the setup and follow the on-screen instructions to complete the process.MTG arena

The MSI installer did the trick for some who were unable to install MTG Arena with the regular setup. So, do try it once when the other methods fail.

3. Get MTG Arena on Epic Games

Tip icon Tip
Use this solution only when all else fails because you will have to run MTG Arena through Epic Games and, therefore, can’t remove the latter.
  1. Go to the official website, and download the Epic Games Launcher.epic launcher
  2. Run the setup and follow the on-screen instructions to complete the installation.
  3. Complete the sign-up process. It shouldn’t take more than a few minutes to complete the initial setup.
  4. Now, search for Magic: The Gathering Arena in the Epic Games Launcher, and click the Get button to purchase the game. Fret not, it’s free!download to fix mtg arena installer not working
  5. Click on Place order to proceed.place order
  6. Finally, click on Install Now in the notification prompt that appears, and once done with it, you can play MTG Arena.install now to fix mtg arena installer not working

One of these solutions should have helped when the MTG installer is not working. However, many users don’t prefer playing the game over Epic Games Launcher, so we recommend you raise a support ticket at MTG Arena’s Submit A Request page.

Before you leave, check some quick tricks to optimize the PC for gaming and get the best performance.

For any queries or to share more solutions with us, comment below.

Search Protocol Host Process Failed: How to Restart it

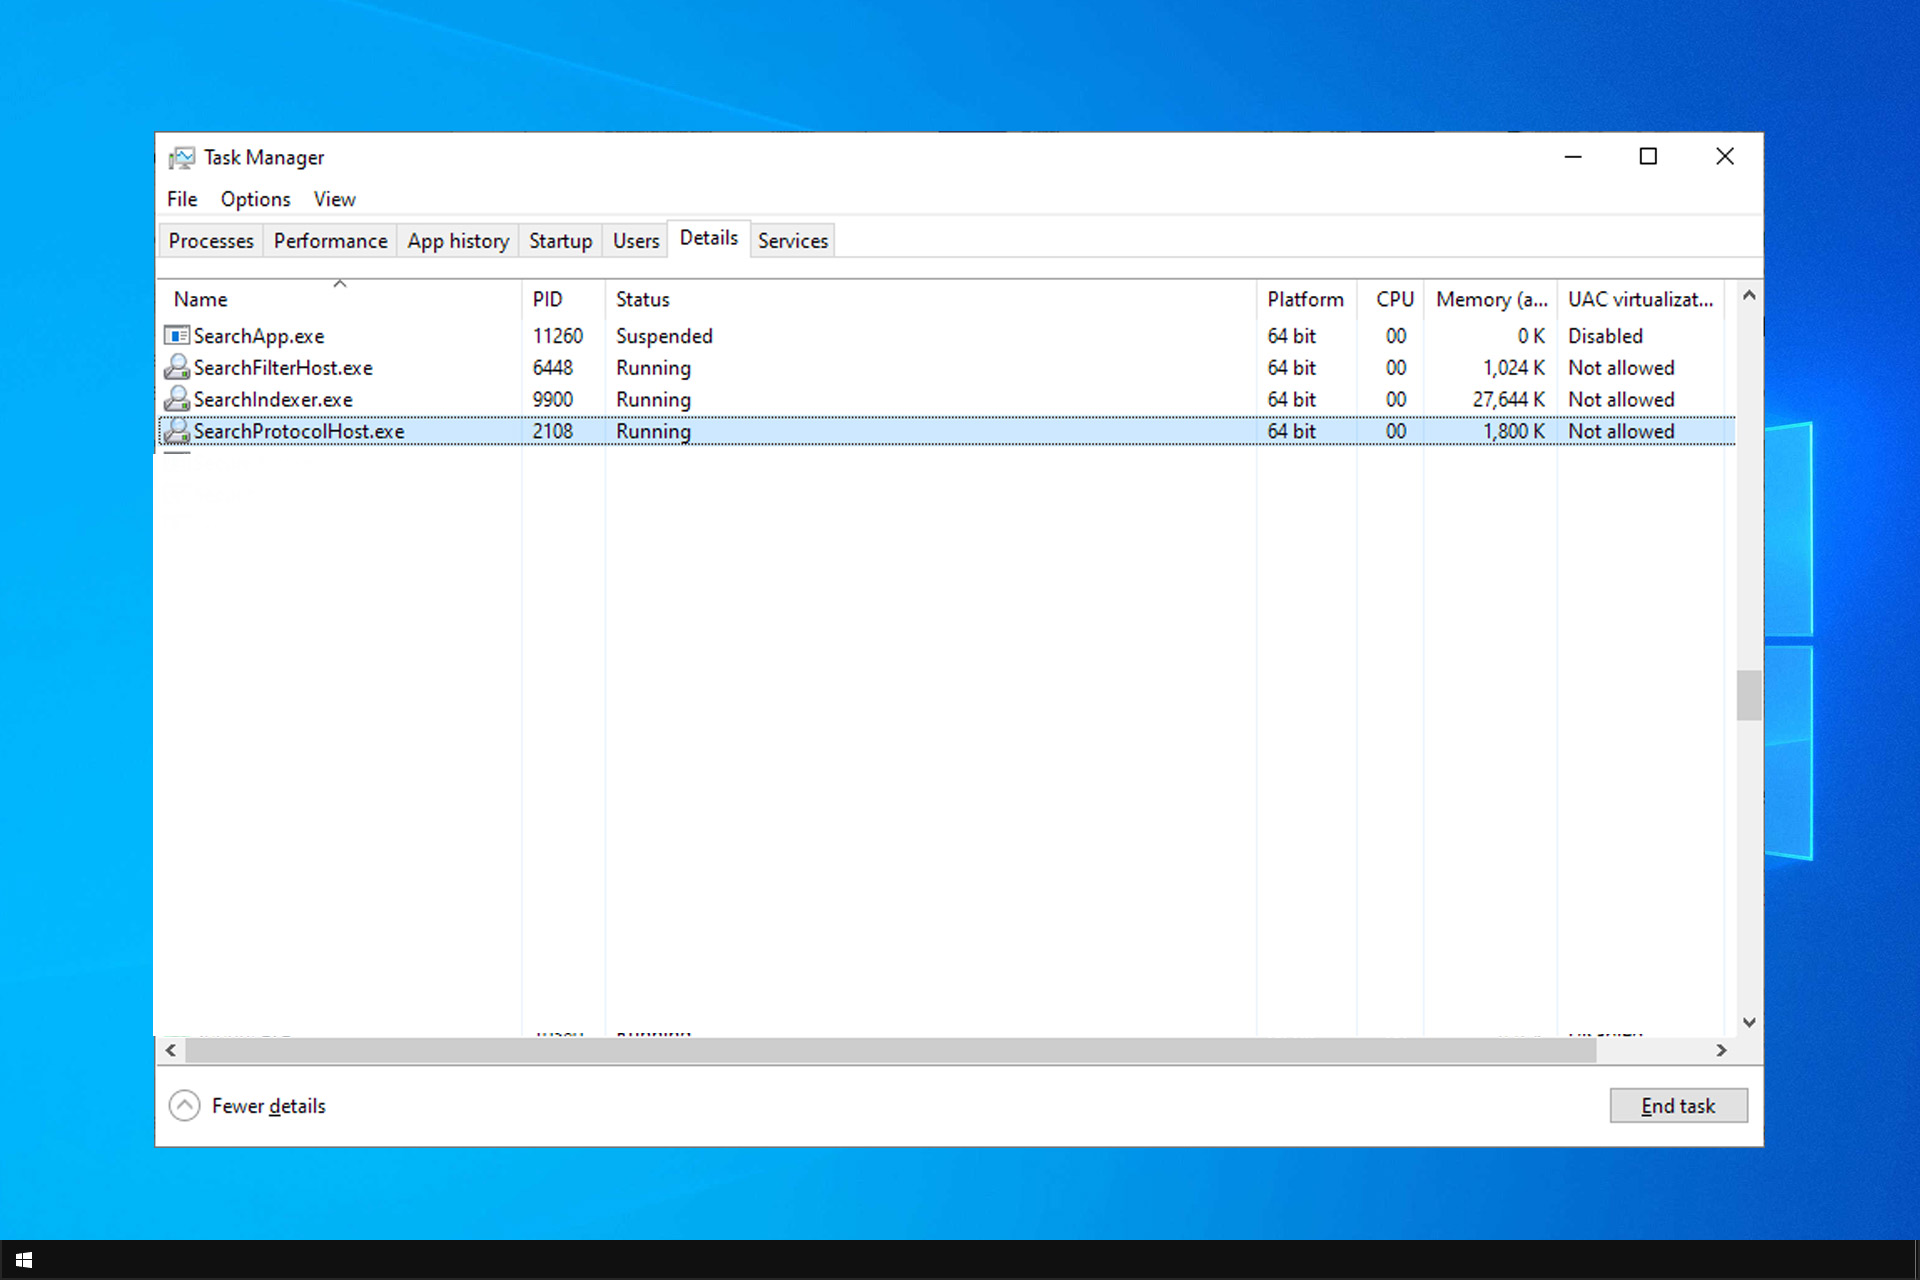
Some users have reported to the Microsoft forums that they’re getting Search protocol host process failed very often.

This can be a problem, and it can even cause File Explorer search to stop working, so it’s important to fix it as soon as you can, and this guide will show you how to do that.

What is the search protocol host process?

  • This process is a core Windows process used by Windows Search Indexer.
  • Windows uses it to perform searches and render search results.

What can I do if Search Protocol Host process has failed?

1. Check if Windows Search service is enabled

  1. Go to Search and type administrative tools.
  2. Open Administrative Tools, and go to Services.
  3. Find Windows Search service and check if it’s enabled.searchprotocolhost.exe application error Windows 10
  4. If the service is not enabled, right click on it and choose Start.

Restarting this service can also help resolve issues with the searchapp.exe process if it’s consuming excessive system resources.

2. Check indexing settings

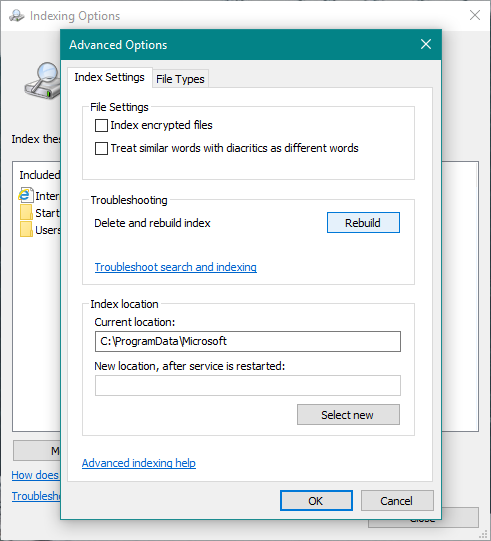
  1. Go to Search, type control panel, and open Control Panel.
  2. Go to Indexing options.
  3. Click on Advanced tab.Microsoft windows search protocol host Windows 10
  4. Click on Rebuild tab, under Troubleshooting section.

Now check if your search works again after rebuilding the index. If you still can’t search your files normally, try some of the following system solutions.

3. Perform a clean boot

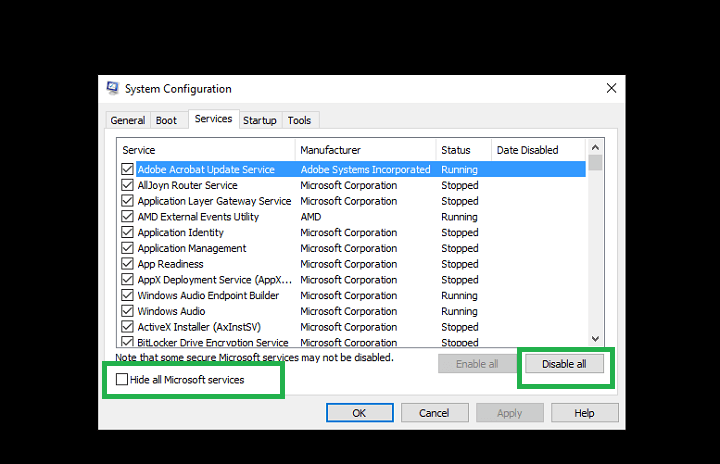
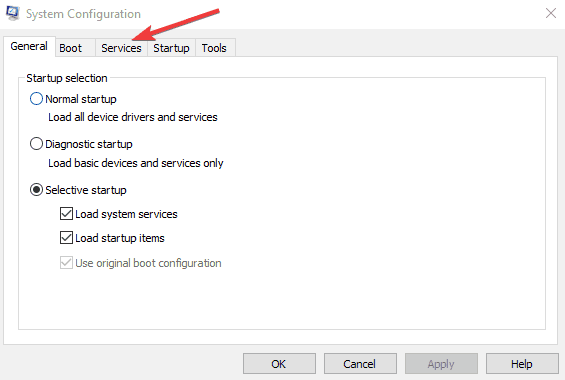
  1. Press Windows key + R and type msconfig.
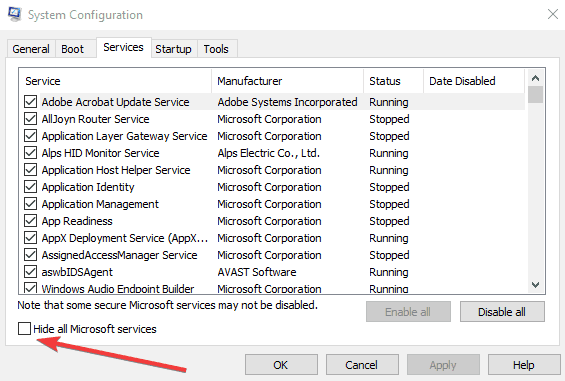
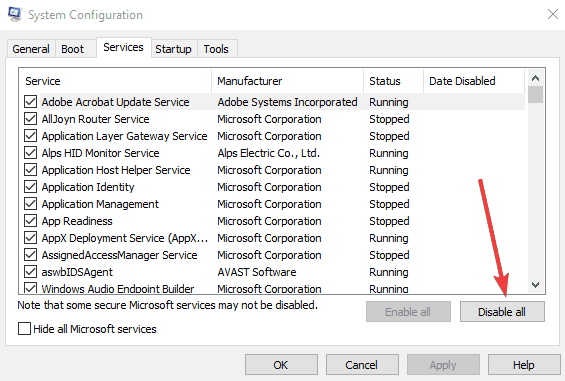
  2. On the Services tab of the System Configuration dialog box, tap or click to select the Hide all Microsoft services check box, and then tap or click Disable all.
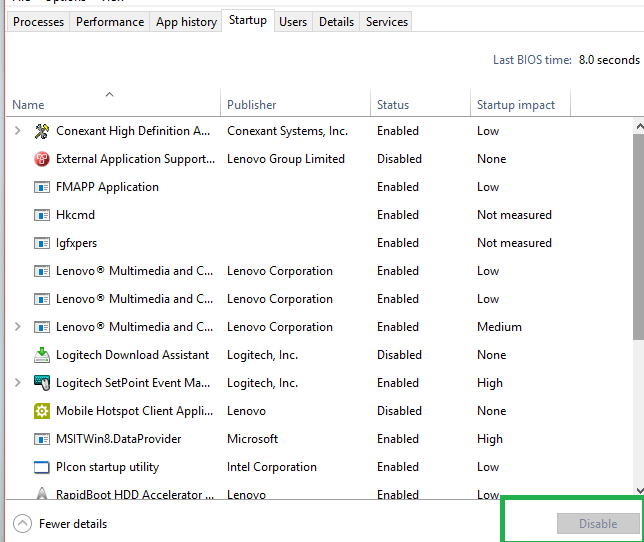
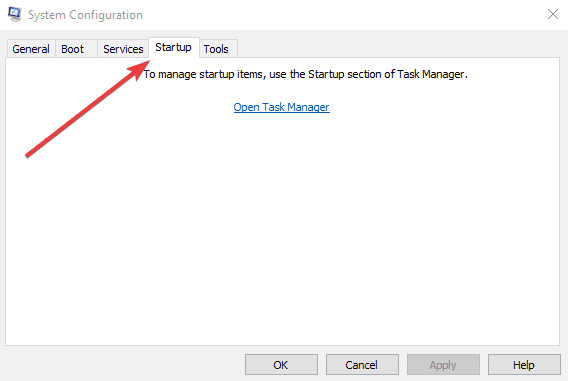
  3. On the Startup tab of the System Configuration dialog box, tap or click Open Task Manager.
  4. On the Startup tab in Task Manager, for each startup item, select the item and then click Disable.
  5. Close Task Manager.
  6. On the Startup tab of the System Configuration dialog box, tap or click OK, and then restart the computer.

4. Use System File Checker Tool to repair damaged files

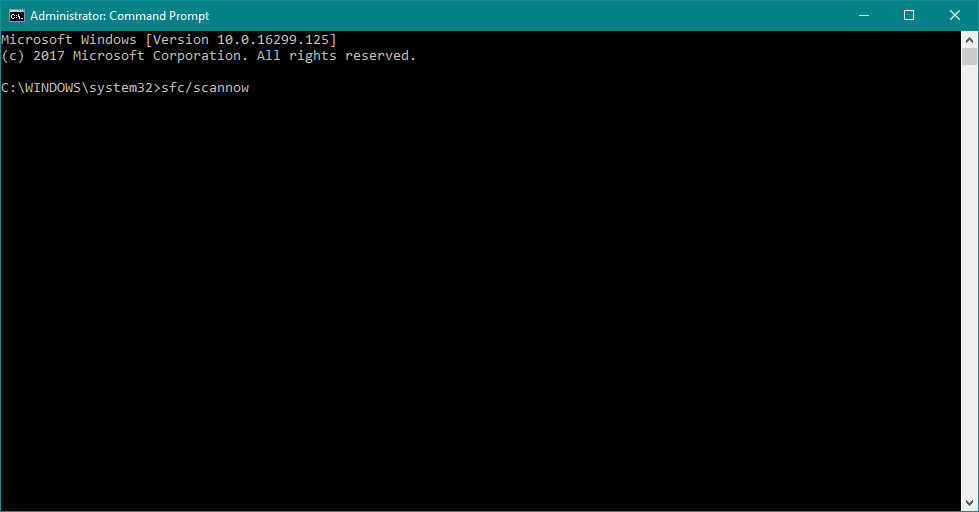
  1. Go to Search, type cmd in the Search box, and then right-click on Command Prompt.
  2. Click on Run as administrator. (If you are prompted for an administrator password or for a confirmation, type the password, or click Allow).
  3. At the Command Prompt, type the following command, and then press Enter: sfc /scannowSearch protocol host process failed Windows 10
  4. Wait for the scan to complete.

After doing that, check if the problem is gone.

5. Perform Disk Cleanup

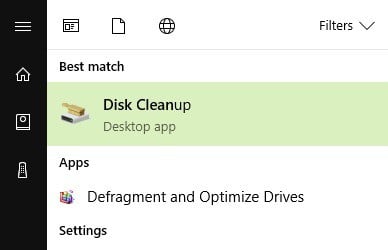
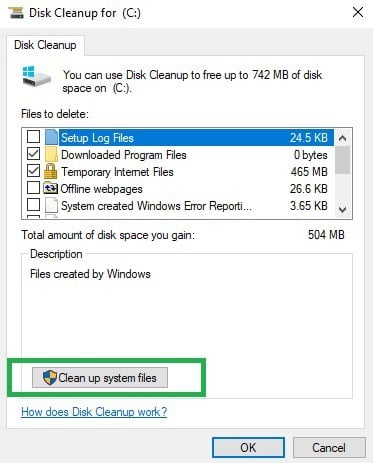
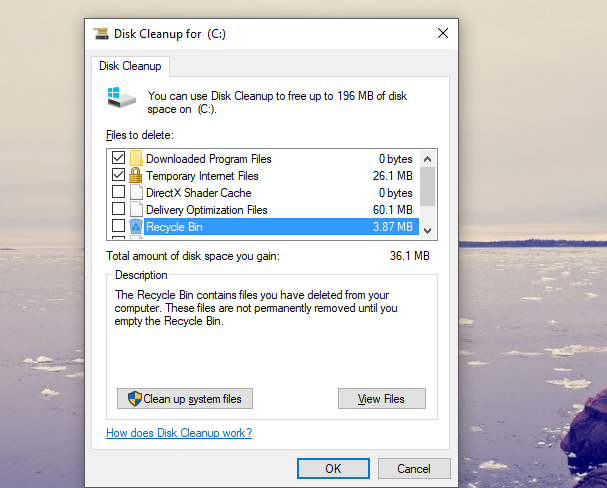
  1. Go to Search, type disk cleanup, and choose Disk Cleanup from the list of results.
  2. Select your Windows 10 hard drive, by default it should be C. Click OK.Microsoft Windows search protocol host popup Windows 10
  3. Disk Cleanup will scan your computer. When the scan is completed, make sure that the Temporary files option is checked on the Files to delete list.
  4. Click OK to clean your disk.

To learn more, we have a great guide on how to use Disk Cleanup, so be sure to check it out.

6. Run DISM

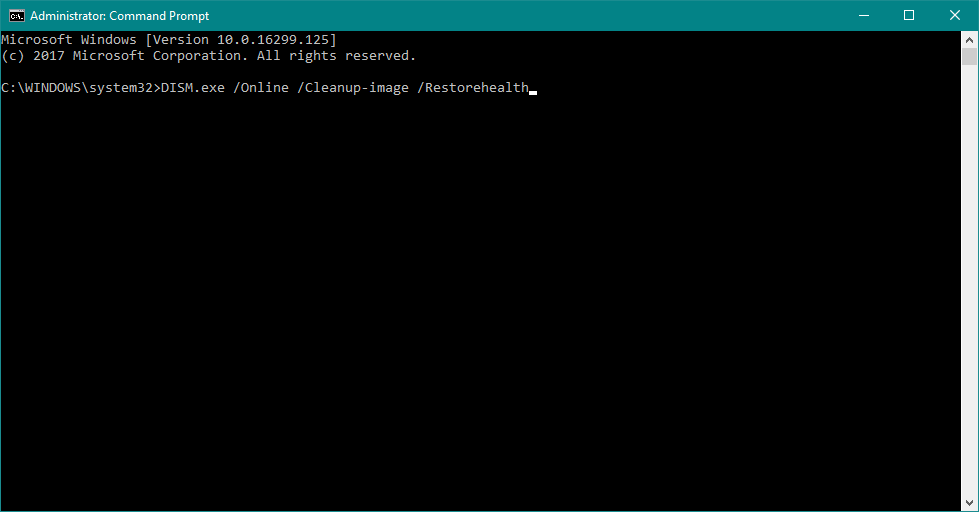
  1. Go to Search, type cmd, and open Command Prompt as Administrator.
  2. Enter the following command on the command line:
    DISM.exe /Online /Cleanup-image /RestorehealthMicrosoft windows search protocol host asking for credential
  3. In case the DISM can’t obtain files online, try using your installation USB or DVD. Insert media and type following command:
    DISM.exe /Online /Cleanup-Image /RestoreHealth /Source:C:Repair/Source/Windows /LimitAccess
    Make sure to replace the following with the path to your installation media C:Repair/Source/Windows

Performing one of these four solutions should solve your problem with the Windows Search service.

But, if you’re still getting the Search Protocol Host processes failed message, try reading out Quick Search not working guide for more solutions.

What method did you use to fix this error? Use the comments section below, and let us know.

5 best email clients for seniors to start emailing today

So, you have gifted your grandparents a computer on their birthday, or maybe they treated themselves to a new one.

For seniors, learning to use computers and the internet is not only to kill boredom but also a way to stay connected to their family and friends. And let’s not forget the grandchildren.

In this age, learning computer skills is not a difficult task especially when all the software are created keeping usability in mind. The same applies to internet services such as for example, emails.

Web-based email services are easy to use for many. You can set up an email address and teach seniors how to use it, and they will catch it faster than you can. However, web-based email services have their own cons.

This is where email clients make it easy for everyone. From beginners to seniors to professionals, email clients are a great way to send and receive emails on your computer without the need of opening the web browser every time.

Email clients can keep your inbox organized, filter out spam and phishing emails, and offer the flexibility to manage multiple emails from a single window.

There is no dearth of email clients for Windows. However, when it comes to email for elderly citizens, you need to choose the client that offers an intuitive interface and doesn’t overwhelm the new user with tons of features.

Let’s take a look at the best email for seniors to learn and use single or multiple email accounts from their computers in no time.

All of these email clients are free to use. If you need more features, you can always upgrade to the premium version for commercial use.

Simple email programs for seniors

Mailbird

MailBird

From managing your multiple email accounts, filtering out spam and bad emails to offering business app integration, Mailbird can do it all.

It is a free email client that also comes in a Pro version for business users and commercial purposes.

Mailbird’s integration with a business apps like WhatsApp, Google Calendar, Dropbox, Twitter, EverNote, Slack, Facebook, and more makes it an ideal solution for corporate and commercial use.

However, for casual users, Mailbird offers enough to keep you seated.

Let’s quickly look at its key features:

  • Unified inbox (manage emails from your multiple email accounts in one place)
  • Customization options (change color, themes, and make it look the way you want to match your mood or desktop theme)
  • Prioritizing emails based on their importance (you can snooze any email for later)
  • Speed Reader feature to fly through your email
  • Custom sounds for incoming emails and notification
  • Linkedin Lookup allows you to connect to the service directly from your inbox
  • Attachment search (similar to Gmail)
  • Dark Theme will enable you to work freely in the silent hours of the night
  • Multilanguage support with translation features

If you are wondering, the free version does not support unlimited email accounts, or features like Snooze email, Speed Reader, attachment quick preview, etc.

Mailbird is a robust, fast, stable, email with no-frills. The free version is enough for most people while the premium version offers a great number of features for business owners and organizations.

Mailbird

Mailbird

Emailing made simple for seniors to harness the internet and enjoy family time.


eM Client

eM Client

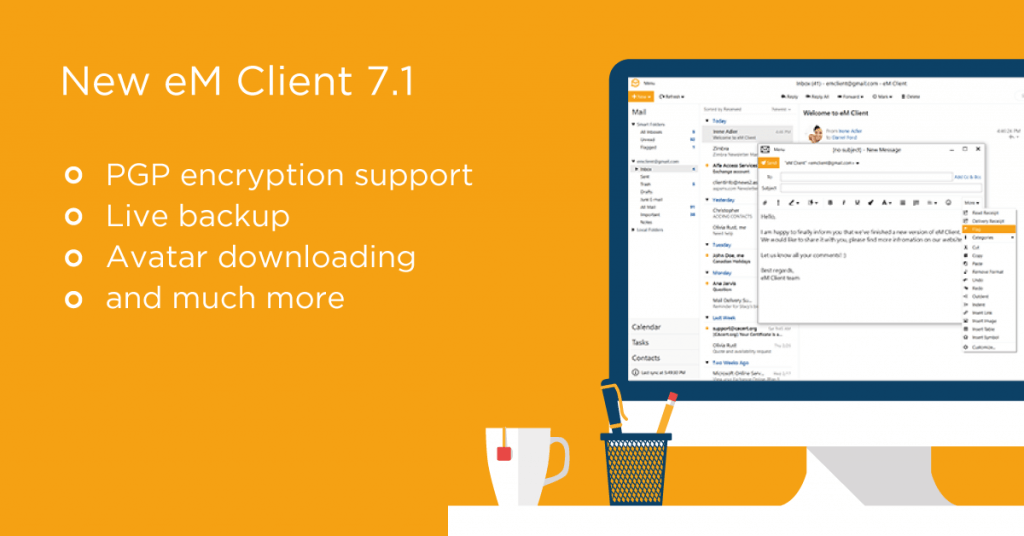
eM Client is a multi-platform email client available for Windows and Mac users. For most people, the free version with support for two email accounts is sufficient. If you want more, there is a Pro version of the same.

The user interface is intuitive, and even for first-time users, it doesn’t feel overwhelming. For security, it has PFP encryption support to send encrypted emails. You can also back up the offline emails while working on your emails.

Let’s quickly look at its key features:

  • You can connect any email service provider supporting IMAP, Exchange, Office 365, POP, and SMTP email technologies
  • Supports several business apps including Google Talk, Jabber, or any other XMPP based service
  • Extensive contacts management options (categorization, exhaustive field, contacts merging, and automatic deduplication to remove duplicate contacts)
  • Calendar management feature in the email client allows you to customize the interface, sync calendar data from services like Gmail and iCloud, and send invitations for meetings

eM Client is an excellent email client for both casual users, professionals as well as seniors looking for a simple yet effective solution that can offer more when needed without cluttering the user experience.

eM Client

eM Client

Enjoy a unique combo of simple UI and powerful features for effortless emailing.

Thunderbird

Formerly known as Mozilla Thunderbird, Thunderbird is an open-source email client which is among the most popular free email clients in the world for Windows users.

Thunderbird has all the features you need from an email client, and if you want more, there is always a plugin to extend the functionality of the email client.

The email client is easy to use for many. However, for senior citizens or for the people who haven’t used an email client before, a few instructional lessons may be needed.

The good news is that the users can customize the looks of the program to match their tastes.

Let’s quickly look at its key features:

  • You can set up unlimited email accounts with Thunderbird as long as they support IMAP, SMTP, and SSL/TLS settings.
  • Add and operate custom email addresses from the dashboard
  • Easy contacts management contacts (edit old contacts or add a new one with personal details such as photo, birthday and other contact information to keep it up to date)
  • Attachment reminder features
  • In-app chat service integration that works with Facebook, Google Talk, IRC, Twitter, and any other XMPP based chat service
  • Powerful search and archive options (search the web without leaving the email client, search all the downloaded email, archive messages)
  • Filter emails with Quick Filter Toolbar
  • Add-on manager to manage third-party add-ons
  • Robust privacy and Do Not Track feature, protection from phishing attacks, and more
Thunderbird

Thunderbird

Easy setup, generous customization, and loads of features for simple and efficient emailing.

Outlook

Microsoft Outlook is probably well-known for the fact that it is the default web email client for Windows 10 users.

In fact, there is also a Business version available to those that have an Office 365 subscription.

What makes this program so accessible, and therefore worthy of recommendation is how simple the UI is, and how intuitive it seems t first-time users.

As long as you are perfectly capable of understanding the language in which Outlook is displayed, controlling it will not be a problem at all.

Another neat feature about Outlook is that it is not just an email client, but it can also double as a personal information manager, allowing you to gain better control over your free time and activities, and enhancing the way you can plan future endeavors.

All in all, Outlook is very good for seniors, and since it is free anyway, why not give it a try?

⇒ Get Outlook

Windows Mail

The Windows 10 running machines come pre-installed with Microsoft’s own email client Mail. It is a simple email client that is built-in and allows you to connect multiple email accounts with it.

The user interface is simple yet elegant. Mail has a Focus Inbox option that allows you to separate important emails from social and promotional emails. You can read social and promotional emails in the other tab.

Let’s quickly look at its key features:

  • Calendar and Contact management features
  • Personalization options to change theme colour, background images and folder and messaging space
  • Set up automatic replies to a selected account, add a signature, change email security and notification settings
  • Focus Inbox option that allows you to prioritize important emails

Windows Mail is the right choice if you don’t want too many features in an email client or don’t want to download a new email client and can compromise a little with not so good organization features.

Whether you are a beginner or looking for an email for seniors, all the email clients in this list offer extremely user-friendly UIs.

While selecting any email client for new users, you should consider the security features on offer to prevent phishing attacks and spam emails from reaching users who are vulnerable to cybercrimes.

Let us know what’s your favorite pick by reaching for the comments section below.

Fix Snapchat notifications not working [iOS & Android]

Many users have complained about Snapchat notifications not working, and like every app, you won’t keep up with your connections without prompt notifications.

Snapchat sends notifications for many actions, not only when you receive a Snap or message; it also alerts you when a screenshot is taken or even when a close friend posts an update.

Fixing the Snapchat notification challenge is not as tough as it looks, because the options are all in your settings. In this guide, we’ll go over the various issues that may cause Snapchat notifications not to work, as well as how to repair the problem.

What to do if you’re not getting Snapchat notifications?

1. Restart your smartphone

Before going into more complex troubleshooting steps, we first need to rule out temporary issues as the cause of Snapchat notifications not working. For this, you should end all services, processes, and applications by restarting your device.

If Snapchat notifications are not working because of a minor software malfunction, rebooting the phone will fix the problem. Having restarted your device, if you still don’t get Snapchat notifications, continue to the next step of this guide.

The troubleshooting steps on this page are for Snapchat notifications not working. If you don’t get notifications from any apps on your Android device.

Find out how to enable Android phone notifications and messages on a PC.

2. Enable Snapchat push notifications

  1. Launch Snapchat on your iOS or Android device.
  2. Log in to your account if you are signed out. Tap LOG IN, type in your username and password and hit the LOG IN button.
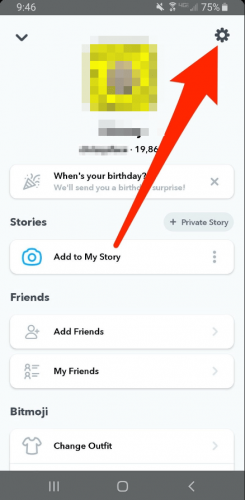
  3. Next, tap on your profile picture or icon to reveal a menu. Without a Bitmoji profile picture, your icon will be a white ghost on a yellow background.
  4. At the top right-hand corner of the phone screen, tap on the gear icon, to enter Snapchat settings.
    snapchat-notifications-not-working-settings-icon
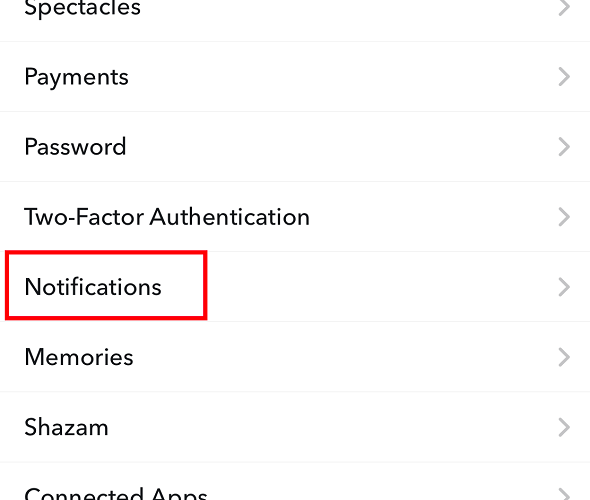
  5. Here, in the My Account section, scroll down to Notifications and select that. For Android devices, the option is called Notification Settings, and it’s located in the Advanced section of the Settings page.
    not-getting-snapchat-notifications-open-settings
  6. On this screen, you will find switches to enable/disable notifications of stories from friends,  friend suggestions, mentions, and other notifications.
  7. Enable the Snapchat notifications that are not working by tapping the toggle to turn green.
  8. If you Snapchat notifications are not working for specific friends and subscriptions, tap the Manage Story Notifications option to enable notifications from them.
  9. Exit the Notifications settings screen by tapping the Back button. Doing this saves your settings.

3. Enable Snapchat notifications on your device

How to enable Snapchat notifications on iOS

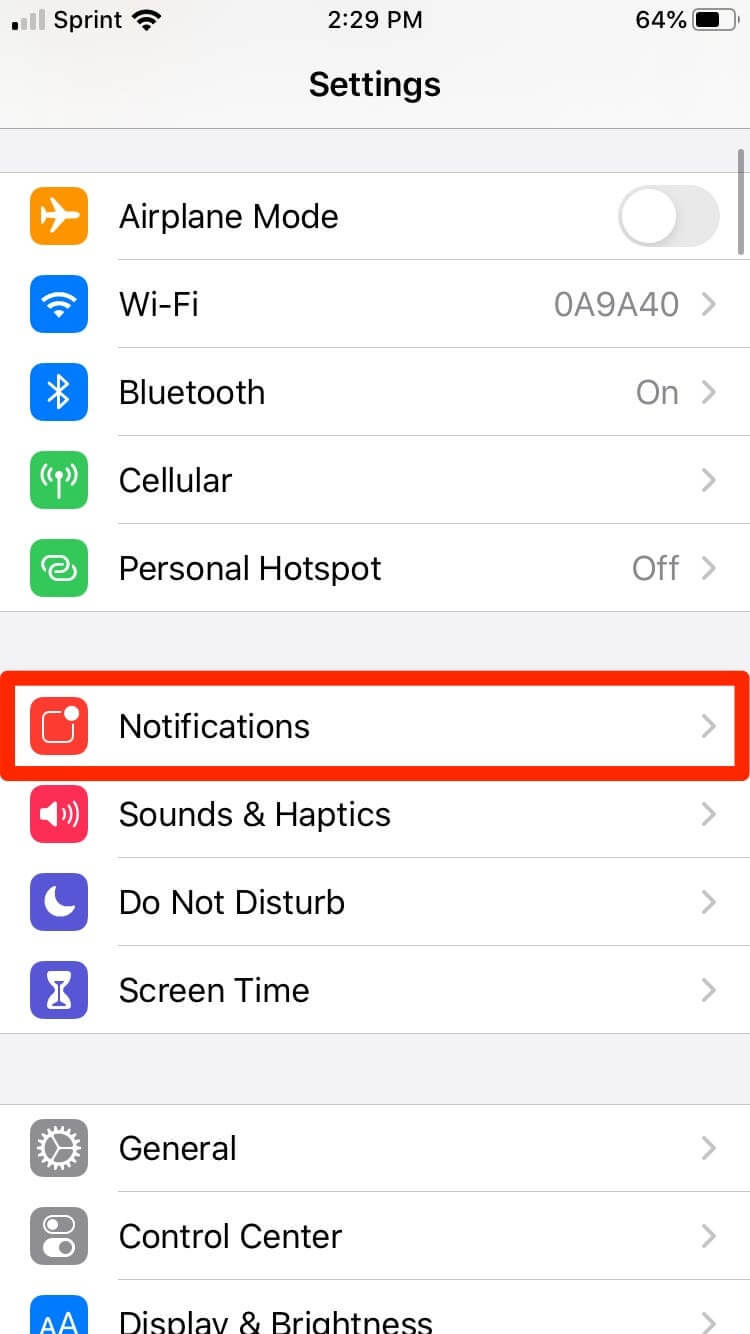
  1. Open the Settings app from your home screen.
  2. Next, select the Notification option.
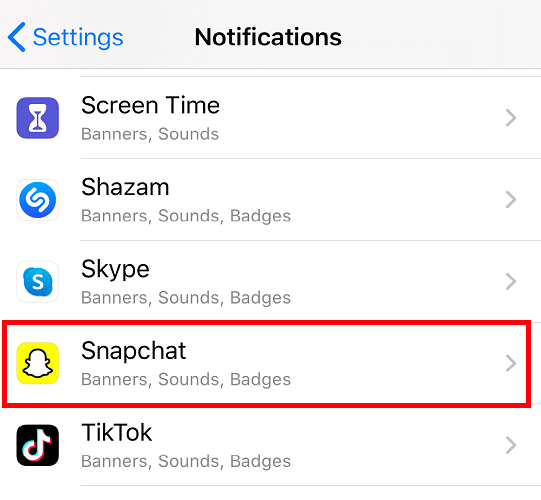
  3. On this next screen, you will find a list of apps installed on your iPhone or iPad in alphabetical order. Here, tap on the Snapchat icon.
    select-snapchat-notifications-not-working
  4. From the previous screen, you would already tell if notifications for Snapchat are off because Off will be indicated beside the Snapchat icon.
  5. Next, tap on the toggle next to Allow Notifications to enable notifications from Snapchat if that was disabled. On toggling this switch on, it turns green.
  6. You may also modify other notification settings on this screen. These include the notification sounds, number badges, lock screen notifications, and the placement of Snapchat notifications.

How to enable Snapchat notifications on Android

  1. Open your device’s Settings app.
  2. Scroll down the options and select Apps. You will see all the applications installed on your Android. This option is labeled as Applications on Samsung smartphones and tablets.
  3. Next, find the Snapchat app and tap on it.
  4. At around midway through the screen, you will locate the Notifications button. Select it and you’ll be taken to the Snapchat notification settings.
  5. Next, tap on the toggle next to Allow Peeking to enable it. This option lets you see quick notifications on received snaps.
  6. Also on this screen, you can modify how you want your Snapchat notifications. You can opt to Treat as a priority. This option lets the notifications come through even if your device is in the Do Not Disturb mode.
  7. You may also like to disable the Block all option here.

Why are event notifications not working?

The most common reason for event notifications not working on your device is because the notifications have been turned on.

Even though the steps required to resolve this problem will vary depending on the device you’re using, here are some steps you can take:

  1. Restart your device.
  2. Re-install the Snapchat application.
  3. Make sure no antivirus software is blocking access.
  4. Navigate to the phone settings on your phone, and make sure that the notifications are turned on for events.

How do I turn my notifications back on?

iOS

  1. Open the Settings app.
  2. Tap Notifications.
  3. Find Snapchat in the list and select it.
  4. Toggle the Allow Notifications button.

Android

  1. Open the Snapchat application.
  2. Click your profile picture.
  3. Click the gear Settings icon found at the corner of the screen.
  4. Open Notifications.
  5. Activate the notifications you want to receive.

Basically, there’s no reported general issue of Snapchat notifications not working. So, if Snapchat is not sending you notifications, the problem is either from your device settings or from your Snapchat notification options.

Thankfully, you can get your notifications up and running in only a couple of minutes if you follow this guide correctly.

Feel free to leave comments and ask questions if your Snapchat notifications are still not working after using these fixes.

How to fix FIFA 18 bugs on your Windows PC

Players around the world finally have the opportunity to play FIFA 18! However, not everything goes smoothly for all of them, as there are already some issues, which certainly kills the hype.

In that manner, we’ve conducted a list of the most common problems that occurred (or may occur) in FIFA 18. So, if you’ve experienced at least one of these problems, check the solutions below.

How do I fix the most common FIFA 18 problems?

1. Invisible players in online mode

This issue hasn’t occurred yet, but based on our experience, it eventually will. The invisible players issue in the online mode will probably be caused by some patch. So, the best solution, in this case, is to simply update the game, as EA will definitely release a proper fix.

2. FIFA 18 unexpectedly exits Ultimate Team

Same thing here. If you encounter unexpected exits while playing the Ultimate Team mode, just update your game.

If updating doesn’t solve the problem, try disabling some background apps that may interfere with FIFA 18. Most of the time the apps you’re looking for are Skype and your antivirus program.

If the problem still occurs, try disabling the Origin in-game feature. Here’s how to do that:

  1. Start Origin desktop client.
  2. Open MyGames. 
  3. Right-click on FIFA 18 and choose Game Properties.
  4. Select Origin In Game and uncheck the box.
  5. Save your selection and start the game.

For a better gaming experience, we recommend downloading Game Fire for free. It will help with various gaming issues, such as low FPS, lags, and slow PC.

3. FIFA 18 controller doesn’t work

If your controller doesn’t work in FIFA 18, there are two things you can do. You can delete your profile, and create a new one. Or you can just update your controller’s drivers.

Here’s how to delete your FIFA 18 profile:

  1. Start the game.
  2. Go to preferred mode where issues occurred.
  3. Move on to Customize.
  4. Select Profile.
  5. Delete it.
  6. Start a New game mode and go to Controller settings.
  7. You should see that the issue is gone.
  8. Move on until you are able to load an old game.

4. Game crashes when launched

Here’s what you need to do if your FIFA 18 crashes on launch:

  1. Go to the FIFA 17.exe file, right click it, and select Properties.
  2. Select the Compatibility tab > check the option “Compatibility Mode” > select Win7.

If your computer has two graphics cards, use this solution:

  1. Go to Control Panel and run your graphics card.
  2. Go to Add > make profiles for fifaconfig.exe and fifa15.exe
  3. Launch regedit > change the value of the following two keys from 1 to 0
    • HKEY_LOCAL_MACHINESOFTWAREMicrosoftWindowsNTCurrentVersionWindowsRequireSignedAppInit
    • HKEY_LOCAL_MACHINESOFTWAREWow6432NodeMicrosoftWindowsNTCurrentVersionWindowsRequireSignedAppInit

5. Black screen

The best solution in case of a black screen issue is to update your graphics card drivers. Here’s how to do that:

  1. Go to Device Manager. You can access it quickly by typing the Device Manager in the Search bar.
  2. Now navigate to Display Adapter section.
  3. Find your display driver and right click it.
  4. Choose Uninstall driver…
  5. Check the Delete the driver software for this device and click OK.
  6. Restart your computer to complete the process.

Alternatively, you can update your graphics card driver automatically with dedicated software such as Fortect Driver Updater. You can set it up to do regular scans and updates while you take care of more important tasks.

It is a time-saving utility that identifies outdated and damaged drivers and installs the best versions available. Fortect Driver Updater always matches your hardware with the corresponding drivers, so you don’t have to worry about that.

6. FIFA 18 won’t connect to EA servers

Here’s what you need to do:

7. The game won’t start

If FIFA 18 won’t start, try running it as Administrator:

  1. Right click on the FIFA 17 desktop shortcut.
  2. Select Properties.
  3. Click on the Compatibility tab, and check the box at the bottom under Privilege Level where it says Run this Program as an administrator.
  4. Click OK.

Also, you can try with updating your display drivers and checking if your computer meets system requirements.

8. VC++ runtime error

  1.  Go to Origin GamesFIFA 17__Installervcvc2012Update3redist
  2. Run the vcredist_x64.exe file
  3.  Immediately go back to your Origin Library and install the game.

9. Issues with saving the resolution option when starting the game

Here’s what you need to do:

  1. Go to: C:DocumentsFIFA 17, open the fifasetup.ini file
  2. Add your customized resolution at the RESOLUTIONHEIGHT and RESOLUTIONWIDTH options
  3. Save the file and go back to the game.

10. FIFA 2018 doesn’t start; the game never worked

[wr_responsive_video_embed url=’https://www.youtube.com/watch?v=WJfPchEDe54&feature=youtu.be’]

This problem can be caused by various factors, therefore multiple solutions can be applied to it. Here are some of the most common workarounds:

  • Start Origin as Administrator
  • Use CCleaner to clean your registry.
  • Delete the Origin cache files.
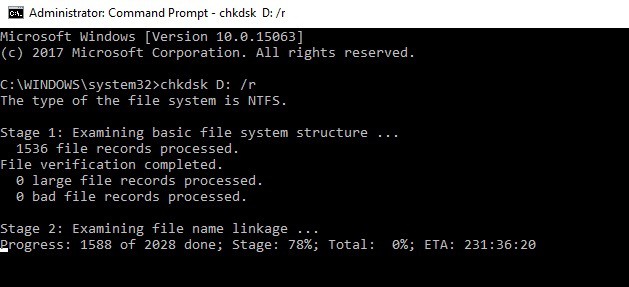
  • Check your hardware for potential issues. You can do that by running the chkdsk command in Command Prompt.
  • Make sure your antivirus software/firewall are not the culprits. Adding the game to the exceptions’ list doesn’t always solve the problem. Nevertheless, add the following programs to your exception list: authorizationUI, TS4.exe, Origin.exe.
  • Start the game in windowed mode. If the game runs, lower the settings and then put it back to full-screen.
  • Reinstall Origin and the game and make sure they are on the same drive.
  • Repair the game through Origin
  • Clean boot your PC
  • Make sure that you don’t have programs with known conflicts with Origin.
  • Update your graphics drivers.
  • VPNs can lead to potential conflicts with the game. Turn off your VPN and check if this solves your problem.
  • Update your Windows version.
  • Update FIFA 17: right-click on the game in Origin and select Search for Updates.
  • Flush the DNS Cache.

11. Fix graphics issues

  1. Update your graphics drivers.
  2. Turn down shadows and adjust graphics settings.
  3. Disable third party background apps and then set FIFA 17 in High Priority in Task Manager.
  4. If your computer is equipped with a Nvidia GPU, go to Settings and set Power Management Mode to Maximum Performance.

12. Transfer Market Purchase – Listing expired error

A lot of players recently encouraged a strange Listing expired error while making purchases in the Transfer Market.

Unfortunately, EA hasn’t released the solution yet, but ‘technicians’ recommend unlinking your profile and linking it once again.

“Thanks for the continued reports on this. Getting an expired error when trying to purchase something on the market is being looked into, you don’t need to unlink accounts to get this to work, we’re looking into a fix.”

13. We are sorry but there has been an error connecting to FIFA 18 Ultimate Team

“We are sorry but there has been an error connecting to FIFA 18 Ultimate Team” is another common FIFA 18 error that bugs too many players.

This was a serious issue some time ago, but EA has been working on the fix. So, you probably just need to update your game in order to fix this problem. If it doesn’t get fixed right away, try again in a few days.

14. EAS FC experience stuck at 86.324/86.700

This is perhaps one of the most serious issues players of the FIFA Ultimate Team have faced so far. Apparently, experience points are just stuck at some point, and no matter what you do, you can’t get them up.

More than one hundred players have reported this issue on the EA forums so far. But unfortunately, there’s still no solution, and we’re clueless about what you should do in this case.

When/If EA releases the solutions, we’ll update the article accordingly. Also, if you know something we don’t know, please share it with us in the comments.

15. Pro Clubs – no opponent found

If you’re not able to find any opponents in Pro Clubs, try the following workaround:

  1. THE CAPTAIN must enable the in-game voice chat (a headset icon will appear next to his name)
  2. The captain must set formation and put himself into his playing position (nobody else should be in the match lobby while the captain is setting formation). Stick to this strictly!
  3. Once the captain sets formations, others can join the lobby.
  4. Now, search for the game, and it should work.

Unfortunately, this is only a temporary solution. Hopefully, some future game update will fix the issue for good.

16. Match won’t start, stuck in pre-match training

This problem was caused by some of the previous squad updates, which messed up boot ids and players. We’re not going to get into details here, if you want to find out more about this issue, visit this forum thread.

To resolve this issue, you basically need to delete your current squad and let the game download new squad files. If you’re not sure how to do that, follow these instructions:

  1. Go to Documents > FIFA 18 > settings.
  2. Delete all the files that begin with MatchDay and Squads. 
  3. Now, open FIFA 18.
  4. Go to Kick-off, and make sure the Live Form is enabled on the team selection screen.
    • This will download the latest Game Day squads.
  5. After that, go back to the Main Menu > Customize > Edit teams > Update latest squads. 
    • This will download the latest offline squads.

After doing this, you should be able to start the match without any problems.

That’s about it, we certainly hope you managed to solve the problem that’s been bothering you with these workarounds. If you have any comments, questions, or suggestions, let us know in the comments below.

This post has been updated to account for the increasing amount of bugs but also with their respective fixes, when applicable.

[Fix] Windows 10 Creators update causing 100% disk activity

One of the good sides of Windows is that the system requirements are not overdemanding. You can run Windows 10 even on an outdated PC and still manage to use resource-hogging programs.

However, it’s not unusual to see a sudden increase in CPU or RAM usage depending on the processes you run. On the other hand, this isn’t exactly a common occurrence for HDD.

Or it did not use to be, at least. Some users reported that, after they obtained the Creators Update, their HDD activity hit sky-high values for no apparent reason. And to make things even worse, that affected the performance radically.

Since this is a grave problem for a lot of users, we compiled a list of solutions. So if you have major HDD issues after the update, check the workarounds below.

How to fix 100% disk usage caused by the Creators Update

1. Use Ashampoo WinOptimizer

Keeping your CPU consumption under control has never been easier, nor has disk space optimization and these two major resource-hogging culprits are easily manageable with the WinOptimizer.

What’s more, you can monitor all running background processes, identify bottlenecks and get a clear overview of all HDD health parameters in just one place with enhancement and optimization recommendations and a system maintenance plan included.

Let’s quickly look at its key features:

  • Accurate and comprehensive dashboards presenting valuable details on all system components in one single location
  • SSD-ready next-gen Defrag tool (merge free space, automate drive analysis and defragmentation)
  • Sophisticated algorithms to detect junk files more efficiently
  • Reclaim precious disk space by eliminating web browsing traces, redundant files, and useless Registry entries
  • monitor all running background processes and get instant notifications on bottlenecks plus potential enhancements
  • Auto-Clean function to reduce clutter before it impacts your system automatically
  • Live Tuner to provide a smart launch boost to all applications and allow custom fine-tuning 
  • Integrated Browser Extension Manager

Ashampoo WinOptimizer

Ashampoo WinOptimizer

Keep CPU usage and disk space under control at all times with this one-of-a-kind system optimization software.
$29.99 Visit website

2. Check the HDD health and inspect hardware

In order to move on to the system inspections, make sure that your HDD is in good shape and not defective. Namely, it may come as a surprise but HDD is the least durable PC component. Except for the SSD drives, those things are as tough as a nail.

So, if you are even mildly accustomed to hardware tweaks, open up your PC case and check out the cables that are connecting your HDD to the motherboard. SATA cables are prone to malfunction so make sure everything is well-connected.

Additionally, you can download any 3rd-party software to check your HDD health, fragmentation levels, and bad sectors.

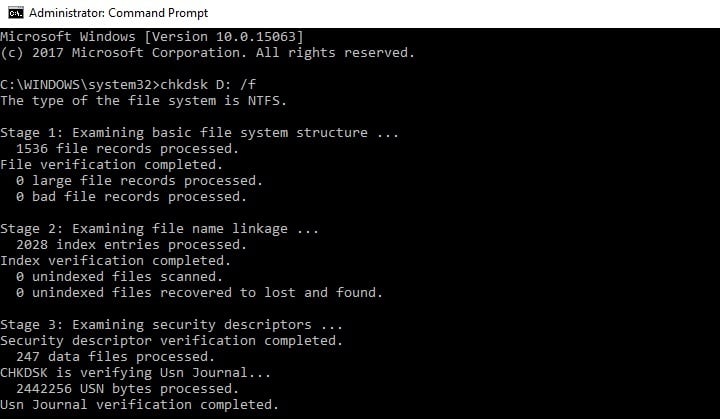
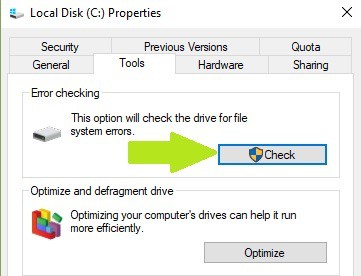
If you’re keener to use a built-in tool, Windows offers you just enough to start with. This is how to check for errors and perform defragmentation on your PC:

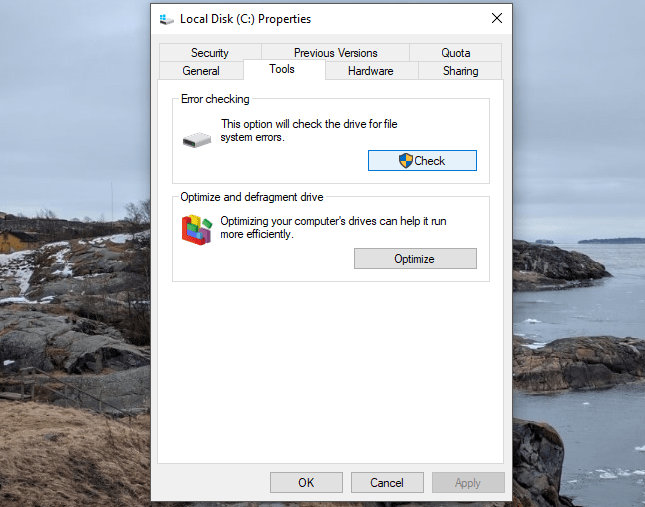
  1. Open This PC, right-click on the system partition, and open Properties.
  2. Under the Tools tab, you’ll see Error Checking and Defragmentation tools.
  3. After you’ve checked your HDD for errors and defragmented it, restart the PC.

The defragmentation part goes only for standard disk drives. SSD drives shouldn’t get fragmented and defragmentation of those can cause a lot of problems.

3. Find the process that hogs on your HDD

Occasionally the rogue system process can be the culprit for this issue, like with some earlier updates. However, sometimes the initiator of the HDD burn might be a 3rd-party program.

And there’s a way to locate and prevent that program from feasting on your resources without control.

Follow these steps to locate the resource-hogging applications:

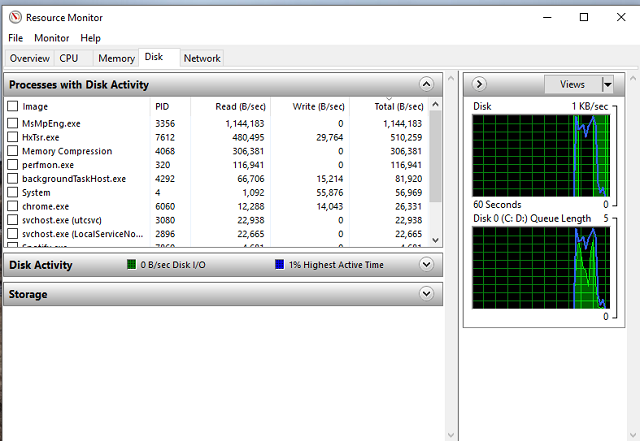
  1. Under Windows Search, type resource, and open the Resource Monitor.
  2. Open the Disk tab.
  3. Sort the processes by total bytes usage.
  4. At the top of the list, you should see the process that consumes the most bytes.
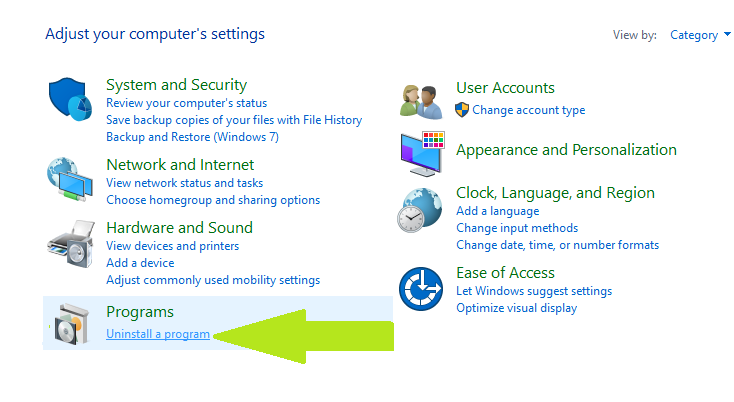
  5. If the process belongs to a 3rd-party application, navigate to a Control Panel, and remove it.

Have in mind that this goes only for the 3rd-party applications. Don’t make any rash actions with the system processes, since that may lead to a lot of issues and even break your system apart.

4. Disable demanding applications from starting

Another action you should take to considerably decrease HDD activity is related to startup. Namely, as you’re probably aware of, certain applications can start with your system in order to make things easier.

However, that may heavily impact your PC performance, increase startup time, and even, in the worst-case scenario, affect your HDD activity.

In the previous Windows versions, users were compelled to use a dubious application in order to disable certain programs from starting. Luckily, that’s not the case with Windows 10. You can easily select the startup programs within the Device Manager.

And this is how to do it:

  1. Right-click the Taskbar and open Device Manager.
  2. Under the Startup tab, you should see all of the applications that start with the system.
  3. Make sure to disable all except the essential ones.

That should increase your startup loading time and, hopefully, decrease HDD activity.

5. Disable Windows Search from indexing

Another thing worth checking is related to Windows Search indexing. Namely, some users reported that the HDD issues were gone after they disabled Search Indexing.

As you already know, in order to speed up the search process, Windows may index your searches. That is quite practical, but, apparently, it may inflict an issue or two.

This is how to disable the Windows Search index and decrease the HDD usage to standard values:

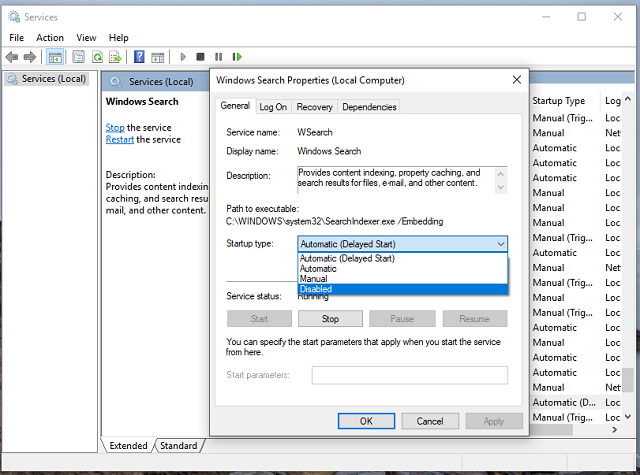
  1. Press Windows key + R to bring out the Run console.
  2. Under the command line, type services.msc and hit Enter.
  3. Navigate to Windows Search service, right-click, and open Properties.
  4. Under Startup Type, choose Disabled.
  5. Click Stop to stop the service.
  6. Restart the PC and look for changes.

That should do it. We hope this was helpful. Still, if you weren’t able to resolve the issue with all of those steps, your best bet is the clean reinstallation. You can find a detailed explanation in this step-by-step guide link.

Moreover, if you have any alternative solutions or questions regarding the subject, make sure to share them with us. The comments section is just below.

[wl_navigator]

Windows 10 v2004 update clashes with certain PC settings

Microsoft started releasing Windows 10 v 2004 on May 27, 2020. While a lot of users expected to download and install the new OS right away, some haven’t managed to do that to date.

A broad range of issues, such as hardware/driver incompatibility, caused Microsoft to place affected PCs on a compatibility block. As you might imagine, that means these PCs couldn’t update to Windows 10 version 2004 until the underlying problems were resolved.

Such is the situation now for some users that have unsuccessfully tried installing the May 2020 Update. This time around, they’re getting an error message along the lines of incompatible PC settings.

Inability to get Windows 10 v2004 due to PC settings issue

It appears that Microsoft recently put some PCs on a Windows 10 version 2004 upgrade block due to a PC settings problem. Therefore, affected users can’t update to the latest version of the Windows OS in the meantime.

In response, the users headed on over to the Microsoft answers forum to express their frustration with the OS update block.

One of them wondered why they’re unable to upgrade to Windows 10 v2004 despite having some high-end processing and graphics hardware on their PC. They’re getting this error message instead:

This PC can’t be upgraded to Windows 10. Your PC settings aren’t supported yet on this version of Windows 10. Microsoft is working to support your settings soon. No action is needed. Windows Update will offer this version of Windows 10 automatically when these settings are supported.

It seems that you can’t do anything about the PC settings issue yet.

Previously, some users reported receiving the error message that their device wasn’t ready for the Windows 10 v2004 update. If you’re still experiencing this kind of trouble, try our guide, and you might be able to upgrade to the latest version of Windows 10 OS.

Meanwhile, you can share your experience with the Windows 10 v2004 update in the comments section below.

Bell Canada Blocking Websites? 4 Tested Solutions & Tools

Bell Aliant is a Canadian telecom company that also provides Internet services.

Unfortunately, many users report that Bell Canada is blocking websites, which prevents them from accessing their favorite online content.

There was even a case proposed against Bell Coalition’s website blocking plan.

If you’re one of these users, you can bypass Bell website restrictions and watch IPTV with the help of a virtual private network service. The role of a VPN is to hide your IP address and encrypt your traffic to ensure your online privacy and security.

However, a VPN can also be used to circumvent geo-blocks and access restricted websites. And it can help with getting around the Bell Canada block, too.

How to work around Bell Aliant blocking your favorite websites?

ExpressVPN – fast servers that can bypass online blocks

ExpressVPN is one of the best VPNs to bypass Internet restrictions. Its strong encryption can help you browse the web without leaving any trace.

You can connect to one of its over 3000 servers located in 94 countries and get access to any website you want without limitations.

The VPN has strong servers all over the world, including in Canada, so if you want to keep up with local websites and media, you can do so without being tracked or having your traffic restricted.

ExpressVPN stops ISP throttling and has unlimited bandwidth. Long story short, you can browse the web completely anonymously without being tracked, for as long as you want.

Other key features of ExpressVPN include:

  • Supports multiple VPN protocols, including OpenVPN, L2TP/IPsec, and Lightway
  • Military-grade AES-256 bit encryption
  • Multi-device support
  • Free trial (for mobile)

ExpressVPN

Use ExpressVPN to unblock restricted websites, protect your private data and improve your connection!
Free trial Visit website

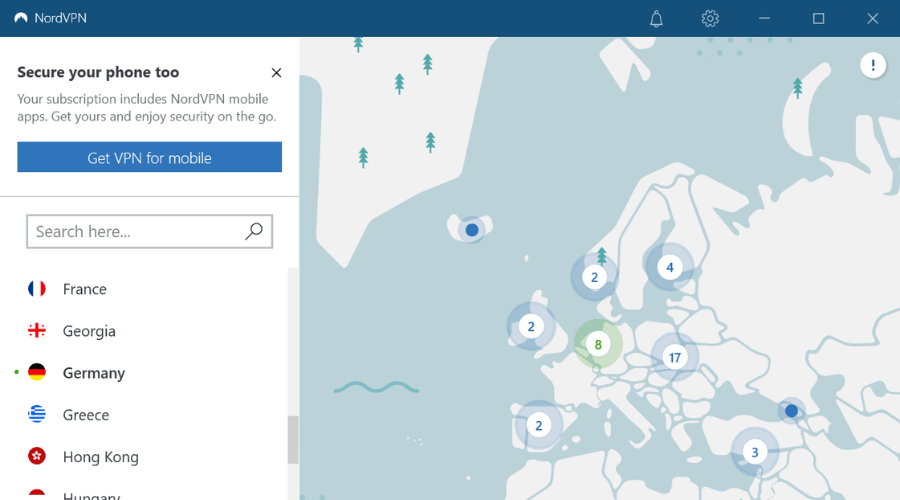
NordVPN – biggest server coverage

Created by Tefincom & Co., NordVPN has something that the other VPNs on this list don’t: obfuscation mode. If your VPN connection gets blocked by Bell Canada, you can connect to NordVPN’s obfuscated VPN servers to hide the fact that you’re using VPN.

This virtual private network solution has CyberSec, an exclusive malware blocker that protects your browsing sessions from phishing attempts and other Internet dangers. It uses OpenVPN to encrypt your data traffic.

Additionally, NordVPN allows up to 6 connections at once, which you can use to lift geo-restrictions if your Bell router blocks websites. Besides unblocking, NordVPN is ideal for streaming, torrenting, traveling, and gaming.

More about NordVPN:

  • +5,100 VPN servers in 59 countries
  • Works with all major platforms
  • No data logs
  • 30-day money-back guarantee (no free trial)

NordVPN

If Bell Aliant is blocking websites you’re trying to access, turn to this reliable VPN for assistance.
Check price Visit website

Private Internet Access – largest server network

Developed by Kape Technologies, Private Internet Access (PIA) is the best VPN that can help you bypass Bell website restrictions and watch IPTV. It supports numerous VPN servers all over the world, and it can also defend your router from hackers.

PIA can encrypt your Internet connection using OpenVPN or WireGuard, speed it up with private DNS servers, as well as reroute it through proxy servers using SOCKS5 or Shadowsocks. It also features a kill switch, split tunneling, and port forwarding.

Up to 10 devices can connect to the same PIA account to fix issues with Bell Aliant blocking websites. Furthermore, if you need technical assistance, you can resort to 24/7 live chat support.

More about PIA:

  • +3,300 VPN servers in 48 countries
  • Compatible with all major platforms
  • No logs
  • 30-day money-back guarantee (no free trial)

Private Internet Access

Stop Bell Canada from blocking your websites with the help of this unrestricted VPN connection.
Check price Visit website

CyberGhost VPN – easiest to use

An alternative virtual private network solution is CyberGhost VPN, which is also operated by Kape Technologies. It has the largest network of VPN servers and it’s the only free VPN on this list.

CyberGhost VPN has servers optimized for streaming, gaming, torrenting, and secure browsing. It also comes with private DNS servers, OpenVPN, split tunneling, and DNS leak protection. You can use it to evade geoblocks.

Moreover, CyberGhost allows 7 simultaneous connections, which means that up to 7 devices can connect on the same VPN account to fix the problem with Bell Aliant blocking websites.

More about CyberGhost VPN:

  • +6,500 VPN servers in 89 countries
  • Can be installed on all major platforms
  • No identifying logs
  • 45-day money-back guarantee (1-day free trial)

CyberGhost VPN

Easily bypass Bell website restrictions and watch IPTV channels with this fast and secure VPN.
Check price Visit website

In conclusion, you don’t have to worry about Bell Aliant blocking the websites you’re attempting to access if you get equipped with a powerful VPN with high-speed servers and plenty of features to preserve your online anonymity.

Windows 10/11 Calendar to get improved search function

What a mess your life would be, at home or in the workplace, without a digital calendar! The utility comes in handy in the management of your tasks, appointments, or assignments.

In fact, there’s hardly a productivity or collaborative tool that doesn’t require calendar integration if it doesn’t offer the tool out of the box.

For desktop users, Windows 10 Calendar proves its value in the management of schedules, including meetings, and much more. And now the app is currently undergoing a transformation that will give it improved features, for example, a better search experience.

New Windows 10 Calendar search

According to a Tweet by Alumia_Italia, an improved search is one of the new features that Microsoft is developing for the Windows 10 Calendar app.

The function, which is currently in preview, looks much better in the GIF that Alumia_Italia shared.

To search any event on your Calendar, simply type it in the search box to yield a list of events. You may then click on any of the items in your search results to view additional details.

A while back, Microsoft announced that it would overhaul the entire Calendar experience on Windows 10. Also, the company revealed multiple features it would be adding to the app each month.

We’re updating the Calendar app for Windows 10 with improved features, new themes, and a cleaner interface that’s easier to use. The Calendar preview is an early look at this update. It will initially include a subset of the features currently available in Calendar today, and we’ll be adding more features each month.

Besides an improved search feature, the Calendar app is getting 34 new themes and a better month view. Microsoft is also redesigning account navigation and offering a better way to add events.

All these features are currently undergoing beta testing though.

Are you excited about the upcoming Windows 10 Calendar feature improvements? Feel free to share your opinion in the comments section below.

[wl_navigator]

FIX: Stuck at making sure you’re ready to install Windows 10

Microsoft has made transitioning from old Windows versions to Windows 10 easier. However, some Windows users experience problems when upgrading to Windows 10.

A common error is that the installation gets stuck at Making sure you’re ready to install prompt while upgrading.

This could be attributed to many causes. Sometimes upgrading problems could be caused by antivirus software and bloated software.

Therefore, we have come up with applicable workarounds to fix the upgrade to Windows 10 problem.

How to fix the ready to install Windows 10 prompt

  1. Preliminary fixes
  2. Run SFC command
  3. Run CHKDSK
  4. Turn off Windows Defender and firewall
  5. Turn off automatic updates
  6. Rebuild Boot Configuration Data
  7. Clean install Windows 10

1. Preliminary fixes

First of all, get your PC ready for the installation of the new OS with a full clean-up, maintenance, and optimization process.

After the quick installation, use the One-Click Optimizer option that you can find under System Maintenance. The tool will help you find web browsing traces, hidden data junk, superfluous Registry entries, and system vulnerabilities that might interfere with other processes.

The tool will also remove unwanted software installations, plus it will scan all of your system components to make sure your drivers are up-to-date.

Its improved Defrag option merges free space on your device and retrims used space to make sure your drive is used to its full capacity.

Additionally, you can also check the following preliminary details:

  • Disconnect any unnecessary peripherals such as external hard drive, SSD, etc.
  • Ensure that drivers for Printer, Ethernet/Wireless webcam, SATA/RAID controller, Chipset, and sound chip are fully updated.
  • Don’t only disable your antivirus but uninstall it.
  • Uninstall any motherboard or OC utilities such as MSI Afterburner, Speedfan, Motherboard Overclocking tools, etc.
  • Uninstall software for peripherals such as mouse, keyboard, USB drives, webcam, etc if you have any.
  • Ensure you have at least 20GB free space on your local disk.

Some Windows users reported quick success by try out any of the preliminary fixes we mentioned above. On the other hand, you can proceed to other solutions for ready to install Windows 10 problem.

2. Run SFC command

  1. Go to Start, type Command Prompt in the search bar and open as administrator.
  2. In the command line type sfc /scannow.ready to install windows 10
  3. Wait for the process to be completed.
  4. Afterwards, close the Command Prompt

Sometimes, important system files might be corrupted or modified due to several reasons such as malware infection, program uninstallation, old Windows updates, and many more. The corruption of the system files damages the Windows Registry.

This is why we recommend you to run the System File Checker (SFC), which checks for and repair corrupt system file violations.

If SFC scan did not fix the ‘ready to install Windows 10’ problem, you might want to proceed to the next method.

3. Run CHKDSK commandrun chkdsk command to fix windows installation

  1. Go to Start, type Command Prompt in the search bar and open as administrator.
  2. Now, type chkdsk c: /f.
  3. Then, type chkdsk c: /r and hit Enter.
  4. After the process completes, restart your PC.

The CHKDSK command verifies the file system integrity of a drive and fixes detected system errors.

4. Turn off Windows Defender and firewall

The antivirus program can prevent Windows upgrade to Windows 10 resulting in the ready to install problem. So, you have to disable the antivirus protection, uninstall it, and then proceed to upgrade your Windows PC to Windows 10.

However, Windows Defender cannot be uninstalled because it is a built-in software by Windows. But you can turn off Windows Defender completely and prevent it from flopping your Windows upgrade.

  1. Go to Settings, then to Update & Security.
  2. Open Windows Defender.
  3. Now select Virus & threat protection.ready to install windows 10
  4. Navigate to Virus & threat protection settings.ready to install windows 10
  5. Now locate Real-time protection and disable it.ready to install windows 10

In addition, you can also switch off Windows Defender Firewall as well. Follow these steps to do that:

  1. Open Run with the Windows key + R.
  2. Enter Control Panel in the text box, and click the OK button.
  3. Then enter firewall in the search box, and click Windows Defender Firewall to open further options.
  4. Click Turn Windows Defender Firewall on or off.Turn off Windows firewall
  5. Select both the Turn off Windows Defender Firewall options, and press the OK button.

5. Turn off automatic updates

  1. Go to Start, and open Control Panel
  2. Go to System and security, then to Windows Update
  3. Choose Change settings
  4. Make sure Recommended updates checkbox is unchecked

This prevents your Windows PC (running older Windows 10 versions) from downloading and installing updates meant for newer Windows 10 versions.


6. Rebuild Boot Configuration Data

  1. Insert the Windows 7 bootable media (USB stick or DVD) and restart your PC.
  2. Set USB/DVD as the primary boot device. Either by entering the Boot menu (F10, F11, or F12) or from the BIOS settings.
  3. The loading process of the installation file should commence.
  4. Select the language, time/format, and keyboard input of choice and click the Next button.
  5. Choose Repair your computer from the bottom left corner.
  6. Open the Troubleshoot option.ready to install windows 10
  7. Select Advanced Options.
  8. Open Command Prompt. Select your account and enter the password if asked.
  9. Copy-paste the following commands and press Enter after each and reboot after the process finishes:
  • bootrec /FixMbr
  • bootrec /FixBoot
  • bootrec /ScanOs
  • bootrec /RebuildBcd

Note: After rebuilding BCD using Windows 7 installation disk, you can proceed to the next solution in order to clean install Windows 10 OS just as intended.

The BCD (Boot Configuration Data) is rarely affected, but it still can get corrupted. Incomplete OS installation, incompatible OS updates, malware, ransomware, and many more might affect the BCD getting you stuck at making sure you’re ready to install Windows 10 screen.

7. Clean install Windows 10

Clean installing Windows 10 prevents you from being stuck while upgrading to Windows 10 with the Making sure you’re ready to install prompt.

Before you proceed, you should ensure that you backup all your important files on an external drive or USB flash drive. Also, you should create an ISO file with the media creation tool, and burn it on DVD or create a bootable USB drive with it.

Note: The proposed USB drive for the Windows 10 installation must be at least 6GB and it’s preferable to be a 2.0 instead of 3.0 or 3.1.

Here’s how to clean install Windows 10:

  1. Download the Media Creation Tool.
  2. Plug in the USB flash drive with at least 4 GB.
  3. Run Media Creation Tool and accept the License Terms.ready to install windows 10
  4. Select the Create installation media (USB flash drive, DVD, or ISO file) for another PC option.ready to install windows 10
  5. Pick the preferred language, architecture, and edition and click Next.
  6. Choose USB flash drive and then click Next.ready to install windows 10
  7. Media Creation Tool will download the setup and copy the installation files onto the USB flash drive.
  8. Finally, restart your PC.
  9. Plug in USB and start the Setup.

In conclusion, any of the aforementioned solutions should be able to prevent you from being stuck at Making sure you’re ready to install Windows 10 prompt.

Have you tried any of our fixes above? We do appreciate it if you share your experience with us. Let us know in the comment section below.

Microsoft’s recent reorg creates new consulting arm while focusing on field sales

A recent July tradition over at Microsoft has become the announcement and implementation of some sort of structural reorg within the company. Back in 2016, there was the Nokia/Microsoft shakeup, followed by a new division classification for fiscal reporting in 2018, then a reorg within the Azure and Windows divisions in 2019, and in 2020, the company is shifting chairs on its decks to focus on field sales.

According to a report from journalist Mary Jo Foley over at All About Microsoft highlights a recent change within the walls at Microsoft where the company is looking to improve its customer use and engagement across its product and services portfolio.

Microsoft officials are shooting for more support-role clarity and improved “right-sizing” of customer support plans with these latest moves.

In addition to shifting titles and daily work focus of current employees, Foley also believes that Microsoft is also on the brink of establishing a new Microsoft Consulting arm that will presumably expand its field sales teams product offerings.

However, unlike in 2017 where thousands of employees were let go, the new reorg doesn’t appear to be accompanied by the customary downsizing Microsoft reorgs have been known for. From what Foley has deduced from sources, not much more beyond the usual churn will be expected of employee loss during this most recent transition.

Microsoft should be discussing the details of this new reorg as soon as its next investors call later this month.

How to watch IPTV Australia channels from anywhere? [Answer]

If you’re looking for solutions to watch IPTV in Australia from anywhere in the world, we’ve got you covered. Australian residents have access to numerous exclusive TV channels, including ABC, Seven Network, Nine Network, SBS, and Foxtel. If you’re living or traveling abroad, or if you’re just interested in watching Australian TV channels online, here are the best solutions to watch TV on Windows 10 and other devices.

How can I watch IPTV channels in Australia?

Use a VPN

Private Internet Access is the best VPN service

  1. Download Private Internet Access (PIA).
  2. Set up PIA on your PC.
  3. In the PIA main window, click VPN Server.
  4. Search for Australia and click the first city (lowest latency).
  5. Press the big power button to connect to the Australian VPN server.

Now you will be able to access live streaming websites that are exclusively available to Australian residents, thanks to the fact that PIA can bypass geoblocks.

Made by Kape Technologies, PIA is the best VPN for streaming, thanks to its impressive network of VPN servers worldwide, together with its superior connection speeds.

PIA comes with private DNS servers, static and dynamic IP addresses, OpenVPN and WireGuard protocols, SOCKS5 and Shadowsocks proxy servers, as well as 24/7 live chat support.

More about PIA:

  • +3,300 VPN servers in 48 countries, including Australia
  • Works with all major platforms, including Windows, Mac, Linux, Android, iOS
  • Up to 10 devices can connect using the same PIA account
  • Unblock Netflix AU, Netflix US, and other Netflix libraries
  • 30-day money-back guarantee (no free trial)
Private Internet Access

Private Internet Access

Watch IPTV channels in Australia using the fast and secure VPN servers of PIA.
$2.85/mo. Buy it now

Use Mobdro

the Mobdro developer logo

  1. Using your Android*, allow apps to install from unknown sources.
  2. Download and set up Mobdro.
  3. In Mobdro, tap the search button and type the name of an Australian IPTV channel.
  4. Select the entry from the search results.
  5. Once the stream is loaded, you can start watching the TV channel.

*Instead of watching IPTV channels in Australia using an Android device, you can download BlueStacks and use this Android emulator to set up Mobdro on your Windows PC.

NOTE: If Mobdro takes a long time to load the stream or if the stream buffers, use PIA to connect to an Australian VPN server before using Mobdro. This should help reduce buffering.

Mobdro is a great idea to watch IPTV channels in Australia, no matter where you are. It’s completely free to use and, although it’s exclusively made for Android smartphones and tablets, you can get it up and running on other operating systems like Windows, Mac, or Linux with an Android emulator.

However, it currently doesn’t support many Australian IPTV channels, so you might not find what you’re looking for. On top of that, it takes longer to prepare an Android emulator. And you can’t remove the in-app ads unless you agree to share your device’s idle resources with a third party.

Use IPTV software

use ProgDVB

  1. Download ProgDVB and set it up on your computer.
  2. In the main application window, go to the FreeWorldTV tab.
  3. Search for an Australian TV channel and double-click it.
  4. You can now watch live streaming.

ProgDVB is one of the best IPTV software tools, even when it comes to watching IPTV channels in Australia. It definitely has more choices than Mobdro, and you can also use it to unlock Australian radio stations.

However, you can’t use ProgDVB to unblock Netflix AU, for example. And the software program is prone to errors and crashes.

Use an Internet circumvention tool

use Psiphon

  1. Download Psiphon and install it on your PC.
  2. Fire up the tool and head over to Settings > Psiphon Server Region.
  3. Select Australia and click Apply Changes.

Once connected to Psiphon, you should be able to access some live streaming services and watch IPTV channels in Australia.

Psiphon is one of the best proxy tools that you can use to unblock websites, bypass geo-restrictions, and enjoy exclusive streaming content. It’s incredibly fast, too.

On the other hand, Psiphon doesn’t encrypt your Internet traffic like a VPN. So if you’re looking for a complete solution for both IPTV streaming and secure browsing, Psiphon is not for you.


Can’t connect to a proxy server on Windows 10? Check out this article to fix it easily.


To summarize, these 4 solutions should set you on the right path if you want to watch IPTV channels in Australia, no matter where you are.

And, if you have trouble deciding which of the 4 solutions is ideal, we recommend a VPN like PIA because it comes with tons of benefits that outweigh the disadvantages.

If you’re considering a free VPN like Hola VPN, keep in mind that these solutions aren’t actually free. Although they don’t ask for money in exchange for their services, they are usually filled with adware, compromise your online privacy by leaking your IP address, share your VPN traffic with third parties. But a premium VPN tool is worth it.

[wl_navigator]

AT&T IP address compromised or hacked? Here is what to do

If you’re an AT&T customer, you’ve probably heard about compromised or hacked IP addresses. If it never happened to you, it might’ve happened to one of your acquaintances, or you might’ve seen it on a forum online.

The gist goes something like this: you’re at home, minding your business when suddenly you receive a phone call. Then the person on the other end or a recorded message informs you that your IP address has been hacked or compromised.

Although it may sound terrifying, this situation is actually way less threatening than it sounds. First of all, you must understand that there’s no such thing as hacking one’s IP address.

It’s exactly the same as someone telling you they’ve hacked your home address. The real danger here is associating your IP address with you (figuring out who’s behind the IP address), since from that point onward you can be targeted by attacks.

It’s more like a privacy invasion if you’d like. Just as you don’t want random strangers to know where you live, letting your IP address be associated with you is best to be avoided. Here are some scenarios you might face.

Possible scenarios of the compromised IP situation

1. You get a call from a tech employee

This one can swipe you right off your feet if you’re not exactly tech-savvy. You receive a call, there’s a voice at the other end informing you about your IP being hacked or compromised. This can be either a real person or a pre-recorded message.

They then give you a fake AT&T phone number you can call and check for yourself. If you do call, you will reach a second person, confirming that the situation, is indeed dire.

Now, this is where things get a bit tricky, as it can go several ways from here. The number could be a premium rate one, and even one minute of conversation can cost you a lot of money.

Another method used by these scammers is requesting money from you so that they can take care of your hacked IP. A red flag you should be aware of is the scammer’s preference towards cryptocurrency.

Note that most of the time, you will be referred to as sir or madam. You can also mark this immediately as a red flag, since companies you signed with usually have your full name, and won’t shy away from using it in a conversation, especially an official one.

2. You receive a mail/message from tech companies

Many scammers will send emails in bulk informing random users about their IP being hacked or compromised. This Hail Mary type of attack is very efficient, as it increases the chances of someone actually buying into the scam.

The content of the email may vary since there’s not just one scammer that will try to pull this off. They might trick you into believing they’re from Microsoft or AT&T, and that there’s something very wrong on your end.

You might be offered a phone number with an invitation to call it and check for yourself. Again, you should steer away from this situation, as the number might be a premium-rate one, and even a minute’s worth of conversation might cost you a lot of money.

Another scenario is when the scammer demands a ransom disguised as payment for tech services. Long story short, they help you un-compromise your IP in exchange for money.

Last, but not least (and this is the most dangerous, believe us), the scammer might request access to your PC. They will even walk you through the process of lowering your defenses (turning off your firewall, enabling remote access, forwarding ports, and so on).

Once they have access to your PC, they can virtually do anything from there, such as plant bugs, infect your device with a remote trojan (RAT), and even leave backdoors to your entire network.

Thus, it leaves your device vulnerable and the perpetrator able to steal credentials, payment details, and even spy on you and blackmail you.

Here is what to do if your IP address is compromised

Like we said before, this is not a real situation. Your IP can’t be hacked or deleted or whatever the scam may say. However, these creepy phone calls and/or messages are very real and they can put you at risk if you don’t exercise caution.

Here’s what you can do to avoid these situations:

  • Don’t answer unknown callers and let them go to voice mail if possible
  • Never try calling the number the scammers will give you
  • If you have doubts, always hang up and try calling AT&T using one of their public numbers displayed on their website
  • Remember that IP addresses can’t be hacked, they can only be used as means of targetting you
  • Never grant anyone access to your computer, no matter how convincing they sound
  • Don’t send money to shady technicians who can magically solve your compromised IP situation
  • Make sure that you’re using a trustworthy firewall/antivirus combo
  • If you’re not hosting a server or something similar, don’t forward (open) ports on your network
  • Change passwords frequently
  • Try not to use the same password for multiple accounts
  • Use a password manager such as LastPass
  • Don’t be afraid to report shady calls/messages to the authorities
  • Check support forums or groups online for problems that might be similar to yours
  • Use a VPN service such as PIA to hide your IP address

Private Internet Access

Private Internet Access

Want to keep your IP private? PIA can help.
$2.85/mo. Buy it now

Your AT&T IP address can’t be hacked

All things considered, your IP address can’t be hacked, much like your home address can’t be compromised. Worst case scenario, someone makes it public and random strangers can use it to target you.

But that’s not exactly AT&T’s responsibility, to make sure your IP address is not made public. Therefore, if you want to protect the privacy of your IP address, you can mask it by using a trustworthy VPN service.

If possible, you could ask AT&T if they can assign you a different IP address (if you’re using a static one and fear that someone could target you through it).

[wl_navigator]

The Device Does Not Recognize the Command [Error 0x80070016]

If you’re getting the ERROR_BAD_COMMAND error code with The device does not recognize the command description, follow the troubleshooting steps listed in this article to fix it.

ERROR_BAD_COMMAND is often accompanied by error code 0x80070016 and usually occurs when users attempt a backup, install a new app, or update existing apps. This error affects all Windows versions.

Various elements are triggering this issue:

  • Damaged or corrupted files and folders.
  • Missing EXE, DLL, or SYS files.
  • Deleted registry values.
  • Malware infection.
  • Outdated or incompatible software versions, etc.

How can I fix the device does not recognize the command error?

1. Use third-party software

Some underlying system issues likely cause this bad command error. Oftentimes, these issues are not very easy to identify.  The Windows operating system is complex, and due to regular use, it is expected to have some corrupt or missing files.

The issue itself is not major, but to detect and repair it, we recommend you use a dedicated PC repair and optimization tool.

The process is simple. These tools scan your PC and detect any issues that may cause errors or other performance problems, and automatically remove faulty system files and install new ones.

2. Install Visual C++ 2015 Redistributable Packages

Many users confirmed fixing this error code by installing or reinstalling Visual C++ 2015 Redistributable Packages. The role of this tool is to install run-time components that are required to run C++ applications built using Visual Studio 2015. As a result, app compatibility is enhanced, allowing users to install and deploy apps smoothly.

⇒ Get Visual C ++2015 Redistributable Packages

3. Run a full system scan

  1. Go to Start > type defender > double click Windows Defender to launch the tool
  2. In the left-hand pane, select the shield icon
  3. In the new window, click the Advanced scan option
  4. Check the full scan option to launch a full system malware scan.

Malware may cause various issues on your computer, including errors. Performing a full system scan to detect any malware running on your computer is a good way to start. You can use Windows’ built-in antivirus, Windows Defender, or third-party antivirus solutions.

4. Repair your registry

1. Go to Start > type cmd > right-click Command Prompt > select Run as Administrator

2. Now type the sfc /scannow command

3. Wait for the scanning process to complete and then restart your computer. All corrupted files will be replaced on reboot.

The simplest way to repair your registry is to use a dedicated tool, such as CCleaner. Don’t forget to first backup your registry in case anything goes wrong. If you haven’t installed any registry cleaner on your computer, check out our article on the best registry cleaners to use on PC.

You can also use Microsoft’s System File Checker to check for system file corruption. However, this utility is only available on Windows 10.

5. Update your OS

Make sure that you’re running the latest Windows OS updates on your machine. As a quick reminder, Microsoft constantly rolls out Windows updates in order to improve the system’s stability and fix various issues.

To access the Windows Update section, you can simply type update in the search box. This method works on all Windows versions. Then go to Windows Update, check for updates and install the available updates.

6. Run the Windows Troubleshooter

  1. Go to Settings > Update & Security > select Troubleshoot in the left-hand pane
  2. In the new window, go to the section Find and fix other problems > select the troubleshooter that you need depending on the tool affected by The device does not recognize the command error > Run the troubleshooter

If you run an older Windows version, you can download the Microsoft Easy Fix tool to troubleshoot various software and hardware issues. The tool is compatible with

  • Windows 10 Version 1607
  • Windows 8.1, Windows 8
  • Windows 7 Enterprise
  • Windows 7 Home Basic
  • Windows 7 Professional
  • Windows 7 Ultimate

Go to the official Microsoft Easy Fix tool webpage, and scroll down to select the troubleshooter that best suits your needs, depending on the tool affected by The device does not recognize the command error. When you select the respective tool, your PC will download the troubleshooting software.

Once the tool has been downloaded, double-click it to launch it. Then follow the on-screen instructions to fix your problem.

7. Check your disk for errors

Start Command Prompt as administrator and type the chkdsk C: /f command followed by Enter. Replace C with the letter of your hard drive partition.

As a quick reminder, if you do not use the /f parameter, chkdsk displays a message that the file needs to be fixed, but it does not fix any errors. The chkdsk D: /f command detects and repairs logical issues affecting your drive. To repair physical issues, run the /r parameter as well.

On Windows 10, go to hard drives > right-click the drive that you want to check  > select Properties > Tool. Under the Error checking section, click Check.

8. Clean your temporary files and folders

  1. Go to Start > type Disk Cleanup > launch the tool
  2. Select the disk that you want to clean > the tool will them tell you how much space you can free up

3. Select Clean up system files.

The simplest and quickest manner to delete your temporary files and folders is to use Disk Cleanup. As you use your computer or browse the Internet, your PC accumulates various unnecessary files.

These so-called junk files may affect your computer triggering various error codes, including the ERROR_BAD_COMMAND error code. Clean your temporary files and then retry the action that first triggered this error.

9. Remove recently installed software

If the ERROR_BAD_COMMAND error code occurred after you installed new software on your computer, try uninstalling it.

Go to Start > type Control Panel > select the program(s) recently added > click Uninstall. Then restart your computer, and see if the issue has been solved.

10. Boot into Safe Mode

  1. Hold down the shift key and click the on-screen power button.
  2. Select the restart option while holding the shift key.
  3. Select Troubleshoot > Advanced options > Startup Settings > hit Restart.
  4. Wait until Windows 10 reboots, and select Safe Mode.
  5. Retry the action that initially triggered the ERROR_BAD_COMMAND error code> restart your computer > check if the problem still persists.

11. Clean boot your computer

hide all microsoft services windows 10
disable start up items windows 10

  1. Type System Configuration in the search box > hit Enter
  2. On the Services tab >  select the Hide all Microsoft services check box > click Disable all.
  3. On the Startup tab > click on Open Task Manager.
  4. On the Startup tab in Task Manager> select all items > click Disable.
  5. Close the Task Manager
  6. On the Startup tab of the System Configuration dialog box >click OK > restart your computer.

A clean boot starts Windows by using a minimal set of drivers and startup programs to eliminate software conflicts that may occur when you install a program or an update or when you simply launch a program.


12. Check the permissions on the drive

  1. Log in as Admin > select the problematic drive > right-click it
  2. Go to Properties > select the Security tab >click on the Advanced button
  3. In the new window, click on Users > click on the Change permissions button

4. Select Users one more time > go to Edit. 5. Under basic permissions, check Full control > OK.

In this manner, you’ve changed the permissions to allow full control for all users. This should solve the problem. However, keep in mind that if you restart your computer or switch users, these settings will revert to default.


13. Reset the Windows Update components

If the ERROR_BAD_COMMAND error code occurs when you try to update your OS or a particular app, reset the Windows Update components. Follow the steps listed below and then check if the issue persists.

1. Go to Start > launch Command Prompt as Administrator

2. Type the following commands and hit Enter after each one:

net stop bits
net stop wuauserv
net stop appidsvc
net stop cryptsvc

3. Type the following command to delete the qmgr*.dat files, and press Enter:
Del “%ALLUSERSPROFILE%Application DataMicrosoftNetworkDownloaderqmgr*.dat”

4. Type the cd /d %windir%system32 command to repair the corrupted repository.

5. Reregister the BITS files and the Windows Update files by typing the following commands in Command Prompt. Hit Enter after you type each command.
regsvr32.exe atl.dll
regsvr32.exe urlmon.dll
regsvr32.exe mshtml.dll
regsvr32.exe shdocvw.dll
regsvr32.exe browseui.dll
regsvr32.exe jscript.dll
regsvr32.exe vbscript.dll
regsvr32.exe scrrun.dll
regsvr32.exe msxml.dll
regsvr32.exe msxml3.dll
regsvr32.exe msxml6.dll
regsvr32.exe actxprxy.dll
regsvr32.exe softpub.dll
regsvr32.exe wintrust.dll
regsvr32.exe dssenh.dll
regsvr32.exe rsaenh.dll
regsvr32.exe gpkcsp.dll
regsvr32.exe sccbase.dll
regsvr32.exe slbcsp.dll
regsvr32.exe cryptdlg.dll
regsvr32.exe oleaut32.dll
regsvr32.exe ole32.dll
regsvr32.exe shell32.dll
regsvr32.exe initpki.dll
regsvr32.exe wuapi.dll
regsvr32.exe wuaueng.dll
regsvr32.exe wuaueng1.dll
regsvr32.exe wucltui.dll
regsvr32.exe wups.dll
regsvr32.exe wups2.dll
regsvr32.exe wuweb.dll
regsvr32.exe qmgr.dll
regsvr32.exe qmgrprxy.dll
regsvr32.exe wucltux.dll
regsvr32.exe muweb.dll
regsvr32.exe wuwebv.dll

6. Reset Winsock by typing this command:
netsh winsock reset

7. Restart the BITS service, the Windows Update service, and the Cryptographic service. Type the following commands and hit Enter after you type each command:
net start bits
net start wuauserv
net start appidsvc
net start cryptsvc

8. Go to Windows Update and install the latest updates.
9. Restart your computer and make sure that the latest updates have been installed.

We hope that the solutions listed above helped you fix The device does not recognize the command error. If you’ve come across other workarounds to fix this problem, you can help the Windows community by listing the troubleshooting steps in the comments below.

Before you leave, you might want to read our guide on how to resolve AHCI Port0 device error.

Bookmark our System Errors Page and stay updated on the latest fixes and solutions.

Visit the Windows 10 Errors Troubleshooting Hub to learn more.

You can now copy Planner plans into Microsoft Teams groups

If you use Microsoft Teams to facilitate collaboration on projects, then you most probably appreciate the importance of task management within your workflows. Fortunately, Teams requires no third-party app integration to help with this aspect of your work.

That’s because Microsoft Planner, which boasts extensive Office 365 integrations, is available to Teams users. Recently, the app got an update for Teams that lets you copy plans into existing groups or teams.

Microsoft Teams plans update

Microsoft Planner is something of a Teams. So now you can simply pick any existing group or team into which you wish to copy a plan.

Moreover, you don’t have to copy the entire plan because Microsoft Planner allows you to choose specific items.

The integration of Microsoft Teams and Planner is one of the most natural in Office 365, considering that the two are project/task management tools. Even before this update, you could create new plans or view existing ones in Teams. You could also add existing plans in channels.

But with the copy update, you may now quickly replicate a plan across a team. The copied plan includes all the pertinent information on tasks, including late, in progress, and completed assignments.

What’s your experience with Planner in Microsoft Teams? Kindly share your views or any concerns via the comments section below.

[wl_navigator]

FIX: Hard drive missing after Windows 10 update

Well, we are in a bit of a pickle: if you update your operating system to the latest Windows 10 version, you might lose the connection to one or more partitions in your system.

But you don’t need to worry because we can fix this issue in the shortest time possible and bring back your Hard Disk if it disappeared after the update to the latest OS version.

Even if you update to the latest build in Windows 10 version, there are still some bugs that need fixing and one of them being the hard drive disappearing issue.

But with the help of an application, you will manage to find your hard drive partitions again and continue working in Windows 10 as usual.

What to do when hard drive disappears after Windows update?

  1. Run the Hardware and Devices Troubleshooter
  2. Initialize your disk
  3. Update your Disk driver
  4. Connect your hard drive to a different USB port
  5. Run MiniTool Partition Wizard

1. Run the Hardware and Devices Troubleshooter

If you don’t want to download a third-party tool on your computer, you can also try to run the built-in hardware troubleshooter.

Go to Settings > Update & Security > Troubleshooter > locate and run the troubleshooter.

windows 10 hardware troubleshooter

2. Initialize your disk

  1. Go to Start > type disk management > double click on the first result to open Disk Management (Create and format disk partitions).
  2. A list of all your hard drives and partitions should appear on the screen. If you find a disk listed as Disk 1 or Disk 5 (or other similar names), you’ll need to localize it.Internal hard drive not showing up Windows 10
  3. Right-click on that partition > select Initialize Disk.Can't see hard drive Windows 10
  4. Select the GUID Partition Table (GPT) option > hit OK.
  5. The partition should now be listed as Basic and Online but won’t have any unallocated space. To fix this minor issue, right-click on the box > click on New simple volume.External hard drive not showing up
  6. Click Next, and assign a drive letter and then format your new drive. Choose the NTFS file system, and run a quick format.Hard drive won't show up in BIOS

For more ways on how to initialize your drive, check out our detailed article.

3. Update your Disk Driver

Another common reason why your hard drive disappeared after updating your Windows 10 computer is due to missing or incompatible drivers. To fix this problem, you need to install the latest driver version.

The safest and quickest way is to use dedicated driver updater software such as Fortect Driver Updater. It will automatically identify missing, outdated, or damaged drivers and fix them within minutes.

You can also update your disk driver manually, from the Device Manager. Follow the instructions below:
1. Type device manager in the taskbar and open the panel.
2. Select the Disk drivers category from the driver list.
3. Right-click on your driver and select Update Driver.

Windows will automatically search for the newest version of your driver and install it.

If it does not find any new driver, find the name of your hardware and look it up on the manufacturer’s website and follow their specific instructions.

When you finish installing your new drivers, reboot your computer and check if the hard drive is now visible on your machine.

⇒ Get Fortect Driver Updater

4. Connect your hard drive to a different USB port

External hard drives may disappear because of faulty USB ports. You can quickly fix this issue by connecting your hard drive to a different port.

5. Run MiniTool Partition Wizard

  1. Tap on the link posted below in order to download the application necessary for this tutorial.
  2. After the download has finished, go to the directory where it was downloaded.
  3. Double click on the executable file in order to start the installation process.
  4. Left-click or tap on the Yes button if you are prompt by a user account control message telling you to allow access.
  5. Follow the instructions on the screen to finish the installation.
  6. Now double click or tap on the executable file of the MiniTool Partition Wizard Free application.
  7. Once you open the application, your partitions should appear on the screen.
  8. Now, just change the letter assigned to them using this application.
  9. Save the changes and close the application.
  10. Reboot your Windows 10 operating system.
  11. After the system starts you can check if you have your hard disk visible again and ready to use.

MiniTool Partition Wizard Free is the best disk partition software that you can find. That’s why it comes as a top recommendation to solve hard drive missing issues.

With the partitions on the screen, your only task is to just change the letter assigned to them using this partition manager. Results are always guaranteed.

There you have a few simple ways to bring our Hard Disk back if it disappeared after you updated your Windows 10 system.

If you have any additional questions, we remain at your disposal (you can contact us by using the comments section below).

If needed, refer to this article dedicated to Troubleshooter has stopped working issues.

  • How do I fix a missing hard drive?

It is fairly annoying to face this issue. However, this guide on how to fix a missing hard drive will tell you all about initializing your disk, updating the drivers, and other tips.

  • Can you recover data from a dead hard drive?

Yes, you can. Just use any of these recovery software tools for damaged hard drives to retrieve your precious data.

6 Best Browsers for Trading [Stocks, Crypto]

Today we’ll show you the best browsers for trading and what they can do. We picked options with strong cybersecurity features as well as trading-friendly features.

Let’s check them out.

What is the best browser for trading?

Opera – Integrated crypto support

opera one dashboard

Opera has a built-in wallet feature that you can easily enable in just a few clicks. You can easily manage your digital assets right from the browser’s sidebar.

For privacy, Opera has a built-in VPN with unlimited bandwidth. This will add a layer of encryption over your connection, protecting sensitive data.

Overall, if you do a lot of stock trading or crypto trading, or even any kind of online trading, the Opera One browser is the best choice right now. It makes buying, selling, and swapping a breeze.

Opera

Trade and make bank payments safely and securely by using this extremely protected and reliable Internet browser.

AVG Secure Browser – Antivirus shield

avg secure browser dashboard

AVG Secure Browser can guarantee you highly private online transactions and HTTPS web encryption for each cryptocurrency platform.

You can make use of anti-phishing security, web tracking prevention, and data theft attacks while navigating trading and stocks websites.

In addition, this browser works cross-platform so you can sync your mobile and PC trading, making it a great option if you are often on the go.

AVG Secure Browser

Secure your financial data online using cutting-edge private browsing.

Microsoft Edge – Secure navigation

microsoft edge dashboard

Microsoft Edge works with Microsoft Defender SmartScreen keeping security threats at bay when you do trading.

The new Edge is built on Chromium, and it works with Chrome extensions. This version also offers performance improvements, so websites will load faster than before.

It also gives you solid control of your data, and it will automatically block trackers while browsing the web.

⇒ Download Microsoft Edge

Mozilla Firefox – Improved privacy tools

mozilla-firefox-browser dashboard

Using the Enhanced Tracking Protection feature, Firefox will automatically block tracking cookies. The feature will also block most of the ads out of the box, making trading more seamless and even more secure.

Its memory usage is very low, so it’ll offer great performance. You can pay attention to your trading activities without having to constantly wait out for pages to load.

For stock trading or crypto transaction, Firefox is a very safe browser. It also supports extensions, so if you need any dedicated add-ons for your trading or crypto platforms, you can easily install them.

⇒ Download Mozilla Firefox

Google Chrome – Private and speedy

Google Chrome dashboard

Google Chrome has built-in protection features such as site isolation, sandboxing, and predictive phishing protection to keep you safe.

To keep your online accounts secure, Chrome has its own password manager that will generate a secure password for each website that you use.

Chrome also supports extensive customization with thousands of available extensions, and the built-in ad blocker is just icing on the cake.

⇒ Download Google Chrome

Brave Browser – Next level privacy

brave browser dashboard

Brave Browser is another security-focused browser that won’t sell your data to advertisers. It blocks ads, tracking scripts, and cookies, so you can rest assured that all your trading sessions are private.

Brave Browser also has Tor integration in a private mode, meaning that your private sessions are confidential, even from your ISP.

It also has a built-in password manager, so you can rest assured that each website uses a unique and secure password.

⇒ Download Brave Browser

Finding a secure and reliable browser isn’t easy, but we hope this article helps you pick the best browser for trading.

If you are using any of these browsers for online trading or have an opinion, feel free to let us know in the comment box.

Microsoft’s return to wearables could include new blood pressure monitoring according to new patent

The Microsoft Band joined the pantheon of extinguished company efforts back in 2016. The fitness-focused smart band had a relatively short shelf life of three years before Microsoft gave the product line the boot but could rival most smartphone watch efforts with the tech the company packed into it.

However, it now seems Microsoft may not be quite finished with measuring health metrics via a wearable device. A newly granted Microsoft patent has surfaced which details a conceptual successor to the Microsoft Band 2, which is titled, “Wearable Pulse Pressure Wave Sending Device.”

Unimaginative marketing name aside, Microsoft’s new patent aims to address a consumer lack of blood pressure measuring solutions. The WPPWSD is less like the previous smart cuff idea Microsoft used and more a patch with an array of pressure sensors that lay across a specific area (presumably near an artery). The kicker to the patent is that the device will seek out and alert users as to where the best place is to place it for the most accurate reading. Ideally, Microsoft’s artery monitoring system will reduce the number of false-positive reads and inform the users with the most accurate reads on a daily basis.

However, Microsoft does leave room for enough of a display for its new patent to double as a smartwatch if necessary.

A wrist-band takes the form of a so-called  ‘smartwatch’ with all its attendant computing, display and communication capabilities. It is noted that given the user interface capabilities of a smartwatch, the wearable sensing implementations can be configured via conventional means to display information to the wearer. For example, instructions for operating the wrist-band implementations can be displayed to the user, as well as the computed cardiovascular metrics.

Microsoft patent is intended to periodically measure pulse pressure along an artery to help individuals with hypertension or high blood pressure, track their levels.

The general design of the patented device isn’t in the list of images available at the moment, but it seems Microsoft may look to leap past the traditional swiss army knife approach of current smartphone fitness offerings and provide a highly focused health monitor in the near future.

While first introduced in 2014, the Microsoft Band didn’t really hit its fitness-first stride until 2015 when the company dropped the Band 2. The Microsoft Band 2 included early industry iterations of optical heart rate monitoring, galvanic skin response sensors, skin temperature sensor, capacitive sensor, and improved sleep tracking software among other features.

Now it seems, that Microsoft’s new patent could help to revive Microsoft’s interest in wearables once again and with a more focused strategy of health monitoring vs. the endless sea of do-everything smartwatches currently out.

It remains to be seen, what the device could ultimately look like, what OS it would run, and whether or not Microsoft is set to bring this idea to a consumer space or reserve it for medical only applications if the company decides to act on the patent at all.

External drive won’t mount on Windows 10 [Solved]

External hard drives (SSDs included) are of great use for various reasons. Having your data with you at all times is normal these days, especially on storage that is easily accessible and has a lot of storage space.

However, Windows 10, the system which should be a top-notch service, has a lot of issues with external drives.

Besides these minor problems, the users had the worst time with mounting, ejecting, or booting from the external drive.

Because of that, we made sure to provide the appropriate solutions for these issues. If you have been looking for a solution that should fix mount/eject/boot errors, look no further than below.

How can I fix external drive issues in Windows 10?

  1. External drive won’t mount in Windows 10
  2. Mounted external drive won’t eject in Windows 10
  3. External drive won’t boot on Windows 10

1. External drive won’t mount in Windows 10

Mounting an external drive should be quite simple. Plug-and-play is there for ages and the system should have an easy time reading any USB-plugged external drive.

However, seemingly, some users experienced a variety of issues which, eventually, lead to the same conclusion. The system can’t recognize the external hard drive whatever they do.

Now, before we outline the possible solutions for this problem, we need you to try and mount your drive on an alternative PC. That way we’ll eliminate possible hardware issues.

Hardware issues are quite common when it comes to hard drives and USB ports. If you’re sure that the external hard drive works on other machines but it just won’t mount on that one Windows 10 PC, you could:

  • Try an alternative USB port. If your device is USB 2.0, make sure to sure the proper port.
  • Reinstall the driver
    1. Plug in the external drive.
    2. Right-click Start and open Device Manager.external drive won't mount/eject/boot/
    3. In the Main menu, click View and check Show hidden devices.
    4. Expand the Disk drives section.external drive won't mount/eject/boot/
    5. Right-click on your external drive and Uninstall device.
    6. Restart your PC and wait until the driver is installed.
  • Change USB power settings
    1. In the Windows Search bar, type Power and open Power & sleep settings.external drive won't mount/eject/boot/
    2. Click on the Additional power settings.external drive won't mount/eject/boot/
    3. Click on the Change plan settings option beside the Power plan of your choice.external drive won't mount/eject/boot/
    4. Choose Change advanced power settings.external drive won't mount/eject/boot/
    5. Expand USB settings > USB selective suspend setting.
    6. Disable this setting and confirm changes.external drive won't mount/eject/boot/
  • Create a new volume
    1. Press Windows key + R to open the Rum elevated command-line.
    2. Type in diskmgmt.msc and run it.
    3. You should see a lot of unallocated space.
    4. Right-click on the Unallocated space and choose to create a New simple volume.
    5. Choose the size and confirm the changes.
    6. Unplug the external drive and plug it in again.
  • Format your external hard drive (preferably in NTFS format)

2. Mounted external drive won’t eject in Windows 10

Now, this is rather peculiar. Problems with mounting a certain drive are one thing, and the reasons spectrum is broader.

On the other hand, the issues one can experience with the inability to eject certain external hard drives are mostly provoked by the background processes.

Namely, some background process associated with the mounted drive prevents it from ejecting. Of course, you can unplug it/shut it down without the Safely remove feature.

That can, consequently, lead to more complex errors and further issues. What you’ll need to do is to follow the solutions we enlisted below and look for improvements.

Hopefully, you should be able to eject the mounted drive safely, without any risks of data corruption.

    • Reboot your system
    • Make sure there’s no application in use of data stored in the drive. Close all applications you’ve used to open those files and try ejecting the external mass storage again. Also, temporarily disable the antivirus.
    • Eject it from the This PC
      1. Open This PC/My Computer.
      2. Right-click on the external drive and click Eject.
      3. If you see the error, just continue.
    • Use a third-party safely remove software
    • Troubleshoot the drive
    • Change advanced settings
      1. Plug in the external drive.
      2. Right-click Start and open Device Manager.
      3. Expand Disk drives.external drive won't mount/eject/boot/
      4. Right-click on the external drive and open Properties.
      5. Under the Policies tab, toggle Better performance and confirm changes.external drive won't mount/eject/boot/
    • Format your drive to NTFS format.

3. External drive won’t boot on Windows 10

Finally, one of the advantages of portable data drives is that you can create a bootable system drive and carry your system around.

However, some user reports outlined the boot issues concerning the external drive. They were unable to boot to Windows 10 from the external drive, even though this worked great on the previous Windows iterations.

When you look at it, it’s quite obvious that the BIOS (UEFI) is the one to blame. However, it doesn’t mean that the BIOS is the only culprit. We enlisted all known troubleshooting steps below:

  • Don’t even try with USB 3.0. Windows 10 can hardly boot from the USB 3.0/3.1 drive
  • Update BIOS
  • Disable Legacy USB in BIOS (UEFI) settings
  • Format external drive in NTFS and create a new bootable drive

That’s a wrap-up. In case you’re aware of any alternative solutions, feel free to share them with us in the comments section below.

Traditional hard disks are long gone, so don’t hesitate to discover the best Western Digital external HDD to get these days.

Also, bookmark this Peripherals Troubleshooting Hub to help you solve any problem with ease.

Microsoft announces first-party Xbox Games showcase on July 23

It’s official, Microsoft will hold its first-party games showcase on July 23. The company has just announced the upcoming event simply named “Xbox Games Showcase,” which will kick off at 9AM PT following a pre-show at 8AM PT with Summer Games Fest host Geoff Keighley.

After Microsoft admitted it set wrong expectations for its May Inside Xbox episode, the company has no choice but to bring out the big guns for its next digital event. This is especially true after Sony’s PlayStation 5 reveal event got a lot of good buzz last month, with 12 million views on YouTube as of this writing.

Microsoft chose to first put the spotlight on third-party games in May, but first-party exclusive games are really what Xbox enthusiasts care about. Halo: Infinite: Hellblade 2, Flight Simulator, and a new Forza game are expected to make an appearance at the show. There are also been rumors about a new Fable game developed by Forza Horizon 4 developer Playground Games, and Rare’s Perfect Dark series may also get a reboot.

We also hope that Microsoft learned a lesson after teasing “gameplay” for its May event, when what we got was a fast-paced series of cinematic trailers with very few gameplay sequences. We hope to see the company truly showcase its next-gen games and highlight next-gen features like ray-tracing and ultra-fast loading times.

Do you expect Microsoft to blow the minds of Xbox fans on July 23? Let us know what you’d like to see during the show in the comments below.

[Solved] Windows 10 creators update not enough disk space

In order to get all the fruits that Creators Update brings to the table, you’ll first need to download and install it. Even though it sounds easy, for thousands of users this task proved as the mission impossible.

Namely, a lot of users were unable to download the Creators Update due to a distinctive error, or, to be more exact, a bug that frequently orbits around Windows Update.

It seems that they were unable to download the update due to a lack of storage space. That would be a proper reason, but, apparently, it mostly occurs with users that have plenty of free space on the system partition.

As we already know, in order to download and install Creators Update you’ll need at least 16 GB of storage space.

So if you meet the requirements but still have this issue haunting you, we prepared a few tips to help you resolve it. Make sure to check them out.

What to do if you don’t have enough disk space to install Creators Update?

1. Reset BITS

Background Intelligent Transfer Service (BITS) is the main Windows Update component.

Basically, its job is to take care of the data transfer from the Windows Servers to your PC, and thus, to regulate and complete the download and installation of the update.

But, on some occasions, it may fail and that can lead to this issue and similar errors.

You can reset BITS manually by using the Command Prompt, with the batch file, or with the Windows Update Troubleshooter that is Windows 10’s exclusive tool.

You can get the tool from this link. After you download it, just run it and follow the instructions. After the completion, restart your PC and try updating again.

2. Clean Temporary Files

In addition, some of the system temporary files may cause a glitch, or confusion if you like it, and that will lead to the corruption of installation files.

Namely, the installer may be misinformed about the realistic storage space available and thus cause the above-mentioned error.

For the storage clean up you can either use the third-party tool or built-in Windows component called Disk Cleanup.

Here’s a quick guide to using the Disk Cleanup tool:

  1. In the Search Windows bar, type Disk Cleanup.
  2. Open Disk Cleanup and select the system partition (most of the time it’s C:).
  3. Click on the ‘Clean up system files’ option and select the system partition again.
  4. Check the boxes beside Temporary files and Temporary Windows Installation files.
  5. Click OK.
  6. After the process is finished, restart your PC. Give another try to Creators Update.

Now, if you’re looking for a professional tool to help you with this job, have a go at this premium optimizer software.

Install Ashampoo WinOptimizer

This powerful system optimizer suite will strengthen your security, build up your privacy, and greatly enhance your system’s performances with just one click.

From removing junk data, corrupted temp files, and broken shortcuts to fixing useless Registry entries and disabling unnecessary services, the WinOptimizer is your very own resource booster!

Free up vital hard drive space, get more memory, enjoy faster startup times, and a smoother overall Windows experience effortlessly.

Let’s quickly look at its key features:

  • Comprehensive dashboard with valuable details on status updates on your Temp Files, Registry, services, or privacy, all neatly arranged
  • New SSD-ready Defrag tool to automate drive analysis and defragmentation
  • Reclaim precious disk space by eliminating redundant temp and log files and superfluous Registry entries
  • Instant notifications on resource hogs and up-to-date data
  • Rids your system of junk data and reduce clutter
  • Live Tuner to provide a smart launch boost to all applications

Ashampoo WinOptimizer

Ashampoo WinOptimizer

Clean, defrag, recover, and repair with a one-of-a-kind system optimization software.
$29.99 Visit website

3. Delete Creators Update installation files

Even though the Disk Cleanup will clear the majority of update files placed under the Software Distribution folder, it’s not safe to say that this will resolve your issue.

Namely, some of the corrupted or incomplete update files may still find refuge in the mentioned folder and provoke errors.

And there we have to use a less subtle, manual effort to clear them out of our system. Follow these instructions to delete the installation files from the system partition:

  1. Go to Search, type cmd, right-click it, and open Command Prompt (Admin).
  2. In the command line type the following commands and press Enter after each:
    • net stop wuauserv
    • net stop bits
  3. Now, navigate to C:WindowsSoftwareDistributionand delete everything inside.
  4. Get back to the Command Prompt, insert two following commands and press Enter after each:
    • net start wuauserv
    • net start bits
  5. Close the Command Prompt and try updating to Creators Update again.

4. Upgrade your system with Media Creation Tool

In the end, if the standard over-the-air approach is inadequate, you can as well use an alternative method.

And this, even though it can be time-consuming, proved as the best solution for all update-related issues. Especially, the storage bug we’re addressing today.

In order to upgrade to the latest patch, in this case to a long-awaited Creators Update, you’ll need a Media Creation Tool, stable bandwidth, and a little dose of patience.

You can obtain Media Creation Tool here. After you download it, just follow the instructions and you’ll be good to go.


These tips should provide you with enough material to resolve the disk space bug.

Don’t forget to share your questions and alternative solutions in the comments section. We would be grateful for your participation.

[wl_navigator]

Fix: There is Insufficient Disk Space to Complete Operation

When you get an error message as you try to open a file and it says there is insufficient disk space to complete operation, it could either be that the file or files are corrupted or device drivers.

This issue has been reported to happen when your computer is running certain antivirus software versions, or if you’re saving to an already full disk.

Sometimes the same error message pops up when you try to save a file, either in Microsoft Office Word or another program and it says there is not enough memory or disk space to complete this operation in Word 2010.

Here are some quick fixes.

How to fix There is insufficient disk space to complete operation error?

1. Reboot your computer

One of the easiest ways to fix the insufficient disk space problem is to reboot your computer. You may have recently installed or upgraded a program, your operating system, or installed updates.

Whatever the case, reboot and see if the problem persists.

2. Boot in Safe Mode

Safe mode starts up your computer with limited files and drivers, but Windows will still run. To know whether you’re on Safe mode, you’ll see the words at the corners of your screen.

If the issue of Shift key not working persists, check whether it occurs while your computer is in Safe mode.

Follow these steps to start your computer in Safe Mode:

  • Click on the Start button
  • Select Settings – the Settings box will open up
  • Click Update & Security
There is insufficient disk space to complete operation
  • Select Recovery from the left pane
There is insufficient disk space to complete operation
  • Go to Advanced startup
There is insufficient disk space to complete operation
  • Click Restart now
There is insufficient disk space to complete operation
  • Select Troubleshoot from the choose an option screen, then click Advanced options
  • Go to Startup Settings and click Restart
  • Once your computer restarts, a list of options will come up.
  • Choose 4 or F4 to start your computer in Safe Mode

If the issue isn’t there while in Safe mode, then your default settings and basic drivers are not contributing to the issue.

Additionally, if booting in safe mode helped remove any enabled add-ins, delete the add-ins from the registry and see if it helps by doing the following:

  • Click on Start< Run< type regedit (without quotes) and click Ok.
There is insufficient disk space to complete operation
  • In the registry window browse to the location given below and delete the add-in key:

HKEY_CURRENT_USERSoftwareMicrosoftOffice14.0WordAddins

HKEY_CURRENT_USERSoftwareMicrosoftOfficeWordAddins

HKEY_LOCAL_MACHINESOFTWAREMicrosoftOffice14.0WordAddins

HKEY_LOCAL_MACHINESOFTWAREMicrosoftOfficeWordAddins

Ensure to back up the registry before deleting the keys.

If you had installed a program and the error came after that, you have to reinstall the program on the computer after uninstalling it, because the installation could have been corrupt.

Speaking about the registry, there is an easier way to fix useless, superfluous or broken entries and this implies using a third-party tool.

In order to repair your registry and clean your disk space, it is recommended to use the best registry cleaner tools for Windows 10.

3. Perform a clean boot

This reduces conflicts related to software that can bring up the root causes of the insufficient disk space error as a result of apps and services that start and run in the background when Windows starts normally.

  • Log on as an administrator, and type msconfig in the search box
  • Select System Configuration
  • Find the Services tab
There is insufficient disk space to complete operation
  • Select Hide all Microsoft services box
There is insufficient disk space to complete operation
  • Click Disable all
There is insufficient disk space to complete operation
  • Go to Startup tab
There is insufficient disk space to complete operation
  • Click Open Task Manager
  • Close Task manager then click Ok
  • Reboot your computer

4. Replace the normal.dot template

One of the causes of the error ‘there is insufficient disk space to complete the operation’ is a corrupted normal.dot template. Here’s how to resolve it:

  1. Click on Start
  2. In the Search box type normal.dot. There should be a search option that you can check for ‘search hidden files’, make sure that is checked.  If it does not find it, try searching for *.dot.  It may be hard to find because it is a hidden file.  You may have to go into folder options and be sure “show hidden files” is checked.
  3. Whenever you find normal.dot, rename it old.dot
  4. Restart your computer.
  5. Open your program or file and it will create a new normal.dot template

5. Check the File Allocation Table (FAT)

The File Allocation Table (FAT) uses a 32-bit integer to store the size of the files thus it is called FAT32, which then means that the maximum size it can hold is just under 4 GB.

If your external hard disk is using the FAT32 File System, then it isn’t a limitation of Windows that you could be facing in terms of the insufficient disk space error, it is in fact a limitation of the file system.

In this case, you could either split your files smaller than 4GB (typical limit of formats like FAT32), or reformat the external Hard disk to NTFS it to something that allows for files larger than 4GB.

Note: Reformatting the hard disk will wipe any data you have on the drive. Make sure you back up the data to another storage media.

6. Use Disk compression utility

This helps you add more hard disk space. If you are running antivirus software, try turning it off. If this corrects the issue, contact the manufacturer of your antivirus software for an update or workaround.

You may be able to recover some disk space by quitting programs that you do not need. After you quit the other programs, a few minutes may pass before Windows changes the size of the paging file.

7. Run Disk Cleanup

You can free disk space by deleting files that you do not need, by following these steps:

  • Click Start, and select All Apps
  • Go to Accessories
  • Click System Tools
  • Click Disk Cleanup
  • In the Select Drive dialog box, click to select the drive that you want to clean up, for example, C:, and then click OK.
  • On the Disk Cleanup tab, click to select each of the options for which you want to remove files.
  • Click OK.

You may be able to save your file to a flash drive, network drive, or any storage that has free disk space.

8. Clean %temp% folder

After your reboot, clean up the %temp% folder by doing the following:

  • Right click Start and select Run
  • Type %temp% and press enter, this opens File Explorer in the TEMP folder
  • Select all files by pressing CTRL+A
  • Press DELETE
  • For any files in use, just SKIPthem

9. Disable add-ins

  • Right-click Start and select Run
  • Type winword /safe
  • If the program successfully click on the File menu
  • Select Options
  • Select Add-ins
  • Click on the Go button beside the Manage: Com-in Add option
  • Check if there are any add-ins enabled, if yes then clear the checkbox to disable them
  • Restart the program and check if you are able to launch it successfully without error.

10. Repair Office from the Control Panel

The steps to access the repair tool vary depending on your operating system.

Choose your operating system then do the following:

  • Right-click Start and select Apps and Features on the pop-up menu.
  • Select the Microsoft Office product you want to repair, and select Modify.

Note: This will repair the entire Office suite even if it’s just one application you want to repair such as Word or Excel. If you have a standalone app installed, then search for that application by name.

Depending on if your copy of Office is Click-to-run or MSI-based install, do the following.

  • Click-to-run the program
  • Go to How would you like to repair your Office Programs
  • Select Online Repair to make sure everything gets fixed
  • Select Repair (The faster Quick Repair option is also available, but it only detects and then replaces corrupted files.)

If yours is MSI-based, go to Change your installation, select Repair, and then click Continue. Follow the instructions on the screen to complete the repair.

Should the problems be caused by RAM, read our guide on how to enable or disable Memory Compression on Windows 11.

Recently we covered a similar problem in our Error Handle Disk Full guide, so don’t hesitate to check it out.

Let us know if any of these fixes helped by commenting in the section below.

Windows 10 news recap: Xbox Game Bar gets new widgets, Edge browser rolls out to Education and Enterprise devices, and more

Welcome back to our Windows 10 news recap, where we go over the top stories of the past week in the world of Microsoft’s flagship operating system.

Xbox Game Bar for Windows 10 gets new widgets, including from 3rd parties

Windows 10’s Xbox Game Bar has gained some new widgets, but not just from Microsoft, also from 3rd parties, including XSplit’s Game Bar HUD widget.

Microsoft’s new Windows File Recovery app helps recover deleted data

If you’ve accidentally deleted or lost some files on your Windows 10 PC, it may now be easier to try and recover the files. Microsoft has released a Windows File Recovery app that uses the command line to make it easier to recover files.

Windows File Recovery app

Microsoft starts rolling out its new Edge browser to Windows 10 Education and Enterprise devices

The Chromium-based Microsoft Edge web browser is now rolling out to users of Windows 10 Education and Enterprise.

That’s it for this week. We’ll be back next week with more Windows 10 news.

Microsoft Teams phones get People app, live captions

Microsoft Teams has been getting substantial feature upgrades off late, which is no surprise considering how important remote collaboration software has become these days. Most probably, if your employees are unable to report to their designated physical offices, you’re offering them Teams or an alternative like Slack.

But for organizations that already have Office 365, Microsoft Teams phones would be an ideal VoIP telephony solution.

Fortunately, Microsoft recently introduced a whole bunch of new Teams phones features to power business VoIP communication and collaboration.

New Teams phones capabilities

The People app is now available to Teams phones users. And it’s all about letting workmates share and collaborate more closely.

The People app on Teams phones allows you to easily connect and collaborate with teammates, colleagues, friends, and family. Through the app, you can organize your contacts by creating and managing contact groups.

Another notable update is the ability to annotate live video in meetings and group calls. The desktop version of Teams has this feature in preview though.

Also, the raise hand capability is a unique addition to Teams meetings. It’s certainly a conspicuous, yet a non-intrusive way to let people know that you wish to contribute to the ongoing meeting agenda.

And that’s not all. Teams phones users can now more quickly transfer calls, thanks to the new frequent contacts suggestion feature. In a typical customer support scenario, for example, the capability comes in handy when you need to urgently get a colleague or boss to respond to an issue you can’t resolve yourself.

Plus, apart from streamlining the lock and unlock experience for your Teams phone and Teams desktop client, the platform now supports the automatic dismissal of Call ended and Rate my call screens.

Last but not least, Microsoft introduced Teams and Skype interoperability for phones users. This new integration facilitates VoIP communication from Skype for Consumer (SFC).

With all the aforementioned updates, Microsoft wishes to level out the Teams phones and Teams desktop experiences. Are you happy with the new features? Let us know in the comments section below.

[wl_navigator]

Hard Drive not showing up in Windows 10/11 [Fix]

If you tried upgrading your operating system from an older version of Windows to Windows 10, at the end of the installation you might notice that the second hard drive or even the hard drive where the initial Windows OS was installed might not appear in your explorer.

This is a common issue that many users are struggling with but don’t be alarmed because we can do a very quick fix on this that will take you only 10 minutes of your time.

The Windows 10 operating system you installed might not recognize the hard drive for several reasons due to installation errors received from the hard disk.

But there is a built-in feature that you can access and set up your hard drive back to normal in no time.

By following the tutorial posted below you can make your hard drive appear in your explorer window as you had it in the previous version of Windows you were using.

How to make your hard drive show in Windows 10

1. Detect HDD from Control Panel

  1. Tye Control Panel in the search bar and open it.
  2. Type Disk Management in the search box.
  3. It will open Administrative tools.
  4. Choose the Create and Format hard disk partitions option.create disk partition
  5. You should look in there for the disk that is not showing up in your explorer (it should have a yellow icon next to it that has an exclamation mark).
  6. Right-click on the hard disk you are having trouble with and choose Import Foreign disk.
  7. Reboot your device and try to open file explorer again. You should see the missing hard drive and everything will be back to normal.

Note: This tutorial does not fix any hardware malfunctions you can have with your hard drive. If it is a hardware malfunction I recommend going directly to a specialized store or perhaps the electronics store you bought the PC from and try replacing the hard drive.

 2. Try some simple fixes

What you should do before making a decision about what to do with your HDD, are some simple steps that are listed below. They might be basic, but believe me, sometimes they might be the problem.

The full guide on how to deploy all of these steps can be found in our dedicated articles about HDD not showing up. Here are the steps to follow:

  1. Check if the disk is well-connected (yes, this might be the problem in some cases)
  2. Initialize Disk
  3. Check BIOS (BIOS ports especially)
  4. Recover your partition.

3. Use a third-party app to detect HDD

It is possible that some files got corrupted during the OS upgrade or that some PC settings are not right. A dedicated third-party app can efficiently help you to fix all potential problems that affect the optimal functioning of your PC.

Consequently, we recommend using Ashampoo WinOptimizer.

The tool offers in-depth cleaning, system optimization, and diagnosis, in an all-inclusive intuitive screen.

Installation is extremely easy and quick, and the optimization and diagnosis process likewise. The interface brings enhanced system details view,  extensive details on installed hardware, plus dashboards for always up-to-date data and instant feature access.

With just one click, you get optimized hardware detection, as well as an up-to-date PC cleaning process, that eliminates web browsing traces, redundant files, and useless Registry entries that might affect the functionality of your new OS.

So you have above the very easy way to fix your hard drive if it doesn’t show up in your operating system. You can leave us a comment below and tell us if this article was in any way useful to you and what we could do to improve it.

Virgin Media High Latency: 6 Easy Ways to Improve Ping

Virgin Media is one of the leading telecom companies that provide Internet services. Unfortunately, some users are complaining about Virgin Media’s high ping and latency, marring their experience with the service.

Thankfully, we’re here to help you identify the causes of this issue and provide a lasting solution to it.

Why is my ping so high on Virgin Media? Below are some of the potential causes for Virgin Media’s high ping issue:

  • Outdated drivers: One of the major causes of this issue is an outdated network driver. You can fix this quickly by updating your driver.
  • Network issues: This issue can also be caused by a corrupt DNS cache. The solution to this is to flush your DNS and reset Winsock, or even use a VPN that is not blocked by Virgin Media.
  • Low connection strength: Sometimes, the connection you opt for can make you experience ping spikes. If you play games and stream a lot, a 1GB connection is ideal.

How can I fix Virgin Media’s high ping?

Listed below are some preliminary troubleshooting steps to perform before exploring the solutions in this section:

  • Update your router’s firmware
  • Remove any powerline network adapters
  • Switch from wired mode to WiFi
  • Upgrade to a gigabit connection
  • Switch to a different device

If you still can’t eliminate the high latency and ping, you can now proceed to the fixes below:

1. Set the Virgin Media Hub from router to modem mode

  1. Connect your device to Hub 3 using WiFi or wired mode.
  2. Launch your browser, type 192.168.0.1 in the address bar, and hit Enter to log into the Hub 3 admin panel.
    path virgin media high ping
  3. Now, set the Hub 3 password (the default key is written down at the bottom of the Hub 3).
  4. Go to Modem Mode, select Enable Modem Mode, and Apply changes.

You might be experiencing the Virgin Media Hub’s high latency and ping because you are in router mode. Switching to modem mode has fixed this issue for many users, and you should try it too.

Note that your IP address changes from 192.168.0.1 to 192.168.100.1 in modem mode.

2. Update your drivers

  1. Press the Windows key + X and select Device Manager.
    device manager
  2. Double-click the Network adapters option to expand it, and right-click your adapter.
  3. Select the Update driver option.
    update driver
  4. Now, choose Search automatically for drivers and install all available updates.
    search auto virgin media high ping

In some cases, the Virgin Media high ping issue can be due to problems with your network drivers. Following the steps above, you should be able to update your drivers quickly.

Alternatively, you can opt for an automatic driver updater like Fortect Driver Updater. This unique tool scans your PC for missing, outdated, and broken drivers and fixes them accordingly.

With this, you can nib all driver issues in the bud before they cause major problems.

⇒ Get Fortect Driver Updater

3. Flush DNS and reset Winsock

  1. Press the Windows key, type cmd, and select Run as administrator under Command Prompt.
    cmd admin
  2. Type the following commands and press Enter after each: ipconfig /flushdns ipconfig /registerdns ipconfig /release ipconfig /renew NETSH winsock reset catalog NETSH int ipv4 reset reset.log NETSH int ipv6 reset reset.log exit
  3. Restart your computer.

4. Set custom DNS servers

  1. Press the Windows key + R, type ncpa.cpl, and click OK.
    ncpa.cpl
  2. Right-click your active network and select Properties.
    properties
  3. Now, select Internet Protocol Version 4 (TCP/IPv4) and click Properties.
    ipv4 virgin media high ping
  4. Tick the Use the following DNS server addresses.
  5. Next, set your Preferred DNS server to 8.8.8.8 and the Alternate DNS server to 8.8.4.4.
    use the
  6. Finally, click the OK button.

By default, Virgin Media is in charge of your DNS requests. That means that your requests get automatically processed by your ISP. However, if their DNS servers are faulty, it can take a long time to finish processing.

So, to fix this Virgin Media high ping issue, you should switch to a custom DNS server. If using the Google DNS server does not work, you can try the following free and secure DNS servers:

  • Cloudflare
    • 1.1.1.1 preferred (IPv4)
    • 1.0.0.1 alternate (IPv4)
    • 2606:4700:4700::1111 preferred (IPv6)
    • 2606:4700:4700::1001 alternate (IPv6)
  • OpenDNS
    • 208.67.222.222 preferred (IPv4)
    • 208.67.220.220 alternate (IPv4)
    • 2620:119:35::35 preferred (IPv6)
    • 2620:119:53::53 alternate (IPv6)

5. Use a VPN

ExpressVPN is a virtual private network solution that can help fix Virgin Media’s bad ping issues if we’re talking about a server-side problem. By connecting to a VPN server, you hide your IP address, encrypt your traffic, and bypass the ISP servers.

Therefore, Virgin Media is no longer in charge of forwarding your data, so you shouldn’t have to worry about Internet slowdowns anymore.

However, you must rule out all other causes of ping issues, so ensure it’s not a local problem with your device, WiFi, or Ethernet. Otherwise, you can end up doing more damage.

6. Contact Virgin Media customer service

Finally, contact the company’s customer service if you can’t fix your Virgin Media bad ping problems no matter what solution you try, not even when attempting to fix Ethernet problems.

They should send a field technician to diagnose and fix your Internet-related issues.

That is all for the Virgin Media high latency and ping issue. You should now be able to solve the problem if you follow the steps carefully.

If you face VPN issues with Virgin Media, check our detailed guide to fix it quickly.

Let us know the solution that helped you fix this issue in the comments below.

FIX: Netflix not loading / showing up on TiVo box 312

If you own a TiVo, this device probably slowly made its way into your daily routine. Aside from its awesome DVR capabilities that let you record your favorite content, TiVo comes with additional functionalities.

For instance, it has an on-screen schedule guide that lets you record new episodes in certain series (Season Pass), and also a wishlist. The latter lets you locate and record shows based on your interests (actor, category, keyword, title).

As awesome as everything listed above sounds, sometimes even TiVo can mess things up. For instance, Netflix, one of the most popular entertainment platforms nowadays, might not work on TiVo.

And since a lot of users access Netflix through TiVo, things might get heated in no time.

How to fix Netflix app not working on TiVo?

1. Sign out and sign back in

Before trying anything radical, try logging out of your account, and then logging back in.

Some users found that this does the trick, especially if the app recently underwent maintenance, or received an update.

2. Reboot your device

Turn the entire home entertainment system off by whatever means you want. Check your manual for any device-related particularities, such as different menus or ways of shutting it off safely.

It usually helps to unplug the device altogether (but not while they’re still on and running) and waiting for 5-10 minutes before plugging them back in.

Many devices enter a sleep/hibernation mode instead of shutting down completely. This can preserve certain settings and processes in standby and ready to be used, in order to reduce loading times.

Therefore, unplugging the device might actually shut it down, along with any process and saved preferences.

3. Toggle the child protection on and off

  1. Go to your Virgin Media account
  2. Head to the My Apps section of your account
  3. Access the Web Safe option in the My Apps section
  4. Turn the Virus and Child-Safe options ON
  5. Restart your TiVo box
  6. Launch Netflix on your TiVo box
  7. Turn the child-safe option OFF
  8. See if the problem still persists

4. Check if your TiVo box works at all

If your Netflix app doesn’t work on TiVo, chances are that some other apps might also not work. Try loading other apps such as HBO GO, Plex, YouTube, or Hulu, and see if they work.

In case they do, then you’re clearly facing a Netflix-only kind of issue. You might also want to check your Internet connection, firewall, router, or anything between TiVo and the home line.

Ordinary things such as a firewall might be blocking your attempts to connect to Netflix, so it’s worth checking them out thoroughly.

5. Restart your Virgin Internet hub

We recommend trying this fix only if you’ve noticed that none of the Internet-enabled apps on your TiVo work.

The reason they don’t work might have something to do with your Internet connection, so giving the hub a good old-fashioned restart might put the wheels back in motion.

Locate your Virgin Internet hub and shut it down by flipping the A/C switch. It should be located at the back of the hub, but your hub model might lack a switch.

In this case, you might want to unplug it and wait a few minutes (5-10) before plugging it back in.

Wait for a few minutes for the connectivity to be 100% restored, then try loading Netflix again.

6. Put your hub into router mode

  1. Launch your default web browser
  2. Sign in to your hub’s page by typing 192.168.100.1 into the address bar
  3. Type your hub password
  4. Click the Modem Mode button on the left
  5. Choose the Disable Modem Mode option
  6. Click Apply changes
  7. Wait for the device to reboot
  8. Restart your TiVo box
  9. Try launching Netflix and see if it works

You can restore your hub’s modem mode by following steps 1-4, and at step 5, just choose the Enable Modem Mode option before you click the Apply changes button.

Note that in router mode, the gateway address changes to 192.168.0.1, so try using that instead of the one mentioned in step 2.

7. Contact TiVo customer service

Don’t be afraid to call customer service if you’re experiencing difficulties with TiVo.

You can save yourself a lot of time and hassle by addressing the issue to a professional, even though we all can’t stand the waiting song or the “your call is very important to us” bit.

In some cases, the trouble might actually be on their side and it might be in their hands to alleviate the issue.

Netflix errors on TiVo can be easily fixed

Long story short, if you can’t access Netflix through TiVo, don’t fret.

There are a lot of fixes you could try before calling it quits, and the most overlooked one is actually contacting the customer support crew.

If it’s still not working, we suggest Disney+. On this streaming service you can watch the most beloved movies and shows produced by Walt Disney Studios.

⇒ Get Disney+

[wl_navigator]

Xbox Summer Game Fest to let you play unreleased titles

Now that people can’t converge in person to enjoy shows like E3 and PAX, many are turning to digital gaming events, which may have their own element of fanfare and thrill. A case in point is the upcoming Xbox Summer Game Fest.

If you’re an Xbox fan, mark July 21, 2020 in your calendar. That date is the beginning of a week-long event during which you’ll get to play demos of prerelease Xbox games.

Xbox Summer Game Fest offers 60+ downloadable

The event takes place from July 21 to July 27. It may not offer the spectacle of a live in-person event, but it gives you an opportunity to sample your favorite Xbox One games before they come out.

However, these games are a work in progress. And Glenn Gregory, Product Marketing Manager, Xbox, adds that the games will keep evolving before hitting general availability. As such, the final product may look or feel different from the version you sampled during the event.

But you should also note that these games will continue to evolve and be polished as they near release. In other words, think of these as akin to “show floor demos” and not necessarily indicative of the final product.

The Xbox Summer Game Fest demos will be available for free, so don’t hesitate to download your favorite titles when the time comes. Also, keep in mind that the games will disappear once the digital gaming festival is over.

Microsoft confirmed at least 60 titles that will be available during the event, including Cris Tales, Destroy All Humans!, Haven, Hellpoint, and Skatebird. The list may expand to 100 before July 21, 2020.

The Xbox 20/20 is another event that may grab your attention this month. Microsoft created it as an Xbox roadmap that gives a preview of the console’s upcoming features and games. In May, the event showcased next-gen gameplay featuring Xbox Series X-optimized titles.

Are you ready for the Xbox Summer Game Fest? Share your expectations or views via the comments section below.

[wl_navigator]

Attempt to access invalid address [Fix]

Attempt to access invalid address error message usually appears alongside ERROR_INVALID_ADDRESS error. This is a system error and it can prevent you from running certain applications.

Not being able to run applications is a big problem, so today we’re going to show you how to fix this error on Windows 10.

What can I do when getting Attempt to access invalid address?

How can I fix ERROR_INVALID_ADDRESS?

1. Scan your PC for malware

This error message can sometimes appear while trying to run certain apps. As confirmed by users, the cause is none other than a malware infection.

If you require effective antivirus support that includes high detection of malware, you should know that different antivirus tools out there can eliminate major threats.

Even though you can encounter strong malware that infected your PC you shouldn’t despair. With cutting-edge detection functionality, the virus will be detected and fully eradicated.

Hence you should take precautions when you install potentially harmful programs that contain malware and can infect the entire system.

To be always secured, you should consider the most efficient antivirus software out there and stop any risky malware to damage your PC.

2. Edit your registry

  1. Press Windows Key + R and enter regedit. Press Enter or click OK.
  2. Optional: Modifying the registry can cause system stability issues, therefore we advise you to create a backup just in case. To do that, just click on File > Export.

    Set Export range to All and then enter the desired file name. Choose a safe location and click on Save.
    After creating a backup, you can use it to restore your registry to the previous state in case anything goes wrong.
  3. Navigate to the HKEY_LOCAL_MACHINESYSTEMCurrentControlSetControlSession ManagerMemory Management key in the left pane.
  4. In the right pane, locate and open MoveImages DWORD. If this DWORD isn’t available, right-click the empty space in the right pane, and choose New > DWORD (32-bit Value). Enter MoveImages as the name of the new DWORD and open it.
  5. Set the Value data to 1 and click OK to save changes.
  6. Close Registry Editor and restart your PC.

According to users, this error appears while trying to run Internet Explorer and many other applications. It’s worth mentioning that this error affects all versions of Windows, including Windows 10.

To fix the problem, users are suggesting to make a few changes to your registry. This is relatively simple and you can do it by following the above steps.

Other users reported alternative solutions regarding your registry. Some of them claim that you can fix the problem by renaming a single key in Registry Editor. To do that, follow these steps:

  1. Open Registry Editor and create your backup.
  2. In the right pane, navigate to ComputerHKEY_LOCAL_MACHINESOFTWAREMicrosoftWindows NTCurrentVersionImage File Execution Optionsiexplore.exe key.
  3. Right click iexplore.exe key and choose Rename from the menu. Rename the key to iexplore.old.
  4. Close Registry Editor and check if that solves the problem.

Keep in mind that renaming keys can cause problems with certain features, so be sure to create a backup beforehand. If you notice any issues after modifying your registry, simply run the backup file to restore it to the previous state.

3. Remove the MoveImages DWORD

  1. Start Registry Editor. We already showed you how to do that in Solution 1, so be sure to check it for extra information.
  2. Create a backup of your registry just in case. Deleting values from the registry can cause certain problems, so it’s always a good idea to have a backup ready in case anything goes wrong.
  3. Navigate to HKEY_LOCAL_MACHINESYSTEMCurrentControlSetControlSession ManagerMemory Management key in the left pane.
  4. In the right pane, locate MoveImages DWORD, right-click it and choose Delete from the menu.
  5. After deleting this value, restart your PC and check if the problem appears again.

If you’re still having this error, you might be able to solve it by removing MoveImages DWORD from your registry. This is relatively simple and you can do it by following the above steps.

4. Delete the Build folder

Users reported this error while using Axoloti software. According to them, they fixed the issue simply by deleting the Build folder from the Documentsaxoloti directory.

After removing the Build directory, the application should start working without any problems.

5. Set EMET to recommended settings

If you’re having problems starting certain applications due to this error, you might be able to fix it by changing EMET settings. According to users, simply change EMET settings to Recommended and the problem should be resolved.

How can I fix Attempt to access invalid address in Adobe?

1. Configure EMET

Users reported this problem when using Adobe Reader, and according to them, they are unable to start the application.

The problem is EMET configuration, so if you’re using EMET be sure to turn off / on all options for Adobe Reader in EMET.

Alternatively, you can set EMET to Maximum Security settings to fix this problem.

2. Delete Acrobat Reader values from the registry

  1. Open Registry Editor.
  2. In the left pane, navigate to the HKEY_LOCAL_MACHINESOFTWAREMicrosoftWindows NTCurrentVersionImage File Execution OptionsAcroRd32.exe key.
  3. Right-click AcroRd32.exe key in the left pane and choose Delete from the menu.
  4. Now navigate to the HKEY_LOCAL_MACHINESOFTWAREMicrosoftWindows NTCurrentVersionImage File Execution OptionsAcroRd32Info.exe key.
  5. Right-click AcroRd32Info.exe key and choose Delete from the menu.
  6. Close Registry Editor and restart your PC.

According to users, you might be able to fix this problem by removing Acrobat Reader values from your registry.

Removing values from the registry can cause certain issues, therefore we strongly advise you to create a backup of your registry before using this solution.

After doing that check if the error message still appears. Keep in mind that this solution only applies if you have at least one of the aforementioned keys in your registry. If you can’t find any of these keys, you should skip this solution entirely.

3. Try running the application as an administrator

  1. Locate the problematic application and right-click it.
  2. Choose Run as administrator from the menu.

Some Adobe applications can’t run due to this error, and if you’re having this problem, a quick workaround is to run the problematic application as an administrator.

If this workaround works, you’ll have to repeat it every time you want to start this app. Alternatively, you can set the application to always run with administrative privileges.

To do that, follow these steps:

  1. Right-click the problematic application and choose Properties from the menu.
  2. When the Properties window opens, go to the Compatibility tab. Check Run this program as an administrator option and click on Apply and OK to save changes.
  3. After doing that, the application will always start with administrative privileges.

4. Try running the application in the Compatibility mode

  1. Locate the problematic application, right-click it, and choose Properties from the menu.
  2. Navigate to the Compatibility tab, check Run this program in compatibility mode for and choose the desired version of Windows. Now click on Apply and OK to save changes.

Sometimes certain applications aren’t fully optimized for Windows 10 and that can cause this error to appear. To fix this problem, you can run your apps in Compatibility mode.

This is a simple solution, but you might have to experiment with different compatibility options until you find the one that works for you.

5. Update the problematic application to the latest version

There are times when these errors can appear due to certain bugs and compatibility issues.

To ensure that your application is fully compatible with your operating system and bug-free, we strongly advise you to update it to the latest version.

In many cases, the developers are aware of these types of errors, and the problem is usually fixed in the newer version of the software.

If you’re having this problem with any application on your PC, we advise you to update it to the latest version and check if the issue still appears.

6. Turn on User Account Control and run the application as an administrator

  1. Press Windows Key + S and enter user account and choose Change User Account Control settings from the menu.
  2. User Account Control Settings window will now appear. Move the slider to the default position and click OK to save changes.

User Account Control is a useful security feature that prevents applications from performing tasks that require administrator privileges.

Thanks to this feature, you’ll always get a security dialog when trying to perform a task that requires administrator rights.

This is a useful feature, but its security dialogs tend to appear too often, and this is the main reason why many users choose to disable this feature.

However, few users reported that they fixed the problem on their PC by turning on User Account Control. To do that, follow the above steps.

After turning this feature back on, try to run the problematic application as an administrator and check if the error message appears again.

7. Remove your antivirus software

If you’re frequently getting Attempt to access invalid address error message, you might want to try disabling your antivirus.

Users reported some problems with older versions of Bitdefender, so if you’re using this tool you need to disable it and check if the issue still persists.

Several users reported that the cause is the Bitdefender firewall feature, and after disabling it the error was resolved completely.

Speaking of firewall, users reported that Intrusion Detection System (IDS) was the problem, so be sure to disable it as well. If disabling the antivirus doesn’t help, you might have to uninstall it to fix this problem.

Antivirus tools can sometimes interfere with your operating system which can lead to various errors. It’s worth mentioning that antivirus software can leave leftover files even after you uninstall it, so it’s recommended to use a dedicated removal tool.

Almost all antivirus companies have these tools for their software, so be sure to download one for your antivirus.

After removing your antivirus and all its related files, the issue should be resolved. Now you just have to update your antivirus to the latest version or switch to a different antivirus solution.

Even though this error is related to older versions of Bitdefender, other antivirus tools can also cause this error.

Several users reported that Comodo Firewall caused this problem on their PC, so if you’re using that application, you might want to disable it or remove it.

As you can see, different security tools can cause this problem to appear, so even if you don’t use Bitdefender be sure to try this solution with your antivirus software.

8. Install the latest Windows updates

  1. Press Windows Key + I to open the Settings app.
  2. Navigate to the Update & security section.
  3. Now click on Check for updates button.

Windows 10 is a solid operating system, but just like any other operating system, it has few bugs and glitches.

These bugs can sometimes cause various system errors, and in order to fix them it’s highly recommended to keep your Windows up to date.

By default, Windows 10 automatically downloads the updates in the background, but sometimes you can miss an important update. To make sure that your Windows is up to date, you can always check for updates manually.

Windows will now check for updates. If any updates are available, Windows will download them in the background and install them once you restart your PC. After updating your system, the issue should be resolved.

9. Uninstall Chrome

  1. Open Google Chrome.
  2. Once Chrome opens, click the Menu button in the top right corner. Choose Help > About Google Chrome.
  3. A new tab will appear and Chrome will automatically check for updates and download them.

After updating Chrome to the latest version, check if the issue still persists. If the error still appears, you might want to remove Google Chrome. To do that, follow these steps:

  1. Open the Settings app.
  2. Navigate to the Apps section.
  3. A list of installed applications will appear. Select Google Chrome from the list and click on Uninstall.
  4. Follow the instructions on the screen to remove Chrome.

According to users, one of the causes for this error might be Google Chrome. Several users reported that removing Google Chrome fixed the issue for them, so you might want to try that.

Before removing Chrome, we would strongly advise you to check if Chrome is up to date and install the necessary updates.

If you don’t want to use the Settings app, you can remove Chrome by doing the following:

  1. Press Windows Key + S and enter control panel. Select Control Panel from the list of results.
  2. When Control Panel opens, navigate to Programs and Features.
  3. When Programs and Features window opens, locate Google Chrome, and double click it.
  4. Follow the instructions on the screen to remove Chrome.

After you uninstall Google Chrome, check if the problem still appears. If not, you might want to try reinstalling Chrome or switch to a different browser.

10. Set your antivirus to Game Mode

Users reported this problem with Bitdefender, and it seems there’s a quick and simple solution for this problem.

According to users, you can simply set Bitdefender to run in Game Mode and that will allow you to run Adobe apps without any problems.

Game Mode runs with a different set of rules, so if you have the ability to run your antivirus in Game Mode, be sure to try that and check if the issue still persists.

11. Add the problematic application to the exclusions list

As already mentioned, your antivirus can interfere with your operating system and prevent you from running certain applications.

Users reported this problem with Bitdefender and Adobe apps, but the problem can also appear with any other application and antivirus.

To avoid this problem, you can try adding the problematic application to the list of exclusions.

Almost every antivirus software has an exclusions list, so be sure to add the problematic app to the list and check if that solves the issue.

12. Remove the problematic applications

We already mentioned that in some cases Google Chrome can cause Attempt to access invalid address error to appear. However, Chrome is not the only cause of this problem.

Users reported problems with apps such as Deluxe Shield, so if you have this application installed, be sure to remove it and check if that solves the issue.

Keep in mind that other applications can cause this problem as well, so be sure to remove any recently installed or updated applications.

Users reported that Real Player can also cause this problem to appear, so be sure to remove it. Another application that can cause this error is Anagram, so you might want to remove it as well.

In addition, be sure to remove any suspicious applications. Sometimes certain apps can install unrequired and potentially malicious software automatically, so be sure to remove any suspicious or unknown software and check if that solves the problem.

13. Reinstall the problematic application

If this error message keeps appearing, you might be able to fix it simply by reinstalling the problematic application.

In some cases your installation can become corrupted and that can lead to this and many other errors. Users reported that they fixed this problem with Adobe apps simply by reinstalling them, so be sure to try that.

According to a few users, reinstalling the application to a different drive fixed the problem for them, so you can try that as well.

14. Reinstall .NET Framework

Many applications are built using .NET Framework, and sometimes these types of errors can occur if your .NET Framework installation is corrupted.

If that happens, you won’t be able to run applications that require this framework. To fix the issue, you need to uninstall .NET Framework from your PC and reinstall it again.

.NET Framework is available for free on Microsoft’s website, however, there are several versions available. To fix the problem, you need to download the exact version that Adobe Reader uses.

After reinstalling .NET Framework, the error should be fixed.

How can I fix Attempt to access invalid address in Office?

1. Update EMET

EMET is the common cause for this problem, and if you can’t run Microsoft Office applications due to this error, you might want to try updating EMET to the latest version

. Several users reported that updating EMET fixed the issue for them, so be sure to try that.

2. Delete or change MitigationOption DWORD

  1. Open Registry Editor.
  2. Optional: Create a backup of your registry.
  3. In the left pane, navigate to ComputerHKEY_LOCAL_MACHINESOFTWAREMicrosoftWindows NTCurrentVersionImage File Execution Options key and expand it.
  4. Locate Office apps on the list. Look for entries such as excel.exe, winword.exe, etc. Once you find the desired application in the left pane, select it.
  5. In the right pane, double click the MitigationOption to open its properties.
  6. Set Value data to 0 and click OK to save changes. Alternatively, you can just delete MitigationOption DWORD from the registry.
  7. Repeat the previous steps for all Office applications.

If you’re using EMET, it’s possible that one of its registry values is interfering with Office apps and causing this problem to appear. To fix this problem, you need to make a few changes to your registry.

After you’re done, close Registry Editor and restart your PC. Once your PC restarts, the problem should be resolved and you’ll be able to run Office applications without any problems.

How can I fix Attempt to access invalid address in Unity?

Update Unity to the latest version

Many users reported this error message with Unity. It seems that this error appears with older versions of Unity, so if you’re having this problem, update Unity to the latest version and check if the error is resolved.

Many users reported that Unity update fixed the problem for them, so be sure to try that.

Attempt to access invalid address can prevent you from running Adobe and Office applications.

This error is usually caused by EMET or by your antivirus software, but you should be able to solve it by using one of our solutions.

How to watch geoblocked live streaming YouTube [Full Guide]

YouTube is a great way to connect with other people from all around the world. Whether you’re in for the laughs or try to figure out a workaround for a certain issue you encountered, YouTube is there for you.

You can either act as a bystander and witness YouTube’s (and its participants’) awesomeness by watching videos, or you can partake by creating and uploading your own material.

Yeah, YouTube is great and all, but sometimes it just splashes a cold beverage on your face in the form of geo-restrictions.
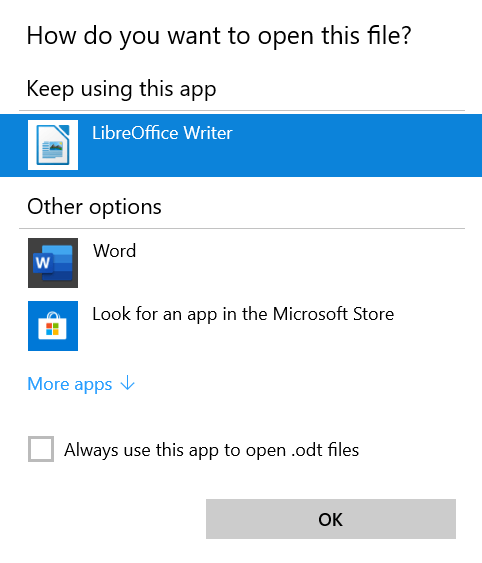
It’s exactly what it sounds like: some videos or live streams might not be available to you, just because you’re not in the right place.

So what can you do in this case?

How to watch geoblocked live streams on YouTube?

1. Use a VPN

  1. Download Private Internet Access
  2. Install it on your PC
  3. Launch it
  4. Log into your PIA account
  5. Connect to an appropriate server (*)PIA is connected to Netherlands
  6. Try watching the geoblocked YouTube live stream

(*) – try to pick a server located in a country where the stream isn’t likely to be blocked.

You might need to do a bit of research for that, but it shouldn’t be too hard. If you can figure the country of the original stream, that’s the location of the server you should choose.

Private Internet Access is an excellent VPN service brought to you by Kape Technologies. It can help you bypass geo-restrictions without any significant efforts.

Thus, it would make a powerful ally in unblocking geo-restricted live streams on YouTube.

Private Internet Access

Private Internet Access

Can't access geo-blocked YouTube live streams? Try using PIA.
$2.85/mo. Buy it now

However, a trustworthy VPN such as PIA can help you achieve so much more than that. For instance, it can help curb packet loss, improve ping, keep your online privacy safe, and secure your connection.

2. Use a Smart DNS service

Smart DNS services can help you spoof your real location by simply changing your DNS.

What this utility does is remove your ISP-assigned DNS address and hands you another one, stripped of all the metadata that might reveal your real location.

A Smart DNS service is a bit similar to using a VPN, but only when it comes to spoofing your real location. However, this type of service offers you almost none of the benefits that using a VPN does.

For the sole purpose of changing your virtual location, Smart DNS services are better than VPNs, since they don’t affect your Internet connection speed one bit.

On the downside, they offer no actual protection, since your IP still remains the same, and there’s absolutely no encryption.

3. Use a proxy service or server

There are a lot of proxy services online, most of which are free. ProxFlow, for instance, is a web browser extension that can help you unblock geo-restricted content on YouTube as easy as pie.


Is ProxFlow unable to unblock videos? Check out our guide to fix this issue.


But ProxFlow isn’t the only proxy service you can use to bypass geo-restrictions. The only downside is that proxy is way easier to detect than VPNs. Therefore, the chances it will work are kind of slim.
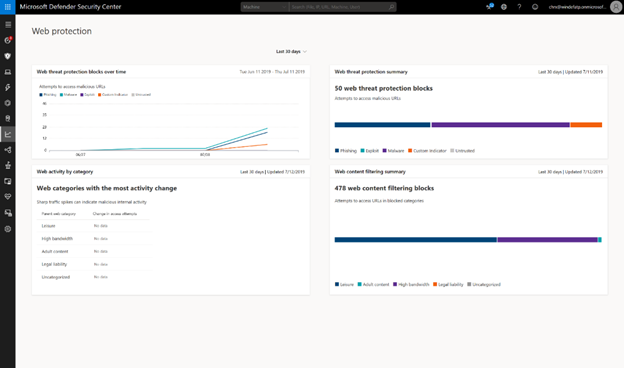
4. Download the stream once it’s over

If you’re lucky enough that the creator of the live stream saved it on their YouTube channel, you can use one of the hundreds of YouTube video downloaders to retrieve it on your device and watch it from there.

The only downside to this plan is that you won’t be able to watch it live. However, you won’t have to worry about bypassing geo-restrictions anymore.

You just pop the YouTube URL in the download field and you’ll have the content on your PC in mere moments.

You can bypass geo-restrictions on YouTube live streams

All things considered, it’s possible that you can watch any geo-blocked YouTube live stream, as long as the creator didn’t make it private.

Whether you choose a VPN, a Smart DNS, or a proxy, chances are you’ll be granted access to it almost instantly. Note that proxy servers are more prone to detection than Smart DNS or VPNs, so they might not work every time.

If you’re not a fan of circumventing geo-restrictions, you may even download the live stream. The only downside to this is that you won’t be able to watch the stream as it happens.
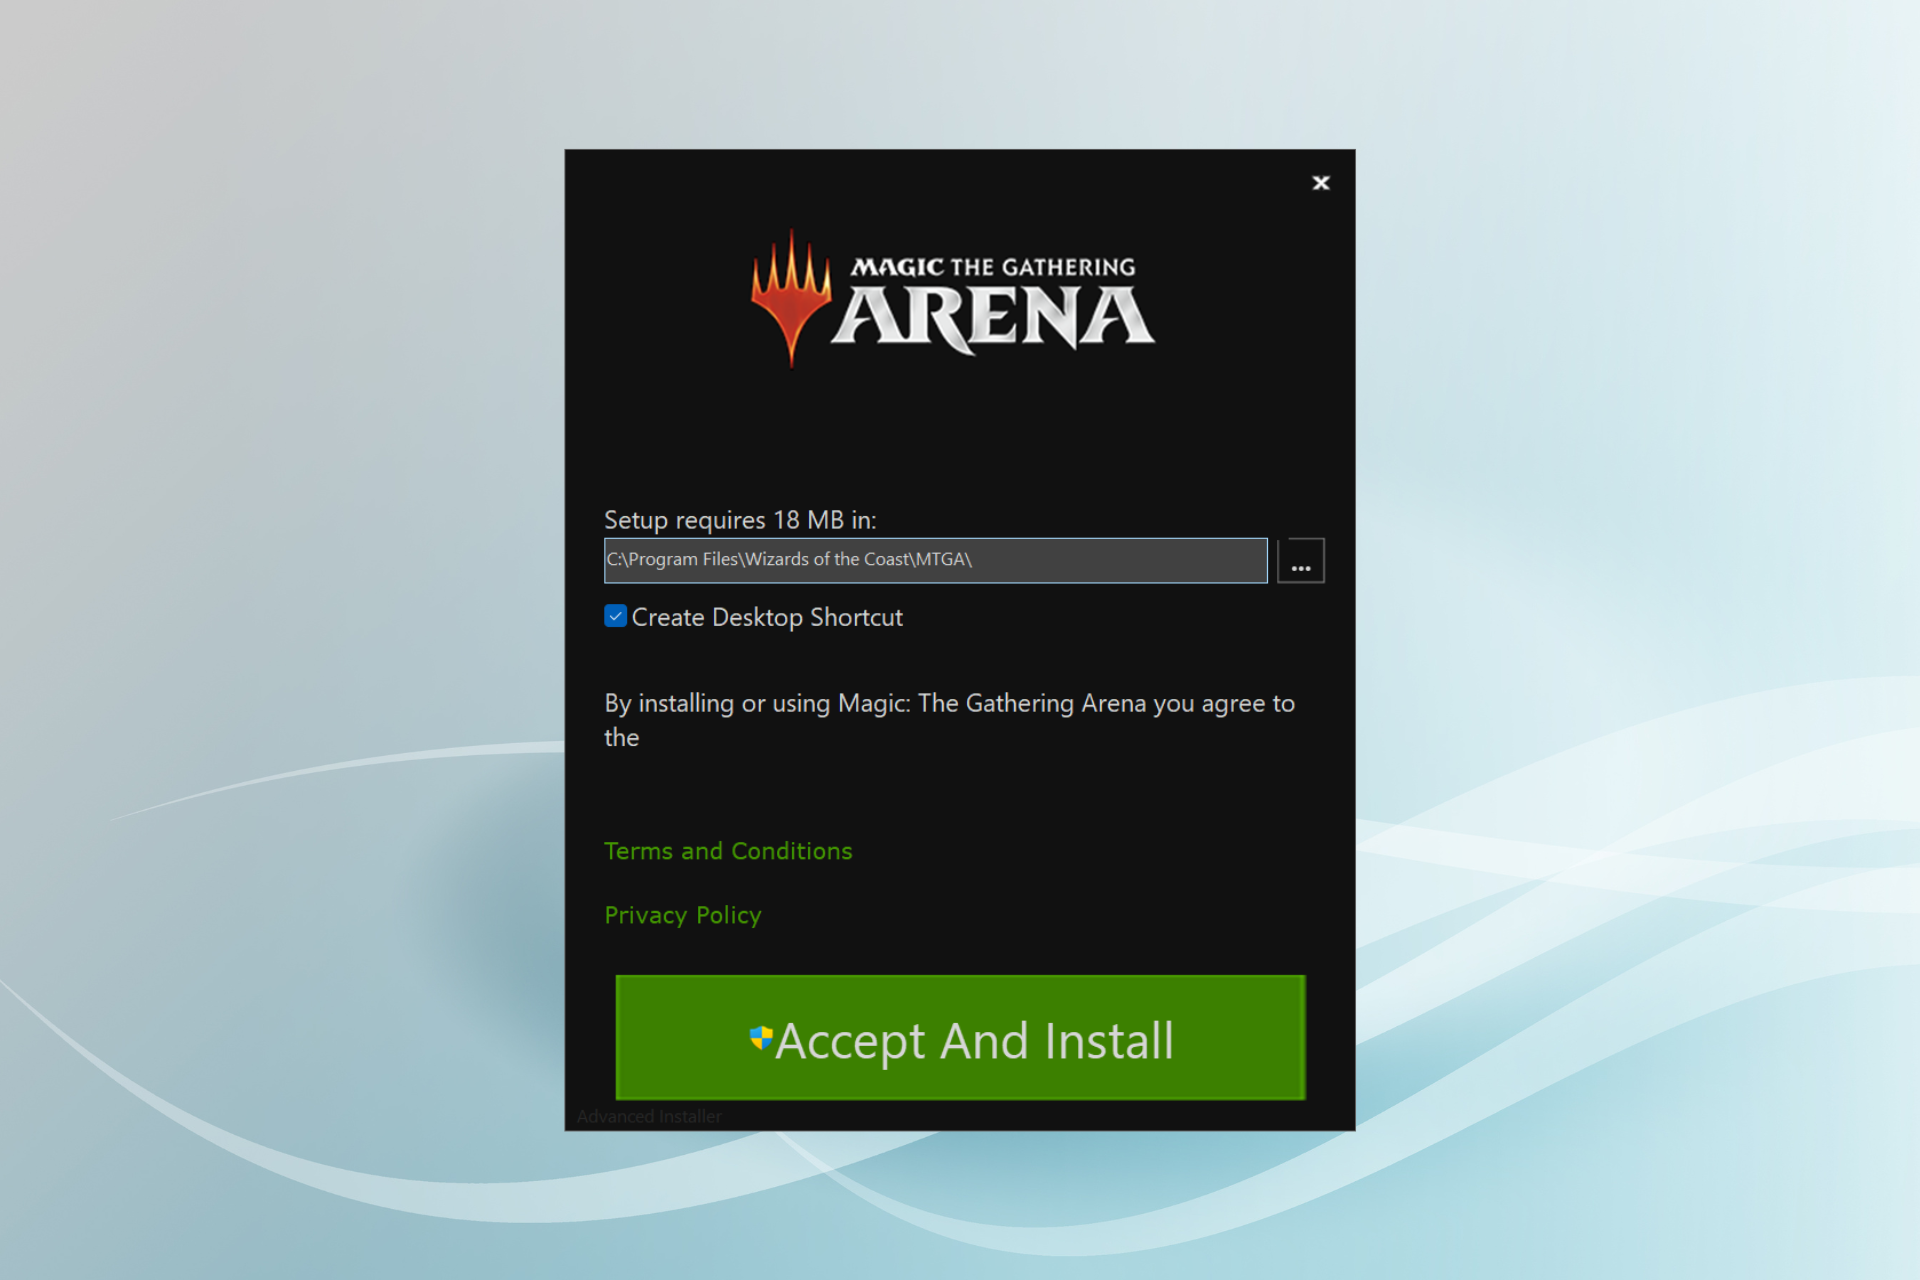
We also have a guide that addresses The uploader has not made this video available in your country error, so don’t miss it.

More so, you can only download a stream if the creator decides to archive it on their channel.

[wl_navigator]