The Environment is Incorrect: How to Fix Error 10

The environment is incorrect error will prevent certain applications or even specific peripherals from working properly.

Such error can lead to crashes and file loss, so it’s important to fix it, and this guide will show you how to do it properly.

What causes the environment is incorrect error?

  • File corruption or missing updates can often lead to this problem.
  • Issues with peripherals, such as your printer, cause this issue.
  • Outdated drivers and services that aren’t running can result in errors.
  • Third-party applications or system cache can also be the problem.

How can I fix The environment is incorrect error?

1. Run a full system scan

  1. Press Windows key + S and type defender. Select Windows Security from the list of results.
  2. In the left pane, go to Virus & threat protection. In the left pane, select Scan options.
  3. Select the desired type of scan and click on Scan now.

In case you don’t use Windows Defender, you can scan your PC with any other antivirus software.

2. Perform SFC scan

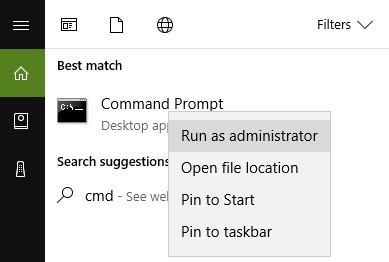
1. Go to Start and type cmd. Next, right-click Command Prompt and select Run as Administrator.
The environment is incorrect error 10

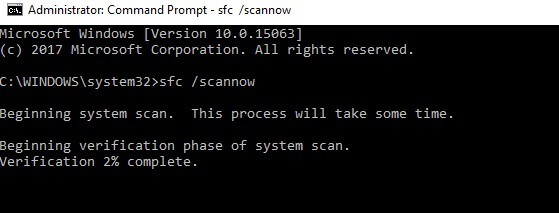
2. Now type the sfc /scannow

The environment is incorrect error 10

3. Wait for the scanning process and then restart your computer. All corrupted files will be replaced on reboot.

Alternatively, if the error still appears, we recommend a comprehensive repair tool that will ease the process significantly.

3. Update your operating system

  1. Press Windows key + I to open the Settings app.
  2. Navigate to Update & Security section.
  3. Click on Check for updates and wait while the update is downloaded in the background.

How can I fix The environment is incorrect printer error?

1. Run the Printer Troubleshooter

  1. To launch it, press Win + R and enter msdt.exe /id PrinterDiagnostic
  2. In the new window, select the Advanced button, click Print and hit Next.
  3. The troubleshooter will then scan your system in order to detect and fix any print-related issues.

2. Update your PC drivers

  1. Press Windows key + X and choose Device Manager.
  2. Locate the device whose drivers you want to update, right-click it and choose Update drivers.
  3. Select Search automatically for drivers and wait for the process to finish.

Another options is to download the available driver updates directly from the manufacturer’s website.

3. Clear the spooler files and restart the spooler service

  1. Press Windows key + R and enter services.msc.
  2. Double-click Print Spooler to open its properties. Click on Stop and save changes.
  3. Open search and enter the following: %WINDIR%\system32\spool\printers
    The environment is incorrect error 10
  4. Navigate to that location and delete all files.
  5. Go back to the services window and start the Print Spooler service. Make sure its Startup Type is set to Automatic.

How can I fix The environment is incorrect when copying files?

1. Remove recently installed software

  1. Press Windows key + I to open the Settings app.
  2. Navigate to the Apps section.
  3. Now select recently installed application and click on Uninstall.
  4. Repeat this for several applications that you’ve installed.

2. Check your disk for errors

  1. Press Windows key + S and type cmd. Select Run as administrator.
  2. When the Command Prompt starts, run the following command: chkdsk C: /f
  3. Wait for the process to finish.

3. Clean your temporary files and folders

  1. Go to Start, type Disk Cleanup and  launch the tool.
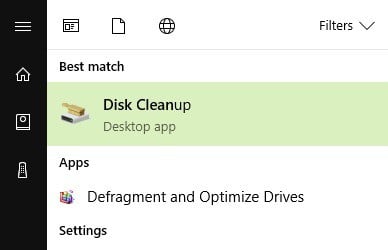
    The environment is incorrect error 10
  2. Select the disk that you want to clean and the tool will them tell you how much space you can free up.
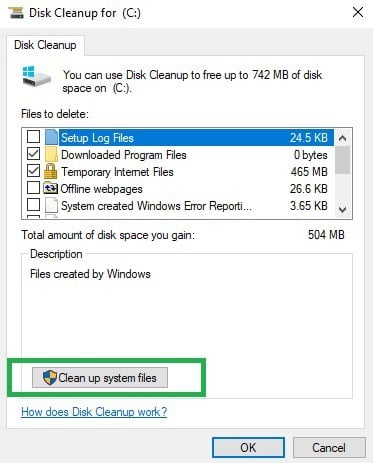
    The environment is incorrect error 10
  3. Select OK to proceed.

How can I fix The environment is Incorrect error when running an executable?

1. Remove recently installed software

We described how to do this in the earlier section of this article, so be sure to check it out for detailed instructions.

2. Change your registry

  1. Press Windows key + R and enter regedit.
  2. In the left pane, go to HKEY_CLASSES_ROOT.
  3. In the right pane, double click (Default) key and set Data value to exefile.
  4. Now go to the HKEY_CLASSES_ROOT\exefile\shell\open\command
  5. In the right pane, select (Default), double click it and set its Value data to “%1” %*.
    exe-files-not-opening-cmd-regedit-3 The environment is incorrect error 10
  6. Restart your computer and check if the problem is resolved.

3. Change the location of Program Files folder to default

  1. Hold the Shift key on your keyboard and click the Restart button.
    exe-files-not-opening-restart-1 The environment is incorrect error 10
  2. Go to Troubleshoot and select Advanced options. Next, select Startup settings and click on Restart button.
  3. When your computer restarts, a list of options will appear. Select any version of Safe Mode by pressing the appropriate key.
  4. Open the Registry Editor. Press Windows key + R and enter regedit.
    exe-files-not-opening-regedit-1 The environment is incorrect error 10
  5. Go to the HKEY_LOCAL_MACHINE\SOFTWARE\Microsoft\Windows\CurrentVersion
  6. Click on ProgramFilesDir and change its Value data to C:\Program Files
    If you have the ProgramFilesDir (x86) entry available, change its Value data to C:\Program Files (x86)
  7. Close Registry Editor and restart your PC.

If The environment is incorrect error is still preventing you from opening .exe files, you may also want to check our dedicated article on how to fix executable files not opening.

The issue is similar to the system could not find the environment option error that we covered in one of our earlier guides, so don’t miss it.

We hope the solutions listed above helped you fix The environment is incorrect error code. If you’ve encountered other workarounds to fix this problem, you can help the Windows community by listing the troubleshooting steps in the comments below.

Score 1,250 bonus points with Microsoft Rewards’ new limited-time “refer a friend” feature

Microsoft Rewards has always been interactive and fun, but it would now appear as though the program recently picked up a new limited-time “refer a friend” feature. It is not clear when this was first added, but we first noticed it today, August 8th, as an activity on the main Microsoft Rewards dashboard.

According to Microsoft, users can earn up to 1,250 Microsoft Rewards points for referring a friend to the program. Users can get 250 points for the first five friends that join and complete a punch card in four steps. The steps include taking the Microsoft Rewards Tour, completing 40 Bing searches, finishing a daily set, and reaching Level 2 status.

Currently, this feature is a limited time offer and is set to expire on August 31, 2019. It also appears to be valid for Microsoft Rewards users in the United States, and our writer in Europe is not seeing it on his dashboard. You can learn more about the refer a friend feature by checking Microsoft’s link here.

How to add an image to Power BI [EASY STEPS]

Adding an image to dashboards in Power BI is one of the most basic features of this app. So, it should be easy to use that. But this is not always the case for quite a few people.

One user reported the following on the official forum:

Hi there, been trying to insert a local image onto my PowerBI Desktop report but could not get the “image” function on PowerBI desktop to work. Seeking help over here. tks in advance for reading my post!

The OP encountered problems while trying to insert an image in a report and received this message:

power bi error unable to load image
Also, the user added that the image he tried to add is 380 kb and in .jpg format. The picture was meant as a tile and not as a background, like in the image below.

power bi image tile example
Fortunately, there is a solution available for this issue and today we will show you how to add an image if you encounter this problem.

Steps to add an image in Power BI

  1. Resize the image in Paint or in any other photo editing tool. In this case, the image was resized from 380 kB to 449 kB.power bi resize image paint
  2. Add it to Power BI Desktop.power bi insert resized image

So, you can try to get your image to a proper size to fit in the dashboard. This should solve your problem.


Learn more about Power BI by reading this guide.


Is adding images in Power BI a walk in the park? Not really

Even for the not so advanced users, it is a known fact that you can only add images in Power BI if they are categorized as URLs. The URL must come from a file system or another website page.

So, the times when you just needed to upload an image from your computer are gone, at least for Power BI.

This can have some major drawbacks. For example, you can’t add an image when you’re offline. Also, if the file is moved, renamed or deleted, the image will not show in your dashboard.

Conclusion

If all the conditions are met, it should be easy to add an image to Power BI. Resize the images to proper dimensions and use them from reliable sources.

Did you find our solution helpful? How do you add images in Power BI? Do let us know in the comments section below.

RELATED ARTICLES YOU NEED TO CHECK OUT:

How to Fix Matchmaking Failed Error on Playerunknown’s Battlegrounds

Many users have reported Player unknown battlegrounds matchmaking failed issue on the official PUBG and Reddit, and this error is usually due to connection issues, or missing or corrupted game files. However, you should first check the PUBG latency to see if you have a strong connection to the server.

How to fix the Matchmaking failed error on PUBG

1. Refresh or Restart PUBG

  1. In case you are consistently getting the matchmaking failed error, try to refresh the lobby. If failed, try again multiple times until you are connected.PUBG Referesh Lobby
  2. If that fails, try to restart the game. In case you are stuck at your last queue and the game was already started, you should be able to connect after restarting the game.

2. Verify the Game Files in Steam

  1. If the error is appearing on your Steam Client, try to verify the integrity of game files to fix the error.
  2. Launch Steam client on your PC.
  3. Click on the Library tab and select Games.
    player unknown battlegrounds matchmaking failed
  4. Now right-click on PUBG and select Properties
  5. Click on Locate Files tab.
    player unknown battlegrounds matchmaking failed
  6. Click the “Verify Integrity of Game Files” button.
  7. Steam will scan and try to fix any issues with the game files.
  8. Exit Steam and relaunch it. Check if you are able to connect and join other players.

3. Change the Region to North America

  1. If the issue persists, try to change the region in the game to North America. Users have reported that changing the region helped resolve the matchmaking issue.
  2. Launch PlayerUnknown’s Battleground and choose a game mode. Open Menu and select Region.Change Region in PUB to fix Matchmaking Failed
  3.  Click the drop-down menu and select it to NA (North America).
  4. Save the changes and check if matchmaking goes through.
  5. Although it is a temporary workaround, it should help you keep busy until the issues are resolved if from the developers end.
  6. If the issue persists, try to disconnect and reconnect to your WiFi network. If that does not work, connect to your phone’s WiFi hotspot and try again.

4. Reinstall the Game

  1. If nothing seems working, as a last resort, try uninstalling and reinstalling the game.
  2. If you are on Steam, click the Library tab and select Games.
  3. Now right-click on the game and select Uninstall.player unknown battlegrounds matchmaking failed
  4. Relaunch Steam and reinstall PUBG.
  5. After the installation is over, check for any improvements.

A full reinstallation of the game should fix the PUBG Matchmaking failed error, but hopefully, you have managed to fix the problem from the first solution.

We also have a useful guide on how to fix the PUBG anti-cheat error with the game.

Tell us in the comments below which solution helped you or if you have any other fixes that worked for you.

WalkingCat finds trailer for Microsoft’s legendary “Standards of Business Contact” Season 3 Series Finale

Microsoft employees have been raving on Twitter for some time about the company’s Office of Legal Compliance video series, Standards of Business Conduct. Most large companies have such videos, used to highlight the various do’s and don’ts of company policy, but apparently Microsoft has taken the usually dry and boring training videos to a whole new level.

Here’s the preview for the “Season 3 Series Finale” of the training videos, found by our favorite Microsoft super sleuth, WalkingCat:

https://twitter.com/h0x0d/status/1158762546435727361

Update: WalkingCat found another one, here’s a trailer for Season 2:

https://twitter.com/h0x0d/status/1158770063010226176

Microsoft employee Scott Hanselman compared the video series to a “telenovella”:

So far the series hasn’t been released externally, and probably won’t be, but at least we get a quick look at what all the fuss has been about!

[Updated] Custom-designed Xbox One X Gears 5 Ultimate Edition console goes up for pre-order

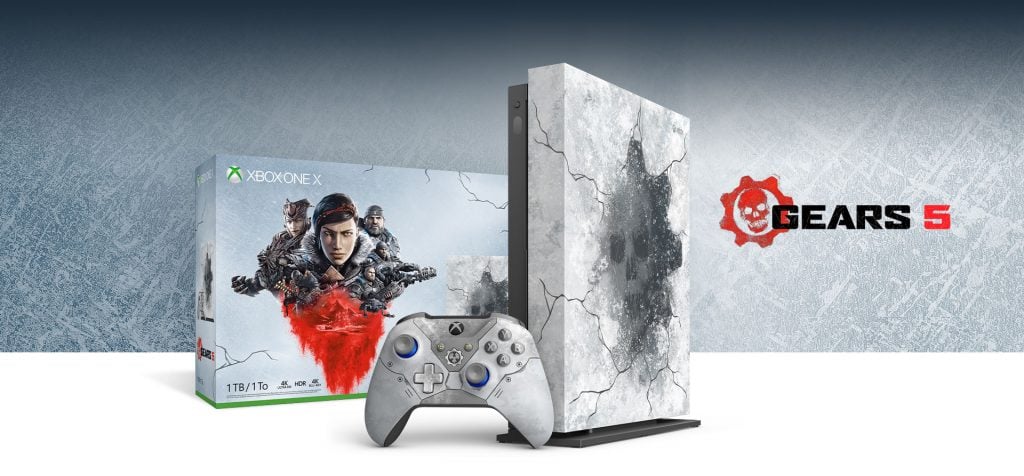
Gears 5 is Microsoft’s next big exclusive game launching on Xbox One and Windows 10 on September 10, and a Xbox One X Gears 5 limited edition console has just been spotted on Amazon Italy (via Reddit). The console is quite a looker, featuring a concrete wall graphic design hiding the series’ iconic “Crimson Omen” logo, and there’s also the Locust emblem at the bottom.

Th €500 bundle also includes the Gears 5 limited edition controller that leaked a couple of days ago, as well as Gears 5 Ultimate Edition, the first four Gears of War games (excluding the spinoff Gears of War: Judgment), one month of Xbox Live Gold and one month of Xbox Game Pass. Judging from the pictures, the console will also come with a vertical stand, something that Microsoft previously offered with the Xbox One X Project Scorpio Edition.

Microsoft has yet to officially announced this Xbox One X Gears 5 Limited Edition bundle and its matching controller, but it definitely looks to be excellent fan service for Gears of Wars fans. Microsoft previously released a custom-designed Xbox One S Gears of War 4 Limited Edition three years ago, and what the company has done with that Xbox One X console is just as good or better depending if you prefer this more subtle grey color.

Update 9AM PDT: It’s official, the Xbox One X Gears 5 Limited Edition console is available for preorder today at participating retailers worldwide, including the Microsoft Store where you can get it for $499. Microsoft didn’t announce a release date today, but the company had this to say about the console’s unique design: “The Xbox One X Gears 5 Limited Edition console features a never-before-seen dark translucent casing and laser-etched cracks across the console’s icy top surface, with snow drifting across a golden Locust symbol on the back.” The Xbox Wireless Controller – Gears 5 Kait Diaz Limited Edition ($74.99) is also available for pre-order today and will start shipping on August 20.

Update 1AM PDT: A Gears 5-inspired headset, keyboard, mouse, and hard drive have also been announced.

Halo Infinite won’t treat Xbox One as “second-class citizen,” 343 Industries says

If Halo Infinite is expected to be a launch title for the next gen “Project Scarlett” Xbox console next year, the latest installment in the popular Halo franchise will also be released on the Xbox One family of consoles. The OG Xbox One and Xbox One S are definitely starting to show their age at the end of this console generation, but developer 343 Industries is committed to make Halo: Infinite run great on all Xbox One consoles.

Frank O’Connor, Halo franchise development director at 343 Industries recently said so in an interview with YouTuber Blackmist523 (via IGN). “Obviously the special citizen [for Halo Infinite] will be Scarlett, and we’ve worked with that hardware team to make sure the game shows up amazingly on it… but it will [also] be for Xbox One and it will look incredible,” O’Connor said.

“The Xbox One is not going to be a second-class citizen,” he added. “We’re building it so it plays and looks fantastic on Xbox One, and then everything else is plus-plus-plus, but we’ve got a few tricks up our sleeves that we’re thinking about.” As you may know, Halo 5: Guardians used a dynamic resolution to achieve 60 FPS on Xbox One, and Halo: Infinite will likely use a similar technique to provide a smooth gameplay experience on Xbox One.


343 Industries is developing a new engine for Halo: Infinite called Slipspace, which we first saw in a E3 2018 trailer for the game. We still don’t have many details about Halo: Infinite except this new engine, but 343 Industries confirmed that the game will also launch on Windows 10 next year and bring back support for split-screen multiplayer on console. Microsoft also recently snagged Ninja, who started out on Halo, presumably to help hype Halo Infinite.

Halo: Infinite probably won’t be the last big blockbuster game to launch on Xbox One next year, but it should be one the few titles that pushes the Xbox One hardware to its limits, especially since 343 Industries and other game developers are now very familiar with the hardware. Anyway, the family of Xbox One consoles should continue to be supported in the years to come, especially since all Xbox One games and accessories will be compatible with Project Scarlett.

Microsoft begins storing Teams data for South Korea in its data centers

Microsoft has announced that it is now providing data residency for customers in South Korea. The tech giant noted on its blog post that all Teams members that have signed up after July 9 will be served though their local data center.

Microsoft will store files uploaded to a channel from within Teams via SharePoint Online, however files uploaded via direct message will be stored in their OneDrive for Business account linked to their local data center. For older users, the company will continue to store files in the one of the Asia Pacific data centers either in Singapore or in Hong Kong.

Microsoft opened the new South Korean data centers in Seoul and Busan back in February, giving Azure users in the region the option for storing their sensitive data right within their home county. However, Teams can now store data in SharePoint Online, Exchange Online, or in the local OneDrive for Business all in those two local data centers.

Microsoft now stores data from most of its Office 365 applications in the local South Korean datacenters for users in the country.

The company says that it plans to offer a data migration tool in the future for those who wish to move their data over to the new data centers. However, it was not able to provide a date as to when that might happen.

Reset temporary Internet files location to default [HOW TO]

In this article, I will show you how to reset temporary Internet files location to default. This fix is useful if you have been getting some errors or warnings on Internet Explorer perhaps from programs or games that need to use the default saving location.

Errors may also come when trying to edit some settings via the Windows 10 Registry.

Why Internet Explorer (IE) Saves Files in a Temporary Location

IE saves certain data inside the aforementioned temporary files folder to enhance our browsing experience.

Ordinarily, the address of this location is C:\Users\user name\AppData\Local\Microsoft\Windows\INetCache

Here you will find cached internet pages, downloaded images, and multimedia as saved by IE. Primarily, whatever cached therein enables web pages to load at lightning-fast speeds.

Anyway, the thing with Internet Explorer’s temporary files location is that if by any chance you had changed it to a new folder/location, even uninstalling explorer won’t work. Here is what works.

How can I reset Temporary Internet files location to default?

Modify your registry

You will have to edit some two registry keys and reboot your PC. Remember we want to move back to:

C:\Users\user name\AppData\Local\Microsoft\Windows\INetCache

  1. Press Windows Key + R. This will initialize the Run dialog as shown below.
    run window Where can I find my temporary Internet files
  2. Now type regedit and press ok. This will open Window’s 10 registry editing window.
    registry editor should i reset temporary internet files location to default
  3. It’s now time to edit the relevant registry keys so navigate to this key:
  4. HKEY_USERS.DEFAULT\Software\Microsoft\Windows\CurrentVersion\Explorer\User Shell Folders
  5. Double-click the highlighted Cache key and type the address of the initial default location as shown below (Observe capitalization):
    • %USERPROFILE%\AppData\Local\Microsoft\Windows\INetCache
      registry editor the location where temporary internet files are stored has changed
  6. Now click OK to proceed with the editing.
  7. We shall now modify the last key. Open this key:
    • HKEY_CURRENT_USER\Software\Microsoft\Windows\CurrentVersion\Explorer\User Shell Folders
  8. Again, go to the Cache key and check it if it was automatically moved to the right location.
    registry editor cache temporary internet files location has changed why
  9. You will repeat the previous steps if it wasn’t so double click the cache, type the default location (%USERPROFILE%\AppData\Local\Microsoft\Windows\INetCache) then confirm by pressing OK.
  10. Now restart your PC and login. You will then open your Internet Explorer browser window to confirm that you have reset temporary internet files location to default.

Looking for a secure and private web browser? Check out our UR Browser review!


How To Check If The Default Location Was Restored

  1. Launch Internet Explorer.
  2. Click on IE’s tools icon.
  3. Then click Internet options.
  4. In the General tab, click Settings.

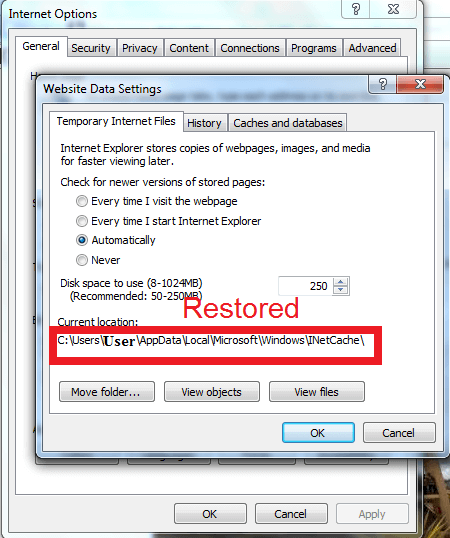
This is what you should see if all went well in your quest to reset temporary internet files location to default.

website data settings temporary internet files location has changed 2018
There you go, we hope that this guide helped you reset temporary Internet files location to its default directory. If you found this guide helpful, feel free to let us know by using the comment section below.

RELATED STORIES YOU NEED TO CHECK OUT:

Small Business Diagnostic Tools: Best to Use in 2026

Do you own an emerging enterprise? Are you looking for a reliable and affordable means of reviewing your business prospects? Then, you’re in the right place.

Business diagnostic software is a tool, specially designed for business owners, advisers, consultants, freelancers, and so on.

The tool uses a set of algorithms to identify and analyze the growth, trends/changes, patterns, and performance of a business, with the aim of identifying the strong and weak points of such a business.

However, like most utility tools, standard small business diagnostic software is hard to come by, as there are numerous substandard diagnostic tools out there. Hence, to avoid falling victim to such tools, we have curated this piece for you.

What are diagnostic tools in business?

Shortly, diagnostic tools for businesses can entail software or automatic instruments that analyze the performance of the entire organization.

Essentially, a standard business diagnostic software seeks to drive up the productivity level of your company. And it’s especially important for small business owners, who are looking to improve their sales or brand image.

Herein, we’ll be outlining the best small business diagnostic software in the market. So read on!

What’s the best small business diagnostic software?

RapidBI – Cost-effective business diagnosis

small business diagnostic software Rapidbi

The BIR – Business Improvement Review software from RapidBI is one of the leading diagnostic tools for small, medium, and large businesses across the globe.

It is designed to run full checks on your business structure, with a view to identifying the key productive areas and the less productive ones.

The tool is applicable to virtually all businesses; hence, it can be employed by most professionals, including Human Resource managers, Accountants, Plant Managers, and Entrepreneurs among others.

The software uses a set of analytical tools to analyze all the key indices of a business, and then present the result in an easy-to-understand graphical illustration, showing the business’ KPI (Key Performance Indicators), staff performance, management style, customer satisfaction, employees confidence and so on.

BIR’s functions revolve around three basic concepts: Knowledge – Understanding – Action. This means that BIR gathers relevant information about your business, and then ensures you have an adequate understanding of every piece of information gathered, before executing your work functions.

BIR is offered in four variants: Coaching Review (BIR-C), Strategic Review (BIR-S), BIR-Solo, and BIR-HR. Its pricing, though affordable, is available only by quote (custom pricing).

➡️ Get BIR

Tooliers – Financial and management tools

Tooliers small business diagnostic software

Tooliers is an all-inclusive small business diagnostic software, which is equipped to perform various forms and degrees of functions, with the primary aim of driving up productivity, towards attaining sustainable business growth.

The tool uses a three-pronged technique, which entails diagnosis, action plans, and growth programs.

The tri-faceted tactical formation seeks to drive up the productivity scale of a small business, by first analyzing the key areas of the business (diagnosis), then drawing up executable plans (action plans) based on the analyzed result, before implementing the plans to generate visible growth patterns (growth programs).

Some of the key diagnostic features of Tooliers include Strategy Evaluation, True Nature, Leader Identity, Staff Motivation Level, Client Perception, Time Use, Borrowing Perspective, Equity Financing, and many more.

All these features are summarized under 5 basic categories. These include management, financial, leadership, business growth, and sustainability categories.

Tooliers, like most standard small business diagnostic software, is fairly affordable. However, its pricing is feature-specific i.e. each feature has its own specific pricing rate and is purchased separately.

➡️ Get Tooliers

CEO Business Diagnostics – Contemporary business success

business diagnostics small business diagnostic software

CEO Business Diagnostics is another top-rated small business diagnostic software, designed to run comprehensive checks and analyses on SMEs, to generate credible reports on business health, performance, and flaws.

This software is a suite of tools, as it offers a host of unique tools, designed to work in unison to provide you with accurate diagnosis (evaluation) of your business. These tools make up the core features of the software.

Some of these features include BD Online Assessment, Value Chain Assessment, Ansoff Matrix, SWOT Summary, TOWS Strategy Analysis, CAPE Model, Online & Email Support, Generic Business Strategy, and Competitor Assessment among others.

Of the above-mentioned tools, BD Online Assessment stands out. It is a diagnostic function that analyzes all the KPIs of your business, including your company’s financial integrity, operational efficiency, customer satisfaction, client-pull effect, technological innovation and more. All these indicators are aptly analyzed and presented in comprehensive reports.

CEO Business Diagnostics’ pricing information is not made public; it is offered strictly by quote. To get the software, you’ll have to place an order in advance.

➡️ Get Business Diagnostics

BBE Diagnostic Tool – Insightful small-business audit

better business expert small business diagnostic software

Diagnostic Tool from Better Business Express is one of the top diagnostic engines for analyzing the performance and growth of emerging businesses. Hence, it makes our list of the best small business diagnostic software.

This diagnostic tool basically checks five critical areas of a business. These areas include people (employees), strategy, finance, processes, and partnerships. Each of these areas is further broken down into four sub-sections, to facilitate analysis.

After the analysis, comprehensive reports are presented, indicating the weak links that need strengthening, as well as the strong (productive) areas that need utmost attention.

Diagnostic Tool from BBE is fairly easy to use, as it hosts an intuitive interface. There is also a video guide (YouTube video) on their website, designed to help you navigate the interface with ease.

To use the software, all you need to do is input all the relevant information (about your business) and the tool will generate feedback based on the information provided.

➡️ Get BBE Diagnostic Tool

RAN ONE – Business Consulting service

RAN ONE - Business Diagnostic Plus small business diagnostic software

Business Diagnostic Plus is one of the products of RAN ONE Management Consulting, a leading online consultancy firm. It is a versatile diagnostic software, designed to run comprehensive checks on all levels of businesses, and proffer solutions to identified problems.

The software, upon analysis, provides credible recommendations on how you can improve your business, towards achieving sustainable growth.

Diagnostic Plus is built for flexibility, and it can be applied to various forms of businesses. It analyzes the strategic and operational pattern of your business and presents you with qualitative & quantitative reports on the performance of every key aspect.

Typically, Business Diagnostic Plus analyzes business areas like production techniques, employee performance, financial structure, sales, and marketing among others. Also, it employs a set of unique techniques to analyze external factors that can influence/affect business performance.

Notable features of Diagnostic Plus include SWOT Analysis, Diagnostic questionnaire, Email distribution, PIVOT Table analysis, Flexible diagnostic sessions, Online guide (via Wizard library), Internal and external review, Viability analysis, and many more.

➡️ Get Business Diagnostic Tool

Conclusion

Small and medium-scale businesses spend most of their money on what and how to produce, with little or no effort dedicated to how they can grow their respective businesses.

And for any business to grow, the owner needs to know the status of all the KPIs of his/her business. By understanding this, you can proceed to draw out plans for growing your business.

In the end, small business diagnostic software is specially designed for this purpose; to offer business diagnostic services to emerging businesses at an affordable cost.

Microsoft acquires NYC-based marketing tech provider PromoteIQ

While Microsoft may not be getting into wholesale online retail to likes of Amazon, the company has just made a strategic purchase that could help integrate some of its software toolsets into the sector.

According to Microsoft’s Advertising blog, the company just announced its acquisition of PromoteIQ, the company happens to be among on the leading firms of marketing technology to online retailers and brands. Today’s announcement puts PromoteIQ in Microsoft’s back pocket of integrated solutions to help its clients not only execute technically but find new monetization avenues via modern digital marketing strategies.

Enable your trusted brand partners to promote products, drive awareness, and increase sales on-site. 

Digital vendor marketing is a critical source of high-margin revenue for global e-commerce retailers. The PromoteIQ platform makes it easy for brands to promote products in a native and unobtrusive way – facilitated by the retailers with full control over the end-user experience.

Microsoft has been in the process of overhauling its advertising platform by first establishing a new brand direction that shifts the focus away from Bing and leverages the higher valued association of Microsoft’s brand while also expanding its feature set by incorporating a new LinkedIn targeting dashboard.

PromoteIQ boasts about its ability to be the connective tissued between brands and vendors while at the same time cutting out the middlemen platforms such as AdWords and Microsoft Advertising, but it’ll be interesting to see if the company software-as-a-service (Saas) becomes yet another integrated marketing tool for Microsoft.

ZDNet is reporting, that for now, Microsoft doesn’t seem inclined to make any major waves in the day to day operations of PromoteIQ, opting instead to allow the company to retain its own brand as well as its headquarter offices in New York City for the time being.

Obviously, the two companies will work in the near future on integrating technologies and services, be it bringing PromoteIQ to the Microsoft Advertising platform or getting the company to hawk Microsoft wares alongside its custom digital marketing services.

Whatever the outcome, we can presume PromoteIQ’s client portfolio of large North American retailers such as Kohl’s, Kroger and Overstock.com will at some point be inundated with Microsoft technologies soon.

How to create slicers in Power BI [EASY GUIDE]

Creating slicers in Power BI is one of the most used functions of this tool, but sometimes, people are encountering an issue with this feature, as one user described:

I wanted to make the slicers look as a button that can be pressed. I tried following previous advice on here but I couldn’t find a Settings>General>Orientation option.

So, the OP didn’t find the Orientation option, which definitely makes work harder. Fortunately, there are quite a few solutions available.

Steps to create slicers in Power BI

1. Enable the header

  1. Go to Visualizations
  2. Enable Visual Headerpower bi visual header slicer

2. Change type

  1. Go to the upper-right area of the slicer.
  2. Change type as List.

This guide will help you become an expert in Power BI!


3. Select a slicer visual

  1. Select the slicer visual.
  2. Move the column that you have the names to filter.power bi slicer column
  3. Edit the properties of the slicer in General and change Orientation from vertical to horizontal.power bi slicer visual
  4. Go to Items and change the font and background of the bottoms.power bi slicer
  5. Modify the size of the slicer visual.

Conclusion

So, there are many ways to create slicers in Power BI, and each method is designed for the needs of each user. Also, these are easy steps that any beginner can understand.

Did you find these methods useful? How do you create slicers in Power BI? Let us know in the comments section below!

RELATED ARTICLES YOU NEED TO CHECK OUT:

My Printer Only Prints One Page at a Time [Expert Fix]

Depending on the print job, the printer can print multiple or single copies of the document. However, some users have reported that their printer prints only one copy despite the print job including multiple copies.

This is a common issue, and the users have explained the problem in various tech forums, including Microsoft Community Forums.

Every thing has been working smoothly but today I tried to print a multi-page document and the printer only prints the last page of the document. I’ve rebooted and turned off the printer and turned it back on but same result.
Thanks for anyone’s help

Follow the steps given in this article to fix printer printing one page at a time problem.

Why does my printer only print one copy?

1. Check Document Compatibility

  1. If you are trying to print documents from the MS Word app, check the compatibility of the document.Check Program compatibility
  2. If the document was saved in MS Word 2003 format and if you are trying to print it from the MS Word 2016 version, you may face the difficulty mentioned in this article.
  3. To fix this, open the document in your current MS Word app and then save it using the current app.
  4. Now try to print the same document and check if the printer accepts and prints multiple copies.

2. Print as PDF File

  1. One workaround that seems to be working for all the affected users is printing the document after converting it to a PDF file.
  2. You can easily save the picture or text document in PDF format from the paint or MS Word app.
  3. After converting the file to PDF format, open the document in a PDF viewer and proceed with printing.my printer only prints one page at a time
  4. Now your printer should print multiple pages without any issues.

3. Disable Mopier Mode

  1. Press Windows Key + R to open Run.
  2. Type control and press OK to open Control Panel.
    my printer only prints one page at a time
  3. In the control panel, go to Hardware and Sound > Devices and Printers.
  4. Now select the printer with the issue and select Printer Properties.
    my printer only prints one page at a time
  5. In the properties window, click on Device Settings.
  6. For the Mopier Mode drop-down menu, select Disable.
  7. Click the Update / Apply button. Click OK to save the changes.
  8. Do the same for the Job Storage option for as well.
  9. Now open the printing app and proceed with printing the documents and check for any improvements.

4. Disable Collate Option

  1. Open the app from which you want to print the document.
  2. Go to File > Print. 
  3. In the print options, look for Collated section.
  4. Click the drop-down menu and select ” Uncollated”.
    my printer only prints one page at a time
  5. Select your printer (if more than one is connected) and click on the Print button.
  6. This should fix the problem and allow you to print multiple pages of the document instead of one page.

The Connection to Microsoft Exchange is Unavailable [Fix]

Many are using Exchange as their mail server, however, users reported that the connection to Microsoft Exchange is unavailable.

This can be a big problem and prevent you from receiving emails. In can also lead to You must connectwith the current profile to Exchange error.

Luckily, there is a way to fix this issue, and in today’s guide, we’re going to show you how to do it.

Why is my Microsoft Exchange server unavailable?

  • Outlook isn’t configured correctly in the registry, causing the issue.
  • Data encryption for Outlook and Exchange isn’t enabled.
  • Your Outlook profile might be corrupted, and that’s causing the problem.
  • Exchange services aren’t running on your PC.

How do I fix Outlook the connection to Microsoft Exchange is unavailable?

1. Edit your registry

  1. On the working computer press Windows Key + R and enter regedit. Click OK.
    connection-to-microsoft-exchange-is-unavailable-regedit-1
  2. When Registry Editor opens, go to the HKEY_CURRENT_USER\Software\Microsoft\Windows\CurrentVersion\Explorer\User Shell Folders
  3. Right-click User Shell Folders key and choose Export from the menu.
    connection-to-microsoft-exchange-is-unavailable-regedit-2
  4. Select the export location for this key, enter a name, for example, export.reg and click Save.
  5. Locate export.reg file and copy it to the problematic PC.
  6. After doing that, just run the export.reg file on the problematic PC, and it will be added to your registry.

After adding this key to your registry, the problem with Microsoft Exchange should be fixed completely.

2. Update your Outlook profile

  1. Press Windows Key + X to open the Win + X menu and choose Control Panel from the list.
  2. When Control Panel opens, locate and select Mail item.
  3. When Mail window opens, click on Show Profiles.
  4. Select your profile and click on Properties.
  5. Click E-mail Accounts.
  6. Select Microsoft Exchange (send from this account by default) account and click Change.
  7. Click on More Settings.
  8. Microsoft Exchange window will now open. Go to the Security tab.
  9. In the Encryption section, check the Encrypt data between Microsoft Office Outlook and Microsoft Exchange and click Apply and OK to save changes.
  10. Click Next and Finish to complete the change.

After making these changes, the issue with Microsoft Exchange should be fixed.

3. Create a new Outlook profile

  1. Go to Control Panel and select Mail.
  2. Click on Show Profiles and then click on Add.
  3. In the Profile Name box enter the name for the new profile and click OK.

After creating a new profile, set it as default and check if the error is resolved.

4. Delete your Outlook profile

  1. Go to Control Panel and select Mail.
  2. Delete your default profile.
  3. After deleting the default profile, start Outlook and you’ll be asked to create a new profile.

After creating a new profile everything should work without any problems.

5. Use flushdns command

  1. Press Windows Key + X and select Command Prompt (Admin) from the menu.
    connection-to-microsoft-exchange-is-unavailable-cmd-1
  2. When Command Prompt opens, enter the following command: ipconfig /flushdns
  3. After the command is executed, close Command Prompt and check if the problem is resolved.

6. Restart Microsoft Exchange services

  1. Press Windows Key + R and enter services.msc. Press Enter or click OK.
    connection-to-microsoft-exchange-is-unavailable-services-1
  2. When Services window opens, locate Microsoft Exchange service, right-click it and choose Restart from the menu. If you have more than one Microsoft Exchange service available, be sure to restart them all.
    connection-to-microsoft-exchange-is-unavailable-services-2
  3. After Microsoft Exchange service restarts, check if the problem is resolved.

7. Disable your antivirus

  1. Locate your antivirus software in the system tray.
  2. Right-click it and choose the option to quit or to pause protection.
  3. Check if that solves the problem.

Users reported that Malwarebytes was causing this error to appear, but keep in mind that almost any third-party antivirus software can interfere with Outlook and cause this issue.

8. Set the WINS IP addresses on your PC

  1. If you’re using a VPN while connecting to the server, you need to set your IP addresses to static.
  2. The process differs depending on the VPN client you’re using.
  3. Once the static PC address is set, check if the problem is still there.

Changing the WINS IP addresses fixes the problem with Microsoft Exchange; therefore, try it if you’re using a VPN.

How to fix The connection to Microsoft Exchange is unavailable in Outlook 2007?

1. Enable RPC encryption in the Group Policy Editor

  1. Start Group Policy Editor by pressing Windows Key + R, entering gpedit.msc and clicking OK.
    connection-to-microsoft-exchange-is-unavailable-gpedit-1
  2. In the left pane navigate to User Configuration > Administrative Templates > Classic Administrative Templates (ADM) > Microsoft Office Outlook 2007 > Tools | Account Settings > Exchange.
  3. In the right pane, locate Enable RPC encryption option and double click it.
  4. In the Settings window select Enabled and click OK to save changes.

2. Export registry keys from a different PC

  1. Open Registry Editor and go to the HKEY_CURRENT_USER\Software\Microsoft\Windows NT\CurrentVersion\Windows Messaging Subsystem
  2. Right-click Windows Messaging Subsystem key and choose Export. Enter the name for the export file and save it.
  3. Transfer the exported registry file to the problematic PC and double click it to add it to your registry.

After adding this file to your registry, the problem with Outlook 2007 and Microsoft Exchange should be fixed completely.

3. Remove ZeroConfigExchange DWORD from the registry

  1. Open Registry Editor.
  2. Go to HKEY_CURRENT_USER\Software\Policies\Microsoft\Office\12.0\Outlook\AutoDiscover
  3. In the right pane, locate ZeroConfigExchange DWORD, right-click it and choose Delete from the menu.
  4. Close Registry Editor and check if the problem is resolved.

4. Create a new DWORD

  1. Open Registry Editor and navigate to the HKEY_CURRENT_USER\Software\Microsoft\Office\12.0\Outlook\RPC
  2. In the right pane, right-click the empty space and choose New > DWORD Value.
  3. Enter DefConnectOpts as the name of the new DWORD and double click it to open its properties.
  4. In the Value data field enter 0 and click OK to save changes.

After that, close Registry Editor and check if the problem is resolved.

How can I fix The connection to Microsoft Exchange is unavailable in Outlook 2010?

1. Enable RPC encryption

  1. Open Group Policy Editor and go to the User Configuration > Administrative Templates (ADM) > Microsoft Outlook 2010 > Account Settings > Exchange.
  2. In the right pane, locate Enable RPC encryption option and double click it.
  3. Make sure that this option is set to Enabled. Click OK to save changes.

2. Add proxy exceptions

  1. Press Windows Key + S and enter internet options. Select Internet Options from the menu.
    connection-to-microsoft-exchange-is-unavailable-internet-options-1
  2. When the Internet Options window opens, go to Connections tab and click on LAN settings.
    connection-to-microsoft-exchange-is-unavailable-internet-options-2
  3. In the Proxy server section click on Advanced button.
    connection-to-microsoft-exchange-is-unavailable-internet-options-3
  4. In the Exceptions section, be sure to add your mail server address. Click OK to save changes.
    connection-to-microsoft-exchange-is-unavailable-internet-options-4

After adding the mail server to the exceptions list, the problem with Microsoft Exchange and Outlook 2010 should be completely fixed.

3. Add DefConnectOpts DWORD to the registry

  1. To fix this problem, start Registry Editor and go to the HKEY_CURRENT_USER\Software\Microsoft\Office\14.0\Outlook\RPC
  2. In RPC key create a new DWORD and name it DefConnectOpts.
  3. Open its properties and set the Value data to 0. Click OK to save changes and check if the problem is resolved.

How can I fix The connection to Microsoft Exchange is unavailable in Outlook 2013?

1. Enable RPC encryption

  1. Start Group Policy Editor.
  2. In the left pane navigate to the User Configuration > Administrative Templates (ADM) > Microsoft Outlook 2013 > Account Settings > Exchange.
  3. In the right pane double click Enable RPC encryption.
  4. Set RPC encryption to Enabled and click OK to save changes.

2. Edit your registry

  1. Open Registry Editor.
  2. When Registry Editor opens, in the left pane navigate to the HKEY_CURRENT_USER\Software\Microsoft\Exchange\Exchange Provider
  3. In the right pane, you need to create a new string value by right-clicking the empty space and choosing New > String Value. Enter DS Server as the name of the string.
  4. Double click DS Server to open its properties. In the Value data field enter the address of your global catalog services domain controller.
  5. Close Registry Editor and create a new profile in Outlook.

After changing your registry and creating a new profile in Outlook, the issue with Microsoft Exchange should be fixed.

3. Download and run Microsoft Office 365 Support & Recovery Assistant

If you’re getting The connection to Microsoft Exchange is unavailable error while using Outlook 2013, you might be able to fix this problem by downloading Microsoft Office 356 Support & Recovery Assistant tool. After downloading this tool, run it and let it fix any potential problems.

A few users reported that this tool fixed the Microsoft Exchange error message on their PC, so you might want to give it a try.

If you want to learn more, we have a great guide on Exchange Mailbox Migration that might help you with further issues.

The connection to Microsoft Exchange is unavailable error will prevent you from sending or receiving any emails. Still, you should be able to fix this problem using one of our solutions.

Outlook Search for Blank Category [How to]

A great number of users have reported not being able to search for a blank category (no value set) inside Outlook.

Here is what one user had to say about this issue on the Microsoft Answers forum:

In Outlook 2016, search does not show flags or categories in the results list. These columns are blank even for emails assigned to a category or are flagged. Flags and categories are still seen in the preview pane.  This is only a problem with search; when looking at the inbox or other folder without searching flags and categories show in the list as they should.

For these reasons, in this article, we will explore some of the best methods to try and fix this issue once and for all. Read on to find out how to do it.

How to search for a blank category in Outlook?

1. Choose a single view

  1. Open Outlook.
  2. Select the View tab.
  3. Click on Change view -> choose Single.
  4. Now, if you search for the emails, you will see the flags and categories in the search results.

2. Use brackets in your search query

  1. Click inside the query field and add open and closed bracket characters instead of the value you would normally search for.
  2. To achieve the opposite results, and find items without any value whatsoever, use NOT before using the brackets.

Here are some examples of this method:

  • To find messages without a subject – subject: [ ]
  • To find messages with no category – category: [ ]
  • To search for messages which have any category assigned – NOT category: [ ]
  • For contacts without a birthday specified but from category ‘Family’ – birthday: [ ] category: Family

3. Switch your email client

How often do you struggle to discover essential communication quickly or fail to follow up after an event? How many newsletters do you get every day that further fill your inbox?

Email is frequently mentioned in productivity publications as a time-consuming issue. And this often appears to be the case. The issue is not emailed itself, it’s a technology that altered the game in communication and introduced millions of opportunities for fast sending and receiving information.

The absence of suitable email efficiency tools and awareness of managing your time. Simply said, email productivity solutions like Mailbird help professionals be more productive while using email.

With Mailbird, you can manage your emails better, synchronize all contacts and accounts in a single inbox and even customize the app to enhance productivity.

Mailbird

Increase your email management and customize your workspace with one of the most efficient email clients on the market.
Free Trial Visit Website

4. Use the Advanced Find option (applies to Outlook 2007 and previous)

  1. Open Outlook.
  2. Press Ctrl+Shift+F keys on your keyboard to open Advanced Find.
  3. Click the Advanced tab.
  4. Type in the query you need and set the condition to ‘is empty’, or ‘does not exist’.

5. Rename all existing categories

  1. Rename all the existing categories to contain either a specific word or number (the same in all categories).
  2. Under your search folders -> create a new one.
  3. Under Criteria -> select Advanced -> add the Categories field.
  4. From the drop-down menu -> select ‘Does not contain’ -> type the value set earlier in the right-side box.
  5. Click Add to list -> click OK 2 times.

In this article, we explored the best methods to deal with the issue caused by your Outlook software being unable to search for items without values.

You might also be interested in checking our article on how to create and use categories in Outlook.

We encourage you to use the comments section below for any questions or suggestions.

Microsoft announces new Azure Security Lab, challenges researchers to hack Azure

Azure is currently one of the fastest-growing businesses for Microsoft, and the company wants everyone to know that its cloud offering is as secure as Fort Knox. Indeed, Microsoft has just announced the Azure Security Lab, which will welcome security researchers willing to test Azure’s security in exchange of financial rewards.

“The isolation of the Azure Security Lab allows us to offer something new: researchers can not only research vulnerabilities in Azure, but they can also attempt to exploit them. Those with access to the Azure Security Lab may attempt the scenario-based challenges with top awards of $300,000,” explained Kymberlee Price, Principal Security PM Manager at Microsoft.

Security researchers willing to join Microsoft’s new Azure Security Lab can fill their application on this page. The new bounty program should be a good incentive to make the Azure ecosystem more secure for all customers, and Microsoft really needs Azure to be as secure as possible if it wants to be taken seriously as an Amazon Web Services competitor.

“In appreciation of their efforts and the opportunity to mitigate issues before they are publicly known and used for harm, we’ve issued $4.4 million dollars in bounty rewards over the past 12 months,” explained Price. “We appreciate our security partners across the industry, and believe the new programs we’re announcing today will help further protect the Azure ecosystem,” she added.

Exclamation Mark on Printer: Use These 4 Fixes to Remove It

Device Manager is a Windows utility that displays the peripherals and devices connected to the computer. When users see the yellow exclamation mark beside the printer, it means that there’s a printer error.

Remember, it’s often a signal of an impending stage where the printer stops working. And some quick troubleshooting at this stage prevents a major hassle later on. So, let’s find out what to do when there’s an exclamation mark on an HP printer or those by other manufacturers.

Why does my printer have an exclamation mark?

Here are a few reasons you are facing the problem:

  • Issues with the driver: When an exclamation mark appears for a printer in the Device Manager, it’s most likely due to a corrupt driver.
  • Antivirus conflicting with the printer: In some cases, users reported that their third-party antivirus conflicted with the printer software or driver, triggering the warning sign.
  • Misconfigured policies: The Local Group Policy Editor in Windows allows users to make complex changes to the PC seamlessly, and the relevant policies here, when misconfigured, can even lead to issues.

How can I fix the exclamation mark on the printer?

Before we head to the slightly complex changes, here are a few quick ones to try:

  • Restart the computer and the printing device and verify whether the exclamation mark on the printer goes away.
  • Install any pending Windows updates since these often hold newer printer driver versions.
  • Disable any third-party antivirus installed on the PC. In case that does the trick, we recommend you switch to a Windows-friendly antivirus solution.

If none work, move to the solutions listed next.

1. Reinstall the printer driver

  1. Press Windows + X to open the Power User menu, and select Device Manager from the list.device manager
  2. Expand the Printers entry, right-click on the device with the exclamation mark, and select Uninstall device.uninstall device to fix exclamation mark on printer
  3. Tick the checkbox for Attempt to remove the driver for this device, and click Uninstall.uninstall
  4. Now, restart the computer, and Windows will automatically install a fresh copy of the driver.

A simple and, undoubtedly, the most effective solution when the printer has an exclamation mark is to reinstall the driver. When you do that, Windows removes the corrupt/problematic one and installs a new driver.

2. Manually install the printer driver

  1. Press Windows + R to open Run, type devmgmt.msc, and hit Enter.device manager
  2. Expand Printers, right-click on the one with the exclamation mark, and choose Properties.properties to fix exclamation mark on printer
  3. Head to the Details tab, choose Hardware Ids from the Property dropdown menu, right-click on the relevant Hardware Id, and select Copy. If there are several hardware IDs listed, you may have to try different ones until it works out.hardware id
  4. Now, go to Google, and search for the hardware ID.update driver to fix exclamation mark on printer
  5. Head to the manufacturer’s website, download the relevant driver, run the setup, and follow the on-screen instructions to complete the process.

Updating to the latest printer driver is often challenging, but it helps fix a range of errors and, sometimes, improves the device’s performance as well. And manually installing the driver is usually the recommended approach because you get to the latest available version.

Also, you can update your PC drivers correctly without harming your system by installing the wrong drivers. Thus, take advantage of the following software to handle any drivers safely and automatically.

⇒ Get Fortect Driver Updater

3. Uninstall the antivirus

  1. Press Windows + R to open Run, type appwiz.cpl in the text field, and click OK.appwiz.cpl
  2. Select the third-party antivirus installed on the PC and click Uninstall.uninstall antivirus to fix exclamation mark on printer
  3. Follow the instructions to complete the uninstall process.
  4. Now, check whether the exclamation mark on the printer disappears.
  5. For some users, reinstalling the antivirus also worked, so you may try that as well.

4. Reconfigure the Local Group Policy Editor

Tip icon Tip
The Local Group Policy Editor (GPEDIT) is now available by default on the Home edition of Windows. Even in that case, you can always manually install GPEDIT.msc.
  1. Press Windows + S to open Search, type gpedit.msc, and click on the relevant search result.gpedit.msc
  2. Now, under Local Computer Policy, expand Computer Configuration, and then choose Administrative Templates.administrative templates
  3. Next, select Printers, and then double-click on Disallow installation of printers using kernel-mode drivers on the right.printers
  4. Select Disabled, and then click on Apply and OK to save the changes.disable policy to fix exclamation mark on printer
  5. Finally, restart the computer

If the previous solutions didn’t work, disabling the Disallow installation of printers using kernel-mode drivers policy should get things up and running when you have a yellow exclamation mark on the Epson printer or even the other ones.

Before you leave, check the best printer software in Windows and get one today for a seamless printing experience.

Tell us which fix worked for you in the comments section below.

How to auto-refresh Power BI and update your dashboard

To auto-refresh dashboards in Power BI is crucial for many users, but quite a few people are encountering problems.

For example, one user reported the following on the official forum:

I have developed one dashboard. But unable to have it updated automaticaly. Please guide me how can I have my dashboard updated after 5 seconds.

So, the OP can’t update the dashboard automatically. This is a simple operation, and today we will show you how to auto-refresh dashboards in Power BI.

Steps to auto-refresh Power BI

1. Refresh the dataset

We already covered this subject and you can schedule a refresh quite easily. Check out our guide here to learn how to refresh the dataset.

2. Refresh the dashboard tiles

After the first step is completed, the dashboard will be refreshed within 15 minutes. If you want to force tile refresh, follow the instructions below:

  1. Select the ellipsis (…) in the upper-right part of the dashboard.
  2. Select Refresh dashboard tiles.power bi tile refresh

You should consider that after a data refresh, tile refresh happens automatically. So, tile refresh is part of the broader data refresh, so the refresh duration might increase with the number of tiles.


This guide will help you become an expert in Power BI.


Conclusion

So, to auto-refresh in Power BI is easier than it seems, but you need to follow a few steps in order to begin updating your dashboards automatically.

The entire process of refreshing your data has many phases, which depend on the amount of information and the type of your datasets, so you should consider that when you use this feature.

Therefore, knowing how and when to refresh your data is often crucial for achieving accurate results. This is why the auto-refresh feature is extremely important.

Users can’t keep themselves busy pressing the Refresh button every time they need to update their data. Therefore, the auto-update feature comes in handy for many people and knowing how to use it brings great results.

Before you go, we also have a guide on what to do if a scheduled refresh on Power BI is greyed out, so don’t miss it.

Did you find our solutions useful? How do you auto-refresh your data in Power BI? Do let us know in the comments section below!

RELATED ARTICLES YOU NEED TO CHECK OUT:

Sorry we’re having trouble opening this item [SOLVED]

Even though Outlook is one of the most prominent email clients, some of Outlook’s bugs are extreme and cause the app to become completely unusable. That is exactly the case with the Sorry we’re having trouble opening this item error that bothers some users.

Here’s what one user had to say on the official Microsoft support forum.

I client of mine is having an issue with outlook where her emails are not showing on the viewing pane on the right (Just a blank space instead) and if she double clicks an email to try and open it, it displays the message: Microsoft Outlook Sorry, we’re having trouble opening this item. This could be temporary, but if you see it again you might want to restart Outlook.

Learn how to fix this problem by following the instructions below.

Why won’t Outlook open items?

1. Restore Outlook’s default view settings

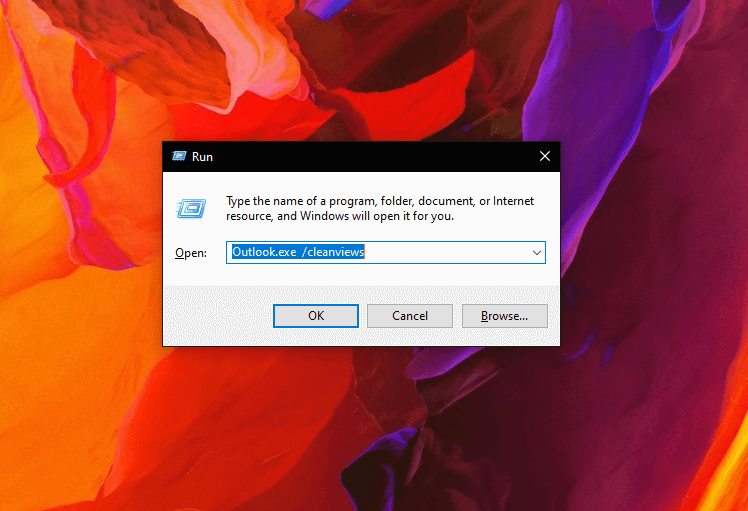
  1. Open the Windows Run dialog box. To do this, press  Windows key + R keys (simultaneously) on your keyboard.
  2. In the next window, type Outlook.exe  /cleanviews( Notice the space after Outlook.exe).Sorry we're having trouble opening this item
  3. Press OK and wait for it to run to completion.
  4. Once you notice it has finished, reopen the Run dialog box (Win+R).
  5. This time you type Outlook.exe  /resetnavpane(Again notice the space after Outlook.exe).
  6. Click OK.

2. Repair your Outlook installation

  1. Close and exit Outlook.
  2. Next, you browse to the C:\Program Files\Microsoft Office\Office16 The last part (Office16) will differ based on the version you use, obviously.
  3. Once there, locate and Double-click the Scanpst.exe file.
  4. The Microsoft Outlook Inbox Repair Tool In its dialog box, select Browse.

Now find and select your current Outlook data file (.pst or .ost), and then press Open.

The locations are as follows:

  • Windows 10: C:\Users\username\AppData\Local\Microsoft\Outlook or C:\Users\username\Roaming\Local\Microsoft\Outlook.
  • Older Windows versions: C:\Documents and Settings\username\Local Settings\Application Data\Microsoft\Outlook or C:\Users\username\My Documents\Outlook Files.

Microsoft Outlook is undoubtedly one of the best business emailing software. But like other software, its functionality can be brought down by the occasional bug.

If Outlook won’t work locally, you can always access it via the browser. The web-based Outlook client is a worthy alternative. Plus, to access the client without interruption you should use an efficient browser like Opera.

With an improved interface, this browser can offer helpful integrations with other apps and great privacy features that keep your online activity protected.

⇒ Get Opera

One such bug is the one that triggers the message ‘sorry we’re having trouble opening this item’. Fortunately, as we have seen, you can swiftly solve it by resetting your app to its default settings or repairing Outlook files.

Canon Printing Program: Best to Use in 2026

Printers are essential at all workplaces to print important documents as and when required. While there are different brands of printers at work, Canon is one of the brands that’s widely used. Canon printers are known for their quality printing capabilities and a multitude of other features. However, to get max benefits out of their printers, users would need the best software for Canon Printer. Having said that, Canon already comes with some built-in software programs for users. These programs help improve their experience with Canon printers, but these are the basic options. For advanced features, users can choose to use third-party software for Canon printers. From calculating ink usage to more complex features like the type of paper, they offer a lot more than the built-in software.

Speaking of printers, you may also want to check out these printer management tools to optimize performance.


Here’s a list of some of the best software for printing with a Canon printer that especially handpicked for you.

Top 3 tools for printing from Canon printers

Qimage

Qimage software for canon printer

Qimage unravels a whole new world of advanced technology that’s unparalleled in the category. It helps the printers to perform far beyond the usual built-in resolutions: 600 or 720PPI, especially on glossy or semi-gloss papers.

Users can now even overdrive their printer using this software beyond the bounds of the built-in resolution. This helps them get refined detail.

The program’s own print engine actually takes care of the print data instead of confusing the driver by trying to transfer all the data at the same time.

So, basically, using the new overdrive, users can get a print with the utmost security. The best part about Qimage is that it’s aware of the built-in resolution that’s used by the Windows printer driver.

It uses superior quality interpolation and antialiasing combinations to automatically resample while making sure that prints of all sizes have the highest possible details.


Need an image resizing tool to edit your pictures before printing them out? Here are our top picks.


It also offers smart sharpening to the prints ensuring that the 13×19 images also look equally good as the 4×6 images.

Moreover, it’s adept at smart data management which means transferring the photo data to printer drivers in small packets instead of overfilling the drivers at once.

The proprietary printer driver of the program makes sure of trustworthy printing along with successfully printing gargantuan prints.

In addition, it’s also known for its automated job logs and the option it offers to save the jobs and printer settings.

Price: priced at $69.99

Get Qimage

Lightroom

Lightroom software for canon printer

Lightroom by Adobe makes life much easier by allowing users to get a print straight from the raw file allowing the program to resize the print. This further helps the print to fit perfectly with the template.

But if it’s a Canon printer in use, people may want Lightroom to manage the color effects and not the printer for enhanced effects.

If someone does not want the color profiles to be applied twice, he/she can set it up to take care of the color profile.


Retouche and prepare your photos for printing with these image-editing solutions


Lightroom not just helps users to get a print with the right printing profiles, but it also comes with an amazing feature with those having similar ICC profiles and a perfectly calibrated display.

This display enables the users to view the print simulations as it’s under process. Therefore, it’s important to calibrate the printer and the monitor and along with non-universal ICC profiles, the entire process becomes much efficient.

Price: free trial available, starts from $119.88

Get Lightroom

ON1 Raw

ON1 Raw software for canon printer

For those who are looking for an alternative for Lightroom, ONI Raw can be a great option. This photo organizer and editor places all the primary photo editing requirements on a single platform.

The program offers faster workflow by offering a mix of effects, local tweaks, development, and portrait prints in tabs that help users smoothly toggle between each edit.

Its new AI-based algorithms offer the power to send photos edited by Lightroom. The technology also finds the subject matter and creates a mask, automatically.

The interface has evolved and offers a fresh and modern touch. It also combines different photos at various focus distances that helps raise the depth-of-field.

In addition to the multitude of advanced features, it also offers plenty of presets that helps to get the desired print size and fine-tune options for your printer and paper combinations.

Price: free trial available, starts from $129.99

Get ON1 RAW

Final Words

Although the Canon Pixma printer comes with a set of renowned and trusted software, there are certain limitations in terms of the print quality, editing or the enhancement options.

While these software programs are included in the initial software setup for the printer, these are just optional and can be installed or uninstalled as per your requirement.

Therefore, for enhanced effects, print quality, or editing options, you may choose the above third-party software for Canon printers that are best in the business. So, choose wisely and get the best results for your Canon prints.

RELATED POSTS:

How to add a trend line in Power BI [STEP-BY-STEP GUIDE]

Adding a trend line is one of the most useful features in Power BI. But sometimes users are encountering problems with this operation.

The official Power BI forum has plenty of threads related to trend line issues:

I have a fact table with sales data which includes a SalesPeriod value. A related SalesPeriod table contains the SalesPeriodID that ties back to the Sales table and includes a “DateOfSales” column which is a datetime. When I add a column visualization, I would like to be able to add a trend line, but do not see that option under the Formatting tab. Note, there is one row in the SalesPeriod table per month where the DateOfSales values are the 1st of each month (all sales occur in a given month.year, aggregated in the data I am provided). I have select Continuous for the X-Axis type (which is the date field) and get expected results, but do not see a Trend Line option using the latest PowerBI desktop update.

So, the OP didn’t know how to add a trend line to the chart. Fortunately, this can be solved easily in a few steps and today we will show you how.

Steps to add a trend line in Power BI

  1. Go to Visualizations and select Fields tab.power bi trend line
  2. Check Sales Date and select SalesDate. It will automatically deselect Date Hierarchy.power bi trend line sales date
  3. Now you can see in the image below that the trend line appears when you select SalesDate.power bi tren line date

We’ve written a nice piece about Power BI, do check it out.


Conclusion

So, there you have it: a really simple solution for a very important issue. The trend line appears with just a little twitch in the options.

How do you add a trend line in Power BI? Share with us your method in the comments section below.

RELATED ARTICLES YOU NEED TO CHECK OUT:

Your Device Needs the Latest Security Upgrades [Quick Fix]

A big number of users have reported getting a pop-up message on their screens saying Your device needs the latest security upgrades. This issue can be extremely annoying as it prevents you from closing or canceling that pop-up.

Even more than that, users have reported that if they let the update process finish, it just starts again from 0%. Some of the most patient users have even let the second loading bar finish as well, but it seems the process is stuck in a never-ending loop.

Because we understand how important it is for you to be able to access your Windows PC when you need to, in this article, we will discuss the reason for this annoying pop-up appearing, and also how to get rid of it.

How to get rid of Your device needs the latest security upgrades message?

Why are you seeing this pop-up message?

Your device needs the latest security updates pop-up is causing your PC to slow down its processing power gradually. This issue appears if you’re using a very old version of Windows on your computer.

If you have Windows 10 version 1507, version 1511, version 1607, version 1703 or version 1709, you will see this pop-up occasionally. This happens because Windows Update doesn’t consider that your version of Windows is up to bar when it comes to security.

The pop-up is intended to remind you that you need to upgrade to a newer version of Windows 10 to avoid any bigger issues. Scroll down to see what you can do about it.

Here’s how to upgrade your Windows 10 to a newer version

  1. To get rid of the Your device needs the latest security upgrades error, first make sure your Windows 10 device has enough battery (more than 60%).
  2. Temporarily disable or uninstall any third-party antivirus software.
  3. Mount your Windows 10 ISO file or plug-in your Windows 10 bootable USB (new version).
  4. Open up the drive you’ve mounted your file to.
  5. Search for setup.exe file -> right-click it -> select Run as administrator.
  6. Inside the Windows 10 Setup window -> select Not at the moment when asked about updates.
  7. Press Accept for the Notices and license terms window.
  8. Choose whether you want to keep all your personal files and apps, or if you want a clean install (Be careful about what option you choose here to avoid any issues).
  9. Hit the Install button and wait for the process to complete.

Note: Your computer will restart by itself a few times.

We hope the information and methods presented in this article helped you better understand and also solve the Your device needs the latest security upgrades error. Even more, here’s what to do when getting this message in your Microsoft account: Your security info change is still pending.

Please feel free to let us know by using the comment section found below.

My printer says Replace drum [FULL FIX]

The drum unit of your Brother printer is an essential part of the printer and may need replacement from time to time. If you have not changed the drum unit of your printer for a long time now, you may get an error asking you to Replace drum. This error can appear due to multiple reasons including a bad drum unit that needs replacement or if you failed to reset the drum counter after replacing it.

Follow the steps given in this article to fix this problem with your printer.

What does it mean when my printer says replace drum?

1. Replace Drum Counter Unit

My printer says replace drum

  1. If it is the Drum unit that needs replacement and you haven’t replaced it recently, then it might be a good time to do it now.
  2. To find the Drum nit, open the front flap of your laser printer and find the toner cartridges.
  3. The drum unit is attached to the toner.
  4. Now pull the green toner locking levelers to release the cartridge.
  5. Slowly pull out the cartridges out of the printer.
  6. Place the tonner on a flat surface. On the Toner cartridge, press the Green lever to lift the toner off the drum.
  7. Now replace the drum unit with a new one and put it back in the printer.
  8. Now turn on the Machine and proceed with the next set of steps to reset the Drum unit and remove the message.

We’ve written extensively on printer issues on Windows 10. Check out these guides for more information.


2. Reset the Drum Counter

My printer says replace drum

  1. Make sure that the printer is turned on and is idle.
  2. Open the Front Cover of the printer.
  3. Press and hold the OK button on your printer control panel for 3 seconds.
  4. Press the Up arrow key or 1 to reset the drum counter.
  5. Close the front cover.
  6. Now try to carry out the print job and check if the error is resolved.

If the error persists, make sure you have followed the above steps carefully. Having the Front Cover open while performing the reset operation is crucial. So, make sure the front cover is open before resetting the Drum counter.

Note: Resetting of the drum counter should only be done on the new drum after the replacement is done. Resetting a drum unit that is currently being used can create issues with its life predictability.

RELATED STORIES YOU MAY LIKE:

How to fix the An update to this title is required FIFA 19 error

A good example of FIFA 19 occasional shortcomings is a bug that states that An update to this title is required before you can access online features when you try to connect to the online EA servers.

Some gaming enthusiasts have also reported encountering the issue when attempting to access a host of the games online features. We have already covered a myriad of FIFA 19 bugs and their fixes so I will concentrate on the irritating An update to this title is required before FIFA 19 hitch in this article.

The solution is rather simple as you see next.

How to fix the An update to this title is required before FIFA 19 error

  1. Restart your PS4, Xbox, PC, or whatever device you’re playing on. You, of course, just turn it off the device then back on.
  2. After your gaming device boots, start FIFA 19.
  3. It will automatically detect the latest title updates and go ahead to download them. Wait as it updates.
  4. The game will now load seamlessly.
  5. Note that you may have to restart the game in some instance for it to work after the update.
  6. Also, remember to set your device to be automatically updating gaming files to prevent such frustrating errors in the future.

an update to this title is required before fifa 19

There is another workaround for this challenge if you’re using PS4. Clearing your console’s cache is quite forthright


Play Fifa 19 FUT mode without ISP throttling your bandwidht with these VPN solutions!


  1. Start by turning off your console then unplugging it.
  2. After this, wait for about minute to allow the device to ‘forget’ its cache.
  3. Then plug the console back in and finally restart it.

Try to load FIFA 19 and see if you have succeeded in clearing the ‘an update to this title is required before FIFA 19’ error.

MORE RELATED GAMING FIXES THAT YOU WAY WANT TO LOOK AT:

How To Change Outlook Password [3 Quick Ways]

A wide range of users has reported encountering the error message Something went wrong and Outlook couldn’t update your password.

This error seems to have appeared with the interface change for the password recovery option inside Outlook 365.

Why can’t I change my Outlook password?

The recover password option has transformed into ‘repair’. Even though this was intended to simplify the process of changing the password in Outlook 365, because of some conflict, it actually made the problem worse.

Users who hit the Repair option and then choose Let me repair my account manually, are then met by the error mentioned above.

This can be because some updates are pending or because Outlook met a bug during the sign in process.

It can be extremely frustrating, as you end up being forced not to use any of your email addresses connected to your Outlook account.

In today’s guide, we will discuss the best way to deal with this issue and solve it once and for all. Please read on to find out how to do it.

What to do if Outlook couldn’t update your password?

1. Check for any updates to your operating system

    For a worthwhile solution to work out Outlook password issues, follow the steps below to update your Windows OS.

  1. 1. Click on the search box and type in Update. Choose the first option from the top.

    outlook-couldnt-update-password
  2. 2. Inside the Windows Update window, click on Check for updates.

    Updates Windows 10 - Something went wrong and outlook couldn't update your password
  3. 3. Wait for the search process to complete, and install any available updates.

  4. 4. Follow the on-screen instructions and restart your PC (if required).

  5. 5. Check Outlook to see if the issue persists.

2. Download the official Support and Recovery Assistant for Office 365

  1. Click this link to download the application.
  2. Run and install the application to your PC by following the on-screen instructions.Install troubleshooter Microsoft - Something went wrong and outlook couldn't update your password
  3. After the installation process is completed, the app will start automatically.
  4. Follow the on-screen instructions to try and fix the Outlook 365 app.
  5. Try to see if this fixed the Outlook not updating password issue.

3. Change the password by accessing Microsoft Outlook settings

Note: This method will enable you to access the same account setup form that was used in the previous versions of Outlook. Update your password inside that form and everything will synchronize perfectly after.

  1. Open up Microsoft Outlook.
  2. Click on File from the top-left menu.
  3. Select Account Settings -> Manage Profiles.
  4. Click on the Email option -> select the Email tab -> select the email address you want to change the password to.
  5. Follow the on-screen instructions and set a new password.

In today’s article, we explored some of the best methods to deal with the Something went wrong and Outlook couldn’t update your password error message on Windows 10.

As you can see, it’s easy to change your Outlook password, and this can be helpful if Outlook keep asking for password, or it can help you fix other issues.

After updating the password in Outlook, it’s a good idea to also refresh it across your Microsoft 365 account for consistent access. See the steps in How to Change Microsoft 365 Password.

Please feel free to let us know if this guide helped you change your Outlook password, by using the comment section below.

An update to support this game may be available error [FIX]

If you’re using Xbox 360, you may receive the An update to support this game may be available message when you attempt to play certain Xbox games.

Now, this could mean a host of things but for the most part, it’s one of the following:

  • The game you’re attempting to play isn’t supported on your Xbox 360.
  • You’re using another storage device but the standard Xbox 360 Hard Disk.
  • You have not installed all the required software updates for your Xbox 360 console.
  • You’re attempting to transfer a game you saved from an old Xbox console to your Xbox 360 console.

The good news is that this is an issue you can resolve by following the simple instructions below.

An update to support this game may be available on Xbox 360

Solution 1: Check your game’s compatibility and update appropriately

  1. Go to this Xbox 360 console games compatibility list
  2. Click backward compatibility.
  3. Select Play original games on Xbox 360.
  4. A huge list of compatible games will be displayed. Scroll through and check if the game you’re attempting to load has been included.An update to support this game may be available

If you are looking for the simplest way to connect the Xbox 360 controller to Windows, check these guides.


How to update your Xbox console software from Xbox Live

  1. On your controller, press on the Guide button and then go to Settings.
  2. While there, select System Settings then press A to access the settings menu.
  3. Choose Network Settings and again press A.
  4. If prompted, choose Wired Network or where applicable, your Wi-Fi’s name then press A.
  5. Click Test Xbox Live Connection then press A.
  6. If prompted, click Yesto commence the update.

The error message ‘an update to support this game may be available’ disappears after this in most cases for compatible games (those listed above).


Solution 2: Switch to an official Xbox 360 Hard Drive

  1. Using the included data transfer cable and CD, copy your data from the Xbox 360 to the new hard drive. You should only install once sure that the data has been successfully copied.We've written extensively on xxxx issues. Check out these guides for more information.
  2. To install, turn off your console and remove your Xbox 360‘s side panel.
  3. You then locate the current hard drive’s cover (at the back of your console).
  4. Next, you remove the cover then slide out the hard drive
  5. You then plug the new hard drive into the vacated slot then replace the cover.
  6. Press your new hard drive firmly until it clicks into place.
  7. Turn on your console and check if your game can play.

RELATED STORIES YOU SHOULD CHECK OUT:

Windows 10 news recap: Microsoft hired someone called “Mac Book” to praise Surface Laptop 2, May 2019 Update on 11.4% of devices according to AdDuplex, and more

Welcome back to our Windows 10 news recap, where we go over the top stories of the past week in the world of Microsoft’s flagship operating system.

Microsoft hires someone named Mac Book to praise Surface Laptop 2 in leaked ad

A leaked ad has shown that Microsoft has hired someone named “Mac Book” to help promote the Surface Laptop 2.

https://twitter.com/h0x0d/status/1156573268960317440

Limited-time Microsoft sale cuts prices on Surface Pro 6 bundles, $100 off Surface Book 2

Prices for the Surface Pro 6 bundles have been cut in a limited-time sale, as well as the Surface Book 2 having $100 cut off of its price tag.

Windows 10 Calculator app will soon get new Always on top mode

In an upcoming update, the Windows 10 Calculator app will be able to be stuck on top of other apps, allowing the calculator to always be in view.

AdDuplex: Windows 10 May 2019 Update now on 11.4% of surveyed PCs

According to AdDuplex’s statistics, the Windows 10 May 2019 Update is now installed on 11.4% of PCs included in their data. This shows a growth of 5% month-on-month.

That’s it for this week. We’ll be back next week with more Windows 10 news!

Microsoft news recap: Twitch streamer Ninja moves to Mixer, Xbox Getting 60 new games over the next 40 days, and more

Microsoft news recap is a weekly feature highlighting the top Microsoft news stories of the past week. Sit back, grab some coffee, and enjoy the read!

Samsung could soon pre-install Microsoft phone apps as the two companies expand their partnership

As Microsoft and Samsung look to expand their partnership, it has been revealed that Samsung could begin to pre-install Microsoft’s suite of apps on its devices. Next week is Samsung’s Unpacked event, in which it is thought Microsoft could be taking the stage.

Bombshell: Twitch superstar Ninja is going to stream exclusively on Mixer

In a large boost for Microsoft’s streaming service, Mixer, one of Twitch’s biggest streamers, Ninja, is switching to Mixer to stream exclusively.

https://twitter.com/WatchMixer/status/1156970299520212993

Microsoft’s social learning platform Flipgrid gets a major revamp

Flipgrid, a social learning platform acquired by Microsoft in June, is receiving a major revamp. It brings a bunch of new features including the Flipgrid Camera, which offers the ability to enhance videos with Live Inking, Stickers, and more.

Microsoft’s Xbox One is getting 60 new video games over the next 40 days, New promotion announced

Over the next 40 days, Xbox One is set to receive 60 new video games. During the release window, Microsoft has announced the Summer Spotlight promotion which gives the opportunity to earn bonus Microsoft Rewards points and win prizes.

Xbox One Summer Spotlight

That’s it for this week. We’ll be back next week with more Microsoft news.

Sorry we’re having a problem finding files in this folder [FIX]

The error Sorry, we’re having a problem finding files in this folder, try opening the folder again arises commonly for OneDrive users. When you try to save files to your OneDrive account locally, the PC returns the message. This error might appear for a variety of reasons, including

Fortunately, it’s an issue you can easily solve by following some simple steps.

Why can’t I save files in the OneDrive folder?

Method 1: Reset your OneDrive account

  1. Right-click on the OneDrive icon in the notification area and open Settings.
  2. Select the Account tab.Sorry we're having a problem finding files in this folder
  3. Click on the Unlink this PC button.
  4. Sign in with your credentials.
  5. Select the location of the OneDrive folder.

We’ve written extensively on OneDrive issues. Check out these guides for more information.


Method 2: Run the dedicated troubleshooter

  1. Download the OneDrive Troubleshooting tool here.
  2. Run the tool and choose Next.Sorry we're having a problem finding files in this folder
  3. Wait for the troubleshooter to finish and restart your PC.
  4. Try deleting the file again.

Method 3: Reinstall OneDrive

UWP version

  1. In the Windows Search, type Add and open Add or remove programs.
  2. Under the Apps & features, search for OneDrive.
  3. Highlight the app and Uninstall it.Sorry we're having a problem finding files in this folder
  4. Open the Microsoft Store and install OneDrive again.
  5. Sign in and look for changes.

Desktop client

  1. Press Windows key + I to open Settings.
  2. Open Apps
  3. Open Apps & features in the left pane.
  4. In the Search bar, type One and expand OneDrive.
  5. Uninstall OneDrive.
  6. Now, follow this path:
    • CUsersYour UsernameAppDataLocalMicrosoftOneDriveUpdate
  7. Double-click the OneDriveSetup.exe file and run the installer.
  8. After the installation completes, log in and look for changes.

Alternatively, you can always rely on the web-based client and that’s where a good browser comes into play. With UR Browser’s enhanced download technology, you can download OneDrive files and store them locally much faster. Add the privacy-oriented nature that this browser brings to the table, we are sure you’ll find it more than welcome improvement over Chrome.

Get UR Browser today and see how it works firsthand.

If all goes well, your OneDrive full functionality should be restored and the error eliminated.

RELATED STORIES YOU SHOULD CHECK OUT:

Sorry You Can’t Access YouTube for Mobile Web [Fix]

YouTube is the biggest video hosting site, but many reported Sorry you can’t access youtube for mobile web with your account while using it.

Unfortunately, this isn’t the only issue with the service, and many reported that YouTube is freezing or crashing. However, we fixed this issue in its own guide, so you should check it out.

That said, the issue can be resolved easily with a minimum of effort, so let’s get started.

Why is my access blocked from YouTube?

  • Temporary issues with your account. In most cases, a quick sign-in and sign-out will fix it.
  • YouTube isn’t properly enabled in your domain.
  • Network issues can prevent you from accessing YouTube.

How can I fix YouTube if it says Sorry you can’t access YouTube for mobile web with your account?

1. Sign out and sign back in

  1. Sign out of your Google account on the device where you get the error message.
  2. After that, sign back in afresh and see if you are able to access youtube.com.
  3. You can also log in via a different account and see if the issue still persists.

After that, check if the Sorry, youtube.com isn’t available for this account message is gone.

2. Get YouTube turned on by your domain admin

  1. Check with your domain administrator if youtube.com is enabled for your domain.
  2. If not, request the admin to act accordingly so that you can add youtube.com as a service.
  3. Also, check if you are not among the select few countries or regions where YouTube is yet to be formally launched. It won’t be available if YouTube is pending launch in your location or country.

After doing that, check if Sorry you can’t access youtube for mobile web with your account error message is gone.

3. Get in touch with the network admin or ISP

  1. You might also have to contact the network admin or the Internet Service Provider to ensure YouTube hasn’t been blocked.
  2. If so, pursue with the authorities to get the block lifted.
  3. Alternatively, try using VPN.

This should be all you need to do if you are getting the Sorry you can’t access YouTube for mobile web with your account.

If you’re having further problems, check our guide on YouTube not working in Edge for more solutions.

What method did you use to fix this error? Let us know in the comments below.

Update Error Code 0xc00000fd on Windows 10/11 [FIX]

Windows 10 update error code 0xc00000fd is an error that a wide range of users have reported on their PCs.

It seems that in some cases, the issue is caused by a Windows update package that is causing a conflict and thus stops you from being able to run the update wizard.

This issue can be extremely annoying, and it can also pose a serious security threat, therefore it’s important to fix it as soon as possible, and in this article, we’re going to show you how to do that.

How can I fix Windows 10 update error code 0xc00000fd?

1. Run the update wizard on Windows 10

  1. Click on Cortana search box -> type Update.
  2. Click on the first option from the top called Update Settings.
    update in cortana search - Windows 10 update error code 0xc00000fd

  3. Inside the Update window -> select Check for updates.
  4. Windows will now start the scan.
  5. If you find any updates, please install them. If this method doesn’t work, try the next one.

2. Troubleshoot Windows Update to fix error code 0xc00000fd

  1. Click on Cortana search box -> type Troubleshoot.
  2. Click on the first option from the top called Troubleshoot Settings.
  3. Inside the Troubleshoot window, scroll down -> select Windows Update -> Run the troubleshooter.Windows update troubleshoot - Windows 10 update error code 0xc00000fd
  4. Wait for the process to complete.

3. Restore your Windows 10 to a time before the update

  1. Click on Cortana search box in your toolbar -> type in Restore.
  2. Select the first option from the top of the list called Restore Settings.
  3. A new System Properties window will open.
  4. Under the System Protection tab -> click on the System Restore button.System restore - Windows 10 update error code 0xc00000fd
  5. Follow the on-screen instructions and select the last restore point before the update occurred.
  6. Restart your PC and check to see if the issue is resolved.

4. Use PowerShell and taskkill command

  1. Press Win+X keys -> select PowerShell (Admin).
  2. Inside the PowerShell window -> type each of the following commands, and press Enter after each one:
    • taskkill /f /fi “SERVICES eq wuauserv” 
    • net stop cryptSvc ; net stop bits 
    • net stop msiserver 
    • ren C:\Windows\SoftwareDistribution 
    • SoftwareDistribution.old 
    • rmdir C:\Windows\SoftwareDistribution\DataStore 
    • C:\Windows\SoftwareDistribution\Download
  3. After the process is completed -> hit Enter -> restart your PC.

5. Use PowerShell with net stop command

  1. Press Win+X keys -> select PowerShell (Admin).
  2. Inside the PowerShell window -> type each of the following commands, and press Enter after each one:
    • Net Stop bits 
    • Net Stop wuauserv 
    • Net Stop appidsvc 
    • Net Stop cryptsvc 
    • Ren %systemroot%\SoftwareDistribution SoftwareDistribution.bak 
    • Ren %systemroot%\system32\catroot2 catroot2.bak 
    • Net Start bits 
    • Net Start wuauserv 
    • Net Start appidsvc 
    • Net Start cryptsvc
  3. After running these commands, try to see if your issue is resolved.

In this article we explored some of the best methods to deal with the error code 0xc00000fd on Windows 10.

Please feel free to let us know if this guide helped you solve your problem by using the comment section below.

We’re having trouble determining if PC can run Windows 10/11

The annoying error Sorry we’re having trouble determining Windows 10 typically crops up when you’re attempting to upgrade your older Windows to Windows 10.

And it could be triggered by the system failing to properly interpret your existing hard drive partitions, especially if you’re running both Linux and Windows on your PC.

But there are two ways to fix it and will discuss them in this article.

We’re having trouble determining if your PC can run Windows 10

1. Tweak your BIOS Settings

  1. Restart the PC and as it’s powering on, press the applicable key to take you to BIOS. For the most part, the keys “F2” and “Delete” redirects you to BIOS. If none works, observe your PC closely when it first restarts for the message indicating the BIOS keyboard key.
  2. Now that BIOS Window has loaded, use your keyboard’s arrow keys to navigate around the myriad options. Your interest is the BIOS menu showing the various drive options.  Look around until you locate the Hardware menu and move your arrow there.
  3. Under the Hardware menu, you will notice a list of installed Hard Drives. Select the unwanted drive (the one with Linux ) and disable it by selecting as directed by the hints on the screen. In most case, you’re supposed to select Disabled or None using your arrow keys and then press Enter.
  4. Exit the BIOS and remember to answer Yes when asked ‘Save settings and exit?’. You may also press F10 in most PCs to save BIOS changes.
  5. Now reboot your PC and attempt the upgrade.

2. Change the Active partition

  1. Press the keys WIN+R to launch the Windows RUN dialog box.
  2. Type diskmgmt.msc then press Ok.
  3. The PC takes you to the Disk Management You now only require to Right-click on the disk partition where your Windows is then select Mark partition as active from the subsequent options. This is traditionally Drive C:Sorry we're having trouble determining windows 10
  4. Lastly, restart the PC and carry out the upgrade.

We recommend using third-party software that has the capability to perform various types of partition management operations automatically. It’s a time-saving solution that can help optimize your entire OS.

Alternatively, you can go for the clean install. Learn how to do that by following the instructions in this article.

PS4 controller Exclusive Mode not working on Windows 10/11

A large number of users have reported that their PS4 Exclusive Mode in Windows 10 has stopped working after a Windows update.

This can be extremely frustrating, as you might find yourself in a situation in which you can not play your favorite PS4 games with the settings that you’ve set.

This issue is most likely caused by interference between the updated files of Windows 10 and the registry setup for the Exclusive Mode inside DS4Windows application.

For these reasons, in this article, we will explore the best way to deal with this issue and get back to your gaming asap. Follow the steps closely to achieve that.


How to fix PS4 controller Exclusive Mode problems?

1. Get the latest HIDGuardian

laptop on desk with coffee - PS4 controller Windows 10 exclusive mode

  1. Click here to download the latest InputMapper HIDGuardian.
  2. Run the downloaded software and follow the on-screen instructions in order to complete the setup.
  3. After the process is completed, follow the next method.

2. Change properties for your controller

controller on table - PS4 controller windows 10 exclusive mode

  1. Click on Cortana search button -> type in Control Panel.
  2. Inside the Control Panel -> select Hardware and Sound -> Devices and Printers.
  3. Right-click your controller -> select Properties.
  4. Inside the Hardware tab -> select HID-compliant game controller -> click Properties.
  5. In the Detail tab -> select Hardware IDs from the drop-down menu.
  6. Copy the first three strings of text in a notepad file (we will need this information later).

Want to use PS4 Remote Play on your PC? Here’s how to set it up quickly!


3. Use Registry Editor to modify values

  1. Press Win+R keys on your keyboard to start the run window.
  2. Inside the Run window -> type regedit -> press Enter.regedit - PS4 controller windows 10 exclusive mode
  3. Navigate to the following location inside the Registry Editor: HKEY_LOCAL_MACHINE\SYSTEM\CurrentControlSet\Services\HidGuardian\Parameters
  4. Right-click the value AffectedDevices -> select Modify.
  5. Copy and paste the code lines you saved in Notepad earlier inside the Value data list.
  6. Press Ok and then restart your PC.

Note: Please make sure that the code lines you are pasting inside the AffectedDevices value data box are using one line per line of text, and make sure the last line is left blank.


4. Make sure your antivirus/firewall is not blocking access

hacker on pc - PS4 controller Windows 10 exclusive mode

  1. Click on Cortana search box -> type in Firewall -> choose the first option from the top.
  2. Inside the Firewall settings -> choose to Allow an app or service through the firewall.
  3. Search for the DS4Windows application on the list.
  4. Make sure all connections are allowed (both incoming and outgoing).
  5. Save the settings and try to see if the issue persists.

Note: If you’re using a third-party antivirus, you’ll need to change the settings form that application as well.


In this article, we explored some of the best methods to deal with the PS4 controller Exclusive Mode not working on Windows 10.

Please let us know if this guide helped you solve your issue by using the comment section found below.

[wl_navigator]

Failed to join game – Not enough room in the lobby for your squad [FIX]

Call of Duty is a popular multiplayer online game and the popularity means tons of users are trying to access the server every second. At times, it can create issues with the game and you may get Failed to join the game. Not enough room in the lobby for your squad error while trying to join the Call of Duty Black Ops as explained by some users in the Reddit Community Forum.

Have been getting constant issue with joining friends lobbies. You accept the invite, join and for your friend it shows that you join but in your screen it says something along the lines that the session is no longer available and then you drop from the lobby. Has been happening constantly the past week or so and for multiple people on my friends list.

This can also happen with CS:Go, as well. Follow the steps give in this article to fix this error on your Steam client.

Why can’t I join the lobby with my squad in Call of Duty?

1. Logout and Login to Steam

  1. If you haven’t tried already, users have reported that they were able to join the lobby and play the game after a simple sign out and sign in attempt.
  2. Launch Steam client.
  3. From the top-right corner, click on your username (email ID) drop-down menu.
  4. From the options, select “Log out of Account“.
    failed to join game not enough room in the lobby for your squad
  5. Close the Steam client and launch it again.
  6. Sign in with your user ID and check for any improvements.

We’ve written extensively on Steam connection issues. Check out these guides for more information.


2. Verify Game Cache

  1. Launch the Steam client on your system.
  2. From the Library section, right-click on the problematic game and select Properties.
  3. In the properties window, click on the Local Files tab.
  4. Click on “Verify Integrity of Game Files” button.
    failed to join game not enough room in the lobby for your squad
  5. Steam will now verify the game‘s files and fix any issues if found.
  6. Once the process is complete, try to open the game again and check for any improvements.

3. Force Close Steam Process

  1. If the issue persists, force closing the steam process in the task manager can help you resolve the issue.
  2. Leave your Steam client running.
  3. Open the Task Manager by right-clicking on the taskbar.
  4. In the Process tab, sort the process through Name.
  5. Now right-click on the Steam client and select “End task“.
    failed to join game not enough room in the lobby for your squad
  6. Close the task manager and relaunch Steam. Try to join the game and check for any improvement.

RELATED STORIES YOU MAY LIKE:

Intel’s 10th Gen processors improve performance on Windows 10

Intel just launched its first 10th Gen “Ice Lake” core processors.

These new processors are using Intel’s new 10nm process technology and architecture design and you will see them in sleek 2 in 1’s and laptops in just a couple of months.

Multitasking on Windows 10 just got easier with Intel’s 10th Gen CPU’s

This means not only that Windows 10 will run faster and you’ll be able to do more tasks, but also the next generation of Windows 10 PCs could be thinner and have a better thermal design.

Here’s what Chris Walker, Intel corporate vice president and general manager of Mobility Client Platforms in the Client Computing Group stated:

These 10th Gen Intel Core processors shift the paradigm for what it means to deliver leadership in mobile PC platforms. With broad-scale AI for the first time on PCs, an all-new graphics architecture, best-in-class Wi-Fi 6 (Gig+) and Thunderbolt 3 – all integrated onto the SoC, thanks to Intel’s 10nm process technology and architecture design – we’re opening the door to an entirely new range of experiences and innovations for the laptop.

It seems like the company bets heavily on AI and thin and lite laptops this year, so we may expect to see the new CPU‘s in the next Surface devices.

Here are some new 10th Gen features:

  • Intel® Deep Learning Boost, a new, dedicated instruction set that accelerates neural networks on the CPU for maximum responsiveness in scenarios such as automatic image enhancements, photo indexing and photorealistic effects.
  • Up to 1 teraflop of GPU engine compute for sustained, high-throughput inference applications like video stylization, analytics and real-time video resolution upscaling.
  • Intel® Gaussian & Neural Accelerator (GNA) delivers a dedicated engine for background workloads such as voice processing and noise suppression at ultra-low power, for maximum battery life.

10th Gen Intel Core processors with Intel Iris Plus graphics come with doubled the graphics performance, 1080p gaming, and 4k video editing.

  • These are the first GPUs from Intel to support VESA’s Adaptive Sync* display standard, which enables a smoother gaming experience across games like Dirt Rally 2.0* and Fortnite*.
  • Based on Intel’s Gen11 graphics architecture, they are also the industry’s first integrated GPU to incorporate variable rate shading for improved rendering performance.
  • With support for the BT.2020* specification, watch 4K HDR video in a billion colors.

So if you’re interested in a performance boost on your Windows 10 PC or if you’re in the market for a sleek 2 in 1 with 10th Gen Intel Core processor, get your wallet ready for this holiday season.

We can’t sync your data with the cloud right now [FIX]

If you bought Forza Horizon 4 for PC, you may encounter We cant sync your data with the cloud right now while trying to play the game online at some point. This error is reported by many Forza Horizon 4 PC users in the Microsoft Community as well as Reddit community forums.

I am having a very frustrating issue that I wanted to see if it was shared.
Basically, I launch the game, it begins to sign in for a second, then it suddenly tells me that “We can’t sync your data with the cloud right now”. It then gives me the option of trying again or playing offline. Trying again doesn’t work, so I press play offline. It then tells me that the sign-in profile has changed and it has to close.

If you are also troubled this error, here is how to fix it on your Windows computer.

Why can’t I sync data to cloud on Forza Horizon 4?

1. Sign into Xbox App

  1. The “we can’t sync your data with the cloud right now” issue can occur if you are not logged into your Xbox app in the PC. Users have reported that the error was resolved after they login to their Xbox App.
  2. Launch the Xbox App on your PC by searching for it in the search bar.
    we can't sync your data with the cloud right now
  3. After launching the app, it will ask you to enter your Microsoft account details. You may also have to enter the password or PIN for your computer.
  4. Keep the Xbox app running and launch Forza Horizon 4 on your PC. This time the game should sync all your data and let you play without any error.

We’ve written extensively on Xbox sync issues. Check out these guides for more information.


2.  Check Email Aliases for Xbox Live Account

  1. If you have changed the aliases for your Xbox Live account then you will be automatically signed into the aliases account on Microsoft Store as well resulting in the aforementioned error.
  2. To fix this, you need to revert the changes and remove the aliases. Here is how to do it.
  3. Sign in to your Microsoft Account.
  4. Click on Your Info at the top of the page.
  5. Select “Manage how you sign in to Microsoft” option. Enter the password for your account if prompted.
    we can't sync your data with the cloud right now
  6. On the “Manage your account aliases” page, click on Remove next to the alias that you added earlier.
  7. Now follow the instructions given on-screen.
  8. After the aliases are removed, restart the system.
  9. Launch Forza Horizon 4 on your PC and check if the error is resolved.

3. Connect to your Mobile Hotspot

  1. Several users have reported that disconnecting from their ethernet / WiFi connection and connecting to their Mobile WiFi hotspot has resolved the error.we can't sync your data with the cloud right now
  2. On your Android phone, you can easily create a WiFi hotspot.
  3. After turning on the Hotspot, connect your PC to the Mobile Hotspot.
  4. Launch Forza Horizon 4 and check for any improvements.

RELATED STORIES YOU MAY LIKE: