Fix KB4497936 related issues using this Registry tweak

Microsoft recently offered users the solution to fix a major security-related bug in Windows 10 cumulative update KB4497936.

The company released this update to both Insiders in Slow and Release Preview rings, as well as non-Insiders who installed the Windows 10 May 2019 Update from MSDN.

The fixed various problems related to protection (Microarchitectural Data Sampling), Internet Explorer and text size, detected in previous updates.

These problems were detected by Insiders to make sure that the final build will be free of such problems. But KB4497936 also brought issues of its own and blocked the launch of Windows Defender Application Guard.

Fix Windows Defender error 0x800705b4

Launching Windows Defender resulted in error 0x800705b4 after installing KB4497936. This prevented users from using the application.

Windows Defender is an important security tool as it scans, detects and then removes malware from PCs.

This problem must be solved urgently otherwise it will cause major security concern among users.

However, you can fix this bug by logging in to administrative account and by following these steps;

  • First, you must create new registry entries (a database used to store all data required for the functioning of Windows). A Registry backup helps to restore your device when something went wrong.
  • Next, launch the Registry Editor by pressing Windows key + R and typing regedit.exe. Navigate to the following path in the Registry Editor:
 HKEY_LOCAL_MACHINE\SOFTWARE\Microsoft\Windows NT\CurrentVersion\Containers\CmService\Policy
  • Right-click the right pane and head over to New > D-WORD (32-bit) Value. You need to do this twice and call the newly created items the following:
    DisableClone
    DisableSnapshot
  • Both new registry entries should be given the following value;
    00000001

Once you’re done here, the next step is to close the Registry editor and restart the computer.

If all these steps are done correctly, Windows Defender will launch properly and the update will be installed.

To check if Windows 10 cumulative update KB4497936 is installed correctly on your device, click the Start menu and type winver. The OS build number with the update installed on the system is 18362.113.

Let us know in the comments below if this solution worked for you.

RELATED GUIDES:

When is Morhau getting female characters?

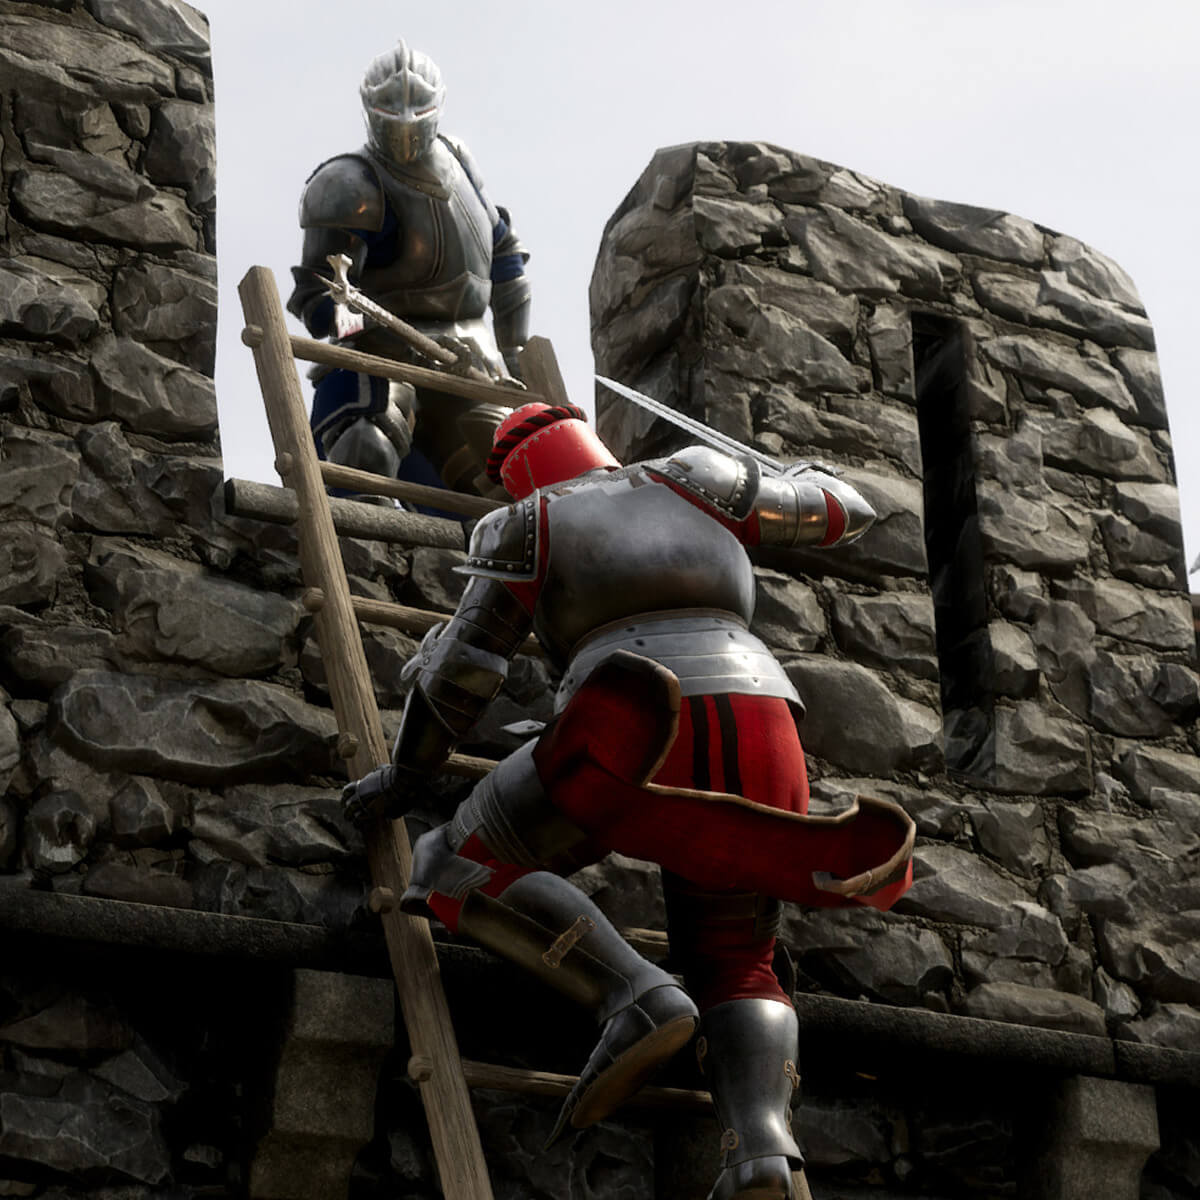
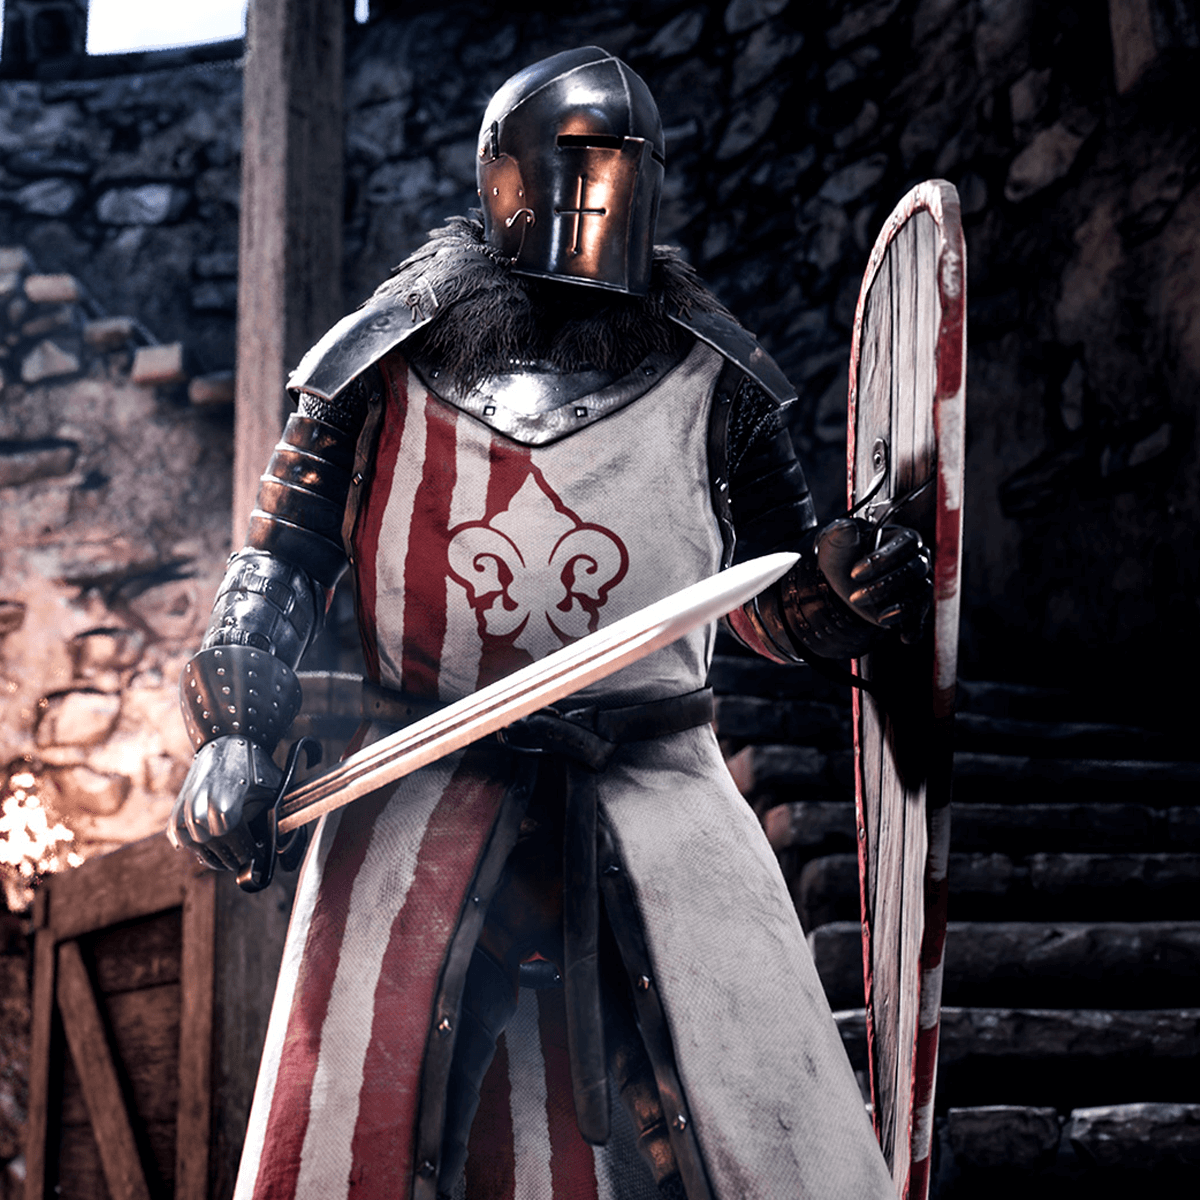
Morhau is one of the most popular games at the moment. It grabbed the attention of gamers soon after its release. But many gamers feel something is missing from this game — namely, female characters.

The good news is that the game‘s devs confirmed they are working on bringing a female character to the game in the near future.

However, they didn’t confirm any timeframe for the release. It seems like the gaming community is eagerly waiting for a female character.

morhau female characters news

One player even created a thread to inquire about the same. The gamer asked Morhau devs if they are going to release female characters.

Heya, I am currently holding out until female characters are added. Is there an ETA? Edit: DEVs already confirmed that they will add female characters. This threads only purpose was to try to get more concrete information on the timeframe.

However, this thread started some intense discussions. Many people started to criticize the OP for being biased towards a female character. Some of them even said that they don’t even want a female character. 

Some reports suggest that developers are currently working on this feature. Moreover, it seems that this feature has been under development for a few months now.

Hopefully, the devs will soon come with an update about the release date of female characters in Morhau.

Over to you now: Are you looking forward to this feature? Let us know in the comments below.

How to set up Google Cloud Print on Windows 10

In this simple tutorial we’re going to show you how to set up Google Cloud Print service natively on Windows 10.

It is the quickest way to print your documents, especially if the printer you have access to is not very close to you. You actually can print files from London to Tokyo if that is what you want.

Cloud printing is one of those software technologies you ask yourself: “why didn’t we had this years ago?”. The most common way this technology can help you is by printing from home to work, in case you need to do that.

How can I set up Google Cloud Print on Windows 10? You can easily download and install it from the official links provided by Google. The process is simple and you’ll be up and running in no time. Install the Print service, run it, and then add your local printers.

To see how you can do that, check the steps below.

Steps to set up Google Cloud Print on Windows 10:

  1. Install Google Cloud Print Service
  2. Run Google Cloud Print Service
  3. Add Local Printers

To do this you’ll need a Windows PC, a Google Account, Google Chrome, download Google Cloud Print Service and Google Cloud Print Driver (the driver that will help you add your a Cloud Printer to your Windows default list).

1. Install Google Cloud Print Service

This first step is to ensure that we have the service working in Windows 10. Head over to the download page and run the setup kit. It will automatically install every file needed for the system.

It’s possible that the download could not work if you’re not using Google Chrome as the browser, that’s why it’s in the list of tools you need. If Windows asks for permission to authorise the installation, then go for it.

2. Run Google Cloud Print Service

This step looks easy, but actually it can give you a bit of a headache because of the login process.

Run App

First of all, find the newly installed service in the Start Menu at the Recently Added section.

Register Account

After you run the application, you get this window where you have to login but to your computer account not to your Google Account.

If you can’t login, you have to be aware that this is the password you insert when you log on to Windows 10. Some users use the Microsoft Account to login, other users create an offline (local) user account.

3. Add Local Printers

The next step here is to login to your Google Account that you’ll use for the service and after that you will receive a message in Chrome Browser asking you to add local printers to Google Cloud.

That’s about it for connecting your standard printers to your Google Account.

Google Cloud Print

Now if you’ll go to another computer into Chrome and login to your Google account you could print a file directly from Chrome as in the image below.

Google Cloud Printer list

You can also manage the list of printers from this link.

One thing to mention is that if the device you used to add the local printers to Cloud Print is not online, you cannot print any files because it will appear offline.

Now, if you want to use Google Cloud Print service as a native printer in Windows 10 and not only from the Chrome browser, you’ll need to download and install the Google Cloud Print Driver.

This process is easier. After installing the driver you will just have to choose which printer should be used to print the files you want, and you’ll also have a few basic options to choose from before you send it out for printing.

Hope that this quick and easy guide helped you get back on track with your file printing, and from now on you you will be able to print everything from anywhere with Google Cloud Print.

If you have any more questions about setting up this service, leave them in the comments section below and we’ll be sure to take a look.

[wl_navigator]

How to fix Clock interrupt was not received [FULL GUIDE]

Blue Screen of Death errors can be quite problematic, and speaking of these errors, many users reported Clock interrupt was not received error on their PC. This error can crash your PC, and in today’s article we’ll show you how to fix it properly.

How to solve Clock interrupt was not received error? For starters, disable all overclock settings. If you’re an AMD user, disable Core Unblocker and Unleashing Mode options in BIOS. In case the problem is still there, try updating your drivers and check if that helps.

How can I fix Clock interrupt not received error?

  1. Don’t overclock your CPU
  2. Try to disable unleashing mode and core unlocker (for AMD Users only)
  3. Update drivers

1. Don’t overclock your CPU

overclock Clock interrupt was not received

Clock interrupt was not received error can appear if your CPU frequency is modified above the recommended value.

Majority of CPUs out there are not made to be overclocked by the user, and in order to fix this issue, it is better you return your frequency to the normal state. After you change your overclock settings, the issue should be resolved and everything will be back to normal.

2. Try to disable unleashing mode and core unlocker (for AMD users only)

For AMD users, this solution might just be the best solution, and it might also work even if your CPU isn’t overclocked. By disabling certain settings in BIOS, you might fix Clock interrupt was not received error.

  1. Enter BIOS on your PC.
  2. Check under the CPU Settings tab for the settings that you need to disable. These settings are called Core Unblocker and Unleashing Mode.
  3. Disable these settings.
  4. Now go to the Exit section and select Exit Saving Changes.

After doing that, check if the problem is still there. If you’re using an Intel CPU, you should have similar options in BIOS.

3. Update drivers

If you’re getting Clock interrupt was not received error, the issue might be your drivers. To fix the problem, we advise you to update your drivers by doing the following:

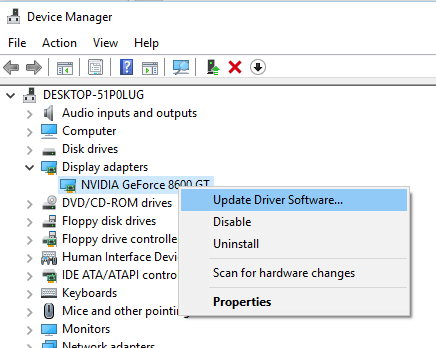
  1. Open the Device Manager.
  2. Then, expand a category and look for the name of your device, right click on it and choose the Update Driver option.
    Clock interrupt was not received update driver
  3. Choose Search automatically to automatically download the driver.
  4. If you can’t update your drivers using this method, be sure to check the manufacturer’s website for the latest drivers.

If you want a more straightforward method of downloading drivers, be sure to check out a driver updater tool that will scan your PC and automatically update all outdated drivers with just a few clicks, so be sure to try it out.

⇒ Get Fortect Driver Updater

In addition to updating your drivers, it’s advised that you check for updates by doing the following:

  1. Press the Windows Key and I, to open the Settings app.
  2. Then, navigate to Update & Security section.
    update and security Clock interrupt was not received
  3. Click on Check for updates button and wait while Windows downloads the available updates.
    check for updates Clock interrupt was not received

After your drivers and system are up to date, check if the problem is still there.

There you go, these are just a couple of solutions that might help you fix Clock interrupt was not received error. Feel free to try all of our solutions and let us know in the comments which solution worked for you.

Xbox Alpha Insiders get the first Xbox One 1906 preview build today

As the Xbox team announced last week, the first Xbox One 1906 Preview build will be available to download for Xbox Alpha Insiders today. This build won’t include the new estimated install time feature that Microsoft announced last week, as Microsoft had to remove it due to a last minute bug.

The only new feature in this first 1906 build is for the Mixer tab on the Xbox One dashboard: After installing the update, Xbox Insiders will be able to navigate this tab and start watching full-screen Mixer streams by simply pressing the A button. As of today, pressing A on any stream opens the video in the Mixer app, but enabling full screen mode requires pressing several buttons afterwards.

It’s also worth noting that this build includes a change that could be annoying for some Insiders. Indeed, you should be aware that Xbox One consoles will now crash when apps or games are taking too long to start. The Xbox team explained that this will allow consoles to send crash data back to Microsoft, so the company can “better understand the increase in activation timeouts we’ve seen in recent releases.”

You can learn more about this specific experience below:

Starting with todays build of 1906, we’ve introduced a deliberate console crash when a game fails to launch due to an activation timeout (0x8027025A). We realize this isn’t the best experience, but this will help us better understand the increase in activation timeouts we’ve seen in recent releases. Here’s what you can expect if you hit an activation timeout while launching a game after taking this update:

  • Your console will freeze on a “Something went wrong” error screen
  • The console’s power button will begin flashing so that we can gather data and drive for a fix, please leave the console alone if you notice the behavior described above. Once the console is finished collecting information (approximately 2 minutes), it will shut down on its own. At this point, please turn your console back on, allowing the console to automatically upload the dump information that was collected in the background. After your console has rebooted, please file a bug using the “Report a problem” tool and indicate in the subject line that you hit the activation timeout console crash. Thanks for helping us track down and squash difficult bugs like this one prior to GA!

This first Xbox One 1906 preview build will be available for Alpha Insiders starting at 2:00PM PST today. “This first update is meant to lay the groundwork for what’s to come in 1906,” the Xbox team explained in the release notes, and we should learn more about other new features in the coming weeks.

Xbox’s Phil Spencer calls for safer gaming, promises to “promote and protect the safety of all”

“When everybody plays, we all win” is a great motto that Microsoft started using after releasing its Xbox Adaptive Controller last year, and the software giant actually means it. Today, Xbox head Phil Spencer himself penned a long post on the official Microsoft blog to explain why gaming is for everyone, and why the video games industry should do more to protect the safety of all 2.6 billion gamers worldwide.

Microsoft’s Xbox safety team, which is tasked with identifying problems on Xbox Live will be expanded soon, Spencer announced today. “We will identify potentials for abuse and misuse on our platform and will fix problems quickly. We are also intent on expanding the composition of our safety team so wide-ranging perspectives can help us identify future safety problems and solutions,” the exec wrote.

To promote a safe environment ion Xbox Live, Microsoft will also be leveraging its 150,000 Xbox Ambassadors program by giving them new community missions. Spencer also mentioned the upcoming roll out of “new programs for the health of our entire gaming community,” without giving further details.

If you often use Xbox Live Clubs, which are Microsoft’s alternative to Discord servers, you can also expect new moderation features coming later this year. “This summer, we are empowering our official Club community managers with proactive content moderation features that will help create safe spaces for fans to discuss their favorite games,” explained Spencer. For everyone else, these new content moderation features should be available by the end of the year.

That’s good news for all Xbox Live users, but Microsoft is actually willing to cooperate with industry partners on safety measures for gamers. “Because we intend to protect all gamers, we will openly share safety innovations with our industry the same way Microsoft has made PhotoDNA technology universally available to everyone from the police to the tech industry to fight the spread of child pornography,” said Spencer.

Microsoft may not have the best selling eight-gen console with the Xbox One, but the company’s influence on the gaming industry seems poised to increase significantly in the near future. Not only is Microsoft leading the way in making gaming more accessible, but the software giant is now willing to share its state-of-the-art tools with other video games companies. That includes the new Game Stack platform aimed at game developers on iOS, Android, Nintendo and PlayStation.

In case you missed it, Microsoft and Sony surprised everyone, even Sony’s PlayStation division, by announcing a new cloud partnership last week. With Sony skipping E3 in June, we expect Microsoft’s press event to be pretty epic this year and we can’t wait to see Phil Spencer and the Xbox team “go big” on Sunday, June 9.

Fix: “Error in content enumeration” on Xbox One

Certain Xbox One errors can be relatively harmless while some other errors can prevent you from playing your favorite games.

Xbox One users reported Error in content enumeration message that prevents them from playing games such as Grand Theft Auto V.

This can be an inconvenient problem, but there are few solutions that you can try.

“Error in content enumeration” on Xbox One, how to fix it?

Fix – Xbox One “Error in content enumeration”

  1. Use Energy-saving mode
  2. Factory reset your console
  3. Clear the cache
  4. Remove local saved games
  5. Sign out and sign back in

Solution 1 – Use Energy-saving mode

Many Xbox One users use Instant-on option that allows them to quickly put their Xbox One in standby mode.

This option is great if you want to turn on and off your Xbox One quickly, but this feature can cause Error in content enumeration message to appear.

To fix this problem, you need to disable Instant-on mode by following these steps:

  1. Press the Menu button on your controller.
  2. Go to Settings > Power & startup.
  3. In Power Options section select the Power mode and press the A button on the controller.
  4. Switch it from Instant-on to Energy-saving.

By switching to Energy-saving mode the problem with Error in content enumeration message should be resolved.

Keep in mind that by using Energy-saving mode your Xbox One will turn on a bit slower, but it will also use a lot less power when you turn it off.

Solution 2 – Factory reset your console

According to users, you can fix this problem simply by performing a factory reset on your console. To do that, follow these steps:

  1. Scroll left on the Home screen to open the Guide.
  2. Choose Settings > All Settings.
  3. Now select System > Console info & updates.
  4. Select Reset console.
  5. You should see two options available, Reset and remove everything and Reset and keep my games & apps. Choose the latter in order to remove corrupted files and reset your console without affecting your games and apps. Keep in mind that this option doesn’t always work, so you’ll might have to use Reset and remove everything option instead. This option will delete all your installed games and apps, so you’ll have to reinstall them again. If you choose to use this option, we advise you to back up all your important files.

Now you need to add your Xbox profile by following these steps:

  1. Scroll left on the Home screen to open the Guide.
  2. On the Sign in tab scroll all the way down and select Add & manage option.
  3. Select Add new.
  4. Now enter your Microsoft account login information.
  5. Read Microsoft Service Agreement and Privacy Statement and select I Accept.
  6. Follow the instructions on the screen to configure Sign-in & Security preferences.

After that, you need to disconnect from the Internet by following these steps:

  1. Open the Guide and select Settings.
  2. Choose All Settings.
  3. Now select Network > Network settings.
  4. Select Go offline option.

Now you need to reinstall the game and play it offline without downloading any updates.

Save the game as soon as you can and connect to the Internet again. You’ll be asked if you want to use your local save or the could save.

Choose the cloud save option and check if the problem is resolved. If the problem persists, you might have to repeat all these steps and choose local save option.

Keep in mind that by using this option your game progress might be deleted.

Solution 3 – Clear the cache

Sometimes Error in content enumeration message can be caused by your cache and in order to fix it you need to clear it.

Your cache holds all sorts of temporary files, and if those files are corrupted, you might encounter this and many other errors. To clean your cache, you need to do the following:

  1. Press and hold the power button on your console to turn it off completely.
  2. Now unplug the power cable.
  3. Wait for a minute or two. You can press the power button on your console few times in order to drain the battery completely.
  4. Connect the power cable again.
  5. Wait until the light on power brick changes from white to orange.
  6. Press the power button on your console to turn it back on again.

After clearing the cache, check if the error is resolved.

Solution 4 – Remove local saved games

Your saved games can sometimes become corrupted and that can cause Error in content enumeration message to appear. To fix this problem you need to delete local saved games from your console.

Keep in mind that your saved games are stored both locally and on Xbox Live servers so you won’t delete them permanently by using this solution. To delete local saved games, follow these steps:

  1. Go to Home screen and navigate to My games and apps.
  2. Select the game that is giving you this error and press the Menu button on your controller.
  3. Select Manage game from the menu.
  4. Now scroll to the right and under Saved Data section select your save data file and press the A button on your controller.
  5. You should see two options available, Delete from console and Delete everywhere. Choose the first option and your local saved game files will be removed. Keep in mind that your saved games will be restored as soon as you connect to the Internet and start your game. If this option doesn’t work, you might want to consider using Delete everywhere option. This option will delete your saved game files from your console and from Xbox Live servers permanently, so use it carefully.

Solution 5 – Sign out and sign back in

According to some users, you can fix this issue simply by signing out and signing back in to your profile. To do that on Xbox One, you need to follow these steps:

  1. Press the Xbox button to go back to the Home screen.
  2. Select your profile in the top left corner.
  3. Select your account and press the A button on the controller.
  4. Choose Sign Out option.

Now sign back in to your profile and check if the problem is resolved.

Error in content enumeration message can cause problems with your saved games on Xbox One, but you should be able to fix it by using one of our solutions.

READ ALSO:

Mordhau is affected by severe firewall issues [POSSIBLE FIX]

Many Mordhau players reported that they can no longer populate the server browser list. Mordhau was quick to respond to the issue and recommended some possible solutions to fix the bug. 

An official source recommends users to make sure that their firewall is not blocking Mordhau. It can be one of the potential causes behind the issue.

Furthermore, some gamers also reported that their antivirus solution is putting Mordhau files into Quarantine. You should address this issue if your antivirus or firewall is doing the same thing. 

None of these solutions worked

Despite the fact that Mordhau claims any one of these solutions will fix the issue, many gamers reported that none of these is working. One player reported that:

Still no success on my end. Even after the updates and troubleshooting many times still not working at all. Cant connect to anything, No matchmaking, server list, joining through friends list/steam, all does not work.

It seems like the die-heart fans of Mordhau are pretty much disappointed by the situation. At the time of writing this article, many gamers created many topics stating this connection problem.

Apparently, the issue is not with the Firewall or antivirus programs. Turning off or deleting antivirus programs didn’t work either. 

So, this clearly indicates the root-cause of the problem is not your firewall or antivirus. We hope that this issue will soon be fixed.

Posted in Fix

What to do if Xbox is unable to find mic [EXPERT FIX]

Xbox users have encountered different problems and one of them is the inability for Xbox to find the microphone. This can be a big problem, but we’re going to show you how to fix this issue in today’s article.

What can I do if Xbox is unable to find my mic? First off, make sure that your microphone is actually working. If the problem persists, try adjusting your settings and switch to Energy Saving mode. If that doesn’t work, try restarting your Xbox One.

Try these solutions if Xbox One mic is not working

  1. Check your microphone
  2. Check Xbox Settings
  3. Turn off your Xbox
  4. Check Headphone in another Device
  5. Select Energy Savings in Settings
  6. General Settings

1. Check your microphone

microphone check xbox unable to find mic

One method that worked for many users was checking their microphone. The system has to confirm that the controller you are using is active. You can create a connection between your profile and the controller manually. To do this, follow these steps:

  1. Go to Xbox One Home and select Sign in.
  2. Select the Choose this person option.
  3. Once you select the desired profile, check if your mic is working fine.

2. Check Xbox Settings

If Xbox is unable to find your microphone, perhaps the issue is related to your settings. You can fix that by doing the following:

  1. Press on the Xbox button on your controller.
  2. Then, go to Settings and select All Settings from the options listed.
  3. Now, choose Adult defaults and click on View details and customize.
  4. Also, check if everybody is chosen as an option in the communication with voice and text.
  5. Check if your mic is working perfectly.

3. Turn off your Xbox

turn off xbox xbox unable to find mic

The act of turning off your Xbox device and turning it back on is known as power cycling and it might help if Xbox can’t find your microphone.

  1. Hold press the Xbox button on your controller for some time, this will turn your controller off without having to remove the headphones.
  2. Press the Xbox button on Xbox One, this will turn it off.
  3. Remove the power cable of the Xbox one and leave it for 5-8 minutes.
  4. Place the cable back and turn on Xbox. See if your mic is functioning properly.

4. Check headphones on another Device

Sometimes you have to find out if the problem is hardware-related. If your Xbox can’t recognize your microphone, try the following:

  1. Plug the controller to another device and check if the voice is registered while using the mic.
  2. If the mic is registered, plug it back to its original device and if see if it works.

5. Select Energy Saving in Settings

There are two power options in Xbox settings, the Energy Saving and the Instant On. The energy saving takes less power and it can help you if Xbox can’t detect your microphone. Here are steps to turn on energy saving.

  1. Go to Xbox One Settings.
  2. Then, go to the Power and startup option.
  3. Now, in the Power option, highlight power mode and select Energy Saving.
  4. Save every change and exit.

6. General Settings

If you have tried the methods above and your mic isn’t still working, try these tips and see if the mic works.

Ensure that you are using a headset that is compatible with Xbox and check if all the cables are plugged in correctly. Confirm that the headset is not set on mute.

  1. Go to headphone settings to change the headset format from Headset audio to Windows Sonic.
  2. Then, ensure that the headset is in the right condition.
  3. Adjust the game sound. If the sound is 100% for the game, you will only hear the game sound and not the chats.
  4. Change the battery of your controller.
  5. Also, turn off Virtual Surround in apps.
  6. Disconnect the headset and plug it back in after some time.
  7. Go to Settings >Device and Accessories in the group of options to increase the audio.
  8. Ensure that Xbox is updated to the latest version.

If you’re having issues, maybe Mic Monitoring feature on Xbox can help you fix them.

There you go, these are six solutions that might help you if your Xbox is unable to find the microphone. If you found our solutions helpful, let us know in the comments below.

RELATED STORIES TO CHECK OUT:

Windows 10 Your Phone app no longer requires Wi-Fi to sync with Android phones

The Windows 10 Your Phone companion app no longer requires a Wi-Fi connection to sync your messages and photos. As noted by Windows Central, the Your Phone app can sync to Android phones using your mobile data connection. Great news for Android users at least, but not so great for iOS. Microsoft’s Lead Designer, Roberto Bojorquez, announced the news on Twitter, although someone else noticed the new update included a redesign of the Your Phone icon.

Microsoft has been quickly refreshing all of their icons for their services across Android and iOS, including new Office, Outlook, and OneDrive icons. The ability to sync your text messages and photos using your mobile connection is live in the Your Phone Companion app on Android (version 3.8.4). You’ll need to go to the Android app settings to enable the “Sync over mobile data” feature. Download the Your Phone Companion app from the Google Play Store.

Link to Windows
Link to Windows
Price:
Free

Google, Intel, others cut ties with Huawei following US blacklisting, is Microsoft next?

The US’ recent blacklisting of Chinese technology giant Huawei, which the Trump administration is accusing of helping state espionage, is already having major repercussions across the tech industry. Yesterday, Reuters reported that Google had suspended all business with Huawei, which means that future Android-powered smartphones from Huawei won’t have access to the Google Play Store, and Google Play Services.

Google later clarified that existing Huawei smartphones will continue to work as usual, but these devices likely won’t receive Android Q, the next major update for Android which is slated to be released this summer.

Huawei is currently the second largest smartphone maker worldwide behind Samsung, and the Chinese company is now selling more phones than Apple. Over the years, Huawei’s smartphones became very competitive thanks to their excellent design, performance (Huawei now designs its own Kirin SoCs), and cameras, and the company’s success reflects the global rise of Chinese smartphone makers like OnePlus, Xiaomi, and Oppo.

Huawei losing access to the Play Store and Google Play Services is a pretty big deal as the company will now be forced to replace these services with its own in-house solutions, similarly to what Amazon did with its Android-based Fire tablets. Huawei’s smartphones for the Chinese market already use a customized version of Android with no Google services on it, and the Chinese company is also rumored to be working on an Android alternative for its own devices.

However, the problem for Huawei is that Google isn’t the only company that can no longer do business with the Chinese giant. Bloomberg is reporting today that Intel, Qualcomm, and other chip makers like Broadcomm will stop supplying Huawei while Trump’s executive order is active, and this will likely impact Huawei’s PC business as well.

For now, it’s not clear if Huawei’s Windows 10 PCs will stop receiving major Windows 10 updates, or if Microsoft will stop selling Windows 10 licenses to Huawei. Contacted by Techradar, the Redmond giant said that “we have nothing to share,” but it’s hard to imagine the company not doing anything. The current situation is pretty unique in recent history, and we’ll have to wait to see if the Chinese government decides to strike back. China is currently the world’s biggest factory, and we remind you that US tech giants all depend on a lot of components that are being manufactured in the country.

We’ve reached out to Microsoft for comment and we’ll let you know if we hear anything back.

How can I fix Bad module Steam error [FULL FIX]

Have you experienced Bad module Steam error on your PC? This error occurs for games like Fortnite, PUBG, and also Counter-Strike: GO, and in today’s article we’re going to show you how to fix this problem once and for all.

What’s the best way to fix Bad module Steam error? Several users reported that they fixed the issue simply by pressing the Windows Key on their keyboard. If you want a long-term solution, try disabling the Full-screen optimization feature or update your drivers to the latest version.

How to fix Bad module Steam error on Windows 10?

  1. Press Windows key
  2. Disable full screen optimizations
  3. Update your Windows drivers
  4. Reset your PC

1. Press Windows key

windows-key on keyboard steam error bad module

Even though it might sound like a waste of time, there are users who solved Bad module errors by using this method. Whenever you get the error bad_module_info has stopped working simply tap the Windows Key button on your keyboard.

Doing this will open up the Start menu, and that will minimize the game you were playing. Then, by using the Alt+Tab buttons on your keyboard, or by selecting the game in your taskbar, try playing the game again. Observe if the error still appears. If the error still occurs, try using the next solution.

2. Disable full screen optimizations

This option was released on Windows in order to better optimize the graphics of games on PC, but in some cases it can cause a steep drop in FPS or even cause Bad module Steam error. Here’s how to deactivate it :

  1. Right-click on the game on your Desktop > choose Properties.properties Bad module Steam error
  2. Click on the Compatibility tab, tick Disable full screen optimizations option > Click OK.disable fullscreen optimization bad module error
  3. Try running the game again and see if the problem got solved. If the problem persists, follow the next methods presented in this article.

3. Update your Windows drivers

  1. Press the Windows + X keys on your keyboard > choose Device Manager.device manager Bad module Steam error
  2. Inside the Device Manager window, click on the drivers that need to be updated, and then hit Update driver.update driver Bad module Steam error
  3. In case you don’t have a driver on your PC, choose Search automatically for updated driver software (If you have the drivers on your PC, choose Browse my computer for driver software).search automatically driver software Bad module Steam error
  4. Choosing this option will automatically search for any drivers online and install them.
  5. After the update process is complete for each of the elements found in the Device Manager, try playing the game again to see if the problem is solved.

If you find this process too complicated, you can always use third-party tools to update all your drivers automatically with just a few clicks.

With the help of automated driver support, you can manage every driver safely and update them accordingly, without causing system issues.

Moreover, you have the option to backup your drivers in case something unexpected happens and you need to restore the device.

All in all, you should benefit from this helpful assistance to efficiently install or update your PC driver devices.

⇒ Get Fortect Driver Updater

4. Reset your PC

This method will make sure that the Steam error is not caused by a previously performed update. Bear in mind that this is a drastic solution that can remove your files, so use it only as a last resort.

Note: Please make sure to follow the steps presented here closely to avoid losing any files

  1. Click on Start button > Power.power button
  2. Press and hold the Shift key > then click Restart.
  3. From the blue window that opens up, choose Troubleshoot.troubleshoot windows recovery
  4. Choose Reset this PCreset this PC Bad module Steam error
  5. Select Keep my fileskeep my files Bad module Steam error
  6. After the process is completed, your PC will automatically restart.
  7. Try playing your game again

Getting Bad module error playing or trying to play your favorite game is extremely frustrating. By reading this article, you now have all the tools you need to solve this issue. Please make sure the follow the steps provided in this article in the order they were presented. This allows you to reach the optimal results, without endangering your data.

Please feel free to let us know if these solutions helped you by using the comment section below.

Windows Media Keys Not Working: How to Fix Them

Media keys are extremely useful, but what if media keys are not working on your PC? If that’s the case, you’ll have to rely on keyboard shortcuts to control your playback, but that’s not always the most accessible solution.

If you have the same problem, be it on a laptop keyboard or an external one, we’ve got the solution for you.

Why are media keys not working?

  • Keyboard issues such as problems with USB ports or conflicting software.
  • You don’t have set the default multimedia app.
  • Browser extensions might be causing issues.

How do I use media keys on my keyboard without FN?

  • Use dedicated media keys if you have them on your keyboard.
  • Try using FN Lock key on your keyboard if you have it.
  • Enable Action Keys Mode in BIOS.

What can I do if media keys are not working?

Before we start, try the following:

  • Connect the keyboard to a different USB port.
  • Remove keyboard software such as IntelliPoint or Logitech.

1. Set the correct default program

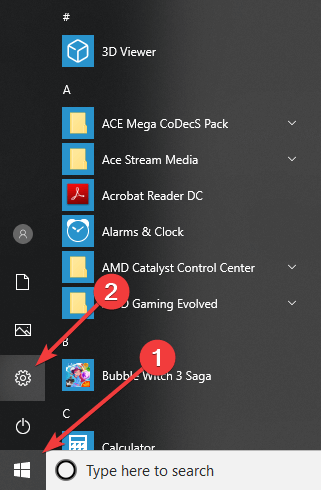
  1. Go to Start and choose Settings.fix media keys windows 10
  2. In Settings, click on Apps and then on Default apps.windows 10 default app media key fix
  3. Under Music Player, click on the default app (usually Groove Music).
  4. The Choose an app window will pop-up. Select the desired media player by clicking on it.

That’s it. A fairly simple solution that will block Groove Music or Windows Media Player from overtaking your media keys.

2. Change the Google Chrome extensions

  1. Open Chrome and go to Settings (3 vertical dots in the upper-right).
  2. Then navigate to More tools and click on Extensions.chrome extensions media keys don't work
  3. Now, in the top-left, right next to Extensions there are 3 horizontal bars. Click on them.media keys not working win 10
  4. Click on Keyboard shortcuts.keybord shortcuts media keys won't work
  5. Search the Google Play Music, Plex, or any other media extension that it’s of interest to you.
  6. Under the respective extension, you will see some drop-down menus set to Global. Change them to In Chrome.media keys won't work in windows 10

After doing that, check if the problem is gone.

This should certainly solve the problem. If you want to go a step further, you can disable the faulty extension altogether:

  1. Follow the first two steps from above.
  2. In Extension, locate the extension that’s of interest to you.
  3. In the extension section there are 3 options: Details, Remove and Enable/Disable.
  4. Click on the blue toggle in the bottom-right to disable the extension. The toggle should now be white/gray.disable chrome extension media keys don't work
  5. If you are certain that you have no use for the respective extension, you can also click Remove. this will delete it.

Keep in mind that any media extension could affect your keyboard, not only the 2 mentioned above.

We recommend that you set all your media controls to In Chrome, even if they aren’t music players.

Hope that these tips and methods will help you, as they were confirmed as working by the majority of users affected.

For more information about shortcuts, check our guide on how to lock and unlock function key on your keyboard.

Don’t forget to tell us if you fixed your media keys in Windows 10, along with any other questions you may have in the comments section below.

Windows media player cannot convert file to required format [FIX]

The Sync function offered by the Windows Media Player allows the users to sync their favorite tracks between the PC and the smartphone. Sometimes, the sync may fail to work properly leaving Windows Media Player unable to convert error. The full error reads Windows Media Player cannot convert the file to the format required by the device.

The error can occur due to several reasons including file incompatibility on the target device as well as wrong configuration on Windows Media Player.

How do I fix the Windows Media Player unable to convert files for other devices? Start by enabling Background File Conversion. That way the conversion will always work in the background when syncing your PC with another device. Alternative solutions concern running Windows Media Player Troubleshooter or configuring Mp3 bitrate limit.

Read in detail about the solutions below.

Fix Windows Media Player cannot convert the file to the required format

  1. Enable Background File Conversion
  2. Run Windows Media Player Troubleshooter
  3. Configure an MP3 Bitrate Limit
  4. Directly Copy Paste the Files

1. Enable Background File Conversion

Windows Media Player automatically converts files before syncing to make it compatible with the target device. The file conversion also reduces the file size if necessary.

If the automatic file conversion option disabled in the Windows Media Player for the selected device, it may result in conversion error. Here is how to fix it.

  1. Launch the Windows Media Player and connect your device to the PC.
  2. Go to the Sync tab in the Windows Media Player.
  3. Click on the Sync Options button (under the sync tab).
    Windows Media Player - Sync
  4. Go to your device and select “Select settings” option.
  5. In the Options window, select your device under Devices section.
    Windows Media Player - Sync Settings
  6. Now click on the Advanced button.
  7. Under “Conversion settings” make sure both “Allows video files to convert in the background” as well “Allow audio files to convert in the background” option checked.
    Allow video files to convert in the background
  8. Click OK. Then click Apply and OK to save the changes.

Try to sync the library and check for any improvements.


2. Run Windows Media Player Troubleshooter

Windows OS offers a built-in troubleshooting utility that allows you to fix common problems with the system apps including Windows Media Player. The utility scans for any known issues and recommends fixes to be applied. Here is how to do it.

  1. Press Windows key + R to open Run.
  2. Type Control and press OK to open Control Panel.
  3. Type troubleshoot in the search bar (top right) and click on Troubleshooting.
  4. Click on Hardware and Sound.
    Windows Media Player - Troubleshoot
  5. Scroll down and click on Windows Media Player DVD.
  6. Click on Next and follow the on-screen instructions to fix any problem with the Windows Media Player.

3. Configure an MP3 Bitrate Limit

Users have reported that Configuring the MP3 bitrate limit has helped them fix the issue. Here is how to do it.

  1. Launch Windows Media Player.
  2. Click on Organize and click on Options.
    Windows Media Player - Organize - Options
  3. In the Options window, open the Plug-ins tab.
  4. Under the Category section, select Background.
  5. Select MGTEK dopisp or any other codes and click on Properties.
  6. In the Conversion tab, check “Re-encode MP3 files which exceed a bitrate limit“. Choose an encoding bitrate and bite rate limit.
  7. Close the Option window and relaunch Windows Media Player.

4. Directly Copy Paste the Files

If you using Windows Phone or other devices, you can directly copy and paste the music tracks onto your smartphone using the File Explorer. Here is how to do it.

  1. Connect your smartphone to your PC.
  2. Copy all the track that you can to move your device.
  3. Open the Device disk in the File Explorer and paste the tracks.
  4. Windows will ask you whether you want to convert the tracks, click on Yes to convert the file to WMA format.

RELATED STORIES YOU MAY LIKE:

KB4497936 is now available to all Windows 10 v 1903 users

Microsoft confirmed that non-Insiders running the Windows 10 May 2019 Update are also getting cumulative update KB4497936.

Microsoft rolled out KB4497936 to all the devices running Windows 10 version 1903. This update is now officially available to some non-Windows Insiders as well.

As a quick reminder, the tech giant first released KB4497936 to users enrolled in Windows Insider program. According to the official update description, machines running Windows 10 Insider Preview Build 18362 in the Slow Ring, Fast Ring, and Release Preview Ring are eligible for KB4497936.

Microsoft says the update will be automatically installed on devices running the Windows 10 May 2019 Update.

As a matter of fact, many non-Windows Insiders are also running Windows 10 version 1903 (May 2019 Update). Indeed, Microsoft will officially releasing Windows 10 May 2019 Update later this month.

However, you can already get the ISO files from MSDN. Many Windows users already downloaded the respective ISO files.

KB4497936 is available to non-Insiders

Many non-insiders confirmed they also received KB4497936 on their systems. The tech giant confirmed the wider rollout via Tweet and stated that the update is available to everyone running the May 2019 Update.

This is expected. Anyone who is on the May 2019 Update will get these servicing releases as we ramp up for general availability.

Microsoft still has fresh memory about the mess created by Windows 10 October 2018 Update. Therefore, the company is taking its time to thoroughly test the upcoming May 2019 Update.

Microsoft is gradually releasing this update to Windows 10 machines and carefully analyzes the feedback it receives. The company wants to make sure that no bugs are introduced to production devices as a result of a public release. 

RELATED ARTICLES YOU NEED TO CHECK OUT:

Windows XP KB4500331 patches severe security vulnerabilities

Microsoft recently released a critical update (KB4500331) to patch a remote code execution vulnerability in Windows XP. It’s been years since Microsoft ended official support for the operating system.

The fact that the company released this patch shows just how severe this vulnerability was. You can imagine the nature of the bug that forced Microsoft to release a critical security patch for Windows XP and Windows Server 2003 after 5 years.

The tech giant released the update for devices running Windows XP, Windows 7, Windows Server 2003, and Windows Server 2008 to fix a “wormable” vulnerability.

However, there is an issue associated with this update, as it is not available via Windows Update. Windows XP users need to manually install the patch from Microsoft’s website.

Download KB4500331

You can simply visit Microsoft’s Update Catalog to download KB4500331 for Windows Server 2003 or Windows XP.

However, the patch is available to Windows Server 2008 and Windows 7 users via Windows Update. Moreover, Microsoft confirmed that Windows 8 and Windows 10 users remain safe from the bug.

No threats so far

Although Microsoft has not seen any serious security threats, the company is taking all necessary measures to prevent hackers from exploiting this secyrity vulnerability.

If exploited, this security problem can lead to another WannaCry-style malware attack. The Redmond giant says that devices that have network level authentication are safe from these threats at least to some extent.

We’re sure no one  forgot the horrible WannaCry outbreak and its impact on users around the world. That is why the company didn’t want to take any risks and fall into the trap once again.

The attackers know that most Windows users (both individual and enterprise users) avoid Windows updates or at least postpone installing them. The update process can sometimes turn into a mess specifically for large organizations. 

Attackers can potentially take advantage of similar situations to inject malware that can spread from one PC to another. Microsoft warns its users by stating that:

However, affected systems are still vulnerable to Remote Code Execution (RCE) exploitation if the attacker has valid credentials that can be used to successfully authenticate.

The company recommends Windows XP users to install the latest updates to block any potential attacks. Or better yet, to upgrade to the latest Windows 10 OS version.

RELATED ARTICLES YOU NEED TO CHECK OUT:

This is how you can fix RAGE 2 fatal errors on PC

The latest patch for Rage 2 is causing quite a few issues for players.

Many users reported encountering graphics related issues like: freezing, game crashing, stuttering or low FPS issues.

Error code 35 could be caused by certain graphic driver related issues, system issues and other root-causes.

In order to fix this error, we came up with a few solutions for you to try out.

6 simple solutions to solve RAGE 2 error code 35

  1. Update your graphics driver
  2. Close running processes in the background
  3. Allow Rage 2 to run through Windows Firewall
  4. Lower the video settings
  5. Set high priority for the game in the graphic driver settings
  6. Reinstall Rage 2

1. Update your graphics driver

If you notice that the game is not as responsive as it used to be, you should consider updating your graphics card driver.

Having outdated drivers installed on your computer prevent you from keeping up with the changes made with the latest patch.

In order to update the video card driver, follow these steps:

  • Press the Windows logo key + R on your keyboard > type devmgmt.msc in the Run box and hit Enter

  • Expand the Display adapters section in the Device Manager > right click each existing device and select Update driver

  • Wait for the updating process to complete and restart your computer

2. Close running processes in the background

Make sure to have no unnecessary apps opened while playing the game.

Active processes running in the background could be using up too much memory, making the game freeze, stutter or crash.

3. Allow Rage 2 to run through Windows Firewall

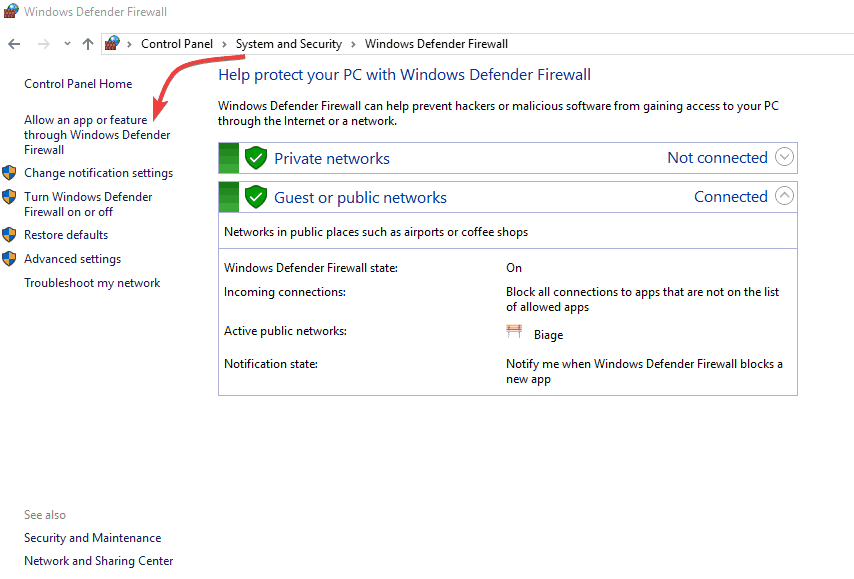
Make sure to grant Rage 2 full access through the Windows Firewall.

Not having full permission could cause the game to encounter different issues.

In order to give Rage 2 full permission, follow these steps:

  • Open Control Panel
  • Select View by Large Icons

  • Open Windows Defender Firewall
  • Click Allow an app or feature through Windows Firewall in the left pane

allow app or feature windows firewall

  • Find Rage 2 in the Allowed apps and features list and make sure to have both Private and Public boxes ticked
  • Press OK and try running Rage 2 again to see if it fixed the issue

4. Lower the video settings

After the new game patch, your computer might not be able to render the game at the highest graphic settings.

Open the game video settings and try choosing to run the game at a lower resolution.

5. Set high priority for the game in the graphic driver settings

Try forcing your video card to maximize its performance when running Rage 2.

If you have a Nvidia graphic card, follow these steps:

  • Open the Nvidia Control Panel
  • Select Manage 3D Settings > in the Program Settings tab select Rage 2
  • Set Power Management to Prefer Maximum Power
  • Save the settings, close the Nvidia Control Panel and see if it fixed the issue.

If you have an AMD graphic card, follow these steps:

  • Open AMD Radeon Settings
  • Go to System > choose Switchable Graphics
  • Select Rage 2, if it’s not in the list click the Browse button and choose the .exe file
  • Choose High Performance from the drop down menu > click Apply
  • Close AMD Radeon Settings and see if this fixed the issue

6. Reinstall Rage 2

If nothing goes your way, then you should attempt reinstalling Rage 2.

Fully uninstall the game from the Control Panel, then download the game back to have a clean running game.

We hope that you found our guide on fixing Rage 2 error code 35 quite useful. If you know other working solutions, feel free to share them with us in the comment section below.

READ ALSO:

Failed to start game with shared content Steam error [PRO GUIDE]

Steam is a great gaming client, but many users reported Failed to start game with shared content please update these games first error. This error usually affects Call of Duty series, and in today’s article, we’ll show you how to fix this problem once and for all.

How can I fix Failed to start game with shared content Steam error? The first thing you should do is to check the game’s cache. If everything is in order, make sure that the game you’re trying to run is up to date. If the issue persists, you might have to reinstall the game to fix it.

What to do if I can’t start the game with shared content on Steam?

  1. Verify Integrity of Game Cache
  2. Make sure the games are always updated
  3. Delete game files and download again

1. Verify Integrity of Game Cache

Sometimes verifying the game cache can fix Failed to start game with shared content error. To do that, follow these steps:

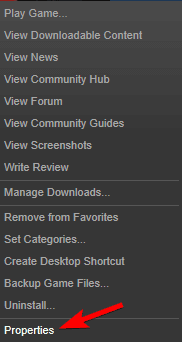
  1. Go to your Steam Library and right-click on the game that gives you this error and select Properties.
    properties steam Failed to start game with shared content Steam
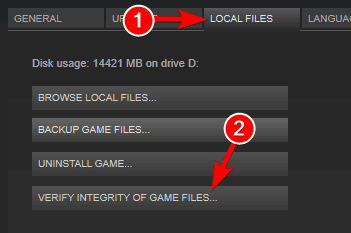
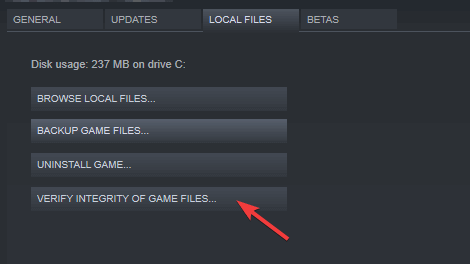
  2. Now, navigate to Local files and click Verify Integrity of Game Cache.
    verify integrity of game files local files

After the process is finished, check if the error is resolved.


2. Make sure the games are always updated

If verifying the integrity of the game cache didn’t fix the Failed to start game with shared content error, you need to ensure that the game is up to date.

Usually Steam updates games automatically, but sometimes issues can occur. If that’s the case, make sure that the game you’re trying to run is set to automatically update:

  1. Open the Properties window.
  2. Open the Update tab and check Always keep this game up to date option.

3. Delete game files and download again

If you have tried the previous methods but the issue is still there, the problem might be with the game itself. If that’s the case, you need to delete all the local files and download the game again from the Steam cloud. Don’t worry, all your saved games will be there once you reinstall the game.

There you go, these are three simple solutions that might help you with Failed to start game with shared content error. Use the comments section below to let us know if our solutions worked for you.

RELATED STORIES TO CHECK OUT:

Steam failed to load broadcast [ULTIMATE FIX]

Steam Broadcasting is a feature that helps you broadcast your gameplay without any other software, but some users reported Steam failed to load broadcast error messages.

There are many things that can cause steam broadcasting to malfunction. These include antivirus, bad network, computer issues, or problems with Steam settings. However, there’s a way to fix those issues.

How can I fix Steam failed to load broadcast error? Your Internet connection is crucial for broadcasting, so make sure that your connection is fast and stable enough for streaming. Bear in mind that your antivirus or firewall can block Steam by accident, so be sure to add Steam to the list of exceptions.

What to do if Steam broadcast isn’t working?

  1. Check your Internet connection
  2. Check your firewall software
  3. Disable your Antivirus Software
  4. Check Steam settings

1. Check your Internet connection

In order to use Steam, you’ll need a fast Internet connection, and if you’re getting Steam failed to load broadcast error, you need to check your Internet connection and ensure that it’s working properly.

If your connection is unstable or not fast enough, you might encounter this and other similar errors. If the connection is the problem, contact your ISP.

2. Check your firewall software

Firewall is security software that protects computers from any threat by monitoring its network connections. It stops unauthorized software from getting access to your computer. It sometimes stops applications such as Steam from connecting to the Internet. As a result, you might get Steam failed to load broadcast error.

To fix this issue, check your firewall settings and make sure that Steam is allowed through your firewall.

3. Disable your antivirus software

Antivirus can sometimes identify Steam as a threat and cause Steam failed to load broadcast error to appear. You can solve this by temporarily disabling your antivirus or by adding Steam to the list of exclusions in your antivirus.

In case that doesn’t work, you might have to uninstall your antivirus. If uninstalling or disabling the antivirus fixes the issue, try switching to a different antivirus.

There are worthwhile choices for you to defend your PC and not block other applications from properly running. Hence, to accomplish that you should choose the best highest detection rates antivirus tools.

4. Check Steam settings

If you have tried all the steps above and you’re still getting Steam failed to load broadcast error, perhaps your settings are the problem. Here’s how to change them:

Turn on the broadcasting indicator

Follow these steps to carry out this method:

  1. Go to Steam then Settings.
  2. After settings, go to Broadcasting.
  3. Go to the Always show Live status option and check it.
  4. After step 3, an indicator will appear at the right upper corner of your screen anytime you are broadcasting.

Lower Steam Quality

To fix this problem, you can lower Steam quality in its settings or change the stream resolution. This might put an end to the problem.

Turn on Steam Broadcasting

  1. Open Steam and go to Settings.
  2. Go to broadcasting and check the Privacy setting option.
  3. Click on the Anyone can watch my games option if you want your broadcast to be public.

Reinstall Steam

If Steam still malfunctions after trying the solutions above, the issue might be a corrupt installation. Uninstall and reinstall Steam and see if it works.

There you go, these are just a couple of simple solutions that might help you fix Steam failed to load broadcast error. Be sure to try them all and let us know if they worked for you.

What to do if your printer prints paper crooked [EXPERT FIX]

Many HP users have reported about their printer printing papers crooked instead of printing it straight. The problem, strangely enough, happens to have affected only HP printers of specific series.

My printer is printing a crooked paper for no apparent reason? Fix it by realigning the printer. One of the most common reasons for crooked paper is misconfigured cartridge alignment in the printer. Additionally, you should reinstall printer drivers or check with HP support for further clarification.

Check instructions for these respective steps below.

Why my printer prints paper crooked?

  1. Realign Printer
  2. Uninstall and Reinstall the Driver
  3. OEM’s suggestions

1. Realign Printer

As discussed already, the issue may occur due to a misconfigured alignment of the printer paper tray. You can easily realign the printer cartridge from the tools menu. However, before that, make sure you that you remove and reinsert the duplexer to make sure no paper jam exists. Here is how to do it.

  1. Remove the duplexer from your printer. Make sure there is no paper stuck anywhere. Reinsert the Duplexer and make sure it is placed correctly. Also, wipe off if any dust exists on the duplexer.
  2. Press the Setup button ( wrench icon) on the printer.
  3. Use the right-arrow key to navigate to the 6th option – Tools.
  4. Press OK to select Tools.
  5. Press the right-arrow button to reach the Align Printer option.
  6. Click OK to select the Align Printer option.

The printer will show “Aligning cartridges .. please wait. This process will take approximates 7 minutes“.

After the process is complete, the printer will print a page automatically with a message “Alignment successful. Recycle or discard the [age printer. Press OK to Continue“.

Now try to print any document on your printer and check for any improvements.

2. Uninstall and Reinstall the Driver

Another common issue that may cause the printer to behave abnormally is the outdated or buggy printer driver software. Users have reported that uninstalling and reinstalling the printer driver has resolved the issue. Here is how to do it.

  1. Search for Device Manager in the search bar and open it.
  2. In the Device Manager, locate and expand the Print Queues section.
  3. Right-click on the problematic printer and select “Uninstall Device”. Click on Yes if asked to confirm the decision.
    Print Queues Uninstall Device
  4. After the printer driver is uninstalled, reboot the system.
  5. Windows will automatically install the printer driver after the restart.
  6. If the Printer is still not detected, open Device Manager and go to Actions > Scan for hardware changes.

Make sure you have the latest version of HP Solution Center installed as well. Also, try to uninstall and reinstall the HP Solution Center if uninstalling the drivers did not work.

3. OEM’s suggestions

According to HP support, the printer itself cannot print the paper crooked. It is only possible if the papers are fed crooked. The problem is usually with the paper tray and the alignment. Even if the paper tray is not loose or miss aligned, it is possible that some object ( like a piece of paper) is causing the issue.

Make sure to clean the paper tray and look for any objects and realign the printer to before considering repairing the printer.

How do I fix DS4Windows Controller Connection in Windows 10?

DS4 Windows is an application intended for Sony’s Dual Shock 4 controllers. It’s more of an emulator that allows you to fool Windows 10 into thinking that you actually are connected with a XBOX controller.

Because many gamers just prefer a controller instead of a mouse and a keyboard, the functionality of this tool is imperative for them.

Lately, many of them are complaining about not being able to connect their controller with the Windows 10 PC through the DS4 Windows app. If you are among them, let’s see how we can fix the issue.

Most often than not, when DS4 Windows is failing to recognize your controller in Windows 10, you will stumble upon the No Controllers Connected (Max 4) error message.

What can I do if  DS4 Windows is not detecting my controller on Windows 10 PC? The fastest solution is to uninstall the latest Windows update. In most cases, this is the main cause of the problem. If that doesn’t work, then uninstall and reinstall DS4 Windows and then install PS4 Remote Play app.

Let’s see how to do that in the guide below.

How do I get my PC to recognize my PS4 controller?

  1. Uninstall the latest Windows 10 update
  2. Install PS4 Remote Play app for Windows 10

You should start with some simple steps, just to make sure that you need a more complex solution:

  • Check your hardware. If your controller is broken, this guide does’t apply to you.
  • Restart your Windows 10 computer.
  • Update DS4 Windows.
  • Uninstall and reinstall the application.

1. Uninstall the latest Windows 10 update

Most of the users are reporting that the error occurred after a Windows 10 update, so let’s start with the simplest fix, and that’s deleting that update. To do that, follow the steps:

  1. Open Start and click on Settings.ds4 windows can't regognize controller
  2. In Settings, click on Update & Security.ds4 windows won't detect controller in windows 10
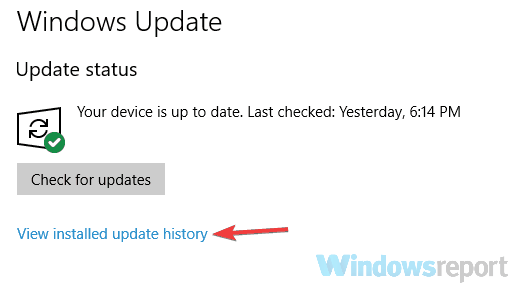
  3. In the left side panel you should be on Windows Update. In the right section, click on View update history.view update history ds4 wondows can't connect controller
  4. Now, in the top of the window you should see the Uninstall updates option. Click on it.uninstall updates ps4 controller connection problem
  5. Select the update that caused the problem (usually is the latest – you can see the date in the last right column), right-click it and hit Uninstall.
  6. Wait for the process to finish and restart your PC.

This should solve the problem. If you’re still experiencing some connection issues, go to the next solution.

2. Install PS4 Remote Play app for Windows 10

This solution is a bit more complicated, but it is tried and true. It’s confirmed as working by the majority of the users. To do it yourself, follow the steps:

  1. Download and install PS4 Remote Play.
  2. After the install finishes, go to the Windows search box and type Device Manager. Hit Enter.ds4 windows doesn't recognize my controller in windows 10
  3. In Device Manager there should be a lib32 Wireless driver. Right-click the Wireless Controller Driver and uninstall it. Also check mark Delete driver software for this device before uninstalling it.
  4. After the uninstall finishes, connect the DS4  and let Windows install the drivers automatically.
  5. Now download, install and set up DS4 Windows without the controller connected.
  6. After that, connect the controller. It should be instantly recognised.
  7. In DS4 Windows setting, check mark the Hide DS4.
  8. If you only need the default profile, uncheck Swipe touchpad to change profile.

If you want to make sure that you install the driver correctly and also save some time, we recommend using a dedicated driver updater/ fixer such as Fortect Driver Updater. It removes all risks that come with faulty drivers and updates them within seconds.

That’s it. Your controller should now be recognized instantly and everything should be in working condition. Again, this solution is confirmed by many, and if you do it properly it should certainly work for you, too.

If you have any more questions, don’t hesitate to reach for the comments section below.

Windows Media Player cannot connect to the server error [SOLVED]

The Windows Media Player cannot connect to the server error is one that arises for some Internet Explorer users. That error message pops for some IE users when they try to watch videos via SharePoint Online library. Consequently, Windows Media Player doesn’t play the videos.

Why is my Windows Media Player unable to connect to the server? Firstly, to fix it check the authentication with Office 365. The lack of access permission for Windows Media Player usually leads to this error. On the other hand, if that doesn’t help, add the SharePoint URL to Internet Explorer’s Trusted Sites or re-register the Wmnetmgr.dll File.

Continue below with the detailed step-by-step instructions.

How do I fix Windows Media Player cannot connect to the server error?

  1. Check That You’re Authenticated With Office 365
  2. Add the SharePoint URL to Explorer’s Trusted Sites
  3. Reregister the Wmnetmgr.dll File

1. Check That You’re Authenticated With Office 365

First, check that you’re signed in with Office 365. To do that, users need to sign in with SharePoint Online with Office 365 account credentials. Then select the Keep me signed in option if it’s not already selected.

Some users might need to sign out of Office 356 first, select the Keep me signed in setting and then sign in with Office 365 account credentials.


2. Add the SharePoint URL to Explorer’s Trusted Sites

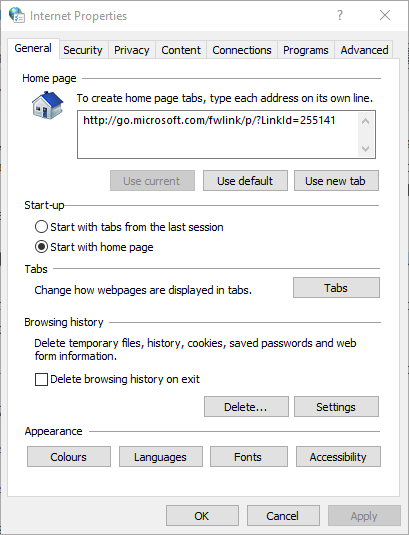
  1. To ensure SharePoint isn’t in any way blocked, add the SharePoint page URL (which includes the videos) to Internet Explorer’s trusted sites. To do so, open Internet Explorer.
  2. Click Tools and select Internet options to open the window shown directly below.internet properties
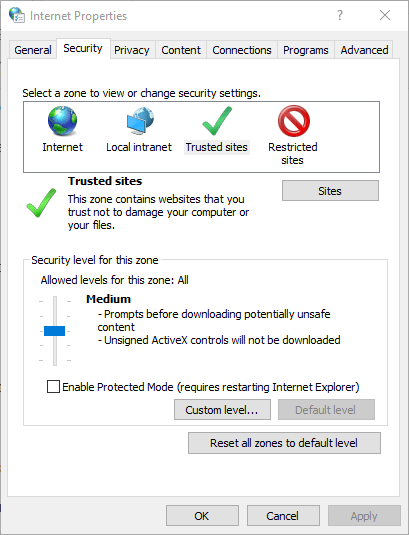
  3. Select the Security tab.
  4. Select the Trusted Sites checkmark on the Security tab.internet properties trusted sites
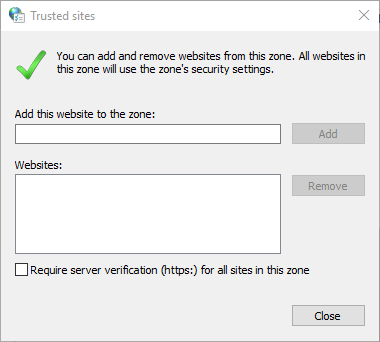
  5. Press the Sites button.trusted sites add url
  6. Next, enter the required SharePoint URL (for organization) in the text box.
  7. Click the Add button.
  8. Click Close to exit the Trusted sites window.
  9. Select the Apply option, and click OK to close the window.

3. Reregister the Wmnetmgr.dll File

Users have also said they’ve fixed the Windows Media Player cannot connect to the server error by registering wmnetmgr.dll file.

  1. To do that, click the Type here to search button to open Cortana in Windows 10.
  2. Input ‘cmd’ in the text box to search for Command Prompt.
  3. Right-click Command Prompt and select the Run as administrator setting.
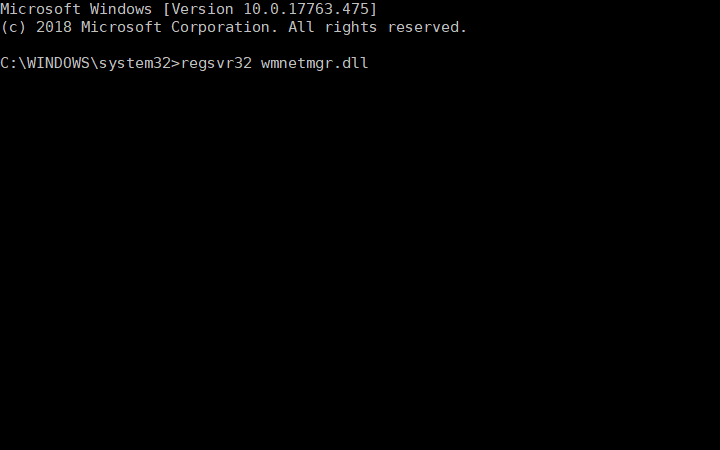
  4. Enter ‘regsvr32 wmnetmgr.dll’ in the Prompt’s window, as below, and press the Return button.regsvr32 wmnetmgr.dll cmd
  5. Then restart Windows.

One of those resolutions might resolve the Windows Media Player cannot connect to the server error so that users can play videos on SharePoint with Windows Media Player. Any IE users who have discovered other fixes for the same WMP server error are welcome to share them below.

RELATED ARTICLES TO CHECK OUT: 

Windows Media Player Cannot Detect The Length of The File [FULL FIX]

Windows Media Player allows the users to burn files to CDs and DVDs. Sometimes, the file burning function of the player may not work properly and start showing Windows Media Player cannot detect the length of the file error.

Is Windows Media Player unable to detect the length of the file when burning CD or DVD? First, use the drag & drop approach to add files instead of a complete batch. This way it’ll be easier for the application to identify files. Alternatively, you can run the dedicated troubleshooter or change the Music folder.

Check the detailed instructions below.

Fix Windows Media Player cannot detect the length of the file

  1. Drag & Drop the Track
  2. Run Troubleshooter for WMP
  3. Change the Music Folder
  4. Use a Third-party CD Burning Software

1. Drag & Drop the Track

Among the most recommended solutions to fix this error, one solution is to directly drag and drop the track you want to burn onto the Windows Media Player. Here is how to do it.

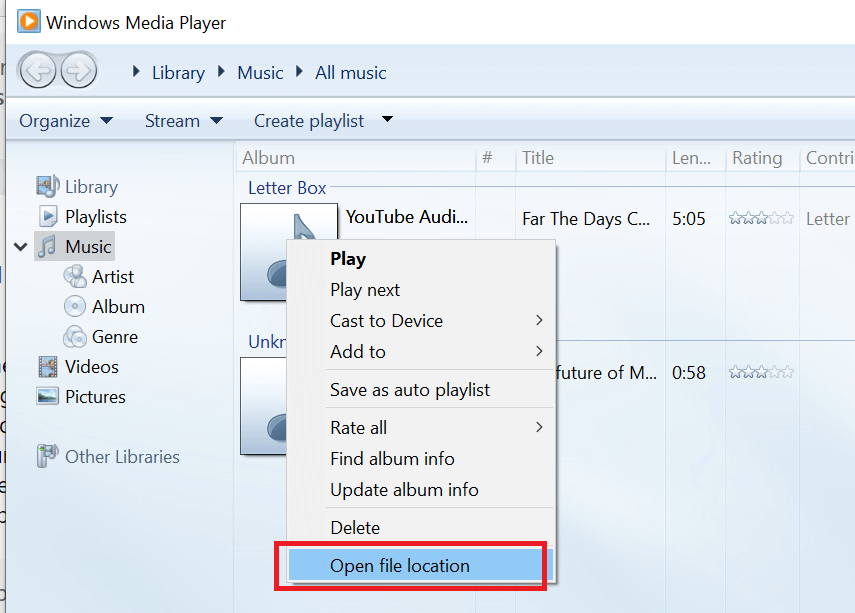
  1. In Windows Media Player, right-click on the track that is causing the error.
  2. Click on Open File Location. It will open the track directory.
    Windows Media Player Open File Location
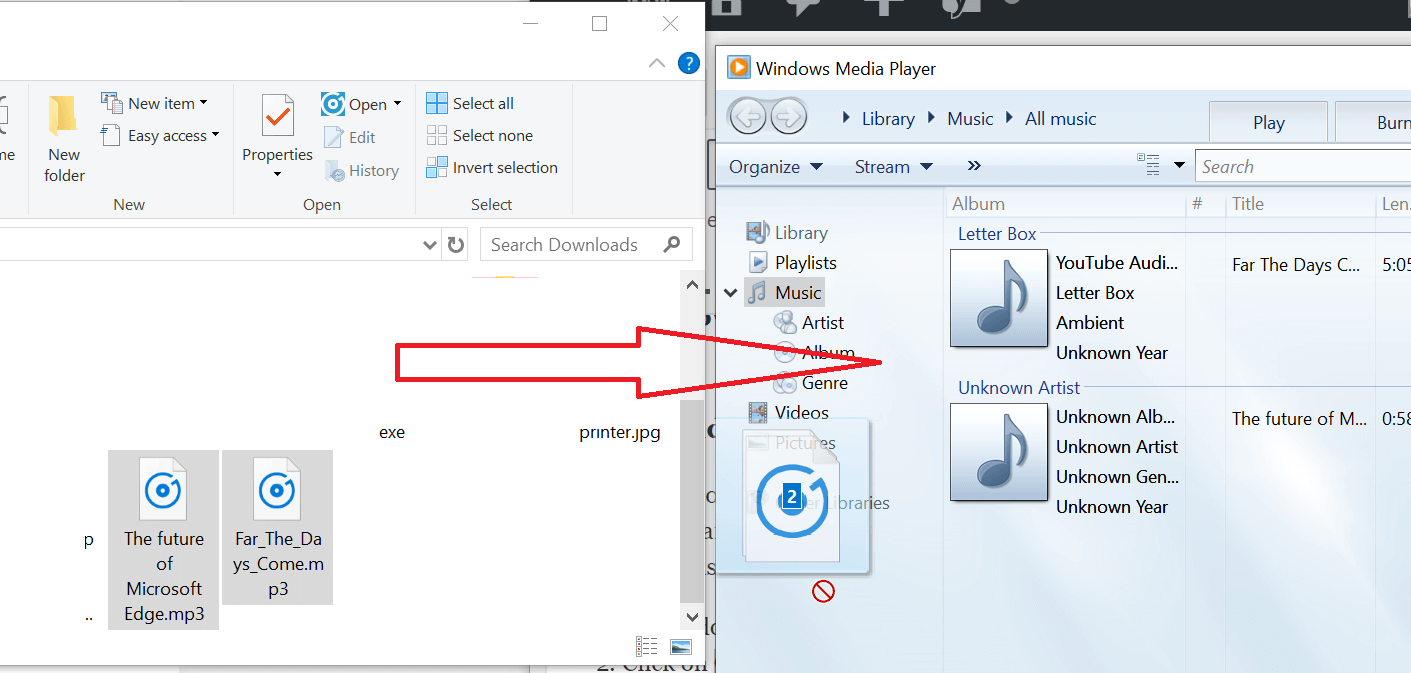
  3. Drag and drop the track from the folder onto the Windows Media Player.
    Windows Media Player - Drag and Drop
  4. Now Windows Media Player should detect the track length. Proceed with burning the track. Check if the error is resolved.

2. Run Troubleshooter for WMP

Windows OS comes with a built-in troubleshooter to find and fix any issues with the Windows Media Player. Run the troubleshooter to scan and fix problems with the media player. Here is how to do it.

  1. 1. Press Windows Key + R to open Run.
  2. Type Control and press OK to open Control Panel.
  3. Click on Troubleshooting.
  4. Click on Hardware and Sound.
  5. Scroll down and click on “Windows Media Player DVD“.
    Windows Media Player - Troubleshoot
  6. Click Next to proceed. The troubleshooter will look for any issues with the DVD Playback device as well as the WM Player and apply the fix.

Close the troubleshoot and restart the PC. After the restart, launch Windows Media Player and try to drag and drop the track again and check for any improvements.


3.  Change the Music Folder

If the file directory or the folder is corrupted, Windows Media Player may fail to recognize the files from that folder. If you can see the length of the media file in the File Explorer but not in the Media Player, try to move the tracks to a new folder.

  1. Select all the track you want to burn and copy it.
  2. Create a new folder outside the original directory and move the copied files to the new folder.
  3. Launch Windows Media Player and drag and drop the tracks from the new folder onto the player.
  4. Windows Media Player should detect the track length. Select the tracks and click on Burn.

4. Use a Third-party CD Burning Software

Now, this is not a fix or solution to Windows Media Player burning error. However, if you use the disc burning feature frequently, consider using a third-party CD burning software.

We have already covered the top 5 free burning software for Windows 10  that you can use to replace Windows Media Player. Third-party disc burning tools have more features and offer more customization options than the Windows Media Player.

RELATED STORIES YOU MAY LIKE:

Windows 10 update error 0x80d06802 [FIXED by EXPERTS]

The Windows 10 update error 0x80d06802 arises for some users when they try to download updates (via Settings). The full 0x80d06802 error message states: There were problems installing some updates but we’ll try again later. If you keep seeing this and want to search the web or contact support for information, this may help: Error 0x80d06802.

Users have stated in forum posts that the error arises for specific updates, such as KB4493440, KB4013429, and KB4493437 when they check for updates. As a consequence, users can’t get the required updates for Windows 10.

What can I do to solve the update error code 0x80d06802 on Windows 10? Firstly, run the Windows Update Troubleshooter from the Settings menu. This usually deals with minor halts in the system update delivery. If the issue persists, reset Windows Update services with Command Prompt or re-register DLL files.

Read about the detailed instructions below.

Fix Windows Update error 0x80d06802 with these steps

  1. Open the Windows Update Troubleshooter
  2. Reregister DLL Files
  3. Reset Windows Update via the Command Prompt
  4. Download the Required Updates From Microsoft Update Catalog

1. Open the Windows Update Troubleshooter

The built-in Windows Update troubleshooter fixes quite a few 0x80 error codes. Therefore, running the Windows Update troubleshooter might provide a fix for error 0x80d06802. Users can open that troubleshooter as follows.

  1. Open Cortana with the Windows key + Q hotkey.
  2. Input ‘troubleshoot’ in the search box.
  3. Then click Troubleshoot settings to open the Settings app as shown directly below.windows update troubleshooter
  4. Select Windows Update and press the Run the troubleshooter button.
  5. Thereafter, the Windows Update window will open; and users can go through its suggested resolutions.windows update troubleshooter detecting problems

2. Reregister DLL Files

Reregistering a few Windows Update DLL files might also resolve error 0x80d06802 for some users. The mssip32, initpki.dll, and mssip32.dll are three of the more essential DLL files to reregister. Users can register those DLL files as follows.

  1. Open an elevated Command Prompt window.
  2. Enter ‘regsvr32 mssip32.dll’ in the Prompt, and press the Return button.
  3. Input ‘regsvr32 initpki.dll’ and press Enter.regsvr32 initpki.dll cmd
  4. Then enter ‘regsvr32 wintrust.dll’ and press Return to reregister the wintrut.dll.
  5. Close the Command Prompt, and restart the desktop or laptop.

As an alternative, you might consider specialized support from a PC repairing software that will take care of problematic DLL files.

3. Reset Windows Update via the Command Prompt

Resetting Windows Update is one of the most common fixes for numerous update error messages. So, resetting Windows Update is certainly worth a shot as that might repair update components. Users can do that with the Command Prompt as follows.

  1. Press the Windows key + X keyboard shortcut to open a Win + X menu.
  2. Select Command Prompt (Admin) on the menu.
  3. Then users need to enter this series of separate commands and press Enter after each:
    net stop wuauserv
    net stop cryptSvc
    net stop bits
    ren C:\Windows\SoftwareDistribution\ SoftwareDistribution.old
    ren C:\Windows\System32\catroot2 Catroot2.old
    net start wuauserv
    net start cryptSvc
    net start bits
  4. Thereafter, close the Command Prompt and restart Windows.

4. Download the Required Updates From Microsoft Update Catalog

Users can also get the updates that error 0x80d06802 occurs for from the Microsoft Update Catalog. Open the Microsoft Update Catalog in Internet Explorer or another browser. The enter the update number in the search box on Microsoft Update Catalog. Click Download to download a compatible update. Then users can manually install that update.

Those are some of the best methods for fixing error 0x80d06802 so that users can install the required updates. In addition, resetting Windows 10 to its factory defaults can also resolve the error.

How to fix frequent Yakuza Kiwami 2 bugs on PC

The remake to Sega’s 2006 Yakuza 2 is finally out. The open-world third-person adventure brings back old characters with new gameplay features, aswell as new story segments.

All these features in Yakuza Kiwami 2 are aimed to tie the older storyline to other titles in the franchise.

We’ve grown accustomed to the fact that no game launch can be considered flawless, and Yakuza is no exception. With a few hiccups here and there, but worry not, we’ve got a few solutions for you.

How do I fix common Yakuza Kiwami 2 issues?

Here’s the list of bugs we’re going to focus on in this guide:

  1. Game crashes
  2. Framerate drops
  3. Out of memory alerts
  4. Audio issues

1. Fix Yakuza Kiwami 2 crashes

Most of the times, this issue can be traced to faulty game files, maybe something got corrupted at some point. But we’ve got a solution for this, that can alleviate installation issues as well. Simply follow these steps:

  1. Open up your Steam client.
  2. In the Library section, right-click on Yakuza Kiwami 2 game and click on Properties from the menu.
  3. Now select the Local files tab and click on the Verify integrity of game files.
  4. After this is done, try running the game again.

A more efficient solution would be to use a real-time game booster. This type of tool has game-oriented features that aim to eliminate crashes and lag.

With a few clicks, it can optimize your computer’s system and help it reach peak performance while you play. Moreover, it enables you to customize the settings and have full control over the optimization process.

⇒ Get Game Fire

2. Fix Yakuza Kiwami 2  low FPS

Proceed by updating your graphic card with the latest drivers. Another good solution is disabling the vertical sync, since it can reduce graphical tearing.

If after this, you are facing tearing while playing Yakuza,  we suggest you toggle vertical sync to back on in your game settings. Or alternately, you can switch from a higher detail setting to a lower one.

3. Fix Out of memory errors

Firstly go to your Control Panel and select System and Security and then click on System. Now you’re going to click on Advanced System Settings, select the Virtual Memory window, uncheck automatically manage paging file size for all drives.

Now select a value that would help you in running the game smoothly.

For additional solutions on how to fix low memory issues, check out the guides listed below:

4. Fix Yakuza Kiwami 2 audio bugs

First things first, try changing your audio from surround sound to stereo. On your desktop, just right click on the speaker icon on the bottom right corner of your screen and select Sounds.

Now head on over to Playback and disable all the sound devices except the internal speaker or the speaker which you wish to use.

Tips for a smoother Yakuza Kiwami 2 gameplay

If you’re running the game from your Steam library, remember to whitelist your game on Windows Firewall or to add an exception for it in your antivirus.

Also, if you’re running an overclocking program, we suggest yo turn it off if your game is unstable.

Always remember, when running a new game, to check up on the minimum system requirements. These

  • OS: Windows 7 (64-Bit Required)
  • Processor: Intel Core i5-3470, 3.2 GHz / AMD Ryzen 3 1200, 3.1 GHz
  • Memory: 4 GB RAM
  • Graphics: GeForce GTX 660, 2 GB / Radeon HD 7870, 2 GB
  • DirectX: Version 11
  • Storage: 42 GB available space

We hope that these fixes were of some help to you. We would love to know on your feelings related to Yakuza Kiwami 2 in the comment section down below.

RELATED STORIES TO CHECK OUT:

New Xbox One 1910 preview build brings estimated install time feature

The latest Xbox One 1910 Preview build, which Microsoft is releasing today for Skip Ahead Xbox Insiders will make the long downloading periods slightly more bearable. After installing the update, the Xbox One OS will now display the estimated download time for games, telling gamers when they will be able to finally play.

“We are adding new features in this build to the Download Queue in My Games and Apps today based on User feedback,” explained Bradley Rossetti, Xbox Insider Team Lead. “You will now see the Estimated time to finish downloads appears in queue and Allow users to move titles in the queue up and down, not just move to front.”

In an era where Xbox One games can weigh more than 100GB of storage and take hours to download, this should be a very welcome improvement. As a reminder, certain Xbox One games support a “Ready to start” feature allowing gamers to launch them before they’re fully downloaded. Other games also support FastStart, a new technology that can get you into your game in half the time by identifying the most important bits to download first.

This new feature won’t be available until the fall when the 1910 update for the Xbox One is released. In the meantime, the Xbox team is planning a new system update (1906) in June, but we don’t know yet what’s in the pipeline for this release.

Purple-colored Xbox One S Fortnite Limited Edition leaks

A new Fortnite limited-edition Xbox One S console is in the pipeline and could be launching soon. Roland Quandt from the German blog Winfuture.de managed to get a picture of the packaging, revealing a purple-colored console with a matching controller.

It’s been quite some time since Microsoft unveiled a limited-edition Xbox One S, though you may remember the custom-designed Gears of War 4 console that launched ahead of the game’s release in October 2016, as well as the Xbox One S Minecraft Limited Edition Bundle that was released a year later. Microsoft is no longer selling these limited edition consoles, so it’s nice to see that a non-white Xbox One S will be available soon.

The Xbox One S Fortnite Limited Edition will reportedly be priced at $299.99 in the US, and it will come with special goodies for Fortnite fans. In case you missed it, Microsoft also released the disc-less Xbox One S All Digital Edition on May 7, though the $249 pricing for the less versatile hardware received lots of criticism right after the official announcement.

Surviving Mars video game is free to play on Xbox One this weekend

Surviving Mars is free to play this weekend for all Xbox One gamers with an Xbox Live Gold subscription. The free play period has already begun and lasts until Monday.

As with previous Free Play Weekends, all gameplay done during this period will save to the cloud and be available should players choose to buy the game and play it in the future. Xbox Achievements are also unlockable while playing it for free.

Surviving Mars is a city-building title in the same vein as Sim City. Players are tasked with colonising the planet Mars and building a thriving city while dealing with city planning issues and the dangers of building on a dead planet.

Here’s the official list of game features:

  • Building a sustainable colony in space: Building on a planet not fit for human life challenges you to build a smart, functional colony. Bad planning isn’t about traffic jams, it’s about survival of your colonists. You really don’t want rolling blackouts in a city constructed in a place without oxygen.
    Individually simulated colonists: Each colonist is a unique individual with problems and strengths that influence the needs and behavior of the other colonists.
  • Things can get really interesting if your chief scientists develops alcoholism after one too many long nights in the lab.
  • Futuristic Space Dome construction: Retro-futuristic super structures housing colonists, factories and commercial buildings with their own “neighborhood personality.” Create colonies that value science over everything else, while tired workers drink their pay away at a local bar, or attempt a utopia among the stars.
  • Exploration of Mars’ secrets: Inspired by the classic sci-fi of Asimov and Clarke, Surviving Mars holds many secrets. During each playthrough players may encounter one of Mars’ individually crafted mysteries. Uncovering these secrets might bring your colony great fortune, or terrible ruin.
  • Randomized research tree: Combine static and random research through exploration, which allows for a different experience for each journey through the game. Attain new scientific breakthroughs by exploring the uncharted terrain of Mars’s surface.
  • Unique retro-futuristic aesthetic: A sleek, modern take on the bright futurism of the 1960s. A time of exploration and adventure.

Have you played Surviving Mars before or will this be your first time? Share your thoughts with the community in the comments below and then follow us Twitter for more Xbox gaming news.

The app was not found in the store. ?

Castlevania Anniversary Collection launches on Xbox One with heaps of classic video games

Castlevania Anniversary Collection is now available to play on Microsoft’s family of Xbox One consoles. This new collections contains eight classic Castlevania video games, most now playable for the first time on Xbox One.

All of the video games are playable in their original aspect ratios and graphic styles including Castlevania The Adventure and Castlevania II Belmont’s Revenge which both originally came out on the Nintendo GameBoy in black and white (well, black and green).

This collections also contains Kid Dracula which has never before been released in English.

Here’s the official game description and trailer:

Konami’s Castlevania Anniversary Collection traces the origins of the historic vampire franchise. Included is a unique eBook with details provided by developers, artists and others inspired by the Castlevania legacy which sheds a fresh light into the world of Castlevania.

Released as part of the Konami 50th Anniversary celebration, relive these timeless classics that helped define the platformer genre. From the Belmont clan to their extended bloodlines and allies, the Castlevania Anniversary Collection is the best first step for anyone to take into the world of Castlevania and the fight against Dracula!

Here’s the full list of included video games in Castlevania Anniversary Collection on Xbox One:

  • Castlevania
  • Castlevania II Simon’s Quest
  • Castlevania III Dracula’s Curse
  • Super Castlevania IV
  • Castlevania The Adventure
  • Castlevania II Belmont’s Revenge
  • Castlevania Bloodlines
  • Kid Dracula (never released in English before)

Are you a Castlevania fan? Let us know which game you think is the best one in the comments below and then follow us on Pinterest for more Xbox gaming content.

Windows 10 Build 18898 adds new disk information in Task Manager

This week, Microsoft rolled out the May 2019 Patch Tuesday Updates for different versions of Windows 10. It looks like the series of Windows 10 updates does not end here.

Fast Ring Insiders recently got access to a new build: Windows 10 20H1 preview build 18898. 

Microsoft started to work on 20H1 builds even though Insiders in the Release Preview Ring are currently testing the May 2019 Update. This feature update is expected to land at the end of this month.

Let’s discuss what changes, improvements and bug fixes 20H1 build 18898 brings to Windows 10 users.

Windows 10 20H1 build 18898 changelog

New Disk type option

Microsoft rolled out a new feature in Task Manager’s Performance tab. The tab now shows what type disks you have. This feature will help users to differentiate among their disks based on the disk type.

DWM crash bug fix

Some Windows 10 users reported DWN crash issues on their Windows 10 systems. This bug was introduced by some recent releases and Microsoft fixed the issue in Windows 10 20H1.

Explorer.exe crash issues resolved

Microsoft addressed a bug that caused explorer.exe to crash. Microsoft fixed pcshell.dll issues introduced by some recent builds.

Japanese IME settings bug fix

Previously, users failed to apply Japanese IME settings for some desktop bridge apps. Microsoft recommended Windows 10 users to reset their application to resolve the issue. You need to navigate to app Settings >> Apps >> Choose your app >> Advanced Options >> Reset. 

We can not deny the fact that Windows 10 users and developers often experience bugs with Insider preview builds.

Therefore, downloading and installing the update on your production machine is not a good idea. Microsoft acknowledged a long list of known bugs that came along with 20H1 release.  

RELATED ARTICLES YOU NEED TO CHECK OUT:

Server execution failed File Explorer error [EXPERT FIX]

Some users have stated in forums that a Server execution failed error message appears when they try to open File Explorer. Consequently, those users can’t utilize File Explorer.

Are you seeing the Explorer.exe Server Execution Failed on your computer? Fix it by setting up a new Admin account. That should promptly deal with the issue, seemingly caused by the corruption of your current profile. Alternatively, try editing the registry entry or rolling back Windows 10 to an earlier point.

Read about instruction in detail below.

Why does my computer say Server execution failed?

  1. Roll Back Windows 10
  2. Set Up a new Admin Account
  3. Edit the Registry
  4. Reset Windows 10

1. Roll Back Windows 10

The System Restore utility might fix the Server execution failed error for corrupted user accounts. System Restore might provide a resolution if users can restore Windows to a date when File Explorer opened ok. Users can roll back Windows 10 as follows.

  1. Open Run’s Window.
  2. Enter ‘rstrui’ in the Open box, and select the OK option.
  3. Click Next and select Show more restore points.system restore server execution failed file explorer
  4. Select a restore point to roll Windows back to.
  5. Press the Scan for affected programs button to check what software gets deleted for a restore point.system restore check affected programs server execution failed file explorer
  6. Click Next to select the Finish option.

We recommend installing a reliable third-party PC repair tool to scan your device and restore compromised system settings, as well as the registry values to their default Microsoft settings.

Repairing and replacing the damaged files are two equally important actions for an optimal operating system. An all-in-one software repair solution can provide a thorough system diagnosis and perform these actions within minutes.

Plus, using this solution you’re able to fix functionality issues on Windows OS or other system malfunctions caused by corrupted files.

2. Set Up a new Admin Account

The Server execution failed error is usually due to a corrupted user account. Some users have fixed the issue by logging in to Windows’ built-in admin account. This is how users can activate the built-in admin account.

  1. Open the Cortana app with the Windows key + Q hotkey.
  2. Enter the search keyword ‘cmd’ in the text box.
  3. Then right-click Command Prompt and select Run as administrator.
  4. Enter net user administrator /active:yes in the Prompt, and press the Return key.net user administrator /active:yes
  5. Close the Command Prompt, and restart Windows 10.
  6. Log in to the new Administrator account.
  7. Then try opening File Explorer in the new admin account.

3. Edit the Registry

Other users have fixed the Server execution failure by restoring the Personal string value in the registry to its default %USERPROFILE%\Documents value. However, set up a system restore point before editing the registry just in case. Then follow the guidelines below to edit the registry.

  1. Press the Windows key + X hotkey, and click Run to open that accessory.
  2. Then input ‘regedit’ in Run’s Open box, and select the OK option.
  3. Enter this path in the registry editor’s address bar:
    Computer\HKEY_CURRENT_USER\Software\
    Microsoft\Windows\CurrentVersion\
    Explorer\Shell Folders
    . HKEY_CURRENT_USER > Software  > Microsoft > Windows > CurrentVersion > Explorer > Shell Folders server execution failed file explorer” width=”975″ height=”623″>
  4. Then double-click Personal to open the window shown directly below.edit string %userprofile%Documents
  5. The Value data box for the Personal string should include the path for your Documents folder. Enter ‘%USERPROFILE%\Documents’ in the Value data box.
  6. Then click the OK button.
  7. Close the Registry Editor, and restart Windows.

4. Reset Windows 10

As a last resort, try resetting Windows 10. That will reset Windows 10 to its default settings, but users will also need to reinstall the software that didn’t come bundled with the platform. Users can reset Win 10 as follows.

  1. Press the Windows + S hotkey.
  2. Enter ‘reset’ as the search keyword.
  3. Then click Reset this PC to open the Settings window as shown directly below.reset windows 10 server execution failed file explorer
  4. Click Get started to open the window shown below.reset windows 10 keep my files server execution failed file explorer
  5. Select the Keep my files option.
  6. Then press the Next and Reset buttons to confirm.

That’s how users can fix the Server execution failed in Windows 10. Users who have fixed the same error with any other alternative resolutions are welcome to share those fixes below.

Fix: Required storage device removed Xbox error

Sometimes while playing your favorite game on Xbox you might encounter certain errors. In most cases these errors are relatively harmless, but some errors can be severe.

Users reported Required storage device removed error on their Xbox, and today we’re going to show you how to fix it.

Required storage device removed Xbox error, how to fix it?

Fix – Xbox error “Required storage device removed”

    1. Clear system cache
    2. Format your hard drive
    3. Set discs to play automatically
    4. Use an 8GB USB flash drive or larger
    5. Restart your console

Solution 1 – Clear system cache

According to users, they managed to fix this error simply by clearing the system cache.

Your cache can sometimes become corrupted and that can lead to this and many other errors. You can fix this error easily by following these steps:

  1. On the Xbox Home screen go to System.
  2. Select Storage.
  3. Select any device and press the Y button on your controller.
  4. Select Clear System Cache option.
  5. After clearing the cache, restart your console and check if the problem is resolved.

Solution 2 – Format your hard drive

Users reported that clearing the cache doesn’t always fix the issue, therefore you might want to try formatting your Xbox hard drive.

Keep in mind that formatting your hard drive will delete all files from your drive, therefore be sure to back up all important files. To format your hard drive, do the following:

  1. Start your Xbox without a disc in its tray.
  2. Go to Settings > System.
  3. Select the Storage option.
  4. List of all storage devices will appear. Highlight your hard drive and press the Y button on the controller.
  5. Select the Format option.
  6. You should see the confirmation message on the screen.
  7. Choose Yes to start the formatting process. During this step you might be asked to insert the console’s serial number, so be sure to do that. You can find the serial number of your console on its back side.

Once again we have to mention that this process will delete all files, including saved games and downloaded content, so be sure to back them up. After formatting the drive, check if the error is resolved.

Solution 3 – Set discs to play automatically

Few users reported that they fixed the issue simply by enabling disc autoplay option. To do that, follow these steps:

  1. Press the Menu button on your controller.
  2. Go to Settings > Disc & Blu-ray.
  3. In the Disc settings section check the Play disc automatically option.

After doing that, the issue should be resolved.

Solution 4 – Use an 8GB USB flash drive or larger

Users reported this issue while using a 4GB USB flash drive with their Xbox. To fix this problem you just need to replace the 4GB flash drive with an 8GB drive or larger.

After doing that, format the 8GB flash drive by following the steps from Solution 2. Once your USB drive is formatted, the issue should be resolved.

Solution 5 – Restart your console

Sometimes you can fix this error simply by restarting your console.

To do that, just press and hold the power button on your Xbox until it turns off. Now press the power button again to turn on your console and check if the error is resolved.

Required storage device removed error can cause certain problems on your Xbox, but this isn’t a serious error and you should be able to fix it simply by clearing your system cache or by formatting your hard drive.

READ ALSO:

How to fix Xbox error Update failed

In order to improve Xbox gaming experience, Microsoft is constantly releasing new software features and bug fixes.

If you want the best Xbox experience, it’s important that you keep your software up to date by downloading the latest updates.

Unfortunately, sometimes you can experience certain errors such as Update failed Xbox error.

“Update failed” Xbox error, how to fix it?

Fix – Xbox error “Update failed”

    1. Try installing the update again
    2. Check if you have enough storage space
    3. Delete the system cache
    4. Reinsert the storage device
    5. Install the update from a USB flash drive or CD
    6. Roll back updates
    7. Use the USB flash drive as a storage device
    8. Check your network connection
    9. Try using a wired connection
    10. Use your phone as a mobile hotspot
    11. Disconnect all external storage devices
    12. Restart your modem
    13. Delete and redownload your profile
    14. Delete the corrupted content
    15. Format your hard drive
    16. Replace your hard drive

Solution 1 – Try installing the update again

If you get Update failed error message after trying to install a certain update, you should try to install it again and check if the error reoccurs. To do that, follow these steps:

  1. Restart your console.
  2. Once your console restarts, press the Guide button on the controller.
  3. Go to Settings and select System Settings.
  4. Now select Network Settings. Select the Wired Network or your wireless network.
  5. Choose Test Xbox Live Connection option and select Yes if you’re asked to update the console software.

Solution 2 – Check if you have enough storage space

Before you try to install new software updates, be sure that you have enough storage space to install them.

Some updates require more than 200MB, therefore you might have to remove some files from your hard drive.

To do that, follow these steps:

  1. From Xbox Home go to Settings and select System.
  2. Select Storage and choose your storage device.
  3. Now you should be able to choose between different content including Games and Apps, Gamer profiles, Demos, Videos, Themes, Gamer Pictures, Avatar Items, System Items and Music.
  4. Select the content that you want to delete, for example, Demos, Music or Videos and choose Delete.
  5. Select Yes to confirm that you want to delete the content.

In some cases you don’t even have to delete your content. If you have external storage device attached, you can simply move your content to it to make enough space for the update to install.

Solution 3 – Delete the system cache

Your system cache includes game updates, system update installation packages and other files that can sometimes interfere with your Xbox and cause this and many other errors to appear.

To fix this problem on Xbox 360, you need to clear the system cache by following these steps:

  1. Press the Guide button on your controller and choose Settings. Select System Settings.
  2. Now select Storage.
  3. Highlight a storage device and press Y to open Device Options. Keep in mind that you can select any storage device to clear cache for entire system.
  4. Choose Clear System Cache option.
  5. When the confirmation message appears, choose Yes.

If you own Xbox One, you can clear cache by doing the following:

  1. Press and hold the power button on your console to turn it off.
  2. Unplug the power cable from your console.
  3. While the power cable is plugged out, press the power button on the console few times. This process will ensure that any remaining power in the battery is drained thus clearing the cache.
  4. Connect the power cable to the console and wait until the light on power brick turns from white to orange.
  5. After that, press the power button on your console to turn it on.

Solution 4 – Reinsert the storage device

According to users, sometimes you can fix Update failed error simply be reinserting the storage device.

If you’re using an Xbox Memory Unit or USB flash drive instead of a hard drive, simply remove it and reinsert it. If you’re using a hard drive, you need to remove it by following these steps:

  1. Turn off your console.
  2. Position the console horizontally.
  3. On the right side of the console you should see a hard drive cover.
  4. Open the cover and remove your hard drive.
  5. After removing the hard drive, wait for a few seconds and reinsert it.

After reinserting the hard drive, try to install the update again.

Solution 5 – Install the update from a USB flash drive or CD

If you have problems while downloading and installing updates, you might want to install the update from a USB flash drive or a CD. To do that, follow these steps:

  1. Download the latest Xbox update to your PC.
  2. The update will be in a zip archive, therefore you’ll need to extract it.
  3. Copy the content from the zip archive to a USB flash drive. Alternatively, you can burn the content to a CD or DVD.
  4. Insert the USB drive or CD to your Xbox.
  5. Restart the console.
  6. Once the console restarts, the installation process will start automatically.
  7. Select Yes to confirm that you want to install the system update and follow the instructions on the screen.

Need a full walkthrough for the USB method? Follow the step by step guide here: Update Xbox Offline.

Solution 6 – Roll back updates

If you’re having problems while installing updates, you might want to consider rolling back the installed updates. This process will delete all system updates that are installed on your console. To roll back updates, do the following:

  1. Press the Guide button on your controller and choose Settings > System Settings.
  2. Select Storage.
  3. Scroll down to Memory Unit or hard drive and highlight it.
  4. Now press the Left bumper, Right bumper and X. Repeat this step one more time.
  5. If you performed the previous step correctly, you’ll see a confirmation message on your screen. Select Yes.
  6. Your console will now restart.
  7. After your console restarts, you’ll be asked to install pending updates, so be sure to install them.

Solution 7 – Use the USB flash drive as a storage device

According to users, you can fix Update failed error on Xbox simply by inserting the a USB flash drive and using it as a memory unit. To do that, follow these steps:

  1. Connect a USB thumb drive to your Xbox.
  2. Once the drive is connected, go to Settings > Storage Settings.
  3. Select the first option in order to use USB flash drive as a memory unit.

After doing that, try installing the update again and check if the problem is resolved.

Solution 8 – Check your network connection

Sometimes you might not be able to install updates due to network connection errors. To check if there are any network errors that prevent you from accessing Xbox Live, do the following:

  1. From the Dashboard choose Settings.
  2. Go to Network and select Test network connection.
  3. Wait for a few moments for the scan to check your network connection.

If there are any problems with your connection, you need to resolve them first before you can download and install updates.

Solution 9 – Try using a wired connection

Sometimes issues with wireless connection can appear and they are usually caused by wireless interference, high packet loss or latency. You can avoid all of these problems simply by using a wired connection.

Connect your Xbox directly to your modem with an Ethernet cable and check if the problem is resolved. If you can’t do that, you might want to change the location of your wireless router in order to get the best reception.

Solution 10 – Use your phone as a mobile hotspot

Users reported that they fixed the Update failed error on their Xbox by using their phone as a mobile hotspot.

After connecting the to the mobile hotspot with their Xbox, users were able to download and install the update without any problems.

If you can’t create a mobile hotspot, you might want to try downloading the update on a different network.

Solution 11 – Disconnect all external storage devices

According to users, sometimes this error can occur due to external storage devices.

To fix this problem, be sure to remove all external storage devices from your console.

After doing that, try to download and install the update, and it should install without any issues.

Solution 12 – Restart your modem

Sometimes you won’t be able to install the latest updates due to network errors, and one of the simplest ways to fix this problem is to restart your modem. To do that, follow these steps:

  1. Press the power button on your modem to turn it off. In addition, you can unplug your modem from the power outlet. If your modem is connected to a wireless router, be sure to turn off the router as well.
  2. Now turn off your console by pressing the power button on the front.
  3. Wait for a couple of minutes and turn your router and modem back on. If you don’t have a router, just turn on your modem.
  4. Now turn on your Xbox and try to download the update again.

Solution 13 – Delete and redownload your profile

Sometimes you can fix this problem simply by removing your profile and downloading it again. This is a simple procedure, and in order to do it you need to do the following on Xbox 360:

  1. Go to Settings > System.
  2. Select Storage.
  3. If you have external devices connected to your Xbox, select All Devices option. If you don’t have any external storage, select Hard Drive.
  4. Select the profile that you want to delete and choose the Delete option.
  5. Now select Delete Profile Only option to remove your profile without removing saved games and achievements.

After deleting the profile, download it again by following these steps:

  1. Press the Guide button on your controller.
  2. Select Download Profile option. If this option isn’t available, you need to sign out of your current profile.
  3. Select the Download Profile button.
  4. Enter your Microsoft account login information.
  5. Select the storage device for your profile and wait for it to download.
  6. After that, check if the problem is resolved.

To remove your profile on Xbox One, follow these instructions:

  1. Scroll left on the Home screen.
  2. Choose Settings > All Settings.
  3. Go to Account and choose Remove accounts.
  4. Select the account that you want to remove and choose Remove.
  5. After you’re done, select Close.

To add your account, do the following:

  1. On the Home Screen scroll left.
  2. On the Sign in tab select Add & manage.
  3. Now select Add new.
  4. Enter your login information.
  5. Follow the instructions on the screen to complete the process.

In some cases you might get signed out of your profile when you encounter issues while installing updates.

If that’s the case, you just need to download your profile again and the issue should be resolved.

Solution 14 – Delete the corrupted content

According to users, you can fix this error simply by deleting the corrupted content from your hard drive.

After you delete the corrupted content, test your internet connection and check if the problem is resolved.

Solution 15 – Format your hard drive

According to users, they managed to fix Update failed error on their Xbox simply by formatting their hard drive.

We have to warn you that formatting your hard drive will delete all your files, therefore we urge you to back up all important files. To format your hard drive, do the following:

  1. Start your console without a disc in the tray.
  2. Go to Settings > System.
  3. Select Storage.
  4. Highlight the storage device you want to format and press the Y button.
  5. Select Format.
  6. You’ll see a confirmation message. Select Yes to format the storage device.
  7. You might be asked to enter your console’s serial number before you’re able to format your hard drive. You can find the serial number on the back of the console. After entering the serial number, the formatting process will start.

Once again, we have to mention that formatting your hard drive will delete all your files, including saved games, so be sure to back up all important files before starting.

Solution 16 – Replace your hard drive

If the problem still persists, you might be able to fix it by replacing your hard drive. Few users reported that the issue was completely resolved after replacing their hard drive with a new one, so you might want to try that.

To see how to remove your hard drive, be sure to check Solution 4 for detailed instructions.

Update failed error will prevent you from downloading important updates on your Xbox, but we hope that you fixed this error by using one of our solutions.

READ ALSO:

Xbox One consoles to get a 1906 update next month, with first preview build coming next week

Microsoft has just released the Xbox One 1905 update today, which brings improvements for Xbox Live Messaging, Friends List and Sorting. This new system update follows the 1904 update released in April, and we’ve just learned today that a 1906 update will also be coming in June.

Brad Rossetti, the head of the Xbox Insider Program announced the upcoming 1906 update on Twitter today, teasing that a first preview build could be released as soon as Monday.

The Xbox One 1906 update will probably be another minor release, just like the 1905 update. It’s also worth noting that the 1905 update is still coming from the same 19H1 development branch that gave us the Xbox One 1904 update in April, as well as the Windows 10 May 2019 update on the PC side.

We don’t know yet what’s coming in the Xbox One 1906 update, but we guess that some experimental features that have been in testing in preview 1905 builds may well end up there. We’re thinking about the new “Play Later” list for Xbox Game Pass subscribers, as well as the Voice channels in Xbox Live Messaging that were mentioned in a previous build.

As usual, Preview Alpha Xbox Insiders should get the new bits first, so make sure to check your Xbox Insider settings before the next testing period kicks off.

How to download and install Silverlight on Windows 10

Microsoft Silverlight was used in the past, but with rapid change of Internet and introduction of new technologies Silverlight was replaced by them.

If you want to use Silverlight on Windows 10, today we’re going to show you how to do it.

How to install Silverlight on Windows 10?

To install Microsoft Silverlight, you need to do the following:

  1. Go to Microsoft’s website and download Silverlight.
    silverlight-download
  2. After downloading it, you should be able to use it without any problems.
    silverlight-install

As we already mentioned, if you visit a website that still uses Silverlight, you’ll have to use Internet Explorer 11 or Firefox in order to display Silverlight content.

Google Chrome has dropped support for NPAPI plug-ins and it doesn’t run Java or Silverlight anymore, so you’ll have to use one of aforementioned browsers.

Check which browsers still work with Silverlight and fix common errors with these guides: Browser support for Silverlight and Silverlight not working.

Silverlight was once a popular framework, but it was replaced by HTML5, and in fact, even Microsoft recommends streaming services to use HTML5 over Silverlight.

HTML5 is supported by all major modern browsers. It works perfectly on all platforms and devices, and there are no additional plug-ins to install.

Silverlight is slowly but surely becoming a thing of a past, and even Microsoft suggests users to move on from Silverlight to different technologies.

If you still need to run Silverlight, you can download it and install it by following the instructions above.

FAQs

Can I install Silverlight on Windows 11?

Yes, the legacy installer still runs, but Silverlight reached end of support in October 2021 and modern browsers block it; it only works through Internet Explorer mode in Microsoft Edge.

How do I open a Silverlight site on Windows 11?

Install Silverlight, open Edge, go to Settings > Default browser, set Allow sites to be reloaded in Internet Explorer mode to Allow, restart Edge, visit the site, then select … > Reload in Internet Explorer mode.

Why does Silverlight not load in Chrome or regular Edge tabs?

Chrome, Edge, and Firefox removed plugin support, so Silverlight content will not run in standard tabs; only Internet Explorer mode in Edge can host the required ActiveX control.

Is using Silverlight on Windows 11 safe or recommended?

It is not recommended for the open internet since it is out of support; if you must use it for a line of business app, isolate usage to trusted intranet sites, restrict permissions, and plan a migration to HTML5 or WebAssembly.

Windows 10 v1703 KB4499181 is all about security improvements

Microsoft releases Patch Tuesday Updates every month to fix known issues and security flaws affecting Windows operating systems.

This month, the Redmond giant is back with a new round of Windows 10 cumulative updates. More specifically, Microsoft released KB4499181 for Windows 10 v1703. The company completely focused on improving the security of Windows components, including the system’s built-in IE and Microsoft Edge browsers.

However, we recommend to pause the updates for around 2-3 weeks until a stable release is available. Sometimes, Windows 10 updates may bring along some major bugs that Microsoft’s engineers failed to detect before the official rollout.

Furthermore, you should enable the system restore option before installing the update. In case you experience any issues, you can use the system restore options to rollback to a working OS version.

Let’s have a brief look at what KB4499181 brings in terms of improvements and bug fixes.

KB4499181 changelog

Fix for Visual Studio Simulator launch issues

Previously, Windows 10 users were unable to launch Microsoft Visual Studio Simulator. Microsoft fixed all these issues in KB4499181.

Japanese fonts bug fix

Microsoft Excel users pointed out that some Japanese fonts are triggering MS Excel formatting issues. The company promised to release a fix in the upcoming release. Finally, KB4499181 fixes all such issues.

A series of security patches

As a part of the Windows 10 cumulative update KB4499181, Microsoft rolled out a series of security patches for most of its products. To learn more about these patches, you can check out the official update page.

Download KB4499181

You can download Windows 10 cumulative update KB4499181 automatically on your system.

However, if you have not yet received the update, you can navigate to Settings > Update & Security > Windows Update and click Check for updates.

Alternatively, you can manually download the update from the Microsoft Update Catalog.

As a quick reminder, a new Windows 10 version is just around the corner. Microsoft is ready to release Windows 10 version 1903 aka the May 2019 Update later this month.

Windows Insiders are currently testing the build. The company wants to make sure that no major bugs make their way to Windows 10 users. That is the reason Microsoft delayed the official release and preferred last-minute testing. 

RELATED ARTICLES YOU NEED TO CHECK OUT: