Best KRK speakers to buy [Black Friday & Cyber Monday]

Owning a pair of good speakers can make or break a party, but even if you’re not planning on throwing the ultimate New Year’s get-together, a good set of speakers can make a big difference.

Wheater you enjoy listening to your favorite music from the comfort of your own couch, work in a music studio or just want to have a full sound experience when watching your favorite shows and movies, KRK has the perfect set of speakers for you.

In order to help you choose from the wide range of speaker options from KRK, this buying guide will give you an important overview of what each option has to offer, and also a link, so you can purchase them fast.

Note: All the prices and offers in this article are subject to change, so be sure to check the official product page to get the latest deal. If the product/offers you’re looking for is no longer available, you can try to find it on its official manufacturer page or get another one from our list.

Which krk rokit should I buy?

  • KRK RP5 G-4 – most affordable option
  • KRK RP7 G-4 – perfect balance between price and sound
  • KRK RP10 G-4 – suited for professionals

Now let’s take a closer look at the features of each set.

KRK RP5 G-4 – most affordable option

KRK RP5 G-4 - KRK speakers

The KRK RP5 speaker set is the first in this list as the price range is the most accessible, but still offers an incredibly powerful and crisp sound experience.

This set of speakers from KRK has a professional-grade 5-inches studio monitor that can play almost any frequency in existence, and it uses a bi-amp set up for those of you that want really powerful volume.

Pros:

  • One 5-inch woofer and a 1-inch tweeter on each speaker
  • The built-in amplifier is a Class D power
  • Drivers that were built from scratch to bolster the latest KRK advancements
  • LCD visual ds-driven equalizer

Cons:

  • Even though the set can be bought at an affordable price for this quality, the overall maximum sound volume could be louder

⇒ Check price

KRK RP7 G-4 – perfect balance between price and sound

KRK RP7 G-4 - KRK speakers

The KRK  speakers model RP7 G-4 is the middle-ground set of speakers released in the acclaimed KRK generation 4 speaker models.

This set of speakers has all the capabilities of the previous model presented in this list, but feature a bigger (7-inches) professional-grade studio monitor that flaunts its double amplifier.

Because of the size of the 7 inches matching woofers, this set sounds a lot louder than the predecessor model.

Pros:

  • Tweeter and woofers made with Kevlar for a crisp sound with no reverberations
  • Class D power amp
  • More powerful sound than the KRK RP5 G-4
  • The same incredible quality of sound with no problem replaying both low, mid, and high-pitch sounds to perfection

Cons:

  • No problems have been reported with these speakers

⇒ Check price

KRK RP10 G-4 – suited for professionals

KRK RP10 - KRK speakers

The RP10 G-4 is the top-of-the-range 3-way speaker from KRK’s 4th Generation series, offering crystal-clear studio-level sound quality, no reverberations, and more power than the previous versions.

The big difference between the RP8 and RP7 models from KRK is the extra set of features available for it, a bigger woofer for a more well-dispersed sound, a mid-frequency driver, and the total sound volume power.

Pros:

  • KRK application that allows you to correct the way the speaker emits sounds (depending on the size and type of room you’re using it in)
  • Built-in visual DSP EQ with 25 available presets
  • Enclosure made with low resonance materials for reduced distortion
  • 10-inches woofer made with Kevlar Aramid Fiber
  • 4,5-inches mid-driver
  • 1-inch tweeter

Cons:

  • Even though the price is well justified for the quality of sound that this model produces, it might be too big for some users considering it’s for only one speaker and not the pair

⇒ Check price

Conclusion on KRK speakers

KRK has released the latest 4th generation speakers that offer a great improvement from the last generation, and they have an option for every price range.

If you don’t want to invest too much in a set of KRK speakers but still appreciate sound quality, the KRK RP5 G-4 is perfect for you.

In case you don’t mind spending a bit more for a bigger woofer setup, then the KRK RP7 G-4 is the best option for you.

If you want top-of-the-range quality with other amazing features and a 3-way setup, the best option is the KRK RP10 model from the 4th generation.

This specific deal is part of our bigger selection of the best speaker deals you can find. You might also want to check out our dedicated Black Friday hub for tech deals.

Best USB-C laptop docking stations [Cyber Monday]

A laptop docking station literally organizes your life.

Here’s why: when you have multiple devices such as a keyboard, mouse, your smart devices like a smartphone or tablet, and thrown in a small printer, you want all these devices connected while you use your laptop right?

The common scenario when all this hardware is together, is a cluttered desk with cables all over the floor, while there are other cables on your desk, but the crazy bit is when you’re done working and you have to unplug each one of them.

The cycle begins all over again when you come back to your desk the next day.

To eliminate the stresses that come with plugging and unplugging cables and chargers, and all that wiring stuff, you need a good docking station for your laptop.

These days, the trend is to get a good USB-C laptop docking station because most modern laptops are built with the USB type C port, including smart devices, so you’re better off with a compatible docking station.

So which are the best USB-C laptop docking station devices available for this Christmas early sales?

We took the stress out of your search, and here are our top picks for the best USB-type C laptop docking stations.

Note: All the prices and offers in this article are subject to change, so be sure to check the official product page to get the latest deal. If the product/offer you’re looking for is no longer available, you can try to find it on its official manufacturer page or get another one from our list.

What are the best USB-C laptop docking stations?

  • Plugable 13-in-1 USB-C Triple Monitor Docking Station
  • WAVLINK USB 3.0 and USB C Universal Laptop Docking Station
  • Dell Universal Docking Station

Now let’s take an in-depth look at the features of each laptop docking station.

1. Plugable 13-in-1 USB-C Triple Monitor Docking Station

  • 60W power adapter (100V-240V) with a US power plug
  • Comes with a quick start guide
  • DVI/VGA passive port adapter,
  • Relatively short cable

This USB-C laptop docking station is currently enjoying the top spot if user reviews are anything to go by. It is one of the bestselling docking stations in the market right now.

Features include compatibility with Windows USB-C and Thunderbolt 3 systems, with up to three added displays and 60W charging power.

It uses cutting-edge USB 3.1 features, plus the tried and tested features of the UD-3900 dock, which is Plugable’s best seller. It also has two added video outputs to HDMI and DVI/VGA, and Gigabit Ethernet via DisplayLink.

It is however not recommended for gaming.

Plugable USB-C laptop docking station is revolutionary in connectivity, as it is the first device of its kind designed to showcase the new Triple Display Docking station standard that delivers flexibility and scalability.

USB-C connector has Alternate Modes that allow other non-USB connectors to be used with it.

These modes include DisplayPort, HDMI, and MHL as alternate display modes, and this docking station features support for the Alternate Modes and PowerDelivery (which enables you to power and charge a supported system without needing an OEM charger.

When it comes to power and charging, this USB-C laptop docking station can charge host systems with up to 60 watts of power (20V/3A) via PowerDelivery standard.

Some devices that support video output over USB-C won’t charge via USB-C, so for such, a charger from your laptop’s manufacturer will be required.

2. WAVLINK USB 3.0 and USB C Universal Laptop Docking Station

  • Supports Windows XP/7/8/8.1/10
  • Delivers superfast transfer speeds of up to 5 Gbps
  • Two USB-C ports for fast charging of up to 3A/5V
  • Slow in connecting to the external monitor

This docking station literally brings technology to life. You can perform multiple functions from one laptop such as multi-monitor, dual video, hub, audio, and Gigabit Ethernet adapter, for different user experiences.

Its performance is super strong, the audio is 5.1 channel surround sound through its HDMI interface, and it is a plug and play with the maximum expansion of up to 6 display units for primary, extended and mirror video mode.

In order to use this docking station, you need 2GB RAM, i3/i5/i7 core processor and 4GB RAM for full-screen video playback, and 2GHz Core2Duo.

With just one USB cable, you can transform your laptop into a professional workstation, easily add two displays to see your work better, and you also get to use your microphone or earphones.

3. Dell Universal Docking Station

Dell is a well-known brand in the computer and accessories industry, so you can trust that they’ll create one of the best USB-C laptop docking station gadgets in the market.

For single cable connectivity, you get a powerful DisplayPort over USB-C cable with the Dell Dock, and quickly connect your laptop to a single data and power source of up to 130W.

It is an easy, reliable use docking station with a connection from your laptop to dual FHD displays, or a single 4K display, with all essential peripherals.

The Dell Dock is small and lightweight, and you can place it anywhere you want to work whether at home, your office, or a conference room regardless of the space.

You can also do presentations by connecting a display screen or projector, as this USB-C laptop docking station is one dock for all.

The USB-C connectivity is the latest and most reliable technology for video performance, owing to the Alternate Modes feature.

Dell Dock provides one docking experience for Dell and non-Dell platforms via the Display Port over USB-C connector, ensuring a crisp display and reliable connection.

With a single cable, you’ll free up desk space and have a clutter-free workspace, with the added ability to mount a monitor behind or on your desk.

⇒ Check price

Have you found the best USB-C laptop docking station you want to get for yourself?

If you rely on USB-C for your setup, the right dock can unlock faster speeds and more ports. Explore the top picks in this guide to the best USB-C docking stations for laptops.

For even more premium solutions, explore this roundup of the best Dell docking stations designed for performance and versatility.

Let us know your choice, or if you know a good one that deserves to be on this list, share with us in the comments section below.

Monitor Not Turning on: Why is It Happening & How to Fix It

Is your monitor not turning on after starting the PC? Do not panic; you’re not in it alone. Many users have recently reported that they are experiencing the same issue.

Be assured that you can fix the problem by trying any proven fixes and checks for your black screen issues provided in this article.

Why is my monitor not turning on?

There can be several reasons why your monitor may not turn on. Some of the factors responsible for this are:

  • Connection problems – If your monitor is not well-plugged into the power supply, or if your cables are not well-connected at both ends or are damaged, likely, your monitor will not work on laptop or desktop PC.
  • The video connector may be faulty – One of the pins in the video connector may be bent or broken. Once you notice any bent pin in the connector, carefully straighten it.
  • Wrong BIOS configuration – If your BIOS is not configured with the dedicated graphics, it could result in your monitor not turning on. Also, BIOS corruption may affect the performance of the monitor.
  • Hardware failure – It is possible that your monitor is experiencing a hardware fault, and you may need to replace it with a good PC monitor.

There can be multiple issues affecting your monitor. You may experience certain black screen issues even when it eventually comes up.

Now that you know some potential reasons why your monitor may not turn on let’s proceed to how you can fix this problem.

How do I fix my monitor if it’s not turning on?

Before anything, perform the following:

  • Ensure that your monitor is connected tightly and that it receives power from the wall outlet or the power adapter.
  • If your monitor uses a detachable video cable, ensure you get a second monitor cable that you can use for testing purposes whenever your primary cable fails.
  • Confirm if your monitor’s power lights come up whenever you try to power it on.
  • Ensure to use a dedicated graphics driver. Many Nvidia owners that use DisplayPort connection reported that updating DisplayPort firmware fixed the issue for them.
  • Try to connect your monitor to another computer. This will help you determine if the monitor is working.
  • Connect the monitor to the motherboard graphics. This will help you determine if your dedicated GPU is the cause of the problem.

Having confirmed the above checks, if the problem persists, you can work through any of the advanced solutions below.

1. Perform an inspectional restart on your laptop

  1. Remove your laptop battery and put it back. Then you can try to turn on your computer again. It should come up.
  2. If you can’t remove the battery, wait for at least 30 minutes, then try to restart your computer.
  3. If you press the power button. Still, if the fan is silent, you should know that the monitor is not faulty but the computer itself.
  4. On the contrary, if your fan runs without a display on your screen, your monitor may be broken, or you may try to replace your video card.

If you put your computer to sleep, but it is not waking up, you can also check our detailed guide on how to fix your computer if it won’t wake up from sleep mode.

2. Disable USB standby on the monitor

Note icon NOTE
This solution works for Iiyama monitors, but you can try it on any monitor that has a USB hub.
  1. Start your PC.
  2. Press the configuration button on your monitor.
  3. Locate the USB Standby setting and disable it.

3. Drain the monitor power

  1. Turn off your PC.
  2. Now disconnect all the cables from the monitor.
  3. Press the Power button and keep it pressed for 30 seconds.
  4. Leave the monitor disconnected overnight or for a few hours.
  5. Connect the cables and check if the problem is resolved.

4. Reset BIOS to default

  1. Press and hold the power button until your computer turns off.
  2. Disconnect the computer case from the power outlet. Next, unplug all devices connected your computer.
  3. Open the case and access the motherboard, then disconnect your CMOS battery.
  4. Reconnect the battery after 5 mins and connect the computer to the power source and on it.

If you’ve tried the above solutions, and none seems to work for your monitor, you should change the monitor. You can decide by following our guide on the best PC monitors.

Please feel free to leave your comments, suggestions, or questions about this article in the comments below.

CMD Keeps Popping up on Windows 11? Stop it in 5 Steps

The CMD prompt popping up is not a new issue and has been reported by users for quite some time. This is why many users want to change the default terminal in Windows 11.

Thankfully in this guide, we will give you 5 ways via which you can easily fix the CMD prompt that keeps popping up issue. Let us get right into it.

What causes the CMD prompt to keep popping up?

After some research, we have found some common reasons the CMD prompt is popping up on your PC.

  • CMD.EXE might be added to the startup folder: By accident, you might have added CMD.EXE to the startup folder because of which it is starting up randomly.
  • Your PC is infected with virus: A virus or malware-infected PC can cause it to malfunction and throw multiple errors. You should always install an antivirus on your PC to keep it safe.
  • Some system files are missing: If a system file is missing or corrupt, then this could cause multiple issues with your PC.
  • The latest Windows update isn’t installed: It could be because of a bug in the version of the Windows update you are currently operating.
  • Scheduled task is running in the background: The most common reason this issue gets triggered is that the scheduled task is running in the background.

What can I do if the CMD prompt keeps popping up?

Here are a bunch of general solutions that you can apply before heading over to the advanced procedures:.

  • It could be because there is a temporary glitch or bug in your PC that is causing the problem. To fix this, you can simply try a restart and see if this resolves the issue or not.
  • Try creating a new user account. Often such glitches are associated with faulty account profiles. You can either try creating a new user profile or try using an admin account to see if the problem exists there or not.

Let us check out the advanced solutions to resolve the error.

1. Disable Office tasks

  1. Press the Win + R keys to open the Run dialogue.
  2. Type taskschd.msc and press Enter.
  3. Expand the Task Scheduler Library.
  4. Double-click the Microsoft folder.
  5. Select the Office folder.
  6. Locate the task named OfficeBackgroundTaskHandlerRegistration.
  7. Right-click on OfficeBackgroundTaskHandlerRegistration and select Disable.

In case you see that the Office task isn’t the one causing problems for you like others, then you can click the Task Scheduler Library from the left pane and look at the scheduled tasks on the right.

You can disable any one of the tasks that you might find odd or unnecessary.

2. Scan your PC for viruses

  1. Open the Start menu by pressing the Windows button.
  2. Search for Windows Security and open it.
  3. Click on Virus & threat protection.
  4. Hit the Quick Scan button.
  5. The system will be scanned and if found any virus, will prompt you to perform necessary actions.
  6. You can also click on Scan options.
  7. Click on Full Scan to perform a deep scan of your PC.

The above options are shown for the in-built Windows Security tool. But even if you have a third-party antivirus installed on your PC, it gives you an idea that you need to perform a virus scan on your PC. You can choose from our best antivirus solutions listed and see what suits your needs best.

3. Run SFC Scan

  1. Open the Start menu.
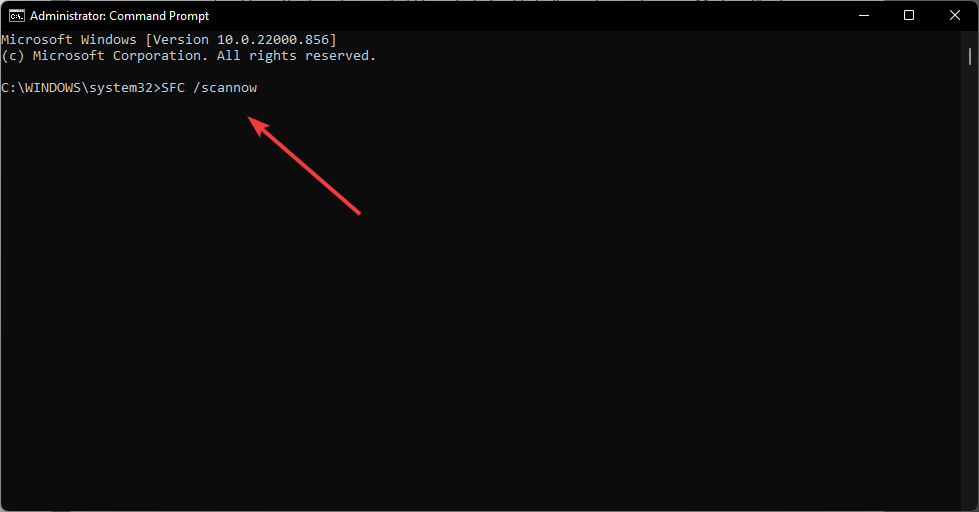
  2. Search for Command Prompt and run it as an administrator.command prompt admin windows 11
  3. Type in the the following command and press Enter: sfc /scannowsfc scan command in command prompt.
  4. The tool will check for missing or corrupt system files and will replace them with working ones.
  5. After the process completes, restart your PC.

SFC Scan is an inbuilt command line that scans your PC for corrupt or missing system files. You can easily fix all the problematic files by running this simple command on your PC and also correct the CMD prompt issue.

If you want an easier and quicker solution then you might want to try a dedicated tool that can perform this process automatically.

4. Perform a clean boot

  1. Open the Start menu.
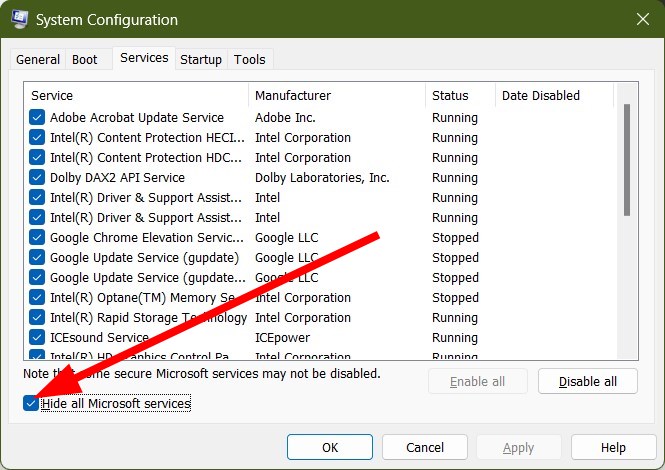
  2. Type msconfig and open System Configuration.
  3. Switch to the Services tab.
  4. Select Hide all Microsoft services.
  5. Click on the Disable all button.
  6. Hit the Apply button to save the changes.
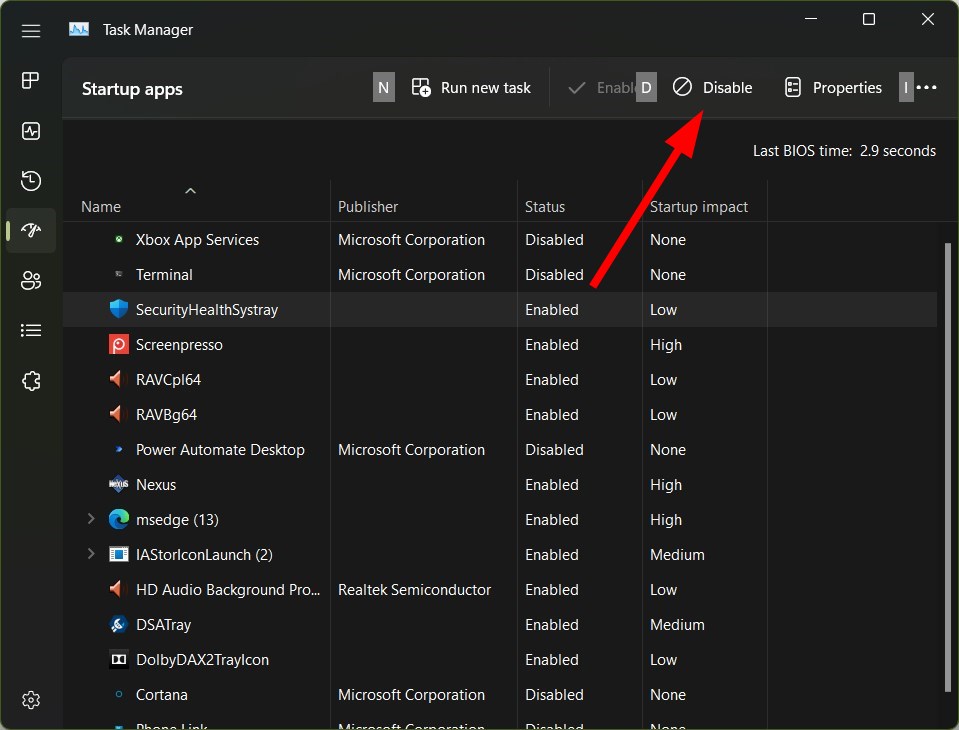
  7. Click on the Startup tab.
  8. Select Open Task Manager.
  9. In the Startup tab of the Task Manager, Disable all the Enabled startup items.
  10. Close Task Manager.
  11. Restart your PC.

This can help you determine if a Microsoft service was causing the CMD prompt keeps popping up an issue or not.

5. Remove CMD.exe from the Registry Editor

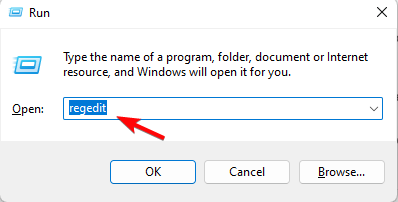
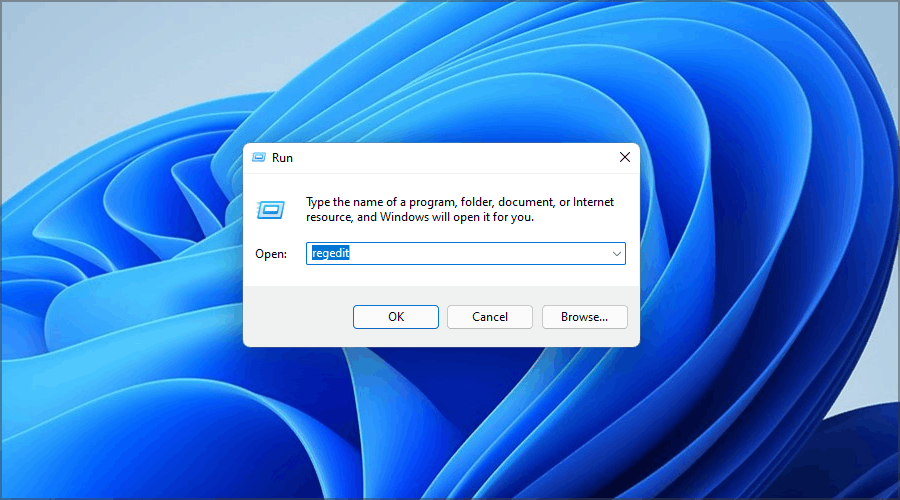
  1. Press the Win + R keys to open the Run dialogue.
  2. Type regedit and press Enter.run regedit command
  3. Navigate to the below path: HKEY_CURRENT_USER\SOFTWARE\Microsoft\Windows\CurrentVersion\Run
  4. If you find CMD.exe on the right side, then right-click on it and select Delete.

That is it from us in this guide. In case you can’t run the Command Prompt as an administrator, you can check out our guide that gives you some easy steps to resolve the issue.

If you can’t view the product key in the Command Prompt, then you can refer to our guide that gives you a proper solution to fix the issue. Consequently, you may want to disable CMD altogether so here’s how to go about it.

Let us know in the comments below, which one of the above-mentioned methods helped you resolve the CMD prompt problem.

Kernel Data Inpage Error on Windows 11: How to Fix it

Let us discuss the Windows 11 kernel data inpage error. The OS has many new features and a great design, but it also inherited some bugs from Windows 10.

For instance, the KERNEL DATA INPAGE ERROR known by Windows 10 users is pretty severe because it can lead to corrupted files and even data loss.

The kernel data inpage error BSoD is directly related to storage drive issues, which you need to address as soon as possible.

What does Kernel_data_inpage_error mean?

The kernel is often characterized as a computer’s central processing unit (CPU) because it is at the core of all your computer operations and is responsible for managing the whole operating system.

This inpage error can signal problems with your storage drive. It is often associated with the BSOD and may represent bad drive sectors, bad connections, and disk failure. It is usually caused by one of the following:

  • Hardware components – For many users, it is triggered by failing RAM or disk controller errors.
  • Driver errors – If you have damaged, unsupported or outdated drivers, it may trigger this error.
  • Bad system files – In some cases, it is triggered because some essential system files have become corrupted.

This error has different variations and may come with error codes that can help you quickly identify the cause. Here are some of the possible error codes:

  • 0x0000007A – File access errors can cause this error. 
  • 0xC000009C – Bad hard drive sectors may be the reason for this code.
  • 0xC000009D – The code signals possible imperfect connections or hard disk failure. 
  • 0xC000016A – Bad sectors on your hard drive trigger it.
  • 0xC0000185 – Check the cables for any damage or improper connections.

How can I fix the KERNEL DATA INPAGE error in Windows 11?

Before you try any of these solutions, do the following checks:

  • Back up your data – Back up your data as soon as possible. If your drive has any malfunctioning problems, this can get even worse, and you might lose your data. So, you can manually copy and paste your sensitive data on an external drive or another drive installed on your PC.
  • Check the cables and connections – Check all the cable connections to and from your hard drive. One of them might be loose or have an improper connection, which might cause the KERNEL DATA INPAGE ERROR.

1. Use the Startup Repair

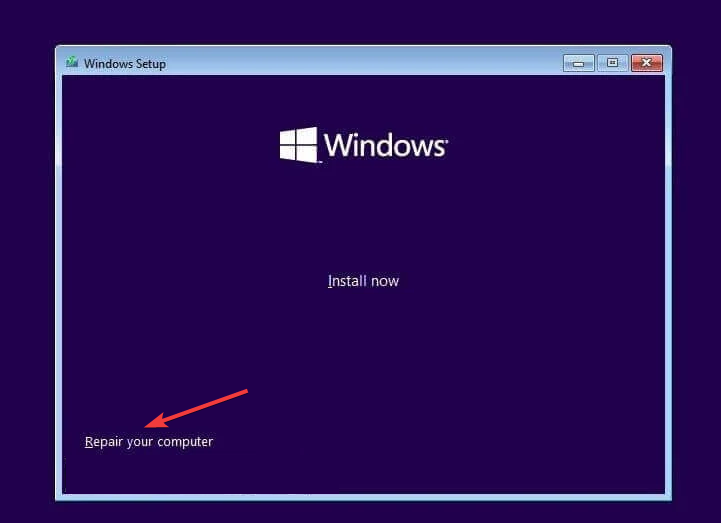
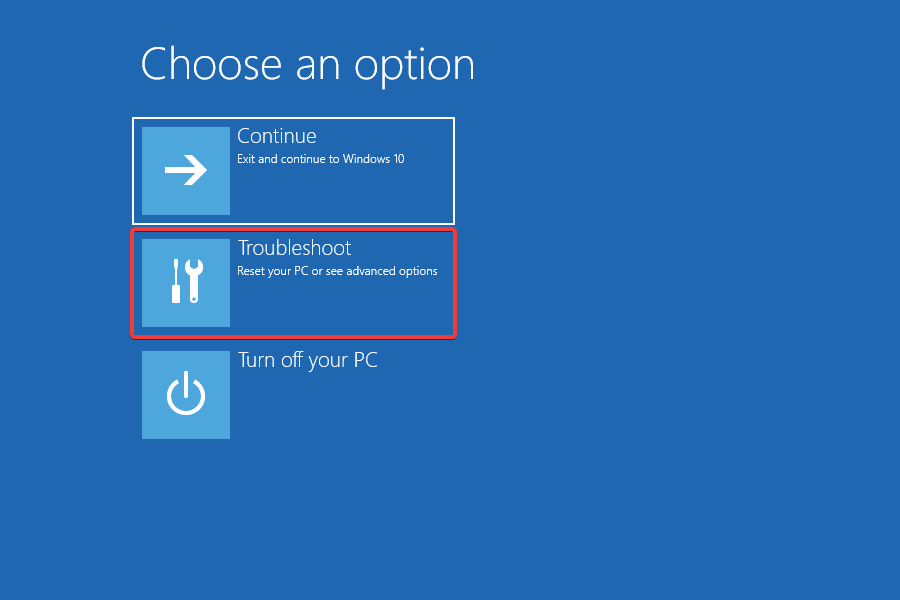
  1. Start Windows 11 with a bootable media or use a hard power off three times in a row to boot the OS into Recovery Mode.
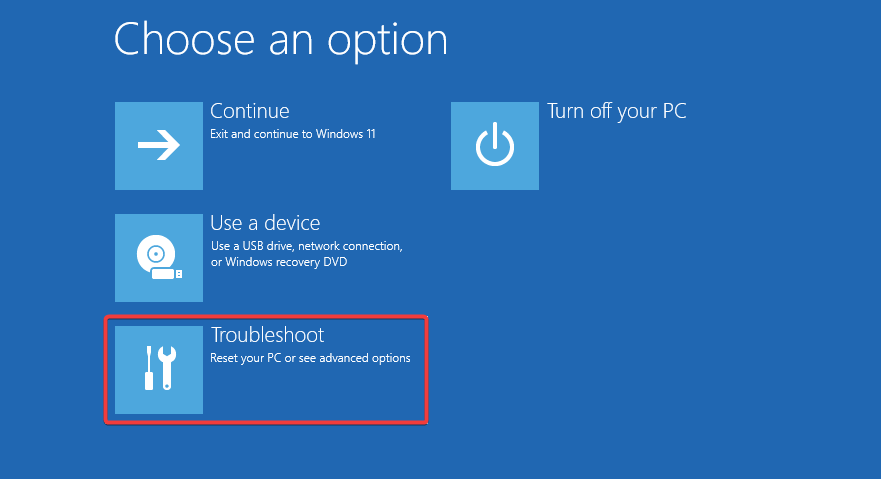
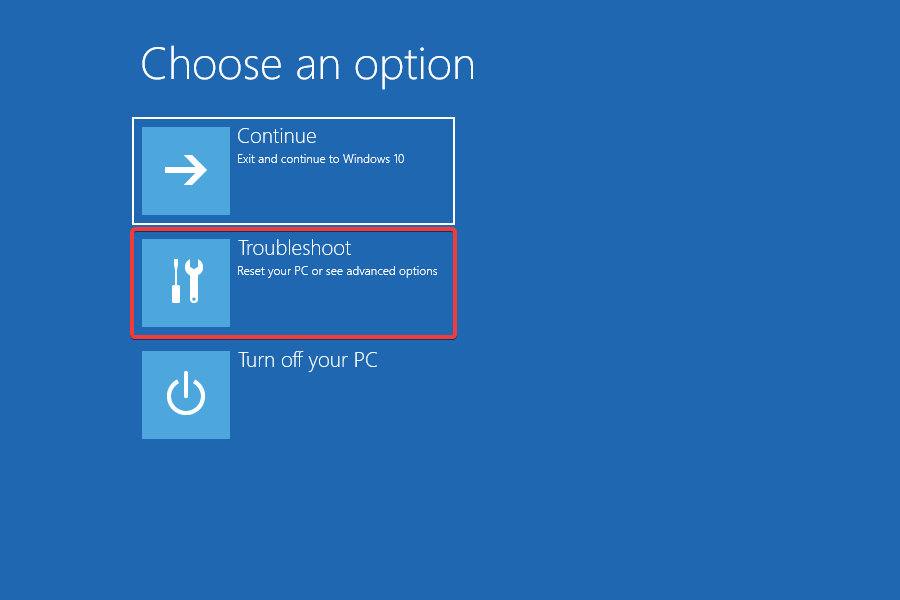
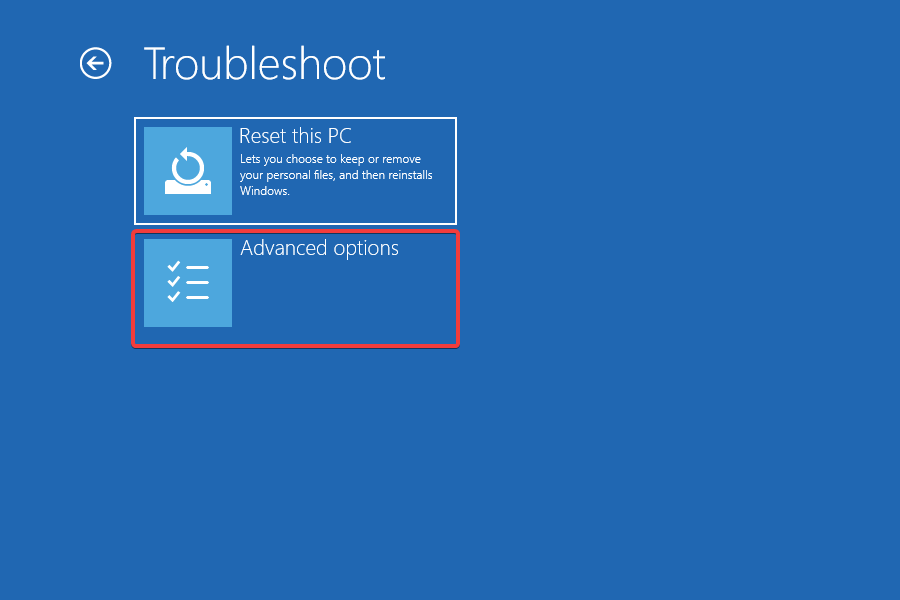
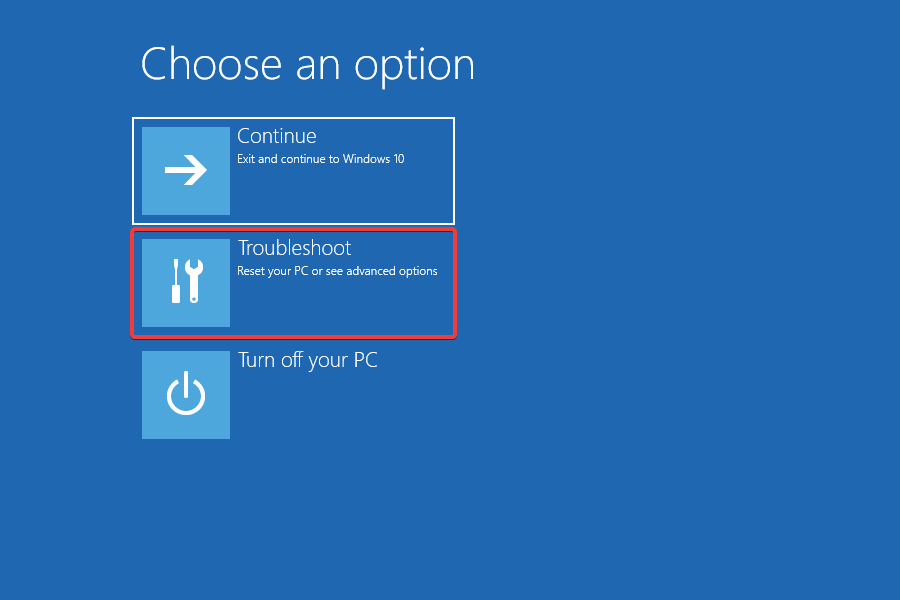
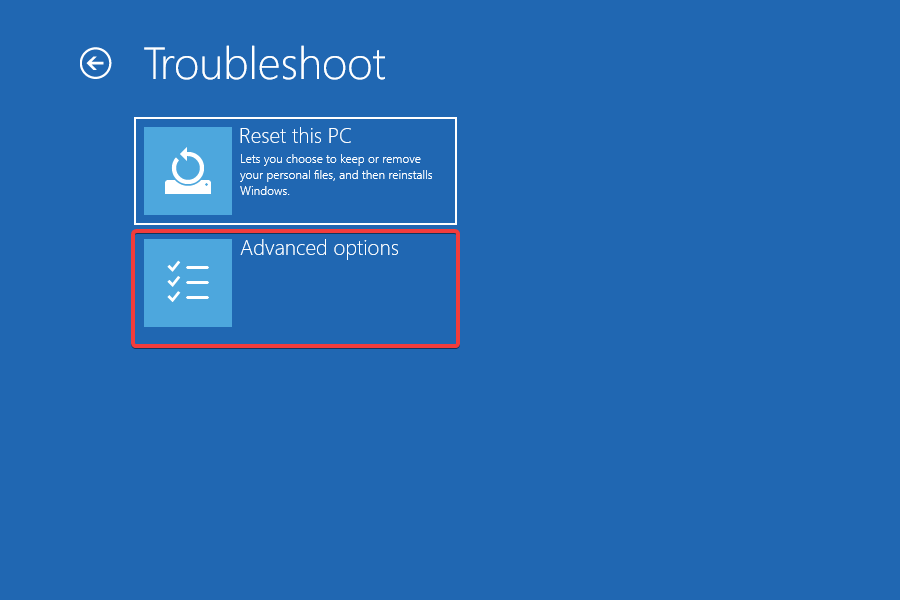
  2. Select Troubleshoot.
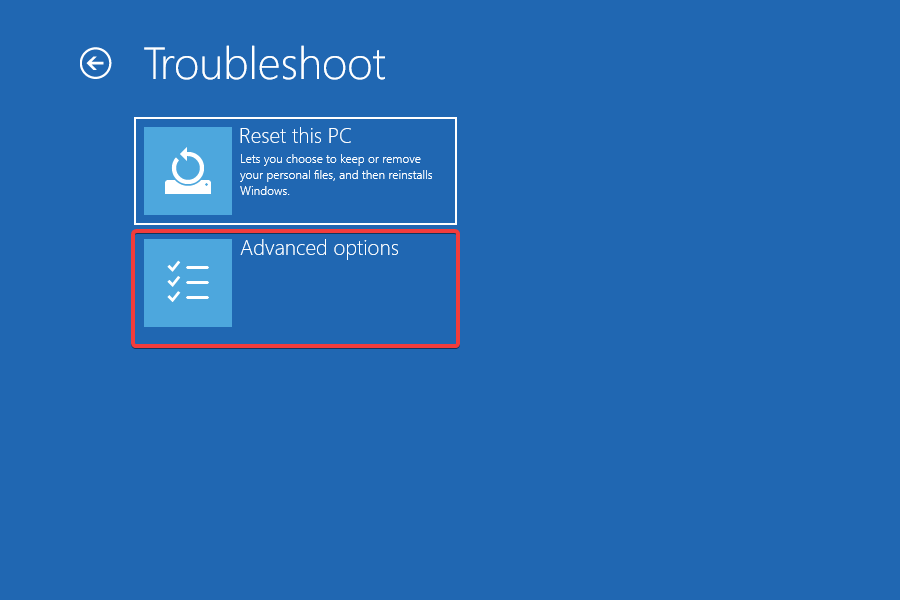
  3. Click on Advanced options.
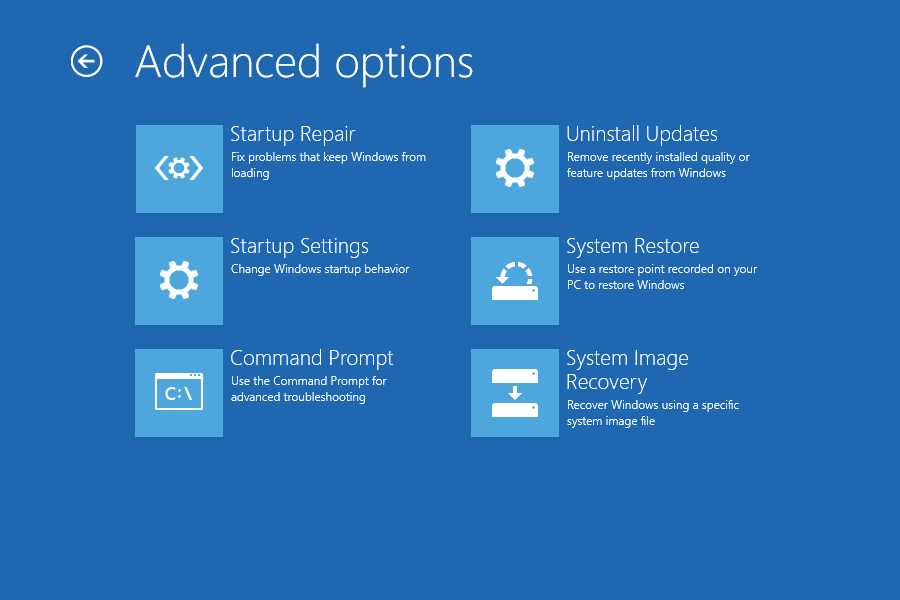
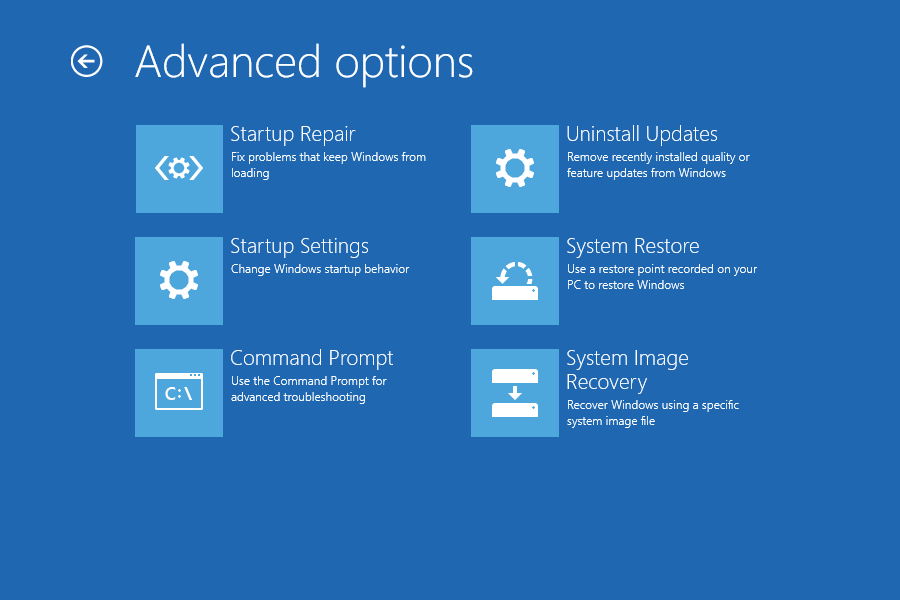
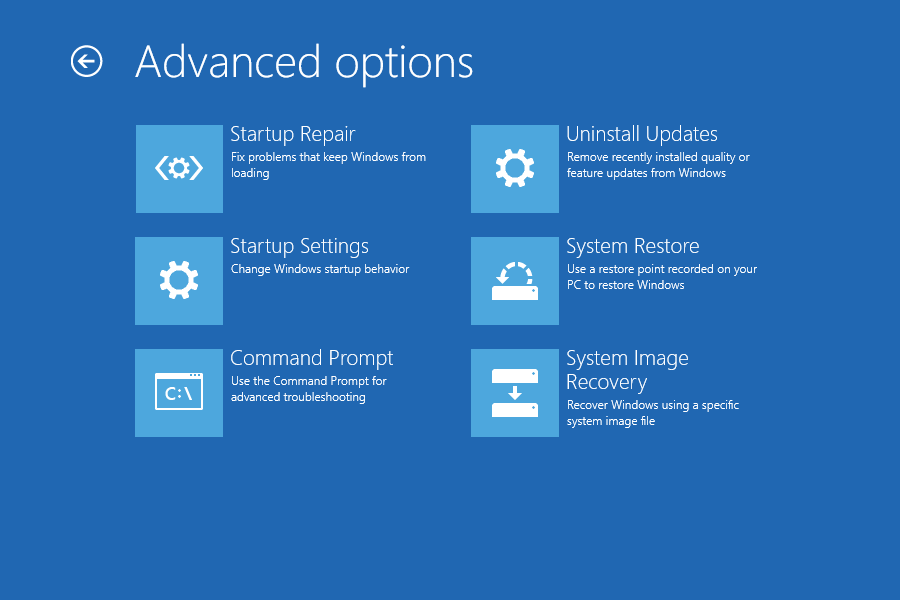
  4. Next, choose Startup Repair.
  5. If the system detects any issues, it will start fixing them. If you get the message that Startup Repair couldn’t repair your PC, click on the Advanced options button.
  6. You will get back to the main screen. Select again Troubleshoot, then Advanced options, and in the new window, click on Startup Settings.
  7. Next, click on Restart to boot the PC in Safe Mode.
  8. After the PC restarts in Safe Mode, check if the problem occurs again. If it doesn’t, third-party software is causing this issue, and you need to uninstall it. If the issue persists, start the PC again in Recovery Mode.
  9. Select Advanced options again from the main window.
  10. Now select Uninstall Updates and roll back any recent updates if you suspect they caused this issue.
  11. If the previous step doesn’t solve the problem, you can choose System Restore from the same menu and roll back your system to an earlier restore point.

If you don’t have a bootable media yet, learn how to create a Windows 11 bootable USB drive and keep it safe for other occasions when you want to restore your system.

2. Run a CHKDSK scan

  1. Press the Search icon from the Taskbar, type cmd, and click on Run as administrator to start Command Prompt with full privileges.
  2. Type or paste the following command and press Enter to run it (C: is the default drive for the system, but you can replace it with the drive letter of your corresponding system partition):
    chkdsk /r /f C:
  3. CHKDSK will attempt to fix any problems found on your drive so wait patiently for the process to finish and then restart your PC.

3. Run a full antivirus scan

  1. Click the Search icon on the Taskbar, type windows security, and click on the app from the results.
  2. Now click on Virus & threat protection.
  3. Select Scan options right under the Quick scan button.
  4. Check the Microsoft Defender Offline scan and hit the Scan now button.
  5. It would be best if you restarted your PC for the scan procedure to start.

Now check if the kernel data inpage error is resolved.

4. Update or reinstall the disk driver

4.1 Update the driver

  1. Click the Search icon, type device manager, and select the app from the results.
  2. Right-click, the driver from the Disk drives section and select Properties.
  3. Select the Driver tab, then click on the Update driver button.
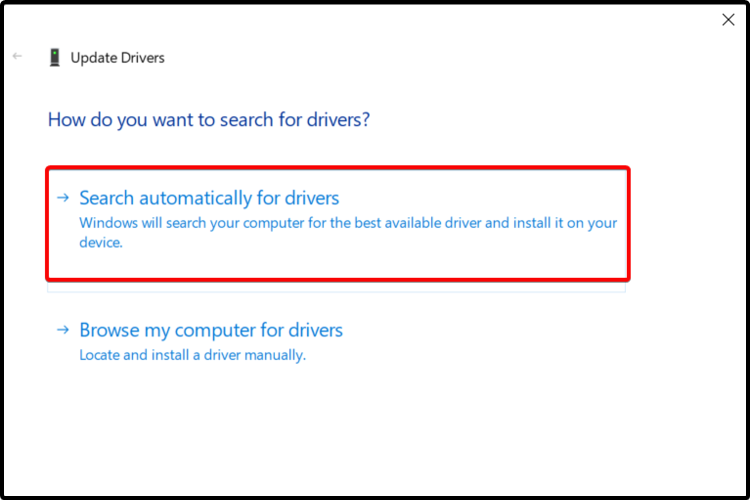
  4. Choose the first option, and Search automatically for drivers.
  5. If the system finds any new drivers, it will install them. If not, you can also click on Search for updated drivers on Windows Update.
  6. You will be redirected to the Windows Update menu, so hit the Check for updates button.
  7. If there are any system updates, they will be downloaded and installed, and some updates may also contain new disk drive drivers.

For automatic driver updates, we recommend Outbyte Driver Updater, which will scan your entire PC and prompt you to choose which outdated or missing drivers to update.

⇒ Get Outbyte Driver Updater

4.2 Reinstall the disk driver

  1. Select the Search icon from the Taskbar, type device manager, and select the app from the results.
  2. Expand the Disk drives section, right-click the driver, and select Properties.
  3. Select the Driver tab and then select Uninstall device.
  4. Click on Uninstall to confirm your choice.
  5. Right-click on the Disk drives section and select Scan for hardware changes.
  6. The system will reinstall the latest driver for the drive.

5. Perform an SFC scan

  1. Click the Search button from the Taskbar, type cmd, and select Run as administrator to start Command Prompt with admin privileges.
  2. Type or paste the following command and press Enter to run it: sfc /scannow
  3. Wait for the scan to complete the scanning process. If there are any corrupted system files, the tool will detect and repair them. First, check if the Windows 11 kernel data inpage error is fixed.

6. Set the Paging system to Automatic

  1. Press the Windows key + E to start File Explorer.
  2. Right-click on This PC and select Properties.
  3. Select Advanced system settings from the right pane.
  4. Hit the Settings button under the Performance section.
  5. Click on the Advanced tab, then click the Change button.
  6. Check the Automatically manage paging file size for all drives box and click OK.
  7. Restart the PC for the changes to take effect.

We hope our solutions helped you fix the Windows 11 kernel data inpage error, and now your computer works perfectly again.

When the drive shows signs of fatigue or malfunctioning, it’s much wiser to use the best backup software and look for a new component.

Tell us in the comments section below if you have any other suggestions or have experienced this problem firsthand.

Cyber Monday Deal on Acer Predator Triton 500 Saves You $300

If your intention is to push the levels of graphics quality beyond the limits of any regular console that you may currently use, then you clearly need a new gaming laptop.

To help you decide where to start, check out our top choice for you – none other than the Acer Predator Triton 500 laptop.

This deal on Acer Predator Triton 500 PT515-52-71K5 saves you no less than $300, so let’s take a closer look at this laptop in order to make an informed decision.

Although BF has ended, Acer Predator Triton 500 can be found at special discounts, just make sure to check frequently for some flash sales.

Where to buy Acer Predator Triton 500?

Acer Predator Triton 500 gaming laptop

You need to know from the very start that Acer Predator Triton 500 is a feature-packed gaming laptop with a powerful Intel Core i7-10750H processor that comes with 16GB memory and a trim design.

On the surface, it may look a lot like other consumer laptops. However, the feel of that nicely crafted chassis is unique.

Gaming laptops have higher-end components than regular ones, comfortable keyboards with excellent RGB lighting, and stylish cooling vents, and Acer Predator Triton 500 truly is the perfect mix of all these.

If you’re still undecided, consider that you can save 20% on PerformanceGuard if you choose to add Microsoft 365 and PerformanceGuard to your order.

  • Responsive 300Hz panel
  • Ethernet and multiple USB ports included
  • Turbo/overclocking settings
  • Lightning-fast SSD
  • Slim and sleek design
  • Questionable battery life

Don’t forget that we’re here to keep you up-to-date on the very best promotions. Let us know if this Acer Predator Triton 500 Cyber Monday sale meets your demands by leaving a comment in the area below.

5 Best Deals for Radeon RX5700 XT [Cyber Monday]

If you want faster gameplay or just to power up your computer, you need to renew your graphics card. You finally have the chance to buy an excellent graphics card from our top picks on the market.

Just continue reading our list to find a plethora of impressive offers for you to grab, so let’s dive in right away.

Note: All the prices and offers in this article are subject to change, so be sure to check the official product page to get the latest deal. If the product or offer you’re looking for is no longer available, you can try to find it on its official manufacturer page or get another one from our list.

What is the best AMD Radeon RX 5700 XT deal?

Gigabyte Gaming OC 8G (rev 2.0)

  • 7nm Radeon RDNA architecture
  • Accelerated game fidelity
  • FreeSync & FreeSync 2 HDR technology
  • WINDFORCE 3
  • Not enough RGB

The Gigabyte Radeon RX 5700 XT gaming OC 8G (rev 2.0) graphics card is powered by 7nm Radeon RDNA architecture and it offers you the best-accelerated game fidelity thanks to its Radeon Image Sharpening & FidelityFX feature.

You can now take the advantage of an immersive gaming experience thanks to the FreeSync & FreeSync 2 HDR technology.

Now you have WINDFORCE 3X with alternate spinning fans and direct-touch copper heat pipes.

XFX thicc III ultra

  • XFX zero DB autoload sensing fans
  • Ultra HD support
  • AMD VR ready premium
  • Intuitive gaming features
  • Large dimensions

The new XFX thicc III ultra 5700 XT features a dynamic cooling power technology that keeps lower temperatures and heightened performance perfectly adapted to the intensity of the moment, thanks to its 2.90-millimeter fans and 100-millimeter fans.

This amazing graphics card is built for high-performance and high-resolution gameplay. You can now experience smooth gameplay performance at 1440P and 4K.

PowerColor Red Devil 8GB GDDR6

  • 7 nanometer technology
  • Radeon image sharpening
  • AMD FidelityFX. Dual BIOS
  • 8GB GDDR6
  • Large dimensions

The PowerColor Red Devil Radeon RX 5700 XT 8GB GDDR6 graphics card has dual BIOS (silent mode and Oc mode), a 1,5mm metal black plate, and a triple fan design of 90mm each fan.

Thanks to the included DrMOS, the high polymer capacitors deliver better performance of 00 phase PWM.

It also includes 5 heat pipes and an extended heatsinkSink. Of course, the RGB side and backplate logo signature are worth to be mentioned.

XFX Triple Dissipation 8GB GDDR6

  • Dual BIOS
  • 1440p and 4k
  • Boost clock: Up to 1905MHz
  • 2 90mm fans and 100mm fan
  • A bit noisy

The new XFX Triple Dissipation 5700 XT is built with style and dynamic cooling power to get temperatures low and to heighten the performance that adapts to the intensity of the moment.

This graphics card is equipped with dual BIOS, the latest 8GB of GDDR6 high-speed memory, and PCI Express 4.0 support, to deliver twice the bandwidth.

Thanks to the 2 90mm fans and 100mm fan and copper GDDR Heatsink this graphics card stays cool and quiet.

PowerColor 8GBD6-3DH

  • 8GB GDDR6
  • 1755 MHz game clock
  • PCIe 4 0
  • Output HDMI/ DisplayPort x3
  • Noisy fans when in heavy use

The PowerColor 8GBD6-3DH graphics card was designed to power high-fidelity gaming for immersive explosions, physics, and lighting effects.

This graphics card is equipped with 8GB of advanced GDDR6 memory to provide high bandwidth of up to 448 GB/s, enabling 1440p performance for most games.

Radeon RX 5700 XT features PCI Express 4.0 support, with a throughput of 16 GT/s.

As you can see in our list, the market offers a variety of graphics cards that suit your needs. Which Radeon RX5700 XT are you going to buy? Let us know in the comments section below.

5 best jukeboxes for home to buy [Cyber Monday]

Whenever you think about a jukebox, you probably think about an old bar somewhere in the ’80s or ’90s that had few songs on it, and half of them were country songs.

Well, jukeboxes exist today as well. However, except for the exterior design that caters to the nostalgic, they have been upgraded to XXIst century standards.

There are even miniature jukeboxes that you can have in the comfort of your home. If you too are a fan of such novelty devices, then you should take a look at our top picks.

Note: All the prices and offers in this article are subject to change, so be sure to check the official product page to get the latest deal. If the product/offer you’re looking for is no longer available, you can try to find it on its official manufacturer page or get another one from our list.

What are the best jukeboxes for home that I can buy?

  • Crosley Bluetooth & CD player Jukebox – 4 built-in stereo speakers
  • ARKROCKET 200 Wall-O-Matic – Can be attached to a wall
  • ARKROCKET Saturn V Jukebox Vinyl Record Player – Amazing speaker quality
  • Roxby Retro Full-Size Jukebox – Great sleek wood finish
  • Victrola Nostalgic Wood Countertop Jukebox – Smallest jukebox

Now let’s take a look at the pros and cons of each one and see what’s the right one for you.

Crosley Bluetooth & CD player Jukebox – 4 built-in stereo speakers

  • Bluetooth receiver for fast streaming of your favorite music
  • Front-loading CD player and built-in AM/FM radio
  • Color-shifting LED lighting and a decorative musical playlist
  • Remote included so you can control both the playlist and the lights
  • Must pay extra for the stand

Enjoy all your favorite music in style with the Crosley Bluetooth Jukebox.

This massive full-sized will take any medium or large room and turn it into a dancefloor thanks to the vintage design.

Instead of vinyl, this jukebox features a front-loading CD player and built-in AM/FM radio, and the hardwood finish brings a note of elegance, making it suitable for rooms with matching furniture.

You can get this beauty at a 20% discount right now for only 1,595$. Don’t miss the opportunity!

ARKROCKET 200 Wall-O-Matic – Can be attached to a wall

  • All-in-One with radio, USB, SD slot, and Bluetooth
  • Special brackets that allow wall-mounting
  • A dynamic retro disco lighting system
  • Real buttons for song selection with access to 200 songs
  • The design may not suit everyone’s taste

This jukebox represents a harmonious mix of classic style and modern technology and is the perfect addition to your home.

If you are looking for a jukebox with an amazing 50’s American diner-style, you are looking at the winner.

Boasting a cool classic look paired with dynamic retro LED lighting that will cheer up even the dullest of designs and advanced technology to support all your favorite Bluetooth devices, you simply cannot go wrong with this piece.

The jukebox comes packed with radio, USB, and SD card readers, with classic style buttons that you can use to choose from a playlist of 200 songs.

The is one of the cheapest you can find, at only 338$.

ARKROCKET Saturn V Jukebox Vinyl Record Player – Amazing speaker quality

  • Vinyl record player, audio CD player, FM radio with PLL & AUX input
  • Bluetooth, USB port & SD/MMC memory card slot
  • Includes remote control with batteries
  • Full-size floor-standing retro-style jukebox & wooden cabinet with chrome trim 
  • Pretty heavy for its size

Boasting a classic jukebox design with rainbow LED lighting that spreads the good old retro vibes in the most charming way, this is the perfect entertainment partner for nostalgia.

Surprisingly, the technology within is anything but dated. With MP3 and WAV compatibility, and full Bluetooth support, you can put modern technology to good use easily.

Get the best out of the built-in 100-Watt amplifier that delivers rich sound along with two full-range 40-watt Speakers, 2 x 5″ tweeters, and a 6 1/2″ woofer.

Right now it has a 100$ discount for the price of 1,799$.

Roxby Retro Full-Size Jukebox – Great sleek wood finish

  • Retro color-changing LED light tubing in 7 bright color
  • Sleek wooden finish for the best vintage speaker looks
  • With full compatibility, radio, AUX, USB, SD, record player, and Bluetooth
  • Remote controlled and equalizer for the best sounds
  • Back panel is hard to access if next to the wall

Another awesome jukebox on our list is the Roxby Retro Full-Size Jukebox, a home jukebox that can fit into pretty much anyone’s apartment and bring the vintage American feel.

This jukebox is great for any party, music festival, man cave, gift, or just to amp up the room, exactly like a jukebox you would see in a ’50s cafe somewhere in New York.

It features retro-looking color-changing LEDs, and it can read music off of CDs or via Bluetooth connection from pretty much any compatible device.

The price is only 799$ since is a smaller version, but if you want the additional stand, the full price for both is 949#.

Victrola Nostalgic Wood Countertop Jukebox – Smallest jukebox

  • AM/FM Radio and a 3.5 mm Aux-in jack at the back to connect all device
  • Features a volume knob, FM tuner buttons, and a complete set of music playback buttons
  • Built-in Bluetooth pairs quickly with iPhone & Android smartphones from 33 feet away
  • The superb sound quality is perfectly paired with 5 jazzy color-changing LED tubes
  • Instructions could be more explicit

Victrola’s 115-year commitment to craftsmanship is evident in this compact, retro diner-style player. Its striking looks, strong build, and well-balanced sound make it a perfect choice to gift to your loved ones

This jukebox is an excellent choice in jukeboxes if you’re trying to gift it to someone, or if you’re trying to give your children or grandchildren a hands-on experience of what the good old times used to look like.

It can read music off of CDs and it can also be connected to a Bluetooth-compatible device, and the neon LED lights and pink outer exterior make it a joy to look at, not just listen to.

The cheapest out of all, small and perfect for countertop, with a discount of 17%, right now it’s only 99$.

If you like to listen to music, you could very easily just go buy a Sony or a Yamaha sound system and be done with it in no time.

But if you like to live in style and you’re also the nostalgic type, then a jukebox could be a good alternative.

These devices will not only make you the envy of the neighborhood, but they have been brought to speed with the latest technologies, so in the end, you don’t actually have anything to lose.

How to Run .Exe Files on a Chromebook [Fastest Ways]

Chromebook is a resourceful tool with many features for surfing the internet, schooling, and working. It runs on Google operating system Chrome OS. However, its major shortcoming is that it doesn’t support Windows programs or full Microsoft apps.

Nevertheless, we’ll take you through how to run .exe files on Chromebook.

Can I run .exe files on Chromebook?

Even though Chromebook doesn’t support running Windows programs because of its operating system, there are ways around it. You can run .exe files, which are installers for Windows programs on your Chromebook, and they’ll work fine.

Furthermore, running .exe files on a Chromebook allows you to conveniently run most apps and games. The process involves installing specific third/party tools on your Chromebook to help run the .exe files.

However, installing the Windows operating system on your Chromebook is the best way to run Windows applications. It is a reliable and efficient method, but it can’t work with all Chromebook.

Nevertheless, anyone can run .exe files on their Chromebook with the right tools. Hence, we’ll take you through the methods you can follow to run .exe files on Chromebook.

How do I run .exe files on Chromebook?

Before trying any steps for running .exe files on your Chromebook, go through the following preliminary checks:

  • Disable offline files on your Chromebook.
  • Connect your Chromebook to WiFi or a fast cable connection.
  • Make sure your device is well-charged or plugged into a stable power source.

The steps above will prepare your Chromebook for the process. So, try the steps below to run .exe files.

1. Use Wine to run .exe files on Chromebook

  1. Restart your Chromebook and hold the Esc + Refresh + Power button while restarting.
  2. Press and hold the Ctrl + D key simultaneously when a warning prompt appears.
  3. Click ENTER when a prompt asking about OS verification appears (The device will restart and set up Developer Mode).
  4. Download the latest version of Wine on your Chromebook.
  5. Press Ctrl + Alt + T keys to launch the terminal window.
  6. Type the following command for 32-bit Ubuntu: sudo apt update sudo apt install wine
  7. Or, type this for 64-bit Ubuntu: sudo dpkg –add-architecture i386
  8. Type the following commands to create a fake C: drive where your .exe programs will be installed before installing Wine: Winecfg
  9. Download the .exe file for the Windows app you want to run with Wine.
  10. Open the terminal and go to the directory where you saved the .exe file, then type: wine filename.exe
  11. The Windows installer will run using Wine. Choose the C: drive on the new prompt asking for the directory.

You can repeat the steps for as many Windows apps as you want. Steps 1-3 will help start the Developer Mode, while the others help initiate the running process with Wine.

2. Use Crossover to run .exe files on Chromebook

  1. Repeat steps 1-3 in the procedure above (The device will restart and set up Developer Mode).
  2. Download a version of Crossover that your Chromebook supports and install it.
  3. Download the .exe file for the Windows app, then save it under the Linux Files folder.
  4. Launch the Crossover app, search for unknown app, and select Install Unlisted Applications.
  5. Click Create an empty environment.
  6. Click the down arrow button beside Launch and select File Explorer from the drop-down.
  7. Right-click the .exe file and select Open.
  8. Select Installer Files.

The Windows .exe file should start running on your Chromebook.

3. Remotely access a Windows computer to use its apps

  1. Go to the Chrome Remote Desktop web app page and install the Chrome Remote Desktop on your Windows PC.
  2. Input the necessary information, set a pin, and click Start.
  3. Then click on Remote Support and click on the Generate Code button to get the secured code for accessing your PC from the Chromebook.
  4. Go to https://remotedesktop.google.com/access on your Chromebook.
  5. Click the Access button, then enter the code generated on Windows earlier.

The two devices should be connected now, so you can use the programs you want. The Remote Desktop connection will give you full access to remotely control the Windows PC.

Nonetheless, it may interest you to check which is better between Windows 11 and Chrome OS and why you should care.

Did you know that you can put apps on the desktop on a Chromebook? That’s right, and we have a guide that shows you how to do it.

Should you have further questions, and suggestions, kindly leave them in the comments section below.

5 Best Studio Microphones to Buy [Cyber Monday]

The beauty of items that can be used in a dedicated field is that when you search for them, you more or less know that they should have some basic specs that make them good for that particular job.

Such would be the case with studio microphones, as you know that all microphones that have that tag will have everything needed to make them more than good for use in studios.

If you work for a radio station or are simply looking to open up your own personal recording studio, podcast station, or streaming setup, then a studio microphone is the right type of microphone for you.

Note: All the prices and offers in this article are subject to change, so be sure to check the official product page to get the latest deal. If the product or offer you’re looking for is no longer available, you can try to find it on its official manufacturer page or get another one from our list.

What is the best studio microphone?

BLUE Condenser Microphone

  • Boasts 3 condenser capsules that can record almost any situation
  • Perfect for vocals, musical instruments, podcasting, and more
  • Compatible with all major Windows OS versions
  • Legendary Blue Broadcast sound
  • Some customers find the mic’s life expectancy to be questionable

The BLUE mic is already a resounding name, as it also holds a top spot as far as condenser microphones go in general.

The robust metallic body, as well as the incredible price-to-quality ratio, make it a customer favorite on Amazon already.

The four distinct pickup patterns offer you the chance to record and stream in ways that would normally require multiple microphones.

TONOR XLR Condenser Microphone Kit

  • Package includes a microphone, shock mount, adjustable suspension scissor arm stand, table mounting clamp, pop filter, windscreen, 3.5mm XLR cable and manual
  • TONOR offers a 12-month repair or replacement warranty and a 30-day hassle-free return policy
  • Cardioid polar pattern
  • Great for all manner of recording sessions
  • Needs an additional power supply that has to be bought separately

The TONOR XLR Condenser Microphone Kit comes in a package that contains almost all the accessories that you would need besides the actual microphone for a good studio recording session.

While each individual product in the package may not be all that impressive, the price is incredibly low considering everything you will be getting.

Audio-Technica AT2020

  • Great price to performance ratio
  • Ideal for both professional project, as well as home studio applications
  • Cardioid polar pattern
  • High spl handling
  • Doesn’t come with an XLR cable

The Audio-Technica AT2020 boasts a rugged construction for durable performance while offering a wide dynamic range and handling high SPLs with ease.

Most customers described the difference between top-end microphones and this one as simply nothing more than a matter of price.

Neewer NW-800

  • Ball-type anti-wind foam
  • Can capture rich
  • Good cardioid pickup output
  • High sensitivity
  • Some user report that the sound may sometimes echo without reason

The Neewer NW-800 uses a precision electronic circuit to eliminate crossover distortion and harmonic distortion.

It also has a good cardioid pickup output and high sensitivity with low noise and a wide dynamic range.

It also comes in a fashionable design, with a noble and elegant appearance, while still being sturdy and durable.

ZINGYOU ZY-007

  • Improved performance
  • Can provide better sound for studio recording, vocals, instruments, podcasts than the previous version
  • Comes bundled with a complete set of mic accessories
  • Cardioid pick-up pattern
  • Some users have reported issues with the mic’s ability to pick up sound, even at max volum

The ZINGYOU ZY-007 microphone presents itself as a leading condenser microphone solution for delivering high-quality sounds for memorable recordings.

This mic comes in yet another affordable bundle that can be considered an all-in-one package.

The ZINGYOU ZY-007 features extremely quiet self-noise. This amazing condenser microphone is a cardioid pick-up pattern, which is the most widely used pattern in professional microphones.

If you plan to seriously invest in studio work, then you better make sure you have the right equipment for the job.

While studio microphones can be a bit costly, they eventually are well worth the investment once you see how your customers appreciate the pristine sound quality.

No Speakers or Headphones are Plugged in: Use These 7 Fixes

There is a common problem circulating on the web about Windows 10 not recognizing audio devices plugged into the machine. This is accompanied by no speakers or headphones plugged in error despite connecting the devices.

While some users complain that this issue started after upgrading their PCs, other factors can still be responsible. Irrespective of the causes, this guide will show you the surefire fixes to get back sound on your PC.

Why is my PC not detecting my speakers?

The issue of no speakers or headphones are plugged into Windows 10 after the update issue can be caused by various factors. Below are some of these causes:

  • Outdated audio drivers: The first thing to look at when facing the no speakers or headphones plugged in Windows 10 issue on an HP or Dell computer is your audio drivers. If they are outdated, you need to update the drivers to restore normalcy.
  • Faulty update: If you started noticing this issue after updating your PC, the problem might be with the update. You need to remove this update to solve this problem.
  • Wrong sound settings: Sometimes, selecting the faulty playback device is why you are getting this error. You need to change the playback device to your speaker or headphone to make them work in this case.
  • Outdated BIOS: Many users have found their BIOS to be the cause of the headphone not plugged in Windows 10 issue. The quick way to fix this is to update your system BIOS from the manufacturer’s website.

How do I fix No speakers or headphones are plugged in error?

Before delving into the detailed fixes in this section, we recommend going to your PC manufacturer’s website to update your BIOS. This has worked for many users and can save you a lot of stress.

Also, if you use a PC with more than one audio port, change the line positions to your speaker by trial. There is no need to follow the color code, as some updates might have tampered with it. If these do not work, you can now proceed to the fix below:

1. Update the audio driver

1.1 Manually update your drivers

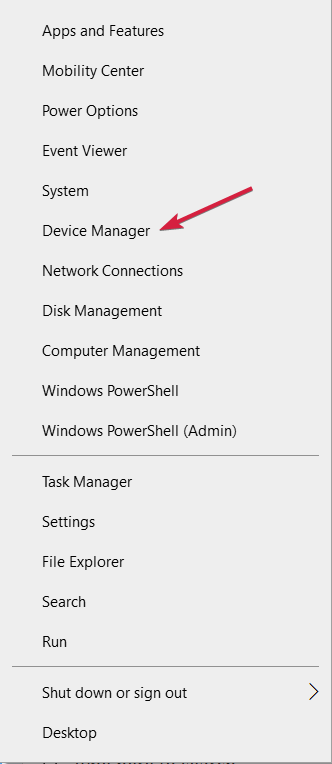
  1. 1. Right-click the Start button and select Device Manager.

    open device manager in windows 10
  2. 2. Expand the Sound, video and game controllers section.

  3. 3. Right-click the audio driver and select Update driver.

    update-sound no speakers or headphones are plugged in
  4. 4. If you have multiple drivers, do the same for all of them.

  5. 5. Choose Search automatically for drivers then restart your computer once the process is done.

  6. If you’re encountering the No Speaker or Headphones are plugged in issue, the first recommended fix is to update your drivers. Aside using the built-in driver updater, you can also go to the manufacturer’s website to download and install the latest driver.

    This has proved effective in solving the no speakers or headphones are plugged in issue for some users.

1.2. Update drivers automatically

Downloading and updating drivers manually can permanently damage your system by installing the wrong versions. To prevent that, we strongly suggest doing it automatically by using a third-party driver updating program.

This tool will also prevent any damage to your PC by downloading and installing the wrong driver versions. It will show you what drivers are outdated and let you choose manually which one to update and which to leave in the current state.

2. Rollback driver

  1. Press the Windows key + X and select Device Manager.
    device no headphones or speakers are plugged in
  2. Click the arrow next to the Sound, video and game controllers option to expand it and double-click the driver there.
    sound driver
  3. Click the Driver tab at the top, followed by the Roll Back Driver button.
    roll back no headphones or speakers are plugged in

If you started noticing the no speakers or headphones are plugged in issue after installing a driver update; you need to roll back your driver. Remember to restart your PC after doing so.

3. Use Command Prompt

  1. Press the Windows key, type cmd, and select Run as administrator under Command Prompt.
    cmd admin
  2. Type the commands below and hit Enter after each: net localgroup Administrators /add networkservicenetwork service net localgroup Administrators /add localservicelocal no headphones or speakers are plugged in exitexit
  3. Finally, restart your PC.

Another cause of the no speakers or headphones are plugged in issue is your PC settings. The commands below will help set the needed settings and fix the audio problem.

4. Change the default playback device

  1. Right-click the sound icon in the Taskbar and select the System Sound Events option.
    system sound
  2. Click on the Playback tab.
  3. Right-click anywhere there and choose Show Disabled Devices.
    show disabled
  4. Now, right-click your speaker or headphone and select Enable, followed by Set as Default device.
    enable  no headphones or speakers are plugged in
  5. Finally, click the Apply button, OK, and restart your PC.
    apply ok

At times, you are simply getting the no speakers or headphones plugged in error because the device is disabled. Enabling and setting it as the default audio device should remedy this.

5. Disable the Front Panel Jack detection

  1. Go to Search, type realtek hd audio manager, and open Realtek Audio HD Manager. You will need to download the Audio Manager if you don’t have it.
  2. Then go to the Speakers tab, and click the folder under Device Advanced settings.
  3. Select Disable front panel jack detection.
  4. Restart your computer.

If your Realtek HD Audio Manager isn’t opening in Windows 10, look at this article dedicated to fixing Realtek issues and learn what to do.

6. Run Sound Troubleshooter

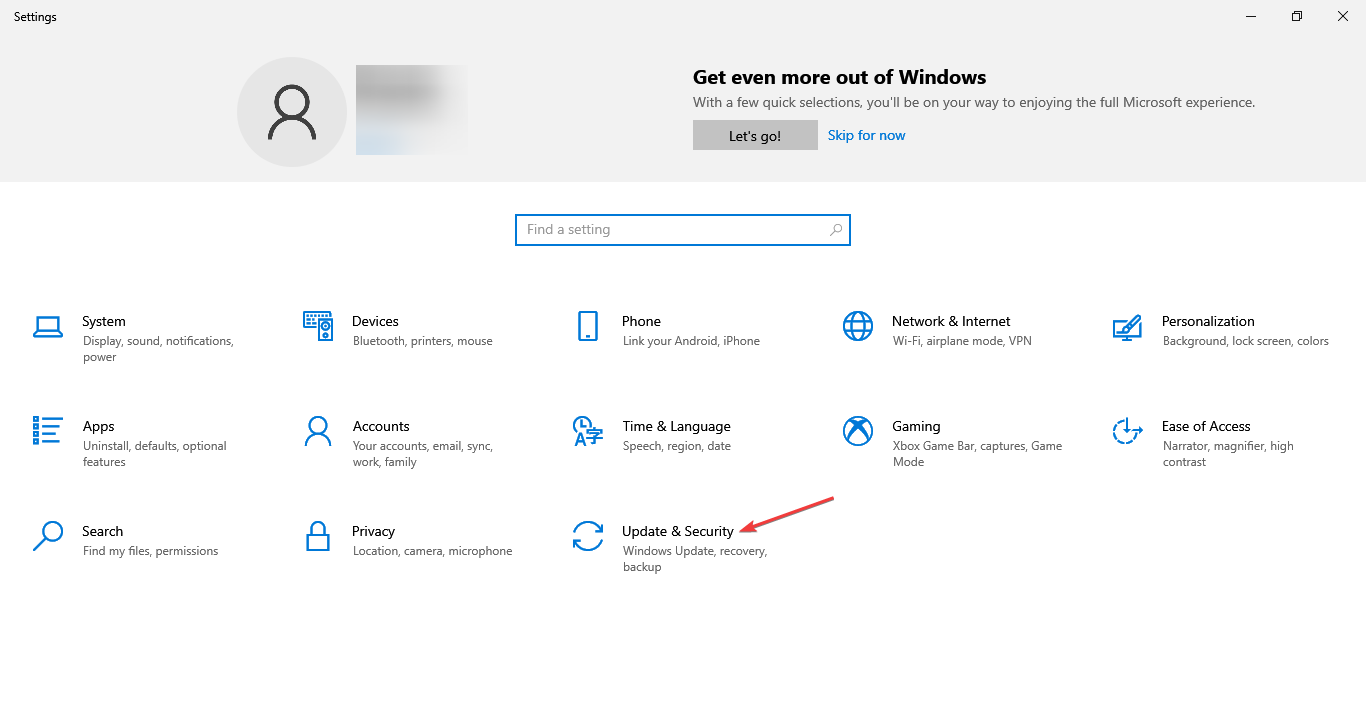
  1. Press the Windows key + I to open the Settings app and select Update & Security.
    update adn security no speakers or headphones are plugged in
  2. Then click on Troubleshoot followed by Additional troubleshooters.
    additional troubleshooters
  3. Click Playing Audio, and select Run the troubleshooter.
    run trouble
  4. Follow further on-screen instructions and restart your computer.

Sometimes, it will be hard to trace the cause of the no speakers or headphones plugged in the issue. Running the troubleshooter will help diagnose it and recommend possible solutions.

7. Delete Windows updates

  1. Open Settings and click on Updates & Security.
  2. Select the View update history.
    view no speakers or headphones are plugged in
  3. Click on Uninstall updates.
    uninstall updates
  4. Find the troublesome update (usually the latest installed update on your computer), right-click it, and choose Uninstall.
    uninstall option
  5. Reboot your computer.

If you keep getting the audio peripheral doesn’t appear to be plugged in error, it might be the last installed Windows update messing with your PC. Therefore, you must remove and wait for newer patches to fix this issue.

That’s about it; we hope at least one of these solutions helped you resolve the annoying No speaker or headphones are plugged in problem in Windows 10.

If your headphones are causing sound problems and you are experiencing no sound, check out our article to solve the problem.

If you have any comments, questions, or suggestions, feel free to let us know in the comments below.

5 best USB audio interfaces for streaming [Cyber Monday]

For those of you that don’t know, audio interfaces are devices that let you plug pro mics, instruments, and other signals into a PC. When an audio interface is used with a computer, it can act as the PC’s sound card.

If you’re on the lookout to buy an audio interface, it’s important to determine the specific port that’s available on your computer for its use. Otherwise, they won’t be compatible, and you’ll need extra adapters.

If you’re interested in buying a USB audio interface specifically for streaming, then you should take a look over our list of top choices.

Note: All the prices and offers in this article are subject to change, so be sure to check the official product page to get the latest deal. If the product/offer you’re looking for is no longer available, you can try to find it on its official manufacturer page or get another one from our list.

What audio interface has the best audio quality?

  • Behringer UM2 – most popular device
  • Behringer U-Control UCA202 – easy setup
  • Focusrite Scarlett 2i2 – made of aluminum
  • Behringer UMC22 – for proffessional workflows
  • Focusrite Scarlett Solo – comes with a bundle

Now let’s take a closer look at the pros and cons of each device.

Behringer UM2 – most popular device

  • Audiophile 48 kHz resolution
  • Maximum Sampling Rate: 48 kHz
  • Compatible with popular recording software
  • Streams 2 inputs / 2 outputs
  • Zero-latency direct monitoring
  • Sound quality is a bit low

The Behringer UM2 is a neat USB audio interface that can even use professional-grade studio condenser mics to create outstanding tracks and studio-level music.

As expected, on the rear panel of the UMC404HD, you can easily find the USB 2.0 port for an easy connection to your PC.

It also features the ability to switch between 48 kHz and 96kHz, and both sampling rates offer better than CD recording quality for professional results quickly and efficiently.

Behringer U-Control UCA202 – easy setup

  • Ultra-flexible audio interface
  • High-resolution 48 kHz converters
  • Stereo Headphone output with dedicated Level control
  • Additional S/PDIF optical output
  • Powered via USB
  • Requires computer-specific drivers

If you’re looking for a first audio interface that doesn’t require much setup beforehand, you can’t go wrong with the Behringer U-Control UCA202.

This neat USB audio interface only needs to be plugged into your PC and you are ready to go. This includes both your Windows PC and Macbook.

Long story short, this makes activities such as song recording sessions or streaming to be extremely easy to start.

Focusrite Scarlett 2i2 – made of aluminum

  • Excellent digital performance
  • The rugged metal unibody case
  • Truly portable interface
  • Authorization code for Ableton Live Lite
  • Bold color choice
  • The software may be difficult to handle

The Focusrite’s Scarlett 2i2 is a 2 in/2 out USB recording interface that is housed in an attractive anodized aluminum unibody chassis, making it look extremely stylish and modern.

It is also equipped with some of the most popular microphone preamps in the industry, which allows the creation of transparent, low-noise and low-distortion preamps.

All these eventually provide a great audio recording and streaming experience. That’s why Focusrite Scarlett 2i2 is part of this list.

Behringer UMC22 – for proffessional workflows

  • Audiophile 48 kHz resolution
  • No drivers required
  • Compatible with popular recording software
  • Streams 2 inputs / 2 outputs
  • Preamplifier with +48 V phantom power
  • Some units have been reported to emit static

If you’re the type that likes to take your tracks seriously, then Behringer UMC22 is the audio interface for you, providing 48 kHz resolution.

That’s simply perfect if you want to enjoy the amazingly-detailed and pristine recording quality that others talk about.

Not only is the device great from a sound-quality point of view, but the fact that it is compatible with all popular OS and recording programs makes it one of the most versatile audio interfaces on the market.

Focusrite Scarlett Solo – comes with a bundle

  • Class-leading conversion
  • Super-low latency
  • Compatible with Windows 7/Mac OS X 10.10 and higher
  • Range of 104dB (A-weighted)
  • Crisp and cleat board sound
  • Quality control issues

The Focusrite Scarlett Solo is a USB audio interface that comes with a variety of extra in the package when you buy it.

Not only is it a great device all in itself, but it also comes with Pro Tools, the first Focusrite Creative Pack and Ableton Live Lite, Softube Time and Tone Bundle, and more.

No less important, Focusrite is known for making high-quality equipment and this one is no exception to the rule.

If you’re the type of person that would love to start recording some music, but hates the bulkiness of professional consoles, then using a USB audio interface to connect to your PC is the next best thing.

Not only are most of the entries on our list easy to install and use, but they also provide pristine sound quality, which is essential if you are also trying to use the interface for streaming.

3 Best Xbox Elite Controllers to Buy [Cyber Monday]

Those of you that are avid Xbox gamers probably know about the Xbox wireless controller Elite and how it is a premium controller released for the Xbox One range of consoles and Windows 10 PCs.

The controller was originally bundled with the Xbox One Elite console, but it is sold separately as well.

A couple of versions of the Xbox Elite controllers were already released, and we’ve ranked them based on their functionality.

Note: All the prices and offers in this article are subject to change, so be sure to check the official product page to get the latest deal. If the product or offer you’re looking for is no longer available, you can try to find it on its official manufacturer page or get another one from our list.

What is the best Xbox Elite controller?

Xbox Elite Wireless Controller Series 2 Core – White

  • Adjustable-tension thumbsticks, wrap-around rubberized grip, and shorter hair trigger locks.
  • It comes with an app that lets you customize performance and controls
  • Brings your FPS games to a whole new level with a variety of fire modes
  • First-time users may not know how to make use of it

On the opposite end of the spectrum, you may be just fine with a product’s exterior design, and the only thing that you actually want to change is the way it behaves.

Save up to 3 custom profiles on the controller and switch between them on the fly. Besides the actual controller, you also get an app that can help you reconfigure it so that whatever game you’re playing, it will respond just as efficiently.

Custom Elite Series 2 Controller (Orange)

  • Several great color schemes to choose from
  • Made specifically for all FPS games
  • Simple-plug-and-play use
  • The price tag considering the improvements

The Elite 2 Custom Controller for Xbox One is just a recolor of the Xbox One Elite Controller Rapid Fire Mod featuring a great gradient color pattern.

Not only will you now be able to play FPS games like a pro, but you will look good doing it as well, and it will give your favorite controller a little bit of extra personality.

You can choose from several different color schemes, so it suits a wider variety of tastes

Xbox Elite Wireless Controller Series 2 Limited Edition by DreamController

  • Amazingly build and painted design on the controller
  • Tailor the controller with the new interchangeable thumbstick and paddle shapes
  • Use Xbox Wireless, Bluetooth, or the included USB-C cable
  • Up to 40 hours of rechargeable battery life
  • None

The Xbox Elite Wireless Controller Series 2 is the second generation in the Elite series and it allows you to play like a pro and feel like a legend.

The interchangeable thumbstick and paddle shapes can be customized to fit your own needs, and the long battery life means you can go for days of playing without a recharge.

Just as specialized gaming gear costs a little extra but is made to specifically target the PC gaming industry, the same can be said about the Xbox Elite controllers.

While in theory all Xbox controllers are designed for gaming, the Elite series was created for those that game on a competitive level, and need all the help that they can get.

Onedrive is not Syncing: How to Force Your Files to Upload

OneDrive is an important part of Windows 10. It helps to save your files on the cloud and constantly sync them.

Also, it offers protection against ransomware that can attack your files locally. However, some users are complaining that OneDrive is not syncing for some reason.

If you are facing this issue, rest assured that the fixes here will help you force your files to upload.

Why are my files not syncing in OneDrive?

Many of the reasons OneDrive is not syncing new and old files is down to the app settings. Below are some of the causes:

  • Insufficient memory: Each of the OneDrive plans has a memory size attached to it. When your quota is filled, you can face the OneDrive not syncing issue while trying to sync the document or desktop folder. You can copy the files to another OneDrive account, buy more memory storage, or switch to another file-syncing software.
  • Incomplete account setting: Sometimes, you face the OneDrive sync pending issue if your account setting is not complete. You need to check if your account is linked and complete it if need be.
  • Wrong internet setting: If your network is set as a metered connection, the OneDrive sync will be paused automatically. To ensure your files are synced, you need to disable the metered connection or reset your network.

How do I fix OneDrive sync issues?

1. Restart the OneDrive desktop app

  1. Right-click on the OneDrive icon on the Taskbar and click the Settings icon.
  2. Choose the Quit OneDrive option.
    quit onedrive not syncing
  3. Click the Close OneDrive button.
    close onedrive not syncing
  4. Now, press the Windows key, type onedrive, and click the OneDrive option to restart the app.
    start one drive

The first line of action if OneDrive is not syncing Excel files or any other folder is to restart the app. This should fix the glitches causing it to misbehave.

2. Unlink and Link account

  1. Right-click on the cloud icon in the Taskbar and click the Gear icon.
  2. Click the Settings option.
    settings onedrive not syncing
  3. Select the Account tab at the top and click Unlink this PC.
    unlink pc
  4. Now, click the Unlink account button to confirm the action.
    unlink account
  5. Finally, restart the OneDrive app and complete the setup.

3. Pause and resume sync

  1. Right-click the OneDrive icon in the Taskbar and click the Gear icon in the top right corner.
  2. Select the Pause syncing option. and choose the duration to pause the sync.
    pause
  3. Now, click the Gear icon again and select the Resume syncing option.
    resume onedrive not syncing

In most cases, the OneDrive not syncing issue is down to little glitches. Pausing and resuming the sync should help clear them.

4. Check the memory amount

  1. Right-click the cloud icon on the Taskbar and click the Gear icon and select the Settings option.
    settings onedrive not syncing
  2. Now, click the Account tab at the top. Check the available space.
  3. If you need more memory, you can move some files out of OneDrive or click the Get more storage option.
    get more
  4. From here, you can pay for any of the available packages.

If OneDrive is not syncing your files, it might be because you don’t have enough storage. If you have the means, it is advisable to purchase more memory. Else, you can just move some files out of OneDrive.

5. Disable metered connection

  1. Right-click your active network from the Taskbar and select Open Network & Internet settings.
    troubleshoot
  2. Click the Properties button.
    properties onedrive not syncing
  3. Toggle the switch for Set as metered connection backward.
    metered
  4. Now, restart OneDrive.

The metered connection helps you save data. It prevents the automatic download of updates and usage of data without your permission.

This feature also stops OneDrive from syncing automatically. You need to disable this feature to allow the app to sync your files at all times.

6. Disable the sync pausing in battery mode feature

  1. Click the cloud icon on the Taskbar, select the Gear icon in the top right corner, and click the Settings option.
    settings onedrive not syncing
  2. Now, select the Settings tab, uncheck the box for Automatically pause sync when this device is in battery saver mode and click OK.
    auto pause
  3. Finally, restart the OneDrive app.

The sync pausing in battery saver mode automatically halts your file sync when your PC enters the battery saver mode. This might be why OneDrive is not syncing at the time you are trying to use it.

Thus, you need to disable the feature to use the app normally.

7. Uninstall and reinstall OneDrive

  1. Press the Windows + I key and select the Apps option.
    apps
  2. Select the Microsoft OneDrive option and click the Uninstall button.
    uninstall onedrive not syncing
  3. Now, follow the onscreen instructions to complete the removal.
  4. Finally, download the latest version of the app from official sources.

If all the fixes above fail to help you fix this issue, then you need to reinstall the OneDrive app. Downloading a fresh version of the app should get rid of the issue.

There you have it: Everything you need to fix the OneDrive not syncing issue. The only thing you need to do now is to follow the instructions carefully.

If you need a list of third-party software to sync your files on Windows 10, check our guide for the excellent options to use today.

Feel free to let us the solution that helped you fix this issue in the comments below.

Posted in Fix

5 best condenser microphones to buy [Cyber Monday]

In an era where having your voice heard is far easier than before, having the right tools can make you stand apart. In this case, the right tools literally refer to having proper hardware at your disposal.

Regardless of whether you are making a podcast, or recording a YouTube video, you will need some really good microphones. Here’s a quick preview of our favorite picks:

  • Audio-Technica AT2020USB+ – Best for home use
  • Blue Yeti USB Microphone – Best for hassle-free installation
  • Audio-Technica AT2020 – Best for studio use
  • Rode NT1-A Large-Diaphragm – Best for limited budgets
  • HyperX QuadCast – USB – Best for gaming

Note: All the prices and offers in this article are subject to change, so be sure to check the official product page to get the latest deal. If the product or offer you’re looking for is no longer available, you can try to find it on its official manufacturer page or get another one from our list.

What is the best cheap condenser microphone?

Audio-Technica AT2020USB+ – Best for home use

  • Condenser microphone with USB output
  • High quality A/D converter with 16 bit
  • Headphone jack
  • Mix control
  • Only cardioid polar pattern

The Audio Technica AT2020USB+ is a plug-and-play. Once plugged into the USB port, the PC will find it and with a couple of mouse clicks, you are ready to record.

This microphone was designed for home studio or office use. It is ideal for live-streaming or home-recording work. 

Blue Yeti USB Microphone – Best for hassle-free installation

  • Tri-capsule array
  • Multiple pattern selection – cardioid, bidirectional, omnidirectional & stereo
  • Signal to noise: 100dB
  • Zero-latency headphone output
  • The product has a knack for breaking after about a year

The BLUE Yeti Silver Edition is probably the most popular condenser microphone on Amazon, and this is entirely justified, as it offers the best value for your money.

Thanks to the fact that you can simply plug it in using USB ports, and because it has no drivers to install, Yeti is the most versatile USB mic available today.

Audio-Technica AT2020 – Best for studio use

  • The noise level is 20 db SPL
  • Ideal for project or home studio applications
  • Output connector:integral 3 pin XLRM type
  • The price and performance ratio is top-notch
  • XLR cable doesn't suit

The Sennheiser MKH416-P48U3 is a condenser microphone that is in a league of its own. It is designed for loud/challenging exterior environments like film and broadcast.

This makes its usage rather niched, but when those precise occasions come, you couldn’t ask for a better product.

Rode NT1-A Large-Diaphragm – Best for limited budgets

  • Large diaphragm 1 inch gold-sputtered capsule
  • Cardioid polar pattern
  • Ultra low noise, self noise of only 5dB
  • Includes RØDE SM6 shock mount, pop filter and dust cover
  • Packages may not include all accessories

The Rode NT1-A is a microphone that is indeed very good for the money you will have to pay, but the real winner with this entry is the assortment of accessories that you receive along with the mic itself.

These include a studio-grade pop shield and shock mount is included, along with a 20′ microphone cable, dust cover, and an instructional video.

HyperX QuadCast – USB – Best for gaming

  • Anti-vibration shock mount
  • Tap to mute sensor
  • Convenient gain control adjustment
  • Multi device and chat program compatibility
  • The LED is not RGB and can't be disabled

The HyperX QuadCast is probably the niched product on our list, seeing that it is a microphone specially dedicated to gaming.

However, what it lacks in versatility more than makes up for in how well it gets the job done.

If you’re a vlogger, YouTube influencer, or just your amateur singer doing covers, then you probably want the best sound equipment that is both good and affordable.

While Amazon may be full of other condenser microphones, the ones listed by us are the ones that we think strike the perfect balance between price, and performance, and that can be used in a wide variety of scenarios.

Windows 11 Antivirus Keeps Turning Off? Stop it in 4 Steps

Windows 11 is here, but if you haven’t tried it already, you should know that it has its share of bugs. Speaking of bugs, many reported that the Windows 11 antivirus keep turning off. This can be a problem since it will leave you without built-in protection.

Without a proper antivirus, your computer is prone to data loss, malware, and phishing attacks; therefore, it’s crucial to solve this issue as soon as possible.

There are ways to fix this problem, and in this guide, we’ll show you the best methods to use and enable Windows Defender again.

Why does Windows Defender keep turning off Windows 11?

The reason Windows 11 Security virus protection feature keeps turning off is within a close circle. Below are some of them:

  • Outdated PC: If your PC is obsolete, it can lead to different issues, including the Windows 11 Virus and threat protection keeps turning off point. You must update Windows 11 to the latest version to restore regular service here.
  • Activity of third-party antivirus: Most antivirus software cannot work alongside another security tool on the same PC. If you have any other antivirus aside the Windows Defender, it might be the one causing this issue. Thus, you need to remove it with one of the best uninstaller software.
  • Wrong Group Policy setting: At times, it might be that Windows Defender is turned off by Group Policy. In this case, you need to adjust your policy settings and re-enable them.

What do I do if Windows Defender is turned off in Windows 11?

1. Install the latest updates

  1. Press Windows Key + I to open Settings.
  2. Go to the Windows Update in the left pane.
  3. In the right pane, click on Check for updates button.
  4. If any updates are available, Windows will download them automatically.
  5. Once the updates are downloaded, restart your PC to install the updates.

The Windows 11 antivirus keep turning off issue seems to appear if you have Antimalware Platform Update .2106. Microsoft has fixed this problem, and after installing Antimalware Platform Update .2107, the issue should be resolved.

Keep in mind that this update isn’t available to everybody, so you might not be able to download it right now. If you’re having issues with the Settings app, check our guide on what to do if the Settings app crashes in Windows 11.

2. Modify your registry

  1. Press Windows Key + R and enter regedit. Next, press Enter or click OK.
  2. In the left pane, go to the following key: Computer\HKEY_LOCAL_MACHINE\SOFTWARE\Policies\Microsoft\Windows Defender
  3. Right-click the Windows Defender key. Expand the New section and select Key.
  4. Enter Spynet as the name of the new key.
  5. Go to the Spynet key you just created, right-click the space in the right pane, and select the option to create a new DWORD (32-bit) Value.
  6. Create three DWORDs:
    • DisableBlockAtFristSeen
    • SpynetReporting
    • SubmitSamplesConsent
  7. Double-click each of the three created DWORDs and set their Value Data like this: DisableBlockAtFristSeen: 0, SpynetReporting: 1, SubmitSamplesConsent: 1.
  8. After doing that, close Registry Editor.

With this, the Windows 11 antivirus keeps turning off issue should be fixed for good. Remember to restart your PC after applying this fix.

3. Add the Windows Defender shortcut to the Startup folder

  1. Press Windows Key + R and enter shell:startup. Press Enter or click OK.
  2. When the Startup directory opens, right-click the space and expand the New menu. Select Shortcut from the menu.
  3. Click Browse.
  4. Go to the Windows Defender directory and select MsMpEng.exe. For example, you can find this file in the following location:
    C:\ProgramData\Microsoft\Windows Defender\Platform\version_number
  5. Now name the shortcut Windows Defender and click Finish.

After adding the shortcut, the Windows 11 antivirus keeps turning off issue should be resolved

4. Remove third-party antivirus

  1. Press the Windows key + I and select Apps in the left pane.
  2. Choose Apps & features.
    apps windows 11 antivirus keep turning off
  3. Click the three vertical dots before the antivirus and select Uninstall.
    uninstall windows 11 antivirus keep turning off
  4. Now, follow the onscreen instruction to complete the process.

Using third-party security software can cause Windows 11 antivirus to keep turning off. But, in most cases, the Microsoft Defender alone should be able to protect you. So, you can remove the third-party antivirus.

If the Windows 11 antivirus keeps turning off, your system might be vulnerable to all sorts of online threats, but hopefully, our guide was able to help you with this problem.

You can also look closely at this guide on what to do if Windows Defender won’t turn on in Windows 10. If the issue persists, you can also reinstall Windows Security on Windows 11 and check if that helps.

Feel free to let us know the solution that helped you fix the issue in the comments below.

How to Verify a Checksum on Windows [MD5 or SHA256]

Learning how to verify a checksum on Windows ensures the integrity of your downloads and protects your system from corrupted or tampered files. Whether it’s a driver, ISO, or software package, checksum verification helps you confirm the file’s authenticity.

Does Windows Have a Checksum?

Yes. Windows can calculate and verify checksums using built-in tools. A checksum is a short but unique string generated by running an algorithm like SHA-256 or MD5 on a file.

The algorithm examines every bit of the file and produces a hash value. This helps you:

  • Identify file changes – Compare two checksums to confirm a file hasn’t been altered.
  • Protect downloads – Detect and prevent the use of corrupted or malicious files.

You can quickly verify checksums in Windows using built-in utilities or third-party tools.

Where Is Checksum Located?

You can generate and check file hashes in Windows using CertUtil, a built-in command-line tool that’s part of Certificate Services. CertUtil offers the -hashfile switch, which allows you to produce a hash value using a chosen algorithm.

Certificate Services handle request validation and certificate issuance, but its hashing capability makes it useful for file integrity checks. You can run CertUtil in either PowerShell or Command Prompt without installing extra software.

How do I verify a checksum on Windows [MD5 or SHA256]?

1. Use the Windows Command Prompt

  1. Press the Windows key +R to open the Run window, type cmd in the text field, and press Enter.
  2. Navigate to the folder that contains the file wherein the MD5 checksum you want to verify is.
  3. Type cd followed by the path to the folder e.g.: cd Documents
  4. Next, type this and press Enter. certutil -hashfile <file> MD5
  5. Replace the <file> with the filename.
  6. Wait for it to load, then compare the resulting checksum with what is expected for the software.

You can also look at our detailed guide on adding the run command to the start menu. This will prevent the stress of taking multiple steps before accessing it.

2. Verify checksum by using your File Explorer

  1. Download HashTab from the developer’s official website, click on the downloaded file, and follow the on-screen instructions to install.
  2. After installation, right-click on the file you want to run a checksum.
  3. Then, select Properties from the context menu.
  4. Locate and click on the tab labeled File Hashes at the top of the window to see the MD5, SHA-1, and CRC32 hashes for your selected file.
  5. Copy the checksum you want to compare against and paste it into the Hash Comparison dialog box.
  6. If the hash matches, you will see a green check mark and a red X if it does not match.

3. Use Windows PowerShell

  1. Click on Start on your Taskbar and type Powershell and select Run as administrator under Windows PowerShell.
  2. Type the following and add a space: Get-FileHash
  3. Drag the downloaded ZIP file onto the Windows PowerShell window after the Get-FileHash command. The path after the command should be similar to this: C:\Users\UserName> Get-fileHash C:\Users\UserName\Downloads\cdq2019s14_Windows.zip
  4. Inspect the calculated hash value while comparing it with the original one. There will be a glaring difference in the checksum, even if there are only a few differences in the underlying file.

You can verify a checksum on Windows using the means provided above. Ensure to follow the steps strictly for optimal results.

Do not hesitate to use the comments section if you have any questions or comments.

Mfc110u.dll Missing: Use These 3 Solutions to Fix It

Mfc110u.dll is a type of DLL file associated with Microsoft’s Visual Studio developed for Windows operating systems. Sometimes, you get the mfc110u.dll missing error when launching some programs.

Various reasons can cause this, and the fix is not far off. This guide will show you how to restore the DLL files and get back to opening your apps usually.

Why is mfc110u.dll missing?

If you are getting the mfc110u.dll missing error while trying to open the Age of Empires 2 or other programs, below are some factors that can cause it.

  • Corrupt system files: You can get the mfc110u.dll missing error on Abrites, PowerDirector, and other apps due to corrupt system files. Running the SFC scan to restore these files should help you fix this easily.
  • Damaged dll file: At times, the missing mfc110u.dll error might be because the file has been damaged by an app. In this case, you need to download the required Visual Studio package.
  • Activity of third-party apps: Third-party antivirus apps have been shown to cause this issue. This is mainly for third-party antiviruses. You must remove these apps and their components using one of the best uninstaller software.

How do I fix the missing Mfc110u.dll error?

1. Perform an SFC scan

  1. Press the Windows key, type cmd, and click Run as administrator under Command Prompt.
    cmd admin
  2. Type the command below and press Enter: sfc/scannowsfc scan mfc110u.dll missing
  3. Now, wait for the scan to complete.

The SFC scan is one of the built-in repair tools that can fix broken system files. This can solve various instances of this error, including the Worms WMD mfc110u.dll missing issue.

Another option is to use a third-party system file and DLL fixer in order to scan for corrupted or damaged files and restore them with the original ones.

2. Re-install the Visual C++ Redistributable Package

  1. Press the Windows key + R, type control, and click the OK button.
    control
  2. Choose Uninstall a program under Programs.
    uninstall  program mfc110u.dll missing
  3. Click the Microsoft Visual C++ 2012 Redistributable x86 and x64 options.
  4. Now, click the Uninstall option at the top.
    uninstall control
  5. From here, visit the Microsoft website to download the Visual C++ Redistributable for Visual Studio 2012 Update 4.
  6. Click the Download button.
    download mfc110u.dll missing
  7. Check the boxes for VSU_4\vcredist_x64.exe and VSU_4\vcredist_x86.exe if you use a 64-bit processor. If you are using a 32-bit process, select only the x86 version.
  8. Now, click the Next button and run the downloaded file after the download is complete.
    next
  9. Finally, reboot your PC after the process is complete.

Since mfc110u.dll is part of the Microsoft Visual C++ Redistributable Package for Visual Studio Update 4 2012 version, you can fix this problem simply by downloading and installing this package again from Microsoft’s website.

This should fix the msvcr110.dll missing on the Wamp server issue.

3. Uninstall third-party antivirus

  1. Press the Windows key + I and select the Apps option.
    apps mfc110u.dll missing
  2. Choose the third-party antivirus and click the Uninstall button.
    uninstall
  3. Finally, follow the onscreen instructions to complete the process.

Some users have reported that the mfc110u.dll is missing due to interference from a third-party antivirus program. AVG is one of the programs that was said to cause this issue.

Hence, make sure you remove the app and all its components. To ease the process, you can use one of the best software uninstallers in CCleaner.

This tool removes even the most stubborn components of these files and ensures no residual file can cause future issues—CCleaner is just about ridding your PC of any unwanted files.

That would be all. We believe you have everything you need to fix the mfc110u.dll missing on your PC with the information in this guide.

If you are facing related issues like DLL files missing on Windows 10, check our excellent guide to fix it effectively.

Feel free to let us know the solution that helped you solve this problem in the comments below.

Google plans to introduce Privacy Sandbox on Android

A few years ago, Google introduced the Privacy Sandbox initiative to improve the privacy of users on the Web.

According to a recent post on Android Developers, Google has plans to bring Privacy Sandbox to Android as well.

What’s Privacy Sandbox for Android and how does it work?

The idea behind Privacy Sandbox is to create an advertising solution that protects user privacy. Although Android uses app sandboxing, SDKs are running from the host’s app sandbox and they have the same privileges as the host app.

This means that they can potentially get access to undisclosed user data. This will change with Android 13 and the new SDK Runtime will have stronger safeguards regarding access to user data.

To achieve this, the Privacy Sandbox for Android will replace cross-app identifiers and covert tracking with Attribution Reporting, Topics, and FLEDGE APIs.

Topics API will determine the user’s interests based on the applications that he has installed. By doing so, advertising SDKs can use these topics to serve ads to users.

With FLEDGE, developers can show ads to users depending on the interaction with their app. And lastly, Attribution Reporting will help with the measurement of conversions using machine learning.

The developers can already enroll for Privacy Sandbox and familiarize themselves with it. Regarding the release date to the general public, there’s no official information at the moment.

However, we know that Google plans to start the Privacy Sandbox beta on Android 13 mobile devices early next year, so you might get the chance to give it a try.

We’re still not sure how this change will impact Windows Subsystem for Android, but we assume that there won’t be any issues with it.

What are your thoughts on Privacy Sandbox for Android? Let us know in the comments below.

Windows 11 Reset PC Not Working: How to Force It

Windows 11 PC reset not working? We’re here to help. Everything from bugs to a damaged OS and corrupted system files can cause this issue.

The good news is that if you get the error message “There was a problem resetting your PC” on Windows 11, you should be able to fix it using the solutions recommended below.

What can I do if Windows 11’s Reset PC option is not working?

Here are quick steps explained in video format. If you want more details and further info, keep reading. We explain everything in simple steps down below.

1. Install the latest updates

  1. Click the Start button.
  2. Now select Settings.
  3. Navigate to the Update & Security section in the left pane.
  4. Download and install any available updates.
  5. Once your system is updated, check if the Reset option is available.

2. Use System Restore

  1. Press Windows + R and enter rstrui. Press Enter.
  2. Click Next to proceed.
  3. Select the desired restore point and click Next.
  4. Click on Finish to confirm your selection.
  5. Follow the instructions on the screen to complete the process.
  6. After restoring your system, check if the problem is still there.

Remember that to use this feature, you need to create a system restore point beforehand or use one created by your system.

Restoring your system to a previous state can fix a number of system issues. A simpler way to safely restore your system is by using a specialized repair tool that can do all the work for you.

3. Use the Uninstall feature update option

  1. Click the Start button.
  2. Now click the Power button, hold Shift, and select Restart.
  3. Select Troubleshoot.
    windows 11 reset pc not working
  4. Navigate to Advanced options.
    windows 11 reset pc not working
  5. Now go to Uninstall Updates.
    windows 11 reset pc not working
  6. Select Uninstall latest feature update.
  7. Click the Uninstall feature update button to confirm.
    windows 11 reset pc not working
  8. Follow the instructions on the screen to complete the process.

4. Reinstall Windows 11

  1. Download Windows 11 ISO by clicking the 64-bit Download button.
  2. Double-click the ISO file to mount it.
  3. Now run the setup.exe file.
  4. Click Next and wait for the updates to download.
  5. Now accept the terms of service.
  6. Select what data to keep. We suggest using the Keep personal files and apps option. Click Next to proceed.
  7. Follow the instructions on the screen to continue.

If the reset PC option is not working on your PC, updating your system or using the System Restore usually helps.

In case the issue is still here, you might have to reinstall Windows 11 to fix this problem. Just be sure to back up your files with proper backup software before doing so.

Did you find a way to fix this problem on your own? If so, feel free to share it with us in the comments section below.

5 Best 3D Printers for Architects to Buy [Cyber Monday]

Using a 3D printer can come in handy to anybody, as you can easily print out parts for your kid’s toys, and create utensils for eating, cups, etc.

Even though it can be very fun to create everyday objects by using a 3D printer, the most important aspect of this technology is that it can be applied in architecture.

If you’re an architect, you can create amazingly intricate 3D models in your preferred 3D modeling software, and then transform them into real-life models.

This can give you a better understanding of the forces involved, and the sustainability aspect, and allows you to change the model easily to make it more efficient.

Note: All the prices and offers in this article are subject to change, so be sure to check the official product page to get the latest deal. If the product or offer you’re looking for is no longer available, you can try to find it on its official manufacturer page or get another one from our list.

What is the best 3D printer for architectural drawings?

Comgrow Creality Ender 3

  • Affordable price
  • Resume print feature
  • Very easy assembly with 20 nuts to install
  • Upgraded extruder
  • The mat on which you print doesn’t always stay perfectly flat

The Creality Ender 3 from Comgrow is a very good 3D printer that can print out complicated structures fast and efficiently, from the comfort of your own home.

It is very easy to assemble, requiring at most 2 hours of your time to get everything set up. This makes it an even more attractive solution to your 3D printing needs.

ANYCUBIC Mega S

  • Meets fast assembly needs
  • Titan extruder
  • Resume print & sensor detection
  • ANYCUBIC Ultrabase
  • The instruction manual is not so clear

The ANYCUBIC Mega S 3D Printer CR-10 is one other amazingly affordable 3D printer that offers great quality prints in the most complex projects.

This 3D printer is very easy to assemble, and that saves your time to enjoy printing and creation.

It has also a full-color, multi-language user-friendly touch screen, and a high-quality extruder.

Creality Ender 3 V2

  • Built-in self-developed silent motherboard
  • MeanWell power supply
  • Resume printing function
  • Carborundum glass platform
  • Poor assembly instructions

TheCreality Ender-3 V2 3D Printer is another affordable 3D printer option that can help you design amazingly-looking buildings without worrying about the levels of complexity of your work.

This amazing 3D printer offers an array of cool and useful tools – an XY-axis tensioner, stable movement, low noise, a rotary knob, and a 4.3-inch color Screen.

MakerBot Replicator+

  • Cloud-enabled management
  • Auto arrange multiple build plates at once
  • Improved rafts for cleaner prints
  • Redesigned breakaway supports
  • Printing model parts can not be well connected

The MakerBot Replicator+ is an amazing machine that offers an incredible array of technology that can be used efficiently by any architect.

This great 3D printer uses a Smart Extruder that can be changed at any point in time, and it allows you to print using hard materials like PLA and tough filament.

9676 – Ultimaker 3 Extended

  • Can connect to it using LAN, USB, and Wi-Fi
  • 215mm x 215mm x 300mm print sizes
  • 3D printing maximum speed is up to 300mm/s
  • Printer software: Cura
  • Some problems have been reported with ABS printing

The 9676 – Ultimaker 3 Extended 3D Printer is an incredibly versatile and exact 3D printer that allows the usage of a wide range of printing materials.

You can use ABS, HIPS, PLA, PVA, PETG, Nylon Layer, etc. This allows your creative skills to not be bounded by the characteristics of a specific type of material.

Using a 3D printer as an architect can give you the edge when facing competition in a modeling contest, and can help you create amazing structures.

In today’s buying guide we presented you with the best 3D printers found online, including low-cost, medium-range, and also expensive options.

Don’t forget to share with us what option you chose to buy. You can do so by using the comment section below.

7 Best Portable Monitors for Gaming [Cyber Monday]

You don’t always know when the gaming fever hits you so you need a cool gaming solution wherever you are.

While multi-monitor displays may be common nowadays, not everyone can stand them. That is when a portable monitor comes in handy, as they extend your viewing field, but not by too much.

That is why we’ve decided to make your life easier by compiling a list of what we consider to be the best 5 portable monitors for gaming.

Note: All the prices and offers in this article are subject to change, so be sure to check the official product page to get the latest deal. If the product or offer you’re looking for is no longer available, you can try to find it on its official manufacturer page or get another one from our list.

What portable monitor should I buy for gaming?

Top portable monitors for Xbox One

AOC e1659Fwu

  • A max resolution 1366 x 768
  • Multiple USB monitors can be simultaneously connected
  • USB-powered with USB 3.0 technology
  • Foldable flexi-stand for portrait or landscape view
  • The screen can be quite sensitive
  • Brightness and colors can be uneven

The AOC e1659Fwu features a sleek design and a very fast USB 3.0 connection which can achieve high transfer rates and fast response times between the Xbox One and the display.

It is designed to have a jet-black glossy finish, which goes well with the 15.6-inch diagonally viewable image. Speaking of which, the e1659Fwu offers a 500:1 contrast ratio, 5 ms response time, and a 1366 x 768 resolution at 60 Hz, making it an extremely fast option for gaming.

ASUS MB168B

  • 15.6-inch HD portable USB-powered monitor
  • Single USB 3.0 cable for power and data transmission
  • World’s slimmest and lightest USB monitor
  • Auto-rotating display bundled with the ASUS Smart Case
  • Has a blue light filter
  • Cable connections can be faulty
  • The USB cable is sensitive to sudden disconnections

What makes the MB168B portable USB-powered monitor great is that it needs just one USB cable for both its video signal and power, delivering a signal to a 15.6-inch, 1366 x 768 Full HD resolution screen.

The USB 3.0 cable allows rapid transfer of data to the screen, bringing fast, fluid images from your connected device that makes having an on-the-go multi-display setup a reality.

Lepow Portable Monitor

  • Full HD 1080P Display
  • IPS screen delivers incredibly vivid images
  • Multiple Devices Connection available
  • Smart Cover and Screen Protector
  • Slim, lightweight, and portable
  • May have issues with HDMI connections

The Lepow Portable Monitor is the epitome of what it means to mix portability with incredible imagery, thanks to the sleek and lightweight design that doesn’t fail to deliver stunning images.

This is thanks to the 1080p display IPS display, which allow you to view images and movie at a quality that is hard to imagine for such a small device.

Innoview

  • Ultra-light
  • Ultra-portable
  • Plug and play via USB-C and Mini HDMI, no drivers needed
  • Full HD resolution display
  • Compatible with a wide range of devices
  • The cables are on the shorter side

This is another ultra-portable option with a 1920×1080 resolution on a 15.8-inch screen made of an ultra-slim ISP panel.

Innoview is very light, weighing only 1.5 lb. It comes with its own protective case which is also very compact so you can easily carry it wherever needed.

It is a great travel monitor that can quickly connect to a wide range of input devices including laptops, PCs, tablets, smartphones, and many more. It comes with a USB type C and Mini HDMI cable.

Best portable monitor for PS4

UPERFECT Portable Monitor

  • Uses a single USB cable for both display and power
  • Capable of HD visual imagery
  • Duplicate mode synchronously displays work content.
  • Can integrate HDMI & Mini DP to transfer data signals from PS4, PC, Mac, Smartphone, and more
  • Has issues when using adaptor cords

The UPERFECT Portable Monitor is the perfect choice for those that prefer a more rugged monitor, thanks to the aluminum alloy body that makes it both resistant and lightweight.

What also makes it incredibly great is how configurable it is with other devices, not just PCs, since it can also be used to extend the screen of an Android or iOS phone.

Asus MB16AC

  • 15.6-inch FHD IPS
  • Ultra-portable design
  • Smart cover and smart pen hole
  • ASUS Eye Care technology
  • Features the intuitive ASUS DisplayWidget
  • A bit too sensitive for a traveler’s monitor
  • The display screen is very glossy

The Asus MB16AC advertises itself as the ideal travel companion for laptops. This is especially thanks to its 15.6-inch Full HD IPS Zen Screen, which brings fantastic imagery along with portability.

It also comes with a smart cover and a smart pen hole, making it great as a substitute tablet, not just a PC monitor.

HORI Universal HD Gaming Monitor

  • 15.6-inch Full HD universal gaming monitor
  • Very slim and portable
  • Adjusted design for compatibility in all HDMI systems
  • Premium leatherette cover
  • Weak sound

If you’re looking for an elegant 15.6-inch portable monitor, you have to take HORI’s alternative. This monitor can connect to any gaming console or PC through the HDMI port. Actually, it has 2 HDMI ports so it can connect to as many devices simultaneously.

It’s a 720p resolution screen but it’s perfect for gaming with a high refresh rate. All this is packed in a leatherette protective case and a body that weighs under three pounds so it’s highly portable.

Portability always comes at a price, and in the case of portable monitors, this includes screen resolution, performance, image quality, and connectivity issues.

However, if you are the type that is always on the road and you find that your laptop’s screen just doesn’t cut it anymore, then getting a portable monitor is the right thing to do.

A Certificate was Revoked by Its Issuer: How to Fix It

It is common for users to encounter an error message saying that a certificate was revoked by its issuer. The error can occur in numerous instances, such as during BIOS upgrades. It can be due to various reasons.

Another certificate issue our users complain about is Windows not having enough information to verify certificates on your system.

What does it mean when a certificate has been revoked?

When a certificate is revoked, the TLS/SSL is invalidated or retracted by the issuer before its due date of expiry. It renders the certificate invalid and with no authorization.

However, a certificate that has been revoked most times is because the certificate’s private key has been compromised. Hence, the issuer terminates every right to use the certificate for security purposes.

Furthermore, many other reasons may cause a certificate revoked by its issuer error on your PC. Some are:

  • Issues with the Certificate Authority (CA) – Many errors may arise from an unstable or compromised Certificate Authority. So, when it’s not working, it won’t be able to authenticate content sent from web servers, resulting in errors.
  • The Certificate has changed to a new one from another issuer – You may encounter the certificate being revoked error on your system if the certificate you’re using is stopped by the issuer or changed to another.
  • Third-party program interference – Some programs installed on your device can interfere with the certificate verification process. Apps like antivirus software and VPNs can sometimes impede certificate use.
  • Incorrect time and date on your PC – Certificates may prompt errors if your time and date are set to their expiry date. Certificates have expiry dates when they’ll be invalid or need replacement. So, you can encounter the certificate being revoked error if your time and date read the time frame.

There are other causes not mentioned above that may prompt the error. Nevertheless, you can fix the problem by troubleshooting some settings on your system.

What can I do if a certificate was revoked by its user?

Before going through any troubleshooting process regarding the error, apply the following:

  • Fix network congestion on your PC.
  • Disable antivirus software.
  • Turn off background apps running on your computer.

If the error message appears after flowing the checks, try the next solutions.

1. Perform a clean boot

  1. Press Windows + R key to open the Run window, type msconfig and click OK.
  2. Go to the Services tab and check the box for Hide all Microsoft services, then tap Disable all.
  3. Navigate to the Startup window and select Open Task Manager.
  4. Select the unnecessary startup programs and click Disable.
  5. Restart your PC and check if the error persists.

Performing a clean boot will kill any interference with third-party apps and disable startup apps that can cause the error.

2. Bypass Certificate Revocation Check

  1. Press Windows + R key to launch the Run window, type inetcpl.cpl, and press ENTER to open the Internet Options menu.
  2. Go to the Advanced Tab, then scroll down to the Security subsection under the settings menu.
  3. Uncheck the boxes for the Check for publisher’s certificate revocation and Check for server certificate revocation options.
  4. Press OK and restart your computer.

Though the above solution is unsafe, it’ll help you bypass the error by not checking for certificate issues.

3. Set the correct Date and Time

  1. Press Windows + I to open the Windows Settings app.
  2. Select Time and Language from the menu and click on Date & time.
  3. Toggle on the option for Set Time Automatically, and Set time zone automatically options.

If your time and date are set past the certificate’s expiry date, changing to the correct time and date is essential. It will prevent certification issues that may occur due to expired certificates.

Also, you can encounter the revoked certificate issue on your browsers. Read about the Chrome certificate revoked error and some fixes for it.

Conclusively, our readers may be interested in how to install Windows 11 root certificates on their PCs.

For further questions and suggestions, kindly use the comments section below.

Office Keeps Asking me to Sign in: 5 Solutions to Use

Many use the Microsoft Office suite for various tasks, and it’s undoubtedly one of the best. However, some users reported that Office keeps asking them to sign in.

The problem can be encountered on all versions of Office and doesn’t seem to go away on its own. So, if you are wondering how to stop Office 365 sign-in pop-up, here’s everything you need to know.

Why does Microsoft Office keep making me sign in?

Here are some of the reasons Microsoft sign-in keeps popping up:

  • Running a non-licensed copy of Office – Many users encountered the error when using a non-licensed copy or after getting a license through unofficial means. So, make sure that’s not the case.
  • Corrupt credentials – In some cases, users reported that their login credentials were corrupt, and, as a result, the login message popped up.
  • Limit the number of devices you are signed in to – Microsoft Office supports up to 5 devices at a time, and if you are logged into more, you may receive the sign-in prompt.

And while we are at it, here are some similar errors:

  • Outlook keeps asking for password in Office 365 – This problem can occur if your credentials aren’t correct.
  • Outlook keeps asking me to sign in – Sometimes your profile can get corrupted, and fix the issue, it’s advised to recreate it.
  • Microsoft Word keeps asking me to sign in – Like other tools in the suite, too, it shows continuous prompts to sign in, and our solutions would help.

What do I do if Office keeps asking me to sign in?

Before trying the solutions listed here, make sure to try these:

  • Ensure you are not using Office on more than the approved devices. Try signing out on others and verify if that fixes things.
  • Update Windows to the latest available version.

If these two don’t work, the ones listed next surely would.

1. Check your credentials

  1. Press Windows + R to open Run, type control panel in the text field, and hit Enter.control panel
  2. Click on User accounts.user accounts
  3. Now, choose to Manage Windows Credentials under Credentials Manager.windows credentials manager to fix office keeps asking me to sign in
  4. Locate any entries that start with MicrosoftOffice or OneDrive, select them individually, and click on Remove.remove to fix office keeps asking me to sign in
  5. Now, click Yes in the confirmation prompt.confirm
  6. Once done, again press Windows + R, paste the following command, and then hit Enter:%localappdata%\Microsoft\OneDrive\onedrive.exe /resetreset onedrive

According to users, if Office keeps asking you to sign in, it might be issues with the Credentials Manager to blame. So, once done with the steps here, go ahead and open Microsoft Office, log in, and verify if the problem is fixed.

2. Modify the Registry

Note icon NOTE
Before you try this solution, make sure to create a restore point or back up the Registry. And follow the steps here as it is without making any other changes.
  1. Press Windows + R to open the Run command, type regedit in the text field, and click OK.registry editor
  2. Now, paste the following path in the address bar and hit Enter:HKEY_CURRENT_USER\Software\Microsoft\Office\16.0\Common\Identitypath
  3. Now, right-click on the Identity folder in the navigation pane, and select Delete.delete to fix office keeps asking me to sign in
  4. Click Yes in the confirmation prompt.Yes

Now, please restart the computer, launch Office and verify whether it still keeps asking you to sign in. If yes, try the next solution.

3. Change OneDrive settings

  1. Click on the OneDrive icon in the System Tray, choose the gear icon, and select Settings.onedrive settings
  2. Please navigate to the Office tab, and uncheck the option for Use Office applications to sync Office files that I open.disable to fix office keeps asking me to sign in
  3. Click on Turn off in the prompt.turn off
  4. Finally, click OK to save the changes.save changes

4. Repair Microsoft Office

  1. Press Windows + R to open Run, type appwiz.cpl, and click OK.appwiz.cpl
  2. Now, select Microsoft Office, and click on Change.change
  3. Click Yes in the UAC prompt.
  4. Next, select Online Repair, and then click on the Repair button.online repair to fix office keeps asking me to sign in
  5. Again, click Repair in the confirmation prompt.repair

If the previous methods didn’t work and Office still keeps asking you to sign in, it could be a problem with the program itself, and a repair should fix things.

5. Update Office

  1. Launch any Microsoft Office application (we used Word), and click on the File menu.file menu
  2. Navigate to Account, click on Update options, and select Update now.update to fix office keeps asking me to sign in
  3. If a newer version is available, it will automatically be installed.

That’s it! This should fix the problem and get things running if all the previous solutions fail. So now on, Office won’t keep asking you to sign in.

Also, check out common issues with Microsoft Office and the solutions while fixing things.

Please let us know how it went by contacting the comments section below.

Enter Recovery Mode From Boot in Windows 10: 5 Methods

That Recovery Mode assists users in troubleshooting Windows when it doesn’t boot as expected. It offers many options, including the Command Prompt, UEFI settings, Startup Repair, System Restore, and Startup Setting (accessing Safe Mode).

To boot in Recovery Mode, press Win + L to get to the sign-in screen, then press Shift while you select the Power button and select Restart in the lower-right corner of the screen.

For issues related to your windows, you can always rely on the help of specialized software. It will perform the required tasks faster and safer.

Here are the 5 methods to enter Recovery Mode from boot.

How can I boot into Recovery Mode on Windows 10?

1. Press F11 during the system startup

The easiest way to get into recovery mode is by pressing the F11 key shortly after turning on your PC. You can enter Windows 10 Recovery Mode from boot.

Note, however, that this method might not work on all PCs. For example, some may have the F9 or F12 keys set by default, so verify that with the manufacturer.

2. Use Start menu’s Restart option

  1. Click on the Start icon, select the Power button, hold the Shift key, and click on Restart.restart
  2. Now, click on Troubleshoot.troubleshoot
  3. Next, click on Advanced options.advanced options to enter windows 10 recovery mode
  4. You now have all the recovery options listed on the screen.advanced options

You can similarly access Windows 10 Recovery Mode from the login screen by clicking the Power button and choosing Restart with the Shift key held.

3. Enter Recovery Mode with a bootable USB drive

  1. First, create a bootable USB drive for Windows 10.
  2. Now, turn off the computer, power it on, enter the BIOS, and choose the USB drive.
  3. Click Next on the Windows setup window.
  4. Select the Repair your computer option.repair your computer
  5. Click on Troubleshoot.troubleshoot
  6. Now, choose Advanced options.advanced options
  7. You now have all the recovery options listed here.recovery mode in Windows 10

If you can’t boot the OS due to errors or a corrupt state, download Windows 10, boot a USB drive, and access the Recovery Mode.

4. Select the Restart now option

  1. Press Windows + I to open Settings, and choose Update & Security. update & security
  2. Now, navigate the Recovery tab, and click on Restart now under Advanced startup.restart now to enter windows 10 recovery mode
  3. Now, choose Troubleshoot.troubleshoot
  4. Click on Advanced options.advanced options
  5. The Recovery Mode options are all listed now.recovery mode in Windows 10

This is another quick way to access the Recovery Mode in Windows 10 while the OS is still running.

5. Boot into Recovery Mode using Command Prompt

That’s it! And if you were wondering, there is no Windows 10 Recovery Mode key that you need to access it. Similar steps can be applied if you want to enter Recovery Mode in Windows 11.

The solutions would help access Windows 10 Recovery Mode in Dell, Asus, HP, and most other devices. In case you face issues, find out how to perform a repair upgrade, one of the most effective troubleshooting methods.

If you’re having trouble entering recovery mode, check our dedicated guide.

Now that you know how to access it, why not check our guide on how to exit Windows Recovery Mode?

If you have any other queries or want us to cover a similar topic, drop a comment in the section below.

5 best CPU and motherboard combos to buy [Cyber Monday]

Those of you that are trying to build a PC on a tight budget probably realized by now that one of the most expensive parts of a PC is the CPU.

That is why some manufacturers have decided to produce motherboards that already have CPUs included.

However, such combos are fairly weak compared to most standalone CPUs that you could buy.

As such, we’ve decided to compile a list of the best motherboard and CPU combos that you could buy today, and that can surely save you some bucks compared to buying them separately.

Note: All the prices and offers in this article are subject to change, so be sure to check the official product page to get the latest deal. If the product or offer you’re looking for is no longer available, you can try to find it on its official manufacturer page or get another one from our list.

What is the best motherboard CPU combo?

Intel Core i7-12700K & MSI PRO Z690-A ProSeries DDR5

  • Intel Core i7-12700K 3.6 GHz procesor
  • 12 Cores & 20 Threads
  • Supports DDR5 Memory, up to 6400+(OC) MHz
  • PCIe 5.0 slots, Lightning Gen4 x4 M.2, USB 3.2 Gen 2×2
  • Overheats despite the fans

The Intel Core i7 3.60GHz processor features a socket LGA 1700 socket for PCB installation and a 25MB L3 cache to improve command processing and system performance.

MSI motherboards are packed with features that bring more speed, greater overclocking ability, and stability to your system’s memory. Optimized traces and fully isolated memory circuits ensure complete stability and performance, so you never have to worry about system crashes. This bundle is also VR-ready.

AMD Ryzen 5 5600X & MSI B550-A PRO AM4 DDR4 ATX

  • 6 cores with 12 threads with a base speed of 3.7 GHz
  • The cooler Wraith Stealth is perfectly made for this processor
  • Supports DDR4 Memory, up to 4400 MHz.
  • Lightning Fast Experience: PCIe 4.0, Lightning Gen4 x4 M.2 with M.2, AMD Turbo USB 3.2 Gen 2.
  • No cons so far

If you’re looking for a budget-friendly motherboard and CPU combo, then the MSI B550-A PRO AM4 DDR4 ATX Motherboard and AMD Ryzen 5 5600X processor is a good choice to start your search.

AMD offers 6 cores and 12 processing threads and can deliver ultra-fast 100+ FPS performance. At the same time, the motherboard provides automated system-wide tuning, with overclocking and cooling profiles that are tailor-made for your device.

AMD Ryzen 7 5800X & ASUS Prime X570-P Ryzen 3 AM4 ATX

  • AMD Ryzen 7 5800X with 8 cores and 16 threads
  • AMD AM4 Socket and PCIe 4. 0: The perfect pairing for Zen 3 Ryzen 5000 & 3rd Gen AMD Ryzen CPUs
  • Asus Optic-MEM: Careful routing of traces and vias to preserve signal integrity for improved memory overclocking
  • Cooler not included, high-performance cooler recommended

With the fastest AMD 8-core processor, its design is perfect for gaming and performance, with a maximum boost of 4.7 GHz, unlocked for overclocking, 36 MB of cache, and DDR-3200 support.

The motherboard features next-gen connectivity via PCIe Gen 4 support, dual M.2 support, and USB 3 Gen 2 ports.

Also, if you have some RGB gear, this motherboard can synchronize all your gear for the best visual aesthetics on your gaming computer.

Intel Core i9-9900K & ASUS Prime Z390-A Motherboard Combo

  • 8 Cores, 16 Threads
  • 128 GB, DDR4 2666 MHz
  • M.2 heatsink, USB 3.1 Gen2 and ASUS Optimum II technologies
  • Price tag

This is actually the most expensive combo on our list.

It features an Intel Core Coffee Lake i9-9900K Desktop Processor with 8 cores and 16 threads, 3.60 GHz up to 5.00 GHz turbo boost, 16 MB Intel Smart Cache, and Intel UHD Graphics 630.

The CPU supports up to 128 GB, DDR4 2666 MHz, No ECC memory, up to 2 memory channels, and 41.6 GB/s max memory bandwidth.

Intel Core i9-11900K & MSI Z590-A PRO ProSeries

  • Intel Turbo Boost Max Technology 3.0 Support
  • 5.3 GHz unlocked LGA 1200
  • Supports up to 3 monitors.
  • 2.5G LAN: Upgraded network solution for professional and multimedia use
  • None

Yet another combination of Intel’s super-fats, world-leading gaming processor, combined with an MSI motherboard.

The processor features a 14 nm design that offers great efficiency for computing and delivers nimble processing with balanced cost, performance, and power along with 16 MB of L3 cache that rapidly retrieves the most used data available to improve system performance.

The motherboard supports DDR4 Memory, up to 5333(OC) MHz, and includes a premium thermal solution, an extended heatsink design, and M.2 Shield Frozr that are built for high-performance systems and non-stop work.

The only conceivable reasons why one would opt to buy a motherboard and CPU combo would be because of budget limitations or to build their own systems.

What’s your take on such combinations? Do you think they are worth it? Tell us in the comments.

TV With Built in DVD Player: Best of 2026

Previously, people had to purchase a separate DVD player along with a TV to watch their favorite movies. Today, many brands are offering TV-DVD combos to eliminate the need for a separate DVD player.

A built-in DVD player provides a better value to the buyers as it saves a lot of space required for a separate DVD player set. Their use is quite large, and you can choose between different alternatives to fit your space, budget, and needs.

For the movie fans out there, we have compiled a list of the best TV sets with built-in DVD players that are worth your money.

Note icon NOTE
All the prices and offers in this article are subject to change, so be sure to check the official product page to get the latest deal. If the product/offer you’re looking for is no longer available, you can try to find it on its official manufacturer page or get another one from our list.

What is the best TV with built-in DVD player?

  • Proscan 24-Inch LED TV – best price for value
  • Continuus 28” LED HDTV – incredibly lightweight
  • RCA RTDVD3215 – big 32 inch display
  • Sceptre 32″ – one of the most popular
  • Proscan PLDV321300 LED HDTV – great in small spaces

Now let’s take a closer look at the pros and cons of each one.

Proscan 24-Inch LED TV – best price for value

  • DVD Player included
  • 60 Hz refresh rate
  • Low price
  • Full HD resolution
  • Only one HDMI input

If you want to chill with a nice DVD movie, get the disk straight into the Proscan 24 inch LED TV. Not only that it’s convenient but it will display the image in awesome Full HD resolution.

This TV could be a great investment for a small room in your home or for a hotel. The price is certainly a big pro argument.

Continuus 28” LED HDTV – incredibly lightweight

  • Sleek and eye-catching, design
  • Comes with ample ports for upgrades in future
  • You can easily connect it with a Cable Box, Gaming device, Laptop, and Computer
  • 28-inch screen
  • Only 720p resolution

Continuus 32” LED HDTV is probably the most light-weight and slim TV with a built-in DVD player on our list, thanks to the crystal clear display and audio quality.

The TV-DVD combo comes with 3 HDMI ports, USB port, VGA port, and RF cable port. It is considered to be one of the reliable options because of the 1-year warranty.

RCA RTDVD3215 – big 32 inch display

  • 32 inches 1080i LED
  • Comes with built-in Stereo Speakers
  • You can easily pair three devices simultaneously
  • Available at an affordable price
  • The built-in DVD player is not that reliable

The RCA RTDVD3215 LED is the right choice if you want to instantly switch over to your movies. It offers easy navigation and multi-language on-screen displays, and digital closed captioning.

A separate DVD player is no longer a necessity, as the 32-Inch LED HD TV with a built-in DVD player.

Sceptre 32″ – one of the most popular

  • Comes with a built-in antenna and a clear QAM to show your cable channels
  • Offers a crystal clear Full HD visual output, making it an ideal candidate for a large room
  • Nice sleek design
  • Some problems with the sound

The Sceptre 32″ is a good TV-DVD player thanks to the Full HD resolution of 1920 x 1080 pixels. On top of that, it has a HDMI port and a USB port.

The clear QAM tuner voids the need for an antenna to watch your favorite cable channels.

Proscan PLDV321300 LED HDTV – great in small spaces

  • Packs a wall-mount and a full-function remote
  • Guarantees the highest quality sound with ATSC Digital tuner
  • 16:09 aspect ratio
  • Different connection options including HMDI connections
  • Quality control issues

Purchasing a Proscan 19-Inch LED HDTV is one way to make sure things will be OK during movie nights with your friends and family. It is a perfect choice for living rooms, children’s bedrooms, and kitchens.

You can easily manage the television and the DVD with a full-function remote control. It offers multiple connection options including PC Audio, YPbPr, HDMI, Headphone, VGA, Coaxial Out, RF and AV Audio/Video.

It is easy to get confused, with the plethora of different options available in the market, but not all of them offer the best value for money.

However, remember to check the necessary functionalities and the size of your room before you make a purchasing decision.

10+ best Wi-Fi adapters for Windows [Cyber Monday]

Wireless networks are great, especially if you don’t want to deal with LAN cables, however, not all Windows 10 and 11PCs have built-in Wi-Fi adapters.

Fortunately for you, there’s a wide array of wireless adapters available, and today we’re going to show you some of the best USB network adapters.

Bear in mind that public wireless networks might not be the safest, and if you decide to purchase a wireless adapter for your Windows 10 and 11 device, make sure to properly protect your Windows 10 PC on a public Wi-Fi network.

How we chose the best Wi-Fi adapters

Our team of expert testers, with a combined experience of 15 years, has tackled a variety of testing tasks for any device you could imagine.

Their experience comes into play as a very important element when choosing the products we described in this guide, and a large variety of factors have been taken into consideration.

The options that have been chosen offer great quality and cover the entire spectrum of price ranges, thus enabling everybody to find something that fits their needs both financially and otherwise.

Note: All the prices and offers in this article are subject to change, so be sure to check the official product page to get the latest deal. If the product/offer you’re looking for is no longer available, you can try to find it on its official manufacturer page or get another one from our list.

Panda 300Mbps Wireless N USB Adapter

  • Lightweight, small, and fast, Panda 300Mbps Wireless N USB Adapter is a great choice for users that want a reliable Wi-Fi adapter.
  • Works with any 2.4GHz wireless g/n routers
  • Multi O/S support
  • Compact
  • WiFi can cause problems if plugged in at power-on

The first thing you’ll notice about Panda 300Mbps Wireless N USB Adapter is its size. This is a tiny USB Wi-Fi adapter, so you can carry it with you at all times.

That’s not all, besides being compact, this model is also affordable, so you won’t have to break the bank to get one.

This Wi-Fi adapter works with a wide range of operating systems, including all older versions of Windows, Windows 11, Linux, and even on Raspberry Pi. Regarding the connectivity, there’s infrastructure and ad-hoc mode support.

In terms of security WEP 64/128bit, WPA, WPA2, 802.11i protocols are supported. However, this model is limited to 2.4GHz frequency. Due to its small size, and its low power usage, it’s a perfect companion for any type of laptop.

Panda Ultra is a great USB Wi-Fi adapter for Windows 10 and 11, so it’s worth checking out.


Alfa Long-Range Dual-Band AC1200 Wireless USB 3.0 Wi-Fi Adapter

  • Dual-Band (2.4GHz/5GHz)
  • Supported Standards 802.11ac
  • Wireless Security Standards Include WPA-PSK, WPA2-PSK
  • External antennas
  • Minor issues with Linux
  • Can sometimes disconnect randomly

This device supports both 2.4GHz and 5GHz frequencies and it works with the latest 802.11ac wireless standard. Of course, the older 802.11n standard is supported as well.

Regarding the speed, you can get up to 300Mbps on 2.4GHz, and up to 867Mbps on 5GHz networks.

One feature that sets apart Alfa Long-Range Dual-Band AC1200 from other devices is its 5dBi dual-band dipole antennas. Thanks to that, you’ll get a decent range, but if want, you can easily remove them and replace them with any other more powerful antennas.

As for the connectivity, the device connects to your PC using a USB 3.0, and it works with a wide array of operating systems including Windows 11 and older, macOS, and Linux.

Regarding security, this adapter supports WEP 64-Bit, WEP 128-Bit, WPA-PSK, and WPA2-PSK encryption.

Overall, this model offers great speed and performance, so it’s worth checking out.


TP-LINK TL-WN823N

  • Speeds up to 300Mbps
  • Easily establish a high-speed Wi-Fi hotspot
  • Comes with a 2-year warranty
  • Compact
  • Minor issues with Sleep Mode
  • It can get hot after a while

This adapter comes with a miniature design and it uses 802.11b/g/n standard, and it can achieve speeds up to 300Mbps, so it’s perfect for both streaming and gaming.

As for the supported networks, 2.4GHz networks are supported allowing you to have great range and stable connection at all times.

TP-LINK TL-WN823N allows you to use Soft AP mode thus turning it into a Wi-Fi hotspot for mobile devices, which can come in handy.

WPS button is also available, so it’s possible to easily connect to a network simply by using the WPS option on your router.

Additional features include Clear Channel Assessment and Multiple Input Multiple Output technologies.

The adapter is incredibly simple to set up, and it should work with any operating system, including Windows 11.

Overall, TP-LINK TL-WN823N is a small, reliable, and faster Wi-Fi adapter, so it’s worth checking out.


TP-LINK Archer T4U AC1200

  • Support for both 2.4GHz and 5GHz networks
  • Works on any operating system, including Windows 11
  • SoftAP support
  • Speeds up to 867Mbps and 300Mbps
  • Bulky design
  • Minor range issues

TP-LINK Archer T4U AC1200 utilizes an 802.11ac wireless standard providing you with speed up to 1200Mbps, which makes it perfect for file transfer, streaming, and gaming.

Regarding the supported networks, this model works with both 2.4GHz and 5GHz frequencies, so you’ll get a great range and a fast, lag-free connection.

As for the file transfer speeds, you can expect up to 867Mbps on 5GHz, and up to 300Mbps on 2.4GHz networks.

To achieve such speeds, this adapter uses a USB 3.0 port, so make sure that you have one available on your PC.

SoftAP feature is also available, allowing you to create a hotspot so that other devices can connect to your wireless network, even if they are far from your router.

Lastly, the adapter comes with a 1m extension cable, so you can position it on your desk to get a better signal.


Panda Wireless PAU06

  • 801.11n standard, speeds up to 300Mbps
  • 5dBi antenna
  • Supports 64b/128bit WEP, WPA, and WPA2 (TKIP+AES)
  • WPS button
  • No 5GHz support
  • Minor issues with random disconnects

Panda Wireless PAU06 fully supports 801.11n wireless standard, but at the same time, it’s compatible with older 802.11g wireless networks as well.

This means that you can expect speeds up to 300Mbps, which should be enough for most less-demanding users.

The adapter comes with a 5dBi antenna and thanks to the low power consumption, it will be perfect for your laptop.

The WPS option is available, allowing you to quickly connect to your network by pressing the WPS button.

Regarding security, Panda Wireless PAU06 works with 64b/128bit WEP, WPA, and WPA2 (TKIP+AES) encryption, and it’s compatible with a wide range of operating systems.

Supported operating systems include all versions of Windows, including Windows 11 and Linux.

Unfortunately, this adapter doesn’t work with 5GHz frequency, so if you plan to use it on a 5GHz network, this model might not be for you.


Bottom runners

Some models didn’t make it to the top 5 list, due to certain factors, but if you want a affordable Wi-Fi adapter that works with Windows 11 and older, you should consider these models:

➡ EW-7811Un

➡ Cudy WU600 AC 600Mbps USB WiFi Adapter

➡ D-Link AC1200

After extensive testing, we can say that all these models work perfectly on Windows 11 and older versions, so you won’t have to worry about compatibility issues.

It’s also a good idea to have the best tri-band router to go along with your adapter to achieve the maximum download speed.

What is your Wi-Fi adapter of choice? Let us know in the comments section below.

5 Best laptops for Dota 2 [Black Friday & Cyber Monday]

Gaming on a laptop is possible, especially if you have enough hardware power to run the latest games. Dota 2 isn’t a new game, so it should be able to work on older gaming laptops as well.

If you’re looking to get a new laptop strictly for playing Dota 2, in this guide we’re going to show you the best gaming laptop for Dota 2.

Note: All the prices and offers in this article are subject to change, so be sure to check the official product page to get the latest deal. If the product or offer you’re looking for is no longer available, you can try to find it on its official manufacturer page or get another one from our list.

What is the best laptop for Dota 2?

ASUS ROG Strix G15

  • 10th Gen Intel Core i7-10750H CPU
  • 15.6-inch display, full HD resolution
  • GeForce RTX 2070 8GB GDDR6
  • 16GB DDR4 2933MHz RAM
  • 1TB PCIe SSD
  • Can get loud

If you’re looking for a high-end laptop, then ASUS ROG Strix G15 might be the right choice for you. The laptop has a 10th Gen Intel Core i7-10750H processor and GeForce RTX 2070 8GB GDDR6 graphics.

The device has a 15.6-inch full HD display and a 16GB DDR4 at 2933MHz, so it should be able to handle the latest games. As for the storage, there’s a 1TB PCIe SSD available.

ASUS ROG Strix G15 is an amazing laptop, and it should handle the latest games with ease, as well as older games such as Dota 2, so be sure to consider it.

⇒ Check price

Acer Aspire 5

  • 15.6-inch full HD display
  • AMD Ryzen 3 3200U up to 3.5 GHz
  • 8GB DDR4 RAM
  • 128GB storage
  • Windows 10 preinstalled
  • Storage space could be better

If you need a budget laptop for Dota 2, then Acer Aspire 5 might be the right choice for you. This model has a 15.6-inch display with full HD resolution, and it’s powered by AMD Ryzen 3 3200U up to 3.5 GHz.

As for memory, there’s 8GB DDR4 RAM and 128GB for storage which might not be enough for additional games and applications.

Acer Aspire 5 is the best budget laptop for Dota 2, and its only drawback might be the low storage space, but that won’t be a problem if you don’t install too many games.

⇒ Check price

HP Pavilion 15

  • 15.6-inch display, full HD resolution
  • Ryzen 5 4600H 3.0 GHz CPU
  • 8GB DDR4 SDRAM
  • NVIDIA GeForce GTX 1650 4GB
  • 512GB SSD and 1TB HDD
  • No major cons

Another great laptop for Dota 2 is HP Pavilion 15. This model comes with Ryzen 5 4600H 3.0 GHz CPU and a 15.6-inch full HD display. Regarding storage, the device has 512GB SSD and 1TB HDD.

HP Pavilion 15 has 8GB DDR4 SDRAM and it’s powered by NVIDIA GeForce GTX 1650 4GB graphics, so it should be able to handle gaming and other resource-intensive tasks with ease.

Overall, HP Pavilion 15 is a solid device, and it’s the best gaming laptop for Dota 2 that won’t break your bank.

⇒ Check price

Acer Nitro 5

  • 15-inch full HD display
  • Intel 9th gen Quad-Core i5-9300H 2.4GHz CPU can be boosted to 4.1GHz
  • NVIDIA GeForce GTX 1650 4GB GDDR5
  • 8GB DDR4 RAM and 256NVme SSD
  • USB 3.1 Gen 1 Type-C port
  • No major drawbacks

When it comes to the best gaming laptop for Dota 2, the Acer Nitro 5 might be what you need. This is a 15-inch full HD device, and it’s powered by Intel 9th gen Quad-Core i5-9300H 2.4 GHz CPU.

As for multimedia, the laptop has NVIDIA GeForce GTX 1650 Graphics with 4 GB GDDR5 VRAM, so it should handle other games as well. As for the memory, there’s 8GB DDR4 and 256GB NVme SSD.

Acer Nitro 5 is a solid gaming laptop, but 256GB might be a little limiting if you plan to play other games besides Dota 2, so keep that in mind.

⇒ Check price

Lenovo Ideapad 3

  • 14-inch full HD display
  • AMD Dual-Core Ryzen 3 3250U 2.6GHz CPU
  • Integrated AMD Radeon Vega 3 graphics
  • 12GB DDR4 RAM
  • 512GB SSD
  • Might not handle the latest games well

Lenovo is a well-known laptop manufacturer and if you’re looking for the best Lenovo laptop for Dota 2, then Lenovo Ideapad 3 is just what you need.

This is a 14-inch full HD device, and it’s powered by AMD Dual-Core Ryzen 3 3250U 2.6GHz processor and integrated AMD Radeon Vega 3 graphics. As for the storage, the laptop has 512GB SSD available.

Lenovo Ideapad 3 has 12GB DDR4 RAM, so it should be able to handle multitasking with ease, and run Dota 2 smoothly at the same time.

⇒ Check price

Picking the best laptop for Dota 2 can be complicated, but we hope that you managed to find the right model for you after reading this article.

Windows 11 Won’t Boot: How to Force Start it

Microsoft grabbed much attention during this period with its latest release, Windows 11. The design, the visual features, and the excellent upgrades are just a few capabilities of what users were seeking.

After checking some of the most valuable forums, we found that Windows 11 is not booting in some cases.

From what we selected, this is the most common reported manifestation:

This PC can’t run Windows 11 – While this PC doesn’t meet the system requirements to run Windows 11, you’ll keep getting Windows 10 updates.

Let us explore some causes and solutions to this booting problem.

Why is Windows 11 not booting?

After seeing a lot of user complaints, we gather that a few elements often trigger this boot problem. The top culprits include the following:

  • Bad system files – When you have some critical files damaged on your system, you may have difficulty booting up. To fix it, you can try to open CMD when your PC boots up & run the SFC scan.
  • Hardware issues – Sometimes, you need to update some hardware to make it work again. You may need to change RAM or your hard disk.
  • Peripherals – Sometimes, the problem is not the computer but the devices attached. Once you get rid of such a device, you can boot.

This article will clarify important information and present the best options you should consider to make your Windows 11 work.

What can I do if Windows 11 does not boot?

Before you go into any of these solutions, do the following:

  • First, check the power supply – There are chances that it is not plugged into power.
  • Check the monitor – In some cases, especially on a PC, you may not have connected the monitor, and even if the computer has booted up, it will seem to be off still.
  • Double-check that your PC meets the minimum requirements for Windows 11 – Considering that if it is based on aged specifications, it might not be compatible with the operating system you want to boot.
  • Unplug peripherals – This is important because, while the PC may have no issue, an attached device may be faulty and cause boot issues.

Most of the solutions below apply if this booting error comes up randomly.

1. Enable TPM

1.1 Check if TPM is enabled

  1. Press the Windows + R keyboard shortcut.
  2. Once the Run dialog box is opened, type tpm.msc, then press Enter.
  3. Look at the Status section and ensure you see the following message: The TPM is ready for use.

If this is what appears in the Trusted Platform Module, then your TPM is enabled and should work fine. If you cannot see the mentioned message, read the steps below.

1.2 Update TPM to boot Windows 11

  1. Restart the system.
  2. Right-click on the Start menu and open Device Manager.
    windows 11 not booting
  3. Expand the Security devices tab, right-click on the TPM device, and select Update driver.
  4. Click on Search automatically for drivers.
  5. The OS will automatically scan and update for any required drivers.
  6. Restart your PC.

In case that does not help, we recommend Outbyte Driver Updater for automatic scans of missing or outdated drivers; besides the TMP device, it will scan your entire PC and prompt you to choose which ones to update.

2. Enable Secure Boot

  1. Press Windows + R.
  2. In the opened Run dialog box, type msinfo32, then press Enter.
  3. Take a look at the Secure Boot State, and check the status. For example, if your computer does not support Secure Boot, the group will be Unsupported, but if you see the option On, you’re all good.
  4. If it is Off, then continue with the following steps.
  5. Press Windows + I to open the Settings app.
  6. On the left pane, click on Windows update, then select Advanced options on the right.
  7. Scroll down and select Recovery.
    windows 11 not booting
  8. Click on Restart now.
  9. From the options, select Troubleshoot.
  10. Click on Advanced options, then select UEFI Firmware settings.
    windows 11 not booting
  11. Click on Restart.
  12. Now, navigate the Advanced, Security, or Boot settings page (this depends on your motherboard).
  13. Set TPM 2.0 and choose the Enabled option.

3. Restore the computer

  1. In the Search menu, type recovery and click the Recovery option.
  2. Go to Open System Restore.
    windows 11 not booting
  3. Click Choose a restore point and click the Next button.
  4. Select the appropriate restore point, click Next, then follow further on-screen instructions.
    windows 11 not booting
  5. Wait for the process to finish, and see if the reboot issue is resolved.

As you can see, some of the most efficient ways are related to the Trusted Platform Module. Thus, we strongly recommend also checking our guide dedicated to Windows 11 and TMP.

In addition, we are here to support you. So, if you have any other questions, do not hesitate to let us know in the comment section below.

3 Best 6DoF Gaming Head Motion Trackers [2026 Guide]

There are quite a few things that you don’t know you need until you have them. The head tracker is one such gear that can immensely improve gaming sessions, especially when it comes to simulation games.

The gaming head motion trackers help the user turn his head movements into virtual head movements.

Imagine playing a flight simulation game like Digital Combat Simulator and being able to look around and control the viewing by moving your head instead of using the keyboard or joysticks.

Turning your head left or right will change the in-game view as well. Most head trackers usually support either 3DoF (three degrees of freedom) or 6DoF (six degrees of freedom).

The differences between these two techniques are quite significant. In summary, a gaming head tracker with 6DoF is any day better than the head tracker with 3DoF, as it offers a more immersive experience in games. 

Having said that, head trackers can be quite an expensive affair if the user doesn’t research thoroughly before making the purchase.

PC gamers don’t need highly sophisticated and costly head trackers, as one can build an IR (infrared) head tracker themselves for as low as $10. 

If you don’t like this idea, feel free to purchase a commercial gaming head tracking system for around $150 for that matter.

Today, we will be looking at some of the best motion head trackers for gaming. The list includes both DIY methods and commercial head trackers with 6DoF support.

Note: All the prices and offers in this article are subject to change, so be sure to check the official product page to get the latest deal. If the product/offer you’re looking for is no longer available, you can try to find it on its official manufacturer page or get another one from our list.

What are the best head motion trackers for 6DoF gaming?

NaturalPoint TrackIR 5

  • Improved tracking system
  • Increased realism
  • Comes with 6DoF support
  • Intuitive TrackIR software
  • Modern design
  • Not the best infrared feature

TrackIR 5 is the latest gaming head tracker from NaturalPoint. It comes with an improved tracking system and offers an immersive experience.

It is a 6DoF based tracker which means, in games with 6DoF support, users can raise and lower their head, lean left and right, move backward and forward, and the view in-game will adjust accordingly.

The TrackIR 5 kit includes a USB infrared camera with adjustable mounts, TrackClips with three reflectors, and a disc to install the TrackIR software.

The USB infrared camera goes on top of the monitor with the help of mounts. The TrackClip, however, requires users to wear a baseball cap and attach the TrackClip onto the brim.

Those that don’t want to wear the baseball cap all the time can opt for the TrackClip Pro clip which can be clipped onto the left side of the gaming headset.

However, the TrackClip Pro costs $10 more (when purchased as a bundle) and the build quality is poor, to say the least.

It’s also a wired solution, which means the user has to be connected to the power every time they want to use it.

For those who can shell a little extra, we would recommend a third-party track clip from TrackHat. TrackHat Plus is wireless, custom-made, and supports TrackIR head tracking system.

Setting up TrackIR 5 is easy. After installing the software, mount and connect the camera to the USB port, put the TrackClip in place and you are ready to roll.

TrackIR 5 works smoothly with major titles like ARMA 11, GTR2, Tom Clancy’s HAWX, and Race Driver: GRID, X-Plane, etc.

However, if you are planning to use it with other triple-A titles like Far Cry 2 and Battlefield 2, the experience is not pleasant, mainly due to a lack of support from the game developers. 

TrackIR 5 comes to life in racing games and flight simulation games. It does take some time getting used to, but once you do, you won’t go back to the usual game-playing modes.  

The TrackIR 5 is one of the best gaming head trackers available today, and it is well worth the money spent as it takes sim gaming to a whole new level.

The only negative aspect to TrackIR 5 is having to pay extra for the Pro clip which ideally should be included in the TrackIR 5 standard bundle.

TrackHat Plus head tracking kit

Trackhat Plus Kit

Trackhat is a head tracker company that offers TrackHat Plus Head Tracking Kit, a decent alternative to TrackIR 5. It not only costs 2/3 of its rival but also offers a similar head tracking experience in sim games.

The best thing about the TrackHat is a custom-made baseball-style cap that has three inbuilt infrared LEDs with a battery integrated into it.

The battery lasts up to 10 hours and can be recharged using the USB cable which is built into the TrackHat Clip.

The company also offers two more products, the TrackHat Clip and TrackHat Clip Plus, which can be separately purchased from the official online store.

For the head tracker, the company has smartly utilized the already available resources rather than building its own. For example, the infrared head tracker camera in the package is manufactured by Sony.

The complete TrackHat Kit includes an Eye Camera which acts as the head tracker camera that has been customized to work with the company’s own OpenStack software.

OpenTrack is an open-source head tracking project that claims to offer joystick and controller key binding, low CPU usage, and a cleaner UI. OpenTrack uses FreeTrack protocol which makes it compatible with all the video games compatible with TrackIR 5.

TrackHat also sells TrackHatPlus (baseball cap), without the head tracking kit for those who already have a TrackIR head tracker but want a reliable track clip.

The downside to TrackHat is that it is not available on any of the leading e-commerce stores as the company prefers to sell its product from its official store with global shipping on offer.

⇒ Get the TrackHat Plus Head Tracking Kit now

FreeTrack – DIY head tracker

FreeTracker - Head Tracking System Software

Gaming head trackers are made of three things: a camera, a track clip with reflectors, and software. Those that don’t wish to spend hundreds of dollars on buying a head tracking kit, can build one with ease.

The software part is covered by FreeTrack. FreeTrack is a free software tool that allows users to simulate head movements in sim games. It also supports 2DoF and 6DoF for compatible games.

FreeTrack uses the PC’s/laptop’s built-in webcam to track the head movement. You can download the FreeTrack software right away.

For the Track Clip, users can buy a premade track clip for around $10. The downside to FreeTrack is the limited number of sim games supported by this free initiative.

⇒ Get FreeTrack – DIY Head Tracker now

The gaming head motion trackers are not meant to replace VR devices but offer a similar experience to an extent, without breaking the bank.

For those that need a pre-built head tracking kit with 6DoF support, both TrackIR 5 and TrackHat Head Tracking Kit are good options except for the price, which is a debatable topic though.

For casual users and everyone else, FreeTrack is a good option as it offers a similar experience, almost for free. So, let us know your choice in the comments area below.

Windows Cannot Find Bin64installmanagerapp.exe [Fix]

If you are using Windows, and you are trying to install AMD graphic drivers, then you might encounter the Windows cannot find bin64\installmanagerapp.exe error.

Updating your graphic drivers is essential for our computers to work properly. For example, you might have noticed that when you try to play some games on your computer, the game doesn’t run smoothly or it crashes. This is due to incompatible or corrupted drivers.

Why can’t I find Bin64\installmanagerapp.exe?

If you’re wondering why the Windows cannot find bin64\installmanagerapp.exe error is appearing on your screen, here are some possible reasons:

  • Corrupt files – If you accidentally delete or move a file and don’t save it elsewhere first, then that file will become corrupted if it’s not recovered. This could be a corrupted registry entry or a damaged hard drive sector.
  • Incompatible drivers – If you are using a new graphics card or a new version of your existing graphics card, then it may not be compatible with the install manager.
  • Firewall restriction – If you have an antivirus program or firewall, the installation process may have been blocked by your firewall.
  • Outdated OS – This can happen if you are using an old version of Windows or the previous installation was interrupted.

Where is Bin64?

The AMD Catalyst Control Center is a desktop application developed by AMD that allows users to configure their graphics card and monitor the performance of their computers. It also allows users to view information about their computer’s hardware and software. 

The AMD Catalyst Control Center is designed to work with all brands of ATI Radeon graphics cards and select AMD A-Series APUs. AMD Catalyst Control Center provides a number of tools to help users configure their ATI graphics card and Bin64 is part of the software component. These include:

  • Software Update – This feature allows users to update their drivers in order to get the latest features and bug fixes from AMD. The software will automatically detect any new updates when run, and prompt you to install them if applicable.
  • 3D Application Settings – This tool allows users to customize various settings for 3D applications like video games or applications. Users can choose between various resolutions, color depth, and refresh rates depending on their needs.
  • Video Overlay – This feature allows users to change how they see their desktop while using their computer. For example, if you have multiple monitors connected together, this tool will allow you to display a picture-in-picture window showing what’s happening on your second screen within your primary monitor’s space.

If you have downloaded the Installmanager app, you should be able to find it in the following location:

C:\Program Files\AMD\CIM\BIN64\

How can I fix Bin64 InstallManagerapp.exe missing?

1. Manually install the AMD driver

  1. Navigate to your browser and download the AMD Graphic driver.
  2. Next, download the DDU. (Your firewall should be off).
  3. Locate the AMD folder and delete all the contents to get rid of any leftover files.
  4. Now, hit Windows, type in Control Panel, and click Open.launch control panel
  5. Select Uninstall a Program under Programs.microsoft-visual-c-runtime-error-windows-10
  6. Find the AMD Graphic Drivers and select Uninstall.
  7. Start Windows in Safe Mode then run the DDU program.
  8. Next, install the drivers downloaded in 1 above.
  9. Restart your PC and check whether the error is still there.

Performing a clean install in Safe Mode allows you to check whether there is an underlying issue preventing the installation.

2. Run DISM and SFC commands 

  1. Hit the Windows key, type cmd in the search bar, and click Run as administrator.cmd-admin hp printer won't scan
  2. Type the following command and press Enter: sfc /scannow
  3. Now type the following command and press Enter: DISM /Online /Cleanup-Image /ScanHealthDISM command
  4. Restart your PC.

If you don’t necessarily want to proceed with the manual steps, you can easily try an automated method that will thoroughly scan your device for damaging elements or crashing apps and then will try to replace them with healthy parts from its up-to-date database.

3. Disable the firewall temporarily 

  1. Hit the Windows button, type Windows Security in the search bar, and click Open.
  2. Click on Firewall & network protection then select Public network.
  3. Locate Microsoft Defender Firewall and toggle the off button.Turn off firewall if canon printer driver not installing.

4. Uninstall the latest Windows updates 

  1. Press the Windows + I keys simultaneously to open Settings.settings windows 11
  2. Navigate to Windows Updates and go to Update history.
  3. Click on Uninstall updates.
  4. Select the most recent update then click Uninstall.

5. Update your OS

  1. Hit the Windows key and select Settings.settings windows 11
  2. Click on Windows Update, then select Check for updates.check-updates-w11 windows 11 blue screen
  3. Download and install if any are available.

If you’re still getting Windows cannot find Bin64\installmanagerapp.exe error after performing all these recommended steps, you should try resetting your PC.

In the worst-case scenario, you may have to perform a clean install of Windows as it is possible your version was corrupted during installation.

Should you encounter any other AMD driver installation issues, we have a comprehensive guide to that effect to help you resolve the majority of them.

And in case you are done with AMD drivers and want to try others in the market, we have a resourceful list of the best Windows 11 graphic cards that promise you an unmatched experience.

Let us know if you have been able to fix this issue in the comment section below.

5 best Arduino kits for kids to buy [Cyber Monday]

Arduino is gaining more and more popularity by the day, and Arduino kits for your children are perfect to get more people involved in creating awesome projects with just a bunch of seemingly random components.

The concept behind all these project creation bundles is to provide you with everything you need (guides included) to develop your own version of the projects.

Moreover, they are ideal to learn a thing or two about automation, robotics, and programming. Therefore, don’t hesitate to take a closer look at our top picks below. 

Note: All the prices and offers in this article are subject to change, so be sure to check the official product page to get the latest deal. If the product or offer you’re looking for is no longer available, you can try to find it on its official manufacturer page or get another one from our list.

Which Arduino kit is best for beginners and children?

ELEGOO Mega 2560

  • Premium quality
  • 100% compatible with Arduino IDE
  • Useful tutorials
  • Lcd1602 module and gy-521 sensor module
  • Small box for the components
  • No support section on the official website

Since you already have an idea regarding what you are looking for, let us tell you more about the MEGA2560 complete starter kit.

It comes with over 200 pcs components, as well as free PDF tutorials on the CD. Those 35 lessons will certainly help you and your child as they include detailed steps on how to connect each part to the main chip (Arduino).

No less important, there’s a nice plastic case that holds all the components and they are all individually wrapped and fully protected.

⇒ Check price

UNIROI UNO starter kit

  • Package includes a CD with tutorials
  • Detailed installation instructions
  • Everything arrives in a plastic case
  • Suitable for anyone interested in Arduino
  • Inexpensive learning aid
  • Bare minimum to create basic Arduino projects

The UNIROI UNO starter kit for Arduino can be the perfect gift if you want to spark your kids’ curiosity for robots and automation, as it holds everything it needs to get them started.

The bundle comes with a free set of tutorials, a great UNO R3 board, a breadboard, a flame sensor, as well as a bunch of multi-colored LEDs.

Included in the package are also an active buzzer, a button, a set of resistors, a 1 digit 7-segment display component, a set of jumper wires, and an RGB LED.

⇒ Check price

REXQualis UNO Project

  • A lot of awesome components
  • DVD with project guides
  • A 9V plug-in power supply is included
  • Individually packaged components
  • Great price
  • Random LED issues

The REXQualis UNO Project super starter kit is an Arduino kit that’s a bit more complex than a standard, basic one.

However, it comes with everything you need to get your children into robotics and automation. Compared to a basic, more limited starter kit, this one comes with more awesome stuff, including but not limited to a classic UNO R3 board, a breadboard, a power supply module, a joystick, and a servo module.

You can also find an ultrasonic sensor, an IR receiver, a temperature and humidity module, two potentiometers, an LCD module, and remote control.

⇒ Check price

ELEGOO UNO Project

  • Lots of components to create your projects with
  • More than 20 lessons
  • Lcd1602 module with pin header
  • High-quality kite with UNO R3
  • Decent price
  • Some breadboard holes aren’t aligned with the connectors within

The ELEGOO UNO Project super starter kit is a starter Arduino project development kit that could turn into the perfect gift for your children.

Granted, the ELEGOO UNO Project Super Starter Kit is a tad more complex than its predecessors, but it’s still suitable for any Arduino enthusiast, regardless of previous experience with these projects.

The kit holds a UNO R3 controller board, a breadboard, an ultrasonic sensor, a 9V battery with DC, an LCD screen module, a temperature and humidity sensor, a remote controller, a servo motor, a joystick module, an IR receiver, a couple of buzzers and lots of other accessories.

⇒ Check price

A&R Nano Uno Mega Monster

  • Comes with a lot of components
  • ESP32 Development Board
  • HC-05 Bluetooth Module
  • Free access to PDF guides and tutorials
  • Lifetime replacement guarantee
  • Price might seem a bit high for an Arduino beginner

The A&R Nano Uno Mega Monster starter kit for Arduino is exactly what its name says. Well, maybe except for that monster part, because there’s nothing monstrous about this bundle (not in a bad way, of course).

This starter kit comprises everything you need to get your children started with understanding what Arduino is all about and considering the size of this package, you’re going to make a more-than-fair point.

With components such as a UNO R3 controller board and a NANO V3 one, a Bluetooth module, an Ethernet shield, an IR remote kit, an ultrasonic range sensor, a vibration sensor, a real-time clock module, proto shields, 4×4 keypads, and much, much more, you’re sure to win the Parent of the year contest this time.

⇒ Check price

If you feel that you don’t have enough time to plan for the perfect gift for your children, try sparking their interest in programming, robotics, and automation with these awesome Arduino creation kits.

Whether it’s the A&R Nano Uno Mega Monster starter kit for Arduino, the REXQualis UNO Project super starter kit, or the UNIROI UNO starter kit for Arduino you’re going to aim for, you simply can’t go wrong if you have even the tiniest hunch that your kid is into creating awesome stuff.

Take a closer look at all our top picks above, make a choice, then don’t hesitate to share it with us via the comments area below.

Top 13 Wi-Fi extenders for Windows [Cyber Monday]

Wi-Fi networks are convenient if you’re using Windows PC, but unfortunately, Wi-Fi networks have their limitations in terms of range.

In our how to fix Wi-Fi range issues on Windows 10 article we briefly mentioned that buying a Wi-Fi extender can help you with Wi-Fi range issues.

Today we have a list of the best WiFi extenders for gaming, but not only that you can pair with your Windows PC.

Note: All the prices and offers in this article are subject to change, so be sure to check the official product page to get the latest deal. If the productor offer you’re looking for is no longer available, you can try to find it on its official manufacturer page or get another one from our list.

What WiFi extender is best for gaming?

Amped Wireless REA20

Amped Wireless REA20

Amped Wireless REA20 wireless booster comes with 3 removable external antennas and it supports dual-band 802.11ac standard.

This device offers a lot of customization options thanks to its software, so it will be perfect for advanced users.

Amped Wireless REA20 might not be the most compact device, and according to the reports, it doesn’t offer the best range.

If you’re not an advanced user who wants to fine-tune Amped Wireless REA20, you might be interested in a different model.

⇒ Buy it now on Amazon

D-Link DAP 1520

D-Link DAP 1520

D-Link DAP 1520 is a minimalistic Wi-Fi booster that doesn’t have a power cable and a stand, instead, it connects directly to the power outlet.

This device doesn’t have any additional ports, so if you want to connect your hard drive or printer to your wireless network, you won’t be able to do that by using this device.

D-Link DAP 1520 supports the latest dual-band 802.11ac standard, and it comes with 2 internal antennas. If you want a Wi-Fi extender without any additional ports, D-Link DAP 1520 offers great performance at a reasonable price.

⇒ Buy it now on Amazon

Linksys RE6500

Linksys RE6500

Linksys RE6500 is a powerful Wi-Fi booster, and unlike several other devices on our list, you cannot connect Linksys RE6500 directly to a power outlet, instead, you need to power it using a standard power cable.

This Wi-Fi extender comes with 2 replaceable 3dBi dipole antennas and it supports both 2.4GHz and 5GHz wireless bands as well as the latest AC wireless standard.

Regarding connectivity, this device has 4 LAN ports as well as a 3.5mm headphone jack. Unfortunately, there’s no USB port available, and that’s the only flaw of this Wi-Fi booster.

Linksys RE6500 is a powerful Wi-Fi extender, it offers great performance, and it’s one of the best Wi-Fi extenders on our list.

⇒ Buy it now on Amazon

ASUS RP-N53

ASUS RP-N53

ASUS RP-N53 supports both 2.4GHz and 5GHz frequencies and it offers decent speed. This Wi-Fi booster comes with one Ethernet port meaning you can connect any wired network device to it.

In addition to an Ethernet port, there’s also an audio jack available.

ASUS RP-N53 connects directly to your power outlet, so it won’t take up too much space in your home.

It’s worth mentioning that this Wi-Fi extender doesn’t have a USB port available, and it also doesn’t support the latest AC Wi-Fi standard.

⇒ Buy it now on eBay

ZyXEL WRE2206

ZyXEL WRE2206

ZyXEL WRE2206 is a compact Wi-Fi booster that connects directly to your power outlet. This device doesn’t support the latest AC wireless standard, but it allows you to easily extend your wireless network.

This Wi-Fi extender comes with an LED indicator that shows you how many devices are currently connected to the extender, and thanks to the WPS button you can easily expand your wireless network.

In addition, this device comes with a single Ethernet port, so you can connect any wired network device to it.

ZyXEL WRE2206 isn’t the best wireless extender, but with its humble specs, it should be great for basic home users.

⇒ Buy it now on Amazon

NETGEAR EX7000 AC1900 Nighthawk

NETGEAR EX7000 AC1900 Nighthawk

NETGEAR EX7000 AC1900 Nighthawk supports AC1900 standards and it can achieve amazing speed as long as you have a compatible router.

Regarding the frequency, this extender supports both 2.4GHz and 5GHz frequencies.

NETGEAR EX7000 AC1900 Nighthawk comes with three external antennas so it has a decent range, and thanks to 5 Ethernet ports and USB 3.0, you can easily connect any device to this Wi-Fi booster.

This is an impressive device with amazing performance, however, such a device comes with a steep price.

⇒ Buy it now on Amazon

Trendnet TPL-410APK

Trendnet TPL-410APK

Trendnet TPL-410APK is a Wi-Fi booster, but at the same time it supports Powerline technology, so you can use it to easily expand your network around your home.

This device supports N wireless standard, and thanks to the 2 Ethernet ports you can easily connect additional network devices to it.

It’s worth mentioning that Trendnet TPL-410APK is fully compatible with TRENDnet Powerline 500 and 200 models, and in order to keep your data safe, TPL-410APK encrypts the Powerline signal.

This might not be the best wireless extender, but since it offers Powerline support, it can be a perfect solution for your home.

⇒ Buy it now on Amazon

Netgear EX6100

Netgear EX6100

Netgear EX6100 might not be the most compact Wi-Fi booster on our list, but it provides great specifications. This device supports the latest 802.11ac standard along with 2.4GHz and 5GHz frequencies.

This device comes with one Ethernet port so you can easily connect any wired network device to it. Netgear EX6100 is a great device, and the only flaw might be the lack of a USB port.

⇒ Buy it now on Amazon

Netgear EX2700

Netgear EX2700

Netgear EX2700 is similar to the previous model on our list, but it offers more humble specifications.

Just like the previous model, this Wi-Fi booster also comes with a single Ethernet port so you can easily connect any wired network device to it.

Unfortunately, this device only supports 802.11 a/b/g/n standards and 2.4 GHz frequency, so it doesn’t offer the same performance as the previous model, but it’s still a decent Wi-Fi extender for your home network.

⇒ Buy it now on Amazon

D-Link DAP-1650

D-Link DAP-1650

D-Link DAP-1650 comes with an impressive design, and we have to admit that it looks more like a wireless speaker than a Wi-Fi booster. Alongside visually appealing design, this device offers support for AC1200 Wi-Fi standard thus delivering maximum speed.

We have to mention that this device can work as a range extender, access point, or media bridge. As for additional features, this device comes with 4 Ethernet ports, one USB, and one audio jack.

D-Link DAP-1650 is an impressive device with great design and amazing features, however, such a device comes with a price.

⇒ Buy it now on Amazon

Amped Wireless REC22A

Amped Wireless REC22A

Amped Wireless REC22A is another Wi-Fi booster that connects directly to your power outlet.

Despite being a compact device, this Wi-Fi extender provides you with high Wi-Fi speed thanks to the latest 802.11ac wireless standard. Of course, both 2.4GHz and 5GHz frequencies are fully supported.

We also have to mention that this device comes with a detachable antenna, so if you need a more powerful antenna you can easily replace it.

⇒ Buy it now on Amazon

Securifi Almond

Securifi Almond

Securifi Almond is another Wi-Fi booster, but unlike other boosters on our list, this one comes with a touchscreen display.

This device offers a great design, but it lacks certain features, such as support for a 5GHz network and the latest 802.11ac standard.

This device comes with 2 LAN and 1 WAN port, and it can work as a Wi-Fi booster or a wireless bridge.

Securifi Almond looks like an amazing device and if you want a Wi-Fi extender with a touchscreen display, this might be the perfect choice for you.

⇒ Buy it now on Amazon

TP-LINK TL-WA850RE

TP-LINK TL-WA850RE

TP-LINK TL-WA850RE is another Wi-Fi booster that connects to your power outlet. This device supports the 802.11n/g/b standard and it comes with 2 internal antennas.

Additional specs include 1 Ethernet port that you can use to connect other wired network devices such as your PC or a game console.

TP-LINK TL-WA850RE offers humble specs, however, it might be perfect for basic home users due to its affordable price.

⇒ Buy it now on Amazon

These are some of the best Wi-Fi boosters for Windows 10, and we hope that you’ll find a model that fits your needs.

Recently we did a list of the best Wi-Fi adapters for Windows 10, so if you’re looking for a new wireless adapter make sure that you check it out.

Here’s What To Do If YouTube Keeps Crashing or Freezing Chrome

Google Chrome is a great browser that usually plays videos without any issues; however, some users have said on forums that YouTube videos freeze on Google Chrome.

This situation is not ideal, and while various reasons may cause it, in most cases, you will need to take a few easy steps to correct the problem.

We will explore a few resolutions that might fix YouTube freezes on Chrome.

Note that you will be able to adjust issues of Bad video quality on YouTube in a few easy steps.

Why does YouTube keep crashing on Chrome?

We have had many users ask why does my youtube keep freezing?

Streaming or watching videos on YouTube should be a smooth, rewarding experience, but some of the following factors may cause your videos to hang:

  • Hardware issues – Sometimes, it has nothing to do with the Youtube service but with the devices you run it on. You may have a faulty hard disk or RAM.
  • Corrupted cache – Your cache stores vital information regarding your activity, but if corrupted, it may also lead to crashes.
  • Overclocking of the CPU – Many activities may increase your CPU clock rate. Streaming is one such activity.
  • Low memory – Streaming or playing videos is often memory intensive, and if you undertake this activity when low on memory, you may experience crashes.
  • Compatibility issues – In most cases, this may be triggered by third-party extensions. Once they are removed, the problem should be solved.

Whichever the case is, we will suggest fixes for you below.

Quick Tip:

With a complete makeover, Opera One comes out strong to deliver matching and often surpassing features that other popular browsers such as Chrome or Mozilla provide.

The Video pop-out is one particular option that offers you a flawless Youtube viewing experience without ever leaving your browser.

Opera One

Load YouTube videos in seconds with this speed-focused browser!

How do I fix YouTube freezes & crashes on Chrome?

1. Clear Chrome’s cache and data

  1. Click on the ellipses or three vertical dots in the top right corner of your browser.
    youtube freezes chrome
  2. Select More tools, then Clear browsing data.
  3. Click the checkboxes for Browser history, Cookies, and other site data, and Cached images and files, then click on the Clear data button.
    youtube freezes chrome

Chrome’s data can also clog up YouTube’s video output. So, clearing Chrome’s data might make some difference when playing videos in the browser. This fix is beneficial, especially if YouTube freezes when playing games.

2. Update Google Chrome

  1. Click on the ellipses or three vertical dots in the top right corner of your browser.
    youtube freezes chrome
  2. Select the Help option and from the list of further options, click on About Google Chrome.
  3. The browser will check for updates, and you can install a recent update if available.
    youtube freezes chrome
  4. Once installed, restart the browser for the changes to take effect, and try playing your YouTube videos again.

While browsing, you will have the best user experience using the most recent browser version. In addition, the latest versions will generally provide superior video playback to older versions.

3. Turn Off Hardware Acceleration

  1. Click on the ellipses or three vertical dots in the top right corner of your browser.
    youtube freezes chrome
  2. Then select Settings on the menu.
    youtube freezes chrome
  3. On the left pane, click on the Systems option.
  4. Then toggle the Use hardware acceleration when available option off if it’s on.
    youtube freezes chrome
  5. Restart Chrome after turning hardware acceleration off.

This is a viable solution if YouTube freezes when playing videos. You can also turn off hardware acceleration from your Windows 11 Settings app.

4. Disable Chrome’s Extensions

  1. Paste the address below onto your Chrome address bar and hit Enter.
    chrome://extensions
  2. Search for your most recently added extensions from the list of extensions displayed.
  3. Toggle the switch off to disable the specific extensions.
    youtube freezes chrome

YouTube’s freezes can also be due to conflicting extensions. So, turning off problematic Chrome extensions might resolve the issue.

5. Reset the browser

  1. Paste the address below onto your Chrome address bar and hit Enter.
    chrome://settings
    youtube freezes chrome
  2. On the left pane, click on Reset and clean up.
  3. Click on Reset settings to their original default.
  4. Click the Reset settings at the bottom.
  5. There will be a confirmation box. Click on the Reset tab for the process to begin.

Note that you can disable all extensions by resetting Chrome, which will clear the browser’s data. We, however, believe a reset may be overkill for a YouTube hanging problem and should only be used as a last resort.

6. Update the Graphics Card Driver

  1. Right-click on the Start menu and click on the Device Manager option.
    youtube freezes chrome
  2. Expand the Display adapters option, right-click on your graphics card, and select the Update diver option.
    youtube freezes chrome
  3. Click on Search automatically for drivers.
  4. If there are any updates, you will be able to install them.

Alternatively, you can use any of the best driver updaters for Windows 10 and 11 to automate the update process.

YouTube crashing in Chrome could be due to antiquated or corrupt video card drivers. Some video card drivers might even be incompatible with some of YouTube’s new features.

The above resolutions will often fix YouTube video playback errors in Chrome. However, remember that users can also utilize alternative browsers that might provide more reliable YouTube playback.

We also have a guide on HLS.js error: NetworkError – fatal: true that covers a similar issue, so check it out.

If your YouTube keeps freezing and you have read up to this point, we are confident you should be able to fix it. Let us know in the comments which of the solutions worked for you.

Stop Motion Animation Software: 10 Best To Use in 2026

Stop motion is an animation technique that involves physically manipulating objects to give the illusion of movement. This is done with an interesting technique.

In other words, the respective objects are moved over very short distances and then photographed individually which gives the impression that they move.

The photos are then played in a fast sequence to create movement. So, if you’re into stop-motion animation, you’ll also need a dedicated stop-motion animation tool for your creations.

Moreover, so-called stop-frame animation is not a simple process, and animators who use this technique have to work carefully to create really fluid animation.

Hence, if you desire to learn this animation method or you’re using it regularly then third-party software comes in handy and can provide real help.

In this article, we’re going to list the best stop-motion animation software that you can use on your Windows PC. Read the product description and if a particular tool suits your needs, download it on your computer.

Note: All the prices and offers in this article are subject to change, so be sure to check the official product page to get the latest deal. If the product/offer you’re looking for is no longer available, you can try to find it on its official manufacturer page or get another one from our list.

Which software is best for stop-motion animation?

  • Adobe Premiere Pro – powerful tool with pro features
  • Filmora Video Editor – lots of visual & audio effects
  • Movavi Video Editor – all-in-one editor
  • Dragon Frame – easy-to-use
  • Stop Motion Studio – very intuitive interface
  • Stop Motion Pro Eclipse – direct connectivity with your camera
  • Frames – classic tool with mainstream features
  • IKITMovie – suited for beginners
  • AnimatorHD – works great on Windows
  • MonkeyJam – pencil test animation tool

Now let’s take a closer look at each tool.

Adobe Premiere Pro – Powerful tool with pro features

Adobe-Premiere-Pro platform

Adobe Premiere Pro is well known for its strong video and audio features. I think we don’t surprise you by mentioning that Adobe can help you in creating stop motion animation effects.

You will be able to make your cartoons more dynamic with the help of Motion effect features and keyframes that Adobe offers you.

The editing process becomes easier as you are free to use Adobe’s animated motion templates or you can create your own motion graphic using the instruments from the Essential Graphics panel.

Moreover, in recent years, several graphic enhancements considerably eased the process of creating a fast sequence of movements.

In the videography process, you are offered to benefit from color correction, color grading, precise trim footage, and more.

You don’t have to be worried about the complexity of Adobe’s instruments, as it provides a lot of tutorials so you can create the quality animation that you like.

Adobe Premiere Pro

Create and edit your video projects from any device, using the cutting-edge techniques employed by this expert tool
Free trial Visit website

Filmora Video Editor – Lots of visual & audio effects

Although Filmora Video Editor is not a stop-motion software per se, you can easily use it to get the best out of your animation projects.

To this end, Filmora brings a plethora of visual and audio effects, including filters, transitions, overlays, custom titles, and elements that will help you create professional videos.

The software adds updates every month so you can make your creations more eye-catching.

The tools come with a user-friendly layout, with all editing options at hand so that you can stay more productive.

Moreover, with this software, it’s easier to create professional-looking videos using technology that will increase your video quality instantly.

For example, you can use audio ducking to improve your recording, color match, or hotkeys commands. Hence, don’t hesitate and create your animations with Filmora to stand out with your movies.

Filmora Video Editor

Give your video projects a new flavor with all the filters and effects this tool brings
Free trial Visit website

Movavi Video Editor – Complete online editor

Movavi Editor is an all-in-one solution for editing your videos in a very creative manner and in a very simple way.

With this video editor software, you can explore your imagination by creating professional videos, using an intuitive editing program. So with powerful functionalities like keyframe animation and other video effects, your video will shine.

More exactly, the program allows you to edit videos with a basic timeline editor and lively effects or text animations, transitions, or chroma backgrounds that will boost your creation beyond expectations.

Moreover, with Movavi it is possible to create stop motion videos easily by importing your photos in the editing program, arranging your scenes, and finally adding some effects or transitions.

Hence, using this video editor solution will drastically simplify your workflow with stop motion animation thus creating a remarkable outcome or put a smile on every single face.

In addition, if you need to create a professional or business-purpose video using stop-motion animation, this software is perfectly suited to add extra quality and make your product popular.

Movavi Video Editor

Using this incredible tool, you can edit and create stop-motion videos professionally!
Check price Visit website

Dragon Frame – Easy-to-use

Dragon Frame is a powerful stop-motion animation tool that will help you create really stunning images.

The software allows you to bring animations to life with the help of a bevy of professional on-screen tools.

Dragon Frame lets you capture precise movements, compose and light the perfect shot with camera controls, and edit images with the help of advanced image review tools.

What’s more, you can animate your video using tools like toggling, looping, or onion skin and make amazing shots with cinematographic features to set the camera settings or adjust focus.

You can also insert audio and edit it according to your characters’ needs. Some of its key features include:

  • Timeline: You can edit your frame with a simple drag-and-drop move to adjust timing, reshoot sequences, or restore deleted frames
  • Drawing tools: Vector-based drawing tools allow you to better control your animation
  • Live view magnification support
  • Color detection lets you compare tone ranges between shots and adjust them

You can try out the tool-free for 30 days. The trial period allows you to test the software with your camera and become familiar with its features.

Keep in mind that all the images captured using the trial version of the tool will have a watermark. Dragon Frame is suitable for professionals and experienced animators.

⇒ Get Dragon Frame

Stop Motion Studio – Very intuitive interface

The next solution on our list is Stop Motion Studio, powerful and rounded software that will make your animation movie look as famous as Lego animation productions.

Firstly, using this intuitive software will help you in creating valuable stop-motion videos with its frame-by-frame editor, simplistic timeline, or sound editing tools.

You should know by now that stop-motion animation is a slow process, and you have to take several pictures to create your final creation. However, using simple tools offered by this program you can edit your videos quickly on desktop or mobile versions.

Additionally, using this program you can produce desktop-class videos and edit them by cutting, removing, copy or paste single photos frames and adding them to any position that fits perfectly for the sequence.

Besides that, you can capture the perfect moment with your digital camera because this program supports known camera brands like Canon, Nikon, or Sony.

Therefore, you can try out the software on different devices including Windows PC, Mac, or Android, and enjoy your movies anywhere.

⇒ Get Stop Motion Studio

Stop Motion Pro Eclipse – Direct connectivity with your camera

Stop Motion Pro is an interesting animation software that easily connects to your camera or webcam. You can use it to capture and paste images and convey interesting stories through your animated characters.

You can also use markers to track and plan your characters’ movements. The tool can play up to 30 frames per second and allows you to record audio while playing back animation. Lip-sync support is also available.

The software is compatible with dozens of cameras and features advanced project management tools which are very useful when managing long-term animation projects.

Furthermore, you can create your story using practical features offered by this tool, such as tracking movement with markers, smooth playback of 30 frames per second, audio recording, multiple frames with one click, and more.

Stop Motion Pro’s UI is available in five languages: English, French, German, Spanish, and Chinese.

Therefore, take advantage of its user-friendly interface and create your animation films and characters using this robust software.

⇒ Get Stop Motion Pro Eclipse

Frames – Classic tool with mainstream features

The next entry is Frames, a powerful stop-motion software designed to produce impressive clay animation or other great animated videos.

With this specialized program, you can dive deep into your animated story and create powerful stories to transmit any message you conceive.

To be more clear, this tool provides help with capturing webcam images or importing folders with images from your digital camera. You can enjoy features like onion skin, chroma key, or time-lapse to simplify the animation process.

Moreover, if you are eager about cartoon animation you can benefit from dedicated tools to make your story alive. For example, you have drawing tools, clip art, and art animation paths, plus more soundtracks to combine narration.

If you want to expose an inspirational digital story, using images text, and videos, this program will not only provide technical help but inspire you to grow out of your comfort zone.

All in all, using Frames you will perfect your video animation skills and get the opportunity to express the stories you always needed to share with the world.

⇒ Get Frames

IKITMovie – Suited for beginners

iKITMovie is a stop motion animation tool compatible with Windows XP/Vista/Windows 7/8 or Windows 10 PCs.

If you’re into LEGO or claymation, this is the perfect tool for you. Most importantly, unlike most stop-motion tools, this program can be used by users of all ages, including older kids and teenagers.

IKITMovie features over 2,200 free sound effects and background music tracks to customize your creations.

The tool also features a green screen that allows users to replace backgrounds with still or moving images. This feature is very popular among animators using this type of animation technique.

If you’re new to stop-motion animation, you can watch step-by-step video tutorials to learn how you can better use the tool. IKITMovie is perfect for students and educators.

With that being said, you should use this solution if you need influential animation videos and qualitative editing features.

⇒ Get IKITMovie 

AnimatorHD – Works great on Windows

AnimatorHD is a Windows-based software that you can use to create stop motion and time-lapse animation.

The tool also supports stereoscopic 3D movies and DSLR cameras, including Canon and Nikon Live View, as well as 3D stereo shooting.

You can use your laptop’s webcam and other video recording devices as input sources. The RAM Player with live frames allows you to control and edit each frame according to your needs.

Once you’re satisfied with the results, you can export your animations to After Effects and further enhance them.

In addition, using this software you can benefit from powerful traits such as advanced frames and AVI movie export, multi-exposure for video feed, variants of each sequence, 3D stereo live preview, camera preview, and many more.

That being said, this software solution will offer all the functional resources you need to create unbeatable stop-motion films.

⇒ Get AnimatorHD

MonkeyJam – Free and intuitive solution

MonkeyJam is a user-friendly stop animation application that offers practical tools to craft fluid animation stories.

This tool can be used by artists or amateurs at the same time, regardless of animating background.

You can record using a webcam, camcorder, or scanner and create stop motion animations with distinct frames.

It’s worth knowing that such tool comes with drawing instruments for crafting animated characters or pictures by hand.

More exactly, you can use specific features to create professional animation movies even though the tool is designed for pencil drawing.

When the project is done, you have certain preview modes to help you see the entire film or a specific range on the shooting.

⇒ Get MonkeyJam

So, we’ll end our list of the best stop-motion animation software here. If you’ve used other similar tools that you think we should add to this list, let us know in the comments below.