5 Ways to Fix Amazon Prime Video Not Working in Firefox

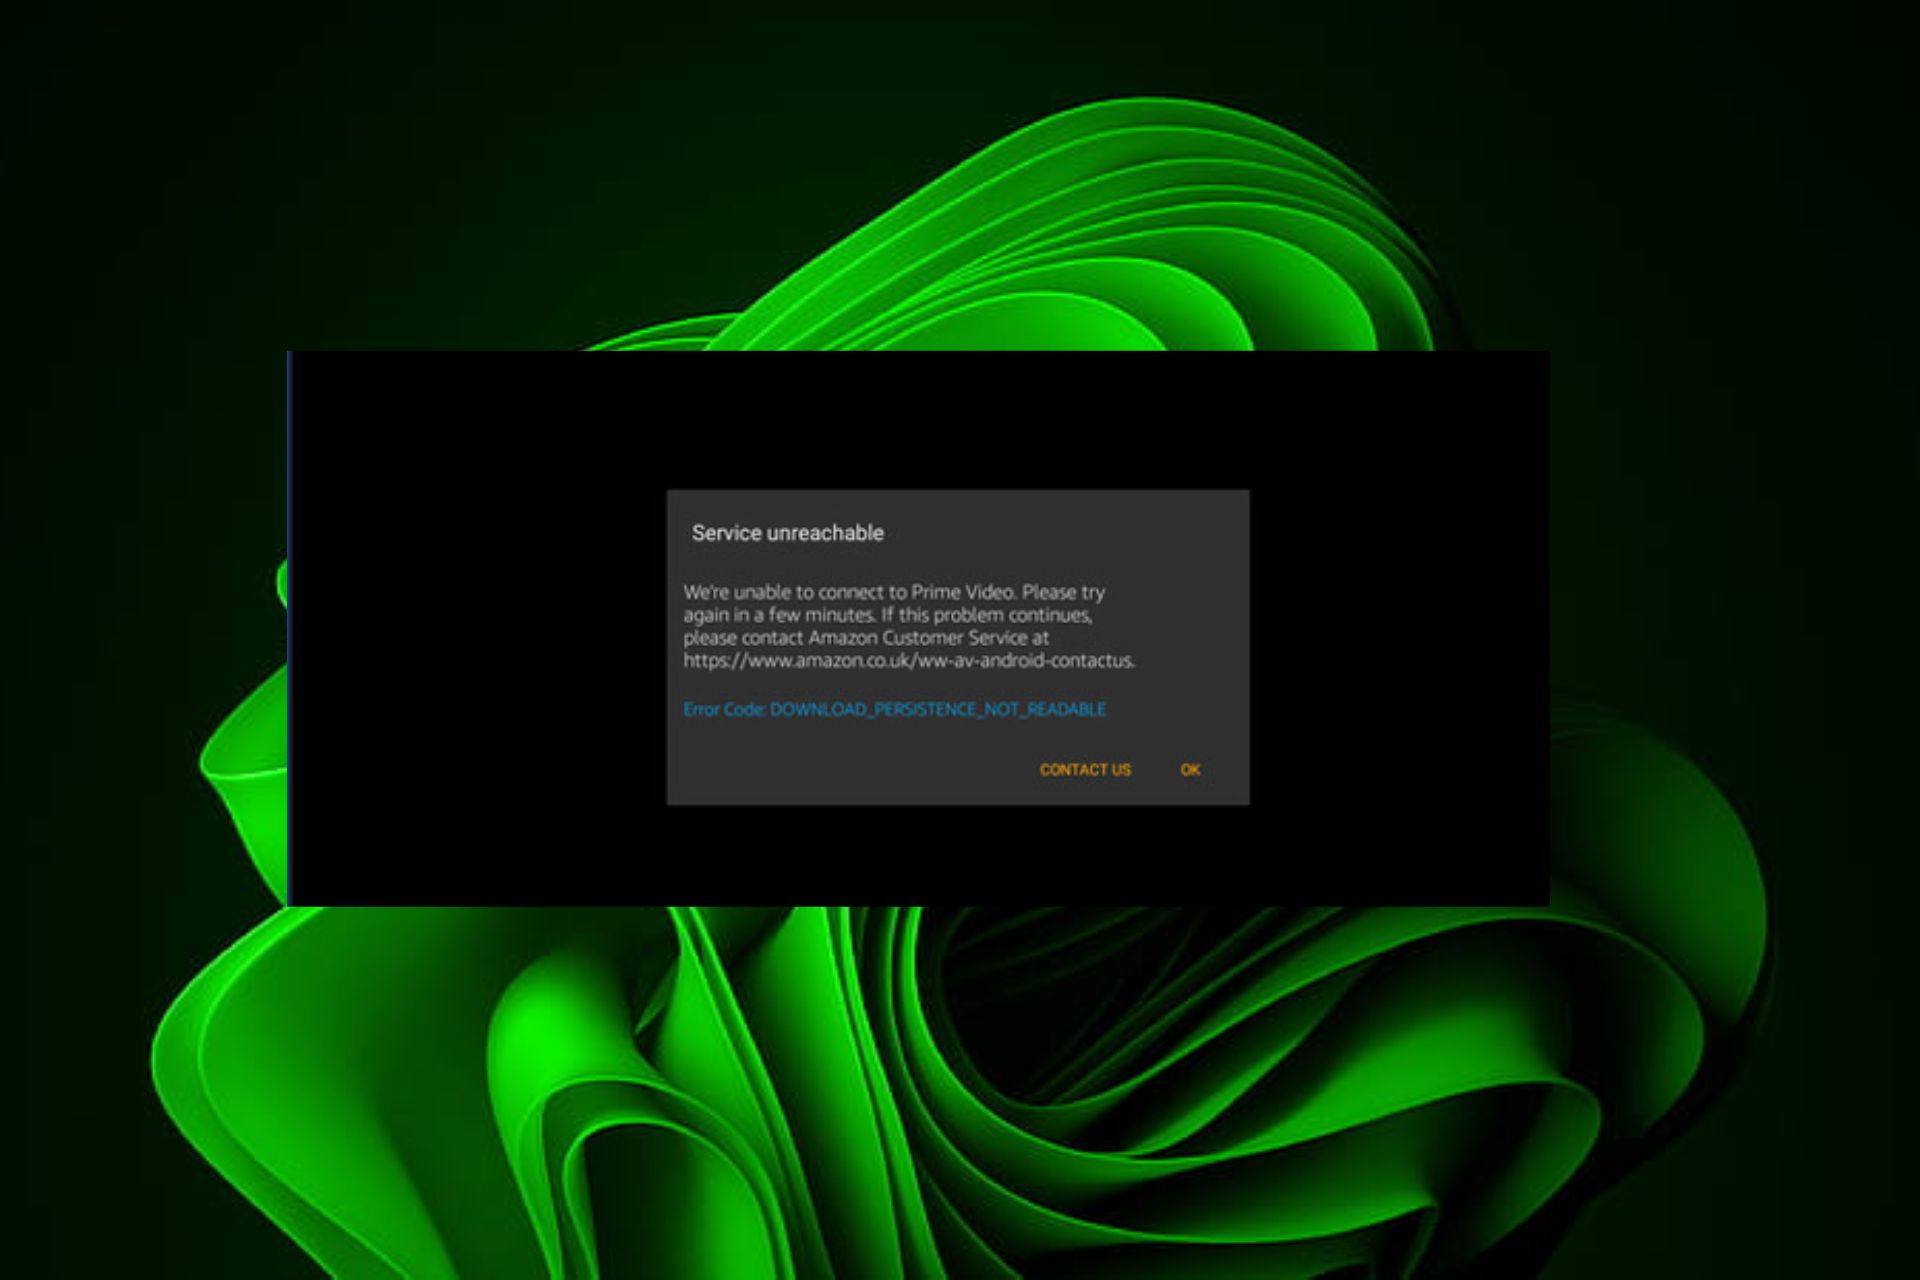
Amazon Prime Video is one of the most popular streaming services in the world, but it’s not without its problems. One of the most common issues is when Amazon Prime Video is not working on the Firefox browser. 

When you are watching a movie or TV show on Amazon Prime Video, the service may freeze, crash, and even close. This can happen for different reasons, but it’s annoying, to say the least.

Sometimes, Amazon Prime Video may not be playing 1080p or a higher quality setting but as soon as you lower the quality settings, you can watch with no lagging.

While this may be a temporary solution, no one likes watching their favorite shows in low quality. You can either install 4K video players or troubleshoot recommended solutions below.

Does Prime Video work on Firefox?

Yes, Prime Video is available on Firefox. You can stream Prime Video on your computer, laptop, or mobile device. You can also watch it on the go by downloading the Prime Video app from Google Play Store or Apple App Store.

Why is my Amazon Prime Video not working?

If you’re not able to watch Prime Video on Firefox, it is likely because of one of the following reasons:

  • Poor internet connection – The first thing you should do is check your internet connection. This is a common cause of problems with streaming apps. If you have trouble loading web pages or downloading files from the internet, it’s possible that your internet connection may be too slow for streaming HD content from Amazon Prime Video.
  • Outdated browser –  If you’re using an outdated browser, then your computer may not be able to run the Amazon Prime Video software properly. Since Firefox is one of the supported browsers, you are likely to get a Mozilla Firefox update required message.
  • Your computer does not meet the minimum requirements – The Prime Video Player requires a computer with certain specifications. If your computer does not meet the minimum requirements, you may experience stuttering video playback or other performance issues.
  • Too many active programs – If you’ve got multiple apps open on your phone or PC at once, it can make it difficult for one app to get all the processing power it needs to run smoothly. This could cause issues with streaming videos from Amazon Prime Video.

Why are videos not working on Firefox?

If none of the above reasons is the cause of the issue, the problem could be related to the browser and not the subscription service. You can check your computer’s date and time settings and ensure they are not incorrect. 

Quick Tip:

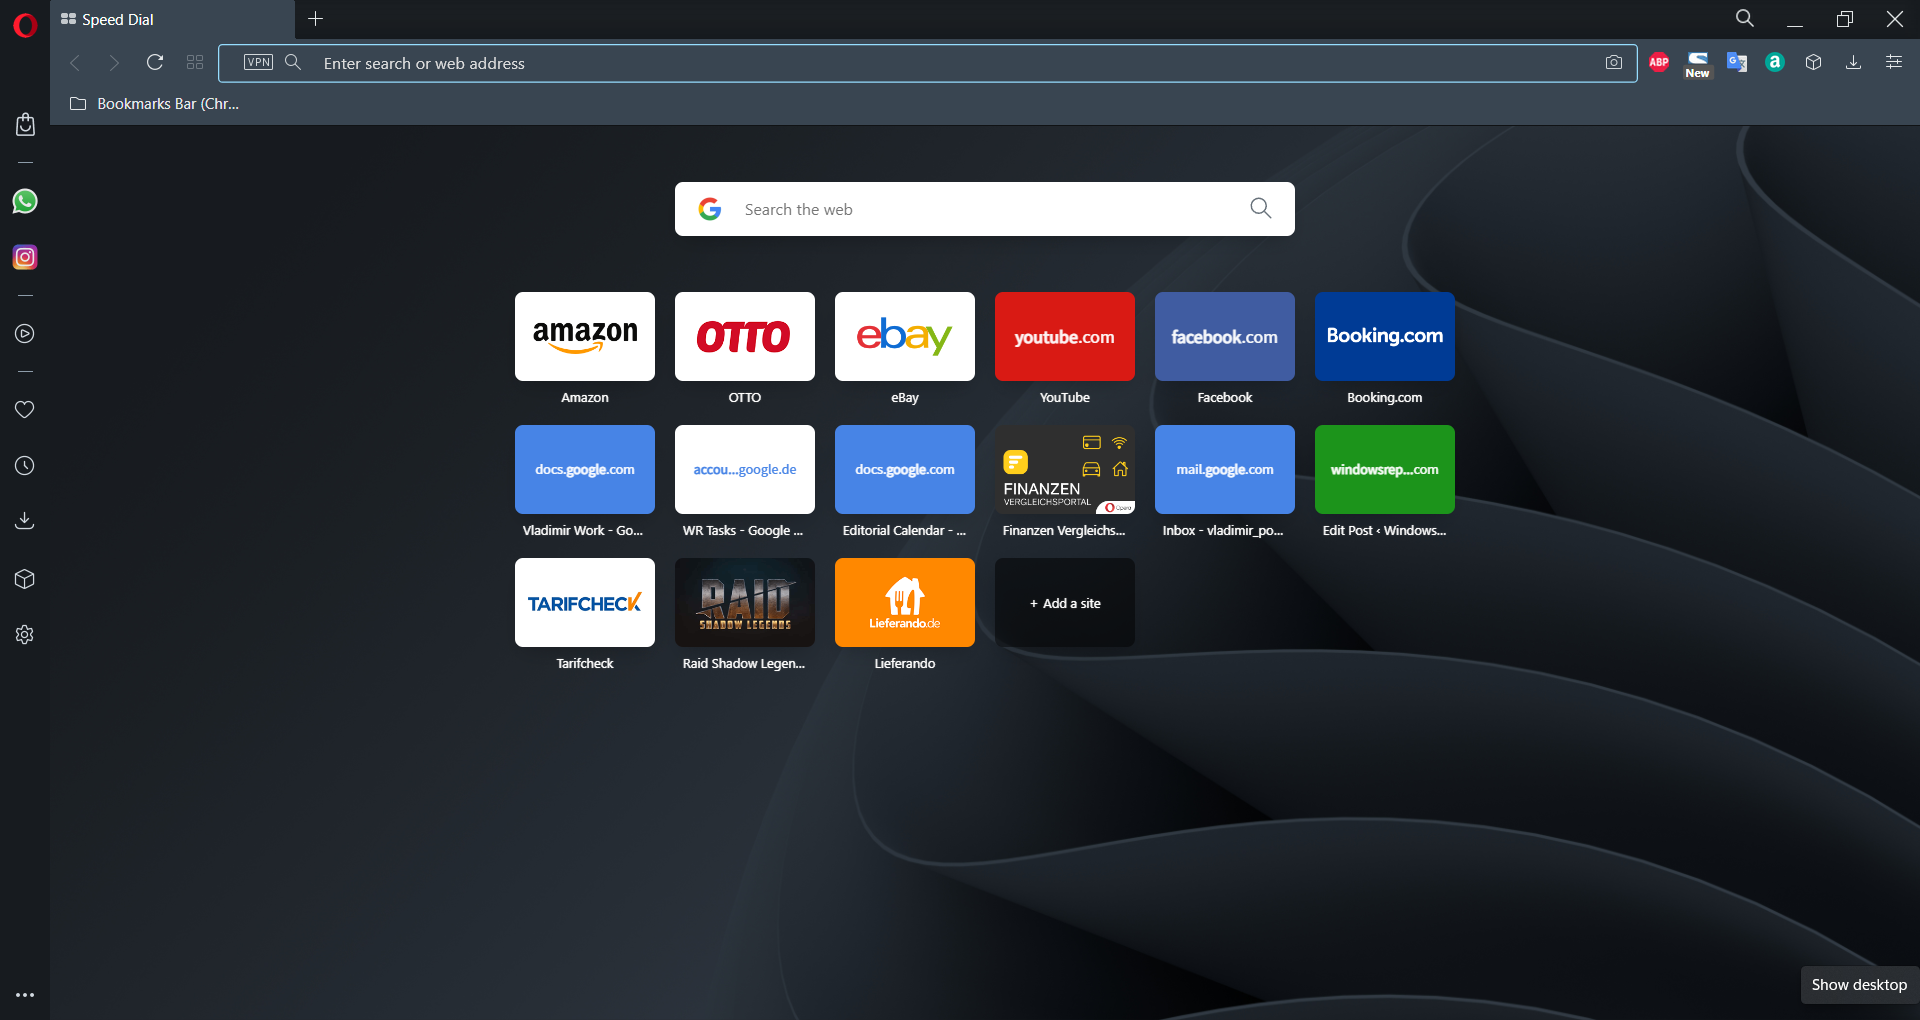
If you’re using Firefox, try another browser like Opera One. Some users report better performance with this browser than with Firefox when it comes to playing Amazon Prime videos.

Opera One has a built-in VPN which will allow you to change your IP address and get access to geo-restricted websites like Amazon Prime. It’s light on resources, so videos should load fast, without buffering.

Opera One

Watch your favorite series without interruptions or errors with this performance-oriented browser!

What can I do if Amazon Prime Video is not working in Firefox?

1. Update your browser

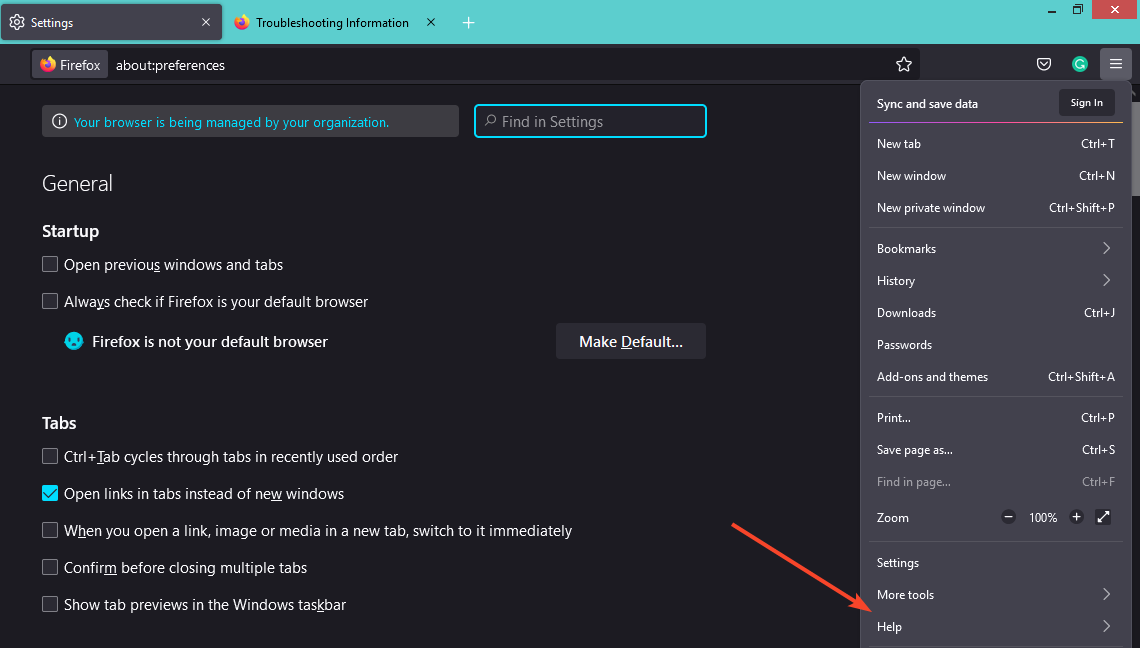
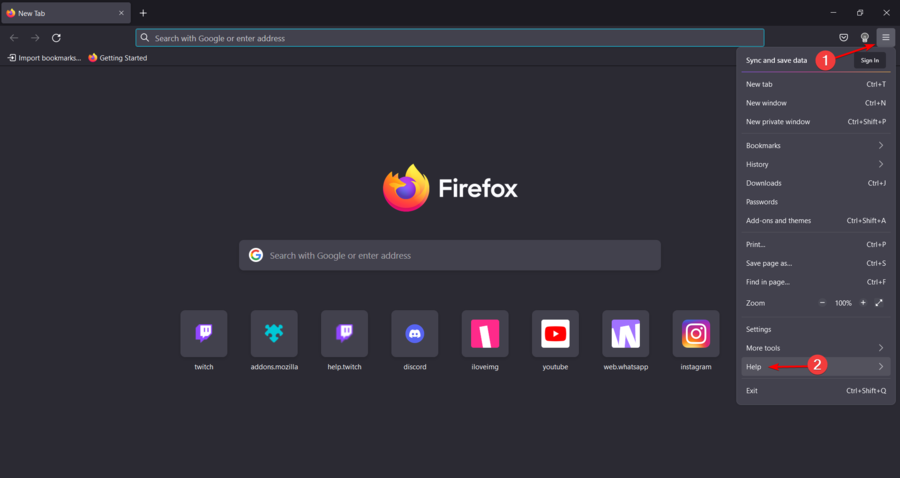
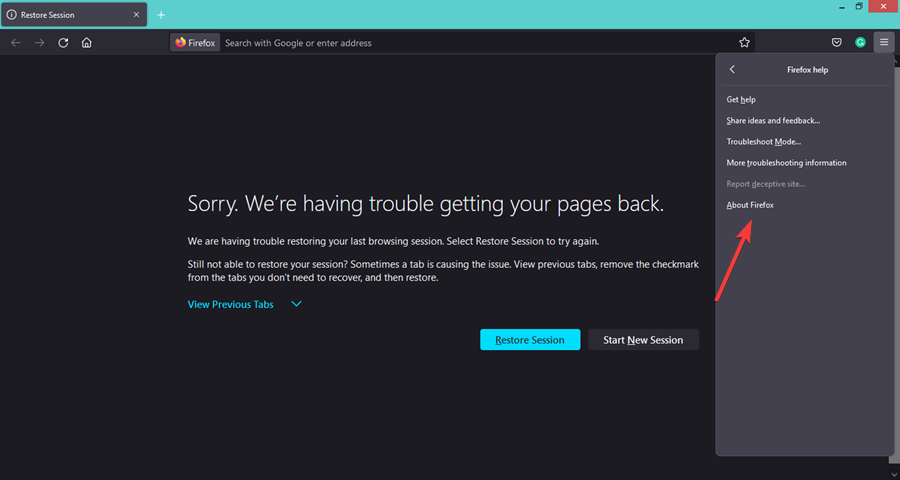
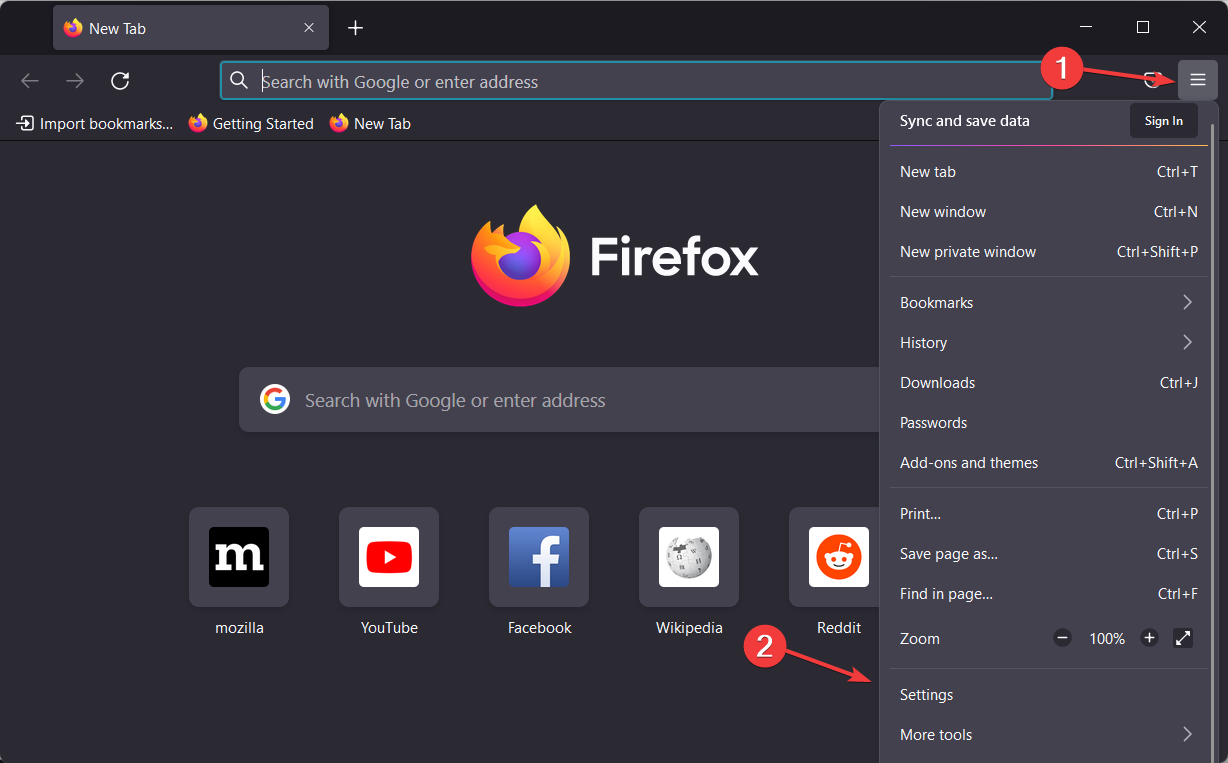
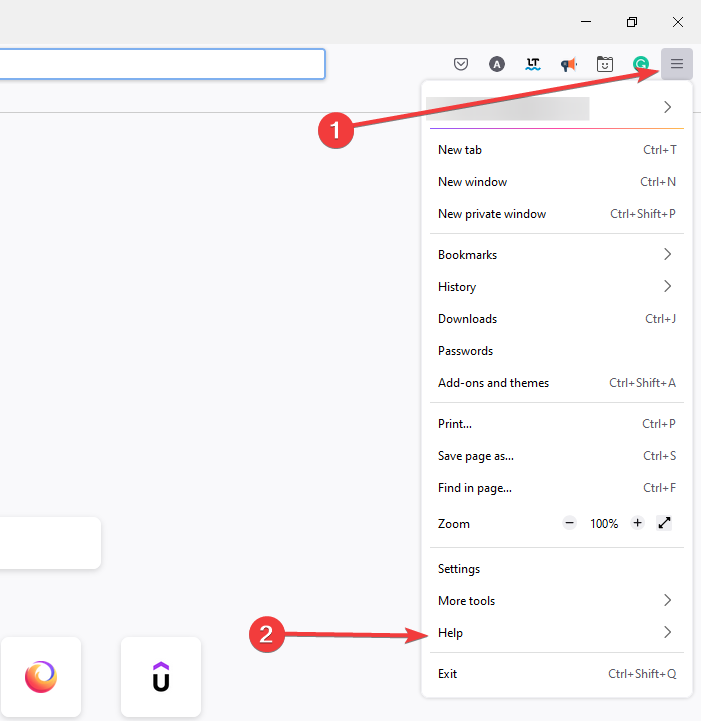
  1. Launch your Firefox browser and click on the three horizontal ellipses in the top right corner.
  2. Select Help.
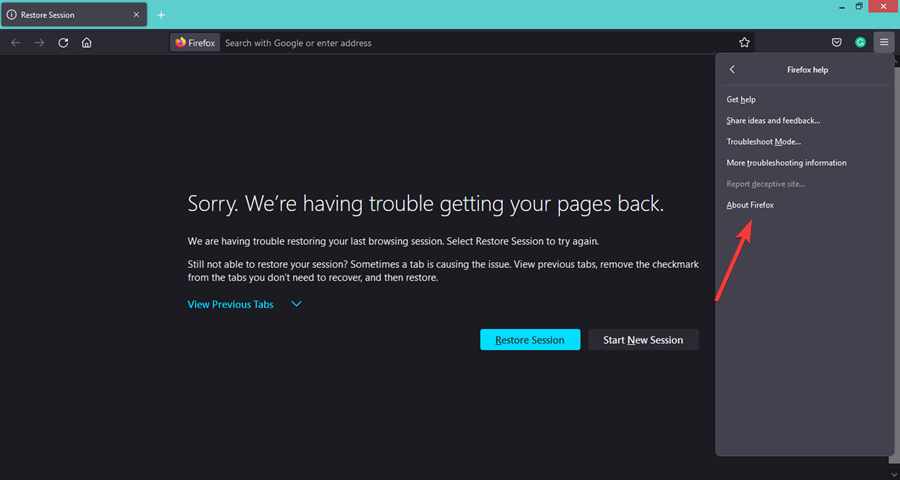
  3. Click on About Firefox.
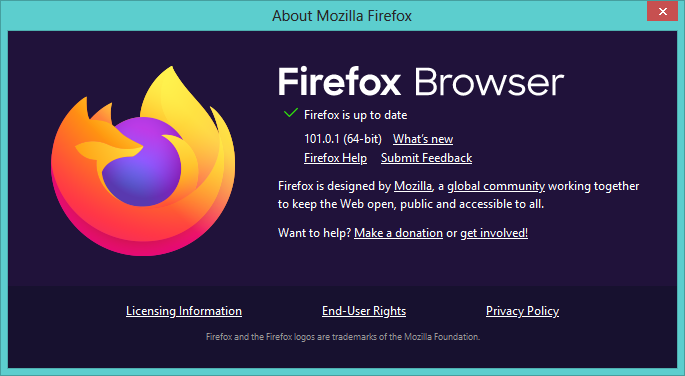
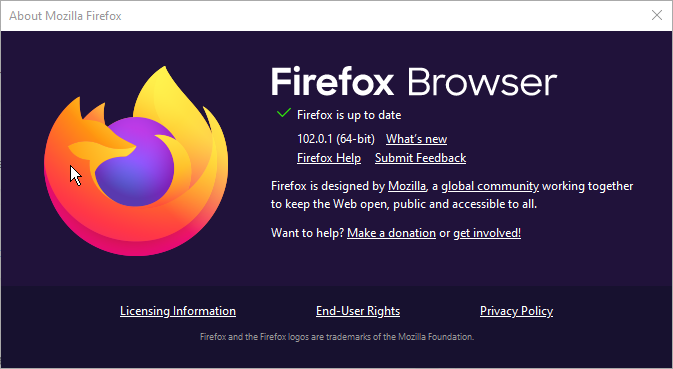
  4. If your browser is up-to-date, you will get the following dialog box.
2. Restart your router

Restarting the router will refresh its memory, which might help you fix Amazon Prime Video not working on Firefox.

The easiest way to do this is to unplug the router’s power supply from the wall outlet for 30 seconds and then plug it back in. This should reset the router and give it a fresh start.

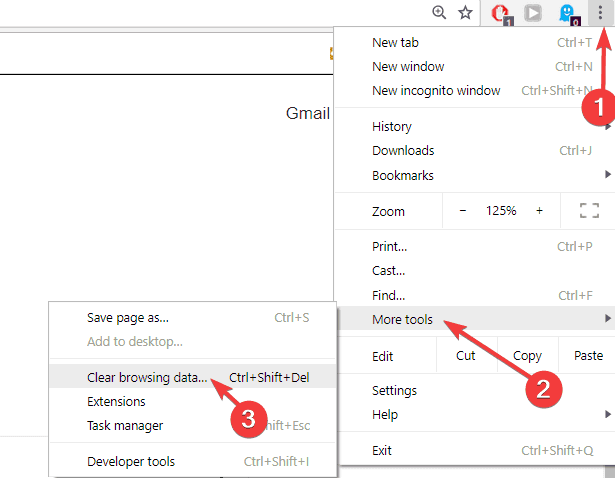
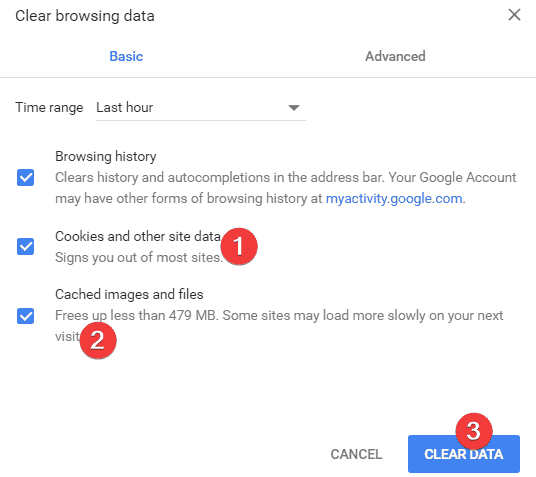
3. Clear cache and cookies

Clearing your cache is a simple way to get rid of any temporary files that may be causing problems with Amazon Prime Video loading properly on Firefox.

It can help solve many of the issues that you might encounter while using a web browser, such as problems loading pages on a site. It will also help speed up performance and free up storage space on your device if necessary.

4. Try disabling the add-ons

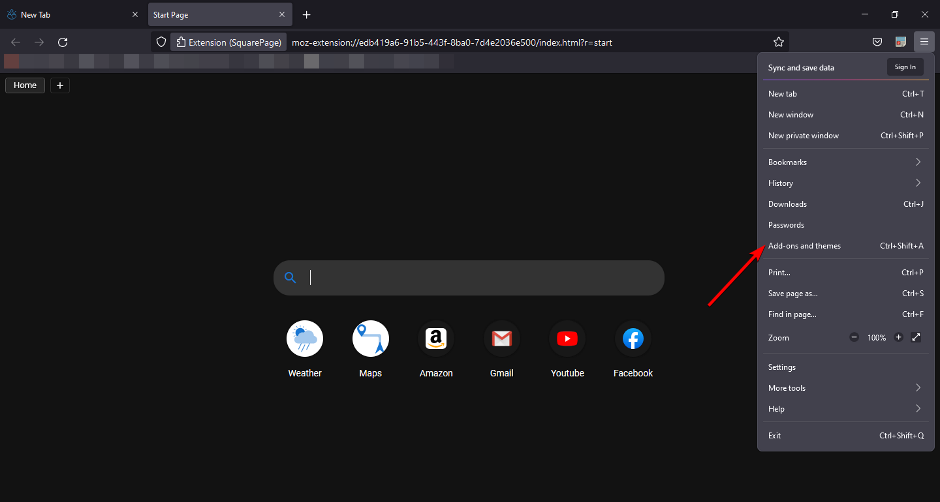
  1. Open Firefox and type Ctrl+Shift+A to open the Add-ons and themes manager.
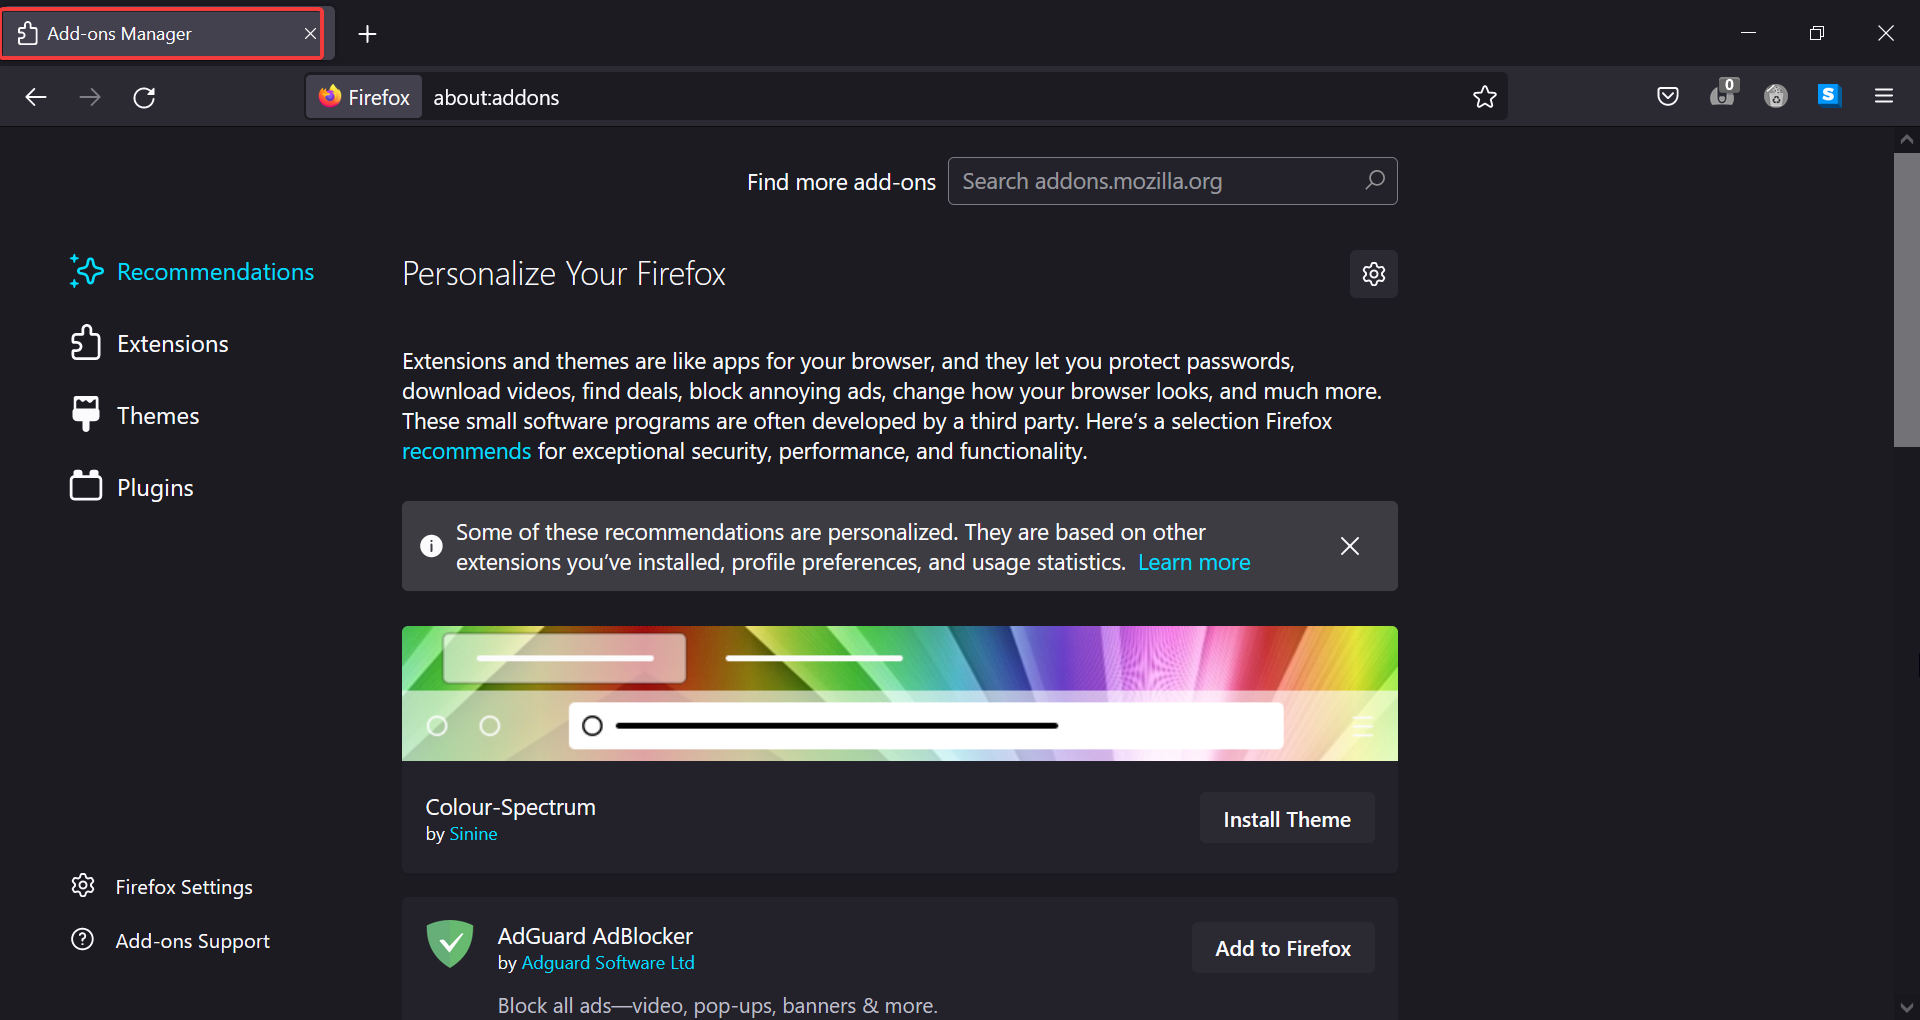
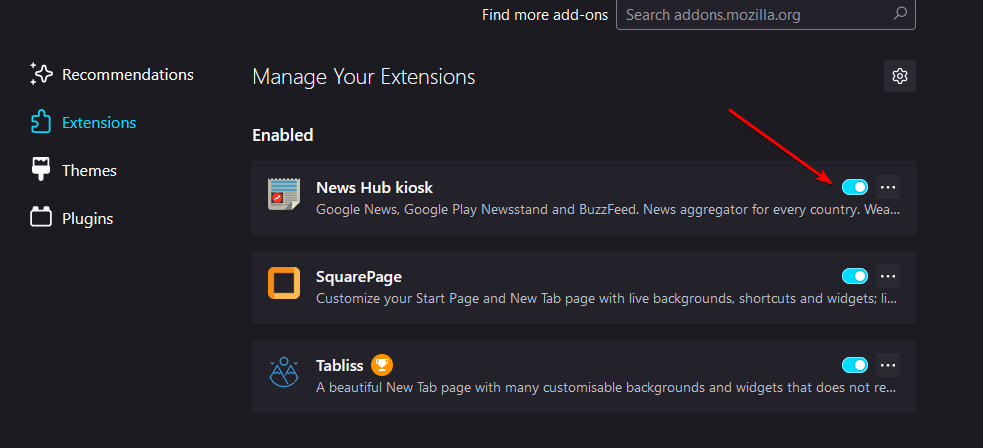
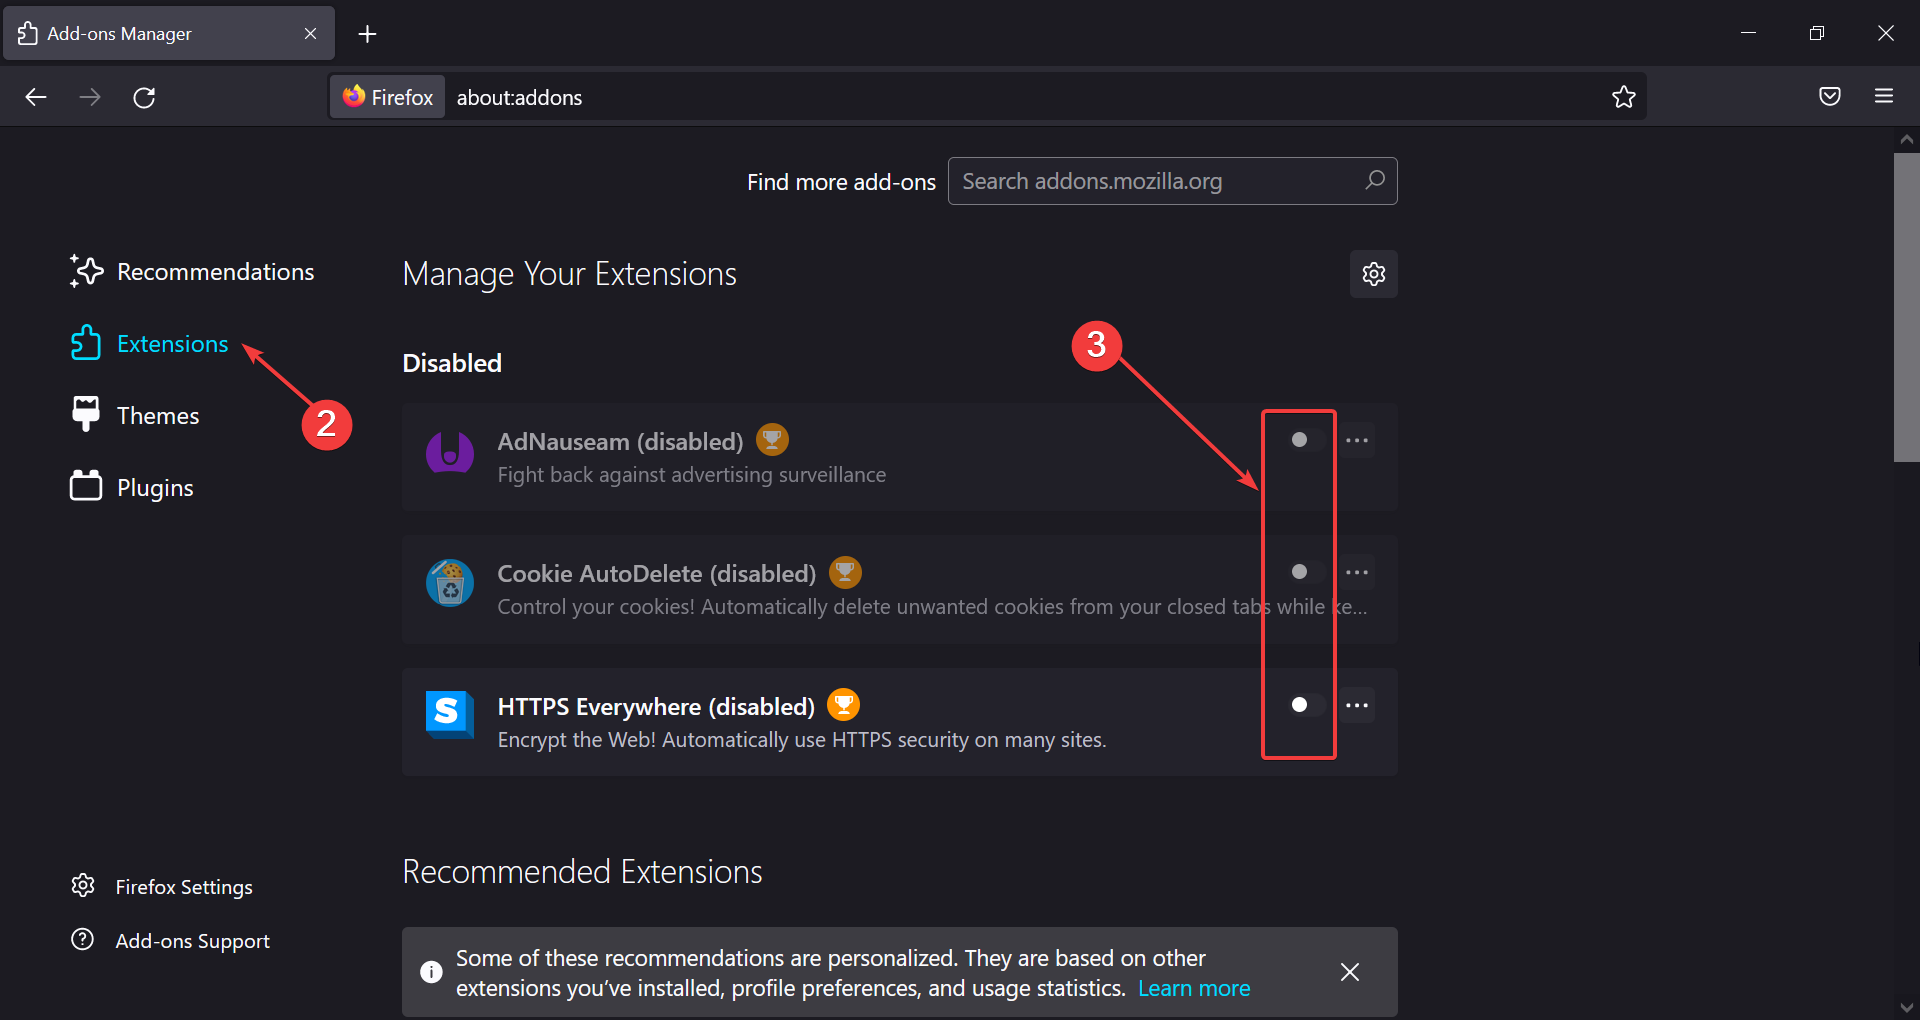
  2. Click on the Extensions section.
  3. Un-toggle the buttons on the right for each extension to disable them.
  4. Try opening Amazon Prime again.

It’s possible that one of your add-ons/extensions is interfering. It’s hard to pinpoint exactly which one, but if Amazon Prime works now, try re-enabling them one by one.

Open Amazon Prime each time and see if it still works. If it stops working after enabling a certain extension, keep it disabled when using Amazon Prime or find a better replacement.

5. Use a VPN service

A VPN service, or virtual private network, encrypts all of your traffic and then routes it through a different server location than what’s specified by your ISP. 

This will make it look as if you’re browsing from somewhere else in the world, which means that any restrictions placed on this content based on location will be invalid. You can check out some of the best VPNs to unblock Amazon Prime and enjoy your content uninterrupted.

And that’s how you can get your Amazon Prime Video working in Firefox again. If the problem persists, the website may be down and you can wait it out and then check in again in a few moments.

You can also check out browsers recommended for streaming Amazon Prime to avoid such errors in the future.

Should you encounter a similar problem where Amazon Prime is not working in Chrome, do not hesitate to apply our recommended fixes on the same.

Let us know what solution worked for you in the comment section below.
How to Set Parental Controls in Firefox, Opera One and Chrome

The Internet is a great source of information, but it also contains sensitive content that isn’t intended for children. This is why it’s always a good idea to restrict access to potentially harmful websites.

It is possible for digital television services, computers, video games, mobile devices, and software to come equipped with features known as parental controls. These controls enable parents to limit the types of information that their children may view on their devices.

These controls were developed to provide parents with an easier way to restrict some types of information that their children are allowed to see on their electronic devices. This may be material that they judge to be improper for their age or their level of maturity.

In today’s article, we’ll show you how to install and use parental controls on Firefox, Chrome, and Opera One, and keep your children safe from harmful content on the Internet.

How do I block inappropriate sites in Firefox, Opera One, or Chrome?

Chrome

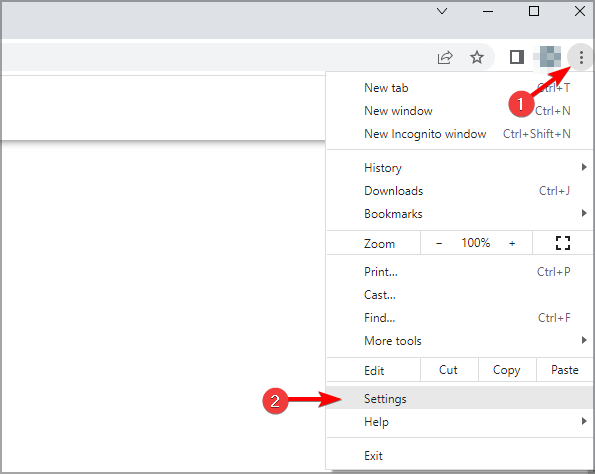
  1. Open Chrome then click the three-dot menu followed by Settings.chrome-settings images not loading in chrome
  2. Here, click on Privacy and security from the left panel followed by Security on the right side.privacy-sec firefox parental controls
  3. From the three protection levels, choose the Enhanced option. This will ensure a more rigorous and proactive protection against inappropriate websites. enhanced-protection firefox parental controls

Firefox

  1. Open Firefox then click the hamburger menu followed by Settings.ham-settings-firefox firefox parental controls
  2. Here, select Privacy and Security from the left side, followed by the Strict option under Browser Privacy.strict-privacy firefox parental controls

Opera

  1. Open Opera One then click its logo from the top-left corner followed by Settings.opera-settings firefox parental controls
  2. Here, click the Privacy and security option from the left side followed by Security on the right side.privacy-security-opera firefox parental controls
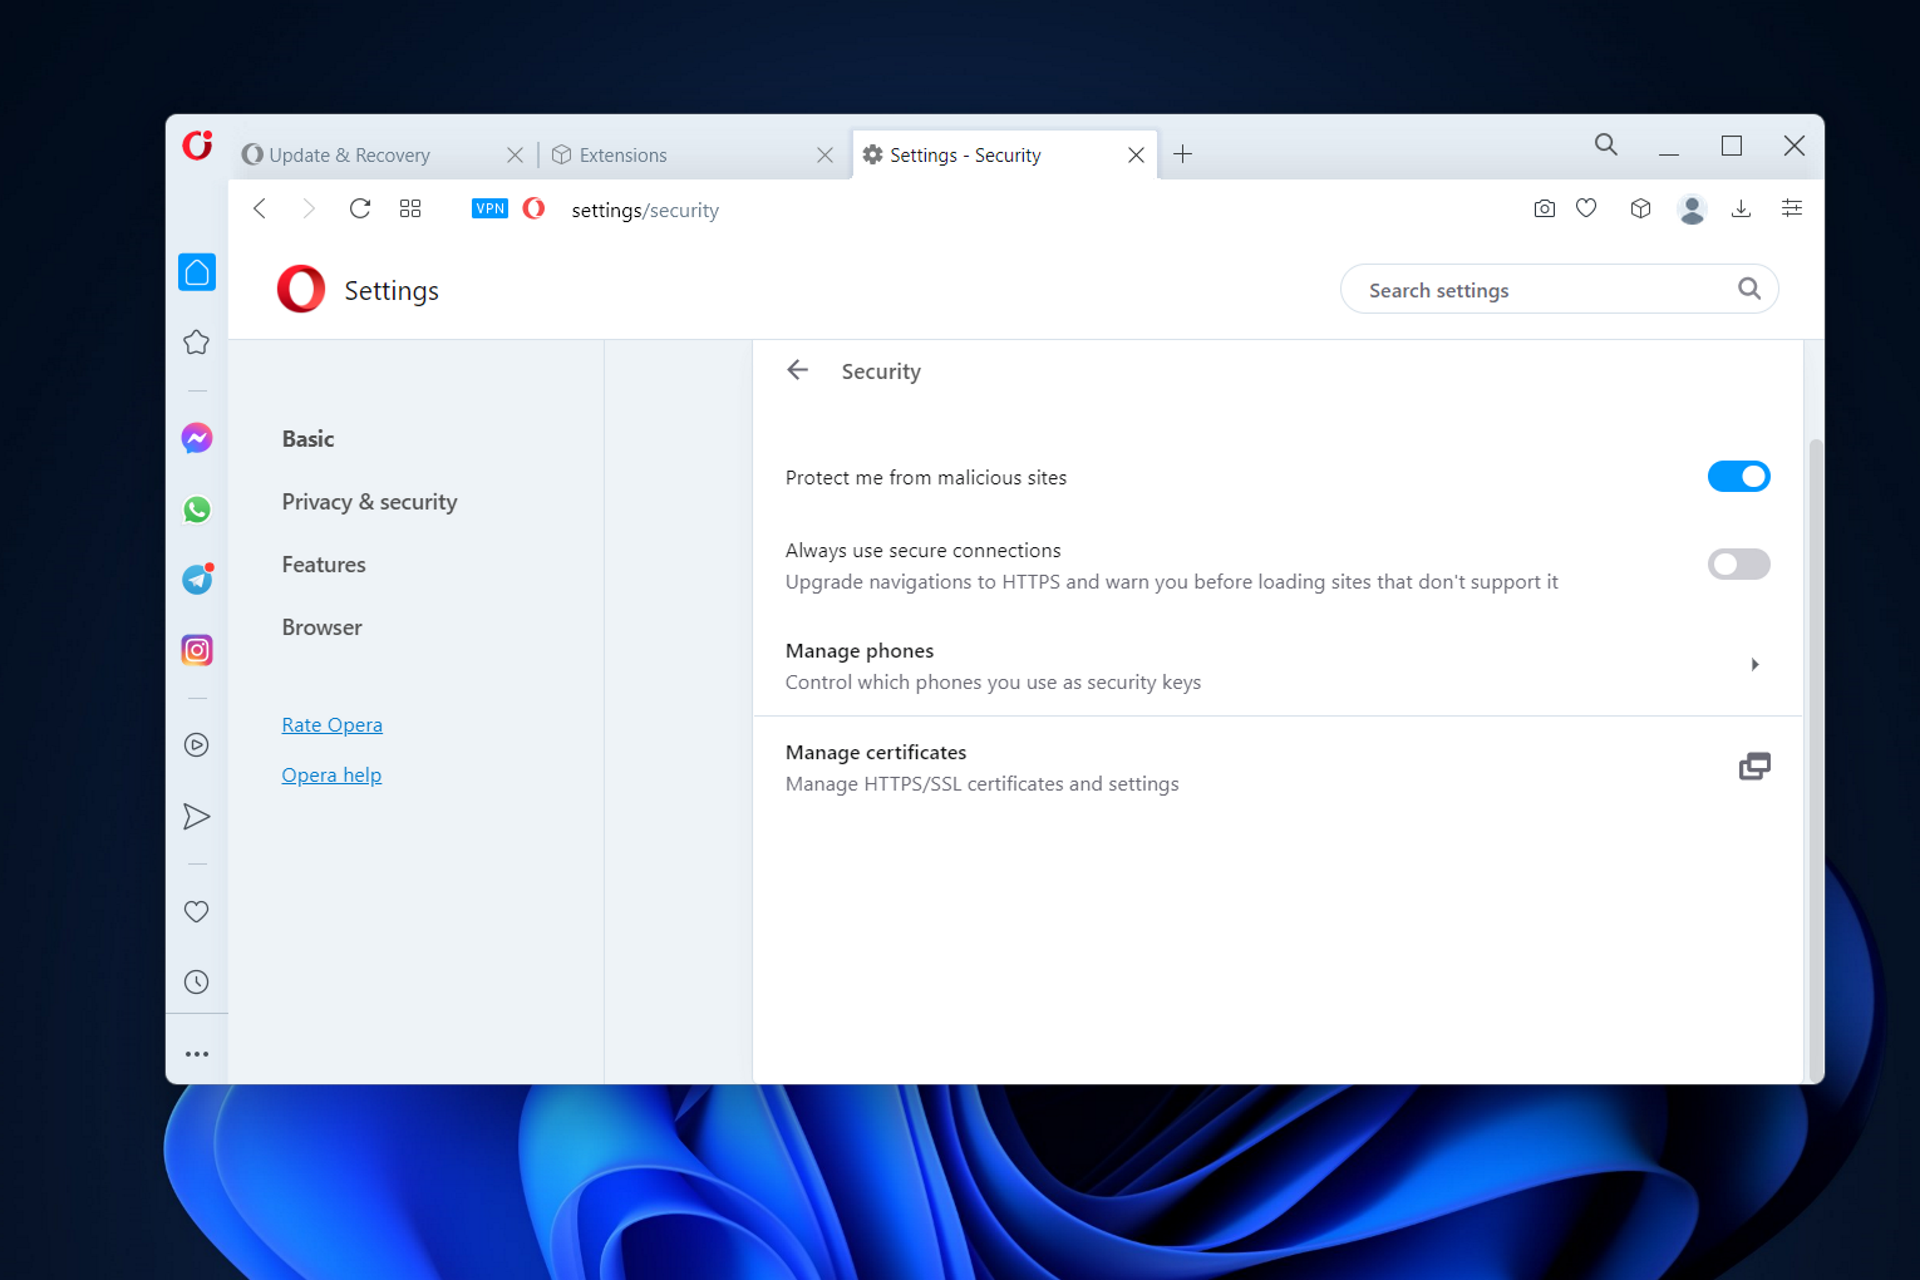
  3. Make sure to turn on the Block me from malicious sites option. This will ensure inappropriate websites will be blocked.block-innaprriate firefox parental controls

How do I stop my child from deleting Internet history?

The unfortunate reality is that there is no way to prevent anyone from deleting their history. On their activity page, however, any and all surfing behavior can be logged, and this recording should not be affected when the user deletes their cache or cookies.

  1. After logging into your Microsoft account, navigate to the family page and select the Activity tab located beneath your child’s profile.family firefox parental controls
  2. After that, you will have to scroll down until you reach the option for web browsing. Once you have navigated to this page, you will be able to view a comprehensive history of the websites that the user visited while they were signed in to their account.

Everything from their Xbox (while Edge is being used), Windows computer, and Android phone is captured by this (providing they are using Microsoft Edge and Launcher – on their phone).

If you want to maintain track of what they are doing online, you will have more success if you prevent them from using Chrome. This is because activity reporting does not record what occurs when users are using Chrome.

This being said, let’s see how to use parental control on Firefox, Chrome and Opera One in order to ensure your kids are safe from malicious content.

How do I set parental controls on my browser?

1. Use the adult material blocker for Opera

  1. Go to the Opera One extension for blocking adult content and click Add to Opera One. Once you set it up it will offer the best parental controls on Opera One that you need.ad-to-opera firefox parental controls
  2. Once the extension is installed, click on it in order to select the Enable option.enable-ext firefox parental controls
  3. After that, you’re good to go. This is a great extension that also offers Opera GX parental controls.

This Opera One adult blocker app will also block all harmful domains. Of course, support for blacklist and whitelist is also there.

In case you’re not familiar with Opera One, it’s a secure browser with built-in tracking protection, so it will keep you safe from websites that want to track your online activity.

Opera One is a great choice, especially if you want a secure and reliable browser. It comes with built-in VPN, Ad blocker and AI.

Furthermore, it is built on Chromium, so it supports Chrome extensions. You can find an integrated Facebook messenger, Twitter, and Instagram.

This browser is available on all desktop and mobile platforms and it’s also great for organization due to it’s workspaces and tab islands.

Opera One

For an ad-free, secure, and private browsing experience, we recommend using Opera.
Free Download Visit website

2. Use Parental Control Family Friendly Filter on Firefox

  1. Visit the Parental Control Family Friendly Filter page and click the Add to Firefox button to download the extension.add-to-firefox-parental firefox parental controls
  2. Once the extension is installed, it will automatically block all harmful searches.
  3. Open the Firefox addons page. You can do that quickly with Ctrl + Shift + A shortcut.
  4. Locate Family Friendly Parental Control, click three dots next to it, and choose Options.options-family firefox parental controls
  5. Now go to the Blacklist tab and add domains that you want to block by writing their URL inside the text box and clicking Add domain to blacklist. This way you will be able to create a layer of child protection in Firefox.blacklist-website-firefox firefox parental controls

Firefox doesn’t have parental control feature built in, and to block harmful websites, you’ll need to rely on one of many available add-ons. Fortunately, there are a few to choose from, whose parental controls’ settings provide everything you need in Firefox.

Keep in mind that this is a pretty simple extension, and it won’t block direct access to domains, so you’ll need to blacklist or whitelist certain websites.

This might not be the best parental control add-on, since it requires a bit of configuration to block harmful domains. Of course, this isn’t the only parental control add-on, so you can use any others.

3. Use the Parental Control extension on Chrome

  1. In Chrome, go to the Parental Control page on Chrome Web Store and click Add to Chrome.add-to-chrome-button firefox parental controls
  2. Once the extension is installed, you can click on its icon from your toolbar and add websites to the blacklist. Besides the blacklisted websites, this extension will make sure any pornographic websites won’t be displayed.

Firefox and other web browsers don’t have parental controls built-in, but you can always enable this feature by using one of the extensions that we mentioned above.

What’s the best Firefox parental control add-on?

The Parental Control browser protection add-on functions as a content filter, preventing access to websites that include pornography or any other form of unsuitable content.

FoxFilter‘s recent praise includes being described as the parental control for Firefox. A personal content filter, FoxFilter helps prohibit pornographic and other unwanted information from being seen on your device.

BlockSite is an addon that silently prevents websites of your choosing from loading in your browser. In addition, this extension will prevent any hyperlinks to these websites from working by only showing the text of the link without the functionality associated with clicking the link.

Furthermore, we recommend that you take a look at our post on the best privacy extensions for Firefox in order to ensure your safety, as well as your family’s.

Let us know, with a comment below, if any of these extensions work for you or if you have any suggestions for us.

How To Enable Or Disable JavaScript In All Browsers

Do you want to know how to enable or disable JavaScript on your web browser? This article explains all the steps in detail.

The JavaScript files often serve as a vehicle for downloading other malware. As a rule of thumb, you must never open a file that looks suspicious.

JavaScript is a crucial component of every browser, but sometimes JavaScript might be disabled for you. We’ll show you how to enable JavaScript in all major browsers in today’s article, so let’s get started.

Do all browsers run JavaScript?

All modern web browsers run JavaScript by default. Different browsers have different JavaScript engines. For Example, Chromium browsers have V8, Firefox has Spider Monkey, Safari has JavaScript Core Webkit, and traditional Internet explorer or old Edge has Chakra.

Without JS, you will not experience the modern web world smoothly. So, this is an essential part.

How do I know if my browser is JavaScript disabled?

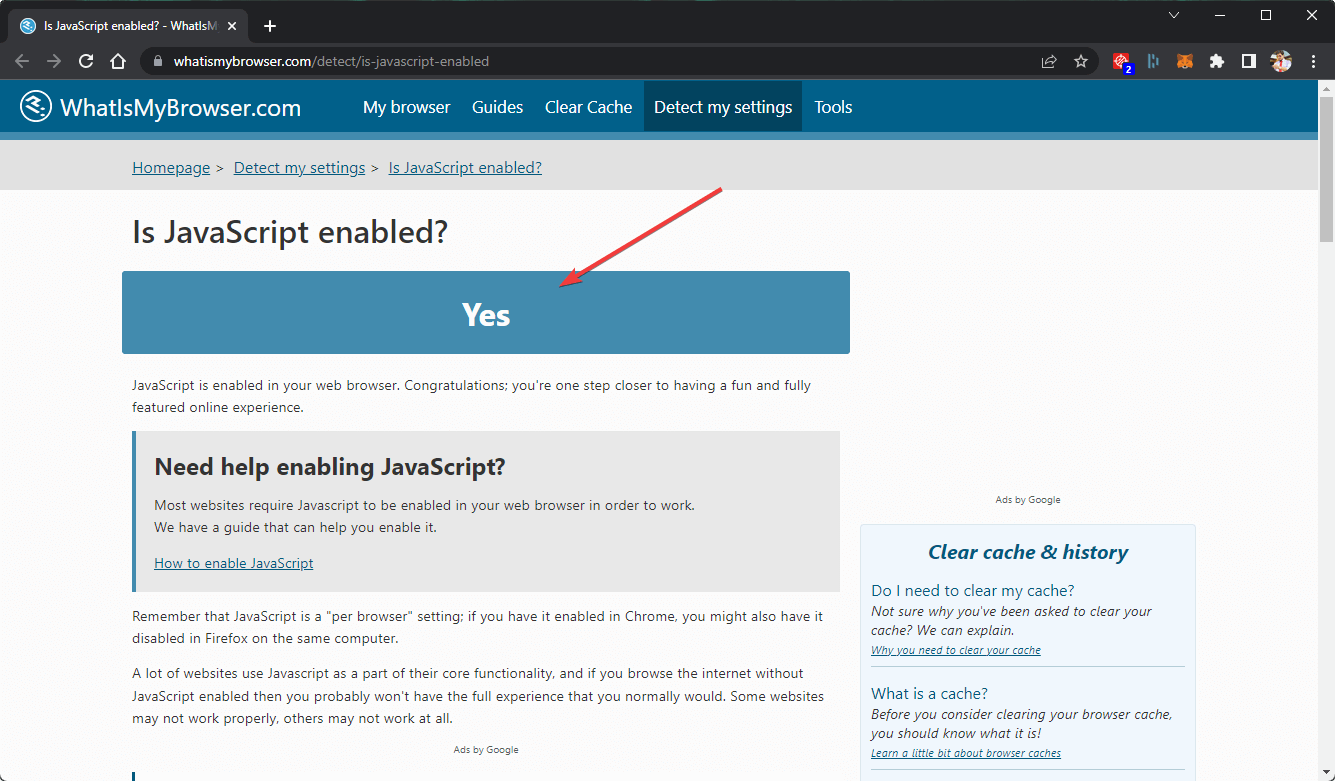
  1. Visit this web page from your web browser.
  2. You will see if JavaScript is enabled or disabled on your browser.
    know javascript enabled disbaled

Alternatively, you can check the browser settings manually to understand the JS status.

Seeing javascript:void(0) on pages even after enabling scripts? Try our step by step fix for Javascript Void(0) to resolve blocked links and script errors in major browsers.

How do I enable or disable JavaScript in my browser?

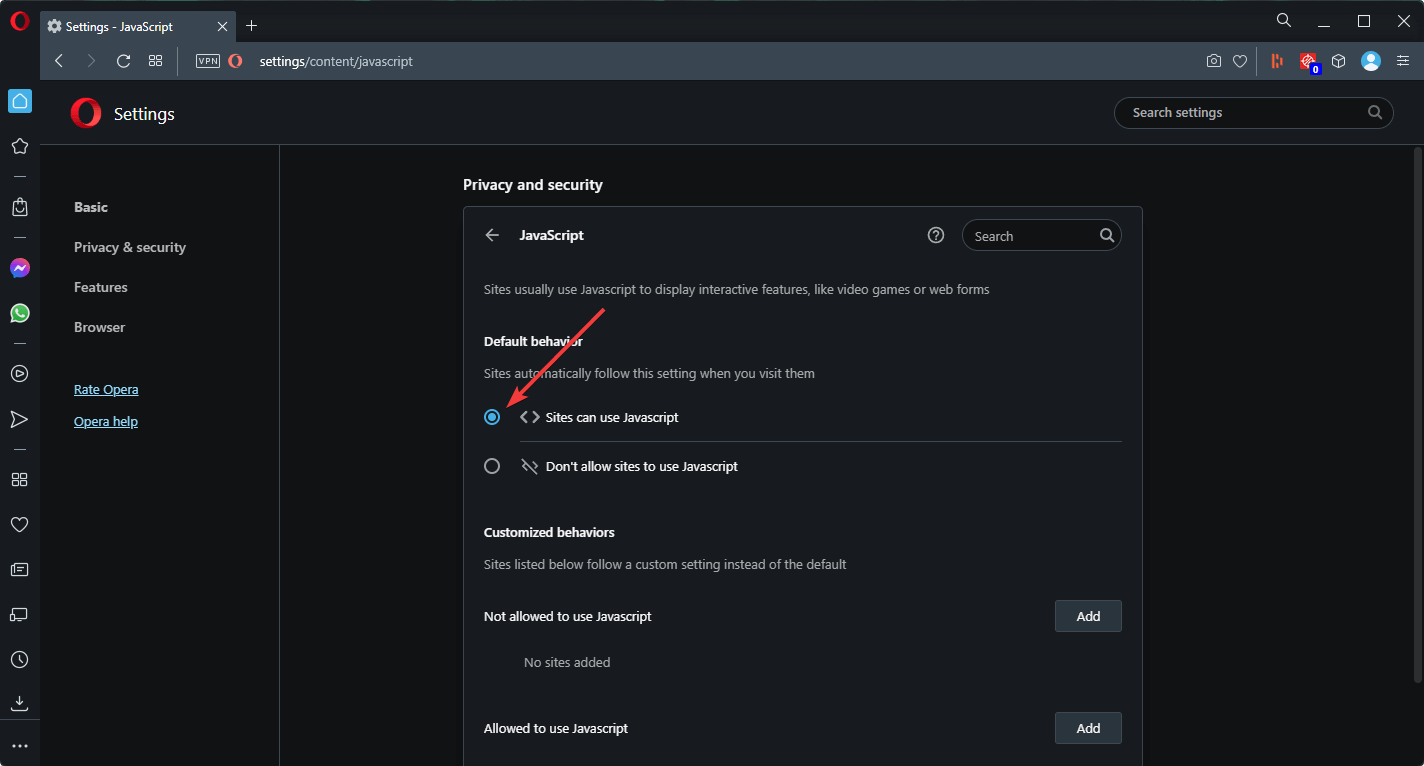
1. Enable JS in Opera One

  1. Open Opera One browser.
  2. Press ALT + P on the keyboard to open its Settings.
  3. Click on the Privacy and security section and go to Site Settings.
    going site settings opera browser
  4. Go to JavaScript.
    going javascript opera
  5. Check Sites can use Javascript.
    enabling javascript opera browser

If you’re not familiar with Opera One, you should know that it comes with a built-in ad blocker, so it won’t show you any ads. By disabling the ads and their scripts, your web pages will load faster.

Opera One also has tracking protection, the ability to detect malware, and for an extra layer of security, there’s a free VPN available with unlimited bandwidth. Plus, it offers it’s own built-in AI.

Opera One

Easily work with JavaScript from within Opera One and enjoy a web browser that has all the features that you could ever ask for.
Free Download Visit website

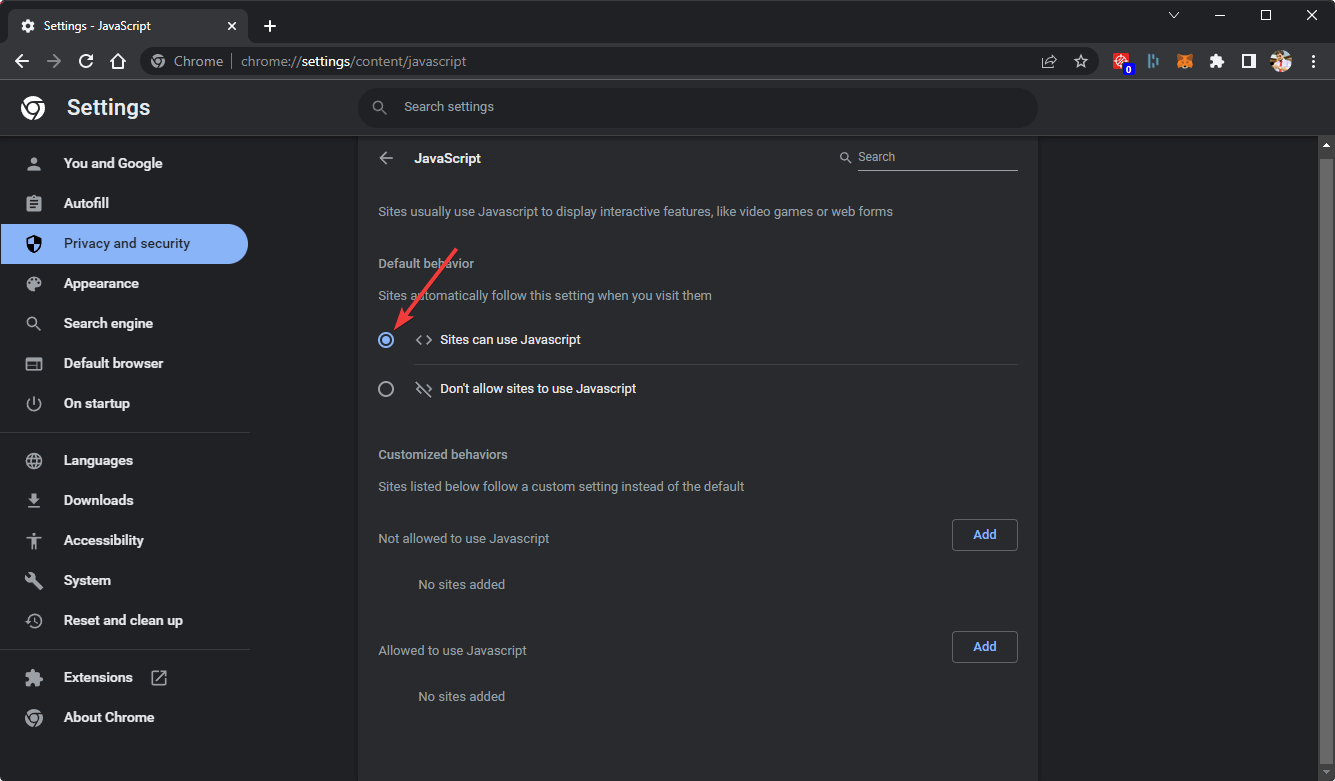
2. Enable in Google Chrome

  1. Open Google Chrome.
  2. Type the following address in the address bar and press enter: chrome://settings/content/javascript
  3. Check Sites can use Javascript.
    enabling javascript chrome

Doing the above things will enable JavaScript on Google Chrome. Though, JS should be enabled by default. You can also manually reach the same JS settings page on Chrome from the Privacy and Security section in the browser settings.

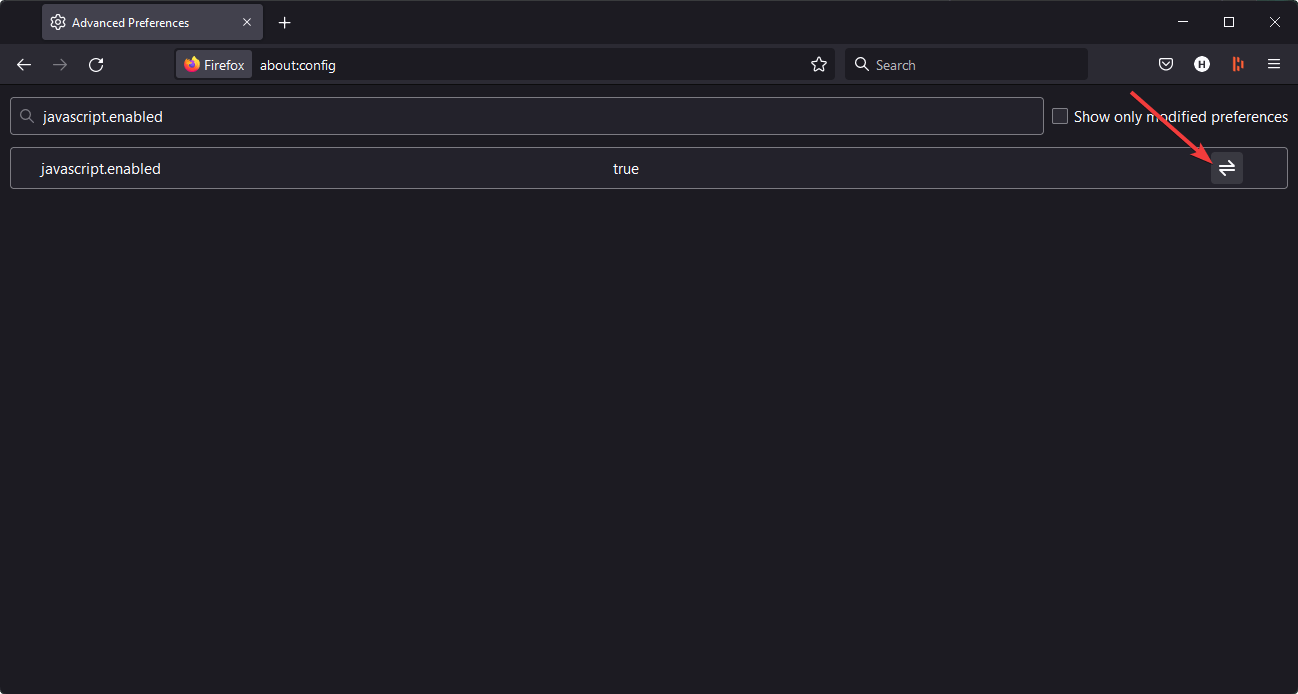
3. Switch On JavaScript on Mozilla Firefox

  1. Open Mozilla Firefox.
  2. Type the following address in the address bar and hit enter: about:config
  3. Search for JavaScript.enabled.
  4. Now, set the option to True by toggling the switch next to it.
    enabling javascript mozilla firefox

In this way, you can enable or disable Javascript on Firefox or any firefox based browsers.

4. Enable JS in Microsoft Edge

  1. Open MS Edge.
  2. Go to the following location using the address bar: edge://settings/content/javascript
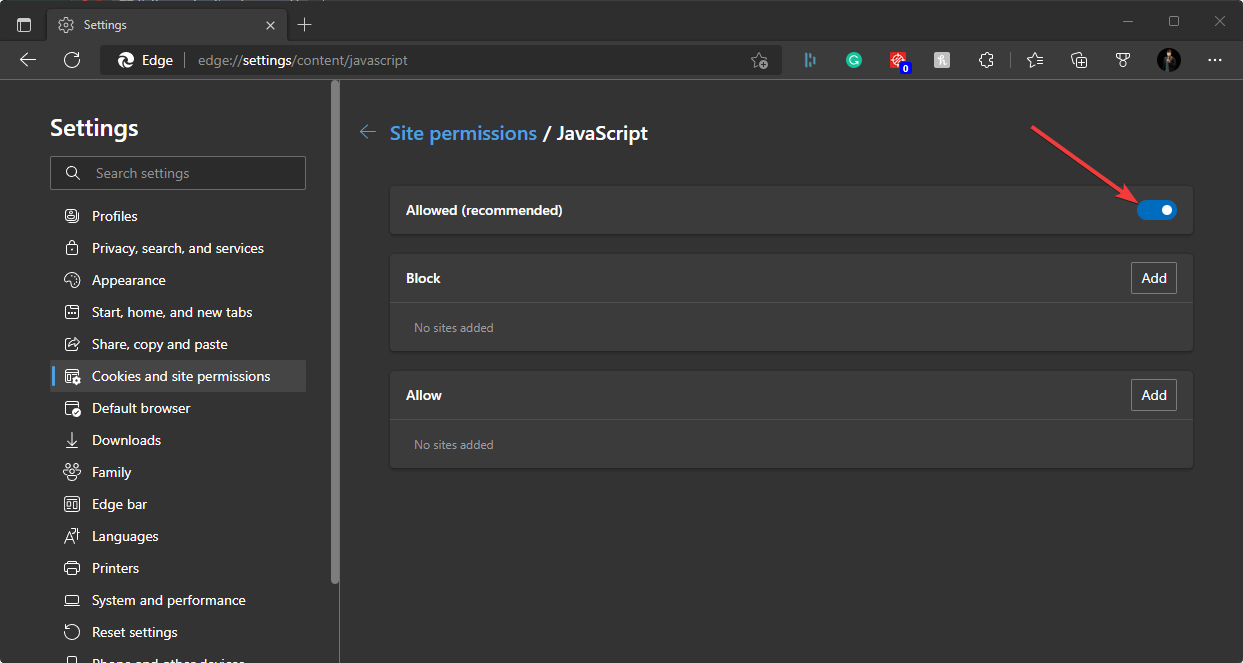
  3. Toggle the switch to enable JavaScript on the Microsoft Edge browser.
    enabling javascript microsoft edge

On older versions of Microsoft Edge, JavaScript is enabled by default and can’t be disabled. The above things are applicable for the Chromium-based Edge only.

5. Enable JavaScript on Apple Safari

  1. Open Safari on macOS.
  2. Press Command + , on the keyboard.
  3. Go to the Security tab.
  4. Check Enable JavaScript.
    enabling javascript safari desktop

If you cannot access Safari settings using the keyboard shortcut, you can click on Safari from the menu and go to preferences to enable or disable JavaScript.

If you face JS issues on this browser, see this solution: How to fix JavaScript problems on the Safari browser

6. Enable JavaScript on Internet Explorer

  1. Open the Start Menu and search for Internet Options, and press enter to open it.
  2. Go to the Security tab and click on Custom Level.
    going custom level internet options windows
  3. Under the Scripting section, enable Active scripting as shown in the screenshot.
    enabling scripting internet explorer
  4. Click on OK.

This method is applicable for Internet Explorer in all Windows versions and the Edge IE mode on Windows 11 and 10.

Is JavaScript necessary?

JavaScript has become an essential part of the modern software industry. Mainly, for the web world, it is an indispensable part. Without JS, we cannot expect any user-friendly functional web applications.

It is also possible to develop a web app without JS. But, it will be challenging to use and almost impossible to benefit from such applications.

So, JavaScript is indeed necessary. It is an essential web component, so you should always keep it enabled in your browser.

This article has explained how you can enable JavaScript on your web browser. If you have any questions or know any better way, feel free to let us know in the comment box.

How to set a dual monitor wallpaper on Windows 10 [QUICK GUIDE]

If you need a lot of space while working on your PC, you’re probably using dual monitors. Many users customize their desktop with different backgrounds, and today we’re going to show you how to set a dual monitor wallpaper on Windows 10.

How can I set a dual monitor wallpaper on Windows 10?

Use third-party applications

If the previous method is too complicated for you, you might want to consider using third-party applications instead. There are many great applications that you can use to manage wallpapers on multiple monitors.

If you’re looking for a simple application, you might want to try John’s Background Switcher.

If you need a more advanced tool that supports advanced monitor control, window management, remote control, and other powerful functions, you might want to consider DisplayFusion.

This application is available in Pro and Free versions, and the Free version will be more than enough for your needs.

DisplayFusion

If you have issues with your dual-monitor setup, or simply want to enhance it visually, then DisplayFusion is what you need!
Check price Visit website

Want animated backgrounds on Windows 11? Set live wallpapers with this step by step guide: How to set live wallpaper on Windows 11.

Set the background from the Settings app

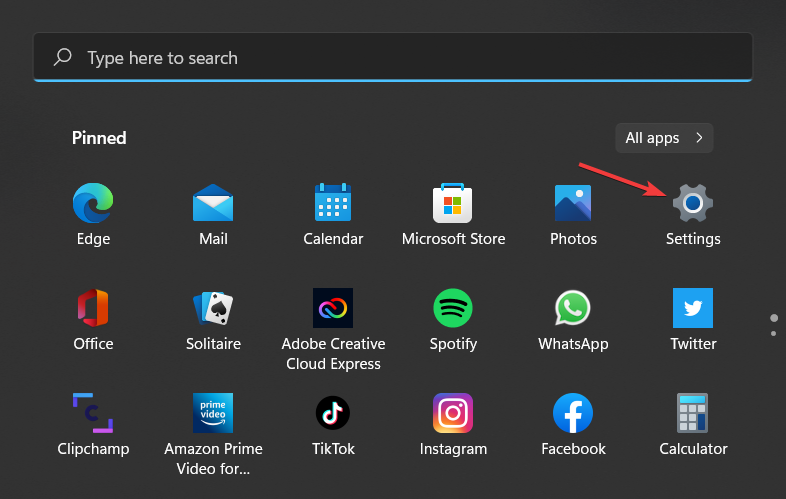
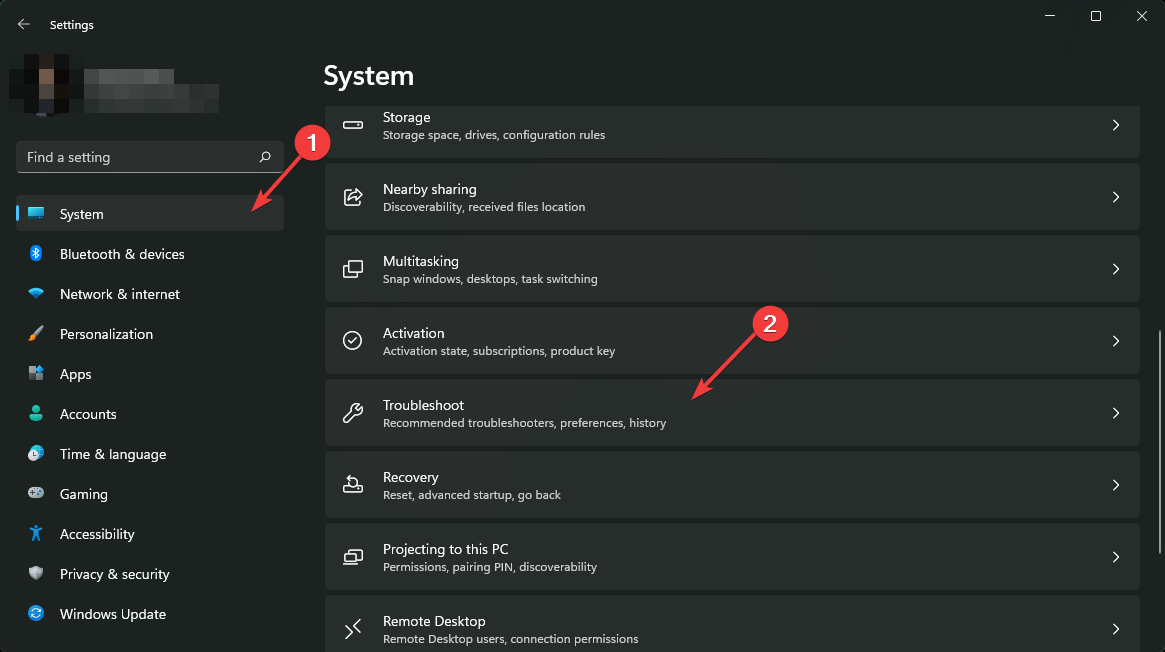
  1. Open the Settings app. You can do that quickly by pressing Windows Key + I.
  2. When Settings app opens, navigate to Personalization section.
  3. Now scroll down to the Choose your picture section, locate the picture you want to use, right click it and choose Set for monitor 1 or Set for monitor 2.

Probably the easiest way to fix this problem is to set your background from the Settings app.

As you can see, this method is rather simple and straightforward, so be sure to try it out. If you’re having trouble opening the Setting app, take a look at this article to solve the issue.

Most users don’t know what to do when the Windows key stops working. Check out this guide and be a step ahead.

Copy the desired files to the Windows directory

  1. Locate the images you want to use as a background, select both of them and click on Copy.
  2. Navigate to C:WindowsWebWallpaperWindows directory. Now right click the empty space and choose Paste from the menu.
  3. Security warning will appear. Check Do this for all current items and click on Continue.
  4. Select the images you want to use as a wallpaper, right click them and choose Set as desktop background from the menu.
  5. Now your wallpaper will change. To switch between different wallpapers, simply right click the desired desktop and choose Next desktop background from the menu.

If you want to set a dual monitor wallpaper on Windows 10, you can do it by using this little workaround. To set a dual monitor wallpaper, you just have to copy the images you want to use as a background to your Windows directory.

In addition, you can also switch between desktop wallpapers by doing the following:

  1. Press Windows Key + Rand enter %appdata%. Press Enter or click OK.
  2. Roaming directory will now appear. Navigate to MicrosoftWindowsThemes directory.
  3. In there, you should see Transcoded_000 and Transcoded_001 files. Each of these files represents a desktop wallpaper. To swap wallpapers on your monitors, you just have to rename Transcoded_000 to 1 and Transcoded_001 to 0.
  4. After renaming the files, you need to log out and log back in to Windows to apply changes.

Few users claim that you don’t even have to copy images to the Windows folder. Instead, you just have to select the desired images, right-click them and choose Set as desktop background.

    Dual monitor wallpaper using the Run dialog

    You can set a different wallpaper for each monitor by using the Run dialog. In older versions of Windows, you had the ability to change your wallpaper from Control Panel, but this feature was removed in Windows 10 and replaced with the Settings app.

    The Control Panel had more options including the ability to configure wallpapers for multiple monitors. This option is still available in Windows 10, but you can only access it by using the Run dialog.

  1. 1. Press Windows Key + R key. This will open the Run dialog.

  2. 2. Enter the following: shell:::{ED834ED6-4B5A-4bfe-8F11-A626DCB6A921} -Microsoft.PersonalizationpageWallpaper

  3. 3. Press Enter or click OK.

  4. 4. Desktop Background window will appear. Locate the desired background and right click it.

  5. 5. Choose Set for monitor 1 or Set for monitor 2 from the menu. This is how you will set up the dual monitor background.

  6. 6. After you’re done, click on Save changes.

    dual monitor wallpaper windows 11 setup

If you’re using an older version of Windows, you might be able to access this application by entering this line in the Run dialogue:

Control / name Microsoft. Personalisation /page pageWallpaper

Setting a dual monitor wallpaper on Windows 10 isn’t as hard as you think. We showed you several ways to set a dual monitor wallpaper, so feel free to try any of them.

If you have any more questions, don’t hesitate to leave them in the comments section below.
4 Ways to Fix Gameloop’s Browser When it’s Not Opening

Previously known as Tencent Gaming Buddy, Gameloop is a popular Android emulator specifically developed to allow users to play mobile games on their PCs. But the entire experience can be tainted by the Gameloop browser not working or the Gameloop website not opening.

The emulator has a built-in web browser, which is both lightweight and easy to install. However, the Gameloop browser sometimes may not work due to software glitches or other issues.

As the Gameloop not opening error appears in Windows 11 and other OSs, we can safely assume that these elements are not connected.

What’s more, the very same glitch can be responsible for the Gameloop site not working or the Gameloop website not opening at all. So how to open the browser in Gameloop?

How do I access the browser on Gameloop?

To access the browser on Gameloop, you will need to follow the steps described below:

  1. Close any running applications.
  2. Press the F9 button on your keyboard (this will unlock access to Settings and Browser).
  3. Click the Browser from the screen to run it, and use it usually.

As you can see, it is straightforward to activate both the Settings and Browser apps inside Gameloop.

Why is Gameloop’s browser not working?

All the answers you seek are waiting for you in the guide below. But, first, find out how to deal with instances where Gameloop is not working, be it the Gameloop browser or other parts.

How do I fix Gameloop’s browsers if it’s not opening?

1. Gameloop browser not working: Try a different browser

A dedicated gaming browser is the best option if you want a good performance. And fortunately enough, Opera GX was designed for the sole purpose of creating a great user experience.

You can forget all about Gameloop browser not working issues, as Opera offers exceptional gameplay features.

You can pick various themes, wallpapers, and highlight colors from the browser. Twitch integration is also available to watch your favorite streamers closely.

You no longer have to worry about RAM and CPU consumption because you can not track them inside the Opera GX browser. Additionally, you get fewer to zero errors when playing games compared to other browsers that don’t have gaming features.

Opera GX also has an incorporated adblocker that is helpful if you play games in your browser. As far as privacy is concerned, a free built-in VPN with unlimited bandwidth is available.

Opera GX

No more errors! Boost up your gameplay with this highly customizable gaming browser.

2. Run Gameloop/Tencent Gaming Buddy in Compatibility mode

  1. Right-click on the Tencent Gaming Buddy shortcut.
  2. Select Properties.
  3. In the Properties window, click the Compatibility tab.
    browser not opening in Tencent Gaming Buddy
  4. Check the box Run this program in compatibility mode: under Compatibility Mode.
  5. Click the drop-down menu and select the OS version.
  6. Click Apply and then click OK to save the changes.

Running the emulator in compatibility mode can help with Gameloop browser not working issues, so make sure to try it out.

3. Run as Administrator

  1. Right-click on the shortcut and select Run as Administrator. browser not opening in Tencent Gaming Buddy
  2. When the UAC asks to confirm the action, click on Yes.
  3. Launch the browser in the emulator.

4. Check your Antivirus / Windows Defender

  1. Click on Start and select Settings.
  2. Go to Update and Security.
  3. Click on Windows Security.
    browser not opening in Tencent Gaming Buddy
  4. Click on Firewall and Network Protection option under Protection areas.
  5. Select the currently active network (Private, Domain, or Public).
  6. Scroll down and turn off Windows Defender Firewall.
    browser not opening in Tencent Gaming Buddy
  7. When the UAC dialogue pops up, click on Yes.

With these tweaks, you should be able to solve the Gameloop browser, not working issues in no time at all.

If Gameloop is not opening, these potential resolutions might help. Please don’t be shy to try every one of them. Also, do let us know in the comments section below which one worked best for your Gameloop browser not working issue.

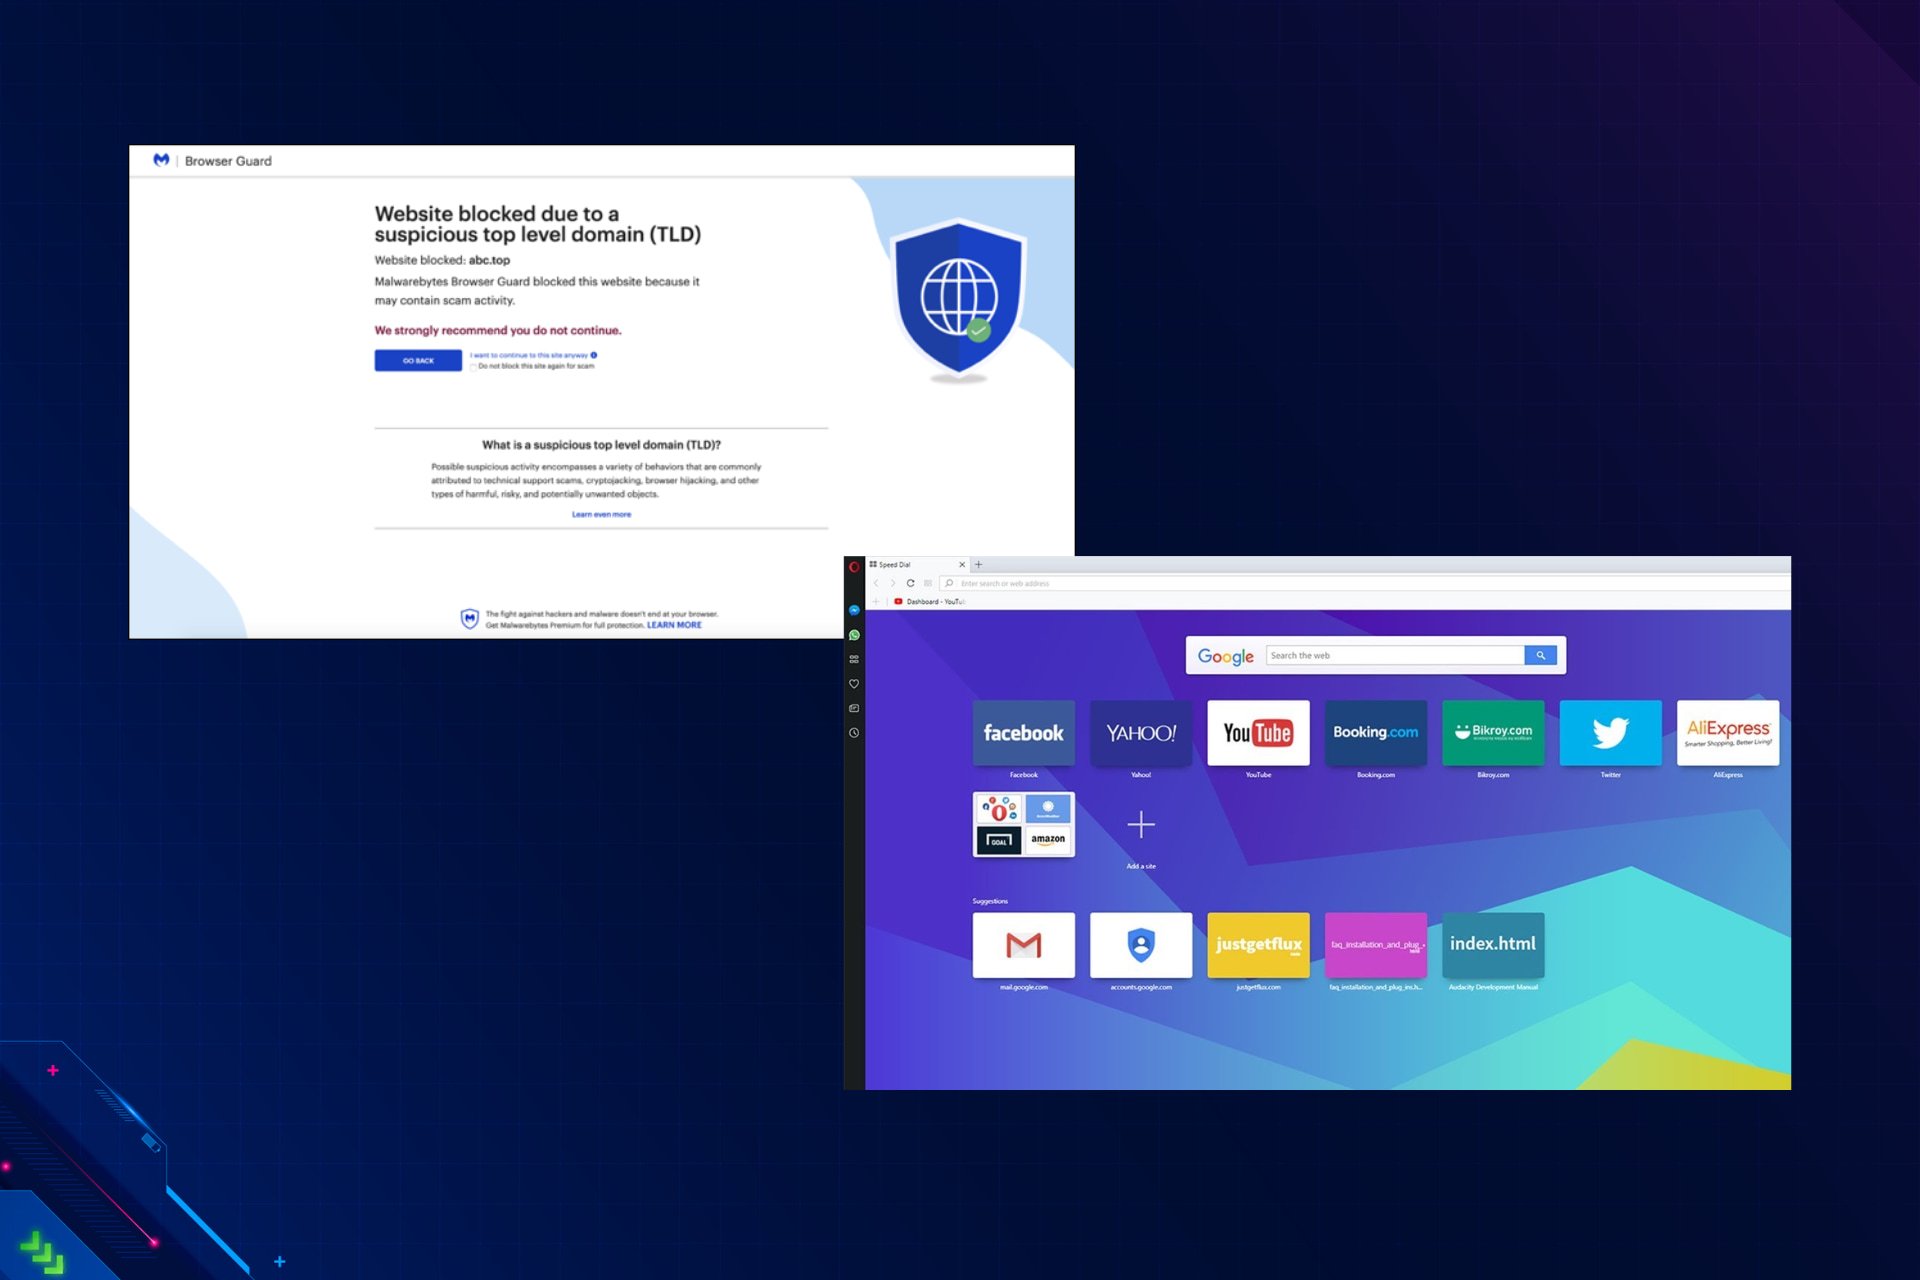
Malwarebytes Browser Guard vs Opera: Which one is better?

There are many ways to protect your privacy online, and some users prefer using security extensions while others prefer privacy-focused browsers.

Today we’re going to compare one of the best security extensions, Malwarebytes Browser Guard, to the Opera web browser and see which offers users better security features.

Is it safe to install Malwarebytes browser Guard?

Malwarebytes Browser Guard is an additional layer of security for your web browser and provides a safer and faster web browsing experience by blocking ads.

It doesn’t only block ads; it does so with websites suspected of compromising your online safety and third-party trackers, so we’re going to say yes, it is safe.

Does Malwarebytes browser Guard track you?

Malwarebytes creators and developers state that they only collect data necessary for the software’s functionality or for the performance of providing the software to clients.

The team also mentioned that the Malwarebytes website uses trackers to monitor how readers engage but that they do not gather any personal information.

That being said, remember that they are trackers, nonetheless. Therefore, to be safe, we advise you to read the website’s permissions before installing it thoroughly.

How do I choose between Malware Browser Guard and Opera?

Opera

Malwarebytes Browser Guard vs Opera

Opera is a web browser that offers various privacy and security features out of the box. This is why Opera is the browser of choice for many users worldwide.

What features does Opera have?

Opera has a built-in ad blocker that will block ads and scripts and reduce the loading time of specific websites by up to 90%.

An incorporated VPN tool is also available, offering unlimited bandwidth, free of charge.

The battery saver feature provides your PC with an additional hour of battery life.

It’s worth mentioning that the browser supports advanced tab management, allowing you to organize tabs into workflows.

Opera is available on all primary desktop and mobile platforms and fully supports syncing your work across all of them via the Opera Flow feature.

Let’s take a look at the Opera’s best features:

  • Built-in ad blocker
  • Unlimited and free VPN
  • Customizable start page
  • Advanced tab management
  • Support for extensions

Opera

For guaranteed data protection while surfing online, try a complete browser such as Opera.

Malwarebytes Browser Guard

malwarebytes extension

What is Malwarebytes Browser Guard?

Malware Browser Guard is a browser extension that protects your privacy and security online. The extension is currently available for both Chrome and Firefox.

What features does Malwarebytes Browser Guard have?

This extension works as an ad blocker against all annoying ads. This way, webpages load faster, and some users reported up to 4 times faster loading speeds overall.

Malwarebytes Browser Guard is designed to fight scammers, and it identifies any browser lockers, browser hijackers, and other tactics that scammers use and warn you about them accordingly.

The extension can also detect malicious websites, and it will even stop cryptocurrency miners from running in the background.

Let’s see what the best features for Malwarebytes Browser Guard are:

  • Works as an ad-blocker
  • It makes websites load up to 4 times faster
  • Designed to detect scam websites
  • Removes clickbait ads
  • Ability to see malicious websites

⇒ Download Malwarebytes Browser Guard

The final verdict: Opera vs. Malwarebytes Browser Guard

We’re sure you’re curious to find out the results of this Malwarebytes-Opera confrontation, so here’s where we draw the line.

While Malwarebytes Browser Guard offers some great features, it can’t compare to Opera regarding privacy and security.

Opera has all the features that Malwarebytes Browser Guard has, plus a free VPN to top of it all. Not to mention that Opera can be used as a fully-featured browser.

So, if you’re looking for a web browser that will protect your privacy without any extensions, Opera is the way to go.

Know that since the latest builds of Opera are based on the same Chromium source code as Chrome, you should be able to install the Chrome version of Malwarebytes Browser Guard without any issues.

That is, if you are looking for a Malwarebytes extension for your Opera browser.

What about you? What is your browser of choice? Are you using any security extensions in your browser?

Would you care for a Malwarebytes Browser Guard vs. Adblock comparison? Let us know in the comments below.

9 Best Antivirus & Security Extensions for Google Chrome

Analyzing the fast pace that cybercrime is increasing these days, it’s becoming more and more essential to boost your online security.

You can do this by getting stronger passwords, making transactions only on sites with SSL certificates, browser security, using a reliable antivirus, and more.

But unfortunately, these measures are not always enough to stay as secure as possible. There are more things that you can do to make your life easier and stress-free.

For instance, you can add a Chrome extension to your Chrome browser to keep you safe. Here are the nine best antivirus extensions for your Chrome browser.

Quick Tip:

If you don’t want to download yet another browser extension, you can switch to another browser that is all about security and privacy.

It packs an integrated virus scanner that instantly alerts you about potentially malicious websites. Moreover, it automatically takes you to the secured version of the website you’re trying to visit.

It also comes with a pre-packed VPN, an ad-blocker, and a tracker-blocker. Thanks to all these security features, it doesn’t need any antivirus extension.

Opera One

An excellent web browser offers many useful tools, including the ability to save and print web pages.

Does Google Chrome have antivirus?

As an answer, we’ll say that the Google Chrome browser comes with a built-in Malware scanner.

The software can search and report malicious files and apps, causing mayhem on your system or Chrome browser.

However, before you breathe that sigh of relief, know that this built-in anti-malware software only comes with the Windows version of Chrome.

Can Google Chrome extensions give viruses?

You might not like the answer, but yes, you can get viruses from Google Chrome extensions just like from other sources.

As many of you imagined, Google is not always effective on the security front, as the 200 million users that get viruses from apps on the Google Play Store every year would say.

What are the best Chrome antivirus extensions to use?

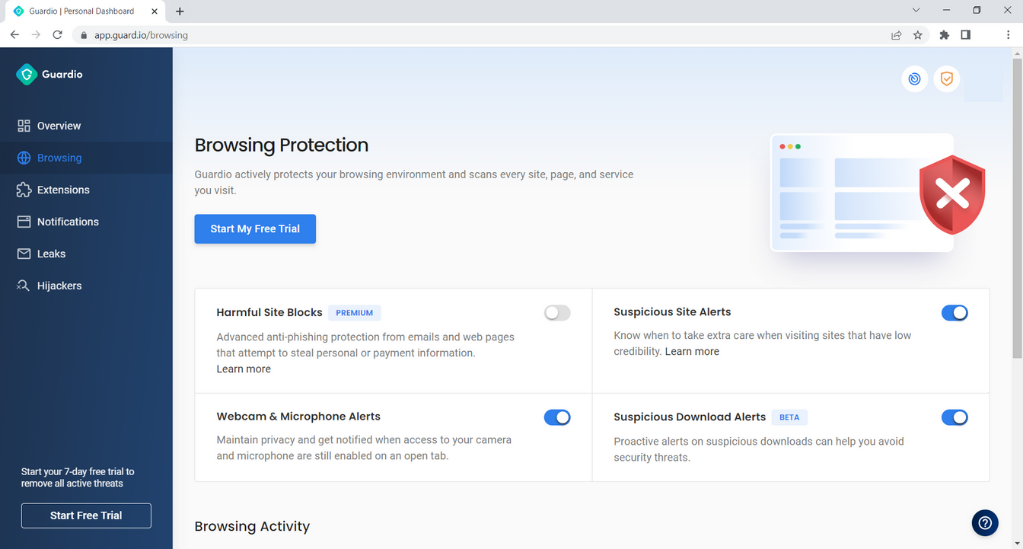
Guardio

We trust that Guardio deserves to be at the top of the list of Chrome antivirus extensions that you can use to browse quickly and effectively.

Guardio extension was built to fill the gap of missing links vulnerable to identity theft and hijacking.

Security is vital during these times when an online environment is required to keep up with communications and shopping.

Because phishing and scamming influence everyday tasks and essential duties, having suspicious site alerts enabled might be helpful.

These are the main features of the Guardio extension:

  • Blocks harmful phishing sites
  • Identity & data leak monitoring
  • Malicious email security
  • Available for Windows, Android and iOS
  • 24/7 customer support

This extension protects you against malicious downloads and notifies you if you leave the camera open in a different tab. In addition, when you install Guardio, you will be offered a free scan to check your device for malware, unwanted pop-ups, and data breaches.

Guardio provides anti-phishing security against emails and websites that try to steal financial details. In addition, it can maintain track of email accounts to give breach alerts and unwanted mute notifications.

It also prevents harmful extensions from controlling browser settings and installing malware, spyware, or adware.

Guardio

Handles threats by detecting hidden phishing attempts and illegal browser usage to safeguard your privacy.

Avast Online Security

This extension comes from Avast, and it will keep you protected during your browsing sessions. Every website that you visit will be scanned, and in case the website is malicious, you’ll be informed.

Avast Online Security can also identify websites trying to steal your data. In addition, there’s a rating system available, so you can see how other Avast users rated a specific site.

To check a rating of a specific website, move your cursor over its link, and you should see the reviews. If you visit a malicious webpage unknowingly, you’ll get a warning message when you open it.

This extension also has a rating system, so you can easily rate a website and tell other users if it is harmful to them.

Avast Online Security also works with online shopping and will open automatically when you do online shopping or banking.

It’s also worth mentioning that this extension will block tracking cookies to keep your browsing activity hidden from third parties.

Overall, it is a solid antivirus extension. With a built-in rating system, you should be able to easily avoid malicious websites that might steal your personal information or harm your PC.

Overview:

  • Ability to detect and block phishing websites
  • Easy to use a rating system
  • Works with online banking and shopping
  • Ability to block tracking cookies

⇒ Get Avast Online Security

Avira Browser Safety

Avira Browser Safety is a free and discreet add-on that secures your surfing and protects your privacy. As a result, you can rest assured that your browsing is safe.

This add-on from Avira will block annoying and infected ads. In addition, it blocks over 80 million malicious sites monthly and prevents over 1 million potentially unwanted apps from hiding in your downloads.

The anti-tracking feature will stop thousands of ad networks from monitoring you online. Moreover, the infected sites are highlighted directly in your search results.

Some more great features:

  • Prevent browser hijackings
  • Stop malicious & phishing websites
  • Find the best deals on items you’re shopping for
  • Optimal experience, access all your favorite web services without interference

⇒ Get Avira Browser Safety

Private Internet Access

Topping off our list is a VPN service that serves as a full-package deal for maintaining online privacy called Private Internet Access.

Developed by Kape Technologies, this provider has over 2500 servers all over the globe, so finding the correct server for you is easy.

Once you have PIA, you will also benefit from an integrated browser extension to gain complete coverage no matter where you navigate.

This enhanced privacy makes it so that malware and adware cannot target you, thus rendering the need for additional antivirus tools redundant.

Here are some of the perks of using Private Internet Access:

  • Support for up to 10 devices
  • Affordable price plans
  • Unlimited bandwidth
  • Wi-Fi encryption
  • P2P support

PureVPN – Chrome VPN Browser Extension

When it comes to maintaining your safety online, PureVPN is ideal for the job. This is one of the leading VPN giants which offers users unmatched online privacy and enhanced security.

Thanks to its fantastic dedication and self-managed global VPN network, this browser extension includes over 750 servers based in over 140 countries.

PureVPN’s chrome VPN extension offers unmatched features such as encryption, WebRTC Leak Protection, IP switching capability, and an unrivaled streaming experience.

You will always be protected against all kinds of hacking attempts, and you will be able to enjoy a smooth browsing experience.

Take a look at the most impressive reasons for which this is one of the best Chrome antivirus extensions:

  • It offers fast-speed Internet capabilities
  • It doesn’t come with any log-maintaining policy for its users
  • You can pass censorship laws in any country while remaining protected at all times when you are connected to a secure server.
  • You can browse with complete security guaranteed
  • You will also enjoy unlimited streaming
  • Using Chrome VPN Browser Extension, you can dodge ISP throttling and buffer, and you can also stream with zero lag
  • You can choose from a host of servers that are strategically located around the world

⇒ Get Chrome VPN Browser Extension

Trustwave SecureBrowsing

Trustwave SecureBrowsing makes it easier and safer to search, socialize, and surf online. It uses proactive real-time security to alert you before an infected website is accessed.

This free browser plug-in displays security icons next to links on search engines such as Bing and Google, on social networking sites, and in web-based emails like Yahoo and Gmail.

The installation is speedy and straightforward; all you have to do is click on the download button from the Trustwave SecureBrowsing official website and follow the steps from the installation wizard.

Check out the best features included in Trustwave SecureBrowsing:

  • Trustwave SecureBrowsing is extremely easy to use
  • It displays obvious safety ratings next to each link on a webpage, and this way, you can be confident that you click through to safe content
  • It protects you from malware that could otherwise compromise your security
  • You can rest assured that Trustwave SecureBrowsing won’t collect any personal data
  • The plug-in won’t install any additional programs or change desktop settings
  • Even if infected sites are logged, it will not track the user’s URL history

⇒ Get Trustwave SecureBrowsing 

ZenMate

ZenMate VPN is an extension that provides excellent online privacy. It encrypts all of your online traffic, and it also hides your IP address so that you will be able to browse the web anonymously.

This is one of the simplest VPNs currently available on the market. ZenMate VPN offers hundreds of servers in over 30 global locations.

Take a look at more exciting features that are included in ZenMate VPN:

  • It provides total security and privacy along with complete freedom
  • This is a trusted tool that is used by over 42 million users all over the world
  • You’ll be able to enjoy the Internet anonymously and without having any restrictions
  • ZenMate VPN provides unlimited bandwidth and fast speeds
  • You can use it on up to five devices at the same time to make sure that you stay safe and secure
  • ZenMate VPN doesn’t follow a strict no-logging policy

⇒ Get ZenMate VPN


Ghostery

Ghostery is a Chrome browser extension that will help you manage website trackers for a cleaner, faster and safer experience.

Once you add this to your Chrome browser, it will be able to detect all the trackers that are placed on a website.

Whether they’re targeted at advertising, site analytics, or social media, Ghostery will allow you to block some or all of them.

Check out more exciting features below:

  • You will be able to find out lots of details about a tracker by clicking on its name
  • For the websites that you trust, Ghostery allows you to mark them as charged, and the trackers from that particular domain will not get blocked
  • For the websites that you do not trust, you will be able to restrict them to stop all trackers automatically
  • Ghostery helps you browse smarter by providing you control over the ads and tracking technology to speed up the page loads, eliminate clutter, and protect your data
  • It automatically optimizes the page performance as you browse
  • Its dynamic UI includes multiple displays and a detailed tracker dashboard
  • The enhanced Anti-Tracking functionality anonymizes your data to protect your privacy even more

⇒ Get Ghostery 


TunnelBear

Nothing can secure you more than a VPN for public Wi-Fi. Other extensions for Chrome either log your activity or are not free, but things are different with TunnelBear.

This free VPN extension secures your browsing on public Wi-Fi with private connections to 20 countries such as the UK, Canada, and the US, and it also doesn’t log your online activity.

TunnelBear is the only VPN worldwide that has published an independent security audit. You can access blocked websites, and it will reduce the websites’ and ads’ ability to track you

Take a look at more reasons for which you should try TunnelBear:

  • With TunnelBear’s free model, you will be able to get up to 500MB of data per month
  • You can get 500MB more by confirming your email and 1GB if you tweet on their Twitter handle
  • If you want to be able to browse unlimited data, you can go to the official website and check their prices

⇒ Get TunnelBear

How do I remove unwanted malware from Chrome?

  1. Open Google Chrome.
  2. Click on the three dots in the top right corner.chrome dots
  3. Select Settings.Chrome settings
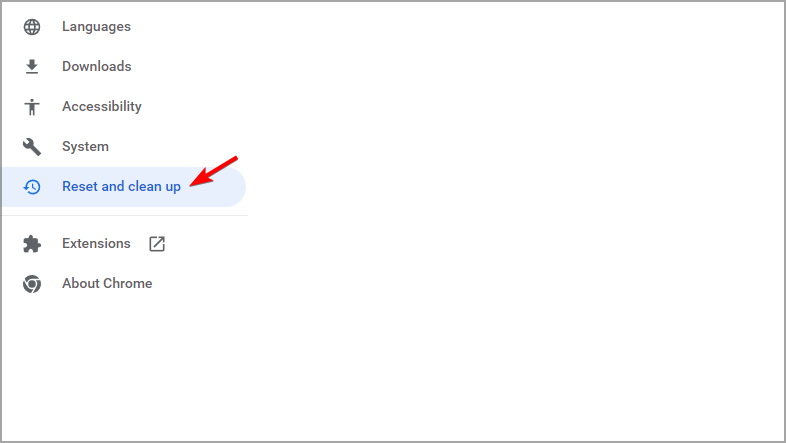
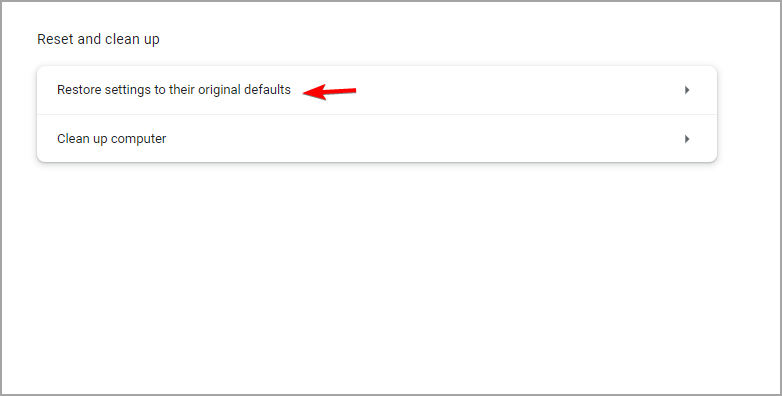
  4. Click on Reset and clean up, then Clean up computer.clean up PC chrome
  5. Press the Find button.find malware chrome
  6. If any malware is found, select the Remove option.

You can never be too prepared to prevent cyberattacks unless you implement all the necessary tools that can combat all malicious entities and keep your online activity secure.

These tools are some of the best and the most efficient and free antivirus extensions if you are looking for a virus blocker for Chrome that you can currently find on the market. For Microsoft Edge users, we have a separate guide on the best antivirus extensions.

Let us know which one you like in the dedicated comments section below!

10 Best Audio Equalizer Software for Windows 10/11

Audio equalization refers to tweaking the balance between frequency components. Back in the day, lots of heavy instruments were needed to achieve this effect.

However, times have changed, and dare we say, for the good. Now, you can perform the same work quicker and easier with the help of equalizer apps.

Moreover, these tools provide access to diverse audio features such as Equalizer, Environment, Surround, Base Management, and so on.

Does Windows 10 have an audio equalizer?

Yes, Windows 10 does have a built-in equalizer that can be accessed from Settings. All you have to do is to access the Sound menu, go to Speakers, and select Properties. Then, you can access the Windows 10 equalizer from the Enhancement tab.

However, the OS equalizer might not meet your sound expectations. So without further ado, here are the 10 best audio equalizer software that is currently available for Windows 10.

Which is the best equalizer?

Boom 3D – Game-specific equalizer settings

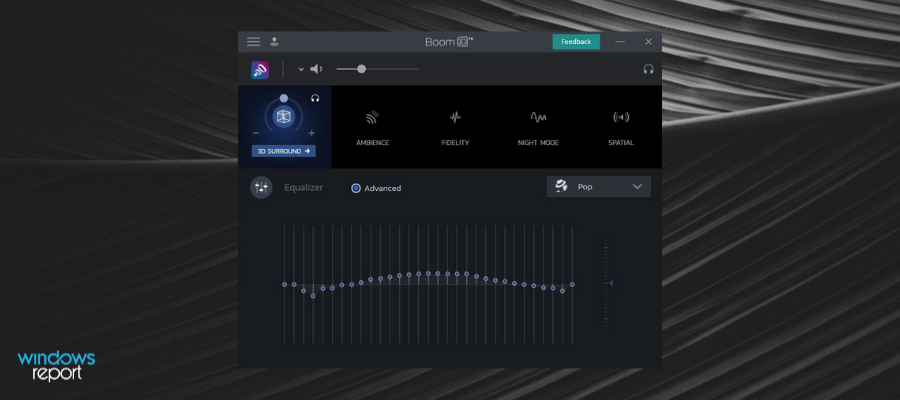
Boom 3D is an amazing sound tool that not only gives you the option to play with the sound in its equalizer but also boosts your sound.

The equalizer comes with lots of presets and can be used also if you have headphones. You can choose genre-specific settings to listen to each track at its full potential.

This feature is especially useful in case you have in-ear or overhead headphones and you need a specific type of sound.

Another great feature for streaming video content is the night mode. This feature detects and reduces harsh sounds at nighttime.

Boom 3D has game-specific equalizer settings that ensure that each audio detail within your game is revealed. It also stops any potential interruptions by apps that run in the background while you’re gaming.

This equalizer has the capacity to improve the sound quality of any output device. It works well with earphones, headphones, laptop speakers, and regular speakers.

Let’s quickly look at its key features:

  • Audio effects for a realistic sound experience
  • Surround sound from every player, media, or streaming
  • Recalibration of the acoustic sense
  • Changing existent presets values for a more custom sound

These are not the only great things about Boom 3D, you will find out more interesting features while using it.

We have already tested it and it really rocks out every type of room. Global Delight Apps created another piece of art that you should try if you need equalizer software.

Boom 3D is a license-based software. One license can be used for 2 different devices and they provide a 30-day money-back guarantee.

Boom 3D

Elevate your sound and enhance every audition using this unique equalizer tool.
Free trial Visit Website

Adobe Audition – Interactive tutorials

Adobe Audition is currently the most reliable Digital Audio Workstation that allows you to professionally edit any audio format. You can use it to record, edit, mix, and even restore audio files.

Audition comes with two types of equalizers: the parametric equalizer and the graphic equalizer.

The difference between the two is that the parametric one has better frequency accuracy whereas the graphic equalizer has a higher phase accuracy.

The graphic equalizer is more newbie-friendly and comes with a couple of presets between 10 bands, 20 bands, and 30 bands. Fewer bands allow for easier adjustments while more deliver greater precision.

To achieve the desired frequency you will need to play around with the gain slider and adjust decibels accordingly.

With the parametric equalizer, you have complete control over your frequencies and you can simultaneously reduce or boost them based on your needs.

Adobe Audition is an incredibly versatile tool, and it’s a great choice if you need an equalizer for the PC.

It has a smart loudness meter that detects the loudness levels of the audio files and makes adjustments if necessary. The ITU-based monitors broadcast, podcast, and streaming media content loudness.

The official website of the software provides multiple in-depth guides about all the features provided.

Let’s quickly look at its key features:

  • Essential Sound Panel for professional editing
  • Complex sound effect design tools
  • Interactive tutorials
  • Improved multitrack UI
  • Adaptive noise reduction

Adobe Audition is a subscription-based application, but you can try it for free for 7 days. If you use other Adobe products, you can opt for the creative cloud plan, but you can also get the software as a stand-alone product.

Adobe Audition

Looking for an equalizer? Why settle for a decent tool when you can polish your sound to perfection with the most powerful DAW?
Free trial Visit Website

WavePad Audio Editing Software – Noise reduction

NCH Software delivers a powerful all-in-one full-featured professional audio and music editor that you can use for pretty much audio tweaking and more.

WavePad‘s built-in PC equalizer brings you booming bass, crystal clear audio, and high fidelity by optimizing all of your music in real time.

The software has plenty of features that help you improve the quality of your audio tracks. You can use preset effects or optimize each detail with audio effects such as amplify, normalize, and equalizer.

WavePad has standard audio track editing tools such as cut, split, copy, compress, and trim. 

If you have audio files that lack clarity due to recording problems or other issues, you can use the audio restoration features to easily fix them. Wavepad provides noise reduction and clicks pop removal tools.

Let’s quickly look at its key features:

  • Batch Processing and Audio Restoration tools for noise reduction
  • Spectral Analysis, FFT and TFFT
  • Supports all popular audio formats (WAV, MP3, VOX, GSM, WMA, AU, AIF, FLAC, OGG, and more)

Wavepad is compatible with Windows, Mac, Android, and iOS devices. 
It has a free version and a licensed-based version with additional features. 

WavePad Audio Editing Software

WavePad Audio Editing Software is a powerful audio editor with an extensive equalizer feature that you mustn’t miss.

CyberLink PowerDirector – Creative transition effects

PowerDirector is all about professional-grade video and audio editing. This CyberLink-powered software provides all the precise, high-end performance tools you need to craft your projects.

The best part is that there is no steep learning curve involved thanks to its well-organized, user-friendly interface and intuitive features.

The in-built equalizer can easily take your tracks right where you want them, plus you get to enjoy exclusive background tracks and play with stunning sound effects.

Although this is video editing software, it still has a great equalizer feature for PC, so it’s worth checking out.

It has advanced volume controls such as dynamic range compression which lets you optimize the difference between high and low levels in the audio track.

The audio editor also allows you to distort the original track with the pitch shift and vocal transformer features.  You can play around with the settings, or select your favorite preset.

Another adjustment feature you can use for a better audio experience is the equalizer which comes with various genre-specific presets.

Let’s quickly look at its key features:

  • Native format video, photo, and audio support in up-to-4 K resolution
  • Extensive library of plug-ins, effects, and audio tracks
  • Audio Scrubbing feature
  • Creative Transition Effects
  • 18 cool new transition effects that will instantly turn your videos into spectacular productions.
  • Advanced, frame-by-frame motion tracking

As we mentioned in the beginning, this software goes beyond audio editing and provides a lot of media file editing options that can help users create professional-level content.

Cyberlink provides extensive online support that helps you understand how to use the software for your specific projects.

It is a subscription-based software and it comes with a free trial version that has fewer features and runs ads.

CyberLink PowerDirector

A great video editing software with a powerful equalizer you can use for all types of multimedia.
Free trial Visit Website

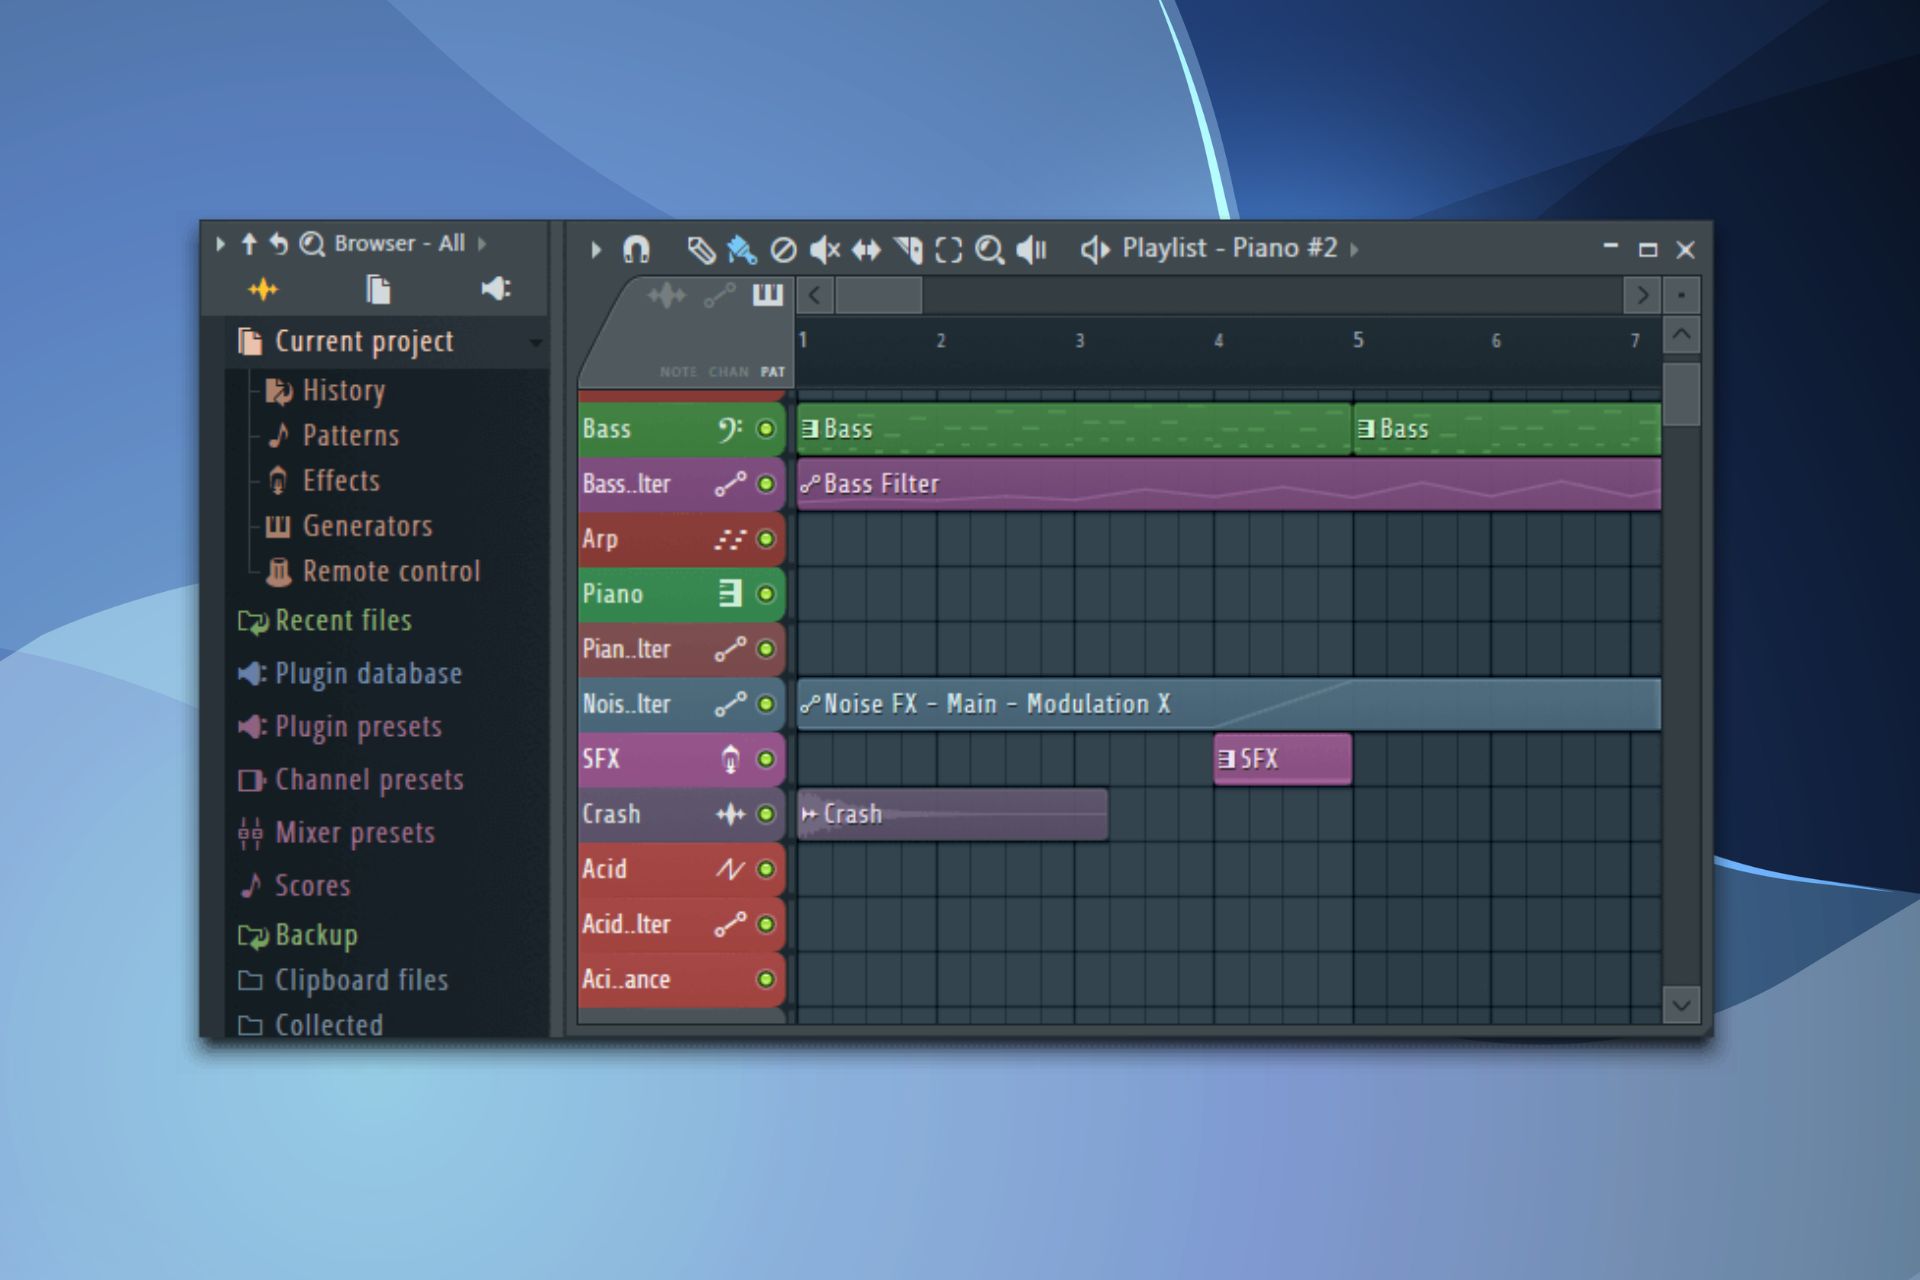
FL Studio – Advanced automation

FL Studio is a world-cherished digital audio workstation that every music producer and aficionado loves.

Packed with an ever-growing library of plugins and effects, this software delivers all the professional tools you need to record, cut, edit, and equalize your tracks to perfection.

You can use the Fruity Parametric EQ 2 for advanced equalizer effects. This is a 7-band equalizer plugin that has a standard and a linear phase mode. You can use it to optimize any audio file, including your own FL Studio creations.

FL Studio is compatible with multiple audio input and output devices. You can easily select what you’re working it from a drop-down menu that displays all your audio device drivers.

What’s more, all these powerful features are wrapped in an easy-to-use, intuitive interface that makes music creation and polishing easy as a breeze.

Let’s quickly look at its key features:

  • Native support for audio formats like MP3 and WAV
  • Countless effects chains, advanced automation, plugin delay compensation, and more
  • Supports all VST standards 1, 2, and 3 currently available
  • Browser feature to organize all the data in your project
  • Extensive toolkit for audio editing and manipulation

FL Studio has both free and paid versions. There are 3 different licensed versions that include multiple additional features.

FL Studio

FL Studio is a professional music-making software, but it also has a great equalizer feature for audio professionals.
Free trial Visit Website

Equalizer APO – Unlimited numbers of filters

Equalizer APO is another great tool that Windows users can use to improve the quality of their audio files. If you are not entirely happy with your audio equipment, this software can be of real help.

It is a lightweight software that is compatible with any output device as long as it’s connected to your computer. It automatically detects your audio output drivers and displays a list of all devices available.

Equalizer APO has a very low latency rate. You can use the filters and settings instantly for various apps like music streaming apps, VoIP apps, or computer games.

To run Equalizer APO, you need to integrate it within another EQ software. Most Equalizer APO use Room EQ wizard. This may seem a little inconvenient, but the fact that it has very low CPU usage and an overwhelming number of good reviews make up for it. Plus, it’s completely free.

You can get a lot of free in-depth information about the configuration of this software and how to use it for your specific needs directly from their website.


Other key features include:

  • Unlimited number of filters
  • Works on any number of channels
  • Integrates into Voicemeeter
  • VST plugin

Equalizer APO is compatible with the Windows operating system, starting with Windows 7.

⇒ Get Equalizer APO

Voice Auto EQ – Voice deepener

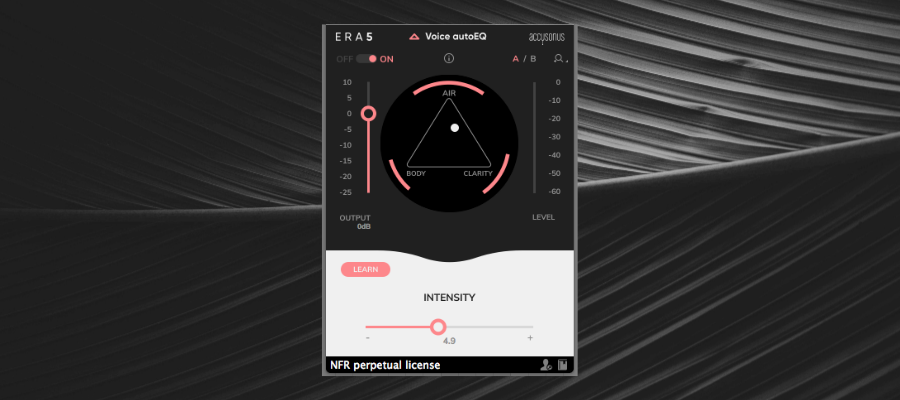
Voice Auto EQ is designed to specifically fine-tune voice recordings. It comes with automated EQ effects suggestions.

The software saves you a lot of time and hassle by analyzing the quality of your audio file and giving fitting EQ settings. You can leave at this stage, or you can further edit the sound by adding Air, Body a Clarity.

ERA Voice Auto EQ improves audio quality with multiple options such as noise remover, reverb remover, and audio cleanup.

You can get Voice Auto EQ as a stand-alone app, or integrate it within the ERA Bundle Pro or the All Access Suite. These come with additional features such as voice changers, background music, and professional-level voice removers.

Other key features include:

  • Voice deepener
  • Plosive remover
  • De-clipper
  • De breath

It is subscription-based with 3 different plans available. The charges are made monthly and each plan comes with a free trial. 

Voice Auto EQ is compatible with the Windows and Mac operating systems.

⇒ Get Voice Auto EQ

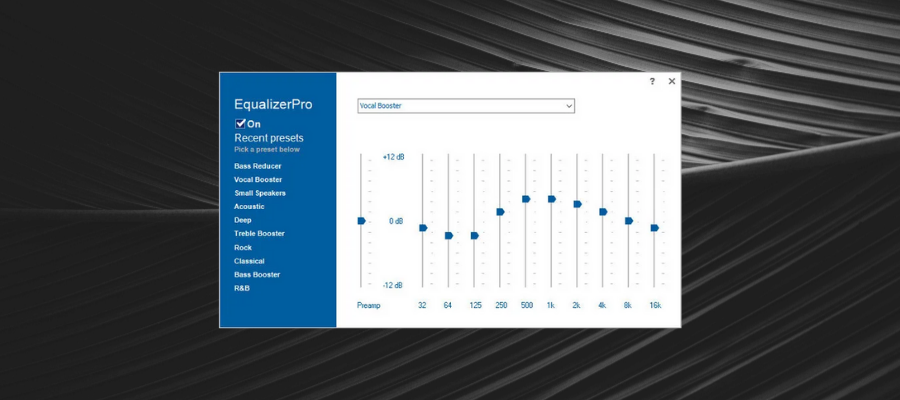
Equalizer Pro – Preamp volume control

Equalizer PRO is an easy-to-use software with multiple audio settings meant to enhance your listening experience.

The software comes with a 10-band equalizer allowing you to make in-depth settings over the tone and pitch of your audio output.

The set-up process is very straightforward, you just have to move the band up and down and see how they affect your sound in real-time.

You can save and store your settings as presets and create specific presets for various types of music genres, for the audio quality of streaming services, and more.

Equalizer PRO also provides its own set of presets for quick set-ups for musical genres and other audio effects.

Along with the equalizers, the software comes with a bass boost effect that amplifies low frequencies of the sound as much as possible considering your output device.

Other key features include:

  • Preamp volume control
  • Easy on/off switch
  • Compatible with Windows OS starting with Windows 7

Equalizer PRO is a licensed-based software with free upgrades and technical support included. You can try it for free for 7 days.

⇒ Get Equalizer Pro

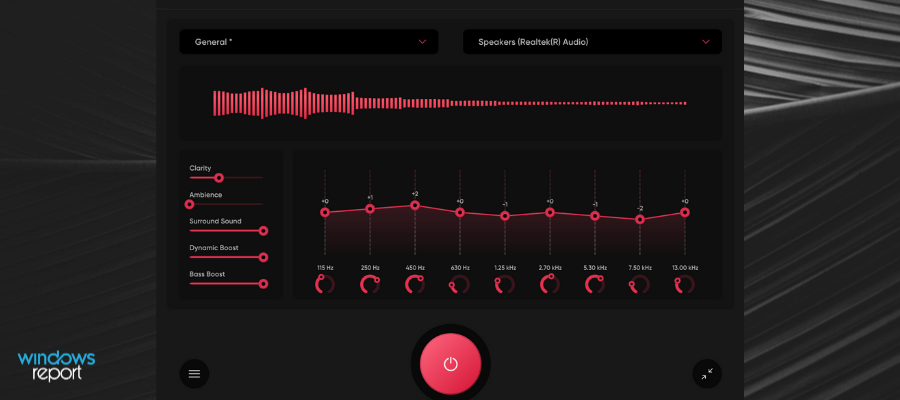
FX Sound – Clean UI

FX Sound aims to be the go-to audio equalizer software regardless of what type of content you want to work on or the type of hardware device you use.

The software is able to balance the sound on pretty much any type of output device. It has a 20-band equalizer which means you can work on every single detail until you are happy with the results.

FX Sound has specific presets for all activities that involve audio files. You can easily select which one you need from the preset list within the UI.

 It has a general preset that is meant to enhance at large all types of audio settings creating louder, smoother, and clearer sounds. This is meant to be used for all types of activities so you don’t have to switch up the settings.

If, on the other hand, you want to make the best of every scenario, FX sound has specific presets for music listening, voice audio files for transcriptionists, video streaming, gaming, VoIP, and more.

Switching between different settings is easy and you don’t lose any information if you want to switch back. Plus, you can save all presets to your computer to make sure you don’t lose them.

FX Sound users can add different types of effects to their audio files including clarity, ambiance, surround sound, and bass boost. 

Other key features include:

  • Clean, easy-to-use UI
  • Dynamic boost control
  • Visualizer

FX sound has a free version and a premium subscription that charges annually. 

⇒ Get FX Sound

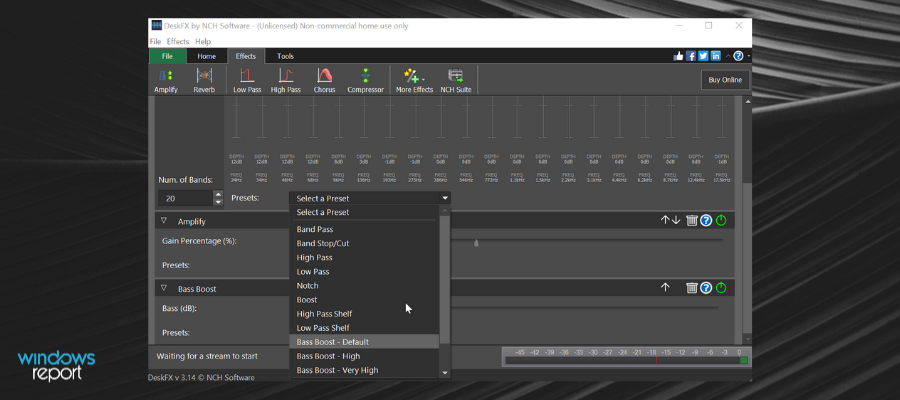
DeskFX Audio Enhancer – Bass boost

DeskFX Audio Enhancer is a powerful tool with multiple audio boost features including an equalizer, live effects, and multiple presets.

It has a simple user interface that should be easy to navigate for any Windows user. It caters to different types of users since it provides a graphic equalizer, a visual equalizer, and a parametric equalizer.

The software can work on up to 20 bands, but you can always select fewer bands if you don’t need to adjust that much.

Besides the equalizer, DeskFX Audio Enhancer also provides multiple effects such as amplify, reverb, chorus, wah-wah, tremolo, and more.

If your output device is not very powerful, this software can be of great help. It has the capacity to boost the volume of your audio with little to no distortion. This can be a great idea for those who use laptop speakers.

DeskFX Audio also has advanced settings that consider your surroundings and allow you to create the best possible audio experience for the room you’re listening into.

The software has a low latency rate and low CPU usage which makes it great for live-stream apps and gaming. It comes with specific presets for such activities.

Other key features include:

  • Bass boost
  • Suppress unwanted noise
  • Unlimited effects
  • Low latency 
  • Compatible with tons of streaming services and video games
  • Works on 64-bit Windows Vista, 7, 8, 8.1, and 10 

⇒ Get DeskFX Audio Enhancer

DeskFX Audio Enhancer has a free version with certain limitations and three types of premium plans. You can get it as a one-time purchase or get a subscription. 

You may also want to check out Zulu, an ideal DJ software for beginners. This tool supports a bevy of real-time effects, automatic beat detection, and more.

Use it with one of these audio equalizers and the crowd will love you.

⇒ Get Zulu

This is the point where our roundup of Windows sound equalizers comes to an end.

Check out all ten tools and their unique features and decide which one is the best choice for your preferences and needs. Have fun!

How to Fix Microsoft Edge If It Closes Immediately After Opening

Microsoft brought many changes with Windows 10, and one of the most significant changes is a new browser called Edge.

Even though Microsoft Edge is a great browser, some users reported that Microsoft Edge closes immediately after opening.

Here are some more examples of this problem:

  • Microsoft Edge opens and closes immediately -Even though crashes are usually followed by some error message, your browser may close immediately after opening, without any warning or error message.
  • Microsoft Edge keeps crashing – When Microsoft Edge hits, the system will likely notify you. Use that error message to determine what to do next, or apply the solutions from this article.
  • Microsoft Edge keeps freezing – The freezing problem will keep your browser running, but you won’t be able to do anything. Sometimes, you might not even be able to close it.
  • Microsoft Edge crashes after opening a tab – Even though we’re talking about the situation where Edge closes immediately after opening, you can apply the exact solutions if the browser crashes after opening a tab.

Having your Microsoft Edge close unexpectedly can cause a lot of frustrations, especially if you’re doing home office and need access to the Internet.

Why does Microsoft Edge keep closing itself?

As users have reported that Microsoft Edge keeps closing after a few seconds and that Edge keeps closing on its own, let’s look at some of the most common causes for your MS Edge browser suddenly shut down.

  • Low available system resources
  • Heavy processing tasks
  • Not using the latest version of the browser

As you can see, Microsoft Edge crashes after opening for a few possible reasons. Additionally, some users complained that Microsoft Edge closed unexpectedly on Windows 10 and 11, making this a windows-OS problem.

To learn how to resolve this issue once and for all, make sure to read the article in its entirety.

How do I fix Microsoft Edge opening and closing?

  1. Consider using a different browser
  2. Set a custom start page
  3. Turn on Windows Firewall
  4. Delete your browsing history
  5. Use a third-party tool
  6. Edit the registry
  7. Create a new user account
  8. Use PowerShell
  9. Switch to a local account
  10. Change the security permissions
  11. Reset the Nvidia Optimus Control Panel
  12. Install the latest updates

1. Consider using a different browser

Before committing to the multitude of solutions mentioned below, you should ask yourself whether it would be easier to switch to a different browser simply.

If you love Microsoft Edge because of its Chromium-based build, we recommend you try another Chromium-based browser: Opera One.

Opera One is highly sleek and modern and packs an entire arsenal of tools that make it an ideal browser, such as an ad-blocker or a VPN.

However, all those tools do not make the browser slow at all. On the contrary, you’ll be amazed by its low impact, even with multiple tabs opened at once.

Opera One

Switch to this highly responsive Chromium browser and say goodbye to errors and bugs.

2. Set a custom start page

  1. Start Microsoft Edge.
  2. Click the Menu button in the top right corner and choose Settings.
    microsoft-edge-closes-immediately-opening-settings
  3. Under the Open with section, select A specific page or pages, select Custom from the menu, and enter the web address of your new start page.
    microsoft-edge-closes-immediately-opening-custom
  4. After that, close Edge, turn on your Internet connection and check if the problem is resolved.

According to users, you can fix problems with Microsoft Edge simply by changing the start page. However, you might have to disable your Internet connection first or unplug your Ethernet cable.

3. Turn on Windows Firewall

  1. Press the Windows Key + S and enter the firewall.
  2. Select Windows Firewall from the list of results.
    microsoft-edge-closes-immediately-opening-firewall
  3. When the Windows Firewall window opens, click on Turn Windows Firewall on or off.
    microsoft-edge-closes-immediately-opening-tunr-off
  4. Select Turn On Windows Firewall for both private and Public network settings.
    microsoft-edge-closes-immediately-opening-turn-on
  5. Click OK to save changes.

A firewall is essential for your online safety, especially if you want to prevent unauthorized software from accessing the Internet.

Regarding firewalls, users claim that Windows Firewall might cause this problem; to fix it, you need to turn the Windows Firewall back on.

4. Delete your browsing history

  1. Click the More button in the top right corner and choose Settings from the menu.
  2. Now go to the Clear browsing data section and click the Choose what to clear button.
    microsoft-edge-closes-immediately-opening-clear
  3. Select Browsing history, Cookies and saved website data, Cached data, and files, and click the Clear button.
    microsoft-edge-closes-immediately-opening-clear-2
  4. After you clear your browsing history and cache, restart Edge and check if the issue is resolved.

Few users claim that you can fix the problem with Microsoft Edge simply by deleting your browser history.

5. Use a third-party tool

Cached temp files can cause this problem, and to fix this problem, you need to remove those files. One of the fastest and easiest ways to do so is to download and run specialized repair software.

Users reported that the issue with Microsoft Edge was resolved after using this type of software and removing the temp file. It takes care of this by replacing and fixing missing registries and DLLs, making your system react as if it were brand-new.

6. Edit the registry

  1. Press the Windows Key + R and enter Regedit.
    microsoft-edge-closes-immediately-opening-regedit
  2. When Registry Editor opens, in the left pane, navigate to this key: HKEY_CURRENT_USER/Software/Classes/Local/Settings/Software/Microsoft/Windows/CurrentVersion/App/Container/Storagemicrosoft.microsoftedge_8wekyb3d8bbwe
  3. Next, right-click this key and choose Permissions.
    microsoft-edge-closes-immediately-opening-permissions
  4. In Group or user names, select Account Unknown (S-1-15-3-3624051433…) and check Full Control in Allow column.
    microsoft-edge-closes-immediately-opening-full-control
  5. Click Apply and OK to save changes.

Changing the registry is somewhat an advanced procedure; sometimes, editing the registry can cause specific issues with your operating system; therefore, be extra cautious while editing the registry.

You might even want to create a backup of your registry, so you can quickly restore it in case anything goes wrong.

7. Create a new user account

  1. Start the Settings app and go to the Accounts section.
  2. Go to the Family & other users tab and click on Add someone else to this PC.
    microsoft-edge-closes-immediately-opening-add
  3. Click on I don’t have this person’s sign-in information.
    microsoft-edge-closes-immediately-opening-no-sign-in
  4. Click Add a user without a Microsoft account.
    microsoft-edge-closes-immediately-opening-no-ms
  5. Enter the username (and password) of the new account and click the Next button.
    microsoft-edge-closes-immediately-opening-next

After creating a new user account, switch to it. If Microsoft Edge works without problems on the latest version, you might want to move your files to this new account and use it as your main account.

8. Use PowerShell

  1. Press the Windows Key + R, enter %localappdata%, and press Enter.
    microsoft-edge-closes-immediately-opening-localappdata
  2. Go to the Packages folder and delete the following folder from it: Microsoft.MicrosoftEdge_8wekyb3d8bbwe
    microsoft-edge-closes-immediately-opening-microsoftedge
  3. Now start the PowerShell as administrator.
  4. Press the Windows Key + S, and enter Powershell.
  5. Right-click PowerShell from the list of results and select Run as administrator.
    microsoft-edge-closes-immediately-opening-run-as-admin
  6. When PowerShell opens, enter this line and press Enter: Get-AppXPackage -AllUsers -Name Microsoft.MicrosoftEdge |Foreach {Add-AppxPackage -DisableDevelopmentMode -Register "$($_.InstallLocation)AppXManifest.xml" -Verbose}
    microsoft-edge-closes-immediately-opening-powershell
  7. Close PowerShell, and restart your PC.

After your PC restarts, check if the issue is resolved. According to users, you can fix this problem by removing the Microsoft Edge folder from your AppData folder.

We must mention that PowerShell is a powerful tool that can cause stability issues if you don’t use it properly. Therefore, you might want to create a System Restore point before trying out this solution.

9.  Switch to a local account

  1. Open the Settings app and go to the Accounts section.
  2. Go to the Your email and accounts tab, and click Sign in with a local account instead.
  3. Enter your current Microsoft account password and click Next.
  4. Now Enter your desired user name and password and click Next.
  5. After you’re done, click Sign out and finish button.

Users claim you can fix Microsoft Edge problems simply by using a local Windows 10 account.

Using a Microsoft account for logging in has certain advantages, such as syncing your passwords and settings, but to fix this problem, you might have to switch to a local account.

After switching to a local account, Microsoft Edge should start working again without any problems. Remember that you can easily change back to Microsoft history if you wish.

10. Change the security permissions

  1. Open the AppDataLocal folder.
    • For more instructions on how to do this, check Step 1 from Solution 6.
  2. Go to the MicrosoftWindows folder.
    1. Locate the WER folder, right-click it, and choose Properties.
      microsoft-edge-closes-immediately-opening-properties
  3. Go to the Security tab and click the Edit button.
  4. Select the APPLICATION PACKAGES user and check Read & execute List folder contents and Read options in the Allow column.
  5. Click Apply and OK to save changes.

According to users, Microsoft Edge closes because the WER folder doesn’t have the necessary permissions.

11. Reset the Nvidia Optimus Control Panel

Users reported that your Nvidia Optimus Control Panel settings could cause this issue.

It seems that Edge doesn’t work well with dedicated Nvidia graphic cards. Therefore you need to use Optimus Control Center and set Edge to use your integrated graphics card instead.

Alternatively, you can just reset the Optimus Control Panel settings to default.

12. Install the latest updates

Sometimes you can fix problems with many applications simply by installing the latest Windows 10 updates.

Many of these updates address hardware and software issues, so use Windows Update and download the latest updates regularly.

How can I improve Microsoft Edge?

There are a few methods that can be applied for Microsoft Edge to work better, and we’ve covered all of them in the Fix Edge When is Slow or Lagging guide, so make sure to read through that as well.

  • Update to the latest version
  • Clear the caches and cookies
  • Optimize the download location for new files
  • Reset the host’s file

If Microsoft Edge closes immediately after opening on your PC, that can be a significant problem, but hopefully, you managed to fix it after using one of our solutions.

Adblock not Blocking ads: 2 Ways to Stop ads for Good

Many users use extensions to prevent ads from appearing. However, issues can occur, and many reported that AdBlock doesn’t block ads.

Many users have reported that even though they tried many ad-blockers, they still end up annoyed by ads while browsing the Internet.

This can be extremely frustrating, especially because you think you tried everything possible to stop those annoying ads from popping up.

Unfortunately, this is somewhat common, and we already wrote about AdBlock not working on Twitch in our previous guides.

For these reasons, in this article, we will discuss what could be the reasons why AdBlock is not working on Chrome, and finally, we will discuss the best way to solve this issue.

Why is Adblock not working?

If Adblock isn’t working, there are a few common reasons. On the top of the list are the following:

  • Outdated Adblock software – Outdated software would not act as it is expected. you will expect a few blogs and flaws, which may mean that for some ads, it will not work.
  • Conflicting extensions – If you have extensions incompatible with Adblock, they may counter-react and cause your ad blocking to be less effective.
  • Disabled Adblock – There is also the chance that you may have disabled Adblock in the settings.
  • Whitelisted websites – Even if you use Adblocker, if you have whitelisted some websites, they will not be affected.
  • Ad formats – If you see ads, there are chances that they are well designed so that they bypass ad blockers.

Why is Adblock not blocking YouTube ads?

If Adblock is not working on YouTube ads, it may be because of any of the following:

  • Update on YouTube – With YouTube updates, which happen quite often, you may expect the advert algorithm to be updated.
  • Anti-adblock measures – Some YouTube measures make it easy to detect if you have Adblock installed, and it can bypass it.
  • Settings – You may have configured settings that prevent Adblock from functioning for YouTbe ads.

Is AdBlock Plus better than AdBlock?

Both are quite the same and share many features, such as the same list of blocked ads and the ability to whitelist websites or block individual elements.

AdBlock has a unique feature that lets you allow ads only on specific YouTube channels, and that can come in handy, but for the most part, both extensions are the same.

However, many users reported that AdBlock Plus is not blocking ads, but there are ways to fix that.

What can I do if Adblock is not blocking ads

Before going into these solutions, you should consider using a browser with an inbuild ad blocker. Many browsers have a built-in ad-blocker.

One such example is Opera One. This web browser uses the Chromium engine, making it very fast and powerful, and it comes with several privacy tools that can help you surf the Internet undisturbed.

These include a VPN and an ad-blocker, both very efficient and without any limitations.

Opera One is a very versatile browser. It comes in multiple versions, each specialized in something like VPN, Gaming, etc. There surely is an Opera One browser for everyone.

Besides being a great search engine, the browser has low bandwidth and little to no impact on system performance. Other browsers, such as Chrome, eat up lots of RAM.

Opera One

Enjoy browsing the Internet without being bothered by pesky ads.

1. Make sure the ads that appear are not caused by malware

  1. Download and install TotalAV
  2. Open the TotalAV software.
  3. From the Dashboard, select Scan Now to start scanning your PC for malware.
  4. After the process is completed, remove any threats that were identified.
  5. Restart your PC, and check to see if the issue is solved.

A lot of times, the ads that appear may be caused by malware that’s already on your PC. This is especially true if you see the ads when visiting less secure websites.

To prevent this type of adware and malware threats on your computer’s system, we advise you to confidently detect viruses with TotalAV.

2. Add Tampermonkey to your browser

  1. Open the Tapermonkey website.
  2. Select your browser’s tab on the Tampermonkey website.
    adblock not blocking ads
  3. Click the Download button for the Tampermonkey stable.
    adblock not blocking ads
  4. Install Tampermonkey by following the on-screen instructions.
  5. Open the Anti-Adblock Killer script page.
  6. Click the Install button there to install that script.
  7. Press the Subscribe button on the Anti-Adblock Killer page.
  8. Thereafter, you’ll see a message that asks if you want to add the filter list for your ad blocker extension. Click OK to confirm that you do.

In this article, we discussed why your browser ad-blocker add-ons might now work and the solution to this issue.

So if AdBlock is not blocking Facebook ads, try the solutions we mentioned in this guide.

If you don’t have any malware on your PC, you can simply download and set Opera One as your default browsing software.

This isn’t the only issue, and many reported that Adblock doesn’t work in Crunchyroll, but we covered that issue in a separate guide, so be sure to check it out. Don’t forget you can always switch to another ad blocker if your current one has isues.

Did you find a different solution to this problem? If so, share it in the comments section with us.

Microsoft Released KB5015879 For Windows Server

Ready for some more Windows Server action? No, we’re not talking about a new Microsoft-developed RPG, we are referring to Windows Server version 2022.

We’re recently shown you all the details surrounding Windows Server Build 25158, and also informed you that Windows Server 20H2 will reach the end of support next month, August 2022.

Now, however, it’s time to focus on Windows Server 2022 for a few minutes and talk about KB5015879 and all the changes it brings.

What does KB5015879 bring to Windows Server 2022?

The Redmond tech giant known as Microsoft has released the July 2022 cumulative update for Windows Server 2022, bringing the OS build to 20348.859, via KB5015879.

Please keep in mind that the update is a C release, which means it’s a non-security update and brings improvements to the operating system.

And, just like the latest Windows 10 Release Preview Build KB5015878, the new Server 2022 update boosts input-output operations per second (IOPs).

Don’t go thinking that’s all it does, because it also fixes bugs like the one which was causing Windows to freeze due to Defender.

Let’s have a look at the changelog and discover together all the tweaks, improvements, and known issues that come with this most recent update.

Improvements and Fixes

  • Improves the reliability of a push-button reset after an OS upgrade.
  • Addresses an issue that makes the tenant restrictions event logging channel inaccessible if you remove the EN-US language pack.
  • Updates the Remove-Item cmdlet to properly interact with Microsoft OneDrive folders.
  • Addresses an issue that prevents certain troubleshooting tools from opening.
  • Addresses an issue that causes port mapping conflicts for containers.
  • Addresses an issue that causes Code Integrity to continue trusting a file after the file has been modified.
  • Addresses an issue that might cause Windows to stop working when you enable Windows Defender Application Control with the Intelligent Security Graph feature turned on.
  • Addresses an issue that triggers lockout policies faster when you use Remote Desktop Protocol (RDP) with fast reconnect and Network Level Authentication (NLA) is disabled. This issue occurs when you call LogonUser() with a blank password.
  • Provides the option to configure an alternate login ID for an Azure Multi-Factor Authentication (MFA) Active Directory Federation Services (AD FS) adapter for on-premises scenarios. You can disable the alternate login ID as required. To configure the Azure MFA ADFS adapter to ignore an alternate login ID, run the following PowerShell command:
    • Set-AdfsAzureMfaTenant -TenantId ‘<TenandID>’ -ClientId ‘<ClientID>’ -IgnoreAlternateLoginId $true.To restart the ADFS service on each server in the farm, use the Restart-Service adfssrv PowerShell command.By default, the adapter configuration will not ignore alternate login ID (IgnoreAlternateLoginId = $false) unless explicitly set to $true as in the command above.
  • Reduces the overhead of resource contention in high input/output operations per second (IOPS) scenarios that have many threads contending on a single file.
  • Addresses an issue that prevents the Storage Migration Service (SMS) from completing inventory on servers that have many shares. The system logs error event 2509 in Microsoft-Windows-StorageMigrationService/Admin channel (ErrorId=-2146233088/ErrorMessage=”Invalid table id”).
  • Addresses an issue that causes the Windows profile service to fail sporadically. The failure might occur when signing in. The error message is, gpsvc service failed to sign in. Access denied.

As you can see, there were quite some issues that needed to be addressed, and Microsoft did so through this recent Windows Server 2022 update.

Known issues

SymptomWorkaround
After installing this update, IE mode tabs in Microsoft Edge might stop responding when a site displays a modal dialog box. A modal dialog box is a form or dialog box that requires the user to respond before continuing or interacting with other portions of the webpage or app.Developer Note Sites affected by this issue call window.focus.We are working on a resolution and will provide an update in an upcoming release.

There you go, all the changes coming to Windows Server 2022 via KB5015879. Share with us in the comments section if you found any issues after installing it.

Grammarly not Working on Firefox? Try These Fixes

If you are a content creator or just a casual writer that loves to write, then you wouldn’t want your written piece to have grammatical mistakes. Don’t you?

Grammarly is a trusted software that helps you get rid of grammatical mistakes automatically. It even suggests better sentences based on your writing.

But what if Grammarly suddenly stops working on your browser? That could be quite frustrating as millions rely on Grammarly for automatic grammar checks.

You will find several user reports confirming that, for them, Grammarly is not working on the Mozilla Firefox web browser.

Some users claim that after updating the Firefox browser, the Grammarly extension stopped working on multiple websites. While others claim that Grammarly is not working completely on Firefox.

If you are one of such users and are looking for solutions, then you have landed in the right place. Because this guide not only lists down the most effective solutions to fix the problem but will also give you some of the common causes that could trigger Grammarly not working on the Firefox issue.

What are the common causes for Grammarly not working on the Firefox browser?

If software or extension doesn’t work, then it is because of the presence of a bug or because of issues related to the platform you are trying to run it on.

In our case, Grammarly not working on Firefox isn’t a big issue, and users have fixed the problem with simple solutions. But before solutions, let us consider the reasons that would trigger this problem.

  • Firefox browser is not updated.
  • Cache and cookies are causing issues.
  • VPN is conflicting with the smooth functioning of Grammarly.
  • Your browser has some in-built bugs.
  • Antivirus is blocking Grammarly.
  • Grammarly extension isn’t installed properly.

After careful research, we have deduced a list of the above reasons that are the most common causes of Grammarly not working on Firefox.

Now that you are aware of the causes, let us check out the solutions.

Quick Tip:

There is another effective way to fix Grammarly issues rapidly, and that is with an integrated browser like Opera One.

With Chromium-based technology, this browser has an extensive Add-on page that will help you find the best grammar checkers out there. Also Opera One features a native AI that can further help you.

Opera One

Resolve any issues on Grammarly by switching your browser to Opera One today for proficient writing.
Free Download Visit website

How can I fix Grammarly not working on Firefox problem?

1. Restart Firefox

Often, browsers fail to load all the important files necessary for their smooth functioning. There is a chance that the current instance of Firefox failed to load all files.

In such a case, we would suggest you restart the Firefox browser, by closing all instances of it. Re-launch it again and check if Grammarly is working or not.

2. Update Firefox

  1. Launch Firefox.
  2. Click on the 3-line menu icon on the top toolbar.
  3. Navigate to Help, then to About Firefox.
  4. Firefox will automatically check for new updates and if it detects one, will install it.
  5. After the download is complete, click on the Restart to update Firefox button.

3. Clear cookies and cache

  1. Launch Firefox.
  2. Click on the 3-line menu icon.
  3. Select Settings.
  4. From the left pane, select Privacy & security.
  5. Under the Cookies and Site Data section hit the Clear Data button.
  6. Check the boxes next to Cookies and Site Data and Cache Web Content.
  7. Hit the Clear button and check if this fixes the Grammarly not working on Firefox problem or not.

4. Disable the VPN

If you are using a VPN to access restricted websites on Firefox, then there are chances that it is conflicting with Grammarly and not letting it work properly.

Simply disable the VPN app on your PC or browser and relaunch the browser, then check if this helps resolve the Grammarly not working on Firefox issue or not.

5. Reinstall Grammarly

  1. Launch Firefox.
  2. Right-click on the Grammarly extension icon on the Extensions bar.
  3. Select Remove Extension from the list of options that appear.
  4. Select Remove again.
  5. After uninstalling, visit Firefox Add-Ons and install the Grammarly extension again.

This solution has helped several users fix the Grammarly not working on Firefox problem. There are chances that during the previous installation, some important files might have been missed. You can also try the add-on on Chrome.

Performing a clean install always helps fix the glitches and, in fact, installs the latest compatible version, negating all issues.

6. Disable the antivirus

  1. Open the Start menu.
  2. Search for Windows Defender Firewall and open it.
  3. From the left pane, select Turn Windows Defender Firewall on or off.
  4. Choose the Turn off Windows Defender Firewall for both Public and Private networks.
  5. Click OK and check if Grammarly not working Firefox issue is fixed or not.

The above steps are to disable the Windows Defender Firewall and are just to show you an idea of how you can disable antivirus on your PC.

The steps for disabling third-party antivirus software are different. So, follow the steps accordingly.

7. Switch to a different grammar checker

If none of the above solutions helped you fix the problem, then you should try out an alternative grammar checker tool on your browser.

We kindly suggest QuillBot to anyone who needs clever proofreading and grammar checking tools, plus paraphrasing functionality that improves your writing for any digital task.

QuillBot

Take this enhanced tool directly on your browser or install it as an extension for quicker use.

Otherwise, you can check our detailed guide on the best browsers for your PC, and install the one that suits your needs.

That’s it from this guide. We hope the above solutions helped you fix the Grammarly not working on Firefox issue.

Let us know in the comments below which solutions fixed the problem for you or if you applied a different solution to resolve the problem.

Fix: Forza Horizon 3 Crashing / Not Loading on Windows 10 & 11

Forza Horizon fans all over the world should be able to play the popular game and push the pedal to the metal. For many gamers, the joy doesn’t last too long. Several users reported that Forza Horizon 3 is crashing.

Other gamers were a bit luckier. They were able to launch the game but couldn’t advance due to various issues in Forza Horizon 3. Speaking of these, here are some common problems that users reported:

  • Forza Horizon 3 freeze and crash, grey screen crash – According to users, if your game tends to freeze and crash, the problem might be your antivirus. If that’s the case, disable your antivirus and check if that solves the problem.
  • Forza Horizon 3 crashes instantly – This problem can occur due to your privacy settings. Many users reported that their microphone caused this issue to appear, but after disabling the Microphone in Forza Horizon 3, the problem was resolved.
  • Forza Horizon 3 crash on loading screen – These problems can appear due to your graphics card settings, and in order to fix the problem, it’s advised that you update the drivers to the latest version and check if that solves the problem.
  • Forza Horizon 3 crashes on startup randomly – If you have any of these problems, be sure to try the solutions from this article and check if that helps.

The Forza Horizon 3 developers quickly reacted, acknowledging the crashes. The team also posted a guide aimed at helping gamers to avoid such situations, and also offered a series of quick workarounds.

We will be taking up these as well as the ones posted by users on several forums in the following sections.

Quick Tip:

Older games will always find a way to create incompatibilities with other apps and crash or freeze and disrupt the pleasure of gaming. Fewer apps or features mean fewer problems in the future.

Have all your features and apps integrated into one with the gaming browser, Opera GX. Especially built for gamers, get in control of your gaming station with the features of Opera GX.

Opera GX

Built for unparalleled gaming and browsing experience for all the gamers.

Why does Forza keep crashing?

There could be various reasons why Forza Horizon 3 keeps crashing on your device. It could be outdated or problematic drivers, critical services not running, or your antivirus messing things up.

Some users also found it was the Nahimic Audio Software’s process that led to the problem, and terminating it did the trick. Besides, modifying the permissions granted to Forza Horizon 3 also helped fix things for several users.

What can I do if Forza Horizon 3 crashes on Windows 10?

1. Update your graphics card drivers

One of the common causes for Forza Horizon 3 crashes is related to your graphics card drivers. Your drivers can be outdated, and that can lead to various issues.

To fix the problem, it’s advised that you update your graphics card drivers to the latest version and check if that helps.

To do that, you basically have to visit your graphics card manufacturer’s website and download the latest drivers.

After installing the latest drivers, check if the problem is still there. However, do keep in mind that downloading drivers manually can be a bit tedious, especially if you don’t know what drivers to install.

Do not hesitate to make this process a lot simpler simply by using Outbyte Driver Updater, an efficient tool that can update all your drivers at once.

The best part is that you can even create drivers’ backups before making changes. As for that database of 18 million driver files, it grows day by day.

⇒ Get Outbyte Driver Updater

2. Don’t allow Forza Horizon 3 to use your microphone

  1. Press Windows + I to launch the Settings app, and select Privacy & security from the left.Privacy & security to fix forza horizon 3 crashing
  2. Click on Microphone under App permissions.App permissions
  3. Locate Forza Horizon 3, and disable its access to microphone by clicking the toggle next to it.Disable to fix forza horizon 3 crashing

This is a peculiar issue, but it seems that Forza Horizon 3 is crashing on startup with Fitgirl if you allow the application to use the microphone.

As a workaround, users are suggesting that you disable the microphone in Forza Horizon 3 on your PC. After doing that, the problem should be completely resolved, and everything will start working again.

3. Terminate the Nahimic Audio Software process

  1. Press Ctrl + Shift + Esc to launch the Task Manager.
  2. Locate the Nahimic Audio Software process, or one with a similar name, select it, and click the End task button.End task

This Nahimic Audio Software has been found to lead to issues with several programs including Forza Horizon 3. If disabling the process fixes the error, you can could go ahead and uninstall the app, in case it’s not used on your computer.

4. Make sure that you’re using a dedicated graphics card

If Forza Horizon 3 is crashing on your PC, the problem might be your graphics card.

If you have both integrated and dedicated graphics, issues can occur when you use the integrated graphics instead of the dedicated ones.

To fix the problem, make sure that your integrated graphics is disabled, or check your graphics card software and make sure that Forza Horizon 3 is set to use your dedicated graphics.

After making these changes, the issue should be resolved.

5. Make sure that the Windows Update service is running

  1. Press Windows + R to open the Run dialog. Enter services.msc and press click OK.
    Forza Horizon 3 crashes instantly
  2. When the Services window opens, locate the Windows Update service and double-click to open its properties.
    Forza Horizon 3 grey screen crash
  3. Make sure that the Startup type is set to Manual or Automatic. If the service isn’t running, click the Start button. Now click on OK to save changes.
    Forza Horizon 3 crashes on startup

If Forza Horizon 3 is crashing on your PC, that can be because your Windows Update service is disabled. Run the service and check if the problem is fixed.

 6. Check your antivirus

According to users, one of the most common causes for Forza Horizon 3 crashing on your PC can be the antivirus.

Having a good antivirus is crucial for your safety, but sometimes it can interfere with certain applications, preventing them from running or causing them to crash.

To fix this problem, simply try disabling certain antivirus features or remove your antivirus altogether and check if that helps.

If this solves the problem, perhaps this is a perfect time to consider switching to a different antivirus.

Then if you look for a more efficient antivirus solution that helps while gaming, you can certainly find one from the best antivirus software for gaming.

7. Try using Forza Horizon 3 drivers

Microsoft is already aware of this issue, and it’s working on a fix. If Forza Horizon 3 is crashing on your PC, the problem might be related to your drivers.

To fix the problem, it’s advised that you completely remove your graphics card drivers and then use the dedicated Forza Horizon 3 drivers.

To completely remove your drivers, we strongly suggest using Display Driver Uninstaller. By using this software, you’ll completely remove all traces of your graphics card driver. Up next, install Forza Horizon 3 drivers, and the issue should be resolved.

8. Disconnect unnecessary USB devices and additional monitors

If Forza Horizon 3 keeps crashing on your PC, the problem might be your USB devices.

According to users, sometimes certain devices can lead to this problem on your PC, so it might be best to disconnect them.

Disconnect non-critical devices and periphrals

As a rule of thumb, you should only have essential devices, such as a keyboard and mouse, connected in order to avoid this problem.

After disconnecting additional USB devices, check if the problem is still there.

In addition, you might want to disconnect any additional monitors since the game doesn’t work well with multiple displays.

9. Reset the game to its default settings

  1. Press Windows + I to launch Settings, and select Apps from the navigation pane.Apps & features
  2. Click on Apps & features on the right.Apps & features
  3. Click on the ellipsis next to Forza Horizon 3, and select Advanced options.Advanced options
  4. Now, click on the Reset button.Reset
  5. Again, click Reset in the confirmation prompt that appears.reset

Sometimes Forza Horizon 3 crashes because its installation is corrupted. This can occur for various reasons, and to fix the problem, you should reset the game’s settings to default. Once done, the Forza Horizon 3 crashes after splash screen problem should be resolved.

Gamers also listed the workarounds they themselves developed to fix the annoying Forza Horizon 3 crashes. They include:

  • Disabling all the accounts in the Microsoft Store.
  • Turning off Drivatar Designs in Settings.
  • Some players have reported issues when running InputMapper. Running it in exclusive mode appears to fix the issues.
  • Players using Intel Kentsfield Core 2 Quad processors may experience the title closing immediately on boot. These processors fall below the minimum spec and are not officially supported. There are no known workarounds at this point.
  • Players may find the game will not boot on single or dual-core machines. These CPUs fall below minimum spec and are not supported.

What do I do if Forza Horizon 3 is not launching in Windows 11?

The problem with Forza Horizon 3 is not limited to Windows 10, but affects the latest iteration as well. Moreover, several users have reported that Forza Horizon 3 is crashing on Xbox One.

But, the solutions listed here should work on Windows 11 and help fix things if Forza Horizon 3 is crashing.

If you experience Forza Horizon 3 crashing, try the suggestions and workarounds listed above, and the problem will be solved.

However, it is worth mentioning that some gamers reported the crashes continued even after they tried all the available fixes. It seems that all they can do is wait for the developers to push an update to fix these issues.

How has your Forza Horizon 3 experience been so far? Tell us more about it in the comments section below.
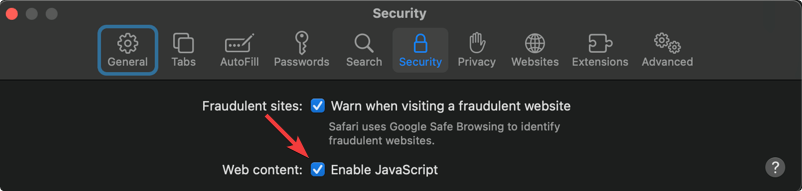
FIX: Your Browser Was Told To Deny Us Microphone Access

Steam is one of the best digital game distribution services, but even an excellent service such as Steam can encounter specific issues.

Many users reported getting the Oops looks like your browser was told to deny us microphone access error.

In today’s article, we’ll show you what can cause such behavior and how to fix it, so keep reading.

Why is my browser denied microphone access?

This can happen due to various causes, including specific permissions not given on the browser or your headset not being correctly plugged in or not recognized by your machine.

When you first plug said microphone in and tried to use it with the browser, you will be prompted to give some permission. Failing to do so could result in the situation mentioned above.

Quick tip:

Since this is a browser issue, you might be able to fix the problem by switching to a different web browser, such as Opera GX.


Opera GX is light on your resources and should handle any multimedia easily. The browser also has a built-in adblocker that will speed up webpage loading.

Additionally, you get fewer to zero errors when playing games compared to other browsers that don’t have the same gaming features.

Opera GX

No more errors! Get your gaming to the next level with this highly customizable browser.

How do I fix my microphone Access Denied?

1. Make sure that your apps are allowed to access your microphone

  1. Go to the Settings app.
  2. Next, go to the Privacy section.
    privacy settings app oops looks like your browser was told to deny us microphone access
  3. Enable the Allow apps to access your microphone option.
    allow apps to access your microphone oops looks like your browser was told to deny us microphone access

2. Clear the Steam cache

  1. Open the Steam menu and choose Settings.
  2. From the left pane, select Web Browsing.
  3. In the right pane, click on Delete web browser cache and
  4. Next, select Delete all browser cookies option.

3. Disable your antivirus

  1. Open your antivirus.
  2. Go to the settings and look for a feature that controls your microphone.
  3. Disable that feature.

Note: If there’s no microphone configuration feature, try disabling your antivirus and check if that helps.

4. Check the hidden sound options

  1. Open the chat window.
  2. Now click the gears icon.
  3. Locate the voice options.
  4. Make sure that your microphone is set as the input device.

5. Check your browser settings

  1. Click the lock icon in the address bar.
    website settings oops looks like your browser was told to deny us microphone access
  2. Now look for permissions and make sure that the current page is allowed to access your microphone.

You have to do this if you are trying to use Steam, but your browser is denied microphone access, or you are on Steam, and the browser won’t allow microphone access.

There’s no doubt that Oops looks like your browser was told to deny us microphone access is an inconvenient problem, and if you managed to fix it using our solutions, don’t be shy about leaving a comment below.

5 Ways to Fix Your Webcam if It’s Not Working In Firefox

Webcams are one of the most important devices for users who want to connect with family and friends. But, sometimes, things don’t go as expected, and your webcam might not work in Firefox. 

For most people, webcams are just used for connecting with friends or attending to work calls. The more advanced users use it to record high-quality videos and even do a production of a short professional clip. Such activities go hand in hand with good webcam software.

If your webcam isn’t working in Firefox, it is likely that your web camera has not been detected. This is because there are many different types of webcams available, and some require additional software to work properly.

Most users who are in a hurry will opt to try an alternative browser, but if Firefox is your preferred browser, we have different troubleshooting solutions you can try for a quick fix.

Why can’t Firefox access my Camera? 

If your webcam is not working in Firefox, it may be caused by various factors. Some include:

  • Webcam settings – The first thing you can do is check the webcam settings on your computer. For example, if the camera is set to a low resolution, it might not be able to handle sending high-quality video streams over the internet.
  • Outdated drivers – If your webcam isn’t working in Firefox, there’s a good chance it’s an issue with your device’s driver. 
  • Computer settings – Make sure Firefox is allowed to access your computer’s devices and hardware (such as your camera).
  • Outdated browser – The most common cause of the camera not working in Firefox is an outdated browser. To resolve this problem, you need to update your browser.
  • Add-ons interference – Some Firefox extensions or add-ons may be hindering webcam access. To fix this issue, you need to ensure you have installed only the essential add-ons. 

If you suspect that any of the above reasons could be the cause of your webcam woes, proceed to try one or more of our recommended solutions.

Quick Tip:

You can try using your camera in a different browser. If the issue is not related to your camera device, the quickest way to access it is from a different, more responsive browser, such as Opera One.

It’s a secure and responsive browser with easy settings for your webcam. You can create personalized permissions and easily disable and enable your webcam in just a few clicks.

Opera One

Make seamless video calls with this error-free browser!

What can I do if my webcam isn’t working in Firefox? 

1. Update your browser

  1. Launch your Firefox browser and click on the three horizontal ellipses in the top right corner.
  2. Select Help.
  3. Click on About Firefox.
  4. If your browser is up-to-date, you will get the following dialog box.

2. Run camera troubleshooter

  1. Hit the Windows key and select Settings.settings-option oops thre was an error
  2. Go to System and click on Troubleshoot.
  3. Select Other troubleshooters.Other troubleshooters
  4. Click on Run next to the Camera.
  5. Wait for the process to finish and apply the recommended fixes.

3. Disable extensions

  1. Launch your Firefox browser and click on the three horizontal ellipses in the top right corner.
  2. Select Add-ons and themes.
  3. Disable the suspected extensions and reload the tab.

4. Update drivers

  1. Hit the Windows key, type Device Manager in the search bar, and click Open.
  2. Navigate to Imaging devices, right-click on your camera, and select Update driver.
  3. Select Search automatically for drivers.

To avoid such problems in the future, use a dedicated driver updater to automate the task. We suggest Outbyte Driver Updater. It’s a very simple utility that scans all your drivers and installs new, up-to-date versions as soon as they are released.

5. Disable hardware acceleration

  1. Launch your Firefox browser and click on the three horizontal ellipses in the top right corner.
  2. Select Settings.firefox-settings firefox freezing windows 11
  3. Click on General, scroll down to Performance, and uncheck Use recommended performance settings.
  4. Next, uncheck Use hardware acceleration when available.

How do I test my webcam in Firefox?

The easiest way to test the webcam is by using a web application like Skype or Google Meet. Simply go to the site and click on the Test your camera button. You’ll then see a live video feed from your webcam and some buttons for taking photos or videos.

If you can see yourself, your webcam works just fine; if not, there may be a problem that needs to be addressed.

Alternatively, to save on time, you may opt for Webcam testing tools that will test the quality and recommend troubleshooting steps in case of a problem.

How do I enable Web camera permissions?

  1. Launch your Firefox browser and click the three horizontal ellipses.
  2. Select Settings.
  3. Navigate to Privacy & security, scroll down to Permissions, and select Settings under Camera.
  4. Uncheck the Block new requests asking to access your camera option, then click on Save changes.

Should you encounter a similar problem where your webcam is not working in Chrome, please refer to our guide on how to fix it.

If you have tried all our recommended solutions, but your camera is still not working, perhaps it might be time for an upgrade. You can check out our rich library of high-quality webcams to find one that is compatible with your device.

Let us know of any other solutions not mentioned above that may have worked for you in the comments section.

6 Best Browsers for QuickBooks Online [Fully Supported]

Managing your finances requires you to use a good service, and that service is QuickBooks for most users.

Although this service is excellent you’ll need a reliable browser to use it, as the official browser for QuickBooks is considered to be a potential security risk due to the end of support starting from June 15, 2022.

and in today’s article, we’ll show you the best browsers for QuickBooks.

Does QuickBooks Online work on all browsers?

Unfortunately, QuickBooks Online doesn’t work on all browsers, but for the best experience, you should choose from the following list:

  • Opera One
  • Chrome
  • Firefox
  • Safari 6.1 or higher

When it comes to mobile devices, it is recommended that you choose one of the following options:

  • Opera Mini
  • Safari (iOS 7 or higher)
  • Chrome (Android 4.2 or higher)

Why is QuickBooks Online so slow?

Even though QuickBooks Online is a web-based service, it also uses your device’s processor, RAM, and also the bandwidth of your Internet connection.

If any of these elements are not up to the requirements of this app, QuickBooks Online will run very slowly.

You can try and improve performance by applying these methods:

  • Change your browser and make sure it’s fully updated
  • Update your OS to the latest stable release
  • Make sure you adhere to the system requirements for this app
  • Test your network speed and bandwidth

These steps will also allow you to tweak any features that might be lagging or simply invest in a more powerful device.

Let’s jump into the best browser recommendations to use with QuickBooks Online.

Which browser is best for QuickBooks Online?

Opera One – The best browser for QuickBooks Online

If you need a reliable web browser for QuickBooks, Opera One is the right choice for you. It has fraud detection features that will protect you from malicious websites.

The browser also has phishing protection, which will prevent hackers from stealing your credentials and other sensitive information. For another layer of security, there’s a built-in VPN with unlimited bandwidth.

Another feature that can come in handy if you’re working with finances is the unit converter. This feature works with currency, time zones, and measurement units, so it will most likely be useful to you.

Opera One also supports a wide array of extensions, so you can easily enhance the browser and customize it any way you want. As you will not be comfortable allowing the QuickBooks browser to be outdated, your app will run smoothly.

With its focus on security and features such as tracking and malware protection, Opera One will be one of the best choices for QuickBooks or any other accounting service, so we strongly encourage you to try it out.

Notable Opera One features:

  • Built-in adblocker that will speed up a website’s loading speed
  • Free VPN with unlimited bandwidth
  • Malware and phishing protection
  • Ability to organize tabs into workspaces
  • A customizable home page that works with RSS feeds

Opera One

Need a reliable web browser to perform your QuickBooks tasks? Get better control of your finances today.

AVG Secure Browser – Private enough for banking

The browser from AVG is the right place when it comes to online transactions and banking activities.

If you need to ensure that accounting tasks on QuickBooks are totally safe, the high-privacy navigation will help you keep any data secured.

With the AVG browser, you have anti-tracking technology for blocking web monitoring or data collecting on different websites.

More so, there is an automatic ad-blocker and seamless antivirus integration to detect emerging malware and the in-built VPN for more online security.

You should be aware of the banking mode which is designed to encrypt personal data while using this accounting tool.

Notable AVG browser features:

  • Forced HTTPS web encryption
  • Anti-tracking cookies
  • Privacy cleaner to cover browsing data
  • Stealth mode

AVG Secure Browser

Do your accounts on Quickbooks from this thoroughly private browser.

Mozilla Firefox – A large set of useful extensions with good privacy

Another great browser that can be used for accounting is Firefox. This application is open-source and made by a non-profit organization, so you can rest assured that your data won’t be sold to third parties.

The browser comes with Advanced Tracking Protection, which will prevent websites such as Facebook from tracking you. By using this feature, Firefox will also block ads and make pages load faster.

Notable Firefox features:

  • Privacy-focused
  • Customizable user interface
  • Support for hundreds of extensions
  • Low memory usage
  • Firefox Monitor feature that lets you know if your online accounts are compromised

⇒ Get Firefox

Google Chrome – The largest set of extensions but heavy on CPU and RAM

Google Chrome is probably one of the most used browsers in the world, and a solid choice for accounting. The browser is optimized to work with multiple tabs, so it’s perfect for multitasking.

Google Chrome has a built-in ad blocker, and its malware detection feature will provide you with an extra layer of security. The biggest strength of Chrome is its extensions, and you can customize it with thousands of available extensions.

Notable Google Chrome features:

  • Built-in password manager
  • Available on all major platforms
  • Ability to sync your data on all devices using Chrome
  • Frequent updates
  • Malware detection

⇒ Get Google Chrome

Microsoft Edge – A fast browser with limitations or privacy

Microsoft Edge was recently revamped and it now runs on the Chromium engine. In addition to the new browsing engine, Edge also got a new and sleek design.

Another new feature is the Profile feature, which will come in handy if you’re sharing your PC and browser with others.

The browser has the ability to block tracking cookies, and thanks to the Microsoft Defender SmartScreen you can easily detect malicious websites.

Notable Microsoft Edge features:

  • Support for Chrome extensions
  • 4K streaming support in Netflix
  • Available on Windows, macOS, iOS, and Android
  • Immersive Reader feature
  • Customizable home page

⇒ Get Microsoft Edge

Brave Browser – Privacy-oriented to protect your banking information

Brave Browser might be the right choice if you’re looking for a privacy-oriented browser. This browser has a built-in ad blocker and tracking protection, so you won’t ever have to deal with ads.

Brave Browser also has built-in Tor support that lets you anonymously surf the Web. Additional features include digital fingerprint protection, the ability to block scripts, and a built-in password manager.

As for availability, Brave Browser is available on all primary desktop and mobile platforms.

Notable Brave Browser features:

  • Privacy-oriented
  • Tor support
  • Support for Chrome extensions
  • Advanced tab management
  • Advanced cookie control

⇒ Get Brave Browser

QuickBooks is one of the best accounting services, and it’s even better if you use it with the right browser. So what browser do you use for accounting? Let us know in the comments below.

Discord Has No sound in Browser: 3 Quick Ways to Fix It

Discord is the most used chat app by gamers that help them communicate via text and voice.

It’s frustrating being in the middle of a game, trying to communicate something, only to realize that you can’t hear a voice while using the chat on Discord in the browser.

The error can appear in various ways, including Discord notifications not working in the browser, absolutely no sound while streaming Discord in your browser, Valorant sound not working with Discord, or the fact that you can’t hear anyone on Discord in the browser.

If you face one of these issues, know that you are not alone. That’s why we have gathered a list of possible solutions in our guide that will help you solve this problem in no time.

Why is Discord not playing any sounds in my browser?

  • The app is down – Keep in mind that there might be a problem with the Discord servers. Don’t worry; you can always check their status, and you’ll see how a bit later.
  • Your browser doesn’t allow microphone usage – To play sounds in the browser while running Discord, you should ensure that your mic has access to the browser you’re trying to use.
  • Incorrect output device settings – This cause is pretty obvious. Fortunately, you can quickly check and configure it from the Discord settings menu.
  • Problems related to your main browser – Last but not least, keep in mind that your browser might not be compatible with such apps. We strongly recommend using an efficient browser dedicated to Discord.

Quick Tip:

Before moving forward and presenting our solutions, we suggest you another browser designed mainly for gaming and streaming.

Although other browsers are good, Opera GX is one of the most useful because it comes with features like Discord and Twitch integration, fast mobile browsing, and many more. For example, no Discord sound issues in Opera GX aren’t a thing to worry about.

Even more, thanks to the GX Control panel, you will have access to a CPU, RAM, and bandwidth limiter. That means your browser will never interfere with your gaming sessions.

Opera GX

Navigate freely on this particular browser while talking with friends on Discord.

What can I do if Discord is not playing any sound in browser?

1. Check the server status

A quick way to see if the Discord sharing screen with no sound on your browser problem is on your side or not is to check the Discord status.

On their site, you’ll be able to see if there are any outages announced. In case there are, know that this can cause your audio not to be working correctly.

All you can do in this situation is wait for them to fix the issues on their side and resume using Discord. If Discord is still not playing any sounds in your browser, make sure you keep on reading.

2. Check your browser settings

2.1 Chrome

  1. Hit the Windows key, type Chrome, then open the first result.
  2. Click on the three vertical dots from the top-right corner of the window, and navigate to Settings.
  3. Go to Privacy and security and click on Site settings.
  4. In the Site settings option, select Microphone.
  5. Make sure the Sites can ask to use your microphone option is checkmarked.

2.2 Mozilla Firefox

  1. Hit the Windows key, type Firefox, then open the first result.
  2. In the right-top corner of the window, click on the 3 horizontal lines to open the More menu.
  3. Go to Settings.
  4. From the left window pane, select Privacy and security.
  5. Now, scroll down in the right window pane until you find the Permissions section.
  6. Click on the Settings button next to the Microphone section.
  7. In the Search Website bar, search for Discord, then click on it.
  8. Click on Save Changes.

2.3 Microsoft Edge

  1. Hit the Windows key, type Edge, then open the first result.
  2. Look at the top-right corner of the window, then click on the 3 horizontal dots.
  3. In the left window pane, navigate to Cookies and site permissions.
  4. Now, scroll down on the right side of the window, then click on Microphone.
  5. In the Allow section, make sure you have Discord.

As you can see, we presented three series of steps, depending on the browser you’re using. We ensured to deliver solutions to the most popular options.

Of course, if you didn’t find your main browser in the methods above, we recommend searching for the support page and checking how to allow mic for usage to forget all about Discord audio not working in your browser.

3. Use the correct Output Device

  1. Hit the Windows key, type Discord, then open the first result.
  2. Click on User settings (in the right bottom of the window).
  3. From the left window pane, select Voice & Video.
  4. Under Output device, choose your preferred device and ensure the output volume is not 0.

Browsers require user interaction before they will play audio on Discord

Double-check that your browser is compatible with the app if you use Discord on your web browser. As described above, you should also adjust the browser’s permission settings to ensure you have allowed the app to use the microphone.

If you have already applied these steps and made no difference, consider giving your Discord web client and browser a fresh start. A simple restart can rule out any temporary glitches that might have caused the issue.

You may even restart your PC or launch the Windows Remote Shutdown Dialog from CMD and use it to restart a remote computer. Then, open your Discord app to see if everything works as it should.

As a final tip, consider joining other servers and channels and check if the sound problem persists. In such a case, contact the server admin with the requirement to enable these two voice permissions: Connect and Speak.

If Discord is not playing sounds in your browser, these are the easiest ways to fix it. As you can see, the fixes imply only a few simple steps to apply.

Following our recommendation, you will regain audio access on Discord when using your browser in no time. To further enjoy streaming with family or friends, also try out the best Discord extensions.

As for those times when Discord screen share has no audio, fortunately, you can refer to our guide as well and learn how to easily fix it.

Let us know which solutions worked best for you; we would love to hear them.

6 Ways to Fix Memory Leaks in Firefox [Windows 10/11]

Did you experience a Firefox memory leak? Let us show you how to fix it.

Firefox is one of the most popular browsers today, but even this stable, user-friendly browser could cause some problems.

After some time, Firefox could start to take more memory than it should, but we’ll tell you how to solve this problem.

Making sure your browser is up to date and disabling the plugins seems helpful.

This article compiled a list of solutions to help you fix Firefox’s high memory usage in Windows 10.

Why is Firefox taking up so much memory?

Sometimes the issue is with an old or outdated internet browser. You should update your browser immediately if it has not been updated. 

The problem is often brought on by faulty data or excessive caching. However, add-ons and specific browser settings also influence Firefox’s behavior on your system.

Changing the theme might potentially result in Firefox consuming too much RAM, in addition to several other issues we will cover in the following section.

How much RAM should Firefox use?

It is impossible to put a cap on RAM use since it will depend on what activities are carried out on a browser.

Suppose all you do with your browser is read articles on the web. In that case, you will be using minimal RAM as opposed to if you are streaming videos, playing graphic-intensive games, performing online video edits, etc. In fact, many users have complained of a Firefox YouTube memory leak.

You should, however, regularly consult your Task Manager to know when there are abnormal changes or spikes in RAM use.

How do I turn off multiple processes in Firefox?

  1. Switch to another browser
  2. Update Firefox
  3. Disable your plugins
  4. Check Firefox preferences
  5. Use fewer tabs
  6. Use the Minimize memory usage button

1. Switch to another browser

Millions of people worldwide chose Opera One for its speed, privacy, and the new features that allow them to work and browse faster and more efficiently.

With this browser, you do get more time and speed by being able to organize your tabs and workspace in a manner that is not even more time-consuming.

You can switch to Opera One fast; the download takes only a couple of seconds, and you’ll have the browser installed on your device in no time.

Using Opera’s unique functionality, you can automatically import all your browser info, install Chrome extensions and begin browsing immediately.

The more tabs you open in your browser, the less memory is available. With Opera’s Workspaces functionality, you can organize your tabs based on interests or personal/professional searches. It’s only up to you which categories you want to create.

Workspaces will allow you to navigate smoothly through your browsing history, find faster what you are looking for, and save more memory by closing all the other tabs you don’t need.

Opera One

If you want to work faster with a reliable browser that allows you to organize tabs and workspaces, this is it.
Free trial Download

2. Update Firefox

  1. Click the Menu icon in the top right corner and choose Help.
    Firefox memory leak
  2. Choose About Firefox from the menu.
    Firefox can't type in text fields
  3. If any updates are available, they will be installed automatically.
    Firefox memory leak

Once you notice a Firefox memory leak, an update should be your first resolution attempt.

3. Disable your plugins

  1. Launch the browser.
  2. Click on the Menu icon and select the Add-ons and themes option.
  3. Toggle off the individual switches in front of each extension.

You can also disable or delete some unnecessary plugins and add-ones because they also could use a lot of memory.

Disabling unnecessary add-ons and plugins proved to be the best guard against a Firefox memory leak. But, of course, if it turns out that you need some of the disabled add-ons, you can always re-enable them.

4. Check Firefox preferences

  1. Type the link below in the Mozilla Firefox Address bar and hit Enter.
    about:config
  2. The following warning might appear, Proceed with Caution, ignore the message, and click on Accept the Risk and Continue button.
    Firefox memory leak
  3. Click the Show all option at the top of the page.
  4. In the Search preference name search field, search for the elements below and adjust their values to 0 (by double-clicking on them and entering 0).
    • browser.cache.memory.capacity
    • browser.sessionhistory.max_total_viewers
    • browser.sessionstore.max_concurrent_tabs
      firefox memory leak
  5. In the Search preference name search field, search for the elements below and adjust their values to False and Disable respectively, by double-clicking on them and entering the required values.
    • browser.cache.memory.enable
    • browser.tabs.animate
      firefox memory leak
  6. As you did in steps 4 and 5, set the values below to True.
    • javascript.options.jit.chrome
    • javascript.options.jit.content
    • network.dns.disableIPv6
    • network.http.pipelining
    • network.http.proxy.pipelining
    • plugin.expose_full_path 
  7. As you did in steps 4 and 5, set the values below to 5, 8, and 0, respectively.
    • content.notify.backoffcount
    • network.http.pipelining.maxrequests
    • ui.submenuDelay

You can reduce Firefox memory usage by tweaking the about:config settings.

5. Use fewer tabs

Most Firefox users open only a few browsers at the same time. However, having around 100 tabs open at once may trigger a Firefox memory leak. Try to close the tabs that you’re not using actively.

6. Use the Minimize memory usage button

  1. Launch Mozilla Firefox Browser.
  2. In the Address bar, type in the address below and hit Enter.
    about:memory
  3. Under the Free Memory tab, click on Minimize memory usage.

How do I turn off multiple processes in Firefox?

  1. Launch the browser.
  2. Type the address below in the Address bar and hit Enter.
    about:performance
  3. Click on any of the processes you want to end and click the close (X) icon.
    Firefox memory leak

As simple as it looks, these methods work. Don’t forget always to update your version of the browser you are using.

You also should know that the more powerful computer you have, the more memory Firefox will use.

Note that most of these solutions have been done on the Windows OS, but the exact solutions will typically work for a Firefox memory leak on Mac.

So you shouldn’t think that you’ll surely avoid memory leaking problems with Firefox if you have more memory in your computer.

That would be all; if you have any suggestions, comments, or maybe other solutions to a Firefox RAM leak, we would like to read your thoughts in the comments section below.

10 Best Browser Start Pages to Customize Your Workspace

Let’s take a look at some of the best browser start pages to kick your productivity up a notch. Your browser is where you spend most of your time, so why not make the most of it?

A custom start page can speed things up and help you access everything you need in a snap. Whether you want quick links, news, or weather updates, there’s a start page for every need. Let’s dive in.

What’s the best browser homepage? 

1. Bonjourr – Lightweight start page for Chrome

Bonjourr is a lightweight, customizable, and beautiful homepage for Chrome designed to be both functional and beautiful.

You can choose from thousands of wallpapers and set your custom color. Instead of a monotonous background all through, it has an elegant design, with changing backgrounds.

Additional features:

  • Has a dark mode
  • Supports multiple devices
  • Customized name greeting
  • Supports multiple languages
  • Compatible with most search engines

⇒ Get Bonjourr

2. Minim – Smart start page for Chrome

Minim is a start page for Chrome that lets you easily open your favorite sites and apps, browse the web, and stay up to date with the latest news and weather.

It’s simple, smart, and beautiful without being intrusive. Users are always looking for start pages that enhance their productivity, so Minim does its job by being simple while still delivering useful features. 

Additional features:

  • Frequent wallpaper refresh
  • Does not collect personal data
  • Huge collection of background images
  • Quick links to your favorite sites

⇒ Get Minim

3. Tabliss – Feature-rich start page for Chrome

Tabliss is a feature-rich, minimalist, and elegant browser extension for Google Chrome. It helps you to save time and improve productivity by making your browsing experience easier and more convenient.

The built-in search bar allows you to search the web instantly without leaving the page you’re currently viewing. You can set your background to change as often as you like if you easily get tired of one image.

The Persist settings also allow your browser to set your current settings permanently so that you don’t have to edit them every time you open the browser.

Additional features:

  • Customized greetings that change at different times of the day
  • Different categories of quotes depending on your mood
  • Real-time weather forecasts
  • Customizable backgrounds
  • Count down timer for work hours

⇒ Get Tabliss

4. Netvibes – Highly customizable start page for Safari

Netvibes has a lot of features that make it one of the best start pages for Safari. It is a free web-based start page that allows you to customize your homepage the way you like it. You can add widgets such as weather, news feeds, calendars, and more.

The start page doesn’t just give you news, weather, and other information; it also lets you customize your home page with widgets that provide quick access to sites like Facebook, Gmail, and Twitter. 

Additional features:

  • Personalized widgets
  • Import your favorite RSS feeds
  • To-do list

⇒ Get Netvibes

5. Home Tab for Safari – User-friendly start page for Safari

Safari is a great browser, but its homepage can be a little bland. If you’re looking to jazz up your Safari’s home page and make it more useful, then Home tab for Safari start page is a great way to start your day. 

The best part about the Home tab is that it’s customizable. It has a clean, uncluttered look, and you can easily add the websites you visit most often. The Home tab also has other features that make it more useful than other web browsers’ home pages.

Additional features:

  • Accessibility feature
  • Dark mode theme
  • Custom greeting
  • Countdown timer

⇒ Get Home Tab for Safari

6. Protopage Start Page – Privacy-focused start page

Protopage is the ultimate replacement for your default start page or homepage. It provides you with a customizable start page that looks like your desktop computer’s desktop. You can easily add or remove the links you want to see on your start page.

The extension doesn’t store your data or track your location, so you can enjoy the perks of private browsing with this extension.

Additional features:

  • Import News headlines from almost all websites
  • Create Sticky Notes on any items or web page
  • Read your own selection of news and blogs in one place
  • Keep bookmarks, to-do lists, and much more

⇒ Get Protopage Start Page

7. News Hub Kiosk – All-in-one news start page

News Hub Kiosk is a news aggregator extension that delivers a curated news feed to your browser. This homepage has been designed to give you a quick overview of how your country’s news is trending and be able to navigate directly to one of the highlighted stories.

It has some great features that make it easy to get the latest updates on any topic you’re interested in. You can read stories in full or just get a quick overview of what’s happening in the world with one tap.

Additional features:

  • Lightweight and low bandwidth consumer
  • Get notifications on topics that matter to you
  • Can be customized to show only the news you want
  • Easily share articles via the social link

⇒ Get News Hub Kiosk

8. SquarePage – Fastest start page

SquarePage is fast and useful as well. It has a minimalist design with just basic information on the left side of the screen, such as weather and maps, and other social platforms.

You can choose what information you want to see on your screen at any time by simply clicking on the edit button at the bottom-left corner of your screen.

The extension supports customizing the new tab by allowing users to change its background color, add an image or video to it, change the page title and even set it to open links in background tabs.

Additional features

  • Customize the new tab page with live images or personal pictures
  • Add folders as part of the homepage
  • Has a dark mode
  • Ability to add custom widgets
  • Huge library of background images

⇒ Get SquarePage

9. Live Start Page – Highly productive start page

Live Start Page is a free and open-source Firefox extension that allows you to add clocks and to-do lists to your browser.

One notable feature that most users will appreciate is the meditation mode. This is an interesting take on how to help people relax and focus their minds as they browse the internet.

Additional features:

  • Speed dial for quick links access
  • Different clock modes
  • To-do list organizer
  • Weather forecast

⇒ Get Live Start Page

10. Infinity New Tab Pro – Intuitive start page

Infinity New Tab Pro is an efficient tool for getting quick results from the web. It is designed to be fast and easy to use.

The main feature of Infinity New Tab Pro is its speed dial, allowing you to access websites you often visit in seconds. You can also add widgets such as weather, news, and email.

If you don’t like the default layout of Infinity New Tab, you can customize it to suit your needs. You can change its color, size, position, and style.

Additional features:

  • Fast access to most visited pages, bookmarks, history, and recent tabs
  • Beautiful themes with cool animations
  • Customization options to fit your style
  • Drag and drop feature

⇒ Get Infinity New Tab Pro

What browser startup page template can I use?

A browser startup page can be as simple or as complex as you like. It can contain just a few links to your most important pages, or it can be a full-fledged start page with news headlines, weather reports, sports scores, and more.

With that being said, there are some items that are a must-have on your browser start page. Below is a template you can use when setting up your start page:

WidgetUse
Quick linksPut your most-visited websites on the same page. This way, you’ll be able to access them quickly and easily, without having to visit each site separately.
Search bar Add a search bar to your browser home page. This makes it easy for users to search the web.
Weather widgetWeather is a common concern for many people. This can be an especially important feature for your homepage if you live in an area with severe weather conditions such as hurricanes or tornadoes.

News feed
A news feed is a great way to keep up with what’s going on in your city or town. If you have a favorite website that gives local news, add it as a widget so you can easily check it out anytime.
CalendarAdding a calendar to your homepage is another way of keeping up with events and appointments. You can also use this feature to help remember important dates, such as birthdays and anniversaries.
Social media widgetsThis is another way to get quick access to your favorite social networks without having to open up their apps every time.
Clock/timerThe timer is a great way to track how long it takes you to complete a task.

What is the default Homepage in most browsers? 

While you are still here, also check out our top recommended productivity apps that will help you remain focused and boost your performance.

We also have a rich list of email clients that ensure you stay on top of your game and stay on track of your to-do list.

Let us know which start page tickles your fancy and why in the comments section below.

How to Use Windows 11: Official Video Tutorials

It is true that changing an operating system is not as easy for some people, especially the ones that are either new to the world of PCs or the ones that have gotten used to the previous one.

Change can sometimes plunge some of us into a world of chaos and having the right tools for learning at your disposal can be crucial.

It’s the same with Windows 11, believe it or not, and people at the Redmond-based tech company have created some much-needed tutorials.

Learn faster about Windows 11 with these tutorials

As we said, Microsoft recently published a new video series called Meet Windows 11, which consists of three introductory videos describing how to do basic things in the latest OS.

The above-mentioned videos highlight personalization, apps, tools, features, and other capabilities that Windows 11 newbies may consider helpful.

Needless to say that experienced Windows users won’t really find anything interesting or special in these new videos.

Redmond developers stated that the series aims at those just starting out with Windows 11 or users looking for refreshers on making the most out of it.

And, as you would have imagined and hoped for, every video has a dedicated support page, making it easy to also read about the features instead of watching the video.

From watching the first video, titled The Basics, you will gain knowledge about simple things such as how to use universal search, essential shortcuts, accessibility features, and much more.

The video above, which is the second one, teaches about personalizing your experience by creating collections in Edge, changing desktop backgrounds, as well as Widgets.

Now, for most of us, these are pretty basic tasks, but you would be surprised how much this would help a Windows operating system newcomer.

And, since dealing with apps and tools can prove a bit tricky at start, especially if you don’t know your way around the OS, the third video shows just that.

Every new experience can prove tricky at first, but perseverance will be the difference between those that learn faster, and those that learn a bit slower.

We also have a ton of Windows 11-related articles that can teach you the operating system’s basics, as well as what to do when something goes wrong with it.

For those of you that didn’t know, Microsoft is now hosting a major Bug Bash event for its latest 22622.436 (KB5015888) Insider Build.

Also, you can check out our Patch Tuesday article for July 2022 if you want to see what the latest security measures taken have been.

Do you feel like Microsoft should create more such videos? Share your thoughts with us in the comments section below.
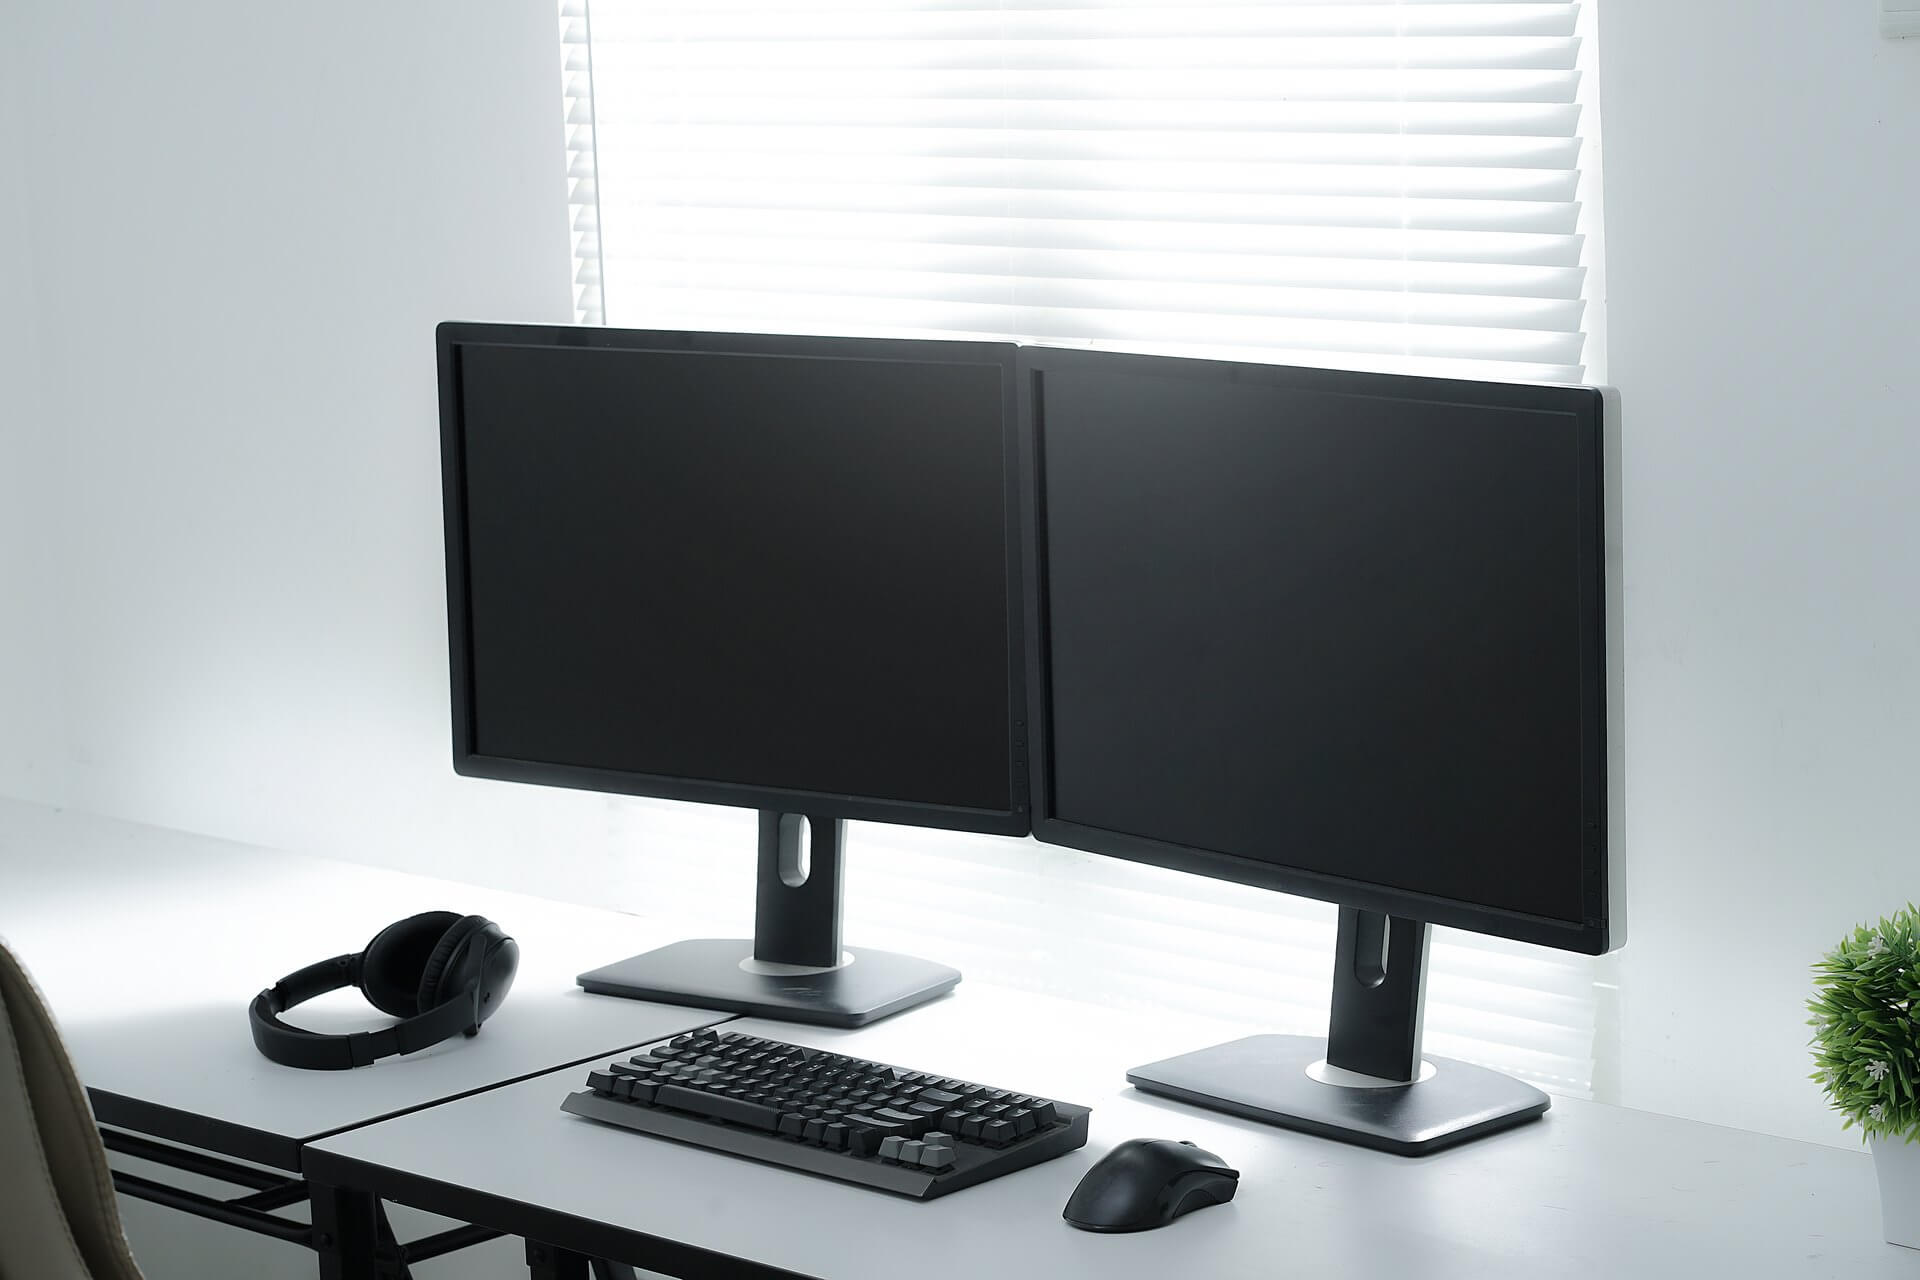
Microsoft starts Bug Bash for Windows 11 Build 22622.436 (KB5015888)

It’s been quite a while since we all participated in a good old-fashioned bug bash, so we’re here to let you in on the latest one.

When we say old-fashioned, we don’t mean dark ages old, so you can leave the torches and pitch forks at home, as we’re actually talking about a Windows 11 virtual bug hunt.

Today, Microsoft released two new beta builds for Windows 11 to the Beta Channel, in the form of Build 22621.436 and 22622.436 (KB5015888).

The latter comes with some interesting new features enabled, and Microsoft needs our help to test these features in order to prepare them for mainstream launch.

Microsoft kicks off KB5015888 Bug Bash

That being said, you’re running the above-mentioned Insider build for the Beta Channel, you can open the Feedback Hub to find a selection of Quests to try out and give feedback on.

We’re pretty sure you will want to join this event, so it’s our duty to tell you that you’ll need to get your machine updated fairly quickly because the Bug Bash will only run between July 20 and July 25 PDT.

The Redmond tech giant did not mention what participants would receive for their efforts, but in previous events, it has awarded Bug Bash stickers that appear in the Feedback Hub.

You are surely curious about what the tasks are, so don’t be discouraged, as we’re they are fairly run-of-the-mill activities.

Seasoned veterans will know that previous quests included things like accessing your Microsoft Account free benefits in Settings and easily finding the Settings you need via the Settings in-app search box.

Now, we know that a novice user could struggle with some tasks but, with a little bit of patience, these tasks will be done in no time.

As you can see, you don’t need to be extra tech-savvy to complete such a list, so go ahead and give it a try if you are running this build.

We all want Windows 11 to be a more complete, stable, and reliable experience, so let’s corner these pesky virtual bugs and give them hell.

Have you completed your July 2022 KB5015888 Bug Bash list? Share your experience with us in the comments section below.
5 Ways to fix Chrome if it’s Blurry [Text, Background, Images]

A good number of Windows 10 users have reported a blurry Google Chrome on their PC. We go through all the complaints and also suggest a few simple fixes.

Yet another Windows 10 problem is affecting users of the Chrome browser – now, a good number of them is reporting that the images and fonts look blurry in the Chrome browser. A while ago we were reporting that the mouse wheel was not working in the Chrome browser for some users and not it seems to be affecting the resolution.

Here are some of the complains from Microsoft TechNet:

I recently installed Windows 8 and i noticed that the screen puts a lot of strain on my eyes compared to Windows 7. It seems like the screen/text is blurry/fuzzy a bit putting strain on my eyes. It is not as crisp as it was in Windows 7. Almost too powerful? Anyone else experiencing this issue?

I updated Windows 8 to the Windows 8.1 Preview last night. I’m using a high-resolution Samsung SMS27A850 display (2560×1440).I noticed immediately that Chrome looks sort of blurry/fuzzy. It looked crisp in the previous version of Windows.

The solutions to these issues will be listed below in a step-by-step manner. Also, note that they can also help if you are experiencing the following problems:

  • Chrome font blurry – Sometimes the fonts seem blurry, and it can be caused by bad scaling. Adjust the settings to fix that.
  • Chrome text blurry – Entire pages can sometimes appear blurry, rendering them unreadable.
  • Chrome resolution blurry – Adjusting the resolution can sometimes lead to blurry UI elements. Fixing this problem is simple, and you just need to adjust your resolution.
  • Chrome looks blurry – At times, the entire Chrome UI can seem blurry.

Why is my Chrome background blurry?

There are multiple reasons for this, the most common being your font settings. In some instances, you can even have issues with your cache that can cause this problem.

Scaling features on your PC can lead to this issue, as well as third-party extensions, so be sure to make changes and adjust your settings accordingly.

Why is Chrome not displaying properly?

If you’re having this problem, it might be that you have issues with your cache, so clear it and try again.

It’s possible that your browser is out of date, so update it and check if that helps. In the worst-case scenario, you might have to reset or reinstall your browser.

Quick Tip:

If you’re going through the trouble of trying to fix blurry Chrome elements, then maybe you are someone that values visuals very much, if that is the case, then we recommend giving it a try to Opera One.

This tool is not only based on the same engine as Chrome but also it can use most of its extensions as well.

As for the visuals, you should know that Opera One boasts one of the most modern and lightweight designs among all browsers, and this can be further customized.

Opera One

Surf the Internet without any visual inconsistencies with one of the most modern web browsers on the market today.

How do I fix blurry Chrome?

1. Disable scaling

  1. Locate Chrome shortcut.
  2. Right-click it and choose Properties.
  3. Navigate to the Compatibility tab and check Disable fullscreen optimizations.
  4. Save changes.

That’s it! After doing that check if the issue with blurry Google Chrome is still there.

2. Clear your browser cache

  1. Open Chrome and then click on the three-dot menu.
  2. Select More tools and choose Clear browsing dataclear chrome cache cookies
  3. You can either choose a time range or simply select All time to delete everything
  4. Go to Cookies and other site data and Cached images and files, and check both boxes. Then click on Clear data.
    clear chrome data

If the problem persists, try clearing your cache and cookies. Keep in mind that this action may delete important browsing information so proceed carefully.

This can help you if Chrome is blurry on Wayland, so be sure to try it.

3. Check the font settings

  1. Click the Menu icon in the top left corner and select Settings.
  2. Now navigate to Appearance.
  3. Select Customize fonts.
  4. Now adjust your settings.

If you’re experiencing Chrome blurry text when scrolling, then the issue might be font settings. Adjust them and check if that solves the problem.

4. Uninstall Helvetica

  1. Click the Menu button, then select Settings.
  2. Select Customize your Chrome profile.
  3. Click on Uninstall.

Many users confirmed that uninstalling Helvetica fixed the problem.

So, if you already installed this extension on your browser, try removing it as soon as possible.

5. Reset Chrome

  1. Click on the three-dot menu and select Settings.
    firefox server not found
  2. From the menu on the left, select Reset and clean up.
  3. Click on Restore settings to their original defaults.

If nothing worked, you fix blurry Google Chrome with a browser reset. Keep in mind that by hitting the Reset button, you will delete all information stored by the browser.

How to fix blurred images in Google Chrome?

Disable GPU rasterization

  1. In the address bar navigate to chrome://flags
  2. Search for GPU.
  3. Locate GPU rasterization and set it do Disabled.

This is a simple workaround, but it might help you if you’re experiencing blurry downscaled images in Chrome.

If Chrome is blurry on Windows 10/11 then using the these solutions will surely help you fix the issue.

This problem can be caused by Chrome scaling and zoom issues but there are ways to fix those problems. Many also want to know how to unblur image on a website, and we have an entire guide dedicated to this issue.

Let us know which solution worked for you by leaving us a message in the comments section below.

What to play on Game Pass: Superhero Games

Don’t know what to play on Game Pass? With so, so many games across nearly every genre out there (and even a few that defy categorization) it can be tough to know where to start. Thankfully, we’ve got you covered with these Game Pass recommendations for those who have always wanted to play the superhero. Let’s get started.

Batman: Arkham Knight

Watch the trailer on YouTube

The fourth installment of the Batman: Arkham series, which includes some of the best superhero games ever made. Arkham Knight introduces the Batmobile as a gameplay element, allowing Batman to get around the open world of Gotham City.

The Batmobile is much more than a means of getting around though: it has a Pursuit Mode focused on driving challenges and a Battle Mode in which the Batmobile becomes a tank outfitted with its own special armory, including a Vulcan rotary cannon and anti-tank missiles. The Batmobile can also be upgraded for even more awesomeness.

Not only is Arkham Knight one of the best superhero game on Game Pass right now, it is also one of the most underrated games on the service, full stop.


Crackdown 3

Coming almost a decade after the release of its predecessor, the third game in the Crackdown franchise picks up where Crackdown 2 left off and goes further. It offers cooperative play in campaign as well as in the “Keys to the City” free-roam mode.

Time to step up your boom and stop crime as a super-powered Agent in Crackdown 3’s sandbox of mayhem and destruction. Explore the heights of a futuristic city, race through the streets in a transforming vehicle, and use your powerful abilities to stop a ruthless criminal empire.


Injustice 2

Watch the trailer on YouTube

We already discussed Injustice 2 in our “What to play on Game Pass: Fighting Games” post, but we thought it would also be worth a mention here. Injustice 2 gathers all your favorite characters from the DC Comics universe – Batman, Wonder Woman, Harley Quinn, The Flash, and many others – and pits them against each other in this glorious fighter.


Marvel’s Avengers

Developed by Crystal Dynamics and published by Square Enix, this Marvel-themed beatemup supports up to four-player online cooperative play. The game features characters, costumes and abilities from “all corners of the Marvel Universe,” including the comic books.

The plot centers around Kamala Khan (recently of Miss Marvel fame, from the television series). Without giving it away, Kamala is tasked with reassembling the disbanded Avengers team to take down an A.I.M. scientist who wants to eliminate all Inhumans.

Marvel’s Avengers is a solid choice for brawler fans, and practically a must-play for Game Pass members who happen to be Marvel fans.


Marvel’s Guardians of the Galaxy

Watch the trailer on YouTube

In this game players take control of Peter Quill (Star-Lord) and his elemental guns. The other members of the GotG team are present in non-playable form: Gamora, Groot, Rocket Racoon and Drax the Destroyer. Each has their own unique special abilities, and can be issued basic commands when the player enters Guardians mode whilst in combat.

Though not exactly a non-linear experience, Marvel’s Guardians of the Galaxy blends action and exploration to great effect. It is definitely a worthwhile undertaking for fans of the Marvel Universe.


Wrap up

So there you have it: the best superhero offerings on gaming’s best service. What do you think of the games featured here? Are there any personal favorites on this list? Let us know in the comments section below.

If you don’t already have a subscription to Xbox Game Pass, you can sign up here. You can also learn more about Game Pass over on its FAQ page. And don’t forget to check out our other “What to play on Game Pass” posts for other Game Pass recommendations.


What Causes a Page Unresponsive Error in Chrome & How to Fix It

Google Chrome is the most popular browser among Windows users, and even though this browser has changed over the years, some common problems remain the same. The Page Unresponsive error on Chrome in Windows 10 is one of these.

Along with the error message, there will be a Kill pages button near the bottom-left in case you want to close the page.

Other similar issues encountered by the users include:

  • Google Chrome keeps killing my pages – Many users reported that Google Chrome is constantly killing their pages. If you encounter this issue, try to reinstall Chrome.
  • Chrome kill pages unresponsive – If your pages are unresponsive, the issue might be caused by one of your extensions. Therefore, disable unnecessary extensions or remove them and check if that helps.
  • Kill pages Chrome not responding – Many users reported that Chrome stopped responding after this message. Try to disable the Sandbox mode in Chrome.
  • Page Unresponsive. You can wait for it to become responsive or exit the page – Exiting and then reopening the page generally does the trick.

So, let’s find out all about the Page Unresponsive error on Chrome in Windows 10 and its most effective solutions.

Why is my Google Chrome unresponsive?

This problem can occur due to your Internet connection or a certain website script. If your Internet connection is slow, there will be issues loading certain scripts, making pages unresponsive.

In addition, many websites use multiple scripts, and sometimes it’s possible that one of those scripts is unresponsive.

The computer configuration can also cause this problem, especially since Google Chrome is a resource-intensive browser. If you open multiple tabs with several applications running in the background, it might lead to the Page Unresponsive error on Chrome in Windows 10.

The Page Unresponsive error causes data loss in some cases. But fortunately, there are a few solutions that would help get rid of the error in no time.

Quick Tip:

Now would be a great time to make a switch to another browser with all your saved data from Chrome. Opera One has gone through a complete overhaul, with constant updates and improvements.

Opera One is also privacy-oriented and the user experience can be pleasant, thanks to the easy interface and workspace management to avoid clogged pages you visit.

Opera One

Allow different perspectives and try a brand-new browser when Chrome is unresponsive.

How do I fix unresponsive pages in Chrome?

1. Remove Trusteer Rapport

If you’re getting a Page Unresponsive error on Chrome in Windows 10, Trusteer Rapport might be the problem. This security software can sometimes interfere with your browser and cause this issue to appear.

To fix the problem, it’s advised to uninstall the program from your PC completely.

There are several ways to do that, but the best way is to use effective uninstaller software.

In case you’re not familiar, uninstaller software is a special application that can remove any program from your PC. It will remove all files and registry entries associated with the application you want to remove.

It’s better than a regular uninstallation because it performs a deeper scan and finds various leftover files. These files are scattered all over the disk, so they take up useless space.

Once you remove the problematic application, check if the problem still persists.

If Trusteer Rapport was the problem, you should consider switching to a different antivirus solution that still offers the best protection.

There is no shortage on the market so look for the very best you can afford while making sure it has an award-winning virus detection engine.

The newest antivirus tools combine artificial intelligence and machine learning to successfully detect malware without the need to download virus signatures. TotalAV is no exception to the rule.

2. Turn off Sandbox mode

  1. Locate the Google Chrome shortcut, right-click on it, and choose Properties from the menu.
    Google Chrome keeps killing my pages
  2. Go to the Target field and add the following to the end after a space:–no-sandbox
  3. Your Target field should look like this after making the change:C:Program FilesGoogleChromeApplicationchrome.exe" –no-sandboxadd sandbox
  4. Once you’re done, click Apply and OK.OK

If the Page Unresponsive error keeps popping up on Chrome in Windows 10, disabling Sandbox might help. In case the error persists, head to the next method.

3. Disable third-party cookies

  1. Open a new tab in Google Chrome, paste the following path, and hit Enter:chrome://settings/content
  2. Click on Cookies and site data.Cookies and site data to fix page unresponsive chrome windows 10
  3. Select the Block third-party cookies option.block

Disabling third-party cookies isn’t the best solution, especially because some websites rely heavily on cookies.

But if you’re frequently getting Chrome’s Page Unresponsive error in Windows 10, you might want to try this solution as a potential workaround.

4. Delete/rename the Default folder

  1. Press Windows + E to launch File Explorer, paste the following path in the address bar, and hit Enter. Make sure to replace Username with the actual account name in your case.C:\Users\Username\AppData\Local\Google\Chrome\User Data
  2. Inside the User Data folder, you should see a Default folder. Rename it to Default Backup or delete it.
    Kill pages Chrome not responding
  3. Close the File Explorer and relaunch Chrome.

5. Use a High-Performance profile

  1. Press Windows + S and enter power settings. Select Power Options from the menu.
    Kill pages Chrome not responding
  2. Select Additional power settings.
    Chrome kill pages unresponsive
  3. If the High performance plan isn’t available, click the Show additional plans option, and then select High Performance.
    Google Chrome keeps killing my pages

Bear in mind that this profile will use more of your battery power, thus draining it faster, but you should achieve better performance while using it. Once done, check if the Chrome Page Unresponsive Javascript error in Windows 10 is fixed.

6. Disable hardware acceleration

  1. Launch Chrome, paste the following path in the address bar, and hit Enter:chrome://settings/system
  2. Disable the Use hardware acceleration when available option here.Disable hardware acceleration to fix page unresponsive chrome windows 10

7. Reinstall Chrome

  1. Press Windows + R to launch the Run command, enter appwiz.cpl in the text field, and click OK.appwiz.cpl
  2. Next, select Google Chrome from the list of programs, click Uninstall, and follow the on-screen instructions.Uninstall to fix page unresponsive chrome windows 10
  3. Once done, restart the computer for the changes to come into effect.
  4. Now, you can download Google Chrome from the official website, run the setup, and follow the on-screen instructions to complete the installation.

8. Check your extensions

  1. Launch Chrome, click on ellipsis near the top-right corner, hover the cursor over More tools, and then select Extensions.extensions
  2. A list of installed extensions will now appear.
  3. Now locate the disabled extensions you don’t use anymore, and click the Remove button.
    Chrome kill pages unresponsive
  4. When the confirmation dialog appears, click Remove to confirm.
    Kill pages Chrome not responding

Once you uninstall the old extensions, check if the problem persists.

If the issue is still present, some of the available extensions might be causing the problem. To find the problematic extension, you need to do the following:

  1. Repeat the steps from above and open the Extensions tab.
  2. Now disable all extensions by clicking the toggle icon next to them.Disable extension to fix page unresponsive chrome windows 10
  3. Once you disable all the extensions, restart Chrome.

If the issue doesn’t appear after restarting Chrome, it means that one of the disabled extensions was causing the problem.

To find the problematic extension, enable them one by one until you find the problematic one. Once you find it, remove the extension to solve the problem.

9. Consider using Beta or Canary versions

If you’re constantly getting the Page Unresponsive error on Chrome in Windows 10, you might consider switching to the Chrome Beta or Chrome Canary versions of the browser.

In case you’re not familiar, the Beta version is a version of Chrome that offers the upcoming features and patches. Therefore, if you’re having any issues with your version of Chrome, consider trying out the Beta version.

There’s also a Canary version available, which is more experimental and offers some upcoming features. This version is less stable than the Beta version but should offer the latest fixes.

10. Switch to a 32-bit version of Chrome

According to users, you might be able to solve this problem simply by switching to a 32-bit version of Chrome.

Downloading the 32-bit version of Chrome

It’s worth mentioning that the 32-bit version might not offer the same performance as a 64-bit version, so keep that in mind. This is just a workaround, but until a permanent solution is available, you might want to continue using the 32-bit version.

What is the Chrome cleanup tool?

The Chrome Cleanup Tool is a feature in the browser that allows you to check for harmful and malicious software and remove it. It’s effective and can help fix several errors with Chrome or the computer itself.

Chrome Cleanup Tool

The Chrome Cleanup Tool can be found on the following path:chrome://settings/cleanup

Also, there’s an option to send a report to Google regarding the malicious software or processes found on the computer. This helps Google stay up-to-date, but you can disable the feature.

The Page Unresponsive error on Google Chrome in Windows 10 can be a hindrance and cause various problems, but you should be able to fix it using one of our solutions.

Also, find out what to do if Chrome uses too much CPU.

Do let us know how it worked for you by reaching for the comments section below.

Fix: You Don’t Have Permission to Access Minecraft.net

Minecraft.net is the official website for the video game Minecraft where players can sign up and purchase the title. It’s also a one-stop shop for Minecraft-related news, fan creations, merchandise, and a helpful library of resources.

Having access to Minecraft.net is pretty invaluable so you can imagine not having access to the website to be pretty debilitating. There are multiple reasons as to why access denial occurred and this guide will help you overcome this.

Why do I not have permission to access Minecraft?

For starters, the website could just be under maintenance. This happens randomly so if you encounter this, just come back later. Other times, you may have to clear browser data.

We also recommend resetting your browser to solve this problem. Some people have complained that certain extensions and proxy server settings have caused access problems too.

This guide will show you on to fix this problem on Firefox and Chrome which are two of the most popular web browsers out there.

Quick Tip:

Instead of fixing this issue on Minecraft on your own, you have an easier alternative to change your browser to Opera GX.

This way, you have quicker and more flexible navigation for accessing joyful games features like GX Corner or system resources optimization.

Opera GX

Take this opportunity to utilize this flexible and fully secured browser to access Minecraft easily.

How can I fix you don’t have permission to access Minecraft.net?

1. Clearing out browser data

  1. On Firefox, press the CTRL, SHIFT, and DEL keys at the same time. This will open the Clear Recent History menu.
  2. In the new window, make the boxes next to Browsing & download history, Cookies, and Cache are checked.
  3. Click OK to erase everything.
  4. On Chrome, you can also press CTRL, SHIFT, and DELETE to open the Clear browsing data menu.
  5. Make sure the boxes for Browsing history, Cookies and other site data, and Cached images and files are checked off.
  6. Click the Clear button to erase everything.

2. Reset the browser

  1. In Firefox, type in about:support into the address bar and hit Enter on your keyboard.
  2. On the right-hand side, click the Refresh Firefox button.
  3. A window will appear telling you that resetting the browser will remove all your extensions and customizations. Essentially, the browser will return to its default settings.
  4. Click the red Refresh Firefox button.
  5. On Chrome, type in chrome://settings into the address bar and hit Enter on your keyboard.
  6. Click Reset and clean up on the left-hand menu.
  7. Click Restore setting to their original defaults in the middle.
  8. In the new middle, click the Reset settings button.

3. Disable extension

  1. Some people have complained that certain extensions cause the access problem. Dark Reader in particular has been known to cause a lot of problems.
  2. In the address bar, type about:addons into the address bar and hit Enter.
  3. Click the toggle switch next to an extension to disable it.
  4. Conversely, you can click the three dots next to the extension to make a context menu appear.
  5. Click Remove to get rid of the extension.
  6. On Chrome, type chrome://extensions into the address bar and hit Enter.
  7. Scroll down to the extension you want remove.
  8. You can either click the toggle switch to turn it off or click Remove.
  9. A small window will appear. Click the Remove button.

4. Disable proxy server

  1. Click the magnifying glass icon and search for Internet Options.
  2. Click the entry that appears.
  3. In the Internet Properties window, select the Connections tab.
  4. Click the LAN settings button located at the bottom of the window.
  5. Make sure the box next to Use a proxy server for your LAN is turned off. If it isn’t, click the box to turn it off.
  6. Click OK to close the window and finish.

How do I allow Minecraft through my firewall?

Sometimes your computer’s firewall will prevent you from playing Minecraft as it won’t recognize the game and see it as malicious. To get past this, you’ll have to give the game permissions in the firewall.

You can do this by opening Windows Defender Firewall and select the option that reads Allow an app or feature through Windows Defender Firewall. Click Change settings then Allow another app.

Find the Minecraft app on your computer and then click Add to give the game Firewall permissions.

Feel free to leave a comment below if you have any questions on Minecraft updates. Feel free to leave comments about guides that you’d like to see or other information.

Windows 11 Insider Builds 22621.436 and 22622.436 (Beta): A closer look

New build alert! Or, in this case, new builds alert, since Microsoft decided to launch two new Insider builds for the Windows 11 Beta Channel.

Yesterday we discussed the latest addition to Windows 10, which is Build 19044.1862, so it’s only right that we now focus on the latest operating system.

So, if you are ready and eager to find out more about what’s in store for your new favorite OS, let’s dive right into it and see what we’re dealing with.

What’s new with builds 22621.436 and 22622.436 (KB5015888)?

As Microsoft specified in the official blog post, today we are receiving Windows 11 Insider Preview Build 22621.436 and Build 22622.436 (KB5015888) to the Beta Channel.

  • Build 22622.436 = New features rolling out.
  • Build 22621.436 = New features off by default.

Keep in mind that Insiders who landed in the group with new features turned off by default (Build 22621.xxxx) can check for updates and choose to install the update that will have features rolling out (Build 22622.xxx).

Not to mention that the Redmond tech giant is also kicking off a Bug Bash for the Beta Channel starting tomorrow, so there’s a lot going on.

We’re about to go more in-depth and check out each individual of the above-mentioned builds, discovering all of the improvements, fixes, and known issues that come packaged.

Windows 11 Build 22622.436

We’re going to start with the fact that the discovery of devices under nearby share when sharing a local file from the desktop, File Explorer, Photos, Snipping Tool, Xbox, and other apps that use the built-in Windows share window has been enhanced by using UDP (Network needs to be set to private).

Bluetooth has also been added, to discover nearby devices, which means you will now be able to discover and share to more devices including desktop PCs.

Also, when sharing a local file from the above-mentioned sources that use the built-in Windows share window, you can choose OneDrive as a target to directly upload the file to OneDrive and share it further along with access control options.

Know that absolutely all this can be done right from sharing local files in File Explorer without any context switches or opening the OneDrive app.

Note icon NOTE
This feature is currently only available for Microsoft accounts. A user will need to switch to their Microsoft account via the top right profile icon in the share window if logged in via AAD. AAD support will be added in a future update.

Changes and improvements

[Windows Terminal]

  • Windows Terminal is now the default terminal in Windows 11. This means, all command line applications will open in Windows Terminal automatically (Command Prompt and PowerShell, for example). The setting for this change can be found via Settings > Privacy & security > For developers. Please note that Windows Terminal version 1.15 or greater is required for this feature.

[Input]

  • You can now report animated gifs that you feel are inappropriate from the emoji panel (WIN + .)

Fixes

[File Explorer]

  • Fixed an issue where the tab order when using CTRL + Tab would be wrong if you’d rearranged the tabs in File Explorer.
  • Fixed an explorer.exe crash when dragging tabs around.
  • If “Show all folders” is enabled, the dividers in File Explorer’s navigation pane should no longer show. With this change, it should also address the issues where dividers were unexpectedly showing in some other folder pickers.
  • Opening a zipped folder in a new tab should no longer have a blank tab name.
  • Removable drives should no longer unexpectedly be displayed in a section by themselves in the navigation pane, which was breaking up the section with This PC and Network.
  • Fixed an issue where the add new tab button wasn’t clearly visible when using Aquatic or Desert contrast themes.
  • A faint line should no longer display between the current tab and the command bar.
  • Updated the tooltip when hovering over a tab to suggest using CTRL + W to close the tab (rather than CTRL + F4, which didn’t work).
  • If focus is on the tab row, CTRL + W will no longer unexpectedly close two tabs instead of just the tab in focus.
  • Fixed an issue where the tab row might unexpectedly expand vertically, covering the command bar contents.

[Start]

  • Fixed a Start crash which was impacting some Insiders on Build 22622.160.

Fixes included for Build 22621.436 & Build 22622.436

  • Fixed an issue that prevents troubleshooters from opening.
  • Fixed an issue that causes the Smart App Control to block catalog-signed files.
  • Fixed an issue that might highly distort photos you take using the Camera app. This issue occurs when using certain cameras under certain low light conditions.
  • Fixed an issue that throws an exception when you debug drivers using Visual Studio 2022 version 17.2 or later.
  • Fixed an issue that causes the Windows profile service to fail sporadically. The failure might occur when signing in. The error message is, “gpsvc service failed to sign in. Access denied”.
  • Fixed an issue that prevents virtualized App-V Office applications from opening or causes them to stop responding.

[General]

  • Fixed an issue resulting in a small number of Insiders in the Beta Channel experiencing cyclical crashes in Explorer.exe and other Windows UI components, making the screen look like it’s flickering. Please note, this fix should stop more Insiders from being newly impacted, however if you are already impacted by this, you will need to run the following command in PowerShell to resolve it: Add-AppxPackage -Register -Path C:\Windows\SystemApps\Microsoft.UI.Xaml.CBS_8wekyb3d8bbwe\AppxManifest.xml -DisableDevelopmentMode -ForceApplicationShutdown
  • Fixed an issue which was causing some Insiders on the previous Beta Channel flight to have their PCs stuck on a black screen after waking from sleep.
  • Fixed an issue which would lead to losing network connectivity after turning on mobile hotspot.
  • Fixed an issue causing Build 22621.290 / 22622.290 to fail to install with error 0x800f081f for some Insiders.

Known issues

[File Explorer]

  • The up arrow is misaligned in File Explorer tabs. This will be fixed in a future update.

These are the changes, improvements, fixes, and known issues that come with the two new Beta Insider Preview Builds 22621.436 and Build 22622.436 (KB5015888) for Windows 11.

Have you noticed any other issues after installing these builds? Share your experience with us in the comments section below.

TurboTax Won’t Let Me E-file Tax Return: 6 Ways to Fix It

TurboTax is a U.S. tax return application and web app widely utilized in the United States, providing excellent accessibility to its users.

However, some clients have said the same thing on the TurboTax support forum. TurboTax is not letting me file return forms – is what they claim – with the software or web app.

If TurboTax e-filing isn’t working for you, check out these proven solutions to resolve it quickly.

Does TurboTax allow you to file electronically?

Rest assured that TurboTax allows you to file your tax return electronically in a few simple steps. The process might sound time-consuming, but this is faster and safer than mailing your tax return since it’s transmitted electronically to the IRS computer systems.

We strongly recommend discovering how the TurboTax app takes care of tax returns and trying it.

Why can’t I e-file my taxes on TurboTax?

Several causes are related to this issue:

  • Browser-related problems – Since common characteristics of the browsers compatible with filing software are privacy and speed, make sure to choose one of the best browsers for Turbotax.
  • Cache and cookies – You may need to clear your cache and cookies, so make sure your return is saved in the account, sign out, then clear the cache and delete the cookies on your PC. Using a cookie cleaner tool will help you to free up space, then you may sign back into your account and try entering your information again.
  • An outage – If the TurboTax server is not found, there could be an outage. Check if the server has outage problems for everyone or just for you.

You should also pay attention to how you’ve filled the form, background software, or outdated TurboTax app (especially with so many users saying: TurboTax won’t let me e-file because of update). Let us guide you step by step and get rid of the issue in no time.

What can I do if TurboTax’s e-filing isn’t working?

1. Try a different browser

Opera turbotax won't let me efile

If you’re trying to e-file a return form with the TurboTax web app, try utilizing a different browser. Opera One is a highly-rated browser that’s compatible with TurboTax. In addition, it is a Chromium-based browser with two extension libraries and one of the most original designs.

When you switch to Opera One, you won’t miss Chrome or Firefox much as it incorporates many unique features. Its battery saver, built-in VPN, customizable Speed Dials, integrated YouTube player, and tab search tool are some of the Opera One features you won’t find in Google Chrome.

Other useful Opera One features:

  • It includes an integrated YouTube player within its sidebar
  • Let’s you create workspaces and tab islands
  • Opera One’s built-in ad blocker removes ads for faster browsing
  • Offers a native AI and modular AI-ready design

Opera One

Never encounter e-filling problems on TurboTax by using this great browser software today.

2. Check your tax form

You should double-check how you’ve filled out your return form. A few non-IT issues can stop users from e-filing their return forms. You can’t e-file a TurboTax return form if it:

  • It doesn’t include any taxable income
  • Includes non-final forms
  • Includes override (you’ll need to undo them)
  • Includes a W-2 in which box 16 has a value greater than box 1 or you leave box 1 blank
  • It contains schedules and IRS forms that aren’t among those accepted on the IRS Forms and Schedules list
  • The form is for amended or prior-year returns

3. Check if TurboTax is down

It might just be that TurboTax is down when you’re trying to e-file a return form. To check if there’s a general outage, open Downdetector for TurboTax.

That page tells you if there’s any notable TurboTax outage. If there is, wait a day or two, and then try e-filing your form again.

DownDetector turbotax won't let me efile

4. Update TurboTax

TurboTax won’t let me file without upgrading – that’s what some users claim, but before getting there, make sure your TurboTax software actually is fully updated by clicking its Online menu option. Then you can select the Check for Updates option on that menu.

TurboTax will then check for and install available updates. You can also manually update the Windows software via this TurboTax Help page.

5. Close all background software

  1. Right-click the taskbar to open a menu from which you’ll need to select Task Manager.
  2. Click the Processes Task Manager tab to select it.
  3. Select programs listed under Apps, and click the End task buttons for them.
    The Task Manager turbotax won't let me efile
  4. Some programs might be listed under Background processes. If you see any third-party programs listed, click their End task buttons to close them.
  5. Also, check if background programs are on your system tray (on the right of the taskbar). Right-click system tray programs and select the Exit options on their context menus to close them.

6. Clear your browser’s cache and cookies

Google Chrome

  1. Click the Customize Google Chrome button on the very far right of that browser’s URL toolbar.
  2. Select the More tools submenu.
  3. Then select the Clear browsing data option.
    Chrome's Clear browsing data tool turbotax won't let me efile
  4. Select the Cached images and files checkbox.
  5. Click the Cookies and other site data option to select it.
  6. Press the Clear data button.

Firefox

  1. Click the Open Application Menu button at the top right of Firefox.
  2. Select Settings on the menu that opens.
  3. Click Privacy & Security on the left side of Firefox’s Settings tab.
  4. Then press the Clear Data button to open the window in the snapshot below.
    Firefox's Clear Data tool turbotax won't let me efile
  5. Select the Cached and Cookies options on that window.
  6. Click the Clear button.

Edge

  1. Press the Alt and F keys at the same time in Edge.
  2. Click the Settings option on the menu.
  3. Then click Privacy, search, and services on the left side of Settings.
  4. Press the Choose what to clear button to open the tool below.
    Edge's Clear browsing data tool turbotax won't let me efile
  5. Select the checkbox for Cookies and other site data.
  6. Click the Cached images and files checkbox to select it.
  7. Press the Clear now button to erase Edge’s cache and cookie data.
Note icon NOTE
This resolution is specifically for users trying to e-file returns with the TurboTax web app. Also, note that cookies must be enabled in browsers so that the CAPTCHA appears.

Those resolutions for fixing TurboTax e-filing are undoubtedly worth a shot. However, if you still need other potential fixes, contact TurboTax’s support on its Contact Us page.

And since we know how challenging it is for business owners to do all the accounting work, we encourage you to check out the best tax filing software for small businesses.

Please let us know your pick in the comments area below.

How to Fix Server Not Found Connection Error in Mozilla Firefox

Sometimes Server not Found messages can appear in Firefox and prevent you from accessing your favorite websites. This can be a big problem, but today we’ll show you how to tackle this issue properly.

If you are using Mozilla Firefox, it is very likely that you have experienced the following error message:

Problem loading page. Firefox server not found.

As with all the error messages out there, troubleshooting this error is not easy and consists of several steps one must follow. First, we have to zero in on the cause to sort out this error.

However, if you prefer to stick to Firefox, follow the troubleshooting steps listed below to fix the Server not found error.

Why Firefox can’t establish a connection to the server?

This is a common problem that users face, and there are many reasons for it. On the top of the list are the following:

  • Bad internet connection
  • Wrongly configured network settings
  • Compatibility issues with app and antivirus

Note that some users have complained that the server is not found, but they are connected to the internet. Regardless of the situation, we should help you connect to your server in this article.

Quick Tip:

If nothing worked in your case using the Firefox browser, you are left with no choice but to consider the possibility of using a different browser.

We recommend Opera One due to its Chromium-based browser, extensive addon support, and lack of notorious resource use, making it one of the most lightweight browsers on the market today.

Opera One

Use this faster and private web browser, only limited by your Internet connectivity.

How do I fix the Server not found error in Firefox?

  1. Check your browser and Internet connection
  2. Check Firefox proxy settings
  3. Check Firefox proxy settings
  4. Disabling DNS Prefetching
  5. Check your antivirus
  6. Restart your modem/router

1. Check your browser and Internet connection

This is one of the most primitive yet effective methods of checking out why the problem loading page Firefox server was not found.

  • Check if the same website opens on other browsers; if not, check with other websites.
  • Ensure that the Internet security software and the Firewall settings are not hindering your connection. If you are connected but behind a firewall, the server connection may not go through.
  • If you are using a proxy server, make sure that the proxy server can connect to the internet.
  • Please follow the troubleshooting steps mentioned below if the website opens and renders correctly on the other browsers.

2. Check Firefox proxy settings

  1. Click the Menu icon (the three horizontal lines), and select the Settings option.
    firefox server not found
  2. Under the General tab, scroll down and click the Settings button under the Network Settings section.
    firefox server not found
  3. In case you don’t use Proxy Server, select No Proxy.
  4. If you connect via a Proxy Server, check the Proxy Settings with the other browser’s Proxy settings.
  5. Once done, click OK; all the changes made will be automatically saved.
    firefox server not found

Following this step is a proper way to check that Firefox has permission to access the web.

3. DisableDNS Prefetching

  1. Launch the Firefox browser.
  2. On the Address bar, enter the link below and hit Enter.
    about:config
    firefox server not found
  3. The following warning might appear, Proceed with Caution, ignore the message, and click on Accept the Risk and Continue button.
  4. Click the Show all option at the top of the page.
  5. In the search bar at the top of the windows, copy and paste the element below:
    network.dns.disablePrefetch
  6. Double click on the network.dns.disablePrefetch option, so the value becomes True.

Firefox uses DNS prefetching technology to render the web pages much faster; sometimes, this might play the spoilsport.

4. Turn off the IPv6

  1. Launch the Firefox browser.
  2. On the Address bar, enter the link below and hit Enter.
    about:config
    firefox server not found
  3. The following warning might appear, Proceed with Caution, ignore the message, and click on Accept the Risk and Continue button.
  4. Click the Show all option at the top of the page.
  5. In the search bar at the top of the windows, copy and paste the element below:
    network.dns.disableIPv6
  6. Double click on the network.dns.disableIPv6 option, so the value becomes True.

Firefox switches on IPv6 by default, and this tends to cause issues in specific scenarios. You can try disabling the IPv6 and then check if the problem loading page firefox server not found problem is solved.

5. Check your antivirus

This is a very peculiar problem; it usually happens when your Internet security software restricts Firefox from connecting to the internet. Also, remember that some of the internet security suites are capable of blocking access to the Internet despite being in an inactive state.

Also, try to add and remove Firefox from the list of trusted or recognized programs.

If your antivirus is the problem, perhaps this would be a good moment to consider switching to different antivirus software. There are various antivirus tools on the market.

You can indeed find a good Windows 10 and 11 compatible antivirus that will not interfere with your browser. All good antivirus software nowadays includes good Internet protection features.

6. Restart your modem/router

If you’re getting Server not found error in Firefox, you may fix the problem simply by restarting your modem or router. This issue can occur due to various glitches; to fix it, you should restart your modem/router. To do that, follow these steps:

  1. Press the Power button on your modem/router to turn it off.
  2. Wait for 30 seconds.
  3. Now press the Power button to turn the modem/router back on.
  4. Wait while the device boots.

Once your router boots, check if the problem is still there. I would also suggest Firefox users Clear Recent History and select Everything in the Time Range to Clear. Also, consider using cleanup tools like CCleaner and maybe uninstall and reinstall the Firefox browser.

The solutions listed above are equally great if you encounter the following issues:

  • When Firefox starts all of the open tabs say server not found – This happens when Firefox is set to open multiple tabs on startup but lacks connectivity to any of them.
  • Server is not found Firefox Ubuntu – This happens even when running Firefox on Ubuntu.
  • Firefox not connecting to the server – This usually happens due to server timeouts.

If you have read to this point, we believe you must have fixed this connection issue. Use the comments section to let us know which solutions worked for you.

2 Ways to Fix eBay if It’s Not Working Properly in Firefox

Firefox is among the best browsers for Yeezy Supply, eBay, and other online stores. It has numerous security features for keeping your details safe when shopping online.

However, users are complaining that eBay is not working or loading correctly on Firefox recently. This issue has been largely reported to be due to one of its security features.

To help you get back to closing deals on the top-notch online store, we have gathered proven solutions to fix this issue quickly.

Why is eBay not loading properly? The Firefox Enhanced Tracking Protection feature is the popular reason for eBay not loading correctly. This is because the feature blocks some files from eBay that it thinks are being used for tracking.

These files hold some of eBay’s core functionality, making it impossible to load the site properly. Another known cause of this issue is the activity of installed extensions.

These can be counter programs to eBay or simply an extension frustrating the website’s processes.

Which browser is best for eBay? The best browser for eBay is undoubtedly Opera One. While other browsers can claim the title, Opera One beats them to it, thanks to its excellent built-in features.

Also, you can use any of the recommended browsers for eBay on different devices. So, you are not short of options.

Quick Tip:

If you can’t make eBay work on Firefox with any solutions, you might need to try an alternative browser, namely Opera One. The browser comes with a built-in AI and amazing organizational features such as workspaces and tab islands.

It can deliver excellent browsing speed, ensuring a page is not stuck during a transaction. Plus, it has a built-in VPN that allows you to access products that might be unavailable in your country. 

Opera One

Navigate any e-commerce website like eBay using this extremely secure browser.
Free Download Visit website

What can I do if eBay isn’t working in Firefox?

1. Disable Enhanced Tracking Protection

  1. Visit the eBay website.
  2. Click the Shield icon to the left of the address bar.
    shield icon ebay not working firefox
  3. Toggle the switch before Enhanced Tracking is ON Protection backward to disable it.
    disable
  4. Wait for the site to reload automatically.

If eBay is not working correctly or loading on Firefox, it might be due to your browser’s security features. The Enhanced Tracking Protection interrupts the activities of any site with any noticeable tracking files. 

This might prevent eBay from working well. Disabling the feature for eBay alone should instantly fix the issue and might also fix the eBay 403 forbidden error that some of our readers encountered.

2. Restart Firefox in Safe Mode

  1. Launch Firefox and click the menu button.
  2. Select the Help option.
    help
  3. Choose the Troubleshoot mode… option.
    troubleshoot ebay not working firefox
  4. Click the Restart button when prompted.
    restart

Sometimes, it might be extensions or custom settings you have made to your browser that are causing the eBay not working on Firefox issue. Restarting in Safe Mode will automatically disable all extensions and themes and override your custom settings.

How do I remove the eBay search from Firefox?

If you have installed a search engine extension on Firefox, you might need to remove it to eliminate the eBay search. But if you don’t have such an extension, deleting the profile with the eBay search should do the trick.

You can miss many deals and offers when eBay is not working on your Firefox browser. Fortunately, it is not the most difficult issue, as shown in this guide.

Check out our list of secure online shopping tips for getting the best deals without compromising security.

Feel free to let us know if you could fix the issue with eBay on Firefox in the comments below.

5 Best WhatsApp Extensions for Sending Bulk Messages

WhatsApp is the most popular instant messaging platform. The app’s ever-growing popularity meant more and more brands now want to use WhatsApp as a marketing platform.

WhatsApp Web allows you to access your WhatsApp account on a web browser. However, the web app does not have an option to send bulk SMS, which is required for a marketing campaign.

WhatsApp extension for bulk messages allows you to connect with your customer on WhatsApp and send bulk messages. You can send messages daily, add intervals and do more.

In this article, we have put together a list of the best WhatsApp extensions for bulk messages that you can use to reach out to existing and potential clients.

Quick Tip:

Opera One browser comes with integrated messengers, thus preventing the hassle of installing third-party extensions. The WhatsApp in Opera One’s sidebar lets you send text and voice recordings and even make calls.

From sending documents and media to having a regular group chat, the WhatsApp shortcut on Opera One can do it all and more. All the WhatsApp notifications instantly appear on your sidebar, and you can interact without leaving the browser.

Opera One

Get quick and easy access to your Whatsapp messaging app directly from this privacy-inclined browser.

How can I send bulk messages on WhatsApp?

It’s not really as difficult as it may sound! You can use third-party software or install an extension on the browser to send bulk messages on WhatsApp.

The extensions available today are advanced and offer several customizations, including adding attachments, setting a delay between messages, and more. Though some of these features might be a part of the paid version.

Is sending bulk WhatsApp messages legal?

WhatsApp has stated on its FAQ Page that sending bulk messages through its app would attract legal action, though it offers the WhatsApp Business app to help businesses interact with clients.

So, it all comes down to what platform or extension you are using to send bulk messages and whether it can evade being detected by WhatsApp. But in all, sending bulk messages using a third-party platform is in violation of WhatsApp’s policies.

What are the best WhatsApp extensions for bulk messages?

WhatsWeb – Send messages to unlimited numbers

WhatsWeb is a Chrome extension for sending bulk WhatsApp messages from your browser. It allows you to send automated, customized WhatsApp messages in bulk.

As per the developers, the users can send messages to unlimited numbers. You can send images, videos, and documents directly from your browser.

You can further customize the app by setting random delays between messages. All the contacts can be imported through a .CSV file. So, use WhatsWeb to send bulk messages today!

⇒ Get WhatsWeb 

WAPSender – Send curated messages to clients

WAPSender is an effective Chrome extension to send bulk WhatsApp messages seamlessly from your browser.

It allows users to grow their business through WhatsApp marketing by sending curated messages to clients.

⇒ Get WAPSender 

WA Sender Free Bulk Messaging – Advanced solution

WA Sender Free Bulk Messaging is an advanced tool that not only allows users to send bulk messages but also to create groups with a single click.

It allows you to create a ChatBot on WhatsApp Web and seamlessly perform the functions. Also, with the Pro version, you get the option to add a delay between messages and add attachments, amongst other features.

⇒ Get WA Sender Free Bulk Messaging

WA Biz Free Bulk Sender – Add contacts manually or upload CSV files

An easy-to-use extension to send bulk messages on WhatsApp, it can help you send messages, attachments, and set auto-replies, amongst other features.

It offers the option to both add contacts manually or upload a CSV file. And you can send pictures, videos, links, documents, and contacts.

⇒ Get WA Biz Free Bulk Sender

WA Self Sender (Edge) – Option to add a delay

WA Self Sender is a free extension that allows users to send messages to individuals or in bulk through WhatsApp Web.

All you have to do is upload the CVS file with contacts, provide the message, and WA Self Sender will take care of the rest. Also, there’s the option to add a delay.

⇒ WA Self Sender

How to send bulk WhatsApp messages without getting banned?

There are two ways you can do that. If you are using WhatsApp to target a small section of users or engage with your client base, see if manually sending messages works.

In case that’s too hectic, you can always use the official WhatsApp Business App or Platform to send bulk messages without violating WhatsApp’s policies and Terms of Service.

WhatsApp extension for bulk messages can help you reach out to your audience with customized messages.

Also, you would find several Firefox Extensions as well to send bulk WhatsApp messages, like WAToolkit (Port).

However, the number of genuine WhatsApp bulk message extensions is very limited. Explore the list to find the one that works for you.

6 Best RSS Feed Readers For Windows in 2026

We take a look at the RSS reader options for Windows. These days, keeping up to date with news and updates is easier than ever, thanks to the concept of RSS reader.

RSS stands for Rich Site Summary and represents a family of web feed formats that relay frequently updated websites like blogs, news websites, etc.

Thanks to RSS feeds, users don’t have to check the websites regularly or subscribe to newsletters.

And people who have installed Windows 10 and 11 on their machines have the opportunity to use some handy apps that will manage the RSS feeds for all the sites users are interested in following.

Windows OS users may also be interested in reading about the Edge RSS reader.

Does Windows 10 & 11 have RSS?

Natively, Windows 10 and 11 do not have an RSS reader, meaning that it is not built-in with the OS. However, getting a suitable RSS reader on the Windows operating system is not a complex process. In this article, we show some of the best you can use.

How do I get an RSS feed in Windows?

One of the easiest ways is installing a browser with an RSS reader. If you do not want the load of a different browser, there are many applications from the Microsoft Store that you may rather install.

What to look for in an RSS reader?

  • Feed structures: A good tool should be able to organize the curated articles or feeds into well-defined categories.
  • Customizable: It must give enough room for your personalization. You should be able to modify the structure, look, and search requirements.
  • Keeps track of reading materials: An RSS feed should permit you to pick up from where you stopped reading regardless of the article type.
  • Powerful search feature: To find the articles or content you look for in just a few seconds, the RSS feed should have a perfect search structure that reduces your search to the tiniest possible queries.
  • Offers dedicated applications for your device(s): Especially for those that work both on computers and mobile devices, you may want a dedicated app that gives you notifications as soon as something new is curated.

Now let us discuss the best Windows 10 and 11 RSS reader options.

What are the best RSS readers for Windows?

Opera One – Best browser RSS reader

With Opera One, anyone can keep their personalized news and stories in one place, surfing the web securely without problems.

This modern browser is the choice for millions of users who need streamlined navigation and RSS feeds on their homepage.

You can benefit from selective news and customized sources in your preferred format. Plus, you get convenient and free access to your newsfeed integrated into the sidebar.

In this way, you can read every story or article in one glance on your categorized list of personal news.

If you wonder how to use the RSS feed on Opera One, it’s so simple you can do it with a click. You have the Add Sources button that will save your websites in one place.

In addition, you have many more benefits like different workspaces and pinboards to keep the information uncluttered.

Other key features of Opera One include:

  • Integrated apps in the sidebar (Instagram, Whatsapp, Messenger)
  • Built-in free VPN and ad blocker
  • Customizable news feed section on the homepage
  • Flow feature to transfer files between devices
  • Video pop-out functionality
  • Syncing news on different devices

Opera One

Take advantage of this organized browser and navigate through any stories using its practical RSS feed.

Feedly – Best RSS app with AI assistance

This news feeder is so advanced that it has its own AI assistant, Leo, to help you prioritize information. As you already know, getting your feeds from all the websites is no longer enough.

That is because the quantity of information can become overwhelming. That’s where Leo comes in to help.

The AI assistant will prioritize information in your feed based on your keywords, topics, and trends so that you only get the relevant information.

Moreover, Feedly will show you exactly why certain information appears in your feed so you can further refine your criteria.

Did you discover interesting information? You can share it with a click with your friends or with your team on the spot.

Feedly has a simple interface that lets you sort out your favorite sources based on topic.

It also supports sharing and integrates popular social media and collaboration tools.

If you are interested in using this tool, you should know that it offers 3 major subscription plans, each with its own specific features. The significant differences are the number of sources and the included integrations.

Other key features of Feedly include:

  • Dedicated mobile applications for iOS and Android
  • Lets you save your favorite sources
  • Adblocker
  • RSS Builder
  • Twitter feeds

⇒ Get Feedly

Omea Reader – Most lightweight RSS reader

Omea Reader is a free RSS Reader and newsgroup aggregator with lightning-fast speed and excellent organizational features.

Not only can this tool allow you to read even your Atom feeds but it also keeps track of your bookmarks. Additionally, the dedicated desktop search function makes it easy to find specific information.

This is not just an RSS reader; it’s a workspace you can customize to separate and organize your data from different projects.

And if you can’t see an RSS link on a webpage, don’t worry because Omea finds it directly from your browser. You can even create clippings from articles.

Omea offers several options when it comes to sorting out your information. For example, it lets you create files and subfiles, add tags, and more.

It also automates routine filling and associates resources in handy ways.

Other key features of the Omea Reader include:

  • Advanced search option
  • Built-in newsgroup reader
  • Delegate tasks to other users

⇒ Get Omea Reader

NewsFlow – Easiest UI

This app has a straightforward interface, is easy to use, and offers good space between elements for a smooth reading experience.

You can easily set up the categories you are interested in and then add your favorite sources to the feed with the latest news.

When you add an RSS feed, there are enough options to customize it on your preferences.

Among its many features, you can read articles using extended readability without opening them in the web browser and watch YouTube and HTML videos inside the app.

Newsflow sends notifications regarding the newest news and gives quick and easy sharing options.

Users can browse around using keywords. Not only that, but they can also organize their feed thoroughly. Newsflow lets you create categories, reading lists, favorites, and more.

Lastly, Newsflow is a free RSS reader. It is compatible with computers operated by Windows 10 version 15063.0 or higher and Xbox

Other key features of Newsflow include:

  • Manage read and unread news
  • Play GIF animations
  • View article images

⇒ Get NewsFlow

Veen Feed Reader – Best built-in search grouping

The Veen Feed Reader offers a pretty similar interface to Nextgen Reader. The feeds are all aptly organized in different categories ranging from Health and Science to Business and Technology.

However, this app will feature an integrated search charm that allows users to look for the most exciting things. The Import and Export of OPML files are also possible within the app.

Veen Feed Reader also keeps track of your unread materials and lets you create favorite lists and add bookmarks.

Users can also create their own folders to better organize the content in their feed.

You can connect your Feedly account to Veen Reader, but you can also log in locally.

Veen Feed Reader is a reliable and customizable RSS reader solution that you can use to sort out the content smartly and efficiently.

Other key features of Veen Feed Reader include:

  • Compatible with Windows 10 or higher
  • Can be used without an account
  • Works on Xbox

⇒ Get Veen Feed Reader

Inoreader – Best for general information

If you need a general information feed manager, Inoreader is the tool to get.

As you probably guessed, this is not just an RSS reader but can aggregate data from multiple sources like Podcasts, Twitter, Blogs, Facebook, and even Email Newsletters.

The only work you need to do is at first to set up the whole workflow and decide whether you want to get push notifications, email, or to set rules for ignoring certain information.

This is a perfect information-mining tool as you can use its Active Searches feature to create search queries to get all the posts mentioned that are key in a news feed.

And if you use Inoreader at night, you will be happy to know it also has a Dark Mode.

Inoreader lets you make your personalized dashboard based on your preferences.

The tool lets you save your web content to third-party applications such as OneNote, Evernote, or platforms such as Google Drive or Dropbox.

Inoreader has a free version and paid versions that require a subscription. The unpaid version is more limited and includes ads.

Other key features of InoReader include:

  • Remove duplicate content
  • Keyword monitoring
  • Bosted feeds
  • Annotations

⇒ Get Inoreader

Google Reader for Windows 10: what happened?

One of the most well-known RSS readers used to be Google Reader, but the application got shut down. So why did Google decide to pull the plug on everybody’s favorite news provider?

According to official information provided by the company’s CEO, Google is trying to consolidate its services and, in the process, concentrate on what’s really important.

The strategy included bringing together services like Reader and Picasa under the Google+ plus umbrella and several shutdowns, including iGoogle and Reader.

Windows users were left out like everyone else, and in this article, we have provided the best alternatives for RSS readers. As a result, you will be able to get the best out of our RSS reader list for Windows 10 and 11.

Note that while we may have left them out of this article, there are also some good options for open source RSS readers for Windows.

Please share your opinion with us in the comments section below and tell.

Did an Xbox Dashboard ad just suggest that Far Cry 6 could come to GamePass? Or was it just a mistake?

Could the latest installment of Ubisoft’s open-world sandbox FPS be making its way to Game Pass in the near future? A banner image for the game that recently appeared on the Xbox dashboard alongside other newer Game Pass additions seems to suggest this is the case.

This would be a rather curious move given that Far Cry 5 came to Game Pass only a few weeks ago. However, there has been a slew of Ubisoft titles making their way to the service as of late, such as Assassin’s Creed Origins and – just a few days ago – Watch Dogs 2.

Of course, the game’s appearance on the Game Pass section of the Xbox dashboard could have been a simple mistake, with the Far Cry 6 cover image accidentally being used in place of that of Far Cry 5. This seems likely enough, and it would not be the first time such an error has occurred.

Besides, fans would scarcely have time to explore all of Hope County (the setting of Far Cry 5) if Far Cry 6 does in fact come to Game Pass soon. Hopefully, we will get clarification on the matter soon.

3 Quick Ways to Record Browser Actions & Macros in Chrome

Today we’ll show you how you can record macros in Chrome using screen recorder software or browser extensions like DéjàClick and iMacros.

Let’s get started:

How do I record a macro in Chrome?

1. Record macros with DéjàClick

  1. Open Chrome’s web store and click on Add to Chrome next to the DéjàClick extension.add-to-chrome-dejaclick chrome macro recorder
  2. Once you’ve added the extension to Chrome, you should find the extension on the browser’s toolbar. Click that button to open the sidebar in the snapshot directly below.dejaclick chrome macro recorder
  3. Before you start recording a macro, enter chrome://extensions into Chrome’s address bar, and select Details under the DéjàClick extension. details-deja chrome macro recorder
  4. Now turn on the Allow in Incognito option. This activates Simulate New User that ensures macros record without cookies.allow-incognito chrome macro recorder
  5. Now press the Begin recording button on the DéjàClick for Chrome window.begin-recording chrome macro recorder
  6. Next, open Bing and Google in two Chrome page tabs.
  7. Press the Stop record/replay button. You’ve recorded a script that opens Bing and Google in two alternative page tabs, and the DéjàClick window includes the script for that as shown below.stop-recording chrome macro recorder
  8. Close the Google and Bing page tabs, and then press the Begin replay button. That plays the macro which opens Google and Bing in Chrome.
  9. To save the macro, click the Save your recording as script button. Then you can enter a title for it and press the Save button.save-rec chrome macro recorder
  10. You can press the Open a recorded script button to open any saved macro.
  11. To adjust the macro replay speed, click the Properties tab and Replay Timings to open the options below.properties chrome macro recorder
  12. There you can select Faster from the Replay speed drop-down menu. Now you can record browser actions in Chrome.

DéjàClick is one Chrome and Firefox extension that enables point-and-click browser recording to generate web scripts. We regarded it as the best Chrome macro extension due to its features and intuitive interface.

For more extensions like this, check out Scribe for Chrome.

2. Record macros with iMacros

  1. Open Chrome’s web store and click on Add to Chrome next to iMacros.add-imacros chrome macro recorder
  2. Next, click the iMacros button on Chrome’s toolbar to open the extension’s window.imacros chrome macro recorder
  3. You can use the Record Macro button under the Record tab to record new macros, as well as the Stop button in order to stop the recording. Quite easy to record browser actions in Chrome, right?record-stop chrome macro recorder
  4. To play the macro, select it on the Bookmarks tab, then click the Play tab and press the Play Macro button.play-imacros chrome macro recorder
  5. Press the Play Loop button to replay the macro a certain number of times. Enter a value in the Max box to configure how many times the macro playback loops.
  6. Note that iMacros also includes some demo macros for you to try. Click Demo-Chrome on the Bookmarks tab to open a list of recorded macros.demo-imacros chrome macro recorder
  7. You can right-click the macros to open the context menu shown in the shot below. Then you can select some extra options to add new folders, edit and erase macros.

3. Use a screen recorder software

Alternatively, you can use a screen recording tool. Though not specifically built for recording macros, these tools could also work.

If you want editing options and advanced controls over your recording, we recommend looking at third-party software.

But if you want to start right away without installing anything on your PC, you can use the Snipping Tool:

  1. Type Snipping Tool in the search bar and open the app.snipping tool
  2. Click on the video camera icon.snipping tool record option
  3. Hit the New button.snipping tool new recording
  4. Go to Chrome.
  5. Select the screen area you want to record and hit start.record chrome with snipping tool

For more useful tips and tricks, check out our Recording video on Chrome browser: Comprehensive guide.

Don’t hesitate to leave a comment in the section below and tell us what you think about our solutions. Thanks for reading!

Inspire 2022: Windows 365 gets new features for one year anniversary

There’s been a lot of stories out of Inspire 2022, and one of the biggest relates to Windows 365. It’s been almost a year since Microsoft first revealed the service, and to celebrate, the company added some new features.

In total, there are three tweaks. The first is Citrix HDX Plus for Windows 365. This is a new add-on for Windows 365 that should add support for a broader range of endpoint devices and peripherals and security and policy controls. Second up is Windows 365 government expanding to government community cloud and government community cloud high.

Finally, there are tweaks for Windows 365 Business edition. Changes here make it even easier to sign up and seamlessly sign into cloud devices using a Microsoft account and restore a computer to an earlier point in time with point-in-time restore.

You can learn more about Windows 365 on Microsoft’s website. Other stories from Inspire 2022 include Microsoft Cloud for Sovereignty, the new Microsoft Digital Contact Center Platform and Excel Live, Video Clips in Teams, as well as a new Viva Engage module. 

3 Ways to Stop Chrome From Closing Tabs When Clicked

Chrome is one of the best browsers striving to limit resource usage through its tab management features. It automatically freezes inactive tabs to save PC battery and memory.

However, users are starting to face issues that are not part of the tab management of Chrome. This is in the form of tabs closing by just clicking on them.

This causes frustration, as you need to stay on a tab to use it. Thankfully, you can easily fix this issue, as we will show in this guide.

Why does my mouse close tabs when I click on them?

There are several reasons Chrome closes a tab when you click on it. It could be down to hardware failure and problems with your browser, among other causes.

Below are some of the popular ones:

  • Faulty mouse/trackpad
  • Issues with installed extensions
  • Glitches with browser

How do I keep a tab active in Chrome?

  1. Launch Chrome and copy and paste the command below in the address bar. chrome://discards
    discard chrome closes tab when clicked
  2. Press the Enter key.
  3. Locate the tab to keep activity and click the Load option in the last cell.
    load

With the deactivation of the tab discarding and freezing options, your opened tabs will always be active. Note that this will affect your PC resources. This is because Chrome freezes and discards tabs in the background to limit resource usage.

Quick Tip:

Use an up-to-date browser with lower error rates. A good alternative to Chrome is Opera One. Running on a Chromium engine as well, the browser offers a similar experience, whilst being lighter and faster.

You can integrate all your preferences, bookmarks, and passwords in just a few clicks and use them for good. It has performance-oriented features like hardware acceleration, a battery saver, and an adblocker.

Opera One

Upgrade your web browsing experience using this highly responsive and error-free tool!

How do I stop Google Chrome from closing tabs when I click on them?

1. Restart your PC

restart

Sometimes, the reason Chrome closes the tab when clicked might be hard to pinpoint. It might just be due to some issues with Chrome’s processes.

In this case, the easiest and fastest fix is to reboot your PC and relaunch Chrome. This fix has proved effective for other users, and you should try it too before other sophisticated solutions.

2. Check mouse/trackpad

The most well-known cause of the Chrome closes tab when clicked is a faulty mouse or trackpad. This is especially true when the middle mouse button is sticky.

The middle mouse button is a known shortcut for closing tabs on Chrome. So when it is sticky, you might experience this issue.

You can perform basic troubleshooting on your mice, like cleaning and servicing. If this does not work, you should employ the service of a professional.

3. Disable extensions

  1. Launch Chrome and click the menu button.
  2. Choose Settings from the options.
    settings
  3. Select Extensions in the left pane.
    extensions chrome closes tab when clicked
  4. Toggle the switch in front of each extension to disable it.
    disable extensions

Too many extensions sometimes make your browser misbehave. In this case, it might cause Chrome to be closing tabs automatically when clicked.

Disabling the extensions and relaunching your browser should restore normal service. 

Need a clean slate for troubleshooting? Follow this guide to close all open tabs in seconds.

The Chrome closes tab when clicked problem can be frustrating. This is because it keeps you reopening tabs only for them to be closed when you try to access them. With the fixes provided in this guide, you should be able to solve the problem effortlessly.

If you are facing other issues like Chrome not responding, check our guide on how to fix it.

Feel free to let us know the fix that helped you resolve the Chrome tab issue in the comments below.

How to Fix Gmail’s Buttons Not Showing or Working

Some users have posted about Gmail buttons not showing or working on Google and Mozilla forums.

Those users can’t see all the buttons they’re supposed to in Gmail, or some of the buttons don’t work when clicked.

Also, here are some other similar errors that may come across on Gmail:

  • Gmail settings button not working
  • Gmail toolbar missing
  • Refresh button missing in Gmail
  • Gmail gear icon missing
  • Send button not working in Gmail
  • Gmail next page button missing
  • Reply button missing in Gmail
  • Gmail compose button missing
  • Gmail attachment button not working

So, let’s find out what’s causing the issue and the potential resolutions for it.

Why are my buttons missing in Gmail?

In most cases, it was an extension or add-on installed to the browser that caused the problem. If you have changed Gmail’s theme, it too could be responsible for the issue.

Also, make sure to check the antivirus software installed on the computer or any other tool that could modify the network properties. Besides, misconfigured browser settings or corrupt browsing data could be the reason behind the problem.

Quick Tip:

Users might find that an alternative browser displays Gmail’s buttons without any issues. So, try opening Gmail in another browser. That won’t fix the issue for the original browser, but users can at least still utilize Gmail if the buttons are ok in other browsers.

Gmail supports the latest versions of Edge, Google Chrome, Internet Explorer, Safari, and Firefox. Alternatively, you can try using Opera. This browser is quite similar to Chrome, but unlike Chrome, it’s not associated with Google, so it won’t send your data to Google.

Opera

Access and manage your Gmail inbox using this fast and private browser!

How do you get the buttons to appear in Gmail?

1. Reset the network

  1. Press Windows + I to launch Settings, and select Network & internet from the tabs listed on the left.Network & Internet to fix gmail buttons not showing
  2. Click on Advanced network settings on the right.Advanced network settings
  3. Now, click Network reset.Network reset to fix gmail buttons not showing
  4. Click the Reset now button.Reset now
  5. Finally, click Yes to confirm the change.Yes

Some users have confirmed that they fixed the Gmail icons missing problem by resetting the network components to their default setting.

2. Reset the Browser to its default settings

  1. Paste the following path in Chrome’s address bar, and hit Enter:chrome://settings/reset
  2. Click on Restore settings to their original defaults.Reset settings to their original defaults
  3. Next, click on the Reset settings button to confirm.Reset settings to fix gmail buttons not showing

Resetting a browser will clear its cache and turn off or remove extensions, which should fix the Gmail buttons not showing problem. If it doesn’t, head to the next method.

3. Check the Button label setting

  1. Click on the Settings icon in Gmail, and select See all settings.See all settings
  2. In the General tab, scroll down and select Icons next to the Button labels entry.Icons to fix gmail buttons not showing
  3. Scroll down to the bottom and click on the Save Changes button.Save changes to fix gmail buttons not showing

4. Select the default Gmail theme

  1. Click on the Settings icon at the top-right corner in Gmail, and select See all settings.See all settings
  2. Select Themes.Themes
  3. Click on the Set theme button.Set theme
  4. Select the Default theme, and click on Save at the bottom.Choose default to fix gmail buttons not showing

After reverting to the default theme, the problem with Gmail’s buttons should be resolved. If it persists, head to the last method.

5. Open Gmail in basic HTML view

Gmail has a Basic HTML View for browsers that it doesn’t support. Gmail’s buttons might work just fine and start showing in the Basic HTML View.

So, try switching to Basic HTML View and select the I’d like to use HTML Gmail option. And this would fix the Gmail button not showing problem once and for all.

How do you add buttons in Gmail?

  1. Go to Gmail Button by cloudHQ extension in the Chrome Web Store, and click on Add to Chrome.Add to Chrome
  2. Next, click on Add extension.Add extension
  3. Once installed, you will find the Insert button option when composing a new email in Gmail.
  4. Click on the Insert button icon, and select Button from the flyout menu.Button
  5. Now, customize the button using the various available options, and click on the Insert into email button.customize button

These resolutions have fixed the Gmail buttons issue for most users and should have worked for you as well.

Remember that Gmail users can also open their emails within client software, such as Mozilla Thunderbird, which can be better alternatives to the Google web app.

Tell us which fix worked for you in the comments section below.