Fixed: System Restore not Working in Windows 10/11

The Windows 10/11 update brought new much-needed features and options, but along with all that’s new, came the problems, as well.

windows 8.1 update system restore

Here’s what some users have been saying about System Restore which doesn’t work for them.

Hello all, I was wondering if you could help me with this problem.

I recently reformatted my computer with the Windows 8.1 Pro with the iso with the recently released update and after installing a WiFi update for my card, I needed to use System Restore as I was loosing internet connection like crazy to no avail.

When I try to use System Restore, it looks like it’s going to work and gets as far as System Restore is restoring the registry and it reboots the computer with the common System restore couldn’t access a file, this could be due to a antivirus, I made no changes to my system since the reformat except the wifi driver and the only antivirus I have is Windows Defender.

I have tried booting into clean boot and also selecting System Restore from the advanced boot menu with the same error.

I even tried creating a restore point on my freshly cleaned laptop, but the error still happens even with Volume Shadow copy on Automatic.

I have contacted Intel too regarding their drivers, but you need to fix System Restore and the issue with reverting WiFi driver, causing my connection not to always auto connect when my computer boots up.

I am computer savy so if you have any suggestions regarding regedits or advanced suggestions besides the ones I have tried on various forums, let me know.

How can I fix System Restore not working after update?

As you can see, the issue has been affecting the user and the problem is detailed in the above excerpt.

After many possible fixes, I’m glad to announce that Microsoft has officially acknowledged the problem and has issued a solution.

Here’s the link to the official support page where Microsoft is discussing this problem in detail:

You create a restore point on a computer that is running Windows 10. You change some settings or install live updates. You try to restore the system to the system restore point that you created.

This issue occurs because the desktop.ini file for the Microsoft OneDrive folder is read-only. The System Restore fails because the desktop.ini file does not change.

So, you need to make sure that you have performed the latest check on Windows Update, or follow the above link to download the specific file to solve the issue.

If the issue persists, here are some additional solutions that you can use.

  • Use Windows 10 Recovery Options

If you are experiencing troubles getting your system restored in Windows 10, check the official Microsoft’s dedicated page for this kind of issue.

Recovery options in Windows 10
  • Rename WindowsApp folder from Safe Mode by running the following commands in Command Prompt as an administrator:
    • cd C:Program Files
    • takeown /f WindowsApps /r /d Y
    • icacls WindowsApps /grant “%USERDOMAIN%%USERNAME%”:(F) /t
    • attrib WindowsApps -h
    • rename WindowsApps WindowsApps.old
  • Run SFC and chkdsk scan in Command Prompt
  • Remove the problematic updates that caused System Restore not to work
  • Restore Windows in Safe Mode.

Let us know if this guide helped you solve this issue. If it didn’t, we’ll try to look further into the issue.

One Piece: Pirate Warriors 4 video game launches on Microsoft’s Xbox One consoles

The fourth video game in the One Piece: Pirate Warriors series, One Piece: Pirate Warriors 4, is now playable on Microsoft’s family of Xbox One consoles from the OG Xbox One up to the Xbox One X.

Based on the incredibly-popular anime and manga series of the same name, One Piece: Pirate Warriors 4 is an action-based title set within the series’ world and featuring fan-favorite characters. The game can be played solo though it also supports online matches with up to four players.

Here’s the official game description and trailer:

The PIRATE WARRIORS series has successfully combined the popular anime ONE PIECE with the thrilling action of the WARRIORS series to create a worldwide phenomenon selling more than four million copies! Based on the concept of “fighting hordes of enemies while adventuring with trusted allies,” experience awesome ONE PIECE action lifted straight from the anime!

ONE PIECE: PIRATE WARRIORS 4 is the latest evolution of PIRATE WARRIORS action! Based on the concept of “experiencing a real ONE PIECE battlefield,” buildings will come crashing down during the action and attacks will throw up smoke and dust, placing you in the thick of the ONE PIECE world! Injecting fresh elements that couldn’t be achieved in previous entries has now realized an even more thrilling brand of PIRATE WARRIORS action!

A Deluxe Edition is also available which includes the full game, early access to Charlotte Katakuri, and a season pass for nine future characters.

Are you a One Piece fan? Let us know if you’re loving this game in the comments below and then follow us on Pinterest and Twitter for more Xbox gaming news.


How to add Run command to Start menu in Windows 10


  1. Pin Run to Start Menu
  2. Create Run window shortcut on desktop
  3. Pin Run to Windows 10 taskbar

The Run command icon in Windows 10 is not available in the Start menu when you first install the operating system. Don’t worry because there is a very easy workaround that you can use.

This guide will show you how to get the Run command in the Start menu in Windows 10. So follow the simple steps listed in this article and you should.

In the previous versions of Windows like Windows 7 or Windows 8, it was quite easy to add the Run command window in the Start menu.

If you are not a fan of the keyboard shortcut used to open Run, you will learn how to do this in Windows 10 in just a few minutes with the help of the guide below.

Note: The keyboard shortcut can be accessed by pressing and holding the Windows button and the R button.

How can I add the Run command to Windows 10 Start menu?

1. Pin Run to Start menu

  1. Left-click or tap on the Start button to open the Start menu.
  2. From within the Start menu, you will have to left click or tap on the All Apps button situated in the lower-left corner of the menu.
  3. Search for the Windows System folder and left click or tap on it to open.
  4. You can now see the Run icon in the above folder you opened.
  5. Now right-click or hold tap on the Run icon.
  6. From the menu that pops up, you will have to left click or tap on the Pin to Start feature.pin run windows start menu
  7. Now close the Start menu and left click or tap again on it to open.
  8. You will see the Run icon present on the right side of the Start menu.
  9. Now, if you would like to move the Run icon to the left side of the menu, you will need to close the Start menu first.

2. Create Run window shortcut on desktop

  1. On an open space in your desktop right-click or hold tap.
  2. From the menu that shows, you need to left click or tap on the “New” feature.
  3. From the menu that pops up, you need to left click or tap on the “Shortcut” feature.
  4. Now double click to open the shortcut you made.
  5. In the field that says : Type the location of the item you will need to write the following or just copy-paste it from here: explorer.exe shell:::{2559a1f3-21d7-11d4-bdaf-00c04f60b9f0}.
  6. Left-click or tap on the Next button situated in the lower right side of this window.
  7. Now in the next window, you will have there a Type a name for this shortcut topic.
  8. As a name, you should write Run without the quotes.
  9. Left-click or tap on the Finish button to complete the process.
  10. Now hold the left click on the shortcut and drag it to the left side of the Start menu.
  11. Now, you have your Run icon on the left side of the Start menu as well.

3. Pin Run to Windows 10 taskbar

You can also pin your Run window to your taskbar. The steps to follow are similar to those you need to follow in order to pin Run to Star menu.

Go to Start > click on the Windows logo > go to Windows System > right-click on Run > select More > Pin to Taskbar, as shown in the screenshot below.

pin run windows taskbar
That is it, you have above a very simple way to get your Run icon back to your Start menu and use it as you wish in Windows 10.

Also, if you have any other questions related to this article, please let us know in the comments below. We will help you further as soon as possible.

FIX: The drive cannot find the sector requested

If you’re getting ‘ERROR_SECTOR_NOT_FOUND‘ with The drive cannot find the sector requested description, follow the troubleshooting steps listed in this article to fix it.

The drive cannot find the sector: Error background

The ‘ERROR_SECTOR_NOT_FOUND’ error code, also known as error 27, occurs when the internal or external hard drive is not working properly. As a result, users can’t access or modify the content stored on the respective drive.

There are various elements triggering this issue:

  • Damaged or corrupted files and folders.
  • Missing EXE, DLL or SYS files.
  • Malware infection.
  • Outdated or incompatible software versions.
  • Incorrect drive format, etc.

How do I fix the sector requested drive error?

1. Unplug and re-plug the external drive

If you’re getting this error with removable storage, unplug the storage device. Close all software on your taskbar and plug the external storage back in. You can also restart Windows before you plug the external HDD back in.

Then, retry the action that triggered the ‘ERROR_SECTOR_NOT_FOUND’ error code.

2. Check your disk for errors

  1. On Windows 10, you can run a disk check using Command Prompt.
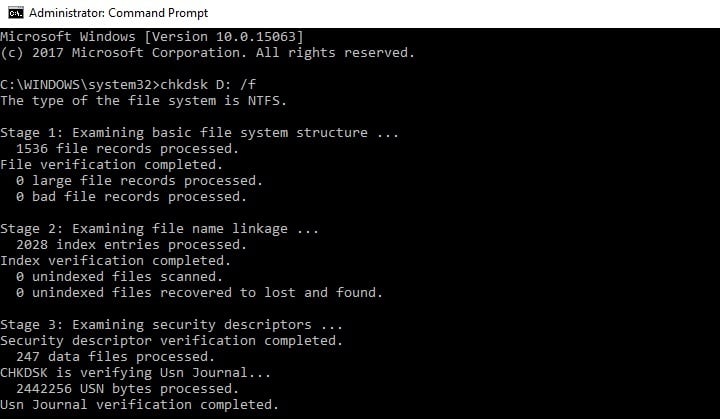
  2. Start Command Prompt as administrator and type the chkdsk C: /f command followed by Enter.
  3. Replace C with the letter of your hard drive partition.

As a quick reminder, if you do not use the /f parameter, chkdsk displays a message that the file needs to be fixed, but it does not fix any errors.

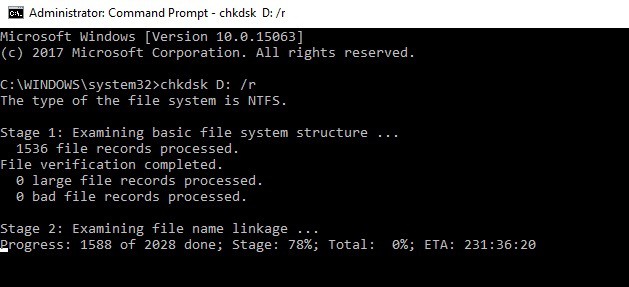
The chkdsk D: /f command detects and repairs logical issues affecting your drive. To repair physical issues, run the /r parameter as well.

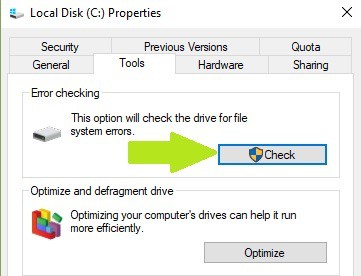
On Windows 7, go to hard drives > right-click the drive that you want to check  > select Properties > Tool. Under the ‘Error checking’ section, click Check.

In addition, you can repair your hard drive easily using HDD bad sector third-party repair tools that can use various techniques to resolve bad sector drive errors on your PC.

3. Clean your temporary files and folders

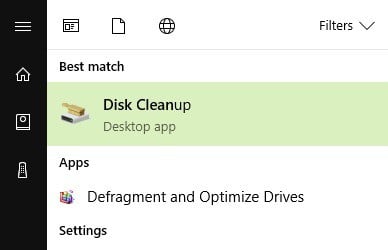
1. Go to Start > type Disk Cleanup > launch the tool

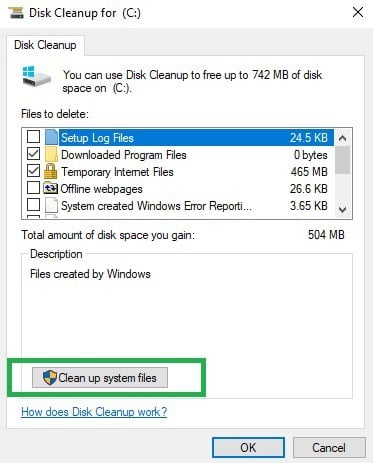
2. Select the disk that you want to clean > the tool will tell you how much space you can free up

3. Select Clean up system files.

The simplest and quickest manner to delete your temporary files and folders is to use Disk Cleanup. As you use your computer or browse the Internet, your PC accumulates various unnecessary files.

These so-called junk files may affect your computer’s processing speed, causing apps to respond slowly, and may also trigger various error codes, including the ‘ERROR_SECTOR_NOT_FOUND’ error code.

Clean your temporary files and then try to write data on the problematic storage device again.

4. Free up more space on your drive

‘The drive cannot find the sector requested’ error may also occur because there is not enough space on your hard drive.

Try uninstalling unnecessary apps and programs, run disk analysis and defragment, delete duplicate files and the Windows.old folder. For a step-by-step guide on how to do that, check out our dedicated article on The Best Ways To Free up Hard Disk Space.

5. Resize your partition

  1. Go to Start > type ‘disk management’ > select the first result and launch Disk Management
  2. Select the drive affected by error 27 > right-click it > select Shrink
  3. In the new window, enter the amount of space to shrink > click OK.

Many users reported that The drive cannot find the sector requested error disappeared after they resized the volume of their drive. Try shrinking your partition by at least 500 MB.

6. Check your drive with a dedicated tool

1. Go to Settings > Update & Security > select Troubleshoot in the left-hand pane

2. In the new window, go to the section ‘Find and fix other problems’ > select the Hardware Troubleshooter > Run the troubleshooter.

If you run an older Windows version, you can download the Microsoft Easy Fix tool to troubleshoot hardware issues. The tool is compatible with Windows 8.1, Windows 8, and all Windows 7 editions.

  1. Go to the official Microsoft Easy Fix tool webpage, scroll down to select the hardware troubleshooter.
  2. When you select the respective tool, your PC will start downloading the troubleshooting software.
  3. Install and run it.

Windows comes with a built-in hardware troubleshooter that can fix general issues. By following the steps above, you will see how to use the Windows 10’s Hardware Troubleshooter:

You can also check the hard drive with the manufacturer’s diagnostic tools. Go to the drives manufacturer’s website and download the available hard drive troubleshooter.

7. Reinstall the external hard drives

  1. Go to Start > type ‘device manager’ to launch Device Manager.
  2. Click Disk drives to expand that section > right-click the external disk drive to fix.
  3. Select the Uninstall option on the context menu.
  4. Press the Scan for hardware changes button to reinstall the disk drive.

Reinstalling the storage device might also fix this issue. Of course, you can’t do that for HDDs with Windows on them, but you can reinstall external storage drives affected by the ERROR_SECTOR_NOT_FOUND error code.

8. Run a full system scan

  1. Go to Start > type ‘defender’ > double click Windows Defender to launch the tool
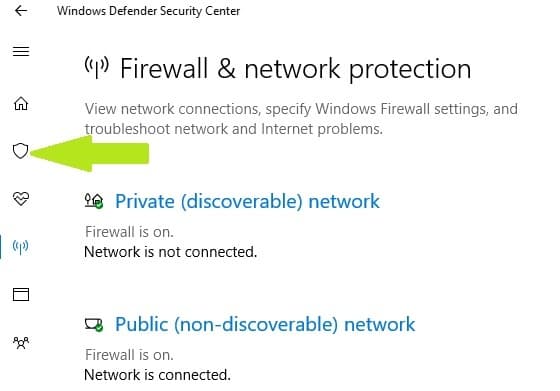
  2. In the left-hand pane, select the shield icon
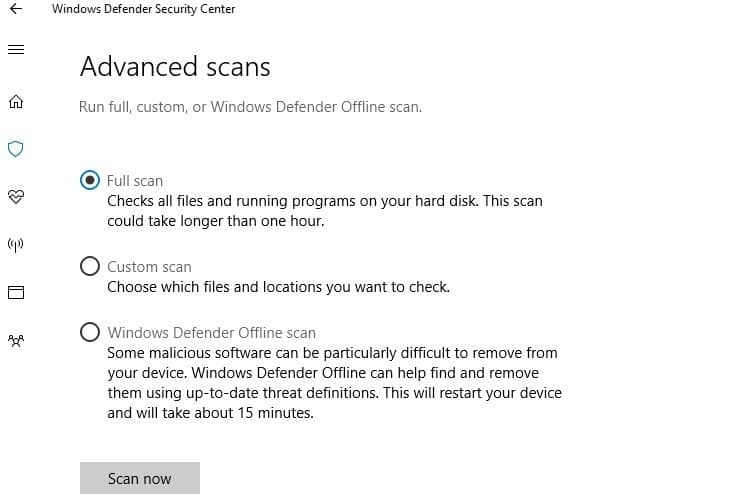
  3. In the new window, click the Advanced scan option
  4. Check the full scan option to launch a full system malware scan.

Malware may cause various issues on your computer, including errors. Perform a full system scan in order to detect any malware running on your computer. You can use Windows’ built-in antivirus, Windows Defender, or third-party antivirus solutions.

9. Repair your registry

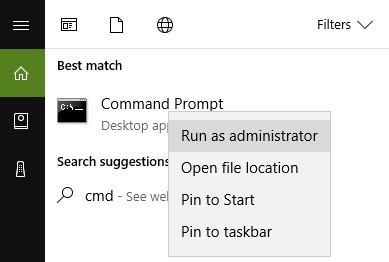
1. Go to Start > type cmd > right-click Command Prompt > select Run as Administrator

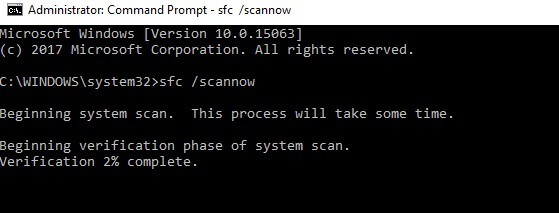
2. Now type the sfc /scannow command

3. Wait for the scanning process to complete and then restart your computer.

  • All corrupted files will be replaced on reboot.

The simplest way to repair your registry is to use a dedicated tool, such as CCleaner. Don’t forget to first backup your registry in case anything goes wrong.

You can also use Microsoft’s System File Checker to check for system file corruption. The utility verifies the integrity of all protected system files and repairs files with problems when possible.

10. Format your drive

1. Go to Start > type ‘disk management‘ > select the Disk Management utility

2. Right-click the drive that you want to format > select the Format option

3. Follow the on-screen instructions to further customize the format process > click OK on the warning window.

4. Once the format process finishes, you can use your drive. Try to install the updates again to see if this action fixed the problem.

If none of the solutions listed above worked, try formatting the problematic drive. Formatting and restoring the default drive settings should fix this problem. Keep in mind that formatting your drive means deleting all the files and folders stored on the respective drive.

We hope that the solutions listed above helped you fix the ‘SECTOR_NOT_FOUND‘ error. If you’ve come across other workarounds to fix this problem, you can help the Windows community by listing the troubleshooting steps in the comments below.

This article is a part of our hub for troubleshooting System Errors, so make sure you take a look at it since you may find other helpful guides as well.

Bookmark our dedicated Fix section for more troubleshooting guides.

FIX: DNS_PROBE_FINISHED_BAD_CONFIG error in Windows 10/11

DNS_PROBE_FINISHED_BAD_CONFIG error is not that uncommon, and it can be seen on all versions of Windows, so it’s no wonder to see this error on Windows 10 as well.

Fortunately for you, this error is quite easy to fix and today we’ll show you how to do it.

DNS_PROBE_FINISHED_BAD_CONFIG error appears in Google Chrome browser when your internet connection is giving you problems and there are few simple ways how to fix it.

Table of contents:

  1. Restart your router
  2. Renew the IP address
  3. Flush the DNS cache
  4. Reset IP catalog
  5. Change the DNS servers
  6. Disable your antivirus
  7. Install the latest network drivers
  8. Disable website blockers
  9. Check your browser

How can I fix DNS_PROBE_FINISHED_BAD_CONFIG error?

Solution 1 – Restart your router

This is quite straightforward, just press the power button on your router, wait for a minute and turn your router back again. This should reset your IP address and fix the problem.

Solution 2 – Renew the IP address

But if simple restarting didn’t solve the problem with DNS_PROBE_FINISHED_BAD_CONFIG error, you can try with renewing your IP address.

And if you’re not sure how to do that, just follow these instructions:

  1. Run Command Prompt by pressing Windows key + R and typing cmd into it.
  2. When Command Prompt starts type the following line and press Enter to run it:
    • ipconfig /releaseDNS_PROBE_FINISHED_BAD_CONFIG Error in Windows 101
  3. This will release your IP address.
  4. Now enter this line and press enter to run it:
    • ipconfig /renewDNS_PROBE_FINISHED_BAD_CONFIG Error in Windows 10 2

Solution 3 – Flush the DNS cache

The next thing we’re going to try is flushing the DNS cache. To do so, follow these instructions:

  1. Open Command Prompt like we explained in the previous solution.
  2. When Command Prompt opens type this line and press Enter to run it:
    • ipconfig /flushdnsDNS_PROBE_FINISHED_BAD_CONFIG Error in Windows 10 3

Solution 4 – Reset IP catalog

  1. Open Command Prompt and run this line:
    • netsh int ip resetDNS_PROBE_FINISHED_BAD_CONFIG Error in Windows 10 4
  2. Next type this line and press Enter to run it:
    • netsh winsock reset catalogDNS_PROBE_FINISHED_BAD_CONFIG Error in Windows 10 5

Solution 5 – Change the DNS servers

And if nothing from above helped, you can try to change the DNS servers, and see if the error is solved. To change the DNS servers, do the following:

  1. Press Windows key + R and when Run dialog opens type ncpa.cpl and press Enter.
  2. This should launch Network Connections window.
  3. Locate your connection and right click it. Choose Properties.
  4. Select Internet Protocol Version 4 and click Properties.
  5. In the Internet Protocol Version 4 Properties window click the Use the following DNS server addresses.
  6. Set these values:
    • Preferred DNS server: 8.8.8.8
    • Alternate DNS Server: 8.8.4.4
  7. Click OK to save your settings.

Solution 6 – Disable your antivirus

If nothing worked, try disabling your antivirus. If you’re using Windows Defender, here are the steps to follow to turn it off:

  1. Go to Start, type defender and click on the first result to launch the Windows Defender Security Center.
  2. Now, click on the Virus and threat protection settingsdisable windows defender
  3. Go to Real Time Protection and toggle off the option.

turn off windows defender
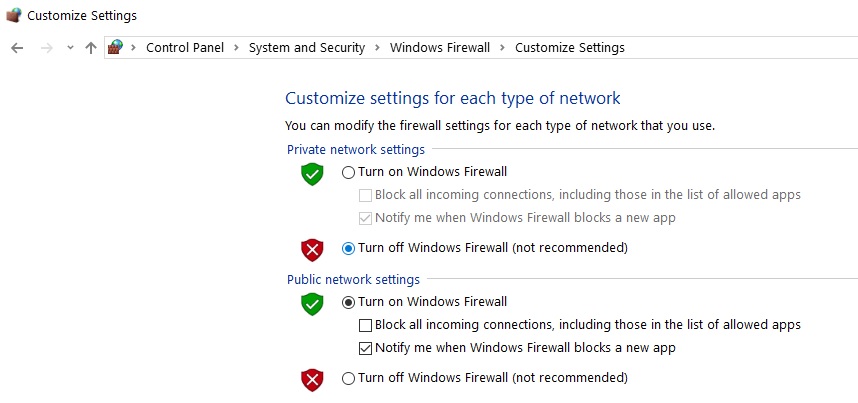
Once you have disabled your antivirus, do the same with your firewall.

  1. Go to Start > Control Panel > System & Security > Windows Firewall
  2. Click on the option “Turn Windows Firewall on and off”turn off windows firewall
  3. Turn off the firewall.

disable windows firewall
Once you’ve disabled both your antivirus and firewall, check if the error persists. Don’t forget to enable both security solutions after you finished the test.

Solution 7 – Install the latest network drivers

If your network drivers are outdated or corrupted, this may explain why you’re getting the DNS_PROBE_FINISHED_BAD_CONFIG error.

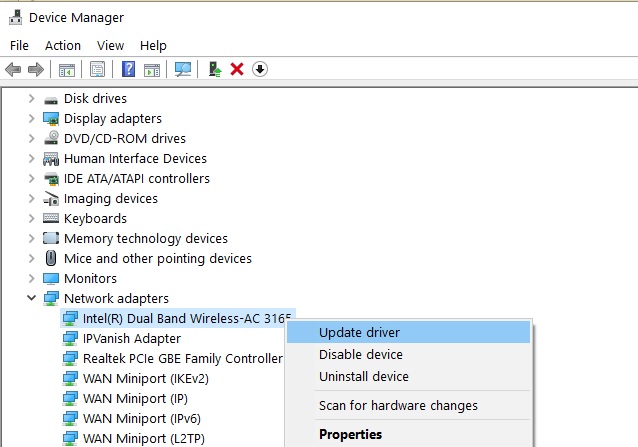
Go to Device Manager, and update your network drivers and check if this solution worked for you.

update network driver

Solution 8 – Disable website blocking software

If you’re using website blockers, temporarily disable these tools to see if this solution fixes the problem.

Some users confirmed that the error disappeared after they turned off their website blockers. Do test this solution to see if it works for you as well.

Solution 9 –  Check your browser and delete temp files, cache, and cookies

And finally, the last solution on our list: make sure that your browser is not actually the one causing the error. Delete cookies, temporary files, and cache and check if this helps.

For more information on the steps to follow, go to your browser’s official support page.

That’s about it, I hope at least one of these five solutions helped you to solve the problem with DNS_PROBE_FINISHED_BAD_CONFIG error in Windows 10.

If you have any comments or questions, just reach for the comments section below.

Can’t add friends in Battle.net games? Fix this problem now

Battle.net is a great service, but many users reported that they keep having issues while adding friends. This can be a problem, but in today’s article, we’ll show you how to fix this issue once and for all.

The greatest thing about multiplayer games is, besides the PvP experience, enjoying the game with your friends. Fighting against dungeon hordes in WoW seems much easier with friend cooperation, and it’s always more fun to play HeartStone with someone you know.

However, we’ve read some reports about friend requests and BattleTag issues. According to them, some users are unable to send or accept friend requests. So, if you’re facing this issue as well, we’ve prepared a few solutions that might come in handy.

Fix Battle.net missing friends and other problems with these solutions

  1. Change region
  2. Turn off parental control
  3. Make some space in the friends cap
  4. Add friends by e-mail

1. Change region

battle.net can't add freinds

Although Battle.net is great, it has some strange limitations. The entire service is region locked meaning that you can only play with friends that are located in the same region. This isn’t a big issue since you can easily change your region in the desktop application. Make sure both of you are on the same server and try sending a request then. You can check your current region at any time from the desktop application.

If you and your friend are in the same region, proceed to the next solution.


2. Turn off parental control

Parental control is a great security and time-limiting addition to a multiplayer platform. It prevents minors from making in-game purchases and lets parents create playing schedules. But, some of the available options will prevent the user from sending/receiving friend requests. You should disable those options in order to resolve the issue.


3. Make some space in the friends cap

battle.net friend list can't add friends

If you have a lot of friends, there is a possibility that your friends cap is full. Be sure to check that out. If your friends cap is full, you should remove some inactive players and make space for new friends.


4. Add friends by e-mail

battle.net friend problem add friend

As you probably know, you can add friends with BattleTag or e-mail address. If the BattleTag option isn’t proving reliable, try searching for your friends with e-mail address they used to create an account. It’ll take you a little more time, but it can be more useful.

If all of these solutions proved to be ineffective, all we can do is wait for some of the upcoming patches to fix this up. In case these workarounds were helpful, give us a heads up in the comments section.


[wl_navigator]

How to Repair Epic Games Launcher if is Not Loading Properly

If you have problems with the Epic Games launcher not working or loading incorrectly, you are definitely in the right place, as today we’re tackling precisely that.

With the popularity of Epic Games on the rise, having a launcher not loading is problematic because it will prevent you from playing games from the Epic store.

Why is my Epic Games Store not launching?

1. Check to see whether the Epic Games server is up

Start off by heading over to the official Epic Games Store website.

You should first check whether or not the servers are down due to issues or scheduled maintenance.

2. Stop Epic Games Launcher from running using the Task Manager

EPic Games Task Manager end
  1. Press Ctrl + Shift + Esc, which will open the Task Manager
  2. Look for the Epic Games Launcher process and select it
  3. Press End Process
  4. Restart the Epic Games Launcher

3. Launching the Epic Games Launcher from the start menu

Epic Games Start Menu
  1. Press Windows
  2. Type in Epic Games Launcher
  3. Click the entry to run

Additionally, you should consider deleting the old desktop shortcut and making a new one.

4. Change the Epic Games Launcher’s properties

  1. Right-click on the Epic Games Launcher’s icon
  2. Select Properties
  3. Select the Shortcut tab
  4. Go to the Target field and add
-OpenGL

The field should now look something like this

"C:Program Files (x86)Epic GamesLauncherPortalBinariesWin32EpicGamesLauncher.exe" -OpenGL

5. Add Epic Games Launcher as an exception to your antivirus

You could also try disabling your antivirus while running the Epic Games Launcher.

Adding the program to your antivirus exception list varies depending on the antivirus, so be sure to check out the proper documentation.

The same goes for disabling your antivirus for a set period of time.

6. Repair Epic Games LauncherRepair Epic Games Launcher

  1. Press Windows + R
  2. Type in control appwiz.cpl to open the Programs and features window
  3. Look for the Epic Games Launcher
  4. Right-click it and select Repair

7. Install a fresh copy of the Epic Games Launcheruninstall epic games launcher

  1. Press Windows + R
  2. Type in control appwiz.cpl to open the Programs and features window
  3. Look for the Epic Games Launcher
  4. Right-click it and select Uninstall
  5. Once it is done, go back to the Epic Games website and download it again.

Reinstalling a fresh copy of Epic Games can also fix similar issues like Invalid Drive Error. You can also check this guide on fixing the Epic Games Launcher setup ended prematurely error to handle installation issues that appear during a reinstall.

Fix Epic Games Launcher flickering

1. Adjust your display settings

  1. Right-click in an empty area of your desktop
  2. Select Display Settings from the list
  3. Under the Scale and layout entry, make sure scaling is set to 100%
Epivc games adjust display settings

2. Update your Graphics Driver

  1. Press Windows + R
  2. Type in control.exe
  3. Go to Hardware and Sound
  4. Enter the Device Manager
  5. Select Display Adapters
  6. Right-click your graphics card and select update

Additionally, you could select Uninstall and get a fresh version from the manufacturer’s website.

Epic games update display adapter

If you have encountered the error code 502 while launching Epic Games Launcher, you need to force close the app, and then restart it; read more to learn other solutions.

If you’re having problems with login, our Request could not be completed during Epic Games login guide should be able to help you.

If you know any other solution that might help, please do not hesitate to share it with the community in the comments below!

FIX: Xbox error 0x8000ffff

While playing your favorite game on Xbox you can sometimes experience certain errors.

For example, users reported error 0x8000ffff on their Xbox, and today we’re going to explain to you what causes this error and how to fix it.

According to users, error 0x8000ffff can occur after trying to start the game or after joining the party chat.

Users also reported that this error occurs after you sign into Xbox Live service, so you can see why this error can be so problematic.

Usually, this error appears because certain Xbox Live features aren’t available due to maintenance or because of issues with your network connection.

Xbox error 0x8000ffff, how do I fix it?

Solution 1 – Check the status of Xbox Live service

As we already mentioned, this error can appear due to problems with Xbox Live service, and if you’re having this problem, we advise you to check if Xbox Live Core Services are running.

You can do that by using any device that has Internet access available.

If Xbox Live Core Services aren’t running it means that there’s a maintenance process going on or there’s a problem with Xbox Live service.

Unfortunately, if there’s a problem with Xbox Live Core Services all that you can do is to wait until Microsoft solves this issue.

Solution 2 – Restart your console

Restarting the console is one of the simplest solutions, but sometimes it can solve error 0x8000ffff. To restart your console do the following:

  1. Press Xbox button on Xbox controller twice to open the guide.
  2. Scroll down and select Settings.
  3. Choose Restart console and select Yes to confirm.

Epic guide alert! Learn how to connect Xbox One controller to Windows 10!


After your Xbox restarts check if the error is resolved.

Solution 3 – Manually refresh the channel list

According to users, you can fix error 0x8000ffff on Xbox 360 simply by manually refreshing the channel list. This is a simple procedure and you can do it by following these steps:

  1. Press the Guide button on your controller.
  2. Hold the Right trigger down and press Y to return to the Xbox Dashboard.
  3. Wait for a couple of seconds and the channel list should be refreshed.

Solution 4 – Test your connection

Another way to fix this error on your Xbox 360 is to test your connection.

As we already mentioned, this error can be caused by your network configuration, therefore it’s crucial that you check your network connection by following these steps:

  1. Press the Guide button on the controller.
  2. Go to Settings > System Settings.
  3. Select Network Settings.
  4. Now select Wired Network or the name of your wireless network.
  5. Select Test Xbox Live Connection.

If there’s a problem with your network connection you might want to try restarting your modem or try to change your network configuration.

Solution 5 – Revert any security changes

Users reported that this problem occurred after making some security-related changes. According to users, they changed their security phone number and the problem started appearing.

When you make a security change to your Xbox account, it takes 21 days for the change to take place. This is in order to prevent malicious users from stealing your account.

If you made any security changes to your account, you need to log in to your Microsoft account and cancel the request to change security settings.

After doing that, you’ll be asked to enter your security details in order to prove your identity.

If you have a phone number associated with your account you’ll get a text message asking you to confirm this request. After canceling the request try to log in to Xbox Live again.

Solution 6 – Perform a hard reset

Sometimes you can fix error 0x8000ffff simply by performing a hard reset.

Hard reset will fix localized problems on your console by clearing the cache and reverting certain settings to default. To perform a hard reset, do the following:

  1. Press and hold the Power button for 10 seconds while your system is running.
  2. After your device turns off, press the Power button again. You’ll see a green startup screen.

You can also perform a hard reset by following these steps:

  1. Go to Settings > Power & Startup.
  2. Locate Power Mode option and change it from Instant-On to Energy-saving.
  3. After that, choose Turn Xbox off.
  4. Hold the Guide button on the controller or the power button on your console.
  5. After your console turns back on again, go to Settings > Power & Startup and re-enable Instant-on option.

Alternatively, you can simply turn off your Xbox, unplug it, wait for a couple of seconds and turn it back on again.

Fix – Xbox error 0x8000ffff party chat

Solution 1 – Sign in and sign out of your account

One of the fastest ways to fix error 0x8000ffff is to sign out and sign back into your account.

Users reported that this solution worked for them, but so far we don’t know if this is just a temporary workaround or a permanent solution, but you can still try it.

Solution 2 – Remove and download your profile

According to users, you should be able to fix this problem simply by removing and downloading your Xbox profile again. To do that, follow these steps:

  1. Go to Settings and select System.
  2. Navigate to Storage.
  3. Select Hard Drive. If you have external storage connected to your console select All Devices.
  4. Select Profiles and then select the Xbox profile that you want to delete. Select Delete.
  5. You should see two options available: Delete Profile Only and Delete Profile and Items. The first option will delete the Xbox profile but it will leave your saved games and achievements. The second option will delete the profile along with your saved games and achievements.

After removing your Xbox profile, you need to add it again by following these steps:

  1. Press the Guide button on your controller.
  2. Select Download Profile option. If you don’t see this option available, be sure to sign out of your current profile.
  3. Download Profile screen will appear. Select Download Profile option.
  4. Enter the login information for the Microsoft account associated with your Xbox profile.
  5. Now select the storage location for your Xbox profile.

After your profile is downloaded, check if the problem is resolved.


Not enough space on Xbox One? Expand it with these drives!


Solution 3 – Enable Smart Connection option

Users reported that they managed to fix this issue simply by enabling Smart Connecting options.

This issue appears with Netgear R7000 routers, but even if you don’t use Netgear network device, you might want to try this solution.

Solution 4 – Turn the energy mode to Instant instead of Energy-saving

Few users reported that this error is caused by Energy-saving mode, therefore you should use Instant mode instead. You can easily change this setting by going to Settings > Power & Startup.

If you need more information on how to change this setting, we suggest having a look at our previous solutions for detailed instructions.

Xbox error 0x8000ffff will prevent you from playing your favorite games or joining a party chat, and in some cases, it can even prevent you from accessing Xbox Live.

This can be a somewhat serious problem, but we hope that you managed to fix it by using one of our solutions.

If you can’t login, it might be because the Xbox Live service is temporary down. It’s easy to check the status of the service. Open a browser and go to Xbox Live Service Status website. There were no major issues around this time.

  • What is Xbox error 0x8000ffff?

Error 0x8000ffff can occur after trying to start the game or after joining the party chat.It can also occur after you sign into Xbox Live service. Here’s a guide on how to fix this error for good.

  • How do I fix Xbox error 0x8000ffff?

Check the status of Xbox Live service, then restart your console. If the problem doesn’t go away, read our complete guide to fix error 0x8000ffff.

[wl_navigator]

Windows 10 news recap: Microsoft working on patch for VPN issue with Office 365, Control Panel could be hidden soon, and more

Welcome back to our Windows 10 news recap, where we go over the top stories of the past week in the world of Microsoft’s flagship operating system.

Microsoft “rushing to release” Windows 10 patch to address VPN internet connectivity errors with Office 365, Teams

Internet connectivity issues when using a VPN and Office 365 or Microsoft Teams on Windows 10 have probably cropped up at the worst time considering the current situation, but Microsoft is “rushing to release” a patch for the problem.

Windows 10 November 2019 Update reaches 28.2% usage share in latest AdDuplex survey

The latest AdDuplex stats are out, and it shows that, according to their figures, Windows 10’s November 2019 Update has reached 28.2% usage share.

AdDuplex Report March 2020

Windows 10 Telegram Desktop app updates with new picture-in-picture feature and more

The Telegram app on Windows 10 has received a new update that brings a picture-in-picture mode, among other new features and changes.

Telegram app icon
Telegram app icon

Legacy Control Panel on Windows 10 could soon be hidden in favor of new Settings app

Windows 10 may be likely to hide the legacy Control Panel in a future update, according to some changes found in a recent preview build. This would leave the new Settings app as the only visible way of adjusting settings on a Windows 10 PC.

That’s it for this week. We’ll be back next week with more Windows 10 news.

Fix the Xbox error 8015D002 when signing in

Millions of games use Xbox Live on a daily basis to play their favorite games with their friends.

Unfortunately, certain errors can occur with Xbox Live, and today we’re going to show you how to fix Xbox errors that can occur when signing in.

Xbox error when signing in, how can I fix it?

Solution 1 – Turn off two-step verification

Xbox 360 users reported error 8015D002 when trying to sign in to Xbox Live on their console.

According to users, it seems that this error is caused by two-step verification and in order to fix the problem, you’ll need to disable this feature.

To disable this security option, do the following:

  1. Use a web browser and sign in to your Microsoft account.
  2. Go to Security and privacy section and select Manage advanced security.
  3. Select Turn off two-step verification.
  4. Click Yes to confirm that you want to disable two-step verification.

Solution 2 – Use an app password to sign in to your account

Two-step verification is a great way to protect your Xbox account, and if you have this option enabled, you need to use an app password to sign in to your profile or else you might get error 8015D002.

If you don’t have an app password, you can set one up by following these simple steps:

  1. Sign in to your Microsoft account with any web browser.
  2. Go to Security & privacy and choose Manage advanced security option. You might be asked to enter a security code, so be sure to do that.
  3. Navigate to App passwords and select Create a new app password. This will generate a new password and show it on your screen.
  4. Write down the app password and log in to your Microsoft account on your console. Be sure to enter the app password during the login process.
  5. Optional: Select Remember password checkbox if you don’t want to enter the app password every time you try to login to Xbox Live.

If you happen to forget your app password, you can use the same steps to set up a new app password and gain access to your profile.

Solution 3 – Check your password

Sign in error 8015D002 can appear if you enter the wrong password while signing in, therefore we strongly suggest that you check if you entered the correct password.

If you’re certain that your password is correct, you might want to try resetting your password and logging in with a new password.

Solution 4 – Restart your Xbox One

Users reported that they are unable to sign in because they are constantly asked to enter their password.

This is a strange problem, but you should be able to fix it simply by restarting your Xbox One console. To restart your device, follow these steps:

  1. On the Home screen scroll left to open the guide. You can also open the guide simply by tapping the Xbox button on your Xbox controller.
  2. Select Settings from the menu.
  3. Now select Restart console. Select Yes to confirm.
  4. After your console restarts, try to sign in again.

Solution 5 – Remove and add your account again

If you’re constantly asked for your password and you’re unable to log in, you might want to try removing your account. To do that, do the following:

  1. Double tap the Xbox button to open the guide.
  2. Select Settings and navigate to All Settings.
  3. Choose Accounts and select Remove accounts option.
  4. Locate the account that you want to remove and remove it.
  5. Optional: Some users reported that you need to repeat the removal process several times before you completely remove the account from the list.

After you remove your account, restart your console by following the steps described in the previous solution.

When your console restarts, you need to add your account again. To do that, follow these steps:

  1. Open the guide by scrolling left on the Home screen.
  2. Select Sign in > Add & manage.
  3. Select Add new and enter your Microsoft account email and password.

After deleting and adding your account, you should be able to sign in again without any problems.

Solution 6 – Reset your Xbox to factory settings

If the problem still persists and you can’t sign in, you might want to consider resetting your Xbox to factory settings.

Resetting your console can remove all files from your console, therefore if you choose to reset your Xbox to factory settings, we strongly suggest that you back up your important files.

To reset your console to factory settings, do the following:

  1. Scroll left on the Home screen to open the guide.
  2. Select Settings > All Settings.
  3. Navigate to System and select Console info & updates.
  4. Select Reset console.
  5. You should see two options available: Reset and keep my games & apps and Reset and remove everything. You should use the first option because it will reset the system and remove potentially corrupted data without removing any saved games, downloaded games or apps.
  6. If this option doesn’t work, you’ll have to use Reset and remove everything option. This option will delete all files including your saved games and downloaded games, so use this option as a last resort.
  7. After resetting the console, check if the problem is resolved.

Solution 7 – Check the status of the Xbox Live service

Sometimes sign in errors can occur if the Xbox Live Core Services aren’t running. You can check the status of these services with any device that has Internet access.

If Xbox Live Core Services aren’t running, only thing that you can do is to wait until Microsoft fixes the problem.

Solution 8 – Disable automatic sign-in

Sometimes automatic sign-in option can cause problems and prevent you from logging in, but you should be able to fix this problem by disabling this option.

To do that, follow these steps:

  1. Use a web browser to access your Microsoft account.
  2. Go to My account section and select Security, family & forums.
  3. Locate Xbox 360 profile protection on the right side. It will display the number of consoles that are using automatic sign-in option.
  4. Select Require Profile Download option.
  5. After that, switch back to your console and you’ll be asked to enter your password in order to log in to your account.

If the problem still persists, you might want to consider resetting your password. To do that, follow these steps:

  1. Log in to your Microsoft account.
  2. Go to Security & password section.
  3. Under Password section select Change your password option.
  4. Follow the instructions on the screen to change your password.

Solution 8 – Make sure that you can access your Microsoft account

Users reported The email address or password you entered is not valid. Please try again error message while trying to access Xbox Live.

To check if your login information is correct, we advise you to try signing in with the same login information to your Microsoft account in any browser.

If you can’t log in to your Microsoft account, be sure to check if your email and password are completely correct.

Solution 9 – Check if your email address is associated with your gamertag

It’s not uncommon that you use a different email address to sign in to Xbox Live, therefore you need to be sure that you’re using the correct address while logging in.

One of the simplest ways to do that is to sign in to Xbox.com with your login information.

If you see your gamertag at the top right corner, it means that this email address is associated with your Xbox Live account.

Solution 10 – Clear the system cache

You should be able to fix sign in errors on your Xbox simply by clearing the cache. To do that, follow these steps:

  1. Press the Guide button on your controller and select Settings.
  2. Navigate to System Settings and select Storage.
  3. Highlight any storage device on the list and press Y on the controller.
  4. Select Clear System Cache option.
  5. Select Yes to start the clearing process.

After the cache is cleared, you can restart your console and check if the problem is resolved.

Solution 11 – Unplug the power cable

Sometimes you can fix sign-in errors on your Xbox simply by disconnecting the power cable from your console.

After disconnecting your power cable, wait for a few seconds and reconnect it again.

If the problem persists, try disconnecting your power cable again and check if that solves the issue.

Solution 12 – Move your profile

If you have Xbox sign-in error 8015D002, you might be able to fix it simply by moving your profile. To do that, follow these steps:

  1. Go to Settings > System Settings.
  2. Select Storage and locate your account.
  3. After you locate your profile, choose the Move option.
  4. Move your profile to a different hard drive or USB flash drive.
  5. After the moving process is completed, you should be signed in automatically and the problem should be resolved.

Xbox sign-in errors can completely prevent you from playing your favorite games, but we hope that you fixed those errors by using one of our solutions.

Not able to hear friends on Xbox One [FIX]

When playing online, being able to hear your friends is very important.

Unfortunately, some Xbox One users have not only reported they’re unable to do this but also difficulties when it comes to connecting to multiplayer games in general.

The common element in these problems is the NAT, or Network Address Translation, a setting within your Xbox One console that defines how the machine will treat different connections.

There are three different types of NAT settings: Open, Moderate and Strict. Each setting changes the permissions and capabilities of your device in regard to other machines it can connect to.

It’s important to remember that in order for two machines to benefit from a mutual connection, at least one of them has to have an Open NAT configuration.

If one of them has a Moderate or Strict connection but the other one has an Open connection, multiplayer games are still accessible.

If your NAT connection isn’t set to Open, you will need to refresh your console’s NAT configuration and restart your machine. To do this, follow these steps:

After restarting your machine, repeat the above instructions to check your console’s NAT configuration once again.

It is important to also keep in mind that some games can bypass an Open NAT configuration through the Xbox Cloud service.

Currently, the games that fall into this category are Titanfall and Forza Motorsport 3.

This is How We Fixed Roblox Error 905 on Xbox One

Roblox is an online game creation platform allowing players to create their own games and play them in the multiplayer mode.

Some Xbox One users encountered an issue when trying to connect to Roblox.

Error code 905 prevents users from playing Roblox after linking their game and Xbox Live accounts.

This specific error seems to be caused by an account or connectivity issue. In order to fix this issue, we managed to come up with a series of solutions.

What to do if you get Roblox error 905 on Xbox?

1. Check the sign-in details

Make sure to have your account details correctly set.

If you forgot your password or are unsure it is correct, reset your password and attempt to sign in again.

2. Verify the Xbox server status

xbox server status information


If the Xbox servers are down, you won’t be able to connect to your account.

Go to the Microsoft website and check the Xbox server status.

3. Check Roblox servers

Similar to the Xbox servers, checking the Roblox server status is important.

Check the server status to see recent server reports.

Here you can see all the recent issues and what type of errors users encountered.

4. Reinstall Roblox

  1. Press the Xbox button > go to Home
  2. Go to My games & appsxbox one list of apps and games
  3. Select Roblox
  4. Press the Menu button on the controller > select Uninstall
  5. Next, you have to reinstall Roblox and see if the issue was fixed

5. Disconnect the Roblox and Xbox accounts

  1. Press the Xbox button > open Settings
  2. Go to Account > choose UNLINK [your gamertag]

Or:

  1. Access your Roblox account on the Roblox website
  2. Under Xbox, open the Security tab > click Disconnect

We hope our solutions helped you fix error code 905 when accessing Roblox on Xbox One. With the problem solved, here’s how to join your friend’s Roblox private server on Xbox.

If you liked this article, comment in the comment section below.

How do I Fix Roblox Error Code 106 on Xbox One

Lately, some user has reported Roblox error code 106 on Xbox One. The error on the Xbox One does not stop you from playing the game but affects its functionalities. Users have reported that they are unable to join a friend’s game unless the users are in their friend’s list in the game.

If you are facing a similar problem, here are a couple of solutions to fix the Roblox error code 106 on Xbox One.

Why can’t I join my friends on Roblox for Xbox One?

1. Login from the Roblox Website

  1. Launch the web browser on your Xbox, PC, or any other device and visit Roblox official website.
  2. Login to your Roblox account by clicking on the login button.
  3. Click on the Search bar, type your friend’s username, and click on Search user account name.
  4. Roblox will list all the users with a similar username. Locate your friend’s account and click on the Add Friend button on the right side.
    Report User add friend
  5. Ask your friend to login to his Roblox account via the website as well.
  6. Your friend should have received your friend request. Ask him to click on the Notification icon and click on Accept button.
  7. Once you have been added to your friend’s list, log out of Roblox.
  8. Launch the Roblox app on your Xbox One.
  9. Now check if your friend is on your friend list. If not, do the following.
  10. Press the Xbox button and go to Friends & Clubs > Find Someone.
  11. Search for your friend’s user account and click on Add friend.
  12. Once the friend is added, try to join your friend’s game and see if it goes through.

2. Perform a Power Cycle

  1. Make sure the Xbox console is powered on.
  2. Press hold the power button (Xbox button on the Console) until the Console shuts down.Xbox-cant-add-user-to-friend-list
  3. Wait for a few minutes and press the Xbox button again to restart the Console.
  4. Launch Roblox and check for any improvements.

Looking for the best browser to play Roblox on your PC? Here are the best options.

3. Reinstall Roblox

  1. From Home, select My games and apps option.
  2. Select See All option to list all the apps and games.
  3. Locate the Roblox app and highlight it. Press the Menu button on the Xbox controller.
  4. Select Manage game and add-ons and then select Uninstall all.
  5. Reinstall the Roblox app and log in using your account, and check for any improvements.

That’s it! Now you can fix Roblox Error code 106 on Xbox One and resume the fun.

If you have any other questions or suggestions, leave us a note in the comments section below.

Xbox Play Anywhere not working? Here are 5 ways to fix it

Xbox Play Anywhere digital game is perhaps one of the best things to happen in any gamer’s life.

Besides allowing you to play digital games bought through the Xbox Store or Microsoft Store, you get it at no additional cost whatsoever! How cool is that?

However, when the Xbox Play Anywhere isn’t working, it definitely spoils the party because you lose out on both sides – your console and your PC.

Worry not, because there are ways to fix Xbox Play Anywhere when it suddenly stops working.

What can I do if Xbox Play Anywhere won’t launch?

1. Check Xbox Live service status

In case you see any alerts when you check the Xbox Live service status, wait till the service is back up running (in green color), and then try again.

2. Check which version of the game you’re playing

Xbox Play Anywhere only works with digital games, so you need to ensure you’re playing a digital version of the game you downloaded. You cannot use it with a game disk.

Purchase a digital version from Xbox Store or Windows Store from your console, a Windows 10 device, or from Xbox and/or Microsoft official websites.

You can also buy a code from a retailer, or redeem on your console or Windows 10 device.

Note: This doesn’t mean you cannot earn achievements or take your games’ progress between consoles when you’re online.

3. Check the game’s compatibility with cross-platform play

Visit the game’s product detail page to check whether its compatible for cross-platform play on Windows 10 and Xbox One console.

4. Check your cable modem or ISP

Sometimes the Xbox Play Anywhere may not work because of a problem with your cable modem, or with your Internet Service Provider.

If other games or apps are not working, restart your router, then check network connection issues in Windows 10 for additional troubleshooting information.

5. Check Windows system requirements

Ensure your Windows device or PC meets the digital game’s hardware system requirements.

In order to ensure your device meets the hardware system requirements, you need to check on the following:

Check your device’s system info

Follow the steps below to do this:

You’ll need to install an update if your device doesn’t have the minimum or later version of Windows to run the game. Version K or KN requires additional software that are available for free download on Microsoft website.

Check the amount of free space on your device

Different games need different disk drive space capacities depending on the title, and if you’re playing the game on your console or PC.

If you’re using Xbox One, check for available disk space using these steps:

If using a Windows PC or device, follow these steps to check the available disk space:

Check which graphics card is installed, and the amount of video memory available

Here’s how to check this:

Check the DirectX version installed on your computer

Here’s how to do this:

Check minimum system requirements for your game

To locate the game’s minimum system requirements on Windows 10 Store, do the following:

If you bought the game from an online location, go to the website you bought it from, then do the following to check minimum game requirements:

If you purchased the game from a retail store instead, check the packaging for the minimum requirements and ensure your device meets them.

How to fix various Xbox Play Anywhere bugs

Troubleshoot: Can’t play with someone else on a different platform

Troubleshoot: Can’t continue playing a game saved elsewhere

Troubleshoot: Can’t see downloaded content on other platforms

Troubleshoot: Game play issues with Xbox Play Anywhere game

Troubleshoot: Can’t download games on a different platform

We trust these solutions were helpful. Let us know in case your experience is different, or the issues persist, in the comments section.

Xbox One S won’t play games? Get the quick fixes here

Among the common reasons why the Xbox One S won’t play games includes the account itself (game sharing issues), your user profile, the disc (if you’re playing disc games), and sometimes the console itself may be the problem.

If you’re looking for workarounds to resolve this problem, try some of these listed below.

What can I do if Xbox One S won’t play games?

  1. General troubleshooting
  2. Replace the game
  3. Change power modes and power cycle the console
  4. Verify the purchasing account for the game
  5. Test your network connection
  6. Remove and add back your profile
  7. Use a different profile
  8. Clear the local save and re-sync with the cloud
  9. Reset the Xbox One S operating system

1. General troubleshooting

2. Replace the game

If none of the general troubleshooting solutions work, and your Xbox One S won’t play games, especially for disc games, you can replace the game.

3. Change power modes and power cycle the console

If this doesn’t work, request a repair from the Xbox Online Service Center.

4. Verify the purchasing account for the game

If you’re trying to play digital games, check that the game was purchased by the account you are using, because they should be the same, even when signing in to Xbox Live.

You can verify this by checking your Xbox Live purchase history, for which you have to provide your Microsoft account email address and password. To do this:

If you cannot verify the purchase account is the same, your games won’t play because many games don’t work without a license. If the account that purchased this game is not loaded on your Xbox One S console, then your Xbox One S won’t play games.

5. Test your network connection

A network connection issue can sometimes mean Xbox One S won’t play games. Test your network connection by doing this:

Note: Any known outages will appear in the middle of the screen. If this the connection test is successful, your console will connect to Xbox Live. If you are prompted to update your console software, choose Yes.

6. Remove and add back your profile

If Xbox One S won’t play games on one specific profile, the profile data associated with this game may be corrupted. Fix this by removing your profile from the console and then downloading your account again.

Download your profile again to create a fresh version of the account data. Here’s how:

7. Use a different profile

Sometimes corrupted profile data on your Xbox One S console affects gameplay. If this is the case, try playing the same game using a different profile on your console.

8. Clear the local save and re-sync with the cloud

The local save for your game may be corrupted, in which case you need to delete it and resync it with the cloud to fix the problem. To do this:

9. Reset the Xbox One S operating system

There may be a problem with your console’s operating system hence Xbox One S won’t play games. The reset can be done without deleting your games or apps. To do that:

Note: Do NOT select Reset and remove everything because this resets the console to factory settings, and all user data, and all games and apps will be deleted. This should only be used as a last resort solution.

If successful, you may have to repeat some general console set-up steps before getting back to the Home screen. Try and play your game again after this.

Did any of these solutions help? Let us know in the comments section below.

FIX: Xbox Live error code 4220

Even though it doesn’t look like that on the first impression, Xbox Live is mostly performing as intended.

There are individual errors that are concerning individual users, but we can rarely encounter the widespread errors that affect the massive player base.

That’s, sadly, not the case for the one error with the 4220 code.

This error occurs mostly on Xbox One and it’s seemingly centralized around Call of Duty WW2.

Namely, this exact error prevents access to the multiplayer mode of the AAA Activision’s first-person shooter placed in the WW2 scenery.

This, of course, doesn’t mean that this error is CoD exclusive since some other games might be affected, as well.

If you’re having a hard time dealing with this error, make sure to check the solutions we provided below.

  1. Restart the console
  2. Check the connection
  3. Log in, log out and try again
  4. Open NAT
  5. Update the game
  6. Reinstall the game

How do I address Xbox Live error with the code 4220?

1: Restart the console

This error code can seemingly point towards different issues. But, after the deeper insight on user reports, we can conclude that the most common solution is as simple as they come.

Namely, a lot of users managed to address the issue by simply restarting the console. After the restart, they were able to access the multiplayer modes without in a seamless manner.

So, make sure to restart your console as the first step.

On the contrary, if the issue is still persistent or you’re seeing a different error code after the restart, make sure to check the additional steps provided below.

2: Check the connection

The next step concerns the connection. Most of the Xbox Live errors are caused by either the in-game bug or a faulty connection.

And since this error appears exclusively with the multiplayer mode (especially Call of Duty WW2), we can safely recommend checking your connectivity and moving from there.

If you’re not sure where to look, follow these instructions:

  1. Open Settings.
  2. Choose All Settings.
  3. Select Network and then Advanced Settings.
  4. Choose Alternate MAC address and then ”Clear”.
  5. Restart your console.

3: Log in, log out and try again

No matter how deep Xbox Live goes errors-wise, here’s another rather simple step to address the 4220 error.

Namely, a substantial number of gamers successfully resolved the error at hand by simply logging out and logging back on their Xbox Live account.

For some peculiar reason, the error was resolved and they managed to access the multiplayer with ease.

Here’s how to do this in a few steps:

  1. Press Xbox button.
  2. Choose Home.
  3. Select your account by highlighting your gamerpic.
  4. Log out.
  5. Restart your console.
  6. Repeat the procedure and log in again.

4: Open NAT

Another important option that isn’t set to Open on default and therefore might cause connectivity issues is Network Address Translation or shorter NAT.

The NAT has 4 different types, starting with Unavailable NAT (ultra-strict) and ending with Open NAT type which is the preferred option for online gaming.

If you’re not sure how to enable it on your Xbox One, make sure to check the steps below:

  1. From the Home screen, choose Settings.
  2. Open All Settings.
  3. Select Network.
  4. Choose Test NAT type from the far right column.
  5. Your NAT should be set as Open after that.

5: Update the game

As we already stated, this error is commonly appearing in Call of Duty WW2, which means that, besides the other issues, we have good reason to believe that the game itself is at the core of the problem.

For the sake of improving the content, optimizing the in-game experience, and fixing bugs, Activision will commonly provide updates.

And there’s a good chance that, by updating, you’ll be able to overcome the 4220 error.

Now, even though both game and system updates are distributed automatically, you can check for the updates by hand. Here’s how to do it:

  1. Select My games & apps.
  2. Under Games, select the error-affected game and open press Start to summon game options.
  3. Select Manage game from the contextual menu.
  4. You should see Updates in the left pane. Open it and install all available updates.
  5. Start the game and look for improvements.

6: Reinstall the game

Finally, if none of the available solutions fits the bill, you can always reinstall the game. This is a long shot, but it’s still better than doing nothing, especially if the error is persistent.

We can’t advise you to do this if your bandwidth is slow since the affected games are mostly large chunks of data and it can take for ages.

On the other hand, if you can manage it, make sure to follow these steps in order to reinstall the game on Xbox One:

  1. Go to Home.
  2. Select My games & apps.
  3. Select the affected game and press Start button.
  4. Choose Manage game.
  5. Backup your game data.
  6. Select Uninstall all and wait until the process is finished.
  7. Restart your console.
  8. Navigate to My games & apps > Games.
  9. Under the Ready to install section, you should see the uninstalled game.
  10. Select Install.

That should do it. If you’re still experiencing issues, make sure to send a ticket to the game developer.

Additionally, make sure to post your questions or suggestions in the comments section you can find just below.

How to Fix Volsnap.sys GSOD Boot Errors [Fixed by Experts]

Error volsnap.sys rarely occurs on Windows 10 computers. But when it does, it wreaks havoc.

Nowadays, these kinds of error are known as GSODs or Green Screen of Death errors. But the fact is that fixing the issues of Volsnap.sys errors on Windows 10 is relatively easy if you have the right tools.

How can I fix Volsnap.sys errors on Windows 10?

1. Disconnect all external devices

  1. Turn off your computer.
  2. Remove all external devices.
  3. Restart your computer. (If the PC starts normally, then the issue was caused by one of the devices attached through USB).
  4. In order to identify which of these devices caused the issue, you can connect the removed devices one by one and note the difference.
  5. Please follow the next methods if this method doesn’t solve your issue.

2. Run System File Checker (SFC) command

  1. Press Win+X keys on your keyboard -> select PowerShell (Admin).Windows PowerShell admin - Volsnap.sys
  2. Inside the PowerShell window, type sfc /scannow -> press Enter.WIndows PowerShell sfc command - Volsnap.sys
  3. After this process is completed, you can close the PowerShell window and restart your PC.
  4. If this method doesn’t solve your issue, run Windows in Safe Mode again and follow the next method.

If you have issues with your system files it is always recommended to use a professional tool to fix them.

3. Update the drivers on your PC

  1. Press Win + X keys on your keyboard -> select Device Manager.
  2. Inside the Device Manager window -> select a device -> Right-click on it -> select Update driver -> Search automatically for updated driver software. (repeat these steps for each of the devices in the list).
  3. Restart your PC, and check to see if the issue is resolved.

4. Install the latest Windows Updates

Windows update - Volsnap.sys
  1. Press Win+X keys on your keyboard -> select Settings.
  2. Scroll down and select the option Update & Security.
  3. Click on the Check for updates button, and wait for Windows to install any files needed.
  4. After the update process is completed, restart your PC.
  5. Check to see if the issue is resolved.

This article explored some of the best troubleshooting methods to fix the dreaded volsnap.sys error. Please follow the steps presented in this article closely to avoid any other complications.

We would love to know if this guide helped you solve your GSOD problem. Please feel free to let us know by using the comment section below.

Xbox One not working with HDMI switch? Here’s how to fix it

As you’re probably well aware, in order to use a single TV for multiple HDMI outputs, one needs to acquire an HDMI Switch. This nifty device automatically switches between various devices (TV Box, consoles, PC) and transmits through the single one HDMI input.

It’s a necessity for folks with a lot of devices. But, it seems that there are issues concerning HDMI Switch and Xbox One.

In order to address this, we provided a few possible solutions below. Make sure to check them out and, hopefully, we’ll be able to make Xbox One work with the HDMI switch.

How to troubleshoot Xbox One issues with the HDMI switch?

  1. Change the HDMI port on the TV
  2. Hard reset the console
  3. Disable Auto-detect TV
  4. Get a proper HDMI Switch

1. Change the HDMI port on the TV

Besides the standard console resetting and variations of plug-in -plug-out HDMI cable, we can also suggest changing the HDMI port on the TV. The usability of the HDMI switch for multiple inputs goes only as far as the TV supports the input.

Now, we read a lot of reports claiming that everything works in other media, even consoles like PS4 or Nintendo Switch.

However, even though some users can’t make it work, the majority uses HDMI Switchers without any issues whatsoever. Which makes this a scarce occurrence, and not something like power fiasco Xbox had in previous iterations.


Looking for the best high-speed HDMI cables? Check out this list and choose yours now.


This can imply that your console, considering that the HDMI Switch is without its power source, fails to deliver enough power to make it work. You can send a ticket to Microsoft right away or just stick around for some time and check the additional steps.

2. Hard reset the console

Hard reset or power cycle can help resolve some minor bugs regarding the HDMI output. By clearing the cache and reverting some settings, this procedure tackles a lot of issues and might as well help in this scenario.

Some users even recommended unplugging everything after the console is shut down and plug it in again.

Follow these instructions to perform a hard reset on Xbox One:

  1. Press and hold the Power button for 10 seconds or so.
  2. Wait until the console shuts down.
  3. After a minute, turn on the console again and look for changes.

3. Disable Auto-detect TV

Besides the reports about the complete absence of the signal when Xbox One runs through the HDMI switch, some users have had a hard time with random lines on the screen.

Some of them resolved this by disabling the Auto-detect TV function which, if enabled, captures the resolution of the TV. Instead of that, you should manually set the resolution you deem proper.

Here’s how to disable Auto-detect TV on Xbox One:

  1. Open System.
  2. Choose Settings.
  3. Select Display and Sound.
  4. Choose Video output.
  5. Select Advanced video settings.
  6. Under TV connection, disable Auto-detect and select your preference resembling the TV resolution.
  7. Restart the console.

4. Get a proper HDMI Switch

Finally, the most important thing is to get the proper HDMI Switch which complies with your needs. Make sure to inform well before acquiring the right tool for the job. A lot of forums cover various tips for different configurations.

This concerns HDPC/HDMI technologies, support for 4K and HDR, passive or powered choice, and a lot of other things involved. So you’ll need to invest some time into configuring your setup, as well.

If you’re not getting an HDMI signal, follow the simple steps from this guide and solve the problem in no time.

We can conclude this article on this point. In case you have questions or suggestions, make sure to share them with us and our readers. You can do so in the comments section below.

[wl_navigator]

Fix Xbox sign in error 0x87dd000f with these 5 solutions

How do I fix Xbox error 0x87dd000f?

  1. Check Xbox Live services
  2. Power cycle the console
  3. Check the connection
  4. Sign in with another account and try again
  5. Try signing offline and enabling Wi-Fi later

Connection-related issues on Xbox Live are probably the most common nuisance on the platform. They come in numbers and are discernible by lots of different codes.

The one we’ll try addressing today goes by the code 0x87dd000f and appears after the sign in fails on Xbox Live.

How do I fix the 0x87dd000f sign in error on Xbox?

1: Check Xbox Live services

From the get-go, let’s check the status of Xbox Live services.

This error commonly suggests that the Xbox Live servers are down and that, of course, means that you won’t be able to complete the sign in. Luckily, this isn’t a frequent occurrence.

Even when the service is down due to maintenance or some temporary issues, it gets back in a matter of hours.

If the services are up and running, but you’re still unable to sign in, continue with the further steps.

2: Power cycle the console

Another commonly-advised step when it comes to troubleshooting on Xbox is the hard reset or console power cycling.

This procedure really handy and it deals with a large variety of errors on Xbox consoles.

After the power cycle, you should be able to sign in without any issues whatsoever.

Here’s how to hard reset your Xbox:

  1. Press and hold the Power button for 10 seconds or so.
  2. Wait until the console shuts down.
  3. After a minute, turn on the console again and look for changes.

3: Check the connection

We’ve come to the point where you need to confirm that your own network connection isn’t the thing to blame for the sign-in issues.

There are a few things you could try running just to be completely sure nothing is wrong with your network.

Here’s what you need to do:

If you’re not sure where to look, follow these instructions:

  1. Press the Xbox button to open the guide.
  2. Choose Settings.
  3. Tap All Settings.
  4. Choose Network.
  5. Select Network settings.
  6. Select Test network connection.
  1. Open Settings.
  2. Choose All Settings.
  3. Select Network and then Advanced Settings.xbox sign in error 0x87dd000f
  4. Choose Alternate MAC address and then ”Clear”.
  5. Restart your console.
  1. Open Settings and then All Settings.
  2. Choose Network.
  3. Open Network settings > Advanced settings.xbox sign in error 0x87dd000f
  4. Write down your IP and DNS values (IP, Subnet mask, and Gateway).
  5. Under the Advanced settings, open IP settings.
  6. Choose Manual.
  7. Now, open DNS and write down DNS input you saved just like you did it in the IP settings.
  8. Enter the values you wrote down and confirm changes in the Advanced settings.
  9. Restart Xbox

4: Sign in with another account and try again

The stall with the 0x87dd000f error code might appear as a bug of some kind. The mixup occurs for users who use multiple Xbox Live accounts on a single console.

In order to address it, some of them tried to sign in with an alternate account and then revert back to the original account.

If you don’t have multiple accounts, you can try creating a new account and sign in. Later on, just sign out and retry signing in with the main account. After that, the error should be resolved.

5: Try signing offline and enabling Wi-Fi later

Finally, the last thing we can suggest is signing in in an offline mode. Later on, you can enable Wi-Fi and give Xbox Live online ago.

On the other hand, if you’re still unable to resolve this, sending a ticket to a responsible support center is the right thing to do.

With that said, we hope that you’ve succeeded in addressing the issue with our modest contribution.

Also, if you know of some alternative solutions we forgot to mention, feel free to share them in the comments section below.

Solved: Xbox Sign In Error 0x80a30204

However, the Xbox comes with its own share of issues, and most are affecting the sign-in procedure.

The number of error codes concerning this is overwhelming, but most codes are easily handled.

The error we’ll try and address today goes by the code 0x80a30204, and it appears when users try to sign in with their Xbox Live account.

How do I fix Sign In error 0x80a30204 on Xbox?

1. Hard reset the console

Let’s start the troubleshooting by hard resetting the console.

This Hard Reset, also known as the Power Cycle, is the best way to resolve minor issues, which are the most common ones in the first place.

The whole procedure shouldn’t take you more than a minute and is simple to utilize.

Here’s how to hard reset the console:

  1. Press and hold the Power button for 10 seconds or so.
  2. Wait until the console shuts down.
  3. After a minute, turn on the console again and look for changes.

2. Check Xbox Live services

Now, even though there’s a good chance that the sign-in error is only an isolated problem on your side, that’s not the case usually.

Xbox Live services frequently go through maintenance procedures and the dedicated servers tend to crash, too.

Luckily, there’s a way to track the current status of Xbox Live services. That way, you’ll know if something is wrong in general or if the problem is solely plaguing your console.

You can find the status reports here. Or, if you’re a social media aficionado, the official Xbox Live Support account is to be found here.

3. Troubleshoot the Network

All sign in errors point towards the connection problem. Whether the problem is widespread on your home network or solely on the console, it doesn’t matter.

However, in more cases than not, users confirmed that the network failure on Xbox is the thing to blame for the sign-in errors.

And there are ways to tackle possible network issues on an Xbox console. Here are some steps you can try:

4. Remove and re-establish the account again

Some users could resolve this by simply removing their Xbox Live account and re-establishing it. This is a standard procedure, and it shouldn’t take too much of your time.

Once you’ve done it, the Xbox Live sign-in error should be gone.

5. Use the Offline mode and sign in later

Finally, if neither of the steps above works for you, we suggest signing in the Offline mode and moving from there.

Once there, you can try switching to an online mode, and hopefully, you’ll manage to connect to Xbox Live services without any issues.

Keep in mind that other login errors, such as 0x0000042b can also make an appearance, so don’t hesitate to check out our detailed article for quick fixes.

With that said, we can conclude this article. Don’t forget to share your thoughts or alternative solutions to the error in the comments section below.

Fix Xbox error 8015D000 in a few easy steps

When using your Xbox console, you can run into problems with the hardware or software used during game play. Sometimes it can be the game itself, or you could run into errors such as the Xbox error 8015D000.

While it is possible to get some of the meanings to most errors you encounter when using your console, not all of them are necessarily covered, but we have everything you need to know why you’re getting error 8015D000 on your Xbox and how to fix it.

Error 8015D000 usually happens when you’re changing the Microsoft account associated with your Xbox Live account on your Xbox 360 console, and this displays the following error message: This profile cannot be downloaded right now. Status Code 8015D000.

What this may mean is that there are issues with the Xbox Live like you could have entered an incorrect email address or wrong password, or, on the other hand, there’s a problem with your Microsoft account.

In order to resolve Xbox error 8015D000, try the solutions below if restarting the console doesn’t help.

How to fix Xbox error 8015D000?

  1. Check for service alerts
  2. Check your password and log in details
  3. Confirm that your account is active
  4. Check that you’re using the right Microsoft account
  5. Use another Microsoft account
  6. Reset your password

1. Check for service alerts

If you get Xbox error 8015D000 on your console, the first thing to do is check for Xbox Live service status alerts page, or if you’re on the Xbox page, check if the service alert is displayed. If there are any alerts, you can wait for a few before trying to use the console again.

If a particular service or application is down, check with Microsoft to notify you when it is up and running again. You can click Notify me when this service or app is up and running under the service or application’s name.

2. Check your password and log in details

As mentioned earlier, Xbox error 8015D000 could occur when you key in the wrong login details such as email or password. Ensure you have entered the correct credentials and try again.

3. Confirm that your account is active

Microsoft is always checking for unusual activity on Outlook.com or Hotmail.com, so if it finds or notices any such strange activity, your account may be temporarily blocked for your own protection.

If your account has been blocked, go to account.live.com and sign in, then follow the instructions to undo/remove the block. Once your account is active, try again.

4. Check that you’re using the right Microsoft account

If you have multiple Microsoft accounts, you could be trying to log in with the wrong one. You need to sign in with the account associated with your gamertag. To ensure you’re using the right one, do the following:

5. Use another Microsoft account

If the Xbox Live account you’re using is a child account, you can use it and sign in using you’re the credentials of your child’s Microsoft account. These credentials have to be the same ones that were used to create that account.

6. Reset your password

Since Xbox error 8015D000 could occur when you key in the wrong log in details such as email or password, you can reset your Microsoft account password if you cannot remember it, before accessing Xbox Live.

Did these solutions help fix the Xbox error 8015D000 problem for you? Share your experience or any other issue you may have by leaving a comment in the section below.

[wl_navigator]

SOLVED: Xbox error 0x800c000b prevents user from signing in

Xbox error codes come in numbers but rarely occur. However, when they do, there’s only so much you can do to fix them.

In this case, users were unable to sign in to their account, use Xbox Party or other similar online modes. They were met with the error code 0x800c000b.

If you’re affected by this error, make sure to check the steps we provided below.

  1. Check Xbox Live services status report
  2. Power cycle the console
  3. Check the connection

How do I fix Xbox Sign In error 0x800c000b?

1: Check Xbox Live services status report

First, make sure that Xbox Live Services are up and running.

Due to maintenance or a temporary server error, the services might be down and thus you’ll be unable to access your Xbox Live account or use the online-based features.

Also, this is the most common reason why sign-in errors occur in the first place. You can see the Xbox Live Services Status Report, here.

2: Power cycle the console

Most of the problems with any Xbox console, starting with Xbox to Xbox One, are resolved with a simple reboot.

Hard reset or power cycle of the console usually fixes all kinds of system halts.

There are rarely some complex reasons behind the sign-in error like this one, so resetting the console should help on most occasions.

Follow these steps to Power Cycle the console:

  1. Press and hold the Power button for 10 seconds or so.
  2. Wait until the console shuts down.
  3. After a minute, turn on the console again and look for changes.

3: Check the connection

Finally, the only thing which should concern you is a stable connection. That’s, besides some penalties and unregulated fees, the only reason why you can’t sign in to your account.

There are a few possible reasons why your network might fail you, so we offer some troubleshooting steps which should help you address this.

Here’s what you need to check:

  1. Press the Xbox button to open the guide.
  2. Choose Settings.
  3. Tap All Settings.
  4. Choose Network.
  5. Select Network settings.
  6. Select Test network connection.
  1. Open Settings and then All Settings.
  2. Choose Network.
  3. Open Network settings > Advanced settings.
  4. Write down your IP and DNS values (IP, Subnet mask, and Gateway).
  5. Under the Advanced settings, open IP settings.
  6. Select Manual.
  7. Once here, open DNS and write down DNS input.
  8. Enter the values you wrote and confirm changes in the Advanced settings.
  9. Restart Xbox

And, on that note, we can conclude this article. In case you have any questions or suggestions, feel free to tell us in the comments section below.

How to fix Windows 10/11 rollback loop

Since Windows 10 is a free upgrade Microsoft has left you the ability to roll back to the previous version of Windows if you’re not pleased with Windows 10. Unfortunately, a number of users reported that the rollback process is stuck on Windows 10 and that users are unable to revert back to an older version of Windows.

Windows 10 rollback stuck: How to fix it?

Not being able to rollback to the previous build of Windows can be a big problem, and speaking of issues, here are some common problems reported by users:

Solution 1 – Force a restart or shutdown

A number of users reported that they are unable to roll back from Windows 10 and that they are getting stuck on a blue screen with a loading icon. This can be a big problem if Windows 10 isn’t working for you and if you want to revert to the older version. Few users reported that you can fix this problem simply by forcing a restart or a shutdown.

According to users, the rollback process is stuck and the hard drive indicator doesn’t show any activity. After the restart, the indicator will start blinking again and the rollback process should start working without any problems.

Solution 2 – Use Legacy Boot

Several users reported that the rollback process was stuck due to UEFI mode. According to the users, there was a problem with booting from a flash drive and DVD and that can sometimes prevent the rollback process.

To fix this issue you need to enter BIOS and change the Boot Mode from UEFI to Legacy. To do that follow these steps:

  1. While your computer boots keep pressing the F2 or Del on your keyboard to enter BIOS. Some versions of BIOS use a different key, so you might have to repeat this step a few times before you find the right key.
  2. Once you enter BIOS you’ll need to find Boot Mode and change its value from UEFI to Legacy. If you can’t find this option be sure to check your motherboard manual for detailed instructions.
  3. Save changes and try to perform the rollback again.

Solution 3 – Use a hard drive image to restore your system

If you are familiar with hard drive images, you probably have a backup hard drive image created. If you don’t use any backup software, then you most likely don’t have a backup image of your hard drive, so you can skip this solution.

If you created your hard drive image before upgrading to Windows 10, you can simply back up your system by using that hard drive image.

Once again, this solution only works if you created a hard drive image before upgrading to Windows 10.

Yes, you can through this process called a Rollback that we discussed in this article. Missing rollback option? Check out our guide.

Solution 4 – Leave your computer running for a couple of hours

Sometimes rollback process can take a couple of hours to complete, and users reported that rollback will be completed after a few hours if you wait patiently. In some cases, the rollback process might encounter a restart loop, but leaving the computer for a few hours can sometimes fix the problem according to some users.

Solution 5 – Use Command Prompt

Windows 10 downgrade stuck

According to users, if your PC is stuck during the rollback process, you might be able to fix it by running a couple of commands in Command Prompt.

Since you won’t be able to boot to Windows, you’ll need to start Command Prompt outside of Windows and run the necessary commands. You can do that by following these steps:

  1. Restart your computer a couple of times while it boots.
  2. You’ll now be presented with a list of options. Select Troubleshoot > Advanced options > Command Prompt.
  3. After the command prompt starts, run chkdsk c: /f command.
  4. The scan will now start and check your hard drive for errors. This process can take a while, so be patient.

Once the scan is finished, try to access Windows 10 again. If the problem is still there, you might need to run a couple of additional commands. To do that, follow these steps:

  1. Repeat the steps above to open Command Prompt.
  2. Once you open Command Prompt, run the following commands:

After the commands are executed, check if the problem is still there.

Solution 6 – Perform an in-place upgrade

Exit and continue to Windows rollback loop

In case you’re not familiar, the in-place upgrade process will force Windows 10 to update to the latest version while keeping all your files intact. To perform an in-place upgrade you’ll need the following:

To fix this problem, first, you need to download Media Creation Tool on another PC and run it. Now follow these instructions:

  1. Connect the USB flash drive to another PC.
  2. Choose Create installation media (USB flash drive, DVD or ISO file) for another PC option. Click Next to proceed.
  3. Make sure that you select the version that matches the version on your other PC and click Next.
  4. Select USB flash drive and click Next.
  5. Choose your flash drive from the list and click Next to proceed.

Now, wait while the Media Creation Tool creates a bootable media. After creating a bootable media, you can switch back to your PC. Connect the USB drive to the affected PC and do the following:

  1. When your PC boots, you’ll be asked to choose between several versions of Windows. Select any version you want and your system should boot in Safe Mode.
  2. When your PC boots, press Ctrl + Shift + Esc to start Task Manager.
  3. In Task Manager, choose File > Run New Task.
    Windows rollback loop after update
  4. Enter explorer.exe and click OK.
    Windows 10 rollback stuck on restarting
  5. Now you need to open your flash drive and run setup.exe file.

The setup process will now start. To upgrade your PC and keep your files, you just need to do the following:

  1. Wait while the setup prepares the required files.
  2. Select Download and install updates (recommended). This isn’t mandatory, and you can always download updates later if you want. Click Next to proceed.
  3. Follow the instructions on the screen until you reach Ready to install screen. Choose Change what to keep.
  4. Make sure to select Keep personal files and apps. Now click Next to proceed.
  5. Follow the instructions on the screen to complete the setup process.

Once you finish the setup, you should have the latest version of Windows installed, and everything should be exactly as you left it.

If Choose what to keep option isn’t available, it means that the ISO file isn’t the same as your version of Windows, so you’ll need to download a new ISO file, or continue and lose all your files on your system drive.

Solution 7 – Reinstall Windows

Sometimes the only solution is to reinstall Windows completely, and in order to do that, you’ll need Windows installation media. Bear in mind that reinstalling Windows will delete all files from your C drive, therefore we urge you to back them up.

If you cannot access Windows 10 due to a certain problem, you can always boot your PC from a Live Linux CD, and use Linux to find and back up your files.

To reinstall Windows 10, you just need to do the following:

  1. Connect Windows 10 installation media to your PC and boot your PC from it.
  2. Choose Install now option.
  3. Enter your product key and click Next. If you don’t have your product key, you can activate Windows 10 later.
  4. Select the version of Windows you want to install and click Next.
  5. Now select your system drive and press Next. Keep in mind that your system partition might not be always labeled, so be extra cautious while picking the partition.
  6. The installation process will now start. Follow the instructions on the screen to complete it.

Once the installation is finished, the problem should be resolved completely. Now you just need to move your files from the backup and you’re good to go. Keep in mind that this is a drastic solution, so you should use it only if other solutions can’t fix the problem.

This brings us to the end of this guide. But before we add the last punctuation mark, there are two important things we’d like to mention.

Exit and continue to Windows rollback loop

This is by far the most annoying and frequent issue that Windows 10 users may encounter. The OS initially asks users to exist any programs in order to go back to Windows. But this rarely works.

However, if you encounter this problem, try to shut down or restart your PC. Sometimes, this might help with the glitches and fix your problem. But in most cases, this error message stays on the screen even after users restarted or shut down their computers several times.

Choose an operating system Windows rollback

If the rollback attempt is successful, you will be asked to choose a previous operating system to go back to for the rollback. Usually, this is a restore point previously created.

But shortly after the rollback, Windows 10 might automatically search for updates. If you don’t want to repeat the whole rollback process all over again, don’t forget to disable automatic Windows 10 updates as soon as the rollback is completed.

Well, the rollback process can sometimes get stuck, and if that’s the case, we suggest that you try all solutions from this article.

Fix Publisher has detected a problem error with these steps

No stranger to Publisher errors? Some of them are indeed easy to fix, but there are others that need a lot of time and research in order to be resolved. One of these errors comes accompanied by the message Publisher has detected a problem in the file you are trying to open.

We’re talking about the runtime error 1100009. This is often encountered when Microsoft Publisher fails or crashes whilst it’s running. In spite of its name, don’t assume from the start that the code was corrupt in some way, but just that it did not work during its run-time.

As you probably discovered on your own, a simple system restart won’t help much to fix it. If you’re not willing to give up on solving this error, you can go through the solutions below.

What can I do if getting Publisher has detected a problem error?

1. Try duplicating the file

right-click on the Publisher file

  1. Right-click on the Publisher file that’s causing the issue and select Copy.
  2. Right-click an empty desktop space and choose Paste.
  3. Open the new file and see if the error still shows up.

Firstly, we’d suggest copying the file and opening the new copy with Publisher once more. This is an easy workaround, yet it doesn’t resolve the underlying causes of the problem. If you’re thinking of a permanent fix instead, then keep on applying the steps below.


2. Disable/uninstall 3rd party security products

Uninstall antivirus to fix Publisher has detected a problem

Windows Defender Antivirus is automatically enabled and installed on Windows 10 computers. However, you’ve chosen protection from a non-Microsoft antivirus or antimalware app and that’s the cost that you are supposed to pay sooner or later.

Plenty of users report experiencing severe conflicts between their paid or free third-party AV and the Microsoft Office tools. To rule out this option, you need to disable all 3rd party antivirus and firewall products on your computer.


Ready to completely remove your antivirus from the PC? Check out this list with the best uninstaller software you can use.


3. Recover data using the Insert Text feature

click on Insert File

  1. Start by opening your Publisher app and creating a new Blank workspace from New > Blank.
  2. Then, go to the Insert tab and click on Insert File or Insert text file.
  3. After you’re inside the Insert Text window, select the problematic .pub file and click on OK.
  4. Now that the content is imported to the new file, arrange it.
  5. Don’t hesitate to save the files using the Save As feature.
  6. Open the newly created file again and see if the Publisher has detected a problem error has been resolved.

In Publisher, you may use the Insert Text feature to recover some of the content you’re afraid is gone forever. The error message described appears when using a highly-outdated Publisher version or if the file that you’re trying to open is not actually a Publisher file in the first place.


4. Run a Repair by using the Office Repair utility

Office Repair

  1. Close Publisher and any other Office programs.
  2. Open Win + X menu.
  3. Choose Control Panel.
  4. Below the Programs heading, click the Uninstall a Program link.
  5. Locate your Office installation. Once you manage to do so, right-click on it and choose Change from the newly appeared context menu.
  6. Choose Quick repair from the list of available options, then click on Repair. Then, the Office Repair utility will start running.
  7. The attempt to fix the problem could take anywhere from a few seconds to a few minutes. Wait patiently for that to happen.
  8. When the procedure is completed, restart your computer and check if Publisher is back to working properly again.

Any time an Office application isn’t working correctly, you can try repairing it. The Office Repair utility tries to figure out what’s wrong. What happens next depends on whether anything needs to be fixed or not. Just follow the directions on the screen and you’ll hopefully solve the issue.

That’s about it. As you can see, fixing the error Publisher has detected a problem in the file you are trying to open requires effort and time from your part, but it isn’t an impossible mission. If you have any suggestions or questions, just let us know in the comments below.

[wl_navigator]

FIX: Skype problem with playback device in Windows 10

Although Skype is one of the most popular messaging services, certain issues can appear once in a while. Windows 10 users reported that Skype has a problem with a playback device, but fortunately for you, there is a solution available.

Problems with the playback device can be troublesome, especially because you won’t be able to hear the other person during a call, but you can fix these problems by following one of our solutions.

But first, here are some more examples of this problem:

How can I fix Skype problem with playback device on Windows 10?

  1. Delete audio device
  2. Temporarily disable audio device
  3. Make sure your audio driver is up to date
  4. Restart Skype
  5. Make sure the correct playback device is set in Skype
  6. Uncheck Automatically adjust speaker settings
  7. Enable and disable your speakers
  8. Turn off any audio programs running in the background
  9. Reset Skype configuration files
  10. Reinstall Skype
  11. Switch to the UWP version
  12. Run Audio Troubleshooter

How do I fix Playback device not working in Skype?

1. Delete audio device

  1. Press Windows Key + X and choose Device Manager from the list.
    device-manager
  2. Navigate to Sound, video and game controllers section and locate your audio device.
  3. Right-click the audio device and choose Uninstall.
    uninstall-driver
  4. After your audio device has been uninstalled, restart your computer and Windows 10 should install it automatically.
  5. Check if the problem still persists.

2. Temporarily disable audio device

  1. Open Device Manager. You can open Device Manager by pressing Windows Key + X and choosing Device Manager from the menu.
  2. When Device Manager opens, locate your audio device, right click it and choose Disable.
    device-manager-disable
  3. Right-click the device again, and choose Enable from the menu.
  4. Close Device Manager and check if the problem still persists.

3. Make sure your audio driver is up to date

Problems with playback devices in Skype can occur if your audio driver isn’t up to date, and if that’s the case, it’s advised you update your audio driver.

To do that, just visit your motherboard or sound card manufacturer’s website and download the latest drivers for your device. After installing the latest drivers, the playback issue should be resolved.

However, if you don’t want the hassle of updating drivers manually you should think of using specialized software that can automate the process.

Using an advanced tool like Fortect Driver Updater will prevent PC damage that could appear by installing the wrong driver version. In fact, once you have selected the correct driver’s version for your device, the application will update them singularly or in groups in just a blink of an eye.

With a few clicks, the software will scan your PC’s hardware and peripherals for potential driver upgrades. With its library of up-to-date drivers, is ready to keep your PC system running smoothly, and you never have to worry about missing drivers.

Save yourself the time and stress of not having a playback device when you need to attend an important meeting or talk.

4. Restart Skype

Few users reported that problems with playback device can be fixed simply by restarting Skype. To do that, just find Skype icon on the Taskbar, right-click it and choose Quit.

After you’ve closed Skype, start it again and check if the issue is resolved.

5. Make sure the correct playback device is set in Skype

  1. Open Skype and choose Tools > Options.
  2. Navigate to Audio settings and expand Speakers section.
    skype-audio-devices
  3. Select the proper audio device and click Save to save changes.
  4. Check if the issue is resolved. You might have to try several different audio devices before you find the one that works for you.

6. Uncheck Automatically adjust speaker settings

Few users reported that Skype problems with playback can be fixed by turning off the Automatically adjust speaker settings option.

To turn this option off, just navigate to Tools > Options > Audio settings in Skype. Navigate to Speakers section, uncheck Automatically adjust speaker settings and click Save to save changes.

7. Enable and disable your speakers

  1. Right click the speaker icon in the bottom right corner and from the menu choose Playback devices.
    playback-devices
  2. Right-click on the empty space in Playback Devices window and make sure both Show Disabled Devices and Show Disconnected Devices are checked.
    show-disabled-devices
  3. Right click your audio device and choose Disable from the menu.
    disable-speaker
  4. Right click the device again and choose Enable.
  5. Click Apply and OK to save changes.

8. Turn off any audio programs running in the background

According to users, you can fix the problem with the playback device by turning off any applications that are using your sound card.

For example, if you have a multimedia player running in the background you might want to disable it before you start a Skype call.

9. Reset Skype configuration files

  1. Close Skype.
  2. Press Windows Key + R and enter %appdata%. Press Enter or click OK.
    appdata-run
  3. Locate Skype folder and rename it to Skype.old. Keep in mind that by renaming your Skype folder your message history will be removed from Skype, but it will still be available in Skype.old folder.
  4. After you’ve renamed Skype folder, start Skype again and check if the issue is resolved.

10. Reinstall Skype

Users suggest that playback device problem can be fixed by reinstalling Skype, so make sure to try that.

Few users claim that they managed to fix this problem by installing an older version of Skype, so you might want to try that as well.

11. Switch to the UWP version

If you can’t make a call with a standard Desktop version of Skype, try using the new UWP version. Microsoft has been heavily insisting on using this version lately.

Truth be told, it’s still not the most stable app out there, but it’s improving.

You don’t need to install the UWP version of Skype, as it’s already pre-installed on your system. So, just give it a try.

12. Run Audio Troubleshooter

  1. Go to the Settings app.
  2. Head over to Updates & Security > Troubleshooting.
  3. Find Recording Audio and click it.
  4. Now, go to Run the troubleshooter.
  5. Follow further on-screen instructions and let the wizard find any issues.
  6. Restart your computer.

With playback device problems you won’t be able to perform Skype calls at all, and that can seriously affect your Skype experience.

We covered several major Skype issues in the past, and if you’re having Skype Error 0x80070497 or if you can’t close Skype in Windows 10, feel free to check some of our other Skype-related articles.

Did you manage to resolve the issue? Let us know how in the comment area below.

Fix Windows update error 0x8024001F in a few easy steps

Worried about the Windows update error 0x8024001F message? This annoying error is mainly noticed when trying to install a pending Windows update.

The issue may often escalate as many users describe the error code as recurring with every Windows updatethat they wish to install.

Moreover, the computer might fall into a reboot loop and continuously restart from Windows sign-in screen to the computer’s boot screen.

This can eventually restrict or limit user access to Windows before the machine restarts.

If you want to learn about the solutions to fix the Windows update error 0x8024001F, keep on reading the lines below.

They will show you some feasible methods precisely for this job.

To avoid conflicts, we suggest performing the actions in exactly the same order as they are presented.

How can I fix Windows update error 0x8024001F?

1. Run the Windows update troubleshooter

troubleshoot error 0x8024001F
  1. Open Control Panel and click Troubleshooting.
  2. In the Windows Update troubleshooter, click Advanced.
  3. Then, click Run as administrator and then Next.
  4. Wait patiently until the initial scan is finished.
  5. If a viable fix is identified, you’ll see a new window that will prompt you to Apply this fix if a recommended strategy is identified.
  6. Let the process finish and restart your computer.

First, the most effective solution to repairing this error involves the usage of the Windows Update troubleshooter.

Windows Update provides the mechanism to download and install quality updates, but it isn’t flawless.

The Windows repair tool may step in to automatically scan and repair the integrity of your operating system when running into issues such as the Windows update error 0x8024001F.

You can find step-by-step instructions detailed above.


If the Troubleshooter stops before completing the process, fix it with the help of this complete guide.


2. Disable/Uninstall 3rd party antivirus or firewall

Programs and Features
  1. Firstly, press the Windows logo key + R keyboard hotkey to open up a Run dialog box.
  2. Type appwiz.cpl into the Run dialog and press Enter.
  3. You may also open the Control Panel and go to Programs and Features.
  4. You will be presented with a list of all the programs installed on your computer. Select the program you want to uninstall, then right-click on it and click on Uninstall.
  5. Follow the on-screen steps to uninstall the program.
  6. You may need to restart your computer for the changes to take effect.

Second, there are times when third-party security programs interfere with other elements on your computer and create problems.

3. Check your computer for driver updates

time to update drivers

Have you considered outdated hardware and drivers as the core of this Windows update error 0x8024001F?

Check your computer for driver updates and update all out-of-date drivers or visit your computer manufacturer’s website.

While there, you need to locate your model number and find all the drivers for your computer. If this rather sounds too much for you, then try out an updating tool instead.


Looking for the best driver updating software? Here are our top picks.


4. Launch the System File Checker

System File Checker
  1. To do this, open up a Run dialog box by pressing Windows key + R.
  2. You may now type cmd inside the text box and press Ctrl + Shift + Enter to open up a Command Prompt with admin access.
  3. When prompted, click Yes to run with elevated privileges.
  4. First, run the DISM tool before launching System File Checker.
  5. Type the following commands, then press Enter:
    Dism.exe /online /cleanup-image /scanhealth
    Dism.exe /online /cleanup-image /restorehealth
  6. Once the DISM scan is finalized, restart your computer.
  7. Then, it’s time to type the next command and press Enter to initiate the SFC scan:
    sfc /scannow
  8. It may take several minutes for the command operation to end. When it does, restart your computer once again and see if the Windows update error 0x8024001F is still present in the next system startup.

SFC, which stands for System File Checker, is known as a useful built-in administrative tool ready to verify the integrity of operating system files and to repair corrupt, damaged, or changed files.

All you need to do is to apply the above steps in the given order.

5. Reset Windows Update Service

Restart Windows Update
  1. Start the procedure by booting into your computer with full administrative rights.
  2. Up next, press Windows key + R, type Services.msc and click on OK.
  3. Once Services loads up, right-click on Windows Update.
  4. Finally, it’s best practice to restart your computer.

One of the many reasons for this error is that the Windows Update service may have crashed.

Thus, a restart is required for it to work again. You may do so without restarting the entire operating system.

Errors like 0x8024001F are sometimes hard to fix. Hopefully, you found help through this guide.

If you have any other ideas or suggestions you want to share, feel free to leave a comment.

  • How can I fix Windows update error 0x8024001F?
The first step is to run the Windows Update Troubleshooter. If that doesn’t solve the issue, read our comprehensive guide on how to fix the error 0x8024001F.
  • How do I fix Windows Update corruption?
Run SFC and CHKDSK to repair Windows Update Database Corruption. Here’s a guide about how to run a SFC scan.

FIX: Microsoft Teams Third-Party Cookies Error

When it comes to the corporate environment, everyone can agree that a good collaborative tool can mean the difference between projects getting done on time, and money being wasted.

That is why many companies use such tools, and one very good example is Microsoft Teams.

The only downside is that this tool isn’t always fool-proof, as some users have reported issues with the cookies in the web client:

We have the issue, that IE 11 is not able to use Microsoft Teams.. FF, Chrome is working fine. IE11 outside of our corporate network is working also fine. Seems to be a group policy setting, does anyone have an idea what that could be?

This is a problem many companies face, since accepting website cookies is not usually something that they do. That’s why we’ve created this step-by-step guide, to show you exactly what needs to be done in order to fix this issue.

How do I fix the MS Teams’ third-party cookies error?

1. Use a GPO that enable s third-party cookies

Since third-party cookies are usually restricted at a corporate scale via Group Policies, the only obvious choice if you really want Microsoft Teams as your collaborative tool is to simply ask the IT administrators to enable a GPO that allows for cookies to be stored.

2. Manually enable third-party cookies on your browser

If your company does not have a GPO that forbids the saving of third-party cookies, then all you need to do is manually enable them on the browser you are using to access the Microsoft Teams web client.

Since this process varies greatly depending on what browser you are using, then you should check up on this in-depth article for steps on how to enable cookies on all of the major browsers.

On the other hand, you might consider changing your browser to one that offers reliable and useful services. To use third-party cookies freely, we suggest you choose Opera One.

3. Add MS Teams’ website in the Local Intranet zone

Local Intranet Zone sites
  1. Open Internet Explorer
  2. Click on Settings 
  3. Go to Internet Options
  4. Select Security tab Local Intranet Zone Sites
  5. Then, click Advanced
  6. Add the base URL for your site to the list
  7. Click OK
  8. Then, click OK again to confirm your action

Adding the site’s path to the list of Local Intranet Zone sites may also help to fix the error. Just don’t forget to configure Internet Explorer to automatically log in using the current username and password for sites in the Intranet Zone.

4. Use the desktop client

Since the cookies issue is only something that you encounter while using the web client, one obvious choice would be to simply switch to the downloadable desktop client instead.

This software comes free of price and it can be acquired free separately or as part of the Microsoft Office Suite.

By following these steps, you should no longer receive any cookie-related errors when trying to log into Microsoft Teams.

%appdata%Microsoftteamsapplication cachecache
%appdata%MicrosoftteamsCache

Browser cookies are not bad in themselves, they are mainly used to profile users so as to deliver them the content they’d be most interested in. The real question is whether the companies that collect information retrieved by cookies used them for dishonest purposes or not.

Browser cookies are usually saved and stored in a dedicated file in the browser folder. Most browsers store the cookies at this location:

C:Users[Username]AppDataLocal[Company owning the browser][Name of the browser]User DataDefaultLocal Storage

Microsoft Teams often blocks third-party cookies due to security reasons. Sometimes this triggers various errors but this guide will help you fix them.

Also, you can visit our Microsoft Teams Hub for more useful tips and guides.

Which of the above procedures works for you? Leave your answer and any other questions or suggestions in the comments area below.

FIX: Skype won’t let me type username or password

Many Windows users, from different versions, ranging from Windows 7 to the most recent Windows 10, have been reporting on the issue that Skype won’t let them type in their username or password.

Here are some potential fixes for that.


Steps to fix Skype username and password issues

  1. Check your DLLs
  2. Reinstall Skype
  3. Update your computer
  4. Additional solutions

Why won’t Skype accept my username and password?

A couple of Windows users have been complaining regarding some problems with Skype‘s login process. Here’s what one of the affected users has been saying:

It’s as simple as that. I cannot click on the username or password field to type my password and log in. I’ve reinstalled it several times, all using different browsers. What can I do?

What can I do if Skype doesn’t accept  my username or password?

1. Check your DLLs

Here’s a first fix that you could try for this particular problem, that seems to be working for Windows 7 users, but you can also try this in other versions, as well

  1. Windows Start -> All Programs -> Accessories -> Right click on Command Prompt, select Run as administrator
  2. In the Command Prompt type: cd c:windowssyswow64 and press Enter
  3. Next type this – regsvr32 jscript.dll – and then press Enter:
  4. Then type this and press Enter – regsvr32 jscript9.dll
  5. After each Enter you should receive a message saying that DllRegisterServer in XXX.dll succeeded
  6. Reboot your computer
  7. See if your Internet Explorer can execute JavaScript by opening this page https://javatester.org/javascript.html

2. Reinstall Skype and running it an administrator

If this works, then this means you can use the web version of Skype until you have figured out what’s wrong with the desktop version.

If it works on the web interface, you can completely wipe Skype from your websites and then try reinstalling it.

However, this doesn’t always work. But according to many Skype users, they didn’t even have to uninstall and reinstall, as adding these code strings fixed the issue.

There are actually situations when simply running the software as an administrator is enough to fix the problem. Also, you can try running the app in compatibility mode, and select a previous Windows version in which it should run.


3. Update your computer

If you’re not running the latest Windows 10 OS version, don’t be surprised if Skype doesn’t work for you. Outdated software is one of the most frequent root-causes for Skype issues. Install the latest Windows update and then test if you can login to your Skype account.

Additional solutions

For additional methods on how to fix Skype sign in problems, you can also check out this troubleshooting guide.

Leave your comment below and let us know if this helped. If it didn’t, then maybe you can suggest another potential workaround for this problem.

[wl_navigator]

FIX: Microsoft Teams error code max reload exceeded

No self-respecting enterprise can exist nowadays without the aid of a very good collaborative tool. These bring all the tools needed in order to make a company’s workforce to communicate and cooperate better.

One good example of a collaborative tool is Microsoft Teams which is part of Microsoft Office Suite. Thankfully enough, companies can get it without a subscription, as it is available free of charge.

Unfortunately, Microsoft Teams can face the occasional error, especially when users mishandle it. For example, some have reported getting an error message when trying to log in:

[Microsoft Teams] will not log in/start up. Opens and closes several times trying to then reports Error code – max_reload_exceeded.

The good news to this entire problem is that this error code is usually solved by carefully managing certain settings on the IT Administrator’s side through the use of Group Policies.

How can I fix Error Code max_reload_exceeded?

1. Fix any company AD FS URL issues

  1. Start Internet Explorer
  2. Press F12 to open the developer tools window
  3. On the Network tab, click the start button or press Start capturing to enable network traffic capturinginternet explorer f12
  4. Browse to the URL of the web application
  5. Examine the network traces to see that the client is redirected to the URL of the AD FS service for authentication
  6. Make sure that the AD FS service URL is correct

If you are redirected to an incorrect address, you likely have incorrect AD FS federation settings in your web application. Check these settings to make sure that the AD FS federation service URL is correct.


2. Use the web version of the service

This error message seems to only occur on the Microsoft Teams desktop client. As such, simply log in and use Microsoft Teams through the web client by means of your Internet browser.


Want to use Microsoft Teams in a completely safe and secure manner? Check out this browser.


Additionally, you could also use the Microsoft Teams mobile apps which have the same functionality and are available for both Android and iOS.

By following these steps, you should now be able to log into your Microsoft Teams account without any issues.

Feel free to let us know if you found this guide helpful. You can do so by leaving a comment in the section found below this article.
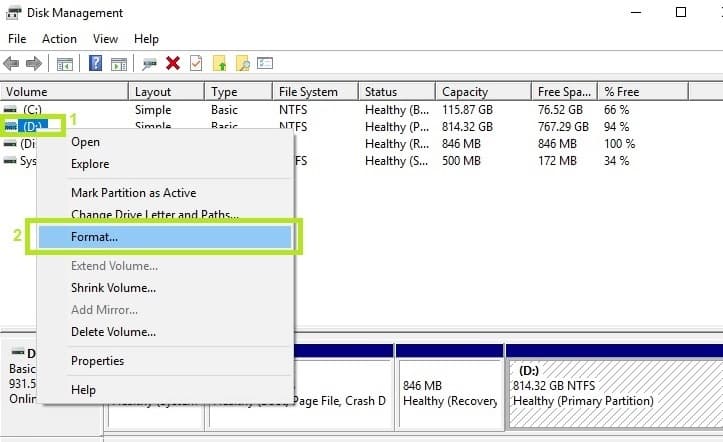
[wl_navigator]

FIX: Skype error 0x80070497 in Windows 10/11

Windows 10 is getting quite popular, and since it’s a free upgrade for all Windows 7 and Windows 8 users, it’s no wonder that most of them have switched to Windows 10.

Despite its popularity Windows 10 is still a new operating system, and there might be some errors, and speaking of errors one error that users report is 0x80070497 error with Skype on Windows 10.

How can I fix Skype error 0x80070497 in Windows 10?

1. Use Command Prompt

  1. Start Command Prompt. You can do so by pressing Windows Key+ X and choosing Command Prompt (Admin).
  2. Now you need to stop BITS service and Windows Update service from Command Prompt. To do so execute these two commands in Command Prompt:
    • net stop bits
    • net stop wuauserv
  3. Next, delete the qmgr*.dat files. To do this enter this in Command Prompt and press Enter:
    • Del “%ALLUSERSPROFILE%Application DataMicrosoftNetworkDownloaderqmgr*.dat”

If you’re trying this solution for the first time, skip this step and go to step 5. If you have tried all the steps already but with no success, repeat all the steps again, but this time don’t skip this step.

This is more aggressive method so use it carefully. Since this is aggressive method, we asked you to skip it before, but if you have tried all other steps while skipping this one, this time try these steps as well.

  1. Run these three commands in Command Prompt to rename the folders. Remember to press Enter after each command:
    • Ren %systemroot%SoftwareDistributionDataStore *.bak
    • Ren %systemroot%SoftwareDistributionDownload *.bak
    • Ren %systemroot%system32catroot2 *.bak
  2. Next you need to reset the BITS service and Windows Update service to the default security descriptor. To perform this, you’ll need to enter these commands in Command Prompt:
    • sc.exe sdset bits D:(A;;CCLCSWRPWPDTLOCRRC;;;SY)(A;;CCDCLCSWRPWPDTLOCRSDRCWDWO;;;BA)
    • (A;;CCLCSWLOCRRC;;;AU)(A;;CCLCSWRPWPDTLOCRRC;;;PU)
    • sc.exe sdset wuauserv D:(A;;CCLCSWRPWPDTLOCRRC;;;SY)(A;;CCDCLCSWRPWPDTLOCRSDRCWDWO;;;BA)
    • (A;;CCLCSWLOCRRC;;;AU)(A;;CCLCSWRPWPDTLOCRRC;;;PU)
  3. After that, enter the following into Command Prompt and press Enter.:
    • cd /d %windir%system32
  4. Enter this line in Command Prompt and press Enter:
    • cd /d %windir%system32
  5. Reregister the BITS files as well as Windows Update files. This step might take a while because there are a lot of commands that you need to enter. Remember to press Enter after each command.
    • regsvr32.exe atl.dll
    • regsvr32.exe urlmon.dll
    • regsvr32.exe mshtml.dll
    • regsvr32.exe shdocvw.dll
    • regsvr32.exe browseui.dll
    • regsvr32.exe jscript.dll
    • regsvr32.exe vbscript.dll
    • regsvr32.exe scrrun.dll
    • regsvr32.exe msxml.dll
    • regsvr32.exe msxml3.dll
    • regsvr32.exe msxml6.dll
    • regsvr32.exe actxprxy.dll
    • regsvr32.exe softpub.dll
    • regsvr32.exe wintrust.dll
    • regsvr32.exe dssenh.dll
    • regsvr32.exe rsaenh.dll
    • regsvr32.exe gpkcsp.dll
    • regsvr32.exe sccbase.dll
    • regsvr32.exe slbcsp.dll
    • regsvr32.exe cryptdlg.dll
    • regsvr32.exe oleaut32.dll
    • regsvr32.exe ole32.dll
    • regsvr32.exe shell32.dll
    • regsvr32.exe initpki.dll
    • regsvr32.exe wuapi.dll
    • regsvr32.exe wuaueng.dll
    • regsvr32.exe wuaueng1.dll
    • regsvr32.exe wucltui.dll
    • regsvr32.exe wups.dll
    • regsvr32.exe wups2.dll
    • regsvr32.exe wuweb.dll
    • regsvr32.exe qmgr.dll
    • regsvr32.exe qmgrprxy.dll
    • regsvr32.exe wucltux.dll
    • regsvr32.exe muweb.dll
    • regsvr32.exe wuwebv.dll
  6. Next try resetting Winsock. To do this, enter:
    • netsh reset winsock
  7. And press Enter to execute the command.
  8. Restart BITS service and Windows Update by entering this into Command Prompt:
    • net start bits
    • net start wuauserv

As you can see error 0x80070497 is a bit complicated, but you should be able to fix it, if you carefully follow these steps.

[wl_navigator]

Microsoft Delaying Retirement of MCSD, MCSA and MCSE Certifications

After making the announcement that Microsoft was planning to retire several of their very popular certifications on June 30 of this year, Microsoft has confirmed that the planned retirement of their Microsoft Certified Solutions Developer (MCSD), Microsoft Certified Solutions Expert (MCSE) and Microsoft Certified Solutions Associated (MCSA) certifications were being put on hold.

With the impact of Covid-19, many potential test-takers have been unable to take their exams as test centers are closed across the country.  In response to that, Microsoft, alongside their exam delivery partner Pearson VUE, said in today’s announcement that not only were they extending the availability of the certifications until January 31, 2021, but they are also proactively making some program changes and would be waiving all exam rescheduling and cancellation fees if the request is made at least 24-hours before the appointment, and automatically extending existing role-based certification expiration dates by another six months.

Pearson VUE is also working to increase the capacity for online proctoring in an attempt to expand its online testing capacity.  Potential test-takers can simply check current availability on Pearson’s website.  Microsoft also indicated that they are transitioning in-person instructor-led courses to virtual instruction and virtual training through their Microsoft Learning website.

While the change in position seems obvious given the current circumstances, it’s great to see that Microsoft is responding to the current situation and taking care of their IT Professionals over the short-term as they continue to push everyone towards the cloud.


How to fix Windows update error code 800F0A13 with ease

Like it or not, it’s just a matter of time before seeing the Windows update error code 800F0A13. This error is quite common after a Windows 10 update fails.

Thankfully enough, be sure that there are a few working solutions that you can try in order to get things back on track.

That is precisely why we’ve created this step-by-step guide that will show you a few simple ways to solve this Windows update error code 800F0A13 in no time. Don’t postpone applying them!

What can I do if getting Windows update error code 800F0A13?

1. Perform a clean boot of Windows

Disable all button

  1. Open up a Run dialog box by pressing Windows key + R keyboard shortcut.
  2. Next, type msconfig.
  3. When the System Configuration window opens, go to the Services tab.
  4. It’s time to put a tick in the Hide all Microsoft services box at the bottom left.
  5. Click the Startup tab.
  6. Then, press the Disable all button.
  7. Finally, you may restart your computer for a clean boot.
  8. Check if the 800F0A13 error is temporarily gone, then load msconfig and start enabling items one by one in the services and startup tabs until you can identify the one causing the issue.

Users often discover that their third party software is the cause of the problem. That’s why our first recommendation for fixing the issue is to prevent all non-Windows programs and services from starting.

The system would prevent any third party software from launching on boot.


2. Fire up DISM and SFC scans

run DISM command

  1. Press Win key+R to show the Run dialog and type cmd.
  2. Press Ctrl + Shift + Enter to open up an elevated CMD prompt.
  3. Up next, click Run as Administrator.
  4. If you are prompted to enter an administrator password or confirmation, type the password or click Allow.
  5. After opening an elevated CMD window, type the following command and press Enter after each line to initiate a DISM scan:
    Dism.exe /online /cleanup-image /scanhealth
    Dism.exe /online /cleanup-image /restorehealth
  6. After finishing the DISM scan, restart your computer.
  7. Once the next startup sequence is complete, follow previous steps again to open up another elevated CMD prompt.
  8. This time, type the following command instead and press Enter to initiate an SFC scan:
    sfc /scannow
  9. When all steps are completed, restart your computer.

Note: Do a full backup of the Windows system partition before you run DISM and SFC scans. If you’re unsure about this procedure, the best local data backup software tools come in handy.

Several users affected by the 800F0A13 error have reported that they managed to resolve this issue by running DISM and SFC scans. The first DISM command checks the image for the corruption flag and returns its findings without running any repair operations.

However, the second one tries to repair any issues that it finds automatically. Even if no issues are reported, you should continue with the SFC scan too.


Don’t know what to do when DISM fails on Windows 10? Read our handy guide and solve the issue in no time.


3. Launch Startup Repair

Startup Repair

  1. Turn on your PC.
  2. As soon as the Windows logo appears on your screen, press the Power button to interrupt the boot sequence.
  3. Repeat the above steps two more times.
  4. After the third interruption, Windows will open into the Advanced Startup environment.
  5. Then, select Troubleshoot > Advanced options.
  6. Click Startup Repair to run the procedure.
  7. Select your account.
  8. Up next, you’ll need to type your account password.
  9. Click the Continue button.

If you’re still having problems, you should use Startup Repair. This tool can’t fix every problem and there are times when your Windows installation is so damaged that reinstalling Windows is the only option.

However, before getting to this conclusion, follow the above steps and see if it can help you remove the Windows update error code 800F0A13 for good.

Anyway, if the computer is loading correctly, you’ll get the Start Repair couldn’t repair your PC message since there’s nothing that needs fixing.

Have you followed the steps in this article to troubleshoot the problem? Do let us know which method helped you resolve the issue in the comments section below.

[wl_navigator]

Microsoft “rushing to release” Windows 10 patch to address VPN internet connectivity errors with Office 365, Teams

If you’re depending on a Virtual Private Network (VPN) on Windows 10 and are having issues connecting to Microsoft Teams and other Office 365 services, you’re not alone. According to a report from ZDNet, Microsoft is currently “rushing to release” a Windows 10 patch which will help address some internet connectivity errors in the operating system.

The issue with VPNs and Office 365 apps was originally caused by last month’s KB4535996 February Cumulative update for Windows 10. The problem is well known, as it was noted in the changelogs, that “devices using a virtual private network (VPN), might show limited or no internet connection status in the Network Connectivity Status Indicator (NCSI) in the notification area.”  All the major versions of Windows, including version 1909, version 1903 and version 1809 were impacted.

This is likely a huge pain for those working on company devices from home due to the Coronavirus outbreak, and as a result, Microsoft has further officially acknowledged it. The company posted that they are working on an out-of-band update to help resolve the issue by early April.

The update to correct the issue will only be downloadable through the Microsoft Update Catalog.  In the meantime, as a workaround, Microsoft recommends for you to mitigate any VPN bugs by restarting your device.

Fix Critical Windows error 0x00000019 in a few easy steps

Without any trigger from your part, you may encounter the Critical Windows error 0x00000019. This isn’t related to older Windows versions only, but it often appears on Windows 10 computers as well.

The error code is though replaced with the BAD_POOL_HEADER code instead, yet it means the same thing. As it turns out, this 0x00000019 error message has been known to occur as a result of one or more of the following: faulty RAM memory, 3rd party utilities, system file corruption, bad sectors on your HDD, and other hard drive issues.

This post shows you how to solve this Windows error, so don’t postpone applying the below procedures.

What can I do if getting Critical Windows error 0x00000019?

1. Check your RAM

check your RAM

  1. Click Start.
  2. Type in Memory Diagnostics Tool in the search box.
  3. Right-click on Memory Diagnostics Tool.
  4. Choose Run as Administrator.
  5. Follow the instructions to begin the diagnostic procedure.

If the error is caused by a faulty RAM memory, your best bet is to check your RAM using the Windows Memory Diagnostic Tool. To do so, follow the procedure detailed above.


2. Disable or uninstall any 3rd party utility

disable real-time protection

Certain brands of anti-malware software and other 3rd party utilities can corrupt the system memory, making this 0x00000019 error to appear. Thus, the second method you can try is to disable real-time protection.

This will be different depending on the 3rd party antivirus suite you’re using. However, you should generally be able to do it directly from the dedicated taskbar menu.

If this makes no difference, uninstall any anti-malware software running on your computer and then restart your computer.


Is your Windows 10 computer stuck on restart now? Fortunately, we’ve got the right solutions for you.


3. Perform a CHKDSK scan

perform a CHKDSK scan

  1. To start, use the keyboard shortcut Windows Key + R to open up a Run dialog box and type cmd.
  2. Press Ctrl + Shift + Enter to open up an elevated Command Prompt.
  3. Once you’re inside the elevated Command Prompt, type the following command:
    chkdsk /f
  4. Up next, press Enter to initiate an offline scan
  5. After you initiate the CHKDSK scan, the CHKDSK function will begin its checks. Depending on the size of your selected drive, and the amount of data stored on it, the operation could take anything from a few minutes to half an hour.
  6. If all is well, you’ll be informed that no issues were found.
  7. However, if the CHKDSK scan does find errors, it will attempt to fix what it can.
  8. Don’t forget to restart your computer and see if the issue is resolved at the next system startup.

No less important, some bad sectors on your HDD could affect a critical service, therefore forcing your system to trigger a stop error like the one you’re seeing.

That’s why we’re recommending performing a CHKDSK scan to maximize your chances of fixing the error 0x00000019. Don’t worry, you can’t do any damage to your computer by running this scan process.


chkdsk is giving you headaches? Check out this quick guide to solve any issues you might fear.


The same applies to other potential fixes. We’re hinting at running DISM and SFC scans and eventually performing a repair install if all other procedures failed.

That’s about it for now. After following some of the steps above, the Critical Windows error 0x00000019 should be gone.

If you have any other questions or suggestions, don’t hesitate to leave them in the comments area below and we will surely check them out.

[wl_navigator]

FIX: Skype won’t close in Windows 10/11


How do I force quit Skype?

  1. Close Skype from system tray
  2. Uninstall Skype and replace it with the latest version
  3. Close Skype using the Task Manager
  4. Create a .bat file

Windows 10 is here, and we are loving it so far. But some users have reported a few bugs affecting Skype.

Namely, they’re not able to close the application. So in this article, we’re going to show you a couple of solutions for this problem

Dozens of Windows 10 users have reported one strange bug with Skype on their computers which prevents them from shutting down the program.

If you want to shut down Skype, usually you would right click the icon in your Taskbar and select “Quit Skype” from context menu.

However, many users have reported that they cannot exit Skype this way, therefore we’re providing you with a few workarounds.

What can I do if Skype won’t close on my computer?

1. Close Skype from system tray

quit skype

If you’re one of those users that cannot close Skype via Taskbar, try closing it via system tray. First go to the bottom right edge of your screen, and there should be a Skype icon next to your clock.

If no Skype icon is available, it might be hidden, so you need to press an arrow button in order to reveal it. After finding the Skype icon in system tray, right-click on it and then press Quit Skype.


2. Uninstall Skype and replace it with the latest version

There’s one more fix available and it requires you to uninstall the current version of Skype.

After uninstalling Skype from your computer, you need to head over to the Skype’s website, download the latest version of Skype and reinstall it.

After reinstalling Skype, you should be able to close it via Taskbar, without going to the system tray.

We have to point out that this solution didn’t fix the problem on all Windows 10 computers, but it has helped number of users, so it’s worth checking out.


Looking for the best uninstalling tools? Here are the best options.


3. Close Skype using the Task Manager

If this doesn’t help, and you still can’t quit Skype, you can always turn it off using Task Manager. Head over to your Taskbar, right-click on it and then choose Task Manager from the context menu.

end task skype

When Task Manager opens up, scroll down the list until you find Skype process, select it, and press “End Task” button. This will forcefully and successfully close Skype.


Alternatively, you can use a third-party Task Manager from our fresh list!


4. Create a .bat file

Another method to force quit Skype is to create a batch file and add the following lines in it:

Save the file to your desktop and simply open it in order to turn off Skype.

At this time we don’t know what is causing this issue, and Microsoft is working really hard to patch Skype and to resolve this minor problem, and we’re hoping that official fix will be available soon to all Windows 10 users.

If you have any other Windows 10-related issues you can check for the solution in our Windows 10 Fix section.

[wl_navigator]

FIX: Skype is not working in Windows 10/11

Microsoft is working hard on its operating system, Windows 10, and speaking of which, another annoying bug has been found in Windows 10. Bear in mind that Windows 10 is always work in progress, so new bugs are constantly unveiled.

One of the majors bugs is related to Skype, and this bug will prevent the app from loading in the Modern UI environment.

As far as we know, there is a compatibility issue between the newer builds of Skype and the preview version of Windows 10, and due to this issue Skype client crashes at launch.

If you’re using Windows 10, and you’re experiencing this problem, there is a simple workaround that will fix this problem.

This could be a big problem for all those who want to stay in contact with their loved ones, but still don’t want to use Desktop version of the software.

What can I do if Skype stopped working?

Change privacy settings

The solution to this problem was delivered by Gabriel Aul, the Windows Insider Program lead.
In order to fix this issue you just need to give Skype permission to access the webcam from the PC Settings menu. To do this, close Skype and follow these simple instructions:

  1. Open the PC Settings app. You can access it from This PC folder as for now, PC Settings has replaced the classic Control Panel on the Ribbon in File Explorer. Now open the Privacy options.
  2. Click Webcam, and turn it on for Skype.
  3. Just relaunch Skype, and your problem should be solved

After doing this Skype should be working normally with Windows 10. If you found some other solution for this problem, or you have some other Skype-related problem, please share your thoughts with us in the comment section.

UPDATE: There have been many similar reports since the writing of this post. It appears that Skype‘s access to your webcam is often blocked when your computer installs a new update.

Perhaps this issue was even worse with the Windows 10 April Update. Thousands of users noticed that apps no longer had access to their cameras and microphones after the update.

Fortunately, this was due to Windows 10’s new privacy settings. Granting the respective apps access to your camera and microphone instantly fixed the problem.

However, if this quick solution didn’t solve your issue, you need to use additional troubleshooting methods. For more information on how to fix Skype problems, check out the guides listed below.

[wl_navigator]