Hybrid sleep missing after Windows 10 update [EXPERT FIX]

While Windows 10 major updates brought many various improvements, they also caused quite a stir in the Windows community due to the many faulty features and bugs that emerged after the update. It seems that Hybrid sleep is missing in Windows 10 after an update.

As you’re probably aware, this feature is a symbiosis of Sleep and Hibernation. It surpasses Sleep in power saving and Hibernation in loading speed by storing everything in RAM so you can continue from the same point.

If the Hybrid sleep feature is missing from your Windows options, make sure to check the list of possible fixes below.

How to reclaim missing Hybrid sleep in Windows 10

  1. Check BIOS and support
  2. Update drivers
  3. Restore default settings in Power Plan
  4. Tweak Registry
  5. Use recovery options

1. Check BIOS and support

Sadly, certain motherboards and notebooks/2-in-1s don’t support the Hybrid sleep feature. Older motherboards are produced and optimized feature-wise to Sleep and Hibernate, but not for the mix of those two. So, the first step you should take is to check for the availability of a given sleep state. That can be done by following these instructions:

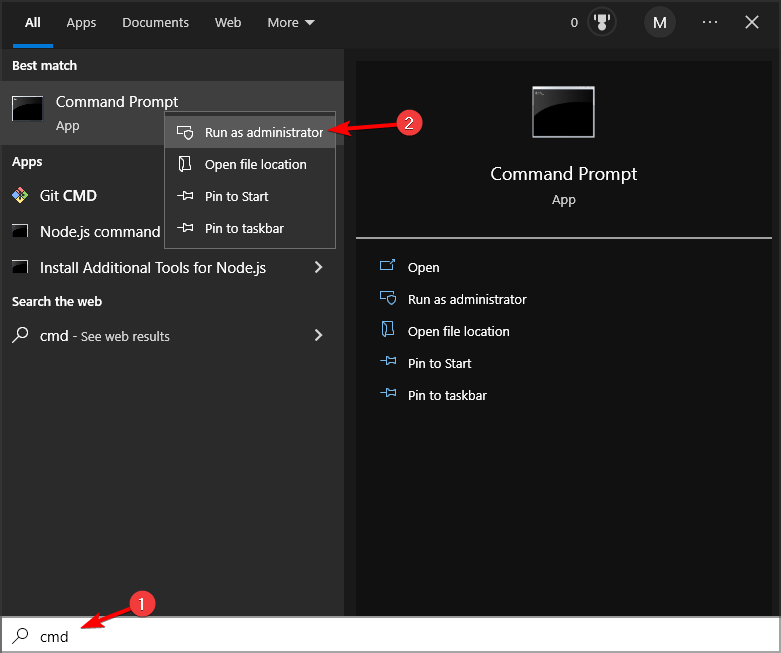
  1. Right-click Start and open Comand Prompt (Admin).
  2. In the command line, type the following command and press Enter:
    • powercfg –availablesleepstatesHybrid sleep missing
  3. If the Hybrid state is available but still missing, you should check other steps.

However, if it’s not, you won’t be able to use Hybrid sleep state. Additionally, there may be some options hidden within the BIOS that you should take into consideration.

This will allow you to see if your motherboard does support Hybrid sleep but has certain related functions disabled by default. In order to enable these features, you’ll need to navigate to BIOS settings and look for the ”Suspend to RAM” feature. Make sure that it’s enabled before you continue with additional steps.

2. Update drivers to restore Hybrid sleep

In addition, drivers, including an up-to-date version of your BIOS, are indispensable. It doesn’t always matter if the issue at hand isn’t exclusively related to drivers. For all-around system stability and functionality, it’s vital to have proper software support.

Hybrid sleep missing

Because of that, make sure that all of your drivers are properly installed and up-to-date. Right-click Start and open the Device Manager. There, you can check each driver individually and update them.

Moreover, you should check your BIOS version and update it, if needed. But, keep in mind that flashing a BIOS is a complex operation, and quite risky too. So, act with caution and fully inform yourself before you start the procedure.

Another effective method to update any driver safely is by using dedicated software. With driver update software, your hardware devices can be optimized by automatically updating drivers in your PC.

⇒ Get Fortect Driver Updater

3. Restore default settings in Power Plan

There are multiple reports that the Windows Update changed some of the default/custom settings, affecting certain system features. The same goes for Power options, including the Hybrid sleep state. So, for that purpose, we advise you to navigate to Power plan settings and reset those to default values.

If you’re not sure how to do it, follow the instructions below:

  1. Right-click the Start menu and open Control Panel.
  2. Open Hardware and Sound in the Category View.
  3. Select Power Options.
  4. Highlight your active Power Plan.
  5. Click Change Plan Settings.
  6. At the bottom, click Restore default settings for this plan.Hybrid sleep missing
  7. Confirm changes.
  8. Now you can click Change advanced power settings > expand Sleep > expand Allow hybrid sleep and set it On for both Battery and Plugged In options.

This is the standard way of retrieving Hybrid sleep on the available sleep state list. However, people who are still unable to resolve the issue this way may turn to some minor registry tweaks.

4. Tweak GPE to restore Hybrid sleep

As we mentioned above, updates tend to change some of the vital system’s settings. As seen above, some of those can be restored by simply resetting to factory settings. But, occasionally, you’ll need to utilize a more advanced approach. Namely, you’ll need to navigate to the registry and make sure that the Hybrid sleep state is enabled.

In order to do so, follow the instructions below:

  1. In the Windows Search bar, type Policy and open Edit group policy.
  2. Navigate to Computer Configuration > Administrative Templates > System > Power Management > Sleep settings.
  3. Open the Turn off hybrid sleep (on battery) option and confirm that’s either disabled or not configured. If it’s enabled, disable it.Hybrid sleep missing

However, if this wasn’t enough to get the Hybrid sleep state option back and you’re quite fond of that power-saving mode, your only remaining options are drastic.

5. Use recovery options

In the end, you may want to turn to recovery options and get rid of the latest update. Yes, while it may be feature-rich or even better optimized to some extent, this or similar problems were enough for some users to make some decisive moves.

We advise you to use some of the restore/reset functions before you finally decide to perform a clean reinstall. For that purpose, we’ll lead you through the Reset this PC procedure, retaining your data and resetting just your settings.

  1. Press Windows key + I to open the Settings app.
  2. Open Update & Security option.
  3. Choose Recovery from the left pane.
  4. Click Get Started under the Reset this PC.reset this pc
  5. Choose Keep my files.

Some users are quite disappointed that Hybrid sleep is missing after Windows 10 update, and we hear them. The Hybrid sleep state option is amazing, especially for laptop users who require as much battery life as possible. However, it’s occasionally difficult to resolve update-instigated issues and as such, may be forced to use old sleep state features Sleep and Hibernate.

Don’t forget to tell us about your experience or post any subject-related questions. The comments section is below!

KB4493474 fixes some nasty Windows 10 v1703 bugs

The April Patch Tuesday updates are here. Cumulative update KB4493474 for Windows 10 version 1703 is now available for download. The update bumps the OS build to version 15063.1747.

The Redmond giant released this patch to enhance the security and overall functionality of the OS.

A quick note for users of version 1703 is that all the editions, except the Education and Enterprise editions have reached their end of service deadline.

To receive the updates, you must upgrade to the latest version as soon as possible.

KB4493474 improvements and fixes

Major Security updates 

As Microsoft explains, KB4493474 brings some important security updates for Windows Server, Windows Storage and Filesystems, Microsoft Scripting Engine, Windows Virtualization, Windows Kernel, Windows Graphics, and more.

Applications not responding 

KB4493474 addresses another important issue related to MSXML6 some applications that stopped responding and threw exception errors.

Blue Screen of Death bug fix

Microsoft fixed a bug that affected previous released and caused blue screen of death errors. As a result, computers would stop working. Update KB4493474 fixed this issue and you should no longer get BSOD errors.

KB4493474 known issues

Surprisingly, unlike other Windows 10 cumulative updates, KB4493474 brings only one known issue to the table. The install process may take longer than expected or stall altogether.

Microsoft is working on a permanent solution to fix this problem. Meanwhile, you can try some of the temporary workarounds mentioned on Microsoft’s Blog.

RELATED ARTICLES YOU NEED TO CHECK OUT:

You can now unplug USB devices without hitting Safely Remove Hardware

Most PC users get annoyed when they have to safely remove a USB drive from their system — me included.

Sometimes, we simply don’t care about losing data and we unplug USB drives without letting Windows about our intention.

However, experts have always been warning users about unexpected transfer termination issues as you might end up losing your data. Even if you disagree, there really is a genuine risk attached to it.

Microsoft also noticed that users don’t care about that risk. As a result, the tech giant finally decided to change Windows 10’s default USB settings.

New Windows 10 versions now feature the Better Performance option aimed at increasing data transfer speed. It does this by allowing Windows 10 to cache write operations to the external device. 

You can remove USB drives without safely removing them

The Safely Remove Hardware option actually protects your data by making sure Windows has finished all cached operations.

However, this option has been removed now and disk write operations are no longer cached by the system. This has been made possible by changing the default settings for USB drives so that users don’t need any mouse actions.

The quick removal feature has been implemented in the October 2018 Update (1809).

It will somehow reduce PC performance but it is still unclear to what extend. It won’t affect low data transfer speeds, but you might notice the change as far as the big data transfers are concerned. 

How to revert the changes for better performance

If you want to revert these changes, you can still enjoy better performance on your own USB drive. You can simply follow these steps:

  1. Open Disk Management, select your USB drive and right click on it.
  2. Go to Properties>>Hardware>>Properties, now switch to the Policies tab.quick hardware removal option
  3. Here you can change the default removal settings for that particular USB drive.

This feature was initially rolled out as a part of October 2018 update last year. However, most of users had no idea it existed. That might be the reason why the Redmond giant has now decided to notify users about i on a large scale.

RELATED ARTICLES YOU NEED TO CHECK OUT:

Windows 10 KB4493509 fixes some Blue Screen of Death issues

This month’s Patch Tuesday Edition came with a new round of Windows 10 cumulative updates. Microsoft released tens of cumulative updates for all the Windows server and Windows 10 versions currently supported.

If you’re running Windows 10 version 1809 also known as the October 2018 Update, you can now download KB4493509 to boost your PC‘s performance.

Microsoft has been working really hard to get rid of the bugs annoying Windows 10 v1809 users. The tech giant didn’t introduced any new features, In other words, KB4493509 brings only fixes and improvements. 

KB4493509 changelog

Blue Screen of Death error fix

Microsoft fixed a bug related to per font end-user-defined characters in KB4493509. It appeared when per font end-user-defined characters (EUDC) were enabled by users.

This issue caused Blue Screen of Death errors and made systems completely unresponsive.

IE 11 authentication bug fix

Windows 10 users reported they were experiencing authentication issues with WININET.DLL based applications including Internet Explorer 11 and few other.

The bug was triggered as soon as users attempted to use one Windows Server machine for multiple, concurrent login sessions.

Security updates

KB4493509 brings some important security updates for Windows App Platform and Frameworks, Windows Server, Windows Input and Composition, Windows Storage and Filesystems, Microsoft Scripting Engine, Windows Virtualization, Windows Kernel, Windows Graphics, Microsoft JET Database Engine and Windows MSXML.

Microsoft also listed some known issues affecting KB4493509. Windows 10 users who are running IE might experience browsing issues on specific sites.

The good news is that Microsoft is working to fix these bugs. However, it seems that users will have to wait for the bug fix to be released with the upcoming updates. You can expect a fix in the May 2019 Patch Tuesday release.

RELATED ARTICLES YOU NEED TO CHECK OUT:

Windows 10 KB4493464 comes with a bunch of security updates

Microsoft recently rolled out a new cumulative update, KB4493464, as part of the Windows 10 April 2018 Update. The update takes the existing OS version to build 17134.706.

As a quick reminder, the company already announced this OS version would no longer receive new delta updates in the future. However, Microsoft promised it would keep on offering quality and security updates. 

The big M didn’t introduce any new system features this time but KB4493464 came with a handful of improvements alongside some bug fixes.

If you’re interested in updating your system, follow the download link below.

And now let’s take a look at what’s new in KB4493464.

KB4493464 improvements and fixes

A bundle of security updates 

KB4493464 brings some important security updates for the Windows App Platform and Frameworks, Windows Server, Windows Storage, Windows Virtualization, Windows Kernel, Windows Graphics, and other system components.

Fix for unresponsive apps

KB4493464 addresses another important issue related to MSXML6 applications. Previously, applications that were using MSXML6 were not responding in a few situations. This issue usually occurred during node operations as a result of an exception.

Stop error fixes

A stop error has also been fixed in KB4493464 that was introduced by the previous builds. Users experienced this error when they tried to start the Secure Shell (SSH) client program from Windows Subsystem for Linux (WSL).

IE 10 bug fix

Users reported an issue regarding the Group Policy editor. When a user attempted to edit a Group Policy Object (GPO) that specifically contained  Group Policy Preferences (GPP) for Internet settings of IE10, an error occurred. You should no longer experience such issues after installing KB4493464.

KB4493464 known issues

Furthermore, Microsoft also listed some known issues related to KB4493464. For example, users might experience some launch issues for custom URI schemes for application protocol controllers.

Other users might also experience a premature disruption issues in connection to the WDS server.

RELATED ARTICLES YOU NEED TO CHECK OUT:

You can now read Outlook desktop app messages in dark mode

Microsoft has finally integrated dark mode in Office 2019 Edition. You can now enable dark mode in your desktop Outlook app.

The Dark mode feature was previously available to Outlook UWP app and Outlook Web app users. Microsoft confirmed that the feature is now available to Microsoft Office users who are running Office 2019 and Office 365 on their systems.

The desktop application informs the user about the change in the form of a pop-up note when you open the Office app.

In Black Theme you can now read your messages with a dark background.

The change was identified and then shared by a Windows user Florian B on his Twitter account.

When another user inquired about the build, Florian responded by sharing more screenshots and adding this was an internal dogfood build. He further added that the build would be available to Fast Ring insiders starting May 15.

It seems like Windows users are big fans of the dark theme, that is the reason Microsoft is expanding the dark theme to other applications. The company recently introduced dark mode to File Explorer to comply with the built-in dark mode of Windows 10.

Additionally, dark mode support is also available on Google Chrome.

The built-in dark mode basically adds a shadow effect to each and every UI component. Text and icons on your screen are changed to lighter colors and your windows are turned to black.

This feature is perfect for users who like contrasting appearance and enjoy working with darker UI tones.

If you are not a dark mode fan and you want to switch between both modes from time to time, there is an option for you as well. Similar to the UWP app users, you can use the Sun and Moon button to switch from dark to light and light to dark mode as per your requirements.

All the Office 2019 users out there! Are you excited about the new dark mode? Let us know in the comments below.

RELATED STORIES TO CHECK OUT:

How to reset World of Warcraft’s user interface

World of Warcraft is a fun game to play, but sometimes your adventure may be interrupted by various technical issues. If you’re looking for a quick fix to solve simple WoW bugs, you can first try to reset the game‘s user interface and see if this action alone solves your problem.

Here’s how to reset WOW’s user interface

Resetting your UI to default settings will fix a series of WoW issues in no time. This solution also allows users to fix corrupted game settings. Here are the steps to follow to reset WoW’s UI:

  1. Exit World of Warcraft
  2. In the Battle.net desktop app > go to Options > select Show in Explorer
  3. Open the World of Warcraft folder
  4. Rename the Cache, Interface, and WTF folders to CacheOld, InterfaceOld, and WTFOld
  5. Launch World of Warcraft again so as to enable the changes
  6. Uninstall add-on managers to make sure they’re not causing any unwanted game interference
  7. Delete specific files in the Virtual Store directory
    1. Set Windows to show hidden files and folders
    2. Go to C:Users%username%AppDataLocalVirtualStoreProgram FilesWorld of Warcraft
    3. Delete the Cache, Interface, and WTF folders >close Windows Explorer > restart your system
    4. Launch WoW again.

Speaking of WoW’s UI, many players choose to customize their interface, highlighting the elements that are useful to them. Blizzard’s UI offers limited features and the overall design leaves a little to be desired. As a result, gamers prefer to use different user interfaces that support more functions.

ElvUI is one of the most popular WoW UIs among gamers, is highly customisable, allowing users to turn off any feature they don’t want and use a separate addon.

Using mods is a great way to improve on the overall experience by customizing it in any way you deem the best. However, some of them, especially after a major game update, might get broken. If that’s the case, make sure to navigate to UI mod developer’s page and update the add-on accordingly.

RELATED STORIES YOU NEED TO CHECK OUT:

How to improve Hollow Knight performance in Windows 10

Hollow Knight is one of those beautiful indie games that draws as much attention as some major titles. The game is beautiful in design, very playable, and the first critics are overwhelmingly positive.

Even though you don’t need a beast computer to play Hollow Knight, some players have recently reported certain performance problems. Mostly on Windows 10 laptops. That’s not a major issue, as everything can get in its place with a few corrections.

In this article, we’ve collected a few useful tips that should help you improve the overall performance of Hollow Knight, in order to provide you the best possible experience while playing this artistic masterpiece.

How to improve Hollow Knight performance

  1. Use your dedicated graphics card
  2. Disable Vsync
  3. Run the game in D3D9 mode
  4. Update the game

1. Use your dedicated graphics card

If you have a computer/laptop with two graphic cards (an integrated GPU and a dedicated GPU), make sure to always use the dedicated AMD/nVidia card for playing Hollow Knight.

In case of a nVidia card, to use your dedicated card, do the following:

  1. Right-click the Hollow Knight icon on your Desktop
  2. Choose Run with graphics processor > High-performance NVIDIA processor (default)

As for AMD cards, follow these instructions:

  1. Open Catalyst Control Center
  2. Now, go to the Switchable Graphics tab, and browse for seratovideo.exe
  3. Set it for High Performance
  4. Do the same for – Scratch Live, Serato DJ or ITCH

2. Disable Vsync

You’ve certainly heard about this one before. Vysnc can cause various issues like stuttering and lags, especially on Windows 10 computers. You can turn Vsync off in the game settings.

It’s also recommended to use a software like RivaTuner to limit FPS manually, in order to avoid overheating and more potential problems. To find out how to limit FPS with RivaTuner, check out this article (section: Locking framerate with V-Sync off).

3. Run the game in D3D9 mode

Another thing you can try is switching from the D3D11 mode to the D3D9 mode. The game is designed to work in D3D11 mode by default, so changing modes will likely result in performance changes. On the other hand, that change isn’t positive every time, as you can easily end up with even worse performance. However, if performance doesn’t get any better, you can always revert to original settings.

To run the game in the D3D9 mode, do the following:

  1. Open your Steam Library, and locate Hollow Knight
  2. Right-click Hollow Knight select Properties and click Launch Options
  3. Paste the following: -force-d3d9
  4. Start the game

In case you don’t notice any performance improvements, just negate the above-mentioned command, to revert your settings back to D3D11.

4. Update the game

Finally, a lot of users reported a significant update to graphics and much better optimization for low-specs PCs after an update. So, make sure your game is up to date. We already said that Hollow Knight is, by no means, a demanding game. However, with these updates, the things should get even better for gamers with underwhelming PC configurations.

That’s about it, we hope at least one of these tricks helped you to improve the performance of Hollow Knight, because this game certainly deserves your attention. If nothing, the future updates and patches are ahead, so maybe the problem will get fixed by itself.

RELATED STORIES YOU NEED TO CHECK OUT:

Fix: Gears of War 4 error 0x00000193

The concept behind Xbox Live online gaming is clear: you pay for the game, you pay a hefty subscription value and, in return, you get the access to multiplayer gaming. Seemingly, not for Gears of War 4.

Namely, after the Bigelowe error that emerged months ago, some users are still experiencing problems with an online segment of the popular shooter but nowadays it goes by the 0x00000193 code.

So, the same issue but it’s named differently. As stated by some troubled users, issues start only when trying to connect to the dedicated multiplayer servers. Some of them are ‘kicked’ with a sudden crash while others aren’t able to connect at all.

Nonetheless, we prepared some troubleshooting steps that should, at least, let you confirm that the error isn’t invoked by your side. Make sure to check them out before posting your issues on the forum and reporting the problem.

How to fix error 0x00000193 (Bigelowe successor) in Gears of War 4

  1. Check your account permissions
  2. Check the connection
  3. Reinstall the game and wait

Solution 1 – Check your account permissions

As reported, users that are plagued by the ”0x00000193” error are mostly able to do everything within the game except to play online. Now, as we already stated below, these solutions are more like reminders and should be treated as such. The main reason for this occurrence is probably lying in server issues that emerged after the September update.

On the other hand, since some users are able to play and others not, it’s worth to check on some things and move from there. After that, you can be certain that TC is responsible for the aforementioned error.

Firstly, as stated by their support team, make sure that your account permissions are properly set. This includes your Xbox Live Gold subscription and parent permissions since the game needs both in order to access the online content. You can check your Xbox Live Gold subscription by following these steps:

  1. Navigate to Payment & billing page here.
  2. Check the expiry date of your Xbox Live Gold subscription and renew it if needed.
  3. Wait for some time and start Gears of War 4 again.

Furthermore, this game is rated M (Mature) so you’ll need to check is the online play and M-rated games permitted. Once you’re certain that everything is properly set, try accessing the online mode within the Gears of War.


Solution 2 – Check the connection

Another possible reason for connection-related errors is, presumably, misconfigured connection settings. Of course, this troubleshooting step applies to rare individual problems (most users can play other games online and Gears of War 4 is an isolated case) and it’s mostly derived from the developer’s inability to address issues on their side. However, since it won’t cost you to try some troubleshooting steps and check for improvements.

Here are some actions you should take in order to troubleshoot the connection issues and confirm that everything is neatly configured:

  • Reset your console or PC and modem/router.
  • Test network connection on Xbox or run Windows Connection Troubleshooter.
      1. Press the Xbox button to open the guide.
      2. Choose Settings.
      3. Tap All Settings.
      4. Choose Network.
      5. Select Network settings.
      6. Select “Test network connection“.
  • Disable connection-dependent programs working in the background.
  • Check are Xbox Live servers down.
  • Use wired connection (LAN cable) instead of the wireless.

If, in spite of these steps, you still can’t access the Gears of War 4’s online mode, make sure to try the final workaround.


Solution 3 – Reinstall the game and wait

Finally, the only thing you can do is to reinstall the game, sign in again with your credentials and wait. Yes, the last advise is probably redundant since some users are waiting for months and the online issues are still present. However, as stated by the team behind Gears of War franchise, they’re putting an effort to address this problem.

We can only hope that some of these steps helped you resolve the ‘0x00000193’ error on your PC/Xbox. If that’s not the case, don’t forget to send a ticket to TC support or post on a dedicated forum. That’s the only way they’ll hear about your issues and longer you wait…

In case you found the way to address this issues, be kind and share it with us in the comments section below.

RELATED ARTICLES YOU SHOULD CHECK OUT:

Microsoft, others to turn London’s famous Bletchley Park into an Institute of Technology

Microsoft, along with seven other organizations that are part of the consortium to convert a portion of the Bletchley Park into an Institute of Technology, have been awarded government funding for the project. The companies will refurbish Block D of the building, which was formerly the home of the Britain codebreakers in World War II, thanks to the £28 million grant.

According to Microsoft’s blog post, approximately 1,000 young adult students are expected to attend the new Institute each year to gain technical qualifications and training in areas such as cybersecurity. The company also estimates that there will be more than 500,000 positions for highly skilled workers to fill digital roles by the year 2022, which is about three times the number of students that graduate computer science in the UK over the last 10 years.

Construction plans for the Institute of Technology at Bletchley Park

According to the General Manager of the Customer Success Unit at Microsoft UK, Derrick McCourt:

“In a world being transformed by technology, many of the jobs and opportunities of tomorrow will require skills and expertise rooted in technical aptitude. This new Institute of Technology at Bletchley Park will offer a much-needed pathway for young people to develop digital skills and practical expertise so vital to building a fulfilling career as well as addressing the digital skills gap across the UK.”

Various other consortiums of universities, colleges, and companies have also been invited by the UK government to bid £170 million of funding to build a network of twelve technology institutes. The Prime Minister Terresa May announced the funding plan, saying that:

“I firmly believe that education is key to opening up opportunity for everyone – but to give our young people the skills they need to succeed, we need an education and training system which is more flexible and diverse than it is currently.

“New technologies are transforming the world of work, and to harness the opportunities on offer we must equip our future workforce with the technical skills they need to thrive, and that the economy needs to grow.

“These new Institutes will help end outdated perceptions that going to university is the only desirable route and build a system which harnesses the talents of our young people.”

The group that Microsoft is in will also be led by the Milton Keynes College, and includes other members such as McAfee, KPMG, Evidence Talks, VWFS, Activate Learning, and the Cranfield University, and will be supported by the Bletchley Park Trust.

How to delete and fix Astroneer corrupt save game files

When you install a game on your Windows PC, there are various useless files that pile up and affect the overall gaming experience. In this case, the best solution is to simply delete the save game files you no longer need or are corrupted.

Usually, each game has its own SaveGames folder where you can find all the save files that have accumulated over time. Basically, all you need to do is delete the content of that folder.

If you’re playing Astroneer and you want to delete the save game files, follow the steps listed below as described by one user on Steam.

How do I remove and fix Astroneer corrupted save game files

Astroneer: How to delete save game files

1. Type %appdata% in the Search Menu
2. Go to the Astro folder
3. Open the SaveGames folder
4. The files with the .sav extension are the save game files. Select the file(s) that you want to delete and press the Delete key on the keyboard.

Fix: Astroneer corrupt save game files

Many Astroneer players report that some of the save game files are corrupted, causing various bugs including game crashes: “Seen a bunch of folks with this issue, happened to me this morning with the game crashing to an Unreal4 engine bug report“.

Fortunately, there’s a quick workaround that you can use to fix corrupt Astroneer save game files.

1. Go to AppDataLocalAstroSaveGame folder
2. Copy – paste the save game file to desktop > change the last two numbers of the file. Example:  AUTOSAVE_8_2017.01.06-02.02.11 changed to  AUTOSAVE_8_2017.01.06-02.02.22
3. Copy the newly renamed file to the save folder. Your lost/ corrupt save game file should now load without any problem.

Speaking of Astroneer, players also report the game is affected by huge FPS issues that severely limit the gaming experience. It is good to know that Astroneer is an Early Access game, meaning that this game is still work in progress and technical issues are normal.

The good news is that there are three workarounds that you can use to fix Astroneer FPS issues:

  1. Change a series of game values from the Config file
  2. Change the FPSRateLimit file from 144 to your monitor’s refresh rate
  3. Enable the NOSOUND command.

If you have any other issues to report or have alternative ways to Astroneer issues, feel free to tell us in the comments section below. We look forward to hearing from you.

RELATED STORIES YOU NEED TO CHECK OUT:

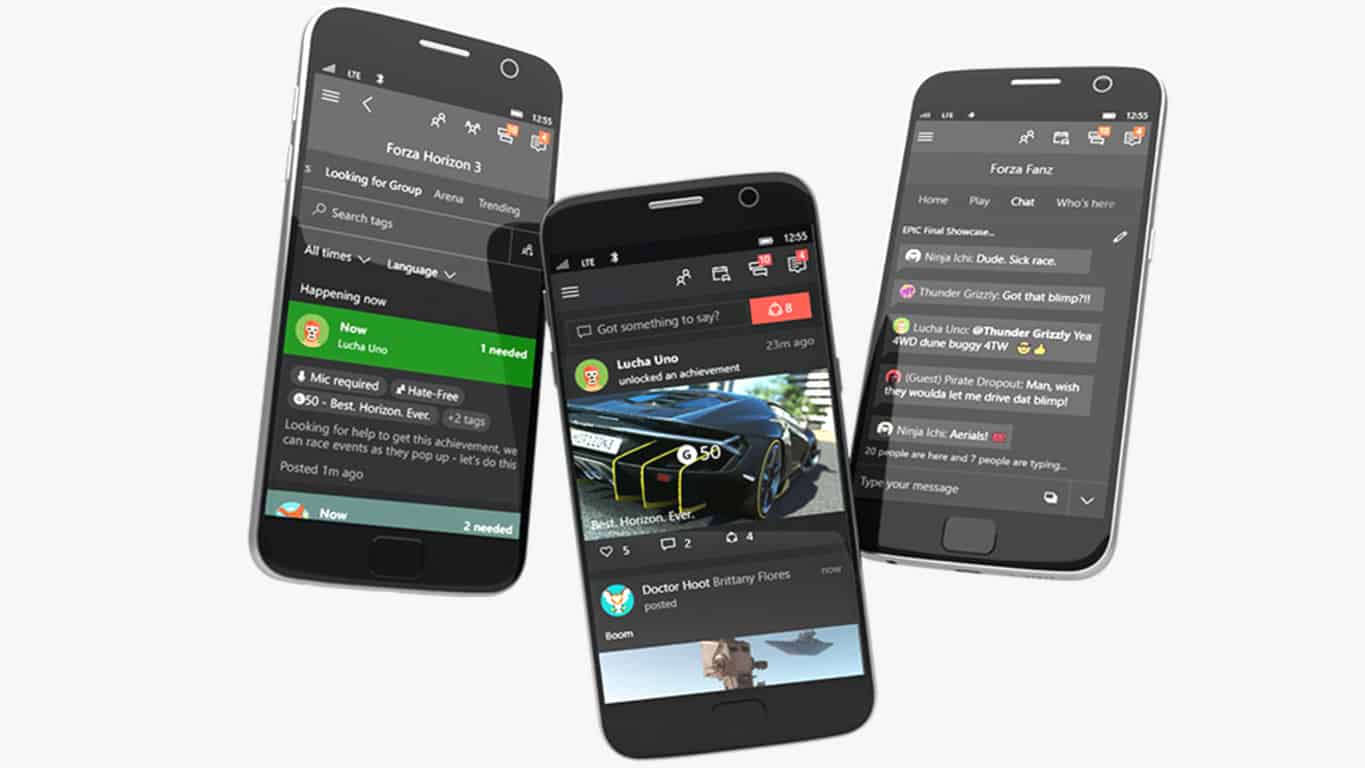
Latest Xbox beta update for Android brings improvements to messaging and notifications

Microsoft has released an update to the Xbox beta app for Android devices. The company has been working on improving the user experience of messaging, and now users are able to see those enhancements live in the beta app.

Additionally, the update also moves to Google’s new push notification platform, so users who wish to continue to receive notifications are encouraged to update “as soon as possible” before the older now deprecated notification system is shut down next month.

Via Reddit.

Microsoft has been working on improving the often slow messaging system for a good minute now, as the company has recently also released performance improvements in a recent Alpha build of the upcoming 1904 Xbox One update. Additionally, improvements are also expected to make their way to the iOS app sometime soon.

If you’re interested in giving the Xbox beta update a try, you can download it from the Google Play Store. Interestingly, Microsoft has chosen to make this a separate app from the main one, as opposed to allowing users to subscribe to become beta tester as it has chosen to do with Microsoft Launcher and Edge on Android.

Xbox beta
Xbox beta
Price:
Free

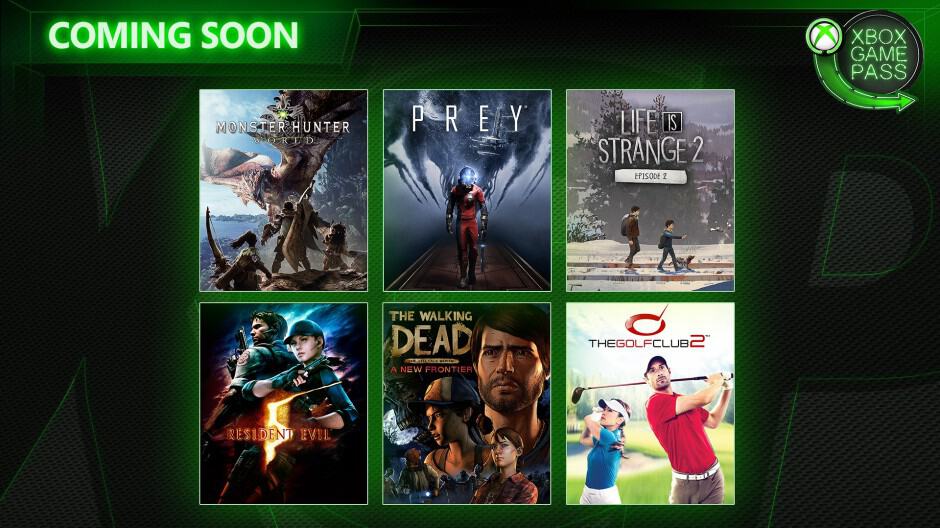
Monster Hunter World, Prey, and Life is Strange 2 episode 2 are coming to Xbox Game Pass in April

Microsoft has just announced the next six new games coming to Xbox Game Pass this month. First of all, Arkane Studios’ survival horror game Prey will join the catalog tomorrow, April 11, along with The Golf Club 2. Prey will be the latest Bethesda game to join the Xbox Game Pass line-up after Doom, Fallout 3 and 4, and The Elder Scrolls Online: Tamriel Unlimited.

The other big new game coming to Xbox Game Pass this month is Monster Hunter: World, Capcom’s critically-acclaimed action RPG title released back in January 2018. The game will be available on Game Pass on April 18, along with The Walking Dead: A New Frontier. The latter is the third season of Telltale Games’ The Walking Dead series of episodic games, and we remind you that the seasons one and two are already available on Xbox Game Pass.

The episode 2 of Life is Strange 2 will also be available on Game Pass on April 24, three months after the first episode was added to the catalog. Square Enix said back in January that all future episodes will be added to Game Pass three months after their official release, which means that the upcoming episode 3 (to be released on May 9) should join the Xbox Game Pass catalog in August.

Lastly, Resident Evil 5 will be available on Xbox Game Pass on April 25. A couple of Resident Evil games have left the catalog in recent months, so it’s nice to see a new episode being added to the game subscription service. That’s six new Xbox Game Pass games in total that Microsoft announced today, but as asual, there may be a few more surprises coming later this month.

Microsoft increases its presence in the UK by doubling the size of its local Azure regions

Microsoft has announced that it has expanded its UK Azure regions by as much as double their original size thanks to the addition of Availability Zones within the South region. This adds up to a whopping fifteen times the computing power since they were first made available back in 2016.

According to the company’s blog post, the zones will give businesses increased protection, as businesses leasing at least two zones within the same region (either West or South) are guaranteed to have access to at least one 99.99% in case of a failure of another area. As Microsoft UK’s chief executive, Cindy Rose, states,

“The Microsoft cloud has become a core component to the strategies of thousands of UK organizations since the launch of services from our UK cloud regions in 2016. We continue to make significant investments to ensure that our customers are able accelerate their digital transformation journeys and their adoption of cloud services. By doubling our UK regions and increasing our compute capacity by more than 1,500%, our customers can have the confidence they can access any Azure services available in UK regions whenever they want. The launch of Availability Zones takes Azure to a new level in the UK by offering customers increased reliability, business continuity and peace of mind for their data and services.”

In addition to the new Availability Zones, the company has also announced the general availability of Azure DevOps in the South Region. This will allow users residing in the area enhanced access to the company’s suite of software development tools.

Microsoft has long been invested in the UK, and notes its customer base of as many as tens of thousands of businesses invested in their platform from within the country. One of these customer’s is ClearBank, with its COO Nigel Walder noting that: “We welcome Availability Zones in UK South as it will enable us to provide improved resilience and scalability more effectively as ClearBank continues with the launch of new products. Since the inception of ClearBank, Azure has been a core component of our platform and the enhanced zonal resiliency will ensure we can serve our customers even more effectively.”

Reset to Device \Device\Raidport0 Was Issued: How to Fix it

If your system freezes, you might get Reset to device, DeviceRaidPort0, was issued error in the Event Viewer.

This issue is related to SATA controllers, and to fix the freezes and other disruptions, today we’re going to show you how to fix that.

Why does Reset to device device raidport0 was issued message appear?

  • Corrupted system files can sometimes lead to this error message.
  • If your power settings aren’t configured properly, you might encounter this issue.
  • In some rare cases, outdated drivers will cause this problem.

How can I fix Reset to device device raidport0 was issued error?

1. Run a System File Checker scan

  1. Click the Cortana or Start menu button to open your Windows search box. Enter the keyword cmd in the search box.
  2. Right-click the Command Prompt and select Run as administrator.
  3. Enter the following command and run it: sfc /scannow
  4. When the SFC scan has finished, restart Windows if it has fixed any files.
  5. If the SFC has no impact, run a DSIM (Deployment Image Servicing and Management) scan by entering DISM /Online /Cleanup-Image /RestoreHealth
  6. Then, scan with the SFC tool again.

For more information, check our guide on how to fix corrupted system files. You can also try using a good repair tool to avoid further errors.

2. Run a Check Disk scan

  1. Open the Command Prompt as an administrator.
  2. Input the following command: chkdsk /r
  3. The Command Prompt will request that you schedule the volume to be checked when you restart Windows. Press the Y key to confirm.
  4. Restart your desktop or laptop. Check Disk will scan and repair volumes during the restart.

3. Adjust the Power settings

  1. Open Run by pressing its Win key + R keyboard shortcut.
  2. Enter regedit in Run’s text box and click OK to open the Registry Editor.
  3. First, you can back up the registry by clicking File > Save and selecting All. Enter a file title in the text box, and press the Save button.
  4. Now open
    Computer\HKEY_LOCAL_MACHINE\SYSTEM
    CurrentControlSet\Control\Power\PowerSettings\
    012ee47-9041-4b5d-9b77-535fba8b1442b2d69d7-a2a1-449c-9680-f91c70521c60
  5. Right-click Attributes on the right of the window and select Modify to open the Edit DWORD window.
  6. Enter 2 in the Value data box, and press the OK button.dword set value to 2
  7. Next, navigate to this Registry Editor location:
    HKEY_LOCAL_MACHINE\SYSTEM\CurrentControlSet
    \Control\Power\PowerSettings\
    012ee47-9041-4b5d-9b77-535fba8b1442dab60367-53fe-4fbc-825e-521d069d2456
    reset to device device raidport0 was issued registry
  8. Right-click the Attributes DWORD and select Modify from its context menu.
  9. Input 2 in the Edit DWORD window’s text box, and click the OK button. 
  10. Now you can close the Registry Editor.

Now adjust the power settings by doing the following:

  1. Enter powercfg.cpl in Run to open the window below.reset to device device raidport0 was issued control panel power options
  2. Click Change plan settings > Change advanced power settings to open the Power Options window.
  3. Double-click Hard disk to expand its options.
  4. Double-click AHCI Link Power Management – HIPM/DIPM and switch both its On battery and Plugged in options to Active.AHCI Link Power Management – HIPM/DIPM
  5. Next, double-click AHCI Link Power Management – Adaptive and switch the On battery and Plugged in settings to 0.
  6. Double-click Turn off hard disk after and adjust it is On battery and Plugged in options to Never.reset to device device raidport0 was issued turn off hard disk after never
  7. Press Apply > OK to apply the settings and close the window.

4. Configure the power plan settings

  1. Press the Windows key + S and type power. Select Choose a power plan.
  2. Select the High Performance power plan.
  3. Close the Power options window.

5. Update the AHCI Driver

  1. Press the Win + X hotkey, and select Device Manager on the menu.
  2. Double-click IDE ATA/ATAPI controllers on the Device Manager window.reset to device device raidport0 was issued device manager
  3. Right-click your listed AHCI driver and select Update driver from the context menu.
  4. Click the Search automatically for updated driver software option to install an updated driver.update drivers
  5. Alternatively, you can manually download a suitable AHCI driver from the manufacturer website. For example, this is the update Rapid Storage Technology (Intel® RST) Driver for Intel systems.
  6. After downloading the driver, select the Browse my computer for driver software option on the Update Drivers window directly above. Then click the Browse button to select the driver to install.

To learn more about drivers, we have a great guide on how to update outdated drivers.

6. Turn off the Fast Startup Option in Windows 10

  1. Press the Win key + X hotkey and select Power Options on the menu.reset to device device raidport0 was issued power plan
  2. Click the Additional power setting to open the tab directly below.
  3. Click Choose what the power buttons do on the left of the window to open the System Settings tab below.
  4. Select Change settings that are currently unavailable to configure the Turn on fast start-up option.power plan system settings disable fast startup
  5. Deselect the Turn on fast start-up (recommended) checkbox if it’s selected.
  6. Press the Save Changes button at the bottom of the tab.
  7. Then restart the Windows OS.

Those remedies might resolve the Reset to device Raidport0 error, so Windows doesn’t freeze. You could also try changing your SATA drive port and replacing the SATA or ATA cable.

Raid errors can be serious, and many reported Rcraid.sys BSoD failure, but we tackled that issue in a different guide.

We want to hear from you. Did you use a different method to fix this problem? If so, share it with us in the comments below.

Windows 10 May 2019 Update hit by install issues

The long-awaited Windows 10 May 2019 Update is now available to Insiders enrolled in the Release Preview Ring.

So, if you can’t wait to test the new OS features, go ahead and install the Windows 10 May 2019 RTM build on your computer. However, don’t be surprised if the build won’t install.

Many Insiders reported they can’t download and install Windows 10 May 2019 Update as their devices are not yet eligible for the build.

The error message that appears on the screen is the following: This PC can’t be upgraded to Windows 10. Although you are enrolled in the Windows Insider Program this device isn’t yet eligible for this build.

And this is a screenshot of the error:

This PC can't be upgraded to Windows 10 Although you are enrolled in the Windows Insider Program

Anti-cheat software might be the culprit

Fortunately, the OP was able to quickly fix this problem by uninstalling games protected by anti-cheat software solutions.

I figured out the problem its happens if you have battleeye anti cheat software in your system, it my case it was bundled with a game called planetsides 2 which I don’t play anymore so I just removed it and it worked. Looks like there are still problems with battleeye software and this update is not yet for everyone

Indeed, it seems there may still be some blocks in place related to BattleEye and anti cheat software. Hopefully, Microsoft will have fixed all these technical limitations by the time the new OS version is available to all users.

Some users suggested that uninstalling BattleEye or anti-cheat software and then installing the May 2019 Update RTM might fix this problem. Once you’ve installed the latest build, you can then reinstall BattleEye.

However, keep in mind that you may encounter various issues while playing online games on Windows 10 May 2019 Update PCs, such as memory corruption issues.

If you already downloaded the Windows 10 May 2019 Update RTM build on your computer, tell us more about your experience in the comments below.

This is why Skype appears offline and what you can do to solve it

In order to understand why Skype appears offline, you need to grasp the meaning of the different statuses in the app.

There are 8 possible statuses at any one given time on Skype.

Here’s what each of these eight types means:

  • Online: this is the default setting once you’re signed in to Skype. It lights up a green dot with a white checkmark in it that lets your contacts know you are online and they can contact you.
  • Away: this shows your contacts you are signed in but may not be on your computer or desk at the time. You can get instant messages and calls though. It is indicated by a yellow clock icon.
  • Offline: this is when you’re not signed in to Skype. However, you can click on the status icon and select Offline as your status but you won’t be able to send messages or make/receive calls. Skype for Web doesn’t have this option.
  • Invisible: this status neither shows you as online, or away, but your contacts see you as offline, though you can still contact them or use Skype normally. It is marked with a blank circle.
  • Do not Disturb: this is marked by a red circle with a white line across it like a stop sign of sorts. Your contacts see you online, but they get the message – you don’t want disturbance. You can still get messages and calls but with no sound alerts.
  • Calls forwarded: this status can be used when you’re not available but set call forwarding or voice messaging to your phone, or home so that you never miss a call. It is only available on Windows Desktop though, and is marked by a white circle with a green lining and a little green arrow inside it.
  • Contact Request pending: this appears next to a contact you requested to add, but they’ve not accepted your request yet. It is indicated by a grey lined circle with a question mark.
  • Blocked: this is for contacts you don’t want to communicate with or reach for one reason or another. It is marked with a red lined circle with a diagonal line inside it.

We’ve written extensively about Skype issues before. Bookmark this page in case you need it later.


Now that you know what each of these statuses means, let’s see the reasons why Skype appears offline yet you are signed in, and what to do about it.

Why Skype appears offline and how to solve it

  1. Your status is set to invisible
  2. You’re signed in but not connected to the Internet
  3. Check whether you have the latest version of Skype
  4. Check Skype for Web
  5. Uninstall and reinstall Skype
  6. Check Skype settings

1. Your status is set to invisible

Probably your contacts have tried to engage you on Skype and they’re asking why you appear as offline, yet you can still communicate.

This is one of the most common reasons why Skype appears offline, and all you need to do to resolve it is change from Invisible to Online, if you’re signed in to your Skype account.

2. You’re signed in but not connected to the Internet

Sometimes you may have logged in to your account, but still your Skype appears offline.

In this case, you may need to check whether your internet connection is working, because if it is down or goes off, your contacts will see your status as offline, even though you hadn’t signed out.

3. Check whether you have the latest version of Skype

You can update this by going to Windows Store, plus ensure your supported operating system is also up to date.

4. Check Skype for Web

You can use Skype for Web to check whether your status on Skype appears offline there as well, or it is just on other devices. If they appear as online, then restart the application, ensuring you’re using the updated version.

5. Uninstall and reinstall Skype

If your Skype appears offline, sometimes uninstalling the app may help.

You can do either of two things:

  • A simple uninstall and reinstall
  • A complete uninstall and reinstall

Before you do either of the two, back up your chat history and personal files so that you can restore them at a later point in time.

Here’s how to back up your history:

  1. Right click Start
  2. Select Run
  3. Type %appdata%skypeRun %appdata%skype
  4. Press Enter or click OK
  5. Copy the My Skype Received Files folder and the Skype Name folder (if using a Microsoft account, check for a folder that starts with live#3).
  6. Paste the copied folders to a different location like the desktop for later use

Need more ideas on how to uninstall Skype? Check out this guide.


How to perform a simple uninstall and reinstall of Skype

Follow the steps below to do this:

  1. Quit Skype by logging out and closing it
  2. Go to your taskbar and right click on the Skype icon
  3. Select Quit
  4. Right click Start
  5. Select Run
  6. Type appwiz.cplappwiz.cpl run
  7. Click OK or press Enter
  8. Find Skype in the list
  9. Right click on it
  10. Select Remove or Uninstall
  11. Download and install the latest version of Skype

If you still experience the Skype appears offline issue, try to completely uninstall and reinstall Skype.

How to perform a complete uninstall and reinstall of Skype

Follow the steps below to do this:

  1. Quit Skype by logging out and closing it
  2. Go to your taskbar and right click on the Skype icon
  3. Select Quit
  4. Right click Start
  5. Select Run
  6. Type appwiz.cpl
  7. Click OK or press Enter
  8. Right click Start
  9. Select Run
  10. Type %appdata%skypeRun %appdata%skype
  11. Press Enter or click OK
  12. Right click Skype folder and click Delete
  13. Go to C:Program Files (x86)
  14. Delete the Skype folder and SkypePM if they’re there
  15. Right click Start
  16. Select Run
  17. Type regedit
  18. Press Enter or click OK
  19. Back up the registry, then delete any Skype entries from it
  20. Right click Start
  21. Select Run
  22. Type regeditregedit find skype
  23. Press Enter or click OK
  24. Go to Edit in the registry


  1. Click Find Next  and type Skype
  2. For each result, right click on it and select delete
  3. Download and install the latest version of Skype
  4. Restore your personal information
  5. Quit Skype again
  6. Right click Start
  7. Select Run
  8. Type regeditregedit find skype
  9. Press Enter or click OK
  10. Type %appdata%skype
  11. Press Enter or click OK
  12. Copy the two folders you saved previously on the desktop and paste them into this folder

Note: Reinstalling Skype can outdate your firewall settings, thus affect your audio calls on Skype. In order to fix this, update your firewall settings.

6. Check Skype settings

Follow these steps to do this:

  1. Go to your Skype account and sign in
  2. Click on Tools then click Optionsskype tools
  3. Click General Settings tab on the left pane
  4. Check the Show me as Away when I’ve been inactive for box, and change your status to online

Skype appears offline

Did any of these solutions help resolve why Skype appears offline? Let us know in the comments section below.

RELATED STORIES TO CHECK OUT:

Download Windows 10 May 2019 RTM on your PC

Microsoft started rolling out the Windows 10 May 2019 Update to Release Preview ring Insiders. If you want to install the new OS version, hit the Check for updates button.

Earlier this month, Microsoft announced it would use the stable channel to release Windows 10 May 2019 builds to the general public. The roll out to the general public should start in late May.

Keep in mind that Microsoft plans to release the build in different phases. This means that the new OS version won’t be available to all Insiders at the same time.

Download Windows 10 May 2019 RTM build

You need to be enrolled in the Windows Insider Program to download the build.

  1. Go to Settings >> Update & Security >> Windows Insider Program and hit the Get started button to join Windows Insider Program.windows insider program
  2. At this step, you will have to Sign-in to your Microsoft account.
  3. You can join the Release Preview ring by clicking Just fixes, apps, and drivers in the Settings app.
  4. Now you will have to follow the instructions available on the screen and reboot your system to apply the new settings.
  5. Double check the Windows Insider program setup after your PC has been rebooted.
  6. Navigate to Settings >> Windows Update and then click check for update. 

You can install the Windows 10 May 2019 Update on your computer.

Microsoft has made the right decision to push the May 2019 Update to the Release Preview ring and have the build tested for about one month.

The company is heading towards a public release in late May.  This allows Insiders to identify additional bugs in the build. Microsoft wants to go for a bug-free update as Windows 10 version 1809 release was hit by a major setback due to technical glitches.

At this point, we can not say that all the bugs will have been fixed by the time the final OS version is available for all users.

New OS version for Fast Ring Insiders

As a quick reminder, Microsoft is also pushing 20H1 builds to the Fast Ring so that Insiders can start testing the upcoming OS. Furthermore, the company is also merging the Skip Ahead and Fast rings in the coming weeks. 

As far as these changes are concerned, users can now decide if they want to install the update or not. Microsoft will force users to install the update only if your version is heading towards the end-of-service timeline.

Apart from this situation, Windows 10 cumulative updates and feature update will be available as separate downloads.

RELATED ARTICLES YOU NEED TO CHECK OUT:

Best Antivirus Solutions For Windows 10 [AV Tested]

A recent research study conducted by an independent German institute confirmed that Windows Defender is everything you need to keep your Windows 10 PCs safe from cyber threats.

AV-TEST institute examined 15000 pieces of malware by conducting a series of in-depth experiments.

The institute detected Zero-Day malware by carefully analyzing Web and attachments during the first phase. The second phase involved the study of known vulnerabilities. AV-TEST created a frame of reference for carrying out the tests.

The research methodology involved assessing three basic factors usability, system load, and detection capacity. Researchers examined the standard configuration of 19 security products that are being used in Windows 10.

We focused on realistic test scenarios and challenged the products against real-world threats. Products had to demonstrate their capabilities using all components and protection layers.

These tests were conducted during the months of January and February. The results of these tests were published online to rank security products including Symantec Norton Security, McAfee Internet Security and F-Secure.

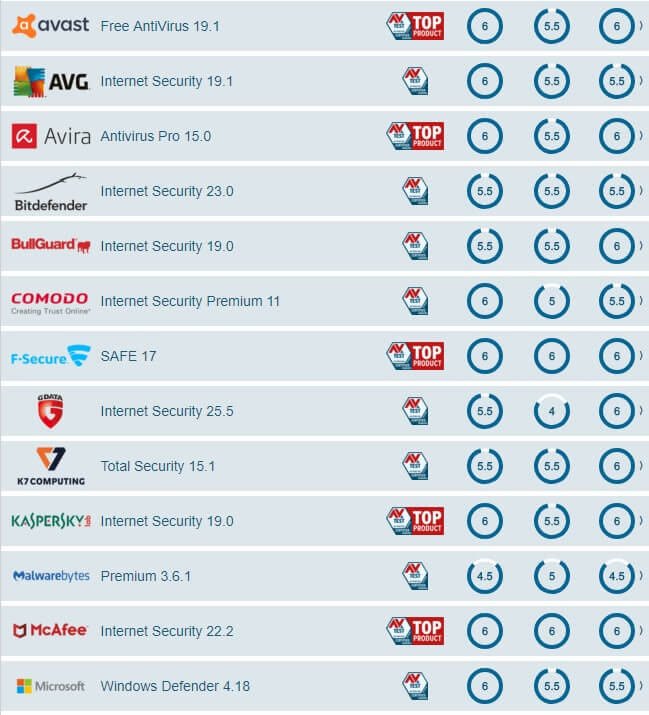
All of these suites scored 6 points in protection, performance and usability and thus got the maximum of 18 points.

So, if these solutions ranked high in February, they can definitely fully protect your PC in March as well. So, check out these results to learn what are the best antivirus solutions to use in 2020.

Antivirus performance results on Windows 10

AV TEST antivirus test results
You might be surprised to learn that Kaspersky Internet Security did not achieve the highest score.

Bitdefender also did not manage to reach within the top positions and the score for both of these products was recorded to be 17.5 and 16.5, respectively.

AhnLab V3 Internet Security and Microworld eScan Internet Security Suite also obtained 16.5 points. Bitdefender can improve in all areas as it obtained 5.5 points for protection, 5.5 points for performance, and 5.5 points for usability.

Another candidate of the top positions Trend Micro Internet Security also scored 16.5 points. This product was rated by the researchers as 5.5 points for protection, 5.0 points for performance, and 6.0 for usability.

However, the lowest score of 14 points was obtained by Malwarebytes Premium. The security solution got 4.5 points for protection, 5 points for performance, and 4.5 points for usability.

Windows Defender got a pretty high score

This research proved that Windows Defender left behind many security products and scored a total of 17 points.

It scored high in protection (5.5 points) for both performance and usability. These results prove once again that Windows 10 users have been underestimating the capabilities of their system’s default antivirus solution.

Speaking of cybersecurity issues, you may also want to check out these posts:

Microsoft merges Fast Ring and Skip Ahead Insider rings

Microsoft is planning for some major changes in its Windows Insider Program. These changes are related to the Insider Rings as the company will soon merge the Fast Ring and Skip Ahead rings.

The announcement was made just before Microsoft shipped Windows 10 May 2019 Update to the Release Preview ring.

As you all know, before the May 2019 Update is available to the general public, it will stay in the Release Preview Ring for about a month for testing purposes.

The company announced that Windows 10 19H1 builds would no longer be available to Fast Ring Insiders. Moreover, Microsoft plans to move Fast Ring Insiders directly to Windows 10 20H1 builds.

With the Windows 10 May 2019 Update being shared to the Release Preview ring soon (see this blog post for details), we’re planning to move Windows Insiders in the Fast ring forward to 20H1. We will also be merging the small group of Insiders who opted-in to Skip Ahead back into the Fast ring. We are looking to make this change in the coming weeks.

As a quick reminder, Windows 10 20H1 will be available to all Windows 10 users next year.

Microsoft has not shared any information about the exact release date of 20H1 update to Fast ring Insiders. However, the tech giant confirmed the change is expected to arrive in the next few weeks.

It should be noted that Microsoft has not shared the reason behind this decision. Rumors suggest that Microsoft has some master plan that forced the company to push Insiders to the next year’s builds. We will have to wait for an official statement from Microsoft in this regard.

The trend was initially broken by the tech giant when Skip Ahead Ring Insiders spotted Windows 10 20H1 in mid-February. The latest changes suggest that Microsoft is essentially moving towards merging the Skip Ahead and Fast rings.

Microsoft already started warning Insiders about its 20H1 builds by stating that the builds may come with some bugs.

20H1 builds are from our development branch (RS_PRERELEASE) and as is normal with builds early in the development cycle, these builds may contain bugs that might be painful for some. If you are in the Fast ring and your PC gets updated to 20H1, you won’t be able to switch your ring to the Slow or Release Preview rings without doing a clean-install on your PC and starting over.

What do you think about Microsoft’s decision to merge the two Insider rings? Let us know in the comments section below.

RELATED ARTICLES YOU NEED TO CHECK OUT:

How to enable Focus Mode in Chromium-based Edge browser

A Reddit user recently spotted Focus Mode in Chromium-based Edge browser. Are you curious to learn how to use this new feature? Then read on.

Microsoft is currently working on perfecting its Chromium-based Microsoft Edge browser. The browser already reached the final stages of development. Most of the users are still unaware of the benefits that come along with this browser version.

As a matter of fact, the Chromium-based Microsoft Edge browser will inherit many features of both Google Chrome and the original version of Edge.

Moreover, the browser supports Chrome’s collection of extensions. In other words, Microsoft Edge is compatible with all of Chrome’s add-ons.

Furthermore, Chromium-based Edge offers a couple of additional features apart from the extensions. Recent reports confirmed the browser will also support Focus Mode.

The feature has been recently spotted by a Reddit user stating that Microsoft is currently testing Focus Mode as an experimental feature in Chrome Canary.

Understanding Focus Mode

This feature has been introduced to minimize distractions for users while reading any content. When a user enables the Focus Mode, a simplified interface for a particular tab will be enabled.

Most of the users are unaware of the fact that the Chromium Edge leaked version 75.0.111.0 has been spotted with a Focus Mode feature. If you are interested in this feature, you can enable the Focus Mode flag in the browser.

If you don’t know how to do that, follow the instructions listed below.

How to turn on Focus Mode in Chromium-based Edge

  1. As a first step, you will have to download and install the Chromium-based Edge version Microsoft Chromium Edge version 75.0.111.0.
  2. Now navigate to browser‘s address bar, type edge://flags/#focus-mode and press the Enter key.
  3. You will see that the Focus mode flag will be highlighted with a Yellow color. Change the settings by using the drop-down button from Default to Enabled.
  4. At this step, the browser needs to be restarted to apply these changes. Hit the Relaunch Now button to apply recent changes.
  5. Finally, you can now right-click on your current tab to use the Focus mode feature. Click Focus this tab from the context menu. 

You will see that the Focus Mode for your desired tab has now been activated. 

RELATED ARTICLES YOU NEED TO CHECK OUT:

Windows 10 Creators Update Mouse Issues: How to Fix Quickly

If you’ve experienced various mouse problems after installing Windows 10 Creators Update, you’re not alone – this is a recurring issue for many users, ranging from minor lag to general unresponsiveness.

Our readers complained that the mouse is not working in a lower resolution fullscreen application. They see the cursor moving for 1-2 seconds, and then it stops responding.

How do I fix mouse issues in Windows 10 Creators Update?

1. Run the new native hardware troubleshooter

  1. Press the Windows + R key combination to start the Run console.
  2. Type the following command and press Enter to run it: msdt.exe -id DeviceDiagnostic
  3. Wait for the troubleshooting process to complete then test your mouse.
  4. If the issue is still present, unplug your mouse and plug it back in.

2. Update your NVIDIA drivers

Many users noticed that mouse problems in Creators Update are prevalent for NVIDIA drivers. Try installing the latest motherboard driver after you’ve upgraded your PC. You can manually download the available drivers for your NVIDIA computer from the company’s official website.

We also have a full guide on what to do if you can’t download the Windows 10 Nvidia driver.

Additionally, you could as well manage all the PC drivers with the right tool. We’re happy to introduce you to standalone driver software with an extensive database and strong updating functionality.

⇒ Get Fortect Driver Updater

3. Perform a Clean Boot

  1. Go to Start, type msconfig, then select System Configuration.
  2. On the Services tab, select the Hide all Microsoft services check box and then click Disable all.
  3. On the Startup tab and click Open Task Manager.
  4. On the Startup tab, for each startup item, select the item and then click Disable.
  5. Close the Task Manager, Click OK, then restart the computer.

Other third-party apps and programs may also be causing mouse issues in Windows 10 Creators Update. Place the system in Clean Boot in order to identify any third-party applications or startup items causing the issue.

4. Roll back to the previous version of Windows 10

  1. Press Windows key + I to open Settings.
  2. Choose Update & Security.
  3. Open Recovery.
  4. Click Get Started under Go back to the previous version of Windows 10.
  5. Follow instructions.

Finally, if you’re unable to deal with the problem and it’s something you can’t ignore for the time being, there are some radical options at your disposal. Thanks to built-in Recovery options, you can roll back to the previous iteration of Windows 10.

That’s it! We hope that now, your mouse works in Windows Creators Update, and everything is back to normal.

Scripted diagnostics native host has stopped working [Fix]

The Scripted diagnostics native host has stopped working error message is one that can pop up for some users when utilizing troubleshooting utilities in Windows.

In addition, the error message states, A problem caused this program to stop working correctly. Some users have also stated that the error message pops up more randomly in Windows 10 every few hours. These are resolutions users have fixed the Scripted diagnostics error with.

What to do if Scripted diagnostics native host is not working?

  1. Run a System File Checker Scan
  2. Run the Check Disk Utility
  3. Clean boot Windows
  4. Open the Reliability Monitor
  5. Roll Back Windows Updates

1. Run a System File Checker scan

A few users have said that they fixed the Scripted diagnostics error with the System File Checker. The SFC utility will scan for and fix corrupted system files. Follow the guidelines below to run an SFC scan in Windows 10.

  1. Open Cortana’s search box by pressing the Windows key + Q hotkey.
  2. Enter the keyword cmd in the search box.
  3. Right-click Command Prompt and select Run as administrator.
  4. First, enter DISM.exe /Online /Cleanup-image /Restorehealth in the Prompt; and press the Enter key.
  5. To initiate a system file scan, enter sfc /scannow and press Return.sfc scannow Scripted diagnostics native host has stopped working
  6. The scan will probably take at least 30 minutes. Thereafter, restart Windows if the scan results say that WRP repaired files.

2. Run the Check Disk Utility

  1. Users have also confirmed that running the Check Disk utility fixed the Scripted diagnostics error for them. To do so, open the Cortana app.
  2. Enter cmd in Cortana’s search box.
  3. Open an elevated Command Prompt by right-clicking it and selecting Run as administrator.
  4. Next, input CHKDSK /R in the Command Prompt and press Return.chkdsk Scripted diagnostics
  5. If prompted for a restart, restart Windows as requested.

3. Clean boot Windows

The Scripted diagnostics error can often be due to third-party programs or services that users don’t really utilize themselves. Remember that the error message states, A problem caused this program to stop working correctly.

Clean-booting Windows will remove superfluous programs and services that might be generating the error. So, that’s another potential resolution for it. Users can clean boot Windows 10 as follows.

  1. First, launch Run with the Windows key + R keyboard shortcut.
  2. Input msconfig in Run’s text box, and click the OK button.
  3. Select the Services tab shown directly below.system configuration Scripted diagnostics native host has stopped working
  4. Select the Hide all Microsoft services option, which will exclude those services.
  5. Then press the Disable all button.
  6. Next, select the General tab on the System Configuration window.system configuration selective startup Scripted diagnostics
  7. Click the Selective startup radio button.
  8. Select both the Load system services and Use original boot configuration checkboxes.
  9. Deselect the Load startup items option.
  10. Click the Apply and OK buttons.
  11. Then click Restart on the dialog box that opens.system configuration restart native host has stopped working

4. Open the Reliability Monitor

The Reliability Monitor is a Control Panel utility that can come in handy for fixing the Scripted diagnostics error. That utility documents program & system crashes.

That utility might show users what program or process generated the Scripted diagnostics error message. Users can open the Reliability Monitor as follows.

  1. Open Run with its hotkey.
  2. Enter perfmon /rel in the Open box and click OK to open the Reliability Monitor shown directly below.performance monitor Scripted diagnostics
  3. Then select the red cross for the Scripted diagnostics error. That will show users what program or process stopped working within the Source box.
  4. Click View technical details to get further info that will include a path for the program.problem details Scripted diagnostics
  5. Users can uninstall any third-party program that generated the error via the Programs and Features Control Panel applet.
  6. If the Source box references a system process, users might need to disable the service for it via the Services or Task Manager windows.

5. Roll Back Windows Updates

The Scripted diagnostics error can also arise after Windows updates. Some users have even said that uninstalling certain Windows updates fixed the error for them.

So, the System Restore utility, which will roll back cumulative updates after a selected restore point, might fix the Scripted diagnostics error. Follow the guidelines below to roll back Windows.

  1. First, open the Run accessory.
  2. Input rstrui in the Open text box and click OK to open System Restore.
  3. Click Next and select Show more restore points.system restore native host has stopped working
  4. Choose a restore point that will roll back recent updates. Some of the restore points might even be listed as Windows Update.
  5. Click Next and select the Finish option to confirm.

Those are a few of the confirmed resolutions for the Scripted diagnostics error. However, there isn’t necessarily a guaranteed resolution for the issue.

RELATED ARTICLES TO CHECK OUT:

Microsoft releases the first, partial, schedule for Build 2019

As Microsoft’s largest developer conference of the year looms over the horizon, the company has finally released a partial schedule for the event.

The current publishing covers a number of sessions that will be offered over the four-day event but leaves out the other conference tangibles such as roundtables, happy hours, breakfast and the like.

Developers attending BUILD 2019 can look forward to choosing between 123 sessions to sit through that include topics ranging from building Hybrid Cloud apps to Code-free data integration at scale. Compared to BUILD 2018, the current listing of sessions is only a partial unveiling as it is roughly 300 sessions short from last year.

Either Microsoft has really cut the cruft from its conference or developers can anticipate more Windows and Microsoft 365 sessions crop up as the conference grows near; with company perhaps, wanting to keep spoiler-like session titles out of the public domain for now.

As it was in 2018, developers should expect to hear a lot more about Azure, Machine Learning, AI and Open source development at this year’s conference, but for the more casual audience, many are looking forward to news about Windows Lite, Chromium powered Edge, PWAs and Windows Core OS. Hopefully, Microsoft will deliver on both fronts at BUILD 2019.

With only one third of the sessions listed, we recommend checking back here for updates and additions as the days go by.


Slack announces new integrations with Outlook and OneDrive

Despite Microsoft Teams being a direct competitor to Slack, the latter has just announced some useful new integrations with Office 365. First of all, the new Outlook Calendar app for Slack will be able to display actionable notifications for calendar invites, or Skype meetings, with direct links to Skype for Business.

The new Outlook Calendar app for Slack is also capable of automatically changing someone’s Slack status using information from Outlook calendar. As an example, a user’s Slack status will automatically change to “in a meeting” when Outlook indicates it.

This new Outlook Calendar app for Slack isn’t the whole story, as there’s also a new Slack for Outlook add-in. Once installed, the add-in will make it possible to forward any emails in Outlook to a Slack channel, or private messages.

Lastly, the existing OneDrive app for Slack has been updated with the ability to quickly import and search files from the cloud storage service. Slack is also now able to display previews of Word, Excel and PowerPoint right within the app. “From responding to calendar invites to sharing files, these updates are the first in a series of steps to integrate the work you create in Office 365 with the collaboration taking place in Slack,” the company said today.

Microsoft wants the US government to do a better job counting those with broadband access

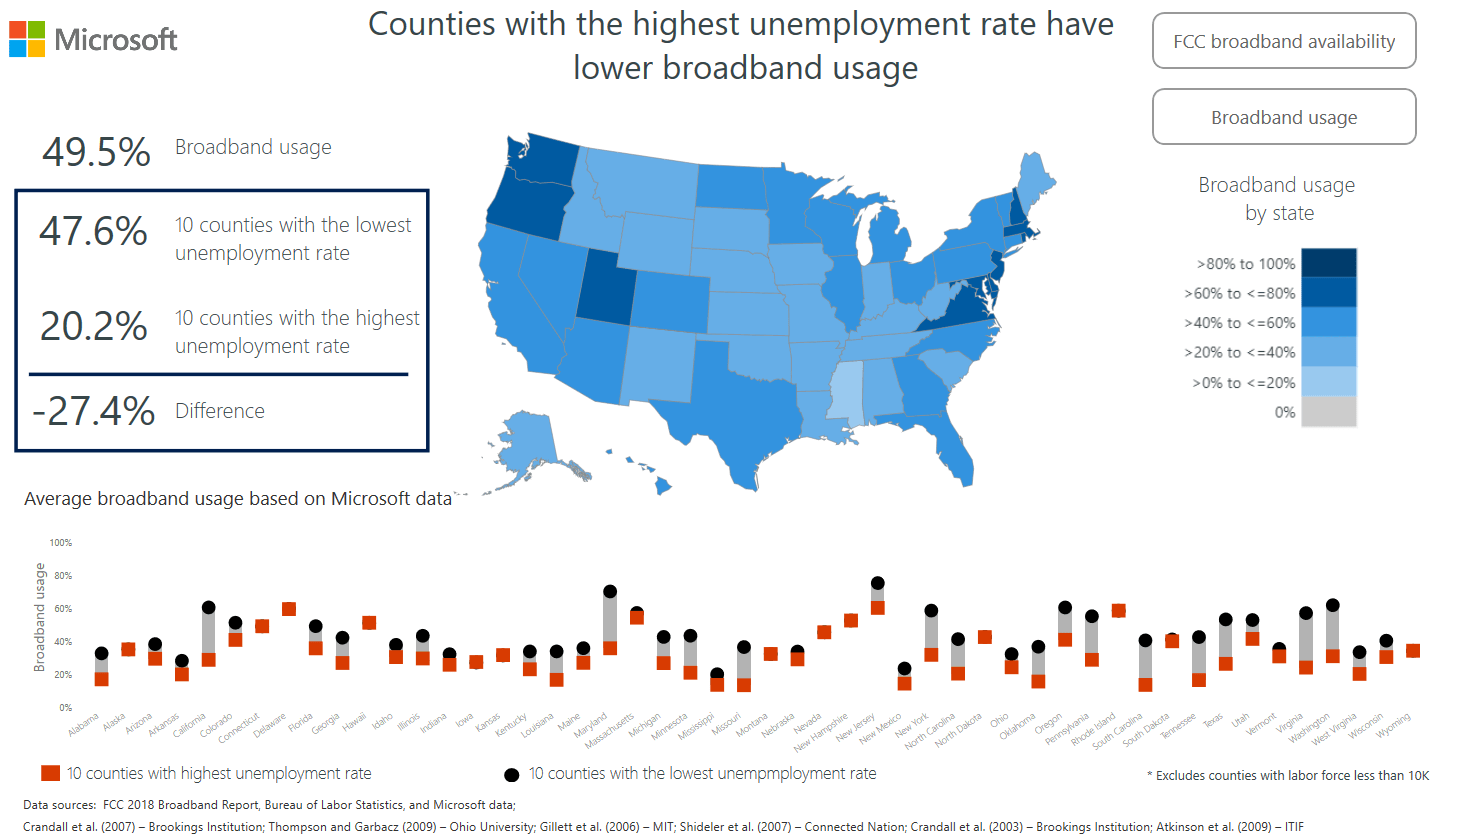
Microsoft has released new statistics that explains the differences of the availability of broadband in the United States per statistics from the FCC versus its actual usage, and has called for the FCC to make changes in collecting the data. According to the company’s blog post, The FCC estimates that there are as many as 24.7 million people without access to Broadband Internet of at least 25 megabits per second. However, according to Microsoft’s own anonymous data, as many as 162.8 million people do not use the Internet at such speeds.

To help fix this ongoing issue, Microsoft recommends that the FCC make various changes in the way that it collects and counts the data. For starters, it suggests that the committee should remove the “could provide” option from the Form 477 submitted to ISPs, and only measure fully covered areas. Right now, the form asks them if ISPs are “providing or could …without an extraordinary commitment of resources provide broadband service to an area.” Since the ISP can check yes to either question, many of the areas that aren’t yet fully covered are counted as having full access to high speed broadband Internet.

The committee should also measure both the availability of as well as the actual usage of high-speed broadband Internet, according to the Redmond giant, and make other changes to improve its data collection of broadband availability before it releases its new report on the issue. For example, the FCC counts data within blocks, and ISP’s can check a whole block as covered even if access is available to only a few households within a large area.

Microsoft has been committed to closing the “broadband gap” for some time now with its Airband Initiative, and has said that it will remain so as it to works with members of the Commerse Committee and with Congress to expand broadband access as quickly as possible. Because as the company says, much of the U.S. economy relies heavily on broadband access, so much so that the issue has major impacts on other problems such as unemployment.

Want to try Edge Insider on Windows 7 now? Here’s how to get it working

Microsoft finally made its new Chromium-based Edge browser available for Windows 10 users yesterday, and it’s currently possible to choose between two different channels, Dev and Canary. The company said that preview builds for the new browser would be coming soon for Windows 7, Windows 8, Windows 8.1 and macOS, but it’s actually already possible to install the new browser on older version of Windows.

As a matter of fact, the leaked Microsoft Edge build that was discovered last month already worked on Windows 7, and it looked pretty good with the Aero interface and built-in support for PWAs.

As reported by Bleeping Computer today, the Edge Dev and Canary installers do work on Windows 7, it’s just that the .exe files are hidden when you visit the new Microsoft Edge Insider website with a non-Windows 10 PC. Fortunately, you should be able to find the installers on this download page, even when you visit it on a non-Windows 10 PC.

Bleeping Computer had no issue running the Edge Insider Dev build on a Windows 7 PC, though the report notes that watching videos on Netflix didn’t work, probably because of missing DRMs on the OS. We don’t have a Windows 8 or Windows 8.1 PC around to test the new Edge browser on these versions of Windows, but it would be surprising if it didn’t work.

Image credit: Bleeping Computer.

If you have yet to try Microsoft’s Edge Insider web browser, we remind you that you can install the Dev and Canary versions side by side: The Dev version will get new builds every week, while the Canary version will be updated daily. There’s already a lot to like in these Insider builds, even though Microsoft is still in the process of removing or replacing some features available in the Chromium open source project.

Download the April 2019 Patch Tuesday updates today

Microsoft will be rolling out the April 2019 Patch Tuesday cumulative updates in just a few hours’ time. As a quick reminder, these updates mark the end of support for the Windows 10 Fall Creators Update OS.

Since 2015, Microsoft has been following a tradition of releasing cumulative updates on the second Tuesday of every month.

This month’s April 2019 Patch Tuesday is coming today with both security and non-security fixes.

As a matter of fact, Windows 10 users have been reporting a bunch of issues that have been introduced by previous builds.

Most of the vulnerabilities will hopefuly be addressed in the April 2019 Patch Tuesday cumulative updates.


Which is the latest version of Windows 10? Find out from our constantly updated article!


Install Windows 10 April 2019 Patch Tuesday updates

If you enabled automatic updates, all you need to do is go to Settings and hit the Check for updates button.check for updates

You can also download the latest Windows 10 update directly from Microsoft’s Update Catalog website.

Microsoft is releasing the April 2019 cumulative updates today but these patches are available for systems running the Fall Creators Update or newer versions.

Windows 10 May 2019 Update coming soon

Speaking of updates, keep in mind that the Windows 10 May 2019 Update lands at the end of May.

This time, Microsoft listened to all the users who have been complaining about the disruptive Windows update process.

The Windows 10 May 2019 update allows users to choose when they want to initiate the update download and install processes.

Fall Creators Update support ends today

As reported earlier, a final batch of updates for Windows 10 v1709 Home and Pro SKUs will be released tomorrow as a part of the April 2019 Patch Tuesday cycle.

Microsoft recommends users to upgrade to the latest version as soon as possible.

If you are looking for a stable and secure OS version, upgrade to Windows 10 v1809 also known as October 2018 Update. 

Microsoft is expected to fix some critical security issues as a part of Windows 10 cumulative updates today. Let’s wait and see if the company manages to patch all the existing vulnerabilities.

Hopefully, the April 2019 Patch Tuesday updates won’t bring issues of their own.

RELATED ARTICLES YOU NEED TO CHECK OUT:

How to fix common Borderlands Game of the Year Edition bugs

What an interesting spring we’re having. Numerous game releases so far, but let’s not forget that Borderlands Game of the Year Edition is out.

You’re back in the shoes of a vault hunter, and the story picks up in the same way the first game did, with the added feature of importing save games from the first game to the game of the year edition now.

With instances of bugs being reported on the game, we’ve gathered up some tips and tricks, that will keep the vault hunting going for a long time. This time it’ll be awesome, I promise!

How to fix common Borderlands GOTY issues

  1. Graphic Issues
  2. Weapon duplicates
  3. Audio issues
  4. Connection issues
  5. Game menu freeze
  6. Screen tearing

Graphic issues

For this fix, we’re going to try to optimize your game running on your Nvidia card.

  1. Firstly, open your Nvidia Control Panel;
  2. Go to Manage 3D settings and then select Program Settings;nvidia control panel andy os
  3. Add the Borderlands game executable from the list and select High-performance NVIDIA processor from the drop-down box and press Apply;

Additionally, you have the chance to manage your graphic drivers automatically with dedicated software like Fortect Driver Updater, skilled for installing and updating any driver correctly.

Weapon duplicates

steam overlay not working windows 10

More or less, this issue can be traced to faulty game files, maybe some got corrupted at some point. But we’ve got a solution for this, simply follow these steps:

  1. Start your Steam client;
  2. In the Library section, right-click on Borderlands GOTY game and click on Properties from the menu;
  3. Now select the Local files tab and click on the Verify integrity of game files;
  4. After this is done, try running the game again.

Audio issues

For this fix to work, go to Sounds and select Properties, now make sure to disable every sound device except for your speakers. Also, keep in mind to update your sound drivers if this problem persists. 

For additional troubleshooting solutions, check out the guides listed below:

Connection issues

Simply add your game to an exception list for both your antivirus or Windows Firewall. The same solution for weapon duplicates works for this as well, you can reproduce the same steps to verify your game files.

Game menu freeze

uninstall game via steam

You should try running the game in Windowed Mode, as a first solution. Or alternatively, repair and verify your files can do the trick. But if that doesn’t work you should uninstall and reinstall your game.

Screen tearing

For this fix, head on over to your game menu, and select Graphic options, and disable Shadowplay, then  turn off V-Sync, and disable Anti-aliasing. Alternately, you can opt which one you wish to disable, and test which feature allows a smoother look.

General tips to run Borderlands GOTY smoothly

Always remember the minimum requirements whenever running a game, here are the specs for Borderlands GOTY:

  • OS: Windows 7 64-Bit.
  • Processor: Intel Core i3 530 @2.93GHz/AMD Phenom 9950 @2.6GHz.
  • Memory: 4 GB RAM.
  • Graphics: Geforce GTX 660, Radeon HD 6970.
  • DirectX: Version 11.
  • Storage: 25 GB available space.

If you’re running the game from your Steam library, remember to whitelist your game on Windows Firewall or to add an exception for it in your antivirus.

Always keep your graphic card’s drivers up to date at all times when running your games.

We hope that these fixes were helpful for you. And in the meantime, let us know what you think of the game so far in the comment section down below.

Windows 10 20H1 builds coming to Fast ring Insiders in May

Microsoft is planning to push the gas pedal for Windows 10 20H1, commonly known as the Windows 10 April 2020 Update. The company will start shipping 20H1 preview builds to Fast ring Insiders starting May 9, 2019.

The Windows 10 May 2019 Update is currently in the final stages of development, and Microsoft is all set to release it later in May.

The big M will add for some major improvements to the Action Center, Start menu, Settings app and other UI elements.

Furthermore, the company will introduce Windows Sandbox, a new Windows light theme experience as a part of its Windows 10 May 2019.

This update will be released to Release Preview Ring Insiders very soon. Before the company rolls out the Windows 10 May 2019 Update to the general public, Windows Insiders will have been testing for one month. Hopefully, the final OS version won’t bring too many bugs.

Windows 10 April 2020 Update released sooner than you expected

The development of Windows 10 20H1 (April 2020 Update) is also under progress. In order to align its development plans with the Windows Insider rings, the tech giant will also push the Windows 10 April 2020 Update update to the Skip Ahead Ring.

This will be done by speeding up the work on Windows 10 20H1. In this way, the preview builds of the update will be available to Fast ring insiders as well.

Currently, just the Skip Ahead Insiders have access to the Windows 10 20H1 builds. Microsoft also decided to merge the Fast Ring and Skip Ahead rings in the next few weeks. 

Last week, the Redmond giant rolled out Windows 10 Insider Preview build 18845 to Skip Ahead Insiders. Although the update did not come with any new features, it includes some general changes and improvements.

Notably, it fixed the issues related to launching Microsoft Edge and Start menu bugs that existed in previous builds.

How to check for updates?

If you are enrolled in the Windows Insider program, you can check for updates by navigating towards Settings >> Update & Security >> Windows Insider Program.

RELATED ARTICLES YOU NEED TO CHECK OUT:

Windows 10 Game Bar gets Chat, Spotify, and Mixer integration

Microsoft is adding some exciting new features to its Windows 10 Game Bar. Insiders running Windows 10 v1809 or higher can now test the new features.

Microsoft is interested in convincing more gamers to adopt the Windows 10 platform. Microsoft made this recent move in order to improve the gaming experience with an enhanced Game Bar along many new features.

These features include Spotify integration and shareable in-game content. Moreover, users will be able to personalize their very own Game bar.

Microsoft confirmed that Spotify, Chat and Mixer will work fine with Windows 10’s Game bar. The new features will support all your PC games and will show up as an overlay when gamer press the Windows key + G keys.

This will help users record video and grab screenshots much faster. The beta version of the Windows 10 Game Bar allows users to instantly control their Spotify playlists during gaming and chat sessions.

User don’t need to leave their game while capturing, editing, adding text and finally tweeting gameplay footage.

The captured screenshots can then be easily turned into memes. Windows 10 users can keep an eye on the activities of their fellow gamers.

Get Game Bar beta in Windows 10

You can get Game bar beta in your Windows 10 OS.

  • On your Windows 10 PC, launch the Xbox Insider Hub
  • On the upper left corner of your screen click Insider Content
  • Click Windows Gaming, the user can enroll automatically into the Game bar flight if he has a Window 10 build #17763 or higher
  • When you are playing any game, you can press Win+G to show Game bar

Right now, Microsoft is testing the new Xbox Game Bar for PC gamers. The company wants to thoroughly test the feature before releasing it to the general public.

We can see that Microsoft is finally addressing the shortcomings that have existed for years. Happy gaming!

RELATED STORIES TO CHECK OUT:

Kaizala becomes part of Microsoft Teams in 2020

Microsoft is planning to integrate Kaizala messaging service into its Teams group-chat. Kaizala is basically a messaging service that is available for large-group communication to both Android and iPhone users.

The move has been made as a part of Microsoft’s strategy to expand its services to more first-line workers.

Back in 2017, the messaging service was launched as a Microsoft Garage incubation and was initially a simple productivity tool. Its distribution has been constantly being extended since then.

Kaizala’s Pro version has now been made part of the worldwide Office 365 commercial plans without any additional charges.

Microsoft made an official announcement stating that it would launch Kaizala to all eligible Microsoft 365 and Office 365 users around the world.

The tool will be available in 180-plus markets and 40 languages as an integrated offering.

The integration should take place over the next 12-18 months in different phases.

Better workplace communication thanks to Kaizala and Microsoft Teams

Kaizala brings unique capabilities to Microsoft 365, with its ability to connect and engage people both inside and outside of an organization’s directory – including contract workers, vendors, partners, suppliers, customers, and citizens – using large and flexible group types. Kaizala enables phone number-based identity for easy onboarding, and a simple user experience for messaging and work management through the open directory.

The company also added some new features to Kaizala. Users can now delete the messages they sent in group or one-on-one chat conversations.

The time duration for this action has been restricted to an hour after the message has been sent.

Secondly, just like other social media services out there, the app now supports tagging individuals in a conversation by using @mentions.

This year, Microsoft is also launching a new Kaizala web app adding new video calling and image annotation features.

Microsoft is also planning to add many more new features in future. Some of these features include email user invites, right-to-left language support and more.

Admins will also be able to designate specific policy management tasks to specific admins. Microsoft Teams users will have to wait for a few months until these features have been integrated into the app.

Microsoft has yet to announce an official date when these new features will be available to the public.

RELATED STORIES TO CHECK OUT:

WindowsReport is attending Affiliate Summit Europe – 2019

The conference rooster starts a bit early this year and the first one on the line for the WindowsReport team will be Affiliate Summit Europe. Held in Amsterdam on the RAI Amsterdam conference center, this event will last three days, between 12th and 14th of March. After the success we’ve had at last year in London, we’ve decided to give it another go.

ASEURO19, as online advertisers call it, promises to be an event filled with various networking chances and the opportunity to connect with other big names from the industry. As usual, we’re going to be particularly interested into discovering new players in the tech industry, while also consolidating bonds with key partners.

This annual event will soon be the home of representatives of big companies, such as Uber, Skyscanner, Adidas and a lot more. Software wise, companies such as PropellerAds, BullGuard, Bitdefender are going to join as well.

We’re also interested into hearing what key-speakers have to say about the latest trends in the industry. Some of the most notable present and perhaps, on my own agenda, are the following:

  • Justin Rondeau – Director of marketing at DigitalMarketer
  • Todd Crawford – VP Strategic Initiatives, Impact
  • Anthony Capano – Managing Director Europe, Rakuten
  • Adam Ross – COO, Awin
  • Ami Spencer – International Publisher Director, Webgains

And many more.

Let’s meet

This year we’re going to send three representatives from our team to this event, including our founder, the head of affiliate sales and a press member.

Are you attending ASEURO19 as well and want to meet us in person? You can book a meeting by sending an email to alex [at] windowsreport.com.

Conclusions:

We’ve had a blast. Thanks to all the partners that managed to reach Amsterdam for getting a chance to meet and chat. Looking forward to next year’s event !

ASEuro_2019_after

How to Fix Frequent Windows Mixed Reality Issues

Windows Mixed Reality is an impressive technology developed by Microsoft that blends reality and virtual worlds.

This so-called hybrid reality is becoming more and more affordable and popular among users.

Unfortunately, Microsoft still has a lot of work to do in order to polish Windows Mixed Reality so as to make it more stable and reliable because several users reported that Mixed Reality is not installing.

Many potential Windows Mixed Reality errors and issues may occur. In this article, we’ll show you how to fix the most common ones.

How can I fix Windows Mixed Reality bugs and errors?

1. PC can’t run Windows Mixed Reality

Make sure your computer’s hardware setup is compatible with Windows Mixed Reality.
Install the latest Windows 10 updates or upgrade your system to the latest Windows 10 OS version, which is currently the Fall Creators Update.

2. Xbox One controller won’t work on Windows Mixed Reality

Make sure your controller is turned on, fully charged, and connected to the PC. Replace its batteries.
If you’re using a Bluetooth controller, make sure it’s paired. Go to Settings > Devices > Bluetooth & other devices to see if it’s listed on the page.

3. Windows Mixed Reality headset stopped tracking

  1. Make sure the lights are turned on. Check to see if anything obstructs your headset’s inside-out tracking cameras.
  2. Wait for a few seconds for tracking to resume.
  3. Restart the Windows Mixed Reality Portal.

ALSO READ: Samsung’s new Windows Mixed Reality headset lands November 6

4. Something Went Wrong error 2181038087-12

This error usually occurs when HMD is plugged into a USB port on which a non-Microsoft USB device driver is running.
To fix error 2181038087-12, launch Device Manager > expand the Universal Serial Bus controllers category > uninstall the driver for each item that includes the text “eXtensible Host Controller” and doesn’t have “Microsoft” in the name.

Now, ensure that all the drivers containing the text “eXtensible Host Controller” have “Microsoft” at the end.

5. Something Went Wrong error 2181038087-4

fix windows mixed reality bugs

This error occurs when the headset driver failed to initialize the two tracking cameras. Unplug and replug your headset to solve this problem. You can also try reinstalling the driver if the problem persists.

6. Something Went Wrong error 2181038087-11

This error indicates that your CPU is too old and incompatible with Windows Mixed Reality. You need to buy a new Windows Mixed Reality-compatible PC to fix this error. Check out the list of compatible devices here.

There is also a tool available that automatically checks if your computer is compatible with WMR.

7. Wi-fi speed is slow when motion controllers are turned on

windows mixed reality bug fix

Your notebook may share a Wi-Fi antenna with Bluetooth when using 2.4GHz access points. Open Device Manager and switch band preference to 5GHz.

8. Windows Mixed Reality overheats PC

This is a common issue when using WMR. Ensure that the fans that blow air into/out of your PC are not blocked, and try to use the PC in a cool environment. Remove all heat sources pointed at the PC.

For more information on how to prevent overheating issues on PC, check out the articles below:

9. The Mixed Reality world often freezes

This issue could be caused by an app or system fatal error or a temporary memory or CPU abnormal usage level.

  1. Open task manager and make sure that you have at least 20% CPU free and 400MB memory free
  2. Check to see if any processes crashed. Open event viewer, navigate to Windows Logs -> Application and Error level event entries.
  3. Reboot your PC if this problem persists.

10. Steam VR is crashing

Launch the Mixed Reality Portal first, and then try relaunching SteamVR. Ensure you’re not running a Beta version of the Steam client.

For more information on how to fix other Windows Mixed Reality issues, go to Microsoft’s Support page.

New Chromium Edge is a lot like Chrome but with several things missing

While Microsoft has officially taken the wraps off its Insider and developer-focused Edge browser replacement, the work to a finished consumer product is still miles ahead of the company’s engineers.

However, there are some kudos to give the Edge team as they have gone from announcement in late December to a relatively usable product in roughly five months.

The expediency in the release of Microsoft’s new Chromium-powered browser has come at cost and the Edge team has noted all the missing, removed and perhaps, soon-to-be-replaced features users have come to expect from the industry leading web browsing alternatives.

According to a recently published list, Chromium Edge testers will find that their builds lack the following:

While that is a long list of missing features a traditional Chrome user might come to long for if switching to the new developer and insider builds of Edge, Microsoft does note that it has simply replaced some of these features with their own solutions.

Which ones?

The 27-slide Power Point identifies Identity and Single Sign-On (SSO), PlayerReady DRM, and Services integration as early changes, alongside more subtle additions such as smoother scrolling protocols in BlinkGen Property Tree (BGPT) Memory Reduction in DLL prefetching and Native Caret browsing among others.

There are several other areas of interest and investigation the Edge team is looking into and would love contribute to, but for now, testers will have to settle with waiting for build updates to get the incremental changes they need, to make Chromium Edge their go-to browser of choice.

Microsoft unveils new ‘Blush Blend’ Surface Pro Signature Type Cover

Perhaps, because the design of the main unit of the Surface Pro has remained relatively consistent, owners have sought to add customization through its accessories as a way to differentiate their device from the next persons. Microsoft has released many different Surface Type Covers over the years, adding a model with a built-in Fingerprint ID as well as the various Signature Type Cover models with alcantara finish.

Today, the company unveiled the Surface Pro Signature Type Cover in Blush Blend, which will be exclusive to John Lewis & Partners in the UK. The exclusive offering keeps the same feel of Microsoft’s Signature Type Cover experience with Alcantara fabric, but comes in a new two-tone blended color scheme reminiscent of dry and wet sand on the shore.

The Blush Blend Type Cover comes in one option for now and it’s a cross blend of navy blue to light peach (it looks like) and offers a color changing dynamic dependant on light and motion. If you live in the UK, the JL&P Type Cove can be snagged for £149.99 starting today at the JL&P website, here.