How to configure the Surface Dial for any Windows 10 PC

The Surface Dial is an accessory for Windows 10 accessory aimed to give people as new way to create. It’s compatible with any PC, laptop, or tablet running Windows 10 with Bluetooth support. In October 2016, Surface Dial was announced as an accessory to the newly unveiled Surface Studio, but  since its introduction, Microsoft has expanded Surface Dial for use beyond the Surface Studio to any Windows 10 PC.

Microsoft Surface Dial and the Surface Studio

If you own a Surface Pro 6, Surface Book 2, or Surface Studio 2, the Surface Dial works well as an onscreen tool with onscreen visual navigation. However, the Surface Dial is also useful for those without Surface integration. While you may not be able to use the Surface Dial as it was originally intended, the Surface Dial works well as a complementary accessory to your keyboard and mouse.

If the Surface Dial wasn’t useful off-screen, you wouldn’t see companies like Logitech integrating a mini-Surface Dial on their keyboard, like they did with the Logitech Craft. The Surface Dial can act as another tool you use to create on your laptop or desktop Windows 10 PC. You might find that the Surface Dial works better off-screen, making it easier for you to navigate around your Windows 10 PC.

By default, Surface Dial brings up the most used shortcuts in Windows 10; Volume, Scroll, Zoom, Undo, and Custom tool. Instead of relying on menu navigation or keyboard macros, you can set up the Surface Dial to control apps or perform other actions in Windows 10. There are custom Windows 10 app shortcuts and commands available in Windows 10 apps with Surface Dial support. You can also customize the tools available when you rotate the Surface Dial. In this guide, you will learn how to set up and configure the Surface Dial on your Windows 10 PC.

In order to change the settings on your Surface Dial, you need to first pair it with your Windows 10 PC. Here’s what you need to do.

How to add Surface Dial to Windows 10

  1. Go to Settings.
  2. Go to Devices.
  3. Go to Bluetooth.

Once you are at this point, you need to add the Surface Dial to your Windows 10 PC.

  • Turn on the Bluetooth toggle.
  • Click Add Bluetooth or other device.
  • When the Add a device window appears, select Bluetooth.

Now you need to put the Surface Dial in Bluetooth pairing mode. Do the following:

  1. Take off the bottom of the Surface Dial
  2. Press and hold the Bluetooth pair button on the Surface Dial until the light starts blinking.

Microsoft, Surface, Surface Dial

The Surface Dial will appear under Bluetooth devices. Select Surface Dial to finish the Bluetooth pairing process.

Once paired, you will be able to configure the Surface Dial settings through the Wheel settings. The Wheel settings are in the left pane under Devices.

Microsoft, Surface, Surface Dial

How to configure Surface Dial settings

Now you can customize Surface Dial settings. Please note that if you do not have a Surface Dial, you will not be able to configure these settings.

  1. Go to Settings.
  2. Go to Devices.
  3. Go to Wheel.

Microsoft, Surface, Surface Dial

From here, you can change the default tools available on the Surface Dial or add your own custom shortcuts. There are a number of global controls available on the Surface Dial that work across Windows 10 apps.

Some Surface Dial controls utilize media controls to raise and lower volume and play music in Windows 10 apps, including Spotify and Amazon Music. The Surface Dial is also helpful to navigate playlists or control music above your lock screen.

The Surface Dial offers haptic feedback, offering vibration that makes it intuitive to be more precise with the controls. Scrolling through documents and web pages is a breeze as is using zoom, undo and redo, and adjusting screen brightness.

How to use Surface Dial gestures

The Surface Dial uses three gestures to navigate: press & hold, rotate and click.

  • Press & hold to see a radial menu on-screen and rotate to a shortcut that you’ve set up and click to select shortcut.
  • Rotate to select the desired shortcut.
  • Click to select the shortcut.

The Microsoft Store offers a number of apps that work with the Surface Dial. Take a look at the Surface Dial apps here.

Microsoft, Surface, Surface Dial

How to keep your Surface Dial working properly

The Surface Dial is a simple Windows 10 accessory to maintain. It uses two AA batteries to function and eventually, those batteries will need to be replaced.

Surface Dial works well on certain devices within the Surface family, including the Surface Pro 6, Surface Book 2, and Surface Studio, but it will not work as well onscreen with the Surface Laptop 2 because the screen does not tilt enough.

New Windows 10 PCs that offer a 360-degree hinge are ideal for the Surface Dial. You can wipe away any dust build up on the bottom of the Surface Dial with an alcohol wipe or damp cloth.

Windows 10 UWP bug allowed full file system access without asking permission

A report by BleepingComputer has shed light on a Windows 10 bug that granted certain Universal Windows Platform (UWP) apps full access to a device’s file system, a great deal more than the expected limited file access.

UWP apps are allowed to request this extra access, however, they are expected to explain to Microsoft what the access will be used for when submitting the app to the store. UWP apps that use this extra access are also supposed to prompt a settings screen with the ability to enable this access when the app is first used.

Unfortunately, this screen wasn’t being prompted correctly and it doesn’t appear as if Microsoft is being that strict with app developers submitting such apps to the store.

This settings prompt bug has apparently been fixed in the Window 10 October 2018 update though that update has been delayed due to some other, unrelated, bugs.

You can read more about the nitty-gritty of this issue, and view some code samples, over on BleepingComputer.

Does this issue bother you? Share your thoughts with the community in the comments below and then follow us on Pinterest for more tech content.

FIX: SD card is disabled in Windows 10/11

As you know, Windows 10 is available on variety of devices such as smartphones and tablets. Unfortunately, some users are experiencing SD card slot issue on their smartphones. If you’re having this issue you might want to check out some of our solutions.

According to users they are getting “SD card slot disabled. You can’t use SD cards on your phone because of a server policy.” message. This can be big problem if you store a lot of important data on your SD card, but there are a few workarounds. Users have already tried performing hard resets but that just temporarily fixes the problem.

According to users, after a hard reset SD card is detected but as soon as you reboot your phone the problem starts again. Performing a soft reset sometimes help and shows the SD card, but that’s also not a permanent solution.

How to Solve Problems with SD Card in Windows 10

Before we start with solutions, it won’t hurt to check and download the latest build. If that doesn’t help, try some of our solutions below.

Solution 1 – Disable Work Access and move Airwatch from SD card to phone storage.

  1. Disable Work Access by going to Settings > Accounts > Work Access > Airwatch > Delete. We have to warn you that by doing so you’ll lose access to emails and contacts stored at work account.
  2. Reboot your phone and your SD card will now become available.
  3. Move the Airwatch app from SD card to phone storage.
  4. If you need to use Airwatch run it from the phone storage.

Solution 2 – Remove your Exchange account

Some users report that removing your work Exchange account from Your Email and Accounts fixes the problem. So you may want to try removing your Exchange account and using just your Outlook account. After removing Exchange account reboot your device and your SD card should be working again.

If your computer doesn’t even recognize a SD card, you should check out this article. Also, did you know that you can install your Windows 10 apps directly on a SD card?

Update: When it comes to Windows 10 phones, Microsoft has already given up hope about the future of these devices. The company decided to focus on its Windows 10 desktop OS and cloud services instead.

If you haven’t switched to another mobile platform, we’re afraid you’ll be forced to pretty soon. Windows 10 Mobile will soon become obsolete, it no longer receives new features and it obviously can’t keep up with the latest Android or iOS phone models.

It’s only a matter of time until Windows 10 phone will become history.

RELATED POSTS TO CHECK OUT:

Unable to Run GTA Episodes from Liberty City [Windows 10/11]


4 solutions to fix GTA issues on PC

  1. Check for updates
  2. Run the game in windowed mode
  3. Use ALT + TAB a few times
  4. Clean boot your computer

Grand Theft Auto games have many fans, and people play Grand Theft Auto and it’s DLCs such as Episodes from Liberty City regularly.

Speaking of Grand Theft Auto: Episodes from Liberty City, it seems that this game stops responding on Windows 10 for some strange reason, so let’s see if we can fix that.

Although this troubleshooting guide refers to this particular game DLC, you can use solutions listed below to fix similar issues affecting other GTA DLCs.

How to Solve GTA problems in Windows 10

Solution 1 – Check for updates

Grand Theft Auto: Episodes from Liberty City is relatively old game, it was released in 2008, so you might have some problems running it on Windows 10.

Usually these kinds of problems are caused by missing updates, so make sure that you update Grand Theft Auto as well as Windows 10 with latest updates.

This will fix any potential incompatibility issues. At the same time it’s advisable that you update your graphic card drivers with the latest version. After your game, Windows and display drivers have been updated you can try this solution.

Solution 2 – Run the game in windowed mode

If the Grand Theft Auto: Episodes from Liberty City is crashing for you you might want to try running it in windowed mode. This isn’t a permanent solution, but some users report that this is a working workaround, so it’s might worth a try.

To run Grand Theft Auto: Episodes from Liberty City in windowed mode you need to start the game, and navigate to Video Options and set it to run in windowed mode. If you can’t even launch a game without crashing it you might want to try this:

  1. Go to the game directory. By default it should be C:Steamsteamappscommongrand theft auto iv episodes from liberty cityEFLC, but it might be different on your computer.
  2. Next in that directory create a new text file called commandline.txt.gta iv episodes from liberty city problems
  3. Open the commandline.txt and enter -windowed.gta iv episodes from liberty city problems 2
  4. Save and exit commandline.txt and try running the game.

Solution 3 – Use ALT + TAB a few times

If the game stopped responding shortly after launch, try using Alt+Tab to go back and forth between the game and your desktop. This workaround may sometimes help, so it’s worth giving it a try.

Solution 4 – Clean boot your computer

If this problem is triggered by low computer resources issues, you can clean boot your machine. In this manner, your computer will use only the minimum set of drivers and programs necessary to run Windows 10.

  1. Go to Start > type msconfig > hit Enter
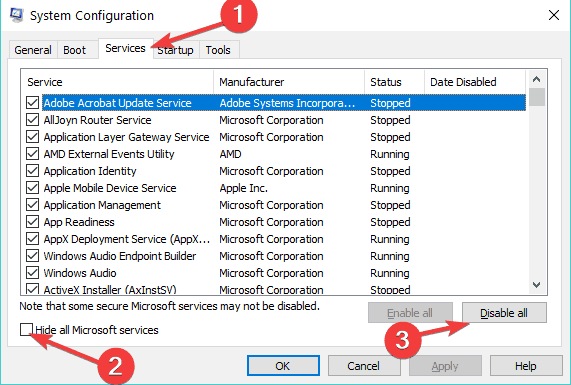
  2. Go to System Configuration > click on the Services tab >  check ‘Hide all Microsoft services’ > click Disable all.hide all microsoft services
  3. Go to the Startup tab > Open Task Manager.
  4. Select each startup item > click Disable > close Task Manager.disable startup programs
  5. Restart your computer and check if the game runs OK.

That’s about it, running the game in windowed mode should solve the problem. If you have any comments, or questions, just reach for the comment section below.

RELATED POSTS TO CHECK OUT:

How to remove ‘React to this message’ alerts on Skype

The future of Skype is determined. Microsoft decided, even after quite an opposing feedback, that the Skype 7.0 is the part of history.

As of November, all Skype users will be forced to either ditch Skype and choose an alternative app or settle for the Skype 8.0. This one is quite similar to the mobile version, with all traits of an instant messenger. Among the other features, Skype 8 includes message reactions.

These allow you to use an emoji and react to the message. A silly addition, especially for Bussines users who use Skype for formal contacts.

How can I disable ‘React to this message’ Skype alerts

There’s no option to disable these, so you’ll need to get used to it. Of course, you can avoid them, just don’t click on that emoji icon under the sender’s name and you’ll be golden. There might be an option in the future, though, as a lot of users are not satisfied with this and some other additions to the latest release of Skype.

But, for the time being, you can try them out and judge on your own. If it happens, by chance, that you’ve accidentally placed a reaction, you can remove it in the same manner. Just click on the reaction icon next to the sender’s name and click again on the emoji you’ve used. Simple as that.

We hope this was an informative read and make sure to tell us your opinion on the changes Microsoft made to Skype. You can do so in the comments section below.

RELATED STORIES YOU SHOULD CHECK OUT:

FIX: Unable to run Solitaire in Windows 10/11


5 quick solutions to fix Solitaire issues on PC

  1. Update your computer
  2. Restart app updates
  3. Rename the Cache folder
  4. Reset Solitaire
  5. Run the Windows Store Apps troubleshooter

Solitaire is one of the most popular games on Windows, and many people like to play Solitaire in their spare time on Windows 10. But sometimes there could be some issues. Users report that they are experiencing problems with Solitaire on Windows 10, and today we’ll try to fix some of these problems.

What to do if you can’t run Solitaire

Solution 1 – Update your computer

Users report that quite often Solitaire is crashing on Windows 10, but before we try any solutions, we advise you that you update Windows 10 using the Windows Update. Quite often these issues are fixed through Windows update, so it wouldn’t hurt for you to download all available Windows 10 updates before trying the following fixes.

Solution 2 – Restart app updates

This isn’t the best solution but some users claim that it works, so it’s worth checking out. Go to the Windows Store and click on the download icon on the top right next to the search box. If there’s a list of stalled app updates close them all by clicking the X button. Now the updates should start downloading again.

It seems that sometimes some app updates can cause problems with Solitaire, so if make sure that you restart any app updates that you have running.

Solution 3 – Rename the Cache folder

This usually works for most Universal apps, so if you’re having problems with Solitaire you might want to try this.

  1. Go to the  Users{Username}AppDataLocalPackagesWinStore_cw5n1h2txyewyLocalState folder.
  2. Find Cache folder inside it, right click it and choose Rename from the menu.
  3. Rename the Cache folder to Cache.old.
  4. Now right click the empty space and choose New > Folder from the menu.
  5. Rename the folder you’ve just created to Cache.
  6. Restart Windows 10.
  7. Try if your Universal apps are working, if everything is working fine, you can go back and delete the Cache.old folder.

Solution 4 – Reset Solitaire

Another method to fix this issue is to reset Microsoft Solitaire. Here are the steps to follow:

  1. Go to Settings > System.
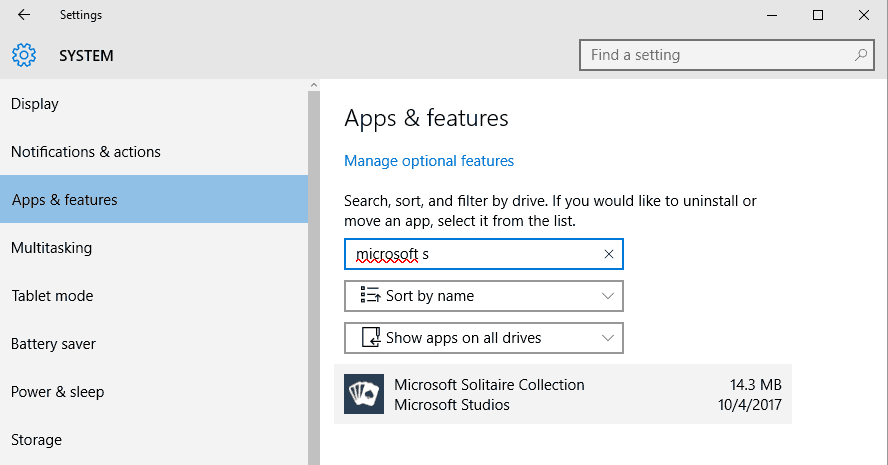
  2. Select App & features > enter ‘Microsoft Solitaire Collection‘ in the search boxreset microsoft solitaire collection
  3. Go to Advanced options > hit the Reset button.

Solution 5 – Run the Windows Store Apps troubleshooter

Microsoft integrated a dedicated troubleshooter for Windows Store apps. With the help of this tool, you can quickly scan your Windows 10 apps and automatically fix general issues affecting them.

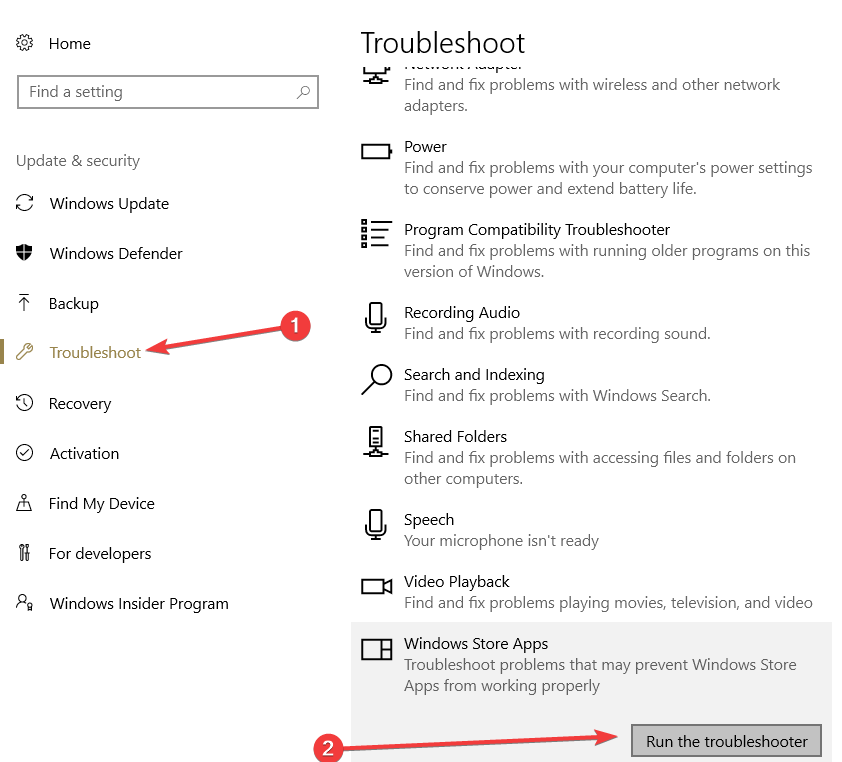
Go to Settings > Update & Security > Troubleshoot > locate and run the Windows Store Apps troubleshooter.

windows store apps troubleshooter

That’s about it, we hope these solutions helped you to solve the problem with Solitaire on your Windows 10 computer.

If you have any comments, or questions, just reach for the comment section, below.

RELATED POSTS TO CHECK OUT:

FIX: Adobe Error 2060 prevents Skype from working


5 quick solutions to fix Adobe security error 2060

  1. Update Skype and Windows 10
  2. Clear temporary Internet files and Skype browser cookies
  3. Enable Skype click to call
  4. Disable ads using the AdFender software
  5. Disable ActiveX

Errors are relatively common, but some errors such as Adobe error #2060 can cause big problems. It appears that this error is preventing Skype from working properly on Windows 10, and today we’ll see if we can somehow fix this error.

According to the users they are getting Adobe error #2060: Security sandbox violation when using Skype and according to them Skype freezes and becomes unusable. This is big problem if you’re using Skype on daily basis, but fortunately there are few solutions that you can try.

Steps to fix Adobe Security Error #2060 in Windows 10

Solution 1 – Update Skype and Windows 10

Before we start, we have to mention that Microsoft is aware of this issue, and the issue will be most likely addressed with the latest update. So, before trying other solutions make sure that your Skype is up to date. Make sure that you download all the Windows 10 updates.

Speaking of Windows updates, Microsoft rolled out security update KB3087916 a while ago specifically to target Adobe Flash Player security issues and errors. So, installing the latest Adobe patches should fix error 2060.

In addition, make sure that you have the latest version of Adobe Flash installed. If the Adobe error #2060 still persists try one of the following solutions.

Solution 2 – Clear Temporary Internet Files and Skype browser cookies

First let’s clear Temporary Internet Files:

  1. Open Internet Explorer and go to Tools > Internet Options > General.
  2. Find Browsing history section and press the Settings button.
  3. Next click the View files button.skype error windows 10
  4. Now delete all the files from Temporary Internet Files folder.skype error windows 10 1

Next, disable Skype browser cookies:

  1. Open Skype and go to Tools > Options > Privacy > Privacy Settings.
  2. Find and uncheck Accept Skype Browser cookies and Allow Microsoft targeted ads, including use of Skype profile age and gender.skype error windows 10 2

— RELATED: Full Fix: Adobe error 16 on Windows 10, 8.1, 7

Solution 3 – Enable Skype click to call

Now enable Skype click to call:

  1. Open Internet Explorer > Settings > Manage add ons.
  2. Under Toolbars try to locate Skype click to call. If Skype click to call is available make sure it’s enabled.

Solution 4 – Disable ads using the AdFender software

According to some users, this issue is caused by ads that are played in your applications such as AIM or Yahoo messaging programs. To stop this error from appearing just download and install AdFender. You don’t have to use AdFender, because any third party ad blocker software should do the trick.

Solution 5 – Disable ActiveX

Adobe also recomments disabling ActiveX. Here’s how to turn off ActiveX:

  1. Go to Internet Explorer > go to Tools > select Safety
  2. Go to ActiveX Filtering and disable the featuredisable activex filtering
  3. Restart your computer and you should be able to view the problematic content without any problems.

That’s about it, I hope this article helped you to solve the problem with Adobe Error #2060 preventing Skype from working. If you have any comments, or questions, just reach for the comment section below.

RELATED POSTS TO CHECK OUT:

Download 72 new sounds for your Windows 10/11 PC

Each new version of Windows has brought something new in terms of visual appearance and functionality, but quite often people miss the little things that come with each new version of Windows. Speaking of little things, today we’re going to see what new sounds are available in Windows 10.

Over the years many things have changed about Windows, and we got improved and simplified design, many new features and more. With the latest versions of Windows we got support for touchscreen devices. These are all major changes that users will surely notice the first time they start their Windows, but let’s talk about small, more subtle changes.

As you know, with every generation of Windows comes new set of sounds, and Windows 10 isn’t an exception, so let’s have a closer look at new sounds in Windows 10.

Download the New Sounds for Windows 10

Sounds are important part of our Windows experience, they allow us to easily distinguish notifications, alerts and errors, and they make our Windows experience more immersive.

Just like previous versions of Windows, Windows 10 comes with set of its own exclusive sounds. If you’ve been following the Windows releases over the years, you’ll notice that sounds have become more melodious. This is maybe not what everybody prefers but Windows 10 is continuing this practice.

You’ll be pleased to hear that Windows 10 comes with 76 new sounds that will play for certain events such as locking or unlocking your Windows 10, email notifications, calendar notification or regular notifications.

As for the sounds, there are sounds for all sorts of notifications from pop-up blocked, notifications, minimization, maximization, proximity connection, proximity notifications, printing completed and many other functions. As we said earlier, the list of sounds includes 76 new sounds and if you’re interested and you want to hear them you can download them here.

Sometimes, your Windows 10 computer may not play sounds. If you’re experiencing this problem, you can use the troubleshooting guides listed below to fix it:

Xbox Game Pass November update includes Sniper Elite 4, Olli Olli 2 XL and more

Microsoft has just announced the new games coming to the Xbox Game Pass catalog in November. Sniper Elite 4, Olli Olli 2 XL, Rise and Shone, Sheltered will be playable starting November 1, and Grip: Combat Racing will also be available on November 6, the same day as it launches on Xbox One.

The five new titles will join the four new survival horror games that Microsoft added to the catalog ahead of Halloween last week. In case you missed the news, these are Outlast, Observer, Dead Island: Riptide Definitive Edition, and Hello Neighbor. That’s already nine new games, but Microsoft plans to announce “even more great games” during its upcoming X018 event on November 10.

For just $9.99 a month, Xbox Game Pass gives you access to over 100 Xbox One and Xbox 360 games, including new first party titles on day one such as the critically-acclaimed Forza Horizon 4. You can try the service for 14 days for free, and Xbox Play Anywhere games such as Forza Horizon 4, Sea of Thieves or State of Decay 2 are also playable on Windows 10 at no additionnal cost.

Windows 10 news recap: ZIP file problems expected to be fixed in early November, security researchers show zero-day vulnerability, and more

Welcome back to our Windows 10 news recap, where we go over the top stories of the past week in the world of Microsoft’s flagship operating system.

Microsoft confirms ZIP file problems in Windows 10 1809, expects “early November” fix

Problems with Windows 10 continue to surface following the release of version 1809, this time with ZIP files. Copying files from a ZIP folder without extracting it may cause it not to copy or move correctly. Microsoft says it expects a fix in early November.

Microsoft is now testing sandboxing Windows Defender, here’s how to enable it sooner

To improve the security of Windows Defender, Microsoft’s built-in anti-malware software for Windows 10, the company has been working on sandboxing the software, and it now has a sandbox mode in testing.

Windows 10 Twitter PWA updates with image tagging & other improvements

Twitter has been busy working on an update to its PWA, including allowing up to 10 accounts to be tagged in attached images, performance improvements, and more.

Windows 10 Twitter app

Security researchers release Windows zero-day exploit proof of concept

Security researchers have found a zero-day exploit in Windows and have shown off a proof of concept. It affects Windows 10, but is patched as of October.

That’s it for this week, we’ll be back next week with more Windows 10 news!

Microsoft news recap: Microsoft officially owns GitHub, record first quarter earnings report, and more

Microsoft news recap is a weekly feature highlighting the top Microsoft news stories of the past week. Sit back, grab some coffee, and enjoy the read!

It’s official, GitHub is now owned by Microsoft

Following the EUs approval of Microsoft’s acquisition of GitHub last week, GitHub’s CEO has announced it is now owned by Microsoft. In a similar vein to LinkedIn, GitHub will continue to act as an independent company, despite being under Microsoft’s umbrella.

Bing removes and bans advertiser accounts following malicious ads when searching for Google Chrome

The Bing Ads team have acted on a report of malicious advertisements showing when searching for “download chrome”, in an ad that appears to have slipped through the moderation process.

Bing Ads

Microsoft’s “By The Numbers” website updated, details new statistics

For those who love numbers, Microsoft has finally taken the time to update its “By The Numbers” website, giving an insight into the company’s top achievements, mainly focused on environmental achievements, like being 100% carbon neutral since 2012.

Microsoft - By The Numbers

Microsoft produces ‘record’ FY19 first quarter earnings report with significant Surface, Office 365 and Azure gains

Microsoft has announced its first-quarter earnings for 2019. Its earnings report show significant growth amongst Surface, Office 365 and Azure, all of its main offerings that it has been focused on over the past few years.

That’s it for this week. We’ll be back next week with more Microsoft news.

Firefox 65 to enhance privacy by blocking third-party tracking by default

As the war for improving privacy continues, Mozilla continues to bring new privacy protections to its web browser, Firefox. Expected to release in January 2019, Firefox 65 will bring a big change that aims to deliver greater privacy, by default.

Firefox 65 will block third-party tracking by default. It will block cookies, local storage, as well as certain APIs such as the Broadcast Channel API.

Mozilla’s Firefox will use the Tracking Protection list, provided by Disconnect, to decide which third-party scripts to block when a website is loaded.

For those who like to try things out early, this feature is available in the current release of Firefox and can be enabled by going to Options > Privacy and Security, then enable the “Third-party cookies” option and set the option to “Trackers”.

Microsoft’s “By The Numbers” website updated, details new statistics

Microsoft’s By The Numbers website is designed to highlight the company’s top statistics, what sets it apart from the rest and show off its successes. Since its inception, it hasn’t really been kept up to date, but now the company has decided to reinvigorate life into the website, adding a number of new statistics, as well as improving the user experience with new animations (via Neowin).

Let’s dive straight into the statistics enlisted on the website, which Microsoft is proud to show off:

  • With a sound level of -20.6dB, Microsoft’s anechoic chamber holds the Guinness Record for “World’s Quietest Place.”
  • Beyond a small amount of drinking water, Microsoft’s Silicon Valley campus consumes zero water from municipal water supplies.
  • Last year, Microsoft donated over $1.4 billion in software and services, helping nonprofit organizations around the world access essential technology and skills.
  • 1.5 billion Windows-powered PCs are used around the world.
  • Microsoft used a branch of artificial intelligence called reinforcement learning to master the Atari 2600 version of Ms. Pac-Man and get a maximum score of 999,990.
  • Microsoft runs several labs around the world that specialize in the fabrication of quantum devices. Cryogenics are used to keep certain quantum components 200 times colder than the farthest reaches of outer space.
  • Microsoft has made 137 “AI for Earth” grants to individuals and organizations in 47 countries, helping them use artificial intelligence to protect the planet in the areas of agriculture, biodiversity, climate change and water.
  • Microsoft’s Rural Airband Initiative invests in partnerships with telecommunications companies with the goal of bringing broadband connectivity to 2 million unserved people in rural America by 2022.
  • Every day, Microsoft analyzes over 6.5 trillion signals in order to identify emerging threats and protect customers.
  • Since 2012, Microsoft has operated 100 percent carbon neutral around the world.
  • Microsoft’s Seeing AI app, which helps people who are blind or have low vision to better navigate the world around them, has assisted people with more than 10 million tasks.
  • Cortana, Microsoft’s intelligent assistant, has been asked 18 billion questions since launch.
  • 189 million pounds of food, packaging and dining-related items from Microsoft’s Puget Sound campus go somewhere other than a landfill every six months.

There’s a lot of stats to climb through. As you’ve probably noticed, a large number of them are environment-related, such as operating carbon neutral around the world since 2012. There are, however, some product-related stats in there, including that 1.5 billion devices are powered by Windows 10, and that Cortana has been asked 18 billion questions by users around the world.

What are your thoughts on the stats? Let us know in the comments!

How to pin apps to the left side of the Start Menu in Windows 10

Quickly accessing your frequently used apps is important, so you might want to pin them to your taskbar or Start Menu.

If you’re not sure how to do it, continue reading this guide. We are going to explain you how to pin any app to the left side of the Start Menu in Windows 10.

Steps to pin apps to the left side of the Start Menu

Pin to Start command has been available in previous versions of Windows, but now it works a bit differently. If you use  the Pin to Start command, it will pin your application to the right side of the Start Menu, not to the left  — as it did in previous versions of Windows.

For example, if you try to navigate to “All apps” list and then try to drag and drop application to the left side of the Start Menu, you won’t be able to do. Your list of apps will get replaced by the “All apps” list.

As you can see, this can be a bit frustrating at times, but there’s no need to worry, since there are few solutions that you can try out.

Step 1 – Drag your app back to the default Start Menu list

  1. Open the Start Menu and navigate to All apps.
  2. In the All apps section locate the application you want to pin to the left side of Start Menu.
  3. Click and hold left mouse button and drag your desired application down to the Back button at the bottom of the Start Menu.
  4. Don’t release the left mouse button and wait for few seconds until the Back button takes you to the previous list.
  5. Now release the left mouse button and drop your app where you want.pin app left start menu

— RELATED: How to Pin Folders to Start Menu in Windows 10

Step 2 – Move your app from the right side to the left side of Start Menu

  1. Open All apps list and find your desired application.
  2. Right click it the desired app and choose Pin to Start option. Your application should be pinned to the right side of Start Menu.pin-any-app-to-start-menu
  3. Now, find your pinned application on right side and drag and drop it to the left side of Start Menu.

pin app left start menu

That’s it, you now know how to pin any app or folder to the Start Menu. If you have any comments, or maybe you know another way to pin apps in the Start Menu, just reach for the comments below.

Update: All the methods to pin apps to the left side of the Start Menu menu that you’ll find on the Internet no longer work. Currently, there is no ‘left side of the Start menu‘.

Indeed, at the time of writing, the methods described above did work. However, Microsoft rolled out new Windows 10 OS versions that no longer support the tweak.

RELATED POSTS TO CHECK OUT:

How to Make Desktop Apps Start Faster in Windows 10

Windows 10 is a  pretty fast operating system. But what if we told you that you can speed it up just a bit more? There’s a way to make desktop apps start faster in Windows 10. Today we’re going to show you how to do it.

Since the Windows Vista era, there have been attempts to make Windows startup faster by adding a Startup Delay feature. Thanks to this feature, your startup programs won’t open all at once when you log in to Windows. Instead, they will wait until Windows has finished loading its processes.

This behavior was transferred to Windows 8 and Windows 10, but there’s a way to disable it and make the desktop app start faster.

How do I start Windows 10 desktop apps quicker?

To reduce the startup delay you’ll need to do the following:

  1. Start Registry Editor. You can open Registry Editor by pressing Windows Key + R and typing regedit in the input field.
  2. After the Registry Editor opens you need to navigate to the following key on the left pane of the window: HKEY_CURRENT_USER/Software/Microsoft/Windows/CurrentVersion/Explorer/Serialize
  3. If the Serialize key doesn’t exist you will have to create it manually. To do this navigate to this path: HKEY_CURRENT_USER/Software/Microsoft/Windows/CurrentVersion/Explorer
  4. Right-click the Explorer key. From the menu choose New, select Key, and enter Serialize as the key name.
  5. After you’ve navigated to Serialize key you need to right-click on the right pane and choose New and pick DWORD.
  6. Set the name of the DWORD to StartupDelayInMSec and set its value to 0.windows 10 apps faster

This is it, now you just need to restart your computer and see if your desktop apps are starting faster. We have to mention that it’s not possible to completely disable startup delay, but at least this way you can improve performance a bit.

What can I do to load desktop apps faster?

Of course, if you want your Windows 10 apps to load faster, there are also some additional methods that you can use. For example, you can open Task Manager and identify the apps and programs that are hogging your CPU. Then, right-click on the problematic programs and select End task.

windows 10 cpu hogging apps

However, we have a full article on how to improve the performance of Windows 10 and optimize your PC.

On the same idea, you might want to use PC optimization software that will improve the performance of your machine with just a few clicks.

If you have any comments or questions, just write them down in the comments below.

How to Enable/ Disable Submenus in Start Menu

The Start Menu has been integral part of Windows since its first version, and users can’t imagine their Windows without it. Over the years, Start Menu got some changes regarding its menus.

Speaking of which, today we’re going to show you how to enable or disable submenus inside the Start Menu in Windows 10.

Start Menu was first introduced in Windows 95 and since then it was a crucial part of Windows. Since Start Menu was replaced by Start Screen in Windows 8 users have been demanding the return of the Start Menu and with Windows 10 Microsoft decided to bring back Start Menu.

Enable/Disable Submenus in Windows 10  Start Menu

Start Menu saw all sorts of changes for last 20 years and the latest version of the Start Menu combines the Start Menu from Windows 7 and Start Screen from Windows 8 allowing you to have your standard Start Menu with apps on the left side and Live Tiles and Universal apps on the right.

One big feature of the Start Menu are its submenus. As you probably know, submenus on Windows 10 appear automatically when you hover a certain option, and some users don’t like this kind of behaviour so let’s see how to disable and enable submenus in Windows 10.

Steps to create or delete Start Menu submenus

Do enable or disable submenus in Start Menu in Windows 10 you need to do the following.

  1. Right click an empty space on your taskbar and from the context menu choose Properties.
  2. Now the Taskbar Properties dialog will open. Navigate to the Start Menu tab and click the Customize button. start submenus windows 10
  3. Locate Open submenus when I pause on them with the mouse pointer and uncheck it if you want to disable it, or check it if you want to enable this feature. submenus windows 10 2
  4. Click OK to save the settings.

Now submenus won’t appear automatically when you hover over certain items, instead you’ll have to click on them in order to expand them.

Windows 10 offers a lot of options to further customize your Start Menu. For example, you can quickly change the size of the Start Menu just by dragging its vertical or horizontal lines.

For additional options, you can go to Settings > Personalization > Start. You can then choose what apps to add to the Start Menu, enable Start full screen, and more.

start menu settings windows 10

If you’ve got any suggestions on how to better customize the Start Menu, let us know in the comments below.

RELATED POSTS TO CHECK OUT:

Predictibly, Microsoft moves LinkedIn employees from Google services to Office 365

Well, it seems like it was only a matter of time before we got public confirmation that Microsoft was encouraging its new LinkedIn employees to move from using Google Services to the company’s own Office 365 solutions.

Today journalist Mary Jo Foley over at ZDNet is reporting on a Microsoft IT Showcase study that identifies how the company quietly pushed 14,000 LinkedIn employees from using Google Services into its parent company’s Office 365 ecosystem.

The case study that goes by “Linking in LinkedIn: How Microsoft onboarded a social networking giant,” details how Microsoft, at least in this specific instance, is rethinking its approach based on the realities of integration.

“To elicit a positive response, we needed to gain a deep understanding of differences in our organizational cultures and develop an approach that complemented the strengths of both organizations. We decided that was the logical starting point for helping LinkedIn employees access and use Microsoft assets in a way that best supported — or even improved — LinkedIn’s business.”

Even though the goal was to have all LinkedIn employees eventually using Outlook, Teams and Outlook Calendar by the end of December 2016, the company had to stage its integration mandate to best accommodate employee workflow with previous Google alternatives, leaving its integration roadmap ‘still in progress’.

Over the past few years, Gmail and Outlook have incorporated several interoperability functions into their software that make moving from to the other relatively painless.

Calendar functions, however, proved to be a sticking point of sorts for LinkedIn employees.

“For example, with Google Calendar, LinkedIn users could easily book multiple rooms in multiple buildings at the same time. That task wasn’t as simple to do in our implementation of Outlook. To ensure a consistent user experience, the LinkedIn migration team used the available APIs to create a new Outlook tool that employees can use to book multiple conference rooms.”

Microsoft was forced again to come out of its comfort zone, so to speak, to help LinkedIn employees accustomed to Google Docs streamlined collaboration tools, begin using Office 365 in a similar fashion.

While Microsoft has seemingly worked tirelessly to add collaboration function parity, there are still gaps in the productivity suites efficiency and user flow. According to Foley’s report, to mitigate the employee frustration and boost adoption, Microsoft implemented a “training and migration plan that included tracking user adoption and utilization to see where any paint points were.”

Presumably, Microsoft will take this telemetry and is work on digital walk-through of its collaboration tools and create new material for its partners to use when selling Office 365 commercial seats.

Windows 10 Mail app Office 365 ad

One would also think that a move from Google Hangouts to Microsoft new productivity chat tool, Teams would seem to be a hard task as well.

However, the company reported that LinkedIn employees moving from Hangouts to Teams, did so, at a high rate of adoption, leaving Microsoft to characterize the integration process as a “success.”

Aside from a servicing as a nice little pat on the back, Microsoft’s case study also highlights the company can start to use its recent acquisitions as hands-on learning experiences that then trickle out improvements to its Office 365 offerings and customers as well as better understand its seller’s market.

Rather than simply pitch its products, Microsoft is learning first hand the ups and downs of moving companies from one productivity tool to another.

How to Manage Users and Groups in Windows 10

You may customize your accounts very easily and in this guide, we’ll explain to you how you can manage users in Windows 10.

To start managing users in Windows 10, you need to open Settings and go to Accounts first. The first option in the Accounts group is Your account, which helps you manage your Microsoft account, customize your profile picture, your user name, etc.

We just have to mention that if you want to manage your Microsoft account, you must do it online.

How do I manage user accounts in Windows 10?

1. Use a local account

  1. Click the Start button and select Settings.
  2. Now, select Accounts.
  3. Scroll down on the right pane and click on Sign in with a local account instead.

If you don’t want to use Microsoft’s account and sync your settings, you can just click Sign in with local account instead to create a local account.

You won’t need to enter email account or phone number, just enter your username and password and you’re good to go. In addition, if you have your camera attached you can create a new profile picture as well.

In addition, if you want to add more Microsoft accounts, for example for your work or school, you can create them using the link at the bottom of the Your account page.

For a detailed walkthrough on accessing these options, see how to open Account Settings in Windows 10.

2. Edit the sign-in options

  1. Press the Windows key and select Settings from the menu.
  2. Click on Accounts.
  3. Now, select Sign-in options from the left pane.

Next on our list are sign-in options, and from this section, you can set if Windows 10 will require a password when your computer wakes from sleep mode or not.

In addition, you can also change your account password here as well. From this section you can also add a PIN password that you can use to unlock your account.

If you want, you can also add a picture password and use your favorite picture along with a series of swipes and other gestures to unlock your PC. The second option is for a fingerprint or card reader, so if you want maximum security this is probably the way to go.

3. Sync your email and accounts

The Email & accounts feature allows you to customize your email, calendar, and contacts. You can add several email accounts for faster access and see what apps use your account information.

4. Set Work Access

The next option is Access work or school, and this option allows you to connect to a computer at work and access its apps, network and email.

4. Manage the Family & Other Users accounts

Next, we have Family & Other Users, and this section allows you to add new users. From this section you can create a user account for your child and monitor it using Microsoft Family Safety.

That way you can make sure that your child visits only appropriate websites and respects time limits. In addition, you can also add other users from this section. The last option here is Assigned access, and with this option, you can allow a user access to only one Windows Store app.

You may also delete local accounts or change their types in standard users or administrators.

How do I sync my Microsoft account settings?

Last section is Sync your settings, and it does just that. It syncs your settings with your Microsoft account across all Windows 10 devices.

By default, this option is activated, and it will sync the passwords, language preferences, and other Windows settings. However, if you don’t want that, you can easily turn off syncing.

As you could notice, Windows brings a variety of options when it comes to managing users. We hope that managing users in Windows 10 is a bit more clear to you now. For effective management, you can enable Local Users and Groups on Windows 11 and use it.

To explore more ways of managing user permissions and profiles, check our detailed guide on how to open Local Users and Groups in Windows 11.

You might also be interested in reading our guide on how to change the main account on Windows 10 or how to switch users on Windows 10.

To learn more about hidden accounts on your PC, don’t miss our What is WDAGUtilityAccount for more information.

If you have any additional questions, feel free to post them in the comment section.

How to Delete a Bundled App Individually in Windows 10

Sometimes, there are apps that you barely or don’t even use at all. Just like the previous versions of Windows, Windows 10 comes with many pre-installed Universal apps.

When you have so many bundled apps, you probably aren’t using all of them regularly and for some reason you might want to remove some of them.

If that’s the case, today is your lucky day because we’re going to teach you how to remove a bundled Windows 10 app individually.
windows 10 wind8apps
Before we start, we would like you to inform you that this process is a bit complex, and that we don’t know whether you can restore any of these apps that you delete, so keep that in mind. So if you’re certain that you want to delete a specific app, follow these steps.

How to uninstall a bundled app separately in Windows 10

Solution 1 – Remove bundled app using Windows PowerShell

  1. Open the Start Menu and type Powershell. When you see Windows PowerShell app in search results right click it and choose Run as administrator. This is extremely important, and you must run Windows PowerShell as administrator or this process won’t be successful.
  2. When the Windows PowerShell window opens you need to type the following command, in order to see what bundled apps you have installed :
    • Get-AppxPackage -AllUsers
  3. You’ll get a list of all bundled apps, and now you need to find name of the application you want to remove. Keep an eye for PackageFullName value, because you’ll need it for you want to remove an app. For example, if you want to remove Solitare Collection app, the PackageFullName value of this app would be:
    • Microsoft.MicrosoftSolitaireCollection_3.2.7240.0_x64__8wekyb3d8bbwe
  4. Now to remove Solitare Collection app for example you would need to type:
    • Remove-AppxPackage Microsoft.MicrosoftSolitaireCollection_3.2.7240.0_x64__8wekyb3d8bbwe
    • to remove it. General formula for deleting bundled apps is:
    • Remove-AppxPackage PackageFullName value
    • so you’ll need to keep a close eye on PackageFullName values of the apps you want to remove.

That’s it, this is how you delete individual bundled apps on Windows 10. As you can see, it’s not too hard, you just need to know PackageFullName value of the app you want to remove.

Solution 2 – Use the Settings Page

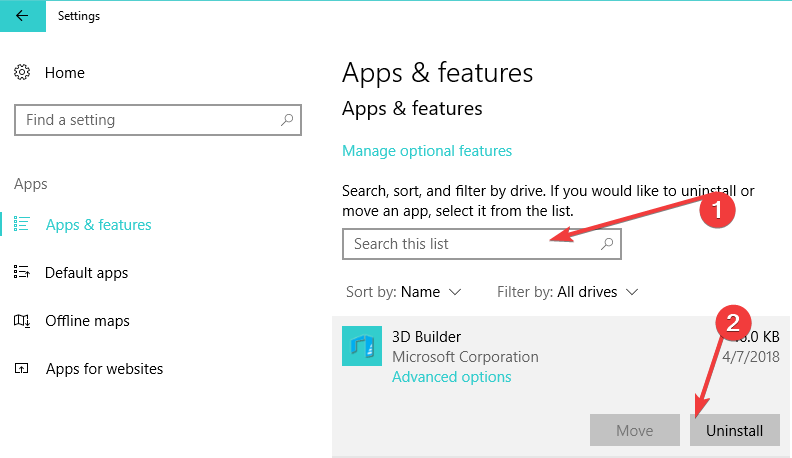
You can also remove pre-installed Windows 10 apps individually from the Settings Page. For this task, go to Settings > Apps > Apps & Features > Search this List.

remove windows 10 bundled apps

Simply enter the name of the app that you want to delete. Once found, select it and click Uninstall.

If you have any questions, suggestions, or maybe some other methods for removing the bundled app individually in Windows 10, don’t hesitate to reach for the comment section, below.

Also, if you have any Windows 10-related issues you can check for the solution in our Windows 10 Fix section.

RELATED POSTS TO CHECK OUT:

I cannot activate Halo 2 in Windows 10/11, what can I do?


3 methods to fix Halo 2 problems on Windows 10

  1. Update your game and Windows OS
  2. Run Halo 2 in compatibility mode
  3. Use lower graphics settings

Windows 10 is new operating system, and like with any other new operating system there have to be some incompatibility issues with older software.

Speaking of older software and compatibility issues, some users have reported that they can’t activate Halo 2 on Windows 10. Let’s see how can we fix that.
halo 2 windows 10
Halo 2
was released in 2004, so it’s expected to have some issues with an operating system that was released 14 years later. Anyway, here are few tips to help you out.

Steps to fix Halo 2 issues on Windows 10

Solution 1 – Update your game and Windows OS

Before starting Halo 2, make sure that your game is up to date with the latest patches. Microsoft won’t be updating Halo 2 in the near future, but it doesn’t hurt to have the latest patch so you can minimize any compatibility issues.

After you updated your game, check for latest Windows updates. If Microsoft has found any issues related to older software, such as Halo 2, the fix should be available in Windows Update. So, make sure that your Windows 10 is up to date.

In most cases these types of problems are solved by updating Windows 10, and users have reported positive results, so it’s in your best interest to keep your Windows 10 updated.

Solution 2 – Run Halo 2 in compatibility mode

As we mentioned earlier, Halo 2 was released back in 2004, so it’s pretty old game. Just like with any old software, sometimes running it in Compatibility mode helps. To start the game in compatibility mode to the following:

  1. Right click Halo 2 shortcut and choose Properties from the context menu.
  2. When Properties window opens go to Compatibility tab.Run this program in Compatibility mode
  3. Check Run this program in compatibility mode > choose an older version of Windows from drop down list.
  4. Save the changes and try again.

This isn’t the best solution, but it can help in certain cases, so it doesn’t hurt to try it out.

Solution 3 – Use lower graphics settings

Since we’re talking about a game that was launched more than 14 years ago, using low graphics settings is a must. For example, you can enable ‘Reduced color mode’ and run the game on a low resolution.

To do this, return to the Properties window, and select ‘Reduced color Mode’. If possible, launch Halo 2 on a 640×480 resolution.

Don’t forget to run the game as an administrator in order to have all the necessary permissions to tweak its settings.

In most cases, the best approach is to wait for official Windows updates that should fix any incompatibility issues. So make sure that you keep your Windows up to date.

RELATED POSTS TO CHECK OUT:

Best tips and tools to extend Windows 10 battery life

Table of contents

  1. Battery Saver
  2. PowerCfg
  3. Power and Sleep
  1. Battery Optimizer
  2. Battery Life Extender
  3. Battery Care
  4. Save Battery
  1. Disable wireless connectivity
  2. Adjust your PC’s display and power settings
  3. Sync data less often
  4. Turn down the volume
  5. Wi-fi and Bluetooth settings
  6. Disconnect unnecessary peripherals
  7. Update Windows while charging
  8. Use Microsoft Edge for browsing

Every individual who owns a mobile device is aware of the frustration that hits them as soon as a red battery appears on their screen.  People are no longer attached to a stationary desktop to perform their daily commutes, and devices like smartphones, tablets, and laptops need some productive battery-saving technique to function for a long-lasting period.

Not to mention, the battery life of modern devices has been extended over the past few years, and with each update, manufacturers focus on how to prolong the battery life of their products.

Microsoft has also been scrutinizing the matter and launched Windows 10 with some nice new features that provide an enhanced battery life. They might not be as flamboyant as continuum support but nonetheless, some Windows 10 laptops are known for essential power-saving traits.

Power management is a factor that might lead to a machine’s downfall if not optimized correctly, same goes for the fate of software applications that eat huge chunks of power.

Windows 10 is known to bring back some features that assist users who had previously been running older versions of the OS to earn familiarity with the product without a huge learning curve, like the battery saver activation suggestion when it’s running low.

Other major changes that are amended are related to mobility factors and today, we are going to acquaint you with some tools and tips that you can use to prolong your mobile device’s battery life.

While there are a number of external apps and software that you can download from the Microsoft Store for extended battery life, there are a few built-in tools and methods as well that would do the job if you are not so psyched about downloading external tools.

Built-in tools that extend Windows 10 battery life

Battery Saver

Windows 10 is operating on millions of devices, and a large proportion of them, in some manner, are portable. To ensure maximum uptime on mobile devices while on the move, Windows developers have provided us with a wider scope to alter our battery settings.

The battery saver tool is baked right into Windows 10 itself. The core purpose of the battery saver is self-defined by its name; it limits background activity and ensures proper energy consumption for individual running applications.

When enabled, Battery Saver automatically:

  • Stops email and calendar updates
  • Blocks Live Tile updates
  • Limits background applications activity

You can find the Battery saver by pressing the Windows+I buttons and spotting ‘Systems’ in settings. Then look for the Battery Saver option in the left panel. Toggle the Battery Saver settings and automatic saver threshold along with choosing the apps that can receive auto-updates.

battery-saver-windows-10

Here you can see the section battery use, this helps you analyze which apps consume the most and the least energy. This is actually very beneficial if you are looking to optimize power usage.

battery-use-windows-10

Windows 10 features that are not supported by your device will not appear as an option. If you’re running the operating system on a desktop computer that runs without a battery, there won’t appear any Battery saver option.

PowerCfg

PowerCfg is a powerful hidden command tool that is used to tweak your battery settings and allows you to generate a list of devices and inquires your permission to wake your computer.

Some programs are also bundled with a feature that allows you to set a timer that allows your system to perform scheduled tasks at a given time.

It is useful in scenarios where Windows update is running unknowingly and can cause massive battery drainage while your device is not plugged into a power source. The powercfg –devicequery wake_armed command will trace those processes and notify you to avoid unwanted waking of your device.

You can keep track of unwanted processes and disable them.

powercfg-windows-10

Another useful trait of powerCfg you can utilize is the powercfg /a command, to find out the various sleep states your system can use. Though it doesn’t block any Skype notifications or calls and also notifies you if a priority email comes through even after your system is put to sleep and surprisingly consumes no more battery than a regular sleeping state.

check-sleep-states-windows-10

But essentially the most useful one is the powercfg /energy command. This command evaluates your system used for 60 seconds and generates a power report that states your system’s power efficiency as you can see in the below screenshot.

cmd-evaluate-battery-usage-windows-10

For serious errors that might raise concerns about your machine’s well-being, have a detailed look at them in the extended HTML report.

cmd-energy-report-windows-10

Finally, use powercfg /batteryreport to generate an up-to-date analysis of your battery, that comprises of charge ratings, number of cycles, and a recent history of battery usage and charge periods. Even a speed-read of this report can help you spot battery issues.

Power and Sleep

power-and-sleep-windows-10

Windows 10, just like the previous version 8.1, comes with built-in power and sleep optimization option. Make sure you pick a low number in the drop-down under the Screen section where you specify the interval after which the display would turn off when the machine is running unplugged on a battery.

Under the Sleep section, set your computer to enter sleep mode around 10-15 minutes when unplugged.


Third-party apps to extend Windows 10 battery life

But if built-in tools are not floating your boat, try downloading some apps that are powerful tools when it comes to power optimization, battery capacity, and improving the overall performance of your machine.

Battery Optimizer

battery-optimizer-windows-10-battery-tool

Battery Optimizer is designed to ensure maximum battery capacity while away from a charging outlet. Who wouldn’t want to roam around with their personal computer without the hassle of having to plug it in for long periods of time? Battery Optimizer is designed to do just that.

You can optimize system tasks and user profiles with a battery optimizer to store the maximum power of your PC. Apart from that, it also informs you about the hardware or software services that eat up the most battery and how you can prevent that from happening.

It also updates you frequently with the remaining battery time, battery lift gain or loss by changing system settings, easy battery usage management, and more.

Battery Life Extender

battery-life-extender-samsung-windows-10

A battery life extender is the best choice for an external battery management app if you own a Samsung laptop. The app works in several ways to optimize your laptop’s overall activity so the machine’s battery performs more efficiently.

It refrains overcharging your device thus prolonging its lifetime and the best part is that it runs in the background without affecting your laptop’s performance. The software also allows you to control the charge level of your battery.

You can download Battery Life Extender from Samsung (scroll to the middle of the page to find the tool).

Battery Care

battery-care-windows-10-battery-tool

Battery care is free of cost battery optimization utility that grooms your device battery to provide a prolonged battery life. It prevents unnecessary drainage of power and delivers reliable stats and analysis of factors such as discharge cycles instead of its stored energy, consumption level, manufacturer, wears level, capacities etc.

It is more precise than any other battery meter. There is a detailed documentation on the official web page that helps non-technical users understand how laptop batteries work and how essential it is to look after your device’s battery to get the most out of it. Other than Windows 10 it is fully compatible with Windows 8 too.

Battery care has a mechanism that automatically chooses a power plan suited best for your machine and your usage, and the newer versions are updated automatically.

You can download Battery Care from the tool’s official page.

Save Battery

save-battery-windows-10-app

Save Battery displays your battery status and remaining charge time on your screen. It helps you to protect your battery from overcharging and notifies you when the battery is fully charged. You can also customize your battery level, add alarm customization and more.

The sound notifications and the Live tile make it easier for you to monitor your battery life and intervene when your battery is draining fast. You don’t have to check your battery status every 5 minutes when Save Battery detects something important, it will immediately notify yours.

Other features include display battery details, remaining battery balance time, four types of live tiles, different types of notifications available (when the battery is fully charged when the battery is low), a badge of battery level on the lock screen, export battery history, and more.

You can download Save Battery for free from the Windows Store.


We’ll end our list here. Have you already used some of the apps listed in this article? Tell us more about your experience in the comment section below.

Effective tips to extend battery life on Windows 10 [Guide]

Here are some really useful tips and tricks to improve battery life for your Windows 10 device.

1. Disable wireless connectivity

airplane-mode-windows-10

In addition to tracking battery usage and optimization, you can also save large units of power by disabling unnecessary wireless connections.

The most common way to do this is by enabling the Airplane Mode, which is a feature embedded in almost all mobile devices. It’s useful for turning off all kinds of wireless communications that include Wi-Fi and Bluetooth connectivity, GPS, mobile data, and others prolonging the battery life of your device.

2. Adjust your PC’s display and power settings

2.1. Set a shorter duration for the display when it’s inactive

Go to Settings > System > Power & sleep > go to the option On battery power, turn off after > pick a shorter duration.

2.2. Reduce display brightness

Go to Settings > System > Display > turn off Change brightness automatically when lighting changes > use the slider to set the brightness level you want.

2.3. Set a shorter duration before PC enters sleep mode

  1. Go to Settings > System > Power & sleep
  2. Go to On battery power, PC goes to sleep after >pick a shorter duration.

2.4. Use the lid

Most laptops can go to sleep automatically by closing the lid. But first, you need to enable this setting:

Go to Settings > System > Power & sleep > Additional power settings > Choose what closing the lid does.

2.5. Press the power button

Most computers let you turn off your display, shut down, sleep, or hibernate when pressing the Power button. Here’s how to enable this setting:

Go to Settings > System > Power & sleep > Additional power settings > Choose what the power buttons do.

2.6. Create a power plan

  1. Go to Settings > System > Power & sleep > Additional power settings > Create a power plan.
  2. Select Balanced or Power saver > type a plan name in the box > select Next.
  3. Choose your display and sleep options > select Create

2.7. Use a dark background or theme

  1. Go to Settings > Personalization > Background, and then choose a dark picture or dark solid color.
  2. For themes, go to Settings > Personalization > Themes > Theme settings, and then choose a dark theme.

3. Sync data less often

Sync email, calendars, and contacts less often:

  1. Go to Settings > Accounts > Email & app accounts > select the account that you want to change > select Manage > Change mailbox sync settings.
  2. Under Download new email, choose a longer syncing interval.

To sync only the items you want:

  1. Go to Settings > Accounts > Email & app accounts > select the account that you want to change > select Manage > Change mailbox sync settings.
  2. Under Sync options, select Email, Calendar, or Contacts to turn them off.

4. Turn down the volume

Completely muting your device helps you extend your battery life. When you watch movies or videos, keep the sound at the minimum volume level. You can also plug in your headphones to reduce the impact on battery life.

5. Wi-fi and Bluetooth settings

Wi-fi and Bluetooth significantly drain battery life. For this reason, don’t forget to disable these features if you don’t use them. The best way to turn off both these options is to switch on the Airplane mode.

6. Disconnect unnecessary peripherals

Microsoft itself suggests avoiding plugging in any peripherals that you are not planning to use urgently for better battery performance.

So it’s about time, you should consider abandoning those external hard drives, inkjet printers, memory sticks and USB-powered mug warmers until you find a nearby charging outlet.

Even having a tiny memory card sitting inside your laptop can drain a small chunk of extra power.

If you want to squeeze the last drop of your battery juice for constructive use, try unplugging any external mouse you have attached, and switch to trackpad or touchscreen input.

7. Update Windows while charging

Sometimes, installing the latest Windows 10 updates can take more than one hour. Of course, the download and install process use a certain amount of battery power. You can install the updates while your device is charging to save both time and battery power.

8. Use Microsoft Edge for browsing

Microsoft has carried out a series of tests to prove that when browsing with Microsoft Edge, your battery lasts 36-53% longer per charge compared to other browsers.

How to fix Windows 10/11 errors 0xc004e016 and 0xc004c003


4 methods to fix errors 0xc004e016/ 0xc004c003

  1. Run a few Command Prompt commands
  2. Change the product key with the slui.exe command
  3. Try to upgrade to Windows 10 once again
  4. Be patient

A lot of errors may occur when you want to activate your Windows 10 OS or change the product key. Recently, some users have reported that they’re facing the error codes 0xc004e016 and 0xc004c003, when they try to activate their copy of Windows 10.

In this guide, I compiled a few solutions to help you fix this issue.
windows 10 activation error wind8apps
First things first, you must be sure that you’re using the product key that hasn’t been used on another computer. Because, if you try to ‘re-use’ the product key, there’s no chance it will work, no matter what.

But, if you’re using the authentic product key, but still receive errors 0xc004e016 or 0xc004c003, you can try some of the following solutions.

Steps to fix Windows 10 errors 0xc004e016/0xc004c003

Solution 1 – Run a few Command Prompt commands

The first solution that could be helpful, if you’re unable to activate your Windows 10, or change the product key is to try to fix things with the Command Prompt. Here’s exactly what you need to do:

  1. Right-click on the Start Menu button and open Command Prompt (Admin)
  2. Enter the following commands, and press Enter after entering each one:
    • slmgr /upk
    • slmgr.vbs /cpky
    • slmgr /ckms
    • slmgr.vbs /ckms
    • slmgr /skms localhost
  3. Close the Command Prompt and try to activate your Windows 10, or change the product key again.

— RELATED: Can’t Find Your Windows 10, 8.1 Product Key? Use these solutions

Solution 2 – Change the product key with the slui.exe command

Slui.exe is Windows’ built-in command that allows users to change the product key. So, if you’re having problems with usual activation, you can can try this method. Here’s what you need to do to activate your Windows 10, or change the product key with slui.exe command:

  1. Go to Search, type slui.exe 3 and open it
  2. Enter your product key and check if you’re able to activate Windows now

If that doesn’t work, you can try another slui.exe command, as well:

  1. Go to Search, type slui.exe 4 and open it
  2. Enter your product key and check if you’re able to activate Windows now.

— RELATED: How to Activate Windows 10 if you Replace your Motherboard

Solution 3 – Try to upgrade to Windows 10 once again

When you upgrade to Windows 10, your license get tied to your hardware, and sometimes there can be some errors related to activation and hardware. So before you start make sure that you remove all Windows 10 listings from your Devices on your Microsoft account. Don’t worry, you’ll get them back later.

Perform a clean reinstall of Windows 7/8.1/10 and log into it using your Microsoft account. Make sure that your Windows 7/8.1/10 is activated by running Command Prompt and typing slmgr.vbs /ato into it.

When you’re sure that your Windows 7/8.1/10 is activated you can upgrade to Windows 10 via Windows Update. Remember to log in to Windows 10 using your Microsoft account.

Also you can run Command Prompt and type slmgr.vbs /ato to see if your Windows 10 is activated. You can also check if your computer is listed under Devices section on your Microsoft account.

Now you can perform a clean install of Windows 10. You can create a setup USB using the Media Creation Tool. Just make sure that during the install you login to your Microsoft account.

— RELATED: KB4457136 gets your PC ready for the Windows 10 October Update

Solution 4 – Be patient

Well, if nothing worked, there is nothing else that you can do but wait patiently. These two error codes may also occur if Microsoft’s update and activation servers are too busy. This happens when too many users are trying to install and activate a new OS version at the same time.Wait for a few hours and then give it a go again.

Besides these methods, you can try some alternative ways to activate your system, like activation via phone, etc.

That would be all, if you have any comments, suggestions, or maybe other solutions, reach for the comment section. Also, if you have any other Windows 10-related issues you can check for the solution in our Windows 10 Fix section.

RELATED POSTS TO CHECK OUT:

This is how you can force your PC to upgrade to Windows 10

After months of testing, numerous preview builds, millions of Insiders, and a lot of announcements, Microsoft usually releases a new Windows 10 version. But since millions of people are waiting to get a free upgrade when a new OS version lands, Microsoft decided to rollout the system in phases, so not everyone will get Windows 10 on the same day.

But if you don’t want to wait one more day, we’ll show you how to force your computer to upgrade to Windows 10. In this manner, you’ll be among the first to get the new OS version.
windows 10 downloading wind8apps
But before we show you how to force your computer to get a free Windows 10 upgrade on day one, you have to make sure you meet all requirements for that.

First and foremost, your computer needs to run a genuine copy of either Windows 7 SP1 or Windows 8.1. And, you must have all the previous updates installed from Windows Update.

Also make sure that you have reserved your free copy of Windows 10 through Get Windows 10 button on your taskbar.

How to force Windows 10 to install updates now

Method 1: Use Command Prompt

If you meet these requirements, you’re good to go. So, to force your computer to receive a free upgrade to Windows 10, follow these steps:

  1. Go to Windows Update and make sure you are set to install updates automatically
  2. Navigate to C:WindowsSoftwareDistributionDownload folder and delete everything from it (don’t worry, it won’t damage your system)SoftwareDistribution
  3. Now right click on the Start button and open Command Prompt (Admin)
  4. Enter the following command and press Enter:
    • wuauclt.exe /updatenow
  5. Wait a couple of minutes and check for updates in Windows Update. You should see Windows 10 being downloaded on your PC.
  6. After the download is finished, it will start ‘Preparing for installation…,” wait until this is finished and you can install Windows 10 normally.

Impatient users around the world have tried this method, and they reported that it worked for them, so we hope  it will work for you, as well.

Method 2: Use Microsoft’s Update Assistant

Another quick method to install a new Windows 10 version as soon as it’s available is to download Microsoft’s Update Assistant.

To do that, go to Microsoft’s official website and make sure that the latest OS version has been uploaded to the site. All you need to do is hit the ‘Update now’ button and follow the on-screen instructions to complete the process.

windows 10 update assistant

If you already upgraded your system to Windows 10, you can tell us your impressions about the newest Microsoft’s operating system in the comments.

RELATED POSTS TO CHECK OUT:

It’s official, GitHub is now owned by Microsoft

After the EU approved Microsoft’s acquisition of GitHub last week, Nat Friedman, CEO of GitHub announced today that the company is now officially owned by Microsoft. The Redmond giant spent $7.5 billion in stock to acquire the web-based hosting service earlier this year, but just like LinkedIn, GitHub will continue to operate independently as a company.

“We will start by focusing on the daily experience of using GitHub and will double down on our paper cuts project,” Friedman wrote today. “We will improve core scenarios like search, notifications, issues/projects, and our mobile experience. And of course we are excited to make GitHub Actions broadly available,” he continued.

Back in June, the initial acquisition announcement was met with some hostility from developers, but that apparently didn’t impact GitHub’s business. As spotted by Geekwire, GitHub actually gained 3 million developers since June, and has now crossed 31 million users overall.

“Our vision is to serve every developer on the planet, by being the best place to build software,” said Friedman. “This is a dream opportunity for all of us at GitHub, and we couldn’t be more excited to roll up our sleeves and start this next chapter.”

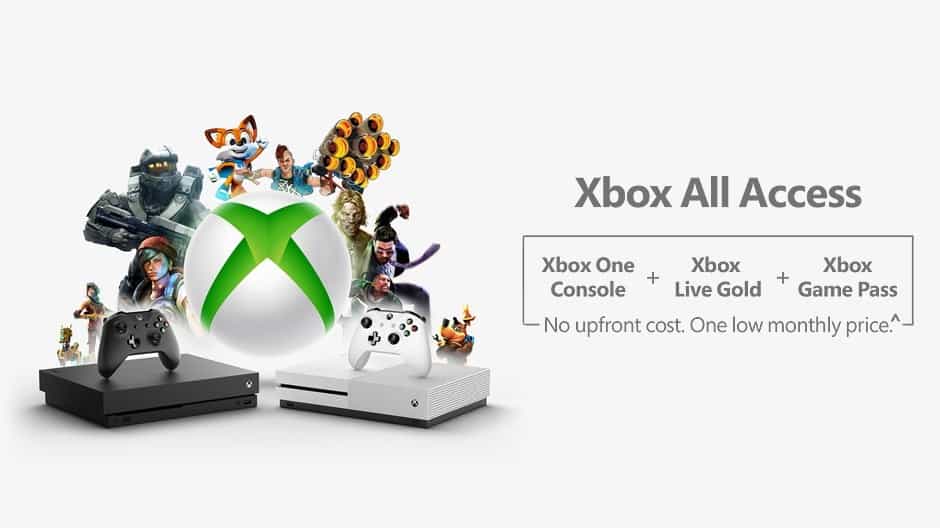
Microsoft’s Xbox All Access financing plan is now available in the US

If you’re planning to get a new Xbox One console during the holiday season, Microsoft has just launched its new Xbox All Access financing plan in the US. Xbox All Access includes an Xbox One S or Xbox One X console plus 24 months of Xbox Games Pass and Xbox Live Gold, all with no upfront cost and one low monthly price over a 24 months period.

We made the math before and Xbox All Access is a pretty good deal, and it’s actually cheaper than buying everything separately. The financing plan starts at $21.99/month if you choose an Xbox One S console, and the Xbox One X is available for $34.99/month. The program is powered by Dell Preferred Account, and all consumers can take advantage of 0% APR for 24 months. Once the bundle is fully paid, consumers also get to keep the console.

Xbox All Access is currently US-only and it will be available for a limited time in the country. It really seems to be a really affordable way to get an Xbox One console, and the inclusion of Xbox Games Pass means that consumers get a catalog of over 100 Xbox One and Xbox 360 games right out of the box. Sound off in the comments if you’re planning to take advantage of this limited-time offer.

Printer Grabbing Multiple Sheets: 7 Ways to Fix it

We print documents daily, and sometimes your printer grabs multiple sheets while printing. This is usually not a big problem, but it can be quite annoying, so today, we will show you how to fix it.

Printer issues can be a problem, and speaking of printing issues, here are some similar issues that users reported:

  • Brother printer grabs multiple sheets, eating paper – This issue can occur due to your rollers. Sometimes the rollers might be worn out, and the only way to fix the problem is to replace the rollers.
  • Epson printer pulling multiple sheets – If your printer pulls multiple sheets, the problem might be dampening foam. To fix the issue, you might have to replace this foam on your own or contact an expert.
  • Printer taking in too much paper – This problem can sometimes occur due to tasks in your printing queue. Simply remove other tasks and check if that solves your problem.
  • Canon printer feeds multiple sheets – Sometimes, this problem can be caused by your rollers, and in order to fix the problem, you need to make them coarser on your own.
  • Printer pulls too many pages HP – Another cause for this issue can be your paper, so be sure that your paper isn’t damaged or damped.

How do I stop my printer from pulling multiple pages?

1. Disconnect the printer from the PC

If the printer pulls too many pages during printing, the issue might be caused by a temporary glitch. However, you might be able to fix the issue simply by disconnecting your printer from your PC and connecting it to a different USB port.

After doing that, the issue should be resolved. In addition to disconnecting the printer from the PC, you might want to disconnect it from the power outlet and check if that helps.

2. Check the roller and paper

If the printer pulls too many pages while printing, the issue is likely your roller. Sometimes your printer roller can become smooth due to prolonged use, and that causes this issue to appear.

The only way to fix this issue is to replace the roller. This isn’t always an easy task, especially if you don’t know how to do it, so you might want to take your printer to the repair shop and ask a professional to do it for you.

In addition, be sure to check your paper as well. Sometimes your paper can stick together, especially in warm climates. The paper can become damp, and that will cause it to stick to other paper. If that’s the case, be sure to dry your paper before you use it for printing to avoid this and other problems.

3. Check the noise-dampening foam

According to users, if the printer is grabbing multiple sheets, the issue can be your dampening foam. Sometimes this foam can deteriorate and become sticky.

This will prevent the release plate from releasing and cause the roller to keep rolling and pick up more paper than needed. This can be a problem, and in order to fix it, it’s advised that you replace the noise-dampening foam.

This might be too complicated for an everyday user, so you might want to take your printer to the repair center and ask a professional when the printer picks up multiple sheets.

4. Make your rubber paper grabber coarser

If you have problems with your printer, the issue might be the rubber paper grabber. Sometimes this rubber part can become smoother and cause the printer to pick up more paper than needed. To fix it, users suggest making the rubber coarser using a nail file.

Simply by making the rubber a bit coarser, you might be able to fix the problem. Users reported that this DIY solution worked for them, so you might want to try it out.

Keep in mind that this solution requires disassembling the printer. So if you’re not comfortable with that, or if your printer is still under warranty, perhaps you should take it to the repair center and ask a professional to repair it when the printer is pulling multiple sheets.

5. Check the paper quality

If your printer pulls too many pages, the issue may be your paper. Sometimes low-quality paper can cause this issue, so be sure that you’re using proper paper for printing. In addition, make sure that your printer is stored in a cool and dry place.

Lastly, do not reuse old paper with something printed on it. If the paper has any ink on it, that could make it slightly damp and cause it to stick with other paper. In addition, be sure to use paper that’s not damaged.

A paper with rips, curls, or wrinkles can sometimes get stuck in your printer, so don’t use it. In addition, make sure that all the paper in your printer is the same size. Different size papers can sometimes get stuck and cause this and many other problems.

The same goes for different kinds of paper. There are different kinds of paper available, so it’s important that you don’t mix two different types since they might stick during the printing process.

In addition, make sure that your paper is properly aligned before printing. Lastly, do not use more than 25 sheets of paper at a time since that can cause printing issues. To avoid paper issues, you should use between 10 and 25 sheets of paper at a time.

If the printer still grabs multiple sheets, perhaps you should try using a different brand of paper and check if that helps.

6. Clean the rollers

  1. Turn off your printer and disconnect it from the power outlet.
  2. Now open the rear access door of the printer. Some printers have a knob, while others have a release tab.
  3. If you have any paper stuck inside the printer, remove it.
  4. Now clean the rollers with a lint-free cloth. Use distilled or bottled water to moisten the cloth for the best results. Be sure to rotate the rollers to clean them from all sides.
  5. Now you need to clean the bottom rollers. These rollers are hard to reach, so use a moist cotton swab to clean them.
  6. After that, check the rollers on the rear access door and clean them if needed.
  7. Wait for a couple of minutes for the rollers to dry. After the rollers are dry, put on the rear access door and check if the problem is still there.

All printers have rollers that are designed to pull paper in. However, if the printer pulls too many pages, there may be an issue with your rollers. To fix the problem, it’s advised that you carefully clean your rollers.

As you can see, this is an advanced solution, and if you don’t know how to remove the rear access door or clean the rollers properly, we suggest you contact an expert.

7. Clear the print queue

  1. Press Windows + S, type Control Panel, and click on the relevant search result.
    Printer taking in too much paper
  2. When Control Panel opens, select Devices and Printers.
    Canon printer feeds multiple sheets
  3. Right-click your printer and choose See what’s printing from the menu.
    Printer pulls too many pages HP
  4. Now click on the Printer menu, and select Cancel All Documents.
    Brother printer grabs multiple sheets, eating paper

After examining the hardware problems, it’s time to look at software issues that can cause this problem. If the printer is grabbing multiple sheets, the issue may be caused by your print queue.

Sometimes there might be multiple documents in the queue, which can lead to this issue, and clearing it should do the trick!

Printing problems can be quite annoying, and if your printer is grabbing multiple sheets, the issue is usually related to your hardware.

Before you leave, check the best printer management software for seamless task execution.

Tell us which fix worked for you in the comments section.

Sorry Your PC Name Can’t be Changed [Fix]

Sometimes it’s necessary to change your PC name, but many users reported Sorry your PC name can’t be changed message. This can be a problem, and today we’re going to show you how to fix this issue.

In case you’re not familiar with this process, we have a great guide on how to rename your Windows PC, so be sure to check it out.

In today’s guide, we will show you what to do if Windows 10 can’t change your computer name, so let’s get started.

Why can’t I rename my PC?

  • Your PC might be having some glitches due to missing updates.
  • Settings on your PC aren’t syncing properly with the cloud.
  • Issues with your Microsoft account.
  • You have a damaged user profile on your PC.

How can I fix Sorry your PC name can’t be changed message?

1. Install the missing updates

  1. Open the Settings app. You can do that by pressing the Windows key + I. When the Settings app opens, go to the Update & Security section.
    Windows 10 can't change computer name
  2. Click the Check for updates button in the right pane. Available updates will now be downloaded automatically in the background.
    Windows 10 can't change computer name

If you keep getting Sorry your PC name can’t be changed message, the issue might be a glitch on your system. Bugs and glitches can sometimes occur, and the best way to deal with them is to keep Windows up to date.

2. Rename the device and remove it from your Microsoft account

  1. Rename your PC name.
  2. Now open your web browser and access your Microsoft account.
  3. In there, you should see a device with your PC name on it. Delete that device.

After doing that, you’ll need to wait 24 hours or more for the changes to take effect. After 24 hours have passed, the issue should be completely resolved.

3. Turn off Sync settings

  1. Open the Settings app and navigate to the Account section.
  2. Select Sync your settings from the left pane. In the right pane, turn off Sync settings feature.
  3. Wait for a couple of minutes and then turn Sync settings feature back on again.

Your PC will now be synced, and the list of devices will show a different name for your PC. Keep in mind that it might take 24 hours or more for the changes to take effect, so be patient.

This is a simple solution, but it can help with Sorry your PC name can’t be changed error.

4. Switch to the local account and then back to the Microsoft account

  1. Open the Settings app and navigate to the Accounts section.
  2. Select Sign in with a local account instead in the right pane.
    Can't change computer name Windows 7
  3. Now you’ll be asked to enter your current password. Enter it and click Next.
    Windows 10 can't change computer name
  4. Now enter the desired username and password and click Next.
  5. Once you’re done, click on Sign out and finish.

After switching to the local account, sign back in again. Now you need to convert the local account to the Microsoft account. To do that, follow these steps:

  1. Open the Settings app and navigate to the Accounts section.
  2. Click the Sign in with a Microsoft account option in the right pane instead.
  3. Now enter your email and password. You’ll need to enter your security code if you’re using two-step verification.

After doing that, you should have your Microsoft account working again, and the PC name should be updated in 24-48 hours.

After the specified period has passed, check if Sorry your PC name can’t be changed error is gone.

5. Try using the Safe Mode

  1. Open the Settings app and go to the Update & Security section.
  2. Select Recovery in the left pane. Click the Restart now button.
    Can't change computer name Windows 7
  3. Now go to Troubleshoot > Advanced options > Startup Settings and click the Restart button.
  4. After your PC restarts, you should see a list of options. Select the desired version of Safe Mode by pressing the corresponding key.

6. Try using the hidden administrator account

  1. Open Command Prompt as administrator. The quickest way to do that is to press Windows key + X and then choose Command Prompt (Admin) or PowerShell (Admin) from the list.
    Can't change computer name Windows 7
  2. When Command Prompt opens, run the following command: net user administrator /active:yes
  3. Now log out of your current account and switch back to the administrative account.
  4. Once you access the administrator account, try to change your PC name.

If this method works for you, be sure to disable the administrator account after you’re done. To do that, start Command Prompt as administrator and run the following command: net user administrator /active:no

7. Try renaming your PC in Command Prompt

  1. Start Command Prompt as an administrator.
  2. When Command Prompt opens, run the following command: wmic computersystem where name="%computername%" call rename name="New-PC-Name"
  3. Be sure to replace New-PC-Name with the actual name that you want to use for your PC.

After doing that, check if the name is changed. This method is perfect if you’re an advanced user or if you simply want to change your PC name quickly without too much hassle.

8. Rename your PC using PowerShell

  1. Press Windows key + S and enter powershell. Locate Windows PowerShell from the list of results, right-click it and choose Run as administrator.
    Can't change computer name Windows 7
  2. When PowerShell starts, run the following: Rename-Computer -NewName "New-PC-Name"
  3. Be sure to replace New-PC-Name with the desired name.

9. Perform a System Restore

  1. Type system restore in the search field. Now select Create a restore point from the list.
    Windows 10 can't change computer name
  2. Once the System Properties window appears, click the System Restore button.
    Can't change computer name Windows 7
  3. System Restore window will now open. Click Next to proceed.
    Windows 10 can't change computer name
  4. If available, check Show more restore points option. Select the desired restore point and click Next.
    Windows 10 can't change computer name
  5. Follow the instructions on the screen to complete the restoration process.

After your PC is restored, check if the problem is still there.

Sorry, your PC name can’t be changed message can be quite annoying. We hope you solved this issue after using one of our solutions.

In case the issue is still there, we have a great guide about Compname is not accessible that might give you more ways to fix this issue.

What method did you use to fix this problem? Let us know in the comments below.

FIX: Can’t Open Universal Apps in Windows 10/11

No matter how much you love old-fashioned, desktop programs, if you’re using Windows 10, there must be at least one Universal app you’re using. Apps are indeed great part of Windows 10 operating system, but sometimes they might cause some problems.

In this article, I’m going to try to solve problems with Windows 10 apps, so you’ll be able to use them normally again.

What to do if Windows 10 universal apps won’t open

Solution 1 – Apps won’t start due to AppLocker issues

AppLocker is a feature in Windows 10, and in other versions of Windows, which controls apps permissions and policy restrictions. So if AppLocker blocks your app/apps, you won’t be able to use it/them. Fixing this AppLocker issue is simple, just do the following:

  1. Right-click on the Start Menu button and choose Command Prompt (Admin)
  2. In the command line, type the following command and press Enter:
    • ren %windir%System32AppLockerPlugin*.* *.bak
  3. Restart your computer

Now, check if your apps are working again. If they do, you’re good to go, if they don’t try one of the solutions below.

— RELATED: FIX: Unable to Install Apps From Windows 10 Store

Solution 2 – Configure Application Identity service

Application Identity service and AppLocker are connected, because AppLocker uses the Application Identity service to verify all necessary attributes of the certain app. So, even if you performed the fix above, it may not work, until you configure Application Identity. To do so, follow these steps:

  1. Go to Search, type run and open Run
  2. In Run window type services.msc
  3. Find service called Application Identity, right-click on it and select Start.

application identity

After performing one of these fixes, or at least one of one of them, you should be able to use your Universal apps again.

Solution 3 – Re-install your apps

This one maybe sounds like an obvious solution, and you don’t need to be a tech expert to guess this, but a lot of people actually reported that simple re-installing solved the problem with their apps. So, if you tried the solutions listed above, and they didn’t help, you should give this simple method a shot.

Re-installing apps is very simple. First, you have to uninstall it by right-clicking on the Live Tile or icon in the Start Menu and choosing Uninstall. After that, just go to Windows Store and install the app again (if you have problems with Windows Store, as well, you should check out this article).

Solution 4 – Run the Windows Apps Troubleshooter

Another quick solution is to run the built-in Windows Apps Troubleshooter from the Settings Page. Go to Settings > Update & Security >Troubleshoot > run the troubleshooter.

windows apps troubleshooter

That would be all, if you have any other Windows 10-related issues you can check for the solution in our Windows 10 Fix section.

RELATED POSTS TO CHECK OUT:

What to Do if Streaming Lags in Xbox App for Windows 10/11


5 solutions to fix Xbox App streaming issues

  1. Change the Streaming quality
  2. Improve Game Streaming Experience
  3. Turn off your antivirus/ firewall
  4. Change software rendering settings
  5. Update your OS and Xbox App

Game streaming is one of the most interesting features of Windows 10 (well, at least for gamers). But, once they installed Windows 10 and tried to stream their games through the Xbox app for Windows 10, a lot of users reported lags in the streaming.

xbox one streaming wind8apps

So, in this article, we’re going to solve this problem with lags so you can have good, quality streaming. And you may also check out our guide on how to minimize input delay for Xbox Elite.

What are the best ways to fix streaming lag in Xbox App?

Before you try with any solution, you should test your Xbox One streaming first. It will get you better insight in the situation, as it will help you decide what is the best streaming quality for you. To run the streaming test, do the following:

  1. Open your Xbox app
  2. From the hamburger menu on the left, go to Connect
  3. Select your console
  4. And go to Test Streaming

After the test is finished it will give you all needed details, and you can perform some of the following solutions, based on the test results.

1. Change the Streaming quality

So, the most logical and the most common solution if you’re having lag problems with your streaming is to decrease the streaming quality. To do so, follow these steps

  1. Open your Xbox app
  2. Go to Settings from the left hamburger menu
  3. And under Video encoding level, change your stream quality based on stream test results

Now start your streaming from the Xbox One again, and see if there are any lags.

2. Improve Game Streaming Experience

Reducing the stream quality will probably get the job done, but if you still face lagging problems in your stream, there are other elements you could adjust a little to get your stream working normally.

There are a lot of things you can do to enhance your streaming, like switching to wired connection, updating wireless drivers, moving the Xbox closer to the PC, changing the frequency, etc. You can find detailed explanations for this solutions on Xbox’s support page.

3. Turn off your antivirus/firewall

In rare cases, your security solutions may slow down your streaming. To test if this is the case, you can temporarily disable your antivirus and firewall and test your game streaming quality.

4. Change software rendering settings

You can also  enable the option ‘Use software rendering instead of GPU rendering’ to reduce the strain on your graphics card.

  1. Launch Internet Explorer > click the Gear
  2. Select Internet Options > Advanced
  3. Select Accelerated graphics
  4. Check the option ‘Use software rendering instead of GPU rendering’use software rendering instead of GPU
  5. Click Apply > Ok
  6. Restart your computer and try to stream your games again.

5. Update your OS and Xbox App

If you haven’t installed the latest Windows 10 updates or the latest Xbox App version, please do so as soon as possible. It’s possible that some of the newest updates bring specific bug fixes and improvements for game streaming.

That’s it, I hope this article helped you to solve the problem with streaming in your Xbox app on Windows 10.

If you have any comments, suggestions, or maybe other solutions for lagging problem, don’t hesitate to write to us in the comments section below. We would love to hear your opinion.

Before you go, check our guide on the best DNS settings for Xbox since they might be able to help you fix this problem.

If you have any other Windows 10-related issues you can check for the solution in our Windows 10 Fix section.

Microsoft to get serious about pushing Always Connected PCs, especially for business

The former head of Windows, Terry Myerson took to the stage last year during the WinHEC conference to unveil the company’s new always-connected initiative.

Always Connected PCs that are instantly on, always connected with incredible battery life.

This year at Microsoft’s WinHEC (Windows Hardware Engineering Conference) 2018 Events in Taipei and Shenzhen, OEM Partners showed of made a pitch for their second round of always-connected devices, many of which were ARM and Intel Mobile architectures with LTE cellular connectivity that rely on the use of a SIM Card or eSIM like today’s mobile phones (via All About Microsoft).

On the heels of several new PC reviews and releases recently, Microsoft is looking to go back to its old role as an alley-oop assisting Center, by providing a bit of digital billboard space with a new section on its Microsoft Store website to help OEM’s peddle their wares powered by Windows.

For some, the new marketing move may feel like a throwback to 2012, when Microsoft started helping OEM market Windows 8 PC’s. With a half a billion dollars dedicated to marketing its new hybrid touch operating system, some observers saw Microsoft’s stewardship of the industry’s marketing direction as a desperate move by a company flailing to make Windows 8 a success, others saw it as the company having a more direct hand in helping partners educate the market on the benefits of new computing paradigms. What both perspective observers agreed upon, was that the days of such public facing co-marketing were behind Microsoft, however, it would appear that strategy continues today with the company’s new highlighted Always Connected PC purchase page on the Microsoft Store Online portal.


While it seems Microsoft is doing some of the digital promotion of the new ACPC lines on its new page, its the OEM’s that are placing substantial financial bets on PCs running a Snapdragon 850 chip such as Lenovo with the Yoga C630 or Samsung as they ditch Intel for the released its Galaxy Book 2 and use Qualcomm technology  which improves LTE speeds by 20 percent.

The drive last year when OEM’s partners showed off there first Windows 10 ARM devices indicated that the Always-Connected PC would be in its own category, but the sub-category is quickly proving to be the future bet many companies are making with their product lines. Erin Chapple, Corporate Vice President said;

“A ‘modern device,’ now, to us, is an Always Connected PC”

Chapple also said,

Built-in LTE networking will allow them to shift to “network as a service” rather than setting up and run their own custom networks.

Once again, Microsoft finds itself in the educator’s seat as the new page explains what eSims are, the convenience afforded by them and where customers can go to purchase them for their new devices.

As interesting as the concept of eSim and Always Connected PCs may appeal to an average person who operates a smartphone, Microsoft’s true push into forging this new PC category is arguably one that targets enterprise. With the release of the Surface Go with LTE support, Microsoft is quietly laying the foundation for its Point-of-Sale marketing benefits of ACPC’s, and it seems on the back of those efforts, OEM partners benefit.

While not as daunting as trying to convince customers to buy into a chunky PC tablet or a hybrid PC/mobile operating experience from overpriced laptops with seemingly unnecessary touch panels bolted on, the industry shift to Always Connected PCs will undoubtedly feel like another semi-Herculean task placed the shoulders of Microsoft and its partners this shopping season.

More details about which devices currently have LTE here

Remedy: Alan Wake should return to the Xbox Store “very soon”

Back in November 2017, we reported that Remedy’s Alan Wake was being removed from the Xbox and Steam stores due to an issue with the music licensing. To drive new sales before the game’s removal, Remedy offered 90% off the game in a final sale on Steam.

Nearly a year later, Remedy has now announced that Alan Wake will be returning to the Xbox Store “very soon”, according to Remedy’s Communications Director, Thomas Puha:

As noted, there’s no firm date as to when, but fans of the game should expect the game to back in the store in the near future. It’s good to see that Microsoft and Remedy have seemingly resolved the long-standing music licensing issue that prevented the game from being sold.

Microsoft posts a mega-list of major product releases to highlight the company’s “accelerating innovation”

Microsoft announced its FY2019 Q1 results yesterday, and it was a new record for the company’s first quarter filings with significant Surface, Office 365 and Azure gains. Microsoft’s cloud and productivity solutions are definitely getting traction in the enterprise world, and the company took the time yesterday to emphasize how it’s innovating like never before.

In a document that summarizes Microsoft’s quarterly highlights and product releases, the company posted a long list of examples showing how it’s “accelerating innovation across our businesses while expanding our market opportunities.” From Microsoft 365 to cloud-driven innovations like Project xCloud, it’s hard not to be impressed by the company’s forward-thinking approach. Perhaps, it was the company’s forward thinking planning that enabled it to beat analyst’s expectations yesterday.

We won’t go through the entire list, but it unsurprisingly kicks off with Microsoft 365, the company’s new enterprise bundle that is set to become a core offering for Redmond. This past quarter, Microsoft announced Microsoft Managed Desktop, a new subscription service which will help companies maximize their business by having Microsoft manage their Windows 10 devices. On the security front, Microsoft also announced password-free sign-in for thousands of apps, Modern Compliance enhancements and much more.

Office 365 also remains very important for Microsoft, and the company is currently improving its core productivity apps with AI-powered features such as LinkedIn integration and collaboration enhancements. It has also been a great year for Microsoft Teams, which has now reached feature-parity with Skype for Business. The communication hub for Office 365 users now has a free tier to compete with Slack, and Microsoft is competing aggressively with intelligent communication features and deep integration with Office 365 apps.

Microsoft Teams is now being used by 329,000 organizations, including 87 of the Fortune 100.

Azure remains one of Microsoft’s fastest-growing business, as well as a huge area of innovation for the company. In recent months, Microsoft introduced new Azure Machine Learning capabilities for data scientists and developers, as well as new Azure IoT products such as Azure Sphere. Microsoft is also making good progress on Quantum Computing, which will be a future Azure capability.

While most of these topics are enterprise-focused, there are other areas where the frontiers between the consumer and business worlds start to blur. As an example, Microsoft’s new 10-inch Surface Go is the most affordable Surface ever, which is obviously great news for consumers. However, the 10-inch form factor could also be very interesting for first line workers and point of sale (PoS) systems, and with Microsoft’s new Surface All Access financing plan, consumers and SMBs can both get a Surface Go for just $25 a month.

On Windows 10, the new Your Phone that syncs texts and photos from Android phones is becoming a great productivity tool. Upcoming features like Android app mirroring could also open up a whole new world of possibilities on Windows 10 PCs. It has been great to see Microsoft embracing iOS and Android devices in its app development roadmap, and expanding the reach of Cortana through interoperability with Alexa is pretty exciting.

“Across our businesses, we are accelerating innovation… picking the right secular trends and investing in large growing markets – many of which are still in their infancy. Additionally, every one of our solutions is reinforcing our core intelligent cloud and intelligent edge platform,” said Microsoft CEO Satya Nadella during the company’s First Quarter Earnings conference call yesterday. The CEO’s strategy has delivered great results thus far, and the rest of the company’s fiscal year 2019 appears set to be another very exciting year with new products like Project xCloud and HoloLens 2 in the pipeline.

Fixed: I can’t stream Xbox games to Windows 10/11

4 solutions to fix Xbox to PC game streaming issues

  1. Enable game streaming
  2. Update your Xbox application
  3. Check the Xbox One signal strength
  4. Disable Game DVR

Windows 10 brought many improvements to Microsoft’s OS. One of those improvements is related to gaming. As you have probably heard, Microsoft is planning to bring PC and Xbox gamers together by allowing you to stream your Xbox games to Windows 10.

xbox stream on windows 10

However, some users might be unable to stream to Windows 10 via Xbox app, so here are few tips that might be helpful. We hope that one of the solutions listed below will fix your game streaming issues.

If you own an Xbox console and Windows 10, you might want to relax and play your favorite games on your PC or laptop instead of on your TV. All you need to do so is an Xbox controller, your Windows 10 computer and a stable internet connection.

However, if you’re experiencing streaming issues while streaming from your Xbox to Windows 10, you might want to try these fixes.

What to do if Xbox One won’t stream to Windows 10

1. Enable game streaming

Have you ever wondered why your computer won’t boot only to notice that you forgot to plug it in? Well, that could happen when you’re trying to stream Xbox One games to your PC as well.

So, first things first, make sure that you enabled Xbox One game streaming.

  1. Navigate to your console’s Settings page
  2. Go to Preferences > select Xbox app connectivity
  3. Then enable the option ‘Allow game streaming to other devices’.
enable xbox one streaming

2. Update your Xbox application

Some users have reported that they are unable to stream to their PCs, but this is usually fixed by updating your Xbox application.

To do so, you need to go to the built in Windows store and check for the updates. Additionally, you can just search for the app and open it in app view and it should update itself. If it doesn’t, give it a minute or two before it starts updating.

3. Check the Xbox One signal strength

Sometimes issues are caused by the signal strength of your wireless network, so you need to navigate to the connect area and check the signal strength that is located next to the name of your device. If the signal indicator is red, you might experience some streaming issues.

To fix this, you can connect to your wireless router with your Xbox to see if issue is related to it. If your wireless router is the problem, you can replace it, or if you don’t want to do that you can connect to it using the network cable.

4. Disable Game DVR

Game DVR is known to cause many issues for gamers. Many users actually confirmed they fixed their game streaming issues after disabling this feature. So, go ahead and disable Game DVR and check if the issue persists.

If you have any other Windows 10-related issues you can check for the solution in our Windows 10 Fix section.

Check out this rare Foot Locker Xbox One S console

In addition to the Xbox One X offered by in a Taco Bell giveaway, Microsoft is offering another Xbox One S giveaway in London. In a partnership with Foot Locker, Microsoft is offering a chance to win a special edition Xbox One S console. As noted in post by Microsoft News Centre UK, the giveaway is taking place in Great Britain as well as German and France. Here’s a look at the Foot Locker-branded Xbox One S.

Microsoft, Xbox One, Xbox, Xbox One S, Foot Locker

Over the next three weeks, Foot Locker is giving away thousands of Xbox prizes every minute in its retail stores across Europe. Lucky shoppers can take home the Foot Locker Xbox One S, valued at £249.99, Xbox Design Lab controllers, Xbox Game Pass 12-month subscriptions, and much more! To be eligible to win an Xbox prize, Foot Locker shoppers must spend £50 or more in thirty-six Foot Locker locations in England, Scotland, and Wales.

Qualified shoppers will be given scratchcards at checkout that will offer a chance to win any one of the Xbox prizes being offered. The Xbox giveaway starts now and runs until November 11, 2018. This year’s Foot Locker Xbox giveaway is similar to last year’s October 2017 event where Foot Locker shoppers played Forza Motorsport 7 for a chance to win an Xbox One X and footwear.

It’s surprising that Foot Locker is not including copies of Forza Horizon 4, given the Xbox One game title takes place in locations across the UK. If you want to enter the Xbox One S giveaway, visit your local Foot Locker. Sorry, offer is only valid for residents of the UK, Germany, and France.

Microsoft confirms ZIP file problems in Windows 10 1809, expects “early November” fix

Yet again, Microsoft has had to confirm another issue regarding its Windows 10 October 2018 Update.

According to M. Hammer, a Microsoft Agent and Community Moderator, “If you copy files from a .ZIP file without extracting them, they might not be copied or moved correctly, even though it looks like they have been.”

There appears to be another known issue with the October 2018 Update the consent prompt for placing unzipped files is missing and results in either misplaced content or no placement at all despite the operation appearing to be complete.

This failure can occur in the following scenarios:

  • Copying from a compressed (.zip) folder to a regular folder.
  • Moving from a compressed folder to a regular folder.
  • Copying from a compressed folder to a protected folder.

There is a silver lining in all this mess, according to Hammer, despite the normal inclination to redo the process, users shouldn’t worry about duplicating or overwritten content as the process just silently fails with the supposedly moved file simly being removed or deleted.

With that being said, Hammer warns users not to try and Cut and Paste items from a compressed (.zip) folder, doing so might inadvertenly make the files unrecoverable.

Thus far, the best solution is to fully extract the zip folder before copying any filed to a new destination. For anyone, who has already suffered content loss or misplacement, Hammer offers this workaround to recovery:

Restore files from the Recycle Bin

  • Open the Recycle Bin
  • Locate item
  • Right-click and select Restore.

Restore files from Temporary File Directory

  • Open the Run command box by simultaneously pressing Windows logo + R keys.
  • Type %temp% and then click OK to open the Temp folder containing temporary files.
  • Locate the file or folder. On the ribbon, select Move to and choose a location or folder to move the file into.

That latest Windows 10 October 2018 Update issue futher highlights the seemingly prolematic quality testing that went into this release as Redmond Magazine points out that that .zip exctract problem may have been a known bug for sometime.

With roughly a week left in the month of October, it seems increasingly unlikely Microsoft will re-release the October 2018 Update on schedule to the general consumer, especially since a fix for .zip extract isn’t estimated until early November.

World of Final Fantasy Maxima digital pre-orders go live on Xbox One consoles

Digital pre-orders for World of Final Fantasy Maxima are now live on Xbox One consoles ahead of its November 6th release.

World of Final Fantasy Maxima is a re-release of the original World of Final Fantasy video game that came out a couple of years ago which features improved visuals and a new feature that allows the main characters to appear as classic Final Fantasy video game heroes.

Here’s the official game description and trailer:

Expanding the horizons of FINAL FANTASY. A tale of many encounters and the birth of a new world.

Originally released in October 2016, WORLD OF FINAL FANTASY is now available on Xbox One as the powered-up FINAL FANTASY Maxima! Beloved characters from FF lore (Champions) and a multitude of capturable monsters (Mirages) appear in this fun and exciting adventure. This new and enhanced version of WORLD OF FINAL FANTASY also features the Avatar Change system, which allows the protagonists, Reynn and Lann, to fight as Champions. Fight your way through exhilarating battles as legendary FINAL FANTASY heroes!

The Xbox One console is expected to get an increasing number of Final Fantasy video game re-releases over the coming year with Final Fantasy VII, Final Fantasy IX, Final Fantasy X | X-2 HD Remaster, and Final Fantasy XII: The Zodiac Age all confirmed for launches in 2019.

Are you a Final Fantasy fan? Let us know which games you’re looking forward to playing on the Xbox One in the comments below and then follow us on Pinterest for more gaming content.

WORLD OF FINAL FANTASY MAXIMA
Developer:
SQUARE ENIX
Price:
$39.99