You either want to block a hotspot on Windows 11 because you don’t want to share the connection with other devices, or just with some of them. We got the tested solutions for this situation below.
1. Turn off the mobile hotspot from Settings
Press Win + I to open the Settings app.
In the left sidebar, click on Network & Internet, then toggle the Mobile Hotspot to Off.
By applying this small change, you will block the hotspot on Windows 11 so other devices won’t be able to connect to it. Sadly, you can’t just ban only some users or devices from using a Windows 11 hotspot. However, you can change the hotspot password and communicate it only to the users you want to use it. Read below on how to do that.
2. Change the hotspot password
Press Win + I to start Settings on Windows 11.
Select Network & Internet and click on the Mobile hotspot option from the right.
Now, click on Edit under the network properties.
Here, you can change the hotspot password and even the name of how it appears on the network. Don’t forget to hit the Save button after you’re done.
You may also select a certain network band for the hotspot users. For instance, you may share the 2.4 GHz band and keep the 5 GHz only for your devices.
After you change the hotspot password, you will be able to block the hotspot on Windows 11 for some users by just not disclosing the new password to them.
3. Block the hotspot using the Local Group Policy Editor
Press Win + R, type gpedit.msc, and press Enter.
Go to Computer Configuration > Administrative Templates > Network > Network Connections.
In the right pane, double-click on Prohibit use of Internet Connection Sharing on your DNS domain network.
Select Enabled and click OK.
This method will prevent sharing a hotspot for all the users of the computer and block all remote access to the PC. So, if you still want to connect to this PC from a different device, undo this change first.
4. Block the hotspot using Registry Editor
Press Win + R, type regedit, and press Enter.
Go to the following key: HKEY_LOCAL_MACHINE\SOFTWARE\Policies\Microsoft\Windows\Network Connections
Right-click in the right pane, select New > DWORD (32-bit) Value, and name it NC_ShowSharedAccessUI.
Double-click the new DWORD and set its value to 0.
Restart your computer to apply the changes.
By making this change, you will block any shared remote access to the PC, not just the hotspot so use it just as a last resort.
In conclusion, we recommend the first two solutions to block the mobile hotspot on Windows 11. While the first just disables the mobile hotspot, you might prefer just changing its password and only share it with the users you trust. We also included instructions on how to share a certain mobile band.
The INVALID_HIBERNATED_STATE blue screen error, with code 0x000000BD, is encountered when the PC resumes from the hibernation state and finds changes to the hardware configuration.
Common causes for Invalid Hibernated State include issues with the hibernation file (hiberfil.sys), corrupted system files, malfunctioning disk or RAM, and outdated/corrupt drivers.
Before you move to advanced troubleshooting, verify whether a new device/peripheral was plugged in before the PC resumed from hibernation, install all pending Windows updates, and uninstall recently added apps.
How can I fix INVALID_HIBERNATED_STATE blue screen error?
1. Re-enable hibernation
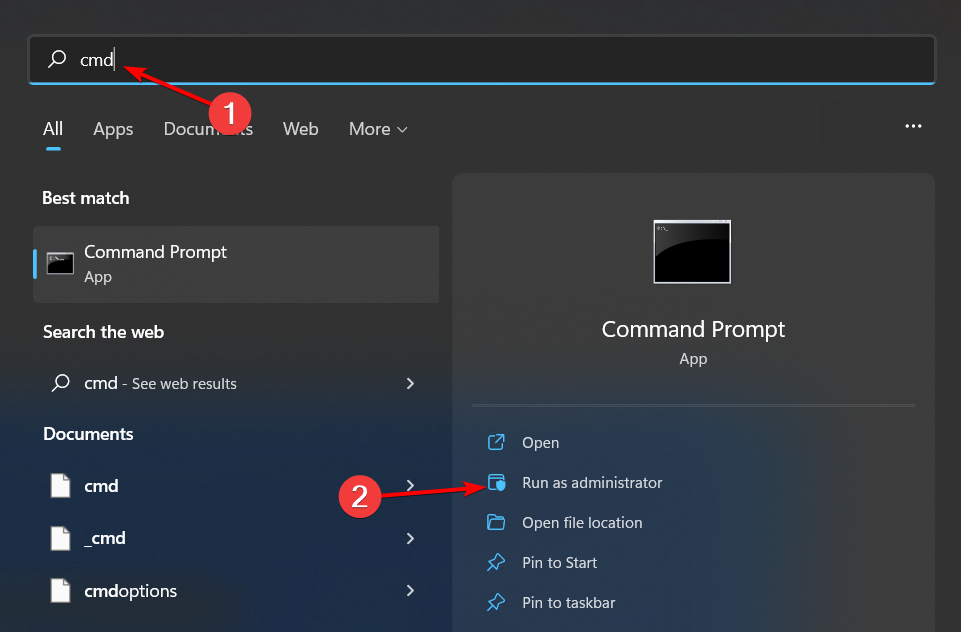
Press Window + S to open Search, type Command Prompt in the text field, and click on Run as administrator.
Click Yes in the UAC prompt.
Paste the following command and hit Enter to disable hibernate: powercfg.exe /hibernate off
Now, execute this command to re-enable hibernate: powercfg.exe /hibernate on
Finally, reboot the PC and verify whether the INVALID_HIBERNATED_STATE Windows error 0xBD is fixed.
If re-enabling hibernation doesn’t work, you can simply keep it disabled, and the BSOD won’t reappear!
2. Update the device drivers
Press Windows + X to open the Power User menu, and select Device Manager.
Expand the different entries here, right-click on the devices listed underneath individually, and select Update driver.
Now, choose Search automatically for drivers and wait for Windows to install the best locally available version.
After updating all the drivers, reboot the PC.
When outdated or corrupt drivers are triggering the INVALID_HIBERNATED_STATE Windows blue screen, update all the drivers. And if Windows can’t find a better driver, head to the manufacturer’s website, locate the latest version, and then manually install the driver.
3. Repair the corrupted system files
Press Windows + R to open Run, type cmd, and hit Ctrl + Shift + Enter.
Click Yes in the UAC prompt.
Paste the following DISM commands individually and hit Enter after each: DISM /Online /Cleanup-Image /CheckHealthDISM /Online /Cleanup-Image /ScanHealthDISM /Online /Cleanup-Image /RestoreHealth
Now, execute this command to run the SFC scan: sfc /scannow
Finally, reboot the PC and check for improvements.
If Windows Memory Diagnostic can’t find issues causing INVALID_HIBERNATED_STATE, I recommend you run Memtest86+, an open-source memory testing tool that performs a wide array of advanced scans on individual RAM modules and detects every problem.
Double-click the ISO file, wait for a few seconds, and then click Open in the confirmation prompt.
Run the setup.exe file.
Click Yes in the UAC prompt.
Now, click on Next to proceed.
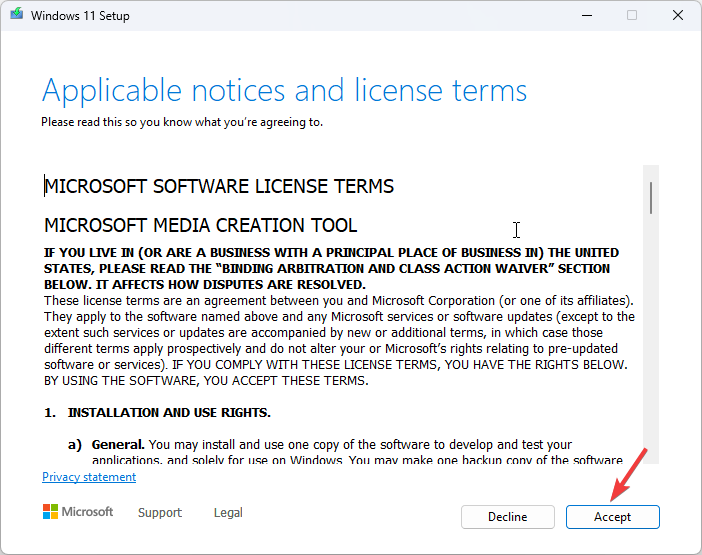
Click Accept to agree to Microsoft’s license terms.
Finally, verify that the setup reads, Keep personal files and apps, and click on Install.
Wait for the process to complete. It may take 30-90 minutes.
An in-place upgrade fixes almost every issue with Windows, including the INVALID_HIBERNATED_STATE BSOD error and the locked_pages_tracker_corruption. And the best part is that your personal files and apps remain safe!
Microsoft has released Windows App SDK 1.6. This latest update brings many new features to the platform, including native Ahead-Of-Time (AOT) support, which can significantly reduce apps’ start time and memory footprint.
The Windows App SDK, in case you’re unfamiliar, is a collection of APIs and tools that are designed to help developers build Windows applications. These apps can be based on WinUI 3, Microsoft’s modern UI framework, or older platforms like WPF and Win32.
One of the headline features of version 1.6 is native AOT support. When publishing an app with Windows App SDK 1.6, developers can choose to compile it to native code, Microsoft says in the official announcement. This can result in startup performance that’s up to 50% faster and a smaller file size.
We’re very excited to bring the powerful capabilities of Native AOT to developers through the Windows App SDK! In our sample Contoso Camera app, we measured a 50% reduction in start time, an ~8x reduction in package size when using a framework package and a ~2x reduction in package size when using Windows App SDK in self-contained mode. While your results might vary, we encourage you to give Native AOT a try if it’s right for your app!
Another significant change in Windows App SDK 1.6 is that the SDK now consumes the Edge WebView2 SDK as a NuGet package rather than including the components directly. This means apps with WebView2 browsers can be updated independently from the Windows App SDK.
The SDK also introduces new APIs for managing app packages and enhancements to TabView, PipsPager, and RatingControl, three WinUI 3 controls. PipsPager, for example, now supports a mode that wraps around the first and last items, and RatingControl is more customizable than before.
Microsoft says that WinAppSDK 1.6 is fully supported with the latest version of Project Reunion, the company’s initiative to modernize and modularize the Windows developer platform.
Developers can start using the Windows App SDK at the official documentation portal, and the release notes provide a complete list of changes.
If you’ve received the ERROR_DUP_NAME message, accompanied by the 52 (0x34) value when you were trying to access a network, that means that there is another computer with the same name there. You will need to change the name of your computer or the other so that you won’t meet the same error when joining a domain or workgroup.
The same error may spawn when validating a domain on a network We’re addressing both issues so here’s what to do!
How do I fix the ERROR_DUP_NAME?
1. Change the computer name
Press Win + I to start Settings.
Now, click on System from the left, scroll down and select About.
Finally, click the Rename this PC button from the top.
Write a different name that you would remember and acknowledge the change.
Now, try to join the network domain or workgroup and see if the ERROR_DUP_NAME still appears.
If you’re running an older Windows OS, you can change the PC name from Control Panel > System. Renaming your computer will ensure that you don’t have a duplicate name on the network, thus avoiding the ERROR_DUP_NAME issue.
2. Change the name of the domain
The same error can appear when you are an admin who is using the ntest /sc_verify:domain.com line in an elevated Command Prompt instance to validate a domain.
Usually, if there are no issues, you will receive the NERR_Success message. However, if the domain is already on the network, the system will return the ERROR_DUP_NAME message. Of course, you will either have to change the domain name or investigate if the domain is already validated and working.
So, by following the solutions above, you will fix the ERROR_DUP_NAME issue and join the network or validate your domain.
Before you leave, you might be interested in our ERROR_DOMAIN_CTRLR_CONFIG_ERROR guide for more information. Have you managed to fix the ERROR_DUP_NAME issue by using our solutions? Let us know in the comments below.
Error PDF validation broken pipe message usually appears for developers, and it will interfere with the handling of PDF files. However, the issue can be easily fixed, and today we’re going to show you how to do it.
What does a broken pipe error mean?
This error indicates that you’re trying to read or write data to a device that is no longer connected.
How can I fix the error PDF validation broken pipe?
1. Check your code
Open your code editor.
Look how you’re passing data.
Try using any other method than InputStreamDataSource() to pass data.
Users reported that this function caused the issue, so ensure that it’s properly implemented.
2. Use the correct URL when linking PDF
Open your code.
Locate the URL that has the PDF you’re trying to open.
Ensure that you’re using the direct URL without redirects.
Error PDF validation broken pipe error usually affects app and web developers, and fixing it isn’t as easy, as steps vary depending on the language you use. Hopefully, our solutions were able to point you in the right direction.
Many users have the issue where they fail to install the Synaptics touchpad driver. However, some of them simply have a problem enable it. So, before anything else, see if you have a function key on your keyboard (typically F1, F5 or F12 on some laptops) and use the Fn + function key to reenable it. If the problem persists, apply the solutions below.
What can I do if the Synaptics touchpad driver is not installing?
1. Check if the driver is hidden and update or remove the driver
Right-click the Start button and select Device Manager.
Now, click on View and select Show hidden devices.
Next, expand the Human Interface Devices category, right click on the Synaptics touchpad driver and select Update driver.
Select Search automatically for drivers, or if you already downloaded a driver for your system, select the Browse my computer for drivers and point the location on your laptop.
In case this doesn’t work, select Uninstall device instead of updating and go to the Microsoft Update Catalog to find the Synaptics touchpad driver for your system. You may also try restarting your laptop after removing the driver and a default one will be installed.
Also, by showing the hidden devices in Device Manager, you will also be able to identify if there are more than one touchpad driver and uninstall the device that you don’t recognize.
If this method doesn’t work or you lack the computer skills to update/fix the drivers manually, we suggest you use dedicated driver updater software to do it automatically.
This type of tool will automate the whole process and assist you in downloading and updating the right version of drivers that best fits your needs.
Type msconfig in the search box, and then tap or click System Configuration.
On the Services tab of the System Configuration dialog box, tap or click to select the Hide all Microsoft services check box, and then tap or click Disable all.
On the Startup tab of the System Configuration dialog box, tap or click Open Task Manager.
List of startup applications will appear. Right-click each item on the list and choose Disable. Repeat this step until you disable all startup applications.
Close Task Manager and go back to the System Configuration window. Click Apply and OK and restart your PC. A clean boot helps to eliminate software conflicts and to determine what is causing the problem.
A Clean Boot helps you to determine if there are any software conflicting with the work of some of your devices. After performing a Clean Boot, check if your touchpad device is working properly.
If it works fine and without any distractions, the problem was probably caused by the conflict between the mouse drivers and the touchpad drivers, or due to the conflict with some other software.
To solve these conflicts, you need to update the drivers for both devices and check if that helps. To do that, follow next steps.
Press Windows + S and enter control panel. Select Control Panel from the list.
When the Control Panel opens, go to the Mouse section.
Now navigate to Device Settings tab.
Select your touchpad from the list and click on the Settings button.
Now locate the Tapping section and make sure that you disable Double tap to enable or disable touchpad option.
According to users, sometimes your touchpad settings can cause your Synaptics touchpad to become disabled. According to them, this touchpad supports a tapping gesture that can enable or disable your touchpad.
After doing that, save changes and check if that solves your issue. Many users claim that this solution works for them, so feel free to try it out.
4. Roll back to the older driver
Open the Device Manager.
Now locate your touchpad driver and double click it to open its properties.
Navigate to the Driver tab and click the Roll Back Driver button.
Keep in mind that this option might not be available. If not, you’ll need to uninstall the driver and try using the default driver instead, just like we pointed in the first solution of this guide.
In the left pane, navigate to HKEY_LOCAL_MACHINE>SOFTWARE>Synaptics>SynTPInstall key.
In the right pane, double click the DeleteUserSettingOnUpgrade DWORD and change its value to 0.
If you’re having problems editing the registry, you may want to take a look at this helpful guide that will show you how to get past them.
After you save the changes, restart your PC and check if the issue reappears.
Following the steps in this guide should help you solve your issues with Synaptics touchpad driver not installing or any other touchpad device. And if you run into code 19, check whether your Registry has a part in this.
Microsoft Edge 130.0.2808.0 has been released to the Dev channel. This browser version includes various fixes and improvements.
First of all, Edge 130 improves general reliability. An issue that could cause the browser to crash when clicking “Permissions and privacy” in the sidebar has been resolved, as has a similar problem that would occur when clicking on the workspace in the Favorites hub after logging out.
When dragging a tab to create a new window on iOS, new windows should now be created without issue, and the ‘Magnify image’ tooltip should now display for the close button.
Edge 130 also resolves issues with the Favorites hub. The ‘Open in new…’ button should now display when right-clicking an item in the Favorites hub/panel, and the tab actions menu hub should no longer close after opening a group tab in a new tab within the window card under the tab actions menu.
This release includes multiple other fixes. The banner title should now display normally after right-clicking ‘Show media control’ and hovering over the browser icon. Icons should no longer be missing in the settings under the sidebar. Microsoft recently enhanced the sidebar with auto-start options.
On Android, a coloured circle icon that would appear in the upper left corner of the tab group has been removed. Issues where the input box wasn’t displaying when editing top site names on Android on the new tab page and where menu items were displayed abnormally in the overflow menu while in InPrivate mode on Android have both been resolved.
Finally, on iOS, an issue where users couldn’t scroll down to view feeds has been resolved, as has an issue where the upper left corner of the profile popover wasn’t rounded in the account panel.
Microsoft Date and Time Picker Control helps you enter multiple date and time entries in Microsoft 365 desktop apps, like Excel, Word, and more.
For example, you might need to regularly update dates and times for employee attendance, meeting schedules, project timings, etc. Date and Time Picker Control steps in to make tasks like this more convenient.
However, enabling this feature is a challenging task because these Microsoft apps don’t activate the service by default. Luckily, I’ll show you how to use it and enable it.
Also, if your Microsoft app isn’t compatible with it, you’ll learn which alternatives you should try. Let’s get started!
What Is the Microsoft Date and Time Picker Control?
Microsoft Date and Time Picker Control is an ActiveX Control service for compatible Microsoft 365 apps, like Excel, Word, PowerPoint, etc. It allows you to type in the date and time in a convenient way. You don’t have to worry about the date and time format of your entries.
You can just visually select your data for the MM-DD-YYYY format or the DD-MM-YYYY format.
The MSCOMCTL.OCX file and Visual Basic 6.0 ensure that this feature works smoothly.
System Requirements for Microsoft Date and Time Picker Control
At the time of writing, this ActiveX Control element is only available in Microsoft 365 and Microsoft Office desktop apps for 32-bit architecture.
Also, you might need to register the MSCOMCT2.OCX file in your Excel or Word software. You’ll have to do this if the feature isn’t readily available in the More Controls menu of the ActiveX Control command.
You might be able to register the above-mentioned OCX file if you own the Microsoft 365 64-bit app. However, the service won’t work when you call it. Instead, you’ll get an error message.
So, if you’re a 64-bit Microsoft Excel or Word user, you’ll need to try the alternatives mentioned later in this article.
Registering the MSCOMCT2.OCX Service
To activate the binary file, follow these steps on your Windows PC. You should be logged in using an administrator account to execute a few commands.
Go to the Windows OS installation drive and enter the following search query into the Search this PC field:
MSCOMCT2.OCX
Wait for the Windows File System Search tool to find the file in the device.
There should be one instance of the MSCOMCT2.OCX file.
When you see the result, right-click on it and choose Open file location from the context menu.
Go into the directory and press the Windows + R keys together to launch the Run command tool.
Into the Open field, enter the following command and hit Enter.
cmd admin
The Command Prompt console will open with administrator privileges.
Enter the following command into the CLI and hit Enter:
C:\Windows\System32\regsvr32.exe mscomct2.ocx
Or
C:\Windows\SysWoW64\regsvr32.exe mscomct2.ocx
To verify that the binary file has been registered successfully, run the following command inside the same Command Prompt window:
regsvr32 -u MSCOMCT2.OCX
A message box will tell you that the file has been loaded. This confirms that you’ve activated the required file successfully.
How To Get Microsoft Date and Time Picker Control
Now that you’ve activated the MSCOMCT2.OCX file, you’re all set to enable the Date and Time Picker Control. Follow along with the steps in Excel as outlined below:
Click on the File tab to open the Excel sidebar.
Find and select the Options menu at the bottom.
The Excel Options dialog box will open.
Click on the Customize Ribbon category on the right.
You’ll see two columns of options on the right.
Below the Customize the Ribbon column, checkmark the box for the Developer tab.
Click OK to save the changes you’ve made.
You should now see the Developer tab in the Excel ribbon menu. Click on that.
Now, click on the Insert drop-down menu in the Controls commands block of the Developer tab.
Select the More Controls tool in the ActiveX Controls section of the context menu.
You should see the More Controls dialog box.
Scroll through the list of available ActiveX Controls to find and select the Microsoft Date and Time Picker Control 6.0 (SP6) item.
Click OK to enable the tool.
Now, click on any cell and a date and time picker will pop up.
Alternatives for Microsoft Date and Time Picker Control
If you can’t enable the built-in feature yet want to use similar automation in Microsoft 365 apps, you can try these alternatives:
Use a Third-Party Add-In
You can install the Mini Calendar and Date Picker from the Office Add-ins Store. It’s free and works exactly as the Date and Time Picker ActiveX Control tool does. Here’s how:
Go to the destination Excel worksheet and click on the Developer tab.
Click on the Add-ins command inside the Add-ins commands block.
The Office Add-ins dialog will open.
Click on the Store tab.
In the Search field, type Mini and hit Enter.
The Mini Calendar and Date Picker add-in will show.
Click Add and follow the on-screen instructions to install the service.
Once installed, the date and time picker will open on the active worksheet.
Click the destination cell and pick a date and time from the dialog box.
Mini Calendar and Date Picker will insert the date and time instantly.
To add a time, click on the adjacent cell.
Select the Time clock on the calendar tool.
It’ll insert the time.
Here are the customizations available in this date and time add-in:
Toggle Calendar Size: If you need to reduce the dialog box size, click on this button.
Change Calendar Theme: To cycle through different dialog box themes, you can use this option.
Change Calendar System: It helps you to switch the calendar system between the U.S. Calendar System and the ISO Calendar System.
Toggle Week Numbers: If you need the week number, add that using this button.
Highlight Range of Dates: Click this button to visualize the cell range containing date and time entries.
The Microsoft Date and Time Picker Control 6.0 (SP6) feature is totally absent in the Excel online or web app. So, you can click on the Add-ins command on the Home tab and search for Mini Calendar.
Summary
You can now easily activate Microsoft Date and Time Picker Control in Excel or Word. Ensure that the Microsoft Office app is a 32-bit program before trying these steps.
If it’s a 64-bit app or you don’t want to downgrade to a 32-bit program, try the alternative method to automate the data entry for date and time values.
Did the article help you? Comment below to let us know. If you want to share a better method, feel free to add that in your comment.
ERROR PRINTER DRIVER ALREADY INSTALLED is the message that appears on Windows devices when accessing specific applications that require a printer. It can also occur when certain APIs are trying to work in particular environments.
What is the ERROR PRINTER DRIVER ALREADY INSTALLED?
Microsoft deemed error 1795 with the message “The specified printer driver is already installed ” a problem. ERROR PRINTER DRIVER ALREADY INSTALLED refers to applications trying to override existing drivers only to fail. This could be due to a forced policy requiring the app to adjust the device’s printer while that printer is already functioning.
What is causing the ERROR PRINTER DRIVER ALREADY INSTALLED?
Driver conflicts might cause this error. Either the printer is already running on its native drivers, or the drivers are corrupt to the point they cause conflicts with any external device or connection.
However, another plausible reason for the ERROR PRINTER DRIVER ALREADY INSTALLED might be that external devices do not recognize the printer, so they try to install drivers for it, only to fail. But it can also be vice versa. The printer’s drivers might be corrupted and behave the same way.
How to fix the ERROR PRINTER DRIVER ALREADY INSTALLED?
1. Update your Windows with the latest patches
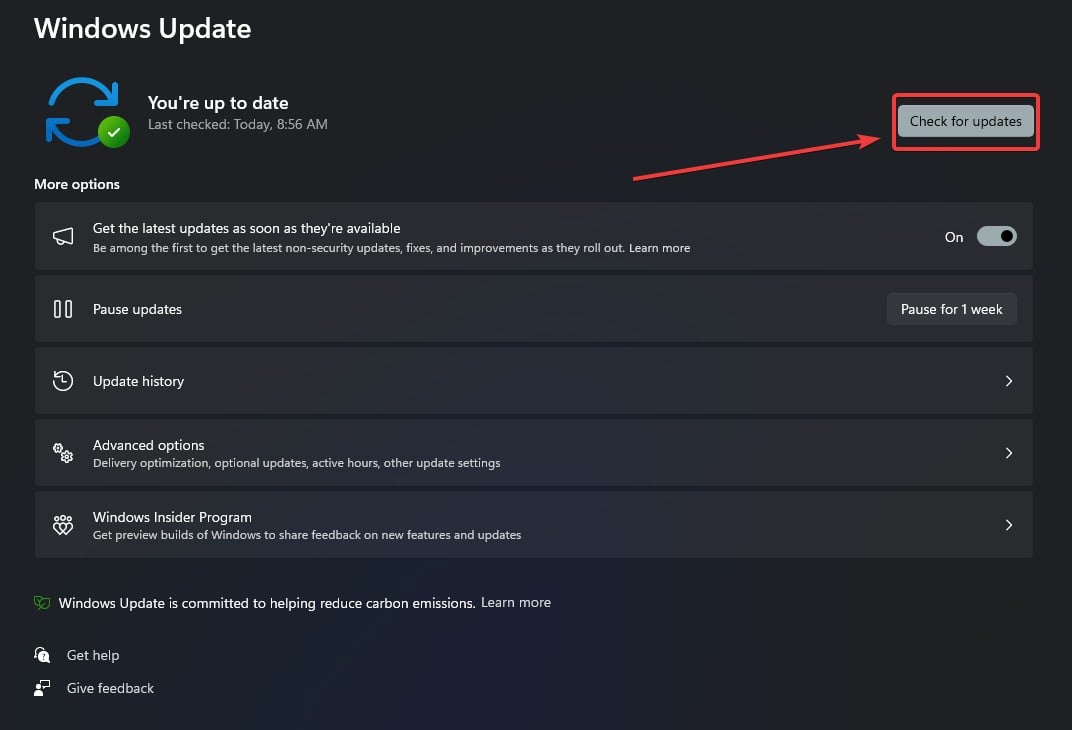
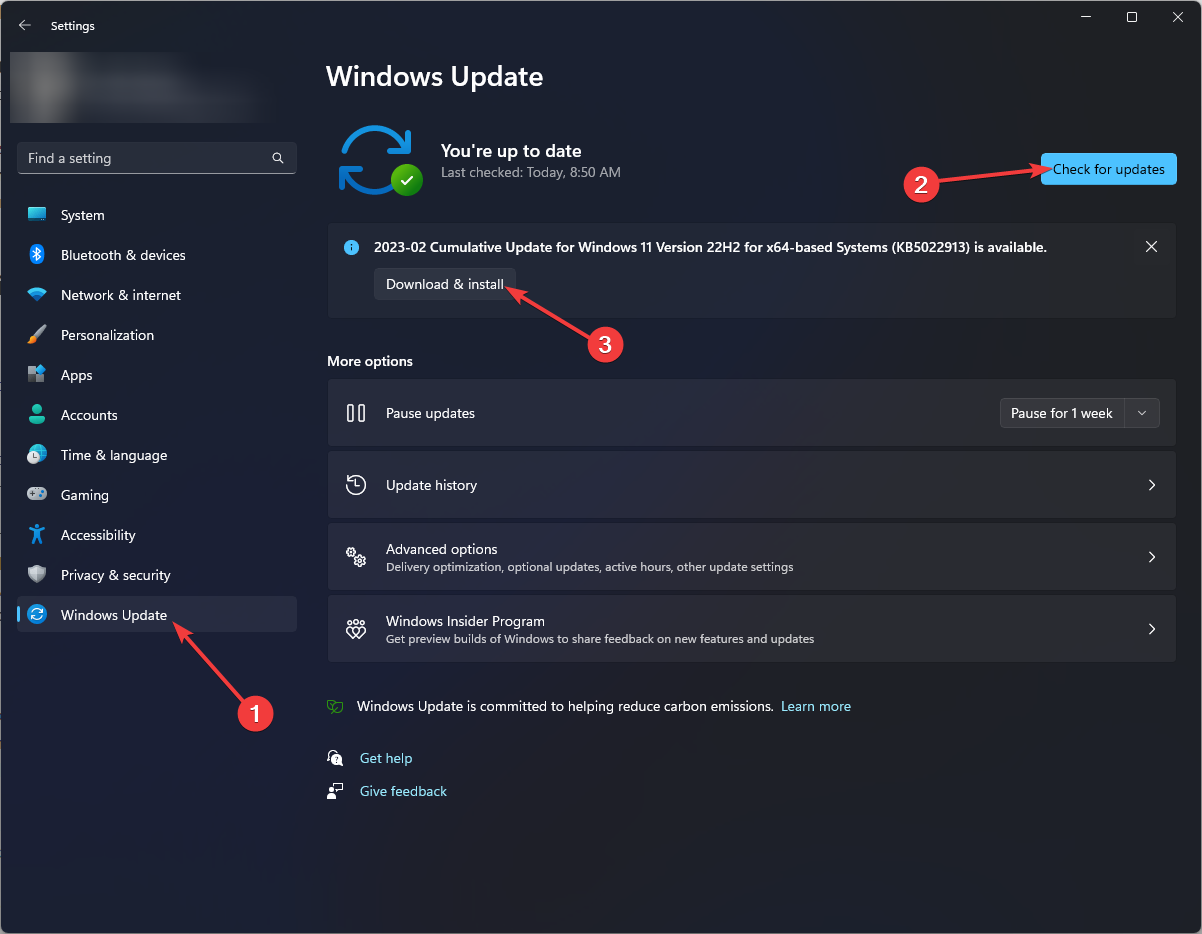
In Windows 11’s Settings go to Windows Update.
Click on Check for Updates.
Let Windows 11 run the update installation process.
Restart your PC, and see if the problem persists.
2. Run a SFC scan to repair any corrupted Windows files
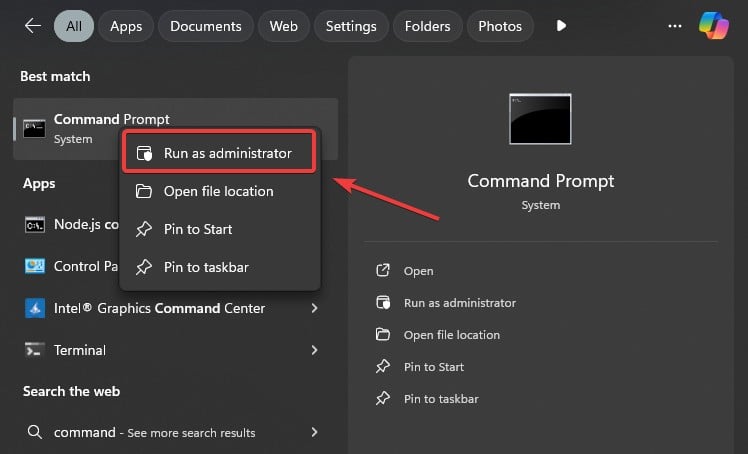
Open Command Prompt with Admin rights.
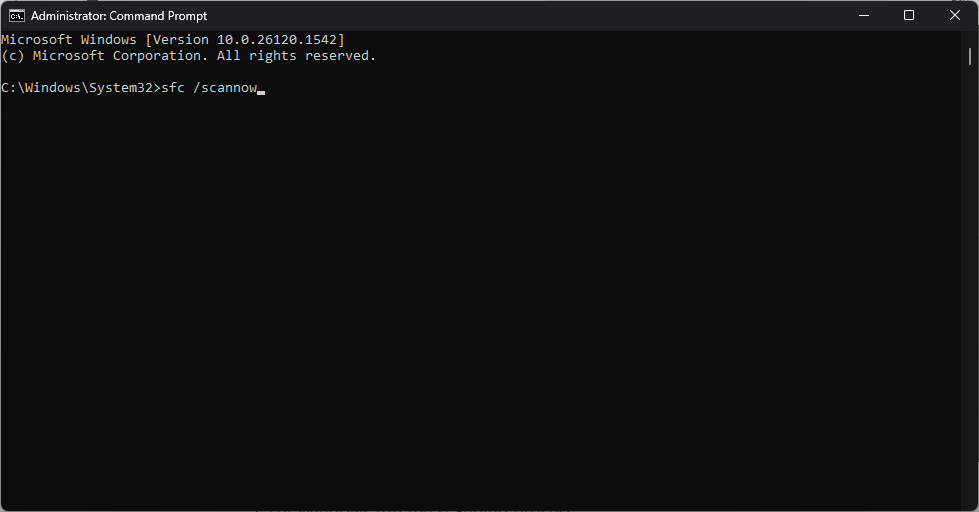
Type in the following command: sfc /scannow
Let Windows run the scanning process.
Restart your PC, and see if the problem persists.
3. Reinstall Printer drivers
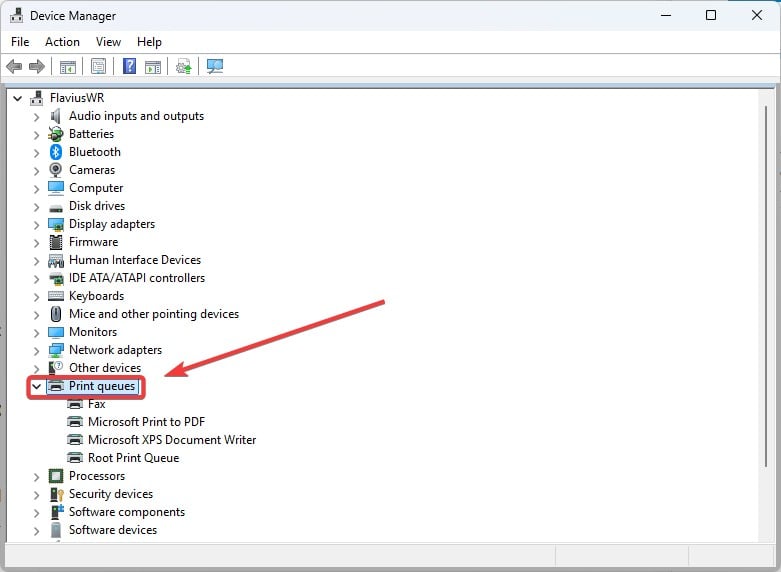
In the Search box, type in Device Manager, and open it.
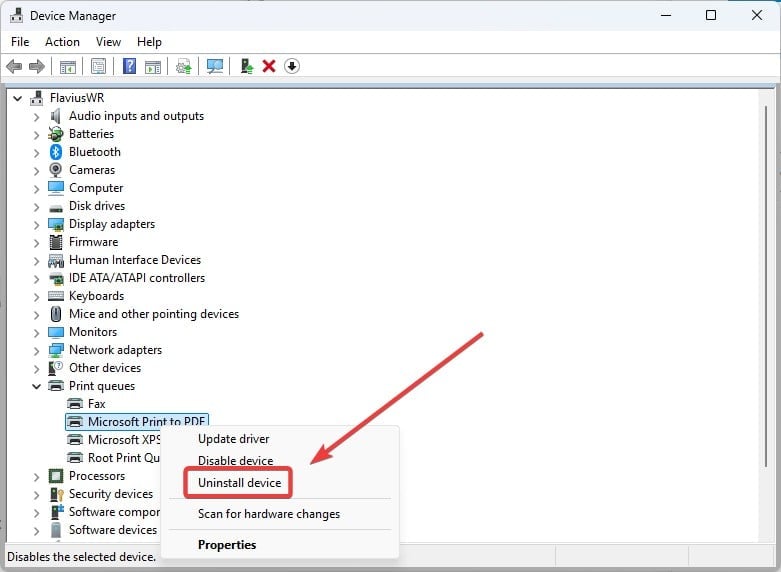
Please scroll down to the Print queues, and click on it.
Right-click on the connected printer and select Uninstall device.
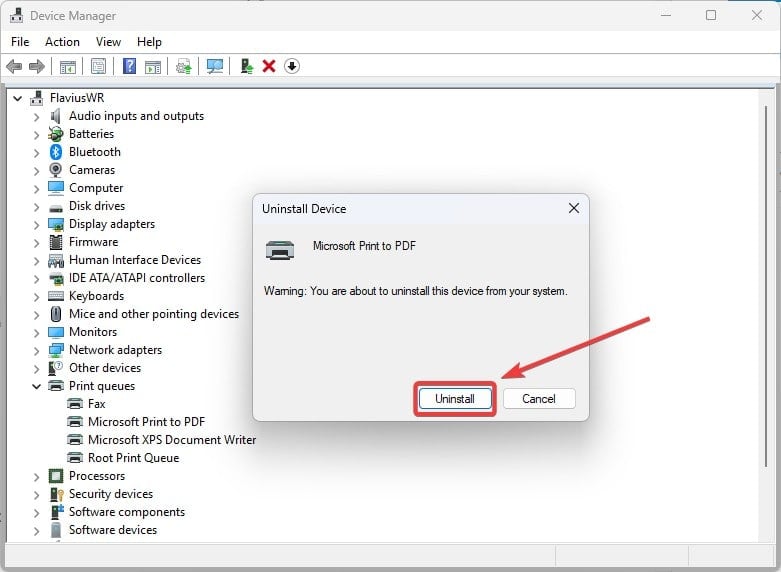
Click on Uninstall, and let Windows run the process.
Restart your PC, and check out if the error shows up or not.
4. Remove corrupted Printer drivers
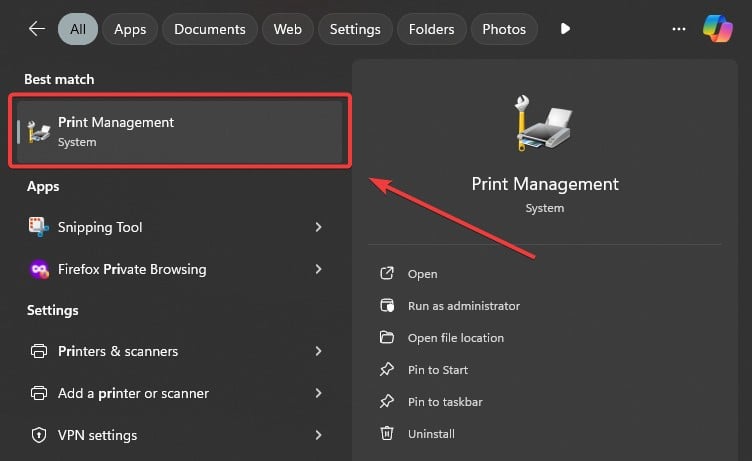
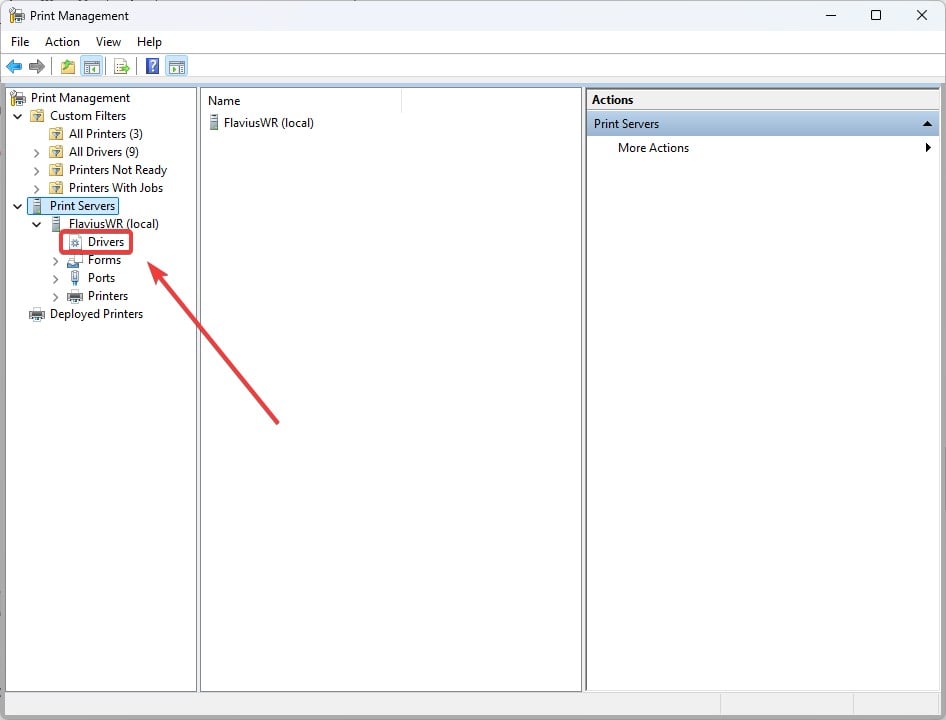
In the Search box, type in Printer Management and open the panel.
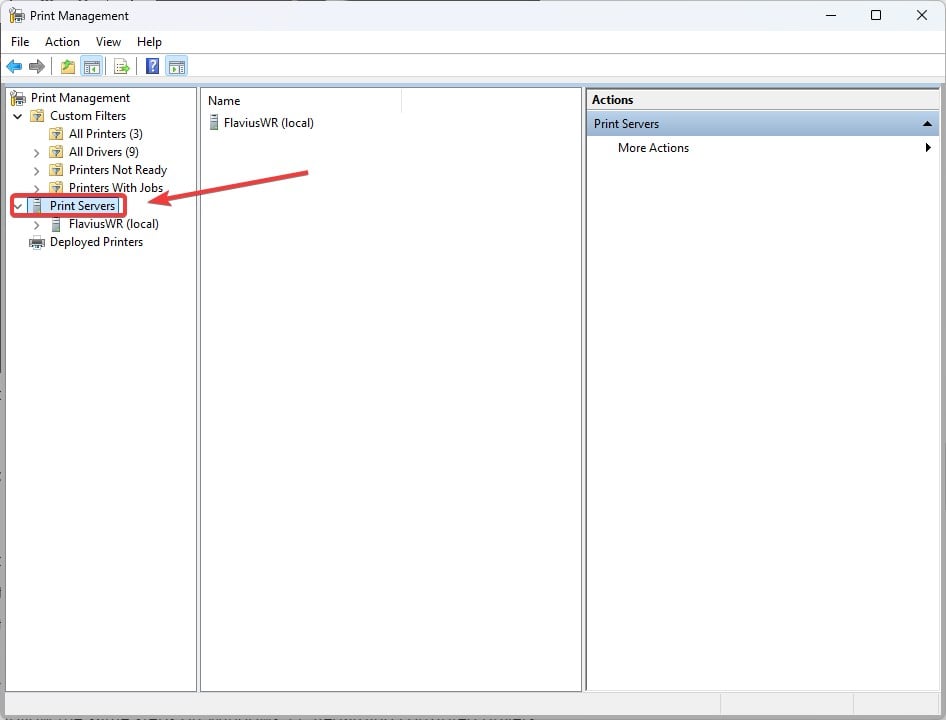
Go to Print Servers, select your local device, and then click on the connected printer.
Select Drivers.
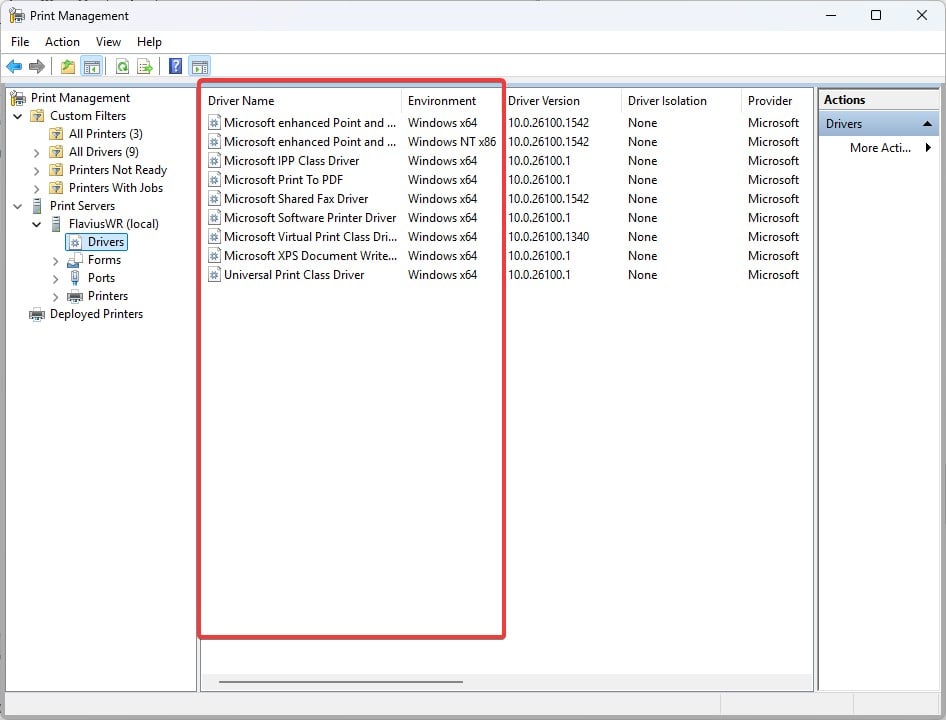
In the right panel a list with all the printer drivers will appear.
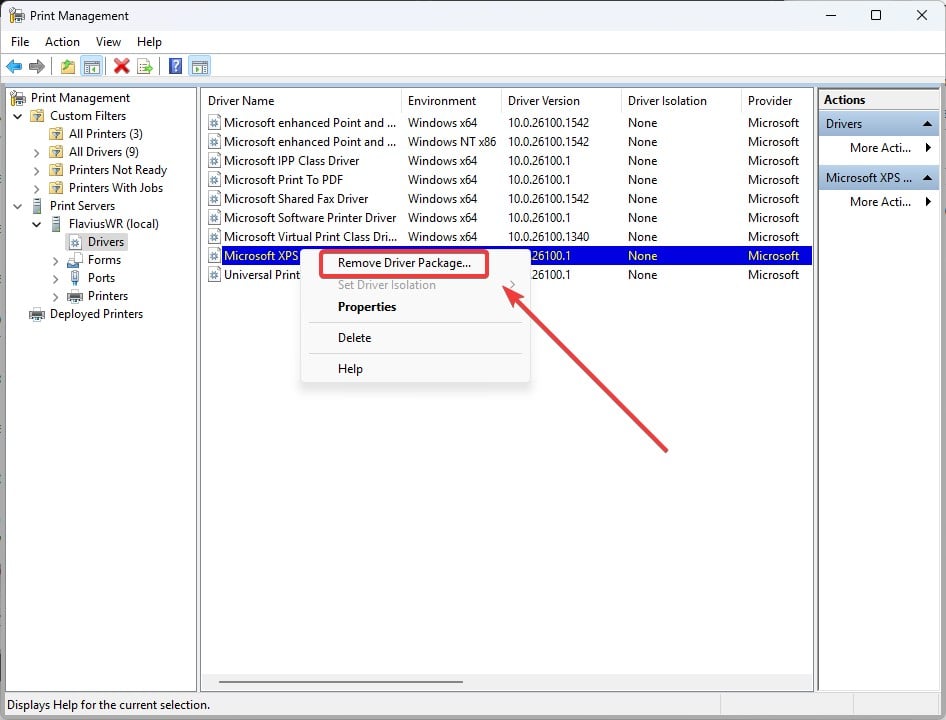
Right-click on the ones related to your printer, and select Remove Driver Package.
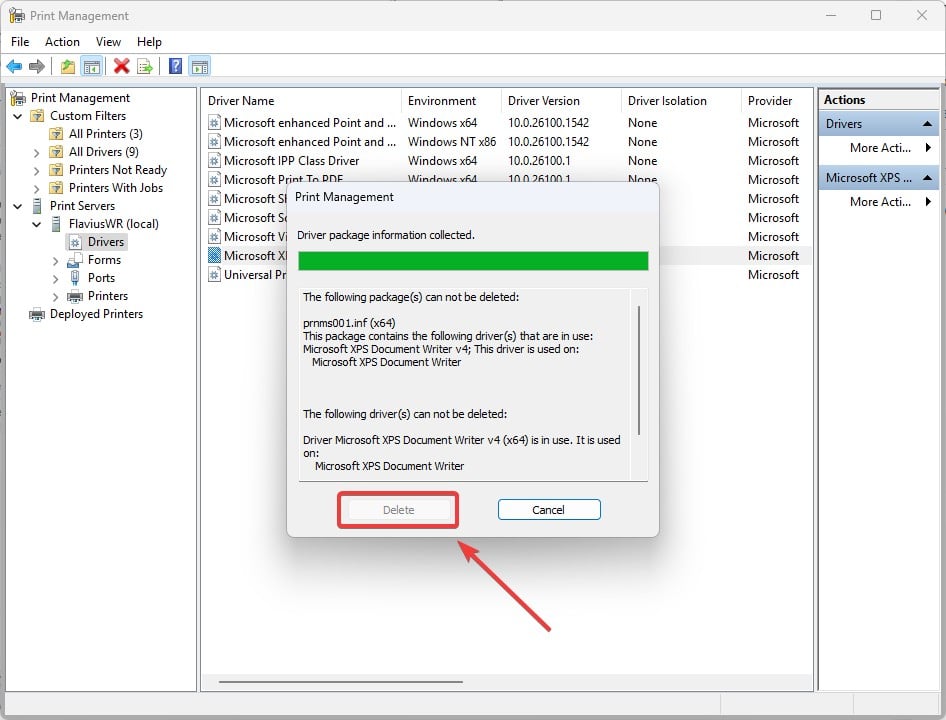
Click on Delete.
These are the most important steps you can take to fix the ERROR PRINTER DRIVER ALREADY INSTALLED bug. However, if you’re feeling up to it, even though it might require a bit of extensive tech knowledge, you might want to try other methods to deal with buggy print drivers.
Fortunately, we have some comprehensive guides for you: make sure to check out this one, and while it applies to Windows 10, you can easily follow the same steps on Windows 11. Regarding corrupted drivers, especially faulty or buggy printer drivers, we also have this guide.
As always, let us know which solutions worked for you in the comments section below.
If you encounter an OrangeEmu.DLL missing error while trying to launch the SIMS 4 game, this guide can help! OrangeEmu.DLL is a dynamic link library linked to SIMS 4, a video game, and is essential to running the game. If you have encountered the DLL file missing error, it could be due to a corrupted/missing DLL file or damaged system files.
How can I fix the OrangeEmu.DLL missing error?
1. Use a third-party DLL fixer
OrangeEmu.DLL is a DLL file used by the game SIMS4. If it is missing or corrupted, the game will not work or launch. You can manually restore a file by copying it from another computer; however, if not done correctly, it can cause more harm than good to your device. Therefore, it is recommended that a third-party DLL fixer tool be used.
These software are known to fix compatibility issues, which are significant problems that plague third-party DLL files and Windows PCs.
2. Turn off real-time protection
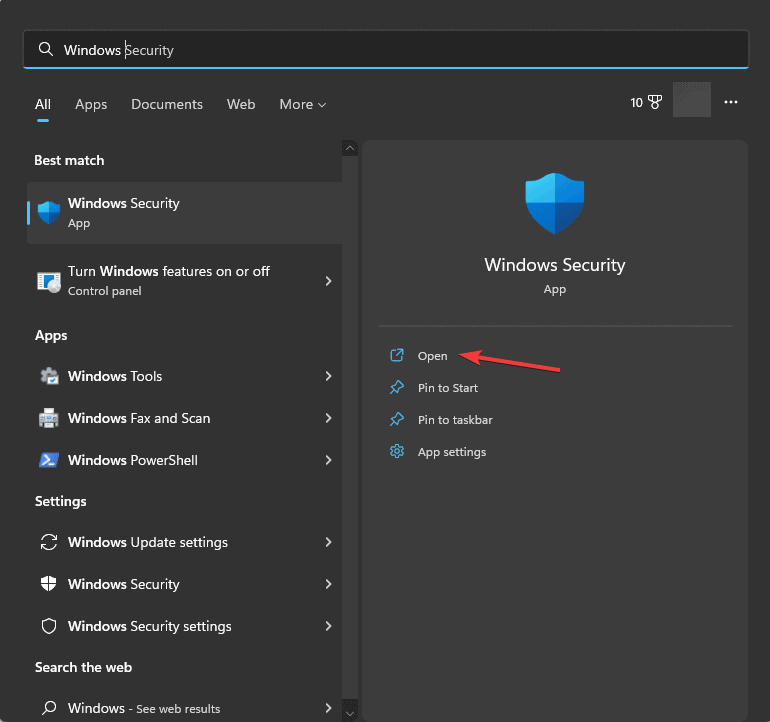
Press the Windows key, type windows security in the search box and click Open.
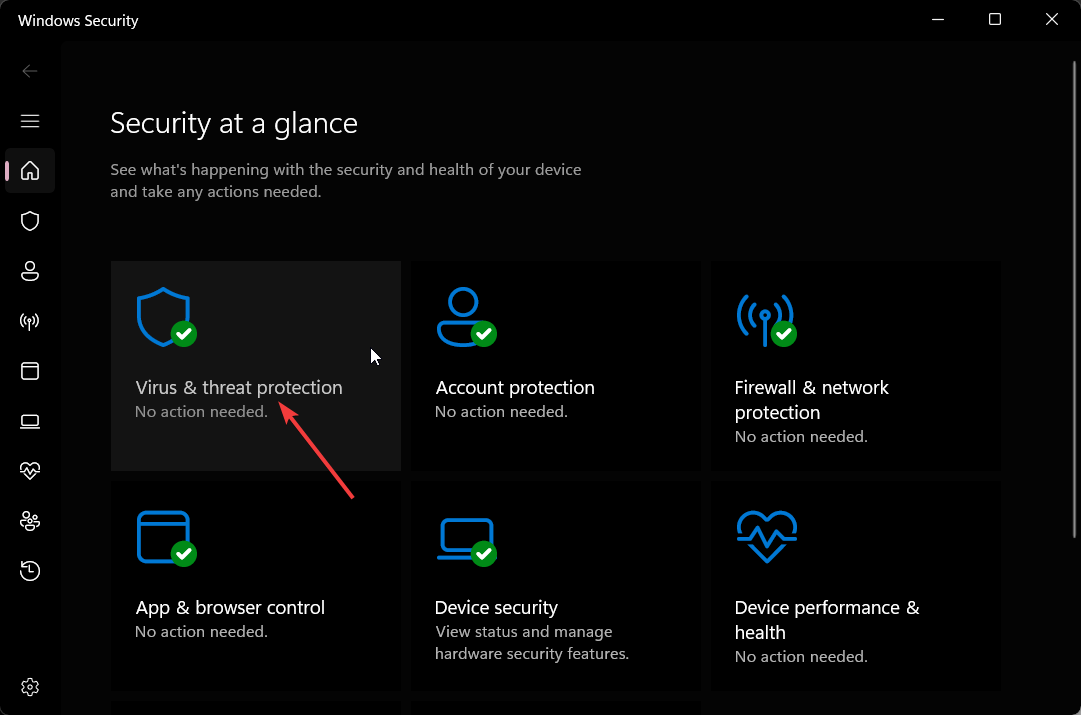
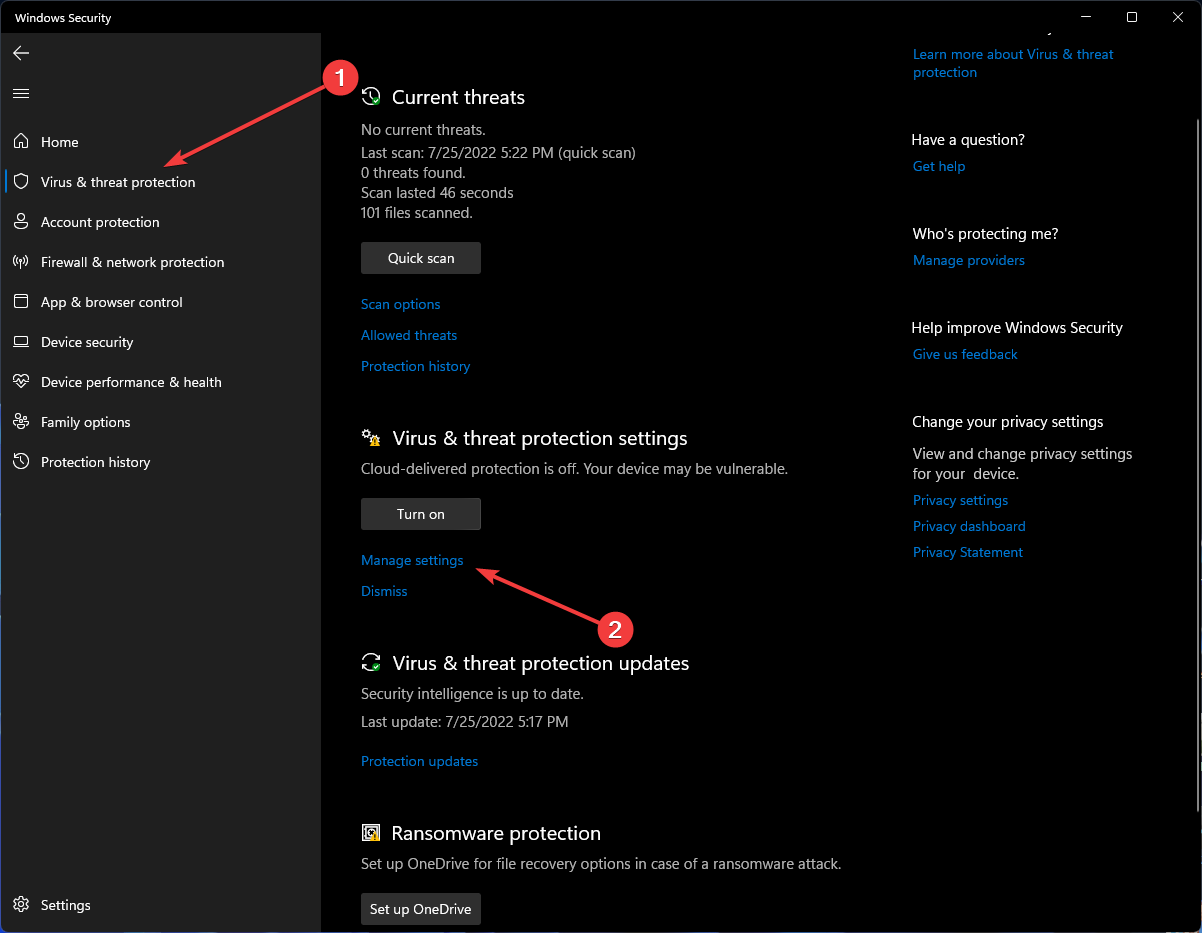
Go to Virus & threat protection, and click Manage settings.
Locate Real-time protection, and toggle off the switch under it.
3. Reinstall Visual C++ Redistributable for Visual Studio 2015
Press Windows + I to open the Settings app.
Go to Apps, then click Installed apps.
Locate Microsoft Visual C++ Redistributable, click the three-dot icon, and select Uninstall. Find and remove all the versions of Visual C++ Redistributable.
Click on this link to go to the Download Center to download the Microsoft Visual C++ Redistributable file.
Double-click the downloaded file to initiate the installation.
Follow the on-screen steps to complete the process.
Follow the same steps and reinstall the SIMS 4 game to try and fix the OrangeEmu.DLL missing error.
Press the Windows key, type window security in the search box, and click Open.
Go to Device security, locate Core isolation, then click Core isolation details.
Toggle off the switch under Memory integrity. Click Yes on the UAC prompt to confirm the choice.
Restart your computer to save the changes.
5. Perform a System Restore
Press the Windows key, type control panel in the search box, and click Open.
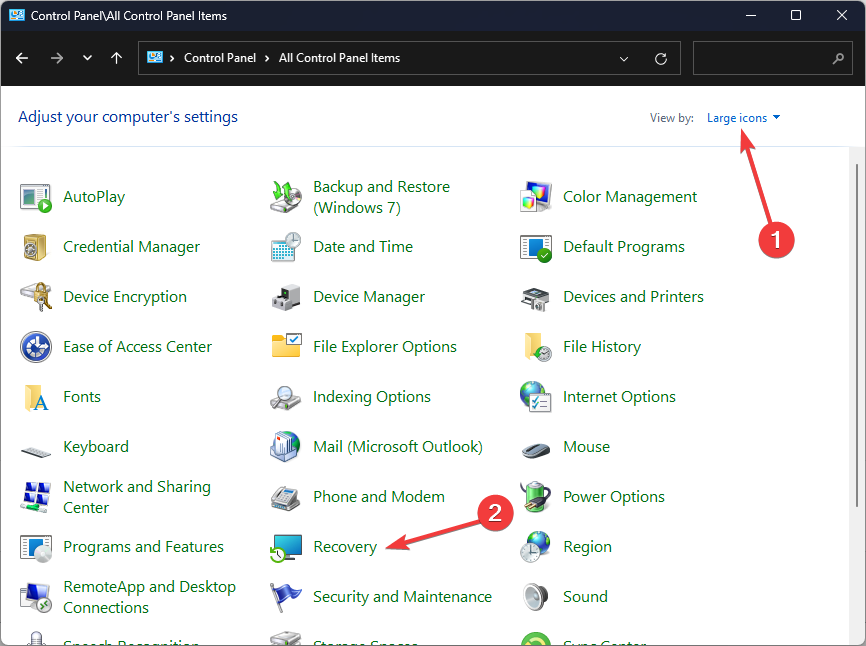
Select Large icons for View by, then click Recovery.
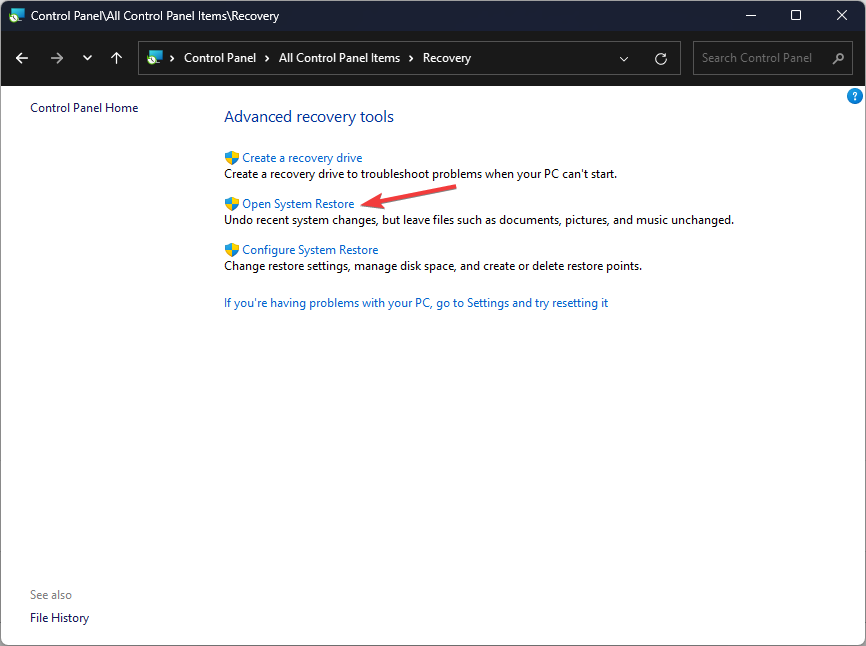
Click Open System Restore.
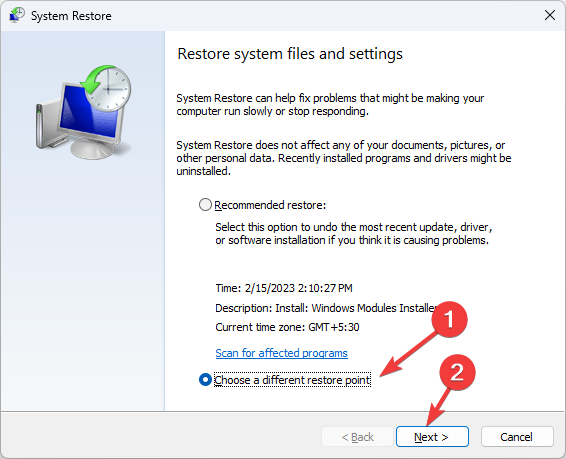
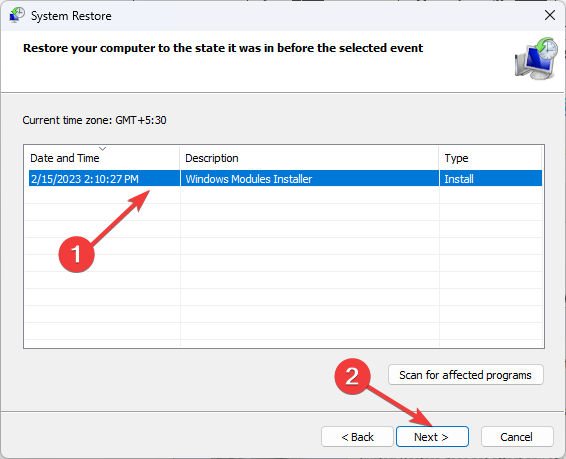
Select Choose a different restore point in the System Restore window and click Next.
You will see a list of all the restore points. Choose the oldest or most recent restore point from when your computer was functioning properly, and click Next.
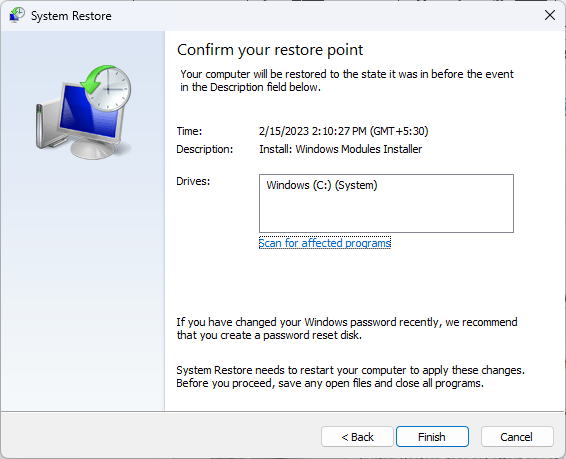
Click Finish to initiate the process.
Windows will restart and restore the system settings to the version you selected. This process may take some time; don’t turn off your computer in between. If you see the System Restore wasn’t completed successfully message after the restart, we suggest you check out this informative guide for solutions.
6. Download the DLL file manually
NOTE
If you want to restore the DLL file manually, you should always download it from a reliable website like DLLme. Our experts at WindowsReport have tested & verified that the files on it are safe to use.
Go to the DLLME website, search OrangeEmu.DLL, choose an appropriate option, and click Download.
Double-click the downloaded folder to open, locate, and copy the .dll file.
Go to this path and paste the DLL file. Don’t forget to replace C with your system drive letter if it is not C for you:C:\Windows\System32
Restart your computer to save the changes.
In conclusion, to fix any issues related to OrangeEmu.DLL, you should reinstall Visual C++ Redistributable for Visual Studio 2015, perform a system restore, or use a third-party DLL fixer to restore the missing DLL file.
If you have any suggestions or questions about the OrangeEmu.dll file missing issue, feel free to mention them in the comments section below. We’re happy to help!
Are you wondering where is the recycle bin in Windows 10?
It’s an important feature for managing deleted files. You can recover accidentally deleted items or permanently remove them from their system. I’ll show you how to open it in several ways.
Let’s get started!
How To Find the Recycle Bin Location in Windows 10
Here are the options:
Open from the Desktop
Accessing the Recycle Bin directly from the desktop is one of the simplest and quickest methods in Windows 10. If the Recycle Bin icon is on your desktop, you can easily open it by double-clicking it.
Launch Through Settings
You can access the recycle bin through settings if you don’t see it on your desktop. Here are the steps:
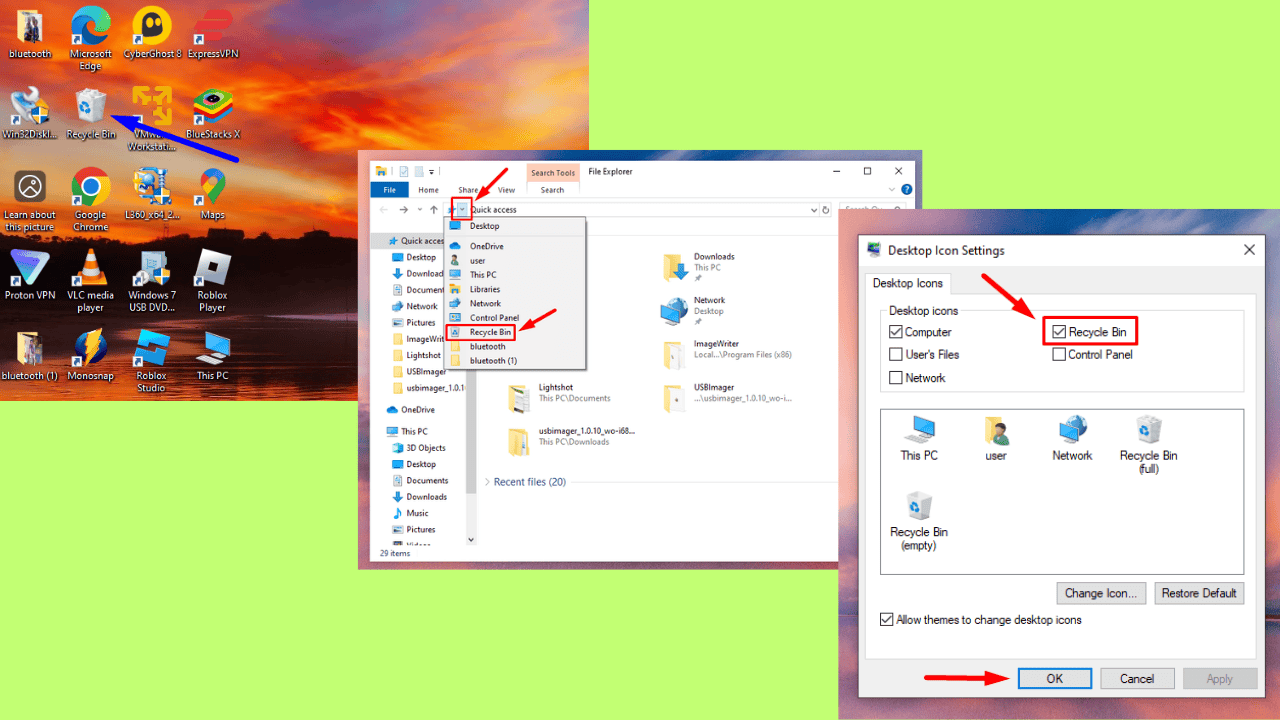
Right-click in a space on the desktop and select Personalize.
Tap Themes, then click on Desktop icon settings under Related Settings.
Check the box next to Recycle Bin, then tap OK to make it visible on the desktop.
Open Using Search
Follow the below steps:
Click on the Search icon in the taskbar.
Type “Recycle Bin” and click on the corresponding result to open it.
Open from File Explorer
Here are the instructions:
Open File Explorer by double-tapping the file icon at the bottom of the screen. Alternatively, press the Windows icon + E.
Type Recycle Bin in the address bar, press Enter, or tap the arrow before Quick Access.
Access Using Run Command
Here’s how:
Press Windows + R to open the Run dialog box.
Type explorer.exe shell:RecycleBinFolder and press Enter.
Your PC’s recycle bin will launch from the file explorer.
ERROR_REM_NOT_LIST may occur when you try to access a network resource but Windows cannot find the network path.
Most of the time, the network path may be incorrect or the destination computer has been turned off. It is also possible that your network configuration is incorrect especially if a recent power failure occurred.
How do I fix ERROR_REM_NOT_LIST?
1. Run the DISM and SFC scans
Hit the Windows key, type cmd in the search bar, and click Run as administrator.
Type the following commands and press Enter after each one: DISM.exe /Online /Cleanup-Image /Restorehealthsfc /scannow
Restart your PC.
2. Run a virus scan
Press the Start Menu, search Windows Security and click Open.
Select Virus & threat protection.
Next, press Quick scan under Current threats.
If you don’t find any threats, proceed to perform a full scan by clicking on Scan options just below Quick scan.
Click on Full scan to perform a deep scan of your PC.
Wait for the process to finish and restart your system.
3. Address driver issues
3.1 Update your network drivers
Hit the Windows key, type Device Manager in the search bar, and click Open.
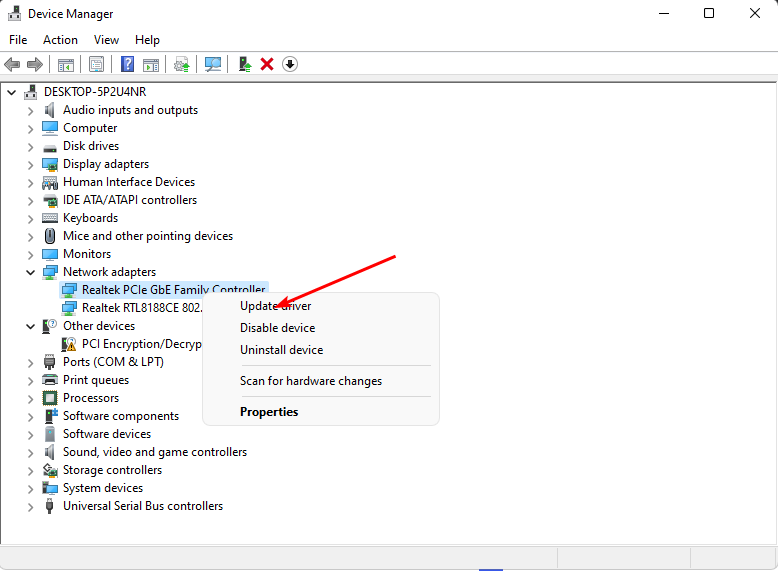
Navigate to your Network adapter, right-click on it, and select Update driver.
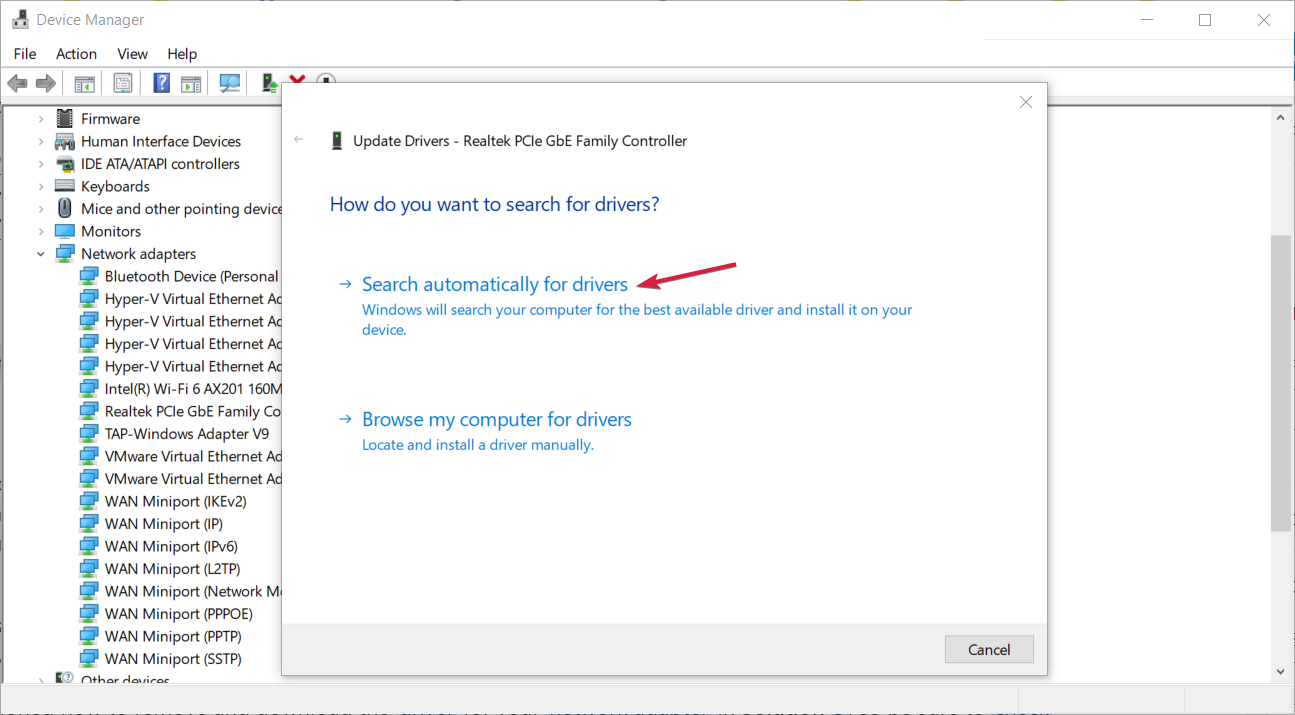
Select Search automatically for updated drivers.
3.2 Reinstall your network drivers
Click on the Start Menu icon, type Device Manager in the search bar, and click Open.
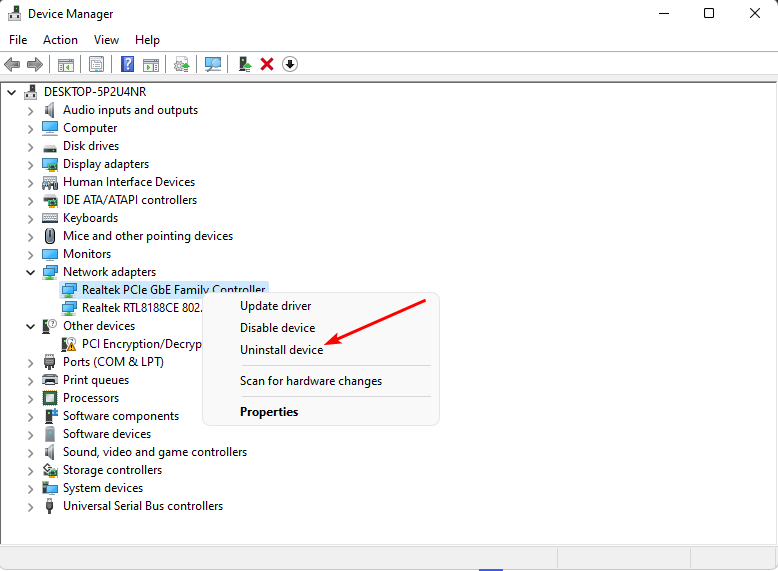
Navigate to your Network adapter, right-click on it, and select Uninstall device.
Confirm Uninstall in the next confirmation dialog.
Restart your PC, and your drivers will be automatically reinstalled.
3.3 Roll back to a previous network driver
Click on the Search icon, type Device Manager in the search bar, and click Open.
Navigate to Network adapter to expand, right-click on your network card and select Properties.
Click on the Driver tab, and select Roll Back Driver.
Select a reason for rolling back in the next prompt, then click Yes.
Restart your PC, and the previously installed drivers for your device will be loaded.
Press Windows + R, type regedit in the dialog box, and press Enter or click OK to open the Registry Editor.
In the app, go to File, then Export.
Now select All as Export range.
Enter the desired file name, choose a safe location, and clickSave. This will create a backup. If any issues occur after you modify your registry, you can run the file you created to restore it to its original state.
Now you can start cleaning the files. In the Registry Editor, go to the following location: HKEY_LOCAL_MACHINE\SOFTWARE
Right-click on the file you want to remove and select Delete.
If the ERROR_REM_NOT_LIST error occurred because of an incorrect network path, cleaning the registry can help restore the default configuration settings that presented errors when accessing these resources.
5. Perform a System Restore
Press the Windows key, type Control Panel, and click Open.
Select Large icons as View by and click Recovery.
Click Open System Restore.
Select Choose a different restore point and click Next.
Now select the restore point and click Next.
Click Finish to restore the previous settings, and Windows will restart.
If you’re out of luck with the above steps, you may have to go for the clean install of your OS. You don’t have to worry about losing your files since this process does not involve formatting your hard drive. Further, if you’ve already performed a backup of your files, this shouldn’t be an issue.
For more related network path errors, we have a more comprehensive article on various ways to go about it. And to prevent such errors in future, always ensure your Wi-Fi has a valid IP configuration to allow seamless connection.
If you have any other suggestions or solutions, let us know in the comment section below.
Between Synaptics touchpad driver and Windows precision, you may need to make a choice to enhance your experience. Aside from the mouse, a touchpad can help you navigate easily through your apps and for this to be a seamless process, you need the right drivers.
If you have a touchpad, Windows precision drivers come pre-installed. Synaptic drivers on the other hand are third-party and custom for every device and you’ll have to get your specific ones from your device’s manufacturer.
Aside from being an alternative, they also have other features such as:
Highly customizable – While Windows precision touchpad offers basic touchpad gestures, the Synaptics option has multiple gestures to choose from and can be customized that can enhance your productivity.
Advanced features – With the Synaptics touchpad drivers, you have the option to control the level of sensitivity and minimize accidental touches. This can make you be more efficient when you’re working.
Multiple profiles – Depending on your needs, you can create multiple profiles with different touchpad gesture settings that cater to your preferences.
What are the main differences between Synaptics touchpad drivers and Windows precision?
Feature
Synaptics Touchpad Drivers
Windows Precision Drivers
Customization
Highly customizable with rich customization options
Basic customization with standard gestures and settings
Gestures
Multiple touch gestures with customizable options
Mostly predefined and limited gesture control
Profile Management
Allows profile settings with different customization settings
Blanket settings throughout
Driver and Software Updates
Regular manufacture updates
Dependent on Windows Update
Compatibility
Limited compatibility with certain hardware or software
Universally compatible with most hardware and software using Windows OS
Installation Process
May require manual installation and configuration
Automatic installation with the Windows OS
How do I install the Synaptics touchpad and Windows precision drivers?
1. Use your laptop manufacturer’s website
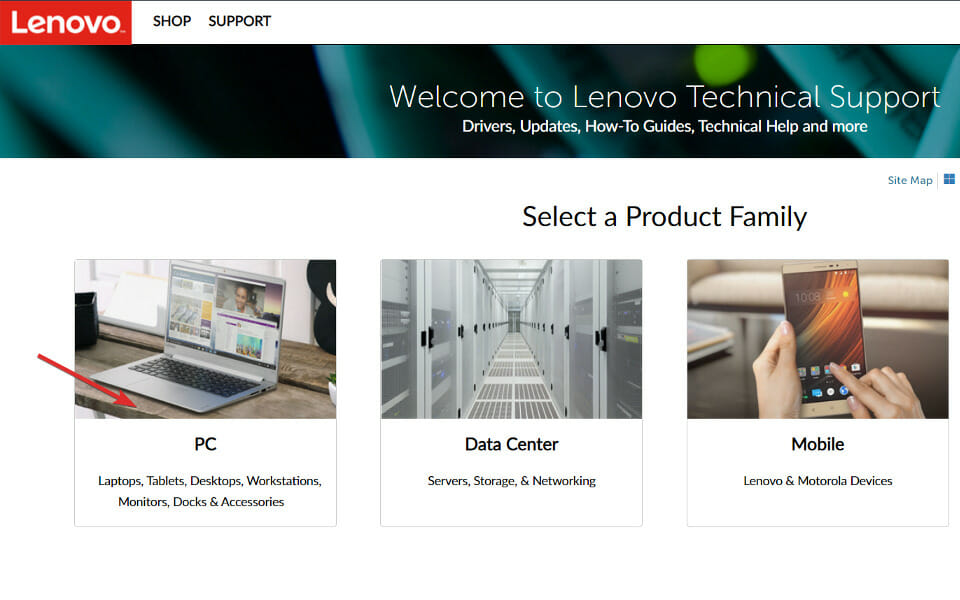
We will be using Lenovo as an example, but you will have to navigate to your own specific device manufacturer in order to download the Synaptics touchpad driver. This being said, here’s the Lenovo support page from where you can choose a PC in order to start.
Next, enter your product model and go to Drivers & software.
Type Synaptics touchpad driver in the search bar. The available drivers will be shown to you as a result.
2. Use Device Manager
Right-click on the Start icon from Taskbar and choose Device Manager.
Expand the Mice and other pointing devices section and right-click on the Synaptics touchpad driver in order to choose Update driver.
Choose the Search automatically for drivers option.
Next, click on the Select for updated drivers on Windows Update option.
Click on Advanced options then Optional updates in order to see the available drivers for download. Lastly, select it and hit the Download & install button.
Since Windows precision drivers come pre-installed, you only need to update them via Device Manager or Windows Update.
With the above information, you can now make an informed decision on which driver to choose. All you have to do is check for compatibility and your needs.
If you go for the Synaptic touchpad driver, you’ll have to disable the Windows precision drivers. In the slight chance that you’re unable to disable your touchpad drivers, we have an article on how to force disable them.
And if you’re looking for customization tips, we have a dedicated article on some of the best touchpad gestures that will enhance your experience. Also, if you’re in the market for a new touchpad, we have a list of the best touchpads to kickstart your journey.
Needless to say, each driver has its own drawbacks. Your touchpad cursor may disappear but it’s nothing we can’t handle.
Have you used these touchpad drivers? Which one would you prefer and why? Share with u your preferences in the comment section below.
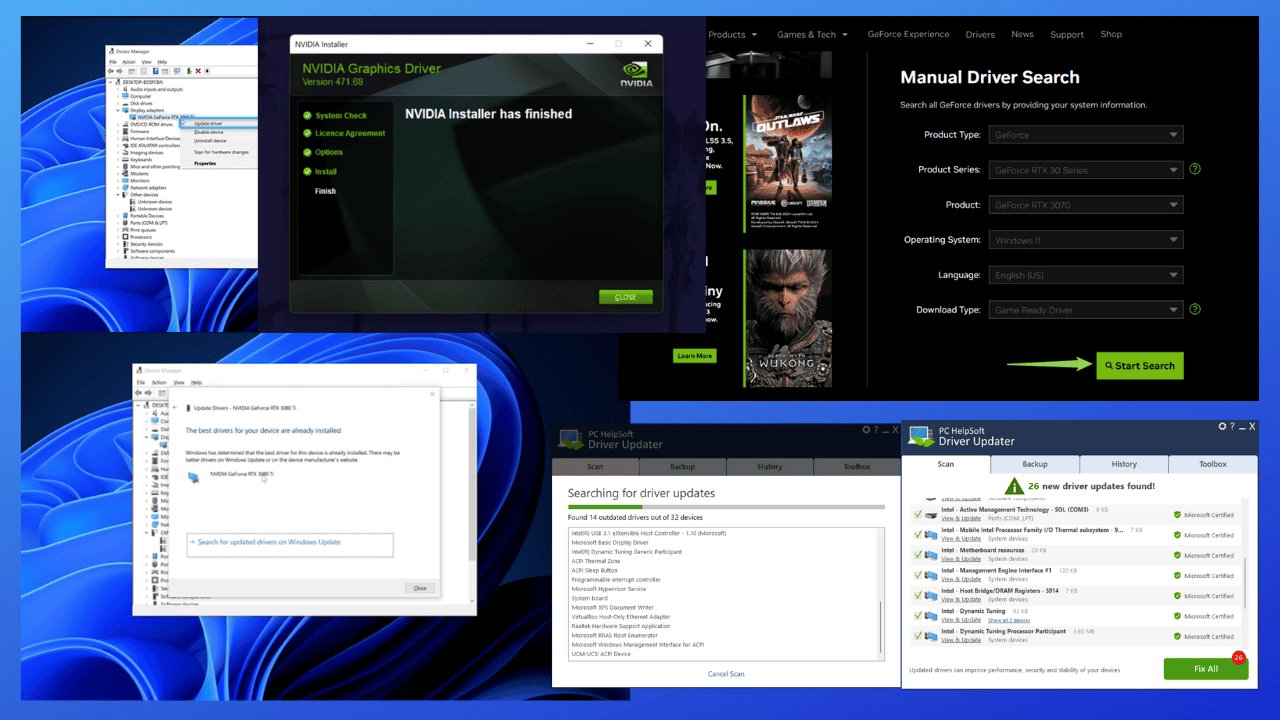
Keeping your GPU up to date is essential for performance and stability. If you’re wondering how to update NVIDIA drivers in Windows 11, there are several reliable methods to get the latest graphics updates quickly. This guide covers automatic and manual options so you can choose the one that works best for you.
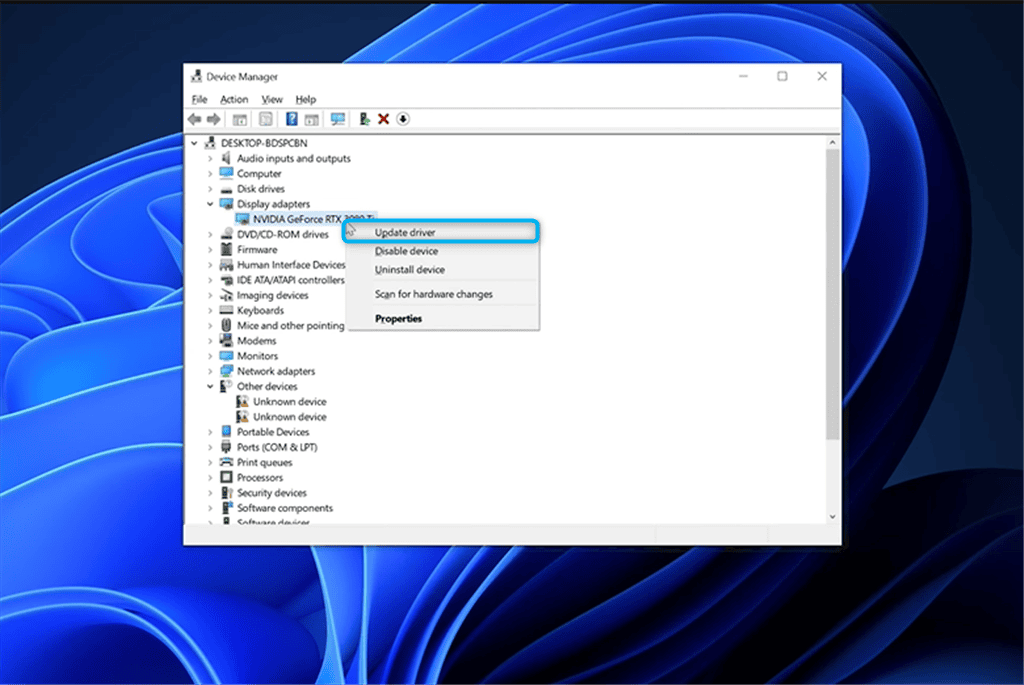
1. Launch the Windows Start menu, search for Device Manager, and click Open.
2. Expand the Display adapters drop-down menu to view your installed NVIDIA driver with version details.
3. Right-click on it and select the Update driver option from the context menu.
4. Switch to the Driver tab and click on the Update Driver button.
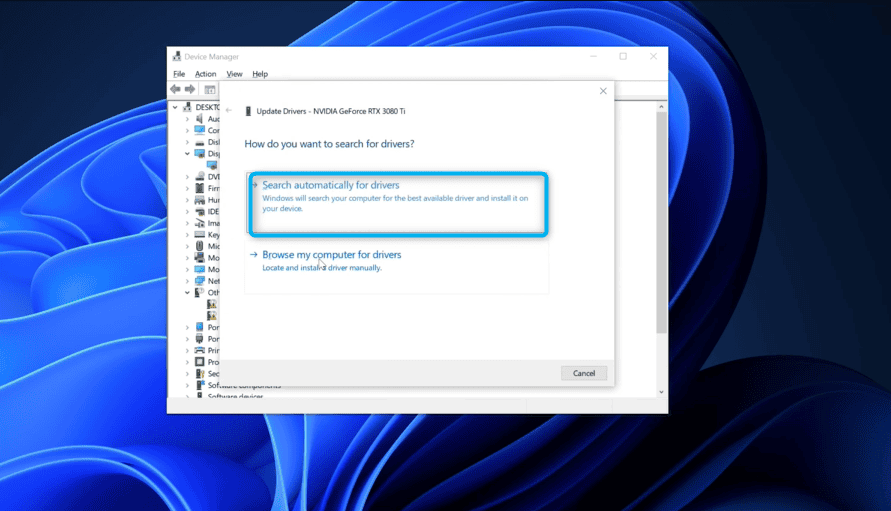
5. From the pop-up window, click on Search automatically for drivers.
6. As you can see, the best driver for NVIDIA GeForce RTX 3080 Ti is already installed on my PC.
However, you can install the updated version if Windows suggests it after searching.
Switching from AMD to NVIDIA? Before installing new GeForce drivers, fully remove old AMD packages to avoid conflicts. Follow this step-by-step guide to cleanly uninstall AMD drivers and install NVIDIA drivers: Uninstall AMD drivers & install NVIDIA drivers.
NOTE
Windows Device Manager follows the same process for updating NVIDIA drivers on different operating system interfaces.
2. Update NVIDIA Drivers Automatically via Windows Update
Windows 11 can handle driver updates automatically. If you want your system to upgrade NVIDIA driver Windows 11 without extra steps, this method is the simplest.
Press Windows + I to open Settings.
Go to Windows Update → Advanced options.
Click on Optional updates and check for driver updates.
Select the latest NVIDIA display update Windows 11 and install it.
Tip: If Optional updates shows nothing, you can download NVIDIA drivers on Windows 11 manually to get day-one Game Ready fixes or urgent stability patches sooner.
3. Use NVIDIA GeForce Experience
1. Navigate to the official website and click on the Manual Driver Search option.
2. Now, enter information regarding your NVIDIA driver, which includes:
Product Type
Product Series
Product
Operating System
Language
Download Type, etc.
Then, click on Start Search.
3. Select the latest version of your NVIDIA driver and click Get Download.
4. Next, hit the Download Now button.
5. Choose the destination folder for the selected NVIDIA driver updater app and click Save.
6. After a successful download, open the updater app.
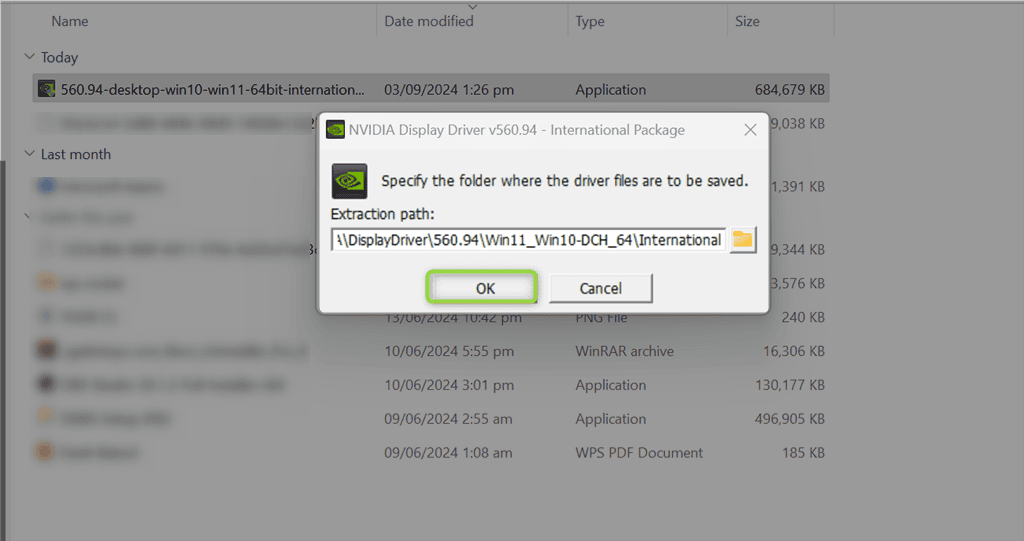
7. Specify the extraction path or folder where you need to save the NVIDIA driver files.
8. Wait for a few minutes while the files are saved to the system.
9. As soon as the NVIDIA driver updater launches, it checks for system compatibility.
10. Select the NVIDIA Graphics Driver and GeForce Experience option and click AGREE AND CONTINUE.
11. Choose the Express (Recommended) installation option and click NEXT.
12. As a result, the NVIDIA Installer prepares to update the relevant driver on your system.
13. Click CLOSE.
4. Download the Latest NVIDIA Drivers from Official Website
To download NVIDIA drivers on Windows 11 safely, including Game Ready and Studio releases, go straight to NVIDIA’s official driver portal. This ensures you get the newest WHQL build matched to your exact GPU and OS.
Select your GPU model and Windows 11 as the operating system.
Click Search and then Download the driver package.
Run the installer and follow the on-screen instructions for installing NVIDIA drivers Windows 11.
If you’re using an older NVIDIA GPU like the GT 210 1GB, you can check this GT 210 1GB driver download guide for the correct package and installation steps tailored for that model.
5. Use a Third-party Tool
You can also use any third-party tool to update NVIDIA drivers on Windows 11. A straightforward tool I have on my system is Fortect Updater Driver.
It automatically downloads, updates, and repairs missing drivers, without requiring any manual actions.
Here’s how you use it:
1. First, install and launch your desired driver update software. In my case, I’ll open Fortect using the Start menu.
2. Click on the Check for drivers option from the right side.
3. Wait for a few seconds until the search is complete.
4. Click on the Fix All button to apply the selected updates.
5. Reboot your system to apply the new changes.
You can select to update all at once or only some.
So now you know how to update NVIDIA drivers on Windows 11. Both Device Manager and NVIDIA GeForce Experience provide manual options. On the other hand, you can perform the same thing automatically with a third-party tool.
1. How do I check if my NVIDIA drivers are up to date?
Open the NVIDIA Control Panel, go to Help → System Information, and look at the driver version. Then compare it with the latest version available on NVIDIA’s official site.
2. Where are NVIDIA drivers located in Windows 11?
You can usually find them in the Program Files folder under NVIDIA Corporation, or check driver details in Device Manager.
3. Can I use Windows Update to install new graphics drivers?
Yes, but it may not always offer the latest version. It’s often better to check manually if you’re looking for the newest features or fixes.
The ERROR_SET_POWER_STATE_VETOED system error, with code 1140 (0x474), appears when an application or driver prevents Windows from changing its power state, i.e., sleep, hibernate, or shutdown.
The error message reads, An attempt to change the system power state was vetoed by another application or driver, but it doesn’t tell us anything about the app or driver that caused the error in the first place. So, troubleshooting may take some time!
Before you proceed, restart the PC, disconnect all non-critical peripherals, and install any pending Windows updates. For many of you, these quick checks alone should fix the error!
How can I fix ERROR_SET_POWER_STATE_VETOED?
Tip
For a quick resolution, check the crash logs in Windows generated around the same time the error appeared on your PC, identify the faulty components (driver or application), and directly head to the relevant solution below. If that’s not possible, follow them in the listed sequence.
1. Terminate active applications
Press Ctrl + Shift + Esc to open the Task Manager.
Now, select the active third-party applications individually and click on End task.
After terminating each app, verify whether the error message goes away.
Once it does, the app last terminated was causing ERROR_SET_POWER_STATE_VETOED (0x474).
2. Uninstall conflicting apps
Press Windows + R to open Run, type appwiz.cpl in the text field, and hit Enter.
Select the conflicting app from the list, and click on Uninstall.
Follow the on-screen instructions to complete the process.
Restart the computer and check for improvements.
If the problem persists after a quick removal, the app may still have some leftover files triggering the 1140 (0x474) error. In this case, I recommend using a top-rated software uninstaller for Windows to get rid of any remnant app cache or Registry entries.
3. Reinstall the malfunctioning driver
Press Windows + X to open the Power User menu, and select Device Manager.
Look for devices with a warning sign (yellow exclamation mark) listed next to the icon. These are the devices with a corrupt driver and the categories they are listed under auto-expand on the opening the Device Manager.
If you find any, right-click on the entry, and select Unistall device.
Tick the checkbox for Attempt to remove the driver for this device, and click Uninstall.
Restart the computer, and Windows will automatically reinstall a fresh copy of the driver.
4. Update the affected driver
Press Windows + R to open Run, type devmgmt.msc in the text field, and hit Enter.
Expand all the entries here, right-click on the devices listed underneath individually, and select Update driver.
Click on Search automatically for drivers and wait for Windows to install the best locally available version.
After updating all the drivers, restart the computer and check for improvements.
If you were able to find the conflicting one in Windows error logs, simply update that driver instead of all the installed ones. In case Windows tells you that the best driver is already installed, head to the manufacturer’s website, find out the newest version, and then manually install the latest driver!
5. Repair the corrupt system files
Press Windows + S to open Search, type Command Prompt, and click on Run as administrator.
Click Yes in the UAC prompt.
Paste the following DISM commands individually and hit Enter after each: DISM /Online /Cleanup-Image /CheckHealthDISM /Online /Cleanup-Image /ScanHealthDISM /Online /Cleanup-Image /RestoreHealth
Now, run the SFC scan using this command: sfc /scannow
Finally, reboot the PC and check for improvements.
In a few cases, the ERROR_SET_POWER_STATE_VETOED Windows system error was caused by corrupted system files. Here, simply running the SFC (System File Checker) and DISM (Deployment Image Servicing and Management) scans should replace the protected system files with their cached copy.
6. Disable fast startup
Press Windows + S to open Search, type Control Panel in the text field, and click on the relevant result.
Click on System and Security.
Now, click on Change what the power buttons do under Power options.
Click on Change settings that are currently unavailable.
Untick the checkbox for Turn on fast startup and click on Save changes.
Finally, restart the PC and verify whether the ERROR_SET_POWER_STATE_VETOED 1140 issue fixed
7. Perform a system restore
Press Windows + R to open Run, type rstrui.exe in the text field, and hit Enter.
Select the Choose a different restore point option, and click Next.
Pick the oldest restore point from the list and click Next.
Verify the restore details, click on Finish, and then confirm the change.
Wait for the process to complete. It may take 15-45 minutes.
A system restore allows you to revert the PC to a previous stable state where the ERROR_SET_POWER_STATE_VETOED issue didn’t exist. All you need is a restore point created before the issue first appeared!
In case a restore point is not available, the last option is to reinstall Windows. For that, get the Windows ISO from Microsoft’s official website and then proceed with the reinstallation.
For any queries or to share which fix worked for you, drop a comment below.
Many users have reported getting a system error with an error message: The program can’t start because tbb.dll is missing from your computer. Try reinstalling the program to fix this problem when trying to start a program on their computer. This could happen if the program you are trying to start is corrupt or the tbb.dll is not found.
To begin with, restart your computer and ensure you have the latest Windows version installed.
How can I fix the tbb.dll not found error?
1. Reinstall the affected app
Press Windows + I to open the Settings app.
Go to Apps, then click Installed apps.
Locate the app, click the three-dot icon, and select Uninstall.
Click the Uninstall button to confirm the action.
Now go to the Microsoft Store, search for the app, and click Get.
The app will be downloaded and installed on your computer.
2. Use a third-party DLL fixer
TBB.DLL (Threading Building Blocks) is a DLL file used by many apps, including Visual Studio 2010 and AutoCAD. If it is missing or corrupted, the apps will not work correctly; you can manually restore a file by copying it from another computer; however, if not done correctly, it can cause more harm than good to your computer. Therefore, it is recommended that a third-party DLL fixer tool be used.
These software are known to fix compatibility issues, which are significant problems that plague third-party DLL files and Windows PCs.
3. Run an offline scan
Press the Windows key, type windows security in the search box, and click Open.
Go to Virus & threat protection, and click Scan options.
Under Scan options, click Microsoft Defender Antivirus (offline scan).
Click the Scan now button to start scanning your computer.
Press the Windows key, type cmd in the search box, and click Run as administrator.
Copy & paste the following command to repair or restore Windows system files, then hit Enter: sfc/scannow
Once the command is successfully complete, type the following commands one by one to restore Windows OS image files, and press Enter after every command:
Wait for the command to be complete, then restart your computer to let the changes take effect.
5. Reinstall Visual C++ Redistributable for Visual Studio 2015
Press Windows + I to open the Settings app.
Go to Apps, then click Installed apps.
Locate Microsoft Visual C++ Redistributable, click the three-dot icon, and select Uninstall.
Click on this link to go to the Download Center to download the Microsoft Visual C++ Redistributable file.
Double-click the downloaded file to initiate the installation.
Follow the on-screen steps to complete the process.
6. Perform a System Restore
Press the Windows key, type control panel in the search box, and click Open.
Select Large icons for View by, then click Recovery.
Click Open System Restore.
Select Choose a different restore point in the System Restore window and click Next.
You will see a list of all the restore points. Choose the oldest or most recent restore point from when your computer was functioning properly, and click Next.
Click Finish to initiate the process.
Windows will restart and restore the system settings to the version you selected. This process may take some time; don’t turn off your computer in between. If you see the System Restore wasn’t completed successfully message after the restart, we suggest you check out this informative guide for solutions.
7. Download the DLL file manually
NOTE
If you manually restore the DLL file, you should always choose a reliable website like DLL-Files to download it. Our experts at WindowsReport have tested and verified that the files on it are safe to use.
Visit the DLL-Files website, search TBB.DLL, choose an appropriate option, and click Download.
Double-click the downloaded folder to open, locate, and copy the .dll file.
Go to this path and paste the DLL file. Don’t forget to replace C with your system drive letter if it is not C for you: C:\Windows\System32
Restart your computer to save the changes.
In conclusion, to fix any issues related to TBB.DLL, you should run SFC & DISM scans, perform a system restore, or use a third-party DLL fixer to restore the missing DLL file.
If you want to keep track of your schedule, you might be interested in how to connect Google Calendar to Slack. This is simpler than you think and this guide will show you how to do it.
How do I connect my Google Calendar to Slack?
1. Install Google Calendar app
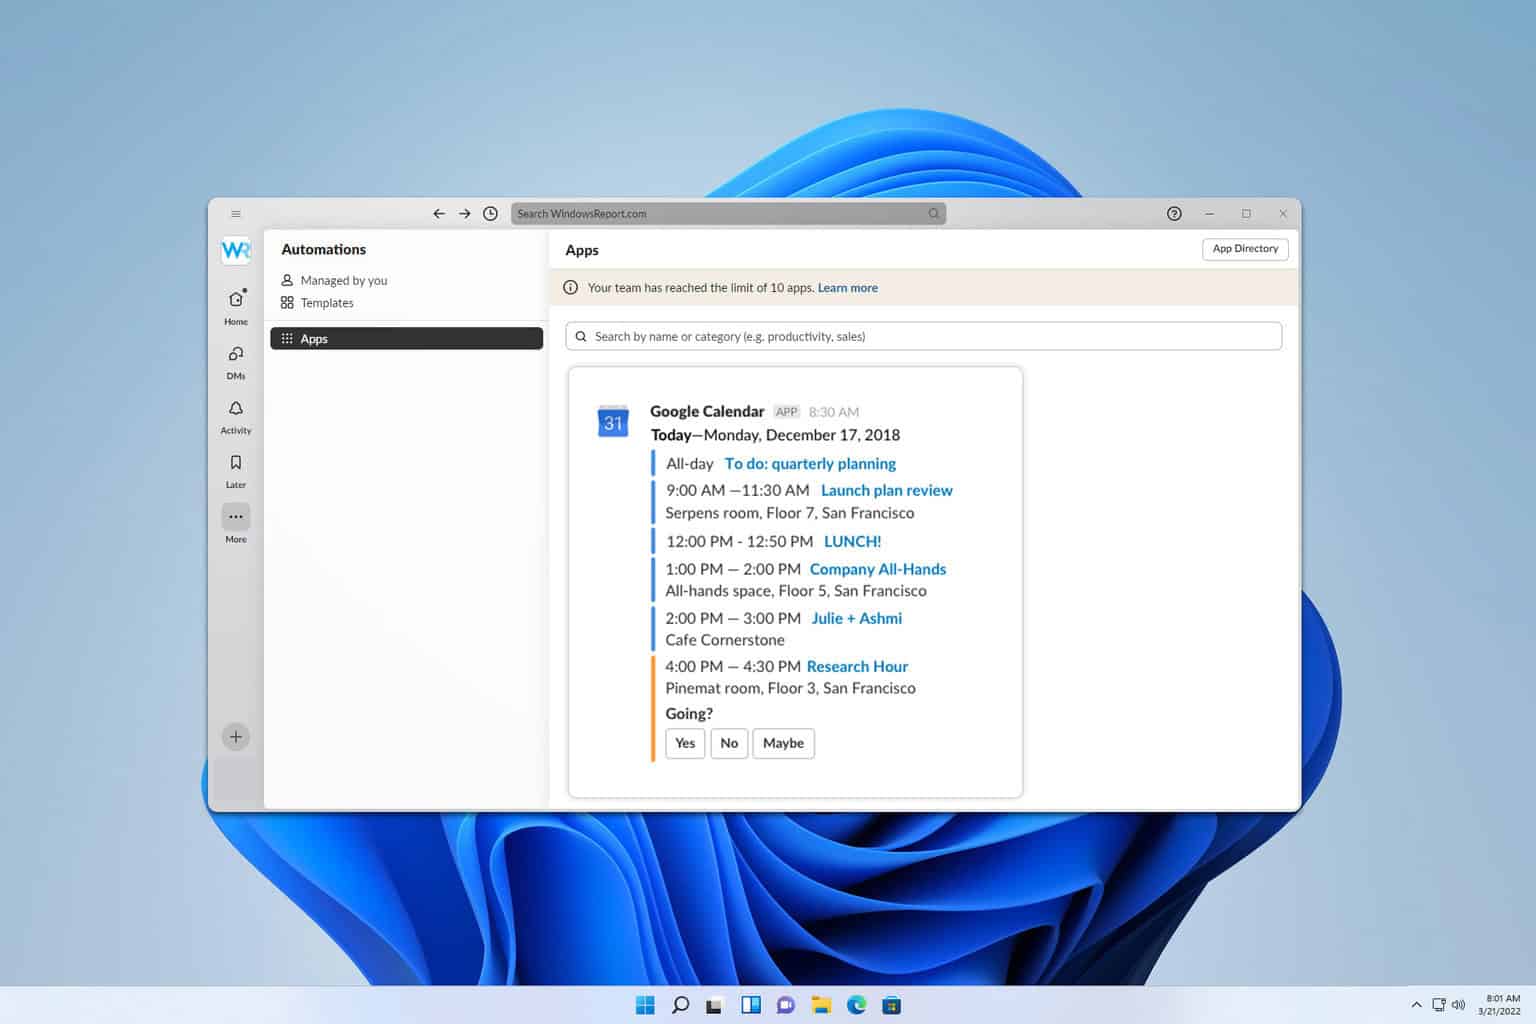
In Slack, click on More and then select Automations.
Next, click on Apps and select Google Calendar.
Click Add to Slack. and then click Allow.
Lastly, click on Open Slack.
2. Connect your account and calendars
In Slack go to More and then to Automations.
Select Apps and then Google Calendar.
Click on Connect an account and follow the instructions.
Once done, click on Open Slack to return to workspace.
If you want to add another calendar, repeat the same steps, but this time choose Connect Calendar and select the one you wish to add.
No, Slack doesn’t have a built-in calendar, and this is why many tend to rely on integrations to bring this functionality.
As you can see, it’s pretty simple to connect Google Calendar to Slack, but did you know that you can also connect Slack with Outlook Calendar?
You can use a desktop calendar when Slack does not provide a built in one, and tools like DesktopCal help you keep your schedule visible at all times.
If you need to manage your tasks, we also have a great guide on how to link Slack to Trello. If Trello is not your service of choice, you can also integrate Slack and Asana just as easily.
FC25, the highly anticipated title from EA Sports, will be released later this month, on September 27, but if you purchase the Ultimate Edition, you can start playing it seven days earlier, on September 20.
The game, which will be available on Windows PCs, Xbox, PlayStation, and Nintendo Switch, promises gamers fun and collaborative gameplay with friends that will make FC25 the main star of every group of friends’ hangouts.
The game is available to pre-order already in two editions:
The Standard Edition: which is £59.99 in the UK and $69.99 in the U.S
The Ultimate Edition: priced at £89.99 in the UK and $99.99 in the U.S.
However, alongside the exciting seven days of Early Access, Ultimate Edition buyers will also get 4600 FC Points (3850 FC Points on Nintendo Switch), a Player Evolution Slot, and Early Access Rush Rewards, which will give them some advantages in multiplayer matches.
Those are good perks if you love to collect achievements, but you should also consider the eight new icons of famous players from across the globe because it will always feel good to show off to your fellow FC25 fans. If you want to keep track of them, check out this impressive list from the folks at FC25Fans.
The seven days of Early Access to FC25 should also be spent learning how to perform each pass and gaining a sense of the game’s tips and tricks so you’ll be prepared when you match with your friends. FC25Fans has another helpful list with all these things to make it easier for you to become an expert in no time.
So, what can you expect from this game? If you’re already accustomed to FIFA, then playing FC25 shouldn’t be very different; however, if we’re to follow the trailer, expect a lot of drama and high-tension moments. You know, just like a real-life match. Except you’re the one in charge now. So you might not want to lose.
0x000000A4 CNSS_FILE_SYSTEM_FILTER is a Blue Screen of Death (BSOD), usually associated with conflicts between drivers or corrupted system files and memory issues. However, I can show you how to fix this problem in a few steps.
But before we begin, try out these quick fixes:
Update Windows. Press Start button + I > Update & Security > Check for updates > Download and install.
Scan for viruses or malware. Press Start button + I > Update & Security > Windows Security > Virus & threat protection > Quick scan
Add new physical memory. Turn off the computer > Open the case > Insert new RAM into the memory slot > Close the case > Turn on the computer.
Temporarily remove peripheral devices. Turn off your PC > Disconnect all peripheral devices > Restart the PC > Reconnect devices individually to identify the problem.
In most cases, these should do the trick. But if none of them work, it’s time to move on to more advanced solutions.
8 Ways To Fix CNSS_FILE_SYSTEM_FILTER Error
Follow these steps in the order they appear in:
Disable Fast Startup
Fast startup can sometimes cause conflicts with drivers or system files, leading to errors like CNSS_FILE_SYSTEM_FILTER. Disabling this feature may help resolve the issue:
Press the Windows icon + S, type Control Panel in the search bar, and then hit Open.
Select Power Options.
Tap Choose what the power buttons do.
Click Change settings that are currently unavailable.
Uncheck the Turn on fast startup box, then tap Save changes.
Restart your computer and confirm if the error is solved.
Uninstall Similar Applications
Multiple applications serving the same function can create conflicts, leading to errors. To uninstall them, do this:
Press the Windows icon + I to open Settings, then tap “Apps.”
Under “Apps & features,” locate the similar applications. Click on each one and select “Uninstall.“
Restart your computer after uninstalling them, and then confirm whether the error is solved.
Update Drivers
Outdated or incompatible drivers can lead to the CNSS_FILE_SYSTEM_FILTER error. Updating them can resolve the issue. Follow the below steps:
Right-click on the driver with a yellow exclamation mark. Tap Update driver.
Click Search automatically for drivers, then follow the prompts to update.
Reboot your PC and confirm if the blue screen error is solved.
Disable or Roll Back Driver
If a recent driver update caused the error, disabling or rolling back the driver might fix the problem. Here’s how to do it:
Open Device Manager. Locate the problematic driver, right-click on it, and select “Properties.“
Tap the “Driver” tab. If the “Roll Back Driver” option is available, click it or tap “Disable Device.” Then hit OK.
Restart your computer and confirm if the CNSS_FILE_SYSTEM_FILTER error is solved.
Perform a System Restore
A system restore can revert your computer to a previous state before the error, potentially resolving the issue. Here are the steps:
Press the Windows icon + I, then click System.
Scroll and tap About, then tap System Protection.
Click System Restore.
Click Next.
Choose a restore point, then click Next.
Click Finish.
Clean the Hard Disk Space
Insufficient disk space can cause various system errors, including CNSS_FILE_SYSTEM_FILTER. Cleaning up your hard disk can free up space and resolve the issue. Follow the below steps:
Open “This PC” from your desktop. Right-click on the drive you want to clean and select “Properties.”
Click “Disk Cleanup.”
Check the boxes next to the files you want to delete and click “OK.”
Click “Delete Files” to confirm and free up space.
Restart your PC and confirm whether the error has been solved.
Run SFC and DISM
Running the System File Checker (SFC) and Deployment Imaging Service and Management Tool (DISM) can repair corrupted system files that might be causing the error. Here are the steps to follow:
Type sfc /scannow and press Enter to run the System File Checker.
After the scan, type DISM /Online /Cleanup-Image /RestoreHealth and press Enter.
Wait for the process to complete, and then restart your computer.
Run the Windows Memory Diagnostic Tool
Memory issues can also lead to the CNSS_FILE_SYSTEM_FILTER error. Running the Windows Memory Diagnostic Tool can help identify and fix these issues. Here’s what to do:
Press the Windows icon + R, type mdsched.exe, and hit Enter or press OK.
Choose “Restart now and check for problems.”
Allow the tool to run, complete the memory check, and review the results for any memory issues.
The CNSS_FILE_SYSTEM_FILTER error can be challenging, but the above steps will help you troubleshoot and resolve the problem. First, try the quick, simple fixes to solve it, then move on to the more detailed solutions.
Age of Mythology: Retold is out now worldwide, and the highly anticipated remake of the classic RTS delivers not only a fun time but also striking visuals, a major new god, remastered soundtracks, and the ability to use God powers over and over again to your liking – and your favour, of course, depending on how much you got.
After being announced earlier in the summer and conducting a closed Beta in July, I was lucky enough to get my hands on the Premium version, which allowed me Advanced Access to the game. Boy, I spent 20 hours gaming through the incredible campaign story and haven’t finished it yet.
With that time, I came to an honest (and honestly, biased, considering I’ve been a fan of the game for almost 20 years) conclusion: Age of Mythology: Retold is one of those rare remakes that is not only as good as the original but, in many ways, better.
First, the new visuals are breathtaking: you’ll need to zoom in to see all the beautiful details of the units, heroes, and myth creatures. I finally know what a chimaera looks like. The best thing is that they don’t take away the magic of the original game. It still feels like the Age of Mythology, with the battles’ hyperrealistic effects and grandiose scale.
The developers also made sure to retain the magic of the original soundtrack—the tracks are all the same—but remastered it with an orchestra: it sounds majestic and lively.
I haven’t managed to finish all of the campaigns. Still, I’m close to finishing the Fall of the Trident story, in which Arkantos embarks on a journey to experience all of the three original mythologies: Greek, Egyptian, and Norse, and Age of Mythology: Retold doesn’t change anything. The maps of the missions are the same as in the original game, and you have many difficulty options to choose from. I went with Moderate, the perfect mix of challenge and fun.
One of the best new changes of the Age of Mythology: Retold is the ability to use god powers more than once. The game lets you use them on a cooldown, considering you have enough favour. The first time is free of favour; subsequent times will cost a certain amount of favour. Fortunately, this mythic resource no longer has a cap limit, and you can gather as much as you want now.
Speaking about god powers, the folks over at AgeMythologyFans have concluded that the best God Power you can use to start a game is Sentinel, and I have to agree. You experience it in one mission (I won’t spoil it), and it’s so effective at defending you from attacks that it might be a wonder if the devs won’t nerf it.
Another big change is the addition of a new major god: the Norse God Freyr, which comes with its own set of sub-gods and talent trees to choose from. While this addition might not seem big, it is important, as it lays out the foundation for experimenting with other similar additions, possibly giving Age of Mythology: Retold a longer life, multiple expansions, official campaigns, and so on.
The studios behind the game promised more expansions in the months to come, and if you purchase the Premium Edition, available on Steam now, you’ll get the first two expansions. So that’s a lot of hope for more expansions coming to Age of Mythology: Retold.
Ultimately, coming from a die-hard fan who’s been playing the original game countless times, Age of Mythology: Retold won’t disappoint you. And it feels good to have a remake of a beloved game that not only meets my expectations but exceeds them.
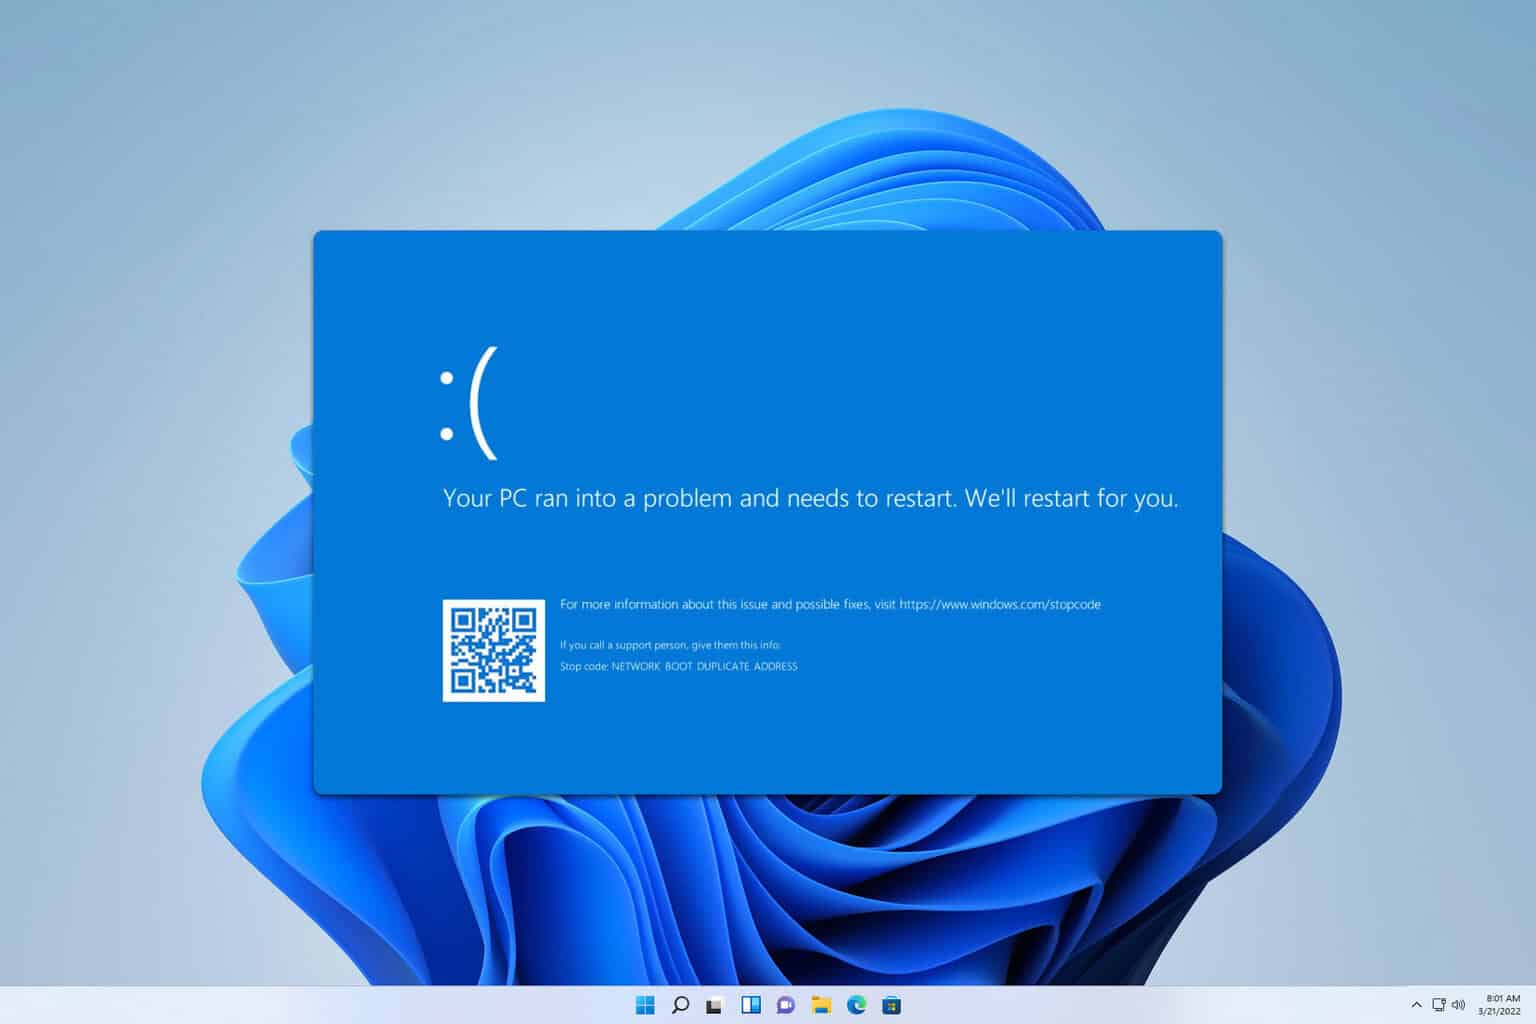
Many have reported Network_Boot_Duplicate_Address error that prevents their PC or virtual machine from booting, but luckily, there are ways to fix this issue, and in this guide, we’re going to show you how to do it.
How can I fix the Network_Boot_Duplicate_Address error?
1. Remove hidden adapters
Try to boot your PC a few times. You’ll be presented with a Troubleshooting screen.
Choose Troubleshoot > Advanced options > Startup Settings and click on Restart.
Once your PC restarts, choose the desired version of Safe Mode by pressing the corresponding key.
Next, press the Windows key + X and choose Device Manager.
Click on View and check Show hidden devices.
Locate any grayed-out network adapters, right-click them and choose Uninstall device.
Open Notepad and paste the following: Windows Registry Editor Version 5.00 [HKEY_LOCAL_MACHINE\SYSTEM\CurrentControlSet\Services\Tcpip\Parameters] “NameServer”=”” [HKEY_LOCAL_MACHINE\SYSTEM\CurrentControlSet\Services\Tcpip\Parameters\Interfaces][HKEY_LOCAL_MACHINE\SYSTEM\CurrentControlSet\Services\Tcpip\Parameters\Interfaces\{GUID_OF_NETWORK_ADAPTOR}] “NameServer”=”” “Domain”=”” “DhcpIPAddress”=”” “DhcpSubnetMask”=”” “DhcpServer”=”” “DhcpNameServer”=”” “DhcpDefaultGateway”=””
Click on File and choose Save as. Set the Save as type to All files and name the file reset.reg.
Open Notepad again and paste the following: net stop DHCP a /s reset.reg
Save the file as script.bat file.
Lastly, set it to run during the shutdown process.
Network_Boot_Duplicate_Address error can cause a lot of trouble, but it mostly affects virtual machines, and fixing it requires using scripts to reset your settings.
The ERROR_KM_DRIVER_BLOCKED message indicates that a printer driver was blocked from installation due to policies set on your PC. The error code is 1930 (0x78A), and the message reads, The printer driver is not compatible with a policy enabled on your computer that blocks NT 4.0 drivers.
The 0x8007078a error usually appears on older iterations of the OS, say Windows Vista, that do not support Kernel Mode printer drivers. But, it has been seen on Windows 11 as well when using incompatible or unsupported drivers.
Before you start troubleshooting things, reboot the PC, install all pending Windows updates, and reconnect the affected printer.
How do I fix ERROR_KM_DRIVER_BLOCKED?
Tip
While the ERROR_KM_DRIVER_BLOCKED issue generally appears due to the policies enforced on the system, reconfiguring them shouldn’t be your primary approach. Policies like these are set to enhance the computer’s security, and altering them puts it at risk. If you still want to proceed, the fourth and fifth solutions describe the policy-specific changes.
1. Get a compatible driver version
As I said earlier, the ERROR_KM_DRIVER_BLOCKED issue may appear due to outdated or incompatible drivers.
So, to fix 0x8007078a, first use a top-rated driver uninstaller tool to clear all the existing driver-related files > visit the manufacturer’s website > search for the latest driver for your printer, which is also compatible with the installed version and iteration of Windows > download the setup (.exe file) > install the driver.
Installing printer driver using setup
For some users, simply uninstalling the driver along with deleting driver-related files and then reconnecting the printer prompted Windows to auto-install a compatible driver, which got the printer running in no time.
2. Install the driver in compatibility mode
Right-click on the downloaded printer setup (.exe file), and select Properties.
Go to the Compatibility tab, tick the checkbox for Run this program in compatibility mode for, and then select a previous version of Windows from the list.
Click Apply and OK to save the changes.
Now, install the printer driver.
If you still get the ERROR_KM_DRIVER_BLOCKED message, try other older iterations of Windows until one works.
3. Scan the PC for malware
Press Windows + S to open Search, type Windows Security in the text field, and click on the relevant result.
Click on Virus & threat protection.
Click on Scan options.
Choose the Full scan entry and then click on Scan now.
Wait for the scan to complete. It may take between 15-45 minutes.
If you downloaded the driver from an unofficial source, it’s wise to scan the PC for malware. And in case Windows Security can’t detect any threats, I recommend using an effective antivirus solution to run a more advanced set of scans!
4. Reinstall the driver with modified settings
4.1 Uninstall the printer driver and software
Press Windows + R to open Run, type appwiz.cpl in the text field, and hit Enter.
Select the printer software from the list, and then click on Uninstall.
Follow the on-screen instructions to complete the process.
Similarly, uninstall the printer driver listed here, as well as any other printer-related software components.
4.2 Reconfigure the Registry
NOTE
Before making any changes to the Registry, create a restore point. This will allow you to revert the changes in case things don’t go as planned.
Press Windows + R to open Run, type regedit in the text field, and hit Enter.
Click Yes in the UAC prompt.
Paste the following path in the address bar and then hit Enter: HKEY_LOCAL_MACHINE\SOFTWARE\Policies\Microsoft\Windows NT
Right-click on the Windows NT entry in the left pane, choose New, then select Key, and name it Printers.
Now, within the Printers key, right-click on the empty portion towards the right, select New, choose DWORD (32-bit) Value, and name it KMPrintersAreBlocked.
Double-click on the DWORD, enter 1 under Value data, and click OK to save the changes.
Now, under Printers, create another Key and name it PointAndPrint.
Under PointAndPrint, create the following entries as you did earlier and set the value data listed next to each:
Press Windows + R to open Run, type services.msc in the text field, and hit Enter.
Scroll down, right-click on the Print Spooler service, and then select Stop from the context menu.
4.4 Rename critical folders
Press Windows + E to open File Explorer, paste the following path in the address bar and then hit Enter: C:\Windows\System32\spool\drivers
Now, rename the W32X86 and x64 folders to W32x86.old and x64.old respectively.
Restart the PC.
4.5 Reinstall the printer driver
Finally, you can run the driver setup (.exe) file that earlier triggered The printer driver is not compatible with a policy enabled on your computer that blocks NT 4.0 drivers message during installation.
5. Reconfigure the Group Policy
NOTE
The following steps require editing the Local Group Policy Editor which is present on Pro and Enterprise editions of Windows. If you are using the Home edition, manually install GPedit.msc.
Press Windows + R to open Run, type gpedit.msc in the text field, and hit Enter.
Navigate the following path using the left pane: Computer Configuration > Administrative Templates > Printers
Double-click on the Disallow installation of printers using kernel-mode drivers policy.
Select the Disabled option, and then click on Apply and OK to save the changes.
Finally, restart the computer and verify whether the 0x8007078a system error is fixed.
6. Reset Windows to factory defaults
As a last resort, you can always reset Windows to factory defaults. For 2 out of 5 users, this is the only solution that worked against ERROR_KM_DRIVER_BLOCKED, even in a multi-computer setup!
Resetting Windows 11
To reset the PC, press Windows + I to open Settings > go to the System tab > click on Recovery > click the Reset PC button > choose whether to keep your files or remove everything > select Local Reinstall > click on Next > verify the change > click on Reset > then wait for the process to complete.
7. Contact support
When nothing else works, contact the support team. First, try the printer manufacturer’s dedicated support (via the official website) and ask for a compatible driver version for your PC. If they can’t help with ERROR_KM_DRIVER_BLOCKED, then get in touch with Microsoft support.
Remember, the ERROR_KM_DRIVER_BLOCKED error is a software-based issue and can usually be fixed with some quick changes to Windows or by using a different driver. Only rarely will have to contact the support team!
If you have encountered ERROR_SERIAL_NO_DEVICE with error code 1118 or 0x45E and the error message No serial device was successfully initialized. The serial driver will unload, this guide can help!
This means the serial driver was unable to successfully initialize a serial device. It usually occurs due to hardware, driver, or configuration issues.
To begin with, make sure the serial device is correctly connected to your computer. If it’s an internal device, ensure the card or module is securely seated in its slot.
How can I fix ERROR_SERIAL_NO_DEVICE?
1. Check the Device and driver status
Press Windows + R to open the Run window.
Type devmgmt.msc and click OK to open the Device Manager app.
Locate the Ports (COM & LPT) section, click it to expand, and check if the serial device is listed.
Right-click the serial device and select Properties.
On the properties window, go to the General tab and check the Device status field; it should say, ” This device is working properly.”
2. Update/reinstall driver
2.1 Update the driver
Press Windows + R to open the Run window.
Type devmgmt.msc and click OK to open the Device Manager app.
Locate the Ports (COM & LPT) section, click it to expand, right-click the serial device, and select Update driver.
On the following page, click Search automatically for drivers.
Windows will now find and install the best driver for your computer. Follow the on-screen instructions to complete.
Go to Windows Update, then click Check for updates.
If an update is available, click Download and install to get it.
4. Run the Hardware & devices troubleshooter
Press Windows + I to open the Settings app.
Go to System, then click Troubleshoot.
Click Other troubleshooters.
Locate Hardware & devices, then click Run.
Follow the on-screen instructions to complete the process.
5. Run an SFC scan
Press the Windows key, type cmd in the search box, and click Run as administrator.
In the command prompt window, type the following command to repair or restore the corrupted system files and press Enter: sfc /scannow
Wait for the scan to complete, then restart your computer to let the changes take effect.
6. Run the CHKDSK scan
Press the Windows key, type cmd in the search box, and click Run as administrator.
In the command prompt window, copy & paste the following command to fix errors on the disk, locate bad sectors, and force the drive to dismount before the process starts and hit Enter: chkdsk C: /f /r /x
As we are trying to scan the system drive (usually denoted by the letter C:), you will get a prompt to schedule the scan on the next restart. Type Y and press Enter to schedule it.
Restart your computer to initiate the CHKDSK scan, which will run before Windows loads and check for errors and bad sectors.
Once the scan is complete, you will receive a summary of the scan and the actions taken to fix the problem.
NVIDIA’s GeForce Experience is an essential tool for managing graphics drivers, and it is a simple way to keep your system performance at peak. However, if you want to find out where the drivers are stored on your computer to keep track of driver updates or troubleshoot issues, this guide can help!
What is the GeForce Experience Driver Download Location?
Press Windows + E to open Windows File Explorer.
Navigate to this path after replacing C with the system drive letter on your computer to find the drivers: C:\ProgramData\NVIDIA Corporation\Downloader
If you can’t find the ProgramData folder on your PC, it might be hidden. To unhide it, open the File Explorer window, locate View, and click the downward arrow next to it. Then click Show from the context menu and choose Hidden items from the subcontext menu.
Knowing the GeForce Experience driver download location can be incredibly useful for managing your NVIDIA graphics drivers. You’ll be better equipped to maintain your device’s performance and troubleshoot any driver-related issues effectively.
The 0x000000B9 CHIPSET_DETECTED_ERROR is a blue screen error that usually indicates a problem with the chipset driver or chipset itself, which acts as a communication hub for various computer parts. The error can appear because of outdated or corrupted drivers, BIOS problems, or hardware malfunctions.
To begin with, inspect the physical connections of all the hardware components, including RAM, CPU, and expansion cards.
How can I fix the 0x000000B9 CHIPSET_DETECTED_ERROR?
1. Verify hardware compatibility
Visit the manufacturer’s website of your computer or motherboard. For instance, we are taking HP as the manufacturer. Open your preferred browser and navigate to HP’s official support page.
In the search bar, enter your HP computer’s model number (Serial number, & product number). You can find it on the back panel of your device.
Click the Product Specifications tab to open the specifications page or compatibility list.
Check if the hardware components, including the chipset and processor, are compatible with your Windows version.
2. Update Windows
Press Windows + I to open the Settings app.
Go to Windows Update, then click Check for updates.
If an update is available, click Download and install to get it. Now, restart your computer, then check if you see the CHIPSET_DETECTED_ERROR again.
3. Update or reinstall the chipset driver
3.1 Update the driver
Press Windows + R to open the Run window.
Type devmgmt.msc and click OK to open the Device Manager app.
In the Device Manager window, expand the System devices category, right-click the chipset driver and choose Update driver from the context menu.
Select Search automatically for drivers, and Windows will search for the latest drivers.
Press the Windows key, type cmd in the search box, and click Run as administrator to launch Command Prompt with admin rights.
Copy & paste the following command to fix errors on the disk, locate bad sectors, and force the drive to dismount before the process starts and hit Enter: chkdsk C: /f /r /x
As we are trying to scan the system drive (usually denoted by letter C:), you will get a prompt to schedule the scan on the next restart. Type Y and press Enter to proceed.
Reboot your PC to start the CHKDSK scan. It will run before Windows loads and check for errors & bad sectors.
After the scan is complete, you will see the scan summary and actions taken to fix the CHIPSET_DETECTED_ERROR.
5. Run SFC & DISM scans
Press the Windows key, type cmd in the search box, and click Run as administrator.
Type the following command to repair or restore the system files, then press Enter: sfc/scannow
Once the command is executed, copy & paste the following commands one by one to repair Windows OS image files, and hit Enter after every command:
Wait for the command to be complete, then restart your computer to save the changes.
6. Run the Windows Memory Diagnostic
Press the Windows key, type memory diagnostic in the search box, and click the first result to launch the Windows Memory Diagnostic tool.
Click Restart now and check for problems.
Your PC will restart automatically, and the scan will start.
During the scan, press F1, then select the type of scan you want to run. To customize more, you can switch between different sections with the Tab and then use the F10 key to save the changes.
You can choose between Standard or Extended scan with at least five passes for best results.
Once the diagnosis is complete, your PC will restart, and you will get the results.
If the results don’t appear, press the Windows key + X and choose Event Viewer.
Go to Windows Logs>System. In the right pane, choose MemoryDiagnostics-Results, to see the mdsched.exe log.
7. Perform a System Restore
Press the Windows key, type control panel in the search box, and click Open.
Choose Large icons for View by, then select Recovery.
Click Open System Restore.
Select Choose a different restore point in the System Restore window and click Next.
From the list of all the available restore points, select the oldest or most recent one from when your computer was functioning correctly, and click Next.
Click Finish to initiate the process.
Your computer will restart and restore the system settings to the chosen version. If System Restore fails and you get the System Restore wasn’t completed successfully message, we advise you to check out this detailed guide for quick fixes.
8. Reinstall Windows
NOTE
Before proceeding with the steps below, copy all your important data to an external drive and make sure you have the product key or Microsoft account credentials for Windows activation. Also, you need an 8 GB USB drive to create a bootable installation media.
Select language and other suitable options on the first screen, and click Next.
Click Install now.
Read the license terms and click Accept to move forward.
Choose Custom: Install Windows only (advanced).
You’ll see a list of drives and partitions. Select the ones you want to remove and click Delete. Afterward, click OK on the prompt to confirm the changes.
Click Next.
The installation will start now, and it may take some time to complete. During the process, your device might restart multiple times, so don’t remove it from the power source.
8.3 Configure Windows settings
Once the installation is complete, choose the region and keyboard layout.
Connect to the Wi-Fi network when prompted.
Next, sign in with a Microsoft account or create one if you don’t have one already.
Select the privacy settings per your preferences, then follow other prompts to set up more features.
Once the setup is finished, press Windows + I to open Settings and go to Windows Update.
Click Check for updates.
If an update is available, click Download & install to get it.
Performing a clean install or repair upgrade on Windows 10 can also help you fix this and other similar issues on your Windows 10 computer; read this guide to learn more.
To address and fix Blue Screen of Death (BSoD) errors like CHIPSET_DETECTED_ERROR, you must carefully review the information provided with the error code. This will help you take more informed steps to troubleshoot and resolve the problem. If you are stuck with a similar error, INVALID_WORK_QUEUE_ITEM, we have a separate guide.
If you have any questions or suggestions about the CHIPSET_DETECTED_ERROR BSoD error, feel free to mention them in the comments section below. We will be happy to help!
Good news for all developers: GPT-4o-2024-08-06 is now available on Azure OpenAI Service. Additionally, OpenAI has made this state-of-the-art technology more affordable for users by reducing the cost of API usage. Compared to its previous version, it is now 50% cheaper per input token and 33% cheaper per output token.
In a blog post, Microsoft says the new GPT-4o-2024-08-06 has some significant AI advancements.
We are excited to announce the release of the API for GPT-4o-2024-08-06, the newest and most advanced AI model from OpenAI, now available via the Azure OpenAI Service. This model brings significant advancements to AI capabilities, including the game-changing JSON Structured Outputs feature, which enhances developer productivity and application versatility. Starting today, you can harness the full power of GPT-4o-2024-08-06 in your generative AI applications.
Here the prices:
Input Costs: Reduced by up to 50% ($2.50 per 1M input tokens)
Output Costs: Reduced by up to 33% ($10.00 per 1M output tokens)
GPT-4o-2024-08-06 also comes with the Structured Outputs, which is a complete shift in the game. It gives developers the power to define precisely what JSON Schema they aim for AI to adhere to. This feature has two types: JSON Schema, which the user determines, and “Strict Mode,” which gives a more precise tool output. This flexibility and accuracy in the kind of output can significantly simplify development procedures. It is beneficial for applications that need organized data.
Although OpenAI did not specifically state performance enhancements, it appears that the gpt-4o-2024-08-06 model is better than its earlier versions. As per benchmarks, this model isn’t only for structured data and emphasizes providing more precise and dependable outputs. This is important for developers who desire to combine AI with their applications since it could significantly improve the user experience and dependability.
While OpenAI lowered pricing, Microsoft remains a little sly by not revealing how much they will charge for this model on Azure; however, according to the official blog post, the Redmond-based tech giant might soon make an announcement.
As gpt-4o-2024-08-06 emerges on Microsoft Azure, OpenAI keeps challenging limits and provides better handling, accuracy, and cost-effectiveness. The real power of this model will be observed in the creative uses that developers make with it. The options range from improving customer service bots to simplifying data processing and creating new user experiences.
Microsoft launched a new build, 22635.4145 under KB5041881, for Windows 11 Insider Program members in the Beta Channel. It includes significant changes to the Windows Spotlight feature and other enhancements.
For those who might not be familiar with Windows Spotlight, the capability adds a bit of zest to your desktop background and locks the screen with beautiful, automatically changing images. But now, it seems there’s even more to get excited about.
KB5041881 adds the ability to sign out from your Microsoft account directly from the Start panel, making switching profiles easier and faster.
The Redmond-based tech giant also added a new keyboard that supports using the Xbox controller to navigate and type.
However, the keyboard is hidden for some Beta users for now, but there is a way you can uncover them with a special command. You’ll have to use the third-party app ViveTool. Thanks to Insider @phantomofearth, here is the command:
vivetool /enable /id:50692135
One of the standout additions is the introduction of hotspots to the Windows Spotlight experience. Imagine right-clicking on the Windows Spotlight icon and discovering hotspots that, when interacted with, reveal additional information or whisk you away to the Bing landing page for a deeper dive – if you remember, Microsoft previewed it earlier this year.
The KB5041881 update doesn’t stop at making your desktop a bit more interactive. It also includes tweaks to the mouse settings and touch gestures, allowing users to turn off enhanced mouse pointer precision or adjust the scrolling direction.
For those who need to share content directly to Notepad or Clipchamp from the Windows share window, we also have good news: the Redmond-based tech giant added the apps to the list of places where we can share files now, alongside Facebook, WhatsApp, or X. Windows enthusiast, @phantomofearth, also published a special command which you can use to enable it.
To enable the ability to quickly share content to Notepad and Clipchamp from the share sheet in Beta 22635.4145, run:
With KB5041881, Microsoft has addressed several issues to smooth out the user experience. These include fixing File Explorer crashes and ensuring the Start menu text remains readable, especially when displaying Phone Link features. It’s all about making the Windows 11 experience as seamless as possible.
However, it’s not all smooth sailing. A known issue has been identified with the Start menu’s All apps list. If you click or tap on a letter, the list may break, but a quick reboot or restart of explorer.exe should set things right again.
Windows Insiders were in for a treat last week: alongside a new build to the Beta Channel, Microsoft has released a new build, Windows 11 Insider Preview Build 27695, to the Canary Channel. This update, the first since August 15, brings many improvements, including enhancements to the Windows Local Administrator Password Solution (LAPS), among other additions and bug fixes. Particularly noteworthy is the change in the expiration date for Canary Channel builds, now set for September 15, 2025, starting with build 27691.
One of the standout features of this update is the new position for the Widgets entry-point on left-aligned taskbars. This change aims to provide users with richer content visibility from their widgets directly on the toolbar, enhancing the overall user experience.
Microsoft has also significantly improved Windows LAPS. This enhancement allows for recovering encrypted passwords from Active Directory backup media even when no AD domain controllers are operational. It’s a game-changer for security, offering much better protection than the traditional method of storing clear-text passwords in Active Directory.
For those interested in the technical side, the Windows LAPS password encryption leverages the Cryptography API: Next Generation Data Protection API (CNG DPAPI). This means that encrypted passwords can still be recovered in the unfortunate event of a disaster where no AD domain controllers are running. This is possible through the Get-LapsADPassword PowerShell cmdlet, which can now perform a purely local operation to decrypt passwords using keys found in the snapshot browser. It’s a critical advancement for maintaining security and access in dire situations.
Update: Microsoft also updated the Wi-Fi dialogue box to match the overall theme of Windows 11.
The update also includes a variety of changes and improvements across the board. For instance, some Insiders in the Canary Channel will now see an estimated time for how long their PC will be offline during the installation of Build 27695. This estimate aims to improve the update experience by providing users with more information upfront. There’s now an option to turn off suggestions to disable notifications from certain apps, giving users more control over their notification preferences.
This update also makes sharing content from Windows on an Android device easier. Users must pair their Android device to their Windows PC using the Link to Windows app on Android and Phone Link on their PC. Moreover, the Widgets Board has received an update to improve security and the APIs for creating widgets and feeds for users in EEA regions. This update lays the groundwork for new widgets and features to roll out soon.
As for fixes, Microsoft has addressed several issues in File Explorer, Task Manager, and Windows Sandbox, among others, to enhance the stability and usability of Windows 11. However, it’s important to note that there are still known issues, such as the potential loss of Windows Hello pin and biometrics for signing into PCs on new Copilot+ PCs joining the Canary Channel from other channels.
Many are wondering if they can install RSAT on Windows 11 ARM, and in this guide, we’re going to answer this and other questions related to RSAT.
How can I install RSAT on Windows 11 ARM?
Is RSAT available on ARM?
RSAT is not available on ARM architecture at the moment, and you can only use it on 64-bit devices with CISC architecture.
This means that you can’t use RSAT on any computer with an ARM CPU regardless of the operating system you’re using.
Can I install RSAT on Windows 11 ARM?
As previously stated, RSAT isn’t compatible with ARM processors, so it won’t work on Windows 11 ARM.
Is RSAT compatible with Windows 11?
Yes, RSAT is compatible with the x64 version of Windows 11, and we have a guide on how to install RSAT on Windows 11, so don’t miss it for more information.
How to check if RSAT is installed?
Press the Windows key + X and choose Terminal (Admin).
Run the following command: Get-WindowsCapability -Name RSAT* -Online | Select-Object -Property DisplayName, State
You should now be able to see if RSAT is installed on your device.
To learn more about RSAT, we have an in-depth article on how to use RSAT, so don’t miss it. Some users also reported that they can’t install RSAT on Windows 11, and we have a guide that addresses that issue as well.
As you can see, it’s not possible to run RSAT on Windows 11 ARM, but hopefully Microsoft will add support for it in the future.
If the Bitdefender installer displays a failed to download product files error message, your device’s protection may be compromised.
Bitdefender is one of the greatest antiviruses out there but it can only be so good when it has successfully been installed. Failure to download product files could be due to an interruption in the network connection, or the files are corrupt.
How do I download Bitdefender failed product files?
2. Turn off the Windows Defender real-time protection
Type Windows Security in the Search bar, and click on the relevant search result.
Click on Virus and Threat Protection.
Scroll down, and click on Manage Settings under Virus and Threat protection.
Finally, turn off Real-time protection.
Windows Defender is Microsoft’s built-in security program with real-time protection. As you install programs, it checks its files and since Bitdefender is another antivirus, it may identify the product files as false positives and quarantine them.
Turning off real time protection will resolve the conflict and allow seamless installation. Just remember to turn it on again as soon as the download process is complete to maintain your system’s security.
Right-click on the Bitdefender installation file and select Properties.
Click on the Unblock button under the Advanced button in the bottom right corner.
Lastly, click Apply and OK to save the changes.
Now run the Bitdefender installer again and check whether the product files download still fails.
4. Repair the Bitdefender Client
Exit Bitdefender if running.
Press Windows Key + R to open Run, type controlpanel, and press hit Enter.
Now, go to Programs, then Programs and Features.
Select Bitdefender from the programs list and click on the Uninstall button.
Follow the on-screen instructions and select Repair.
Finally, relaunch Bitdefender and try to install the pending update.
To prevent such issues in future, ensure you’re downloading Bitdefender from the official source or a verified and trusted retailer. Also ensure your internet connection is fast and stable to prevent interruptions.
The VIDEO_DRIVER_DEBUG_REPORT_REQUEST BSOD, with error code 0x000000AD, arises due to issues with the installed graphics driver or the GPU and is encountered during the boot stage (startup) or while the OS is running.
The causes for Video Driver Debug Report Request blue screen error include overheating of the GPU, corrupt system files, conflicting third-party apps, malware infection, and an outdated, corrupt, or buggy graphics driver.
Press Windows + R to open Run, type devmgmt.msc in the text field, and hit Enter.
Expand the Display adapters entry, right-click on the graphics adapter, and select Properties.
Go to the Driver tab, and click the Roll Back Driver button.
Now, choose a reason for rolling back the driver update and click Yes to confirm.
Finally, reboot the PC and check for improvements.
If you find the Roll Back Driver button greyed out, it means that either the driver was not updated recently or Windows didn’t store the files for the previous version. So, you will have to rely on other ways to roll back the driver in Windows!
4. Repair the corrupt system files
Press Windows + S to open Search, type Command Prompt, and click on Run as administrator.
Click Yes in the UAC prompt.
Paste the following commands individually and hit Enter after each: DISM /Online /Cleanup-Image /CheckHealthDISM /Online /Cleanup-Image /ScanHealthDISM /Online /Cleanup-Image /RestoreHealth
Now, run this SFC scan command: sfc /scannow
Reboot the PC for the changes to come into effect.
Corrupt system files are found to cause the VIDEO_DRIVER_DEBUG_REPORT_REQUEST Windows BSOD. To fix this, run the SFC (System File Checker) and DISM (Deployment Image Servicing and Management) scans, and all problematic protected files will be replaced with the cached copy.
5. Scan the PC for malware
Press Windows + S to open Search, type Windows Security, and click on the relevant result.
Click on Virus & threat protection.
Click on Scan options.
Choose the Full scan entry and click on Scan now.
Wait for the scan to complete. It may take 15-60 minutes.
If Windows Security doesn’t detect threats but the VIDEO_DRIVER_DEBUG_REPORT_REQUEST error keeps appearing, consider using a top-rated antivirus solution to run a more extensive malware scan!
6. Perform a system restore
Press Windows + R to open Run, type rstrui.exe in the text field, and hit Enter.
Select the Choose a different restore point option, and click on Next.
Pick the oldest restore point from the list, and click Next.
Verify the restore details, click on Finish, and then confirm the change.
Wait for the system restore to complete. It may take between 15-30 minutes.
7. Reinstall Windows
When nothing else works, the last software-based solution is to reinstall Windows. It will fix all inconsistencies with the OS and clear out any driver-based misconfigurations.
If the VIDEO_DRIVER_DEBUG_REPORT_REQUEST BSOD still appears after reinstalling Windows, it’s a hardware malfunction to blame. So, I recommend you visit a local repair shop and get the GPU inspected for faults.
Have you ever stumbled upon the PNP Invalid ID for a Child Device error while diving into the digital gaming world or during one of those deep, system-tweaking sessions? If you nodded yes, then you’re not alone.
This pesky error often pops up in the Windows Event Viewer, confusing many users. But as confusing as it can be, you should know there are solutions. However, before we delve into them, let’s look at the ERROR PNP INVALID ID and what causes it.
What is the ERROR PNP INVALID ID?
As the name suggests, the ERROR PNP INVALID ID is a conflict of driver updates or driver files not recognizing a particular ID. Microsoft labels it as 674 (0x2A2) Driver %2 returned invalid ID for a child device (%3), on their forum,
What is causing the ERROR PNP INVALID ID?
The ERROR PNP INVALID ID can be caused by several culprits, such as a duplicate XHCI Controller driver, outdated chipset drivers, or even conflicting antivirus software. Your outdated PC’s BIOS can also invite this error to the party. And let’s not forget potential system file corruption or driver conflicts.
Duplicate XHCI Controller driver
Outdated chipset drivers
Conflicting antivirus software
Outdated BIOS
System file corruption
Driver conflicts
Fix the ERROR PNP INVALID ID: 8 methods
1. Disable/update the onboard graphic card
To disable the onboard graphic card, you’ll need to:
Access Windows 11 in Safe Mode.
Open Device Manager, by typing it up in the Search Box.
Click on Display Adapters, and there, you’ll see the main graphic card.
Right-click on it and choose Disable device.
Click Yes on the pop-up that appears.
Restart your PC.
To update the onboard graphic card:
Open Device Manager.
Click on Display Adapters, and then right-click on the main graphic card.
Click on Update Driver.
Select Search automatically for drivers, and let Windows update the drivers.
2. Disable Windows Automatic Restart
Open the Control Panel and make sure the View by panel is set on Category.
Select the System and Security option.
Click on System.
Select Advanced System Settings, and a new windows will open up.
Here, go to Advanced > Startup and Recovery > Settings.
Untick the Automatically Restart option, and then click OK.
Click OK on the System Properties window.
3. Uninstall the XHCI Controller
Open Device Manager again, but go to Universal Serial Bus Controllers now.
Right-click on the XHCI Controller (it usually has a peculiar name) and uninstall it.
Restart your PC.
4. Check your RAM
While you’re at it, consider giving your RAM a good check-up.
If you have a dual setup, carefully remove one of the RAM sticks and check if the ERROR PNP INVALID ID still pops up. If it does, you’ve identified the problem: change your RAM cards. If it doesn’t, repeat the process with the other RAM stick.
5. Uninstall Avast antivirus
If you’re using Avast antivirus, it might be time to say goodbye temporarily. Some users have found relief from the ERROR PNP INVALID ID by uninstalling Avast.
Open Settings, and go to the Apps pane.
Click on Installed Apps.
Scroll down until you find Avast (it should be at the top of the list).
Click on it, and uninstall it.
6. Update your Chipset Drivers
Remember to update your chipset drivers, as not updating them can also cause the ERROR PNP INVALID ID message to appear. Depending on the manufacturer, you must download them manually from Intel or AMD.
The ERROR PNP INVALID ID message can often pop up due to a lack of BIOS updates. However, updating the BIOS is not easy; if you do it improperly, you can permanently damage your device.
Create an installation media kit with it by using a USB.
Restart your PC and boot the USB flash drive.
Select the language, time, currency formats, and keyboard.
Click Next > Install Now.
Select I don’t have a product key, then the preferred operating system.
Make sure to delete the System Reserved partition and partition 2.
Select the unallocated space to continue the installation
Follow the rest of the on-screen instructions.
So, there you have it. If the ERROR PNP INVALID ID has been a thorn in your side, these solutions might be the tweezers you need. Remember, tackling such issues is all about patience, some know-how, and sometimes, just knowing when to hit the reset button.
Let us know which of these solutions worked for you.
This GitHub Copilot vs Microsoft Copilot comparison will help you understand which is the most suitable for functional coding.
Generative artificial intelligence programs have made their way into many fields of work, like writing, documentation, designing, website development, and software coding. However, tech giants like Microsoft and Google are developing all-encompassing AI tools to help you with all tasks in one user interface.
Two of the most popular ones are Microsoft Copilot and GitHub Copilot. If you’re primarily a software programmer with an occasional need for other tasks, read this in-depth comparison to make your decision. Let’s get into it!
What Is GitHub Copilot?
GitHub Copilot is a GitHub repository-linked AI coding suggestion app. It works as an IDE plugin for software development platforms, like JetBrains IDEs, Visual Studio, Visual Studio Code, and Neovim. Also, the AI is conversant in all programming languages available in public code repositories.
It extends the function of an AI from simply suggesting the next code line to more functional tasks, code explanations via chat, software documentation, etc.
According to a GitHub report, it increases the productivity of any software programmer by up to 55%. It does so by eliminating the need for coders to handle mundane tasks, import boilerplate functions, etc., to their project and managing the quality of those imported code lines. Instead, programmers can focus truly on writing new codes for their software.
Unlike other coding autocomplete services, GitHub Copilot doesn’t just copy-paste code lines from a central repository by looking up a codebase. Instead, the coding AI is integrated deep into the IDE and your projects. So, it analyzes the project’s ultimate goal and previously written codes to suggest suitable additions.
Pros and Cons
When you start using this tool, you’ll enjoy benefits as well as face some bottlenecks. Here are some of the advantages and drawbacks you should know:
Pros
Cons
It’s one of the most trusted AI code completion programs.
Since the coding AI has been trained on public codebases, you’ll still need to go through the final code before publishing.
It integrates with almost all standalone IDEs, thanks to its integration with the JetBrains IDE engine.
Inaccurate codes are possible, so manual quality control is mandatory.
You can get code explanations and suggestions in all software development scripts.
Many important automations, like Pull Request, Text Completion, Knowledge Bases, etc., are only available in the Copilot Enterprise package.
Besides working as a plugin in IDEs, it also works as a coding AI in command-line interface tools through API integration.
Sometimes, the coding AI might not suggest the next code lines until there is enough context.
It automates almost all coding tasks for coders, enterprises, and administrators.
It may consume considerable system resources, especially memory.
There’s a 14-day free trial.
It might import all the biases it learned from public repositories and make your project biased or harmful.
GitHub maintains elaborate documentation so you can get high-level support as a developer.
Using GitHub Copilot’s scripting suggestions come with the risk of copyright infringement.
It complies with various data protection laws, like GDPR and CCPA.
Offline coding automation isn’t possible.
What Is Microsoft Copilot?
Microsoft Copilot is a general-purpose AI assistant. It helps you to find focused answers to queries from the web with source links. Besides specialized web search, it also works as a generative AI chat for instant answers to any questions.
It uses advanced artificial intelligence models to offer interactive questions and answers through text, images, and audio inputs. Alongside general answers, it can also write program scripts in up to 20 languages, like Python, JavaScript, Java, C++, C#, Swift, and more.
Microsoft Copilot is primarily available for free for individual users. However, you can get cross-app intelligence by integrating it with most Microsoft 365 apps. For integration purposes, you’ll need a subscription to Copilot for Microsoft 365.
Pros and Cons
Here are the benefits and shortcomings of using Microsoft Copilot:
Pros
Cons
It accepts inputs in various forms, like text, image, or audio files.
It’s as efficient as GitHub Copilot when creating a functional script.
Microsoft encrypts all the data transmissions when using the tool.
It suffers from many glitches and its responses can be of poor quality. So, you must optimize the prompt to get better results.
For business subscription users, Microsoft Copilot uses secure data partitions.
All AI chats are limited to up to 5 threads.
Integrates easily with Microsoft 365 apps, like Teams, Excel, Word, and more.
It can’t integrate with public code repos, like GitHub.
Microsoft never uses your data to train the underlying AI model.
The work email edition of free Microsoft Copilot doesn’t save conversations.
Works directly from the web browser so you don’t need to install any software.
The individual version offers limited plugins or customizations. For extensive plugin choices, you need to buy a paid plan.
It’s accessible anonymously. However, you can register an account to save responses for the future.
Often, the AI copilot only generates responses when you’re on the webpage, so performance is limited.
GitHub Copilot vs Microsoft Copilot – Feature Comparison
Though both of these tools primarily integrate with a user interface and offer real-time AI responses, there are subtle differences that make them unique:
AI Code Generation
Both of these apps help you generate codes automatically with a prompt.
However, GitHub Copilot is intended specifically for software code generation. It has been trained on real coding projects from many public code repos. Also, the tool is conversant in all app development languages.
Furthermore, it integrates into a specific coding project and starts suggesting code lines automatically as you build features and functions. In a nutshell, it writes scripts just like a software coder but learns continually and can think much faster than a human programmer.
Contrarily, Microsoft Copilot writes codes as a generative AI tool. It’s not designated for professional coding in software development projects. In most scenarios, the AI will simply populate a script from a web search if it finds a match. So, you can’t use that code as is for commercial use because you’ll violate software program copyright laws.
Moreover, it can generate codes in only 20 coding languages and can’t integrate with an ongoing programming project.
You can see that Microsoft Copilot has also generated a script for mobile app button coding but referenced published articles or websites.
AI Copilot Chat
The chat feature of GitHub Copilot has been designed specifically for programming-related assistance. You can ask the AI to explain a codebase, generate a unit test for a function, add a code line to a documentation with explanations, and more.
Furthermore, the Copilot Enterprise edition can create pull request summaries, text completion for pull request description writing, create a knowledge base of prompts, etc.
On the other hand, Microsoft Copilot chat is for general purposes. You can ask it to write a VBA script for Excel, small Python scripts for data analysis, create AI-generated stock images, or synthesize AI music. This AI assistance won’t be able to help you with specialized coding tasks like GitHub Copilot.
Integration With Other Apps
You’ll have to integrate GitHub Copilot with your preferred IDE, like Visual Studio, Visual Studio Code, and Neovim. If you’re using any other coding tool, it must be based on the JetBrains IDE engine for GitHub Copilot integration. For example, you can integrate the AI coding plugin in Android Studio since it’s a JetBrains IDE-compliant development platform.
On the contrary, the Microsoft Copilot free edition only allows a select few plugins, like Search, Instacart, Klarna, Phone, etc. If you get the Microsoft Copilot for Microsoft 365 subscription, you can integrate the service with Word, Excel, PowerPoint, Teams, Outlook, and more. However, for coding purposes, it won’t integrate with any IDE.
Technical Support
GitHub Copilot offers technical assistance to individual and business users in various ways. You can choose one or more from the list provided below:
GitHub Docs: This is technical documentation you can use as a developer to understand the tool from the ground up.
Community Forum: This channel is specifically for active users. You can go through existing forum discussions or post a new issue if you can’t find any relevant resolution.
The GitHub Expert Services Team: You can contact this specialized team to get training materials on topics like GitHub Copilot for Business, GitHub Copilot for Business Administration and Security, GitHub Copilot for Business Adoption at Scale, and more.
GitHub Premium Support: You can opt for a paid technical support plan for a dedicated Technical account manager, Phone support, Screenshare support, Guaranteed service level agreements, Priority ticket handling, Escalation management, and more.
Microsoft Copilot also offers functional support through the following channels:
GitHub Copilot collects various data, like Prompts, Feedback Data, User Engagement Data, and Suggestions when you use the service on your IDE. However, it processes in encrypted mode so no one can know what you’re actually working on. Also, it doesn’t use your data to train the AI engine.
Moreover, it has data privacy and protection certificates, like GDPR and CCPA to help you stay compliant.
Since the program has been trained from public codebase platforms, it might sometimes populate personally identifiable data. However, the chances of such occurrences are very low.
On the other hand, Microsoft Copilot uses general security and privacy features for the free edition subscribers. For example, the app has data transmission encryption so hackers can’t intercept your work. You can log in with a Microsoft Account to keep a copy of all of your work. Moreover, Microsoft doesn’t use your data to train its large language models.
For business subscribers and premium users, Microsoft uses dedicated disk partitions for work data. Also, it applies the same content and access restrictions as configured in your Microsoft 365 Admin Center.
In a nutshell, both of these AI tools are safe from prying eyes so you can work with business or confidential data.
Pricing
GitHub Copilot isn’t available for free for individual developers. You can get a 14-day free trial period but you must sign up with a credit or debit card. You can cancel the subscription before the trial ends or you’ll get charged.
The Copilot Individual subscription starts at $10/ user/ month and could go up to $39/ user/ month for the Enterprise plan.
Contrarily, the basic version of Microsoft Copilot is free forever for registered and visitor users. You could get a Copilot Pro subscription for $20/ user/ month. Alternatively, if you need to use the AI assistance in the Microsoft 365 suite, you can subscribe to the $30/ user/ month premium package.
GitHub Copilot vs Microsoft Copilot: Verdict
So, here are my thoughts:
If you’re a trainee, expert, or business-level software programmer looking to reduce manual work, you should go for GitHub Copilot.
However, if you code as a hobby or are just in the learning phase, you can start with Microsoft Copilot. It’ll help you get answers to theoretical content related to programming. For Microsoft Copilot alternatives, dive into our article for recommendations.
Hopefully, this GitHub Copilot vs Microsoft Copilot will help you make up your mind.
Your printer drivers are responsible for bridging the communication gap between the printer and PC so if you need to update them but keep getting Epson driver download failed, you’ll not be able to print anything.
Usually, driver updates are automatic but you might end up with outdated or wrong drivers. And if you go the manual way and this fails too, it’s probably a network, driver signature or compatibility issues.
What can I do if my Epson driver download has failed?
1. Disable driver signature checks
Press the Windows key, type cmd, and select Run as administrator under Command Prompt.
Type the command below and hit Enter to run it: bcdedit.exe /set nointegritychecks on
Now, try to download the stubborn driver anew.
After downloading and installing the driver, type the command below and hit Enter to restore driver verification: bcdedit.exe /set nointegritychecks off
Driver signature is an added layer of security to ensure only verified manufacturers can install drivers in your system. However, some custom drivers may bypass these checks and deemed a security risk hence fail to download.
In this case, temporarily disabling this feature can allow you to download and install the Epson driver.
2. Download the driver from official manufacturer
Navigate to your browser and go to Epson’s official driver download page.
Select your OS from the Operating System list. In most cases, it detects your Windows version but it can be incorrect so make sure you manually select for your version of Windows.
Now, download the driver.
Open the installer file and install it on your computer.
Next, click on the taskbar’s magnifying glass icon.
Type Control Panel within the search tool that opens and select Control Panel to open that window.
Next, select Large Icons on the View by drop-down menu.
Click Devices and Printers in the Control Panel.
Then press the Add a printer button.
Choose your specific Epson printer on the Add a device window, and press the Next button to install it. If not available, you’ll have to add it manually by clicking on the The printer that I want isn’t listed option.
Press the Next button and follow the on-screen prompts.
Hit the Finish button after the printer has been added and restart your PC.
This immediately brings up the .exe file and requests you grant permission to download.
Open File Explorer by pressing the Windows + E keys. By default, the file should be in the Downloads folder.
Launch the .exe file and click Agree on theLicense Agreementpage, then click OK.
After the installation, click on your Epson product and wait for driver’s suggestions, then click Install.
If your Epson printer driver still fails to download, you might have to get in touch with Epson support for further assistance.
A printer driver failing to download is not an unusual experience but you can prevent such issues by keeping your printer firmware and operating system updated at all times.
The ERROR_UNKNOWN_PRINTER_DRIVER falls under the category of system errors and appears when the printer driver is missing or incompatible, required services are not running, system files are corrupt, or access to the driver is being blocked.
The error code is 1797 (0x705), and the message reads, The printer driver is unknown.
Before you start troubleshooting, restart the computer, reconnect the printer, install all pending Windows updates, and make sure the installed driver version matches the system architecture, i.e., you have a 32-bit printer driver for 32-bit Windows or a 64-bit driver for 64-bit Windows.
How can I fix ERROR_UNKNOWN_PRINTER_DRIVER?
1. Manually install a compatible printer driver
When you connect a device for the first time, Windows usually automatically installs the best available driver. If that doesn’t happen, you can always manually install the driver!
For that, you must visit the manufacturer’s website, locate the new releases, download the driver setup, and then proceed with the installation.
2. Run the printer troubleshooter
Press Windows + R to open Run, paste the following command in the text field, and hit Enter: msdt.exe -id PrinterDiagnostic
Now, follow the on-screen instructions to troubleshoot issues with the printer.
3. Install a generic driver for the printer
Press Windows + I to open Settings, go to Bluetooth & devices from the navigation pane, and click on Printers & scanners.
Click on Add device and then on Add manually when the option appears.
Select the Add a local printer or network printer with manual settings option and click on Next.
Select the Use an existing port option, then pick FILE (Print to File) from the dropdown menu, and click Next.
Choose Generic from the left pane, select a driver from the list, click on Next, and then proceed with the setup.
Once done, check whether the ERROR_UNKNOWN_PRINTER_DRIVER Windows issue is resolved. If not, try other generic drivers from the list until one works.
4. Restart the Print Spooler service
Press Windows + S to open Search, type Services in the text field, and click on the relevant result.
Scroll down, right-click on the Print Spooler service, and select Properties.
Click on the Stop button under Service status.
After the service stops running, select Automatic from the Startup type dropdown menu, and then click the Start button under Service status.
Finally, click Apply and OK to save the changes, then restart the computer and check for improvements.
5. Run the required services
Press Windows + R to open Run, type services.msc in the text field, and hit Enter.
Scroll down, right-click on the UPnP Device Host service, and select Properties.
Choose Automatic from the Startup type dropdown menu, and click on Start under Service status.
Next, click on Apply and OK.
Similarly, run the SSDP Discovery and Remote Procedure Call (RPC) services.
Often, ERROR_UNKNOWN_PRINTER_DRIVER or the 1797 (0x705) The printer driver is unknown message appears when UPnP Device Host, SSDP Discovery, and Remote Procedure Call (RPC) services are not running. While you are at it, also run the HTTP service, if it’s available.
6. Repair the corrupt system files
Press Windows + S to open Search, type Command Prompt, and click on Run as administrator.
Click Yes in the UAC prompt.
Paste the following DISM commands individually and hit Enter after each: DISM /Online /Cleanup-Image /CheckHealthDISM /Online /Cleanup-Image /ScanHealthDISM /Online /Cleanup-Image /RestoreHealth
Run the SFC scan using this command: sfc /scannow
Finally, reboot the PC and check for improvements.
Corrupted system files are a common reason behind the ERROR_UNKNOWN_PRINTER_DRIVER system error in Windows. An easy fix for this is to run the SFC (System File Checker) and DISM (Deployment Image Servicing and Management) scans, which will replace all such files with their cached copy!
7. Uninstall conflicting apps
Press Windows + R to open Run, type appwiz.cpl in the text field, and hit Enter.
Select any third-party security software or program that might conflict with Windows, and click on Uninstall.
Follow the on-screen instructions to complete the process.
Similarly, uninstall other conflicting apps and then restart the PC.
If a quick app removal doesn’t help fix ERROR_UNKNOWN_PRINTER_DRIVER, I recommend using a top-rated software uninstaller for Windows to automatically delete the related leftover files and Registry entries.
Remember, ERROR_UNKNOWN_PRINTER_DRIVER is usually a software-based issue that can be resolved with one of the solutions listed above. However, if the problem persists, contact the printer’s dedicated support or get in touch with a professional for more help.
The BGI_DETECTED_VIOLATION comes with the value of 0x000000B1 and is usually caused by a problematic or corrupted driver. Before performing the solutions below, disconnect all the external devices, except for the mouse and keyboard.
How do I fix BGI_DETECTED_VIOLATION?
1. Disable Driver Verifier
Click the Start button, type cmd and select Run as administrator from the results to start Control Panel with administrator rights.
Type verifier /reset and press Enter. This will reset the Driver Verifier.
Resetting the Driver Verifier will force the system to see the drivers more accurately, fixing the BGI_DETECTED_VIOLATION BSoD. If you can’t boot the system, you can run Command Prompt through the System Recovery screen.
2. Update your drivers
Press Windows + X and select Device Manager.
Look for any devices with a yellow triangle or exclamation mark.
Right-click the problematic device, select Update driver, and choose Search automatically for drivers.
If there is a newer version of the driver, the system will install it.
If that doesn’t work, you may go to the manufacturer’s website and download the correct driver for your device.
3. Run System File Checker (SFC) and DISM
Click the Start button, type cmd and select Run as administrator from the results.
Type sfc /scannow and press Enter. This will scan and repair corrupted system files.
After the scan is complete, type DISM /Online /Cleanup-Image /RestoreHealth and press Enter.
This is a system problem so running the SFC and DISM scans will fix any corrupted files that might be causing the BGI_DETECTED_VIOLATION BSoD.
4. Check for hardware issues
The Blue Screen of Death is a way to stop the processes pointing to hardware problems. So, if none of the solutions above worked, try to open the PC case and take a look inside to see if there is no sign of damage and that all components are connected properly.
Dust and debris can prevent normal functioning and overheating of the components. Therefore, you may also dust them gently and ensure that all the coolers are spinning properly.
5. Restore the system to a previous point in time
The BGI_DETECTED_VIOLATION may also be caused by a software conflict so you may also try restoring the system to a point in time before this BSoD occurred.
To do that, type system restore into Windows Search and press Enter, then choose a restore point before the incident. We also have a full guide on how to use System restore on Windows 11.
Hopefully, by using the solutions above, you got rid of the BGI_DETECTED_VIOLATION BSoD and now your PS is working fine. You might also check our complete guide on how to fix a BSoD on Windows 11.
If you have any questions or suggestions, feel free to address them in the comments below.