Mpksldrv.sys: What is it & How to Fix its Reloading Bug

Many of our readers have reported that mpksldrv.sys file, a part of Microsoft Malware Protection, keeps reloading repeatedly every ten minutes with the message The service mpksldrv has been created.

This reloading bug suddenly showed up after installing an update and keeps clogging up the display of the monitoring system. 

Why do I encounter the mpksldrv.sys reloading bug? 

The mpksldrv.sys reloading bug can show up in several scenarios, some of the significant ones being: 

  • Incompatible drivers – Corrupt or incompatible kernel mode drivers often cause the mpksldrv.sys file to reload on a Windows computer.
  • Malware attack – If your PC gets infected by viruses and malware, reloading bugs like these are a common sight. 
  • Buggy Windows update – A recently installed Windows update may be bug-ridden, which might trigger the mpksldrv.sys bug.
  • Corrupt system files – This reloading bug can also occur if the system files get corrupted or are damaged during an incomplete Windows update. 
  • Incompatible software – A recently installed app may interfere with the functionality of the malware protection service hence the error. 

If you also experience the same problem on your computer, walk through this guide to discover the possible solutions. 

How do I fix the mpksldrv.sys reloading bug?

Try these workarounds before proceeding to the advanced solutions listed below. 

If these methods did not help get past this BSOD error, employ the following fixes. 

1. Perform a clean boot state  

  1. Right-click the Windows icon and choose the Run option from the Quick Links menu. 
  2. Enter the following command in the text box and press Enter to launch the System Configuration window. msconfig mpksldrv.sys
  3. In the General tab, disable the Load startup items option and enable the Load system services option. mpksldrv.sys
  4. Now in the Services tab, enable the box for the Hide all Microsoft services option in the bottom left, and press the Disable all button. mpksldrv.sys
  5. Switch to the Boot tab, here check the box for the Safe Boot option present in the Boot Options section, and enable the Minimal radio button. mpksldrv.sys
  6. Press Apply to save the changes and OK to close the System Configuration window. 

Now restart your PC to perform the safe boot and enter the clean boot state. At this point, your computer will load minimal services and no third-party programs will function. Use your computer for some time to see if it mpksldrv.sys bug still reloads on your PC.

If this problem does not arise, it means a third-party program installed on your computer is causing this bug to reload repeatedly. You should try uninstalling that conflicting app and see if it helps.

2. Run SFC and DISM scans

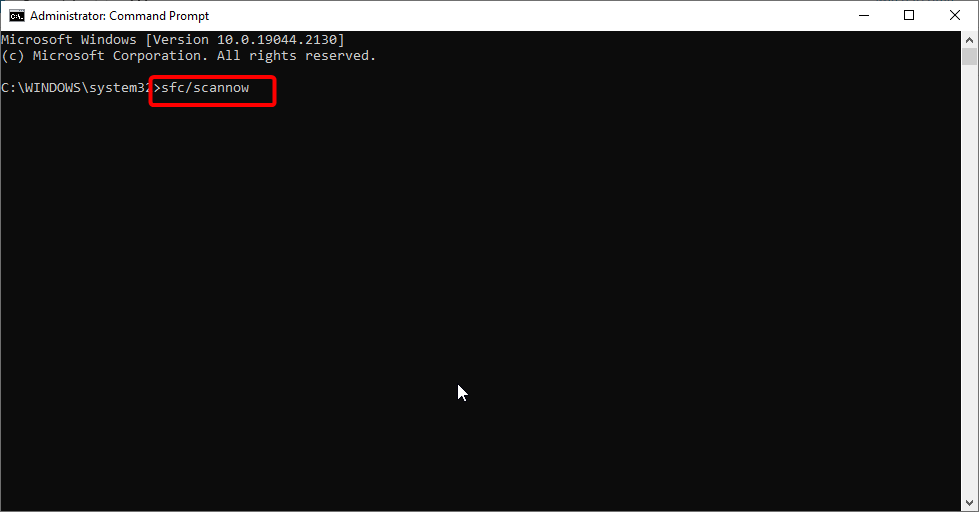
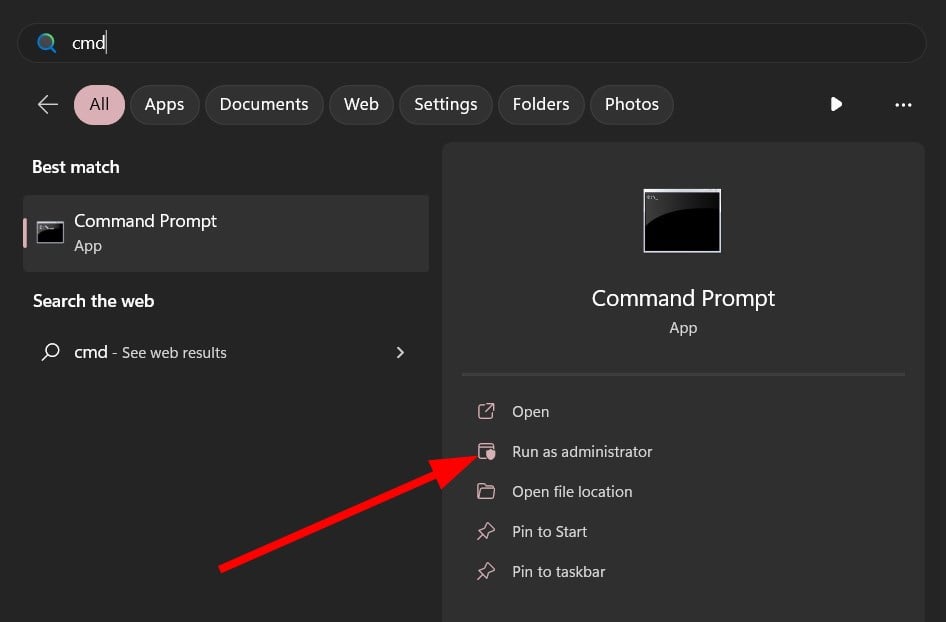
  1. Press the Windows key to launch the Start menu, type cmd in the Search bar and choose Run as administrator from the right results section. mpksldrv.sys
  2. Click the Yes button on the User Account Control prompt. 
  3. Type or paste the following command and press the Enter key to initiate the System File Checker. sfc /scannow Mpksldrv.sys
  4. After you see the message verification is 100% complete, type or paste the below command and press the Enter key. DISM /Online /Cleanup-image /Restorehealth Mpksldrv.sys

System File Checker will scan your PC to find the corrupt system files and will replace them with the original file stored in the compressed folder. Similarly, the DISM tool will identify and repair faulty system images in Windows. 

3. Run Driver Verifier

  1. Bring up the Run dialog box using the Windows + R shortcut key combination. Type the following command in the command box and press Enter to execute the command. verifier Mpksldrv.sys
  2. Click the Yes button on the User Action Control prompt to grant Driver Verifier Manager permission to make changes on your PC.
  3. Next, from the Select a task section, enable the Create Standard Settings option and press Next. mpksldrv.sys
  4. Now, enable the radio button preceding the Automatically select all drivers installed on this computer option and click the Finish button. Mpksldrv.sys

Restart your computer as you normally do and try using your PC for some time until the mpksldrv.sys files begin to reload with the name of the problematic driver. You can then update or rollback that system driver to get rid of this bug from your PC. 

Driver Verifier monitors the Windows kernel-mode drivers and graphics drivers and diagnoses the illegal function calls that might lead to abnormal system behavior. 

That’s pretty much it! We are positive that you we’re able to successfully troubleshoot the mpksldrv.sys reloading bug on your PC using the solutions listed in this guide. 

In case you are facing high CPU usage due to the antimalware executable service, refer to this guide to disable it.

If you need further assistance regarding troubleshooting this error on your PC, feel free to reach out to us. 

Check out the new Windows 10/11 HVCI/memory compatibility check tool

We know you like keeping your machine in tip-top shape, and for that, you need the right set of tools. Whether you work on Windows 10 or Windows 11, this will be right up your alley.

Only a few days back, Microsoft released a new tool that will let users check compatibility issues with memory integrity or hypervisor-protected code integrity (HVCI).

This tool is simply known as memory integrity scan tool (hvciscan) and it can be useful on Windows 11, Windows 10, and Windows Servers.

By the way, don’t forget to check out the May 2023 Patch Tuesday rollout. Also, remember that emails from outdated or unpatched Exchange Servers will be blocked.

Windows 10, Windows 11 and Servers just got a new tool

If you weren’t already aware, memory integrity is a feature of Virtualization-based Security (VBS) and essentially runs Kernel Mode Code Integrity (KMCI).

Of course, we’re talking about an isolated virtualized Windows Hypervisor part of the memory such that the kernel is kept safe from malicious code.

Not to mention that it is often cited as a reason why Windows 11 does not support AMD Ryzen 1000 (Zen1), Intel 7th Gen, and older chips.

Keep in mind that newer Intel and AMD CPUs have special hardware-based acceleration feature for hypervisor which enables a more efficient code integrity handling.

For Intel users, it is known as Mode-based Execution Control (MBEC), while on AMD it is called Guest Mode Execute Trap (GMET). Even then, VBS can still lead to performance loss.

Here’s what we’re looking at when talking about this tool:

Memory integrity scan tool

Use the hvciscan.exe to check for compatibility issues with memory integrity, also known as hypervisor-protected code integrity (HVCI).

System Requirements

Supported Operating System

  • Windows 11, Windows Server 2016, Windows Server 2019, Windows Server 2022
  • Windows 10, Windows 11, Windows Server 2016 or higher

Install Instructions:

Download the hvciscan.exe for your system architecture (AMD64 or ARM64). From an elevated command window or PowerShell, run hvciscan.exe. Review the resulting output to identify any incompatibilities.

If you want to use it, you can download it directly from the official Microsoft website. We urge caution and advise you not to get it from anywhere else.

Have you downloaded and used this new tool? Share your experience with us in the comments section right below.

How to Resize the Discover Pane in your Microsoft Edge

After the relatively not-so-heavy Patch Tuesday, The Dev Channel update to 115.0.1843.0 is now live, too, and it comes with a lot of fixes, policies, and new features.

Some of them focus on stability and reliability, and after updating, you will be able to play videos and media files on certain websites where they wouldn’t work.

Another much-needed feature is that you can now drag your links anywhere in the Vertical Tabs area to open them in a new tab.

However, one of the most significant features is the one that lets you resize the Discover pane in Edge. This feature is quite handy because you can allocate as much space as you want to the Discover panel without overcrowding your Edge.

Here is how you can resize the Discover pane in Edge

  1. Open your Microsoft Edge browser.
  2. Click on the Discover button at the top right of the browser (a rectangular pane should pop up automatically).discover pane edge
  3. Once you’re there, just go to its left border and you should be able to resize it.edge resize

With this being said, the update release to 115.0.1843.0 follows the same pattern as the major Patch Tuesday updates released by the Redmond tech giant this week. The list is fairly simple, but the features are worth it.

You can read the complete release details below:

Added features:  

  • You can now drag links anywhere in the Vertical Tabs area to open the link in a New Tab.
  • Discover pane is now resizable.
  • macOS:
    • Added Control + Option + Command + Down shortcut to open spellcheck correction card.
  • Enterprise:
    • New policy: (Note: Updates to documentation and administrative templates may not have occurred yet)
      • Added DiscoverPageContextEnabled policy.
      • Added policy to configure recommended settings dialogs.

Improved reliability:  

  • Fixed browser crash when selecting text in the InPrivate window.
  • macOS:
    • Fixed browser crash when prompting proxy credentials.
  • Android:
    • Fixed browser crash when tapping on the forward or back button twice quickly.

Changed behavior: 

  • Fixed unable to play videos on certain websites.
  • Fixed AV1 media playback.
  • Fixed Workspaces unable to reconnect when lost connection.
  • Fixed edge://app-settings page displaying “This page has been blocked by Microsoft Edge” message.
  • Fixed the missing Discover pane header.
  • Linux:
    • Fixed spellcheck suggestions not working in certain scenarios.
  • macOS:
    • Fixed the browser not getting focus when opening links from other apps
  • WebView2:
    • Fixed ScriptDialogOpening issues for beforeunload kind (#3355)
    • Lunching External URI API has now been promoted from the experimental stage to public.
  • Enterprise:
    • Fixed external unmanaged links not opening in InPrivate tabs on Android.
    • Fixed keyboard shortcut for Discover still activates Discover while being disabled by policy.

Speaking of Edge, it seems that Microsoft is keen on making the browser stand out in the crowd by any means.

Just this week, users in Turkey got a notification on Edge whenever they would download another browser.

And there is more. It seems that the Redmond tech giant is making it even harder to switch from Edge to another browser. Microsoft is blocking other browsers’ one-click feature to set them as default browsers.

What do you think about all this? Are you using Edge as your default browser? Do you like it? Let us know in the comments section below.

How to Use a Laptop Display as Your Second Monitor

If you don’t have an external monitor, you may still use a laptop as a second monitor. It’s not the best option, but two screens are better than one. In this article, we will explain how to use a laptop as a second monitor and extend your desktop screen area.

Can I use a laptop display as a second monitor?

The short answer is yes, but you probably have problems with this task because you were trying to use a USB-C or HDMI cable.

Using a laptop display as a second monitor is impossible with a cable unless you have a video captioning dongle connected to the second laptop.

However, you can do that wirelessly, and in this article, you will learn exactly how to do that.

How can I use a laptop display as a second monitor?

1. Install the Wireless Display feature

  1. Turn on the laptop you will use as a second screen, click the Start button, and select Settings.
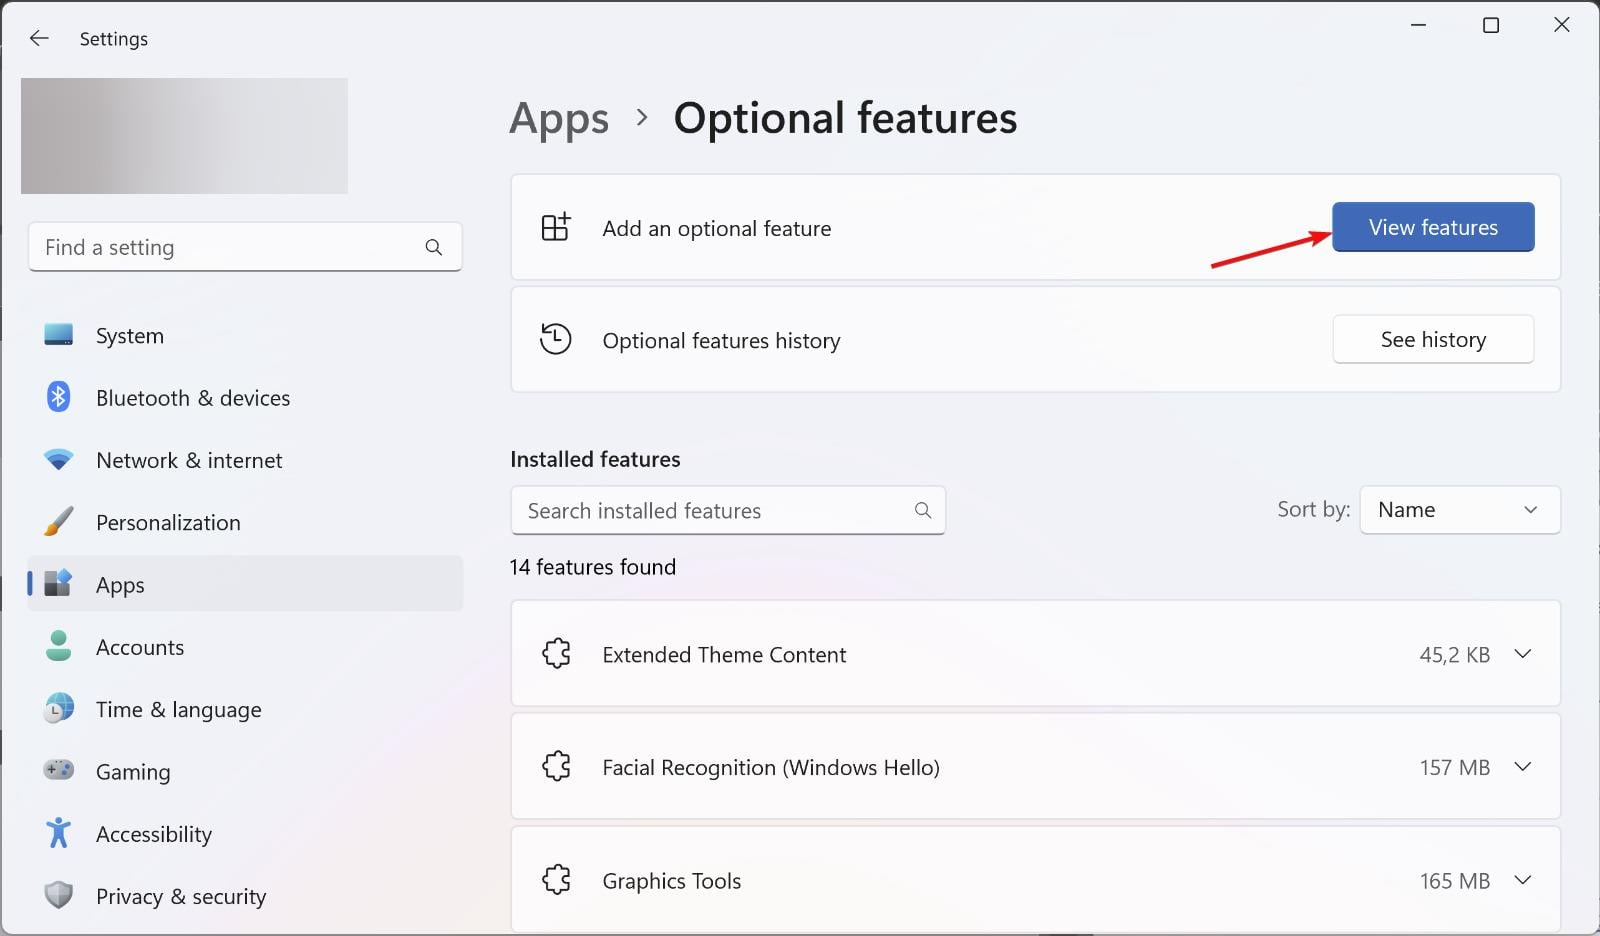
  2. Now, select Apps from the left pane and click on Optional features from the right.
  3. Click the View features button under the Add an optional feature section.
  4. Next, type wireless display in the Search bar, check the Wireless Display box, and hit Next.
  5. Hit the Install button and now, your laptop will be available as a wireless display.

Make sure that your laptop is connected to the internet so that it can install the feature.

2. Extend the display to the second laptop

  1. Click the Start button and choose Settings.
  2. In the System tab, click on Projecting to this PC from the right.
  3. Now, tweak the settings according to your requirements and make sure that the discovery feature from the bottom is turned On.
  4. Now, press the Windows key + P to start the projection options, and select Extend.
  5. Finally, choose the laptop you want to project to and enjoy.

Again, make sure that both laptops are connected to the same wireless network, otherwise, it won’t work.

To expand your setup even further, see how to use 3 monitors on a laptop and create a seamless multi-display workspace.

How do I use a laptop as a second monitor in Windows 10?

You will be happy to know that the process on Windows 10 is almost the same. Although, the Projecting to this PC looks a bit different.

Other than that, all the process is the same as the one described for Windows 11 above.

We also recommend reading our guide on what to do if Windows 11 is not detecting the second monitor.

Before leaving, you might also want to learn how to check your laptop warranty to ensure your devices are still covered for repairs or replacements.

If you have any questions or suggestions, please drop them in the comments section below.

Chat history is coming to Microsoft’s Bing Chat

We got another one in the Bing Chat-GPT saga, so hold on to your seats. Before we tell you what it is though, you should learn how to disable Bing Chatbot in Skype.

Also, if your Bing Chat is not working, we got the solution you were looking for. But enough about that, let’s get into why we are here for.

We’re here to tell you that Microsoft Bing Chat finally starts rolling out its long-requested chat history feature.

You might not get the feature right away but it’s coming

When Microsoft first launched the Bing Chat chatbot a few months ago, one of the most requested features by users was to add a way to save their chats.

Back then, the Redmond-based tech giant promised for weeks that the feature was indeed in the works, and that was repeated last week when the company revealed a ton of other upcoming Bing Chat additions.

This week, however, it appears the chat history feature has started rolling out and posts on the Bing Reddit forums show screenshots of the feature in action. 

Even though there are reports of seeing the feature go live as well, there are apparently still some users who don’t see it when they use Bing Chat.

The simple explanation is that this feature is actually still rolling out for public use, so don’t get alarmed if you don’t get it right away.

Furthermore, this feature is, at least so far, limited to the web version of Bing Chat. Keep that in mind before giving yourself a hard time trying to install it anywhere else.

That being said, if the feature is indeed live where you are when you use Bing Chat, there’s no need to panic.

In fact, any conversation thread is saved and placed in a Recent Activity section on the right-hand side of the chat, complete with a time stamp.

You can actually rename the saved chat if you want and it will certainly be a very helpful addition for people who want to preserve their conversation turns.

How do you feel about this whole situation? Make sure you let us know in the comments section located right below.

Even more, Copilot’s chat history gets expanded, so find out more on this topic right away.

Fix: Windows Can’t Communicate with the Device or Resource

Windows can’t communicate with the device or resource error indicates that your PC can’t communicate with the Primary DNS Servers assigned by your internet service provider. So, it’s advisable to know how to check and change DNS servers on Windows 10/11 PCs.

Why can’t Windows communicate with the device?

The main culprit for this problem is an outdated network driver. When network drivers are outdated, they can malfunction and cause issues with your connections. Other factors that may cause the problem are:

  • Issues with the DNS server – When the DNS server set by your internet service provider or you to use is unavailable, it may prevent your PC from accessing the DNS server, prompting Windows can’t communicate with the device or resource error. You can check our guide on how to DNS server set up 1.1.1.1 on Windows 10/11.
  • Issues with your network settings – Windows may experience difficulties communicating with the Primary DNS server if there are conflicting configurations in your network settings. It can impede the network connection on your PC.
  • Network device problems – Devices such as Ethernet and routers can run into several errors that can outrightly cause issues with their connection to Windows. Also, corrupt or outdated router firmware infects it with bugs that can affect its functionality.

However, Windows can’t communicate with the device, or resource error messages can appear when you run the Network Diagnostics. You can fix it by troubleshooting some settings on your PC.

Why can’t Windows communicate with the device?

Before proceeding with advanced troubleshooting, we recommend you follow these preliminary checks to prepare your devices.

  • Disconnect your every connection on the network device.
  • Power cycle your network device and reconnect your PC.
  • Unplug external USB devices and peripherals connected to your computer.
  • Restart Windows in safe mode and check if the error message appears again.

After observing the preliminary checks above and the error persists, go ahead with the troubleshooting steps below.

1. Change the IPv4 and IPv6 settings

  1. Press Windows + R keys to open the Run box, type the control panel in the search box, and press Enter.
  2. Click on the Network and Internet, then select the Network and Sharing Center option.
  3. Select your network on the View your basic network information and set up connections tab.
  4. Then click the Properties button at the bottom of the screen.
  5. Double-click on Internet Protocol Version 4 (TCP/IPv4).
  6. Tick the boxes for the Obtain an IP address automatically and Obtain DNS server address automatically options, then press OK to save the changes.
  7. Double-click on Internet Protocol Version 6 (TCP/IPv6).
  8. Tick the boxes for the Obtain an IP address automatically and Obtain DNS server address automatically options, then press OK to save the changes, then restart your PC.

Changing the Internet Protocol Version (IPv4 and IPv6) Settings on your PC can resolve conflicting issues causing the error.

2. Update your Network drivers

  1. Press Windows + R key to open the Run box, type devmgmt.msc, and click OK to open the Device Manager.
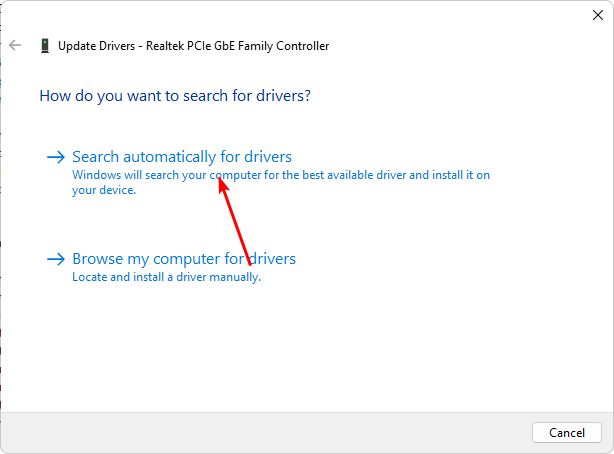
  2. Expand the Network adapters menu, right-click on your device, and select the Update driver option from the drop-down. 
  3. Select the Search automatically for updates option and restart your computer.

Read our article if you have issues updating network drivers in Windows 11.

Sometimes updating your drivers automatically is much easier, thus we recommend you use Outbyte Driver Updater. It is a dedicated tool that finds the latest updates for your drivers from its large database.

Outbyte Driver Updater

The quickest method to update not only your network drivers but all your device drivers as well in a second.
Free Trial Download now

3. Reset TCP/IP

  1. Press the Start button, type Command Prompt, and select Run as administrator.
  2. Type the following commands on the new page one after the other, then press Enter after each command: ipconfig /flushdns  nbtstat –r  netsh int ip reset  netsh winsock reset
  3. Restart your computer and check if Windows can’t communicate with the device or resource error is solved.

Resetting the above network properties will fix any conflicting configurations in your settings. This guide teaches you what to do if you can’t run Command Prompt as administrator on Windows 10/11.

4. Clear DNS records on your PC

  1. Press the Windows + R keys to open the Run tab, type cmd, and press Enter to open the Command Prompt.
  2. Type the following in the command box and press Enter: ipconfig/flushdns
  3. Then restart your PC.

Flushing or clearing the DNS record on Windows can help fix issues with the DNS server that may prompt the error. It can also fix the DNS server not unavailable on Windows 10/11.

Alternatively, you can read our detailed article on how to resolve DNS issues on Windows computers.

Kindly leave your questions and suggestions in the comments section below. We’d like to hear from you.

What is Ene.exe & Should You Remove It?

If you experience device or system performance issues, you may wonder if you should remove the ene.exe process. In this guide, we will discuss what ene.exe is, its purpose, and whether or not you should remove it from your computer.

What is ene.exe?

Ene.exe is a process that runs in the background of Windows operating systems, including Windows 10. It is related to devices such as keyboards and touchpads manufactured by ENE Technology Inc.

While the process is not essential for the functioning of the Windows operating system, it is required for some devices to function correctly. Removing it could cause malfunctioning of some devices; however, if it is of no use to you and you want to get rid of it, scroll down.

How can I remove ene.exe from my PC?

Before removing the ene.exe process, it is important to consider the following prerequisites:

  • Make sure the ENE Technology Inc. driver is not required.
  • Verify you have logged in using your Administrator account.
  • Create a backup of your computer.

Once you finish these checks, move to the steps to remove the process. You must follow the steps mentioned in the same order to complete it.

1. Uninstall the related driver

  1. Press Windows + R to open the Run dialog box.Device Manager Run command ene.exe
  2. Type devmgmt.msc and click OK to open the Device Manager.
  3. Locate the device which uses the ENE Technology Inc. driver, right-click on it, and select Uninstall device.Uninstall device Ene.exe
  4. Follow the on-screen instructions to complete the process.

2. Stop the ene.exe process

  1. Press Ctrl + Shift + Esc to open the Task Manager app.ene.exe Task Manager End task
  2. Go to Details & right-click the ene.exe, then select End task.

3. Delete the ene.exe file

  1. Press Windows + E to open the File Explorer window.
  2. Navigate to this path: C:\Program Files (x86)\ENE\ioene exe delete
  3. Select the ene.exe and click the Delete button to remove it.

If you face any issues removing the file, you can enter safe mode and try again.

So, these are steps that you can follow to remove the ene.exe file. If you have any questions or suggestions, feel free to mention them in the comments section below.

Microsoft and Oracle Considering Alliance to Solve GPU Shortage

Oracle and Microsoft are considering a collaboration to tackle the growing demand for high-capacity servers in the field of artificial intelligence. According to The Information, the two tech giants are contemplating an arrangement that would enable them to rent servers from each other to cater to their large-scale AI cloud customers. The companies plan to offer their clients easy access to computing resources on both clouds by using their existing partnership established in 2019.

The agreement being proposed will use the strong infrastructure built by the fiber links connecting Oracle and Microsoft’s data centers directly. Originally designed to help distribute computing tasks, these connections can now also be used to share GPU server capacity. This helps address server shortages and meets the growing demand for AI computing power for both companies.

Microsoft has previously implemented access restrictions to AI servers for certain internal teams, prioritizing customers’ access to computing resources, with companies like OpenAI benefiting from this arrangement. The company has an exclusive license to offer OpenAI’s ChatGPT and Dall-E creator services over its Azure cloud platform.

Other than resource sharing, Oracle has also expressed interest in reselling OpenAI’s software to its customers, just as it resells Microsoft 365 productivity suite to its customer base. Incorporating OpenAI’s software into its offerings will enhance Oracle’s AI capabilities and provide its clients with cutting-edge solutions for their business needs.

The discussions between Oracle and Microsoft highlight the importance of collaboration and resource optimization in the fast-evolving field of AI. The two companies aim to pool their resources and expertise to ensure their customers can harness the full potential of artificial intelligence in a seamless and efficient manner. This collaboration has the potential to enhance the availability and efficiency of AI-related computing power, benefitting large-scale AI cloud customers, and paving the way for improved customer experiences.

Via: DCD

What is SDXHelper.exe and How to Disable It

SDXHelper.exe is a process that runs in the background of Windows operating systems, specifically Windows 10. It is a system component that helps to manage and install updates for Windows, Microsoft Store apps, and other related components.

While this process is essential for maintaining the health and security of your PC, it can sometimes consume high CPU and memory usage, slowing down your system’s performance.

How can I disable SDXHelper.exe?

1. Disable the associated task

  1. Press Ctrl + Shift + Esc to open the Task Manager app.End task SDKhelper
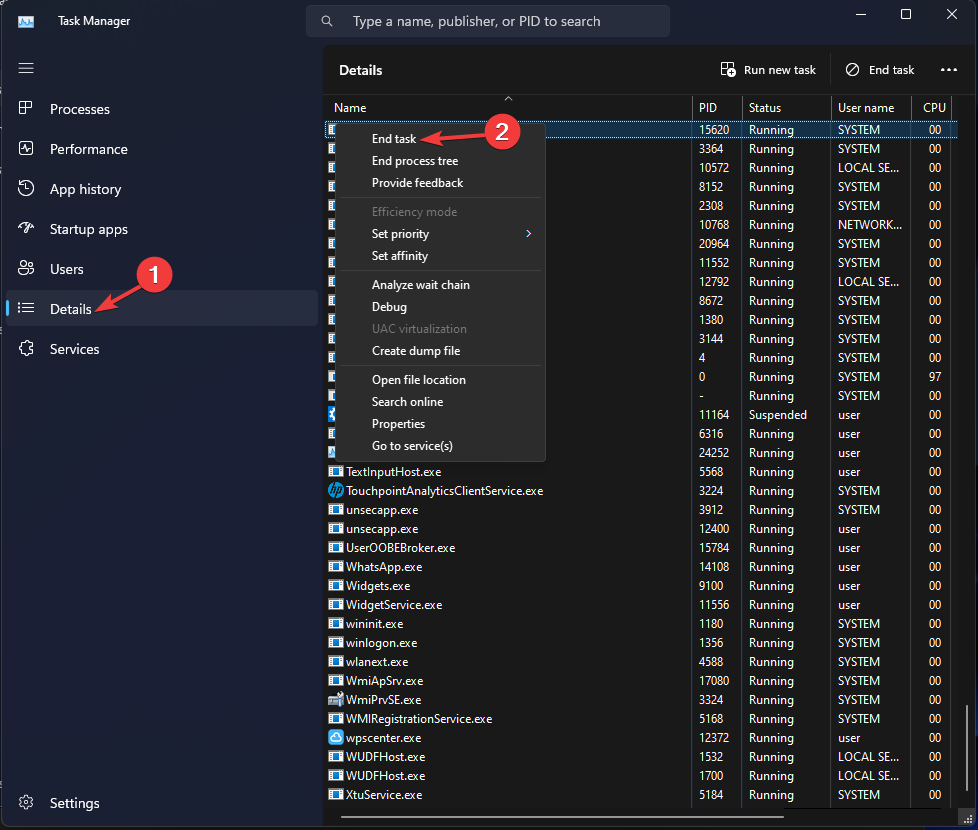
  2. Go to Details & right-click the SDXHelper.exe, then select End task.

2. Disable the MS Office feature updates

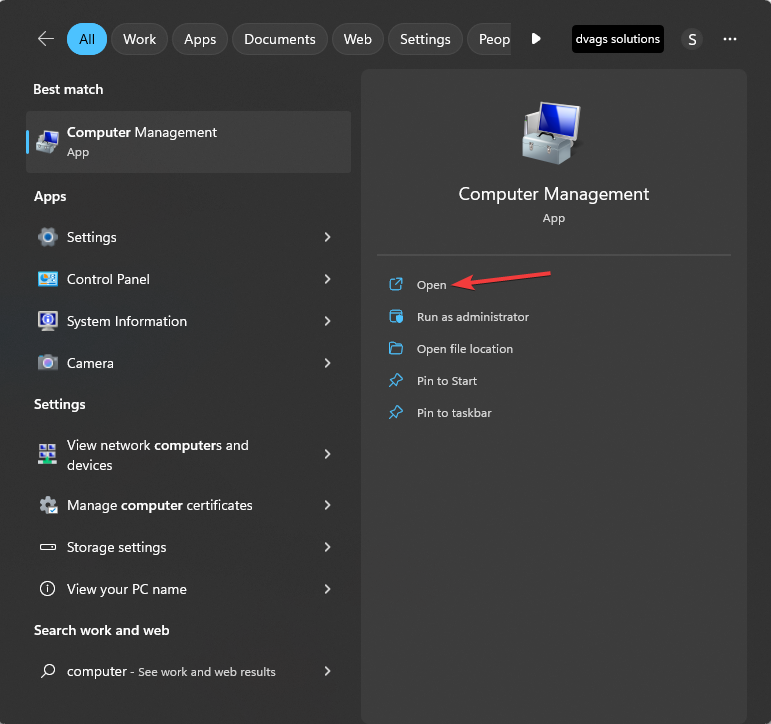
  1. Press the Windows key, type computer management, and click Open.Computer Management click OPen SDXHelper
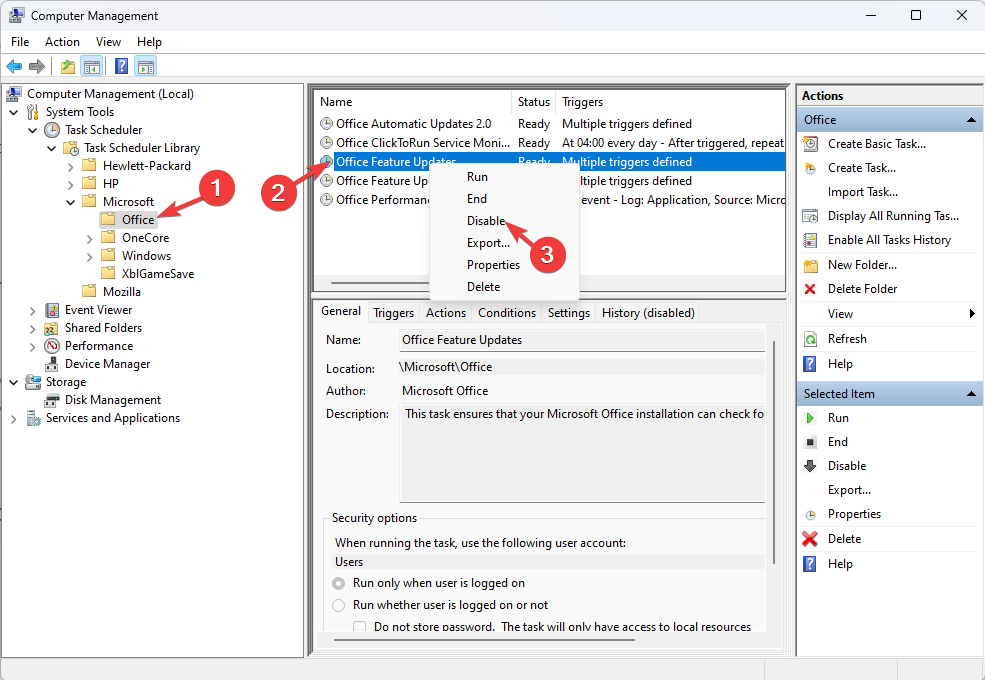
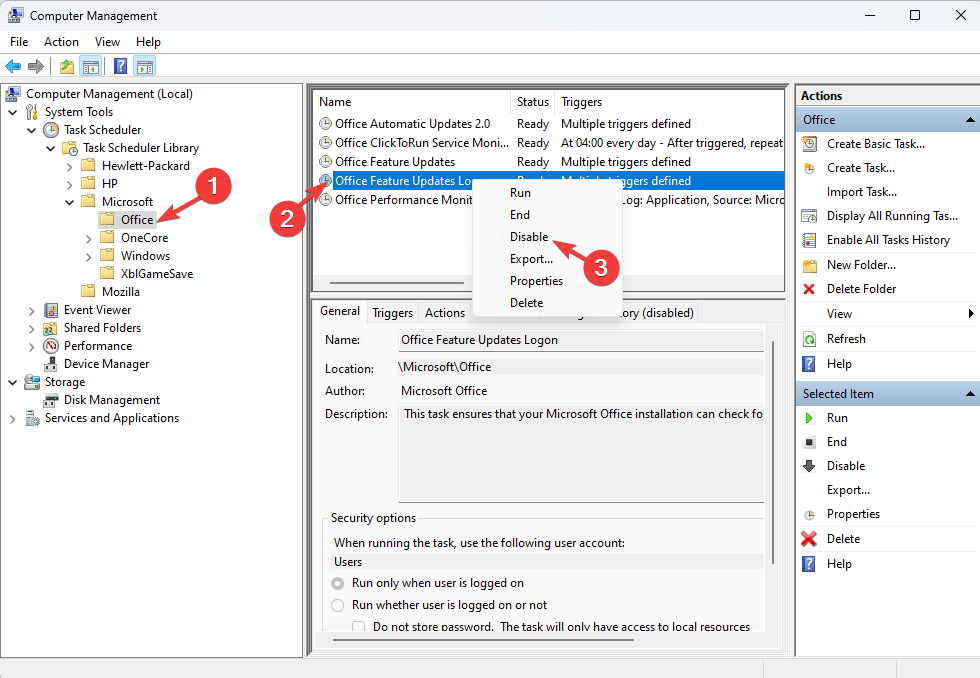
  2. On the Computer Management window, click the arrow next to the Task Scheduler.
  3. Then, click the arrow for Task Scheduler Library.
  4. Click Microsoft, then select Office.
  5. Right-click Office Feature Updates, and select Disable.Disable
  6. Now right-click Office Feature Updates Logon and choose Disable.Disable

3. Repair/Reinstall the Office app

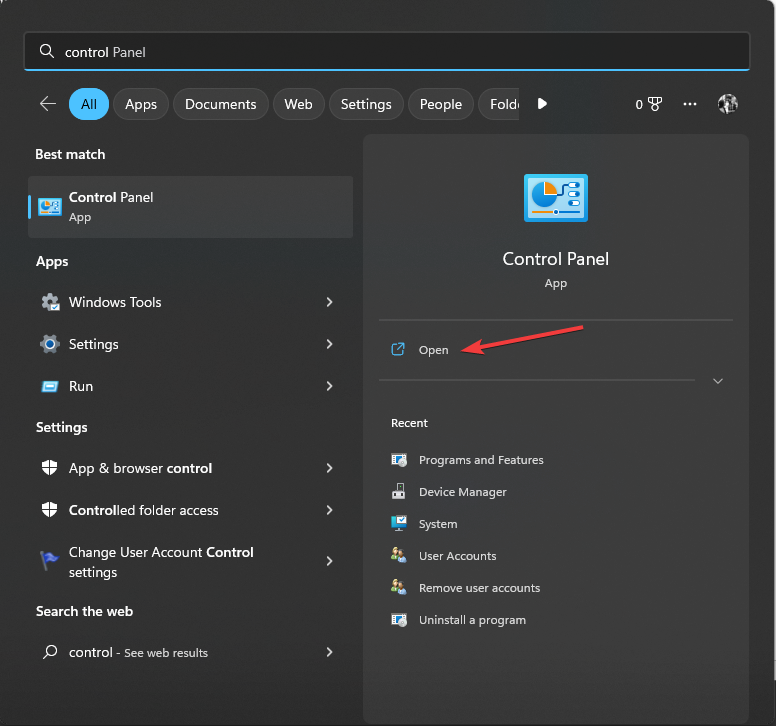
  1. Press the Windows key, type control panel, and click Open.Control Panel start menu SDXHelper
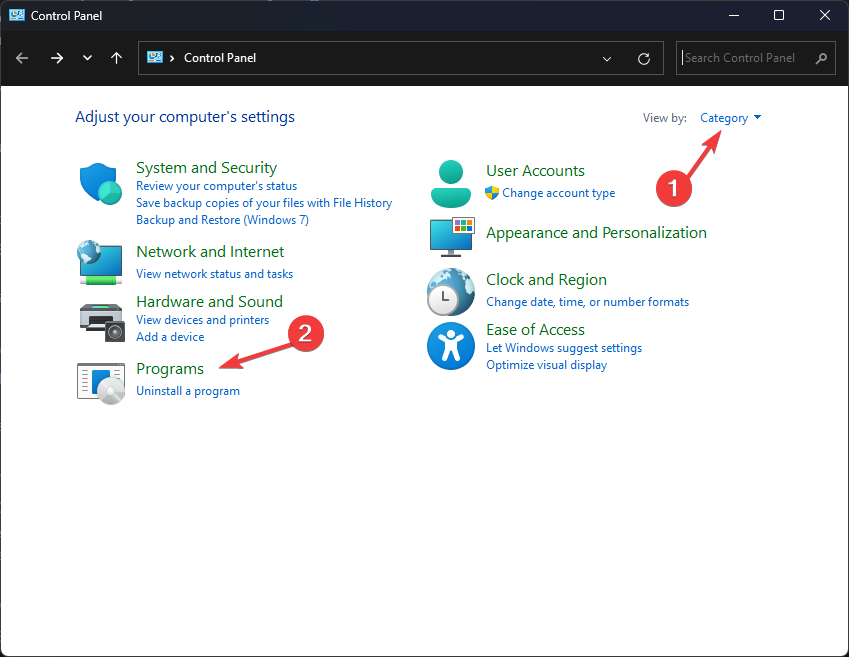
  2. Select View by as Category and click Uninstall a program.CP Uninstall
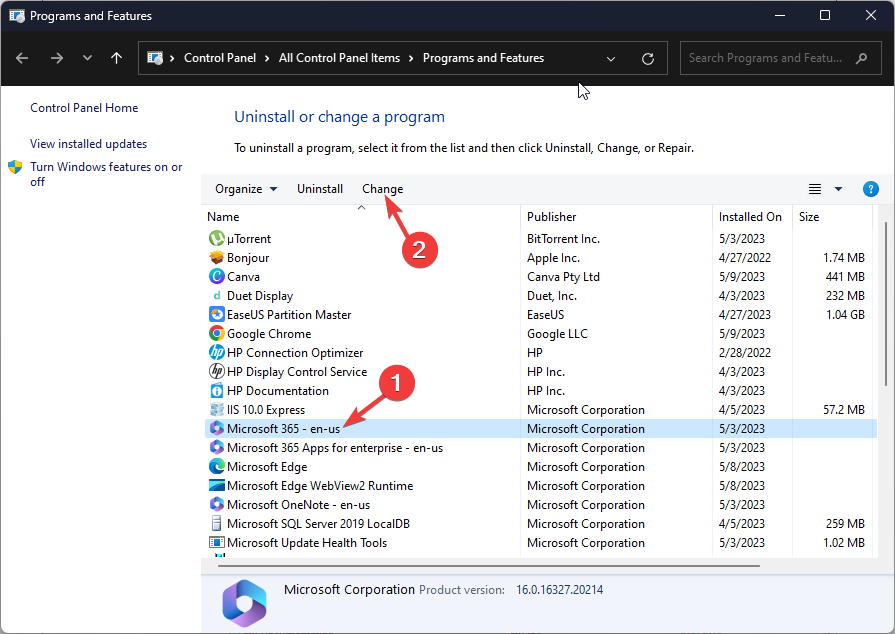
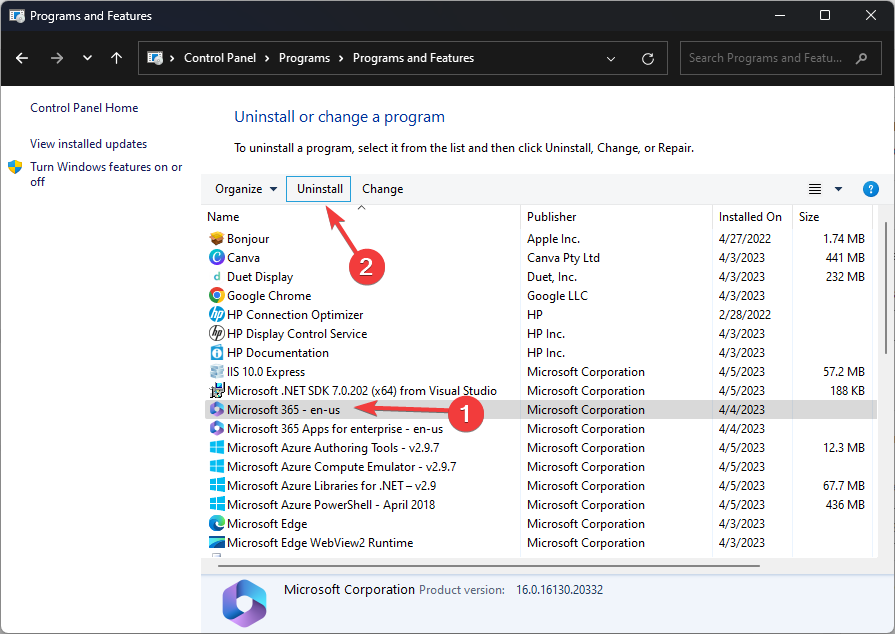
  3. On the Programs & Features window, select Microsoft Office and click Change.Change
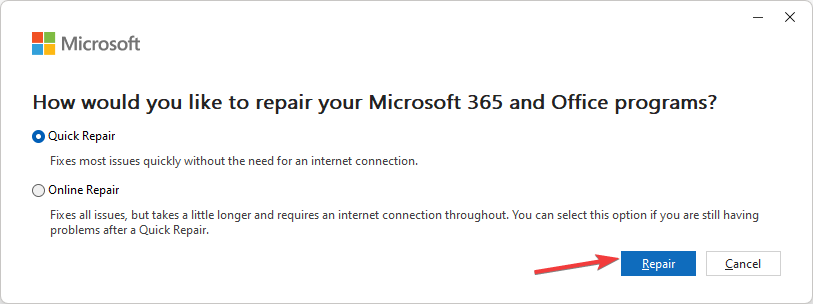
  4. Click Repair.repair Office
  5. If this doesn’t help, go to Programs & Features window, select Microsoft Office, and click Uninstall.Uninstall Office
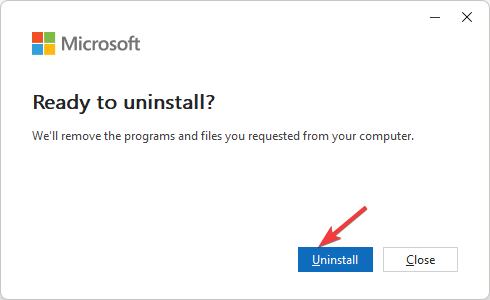
  6. Click Uninstall.Uninstall
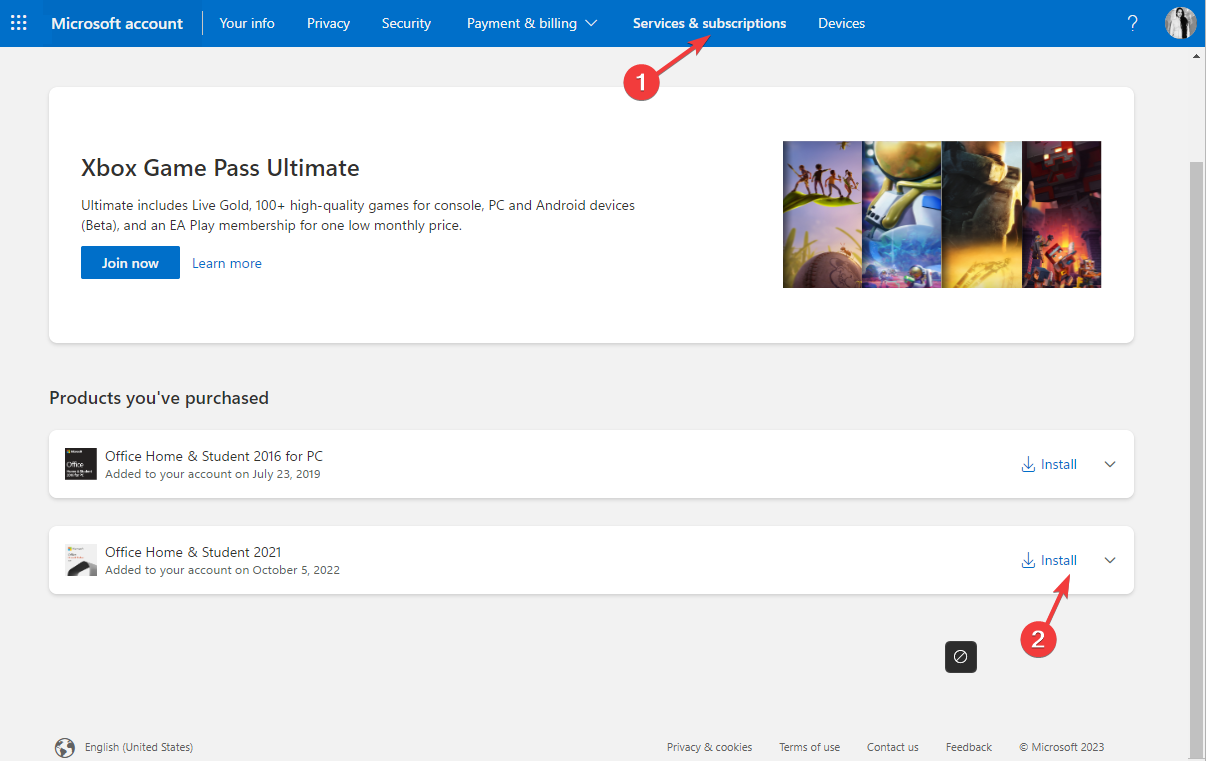
  7. Now login to your Microsoft account and click Services & subscriptions.
  8. Click Install.Install office
  9. Now double-click the downloaded file and follow the onscreen instructions.

Restart your computer to save the changes.

4. Rename the SDXHelper.exe file

  1. Press Ctrl + Shift + Esc to open the Task Manager app.
  2. Go to Details, & right-click the SDXHelper.exe, then select End task.
  3. Press Windows + E to open File Explorer.SDXHelper.exe rename
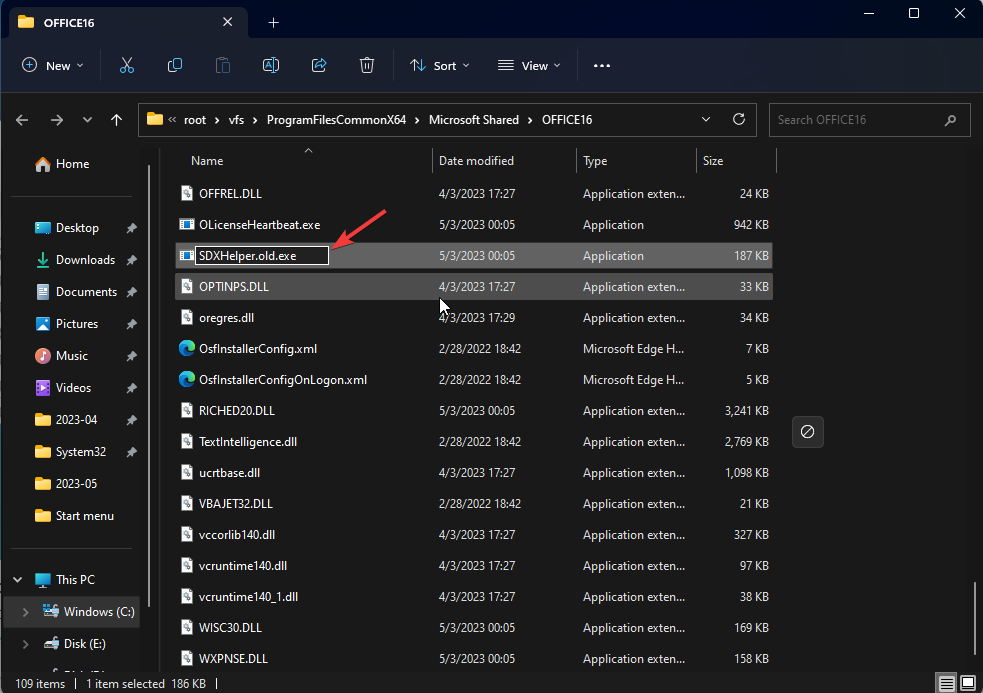
  4. Navigate to this path: C:\Program Files\Microsoft Office\root\vfs\ProgramFilesCommonX64\Microsoft Shared\OFFICE16
  5. Locate the SDXHelper.exe and rename it SDXHelper.old.exe.

Open Task Manager and check if the process is still running. Also, if you run into trouble, perform the above solution again and restore the file’s original name.

5. Disable the feature update using the Windows PowerShell

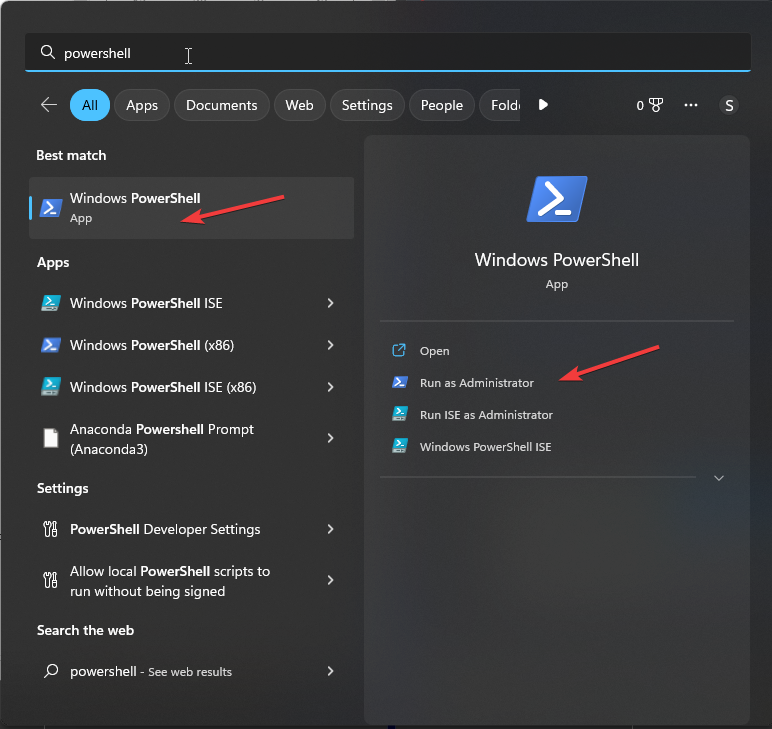
  1. Press the Windows key, type powershell, and click Run as Administrator.Powershell 2
  2. Copy & paste the following command one by one and hit Enter after every command:
    • Schtasks /change /s $_ /tn ‘\Microsoft\Office\Office Feature Updates’ /disable
      Schtasks /change /s $_ /tn ‘\Microsoft\Office\Office Feature Updates Logon’ /disable

Now open Task Manager and check if the SDXHelper.exe is disabled. Also, if you run into trouble, perform the solution again to restore the file’s original name.

So, these are methods to disable the SDXHelper.exe safely and quickly and we hope that you have done that successfully. You may also look at our guide on what to do if Windows Update is not working.

If you have questions or suggestions, feel free to mention them in the comments section below.

4 more games this week with Xbox Free Play Days May 11-14

Xbox Free Play Days is back once again. The program has been on quite a roll as of late, delivering more than the usual two or three offerings for several weeks now. This time it’s another four games on offer for subscribers of Xbox Live Gold and Xbox Game Pass Ultimate. Without further ado, let’s check them out.

Just Die Already

Just Die Already is an old people mayhem sandbox game created by the designers of Goat Simulator.

You are an old retired person in a near future where people aren’t having any children. There isn’t anyone to pay for pensions due to those ungrateful millennials who prefer playing video games instead of doing actual work. With no one to cover your living costs, you – just like all other old people in this world – have no other choice but to survive on your own.
How will you survive in a world that wants you to Just Die Already?

DRAGON BALL XENOVERSE 2

DRAGON BALL XENOVERSE 2 gives players the ultimate DRAGON BALL gaming experience! Develop your own warrior, create the perfect avatar, train to learn new skills & help fight new enemies to restore the original story of the DRAGON BALL series. Join 300 players from around the world in the new hub city of Conton & fight with or against them.

Hunting Simulator 2 (Xbox Series X|S and Xbox One)

It’s open season! In stunning natural environments, choose your gear from the best official weapons and accessories and set off with your dog in search of a variety of animal species in this hunting simulation.

Overcooked! All You Can Eat

Overcooked!, Overcooked! 2 and all additional content are blended together and remastered in this delicious definitive edition! Enjoy hundreds of levels of cooperative cooking chaos across increasingly perilous and obscure kitchens.

How to take advantage of Xbox Free Play Days

As mentioned, you’ll need either Xbox Live Gold or Xbox Game Pass Ultimate to enjoy these games, which will be available from May 11-14 as part of the event. Learn more over on the Xbox Free Play Days FAQ page.

D3d12.dll Missing: How to Fix or Reinstall it 

D3D12.dll, also known as Direct3D 12 Runtime, is a DLL (Dynamic Link Library) file developed by Microsoft for the Windows operating system.

This DLL contains essential procedures and drivers required by several programs specifically games. So, if it goes missing, the related apps and games will be restricted from launching. 

Why do I get the missing d3d12.dll missing error? 

While it is not possible to identify the exact cause of the problem, the following may be the possible reasons for this problem:

  • Presence of malicious software – Viruses and malware present in your PC mess up your computer and corrupt the system files such as d3d12.dll. Scan your PC with a reputable antivirus to get rid of them. 
  • Accidental deletion – There is a possibility that the missing DLL might have been deleted accidentally while cleaning up the disk space. 
  • Corrupt Windows Registry – If the Windows Registry files become corrupt, they may restrict system programs from accessing certain files.
  • Missing system files – D3d12.dll file might also go missing if the system files get damaged or faulty for some reason.
  • Physically damaged hard drive – If there is any physical damage to your hard drive, your machine will not be able to locate several files. 

If you are also struggling with the missing d3d12.dll file, the guide will provide you with effective ways to solve the problem.

How do I fix the missing d3d12.dll error? 

1. Use a dedicated DLL fixer 

Incompatibility between the game and DirectX is the primary reason why the d3d12.dll file may be missing or not recognized by Windows.

In such a scenario, it is recommended to employ a dedicated DLL repair tool capable of resolving various system-level issues such as the one at hand at a button click.  

2. Reinstall DirectX Runtime libraries

  1. Launch your preferred web browser and navigate to the download page of the DirectX End-User Runtime Web Installer.
  2. Select your preferred language in the drop-down, and hit the Download button next to it to initiate the download of DirectX 12 Web Installer. d3d12.dll
  3. Next, run the installer, accept the license agreement, click Next, and follow the step-by-step instructions to complete the package installation. d3d12.dll

Once the installation is completed, reboot your computer to ensure that the changes are applied, and then launch the affected app.

3. Run DISM and SFC scans

  1. Press the Windows icon on the taskbar to launch the Start menu, type cmd in its search bar on top and choose the Run as administrator option from the results section. d3d12.dll
  2. Click Yes on the User Action Control prompt to launch the Command Prompt with elevated permissions.
  3. Type or paste the following command and press the Enter key to run the System File Checker scan. sfc /scannow d3d12.dll
  4. After the SFC scan gets completed, type or paste the following commands one at a time and press Enter after each command.  DISM /Online /Cleanup-image /Scanhealth DISM /Online /Cleanup-image /Restorehealth DISM /online /cleanup-image /startcomponentcleanup d3d12.dll

The SFC scan and DISM tool will scan all the protected system files of your PC and will replace the damaged system images with the cached copy of the files compressed folder.  

After the repair is successful, you will no longer get the missing d3d12.dll file error on your Windows PC.

4. Manually install the missing DLL 

If you are still struggling with the missing d3d12.dll issue despite employing the fixes listed above, we will advise you to manually download and replace the DLL file. While doing so, you should stay clear of unreliable sources to avoid falling prey to online threats. 

You can visit reliable websites like DLL_Files and download the missing d3d12.dll file compatible with the architecture of your system. 

After the download gets completed, unarchive the ZIP or RAR file and paste it into the given location. C:\Windows\System32

You can also move this DLL into the installation folder of the game or program affected by the file. regsvr32 d3d12.dll

After replacing the corrupt DLL in the given folder, launch the application and see if the problem is resolved. 

That’s it! Try the easy solutions listed in this guide to fix the missing d3d12.dll file issue on your computer. 

If several DLL files are missing from your PC, you can implement the methods listed here to restore them. We also have a guide on restoring 3dmgame.dll file that can come in handy, so don’t miss it.

Also, if you have any suggestions or feedback for us, do let us know in the comments section below. 

0x800710e0: Operator Has Refused The Request [Fix]

If an automated task failed with the 0x800710e0: operator has refused the request error, this guide can help.

We will discuss some expert-recommended methods to fix the problem right after explaining the causes.

What causes the 0x800710e0 error on Task Scheduler?

There could be various reasons for this error; some of the common ones are mentioned here:

  • Wrong user permissions – When the user account running a scheduled task has insufficient permissions to complete the task, you can see this error. Check for proper permissions.
  • Task scheduling conflicts – The error can occur if scheduling conflicts with other tasks prevent the task from running.
  • Security software interference – Firewall software can sometimes block scheduled tasks from running, causing the error. Check the firewall permissions.
  • Task corruption – Sometimes, a scheduled task can become corrupted, preventing it from executing properly. Try to edit the permissions or create a new task.

So, these are the causes of this problem, let us check out the solutions for the same.

How do I fix the 0x800710e0 error on Task Scheduler?

Before engaging in advanced troubleshooting steps, you should consider performing the following checks:

  • Ensure you have logged in via the administrator account.
  • Check for the scheduled tasks to ensure no other task conflicts with this task.
  • Make sure you have entered the right path for the task.
  • Disable the antivirus temporarily and try again.

If you still have the issue, follow the below-mentioned methods to fix the problem.

1. Change the task settings

1.1 On the General tab

  1. Press the Windows key, type task scheduler, and click Open.Task Scheduler 0x800710e0
  2. Locate and right-click the affected task and click Properties.Properties
  3. Go to the General tab, and make sure there is a checkmark next to Run with highest privileges.General tab, 0x800710e0
  4. Now click the User or Group option.Admin click OK
  5. For the Enter the object name to select field, type Administrators and click OK.

1.2 On the Conditions tab

  1. On the Properties window, switch to the Conditions tab.Conditions tab
  2. Remove the checkmark next to Start the task only if the computer is on AC Power.

1.3 On the Settings tab

  1. Now switch to the Settings tab, and place a checkmark next to Allow task to be run on demand & Run task as soon as possible after a scheduled start is missed.Settings app user permissions  0x800710e0
  2. For the If the task is already running, then the following rule applies option, select Stop the existing instance from the drop-down.
  3. Click OK.

Now restart your computer and check if the task is running. If the error still appears, try creating a new task to fix it.

2. Run an SFC scan

  1. Press the Windows key, type cmd, and click Run as administrator.CMD elevated 0x800710e0
  2. Type the following command to repair the system files on your PC and hit Enter: sfc/scannowSFCSCANNOW CMD
  3. Wait for the scan to complete and if the command comes up with an error, copy and paste the following command and press Enter: Dism /Online /Cleanup-Image /RestoreHealthRestore health
  4. Wait for the command to be executed successfully, then restart your computer to save the changes.

3. Verify if the Task Scheduler service is running

  1. Press Windows + R to open the Run console.sERVICES ruN COMMAND 0x800710e0
  2. Type services.msc and click OK to open the Services app.
  3. Locate & right-click Task Scheduler, and select Properties from the context menu.pROPERTIES
  4. Now, check whether the Service status is Running.Running Services
  5. If not, click on the Start button and select Startup type as Automatic.
  6. Click Apply and OK, then restart your computer to save the changes.

So, these are steps you can follow to fix the 0x800710e0: operator has refused the request error.

We also recommend reading our tips guide on how to use Task Scheduler on Windows 11.

If you have any questions or suggestions, feel free to mention them in the comments section below.

The CMA issues restrictive order to prevent any further action in the Microsoft and Activision acquisition

Microsoft’s Activision Blizzard deal is hit with another curve ball as the United Kingdom’s Competition and Market Authorities (CMA) issues a restrictive interim order doubling-down on its decision to block the deal a few weeks ago.

While the CMA operates as an independent anticompetitive watchdog for the UK, it appears to be taking some bold moves on behalf of the region as it issues an order to restrict Microsoft and Activision from acquiring an interest in one another according to a Business Insider report.

Specifically, the CMA is calling on Microsoft and Activision Blizzard to have “prior written consent” from the regulatory before the two can proceed with any acquisitions related to each business.

Effectively, this would thwart any attempt by Microsoft and Activision to skirt around the UK while still pushing ahead with an acquisition deal if the two were to get the remaining international regulatory bodies to approve.

As of this reporting, neither Microsoft, Activision, nor the CMA have issued any public responses to the order.

TextInputHost.exe: What Is This Process & Removal Guide

Textinputhost.exe is a part of the Windows Feature Experience Pack and is often known as Windows System File or Microsoft GameEngine, or UX.Client.ST. It is responsible for the text input process for UWP (Universal Windows Platform).

In this guide, we will explain how you can disable it. We will also discuss whether or not this is a safe file and whether or not it should remain on your PC.

Let us get right into it.

How do I disable the textinputhost.exe?

Change the file name

  1. Open the Start menu by pressing the Win key.
  2. Open Task Manager.
  3. Select Microsoft Text Input Application process and hit the End task button.
  4. Press the Win + E keys to open the File Explorer.
  5. Navigate to the below path. C:\Windows\SystemApps\MicrosoftWindows.Client.CBS_cw5n1h2txyewy\
  6. Rename the InputApp folder to anything.

How do I remove textinputhost.exe from my PC?

1. Scan the PC for virus

  1. Press the Win key to open the Start menu.
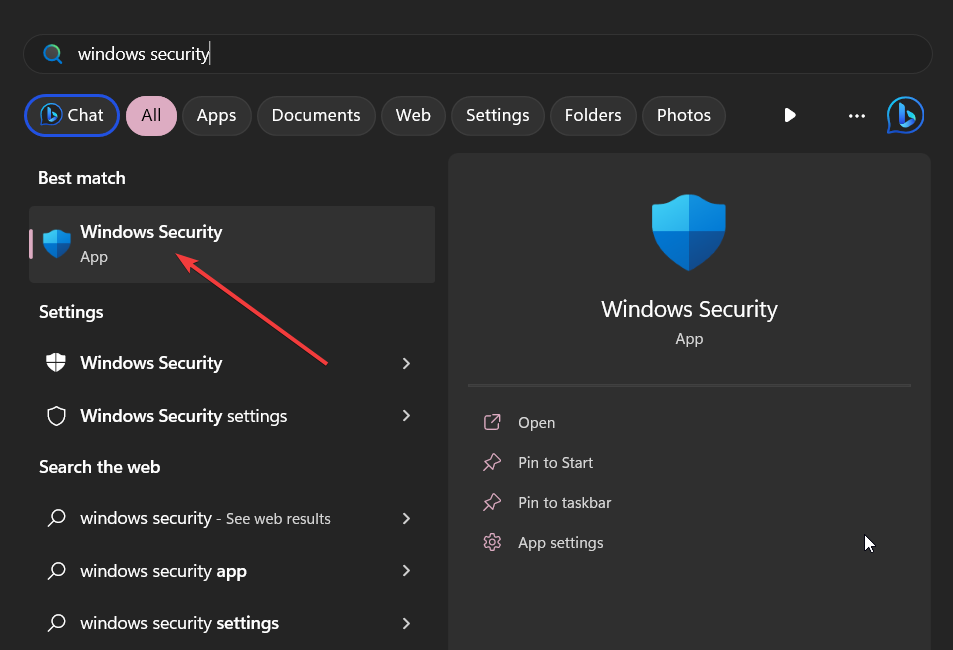
  2. Open Windows Security.
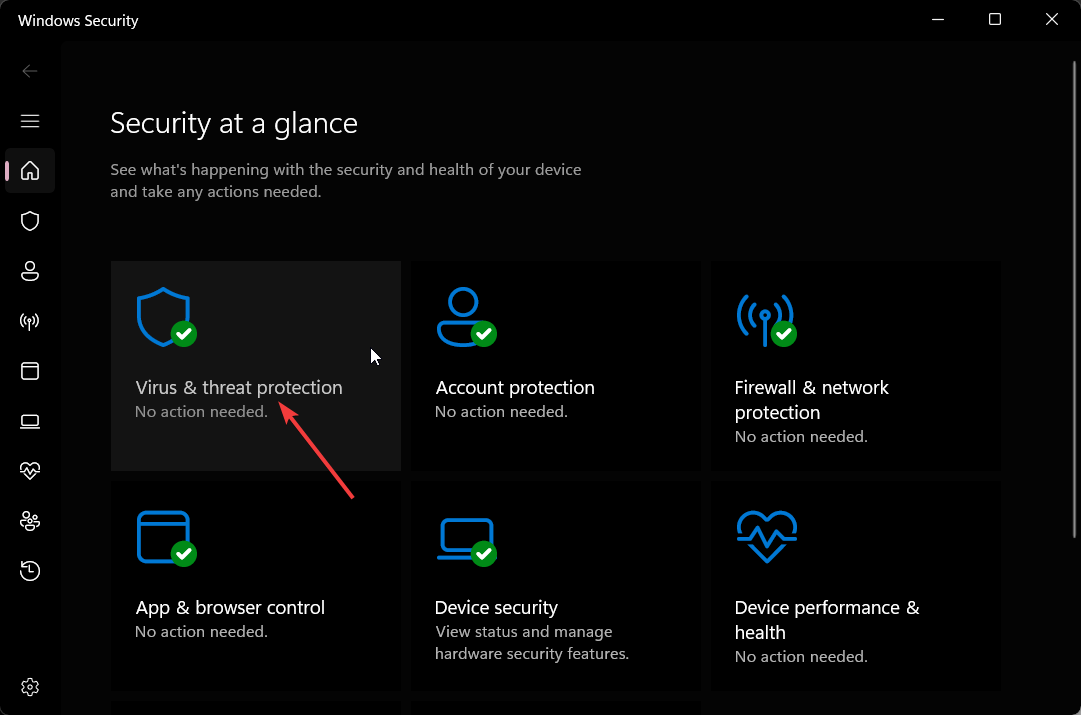
  3. Select Virus & threat protection.
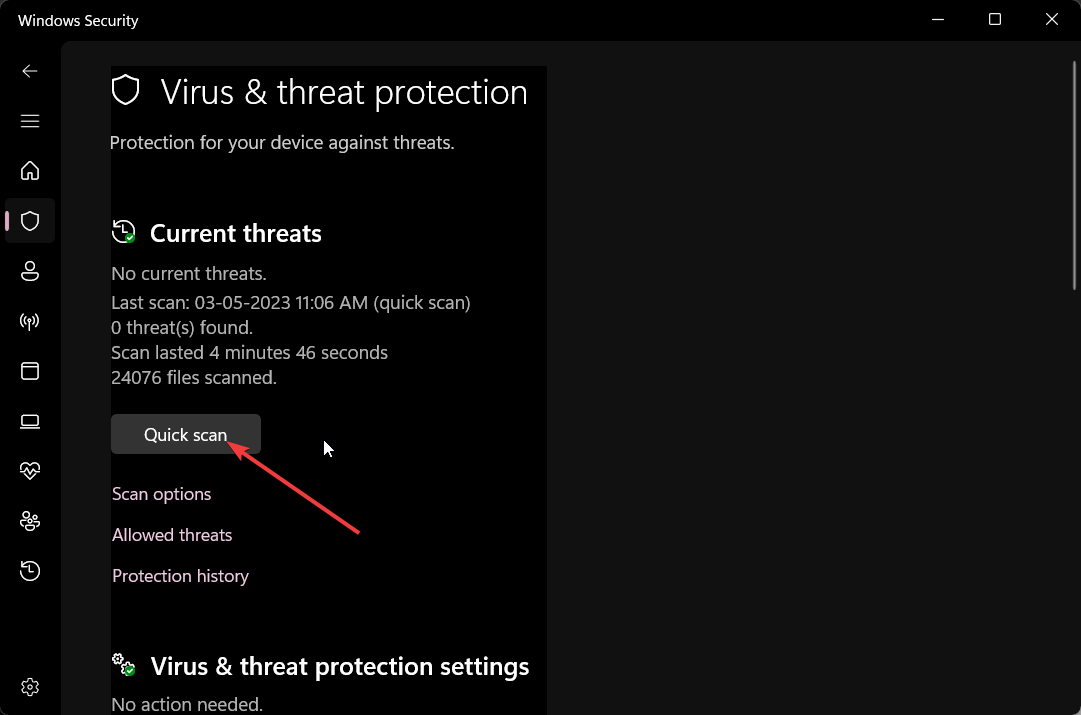
  4. Choose Quick Scan.
  5. You can also click on Scan options and select Full scan for an in-depth scan.
  6. Apply the prompted fixes.
  7. Restart your PC.

Viruses and malware can create a copy of the textinputhost.exe file and cause your system to misbehave. In such a case, we would suggest you scan your PC and remove the virus, if any.

For your convenience, we have prepared a list of some of the best antivirus tools that will help keep your PC safe and protected.

More specifically, you could use the antivirus software for enhanced security and detection rate for complex cyber threats.

⇒Get TotalAV

2. Disable Asus GPU Tweak II

  1. Open the Start menu by pressing the Win key.
  2. Type control panel and open the app.
  3. Select Programs and Features.
  4. Right-click on Asus GPU Tweak II and select Uninstall.
  5. Follow the on-screen prompts to uninstall the program from your PC.
  6. Reboot your PC.

Asus laptops come with Asus GPU Tweak II software that helps monitor and adjust the graphics card settings and overclock your GPU.

However, one of our readers pointed out that after trying out several solutions and disabling apps, exiting the Asus GPU Tweak II software helped get rid of the TextInputHost.exe. You can also try out this solution if you own an Asus laptop.

3. Run an SFC scan

  1. Press the Win key to open the Start menu.
  2. Open the Command Prompt as an admin.CMD elevated CAPICOM.dll
  3. Type the below command and press Enter. sfc /scannow
  4. Wait for the process to complete.
  5. Restart your PC.

How can I know if the textinputhost.exe file is dangerous?

The file should be located in the following locations:

C:\Windows\SystemApps\MicrosoftWindows.Client.CBS_cw5n1h2txyewy\InputApp\

C:\Windows\SystemApps\MicrosoftWindows.Client.CBS_cw5n1h2txyewy\

In case, the file is found on a different location in your PC, then there are higher chances that this file isn’t legit and is an infected file.

So, you should first check the location of the textinputhost.exe file, because if you will block or remove the original file, then your emoji picker tool and the GIF image selector tool won’t be able to fetch any images.

You can follow this detailed guide to disable Microsoft Text Input Application and apply extra methods when the basic steps do not help enough.

That is it from us in this guide. We have a guide that explains what is Startmenuexperiencehost.exe and how you can disable it if it is not an important executable file.

We also have guide explaining what is HpseuHostLauncher.exe and a guide on Twdsuilaunch.exe, so don’t miss them.

Let us know in the comments if you found any other ways to end this textinputhost.exe process.

Microsoft signs nuclear fusion power purchase deal with Helion Energy

Microsoft has gotten into an agreement with Helion Energy, a nuclear fusion generator, and indicated its intentions to start purchasing clean energy from the firm as soon as 2028. The goal behind this move is to get rid of harmful emissions radiating into the environment, as nuclear energy provides a limitless source of clean energy to users.

With this new agreement in place, Helion Energy is expected to generate up to 50 megawatts after a one-year ramp-up period. To put this into perspective, one megawatt can keep the lights running in approximately 1,000 households in the U.S.

According to Helion Energy’s CEO and founder, David Kirtley:

Fifty megawatts is a big first step of commercial-scale fusion, and the revenue feeds right back into us developing more power plants and getting fusion out on the grid both in the United States and internationally as fast as possible.

In order to produce nuclear fusion, two light atoms like hydrogen must be placed together under extremely hot temperatures causing them to fuse and become one heavy atom that produces a lot of energy. To this end, fusion reactions have been cited to suck up more energy than what is actually released.

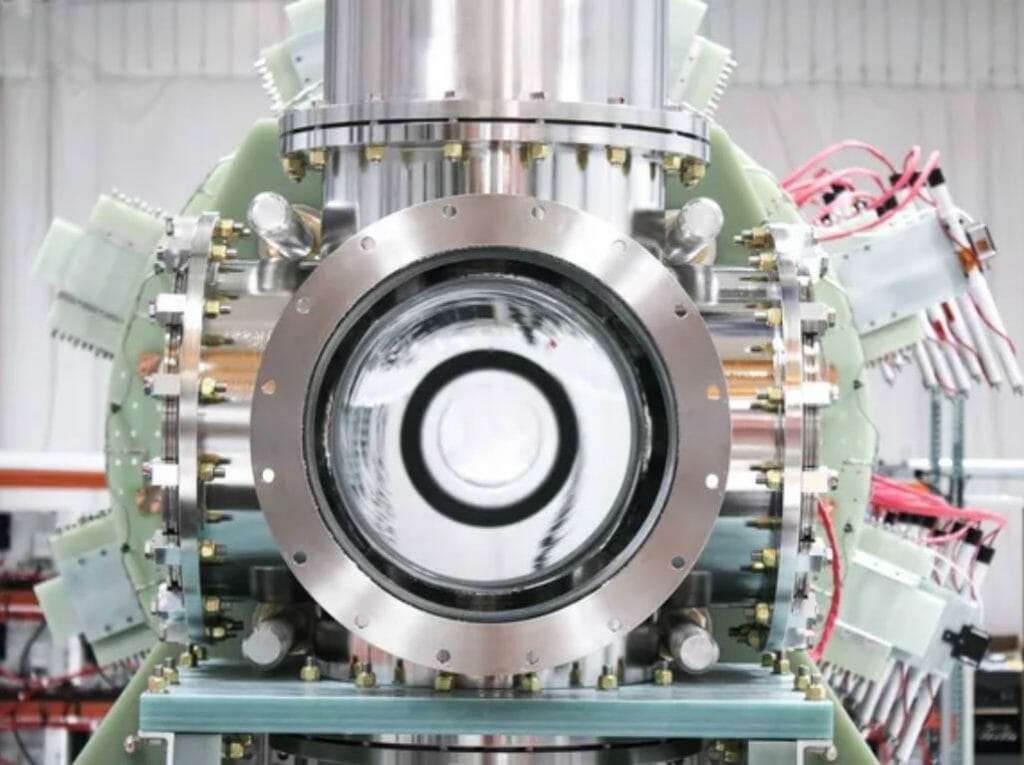
Helion is set to debut its seventh-generation Polaris next year that’s designed to help with power generation. The machine is designed to make use of pulsed high-power magnet technologies to produce nuclear fusion. Helion has already hit incredible feats before. Back in 2012, it was the first private company able to get to 100 million degrees Celsius.

Most companies in the nuclear fusion business tend to gravitate towards tritium during the production phase, but Helion intends to incorporate Helium 3 into the process instead. Helium 3 is a rare gas that’s often used in quantum computing.

Helion has managed to come up with more than $570 million in private capital, that’s in place to see this venture come to fruition. Sam Altman, OpenAI’s  CEO also made a $375 million investment in this venture back in 2021.

However, the company needs to get its designs as well as construction approved by the Nuclear Regulatory Commission alongside local permits. Last month, the NRC moved to distinguish fusion regulation from fission a move that’s guaranteed to expedite the approval process

Microsoft’s vice chair and president, Brad Sams further added that this venture aligns with the company’s “long-term clean energy goals” and will play a major role in helping it advance in the market as well as assisting it to establish a new and effective method that will help bring cleaner energy to the grid quicker.

Via The Verge

Featured image via Helion Energy

Google’s Nearby Share for Windows app expands its reach to more countries

For the longest time, Android users have been looking for an easier way to connect their devices to Windows. And while it’s possible to do this using Microsoft’s Phone Link app (previously referred to as Your Phone app), Google debuted its own tool dubbed Nearby Share for Windows in beta back in April to serve the same purpose.

The app is designed to let users share photos and documents between Android devices and Windows PCs easily. While making the debut, Google indicated that it was rolling out the app to the US and most countries globally. At the time, there was a significant number of countries that were left out of the loop.

However, Google has quietly expanded the app’s support to more countries. If you’re based in Cuba, Iran, North Korea, or Syria you won’t have access to Nearby Share for Windows just yet.

As earlier reported, to leverage the app’s capabilities, you’ll need to meet a set of requirements first. For instance, your PC must be running the 64-bit version of Windows 10 and up. It should also be noted that ARM processors aren’t supported. Additionally, your Android device should also be running on Android 6.0 and up.

If you’re part of the “most countries globally” that currently support the app and have met its minimum set requirements, you can now start sharing files between your Android device and Windows PC. We’d also like to invite you to check out our expert guide on how to use the Nearby Share app to share files between Android and Windows.

via 9to5Google

Sppextcomobj.exe: What Is It & How to Fix Its Errors

Running your antivirus regularly can help you isolate any problematic files early before they get a chance to compromise your system. Sppextcomobj.exe seems to be quarantined by most antivirus programs as a malicious file.

Note that there is also a legitimate sppextcomobj.exe file with network service privileges. If it becomes obsolete, you may experience connection issues. So how do you resolve such errors? Here’s how.

What is sppextcomobj.exe?

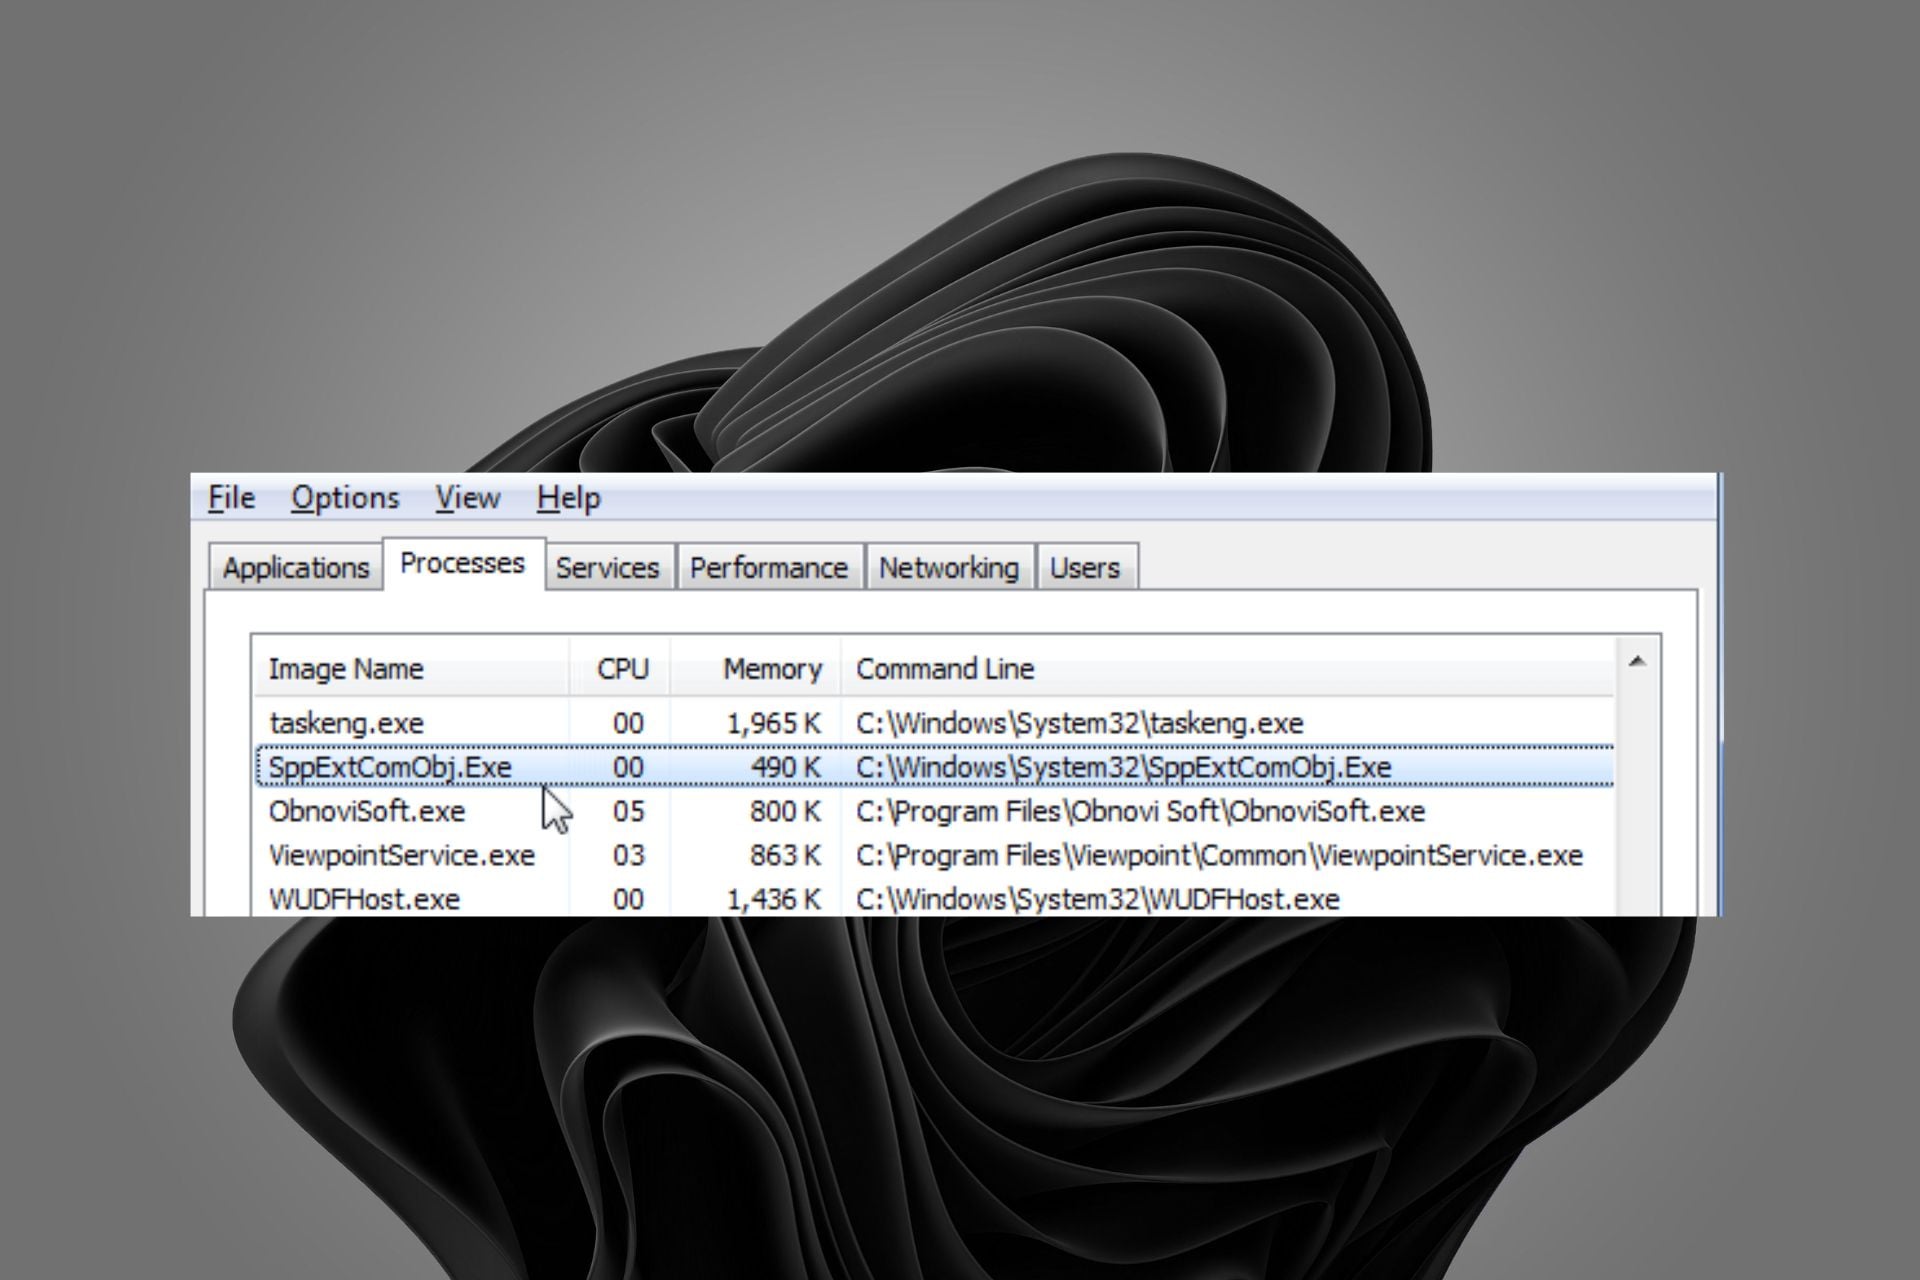
The sppextcomobj.exe is a legitimate Windows file found in the following location: C:\Windows\System32

It is part of the Software Protection Platform, a suite of services that allows you to activate and manage the licenses for your Windows.

The sppextcomobj.exe file provides functionality for application developers to implement licensing and activation features for their applications. It is a critical Windows operating system component and should not be terminated or disabled.

Still, you should pay attention to this process because it may be a virus, trojan, or malware hiding in your system and causing many problems.

A classic tell-tale sign of whether you’re dealing with a malicious file is its location. It could be a virus masquerading as the real thing if it’s in an unfamiliar location.

Also, as most users reported, if your antivirus quarantines it, it is probably a virus and should be removed from your system. Other signs include your Wi-Fi keeps disconnecting, so be on the lookout for subtle but recurrent hints.

How do I fix sppextcomobj.exe errors?

A few workarounds that may salvage the situation include:

  • Check your internet speeds and ensure they are optimal.
  • If you’re using a wireless connection, ensure there are no interferences.
  • Switch to an Ethernet cable if possible.
  • Restart your router.
  • Run the SFC scan to check for system file errors.

1. Run the network adapter troubleshooter 

  1. Press Windows + I to launch Settings.
  2. Click on Troubleshoot on the right in the System tab.Open system troubleshooter
  3. Select Other troubleshooters.other troubleshooters
  4. Locate the Network Adapter troubleshooter and click the Run button next to it.

2. Update your Network drivers

  1. Hit the Windows + I keys to open Settings.
  2. Type Device Manager in the search bar and click Open.device manager w11
  3. Navigate to your Network adapter, right-click, and select Update driver.
  4. Select Search automatically for updated drivers.

Windows is sometimes known to match you with the wrong drivers, so as an alternative, you’re better off using a driver updater tool.

Namely, Outbyte Driver Updater will scan your system for missing, corrupt, and outdated drivers and automatically download and install the correct versions.

It can also identify faulty drivers and remove them from your computer to ensure your hardware works perfectly.

Outbyte Driver Updater

Get rid of various system errors by updating PC drivers efficiently with this tool.
Free trial Download

3. Disable your firewall/antivirus temporarily

  1. Hit the Start menu icon, type Windows Security in the search bar and click Open.
  2. Click on Firewall & network protection, then select Public network.league of legends black screen after champion select
  3. Locate Microsoft Defender Firewall and toggle the off button.turning off Microsoft Defender Firewall Windows

4. Scan for viruses

  1. Press the Windows key, search Windows Security, and click Open.
  2. Select Virus & threat protection.
  3. Next, press Quick scan under Current threats.
  4. If you don’t find any threats, proceed to perform a full scan by clicking on Scan options just below Quick scan.Scan options
  5. Click on Full scan, then Scan now to perform a deep scan of your PC.Full Scan Scan Now
  6. Wait for the process to finish and restart your system.

5. Reset your internet connection 

  1. Hit the Windows Search icon, type cmd in the search bar, and click Run as administrator.cmd-run-admin-w11 unexpected kernel mode trap windows 11
  2. Type the following commands, then press Enter after each: netsh int ip reset resettcpip.txt netsh winhttp reset proxy netsh int ip reset ipconfig /release ipconfig /renew ipconfig /flushdns netsh winsock reset

6. Reset TCP/IP

  1. Press the Windows key, type cmd in the search bar, and click Open.cmd-run-admin-w11 unexpected kernel mode trap windows 11
  2. Type in the following commands and press Enter after each one: netsh winsock reset catalog netsh int ipv4 reset reset.log netsh int ipv6 reset reset.log
  3. Now restart your PC and see if the error is still there.

7. Edit the Registry

  1. Hit the Windows + R keys to open the Run command.
  2. Type regedit in the dialog box and hit Enter to open the Registry Editor.
  3. Navigate to the following location: HKEY_LOCAL_MACHINE\SOFTWARE\Microsoft\Windows NT\CurrentVersion\SoftwareProtectionPlatform
  4. Right-click on an empty space on the right pane, select New DWORD 32 bit, and rename it as DisableDnsPublishing.
  5. Under Value data, set it to 0.

As a disclaimer, editing the Registry should only be done where necessary to avoid irreparable damage to your system. If there’s no other option, ensure you backup your Registry or create a restore point before any changes.

In other news, we have an exciting article on how to open exe file content without installing, so ensure you check that out.

Elsewhere in our detailed guide, we also answer everything about the itibiti.exe file and whether it’s safe for your PC.

Share with us any other additional thoughts on this article down below.

Error 1721: How to Fix This Windows Installer Problem

Windows Installer is an essential Windows service, especially when you want to install programs. However, things don’t always go as planned, with users reporting an error code 1721. This error is accompanied by a there is a problem with this Windows installer package message.

Another similar error is 1722, but we’ve already covered that. Windows Installer can be used to install, repair, configure, and uninstall software while adding or removing features from a user’s computer. So why is it throwing the error 1721? Let’s find out.

Why am I getting the error 1721?

This common error occurs when there is an incompatibility between the Windows Installer and some other program on your computer.

The Windows Installer service allows your OS to install, modify, and repair applications provided as Windows Installer packages. 

It also detects changes in hardware and software that might affect applications. Since it acts as a point of control for all phases of the application installation process, if it fails, apps that depend on it may fail to launch.

Some of the reasons you’re getting the 1721 error when you try to install apps include:

  • Insufficient permissions – This can occur if you do not have sufficient rights to modify the installation. Only administrators have the privilege to make changes to computers.
  • Incorrectly installed program – If you have installed the wrong program, this can cause an issue with the Windows Installer Package.
  • Incompatible program – It is possible that the app you are trying to install is not compatible with your current operating system or hardware configuration.
  • Missing/invalid registry entries – Missing files or invalid entries in the registry can cause problems when attempting to install programs using Windows Installer Packages.
  • Incompatible OS – The program must be written for the same version of Windows that you’re running.
  • Windows installer service has stopped –  If the service is not running, you may have trouble installing programs. This can happen if you have changed the default installation location in the registry or you have installed the application in another location on your computer.

How do I fix error 1721?

Ensure you fulfill the following prerequisites before attempting the complex solutions below:

1. Restart the Windows Installer service

  1. Press the Windows + R keys to open the Run command.
  2. Type services.msc in the dialog box and hit Enter.run services.msc command
  3. Find Windows Installer, right-click on it, and select Stop.
  4. Right-click again, and this time select Restart.

2. Run the Program Install and Uninstall troubleshooter

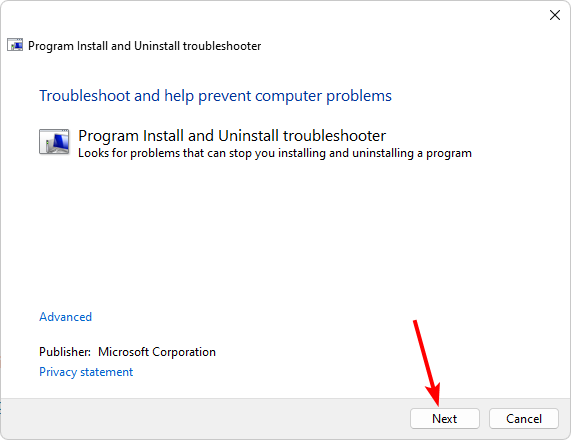
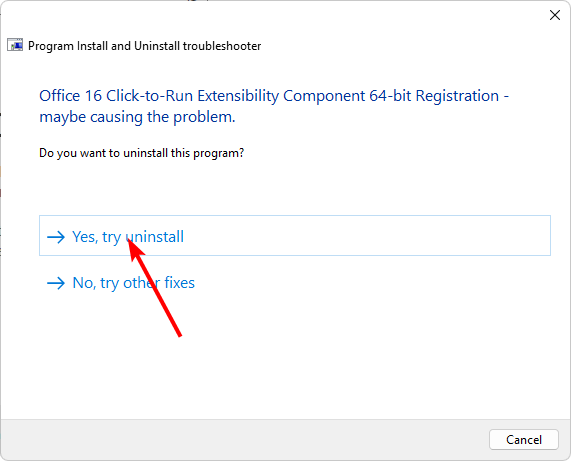
  1. Download the Program Install and Uninstall troubleshooter and install it.
  2. Open it and click on Next.
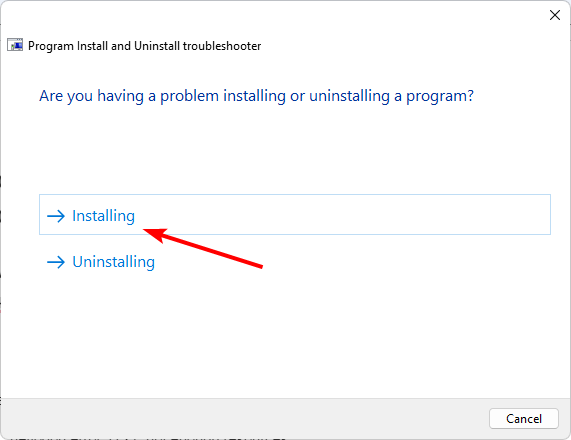
  3. You’ll be asked whether you have a problem installing or uninstalling a program. Select one option.
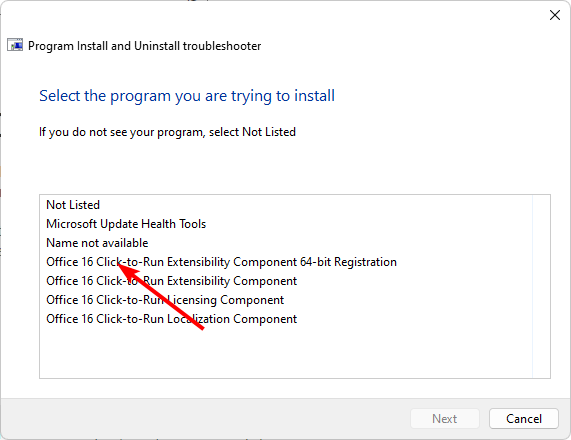
  4. Next, you’ll be asked to select the program that is not installing. Pick the problematic program from the list.
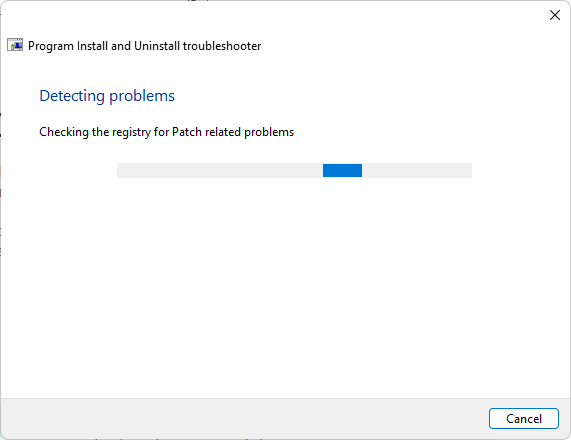
  5. The troubleshooter will start scanning for problems.
  6. Once it completes, you’ll be presented with two options. Pick either and wait for the troubleshooter to recommend fixes.

The Program Install and Uninstall troubleshooter helps you identify and fix problems that occur when installing or uninstalling programs on your computer. It can also help you uninstall programs that are causing problems with your computer.

3. Install the problematic app in compatibility mode

  1. Locate the .exe file of the problematic problem usually in one of the following paths depending on your version of Windows: C:\Program Files (x86) or C:\Program Files
  2. Scroll down until you find the program you’re looking for. 
  3. Right-click on the .exe file of the program and select Properties.    
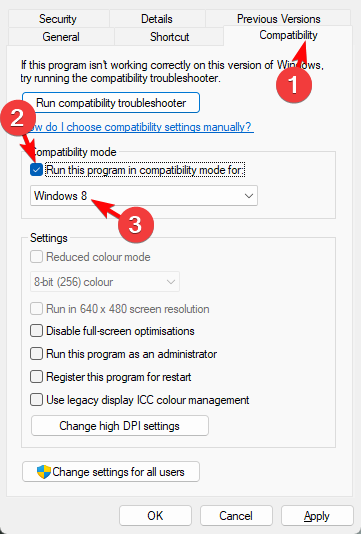
  4. Navigate to the Compatibility tab, check the Run this program in Compatibility mode option, and select Windows 8  from the drop-down menu.   run this program in compatibility for
  5. Allow the program to finish installing, then check whether the error persists.

Compatibility mode is a feature of Windows that lets you run older programs on your computer. It’s not exactly the same as running an older operating system, but it allows you to run some older programs that won’t work otherwise.

Many applications are written for earlier versions of Windows and have been tested only on those versions. When you try to run them on a newer version, you may find that they don’t work properly or at all.

This is because applications can use features only available on older versions of Windows and not on newer versions.

That’s it for the error 1721, but also check out our other article on what to do when you can’t access the Windows installer service.

We also have an expert recommendation list of the best installer software package, so don’t hesitate to visit that guide.

We’d love to hear your thoughts on this error and which solution helped you bypass it, so drop us a comment below.

Cdpsvc: What Is It & Should You Disable It?

In the Windows operating system, there are many services you’ll probably never encounter because you don’t know what they do. Cdpsvc seems to be one of these services that is still ambiguous.

It may appear in your list of services that register high CPU usage, so the most obvious thing you’ll do is disable it. However, you might want to pump the brakes before taking this action.

Is Cdpsvc important, and should you disable it? Find out here.

What does Connected Devices platform User Service do?

The Connected Devices platform User Service is a fairly new service in Windows, so it’s not surprising that many people are still in the dark about what this service does and whether they need it for the smooth running of their PCs.

Some of these users agree that it has been notoriously found in the list of services that consume high CPU.

So what services does the Cdpsvc do? You’ll probably need this service if you have connected several peripherals on your PC. 

It is known for providing a bridge when connecting PCs and smartphones. Also, you’ll need this service if you’re connecting other Bluetooth devices, printers, or any other external device.

Is it safe to disable CDPUserSvc?

Now, for the users who find the cdpusersvc annoying, they are probably quick to disable this service, but should you really disable it? Well, it depends on your PC and what you use it for.

First, if you don’t have enough RAM and must keep checking your CPU usage regularly, disabling it is probably a good idea. 

However, if you’re using a lot of Bluetooth peripherals, such as headphones while working, a mouse, or a keyboard, it may not be a good idea to disable it. The key is to find a balance.

You can add more RAM to your PC to avoid running out of memory often or switch to peripherals that don’t require the cdpsvc.

On the other hand, if your PC doesn’t use the said peripherals, you can disable it and then monitor how your computer behaves over a few days. 

If you notice that some features are not working or encounter any problems, you can conclude that it is the service you recently disabled.

Disabling the service should be a last resort step. If your PC is having issues, always check for system file errors before taking any permanent measures.

How do I disable Cdpsvc?

1. Use the Run command 

  1. Hit the Windows + R keys simultaneously to open the Run command.
  2. Type services.msc in the dialog box and hit Enter.run services.msc command
  3. Find the Connected Devices platform User Service, right-click on it, and select Properties.
  4. Navigate to the Startup type option, and in the drop-down menu, select Disabled, then click on Stop.
  5. Click on Apply and OK to save the changes.

2. Use the Command Prompt 

  1. Hit the Windows key, type cmd in the search bar, and click Run as administrator.cmd-run-admin-w11 unexpected kernel mode trap windows 11
  2. Type the following command and hit Enter: sc config CDP user SVC type=own
  3. Restart your PC for the changes to take effect.

3. Use the Registry Editor

  1. Hit the Windows + R keys to open the Run command.
  2. Type regedit in the dialog box and hit Enter to open the Registry Editor.
  3. Navigate to the following location: HKEY_LOCAL_MACHINE\SYSTEM\CurrentControlSet\Services\CDPUserSvc
  4. Locate Start on the right-hand side. If unavailable, right-click on an empty space, select New DWORD 32-bit, and name it as Start.
  5. Right-click on Start and select Modify.
  6. Change the Value data to 2, then restart your PC.

If you want to make changes to the registry, you need to be careful. Even if you know what you’re doing, there’s always the possibility that something will go wrong.

Registry edits are permanent and cannot be undone unless you have an exact copy of the original registry settings somewhere safe. 

This means that if something goes wrong with your system after making a change in the registry, there’s no way to fix it except by reinstalling Windows or going through a long process of restoring your system from a backup.

An easier way is to create a safe point of return through system restore points. These are useful as you can always remember when your PC was working well.

That brings us to a close in this article. However, if you’re looking for services to disable in Windows 11, we have compiled a list to help you eliminate superfluous services you don’t need. But there are some critical processes, like Svchost.exe Imgsvc, that can’t be disabled but have to be fixed.

Share with us any additional thoughts you may have on this topic down below.

0x8007007 Error Code: What is it & How to Fix it

The 0x8007007 error code highlights that some third-party program is interfering with the Windows 11 Installation Assistant Utility.

If you are also facing the Windows 11 error code 0x8007007, then you are in the right place. Because in this guide, we have a bunch of solutions that will help you resolve the error on your PC.

What is error code 0x8007007?

Our readers come across the Windows 11 error code 0x8007007 when they are attempting to upgrade to the latest OS using the Installation Assistant Utility.

Besides, you will face the 0x8007007 error even though your PC meets the requirements to upgrade to Windows 11.

Microsoft hasn’t shared details on why this error pops up for users trying to upgrade their PCs. However, after going through multiple user reports, it is confirmed that this error is related to the Windows 11 Installation Assistant Utility.

If you are also facing the error 0x8007007, then you can apply the solutions mentioned below to resolve the problem.

How can I resolve Windows error 0x8007007?

1. Run the Installation Assistant as an admin

  1. Download the Windows 11 Installation Assistant Utility from the official website.
  2. Locate the file on your PC.
  3. Right-click on the Installation Assistant EXE file and select the Run as administrator option.
  4. In the UAC prompt that appears, select Yes.
  5. Follow the onscreen steps to upgrade your PC.

For certain programs, such as the Windows 11 Installation Assistant Utility, you need to have sufficient privileges in order to run it.

You can easily run the program with elevated permissions by following the above steps and hopefully resolve the error 0x8007007.

2. Temporarily disable your antivirus

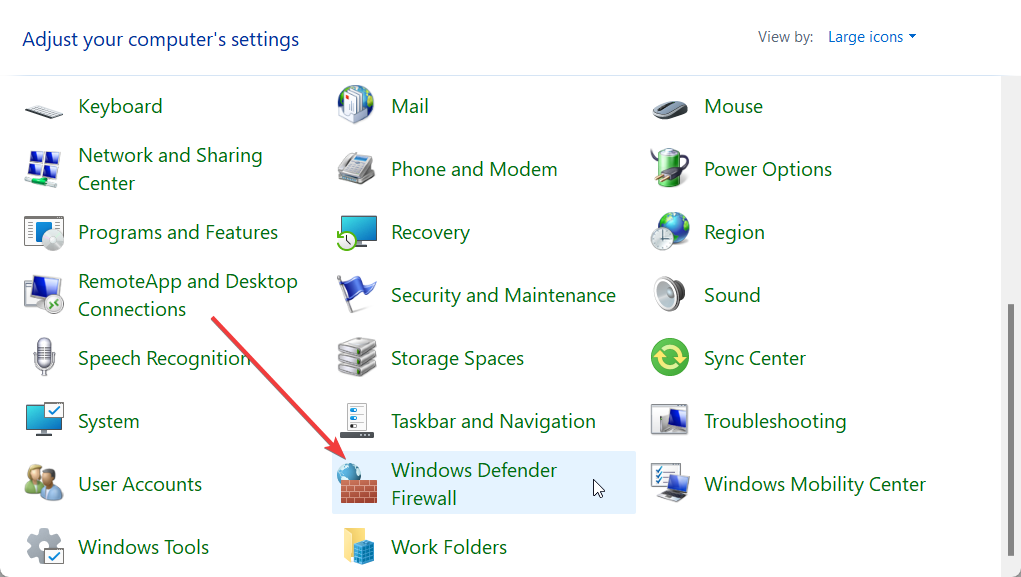
  1. Press the Win key to open the Start menu.
  2. Type control panel and open the app from the results.
  3. Choose Windows Defender Firewall.
  4. Click on Turn Windows Defender Firewall on or off option from the left pane.
  5. Check the radio button Turn off Windows Defender Firewall (not recommended) for both Public and Private networks.
  6. Click OK.
  7. Run the Installation Assistant.

The above steps are shown for the Windows Defender Firewall, but it is to show you the idea that you can try disabling the antivirus on your PC that might be blocking the Installation Assistant.

However, in case this solution doesn’t work, you can check out our guide which has some of the best antivirus tools that can help protect your PC from viruses or malware.

3. Run a SFC scan

  1. Press the Win key to open the Start menu.
  2. Open the command prompt as an admin.
  3. Type the below command and press Enter. sfc /scannowsfc scan netwbw02.sys
  4. Wait for the process to scan and fix corrupt system files.
  5. Restart your PC.

Corrupt system files can also collide with whatever the Installation Assistant is trying to do. In that case, you can try fixing the corrupt system files by running the SFC Scan command.

4. Perform a clean install

  1. Download the Windows 11 Installation Media from the official website.
  2. Run the downloaded EXE file.
  3. Follow the on-screen steps.
  4. Insert the USB drive and let it create a bootable USB.
  5. Restart your PC.
  6. Choose your bootable USB drive.
  7. Perform a clean Windows 11 install.

Some users have suggested that creating a bootable media and performing the clean install has helped them get rid of the error 0x8007007 on their PCs. You can also try this solution and resolve the problem at your end.

That is it from us in this guide. Before you upgrade to Windows 11 reading all the good things about the new OS, you can refer to our guide that lists some of the cons of Windows 11.

For users that are facing Windows 11 Installation Assistant not working problem, we would recommend you apply the fixes mentioned in our guide to fix the error.

Feel free to let us know in the comments below, which one of the above solutions resolved the problem of error 0x8007007.

4 Ways to Map A Network Drive in Windows 10

Mapping a network drive in Windows 10 allows you to connect to shared folders and resources on other computers or servers in your network. This feature is helpful in work environments where multiple users need access to the same files and folders.

In this guide, we will discuss different ways to map a network drive on Windows 10 which can help you easily connect to shared resources and improve your productivity.

If you are looking for ways to map a network drive on Windows 11, we suggest you check out this detailed guide.

What can I do to map a network drive in Windows 10?

Before proceeding with any steps to map a network drive, go through the following preliminary checks:

  • Verify you have network access to the drive you want to map.
  • Ensure you know the location of the network drive.
  • Ensure you have a user account on the computer hosting the network drive.
  • If you are in a workgroup or domain environment, ensure your computer is properly connected to the network.

Once you have checked all these things, move to the actual steps mentioned below.

1. Use the File Explorer

  1. Press Windows + E to open File Explorer.
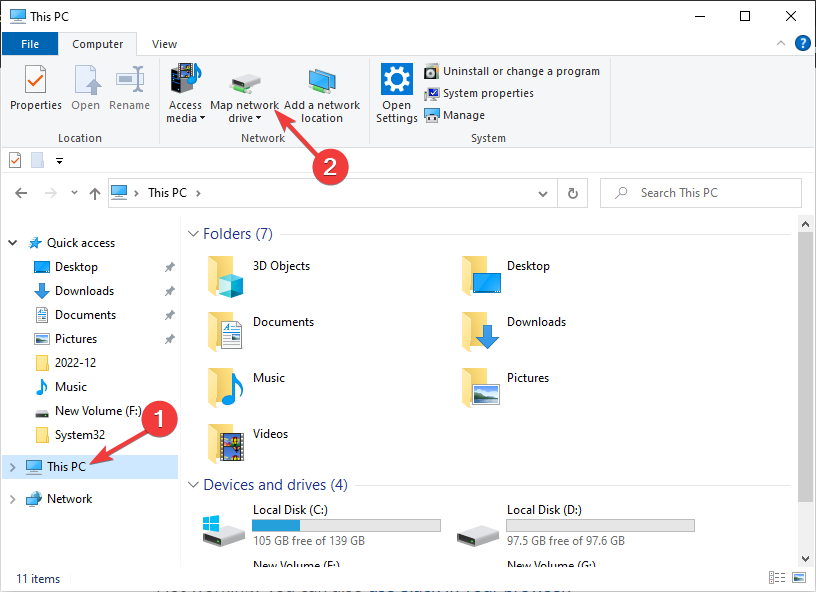
  2. Click on This PC, click on three dots, and then select Map network drive.Map a network drive Windows 10
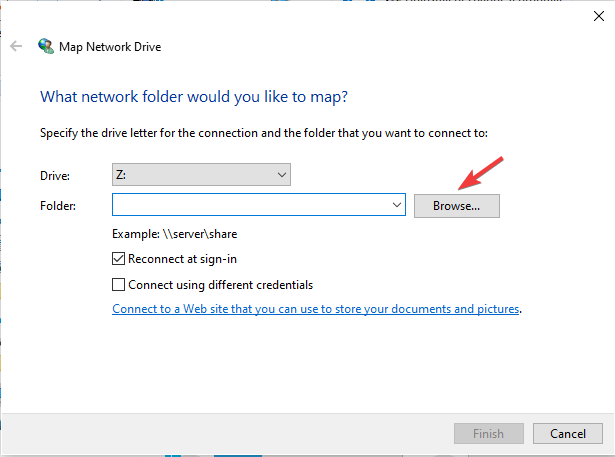
  3. Choose the drive letter from the drop-down list in the Map Network Drive window.Browse location
  4. Type the network location of the folder you want to map in the Folder field. You can also click on the Browse button to locate the folder manually.
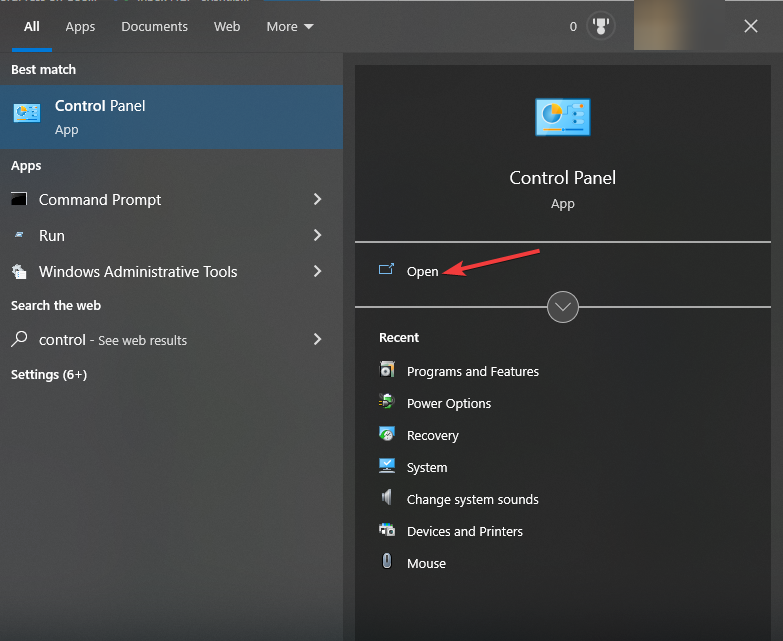
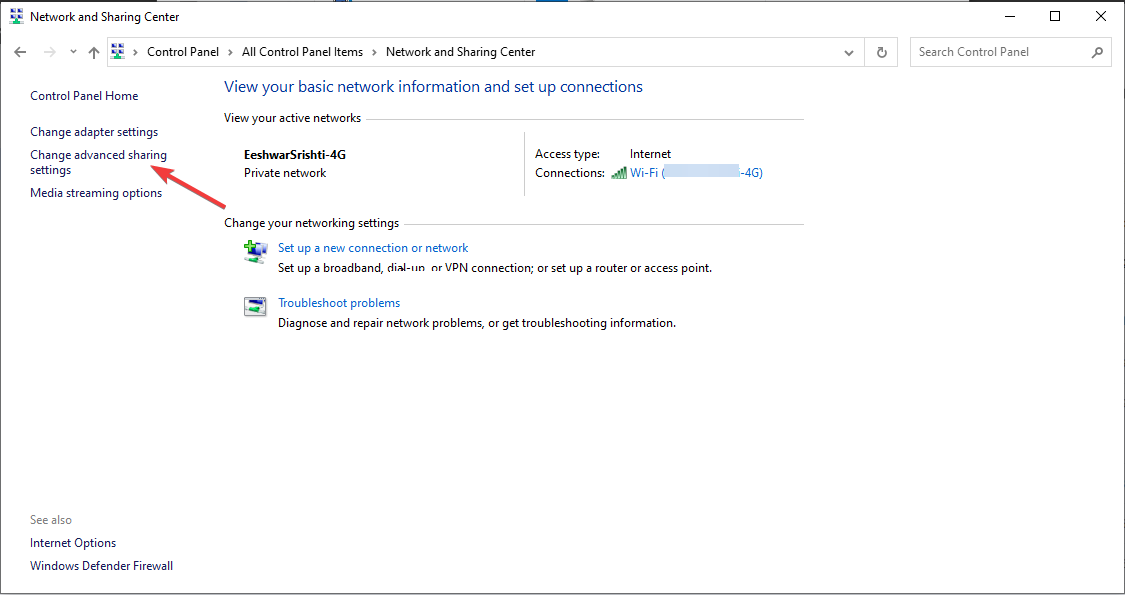
  5. If there is an error, press the Windows key, type control panel, and click Open.Control Panel map a network drive Windows 10
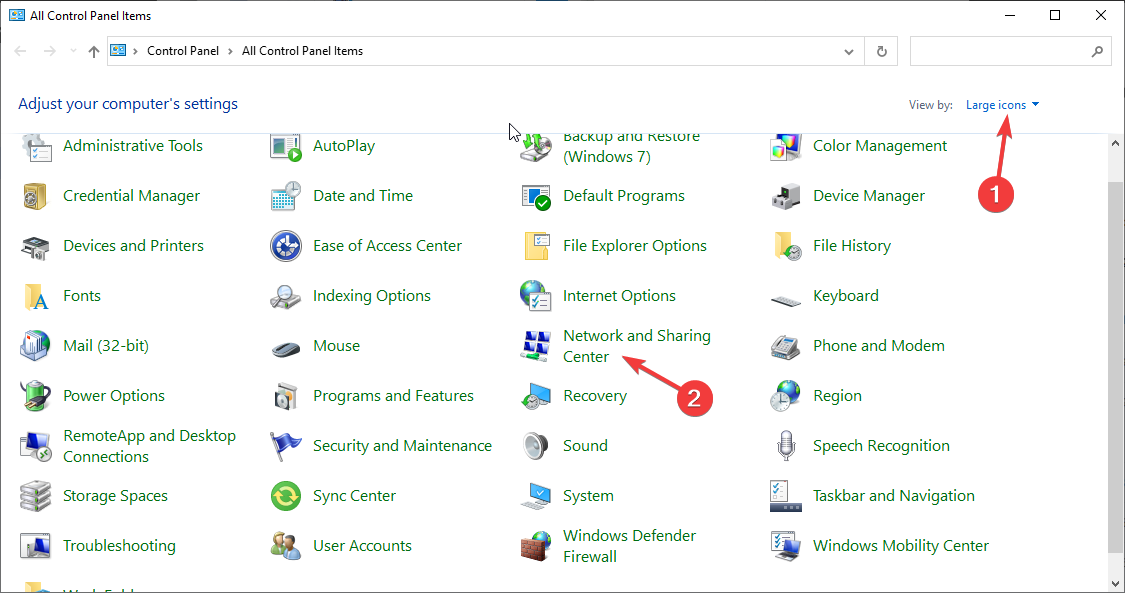
  6. Select View by as Large icons and click Network and Sharing Center.Select Network & Sharing Center
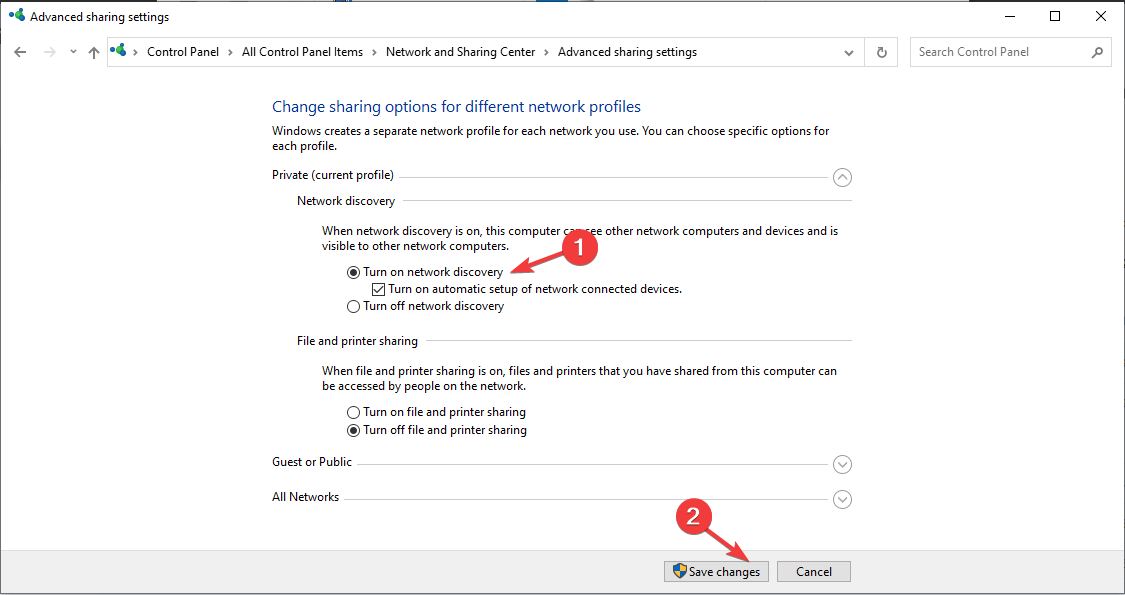
  7. Click Change advanced sharing settings.Change an advanced settings
  8. Toggle on the switch for Network discovery and click Save changes.Turn on network discovery
  9. Go back to the Map Network Drive window and select the location.
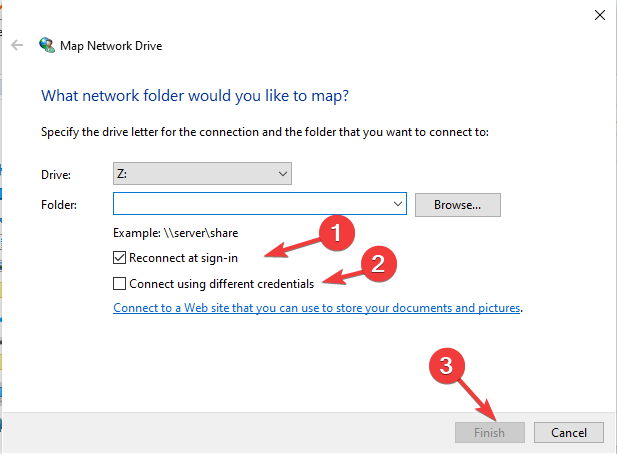
  10. Place a checkmark Reconnect at sign-in to map the drive automatically every time you sign in to Windows.Reconnect sign in map a network drive Windows 10
  11. Also, select the Connect using different credentials option.
  12. Click Finish to complete the process.

2. Use Command Prompt

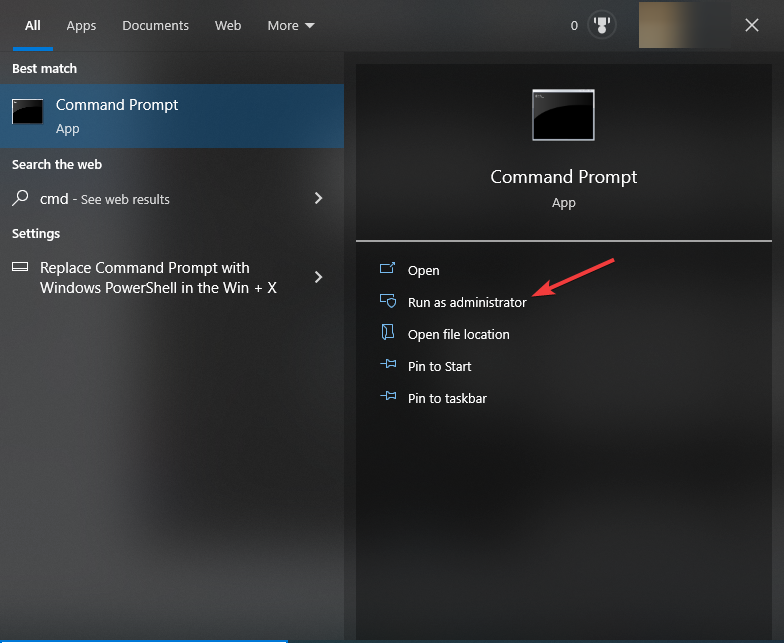
  1. Press the Windows key, type cmd, and click Run as administrator.CMD elevated Windows 10
  2. Copy & paste the following command to map the drive after replacing Z with the drive letter which not already in use, DEVICE-NAME-OR-IP\SHARED-FOLDER with the computer name or IP address of the device hosting the shared folder & the name of the shared, and hit Enter: net use Z: \\DEVICE-NAME-OR-IP\SHARED-FOLDERAdmin map a network drive Windows 10
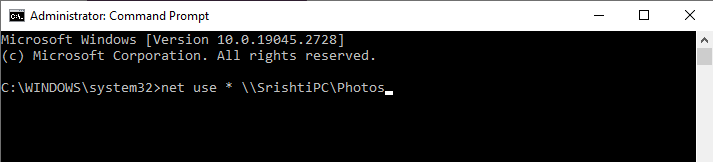
  3. If you want the system to assign the drive letter, then type the following command after replacing DEVICE-NAME-OR-IP\SHARED-FOLDER with the computer name or IP address of the device hosting the shared folder & the name of the shared to map the drive and press Enter: net use * \\DEVICE-NAME-OR-IP\SHARED-FOLDERWithout assigning a drive letter
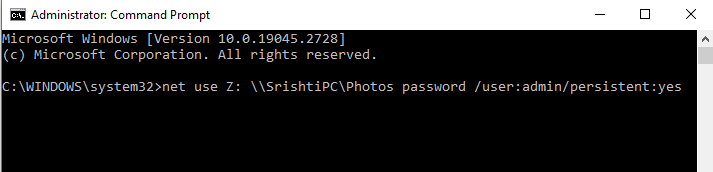
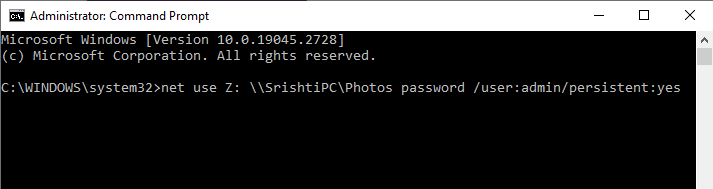
  4. If you want the user to enter credentials every time a connection is established, copy & paste the following command to map a drive after changing DEVICE-NAME-OR-IP and SHARED-FOLDER to the computer name or IP address of the device hosting the shared folder and the name of the shared, & change the username and password with credentials and hit Enter: net use Z: \\DEVICE-NAME-OR-IP\SHARED-FOLDER PASSWORD /user:USERNAME /persistent:yesadd a password map a network drive Windows 10
  5. Restart your computer to confirm the changes.

3. Use the Group Policy Editor

  1. Press Windows + R to open the Run console.Gpedit.msc Run command
  2. Type gpedit.msc and click OK to open Group Policy Editor.
  3. Navigate to this path: User Configuration\Preferences\Windows Settings\Drive Maps
  4. Right-click the space in the right pane, choose New, then Mapped Drive.map network drive windows 10
  5. In the New Mapped Drive Properties window, choose the drive letter, network location, and other options accordingly.
  6. Click OK to save the changes.

4. Use PowerShell

  1. Press the Windows key, type powershell, and click Run as administrator.Windows POwershell
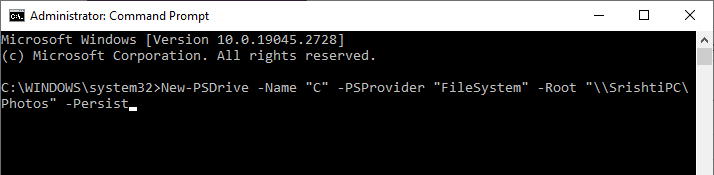
  2. If you want to choose the drive letter manually, type the following command to map a drive after replacing the Drive letter with the one which is not in use, change  DEVICE-NAME-OR-IP and SHARED-FOLDER to the computer name or IP address of the host machine with the shared folder & the name of the shared and hit Enter: New-PSDrive -Name "DRIVER-LETTER" -PSProvider "FileSystem" -Root "\\DEVICE-NAME-OR-IP\SHARED-FOLDER" -PersistMal a network drive Windows 10
  3. To map a network drive with credentials, copy & paste the following command and press Enter: $cred = Get-Credential -Credential USERNAME
  4. You will be prompted to enter User name and Password, enter the details, and click OK.
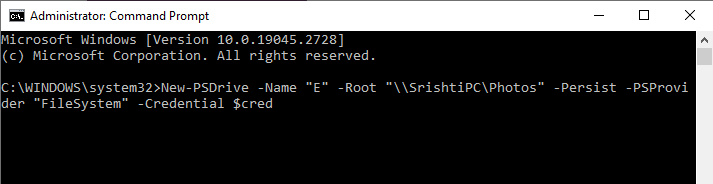
  5. Now type the following command to map a drive after replacing the Drive letter with the one which is not in use, change  DEVICE-NAME-OR-IP and SHARED-FOLDER to the computer name or IP address of the host machine with the shared folder & the name of the shared and hit Enter: New-PSDrive -Name "E" -Root "\\DEVICE-NAME-OR-IP\SHARED-FOLDER" -Persist -PSProvider "FileSystem" -Credential $credCredentials added
  6. Enter your credentials again to complete the process.

If you can’t map a network drive on Windows 10, read this informative guide to fix the quick solutions.

So, these are the different methods you can follow to map a network drive on Windows 10. If you have any questions or suggestions, please let us know in the comments section below.

Hostfxr.dll Could Not Be Found: How to Fix It

Hostfxr.dll is a Dynamic Link Library related to the .NET Core runtime and is used by certain applications and programs to function properly.

If you have encountered the hostfxr.dll could not be found error when you are trying to run certain apps or programs, this guide can help you restore the missing DLL file!

What causes the hostfxr.dll could not be found error?

There could be several reasons why the file can’t be found; some of the common ones are mentioned here:

  • Outdated .NET Core runtime – If the .Net Core Runtime on your computer is incompatible, old, or corrupted, you might see this error. Try repairing or reinstalling it.
  • Malware infection -Viruses on a computer can corrupt system files and cause errors like this. Run a deep scan using an antivirus tool.
  • Corrupted system files – If the system files related to the DLL file are corrupted or damaged, you may face this error. Try running an SFC scan to fix the issue.
  • Bad Windows update – Sometimes, upgrading to a newer version of Windows can cause this error. Try uninstalling the latest update or checking for pending updates.
  • Improperly uninstalled or installed apps – If an application that uses the DLL file is not installed or uninstalled correctly, it can cause this problem. Try reinstalling the app.

So, these are the causes of the issue; let us check out the solutions for the same.

What can I do to fix the hostfxr.dll could not be found error?

Before engaging in advanced troubleshooting steps, you should consider performing the following checks:

  • Restart your computer.
  • Check for Windows pending updates.
  • Try reinstalling the affected app.

If these minor tweaks don’t work, check out the detailed solutions below.

1. Use a DLL fixer

Recovering a DLL file manually can cause more harm than good to your computer if not done right! Therefore, it is suggested to use a third-party DLL fixer tool.

These tools can recover and restore all DLL files without a miss. Thereby resolving the conflicts between third-party apps & the operating system and enhancing PC performance.

2. Repair/Reinstall the .NET Core Runtime app

  1. Press the Windows key, type control panel, and click Open.Control Panel start menu
  2. Go to View by as Category and click Uninstall a program.Programs Hostfxr.dll
  3. On the Programs and Features window, from the list, locate and select Microsoft .NET SDK and click Uninstall.Uninstall .NET CORE Hostfxr.dll
  4. On the next window, select Repair.Repair the app
  5. If the issue persists, go to the Programs and Features window, select Microsoft .NET SDK, and click Uninstall.Uninstall .NET CORE Hostfxr.dll
  6. This time select Uninstall to remove the file.Uninstall the app
  7. Now go to the official website to download the latest version of .NET Core and click Download.Download the latest version
  8. Next, click Install.Install

3. Run an SFC scan

  1. Press the Windows key, type cmd, and click Run as administrator.CMD elevated Hostfxr.dll
  2. Copy & paste the following command to repair the system files and hit Enter: sfc/scannowSFCSCANNOW CMD
  3. Wait until the scan completes, and restart your computer.

4. Perform a System Restore

  1. Press the Windows key, type control panel, and click Open.Control Panel start menu
  2. Select View by as Large icons and click Recovery. Recovery Control Panel Hostfxr.dll
  3. Click Open System Restore.Open system restore
  4. Select Choose a different restore point and click Next.Next Choose a different restore point
  5. Now select a restore point and click Next.Finish
  6. Click Finish to start the process.Choose a point

Windows will restart and restore to the selected version. If System Restore didn’t complete successfully, we suggest you follow this guide to learn the solutions.

5. Download the DLL file manually

Note icon NOTE
Using an unreliable website to install DLL files can be dangerous and is never recommended. However, If you know a trusted source, like DLL-FILES, which has been verified and trusted. You can follow the steps mentioned to restore the file manually.
  1. Go to the DLL-FILES website, search hostfxr.dll, select an appropriate option, and click Download.Download Hostfxr.dll
  2. Double-click the downloaded folder to open it, and locate and copy the .dll file.
  3. Go to this path and paste the file:C:\Windows\System32\
  4. Restart your computer to keep the changes.

If you are facing missing the DLL files issue on your Windows 10, we suggest you read our informative guide to know solutions for this common problem.

So, these are methods that you can use to fix the hostfxr.dll could not be found issue. If you have any questions or suggestions, feel free to mention them in the comments section below.

What is Mstsc.exe & How to Properly Use it

The mstsc.exe is located in Windows 11 inside the C:\System32\ folder. MSTC stands for Microsoft Terminal Service Client and is an executable file.

In this guide, we will discuss some important things such as what is mstsc.exe and how you can properly use it. Let us get right into it.

What is mstsc.exe used for?

Remote Desktop is an important Windows feature that is used by millions across the globe. With the mstsc.exe or Microsoft Terminal Service Client (MSTSC), you can run the Microsoft Remote Desktop (RDP) client.

Meaning, you can use the mstsc command to establish a remote connection with someone else’s computer. This can let you edit or tweak things as if you were using their computer by being physically present there.

You have to be on the same network to establish the remote connection. The mstsc command is run using the Windows Command Prompt and it is vital to manage the desktop.

What is the syntax for the mstsc command?

The syntax of the mstsc command is:

mstsc.exe [<connectionfile>] [/v:<server>[:<port>]] [/g:<gateway>] [/admin] [/f<fullscreen> ] [/w:<width> /h:<height>] [/public] [/multimon] [/l] [/restrictedadmin] [/remoteguard] [/prompt] [/shadow:<sessionid>] [/control] [/noconsentprompt]
mstsc.exe /edit <connectionfile>

Below is the basic understanding of common mstsc parameters:

ParameterDescription
<connectionfile>The name of the .rdp file required for connection.
/v:<server>[:<port>]Specifies the remote computer or the port number to which you want to connect.
/g:<gateway>It is the RD Gateway server that will be used for the connection. Only required if endpoint remote PC is specified with /v.
/adminTo establish the connection as an admin.
/fTo view the remote desktop in full-screen mode.
/w:<width>To specify the width of the Remote Desktop window.
/h:<height>To specify the height of the Remote Desktop window.
/publicRuns Remote Desktop in public mode, where passwords and bitmaps aren’t cached.
/multimonConfigures the Remote Desktop Services session monitor layout identical to the client-side configuration.
/lLists the monitor attached to the local PC and the ID associated with each monitor.
/edit <connectionfile>Opens up the specified .rdp file for editing.
/restrictedAdminThis mode won’t send your credentials to the remote PC.
/remoteGuardThis mode prevents credentials from being sent to the remote PC.
/promptAsks for your credentials when you connect to the remote PC.
/shadow:<sessionID>Specifies the ID of the session to shadow.
/controlLets you control the session when shadowing.
/noConsentPromptLets you control shadowing without user consent.
/?Displays help at the CMD.

How do I run mstsc.exe?

  1. Press the Win + R keys to open the Run dialogue.
  2. Type mstsc and press Enter.
    (If you want to open the remote connection in fullscreen mode, then you need to type mstsc.exe /f. Also, you can use the above parameters to their advantages as listed above.)
  3. Type the computer name or the IP address of the remote desktop and hit Connect.

Let us now understand how you can enable or disable the remote desktop. For that, check out the next two sections.

How do I enable Remote Desktop?

  1. Press the Win key to open the Start menu.
  2. Open Command Prompt as an admin.
  3. Type the below command and press Enter. reg add "HKLM\SYSTEM\CurrentControlSet\Control\Terminal Server" /v fDenyTSConnections /t REG_DWORD /d 0 /f
  4. Run the below command to enable remote desktop. netsh advfirewall firewall set rule group="remote desktop" new enable=yes

How do I disable Remote Desktop?

  1. Press the Win key to open the Start menu.
  2. Open Command Prompt as an admin.
  3. Type the below command and press Enter. reg add "HKLM\SYSTEM\CurrentControlSet\Control\Terminal Server" /v fDenyTSConnections /t REG_DWORD /d 1 /f
  4. Run the below command to disable remote desktop. netsh advfirewall firewall set rule group="remote desktop" new enable=No

How can I fix mstsc.exe crashes?

1. Run the SFC scan

  1. Press the Win key to open the Start menu.
  2. Open Command Prompt as an admin.
  3. Execute the below command. sfc /scannow
  4. Wait for the SFC Scan process to complete and fix the corrupt files.
  5. Restart your PC.

When you come across a mstsc.exe crash or error, then we would suggest you fix the corrupt system files on your PC. This is because often new Windows updates can crash certain system processes.

That is it from us in this guide. Let us know in the comments below, if this helped you understand what mstsc.exe is and how you can use it to establish a remote desktop connection.

How To Stop McAfee From Changing Search Engine [Step-by-Step]

Is McAfee changing the search engine in your browser for no apparent reason? You’re not alone. Many users have the same problem.

It’s most commonly changing Chrome engine to Yahoo, but it might be another search engine too.

Regardless, here’s how to stop it:

How do I stop McAfee from changing my default search engine?

1. Disable McAfee Web advisor extension

  1. Navigate to your browser (in this case, Chrome).
  2. Click on the three vertical ellipses in the top right corner, select More tools, and click on Extensions.chrome extensions settings
  3. Find McAfee WebAdvisor and toggle off the disable button.disabling mcafee web advisor
  4. Remember, when you turn it off, you may get the McAfee secure search is off – be careful message which warns you that your system may be at risk. you don't have secure search mcafee

This is because it won’t be able to detect any malicious sites. However, you should be fine as long as you activate other protective means.

2. Uninstall McAfee WebAdvisor

  1. Hit the Windows key, type in Control Panel, and click Open.control panel
  2. Select Programs, then click on Uninstall a program.uninstall a program
  3. Locate McAfee WebAdvisor or McAfee SiteAdvisor from the programs list and click Uninstall.uninstall mcafee web advisor

For detailed removal instructions, check our Remove McAfee WebAdvisor guide to make sure no traces remain after uninstalling.

3. Reset your browser to default settings

  1. Navigate to your browser (in this case, Chrome).
  2. Click on the three vertical ellipses in the top right corner and select Settings.google settings
  3. Select Advanced, then click on Reset and clean up.google settings reset and clean up
  4. Click on Restore settings to their original defaults and select Reset settings.reset browser settings

If McAfee is changing your search engine, it’s likely due to the WebAdvisor browser extension or the search protection feature.

You can adjust these settings to prevent future changes. For users of Windows 11, McAfee offers added security, but built-in tools like Windows Defender may be enough for basic protection.

Hopefully, you have successfully changed to your preferred search engine using one or more of the above solutions. 

Keeping your antivirus up to date can also help with this and related problems like McAfee errors communicating with event log.

If the problem is more persistent on your PC, we have a dedicated guide on what to do when your browser keeps switching to Yahoo.

Let us know what solution worked for you in the comments section below.

PR_END_OF_FILE_ERROR: How to Bypass Secure Connection

Mozilla Firefox is considered one of the feature-rich and safe browsers available. However, some of our readers encountered the PR_END_OF_FILE_ERROR. This error pops up when the browser can’t establish a secure connection.

We have listed down some solutions that will help you fix the PR_END_OF_FILE_ERROR with the Mozilla Firefox browser.

What triggers the PR_END_OF_FILE_ERROR?

When the Mozilla Firefox browser fails to establish a secure connection with a certain website, then you will come across the PR_END_OF_FILE_ERROR. This usually happens because all cipher suites fail.

There are a bunch of reasons that could trigger the PR_END_OF_FILE_ERROR in Mozilla Firefox, which are listed below:

  • VPN interference: VPN may let you access blocked websites, but it can also cause mishaps that can block you from visiting websites by interfering with the browser’s operation.
  • Incorrect cipher variants: If you have recently modified the SSL settings, then your browser might be enforcing a cipher that isn’t supported by the Firefox browser, thus the error message.
  • Corrupt Firefox profile: You will come across the PR_END_OF_FILE_ERROR in Firefox if your profile has some underlying issues or is corrupt.
  • A firewall is interfering: Aggressive Firewall or antivirus settings might be interfering with the smooth functioning of the browser.
  • Browser cache is conflicting: Corrupt browser cache can always cause multiple issues with the browser’s performance and functioning.

Let us now check out the advanced solutions to resolve this error.

How can I fix the PR_END_OF_FILE_ERROR?

Here are a few quick solutions that you can try before jumping ahead with the advanced solutions.

  • Restart your browser and then visit the website and check if this resolves the issue or not.
  • Disable any VPN that you are using because chances are that the VPN is conflicting with the browser.

1. Reset Firefox SSL settings

  1. Launch Firefox.
  2. Click on the Menu button at the top-right corner and select Help.
  3. Choose More troubleshooting information.
  4. Under Give Firefox a tune up, hit the Refresh Firefox button.
  5. Click Refresh Firefox in the pop-up that appears.

When you hit the Refresh Firefox button, it will clean the SSL settings that might have been accidentally modified. Once that is done, check if you are getting the PR_END_OF_FILE_ERROR or not.

2. Clear the startup cache

  1. Open Firefox.
  2. Click on the Menu button at the top-right corner and choose help.
  3. Click on Help.
  4. Click on More troubleshooting information.
  5. Select Clear startup cache option under the Try clearing the startup cache option.

Clearing the startup cache has also helped our readers fix the problem of PR_END_OF_FILE_ERROR in Mozilla Firefox.

3. Disable Firewall

  1. Press the Win key to open the Start menu.
  2. Open the Control Panel from pinned apps.
  3. Select Windows Defender Firewall.
  4. Click on Turn Windows Defender Firewall on or off option from the left pane.
  5. Check the radio button Turn off Windows Defender Firewall (not recommended) for both Public and Private networks.
  6. Click OK.
  7. Launch Firefox and check if this fixes the issue or not.

We have shown the above steps for the Windows Defender Firewall, but you get the idea that you need to disable your third-party antivirus software.

However, in case this doesn’t work, we would suggest you enable the Firewall. We have a guide that lists down some of the best antivirus tools that can help protect your PC.

4. Create a new Firefox profile

  1. Launch Firefox.
  2. In the address bar, type below and press Enter. about:profiles
  3. Hit the Create a new profile button.
  4. Click Next.
  5. Enter a new profile name.
  6. Click Next.
  7. Complete the new profile creation process.
  8. Launch the profile in a new browser.
  9. Visit the website and check if you are getting the same error or not.

Several users have reported that creating a new profile and then visiting the website on Firefox resolves the problem of PR_END_OF_FILE_ERROR.

5. Disable the DNS over the HTTPS option

  1. Launch Firefox browser.
  2. In the address bar, type the below and hit Enter. about:preferences#general
  3. Scroll down and select the Settings option in front of Network Settings.
  4. Uncheck the DNS over HTTPS option.
  5. Click OK.
  6. Restart Firefox.

That is it from us in this guide. If your Firefox browser is using too much memory, then you can apply the solutions in our guide to resolve the problem.

Feel free to drop a comment below and let us know which one of the above solutions resolved the PR_END_OF_FILE_ERROR.

Dnsapi.dll Was Not Found: How to Fix It

Dnsapi.dll is a Dynamic Link Library file, a software component for Windows OS by Microsoft Corporation. If you have encountered the Dnsapi.dll was not found error, this guide can help you restore the missing DLL in no time.

What causes the dnsapi.dll was not found error?

There could be various reasons for the missing DLL error; some of the common ones are:

  • DLL file deleted – If the app using the DLL file or the DLL file itself is corrupted or deleted, you may face this error. Try reinstalling the app to fix it.
  • Malware infection – Viruses on your computer can damage system files, including this file, causing the problem. Run a malware scan using an antivirus tool.
  • Corrupted system files – The system files related to the DLL file are damaged or missing, you can see this error. Try running an SFC scan to resolve it.
  • Damaged Windows registry – If the registry entries are broken or missing, your computer can throw various errors, including this one. Try using a registry cleaner to get rid of the issue.

Now that you know what causes the error, let us focus on resolving the problem.

How can I fix the dnsapi.dll was not found error?

Before engaging in advanced troubleshooting steps, you should consider performing the following checks:

  • Restart your computer.
  • Try reinstalling the affected app.
  • Make sure there are no pending Windows updates.

If these minor tweaks don’t work for you, check out the detailed solutions below.

1. Use a DLL fixer

Restoring or recovering the DLL files manually can be tricky, especially if you are not tech-savvy. Therefore, it is advised to use a third-party DLL fixer solution like the one below.

The system repair tool will restore Windows-related DLL files without a miss. Hence, you can repair the conflicts between third-party apps & the operating system to improve and fix this missing DLL trouble.

2. Run SFC & DISM scans

  1. Press the Windows key, type cmd, and click Run as administrator.CMD elevated dnsapi.dll
  2. Type the following command to repair the system files and press Enter: sfc/scannowSFCSCANNOW CMD dnsapi.dll
  3. Wait for the scan to complete, copy and paste the following command to restore the Windows OS image, and hit Enter: Dism /Online /Cleanup-Image /RestoreHealthRestore health
  4. Once the scan is complete, your PC will connect to the Windows Update service to download and replace the damaged files.
  5. Restart your computer to let the changes take effect.

3. Run a malware scan

  1. Press the Windows key, type windows security, and click Open.Windows Security open Windows key
  2. Click Virus & threat protection from the right pane, and then click Scan options.V& T Scan options dnsapi.dll
  3. Select Full scan and click Scan now.Full scan -
  4. The tool will scan your computer for all malware threats, and list them. Delete them to get rid of the problem.

Running the scan is important because if the DLL missing error is caused by malware, this action will remove it, thereby fixing the problem.

4. Perform a System Restore

  1. Press the Windows key, type control panel, and click Open.Control Panel start menu
  2. Select View by as Large icons and click Recovery.Recovery Control Panel
  3. Click Open System Restore.Open system restore
  4. Select Choose a different restore point and click Next.
  5. Now select a restore point and click Next.Choose a point
  6. Click Finish to start the process.Finish

Windows will restart and restore to the selected version. If System Restore didn’t complete successfully, then we suggest you follow this guide to know the solutions.

5. Use a reliable website to download the DLL file

Note icon NOTE
Using an unreliable website to install DLL files can be dangerous and is never advised. However, If you know a trusted source, like DLL-FILES, you can follow the steps mentioned to restore the file.
  1. Go to the DLL-FILES website, search dnsapi.dll, select an appropriate option and click Download.dnsapi.dll Download DLL file
  2. Double-click the downloaded folder to open it, and locate and copy the .dll file.
  3. Go to this path and paste the file: C:\Windows\System32\
  4. Restart your computer to confirm the changes.

If you are facing missing the DLL files issue on your Windows 10, we suggest you read our informative guide to know solutions for this common problem.

To learn more about DLL files, don’t miss our what is gcapi.dll article for more information.

So, these are methods that you can use to fix the dnsapi.dll not found issue. If you have any questions or suggestions, feel free to mention them in the comments section below.

How to easily submit feedback on Windows LAPS

Windows LAPS is now available to the general public. On this platform, you can easily manage and back-up passwords for local administration accounts on your Azure Active Directory-joined devices.

But this is not all. As Microsoft is working on the platform to create a stable and focused version, they also want users’ input on how to make it better. That means you can now submit your ideas and suggestions.

To do it, you must first have a Microsoft Tech Community account. Then, whenever you want to submit your feedback, just make sure you are signed in to that account.

You can also bookmark the Windows LAPS feedback board page, which can come in handy when you want to do it.

Here is how you can help improve Windows LAPS

  1. Go to the Windows LAPS board.
  2. Sign into your Microsoft Tech Community account, if you haven’t already.
  3. Click on the Submit an Idea button, in the top right corner of the page.
  4. Complete all the fields (at least, those marked with an *). To avoid duplication, the tool will automatically display similar entries, when you enter your title. If there is an entry that matches your Windows LAPS feedback, upvote the existing one and add a message if you have additional suggestions.
  5. This step is optional, but you can check the box for “Email me when someone replies.”
  6. Click on Post to submit your feedback and you’re all set.

After you submit your ideas and suggestions, the board will review them and they will update the status as follows:

New = Not yet reviewed.
Needs more info = We need more information about this idea, your use case, or desired support.
In the backlog = Good idea! It’s now on the list, but work has not yet started.
Working on it = This idea is in active development.
Completed = This request is now available.
Not at this time = We currently have no plans to implement this.
Duplicate = Another feedback item already covers this request. We’ll include a link so you can upvote it!

Windows LAPS has recently come under fire, as the platform has been experiencing legacy issues on both Windows 10 and Windows 11. The issues were causing the legacy and the newer versions of Windows LAPS to break.

Microsoft acknowledged the problem and they say it will get fixed with the next security/cumulative update release.

We will closely follow this issue and we will let you know when the release is out, so you can update your computer, in case you are affected by this problem.

With that being said, the feedback section is more than a welcome addition, as users will now be able to express their ideas and actually improve Windows LAPS as a whole, from their perspective, as well.

What do you think about it? Will you leave your feedback on this platform? Let us know in the comment section below.

CAPICOM.dll Missing: How to Fix or Download It Again

CAPICOM.dll is a Dynamic Link Library file used by Microsoft’s Crypto API, a software interface used to perform cryptography-related tasks. Microsoft no longer supports it, and it has been deprecated since Windows Vista.

However, some legacy applications may still require the file to function properly. If you encounter CAPICOM.dll missing error, this guide can help you restore the missing DLL quickly.

What causes the CAPICOM.dll missing error?

There could be various reasons for the DLL missing error; some of the common ones are:

  • DLL file deleted – If the DLL file is corrupted or missing, the app depending on it, won’t function properly, hence the error. Try restoring the file to fix the problem.
  • Malware infection – A virus can corrupt system files on your computer, leading to this error. Run a deep scan using an antivirus tool to get rid of it.
  • Faulty app -If the app using the DLL file, is outdated or corrupted, you may see this message. Try reinstalling the app to resolve the issue.
  • Registry issues – A computer with broken registry entries may encounter various errors, including this one. Run a registry cleaner to fix it.

Now that you know the reasons for the error, let us check out the resolutions.

What can I do to fix the CAPICOM.dll missing error?

Before engaging in advanced troubleshooting steps, you should consider performing the following checks:

  • Try reinstalling the app, which is throwing the error.
  • Restart your computer.
  • Make sure there are no pending Windows updates.

If these minor tweaks don’t work for you, move to the solutions below.

1. Use a third-party DLL fixer

Fixing DLL missing errors manually could be cumbersome and harm your PC if not done correctly. Therefore, it is advised to use a third-party DLL fixer tool to address this issue effectively.

These tools can scan your computer for corrupted DLL files and quickly restore or replace files like CAPICOM.dll. Thereby resolving the conflicts between third-party apps & operating systems, enhancing system performance, and achieving greater stability for your PC.

2. Run SFC & DISM scans

  1. Press the Windows key, type cmd, and click Run as administrator.CMD elevated CAPICOM.dll
  2. Type the following command to repair system files and press Enter: sfc/scannow
  3. Wait for the scan to complete, then copy & paste the following command to restore the Windows OS image and hit Enter: Dism /Online /Cleanup-Image /RestoreHealthRestore health
  4. Once the scan is complete, your PC will automatically connect to the Windows Update service to download and replace the corrupt files. Restart your computer to let the changes take effect.

3. Run a malware scan

  1. Press the Windows key, type windows security, and click Open.Windows Security open Windows key
  2. Go to Virus & threat protection and click Scan options.V& T Scan options
  3. Select Full scan and click Scan now.Full scan - CAPICOM.dll
  4. The tool will scan the whole computer for all types of malware threats, including viruses, spyware, adware, & rootkits, and list them. Delete them when prompted.

Running a malware scan is important as if the DLL missing error is fake and caused by malware, this action will remove it, thereby resolving the problem.

4. Restore your system to a previous point in time

  1. Press Windows + R to open the Run console.Sysdm.cpl CAPICOM.dll
  2. Type sysdm.cpl and click OK to open System Properties.
  3. Go to the System Protection tab, and click the System Restore button.SystemProperties_ System Restore button
  4. On the System Restore window, select Choose a different restore point and click Next.Next Choose a different restore point
  5. Select a restore point and click Next.Choose a point CAPICOM.dll
  6. Click Finish.Finish

Windows will restart and restore to the chosen version. If the System Restore is not working for you, we suggest you read this informative guide to find the solution.

5. Download the DLL file from a third-party website

Note icon NOTE
Using an untrusted website to install DLL files is not advised. However, If you know a trusted source, like DLL-FILES, that has been tested and verified, you can follow the steps mentioned to restore the file.
  1. Go to the DLL-FILES website, search CAPICOM.dll, select the suitable option, and click Download.Download The DLL file CAPICOM.dll
  2. Double-click the downloaded folder to open it, and locate and copy the .dll file.
  3. Navigate to this path and paste the file: C:\Windows\SysWOW64\
  4. Restart your computer to save the changes.

If you’re experiencing missing the DLL files issue on your Windows 10, we advise you to refer to our informative article that provides solutions to this common problem.

So, you can follow these methods to fix the missing CAPICOM.dll issue. If nothing worked for you, you could perform a clean install of Windows to eliminate the problem.

If you have any questions or suggestions, feel free to mention them in the comments section below.

0x800701e7 Xbox Error: How to Quickly Fix it

Some of our Xbox One users have reported coming across the 0x800701e7 error. Because of this error, they aren’t able to update their consoles. Thankfully, in this guide, we have listed some solutions that will help fix the 0x800701e7 update error on Xbox One.

What is the 0x800701e7 update error on Xbox?

While the 0x800701e7 error prevents you from downloading an update on your Xbox consoles, some users have reported facing this issue when playing a game after installing the update. Here are a few reasons that can trigger this error.

  • Internet isn’t stable: Chances are the internet that you are connected to is jumpy and isn’t stable for the update to get downloaded.
  • Corrupt Xbox data: Some corrupt underlying Xbox system files might be causing the 0x800701e7 error on your Xbox console.
  • The update itself is faulty: Often the updates that roll out are known to carry some bugs that prevent them from getting installed.
  • Some files are conflicting: Some underlying files might e conflicting or interfering with the update file that you are downloading, hence, causing the issue.

Now that we know the main reasons, let us apply the solutions and resolve the problem.

How do I fix error code 0x80072ee7 on Xbox One?

Before jumping ahead with the advanced solutions, here are a few fixes that you should try out and hopefully fix the issue.

  • Check your internet connection and ensure that it is stable and working.
  • Restart your Xbox console and check if it can install the update without any issues or not.

Let us take a look at the actual solutions that will help resolve the problem.

1. Add your Microsoft account again

  1. Press the Xbox Power button on your console to open the guide.
  2. Select Profile & system.
  3. Choose Settings.
  4. Choose Account.
  5. Select the Remove accounts option.
  6. Select the profile you want to remove and hit Remove to confirm.
  7. Go back to Profile & systems.
  8. Select Add or switch.
  9. Choose Add new.
  10. Type the email address of your Microsoft account.
  11. Enter your password.
  12. Agree to the terms and agreements, then follow the on-screen prompts to finish adding your profile.

There are chances that your Microsoft profile might be causing the issue and preventing your Xbox console from installing the update. Follow the above steps to re-add your profile and try installing the update, then check if this resolves the 0x80072ee7 error.

2. Reinstall the game

  1. Press the Xbox button on your controller.
  2. Select My games & apps.
  3. Highlight the game that you would like to remove and press the Menu button on your controller.
  4. Select Uninstall from the pop-up menu.
  5. Choose Uninstall All option to remove everything related to the game including DLCs.
  6. Head back to My Games & Apps.
  7. Select Full Library from the top drop-down.
  8. Choose All Owned Games.
  9. Select the game that you recently uninstalled.
  10. Highlight the game and select Install.

Some of our readers have fixed this issue by reinstalling the problematic game that crashes after the update, so we strongly recommend trying it as well.

3. Clear the Xbox cache

  1. Press the Xbox button on your Xbox One.
  2. Go to System menu and choose Settings.
  3. Click on Devices & streaming.
  4. Select Blu-ray.
  5. Choose Persistent Storage.
  6. Select Clear persistent storage.

Corrupt cache files can also cause multiple issues within the console and prevent you from installing the latest updates. In such cases, you should follow the above steps and clear the cache files and possibly fix the 0x80072ee7 error.

4. Reset the Xbox console

  1. Power on your Xbox.
  2. Press the Xbox button on your controller and select the System menu.
  3. Select Settings and choose System.
  4. Select System from the left pane and choose Console info.
  5. Choose Reset Console.
  6. Select Reset and keep my games & apps.

Resetting your Xbox console will help resolve various underlying problems within the system and could also get rid of the 0x80072ee7 error.

That is it from us in this guide. You can refer to our guide on Xbox error E102 which will help you resolve the error at your end. If your Xbox One headset is not working, then check out our guide and the solutions to fix the issue.

Feel free to let us know in the comments below which one of the above solutions resolved the 0x80072ee7 error.

0x0000007e BSoD Error: How to Fix it

Blue Screen of Death or BSoD errors are pretty troublesome as they randomly crash your PC. Several users have reported coming across the 0x0000007e BSoD error on their Windows 11 PCs. In this guide, we have compiled the solutions that will help you fix the 0x0000007e error. Let us jump right into it.

What causes 0x0000007e BSoD error?

You will come across the 0x0000007e error during startup when your system fails to access the system files. There are a few common reasons that could result in the 0x0000007e error:

  • Virus or malware infection: A virus or malware infection could result in multiple issues on your PC and can also prevent your system to access important files.
  • The drivers are outdated: For the smooth performance of your PC, all drivers must be updated with their latest version.
  • The BIOS is outdated: Outdated BIOS can result in various system-level issues such as the 0x0000007e Windows 11 BSoD error.
  • Hard disk is damaged: Chances are the hard disk of your PC is at fault and causing multiple issues within the system.
  • Sudden removal of a USB device: Any USB device connected to your PC should not be removed abruptly causing the system to misbehave.

Now that we know the causes for this BSoD, let’s go to the actual solutions to fix it.

How do I fix the blue screen 0x0000007e error?

1. Update BIOS

  1. Visit your motherboard manufacturer’s website.
  2. Download the latest BIOS version and copy it onto a USB drive.
  3. Turn off your PC 2-3 times to enter the Advanced Startup Environment.
  4. Select Troubleshoot.
  5. Click on Advanced Options.Advanced options
  6. Select UEFI Firmware Settings.UEFI 2
  7. Click Restart.
  8. In the BIOS menu, look for the BIOS update option.
  9. Insert the USB drive containing the latest BIOS update file and wait for the BIOS to get updated.
  10. Restart your PC.

We have a dedicated guide that explains how you can update BIOS on your Windows PC. It also explains how you can check the current BIOS version and all other details you should know before updating BIOS.

2. Disable the antivirus or Firewall

  1. Press the Win key to open the Start menu.
  2. Open Control Panel.
  3. Click on Windows Defender Firewall.
  4. Select Turn Windows Defender Firewall on or off from the left pane.
  5. Check the radio button for Turn off Windows Defender Firewall (not recommended) for both Public and Private networks.
  6. Click OK.
  7. Restart your PC.

Your Firewall might be interfering with the system’s access to the system files. In such a case, disabling the Firewall can help resolve the blue screen 0x0000007e error on Windows.

3. Run the CHKDSK command

  1. Turn off your PC 2-3 times to boot into the Advanced Startup Environment.
  2. Select Troubleshoot.
  3. Click on Advanced Options.Advanced options
  4. Select Command Prompt.
  5. Type the below command and press Enter. chkdsk x: /f
    (Replace x with the drive you wish to check)
  6. Wait for the command to fix the hard disk errors.
  7. Restart your PC.

4. Change the Intelppm Registry value

Note icon NOTE
We recommend creating a backup of your Registry before tweaking it so that you can go back to the normal state in case things go south.
  1. Press the Win + R keys to open the Run dialogue.
  2. Type regedit and press Enter.
  3. Navigate to the below-mentioned path. HKEY_LOCAL_MACHINE\SYSTEM\ControlSet001\Services\Intelppm
  4. On the right-side double-click on the Start key.
  5. Change the Value to 4.
  6. Click OK, then restart your PC and check if the error persists.

Several users have managed to resolve the 0x0000007e Windows 10 blue screen error by tweaking the registry as mentioned above. You can follow the same steps to resolve the 0x0000007e Windows 7 and 0x0000007e Windows 11 BSoD errors as well.

But if you haven’t created a backup, then do not worry. As we have a guide that explains how you can restore the registry without backup.

5. Update the drivers on your system

  1. Press the Win key to open the Start menu.
  2. Open Device Manager.
  3. Expand the Display adapters section.
  4. Double-click on your GPU.
  5. Switch to the Drivers tab.
  6. Select the Update driver option.
  7. Choose Search automatically for drivers option.
  8. Install the update.
  9. Follow the same steps for other drivers.
  10. Restart your PC.

Several Windows users have reported that updating the display driver on their PCs has fixed the 0x0000007e Windows 11 BSoD error. We would suggest you update all the drivers and make sure nothing like this happens again because of driver issues.

That is it from us in this guide. For an effortless fix for blue screen errors, we would recommend you to check out our guide which lists down some of the best BSoD fixers that will help you fix these issues in no time.

Let us know in the comments below, which one of the above solutions fixed the 0x0000007e BSoD error for you.

38 CVEs addressed through the May 2023 Patch Tuesday Release

It’s May already and everyone is looking towards Microsoft, in hopes that some of the flaws they’ve been struggling with will finally get fixed.

We’ve already provided the direct download links for the cumulative updates released today for Windows 10 and 11, but now it’s time to talk about Critical Vulnerabilities and Exposures again.

This month, the Redmond tech giant released 38 new patches, which is a lot less than some people were expecting right after Easter.

These software updates address CVEs in:

  • Microsoft Windows and Windows Components
  • .NET and Visual Studio
  • Microsoft Edge (Chromium-based)
  • Microsoft Exchange Server
  • Office and Office Components
  • Windows Hyper-V
  • Windows Authentication Methods
  • BitLocker
  • Windows Cluster Shared Volume (CSV)
  • Remote Desktop Client
  • Windows Network File System
  • NTFS
  • Windows Point-to-Point Tunneling Protocol

For May, Microsoft only released 38 new patches, which is still a lot less than some people were expecting for the fifth month of 2023.

One of Microsoft’s lightest months with only 38 updates

Not the busiest but also not the lightest month for Microsoft security experts, so we can relax a bit right before the summer.

You might like to know that, out of the 38 new CVEs released, seven are rated Critical and 31 are rated Important in severity.

As many of you probably already know, May is always a smaller month for fixes historically, but this month’s volume is the lowest since August 2021.

Know that one of the new CVEs is listed as under active attack and two are listed as publicly known at the time of release.

CVETitleSeverityCVSSPublicExploitedType
CVE-2023-29336Win32k Elevation of Privilege VulnerabilityImportant7.8NoYesEoP
CVE-2023-29325Windows OLE Remote Code Execution VulnerabilityCritical8.1YesNoRCE
CVE-2023-24932Secure Boot Security Feature Bypass VulnerabilityImportant6.7YesNoSFB
CVE-2023-24955Microsoft SharePoint Server Remote Code Execution VulnerabilityCritical7.2NoNoRCE
CVE-2023-28283Windows Lightweight Directory Access Protocol (LDAP) Remote Code Execution VulnerabilityCritical8.1NoNoRCE
CVE-2023-29324Windows MSHTML Platform Elevation of Privilege VulnerabilityCritical7.5NoNoEoP
CVE-2023-24941Windows Network File System Remote Code Execution VulnerabilityCritical9.8NoNoRCE
CVE-2023-24943Windows Pragmatic General Multicast (PGM) Remote Code Execution VulnerabilityCritical9.8NoNoRCE
CVE-2023-24903Windows Secure Socket Tunneling Protocol (SSTP) Remote Code Execution VulnerabilityCritical8.1NoNoRCE
CVE-2023-29340AV1 Video Extension Remote Code Execution VulnerabilityImportant7.8NoNoRCE
CVE-2023-29341AV1 Video Extension Remote Code Execution VulnerabilityImportant7.8NoNoRCE
CVE-2023-29333Microsoft Access Denial of Service VulnerabilityImportant3.3NoNoDoS
CVE-2023-29350Microsoft Edge (Chromium-based) Elevation of Privilege VulnerabilityImportant7.5NoNoEoP
CVE-2023-24953Microsoft Excel Remote Code Execution VulnerabilityImportant7.8NoNoRCE
CVE-2023-29344Microsoft Office Remote Code Execution VulnerabilityImportant7.8NoNoRCE
CVE-2023-24954Microsoft SharePoint Server Information Disclosure VulnerabilityImportant6.5NoNoInfo
CVE-2023-24950Microsoft SharePoint Server Spoofing VulnerabilityImportant6.5NoNoSpoofing
CVE-2023-24881Microsoft Teams Information Disclosure VulnerabilityImportant6.5NoNoInfo
CVE-2023-29335Microsoft Word Security Feature Bypass VulnerabilityImportant7.5NoNoSFB
CVE-2023-24905Remote Desktop Client Remote Code Execution VulnerabilityImportant7.8NoNoRCE
CVE-2023-28290Remote Desktop Protocol Client Information Disclosure VulnerabilityImportant5.5NoNoInfo
CVE-2023-24942Remote Procedure Call Runtime Denial of Service VulnerabilityImportant7.5NoNoDoS
CVE-2023-24939Server for NFS Denial of Service VulnerabilityImportant7.5NoNoDoS
CVE-2023-29343SysInternals Sysmon for Windows Elevation of Privilege VulnerabilityImportant7.8NoNoEoP
CVE-2023-29338Visual Studio Code Information Disclosure VulnerabilityImportant5NoNoInfo
CVE-2023-24902Win32k Elevation of Privilege VulnerabilityImportant7.8NoNoEoP
CVE-2023-24946Windows Backup Service Elevation of Privilege VulnerabilityImportant7.8NoNoEoP
CVE-2023-24948Windows Bluetooth Driver Elevation of Privilege VulnerabilityImportant7.4NoNoEoP
CVE-2023-24944Windows Bluetooth Driver Information Disclosure VulnerabilityImportant6.5NoNoInfo
CVE-2023-24947Windows Bluetooth Driver Remote Code Execution VulnerabilityImportant8.8NoNoRCE
CVE-2023-28251Windows Driver Revocation List Security Feature Bypass VulnerabilityImportant5.5NoNoSFB
CVE-2023-24899Windows Graphics Component Elevation of Privilege VulnerabilityImportant7NoNoEoP
CVE-2023-24904Windows Installer Elevation of Privilege VulnerabilityImportant7.1NoNoEoP
CVE-2023-24945Windows iSCSI Target Service Information Disclosure VulnerabilityImportant5.5NoNoInfo
CVE-2023-24949Windows Kernel Elevation of Privilege VulnerabilityImportant7.8NoNoEoP
CVE-2023-24901Windows NFS Portmapper Information Disclosure VulnerabilityImportant7.5NoNoInfo
CVE-2023-24900Windows NTLM Security Support Provider Information Disclosure VulnerabilityImportant5.9NoNoInfo
CVE-2023-24940Windows Pragmatic General Multicast (PGM) Denial of Service VulnerabilityImportant7.5NoNoDoS
CVE-2023-24898Windows SMB Denial of Service VulnerabilityImportant7.5NoNoDoS
CVE-2023-29354Microsoft Edge (Chromium-based) Security Feature Bypass VulnerabilityModerate4.7NoNoSFB
CVE-2023-2459 *Chromium: CVE-2023-2459 Inappropriate implementation in PromptsMediumN/ANoNoRCE
CVE-2023-2460 *Chromium: CVE-2023-2460 Insufficient validation of untrusted input in ExtensionsMediumN/ANoNoRCE
CVE-2023-2462 *Chromium: CVE-2023-2462 Inappropriate implementation in PromptsMediumN/ANoNoRCE
CVE-2023-2463 *Chromium: CVE-2023-2463 Inappropriate implementation in Full Screen ModeMediumN/ANoNoRCE
CVE-2023-2464 *Chromium: CVE-2023-2464 Inappropriate implementation in PictureInPictureMediumN/ANoNoRCE
CVE-2023-2465 *Chromium: CVE-2023-2465 Inappropriate implementation in CORSMediumN/ANoNoRCE
CVE-2023-2466 *Chromium: CVE-2023-2466 Inappropriate implementation in PromptsLowN/ANoNoRCE
CVE-2023-2467 *Chromium: CVE-2023-2467 Inappropriate implementation in PromptsLowN/ANoNoRCE
CVE-2023-2468 *Chromium: CVE-2023-2468 Inappropriate implementation in PictureInPictureLowN/ANoNoRCE

Let’s take a closer look at CVE-2023-29336, as its the one bug listed as being under active attack at the time of release.

Thus, as a result, you must go all the way back to May of last year before you find a month where there wasn’t at least one Microsoft bug under active attack.

In fact, this type of privilege escalation is usually combined with a code execution bug to spread malware, so we advise caution.

Moving on to CVE-2023-29325, we learn that while the title says OLE when it comes to this bug, the real component to worry about is Outlook.

Please note that this vulnerability allows an attacker to execute their code on an affected system by sending a specially crafted RTF e-mail.

The Preview Pane is an attack vector, so a target doesn’t even need to read the crafted message, and while Outlook is the more likely exploit vector, other Office applications are also impacted.

Microsoft mentioned that this is one of the publicly known bugs patched this month and has been widely discussed on Twitter.

CVE-2023-24941 has been given a CVSS of 9.8 and allows a remote, unauthenticated attacker to run arbitrary code on an affected system with elevated privileges.

And, the worst part is that no user interaction is required. Another interesting thing about this vulnerability is that exists in NFS version 4.1 but not versions NFSv2.0 or NFSv3.0.

Rest assured that you can mitigate this bug by downgrading to a previous version, but Microsoft warns that you should not use this mitigation unless you have the CVE-2022-26937 patch from May 2022 installed.

Observing the remaining Critical-rated patches, there’s another CVSS 9.8 bug in Pragmatic General Multicast (PGM) that looks identical to PGM bug patched last month.

It’s important to know that this could indicate a failed patch or, more likely, a wide attack surface in PGM that is just starting to be explored.

There are also patches for Critical-rated bugs in the LDAP and SSTP protocols and an intriguing bug in MSHTML that could allow a remote attacker to escalate to administrator privileges.

The Redmond tech giant doesn’t provide details here, but they do note some level of privileges is required.

The next Patch Tuesday rollout will be on May 10th, so don’t get too comfortable with the current state of affairs, as it might change sooner than you think.

Was this article helpful to you? Share your opinion in the comments section below.

Redfall reportedly had a strong launch in spite of poor critical reception

Redfall’s May 2 launch has been a hot topic online, with the game coming as a disappointment for most—and that’s putting it mildly. As seen in our Redfall review roundup, Redfall fell far short of expectations.

So much so, in fact, that the game’s disastrous launch—together with Microsoft Gaming CEO Phil Spencer’s comments on the Kinda Funny Xcast podcast a few days later—has prompted an ongoing discussion of Microsoft’s Xbox strategy and has led many to question the Redmond company’s future in the home console gaming market.

Nonetheless, the game’s decidedly negative reception hasn’t stopped Redfall from becoming one of the biggest game launches of the year so far in terms of player count. True Achievements has reported that Redfall had the second biggest Xbox game launch of 2023 at this point, second only behind that of Atomic Heart.

And for the week ending May 7, Redfall was the third biggest Xbox games in terms of total gameplay time. It was only behind Call of Duty: Modern Warfare 2 in second place, with Fortnite taking the lead in that category.

No doubt Redfall’s launch day one on Xbox Game Pass helped it in this regard. Still, it goes to show that enough gamers were intrigued enough to at least give it a chance in spite of the negativity surrounding its launch. Whether Redfall will have any staying power remains doubtful.

Redfall
Redfall
Developer:
Bethesda Softworks
Price:
Free

Via GamesRadar. 

Fix: Invalid Notebook Name Error on OneNote

Are you getting the Invalid Notebook Name error when trying to create a new notebook using the OneNote desktop app? If so, then you are in the right place.

Because, in this guide, we will list some of the working solutions that will help you resolve the error. We have discussed the common reasons as well to help you troubleshoot the problem faster if it occurs again. Let us jump right into it.

Why am I getting the Invalid Notebook Name error?

After our research regarding the Invalid Notebook Name error when creating a new notebook on the OneNote desktop., we have compiled a list of reasons that could trigger this problem.

  • OneNote is outdated: Most users have reported that because they were running an old version of the OneNote they were getting this error message.
  • Corrupt OneNote installation: Chances are that some important files related to OneNote are missing from your Office installation.
  • The location isn’t available: There could be chances that the location that you have specified for the notebook isn’t available.
  • The notebook name is wrong: If your notebook name contains invalid characters then you will come across the Invalid Notebook Name error.
  • Corrupt OneNote cache: Cache files if corrupt can cause multiple issues thereby causing the app to misbehave.

Let us check out the solutions that will help you fix the Invalid Notebook Name error.

How can I fix the Invalid Notebook Name error in OneNote?

Here are a few quick fixes that you can apply and possibly resolve the issue:

  • Restart OneNote and try saving the file again.
  • Remove any character or special symbol from the file name. The name should contain only letters and numbers.

Let us now go through the advanced solutions to resolve the problem.

1. Update OneNote

  1. Open the OneNote app on your desktop.
  2. Click on File.
  3. Select Account.
  4. Click on the Office Updates drop-down.
  5. Click Update Now.
  6. If a new version is available, install it.
  7. Restart your PC.

Updating OneNote to the latest version has resolved the Invalid Notebook Name error for several users. We would also suggest you try this solution first and hopefully fix the issue.

2. Repair OneNote installation

  1. Open the Run dialogue by pressing the Win + R keys.
  2. Type appwiz.cpl and hit OK.APPWIZ RUN COMMAND
  3. Select Microsoft Office and hit the Change button at the top.
  4. Hit the Repair button.
  5. The repair process will begin.
  6. Reboot your PC.
  7. Launch OneNote and check if this resolves the issue or not.

Chances are there are some underlying problems within OneNote that are causing the problem of the Invalid Notebook Name error. Simply use the repair program of Microsoft Office as it will help fix several issues including the one at hand.

3. Reset the OneNote app

  1. Press the Win + I keys to open the Settings menu.
  2. Click on Apps on the left pane.
  3. Select Installed apps.
  4. Locate the OneNote app.
  5. Click on the 3-dot menu icon for OneNote.
  6. Select Advanced options.
  7. Scroll down and select Reset.
  8. Restart your PC.

4. Clear the OneNote cache

  1. Launch OneNote.
  2. Click on the File tab at the top.
  3. Select Options.
  4. Open Save & Backup option.
  5. Note down the location of the Cache file location.
  6. Open File Explorer by pressing the Win + E keys.
  7. Navigate to the below path. C:\Users\AppData\Local\Microsoft\OneNote\16.0
  8. Select the Cache folder and delete it.
  9. Restart your PC.

Corrupt cache files can often cause the program to misbehave or malfunction. In such a case, we would suggest you clear the cache files of OneNote and check if this resolves the Invalid Notebook Name error or not.

5. Reinstall Microsoft Office

  1. Open the Run dialogue by pressing the Win + R keys.
  2. Type appwiz.cpl and hit OK.APPWIZ RUN COMMAND
  3. Select Microsoft Office and hit the Uninstall button at the top.
  4. Follow the on-screen steps to remove Microsoft Office from your PC.
  5. Re-install Microsoft Office on your PC.

If some important files related to OneNote go missing or corrupt, then you will face several issues including the Invalid Notebook Name error. If nothing works, then you should try reinstalling Microsoft Office and make sure the installation isn’t interrupted.

That is it from us in this guide. You can check out our guide that explains how you can change the layout in the OneNote app.

Also, several readers have reported coming across an error that they aren’t able to sign in to OneNote in Windows 10 and 11. You can fix this issue by applying the solutions in our guide.

Feel free to let us know in the comments below, which one of the above solutions fixed the Invalid Notebook Name error.

Xbox May update arrives this week with exciting new features

The Xbox May update will go live this week, bringing with it several new features to make the Xbox OS better than ever. Check out what’s new in this latest monthly Xbox update.

See Discord friend’s Xbox gamertags 

You will now be able to see your Discord friend’s Xbox gamertags on your console while connected to Discord Voice. That is, provided your Discord account is linked to Xbox.

Discord Asset

New sort and filter options on the Xbox Store

These new options on your Xbox console and Xbox.com allow you to sort and filter search results by price, subscriptions, supported languages, and accessibility features. Finding exactly what you’re looking for has never been easier.

Microsoft Store Asset

Firmware update for Xbox Wireless Controller

This update includes bug fixes to improve battery efficiency as well as improving connection stability when using headphones with 4K, 120Hz, and VRR enabled.

New Rewards tab makes it easier to find Game Pass Quests

Xbox Game Pass and Game Pass Ultimate subscribers can earn Microsoft Rewards points by completing Game Pass Quests. These quests are now easier to find thanks to the new Rewards tab implemented in the May Xbox Update.

Quests can also be found by bringing up the guide by pressing the Xbox button, selecting Profile & system, selecting your profile, then selecting My rewards. You’ll still need to head over to the Microsoft Rewards app to spend points.

Find out more about the Xbox May Update by heading over to the official Xbox support site.

No Usable Free Extent Could Be Found: How to Fix it

Some of our readers encountered the error message No usable free extent could be found when they tried to create a partition with Diskpart. This usually happens when you’re working with an MBR disk, an SD card, or a USB external drive but in this guide, we will help you fix the problem.

Why do I get the No usable free extent found error?

There are a few reasons why you can see the No usable free extent found error when creating a primary partition:

  • Insufficient disk space – If you don’t have sufficient disk space (usually on SD cards or external drives), you will see this error.
  • Unrecognized disk – Some MBR disks or external drives might not be recognized by the system, causing this error in return.
  • MBR issues – If the MBR already has some partitions, you might get the No usable free extent found error.

Now that we know the roots of this issue, let’s apply the solutions below to fix it.

How do I fix the No usable free extent found error?

Before getting into more complicated tweaking, let’s crosscheck some quick steps that might solve the problem easier:

  • Run Command Prompt with administrative privileges by searching for cmd in the Search bar and selecting Run as administrator from the results. Creating partitions requires full rights.
  • Make sure you have enough space on the drive for the new partition. Free some space first.

If none of these prerequisite measures solved the issue, let’s go to the actual solutions below.

1. Reinstall the USB driver

Note icon NOTE
This solution is only if you are creating a partition on an external USB drive.
  1. Right-click the Start button and select Device Manager from the list of options.
  2. Expand the Universal Serial Bus controllers section, right-click on your device, and select Uninstall device.
  3. Then, unplug the USB cable from your device and plug it back in.
  4. The system should recognize the external drive and install the proper driver. If not, you will have to visit the device’s manufacturer’s website and download the right driver for your system and install it manually.

You may also use a driver update software that does all that automatically using large and updated databases.

2. Set your partition as Logical

  1. Click the Search button, type diskpart, and choose Run as administrator from the results.
  2. Type the following commands one by one and press Enter after each one:
    • list disk
      select disk 1 (or the number of the disk you want to partition)
      create partition extended
      create partition logical
      format quick
      assign letter=F (make sure that the letter is not already used)
      exit

The error No usable free extent found may be due to the fact that the disk is in the MBR format and it already has 4 primary partitions, or 3 primary partitions and one extended partition.

That means you can’t create another new primary partition and setting a partition as Logical fixes this problem.

3. Convert the disk from MBR to GPT

Note icon NOTE
Make sure you back up all the important data on the drive because this solution will wipe all the files and partitions from it.
  1. Click the Search icon, type diskpart, and select Run as administrator from the results.
  2. Input the following command and press Enter: list disk
  3. Now, enter the following command (replace 1 with the correct disk): select disk 1
  4. Type clean and press Enter. This command will wipe all the files and partitions from the disk.
  5. Finally, input the following command and press Enter to run it: convert gpt
  6. After doing that, the selected hard drive will be converted from MBR to GPT.

For more information, you can read our guide on how to convert a drive from MBR to GPT.

So, these are the most efficient methods to fix the No usable free extent found error. We hope that our solutions helped you and you have created the partition.

Diskpart is a tool but we also recommend our list of the best partitioning apps that also have simple interfaces and are easier to use.

If you have any questions or suggestions, don’t hesitate to use the comments section below.

Windows 10 & 11 May Patch Tuesday [DIRECT DOWNLOAD LINKS]

Yes, you guessed it! The third round of the monthly Patch Tuesday updates of 2023 have arrived, and they bring an entire array of changes for both Windows 10 and Windows 11, regardless of whether it is a newer or an older version.

As we announced earlier today, the May 2023 Patch Tuesday updates are expected to fix some of the issues that were still pending, and in the article below we will be looking to see exactly what we get.

We’ve included detailed changelogs for each cumulative update, and we will also be providing you with direct download links from Microsoft’s Windows Update Catalog, so you know that they are secure.

Alternatively, you can always use other methods to get the latest updates, including:

  • The Windows Update menu on your OS
  • The WSUS (Windows Server Update Service)
  • Group Policies set up by your admins if you’re part of a larger network.

Changes included in the May Patch Tuesday Updates

Windows 11

As most of you know by now, Microsoft released its latest operating system, Windows 11, on the 5th of October, 2021.

Five months after the general rollout, the new OS seems to become increasingly stable and far less buggy than we’ve gotten used to.

You might also like to know that the 22H2 version of Windows 11, the operating system’s first major update, has already been declared feature complete.

It will, most likely, come in the first half of the year, so we might just get it until the summer. Of course, there is a possibility that the Redmond tech giant could postpone to the third, or fourth quarter.

Cumulative update name

KB5026368

Improvements and fixes

  • This update addresses a race condition in Windows Local Administrator Password Solution (LAPS). The Local Security Authority Subsystem Service (LSASS) might stop responding. This occurs when the system processes multiple local account operations at the same time. The access violation error code is 0xc0000005.

Known issues

  • After installing this or later updates, Windows devices with some third-party UI customization apps might not start up. These third-party apps might cause errors with explorer.exe that might repeat multiple times in a loop. The known affected third-party UI customization apps are ExplorerPatcher and StartAllBack. These types of apps often use unsupported methods to achieve their customization and as a result can have unintended results on your Windows device.

[DIRECT DOWNLOAD LINK]

Windows 10 versions 21H2, 21H1, and 20H2

Windows 10 v21H2 is the latest major version of Windows 10, and as such has the most experimental features on it.

Fortunately, most bugs that were first present when it was first made available have been weeded out, and this version of Windows 10 is far more stable.

Cumulative update name

KB5026361 

Improvements

  • This update addresses a race condition in Windows Local Administrator Password Solution (LAPS). The Local Security Authority Subsystem Service (LSASS) might stop responding. This occurs when the system processes multiple local account operations at the same time. The access violation error code is 0xc0000005.

Known issues

  • Devices with Windows installations created from custom offline media or custom ISO image might have Microsoft Edge Legacy removed by this update, but not automatically replaced by the new Microsoft Edge. This issue is only encountered when custom offline media or ISO images are created by slipstreaming this update into the image without having first installed the standalone servicing stack update (SSU) released March 29, 2021 or later.
Note icon NOTE
Devices that connect directly to Windows Update to receive updates are not affected. This includes devices using Windows Update for Business. Any device connecting to Windows Update should always receive the latest versions of the SSU and latest cumulative update (LCU) without any extra steps. 

[DIRECT DOWNLOAD LINK]

Windows 10, version 1809

This version of the OS is outdated and will no longer receive any updates from the tech company. Users that are still running this old version on their devices are strongly advised to choose a more recent one to update to.

If you still want to use Windows 10 and are not willing to upgrade to 11, you don’t have to do so right away. After all, Microsoft announced that the support for Windows 10 will go on until 2025.

Cumulative update name

KB5026362 

Improvements and fixes:

  • This update addresses an issue that affects conhost.exe. It stops responding.  
  • This update affects the Islamic Republic of Iran. The update supports the government’s daylight saving time change order from 2022.
  • The update addresses an issue that affects the Remote Procedure Call Service (RPCSS). A lock order inversion causes a deadlock in it.
  • This update addresses an issue that affects the Key Distribution Center (KDC) service. When the service stops on a local machine, signing in to all local Kerberos fails. The error is STATUS_NETLOGON_NOT_STARTED.
  • This update addresses an issue that affects accounts that run the Set-AdfsCertificate command. The command fails. This occurs when an account does not have read permissions for the related Distributed Key Manager (DKM) container.
  • This update addresses an Active Directory Federation Services (AD FS). You might need to retry authentication multiple times to sign in successfully.
  • This update addresses an issue that affects SMB Direct. Endpoints might not be available on systems that use multi-byte character sets.
  • This update addresses an issue that might affect the Windows Local Administrator Password Solution (LAPS). It might fail. This occurs on versions of Windows Server 2019 that run Server Core. The error is 0x8007007f.
  • This update addresses an issue that affects apps that use DirectX on older Intel graphics drivers. You might receive an error from apphelp.dll.
  • This update addresses a race condition in Windows LAPS. The Local Security Authority Subsystem Service (LSASS) might stop responding. This occurs when the system processes multiple local account operations at the same time. The access violation error code is 0xc0000005.
  • This update addresses an issue that affects the legacy Local Administrator Password Solution (LAPS) and the new Windows LAPS feature. They fail to manage the configured local account password. This occurs when you install the legacy LAPS .msi file after you have installed the April 11, 2023, Windows update on machines that have a legacy LAPS policy. 

Known issues

  • After installing KB5001342 or later, the Cluster Service might fail to start because a Cluster Network Driver is not found.
  • After installing updates released January 10, 2023, and later, kiosk device profiles that have auto log on enabled might not sign in automatically. After Autopilot completes provisioning, affected devices will stay on the sign-in screen prompting for credentials.

[DIRECT DOWNLOAD LINK]

Windows 10, version 1607

Windows 10, version 1607 has reached the end of service for all of its available editions. Update to the latest version of Windows 10 in order to keep your system protected.

Cumulative update name

KB5026363 

Improvements and fixes

  • This update affects the Islamic Republic of Iran. The update supports the government’s daylight saving time change order from 2022.
  • This update addresses an issue that affects the Key Distribution Center (KDC) service. When the service stops on a local machine, signing in to all local Kerberos fails. The error is STATUS_NETLOGON_NOT_STARTED.
  • This update addresses an issue that affects Microsoft Edge IE mode. The issue stops you from configuring add-ons.

[DIRECT DOWNLOAD LINK]

Windows 8.1

Although considered obsolete, there are still many users that choose to stick with good old Windows 8.1, for different reasons.

Due to this, Microsoft has continued to provide security updates for this old version of the operating system.

During this Patch Tuesday rollout, the Redmond-based tech giant did not forget about the OS and has released yet another security patch.

Cumulative update name

KB5026415 

Improvements and fixes

  • By order of the Islamic Republic of Iran on September 22, 2022, daylight saving time (DST) will no longer be observed and the republic will remain on Iran Standard Time UTC+03:30.
  • Local Kerberos authentication fails if the local Key Distribution Center (KDC) service is stopped. Additionally, all local Kerberos logons fail with the error STATUS_NETLOGON_NOT_STARTED.
  • After the Windows Monthly Rollup dated on or after November 8, 2022, is installed, Kerberos constrained delegation (KCD) fails with the error message KRB_AP_ERR_MODIFIED on Read/Write Domain Controllers.

[DIRECT DOWNLOAD LINNK]

Windows 7 SP1

Maybe some of you might have forgotten about the veteran on this list, but Microsoft sure hasn’t done so, at least yet.

There are still too many users on this old operating system for the company to simply put it in the back of its head and pay it no attention.

And yes, the May 2022 Patch Tuesday rollout brings another security update for Windows 7 SP1. Let’s see what this is all about.

Cumulative update name

KB5026413 

Changes and improvements

  • By order of the Islamic Republic of Iran on September 22, 2022, daylight saving time (DST) will no longer be observed and the republic will remain on Iran Standard Time UTC+03:30.
  • After the Windows Monthly Rollup dated on or after November 8, 2022, is installed, Kerberos constrained delegation (KCD) fails with the error message KRB_AP_ERR_MODIFIED on Read/Write Domain Controllers.

Known issues

  • After installing this update and restarting your device, you might receive the error, “Failure to configure Windows updates. Reverting Changes. Do not turn off your computer”, and the update might show as Failed in Update History.

[DIRECT DOWNLOAD LINK]

This wraps up our brief overview of this month’s Patch Tuesday updates, and we hope that by reading the changelogs above, you will make a more informed decision regarding whether to update or not.

However, keep in mind that if you choose not to update for too long, you will risk exposing yourself to subsequent malware attacks that usually follow the Patch Tuesday updates, called Exploit Wednesday.

On that note, if you do prefer to wait out until Microsoft fixes the issues detected in this month’s updates, know that you can always choose to delay the Update notification that you get for up to 35 days.

All in all, it is important to remember that the Patch Tuesday updates are released for a reason, so installing them, eventually, is something that you should do.

Have you already downloaded the security updates for your version of the Windows operating system? Let us know in the comments section below.