Windows 11 Sleep Mode Not Working? 6 Ways to Fix it

Sleep Mode is one of the most valuable features of the Windows 11 operating system. It puts your device in a low-power state and lets you get back exactly where you left off.

It’s a great way to save on electricity without turning off your system and avoids the hassle of having to open all of your apps again.

It’s best used when you’re away from your computer for a short while. The Sleep mode, like hibernation, ensures that your power supply unit doesn’t overheat from extended use.

Users have reported that sleep mode is not working on their Windows 11 devices.

In this guide, we will show you the best ways to fix issues with this superb feature on Windows 11.

Why does my Windows 11 not sleep?

If Windows 11 is not entering Sleep, it might be because of outdated display drivers. You can fix this by updating them manually or with a dedicated tool.

Wrong power settings can also cause this issue. You only need to adjust it here, and things should be back to normal.

What are the differences between Sleep and Hibernation mode?

Windows 11 also has a hibernation mode that is similar to Sleep mode but has a distinct difference.

Whereas Sleep mode puts a computer in a low power state, hibernation mode has the computer take in a minimal amount of power while saving all the current settings on the hard drive. After that, it enters a state of being almost entirely off.
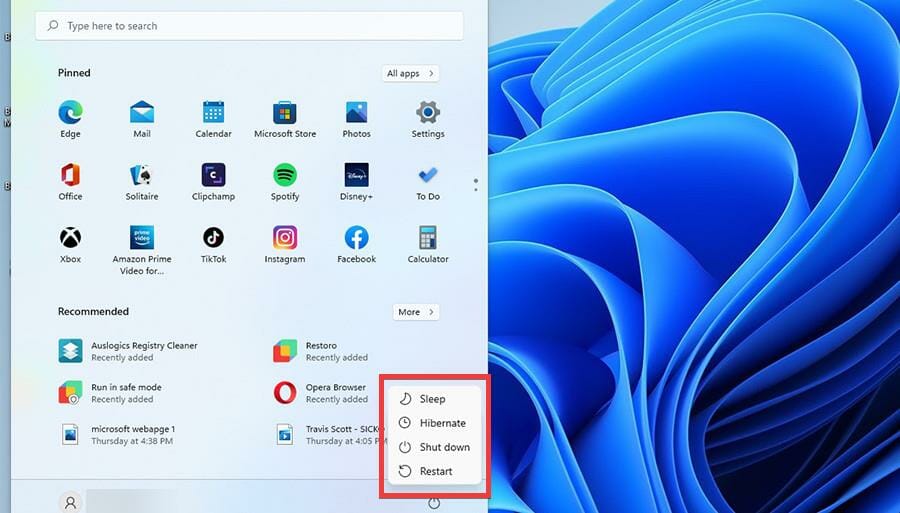
Hibernation mode takes a bit longer to turn on when the computer exits this state. You use this mode when you aren’t using your laptop for an extended period but don’t want to lose anything.

Check our excellent guide for a more detailed comparison between hibernation and Sleep mode.

How to fix Sleep Mode not working on Windows 11?

1. Set Sleep mode time manually

  1. Open the Windows Start menu by clicking the Start menu icon in the taskbar.
  2. Search for the Settings icon and click on it.
  3. Click on the System tab.
  4. In the System section, scroll down to the Power tab.
  5. In the next window, click on the Screen and sleep option.
  6. Customize the specific time the computer will be put to sleep.
  7. After the time has been set, close the window.

If the Sleep mode is not working automatically on Windows 11, it might be because the time settings are too long. By setting the timer yourself, you should be able to fix the issue.

2. Edit power plan settings

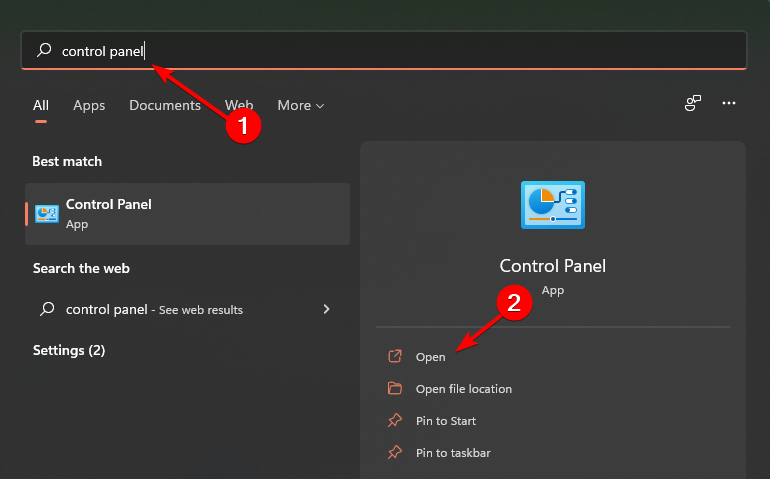
  1. Click on the magnifying glass icon on the taskbar to bring up the search bar.
  2. Type Control Panel in the search bar.
  3. Open the first entry you see.
  4. In the Control Panel window, click the Hardware and Sound option.
  5. On the next window, locate and click Power Options.
  6. On the left-hand side, select Change when the computer sleeps.
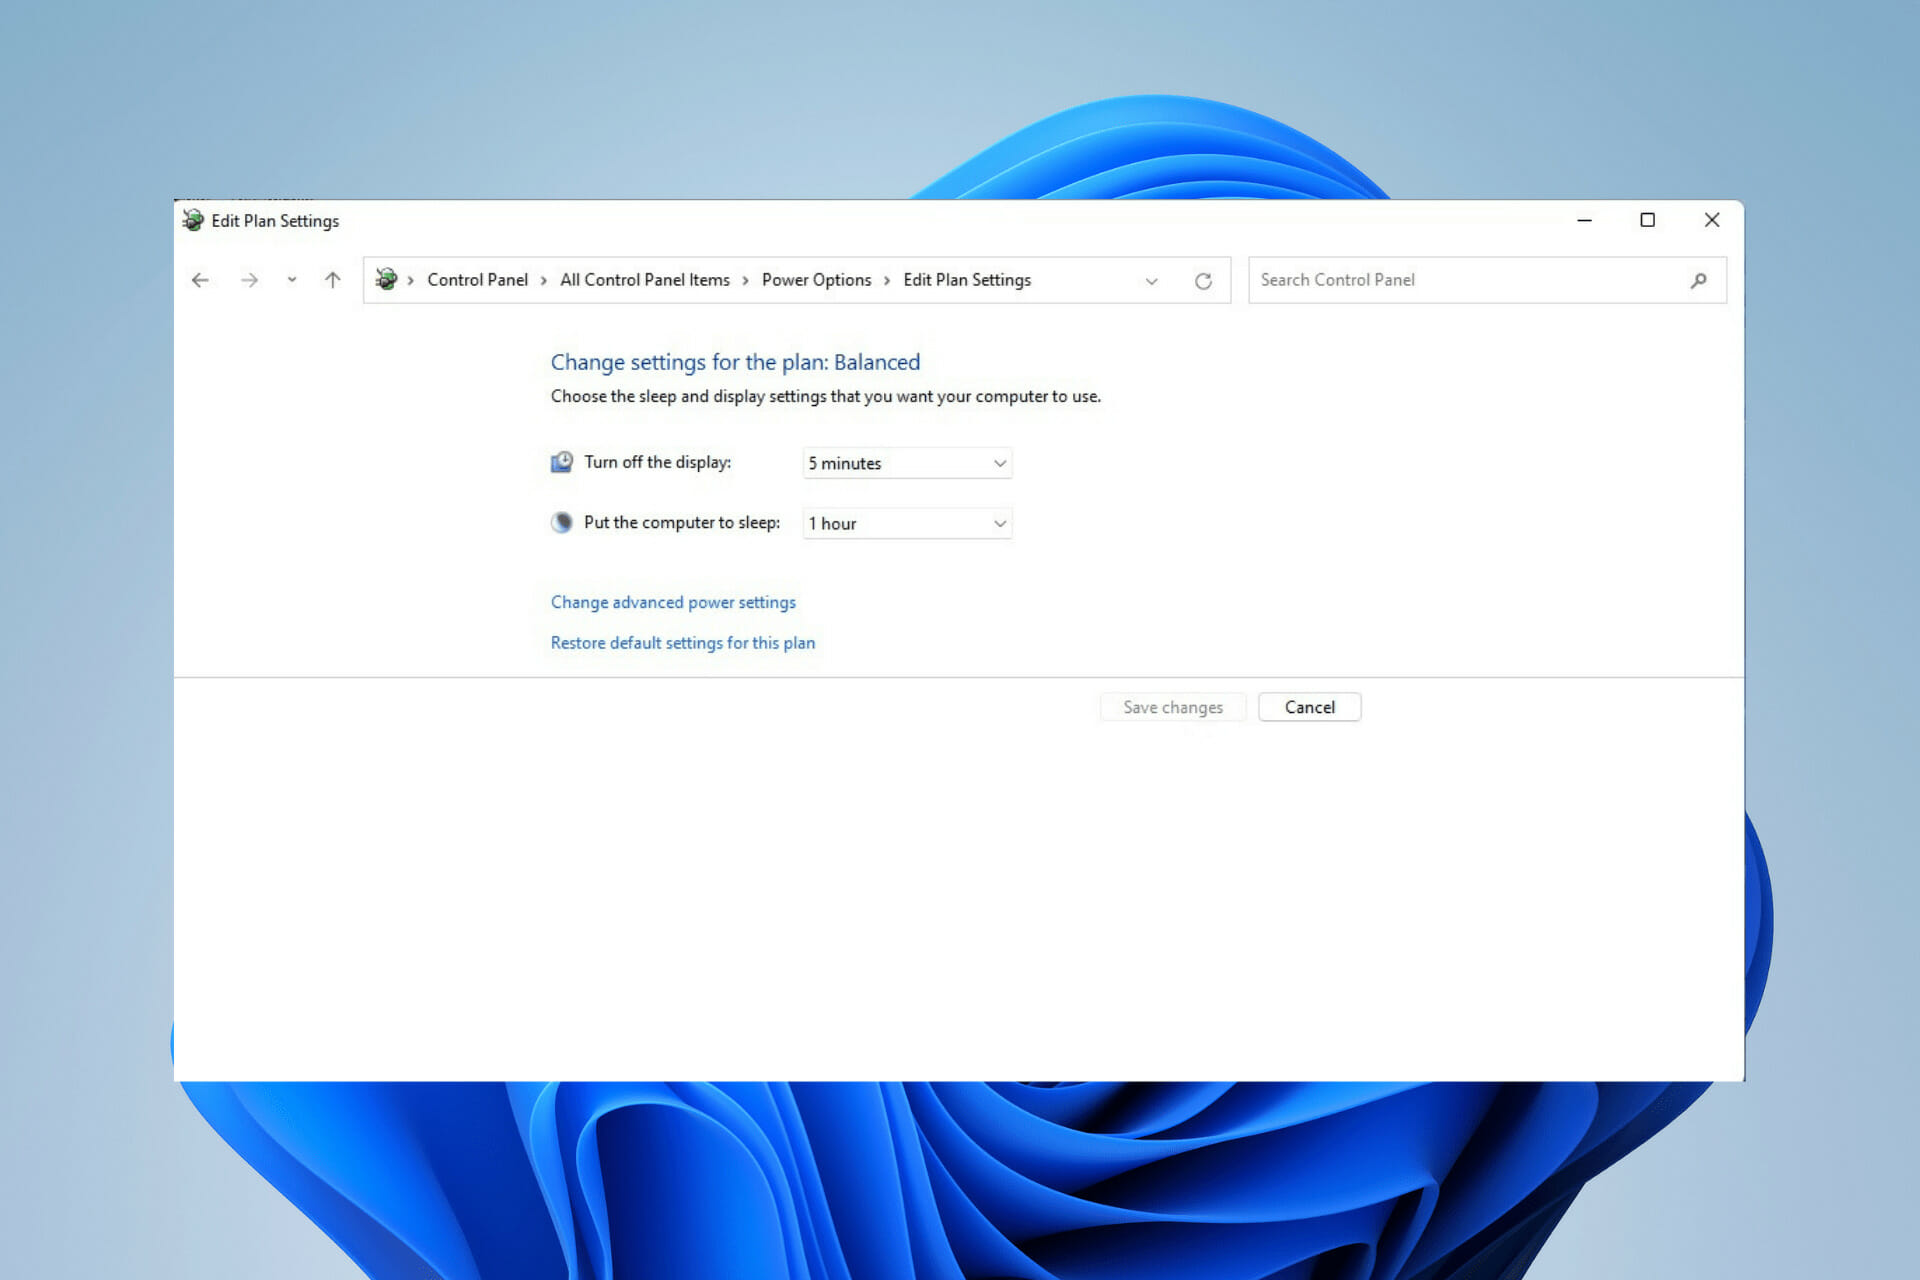
  7. Configure the settings to the desired time the computer will go to Sleep. As seen in this example, the display will turn off after 5 minutes, and the computer will sleep for 10 minutes.

If the processor fans are still running after activating the Sleep mode on Windows 11, it might be down to your power settings. This fix should restore normalcy in this case.

3. Update display driver

3.1. Update driver manually

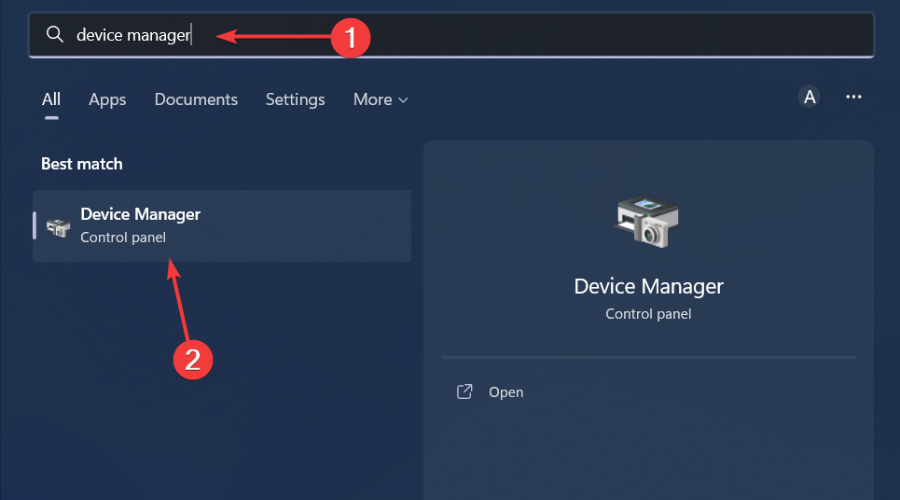
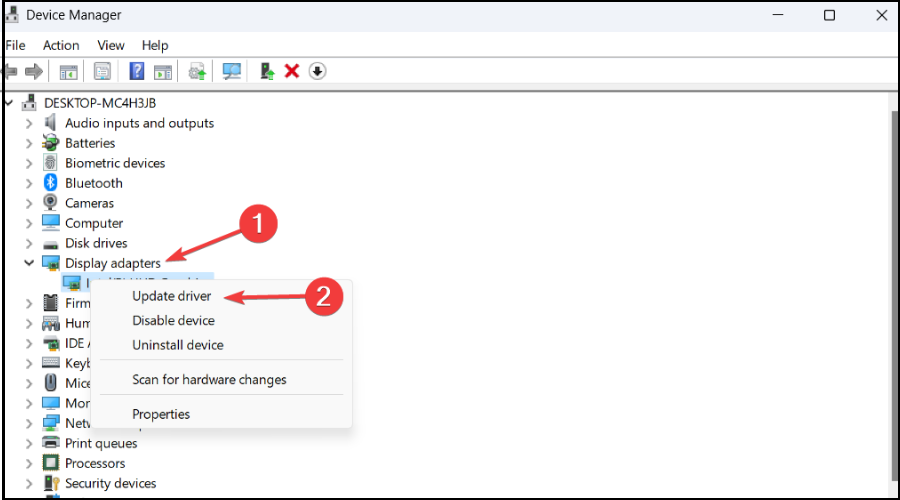
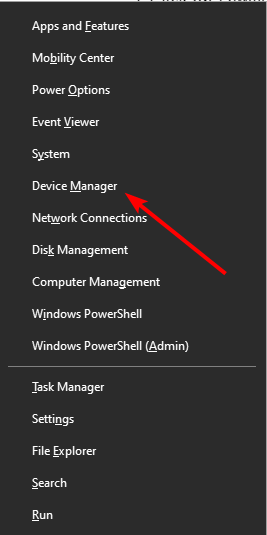
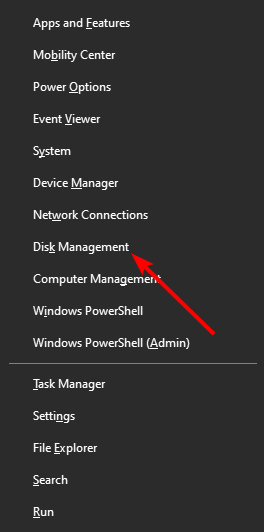
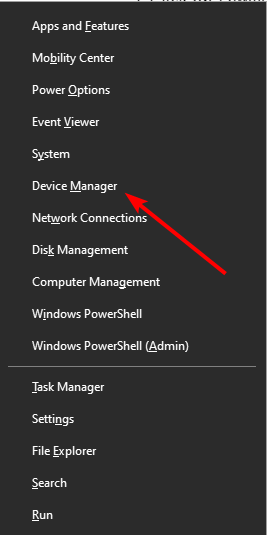
  1. Press the Windows key + X and select Device Manager.
    device manager windows 11 sleep mode not working
  2. Double-click on the Display adapters option to expand it.
    display adapter windows 11 sleep mode not working
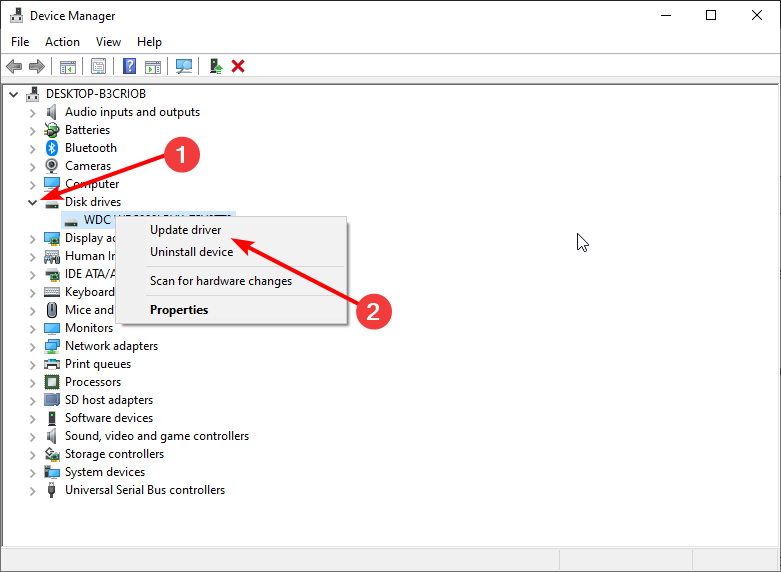
  3. Right-click on each of the drivers there and select Update driver.
    update driver  windows 11 sleep mode not working
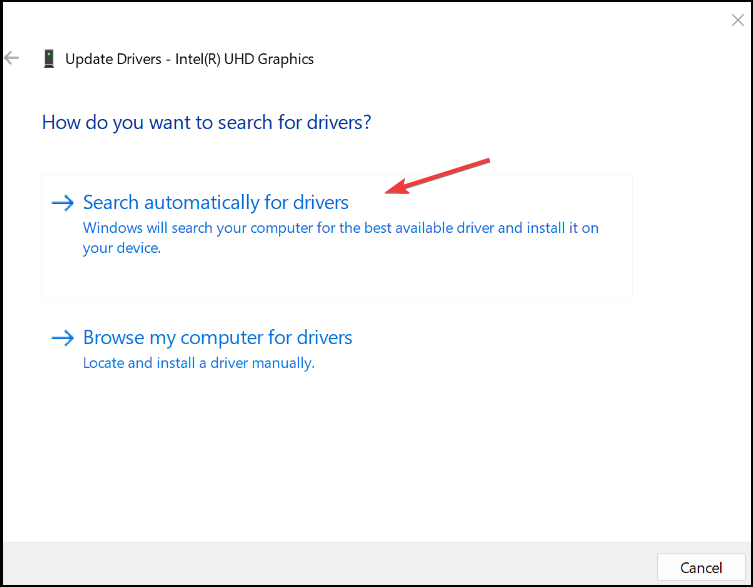
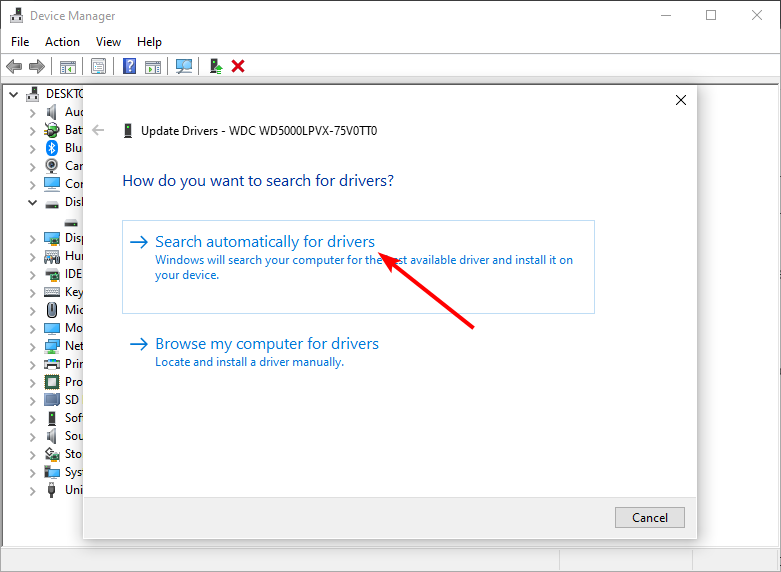
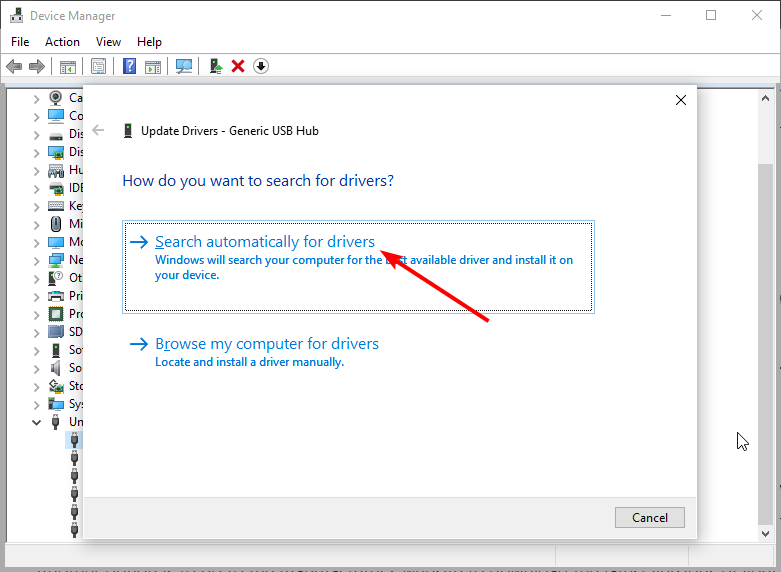
  4. Choose Search automatically for drivers.
    search windows 11 sleep mode not working
  5. This will scan and show any available updates.

After updating your drivers, check if the Windows 11 Sleep mode is still not working.

3.2. Use a driver updater

The Sleep mode not working on Windows 11 issue may appear due to outdated display drivers on your PC.

To resolve power state issues, update graphics drivers with their latest versions. You can perform this action using Control Panel and search for available drivers in your system.

Yet, this process will eat a significant amount of time. But thankfully, you have dedicated software named Outbyte Driver Updater that can update old or broken drivers immediately.

This tool will scan your system for outdated drivers in seconds and find the official drivers from its extensive online database.

Outbyte Driver Updater

Scan and update all your drivers automatically with this excellent software for the health of your PC.
Free Trial Download now

4. Disable hybrid mode

  1. It would help if you first made sure hibernation mode was on. Then, click on the magnifying glass icon on the taskbar to bring up the search bar.
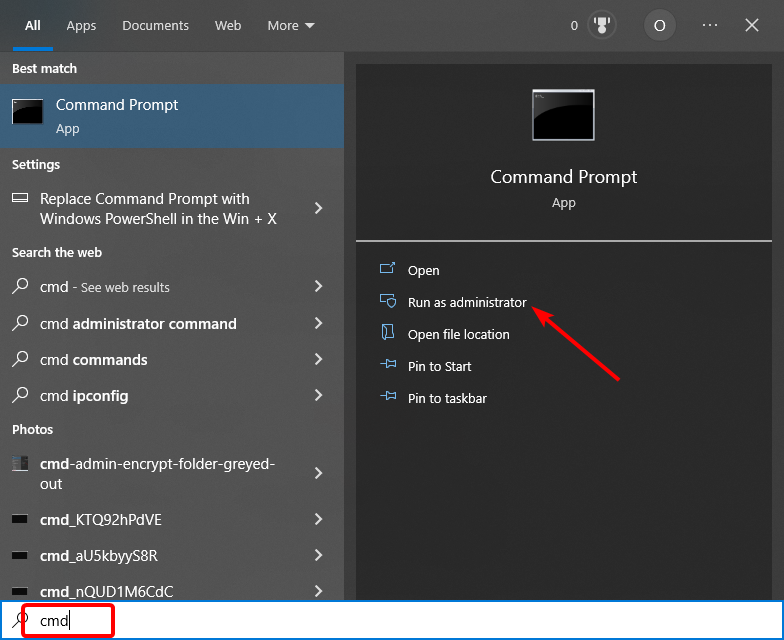
  2. In the search bar, type in cmd to bring up the Command Prompt.
  3. Click Run as administrator.
  4. Type the following command and press Enter: powercfg /hibernate on
  5. Restart your computer.
  6. After restarting, click on the magnifying glass icon again.
  7. Type Control Panel and open the first entry.
  8. Click on the Hardware and Sound option.
  9. Click on the Power Options.
  10. Locate the Preferred plans section in the middle of the screen.
  11. Click on Change plan settings next to Balanced (recommended).
  12. In the next window, click Change advanced power settings.
  13. A small window will appear. Locate the Sleep option.
  14. Tap on the (+) plus icon next to Sleep to expand the set of options.
  15. Click on Allow Hybrid Sleep to bring another drop-down menu.
  16. Click Settings and turn off Hybrid mode.
  17. Afterward, move to Multimedia Settings and click on the (+) plus icon next to the entry.
  18. Click on When sharing media.
  19. Click on Prevent idling to Sleep next to Setting.
  20. Select Allow the computer to sleep in the drop-down menu.
  21. Locate PCI Express and click on the (+) plus icon to bring up the drop-down menu.
  22. Click the (+) plus sign next to Link State Power Management.
  23. Next to Setting, click on the drop-down menu and turn it Off.
  24. Once it’s off, hit Apply, then OK.

The Hybrid mode might be why the sleep mode is not working on Windows 11. While this feature is good, combining Sleep and hibernation can affect sleep mode.

5. Disable wake timers

  1. Click on the magnifying glass icon on the taskbar to open up the search bar.
  2. Type in Control Panel and click on the first entry.
  3. Click on Hardware and Sound.
  4. In this new window, click Power Options.
  5. Next to the Balanced (recommended) plan, click Change plan settings.
  6. Click Change advanced setting.
  7. Locate Sleep in these new windows and tap the plus (+) icon next to it.
  8. Click Allow wake timer and tap on Setting to bring up a drop-down menu.
  9. In this new menu, select Disable.

6. Deactivate fast startup

  1. Click on the magnifying glass icon on the taskbar to bring up the search bar.
  2. Search for Control Panel and open the first entry you see.
  3. In the Control Panel, click Hardware and Sound.
  4. Click Power Options.
  5. Click Choose what the power button does in the upper left-hand corner.
  6. In the next window, click Change settings that are currently unavailable.
  7. Click Turn on fast startup to turn it off and disable the function.

How do I force Sleep in Windows 11?

If your Windows 11 PC is not entering the Sleep mode automatically, you can enable it to sleep with the power button or the keyboard shortcut.

You can make Windows 11 sleep with the Alt + F4 shortcut or the Windows + X via the power user settings. Also, you can force it to Sleep by pressing the power button once.

Issues with the sleep mode on Windows 11 can be frustrating, as it takes away a significant power and time-saving feature. But with the fixes in this guide, you should be able to solve the problem effectively.

Are you having other issues like Black Screen After Sleep on Windows 10 and 11? Then, check our guide for the quick ways to fix it quickly.

Feel free to let us know if this guide’s solutions helped you fix the Windows 11 sleep mode not working issue in the comments below.

REDIRECTED – DELETE IN NOVEMBER Ghana Vs Uruguay

Uruguay robbed Ghana of entering the semi-finals in the 2010 World Cup by winning the penalty shoot-out. These two teams will yet again play head-to-head in the 2022 FIFA World Cup.

The match will be held in the AI Wakrah Sports Club, Qatar on 2nd December 2022 at 17:00 UTC. There will be so much tension among spectators as everyone would want their favorite team to win.

We don’t want you to miss out on seeing these teams tackle their way to the next stage that’s why this article shows you how you can watch Ghana vs Uruguay live.

What channels stream Ghana vs Uruguay?

There are a lot of stations that broadcast FIFA 2022 matches. Below are the official partners for each team’s country:

Ghana:

  • SuperSport International
  • New World TV (free to air)
  • Ghana Broadcasting Corporation

Uruguay:

  • New IP Co., LLP
  • TyC International B.V
  • DirecTV Latin America
  • Monte Carlo TV (Canal 4 TV)
  • SAETE 
  • Teledoce
  • Antel (only mobile)

Radio stations are not left out as they will participate in sharing the World Cup updates with those without access to TVs and the internet.

We also found an online service that streams it for free. Learn below how to access it.

How to watch Ghana vs Uruguay for free?

RTVE is a government-owned TV company in Spain that broadcasts through all media, from radio to online platforms. This company with the help of several supporters will air the 2022 World Cup for free.

However, the only option for non-residents of Spain to watch the match remotely on RTVE is with a VPN.

That is because the platform is geo-locked, and normally only available to people that connect from Spain.

Follow the instructions below to watch football matches on RTVE for free:

  1. Sign up for an ExpressVPN subscription. We picked this service because it has unlimited bandwidth, it’s fast, and has high-quality servers in Spain.

  1. Download and install the VPN on your device.

  1. Log in with either your activation code or email.
  1. Connect to a Spanish server. ExpressVPN has options for Madrid and Barcelona.
  1. Open RTVE in your web browser and watch Ghana vs Uruguay.watch ghana vs uruguay live on rtve

Not only does it camouflage your true identity, but it also blocks trackers from detecting your presence.

Additionally, VPN blocks your ISP from throttling your internet by masking your IP address. So you’ll be able to enjoy seamless streaming, without limits.

ExpressVPN offers unlimited bandwidth so there really isn’t much to worry about in that regard.

It has 3000+ servers in 94 countries, with a decent number located in Spain. Besides unlocking RTVE to watch Ghana vs Uruguay, you can use it to change your location and access geo-locked content worldwide.

With the DNS leak protection in this VPN, you can rest assured that your information is safe. Its encryption and an automatic kill switch further add to this, making sure you remain untraceable.

The 2022 FIFA world cup team made provision for viewers to watch from different devices. So, whether you are using a TV or mobile phone, ExpressVPN supports them. The VPN secures up to five devices at once.

ExpressVPN

Don’t miss out on the Ghana vs Uruguay match and watch it live with the help of ExpressVPN!
Check price Visit website

Conclusion

The World Cup 2022 is going to kick off this winter.

We hope you are in for the thrill. Follow our guide to easily watch Ghana vs Uruguay as it unfolds in December.

You know at this point that you don’t have to be limited to the channels that broadcast in your particular country. With a VPN, you get the freedom to access geo-locked platforms from anywhere.

Use the comment section to ask any further questions and let us know how your watching experience went if you decided to use this method.

Computer Reboots or Shuts Down When I Print: How to Fix It

Using external devices like printers with your PC shouldn’t cause issues with your computer. However, it is common for users to complain about computer rebooting when they print.

Likewise, the problem can also appear as the printer not printing on Windows 10/11 for some reason.

Why does my computer reboot when I print?

Many factors may be responsible for the computer rebooting or shutting down when you want to print. The common culprit is a corrupt or outdated printer driver on your computer. The corrupt driver can cause your PC to crash whenever it tries to access it.

Other factors that are liable to cause your PC to reboot or shutdown when you print are:

  • Issues with Windows update – Windows users have complained about issues with updating Windows OS on their PC. It can cause problems with your system and the devices connected to it, including the printer. Hence, it results in the PC crashing or rebooting.
  • Hardware issues – There is no doubt that numerous problems can erupt from a faulty printer or a bad hardware connection. When the printer is not intact, it can cause it to malfunction. Also, if the printer is not correctly connected to your computer, it can cause problems.
  • Virus or malware infection – The computer can reboot or shut down when printing if a bug or virus infects it. It will impede its operation with other devices and cause it to rebel, resulting in a crash. Check out our recommended list of the best anti-malware to combat it.
  • Printer Firmware issues – When the printer’s firmware is outdated or corrupt, it will impede its activities with your PC and can cause problems.

These causes may vary on different devices, but you can fix them by troubleshooting your computer and printer.

What can I do if my computer reboots when I print?

Before proceeding with any advanced troubleshooting process, go through the following preliminary checks:

  • Restart the printer.
  • Reconnect the printer to the computer.
  • Disconnect other external devices connected to your PC.
  • Restart Windows in Safe Mode and check if it resolves the problem:

If the problem continues, try the solutions below:

1. Uninstall the Windows Updates

  1. Left-click the Start button, type control panel, and open it.
  2. Go to Programs and select Programs and features.
  3. Click the View installed updates option.
  4. Find KB4524147, right-click on it, and click Uninstall from the drop-down.
  5. Restart your PC and check if it resolves the problem.

You can uninstall other updates if the first one doesn’t. Uninstalling specific updates can fix the problem and prevent your computer from rebooting when printing.

You can check the Windows updates to download for fixing printer issues on your PC.

2. Run the Printer Troubleshooter

  1. Press Windows + S, type Troubleshoot settings, and open it.
  2. Click Other troubleshooters.
  3. Click the Run button against the Printer to run the troubleshooter.
  4. Select the printer to troubleshoot and click Next.

The troubleshooter will find and repair issues that may cause printer errors to occur on the computer.

3. Update the Printer driver

  1. Press Windows + R key to launch the Run window, and type devmgmt.msc, then click Device Manager.
  2. Double-click on Print queues from the devices list, right-click each driver and click the Update driver option.
  3. Click Search automatically for drivers.

Windows will automatically download and install updates if any are available. For example, updating the printer drivers on your PC can fix it if it’s corrupt or outdated.

Check other ways to update drivers on Windows 11 if you cannot use the above steps.

One of the easiest ways to update your printer driver is by letting a third-party software, for example, Outbyte Driver Updater, do this procedure automatically.

This tool helps you run a quick scan of your computer to detect outdated or missing drivers, and then automatically find the latest updates for them so your device performance can be significantly improved.

Outbyte Driver Updater

Find the best updates for your drivers and enjoy smoother PC activity with Outbyte Driver Updater.
Free Trial Download now

4. Update the printer’s Firmware

Updating firmware for a device like a printer differs in procedures. However, it depends solely on the manufacturer of your printer.

Furthermore, every printer has a program that helps you manage its activities, and you can update the firmware. Likewise, you can contact your manufacturer directly for assistance.

5. Set the Print Spooler Service Startup Type to Automatic

  1. Press Windows + R key to launch the Run window and type services.msc, then click OK to open the Services window.
  2. Right-click on the Print Spooler service and select Properties.
  3. On the prompt, click the drop-down button for Startup type and select Automatic.
  4. Click Apply and OK to save the changes.

Setting the Printer Spooler to Automatic can help it print jobs smoothly and fix problems that may cause the system to crash.

Alternatively, our readers can check what to do if Windows 10/11 can’t find the printer on the network.

Likewise, users experiencing issues with printers accepting cartridges can read our article on fixing the problem.

If you have more questions or suggestions about this guide, do not hesitate to use the comments section.

Steering Wheel Deals [Pc, Xbox, Racing]

Although the quality of sim racing equipment might vary greatly, if you don’t want to take out a mortgage only to go racing, the cost is likely to be an essential consideration for you.

First and foremost, you’ll want to look for a wheel that has a feature known as force feedback in order to get the most out of it.

It is force feedback that puts the sim in simulation racing, as it models the way a genuine steering wheel would react in a real situation.

Aside from that, the wheel is little more than a glorified Xbox controller. The good news is that there are numerous alternatives available that are suitable for almost any budget. If you like the sound of it, do not hesitate to check out some great offers below.

Note: All the prices and offers in this article are subject to change, so be sure to check the official product page to get the latest deal. If the product or offer you’re looking for is no longer available, you can try to find it on its official manufacturer page or get another one from our list.

What are the best Black Friday racing wheel deals?

All these items have special prices.

It not only helps you become more immersed in the activity, but it also delivers a better, more accurate range of motion that seems more true to the situation. It is your hands that have complete control rather than just a single finger or thumb.

As previously said, a wheel provides gamers with greater control over their gaming experience. There are some obvious advantages to this, such as having both hands free to solely steer and not having to worry about any acceleration or braking, among other benefits.

Beyond the previously mentioned issue of your thumbs frequently failing you in critical situations, what else does the wheel have to offer that a pad might not have?

The manner in which the wheels turn is also highly essential. Often, gamepads have a relatively narrow degree of turning, causing players to frequently over or under-turn because a slight difference in where the joypad is pointing can have a significant impact on the outcome.

The amount of rotation available with wheels, on the other hand, is significantly more.

If you’ve made the decision to purchase a new steering wheel for your computer, here are the ten best racing games for Windows 10 that you can play with your new product.

Let us know which option you bought as well as how you like the new addition to your life.

5 Best Razer Laptops For Gaming [2026 Guide]

Razer is a well-known brand recognized for its gaming devices, including mice, keyboards, controllers, and, of course, PCs and laptops.

Here, we’re going to bring you the best Razer gaming laptops on the market this year and we’re going to discuss their best features.

The Razer laptops are famous for pushing the limits of their configurations so stay put and check your budget because one thing we’re certain of, they’re not cheap!

Note: All the prices and offers in this article are subject to change, so be sure to check the official product page to get the latest deal. If the product or offer you’re looking for is no longer available, you can try to find it on its official manufacturer page or get another one from our list.

What is the best Razer laptop on sale right now?

Razer Blade 15 Advanced Gaming Laptop

  • Intel Core i7 10875H 8-Core processor
  • NVIDIA GeForce RTX 3080 graphics card
  • 32GB RAM, 1TB SSD
  • THX Spatial Audio
  • Thunderbolt 3 connector
  • High price

Check out the latest and the greatest laptop from Razer’s gaming world, the Razer Blade 15 Advanced Gaming Laptop.

It will run the latest gaming title with ease thanks to its NVIDIA GeForce RTX 3080 graphics card and 32 GB of RAM.

The THX Spatial Audio technology will ensure a maximum boost in the sound department while the 1 TB SSD will provide plenty of space and access speed.

If you want a big image, the only possible downsides come from the screen, which is only 15 inches and, of course, there is also the slightly prohibitive price.

Razer Blade Pro 17 Gaming Laptop

  • Intel Core i7-10875H 8-Core processor
  • NVIDIA GeForce RTX 3060
  • 17.3-inch screen with QHD resolution and 165Hz refresh rate
  • 16GB RAM, 512GB SSD
  • Possible screen freezes

If you’re looking for a bigger screen real estate, you can bet on Razer Blade Pro 17 Gaming Laptop. It’s the bigger screen counterpart of its brother above with a few differences.

It comes with the same Intel i7 8-Core processor and the same NVIDIA GeForce RTX 3060 graphics card but it has half the RAM (16 GB) and the SSD space (512 GB).

Of course, the awesome QHD screen with the 165 Hz refresh rate and the 17.3-inch screen can make up for everything. It even has a lower price so you should definitely check it out.

Razer Blade 15 Base Gaming Laptop

  • 10th generation Intel Core i7-10750H processor
  • GeForce GTX 1660 Ti graphics
  • Chroma RGB Lighting
  • Windows 10 preinstalled
  • Plastic body

Nobody says that it’s necessary to have a CNC-body top-of-the-line model. You can go with a classic model like the Razer Blade 15 Base model.

But the 15.6-inch model is not bad at all. It comes with 16 GB of RAM, and a GeForce GTX 1660 Ti graphics card with 6GB of GDDR6 memory.

So, you will still be able to run the latest games and the preinstalled Windows 10 will allow you to do that out of the box.

You should also enjoy the RGB backlit keyboard and the great, 15.6-inch Full HD screen with a 120Hz refresh rate.

Razer Blade 15 Advanced Gaming Laptop

  • Intel Core i7-10875H 8-Core processor
  • NVIDIA GeForce RTX 2080 Super Max-Q graphics card
  • 15.6-inch FHD screen with 300Hz refresh rate
  • 16GB RAM, 1TB SSD
  • CNC Aluminum body
  • Model from 2020

Yes, the Razer Blade 15 Advanced Gaming Laptop 2020 is still available and in great demand. And even if it’s an older model, it still delivers a great punch.

And that is thanks to the NVIDIA GeForce RTX 2080 Super Max-Q graphics card and the 10th generation Intel Core i7-10875H processor.

And the 15.6-inch screen with the 300 Hz refresh rate will definitely leave you speechless in any of the latest games.

The only aspect that you could improve would be 16 GB of RAM but you can upgrade that pretty easily.

Razer Blade Stealth 13 Ultrabook Gaming Laptop

  • Intel Core i7-1165G7 4-Core processor
  • NVIDIA GeForce GTX 1650 Ti Max-Q
  • 16GB RAM, 512GB SSD
  • CNC Aluminum body
  • Small, 13-inch screen

You can go bigger, or you can definitely go for more portability. And if you’re looking for a powerful but small gaming tool, you can try the Razer Blade Stealth 13 Ultrabook Gaming Laptop.

It’s got a small, 13.3-inch screen with a Full HD resolution but in the CNC sculpted body, there’s a bevy of brute force.

We’re talking about an Intel Core i7-1165G7 4-Core processor and an NVIDIA GeForce GTX 1650 Ti Max-Q graphics card that needs no presentation.

It will run all the latest games with 16 GB of RAM from its fast access, and 512 GB SSD so get your game on the move right now.

That’s it! We hope you found your weapon of choice when it comes to the best Razer gaming laptop for this year.

If you’re not a hardcore Razer fan, you can also take a look at our selection of the best gaming laptop deals to get today.

What model did you choose? If you also have other preferences, you can lay them down in a comment from the dedicated section below.

Windows Subsystem for Linux drops preview tag, now on both Windows 10 and Windows 11 via Microsoft Store

Microsoft first introduced Windows Subsystem for Linux way back in 2016 but it’s come a long way since then, and now today, WSL on the Microsoft Store is dropping its preview tag and is now available on both Windows 10 and Windows 11.

The subsystem allows Windows users to run Linux apps directly on Windows without having to dual boot. There are two big announcements coming with this latest release: first, Windows 10 users will now be able to run Linux GUI apps, and the Microsoft Store version of WSL is now the default installation, meaning that running wsl –install will now install the Store version of WSL instead of the option Windows “Windows Subsystem for Linux” component available in “Turn Windows Features On or Off.”

  • wsl.exe --install will now automatically install the Store version of WSL, and will no longer enable the “Windows Subsystem for Linux” optional component, or install the WSL kernel or WSLg MSI packages as they are no longer needed (The Virtual machine platform optional component will still be enabled, and by default Ubuntu will still be installed).

If you previously had WSL installed using the Windows components, you can update to the Store version by running wsl –update from a command prompt, and you can check which version you’re on by running wsl –version (this will fail if you’re on the Windows Component version, now known as “–inbox.”)

You can learn more about this latest version of WSL over at the Windows Command Line blog.

Num Lock Won’t Stay on: How to Fix It in 6 Ways

When the Num Lock key won’t stay on, it’s usually caused by Windows’ Fast Startup feature.

Other common causes included outdated Windows versions, and external device interference (such as keyboards), and misconfigurations in the BIOS.

Following the steps below you should be able to fix this Num Lock issue in just a few minutes.

What can I do if the Num Lock won’t stay on?

First, try to disconnect any external devices and restart your PC in safe mode. If NumLock is still not staying on, follow the advanced troubleshooting steps below.

1. Disable fast startup

  1. Right-click the Start button, type the control panel and launch it.
  2. Select Hardware and Sound, then click Power Options.
  3. Click on Choose what the power buttons does.
  4. Select Change settings that are currently unavailable.
  5. Uncheck the Turn on fast startup option and click Save Changes.
  6. Restart your PC to sync the changes correctly and check if the problem persists.

Disabling Fast startup allows Windows to start its components properly before starting up.

2. Update Windows OS

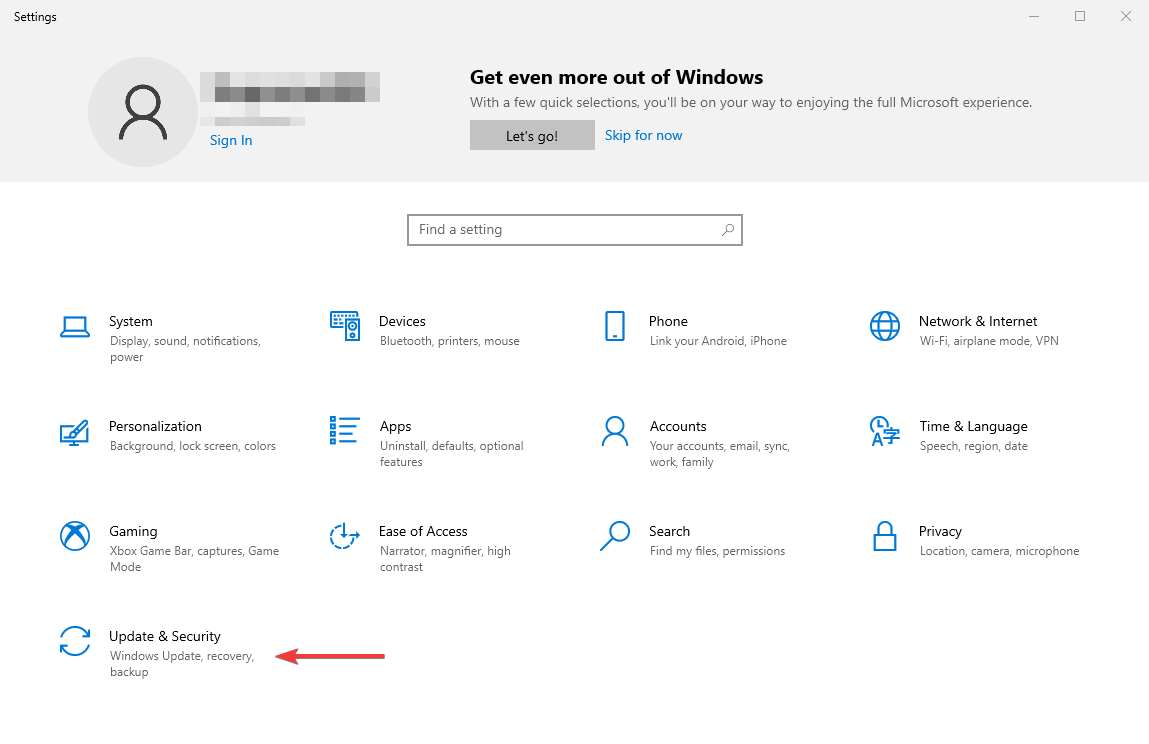
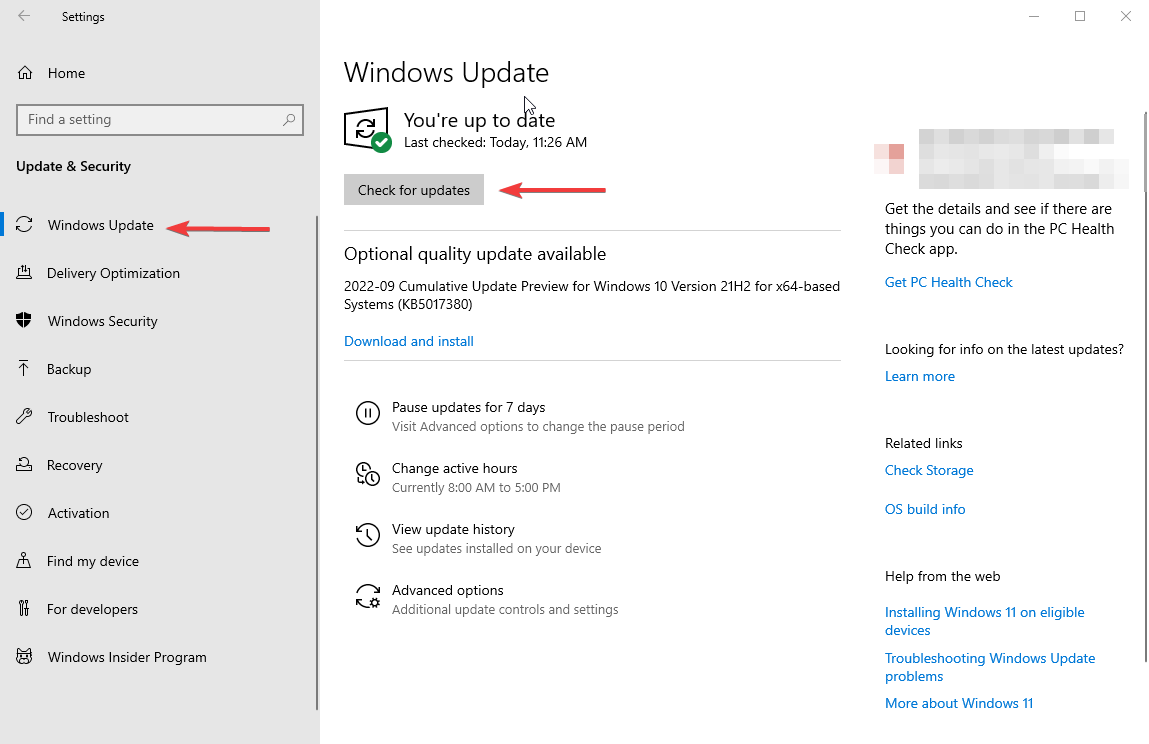
  1. Click on the Start button and select Settings.
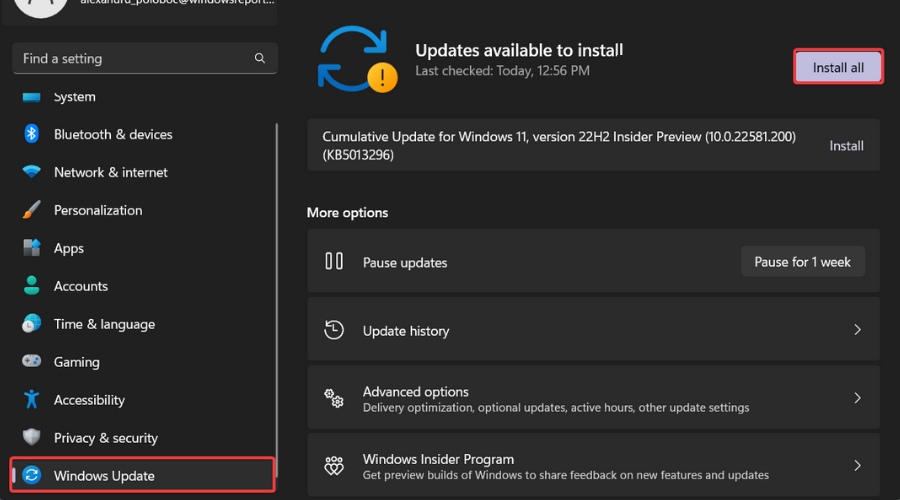
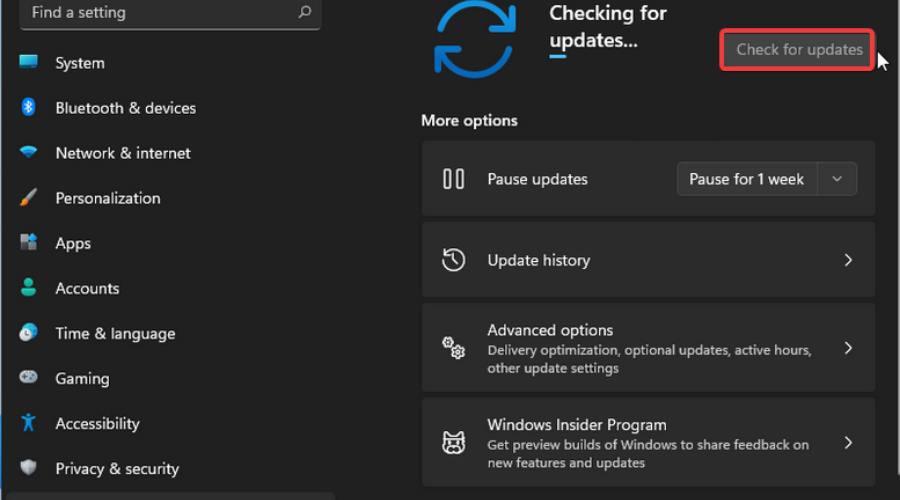
  2. Click the Windows Update option and select Check for updates. If there are any updates available, Windows will search for and install them.

Updating your OS can fix bugs affecting your PC and causing the Num Lock not to stay on.

If you encounter issues with the Windows update, check our guide on fixing Windows updates & security issues on your PC.

3. Update your keyboard driver

  1. Press Windows + R key to open the Run window, and type devmgmt.msc into the search space, and click OK to open the Device Manager.
  2. Expand the Keyboards from the devices menu, right-click on your keyboard device, and select Update driver.
  3. Then click on Search automatically for drivers and restart your PC.

Updating your keyboard driver can fix any problems or bugs plaguing it. If you can’t go with the steps above, check other ways to update drivers on Windows 11.

4. Enable the Registry key

  1. Press Windows + R key to open the Run dialog box, type Regedit, and click OK to open the Registry Editor.
  2. Navigate to the following key: HKEY_CURRENT_USER\Control Panel\Keyboard
  3. Right-click on the InitialKeyboardIndicators registry string, clear the value data and set it to 2, then click OK.
  4. Navigate to the following key: HKEY_USERS\.DEFAULT\Control Panel\Keyboard
  5. Right-click on the registry string InitialKeyboardIndicators, then set the value to 2147483648.
  6. Close the Registry Editor and restart your PC.

Using the Registry Editor allows you to edit the keyboard registry keys, helping it to function.

5. Turn off the Mouse key

  1. Left-click the Start button, type the control panel, and launch it.
  2. Go to the Ease of Access Center.
  3. Then click on Make the keyboard easier to use.
  4. Go to Control the mouse with the keyboard and uncheck the box for the Turn On Mouse Keys option.
  5. Click on Apply and then on OK.

6. Run the keyboard troubleshooter

  1. Open Windows Settings (press Windows key + i).
  2. Click on System.
  3. Go to Troubleshoot.troubleshoot settings section
  4. Click on Additional troubleshooters.additional troubleshooters
  5. Find Keyboard and select it.
  6. Click on Run the troubleshooter.keyboard troubleshooter

Many users have reported that this helped them fix the problem with the Num Lock not staying on.

Alternatively, you can read about what to do if the number pad is not working in Windows 10/11.

Likewise, we have a detailed guide on how to fix keyboard beeping when typing on your PC.

Please leave your suggestions or questions in the comments section below.

5 Jabra Elite Earbuds on Cyber Monday [65T, 75T]

Regardless of whether you are casually strolling through the park, sitting in a car with a long road ahead of you, or going through an intense workout at the gym, music has always been the supreme equalizer.

Speaking of equalizers, the way you listen to music can change the entire way you feel a song, and this means having a very good pair of headphones or earbuds at your disposal.

Well, Jabra, one of the best manufacturers of consumer-grade earbuds and headphones has put a couple of their models up for sale this year, and we will be showcasing the best ones that you can buy today!

Note: All the prices and offers in this article are subject to change, so be sure to check the official product page to get the latest deal. If the product or offer you’re looking for is no longer available, you can try to find it on its official manufacturer page or get another one from our list.

What are the top 5 best Jabra earbuds deals?

Jabra Elite 75t earbuds

  • Enhanced ergonomic design
  • Will fit any ear shape and size
  • Wind and environmental noise filter
  • 4th generation wireless connection for stable calls
  • The Jabra app needs improvements

Topping off our list is one of the most popular Jabra Elite earbud models, the 75T, and it has plenty of features that make it well-deserving of this place.

They are not only made to fit into any ear, but the enhanced 4-microphone call technology filters out all the wind and other common environmental noises, making calls not only comfortable but also clear.

Featuring 4th generation wireless connection, anything you listen to with these headphones, be it calls or music, will not only be crystal-clear but also extremely stable.

Jabra Elite 65t earbuds

  • The long-lasting battery of up to 15h
  • Sound customization via the Jabra+ App.
  • Great sound quality thanks to 4-microphone technology
  • Stable connectivity for uninterrupted calls and music sessions
  • Pressing the activation button is not very practical

The next entry on our list is an older set of Jabra Elite earbuds, but that doesn’t mean that they are worse than the previous entry.

The Jabra Elite 65t earbuds feature the same true wireless technology that provides crystal-clear conversations,  and the long-lasting batteries will make it so that you can talk and talk all day long.

Besides, you can personalize the sound using the Jabra+ App, making your earbuds sound just like those from Samsung or Apple.

Jabra Elite 85t earbuds

  • Comes with a powerful magnetic case
  • Amazing sound quality thanks to 6-microphone build
  • Incredibly long battery life that can provide with up to 25h of calls
  • Great active noise-canceling that reduces environmental distractions
  • The price tag

Continuing our list of best Jabra Elite earbuds is the Jabra Elite 85t, a pair of true-wireless earbuds developed for hardcore music lovers.

Thanks to its already common 4-microphone technology, it will provide you with some of the best sound quality on the market.

Additionally, this is further enhanced by the active noise-canceling technology that will eliminate all distracting sounds while you listen to your favorite tunes.

Jabra Elite Sport earbuds

  • Ergonomic design and materials that make it fit into your ear
  • Water-proof build that will help with sweat and swimming
  • Great audio quality
  • Long battery life
  • Only great for sports, not as great for listening to music like the other entries

The name says it all with this particular set of earbuds, since their main emphasis is on sports, and therefore feature a bit of a design change.

Not only are they designed to be water-proof, but they are also made into an ergonomic shape and from materials that will stop them from falling off even when you are running, jumping, or swimming.

More so, 3 sizes of EarWings further enhance comfort and heart rate sensor.

Jabra Elite 45h headphones

  • Comfortable fit thanks to high-quality cushions
  • Up to 50h of battery on a single full charge
  • High-quality sound for both calls and music
  • Foldable and easy to take on the road
  • Works better on tablets and smartphones than with PCs

The last entry on our list is also the only pair of Jabra Elite headphones, and they are a great alternative for those that find earbuds to be uncomfortable.

Featuring advanced 40mm speakers, these headphones will surely deliver the sound quality anyone might ever be looking for.

More so, thanks to their larger size, the battery is also larger and with a greater capacity, reaching up to 50h on a full charge.

This concludes our list of the best Jabra Elite earbuds and headphones. 

We’ve covered the best models on the market, and took consumer feedback into consideration when creating this list, so go ahead and make your pick.

Do you know of any model that may have deserved to end up on this list?

Let us know what else we should have added by leaving your feedback in the comments section below.

6 Fixes for The System Cannot Write to the Specified Device

The ERROR_WRITE_FAULT error code with The system cannot write to the specified device description occurs when users try to install the latest updates on their computers. Reportedly, this error is prevalent for driver updates.

It may also occur when users try to create and save backup files and folders. Irrespective of the causes, we have gathered the surefire solutions that will help you fix it in this guide.

What causes The system cannot write to the specified device error?

The system cannot write to the specified device error can be down varying reasons. Listed below are some of the various causes:

  • Damaged or corrupt system files: Corrupt system files is one of the chief causes of the FSlogix the system cannot write to the specified device and other variations of the issue. The quickest way around this is to repair the broken system files with either the built-in tool or dedicated software.
  • Issues with system memory: When there is a problem with your system memory, you can also get an error message. Running the CHKDSK command is should help here.
  • Malware infections: The presence of viruses on your PC can cause all sorts of problems, including this issue we are dealing with. You need to eliminate the malware using one of the best antivirus software.

How can I fix The system cannot write to the specified device error?

1. Perform an SFC scan

  1. Press the Windows key + S, type cmd, and select Run as administrator under Command Prompt.
    cmd the system cannot write to the specified device
  2. Type the command below and hit Enter: sfc/scannowsfc
  3. Wait for the command to finish running.

If your getting the 0x1d – the system cannot write to the specified device error on your PC, running the SFC scan on CMD should restore normalcy. This is because most variations of the error are caused by faulty or missing system files.

Alternatively, you can fix these files using a specialized tool to restore or replace corrupted files and folders as well.

2. Run the CHKDSK command

  1. Launch Command Prompt as admin.
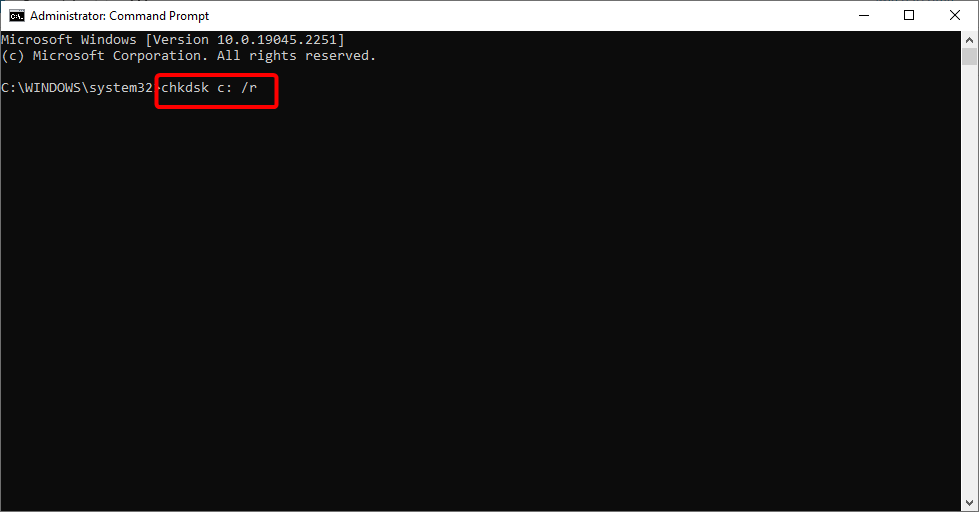
  2. Type the command (replace C with your drive letter) below and hit Enter: chkdsk c: /rchkdsk
  3. If you receive a prompt, press Y and restart your PC. The scan will start immediately after your PC restarts.

Memory issues can make lead to the WinToUSB the system cannot write to the specified device error. The CHKDSK command is a powerful built-in tool known to fix many memory issues, including this one.

Thus, you should try it too.

3. Scan for malware

  1. Press the Windows key, type virus, and select Virus & threat protection.
    virus the system cannot write to the specified device
  2. Click Scan options.
    scan options
  3. Choose the Full Scan option and click the Scan now button.
    scan now

Malware may cause various issues on your computer, including the system cannot write to the specified device error. Performing a full system scan should help clear them and restore your PC’s health.

However, if you want to run a really deep scan and eliminate even the most stubborn virus, you should a third-party antivirus in ESET NOD32.

This lightweight software employs a no-nonsense policy against viruses. It eliminates them before they can affect your PC. All these without disturbing your activities.

4. Update your OS

  1. Press the Windows key + I to open the Settings app and select Update & Security.
    update and the system cannot write to the specified device
  2. Click the Check for updates button.
    check for
  3. Install all available updates including the optional ones.

Windows updates are important in fixing bugs and issues. If you have not updated your PC in a long time, you can face the system cannot write to the specified device error.

After installing the updates, remember to restart your PC.

As a quick reminder, Microsoft constantly rolls out Windows updates in order to improve the system’s stability and fix various issues.

5. Clean your temporary files and folders

  1. Click the Start icon, type disk, and select Disk Cleanup.
    disk the system cannot write to the specified device
  2. Check the boxes for the files you want to clean.
  3. Now, click the Clean up system files button.
    clean up

At times, the system cannot write to the specified device error can be because of junk files on your hard drive. The Disk Cleanup tool will help you clear the files you want to remove.

Another option, which is probably a better one, is to use a dedicated tool in CCleaner. This tool helps to optimize your PC by clearing out junk files and unwanted documents.

CCleaner also serves as an uninstaller software that can remove an unwanted app and its components. It might just be all you need to protect your PC from this type of issue.

6. Run the Hardware and Device troubleshooter

  1. Press the Windows key + S, type cmd, and choose Run as administrator under Command Prompt.
    cmd the system cannot write to the specified device
  2. Type the command below and hit Enter: msdt.exe -id DeviceDiagnosticmsdt the system cannot write to the specified device
  3. Wait for the diagnosis to be complete and apply any recommendations.

One of the best things about the Windows OS is its array of troubleshooters. Running the hardware and devices troubleshooter helps to fix many hardware issues including the system cannot write to the specified device error.

You should restart your PC after applying the fixes to let them take effect.

With this, we can conclude this guide. We believe that you have everything you need to fix the system cannot write to the specified device error easily. All you need to do it to follow the steps carefully.

If you are facing other problems like your device ran into a problem and needs to restart, check our detailed guide to fix it effectively.

Feel free to let us know the solution that helped you solve this problem in the comments below.

5 Best Cyber Monday Deals for Laptops with Microsoft Office

With the increased numbers of people needing to work remotely because of the latest global events, it becomes increasingly important to have Microsoft Office installed on your PC.

There’s no better time to invest in a powerful and capable laptop than during this year’s shopping spree, enabling you to secure a great laptop at an affordable price, and also get Microsoft Office pre-installed and licensed.

Because we know how hard it is to make an informed decision with the wide range of options available on the market, we decided to make things easier for you.

Make sure to read through the article in its entirety to make the best decision possible.

Note: All the prices and offers in this article are subject to change, so be sure to check the official product page to get the latest deal. If the product or offer you’re looking for is no longer available, you can try to find it on its official manufacturer page or get another one from our list.

What are the best laptops with Microsoft Office pre-installed?

Lenovo IdeaPad 1.6GHz

  • AMD A6-9220e 1.6Ghz
  • 4 GB RAM
  • 64 GB eMMC Flash Memory HDD
  • AMD Radeon R4
  • Comes with Windows 10 Home edition installed

The Lenovo IdeaPad 1.6GHz is a nice laptop that comes with a 1 year Microsoft Office subscription, ensuring that you will never have to worry about buying a license.

Featuring a 14-inch display with a 1366 x 768 HD resolution, you can easily carry this laptop with you wherever you are, and you get full access to a year of Office 365.

The ultra-compact memory system with DDR4 ensures that your data will be processed quickly and that you can complete tasks in a timely manner.

Microsoft V4C-00022 Surface Laptop 3

  • Touch-screen
  • Intel Core i5
  • 256 GB SSD drive
  • 8GB RAM
  • Slick matte-black design
  • Only has 2 USB ports

The Microsoft V4C-00022 Surface Laptop 3 is an amazingly powerful and versatile laptop that offers you touch-screen capabilities besides the amazingly looking design.

This laptop uses an Intel i5 processor, ensuring that even the most complex tasks can be achieved in a fraction of the time.

The 8 GB RAM also allows you to run multiple applications without worrying about your laptop getting stuck, thus allowing you to open a big number of Office-related windows at no cost for the processing power.

ASUS L203MA-DS04 VivoBook

  • Foldable design
  • 4GB RAM
  • 64 GB storage
  • Up to 10 hours battery life
  • Small display

The ASUS L203MA-DS04 VivoBook ensures that you will always get noticed with an incredible folding design.

The Intel Celeron N4000 processor ensures a smooth operation sequence, being more than capable to run the included Microsoft Office software that comes included.

Another great advantage of this laptop is that because of its small size and thinness, you can carry it easily with you wherever you go.

Microsoft Multi-Touch Surface Laptop Go

  • 9 GHz Intel Core i5 1035G1 Quad-Core
  • 12.4 inches
  • Coprocessor Intel UHD graphics
  • Dolby audio Omnisonic speakers
  • RAM 8 GB DDR4 and 128 GB SSD
  • Overheating and short battery life

The next Microsoft Multi-Touch Surface laptop is the ideal choice in terms of lightweight usage, system performance, or RAM memory specifications.

There is guaranteed high-quality offered by a powerful processor 10th generation Intel Core i5 or the 12.4-inch PixelSense display that offers you crystal clear graphics.

In addition, you benefit from the original Microsoft Office installed with cutting-edge features and immaculate condition without any marks or malfunctions.

HP HD Intel N4000

  • 2.6 GHz
  • 4 GB RAM
  • 64 GB eMMc
  • Windows 10 pre-installed
  • Lightweight
  • Windows 10 S is not for all users

The HP HD Intel N4000 is another great laptop that comes ready to do work using Office 365, offering decent processing speeds and great RAM memory to ensure you can run multiple versions of the software.

With a processing speed that goes up to 2.6 GHz, you don’t need to worry about stalling processes, and the 1 year Office subscription allows you to work using this software seamlessly.

Added to all this, the slick silver design is sure to fit in any environment you choose to use it.

These are the best options for laptops that have direct access to Microsoft Office 365 and are also on a deal this year.

We hope that this guide has provided you with useful information and that you chose a laptop from the list.

Feel free to share your opinion with us by using the comment section below.

Error 0xc1900223: How to Fix This Windows Update Issue

Error 0xc1900223 is a Windows Update issue that can arise on Windows 11 and 10. This can be a problem and result in Windows Update not working.

There isn’t any one specific cause for the 0xc1900223 update error but it’s mainly due to glitches with the update components or corrupted system files. We can’t exclude issues with the update service or network connection problems. Flushing the DNS can sometimes help with the latter.

How can I fix error 0xc1900223?

1. Open the Windows Update troubleshooter tool

  1. First, click Start, and the Settings app pinned to that button’s menu.
  2. Select the Troubleshoot Settings category.
    Troubleshoot option error 0xc1900223
  3. Click the Other trouble-shooters box to view a list of repair tools.
    Other trouble-shooters error 0xc1900223
  4. Select the Run option for opening Windows Update.
    Run button error 0xc1900223
  5. Then wait for the Windows Update troubleshooter to detect issues and hopefully apply fixes. It will display a completed troubleshooting overview when it’s done.

2. Enable and Run the Windows Update service

  1. Open the Run command dialog by holding the Windows button on the keyboard and pressing R.
  2. Type in services.msc within Run’s text box.
  3. Select Run’s OK option to view Services.
    The OK button error 0xc1900223
  4. Double-click the listed Windows Update service.
    Windows Update troubleshooter error 0xc1900223
  5. Select Automatic for the service’s startup.
  6. Click Start to start Windows Update.
    Automatic option error 0xc1900223
  7. Press Apply on the Windows Update Properties window.

After restarting the service, check if error 0xc1900223 is gone.

Note icon NOTE
If Windows Update is already enabled and running, stop the service by right-clicking it and selecting Stop. Right-click it again and select Start to restart the service.

3. Clear the DNS (Domain Name System)

  1. To view the search tool’s box, press the Windows and S keys simultaneously.
  2. Find Command Prompt by inputting the search phrase cmd.
  3. Click Command Prompt’s Run as administrator option on the right side of the search tool.
    Run as administrator option error 0xc1900223
  4. Input this DNS flush command and press Return: ipconfig /flushdns
    ipconfig /flushdns command error 0xc1900223
  5. Also, input these separate ipconfig commands and press Return after each one entered:
    ipconfig /registerdns
    ipconfig /release
    ipconfig /renew

    registerdns command error 0xc1900223
  6. Finally, restart your laptop or desktop by selecting Power and then Restart from Start menu options.
    Restart option error 0xc1900223

This is a simple method, but it can help with error 0xc1900223, so be sure to try it.

4. Run a scan with the System File Checker

  1. Open Command Prompt with administrative privileges.
  2. First, execute this Deployment Image Servicing and Management command: DISM.exe /Online /Cleanup-image /Restorehealth
    Restorehealth command error 0xc1900223
  3. Then type in this SFC utility command and press Return: sfc /scannow
    sfc /scannow command error 0xc1900223
  4. Wait for the SFC scan to finish and show an outcome message.

5. Rename the SoftwareDistribution and Catroot2 folders

  1. Open Command Prompt with administrative rights as outlined in method three.
  2. Disable Windows Update components by executing the following separate commands:
    net stop wuauserv
    net stop cryptSvc
    net stop bits
    net stop msiserver

    net stop command error 0xc1900223
  3. Next, rename SoftwareDistribution to SoftwareDistribution.old by executing this command: ren C:\Windows\SoftwareDistribution SoftwareDistribution.old
    rename catroot2.old command error 0xc1900223
  4. Input this rename command for the catroot2 folder and hit Enter: ren C:\Windows\System32\catroot2 Catroot2.old
    rename catroot2.old command error 0xc1900223
  5. Restart the stopped update components by inputting and executing these commands:
    net start wuauserv
    net start cryptSvc
    net start bits
    net start msiserver
  6. Restart your PC after restarting the services.

So, that’s how you can get error 0xc1900223 fixed on Windows 11 PCs. We don’t promise those potential fixes for error 0xc1900223 will work for everyone, but they’re some of the more likely solutions.

There are also workarounds for error 0xc1900223. You can instead try installing updates by downloading them from the Microsoft Update Catalog. Or you can install a build update with the Media Creation Tool.

Before you go, don’t miss our guide on Windows Update 0x80240009 error for more information.

You can discuss error 0xc1900223 in the comments section below. Feel free to add any questions about fixing that error or even share other resolutions for it there.

7 Best Email Spam Filters to Permanently Stop Spam

Spam emails are among the leading disturbances we receive daily. These emails can carry malicious links and advertisements of various fake products.

This is why most users prefer to use email privacy software. However, to get rid of these spam emails even with your regular email, you need the best spam email filters.

In this guide, we have gathered the list of the best filter tools you can download and use for this purpose today.

How can I stop spam emails permanently?

There are a few ways to stop spam emails for good. Below are some of the best methods to use:

  • Block spam emails: The first thing you can do is to flag and block any spammy email address. This can be done from your email client’s settings.
  • Disable unwanted newsletters: Sometimes, you subscribe to newsletters on some websites. These pages can become spammy over time. Your way out here is to unsubscribe from them and any other needless mailing list.
  • Report the email: Another option is to report the email as spam. With this, your email client will track the email address and prevent you from receiving emails from it in the future.
  • Use an email spam filter: Using one of the best email spam filter service software is an excellent way to stop spam emails. These tools combine the best spam-detecting techniques to ensure they never disturb you. You can find the top-notch options in the next section of this article.

What are the best free email spam filters that I can use?

eM Client – Email client with built-in spam filter

em client best spam email filter

Topping off our list is not a spam filter per se, but an email client with ones already built into it.

While this feature is not that uncommon among modern-day email clients, eM Client’s spam filter stands out because it is one of the best, if not the best, in the world.

What makes it so great is not the fact that it blocks the spam itself but that you can tailor the spam filter’s settings to suit various scenarios and your needs.

More so, these settings can be later revised if you change your mind about a source of emails and no longer want to flag them as spam.

eM Client

eM Client

Try out this fantastic email client and set the Spam Filter settings to whatever suits your needs most so that you can avoid annoying messages.
Free trial Visit website

Spamfence – Easy-to-use tool

spamfence

Spamfence is one of the best email spam filter software for Gmail, Yahoo mail, and other email clients. This tool is an excellent option because it uses a complex mechanism involving two email addresses to eliminate spam.

So, how does it work? When you sign up with Spamfence, you create a new email address after that and submit both your current, spam-riddled address and the new one to the service.

After that, all mail from your main account is forwarded to Spamfence filters, where the service checks if any message is spam and then sends approved messages to a secondary email protected from spambots.

You’ll be notified about any spam mail and have complete control over it.

Besides providing an effective way of filtering spam from your email, Spamfence also provides free virus security. So, this program won’t keep you safe from spam; it will also prevent the spreading of malicious software through the mail.

⇒ Get Spamfence

POPFile – Top organization

popfile

POPFile is another powerful POP and NNTP proxy. This tool can effectively filter your email address from spam messages. This software works on the principle of classification, as you can create as many mail categories as you want.

Of course, by default, categories are spam and not spam, as mail from the spam category goes through, and the other doesn’t. However, you can create custom categories, like work, personal, important project, hobby, and sort mail into each category.

POPFile uses the Bayes algorithm to classify messages, which means it uses statistics to determine which words are likely to appear in which messages.

But before POPFile effectively protects your email from spam, you must first train it to ‘tell’ it which messages should be marked as spam. So before start using POPFile, make sure you set it up.

Once you’ve ‘trained’ POPFile, it should automatically eliminate any unwanted mail you receive.

⇒ Get POPFile

Spamihilator – Email filter with plug-in support

spamijilator best spam email filter

Spamihilator is perhaps the best email spam filter to use if you mainly receive your mail through desktop clients, like Outlook for Windows 10, Mozilla Thunderbird, etc. This program runs alongside your email client for the desktop and successfully removes any unwanted email of your choice.

You can also train Spamihilator for more successful filtering. It contains a unique feature called the Training area, where you mark specific messages as spam.

Based on your decisions in the Training area, Spamihilator will remove messages from the same sender or of a similar kind. The more you use the Training area to filter spam, the more effective it becomes.

Spamihilator also supports various plugins, which you can download to improve filtering even more. In addition, there are some additional options, like the ability to filter links. The program and all plugins are entirely free to download and use.

⇒ Get Spamihilator

Gmail – Excellent navigation

gmail

If your email service is Google’s Gmail, you don’t need any spam filter because this service has all it takes to keep your inbox clean. In Gmail, you can manually mark any email as spam, preventing it from appearing in your inbox.

Once you mark an email as spam, it will be automatically transferred to the spam section of Gmail, and future messages from that sender won’t make it to your primary inbox.

You also have the option to unsubscribe from receiving emails from a specific sender, which is extremely useful if you’ve accidentally subscribed to some newsletters and promotional offers.

Of course, marking each email individually can be exhausting and time-consuming. But you’ll disable it forever. So, if you don’t receive a lot of spam mail, Gmail’s built-in option is the best solution, but if you do, try some of the programs from this list.

⇒ Get Gmail

MailWasher Free

mailwasher

MailWasher is a simple spam-filtering service for POP3, IMAP, or webmail email addresses. First, you must connect it to your email account and filter unwanted messages. Of course, it will require work first until you filter a certain amount of mail.

But since MailWasher also uses a Bayesian algorithm, it will automatically remember your choices and further filter based on your decisions. This is why it is considered one of the best email spam filter software.

The program is elementary, as you have two options – spam and good. So, check emails you want to get rid of, mark them as spam, and you’re good to go.

MailWasher also has a premium version that, of course, you need to pay for. But in our opinion, the free version contains all you need to keep your inbox clean.

However, it limits you to just one email account, but if you’re a regular user, that shouldn’t be a problem. However, if you want to add more than one account, and have some customization options, consider buying the paid version of MailWasher.

⇒ Get MailWasher

SpamBayes – Spam messages analysis feature

spambayes best spam email filter

SpamBayes is another top email spam filter program that uses Bayesian statistics to eliminate unwanted mail in your inbox. This filter for POP and IMAP mail accounts plugs in directly into Outlook, and Mozilla Thunderbird, so installation on these clients is relatively easy.

However, some less popular email clients don’t support the direct SpamBytes plugin, so installation on these clients might be tricky.

Just like it’s the case with the majority of spam filters from this list, SpamBytes uses the Bayesian method to learn from your decisions and automatically filter unwanted mail.

The program also analyzes all spam messages, so you can have further insight into what you’re marking as unwanted mail.

⇒ Get SpamBayes

That’s about it for our list of the best spam-filtering software for your inbox. Rest assured that you will find anyone you select worthy.

If you need a list of the best antiviruses with an anti-spam feature, check our carefully-curated list for the top options to commit to.

Feel free to let us know the software you enjoy using on our list and why in the comment below.

5 Best External HDDs for Xbox One on Cyber Monday Sale

Because we all love playing games on Xbox One, one of the problems that come up very often is not having enough storage space.

The storage space required by new games adds up in time and you may end up not being able to save the game you played so much. Nobody wants that to happen.

Fortunately, there are enough options on the market that allow you to extend your Xbox One storage with up to 5TB of HDD space that also has plug-and-play features.

In this article, we will explore the best options for external HDD for your Xbox One that you can get.

Note: All the prices and offers in this article are subject to change, so be sure to check the official product page to get the latest deal. If the product or offer you’re looking for is no longer available, you can try to find it on its official manufacturer page or get another one from our list.

Which is the best deal for Xbox external HDDs?

Toshiba HDTB Canvio

  • Easy plug and play
  • 1, 2, and 3 TB storage space versions
  • has both USB 2.0 and 3.0
  • Slow on data transfer

Toshiba HDTB Canvio is a great plug-and-play option for your Xbox One storage needs. It comes in 1, 2, and 3 TB storage space versions.

This external HDD has both USB 2.0 and 3.0 and if you buy it you will have a 1-year warranty.

WD Passport X

  • Compatible with Xbox One
  • High-speed performance
  • 3 year included warranty
  • Can make some noises when running

WD Passport X is a great storage option and it’s compatible with Xbox One. Passport X has 2 TB of storage space and can reach speeds of 5 Gbs/s when transferring files through its 3.0 USB ports.

The design is really nice, it’s a small portable device that you can carry around everywhere you need without feeling it’s an inconvenience.

Setting up the device is extremely simple and fast, all you need to do is carefully follow the instructions.

Silicon Power A60

  • Military-grade shockproof technology
  • Waterproof resistant
  • Compatible with your Xbox One gaming console
  • Transfer files randomly without keeping the date

Silicon Power A60 is a very good option for portable HDDs as it has military-grade shockproof technology and also is Ipx4 water-resistant.

This tiny HDD is perfectly compatible with your Xbox One gaming console and has 3.0 USB ports for fast speeds and a FAT32 formatted memory.

Silicon Power A60 comes in 1TB, 2TB, 4TB, and 5TB options and has a 3-year warranty.

Fantom Xbox One Storage Hub

  • Flash-accelerated
  • 3 USB 3.0 ports
  • Data transfer speed – 5 Gbps
  • Multi-tier caching technology
  • Can freeze when copying files

Fantom Xbox One Storage Hub is a great HDD for your Xbox and has a snap-on design that allows you to save space.

Using the device is really simple, you only need to carefully follow the guiding instructions available in the manual.

The device comes with extra USB ports that really come in handy for charging devices while playing.

Fantom Drives GForce Pro

  • Compatible with your Xbox One
  • Comes with 4TB of data storage
  • Reaches transfer speeds of up to 5Mb/s
  • Can be a bit noisy

Fantom Drives GForce Pro is another great option. This external HDD is fully compatible with your Xbox One and has 4TB of data storage.

Gforce Pro has a slick look with its aluminum case and has USB 3.0 ports allowing you to reach transfer speeds of up to 5Mb/s.

This hard drive has a plug-and-play design making it very easy to set up and use. This HDD comes with a 1-year warranty.

In this article, we explored the best deals on external hard drives compatible with Xbox One.

The options presented here cover a wide range of needs, including portable options and also high storage capabilities of up to 5TB.

Let us know which HDD you’ll buy in the comments below.

Get Surfshark VPN For 80% Off This Black Friday

If you’re looking to amp up your online privacy and computer security this year, check out Surfshark. It’s a reliable VPN service for any Internet-dependent user.

Developed by Surfshark LTD, Surfshark keeps you anonymous when going online by hiding your browsing activity from your ISP. It supports more than 3,200 VPN servers in 100 countries.

All servers all P2P-friendly, which means that you can stay off the grid when downloading or uploading torrents.

Note: All the prices and offers in this article are subject to change, so be sure to check the official product page to get the latest deal. If the product or offer you’re looking for is no longer available, you can try to find it on its official manufacturer page or get another one from our list.

What is the best Surfshark promo discount this year?

  • 80% off + 5 months free for 3.99$ a month

The plan includes a 30-day money-back guarantee and 24/7 live chat and email support.

Surfshark VPN

Get this powerful VPN at an incredible price and maximize your online privacy!

Why use Surfshark

use Surfshark for mobile

Surfshark has private DNS on each server and comes with a strict zero-logging policy, which is backed by the British Virgin Islands’ safe jurisdiction.

The best part about it is that you can set up Surfshark on any number of devices and share your VPN account since it allows unlimited simultaneous connections.

It works with Windows, macOS, Linux, Android, iOS, Fire TV, Chrome, Firefox, and even routers. That makes Surfshark the best VPN for multiple devices.

Moreover, Surfshark supports the new WireGuard protocol, in addition to OpenVPN with up to 256-bit military-grade encryption.

This ensures the best possible privacy and security over VPN without sacrificing your connection speed.

As far as streaming is concerned, you can unblock multiple Netflix libraries, including Netflix US.

Furthermore, you can set up Surfshark on streaming devices without native VPN support (such as Smart TVs and gaming consoles) by turning to its Smart DNS service.

Other features include an ad and malware blocker for web browsers, an emergency kill switch, IP leak protection, obfuscated servers (Camouflage), double VPN connections (MultiHop), split tunneling (Whitelister), and anti-censorship (NoBorders).

Surfshark is one of the few VPNs that can change your GPS location on Android. So what are you waiting for? Get SurfShark VPN 80% off + 5 months free for this shopping season.

How to Refresh/Clean Install Windows Without Refresh Tool

If you’re experiencing issues on your Windows computer, the cause may be in various bottlenecks, bloatware, and settings that slow down your computer’s performance. And a simple solution would be to download the Windows refresh tool.

The problem is that the Windows Refresh tool is no longer available for users to download. But you can still perform the same operation without it with the same level of ease. So, let’s find out!

What does the Refresh Windows tool do? A refresh means reinstalling Windows, but the files and the installed apps, both from the Microsoft Store and the ones that came along with the OS, are kept.

Here are a few issues a refresh to fix in Windows:

  • Corrupt system files – Corrupt system files are responsible for many problems and can considerably affect the functioning of the OS.
  • Problems with Windows Update – Update errors, though not a common occurrence in Windows, can affect the performance of the OS and put your PC at risk.
  • Inability to launch or run an app – Often, misconfigured settings or other underlying causes can prevent apps from launching, and a refresh is a proven fix.

How can I perform Windows refresh without the Refresh tool?

1 Use the Settings app

  1. Press Windows + I to open the Settings app, and click on Update & Security.update & security to refresh windows tool download
  2. Now go to Recovery and click on Get Started under Reset this PC.reset to refresh windows tool download
  3. Choose if you want to keep the personal files or remove them. We suggest using the Keep my files option since it’s similar to a refresh.
  4. Now select what type of reinstallation you want to perform. Local reinstall is usually faster, so we recommend using it.
  5. Follow the instructions on the screen to complete the process.

Remember that the Windows reset utility will remove your installed apps, but it should keep your files.

2. Perform in-place upgrade

  1. Visit Microsoft’s official website, and download Windows 10 Media Creation Tool.download now refresh windows tool
  2. Once the file is downloaded, run it, and click on Accept to agree to the license terms.accept
  3. Select Upgrade this PC now and click on Next.upgrade this PC to refresh windows tool download
  4. The setup will now download the latest version of Windows 10.downloading
  5. When you get to the Ready to install screen, keep personal files and apps listed, if not, go to Change what to keep and enable it, and then click on Install.
  6. Follow the instructions on the screen to complete the setup process.

Performing an in-place upgrade is another highly effective method to start afresh with a clean installation of Windows 10 and works as a perfect alternative to the Windows Refresh tool. With this, you don’t lose the installed apps.

How can I use Refresh Tool on Windows 11?

1. Use the Settings app

  1. Press Windows + I to open Settings, and click on Recovery in the System tab.recovery to refresh windows tool download
  2. Click on Reset PC.reset to refresh windows tool download
  3. Select Keep my files.
  4. Now pick the reinstall type. Again, we suggest using Local reinstall since it’s faster.
  5. Follow the on-screen instructions to complete the process.

2. Perform an in-place upgrade

  1. Visit Microsoft’s download page, choose the appropriate response from the dropdown menus, and download the Windows 11 ISO file.windows 11 iso
  2. Once the download is finished, run the file and click Open.open
  3. Now, launch setup.exe.setup.exe
  4. Click Yes in the UAC prompt.
  5. Click Install in the Windows 11 setup.next
  6. Now, wait for the setup to initialize things and click on Accept to agree to the license terms.accept
  7. Finally, verify that everything is in order, the setup lists, Keep personal files and apps, and click on Install.install
  8. Wait for the installation to complete. It shouldn’t take very long, so be patient and don’t interrupt the process.

That’s it! These are all the ways you can refresh the OS, both Windows 10 and Windows 11, without downloading the tool. And once done, any problem with it should be eliminated. If that doesn’t work, a clean install of the OS will do the trick.

Also, while fixing things, make sure to boost the performance of Windows 11 and get things done faster and smoother.

What is your preferred way to refresh your Windows installation? Let us know in the comments section below.

How to Adjust Microphone Sensitivity (+5 Useful Tips)

Your microphone is an essential tool as it allows you to communicate and get information on what’s happening around you. For this reason, keeping your microphone sensitivity at the proper level is essential. 

The problem is that your microphone is not working at times or can be too sensitive or not sensitive enough. This can cause issues when you want to talk with your friends, but your mic picks up a lot of background noise or even other people talking.

Why should I change my mic sensitivity?

The default mic sensitivity is the level at which your microphone picks up sound. The higher the sensitivity, the more sensitive it is to sound and vice versa. So, what prompts you to adjust your mic settings?

  • Accurate voice recognition – If you’re using an application like Skype, Discord, or Hangouts, having the proper mic sensitivity settings will make voice recognition much more accurate. Better yet, you can incorporate headphone software to boost your audio.
  • You have a hearing problem – A low mic sensitivity means that you’ll be able to hear more sounds around you than someone with a high mic sensitivity. This is especially useful for people with hearing problems.
  • Avoid repetitions – If you have a high mic sensitivity, other people may not hear everything you say because they’re not close enough to the speakers or the volume on your mic is too low. A low mic sensitivity will allow them to hear everything clearly without repeating themselves multiple times.
  • It’s less distracting – Another reason why lowering your mic sensitivity can help: it keeps other people from hearing every little sniffle and cough that you make. This can be incredibly distracting for those who are trying to listen in on the conversation. 
  • Improve the quality of your voice recordings – When you’re recording a voiceover, it’s important to have the right mic sensitivity, as it will improve sound quality. This is especially useful if you’re recording in noisy environments, such as at a loud concert. 

How can I adjust my mic sensitivity?

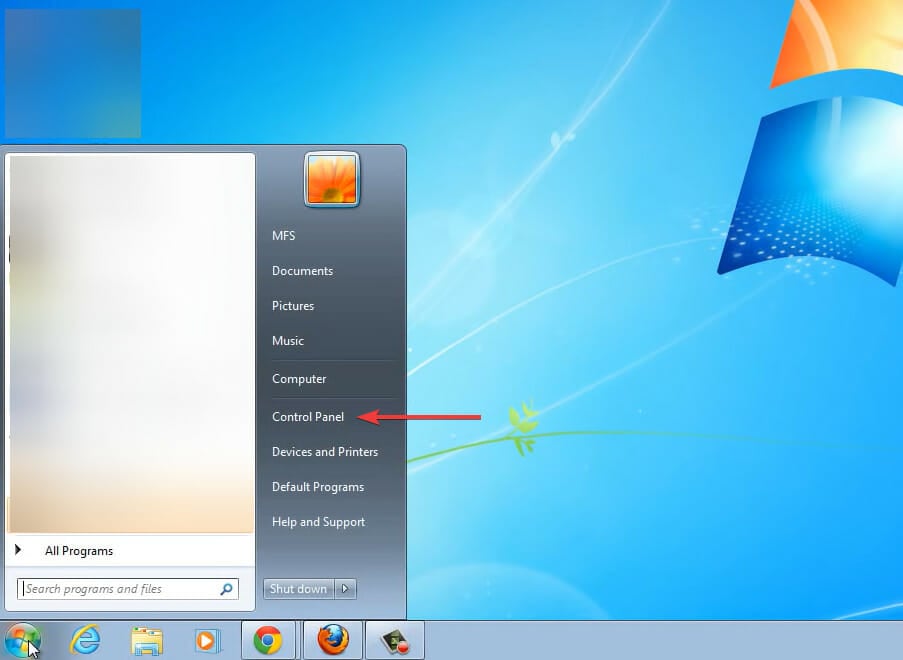
  1. Click on the Windows key to launch the Start menu, and then select Control Panel from the options on the right.
  2. Select Hardware and Sound.
  3. Click on Sound.
  4. In the Sound dialog that pops up, click on the Speakers you are using then select Properties at the bottom.
  5. Navigate to the Levels tab and select Balance next to your speaker.
  6. Now drag the sliders until you achieve your desired sensitivity level.

How can I boost the microphone sensitivity in Windows 7?

If you’re using a computer headset or a standalone microphone, you can try a few things to boost your microphone’s sensitivity.

Before trying anything else, the first step is to ensure your microphone is connected and working correctly with your computer. Other tips include:

1. Try moving closer to the mic 

If you’re using an external microphone, move it toward or away from the source of sound until you find the sweet spot where it picks up your voice.

Some situations will require you to come closer while others further away to transmit sound at quality levels.

2. Adjust background noise levels

Background noise can interfere with the quality of your audio recording and make it harder for people to understand what you’re saying.

If you are in a noisy place with lots of distractions, this can significantly interfere with the sound quality of your speakers. You can try moving to an area with fewer distractions,

3. Adjust the microphone settings 

Some speakers/headsets have specific settings for adjusting how much sound comes out of the microphone. You can easily change these settings until you find a good balance.

Others even have built-in settings that can detect your surroundings and adjust the sensitivity accordingly.

4. Use a quality headset

If you are using low-quality headsets or earphones, there are high chances that these devices may not work correctly with microphones and hence will not provide good sound quality. 

Quality doesn’t necessarily mean expensive. You can find affordable headsets with excellent sound quality. There are even noise-canceling headsets that allow you to record in noisy places.

5. Check for software conflicts 

If you are using multiple sound recordings or voice chat programs, they may conflict with each other. This could end up blocking the signal from reaching your headset mic.

You can disable or uninstall any other programs that may interfere with how your microphone works.

6. Update sound drivers 

If you’re using a USB/Bluetooth headset, ensure that your computer has its latest drivers. If not, there’s a good chance the driver is causing problems.

An automated solution like Outbyte Driver Updater will help you greatly because it has a substantial database with which it locates the latest updates for your drivers.

⇒ Get Outbyte Driver Updater

And that’s how to adjust your microphone sensitivity in Windows 7. Should you encounter any other issues, such as the Volume Mixer not showing up in Windows 7, we have a detailed article on how to resolve them.

In addition to improving your mic sensitivity settings, you may be interested in audio booster software that can significantly enhance your sound quality.

Please let us know any other tips you may have on boosting your mic sensitivity in the comment section below.

Sims 4 Error Code 22: Solved for PC

Sims 4 is the latest addition to one of the most famous game series ever, the Sims. This timeless title certainly rose above its prequels with a few brilliant innovations.

However, EA is kind of known for the unfinished, buggy games that scream for a patch. And sadly, Sims 4 is not an exception.f

A lot of users reported various errors, but just a few of them are too repetitive and prevent the game from starting. That is the case with the Sims 4 error code 22. And in this article, we’ll try and address this issue.

What is the Sims 4 error 22?

Error Code 22 in the Sims 4 appears when users try to save their games. It usually means that your game cannot load the game files because it is blocked by another program, or the files are missing from your device.

The full error message reads: The game failed to Save. Please exit to the Main Menu and then select Play to reload the game. Error code: 22.

Read on to find out what solutions are available for solving this issue in no time and getting back to playing your beloved game.

How can I fix the Sims 4 error code 22 on PC?

1. Clean the game cache

    The first step to fix the Sims 4 error code 22 would be to manually clean the game’s cache. Due to virus infection or a few other reasons, your game can get corrupted.

    That can and will lead to performance drops or unexpected loading errors. In most cases, the autosave file (slot 001) is the culprit for error 22, so try loading other saves.

  1. 1. Quit the game and stop the Sims 4 process in Task Manager. If it’s already closed, skip to step 2.

  2. 2. Go to Documents (My Documents).

  3. 3. Open the Electronic Arts folder.

  4. 4. Click on the Sims 4 folder.

  5. 5. Locate the Saves folder in the list and copy it to the Desktop.

  6. 6. Delete these cache files from Cache folder:

    • localthumbcache.package
    • cache
    • cachestr
    • cachewebkit
    • lotcachedData
  7. 7. Launch the game. It will create a new save instead of loading the old ones.

  8. 8. After new save is created, move your old saves from the desktop Saves folder, one by one, to the newly generated Saves folder.

If your game for no apparent reason crashed while autosave was performing, the save file may be corrupted. For that purpose, we advise you to perform more often manual saves.

2. Update the game with Origin

There is a widespread opinion that the game won’t load saves because of a weird update error. Namely, the client may inform you that you are trying to load the save that has been saved on a newer game version. That is a bit confusing, but you may try and update the game with the Origin client.

  1. Open the Origin desktop app.
  2. Find Sims 4.
  3. Right-click on the game and open the Check for update option.
  4. If there are any updates/patches available, the client will download and install them.

On the other hand, if your game is up to date and the problem is still persistent, try other workarounds below.

3. Close background programs

Another reason for this specific issue can be the activity of background programs. Nonetheless, there are programs that won’t impact the game whatsoever. For that purpose, follow this list and disable these programs while playing:

  • Cloud applications (OneDrive, Dropbox, Google Drive etc.).
  • Torrent clients and download managers.
  • Antimalware and third-party Firewall solutions.
  • VoIP programs like Skype or Team Speak.
  • VPN and Proxy.

4. Start PC with Safe Boot

Additionally, to make sure that there’s no single program interfering with the game, try and start your PC with Clean Boot. The procedure is swiftly done in a few steps:

  1. Open Windows Search and type msconfig.
  2. Right-click and run System Configuration like Administrator.
  3. Select the Services tab.
  4. Click Hide All Microsoft Services.
  5. Choose Disable All.
  6. Click on the Start Up tab and Open Task Manager.
  7. Right-click and choose Disable.disable defender
  8. Disable all startup services individually.
  9. Confirm selection and reset your PC.

If you’ve accidentally disabled any valuable services, you can easily retrieve them by repeating the process.

5. Check the Sims 4 game’s integrity with the Origin client

Before you lose your nerves and perform reinstallation, we advise you to try and repair the installation files. For that purpose, Origin implements a tool that is similar to the ones on Battle.net or Steam. And this is how you can use it.

  1. Open Origin client.
  2. Go to My Games.
  3. Right-click Sims 4.
  4. Choose Repair Install.
  5. The tool will check your game and repair corrupted or incomplete files.

6. Reinstall the game

Finally, you can try and reinstall the game. Most of the time, the users with the mentioned error haven’t succeeded to fix this issue by reinstalling. Nevertheless, we think they overlooked the importance of a ‘clean’ install, as it might actually help you. Here’s what you need to do:

  1. Open Origin and choose My Games.
  2. Right-click and select Uninstall.
  3. After the process is finished go to the location of installation and delete remaining folders.
  4. Use CCleaner or similar 3rd-party tool to clean registry.
  5. Restart your PC.
  6. Start Origin again.
  7. Find Sims 4 and select Install.

If this wasn’t helping your saved games are probably doomed. So, you’ll need to start the game from a scratch.

We hope you were able to solve the Sims 4 error code 22 with one of the presented workarounds. In case you have any questions or suggestions related to the subject, feel free to share them in the comments.

5 Best Game Capture Cards for Twitch [Cyber Monday]

Game capture cards add new functionality to your computer or gaming console. They are designed to record audio, video, and gameplay so that you can show them off to your friends or followers on the Internet.

In this article, we focused on finding the 5 best game capture cards for Twitch that you can buy from Amazon.

Some devices on this list even support live streaming on Twitch, OBS, XSplit, YouTube, RECentral, and other streaming services.

And, if you’re lucky enough to find a card that delivers zero delays, you can play games while streaming.

Note: All the prices and offers in this article are subject to change, so be sure to check the official product page to get the latest deal. If the product or offer you’re looking for is no longer available, you can try to find it on its official manufacturer page or get another one from our list.

Is it better to stream with a capture card?

Many of the more popular Twitch users stream and game on a PC using a two-PC setup. In these terms, they’ll need a capture card.

With one PC for gaming and one for streaming duties, the capture card sends the video signal from the gaming PC to the streaming/recording PC.

Keep in mind that capture cards provide the best facility for live streaming and also if you wish to transform your old sources of movies like DVDs into HD format.

Now, let’s discover what are the most efficient options you can use to get the best out of this experience.

What capture card do Twitch streamers use?

Elgato HD60

  • Supports USB 3.0 Type C to play games while recording with minimal delays (Instant Gameview)
  • Add facecam, overlays, alerts, and others (Stream Command)
  • Record videos retroactively (Flashback Recording)
  • Record 1080p videos with 60fps
  • Live commentary support
  • Doesn’t support H.264 encoding

With the Elgato HD60 game capture card from Corsair, you can record and stream your gameplay in full HD. It has integrated support for Twitch, YouTube, and others.

The device supports Playstation 4, Xbox One, and Nintendo Switch (unencrypted HDMI) for the input, along with an HDMI passthrough for the output.

If you choose to use this capture card, you’ll be able to stream and record your finest gaming moment, offering a stunning 1080p quality with 60 fps.

The built-in Live Streaming feature gets you up and running on Twitch or YouTube in a snap. Also, with Stream Command, customizing your stream layout would be done without any limits.

AVerMedia

  • 4Kp60 HDR recording, passthrough, and ultra-wide resolution
  • 4k video editing software included (CyberLink PowerDirector)
  • Play uncompressed videos on PC monitors with no latency
  • 5.1 / 7.1 surround sound support
  • 3 preset RGB lighting modes
  • Live streaming support
  • Setup instructions can be complicated

The Live Gamer from AVerMedia offers you several great features, among which you have to consider the 4K with 60fps HDR and Full HD 240fps support.

The game capture card is ideal for video recording and live streaming. It can be used with various software applications such as Twitch, OBS, XSplit, and RECentral.

Its Ultra-Low Latency for broadcasting and recording PS4 Pro and Xbox One X would offer you a smooth and complete experience.

AverMedia is extremely popular among worldwide users, so it is no longer a surprise that it’s pretty efficient.

MiraBox Capture Card

  • There is no latency when you use the HDMI loop out port
  • It is compatible with Linux, Mac OS, Windows 7/8/10
  • It is very suitable to use it for game live streaming
  • Compatible with all 1080P or 720P HDMI devices
  • Can support HDCP 1080P with 60FPS
  • Lights may blink without any known reason why

Streaming your best gaming moments can be very exciting, both for you and your viewers, especially when you are covering important content.

However, you need a good game capture card to make sure everything goes smoothly, and the MiraBox Capture Card is one such device.

It works on all mainstream OSes, and it is compatible with all 1080 and 720p devices, so unless your monitor is a 4K monster, you’ll be just fine.

For those of you who are beginners, keep in mind that it is very easy to set up and there is no need to install a driver. Also, it is compatible with multiple operating systems like Windows 7/8/10, Linux, or Mac OS.

Magewell

  • Supports multiple streaming, including OBS, Twitch, and Skype
  • 4 channels, 4 HDMI input ports, and 4 embedded audio
  • Input resolution up to 2048×2160 pixels
  • Set up multiple devices on one host
  • Features unlimited recording
  • Doesn’t capture 4K video

Magewell’s Pro Capture Quad HDMI is a feature-rich HD video capture card that can be used for recording videos and live streaming, including Twitch.

Keep in mind that it has a PCIe Gen2 x4 host interface and supports any DirectShow application.

With a 10-bit video processing engine, it includes various video editing options, such as color adjustment, cropping, and deinterlace.

It is ideal for any video capture application, including live streaming and it’s also compatible with any DirectShow application.

Any game capture card from this list is suitable for recording your gameplay and streaming it on Twitch, OBS, YouTube, and others. But they distinguish themselves by feature set.

Therefore, you should carefully explore your options before deciding what to buy from Amazon to improve your overall gaming experience.

Noise Canceling Software: 8 Best Apps to Use in 2026

Noise canceling software is a brilliant way to cancel your microphone noise, and the market is filled with tools that are able to do this.

You may need noise cancellation software for various reasons such as talking to your friends while you are gaming, chatting on Skype, editing a recorded voice track, and so on.

Unfortunately, if you don’t have the highest-quality microphone, the audio will end up collecting a lot of background noise.

But the good news is that there are lots of programs that are able to cancel the microphone noise, and we’ve gathered the best options of noise suppression software for PC that you have at your disposal these days.

How does noise suppression software work?

A noise suppression software is an app created to reduce background noise on voice recordings, conference calls, and other types of audio.

It works as a virtual microphone filter that connects to any calling app and starts reducing surrounding noises automatically.

This kind of software is like a noise gate because it has a technology that relies on AI to master what a human voice sounds like, then becomes able to select only that part of the audio and develops an active noise canceling to cut out the background noise.

What is the best noise suppression software?

  1. Krisp
  2. Adobe Audition
  3. LALAL.AI
  4. Descript
  5. NoiseGator
  6. SoliCall
  7. Andrea PC Audio Software
  8. Samson Sound Deck

Krisp – HD quality of voice

Krisp is another creative solution for noise reduction and disrupting sounds that stop your productivity. This AI-powered software is perfect for eliminating undesirable noise from online meetings. 

With this feature-rich technology, it’s very easy to control the background noise that disturbs your concentration during video calls. If you can imagine a tool that can erase distracting sounds in a second, you have it. 

The noise cancelation can be done with just a press of a button. This awesome software has an intuitive interface and it shows efficiency through comprehensive features such as noise reduction from both ends of the call. 

To give you an example, there are various sounds that may disturb your meeting. By choosing Krisp it’s possible to remove all distractions like barking dogs, traffic sounds, or even keyboard and mouse noise during the calls.

Thereby you will enjoy the HD quality of video or audio calls by removing any type of noise from your side, other participants, or room echo resonating sound.

In other words, no background sounds will disturb your calls again with this powerful AI-built software, so have a free trial to see yourself.

Krisp is a great choice if you are looking for free noise cancelling software to use for a few files. The trial version allows you to test it and see if it fits your needs.

Check out the most important features of Krisp: 

  • Acoustic room echo removal
  • AI noise cancellation 
  • Support for any microphone or headphones  
  • HD quality of voice 
  • Audio recording option 
  • Floating widget to access features 

Krisp

Did somebody say noise removal? Get Krisp today if you need class-quality sound for your online video calls.  
Check price Visit Website

Adobe Audition – Improved multitrack UI

Those of you that aren’t aware of Adobe’s entire suite of programs will probably overlook Adobe Audition. This dedicated digital audio workstation has everything you may ever need for professional-level audio processing.

This includes both a multitrack, a non-destructive mix and an editing environment, and a destructive-approach waveform editing view.

You can use the audio professional toolkit of this program to achieve qualitative audio for any of your projects, from music to podcast recording.

Furthermore, knowing the complexity of this software you may need some guidance to help you out. Well, using the Essential Sound panel you can steadily identify tasks to optimize your sound.

In addition, the noise reduction capacities help you with adjusting noise levels, using audio effects like DeNoise, or modifying high or low frequencies with spectral frequency display.

Check out the most important features of this program:

  • DeReverb & DeNoise effects
  • Improved playback and recording performance
  • Improved multitrack UI
  • Improved multitrack performance
  • Add album art in MP3 files
  • …and more

As far as noise-canceling is concerned, Adobe Audition works as a noise cancellation software that can handle a wide variety of noises:

  • Crackle from wireless microphones or old vinyl records
    • You can fix this with the Automatic Click Remover effect.
  • Background noise like wind rumble, tape hiss, or power-line hum
    • These can be fixed using the Adaptive Noise Reduction effect and DeHummer effect.
  • Phase cancelation from poorly placed stereo microphones or misaligned tape machines.
    • These can be fixed using the Automatic Phase Correction effect.

Adobe Audition

Get professional support with noise cancelation software that is capable of complex sound editing and mastering.
Check price Visit website

LALAL.AI – Completely web-based

If you’re looking for a reliable noise cancellation software, then LALAL.AI might be just what you need. The app is designed to remove vocals and instruments from any track without quality loss.

LALAL.AI is powered by neural network called Phoenix and it allows you to extract both audio and vocals. Unlike other services, it also can extract other instruments, including bass, acoustic or electric guitar, piano and synthesizer.

This makes LALAL.AI the world’s first 8-stem splitter. The app also has a Voice Cleaner feature that cancels noise, removes background music, mic rumble and other interference.

The app is available in web browser, so be sure to give it a try if you need a simple but powerful noise canceling solution.

LALAL.AI features:

  • Completely web-based
  • Offers 8-stem splitter
  • Can remove both vocals and instruments
  • Voice Cleaner feature for noise cancellation
  • Incredibly simple to use

LALAL.AI

Powerful and simple noise canceling directly in your browser.
Check Price Visit Website

Descript – Speaker voices amplifier

Descript is an exceptional app with a sound remover that can help you easily cancel background noise and unwanted surround sounds.

It has a Studio Sound feature that uses AI to remove noise and echo and elevate speakers’ voices, thus improving your audio quality. It can make distorted recordings sound like professional-made audio.

Descript has a full effects suite with auto-leveling, loudness normalization, and room tone with creative and quality features such as compression, EQ, reverb, and many more.

Besides these features, it also offers a screen recorder with transcripts, faster exports, instant editing, and personalization of the thumbnails on your shared videos.

Furthermore, it has a well-developed feature that provides quality voiceovers for corrections to podcasts and screen recordings by plainly typing in the correction.

Take a look at the other good features of this noise cancelling software app:

  • Screen recording
  • Remote recording
  • Edit audio
  • Remove silence
  • Add crossfades and effects

⇒ Get Descript

NoiseGator (Noise Gate) – Lightweight app

This is quite a simple noise gate software that is intended for use with VOIPs such as Skype to cancel the background noise and provide you with an enhanced experience while you are talking to your buddies.

Simply said, this skillful program can remove your background noise effectively and help you to have a crystal-clear sound while talking in your meetings.

More so, it’s a lightweight app that routes through audio input to an audio output. The audio quality is analyzed to see if the sound level is higher than the average.

You can as well to use it with your microphone to see your voice in the headphones. Hence it’s possible to remove all background noise from your part too. Basically, it works as a mic filter software as well.

Lastly, this program requires Java 7 or higher to run in Windows and Mac alike.

Check out the most important features that are packed in this app:

  • The app is able to completely cut out background noise while you’re talking to others on Skype.
  • NoiseGator is a lightweight app that is also effortless to use.
  • It routes the audio through an audio input to an audio output.
  • The app is able to analyze in real time the audio level, and if the audio level is higher than the threshold, the audio will bypass as normal.
  • If the audio level goes below the threshold, the gate will close, and the audio is cut.
  • When you are using the app with a virtual audio cable, it will be able to act as a noise gate for either a sound input such as a microphone, or sound output such as speakers.
  • The app can also be used to gate noise from your very own mic or play your mic through your speakers.

⇒ Get NoiseGator

SoliCall – Innovative technology

SoliCall developed a patented technology for improving the audio quality in telephony.

SoliCall’s audio noise reduction software includes innovative noise reduction, client, and cloud-based echo cancellation as well.

With this tool, you will be able to easily improve the audio quality in any type of phone call. Choosing this tool is beneficial for anyone who needs a better sound quality and robust noise cancelation functionality.

Check out the most impressive features of the software below:

  • This innovative technology has been improved over the years by solving highly complex audio quality issues.
  • This tool provides a professional solution to all kinds of audio problems that you may encounter.
  • The technology is used worldwide to filter millions of phone calls each day.
  • SoliCall customers include developers of communication software, call centers, conference bridge providers, and network operators and organizations all over the world.
  • It boosts the audio quality of the calls.

SoliCall also has a dedicated support team that will help users analyze the audio behavior in their systems and will guide them on the best tuning to enhance the sound quality in their environments.

The app comes with innovative and patented noise reduction technology, and it’s compatible with lots of devices and platforms. It is also available for cloud-based communications.

⇒ Get SoliCall

Andrea PC Audio Software – Intelligibility enhancer

The Andrea PC Audio Software provides the latest Audio Commander and noise cancellation filters that you can use with Andrea USB devices. The service supports Windows.

This rich-featured tool comes with qualitative solutions such as speaker noise removal from VoIP received audio, so anyone can enhance sound audio quality in minutes.

More so, it includes aggressive noise cancelation to stay apart from disturbing loud noise. Plus, the graphic equalizer and microphone recording capabilities will change your sound settings to improve your audio immediately.

therefore with such an intuitive platform and qualitative sound you will get no distractions during important video calls or while recording your own voice.

Take a look at the essential features that come with Andrea PC Audio Software:

  • The app is able to provide noise cancellation, and the speaker output is enhanced with Andrea’s PureAudio noise reduction for removing noise from your VoIP received audio.
  • By cleaning up the signal that you are listening to, you will enhance intelligibility.
  • The Aggressive PureAusio noise reduction on the speaker output will remove even more noise from your VoIP received audio.

The software comes with a high fidelity ten band Graphic Equalizer with preset selections for specific control of the bass, mid-range and treble audio levels for customizing the sound tone to best fit your favorite music type.

The app also comes with microphone recording features such as stereo noise cancellation, acoustic echo cancellation, light beamforming, aggressive beam forming, beam direction, microphone boost, and many more.

⇒ Get Andrea PC Audio Software

Samson Sound Deck – Built-in recorder

Samson Sound Deck for Windows is a noise cancellation software for PC that is able to expand the capability of your computer communication and recording as well.

The software is inspired by the digital audio processing technology that is used in the cockpits of military fighter jets.

The program is powered by state-of-the-art digital noise reduction algorithms that produce crystal clear communications and recordings in any environment.

Check out the most impressive features that are packed in Samson Sound Deck:

  • This is the ultimate tool for home and office VoIP communication, voice recognition software, gaming and recording music and audio for YouTube videos, webinars and more.
  • Samson Sound Deck Windows will reside on your computer’s taskbar always improving sound quality and removing repetitive background noises.
  • The software lets you control lots of filters.
  • If your surrounding suddenly becomes quieter, you can just turn off the Digital Noise Reduction and utilize the unfiltered sound that is captured by the microphone.
  • Samson Sound Deck Windows includes a digital audio recorder with simple file saving and export functionalities.
  • The built-in recorder is perfect for recording voice memos, or full audio files for webinars.

The merging of the Samson Sound Deck Windows with Samson’s USB microphones will result in some of the most advanced computer VoIP communication and recording solutions that are available these days.

Therefore you’ll be able to rejoice at the sound quality and provide stunning recording sessions for the projects you really believe in.

⇒ Get Samson Sound Deck

These are currently the best five solutions that you can find for canceling noise.

Check out all their features and according to your needs decide which program is the best one for you and is ideal for providing the best noise-canceling features.

They all come packed with tons of impressive features that you can check out in more detail by heading to their official websites.

We hope you managed to find out which is the best noise cancelling software for you from the list above. Let us know your choice in the lines below.

6 Best Virtual Reality Goggles [Cyber Monday Deals & Sales]

The hype level stays the same, it’s just different products we get excited about every year. The last couple of years of technological advancement brought an entirely new market. And that’s VR.

But VR isn’t just Oculus Rift anymore. There’s a whole new world to be explored, with thousands of options. From VR headsets to games and apps running on those headsets.

As the VR market is relatively new, chances are you’re not in it yet. And there’s no better time to dive into this new world of virtual reality than now.

To save you some time and energy (and money, of course), we compiled a list of the best VR deals. So, all you have to do is choose what’s right for you, and your journey into VR can start.

Note: All the prices and offers in this article are subject to change, so be sure to check the official product page to get the latest deal. If the product or offer you’re looking for is no longer available, you can try to find it on its official manufacturer page or get another one from our list.

Which VR goggles to buy?

HTC VIVE Cosmos

  • Comes with 6 tracking cameras
  • 2880 x 1700 combined-resolution
  • VR content stores
  • The headphones could be of better quality

You can’t even think about going VR without a strong GPU to power it. And there’s no better time to upgrade your computer than now.

HTC VIVE Cosmos comes with its own mixed-reality headset. Sure, it’s not as powerful as some better-known alternatives, but this device is a pretty good deal for the price.

You will have access to the VR library store from where you can play your favorite VR games and apps.

3D Virtual Reality VR Headset with Wireless & Bluetooth

  • Keeps a good balance for the head
  • No need to wear glasses, closer to the world
  • Compatible with all iPhones, and Android phones within 4.7-6 inches
  • The material quality could be better

Pansonite 3D VR Glasses Virtual Reality Headset for Games & 3D Movies is great and comes upgraded from the previous model and the lightweight is adjustable.

The VR is compatible with all iPhones, and Android phones that are within 4.7-6 inches. 

It’s easy to use with the design that helps dissipate the heat from the head area while the adjustable T-shaped straps will help reduce the pressure around the face by balancing the head stress.

V3H S900 Multi-Purpose VR Virtual Reality Glasses

  • Support 2D, 3D movie and panoramic video playback
  • Up to 4K playbacks with super clear decoding
  • 64 GB for storing movies & video games
  • Nothing noticeable

With a system developed based on Android 5.1, it has a 2560*1440 super clear screen, S900 quad-core ARM Architecture A53 architecture, main frequency up to 1.7G processor, and a 3G running memory,

With the large storage, you can use the Wi-Fi connection to download massive resources online and play your favorite games as well as watch your favorite movies.

Oculus Rift S PC-Powered VR Gaming Headset

  • VR gaming library
  • Ergonomic design
  • Room-scale tracking
  • Requires your Facebook account to log in

Oculus Rift S PC-Powered VR Gaming Headset comes along with controllers, batteries, and a display port along with a manual of instructions. But don’t worry about it, there is nothing complicated about using this VR.

This headset comes with a high level of comfort, enriching your overall experience. And with the built-in VR library, it is definitely something worth trying.

HTC VIVE Virtual Reality System

HTC VIVE is one of the most known and popular virtual reality headsets. So, you can hardly go wrong with this one.

It boasts one of the most diverse ecosystems, as more than 2500 apps and games are currently compatible with this device, including the full integration with Steam VR, so you can enjoy all the benefits of your favorite gaming platform in VR.

⇒ Check price

Is there anything that interests you here? Make sure to let us know in the comments which VR gadget/game are you getting.

In case you didn’t find what you were looking for, perhaps you’d be interested in our VITURE Pro XR review.

Posted in VRTagged

Fix: Realtek HD Audio Manager Headphones are not Working

Realtek HD Audio Manager is an essential component of the audio system of any standard PC, but many users reported that their headphones are not working via it.

The problem is not new and can arise due to several reasons. Usually, identifying the underlying case is a task in itself, but we will help you fix things Realtek is not detecting headphones.

Why are my headphones not working with Realtek?

Here are some of the reasons why the Realtek headphones are not detected or working:

  • Outdated, corrupt, or incompatible drivers – These cases can lead to issues with the headphones, but it’s usually the outdated drivers to blame.
  • Issues with the connection – In some cases, the connection was improper, which led to Realtek not detecting the headset mic.
  • Misconfigured settings – If the input mode or audio settings are misconfigured, chances are that you will face trouble with the Realtek headphones.

What can I do if headphones are not working in Realtek HD Audio Manager?

Before we move to the slightly complex solutions, here are a few quick ones that might work:

  • With the headphone still plugged in, restart the computer and check if it works.
  • If the previous one didn’t work, restart the computer with unplugged headphones beforehand.
  • Update Windows to the latest available version.

If these fixes don’t work, head to the ones listed next.

1. Disable front panel jack detection

  1. Launch the Realtek HD Audio Manager, and click on the folder icon near the right.Folder icon
  2. Now, tick the checkbox for Disable front panel jack detection, and click OK to save the changes.Disable front panel jack detection to fix realtek hd audio manager headphones not working

Once done, restart the computer and check whether the Realtek HD audio manager headphones are still not working if that’s the case, head to the following method.

2. Set the headphone as the default device

  1. Connect the headphone to the computer.
  2. Press Windows + S to open Search, type Change system sounds in the text field, and click on the relevant search result.change system sounds
  3. Navigate to the playback tab, right-click on the headphone, and then select Set as Default Device.set as default device to fix realtek hd audio manager headphones not working
  4. Again, right-click on the headphone, and select Properties.
  5. Go to the Advanced tab, untick the checkbox for Allow applications to take exclusive control of this device, and click OK to save the changes.exclusive control
  6. Now, restart the computer and verify if the headphones start to work.

3. Update the audio drivers

  1. Press Windows + R to open Run, type devmgmt.msc, and click OK.device manager
  2. Expand Sound, video and game controllers, right-click on the headphone, and select Update driver.update driver to fix realtek hd audio manager headphones not working
  3. Select Search automatically for drivers and wait for Windows to install the best one.search automatically for drivers

This is the simplest way to update the driver, but it doesn’t always work. So, you may have to manually update the drivers or head to the manufacturer’s website and download it.

Once done, things should work if earlier Realtek HD Audio Manager had no headset option and the headphones were not working.

If the solution mentioned above didn’t seem to work, we recommend using Outbyte Driver Updater, a tool that will automatically find and update all outdated drivers on your system.

Outbyte Driver Updater

Have your Realtek driver updated along with all other outdated drivers in no time.
Free Trial Download Now

4. Make sure the relevant programs launch at startup (Dell devices)

  1. Press Ctrl + Shift + Esc to open the Task Manager, and navigate to the Startup tab.startup apps
  2. Now, select the Waves entry here, and click on Enable.enable

5. Reinstall the Realtek drivers

  1. Press Windows + X to open the Power User menu, and select Device Manager.device manager
  2. Expand the Sounds, video and game controllers entry, right-click on Realtek audio, and select Uninstall device.uninstall device to fix realtek hd audio manager headphones not working
  3. Now, tick the checkbox for Attempt to remove the driver for this device, and click on Uninstall.uninstall driver
  4. Once done, restart the computer, and Windows will automatically install a fresh copy of the driver.

If you encounter a problem after Windows undergoes an update, disable automatic driver updates. Things should be fine if earlier Asus Realtek HD audio manager headphones were not working.

Also, once you fix the error, get a reliable audio enhancer for better sound quality.

Please tell us which fix worked for you in the comments section below.

Attempt Made to Reference a Token That Doesn’t Exist [Fix]

File Explorer is one of the most critical Windows utilities, as it allows you to access all your files and folders in one place. However, sometimes, the File Explorer is not responding and causes issues. 

Users recently noted that they cannot open File Explorer and are getting an error message that reads: An attempt was made to reference a token that does not exist. According to the users, they started experiencing these issues immediately after a Windows update.

Why am I getting the Attempt made to reference a token that doesn’t exist error?

If you are getting the An attempt was made to reference a token that does not exist error, it could be due to one or more of the following reasons:

  • Corrupt registry – When you have a corrupt registry on your hands, it can cause errors and other problems with your computer. This is why we recommend using a registry cleaner periodically as part of your maintenance plans.
  • Problematic installations – If you’re having this problem too, chances are it has something to do with incompatible software installed on your system. This means that you have probably installed some new software recently, and it has caused problems.
  • Corrupt windows update – Sometimes, if one of these updates is incomplete or broken, it can upset how your computer functions and lead to such errors.

How can I fix the An attempt was made to reference a token that does not exist error?

1. Repair corrupt files

  1. Hit the Windows key, type cmd in the search bar, and select Run as administrator.cmd-run-admin-w11 unexpected kernel mode trap windows 11
  2. Type the following commands and press Enter after each one: cd %WINDIR%\System32 for /f %s in ('dir /b *.dll') do regsvr32 /s %s
  3. Restart your PC.

If you aren’t sure about performing this manually, then you can opt for a specialized tool to scan your PC comprehensively and automatically repair all the corrupted files.

2. Run DISM and SFC commands

  1. Hit the Windows key, type cmd in the search bar, and select Run as administrator.cmd-run-admin-w11 unexpected kernel mode trap windows 11
  2. Enter the following command: DISM.exe /Online /Restorehealth 
  3. Allow for the command to be executed, then type in the next one: sfc /scannow

3. Uninstall recently installed programs 

  1. Hit the Windows key, type Control Panel in the search bar and click Open.launch control panel
  2. Select Uninstall a program under Programs.microsoft-visual-c-runtime-error-windows-10
  3. Navigate to the latest install and click on Uninstall.

4. Revert to a previous Windows version 

  1. Hit the Windows key and select Settings.settings windows 11
  2. Navigate to Windows Update and select Advanced options.
  3. Scroll down and select Recovery.
  4. Under Advanced startup, select Restart now.
  5. Select Troubleshoot.troubleshoot Driver Power State Failure
  6. Click on Advanced options.
  7. Now, click on Go back to the previous build.

If you have installed a Windows update that causes problems, you can restore your PC to its previous state. This will keep all your files but replaces all files in your system folders with the older versions of those files.

5. Reset Windows

  1. Hit the Windows key and select Settings.settings windows 11
  2. Navigate to Windows Update and select Advanced options.
  3. Click on Recovery options, then under Reset this PC hit the Reset PC button.
  4. Select Keep my files.

If reverting to a previous Windows version doesn’t do the trick, resetting your PC might be the answer. When you reset your PC, it returns the system to its original factory settings. 

This means that all your files and apps are removed from the computer, returning to the state you were in when you first got them. Remember to back up all your files, so you don’t lose any critical information.

If you encounter any problems resetting your PC, refer to our comprehensive guide.

Hopefully, you have been able to address the  An attempt was made to reference a token that does not exist error using one of the solutions above. 

Let us know of any other additional solutions you may have tried that have worked for you but are not mentioned here in the comment section below.

Sims 2 DirectX 9 Error on Windows 10 & 11: Solved

No doubt, you have at least heard of the Sims games at least once in your life. We say that because this gaming franchise is surely among the top 5 most popular ones in the world so far.

This simulator has managed to gain tens of millions of fans worldwide, and users are still playing old versions of the game such as The Sims 2, even though Sims 4 has been out for quite some time.

However, people still playing Sims 2 on Windows 10/11 are talking about a DirectX error that leaves them unable to play.

Lucky for you, today we are about to focus on this nasty issue and show you what you can do to fix it.

Why do I get the Sims 2 DirectX 9 error?

As with most games nowadays, such errors don’t just happen for one reason. The Sims 2 DirectX 9 error can be triggered by random game or PC bugs, corrupted game files, or maybe even outdated software or drivers.

You should know that incompatibility issues with other programs that are running on your PC can be another cause, along with a faulty or nonexistent internet connection.

There are many causes for the Sims 2 DirectX 9.0c error on Windows 10 or Windows 11, and we are about to show you how to fix it.

How can I fix the Sims 2 DirectX error?

1. On Windows 11

1.1 Restart your PC

We’re going to start you off with a pretty simple solution from this troubleshooting process. However, even though it is simple, it might very well prove to be the most effective one.

What is that, you ask? A simple system restart should do the trick and get rid of the DirectX 9 Sims 2 error, according to other users who were in the same situation.

Simply restart your PC and everything should go back to normal. If not, the following steps in this guide will surely help you overcome the issue.

1.2 Run The Sims 2 as an administrator

  1. Navigate to the folder where The Sims 2 is installed.
  2. Right-click the Sims 2 executable and select Run as administrator.run as administrator

1.3 Update your GPU

  1. Search for Device Manager and open the app.device manager windows 11
  2. Expand Display adapters, then right-click on our GPU and select Update driver.update GPu driver
  3. Select Search automatically for drivers.search automatically for drivers

1.4 Update Windows

  1. Press Windows + I to access Settings.
  2. Select the Windows updates tab and click Install all.install-Windows-updates-1
  3. If no updates are queued for installation, press the Check for updates buttoncheck-for-updates-1

This also helps when The Sims 2 is not working on Windows 11.

1.5 Manually download & install DirectX 9

  1. Download DirectX 9.0c redistributable from June 2010 from the official website.
  2. Run the directx_Jun2010_redist.exe setup file as an administrator.v
  3. Restart your PC.

2. On Windows 10

2.1 Run the game as an administrator

  1. Navigate to the folder where The Sims 2 is installed.
  2. Right-click the Sims 2 executable and select Run as administrator.run as administrator

2.2 Update your graphics card driver

  1. 1. Search for Device Manager and open the app.

    device manager windows 11
  2. 2. Expand the Display adapters section.

  3. 3. Locate and right-click on your GPU in the list and select Update driver.

    update GPu driver
  4. 4. Select Search automatically for drivers.

  5. 5. Wait for the new drivers to be updated, then check whether the Sims 2 DirectX error persists.

  6. If you’re a Windows 10 user encountering the Sims 2 DirectX 9 error, updating your GPU is a method that is likely to solve it. This can be done quite easily via Device Manager.

2.3 Update your Windows

  1. Press Win + I to access Settings.
  2. Select the Update & Security tab.w10 settings
  3. Select the Windows Update tab and press the Check for updates button.w10 update

2.4 Manually download and install DirectX 9

  1. Download DirectX 9.0c redistributable from June 2010 from the official website.
  2. Run the directx_Jun2010_redist.exe setup file as an administrator.v

Are you also stuck on The Sims 2 and can’t put it aside? If so, we can show you what to do if your Sims 2 crashes on your Windows 10 PC.

Can I play The Sims 2 on Xbox Series X|S or Playstation 5?

Unfortunately, no, you can’t. There is no backward compatibility for this vintage game, so there’s no playing it on next-gen consoles just yet.

There have been some rumors about a remastered version of The Sims 2 in the works, but most Sims fans are waiting on Sims 5 after the fourth title was such a big hit.

If you want to play the vintage Sims 2, you have to look at machines/operating systems that will run it, first of all.

But, to answer your question, no, there’s no Sims 2 for Xbox Series X|S, or Sony’s latest PlayStation5. However, if you play it on your Windows PC, at least you have the guarantee it works.

Has this guide helped you fix the Sims 2 DirectX 9 error on your Windows 10/11 PC? Let us know in the comments section below.

Best Cpu Motherboard Combo Deals

Choosing the right CPU and motherboard combo is no easy feat. However, it is dependent on the purpose you intend to use them for, whether you are building a top-level gaming station or workstation.

With Amazon’s deals before us, it can be quite frustrating if you do not know what you want to buy. As such, incredible deals could easily slip away from you. Besides, you could end up saving a lot of money by leveraging the available deals.

Do not fret! We will help you make the decision based on your needs and budget. You will first need to look at the sed of the CPUs and the specifications of the motherboards.

It is important to note that they both must be compatible as this will guarantee the smooth performance of your device.

The same goes for the memory of your motherboard and chipset specifications. They both play a crucial role and can actually affect the performance of your PC.

If you’re planning on using this bundle for high-intensity work, then investing in a more powerful CPU might be the best choice for you.

This of course depends on the actual power of the motherboard, so they will need to be fully compatible for your system to work optimally.

What is the best buy for a CPU motherboard combo?

All these items have special prices.

Also, it is important to ensure that your motherboard can handle the speed of the CPU. It should also have enough memory in case you might want to make an upgrade in the future.

Note: All the prices and offers in this article are subject to change, so be sure to check the official product page to get the latest deal. If the product or offer you’re looking for is no longer available, you can try to find it on its official manufacturer page or get another one from our list.

Feel free to share your choices with us by using the comment section below. Which of these products fit your needs, and why?


Red Tint On Laptop Screen – Causes and How to Fix It

A red tint on your laptop screen can be distracting—whether you’re working, browsing, or gaming. It’s usually caused by one of a few common issues:

  • Night Light mode adding a warm color filter
  • Outdated or corrupted display drivers
  • Third-party display software overriding color settings
  • Misconfigured color calibration
  • Loose or faulty cables, if you’re using an external monitor

The good news? Most of these are easy to fix. In this guide, we’ll walk you through simple steps to identify the cause and get your screen back to normal.

How do I fix a red tint on a laptop screen?

Before going through these solutions, if you use a monitor, ensure the connections are tight and correctly done. This way, you will rule out the possibility of simple issues arising from poor cable connections.

1. Confirm the Night Light mode is disabled

1.1 Disabling Night mode

  1. Press the Windows + I keyboard shortcut to open the Settings app.
  2. Open System, then under the Display section, toggle the Night Light mode off.
    laptop screen red tint

1.2 Reducing screen warmth

  1. Press the Windows + I keyboard shortcut to open the Settings app.
  2. Choose System, then under the Display section, click Night Light settings.
    laptop screen red tint
  3. Under Color temperature at night, move the slider to the right to reduce the red tint effect.windows 10 red tint screen fix

2. Check the display driver

2.1 Update the driver

  1. Right-click Start and open Device Manager.
    laptop screen red tint
  2. Expand Display adapters.windows 10 red tint screen fix
  3. Right-click on your GPU and choose Update driver from the contextual menu.
  4. Click Search automatically for drivers.
    laptop screen red tint

Another reliable and easy way of updating your display drivers is to use an automated program, such as Outbyte Driver Updater, to help you find the most recent updates from its abundant database with a single click.

2.2 Reinstall the driver

  1. Right-click Start and open Device Manager.
    laptop screen red tint
  2. Expand Display adapters.
    windows 10 red tint screen fix
  3. Right-click on your GPU and click Uninstall device.
  4. Restart your PC and wait until the system installs the driver.

3. Inspect the accompanying third-party software

  1. Press Windows + R, type control panel, and hit Enter.
    laptop screen red tint
  2. Click Uninstall a program.
  3. Search the list of programs for anyone associated with display configuration, click on it and select Uninstall.

4. Recalibrate display colors

  1. Click the Search menu and type calibrate display color, then select the Calibrate display color app.
  2. Click Next and follow the instructions to calibrate the color.
    laptop screen red tint

That’s it. The red tint on your laptop screen should now be gone. Since we have not written them in any particular order, you should pick the most appropriate.

This isn’t the only issue, and many encountered red screen while playing games as well as red lines on laptop screen.

If you’re unlucky, you might even encounter a Red Screen of Death error on your PC, but we have a guide that addresses it, so you shouldn’t worry too much.

Getting a pink crash screen on Windows? Follow these steps to resolve the Pink Screen of Death and stabilize your display.

Finally, don’t forget to tell us whether writing this was worthwhile or if the screen is still infuriatingly reddish. You can do that in the comments section below.

Step-by-Step Guide to Changing The Sims 4 Language on Any Platform

The Sims 4 is available in many languages, but sometimes the game defaults to one you don’t want.

Whether you bought it on Steam, Epic Games, or the EA App, changing the language settings is usually quick if you know where to go. Here’s a no-nonsense guide to changing your Sims’ language on PC.

How do I change the language in The Sims 4?

1. Change the language on Sims 4 PS4/PS5

ps4 and ps5 logo
  1. Open Settings from the PS dashboard.
  2. Scroll down until you find Language in the list. Then, open it by pressing X.
  3. Choose your preferred language from the drop-down list that appears.
  4. The game will now launch in the language you selected.

2. Change the Sims 4 language on Xbox

  1. Open the Xbox menu.
  2. Choose Settings.
  3. Click on System Settings.
  4. Enter the Console Settings option.
  5. Find the Language and Locale entry, and click on Language.
  6. Select your desired language from the list.

3. Change the Sims 4 language on Steam

Game language settings

  1. Open your Steam Library.
  2. Right-click on the Sims 4 game and select Properties (for the example, we are using Counter-Strike).
  3. Open the Language tab.
  4. Choose the language you want to use by clicking the drop-down menu.

Steam language settings

  1. Log into your Steam account.
  2. Click Steam from the top menu.
  3. Open the Settings.
  4. Click the Interface tab.
  5. Choose the language you prefer from the drop-down menu.
  6. Click OK and choose the Restart Steam option.

4. Change the Sims 4 language on Origin

  1. Log into your Origin Client account.
  2. Open the My Game Library option by clicking it.
  3. Right-click the Sims 4 entry, and choose Game Properties.
  4. Click the Advanced Launch Options and select your desired language from the drop-down.

5. Change The Sims 4 language from the Windows registry editor

  1. 1. Go to u003cstrongu003eStartu003c/strongu003e.

  2. 2. Type u003cemu003erunu003c/emu003e and click on the first result to launch the Run dialog.

  3. 3. In the Run box, type u003cemu003eregeditu003c/emu003e and then click on u003cstrongu003eOku003c/strongu003e.

  4. 4. Go to the following destination: u003cstrongu003eu003cspan id=u0022urn:enhancement-dba2fb7du0022 class=u0022textannotation disambiguated wl-thingu0022u003eu003ccodeu003eHKEY_LOCAL_MACHINE/Software/Wow6432Node/Maxis/The Sims 4u003c/codeu003eu003c/spanu003eu003c/strongu003e

  5. 5. Change the u003cstrongu003eLocale valueu003c/strongu003e to the desired u003cspan id=u0022urn:enhancement-af4e30bbu0022 class=u0022textannotation disambiguated wl-thing wl-no-linku0022u003elanguageu003c/spanu003e. For example, add pt_BR for Brazilian Portuguese.

6. Change the game config file

If you don’t like editing the Registry, you can tweak the RIdOrigina.ini file. First, navigate to the folder where you installed your The Sims 4, and then open the GameBinRldOrigin.ini with Notepad.

Locate the line “Language,” and you should see a semicolon at the beginning of the line.

Remove the semicolon to activate the language of your choice. You can also change the language by using the following codes:

  • cs_CZ = Czech
  • da_DK = Danish
  • de_DE = German
  • en_US = US English
  • es_ES = Spanish (Spain)
  • fi_FI = Finnish
  • fr_FR = French (France)
  • it_IT = Italian
  • ja_JP = Japanese
  • ko_KR= Korean
  • nl_NL = Dutch
  • no_NO= Norwegian
  • pl_PL = Polish
  • pt_BR = Portuguese (Brazil)
  • ru_RU = Russian
  • sv_SE = Swedish
  • zh_TW= Chinese (Traditional)

Save the file, launch the game, and that’s all.

7. Use the Sims 4 Language Changer

Note icon NOTE
We need to specify that u003cstrongu003eyou will be downloading these files at your own risku003c/strongu003e, as our security systems can not vet the download source.
  1. Update the game to the latest version to have all languages downloaded.
  2. Download the Sims 4 Language Changer installer.
  3. Open it and select your preferred language.

What languages is The Sims 4 available in?

Here are the supported languages:

EnglishRussianItalianDanishSpanishChinese (Simplified)
GermanPolishDutchFinnishCzechJapanese
FrenchSwedishNorwegianBrazilian PortugueseChinese (Traditional)Korean
Source: EA.com

Is there a mod to make Sims speak English?

Not really—Simlish is hardcoded into the game and has been part of The Sims’ identity since the beginning. There’s no official mod that replaces Simlish with real spoken English or other languages.

A few YouTubers have experimented with voice-over mods or fan dubs, but nothing that’s truly functional or widely supported.

For more fun, while playing the game, check out our article on how to install Sims 4 mods.

Wrapping up

Keep in mind that the game can encounter issues, and we already wrote about Sims 4 not opening. We also have a guide on what to do if Sims 4 won’t update, so don’t miss it.

Check out our detailed guides on how to fix Sims 4 won’t start, mods not working, lag problems, and Sims 4 won’t load household issues to get back to smooth gameplay.

If you’re aware of another solution to the problem, please share it with us in the comments section below. Also, leave any other questions, and we’ll be sure to take a look.

External Hard Drive Error: 6 Methods You Can Use to Fix It

What happens when you receive an external hard drive error on the disk? Well, it’s not pleasant, but it’s not the end of the world. It can be fixed.

There are various reasons your external hard drive is not working well, including:

How can I fix the external hard drive error?

First, disconnect your hard drive and restart your PC. Try using it on another computer. If it’s not working, keep reading:

1. Run the CHKDSK scan

  1. Press the Windows key, type cmd, and click Run as administrator under Command Prompt.
    cmd  admin external hard drive error
  2. Type the command below (replace C with the drive letter) and hit Enter: chkdsk c: /rchkdsk
  3. Wait for the command to finish running and apply any recommendations.

CHKDSK is a built-in tool that fixes many hard disk issues on Windows. For example, it can improve the problems causing the external hard drive error 0x80071ac3 and other versions of the error.

Remember to restart your PC after applying the recommended fixes.

2. Update drivers

  1. Press the Windows key + X and select Device Manager.
    device manager
  2. Double-click the Disk drives option and right-click your external driver.
  3. Select the Update driver option.
    update driver disk external hard drive error
  4. Now, choose Search automatically for drivers and install any available update.
    search auto
  5. Click the arrow next to the Universal Serial Bus controller option.
  6. Right-click each device there, select Update driver, and choose the Search automatically for drivers option on the next page.
    search auto usb
  7. Better still, if you find any device with a yellow exclamation sign, right-click it and select Uninstall device.
    uninstall device
  8. Now, click the Uninstall button and restart your PC.
    uninstall button external hard drive error

3. Assign a drive letter

  1. Press the Windows key + X and select Disk Management.
    disk management
  2. Right-click the external drive and select Change Drive Letter and Paths.
    change drive
  3. If the drive already has a letter, click the Change button. If it does not have, click the Add button.
    add or change external hard drive error
  4. Now, choose a drive letter and click the OK button.
    driver letter

Drive letters make it easy to access your disks. So, if you are getting an I/O device error on your external hard drive, you might need to assign or change its letter.

4. Initialize disk

  1. Launch Disk Management and right-click your external hard drive.
  2. Select the Initialize Disk option.
    initialize external hard drive error
  3. Select the disks you want to initialize, select either MBR or GPT partition styles and click OK.

Initializing your hard drive is a way of activating it. This should clear any roadblocks that might be giving the error you are getting on your external hard drive.

5. Change the drive format

  1. Right-click the Start icon and select the Disk Management option.
  2. Right-click the drive and select Format…
    format
  3. Select the NTFS or exFAT option, tick Quick format, and click the OK button.

You will likely face different errors if your external hard drive is in the wrong format. Changing the format to accessible ones should eliminate these issues and restore normalcy.

This solution can also help with Disk read error occurred error that we covered earlier.

6. Change the power setting for the USB driver

  1. Press the Windows key + X and select the Device Manager option.
    device
  2. Double-click the Universal Serial Bus controllers option to expand it and right-click the driver there.
  3. Choose the Properties option.
    properties
  4. Now, click the Power Management tab at the top.
  5. Finally, uncheck the box for Allow the computer to turn off this device to save power and click OK.
    power external hard disk error

Your external hard drive needs the required power to function correctly. If the USB port device is set to turn off to save energy, your external disk might give error messages when the feature is activated.

The external hard drive error can be frustrating, as it might lead to the loss of crucial data. But by applying the fixes above, you should be able to fix them quickly.

If you are facing the external hard drive not showing on Windows 10 issue, check our detailed guide to regain access to it quickly.

Let us know the solution that worked for you in the comments below.

Windows 10 Screensaver not Working: 6 Ways to Fix it

You’ve upgraded to Windows 10 from Windows 8.1 or 7, and now your screensaver is not working anymore. You did a fresh install of Windows 10, but the screensaver still isn’t working. Or maybe it is working but only intermittently.

This is a problem many users have contended with, often without much success.

In today’s article, we’ll go through some things that might stop your screensaver from working and what to do in each case to fix it.

Why is my screensaver not working on Windows 10?

From user experience, there may be a few reasons to encounter this error. On top of the list are the following:

  • Settings configuration – In some cases, the problem may be that you have not correctly configured the screensaver. The moment you change your configuration, it should start working.
  • Problems with drivers – The screensaver may also be affected by outdated or bad drivers.
  • Connected peripherals – In some cases, if you have certain devices connected to your system, the problem may be triggered. This is often the case with some game controllers.
  • Damaged files – Corrupted system files may also play a role in the Windows screensaver problem.

As it appears, problems with the screensaver are quite common in Windows 10. In fact, screensaver issues come in various forms. Here are some of the most common screensaver issues you can encounter:

  • Screensaver won’t turn off Windows 10 – This can be a serious problem, as it may render your computer unusable. If you experience this issue, restart your computer, and check out the solutions from this article.
  • Windows 10 screensaver won’t start – If your screensaver won’t even start, ensure it’s enabled first. If the screensaver is activated, check out other solutions from this article.
  • Windows 10 screensaver won’t activate – This problem occurs when you cannot activate your screensaver. Keep reading this article for potential solutions.
  • Screensaver won’t stop Windows 10 – This issue makes your screensaver run constantly. It’s a serious problem, as it can also render your computer unusable.
  • Windows 10 screensaver won’t work – This error appears when the screensaver won’t show up under no circumstances.
  • Screensaver freezes Windows 10 – This problem occurs when you can start the screensaver, but it freezes. If your screensaver keeps freezing, you may not be able to use your computer, which is a serious problem.

Let us now consider some solutions.

How can I fix Windows 10 screensaver if it’s not working?

Before applying any of the solutions recommended in this article, we suggest doing the following:

  • Disconnect peripherals – In some cases, they may trigger the problem, and disconnecting them becomes the easy fix.
  • Restart your computer – Some tiny glitches require that specific processes are rebooted. A restart helps them reboot and may correct this problem.
  • Clean the mouse sensor and mouse pad – Optical mice use an optical sensor to detect movement and direction. Sometimes if the optical sensor or lens has dust on them, the mouse might detect false inputs and prevent your screensaver from showing up.
  1. Update Windows
  2. Check screensaver settings
  3. Update drivers
  4. Reset Power Management Option
  5. Run power troubleshooter
  6. Run the SFC scan

1. Update Windows

  1. Open the Settings app using Windows + I, then click Update & Security.
    windows 10 screensaver not working
  2. Click on Check for updates and install any updates found.

If you can’t launch the Setting app, look at this article to solve the issue.

2. Check screensaver settings

  1. Press the Start menu, type screensaver, and select the Change screen saver option.
    windows 10 screensaver not working
  2. Pick from the list under the Screen saver dropdown and click Apply, then OK.

You can customize the Photos option further by following our guide on setting your pictures as a screen saver in Windows, which explains how to build a personal slideshow.

3. Update drivers

Device drivers are also prone to bugs; keeping them up to date is as important as doing it for your Windows installation.

Always keep ahead with updating your outdated drivers for your computer to work correctly. With the help of a professional driver updater tool, you can do it automatically and prevent the risk of downloading and installing the wrong driver versions.

⇒ Get Outbyte Driver Updater

4. Reset Power Management Option

  1. Go to Search, type power, and open Choose power plan.
    windows 10 screensaver not working
  2. Choose Change plan settings next to your selected plan.
    windows 10 screensaver not working
  3. Now, go to Change advanced power settings.
  4. Lastly, in the Advanced settings window, choose Reset plan defaults.

5. Run power troubleshooter

  1. Press Windows + I to open Settings, then select Update & Security.
    windows 10 screensaver not working
  2. Now, go to Troubleshoot and select Additional troubleshooter.
  3. Scroll down, find Power, then click Run the troubleshooter.
  4. Wait for the process to finish, and follow further on-screen instructions
  5. Lastly, restart your computer

6. Run the SFC scan

  1. Press Windows + X and select Command Prompt (Admin).
    windows 10 screensaver not working
  2. Enter the following script and hit Enter:
    sfc/scannow
    cmd sfc scannow
  3. Wait for the process to finish
  4. Finally, restart your computer

The solutions will work if the Windows 10 screensaver timeout is not working or even after an update.

We hope these tips help solve the screensaver problems you’re facing in Windows 10. If not, let us know in the comment section below, and we’ll try to help you.

5 Best Laptop Sleeve, Bag & Case Deals

Are you looking for a protective laptop sleeve? Do you want your laptop to be fully protected against bumps, falls, and other unexpected events that may damage it? If the answer is ‘Yes, then look no further.

In this quick buying guide, we’re going to list the best laptop sleeve deals that you can get right now.

Note: All the prices and offers in this article are subject to change, so be sure to check the official product page to get the latest deal. If the product or offer you’re looking for is no longer available, you can try to find it on its official manufacturer page or get another one from our list.

What are the best laptop sleeves to buy?

Arvok 15-15.6 ” laptop sleeve

  • Protects laptop from dust, shocks, bumps, scratches, scuffs, and spills
  • Premium thickened water-resistant neoprene material
  • Quick top-loading zipper on the bag glides smoothly
  • Ideal fit for most of 15-16-inch laptops laptop
  • Ultra-slim and lightweight
  • Easily develops a smell if you don't wash it

Laptop sleeves are the lightweight version of a laptop bag, but they are still useful for transportation nonetheless, and one good example is the Arvok laptop sleeve.

The material is very soft to the touch and yet very durable, and the neoprene will make it so that your laptop will be safe from bumps, dust, and water damage.

More so, you don’t have to worry about carrying it, since it is so lightweight you won’t feel a difference with regards to your laptop.

MOSISO polyester laptop shoulder briefcase bag

  • Polyester foam padding layer and soft fabric lining
  • Removable and adjustable padding shoulder strap
  • Front arc pocket is ideal for storage of small items
  • The top-loading zipper on the bag glides smoothly
  • Ideal for you to carry your laptop out
  • Some pockets seem too small to be usable

This is a great slim laptop bag that can also be used as a laptop sleeve. It features a polyester foam padding layer that allows it to absorb shocks and bumps thus protecting your laptop.

It comes with a removable and adjustable padding shoulder strap that can vary from 27 inches to a maximum of 48 inches.

There is also a small side pocket that you can use to store power adapters, cables, pens, and other small items.

Tucano Second Skin Colore

  • Simple, elegant protective pouch
  • Hard fabric shell type
  • Compatible with 17/18″ laptops
  • Only runs in one color

This elegant laptop sleeve is extremely light light and soft, while also being protective and resistant.

Thanks to the envelope design of the case, you can carry your Windows laptop or tablet in style.

Besides, it can also double as a document-carrying case, especially given its business-like design of it.

DOMISO Laptop Sleeve

  • Waterproof
  • Shockproof
  • Multiple colors
  • Minimal padding

This ultra-slim laptop sleeve is perfect for 17″ display laptops. It fits right over your computer, allowing you to easily carry your laptop around in your backpack or in this pouch alone.

We really like this sleeve’s professional appearance. You can pick from a wide range of different colors, all following the same simple and elegant design.

Vova Laptop Bag

  • 13-17.3″ inches compatible
  • Runs in 8 different colors
  • Shoulder strap
  • Water-resistant
  • Limited storage capacity

Made of high-quality Oxford, this versatile laptop bag is the perfect fit if you want to easily carry your device.

Thanks to its added strap and handles, you can use it on its own, with no need for any additional bag. It runs in multiple colors.

The design is simple, but you can spice it up a little bit and pick a more vibrant color if that’s what you prefer.

These are the hottest laptop sleeve deals of the moment. We’ll keep an eye on these deals and update this guide as soon as we’ve found new laptop sleeve deals.

6 Best Wireless Backup Cameras To Get

It’s that time of the year again when a lot of memories are made from Thanksgiving to the Christmas holidays.

It is also during this time that a lot of accidents take place as a lot of people are on the road traveling to see their families.

The pandemic has already done away with a significant number of people so you want to stay safe while on the road. As such, you need to hurry up your boots and get on the Christmas train with the amazing deals available for wireless backup cameras.

The wireless backup camera comes with its own advantages. While many people trust their rearview mirrors, it wouldn’t hurt to have a set of third eyes on deck. 

Those moments in your driveway when you were close to hitting a kid or a blind spot will be long gone once you get yourself one of these wireless backup cameras.

If technical stuff is not your forte, you are in luck. These cameras are easy to install and you have two options either bracket or flush mounting.

You don’t even have to use it as a rearview camera. Simply place it where you feel most vulnerable from either the front or back.

What is best wireless backup camera?

All these items have special prices.

The cameras have superior night vision with accuracy and stable vivid images with waterproofing capabilities.

What’s so good about the wireless backup cameras is their one-year and some up to two-year warranties with after-sale services and a professional technical team on call.

Note: All the prices and offers in this article are subject to change, so be sure to check the official product page to get the latest deal. If the product or offer you’re looking for is no longer available, you can try to find it on its official manufacturer page or get another one from our list.

Have your eye on any of the wireless backup cameras on sale this Cyber Monday? Let us know in the comment section below.

Sony Honda Mobility EV may include PS5 integration

If you are unfamiliar with Sony Honda Mobility Inc., it is a joint venture established earlier in 2022 by the two Japanese companies to “create new technologies to pioneer a new era of mobility,” according to its mission statement. The venture is seen as one of the most likely competitors to seriously take on Tesla in the electric vehicle market.

The company’s first car models are expected to roll out (no pun intended) sometime in 2025. The stated aim of Sony Honda Mobility is to “develop a car as hardware that will cater to the entertainment and network we would like to offer.” In addition to going head to head with Tesla in the area of autonomous driving technology, Sony Honda Mobility also hopes to get an edge over Tesla in another key department: entertainment technologies. This is where Sony comes in to the Sony Honda Mobility equation.

Sony’s Vision-S 01 has a whole lot of screens and plenty of Sony content to consume.
Via The Verge.

Sony Honda Mobility President and COO Izumi Kawanishi said in an interview with the Financial Times,

Sony has content, services and entertainment technologies that move people. We are adapting these assets to mobility, and this is our strength against Tesla.

So while the company may not be prepared to literally cram a PS5 into the dashboard, you can bet we’ll see some sort of integration with it in these new cars. In the interview Kawanishi suggested it would be possible.

And Sony Honda Mobility would not be the first to do so. Just last month BMW announced that it will bring casual gaming to its iDrive touchscreen systems. And Tesla of course has its Tesla Arcade, which features a catalog of classic games.

Featured image via Car and Driver. 

PDF not Opening in Outlook? How to Fix

Microsoft Outlook is one of the top relevant desktop email clients that can be synced even with custom webmail.

Some Windows users reported that Microsoft Outlook won’t open PDF attachments in their emails. so this seems to be a general problem. It is known that this issue also occurs in Chrome, and also other popular browsers.

For this reason, Windows Report has compiled relevant solutions to this menacing problem. In case you can’t open PDF files in Outlook, consider the practical guide below.

Why can’t I open a PDF email attachment?

If you find yourself in this situation, it could be because of any of the following reasons:

  • Missing programs – Your computer may not have important programs to open files in PDF format.
  • Outdated applications – Sometimes, you would need updated applications to some PDF formats.
  • Damaged files – It is also likely that your current PDF reader is damaged and will need to be repaired or replaced.
  • Malware infections – There are chances that your antivirus is blocking the attachment because it is infected by malware.

Now that we have spoken about possible causes, we can discuss some accessible alternatives and solutions.

What can I do if I can’t open PDF attachments in Outlook?

Table of contents:

  1. Scan the PDF
  2. Use a PDF reader
  3. Run Windows Update
  4. Use the right password
  5. Temporarily disable the antivirus protection

1. Scan the PDF

  1. Press Windows + I to open the Settings app, then select Update & Security.
  2. Click on Windows Security and then select the Virus & threat protection option.
    can't open pdf attachments in outlook
  3. Select Scan options.
  4. Click on Custom scan and click Scan now.
    can't open pdf attachments in outlook
  5. Select the folder where the PDF file is located, and click on scan to proceed.

If Outlook won’t open a PDF file, you need to scan it to ascertain whether it is safe for your Windows PC.

Some PDF files sent to email contain viruses, malware, or even spyware that pose unwanted threats to your system, so be sure to scan it.

Alternatively, you can right-click on the PDF file and select scan with ….(third-party antivirus) to scan the PDF file.

2. Use a PDF reader

You may be unable to open a PDF attachments in Outlook directly due to corrupted files or other causes. To bypass this unpleasant issue, it’s recommended to use PDF reader software.

So, you can get an all-rounded solution that will open each PDF file with no troubles, then pdfFiller is the go-to resolution.

This software lets you view, edit, and share your PDFs, giving the best viewing experience with its easy-to-use tools. The process is plain intuitive, with drag-and-drop action that will open your documents without any troubles.

Moreover, you can fill and sign PDF documents and get or offer feedback by adding notes, text boxes to your teammates.

➡️ Get pdfFiller

3. Run Windows Update

  1. Open the Settings app using Windows + I, then click Update & Security.
  2. In the Windows Update windows, click on the Check for updates button.

Microsoft constantly releases frequent patches containing fixes and drivers for your Windows PC. Hence, ensure you’re running the latest OS version on your computer.

This would keep your PC bug-free and help you if Outlook doesn’t open a PDF file.

4. Use the correct password

Some PDF files are encrypted using a password that secures the PDF from unwanted access—for example, bank statements, payment receipts, sensitive files, etc.

To open this set of files, you need to use the correct password, which is confidential and can only be known by the appropriate individual.

If your PDF file is password-encrypted, you may need to ask for the password to open the PDF file.

5. Temporarily disable the antivirus protection

  1. Click on the hidden access arrow in the Taskbar.
  2. Click on your antivirus icon, hover over Avast shields Control and select Disable for 10 minutes (This step varies for different antivirus software).
  3. Try opening the PDF document again.

Sometimes, antivirus programs can delete or quarantine specific files, patches, or DLLs associated with programs. However, antivirus scanning engines might misinterpret files that can be trusted with potentially harmful packages.

So if you experience PDFs that are not opening in Outlook 365, disabling your antivirus might be a helpful workaround.

Note: After opening the PDF attachments, ensure you enable the antivirus protection afterward.

Before you leave, find out how to download Outlook emails as PDF.

Please share your experience solving the Outlook won’t open PDF attachments problem. Feel free to comment below in the comment section, and we will get back to you.

Windows 10 Version 22H2 (2023 Update) Is Officially Ready For Deployment

It was only yesterday that we were saying that Microsoft just sneaked important software changes past you again and you didn’t even notice.

What were we talking about? Well, Windows 10 version 22H2, which was unofficially confirmed by Microsoft right under our noses some time ago.

Now, this feature update for the Windows 10 operating system has started rolling out and is now available as an enablement package for those sticking to good-old Windows 10 (version 2004 and newer).

Microsoft’s Windows 10 version 22H2 is ready

The Redmond-based tech company says this highly-anticipated release is now finally ready for broad deployment.

Even though Microsoft has yet to tell more about those mysterious productivity features, we managed to dig out some details about what is new in Windows 10 2022 Update.

As you know, broad deployment is the final rollout phase in the lifecycle of a Windows release, so we should all be excited.

It actually means more users with compatible computers receive offers to update, not only those daring to press the Check for updates button.

Just so you know, Windows 11 2022 Update (also 22H2) is currently available to all who check for updates manually.

Now, you can update to Windows 10 22H2 from version 20H2, 21H1, and 21H2, and the process will not take much time or bandwidth since all those releases are enablement packages only and work as regular cumulative updates.

Also, keep in mind that Microsoft is about to stop supporting Windows 10 version 21H1, so users must prepare for a forced upgrade to a newer release.

From what we can see in the official documentation, Windows 10 21H1 will reach its end of life on December 13, 2022. 

Regular users running Windows 10 2022 Update Home and Professional editions will receive 18 months of support, while commercial customers with Enterprise and Education editions will get 30 months.

Microsoft also wanted to remind everyone that at least one version of Windows 10 will remain supported until October 14, 2025, which means users can expect more similar updates in the future.

You can download official ISO files for a clean installation or an in-place upgrade using the updated MediaCreationTool.

Windows 10 version 22H2 will install like the previous smaller feature updates for Windows 10, so there really isn’t anything new in the process itself.

The tech giant said that the Windows 10, version 22H2 release will not bring updates to the Windows Hardware Compatibility Program (WHCP).

Instead, it will follow the same guidelines as Windows 10, version 2004. Let’s have a bit of a closer look at this matter and decide for ourselves:

  • WHCP requirements – No change. Windows 10, version 2004 requirements remain applicable for Windows 10, version 22H2.
  • Windows Hardware Lab Kit – No change. Since WHCP requirements will persist in Windows 10, version 22H2, the Windows Hardware Lab Kit (Windows HLK) will also remain the same. There will not be a new Windows HLK release for Windows 10, version 22H2 and partners can continue using Windows 10, version 2004 HLK for certification.
  • Errata – No change. All Windows 10, version 2004 errata will continue to be valid for Windows 10, version 22H2.
  • Windows HLK playlist – No change. The Windows HLK version 2004 playlist can be used for Windows 10, version 22H2.
  • Driver signature – No change. Drivers that meet all the applicable Windows 10, version 2004 requirements will be digitally signed with the same signature attributes.
  • Submission – No change. Windows 10, versions 2004, 20H2, and 21H1 can be used for WHCP submission.
  • WHCP qualification – Windows 10, version 2004
  • Required OS version – Windows 10, version 22H2
  • HLK version – HLK version 2004

We will keep you posted as soon as new information on the 2022 update, or Windows 10 version 22H2, becomes available.

Until then, check for updates or use the MediaCreationTool and see for yourself what this update has actually brought to the Windows 10 OS.

5 Best Laptop Backpack Deals To Grab Now

A laptop backpack is still the number one option as far as lugging your laptop around is concerned.

Whether you’re attending a meeting, a lecture, or on your way to a business presentation, the laptop backpack is safe and very convenient.

And the latest models are so advanced and come with bonuses like USB charging ports meaning the backpack is now more than just a carrier.

Well, we’ve been out looking for great laptop backpack deals and returned with bucketloads of super offers. Here are the winning laptop backpack packages that you can get.

Note: All the prices and offers in this article are subject to change, so be sure to check the official product page to get the latest deal. If the product or offer you’re looking for is no longer available, you can try to find it on its official manufacturer page or get another one from our list.

Which brand is best for a laptop backpack?

Matein 15.6-Inch

  • Lots of storage space and pockets
  • Comfortable airflow back design
  • Breathable and adjustable shoulder straps
  • Foam padded top handle
  • Lack of padding on the underside

The Matein travel laptop backpack 15.6-Inch is a professional office work bag, that can be also used for college, high school, for big students, or for boys, girls, and teens. This backpack got your back.

You can charge your phone while walking thanks to its built-in USB charger outside and built-in charging cable inside. This USB charging port only offers you easy access to charge, but it will not power itself.

Volher 15.6-Inch

  • Storage space & pockets
  • Mesh pockets at the side for water bottle
  • Multi-panel ventilated padding
  • Breathable and adjustable shoulder straps
  • No metal zippers

The Volher 15.6-inch laptop backpack is made of water-resistant and Durable fabric, and it’s great for secure and long-lasting usage every day.

It has one separate laptop compartment to hold a 15.6-Inch laptop, as well as a 15-Inch, 14-Inch, and 13-Inch Macbook/laptop. 

If you’re looking for a backpack for everyday use, I am not sure it can get better than this!

Mancro 15.6-Inch

  • Perfect size and storage pockets
  • USB port design
  • Antitheft travel laptop backpack
  • Water resistant
  • Bottle does not fit in the side pockets

The Mancro 15.6-Inch laptop backpack doesn’t only carry your favorite 15-inch laptop comfortably but is also spacious enough to haul a lot of your personal essentials.

It can thus serve a multitude of uses:  as a college laptop backpack, or for everyday usage.

And while on the go, the external USB port will offer a convenient charging system for your cell phone. At the same time, you can be listening to your best beats via the headphones jack.

Altmont Victorinox Unisex

  • Available in multiple colors
  • Durable fabric
  • Water-resistant
  • Lightweight
  • Roomy, but not for traveling

First and foremost, the used versatek fabric coupled with the abrasion-resistant special nylon base makes it super durable. Secondly, this backpack has a brilliant design and looks the part in every way.

This multi-compartment backpack will certainly fit and protect your laptop. All pockets are secured with strong zippers.

It’s a great choice to fit all your work or study supplies in one place. The bag itself is pretty light, so you don’t have to worry about having too much weight to start with.

OGIO ALPHA Convoy

  • Waterproof zippered laptop pocket
  • 20L capacity
  • Front valuables pocket
  • Internal key clip
  • Not suitable for traveling

While the Ogio Alpha Backpack has caused quite an excitement because of its long-lasting construction, the outstanding news here is its environmentally friendly nature.

Now, this backpack takes an approach drastically different from the others by using a fabric made from recycled plastics – mainly water bottles.

But that’s not where it all ends. The basics are well catered for so organization is perfect: you will have the waterproof zippered 15” laptop pocket, a luggage pass-through, front valuables pocket, an internal key clip, and reflective zipper pulls amongst other organizers.

It’s hard to separate our exquisite options so choosing may ultimately come down to your specific needs.

Regardless, you can rest assured that these are some of the best backpacks that you’ll ever come across!

MSDN Bugcheck Video TDR Error: 6 Easy Ways To Fix it

You have probably just gotten an MSDN bugcheck video_tdr_error. Let us share all you need to know about this error.

Blue Screen of Death errors like this can cause many problems on your Windows 10 PC.

These BSOD errors will restart your computer every time they appear; therefore, you must know how to fix them.

Why am I getting MSDN bugcheck video_tdr_error?

Users have experienced this error for varying reasons. For example, on the top of the list of triggers, including the following:

  • Issues with drivers – On devices with bad, corrupted, or outdated graphics drivers, you may experience this and other errors.
  • Background apps – On devices with too many applications running in the background, you may also experience this error.
  • Graphics card – If you have a bad graphics card, it is often known to trigger the MSDN bugcheck video error.

The VIDEO_TDR_ERROR blue screen is a relatively standard error that can appear on any PC. Speaking of this error, users reported the following problems:

  • VIDEO_TDR_ERROR Windows 7, Windows 8.1 – This error can appear on any version of Windows, and both Windows 8.1 and 7 users reported it. Even if you’re not using Windows 10, you should be able to apply most of our solutions to your version of Windows.
  • VIDEO_TDR_ERROR nvlddmkm sys, dxgkrnl.sys – Sometimes, this error will give you the file name responsible for the crash. Once you know which file caused the crash, with some research, you can easily find the problematic software or device.
  • VIDEO_TDR_ERROR Nvidia, AMD, Geforce – Your graphics card drivers can cause this error, and both Nvidia and AMD users reported this issue. However, you should be able to fix this problem simply by updating your drivers.
  • VIDEO_TDR_ERROR blue screen, BSOD – This is a blue screen error, and just like any other BSOD error, it will force your PC to crash. However, you should be able to fix it using one of our solutions.
  • VIDEO TDR failure on startup, won’t boot – Many users reported this problem on startup. This is a big problem since your PC won’t be able to boot at all, and if that’s the case, be sure to remove overclock settings and check if that helps.

These are the primary triggers you may expect. That said, let us now consider some fixes.

How can I fix the msdn bugcheck video_tdr_error?

1. Use a dedicated tool for fixing BSoD

BSOD errors are not to be joked with and must be addressed immediately, as they can lead to more severe problems. But don’t worry because, as you can see, we offer plenty of solutions, and one will work.

However, let’s start with the easiest one, which implies using a third-party tool that automatically fixes BSOD errors.

2. Update your drivers

  1. Press Windows Key + X on your keyboard to open the Power User menu and select Device Manager from the list.
    Video tdr error dxgkrnl.sys
  2. When Device Manager opens, locate the driver you want to update, right-click it and choose Update driver.
    Video_tdr_error Windows 7, Windows 8.1
  3. Select Search automatically for updated driver software and let Windows 10 download the appropriate driver.
    Video tdr error nvlddmkm sys
  4. Repeat these steps for all drivers that you want to update.

3. Reinstall your display drivers

  1. Press Windows Key + X on your keyboard to open the Power User menu and select Device Manager from the list.
    Video tdr error dxgkrnl.sys
  2. When Device Manager opens, locate the display driver you want to reinstall, right-click it and choose Uninstall device.
    msdn bugcheck video_tdr_error
  3. Confirm your choice, and restart the computer.

Sometimes the MSDN bugcheck video_tdr_error can be caused by your display adapter drivers, and to fix this error, you’ll have to reinstall your graphics card drivers.

Choosing drivers manually is a long and tedious process; therefore, you might want to use dedicated software that automatically downloads all the necessary drivers.

Outbyte Driver Updater can automatically repair and update your drivers in one go with just a few clicks, so make sure you try it out. Also, it will keep your system safe from malfunctions while installing the wrong driver versions.

4. Install the latest Windows updates

  1. Press Windows Key + I to open the Settings app.
  2. When the Settings app opens, navigate to the Update & Security section.
    Video tdr failure on startup
  3. Now click on Check for updates button.
    Video_tdr_error Windows 8.1

Sometimes you might miss an important update due to specific bugs, but you can always check for updates manually by performing the steps above.

Installing Windows updates is crucial for your system’s safety and stability. Windows 10 has a few issues with specific software and hardware, which can sometimes cause the MSDN bugcheck video_tdr_error to appear.

To prevent this and other BSOD errors from appearing, we advise you to use Windows Update and download the latest Windows 10 patches.

Many of these updates offer new features, but many bug fixes are related to hardware and software.

Therefore, if you want to keep your PC safe and error-free, we suggest installing the latest updates frequently.

Windows will check for available updates and download them automatically in the background.

Once the updates are downloaded, they’ll be installed automatically as soon as you restart your PC. So after you update your Windows, the problem should be resolved.

5. Remove overclock settings

  1. Press Windows + I, navigate System, Recovery, and click Restart now under Advanced startup.
  2. Select Troubleshoot from the options.
  3. Click on Advance options.
  4. Then click on UEFI Firmware Settings.
    msdn bugcheck video_tdr_error
  5. Click Restart.
  6. Under Performance, find Overclocking, and change the setting to Disable (this final step will depend on the manufacturer).

You can get better performance by overclocking your hardware, but if your overclocking settings aren’t stable, you can cause the MSDN bugcheck video_tdr_error to appear.

To fix this and any other BSOD errors caused by overclocking, we strongly advise you to remove all overclocking settings.

Several users reported fixing the problem simply by changing their RAM frequency. For example, they changed their RAM frequency from 2400MHz to 1600MHz, solving the issue for them.

A few users reported that they managed to fix this error by underclocking their core by 50, so you might want to try that as well.

We must mention that overclocking and underclocking can be potentially dangerous; therefore, use extra caution.

6. Use System Restore

  1. Restart your PC several times during the boot sequence to force the PC to perform an Automatic Repair.
  2. Now choose Troubleshoot, select Advanced options, and click on System Restore.
    msdn bugcheck video_tdr_error
  3. Select your username and enter your account password.
  4. The System Restore window will now appear. Click the Next button to proceed.
    msdn bugcheck video_tdr_error
  5. A list of available restore points will appear. If available, check the Show more restore points option. Now select the desired restore point and choose Next.
    msdn bugcheck video_tdr_error
  6. Follow the instructions on the screen to restore your PC. Once your PC is fixed, check if the issue persists. If not, it means that a third-party application or a driver caused the problem.

The MSDN bugcheck VIDEO_TDR_ERROR can sometimes appear due to installed applications or Windows updates.

These solutions will help you resolve issues related to the MSDN bugcheck video_tdr_error.

We have not written them in any particular order, so we recommend that you try what seems most relevant to you.

Finally, please let us know what worked for you in the comments below.

3 Best Diablo III Deals to Get This Cyber Monday

If you’re a veteran gamer that grew up in the 90s, or a younger one that heard of the oldies but goldies, then you are probably well-familiarized with the Diablo franchise.

Their latest entry, Diablo III, has been a fan-favorite ever since it was first launched, and its popularity doesn’t seem to be dropping at all.

Blizzard knows that very well and is rewarding players that haven’t had the chance to play it yet with the opportunity to get it at a special discount price.

As you may already know, Diablo III has expansions launched until now, and both of them, along with the base game, are now available at discounted prices.

Note: All the prices and offers in this article are subject to change, so be sure to check the official product page to get the latest deal. If the product or offer you’re looking for is no longer available, you can try to find it on its official manufacturer page or get another one from our list.

Which are the best Diablo III deals this year?

Diablo III – Standard Edition

Get started with the third entry in the critically-acclaimed Diablo series and save the world of Sanctuary with the Diablo III – Standard edition.

Play as one of the 4 base classes and fight hordes of endless monsters until you finally manage to face Diablo once more.

Diablo III

The base Diablo III game will bring you tons of hours of entertainment while you slay monsters, clear dungeons, and loot artifacts.
Check price Visit Website

Diablo III – Reaper of Souls

The next chapter in the Diablo III game is called Reaper of Souls, and you now have the chance to continue the story you finished in the base game.

This time you’ll have to face Malthael, and bring balance between Heaven, Hell, and the mortal realm once more.

Diablo III – Reaper of Souls

Continue where you left off in Diablo III and face the forces of evil once more, and finally, come face to face with the fallen angel Malthael!
Check price Visit website

Diablo III – Eternal Collection Xbox

Console players can take advantage of the Diablo III – Eternal Collection that combines the Ultimate Evil Edition and Rise of the Necromancer pack into a single game.

So, grab your console, and fight the demons of hell with your axe, arrows, and spells in the name of good!

Diablo III – Eternal Collection

Console players should rejoice at the chance to play this RPG, especially considering how the previous two entries were PC-exclusive.
Check price Visit website

This concludes our list of the best Diablo III deals that you can get this holiday.

It’s not every day that you can get these games at such a low price, so take advantage of the deal while it still lasts and tries one of the most beloved RPG games of all time.