HP Deskjet 4155e Review: Should You Buy it?

Thinking about buying an HP Deskjet 4155e Printer? You’ve probably wondered about whether an all-in-one printer is the best choice. But there are more things you have to consider when buying a printer. To help you make an informed decision, we will review this printer thoroughly below.

Is the HP 4155e printer any good?

HP’s inkjet printers are known for their excellent photo quality, but they’re also reliable and easy to use, and the HP 4155e is no exception. When you want to buy a printer, there are several essential things to consider, such as speed, reliability, resolution, and cost.

The HP 4155e is a good choice for an affordable printer that produces high-quality printed documents and photos.

What are the main features of the HP Deskjet 4155e printer?

Overview

The HP Deskjet 4155e is one of the most affordable all-in-one printers. It’s a compact and lightweight printer that is designed to be portable.

It’s an inkjet printer with a black cartridge and a tri-color cartridge, has a built-in scanner, and can be connected to your computer using the USB port or wirelessly via the network via Wi-Fi.

1. All-in-one printer

Printing, scanning, copying, and faxing are all easy to do on this device. The printer comes with an inkjet color scanner that can scan documents from up to A4 size.

  • Printing – The print resolution of 4800 x 1200 dpi for color and 1200 x 1200 for black. This means that your documents will look sharp and clear.
  • Scanning – You can scan your documents with this printer without any problem as it has an automatic document feeder (ADF), which can scan at 300 dpi (dots per inch). This is particularly useful if you need to scan large documents like books or magazines.
  • Faxing – There’s no built-in fax machine, but you can print directly from the machine or copy documents onto a memory card so they can be transmitted by email or text later. The resolution for sending faxes is 300 x 300 dpi and has unlimited storage.

2. Smart features

It’s easy to install the HP Deskjet 4155e because setup is done via the HP Smart mobile app. The printer comes with an HP smart mobile app that allows you to print from anywhere. The app is available for both Android and iOS devices.

Once you connect your printer to your computer using the USB cable, printing, scanning, and faxing becomes a breeze. The HP Deskjet 4155e printer is an inkjet printer that uses thermal inkjet technology. This means that it uses heat to generate color.

It also features an easy-to-use touchscreen display with simple icons that guide you through the process of printing a document and let you know when there are issues with printing.

3. Wireless and USB connection

Another great feature of this printer is the built-in wireless connectivity option. You can connect wirelessly to your network without having to run any wires through your home or office space.

It comes with a built-in USB 2.0 port, allowing you to connect it directly to your computer or network if you prefer not to use Wi-Fi. It is easy to set up and use, so you don’t have to worry about any technical issues while using it.

If you have an older version of the HP printer, then you can easily update it by downloading new software from the official website of HP to prevent your printer from printing gibberish.

4. Media support

The HP Deskjet 4155e printer is compatible with both Windows and Mac operating systems, offering you the flexibility you need to print from either device. This printer supports various media types, including envelopes, labels, cards, and transparencies.

You can also save files as JPEGs or PDFs, which means you can send them by email without using a computer if you don’t have one in hand.

5. Print speed

The HP Deskjet 4155e has a print speed of up to 8.5 pages per minute for black and white documents, and up to 5.5 pages per minute for color documents.

It’s slightly slower than the average for inkjet printers but very fast speed for a budget printer, especially considering that it offers both black and white and color printing capabilities.

Still, if you’re printing in color then you might want to look for a different machine. But if you’re only printing black-and-white documents, this printer should work fine for you.

6. Ink plan

The HP Deskjet 4155e printer uses three ink cartridges. It’s not your regular refill printer where you replace the cartridge once the ink runs out. It comes with a feature called the HP Instant Ink plan which is a subscription-based service.

The HP ink plan will let you replace your ink cartridge with a new one when it runs out of ink.

It also includes an option to get replacement cartridges at discounted rates. The printer has a one-year warranty and six months of free ink for the trial period.

The program automatically checks your ink levels and notifies you when it’s time to replace them. It also lets you know when the cartridges are running low on ink so that you can be prepared for the replacement process.

Ink refills may not be cheap since it’s a subscription that sets you back if you let it expire. However, if you’re looking for printers with cheaper ink options, we’ve got you covered.

7. Paper capacity

The paper capacity of this printer is 60 sheets, which should be enough for most uses. If you need more capacity, you can upgrade. This device has a monthly duty cycle of up to 1,000 pages for black and white printing, while it can handle up to 500 pages for color printing per month.

It can also handle up to 5 envelopes at a time and supports an automatic document feeder for scanning multiple pages at once. This should be enough for most users who need to print only occasionally or infrequently.

8. Memory

The HP Deskjet 4155e printer comes with 64 MB DDR RAM and 20 MB flash memory. The memory specifications of a printer are very important. It can affect the speed of your printer, which is especially important if you print a lot of documents.

64 MB DDR1 RAM is enough for most printers. If you have a lot of documents being printed at once or if your printer needs to use more memory than this, then it could be worth upgrading your printer to one that does because this one does not have memory card support.

Does the HP DeskJet 4155e print photos?

The HP DeskJet 4155e is not designed specifically for printing photos, but it does a decent job. Note that it might not be able to handle all formats.

Does HP 4155e print double-sided?

Yes, HP 4155e can print on both sides of the paper, but not automatically. You’ll have to set it to print double-sided manually.

What are the pros and cons of the HP Deskjet 4155e?

Pros
Easy to use
Print quality is good, but not outstanding
Prints in black and white or color
Compatible with both Windows and Mac operating systems
Small and lightweight
1-year warranty
Free six-month trial ink
Fax has unlimited storage
Auto-detects low ink
Cons
It is not a very fast printer
Stringent system requirements
Scanner quality is sub-par
Requires HP account and internet to connect
Only supports 20 sheets per tray
Colored ink is only available in one cartridge
Ink replacement requires a restart
No support for duplex scanning
No memory card compatibility
Double-sided printing is not automatic

Aside from the stated issues, your printer may also fail to join a wireless network or print incomplete pages.

And if you put it to work constantly, you may soon hear some buzzing noise from your printer. However, with regular maintenance, the HP Deskjet 4155e can serve you for years.

What is the difference between 4155 and 4155e?

The HP DeskJet 4155 is a printer that has been discontinued by the manufacturer. It has been replaced by the HP DeskJet 4155e.

Perhaps the most notable feature difference is that the former had Bluetooth connectivity while the replacement doesn’t. Wi-Fi has replaced this wireless connection. A USB cable was also included in the discontinued printer, but you have to purchase it separately for the replacement.

Now, let’s cut to the chase. If you’re printing high-quality photos, no, you shouldn’t buy this printer. It just won’t produce the results you want. While it was a quick printer to set up and had a decent print speed, the low quality of its prints and frequent paper jams made it fail as an excellent all-around printer.

However, if you use your printer for other things like printing out papers or documents that don’t require more precision, then this should be a perfectly fine printer for your everyday home printing needs. It has a 4.1 rating on Amazon, so the majority of people seem to like it.

But as a more experienced user, you’ll likely want to opt for something with more power. Perhaps a printer for mid-sized businesses may interest you as they’ll be able to pick up where the 4155e fails.

If we were to do it all over again, knowing what we now know about the HP Deskjet 4155e, getting a cheaper printer would have sufficed.

We would go for one that wasn’t tied to a subscription, limited to specific cartridges and inks, required sensitive information to install a program, and didn’t have a cap for printing a certain number of papers.

But enough about us. How about you? What qualities stand out for you in this review, and would you consider getting it? Let us know in the comment section below.

Fix: Ark Survival Ascended Server Not Showing Up

If you are trying to play Ark Survival Ascended, but the servers are not showing up, then this guide can help!

We will discuss the probable causes and offer WR experts-tested solutions to resolve the issue so that you can continue playing your favorite game without any interruption.

What causes the server not showing up issue on Ark Survival Ascended?

  • Servers are down for maintenance or facing technical issues.
  • Outdated game or corrupted game files.
  • Security software interference.

How can I fix the Ark Survival Ascended server not showing up issue?

Before moving to the troubleshooting steps to fix the server missing from the server list issue, here are a few preliminary checks you should do:

  • Check the server status or official community forums to ensure there are no announcements about technical issues or outages.
  • Restart your game & the game launcher, then ensure your internet connection is stable or switch to a wired connection.
  • Ensure your game and mods are updated to the latest version.

1. Refresh the server list

  1. Launch the game and go to the game’s server browser.
  2. Locate an option similar to Refresh or Update to refresh the list.
  3. Once done, you will get the latest server list; check if you see the server you want to join.

2. Verify the game files

  1. Press the Windows key, type steam, and click Open.Steam Open -  Ark Survival Ascended Server Not Showing Up
  2. Click the Library option, right-click the ARK: Survival Ascended option, and then choose Properties.Select Library
  3. Now, click the Installed Files option from the left pane.steamwebhelper_verify the game files
  4. Click the Verify Integrity of Game Files button and let it check the game for missing files and if found, it will repair them.

3. Add the game to the allowed app list

Note icon NOTE
Before moving with the steps mentioned below, check if ARK: Survival Ascended is blocked by Windows Firewall using our guide.
  1. Press the Windows key, type control panel in the search box, and click Open. Control Panel start menu - Ark Survival Ascended Server Not Showing Up
  2. Select Category for View by and click System and Security.System and security  -Select Category for View by and click System and Security.
  3. Locate Windows Defender Firewall, and click Allow an app through Windows Firewall.Allow an app
  4. On the Allowed apps screen, look for ARK: Survival Ascended; if not found, click Change settings, then Allow another app. Change app settings
  5. Click Browse, look for the executable file of the game in the system drive, select it, and click Open.Browse -Ark Survival Ascended Server Not Showing Up
  6. Click Add.ADD
  7. Once added to the Allowed apps page, place a checkmark next to the Private and Public options and click OK to complete.         

It is essential to allow ARK: Survival Ascended through the Firewall on Windows, as it solves other problems that could arise due to firewall interference.

4. Add the game to the antivirus exclusion list

  1. Press the Windows key, type windows security in the search box, and click Open.Windows Security- Ark Survival Ascended Server Not Showing Up
  2. Go to the Virus & threat protection from the left pane, and select Manage Settings.Manage Settings - VT
  3. Scroll down the page to find Exclusions, and click the Add or remove exclusions option.Find Exclusions, and click the Add or remove exclusions option
  4. Click Yes on the UAC prompt.
  5. Now, click the Add an exclusion button.Click Add an exclusion button
  6. Select Folder from the drop-down menu.
  7. From the following window, select the game and click Select Folder to add it to the exclusion list.

Restart your computer, then try to access the server for the game and check if the issue persists.

5. Add the ports to your router & firewall

  1. Press the Windows key, type cmd, and click Run as administrator.CMD elevated -Ark Survival Ascended Server Not Showing Up
  2. Type the following command to get the IP address and hit Enter: ipconfig
  3. From the list of connections, locate your active connection and note down the address next to Default Gateway.cmd_ipconfig
  4. Launch your preferred browser and type in the IP address you noted.
  5. Enter the username and password; for most routers, the username is admin, and the password is password unless you or your ISP has changed it. You can also check the credentials from the back of your router to be sure.
  6. Next, go to Services, then click Firewall.
  7. Click Port Forwarding, and click Enable or a similar option to turn it on.port forwarding - Ark Survival Ascended Server Not Showing Up
  8. Now, mention these values:
    • Steam TCP – 27015, 27036
    • Xbox TCP – 3074
    • Steam UDP – 27015, 27031-2703
    • Xbox UDP – 88, 500, 3074, 3544, 4500
  9. Click Apply changes to confirm.

The steps for adding the ports can differ depending on the make and model of your router, so look for the similar options mentioned in the steps above.

Now, to add the ports to your firewall, follow these steps:

  1. Press Windows + R to open the Run window.wf.msc  - Ark Survival Ascended Server Not Showing Up
  2. Type wf.msc and press Ctrl + Shift + Enter to open Windows Defender Firewall with Advanced Security.
  3. Click the Inbound Rules, then select New Rule.New rule - inbound rules
  4. On the next page, select Port, then click Next.mmc_port - rk Survival Ascended Server Not Showing Up
  5. Select TCP and select the Specific local ports option, and type 27015, 27016, 27020, 7777, and click Next.TCP and select ports
  6. Choose the Allow the Connection option and click Next.Allow the Connection
  7. On the When does this rule apply page, select Domain, Private, and Public, then click Next.When does this rule apply page, select Domain, Private, and Public, then click Next
  8. Name the rule and click Finish.Finish

Now repeat the steps from 3 to 8; instead of selecting TCP, choose UDP and follow the instructions, then name the rule accordingly.

Adding the additional port can also help you resolve other issues like the server not responding on ARK: Survival Evolved; read this guide to learn more.

If nothing worked for you, we suggest you contact ARK customer support, explain the issue & fixes you tried for further assistance.

To sum up, to avoid the Ark Survival Ascended server not showing up, ensure you have a stable internet connection, the game is allowed by your firewall, and your system meets the minimum requirements for seamless gameplay.

Did we miss a step that helped you fix the issue? Don’t hesitate to mention it in the comments section below. We will happily add it to the list.

Phomemo D30 Review: Is It A Perfect Label Maker For You?

Whether you are a small business owner or someone passionate about organizing things, a label maker like Phomemo D30 can be an excellent tool for you.

In this comprehensive review, we will delve into its features, design elements, and functionality to help you decide whether Phomemo D30 is a worthy contender for the perfect label maker title.

What features should an ideal label maker have?

  • Printing technology – Some popular technologies include thermal transfer, direct thermal, and inkjet. Each has its pros and cons; check which matches your needs.
  • Compatibility with label types – Make sure the label maker supports various label types and sizes to fulfil all your labelling needs.
  • Consumables cost – Always keep the cost of label rolls and cartridges in mind as you need to replace supplies, and it could help you decide to look at the overall budget.
  • Customization features – The label maker should have custom features like font styles, sizes, and graphic options so that you can personalize the labels the way you like.
  • Design, portability, and storage – It should be compact and lightweight with sufficient memory to store frequently used labels & templates.

What features make Phomemo D30 a must-have?

1. Inkless Label Printer

Phomemo D30 uses a BPA-free direct thermal technology, which means you don’t need ink, ribbons or toner to print labels of your choice.

It also comes with a lot of color thermal paper options and the printing speed is fast, and you can get the output in a few seconds. However, the label marker can only provide monoChrome printing output.

To make this inkless label printer work, all you need is a roll; each roll can print 210 small labels, which are perfect when organizing stuff at home or for schoolwork.

2. Dedicated app

Print master app  - Phomemo D30 review

The Phomemo D30 can be operated using a dedicated app called Print Master, which is available on both the Apple App Store and Google Play Store.

It is an easy-to-use app with an intuitive interface, which connects your app with the printer using Bluetooth of your Android or iOS phone or tablet. Once connected, it lets you edit the size & change the text’s direction, and click the Print icon on the top-right corner of the screen to print your label.

Additionally, you can scan the content you want to print and transfer it to text, 1-D or 2-D code. There are up to 500 label templates to choose from and a robust search system which makes finding the perfect label template easier.

3. Easy to use & portable

Multiple label - Phomemo D30 review

With a total of 180 Grams, the Phomemo D30 is portable, is half the weight of the traditional label maker and can easily fit in a pocket, which makes carrying it easy.

To start printing labels, all you need is the Print Master app on your phone and connect your printer to it. You get a wide variety of pre-designed templates, including more than 1000 symbols, 60+ frames, and fonts to choose from.

You can insert any picture, text, emoticons, QR codes, one-dimensional code, forms, logos, tables and more, and it also supports batch printing.

4. Performance & battery backup

Performance - Phomemo D30 review

Phomemo D30 comes with a German thermal print head, with 25% increased DPI than the earlier models, providing better print clarity, and thereby fast processing.

The white paper rolls and lint-free material in tape in the label maker guarantee crisp, dark imaging, ensuring a smooth printing experience without any concerns of paper jams or faded labels.

Another great thing about the product is its durability; the self-adhesive sticker thermal paper is oil, water and friction resistant, which makes it suitable for even the oil or pickle jars in your kitchen cabinet or toolbox in your garage.

This mini label Printer supports Bluetooth 4.0 connection, which supports long-distance printing, i.e, 10 meters. It charges quickly and can be charged using a USB cable, or you can also plug it into a power bank.

It has a battery capacity of 1000mAh and can efficiently print more than 4 rolls of thermal paper in 2 hours of charge.

5. Price & availability

What is in the box -Phomemo D30

At the time of writing, the Phomemo D30 Portable Bluetooth Label Maker is available at $29.59 on its official website and comes with a 1-year warranty. In the box, you get the label maker, USB cable and a plain white roll of label tape to start with.

You can also bundle it with the 3 rolls of thermal paper of your choice at $32.99. You can use this label marker to organize your home supplies, medicine cabinets, school work or office files, name tags and more.

Moreover, if you are a small business owner, you can create customized price tags and name tags to stand out. Phomemo also has a responsive customer service team in case you are stuck with something.

Pros
Portal option that comes with different label sizes, patterns, and fonts
Refill tapes are easily available, making it pocket-friendly
Print clarity and quality is very impressive
Cons
Requires an app to use
Can only print black text

How can I use Phomemo D30 to print labels?

  1. Open the label printer cover to get to the printer spool.
  2. Now, take out the label spool and remove the sticker to release it. Once done, ensure the label is just poking through the label printer, then shut the case.
  3. Download the Print Master app for your Android or iOS device, then select Phomemo D30 and register your device using an email and security code. Registering the account may take some time, so be patient.Download the app
  4. Now, select the label design, type in the text, choose an emoticon if you want, and tap on Print to get your label.Print the label

If you are wondering how you can print labels from Excel, all you need to do is insert Excel on the app, select the label design, font, and style, then click Print and voila! 

Final Thoughts on Phomemo D30

In this fast-paced modern lifestyle, keeping your things organized is important to save time, and a portable label maker like Phomemo D30 can be the ideal choice.

With a long storage period, a label size from 0.24 – 0.47, superior print clarity, an easy-to-use setup and an innovative label creator, the sky is the limit.

You can use it for your school projects or can organize your household things using it, and the best part is it doesn’t use ink, which is kind of weird.

However, it cuts the costs of consumables to half as you just need the thermal paper, which is easily available in online stores like Amazon and Walmart.

If you are unsure, we recommend you check our recommendations for the best label printers and compare them before making the final decision.

What do you think about this Phomemo D30 label creator? Tell us your views and experience in the comments section below. We would love to talk!

CDrom.sys is Corrupted: How to Fix This Error

A CDrom.sys is corrupted error may occur when you insert a CD in the DVD drive but your system is unable to communicate with the CD/DVD drivers.

When you use your DVD drive, you’ll need it to be functional so here’s what WindowsReport experts recommend.

Causes of the CDrom.sys error:

  • Corrupt or missing driver files.
  • Hardware incompatibility issues between Windows and your computer hardware.
  • Software conflicts with other programs on your computer.
  • Malware infections and registry errors.

How can I fix the CDrom.sys is corrupted error?

To cover your bases, ensure the following are in check:

Note icon NOTE
For these steps, you may have to start your PC in Safe Mode.

1. Run the Hardware and Device Troubleshooter

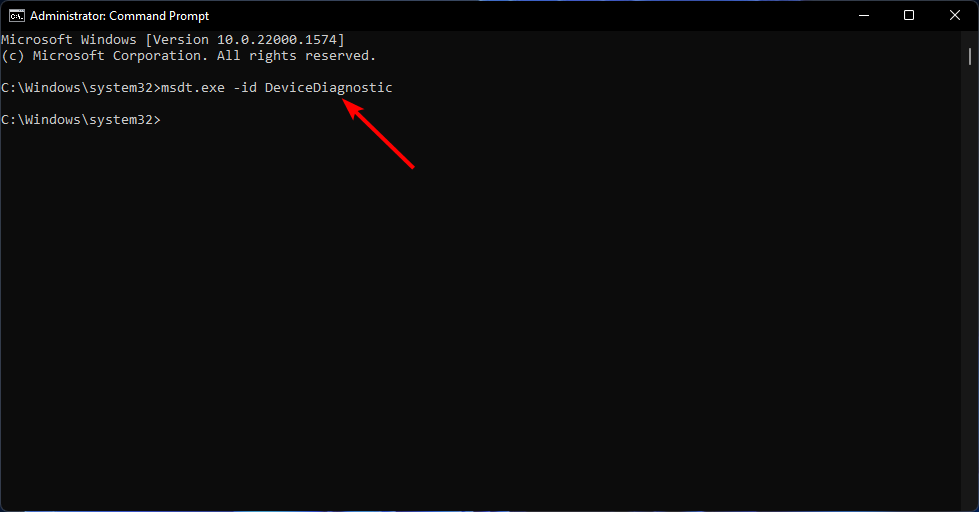
  1. Hit the Windows key, type cmd, and select Run as administrator.cmd-run-admin-w11 unexpected kernel mode trap windows 11
  2. Type the following command and hit Enter to open Hardware and Devices troubleshooter: msdt.exe -id DeviceDiagnostic
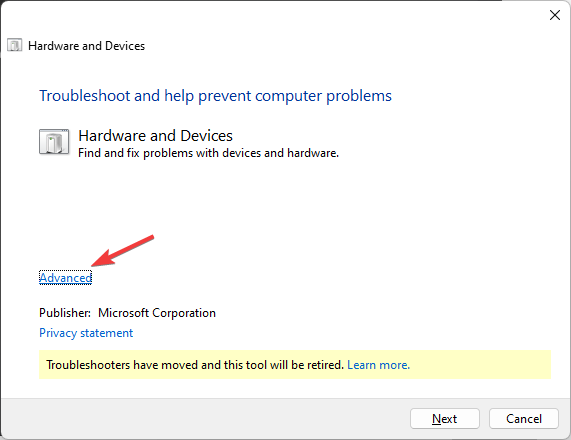
  3. Click Advanced.Advanced -  Hardware and Devices troubleshooter:
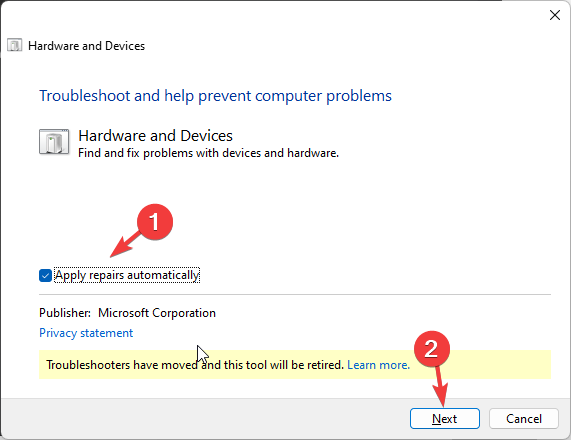
  4. Place a checkmark next to Apply repairs automatically and click Next.Apply repairs automatically
  5. Select the device from the list.
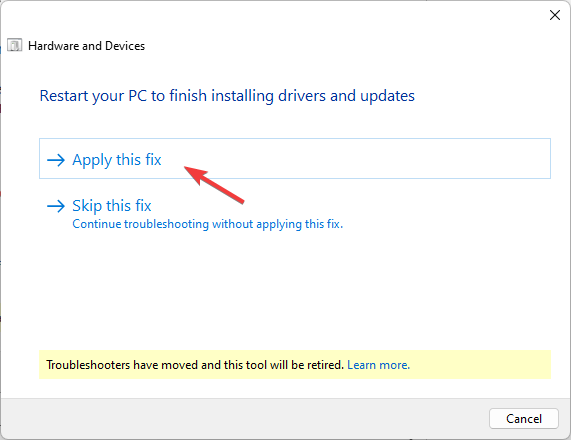
  6. Click Apply this fix.Apply this fix
  7. On Restart your PC screen, click Next. Your computer will reboot, so make sure before you click Next, you save up all your work to avoid losing any data.

Once the CDrom.sys is corrupted message disappears and you’re good to go, you may want to encrypt your CD or DVD. Most corrupt CDs and DVDs result from unauthorized access where data ends up being moved or deleted without your permission.

2. Update the driver

  1. Click on the Search icon, type Device Manager in the search bar, and click Open.device manager w11
  2. Navigate to your DVD/CD-ROM drives and right-click on your driver name. Select Update driver.
  3. Select Search automatically for updated drivers.

Unfortunately, updating your drivers manually does not always guarantee the correct drivers. You may still end up with the wrong drivers or Windows may fail to detect your DVD drivers at all. A more sure way is to go the automatic way.

3. Reinstall the driver

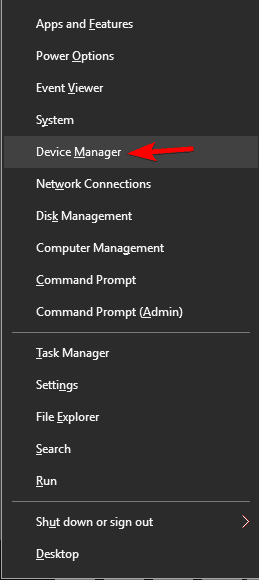
  1. Open Device Manager by right-clicking on the Start Menu and choosing Device Manager.
    device manager DVD drive not showing
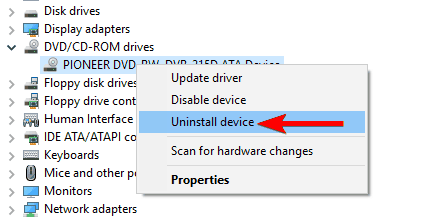
  2. Locate your DVD drive and right-click it. Choose the Uninstall device option.
    uninstall device DVD writer not working properly
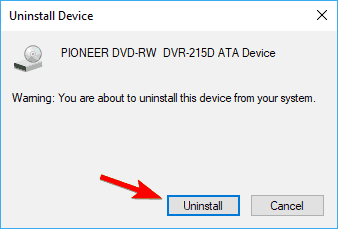
  3. In the confirmation menu that appears click on the Uninstall button.
    confirm uninstall DVD not found
  4. Eject the optical drive from your computer and restart it.
  5. Reconnect it and Windows will automatically reinstall the driver.

4. Run the DISM and SFC commands

  1. Hit the Windows key, type cmd, and select Run as administrator.cmd-run-admin-w11 unexpected kernel mode trap windows 11
  2. Type the following commands and press Enter after each one: dism /online /cleanup-image /restorehealth sfc /scannow
  3. Now restart your PC.

5. Run a virus scan 

  1. Press the Start Menu, search Windows Security and click Open.
  2. Select Virus & threat protection.
  3. Next, press Quick scan under Current threats.
  4. If you don’t find any threats, proceed to perform a full scan by clicking on Scan options just below Quick scan.Scan options
  5. Click on Full scan to perform a deep scan of your PC.Full Scan Scan Now
  6. Wait for the process to finish and restart your system.

6. Delete and recreate the corrupted registry key

6.1 Delete the corrupt registry key

  1. Before you start making any changes, ensure you back up your Registry or create a restore point as some changes can make your PC unstable.
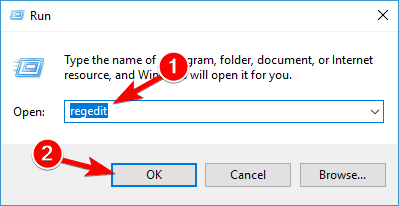
  2. Press the Windows + R keys and type regedit. Click OK or press Enter to start Registry Editor.
    Windows 10 CD drive not reading discs
  3. When Registry Editor starts, navigate to the following key in the left pane: HKEY_LOCAL_MACHINE/SYSTEM/CurrentControlSet/Control/Class{4D36E965-E325-11CE-BFC1-08002BE10318}
    Windows 10 CD drive Access Denied
  4. In the right pane locate UpperFilters entry. Right click it and choose Delete.
  5. Now locate LowerFilters in the right pane and delete it.
  6. After you’ve deleted LowerFilters and UpperFilters entries, close Registry Editor and restart your computer.
  7. If you can’t find LowerFilters or UpperFilters, don’t worry, just skip to the next step of the solution.

6.2 Recreate the key

  1. Start Registry Editor by pressing Windows + R keys and typing regedit in the Run dialog.
  2. When Registry Editor starts, navigate to the following key: HKEY_LOCAL_MACHINE/SYSTEM/CurrentControlSet/Services/atapi
  3. Right-click on atapi and choose New > Key.
    Windows 10 CD drive won't play CD
  4. Enter Controller0 as the name of the new key.
  5. Right-click Controller0 key and choose New > DWORD(32-bit) Value.
    Windows 10 my CD drive disappeared
  6. Enter EnumDevice1 as the name of new DWORD.
  7. Double-click the EnumDevice1 to open its properties.
  8. When properties window opens, in the Value data box enter 1 and click OK to save changes.
  9. Exit Registry Editor and restart your computer.

The above steps can also come in handy when your PC fails to recognize your CD ROM.

7. Perform a System Restore

  1. Press the Windows key, type Control Panel, and click Open.control-panel-search fallout new vegas runtime error
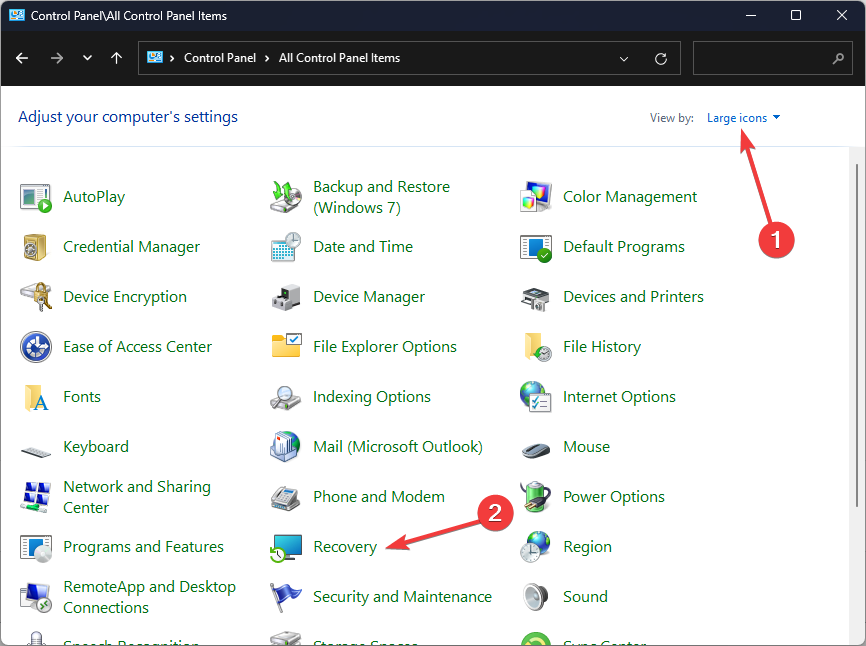
  2. Select Large icons as View by and click Recovery.Recovery Control Panel Advrcntr6.dll
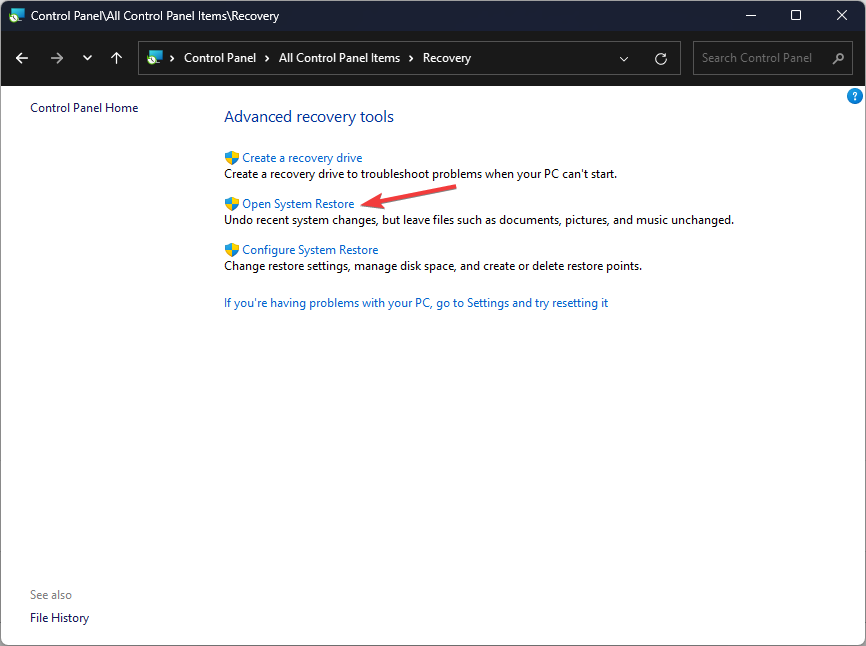
  3. Click Open System Restore.Open system restore
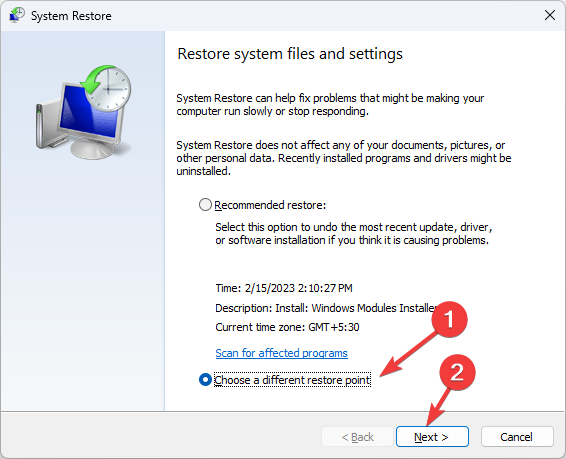
  4. Select Choose a different restore point and click Next.Next Choose a different restore point
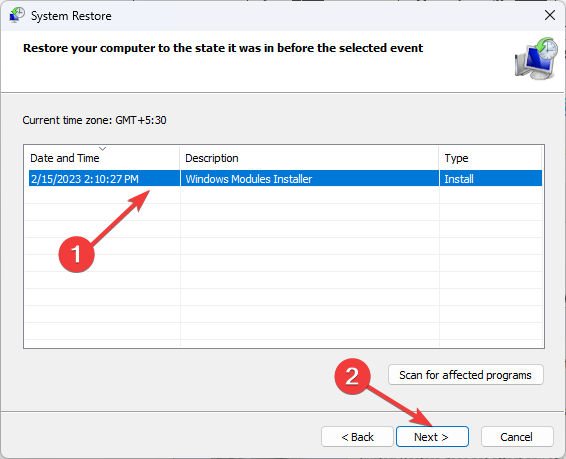
  5. Now select the restore point and click Next. Choose a point
  6. Click Finish to restore the previous settings, and Windows will restart.Finish Restore point

Hopefully, you’ve found a fix for the CDrom.sys is corrupted error. It’s important that you test your CD/DVD tray regularly because if you stay too long without using it, your CD may get stuck inside your laptop.

Other times, you may find that your DVD drive only plays CDs but it’s nothing to worry about as we’ve got you covered.

We’d love to hear about your encounter with this error if it’s not an unfamiliar guest on your PC. What solutions worked for you and what steps have you taken to limit its occurrence in the future? Drop us a comment down below.

Keyboard Delay in Windows 11: How to Fix the Lag

Keyboard delay in Windows 11 is often caused by improper connection or placing the keyboard and dongle far away from each other (for wireless keyboards). Outdated drivers, misconfigured settings, or corrupt system files can also contribute.

Below, we’ll outline easy steps to get rid of all these problems that cause input lag on your keyboard. Let’s get started.

How do I fix my keyboard input delay on Windows 11?

Start by connecting your keyboard to another port, and disable filter keys and fast startup. If you’re still struggling, keep reading.

1. Update the keyboard drivers

  1. Press Windows + X to open the Power User menu, and select Device Manager from the list.
  2. Expand the Keyboards entry, right-click on the affected device, and select Update driver.search automatically
  3. Choose Search automatically for drivers and let Windows find and install the best available version.update drivers to fix keyboard delay windows 11
  4. Once done, reboot the device and check for improvements.

If it’s the outdated drivers to blame, you can fix the typing delay in Windows 11 by updating the keyboard drivers.

When Windows can’t find a better version, head to the manufacturer’s website, locate the latest version, and manually install the driver. This also helps when you find a Bluetooth keyboard lagging.

2. Change the power settings

2.1 Turn off the USB selective suspend setting

  1. Press Windows + S to open Search, type Edit power plan in the search field, and click the relevant result.
  2. Click on Change advanced power settings.power settings
  3. Double-click the USB settings entry.
  4. Under USB selective suspend setting, select Disabled, and click OK to save the changes.disable to fix keyboard delay windows 11
  5. Finally, reboot the device and check for improvements.

2.2 Change the USB Root Hub properties

  1. Press Windows + S to open Search, type Device Manager in the search bar, and click the relevant result.device manager
  2. Expand the Universal Serial Bus controllers section.
  3. Right-click on USB Root Hub and select Properties.properties
  4. Go to the Power Management tab, untick the checkbox for Allow the computer to turn off this device to save power, and click OK to save the changes.disable control to fix keyboard delay windows 11
  5. Make similar changes to any other USB Root Hub devices that appear here, reboot the device, and check whether this eliminates the Windows 11 keyboard delay.

3. Repair the corrupt system files

  1. Press Windows + R to open Run, type cmd, and hit Ctrl + Shift + Enter.cmd
  2. Click Yes in the UAC prompt.
  3. Paste the following DISM commands individually and hit Enter after each: DISM /Online /Cleanup-Image /CheckHealth DISM /Online /Cleanup-Image /ScanHealth DISM /Online /Cleanup-Image /RestoreHealth
  4. Now, run this command for the SFC scan: sfc /scannowsfc scan to fix keyboard delay windows 11
  5. Finally, reboot the device for the changes to apply.

Often, corrupt system files can lead to issues with built-in components and external devices, including keyboard typing lag in Windows 11. Running the DISM commands and SFC scan will replace all such files with their cached copy.

If the problem is not solved yet, you should consider using a third-party repair tool aimed to fix corrupted files on your PC and on any other peripheral device connected to it. This also helps when the keyboard responds slowly.

4. Increase the virtual memory

  1. Press Windows + S to open Search, type View advanced system settings, and click the relevant result.
  2. Click the Settings button under Performance.settings
  3. Go to the Advanced tab, and click on Change under Virtual memory.
  4. Untick the checkbox for Automatically manage paging file size for all drives, select No paging file, and click Set.no paging file
  5. Once done, select Custom size, and enter the following in the fields underneath based on the available RAM:
    • Initial size (MB): 1.5 x Available memory (in GB) x 1024
    • Maximum size (MB): 3 x Available memory (in GB) x 1024increase virtual memory to fix keyboard delay windows 11
  6. Finally, click Set and then on OK to save the changes.

When increasing the virtual memory, use Microsoft’s recommended initial and maximum size. For instance, if the physical RAM is 4 GB, the Initial size becomes 6144 MB (1.5 x 4 x 1024), and the Maximum size becomes 12288 MB (3 x 4 x 1024).

5. Modify the Registry

  1. Press Windows + R to open Run, type regedit in the text field, and click OK.
  2. Click Yes in the UAC prompt.
  3. Navigate the following path or paste it in the address bar and hit Enter: HKEY_CURRENT_USER\Control Panel\Accessibility\Keyboard Responsepath
  4. Double-click the AutoRepeatDelay string.AutoRepeatDelay
  5. Now, enter 200 under the Value data field, and click OK.change to fix keyboard delay windows 11
  6. Similarly, set the following values for the remaining strings:
    • AutoRepeatRate: 6
    • DelayBeforeAcceptance: 0
    • Flags: 59
    • BounceTime: 0
  7. Reboot the device and check for improvements.

6. Reconfigure the keyboard settings in BIOS

Another option that worked for users was to set the USB Keyboard Support Via setting to BIOS instead of the OS. In case you can’t find it, look for something along the lines of accepting the OS’s keyboard settings. If found, disable it to fix the keyboard delay in Windows 11.

Remember, the process will vary for every device. So, we recommend you check the manufacturer’s website for the exact steps.

7. Perform an in-place upgrade

  1. Go to Microsoft’s official website, select the OS edition and product language, and then download the Windows 11 ISO.download
  2. Once downloaded, double-click the ISO file, and select Open in the confirmation prompt.
  3. Run the setup.exe file.setup.exe
  4. Click Yes in the UAC prompt.
  5. Click Next in the Windows 11 Setup to proceed.next
  6. Now, click Accept to agree to Microsoft’s license terms.
  7. Finally, verify the setup reads, Keep personal files and apps, click Install, and wait for the process to complete.in-place upgrade to fix keyboard delay windows 11

When nothing listed previously works, an in-place upgrade will help get rid of keyboard delay in Windows 11 and even the laptop keyboard’s lag. It’s basically like reinstalling the OS, but you don’t lose any installed apps and stored files.

Remember, the lag or delay may also appear when running low on system resources, so you may consider reducing the RAM usage. If that’s not the case, make sure Windows 11 is using all available RAM.

If the keyboard delay in Windows 11 persists, it’s likely a hardware fault, and you should have the device checked by a professional or replace it with a top-rated keyboard for the PC.

For any queries or to share what worked for you, drop a comment below.

Matein Backpack Review: Is it the Perfect Carry-on?

If you’re always on the move and need to carry your laptop with you, then you can appreciate a carry-on backpack like one from Matein. It fits the maximum dimensions allowed by airlines but still has plenty of storage space for your personal items.

But just how good is this laptop bag? The Matein backpack comes with some great features that are second to none as you shall see below.

Is Matein a reputable brand?

The reputation of a company is relative but as a consumer, you should always look out for reviews. These are from people who have already purchased the item in question.

Matein seems to be holding the fort in this sector as a look at one backpack boasts a 4.7 score on Amazon with over 90,000 ratings. If this is anything to go by, we’d say it’s a pretty solid factor that gives you the green light if you were skeptical about making a purchase.

What key features that make Matein’s backpack a must-have?

Overview

Matein backpack claims to be the ultimate carry-on bag. It’s a stylish, lightweight backpack for men and women that is made from premium materials and will last you for years to come. But don’t just take our word for it, here are some undeniable features.

1. Ample storage

We can all agree that it’s not just your laptop that will be occupying space. And Matein backs you up on this. The backpack offers a lot of space for your laptop and additional well-designed compartments for other things you might need during the day.

  • Laptop compartment – Matein’s backpack is the perfect combination of form and function. This is the main compartment and it can accommodate up to two laptops of 15 inches as well as multiple documents and other supplies with ease.
  • Packing compartment – Forget about digging through your bag to find your accessories, as they’re all stored in convenient, easy-to-reach pockets.
  • Front compartment – The front compartment is perfect for storing small items like keys, wallets, and phones. It also features a keychain holder so you can keep track of your keys on the go.
  • Anti-theft compartment – This is a hidden pocket on the inside of this bag that can be used as a secret storage for keeping valuables safe and secure while traveling.

2. Comfort

Perhaps the most important feature of the Matein backpack is its comfortable padded straps, which provide extra support for your shoulders and back. The padded straps are made from high-quality materials so you can rest assured they won’t dig into your shoulders when carrying heavy loads around.

It features ergonomically shaped and adjustable shoulder straps to ensure a perfect fit. The padded back panel helps to reduce sweating and heat build-up during use. The breathable mesh padding on the back panel also helps to regulate temperature and keep you comfortable even in hot weather conditions.

What’s more, the Matein backpack weighs approximately 1.5 pounds, making it easy to carry around anywhere.

3. Durability

The Matein backpack is made from high-quality materials and constructed from durable polyester fabric with waterproof coating, which makes it a long-lasting product that can withstand even rough use over time.

The bag’s outer layer is made of waterproof material that protects your belongings even in rainy weather. You may be worried that the outer material is waterproof and water may sip in through the zipper and ruin whatever you’re carrying. Well, Matein thought about it too and its zipper is waterproof too!

The inside padding ensures your laptop can withstand even the toughest conditions. The laptop compartment comes with protective foam padding to protect your device from bumps and scratches during transport.

It also features an adjustable strap and Velcro enclosure so that you can easily secure your laptop in place without worrying about it slipping or falling out during use.

4. Built-in charger

You never know when you’ll need your phone, but it’s always there when you do. With Matein’s backpack, you can charge your phone on the go. The USB port is located inside the bag, so it’s easy to access without having to dig around in your bag.

Note that it’s only an easily accessible way to charge your phone without taking out your backpack and opening it. You’ll have to connect a power bank or any device that can discharge power to the USB port for it to work.

5. Variety of colors and prints

Matein’s backpack is designed with a variety of colors and prints, allowing you to express your personality.

It is available in 28 colors and prints so you’ll definitely find one that matches your personality. You can even get more than one if you like to change them based on your mood for the day.

Other notable features include:

  • Luggage strap – This allows you to hook your Matein backpack to your suitcase so it’s easy to carry both together. It won’t be necessary to take it off every time you need something out of it.
  • Expandable side pockets – It also has elasticized side pockets. You can carry a water bottle holder here as it keeps your drink safe from spills in transit.
  • Hanging clasps – The hanging clasps allow you to hang your bag on any hook or railing.

6. Affordability

Now, after listing down all those great features, you’d probably think that the Matein backpack costs an arm and a leg. To burst your bubble, it is actually very affordable. For $40, you too can have the backpack of your dreams.

You can also get a discount when you purchase other selected items. Further, other discounts like Cyber Monday can scoop you a deal where you get up to 40% off.

What are the pros and cons of the Matein backpack?

Pros
Spacious
Durable and waterproof
Sturdy, comfortable and well-made
Has a built-in charging port
Affordable and comes in a variety of colors
Lightweight and easy to carry around
Comes in different sizes
Cons
Doesn't have wheels for easy transportation
The backpack doesn't power itself to facilitate charging
Extreme weather conditions may cause damage

Overall there is little to find fault with in the design and construction of the bag and from the looks of it, it will provide years of use. This laptop backpack would be perfect to help a student get through college years or someone looking for something that will last a lifetime.

If you need an everyday-carry bag that checks all the boxes then this is the one to get. The quality of this backpack is exceptional so in our books, this bag exceeds expectations. If we had to choose only one feature, it would be the extra padding.

Laptops don’t come cheap so knowing that even if your Matein backpack was mishandled or dropped, your laptop would be safe and secure is something that puts our hearts at ease.

However, if you have other needs, you may benefit from our review of backpacks for gamers or laptop bags for travel to find something that suits you.

Have you tried the Matein backpack and would you after this review if you haven’t? We welcome all thoughts in the comment section below.

Nelko P21 Review: A Compact Label Maker Worth the Hype

A label maker isn’t something we all need, but the ones who do prefer a compact and portable handheld device. In today’s market, Nelko P21 seems to be the first choice of many, though you should read our review before making the purchase.

No matter what the product description or customer reviews say, an unbiased Nelko P21 review will help you make the right decision. So, let’s get straight to it!

Is the Nelko P21 label maker good?

We will examine the Nelko P21 label maker on several critical factors and identify whether it’s the right purchase for you. And if not, find out which product would best suit your needs.

Build and performance

Nelko P21 is a feature-packed label maker that allows users to print labels on the go. The small 6.65 x 4.5 x 1.9 inches device weighing just 11.3 ounces can easily fit into your pocket and be used in workspaces, homes, or on vacation. It’s got a sturdy build and can be comfortably and conveniently held.

The Nelko P21’s Bluetooth connectivity is a significant advantage, allowing seamless wireless printing from Android and iOS smartphones. So, no more tangled wires to deal with!

However, there’s room for improvement with the print speed, capped at 60 mm/s. The Nelko Bluetooth Thermal Shipping Label Printer, though not as compact, offers a print speed of 150 mm/s and can print up to 72 labels/min.

So, the Nelko P21 label maker would be a great fit for homes or smaller tasks, but if it’s to be extensively used for longer durations, you may consider going with a label maker that offers a higher print speed.

The print quality is high with a resolution of 203 DPI, though you may face issues using a non-official thermal label paper. That’s a downside, but it won’t be a factor for most users since the Nelko thermal paper is easily available and reasonably priced.

Usability

Most buyers are satisfied with the Nelko P21 label maker. The compact size and self-adhesive labels are enticing. Besides, many people used it to print bar codes and QR codes, and the Nelko P21 worked perfectly fine, making it a suitable product for small businesses.

Printing QR codes with Nelko P21

However, Nelko P21 lacks coloured text printing, a major downside for a label maker. Though you can use white labels in different sizes (15×30 mm, 12×40 mm, 15×40 mm, 15×50 mm) coloured labels, choose from a range of patterns, or go with the transparent ones.

Also, it doesn’t come equipped with an automatic label-cutting functionality, and you will have to detach each manually.

Another major drawback of Nelko P21 is its lack of compatibility with computers. While mobile phones have become the go-to solution for everything, computers still are the primary device in most workplaces. There’s simply no option to connect it with computers. Nelko P21 is a mobile-only label maker!

Battery backup

Powered by a 1200 mAh Lithium Polymer battery, the Nelko P21 will easily last several days (of normal use) on a single charge. The battery life sure is an added bonus with this label maker!

Also, you will get a USB Type-C cable to recharge the device within the box. But even in its absence, charging wouldn’t have been a problem after the mass adoption of the Type-C standard. If required, you could use a USB-C extension cable for enhanced usability.

The dedicated Nelko app

To print labels with Nelko P21, you must download the dedicated Nelko app, available on both the Google Play Store and the Apple App Store.

Nelko on the App Store

Besides being a necessity, the Nelko app provides a wide array of templates and designs, including QR codes, bar codes, texts, images, and different font options. With these, you can create both personalized and professional labels.

Pricing

The Nelko P21 presently costs $39.99 on the official website, which is a reasonable price for the label maker. Its compactness, print clarity, complete elimination of ink and toner, and high battery life would be perfect for home use.

The Nelko P21 is the cheapest label maker offered by Nelko, while its other products are in the price range of $50-150.

Label makers with a similar feature set developed by other manufacturers will cost you roughly in the range of $25-80. So, the Nelko P21 is not the cheapest option, but it is competitively priced.

That’s our review of Nelko P21 after extensive research and collating user reviews. The label maker is a game changer in several aspects, be it the size, clarity of prints, or price range, but the non-compatibility with computers will surely count as a major drawback!

If you are unsure, we recommend you check our recommendations for the best label printers and compare them before making the final decision.

For any queries or to share your review of Nelko P21, drop a comment below.

Norton 360 Deluxe Review: Cybersecurity Bliss or Miss?

In this ever-evolving digital landscape, cyber threats continue to evolve; keeping a reliable and overall security tool to keep your devices is the need of the hour, and Norton 360 Deluxe can help you with that.

In this comprehensive review of Norton 360 Deluxe, we will discuss its antivirus features, secure VPN, password manager, and other additional tools that it has to offer to help you make an informed decision.

What features to look for when purchasing an antivirus tool?

  • Real-time protection to detect & block threats as they come.
  • Advanced malware detection and removal to keep your system free from viruses, trojans, worms, and more.
  • Firewall protection to monitor & control the incoming & outgoing network traffic.
  • Should have phishing and email protection features.
  • Easy on system resources, user-friendly, and compatible with your operating system.

What are the best features of Norton 360 Deluxe?

1. Antivirus capabilities

Antivirus capabilities -Norton 360 Deluxe Review

With real-time threat protection, the Norton 360 Deluxe keeps an eye on emerging online threats and keeps your private and financial information safe when you browse online.

The Smart Firewall for your computer monitors communication between your PC and other computers and blocks any unauthorized traffic coming your way.

It comes with ARP and DNS spoofing protection, SSL man-in-the-middle attack detection, and more to detect every intrusion.

You can run full, quick, and custom antivirus scans as and when required. Additionally, you can also run the rigorous Norton Power Eraser feature to find out persistent threats.

The Data Protector feature of Norton 360 Deluxe stops malicious programs, mainly ransomware, from making changes to protected files.

Norton 360 Deluxe’s Intrusion Prevention blocks exploits at the network level as, unlike other security software, Norton comes with a powerful firewall right in the tool.

2. Dark web monitoring

Dark Web monitoring - Norton 360 Deluxe Review

With Norton 360 Deluxe, you get the Dark Web Monitoring feature to keep an eye on your information, such as your email address, phone number, driver’s license, insurance, credit card, bank account passwords, and even gamertag, to verify if they have been compromised online.

Once you log into it from My Norton dashboard, it will scan and show you the list. If your information is exposed, then you will be informed. You can open the item listed to get the important details.

On the same page, you will get the alerts generated. When you open an alert, you can see the details, including personal data.

It also provides you with steps you need to take to fix the issue and sometimes chat-based help to understand the pop-up.

3. Powerful VPN

 Powerful VPN - Norton 360 Deluxe Review

Another exceptional feature is Secure VPN, a virtual private network, which makes this antivirus protection suite all the more powerful.

With the increase of users understanding the importance of staying anonymous, security companies have started adding a full VPN to the security suite.

The Norton 360 Deluxe comes with the full power of Norton Secure VPN, which you can use on up to five devices, including your PC, macOS, Android, and iOS.

You can turn it on and choose a VPN region from the options presented once you do that. Next time, you can just click the button next to VPN on My Norton to enable or disable it.

It harnesses the power of WireGuard Protocol, an open-source framework that ensures better security and privacy. Complemented with important features like Kill Switch and Split Tunneling features, the VPN provides a much more reliable online experience.

In case the VPN feature isn’t working for you, the culprit could be your slow internet connection; to learn more, read this guide.

4. Webcam security

With advanced and nasty spyware and notorious hackers, it is possible to activate your camera without you even realizing it.

Thankfully, with Norton’s PC SafeCam spyware protection system, you can keep these snooping cybercriminals away from your devices and misuse the webcam. At the time of writing, the feature is only available for Windows.

SafeCam allows only safe programs to access your camera. If an unknown app tries to access it, Norton sends you a warning alerting you about it. You can then choose to allow or restrict the access once or always.

5. Parental control

With parental control across all your devices, Norton 360 Deluxe allows you to supervise your kids’ devices and their online activities, keeping them safe.

To enable it, you can click Manage next to the Parental Controls option from the My Norton dashboard. To monitor a device, you need to log in to the Norton account, create a profile for your child, and then install the app on the device used by the kid.

You can create n number of child profiles and install the app on any number of devices, excluding the one with macOS.

This feature will help you block websites and age-inappropriate content according to the rules you set under the Parental Control feature.

You can set Mobile app supervision(Android & Windows), Search Supervision, Location Supervision (iOS and Android), and even Video Supervision.

6. Privacy Monitor

Norton 360 Deluxe comes with a Privacy Monitor, then you can access it from the My Norton online dashboard.

To set it up, you need to fill in the personal information, including Full Name, State, City, and your birth year.

The Privacy Monitor checks data brokers and reports to see if your information is available online. You can check the report and click the Request Removal from any brokers who have your information.

Next, Norton provides the link; then, you can get in touch with the data broker to make the request to get the information deleted.

If you don’t have Norton 360 yet but want to check the information online, you can use the Privacy Monitor Assistant web page.

7. Other features

The real-time protection feature of a traditional security suite can take a toll on your system performance as they need to start working as soon as your computer boots up

However, with Norton 360 Deluxe, the impact is lower than other protection software, making the tool perfect for users who prioritize comprehensive security without sacrificing significant system performance

Norton 360 Deluxe also comes with an inbuilt password manager with secure 256-bit AES encryption, unlimited password storage, sync across all your devices, a password generator, and an auto-save & auto-fill feature.

However, you must remember the master password and try setting up a catchphrase as the password, as Norton doesn’t offer many recovery options.

In case you are wondering whether you should get Norton security suite or stick to the basic Windows Defender, read this guide to get clarity.

Final Thoughts on Norton 360 Deluxe

Pros
VPN with no bandwidth or server limits
Password manager with 256-bit AES encryption
Supervise searches on Google, Yahoo, Bing, and other search engines
Cons
Parental control is not available for macOS
Online backup is only for Windows

Norton 360 Deluxe is a one-stop security suite with advanced features like PC SafeCam to protect your webcam, a Spam filter to set up exclusion lists for trusted mail & unblock untrustworthy emails, and more.

The Virus protection promise (If you have a virus that Norton can’t remove, you get a full refund) gives you a compelling assurance and provides confidence in the software’s capability.

Norton 360 Deluxe can be installed on five devices, including Windows, Mac, Android & iOS, and has a fair price for all the features it can provide.

Installing the software and using it is pretty straightforward, and at the time of testing, it proves true to its claims. However, if it is not for you and you are having trouble uninstalling it, read this guide.

What do you think about Norton 360 Deluxe? Tell us about your experience in the comments section below. We would love to talk!

Samsung 980 Pro Review: Is the SSD Worth it?

Planning to purchase the Samsung 980 Pro and looking for an honest review? You have come to the right place. While most websites and user forums highlight the pros of the Samsung SSD, there are some cons too. But does the latter overshadow the former, or is it the other way around?

A high-performance SSD, the Samsung 980 Pro is definitely one of the most preferred options in the market, especially among gamers. But is it worth the hype? Let’s find out in this detailed and user-oriented review of the Samsung 980 Pro!

Is the Samsung 980 Pro good or bad?

We will be assessing the Samsung 980 Pro on different factors to help you better understand both upsides and downsides. It’s kept brief for enhanced readability but encompasses all the critical aspects.

Performance (Transfer Speed)

Transfer speeds on Samsung 980 Pro are astonishing, both when tested on the dedicated Samsung Magician or a third-party SSD management software.

For most users, data transfer speed turned out to be 75-90% of what’s claimed, and that’s decent, given there are several factors at play. Samsung 980 Pro is powered by the Elpsis controller and comes with a PCIe 4.0 interface, making it 2x faster than PCIe 3.0 SSDs and almost 12x faster than the conventional Samsung SATA SSDs.

Claimed by SamsungReported by users
Read7,000 MB/s5,500-6,500 MB/s (rarely lower than that)
Write5,100 MB/s4,000-4,500 (rarely lower)

Besides, as per user reviews, the Samsung 980 Pro is good for gaming, delivers high loading speed and lower boot time, and substantially improves the game’s performance.

Remember, you will only get these figures with Intelligent TurboWrite technology activated. Also, if the read and write speeds are considerably poor, consider disconnecting the Samsung 980 Pro and then reinstalling it.

Compatibility and thermal controls

Given the compact M.2 2280 form factor, you can easily plug Samsung 980 Pro into most computers and laptops.

However, its backward compatibility with PCIe 3.0 results in reduced transfer speed on older systems, sometimes as low as 1,500-3,500 MB/s, which is significant, considering the higher price range. So, people with older AMD or Intel systems are probably better off with other cheaper high-speed SSDs.

Also, the Samsung 980 Pro is compatible with PS5 and rated by some as the best among the available options, given the fact that it doesn’t throttle the performance.

As for temperature and heating on the Samsung 980 Pro, it boasts a cutting-edge thermal control algorithm coupled with a nickel coating to effectively auto-manage the controller’s heat level and transfer speed to deliver superior performance, even under prolonged use.

The Samsung 980 Pro performed well under tests, and you, most likely, shouldn’t have to face overheating issues!

Availability of different storage options

The Samsung 980 Pro is available in four storage options: 250 GB, 500 GB, 1 TB, and 2 TB. While not directly related to the experience or performance, the availability of four different options ensures that users can get one based on their requirements.

So, with the Samsung 980 Pro, you can always get the desired storage space and won’t have to shell out a higher sum.

Data encryption

With security and privacy being a concern for most of us, Samsung 980 Pro’s built-in encryption is certainly an added benefit.

The much-talked-about SSD offers a hardware-based 256-bit AES encryption, one of the most secure algorithms. So, the Samsung 980 Pro would be a great fit for users who intend to store critical or confidential data.

Samsung Magician support

Samsung Magician is the manufacturer’s dedicated program to manage storage solutions, and with it, you can get a lot more out of the Samsung 980 Pro. The software’s built-in optimization tools will improve the SSD’s performance.

Samsung Magician

Samsung Magician will facilitate the installation of firmware updates and help monitor the drive’s health. Also, you can enable the 256-bit AES encryption for the Samsung 980 Pro using the program. Besides, you could turn on over-provisioning to free up storage.

As per our Windows Report experts, Samsung Magician is one of the best SSD optimization tools available, and coupling its rich and performance-oriented functionality with the Samsung 980 Pro does lead to an impressive boost!

Pricing

As per the official website, the Samsung 980 Pro is priced at $79.99 for the 500GB model, $109.99 for the 1TB model, and $179.99 for the 2TB model.

Though priced a little towards the higher side, the features and transfer speed offered by the Samsung 980 Pro are reasonably good for the range. Besides, you can’t put a price on the peace of mind, knowing the SSD has a longer life. And if you manage to buy the SSD at a discount, it would be a good deal!

Remember, its high pricing can only be justified if the Samsung 980 Pro can deliver the claimed transfer speed. But this has been a problem with older PCs. So, you might want to look at the other available Samsung SSDs, ones that are fully compatible with the device.

What is the lifespan of the Samsung 980 Pro?

The Samsung 980 Pro comes with the standard 5-year warranty, but given the high TBW (TerraBytes Written) rating, it will likely last 6-8 years or longer for regular users.

SizeTBW rating
256 GB150 TB
512 GB300 TB
1 TB600 TB
2 TB1200 TB
Source: Samsung 980 Pro Series Brochure

Is the Samsung 980 Pro better than the normal SSD?

The Samsung 980 Pro is certainly better than a regular SSD due to its high read and write speed, secure encryption algorithms, longer lifespan, easy management, and efficient thermal controls. But at the same time, it’s costlier!

So, if money is a critical factor, you should look at the cheaper alternatives. But remember, with the Samsung 980 Pro, the graphics and gaming performance will certainly witness an instant boost.

That’s our unbiased review of the Samsung 980 Pro, an excellent SSD for anyone with a high-end PC willing to shell out a slightly higher sum.

Though if you are looking for the best mid-range 1TB and 2 TB SSDs, there are several good options to choose from!

For any queries or to share your review of the Samsung 980 Pro, drop a comment below.

Jio Error 7050: How to Fix it

Streaming apps like Jio Cinema may face loading errors like 7050 from time to time, especially if you have an unstable connection. However, once you address the issue but the error is persistent, you need to dig deeper. Well, we did, and here are the results.

How do I fix Jio error 7050?

Here are a few workarounds to start you off:

  • Disconnect other devices on the network and only leave the streaming device then log out and log back in.
  • Switch to a different connection if available and verify that the server status is active.
  • Check for updates on the relevant app store, restart the app and your device then retry.

1. Force stop Jio Cinema

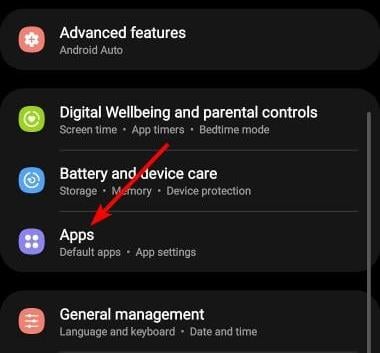
  1. Tap on settings on your phone.
  2. Next, tap on Apps.
  3. Find the Jio Cinema app and tap on it.
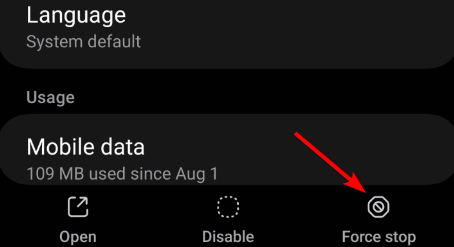
  4. Tap on Force stop at the bottom then reopen the app.

2. Delete app cache

2.1 TV app

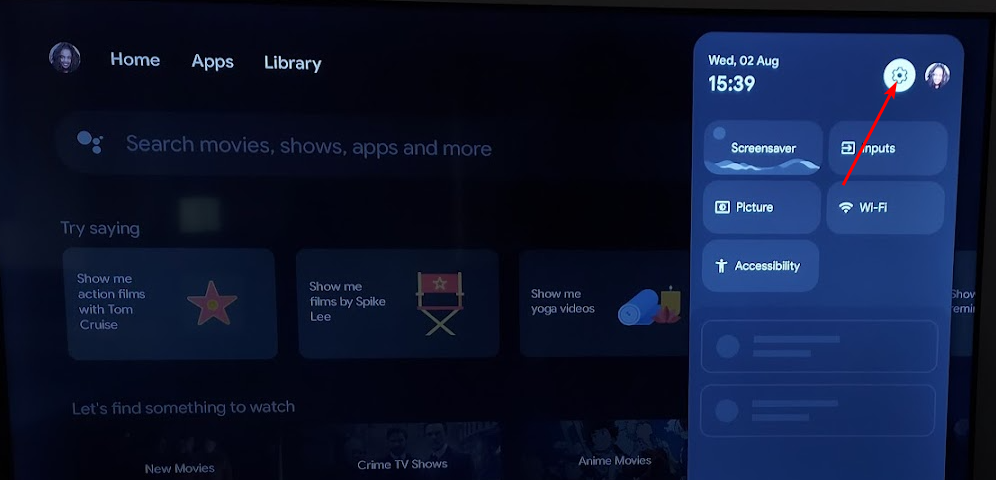
  1. On your TV, find your Settings.
  2. Go to Apps and select Jio Cinema.
  3. Scroll down and hit Clear data and Clear cache.

2.2 Android app

  1. Tap on settings on your phone.
  2. Next, tap on Apps.
  3. Find the Jio Cinema app and tap on it.
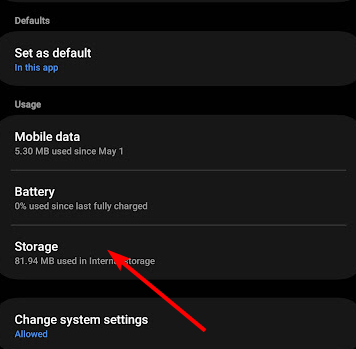
  4. Scroll down and select Storage.
  5. Tap on Clear data and Clear cache, then try again.

2.3 Browser cache

  1. For this step, we shall be using the Chrome browser.
  2. Launch your Chrome browser and click the three vertical ellipses in the top right corner.
  3. Select Settings.Settings CHrome
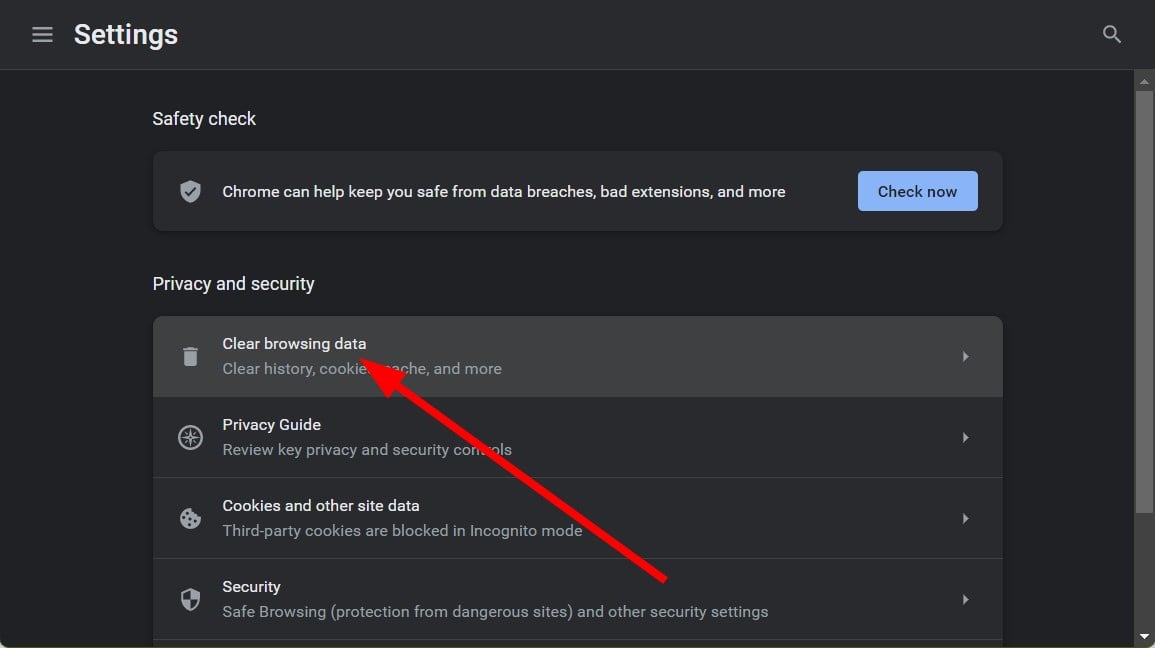
  4. Click on Privacy and security, then select Clear browsing data.
  5. Check Cookies and other site data and Cached images and files, then hit Clear data.Clear data

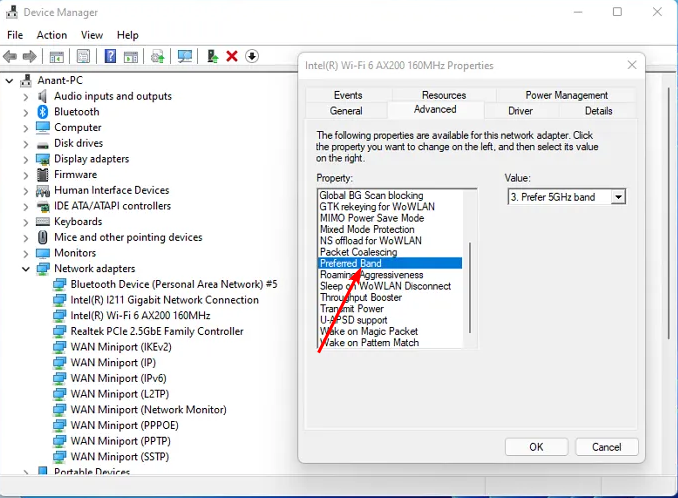
3. Switch to a faster frequency

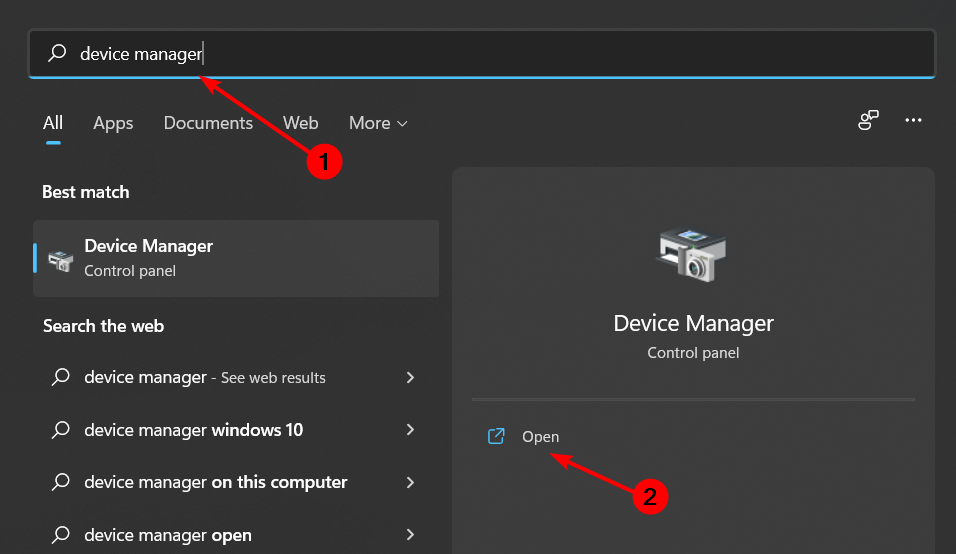
  1. Hit the Windows key, type Device Manager in the search bar, and click Open.
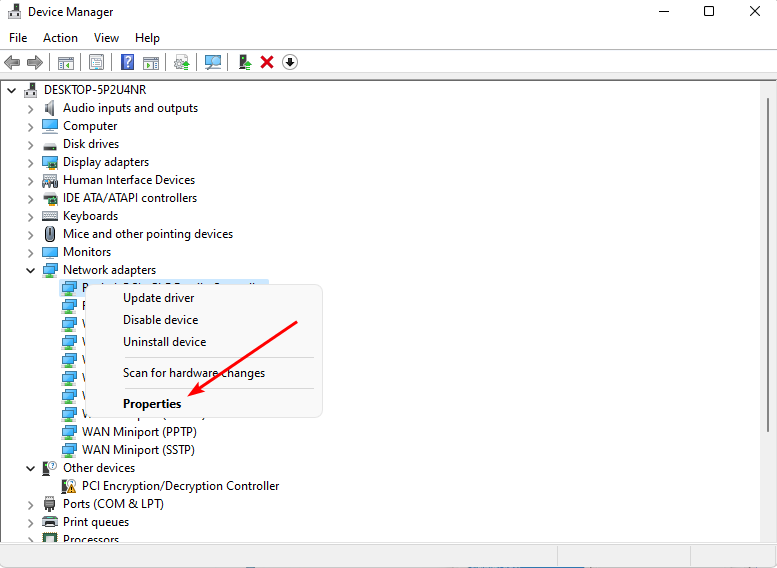
  2. Navigate to Network adapters and double-click to expand.
  3. Right-click on your network adapter and select Properties.
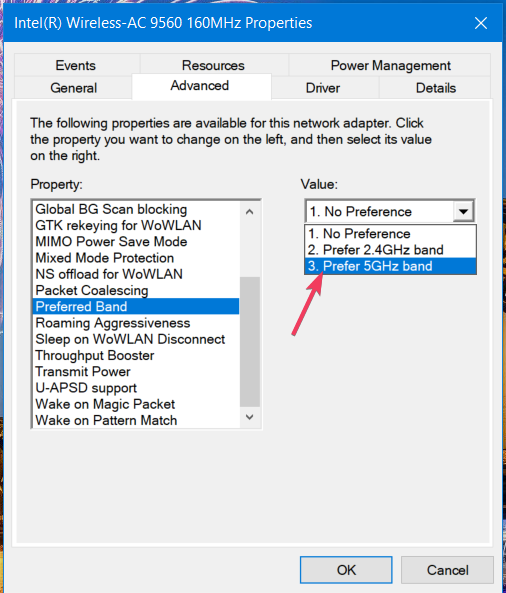
  4. Click on the Advanced tab and locate the Preferred Band.
  5. In the Value drop-down menu, select Prefer 5GHz band then hit Enter.
  6. Restart your PC.

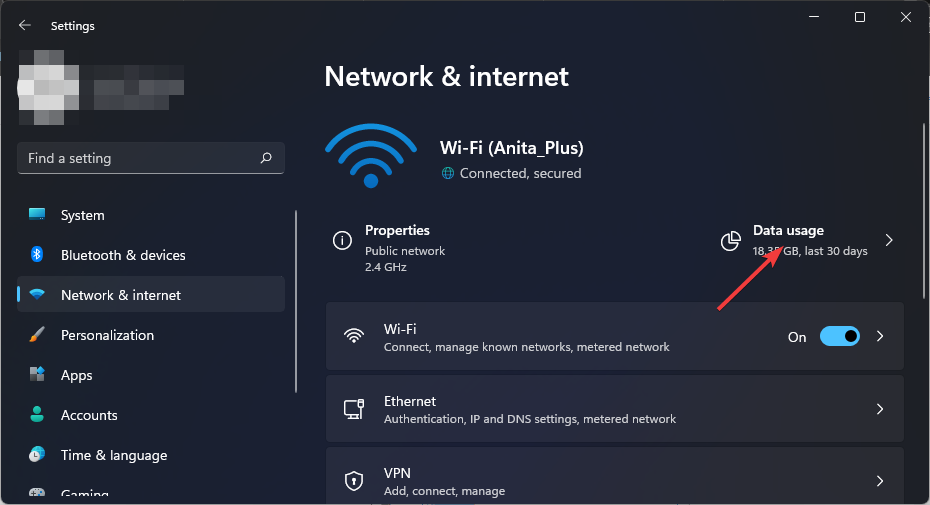
4. Remove bandwidth limits

  1. Hit the Windows key and select Settings.settings windows 11
  2. Click on Network & internet on the left pane.
  3. On your current Wi-Fi connection, click on Data usage.
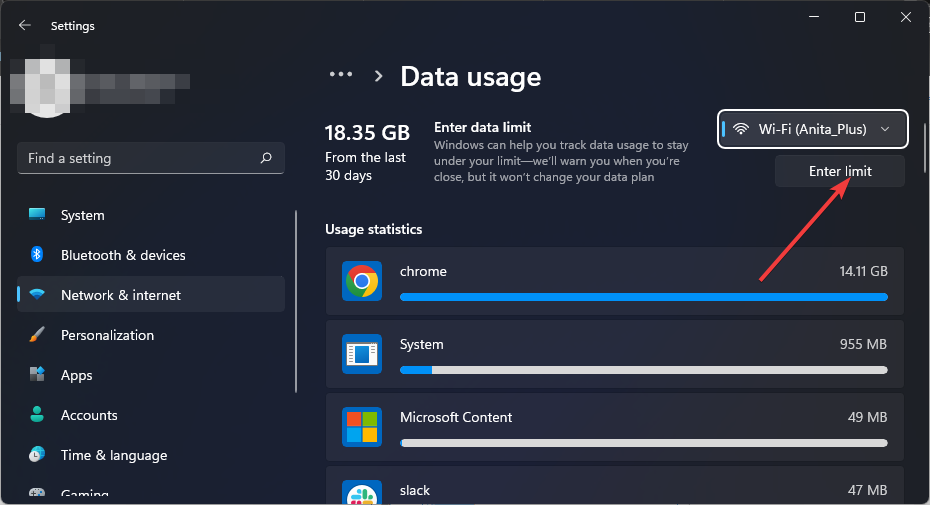
  4. Select Enter limit.
  5. Under Set data limit, check the Unlimited box, then click Save.

5. Reinstall the Jio Cinema app

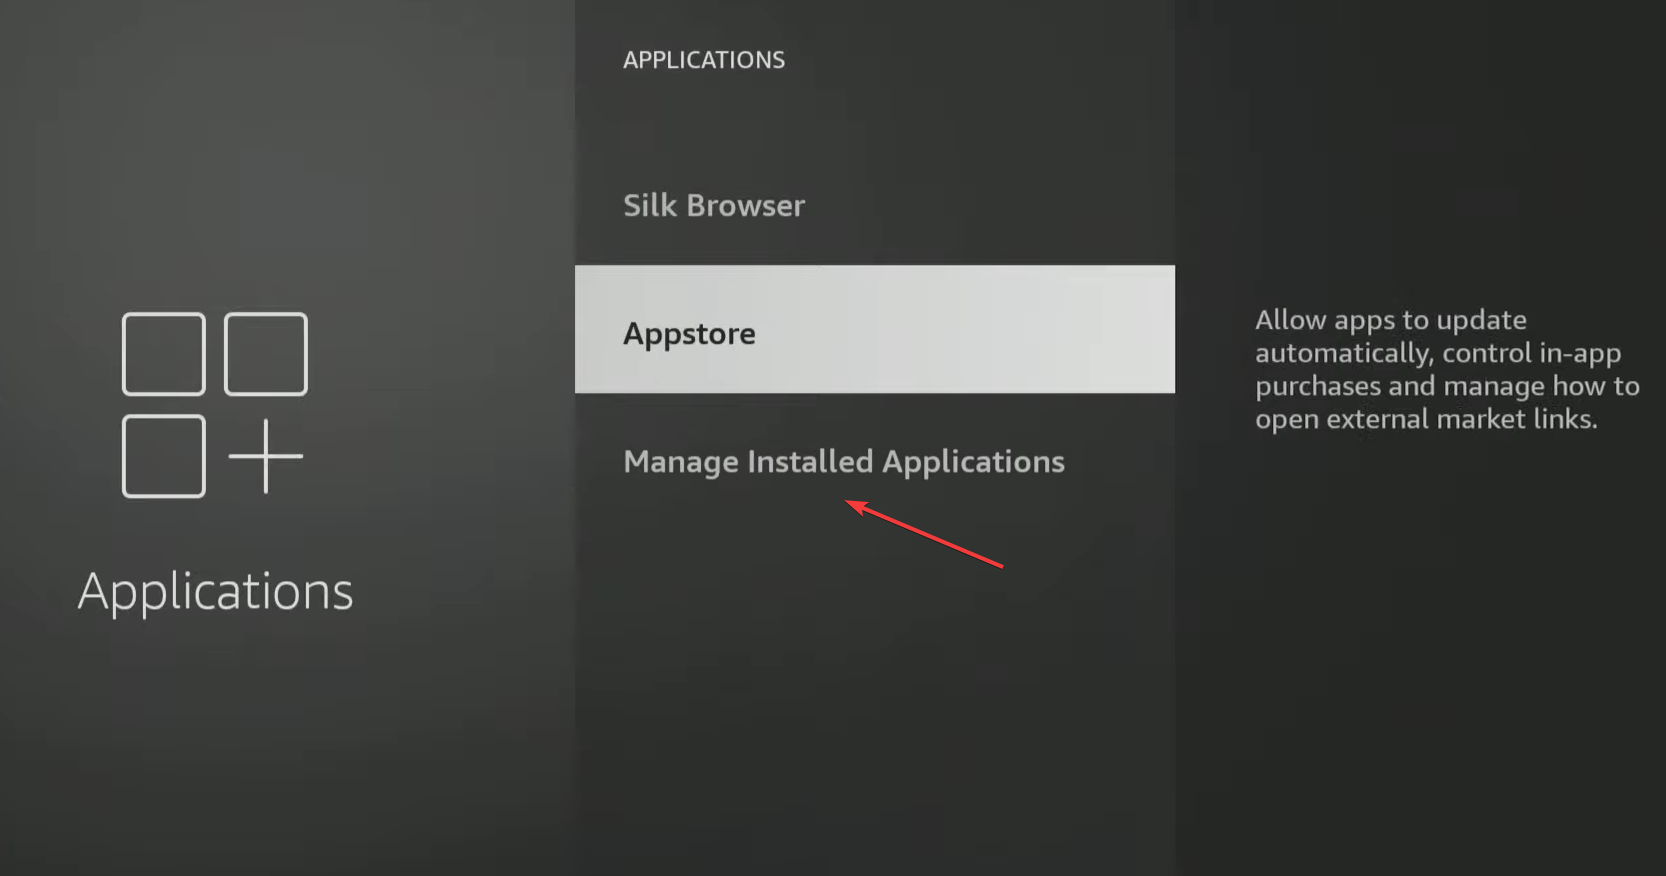
  1. On your TV, open Settings, and go to Applications. 
  2. Head down and select Manage installed applications.manage installed applications
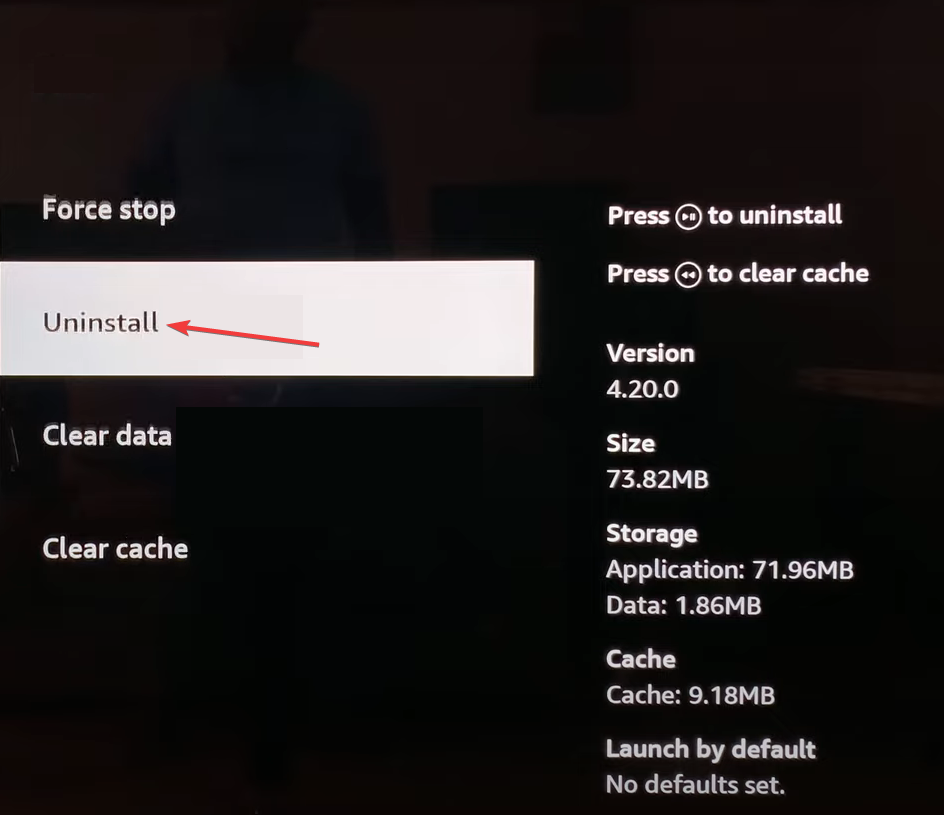
  3. Choose Jio Cinema from the list.
  4. Scroll down to the bottom and select Uninstall.uninstall to fix iplayer error code 02062
  5. Finally, choose Confirm to start the uninstallation.
  6. Once done, reinstall the Jio Cinema app from the dedicated app store and verify whether error code 7050 has disappeared.

6. Reset your network

6.1 Android

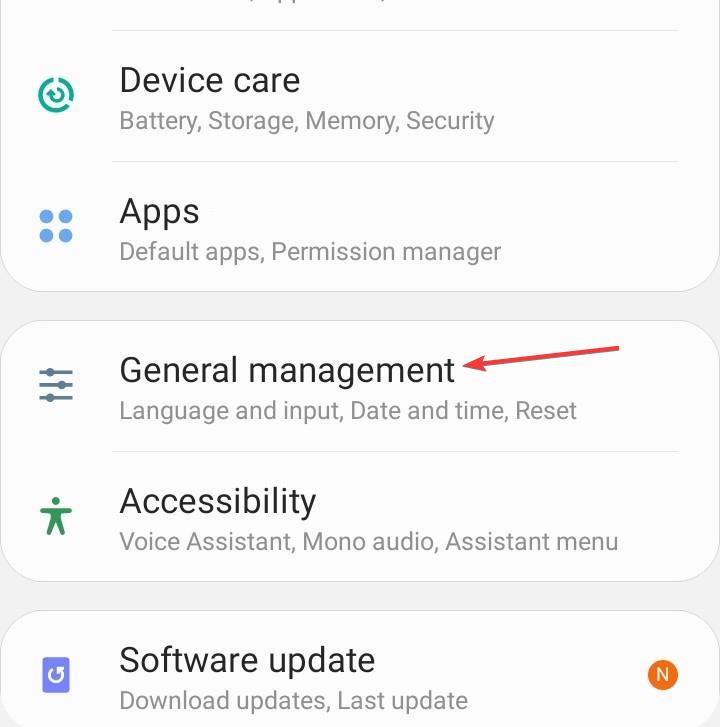
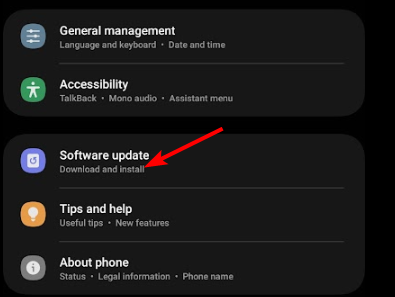
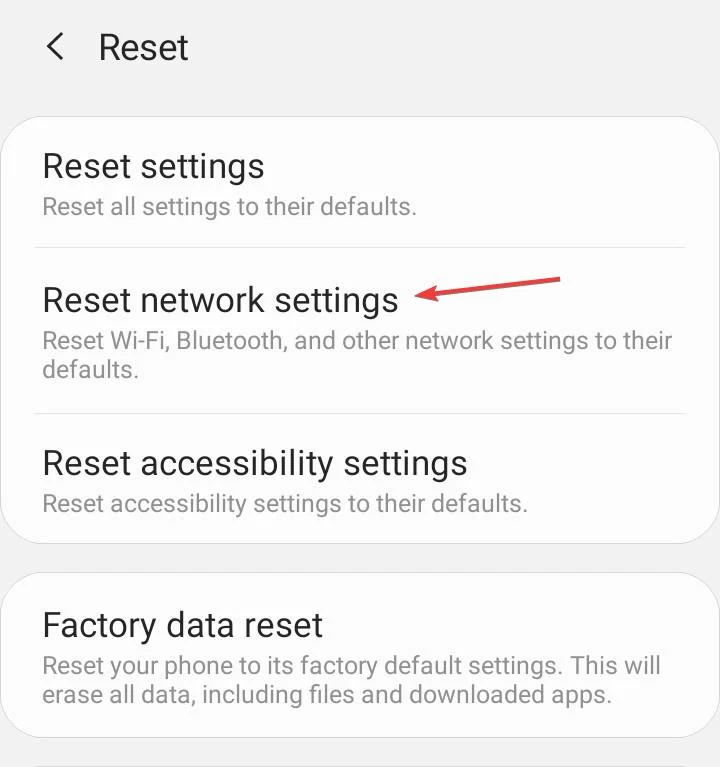
  1. Open the phone Settings, and go to General management.general management
  2. Tap on Reset.
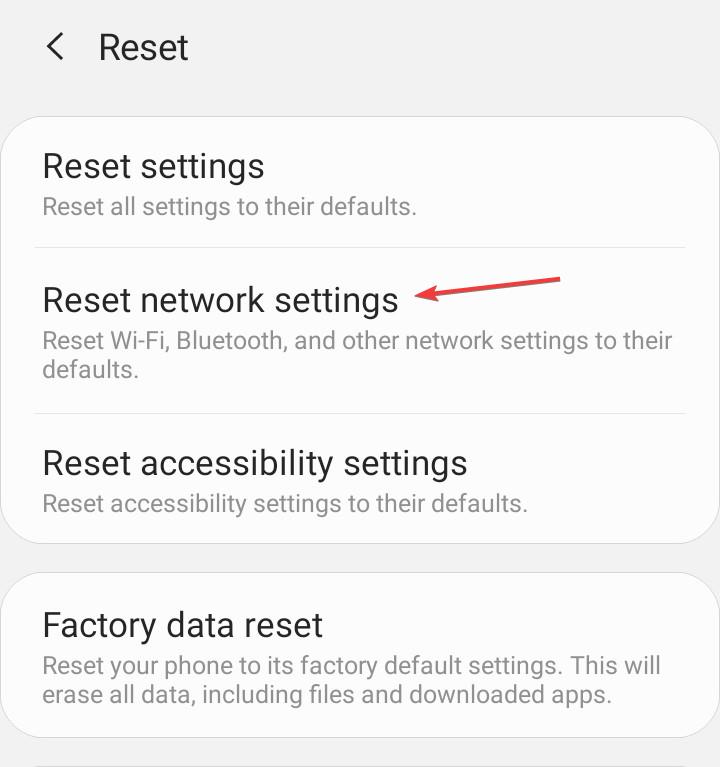
  3. Now, select Reset network settings from the list of options.reset network settings to fix error 201 arena of valor
  4. Tap on Reset settings to confirm.

6.2 iPhone

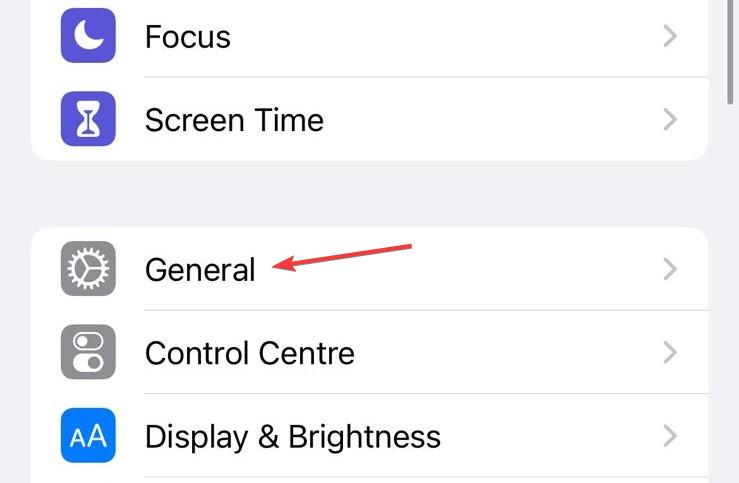
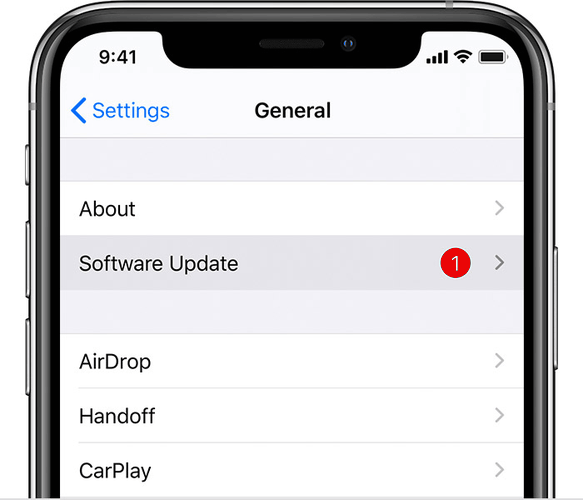
  1. Open the iPhone Settings, and go to General.general
  2. Tap on Transfer or Reset iPhone.
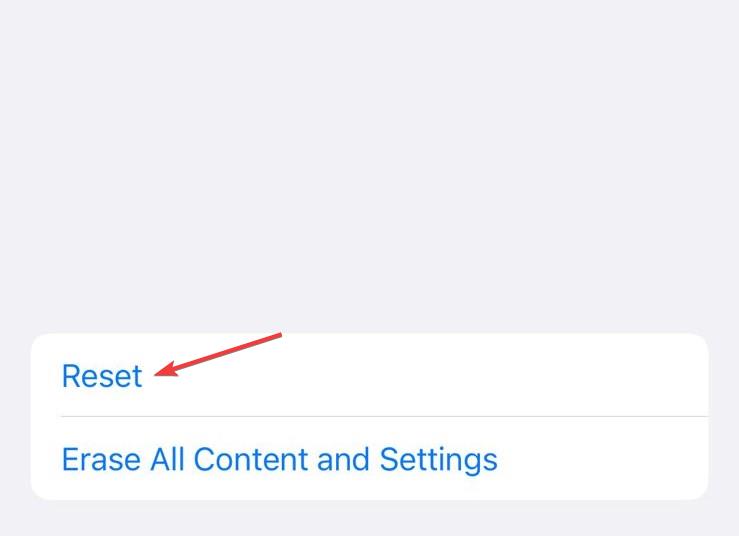
  3. Tap Reset at the bottom.reset to fix error 201 arena of valor
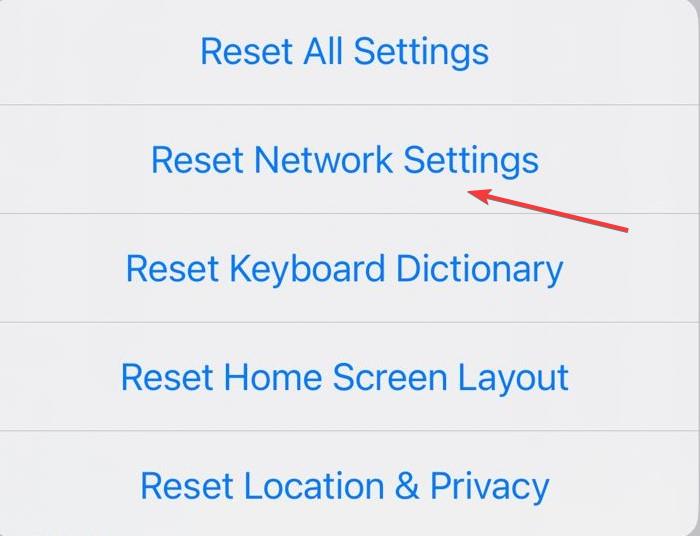
  4. Select Reset Network Settings from the list of options.reset network settings
  5. Enter the device’s passcode to confirm the reset.

6.3 PC

  1. Hit the Windows key and click on Settings.settings windows 11
  2. Navigate to Network & internet.
  3. Select Advanced network settings.going advanced network settings win11
  4. Click on Network reset.Network Reset 1
  5. Next, hit the Reset now button.Network Reset now

7. Contact support

Finally, some issues like error 7050 may require more muscle from the developers. If you’ve sorted out all your internet-related issues and even verified from your ISP that everything is okay, Jio Cinema support should be able to help with this one.

Otherwise, you might just have to wait and try later. Some connection issues usually resolve themselves so hopefully, you won’t be waiting too long.

Why does JioCinema buffer so much?

  • The number of people trying to access content simultaneously is very high. You can try streaming during off-peak hours.
  • You’re streaming on high-quality resolution and not enough bandwidth to match. You can upgrade your bandwidth and boost your internet speeds.
  • Your VPN is throttling. Disabling your VPN can improve the buffering time by up to 70%, but it will also mean losing access to geo-restricted content.
  • The type of device you’re using also plays a role. If your device isn’t powerful enough to run certain apps smoothly, they will naturally start lagging or even crashing while running them.

We do hope that you found this article helpful in addressing error 7050 on the Jio Cinema app. Playback errors on Jio Cinema don’t end there, but we’ve done our homework and covered most fixes.

You can also try your luck with well-performing browsers with JioTV. You never know; you might find one that bypasses this error.

Finally, there’s no reason to rely on one streaming app. There are so many movie apps out there, and you should at least try them and see what they have to offer.

Did you manage to fix this error? Which solution worked for you? Let us know in the comment box below.

Grounded Hosting Game Error: 7 Ways to Fix it

The Grounded Hosting Game Error is encountered when trying to set up a multiplayer game or even when joining one. The developers are aware of the problem for all three: Xbox, Microsoft Store, and Steam.

The error message reads, Hosting Game Error. There was an issue hosting a multiplayer game. Check your connection and try again.

Why can’t I host a game in Grounded?

If you can’t host a game in Grounded, it’s usually the missing critical components (Gaming Services), misconfigured privacy settings, or conflicting apps (antivirus and firewall) to blame. Besides, an incorrect date and time will trigger issues with the server, leading to the error.

How do I fix the Grounded Hosting Game Error?

Before we start with the slightly complex solutions, try these quick ones:

  • Check the Grounded issue tracker and look for any downtimes. If that’s the case, wait for a few hours and try again.
  • Make sure you are running the latest version of Grounded. As per the official communication, a patch for the error has been released. Also, disable any third-party antivirus or similar security software running on the PC.
  • When running the game initially, connect to a mobile hotspot, and after you have joined multiplayer, switch back to the previous network, whether Ethernet or Wi-Fi.
  • If faced with the Grounded Hosting Game Error on Xbox, force-restart the console. Also, you may sometimes be able to join in the second or third attempt. So, keep trying!
Tip icon Tip
The solutions listed here are for a Windows PC, though they apply to the console as well. If you are playing Grounded on Xbox, use the equivalent measures.

1. Use a VPN

If you see the Grounded Hosting Game Error, get an effective VPN solution and switch to a server based in another region before hosting a multiplayer game.

Remember, this is not a fix but a workaround that worked for 4 out of 5 users faced with the connection error. And until a patch is released for your platform, a VPN will do the trick!

ExpressVPN can easily handle this task. This software provides you with a large number of servers to connect to, located in 105 countries all around the world. ExpressVPN can also be used to bypass some issues that might appear due to your ISP or local network setup.

ExpressVPN

Improve your online gaming experience with this powerful VPN.
Check Price Visit Website

2. Set the correct date and time

2.1 Set date and time automatically

  1. Press Windows + I to open Settings, go to Time & language from the navigation pane, and click Date & time on the right.date & time
  2. Enable the toggle for both Set time zone automatically and Set time automatically.automatically to fix grounded hosting game error
  3. Relaunch Grounded and check for improvements.

Even if automatically setting the two leads to an incorrect date and time being displayed, it should help with the Grounded Hosting Game Error.

2.2 Set date & time manually

  1. In the Date & time settings, disable the toggle for Set time zone automatically and Set time automatically.
  2. Select your region from the Time zone dropdown menu.time zone
  3. Click the Change button next to Set the date and time manually.
  4. Set the correct date and time and click Change for them to reflect.change

3. Repair the game files

  1. Launch Steam, and head to the games Library.
  2. Right-click on Grounded, and select Properties from the context menu.properties
  3. Go to the Installed Files tab, and click on Verify integrity of games files.verify integrity to fix grounded hosting game error
  4. Once done, relaunch the game and verify whether you can now host a multiplayer game.

4. Update Gaming Services and the Xbox app

Note icon NOTE
This fix only applies when you are using the Xbox app to play Grounded on the PC. If not, head to the next solution.
  1. Press Windows + S to open Search, type Microsoft Store in the text field, and click the relevant result.
  2. Click the Library icon near the bottom left.library
  3. Click the Get updates button.get updates
  4. If an update is listed for Gaming Services, the Xbox app, or any related components, download them.gaming services to fix grounded hosting game error
  5. Once done, reboot the PC, launch Grounded, and check for improvements.

5. Change the Steam’s privacy settings

  1. Open the Steam app, click on your display name, and select Profile from the menu.profile
  2. Click the Edit profile button.
  3. No, go to Privacy settings from the navigation pane, and set the various options as follows:
    • My basic details: Public
    • My profile: Public
    • Game details: Friends Only
    • Friends list: Public
    • Inventory: Friends Only
    • Can post comments on my profile: Friends Onlychange to fix grounded hosting game error
  4. Relaunch Grounded and check for improvements.

A few users reported that restrictions placed by Steam on the account, usually on under-18 accounts, led to the Grounded Hosting Game Error. If you are still unsure of the correct configuration, match it with another Steam account that doesn’t receive the error.

6. Whitelist the game and platform in the firewall

  1. Press Windows + S to open Search, type Allow an app through Windows Firewall in the search bar, and click the relevant result.allow another app
  2. Click the Change settings button.
  3. Make sure the game, Grounded, and Steam/Xbox are listed here and have both the Private and Public checkboxes ticked.firewall
  4. If not listed, click the Allow another app button.allow another app
  5. Click on Browse.
  6. Locate the game’s or platform’s launcher, select it, and click on Open.open
  7. Click the Add button.
  8. Now, tick both the Private and Public checkboxes, and click OK to save the changes.whitelist to fix grounded hosting game error

If the firewall is blocking the program, resulting in the Grounded Hosting Game Error, you will need to manually whitelist both the game and the platform, be it Xbox or Steam. This also helps when Cold War multiplayer is not working.

7. Reinstall the game

  1. Press Windows + R to open Run, type appwiz.cpl in the text field, and hit Enter.appwiz.cpl
  2. Select Grounded from the list of applications, and click Uninstall.uninstall to fix grounded hosting game error
  3. Follow the on-screen instructions to complete the uninstall process.
  4. Now, reboot the device and reinstall Grounded from the Steam Store or Microsoft Store, as the case may be.

If a quick removal doesn’t work, use a reliable software uninstaller tool to get rid of any remnant app files and Registry entries.

One of these solutions should have helped with the Grounded Hosting Game Error, as it did for other users. If not, contact Obsidian support. Remember, in most cases, simply relaunching the game should do the trick!

Before you leave, discover some quick tips to optimize the PC for gaming and get the best performance.

For any queries or to share what worked for you, drop a comment below.

WhatsApp for Windows users will be able to access the view-once files

Good news for WhatsApp for Windows users: according to the latest findings from the folks over at WABetaInfo, WhatsApp for Windows users will be able to send and receive view-once pictures and videos on the platform, a year after the feature was deprecated on the platform.

What sparked the change and why this feature is coming back, we don’t know, but maybe it has to do with the rapid development of WhatsApp that’s been happening lately, in terms of security, and new features.

A year ago, this version of WhatsApp had the feature, but, as WABetaInfo reports, claims of security breaches were the reason the feature was deprecated in the first place. But now, it seems WhatsApp for Windows, WhatsApp Web, and Desktop users are able to use this feature once again, after installing the latest updates.

It’s a welcomed addition to WhatsApp for desktop devices, considering the updates WhatsApp has been getting this year. For instance, WhatsApp recently debuted Channels, allowing users to subscribe to communities and public persons, for the latest updates.

How to get the view-once feature on WhatsApp for Windows

To get the view-once feature on WhatsApp for Windows, make sure you have the latest version of WhatsApp for Windows available.

To update your WhatsApp for Windows, you’ll just need to open the Microsoft Store, search for WhatsApp, and download the latest updates. If there are any updates, the store will automatically download and install them.WhatsApp for Windows view once

When you open WhatsApp for Windows you might be one of the lucky users who gets to try the feature. You should know that it’s not yet widely available, and some users might have the feature, while others might not have it at all. However, according to WABetaInfo, it will roll out to all users in the following weeks.

As we mentioned earlier, the addition of the feature to WhatsApp for Windows is a welcomed one, especially for those users who predominately use WhatsApp for desktop devices.

It allows for more versatility, and the feature itself is designed in such a way files won’t be stored on devices, which is a good perspective to consider for those who want privacy.

The feature should be out to all desktop versions of WhatsApp by the end of this year. Are you excited about it?

Fox Sports Error 403: Easy Ways to Fix It

If you encountered error 403 while visiting the Fox Sports website, this guide can help. We will discuss the probable reasons and offer practical solutions to fix it so that you can enjoy an uninterrupted sport-watching session.

What causes the error 403?

  • Browser cache and cookies, or you have insufficient permissions.
  • Your ISP has blocked the website, or the server is misconfigured.

How can I fix error 403 on Fox Sports?

1. Clear the browser cache & cookies

  1. Launch your preferred browser; here, we are using Google Chrome to demonstrate the steps.
  2. Click the three dots icon from the upper right corner, and select Settings from the drop-down menu.Settings CHrome - error 403 Fox Sports
  3. Choose the Privacy & security option from the left pane, then click Clear browsing data.Settings 2 - cleaing browsing data
  4. For Time range, select All time from the drop-down list, then place a checkmark next to Cookies and other site data, & Cached images and files.Clear data
  5. Click Clear data, then restart your browser and try to access the website.

Clearing cache and browser data can help you fix other app-related issues, such as error code 403-1000 on Fox Sports; read this guide to learn more.

2. Disable all extensions on your browser

  1. Launch your preferred browser; here, we are using Google Chrome to demonstrate the steps.
  2. Click the three dots icon from the upper right corner, and select Extensions, then Manage Extensions from the drop-down menu.Manage Extensions new -error 403 Fox Sports
  3. You will see a list of extensions, now go to every enabled extension, click the toggle button next to it to disable and remove them completely, and click the Remove button.Extensions Remove

To learn what types of extensions you should remove, we recommend you read this detailed guide on spotting an unwanted extension on Chrome.

If none of these methods work for you, first try using the Fox Sports Go app for Windows. However, if that doesn’t help you either, seek assistance from the Fox Sports support team and explain the issue to them along with the steps tried.

You may also try to:

  • Restart your device and router to refresh the connection, then try using a VPN to access the website. If you can access the website now, contact ISP to get it unblocked.
  • Double-check the URL you are using to ensure you are using the correct one, and try opening the website in incognito mode.

To sum up, check the server status of the website, then ensure you have an active subscription, compatible device, and valid credentials to access the website.

Clearing the browser cache and disabling interfering extensions can clear out a lot of issues, including browser not supported error.

However, if you can access everything other than the website on your device, it is better to wait for some time to let things get clear from the server side. In case you’re still having problems, our Fox Sports Error 403-1000: Quick and easy solutions guide offers more fixes you can try.

Did we miss a step that helped you? Feel free to mention it in the comments section below. We will happily add it to the list.

How to Fix Error 1 on Jio Cinema

Jio Cinema’s being one of India’s largest on-demand service providers means it’s not exempted from occasional issues such as error 1. Luckily, we narrowed down the top solutions so you can get back to streaming quickly.

Why is Jio Cinema showing error 1?

This error may occur while streaming, preventing playback of the video. The server could be overloaded, you may have internet connection issues, or a recent app update has issues causing another loading error 7050.

How do I fix error 1 on Jio Cinema?

Start with the following simple workarounds:

  • Ensure you have a stable and working internet connection, then verify that the Jio Cinema servers are up and running.
  • Close any bandwidth-hogging processes, applications, and devices.
  • Check your device for firmware updates and restart it.

1. Enable background data

  1. On your phone, go to Settings.
  2. Scroll down and select Apps.
  3. Locate the Jio Cinema app and click on it.
  4. Tap on Mobile data.
  5. Toggle on the Allow background data usage option.

Background data can help an app work more efficiently. It makes sure that your app is up-to-date with the latest information at all times so that you don’t have to re-download large files from scratch every time you open your app.

This is also a good time to disable any bandwidth limits you may have set up to ensure your Jio Cinema app is not capped when streaming.

2. Reset Access Point names

  1. On your phone, go to Settings.
  2. Tap on Connections.
  3. Next, tap on Mobile networks>Access Point Names.
  4. Tap on the three ellipses in the top right corner and tap on Reset to default.

Resetting access point names is changing the name of an access point. This can be used to avoid interference from other nearby networks. It’s also a good idea to reset the default login information for your wireless router if someone else has gotten hold of your credentials.

3. Delete app cache

3.1 TV app

  1. On your TV, find your Settings.
  2. Go to Apps and select Jio Cinema.
  3. Scroll down and hit Clear data and Clear cache.

3.2 Android app

  1. Tap on settings on your phone.
  2. Next, tap on Apps.
  3. Find the Jio Cinema app and tap on it.
  4. Scroll down and select Storage.
  5. Tap on Clear data and Clear cache, then try again.

3.3 Browser cache

  1. For this step, we shall be using the Chrome browser.
  2. Launch your Chrome browser and click the three vertical ellipses in the top right corner.
  3. Select Settings.Settings CHrome
  4. Click on Privacy and security, then select Clear browsing data.
  5. Check Cookies and other site data and Cached images and files, then hit Clear data.Clear data

4. Use a VPN

Error 1 on Jio Cinema happens for many reasons, and one of them is the VPN connection you might be using. When you connect to a VPN server, your IP address changes and this can cause issues. The app already has location restrictions, so you need to tread carefully when selecting your server.

So, we recommend that users turn off their VPN connection before connecting to the Jio Cinema app or switch to a more reliable VPN option, such as ExpressVPN.

ExpressVPN is a powerful dedicated VPN solution that can be used to bypass connection errors, coming either from the local network setup or from the ISP. Also, due to its large number of servers, located in 105 countries, ExpressVPN is perfect for watching geo-blocked content.

ExpressVPN

Do not let any errors ruin your experience when watching your favorite movies with this amazing VPN solution.
Check Price Visit Website

5. Uninstall recent app updates

  1. On your TV, find your Settings.
  2. Go to Apps and select Jio Cinema.
  3. Select Uninstall updates.

For other devices, this option may be unavailable. You’ll have to download an older version from a third-party site. Just ensure you have a comprehensive antivirus for maximum protection.

Note icon NOTE
WindowsReport is not affiliated with 9apps.com. If you choose to download software from the site, do your due diligence first.

6. Change your DNS settings

  1. Head over to the Settings app using the Windows + I shortcut.
  2. Select Network & internet from the left sidebar and choose Wi-Fi or Ethernet from the right section, depending on your internet connection.Change DNS Settings on Windows 11
  3. Scroll down and select Hardware properties.Change DNS Settings on Windows 11
  4. Locate the DNS server assignment setting and click the Edit button next to it.Change DNS Settings on Windows 11
  5. This will open the Edit DNS settings popup. Here, expand the drop-down on the top and choose Manual instead of Automatic (DHCP).
  6. Next, enable the toggle for either IPv4 or IPv6, based on the IP connection type. Change DNS Settings on Windows 11
  7. Now provide the primary DNS server address in the Preferred DNS field followed by a secondary DNS server address in the Alternate DNS field. (For instance, 8.8.8.8 is the preferred DNS address, and 8.8.4.4 alternative DNS address for Google’s DNS server)Change DNS Settings on Windows 11
  8. If you wish to enable the DNS over HTTPS feature to encrypt DNS requests, choose Encrypted only (DNS over HTTPS) for both Preferred DNS Encryption and Alternate DNS Encryption dropdowns.Change DNS Settings on Windows 11
  9. Press the Save button once you are done with the changes. 

7. Reinstall the Jio Cinema app

  1. On your TV, open Settings, and go to Applications. 
  2. Head down and select Manage installed applications.manage installed applications
  3. Choose Jio Cinema from the list.
  4. Scroll down to the bottom and select Uninstall.uninstall to fix iplayer error code 02062
  5. Finally, choose Confirm to start the uninstallation.
  6. Once done, reinstall the Jio Cinema app from the dedicated app store and verify whether error code 1 has disappeared.

8. Contact support

There are many different kinds of errors that can occur while using Jio Cinema on your device. Some might be pretty simple to solve, while others may require advanced technical knowledge to resolve them successfully.

If error 1 has become extremely hard to crack, the Jio Cinema help center may be able to come through for you.

While you’re still here, check out the top browsers that work well with JioTV as they do for Jio Cinema.

Have any other solution in mind that worked for you? We’d love to hear about it. Leave a comment down below.

5 Easy Ways to Fix Giffgaff Error 38

Many users have complained about getting error 38 on Giffgaff, or Your messages won’t send error while trying to send a text.

In this guide, we will discuss the reasons for the issue and offer WR experts recommended solutions to fix the problem in no time.

What causes the error 38 on Giffgaff?

  • You have entered an incorrect number or area code.
  • Might have run out of phone credit.
  • Network signal issues.

How can I fix the error code 38 on Giffgaff?

Before engaging in advanced troubleshooting steps to fix error 38 on Giffgaff, you should consider performing the following checks:

  • Check the Giffgaff server status, then restart your device & put it on Airplane mode, then wait for it and turn it off; repeat it 5-6 times.
  • Double-check the number mentioned, and don’t forget to mention the country code correctly. If you get this issue for a specific number, remove it from your contacts and message history.
  • If you recently got the Giffgaff SIM, wait for 24 hours to get it activated completely, and use the default messaging app & remove others if installed.

1. Check your mobile network strength

Check your mobile network strength -error code 38 on Giffgaff

Make sure your mobile device is displaying network bars and has a strong & uninterrupted internet connection.

If you are using mobile data, check if it is working by using a browser or any other app that uses the internet. You can also try going to a different location to get better network coverage.

In case your phone doesn’t work without Wi-Fi, this could indicate a problem with your cellular connection or the mobile data; read this guide to learn more.

2. Verify your message center number

Note icon NOTE
The steps mentioned for each method for Android devices may vary a little depending on the device you are using.

Android

  1. Locate the SMS app from the home screen.
  2. Tap on your profile icon, then select Message settings.Message settings  -error code 38 giffgaff
  3. Click Advanced.Advanced settings 1
  4. Locate and tap on SMSC,  then check the number under it.Edit SMSC
  5. If it is not +44 78020 02606, you can now edit the message center number. To do that, open the keypad on your screen and type in *#*#4636#*#*
  6. Follow the on-screen instructions to change it, then tap OK to confirm.

Now try sending a message to the same number and check if the recipient has got the messages. If not, set your SMS app as the default messaging app.

iPhone

  1. Tap the Call icon from the bottom left side of the screen.Call - Fix Giffgaff Error 38
  2. Select Keypad from the options present at the bottom and type the following number followed by +44 78020 02606 (Giffgaff SMS Service Centre number) –  **5005*7672*+44 78020 02606Keypad

If this SMS center number doesn’t work for you, you need to call customer care and ask for the number, as sometimes it can be different for some devices.

3. Perform a manual roam

Android

  1. Tap on Settings from the home screen.Settings - error code 38 giffgaff  
  2. Go to Mobile networks.
  3. Click on the SIM you are using.
  4. Tap Carrier.  
  5. Toggle off the switch next to Auto select, then click Off to confirm.
  6. Now, your device will search for a network and choose a network other than Giffgaff, O2-UK, or Tesco.
  7. Your phone will have no network as soon as you close the Settings menu.  
  8. Repeat the process, and now choose O2-UK as your mobile network. If you are traveling abroad, tap on Auto select.

These steps will update the message center number forcefully; you can use the above method to check it & confirm.

iPhone

  1. Tap on Settings.Settings -Fix Giffgaff Error 38
  2. Select Carrier or Mobile Service.Mobile service - Fix Giffgaff Error 38
  3. Go to Network Selection.Network selection -
  4. Toggle off the switch next to Automatic; then you will get a list of available networks; select any other network manually.Automatic - Select the network
  5. Let the device find another network; it will fail to do so; repeat the process and choose O2-UK or select Automatic selection.

4. Check your phone and text credit balance

  1. Tap the Call icon from the bottom left side of the screen.Call - Fix Giffgaff Error 38
  2. Open your keypad and dial *100*5# to check how many texts you have. However, you don’t have to do this if you have opted for an unlimited text goody bag.
  3. To check the phone credit to send texts, open the keypad again, and press *100#, and it will show you the phone credit balance.

In case you have insufficient phone or text credit, you need to top-up to ensure you have sufficient funds to prevent this issue.

5. Perform a soft reset on your phone

Android

  1. Hold the Power button and press the Up and Down Volume button simultaneously until your phone reboots.
  2. Once your phone boots up, try to send the message again to check if the issue persists.

iPhone

  1. Press and quickly release the Volume Up button.
  2. Press and release the Volume Down button.Reset your phone  - Giffgaff error 38
  3. Press and hold the Side button until you see the Apple logo. Once it appears, release the button.

Getting error code 38 while using the GiffGaff sim can frustrate you, especially when you urgently need to send a text.

To fix it, first, check the GiffGaff server status to verify the message center number mentioned is correct and that you have enough sufficient text and phone credits.

To prevent error code 38 while texting using GiffGaff sim, ensure your phone has network bars, and the message center number should also be correct.

In case your computer has built-in eSIM functionality capabilities, you can use the SIM on your Windows 11 to check the issue. To learn more, read this guide on how to enable or disable it.

In case you are facing other messaging issues, like you have been blocked from originating messages, read this guide to learn the causes and simple solutions.

Did we miss a step that helped you? Don’t hesitate to mention it in the comments section below. We will happily add it to the list.

Peacock Error Code PAS_41004: How to Fix it

Peacock TV is a US-only (and a few US territories) streaming service, but many, when making payments, received the error code PAS_41004. It only appeared recently, and there aren’t many reported cases of it.

The error message either reads We’re unable to complete your transaction right now. Please contact your card issuer for resolution, or Sorry, there’s been a problem. Please try again, followed by the error code PAS_41004.

What is Peacock payment error code PAS_41004?

PAS_41004 is a payment error that appears when buying the Peacock TV premium subscription plan. For some users, the error came up while applying a discount code. It could be due to using a non-supported payment method, server issues, or problems with the Internet connection.

How do I fix Peacock error code PAS_41004?

Before we start with the slightly complex solutions, try these quick ones:

  • Verify whether the Peacock TV servers are down using a real-time monitoring service like Downdetector. If so, try again in a few hours.
  • Restart the device or try making the payment on another one, preferably an Android or iOS device over mobile data. If using the Peacock website, run it in Incognito/Private mode.
  • Make sure the network connection is running fine and check whether the Internet disconnects intermittently.

1. Use a VPN

Your primary approach when faced with the Peacock error code PAS_41004 error should be to use a reliable VPN software.

This is the best solution if you are trying to pay for Peacock TV outside the US. Also, a VPN helps bypass other trivial network-related issues and will allow you to make payments seamlessly.

ExpressVPN is a powerful solution for this issue. This tool will provide you with countless servers you can connect to, located in 105 countries. You can improve your connectivity and even your internet speed just by choosing a different server.

ExpressVPN

Don’t let errors ruin your experience when trying to watch your favorite Peacock shows with this powerful VPN.
Check Price Visit Website

2. Try another payment method

As per users who contacted Peacock support, a non-supported payment method was to blame for the error. And switching to another one did the trick!

Acceptable payment methods for a Peacock subscription include:

  • Credit card (Visa/MasterCard/Discover/American Express)
  • Debit card
  • PayPal
Tip icon Tip
If another payment method doesn’t work, make sure it is connected to a bank based in the USA or use Android Pay or Apple Pay.

3. Clear the app cache

Note icon NOTE
The device-based solutions listed here are for an Android device. The same idea also applies to a smart TV, iOS device, or the PC.
  1. Open the Settings on your device, and go to Apps.apps
  2. Select Peacock TV from the list of applications.
  3. Tap on Storage.storage
  4. Now, tap on Clear data and Clear cache to delete all non-critical app files.clear data to fix peacock error code pas 41004
  5. Once done, relaunch the app and verify whether the payment goes through.

4. Reinstall Peacock TV

  1. Open the device Settings, and go to Apps.
  2. Select Peacock TV from the list.
  3. Tap the Uninstall option at the bottom.uninstall
  4. Tap OK in the confirmation prompt to proceed.
  5. Once done, re-download Peacock TV from the Google Play Store, sign in and try making the payment.

5. Contact Peacock TV support

When nothing else works, the last option is to contact Peacock support. Their dedicated chat agent will help identify the underlying cause, whether it’s at Peacock’s end or yours, and share a fix with you.

One of these solutions should have helped fix the Peacock error code PAS_41004. Also, while you are at it, find out some quick tricks to get rid of buffering and freezing on Peacock TV.

For any queries or to share what worked for you, drop a comment below.

5 Ways to Fix the Error Code A19 on Stan

An error code dubbed A19 with the Sorry, we can’t play the video. Please try again message may appear when you try to watch a video on Stan.

And since Stan is compatible with multiple devices, you can switch from one to the other. Still, we came up with ways to deal with this issue as you shall see below.

How do I fix error code A19 on Stan?

Begin with the following basic workarounds first:

1. Delete Stan app cache

1.1 Android/Smart TV

  1. On your TV, find your Settings.
  2. Go to Apps.
  3. Find Stan app and click on it.
  4. Scroll down and select Clear data and Clear cache.

1.2 Android phone/tablet

  1. Tap on settings on your phone.
  2. Next, tap on Apps.
  3. Find the Stan app and tap on it.
  4. Scroll down and select Storage.
  5. Tap on Clear data and Clear cache, then try again.

1.3 Browser

  1. For this step, we shall be using the Chrome browser.
  2. Launch your Chrome browser and click the three vertical ellipses in the top right corner.
  3. Select Settings.Settings CHrome
  4. Click on Privacy and security, then select Clear browsing data.
  5. Check Cookies and other site data and Cached images and files, then hit Clear data.Clear data

1.4 Xbox

  1. Press the Xbox button on your console.
  2. Select Settings.
  3. Click on Device & connections on the left.
  4. Select Blu-ray.
  5. Select Persistent Storage.
  6. Choose Clear persistent storage.

2. Re-establish your connection to Stan

2.1 On your TV

  1. Take the batteries out of your remote control, press and hold the power button for a few seconds, then release.
  2. Now, press every button on the remote at least once while the batteries are out. This helps to clear residual power.
  3. Insert the battery into the remote.
  4. Next, unplug the TV from the power outlet, and press and hold down the TV’s power button for a few seconds.
  5. Wait for one minute after doing this, plug the TV back into the power source, and power it on.

2.2 On your Xbox console

  1. On your controller, press the Xbox button, and on the menu, click the System tab to open Settings.
  2. Select System, then click on Console info.
  3. Click on Reset console.
  4. Choose Reset and keep my games & apps.

2.3 On your PS4/5

  1. From the PS5 Home Screen locate and select Settings. 
  2. Next, go to System and select Accessories.
  3. Here select General and Bluetooth Accessories.
  4. Under the heading Registered Accessories locate and select your controller.
  5. From the menu choose Delete.
  6. When prompted to forget the device, select OK.
  7. After that, pair your controller once again.

3. Re-enable the Widevine component

  1. Open your Chrome browser, open a new tab, and enter the following address: chrome://components/
  2. Locate Widevine Content Decryption Module then click Check for updates and wait for the component to be updated.
  3. Launch Google Chrome, click three dots to open the Menu, and go to Settings.
  4. Expand the Advanced tab, then click on System.
  5. Toggle on the Use Hardware Acceleration when available option, then click the Relaunch link to restart the browser.

Widevine Content Decryption Module (Widevine CDM) is a software that allows playback of encrypted premium video content on web browsers, mobile devices, and set-top boxes.

It is widely adopted by content owners and service providers so if the error code A19 is persistent on Stan, the software may be disabled or outdated.

If you’re using other browsers, ensure you switch on this feature as well. The steps may vary slightly but these ones from Chrome give you a rough idea of how to go about it. Also, for Windows users, ensure to check whether the Widevinecdm.dll is missing or corrupted before trying again.

4. Adjust audio settings

On your Stan account, click on your profile then go to Device Settings>Play stereo audio by default and toggle this option on. When you’re watching videos online, you’ll notice that some videos play without any problems while others are choppy or stop playing altogether.

This is because every video has its own encoding specifications. If the error code A19 on Stan is caused by the inability of your device to detect the right codec, changing to stereo mix can help resolve this issue because it is widely accepted and doesn’t require additional software or hardware.

5. Reinstall the app

  1. On your TV, open Settings, and go to Applications. 
  2. Head down and select Manage installed applications.manage installed applications
  3. Choose Stan from the list.
  4. Scroll down to the bottom and select Uninstall.uninstall to fix iplayer error code 02062
  5. Finally, choose Confirm to start the uninstallation.
  6. Once done, reinstall the Stan app from the dedicated app store and verify whether error code A19 has disappeared.

Finally, contact Stan support team if you’re still getting the error code A19 and you’ve tried other browsers to watch Stan content from. It could be an isolated problem with your account which they’ll be able to confirm on their end and offer solutions.

You may also benefit from streaming software that will make your experience a breeze especially if frequently you encounter a lot of streaming errors.

We’re always open to hearing more about how our readers were able to solve these problems so if you have one up your sleeve, don’t hesitate to share it with us in the comment section below.

Will Microsoft switch the regular Windows for the ARM-based Windows in the future?

Among all the AI development Microsoft put out this year so far, the Redmond-based tech giant found time to focus on Windows ARM, as well, which is a stripped version of Windows that runs on fewer technologies compared to its standard x86 / x64 version, but it delivers great performance and an insane amount of battery life.

What is Arm technology?

Arm technology is an architecture almost always found in smartphones and mobile devices, but bigger devices, such as laptops and computers have been extensively relying upon x86 / x64 architecture.

Suitable for portable devices, the architecture allows for easy and faster interaction with a device, a strong internet connection through 4G/5G technologies, and durable battery life.

It wasn’t until Apple debuted the M1 and M2 chips on their laptops, which made them faster and proved to deliver greater performance, that the tech world started to focus on integrating Arm technologies into ultraportable laptops.

What is Windows Arm?

Windows Arm is a type of Windows that employs Arm technologies, which allows for the installation of Arm-powered apps. From an UI perspective, Windows Arm (Windows 11 Arm) retains the same design, but delivers different and faster performances, compared to its standard x86 / x64 version. However, it comes with drawbacks, but we’ll talk about them later.

Naturally, for Windows Arm to work best it would need to be installed in an Arm-powered device, which could be a laptop, tablet, or mobile phone built in such a way it could support this type of Windows. Arm-powered devices are starting to get popular, with the Microsoft Surface devices being some of the best examples around.

Their main characteristic would be the Arm Systems on Chip (SoC) which, as Microsoft states, often include other key features such as a powerful CPU, GPU, Wi-Fi & mobile data networks, as well as Neural Processor Units (NPUs) for accelerating AI workloads.

Windows 10, and Windows 11 both support various types of Arm-based technology, with Windows 11 being designed to be an Arm operating system. Windows 10, for example, enables existing unmodified x86 apps to run on Arm devices, while Windows 11 adds the ability to run unmodified x64 Windows apps on Arm devices.

However, for the best results, and this includes superior performance, insane battery life, responsiveness, and so on, users should consider getting Arm-based apps and Arm-based software to run on Arm-based Windows, preferably on an Arm device.Windows ARM

Will Microsoft switch entirely to Windows on Arm in the future?

While Windows on Arm could be a good idea, it will take some time until it can be fully adopted, if it will. And it’s a big if.

There are several reasons why Microsoft won’t entirely switch to Windows on Arm, even though it’s faster, far more suited for mobility, and durable.

  1. It can’t manage heavy processing: Windows on Arm runs best when used together with Arm-based apps. If these apps are also Windows native, even better. But for now, that’s about it. So, no gaming, no AAA titles on your Windows Arm laptop. Maybe, in time, it could happen, but that’s going to take a lot of time, which brings us to point 2.
  2. Windows on Arm will lack consistency between hardware and software: What I’m trying to say by this is that different manufacturers are going to come up with different Arm-based hardware, and Microsoft will have to somehow build Windows on Arm to run well on all of them. That will also take some time.
  3. Windows on Arm is best suited for professional settings: those who want ultramobile laptops that have a durable battery and are suited for light office work, such as document editing. Any demanding task is easily out of the question. Editing a video on an Arm-based laptop? Not anytime soon. But it could happen one day.
  4. The market for Arm-based processors is still at the very beginning: Intel and AMD announced they will release Arm-based processors, and Qualcomm will also come up with Arm-based processors suited for laptops, but it take some years before these processors will be able to carry out demanding tasks.
  5. Ultimately, it would not be good for business: Sure, M chips are excellent but it also means they last longer, and Mac devices will be durable. The same goes for Arm-based Windows laptops. It all sounds good, from a consumer perspective, but it would be a counterintuitive move, business-wise. Microsoft would have to come up with newer features that would be attractive enough to motivate consumers to purchase. And why do it, if your machine still works?

The conclusion: no, Windows on Arm is not going to replace the standard Windows, at least not anytime soon. By all means, if Windows on Arm proves to be the OS that makes our devices last longer, while also outperforming everything previously released, then yes, let it out already.

But it will take some time to get there, and Microsoft will have to think about it from a business-wise perspective, to avoid the risk of, you know, running out of business.

Eversoul Error 4010: How to Fix it

As gaming fanatics, one of our greatest fears is losing game progress because of an error like 4010 in Eversoul. All that hard work going down the drain can be scary but lucky for you, we went through the trial and error phase so that you don’t have to.

Causes of Eversoul error 4010

You already know that Eversoul is a mobile game but PC users can get around it by using emulators. Coincidentally, PC users are the most affected by this error and it all boils down to the emulator used. Other possible causes include an outdated game, age restrictions, and connection issues.

How can I fix error 4010 on Eversoul?

A few basic troubleshooting steps to help you get started include:

  • Double-check that your device meets the system requirements to run Eversoul.
  • Ensure you have a working internet connection by trying with another device or doing the internet test.
  • Log out then log back into your account then restart your device.

1. Check for app updates

  1. On your Android phone (Samsung in this case), locate the Google Play Store app and launch it.
  2. Search for Eversoul and next to it, tap on the Update button if available.

2. Use another emulator

Eventhough you can download and play Android games on your Windows PC, they are often plagued by errors because they’re not natively designed to run on the Windows OS. Still, it is also possible that your emulator is the issue.

The best way to solve this problem is to use a different emulator like BlueStacks. We admit that setting up an emulator is no easy task so if one isn’t working and you’ve already tried with the other, move on to the next steps.

3. Roll back to an older version

Usually, app updates are supposed to come with bug fixes but sometimes, they bring the bugs. If this is the case, you can revert to an older version of the Eversoul app as you wait for an official fix.

The only issue is that you will not find the older version on your respective app store. You’ll therefore have to source it from a third-party vendor.

Since you cannot verify the authenticity of these apps, we recommend that you keep your antivirus close to check for any issues before you allow an app to be installed on your device.

Note icon NOTE
WindowsReport is not affiliated with Uptodown.com so ensure you do your due diligence before downloading from this site.

4. Reconfirm your age

With the error 4010 on Eversoul, a number of users were logged out and asked to re-login but this time, to confirm if they were past the age of 13. Most games have an age restriction so if you do not meet these requirements, you may be locked out.

This may have been as a result of a new app update so simply clear the cache, and log back in again to see if there are any changes. You can also try a reinstall and see if it works.

5. Contact support

Kakao has a dedicated help page that covers a wide range of issues likely to occur while playing any of their games like Eversoul. You can scan through the page and see if the error 4010 has been addressed in any of their articles.

If not, you’re at liberty to contact them and give a detailed account of the issue. The form has an information list where you should fill in as much detail as possible for the developers to adequately address the problem.

In the meantime, make sure you check out our extensive library of recommended browser games you can play. These are much easier to play on your PC especially if you have limited storage space and they don’t need emulators.

That’s all we had for this article but if you have any other solution that worked for you, we’d love to hear it. Drop us a line below.

Error Code 465 CBS: 8 Ways to Fix it

Sports fans are a special group of people so when catching up on the latest game and the error code 465 making an appearance on CBS, it is quite the ick. Unfortunately, we’ve experienced this error before but on the bright side, you can learn from us what works to eliminate it.

What is the CBS error code 465?

This is a subtle message that you’re trying to access content restricted in your area. CBS Sports is a geo-restricted app so if you’re not using a VPN or in an area flagged off, you’ll encounter this error.

How do I fix error code 465 on CBS?

Kickstart the troubleshooting process with the following preliminary checks:

  • Verify the CBS Sports server status from a reliable site like downdetector for any outages.
  • Test your internet connection speeds, and try with another device to check whether the issue is with your device.
  • Check for any available updates for your CBS sports app, log out, then back in and retry.

1. Update your device’s OS

1.1 Android

  1. Locate Settings on your device. (We’ll be using the Samsung model for this step).
  2. Go to Software update.
  3. Tap on Download and install.
  4. Wait for the update to finish installing if available, and retry your video.

1.2 iPhone

  1. Make sure that your device is connected to a power source and Wi-Fi.
  2. Go to Settings > General.
  3. Select Software Update.
    software update iphone not sending pictures
  4. Now tap on Download and Install.
  5. Follow the instructions on the screen to complete the update.

1.3 Xbox

  1. Press the Xbox button on your console and click on your account icon to open Settings.
  2. Click on Devices and connections.
  3. Select Accessories.
  4. Click on your Xbox controller and select Update now and restart once it is finished.

2. Clear app cache

  1. Tap on settings on your phone.
  2. Next, tap on Apps.
  3. Find the CBS Sports app and tap on it.
  4. Scroll down and select Storage.
  5. Tap on Clear data and Clear cache, then try again.

The steps here are for an Android device but if you have an Apple TV, iOS device, or Roku, the steps are somewhat similar when you want to delete the app cache to get rid of the error code 465 on CBS Sports.

3. Turn off your VPN

  1. Press the Windows key and select Settings.settings windows 11
  2. Next, select Network & internet and click on VPN in the right-side menu.
  3. Select the VPN connection you want to disable, click on the drop-down and select Remove.remove VPN

If your VPN is giving you problems, we recommend switching to a powerful VPN that can mask its IP address to avoid frequent disconnections.

4. Disable Proxy 

  1. Press the Start Menu icon and select Settings.settings windows 11
  2. Click on Network & Internet on the left pane, then scroll down and click Proxy on the right pane.Network proxy settings
  3. Select Edit next to Use a proxy server option in the Manual proxy setup section, toggle off Use a proxy server and click on Save.Disable proxy server

5. Reinstall the CBS Sports app

If the CBS error code 465 is persistent, you may need an overhaul of the application and a complete uninstallation and fresh install will achieve this.

Also, when reinstalling, ensure you download from the official sources. We understand the app is not available in the various app stores for some users because of the location restrictions but use a VPN to avail it instead of downloading from third-party sites.

6. Reset your network

6.1 Android

  1. Open the phone Settings, and go to General management.general management
  2. Tap on Reset.
  3. Now, select Reset network settings from the list of options.reset network settings to fix error 201 arena of valor
  4. Tap on Reset settings to confirm.

6.2 iPhone

  1. Open the iPhone Settings, and go to General.general
  2. Tap on Transfer or Reset iPhone.
  3. Tap Reset at the bottom.reset to fix error 201 arena of valor
  4. Select Reset Network Settings from the list of options.reset network settings
  5. Enter the device’s passcode to confirm the reset.

7. Try another device

Although the app offers the same content across the board, you may find that the CBS Sports app is not working on Xbox but works on your Android device. This means that the error code 465 may be device-related.

If so, you’ll have to troubleshoot issues with your device rather than the app. Most of the time a restart or firmware update does the job.

8. Contact CBS customer support

If none of the above solutions have been fruitful, it’s time for reinforcement from the masters. Contact the CBS Sports support team and describe the error in detail. Share a screenshot if possible, your country you’re trying to stream from and the type of device you’re using.

With such errors, the more information you give, the higher possibility that the team will be able to come up with a solution fast enough.

Finally, sports apps are in plenty and you can catch all the action from a wide range. WatchESPN and Fox Sports Go are some of our personal favorites so ensure you check them out to avoid missing out.

Otherwise, for any additional thoughts on this article, share them with us in the comment section below.

Get Udemy Courses at $9.99 [Cyber Monday 2023]

Udemy is a popular platform offering educational courses at a reasonable cost, as opposed to other websites that charge a hefty per-course or monthly subscription fee. And Udemy courses are just as good!

With over 213,000 courses for users to choose from, Udemy certainly has an extensive library. These range across niches and technologies, including Web Development, IT Certifications, Leadership, Data Science, Communication, and Business Analytics & Intelligence, amongst others. Besides, Udemy courses are available in 14 languages.

This time of the year, Udemy courses are available at massive discounts, but it’s a limited-period deal!

What are the best deals on Udemy courses?

Get Udemy courses starting at $9.99 – Offer valid until November 24

A few popular courses available at $9.99:

  • Practical Web Development: 22 Courses in 1
  • The Ultimate React Course 2024: React, Redux & More
  • AWS Business Essentials – The Business Value of AWS [2023]
  • Data Analytics A-Z with Python
  • The SQL Programming Essentials Immersive Training

Udemy

Get access to a wide range of courses, acquire new skills, and outshine others!

It’s raining discounts at Udemy and there couldn’t be a better time to grab the courses that you always wanted. Get them before the prices increase!

Also, if you want to weigh Udemy against the available options, check our recommendations for the best learning software trusted by users worldwide.

Cyber Monday 2023: Get Coursera Plus for $1 [Best Deal]

Coursera is amongst the top three platforms offering online courses from universities and other reputed organizations. Subsequently, its certificates are always accredited and carry a lot of weight.

The platform offers courses from over 275 leading universities, and with Coursera Plus, you get access to 7000+ of these. The courses range across topics and technologies, and there’s always something for everyone!

But it’s pricing has been a concern for many. Not anymore! Coursera Plus is now available at a massive discount, bringing you closer to exciting opportunities.

What’s the best deal for Coursera Plus?

Get Coursera Plus at $1 ($59), a whopping 98.3% discount

Offer applicable only for the first month and valid until November 24, 2023.

Coursera

Learn new skills, get a pay hike, or explore new job opportunities. It all starts at Coursera!

So, join Coursera Plus today and save $58 on the first month of membership. It couldn’t get any cheaper!

And if you are still unsure and want to weigh the available options, discover the best education software trusted by millions worldwide!

HideIPVPN is 70% Off With a 2-year Plan For Cyber Monday

Protecting your online privacy is important, and one of the most common methods of doing that is with a VPN.

HideIPVPN is currently available with a 70% discount on a 2-year plan, so you might want to get it before this limited offer expires.

What are the best HideIPVPN deals to get?

What is HideIPVPN?

HideIPVPN is a VPN client, and it comes with the following features:

  • The software provides you with 100% privacy and hides your IP address
  • All your data is encrypted meaning that no one can see it
  • Using this service you can access geo-restricted websites
  • Smart DNS feature that lets you achieve maximum speeds
  • Incredibly easy to set up
  • Works with routers, PCs, Macs, smartphones, smart TVs, and consoles

As you can see, this service offers some great features, and it will protect your online activities and identity from both hackers and your ISP. So if you’re in need of a new VPN, get HideIPVPN at 70% for a 2 year plan.

HideIPVPN

Protect your online identity and keep your browsing activity private with HideIPVPN software

HideIPVPN offers some amazing features, and it’s one of the better VPNs for Windows, so be sure to give it a try while this amazing discount lasts.

Save 35% on DVDFab All-In-One (Lifetime) This Cyber Monday

DVDFab has been the go-to software for most users when creating disk backups or converting from one format to another. It’s an all-rounder solution, aiding users for over two decades.

DVDFab comes with a range of video-editing features, including trim, crop, rotate, merge, or add subtitles. Then there are the Light and Dark modes for a less eye-straining experience.

Besides, DVDFab has, over time, gotten faster with each update, making it one of the best conversion and ripping tools. And it’s now available at a huge discount, coupled with several exciting add-ons that you simply can’t miss!

What is the best deal on DVDFab All-In-One?

Get DVDFab All-In-One at $246.99 ($379.99, 35% off) + exciting gifts

Add-ons include:

  • PlayerFab All-In-One ($169.99)
  • License to operate the software on 5 different devices
  • Amazon gift voucher worth $30
  • Verbatim DVD-R disc (on 100 randomly picked orders)

DVDFab

Offers a user-friendly interface coupled with powerful tools for every need

Grab the deal today because it’s a limited-period offer, and save big on DVDFab, one of the best DVD/Blu-ray/UHD solutions. Do not forget to share your experience with our readers in the comments section.

Also, if you want to explore the available options, check our dedicated guide listing the best DVD software.

Get 50% Off Premium Plan on Dashlane For Cyber Monday

Having a strong and unique password for every website is crucial, and this can be done by using a password manager, such as Dashlane.

This great password manager is available at 50% off for the Premium plan, so join us while we explore what it offers and how to get it.

What are the best Dashlane deals to get?

What is Dashlane?

Dashlane is a well-known password manager software, and it comes with great features, including the following:

  • Support for unlimited devices, passwords, and passkey
  • Secure sharing of passwords
  • Dark web monitoring feature that lets you know if your password has leaked online
  • VPN for Wi-Fi protection
  • Real-time phishing alters

These are just a couple of features that this service offers, and if you want to give it a try, this is the perfect moment to do so since it’s 50% off for a limited time.

Dashlane

Protect all your online account passwords and keep them safe with Dashlane.

Have you ever used a password manager? If not, Dashline is one of the best, and you should give it a try while the discount lasts.

In case you’re looking for a different software, you can try one of these password managers with emergency access instead.

Get 2 Months of Todoist Pro for Free [Cyber Monday 2023]

Want to be on top of all tasks? Todoist will help you do that. Rated one of the top task manager and to-do list apps, Todoist is used by millions across the globe.

With the program, you can systematically organize the tasks, prioritize the critical ones, and monitor their progress. It’s easy to use, provides a clear overview, lets you set recurring dates, create reminders, configure priority levels, mark favourites, and allows delegating tasks and sub-tasks.

Todoist is the perfect companion for home and office needs, for individuals and organizations, and for everyday tasks to the most intricate projects.

What is the best deal on Todoist?

First 2 months free on Todoist Pro Plan purchase – After that, $5/month ($48, if billed annually)

The Todoist Pro plan includes:

  • 300 personal projects, 150 filter views
  • Reminders for tasks
  • Ability to monitor task duration
  • Automatic backup
  • AI assistant to streamline the activity
  • Email and calendar integration

Todoist

Be on top of all tasks, prioritize the critical ones, delegate amongst team members, and never miss a deadline

Get Todoist this season, enjoy free extra months on the Pro plan, and share your experience in the comments section. Or, if you want to weigh the available options, check our dedicated guide listing the best information organization software.

Get 49% Off & 3 Months Free on ExpressVPN For Gaming

ExpressVPN is one of the most reliable VPN solutions, often rated amongst the top five by experts and enthusiasts alike. And, with a dedicated ExpressVPN for Gaming, you can seamlessly play games without worrying about throttled Internet speed and connection issues.

ExpressVPN for Gaming reduces ping, eliminates geographical restrictions and allows you to play with gamers worldwide. It has global, high-speed servers in 105 countries for an uninterrupted gaming experience while offering the best-in-class security.

And with the VPN available at a massive discount and extra months during the sale, there couldn’t be a better time to get ExpressVPN for Gaming!

What are the best deals on ExpressVPN for Gaming?

ExpressVPN for Gaming: 12 months (+3 months free) at only $6.67 per month – You save $94.30 (49%)

The plan includes:

  • 8 simultaneous device connection
  • Dedicated app for each device
  • A dedicated built-in password manager
  • Ad blocker and protection against online threats
  • A no-log policy for peace of mind
  • 30-day money-back guarantee

ExpressVPN For Gaming

Powerful protection, better connectivity, and access to gaming titles worldwide

So check ExpressVPN for Gaming and enjoy your favourite game titles like never before! Also, if you want to look at other available options, check our VPN recommendations for LAN gaming.

Save 50% on Annual Plans for QuillBot [Cyber Monday 2023]

Writing is always tricky, especially when you cater to a global audience. That’s where a tool like QuillBot comes to your aid. QuillBot helps you write better, faster, and smarter, significantly enhancing the draft’s value.

QuillBot has been around for years, catering to the needs of writers, editors, and publishers alike. Its powerful integrated tools (Plagiarism Checker, Grammer Checker, Citation Generator, Translator, and more) improve readability and help create a lasting impression in readers’ minds.

And this time of the year, QuillBot is offering heavy discounts, making it the perfect opportunity for anyone planning to get a paraphrasing tool!

What are the best deals on QuillBot?

Save 79% on QuillBot Premium, one-time offer – $4.16 per month (only $49.97 for the first year)

The Premium subscription includes:

  • Unlimited words in Paraphraser
  • 6000 words in Summarizer
  • Unlimited custom modes and 8 pre-set modes
  • Higher processing speed
  • Writing recommendations, tone insights
  • Plagiarism checker

QuillBot

No more plagiarism or grammatical errors. QuillBot delivers results that make a difference!

Grab the deal today, and share your QuillBot experience with us in the comments section. And if you want to compare it with other options, check our dedicated guide listing the best paraphrasing tools.

RoboForm is up to 42% Off For 2023 Cyber Ghost Sale

The best way to protect your online accounts is by using a password manager, and if you’re looking for one then RoboForm is the right choice for you.

If you’re in need of a password manager, we’re pleased to inform you that RoboForm is available for up to 42% discount this holiday season, so don’t miss this amazing offer.

What are the best RoboForm discounts?

What is RoboForm?

RoboForm is a password manager designed to protect your online accounts from unauthorized access. It comes with the following features:

  • Allows for unlimited password storage
  • Ability to fill web forms
  • Available on multiple platforms
  • Available for offline access
  • Supports passkey
  • Comes with a password generator
  • AES 256 encryption
  • Safe notes
  • Password audit
  • Ability to restore master password

You can get the software up to 42% off during this shopping season, so be sure to use this amazing offer.

RoboForm

Protect all your online accounts and prevent unauthorized access with RoboForm.

RoboForm is a great password manager, and you should use the discount while it lasts. If you prefer a different password manager, maybe one of these offline password managers would suit you.

Use BF2023 Promo Code And Get Incogni For 55% Off

Nobody likes to deal with spam emails, especially since these emails can be malicious and intended to steal your personal data.

Incogni is a service that can help you with that, and you can get it for 55% off with code: BF2023 this season. Before deciding to make a purchase, let’s see what this service offers.

What are the best Incogni deals to get?

How does Incogni work?

This service is designed to remove data from data brokers, and it works by doing the following:

  • You register the account and choose the desired subscription.
  • Incogni personnel will contact data brokers and ask them to remove your data.
  • The service will also protect you from spam calls and emails.
  • It can also protect your privacy and prevent identity theft.

Data brokers are constantly gathering personal information on online users by using shadow profiles, and if you’re concerned about your privacy and your data, be sure to give Incogni a try.

Incogni

Protect your online data, and make sure that it remains private with Incogni service.

Incogni is a great choice if you want to make sure that data brokers don’t sell your data, but you can also protect your privacy with a VPN with a dynamic IP address, so consider getting one as well.

Have you ever used Incogni? If not, use the promo code BF2023 and get it for 55% off while the discount lasts.

Intego Antivirus for Windows is 60% Off For Cyber Monday

Intego is a well-known antivirus developer, and this year this year the company offers great deals and discounts.

All Intego products are 60% off, so be fast and grab them while the discount lasts.

What are the best Intego deals to get?

What is Intego?

Intego is a famous antivirus software and it offers the following features to its users:

  • 24/7 protection against the latest malware, spyware, ransomware, and other threats
  • Prevention Engine that blocks new threats that other antiviruses can’t detect
  • Blocks phishing attacks, fake websites, and other threats that try to steal your data
  • Smart scan that can clean your PC in a matter of minutes
  • PUA protection that can detect unwanted apps and remove them from your PC
  • Network security feature that will protect your network drives from malware

All versions of the software are available for 60% off, so be sure to use this discount to enhance the security of your PC.

Intego Antivirus

With 24/7 protection, Intego offers maximum security for your Windows PC

Intego Antivirus offers great features, but if you prefer something else, we have a great choice of antiviruses with lifetime licenses that you might want to consider.

Are you planning to get Intego Antivirus? Let us know in the comments section.

Get 6 Extra Months With NordPass This Year Cyber Monday

Password managers are a necessity, given the increase in cyber attacks, and there’s none better than NordPass, the ultimate solution. It also works with passkeys, credit cards and more.

NordPass will help generate strong passwords, allow access across devices, securely share them with others, and find out if your password has been breached in a data leak. It’s a complete package!

With the Business and Personal & Family subscriptions being offered at discounted rates (up to 58%) and an additional 3-6 months, there couldn’t be a better time to grab the deal!

What are the best deals on NordPass?

NordPass Business

  • Team: $1.79 per user/month + 3 months extra
  • Business: $3.59 per user/month + 3 months extra
  • Enterprise: $4.10 (25% off, previously $5.40) per user/month + 6 months extra

NordPass Personal & Family

  • Free: $0.00 (Includes a free 30-day premium trial)
  • Premium: $1.29 per month (56% off) + 3 months extra (1 premium user account)
  • Family: $2.49 per month (58% off) + 3 months extra (6 premium user accounts)

NordPass

Keep your passwords in a safe and secure place and fill out forms faster

Get the NordPass password manager at amazing discounts, and share your experience with us in the comments section.

Also, you could check out our other recommendations for password managers.

Get NordLayer Business VPN With 22% Discount on Annual Plan

For business users, it’s necessary to have a proper VPN in order to protect their data and sensitive corporate information, and this is where NordLayer can come in handy.

The software comes with a 22% discount on an annual plan, so be sure to get it while the discount lasts!

What are the best NordLayer deals to get?

What is NordLayer?

NordLayer is designed for business users and it offers the following features:

  • 2FA for an additional layer of protection
  • SSO that allows you to access multiple applications with a single set of credentials
  • Auto-connect feature that connects as soon as Internet access is available
  • Site-to-site connection that connects to your LAN via Virtual Private Gateway
  • AES 256-bit encryption that ensures your traffic is perfectly safe
  • NordLynx protocol for enhanced security
  • Fixed IP that lets you set up virtual locations for your organization

The software is available with a 22% discount for an annual plan, so why not use it to boost your business security?

NordLayer

A business VPN such as NordLayer will keep your company data safe from third parties.

NordLayer will keep your business data safe, but there are many other great corporate VPNs that you might want to try.

What is your corporate VPN of choice? Let us know in the comments below!

How to Fix O2 Error 38 [SMS Issue]

The O2 Error 38 is a text failure issue that may appear while sending an SMS to all, a few, or a specific contact. Some users faced it when availing roaming services, while others encountered the error within their region.

It reads Sending for a while followed by the error message with code 38.

What is SMS error 38?

Error 38 highlights the inability to send texts due to localized server issues, misconfigured network settings, corrupt SMS app cache, incorrect SMSC number, or when the wrong network operator is selected.

How do I fix O2 text error 38?

Before we start with the slightly complex solutions, try these quick ones:

  • Check the O2 server status in your area through the official website or use a reliable real-time monitoring platform like Downdetector.
  • Turn on Airplane Mode for a minute and then disable it.
  • Take out the SIM card, wipe it with a soft piece of cloth to remove any dust deposits, reinsert the SIM, and check for improvements.
Note icon NOTE
Since the error can be encountered on Android and iPhone, we have listed the steps for both where the solution is tricky. Otherwise, it’s just for Android.

1. Check the list of blocked contacts

  1. Go to the Messages app, tap on the ellipsis, and select Settings from the flyout menu.settings
  2. Tap on Block numbers and messages.block numbers and messages
  3. Select Block numbers.
  4. If you find the affected contact in the list, tap the – icon to remove it.remove to fix o2 error 38
  5. Reboot the device and try sending a text again.

2. Clear the SMS app cache

Tip icon Tip
You can’t delete the app cache on iOS. If facing the issue on an iPhone, head to the next solution.
  1. Open the Android Settings, and go to Apps.apps
  2. Select Messages from the list.
  3. Tap on Storage.storage
  4. Now, tap on Clear data and then Clear cache to delete all non-critical files.clear data to fix o2 error 38
  5. Once done, reboot the device and check for improvements.

When faced with O2 error 38, a quick solution is to clear the Messages’ app cache. This also helps with EE error 0.

3. Change the SMSC number

  1. Open the Messages app, tap the ellipsis (three dots), and select Settings.
  2. Tap on SMSC from the list of options.smsc
  3. Now, based on your subscription type, enter one of the following numbers:
    • Pay & Go tariffs: +447802092035
    • Pay Monthly tariffs: +447802000332change SMSC number to fix o2 error 38
  4. Tap OK to save the new message center number, reboot the device, and check for improvements.

4. Reset the network settings

4.1 Android

  1. Open the device Settings, and go to General management.general management
  2. Select Reset from the options.
  3. Tap on Reset network settings.reset network settings to fix o2 error 38
  4. Tap the Reset settings button to confirm.

4.2 iPhone

  1. Open the Settings app, and go to General.general
  2. Tap on Transfer or Reset iPhone.trasnfer or reset
  3. Now, tap Reset.
  4. Finally, choose Reset Network Settings from the options, and enter the iPhone’s passcode to confirm the change.reset network settings to fix o2 error 38

Often, the misconfigured or bugged network settings are to blame for O2 error 38, and resetting them to default does the trick! This also works for Vodafone SMS error 69.

5. Manually select the network operator

5.1 Android

  1. Open the device Settings, and go to Connections.connections
  2. Tap on Mobile networks.
  3. Select Network operators.network
  4. Tap on Select manually.manually to fix o2 error 38
  5. Wait for the device to scan for available networks and choose O2 from the list.

5.2 iPhone

  1. Open the iPhone Settings, and go to Mobile Data.mobile data
  2. Tap on Network Selection.
  3. Disable the toggle next to Automatic.disable to fix o2 error 38
  4. Allow the device a few moments to scan for available networks and then choose O2.

If your device automatically chooses another network, manually selecting O2 should fix error 38. It also helps when utilizing roaming services. In this case, you just have to select the network operator’s roaming partner.

6. Contact O2 support

When nothing else works, the last option is to contact O2 support. They have a virtual chat assistant to assist with queries.

The support team helps in cases where a technician’s visit is to be arranged or the SIM card needs replacement, amongst other issues.

One of these solutions should fix O2 error 38. And by now, you most likely have regained the text (SMS) functionality on the phone.

In case the problem remains unresolved, check the solutions for T-Mobile error 2 since both deal with the same issue.

For any queries or to share what worked for you with our readers, drop a comment below.

What are The Common OAuth2 Errors & How to Fix Them

Developers often encounter errors during the OAuth2 authentication process when they implement secure access to resources.

In this guide, we will discuss different OAuth2 errors, offering insights into their origins and providing practical solutions to troubleshoot and resolve them effectively.

How can I fix the common OAuth2 errors?

1. Invalid_request

 Invalid_request -OAuth2

If an authentication request to Hub doesn’t have a required parameter, includes a parameter more than once, has an invalid parameter value, or is malformed, you can see the invalid_request error.

To fix it, check these things:

  1. First, check the request parameters mentioned, including client_id, response_type, redirect_uri, and scope are correctly formatted and match the expected values.
  2. Next, check the Redirect URI mentioned is the exact match, including trailing slashes and query parameters with the one registered with the OAuth2 provider.
  3. Check the encoding of parameters in the request, use HTTPS, and make sure the requested scope is valid & supported by the OAuth2 provider.

To know more about the issue, you should use the debugging tools or take a good look at the logs provided by the OAuth2 provider.

2. Unauthorized_client

Unauthorized_client

If the client is attempting to authenticate and doesn’t have permission to request an access token or is not recognized by the authorization server.

To fix it, check these things:

  1. Verify that the client_id & client_secret provided in the request are correct and OAuth2 provider supports the grant type used.
  2. Double-check the client is registered with the OAuth2 provider, the client status is active and is allowed to use the requested grant type.
  3. Ensure the provided redirect URI is correct & registered as one of the service’s redirect URIs & your service should provide at least one redirect_uri in Hub.

3. Unsupported_response_type

Unsupported_response_type - oauth2

The unsupported response type error in OAuth2 appears when the requested response type in the authorization request is not supported or allowed by the authorization server.

To fix it, check these things:

  1. Check the response_type parameter in the authorization request is set to a valid value and chosen response.
  2. Verify the documentation to recognize the supported response types & other requirements.
  3. Ensure the selected response_type matches the suitable grant type and the response_type parameter is formatted properly.
  4. Make sure the client application is registered with the authorization server & is allowed to perform a specified response type.

4. Invalid_scope

Invalid_scope - oauth2

You get the Invalid_scope error message when the scope for which authorization is requested doesn’t match with the registered service.

To fix it, check these things:

  1. Double-check the Scope parameter to ensure the authorization request contains a valid scope, and check the documentation to understand which scopes are supported by the authorization server and provider.
  2. If requesting multiple scopes, ensure they are separated by spaces and check the permissions to ensure the user is allowed to use the requested specific scopes.
  3. Verify if the client application is registered with the authorization server and has permission to access a specific scope.

5. Invalid_client

invalid_client  - oauth2

When a client who is trying to authenticate or client ID or Client secret are not recognized or incorrect, you see the Invalid_client error.

To fix it, check these things:

  1. Double-check that client_ID and client_secret are correctly mentioned in the request and ensure the client registration is aptly done with the OAuth2 authorization server.
  2. Verify whether the client type in the request aligns with the client registration on the authorization server and ensure the authorization server configuration is done to support OAuth2 version.
  3. Check the client credentials are correctly formatted and the client status is active with the authorization server.

6. Access denied

If a user denies requested permissions or when the authorization server doesn’t accept the authorization request, you see the access_denied message.

To fix it, check these things:

  1. Guide the user through the authorization process or review & modify the requesting scopes that the user is not comfortable accepting.
  2. Check the client registration for misconfiguration like incorrect redirect URI and the authorization server’s policies and documentation to understand the requirements and restrictions.

7. Invalid Redirect URI

When the Redirect URI mentioned in the OAuth2 authorization request is not the same as the one registered with the authorization server.

To fix it, check these things:

  1. Make sure that the Redirect URI in the request is correct, matches with the one mentioned with the server, and is correctly registered with the OAuth2 provider.
  2. Check URI formatting and encoding for differences in both request and registration to ensure consistency.
  3. If you are using wild card characters in the request, make sure you are using them correctly in the registered URI.

Understanding the error message is the first step to diagnosing and resolving any OAuth2 error; therefore, first, find the root cause of the issue, then use the necessary steps to fix it.

Insufficient permissions can also cause other issues like the 403 Forbidden error on Ebay; read this guide to learn more about it.

If you have any questions or suggestions about the subject, feel free to mention them in the comments section below. We will be happy to help!

7 Easy Ways to Fix The File System Error-2147163890

File system errors like 2147163890 are disk-related errors that usually stop you from opening a file or Microsoft app on a Windows computer.

In this guide, we will discuss probable causes and offer WR expert recommended solutions so that you can gain access to your file or app in no time.

What causes the file system error- 2147163890?

  • Bad or corrupted disk sectors.
  • Damaged system files or bad Windows updates.
  • Malware infection.

How can I fix the file system error 2147163890?

Before we go to the advanced troubleshooting to fix the file system error 2147163890, here are a few preliminary checks you should do:

1. Run the Chkdsk command

  1. Press the Windows key, type cmd, and click Run as administrator.CMD elevated -File System Error-2147163890
  2. Type the following command after replacing the letter C with your system drive letter and hit Enter: chkdsk C: /fcmd_chkdsk - file system error 2147163890
  3. If the system drive is in use, you will be asked if the scan could be scheduled the next time you reboot your PC, type Y, and hit Enter.

Your PC will restart and the tool will check the file system integrity on a disk and try to repair it before the issue escalates or worse you lose your data.

This can also help you fix other common File System BSOD errors on Windows 10/11; read this guide to learn more about the solutions.

2. Run SFC & DISM scans

  1. Press the Windows key, type cmd, and click Run as administrator.CMD elevated -File System Error-2147163890
  2. Type the following command to scan or repair the damaged or missing system files and hit Enter: sfc /scannowSFCSCANNOW CMD
  3. If any anomalies are found, the tool will try to replace the files using the local cache and the original installation media.
  4. Once the command is complete, copy & paste the following command to repair the Windows system image and press Enter: DISM /Online /Cleanup-Image /RestoreHealthRestore health --File System Error-2147163890
  5. Reboot your computer to let the changes take effect.

Running the SFC and DISM scans can help you fix other common file system errors on Windows 11, therefore you should execute these commands whenever you face similar problems. Moreover, you can use dedicated repair software to proceed with this task automatically.

3. Run the Windows Store Apps troubleshooter

Note icon NOTE
If you get a file system error while launching a Microsoft Store app, you can try running the troubleshooter by using the steps below.
  1. Press Windows + I to open the Settings app.
  2. Go to System, then click Troubleshoot.troubleshoot -File System Error-2147163890
  3. Click Other troubleshooters.troubleshooters
  4. Locate Windows Store Apps and click Run.Windows store app - File System Error-2147163890
  5. Follow the on-screen instructions to complete the process.

4. Uninstall the recent Windows updates

  1. Press Windows + I to open the Settings app.
  2. Go to Windows Update, and select Update history.Windows Update 2 - update history - File System Error-2147163890
  3. Under the Related settings section, click Uninstall updates.Windows Update - Update history
  4. Choose the recent update and click Uninstall.Uninstall updates Windows Update

5. Reinstall the affected app

  1. Press Windows + I to open the Settings app.
  2. Go to Apps, then click Installed apps.Apps - Installed apps - File System Error-2147163890
  3. Locate the app, click the three dots icon, and select Uninstall.Uninstall the app
  4. Click Uninstall again to confirm the action.

Once the app is uninstalled, reboot your computer, then follow these steps to reinstall:

  1. Press the Windows key, type store, and click Open to launch Microsoft Store.Microsoft Store - File System Error-2147163890
  2. Use the search box to look for the app and click Install or Get to reinstall it.

6. Reset the Windows Store cache

  1. Press Windows + R to open the Run dialog box.explorer_reset Microsoft Cache -  File System Error-2147163890
  2. Type wsreset.exe and click OK to clear the Windows Store cache.
  3. Once the process is complete, Microsoft Store will launch on its own.

7. Perform a system restore

  1. Press Windows + R to open the Run window.rstrui command Restore point
  2. Type rstrui and click OK to open the System Restore window.
  3. Select the Choose a different restore point option and click Next.Next Choose a different restore point - File System Error-2147163890
  4. Choose the desired restore point from the list available and click Next.Choose a point
  5. Click Finish.Finish

Windows will restart and restore your system to the selected version. The process might take some time, so don’t turn your PC off until it is complete.

If you see the System restore was not completed successfully message, check out this guide to learn the reasons.

Tips for preventing file system errors & corruption on Windows 11

  • Ensure all the Windows updates and security patches are installed periodically installed.
  • Avoid improper shutdowns and make sure your computer hardware is in good condition.
  • Use reliable antivirus software to protect your computer from malware.
  • Ensure your computer has sufficient disk space, and keep an eye on disk errors & damaged system files.
  • Always install apps that are compatible with your Windows operating system.

To conclude, encountering file system errors like 2147163890 could indicate something wrong with the disk or the file system itself.

Therefore, running tools like CHKDSK, SFC, and DISM can help you fix the issue before anything goes out of your hands.

Did we miss a step that helped you? Don’t hesitate to mention it in the comments section below. We will happily add it to the list.