Microsoft tries to help make sense of AI with its latest Research Podcast and portal

Microsoft Research and Incubations corporate vice president Peter Lee and distinguished scientist and managing director of Microsoft Research Outreach Ashley Llorens have come together to help kick off the first entry in the company’s new artificial intelligence research dedicated informational portal.

With all the chatter, inquisition and misinformation surrounding the blossoming topic of AI, and more specifically, Microsoft Copilot platforms, the company latest Microsoft Research Podcast entry acts as both an auditory entertainment medium but a launch point for additional subject information.

Beyond the thirty-seven-minute-long podcast featuring Lee and Llorens, the Microsoft Research Podcast page for episode 137 includes a Learn More section with links to tangential research and discussion that includes, The AI Revolution in Medicine: GPT-4 and Beyond, Benefits, Limits, and Risks of GPT-4 as an AI Chatbot for Medicine, VALL-E, as well as bridge to the company’s new Microsoft AI help & learning portal.

While the Microsoft Research Podcast volleys a myriad of technological topics, it appears that GPT, Chatbots and expanding language models will be a more recent focus of the hosts as they segment off a dedicated series to those topics.

In this new Microsoft Research Podcast series, AI scientist and engineer Ashley Llorens hosts conversations with his collaborators and colleagues about what these new models—and the models that will come next—mean for our approach to creating, understanding, and deploying AI, its applications in areas such as health care and education, and its potential to benefit humanity.

A second episode will be available soon that covers the difference that make integrating modern AI into health care a more realistic proposition as well as limits of GPT-4.

As for the AI portal, visitors are greeted with links that aim to help educate about Microsoft’s 365 Copilot and “what AI can and can’t do.” There is a dedicated search engine built into the portal to help answers some of the most common queries about AI as well as other links that help to explain Copilot for the web, most recent announcements and even walk users through using ChatGPT for content creation.

Head over to the Microsoft Research Podcast website to download, share, or subscribe to the podcast or jump straight into the AI help & learning portal here.


 

0x80040900 Outlook Error: 6 Ways to Easily Fix It

The Outlook error 0x80040900 is a common error when an email cannot be sent. You can access your emails using the web version, but the app just fails.

This can happen due to various reasons, such as the email account is not configured properly or there being a problem with the server. If you want to fix it immediately, this article will help you.

What is the error message 0x80040900?

Outlook is one of the most used email clients in the world. This does not mean it is devoid of issues. The Outlook error 0x80040900 is one of the most pressing issues because you can neither send nor receive emails.

It’s important to note that this problem can happen with any version of Outlook. If you’ve been wondering why you are the recipient of such an error message, below are some possible reasons:

  • Outdated version of Office – Your computer might not have an updated Office version installed, which results in errors like 0x80040900.
  • Internet connection – If you’re trying to send or receive an email, it won’t work if your computer doesn’t have internet access.
  • Virus infection – A virus may have entered your system and changed the registry settings so you can no longer access your emails.
  • Corrupt PST file – The PST file is the personal storage for all your emails, among other details. If this file becomes corrupted or damaged, you may encounter problems accessing and using it for storing or retrieving data.
  • Outlook profile corruption – Sometimes, due to any reason, your Outlook profile gets corrupted, and that causes this problem. 
  • Damaged installation files – It’s possible that the Microsoft Office installation files were corrupted or damaged during the installation or uninstallation process.
  • Incorrect Mail Server Settings – Sometimes, due to some technical glitch or other reasons, Outlook fails to recognize your email account properly, and thus it throws an error message like 0x80040900.

How do I fix error code 0x80040900?

Try the following first before any complex solutions:

  • Ensure you have a good and stable internet connection before sending or receiving emails from Outlook. Also, check for any problems with your router and other hardware devices that might be causing connectivity issues between your computer and the server.
  • Sign out, then sign in back again to your Outlook account.
  • Check that your Outlook email settings are correct. 

1. Scan for viruses

  1. Press the Start Menu, search Windows Security, and click Open.
  2. Select Virus & threat protection.
  3. Next, press Quick scan under Current threats.
  4. If you don’t find any threats, proceed to perform a full scan by clicking on Scan options just below Quick scan.Scan options
  5. Click on Full scan to perform a deep scan of your PC.Full scanFull Scan Scan Now
  6. Wait for the process to finish and restart your system.

2. Disable your antivirus temporarily

  1. Hit the Windows button, type Windows Security in the search bar, and click Open.
  2. Click on Firewall & network protection, then select Public network.league of legends black screen after champion select
  3. Locate Microsoft Defender Firewall and toggle the off button.turning off Microsoft Defender Firewall Windows

3. Repair Microsoft Office

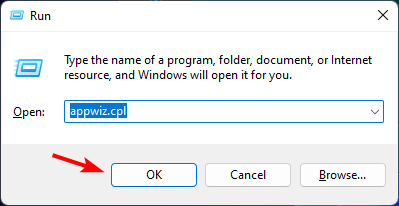
  1. Hit the Windows + R keys to open the Run command.
  2. Type appwiz.cpl in the dialog box and press Enter.
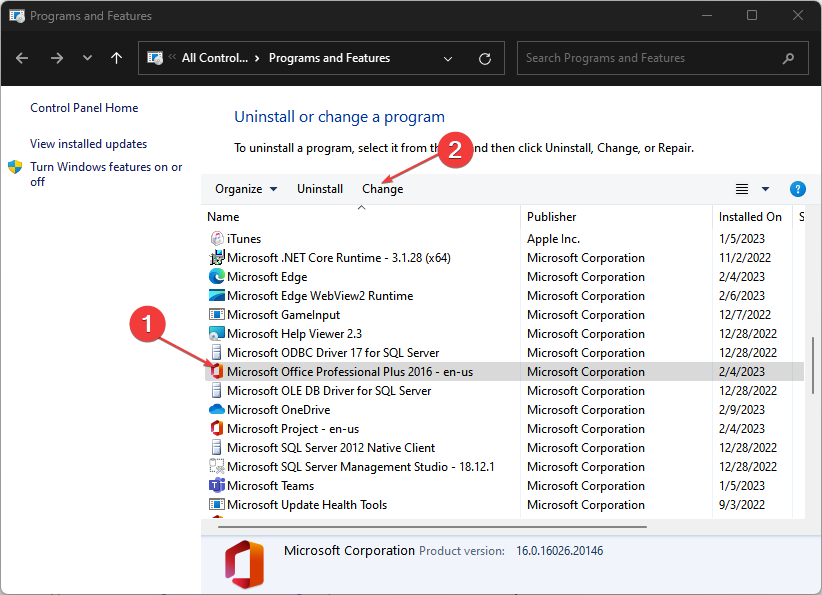
  3. Select your Microsoft Office suite software. Then, click the Change button to open a repair utility for MS Office.
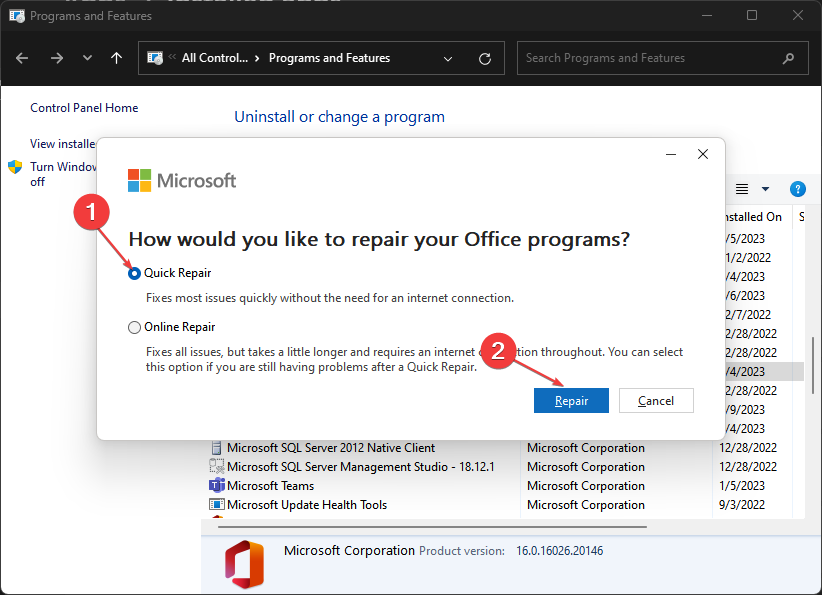
  4. Select the Quick Repair option and click the Repair button.

4. Start Outlook in Safe Mode

  1. Hit the Windows Search icon, type outlook.exe /safe in the search bar, and click Open.
  2. Try sending emails in Outlook and check whether the problem persists.

5. Create a new Outlook profile 

  1. Hit the Windows key, type Control Panel in the search bar, and click Open.control-panel-search fallout new vegas runtime error
  2. Type Mail in the search bar and click to open.
  3. Next, click on Show Profiles under Profiles in the Mail setup window that pops up.
  4. A list of Outlook profiles registered on your PC will appear. Find the one that was having problems, click on it, then select Remove.
  5. A confirmation dialog box will appear, so click Yes to confirm.

While this step doesn’t fix the issue, it will help uncover whether there’s an issue with your current profile. If it works, you can confirm that it is corrupted and move ahead with configuring the new one as the default email profile.

This will disable any add-ins or plugins that might be causing the problem. If this fixes your issue and your mail starts working again, you’ll need to figure out which add-in or plugin is causing it. You can do this by disabling each individually until you find the culprit.

6. Repair the PST file

  1. Press the Windows + E key to open File Explorer.
  2. Navigate to the following path depending on where your Outlook files are located: C:\Program Files\Microsoft Office\ OfficeXX 
  3. Double-click on the SCANPST key to launch the SCANPST.EXE utility.
  4. On the Microsoft Outlook Inbox Repair utility page, click Browse, and choose the PST file.
  5. Click the Start button to scan the PST file and check for errors.
  6. If the scan detects any error, click the Repair button.

If this sounds like a lengthy procedure, you’ll be happy to know a third-party tool can repair the PST file for you.

⇒ Get Stellar Repair for Outlook

You may also be interested in how to rebuild your Outlook profile, so check out the full details from our comprehensive guide.

For any further suggestions, leave a comment down below.

0x800700df Error: File Size Exceeds Limit [Fix]

We often move files between folders on the PC or fetch these from a cloud storage service if one is set up. But several issues may prevent the operation. One such is the error 0x800700df in Windows 11 and previous iterations.

The error arises from a file size limit in place, and the message reads, The file size exceeds the limit allowed and cannot be saved. Users generally get error 0x800700df on SharePoint, though other applications, too, are affected.

What is file copy error 0x800700DF?

The file copy error 0x800700df is common in Windows and has a dedicated Microsoft page, but the solution there doesn’t usually work, as reported by users.

Here are a few reasons you might be getting the error:

  • Misconfigured registry: There’s a key in the Registry to set the maximum file size limit, which, if misconfigured, can trigger The file size exceeds the limit allowed error in Windows 10.
  • Size limit placed by client: There’s also the likelihood that the online storage solution where you are copying the file may have placed a file size limit.
  • Incompatible file system: The debate between FAT32 and NTFS has long been ranging, with both offering specific pros and cons. However, setting the former as the file system can trigger the 0x800700df error in Windows 10.

How do I fix error 0x800700DF?

Before we head to the slightly complex solutions, here are a few quick ones to try:

  • Restart the computer and check if you can now copy or move the file.
  • When facing the error 0x800700df in online storage, use a different browser to upload or download the file.
  • If an organization manages your PC, verify whether they have placed a file size limit on copying files, downloads, or uploads.
  • Make sure you have enough storage left on the drive. In case not, free up disk space and then try again.

If these don’t work, move to the fixes listed next.

1. Modify the registry

  1. Press Windows + R to open Run, type regedit in the text field, and hit Enter.registry
  2. Click Yes in the UAC prompt.
  3. Paste the following path in the address bar and hit Enter:HKEY_LOCAL_MACHINE\SYSTEM\CurrentControlSet\Services\WebClient\Parameterspath
  4. Double-click on the FileSizeLimitInBytes DWORD on the right.dword
  5. If you can’t find it, right-click on the empty portion, hover the cursor over New, choose DWORD (32-bit) Value, name it FileSizeLimitInBytes, and then double-click it.dword to fix 0x800700df
  6. Now, choose Decimal, enter 50000000 under Value data if any other number is listed here, and click OK to save the changes.value data to fix 0x800700df

One of the fixes that worked for all was to modify the Registry and change the FileSizeLimitInBytes DWORD value to 50000000, which immediately fixed the 0x800700df error.

2. Change the file system

Note icon NOTE
This solution works only when you cannot download files to a particular drive with a FAT32 file system, which has a 4GB limit on the maximum file size.
  1. Press Windows + E to open File Explorer, and select This PC from the navigation pane.this PC
  2. Right-click on the drive that’s throwing the error, and choose Format from the context menu.format to fix 0x800700df
  3. Select NTFS from the File Type dropdown menu, untick the checkbox for Quick Format under Format options, and then click on Start.NTFS to fix 0x800700df
  4. Click OK in the confirmation prompt and wait for the process to complete.ok
  5. Once done, check if you are now able to download files to the drive you just formatted.

3. Run the WebClient service

  1. Press Windows + S to open Search, type Services, and click on the relevant result.services
  2. Scroll down, locate the WebClient service, then right-click on it, and choose Properties.service
  3. Select Automatic from the Startup type dropdown menu, and click the Start button to run the service.start to fix 0x800700df
  4. Once it’s running, click on Apply and OK to save the changes.save changes

Running the WebClient service should have helped get rid of the 0x800700df maximum file size limit error in case the previous solutions didn’t work.

Before you leave, discover some quick tips to boost Windows speed and performance and make it faster than ever.

Tell us which fix worked for you in the comments section below.

E3 won’t be taking place after all

The E3 2023 event has officially been canceled. This comes after multiple big players in the gaming industry like Nintendo, Microsoft, and Ubisoft pulled back and indicated that they were going to skip it. The event was set to make a comeback in an in-person event in Los Angeles scheduled for June 13 through to June 16.

Admittedly, E3 has been through a couple of rough patches dating back to the time when both Sony and Nintendo opted out of hosting their annual gaming showcases at the convention prior to the pandemic. And it seems that it’s not quite over the hump just yet.

According to IGN, the Entertainment Software Association sent out emails to its member yesterday indicating that the event had been canceled. The email stated that E3 2023 didn’t quite attract enough interest for the company to properly showcase its size, strength, as well as, role it plays in the industry.

The Global VP of Gaming at ReedPop, Kyle Marsden-Kish stated:

This was a difficult decision because of all the effort we and our partners put toward making this event happen, but we had to do what’s right for the industry and what’s right for E3. We appreciate and understand that interested companies wouldn’t have playable demos ready and that resourcing challenges made being at E3 this summer an obstacle they couldn’t overcome. For those who did commit to E3 2023, we’re sorry we can’t put on the showcase you deserve and that you’ve come to expect from ReedPop’s event experiences.

In the announcement, it was also highlighted that ReedPop and the ESA will continue to partner together in future E3 events. A clear indication that the cancellation of E3 2023 doesn’t necessarily mean there it won’t happen in the future.

Despite opting out of E3, Ubisoft’s plan to host its own event in Los Angeles on June 12 is still on course. Share your thoughts with us in the comments.

Xbox Friends & Family Plan is reportedly set to launch soon

Last year in August, Microsoft announced that it was working on an Xbox Friends & Family Plan designed to enhance the gaming experience for people that have multiple game players in one household. At the time, the company didn’t disclose when it was planning to make the official launch.

However, it now seems that we’re edging closer to that date according to @Jawmuncher on Twitter who shared a screenshot of an ad that appeared on his Xbox’s dashboard. Per the screenshot, Microsoft’s Xbox Friends & Family Plan will be priced at $39.95 per month. It hasn’t yet been established whether this is the New Zealand Dollar or the US Dollar.

Multiple users have also highlighted that they’ve encountered a similar experience. There was also another indication that the plan was set to launch in the US soon. This is after multiple users reported that the plan’s ads were appearing on the Xbox PC app’s home screen.

As reported earlier, the plan encourages account sharing among gamers and supports up to 5 members. This means that all 5 members get to enjoy all the Game Pass Ultimate perks under one account. However, there are several requirements that a user must meet to be part of the program.

First up, all members that want to be part of the Xbox Game Pass Family Plan must be residing in the same country. Additionally, once you join the plan, the remaining time on your membership will be converted to time in the new plan. Microsoft will base this upon the monetary value of the old membership.

It should be noted that the conversion won’t be available for invited group members. Furthermore, if you’re part of the Xbox All Access program, you won’t have access to this plan.

The news comes after Microsoft announced that it was scrapping its long-running $1 Game Pass trial promotion, and indicating that it is “evaluating different marketing promotions for new members in the future.”

via: Windows Central

Microsoft makes it easier to download free apps on Windows 11

Microsoft has made some major improvements to the Microsoft Store with its latest releases to both the Canary and Dev Channels. And one of the major changes shipping with these releases is that users will now be able to download both free games and apps from the Microsoft Store easily.

Now, instead of having to navigate to the product page, users can make downloads directly from search results. However, this only applies to free apps and games, it’s not yet clear if this new capability will be rolled out to purchased apps and games.

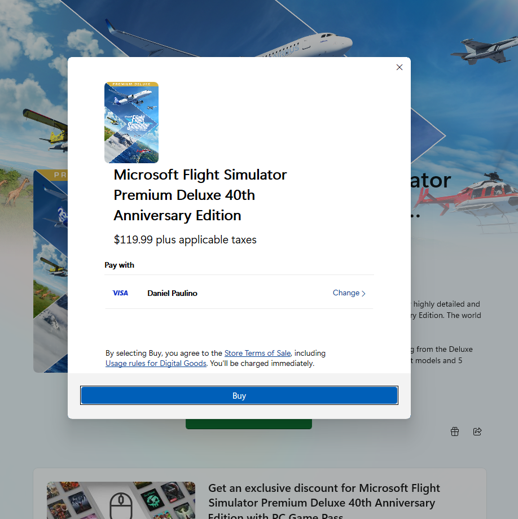
New design when purchasing apps and games in the Store.

According to Microsoft:

Install free apps and games from search results: We’ve introduced a new way to install free apps and games. Hovering over a free product on the search results page opens a new expanded card experience, where you can find a convenient install button. This will trigger the installation without having to navigate into the product page.

It’s also worth noting that you must be running 22303.1401.x of the Microsoft Store or higher. Additionally, the company has also incorporated a “new and redesigned experience” for users when purchasing apps from the Microsoft Store. The new fluent design aligns with Windows 11.

New design when purchasing apps and games in the Store.

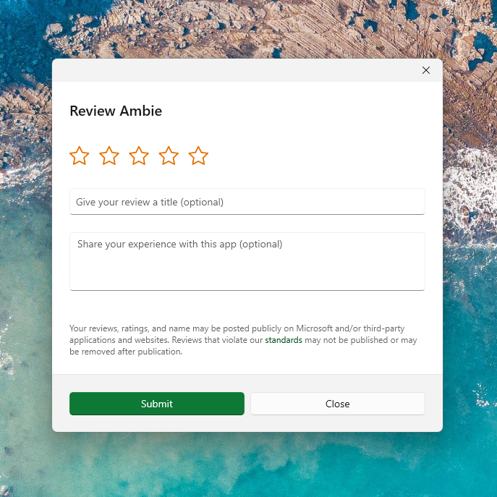
The new experience also features a new UX for in-app ratings dialog which is faster, more reliable, and lastly aligned with Windows 11’s design.

New UX for in-app ratings dialog in the Store.

Share your thoughts in regards to the new changes made on the Microsoft Store in the comments below.

How to change the layout in OneNote

Microsoft continues to innovate with its products. This time, Redmond officials just rolled out a set of left-sided layout options in OneNote, and you can change it however you want, and this guide will show you how to do it.

How to change the layout in OneNote

Use the View tab

1. With your OneNote app opened, click View on your upper screen.

2. On the Tabs Layout tab, click Vertical Tabs.

Speaking on Microsoft 365 Insider blog, product manager Greg MacEachern said that the update could be a massive game-changer, especially for those working on tablets.

For those who love the left-sided layout on OneNote for the web, OneNote for Mac, and OneNote for iPad, you’ll be thrilled to hear that we’re now bringing this experience to OneNote on Windows client! Using the new Vertical Tabs layout option, you can use a navigation experience similar to other Microsoft 365 apps and services, such as Outlook and Teams.

Now, instead of having all the notebook tabs crammed up below the ribbon, you can have them placed on the left side of your screen so you can switch to whichever tab you need to access instantly.

With that said, however, Microsoft also said that only users with Version 2302 (Build 16124.20000) or later on Windows 11 devices can access this update. That means Windows 10 users may need to wait a little longer.

With that said, however, being an insider-only feature means that Microsoft is using very few select users to experiment with this functionality before rolling it out to general users.

So, if you don’t see options to change it, or you do but you also run into some uncomfortable bugs, it’s bound to happen.

FAQ

How do I switch between vertical and horizontal tabs in OneNote?

Open View, then select Tabs Layout. Choose Vertical Tabs or Horizontal Tabs based on your preference.

How do I change the page layout in OneNote?

Go to View, select Paper Size, and adjust the width or choose a predefined layout to match your needs.

How do I get the old OneNote layout back?

Switch to OneNote 2016 or enable the legacy navigation layout in the Windows app under Settings > Options > Navigation if available in your build.

How do I simplify the layout for distraction-free writing?

Open View, then turn on Immersive Reader or hide unnecessary panes using Hide Page List and Hide Navigation for a cleaner workspace.

You can learn more about customizing OneNote by checking this guide on how to move tabs to the top, which explains another layout option you can adjust on Windows.

If you’re just starting out and want a broader overview, read our complete how to use OneNote guide to learn all the basics alongside layout tips.

For more notebook management options, you can also see our tutorial on how to delete a OneNote notebook, and learn how to create a new notebook in OneNote so you can organize fresh notes whenever you need.

Do you find these tips helpful? Let us know in the comments!

Working with large files? Avoid installing KB5023778

It’s that time: Microsoft released another build on the Release Preview channel, dubbed KB5023778. Recommended for commercial users, the channel brings fixes and certain key features one step ahead of general availability.

The build, while it brought attention to a nice update for Microsoft accounts in the Start menu and addressed Notepad issues, also bears a problem, especially for those working with large files. 

As noted from its release note, transferring large files that contain multiple GBs will take longer on desktops with Windows 11, version 22H2, especially through SMB. 

Copying large multiple gigabytes (GB) files might take longer than expected to finish on Windows 11, version 22H2. You are more likely to experience this issue copying files to Windows 11, version 22H2 from a network share via Server Message Block (SMB) but local file copy might also be affected. Windows devices used by consumers in their homes or small offices are not likely to be affected by this issue.

Redmond officials, however, also provided a workaround for you to mitigate the issue, while working closely to patch it in an upcoming release. 

To mitigate this issue, you can use file copy tools that do not use cache manager (buffered I/O). This can be done by using the built-in command-line tools listed below: robocopy \\someserver\someshare c:\somefolder somefile.img /J or xcopy \\someserver\someshare c:\somefolder /J

Problems in copying large files in KB5023778: Not the first time

With that said, this wasn’t the first time a Windows 11 build bears a significant low at copying and pasting documents over SMB. 

As we reported back in October 2022 when KB5018496 cumulative update arrived, the same problem also reportedly appeared. At that time, Microsoft tested the right-click option on the taskbar to view Task Manager directly without pressing Ctrl + Alt + Del, dozens of visual and technical improvements too. 

What do you think about this bug? Have you ever encountered this after updating to KB5023778? Let us know in the comments

4 Ways to Fix DellInstrumentation.sys Blue Screen Error

Blue screen errors are rare in Windows, but when these do arise, chances are they will keep reappearing until the underlying cause is eliminated. One such is the System Service Exception error caused by the DellInstrumentation.sys file.

The error is recent and affects only the Dell devices, given that the Dell Instrumentation is failing each time. So, let’s find out why you are encountering the error and the solutions that should do the trick.

What is the DellInstrumentation.sys blue screen?

The DellInstrumentation.sys started appearing in Dell devices after a Windows update and affected many users. The error is triggered when the Dell SupportAssist software leads to the malfunctioning of other programs and devices.

Here are a few reasons you started facing the error:

  • A buggy version of the app: Most users reported that a particular version of the Dell SupportAssist app triggered the blue screen, indicating a bug in the version.
  • Conflicting Windows Update: It could also be a conflicting Windows update that doesn’t allow the Dell apps and drivers to function effectively.
  • Corrupt, incompatible, or outdated drivers: Certain devices, for instance, the biometric one, seem to trigger the error due to a corrupt, incompatible, or outdated driver.

How do I fix the DellInstrumentation.sys BSOD?

Tip icon Tip
If you are unable to turn on the PC or don’t get enough time to execute the fixes, boot Windows into Safe Mode and then try performing the steps listed here. Once done, boot Windows normally, and things should work fine.

Before we move ahead, here are a few quick checks to perform:

  • Restart the computer and verify whether the error reappears.
  • Check for any pending Windows updates and install them.

If these don’t work, head to the solutions listed next.

1. Uninstall the Dell SupportAssist app

  1. Press Windows + R to open Run, type appwiz.cpl in the text field, and hit Enter.appwiz.cpl
  2. Select Dell SupportAssist from the list of apps, and then click Uninstall.uninstall to fix DellInstrumentation.sys
  3. Click Yes in the confirmation prompt and follow the on-screen instructions to complete the uninstall process.confirm
  4. Similarly, uninstall the Dell SupportAssist Remediation and Dell Power Manager Service apps as well.

One of the simplest solutions to the DellInstrumentation.sys BSOD in Windows, which worked for all, was to delete Dell SupportAssist and other related apps.

2. Install another version of SupportAssist

The bug that triggered the BSOD was found in just one version of the SupportAssist, which wreaked havoc, and forums were flooded with complaints.

So, if you depend on the Dell SupportAssist, there’s always the option to download a previous version, 3.10.4, or head to the official SupportAssist for Home PCs webpage to get the latest version, if one is available. And this should fix the DellInstrumentation.sys error in Windows.

3. Disable affected devices

  1. Press Windows + X to open the Power User menu, and select Device Manager from the list.device manager
  2. First, expand the DellInstrumentation entry, right-click on the DellInstrumentation Device, and then select Disable device from the context menu.disable device to fix DellInstrumentation.sys
  3. Click Yes in the confirmation prompt that appears.yes
  4. Next, expand the Biometric devices entry, and then double-click on the device(s) listed under it.biometric devices
  5. Navigate to the Drivers tab, and click on the Disable Device button.disable device to fix DellInstrumentation.sys
  6. Click Yes in the prompt.device
  7. Similarly, disable any other biometric devices that are listed here.

For many users, disabling the DellInstrumentation device and all the Biometric devices did the trick and helped get rid of the DellInstrumentation.sys blue screen.

4. Turn off services

  1. Press Windows + S to open the Search menu, type Services in the text field, and click on the relevant search result. services.msc
  2. Locate all the Dell services here (listed together in alphabetical order), and double-click on one.properties
  3. Select Disabled from the Startup type dropdown menu, and then click on the Stop button.stop to fix DellInstrumentation.sys
  4. If a confirmation prompt pops up saying that another linked Dell service(s) will stop, click Yes to proceed since we anyway are disabling these later.confirm
  5. Finally, click Apply and OK to save the changes.save changes to fix DellInstrumentation.sys
  6. Similarly, disable the other Dell services that are currently running.

That’s it! If the previous solutions didn’t work, disabling the services should have helped fix the DellInstrumentation.sys blue screen on your PC.

And before you leave, check our curated list of the best PC optimization software, and get one today! These are reliable substitutes for Dell SupportAssist.

For any queries or to share a solution not listed here, use the comments section below.

How to Easily Update Visual Studio to the Latest Version

If you’re a developer, you’re probably familiar with Visual Studio. Keeping the software up to date is important, especially if you want to get the latest features, and many are wondering how to update Visual Studio on their PC.

This is incredibly easy to do with Visual Studio, and the software will usually inform you if a pending update needs to be installed.

If you’re using this code writing software, join us while we take a closer look and learn how to keep Visual Studio software up to date properly.

How often does Visual Studio update?

There are two types of updates for Visual Studio:

  • Minor updates – These are released every three months and bring new features, bug fixes, and more.
  • Servicing updates – These updates are released to fix critical issues as soon as they are discovered.

If you’re on a Preview channel, you’ll get minor updates every month, but keep in mind that some updates might not be fully stable.

How do I update Visual Studio?

1. Manually check for updates

  1. Open Visual Studio.
  2. When it opens, go to Help and select Check for Updates.
     
  3. The software will now check for available updates.
  4. If updates are available, click the Update button to download them.

This is the simplest way of checking for updates, so be sure to give it a try.

2. Use the notification

  1. Start Visual Studio.
  2. A notification will appear in the bottom right corner. Select Update on close and close the software to install the update.
     
  3. If you miss the notification, click the bell icon in the bottom right corner.
  4. Now choose Update on close and restart the software. You can also select View details to view what’s in the update and manually install it.

Visual Studio will inform you if an update is available via the notification, so you won’t miss an update.

3. Use the Visual Studio installer

  1. Make sure that Visual Studio is closed.
  2. Press Windows key + S and search for the visual studio installer. Select Visual Studio Installer from the list of results.
  3. If you see the Update button available, click it.
  4. Follow the instructions on the screen to complete the process.

As you can see, updating Visual Studio is simple and easy and can be done in a matter of seconds.

If you’re having issues updating the software, Windows Firewall may be blocking Visual Studio, but that can be easily fixed.

Before updating, you might also want to check this quick guide on how to run code in Visual Studio to make sure you’re familiar with its core features.

Keep your projects tidy after updating by learning how to format code in Visual Studio with shortcuts and Code Cleanup.

Learn how to comment multiple lines in Visual Studio to streamline testing and documentation. Read the full guide Comment Multiple Lines in Visual Studio.

What method do you use to update Visual Studio? Let us know in the comments section below.

USBXHCI.sys Blue Screen Errors: Causes & How to Fix

Some of our readers have recently complained that they encounter a usbxhci.sys Blue screen of death (BSOD) error whenever one or more external devices are connected to their computer.

If you have been wondering about what could be the cause or what fix to apply, worry less as we have compiled some potential fixes to troubleshoot the issue in this article.

What causes the Blue Screen error usbxhci.sys?

There can be several reasons behind the usbxhci.sys Blue screen errors. Before diving into the solutions, let us consider some of the most known triggers for this error:

  • Corrupt USB drivers – The most common factor that triggers this particular issue is the corrupt USB driver on the system. You can try to update or reinstall your USB drivers and see if that fixes the issue.
  • Hardware problems – Several users also encountered this issue as a result of a hardware malfunction caused by components that were not properly connected to the motherboard. The usbxhci.sys Blue screen issue can also be triggered by a sudden disconnect due to a power outage or by a damaged system component.
  • Outdated firmware – Software developers create programs called firmware that power hardware devices. The usbxhci.sys error may appear if the firmware is out-of-date. To upgrade your firmware, carefully follow the manufacturer’s instructions.

Now that you know some of the potential reasons behind the usbxhci.sys blue screen errors, let’s proceed to how you can fix this problem.

How can I fix the usbxhci.sys error?

Before seeking advanced solutions regarding the usbxhci.sys Blue screen errors, consider observing the following preliminary checks.

  • Check your computer for malware and virus with the best antivirus software.
  • Update your Windows by installing all updates.
  • Update all your drivers.
  • Disconnect external drivers and reboot your computer.

Having confirmed the above checks if you still require further assistance, you can work your way through any of the advanced solutions below.

1. Update your USB Driver

  1. Press the Windows + R keys to open the Run window, type devmgmt.msc and press Enter.
  2. Expand the Universal Serial Bus Controller section, right-click on USB Root Hub, and click on Update driver.
  3. Now, click on Search automatically for drivers and wait for the system to look for an updated version of the driver.
  4. Follow the on-screen instructions to complete the process.

Once the USB driver is updated, check if you still face the usbxhci.sys blue screen problem. If you do, you should consider reinstalling the driver.

Moreover, you can try dedicated software to update your drivers without effort, as it will automatically find the latest versions for all your outdated or missing drivers.

2. Reinstall your USB driver

  1. Press the Windows + R keys to open the Run window, type devmgmt.msc and press Enter.
  2. Expand the Universal Serial Bus Controller. Right-click on the USB Root Hub and click on Uninstall.
  3. Now, check the box next to Delete the driver software for this device and click on Uninstall.
  4. Restart your PC.

After restarting your PC, the driver will install back automatically. If the problem persists, you can run the System File Checker scanner to know and fix corrupted files.

3. Run the SFC scan

  1. Press the Windows key and type cmd in the Search box, and launch Command Prompt as admin.
  2. Type the following command in the text field and press Enter: sfc /scannow
  3. Close the Command Prompt and restart your PC.

The SFC scanner will thoroughly check your computer for potentially damaged files which may be triggering several errors. In case you encounter problems with the command prompt, you can explore our dedicated guide to fix it.

4. Perform a System Restore

  1. Press the Windows + R keys to open the Run window, type rstrui in the text field and press Enter.
  2. Select the desired restore point (preferably the most recent one) and click on Next.
  3. Click on Finish.
  4. Wait while your PC restores your system and check if the problem is fixed.

The System Restore will help to revert your PC to when it worked properly without the usbxhci.sys blue screen.

Since this is more like a lifesaver, you can explore our article to know how to create Windows 11 restore points manually.

5. Perform a System Reset

  1. Press the Windows + I keys to open the Settings app.
  2. Click on System and click on Recovery.
  3. Navigate to the Recovery options section and click on the Reset PC button.
  4. Follow the on-screen instructions to complete the process.

If all other steps do not work, hopefully, performing a system reset will fix the usbxhci.sys blue screen problem.

Alternatively, before proceeding with a system reset, you should consider getting further assistance from Microsoft Support.

Additionally, you can explore our detailed article to make use of any of the best BSOD fixers to get rid of BSOD issues for good. And that’s it on how to fix the usbxhci.sys blue screen error.

However, if you have any questions or suggestions regarding the blue screen of death errors, do not hesitate to use the comments section below.

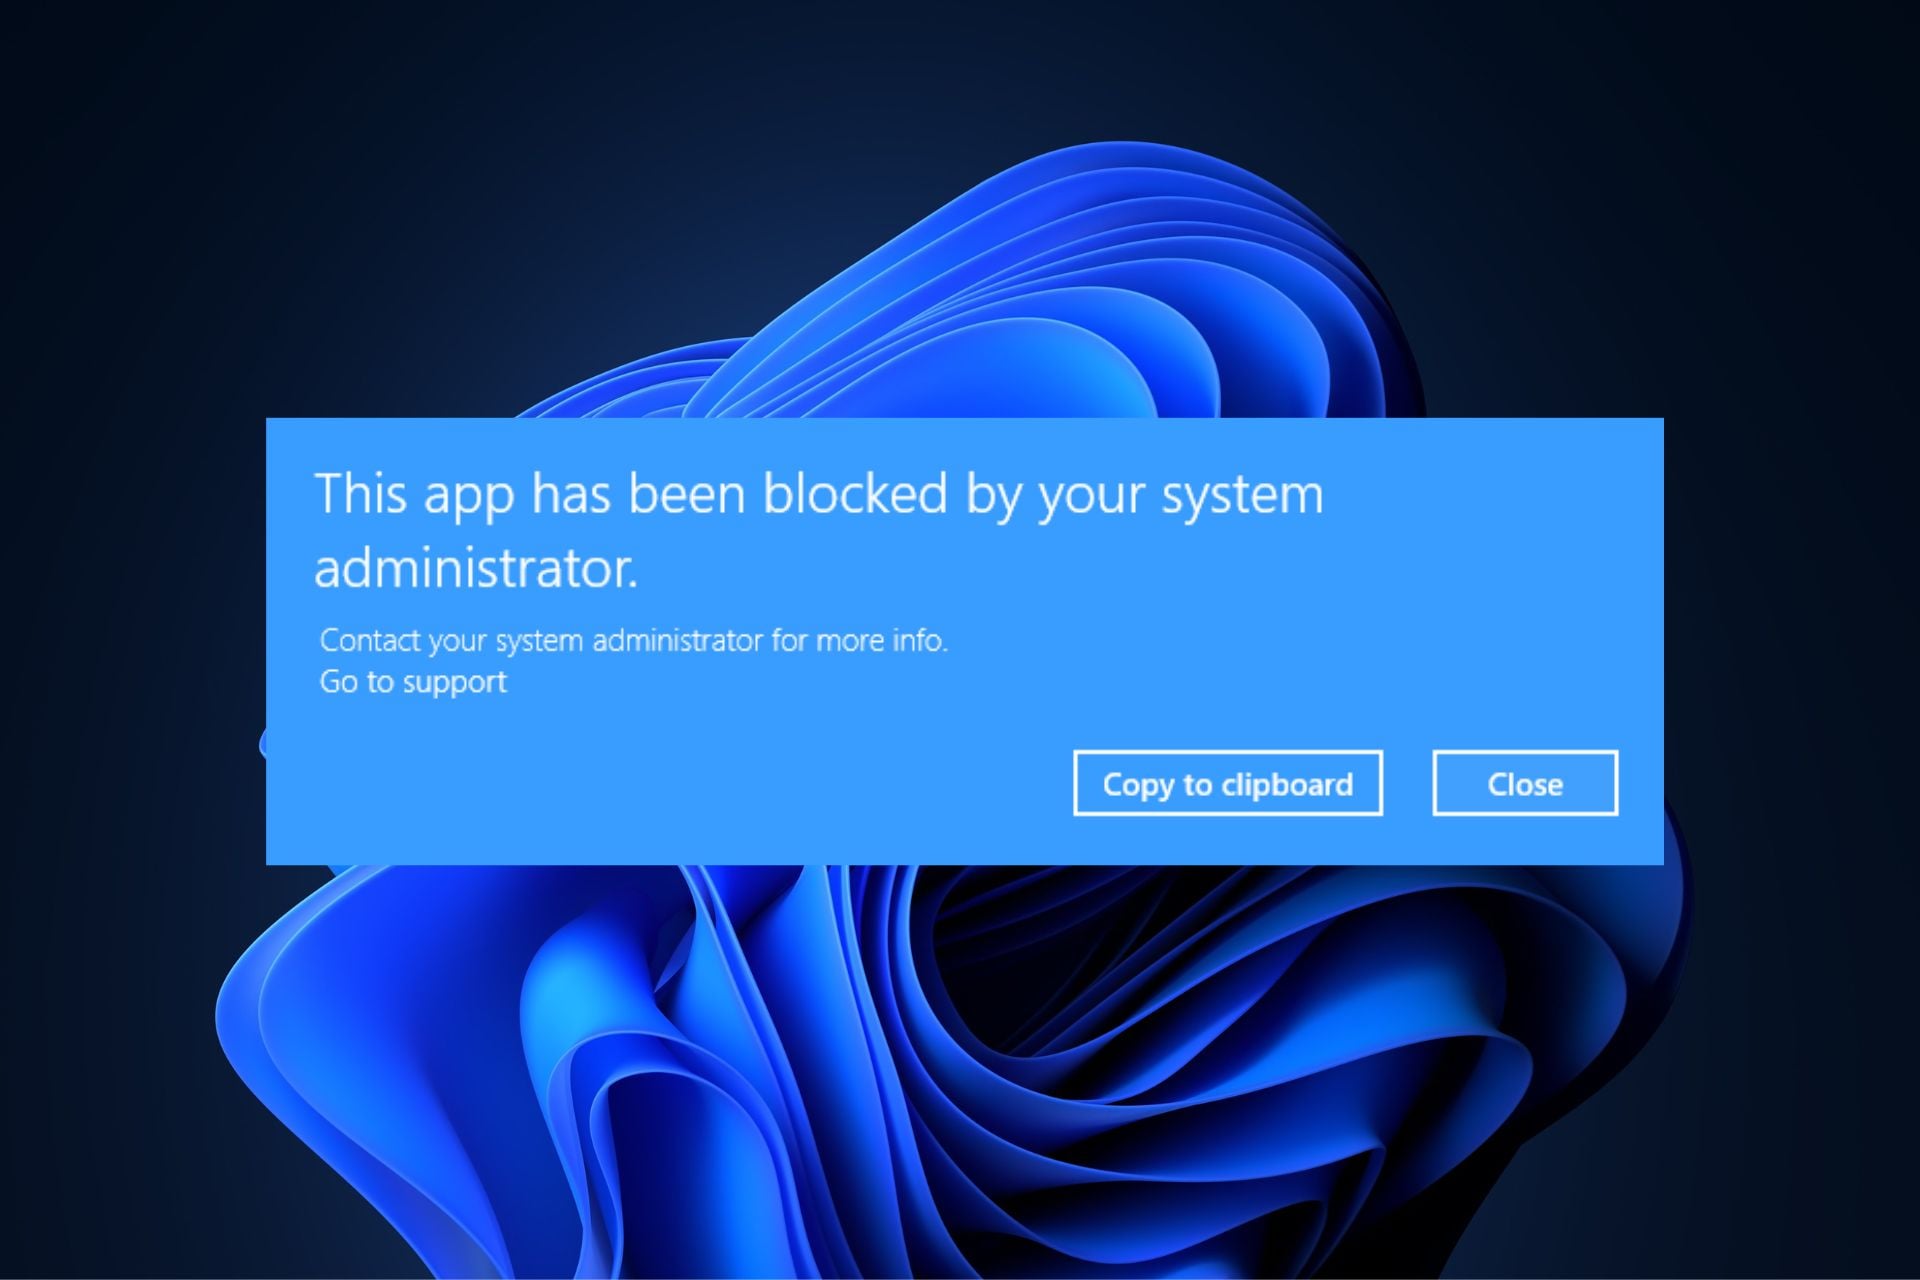
Fix: This App Has Been Blocked by Your System Administrator

Some of our readers have recently reported that they come across an error message that reads this app has been blocked by your System Administrator while trying to launch an application on their Windows PC.

Whenever you come across this issue, it is possible that the app is harmful to the device. We’ve compiled potential fixes to avoid the error in this article.

Why is this app blocked by System Administrator?

There can be several reasons why you’re getting this app has been blocked by your System Administrator error message. Below are some of them;

  • Windows Defender or SmartsScreen has blocked the app – This error message may appear for security reasons if any application appears to pose a risk to your desktop. Your Windows PC comes pre-installed with Windows Defender and SmartScreen which scans your computer for malicious software and phishing attacks.
  • Third-party Antivirus Software – The issue is similar if you’re using a third-party antivirus program that might assume the app you’re trying to download is infected.
  • Applock enabled by Administrator – Only the Windows Professional edition is affected by this problem. It is likely that the administrator of the domain network to which your computer is linked has set specific Applock policies that limit the downloading of programs.
  • Access Restricted by Administrator – There may be restrictions on the updates and features you can use if Windows is running under the default account rather than an administrative account.
  • Outdated Application – Another reason for this problem could be that the software has been withdrawn by the developers or that the current version of Windows does not support your application.

Now that you know some of the potential reasons behind the error, the next section will provide you with simplified step-by-step instructions on how to fix the issue.

What can I do if I get this app has been blocked by your System Administrator?

Before engaging in any advanced troubleshooting or settings tweaks, users should ensure they perform the following preparatory checks;

  • Restart your PC.
  • Ensure that the application is safe to download and will not affect your PC.
  • Disable the security settings hindering the launch of the app.

Having confirmed the above checks and if you still require further assistance, you can explore the advanced solutions provided below.

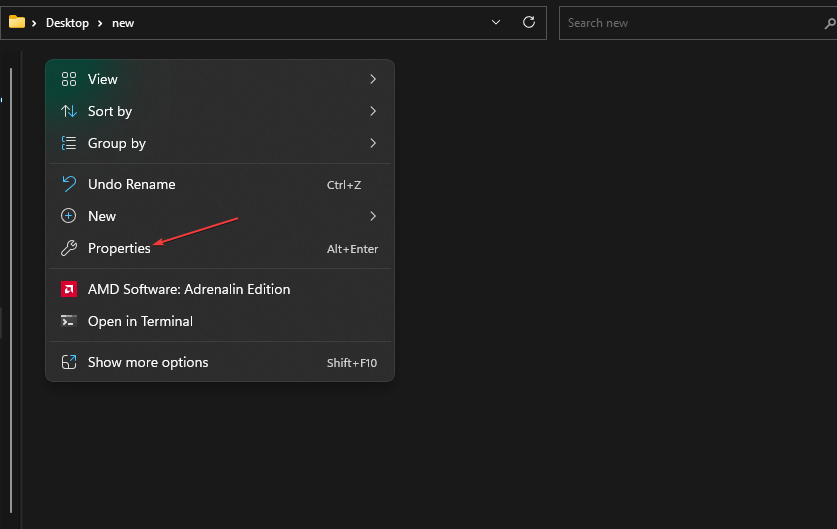
1. Unblock the App from the Properties

  1. Right-click on the app and select Properties from the context menu.
  2. Once the window opens, navigate to the General tab. At the bottom of the page, check the box next to the Unblock option.
  3. Click on Apply followed by OK to save the changes.
  4. Now, launch the app.

Some files are blocked by Windows’ security function, particularly those downloaded from the internet. In this scenario, before the app launches, you must unblock your app file from Properties.

2. Disable SmartsScreen temporarily

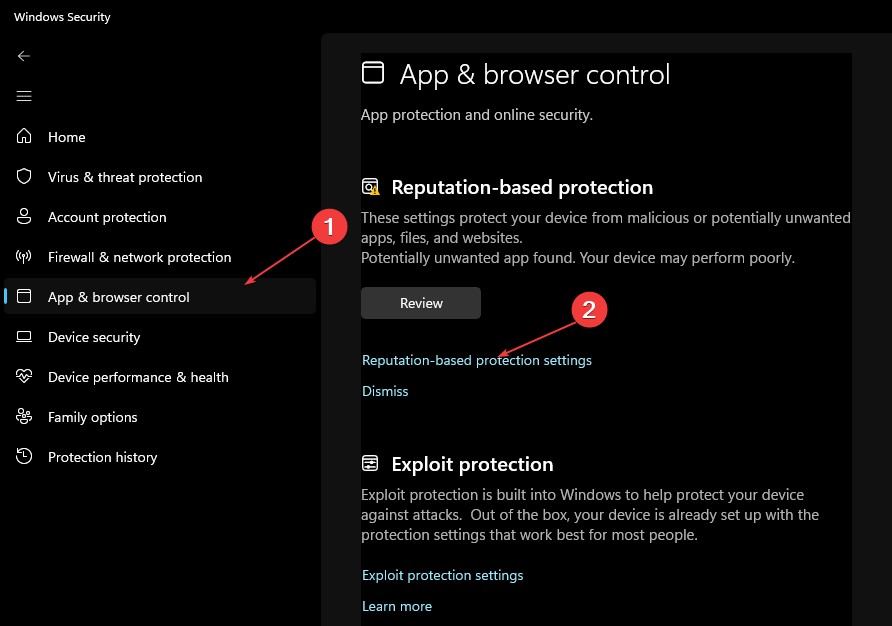
  1. Press the Windows button, search for Windows Security, and launch it.
  2. Now, click on the App & browser control icon. Next, click on the Reputation-based protection settings link.
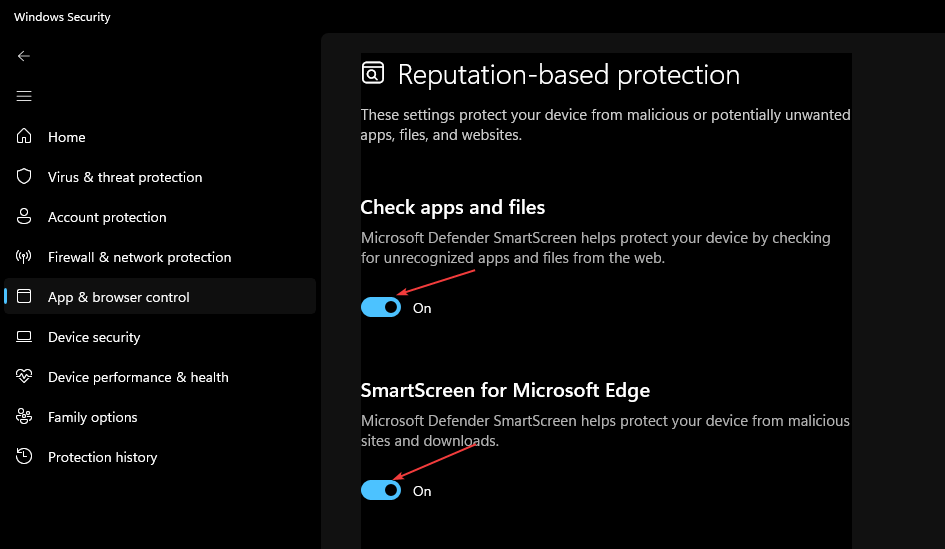
  3. Under Check apps and files, select off.
  4. Select off under the Smart Screen for Microsoft Edge.
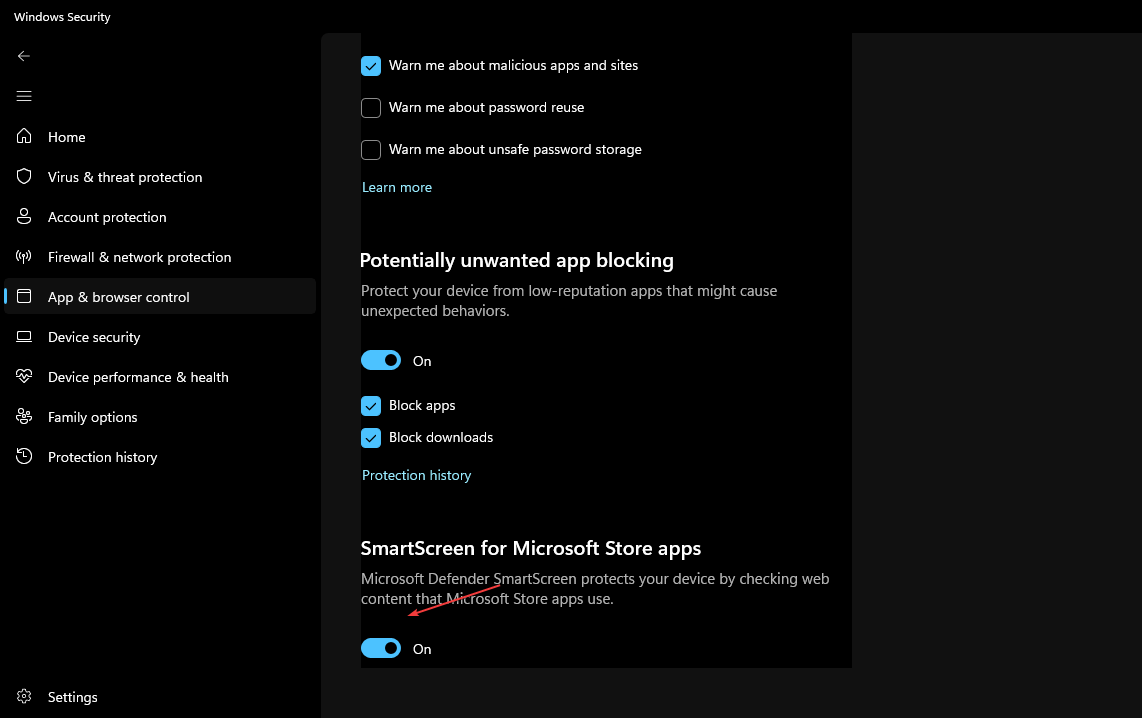
  5. Under Smart Screen for Microsoft Store apps, select off.
  6. Now, try downloading the app again and check if the problem is fixed.
  7. Then, turn on the SmartsScreen following the steps above.

Disabling the SmartScreen for a period will allow for the application to download without any hindrance. However, do this only if you’re sure the app is safe.

3. Disable third-party antivirus software or make app exception

  1. On your PC’s notification tray, right-click on the antivirus software.
  2. Select Disable. Then, proceed to make an exception for your app.
  3. Launch the Windows Security.
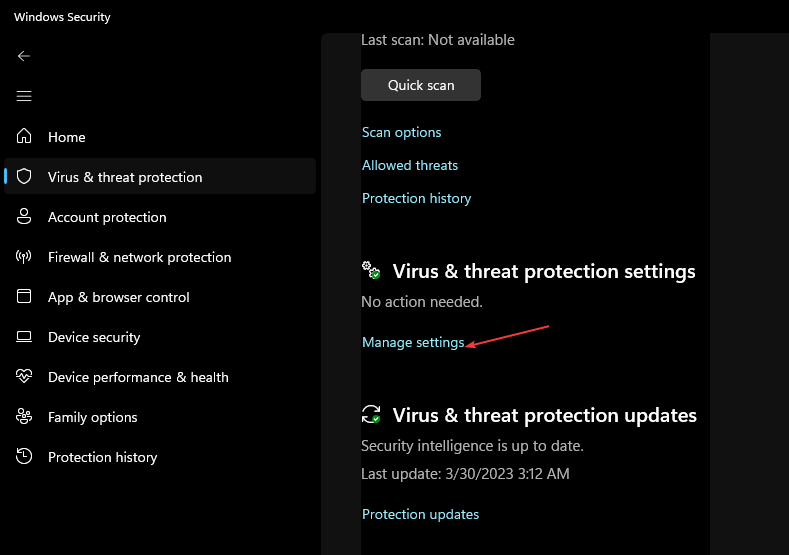
  4. Under Virus and Threat Protection settings click on Manage Settings.
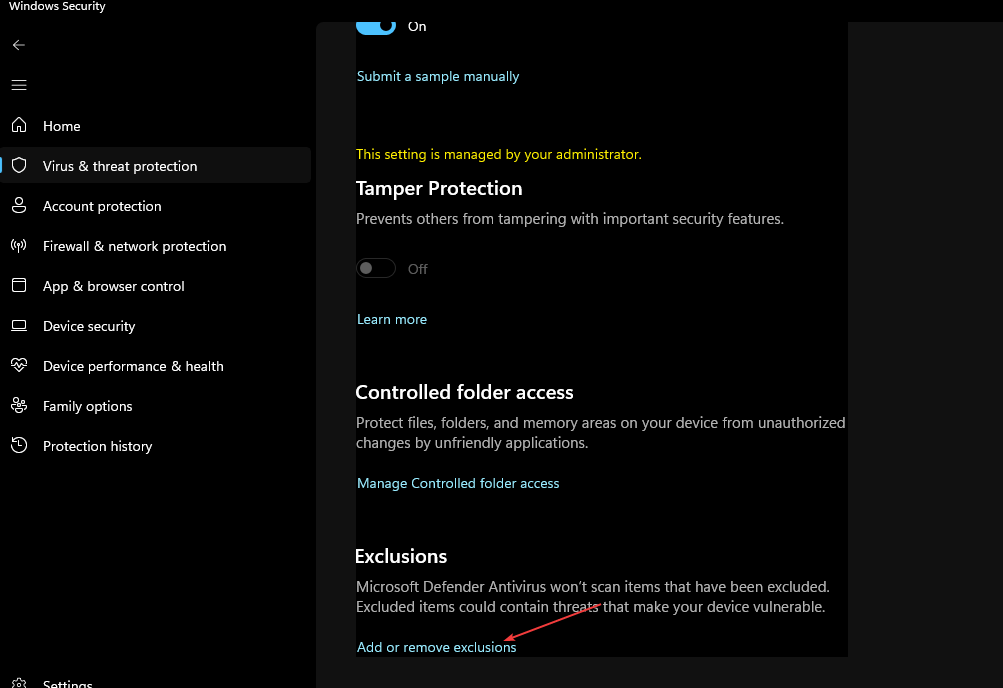
  5. Next, click on the Add or remove exclusions link.
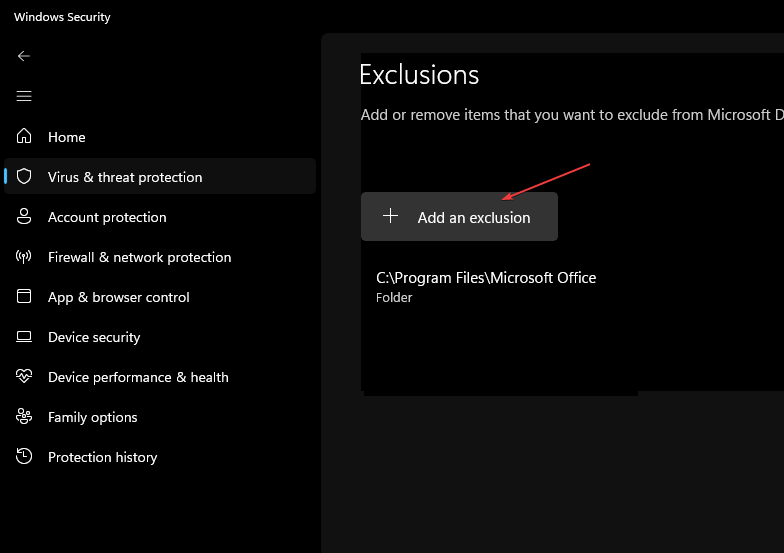
  6. To select the file which you want to download, click on the + Add an exclusion icon.
  7. Finally, click on OK.

If turning off the SmartScreen still doesn’t let you download the app, third-party antivirus software may be blocking it. The software allows you to either disable the application or set an exception just for it.

4. Run the app as an Administrator

  1. Right-click on your app’s shortcut and click on Properties.
  2. Navigate to the General tab. Copy the path displayed as the location of the app and close Properties.
  3. Click on the Start icon and type command prompt, and select Run as administrator.
  4. Next, paste the app’s copied path by pressing Ctrl + V. Then, press Enter.
  5. Command Prompt will now launch your app as an administrator.

To fix this app has been blocked by your System Administrator, you can run the file as an administrator. In case you encounter problems with command prompt, you can explore our dedicated guide to fix it.

Also similar to this issue is a report that an administrator has blocked you from running this app. You can explore it for further assistance.

Make sure you work your way through the steps provided in this article from start to finish to know what works best for you.

If you have any questions or suggestions on what to do if users get this app has been blocked by your System Administrator error message, please don’t hesitate to use the comments section below.

What is Angle Snapping on Mouse & Why Should you Enable It

Some of our readers encountered terms like Angle Snapping that they found hard to understand while reading mouse reviews or press materials for mice. 

If no one has explained to you what it means or how to enable Angle Snapping mouse, this article will provide you with all you need to know about it.

What is angle snapping mouse?

Have you ever attempted to draw a circle or a straight line? It’s quite difficult to do it freehand unless you’ve had a great deal of practice. The same can be said when we use a mouse.

Assuming you have a (good) gaming mouse or a mouse without angle snapping, you would probably fail if you opened Paint right now and tried to draw a pixel-perfect straight line.

You would fail because it’s nearly hard for most people to draw a perfectly straight line on their first try. However, you can accomplish that with the aid of angle snapping.

Although your actual movements aren’t straight at all, an Angle Snapping mouse predicts when you want to draw a straight line and artificially maintains that line on the screen.

Why should you enable it?

Using the angle snapping feature is only beneficial for one purpose which is to gain more precision while gaming. Sometimes, the mouse cursor will fail to lock to your game and interrupt gameplay.

Angle snapping is a feature that may be enabled to reduce unnecessary movement during target snapping while playing games and is a useful tool for inexperienced players.

For instance, it can help you track your opponent as he runs across the field, keeping you scoped on the head and not sinking below or rising above.

If you want to enable the Angle Snapping feature for your mice, you can explore the steps provided below to get the help you need.

How can I enable angle snapping mouse?

Before engaging in any advanced settings tweak, you should consider performing the preliminary check below;

  • Confirm that your mice are eligible for the Angle Snapping feature. This is because most contemporary gaming mice lack angle snapping. After all, the sensors used in high-quality products nowadays are all perfect. In other words, they don’t use performance-limiting modifications like smoothing.

Since the Angle Snapping feature can only be enabled on an eligible gaming mouse, the next section will discuss how to enable it from the software of the mouse’s manufacturer.

1. Enable Angle Snapping using the Republic of Gamers website

  1. Go to the ROG Armoury II official website to download the application.
  2. Launch the program after installing it.
  3. Navigate to the Performance tab under the Mouse section.
  4. Under the Angle Snapping option, click on the straight line option to enable it.
  5. Restart your PC.

After installing the software to your PC, make sure you restart your PC for the feature to take effect.

2. Download the Lioncast Software to enable Angle Snapping

  1. Visit the official website for Lioncast to download and install the Lioncast software depending on the mouse.
  2. Launch the application and click on the Sensor tab.
  3. Then, enable Angle Snapping and scroll to adjust the limit.

You can access Angle Snapping if you purchase your gaming mouse from Lioncast.

3. Download Corsair’s (iCUE) software to enable Angle Snapping

  1. Visit Corsair’s official website to get the iCUE program.
  2. Install the program, then run it. The Dashboard menu will then appear.
  3. Choose the Home tab, move the mouse pointer over the choices, and select Device Settings.
  4. Scroll down and turn on Angle Snapping in the newly opened window.

Gamers can use the above steps to enable Angle Snapping in their mice depending on the manufacturer’s support for the model.

Installing any additional third-party software could interfere with the game’s anti-cheat features and result in a permanent ban, so we strongly advise players to stick with the supplied software.

Alternatively, if you need help with the best mouse to improve your gaming performance, you should check out these Asus gaming mice.

Moreover, having gaming-efficient keyboards could also improve your gaming performance, so check out a list of the best Razer keyboards.

If you have any questions or suggestions, do not hesitate to use the comments section below.

Fix: Teams Blue Screen When Opening Files

Many of our readers have been experiencing a blue screen in Microsoft Teams upon opening files in the app. This transparent blue screen appears when you click to access any document from the file tab. If the blue screen is causing inconvenience, this guide will provide effective solutions to get rid of it.

What causes a blue screen in Teams when opening files?

There can be several reasons why you encounter a blue screen on Microsoft Teams when opening files:

  • Corrupt cache – If the corrupt cache files of the Teams app can cause random errors like the partial blue screen in Teams.
  • Slow internet connection – An unstable or poor internet connection can result in a blue screen when opening files.
  • Buggy update – The current Microsoft Teams version can be buggy and cause a blue screen to appear every time you try opening files.
  • Hardware Acceleration is enabled – When enabled, hardware accelerated GPU scheduling can trigger the Teams blue screen error upon opening files.
  • Outdated display drivers – Obsolete display drivers are a potential cause for several display-related problems, including the Teams blue screen problem.

Now that we know the reasons for the blue screen when opening files in Microsoft Teams, let’s find out how to get rid of the inconvenience.

How can I fix the blue screen in Teams when opening files?

Before moving on to the complex solutions, we recommend trying these basic workarounds:

  • Restart your computer to get rid of the temporary technical glitches.
  • Ensure that you are signed into Microsoft Teams using the correct email account.
  • Check the Teams app for new updates and install them on your PC.
  • Connect to a different network, such as a mobile hotspot, and then access files in the Teams app.
  • Check and install the available Windows updates to resolve the underlying bugs.

If you still encounter the blue screen upon opening files in Teams, perform the actions mentioned below.

1. Restart Microsoft Teams

  1. Right-click the Windows icon on the taskbar and select Task Manager from the Quick Links menu.Teams blue screen when opening files
  2. Look for Microsoft Teams in the Processes tab, right-click it, and choose End Task from the context menu.Teams blue screen when opening files
  3. Press the Windows key, type teams in the search bar on top, and select the app from the search result.Search Microsoft Teams from Start menu

Restarting the app can help resolve the temporary bug causing the blue screen when you try opening files in Teams.

2. Clear the Microsoft Teams cache

  1. Make sure you close the Teams app.
  2. Use the Windows + R shortcut to launch the Run dialog box.
  3. Type the following command in the text box and press the Enter key to directly access the Microsoft Teams folder. %appdata%\Microsoft\TeamsTeams blue screen when opening files
  4. Use the Ctrl + A shortcut to select all the files and folders in the directory and press the Delete key.Teams blue screen when opening files

Now restart the Teams once again, and hopefully, you will no longer witness the Teams blue screen while opening files.

Like other apps, Microsoft Teams accumulates the cache data to deliver better performance. Over time, the cache folder grows in size and may get corrupt and cause random issues like the one at hand.

3. Restore the default theme

  1. Launch Microsoft Teams.
  2. Click the Menu icon (horizontal three dots) located next to your profile picture on the top, and choose Settings from the drop-down menu.Teams blue screen when opening files
  3. Select Default instead of Dark and High Contrast theme from General settings.Teams blue screen when opening files

The default theme will now be applied as soon as you make the selection.

As reported by several of our readers, the partial blue screen appears on files only when the dark or high-contrast theme is applied in the Teams app. So restoring the theme settings to default can do away with the Teams blue screen that appears upon opening files in the app.

4. Disable the hardware acceleration

  1. Press the Windows key to launch the Start menu, type teams in the search bar, and select Microsoft Teams from the search result.
  2. Click the Menu icon (horizontal three dots) located on the top right and choose Settings from the drop-down menu.Teams blue screen when opening files
  3. Enable the checkbox preceding Disable GPU hardware acceleration option under the Applications section.Disable GPU hardware acceleration

When the GPU hardware acceleration is enabled, CPU and RAM usage by Teams increases tremendously. Consequently, your PC delays responding to the requests when you double-click to access the file and displays a partial blue screen.

5. Update the display driver

  1. Right-click the Windows icon and select Device Manager from the Quick Links menu.Teams blue screen when opening files
  2. Double-click the Display adapters category to expand the list of devices.
  3. Right-click the graphics card and choose Update driver from the context menu.Teams blue screen when opening files
  4. Select the Search automatically for drivers option from the Update Drivers window.Teams blue screen when opening files

Your computer will search for the latest update for your graphics card and automatically download and install them without your intervention. Hence, Installing the latest available driver can easily fix the Teams blue screen that appears when you open any files within the app.

These workarounds can help fix the partial blue screen in Teams that appears when you try opening the different files. Also, we recommend that you go through this guide if you are unable to download files from Microsoft Teams.

Let us know if these solutions helped you get rid of the blue screen. Also, if you have any other questions or suggestions, you can leave them in the comments section.

How to Make Outlook Automatically Open Replies & Forwards

Microsoft Outlook typically opens replies and forwards in the same window by default when you click Reply or Forward from the reading pane. But, some of our readers have requested to know how to make Outlook pop out reply in a new window.

In case you have been wondering how to deal with this task in Outlook too, you can explore this guide to learn how to resolve it quickly and easily.

What does it mean to automatically pop out replies in Outlook?

In Outlook 2013, 2016, and Microsoft 365, email replies and forwards are done in line by default. This means, your reply or forward message is typed within the preview pane.

However, with the Outlook pop out reply feature, users can modify Outlook’s default configuration, which opens replies or forwards in the same window, to automatically open replies and forwards in a separate window.

In the section below, we will take you through a simplified process of how to tweak this setting.

How to configure Outlook to open replies and forwards in Pop out Window?

1. Via the Outlook app

  1. Launch the MS Outlook app.
  2. On the File tab, click on the Options button.
  3. From the Outlook dialog box that opens immediately, click Mail on the left pane.
  4. Now, scroll down to the Replies and forwards section and check the box with Open replies and forwards in a new window option.
  5. Then, click the OK button to save the changes.  

Now, when you click Reply, Reply All or Forward from the reading pane, a new window will be displayed at once.

2. Use the Outlook Web version

  1. Sign in to your Outlook account via your web browser and click on the gear icon.
  2. Now, click on Options from the menu.
  3. Under Layout, click on the Reading pane.
  4. Finally, under When writing email messages, select Type in a new window.

The setting should be automatically changed once you’ve applied the settings. You can also check our detailed guide for the best browsers to use for all purposes here.

Alternatively, if you’re having issues with opening your Outlook app in Windows 11, you can fix it in the 6 steps provided in this article.

And that’s it on how to make Outlook automatically open replies and forwards. If you have any questions or suggestions, do not hesitate to use the comments section below.

High CPU Usage on Apex Legends: 3 Ways to Lower It

Several players have recently reported encountering the Apex Legends high CPU usage issue when starting the game on a Windows PC.

If your CPU usage rate on Apex Legends has been abnormally high, do not worry. In this article, we have compiled some steps to lower it to enable the game to run smoothly without crashing.

What causes high CPU usage on Apex Legends?

  • Corrupted or damaged game files – There is a high chance that corrupted and faulty game files cause Apex Legends’ high CPU usage issue. Infected game files have a history of lowering game performance and raising CPU use on your computer. It may also trigger the Apex game logic error.
  • Outdated Graphics Driver – Out-of-date graphics and other device drivers can also trigger this problem. Therefore, update your GPU drivers if you haven’t done so in a while. By doing this, you’ll be able to eliminate any problems or bugs causing CPU usage to increase.
  • Corrupted Cache associated with the game launcher – The Apex Legends’ high CPU usage could be caused by a corrupted cache linked to the game launcher, such as Origin or Steam. To resolve the problem, try clearing the Origin or Steam cache if the scenario applies.
  • In-game overlays – In-game overlays may also be the root of the current problem. Therefore, turn off in-game overlays.
  • In-game Graphics Settings – The Apex Legends’ high CPU usage may occur if you have high graphics settings enabled. Instead of this, modify the game’s visual settings.

Now that you know some of the possible reasons behind the Apex Legends’ high CPU usage issue, let us proceed to how you can lower it.

How can I fix high CPU usage on Apex Legends?

Before engaging in any advanced troubleshooting or settings tweaks for the Apex Legends high CPU usage error, restart your PC, update your computer drivers, and close unnecessary applications or windows you have opened.

1. Run Apex Legends with Administrative privileges

  1. Press the Windows + E keys to open File Explorer.
  2. Locate the main executable file of Apex Legends. Right-click on the ApexLegends.exe file and select Properties from the context menu.
  3. Next, navigate to the Compatibility tab and check the box with the Run this program as an administrator.
  4. Then, click the Apply and OK buttons to save changes.

Running Apex Legends as an administrator has worked for several players. However, you can check the next fix if it doesn’t work for you.

2. Clear Origin or Steam Cache

2.1. How to clear the Origin cache

  1. Press the Windows + R to open the Run dialog box. Type %ProgramData%/Origin in the text field.
  2. Next, in the opened directory, delete all the folders except for the LocalContent folder.
  3. Then, open the Run command dialog box again. Type %AppData% in the text field, and clear the  Origin folder.
  4. Alternatively, open the Run command dialog again, and type %userprofile% in the box.
  5. Open the AppData folder, navigate to the Local folder, and delete the Origin folder.
  6. Restart your PC.

You can now relaunch Origin and Apex Legends to check if the problem is fixed.

2.2. How to clear the Steam cache

  1. Press the Windows + R keys to open the Run command dialog box. Type %appdata% in the text field.
  2. Locate the Steam folder in the opened location. If you can’t see the folder, you can show hidden files/folders.
  3. Next, delete the Steam folder and close File Explorer.
  4. Finally, restart your PC and launch your game1 to see if the high CPU usage problem is fixed or not.

Some users have reported that clearing the cache from Steam and Origin has helped them with the high CPU usage. You should try it too.

3. Update your Graphics drivers

  1. Press the Windows + R keys to open the Run window. Type the following in the search box devmgmt.msc, and press Enter.
  2. Choose Display adapters by double-clicking from the search results. Right-click on the graphics driver and select Update driver from the context menu.
  3. Now, select Search automatically for drivers.
  4. Restart your computer after the updating process is complete.

You can also get the latest graphics driver from the manufacturer’s website, such as Intel, AMD, or Nvidia, depending on your GPU.

Instead of manually searching and updating the drivers, which can be risky and cause other issues, you can use a secure and automatic method.

There is software that can scan your PC entirely and find outdated drivers, thus updating them with the official versions with one click.

⇒ Get Fortect Driver Updater

The issue should be fixed after updating your graphics drivers. However, if the error persists, you can explore our dedicated guide on how to fix Apex Legends if it’s not using the GPU for further assistance.

Alternatively, you can work through the steps provided in our best ways to limit the CPU usage of a process troubleshooting guide.

And that’s how to lower high CPU usage on Apex Legends. Moreover, make sure your graphics drivers & network drivers are up to date to prevent issues like Apex Legends Anticheat error.

Still, on Apex errors, ensure your time synchronization is in check to prevent issues like the clock code error.

If you have any questions or further information regarding Apex Legends’ high CPU usage issue, please use the comments section below.

4 Ways to Fix Office 365 Error Code 0x80048823

While using Office 365, some users reported that the error code 0x80048823. The error prevents Microsoft Office from working as you’ll be unable to login to the website.

In this article, we’ll take a brief overview of the Office 365 error code 0x80048823, its causes, and provide you with 4 of the best ways to resolve the error. 

What causes office 365 error code 0x80048823?

The following are some of the common causes of the Office 365 error code 0x80048823:

  • Wrong Sign in Credentials – If you’re attempting to sign into Office 365 with the wrong credentials, you’ll be unable to access the service. Errors like the 0x80048823 are likely to occur in such cases.
  • Corrupt System Files – The Windows OS consists of a host of system files and applications that enable the computer to run correctly. Sometimes, these files can get corrupted while using your PC. Forced shutdowns, viruses, etc, can all corrupt such files. If your PC has corrupt system files, it can trigger the error code 0x80048823.
  • Viruses and Malware – A PC infected with virus usually causes lots of errors and bugs. If you’re experiencing the Office 365 error code 0x80048823, your PC might be infected with malware.
How can I fix office 365 error code 0x80048823?

If you’re currently facing the 0x80048823 error code in Office 365, here are a few troubleshooting techniques you can attempt:

1. Delete the Office365ServiceV2 from the Task Manager

  1. Press the Windows key + S, type in Task Manager, and hit Enter.
  2. In the Task Manager window, locate the Microsoft Office365ServiceV2 process. Right-click on the process and select End task.
  3. Close the Task Manager window to check if the error persists.

There are times when the Task Manager may not respond. If you encounter this, do not hesitate to check out our guide.
2. Verify your Microsoft Account

  1. Locate Office from your Desktop, and double-click the icon to launch Office 365.
  2. In Office 365, navigate to Settings, and click on Email and Accounts.
  3. Check to see if your Microsoft account is synchronized properly and if it needs attention.
  4. If you see that it needs attention, click on Account, and re-enter your password.
  5. Check to see if the error persists.

3. Run a Windows Clean Boot

  1. Press the Windows key + R, type in msconfig, and hit Enter to launch the System Configuration Utility.
  2. On the General tab, select the Selective startup option, and then clear the Load startup items checkbox by clicking the checkboxes.
  3. On the Services tab, select the Hide all Microsoft services check box and click the Disable all button.
  4. Click OK, then click Restart to restart your PC with a Clean Boot.

A clean boot restricts certain third-party functionalities in your PC. If the error code 0x80048823 is triggered as a result of such third–party features, performing a clean boot can help eliminate the error. 

4. Run a Windows System Restore

  1. Press the Windows key, type in create a restore point, and hit Enter.
  2. In the popup window, click the System Restore button, and click the Next button.
  3. In the next window, select the specific restore point you wish to revert your system to, and click Next.
  4. Click the Scan for affected programs button to confirm apps that will be removed after the System Restore.
  5. Select the Close button, and click Next.
  6. Click the Finish button to complete the system restore.

System Restore is a very useful feature in Windows that enables users to restore their PCs to an earlier state which was functional and free of errors. 

If you noticed the error after making changes to Windows, you can easily revert to an earlier state of Windows using System Restore.

However, you’ll need to have created a restore point before you can utilize this fix. Here is a detailed guide on how to create a restore point in Windows. 

Resolving the error code 0x80048823 in Office is pretty straightforward and can be achieved by following the steps listed in our guide. 

If you’ve come across this error in the past, and successfully resolved it using alternative solutions, you can let us know in the comments below.

Rust keeps crashing: Causes & How to Fix It

Rust is an online multiplayer game available for Windows and other platforms. While playing the game, users have triggered the Rust keeps crashing error, preventing the game from launching.

If you’re experiencing the Rust keeps crashing error, we’ll brief you on the causes and provide you with steps to help resolve the error.

Why does Rust keep crashing?

Here are some of the common reasons why rust keeps crashing:

  • Outdated Graphics Driver – Rust like most PC games requires a graphics driver to function optimally. If your PC’s graphics card is outdated, it can cause rust to crash when launched.
  • Insufficient RAM – Background applications use a lot of your PC’s internal memory. If your PC possesses an average memory, opening too many applications at once could cause lagging which can trigger the rust keeps crashing error.
  • Low System Specs – When games are released, the developers specify a list of PC requirements needed to run the game without hitches. If your PC doesn’t meet Rust’s minimum system requirement, it can cause the game to crash when launched.
  • Outdated Windows OS – An outdated Windows OS can lead to a series of errors for the PC and applications installed on it. If you’re running an outdated Windows version, it could be the reason why Rust keeps crashing.
  • Corrupted Game Files – In some cases, the error Rust keeps crashing can be triggered when the game’s files are corrupted. Game files can be corrupted due to viruses, forced system shutdowns, etc. If any of Rust’s files are corrupted, it can trigger the error Rust keeps crashing.

What can I do if Rust keeps crashing in Windows?

Before we proceed with more advanced solutions, here are a few quick tips you can attempt:

  • Restart your PC.
  • Close and Relaunch Rust.
  • Check to see if your PC meets the minimum system requirements.

If those steps couldn’t resolve the error, here are more advanced troubleshooting techniques you can attempt:

1. Update Graphic Drivers

  1. Press the Windows key, type in Device Manager, and hit Enter.
  2. In the Device Manager window, locate Display Adapter, right-click on the device, and select Update driver.
  3. Choose Search automatically for drivers and wait for Windows to scan for available drivers.
  4. Restart your PC after the update and relaunch Rust to see if the error persists.

2. Update Windows

  1. Press the Windows key + I to open the Settings app.
  2. Click on Windows Update and select Check for Updates. If there are any available updates, click on Download and Install to initiate the update process.
  3. Restart your PC once the update is complete and check to see if the error persists.

3. Run the Steam as an Administrator

  1. Locate the Steam app icon on your Desktop, right-click on it, and select Properties.
  2. Navigate to the Compatibility tab and check the box next to Run this program as an administrator.
  3. Click Apply and then click OK.
  4. Relaunch Steam and open the Rust app to see if the error persists.

You can run most games without admin privileges but if you’re experiencing the Rust keeps crashing error, you should Run the app as an administrator to see if it’ll resolve the error.

Here is a guide showing you how to make yourself an administrator in Windows.

4. Close Background Programs

  1. Right-click on your Start button and select Task Manager.
  2. Under the CPU and Memory usage tab, check to see which processes are consuming the most resources. Right-click on the Process and select End Task.
  3. Repeat this step until you’ve closed all resource-hogging programs and relaunch Rust to see if the error persists.

Background applications use up a lot of memory and can cause apps to crash if they’re too many opened. Closing background apps ensures that your PC can allocate memory for more important tasks and help speed up your system.

5. Verify the Integrity of Game Files

  1. Locate the Steam app from your Desktop and double-click the app icon to launch it.
  2. In the Steam app, click on Library. Right-click on Rust and select Properties.
  3. Click the Local Files tab and select Verify Integrity of Game Files.
  4. Wait for the scans to be complete and relaunch Rust to see if the error is fixed.

If the game files get corrupted or missing, you’ll have to verify the integrity of the game files to determine if that’s the cause of the error.

6. Change the Power Options

  1. Press the Windows key + R to open the Run box, type in powercfg.cpl, and hit Enter.
  2. In the popup window, select the High-Performance option.
  3. Close the window, and restart your PC to see if the error persists.

The Power Option of most Windows PCs is set to Balanced. It helps conserve the battery but at the expense of reducing the performance. 

While trying to change your power options, you can run into the Power options greyed out error. Be sure to read our guide to resolve the error.

7. Reinstall Rust

  1. Locate the Steam icon on your Desktop and double-click it to launch the app.
  2. Click Library and locate Rust from the list of apps. Right-click and select Uninstall.
  3. Click Delete to complete the uninstallation.
  4. Close the Steam app.
  5. Press the Windows key + E to open File Explorer.
  6. In the File Explorer window, copy and paste this C:\Program Files (x86)\Steam\steamapps\common in the address bar, and hit Enter.
  7. Click on the Rust folder and press the Del key on your keyboard to delete the folder.
  8. Relaunch the Steam client and reinstall Rust.

Reinstalling Rust is one of the best ways to resolve the Rust keeps crashing error. In addition, a reinstall often clears other crash issues and errors that you’ve been experiencing from the game.

However, you should reinstall only when you’ve attempted all the troubleshooting techniques and the error remains unfixed.

There are tons of ways you can get rid of the Rust keeps crashing error on Windows. In this article, we’ve provided you with 8 of the best steps to help resolve the error. If you follow through carefully, you should get Rust up and running in no time.

If you’ve experienced the error in the past and have alternative solutions that helped resolve the error, you can let us know in the comments below.

Latest Dev build lets you disable annoying notifications in the Start menu

Recently, we spoke about the newest Windows 11 Dev Channel build (23419) released through the Windows Insider program.

Back then, we told you that a small change with some Windows Insiders where the Recommended section of the Start menu is changed to For you.

We know that many of you aren’t at all happy about this, so just know that there is a tiny back door you can creep through.

By that, we mean that there is a still hidden feature in the update, which will give you the possibility to turn them off.

Is Microsoft letting us disable notifications in the Start menu?

As we’ve said, the latest cumulative update preview for Windows 11 has introduced a change that sparked a lot of controversies, in the form of Microsoft Account notifications in the Start menu.

Many of the involved users agree that those notifications are nothing but native ads that bait customers to click by creating a false sense of urgency.

A lot of people are asking themselves if backing up the Documents folder really that important to place a banner in the Start menu.

After probably listening to some customer feedback, Microsoft may actually let you do just that. By just that, we mean disabling these notifications, just so we’re clear.

Windows 11 build 23419, currently available for Windows insiders in the Dev Channel, contains a hidden feature for turning on or off account-related notifications in the Start menu.

If know what you are doing, know that a little bit of digging it up allows disabling the ads by heading to the appropriate section in the Settings app.

Keep in mind that Microsoft has not announced the option, so whether it will ship it to all customers in the Stable Channel remains an open question.

As a side note, this hidden feature is only available for Dev Channel users. Not even Canary Channel Insiders have this ability.

Thus, if you are using Dev builds and want to remove Microsoft Account notifications from the Start menu, you will need the help of ViveTool for this one.

That being said, know that enabling hidden experimental changes could lead to instabilities and bugs. We highly recommend that you back up important data before using the ViveTool app.

What is your opinion on the new Microsoft Account notifications in the Start menu? Share your thoughts and opinions with us in the comments section below.

How to Remove Write Protection from Pen Drive

You may encounter a prompt that says this disk is write-protected when you attempt to modify the contents of a pen drive. This can be frustrating as you are prohibited from writing, deleting, or changing any data on the pen drive.

You may initially think that the pen drive is no longer usable, but surprisingly, it is possible to remove the write protection from your pen drive. Let’s find out how.

Why is my pen drive write-protected?

Generally, Pen drives or USBs are write-protected to prevent someone from copying or modifying the files. However, there can be other reasons as well that you should take into account:

  • Individual files have read-only attributes – A pen drive may become write-protected if a file is marked as read-only and cannot be deleted.
  • BitLocker is enabled – If BitLocker is turned on, you won’t be able to make changes to files and locked pen drives.
  • No storage space – Insufficient disk space on the USB or pen drive can also cause a write-protected error.
  • Write protection switch is enabled – The physical write protection switch on the pen drive has been enabled accidentally.
  • Virus or malware infection – A virus infection or malware attack on the pen drive can also make it write-protected.

So, if you’re struggling to access a write-protected pen drive, you should know that there are several methods to remove write protection from your pen drive or USB. This guide lists the most effective ones and explains the step-by-step procedure.

How do I remove write protection from the pen drive?

Before employing the software-related workaround listed below, make sure to perform the following:

  • Look for the physical write protection lock and move it to the off position in case your pen drive has one.
  • Scan your pen drive for viruses and malware infections using Windows Defender or any third-party antivirus.

If these simple actions could not remove the write protection from your pen drive, move on to the workarounds listed below.

1. Change pen drive properties

  1. Insert the pen drive into a USB port on your computer and use the Windows + E shortcut to launch File Explorer.
  2. Choose This PC from the left navigation pane and locate your pen drive in the list of available drives.
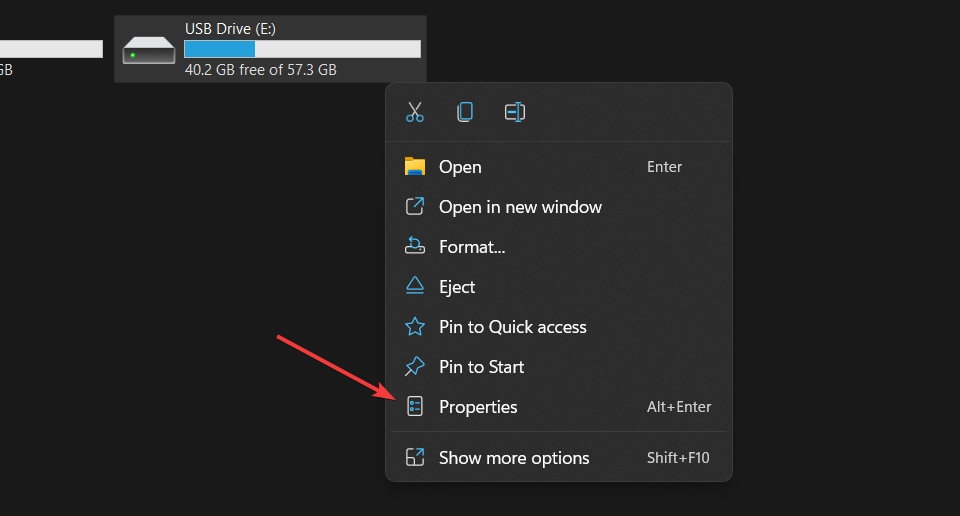
  3. Right-click your pen drive and select Properties from the context menu.Remove write protection from pen drive
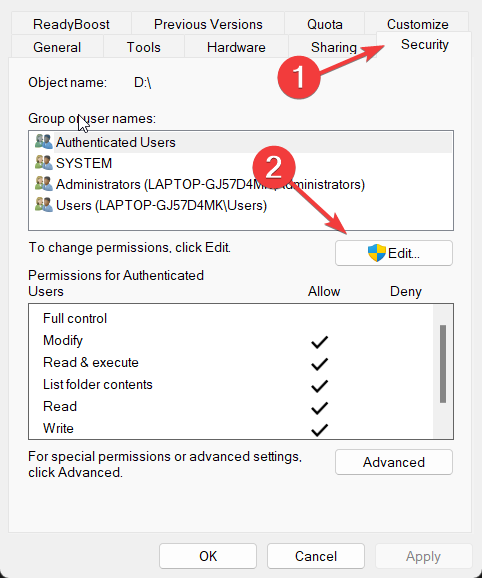
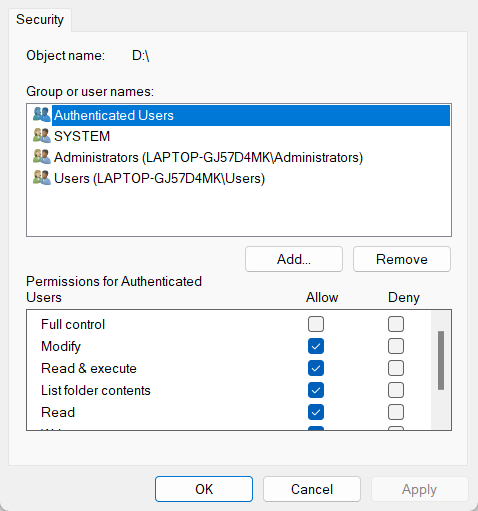
  4. Switch to the Security tab of the Properties dialog box and press the Edit button to modify the permissions for the pen drive.Remove write protection from pen drive
  5. In the permission window, Allow or Deny the permission to perform a write operation for each group and user name.Remove write protection from pen drive
  6. Click Apply to save the changes and OK to close the Properties window.

Once you’ve changed the read-write properties of the pen drive, it will no longer be write-protected, and you should be able to save, delete, and modify files on the pen drive as needed.

2. Remove read-only attributes using Command Prompt

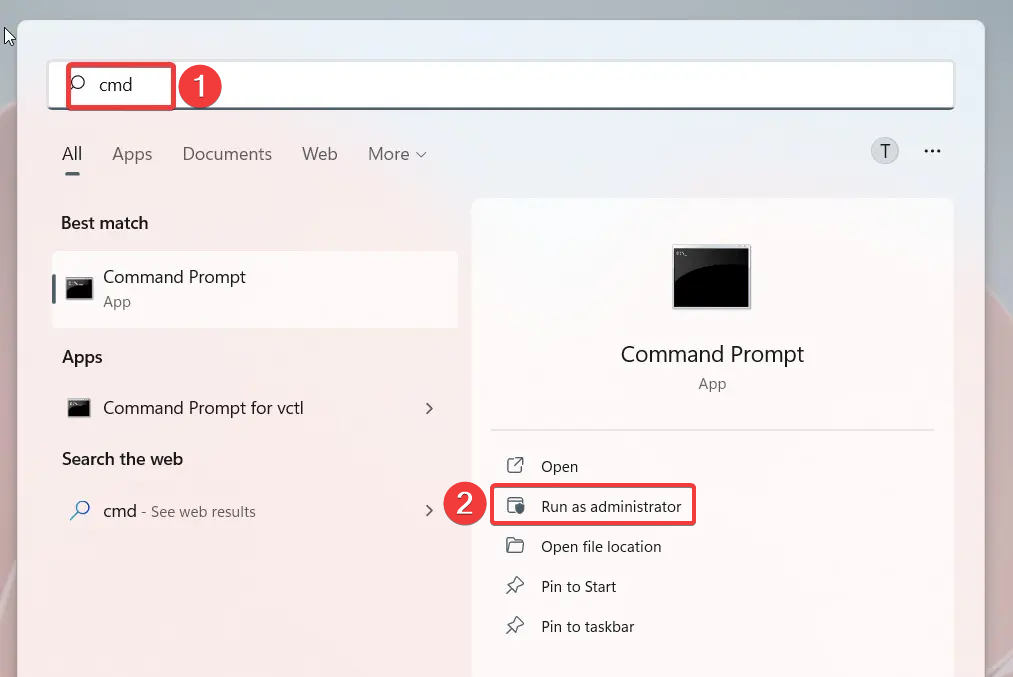
  1. Press the Windows key to launch the Start menu, type cmd in the search bar on top, and select Run as Adminstrator from the result section.Remove write protection from pen drive
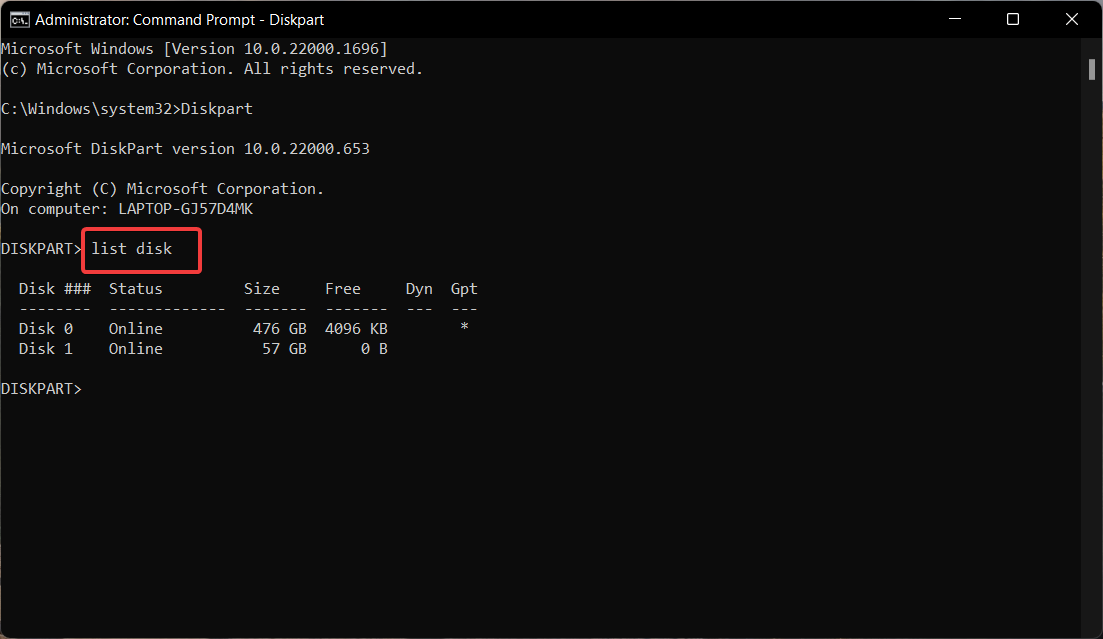
  2. Type or paste the following command and press the Enter key to execute it. Diskpart
  3. Next type the following command to view all the disks connected to the computer and note down the number representing your pen drive. list diskRemove write protection from pen drive
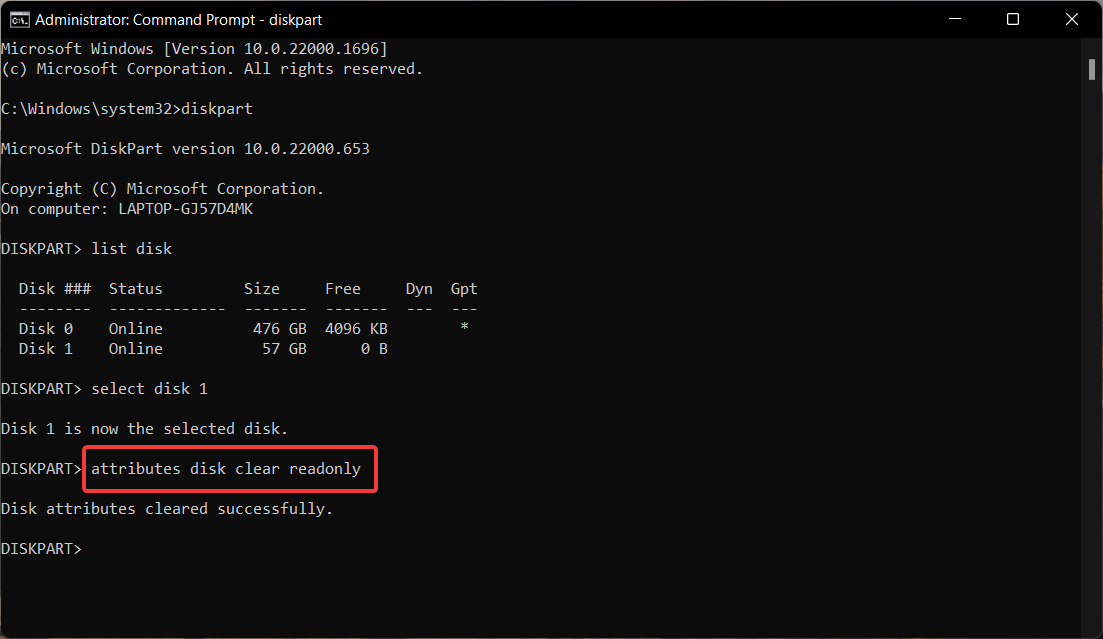
  4. Execute the following command and replace # with the number you copied previously. select disk #
  5. Now type the following command to disable the write protection on your pen drive. attributes disk clear readonlyRemove write protection from pen drive

When the disk attributes are cleared successfully, exit the command prompt window. The attribute command in Windows Command Prompt can remove read-only attributes from files or directories.

3. Modify the registry to disable write protection

Note icon NOTE
Modifying the Windows registry can be risky, so before proceeding, you should ensure you have a backup of your registry and understand the potential risks involved.
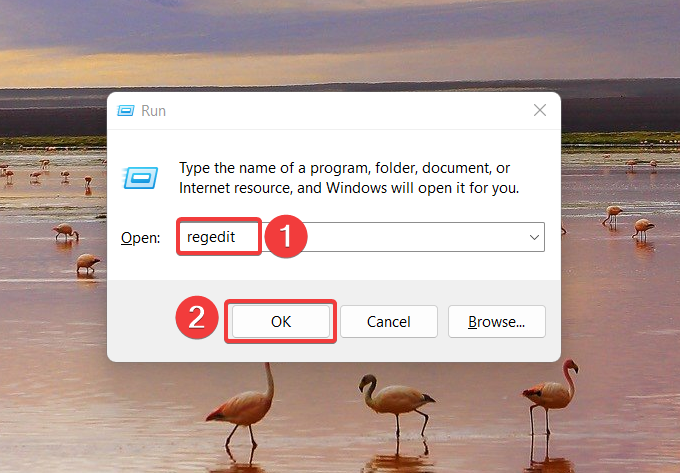
  1. Launch the Run command window using the Windows + R shortcut key, type the following command in the text box, and press the Enter key. regeditRemove write protection from pen drive
  2. Type the following path in the address path of the registry path: HKEY_LOCAL_MACHINE\SYSTEM\CurrentControlSet\Control\StorageDevicePolicies
  3. Look for the WriteProtect value, right-click it, and choose Modify from the context menu.Remove write protection from pen drive
  4. Assign 0 as the data value instead of 1 and press OK.Remove write protection from pen drive

Now reconnect your pen drive, and you will see that the write protection is eliminated.

If you don’t see the StorageDevicePolicies folder in Registry, you can create one and then follow the steps above.

4. Disable BitLocker using Windows PowerShell

  1. Press the Windows key to launch the Start menu, type powershell in the search bar on top, and choose Run as Administrator.Remove write protection from pen drive
  2. Type or copy-paste the following command and press Enter key to execute it. Make sure to replace E with the letter representing your write-protected pen drive. Disable-BitLocker -MountPoint "E:” How to remove write protection from pen drive
  3. Exit the command prompt after the BitLocker is successfully disabled on your system.

The decryption process can take several moments, depending on the contents of the pen drive. Once the process is complete, your pen drive will no longer be write-protected.

So that’s how easy it is to remove write protection from a pen drive and perform the write operation as required.

We also recommend reading another guide to repair a Kingston Flash Drive if it has become corrupt.

Let us know in the comments if any of these methods were successful in removing the write-protected limitation from your pen drive.

How to Clean a Mouse Scroll Wheel [Easiest Methods]

A computer mouse tends to get dirty very quickly, and the buildup of debris can cause it to become less responsive or even stop working. Whether you use your mouse for work or for gaming purposes, a clean scroll wheel is essential for a seamless experience.

Why should I clean the mouse scroll wheel?

There are not one but many reasons why you should consider cleaning your mouse scroll wheel regularly. Some of the obvious ones are: 

  • Cleaning your mouse screen wheel preserves the life of your computer mouse and keeps it working properly. 
  • Food particles and dead skin cells clogged in the scroll wheel can damage the internal mechanisms of the mouse. 
  • A dirty mouse scroll wheel makes it difficult to scroll the web pages and affects your productivity. 

Now that you know why keeping a mouse scroll wheel clean is necessary, let’s proceed to the different methods to clean the mouse scroll wheel without investing much time and effort.

How do I clean a mouse scroll wheel? 

1. Things you need 

  1. Compressed air can – To blow away the dust or debris stuck on and around the scroll wheel
  2. Q-tip/Cotton swab – To clean the scroll wheel with disinfectant. 
  3. Jeweler’s screwdriver – To loosen the small screws that hold the mouse panels together 
  4. Isopropyl alcohol – To disinfect the scroll wheel and clean the oil buildup.
  5. Microfibre cloth – To wipe and dry the scroll wheel and internal circuit of the mouse

2. Cleaning Process 

  1. Unplug the mouse and remove the batteries if it is a battery-powered wireless mouse.How to clean mouse scroll wheel
  2. Turn over the mouse such that its bottom faces upwards. Identify the screws that hold the panels together and use a jeweler’s screwdriver to loosen and remove them, keeping them in a safe place. Some models have a central screw instead of several screws. 
  3. Gently lift the top panel upward to remove it and reveal the scroll wheel and internal circuit. Remove the wheel and both attached springs by pulling the plastic assembly upward.How to clean mouse scroll wheel
  4. Hold the can of compressed air about four inches above the wheel and the internal circuit. Now blow short bursts of air on each side of the wheel to remove all trapped dust and debris particles. Repeat the process until the mouse looks completely clean.
  5. Dip the Q-tip or cotton swab in isopropyl alcohol and gently wipe the tip around the wheel’s circumference to clean away any oily buildup and dirt. 
  6. Use the microfibre cloth to dry the scroll wheel and internal circuit, and maintain extreme caution. 
  7. Once the internals of the mouse is completely dry, place the wheel back and reposition the assembly in the center. A small click sound will ensure that the wheel is well seated in its correct position. 
  8. Now fit the top panel back in place, flip over the mouse to replace the screws, and tighten them using the screwdriver.how to clean mouse scroll wheel 
  9. Test your mouse to make sure it works flawlessly.

How do I clean the mouse scroll wheel without taking it apart?

1. Things you need

  1. Q-tips – To clean the scroll wheel. 
  2. Microfiber cloth – To dust and dry the mouse wheel without leaving any lint behind. 
  3. Toothpick – To reach hard-to-reach areas where Q-tip won’t reach.
  4. Isopropyl alcohol or contact electronic cleaner – To sanitize and disinfect the mouse from viruses and bacteria.

2. Cleaning Process 

  1. Ensure your mouse is disconnected from your PC. If you have a wireless mouse, power it off and take out any batteries to avoid causing damage.
  2. Put your mouse under a bright light source and turn it over. 
  3. Slowly roll the scroll wheel with your hands and run a toothpick around to loosen the stubborn dust and grime stuck in the scroll wheel and surrounding areas.How to clean mouse scroll wheel
  4. If your scroll wheel feels sticky or not functioning properly, take a Q-tip dipped in isopropyl alcohol or electronic contact cleaner and carefully disinfect the scroll wheel and the ridges around it. Apply minimum pressure to avoid damaging the scroll wheel mechanism. 
  5. Use a microfibre cloth to dry alcohol or contact cleaner completely before using the mouse again.How to clean mouse scroll wheel
  6. Once the cleaning is done, reconnect the mouse to your computer and turn it back on.

It’s easy to wipe clean the scroll wheel of your mouse without taking it apart, unlike most people think. But it would be best if you exercise caution when doing so.  

That’s it! You can thoroughly clean the mouse scroll wheel by applying minimal effort. You may want to check out our guide that explains what you should do if the right click is not working on your mouse. 

If you have any queries or suggestions, feel free to contact us in the comments section below, and we’ll be in touch as soon as possible.

The new Bing Ai-Chat will soon feature ads in its answers

We’re pretty sure you’ve heard about this Chat GPT 4 versus BARD AI battle. People are now torn between which of these software solutions has the better answers.

This subject has sparked massive controversy in the IT world, with users’ opinions pouring on social media platforms and dedicated forums.

The new AI-powered software chatbot has undergone several changes since it was recently launched and it will become more restrictive when competitors use it.

It has also become more accessible and you can use it directly from the Windows 11 taskbar. And, pretty soon, it will also feature annoying ads.

Prepare for a ads to be incorporated in your answers

There have been several reports of ad links being spotted in Microsoft’s Bing Chat service in the past few weeks, but today the Redmond company has made it official.

Microsoft has just posted a new Bing blog entry that describes the plans it has for monetizing the chatbot with ads.

The above-mentioned blog post stated that Microsoft’s goal with Bing Chat is to drive more traffic to publishers in this new world of search.

In fact, Yusuf Mehdi, the company’s Corporate Vice President & Consumer Chief Marketing Officer, stated that early progress is more than encouraging.

Based on data gathered from the preview, the company vouched for driving more traffic from all types of Bing AI ChatGPT users.

Redmond claims it has brought more people to Bing/Edge for new scenarios like chat and we are seeing increased usage.

There is also talk of uniquely implemented ways to drive traffic to publishers including citations within the body of the chat answers that are linked to sources as well as citations below the chat results to learn more with links to additional sources.

Furthermore, officials also state that the company has met with some of the businesses that are partners in the Microsoft Start news feed service.

These partners provided feedback to Microsoft on how they could use Bing Chat to link to their content and services. Microsoft added a couple of early ideas.

  • An expanded hover experience where hovering over a link from a publisher will display more links from that publisher giving the user more ways to engage and driving more traffic to the publisher’s website.
  • For Microsoft Start partners, placing a rich caption of Microsoft Start licensed content beside the chat answer helping to drive more user engagement with the content on Microsoft Start where we share the ad revenue with the partner. We’re also exploring placing ads in the chat experience to share the ad revenue with partners whose content contributed to the chat response.

Keep in mind that, since Microsoft still considers these ad plans to be early ideas, it’s more than likely that formatting and the overall ad experience will change in the coming months for Bing Chat.

What is your take on this entire situation? Be sure to share your thoughts and opinions with us in the comments section below.

How to enable Desktop Stickers in Windows 11 22H2

Desktop stickers are a fun and creative way to personalize your Windows 11 desktop and add a touch of personality to your workspace. In this guide, we will walk you through the step-by-step process of enabling desktop stickers in Windows 11 22H2 and give you some tips and tricks to make the most of this exciting feature.

At this time of this writing, Microsoft has yet to announce Desktop Stickers in Windows 11 22H2, so this guide may change, but you need to be running at least Windows 11 build 22621 (version 22H2 or newer) on your PC.

To check your Windows version, press the Windows key + R shortcut to bring up Run, type winver and press Enter to see what version of Windows 11 you have. DESKTOP STICKERS IN WINDOWS 11

Once you verify that you have the correct Windows 11 version, you can continue to the next step to enable desktop stickers in Windows 11 22H2.

Enabling Desktop Stickers in Windows 11 22H2

desktop stickers in windows 11 22H2

Desktop Stickers are not enabled by default in Windows 11 22H2. To enable Desktop Stickers, follow these steps:

  1. Use the Windows key + R keyboard shortcut to bring up Run, type regedit and press Enter. After you approve the User Account Control prompt, the Registry Editor will open.
  2. Navigate to the following location:
    HKEY_LOCAL_MACHINE\SOFTWARE\Microsoft\PolicyManager\current\device
  3. Right-click the device key and create a new key called Stickers.
  4. In the Stickers key you just created, create a new DWORD (32-bit value) and rename the new value to EnableStickers and change its value data to 1 and click OK to save the changes.
  5. Restart your computer for the new registry edit that you just made to be enabled.

Once you may the registry edits and restart your computer, you are now ready to use desktop stickers in Windows 11 22H2.

How to add, edit, or delete Desktop Stickers

Please note that the button to add or edit stickers will not work if you use the slideshows option to change the background of your desktop. Switch to using a single picture of Windows spotlight to enable desktop stickers in Windows 11 22H2. Once the feature is enabled, follow these steps to add, edit, or delete stickers on your desktop.

  1. Right-click anywhere on your screen and select Add or edit stickers. DESKTOP STICKERS IN WINDOWS 11
  2. Another way you can access desktop stickers in Windows 11 22H2 is using the Settings app and navigating to Personalization > Background and click Add Stickers. DESKTOP STICKERS IN WINDOWS 11
  3. Once you click Add or edit stickers or Add stickers the sticker menu will appear at the top of your screen giving you the option of browsing through the stickers or usinga keyword to find the stickers you want to use. DESKTOP STICKERS IN WINDOWS 11
  4. Once you find the sticker that you want to use, click or tap on it to add the sticker to your desktop. Once added, you can click to resize it or reposition where you want to see it on your desktop. If you want to delete the sticker, you can always use the trash icon below the sticker when you want to delete it. DESKTOP STICKERS IN WINDOWS 11
  5. You can add as many stickers as you want, just click the sticker menu at the top when you want to add more. If you want to exit the menu, just click the X button that appears to the right on the Desktop Stickers menu.

How to disable Desktop Stickers in Windows 11

If you want to disable Desktop Stickers in Windows 11 22H2, you will need to go back to the Registry Editor and make a few edits, just follow these steps:

  1. Use the Windows key + R keyboard shortcut to bring up Run, type regedit and press Enter. After you approve the User Account Control prompt, the Registry Editor will open.
  2. Navigate to the following location:
    HKEY_LOCAL_MACHINE\SOFTWARE\Microsoft\PolicyManager\current\device\Stickers
  3. In the Stickers, change the value of EnableStickers from1to 0 and click OK to save the changes.
  4. Restart your computer for the changes to take effect.

You can also delete the Stickers key altogether, but you will have to repeat the steps in the beginning of this guide to re-enable Desktop Stickers in Windows 11 22H2.

Keep in mind that disabling Desktop Stickers in Windows 11 22H2 does not remove the existing stickers. You will need to remove the stickers BEFORE disabling this feature, or otherwise change the desktop background to something different to avoid displaying a background that already contains Desktop Stickers.

We hope that this guide has been helpful in enabling desktop stickers in Windows 11 22H2 and giving you some ideas for how to make the most of this fun and creative feature. By following the steps outlined in this guide and using our tips and tricks, you can add a touch of personality and style to your desktop and make your workday more enjoyable. Thank you for reading, and happy desktop-stickering!

Google claims Microsoft still anti-competitive in European Cloud

Google isn’t happy with the recent changes Microsoft made for European cloud vendors. A recent Reuters report takes a look at Google’s stance and includes comments from Google Cloud President, Amit Zavery.

The news comes just days after a Reuters report that Microsoft had offered to change some of its cloud practices for several small European Vendors.  Google believes Microsoft is cherry-picking vendors for its deals in an effort to maintain market dominance, not make genuine changes.  In an interview, late Wednesday Zavery further explained Google’s stance.

Microsoft definitely has a very anti-competitive posture in cloud. They are leveraging a lot of their dominance in the on-premise business as well as Office 365 and Windows to tie Azure and the rest of cloud services and make it hard for customers to have a choice.

When speaking with Reuters Microsoft give reference to a blog post in May of 2022, and a spokesperson shared a statement.

We are committed to the European Cloud Community and their success.

Microsoft introduced changes in October 2022, in response to feedback from European cloud providers.  Zavery still believes Microsoft is offering targeted deals or even buying out smaller vendors and not making deals available to everyone.

Whatever they’re offering, there should be terms across for everybody, not just for one or two they’ve chosen and pick, and that shows you that they have so much market power they can kind of go and do those things individually.

The European Commission has declined to comment.  Microsoft still faces another EU antitrust complaint for CISPE, whose members include Amazon. The trade group has rejected Microsoft’s changes.

Via Windows Central

0x8007054f: How to Fix This Windows Update Error Code

Updating the Windows operating system helps it fix bugs affecting the current version and install new features to improve performance. However, our readers report a Windows update error 0x8007054F preventing them from doing that.

Alternatively, we have a detailed article about Windows 10/11 not installing and effective ways to fix it.

What causes the update error code 0×8007054f?

Many factors can cause the error message Something went wrong. You can contact Microsoft support for help with this error. Here is the error code: 0x8007054F on your PC. Some are:

  • Network-related issues – The error may occur due to network connection issues causing the Windows Update services not to connect to the server.
  • Corrupt system files – When the system files are corrupt, it makes them inaccessible or damaged. Hence, it can prevent the Windows update process from accessing them when needed, resulting in the 0x8007054F error.
  • Third-party app interference – The Windows update process on your PC may be impeded by installing third-party apps like antivirus software. They are liable to interfere with the connection between your PC and the Windows update service, resulting in error 0x8007054F.
  • Issues with Windows Update components – If the services are not running or intact, it can cause the Windows Update error because it won’t have any support on your PC.

Fortunately, we have come up with some effective and easy fixes you can use for resolving the 0x8007054f error.

How can I fix the Windows update error code 0×8007054f?

Before attempting any advanced troubleshooting steps, go through the following:

If you can’t resolve the error, go ahead with the solutions below:

1. Run Windows Update troubleshooter

  1. Press Windows + I key to open the Settings app.
  2. Select System, Troubleshoot, then click on the Other troubleshooters.
  3. Navigate to Most frequent and select the Run button beside Windows Update.
  4. Follow the on-screen instructions to complete, then restart your PC to check if the error is resolved.

Running the Windows Update troubleshooter will find and resolve issues impeding the updates process on your computer. Read our guide on other ways to run the Windows Update troubleshooter on Windows 11.

2. Reset the Windows Update components

  1. Left-click the Start button, type Command Prompt, and click the Run as administrator option.
  2. Click Yes on the User Account Control prompt.
  3. Copy and paste the following commands and press Enter after each one: net stop wuauserv   net stop cryptSvc   net stop bits    net stop msiserver
  4. Copy and paste the following command one after the other: ren C:\Windows\SoftwareDistribution SoftwareDistribution.old   ren C:\Windows\System32\catroot2 Catroot2.old
  5. Type the following commands and press Enter after each one: net start wuauserv   net start cryptSvc   net start bits    net start msiserver
  6. Exit the Command Prompt and restart your PC.

The above steps will reset the components involved in the updating process and fix the problems causing the 0x8007054f update error.

If you encounter issues running the Command Prompt as an administrator on Windows 11, read our guide for quick fixes.

3. Run an SFC scan

  1. Left-click the Start button, type Command Prompt, and click the Run as administrator option.
  2. Click Yes on the User Account Control prompt.
  3. Type the following and press Enter: sfc /scannow
  4. Restart your PC and check if the Windows update 0x8007054f error persists.

An SFC scan will find and repair corrupt system files preventing the computer from installing the Windows update. Do not hesitate to check our guide on how to repair corrupt system files on your PC.

As a time-saving option, you can try dependable software that will help you find all corrupt files after a thorough scan and replace them with fresh parts from its repository.

4. Clear Windows Update cache via File Explorer

  1. Press Windows + E to open File Explorer.
  2. Navigate to Local Disk (C), right-click on it, and click on Properties from the drop-down.
  3. Select Disk Clean-up, then click the Cleanup system files button.
  4. Check the boxes for Windows upgrade log files and Temporary Windows Installation files, then click OK.

Deleting the Windows update cache files will clear the corrupt files affecting the update process and allow the system to write new files.

Read our article on what to do if File Explorer keeps crashing your PC.

Further, you may be interested in our article about fixing slow Windows updates on PCs. Also, we have a detailed guide on Windows Update error 0x8007045b and some fixes.

If you have further questions or suggestions concerning this guide, kindly drop them in the comments section.

Surface Hub 2S to become a Teams Rooms device with upgrade later this year

Microsoft announced that a second-generation Surface Hub 2S is making its way to Microsoft Teams Rooms later this year with a new version of Windows called Teams Rooms on Windows.

“When all new Surface Hubs ship with the Teams Rooms experience starting later this year, Surface Hub 2S will become the first touch-enabled board running Teams Rooms on Windows,” says Microsoft. The second-generation devices will ship with a similar design as before, that is, the 50-inch and 85-inch.

Teams Rooms on Windows ships with a host of new capabilities that are designed to enhance the meeting experience for both users and admins such as Front Row, persistent chat, consistent remote management capabilities, and more. Windows Central’s Zac Bowden also indicated that the new experience features a new user interface that’s quite similar to the one on Teams Rooms for Android devices.

thumbnail image 1 of blog post titled Surface Hub 2S: Now a Microsoft Teams Rooms on Windows device

Microsoft has indicated that it will continue supporting the existing Surface Hub 2S till it hits its end-of-support date which is slated for October 14, 2025. It’s worth noting that the Surface Hub 2S currently runs on Windows 10, which is also set to reach its end of support on the same date.

The company has further indicated that it will be rolling out the new Teams Rooms on Windows update to second-generation devices, existing Surface Hub 2S devices running on Windows 10 will be able to access the update at a later date.

Microsoft hasn’t given a precise date indicating when it intends to make this launch, neither has it given a price tag for these devices.

Registry Preview is coming to PowerToys

Microsoft is set to introduce a fresh addition to its open-source PowerToys suite, the Registry Preview tool. This forthcoming feature is specifically designed for advanced users and will enable them to preview the impact of importing a .reg file into the registry, along with registry editing options. The disclosure of integrating this tool into PowerToys was recently publicized on the project’s GitHub repository.

Registry Preview is set to introduce its own in-built registry editing tool, which will eliminate the need for adjustments through .reg files using external software like Notepad. Moreover, the team is working towards implementing a context menu entry for effortless access to Registry Preview and its manifold range of features. However, it is worth noting that the current stage of development is uncertain, and the release schedule will depend on a multitude of factors, such as finalizing a well-rounded set of functionalities and options.

Registry Preview is a tool that helps Windows administrators preview Registry files before importing them into the Registry. Rather than opening the file in a text editor, administrators can use this app to view the contents of the file, including the keys and values that it contains. This makes it easier to audit and edit large Registry files with many lines of code. The tool acts as an intermediary between the Registry file and the user, making it more accessible and user-friendly.

Moreover, the Registry Preview tool is furnished with several supplementary options. For instance, it can write content directly to the Windows Registry or open the Registry Editor. The latter is especially useful for verifying existing settings or creating a backup of the Registry before importing any data. Additionally, changes can be saved to Registry files, which maximizes its efficiency and productivity.

The latest iteration of PowerToys is equipped with a novel feature that allows users to modify their Registry files through its interface, thereby enhancing their experience. You can access this functionality by simply clicking on the “edit file” button, which automatically displays any changes made as previews directly in the interface.

Via Beta News

Play Age of Empires II: Definitive Edition and 3 more games with Xbox Free Play Days

Four games are available to play at no additional cost this week with Xbox Free Play Days, which is a perk of having an Xbox Live Gold or Xbox Game Pass Ultimate subscription. It’s a stacked lineup of exciting titles playable from now through Sunday, April 2, so let’s have a look at this week’s Xbox Free Play Days slate.

Age of Empires II: Definitive Edition (10% off at $16.99)

For years, we’ve battled armies and conquered history. Now it’s time for the next evolution. Age of Empires II: Definitive Edition is now available across Xbox platforms. Enjoy a new way to play this much-loved game on console including optimizations for playing with a controller and new tutorials to get you into the fun quickly. Or if you prefer playing with a keyboard and mouse you can easily plug into your console or play on PC.

Enjoy 200+ hours of historical campaign gameplay, 1,000 years of human history and 35 civilizations now from the comfort of your living room.

Embr (70% off at $5.99)

Team up with friends to become the most über firefighters money can buy. Rush into burning buildings filled with dangerous hazards, valuables, and top-of-the-line security systems. Fight fires, save lives, salvage goods, and make life-changing money. Buy high tech tools with advanced upgrades, and fresh outfits that unlock new ways to play.

There’s plenty of fire to go around! Play by yourself or join a response crew of up to 4 players online, with dynamic difficulty that adapts to the size of your team.

Play through 25 unique levels across 3 districts filled with traps, hazards, and escalating danger.

There’s more than one way to be a hero. Break down doors, smash windows, fix electrical circuits, clear gas leaks, evade security systems, and do whatever you can to get the job done and get paid.

Indivisible (75% off at $9.99)

Indivisible is an action RPG / platformer featuring stunning hand drawn art and animation combined with unique real-time combat mechanics. Immerse yourself in a fantastical world with dozens of playable characters, a rich storytelling experience, gameplay that’s easy to learn but difficult to master, and the trademark razor-sharp quality that Lab Zero Games is known for!

Our story revolves around Ajna, a fearless girl with a rebellious streak. Raised by her father on the outskirts of their rural town, her life is thrown into chaos when her home is attacked, and a mysterious power awakens within her.

The game’s huge fantasy world, characters and aesthetic design are inspired by various cultures and mythologies. Throughout Ajna’s quest she’ll encounter many “Incarnations”: people whom she can absorb and manifest to fight alongside her. There are many Incarnations to recruit, each with their own story and personality. By uniting people from faraway lands, Ajna will learn about herself, the world she inhabits, and most importantly, how to save it.

Journey to the Savage Planet: Employee of the Month Edition (20% off at $23.99)

The definitive edition of the hilarious first-person adventure game Journey to the Savage Planet! Fully optimized for new hardware, running at a snappy 60 frames per second, includes all patches, all that juicy DLC, and a few new cinematics for your viewing pleasure.

You have been sent to a distant alien world by your semi-competent employer, Kindred Aerospace, with the aim of finding a new home for humanity! But the world that awaits you is filled with challenges, humor, and surprise, and sadly, Kindred forgot to equip you with any of the gear you will need, meaning you have to go find it and craft it yourself.

Play alone or in two-player co-op as you explore a beautiful and surprising alien world to solve the mystery that lurks at its heart before deciding whether or not to return to Earth! Four unique biomes, each with their own flora and fauna to explore. Dozens of wacky creatures to find, catalog, and photograph. A plethora of tools, weapons, and throwables let you tackle the challenges the way you want! Jet Boots! A Grapple! Acid grenades! And more! You’ll laugh, you’ll cheer, you’ll uncover secrets, and you can do it all with your best friend!

Wrap up

It’s a pretty sweet lineup for Xbox Free Play Days this week with four awesome game to try out. Keep in mind that featured games are typically discounted, so if there’s something you want to hang on to here this would be the time to act.

What do you think of this week’s Xbox Free Play Days games? Let us know down in the comments. And if you would like to learn more, head on over to the Xbox Free Play Days FAQ page.

Featured image via IGN. 

How to Download and Install Microsoft Office for Free (Step-by-Step Guide)

You can now download and install Microsoft Office for free on your Windows PC, and in today’s guide, we’ll tell you all you need to know about it. Microsoft rolled out a free ad-supported version. Find all the setup steps you need to get started as soon as possible.

Step-by-Step Methods to Install the Free Microsoft Office

1. Download the Setup File from Microsoft’s Official Website

If you’re in a supported region, the simplest way to access the Microsoft 365 free version for Windows 11 is by downloading Office directly from the official website.

Follow these steps:

  1. Go to the official Microsoft Office site.
  2. Look for a version that mentions “Free with ads”, “Basic Office for Windows 11”, or “Office for Windows”.
  3. Click the download button for the setup file.
  4. Run the installer and wait for it to complete.
  5. Launch any Office app (Word, Excel, or PowerPoint).
  6. On the sign-in screen, click “Skip for now.”
  7. On the welcome screen, click “Continue for free.”
  8. Confirm that your files will be saved to OneDrive only.

📌 This version is not available worldwide. If you don’t see this option, your region may not be eligible.

If you’re looking for more general instructions, here’s a helpful guide on how to download Microsoft Office with various installation routes, including the official suite and third-party sources.

2. Install Office from the Microsoft Store (If Available)

You can also find a lightweight Microsoft 365 free version through the Microsoft Store, which includes access to apps like Word and Excel with limited features and integrated ads.

Here’s how:

  1. Open the Microsoft Store from your Start menu or taskbar.
  2. Type “Microsoft Office” in the search bar.
  3. Locate the listing that offers Word, Excel, and PowerPoint for free with ads.
  4. Click Install and wait for the apps to download.
  5. Open any installed app.
  6. Click “Continue for free” on the welcome screen.
  7. Agree to save files via OneDrive only.

⚠️ If this listing isn’t visible, the free version may not be available in your location.

Previously, Microsoft allowed users to install Office apps on Windows for free, but those promotions were time-limited and region-based, similar to the version discussed here.

3. Confirm Eligibility and Activate the Free Version

Even if Office apps appear on your device, you’ll need to activate the free Microsoft Office version to use them without a subscription.

Steps to activate:

  1. Open Word, Excel, or PowerPoint from your Start menu.
  2. When prompted to sign in to OneDrive, choose “Skip for now.”
  3. On the next screen, click “Continue for free.”
  4. Confirm OneDrive-only file saving.

📝 If the “Continue for free” option doesn’t appear, your system may not be part of Microsoft’s test rollout for this version.

If you run into installation problems, like the common error message “We had a problem installing your Office program”, this fix-it guide provides troubleshooting steps to get you back on track.

Other Free Ways to Access Microsoft Office

If the ad-supported version isn’t available, try these official options:

  • Free Trial: Get full access to Microsoft 365 for 1 month via the Microsoft 365 Free Trial. It includes desktop apps like Word, Excel, and PowerPoint. Just cancel before the trial ends to avoid charges.
  • Student or Teacher Access: If you have a school email, you may qualify for Microsoft Office for Education, which provides Microsoft Word, Excel, and more for free.
  • Web Version: Visit Office.com to use Microsoft 365 free in your browser. It’s limited compared to the desktop version but works well for basic editing.

Important Notes About This Version

  • The free Office version is ad-supported and displays banners or short videos.
  • It only saves documents to OneDrive. Local storage is not supported.
  • Many standard features are removed (like SmartArt, macros, pivot tables, and more).

While it may not replace a full subscription, the free offering is a great option if you simply need a Microsoft Word free download or a Microsoft Excel free download for basic editing tasks without paying for Microsoft 365.

You can find a complete list of Microsoft Office programs to better understand what’s included and what’s missing in this pared-down release.

Also, some users upgrading to newer versions like Office 2024 may encounter licensing conflicts. Microsoft has detailed a workaround if you’re ever switching between versions.

Summary

To install the free version of Microsoft Office on Windows 11, start by downloading it from Microsoft’s official website if you’re in a supported test region. If that doesn’t work, try the Microsoft Store. Lastly, check if it’s already on your device and activate it using the “Continue for free” flow.

This lightweight version is best for basic editing and cloud-only workflows. It’s ideal for casual users who don’t need advanced features or offline storage but still want access to Word and Excel at no cost.

FAQs

Is the free version of Microsoft Office available worldwide?

No, it’s only available in select regions as part of a limited test rollout.

Can I save files locally with the free version?

No, documents are saved to OneDrive only. Local saving is not supported.

Does the free version include all Office apps?

It includes Word, Excel, and PowerPoint with limited features

Patent for Turtle Beach Xbox controller with touchscreen surfaces online

It appears that third party gaming accessory maker Turtle Beach has patented a new Xbox controller that will feature a touch screen. As reported by Game Rant, a patent image that have surfaced online show a schematic for what the image dubs as a “Stealth Controller,” with a touchscreen interface at the top of the controller above the Xbox button.

As seen in the image, this touchscreen displays tabs for audio, loadouts, performance, social and a home screen. A notifications bell, battery status bar, and profile data can also be seen. Going off this schematic, the touch display could be used to save custom controller loadouts, track player performance in a game, and connect to social media. Reportedly the patent also mentions compatibility with mobile phones and other external devices via a dedicated app.


This isn’t the first such Xbox controller to appear recently. Asus announced its in-development Rakiri Pro OLED Xbox controller earlier this year at the Consumer Electronics Show. A month prior, Microsoft filed a patent of its own for a controller with an LCD display.

With all these touch screen controllers in development, it wouldn’t be too far-fetched to think that touch displays will become standard controller features in the near future.

Via Video Games Chronicle. 

Featured image via IGN. 

Researcher breaks in to Bing, Office 365 via AAD misconfiguration, now fixed

Wiz, a cybersecurity firm discovered a major security flaw affecting Microsoft’s Bing search engine earlier this year. The bug not only allowed users to make changes to search results but also grant them access to personal credentials and information from Microsoft Teams, Outlook, and even Office 365.

Upon further analysis, Wiz researchers narrowed down the high-risk vulnerability to Microsoft’s Azure Active Directory, which is used as the authentication mechanism for Azure App Services and Azure Functions apps. However, it was found to be flawed thus allowing unauthorized users to access these apps.

Microsoft’s Azure Active Directory ships with support for various types of account access, which includes apps using the service’s multi-tenant permissions. Any user that’s part of any Azure tenant can access the apps. However, with elaborate measures in place, this can be prevented.

Wiz has further highlighted that 25% of the multi-tenant apps lacked proper validation. It’s the developer’s responsibility to ensure that they are checking for the user’s original tenant and that there are policies in place to prevent unauthorized users from gaining access to their apps.

And Microsoft’s case is quite similar according to Wiz’s findings, with its Bing Trivia app falling victim. The researchers were able to tap into the app using their own Azure accounts which then grant them access to a content management system (CMS) that was linked to Bing.com. From this point, they were able to manipulate search results.

Wiz states that from this point, it would have been very easy for the researchers that had access to launch phishing attacks (BingBang) on unsuspecting users. “A malicious actor landing on the Bing Trivia app page could therefore have tampered with any search term and launched misinformation campaigns, as well as phished and impersonated other websites,” indicated Wiz.

While looking further into the matter, Wiz came to the discovery that Bing and Office 365 were linked. This allowed the researchers to access the users’ Outlook emails, calendars, Teams messages, SharePoint documents, and OneDrive files. Multiple apps and websites belonging to Microsoft were also found to be susceptible to the same misconfiguration exploits, they included: Centralized Notification Service (CNS) API, Contact Center, PoliCheck, Power Automate Blog, and Cosmos.

In an interview with The Wall Street Journal, Ami Luttwak, the chief technology officer at Wiz stated that “A potential attacker could have influenced Bing search results and compromised Microsoft 365 emails and data of millions of people. It could have been a nation-state trying to influence public opinion or a financially motivated hacker.”

According to Wiz:

The issues we identified in this research may affect any organization with Azure Active Directory applications that have been configured as multi-tenant but lack sufficient authorization checks. Based on data from our scans, we assess that exposure is significantly more common across Azure App Service and Azure Functions applications, where validation responsibility is unclear to developers.

The cybersecurity firm details that attackers hadn’t leveraged the vulnerability to deploy their phishing attacks to unsuspecting users. Wiz reported the issue to Microsoft’s Security Response Center on January 31. Microsoft quickly acknowledged it and issued a fix on Feb 2, a few days before The new Bing’s debut. The vulnerability affecting the rest of Microsoft’s application listed above was also patched towards the end of February.

The new entry has played a significant role in helping Bing hit and cross the 100 million daily active users mark. Had the issue not been patched in time for the launch or not discovered at all, the potential risk and threat in place would have been unimaginable. Microsoft has indicated that it is invested in putting elaborate measures to ensure that the user’s security and privacy is maintained.

It’s important for admins to ensure that multi-tenant access is properly configured. Wiz has since received a $40,000 bug bounty reward from Microsoft that they said they’d donate.

via: The Verge

Word for Windows 11: How to Download It For Free

Microsoft Word is one of the most popular word processors in the world, offering a variety of features and tools for creating professional documents. With the release of Windows 11, many users ask how to download Microsoft Word for free.

Therefore, we will examine how to download and install MS Word for free on your Windows 11. Likewise, you can read about free Word Processors for Windows 11.

How can I download MS Word for Windows 11?

1. Download MS Word free trial

  1. Navigate to the Microsoft 365 Official free trial page.
  2. Select your subscription plan and click the free Try 1 Month Free button.
  3. Create a Microsoft account or log in with your existing Microsoft account.
  4. Select the 1-month free trial and click the Next button.
  5. Choose your means of payment, input your payment details, and click Save.
  6. Press the Start Trial, Pay Later button and click the Continue button after confirming your subscription.
  7. Select the Download the Desktop Apps button, and click the Install Office button from the new tab.
  8. Choose the language and the version you want to download, and click the Install button.
  9. Select the storage location to download the file and click on Save.
  10. Double-click the downloaded file, and Microsoft will automatically install the entire collection of Microsoft 365 apps to your computer.

Microsoft allows you to download their free 30 days trial before subscribing. Should you include your card details, you may be automatically charged for a subscription when the free trial elapses.

After you install the app, you can follow our step-by-step guide on how to use Microsoft Word so you can start creating and saving documents right away.

2. Download Microsoft Word for student

  1. Open your browser and visit the Microsoft Office website.
  2. Input your student email address and select the Get started button.
  3. Select the I’m a student option if you are a student.
  4. Microsoft will send a confirmation link to your school email address.
  5. Click the link in your email address and proceed to create your password.

Microsoft allows students to use its Word software for free if their institution supports it. Also, other institutions like non-profit organizations can use it for free.

Check our article about downloading and installing free Microsoft Office for students on Windows.

3. Use the online version of Word

The MS Word online version allows you to use the Word tool for free with your internet connection. The web-based version has a 5GB storage space to store your Word document.

It uses Cloud base storage and saves your file in real time, preventing data loss. Also, it saves files in .docx format, which makes it easy to share files with others like the Google docs counterpart.

FAQ

How can I download Microsoft Word on Windows 11?

You can download Microsoft Word from the official Microsoft Store or via the Microsoft 365 website after signing in with your Microsoft account.

Is Microsoft Word free on Windows 11?

Word isn’t completely free, but you can access a free online version through Office.com or get a free trial of Microsoft 365.

Can I install Microsoft Word without Microsoft 365?

Yes, you can purchase and download Word as a standalone app from the Microsoft Store without subscribing to Microsoft 365.

Why can’t I install Word on Windows 11?

Installation issues often happen due to pending system updates, lack of storage, or corrupted files—restart your PC and try again.

In addition, try to read our complete guide on opening and using Microsoft Word in your browser. You can also read about how Word compares to Pages.

Check our detailed guide on how to fix Microsoft Word that hasn’t been activated on your device.

In conclusion, check our guide about how to fix Microsoft Word not opening on your PC. Also, you can read about how to repair a corrupted Word document on your PC.

If you have further questions or suggestions, kindly drop them in the comments section.

Kojima Productions partners with Gresham Blake to launch Death Stranding apparel line

Kojima Productions has entered into a collaboration with famed designer Gresham Blake to create a Death Stranding-themed clothing line. The seven-piece unisex collection is now available over on the Kojima Productions Store.

The collection includes tracksuits, tee shirts, hats, jackets and more. The collection is considered luxury apparel, and a few examples can be seen below.

Gresham Blake x Death Stranding Tracksuit
Gresham Blake X Death Stranding Tracksuit $245.00

For those unfamiliar,

Gresham Blake is a design led tailoring business and ready to wear clothing brand, creating bespoke, made to measure & limited edition luxury clothing, shoes & accessories for both men and women.

With stores situated in the heart of Shoreditch, London and Brighton’s famous North Laine.

Our website offers worldwide shipping, simple returns and exchanges alongside unparalleled customer service.“—From the Gresham Blake site’s About Us page.

Gresham Blake x Death Stranding Silk Jacket
Gresham Blake X Death Stranding Silk Jacket $1,050.00

The collection was previewed rather surreptitiously at The Game Awards back in December when Kojima wore the Death Stranding Silk Jacket onstage during the Death Stranding 2 presentation. Senior Director of Marketing and Communications at Kojima Productions Jay Boor had htis to say on the launch of the Gresham Blake X Death Stranding Collection.

Death Stranding has inspired porters around the globe through its thought-provoking storytelling, amazing cast and unique gameplay. We continue to be humbled by the passion shown from our player community and now we are excited to offer them a new way to engage with the franchise through the launch of a bespoke fashion line that pays homage to the game.”

Featured image via Kojima Productions Store. 

PowerPoint for the web lets you add videos from your device to presentations

If you often interact with PowerPoint to make your presentations, then you’ll be happy to know that Microsoft has added a new feature. 

While it has been possible to add videos to your presentation from online platforms like YouTube and Vimeo, PowerPoint didn’t support the incorporation of videos from a user’s own device.

Microsoft is now rolling out this long-requested feature to PowerPoint for web users. This means that you can now insert videos into your presentation directly from your computer.

To access this feature:

  1. Launch a new or existing presentation in PowerPoint for the web.
  2. Next, select Insert > Video > Video from the device.Video menu showing the Video from device command
  3. Then, pick the video you’d like to add to your presentation and click on the Open button to insert it.Selected video file and highlighted Open button

Note: Once the video appears in your slide, you can resize, move, or even apply shape effects to it.PowerPoint for the web presentation with newly added video from computer

It should also be noted that the maximum size of the video you can include in your presentation is 256MB. Microsoft also recommends a .mp4 video file format for a better and quality experience.

Your internet connection also plays a major role and determines how fast you are able to insert a video into your PowerPoint presentation. In related news, users can also be able to convert their presentations to animated GIFs.

How to Enable Internet Explorer (IE) Mode in Microsoft Edge

One of the neat features of Microsoft Edge is that it allows users to access legacy websites without switching browsers. This functionality is possible through the Internet Explorer Mode feature. Hence, if you’ve been searching for a way to enable IE mode in Microsoft Edge, this article will provide the steps needed to enable the feature in Microsoft Edge.

Can you use Internet Explorer on Edge?

The short answer is yes, you can use Internet Explorer on Windows. Microsoft Edge is Windows’ upgraded browser developed to replace Internet Explorer.

Even the latest version of Internet Explorer has become obsolete and rarely used. However, some of the browser’s functionalities are still used by some people, especially Web Developers. 

Microsoft retired Internet Explorer on June 15, 2022, but you’ll still be able to access some of the functionalities and utilities in Microsoft Edge.

Users can access Internet Explorer’s functionalities through Internet Explorer Mode.

How can I Enable IE Mode in Microsoft Edge?

If you’d like to enable the IE Mode to access Internet Explorer’s functionalities, follow the steps listed below:

  1. Press the Windows key, type in Microsoft Edge and hit Enter.
  2. In the Browser window, Click the More (Ellipsis) button in the top right corner, and click on Settings.
  3. In the Settings window, click on the Default Browser tab from the list of options.
  4. Under the Internet Explorer compatibility section on the right pane, set the option to Allow next to the Allow sites to be reloaded in Internet Explorer mode (IE mode).
  5. Then, click the Restart button to save your changes and refresh the browser.

In addition, you can also use Internet Explorer mode to open specific incompatible websites. To open an incompatible webpage, follow these steps:

  1. Press the Windows key, type in Microsoft Edge, and hit Enter.
  2. Then, click the Settings after the More (ellipsis) button in the top right corner.
  3. Hover on More tools, and click on Reload in Internet Explorer Mode. 

Edge will automatically reload the page and render the page like an Internet Explorer web page. Also, the web page will display an Internet Explorer logo to confirm that you’re viewing the page in IE mode. You can click on the logo to get more information. 

Further, if you want to exit Internet Explorer mode, there’ll be an exit button at the top of the page. Click on the option to exit Internet Explorer mode.

The Internet Explorer mode is not a very common feature among regular PC users. However, the feature proves very useful to some users as it allows them to view older web pages without switching between browsers.

This is rather a useful trick, especially if you’re dealing with Your browser is not supported in Hikvision error, as enabling IE mode can easily fix that issue.

After reading this article, enabling the Internet Explorer (IE) mode in Microsoft Edge should be a piece of cake. 

Teams 2.0: What do all the performance improvements mean?

Microsoft said that a newer, speedier, and more energy-efficient Teams app is coming soon — some calls it as Microsoft Teams 2.0.

Speaking in a blog post, Redmond official Anupam Pattnaik said that the app has arrived for preview release for several select insiders as an experiment before rolling it out for all mobile and desktop users in the June 2023, including on Mac and web devices.

The app has never been far from performance issues since it first came out, not to mention the endless loop of its over-the-top data usage.

“The preview of the new Teams app is currently only available to our commercial users on Windows. We’re working on extending the preview of the new Teams to a broader set of customers, including Education, Government Clouds, and platforms such as Mac, VDI, and Web later this calendar year.”

Previously, rumors about Microsoft Teams 2.0 have been circulating. Several tech publications reported the same thing: a rebuilt version, dubbed Teams 2.0, is coming and it will be a ground-up revolution & a nice upgrade to Edge Webview 2 and Javascript library React-powered technologies.

What does Microsoft Teams 2.0 mean?

While Redmond officials do not officially call it a “Teams 2.0,” the brand-new app will boast a plethora of nice updates, especially in speed and performance.

Installing, launching, joining a meeting, and switching between chats and channels will at least be twice faster as the current version. It will also consume less memory by half and less disk space by almost a third of four.

Not only that, but the new Teams will also support a swift and smooth switch between emails, and it can be super helpful for those working in different organizations eg: one for work and one for school.

Microsoft also adopts Trusted Types and implements a more stringent Content Security Policy to protect users’ data from cyberattacks, especially cross-site scripting.

What do you think about this? Let us know in the comments!